/


Text
PATTERNS ’ IDEAS’ YARN ’ INSPIRATION • TECHNI
TEXTURED TANK TOP Й LACE SCARF PRETTY COASTERS KID'S PLAY SET MOSAIC WRAP I & MORE!
ISSUE ONE HUNDI
BEST KID-FRIENDLY YARNS
WEST YORKSHIRE SPINNERS
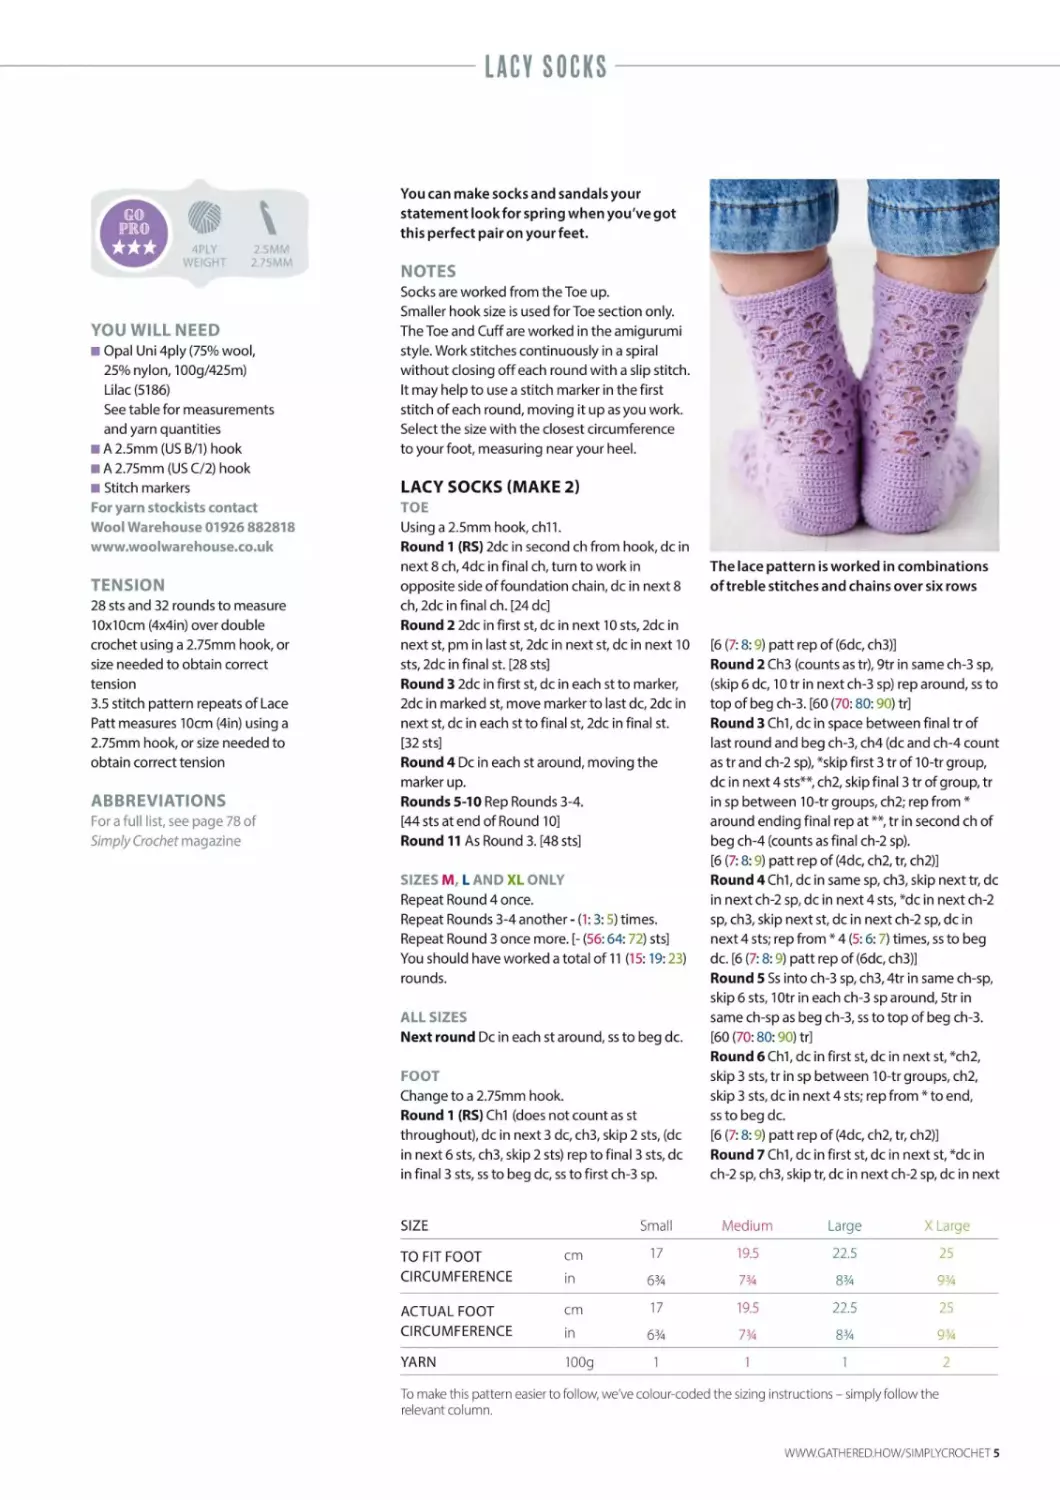
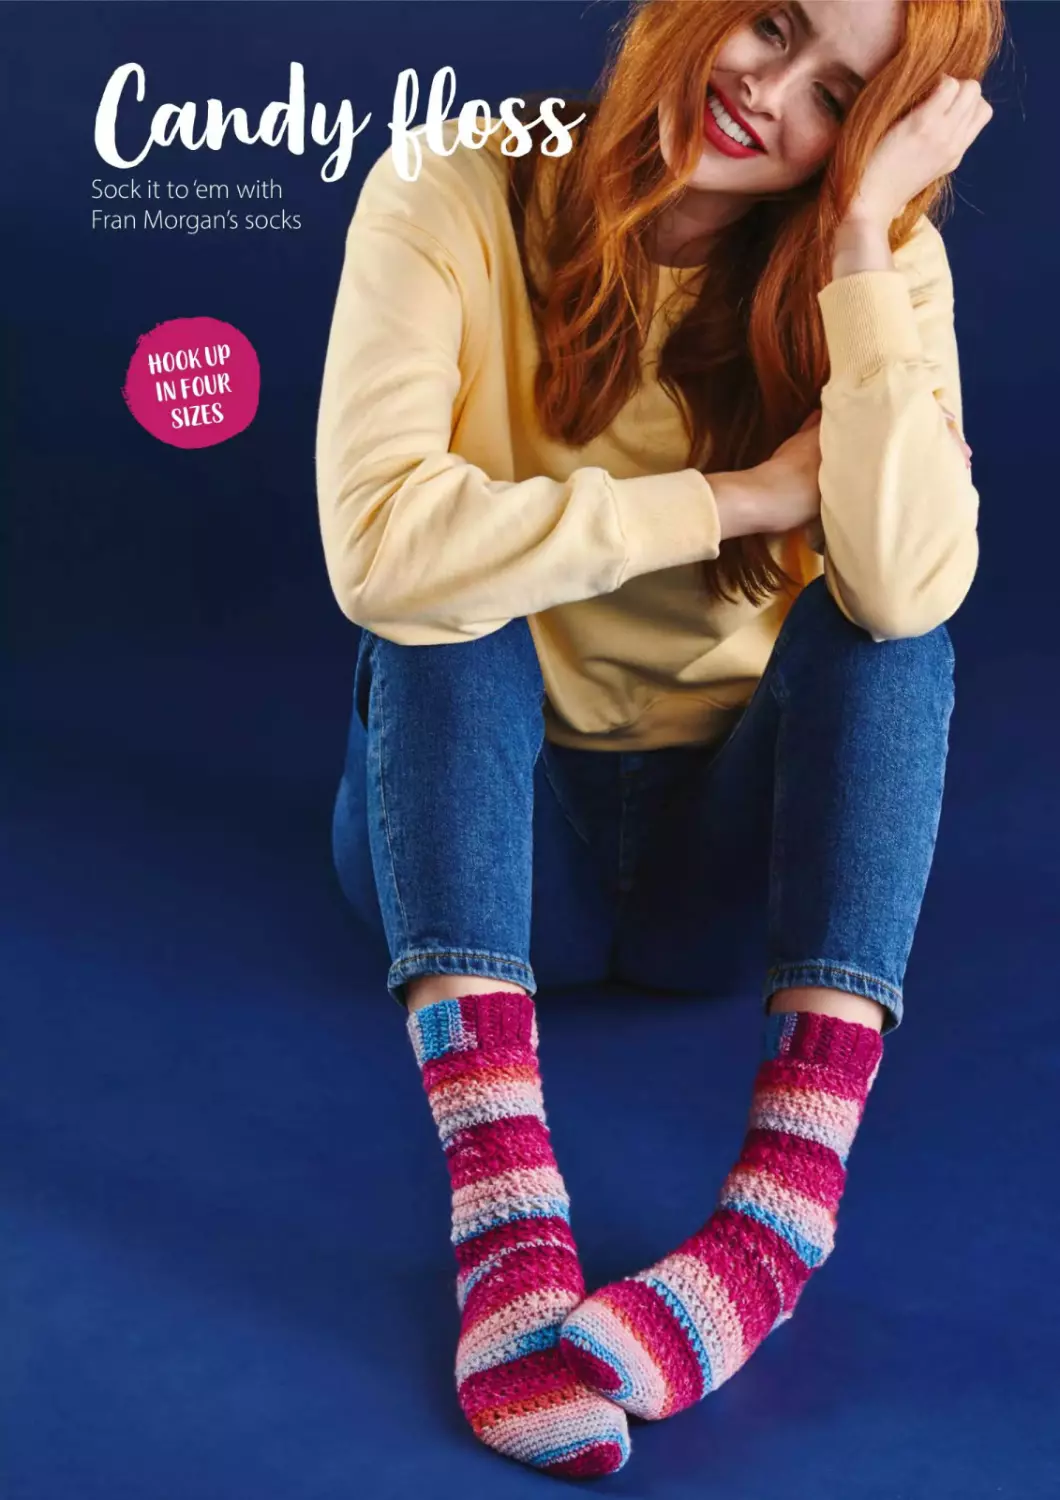
Perfect for your next crochet sock project.
Find your local stockist at wyspinners.com/stockists
w @000
britishwool 01535 664500
Blend
1Ж *S/J?**- - ’Г-
(tocIicI
Dreaming of the perfect crochet project? You might
find it in our Fairy Tale collection. Or maybe you're
fantasising about a new scarf, decoration or toy -
whatever you're wishing for, you'll find it inside!
Ci’dchel
(ft ew
ISSUE ONE HUNDREDS FORTY SIX
CONTENTS
27 TEXTURED TUNIC
31 AMIGURUMI GROMIT
39 CHECKED SCARF
41 EMBELLISH: HOOP EARRINGS
45 CHILDREN'S TOOL SET
EXCITING CROCHET IDEAS TO INSPIRE YOU
15 FAIRYTALE COLLECTION 51 STASHBUSTER BUNTING
53 OVERLAY MOSAIC WRAP
59 MOSAIC BLANKET
61 HERITAGE MAKES: OSSETIAN SCARF
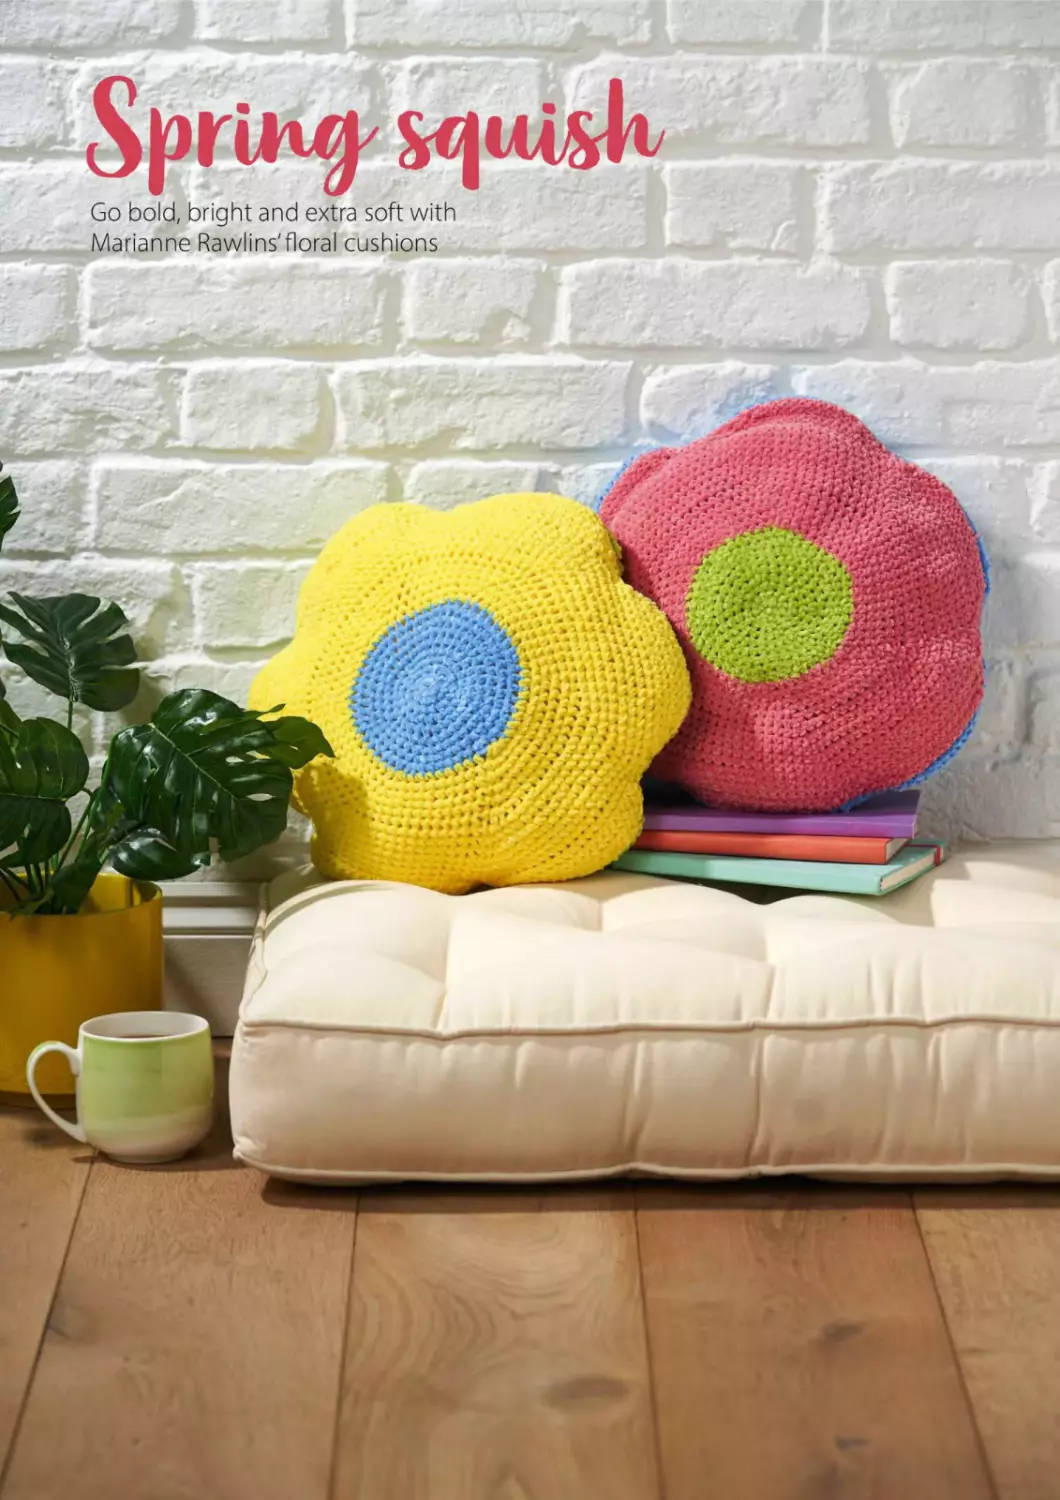
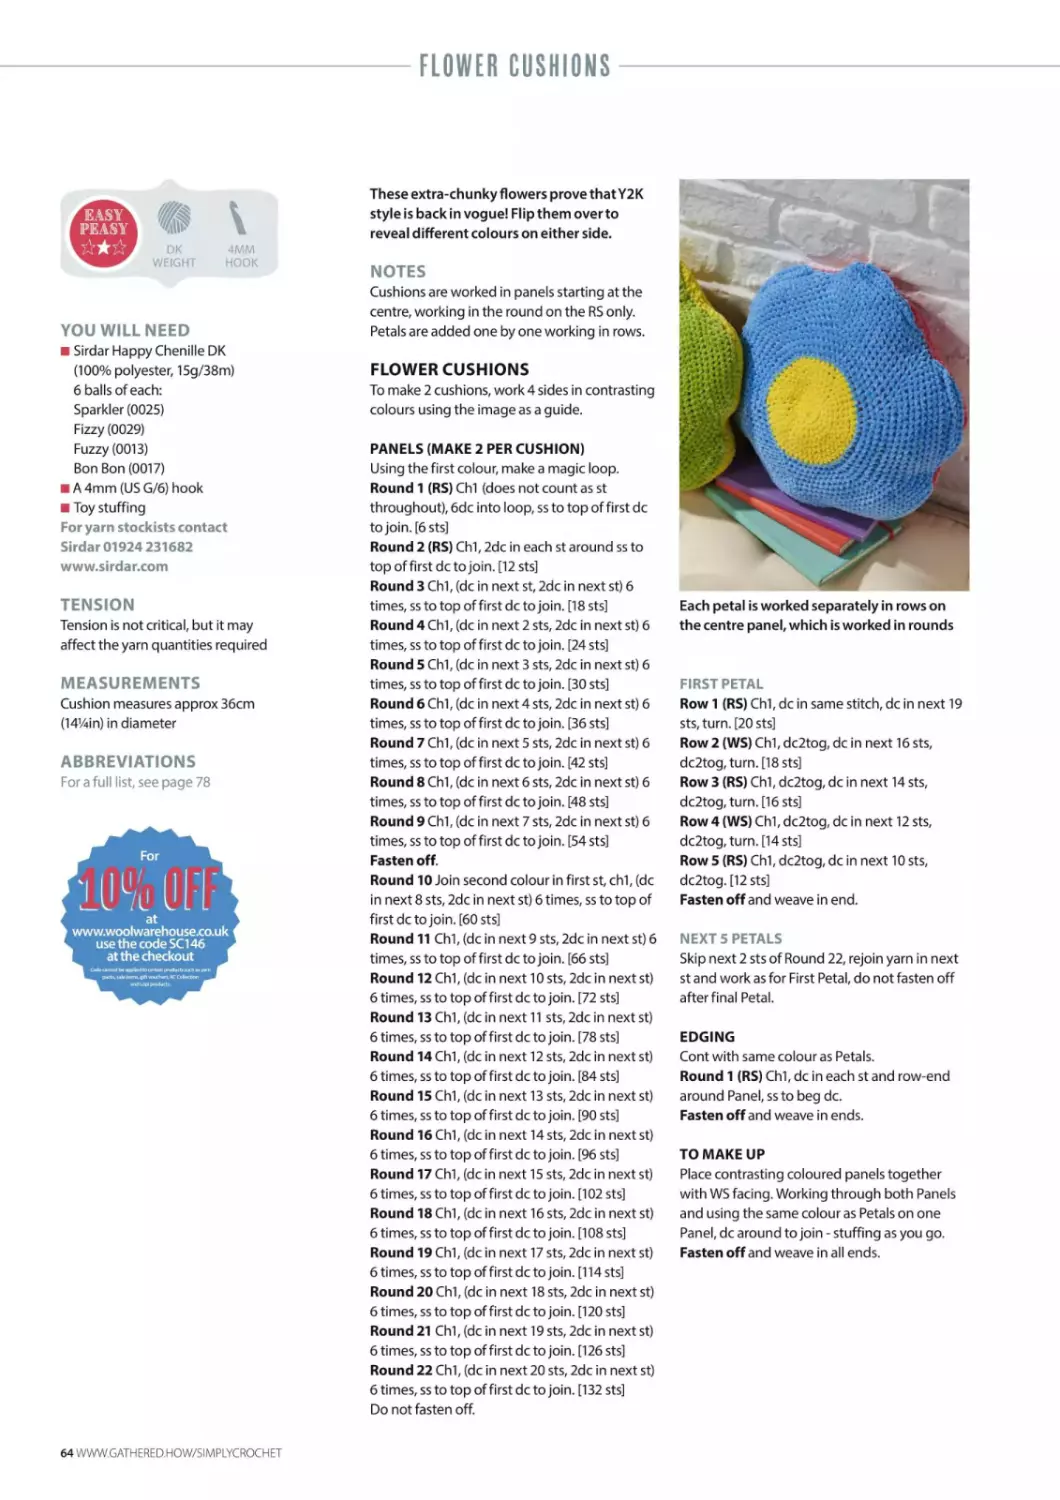
63 FLOWER CUSHIONS
65 HEART COASTERS
36 JOURNAL: ERINNALEE
43 FIVE QUESTIONS WITH...
SUTTON FOSTER
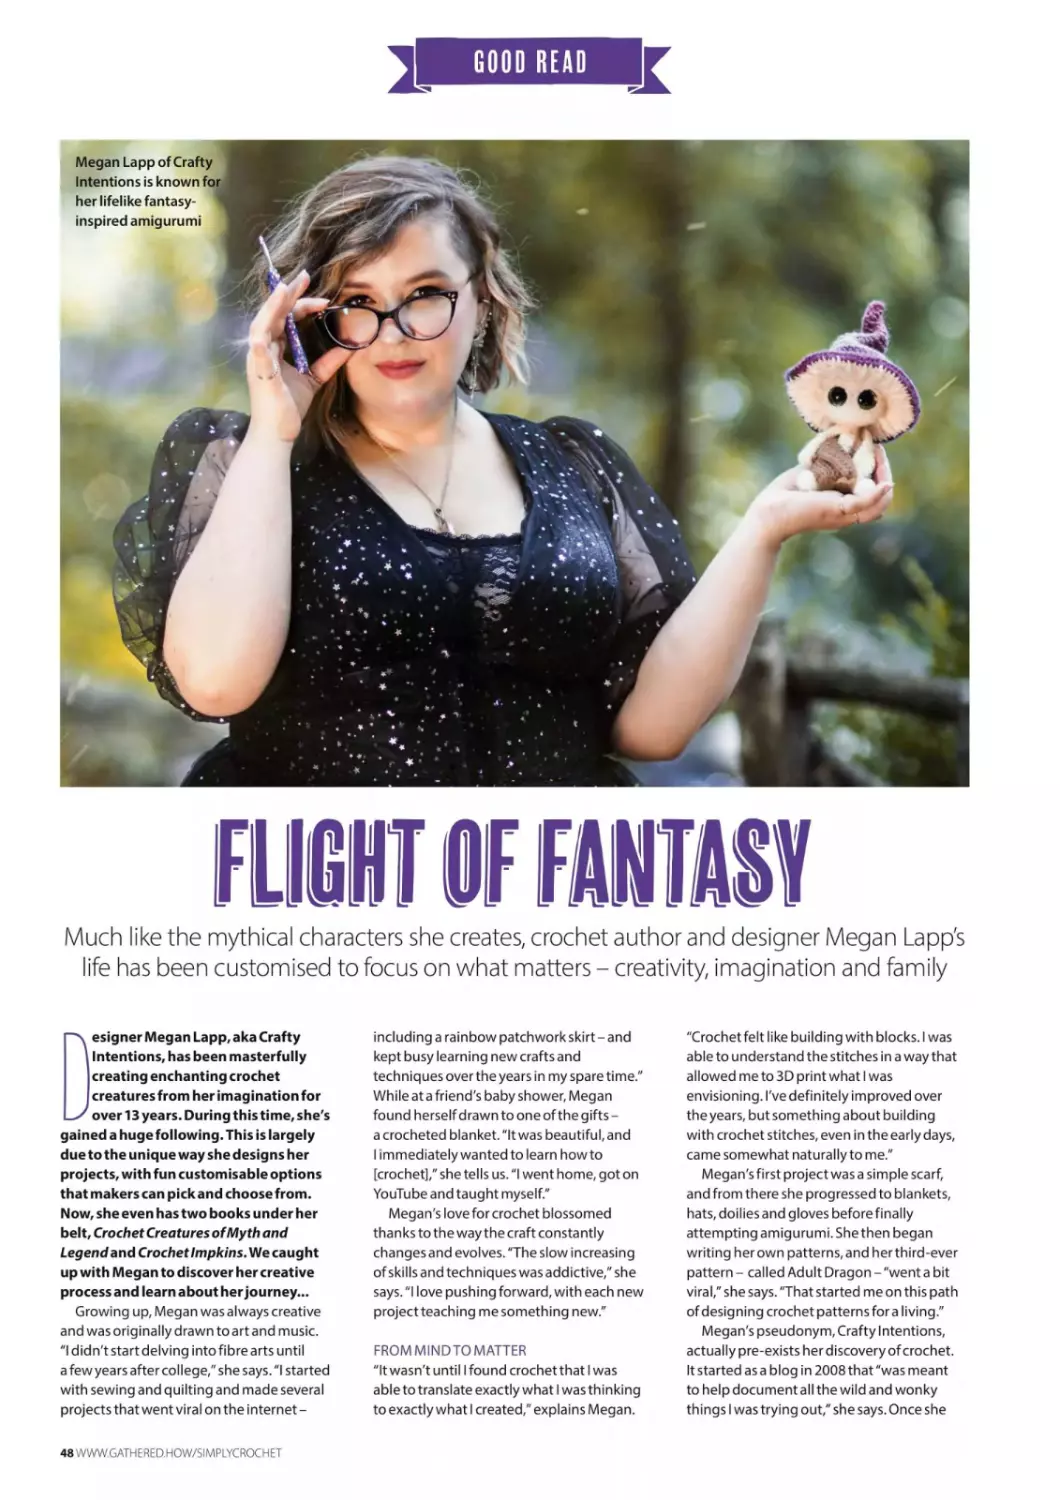
48 PROFILE: MEGAN LAPP
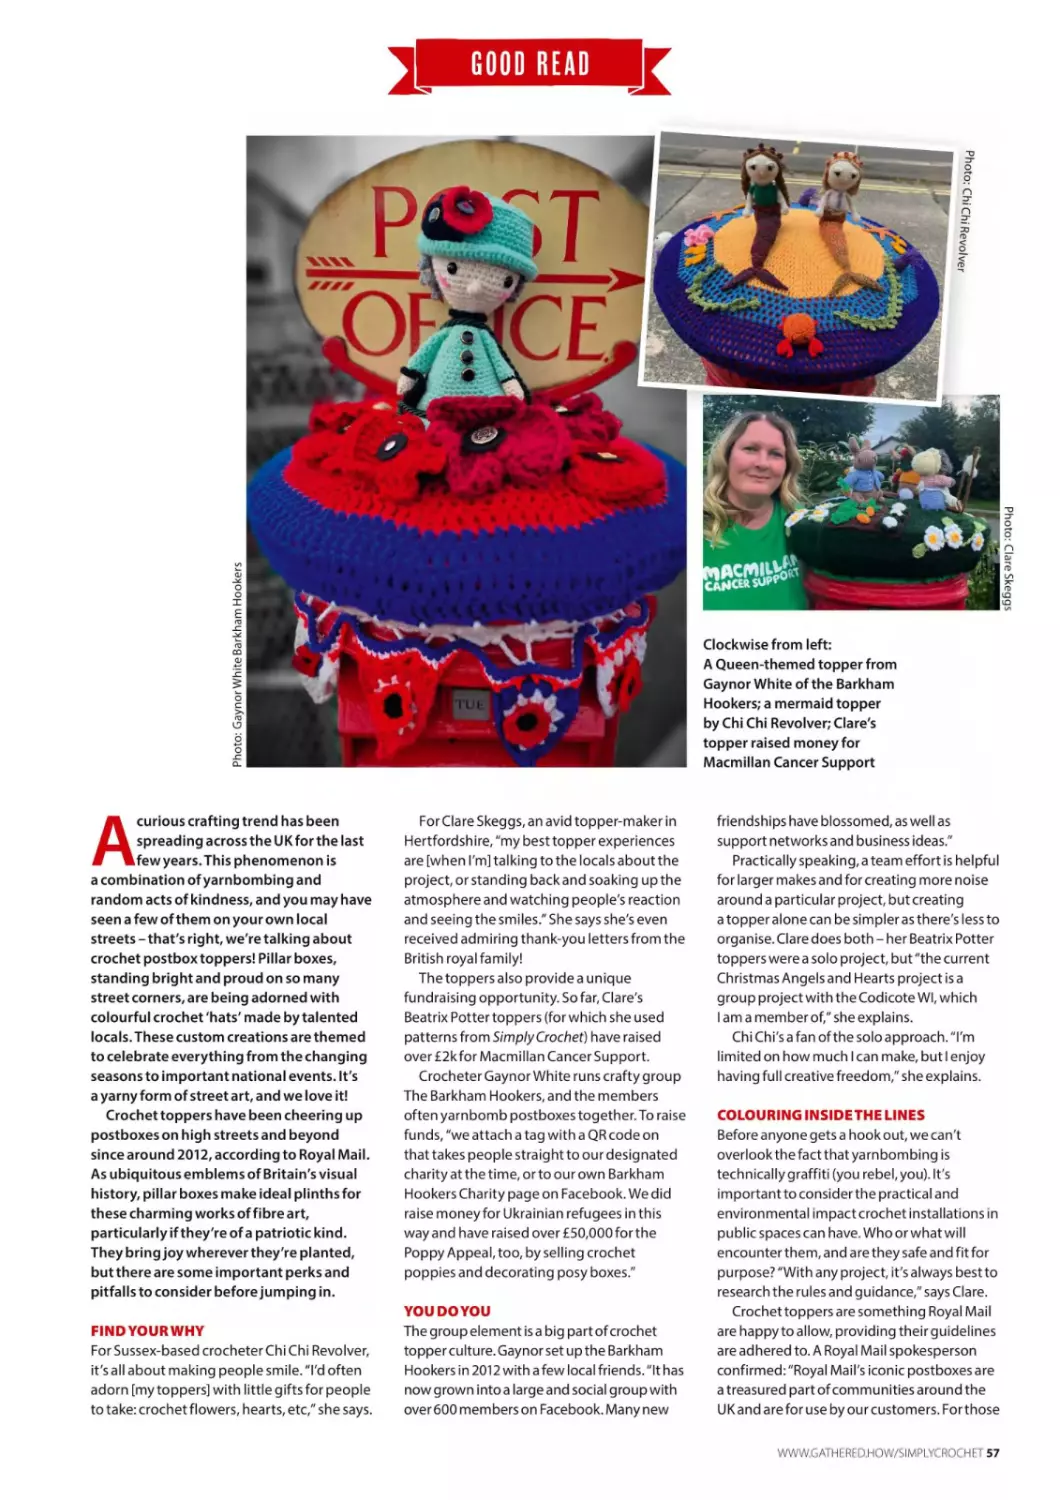
56 FEATURE: SO YOU WANT TO
CROCHET A POSTBOX TOPPER?
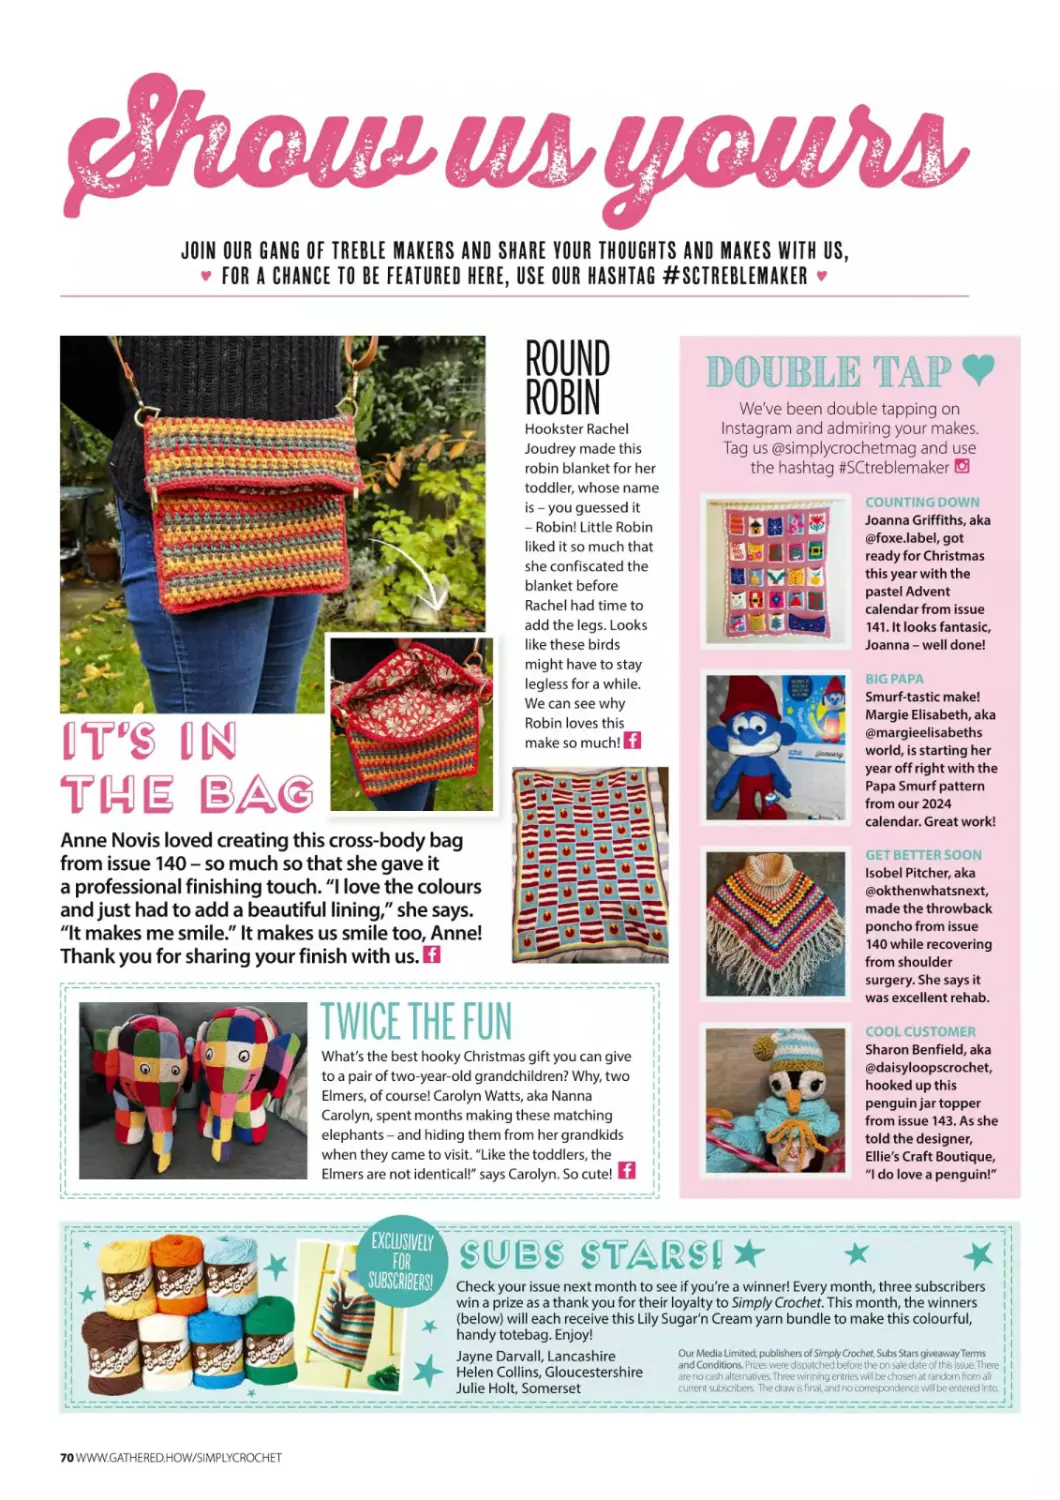
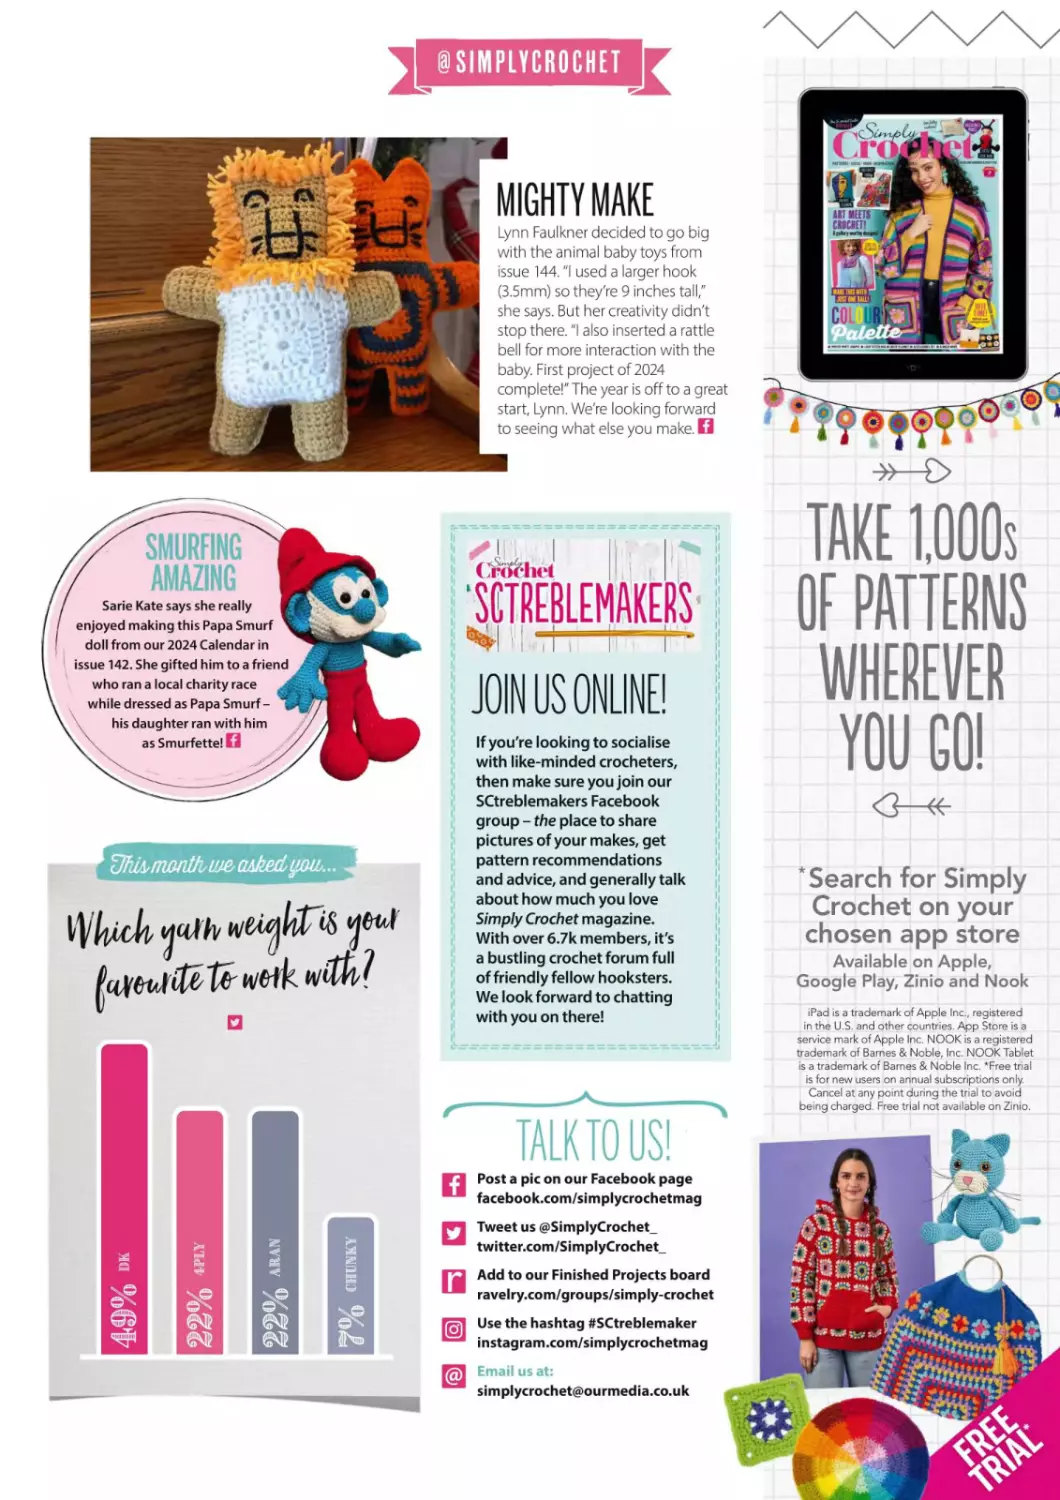
70 SHOW US YOURS!
82 FAVE FOLLOW
What's new on social
Never miss an issue!
68 YARN REVIEWS
Use this yarn when crocheting for kids
72 CROCHET UNRAVELLED
What is a continuous round?
75 THE GUIDE
Essential step-by-steps for you
CwWf htogic...
Crochet
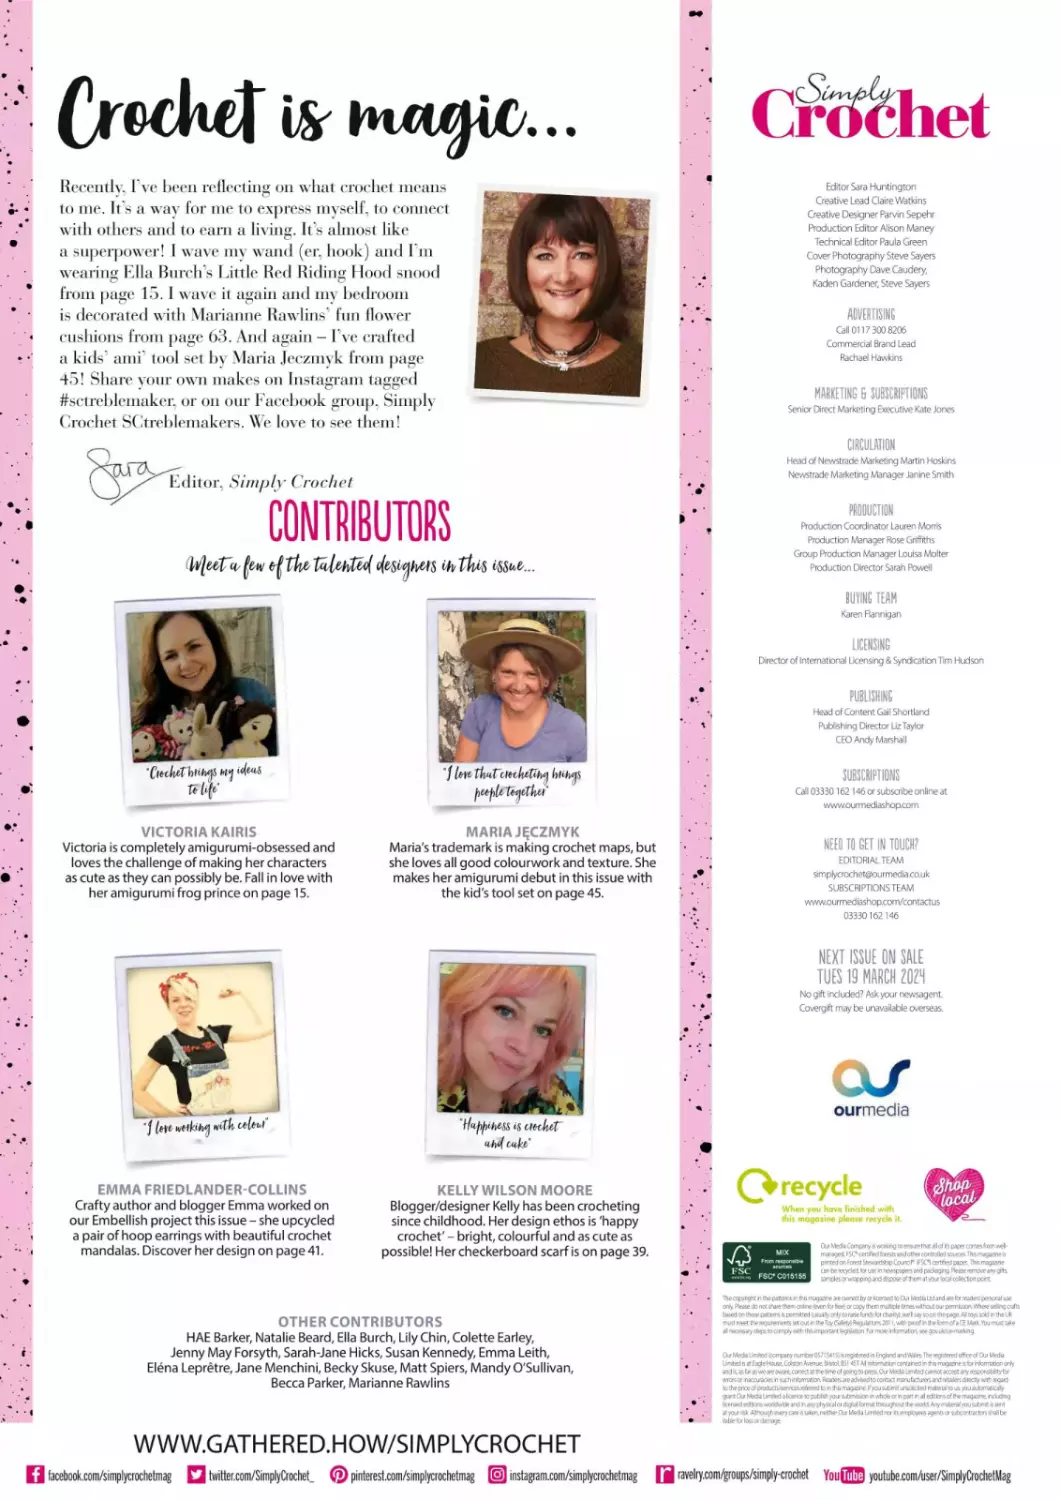
Recently, I’ve been reflecting on what crochet means
to me. It’s a way for me to express myself, to connect
with others and to earn a living. It s almost like
a superpower! 1 wave my wand (er. hook) and I m
wearing Ella Burch’s Little Red Riding 1 lood snood
from page 15. I wave it again and my bedroom
is decorated with Marianne Rawlins fun flower
cushions from page 63. And again - I've crafted
a kids ami tool set by Maria Jeczinyk from page
45! Share your own makes on Instagram tagged
#sctreblemaker, or on our Facebook group. Simply
Crochet SCtreblemakers. We love to see them!
Editor. Simply Crochet
CONTRIBUTORS
Editor Sara Huntington
Creative Lead Claire Watkins
Creative Designer Parvin Sepehr
Production Editor Alison Maney
Technical Editor Paula Green
Cover Photography Steve Sayers
Photography Dave Caudery,
Kaden Gardener, Steve Sayers
ADVERTISING
Call 0117 300 8206
Commercial Brand Lead
Rachael Hawkins
MARKETING 6 SUBSCRIPTIONS
Senior Direct Marketing Executive Kate Jones
CIRCULATION
Head of Newstrade Marketing Martin Hoskins
Newstrade Marketing Manager Janine Smith
PRODUCTION
Production Coordinator Lauren Morris
Production Manager Rose Griffiths
Group Production Manager Louisa Molter
Production Director Sarah Powell
BUYING TEAM
Karen Hannigan
LICENSING
Director of International Licensing & Syndication Tim Hudson
PUBLISHING
Head of Content Gail Shortland
Publishing Director Liz Taylor
CEO Andy Marshall
SUBSCRIPTIONS
Call 03330 162146 or subscribe online at
wwwourmediashop.com
VICTORIA KAIRIS
Victoria is completely amigurumi-obsessed and
loves the challenge of making her characters
as cute as they can possibly be. Fall in love with
her amigurumi frog prince on page 15.
MARIA JECZMYK
Maria's trademark is making crochet maps, but
she loves all good colourwork and texture. She
makes her amigurumi debut in this issue with
the kid's tool set on page 45.
NEED TO GET IN TOUCH?
EDITORIAL TEAM
simplycrochet@ourmedia.co.uk
SUBSCRIPTIONSTEAM
wwwourmediashopcom/contactus
03330 162146
NEXT ISSUE ON SALE
TUES 19 MARCH Z0Z4
No gift included? Ask your newsagent.
Covergift may be unavailable overseas.
ourmedia
EMMA FRIEDLANDER-COLLINS
Crafty author and blogger Emma worked on
our Embellish project this issue - she upcycled
a pair of hoop earrings with beautiful crochet
mandalas. Discover her design on page 41.
KELLY WILSON MOORE
Blogger/designer Kelly has been crocheting
since childhood. Her design ethos is 'happy
crochet' - bright, colourful and as cute as
possible! Her checkerboard scarf is on page 39.
Ou Mede Corpsny is worksig to ensure that sH of its paper cones from wel
managed F$C*-certified forests rid other < ontiolkv) sources This magazcie s
printed on Forest Stewardship Council* f SCI certified paper. This magaane
can be recycled fa use m newspaper and padragrig Please remove any gifts,
samples u wtappmg and dispose of them at ycur toast collection point
The copyright n the patterns «1 this magame are owned by a kerned to Cur Media ltd and are fa readers personal use
only. (Vase do not share them onkre leven fa free) or copy them miAple times without our permission Where settng crafts
OTHER CONTRIBUTORS
HAE Barker, Natalie Beard, Ella Burch, Lily Chin, Colette Earley,
Jenny May Forsyth, Sarah-Jane Hicks, Susan Kennedy, Emma Leith,
Elena Lepretre, Jane Menchini, Becky Skuse, Matt Spiers, Mandy O'Sullivan,
Becca Parker, Marianne Rawlins
based on these patterns is permitted I usually only to raise Funds fa charity), wel say soon the page Al toys sdd in the UK
must meet the requremeres set cut in the Toy (Safety: Regulations Ml I, with proof <1 the farm of a CE Mart. *ou must ta*e
Our Meda Limeed Icompany number 0571 Ml Я n regstered «1 England and Wales The regsaered office of Cur Mede
United is at Eagle House. Colston Avenue. Bristol 351AST Al nfarraticn contained m this шадаипе is fa information only
and is. as far» we are aware correct «the time of going to press. Our Meda United cannot accept any responsiblityfa
errors or inaccuracies in such information Readers are advised to contact manufacturers and retalers directly with regard
to the price ol productsAervices referred to in this magaane. If you submit unsokited material to us you automatical/
grant Our ktafa Lrrrted a kence to pubkhiosri!^!^'in wtfaeorripwi in JI rUttons of ftv magazine, rxi.tonq
kensed editions iwndwide and in any physcal or dgnal format throughout the world Any material you submr is sent
at your risk. Although every care в taken, neither Ou Meda Lznrted nor is employees agents or subcontractors shall be
kabfe fa loss or damage
WWW.GATHERED.HOW/SIMPLYCROCHET
□ facebook.com/simplycrochetmag □ twitter.com/SimplyCrochet_ @ pinterest.com/simplycrochetmag [s] instagram.com/simplycrochetmag И ravelry.com/groups/simply-crochet YouilW youtube.com/user/SimplyCrochetMag
FAMILY OWNED SINCE 1987
100% WOOL
www.cascadeyarns.com
' '' Г
CASCADE 220‘
GRANNY SQUAR
HOODED COAT
BY DEBORAH NEWTON
FREE PATTERN W879
Cl с м с и r c V*
CHSRUS
Vick S (Ж1/Х. CKAL Experience
а^
VLckSjMz
KNIT OR
CROCHET
Ih-
Goldcrest Scarf by Martin Up North
www.scheepjes.com
instagram.com/scheepjes
facebook.com/scheepjes
DOUBLE KNITTING
A luxurious blend of fibres and colours
Statecraft
Member of the UK Hand Knitting Association
For all our latest patterns & yarns visit
www.stylecraft-yarns.co.uk
f
For your nearest stockist telephone
01484 848435
IDEAS ♦ INSPIRATION ♦ ACCESSORIES * WEBSITES » EVENTS • STUFF
04 4
There's treasure to be found - but who will reach it first? An entire fishing village of characters is heading into the open
ocean to hunt for their fortune. Hook an intrepid tortoise, a seafaring bear, a pirate lass and much more in Rico Design's
nautical Ricorumi Spring CAL Patterns will be released starting in March, so grab your yarn kit ahead of time for £52.
WWW.GATHERED.HOW/SIMPLYCROCHET 9
JOIN UP
▼ Sandra Gutierrez of
Nomad Stitches has
created a new online
platform just for
crocheters! Meet
Plyful, an online hub
filled with crochet
patterns from guest
designers, useful
hooky courses and
a helpful"community
of crochet lovers," says
Sandra. Get involved
at www.plyful.com
Sometimes, all you need is texture. Hooked
entirely in rich purple Caron Simply
Soft yarn, this hat and cowl set is made
interesting with creative ribbing in
a repeating pattern. The tactile finished
piece is as fun as it is cosy. Add a poofy
pompom to the top and you're all set to ride
out the rest of the winter! Get the pattern for
free and buy the yarn at www.readicut.co.uk
WELCOME LITTLE ONE
Get more flounce per ounce with this
super-sweet baby romper from Babes in the
Wool Design on Etsy - it's the perfect gift for
any baby girl on your to-stitch-for list. The
downloadable pattern includes sizing for
zero to 36-month-olds as well as written
instructions, photos, a list of materials and
the designer's contact details (in case you
have any questions along the way). Add a few
heart buttons at the bottom, as seen here, for
the perfect finish, then layer over a plain
romper or frilly top. Get the pattern for £4.74
from www.babesinthewooldesign.etsy.com
Уе|Т T&
Immerse yourself in a mountain of fluff with the new Himalaya
Yumos collection. This soft and warm fur-effect yarn is great for
extra-fuzzy jackets and winter accessories. Get all 12 shades of
this 100% polyester yarn at www.knittingnetwork.co.uk
LIGHT MY FIRE
Fate, chance, luck - whichever you believe in, it was in full force
when Wool Couture set up next to handmade homegoods
company Olor at a tradeshow. Together, the two ended up
collaborating on the new Crafting by Candlelight scented candle,
designed to add a little something extra to the peaceful experience
ofcrafting. Hand-poured in the UK and infused with mandarin and
sandlewood scents, this luxurious soy-blend candle burns for 30
hours - now that's a lot of crafting time! Buy it for yourself or
a hooky friend for £16.99 at www.woolcouturecompany.com
10 WWW.GATHERED.HOW/SIMPLYCROCHET
HOOKED
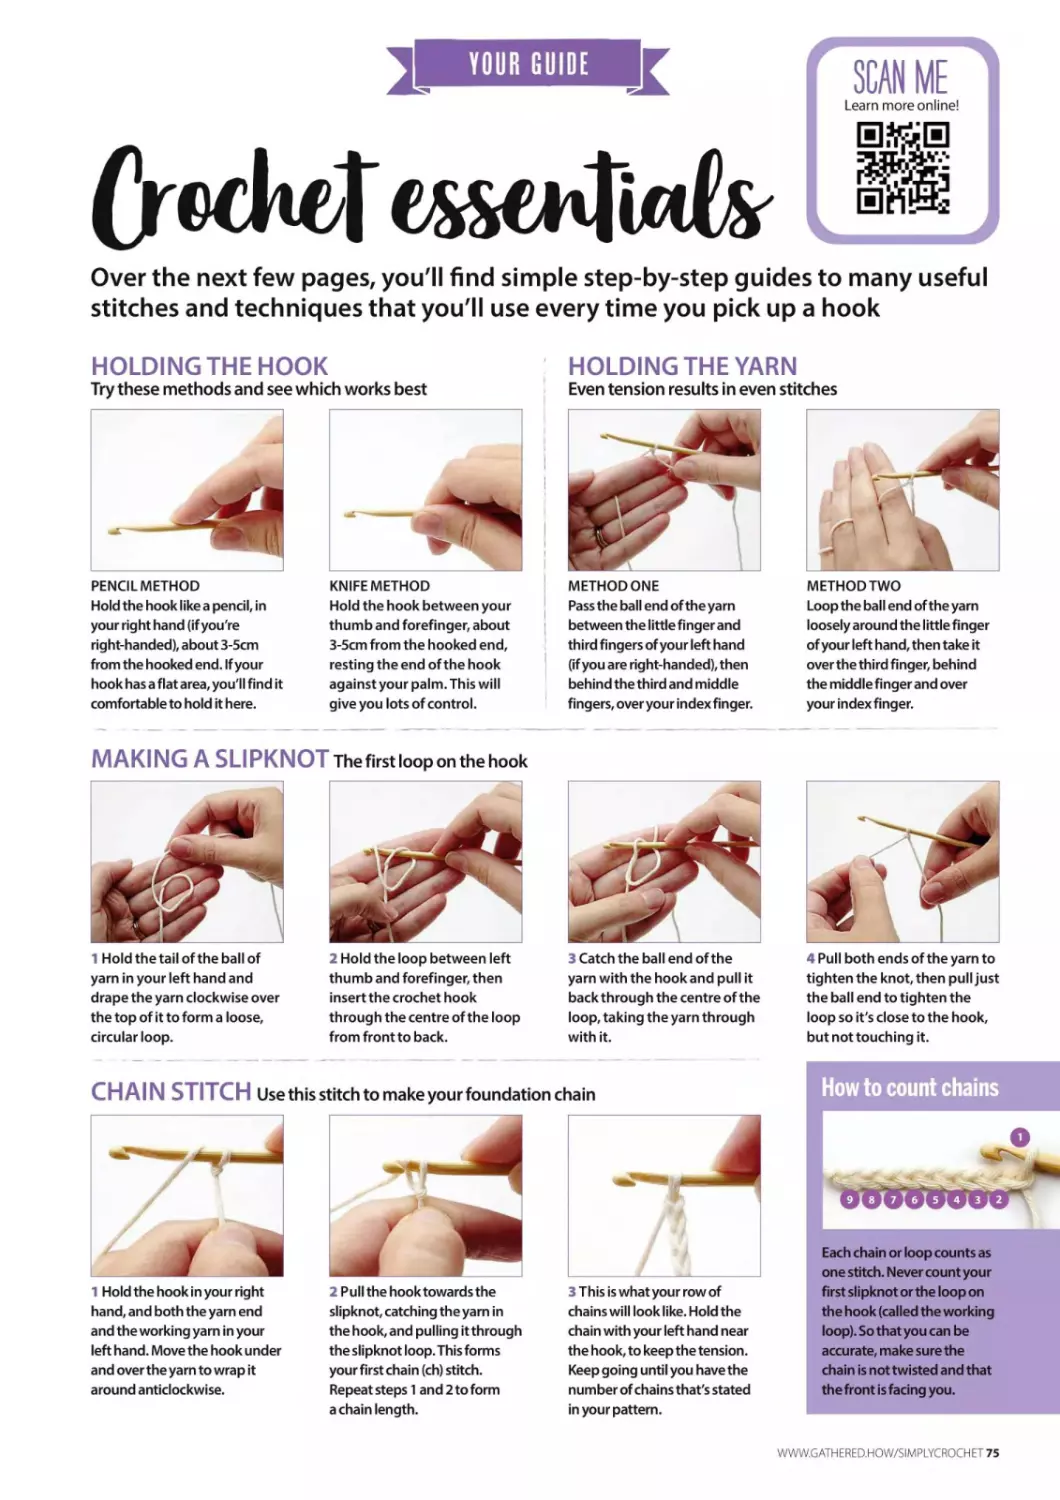
HOWTO DROP AND
JOIN ROUNDS
I'm Lily, and I've been teaching
yarncrafts internationally
since 1989.1 was named to the Crochet Hall
of Fame in 2015 and have been involved
in some aspect of the fashion industry
since age 13, designing for magazines and
yarn companies since 1982 and working
for designers such as Ralph Lauren and
Diane von Furstenberg. I was officially
named 'fastest crocheter in the world'
in a 2002 international competition and
have authored books on knitting and
crochet since 1999. I've made hundreds
of appearances on television and in print
media and am on the season 13 and 14 cast
of PBS' Knit and Crochet Now. But most of
all, I'm proud of my teaching skills. Come
learn something new with me!
When working in the round, the ends are
joined with a slip stitch to the beginnings. This
slip stitch forms a small jog. To avoid this gap,
try this instead...
Step 1 On a Right Side (RS) round, complete
the last stitch and drop the live loop from the
hook. Insert the hook from the WS to the RS
(back to front). Place the loop back onto the
hook and draw this loop through the first st.
Step 2 On a Wrong Side (WS) round, complete
the last stitch, then drop the loop from the
hook. Insert the hook from the WS to the RS
(front to back). Place the loop back onto the
hook and draw this loop through the first st.
Step 3 Note how the hook is always inserted
into the st from the WS to the RS, and the yarn
is always pulled through from the RS to the
WS. The result is a tight, non-gaping join.
Step 4 There is, however, a slight ridge on the
back or WS of the work. Thus, use this in
non-reversible pieces. No one will detect it!
For more from Lily, follow her on Facebook at
Lily M Chin, on Instagram at @lilymchin, and on
Twitter at @LilyMChin 1.
NEXT ISSUE Tips for weaving in ends
INSPIRING
BOOKS
The Beginner's Guide to
Crochet
THEBEGINNER'S
GUIDETOCROCHET
CLAIRE
MONTGOMERIE
(£12.99, Search Press)
If you're new to crochet
and are looking for
a comprehensive guide
to get you started, this complete course might
bejustthebookfor you. Inside, you'll use eight
projects to learn multiple different techniques,
incuding increasing and decreasing, changing
colour and joining seams. You'll workyour
way through the steps while learning the
abbreviations - and having fun!
THECOMPLETE
CROCHETHANDBOOK
JANECROWFOOT
(£14.99, Search Press)
As an in-depth crochet
resource from one of the
world's top designers, this
volume would be a welcome addition to any
crafter's library.Thebookis packed with helpful
tips and techniques for creating a professional
finish, no matter your crochet skill level. It even
has advice on how to add embellishments like
beads, tassels, pompomsand more, and it's full
of beautiful photos, too. What's not to love?
A YEAR OF
GRANNY SQUARES
AYEAROF
GRANNYSQUARES
KYLIEMOLETA
(£14.99, Search Press)
Hook a granny square
for every week of the
year with this collection
of creative square motifs! You can optto make
one of each, create a project with multiple of the
same square or hook up four seasonal projects
that each include several of the 15x15cm motifs.
The pattern for each square features clear
instructionsand useful walkthrough photos to
helpyou learn techniques in afun, quick way.
Skith& events
27 FEB Crochet next steps workshop
£45, Lechlade
www.lechladecraftbarn.com
4 MAR Crochet socks w/ Coastal Crochet
£75, Sussex
www.madeandmaking.co.uk
2 MAR Small purse with tapestry crochet
£49.60-62, Bristol
www.bristolfolkhouse.co.uk
16 MAR Makean amigurumi Easter chick
£15-40, Pontyclun
www.ammoniteyarns.co.uk
GRANNYSQUARE
FASHION
CASSIEWARD
(£14.99, Search Press)
Wear your favourite motifs
in style with this collection
ofclever crochet clothing
and accessories. The projects are best for
beginner-to-intermediate stitchers and include
jumpers, cardigans, a tank top, vests, bags,
T-shirts, dresses and shawls. Plus, you'll learn
how to join squares in different ways, choose
colours, combine designs and much more.
GLOW UP
▼ TOFT founder Kerry
Lord is celebrating the
tenth anniversary of
her seminal book,
Edward's Menagerie,
with a special 2024
edition featuring 17
new patterns, 13
improved patterns
and even more
beginner step-by-
steps. Pre-order the
book and find more at
www.toftuk.com
It's official - Gen Z loves crochet. Mega-craft
retailer Hobbycraft says sales of crochet
supplies increased by 35% between autumn
2022 and autumn 2023, and that young
people are the driving force behind the hooky
trend. This could be down to a number of
factors, including crochet's popularity on
TikTok and a move away from fast fashion. To
capture this new audience, Hobbycraft are
partnering with hip yarncraft brand Wool and
the Gang. Check out www.hobbycraft.co.uk
FANTASTIC FLORALS
Jasmine stitch is everywhere. Our social media
feeds are filled with these squishy, flower-like
stitches - we see them on headbands, on
potholders, on ornaments and on coasters. And
once you start tapping on jasmine stitch makes,
all roads seem to lead back to Etsy shop Nordic
Yarn Art, where designer Makalani Saether has
made jasmine stitches her signature look. "The
first time I saw the jasmine stitch, I was totally
blown away. It was love at first sight," Makalani
says. "I have now spent years learning and
playing around with the stitch... with the right
info in the right order, crocheters are moving
from, 1 could never do that' to 'Woohoo, this is
officially my favourite stitch' in no time. That's
what I love the most." Her Jasmine Headband,
pictured above, is a great place to start if
you're new to the stitch - it's worked back and
forth, with no increases or decreases, and the
downloadable pattern includes 28 instructional
photos. Visit www.nordicyarnart.etsy.com
Each issue we explore a UK yarn shop
COLOUR THEORY
Looking for a specific shade? Chances are,
you'll find it in Wool Warehouse's Yarnsmiths
Create DK range.The online retailer has
recently released 76 new shades of their
popular yarn, bringing the total number of
colours available to 120 - that's the largest
number of DK shades available in the UK!
"We aim to ignite imagination and inspire
our customers," explains Charlotte Hancock,
the Marketing Manager at Wool Warehouse.
Visit www.woolwarehouse.co.uk
Who's in charge? Norma Arthur.
Where can we find you? Amble-by-the-Sea,
Northumberland.
What is your shop like? A quirky Aladdin's cave for
crafters, with a wide range ofcrafting components
and kits, including our own brand, Northumbria Knit
and Stitch. Visit us when you're in Northumbria!
What are your most popular items? Moderately
priced yarn from James C Brett, King Cole,
Hayfield, Stylecraft and Sirdar. We also sell our
own crochet blanket kits. We have supplies for other
crafts, too, like quilting, sewing and cross stitch.
20-22 Queen Street, Amble,
Northumberland, NE65 OBZ
www.amblepincushion.co.uk
Instagram: @amblepincushion
Facebook: Amble Pin Cushion
«•tOSifc
UK HAND KNITTING
12 WWW.GATHERED.HOW/SIMPLYCROCHET
Order online: www.woolwarehouse.co.uk
T WWL Phone us: 01926 882818 or 0800 505 3300
4/t ди, WAREHOUSE Email us: hello@woolwarehouse.co.uk
FREE delivery on UK orders over £30
WOOL
4ft Jill WAREHOUSE
ornamentals шапкег ratrern 1U724 । ta.yy *
Sirdar Jewelspun Aran | £9.99 a ball ? . \
: ;A&- <
Free UK delivery on orders over £30
BlackSheepWools.com
©OOOOO
Black Sheep Craft Barn
Warehouse Studios, Glaziers Lane, Culcheth,
Warrington, WA3 4AQ
T. 01925 764231 E. info@blacksheepwools.com
("rochet
DOWNLOAD
S/Ш SUSI
TODAY!
Like your gadgets? Download the latest issue of
Simply Crochet -with our trial offer, you get one
month for 99p, which includes access to the latest
issue as well as any released in the following 30 days.
Well bring you all our usual inspiring patterns, fun
features and fresh ideas straight to your device!
In the App Store or
Google Play, search
'Simply Crochet'
and other services
iPad is a trademark of Apple Inc., registered in the U.S. and
other countries. App Store is a service mark of Apple Inc.
Write your own story with our collection of enchanting makes -
you're sure to hook up something magical!
16 WWW.GATHERED.HOW/SIMPLYCROCHET
I KUl LUVl d Mod
This featherweight shawl will feel like |
the softest touch on your neck and
shoulders, and will look incomprably |
beautiful hooked in the whitest white.
WWW.GATHERED.HOW/SIMPLYCROCHET 17
18 WWW.GATHERED.HOW/SIMPLYCROCHET
WOODLAND WANDERER
With simple shapes and textured
stitches, this hood is just the thing to
take on your next journey. Just keep|
an eye out for rascally wolves! Д
PRINCE OF THE POND
When looking for love, you have to kiss |
a few frogs - but when they're the cute
amigurumi kind, we don't mind at all! |
[This one even has a regal little cushion. |
20 WWW.GATHERED.HOW/SIMPLYCROCHET
Г FAIRY TALE COLLECTION
SLEEPING BEAUTY BLANKET
You'll have only pleasant dreams under this
light and airy motif blanket by Marianne
Rawlins. Its hues give it an old-world charm
Rico Creative Melange Aran (51% wool, 49%
acrylic, 200g/640m), 1 ball of Olive-Rust (021)
Rico Creative Soft Wool Aran (76% acrylic,
25% wool, 100g/300m), 3 balls of each: Berry
(013), Cherry (009)
A 6.5mm (US KIO1/?) hook
TENSION
Tension is not critical, but it may affect the yarn
quantities required
MEASUREMENTS
Blanket measures approx 110x110cm
(43’/4х43’/41п)
NOTES
Blanket is made up of 36 Squares, which are
worked in rounds with RS facing and joined
together with a double crochet seam. A Border
is worked around the Blanket at the end.
SLEEPING BEAUTY BLANKET
SQUARES (MAKE 36)
Make 12 in each colour.
Make a magic loop
Round 1 (RS)Ch3 (counts as a tr), lltr into loop,
ss to top of beg ch-3. [12 sts]
Round 2 (RS) Ch3 (counts as htr, ch1), (htr in
next st, chi) 11 times, ss to second ch of beg
ch-3, ss into first ch-1 sp. [12 sts, 12 ch-1 sps]
Round 3 Ch2,2-tr cl in sp at base of ch-2, ch2,
(3-tr cl in next ch-1 sp, ch2) 11 times, ss to top of
beg cl, ss to first ch-2 sp. [12 sts, 12 ch-2 sps]
Round 4 Ch3 (counts as tr), 2tr in same sp, 3tr in
next ch-2 sp, *(3dtr, ch2,3dtr) in next ch-sp**,
3tr in next 2 ch-sps; rep from * 3 times more
ending final rep at **, ss to top of beg ch-3.
[48 sts, 4 ch-2 sps]
Round 5 Ch1 (does not count as st throughout),
(de in each st to ch-2 sp, 3dc in ch-sp) rep
around, ss to beg de. [60 sts]
Fasten off.
TO MAKEUP
Using the image as a guide join Squares
together in a 6x6 formation. We have joined
with a double crochet seam worked in the bl
only using Cherry throughout.
BORDER
Join Cherry in any corner.
Round 1 (RS) Chi, *(dc, ch2, de) in corner, de in
bl of each st to next corner; rep from * 3 times
more, ss to beg de.
Fasten off.
Join Olive-Rust in any ch-2 sp.
Round 2 Chi, *(dc, ch2, de) in ch-2 sp, de in bl of
each st to next ch-sp; rep from * 3 times more,
ss to beg de.
Fasten off.
Join Berry in any ch-2 sp.
Rounds 3-4 As Round 2, changing to Cherry for
Round 4.
Fasten off and weave in all ends.
SNOW WHUE SHAWL
Soft and light as driven snow, Emma
Leith's delicate mohair and silk wrap is
an ultimate luxury project that's fit for
a princess - truly the fairest of all!
Rowan Kidsilk Haze (70% mohair, 30% silk,
25g/210m), 5 balls of White (612)
A 6mm (US J/10) hook
TENSION
Tension is not critical, but it may affect the yarn
quantities required
MEASUREMENTS
Shawl measures approx 43x168cm (17x66in)
WWW.GATHERED.HOW/SIMPLYCROCHET 21
r FAIRY TALE COLLECTION^
NOTES
Shawl is worked in rows throughout.
Use 2 strands of yarn held together as 1 and
keep a relaxed tension for a drapey finish.
SNOW WHITE SHAWL
Using 2 strands of White, ch53.
Row 1 Tr in fourth ch from hook, tr in next 3 ch,
ch1, skip next ch, (tr in next 3 ch, ch1, skip next
st) 11 times, tr in last ch, turn.
Row 2 Ch3 (counts as tr throughout), skip next
st, *(3tr, ch3,3tr) in next st, skip next (tr, ch-1 sp,
tr); rep from * to last 2 sts, skip next st, tr in last
st, turn.
Row 3 Ch4, (counts as tr, chi), (3tr in ch-3 sp,
ch1) rep from * to last 2 sts, skip next st, tr in last
st, turn.
Rep Rows 2-3 until Shawl measures 168cm.
Fasten off and weave in ends.
JACK'S BEANSTALK
Grow a fun houseplant that never needs
watering! Make as many of Emma Leith's
yarny fronds as you desire - they can
go all the way up to the sky, just like the
beanstalk in the classic fairy story
Rico Creative Cotton Aran (100% cotton,
50g/85m), 3 balls of Yarn D Fir Green (023),
2 balls of Yarn A Light Green (040), 1 ball of
each: Yarn В Green (049), Yarn C Emerald
(069)
A 6mm (US J/10) hook
A 4mm (US G/6) hook
Florist wire
140cm macrame cord, 3mm wide
TENSION
Tension is not critical, but it may affect the yarn
quantities required
MEASUREMENTS
Strand measures approx 140cm (55in) long
ABBREVIATIONS
alt ss Remove live loop from hook, insert hook
in ch indicated, place loop back on hook and
pull through
For a full list, see page 78
NOTES
Strand of Leaves are made up of 9 large Leaves
and 19 small Leaves. Large and small Leaves
are worked to the same pattern. The large
Leaves are worked with a 6mm hook and 2
stands of yarn held together as one. The small
Leaves are worked with a single strand of yarn
and a 4mm hook.
BEANSTALK
STRAND OF LEAVES
LEAVES (MAKE 28)
To make a large Leaf use 2 strands of the same
colour yarn and a 6mm hook.
To make a small Leaf use a single strand of yarn
and a 4mm hook.
Using Yarn A, make 2 large Leaves and 8 small
Leaves.
Using Yarn B, make 8 small Leaves.
Using Yarn C, make 1 large Leaf and 3 small
Leaves.
Using Yarn D, make 6 large Leaves.
Ch17.
Row 1 Ss in third ch from hook, de in next ch,
htr in next ch, tr in next ch, ch3, pm in last ch, de
in next ch of beg ch-17, ss in next ch, turn.
Row 2 Ch4, alt ss in marked ch of ch-3, turn.
[Ch-4sp]
Row 3 Ch2 (counts as htr throughout), (2htr, de)
in ch-4 sp, ss in final ch of ch-4, de in next ch
from foundation ch, ss in next ch, turn. [5 sts]
Row 4 Ch6, alt ss in top of beg ch-2 from last
row, turn. [Ch-6 sp]
Row 5 Ch3 (counts as tr), (htr, htr, de) in ch-6 sp,
ss in last 3 ch of ch-6 sp, de in next ch from
foundation ch, ss in next ch, turn. [8 sts]
Row 6 Ch6, alt ss in top of beg ch-3 from last
row, turn. [Ch-6 sp]
Row 7 As Row 5.
Row 8 Ch5, alt ss in top of beg ch-3 from last
row, turn. [Ch-5 sp]
Row 9 Ch2, (htr, tr, htr, de) in ch-5 sp, ss in last
ch of ch-5 sp, de in next ch from foundation ch,
ss in next ch, turn. [7 sts]
Row 10 Ch4, alt ss in top of beg ch-2 of last row,
turn. [Ch-4 sp]
Row 11 Ch1, (de, htr, 2tr, htr) in ch-4 sp, ss in last
ch of foundation ch, ch1, turn to work down
opposite edge of foundation ch, de in next 13
ch, ss in next 2 ch, turn. [19 sts]
Row 12 Ch1, de in next st, htr in next st, tr in
next st, ch3, de in next st, ss in next st, turn.
[5 sts, 1 ch-3 sp]
Row 13 Ch4, alt ss in first ch of ch-3 from last
row, turn. [Ch-4 sp]
Row 14 Ch2, (2htr, de) in ch-4 sp, ss in final ch of
ch-4 sp, de in next st from Row 11, ss in next st,
turn. [6 sts]
Row 15 Ch6, alt ss in top of beg ch-2 from last
row, turn. [Ch-6 sp]
Row 16 Ch3, (tr, htr, de) in ch-6 sp, ss in fourth
ch of ch-6, ss in next 2 ch, de in next st from
Row 11, ss in next st, turn. [8 sts]
Row 17 Ch6, alt ss in top of beg ch-3 from last
row, turn. [Ch-6 sp]
Row 18 As Row 16.
Row 19 Ch5, alt ss in top of beg ch-3 from last
row, turn. [Ch-5 sp]
Row 20 Ch2, (htr, tr, htr, de) in ch-5 sp, ss in last
ch of ch-5 sp, de in next st from Row 11, ss in
next st, turn. [7 sts]
Row 21 Ch4, alt ss in top of beg ch-2 from last
row, turn. [Ch-4 sp]
Row 22 Chi, (de, htr, 2tr, htr) in ch-4 sp, ss in
next st of Row 11, ch9, ss in second ch from
hook, ss in next 7 ch (stem made).
Fasten off.
TO MAKEUP
Thread florist wire along centre and through
'veins' of each Leaf. You can use the image as a
guide.
Using a single strand of Yarn D and a 4mm
hook, de around length of rope.
Fasten off.
Sew the stems of each Leaf randomly across the
rope. Weave in all ends.
22 WWW.GATHERED.HOW/SIMPLYCROCHET
Г FAIRY TALE COLLECTION
PED RIDING HOOD CLOAK
Warm but not too heavy, Ella Burch's cloak
is a great throw-on for travel - through the
woods to your grandmother's, perhaps?
Stylecraft Highland Heathers DK (100%
acrylic, 272m/100g), Hawthorne (7227)
See table for measurements and yarn
quantities
A4mm(USG/6) Hook
TENSION
13 sts and 8 rows to measure 10x10cm (4x4in)
over treble crochet using a 4mm hook, or size
needed to obtain correct tension
ABBREVIATIONS
puff st (Yrh, insert hook in st indicated, yrh and
pull up loop to the height of row) 4 times, yrh
and draw through all 9 loops on hook, chi to
close
For a full list, see page 78
NOTES
Cloak is made up of 4 identical Panels and
a Hood. All parts are worked in rounds
throughout and are joined together at the
end. The Cloak is designed to be one size with
the option to vary the length only.
RED RIDING HOOD CLOAK
PANEL (MAKE 4)
Ch4, ss to fourth ch from hook to create a loop.
Round 1 Ch2 (does not count as st), *puff st,
ch2, puff st; rep from * 3 times more, ss to top of
ch-3 to join.
Round 2 Ch3 (counts as tr throughout), tr in st
at base of ch-3, *(puff st, ch2, puff st) in next
ch-2 sp, 3tr in sp between next 2 puff sts; rep
from * twice more, (puff st, ch2, puff st) in next
ch-2 sp, tr in st at base of beg ch-3, ss to top of
beg ch-3 to join. [8 puff sts, 4 ch-2 sps, 12 tr]
Round 3 Ch3, tr in st at base of ch-3,2tr in next
tr *(puff st, ch2, puff st) in next ch-2 sp, 2tr in
next 3 tr; rep from * twice more, (puff st, ch2,
puff st) in next ch-2 sp, 2tr in next tr, ss to top of
beg ch-3 to join.
[8 puff sts, 4 ch-2 sps, 24 tr]
Round 4 Ch3,2tr in next tr, tr in next tr, 2tr in
next tr, *(puff st, ch2, puff st) in next ch-2 sp, (tr
in next tr, 2tr in next tr) 3 times; rep from * twice
more, (puff st, ch2, puff st) in next ch-2 sp, tr in
next tr, 2tr in next tr, ss to top of beg ch-3 to
join. [8 puff sts, 4 ch-2 sps, 36 tr]
Round 5 Ch3, tr in st at base of ch-3, tr in next 2
tr, 2tr in next tr, tr in next 2 tr, *(puff st, ch2, puff
st) in next ch-2 sp, (2tr in next tr, tr in next 2 tr) 3
times; rep from * twice more, (puff st, ch2, puff
st) in next ch-2 sp, 2tr in next tr, tr in next 2 tr, ss
to top of beg ch-3 to join.
[8 puff sts, 4 ch-2 sps, 48 tr]
Round 6 Ch3,2tr in next tr, tr in next 3 tr, 2tr in
next st, tr in next 2 tr, *(puff st, ch2, puff st) in
next ch-2 sp, (tr in next tr, 2tr in next tr, tr in next
2 tr) 3 times; rep from * twice more, (puff st, ch2,
puff st) in next ch-2 sp, tr in next tr, 2tr in next tr,
tr in next 2 tr, ss to top of beg ch-3 to join.
[8 puff sts, 4 ch-2 sps, 60 tr]
Round 7 Ch3, tr in next 3 tr, 2tr in next st, tr in
next 4 tr, 2tr in next tr, *(puff st, ch2, puff st) in
next ch-2 sp, (tr in next 4 tr, 2tr in next tr) 3
times; rep from * twice more, (puff st, ch2, puff
st) in next ch-2 sp, tr in next 4 tr, 2tr in next tr, ss
to top of beg ch-3 to join.
[8 puff sts, 4 ch-2 sps, 72 tr]
Cont in pattern of Round 7 until 14(18:22)
rounds have been worked. Evenly increasing by
3tr per segment (12tr per round) Vary the
location of the increases to maintain a square.
[156 (204:252) tr, 8 puff sts, 4 ch-2 sps]
Fasten off and weave in ends.
CLOAK BORDER
Round 1 Join yarn in first tr of any segment to
work along edge, ch3 (does not count as st
throughout), puff st in same st, *(ch1, skip next
tr, puff st in nexttr) 19 (25:31) times, chi, (puff
st, ch2, puff st) in ch-2 corner sp, chi, puff st in
Length: 49 (62:75)cm, 19 (24’/2:291/2)in
SIZE S M L
cm 49 62 75
LENGTH in 19 24’/2 291/2
YARN 100g 5 6 8
To make this pattern easier to follow, we've colour-coded the sizing instructions - simply follow the
relevant column.
WWW.GATHERED.HOW/SIMPLYCROCHET23
Г FAIRY TALE COLLECTION-3
nexttr; rep from * around, ss to top of first puff
st, turn.
Round 2 Ch3, puff st in next ch-1 sp, *ch1, (puff
st, ch2, puff st) in ch-2 corner sp, *(ch1, skip next
puff st, puff st in next ch-sp) 21 (27:33) times;
rep from * around, omitting last puff st, ss to
top of first puff st to join, ss into next puff st and
next ch-1 sp,turn.
You will now work back and forth in rows along
a single side of the Square.
Row 3 Ch3, puff st in st at base of ch-3, *ch1,
skip next puff st, puff st in next st; rep from *
across to last ch-1 sp before corner ch-2 sp, turn.
Row 4 Ch3, *puff st in next st, chi, skip next
puff st; rep from * across to last ch-1 sp, puff st
in last ch-1 sp, tr in last puff st, turn.
Rows 5-10 Rep Rows 3-4 another 3 times.
Fasten off.
HOOD (MAKE 2 PANELS)
Work as Rounds 1 -14 of Cloak Panel.
Fasten off, leaving long tails.
TO MAKE UP
Consider the edge with the extra border rows
to be the top of each Panel, place all Panels RS
up on a flat surface. When joining, do not join
the row ends from the addtional border rows.
Instead, join the top of a Panel to the left edge
of the next Panel - between the corner ch-sps
from Round 2 of the Border.
Sew the top of one Panel to the left edge of a
second Panel. Then sew the top edge of the
second Panel to the left edge of the next Panel.
Rep this until all 4 Panels are joined, ending by
joining the top of the last Panel to the left edge
of the first Panel.
Place two Hood Panels together with WS facing
out. Sew together across two edges, this forms
the top and back of the Hood.
Pin the base of the join that's positioned at the
back of the Hood to the centre back of the
Cloak. Pin the edge around the neck opening,
leaving the front of the Hood open. Once
happy with the position, sew in place.
HOOD BORDER
Round 1 Join yarn in corner to work around
Hood opening, ch3, (puff st in next st, ch1, skip
next st) around the Hood opening and across
the front of the neckline, ss to first puff st to
join, turn.
Round 2 Ch3, (puff st, ch-1) in each ch-sp
around, ss to top of beg ch-3 to join.
Fasten off and weave in ends.
FROG PRINCE
Victoria Kairis' lifelike amphibian doesn't
need to change into a human to capture
our hearts. Hook him and his red cushion
Scheepjes Soft Fun DK (60% cotton, 40%
acrylic, 50g/140m), 2 balls of Bordeaux (2492),
1 ball of each: Moss (2606), Mustard (2621),
Butterscotch (2610)
A 2.75mm (C/2) hook
A stitch marker
Toy stuffing
A tassel maker
18mm green cat eye safety eyes, (available
from bit.ly/greenfrogeyes)
TENSION
Tension is not critical, but it may affect the yarn
quantities required
MEASUREMENTS
Frog measures approx 14x8cm (З’/гхЗМп)
Pillow measures approx 20x20cm (7%x7%in)
ABBREVIATIONS
invdec Insert hook in front loop of next st,
insert hook in front loop of next st across, yrh
and pull through both sts, yrh and pull through
2 loops on hook
spiked de Insert hook in st 2 rounds below, yrh
and pull loop up to heights of current round,
yrh and pull through 2 loops on hook
For a full list, see page 78
NOTES
Pattern is worked in the amigurumi style. Work
stitches continuously in a spiral without closing
off each round with a slip stitch. You may find it
helpful to mark the first st of the round with a
stitch marker, moving it up as you work.
Frog is made in one piece. Legs are made first
and joined to the Body as you go.
FROG PRINCE
BACK LEGS (MAKE 2)
THIGH
Using Moss, make a magic loop.
Round 1 (RS) Ch1,6dc in loop. [6 sts]
Round 2 (RS) 2dc in each st around. [12 sts]
Round 3 (De in next 2 sts, 2dc in next st) 4
times. [16 sts]
Round 4 (De in next 3 sts, 2dc in next st) 4
times. [20 sts]
Round 5 (De in next 4 sts, 2dc in next st) 4
times. [24 sts]
Round 6 De in each st around.
24 WWW.GATHERED.HOW/SIMPLYCROCHET
Г FAIRY TALE COLLECTION.
Round 7 (De in next 3 sts, 2dc in next st) 6
times. [30 sts]
Round 8 De in next 7 sts, ch2, skip 15 sts, de in
next 8 sts. [15 sts, 1 ch-2]
Round 9 Invdec, de in next 3 sts, 2dc in next st,
de in next st, de in ch, 2dc in next ch, de in next
2 sts, 2dc in next st, de in next 3 sts, invdec.
[18 sts]
Round 10 Invdec, de in next 5 sts, 2dc in next
st, de in next 2 sts, 2dc in next st, de in next 5
sts, invdec. [18 sts]
Fasten off leaving a long tail.
Pm in the ninth st of Round 10 of the Back Right
Leg and the first st of Round 10 of the Back Left
Leg.
RIGHT MID LEG
Join Moss to the first unworked st of Round 7 of
Thigh.
Round 1 (RS) De in next 15 sts, de in next 2 ch.
[17 sts]
Rounds 2-3 De in each st around.
Round 4 De in next 15 sts, invdec. [16 sts]
Round 5 De in next 10 sts, ch10, skip 2 sts, de in
next 4 sts. [14 sts, 1 ch-10]
Round 6 De in next 10 sts, de in next 10 ch, de
in next 4 sts. [24 sts]
Round 7 (De in next 2 sts, invdec) 6 times.
[18 sts]
Round 8 De in each st around.
Round 9 (De in next st, invdec) 6 times. [12 sts]
Round 10 (Invdec) 6 times. [6 sts]
Fasten off.
Thread tail through the fl of final 6 sts and pull
tight to close.
Weave in ends.
LEFT MID LEG
Join Moss to the first unworked st of Round 7 of
Thigh.
Rounds 1-4 (RS) As Rounds 1-4 of Right Mid
Leg.
Round 5 De in next 4 sts, ch10, skip 2 sts, de in
next 10 sts. [14 sts, 1 ch-10]
Round 6 De in next 4 sts, de in next 10 ch, de in
next 10 sts. [24 sts]
Rounds 7-10 As Rounds 7-10 of Right Mid Leg.
Fasten off.
Thread tail through the fl of final 6 sts and pull
tight to close. Weave in ends.
FEET
Work a Foot on the Right and Left Back Legs.
Join Moss to the first ch of Round 5 of Mid Leg.
Round 1 (RS) De in next 10 ch, de in next 2
unworked sts of Round 4. [12 sts]
Rounds 2-9 De in each st around.
Round 10 (De in next 4 sts, invdec) twice.
[10 sts]
Round 11 (De in next 3 sts, 2dc in next 2 sts)
twice. [14 sts]
Round 12 (De in next 5 sts, 2dc in next 2 sts)
twice. [18 sts]
Stuff the Foot s you work.
Round 13 De in each st around. [18 sts]
Do not fasten off.
FIRST TOE
Round 14 De in next 4 sts, pm in last st, de in
next 5 sts, leave rem sts unworked. [9 sts]
Round 15 De in marked st, de in next 5 sts.
[6 sts]
Round 16 (De in next 2 sts, 2dc in next st) twice.
[8 sts]
Round 17 (Invdec) 4 times. [4 sts]
Fasten off.
Thread tail through the fl of final 4 sts and pull
tight to close. Weave in ends.
SECONDTOE
Join Moss to first unworked st of Round 13 of
Foot.
Round 1 (RS) De in next 3 sts, skip next 6, de in
next 3 sts. [6 sts]
Round 2 De in each st around.
Round 3 (De in next 2 sts, 2dc in next st) twice.
[8 sts]
Round 4 (Invdec) 4 times. [4 sts]
Fasten off.
Thread tail through the fl of final 4 sts and pull
tight to close. Weave in ends.
THIRD TOE
Join Moss to first unworked st of Round 13 of
Foot.
Round 1 De in next 6 sts. [6 sts]
Rounds 2-4 As Rounds 2-4 of Second Toe.
Fasten off.
Thread tail through the fl of final 4 sts and pull
tight to close. Weave in ends.
FRONT LEGS (MAKE 2)
LEG
Using Moss, make a magic loop.
Rounds 1-4 (RS) As Rounds 1-4 ofThighs.
[20 sts]
Round 5 De in next 12 sts, ch2, skip next 8 sts.
[12 sts]
Round 6 De in next 12 sts, de in next 2 ch.
[14 sts]
Rounds 7-11 De in each st around. [14 sts]
Fasten off leaving a long tail.
Mark the seventh st of Round 11 for the Front
Right Leg and the first st of Round 11 for the
Front Left Leg.
FEET
Join Moss to first unworked st of Round 4 of
Front Leg.
Round 1 (RS) (De in next 2 sts, 2dc in next st)
twice, de in next 2 sts, de in next 2 ch. [12 sts]
Round 2 Invdec, de in next st, 2dc in next st, de
in next 2 sts, 2dc in next st, de in next st, invdec,
de in next 2 sts. [12 sts]
Round 3 De in next 4 sts, 2dc in next st, de in
next 5 sts, invdec. [12 sts]
Rounds 4-5 De in each st around.
Round 6 (De in next 4 sts, invdec) twice. [10 sts]
Round 7 (2dc in next st, de in next 3 sts, 2dc in
next st) twice. [14 sts]
Round 8 (2dc in next 2 sts, de in next 5 sts)
twice. [18 sts]
Stuff Front Leg.
Round 9 De in each st around, do not fasten off.
FIRST TOE
Round 10 De in next 6 sts, pm in last st, de in
next 5 sts, leave rem sts unworked. [11 sts]
Round 11 De in marked st, de in next 5 sts.
[6 sts]
Round 12 (Invdec, de in next st) twice. [4 sts]
Fasten off.
Thread tail through the fl of final 4 sts and pull
tight to close. Weave in ends.
SECONDTOE
Join Moss to first unworked st of Round 9 of
Foot.
Round 1 (RS) De in next 3 sts, skip next 6, de in
next 3 sts. [6 sts]
Round 2 De in each st around.
Round 3 (Invdec, de in next st) twice. [4 sts]
Fasten off.
Thread tail through the fl of final 4 sts and pull
tight to close. Weave in ends.
THIRD TOE
Join Moss to first unworked st of Round 9 of
Foot.
Round 1 (RS) De in next 6 sts. [6 sts]
Rounds 2-3 As Rounds 2-3 of Second Toe.
Fasten off.
Thread tail through the fl of final 4 sts and pull
tight to close. Weave in ends.
HEAD AND BODY
Using Moss, ch7.
Round 1 (RS) De in second ch from hook, de in
next 4 ch, 3dc in next ch, turn to work in
opposite side of foundation ch, de in next 4 ch,
2dc in next ch. [14 sts] »
WWW.GATHERED.HOW/SIMPLYCROCHET25
FAIRY TALE COLLECTION
Round 2 (2dc in next st, de in next 4 sts, 2dc in
next 2 sts) twice. [20 sts]
Round 3 *Dc in next st, 2dc in next st, de in
next 4 sts, (de in next st, 2dc in next st) twice;
rep from * once more. [26 sts]
Round 4 *Dc in next st, 2dc in next st, de in
next 5 sts, (de in next st, 2dc in next st, de in
next st) twice; rep from * once more. [32 sts]
Round 5 *Dc in next 3 sts, 2dc in next st, de in
next 4 sts, (de in next 3 sts, 2dc in next st) twice;
rep from * once more. [38 sts]
Round 6 *Dc in next 2 sts, 2dc in next st, de in
next 6 sts, (de in next 2 sts, 2dc in next st, de in
next 2 sts) twice; rep from * once more. [44 sts]
Round 7 *Dc in next 5 sts, 2dc in next st, de in
next 4 sts, (de in next 5 sts, 2dc in next st) twice;
rep from * once more. [50 sts]
Round 8 *Dc in next 3 sts, 2dc in next st, de in
next 7 sts, (de in next 3 sts, 2dc in next st, de in
next 3 sts) twice; rep from * once more. [56 sts]
Round 9 De in 11 sts, 2dc in next st, de in next 2
sts, 2dc in next 2 sts, de in next 4 sts, 2dc in next
st, de in next 2 sts, 3dc in next st, de in next 2
sts, 2dc in next st, de in next 4 sts, 2dc in next 2
sts, de in next 2 sts, 2dc in next st, de in next 20
sts. [66 sts]
Round 10 De in next 7 sts, 2dc in next st, de in
next 5 sts, 2dc in next st, de in next st, 2dc in
next 4 sts, de in next st, 2dc in next st, de in next
3 sts, 2dc in next st, (de in next 3 sts, 2dc in next
st) 3 times, de in next st, 2dc in next 4 sts, de in
next st, 2dc in next st, de in next 6 sts, (de in
next 7 sts, 2dc in next st) twice. [84 sts]
Round 11 De in next 4 sts, 2dc in next st, de in
next 61 sts, (de in next 4 sts, 2dc in next st, de in
next 4 sts) twice. [87 sts]
Round 12 De in next 5 sts, 2dc in next st, de in
next 61 sts, (de in next 5 sts, 2dc in next st, de in
next 4 sts) twice. [90 sts]
Round 13 De in next 6 sts, 2dc in next st, de in
next 9 sts, (de in next st, invdec) 5 times, de in
next 2 sts, (de in next 3 sts, 2dc in next st) 3
times, de in next 4 sts, (invdec, de in next st) 5
times, de in next 4 sts, (de in next 6 sts, 2dc in
next st, de in next 4 sts) twice. [86 sts]
Round 14 De in next 2 sts, 2dc in next st, de in
next 12 sts, (de in next st, invdec) 3 times, de in
next 7 sts, 2dc in next st, de in next 9 sts, 2dc in
next st, de in next 7 sts, (invdec, de in next st) 3
times, de in next 17 sts, 2dc in next st, de in next
10 sts. [84 sts]
Round 15 De in each st around.
Back Legs are joined to Body over the next 2
rounds. When Legs are joined make sure that
Feet are facing forwards.
Round 16 De in next st, place Back Right Leg
next to Body so that marked st is next to next st
of Body, work through WS of marked st of Leg
and RS of Body (working through 2 layers), de
through next 9 sts of Leg and Body, de in next
11 sts of Body, (de in next 3 sts, invdec, de in
next 2 sts) 4 times, de in next 13 sts, place Back
Left Leg next to Body so that marked st is next
to next st of Body, de through next 9 sts of Leg
and Body, de in next 13 sts. [80 sts]
Round 17 De in next st, de in 9 unworked sts of
Back Right Leg, skip joining sts of prev round,
de in next 11 sts, de in fl of next 25 sts, de in
next 12 sts, de in next 9 unworked sts of Back
Left leg, de in next 13 sts. [80 sts]
Front Legs are joined to Body over the next 2
rounds in the same way the Back Legs were
joined. Make sure the Feet are facing forwards.
Round 18 De in next 13 sts, place Front Right
Leg next to Body so marked st is next to next st
of Body, de through next 7 sts of Leg and Body,
de in next 28 sts of Body, place Front Left Leg
next to Body so marked st is next to next st of
Body, de through next 7 sts of Leg and Body, de
in next 25 sts of Body. [80 sts]
Change to Mustard.
Round 19 De in next 13 sts, de in next 7
unworked sts of Front Right Leg, skip joining sts
of prev round, de in next st, working through
next st and next bl of Round 16: de in next 25
sts, de in next 2 sts, de in next 7 unworked sts of
Front Left Leg, de in next 25 sts. [80 sts]
Insert safety eyes between Rounds 13-14,
approximately 30 sts apart.
Round 20 Invdec, de in next 16 sts, (de in next 3
sts, invdec, de in next 3 sts) 4 times, de in next
15 sts, (de in next st, invdec, de in next 2 sts) 3
times. [72 sts]
Round 21 Invdec, de in next 15 sts, (de in next 2
sts, invdec, de in next 3 sts) 4 times, de in next
15 sts, (de in next st, invdec, de in next st) 3
times. [64 sts]
Round 22 De in next 15 sts, (de in next st,
invdec, de in next st) 6 times, de in next 14 sts,
invdec, (de in next st, invdec) 3 times. [54 sts]
Round 23 Invdec, de in next 14 sts, (de in next
st, invdec) 6 times, de in next 14 sts, (invdec) 3
times. [44 sts]
Round 24 (Invdec) twice, de in next 36 sts,
(invdec) twice. [40 sts]
Round 25 (Invdec) twice, de in next 32 sts,
(invdec) twice. [36 sts]
Round 26 (Invdec) twice, de in next 6 sts, (de in
next 2 sts, invdec) 4 times, de in next 6 sts,
(invdec) twice. [28 sts]
Round 27 (Invdec) twice, de in next 4 sts, (de in
next st, invdec) 4 times, de in next 4 sts, (invdec)
twice. [20 sts]
Stuff the Head and Body.
Round 28 (Invdec) twice, (de in next st, invdec)
4 times, (invdec) twice. [12 sts]
Round 29 (Invdec) 6 times. [6 sts]
Fasten off.
Thread tail through the fl of final 6 sts and pull
tight to close. Weave in ends.
CROWN
Using Butterscotch, ch24 and ss into first ch,
being careful not to twist the ch.
Round 1 (RS) Ch1, de in each ch around. [24 sts]
Rounds 2-5 De in each st around.
Round 6 *Htr in next st, (tr, ch2, ss in second ch
from hook, tr) in next st, htr in next st, ss in next
st; rep from * 5 times more. [36 sts]
Fasten off and weave in ends.
Sew Crown to top of Frog's Body.
PILLOW
PANELS (MAKE 2)
Using Bordeaux, ch43.
Round 1 (RS) De in second ch from hook, (tr in
next st, de in next st) 20 times, tr in next st, turn.
[42 sts]
Rows 2-33 Chi, de in first st, (tr in next st, de in
next st) 20 times, tr in final st, turn.
Fasten off.
PILLOW EDGING
Place Panels together with RS facing out. Work
next round through both pieces to join.
Join Butterscotch to first st of Row 33.
Round 1 (RS) *Ss in next 42 sts, 42ss evenly
spaced across row-end edge; rep from * once
more stuffing before closing final side. [168 sts]
Round 2 (Working in fl only) (3dc in next st, de
in next41 sts)4times. [176sts]
Rounds 3-5 De in each st around.
Round 6 (Dc3tog, de in next 41 sts) 4 times.
[168 sts]
Fasten off leaving a long tail.
Sew top of final round to unworked bl from
Round 1.
Using Butterscotch, make 4 small tassels and
sew to the corners of the Pillow.
Weave in any rem ends.
YARN STOCKISTS
Black Sheep Wools
www.blacksheepwools.com
26 WWW.GATHERED.HOW/SIMPLYCROCHET
Layered up or worn on its own, Jane
Menchini's tunic is a ray of sunshin
da^
J
i г>
TEXTURED TUNIC
FEASY1
PEASY
DK 3.5MM, 4MM,
WEIGHT 4.5MM
к *' J
YOU WILL NEED
Stylecraft Bellissima
(100% acrylic, 100g/268m)
Silver Lining (3928)
See table for measurements
and yarn quantities
A 3.5mm (US E/4)hook
A 4mm (US G/6) hook
A 4.5mm (US 7) hook
For yarn stockists contact
Stylecraft 01484 848435
www.stylecraft-yarns.co.uk
TENSION
15 sts and 10 rows to measure
10x10cm (4x4in) over pattern using
4.5 mm hook, or size needed to
obtain correct tension
ABBREVIATIONS
FPV (front post v) Skip 1 st, FPdtr
around next st 2 rows below, tr in
next st on current row, FPdtr around
same st as last FPdtr, skip next st on
current row
For a full list, see page 78
Width a: 50 (55:60.5:66:71: 77)cm,
19% (21%: 23%: 26:28:30)in
Length b: 58 (58:60:60:62:62)cm,
22% (22%: 23%: 23%: 24%:24%)in
With tactile ribbing, cap sleeves and a loose
fit, this top is as easy to wear as it is to make.
Pair it with a bold turtleneck, as we did here,
or wear it on its own as the seasons change.
NOTES
Tunic is made up of 2 pieces: Front and Back.
Each piece is worked in rows throughout.
Front and Back are joined together at the
shoulders and sides.
Edging is worked around the neck and armhole
openings at the end.
TUNIC
FRONT
Using 4.5mm hook, ch76 (84:92:100:108:116).
Row 1 (RS) De into second ch from hook, de
into each ch to end, turn.
[75 (83:91:99:107:115) sts]
Row 2 Ch1 (does not count as st throughout),
de in each st to end, turn.
Rows 3-6 Ch2 (counts as tr throughout), tr in
each st to end, turn.
Row 7 Ch2, tr in next 2 (3:4:5:3:4) sts, (FPV, tr in
next 3 sts) 11 (12:13:14:16:17) times, FPV, tr in
last 3 (4:5:6:4:5) sts, turn.
Row 8 Ch2, tr in each st to end, turn.
Rep Rows 7-8 until piece measures 43cm
long.**
Next row Ch2, tr in each st to end, turn.
Rep last row until work measures 48cm, ending
on a WS row.
DIVIDE FOR NECK: LH SIDE
Row 1 (RS) Ch2, tr in next 23 (27:30:33:37:40)
sts, tr2tog, tr in next st, turn.
[26(30:33:36:40:43) sts]
Row 2 (WS) Ch2, tr2tog, tr in each st to end,
turn. [25 (29:32:35:39:42) sts]
Row 3 Ch2, tr in each st to final 3 sts, tr2tog, tr in
last st, turn. [24 (28:31:34:38:41) sts]
Row 4 Ch2, tr into next and each rem st to end,
turn.
Rep last row another 6 (6:8:8:10:10) times.
SHAPE SHOULDER
Row 1 (RS) Ss in first 4 (4:5:5:5:6) sts, htr in
each st to end, turn. [20 (24:26:29:32:35) sts]
The neckline and cap sleeves are finished
with an edging worked in double crochet
The tunic is worked from the hem up, then
divided for the front neckline and shoulders
SIZE S M L XL 2X 3X
cm 81-86 91-97 102-107 112-117 122-127 132-137
TO FIT BUST in 32-34 36-38 40-42 44-46 48-50 52-54
ACTUAL BUST cm 100 110.5 121 132 142.5 153.5
(APPROX) in 39% 43% 47% 52 56 60%
cm 58 58 60 60 62 62
LENGTH in 22% 22% 23% 23% 24% 24%
YARN 100g 4 5 5 5 6 6
To make this pattern easier to follow, we've colour-coded the sizing instructions - simply follow the
relevant column.
28 WWW.GATHERED.HOW/SIMPLYCROCHET
TEXTURED TUNIC
Row 2 Ch1, htr into each st to final 4 (4:5:5:5:6)
sts, turn leaving rem sts unworked.
[16(20:21:24:27:29) sts]
Rep rows 1-2 once more, then rep Row 1.
[4(8:6:9:13:11) sts]
Fasten off.
DIVIDE FOR NECK: RH SIDE
With RS facing skip central 21 (21:23:25:25:27)
sts from last full row of Front. Join yarn in next st.
Row 1 (RS) Ch2, tr2tog, tr into each st to end,
turn. [26 (30:33:36:40:43) sts]
Row 2 Ch2, tr in each st to final 3 sts, tr2tog, tr
into last st, turn. [25 (29:32:35:39:42) sts]
Row 3 Ch2, tr2tog, tr into each rem st to end,
turn. [24 (28:31:34:38:41) sts]
Row 4 Ch2, tr into next and each rem st to end,
turn.
Rep last row another 6 (6:8:8:10:10) times.
SHAPE SHOULDER
Row 1 (RS) Chi, htr into each st to final 4 (4:5:5:
5:6) sts, turn leaving rem sts unworked.
[20(24:26:29:32:35) sts]
Row 2 Ss into first 4 (4:5:5:5:6) sts, htr into
each rem st to end, turn.
[16(20:21:24:27:29) sts]
Rep Rows 1-2 once more, then rep Row 1.
[4(8:6:9:13:11) sts]
Fasten off and weave in ends.
BACK
Work as Front to **.
Next row Ch2, tr in each st to end, turn.
Rep last row until you have worked 5 fewer
rows than the Back.
SHAPE SHOULDERS
Next row Ss in first 4 (4:5:5:5:6) sts, htr in each
st to final 4 (4:5:5:5:6) sts, turn leaving rem sts
unworked.
Rep last row another 4 times.
Fasten off and weave in ends.
TO MAKE UP
Pin the Front and Back together with WS facing
outwards.
Whipstitch together at the shoulder seams and
side seams, leaving 25 (26:27:28:29:30)cm
unjoined at the top of the sides for the armhole
openings.
NECKLINE EDGING
Using 4.5mm hook and with RS facing, join yarn
to right shoulder seam.
Round 1 (RS) Ch1, de in each st along back
neck edge, (2dc in next row-end, Ide in next
row end) rep to centre of neck, de in next 21 (21:
23:25:25:27) sts, (2dc in next row-end, 1dc in
next row end) rep to end, ss to beg de.
Change to a 4mm hook.
Round 2 Ch1, de in each st around, ss to beg de.
Round 3 As Round 2.
Change to a 3.5mm hook.
Round 4 As Round 2.
Fasten off and weave in ends.
ARMHOLE EDGING
Using 4.5mm hook and with RS facing join yarn
to underarm seam.
Round 1 (RS) Chi, 2dc in each row-end around,
ss to beg de.
Rounds 2-3 (RS) Ch1, de in each st around, ss to
beg de.
Fasten off and weave in ends.
The pattern is created by working V stitches
into the front posts two rows below
SAVIOR
8ИЛЛМ»
For a more luxurious make, try King Cole
Luxury Merino DK 8 (9:10:10:11:12) balls of
Pewter (2632). Check hook size, tension
and ball length if you use a different yarn.
For yarn stockists contact
www.kingcole.com
SIMPLE STEPS HOW TO SEW SEAMS
§
1 Sewing with a tapestry
needle is the regular and neat
way to join seams. Place pieces
of crochet WS together and
oversew them as above, using
a tapestry needle.
2 To slip stitch a seam, place
the crochet pieces RS together.
*lnsert hook through both
edge stitches, yrh, pull
through to complete 1 slip
stitch; rep from *, keeping the
work fairly loose.
3 For a de seam, place the
crochet pieces RS together, or
WS together for a visible
seam. Work as for slip stitch
seam, using double crochet
instead of slip stitch.
4 A useful variation on the de
seam, the de and chain seam
is used when you need less
bulk and/or greater flexibility
in the seam. Work as for the
de seam, but work 1 de and
1 chain alternately.
WWW.GATHERED.HOW/SIMPLYCROCHET29
If you love crochet, you are going to love receiving this little box
every month. Filled with a crochet project and treats, it's one not
to miss.
Whether it's for yourself or a gift for a crochet lover, you won’t be
disappointed.
All the details are on our website www.littleboxofcrochet.com
or you can follow us on Facebook and Instagram
П @newlittleboxofcrochet @littleboxofcrochet
Free UK Delivery on orders over £25, Click and Collect
W««L
AND
CRAFTS
Yarn | Fabric | Accessories
DON’T JUST READ
BBC COUNTRYFILE
MAGAZINE...
LISTEN TO IT, TOO
Your chancefora
weekly adventure
in nature and the
countryside with
the BBC Countryfile
Magazine team
You can find the Plodcast on all good podcast platforms
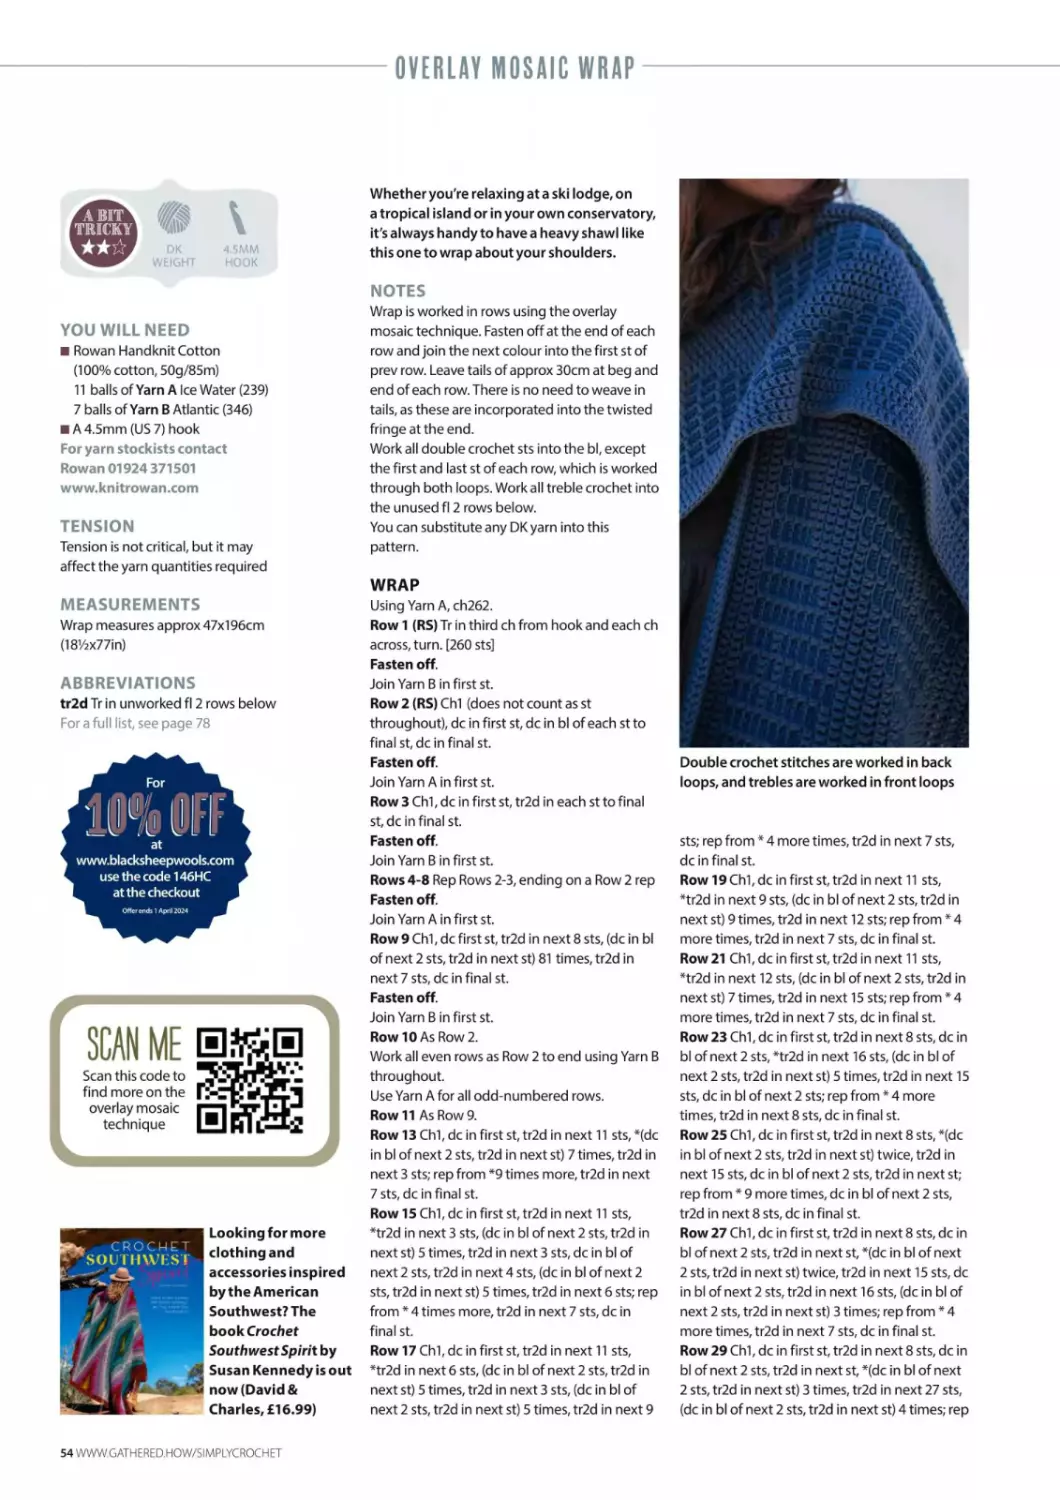
Creating a stunning defined stripe effect when worked up,
this yarn is versatile and fully machine washable.
O@®@ * 1Л6.ШНЛ QUALITV. SENSIBLE PKICfD. WWW.C1GNEIHIINS.COM Ol CALL012H
AMIGURUMI GROMIT
MAN’S BEST FRIEND
The famous Gromit of Wallace & Gromit is the
loyal buddy we all need! By Sarah-Jane Hicks
WWW.GATHERED.HOW/SIMPLYCROCHET 31
AMIGURUMI GROMIT
2.5MM
3MM
YOU WILL NEED
Any DK cotton yarn in:
Yarn A ivory
Yarn В brown
Yarn C black
Yarn D white
A 3mm (US C/2 or D/3) hook
A 2.5mm (US B/1 or C/2) hook
Toy stuffing
TENSION
Tension is not critical, but it may
affect the yarn quantities required
MEASUREMENTS
Gromit measures approx 10cm (4in)
tall
ABBREVIATIONS
invdec Insert hook in front loop of
next st, insert hook in front loop of
next st across, yrh and pull through
both sts, yrh and pull through 2
loops on hook
For a full list, see page 78
When he's not busy getting his owner,
Wallace, out of various scrapes, this clever
little beagle makes for a wonderful
companion - hook him up for your home!
NOTES
Gromit is made up of separate pieces, which
are joined together at the end.
Parts of this pattern are worked using the
amigurumi method. Work stitches
continuously in a spiral without closing off
each round with a slip stitch. It may help to use
a stitch marker in the first stitch of each round,
moving it up as you work.
GROMIT
HEAD
Using a 3mm hook and Yarn A, ch2.
Round 1 (RS) 5dc in second ch from hook.
[5 sts]
Round 2 (RS) 2dc in each st around. [10 sts]
Round 3 (Ide, 2dc in next st) 5 times. [15 sts]
Rounds 4-5 De in each st around.
Round 6 (4dc, 2dc in next st) 3 times. [18 sts]
Round 7 7dc, 2dc in next st, 3dc in next 2 sts,
2dc in next st, 7dc. [24 sts]
Round 8 9dc, 2dc in next st, Ide, 2dc in next 2
sts, Ide, 2dc in next st, 9dc [28 sts]
Rounds 9-11 De in each st around.
Round 12 9dc, invdec, Ide, (invdec) twice, 1dc,
invdec, 9dc [24 sts]
Round 13 (2dc, invdec) 6 times. [18 sts]
Stuff the Head.
Round 14 (Dc2tog) 9 times. [9 sts]
Fasten off, leaving a long tail.
BODY
Using a 3mm hook and Yarn A, ch2.
Round 1 (RS) 6dc in second ch from hook.
[6 sts]
Round 2 (RS) 2dc in each st around. [12 sts]
Round 3 (Ide, 2dc in next st) 6 times. [18 sts]
Round 4 (2dc, 2dc in next st) 6 times. [24 sts]
Round 5 (5dc, 2dc in next st) 4 times. [28 sts]
Rounds 6-13 De in each st around.
Round 14 (5dc, invdec) 4 times. [24 sts]
Round 15 De in each st around.
Round 16 (2dc, invdec) 6 times. [18 sts]
Round 17 De in each st around.
Stuff Body.
Round 18 (Invdec) 9 times. [9 sts]
Fasten off, leaving a long tail.
EARS (MAKE 2)
Using a 3mm hook and Yarn B, ch2.
Round 1 (RS) 6dc in second ch from hook.
[6 sts]
Round 2 (2dc, 2dc in next st) twice. [8 sts]
Rounds 3-7 De in each st around.
Round 8 (2dc, invdec) twice. [6 sts]
Rounds 9-10 De in each st around.
Flatten top of Ear and work next row through
both layers to close.
Make Gromit's beady eyes with little white
circles with a black French knot in the centre
Row 11 1dc, dc2tog. [2 sts]
Fasten off, leaving a long tail.
NOSE
Using a 3mm hook and Yarn C, ch2.
Round 1 (RS) 6dc in second ch from hook.
[6 sts]
Round 2 (RS) (Ide, 2dc in next st) 3 times. [9 sts]
Round 3 7dc, invdec. [8 sts]
Fasten off, leaving a long tail.
LEGS (MAKE 4)
Using a 3mm hook and Yarn A, ch2.
Round 1 (RS) Ch1,6dc in second ch from hook.
[6 sts]
Round 2 2dc in each st around. [12 sts]
Round 3 3dc, (5-tr cl, Ide) 3 times, 3dc.
Round 4 3dc, (invdec) 3 times, Ide, invdec.
[8 sts]
Stuff Legs firmly as you work.
Rounds 5-13 De in each st around.
Fasten off.
TAIL
Using a 3mm hook and Yarn B, ch2.
Round 1 (RS) 3dc in second ch from hook.
[3 sts]
Round 2 2dc in next st, Ide, 2dc in next st.
[5 sts]
Rounds 3-7 De in each st around.
Fasten off, leaving a long tail.
TO MAKEUP
Refer to the images when joining pieces
together.
32 WWW.GATHERED.HOW/SIMPLYCROCHET
AMIGURUMI GROMIT
Stuff as you join.
Sew the Ears over Round 2 of the Head, 1 st
apart at the front.
Sew the Nose over Rounds 8-10 of the Head.
Sew the Head to the Body.
Sew the Tail over Round 4 of the Body.
Pin the Legs to the Body, making sure Gromit is
well balanced. Once happy with the position,
sew in place.
EYES
Using a 2.5mm hook and Yarn D, ch4 and ss in
last ch from hook.
Fasten off.
Sew the Eyes over Rounds 4-5 of the Head.
Using Yarn C, embroider French knots in the
centre of each Eye.
Weave in any rem ends.
The book Wallace &
Gromit: Cracking
Crochet by Sa rah-
JaneHicksisout
now. (Search Press,
£14.99, ISBN
9781800921535).
Available from www.
searchpress.com
All of Gromit's body parts are made
separately and sewn together at the end
SIMPLE STEPS HOW TO MAKE A FRENCH KNOT
1 Secure yarn at back of fabric
and bring needle to the front.
Using thumb and forefinger,
hold yarn as it comes out of
fabric. Keeping it taut, twist
the needle around the yarn
3 times, as shown above.
2 Insert needle back into the
fabric, very close to where it
came out. Tip: you'll need to
pierce the fabric, so use a
sharp needle.
4 Pull the needle through
gently to form a knot on the
surface of the fabric.
3 Hold the yarn taut and push
the twists of yarn so they sit
right up next to the fabric.
WWW.GATHERED.HOW/SIMPLYCROCHET33
Crochet
SAVE TIME. MONEY ANO HASSLE WITH AN
ANNUAL И ШШ1SUBSCRIPTION
Download the latest issue
straightaway
Get a further 12 issues in
your first year
All issues download
automatically
Download it once...
read it offline forever
Available on the
App Store
ANOfiOlO APP ON
Google play
nook
by fern» A Nnblr
zinio
iPad is a trademark of Apple Inc., registered in the U.S. and other countries. App Store is a service mark of Apple Inc.
NOOK is a registered trademark of Barnes & Noble, Inc. NOOKTablet is a trademark of Barnes & Noble, Inc
To subscribe simply visit:
www.ourmediashop.com/simply-crochet-magazine-wmonam23bs
The digital version of the magazine does not include the cover gift that you would find on newsstand copies
f ERINNAS
JOURNAL 5
I tkc/ btu clu>
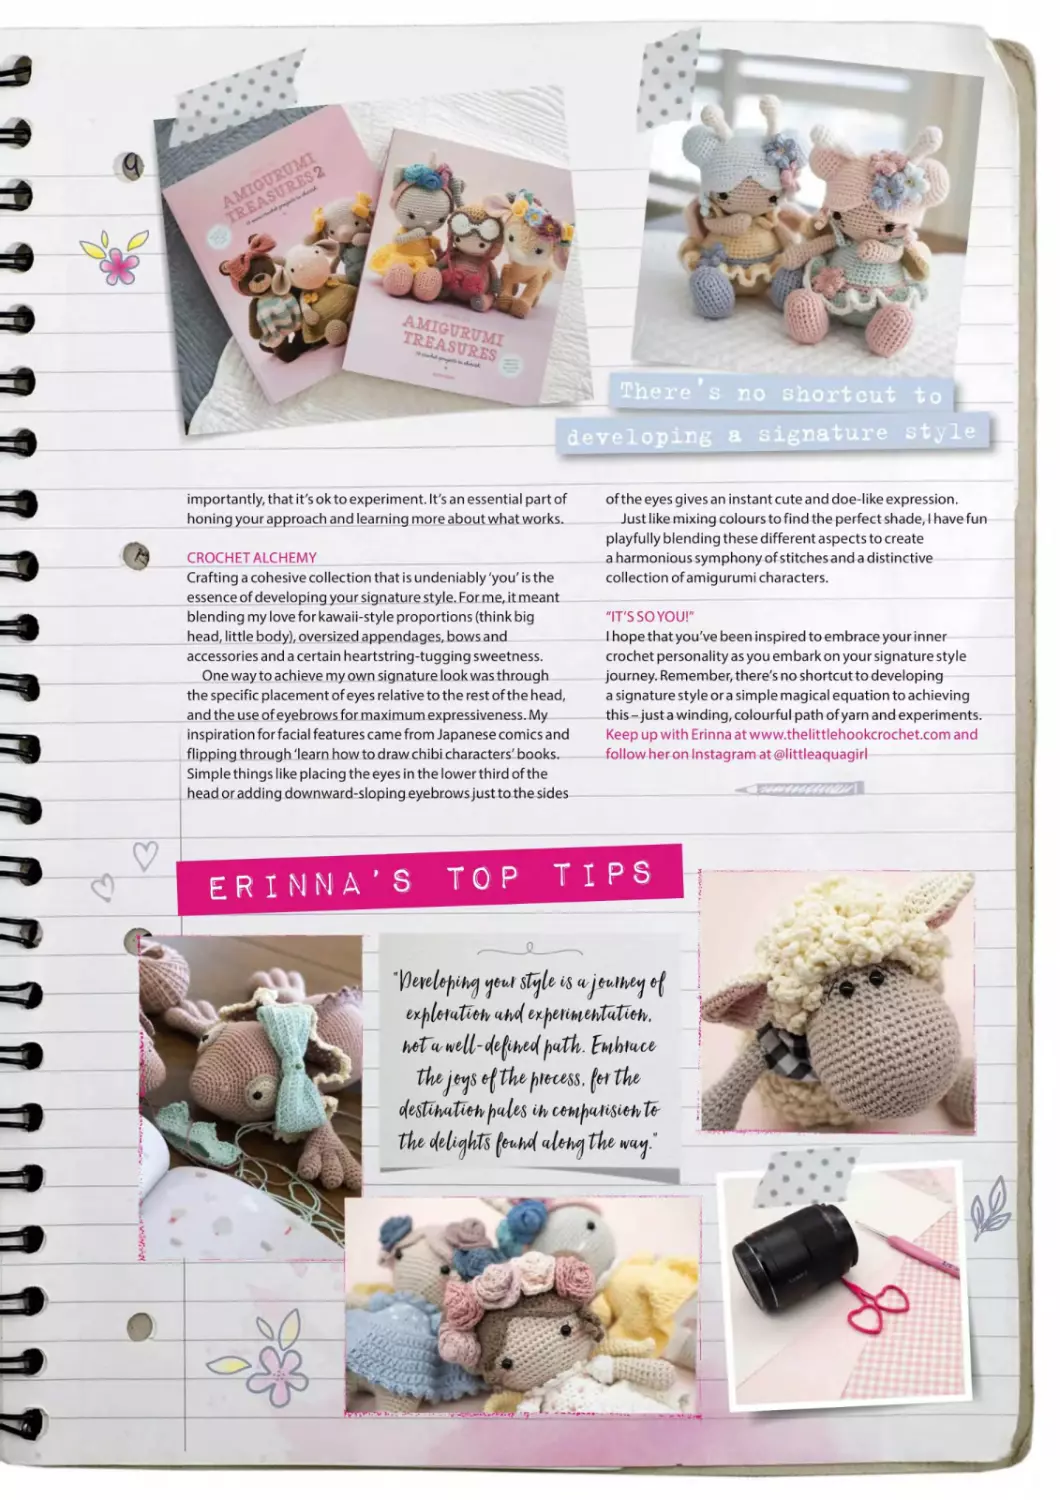
Looking to create your own signature crochet
style? Erinna Lee ofThe Little Hook Crochet is here
to help you find the aesthetic that speaks to you...
Dicture this: a crocheter spots your latest creation while
scrolling through Instagram and exclaims, "Oh, that
must be yours - it's so YOU!" That, my fellow crochet
lovers, is the holy grail of compliments for any artist or
designer. I fondly remember occasions where someone
would DM me on Instagram to comment on one of my
designs, which they had instantly picked out of a line-up
(for instance, as part of a CAL). This truly made me feel that,
since embarking on my design journey, I had reached
a point where my work had become recognisable as mine.
But, when you're starting out, how do you find a style that's
truly 'yours'? Here's my advice...
EMBRACEYOUR CROCHET PERSONALITYTYPE
The world is filled with fabulous fibres and kaleidoscopic
colours, so it's easy to be enticed by a million different
crochet trends at a time. However, I quickly realised that
staying true to myself and my personal tastes, quirks and all,
was the key to unlocking my signature style. Embracing my
love for soft pastel hues, elegant Scandinavian design
aesthetics, cotton fibres and lots and lots of pink helped me
showcase my true crochet personality. So, don't be afraid to
let your inner self shine through your colour, fibre and design I recognised my personal taste preferences, and more
preferences and stay true to what you love. This is perhaps
one of the easiest and most straightforward ways to develop
a consistent style.
THE ARTOFTRIAL AND ERROR
Finding your crochet groove is an organic process of growth
that requires time, patience and experimentation. Trust that
your style will evolve overtime. Mine came only after working
from other designers' patterns as well as creating my own
original designs.
In hindsight, I've made many questionable choices with my
crochet designs. I've tried different head shapes (round vs
flat), limb proportions (short and chubby vs long and skinny)
and ways of attaching pieces together (sewn together or as
a continuous piece). For example, inspired by stuffed toys
I saw online, I started making crochet dolls with rectangular,
flat headsand large crochet eyes. I was convinced that this
was going to be 'my look'. However, I quickly recognised that
the final aesthetic was not to my personal taste.
It's important to embrace the learning curve and relish the
decisions you make, right or wrong. From taking chances,
releasing your inhibition and trialling differentthings,
importantly, that it's ok to experiment. It's an essential part of of the eyes gives an instant cute and doe-like expression.
honing your approach and learning more about what works. Just like mixing colours to find the perfect shade, I have fun
playfully blending these different aspects to create
CROCHET ALCHEMY a harmonious symphony of stitches and a distinctive
Crafting a cohesive collection that is undeniably 'you' is the collection of amigurumi characters.
essence of developing your signature style. For me, it meant
blending my love for kawaii-style proportions (think big "IT'S SO YOU!"
head, little body), oversized appendages, bows and I hope that you've been inspired to embrace your inner
accessories and a certain heartstring-tugging sweetness. crochet personality as you embark on your signature style
One way to achieve my own signature look was through journey. Remember, there's no shortcut to developing
the specific placement of eyes relative to the rest of the head, a signature style or a simple magical equation to achieving
and the use of eyebrows for maximum expressiveness. My this - just a winding, colourful path of yarn and experiments,
inspiration for facial features came from Japanese comics and Keep up with Erinna at www.thelittlehookcrochet.com and
flipping through 'learn how to draw chibi characters' books. follow her on Instagram at @1 ittleaquagirl
Simplethings like placing the eyes in the lower third of the
head or adding downward-sloping eyebrows just to the sides
LOOKING FOR
A GOOD YARN?
VISIT YOUR
WEBSITE.
ukhandknitting.com
FIND A 4
YARN SHOP
r*^' л* • r ?
* v v \ ?v
г>-лМ
FIND A
KNITTING
GROUP
FIND AN EVENT < January 2022 >
Click on the m t w t f s s
1 2
calendar to
discover local and 3 4 5 6 7 8 9
national events 10 11 12 13 14 15 16
17 18 19 20 21 22 23
24 25 26 27 28 29 30
31
There are over 500 yarn shops in our community of
independent retailers. Each one has a warm welcome and
offers you the personal service you've always loved.
You can chat about a project. Feel the quality of the yarn.
Pick up some useful advice. Join the shop's craft group.
Invest in a stash for the future. And much, much more.
Before you start your next knitting or crochet project, or if you
need help with an existing one, visit ukhandknitting.com
to see what your yarn shops can offer you.
WE ARE
UK HAND KNITTING
Check
Bye-bye, black and white! Kelly Wilson
Moore's checked scarf is all spring shade;
CHECKED SCARF
Г EASY7!
PEASY
4PLY
WEIGHT
3.5MM
HOOK
YOU WILL NEED
Scheepjes Stonewashed
(78% cotton, 22% acrylic,
50g/130m)
1 ball of each:
Red Jasper (807)
Lilac Quartz (818)
Turquoise (824)
Fosterite (826)
Peridot (827)
Beryl (833)
Morganite (834)
Tourmaline (836)
A 3.5mm (US E/4) hook
For yarn stockists contact
Scheepjes
www.scheepjes.com/en
TENSION
Tension is not critical, but it may
affect the yarn quantities required
MEASUREMENTS
Scarf measures approx 148x27cm
(5814x1 OViin) excluding tassels
ABBREVIATIONS
For a full list, see page 78
By using simple colourwork and working in
rows, you can hook up this flower garden-
worthy scarffor the chilly first days of spring.
NOTES
Scarf is worked in rows throughout. Each row is
worked using 4 colours: 2 colours on the first
half of the row and 2 colours on the second
half. Change colour on the final yrh of st before
colour change is indicated. Work over the
carried yarn as you work, carrying the first 2
colours only for the first half of each row, and
the rem 2 colours for the second half of the row.
A fringe is added to the short edges of the Scarf
at the end.
SCARF
Using Turquoise, ch62.
Row 1 (WS) Tr in fourth ch from hook (skipped
chs counts as st), tr in next ch, (change to Beryl,
tr in next 3 ch, change to Turquoise, tr in next 3
ch) 4 times, change to Beryl, tr in next 3 ch,
change to Tourmaline, leave Beryl and
Turquoise on the WS of your work ready to use
on the next row, (tr in next 3 ch, change to
Peridot, tr in next 3 ch, change to Tourmaline) 5
times, turn. [60 sts]
Row 2 (RS) Ch2 (does not count as st
throughout), tr in first 3 sts, (change to Peridot,
tr in next 3 sts, change to Tourmaline, tr in next
3 sts) 4 times, change to Peridot, tr in next 3 sts,
change to Turquoise, leave Peridot and
Tourmaline on the WS of your work ready to
use again on the next row, (tr in next 3 sts,
change to Beryl, tr in next 3 sts, change to
Turquoise) 5 times, turn.
Row 3 Ch2, tr in first 3 sts, (change to Beryl, tr in
next 3 sts, change to Turquoise, tr in next 3 sts)
4 times, change to Beryl, tr in next 3 sts, change
to Tourmaline, (tr in next 3 sts, change to
Peridot, tr in next 3 sts, change to Tourmaline) 5
times, turn.
Rows 4-12 Rep Rows 2-3, ending on a Row 2
rep.
Fasten off.
Join Morganite in first st.
Row 13 Ch2, tr in first 3 sts, (change to Lilac
Quartz, tr in next 3 sts, change to Morganite, tr
in next 3 sts) 4 times, change to Lilac Quartz, tr
in next 3 sts, change to Red Jasper, (tr in next 3
sts, change to Fosterite, tr in next 3 sts, change
to Red Jasper) 5 times, turn.
Row 14 Ch2, tr in first 3 sts, (change to Fosterite,
tr in next 3 sts, change to Red Jasper, tr in next 3
sts) 4 times, change to Fosterite, tr in next 3 sts,
change to Morganite, (tr in next 3 sts, change to
Lilac Quartz, 3tr, change to Morganite) 5 times,
turn.
Rows 15-24 Rep Rows 13-14.
Fasten off.
Continue in pattern set, using the following
colour sequence:
Use Turquoise, Tourmaline, Lilac Quartz and
When making the fringing, match each fringe
to the colour of the stitching above it
For the check pattern, change the yarn shade
every three stitches and be mindful of tension
Beryl for Rows 25-36.
Use Peridot, Red Jasper, Morganite and
Turquoise for Rows 37-48
Use Beryl, Tourmaline, Lilac Quartz and
Fosterite for Rows 49-60.
Use Lilac Quartz, Red Jasper, Morganite and
Peridot for Rows 61-72.
Use Fosterite, Tourmaline, Red Jasper, and
Turquoise for Rows 73-84.
Use Turquoise, Beryl, Tourmaline, and Lilac
Quartz for Rows 85-96.
Use Red Jasper, Morganite, Fosterite and
Peridot for Rows 97-108.
Use Lilac Quartz, Turquoise, Beryl, and
Tourmaline for Rows 109-120.
Use Red Jasper, Peridot, Fosterite and Lilac
Quartz for Rows 121-132.
Use Turquoise, Tourmaline, Beryl, and Red
Jasper for Rows 133-144.
Fasten off and weave in ends.
TO FINISH
Cut 4 strands of Turquoise, 23cm long. Hold
strands together and fold in half. Insert hook
through second tr of any Turquoise 3-tr group
from final row, place folded end on hook and
pull through. Thread tails through folded end
and pull tight to secure. Rep in central tr of each
3-tr group across short edges, matching the
colours of the 3-tr group to the fringe.
Trim to your desired length.
40 WWW.GATHERED.HOW/SIMPLYCROCHET
EMBELLISH HOOP EARRINGS
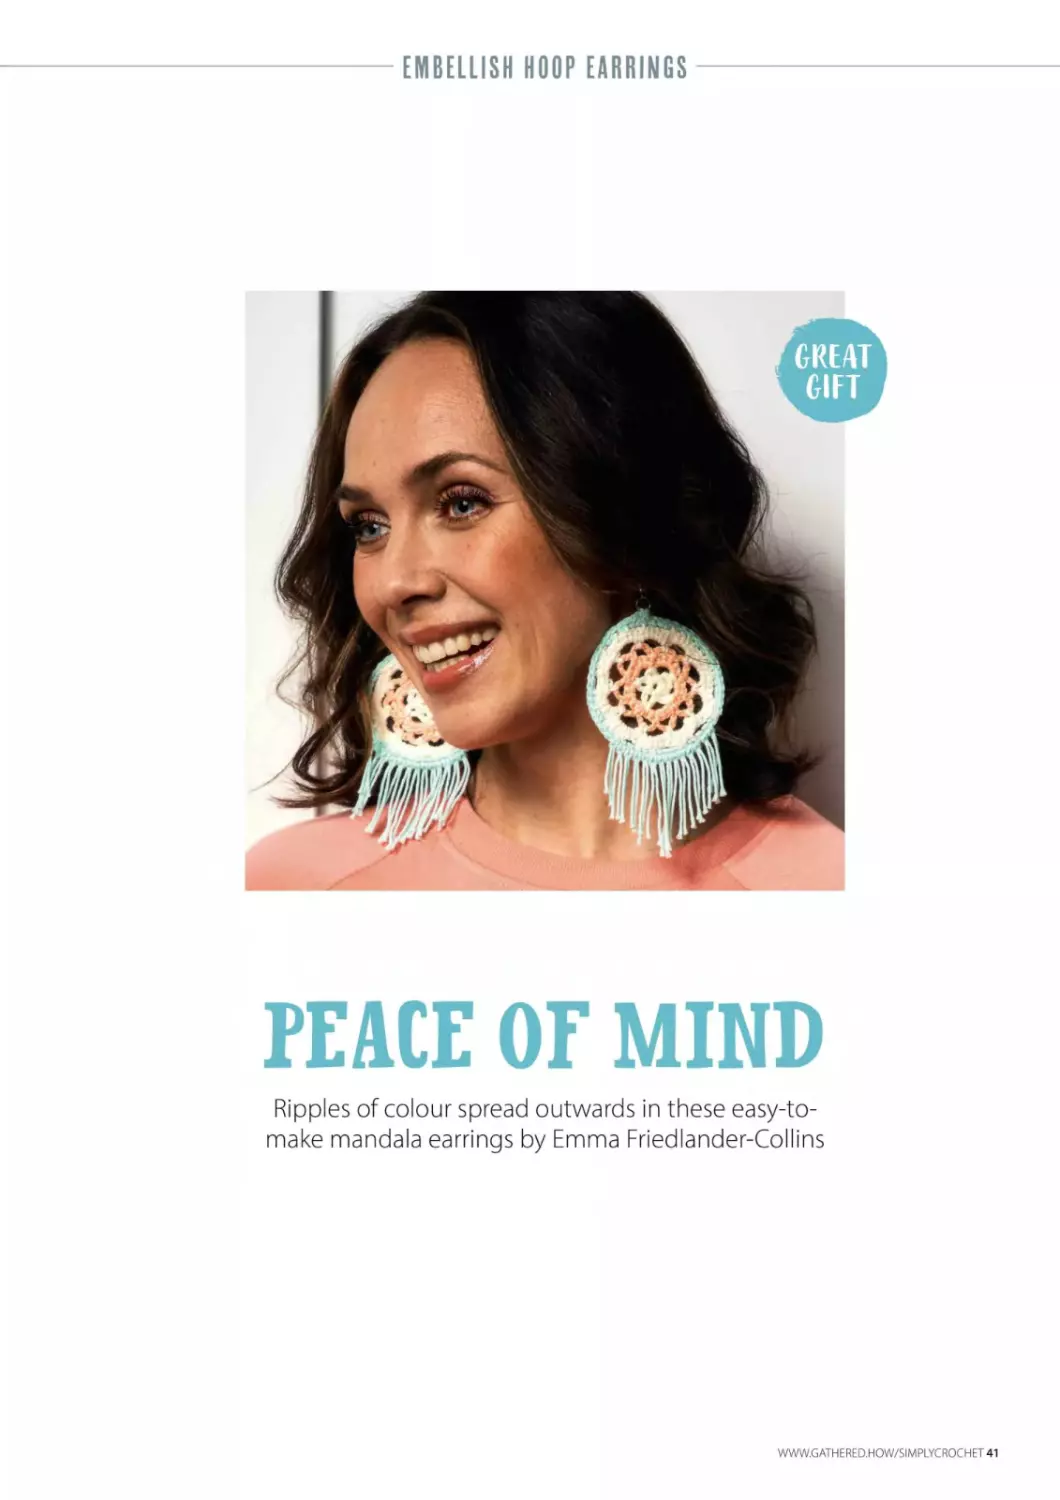
PEACE OF MIND
Ripples of colour spread outwards in these easy-to-
make mandala earrings by Emma Friedlander-Collins
WWW.GATHERED.HOW/SIMPLYCROCHET 41
EMBELLISH HOOP EARRINGS
4PLY
WEIGHT
3MM
HOOK
YOU WILL NEED
Scheepjes Organicon
(100% cotton, 50g/170m)
1 ball of each:
Yarn A Broken Almond (220)
Yarn В Peach Fuzz (208)
Yarn C Glacier (214)
A 3mm (US C/2 or D/3) hook
A pair of earrings, 7cm diameter
For yarn stockists contact
Scheepjes
www.scheepjes.com/en
TENSION
Rounds 1-5 measure 5cm (2in) in
diameter
MEASUREMENTS
Mandala measures approx 7cm
(2%in) in diameter
ABBREVIATIONS
For a full list, see page 78
SCAN ME НЭДИ
Scan this code
for a free bonus
mandala earring
pattern!
Breathe new life into an old pair of large hoop
earrings by filling them with colourful
mandalas.This is a great way to use up small
scraps of yarn - make a few sets in different
colourways and give to friends and family!
NOTES
Mandala is worked in rounds with RS facing
throughout.
An edge is worked around the earrings and the
Mandalas are sewn into the centre.
If using different sized earrings, you may need
to adapt the number of rounds worked.
EARRINGS
MANDALA (MAKE 2)
Using Yarn A, ch5 and ss in last ch from hook to
form a loop.
Round 1 (Ch4, ss into loop) 5 times. [5 ch-4 sps]
Round 2 Ss in first 2 ch of first ch-4 sp, (ch4, ss
in next ch-4 sp) 5 times.
Fasten off.
Join Yarn В in any ch-4 sp.
Round 3 Ch1 (does not count as st) 4dc in each
ch-sp around, ss to beg de. [20 sts]
Round 4 (Ch5, skip 2 sts, de in sp before next st)
10 times, ss to first ch of beg ch-5. [10 ch-5 sps]
Fasten off.
Join Yarn A in any ch-sp.
Round 5 (Ch5, de in next ch-sp) 10 times, ss to
ss to first ch of beg ch-5.
Round 6 Ch2 (counts as de), 5dc in first ch-sp,
6dc in next 9 ch-sps, ss to top of beg ch-2.
Fasten off.
Work edging around earring hoop, then
stitch the crocheted mandala inside it
EDGING
Join Yarn C around edge of earring, chi, de
around edge until the whole hoop is covered.
Twist so tops of the sts are facing the outside of
the earring. Sew the Mandala to the inside.
TASSEL
Cut a length of Yarn C, approx 20cm long.
Insert hook into stitch at base of earring, fold
length in half, place on hook and draw through
the stitch. Thread tails through folded end and
pull tight to secure.
Repeat across 14 sts at lower edge of earrings
and trim to desired length.
SIMPLE STEPS HOWTO ADD FRINGING
1 Follow the instructions in
the pattern, or try this
method. Cut 2 pieces of yarn,
twice as long as you want the
fringe to be. Fold in half.
2 Insert hook through the
edge of the fabric, where you
want the first piece of fringing
to be placed. Loop the yarn
lengths over the hook and pull
back through the fabric.
3 Pull the yarn lengths to
make a small loop next to the
fabric. Pass the ends of the
yarn lengths through this loop
and pull tight to secure.
4 Repeat from step 1 along
the edge of the fabric, as close
together or far apart as you
wish. Use a matching or
contrasting yarn colour. Trim
any uneven lengths of yarn to
create a neat finish.
42 WWW.GATHERED.HOW/SIMPLYCROCHET
GOOD READ
ццАЬШмиь шШъ
American television and Broadway star Sutton Foster has a passion for crochet - her
memoir is even called Hooked'. \Ne asked her to share some of her hooky memories...
We occasionally hear whispers
about celebrities who dabble in
craft, but legendary Broadway
and television actress Sutton Foster is
different - she proclaims her love of
crochet and other crafts loudly and
proudly. The star even uses craft as
a framing device for her own life story in her
memoir, Hooked. (Great title!) Sutton is
known for herTony Award-winning
performances in the musicals Thoroughly
Modern Millie and Anything Goes, as well as
her starring role in all seven seasons of the
American television series Younger.
1 Simply Crochet: What types ofcrochet
projects do you like best, and do you
have an all-time favourite project?
Sutton Foster: I really love granny squares
and small projects. One of my favourites was
a granny square blanket I made when I was
going through a bad breakup. I used this
100% wool Patonsyarn in vibrant colours -
Photo: Marten De Boer Photography
crochet top; Sutton Foster's craft-themed
memoir, Hooked
bright greens, magentas, hot pinks,
turquoise - and each square has a super-
detailed poppy on it. It took me about 10
years to sew it all together! Out of something
painful came something beautiful.
2 SC: Have you taught any other
celebrities how to crochet, and if so, how
did they do?
SF: I helped Hilary Duff [of Lizzie McGuire
fame] on the set of Younger and she was
a natural. She also loves to knit, so I was trying
to convert her to crochet. Ha!
3SC: What is your favourite crochet-
related memory?
SF: Well, I feel like every project that I've
worked on is tied to some memory or aspect
of my life. That's really what my book, Hooked,
is about. I made ten baby blankets while I was
filming Younger-right after my daughter was
born. I was on set for 14 hours a day and
“I FEEL LIKE EVEK7
PROJECT THAT I’VE
WORKED ON IS TIED TO
SOME MEMORY”
decided to make these blankets. [They were]
original designs using corner-to-corner
crochet - a giraffe, an octopus, a pink
dinosaur, etc. And then I auctioned them all
off for a charity supporting adoption.
4SC: How and when did you first learn to
crochet, and what did you make first?
SF: I was 19 and on a national tour of
a Broadway musical. I was on vocal rest and
had to take a few weeks off from the show.
I went to a local craft store and bought a book
on how to crochet, a hook and someyarn.
I can't remember what I made first... probably
a scarf. I think that's everyone's first project!
5 SC: What's the inspiration behind the
'Badass Baby Blanket' pattern included in
your book? Did you design it yourself?
SF: I did design it! Well, you are never too
young to be a badass, and sometimes we
need that extra encouragement and
reminder of how strong and resilient we are.
BONUSQUESTION
SC: Pencil grip or knife grip?
SF: Pencil grip!
The book Hooked: A Memoir in Crafts by
Sutton Foster, also known as Hooked: How
Crafting Saved My Life, is out now. (Grand
Central Publishing, £22.04).
WVWV.GATHERED.HOW/SIMPLYCROCHET 43
TRY 3 ISSUES FOR £9.99!
Simply Sewing is the perfect magazine for the modern sewist!
Simple-to-follow projects mean you can get started straight away using the fabulous gifts included with every issue. Already
whipping up home-sewn makes? Be inspired by expert tricks and tips, in-depth technical features and profiles of amazing
designers. Simply Sewing is a new approach to dressmaking and home sewing.
www.gathered.how/simplysewing
TRY 3 ISSUES FOR £9.99
A2<
call 03330 162 149f & quote code SWHA2024
SUBSCRIBE TODAY:
http://www.ourmediashop.eom/S
or
4JK calls will cost the same as the other standard fixed line numbers (starting 01 or 02) and are included as part of any inclusive ore free minutes allowance (if offered in your phone tariff).
Outside of free call packages call charges from mobile phones will cost between 3p and 55p per minute. Lines are open Monday to Friday 9am-5pm.
Terms and conditions This introductory offer ends 31st December 2024 is for new UK Direct Debit subscribers only. After your first 3 issues, your subscription will continue at £19.99 every 3 issues. If you cancel within
2 weeks of receiving your penultimate issue you will pay no more than the £9.99 shown. Price includes home delivery. Full details of the Direct Debit guarantee are available on request.
CHILDREN’S TOOL SET
JACK ОГ ALL TRADES
Set a little one up for success with Maria
J^czmyk's amazing collection of ami'tools
WWW.GATHERED.HOW/SIMPLYCROCHET 45
CHILDREN’S TOOL SET
YOU WILL NEED
DROPS Safran
(100% cotton, 160m/50g)
1 ball each of:
Medium Grey (07)
Sunshine (11)
Light Brown (22)
Turquoise (30)
A 3mm (US D/3) hook
A tapestry needle
Toy stuffing
A stitch marker
For yarn stockists contact
Wool Warehouse 01926 882818
www.woolwarehouse.co.uk
TENSION
21 sts and 25 rows to measure
10x1 Ocm (4x4in) over de
MEASUREMENTS
Hammer measures approx 17x11cm
(61/2x41/2in)
Spannner measures approx 18cm
(7in)
Screwdriver measures approx 16cm
(61/2in)
Saw measures approx 20x1 Ocm
(8x4in)
ABBREVIATIONS
For a full list, see page 78
Finally, a safe - and quiet - way to let kids
play with tools’ Before you know it, your tots
will be'fixing'everything with their new toys.
NOTES
The Hammer Handle, Screwdriver and
Spanner are worked using the amigurumi
method. Work in a continuous spiral without
closing off each round with a slip stitch. You
may find it helpful to place a marker in the first
st of each round and move it up as you work.
HAMMER
HEAD
Using Medium Grey, chi 1.
Row 1 De in second ch from hook and each ch
across, turn. [10 sts]
Row 2 Ch1 (does not count as st throughout),
de in each st across, turn. [10 sts]
Rows 3-9 Repeat Row 2.
Fasten off.
Row 10 Using Medium Grey, ch9, de in bl of first
st of Row 9, de in each bl across, ch9, turn.
[28 sts]
Row 11 Ch1, de in each ch/st across, turn.
Rows 12-25 Repeat Row 11.
Row 26 Chi, de in first 7 sts, dc2tog, turn
leaving remaining sts unworked. [8 sts]
Row 27 Chi, dc2tog, 6dc, turn. [7 sts]
Row 28 Ch1,5dc, dc2tog, turn. [6 sts]
Row 29 Ch1, dc2tog, 4dc, turn. [5 sts]
Row 30 Chi, 3dc, dc2tog, turn. [4 sts]
Row 31 Ch1, dc2tog, 2dc, turn. [3 sts]
Row 32 Chi, de, dc2tog, turn. [2 sts]
Row 33 Ch1, dc2tog, fasten off.
Join Medium Grey in first st at opposite end of
Row 25 and rep Rows 26-33.
Join Medium Grey in bl of first unworked st of
Row 25.
Row 26 Chi, de in bl of each st, turn. [10 sts]
Row 27 Chi, 10dc, turn. [10 sts]
Rows 28-36 Repeat Row 27.
Row 37 Ch1, de in bl only of each st across, turn.
[10 sts]
Rows 38-63 Repeat Row 27.
Fasten off leaving a long tail.
Fold edges together to create a Hammer Head.
Sew using mattress stitch, stuffing before
closing.
HANDLE
Using Light Brown, ch2.
Round 1 (RS) 6dc in second ch from hook.
[6 sts]
Round 2 (RS) 2dc in each st around. [12 sts]
Round 3 (De in next st, 2dc in next st) 6 times.
[18 sts]
Round 4 De in each st around. [18 sts]
Stuff as you go.
Rounds 5-30 As Round 4.
Fasten off, leaving a long tail.
Sew Handle to Head, using the image as a
guide.
Work the hammer head in rows and the
handle in rounds, amigurumi-style
SPANNER
HANDLE
Using Medium Grey, ch2.
Round 1 8dc in second ch from hook. [8 sts]
Round 2 2dc in each st around. [16 sts]
Round 3 De in each st around.
Rounds 4-27 Repeat Round 3.
Fasten off.
OUTER HEAD
Cont on in rows.
Row 1 Using Medium Grey, ch2, de in first 5 sts
of Round 27, ch2, turn. [9 sts]
Row 2 Ch1,2dc in second ch from hook, 7dc,
2dc in last ch, turn. [11 sts]
Rows 3-6 Ch1,2dc in first st, de in each st across
to last st, 2dc in last st, turn. [19 sts]
Row 7 Ch1,6dc, turn, leaving remaining st
unworked [6 sts]
Rows 8-10 Ch1, de in each st across, turn.
Row 11 Chi, dc2tog, 4dc, turn. [5 sts]
Row 12 Chi, 3dc, dc2tog, turn. [4 sts]
Row 13 Chi, dc2tog, 2dc, turn. [3 sts]
Row 14 Ch1, de, dc2tog, turn. [2 sts]
Row 15 Ch1, dc2tog. [1 st]
Fasten off and weave in ends.
Rejoin Medium Grey at opposite side of Row 6.
Repeat Rows 7-15.
Skip next 3 sts of Round 27 and repeat Rows
1-15, then Rows 7-15 to complete opposite side
of Spanner.
Join Medium Grey in first skipped st of Row 27.
Next row Ch1, de in same st and next 2 sts,
turn. [3 sts]
Rows 2-18 Ch1,3dc, turn. [3 sts]
Fasten off leaving a long tail.
46 WWW.GATHERED.HOW/SIMPLYCROCHET
CHILDREN’S TOOL SET
Using needle and mattress stitch, sew
corresponding edges together.
Repeat at opposite side of Round 27.
INNER HEAD
Using Medium Grey, ch4.
Row 1 De in second ch from hook and next 2
ch, turn. [3 sts]
Rows 2-26 Ch1, de in each st across, turn.
Fasten off, leaving a long tail to sew to inside
edges.
Sew to inside edge of Spanner, stuffing before
closing.
SCREWDRIVER
Using Turquoise, ch2.
Rounds 1-3 As Rounds 1-3 of Hammer Handle.
[18 sts]
Round 4 (De in next 2 sts, 2dc in next st) 6
times. [24 sts]
Round 5 (De in next 3 sts, 2dc in next st) 6
times. [30 sts]
Round 6 De in each st around.
Rounds 7-15 Repeat Round 6.
Round 16 (De in next 3 sts, dc2tog) 6 times.
[24 sts]
Rounds 17-20 De in each st around.
Round 21 (De in next 2 sts, dc2tog) 6 times.
[18 sts]
Rounds 22-23 De in each st around.
Round 24 (De in next st, dc2tog) 6 times.
[12 sts]
Round 25 De in each st around.
Round 26 Working in fl only, (de in next st, 2dc
in next st) 6 times. [18 sts]
Round 27 (De in next 2 sts, 2dc in next st) 6
times. [24 sts]
Fasten off.
Join Medium Grey in bl of first st of Round 25
Round 28 De in bl of each st around. [12 sts]
Rounds 29-42 De in each st around.
Turn at the end of Rounds 43 and 44.
Round 43 Ch1,12dc, ss to first st, turn.
Round 44 Ch1,3dc, dc3tog, 3dc, dc3tog, turn.
[8 sts]
Flatten end to work through 2 layers.
Row 45 Chi, 4dc across, turn. [4 sts]
Row 46 Ch1,4dc.
Fasten off and weave in ends.
SAW
BLADE
Using Medium Grey, ch2.
Row 1 De in second ch from hook, turn. [1 st]
Row 2 Chi (does not count as st throughout),
2dc in st, turn. [2 sts]
Row 3 Ch1,2dc in first st, de in last st, turn.
[3 sts]
Row 4 Ch1,2dc in first st, 2dc, turn. [4 sts]
Row 5 Ch1,2dc in first st, 3dc, turn. [5 sts]
Row 6 Ch1,2dc in first st, 4dc, turn. [6 sts]
Fasten off.
Row 7 Using Medium Grey, ch7, de in each st in
Row 6, ch7, turn. [20 sts]
Row 8 Ch1, de in second ch from hook, de in
each ch/st across, turn.
Row 9 Chi, de in each st across, turn.
Row 10 Chi, 2dc in first st, de in each st across
to last st, 2dc in last st, turn. [22 sts]
Rows 11-12 Ch1, de in each st across, turn.
Rows 13-33 Repeat Rows 10-12 another 7
times. [36 sts]
Fasten off.
Join Medium Grey in 16th st from Row 33.
Row 34 Ch1,6dc, turn, leaving rem sts
unworked. [6 sts]
Row 35 Chi, de in each st across, turn.
Row 36 Chi, dc2tog, de in each st across, turn.
[5 sts]
Rows 37-42 Repeat Rows 35-36 another 3
times. [2 sts]
Row 43 Ch1, de in each st across, turn.
Row 44 Ch1, dc2tog, turn. [1 st]
Row 45 Ch1,1dc.
Fasten off.
With WS facing out, fold together to create a
3D Saw Blade. Sew final row together and base
of Row 1 together using mattress stitch. Turn
so RS is facing out.
Join Medium Grey to row-ends of Row 1 and
work next row through both layers to join,
stuffing as you close.
Next row Ch1, *3dc, ch4, ss in forth ch from
hook; rep from * to end.
Fasten off.
HANDLE (MAKE 2)
Using Sunshine, ch30, ss to first ch to form a
loop.
Round 1 (RS) Chi, (5dc, 2dc in next st, 8dc, 2dc
in next st) twice, ss to first st to join, turn. [34 sts]
Round 2 Ch1, (9dc, 2dc in next st, 6dc, 2dc in
next st) twice, ss to first st to join, turn. [38 sts]
Round 3 Chi, (7dc, 2dc in next st, 10dc, 2dc in
next st) twice, ss to first st to join, turn. [42 sts]
Round 4 Ch1, (11dc, 2dc in next st, 8dc, 2dc in
next st) twice, ss to first st to join, turn. [46 sts]
Round 5 Chi, (9dc, 2dc in next st, 12dc, 2dc in
next st) twice, ss to first st to join, turn. [50 sts]
Round 6 Chi, (13dc, 2dc in next st, 10dc, 2dc in
next st) twice, ss to first st, do not turn. [54 sts]
Round 7 Ch3,3tr, 2htr, 5ss, 2htr, 3tr, ch3, ss in
same st as last tr..
Fasten off, leaving remaining sts unworked.
HANDLE EDGE PIECES (MAKE 2)
Using Sunshine, ch7.
Row 1 (RS) De in second ch from hook, de in
each across, turn. [6 sts]
Row 2 Ch1, de in each st across, turn.
SHORT INSIDE EDGE
Work on one Handle only.
Rows 3-30 Repeat Row 2.
Fasten off leaving a long tail.
Part of the spanner head is worked from the
handle, then a separate strip is stitched on
Work the screwdriver in one piece, changing
yarn from turquoise to grey after 27 rounds
The teeth of the saw are created by working
a row of picot stitches while sewing the seams
LONG INSIDE EDGE
Work on the rem Handle only.
Rows 3-61 Repeat Row 2.
Fasten off leaving a long tail.
Using the image as a guide, sew the four parts
together using mattress stitch, stuffing before
closing.
Sew Handle to Blade.
WWW.GATHERED.HOW/SIMPLYCROCHET47
GOOD READ
FLIfiiHI OF FANTASY
Much like the mythical characters she creates, crochet author and designer Megan Lapp's
life has been customised to focus on what matters - creativity, imagination and family
esigner Megan Lapp, aka Crafty
Intentions, has been masterfully
creating enchanting crochet
creatures from her imaginationfor
over 13 years. During this time, she's
gained a hugefollowing. This is largely
due to the unique way she designs her
projects, with fun customisable options
that makerscan pickand choosefrom.
Now, she even has two books under her
belt, Crochet Creatures of Myth and
Legend and Crochet lmpkins.\Ne caught
up with Megan to discover her creative
process and learn about her journey...
Growing up, Megan was always creative
and was originally drawn to art and music.
"I didn't start delving into fibre arts until
a few years after college," she says. "I started
with sewing and quilting and made several
projects that went viral on the internet -
including a rainbow patchwork skirt - and
kept busy learning new crafts and
techniques over the years in my spare time."
While at a friend's baby shower, Megan
found herself drawn to one of the gifts -
a crocheted blanket. "It was beautiful, and
I immediately wanted to learn how to
[crochet]," she tells us. "I went home, got on
YouTube and taught myself."
Megan's love for crochet blossomed
thanks to the way the craft constantly
changes and evolves. "The slow increasing
of skills and techniques was addictive," she
says. "I love pushing forward, with each new
project teaching me something new."
FROM MINDTO MATTER
"It wasn't until I found crochet that I was
able to translate exactly what I was thinking
to exactly what I created," explains Megan.
"Crochet felt like building with blocks. I was
able to understand the stitches in a way that
allowed me to 3D print what I was
envisioning. I've definitely improved over
the years, but something about building
with crochet stitches, even in the early days,
came somewhat naturally to me."
Megan's first project was a simple scarf,
and from there she progressed to blankets,
hats, doilies and gloves before finally
attempting amigurumi.Shethen began
writing her own patterns, and herthird-ever
pattern - called Adult Dragon - "went a bit
viral," she says. "That started me on this path
of designing crochet patterns for a living."
Megan's pseudonym, Crafty Intentions,
actually pre-exists her discovery ofcrochet.
It started as a blog in 2008 that "was meant
to help document all the wild and wonky
things I was trying out," she says. Once she
48 WWW.GATHERED.HOW/SIMPLYCROCHET
GOOD READ
Photo: Megan Lapp, Crafty Intentions
began to publish patterns in 2017, she
started to hone her process, from designing
to writing to pattern layout to testing,
publishing and more.
CUSTOMISED CROCHET
Megan's patterns are either stand-alone
designs or include 'add-ons' - a way for
Megan to provide additional options to
further customise a make. "For example,
I offer an 'Eastern Dragon' pattern with the
full body instructions, plus one set of
ornamentation, ears and horns and more,"
she says. "But I also have an 'Add-On Eastern
Dragon' pattern - this includes all-new
options for ears, bellies, horns, fins, scales,
and more that are not included in the main
pattern. These patterns give you the ability
to expand your choices and make your
creature even more uniquely your own."
Sometimes Megan writes add-on
patterns at the same time as the main
pattern, and other times she writes them
years later. "It depends on how many ideas
I have for finishing any one creature," she
explains. "I used to try to focus only on
writing the main pattern. But I've realised
that if I have additional ideas, those are
interesting and valuable, and not just to me.
People really love having extra options."
MYTHICAL MAKES
When it comes to what inspires her makes,
Megan says it's largely down to her interest
in fantasy and sci-fi literature. "I love that the
only limit on mythical creatures is my own
imagination, and my imagination only has
limits when I put them there," she says. Even
today, Megan loves doing research on
creatures from folklore, legend and art. "I've
been making art of fantasy creatures since
I was little - it's only with crochet that they
come alive in my hands and become what
"I LOVE THAT THE ONLY LIMIT ON
MYTHICAL CREATURES S MY OWN
IMAGINATION"
I see in my head," she says.
While it's difficult for Megan to choose
a favourite of her designs ("It's often
whatever I'm currently working on!") she
does have a soft spot for her Moon Sprite,
a lanky, large-eyed elf-like creature that's
equal parts creepy, cute and graceful.
"When I designed it, I didn't have a plan. It
just sort of flowed out of me and came to life
- and worked spectacularly well." The
A few of her favourite things
When Megan's not working on her legendary designs...
"I try to be intentional about spending time with my family. My
daughter and I read books and watch shows together. Currently,
we're working through Tamora Pierce's The Immortals series and My
Hero Academia." Follow Megan on www.craftyintentions.com and at
@craftyintentions on Instagram and TikTok
design showcases all sorts of different
techniques that Megan had dreamed up,
including intricate shaping. "That said,
I really love my original Dragon pattern and
might be most proud of it. It's really the
Dragon that made it possible to dedicate
my time to doing this work professionally.
Until that, I didn't know what I wanted to be
when I grew up," Megan says.
And she's clearly found her dream career.
"I get to help support my family doing
something I absolutely love to do," she says.
"I also get to interact with creative, artistic
people all the time, every day online."
So, what's next for Megan? She's currently
working on a third and fourth book, so stay
tuned! "I have a few more sets of Wearable
Horn patterns that will beavailableoverthe
next year, as well as a series of'Bite Size
Sugarshrooms', which are mushrooms with
caps made of baked goods and sweets," she
says. "I will be publishing a small wyvern
pattern in the near future, and justfinished
a design for a celestial whale." Sounds like
the stuff of fantasy - and we love it!
Written by Colette Earley
WWW.GATHERED.HOW/SIMPLYCROCHET49
Aboard
Your greatest discovery yet
Whether you want to cruise the coastlines of
the Caribbean, Rome further from home or
marvel at the heights of the northern lights,
we've got it all.
Find expert guides, get inspired and uncover
exclusive deals. All this and more, for FREE.
CRUISE
COLLECTIVE
Clear out your stash with creative scrap yarn
bunting designed by Alexandra Lund
STASHBUSTER BUNTING
ARAN
WEIGHT
5MM
HOOK
YOU WILL NEED
Any aran-weight yarn in:
Yarn A bright pink
Yarn В orange
Yarn C white
Yarn D purple
Yarn E mint green
Yarn F light pink
Yarn G yellow
Yarn H black
Yarn I lilac
A 5mm (US H/8) hook
TENSION
Tension is not critical, but it may
affect the yarn quantities required
MEASUREMENTS
Bunting measures approx 150cm
(59in) long
Each flag measures approx 16cm
(6!/4in) wide
ABBREVIATIONS
popcorn Work 5tr in st/sp indicated,
remove live loop from hook, insert
hook in top of first tr, place loop
back on hook and pull through st,
ch1 to close
exdtr (extended double treble) Yrh
twice, insert hook in st indicated, yrh
and pull up a loop, yrh and pull
through first loop on hook, (yrh and
pull through 2 loops) 3 times
For a full list, see page 78
Decorate a desk space, bedroom or craft area
with as many bright flags as you canIThe
colour possibilities are endless.
NOTES
Each Flag is worked in rows from the bottom
up. Edging is worked around each Flag before
joining them together.
You can adapt the length of the Bunting by
making more or fewer Flags. This will affect
the yarn quantities required.
Change colour on the final yrh before colour
change is indicated. Work over the tails where
possible to reduce the number of ends you
need to weave in.
BUNTING
FLAGS (MAKE 5)
Using Yarn A, ch2.
Row 1 (WS) 2dc into second ch from hook,
turn. [2 sts]
Row 2 (RS) Ch1 (does not count as st
throughout), de in first st, 2dc in next st, turn.
[3sts]
Row 3 Ch1, de in first 2 sts, 2dc in last st, turn.
[4 sts]
Change to Yarn B.
Row 4 Chi, 3tr in first st, skip 2 sts, 3tr in last st,
turn. [6 sts]
Change to Yarn C.
Row 5 Chi, 2htr in first st, htr in next 4 sts, 2htr
in last st, turn. [8 sts]
Change to Yarn D.
Row 6 Ch1,2tr in first st, BPtr around each of
next 6 sts, 2tr in last st, turn. [10 sts]
Change to Yarn E.
Row 7 Chi, 2dc in first st, de in next 8 sts, 2dc in
last st, turn. [12 sts]
Row 8 Ch1,2dc in first st, de in next 10 sts, 2dc
in last st, turn. [14 sts]
Change to Yarn F.
Row 9 Chi, 2dc in first st, skip 2 sts, 5tr in next
st, skip 2 sts, 1dc in next 2 sts, skip 2 sts, Str in
next st, skip 2 sts, 2dc in last st, turn. [16 sts]
Change to Yarn A.
Row 10 Chi, 2tr in first st, *tr in next st, htr in bl
of next st, de in bl of next st, BPhtr around next
st, de in bl of next st, htr in bl of next st, tr in
next st; rep from * once more, 2tr in last st, turn.
[18 sts]
Change to Yarn G.
Row 11 Ch1,4tr in first st, skip 3 sts, 4tr in next
st, skip 3 sts, 2tr in next 2 sts, (skip 3 sts, 4tr in
next st) twice, turn. [20 sts]
Change to Yarn B.
Row 12 Ch1,2htr in first st, htr in next 2 sts,
exdtr into second skipped st from prev row, *htr
in next 3 sts, exdtr into second skipped st from
prev row; rep from * twice more, htr in next 3
sts, 2htr in last st, turn. [22 sts]
Change to Yarn A.
Row 13 Chi, 2dc in first st, de in each st to final
st, 2dc in final st, turn. [24 sts]
Decorate the flags with bunches of yarn
threaded through the points and tied tight
Change to Yarn H.
Row 14 Ch1, de in first st, ch3, skip 3 sts,
popcorn in next st, ch2, skip 2 sts, (popcorn in
next st, ch2, skip 2 sts) 4 times, popcorn in next
st, ch3, skip 3 sts, de in last st, turn.
[6 popcorns, 2 de, 5 ch-2 sps, 2 ch-3 sps]
Change to Yarn E.
On Row 15 you'll work over the ch-sps of Row
14, so they're encased in the sts.
Row 15Ch1,2troverthe last st of Row 14 and
into first st from Row 13, tr in next 2 sts from
Row 13 working over ch-3 sp, *dc in popcorn, tr
in next 2 sts from Row 13 working over ch-2 sp;
rep from * 4 times more, de into next popcorn,
tr in next 2 sts from Row 13 working over ch-3
sp, 2tr in last st or Row 13. [24 sts]
Fasten off.
EDGING
Join Yarn I in any st across top.
Round 1 (RS) Chi, de in each st to corner, (de,
ch2, de) in corner, 20dc evenly across row-end
edge, (de, ch2, de) in corner, 20dc across,
row-end edge, (de, ch2, de) in corner, de in each
st to end, ss to beg de.
Fasten off.
TO MAKE UP
Using Yarn I, ch30, (de in each st across top of
one Flag, chi0) 5 times, ch20.
Fasten off.
Using Yarn G, cut 7 lengths of yarn, 30cm long.
Thread through the point of a Flag to secure
and trim to desired length.
Rep for each rem Flag.
52 WWW.GATHERED.HOW/SIMPLYCROCHET
OVERLAY MOSAIC WRAP
Keep chills at bay with Susan Kennedy's cosy patterned
wrap, ideal for magical evenings under the stars
WWW.GATHERED.HOW/SIMPLYCROCHET 53
OVERLAY MOSAIC WRAP
WEIGHT HOOK
DK 4.5MM
YOU WILL NEED
Rowan Handknit Cotton
(100% cotton, 50g/85m)
11 balls of Yarn A Ice Water (239)
7 balls of Yarn В Atlantic (346)
A 4.5mm (US 7) hook
For yarn stockists contact
Rowan 01924 371501
www.knitrowan.com
TENSION
Tension is not critical, but it may
affect the yarn quantities required
MEASUREMENTS
Wrap measures approx 47x196cm
(18y2x77in)
ABBREVIATIONS
tr2d Tr in unworked fl 2 rows below
For a full list, see page 78
Looking for more
clothing and
accessories inspired
bythe American
Southwest? The
book Crochet
Southwest Spirit by
Susan Kennedy is out
now (David &
Charles, £16.99)
Whether you're relaxing at a ski lodge, on
a tropical island or in your own conservatory,
it's always handy to have a heavy shawl like
this one to wrap about your shoulders.
NOTES
Wrap is worked in rows using the overlay
mosaic technique. Fasten off at the end of each
row and join the next colour into the first st of
prev row. Leave tails of approx 30cm at beg and
end of each row. There is no need to weave in
tails, as these are incorporated into the twisted
fringe at the end.
Work all double crochet sts into the bl, except
the first and last st of each row, which is worked
through both loops. Work all treble crochet into
the unused fl 2 rows below.
You can substitute any DK yarn into this
pattern.
WRAP
Using Yarn A, ch262.
Row 1 (RS) Tr in third ch from hook and each ch
across, turn. [260 sts]
Fasten off.
Join Yarn В in first st.
Row 2 (RS) Ch1 (does not count as st
throughout), de in first st, de in bl of each st to
final st, de in final st.
Fasten off.
Join Yarn A in first st.
Row 3 Ch1, de in first st, tr2d in each st to final
st, de in final st.
Fasten off.
Join Yarn В in first st.
Rows 4-8 Rep Rows 2-3, ending on a Row 2 rep
Fasten off.
Join Yarn A in first st.
Row 9 Ch1, de first st, tr2d in next 8 sts, (de in bl
of next 2 sts, tr2d in next st) 81 times, tr2d in
next 7 sts, de in final st.
Fasten off.
Join Yarn В in first st.
Row 10 As Row 2.
Work all even rows as Row 2 to end using Yarn В
throughout.
Use Yarn A for all odd-numbered rows.
Row 11 As Row 9.
Row 13 Chi, de in first st, tr2d in next 11 sts,*(dc
in bl of next 2 sts, tr2d in next st) 7 times, tr2d in
next 3 sts; rep from *9 times more, tr2d in next
7 sts, de in final st.
Row 15 Ch1, de in first st,tr2d in next 11 sts,
*tr2d in next 3 sts, (de in bl of next 2 sts, tr2d in
next st) 5 times, tr2d in next 3 sts, de in bl of
next 2 sts, tr2d in next 4 sts, (de in bl of next 2
sts, tr2d in next st) 5 times, tr2d in next 6 sts; rep
from * 4 times more, tr2d in next 7 sts, de in
final st.
Row 17 Chi, de in first st, tr2d in next 11 sts,
*tr2d in next 6 sts, (de in bl of next 2 sts, tr2d in
next st) 5 times, tr2d in next 3 sts, (de in bl of
next 2 sts, tr2d in next st) 5 times, tr2d in next 9
Double crochet stitches are worked in back
loops, and trebles are worked in front loops
sts; rep from * 4 more times, tr2d in next 7 sts,
de in final st.
Row 19 Chi, de in first st, tr2d in next 11 sts,
*tr2d in next 9 sts, (de in bl of next 2 sts, tr2d in
next st) 9 times, tr2d in next 12 sts; rep from * 4
more times, tr2d in next 7 sts, de in final st.
Row 21 Ch1, de in first st, tr2d in next 11 sts,
*tr2d in next 12 sts, (de in bl of next 2 sts, tr2d in
next st) 7 times, tr2d in next 15 sts; rep from * 4
more times, tr2d in next 7 sts, de in final st.
Row 23 Ch1, de in first st, tr2d in next 8 sts, de in
bl of next 2 sts, *tr2d in next 16 sts, (de in bl of
next 2 sts, tr2d in next st) 5 times, tr2d in next 15
sts, de in bl of next 2 sts; rep from * 4 more
times, tr2d in next 8 sts, de in final st.
Row 25 Chi, de in first st, tr2d in next 8 sts, *(dc
in bl of next 2 sts, tr2d in next st) twice, tr2d in
next 15 sts, de in bl of next 2 sts, tr2d in next st;
rep from * 9 more times, de in bl of next 2 sts,
tr2d in next 8 sts, de in final st.
Row 27 Ch1, de in first st, tr2d in next 8 sts, de in
bl of next 2 sts, tr2d in next st, *(dc in bl of next
2 sts, tr2d in next st) twice, tr2d in next 15 sts, de
in bl of next 2 sts, tr2d in next 16 sts, (de in bl of
next 2 sts, tr2d in next st) 3 times; rep from * 4
more times, tr2d in next 7 sts, de in final st.
Row 29 Ch1, de in first st, tr2d in next 8 sts, de in
bl of next 2 sts, tr2d in next st, *(dc in bl of next
2 sts, tr2d in next st) 3 times, tr2d in next 27 sts,
(de in bl of next 2 sts, tr2d in next st) 4 times; rep
54 WWW.GATHERED.HOW/SIMPLYCROCHET
OVERLAY MOSAIC WRAP
from * 4 more times, tr2d in next 7 sts, de in
final st.
Row 31 Ch1, de in first st, tr2d in next 8 sts, de in
bl of next 2 sts, tr2d in next st, *(dc in bl of next
2 sts, tr2d in next st) 4 times, tr2d in next 21 sts,
(de in bl of next 2 sts, tr2d in next st) 5 times; rep
from * 4 more times, tr2d in next 7 sts, de in
final st.
Row 33 Ch1, de in first st, tr2d in next 11 sts, *(dc
in bl of next 2 sts, tr2d in next st) 5 times, tr2d in
next 15 sts, (de in bl of next 2 sts, tr2d in next st)
5 times, tr2d in next 3 sts, rep from * 4 more
times; tr2d in next 7 sts, de in final st.
Row 35 Ch1, de in first st, tr2d in next 11 sts,
*tr2d in next 3 sts, (de in bl of next 2 sts, tr2d in
next st) 5 times, tr2d in next 9 sts, (de in bl of
next 2 sts, tr2d in next st) 5 times, tr2d in next 6
sts, rep from * 4 more times, tr2d in next 7 sts,
de in final st.
Row 37 Ch1, de in first st, tr2d in next 11 sts,
*tr2d in next 6 sts, (de in bl of next 2 sts, tr2d in
next st) 5 times, tr2d in next 3 sts, (de in bl of
next 2 sts, tr2d in next st) 5 times, tr2d in next 9
sts, rep from * 4 more times, tr2d in next 7 sts,
de in final st.
Row 39 Ch1, de in first st,tr2d in next 11 sts,
*tr2d in next 9 sts, (de in bl of next 2 sts, tr2d in
next st) 9 times, tr2d in next 12 sts; rep from * 4
more times, tr2d in next 7 sts, de in final st.
Row 41 Rep Row 37.
Row 43 Rep Row 35.
Row 45 Rep Row 33.
Row 47 Rep Row 31.
Row 49 Rep Row 29.
Row 51 Rep Row 27.
Row 53 Rep Row 25.
Row 55 Rep Row 23.
Row 57 Rep Row 21.
Row 59 Rep Row 19.
Row 61 Rep Row 17.
Row 63 Rep Row 15.
Row 65 Rep Row 13.
When changing yarns at row-ends, leave tails
at each end to use to form the fringing
Row 67 Rep Row 9.
Row 69 Rep Row 9.
Rows 71-77 As Row 2.
Fasten off.
TO FINISH
Block to dimensions.
Trim yarn tails to 28cm.
For a twisted fringe, gather the ends from Rows
1 and 3 in one hand and the ends from Rows 5
and 7 in the other hand. Twist both groups of
yarn in the same direction, either clockwise or
anticlockwise, until the yarn begins to kink. Tie
the 2 groups of 2 twisted tails together in a
knot about 15cm from the edge of the wrap to
create one twisted fringe containing 4 yarn
tails. Trim the yarn ends to 1cm below the knot.
Repeat with the ends from Rows 2 and 4 in one
hand and the ends from Rows 6 and 8 in the
other.
Repeat with the rest of the yarn tails.
SIMPLE STEPS HOW TO WASH YOUR CROCHET PIECES
1 Keep the yarn's ball band
safe and check it for care
information. The band will tell
you what temperature to
wash the yarn at and whether
it can go in the machine or if it
needs to be handwashed.
2 To handwash, soak for
around 30 minutes in a bowl
of lukewarm water with a mild
detergent. Don't rub or you
may felt the piece. Then rinse,
unless you've used a
non-rinsing detergent, such
asSoakorEucalan.
3 Lay the crochet item on top
of a towel and roll up the
towel to squeeze out excess
moisture, making sure you do
not wring.
4 Gently reshape the crochet
item. Leave it to dry on a towel
somewhere flat, such as on a
board or a folded blanket. Pin
out if needed. Never hang up
an item to dry because its
weight may stretch the yarn.
WWW.GATHERED.HOW/SIMPLYCROCHET55
GOOD READ
Photo: Chi Chi Revolver
S® iwtnTt® hutke
a p®slbox topper?
Here's everything you need to know about jollying up a pillar box with crochet
56 WWW.GATHERED.HOW/SIMPLYCROCHET
GOOD READ
Photo: Clare Skeggs
A curious crafting trend has been
spreading across the UKfor the last
fewyears.This phenomenon is
a combination of yarnbombing and
random acts of kindness, and you may have
seen a few of them on your own local
streets - that's right, we're talking about
crochet postbox toppers! Pillar boxes,
standing bright and proud on so many
street corners, are being adorned with
colourful crochet 'hats' made by talented
locals.These custom creations are themed
to celebrate everything from the changing
seasonsto important national events. It's
a yarny form of street art, and we love it!
Crochet toppers have been cheering up
postboxes on high streets and beyond
since around 2012, according to Royal Mail.
As ubiquitous emblems of Britain's visual
history, pillar boxes make ideal plinthsfor
these charming works of fibre art,
particularly if they're of a patriotic kind.
They bring joy wherever they're planted,
but there are some important perks and
pitfalls to consider before jumping in.
FINDYOURWHY
For Sussex-based crocheter Chi Chi Revolver,
it's all about making people smile. "I'd often
adorn [my toppers] with little gifts for people
to take: crochet flowers, hearts, etc," she says.
For Clare Skeggs, an avid topper-maker in
Hertfordshire, "my best topper experiences
are [when I'm] talking to the locals about the
project, or standing back and soaking up the
atmosphere and watching people's reaction
and seeing the smiles." She says she's even
received admiring thank-you letters from the
British royal family!
The toppers also provide a unique
fundraising opportunity. So far, Clare's
Beatrix Potter toppers (for which she used
patterns from Simply Crochet) have raised
over £2kfor Macmillan Cancer Support.
Crocheter Gaynor White runs crafty group
The Barkham Hookers, and the members
often yarnbomb postboxes together. To raise
funds, "we attach a tag with a QR code on
that takes people straight to our designated
charity at the time, or to our own Barkham
Hookers Charity page on Facebook. We did
raise money for Ukrainian refugees in this
way and have raised over £50,000 for the
Poppy Appeal, too, by selling crochet
poppies and decorating posy boxes."
YOU DO YOU
The group element is a big part ofcrochet
topperculture.Gaynorsetupthe Barkham
Hookers in 2012 with a few local friends. "It has
now grown into a large and social group with
over600 members on Facebook. Many new
friendships have blossomed, as well as
support networks and business ideas."
Practically speaking, a team effort is helpful
for larger makes and for creating more noise
around a particular project, but creating
a topper alonecan be simpler as there's less to
organise. Clare does both - her Beatrix Potter
toppers were a solo project, but "the current
Christmas Angels and Hearts project is a
group project with the Codicote Wl, which
I am a member of," she explains.
Chi Chi's a fan of the solo approach. "I'm
limited on how much I can make, but I enjoy
having full creative freedom," she explains.
COLOURING INSIDETHE LINES
Before anyone gets a hook out, we can't
overlook the fact that yarnbombing is
technically graffiti (you rebel, you). It's
importantto consider the practical and
environmental impact crochet installations in
public spaces can have. Who or what will
encounter them, and are they safe and fit for
purpose? "With any project, it's al ways best to
research the rules and guidance," says Clare.
Crochet toppers are something Royal Mail
are happy to allow, providing their guidelines
are adhered to. A Royal Mail spokesperson
confirmed: "Royal Mail's iconic postboxes are
a treasured part of communities around the
UK and are for use by our customers. Forthose
WWW.GATHERED.HOW/SIMPLYCROCHET57
GOOD READ
Clockwise from
top left:
Paratroopers by
Carolina of the
Barkham Hookers;
one of Clare Skeggs'
Beatrix Potter
toppers; Chi Chi
Revolver's Easter-
themed topper;
a Queen Elizabeth-
themed postbox
topper from the
Barkham Hookers
groups who enjoy crocheting, knitting and
decorating our thousands of postboxes
across the country, we generally advise to
ensure that the decoration doesn't cause
a safety concern or any kind of offence. Care
should also be taken to ensure the toppers do
not obstruct other customers from posting
items, or our posties from collecting mail."
And postie access isn't the only thing to
consider. The elements are one of the biggest
obstacles facing a topper crocheter. Britain is
known for its rainy days and grey skies, after
all. Acrylic yarn isgenerally accepted as the
most suitable for outdoor use. "It doesn't
seem to be affected by inclement weather!"
says Gaynor, and Chi Chi agrees: "So far it has
withstood wind, rain and snow."
The Barkham Hookers have other hacks up
their sleeves, too. "As postboxes are large
items, we try to use chunky yarn as much as
possible, which makes them grow quicker,"
says Gaynor. "When making dolls to attach,
I put the stuffing inside a plastic bag before
stuffing the doll so it doesn't get too soggy
and heavy. We use cable ties when needed,
but generally they're just tied on with yarn,
threaded around or underthe lip."
Clare's top tip is to add structure. "Items can
flop due to the weather," she warns, "but
using a support inside like coated garden wire
or a durable wadding can help support them.
And, of course, the pattern you choose
should be fun! You can find free patterns for
the baseson Ravelry, LoveCrafts, Etsyand
Pinterest.Then it'ssimply a matterof
choosing or designing someamigurumi
elements and trimmings. Chi Chi loves to
freestyle her creations, while Clare uses
patterns for some of her topper elements.
The key thing for a topper pattern? "Make
sure you know the size of the box you're
doing, as there are quite a lot of different
ones," says Gaynor. "Some have lips for easy
attaching, some are square, some are on
posts, some have poles attached to them."
OUTOFYOURHANDS
The final stage in the process is letting go,
getting a postbox topper fixed on and out in
the world where it's destined to be.
Installation can be done guerilla-style under
the cover of darkness for anonymity and the
element of surprise-this is thefavoured
method for The Barkham Hookers. Clare
prefers the daylight approach so she can soak
up the community buzz. "It is lovely to have
a chat with passersby who want to learn
aboutthe projects," she says.
Once it's off the crochet hook and out in the
world, a postbox topper becomes part of the
community,for better orforworse. It's public
property, but not always respected as such, as
many makers have discovered. "Recently I had
a topper stolen in London, and I see this
happening more in the groups I follow on
social media," says Clare. "Sometimes they are
stolen or people set them alight, which is
really sad"
"It is a good idea to have a label on them
with a contact number on," adds Gaynor.
"I attach a note underneath all my toppers
explaining who we are and how much we've
raised... and if they have 'found it or borrowed
it' to please return it so we can continue to
raise money for charities."
For Chi Chi, who's also had pieces go
missing, says the benefits outweigh the risk.
"When people say it makes them happy and
smileand brightens uptheirday, then that's
a job well done."
Written by Becca Parker
Chi Chi Revolver: @chichi_crochet
Claire Skeggs: @mycraftingmindset
Gaynor White: The Barkham Hookers on FB
58 WWW.GATHERED.HOW/SIMPLYCROCHET
MOSAIC BLANKET
4PLY
WEIGHT
4.5 MM
HOOK
YOU WILL NEED
Scheepjes Whirlette
(60% cotton, 40% acrylic,
100g/455m)
2 balls of Yarn A Ice (86)
Scheepjes Whirl
(60% cotton, 40% acrylic,
2200g/1000m)
1 ball of Yarn В Shrinking Violet
(558)
A 4.5mm (US 7) hook
For yarn stockists contact
Scheepjes
www.scheepjes.com/en
TENSION
Tension is not critical, but it may
affect the yarn quantities required
MEASUREMENTS
Blanket measures approx 81x107cm
(31%x42in)
ABBREVIATIONS
mtr (mosaic treble) Work a treble
into the skipped st 3 rows below,
working in front of the ch-sps of the
prev 2 rows
For a full list, see page 78
The sharp lines and corners of this modern
throw are sure to add a level of smart
sophistication to your living room decor.
NOTES
Blanket is worked in rows in the mosaic style.
There is a Chart on page 81, which you will
need to refer to. Read each row twice; once
from right to left for a RS row and then from left
to right for a WS row. One colour is used on
each row and is shown by the colour of the first
st. If a second colour appears on the row you
need to skip the number of sts shown and work
a ch for each skipped st plus 1. For example, if
you skip 2 sts you will make a ch3. On the next
row using that colour you will work an mtr into
each skipped st. The first few rows of the Chart
have been written out to guide you.
Carry yarns up the side of the work ready to use
again. You will work over the carried yarns
when working the Border.
MOSAIC BLANKET
Using Yarn A, chi63.
Row 1 (RS) De in second ch from hook and
each ch across, turn. [162 sts]
Row 2 (WS) Ch1 (does not count as st
throughout), de in each st across, turn. [162 sts]
Change to Yarn B.
Row 3 Ch1, (8dc, ch3, skip 2 sts, 6dc) 10 times,
2dc, turn. [142 sts, 10 ch-3 sps]
Row 4 Chi, (de in each st to next ch-sp, ch3, skip
ch-sp) rep across to end, turn.
Change to Yarn A.
Row 5 Chi, (8dc, 2mtr, ch3, skip 2 sts, 10 de, ch3,
skip 2 sts, 2mtr, 6dc) 5 times, 2dc, turn.
Row 6 Chi, (de in each st to next ch-sp, ch3, skip
ch-sp) rep across to end, turn.
Rows 7-20 Cont in patt set, using the Chart as
you work.
Row 21-212 Rep Rows 5-20.
Row 213-220 Rep Rows 5-12.
Change to Yarn A.
With the mosaic colourwork technique you
work only one colour at a time per row
Row 221 Ch1, (8dc, 2mtr, 14dc, 2mtr, 6dc) 5
times, 2dc, turn. [162 sts]
Row 222 Chi, de in each st across, turn.
BORDER
Change to Yarn B.
Round 1 Ch2 (does not count as st), tr in each st
across top row, ch3,222tr evenly across
row-end edge, ch3, tr in each st across base,
ch3,222tr evenly across row-end edge, ch3, ss
to top of beg tr. [768 sts]
Change to Yarn A.
Round 2 Ch2 (does not count as st), *tr in each
st to ch-3 sp, (tr, ch3, tr) in ch-sp; rep from *
around, ss to top of beg tr.
Fasten off and weave in ends.
SIMPLE STEPS HOW TO WORK THE MOSAIC TECHNIQUE
Gm ™
1 We've marked the skipped
stitch 2 rows below to make
them easier to see. On Rows
3-4 a ch-3 sp has been worked
over the skipped sts.
2 Chi, de in each de of row
below to first ch-sp.
3 Work a treble into the first
skipped stitch 3 rows below.
Working in front of the ch-3
sps. Work a treble in each
skipped st and a de in each de.
4 When you reach a point in
the row that is showing a
different colour, skip those sts
and work a ch for each
skipped st+1. We've worked a
ch-3 in this example.
60 WWW.GATHERED.HOW/SIMPLYCROCHET
MISTY MEMORIES
Designer Elena Lepretre celebrates her Ossetian roots with a filet stitch headscarf
inspired by traditional motifs and woven shawls from the Caucasus Mountains
WWW.GATHERED.HOW/SIMPLYCROCHET 61
YOU WILL NEED
Fyberspates Gleem Lace
(55% Superwash Bluefaced
Leicester, 45% silk, 100g/800m)
2 skeins of Heavenly (724)
A 1.25mm (US 12 steel) hook
A piece of cardboard 16x16cm for
fringe
For yarn stockists contact
Fyberspates
www.fyberspates.com
TENSION
14filet blocksand 15 rows measure
10x10cm (4x4in) after blocking
MEASUREMENTS
Shawl measures approx 132x60cm
(52x23y2in)
ABBREVIATIONS
open block Tr in next st, ch2, skip 2
sts or chs
filled block Tr in next 3 sts
edge block At beg row: Ch6, tr in
base of ch-6; at end of row: (tr, ch2,
dtr in final st)
For a full list, see page 78
SL&vahpehwuiL
cultured rtudieb
"I have Ossetian roots (my father is
Ossetian, and my mother is Russian) and
I lived in North Ossetia, in Vladikavkaz, its
captial. Ossetians are the descendants of
Sythians, Sarmatians and Alans and have
inherited and kept many traditions from
their ancestors. This richness is a part of
every Ossetian, whether we speak the
language or not, live in Ossetia or not. In
fact, I think that living far from your
motherland actually increases your
interest in and links to your heritage. For
this piece, I was inspired by an ornament
I saw in the book Ossetian Ornament (1960
edition) - it's a square motif from a metal
piece. I was also inspired by traditional
Ossetian headscarves, which are woven in
a kind of net tatting, with some squares
filled in with embroidery, using thin silk
threads." Words by Elena Lepretre
During a recent trip back to North Ossetia,
Elena was inspired to translate her culture's
motifs and handicrafts into airy filet crochet.
PATTERN NOTES
Shawl is worked from the bottom up in filet
crochet.
Each row begins and ends with an edge block
which works as an inc.
There is a Chart on page 80, which you will
need to refer to. Each black square represents
1 filled block and each white square represents
1 open block (see Abbreviations). The first few
rows have been written out to guide you.
SCARF
Row 1 (RS) Ch6 (counts as dtr, ch2 throughout),
(tr, ch2, dtr) in sixth ch from hook, turn.
[2 edge blocks]
Row 2 (WS) Ch6, tr in st at base of ch-6, tr in
next 2 ch, tr in next tr, tr in next 2 ch, (tr, ch2, dtr)
in final st, turn.
[2 edge blocks, 2 filled blocks]
Row 3 Ch6, tr in st at base of ch-6, tr in next 2
ch, tr in next 7 tr, tr in next 2 ch, (tr, ch2, dtr) in
final st, turn. [2 edge blocks, 4 filled blocks]
Row 4 Ch6, tr in st at base of ch-6, tr in next 2
ch, tr in next 4 tr, ch2, skip 2 sts, tr in next tr, ch2,
skip 2 sts, tr in next 4 tr, tr in next 2 ch, (tr, ch2,
dtr) in final st, turn.
[2 edge blocks, 4 filled blocks, 2 open blocks]
Rows 5-84 Using Chart, work in pattern as set.
Row 85 Ch6, tr in st at base of ch-6, tr in each ch
and tr across to final st, (tr, ch2, dtr) in final st,
turn. [168 filled blocks, 2 edge blocks]
Row 86 *Ch3, skip 2 sts, ss in next st; repeat
from * across, turn.
Row 87 Ch1 (does not count as st), 5dc in each
ch-3 sp across, rotate to work along diagonal
edge of Shawl, 6dc in each edge block of both
diagonal sides, ss to first de to join.
Fasten off and weave in ends.
Solid areas of the filet pattern are made with
filled blocks with open blocks around them
TO FINISH
Block Shawl to measurements listed.
Wrap yarn around cardboard 5 times and cut to
create five 32cm lengths. With RS facing,join
fringe into the first edge block along the
diagonal edge (see page 40 for step-by-step
instructions on this technique). Then rep on
each alternate edge block across diagonal
sides.
Divide each fringe into 2 parts. Knot 2 adjacent
pieces together and repeat around the edges of
the Shawl. Repeat the process dividing the
section below the knot in 2 and knotting to
create a lattice pattern. Trim ends as required.
SAJIWt
8НДПШ
For a more budget-friendly make, try
Scheepjes Sugar Rush, 6 balls of Lilac Mist
(399). Check hook size, tension
and ball length if you use a different yarn.
For yarn stockists visit
www.scheepjes.com/en
62 WWW.GATHERED.HOW/SIMPLYCROCHET
Spring frqui&k
Go bold, bright and extra soft with
Marianne Rawlins'floral cushions
FLOWER CUSHIONS
FEASYl
PEASY
4MM
HOOK
YOU WILL NEED
Sirdar Happy Chenille DK
(100% polyester, 15g/38m)
6 balls of each:
Sparkler (0025)
Fizzy (0029)
Fuzzy (0013)
Bon Bon (0017)
A 4mm (US G/6) hook
Toy stuffing
For yarn stockists contact
Sirdar 01924 231682
www.sirdar.com
TENSION
Tension is not critical, but it may
affect the yarn quantities required
MEASUREMENTS
Cushion measures approx 36cm
(M’Ain) in diameter
ABBREVIATIONS
For a full list, see page 78
<
/LULL 1
at 1
www.woolwarehouse.co.uk
use the code SC 146 .
i at the checkout
J
These extra-chunky flowers prove that Y2K
style is back in vogue! Flip them over to
reveal different colours on either side.
NOTES
Cushions are worked in panels starting at the
centre, working in the round on the RS only.
Petals are added one by one working in rows.
FLOWER CUSHIONS
To make 2 cushions, work 4 sides in contrasting
colours using the image as a guide.
PANELS (MAKE 2 PER CUSHION)
Using the first colour, make a magic loop.
Round 1 (RS) Ch1 (does not count as st
throughout), 6dc into loop, ss to top of first de
tojoin.[6sts]
Round 2 (RS) Ch1,2dc in each st around ss to
top of first de to join. [12 sts]
Round 3 Ch1, (de in next st, 2dc in next st) 6
times, ss to top of first de to join. [18 sts]
Round 4 Ch1, (de in next 2 sts, 2dc in next st) 6
times, ss to top of first de to join. [24 sts]
Round 5 Ch1, (de in next 3 sts, 2dc in next st) 6
times, ss to top of first de to join. [30 sts]
Round 6 Ch1, (de in next 4 sts, 2dc in next st) 6
times, ss to top of first de to join. [36 sts]
Round 7 Chi, (de in next 5 sts, 2dc in next st) 6
times, ss to top of first de to join. [42 sts]
Round 8 Ch1, (de in next 6 sts, 2dc in next st) 6
times, ss to top of first de to join. [48 sts]
Round 9 Chi, (de in next 7 sts, 2dc in next st) 6
times, ss to top of first de to join. [54 sts]
Fasten off.
Round 10 Join second colour in first st, ch1, (de
in next 8 sts, 2dc in next st) 6 times, ss to top of
first de to join. [60 sts]
Round 11 Chi, (de in next 9 sts, 2dc in next st) 6
times, ss to top of first de to join. [66 sts]
Round 12 Chi, (de in next 10 sts, 2dc in next st)
6 times, ss to top of first de to join. [72 sts]
Round 13 Ch1, (de in next 11 sts, 2dc in next st)
6 times, ss to top of first de to join. [78 sts]
Round 14 Ch1, (de in next 12 sts, 2dc in next st)
6 times, ss to top of first de to join. [84 sts]
Round 15 Ch1, (de in next 13 sts, 2dc in next st)
6 times, ss to top of first de to join. [90 sts]
Round 16 Chi, (de in next 14 sts, 2dc in next st)
6 times, ss to top of first de to join. [96 sts]
Round 17 Ch1, (de in next 15 sts, 2dc in next st)
6 times, ss to top of first de to join. [102 sts]
Round 18 Ch1, (de in next 16 sts, 2dc in next st)
6 times, ss to top of first de to join. [108 sts]
Round 19 Ch1, (de in next 17 sts, 2dc in next st)
6 times, ssto top of first de to join. [114 sts]
Round 20 Ch1, (de in next 18 sts, 2dc in next st)
6 times, ss to top of first de to join. [120 sts]
Round 21 Chi, (de in next 19 sts, 2dc in next st)
6 times, ss to top of first de to join. [126 sts]
Round 22 Ch1, (de in next 20 sts, 2dc in next st)
6 times, ss to top of first de to join. [132 sts]
Do not fasten off.
Each petal is worked separately in rows on
the centre panel, which is worked in rounds
FIRST PETAL
Row 1 (RS) Ch1, de in same stitch, de in next 19
sts, turn. [20 sts]
Row 2 (WS) Chi, dc2tog, de in next 16 sts,
dc2tog, turn. [18 sts]
Row 3 (RS) Chi, dc2tog, de in next 14 sts,
dc2tog, turn. [16 sts]
Row 4 (WS) Ch1, dc2tog, de in next 12 sts,
dc2tog, turn. [14 sts]
Row 5 (RS) Chi, dc2tog, de in next 10 sts,
dc2tog. [12 sts]
Fasten off and weave in end.
NEXT 5 PETALS
Skip next 2 sts of Round 22, rejoin yarn in next
st and work as for First Petal, do not fasten off
after final Petal.
EDGING
Cont with same colour as Petals.
Round 1 (RS) Chi, de in each st and row-end
around Panel, ssto beg de.
Fasten off and weave in ends.
TO MAKE UP
Place contrasting coloured panels together
with WS facing. Working through both Panels
and using the same colour as Petals on one
Panel, de around to join - stuffing as you go.
Fasten off and weave in all ends.
64 WWW.GATHERED.HOW/SIMPLYCROCHET
HEART COASTERS
FEEL THE LOVE
Pop over for a cuppa and have a heart-to-heart over
these easy motif coasters by Mandy O'Sullivan
WWW.GATHERED.HOW/SIMPLYCROCHET 65
HEART COASTERS
FEASYT
PEASY
w
DK
WEIGHT
4MM
HOOK
YOU WILL NEED
Paintbox Yarns Cotton DK
(100% cotton, 50g/125m)
1 ball of each:
Bubblegum Pink (451)
Daffodil Yellow (422)
Stormy Grey (405)
A 4mm (US G/6) hook
A tassel maker
For yarn stockists contact
LoveCrafts 01409 404010
www.lovecrafts.com
TENSION
Tension is not critical, but it may
affect the yarn quantities required
MEASUREMENTS
Coaster measures approx 11x11cm
dO’AxIO’Ain)
ABBREVIATIONS
For a full list, see page 78
Whether you're hooking up a quick but
heartfelt gift or sprucing up your own coffee
table, these lovely coasters are a must!
NOTES
Coasters are worked in rounds with RS facing
throughout.
Change colour on the final yrh of st before
colour change is indicated. Fasten off last
colour and leave strand on WS ready to weave
in at the end.
COASTERS (MAKE 2)
Make 1 using Bubblegum Pink as Yarn A and
Daffodil Yellow as Yarn B.
Make 1 using as Daffodil Yellow Yarn A and
Bubblegum Pink as Yarn B.
Using Yarn A, make a magic loop.
Round 1 (RS) Ch3 (counts as tr throughout), 2tr
in loop, ch1, (3tr in loop, ch1) 3 times, ss into the
top of beg ch-3, ss to first ch-1 sp.
[12 tr, 4 ch-1 sps]
Round 2 (RS) Ch3, (2tr, ch1,3tr) in the same sp
as beg ch-3, (3tr, ch1,3tr) in each ch-1 sp
around, ss to top of beg ch-3, ss into first ch-1
sp. [24 tr, 4 ch-1 sps]
Round 3 Ch3, (2tr, ch1,3tr) in the same sp as
beg ch-3, change to Yarn B, 3tr in sp between
next two 3-tr groups, change to Yarn A, (3tr, chi,
3tr) in ch-1 sp, 3tr in sp between next two 3-tr
groups, change to Yarn B, (3tr, chi, 3tr) in corner
ch-1 sp, change to Yarn A, 3tr in sp between
next two 3-tr groups, change to Yarn B, (3tr, chi,
3tr) in the corner ch-1 sp, change to Yarn A, 3tr
in sp between next two 3-tr groups, ss to top of
beg ch-3, ss to first ch-1 sp. [36 tr, 4 ch-1 sps]
Round 4 Ch3, (2tr, chi, 3tr) in same sp as beg
ch-3, change to Yarn B, 3tr in next two sps
between 3-tr groups, change to Yarn A, (3tr,
ch1,3tr) in corner ch-1 sp, 3tr in sp between the
next two 3-tr groups, change to Yarn B, 3tr in
next sp between two 3-tr groups, (3tr, ch1,3tr)
Work a classic granny square and change
colours mid-round to form the heart motif
in corner ch-1 sp, 3tr in next 2 sps between 3-tr
groups, (3tr, ch1,3tr) in corner ch-1 sp, 3tr in sp
between next two 3-tr groups, change to Yarn
A, 3tr in next sp between the two 3-tr groups, ss
to top of beg ch3. [48 tr, 4 ch-1 sps]
Fasten off.
Join Yarn В in any ch-1 sp.
Round 5 Ch3, (2tr, ch1,3tr) in same sp as beg
ch-3, *3tr in each sp between 3-tr groups across
to next corner, (3tr, chi, 3tr) in ch-1 sp; rep from
* around to end, ss to top of beg ch-3.
Fasten off.
Join Stormy Grey in any ch-1 sp.
Round 6 Chi (does not count as st), *(2dc, ch2,
2dc) in ch-1 sp, de in each st to next ch-1 sp; rep
from * 3 times more, ss to beg de.
Fasten off.
TO FINISH
Weave in ends.
Using Stormy Grey, make 4 tassels (10cm long)
for each Coaster. Sew a tassel to each corner
and trim to desired length.
SIMPLE STEPS HOW TO MAKE A TASSEL
1 Cut a piece of cardboard
that's about 5cm wide and as
long as you'd like the tassel to
be. Make a 1cm cut in one
short end of the card. Tie a
knot in one end of the yarn
and secure it around the slot.
2 Wrap the yarn round the
length of the card to the
thickness you require. If you
want to use more colours,
knot the yarns together at the
base of the card and carry on
wrapping around.
3 Cut a small piece of yarn,
thread under the yarn wraps
at the top of the card and knot
the 2 ends. Cut through the
bottom wraps and snip off
the starting knot(s).
4 Cut another piece of yarn
and wrap it around the tassel,
approx 2cm from the top, to
form head. Thread end onto a
needle and insert down inside
the head wraps. Trim tassel
ends to neaten.
66 WWW.GATHERED.HOW/SIMPLYCROCHET
The home of butter l^rfttfng Crc^het
Learn
Boost your skills with...
• FREE how to guides and expert advice
• FREE video tutorials that help you every step
• FREE craft classes
• FREE seasonal patterns
something
new with
gathered.
www.gathered.how
Soft, colourful and easy on the skin - these yarns are
ideal for making fabulous gifts for children!
68 WWW.GATHERED.HOW/SIMPLYCROCHET
Ch8 (loosely).
De in second ch from hook,
de in each ch across, turn. [7 de]
Ss in first 4 de, ch1, de
(tightly) in st at base of ch-1, turn.
J Ch5 (loosely), de in second
ch from hook, de in next 3 ch, ss in
de from Row 2.
] Ch4, ss in each ch across, ss
in de from Row 2.
[ and weave in ends.
K'PATTERN
ROW 2
R0W3
FASTEN OFF
The leftover yarns from this yarn review
will be donated to Knit for Peace. Learn
more at www.knitforpeace.org.uk and
go to www.gathered.how for more yarn
donation ideas.
YARN REVIEWS
YARNSMITHS
PLAY BABY DK
WEIGHT DK
CONTENT 100% acrylic
BALL 100g/360m
HOOK 4mm
RRP £4.50
Get creative with colour with a
soft, self-striping DK. Each tone
merges gradually into the next,
and kids big or small will love
the cool effects you can create.
The yarn is formed of three
fuzzy plies twisted together,
so it's a doddle to hook (no
splitting!) into a matt fabric with
gentle stitch definition. There
are 10 colourways with various
effects, each named after
children's playthings, like
Marbles and Monkey Bars. Pop
makes in the machine on a cool
30°C setting and tumble dry
low, so it looks fresh again.
www.yarnsmiths.co.uk
। WEST YORKSHIRE SPINNERS
BO PEEP DK
I
I WEIGHT DK
CONTENT 52% Falklands wool,
1 48% nylon
BALL 50g/112m
HOOK 4mm
RRP £4.20
What child wouldn't like this
yarn? It has a satisfying smoosh
and cheerful colours, including
26 solid shades, six pastel prints
and six variegated colourways.
The combo of wool and nylon
creates warmth, longevity and
washability - perfect for kids!
The springy lengths have
a fuzzy halo and create good
stitch definition. The solid
shades are great for cables and
textured patterns, while the
variegated options create
texture for you. It also comes in
4ply. Machine wash on a gentle
40°C cycle and don't tumble dry.
www.wyspinners.com
PAINTBOX
BABY DK
WEIGHT DK
CONTENT 45% acrylic, 55% nylon
BALL 50g/167m
HOOK4mm
RRP £3.75
1 RICO DESIGN
BABY MERINO
WEIGHT Sport
CONTENT 100% virgin wool
BALL 25g/100m
HOOK 4mm
RRP £3.09
With a barely-there feel and
a great choice of colours, this
is a great all-rounder for any
children's project. It's smooth
enough to hook easily, yet fuzzy
enough to give finished fabrics
a gentle touch for delicate skin.
The nylon also adds durability,
so you can be sure your makes
SIRDAR
SNUGGLY
WEIGHT 3ply
CONTENT 55% nylon, 45% acrylic
BALL 50g/301m
HOOK 3mm
RRP £3.99
Snuggly is amazingly light and
soft with a fuzzy halo and a cosy
feel, so it's a dream to hook and
to wear. Perfect for a newborn
cardigan or gift set, one of these
balls goes a long way. This 3ply
yarn comes in seven pastel
shades and is part of the
adorable Snuggly range
will last and even get handed
down to younger siblings. The
24 colours are great for intarsia
motifs or Fair Isle patterns, and
range from traditional pastels to
bold tones. Don't stress about
spills - it's machine washable on
a gentle 40°C cycle, then air dry.
www.lovecrafts.com
designed for kids, which also
includes 2ply, 4ply and DK
versions. Best of all, when spills
happen it's easy peasy to clean
on a gentle 40°C wool cycle -
and you can tumble dry it on
a gentle setting, so it'll be ready
to wear again super-quick.
www.sirdar.com
Baby Merino is a modest little
yarn with a lot to offer. Each
I cute ball has a luxurious feel and
is OEKO-TEX* certified, so it's
gentle enough for sensitive skin.
The gentle palette of 12 tones
includes beige and navy as well
as pink and blue, plus there's
a range of six variegated prints
KING COLE
CUTIE PIE DK
WEIGHT DK
CONTENT 100% antipilling acrylic
BALL 100g/250m
HOOK 4mm
RRP £3.99
Here's a delicious yarn that'll be
a treat for your own little cutie
pies! It comes in six gorgeous
colourways with sweet names
like Apple Pie and Peach Pie. It's
smooth and slinky, so it glides
over your hook with ease,
forming shiny stitches with
strong definition. While you
to add more colour to your
project. It's a delight to work
with and the stitch definition is
strong and clear. It's ideal for
smaller projects like hats,
mittens or even a lacy baby
shawl. Machine washable on
a gentle 30°C setting. Air dry.
www.rico-design.de
hook, the yarn creates subtle
pastel stripes in your fabric that
will capture the imaginations of
children (and hooksters!). It's
a great all-rounder for jumpers
in any season, for kids of any
age. Wash it on a mild 30°C
setting and cool tumble dry.
www.kingcole.com
ЮЕКО-ТЕХ certifies that a textile or fabric isfree of harmful chemicals and is safe for human use.
WWW.GATHERED.HOW/SIMPLYCROCHET69
JOIN OUR GANG OF TREBLE MAKERS AND SHARE YOUR THOUGHTS AND MAKES WITH US,
* FOR A CHANCE TO BE FEATURED HERE, USE OUR HASHTAG #SCTREBLEMAKER r
Hookster Rachel
Joudrey made this
robin blanket for her
toddler, whose name
is-you guessed it
- Robin! Little Robin
liked it so much that
she confiscated the
blanket before
Rachel had time to
add the legs. Looks
like these birds
might have to stay
legless for a while.
We can see why
Robin loves this
make so much! Q
We've been double tapping on
Instagram and admiring your makes.
Tag us @simplycrochetmag and use
the hashtag #SCtreblemaker 0
COUNTING DOWN
Joanna Griffiths, aka
@foxe.label, got
ready for Christmas
this year with the
pastel Advent
calendar from issue
141. It looks fantasic,
Joanna - well done!
Anne Novis loved creating this cross-body bag
from issue 140 - so much so that she gave it
a professional finishing touch. "I love the colours
and just had to add a beautiful lining," she says.
"It makes me smile." It makes us smile too, Anne!
Thank you for sharing your finish with us. П
BIG PAPA
Smurf-tastic make!
Margie Elisabeth, aka
@margieelisabeths
world, is starting her
year off right with the
Papa Smurf pattern
from our 2024
calendar. Great work!
TWICE THE FUN
What's the best hooky Christmas gift you can give
to a pair of two-year-old grandchildren? Why, two
Elmers, of course! Carolyn Watts, aka Nanna
Carolyn, spent months making these matching
elephants - and hiding them from her grandkids
when they came to visit. "Like the toddlers, the
Elmers are not identical!" says Carolyn. So cute! П
EXCLUSIVELY
ИИЛ
GET BETTER SOON
Isobel Pitcher, aka
@okthenwhatsnext,
made the throwback
poncho from issue
140 while recovering
from shoulder
surgery. She says it
was excellent rehab.
COOL CUSTOMER
Sharon Benfield, aka
@daisyloopscrochet,
hooked up this
penguin jar topper
from issue 143. As she
told the designer,
Ellie's Craft Boutique,
"I do love a penguin!"
SlflsS STILUS I * * +
Check your issue next month to see if you're a winner! Every month, three subscribers
win a prize as a thank you for their loyalty to Simply Crochet. This month, the winners
(below) will each receive this Lily Sugar'n Cream yarn bundle to make this colourful,
handy totebag. Enjoy!
Jayne Darvall, Lancashire
Helen Collins, Gloucestershire
Julie Holt, Somerset
Our Media Limited, publishers of Simply Crochet, Subs Stars giveaway Terms
and Conditions. Prizes were dispatched before the on sale date of this issue. There
are no cash alternatives.Three winning entries will be chosen at random from all
current subscribers. The draw is final and no correspondence will be entered into.
70 WWW.GATHERED.HOW/SIMPLYCROCHET
©SIMPLYCROCHET
MIGHTY MAKE
Lynn Faulkner decided to go big
with the animal baby toys from
issue 144. "I used a larger hook
(3.5mm) so they're 9 inches tall,"
she says. But her creativity didn't
stop there. "I also inserted a rattle
bell for more interaction with the
baby. First project of 2024
complete!" The year is off to a great
start, Lynn. We're looking forward
to seeing what else you make. П
SMURFING
AMAZING
Sarie Kate says she really I
enjoyed making this Papa Smurf i
doll from our 2024 Calendar in
issue 142. She gifted him to a friend
who ran a local charity race
while dressed as Papa Smurf- 8
his daughter ran with him
\ as Smurfette! Ы .
Cntfhei
SCTREBLEMAKERS
U I I I _ I_
JOIN US ONLINE!
If you're looking to socialise
with like-minded crocheters,
then make sure you join our
SCtreblemakers Facebook
group - the place to share
pictures of your makes, get
pattern recommendations
and advice, and generally talk
about how much you love
Simply Crochet magazine.
With over 6.7k members, it's
a bustling crochet forum full
of friendly fellow hooksters.
We look forward to chatting
with you on there!
TAKE 1,000s
OF PATTERNS
WHEREVER
YOU CO!
<w-
* Search for Simply
Crochet on your
chosen app store
Available on Apple,
Google Play, Zinio and Nook
iPad is a trademark of Apple Inc., registered
in the U.S. and other countries. App Store is a
service mark of Apple Inc. NOOK is a registered
trademark of Barnes & Noble, Inc. NOOK Tablet
is a trademark of Barnes & Noble Inc. ‘Free trial
И
□
и
[s]
TALK TO US!
Post a pic on our Facebook page
facebook.com/simplycrochetmag
Tweet us @SimplyCrochet_
twitter.com/SimplyCrochet_
Add to our Finished Projects board
ravelry.com/groups/simply-crochet
Use the hashtag #SCtreblemaker
instagram.com/simplycrochetmag
Email us at:
simplycrochet@ourmedia.co.uk
is for new users on annual subscriptions only.
Cancel at any point during the trial to avoid
being charged. Free trial not available on Zinio.
| WHATflRE CONTINUOUS ROUNDS?
Brush up on your technique with our simple guide...
A continuous round in crochet is just the same as a spiral
round, and they're most often used to make amigurumi toys.
If you're not familiar with either of these terms, don't worry!
They're easy to hook, and I'll explain everything you need to
know in this workshop.
Most projects made in the round use concentric or circular
rounds - this is where you make a turning chain at the start of
the round and then, at the end of the round, you slip stitch to
the first stitch. Granny squares usually use this method,
creating a complete shape at the end of each round.
The key difference with continuous rounds is that they
create a spiral shape instead. You don't need to make a turning
chain at the start of the round nor a slip stitch at the end of the
round. You just keep going around and around continuously
until you've finished the pattern. This way of working is slightly
faster but the stitches can appear to be sloping. Let's hook...
Continuous Spiral
HOW DO I MAKE A CONTINUOUS ROUND?
It's easy to work stitches in a spiral...
To start working any round, you need to make a foundation
ring - this could be a magic loop or a small chain length that
you've joined with a slip stitch. The process is the same,
whatever foundation ring you use.
Step 1 Now make your first round of stitches into the
foundation ring, as instructed in your pattern - this is often
ch1 and 6dc into the loop. Stop here, with a gap between the
first and last stitches. With continuous rounds, it's a good idea
to mark the first stitch of Round 1 with a stitch marker - we've
marked it with an arrow instead.
Step 2 Now start Round 2 by working the first stitch straight
into the marked first stitch of the previous round. It can seem
like a long way away, but be brave! Insert your hook into that
first stitch on the round below...
Step 3 yrh...
(continued opposite)
Find out more about Becky at makemedo.wordpress.com
72 WWW.GATHERED.HOW/SIMPLYCROCHET
Step 4 ...and pull the yarn back through this stitch...
Step 5 yrh...
Step 6 ...and pull through 2 loops on the hook to complete the
first de of Round 2.
Step 7 It's really important to mark the stitch you just made as
the first one of the round, so you don't lose track of your
stitches. Use a stitch marker or spare piece of yarn and insert it
into the top of the stitch, as you would insert the hook.
Step 8 Now you can make the rest of the stitches of Round 2
as usual, up to the last stitch - this is the one before the stitch
marker. As you hook, there should always be a 'step' between
the stitch you've just made and the round below.
Step 9 To continue with Round 3 and make more stitches in
a spiral, remember to make the first stitch of a new round into
the marked first stitch on the round below - then immediately
remove the stitch marker and place it into the new first stitch
of the new round. It’s important that you do not skip this step
as you could end up losing track of where you are in the round.
Complete the rest of the new round as instructed in your
pattern, up to the last stitch (the one before the stitch marker).
HOW DO I FINISH A CONTINUOUS ROUND?
Add one last stitch for a smooth edge...
Once you've followed your pattern to
the end, you might be wondering what
to do about that 'step' between your
stitches. This is a natural part of
continuous rounds, but there's an easy
way to neaten up that gap. Here's how:
Step 1 After making your last stitch, you
need to slip stitch into the first stitch. So
remove the stitch marker and insert the
hook into the first stitch...
Step 2 yrh...
Step 3 ...and pull the yarn back through
the stitch and the loop on the hook as
well. This completes the slip stitch and
finishes the final continuous round.
Let Becky solve your hooky conundrums!
Crochet Unravelled aims to dive deep into the techniques, tutorials and terminology that
will make you a better hookster. Have you got a question you want Becky to unravel?
Send it in to us at simplycrochet@ourmedia.co.uk
WWW.GATHERED.HOW/SIMPLYCROCHET73
MOSAIC CUSHION
PIANO KEYS SCARF
BABY'S DINOSAUR CARDI
BOLD COLOURWORK
WAISTCOAT
ПЙЙП
duAt^vy^ j
° 4 TERRIFIC TROPICAL 1
BIRD PATTERNS
GAME
ON SALE 19 MARCH
AMIGURUMI RABBIT
EASTER BUNNY
EASTER EGG COSIES
& MUCH MORE
LANDSCAPE MOTIF BLANKET
SIX SCIENCE-
INSPIRED MAKES
Contents subject to change
YOUR GUIDE
SCAN ME
Learn more online!
1 U L*
Over the next few pages, you'll find simple step-by-step guides to many useful
stitches and techniques that you'll use every time you pick up a hook
HOLDING THE HOOK
HOLDING THE YARN
Try these methods and see which works best
Even tension results in even stitches
METHOD TWO
Hold the hook like a pencil, in
your right hand (if you're
right-handed), about 3-5cm
from the hooked end. If your
hook has a flat area, you'll find it
comfortable to hold it here.
Hold the hook between your
thumb and forefinger, about
3-5cm from the hooked end,
resting the end of the hook
against your palm. This will
give you lots of control.
Pass the ball end of the yarn
between the little finger and
third fingers of your left hand
(if you are right-handed), then
behind the third and middle
fingers, over your index finger.
Loop the ball end of the yarn
loosely around the little finger
of your left hand, then take it
overthethird finger, behind
the middle finger and over
your index finger.
MAKING A SLIPKNOT The firstioop on the hook
1 Hold the tail of the ball of
yarn in your left hand and
drape the yarn clockwise over
the top of it to form a loose,
circular loop.
2 Hold the loop between left
thumb and forefinger, then
insert the crochet hook
through the centre of the loop
from front to back.
3 Catch the ball end of the
yarn with the hook and pull it
back through the centre of the
loop, taking the yarn through
with it.
4 Pull both ends of the yarn to
tighten the knot, then pull just
the ball end to tighten the
loop so it's close to the hook,
but not touching it.
CHAIN STITCH Use this stitch to make your foundation chain
How to count chains
1 Hold the hook in your right
hand, and both the yarn end
and the working yarn in your
left hand. Move the hook under
and over the yarn to wrap it
around anticlockwise.
2 Pull the hook towards the
slipknot, catching the yarn in
the hook, and pulling it through
the slipknot loop. This forms
your first chain (ch) stitch.
Repeat steps 1 and 2 to form
a chain length.
3 This is what your row of
chains will look like. Hold the
chain with your left hand near
the hook, to keep the tension.
Keep going until you have the
number of chains that's stated
in your pattern.
Each chain or loop counts as
one stitch. Never count your
first slipknot or the loop on
the hook (called the working
loop). So that you can be
accurate, make sure the
chain is not twisted and that
the front is facing you.
WWW.GATHERED.HOW/SIMPLYCROCHET 75
YOUR GUIDE
SLIP STITCH (ss)
This stitch has no height - often used to join rounds
1 You can make a slip stitch in
any chain or stitch, to join it to
the working loop on the hook.
To make a slip stitch, simply
insert the hook into the stitch
indicated, from front to back.
2 Catch the ball end of the
yarn with the hook, so the
yarn wraps anticlockwise
around it (yarn round hook,
or yrh).
3 Gently pull the hook, and
the yarn wrapped around it,
back towards the 2 loops on
the hook. Draw the yarn
through both the loops on
the hook.
4 This will finish the stitch and
you'll see how the slip stitch
has joined the working loop
to the chain or stitch you
inserted the hook into. You
can also use slip stitch to form
a neat edging.
DOUBLE CROCHET (de) US term: single crochet
One of the key stitches in crochet, doubles are simple, compact stitches that form a dense fabric
1 To make a double crochet
stitch, insert the hook under
the top 2 loops of the next
stitch on the previous row.
2 Wind the yarn around the
hook (yrh).
3 Pull the yarn through the
stitch, giving you 2 loops on
your crochet hook.
4 Yarn round hook again, then
pull the yarn through both
loops. There's your double
crochet made and you'll have
one loop left on the hook,
ready to do the next stitch.
HALF TREBLE CROCHET (htr) US term: half double crochet
A handy stitch that's between double and treble crochet in size, and it looks slightly looser than double crochet
1 To make a half treble crochet
stitch, work to where you
want the htr and then wind
the yarn round the hook (yrh).
2 Insert the hook under the
top 2 loops of the next stitch
in the previous row. Wrap yarn
around the hook again (yrh).
3 Pull the yarn through the
stitch only (3 loops on hook).
4 Yarn round hook again, pull
the yarn through all 3 loops.
You've made a half treble
crochet. Continue working htr
into next and following sts to
the end of the row.
76 WWW.GATHERED.HOW/SIMPLYCROCHET
YOUR GUIDE
TREBLE CROCHET (tr) US term: double crochet
One of the most popular stitches in crochet, this simple stitch is twice as high as a double crochet stitch
1 To work a treble crochet,
start by winding yrh and then
insert the hook under the top
2 loops of the stitch on the
previous row.
2 Wrap the yarn around the
hook (yrh) and pull the yarn
through the stitch only.
3 You will now have 3 loops on
the hook. Yrh again, and draw
the yarn through just the first
2 loops on the hook.
4 You will now have 2 loops
on the hook. Yrh again and
draw the yarn through the
remaining loops on the
hook. Your treble crochet
is complete.
WORKING IN ROWS
Follow these simple rules to construct crochet fabric
WORKING STITCHES INTO A RING
To make circles, tubes and other shapes
1 The first row is made by
working across the
foundation chain from right to
left. At the end of the chain or
row, turn the work so that the
yarn is behind the hook.
2 For the next row, first make
the turning chain for the stitch
you're about to work (see
opposite). Now work the next
stitch into the top of the
stitches on your first row,
missing the first stitch.
1 Make a foundation ring and
work the t-ch (3ch for treble
sts). Work a treble st as usual,
but insert hook into centre of
ring. For treble sts, yrh, insert
hook into ring.
2 Finish the treble, as usual
(yrh, pull yarn through ring,
yrh, pull yarn through first
2 loops, yrh, pull yarn through
2 loops). Work more sts into
the ring as needed.
DOUBLE TREBLE CROCHET (dtr)
US term: treble crochet
TRIPLE TREBLE CROCHET (ttr)
US term: double treble crochet
This is a stitch regularly used
as an elongated version of the
treble (described above). It's
worked in a very similar way to
the treble, as follows:
1 Make a foundation chain. Skip
4ch, *yrh twice, and insert the
hook under the top loop of the
next ch.
2 Yrh, pull the yarn through the
ch loop only (4 loops on hook).
3 Yrh and pull the yarn through
2 loops only (3 loops on hook).
Yrh and pull the yarn through
2 loops only (2 loops on hook).
4 Yrh and pull the yarn through
the remaining 2 loops. Repeat
from * to make more dtr sts.
5 To make the next row of dtr,
turn work and ch4. This turning
chain counts as the first dtr in
a new row. Skip first st at the
base of the t-ch, work 1 dtr under
the top 2 loops of the second
stitch in the previous row;
continue to the end of the row.
This is one of the longest
standard crochet stitches and is
mainly used in fancy stitch
patterns. It's taller than a double
treble crochet stitch (described
left) and is worked in a very
similar way, as follows:
1 Make a foundation ch. Skip
5 ch, *yrh 3 times, insert hook
under top loop of next ch.
2 Yrh, pull yarn through ch loop
only (5 loops on hook).
31 Yrh, draw loop through
2 loops only. Repeat from t
3 times more and your triple
treble will be finished. Repeat
from * to make more ttr sts.
4 To make the next row, turn
work and ch5. This turning chain
counts as the first triple treble in
a new row. Skip first st at base of
the t-ch. Work 1 triple treble,
inserting hook under the top
2 loops of the second st in the
previous row; continue to the
end of the row.
WWW.GATHERED.HOW/SIMPLYCROCHET77
YOUR GUIDE
Abbreviations
Crochet hook conversions
across to end of the row meas measures
approx approximate(ly) patt(s) pattern(s)
beg beginning pm place marker
bl insert hook under prev previous
BP back loop only Back Post: qtr rem quadruple treble remain(s)/remaining
ch(s) work st indicated, inserting hook around post of st from back to front to back and not in top of st chain/chain stitch(es) rep RH rnd(s) RS sk sp(s) repeat righthand round(s) right side skip space(s)
ch- refers to ch made ss slip stitch
ch-sp(s) previously, eg. ch-3 chain space(s) St(s) t-ch(s) stitch(es) turning chain(s)
cl(s) clusters tog together
cont continue tr treble crochet
de double crochet trcl (yrh, insert hook in sp/
dc2tog dec dtr (insert hook in next st, yrh&drawa loop through) twice, yrh & draw through all 3 loops on hook decrease double treble crochet tr2tog st, yrh & pull up loop, yrh & draw through 2 loops) number of times indicated, yrh & draw through all loops on hook (yrh, insert hook in
dtr2tog fdc fl foll/folls FP ftr work 2dtr together foundation de insert hook under front loop only following/follows Front Post: As BP, inserting hook around post from front to back to front foundation tr ttr WS yrh next st, yrh & pull up loop, yrh a& draw through 2 loops) twice, yrh&draw through all loops on hook triple treble crochet wrong side yarn round hook work instructions
htr htr2tog in next inc LH lp(s) half treble work 2htr together sts to be worked into the same stitch increase left hand loop(s) 0 immediately foil *, then rep as many more times as directed work all instructions in the brackets as many times as directed
UK METRIC US
14 2mm -
13 2.25mm B/1
12 2.5mm -
- 2.75mm C/2
11 3mm -
10 3.25mm D/3
9 3.5mm E/4
- 3.75mm F/5
8 4mm G/6
7 4.5mm 7
6 5mm H/8
5 5.5mm I/9
4 6mm J/10
3 6.5mm K/10%
2 7mm -
0 8mm L/11
00 9mm M/13
ООО 10mm N/15
Which hook do 1 use?
Hook size UK yarn weight
2.5-3.5mm hook 4ply yarn
3.5-4.5mm hook double knitting yarn
5-6mm hook aran yarn
7mm and bigger chunky yarn
UK/US conversions
UK us
chain ch chain ch
slip stitch ss slip stitch ss
double crochet de single crochet sc
half treble htr half double hdc
treble tr double de
double treble dtr treble tr
triple treble ttr double treble dtr
LEARN MORE ON
OUR WEBSITE
Scan here to go directly to our
page on www.gathered.how -
Find out everything you need to know about crochet
on Gathered! Our page is filled with step-by-step videos,
useful how-tos and information on the tools you'll need.
Learn techniques such as how to create a turning chain,
change colour, increase and decrease, sew seams, check
your tension, make a magic loop join your rounds and
much more. And while you're there, have a look at our
free crochet patterns - you may just find your next make!
78 WWW.GATHERED.HOW/SIMPLYCROCHET
$ Knitting
TRY 3 ISSUES FOR £9.99
when you subscribe today!
* THE UK'S BESTSE11NG KNITTING MAGAZINE *
Forever fnends
EXCLUSIVE!
НИШ u.a..
INSPIRATION ♦ EXPERTS » YARN OFFE|
--«OH wtw\ffrnr
AUTUMN-
MUST-KNITS
FABULOUS MAKES FOR «dfep
YOU AND YOUR FAMILY 1
BEE-UTIFUL
KIDS'JUMPER
2* was wars
V L-W‘
n tHPaTTepni
Ж’
,y ; sNUGGLYdk
?fD
|GOLO]
BUSH
MASUnMOSA^T
«В |
MOMWS
MODERN
CLASSIC
* TWIST IT WITH A TANK*
TISSUES
fOR £9.99
_hrt -°nthe
, snoppriCG j
every issue
With step-W»”*^
3 EASY WAYS TO SUBSCRIBE
ORDER ONLINE
'SKHA24
03330162146+ and quote promo code SKHA24
UK calls will cost the same as other standard fixed line numbers (starting 01 or 02) and are included as part of any inclusive or free minutes allowances
(if offered by your phone tariff). Outside of free call packages call charges from mobile phones will cost between 3p and 55p per minute.
Lines are open Mon to Fri 9am - 5pm for orders and enquiries.
i - facebook.com/SimplyKnitting twitter.com/SimplyKnitMag pinterest.com/simplyknitmag ravelry.com/groups/simply-knitting-magazine
www.gathered.how/simplyknitting
*This trial offer is for new print subscribers only subscribing by Direct Debit. You will receive 3 issues for £9.99 and then continue on a 6 issue Direct Debit of £34.99 thereafter.
All savings are calculated as a percentage of Basic Annual Rate. The UK Basic annual rate is £118.87 which includes any event issues (issues charged at higher than standard
cover price) published in a 12 month period. This offer is for new UK print subscribers only. Full details of the Direct Debit guarantee are available on request. Prices correct at
point of print and subject to change. Offer ends 31st December2024.
CHARTS
ШИК & NMUK
Use these charts when making the Ossetian scarf and mosaic blanket.
Ossetian Scarf (left), page 53
86
84
82
80
78
76
74
72
70
68
66
64
62
60
58
56
54
52
50
48
46
44
42
40
38
36
34
32
30
28
26
24
22
20
18
16
14
12
10
8
6
4
2
Key
I Filled block ( I Open block X Edge block
80 WWW.GATHERED.HOW/SIMPLYCROCHET
CHARTS
Mosaic blanket, page 59
Key
□ Yarn A
В Yarn В
Ш Mosaic treble
□ Repeat
Ossetian Scarf (right), page 53
WWW.GATHERED.HOW/SIMPLYCROCHET81
HOOKY TREASURE
№s imwf’Rf
folding on
_ \ SOCIALS'/
i dManu,
v уУ Six reasons to follow Natasha Emmerson of Love Indy
>4 and her pastel-coloured pop art confections
Etsy: LovelndyUK
Sales: 5,596
Instagram: @love.indy_
Followers: 79K
IF YOU LIKE... Y2Kprints and Danish
pastel home decor, you'll be obsessed
with Natasha's style. #mixandmatch
#printpatternsgalore#funandfeminine
IF YOU WANNA... learn howto make
some of Natasha's projects, try her
accessible patterns and watch her
tutorials on Instagram. #makeityourself
IF YOU LOVE... books,you and Natasha
have that in common! "I'm an avid
booktoker with a never-ending TBR list,"
she says. #TBRstandsforToBeRead
IF YOU NEED... a full-fledged
dopamine hit, you'll find it here. "I love
mismatching different patterns," says
Natasha. #makeyourselfhappy
IF YOU ARE... an impulsivecrocheter
who doesn't like to plan ahead, you're
just like Natasha! "I try to wing it and
hope for the best.” #zeroplanning
IF YOU HAVE... a soft spot for little wall
hangings, check out Natasha's collection
- she's been working on it for the past
three years. #trademarkmake
82 WWW.SIMPLYCROCHETMAG.COM
RICORUMI
SNACKS
In our brand new instruction booklet
Ricorumi Snacks we show you how
to crochet sweet and salty snacks!
The gorgeous gummy bears, salty
sticks, cookies, apple rings, peanut
puffs and more are crocheted with
our popular yarn Ricorumi dk.
Discover all the delicacies now and
crochet your favourite snacks!
follow us on
ISSUE 145
Fall in love with our
February issue! Inside;
you'll find Valentine's Day
makes like a love letter
cushion and amigurumi
love bug. You'll also play
with colour in our Art
House collection, stripes-
and-motifs cardigan, one-
ball ombre shawl and
motif blanket You're sure
toj find something you
love in issue 145!
Crq
PATTERNS * IDEAS * YARN ’ INSPIRATION
[ISSUE ONE HUNDRED & I
ABSTRACT
THROW I
ART MEETS $
ЖНЕТ! e#
6 gallery-worthy designs! /
GOOD FOR
BEGINNERS
ART MEETS
CROCHET!
JUST ONE BALL!
'tlfhich.orue
mill you hook?
WINTER-WHITE JUMPER LOOP STITCH RUG MOTIF BLANKET ACCESSORIES SET & MUCH MORE
RETURN TO THE APP TO BUY YOUR RACK ISSUES
I !
All issues of Simply Croc^t
permanently stored in yc
let are avaik ble as digital editions, reac у to read when ?ver you want. Every purchase is
r^ed in Vour magazi ie library. Once your maga dne has downk >aded, an internet connection is 1
1 not Required, so /ou can take your magazir e with you whe ’ever you go.
'll '' . ; '
EVERY ISSUE IS AVAILABLE DIGITALLY.
STARTING FROM ISSUE ONE!
ISSUE 14?
Nordic Christmas
collection, Tunisian
snowflake jumper, ami'
holly and mistletoe,
robin blanket, shawl.
Swirl collection, stripy
( jumper, ami' party .
I granny, gym ba^, ebr
muffs, baby toys, cosy
; socks, winter blankets.
ISSUE 144
wnp.
collection,
Hoodie,
and
ISSUE 141
Artfully mismatched
collection, tweed
jacket, ami'moth and
butterfly, official Elmer
poncho, quilt blanket.
ISSUE 140
Animal homevyares
collection, Tun sian
entrelac hat & £carf,
ami' blue cat, clothes
line bunting, poncho.
ipti
ISSUE 139
Variegated collection,
granny square tank
top, ami' koala, intarsia
shawl, felted hanging,
two blue blankets.
ISSUE 13(
Fun retro collection,
^ranrjy triangl^ cardi,
ami'footballer,! kids'
. hopscotch rug, bottle
! holdetrsuhnmer skirt.
ISSUE 137
Beach holiday
collection, blockbuster
vest, ami' sunflower,
summer shawls, pride
badge, mandala decor.
ISSUE 136
Showtime collection, •
popcorn and lace .
jumper, ami' pink fairy
armadillo, passion fruit
throwjacket sleeves.
ISSUE 135
Zigzag florals, /
collection, short-
sleeved jumper, a ni'
King Charles III, filet
stitch cui tainjs.
ISSUE 134
Embroidered crochet
collection, granny
1 circles cardi, ami'
i duckling, ripple vest
and scarf, fun pouffe.
IUJUL IJJ
l\|lini mptifs cbllection,
stripy pbncho, ami'
peas in a pod, dolly
njiixture blanket,
checked cardigan.
ISSUE 13?
Stained glass
collection, tessellation
jumper, ami' Highland
cow, textured blanket^
lacy necklace. 1
CROCHfl ALONG
SIGNUPFORA \
DIGITAL SUBSCRIPTION
ANO YOU'LL NEVER MISS
. ANOTHER ISSUE
2 WWW.GATHERED.HOW/SIMPLYCROCHET
Crochet EXTRA
Welcome
Nothing beats a good pair of socks. Though they're often a winter
project staple, I love to refresh my springtime sock collection with
joyful colours and pretty filet. Here, you'll find all the socks you'll
need for the warmer months and beyond - long socks to wear
with boots, comfy striped socks for padding around the house
and lightweight filet socks that slip easily into shoes or even
sandals (if you're feeling brave). I especially love giving handmade
socks as gifts this time of year. Not many people expect to receive
them, and I find they're often met with delighted surprise and an
instant try-on. So, discover your next sock project inside...
', Simply Crochet
CONTENTS
KEEP YOUR TOES WARM WITH THESE FAB SOCKS...
04 LACY SOCKS 13 LACY KNEE-HIGHS
Hook these delicate delights for spring
07 VARIEGATED SOCKS
Show off the shades in beautiful yarn
09 BLACK AND WHITE SOCKS
A classic look in self-striping yarn
11 FESTIVAL SOCKS
Perfect for wearing with welly boots!
Create an elegant and feminine pair
15 MULTI-STITCH SOCKS
Switch it up with these snazzy stripes
17 SOCK-MAKING TIPS
Pro advice for perfecting your craft
18 CHARTS
Use these charts when making your socks
WWW.GATHERED.HOW/SIMPLYCROCHET 3
LACY SOCKS
4PLY
WEIGHT
2.5MM
2.75MM
YOU WILL NEED
Opal Uni 4ply (75% wool,
25% nylon, 100g/425m)
Lilac (5186)
See table for measurements
and yarn quantities
A 2.5mm (US B/1) hook
A 2.75mm (US C/2) hook
Stitch markers
For yarn stockists contact
Wool Warehouse 01926 882818
www.woolwarehouse.co.uk
TENSION
28 sts and 32 rounds to measure
10x1 Ocm (4x4in) over double
crochet using a 2.75mm hook, or
size needed to obtain correct
tension
3.5 stitch pattern repeats of Lace
Patt measures 10cm (4in) using a
2.75mm hook, or size needed to
obtain correct tension
ABBREVIATIONS
For a full list, see page 78 of
Simply Crochet magazine
You can make socks and sandals your
statement lookfor spring when you've got
this perfect pair on your feet.
NOTES
Socks are worked from the Toe up.
Smaller hook size is used for Toe section only.
The Toe and Cuff are worked in the amigurumi
style. Work stitches continuously in a spiral
without closing off each round with a slip stitch.
It may help to use a stitch marker in the first
stitch of each round, moving it up as you work.
Select the size with the closest circumference
to your foot, measuring near your heel.
LACY SOCKS (MAKE 2)
TOE
Using a 2.5mm hook, chi 1.
Round 1 (RS) 2dc in second ch from hook, de in
next 8 ch, 4dc in final ch, turn to work in
opposite side of foundation chain, de in next 8
ch, 2dc in final ch. [24 de]
Round 2 2dc in first st, de in next 10 sts, 2dc in
next st, pm in last st, 2dc in next st, de in next 10
sts, 2dc in final st. [28 sts]
Round 3 2dc in first st, de in each st to marker,
2dc in marked st, move marker to last de, 2dc in
next st, de in each st to final st, 2dc in final st.
[32 sts]
Round 4 De in each st around, moving the
marker up.
Rounds 5-10 Rep Rounds 3-4.
[44 sts at end of Round 10]
Round 11 As Round 3. [48 sts]
SIZES M, LAND XL ONLY
Repeat Round 4 once.
Repeat Rounds 3-4 another - (1:3:5) times.
Repeat Round 3 once more. [- (56:64:72) sts]
You should have worked a total of 11 (15:19:23)
rounds.
ALL SIZES
Next round De in each st around, ss to beg de.
FOOT
Change to a 2.75mm hook.
Round 1 (RS) Chi (does not count as st
throughout), de in next 3 de, ch3, skip 2 sts, (de
in next 6 sts, ch3, skip 2 sts) rep to final 3 sts, de
in final 3 sts, ss to beg de, ss to first ch-3 sp.
The lace pattern is worked in combinations
of treble stitches and chains over six rows
[6 (7:8:9) patt rep of (6dc, ch3)]
Round 2 Ch3 (counts as tr), 9tr in same ch-3 sp,
(skip 6 de, 10 tr in next ch-3 sp) rep around, ss to
top of beg ch-3. [60 (70:80:90) tr]
Round 3 Chi, de in space between final tr of
last round and beg ch-3, ch4 (de and ch-4 count
as tr and ch-2 sp), *skip first 3 tr of 10-tr group,
de in next 4 sts**, ch2, skip final 3 tr of group, tr
in sp between 10-tr groups, ch2; rep from *
around ending final rep at **, tr in second ch of
beg ch-4 (counts as final ch-2 sp).
[6 (7:8:9) patt rep of (4dc, ch2, tr, ch2)]
Round 4 Ch1, de in same sp, ch3, skip next tr, de
in next ch-2 sp, de in next 4 sts, *dc in next ch-2
sp, ch3, skip next st, de in next ch-2 sp, de in
next 4 sts; rep from * 4 (5:6:7) times, ss to beg
de. [6 (7:8:9) patt rep of (6dc, ch3)]
Round 5 Ss into ch-3 sp, ch3,4tr in same ch-sp,
skip 6 sts, 10tr in each ch-3 sp around, 5tr in
same ch-sp as beg ch-3, ss to top of beg ch-3.
[60 (70:80:90) tr]
Round 6 Ch1, de in first st, de in next st, *ch2,
skip 3 sts, tr in sp between 10-tr groups, ch2,
skip 3 sts, de in next 4 sts; rep from * to end,
ss to beg de.
[6 (7:8:9) patt rep of (4dc, ch2, tr, ch2)]
Round 7 Ch1, de in first st, de in next st, *dc in
ch-2 sp, ch3, skip tr, de in next ch-2 sp, de in next
SIZE Small Medium Large X Large
TO FIT FOOT cm 17 19.5 22.5 25
CIRCUMFERENCE in 63/4 73/4 83/4 93/4
ACTUAL FOOT cm 17 19.5 22.5 25
CIRCUMFERENCE in 63/4 7% 83/4 93/4
YARN 100g 1 1 1 2
To make this pattern easier to follow, we've colour-coded the sizing instructions - simply follow the
relevant column.
WWW.GATHERED.HOW/SIMPLYCROCHET 5
LACY SOCKS
4 sts; rep from * around to end, ss to beg de,
ss in first ch-3 sp.
Repeat Rounds 2-7 until Foot measures approx
4 (5:5:6.5)cm less than desired foot length,
ending on a Round 3 repeat.
HEEL
The Heel is worked back and forth in rows over
ha If of the stitches.
Row 1 (RS) Ch1,2dc in ch-2 sp, *dc in next st,
2dc in ch-2 sp, de in next 2 sts**, de in next 2 sts,
2dc in next ch-2 sp) 3 (3:4:4) times, rep from *
to ** 0 (1:0:1) times, turn. [29 (34:38:43) de]
Row 2 (WS) Ch1, de in in each st to final st, turn
leaving final st unworked, turn.
[28 (33:37:42) de]
Repeat Row 2 until 18 (19:23:24) de rem.
Next row Ch1, dc2tog first 2 sts, de in each st to
final st, turn leaving final st unworked.
[16 (17:21:22) de]
Next row Ch1, dc2tog, de in each st across, de
in skipped de from 2 rows below, ss in same st,
turn.
Next row Skip ss, de in each de across to end,
de in skipped de 2 rows below, ss in same st,
turn. [17 (18:22:23) de]
Rep final row until you have increased to 26 (31:
35:40) de.
SIZES S AND L ONLY
Next row Skip ss, de in each de to end, de into
the next st from 2 rows below, ss in tr of final
round of Foot, turn. [27 (-: 36: -) de]
Next row Skip ss, de in each de across to end,
de in next de from 2 rows below (this should be
the first de after the ch-2 sp on the final round
of Foot), ss into next de, turn so RS is facing.
[28(-:37:-)dc]
Next round (RS) Chi, skip ss, de in first 2 sts,
ch3, skip 2 de, de in next 6 sts, (ch3, skip 2 de, de
in next 6 sts) 2 (-: 3: -) times, ch3, working across
unworked sts from Foot: skip next tr, *dc in next
ch-2 sp, de in next 4 sts, de in next ch-2 sp, ch3,
skip tr; rep from * to final ch-2 sp, de ion ch-2 sp,
de in next 3 sts, ss to beg de to join into round,
ss to first ch-3 sp. [6 (-: 8: -) patt rep of (6dc, ch3)]
SIZES M AND XL ONLY
Next row Skip ss, de in each de to end, de into
the next st from 2 rows below, ss to next de (de
of the final round of Foot), turn. [-(32: -: 41) de]
Next row (WS) Skip ss, de in each st across, de
in next de from 2 rows below (the first de after
the ch-2 sp on the final round of Foot), ss into
next de, turn so RS is facing. [- (33: -: 42) de]
Next round (RS) Ch1, skip ss, de in next 2 sts,
ch3, skip 3 de, (de in next 6 sts, ch3, skip 2 de) -
(3: -: 4) times, skip - (0: -: 1) st, de in next 4 de,
working across unworked sts from Foot: de in
next de, de in ch-2 sp, ch3, skip tr, *dc in next
ch-2 sp, de in next 4 sts, de in next ch-2 sp, ch3,
skip tr; rep from * to final ch-2 sp, de in ch-2 sp,
de in next 3 sts, ss into beg de to join into
round, ss into next de, ss to first ch-3 sp.
LEG
Repeat Rounds 2-7 of Foot 3 times, then rep
Rounds 2-3 once more.
CUFF
Cuff is worked in a continuous spiral.
Round 1 (RS) Ch1, *2dc in ch-2 sp, skip tr, 2dc in
next ch-2 sp, de in next 4 sts; rep from * 5 (6:7:
8) times mores. [48 (54:64:72) de]
Rounds 2-4 De in each st around, ss to beg de
to join.
Fasten off using the invisible join method.
Block to measurements listed.
SIMPLE STEPS HOWTO WORK AN INVISIBLE JOIN
1 Do not join the final stitch
to the first stitch with a ss.
Instead, fasten off and pull the
loop on your hook until the tail
comes through the top.
2 Thread the tail onto a
darning needle. Skip the first
stitch of the round, insert the
needle through the top loops
on the second stitch and pull
through.
3 Turn so the WS is facing,
thread the needle through
the back 2 loops on the last
stitch of the round.
4 Weave away the final tail.
The invisible join has created
a false top on the first stitch of
the round.
6 WWW.GATHERED.HOW/SIMPLYCROCHET
VARIEGATED SOCKS
Hook up colourful, stripy socks with minimal effort!
We love this stylish mid-calf pair from DROPS
WWW.GATHERED.HOW/SIMPLYCROCHET 7
VARIEGATED SOCKS
feasy i
PEASY
4PLY
WEIGHT
5MM
HOOK
YOU WILL NEED
DROPS Delight (75% wool,
25% polyamide, 50g/175m)
2 balls of each:
Green/Beige (08)
Beige/Grey/Pink (05)
A5mm(USH/8) hook
Stitch markers
For yarn stockists contact
Wool Warehouse 01926 882818
www.woolwarehouse.co.uk
TENSION
14 sts and 8.5 rounds measure
10x10cm (4x4in) over treble crochet
using a 5mm hook, or size needed
to obtain correct tension
MEASUREMENTS
Socks measure 23 (24:27)cm
(9 (916:10VaJin) long across foot
ABBREVIATIONS
For a full list, see page 78 of
Simply Crochet magazine
If you're new to sock making, these cosy
cuties are a great place to start! They also
work well as quick-to-make gifts.
NOTES
Socks are worked from the top down, in
3 sizes: Small, Medium and Large.
Work with 2 strands of yarn held together as
one throughout.
SOCKS
CUFF
Using a strand of Yarns A and В held together as
one, ch42 (44:47) and ss in last ch to form a
loop, being careful not to twist the ch.
Round 1 (RS) Ch3 (counts as tr throughout), tr
in next 1 (3:1) sts, (skipl ch, tr in next 4 ch) rep
to end, ss to top of beg ch-3. [34 (36:38) sts]
Round 2 (RS) Ch3, tr in each st around, ss to top
of beg ch-3. [32 (34:36) sts]
Rounds 3-8 As Round 2.
Round 9 Ch3, tr2tog, tr in each st to final 2 sts,
tr2tog, ss to top of beg ch-3.
Rounds 10-17 As Round 2.
Round 18 As Round 9. [30 (32:34) sts]
Rep Round 2 another 1 (2:3) times.
Fasten off.
HEEL
Heel is worked in rows over 16 sts of the Leg.
With WS facing, join a strand of Yarns A and В
held together as one into the eighth st from last
round.
Row 1 (WS) Ch1 (does not count as st) de in
next 16 sts, turn. [16 sts]
Row 2 (RS) Ch1, (dc2tog) de in each st to final 2
sts, (dc2tog), turn. [14 sts]
Rows 3-5 As Row 2. [8 sts]
Pm in last st of Row 5.
Row 6 Chi, de in each st across, 2dc in marked
row-end, turn. [10 sts]
Row 7 Ch1, dc2tog, de in each st across, 2dc in
next row-end of Heel. [11 sts]
Rows 8-12 As Row 7. [16 sts]
Fasten off.
FOOT
With RS facing join a strand of Yarns A and В
held together as one into the eighth st of final
row of Heel.
Round 1 (RS) Ch3, tr in next 7 sts, 4tr in corner
of Heel, tr in next 14(16:18) sts from Leg, pm in
first and last st worked into Leg, tr in next 8 sts
of Heel, ss to top of beg ch-3. [38 (40:42) sts]
Move marker up as you work.
Round 2 Ch3, tr to 2 sts before next marker,
tr2tog, tr up to an inc next marker, tr2tog next 2
sts, tr in each st to end, ss to top of beg ch-3.
[36(38:40) sts]
Rounds 3-6 As Round 2. [28 (30:32) sts]
Round 7 Ch3, tr to 2 (2:4) sts before next
marker, (tr2tog) once (once: twice), tr up to an
inc next marker, (tr2tog) once (once: twice), tr in
Socks are worked from the top down using
treble stitches over the leg and foot
each st to end, ss to top of beg ch-3.
[26(28:28) sts]
Round 8 Ch3, tr in each st around, ss to top of
beg ch-3.
Rep last round until Foot measures 19 (19:22)
cm.
Do not fasten off.
TOE
Round 1 (RS) Ch1, de in each st around, ss to
top of beg ch-3. [26 (28:28) sts]
Flatten Round 1 and pm on either side (in line
with ends of Heel), with 12 (13:13) sts between.
Move markers up as you work.
Round 2 (RS) Ch1, (de in each st to 1 st before
marker, dc3tog) twice, de in each st to end, ss to
beg de. [22 (24:24) sts]
Round 3 Ch1, de in each st around, ssto beg de.
Rep last two rounds another 2 (3:3) times.
[14(12:12) sts]
Fasten off.
TO FINISH
Turn so WS is facing. Flatten final round of Toe
and sew closed.
For best results, block the Socks.
8 WWW.GATHERED.HOW/SIMPLYCROCHET
(inc
Tuck your toes into a pair of gorgeous stripy
socks designed by Marianne Rawlins
BLACK AND WHITE SOCKS
4PLY 3.5MM
WEIGHT HOOK
YOU WILL NEED
Dyebath Delisock
(75% Merino, 25% nylon,
100g/400m)
1 skein of Stormcloud
A 3.5mm (US E/4) hook
A stitch marker
For yarn contact
Wool Bath 01225 469144
www.woolbath.co.uk
TENSION
26 sts and 20 rounds measure
10x1 Ocm (4x4in) over pattern using
a 3.5mm hook, or size needed to
obtain correct tension
MEASUREMENTS
To fit UK shoe size 4-7
Socks measure 18cm (7in) in
circumference around foot
ABBREVIATIONS
For a full list, see page 78 of
Simply Crochet magazine
We really love your tiger feet! Pad around
your home in these trendy yet timeless black
and white socks, or give them as a gift.
NOTES
Socks are worked from the top down.
The pattern has been written so it can be
adapted to different sizes if required.
This yarn is dyed in small batches and the
colours available may vary.
SOCKS
CUFF
Ch11.
Row 1 De in second ch from hook and each ch
across, turn. [10 sts]
Row 2 Ch1 (does not count as a st throughout),
de in bl of each de across, turn.
Rep Row 2 another 46 times, or to desired leg
circumference working a multiple of 3 rows in
total.
Ss the final row to the base of Row 1 to join into
round.
Turn so ss seam is on the inside.
Do not fasten off.
OOH®
For a more budget-friendly
make, try DROPS Fabel:
2 balls of Salt and Pepper (905)
Check hook size, tension and ball
length if you use a different yam
For yarn stockists contact
www.woolwarehouse.com
LEG
Round 1 (RS) Chi, de in each row-end around,
ss to beg de. [48 sts]
Round 2 (RS) Ch2 (counts as de, chi
throughout), de in st at base of ch-2, skip 2 sts,
*(dc, chi, de) in next st, skip 2 sts; rep from *
around, ss into first ch-1 sp. [16 patt reps]
Round 3 Ch2 (counts as de, chi throughout), de
in ch-sp at base of ch-2, (de, ch1, de) in each ch-1
sp around, ss into first ch-1 sp.
Rep Round 3 another 18 times, or to desired leg
length.
Do not fasten off.
HEEL
The Heel is worked in rows.
Row 1 (RS) (De in ch-1 sp, de in next 2 sts) 8
times, turn. [24 sts]
Row 2 Chi, de in each st to last st, turn leaving
last st unworked. [23 sts]
Rows 3-13 As Row 2. [12 sts at end of Row 13]
Row 14 Ch1, de in each st across, de in next
unworked st in row below, ss in end of same
row, turn. [13 de, 1 ss]
Rows 15-24 Skip ss, de in each de across, de in
next unworked st in next row below, ss in end
of same row, turn. [24 de]
Do not fasten off.
FOOT
The Sock continues in rounds.
Round 1 Ch2, de in st at base of ch-2, skip 2 sts,
*(dc, ch1, de) in next st, skip 2 sts, repeat from *
across sts of Heel, (de, ch1, de) in each ch-1 sp
across unworked sts of Leg, ss to top of beg
ch-2. [48 sts]
Round 2 Ch2, de in st at base of ch-2, skip 2 sts,
Work the heels in rows, decreasing then
increasing stitches to achieve the shape
*(dc, ch1, de) in same st, skip 2 sts; rep from *
around, ss into first ch-1 sp. [16 patt reps]
Repeat Round 2 Foot until measures 17cm from
the back of the Heel, or to desired foot length
minus 5cm.
Do not fasten off.
TOE
Round 1 (RS) Ch1, de in each st and ch-1 sp
around, ss to beg de. [48 de]
Round 2 As Round 1.
Round 3 Ch1, (dc2tog, de in next 10 sts) 4 times,
ss to beg de. [44 sts]
Round 4 As Round 1.
Round 5 Ch1, (dc2tog, de in next 9 sts) 4 times,
ss to beg de. [40 sts]
Round 6 As Round 1.
Round 7 Ch1, (dc2tog, de in next 8 sts) 4 times,
ss to beg de. [36 sts]
Round 8 As Round 1.
Round 9 Ch1, (dc2tog, de in next 7 sts) 4 times,
ss to beg de. [32 sts]
Round 10 As Round 1.
Round 11 Ch1, (dc2tog, de in next 6 sts) 4 times,
ss to beg de. [28 sts]
Round 12 As Round 1.
Round 13Ch1, (dc2tog,dcin next 5 sts) 4 times,
ss to beg de. [24 sts]
Round 14 As Round 1.
Round 15Ch1,(dc2tog,dcin next 4 sts) 4 times,
ss to beg de. [20 sts]
Fasten off, leaving a long tail.
TO FINISH
Turn Socks so WS is facing out. Using the end
tail, sew the Toe closed.
Weave in ends.
10 WWW.GATHERED.HOW/SIMPLYCROCHET
FESTIVAL SOCKS
Get festival-ready with these super-cool
fringed socks by Marianne Rawlins
WWW.GATHERED.HOW/SIMPLYCROCHET11
FESTIVAL SOCKS
4PLY
WEIGHT
3MM
HOOK
YOU WILL NEED
Schoppel Wolle Zauberball 4ply
(75% wool 25% nylon,
100g/420m),2 balls of
Fuchsienbeet (1536)
A 3mm (US C/2 or D/3) hook
Stitch markers
For yarn stockists contact
Wool Warehouse 01926 882818
www.woolwarehouse.co.uk
TENSION
23 sts over 16 rounds to measure
10x10cm (4in) over pattern using
a 3mm hook
MEASUREMENTS
Socks fit UK shoe sizes 5-8
ABBREVIATIONS
For a full list, see page 78 of
Simply Crochet magazine
The fringe is made up of a series of looped
chains, which naturally curl and volumise
Never let the sun go down on a party with
these knee-to-toe sunset socks - a perfect
accompaniment to a pair of novelty wellies.
NOTES
Parts of the pattern are worked in a continuous
spiral, without closing off each round with a ss.
You may find it helpful to mark the last st of
each round, moving the marker up as you work.
The Heel is worked in rows from the Leg, then
the Foot is worked around the unworked sts
from the Leg and the Heel.
SOCKS (MAKE 2)
CUFF
Using a 3mm hook, ch9.
Row 1 (WS) Htr in third ch from hook, htr in
each ch to end, turn. [8 sts].
Row 2 (RS) Ch2 (counts as htr throughout), htr
in bl of each st across, turn.
Rows 3-36 As Row 2.
Fold Cuff so that first and last rows meet, work
a ss seam to join the rows together,
do not fasten off.
Rotate Cuff to work into row-ends.
LEG
Round 1 (RS) Chi (does not count as st
throughout), 55dc evenly around. [55 sts]
Round 2 (RS) (De in next st, tr in next st) 27
times, de in last st.
Round 3 (Tr in next st, de in next st) 27 times, tr
in last st.
Repeat Rounds 2-3 until Sock measures 27cm,
including Cuff.
ANKLE
Round 1 (RS) Tr2tog, dc2tog, (tr in next st, de in
next st) 25 times, tr in last st. [53 sts]
Round 2 (RS) (De in next st, tr in next st) around
to last st, de in last st.
Rounds 3-10 Repeat Rounds 1-2, ending on a
Round 1 repeat. [45 sts]
Round 10 As Round 2.
Round 11 (Tr in next st, de in next st) around to
last st, tr in last st.
Repeat Rounds 10-11 until entire Leg measures
36cm, ending on a Round 11 rep.
HEEL FLAP
Row 1 (RS) De in next 22 sts, turn leaving rem
sts unworked. [22 sts]
Row 2 (WS) Chi, de in each st across, turn.
Rows 3-10 As Row 2.
Row 11 Ch1, de in next 13 sts, (dc2tog), de in
next st, turn leaving rem sts unworked. [15 sts]
Row 12 De in next 6 sts, (dc2tog), de in next st,
turn leaving rem sts unworked. [8 sts]
Row 13 De in each st to last st, dc2tog last st
and next unworked st from Row 10, de in next
st, turn. [9 sts]
Rows 14-18 As Row 13. [14 sts]
Do not fasten off.
FOOT
Round 1 (RS) Ch1, de in next 14 sts, 10dc evenly
down side of heel, de in next st of Leg, (tr in
next st, de in next st) 11 times, 12dc evenly up
side of Heel, do not turn. [59 sts]
Round 2 (RS) De in next 20 sts, (dc2tog) twice,
tr in next st, (de in next st, tr in next st) 11 times,
de in next st, (dc2tog) twice, de in next 7 sts. [55
sts]
Round 3 (De in next st, tr in next st) 9 times,
(dc2tog), (tr2tog), de in next st, (tr in next st, de
in next st) 11 times, tr in next st, (tr2tog),
(dc2tog), (tr in next st, de in next st) twice, de in
last st. [51 sts]
Round 4 (Tr in next st, de in next st) 8 times,
(tr2tog), (dc2tog), tr in next st, (de in next st, tr in
next st) 11 times, de in next st, (dc2tog), (tr2tog),
de in next st, tr in next st, de in last st. [47 sts]
Round 5 (De in next st, tr in next st) around to
last st, de in last st.
Round 6 (Tr in next st, de in next st) around to
last st, tr in last st.
Repeat Rounds 5-6 until Foot measures 16cm
from Heel.
TOE
Round 1 (RS) De in next 16 sts, (dc2tog), mark
last st, de in next 23 sts, mark last st, de in last 6
sts. [46 sts]
Round 2 *Dc to 3 sts before marker, dc2tog, de
in next st, move marker up, de in next st,
dc2tog; rep from * once more, de to end.
[42 sts]
Rounds 3-5 As Round 2. [30 sts]
Round 6 *Dc to 3 sts before marker, dc2tog, de
in next st, move marker up, de in next st,
dc2tog; rep from * once. [26 sts]
Round 7 As Round 6. [22 sts]
Fasten off, leaving a long tail.
TO FINISH
Turn the Sock inside out, flatten the opening so
it is in line with Heel, ss last round together.
Weave in all ends.
FRINGE
Join yarn into top of Cuff.
Round 1 (RS) Ch1,55dc evenly around, ss to
beg de. [55 sts]
Rounds 2-3 Ch1, de into each st, ss to beg de.
Round 4 (Ch20, ss to next st) 54 times.
[54 ch-20 loops]
Rounds 5-12 Repeat Rounds 2-4, ending on a
Round 3 rep.
Fasten off and weave in ends.
12 WWW.GATHERED.HOW/SIMPLYCROCHET
LACY KNEE-HIGHS
WEIGHT HOOK
4PLY 5MM
YOU WILL NEED
DROPS Fabel (75% wool,
25% polyamide, 50g/205m)
3 balls of Mustard (111)
A 2mm (US B/1) hook
Stitch markers
For yarn stockists contact
Wool Warehouse 01926 882818
www.woolwarehouse.co.uk
TENSION
28 sts and 16 rounds measure
10x10cm (4x4in) over treble crochet
using a 2mm hook, or size needed
to obtain correct tension
MEASUREMENTS
Socks measure 22 (24:27)cm
(8% (9Уг: Win) long across foot
ABBREVIATIONS
For a full list, see page 78 of
Simply Crochet magazine
The eyelets that make up the floral motifs are
created by working chains and skipping stitches
A touch of elegant trim there, a filet flower
here - these pretty socks are all about the
details! Pair with Mary Janes for a sweet look.
NOTES
Socks are worked from the top down, in
3 sizes: Small, Medium and Large.
There are 3 Stitch Diagrams on page 18, which
you will need to refer to when making the
Socks. Read all rounds from right to left. The
number of times each Diagram is repeated is
shown in the pattern text for that section.
SOCKS
LEG
Ch98 (105:112) and ss in last ch to form a loop,
being careful not to twist the ch.
Round 1 (RS) Ch3 (counts as tr throughout), tr
in next 5 ch, skip 1 ch, (tr in next 6 ch, skip 1 ch)
rep to end, ss to top of beg ch-3. [84 (90:96) sts]
Refer to Diagram A1. The first section of the
Diagram is referred to as A.1A, the second A.1B
and the third A.1C.
Round 2 Ch3, tr in next 11 (14:17) sts, pm in last
st, work A.1 A, work АЛ В twice, work A.1C, tr in
next st, pm in last st, tr in final 11 (14:17) sts, ss
to top of beg ch-3.
Stitches inside marker show area of Diagram.
Move them up as you work.
Rounds 3-8 As Round 2 working from Diagram
as you go.
Round 9 Ch3, tr2tog, tr in each st up to and
including marker, work from Diagram across to
next marker, tr in each st to final 2 sts, tr2tog, ss
to top of beg ch-3. [82 (88:94) sts]
Rounds 10-11 As Round 2.
Round 12 As Round 9. [80 (86:92) sts]
Once you get to the end of Row 13 on the
Diagram, rep Rows 4-13 of Diagram to end of
Leg section.
Rep Rounds 10-12 another 8 (9:10) times.
[64(68:72) sts]
Next round Ch3, tr in each st up to and
including marker, work from Diagrams as
established to next marker, tr in each st to end,
ss to top of beg ch-3.
Rep last round until Leg measures 25 (27:29)
cm.
Fasten off.
HEEL
With RS facing join yarn in 14th (16th: 16th) st
from end of last round.
Row 1 (RS) Ch1 (does not count as st
throughout), de in next 27 (31:31) sts, turn.
Row 2 (WS) Chi, de in each st across, turn.
Rep Row 2 until Heel measures 5 (5.5:6)cm.
Pm in row-end of last row. This is used to
measure the length of the Foot.
Next row Ch1, de in next 19 (22:22) sts, dc2tog,
turn leaving rem sts unworked. [20 (23:23) sts]
Next row Chi, de in next 12 (14:14) sts, dc2tog,
turn leaving rem sts unworked. [13 (15:15) sts]
Next row Ch1, de in each st to final st of last
row, (dc2tog) last st and next unworked st
across, turn.
Rep last row until all unworked sts have been
worked into.
Do not fasten off.
FOOT
Round 1 (RS) Ch3, tr in each st across Heel, 14
(15:16) tr down side of Heel, 33 (37:41) tr across
unworked sts of Leg, 14(15:16)trdown side of
Heel, ss to top of beg ch-3. [78 (82:88) sts]
Mark out 33 (37:41) sts across centre top of
Foot.
Round 2 (RS) Ch3, tr to 2 sts before first marker,
tr2tog, work from Diagram A.2 over next 33 (37:
41) sts, tr2tog, tr in each st to end, ss to top of
beg ch-3. [76 (80:86) sts]
Rep last round another 11 (11:12) times.
[54 (58:62) sts]
Next round Ch3, tr in each st to marker, work
from Diagram A2 over next 33 (37:41) sts, tr in
each st to end, ss to top of beg ch-3
Rep last round until Foot measures 19 (21:23)
cm from marker on Heel.
Do not fasten off.
TOE
Flatten final round and place marker on either
side, in line with the edges of the Heel. There
should be 26 (28:30) sts between each marker.
Move the markers up as you work.
Round 1 (RS) Ch1, de in each st around, ss to
top of beg de. [54 (58:62) sts]
Round 2 (RS) Ch1, *dc in each st to 2 sts before
marker, dc2tog, de in marked st, dc2tog; rep
from * once more, de in each st to end, ss to beg
de. [50 (54:58) sts]
Rep Round 2 another 9 (10:11) times.
[14(14:14) sts]
Next round Chi, (dc2tog) 7 times, ss to beg de.
Fasten off
Thread tail through fl of final 7 sts and pull tight
to close.
UPPER EDGING
Join yarn in any st around top edge.
Refer to Diagram A.3 for the Upper Edging. The
Diagram should be repeated 14 (15:16) times
on each round.
Round 1 Ch5 (counts as tr, ch2), skip 1 st, (tr in
next st, ch2, skip 1 st) rep around, ss to third ch
of beg ch-5.
Round 2 Ss into first ch-2 sp, ch3, (tr, ch2,2tr) in
same sp, ch1, skip next 2 ch-2 sps, *(2tr, ch2,2tr)
in next ch-2 sp, chi, skip next 2 ch-1 sps; rep
from * around, ss to top of beg ch-3.
Round 3 Ss in first ch-2 sp, ch3,7tr in same sp,
de in next ch-1 sp, (7tr in next ch-2 sp, de in next
ch-1 sp) rep around, ss to top of beg ch-3.
Fasten off and weave in ends.
14 WWW.GATHERED.HOW/SIMPLYCROCHET
MULTI-STITCH SOCKS
4PLY 3MM
WEIGHT HOOK
YOU WILL NEED
Stylecraft Head Over Heels
Allstars (75% wool 25% nylon,
100g/400m)
1 ball of Splash (3920)
A 3mm (US C/2 or D/3) hook
Stitch markers
For yarn stockists contact
Stylecraft 01484 848435
www.stylecraft-yarns.co.uk
TENSION
24 sts and 30 rows to measure
10x10cm (4x4in) over pattern using
a 3mm hook, or size needed to
obtain correct tension
MEASUREMENTS
Sock measures 18.5 (20:21.5:23)cm
(7!/4 (7%: 8У2:9)in) in circumference
ABBREVIATIONS
x-tr Skip 1 st, tr in next st, tr in
skipped st
For a full list, see page 78 of
Simply Crochet magazine
Socks are classic gifts, and this super-stripy
pair is definitely on our wish-list... though
we're not sure whether they're more fun to
make or receive! We love that they showcase
two different types of stitches.
NOTES
Socks are worked from the Toe up. The length
of the Sock can be adjusted in both the Foot
and Leg sections.
Socks are designed in four sizes: XS, S, M and L.
The instructions for the XS size are written first
with all other sizes written in brackets.
STRIPY SOCKS
TOE
Ch9.
Round 1 (RS) 2dc in second ch from hook, de in
next 6 ch, 4dc in final ch, working back along
opposite side of foundation ch, de in next 6 ch,
2dc in final ch, ss to beg de to join. [20 de]
Round 2 (RS) Ch1 (does not count as st
throughout), 2dc in first st, de in next 8 sts, 2dc
in next st, pm in last st, 2dc in next st, de in next
8 sts, 2dc in final st, ss to first de. [24 de]
Round 3 Ch1,2dc in first st, de in each st to
marker, 2dc in next 2 sts, move marker up to
second de on first inc, de in each st to final st,
2dc in final st, ss to beg de. [28 de]
Rep last round another 4 (5:6:7) times.
[44(48:52:56) sts]
Next round Ch1, de in each st around, ss to beg
de.
Repeat last round twice more.
FOOT
Round 1 (RS) Ch3 (does not count as st
throughout), tr in first 22 (24:26:28) sts, x-tr
around to end, ss to top of beg ch-3, turn.
Round 2 (WS) Chi, de in each st around, ss to
beg de, turn.
Repeat Rounds 1-2 until Foot measures approx
6cm less than desired foot length, ending with
a WS row.
HEEL
Heel is worked in short rows, first decreasing in
length, then increasing again.
DECREASING
Row 1 (RS) Ch1, skip first st, de in next 21 (23:
25:27) sts, turn. [21 (23:25:27) sts]
Pm in beg ch-1 to mark where increases will be
worked.
Row 2 (WS) Ch1, skip first de, de in each de
across, turn. [20 (22:24:26) sts]
Rep Row 2 another 10 (12:14:16) times. [10 sts]
INCREASING
Row 1 (RS) Ch1, de in each st across, de in
skipped de 2 rows below, turn. [11 sts]
Row 2 (WS) Chi, de in each st across, de in next
skipped st, turn. [12 sts]
Work the heel in short rows while leaving
unworked stitches on the foot
Start the socks at the toe by working along
both sides of a foundation chain
Repeat Row 2 until you have 22 (24:26:28) sts,
ending with a WS row.
LEG
Leg is worked over the sts of final row of Heel
and the unworked sts at the top of the foot.
Round 1 (RS) Ss in second st, ch3 (counts as tr),
tr in first st (before ss), x-tr around, ss to top of
beg ch-3, turn.
Round 2 (WS) Ch1, de in each st around, ss to
first st to join, turn.
Repeat Rounds 1-2 until Leg measures approx
15cm, ending with a WS row.
CUFF
Cuff is worked in short rows off of the Leg.
Row 1 (RS) Ch9, htr in second ch from hook
and next 7 ch, ss in next 3 sts of last row of Leg,
turn. [8 htr]
Row 2 Skip 3 ss, htr in bl only of next 8 htr, turn.
Row 3 Ch2 (counts as htr), htr in bio of next 7
sts, ss in next 3 sts of last row of Leg, turn. [8 htr]
Repeat Rows 2 and 3 around the top of Sock
until last row meets Row 1, do not fasten off.
Join Cuff by turning inside out and working a ss
seam through the starting ch and bio of
corresponding htr in last Row worked.
Fasten off.
TO MAKE UP
Weave in all ends and block to size.
16 WWW.GATHERED.HOW/SIMPLYCROCHET
GOOD READS
10 жк «мт
Designer Rohn Strong shares hot tips for hooking socks
When we think ofcrochet, we don't
always think about socks, but crochet
socks are one of the most comfortable
and quick projects that you can whip up
with your hook. No matter what the
season, I love crocheting socks, whether
they're gifts for friends or for myself. Here, I've compiled
a quick list of 10 of my secrets to sock success - they'll
soon have you crocheting pair after pair of them!
IRow tension doesn't really matter a whole lot, to be
honest. You can always add and subtract rows as you
see fit. You'll absolutely need to get stitch tension down,
however. Without that, you'll have a sock that's ill-fitting
and unwearable.
When picking up stitches between the heel flap and
gusset, do so evenly spaced in the row ends. An easy
method I use is: one stitch for every de row, three stitches
for every two htr rows and two stitches for every tr row.
S For a nice, dense sock that will last longer, crochet the
sock with a hook one size smaller than the one the
pattern calls for.
4 If you're not getting the right tension, try using a hook
made of a different material (wood or plastic or metal)
or a hook with a different size shaft.These elements can
actually affect your stitch gauge a great deal.
S Choose the right yarn for the right sock. No, before
you ask, 100% cotton yarn will not work for socks.
They'll lose shape and have little stretch. I personally
recommend wool - it's fab for socks.
The cuff of the socks needs to be just right. Too tight
I and they won'tfit.Too loose and they'll fall down. If
you're a tight crocheter, try a hook a size larger. A loose
crocheter should try a hook a size smaller.
If you love crocheting toe-up socks, learn how to work
a square toe. It's easy and amazing. It looks great and
it's incredibly comfortable.
Л If you tend to wear out the heels and toes of your
J socks very quickly, try using a strand of nylon thread
with the yarn when working the heel flap, the heel turn
and toe shaping.
। When washing your socks, soakthem in warm (not
hot) water and lay flat to dry. Dryers will break down
the fibres and hot water can felt even the most super of
superwash wool.
] Try working both socks at the same time. By
working a few rows of one and then a few rows of
another, it allows you to avoid the dreaded second sock
syndrome and it ensures that both of your socks are
almost exactly the same.
WWW.GATHERED.HOW/SIMPLYCROCHET 17
CHARTS
CHARTS & NtUK
Use these charts when making the lacy knee-highs.
Lacy knee-highs, page 13
A.1
НПЖННННПЖНННННЖНЖН
I___r__I____‘____I_•_I
Key
<=> Chain (ch)
+ Double crochet (de)
т Treble crochet (tr)
A.3
Repeat
18 WWW.GATHERED.HOW/SIMPLYCROCHET
Crochet
Presented with issue 146 of Simply Crochet. Printed in the UK.