/


Tags: knitting magazine crochet magazine better homes and gardens
Year: 2024


Text
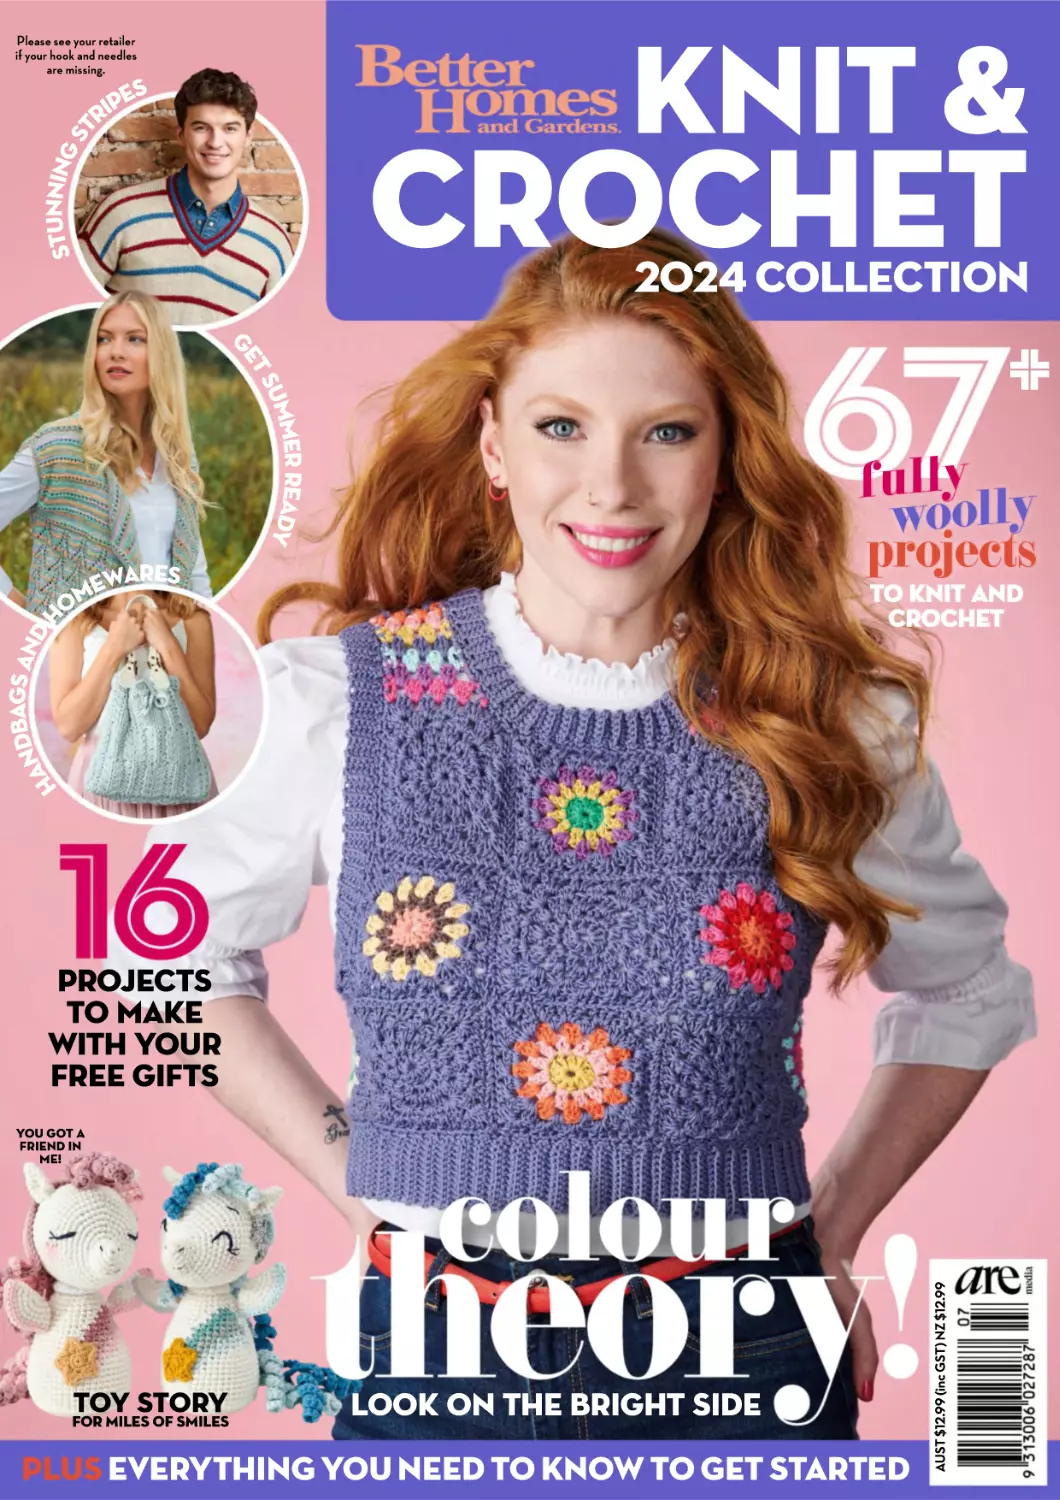
KNIT &
stunning s
t
Please see your retailer
if your hook and needles
are missing.
s
pe
i
r
CROCHET
2024 COLLECTION
mer ready
um
ts
ge
+
fully
woolly
projects
re
ewa s
m
o
ags an
ndb
dh
a
h
to knit and
crochet
projects
to make
with your
free gifts
colour
TOY STORY
FOR MILES OF SMILES
Look on the bright side
PLUS EVERYTHING YOU NEED TO KNOW TO GET STARTED!
AUST!"#$%&&!'inc!GST(!NZ!"#$%&&
you got a
friend in
me!
WELCOME
It’s knitting
season!
Project rating
= easy
=medium
Photography Getty Images
=hard
A common topic at get
togethers and catch-ups these
days is what we are watching
on TV. Or rather, what we
are watching on the many
streaming options we have.
There’s so many great shows
out there and it seems there’s
not enough time to watch
them all.
To make time “invested”
in a new show seem more
worthwhile, I like to do some
handwork while I’m watching.
That could be quilting,
paperpiecing or kni!ing.
Nothing complicated of course
- I don’t want to lose track of
the plot - but just enough that
I feel like I’m being productive
while I’m enjoying myself.
If that sounds like you,
you’ve come to the right place
as this issue is full of projects
to tackle over the darker
winter months. Some of them
will require your full a!ention,
while others are simple
enough to do while you’re
watching (not sure that I could
manage subtitles though!).
Take a look through this
issue to discover classic takes
(and new twists) on stripes,
bright hues to add some
sunshine to gloomy days,
cables that will stretch your
skills, soothing neutrals and
projects to dress and entertain
the kids. There are projects
for your wardrobe, your home,
your partner and your children
or grandchildren, and there
are a range of skill levels so
you can find the project that
suits.
If you’re just ge!ing started,
turn to page 57 for our kick-off
guide, then pick a project,
select your new favourite show
(I’m a bit late to the party but
love Grace & Frankie), cast on
and get started.
Happy making!
KNIT!&!CROCHET!COLLECTION!"#"$ BHG %
Advertising & Marketing
Commercial Brand Manager!
JO-ANN!TAYLOR!
jo-ann.taylor@aremedia.com.au!
Marketing Director
KATHRINE!HOLLAND!
Production
Production Manager
DANIELLA!KALACH!
Ad Controller!DOMINIC!ROY
Chief Executive Officer!
JANE!HUXLEY!
Commercial Director
ANDREW!COOK!
Associate Publisher!
SHANE!SUTTON!
Editor BHG Brand
DORA!PAPAS!
DOTDASH!MEREDITH!
INTERNATIONAL
Vice President/Business Affairs!
TOM!ROWLAND!
Executive Director, Licensing
Operations
PAUL!ORDONEZ!
Senior Director, Business
Development!
WENDY!ZHANG!
Subscription Enquiries
Phone: 136 116 (Mon-Fri 8am to
6pm AEST) www.magshop.com.au
Editorial Enquiries
bhgsip@aremedia.com.au
PUBLISHED BY ARE MEDIA
PTY LIMITED (ACN 053 273 546).
54-58 Park St, Sydney, NSW 2000;
GPO Box 4088, Sydney, NSW 2001.
The trademark Be#er Homes and
Gardens is also the property of Are
Media Pty Limited and used under
licence. ©2020 All rights reserved.
Print by IVE (ABN 58 000 205 210) at
Unit 1, 83 Derby Street, Silverwater,
NSW 2128. Distributed in Australia by
Ovato Retail Distribution Australia Pty
Ltd (ACN 088 251 727). Distributed
in New Zealand by Ovato Retail
Distribution New Zealand Pty Ltd
(CRN 1540329). Title and trademark
BETTER HOMES AND GARDENS®
reg US Patents Office, Canada and
Australia, by Meredith Corporation.
Use of trademark is strictly prohibited.
Recommended and maximum price
$12.99, inc GST.
16
The Bright
side
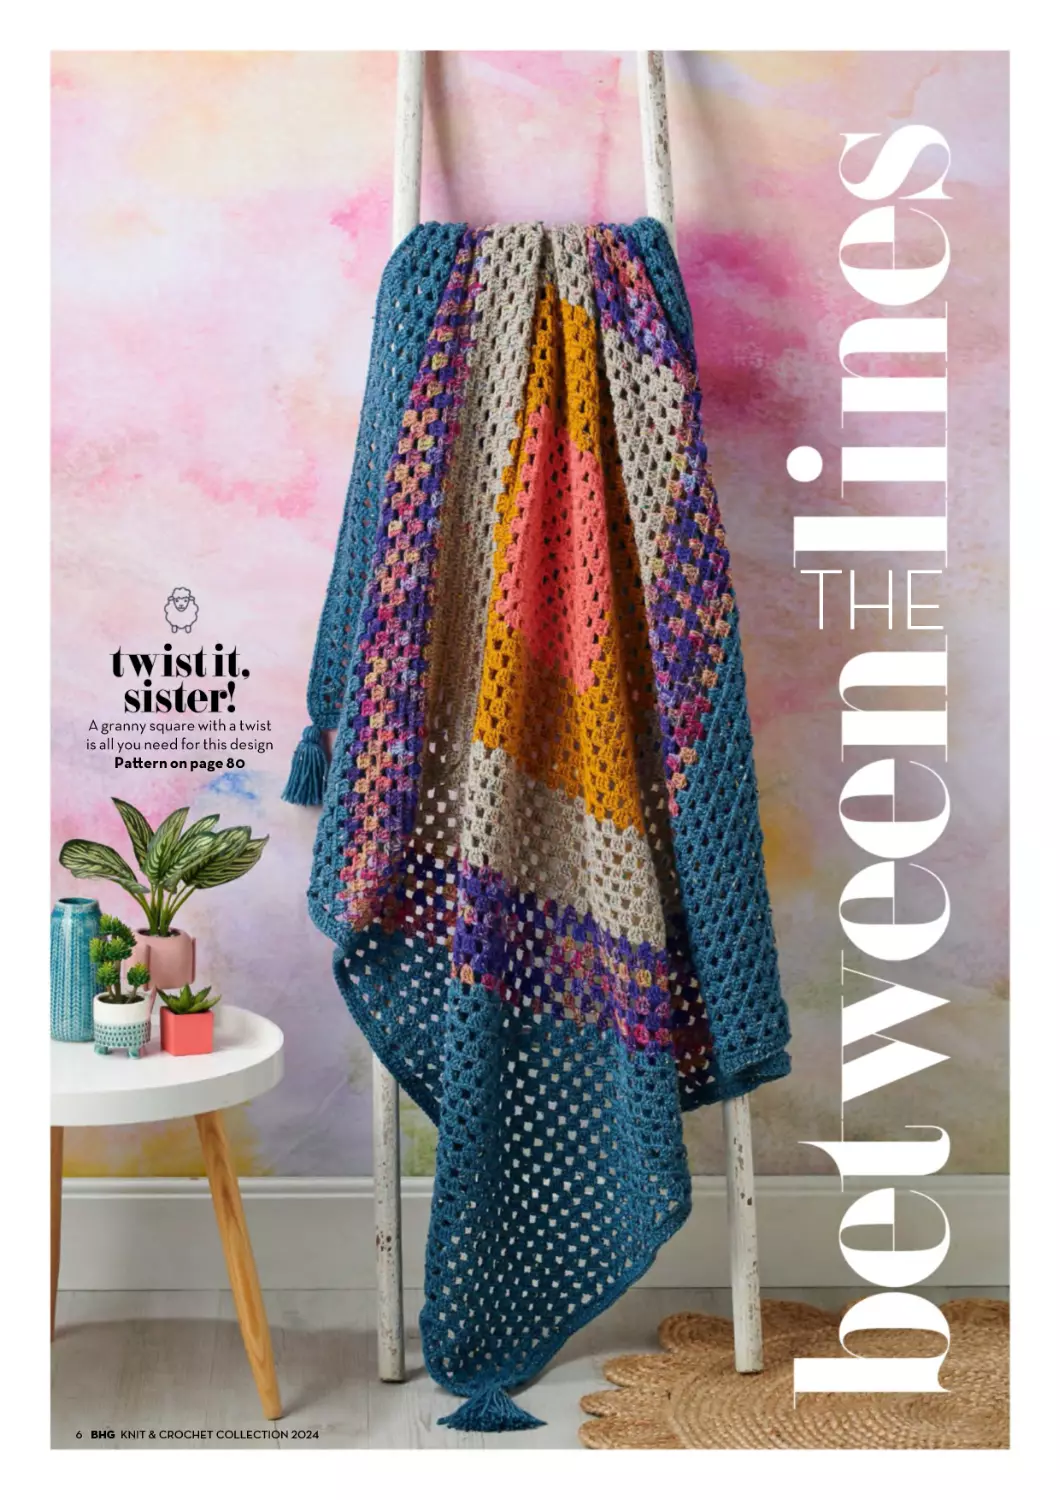
6
Between
the Lines
Photography Immediate Media; Additional Photography Getty Images
Editor!ALIX!DAVIS!
Creative Director!
SCOTT!CASSIDY
Art Director!DANIA!WARMERDAM
Pa!ern Editor!
FIONA!CONNOLLY
Editorial Coodinator!
ERIN!ROBERTS
TAKE!A!LOOK!INSIDE
Editorial
30
Twisted
Treats
50
Sunny
Days
46
Tiny
Treasures
40
34
Big Li!le
Lives
Muted Tones
56 Yarns, Hooks & Needles
60 Crochet Essentials
70 Knit Essentials
74 Finishing Essentials
80 Patterns
146 Privacy Notice
146 Where To Buy
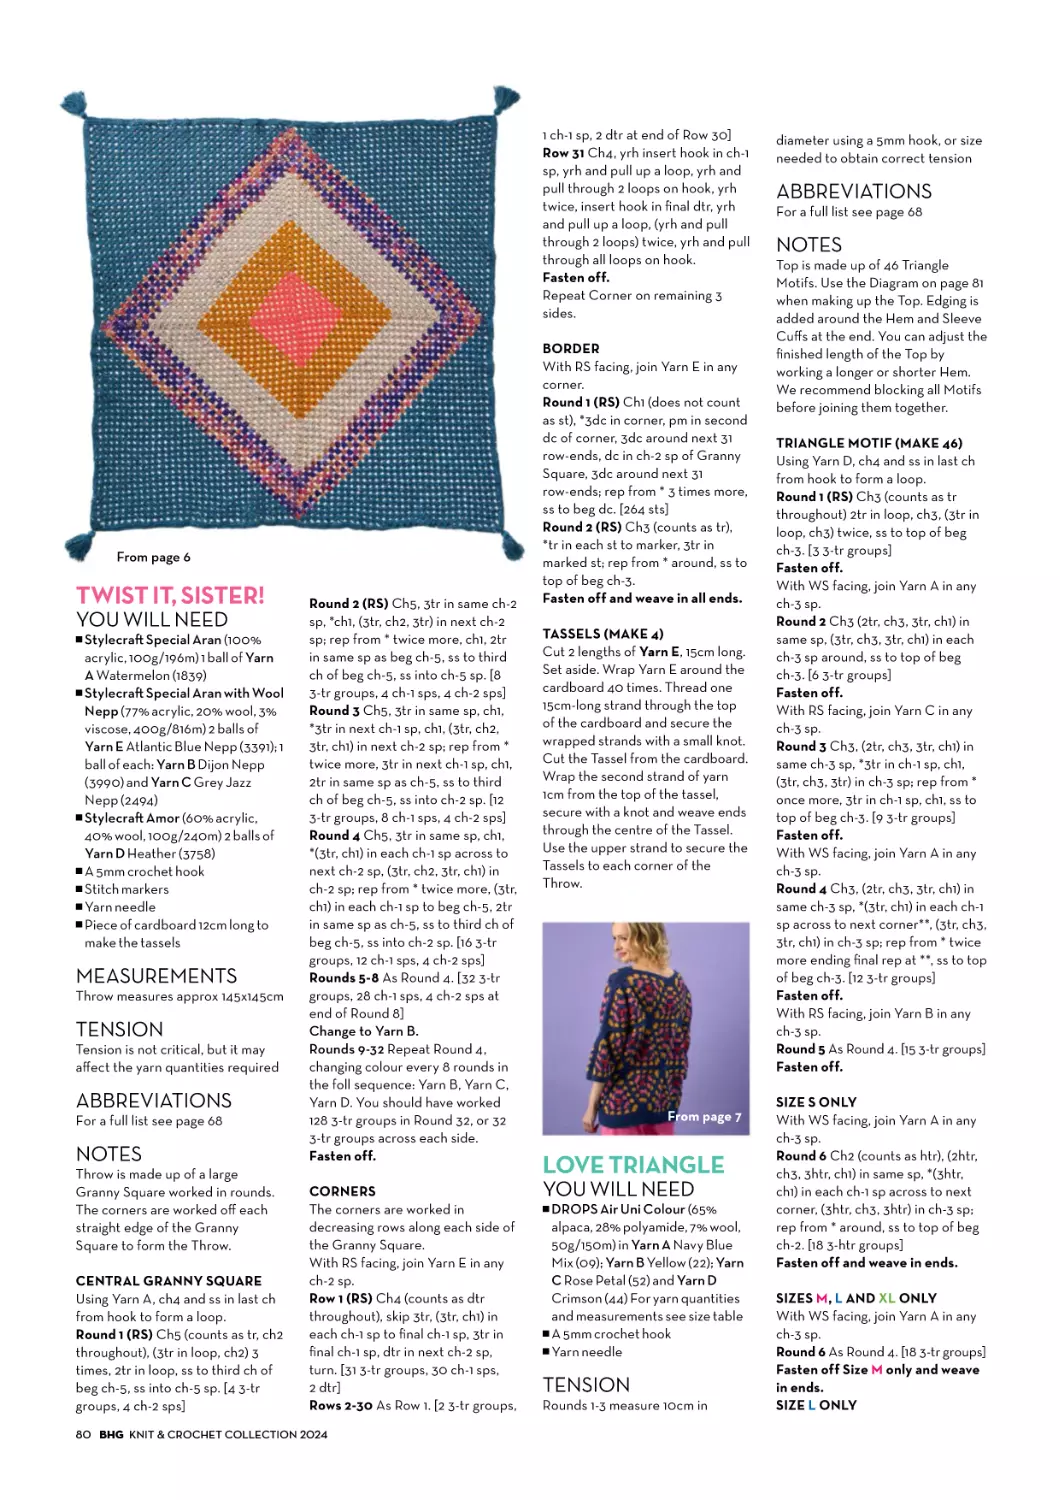
twist it,
sister!
A granny square with a twist
is all you need for this design
Pa!ern on page 80
! BHG KNIT"&"CROCHET"COLLECTION"#$#%
THE
STRIPES
Get your world aligned
with this line-up of
projects that will help
you earn your stripes.
love
triangle
There are three sides to this
crochet motif story and it has a
very happy ending.
Pa!ern on page 80
KNIT!&!CROCHET!COLLECTION!"#"$ BHG %
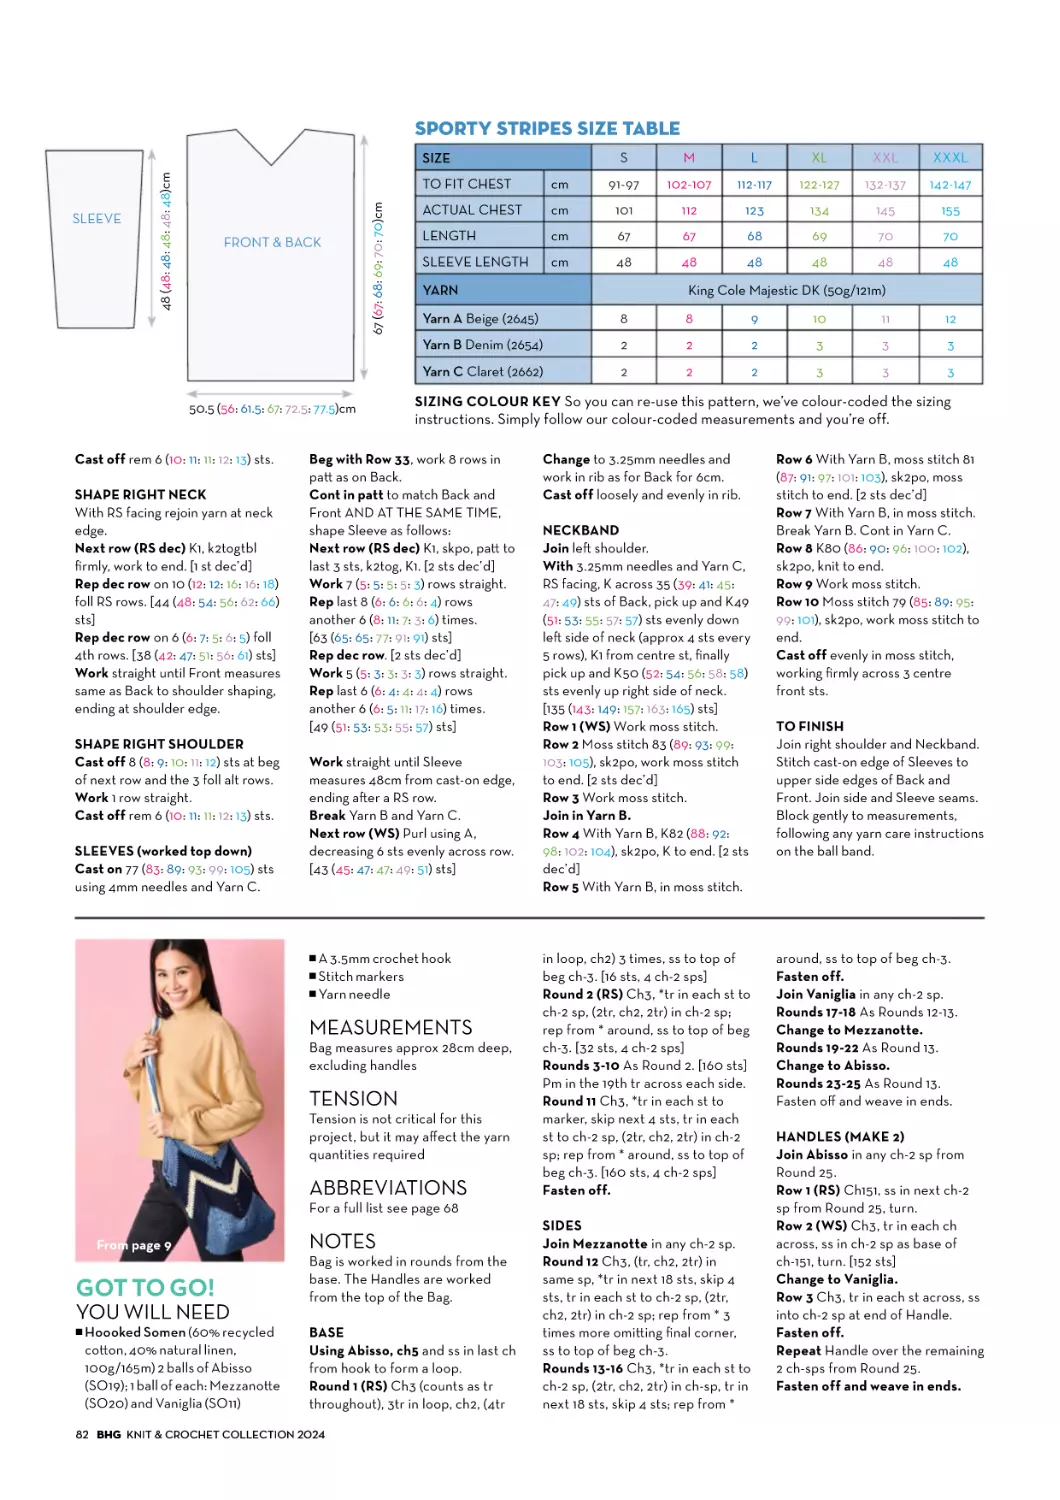
sporty stripes
This classic, smart-casual jumper comes
with raised, textured strpes and a unique
collar finish
Pa!ern on age 81
! BHG KNIT"&"CROCHET"COLLECTION"#$#%
STRIPES
got to go!
This chevron bag design gets
you moving in the right
direction
Pa!ern on page 82
KNIT!&!CROCHET!COLLECTION!"#"$ BHG %
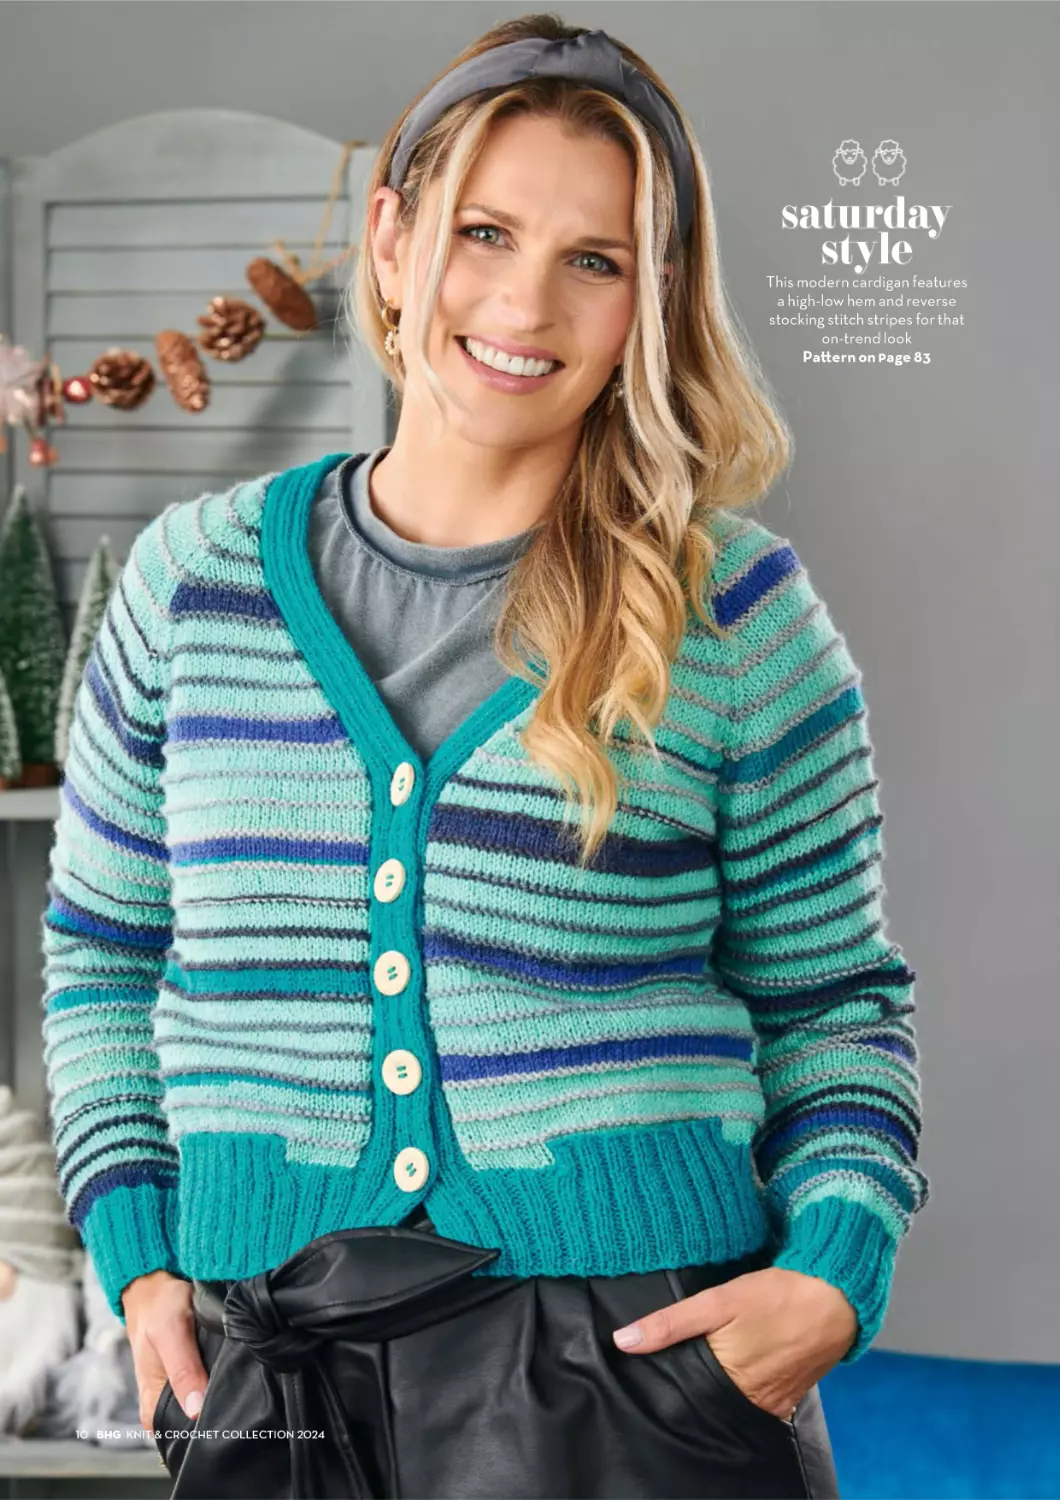
saturday
style
This modern cardigan features
a high-low hem and reverse
stocking stitch stripes for that
on-trend look
Pa!ern on age 83
!" BHG KNIT#&#CROCHET#COLLECTION#$"$%
STRIPES
northern
lights
Traditional details and modern
colours combine to make this
Nordic-inspired design
Pa!ern on page 85
KNIT!&!CROCHET!COLLECTION!"#"$ BHG %%
stash
buster!
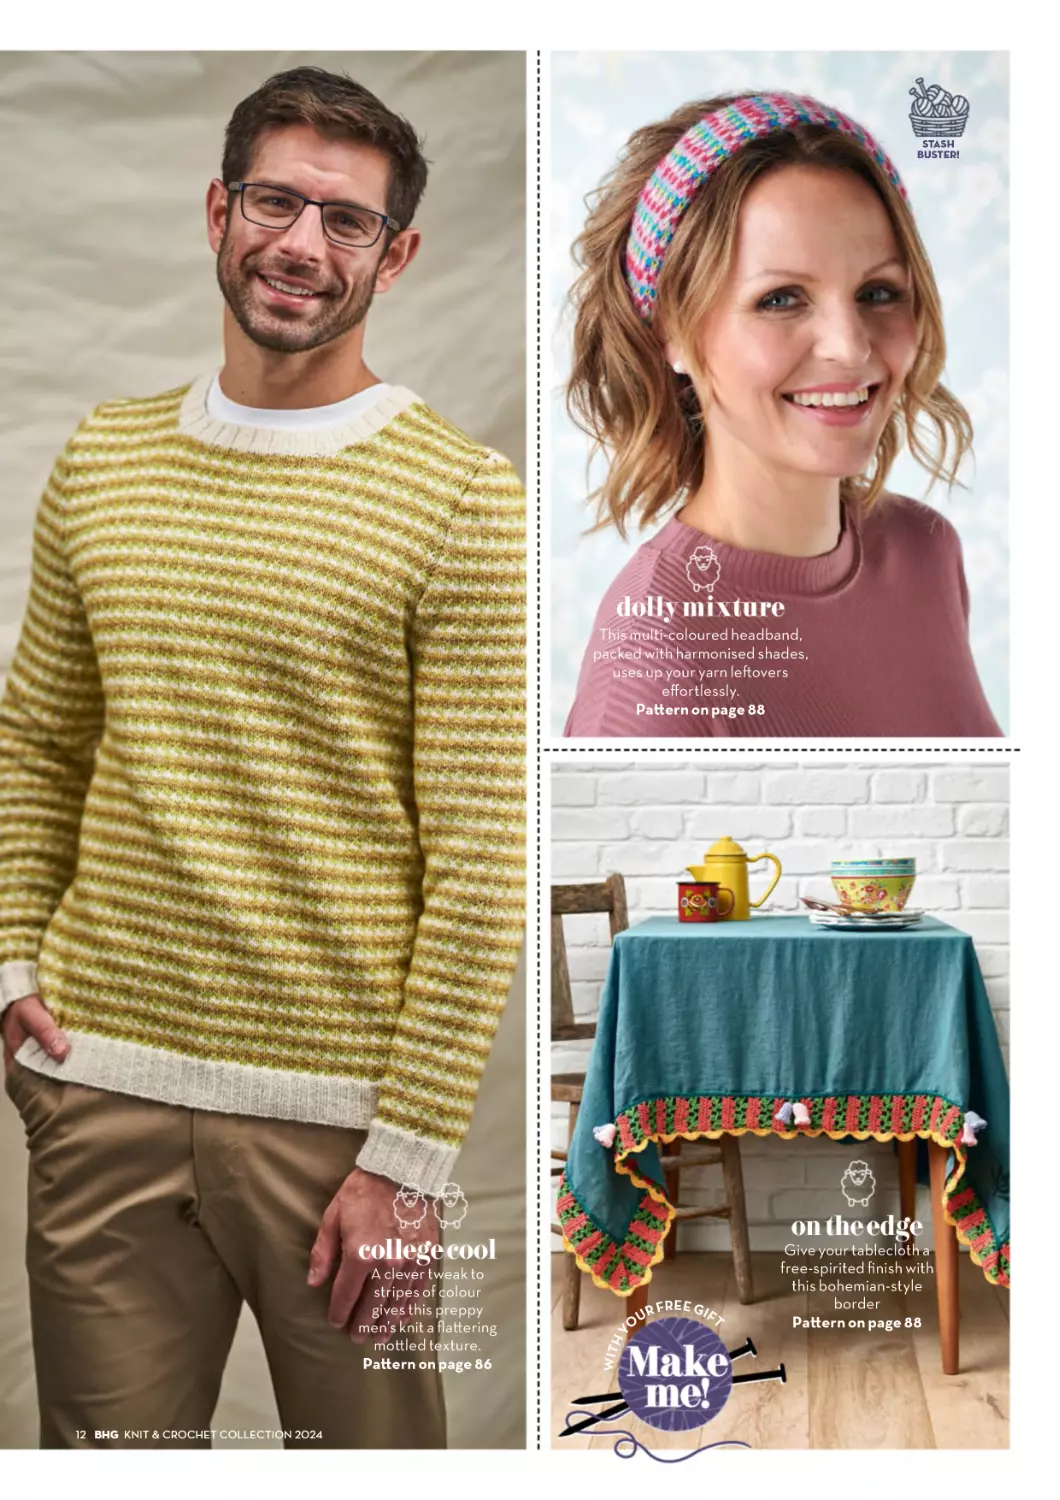
dolly mixture
This multi-coloured headband,
packed with harmonised shades,
uses up your yarn le"overs
effortlessly.
Pa"ern on page 88
on the edge
A clever tweak to
stripes of colour
gives this preppy
men’s knit a fla!ering
mo!led texture.
Pa"ern on page 86
!" BHG KNIT#&#CROCHET#COLLECTION#"$"%
WITH
!Y
college cool
O
!FREE!GIF
UR
T
Make
me!
Give your tablecloth a
free-spirited finish with
this bohemian-style
border
Pa"ern on page 88
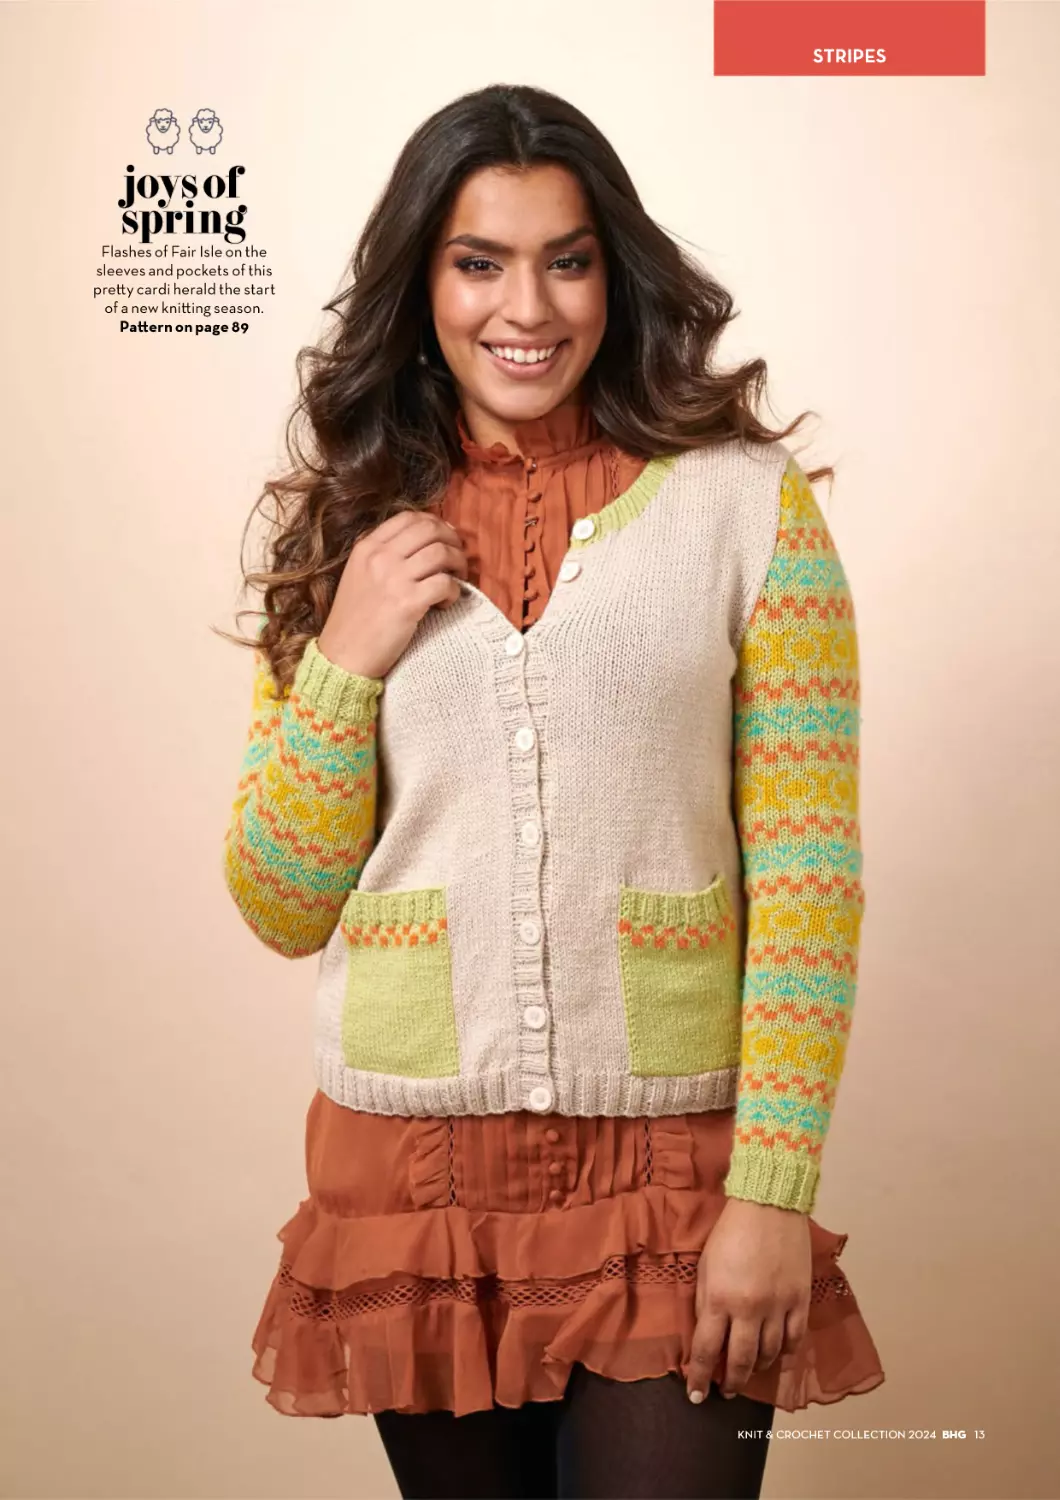
STRIPES
joys of
spring
Flashes of Fair Isle on the
sleeves and pockets of this
pre!y cardi herald the start
of a new kni!ing season.
Pa!ern on page 89
KNIT!&!CROCHET!COLLECTION!"#"$ BHG %&
rainbows
everyday
Wrap up and cheer up with
this colourful design
Pa!ern on page 92
!" BHG KNIT#&#CROCHET#COLLECTION#$%$"
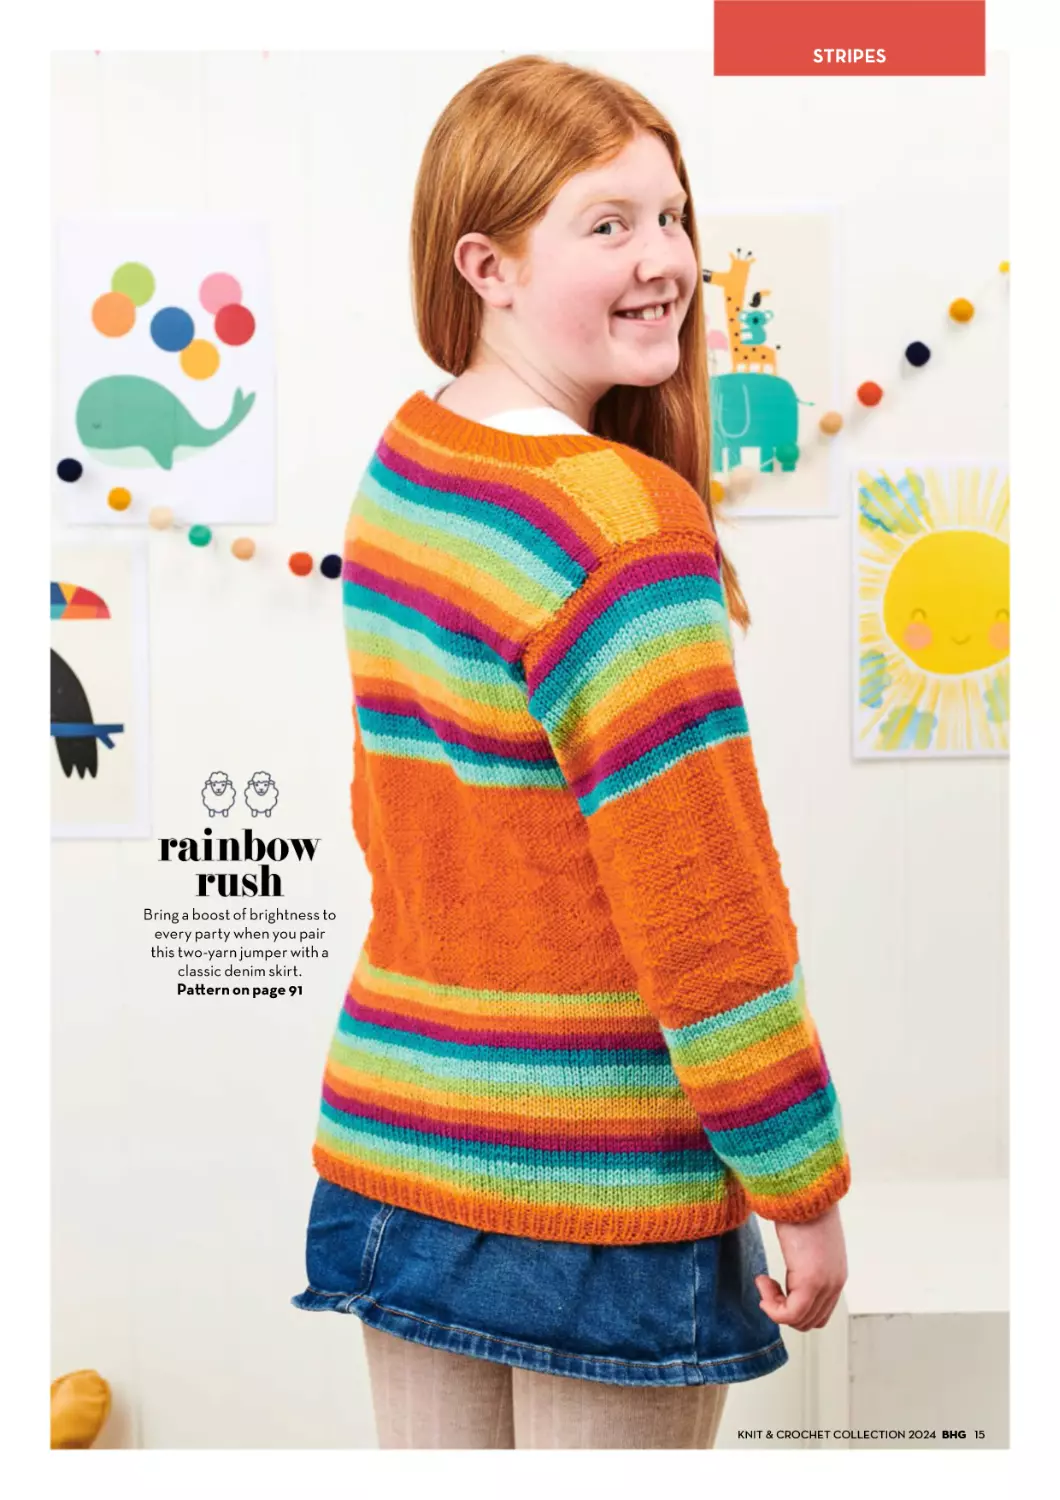
STRIPES
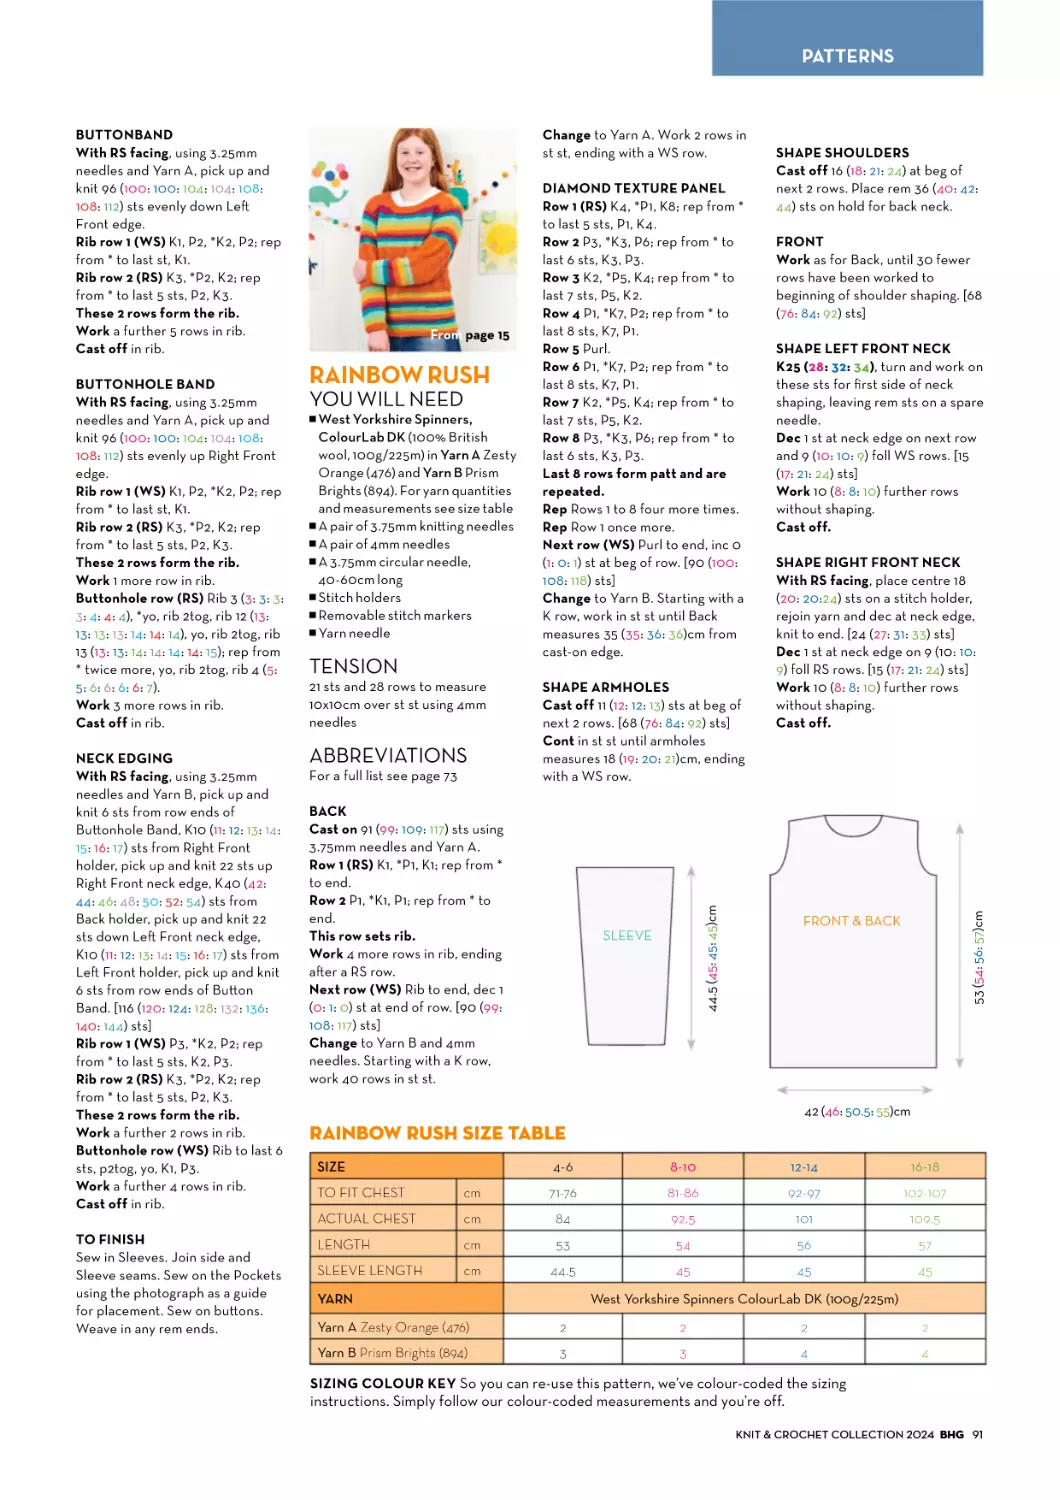
rainbow
rush
Bring a boost of brightness to
every party when you pair
this two-yarn jumper with a
classic denim skirt.
Pa!ern on page 91
KNIT!&!CROCHET!COLLECTION!"#"$ BHG %&
W I TH
!Y
O
!FREE!GIF
UR
T
Make
me!
check mate
Ideal for layering, this floral design
is what your cool weather
wardrobe is looking for
Pa"ern on page 93
COLOUR
Look on the
colourful side
of life with
these eyepopping makes
that will a!ract
the right kind of
a!ention.
THE
SIDE
KNIT!&!CROCHET!COLLECTION!"#"$ BHG %&
Make this funky floral footstool
cover then put your feet up to
admire your hooky handiwork
Pa"ern on page 94
WITH
!Y
best of
the rest
O
!FREE!GIF
UR
T
Make
me!
COLOUR
floral fancy
Boost a simple raglan t-shirt with a
meadow of colourful flowers using
some basic embroidery stitches.
Pa!ern on page 95
KNIT!&!CROCHET!COLLECTION!"#"$ BHG %&
W I TH
"Y
O
"FREE"GIF
UR
T
Make
me!
stash
buster!
rainbow
lanyard
O
Capture a sunset scene in
an arid North American
landscape with this
blanket border
Pa!ern on page 98
"FREE"GIF
UR
T
Make
me!
pick ‘n’
mix for
six
It’s all about the
hexagons in this design
Pa!ern on page 97
W I TH
"Y
W I TH
"Y
Brighten up your work day
by keeping your door pass
and keys safe on this basket
rib stitch lanyard.
Pa!ern on page 100
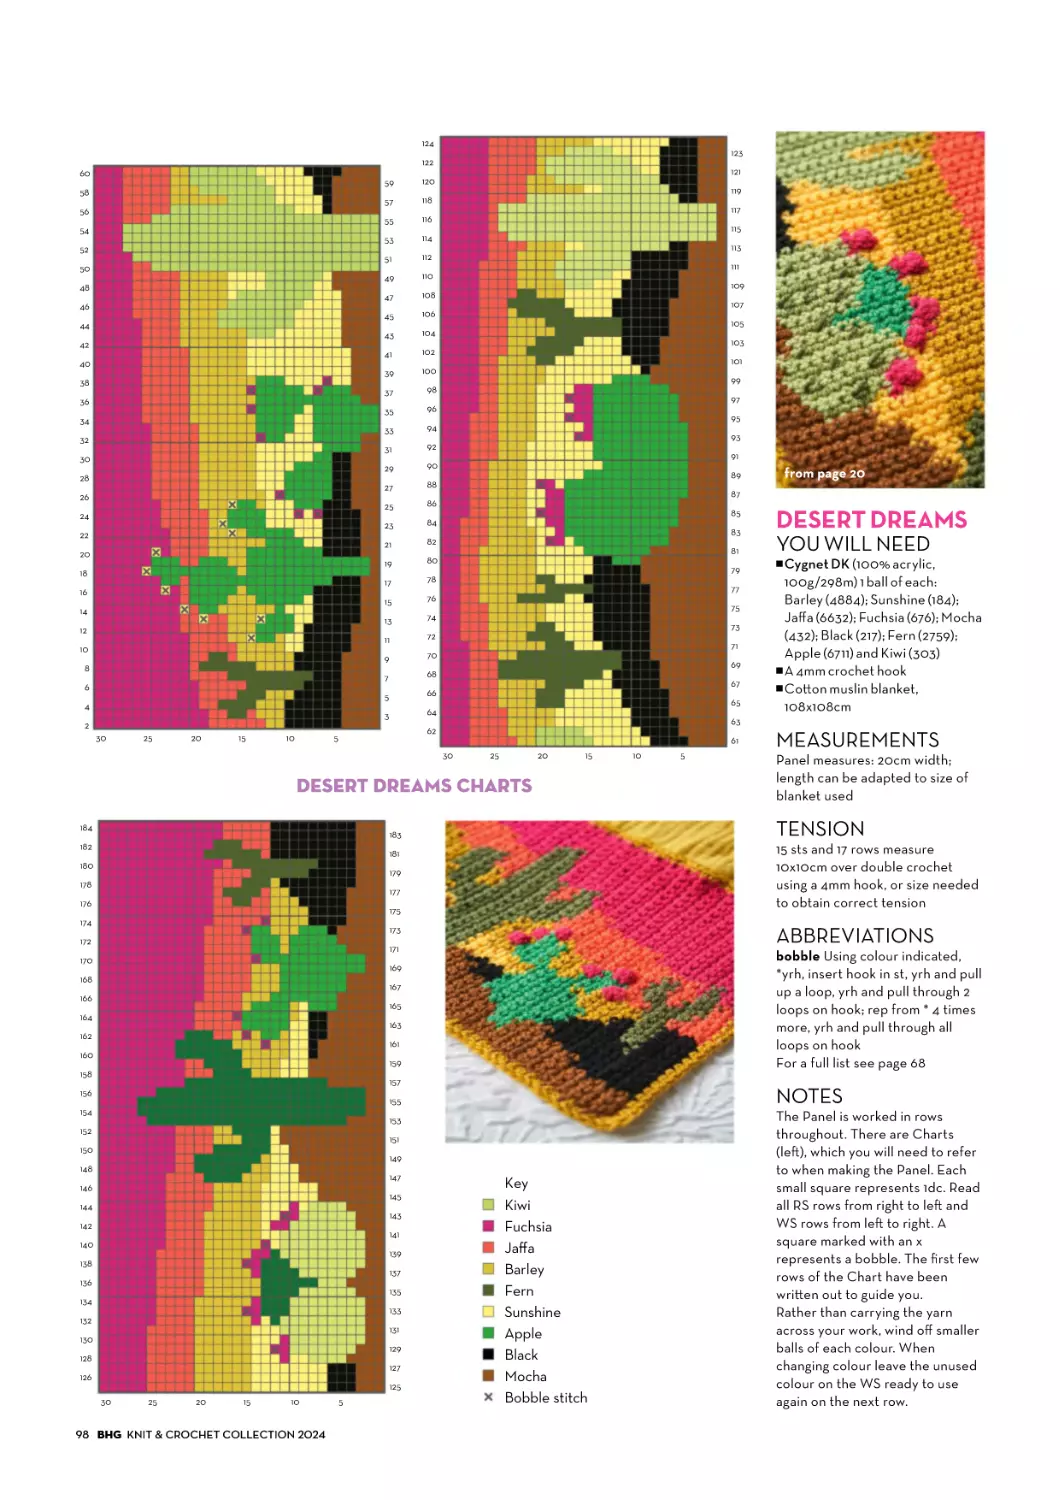
desert
dreams
O
"FREE"GIF
UR
T
Make
me!
pom appeal!
Decorate your door or cra! room with
a vibrant springtime wreath
Pa!ern on page 97
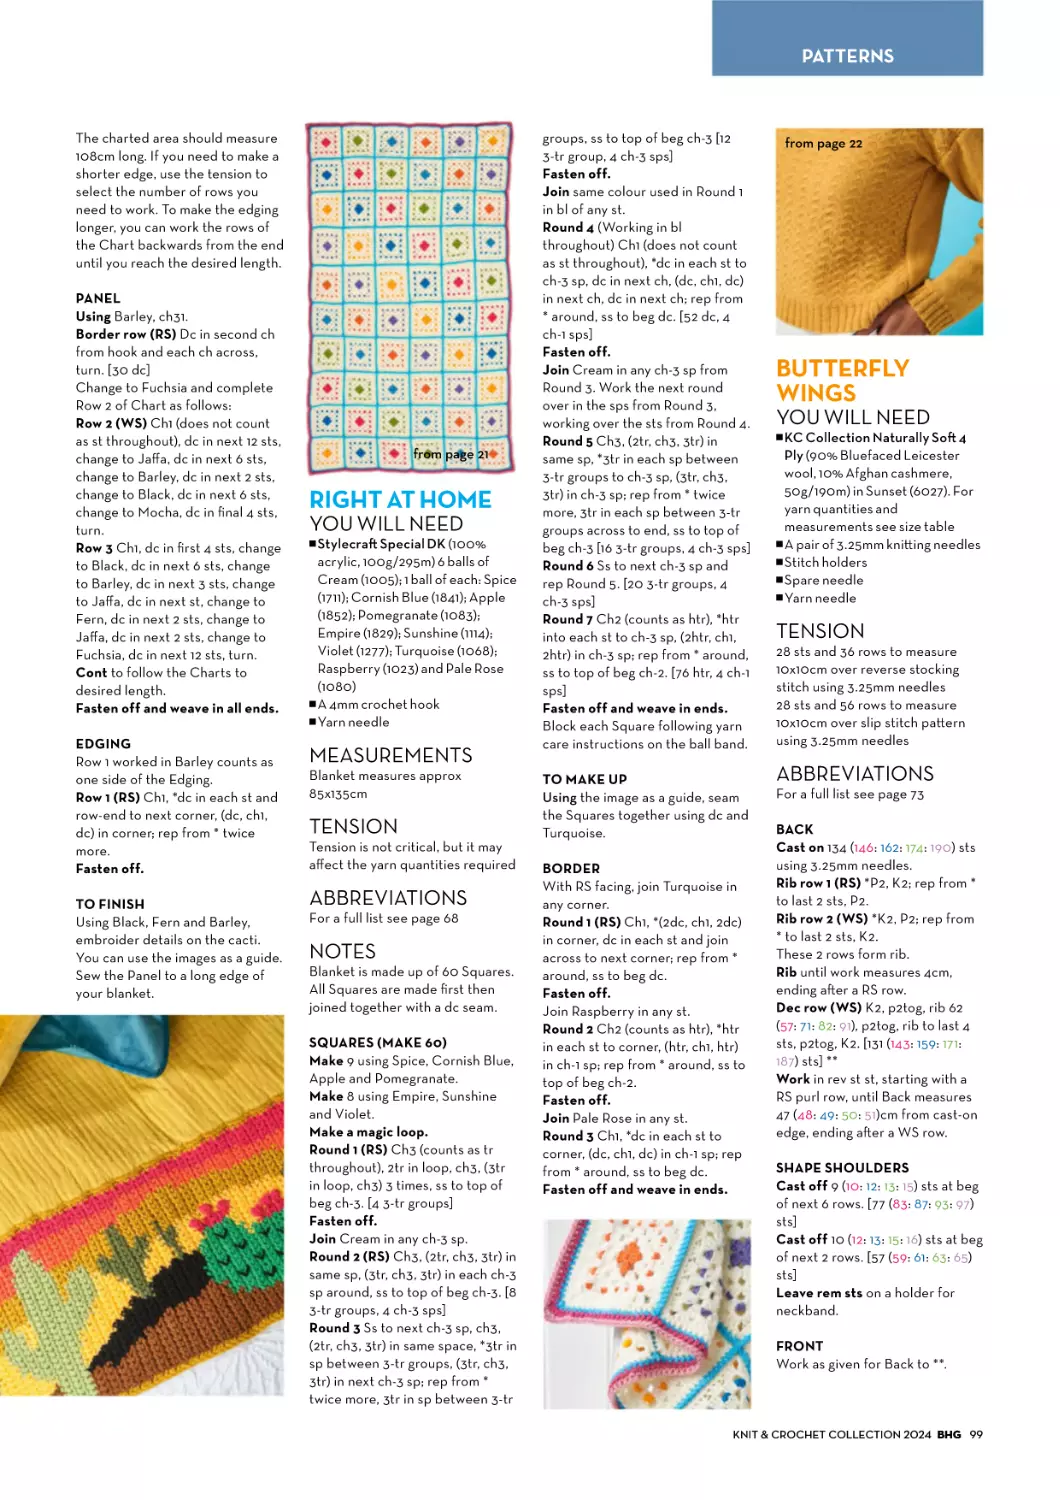
COLOUR
right at
home
WITH
!Y
Snuggle into this cosy
granny square throw
Pa"ern on page 99
O
!FREE!GIF
UR
T
Make
me!
KNIT!&!CROCHET!COLLECTION!"#"$ BHG "%
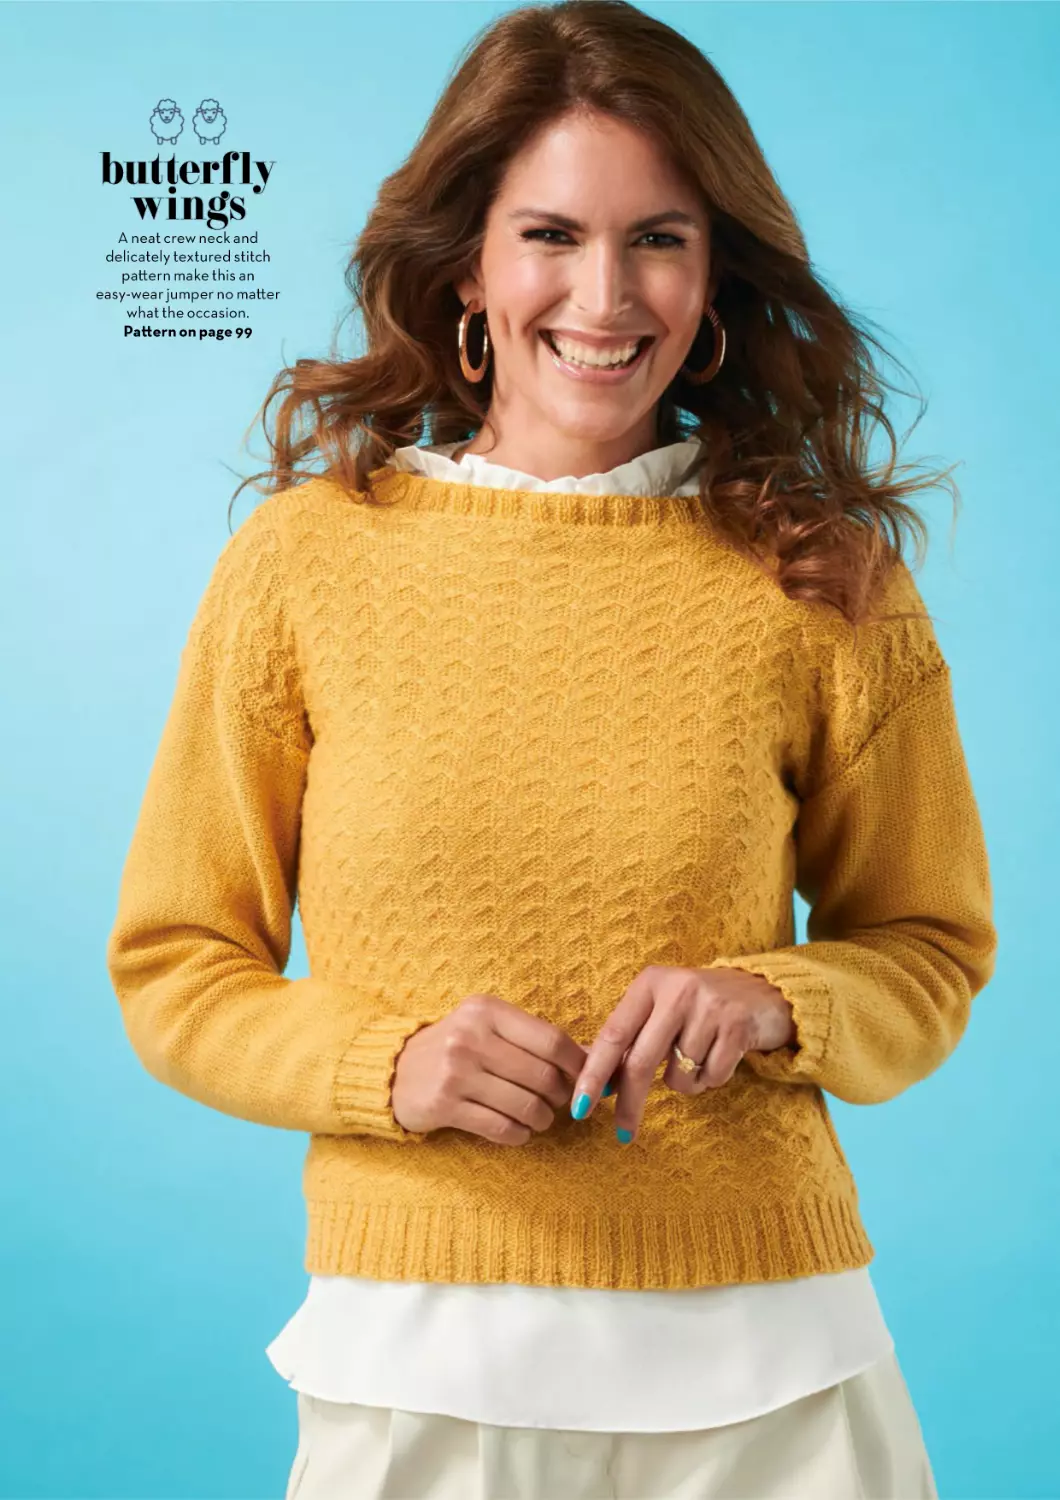
butterfly
wings
A neat crew neck and
delicately textured stitch
pa!ern make this an
easy-wear jumper no ma!er
what the occasion.
Pa!ern on page 99
COLOUR
granny to
the rescue
WITH
!Y
Jump-start an old woolly and join
in the granny square revival with
this design
Pa"ern on page 100
O
!FREE!GIF
UR
T
Make
me!
KNIT!&!CROCHET!COLLECTION!"#"$ BHG "%
COLOUR
stash
buster!
time for tea
No one likes a cold cuppa, but you
can ensure your beverage is always
the perfect temperature by casting
on this handy mug hug
Pa!ern on page 96
!" BHG KNIT#&#CROCHET#COLLECTION#!$!"
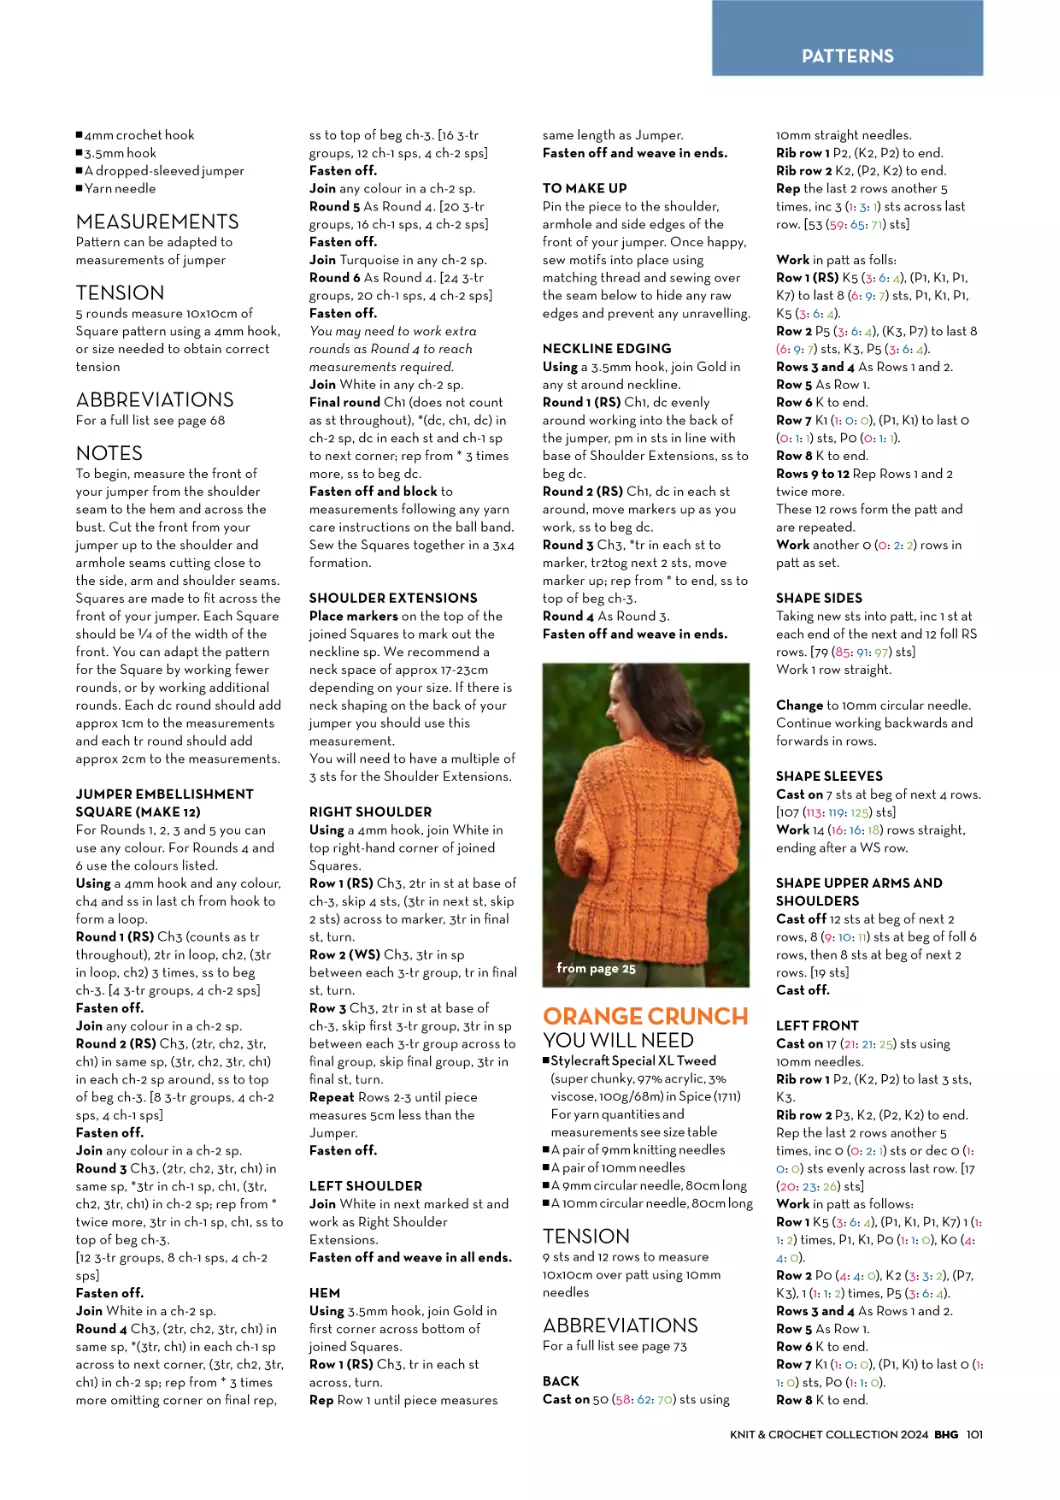
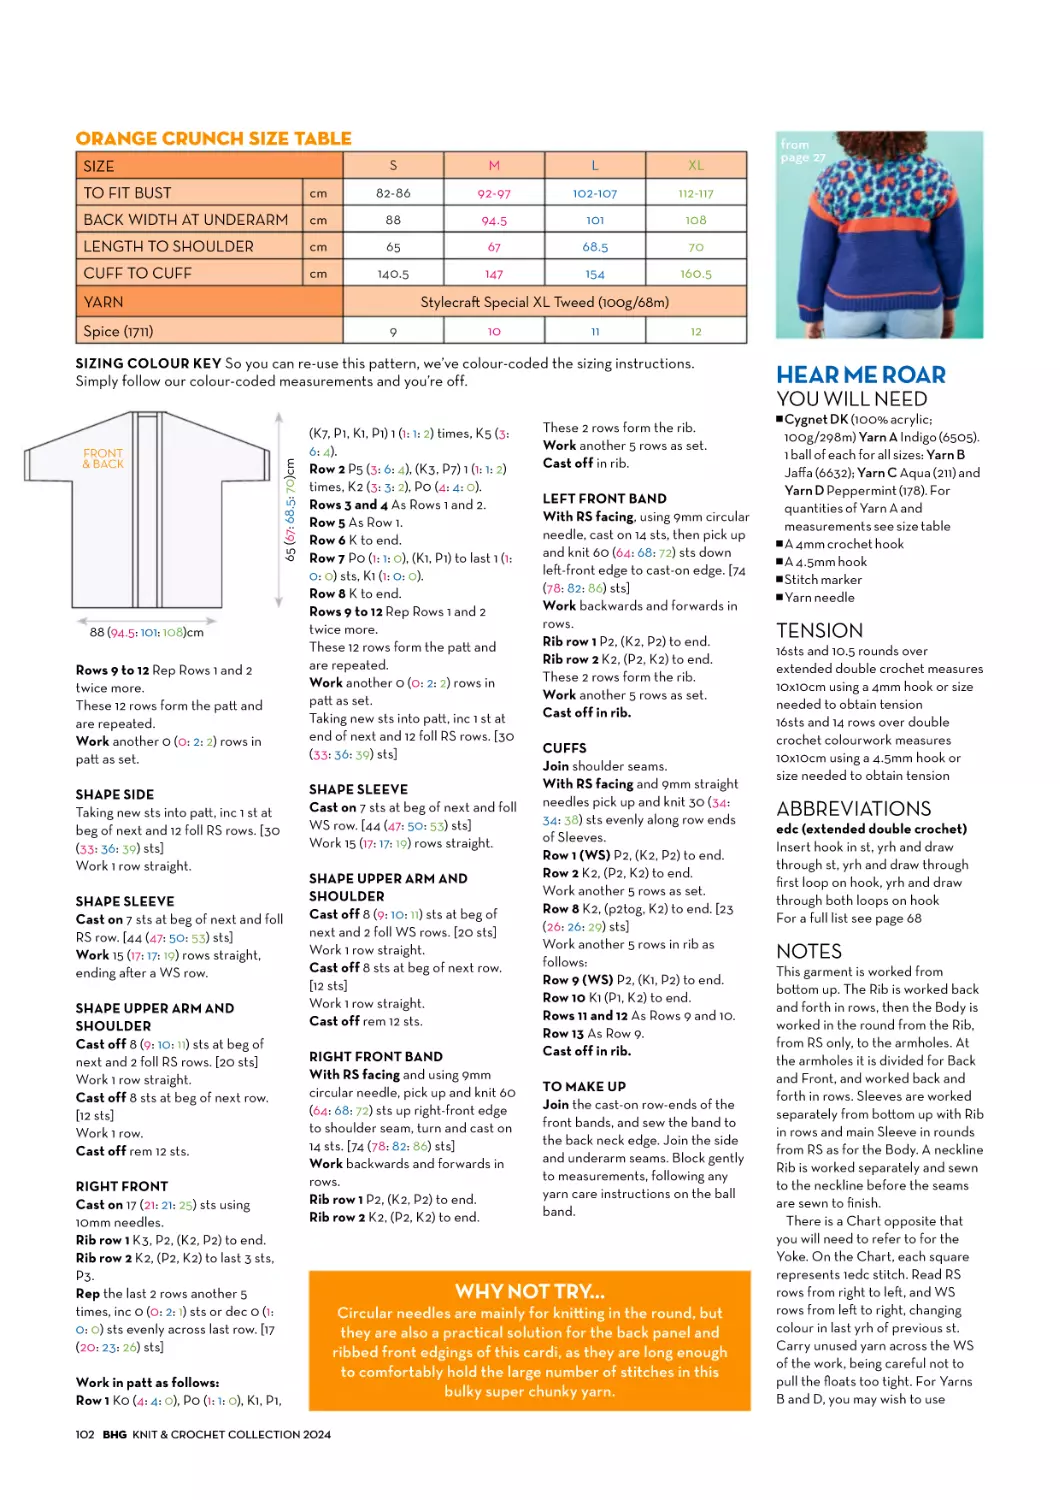
orange
crunch
This cosy batwing cardi has all
the feels of autumn in a
tweed-flecked super chunky
yarn that will knit up in no time!
Pa!ern on page 101
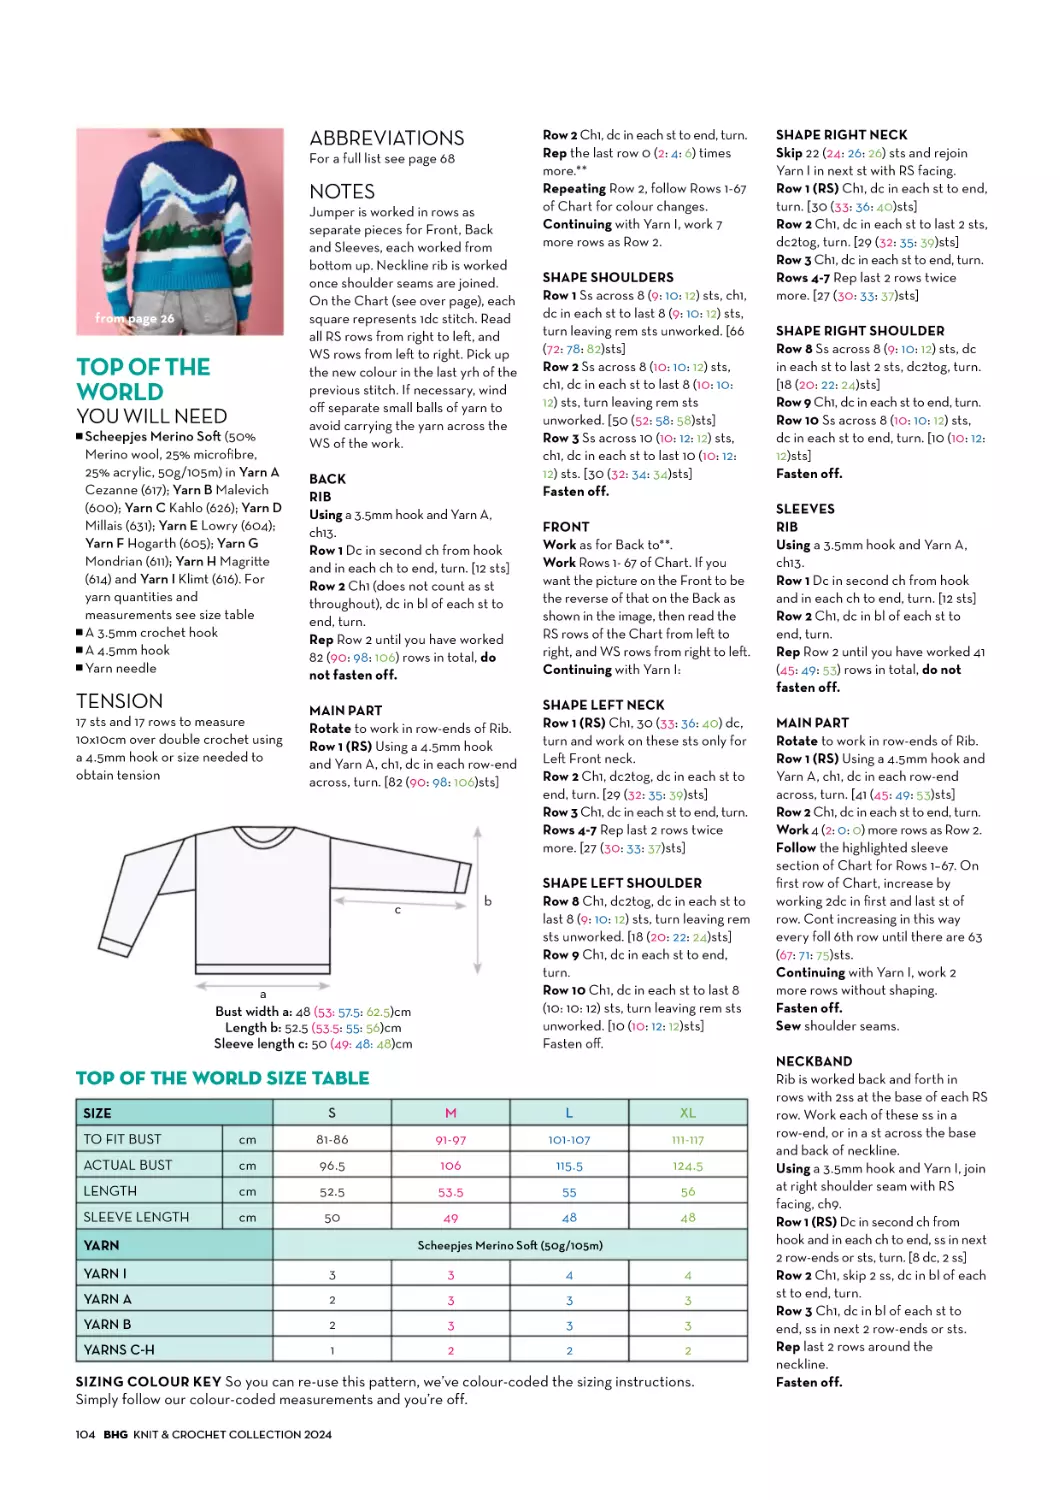
top of
the world
Crochet a stunning mountain
scene with this design. The view is
amazing from here!
Pa!ern on page 104
COLOUR
hear me roar
WITH
!Y
If you’re fierce and you know it, this
colourful leopard-print jumper will
speak to your wild side
Pa"ern on page 102
O
!FREE!GIF
UR
T
Make
me!
KNIT!&!CROCHET!COLLECTION!"#"$ BHG "%
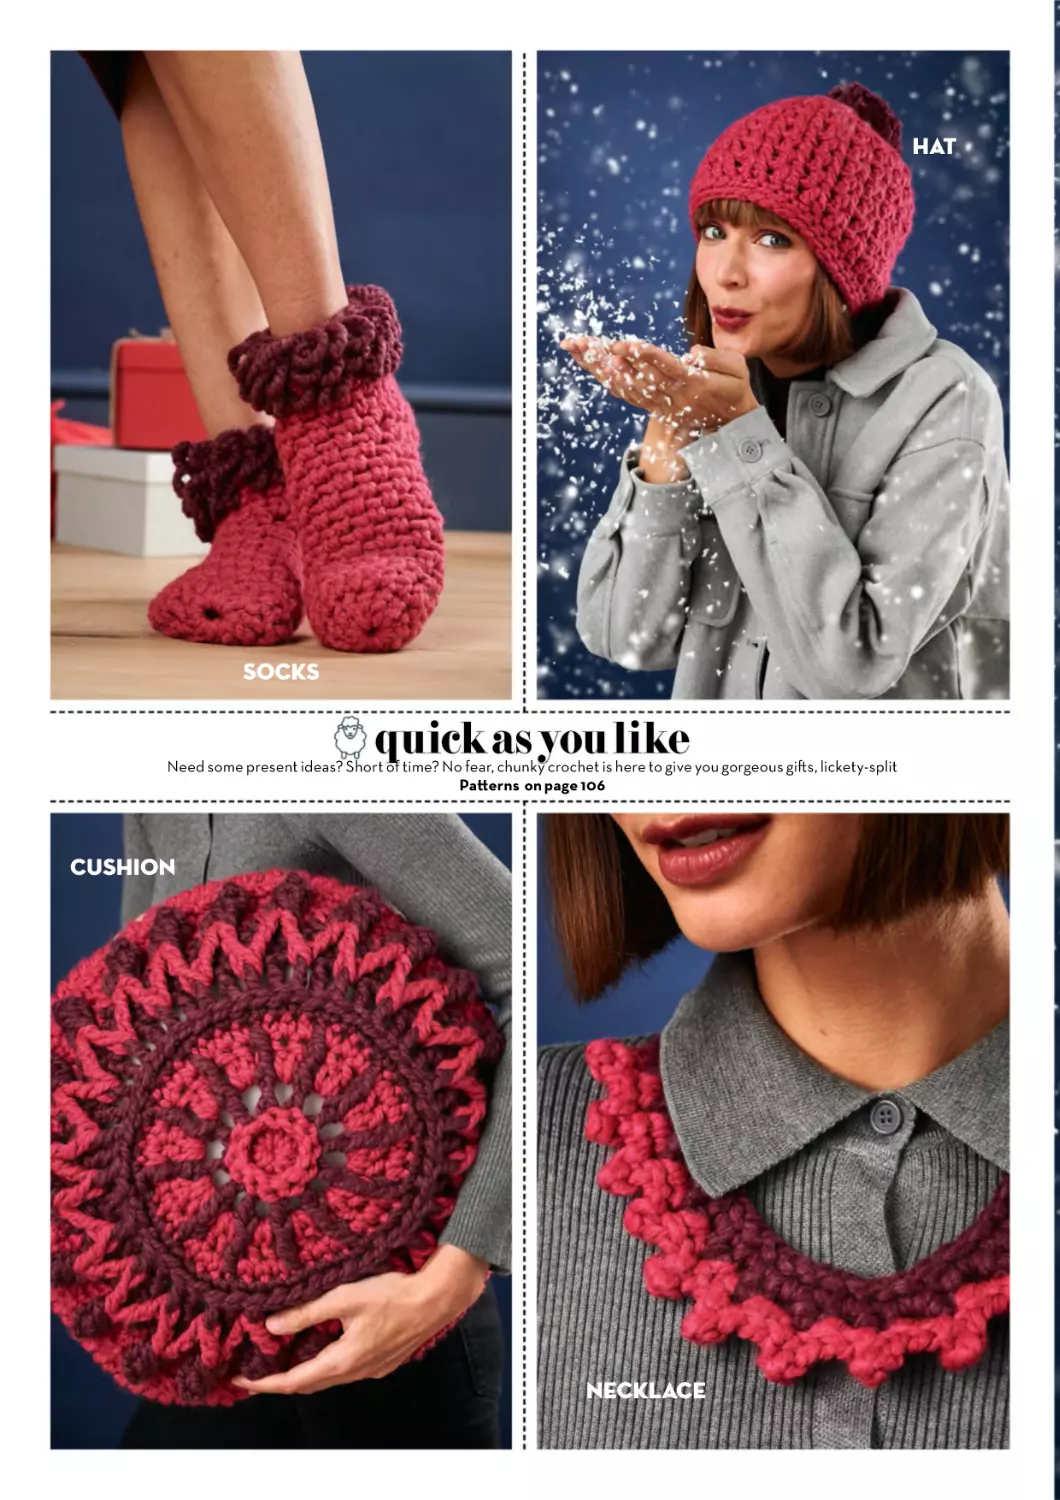
hat
socks
quick as you like
Need some present ideas? Short of time? No fear, chunky crochet is here to give you gorgeous gi!s, lickety-split
Pa!erns on page 106
cushion
necklace
COLOUR
scarf
KNIT!&!CROCHET!COLLECTION!"#"$ BHG "%
into the
blue
With cool cables and
textured Gansey panels, this
classic men’s slipover is one
of this season’s must-knits!
Pa!ern on page 108
!" BHG KNIT#&#CROCHET#COLLECTION#$"$%
CABLES
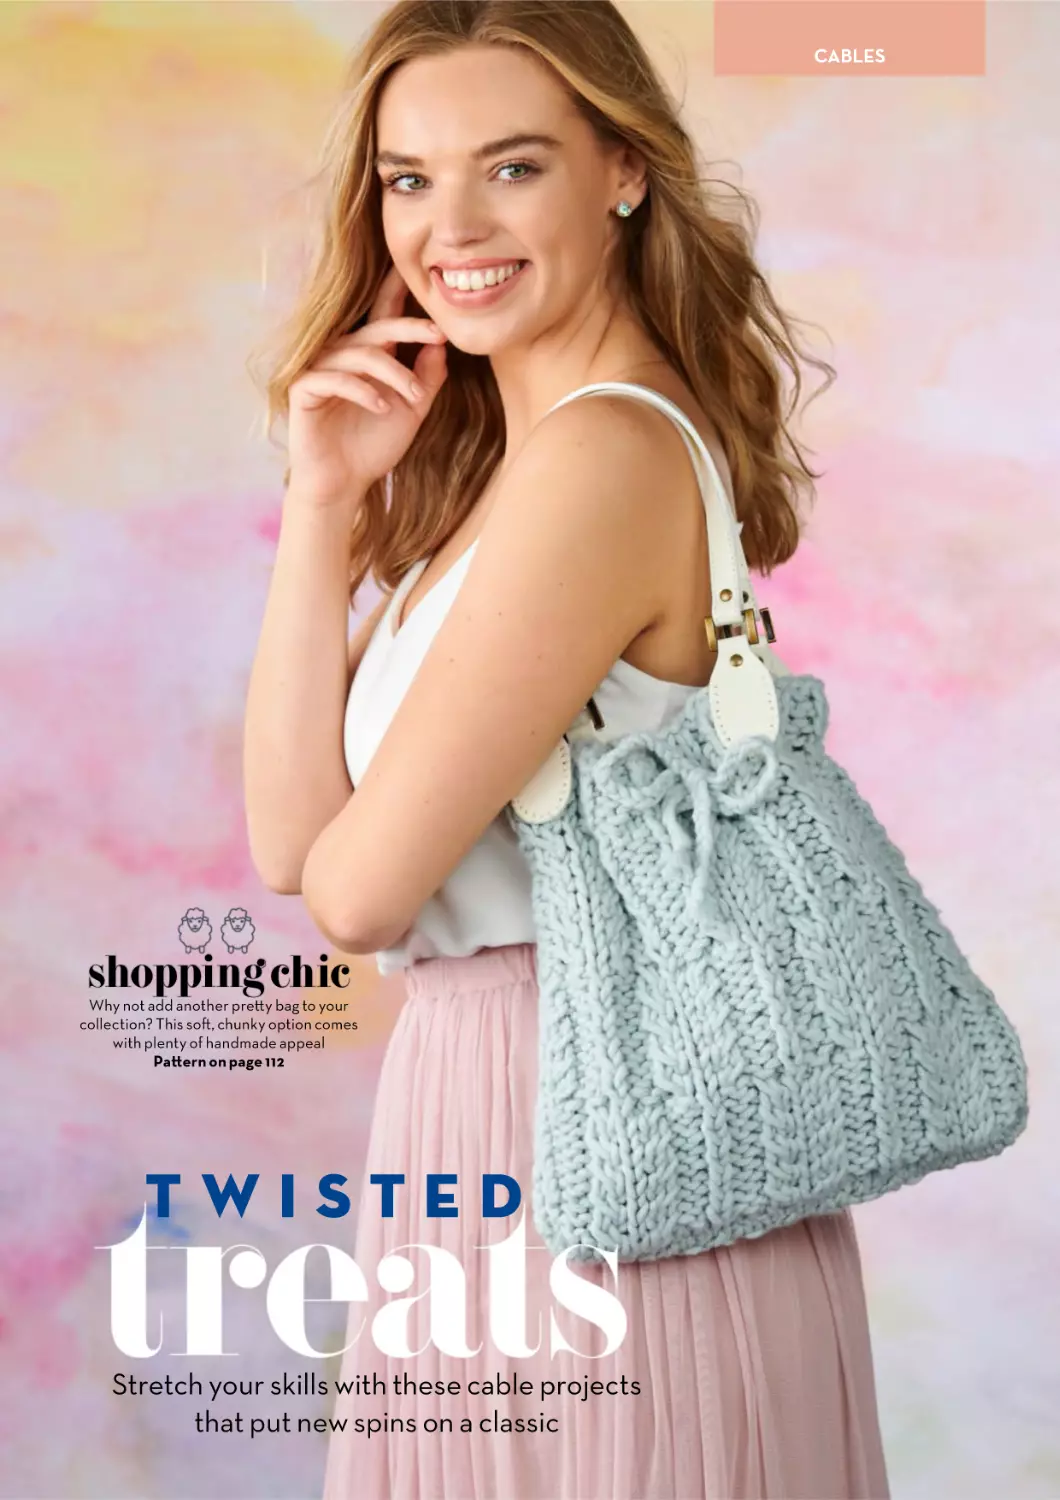
shopping chic
Why not add another pre!y bag to your
collection? This so", chunky option comes
with plenty of handmade appeal
Pa!ern on page 112
TWISTED
Stretch your skills with these cable projects
that put new spins on a classic
CABLES
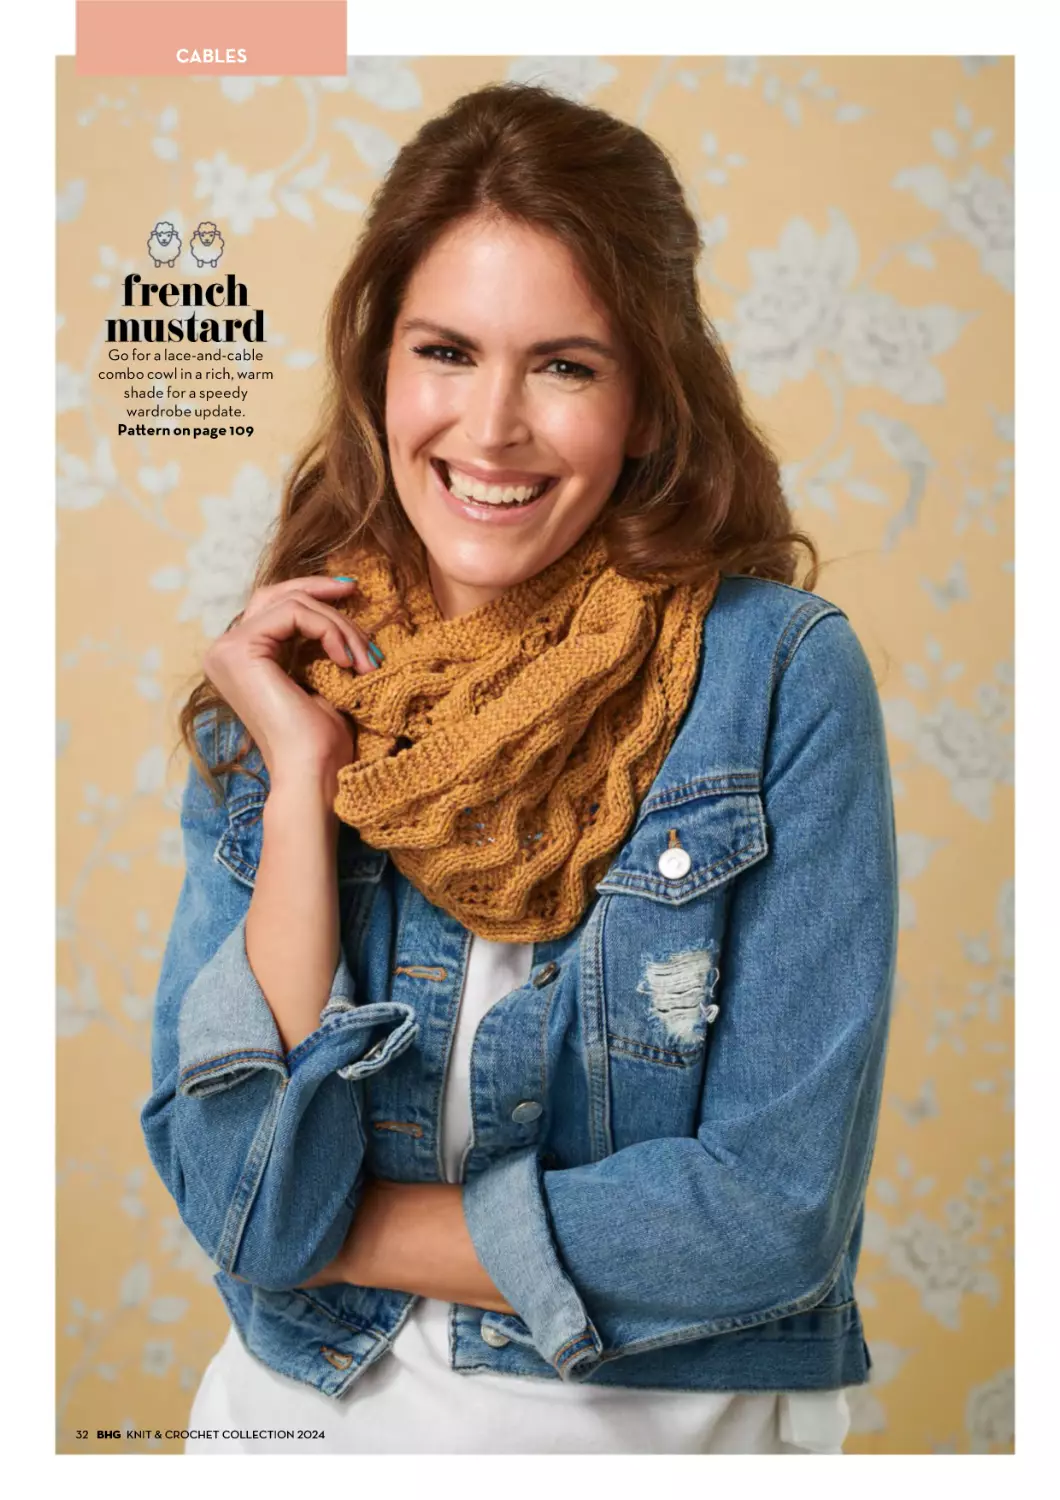
french
mustard
Go for a lace-and-cable
combo cowl in a rich, warm
shade for a speedy
wardrobe update.
Pa!ern on page 109
!" BHG KNIT#&#CROCHET#COLLECTION#"$"%
WITH
!Y
O
!FREE!GIF
UR
T
Make
me!
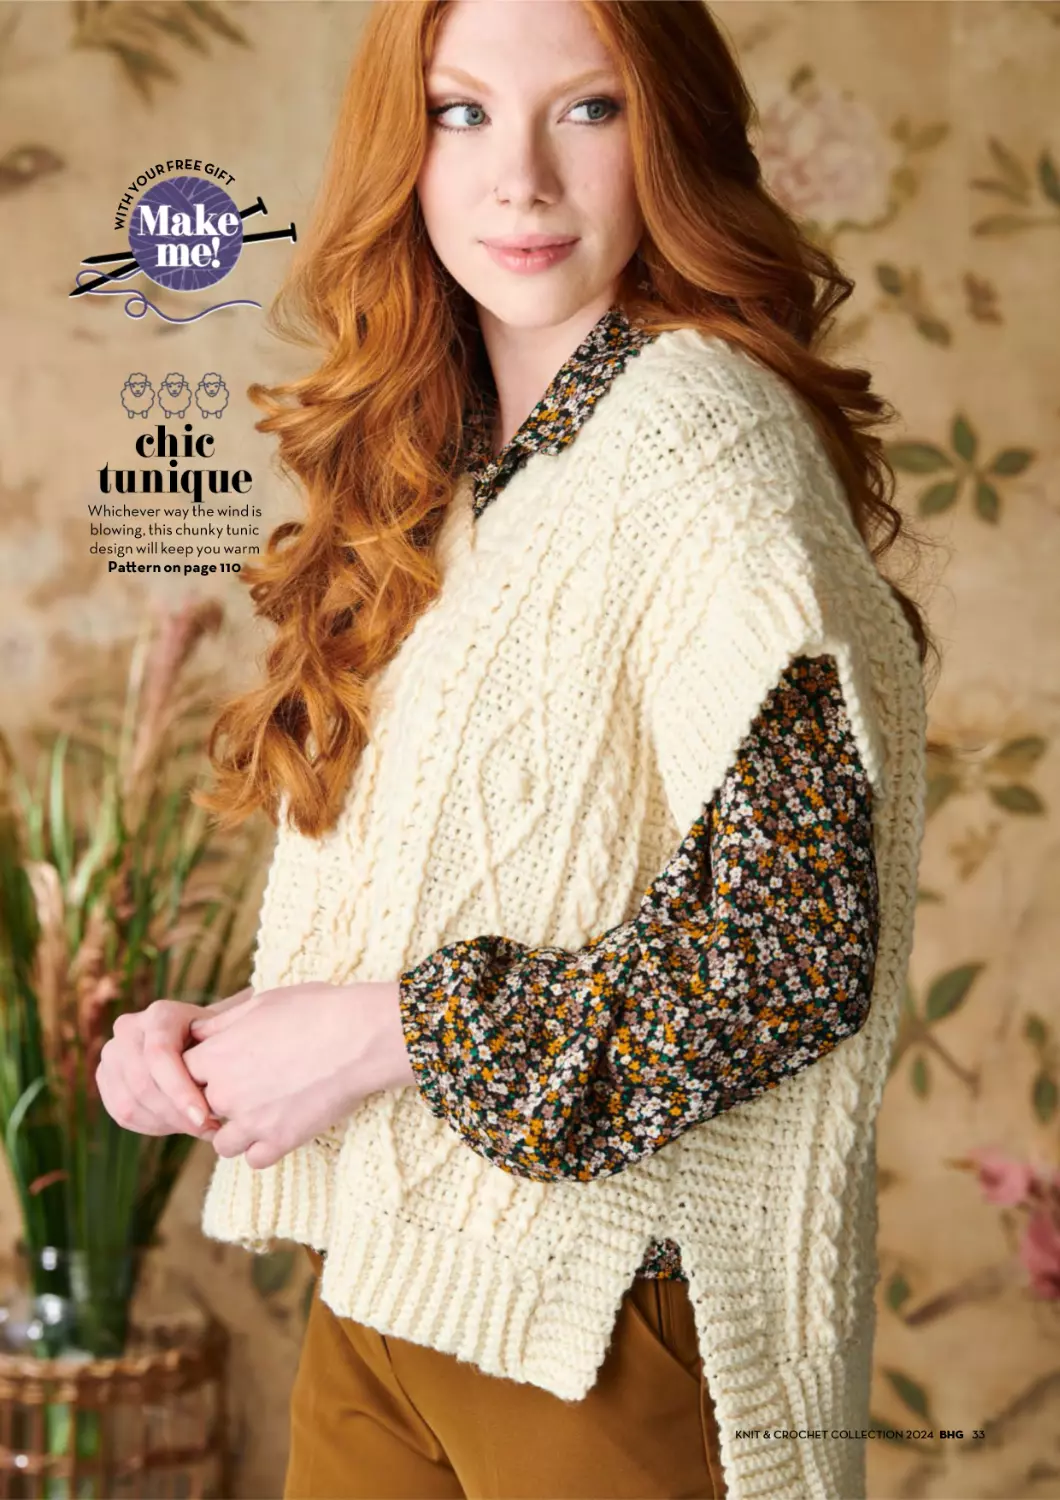
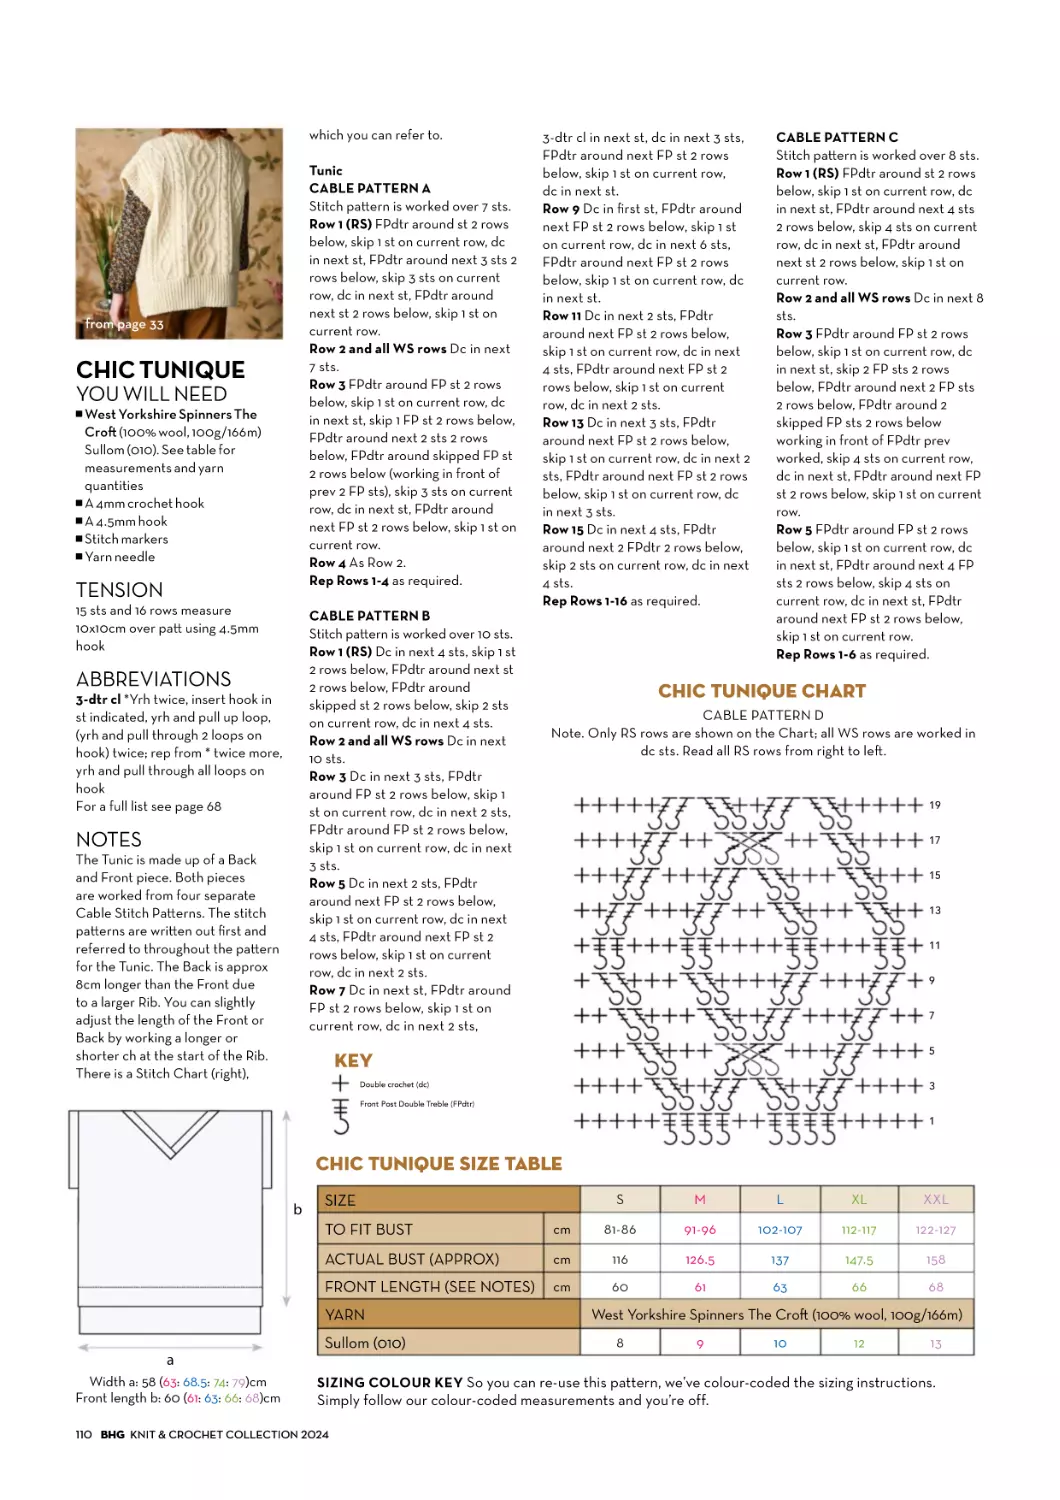
chic
tunique
Whichever way the wind is
blowing, this chunky tunic
design will keep you warm
Pa"ern on page 110
KNIT!&!CROCHET!COLLECTION!"#"$ BHG %%
storm
chaser
This go-with-everything
poncho is kni!ed in Rowan
Denim Revive DK, and
creates casual chic
effortlessly!
Pa!ern on page 118
Quiet, classic hues speak
volumes in these elegant makes
TONES
WITH
!Y
NEUTRALS
O
!FREE!GIF
UR
T
Make
me!
country
casual
A so! shawl collar,
decorative pockets and a
great textured stitch
make this classic
cardigan a joy to knit.
Pa"ern on page 119
KNIT!&!CROCHET!COLLECTION!"#"$ BHG %&
fit and
flare
A loose silhoue!e and
lace loveliness make
this gorgeous silk-mix
jumper exciting to knit
and a joy to wear
Pa!ern on page 113
!" BHG KNIT#&#CROCHET#COLLECTION#$%$&
NEUTRALS
soft
elegance
Celebrate cherry blossom
season everyday with this
stunning spring make
Pa!ern on page 122
KNIT!&!CROCHET!COLLECTION!"#"$ BHG %&
folksy
footwork
Add a touch of Polish folk
art to your decor with this
rug design
Pa!ern on page 115
stash
buster!
happy
hairdos
Have a rummage in your stash
for your favourite colours and
make a handful of these
easy-to-knit hair slides.
Pa!ern on page 114
frilly flourish
Plants are like friends, show them you
care by perking up their pots with our
simple lacy decorations.
Pa!ern on page 114
keep it
simple
Use what’s already in your stash
to whip up rustic hanging baskets
Pa!ern on page 116
NEUTRALS
love the
lace
WITH
!Y
Panels of pre!y floral
pa!erns decorate this sweet
jumper design
Pa"ern on page 116
O
!FREE!GIF
UR
T
Make
me!
KNIT!&!CROCHET!COLLECTION!"#"$ BHG %&
The kids are alright
in these fun and
fearless makes
they’ll love
peekaboo
Cast on a timeless classic that
will be handed down from
generation to generation
with this exquisite lace insert
baby dress
Pa!ern on page 120
!" BHG KNIT#&#CROCHET#COLLECTION#$"$!
LIVES
WITH
!Y
KIDS
O
!FREE!GIF
UR
T
Make
me!
building
blocks
Featuring raglan sleeves and
a crew neck for a classic fit,
this design in four sizes is a
wardrobe staple for boys
and girls alike
Pa"ern on page 122
KNIT!&!CROCHET!COLLECTION!"#"$ BHG $%
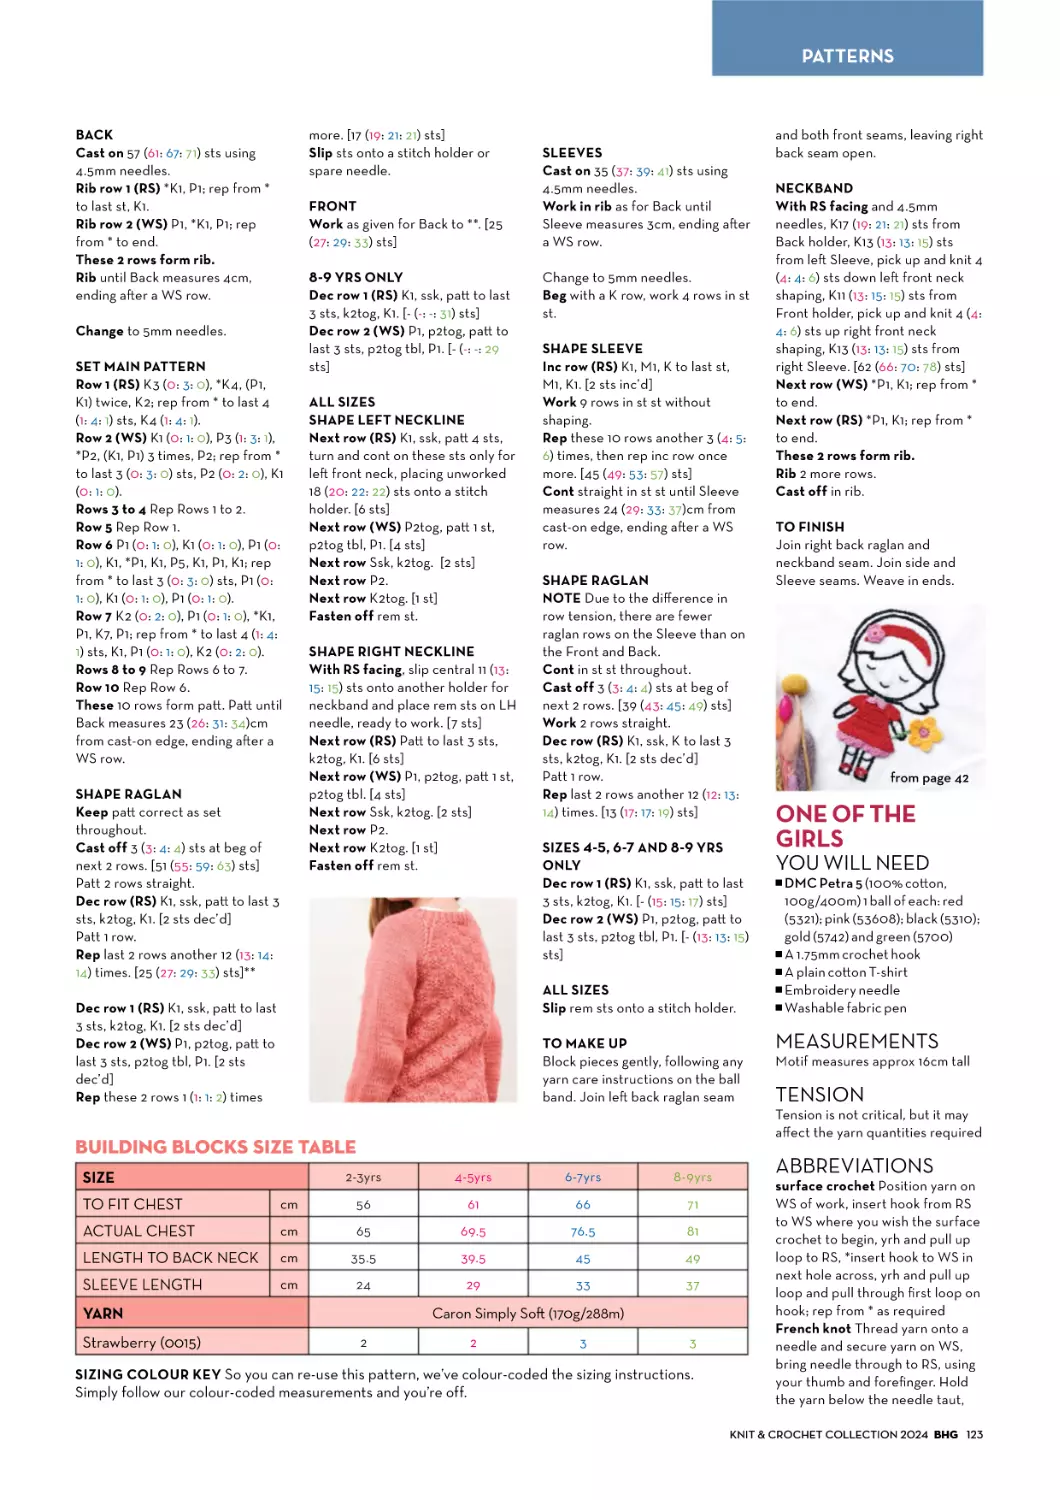
KIDS
one of
the girls
You’ll always have a friend close
at hand (and heart) with this
sweet embellishment
Pa!ern on page 123
!" BHG KNIT#&#CROCHET#COLLECTION#"$"!
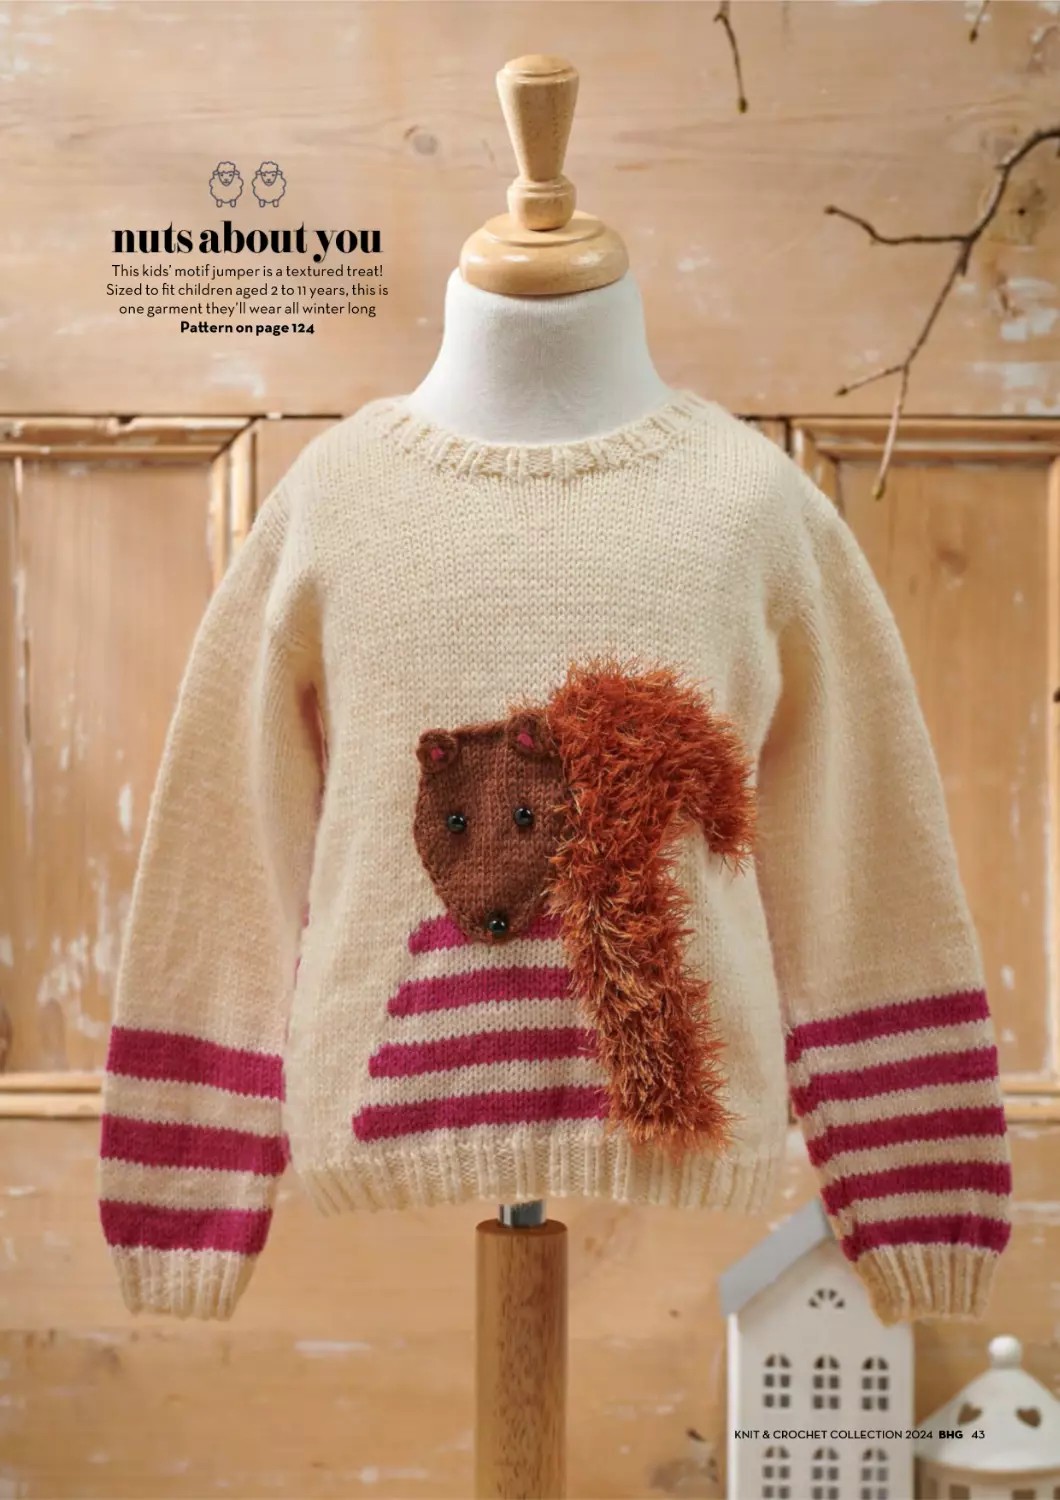
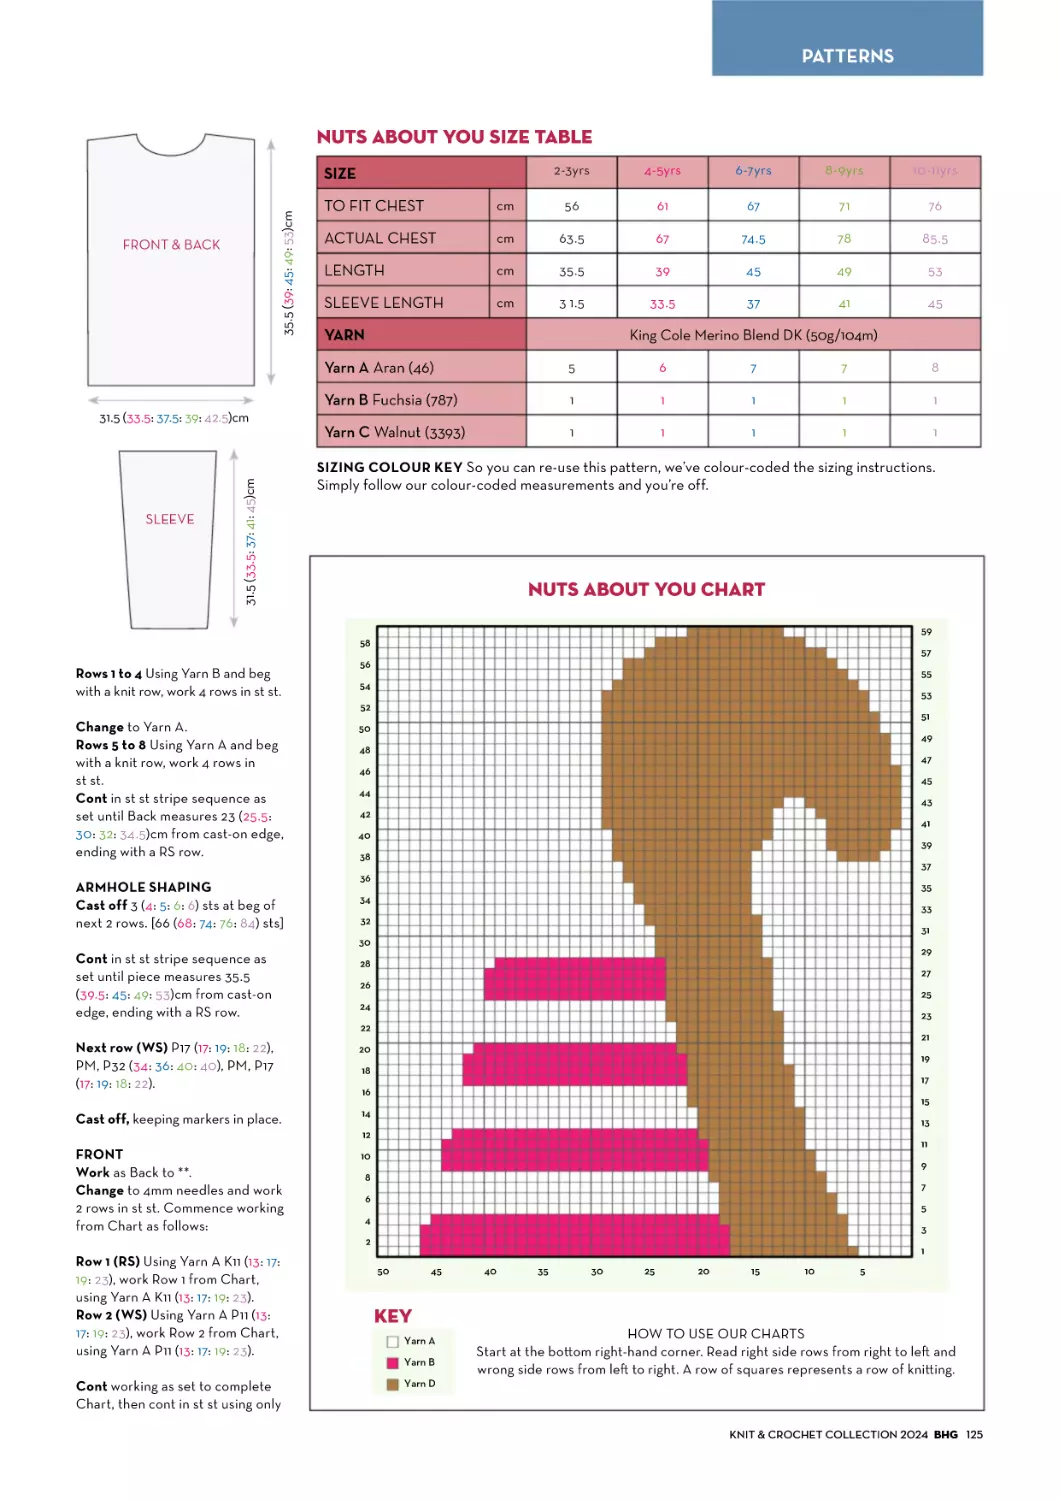
nuts about you
This kids’ motif jumper is a textured treat!
Sized to fit children aged 2 to 11 years, this is
one garment they’ll wear all winter long
Pa!ern on page 124
KNIT!&!CROCHET!COLLECTION!"#"$ BHG $%
wheely great!
We all know a toddler who can’t wait to get
behind the steering wheel – they’ll be begging
you to cast on this adorable car jumper
Pa!ern on page 126
!! BHG KNIT"&"CROCHET"COLLECTION"#$#!
KIDS
cuddle up,
buttercup
The colours of the year glow
brightly in this gorgeous design
Pa!ern on page 128
KNIT!&!CROCHET!COLLECTION!"#"$ BHG $%
TREASURES
!
Cra
nion for the li"le in
a
p
m
you
a co
r
life
TOYS
sweet
squeak
Julius the mouse needs
comforting, can you give
him a hug?
Pa!ern on page 129
KNIT!&!CROCHET!COLLECTION!"#"$ BHG $%
WITH
!Y
O
!FREE!GIF
UR
T
Make
me!
clowning
around
Fun and laughter are in
store with this
traditional design
Pa"ern on page131
king of
the crib
This mane
a!raction will be
greeted by roars
of delight from
excited cubs.
Pa"ern on
page 130
cloud pleaser
It’ll be all sunny days and
blue skies with this
rainbow bunting
Pa"ern on page 132
Water
springs
from
wherever
i land!
!" BHG KNIT#&#CROCHET#COLLECTION#$%$!
TOYS
!I THINK THAT IF YOU HAVE
A HORSE, PEGASUS, QILIN, OR
UNICORN, YOU SHOULD SIT
ON IT! YOU SHOULD STROKE
ITS HAIR, WHISPER IN ITS EAR,
BE ONE WITH IT!!
C. JoyBell C.
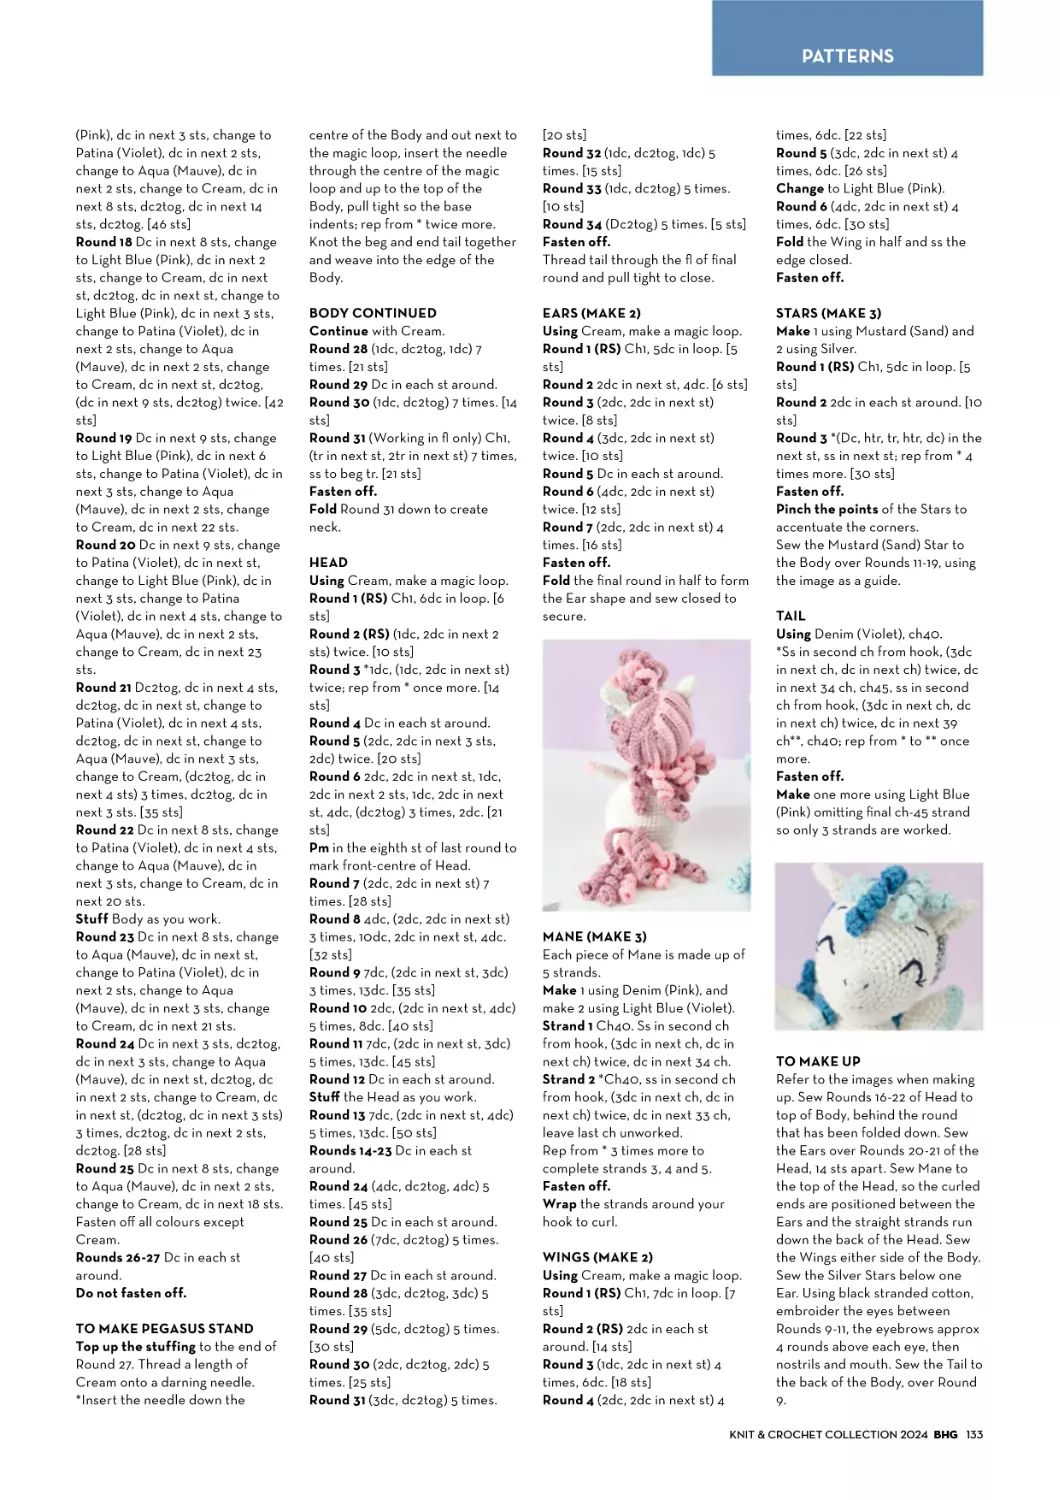
mythical mates
Take a magical flight with these
amigurumi Pegasus pals
Pa!ern on page 132
KNIT!&!CROCHET!COLLECTION!"#"$ BHG $%
life’s a
beach
WITH
!Y
Pack your bags for a
seaside holiday – and
decorate them with
summer-themed motifs
Pa"ern on page 134
O
!FREE!GIF
UR
T
Make
me!
SUMMER
shine
bright
No ma!er the weather,
every day will be a sunny
day with this smiley key
ring in your pocket
Pa!ern on page 134
stash
buster!
DAYS
Summon warmer weather with these
easy, breezy summer projects
KNIT!&!CROCHET!COLLECTION!"#"$ BHG %&
SUMMER
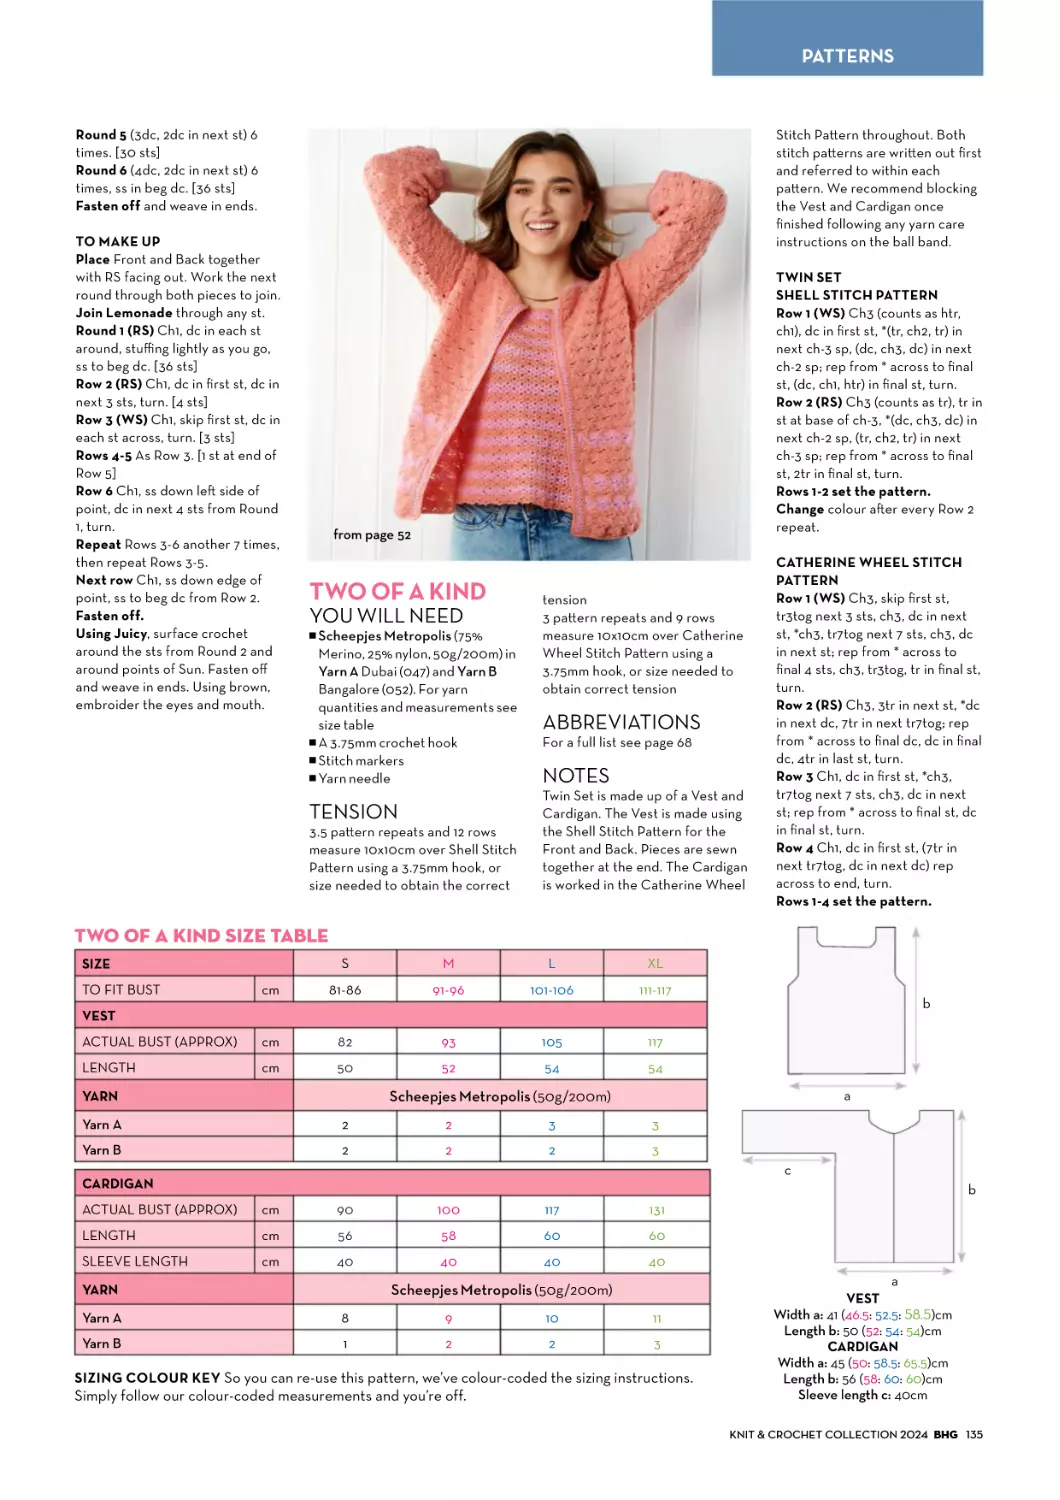
two of
a kind
You’ll look perfectly put
together in this coordinated
cardi and top
Pa!ern on page 135
KNIT!&!CROCHET!COLLECTION!"#"$ BHG %&
W I TH
!Y
O
!FREE!GIF
UR
T
W I TH
!Y
Make
me!
O
!FREE!GIF
UR
T
Make
me!
cardi
calling
Love cardigans? Try out
this summer version for
cool layers
Pa"ern on page 141
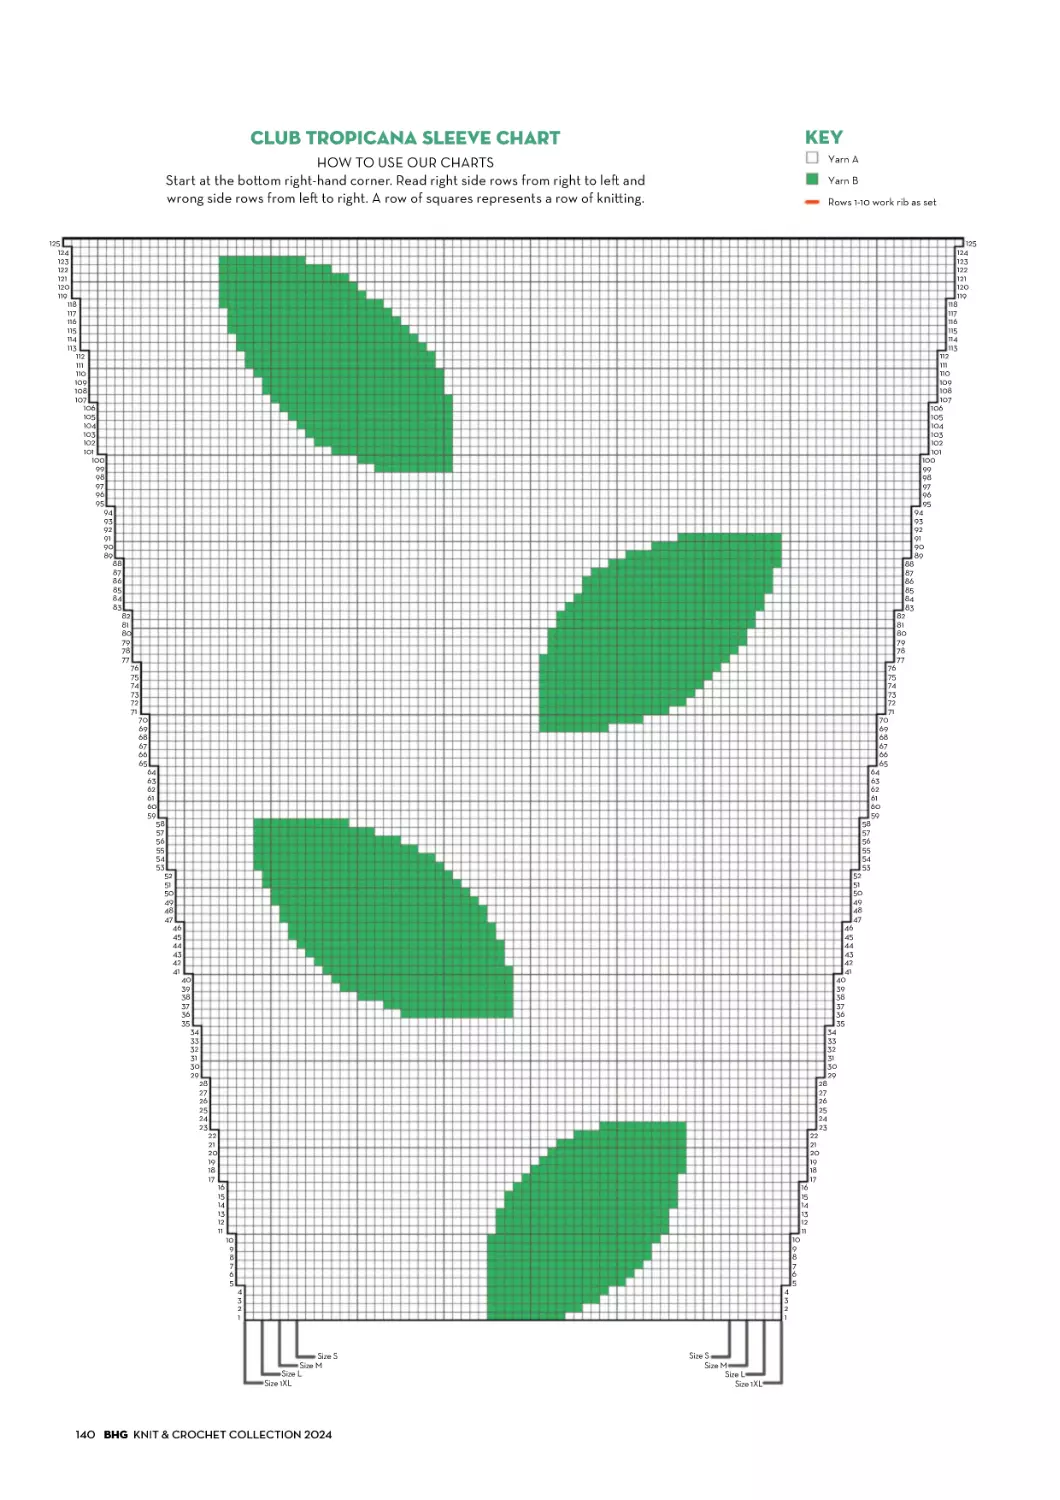
club
tropicana
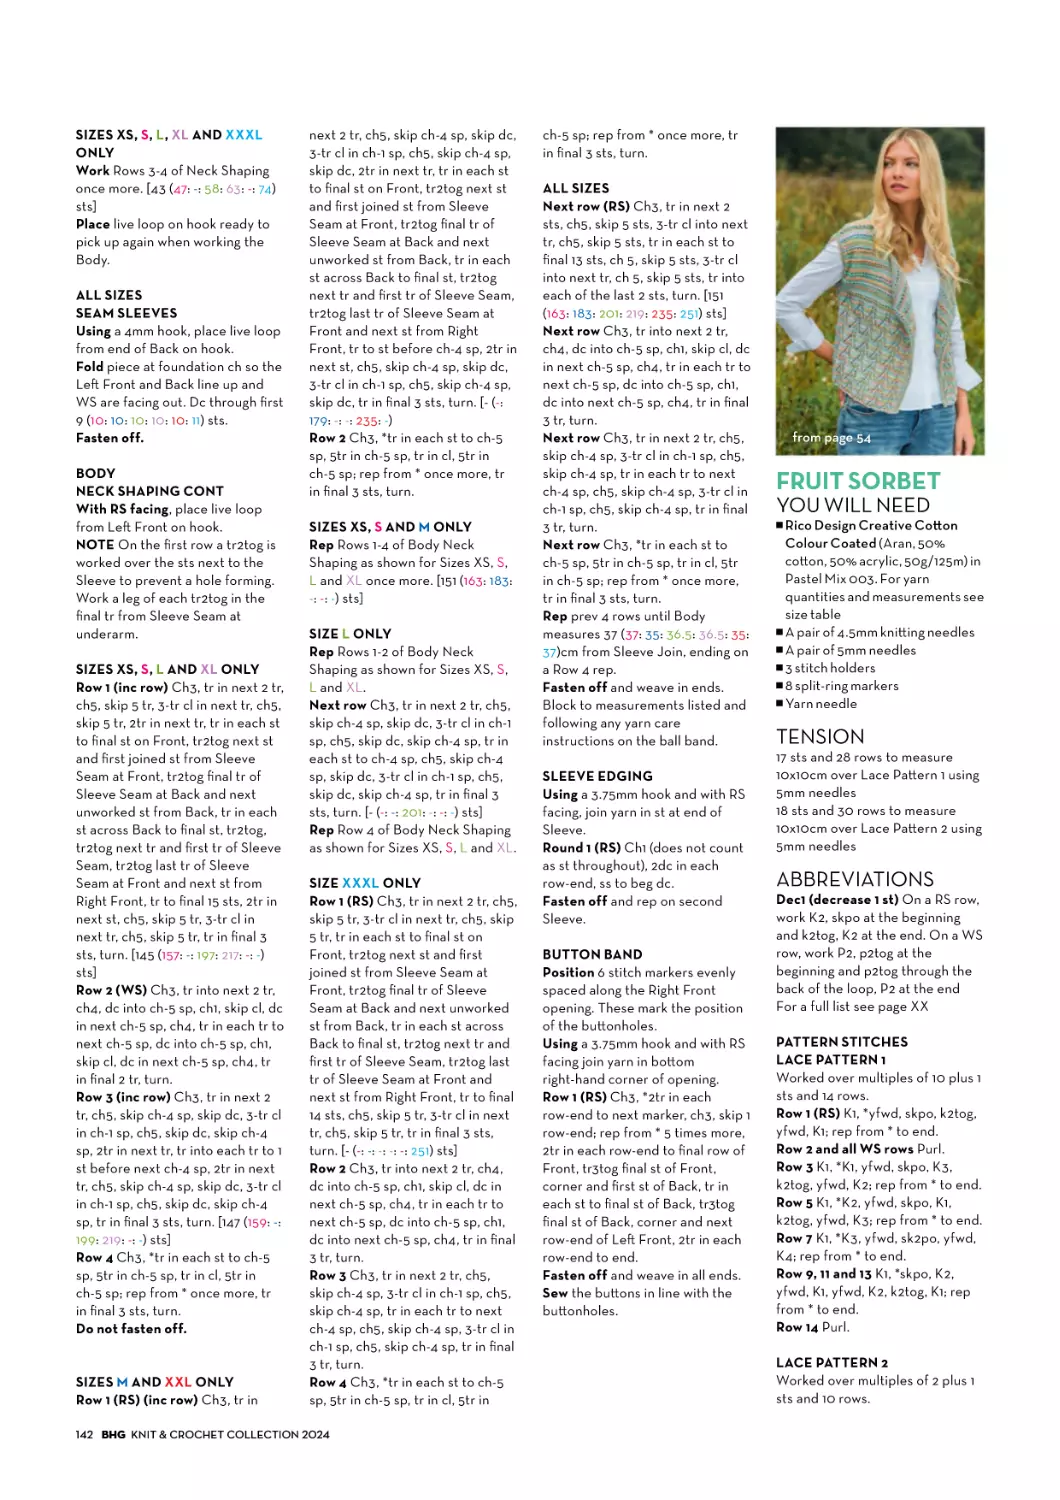
fruit sorbet
Refresh your summer garments
with a new-season signature
piece boasting a pre!y lace
pa!ern and drape front to
keep you cool.
Pa"ern on page 142
Huge tropical
leaves cover this
biological
beauty, kni!ed in
gorgeous
nep-filled yarn.
Make it your
multi-season
must-knit!
Pa"ern on
page 137
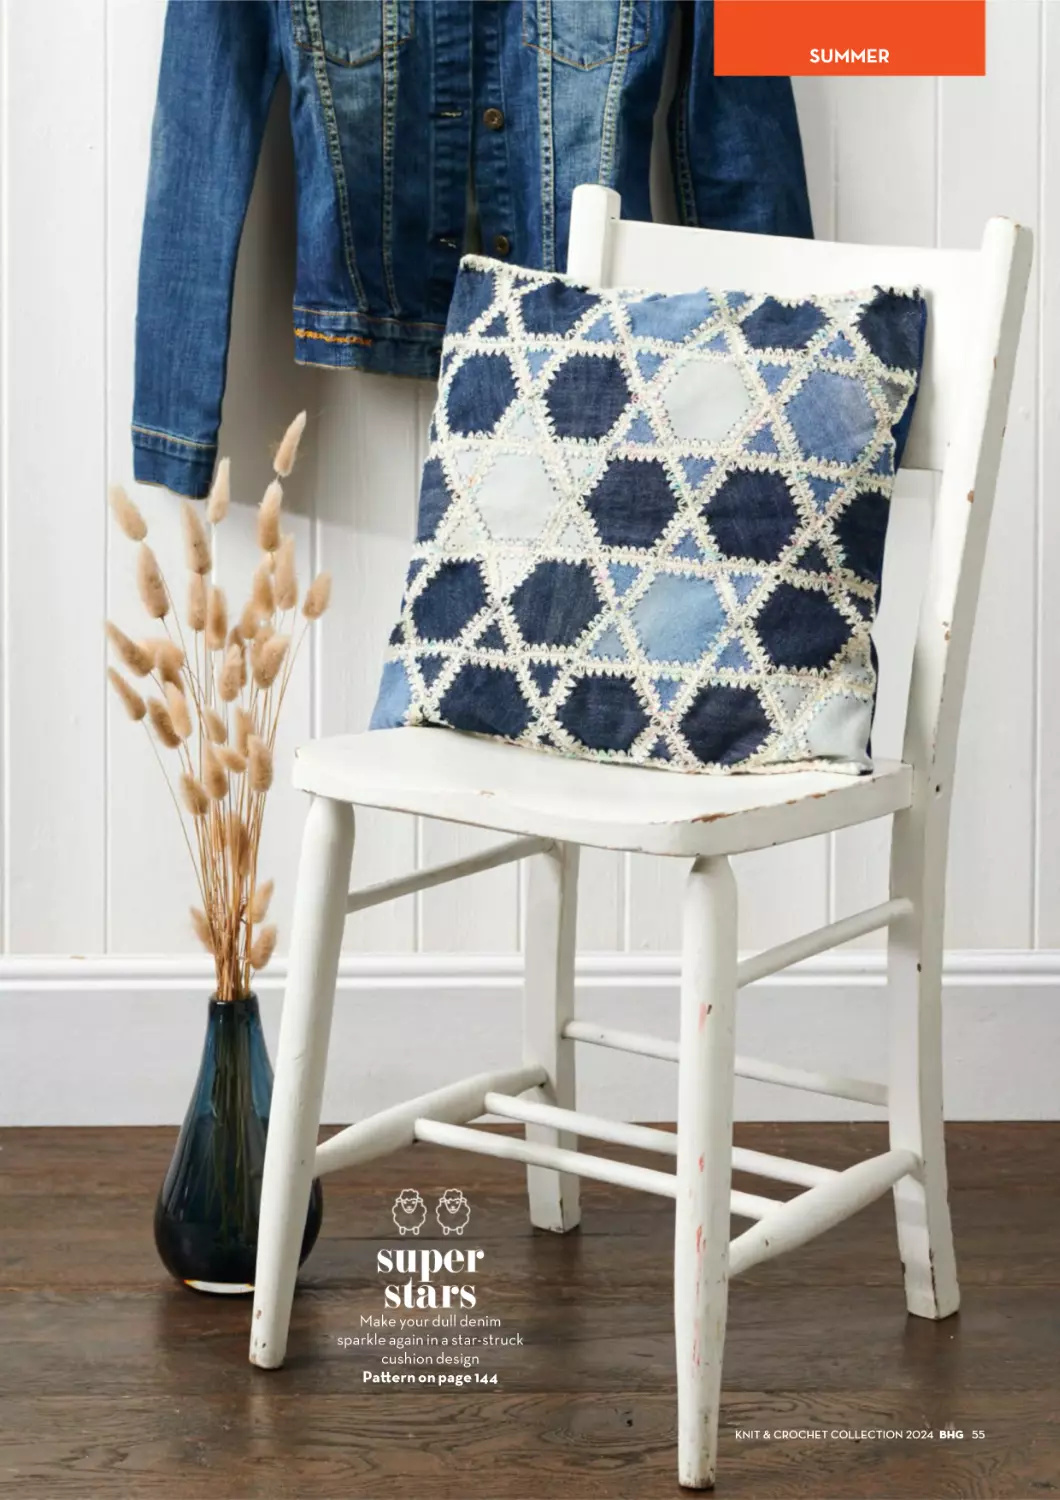
SUMMER
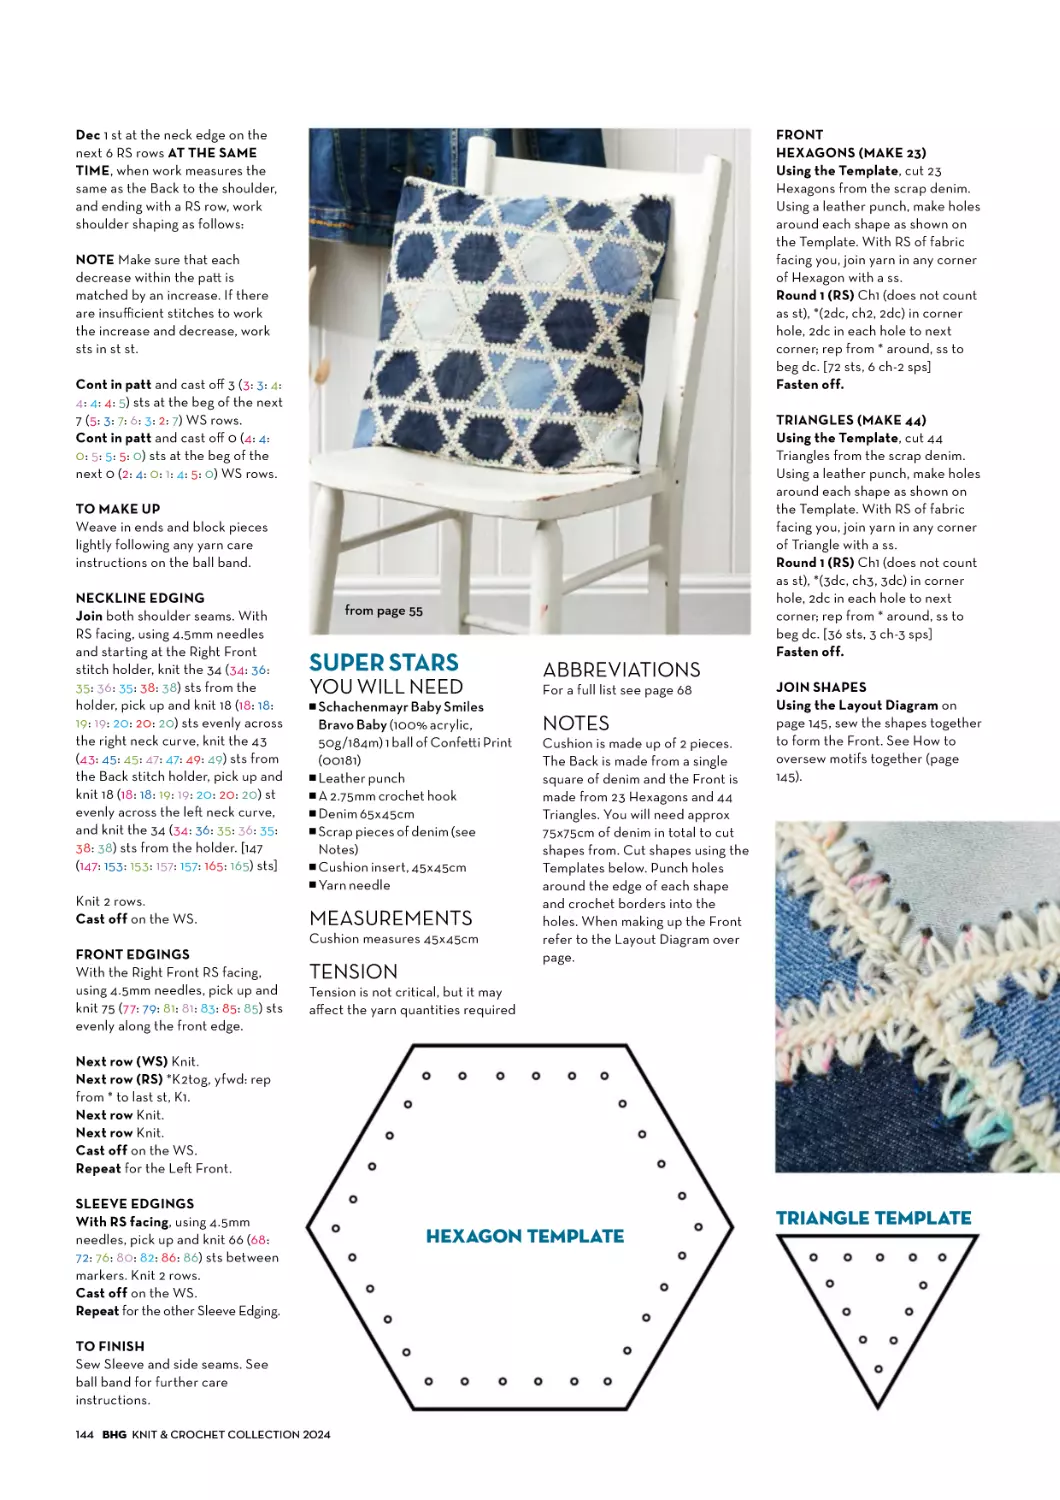
super
stars
Make your dull denim
sparkle again in a star-struck
cushion design
Pa!ern on page 144
KNIT!&!CROCHET!COLLECTION!"#"$ BHG %%
Know your
YOU#WILL#NEED
YARN WEIGHTS
Choose the right yarn for your project
!"#$#&#%PLY#Essentially one strand, or two or three strands
of yarn twisted together, these are great for kni!ing fi!ed
garments such as socks, gloves or lace. Most o"en, 2ply is
kni!ed on 1.5-3.5mm needles or crochet hook, and it’s best
used for delicate lace kni!ing and baby garments.
&PLY#This is a favourite weight for baby clothes, socks, and
lightweight jumpers and cardigans. The best needles to use
with 4ply yarn range between 3mm and 4mm, although
socks are kni!ed with smaller needles to create a denser
fabric that’s more hard-wearing. To crochet 4ply use a
hook between 3.5 and 4.5mm.
'PLY#OR#DOUBLE#KNITTING#(DK)#So called because it’s
usually double the weight of 4ply, DK is the most widely
used yarn and is versatile enough for many garments. It’s
also quick to knit with. Most pa!erns and yarns suggest you
use a hook or needles between 3.5 and 4.5mm.
ARAN Originally created for fishermen’s jumpers,
Aran-weight wool can be used to make up accessories
and many different garments when DK isn’t heavy enough,
and chunky is too bulky. It’s perfect for outdoor or warm
clothing. Best results are gained using 4-5.5mm needles
and a hook between 5.5 and 6.5mm.
CHUNKY Heavier than Aran, chunky wool is traditionally
associated with outdoor wear and winter jumpers. It’s
kni!ed on 5.5-7mm needles and is ideal for beginners
because the kni!ing will grow quickly. It’s also great for
oversized garments. Crochet chunky yarn with a
6.5-9mm hook.
SUPER#CHUNKY#This weight of yarn is proving increasingly
popular for making winter coats and jumpers. It’s also good
for beginners because it produces quick results. We’d
recommend using needles that are at least 7mm thick, up to
12mm thick and a hook 6.5-9mm thick.
BIG#Quick and easy to knit with, big yarns are perfect
for winter and making bold statements. You’ll need large
needles or a hook for this yarn – from 13mm up to 20mm
thick. It’s perfect for bold scarves and coats, as well as cosy
cushions and throws.
YARN LABELS
How to read the ball band on your yarn
A ball band is the piece of paper wrapped around the yarn,
where the manufacturers put all the information about the
yarn. Have a look at the annotations below to see what it all
means. It’s a good idea to keep your ball bands to refer back
to when you wash a garment, or in case you decide to knit
the same pattern again.
MANUFACTURER’S#
ADDRESS
Contact details
for the yarn
manufacturer.
TENSION#
RECOMMENDED#
NEEDLE#SIZE#
Make your tension
square with this
size, but if it
doesn’t
match, try
larger or
smaller needles.
YARN#
CONTENT#
The fibres
that make up
the yarn. This
will affect the
look and feel
of the fabric
and the care
instructions.
WEIGHT#AND#
QUANTITY#
If your yarn length
is shown in metres,
multiply the number
by 1.09 to convert it
to yards (if needed).
These numbers tell you
how many stitches
and rows you should
be kni#ing in a
10 x 10cm square.
MANUFACTURER#
AND#YARN#NAME#
The front of the
ball band usually
has this key
information.
COLOUR#NAME
OR#NUMBER#
AND#DYELOT#
NUMBER#
Colours are usually
numbered. Check
all your yarn is from
the same dyelot for
consistent colour.
CARE#
INSTRUCTIONS#
In standard symbols
and words. Ignore
these at your peril!
Give your yarn
the best care to
keep it looking
like new.
KNIT$&$CROCHET$COLLECTION$%&%' BHG ()
TYPES!OF!HOOK
CHOOSE!THE!RIGHT!HOOK!FOR!YOUR!PROJECT
WOOD!&!
BAMBOO
Smooth, gorgeous
to handle and great
to look at, bamboo
and wood are good
materials to use with
slippery yarns such
as silks and fine
wools, because
they grip the
yarn better than
metal hooks. If you
have arthritis
or similar, try using
wooden hooks.
METAL
Made from one of the most
common and useful materials,
metal hooks are perfect for
‘stickier’ yarns such as acrylic,
because they’re smooth and the
yarn slides along easily. The more
polished a hook is, the faster you
can work. Very fine crochet
hooks are usually metal and can
bend easily, so take good care
of them!
MIXTURE
Some hooks combine different materials
to get the best of both. Most popular are
hooks with metal tips and wooden or plastic
handles, which can manoeuvre the yarn
easily and feel good in your hand. Some
hooks even have moulded ergonomic grips to
place the least possible strain on your hands.
PLASTIC!
Light and strong,
plastic is great
for getting new
or young crafters
to learn crochet.
Plastic hooks are an
inexpensive way to
build up your hook
stash, especially
since plastic is often
used for larger hooks.
Acrylic hooks are
similar to plastic, but
they can be a little
heavier. Both are
comfortable to use.
TUNISIAN
Also known as Afghan hooks,
these straight tools have
a hook at one end or both
ends and are especially
designed for use in Tunisian
crochet patterns.
YOU!WILL!NEED
TYPES!OF!NEEDLES
FIND$THE$RIGHT$NEEDLES$FOR$YOUR$PROJECT
STRAIGHT
Perfect for beginners, these come in pairs and allow you to create large, flat
pieces of fabric. They can be unwieldy though, and you’re o!en li!ing the
entire weight of your kni"ing as you work, which can be uncomfortable.
CIRCULAR
Made of two needle ‘tips’
connected by a cable, circulars
can be used to knit in the round or
in rows, back and forth between
the tips. Used in this way, like
ordinary needles, the cable
takes the weight of the fabric.
INTERCHANGEABLE$
Circular needles come in
various sizes and lengths.
Interchangeable needles
allow you to mix and match
needle tips with cables so
you don’t have to buy one of
every thickness and length.
You can buy sets as well
as individual parts.
DOUBLE-POINTED
Sold in sets of four or five, they
enable you to knit in the round.
It might seem scary using so
many needles, but you only
ever ‘knit’ with two – the rest
just hold stitches.
SUPER-SIZED
Use enormous pairs
like this to knit with
big yarns, or even
a thinner yarn for a
lacy look. Super-sized
needles result in
super-quick projects!
Great fun for young,
instant-gratificationloving kni"ers too.
CABLE
Used when kni"ing cables,
these kinked, or straight,
needles are handy for
holding a small number of
stitches that you don’t want
to knit yet (the kink stops the
stitches falling off). You could
use a stitch holder or a spare
needle instead.
EXTRA$LONG
Useful (as you might
expect) for extra-large
projects, such as big
jumpers, cushions and
throws, especially if
you’re not keen on using
circular needles or you
like to tuck one needle
under your arm.
KNIT!&!CROCHET!COLLECTION!"#"$ BHG %&
CROCHET!ESSENTIALS
HOLDING THE HOOK
HOLDING THE YARN
Try these methods and see which works best.
Pencil method
Hold the hook like a pencil, in
your right hand (if you’re
right-handed), about 3-5cm
from the hooked end. If your
hook has a flat area, you’ll find
it comfortable to hold it here.
Even tension results in even stitches.
Knife method
Hold the hook between your
thumb and forefinger, about
3-5cm from the hooked end,
resting the end of the hook
against your palm. This will
give you lots of control.
Method one
Pass the ball end of the yarn
between the li!le finger and
third fingers of your le" hand
(if you are right-handed),
then behind the third and
middle fingers, over your
index finger.
Method two
Loop the ball end of the yarn
loosely around the li!le finger
of your le" hand, then take it
over the third finger, behind
the middle finger and over
your index finger.
MAKING A SLIP KNOT THE FIRST LOOP ON THE HOOK
STEP 1
STEP 1 Hold the tail of the
ball of yarn in your le" hand
and drape the yarn clockwise
over the top of it to form
a loose, circular loop.
STEP 2
STEP 2 Hold the loop between
le" thumb and forefinger, then
insert the crochet hook
through the centre of the
loop from front to back.
STEP 3
STEP 3 Catch the ball end
of the yarn with the hook
and pull it back through the
centre of the loop, taking
the yarn through with it.
CHAIN STITCH Use this stitch to make your foundation chain.
STEP 4
STEP 4 Pull both ends of the
yarn to tighten the knot, then
pull just the ball end to tighten
the loop so it’s close to the
hook, but not touching it.
HOW TO
COUNT CHAINS
9 8 7 6 5 4 3 2 1
STEP 1
STEP 1 Hold the hook in
your right hand, and both
the yarn end and the
working yarn in your le"
hand. Move the hook under
and over the yarn to wrap
it around anticlockwise.
STEP 2
STEP 3
STEP 2 Pull the hook
towards the slip knot,
catching the yarn in the
hook and pulling it through
the slip knot loop. This forms
your first chain (ch) stitch.
Repeat Steps 1 and 2 to
form a chain length.
STEP 3 This is what your row
of chains will look like. Hold
the chain with your le" hand
near the hook to keep the
tension. Keep going until
you have the number of
chains that’s stated in
your pa!ern.
!" BHG KNIT#&#CROCHET#COLLECTION#$"$%
Each chain or loop counts as
one stitch. Never count your
first slip knot or the loop on
the hook (called the working
loop). So that you can be
accurate, make sure the
chain is not twisted and
that the front is facing you.
HOW!TO!CROCHET
Over the next few pages, you’ll find simple step-by-step guides to many useful
stitches and techniques that you’ll use every time you pick up a hook
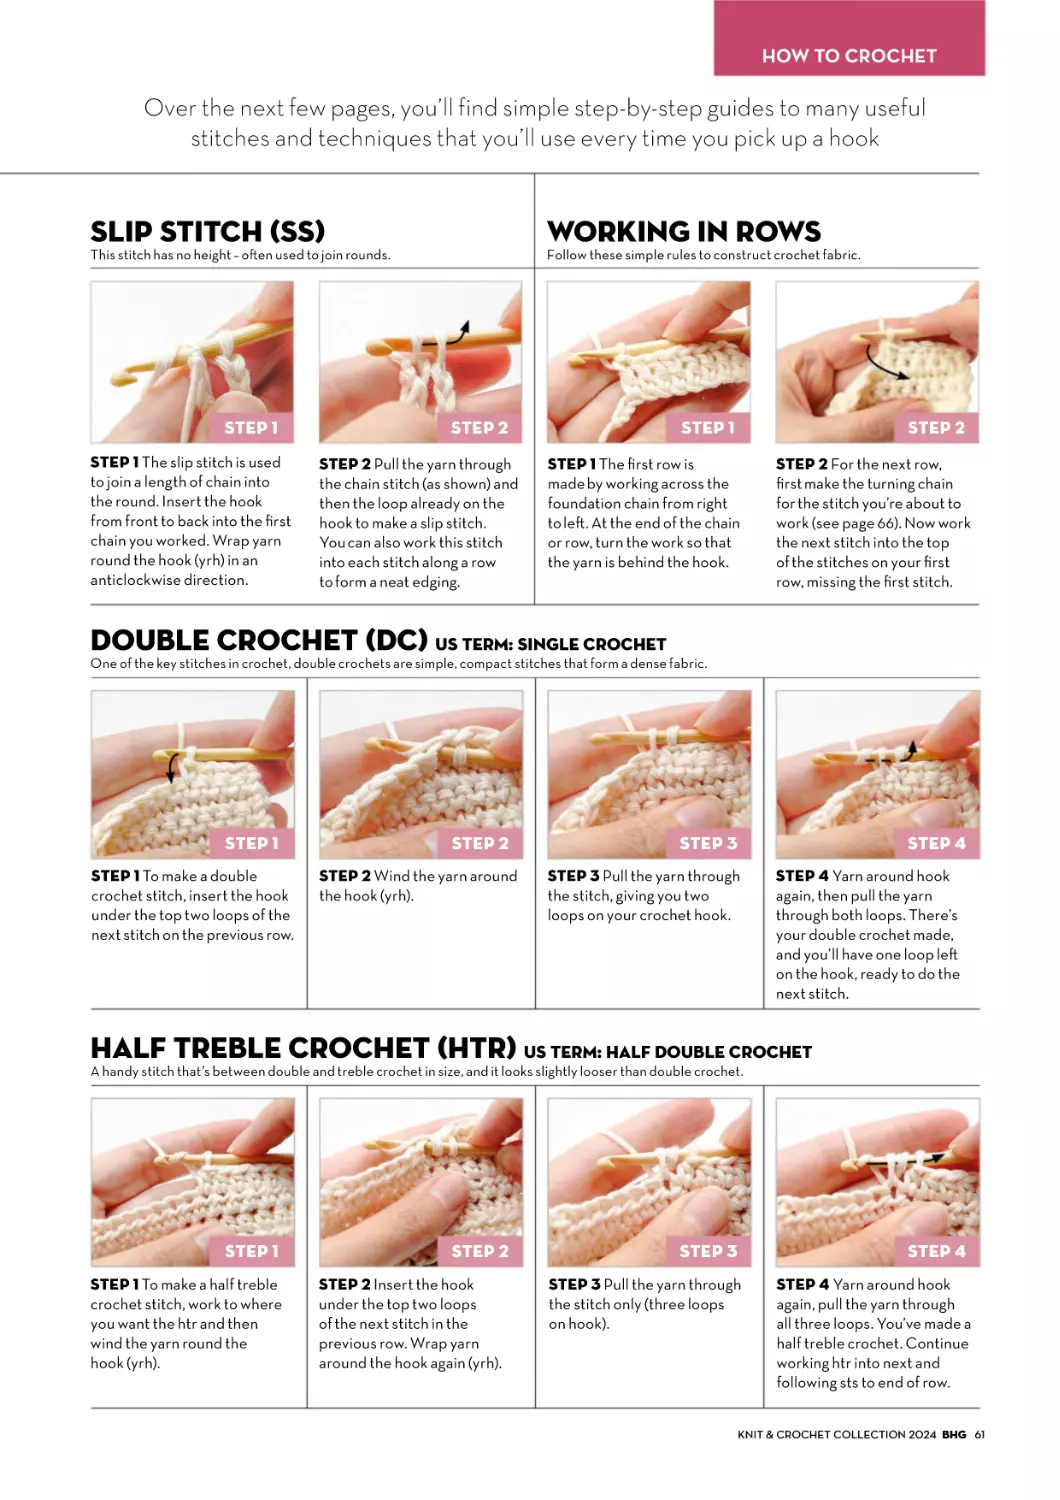
SLIP STITCH (SS)
WORKING IN ROWS
This stitch has no height – o"en used to join rounds.
STEP 1
STEP 1 The slip stitch is used
to join a length of chain into
the round. Insert the hook
from front to back into the first
chain you worked. Wrap yarn
round the hook (yrh) in an
anticlockwise direction.
Follow these simple rules to construct crochet fabric.
STEP 2
STEP 2 Pull the yarn through
the chain stitch (as shown) and
then the loop already on the
hook to make a slip stitch.
You can also work this stitch
into each stitch along a row
to form a neat edging.
STEP 1
STEP 2
STEP 1 The first row is
made by working across the
foundation chain from right
to le". At the end of the chain
or row, turn the work so that
the yarn is behind the hook.
STEP 2 For the next row,
first make the turning chain
for the stitch you’re about to
work (see page 66). Now work
the next stitch into the top
of the stitches on your first
row, missing the first stitch.
DOUBLE CROCHET (DC) US TERM: SINGLE CROCHET
One of the key stitches in crochet, double crochets are simple, compact stitches that form a dense fabric.
STEP 1
STEP 1 To make a double
crochet stitch, insert the hook
under the top two loops of the
next stitch on the previous row.
STEP 2
STEP 2 Wind the yarn around
the hook (yrh).
STEP 3
STEP 4
STEP 3 Pull the yarn through
the stitch, giving you two
loops on your crochet hook.
STEP 4 Yarn around hook
again, then pull the yarn
through both loops. There’s
your double crochet made,
and you’ll have one loop le"
on the hook, ready to do the
next stitch.
HALF TREBLE CROCHET (HTR) US TERM: HALF DOUBLE CROCHET
A handy stitch that’s between double and treble crochet in size, and it looks slightly looser than double crochet.
STEP 1
STEP 1 To make a half treble
crochet stitch, work to where
you want the htr and then
wind the yarn round the
hook (yrh).
STEP 2
STEP 2 Insert the hook
under the top two loops
of the next stitch in the
previous row. Wrap yarn
around the hook again (yrh).
STEP 3
STEP 4
STEP 3 Pull the yarn through
the stitch only (three loops
on hook).
STEP 4 Yarn around hook
again, pull the yarn through
all three loops. You’ve made a
half treble crochet. Continue
working htr into next and
following sts to end of row.
KNIT!&!CROCHET!COLLECTION!"#"$ BHG %&
TREBLE CROCHET (TR)
One of the most popular stitches in crochet, this simple stitch is twice as high as a double crochet stitch.
STEP 1
STEP 1 To work a treble
crochet, start by winding yarn
around the hook.
STEP 2
STEP 2 Insert the hook under
the top two loops of the stitch
on the previous row. Wrap
yarn around the hook (yrh) and
pull the yarn through the
stitch only.
STEP 3
STEP 3 You will now have
three loops on the hook.
Yrh again, and draw the
yarn through just the first
two loops on the hook.
STEP 4
STEP 4 You will now have
two loops on the hook.
Yrh again and draw the yarn
through the remaining loops
on the hook. Your treble
crochet is complete.
DOUBLE TREBLE (DTR)
STEP 1
STEP 1 Yrh twice and insert
the hook under the top 2 loops
of the stitch indicated. Yrh and
draw through the stitch only (4
loops on hook).
STEP 2
STEP 2 Yrh and pull the yarn
through the first 2 loops only (3
loops on hook).
STEP 3
STEP 3 Yrh and pull the yarn
through the first 2 loops only (2
loops on hook).
STEP 4
STEP 4 Yrh and pull the yarn
through the remaining 2 loops.
There’s your double treble
made and you’ll have 1 loop le"
on your hook ready to do the
next stitch.
WORKING A CLUSTER STITCH (3-TR)
STEP 1
STEP 1 Start a treble in the
usual way: yrh, insert hook,
yrh, pull loop through (3 loops
on hook), yrh, pull through first
2 loops (2 loops on hook). Stop
here, without finishing.
STEP 2
STEP 2 Start treble in the
same st/sp: yrh, insert hook in
the same st/sp again, yrh, pull
loop through (4 loops on
hook), yrh and pull through
first 2 loops (3 loops on hook).
Stop here.
!" BHG KNIT#&#CROCHET#COLLECTION#"$"%
STEP 3
STEP 3 Repeat step 2 until
you’ve worked the number of
trebles shown in pa#ern; in
this example we’re working
3-tr cl. Next finish all trebles
together: yrh, pull loop
through all loops on hook.
STEP 4
STEP 4 This is how the
completed cluster should look.
On the next row, just work a
stitch into the top of the
cluster as usual. The stitch
count should remain the same.
HOW!TO!CROCHET
HOW TO CHANGE COLOUR
INCREASING AND DECREASING
Create stripes and other colour effects.
Shaping stitches are vital for making garments.
STEP 1
STEP 1 Before you work the
final yrh (yarn round hook)
on the last stitch of a row in
the old colour, drop the old
yarn and then pick up the new
one with your hook.
STEP 2
STEP 2 Pull through a loop
of the new yarn to finish the
old stitch. The working loop
will be in the new colour.
Continue, keeping the old
yarn at the wrong side.
INCREASE To increase one
stitch is very simple – work
one stitch into the next stitch
on the row below. When
you’ve finished, work another
stitch into the same stitch.
DECREASE For a quick
decrease, just skip one stitch.
For a neater look, work the
first part of one stitch and
then begin the next stitch.
Finish both together.
DECREASE WITH DOUBLE CROCHET TWO TOGETHER (DC2TOG)
STEP 1
STEP 1 Start by inserting
the hook under the top two
loops of the next stitch on the
previous row. Begin to work
a double crochet stitch in
the usual way, working yrh
and pull loop through
(two loops on hook).
STEP 2
STEP 2 Without finishing the
first dc, begin the next dc by
inserting the hook in the next
stitch on the previous row.
Again, work yrh and pull
loop through (three loops
on hook).
STEP 3
STEP 4
STEP 4 This is how your
completed dc2tog should look.
You will have neatly decreased
one stitch. On subsequent
rows, you can simply work
a stitch into the top of the
dc2tog stitch as usual.
STEP 3 Now complete
both dc stitches together
by working yrh and pull this
loop through all three loops
on the hook.
DECREASE WITH TREBLE TWO TOGETHER (TR2TOG)
STEP 1
STEP 1 Begin working a treble
as usual: yrh, insert hook under
top two loops of next stitch
on prev row, yrh, pull loop
through (three loops on hook),
yrh and pull through first two
loops (two loops on hook).
STEP 2
STEP 2 Without finishing
the first tr, begin the next tr,
working yrh, insert hook in next
stitch on prev row. Again, work
yrh and pull loop through, yrh
and pull through first two
loops (three loops on hook).
STEP 3
STEP 3 Now complete both
the treble stitches together
by working yrh and pull this
loop through all three loops
on the hook.
STEP 4
STEP 4 This is how your
completed tr2tog should look.
You will have neatly decreased
one tr stitch. On subsequent
rows, you can simply work
a stitch into the top of the
tr2tog stitch as usual.
KNIT!&!CROCHET!COLLECTION!"#"$ BHG %&
FRONT POST TREBLE STITCH (FPTR)
STEP 1
STEP 1 Identify the post of the
next stitch. Then work yrh (as
usual for a treble stitch) and
insert hook into the front of
the fabric, around the back
of the post, and bring out hook
on other side of post.
STEP 2
STEP 2 Work the rest of the
stitch as you usually would for
a treble, so yrh and carefully
pull the loop of yarn out of the
fabric – it should loop around
the post of the stitch.
STEP 3
STEP 3 Work yrh again and
pull the yarn through the first
two loops. Yrh and pull the
yarn through the remaining
two loops to complete the
front post treble stitch.
STEP 4
STEP 4 You’ll see how the
stitch is raised up, compared
to the rest of the fabric. Work
more front post treble stitches
in the same way, repeating
from Step 1.
BACK POST TREBLE STITCH (BPTR)
STEP 1
STEP 1 Identify the post of the
next stitch. Then work yrh (as
usual for a treble stitch) and
insert hook into the back of
the fabric, around the front
of the post, and bring out hook
on other side of post.
STEP 2
STEP 2 Work the rest of the
stitch as you usually would for
a treble, so yrh and carefully
pull the loop of yarn out of the
fabric – it should loop around
the post of the stitch.
HOW TO CHECK YOUR TENSION
Make and measure a swatch to check your tension.
Most crochet pa!erns state the
tension required in rows and stitches
of a specific type. Make a swatch at
least 15cm square and check that
your tension matches. Place the ruler
along a column of stitches and insert
two pins 10cm apart. Then place a
ruler across the swatch and insert
two pins, 10cm apart. Count the
stitches and rows between the pins
– if you have less than the pa!ern,
your tension is too loose, so you need
to use a smaller hook, but if you have
too many, use a larger hook. It’s
usually be!er to match the stitches
than rows, because you can always
work more or fewer rows.
!" BHG KNIT#&#CROCHET#COLLECTION#$%$"
STEP 3
STEP 3 Work yrh again and
pull the yarn through the first
two loops. Yrh and pull the
yarn through the remaining
two loops to complete the
back post treble stitch.
STEP 4
STEP 4 You’ll see how the
stitch is set back, compared to
the rest of the fabric. Work
more back post treble stitches
in the same way, repeating
from Step 1.
HOW!TO!CROCHET
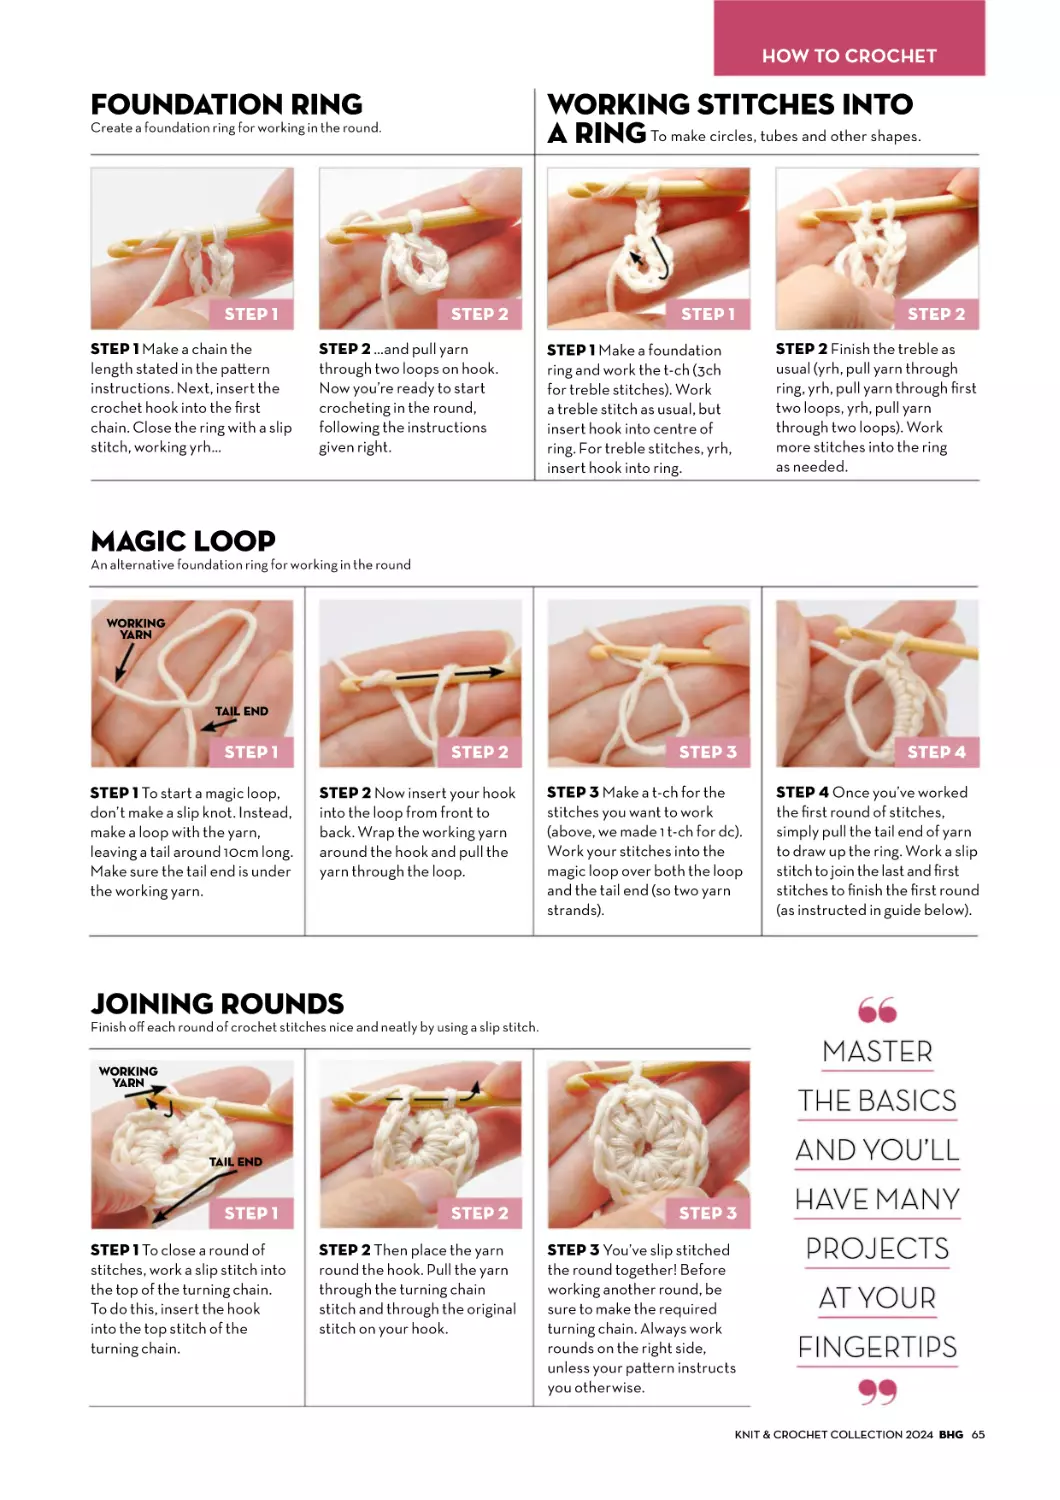
FOUNDATION RING
WORKING STITCHES INTO
A RING To make circles, tubes and other shapes.
Create a foundation ring for working in the round.
STEP 1
STEP 1 Make a chain the
length stated in the pa"ern
instructions. Next, insert the
crochet hook into the first
chain. Close the ring with a slip
stitch, working yrh…
STEP 2
STEP 2 …and pull yarn
through two loops on hook.
Now you’re ready to start
crocheting in the round,
following the instructions
given right.
STEP 1
STEP 2
STEP 2 Finish the treble as
usual (yrh, pull yarn through
ring, yrh, pull yarn through first
two loops, yrh, pull yarn
through two loops). Work
more stitches into the ring
as needed.
STEP 1 Make a foundation
ring and work the t-ch (3ch
for treble stitches). Work
a treble stitch as usual, but
insert hook into centre of
ring. For treble stitches, yrh,
insert hook into ring.
MAGIC LOOP
An alternative foundation ring for working in the round
Working
yarn
Tail end
STEP 1
STEP 1 To start a magic loop,
don’t make a slip knot. Instead,
make a loop with the yarn,
leaving a tail around 10cm long.
Make sure the tail end is under
the working yarn.
STEP 2
STEP 2 Now insert your hook
into the loop from front to
back. Wrap the working yarn
around the hook and pull the
yarn through the loop.
STEP 3
STEP 3 Make a t-ch for the
stitches you want to work
(above, we made 1 t-ch for dc).
Work your stitches into the
magic loop over both the loop
and the tail end (so two yarn
strands).
STEP 4
STEP 4 Once you’ve worked
the first round of stitches,
simply pull the tail end of yarn
to draw up the ring. Work a slip
stitch to join the last and first
stitches to finish the first round
(as instructed in guide below).
JOINING ROUNDS
Finish off each round of crochet stitches nice and neatly by using a slip stitch.
MASTER!
Working
yarn
THE!BASICS!
AND!YOU’LL
Tail end
STEP 1
STEP 1 To close a round of
stitches, work a slip stitch into
the top of the turning chain.
To do this, insert the hook
into the top stitch of the
turning chain.
STEP 2
STEP 2 Then place the yarn
round the hook. Pull the yarn
through the turning chain
stitch and through the original
stitch on your hook.
STEP 3
STEP 3 You’ve slip stitched
the round together! Before
working another round, be
sure to make the required
turning chain. Always work
rounds on the right side,
unless your pa"ern instructs
you otherwise.
HAVE!MANY
PROJECTS
AT!YOUR
FINGERTIPS
KNIT!&!CROCHET!COLLECTION!"#"$ BHG %&
TURNING CHAIN (t-ch)
HOW TO COUNT STITCHES
For an even finish, start each row with a turning chain.
In crochet, you need to add
turning chains (t-chs) to the
beginning of rows. The reason
for this is to bring the hook up
to the height of the stitches
you’re crocheting. Each basic
stitch has its own number
of chains. The table below
Check your work is correct.
tells you how many t-ch sts
form the first stitch. *For dc,
usually the turning chain does
not count as a stitch, and
the first stitch of the row is
worked into the stitch at the
base of the turning chain.
STITCH
Add to
foundation
chain before
starting row
Skip at
start of
foundation
row (counts
as first st)
For
turning
chain
(counts
as first st)
Double crochet
1 ch
1 ch*
1 ch*
Half treble
1 ch
2 ch
2 ch
Treble
2 ch
3 ch
3 ch
Double treble
3 ch
4 ch
4 ch
Triple treble
4 ch
5 ch
5 ch
ROUNDS OR SPIRALS
Check which technique you need to use.
Some pa#erns are worked in rounds that are
joined together at the end of each round.
Other pa#erns (particularly toys) are made
using the amigurumi method, working in a
continuous spiral without closing off each
round with a slip
stitch; you just
keep going,
working into the
next stitch on the
previous round.
You may find it
helpful to mark
the first st of the
round, moving the
marker up as you
work.
short stitches such as
double crochet, look at the
plaited tops (see below top).
For taller stitches, count the
upright ‘stems’ – each ‘stem’
is counted as a stitch (see
below bo#om).
Being able to count your
stitches is very important
and helps you to ensure that
you’re following a pa#ern
correctly. It’s a good idea to
count your stitches at the
end of every row. To count
1
1
2
2
3
3
4
4
GROUPS/SHELLS
5
5
6
6
7
7
8
9
CRAB STITCH
These consist of a number of complete
stitches worked into the same place.
They can form a pa#ern or be used as a
method of increasing. This example is
working three treble stitches into a
foundation chain.
Also known as reverse double
crochet, this stitch is most commonly
used on the final round of a project for
the neat finished look it gives. For
right handers you are working le" to
right instead of the usual right to le".
HOW TO WORK STRIPES AND WEAVE IN YARN ENDS
STEP 1
STEP 1 Stop working the last
stitch of the previous row before
the final yrh. Work the final yrh in
the new colour. Cut off the old
yarn, leaving a 7cm-long tail.
STEP 2
STEP 3
STEP 4
STEP 2 Continue with the new
STEP 3 Work the next stitch
over the top of both yarn tails so
that they’ll be worked into the
stitch, and simultaneously be
woven in.
STEP 4 Continue across the
row until the tails are completely
hidden and complete the rest of
the row as usual.
colour, working the t-ch as usual,
and then lay both tails of yarn
along the top of the last complete
row of stitches.
!! BHG KNIT"&"CROCHET"COLLECTION"#$#%
HOW!TO!CROCHET
HOW TO EMBROIDER FACIAL FEATURES
STEP 1
STEP 1 Thread the chosen
yarn colour onto a tapestry
needle. Insert the needle from
the back of the head through
to where you want to place the
facial feature. In this example
we are embroidering a mouth.
STEP 2
STEP 2 Embroider the
desired shape. Here we have
worked 2 small straight
stitches to form a small
v-shape.
STEP 3
STEP 4
STEP 3 Once you are happy,
insert the needle back through
to the back of the head,
through the same space where
you began in Step 1.
STEP 4 Make sure that the 2
strands of yarn are protruding
from the same space. Make a
small knot with the strands of
yarn and weave them back into
the head.
HOW TO CHANGE COLOUR IN A SPIRAL
STEP 1
STEP 1 If you need to work
stripes in a spiral, the pa!ern
will ask you to change colour.
Always do this on the last yrh
of the last stitch of the round in
the previous colour.
STEP 2
STEP 2 Work the first stitch of
the new round in the new
colour and place a stitch
marker in this first stitch.
STEP 4
STEP 3
STEP 3 Work a round of
double crochet stitches until
you’ve worked the last stitch of
the round. The next stitch
you’ll want to work into will
have the stitch marker in it.
STEP 4 You’ll need to remove
the marker, work the first
stitch of the new round and
then replace the stitch marker
in this first stitch, to mark the
start of the round again.
HOW TO WORK DOUBLE CROCHET IN A SPIRAL
STEP 1
STEP 1 Make a foundation
ring, then work the t-ch (1ch for
dc). Work dc stitches into the
ring, but do not join the last
stitch and first stitch of this
first round with a slip stitch.
STEP 2
STEP 2 Instead, work the first
dc stitch of the second round
into the first stitch of the first
round. To do this, insert the
hook into the stitch, yrh, pull
yarn through, yrh and pull the
yarn through both loops.
STEP 3
STEP 4
STEP 3 You’ll now be working
in a spiral. Continue to work
more rounds of dc stitches in a
spiral, according to the pa!ern
instructions.
STEP 4 On the last round,
a"er you’ve worked the last dc
stitch, you’ll need to finish off
the spiral with a slip stitch for a
neat edge: insert the hook into
the next stitch, yrh and pull
through both loops.
If you want to learn a new stitch or you need a visual of how to stitch,
there are thousands of tutorials you can watch on YouTube.
KNIT"&"CROCHET"COLLECTION"#$#% BHG &'
CROCHET!ABBREVIATIONS
Australia/UK abbreviations used throughout the magazine
across to end of the row
approx approximate(ly)
beg beginning
bl insert hook under back loop only
BPhtr back post half treble as htr, inserting
hook from back to front to back around
post of st indicated.
BPtr back post treble: yrh, starting from the
back, insert hook from back to front to
back around post of st in row below,
complete as treble st. See page 64
c2c corner to corner
ch(s) chain/chain stitch(es)
ch-sp(s) chain space(s)
ch- refers to ch made previously,
e.g. ch-3
cl(s) clusters
cont continue
crab insert hook into next st on the right
stitch from front to back, yrh and draw loop
through (2 loops on hook), yrh and draw
through both loops on hook.
See page 66
dc double crochet
dc2tog (insert hook in next st, yrh and draw
a loop through) twice, yrh and draw
through all 3 loops on hook
dec decrease
dtr double treble crochet
dtr2tog work 2dtr together
etr (extended treble) yrh, insert hook into
next ch or st, yrh and draw up loop, yrh,
draw hook through first loop on hook,
(yrh, draw yarn through 2 loops on hook)
twice
fdc foundation dc
fl
insert hook under front loop only
foll/folls following/follows
Fhtr (foundation half treble) ch3 (counts as
first st), *yrh, insert hook into last ch from
hook, yrh and pull up a loop, yrh and pull
through one loop (ch-1 made), complete
as htr; rep from * inserting hook into ch-1
at base of prev st
FPdtr (front post double treble) (Yrh) twice,
starting from the front, insert hook from
front to back to front around the post of
st specified, complete as a double
treble st
FPhtr front post half treble as htr, inserting
hook from front to back to front around
post of st indicated
FPtr front post treble: work in opposite way to
BPtr. See page 64
!r foundation tr
htr half treble
htr2tog Work 2htr together
htr3tog Work 3htr together
inc increase
LH le! hand
lp(s) loop(s)
magic loop See page 65
meas measures
pa"(s) pa"ern(s)
pc popcorn stitch – 5tr into the stitch, pull up
the working yarn from last tr and remove
hook. Insert hook into top of first tr made
then replace working loop onto the hook.
Pull this loop back through the first st and
pull together until the 5tr cluster pops up
pm place marker
prev previous
qtr quadruple treble
rem remain(s)/remaining
rep repeat
reverse dc (also known as crab stitch) as
standard dc but working from
le! to right (or right to le! if
le!-handed). See page 66.
RH right hand
rnd(s) round(s)
RS right side
sdc (split double crochet) work as standard
dc, but insert hook between legs of stitch
rather than top of stitch
sk skip
sp(s) space(s)
ss
slip stitch
st(s) stitch(es)
star stitch insert hook in centre ch-1 of previous
star st, yrh, draw a loop back through,
insert hook in front loop of last ‘leg’
of star st, yrh, draw a loop through,
insert hook in same st as last ‘leg’ of
previous star stitch, yrh, draw a loop
through, (insert hook in next st along,
yrh, draw a loop through) twice, yrh,
draw through all 6 loops, ch1
stpc starting popcorn stitch – ch3 (counts as
1tr), 4tr in same st (or sp), pull up the
working yarn from the last tr and remove
hook. Insert hook into top of 3rd ch that
was made and then replace the working
loop onto the hook. Pull this loop back
through the 3rd ch to complete your first
popcorn st
t-ch(s) turning chain(s)
tbl through back loop
tog together
tr
treble crochet
tr2tog (yrh, insert hook in next st, yrh and pull
up loop, yrh and draw through
2 loops) twice, yrh and draw through
all loops on hook
tr3tog treble 3 together – (yrh, insert hook in
next st, yrh and pull up loop, yrh and
draw through 2 loops) three times, yrh
and draw through all loops on hook
"r triple treble crochet
WS wrong side
yrh yarn round hook
*
work instructions immediately foll *, then
rep as many times as directed
(#) work all instructions in the brackets as
many times as directed
2-tr cl (yrh, insert hook in sp/st, yrh and pull up
loop, yrh and draw through 2 loops)
twice, inserting hook in same sp/st, yrh
and draw through all loops on hook
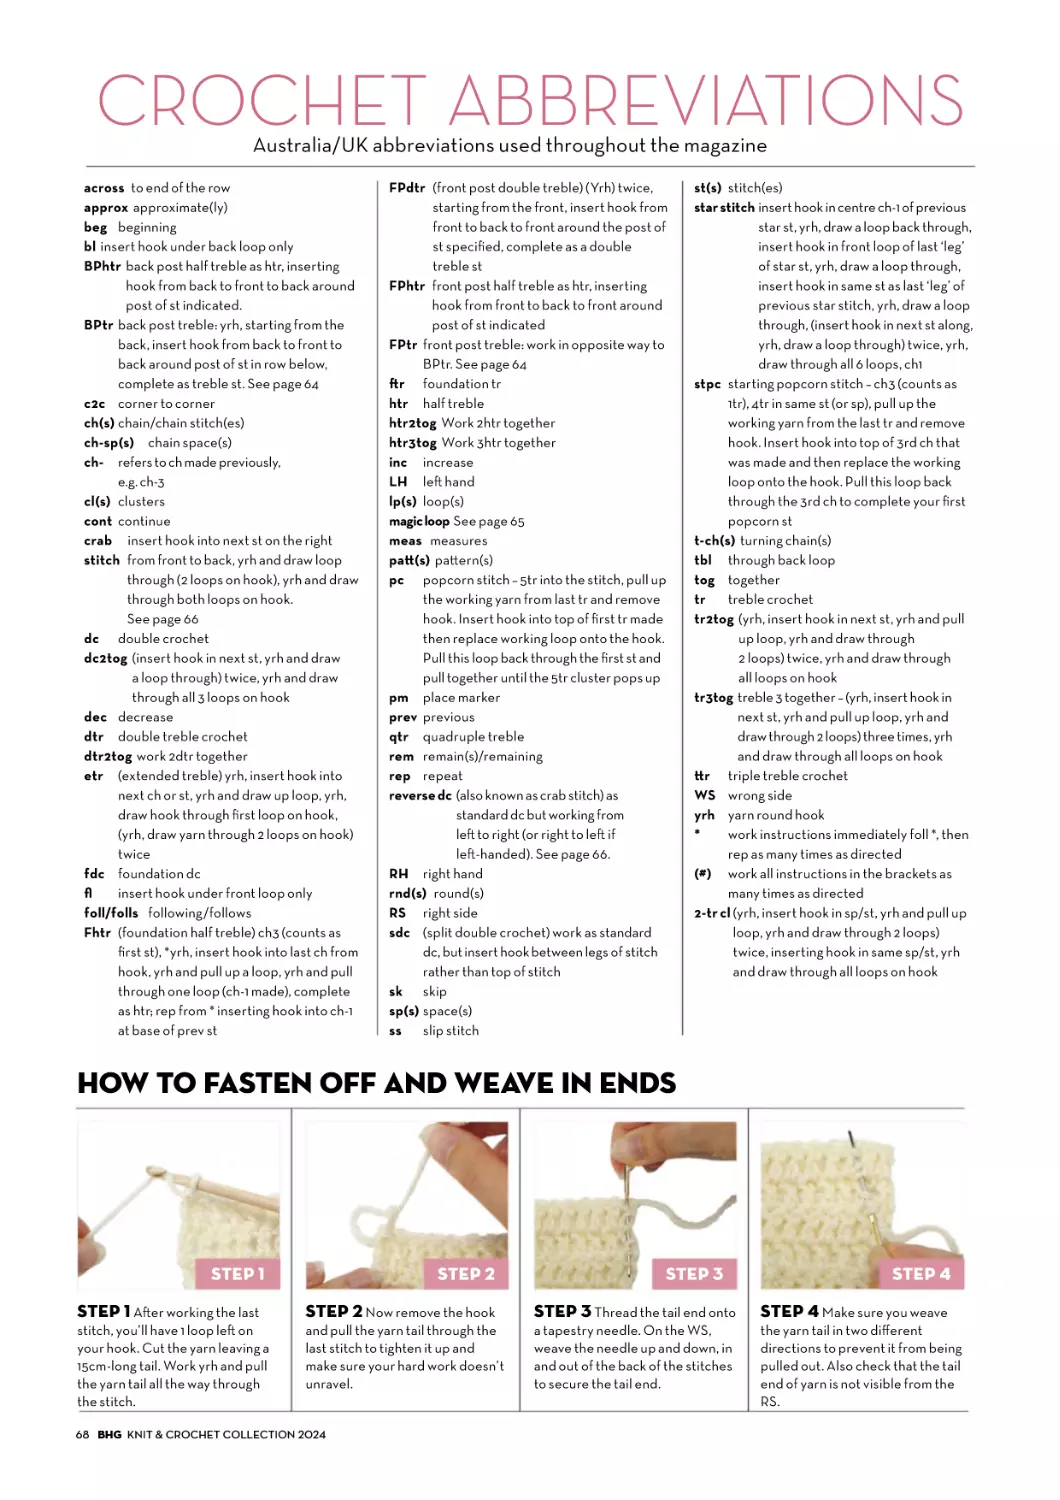
HOW TO FASTEN OFF AND WEAVE IN ENDS
STEP 1
STEP 2
STEP 1 A!er working the last
STEP 2 Now remove the hook
stitch, you’ll have 1 loop le! on
your hook. Cut the yarn leaving a
15cm-long tail. Work yrh and pull
the yarn tail all the way through
the stitch.
and pull the yarn tail through the
last stitch to tighten it up and
make sure your hard work doesn’t
unravel.
!" BHG KNIT#&#CROCHET#COLLECTION#$%$&
STEP 3
STEP 3 Thread the tail end onto
a tapestry needle. On the WS,
weave the needle up and down, in
and out of the back of the stitches
to secure the tail end.
STEP 4
STEP 4 Make sure you weave
the yarn tail in two different
directions to prevent it from being
pulled out. Also check that the tail
end of yarn is not visible from the
RS.
HOW!TO!KNIT
KNITTING!ESSENTIALS
If you’re new to knitting or just need a little refresher, our knitting guide
is here to make sure you get it right first time, every time
CABLE CAST-ON METHOD
Use it for a firm edge, and when adding stitches to your work.
STEP 1
STEP 1 Make a slip knot. Insert
right-hand needle into the
stitch as if to knit. Wrap the
yarn around the point and pull
through, slipping the stitch on
to the le!-hand needle.
STEP 2
STEP 3
STEP 4
STEP 2 Push the point of the
right-hand needle between
the first and second stitches.
Wrap the yarn around the
point of the right-hand
needle.
STEP 3 Pull the loop out
with the right-hand needle,
then slip it over the tip of the
le!-hand needle.
STEP 4 Repeat Steps 2 and 3
until you have the number of
stitches you require.
THUMB CAST-ON METHOD
A great all rounder, use it to cast on stitches quickly and easily. This method creates a stretchier edge.
STEP 1
STEP 2
STEP 2 Hold the tail in your
le! hand with your thumb
sticking up. Make a circle
anticlockwise with your
thumb. You should end up
with a cross on the front
of your thumb.
STEP 1 Make a slip knot and
place it on a needle, leaving
a long tail. The tail length
depends on the number of
stitches you wish to cast on.
Try a length about 3 times the
width of the project.
STEP 3
STEP 4
STEP 4 Draw the yarn
through the thumb loop and
then between the arms of
the cross. Slip your thumb
out and pull to tighten the
stitch. Repeat from Step 2.
STEP 3 Push the needle tip
along the outside of your
thumb so it passes through
the loop. Wrap the working
yarn as if to knit.
KNIT STITCH (K)
Follow our simple steps to make the most important stitch you’ll learn.
STEP 1
STEP 1 Hold the needle with
the stitches on it in your le!
hand. Keeping the yarn in your
right hand and at the back of
your work, insert the point
of the right-hand needle up
into the front loop of the first
stitch, as shown.
STEP 2
STEP 2 Now wind the yarn
anticlockwise around the
point of the right-hand needle
using your index finger. It’s
important to keep the yarn in
your right hand relatively taut
to maintain an even tension
as you go.
STEP 3
STEP 3 Bring the right-hand
needle down through the loop,
making sure that you catch the
yarn you wound around the
needle. This creates the stitch.
Don’t pull the free yarn too
tightly – let out some slack.
STEP 4
STEP 4 Push the point of the
right needle further through
the stitch you created, then
gently pull the right needle
up and off, taking the original
loop with it. You’ve now
created one knit stitch. Repeat
Steps 1-4 across the row.
KNIT!&!CROCHET!COLLECTION!"#"$ BHG %&
KNIT TWO TOGETHER (K2TOG)
Knit two stitches together to give a right-leaning decrease.
STEP 1
STEP 1 Insert the point of the
right-hand needle through the
loops of the next two stitches
as if to knit.
STEP 2
STEP 2 Wind the yarn around
the tip of the right-hand
needle and pull the yarn
through the two stitches,
kni#ing them both together.
STEP 3
STEP 3 Drop the two
stitches from the le!-hand
needle and keep the new
stitch on the right-hand
needle.
STEP 4
STEP 4 Kni#ing two stitches
together decreases your stitch
count by one, and the decrease
stitch leans to the right. This
is how a series looks.
PURL STITCH (P)
To make purl stitches, just reverse the action of plain knit stitches.
STEP 1
STEP 2
STEP 1 Holding the needle
with all the stitches on in your
le! hand, and ensuring that
the yarn is at the front of your
work, insert the right-hand
needle through the
front loop of your first stitch
as shown.
STEP 2 Wind the yarn
around the tip of the righthand needle from right to le!
in an anticlockwise motion,
constantly keeping a slight
tension on the yarn.
STEP 3
STEP 3 Now slip the righthand needle back through the
stitch, ensuring that you catch
the yarn that you’ve already
wound around the needle.
This creates a stitch on your
right-hand needle.
STEP 4
STEP 4 Pushing the point of
the right-hand needle a li#le
further through the stitch
you’ve just created, pull the
original loop up and off the
le!-hand needle. That’s your
first purl stitch! Repeat Steps
1-4 across the row.
PURL TWO TOGETHER (P2TOG)
Purl two stitches together to give a right-leaning decrease.
STEP 1
STEP 1 Push the point of your
right-hand needle through
the first two stitches on your
le!-hand needle, going from
right to le! as you would for
a purl stitch.
STEP 2
STEP 2 Bring yarn
anticlockwise around
the needle, between the
two needles.
!" BHG KNIT#&#CROCHET#COLLECTION#$"$%
STEP 3
STEP 3 Pull the yarn through
both stitches as you would
when working a purl stitch,
and drop both stitches from
the le!-hand needle.
STEP 4
STEP 4 Purling two stitches
together decreases your stitch
count by one, and the decrease
stitch leans to the right. This is
how a series looks on the right
side of stocking stitch.
HOW!TO!KNIT
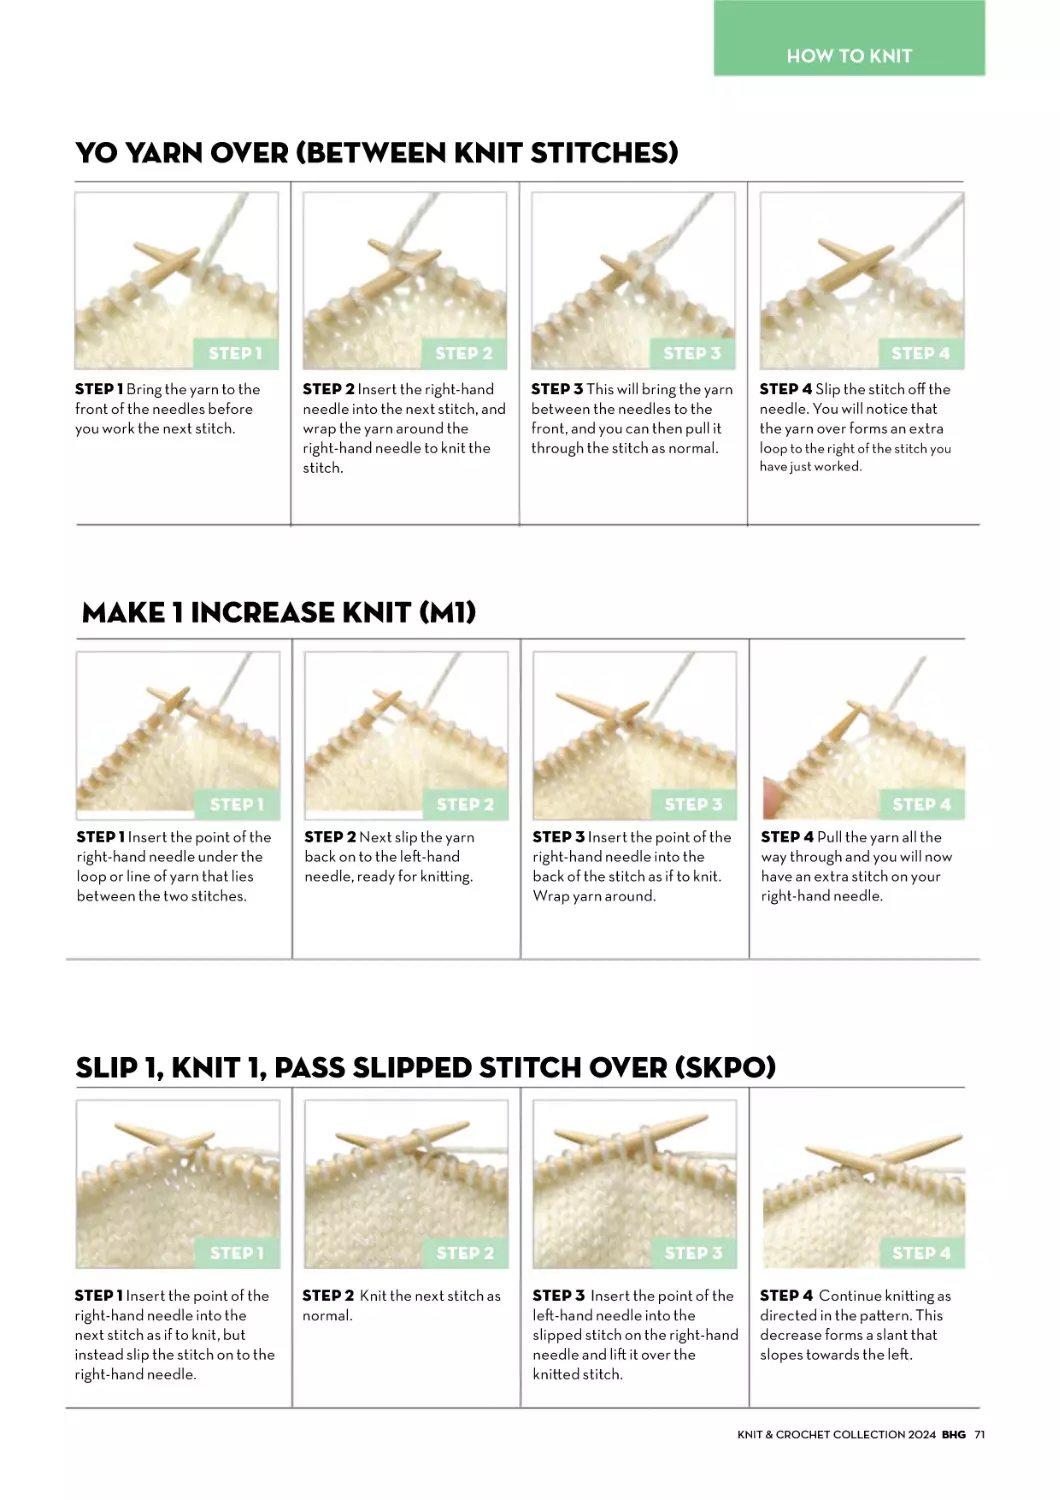
YO YARN OVER (BETWEEN KNIT STITCHES)
STEP 1
STEP 1 Bring the yarn to the
front of the needles before
you work the next stitch.
STEP 2
STEP 2 Insert the right-hand
needle into the next stitch, and
wrap the yarn around the
right-hand needle to knit the
stitch.
STEP 3
STEP 4
STEP 4 Slip the stitch off the
needle. You will notice that
the yarn over forms an extra
loop to the right of the stitch you
STEP 3 This will bring the yarn
between the needles to the
front, and you can then pull it
through the stitch as normal.
have just worked.
MAKE 1 INCREASE KNIT (M1)
STEP 1
STEP 1 Insert the point of the
right-hand needle under the
loop or line of yarn that lies
between the two stitches.
STEP 2
STEP 2 Next slip the yarn
back on to the le!-hand
needle, ready for kni"ing.
STEP 3
STEP 4
STEP 4 Pull the yarn all the
way through and you will now
have an extra stitch on your
right-hand needle.
STEP 3 Insert the point of the
right-hand needle into the
back of the stitch as if to knit.
Wrap yarn around.
SLIP 1, KNIT 1, PASS SLIPPED STITCH OVER (SKPO)
STEP 1
STEP 1 Insert the point of the
right-hand needle into the
next stitch as if to knit, but
instead slip the stitch on to the
right-hand needle.
STEP 2
STEP 2 Knit the next stitch as
normal.
STEP 3
STEP 4
STEP 3 Insert the point of the
le!-hand needle into the
slipped stitch on the right-hand
needle and li! it over the
kni"ed stitch.
STEP 4 Continue kni"ing as
directed in the pa"ern. This
decrease forms a slant that
slopes towards the le!.
KNIT!&!CROCHET!COLLECTION!"#"$ BHG %&
JOINING IN A NEW BALL
KNITTING I-CORDS
At!the!end!of!a!row"!lay!your!kni#ing!flat$!When!the!
remaining!yarn!no!longer!reaches!across!your!work!%!times"!
begin!a!new!ball$!Always!leave!&'cm!of!yarn!from!the!old!
ball!for!sewing!in!with!a!yarn!needle$!Leaving!a!&'cm!end!on!
the!new!ball"!start!the!next!row$!A(er!working!a!few!stitches"!
tie!the!)!ends together!in!a!loose!knot$!Sew!ends!in!later$
NOTE!If!you!find!a!knot!in!your!ball!of!yarn"!cut!and!rejoin!
the!yarn!at!the!end!of!a!row"!leaving!&'cm!ends!for!sewing!
in"!as!you would!for!a!new!ball$
An i-cord is a round cord that can be
used for ties, handles, toys or
embellishments. An i-cord is similar to
French kni#ing, but much more flexible
in size and stitch numbers, and is
worked on 2 double-pointed needles.
Cast on a few stitches (between 2 and
6, depending on the yarn).
STEP 1 Knit the first row.
STEP 2 At the end of the row, instead
of turning for the next row, slide the
stitches to the other end of the needle.
STEP 3 Pull the yarn firmly across the
back of the stitches to knit the next row
from the same direction as the first
row. Continue kni#ing every row in the
same direction, pulling the yarn firmly
across the back. When the i-cord is the
length required, you can either cast
off the stitches or thread the end of
the yarn through the stitches and
secure firmly.
Back
view
KNIT FRONT AND BACK (KFB)
Increase 1 stitch by kni#ing into the front and back of an existing stitch.
STEP 1
STEP 1 Insert the tip of the
right-hand needle into the
front of the stitch and knit
as normal, but don’t drop it
from the le(-hand needle.
STEP 2
STEP 2 Then take the righthand needle behind the le(
and insert the tip of the
needle down through the
back of the stitch on the
le(-hand needle.
STEP 3
STEP 3 Wrap the yarn around
the tip of the right-hand
needle to knit the stitch. Bring
the needle through to make
the stitch, keeping it on the
right-hand needle.
STEP 4
STEP 4 Take the stitch off
the le(-hand needle. You will
have increased one stitch by
kni#ing twice into the original
stitch, first at the front, then
at the back.
CAST OFF
Finish off your kni#ing with this straightforward cast-off technique.
STEP 1
STEP 1 Start by kni#ing the
first two stitches of the row
as normal, but don’t go any
further along as you usually
would.
STEP 2
STEP 3
STEP 4
STEP 2 Insert the le(-hand
needle through the first stitch
as shown. Li( this stitch over
the other stitch on the righthand needle and over the
needle point.
STEP 3 Knit another stitch
so you have two on the right
needle. Li( the first stitch
over the second, then repeat
Steps 1-3.
STEP 4 When you get to the
last stitch, cut the yarn about
15cm away, feed it through
the loop and pull through
firmly to fasten off.
!" BHG KNIT#&#CROCHET#COLLECTION#"$"%
HOW!TO!KNIT
PICKING UP DROPPED STITCHES
A dropped stitch can be picked up easily with a crochet hook, even
if it has unravelled several rows down. To pick up knit stitches in
stocking stitch, insert the crochet hook from the front into the
dropped stitch, pick up the bar lying above the dropped stitch
and draw it through the loop of the dropped stitch.
KNITTING!ABBREVIATIONS
alt
approx!
beg!
C"B
C"F
C$B
C$F
C'B
C'F
cb
CC
cf
cn
co
cont
dec
est
DK
DPNs
foll/s
g!st
inc
K/k
k(
k(f
kwise
K)%C"
k"tog
k&tog
ktbl
LH
LT
meas
M)
M)L
M)P
M)R
alternate
approximately
beginning
slip"next"stitch"to"cn"and"hold"at"
back#"K$%"K$"from"cn
slip"next"stitch"to"cn"and"hold"at"
front#"K$%"K$"from"cn
slip"next"&"stitches"to"cn"and"hold"
at"back#"K&%"K&"from"cn
slip"next"&"stitches"to"cn"and"hold"
at"front#"K&%"K&"from"cn
slip"next"'"stitches"to"cn"and"hold"
at"back#"K'%"K'"from"cn
slip"next"'"stitches"to"cn"and"hold"
at"front#"K'%"K'"from"cn
cable"back
contrast"colour
cable"forward
cable"needle
cast"on
continue
decrease(ing)"(by"working"two"
stitches"together)
established
double"kni*ing"
double-pointed"needles
following/follows
garter"stitch"(knit"every"row)
increase"(usually"knit"into"same"
stitch"twice)
knit
knit"into"front"and"back"of"stitch
knit"into"front#"back"and"front"of"
next"stitch
knitwise%"by"kni*ing"the"stitch
Knit"$,"sts"in"Yarn"C"(applies"
to"all"variations"of"this"type"of"
instruction#"for"example"sskB"slip#"
slip#"knit"in"Yarn"B)
knit"the"next"two"stitches"together
knit"the"next"three"stitches"
together
knit"into"back"loop
le-"hand
le-"twist
measure(s)"
make"one"by"kni*ing"into"back"
of"loop"between"two"stitches"
(increase"$"stitch)"
(le-"leaning"increase)"with"le-"
needle"tip#"li-"strand"between"
needles"from"front"to"back."Knit"
li-ed"loop"through"back"of"loop"
make"one"purlwise"by"purling"into"
back"of"loop"between"two"stitches"
(increase"$"stitch)
(right"leaning"increase)"with"le-"
needle"tip#"li-"strand"between"
needles"from"back"to"front."Knit"
li-ed"loop"through"front"of"loop
M&
(K$#"P$#"K$)"all"into"front"of"next"st#"
making"'"sts"out"of"$
MB
make"a"bobble
MC
main"colour
P/p
purl
pa*+s, pa*ern(s)
p(
purl"into"front"and"back"of"stitch
PM
place"marker
prev
previous
psso
pass"slipped"stitch(es)"over
pwise
(purlwise)"by"purling"the"stitch
P"tog
purl"&"stitches"together"
($"stitch"decreased)
P&tog
purl"'"stitches"together"
(&"stitches"decreased)
ptbl
purl"into"back"of"the"loop
rem
remain/remaining
rep+s,
repeat(s)
rev!st!st reverse"stocking"stitch
RH
right"hand
rib"tog either"k&tog"or"p&tog#"depending"
on"what"next"stitch"in"ribbing"
should"be"(keeps"ribbing"looking"
neat"on"bu*onholes)
rnd+s,
round(s)"(on"a"circular"needle)
RS
right"side
RT
right"twist
skpo
slip"$"stitch#"knit"$"stitch#"pass"
slipped"stitch"over"($"stitch"
decreased)
sk"po
slip"$"stitch#"knit"&"stitches"
together#"pass"slipped"stitch"over"
(&"stitches"decreased)
sl
slip"
sl!st
slip"stitch
SM
stitch"marker
ssk
slip"&"stitches"one"at"a"time#"knit"&"
slipped"stitches"together"
($"stitch"decreased)
ssp
slip"&"stitches"one"at"a"time#"purl"&"
slipped"stitches"together"through"
back"loops"($"stitch"decreased)
sssk
slip"'"stitches"one"at"a"time#"knit"
'"slipped"stitches"together"(two"
stitches"decreased)
st+s,
stitch(es)
st!st
stocking"stitch
tbl
through"the"back"of"the"loop
tog
together
T"B
slip"next"stitch"to"cn"and"hold"at"
back#"K$%"P$"from"cn
T"F
slip"next"stitch"to"cn"and"hold"at"
front#"P$%"K$"from"cn
T$B"
slip"next"&"sts"on"cn"and"hold"at"
back#"K&%"P&"from"cn
T$F"
slip"next"&"sts"on"cn"and"hold"at"
front#"P&%"K&"from"cn"
WS
wrong"side
wyib
with"yarn"in"back
wyif
with"yarn"in"front
W&
ybk
yfwd
yo
yon
yrn
*
(wrap"'"stitches)"with"yarn"held"at"
back"of"work#"slip"next"'"sts"to"cn"
and"hold"at"front"of"work."Wrap"
yarn"'"times"around"these"'"sts#"
being"careful"not"to"pull"it"too"
tight"and"ending"up"with"yarn"at"
back"of"work."Slip"the"'"sts"to"right"
needle"without"kni*ing"them
yarn"to"the"back
yarn"forward
yarn"over"
yarn"over"needle
yarn"round"needle
work"instructions"immediately"
following"*#"then"repeat"as"
directed
KNIT!&!CROCHET!COLLECTION!"#"$ BHG %&
FINISHING!ESSENTIALS
A fun and fluffy pompom can add a cute final touch or a pop of colour to any
craft project. They’re quick and so easy to make – here’s how
BASICS OF THE POM
STEP 1 Start by making a
spherical pompom, which we’ll
sculpt into a heart shape later.
You’ll need a pink or red yarn
(or any colour you like for your
heart) in any weight. You can
use any method you prefer,
but we made ours with a
Clover pompom maker to
make the process quick and
easy (see our quick step-bystep guide below).
STEP 2 You can make the
pompom for your heart in any
size – we made ours 4cm in
diameter. If you’re using the
fork or skein method, to make
a 4cm-diameter pompom you
need 4cm yarn lengths and a
2cm diameter yarn bundle.
$cm
%cm
Begin the fun by making a standard pompom with some so+ yarn.
USING A POMPOM GADGET
Pompom-making gadgets, such as the Clover pompom makers we’re using, are really simple. Here’s how, step by step:
STEP 1!Place!the!two!halves!of!the!gadget!
together"!aligning!and!unfolding!the!arms#!
STEP 2!Evenly!wrap!your!yarn!around!
each!curved!arm#!Try!not!to!wrap!too!
tightly!and!don’t!overfill!the!curves#
STEP 3!Fold!the!curved!arms!inward!
so the!gadget!is!a!round!shape#!Cut!the!
yarn!in!the!gap!between!each!half#
STEP 4!Cut!a!%&cm!length!of!matching!
yarn!and!tie!it!around!the!centre!of!the!
pompom"!in!between!the!two!halves!of!
the!gadget#!Knot!it!as!tightly!as!you!can#
STEP 5!Carefully!unfold!the!curved!arms!
and!remove!the!two!halves!of!the!gadget!
to!release!the!pompom#
STEP 6!Trim!the!pompom!to!a!sphere"!
then!give!it!a!quick!wash!to!encourage!the!
yarn!to!untwist!and!fluff!up!–!immerse!it!in!
warm!water"!gently!squeeze!the!water!into!
it"!swish!it!around!a!bit!and!leave!it!to!dry#!
Your!finished!pompom!will!be!ready!for!
trimming#!If!you!prefer"!you!can!skip!the!
‘trim!to!a!sphere’!and!washing!steps!and!
go!straight!to!creating!your!shape#
NOTE!If!you!don’t!have!a!pompom!maker!
in the!size!you!need"!try!using!pieces!
of card# You’ll!need!two"!cut!into!a!circle!
with a!circle cut!out!of!the!middle!)so!it!
looks like a doughnut*#!Have!a!look!online!
for a!tutorial!–!you’ll!find!there!are!loads!
of them#
STEP 1
STEP 2
STEP 3
STEP 4
STEP 5
STEP 6
GOOD TO KNOW
SOME!PEOPLE!WONDER!WHAT!THE!BEST!YARN!IS!SPECIFICALLY!FOR!FLUFFY!POMPOMS"!CREATING!FLUFFY!
POMPOMS!IS!LESS!ABOUT!THE!YARN!TYPE!AND!MORE!ABOUT!HOW!MANY!TIMES!YOU!WRAP!THE!POMPOM!
AROUND!THE!POMPOM!MAKER"!THE!MORE!TIMES!YOU!WRAP!IT#!THE!FLUFFIER!YOUR!POMPOMS!WILL!BE"
!" BHG KNIT#&#CROCHET#COLLECTION#$%$"
FINISHING!ESSENTIALS
HOW TO MAKE SHAPED POMPOMS
Have fun trimming our simple heart shape.
To$make$shaped$pompoms%$it’s$a$good$idea$
to$plan$out$the$shape$you$want$first&$
STEP 1$We’ve$positioned$the$heart$with$the$
central$tie$down$the$side%$where$the$yarn$
will$be$longer$–$at$the$front$and$back%$we’re$
going$to$fla"en$the$pompom$a$bit$so$it’s$just$
the$front$and$back$that$are$heart$shaped&$
STEP 2$Take$your$pompom$and$start$by$
fla"ening$the$shape%$then$trim$the$front$and$
back%$snipping$off$small$amounts$at$a$time&
STEP 3$Next%$trim$the$point$at$the$base&$
To$do$this%$locate$the$centre$base$of$the$
pompom$and$trim$a$line$from$here$up$
to the$centre$right$point&$Repeat$from$
the centre$base$to$the$centre$le)&$Then$
so)en$the$lines$and$graduate$the$curves$
up$towards$the$top$le)$and$top$right&
STEP 4$Now$create$the$centre$top$of$the$
heart&$It$can$help$to$dangle$the$pompom$
from$the$tie$while$you$trim&$Carefully$snip$
into$the$centre$top$as$short$as$you$can$
safely$go%$then$curve$this$dip$up$and$out$
towards$the$top$le)$and$top$right&$Then$
curve$the$centre$top$dip$down$towards$
the fla"ened$centre$front$and$centre$back&
STEP 5$Keep$trimming$to$so)en$the$curves$
until$you’re$happy$with$the$shape&$Take$
your$time%$pause$regularly%$scrutinise$your$
work$and$only$snip$off$li"le$bits$of$fibre$
at a time&$Move$the$pompom$around$to$
see it$from$different$angles$and$make$sure$
it$looks$good$from$both$front$and$back&$
F R O N T/ BAC K
SIDE
STEP 1
STEP 2
STEP 3
STEP 4
STEP 5
HOW TO MAKE SPOTS
STEP 1
STEP 2
STEP 3
STEP 4
Creating spots is really simple. Start by making
one spot, using two contrasting yarn colours:
STEP 1 Wrap a small amount of mauve yarn at
the centre of one arm. Leave a long starting
tail, then knot it to the yarn end once you’ve
finished, to help secure the spot.
STEP 2 Wrap cream yarn on either side of
the spot and on top of it, until the arm is full.
STEP 3 Wrap cream yarn around the other
arm and finish the pompom as usual – tie
cream yarn around the pompom and position
the knot at the side hinge of the gadget so
the spot sits at the front of the pompom.
STEP 4 Trim the pompom and give it a quick
wash, and it will have a mauve spot at the front.
Pompom fibres are pre"y flexible, so try
arranging your spot fibres into a different
shape, such as the heart we’ve tried here.
To make an area look bigger, fluff out the
yarn with your fingertips. To make an area
appear smaller, squeeze the fibres together.
NOTE Don’t be disappointed if your pompom’s colours don’t sit perfectly straight away! You always need to manipulate the fibres a bit.
Different colours within a pompom will always tend to look more like patches that merge together. Stick to simple effects rather than
detailed designs – for example, lots of precise spots may not end up in exactly the position you want, while narrow stripes may blend
together. Don’t give up – you might not get the result you want first time, but a li"le trial and error can lead to exciting discoveries!
KNIT!&!CROCHET!COLLECTION!"#"$ BHG %&
HOW TO MAKE OTHER SPOT EFFECTS
You!can!adapt!the!one-spot!pompom!
technique!to!create!various!effects$!Try!
adjusting!the!size!of!your!spot!for!larger!or!
smaller!areas!of!colour"!or!change!the!
shape!into!an!oval!or!a!rounded!triangle(!
these!shapes!are!useful!for!animal!heads!
with!muzzles$!You!can!also!make!layered!
spots"!like!this!eyeball)
STEP 1!Wrap!a!li#le!black!yarn!at!the!
centre!of!the!first!arm$
STEP 2!Wrap!grey!yarn!at!the!sides!and!
on!top!of!the!black!yarn$
STEP 3!Wrap!cream!yarn!at!the!sides!and!
on!top!of!the!grey!until!the!arm!is!full$!
Wrap!the!other!arm!with!cream$
STEP 4!Finish!the!pompom!as!usual"!
kno#ing!with!cream!at!the!hinge$
STEP 1
STEP 2
STEP 3
STEP 4
HOW TO MAKE A (PANDA) FACE
Now you’ve mastered the basics, create this cute and furry friend!
3 white
4 white
2 grey
1 black
STEP 1
STEP 1!First"!you!need!to!know!that!the!
pa#erns!on!each!arm!will!appear!in!the!
finished!pompom!symmetrically"!on!either!
side!of!the!central!tie$!This!means!that!
a!line!of!symmetry!runs!between!the!two!
layers!of!each!arm"!as!shown!here!with!
the!layered!spot!eyeball$
STEP 4
STEP 4!First"!wrap!Section!*!black!around!
the!arm!at!the!angle!shown!in!the!winding!
diagram$!Wrap!Section!+!white!on!both!
sides!of!the!black!spot!and!slightly!on!top$
!" BHG KNIT#&#CROCHET#COLLECTION#$%$&
3b
ck
la
2 white
1b
la
ck
Note: Colours
are layered
Note: Colours
are layered
EYE BA L L W I N D I N G P L A N
PA N DA W I N D I N G P L A N
STEP 2!A!winding!diagram"!like!this!one!
for!the!layered!spot"!can!help!you!to!plan!
where!to!place!each!yarn!colour$!Some!
winding!diagrams!are!different"!but!ours!
shows!one!arm!divided!into!thirds!to!help!
get!an!even!effect$!Colours!are!wound!on!
top!of!each!other"!so!each!area!is!numbered!
in!the!order!you!wind!it!onto!the!arm$
STEP 5
STEP 5!Wrap!Section!,!black!over!the!
white"!at!the!angle!shown!in!the!diagram$!
STEP 3!Now!try!making!a!pompom!
using!a!winding!diagram"!like!this!one!
for!a!panda head$
STEP 6
STEP 6!Fill!the!rest!of!the!arm!with!
Section!-!white!and!wrap!the!other!arm!
with!all!white$!Your!panda!head!will!have!
one!black!spot!for!the!nose!and!spaced!
spots!for!the!eyes$!Very!carefully!.you!
can’t!undo!a!cut!/"!trim!and!shape!the!
muzzle"!then!add!crochet!ears!.ch0"!tr!in!
,rd!ch!from!hook"!ss!to!last!ch/!to!finish$
FINISHING!ESSENTIALS
EMBROIDERY!STITCHES
BACKSTITCH
SPLIT STITCH
FRENCH KNOT
1
3
1
2
2
Backstitch forms a neat line
which can be used alone or to
outline other stitches.
Backstitch should be worked
so that all the stitches are the
same length with no gaps
between them. Bring the
needle up at 1, down at 2, up
at 3 and so on. Continue
stitching in this way, always
working back on yourself.
1
Bring the needle up at 1. Holding the thread with one hand,
twist the needle around the thread twice. Insert the point of
the needle into the fabric close to where the thread
emerged, pull the thread to tighten the knot, then push the
needle slowly through the fabric. Make a larger knot by
increasing the number of twists.
3 2
Bring the needle up at 1, down at 2
and up at 3, but don’t pull it all the
way through the fabric. Pull the
needle up through the centre of
the thread to split it, then carry on
pulling it up through the fabric and
the thread. Work the whole
outline in this way, making sure
you always split the thread in the
centre to form even stitches.
SATIN STITCH
2
3
1
Bring the needle up at 1, down at 2 and up at 3, working
stitches close together. Keep stitching in this way, under and
over, so that the back of the work looks the same as the front.
To maintain an even tension, always take the needle out at
the back, then back in at the front in two steps rather than in
and out in one motion.
lazy daisy
stitch
cross stitch
HOW TO WORK CHAIN STITCH
STEP 1
STEP 2
STEP 1 Bring needle to front
of fabric, a!er securing the
thread at the back. Insert
needle back into same hole
(or very close to it) and pull
gently to leave a small loop.
STEP 2 Bring needle to the
front a li"le way to the right,
making sure the needle
passes through the loop.
Insert the needle back into
the same hole (or very close
to it). Pull gently to leave a
small loop.
STEP 3
STEP 4
STEP 3 Repeat step 2 to make
more loops.
STEP 4 A!er the final loop,
make a small stitch over the
last loop to secure it.
KNIT!&!CROCHET!COLLECTION!"#"$ BHG %%
HOW TO MAKE A TASSEL
STEP 1
STEP 1 Cut a piece of
cardboard that’s about 5cm
wide and as long as you’d like
your tassel to be. Make a 1cm
cut in one short end of the
card. Tie a knot in one end
of your yarn and secure it
around the slot.
STEP 2
STEP 2 Wrap the yarn around
the length of the card to the
thickness you require. If you
want to use more colours,
knot the yarns together
at the base of the card and
carry on wrapping around.
DUPLICATE STITCH/
SWISS DARNING
3
2
4
1
Duplicate!stitch"!or!Swiss!
darning"!is!a!great!way!to!
add!small!details!to!your!
kni+ing"!covering!the!stitch!
with!an!embroidery!stitch!
the!same!shape!as!the!stitch!
beneath!it(!Work!from!
bo+om!to!top"!bringing!
the needle!out!at!the!base!
of!the!stitch!at!&(!Take!the!
needle!behind!the!top!of!
the!‘V’"!in!at!-!and!out!at!#(!
Take!the!needle!down!at!
&!and!bring!it!up!at!."!at!the!
base!of!the!stitch!above(!
Continue!in!this!way!up!the!
line!of!kni+ed!stitches(
STEP 3
STEP 3 Cut a small piece of
yarn, thread under the yarn
wraps at the top of the card
and knot the two ends. Cut
through the bo+om wraps
of the tassel and snip off
the starting knot(s).
STEP 4
STEP 4 Cut another piece
of yarn and wrap it around the
tassel, approx 2cm from the
top, to form head. Thread
end onto a needle and insert
down inside the head wraps.
Trim tassel ends to neaten.
HOOKING FRINGING
STEP 1
STEP 1!Cut!a!piece!of!
cardboard!to!desired!width"!
noting!if!the!instructions!
specify!#$cm!lengths"!then!
the!cardboard!should!be!at!
least!half!as!wide!–!that!is"!
&'cm!–!to!allow!for!yarn!
stretching!as!it!is!wound(!Wind!
the!yarn!around!cardboard!
and!cut!along!one!edge(
STEP 2!With!the!right!side!
of!your!work!facing"!using!
STEP 2
a!crochet!hook!and!the!
number!of!strands!of!yarn!
specified"!fold!yarn!in!half!
and draw!the!loops!through!
with!hook(!Insert!the!ends!of!
the!yarn!through!these!loops!
and!pull!firmly!to!form!a!knot(!
STEP 3!In!the!same!way"!
hook!each!fringe!evenly!
along!the!edge!of!the!work(!
Trim!the!ends!neatly(
SEWING SEAMS
Here are various methods you can use to join crochet seams using a tapestry needle or a crochet hook.
1 Sewing with a tapestry
needle is the regular and neat
way to join seams. Place two
pieces of crochet right sides
together and oversew them
as shown above, using a
tapestry or yarn needle.
2 To slip stitch a seam, place
the crochet pieces right sides
together. *Insert hook into
both edge stitches, yrh and
pull through to complete 1 slip
stitch; rep from * working into
the next edge stitches,
keeping work fairly loose.
!" BHG KNIT#&#CROCHET#COLLECTION#$%$&
3 For a dc seam, place the
crochet pieces right sides
together, or wrong sides
together for a visible seam.
Work as for slip stitch seam,
using double crochet instead
of slip stitch.
4 A useful variation on the dc
seam, the dc and chain seam is
used when less bulk and/or
greater flexibility is needed.
Work 1 double crochet and 1
chain alternately.
FINISHING!ESSENTIALS
HOW TO SEW ON A BUTTON
STEP 1
STEP 2
STEP 2 Push the needle back
through the bu!on and the
fabric, pulling the yarn firmly.
Bring the needle out through
the fabric and bu!on, and
back down again.
STEP 1 Use a pin to mark
position of your bu!on, lining
up with the bu!onhole. Secure
yarn on wrong side of fabric
and thread onto tapestry
needle. Bring needle out at
pin mark and through bu!on.
BACKSTITCH
3
STEP 3
STEP 3 Take yarn to the front
of the fabric, but under bu!on
and NOT through bu!on.
Wrap yarn around twice, pull
yarn tight (to create a shank
and prevent fraying).
STEP 4
STEP 4 Take the yarn to the
back of the fabric and weave
in end to secure.
MATTRESS STITCH
1
2
Place your kni!ed pieces RS up, side by side. Thread your yarn on
to a needle, anchor the end and weave along an edge to your start
point. Working from back to front, push your needle up between
the first and second stitches of the le# piece’s edge, then insert
the needle down between the first two stitches of the right
piece’s edge (on the equivalent row). Moving upwards, bring the
needle back up on the right piece, scooping up the bar that lies at
the back of the stitch. Return to the opposite piece and repeat.
Pin$your$two$pieces$together$and$secure$your$sewing$yarn$tail$a$
stitch$length$to$the$right$of$where$you$are$starting%$Now$working$
from$right$to$le#&$bring$the$needle$up$a$couple$of$stitches$away$
at$"%$Take$the$needle$down$at$#$and$up$again$at $% Repeat$this$
motion&$keeping$the$stitches$regular$and$ensuring$you$put$the$
needle$through$the$middle$of$each$kni!ed stitch$to$avoid$
spli!ing$the$fabric%
BLOCKING YOUR FINISHED PRODUCT
Words & Photography Immediate Media; Additional Photography Getty Images
Blocking is the pinning out of each piece of kni!ing or crochet to the correct size and shape.
STEP 1 Arrange piece(s) on
a padded surface, wrong side
up. Using rust-proof pins,
anchor each piece at
each corner. Use a ruler
or tape measure to check
measurements, then place
pins at 2cm intervals, angling
them through the edge into
the padded surface.
STEP 2 Re-measure and
check that the lines are
straight. Re-pin as necessary
to correct the shape and size.
STEP 3 Check the ball band
for pressing instructions, as
any special requirements will
be listed there. Synthetics
are usually not pressed at all.
Synthetic garments can be
pinned to shape as above
then dampened. Leave to
dry naturally.
STEP 4 If pressing is
recommended, cover with a
damp cloth and steam each
piece, but DO NOT PRESS.
STEP 5 When pieces are
cool (or dry, for synthetics),
remove pins and complete
item by following the
make-up instructions. ■
KNIT!&!CROCHET!COLLECTION!"#"$ BHG %&
1 ch-1 sp, 2 dtr at end of Row 30]
Row 31 Ch4, yrh insert hook in ch-1
sp, yrh and pull up a loop, yrh and
pull through 2 loops on hook, yrh
twice, insert hook in final dtr, yrh
and pull up a loop, (yrh and pull
through 2 loops) twice, yrh and pull
through all loops on hook.
Fasten off.
Repeat Corner on remaining 3
sides.
From page 6
TWIST!IT"!SISTER!
NOTES
Round 2 (RS) Ch5, 3tr in same ch-2
sp, *ch1, (3tr, ch2, 3tr) in next ch-2
sp; rep from * twice more, ch1, 2tr
in same sp as beg ch-5, ss to third
ch of beg ch-5, ss into ch-5 sp. [8
3-tr groups, 4 ch-1 sps, 4 ch-2 sps]
Round 3 Ch5, 3tr in same sp, ch1,
*3tr in next ch-1 sp, ch1, (3tr, ch2,
3tr, ch1) in next ch-2 sp; rep from *
twice more, 3tr in next ch-1 sp, ch1,
2tr in same sp as ch-5, ss to third
ch of beg ch-5, ss into ch-2 sp. [12
3-tr groups, 8 ch-1 sps, 4 ch-2 sps]
Round 4 Ch5, 3tr in same sp, ch1,
*(3tr, ch1) in each ch-1 sp across to
next ch-2 sp, (3tr, ch2, 3tr, ch1) in
ch-2 sp; rep from * twice more, (3tr,
ch1) in each ch-1 sp to beg ch-5, 2tr
in same sp as ch-5, ss to third ch of
beg ch-5, ss into ch-2 sp. [16 3-tr
groups, 12 ch-1 sps, 4 ch-2 sps]
Rounds 5-8 As Round 4. [32 3-tr
groups, 28 ch-1 sps, 4 ch-2 sps at
end of Round 8]
Change to Yarn B.
Rounds 9-32 Repeat Round 4,
changing colour every 8 rounds in
the foll sequence: Yarn B, Yarn C,
Yarn D. You should have worked
128 3-tr groups in Round 32, or 32
3-tr groups across each side.
Fasten off.
CENTRAL GRANNY SQUARE
Using Yarn A, ch4 and ss in last ch
from hook to form a loop.
Round 1 (RS) Ch5 (counts as tr, ch2
throughout), (3tr in loop, ch2) 3
times, 2tr in loop, ss to third ch of
beg ch-5, ss into ch-5 sp. [4 3-tr
groups, 4 ch-2 sps]
CORNERS
The corners are worked in
decreasing rows along each side of
the Granny Square.
With RS facing, join Yarn E in any
ch-2 sp.
Row 1 (RS) Ch4 (counts as dtr
throughout), skip 3tr, (3tr, ch1) in
each ch-1 sp to final ch-1 sp, 3tr in
final ch-1 sp, dtr in next ch-2 sp,
turn. [31 3-tr groups, 30 ch-1 sps,
2 dtr]
Rows 2-30 As Row 1. [2 3-tr groups,
YOU!WILL!NEED
Stylecra! Special Aran (100%
acrylic, 100g/196m) 1 ball of Yarn
A Watermelon (1839)
■ Stylecra! Special Aran with Wool
Nepp (77% acrylic, 20% wool, 3%
viscose, 400g/816m) 2 balls of
Yarn E Atlantic Blue Nepp (3391); 1
ball of each: Yarn B Dijon Nepp
(3990) and Yarn C Grey Jazz
Nepp (2494)
■ Stylecra! Amor (60% acrylic,
40% wool, 100g/240m) 2 balls of
Yarn D Heather (3758)
■ A 5mm crochet hook
■ Stitch markers
■ Yarn needle
■ Piece of cardboard 12cm long to
make the tassels
■
MEASUREMENTS
Throw measures approx 145x145cm
TENSION
Tension is not critical, but it may
affect the yarn quantities required
ABBREVIATIONS
For a full list see page 68
Throw is made up of a large
Granny Square worked in rounds.
The corners are worked off each
straight edge of the Granny
Square to form the Throw.
"# BHG KNIT$&$CROCHET$COLLECTION$%#%&
BORDER
With RS facing, join Yarn E in any
corner.
Round 1 (RS) Ch1 (does not count
as st), *3dc in corner, pm in second
dc of corner, 3dc around next 31
row-ends, dc in ch-2 sp of Granny
Square, 3dc around next 31
row-ends; rep from * 3 times more,
ss to beg dc. [264 sts]
Round 2 (RS) Ch3 (counts as tr),
*tr in each st to marker, 3tr in
marked st; rep from * around, ss to
top of beg ch-3.
Fasten off and weave in all ends.
TASSELS (MAKE 4)
Cut 2 lengths of Yarn E, 15cm long.
Set aside. Wrap Yarn E around the
cardboard 40 times. Thread one
15cm-long strand through the top
of the cardboard and secure the
wrapped strands with a small knot.
Cut the Tassel from the cardboard.
Wrap the second strand of yarn
1cm from the top of the tassel,
secure with a knot and weave ends
through the centre of the Tassel.
Use the upper strand to secure the
Tassels to each corner of the
Throw.
From page 7
LOVE!TRIANGLE
YOU!WILL!NEED
DROPS Air Uni Colour (65%
alpaca, 28% polyamide, 7% wool,
50g/150m) in Yarn A Navy Blue
Mix (09); Yarn B Yellow (22); Yarn
C Rose Petal (52) and Yarn D
Crimson (44) For yarn quantities
and measurements see size table
■ A 5mm crochet hook
■ Yarn needle
■
TENSION
Rounds 1-3 measure 10cm in
diameter using a 5mm hook, or size
needed to obtain correct tension
ABBREVIATIONS
For a full list see page 68
NOTES
Top is made up of 46 Triangle
Motifs. Use the Diagram on page 81
when making up the Top. Edging is
added around the Hem and Sleeve
Cuffs at the end. You can adjust the
finished length of the Top by
working a longer or shorter Hem.
We recommend blocking all Motifs
before joining them together.
TRIANGLE MOTIF (MAKE 46)
Using Yarn D, ch4 and ss in last ch
from hook to form a loop.
Round 1 (RS) Ch3 (counts as tr
throughout) 2tr in loop, ch3, (3tr in
loop, ch3) twice, ss to top of beg
ch-3. [3 3-tr groups]
Fasten off.
With WS facing, join Yarn A in any
ch-3 sp.
Round 2 Ch3 (2tr, ch3, 3tr, ch1) in
same sp, (3tr, ch3, 3tr, ch1) in each
ch-3 sp around, ss to top of beg
ch-3. [6 3-tr groups]
Fasten off.
With RS facing, join Yarn C in any
ch-3 sp.
Round 3 Ch3, (2tr, ch3, 3tr, ch1) in
same ch-3 sp, *3tr in ch-1 sp, ch1,
(3tr, ch3, 3tr) in ch-3 sp; rep from *
once more, 3tr in ch-1 sp, ch1, ss to
top of beg ch-3. [9 3-tr groups]
Fasten off.
With WS facing, join Yarn A in any
ch-3 sp.
Round 4 Ch3, (2tr, ch3, 3tr, ch1) in
same ch-3 sp, *(3tr, ch1) in each ch-1
sp across to next corner**, (3tr, ch3,
3tr, ch1) in ch-3 sp; rep from * twice
more ending final rep at **, ss to top
of beg ch-3. [12 3-tr groups]
Fasten off.
With RS facing, join Yarn B in any
ch-3 sp.
Round 5 As Round 4. [15 3-tr groups]
Fasten off.
SIZE S ONLY
With WS facing, join Yarn A in any
ch-3 sp.
Round 6 Ch2 (counts as htr), (2htr,
ch3, 3htr, ch1) in same sp, *(3htr,
ch1) in each ch-1 sp across to next
corner, (3htr, ch3, 3htr) in ch-3 sp;
rep from * around, ss to top of beg
ch-2. [18 3-htr groups]
Fasten off and weave in ends.
SIZES M, L AND XL ONLY
With WS facing, join Yarn A in any
ch-3 sp.
Round 6 As Round 4. [18 3-tr#groups]
Fasten off Size M only and weave
in ends.
SIZE L ONLY
PATTERNS
LOVE TRIANGLE SIZE TABLE
SIZE
B
C
A
BUST!A" 49.5 (54: 59: 61)cm
LENGTH!B" 60.5 (64.5: 68.5: 77)cm
SLEEVE!LENGTH!C"!28 (30: 32: 35)cm
PIECING
DIAGRAM
S
M
L
XL
TO!FIT!BUST
cm
81-86
91-97
101-107
111-117
ACTUAL!BUST
cm
99
108
118
132
LENGTH
cm
60.5
64.5
68.5
77
SLEEVE!LENGTH
cm
28
30
32
35
Yarn A
5
5
8
11
Yarn B
2
2
2
2
Yarn C & D
1
1
1
1
SIZING!COLOUR!KEY!So you can re-use this pattern, we’ve colour-coded the sizing
instructions. Simply follow our colour-coded measurements and you’re off.
FRONT
From page 8
BACK
SPORTY!STRIPES
YOU!WILL!NEED
King Cole Majestic DK (50%
superwash wool, 30% acrylic, 20%
polyamide, 50g/121m) in Yarn A
Beige (2645); Yarn B Denim (2654)
and Yarn C Claret (2662). For yarn
quantities and measurements see
size table
■ A pair of 3.25mm kni"ing needles
■ A pair of 4mm needles
■ A stitch holder
■ Yarn needle
■
Cont with Yarn A.
Round 7 (WS) Ch2 (counts as htr),
*htr in each st and ch-1 sp to ch-3
sp, (3htr, ch3, 3htr) in ch-3 sp; rep
from * around, ss to beg ch-3, ss to
top of beg ch-2. [105 sts]
Fasten off and weave in ends.
SIZE XL ONLY
Cont with Yarn A.
Round 7 (RS) As Round 4. [21 3-tr
groups]
Round 8 (RS) Ch1, *dc in each st
and ch-1 sp to corner, (2dc, ch2,
2dc) in ch-3 sp; rep from * around,
ss to beg dc.
Fasten off.
TO MAKE UP
Block all Motifs following any yarn
care instructions on the ball band.
Using the Diagram above,
whipstitch the Motifs together to
form the Front and Back.
EDGING
Join Yarn A in first st across top
edge of Front.
Round 1 (RS) Ch1, dc in each st and
ch-sp across, turn.
Rows 2-3 Ch1, dc in each st across,
turn.
Fasten off.
Rep Edging across Back.
Sew the Front and Back together,
leaving a 22 (22: 24: 24)cm gap at
the centre for the neck opening.
Sew the sleeve and side seams.
CUFF EDGING
Join Yarn A to sleeve seam at base
of Sleeve.
Round 1 (RS) Ch1, dc in each st
around, ss to beg dc, turn.
Rounds 2-3 As Round 1.
Fasten off.
HEM
Join Yarn A in the side seam at
base of Top.
Ch13 (11: 9: 7).
Row 1 Dc in second ch from hook
and each ch across, ss in next 2 sts
at edge, turn. [12 (10: 8: 6) sts]
Row 2 Dc in bl of each st across,
turn.
Row 3 Ch1, dc in bl of each st
across, ss in next 2 sts at edge,
turn.
Rep Row 2-3 around base of Top.
Fasten off.
Sew the short edges of the Hem
together.
TO FINISH
Weave in all ends. Block to the
measurements listed following any
yarn care instructions on the ball
band.
TENSION
22 sts and 28 rows to measure
10x10cm over st st using 4mm
needles
ABBREVIATIONS
Moss stitch (over an odd number
of stitches)
Row 1 (RS) (K1, P1) to last st, K1.
Row 2 (WS) (K1, P1) to last st, K1.
For a full list see page 73
BACK
Cast on 109 (121: 133: 145: 157: 169)
sts using 3.25mm needles and Yarn
A.
Row 1 (RS) K2, (P1, K1) to last st, K1.
Row 2 K1, (P1, K1) to end.
Rep the last 2 rib rows twice more,
increasing 1 st at each end of last
row. [111 (123: 135: 147: 159: 171) sts]
Change to 4mm needles and begin
striped pa"ern as follows:
Row 1 (RS) Knit using Yarn A.
Row 2 Purl using Yarn A.
Rows 3 to 14 Rep Rows 1 and 2
another six times.
Join in B.
Row 15 Knit using Yarn B.
Rows 16 to 18 Work 3 rows in moss
stitch using Yarn B.
Break B.
Rows 19 to 32 As Rows 1 to 14.
Join in C.
Rows 33 to 36 Using Yarn C as
Rows 15 to 18.
Break Yarn C.
These 36 rows form pa".
Cont in patt until work measures
67 (67: 68: 69: 70: 70)cm from
cast-on edge, ending a#er a WS
row.
SHAPE SHOULDERS
Cast off 8 (8: 9: 10: 11: 12) sts at beg
of next 8 rows, then 6 (10: 11: 11: 12:
13) sts at beg of next 2 rows.
Slip rem 35 (39: 41: 45: 47: 49) sts
on a stitch holder and leave.
FRONT
Work as Back until Front measures
47 (47: 47: 46: 46: 46)cm, ending
a#er a RS row.
SHAPE LEFT NECK
Next row (WS) Pa" across 56 (62:
68: 74: 80: 86) sts, slip last st
(centre st) on a short length of yarn
and leave, pa" to end.
Cont in pa", working shaping on
last group of 55 (61: 67: 73: 79: 85)
sts for le# side of neck.
Next row (RS, dec row) Pa" to last
3 sts, k2tog firmly, K1. [1 st dec’d]
Rep dec row on 10 (12: 12: 16: 16: 18)
foll RS rows. [44 (48: 54: 56: 62: 66)
sts]
Rep dec row on 6 (6: 7: 5: 6: 5) foll
4th rows. [38 (42: 47: 51: 56: 61) sts]
Work straight until Front measures
same as Back to shoulder shaping,
ending at shoulder edge.
SHAPE LEFT SHOULDER
Cast off 8 (8: 9: 10: 11: 12) sts at beg
of next row and the 3 foll alt rows.
Work 1 row straight.
KNIT!&!CROCHET!COLLECTION!#$#% BHG &'
SPORTY STRIPES SIZE TABLE
FRONT!&!BACK
67 (67: 68: 69: 70: 70)cm
SLEEVE
48 (48: 48: 48: 48: 48)cm
SIZE
50.5 (56: 61.5: 67: 72.5: 77.5)cm
Cast off rem 6 (10: 11: 11: 12: 13) sts.
SHAPE RIGHT NECK
With RS facing rejoin yarn at neck
edge.
Next row (RS dec) K1, k2togtbl
firmly, work to end. [1 st dec’d]
Rep dec row on 10 (12: 12: 16: 16: 18)
foll RS rows. [44 (48: 54: 56: 62: 66)
sts]
Rep dec row on 6 (6: 7: 5: 6: 5) foll
4th rows. [38 (42: 47: 51: 56: 61) sts]
Work straight until Front measures
same as Back to shoulder shaping,
ending at shoulder edge.
SHAPE RIGHT SHOULDER
Cast off 8 (8: 9: 10: 11: 12) sts at beg
of next row and the 3 foll alt rows.
Work 1 row straight.
Cast off rem 6 (10: 11: 11: 12: 13) sts.
SLEEVES (worked top down)
Cast on 77 (83: 89: 93: 99: 105) sts
using 4mm needles and Yarn C.
S
M
L
XL
XXL
XXXL
TO!FIT!CHEST
cm
91-97
102-107
112-117
122-127
132-137
142-147
ACTUAL!CHEST
cm
101
112
123
134
145
155
LENGTH
cm
67
67
68
69
70
70
SLEEVE!LENGTH
cm
48
48
48
48
48
48
YARN
King Cole Majestic DK (50g/121m)
Yarn A Beige (2645)
8
8
9
10
11
12
Yarn B Denim (2654)
2
2
2
3
3
3
Yarn C Claret (2662)
2
2
2
3
3
3
SIZING!COLOUR!KEY!So you can re-use this pattern, we’ve colour-coded the sizing
instructions. Simply follow our colour-coded measurements and you’re off.
Beg with Row 33, work 8 rows in
pa" as on Back.
Cont in patt to match Back and
Front AND AT THE SAME TIME,
shape Sleeve as follows:
Next row (RS dec) K1, skpo, pa" to
last 3 sts, k2tog, K1. [2 sts dec’d]
Work 7 (5: 5: 5: 5: 3) rows straight.
Rep last 8 (6: 6: 6: 6: 4) rows
another 6 (8: 11: 7: 3: 6) times.
[63 (65: 65: 77: 91: 91) sts]
Rep dec row. [2 sts dec’d]
Work 5 (5: 3: 3: 3: 3) rows straight.
Rep last 6 (6: 4: 4: 4: 4) rows
another 6 (6: 5: 11: 17: 16) times.
[49 (51: 53: 53: 55: 57) sts]
Work straight until Sleeve
measures 48cm from cast-on edge,
ending a#er a RS row.
Break Yarn B and Yarn C.
Next row (WS) Purl using A,
decreasing 6 sts evenly across row.
[43 (45: 47: 47: 49: 51) sts]
A 3.5mm crochet hook
Stitch markers
■ Yarn needle
■
■
MEASUREMENTS
Bag measures approx 28cm deep,
excluding handles
TENSION
Tension is not critical for this
project, but it may affect the yarn
quantities required
ABBREVIATIONS
Change to 3.25mm needles and
work in rib as for Back for 6cm.
Cast off loosely and evenly in rib.
NECKBAND
Join le# shoulder.
With 3.25mm needles and Yarn C,
RS facing, K across 35 (39: 41: 45:
47: 49) sts of Back, pick up and K49
(51: 53: 55: 57: 57) sts evenly down
le# side of neck (approx 4 sts every
5 rows), K1 from centre st, finally
pick up and K50 (52: 54: 56: 58: 58)
sts evenly up right side of neck.
[135 (143: 149: 157: 163: 165) sts]
Row 1 (WS) Work moss stitch.
Row 2 Moss stitch 83 (89: 93: 99:
103: 105), sk2po, work moss stitch
to end. [2 sts dec’d]
Row 3 Work moss stitch.
Join in Yarn B.
Row 4 With Yarn B, K82 (88: 92:
98: 102: 104), sk2po, K to end. [2 sts
dec’d]
Row 5 With Yarn B, in moss stitch.
in loop, ch2) 3 times, ss to top of
beg ch-3. [16 sts, 4 ch-2 sps]
Round 2 (RS) Ch3, *tr in each st to
ch-2 sp, (2tr, ch2, 2tr) in ch-2 sp;
rep from * around, ss to top of beg
ch-3. [32 sts, 4 ch-2 sps]
Rounds 3-10 As Round 2. [160 sts]
Pm in the 19th tr across each side.
Round 11 Ch3, *tr in each st to
marker, skip next 4 sts, tr in each
st to ch-2 sp, (2tr, ch2, 2tr) in ch-2
sp; rep from * around, ss to top of
beg ch-3. [160 sts, 4 ch-2 sps]
Fasten off.
For a full list see page 68
From page 9
GOT!TO!GO!
YOU!WILL!NEED
■
Hoooked Somen (60% recycled
co"on, 40% natural linen,
100g/165m) 2 balls of Abisso
(SO19); 1 ball of each: Mezzano"e
(SO20) and Vaniglia (SO11)
NOTES
Bag is worked in rounds from the
base. The Handles are worked
from the top of the Bag.
BASE
Using Abisso, ch5 and ss in last ch
from hook to form a loop.
Round 1 (RS) Ch3 (counts as tr
throughout), 3tr in loop, ch2, (4tr
!" BHG KNIT#&#CROCHET#COLLECTION#"$"%
SIDES
Join Mezzanotte in any ch-2 sp.
Round 12 Ch3, (tr, ch2, 2tr) in
same sp, *tr in next 18 sts, skip 4
sts, tr in each st to ch-2 sp, (2tr,
ch2, 2tr) in ch-2 sp; rep from * 3
times more omi"ing final corner,
ss to top of beg ch-3.
Rounds 13-16 Ch3, *tr in each st to
ch-2 sp, (2tr, ch2, 2tr) in ch-sp, tr in
next 18 sts, skip 4 sts; rep from *
Row 6 With Yarn B, moss stitch 81
(87: 91: 97: 101: 103), sk2po, moss
stitch to end. [2 sts dec’d]
Row 7 With Yarn B, in moss stitch.
Break Yarn B. Cont in Yarn C.
Row 8 K80 (86: 90: 96: 100: 102),
sk2po, knit to end.
Row 9 Work moss stitch.
Row 10 Moss stitch 79 (85: 89: 95:
99: 101), sk2po, work moss stitch to
end.
Cast off evenly in moss stitch,
working firmly across 3 centre
front sts.
TO FINISH
Join right shoulder and Neckband.
Stitch cast-on edge of Sleeves to
upper side edges of Back and
Front. Join side and Sleeve seams.
Block gently to measurements,
following any yarn care instructions
on the ball band.
around, ss to top of beg ch-3.
Fasten off.
Join Vaniglia in any ch-2 sp.
Rounds 17-18 As Rounds 12-13.
Change to Mezzanotte.
Rounds 19-22 As Round 13.
Change to Abisso.
Rounds 23-25 As Round 13.
Fasten off and weave in ends.
HANDLES (MAKE 2)
Join Abisso in any ch-2 sp from
Round 25.
Row 1 (RS) Ch151, ss in next ch-2
sp from Round 25, turn.
Row 2 (WS) Ch3, tr in each ch
across, ss in ch-2 sp as base of
ch-151, turn. [152 sts]
Change to Vaniglia.
Row 3 Ch3, tr in each st across, ss
into ch-2 sp at end of Handle.
Fasten off.
Repeat Handle over the remaining
2 ch-sps from Round 25.
Fasten off and weave in ends.
PATTERNS
ABBREVIATIONS
BACK
Cast on 94 (106: 118: 126: 138: 150:
162: 170) sts using 3.25mm needles
and Yarn A.
Row 1 (RS) *K2, P2; rep from * to
last 2 sts, K2.
Row 2 (WS) *P2, K2; rep from * to
last 2 sts, P2.
Rows 3 to 20 Rep Rows 1 and 2
another 9 times.
Change to 4mm needles.
Working in Main Pattern
throughout and following Stripe
Pa"ern order for Back, work until
Back measures 36 (36: 36: 36: 34:
34: 32: 32)cm from cast-on edge,
ending a#er a main pa"ern Row 6.
For a full list see page 73
NOTE!
From page 10
SATURDAY!STYLE
YOU!WILL!NEED
West Yorkshire Spinners
ColourLab DK (100% wool,
100g/225m) in Yarn A Deep Teal
(716); Yarn B (Aqua Green (705);
Yarn C Moonlight Grey (895) and
Yarn D Frosty Blues (892)
For yarn quantities and
measurements see size table
■ A pair of 3.25mm kni"ing needles
■ A pair of 4mm needles
■ Stitch holders
■ 5 bu"ons, 2.5cm diameter
■ Yarn needle
■
TENSION
56 (56.5: 58: 58.5: 59: 59.5: 58.5: 59.5)cm
22 sts and 32 rows to measure
10x10cm over main pa"ern using
4mm needles
FRONTS!&!BACK
42 (47.5: 53: 58: 63: 67.5: 73: 78)cm
The Main Pa"ern is worked in
multiples of 6 rows. To ensure
ridges are aligned between the
fronts, sleeves and back, all raglan
shaping begins on the same row of
main pa"ern Rows 1 to 6.
STRIPE!PATTERNS
MAIN PATTERN
Worked over 6 rows, see Stripe
Pa"ern below for shade order.
Row 1 (RS) Using Yarn B or D, knit.
Row 2 (WS) Using Yarn B or D, purl.
Rows 3 and 4 Using Yarn B or D,
work as Rows 1 and 2.
Row 5 Using Yarn C, knit.
Row 6 Using Yarn C, knit.
These 6 rows set the main pa"ern,
with Rows 5 and 6 worked in Yarn
C throughout the garment.
SHAPE RAGLAN
Cast off 5 (5: 5: 7: 7: 7: 8: 8) sts at
the beg of the next two rows. [84
(96: 108: 112: 124: 136: 146: 154) sts]
Dec row K2, ssk, pa" to last 4 sts,
k2tog, K2. [82 (94: 106: 110: 122: 134:
144: 152) sts]
STRIPE PATTERN SHADE
ORDER
Worked over 24 rows of main pa"ern.
Back
Rows 1 to 18 Yarn B and Yarn C.
Rows 19 to 24 Yarn D and Yarn C.
Sizes XS and S only
Rep dec row on the 7 (3: -: -: -: -: -:
-) following 4th rows. [68 (88: -: -: -:
-: -: -) sts]
All sizes
Rep dec row on the 11 (20: 28: 27:
29: 27: 24: 22) following RS rows.
[46 (48: 50: 56: 64: 80: 96: 108) sts]
Next row (WS) Pa" to end.
Left Front
Rows 1 to 18 Yarn B and Yarn C.
Rows 19 to 24 Yarn D and Yarn C.
Right Front
Rows 1 to 12 Yarn B and Yarn C.
Rows 13 to 18 Yarn D and Yarn C.
Rows 19 to 24 Yarn B and Yarn C.
Sizes L, XL, 2XL, 3XL and 4XL
only
Next row (RS dec) K2, ssk, pa" to
last 4 sts, k2tog, P2. [2 sts dec]
Next row (WS dec) P2, p2togtbl,
pa" to last 4 sts, p2tog, P2. [2 sts
dec]
Rep last 2 rows another - (-: -: 0: 2:
5: 9: 12) times. [- (-: -: 52: 52: 56: 56:
56) sts]
Sleeve 1
Rows 1 to 6 Yarn D and Yarn C.
Rows 7 to 24 Yarn B and Yarn C.
Sleeve 2
Rows 1 to 6 Yarn B and Yarn C.
Rows 7 to 12 Yarn D and Yarn C.
Rows 13 to 24 Yarn B and Yarn C.
All Sizes
Cast off remaining 46 (48: 50: 52:
52: 56: 56: 56) sts.
FRONTS
POCKET LINERS (MAKE TWO)
Cast on 26 (30: 30: 30: 34: 34: 34:
34) sts using 3.25mm needles and
Yarn A.
Row 1 (RS) *K2, P2; rep from * to
last 2 sts, K2.
Row 2 (WS) *P2, K2; rep from * to
last 2 sts, P2.
Rows 3 to 17 Work as Row 1 and 2,
ending a#er a RS row.
Place stitches onto a stitch holder.
LEFT FRONT
Cast on 53 (59: 65: 73: 77: 81: 87:
95) sts using 3.25mm needles and
Yarn A.
Row 1 (RS) P2 (0: 2: 2: 2: 2: 0: 0),
*K2, P2; rep from * to last 3 sts, K3.
Row 2 (WS) Sl1, *P2, K2; rep from *
to last 4 (2: 4: 4: 4: 4: 2: 2) sts, P2,
K2 (0: 2: 2: 2: 2: 0: 0).
Rows 3 to 19 Work as Rows 1 and 2.
Row 20 (WS) (set up front band
and pocket) Pa" 13 sts, place these
13 sts on a st holder, pa" 6 (8: 10:
14: 14: 16: 20: 24) sts, place the next
26 (30: 30: 30: 34: 34: 34: 34) sts
on a stitch holder, then with WS
facing, pa" across 26 (30: 30: 30:
34: 34: 34: 34) sts from first pocket
liner, pa" to end. [40 (46: 52: 60:
64: 68: 74: 82) sts]
Change to 4mm needles.
Working in main pa"ern
throughout and following stripe
pa"ern order for Le# Front,
continue until Le# Front measures
31 (31: 31: 31: 29: 29: 27: 27)cm from
cast-on edge, ending with main
pa"ern Row 6.
SHAPE RAGLAN AND
FRONT NECK
Cast off 5 (5: 5: 7: 7: 7: 8: 8) sts at
SLEEVE
42 (42: 42: 42: 42: 44: 44: 44)cm
SATURDAY STYLE SIZE TABLE
SIZE
XS
S
M
L
XL
2XL
3XL
4XL
TO!FIT!BUST
cm
76
86
97
107
117
127
137
147
ACTUAL!BUST
cm
83.5
94.5
105.5
116
125.5
134.5
145.5
156
ACTUAL!LENGTH!BACK
cm
56
56.5
58
58.5
59
59.5
58.5
59.5
ACTUAL!LENGTH!FRONT
cm
50.5
51
52.5
53
53.5
54
53
54
SLEEVE!LENGTH
cm
42
42
42
42
42
44
44
44
YARN
WYS ColourLab DK (100g/225m)
Yarn A Deep Teal (716)
1
2
2
2
2
2
2
2
Yarn B Aqua Green (705)
2
2
3
3
3
3
3
3
Yarn C Moonlight Grey (895)
2
2
2
2
2
2
2
3
Yarn D Frosty Blues (892)
1
1
1
1
1
2
2
2
SIZING!COLOUR!KEY!So you can re-use this pattern, we’ve colour-coded the sizing
instructions. Simply follow our colour-coded measurements and you’re off.
KNIT!&!CROCHET!COLLECTION!"#"$ BHG %&
the beg of the next RS row. [35 (41:
47: 53: 57: 61: 66: 74) sts]
Patt 1 row.
NOTE! READ AHEAD, neck
shaping decreases are now
worked AT THE SAME TIME as
raglan decreases.
NECK SHAPING
Work these decreases AT THE
SAME TIME as the raglan shaping.
Neck Dec row (RS) Working
raglan dec as given for your size
below, work to last 4 sts, k2tog, K2.
Work Neck Dec row on the 3 (2: 5:
4: 6: 8: 10: 8) following 4th rows
and on the 10 (12: 10: 15: 12: 10: 8:
14) following RS rows.
RAGLAN SHAPING
Work AT THE SAME TIME as the
neck shaping as follows:
Raglan Dec row (RS) K2, ssk, pa!
to end, working neck edge dec if
given for your size .
Sizes XS and S only
Work Raglan Dec row on the 7 (3:
-: -: -: -: -: -) following 4th rows.
All sizes
Work Raglan Dec row on the 10
(19: 27: 26: 29: 27: 24: 22) following
RS rows. [3 (3: 3: 6: 8: 14: 22: 28) sts]
Sizes XS, S and M only
Next row (WS) Pa! to end.
Next row (RS) K1, ssk. [2 sts]
Next row (WS) Pa! to end.
Cast off.
Sizes L, XL, 2XL, 3XL and 4XL
only
Raglan Dec row (WS) Pa! to last 4
sts, p2togtbl, P2.
Raglan Dec row (RS) K2, ssk, pa!
to end, working neck edge
decrease if required.
Rep last 2 rows another -(-: -: 0: 1:
4: 8: 11) times. [4 sts]
Next row (WS) P2togtbl, P2. [3 sts]
Next row (RS) K3.
Next row (WS) P2togtbl, P1. [2 sts]
Cast off.
RIGHT FRONT
Cast on 53 (59: 65: 73: 77: 81: 87:
95) sts using 3.25mm needles and
Yarn A.
Row 1 (RS) Sl1, *K2, P2; rep from *
to last 4 (2: 4: 4: 4: 4: 2: 2) sts, K2,
P2 (0: 2: 2: 2: 2: 0: 0).
Row 2 (WS) K2 (0: 2: 2: 2: 2: 0: 0),
*P2, K2; rep from * to last 3 sts, P3.
Rows 3 to 19 Work as Rows 1 and 2.
Row 20 (Set up front band and
pocket) Pa! 8 (8: 12: 16: 16: 18: 20:
24) sts, place the next 26 (30: 30:
30: 34: 34: 34: 34) sts on a stitch
holder, then with WS facing, purl
across 26 (30: 30: 30: 34: 34: 34:
34) sts from first pocket liner, pa!
to last 13 sts, place these sts on a
st holder, turn work. [40 (46: 52:
60: 64: 68: 74: 82) sts]
Change to 4mm needles.
Working in Main Pattern
throughout and following stripe
pa!ern order for Right Front,
continue until work measures 31
(31: 31: 31: 29: 29: 27: 27)cm from
cast-on edge, ending with main
pa!ern row 1.
SHAPE RAGLAN AND
FRONT NECK
Cast off 5 (5: 5: 7: 7: 7: 8: 8) sts at
the beg of the next WS row. [35
(41: 47: 53: 57: 61: 66: 74) sts]
NOTE! READ AHEAD, neck
shaping decreases worked AT
THE SAME TIME as raglan
decreases.
NECK SHAPING
Work these decreases AT THE
SAME TIME as the raglan shaping.
Neck Dec row (RS) K2, ssk, pa! to
end, working raglan dec as required.
Work dec row every 4th row
another 3 (2: 5: 4: 6: 8: 10: 8) times.
Then work dec row every RS row
10 (12: 10: 15: 12: 10: 8: 14) times.
RAGLAN SHAPING
Work AT THE SAME TIME as the
neck shaping as follows:
Raglan Dec row (RS) Working
neck edge decrease if required,
pa! to last 4 sts, k2tog, K2.
Sizes XS and S only
Work Raglan Dec row on the 7 (3:
-: -: -: -: -: -) following 4th rows.
All sizes
Work Raglan Dec row on the 10
(19: 27: 26: 29: 27: 24: 22) following
RS rows.
Sizes XS, S and M only
3 sts rem.
Next row (WS) Pa! to end.
Next row (RS) K2tog, K1. [2 sts]
Next row (WS) Pa! to end.
Cast off.
Sizes L, XL, 2XL, 3XL and 4XL
only
Raglan Dec row (WS) P2, p2tog,
pa! to end.
Raglan Dec row (RS) Working
neck edge decrease if required
pa! to last 4 sts, k2tog, K2.
Rep last two rows another -(-: -: 0:
1: 4: 8: 11) times. [4 sts]
Next row (WS) P2, P2tog. [3 sts]
Next row (RS) K3.
Next row (WS) P1, P2tog. [2 sts]
Cast off.
!" BHG KNIT#&#CROCHET#COLLECTION#$%$"
SLEEVES
Cast on 54 (54: 54: 58: 62: 62: 62:
66) sts using 3.25mm needles and
Yarn A.
Row 1 (RS) *K2, P2; rep from * to
last 2 sts, K2.
Row 2 (WS) *P2, K2; rep from * to
last 2 sts, P2.
Rows 3 to 20 Work as Row 1 and 2.
Change to 4mm needles.
Work 24 (24: 24: 20: 20: 20: 16: 16)
rows in main pa!ern, following
stripe pa!ern order for Sleeve 1.
NOTE! READ AHEAD
Continue in main pattern and AT
THE SAME TIME begin Sleeve
increases on next row.
Next row (RS, inc row) Using yarn
colour as required for pa!, K2, M1,
K to last 2 sts, M1, K2. [56 (56: 56:
60: 64: 64: 64: 68) sts]
Increase at each end of row as set
on the 1 (1: 5: 11: 1: 11: 18: 3) following
14th (8th: 6th: 6th: 4th: 4th: 4th:
2nd) row(s), then at each end of
row on the 4 (7: 6: 2: 13: 7: 3: 21)
following 16th (10th: 8th: 8th: 6th:
6th: 6th: 4th) rows. [66 (72: 78: 86:
92: 100: 106: 116) sts]
Continue straight until work
measures 42 (42: 42: 42: 42: 44: 44:
44)cm from cast-on edge, ending
with main pa!ern Row 6.
SHAPE RAGLAN
Cast off 5 (5: 5: 7: 7: 7: 8: 8) sts at
the beg of the next two rows. [56
(62: 68: 72: 78: 86: 90: 100) sts]
Dec row (RS) K2, ssk, pa! to last 4
sts, k2tog, k2. [2 sts dec’d]
Work 3 rows straight.
Rep last 4 rows another 6 (2: 1: 0:
4: 2: 2: 4) times. [42 (56: 64: 70: 68:
80: 84: 90) sts]
Rep dec row.
Work 1 row straight.
Rep last 2 rows another 9 (20: 24:
26: 19: 23: 24: 16) times. [22 (14: 14:
16: 28: 32: 34: 56) sts]
Sizes XS, XL, 2XL, 3XL and 4XL
only
Dec row (RS) K2, ssk, pa! to last 4
sts, k2tog, k2.
Dec row (WS) P2, p2tog, pa! to
last 4 sts, p2togtbl, P2.
Rep last 2 rows another 1 (-: -: -: 2:
3: 3: 8) times. [14 (-: -: -: 16: 16: 18:
20) sts]
All sizes
Cast off rem sts.
Repeat for second Sleeve, using
stripe pa!ern order for Sleeve 2.
TO MAKE UP
Block work following measurements
given and any yarn care instructions
on the ball band. Sew all raglan
edges together. Sew Sleeve and
side seams, noting that back is 5cm
longer than the Fronts, so the Back
rib will be le" ‘floating’.
BUTTONBAND
With RS facing, using Yarn A and
3.25mm needles, pick up 13 sts
from le" front stitch holder and
work as follows:
Row 1 (RS) K#, P1, *K2, P2; rep
from * to last 3 sts, K3. [14 sts]
Row 2 (WS) Sl1, *P2, K2; rep from *
to last st, P1.
Row 3 K1, *P2, K2; rep from * to
last st, K1.
Rows 2 and 3 set the pa!ern for
the le" front band.
Continue to work these rows until
the band fits around front edge,
across top of Sleeves and half way
across back of neck.
Cast off.
BUTTONHOLE BAND
With WS facing, using Yarn A and
3.25mm needles, pick up 13 sts
from right front stitch holder and
work as follows:
Set up row (WS) K#, K1, *P2, K2;
rep from * to last 3 sts, P3. [14 sts]
Row 1 (RS, buttonhole row) Sl1,
K2, P1, k2tog, (yo) twice, ssk, P1, K2,
P2, K1.
Row 2 (WS) P1, K2, P2, K1, P1, (K1,
P1) into loop, P1, K1, P3.
Row 3 Sl1, *K2, P2; rep from * to
last st, K1.
Row 4 P1, *K2, P2; rep from * to
last st, P1.
Rep Rows 3 and 4 another 7 (7: 7: 7:
6: 6: 5: 5) times.
The previous 18 (18: 18: 18: 16: 16: 14:
14) rows set the pa!ern and
bu!onholes for the lower right
front band. Work these rows
another 3 times, then work Rows 1
and 2 once more.
Next, continue in rib as set by
Rows 3 and 4 until the band fits
around front edge, across top of
Sleeves and half way across back
of neck.
Cast off.
Join front bands at back of neck
and stitch into place around front
edges, across top of Sleeves and
halfway across back of neck. A!ach
bu!ons to le" front band matching
placement of bu!onholes.
POCKET TOPS
Using 3.25mm needles and Yarn A,
place stitches from holder onto
needles and work 6 rows in rib to
match lower border or continue in
rib until desired depth of pocket is
reached. Cast off in pa!ern. Pin
pocket liners onto inside of each
front and slip stitch in place. Stitch
sides of pocket top into place on
fronts.
PATTERNS
Round 1 (RS) Ch2 (counts as htr
throughout) 135 (151: 167: 183: 199)
htr, ss to beg st, turn. [136 (152: 168:
184: 200) sts]
Round 2 (WS) Ch2, htr in each st
around, ss to beg st, turn.
Round 3 Ch1 (does not count as st
throughout) *1dc, 2htr, 1tr, 3tr in
next st, 1tr, 2htr; rep from * 17 (19:
21: 23: 25) times, ss to beg st, turn.
[170 (190: 210: 230: 250) sts]
From page 11
NORTHERN!
LIGHTS
YOU!WILL!NEED
Rowan Norwegian Wool (100%
wool, 50g/123m) Yarn A Coastal
Fjord (013); Yarn B Daphne (011);
Yarn C Golden Nugget (012) and
Yarn D Cloud Dancer (014)
For yarn quantities and
measurements see size table
■ A 4.5mm hook
■ Stitch markers
■ Yarn needle
■
TENSION
16 sts and 12 rows to measure
10x10cm over Chevron Pa$ using
a 4.5mm hook or size needed to
obtain correct tension; the row
measurement for the Chevron
Pa$ is taken from the bo$om
point to the top point of the pa$
ABBREVIATIONS!
For a full list see page 68
NOTES
The Body is worked first in the
round from the bo$om up in a
chevron pa$ern and set aside as
the Sleeves are worked. The Yoke
is continued from the Body and
the Sleeves are joined in. Cuff and
Hem Ribs are added a&erwards,
working onto the foundation ch.
The Yoke is started by working htr
sts in the round in a spiral and
then continued with a chevron
pa$ern in turned rounds, while
working decreasing for the Yoke.
There are more spiral htr rounds
before working the collar in
turned rounds of post stitches.
BODY
Using Yarn A, ch136 (152: 168: 184:
200), ss to first ch to join into the
round, being careful not to twist.
CHEVRON PATT
Round 4 2ss, ch2 (counts as htr),
2htr, 3htr in next st, 3htr, dc3tog,
*3htr, 3htr in next st, 3htr, dc3tog;
rep from * to end, ss to beg st, turn.
Round 5 Ch1, *dc3tog, 3htr, 3htr in
next st, 3htr; rep from * to end, ss
to beg dc3tog, turn.
Repeating Round 4 and Round 5,
turning at the end of each round,
cont pa$ until work measures 19cm
(from edge to the tip point of the
chevron) ending with a Round 4.
Fasten off.
COLOUR CHEVRON SECTION
Join Yarn C with ss.
Round 1 (RS) Working in back
loops only, ch1 *dc3tog, 3htr, 3htr
in next st, 3htr; rep from * to end,
ss to beg dc3tog, turn.
Round 2 (WS) Working in both
loops as normal, 2ss, ch2, 2htr,
3htr in next st, 3htr, dc3tog, *3htr,
3htr in next st, 3htr, dc3tog; rep
from * to end, ss to beg st, turn.
Fasten off.
Rounds 3-6 Repeat Rounds 1 and
2 with Yarn A and then Yarn D.
Rounds 7-8 Repeat Rounds 1 and
2 with Yarn C but work in both
loops of the st on both rounds.
Rounds 9-12 Repeat Rounds 1 and
2 with Yarn B then Yarn D.
Round 13 Join Yarn A with ss,
working in back loops only, ch2,
htr in each st around, turn. [170
(190: 210: 230: 250) sts]
Fasten off.
RIB TRIM
When working colour changes in
Rib section, change colour in the
last yrh of the st before the
change and carry the yarn across
the WS of the work, so you will be
carrying yarn at the front on a WS
row and at the back on a RS row.
Join Yarn A with ss in opposite
side of foundation sts at hem edge.
Round 1 (RS) Ch1, dc in each st
around, ss to beg dc, turn. [136
(152: 168: 184: 200) sts]
Round 2 (WS) Ch3 (counts as tr
throughout), ss Yarn B, FPtr Yarn
B, *ss Yarn A, FPtr Yarn A, ss Yarn
B, FPtr Yarn B; rep from * to end,
ss to beg st, turn.
Round 3 (RS) Ss Yarn A, Ch3, ss
Yarn B, BPtr Yarn B, *ss Yarn A,
BPtr Yarn A, ss Yarn B, BPtr Yarn
B; rep from * to end, ss to beg st,
turn.
Repeat Rounds 2-3 using both
Yarn A and Yarn C.
Repeat Rounds 2-3 using both
Yarn A and Yarn D.
Round 8 Using Yarn A, Ch1, FPdc
in each st around, turn.
Round 9 Ch1, dc in each st around.
Fasten off.
SLEEVES (MAKE 2)
Using Yarn A, ch28 (28: 28: 32: 32),
ss to first ch to join into the round,
being careful not to twist.
Round 1 (RS) Ch2 (counts as htr),
27 (27: 27: 31: 31) htr, ss to top of
beg ch-2, turn.
Round 2 (WS) Ch2, htr in same st,
2htr in each st around, turn. [56
(56: 56: 64: 64) sts]
Round 3 Ch1 (does not count as st
throughout) *1dc, 2htr, 1tr, 3tr in
next st, 1tr, 2htr; rep from * 6 (6: 6:
7: 7) times more, ss to beg st, turn.
[70 (70: 70: 80: 80) sts]
Round 4 2ss, ch2, 2htr, 3htr in next
st, 3htr, dc3tog, *3htr, 3htr in next
st, 3htr, dc3tog; rep from * to end,
ss into beg st, turn.
Round 5 Ch1, *dc3tog, 3htr, 3htr in
next st, 3htr; rep from * to end, ss
to beg dc3tog, turn.
Repeating Round 4 and Round 5,
turning at the end of each round,
cont pa$ until work measures
32cm from foundation ch to the
tip point of the chevron.
Fasten off a&er a WS round.
b
DIRECTION
OF!WORK
c
a
Bust width a: 42 (47: 52: 57: 62)cm
Length from shoulder b: 59 (60: 61: 61: 62)cm
Sleeve length c: 50cm
NORTHERN LIGHTS SIZE TABLE
6-8
10-12
14-16
18-20
22-24
TO!FIT!BUST
cm
76-81
86-91
97-102
107-112
117-122
ACTUAL!BUST!"APPROX#
cm
84
94
104
114
124
LENGTH!FROM!SHOULDER
cm
59
60
61
61
62
SLEEVE!LENGTH
cm
50
50
50
50
50
SIZE
YARN
Rowan Norwegian Wool (100% wool, 50g/123m)
Yarn A
7
8
9
10
10
Yarn B
2
2
2
2
3
Yarn C
2
2
2
2
3
Yarn D
2
2
2
2
3
SIZING!COLOUR!KEY!So you can re-use this pattern, we’ve colour-coded the sizing
instructions. Simply follow our colour-coded measurements and you’re off.
KNIT"&"CROCHET"COLLECTION"#$#% BHG &'
Cuff detail
COLOUR CHEVRON SECTION
Repeat Rounds 1-13 of the Colour
Chevron Section of the Body,
ending with [70 (70: 70: 80: 80)
sts] for Round 13.
Fasten off.
CUFF TRIM
Join Yarn A into opposite side of
foundation sts at edging with ss.
Repeat same pa! as Rib trim for
Body. [28 (28: 28: 32: 32) sts]
YOKE
Joining round (WS) Skip 3 (4: 5: 6:
7) sts st beg of Body round and
rejoin Yarn A with WS facing in
next st. Ch2 (counts as first htr), 78
(86: 94: 102: 110) htr across Body,
skip 3 (4: 5: 6: 7) sts at beg of first
Sleeve round, pm before next st,
54 (62: 60: 68: 66) htr around
Sleeve, skip next 6 (8: 10: 12: 14) sts
on Body, pm before next st, 79 (87:
95: 103: 111) htr along second side
of Body, skip 3 (4: 5: 6: 7) sts at
beg of second Sleeve round, pm
before next st, 54 (62: 60: 68: 66)
htr around Sleeve, skip 6 (8: 10: 12:
14) sts on Body, pm before next st
on Body, ss to first st, turn. [266
(298: 310: 342: 354) sts]
UNDERARM SHAPING
Size 6-8 only
Next round Ch2, htr in each st
around, ss to first st, turn.
Rep last round once more.
Sizes 6-8, 10-12 and 14-16 only
Dec round 1 (RS) Htr in first st,
htr2tog, *htr in each st to 3 sts
before next marker, htr2tog, htr in
next st, move marker up, htr in
next st, htr2tog; rep from * twice
more, htr to last 3 sts, htr2tog, htr
in next st, move up marker.
Continuing in a spiral moving
markers up, work last round a
further 2 (6: 7: -: -) times. [242 (242:
246: -: -) sts]
Remove all markers except the
one before the beg of round.
Sizes 18-20 and 22-24 only
Dec round 1 Htr in first st,
(htr2tog) twice, *htr in each st to 5
sts before next marker, (htr2tog)
twice, htr in next st, move marker
up, htr in next st, htr2tog, htr in
each st to 3 sts before marker,
htr2tog, htr in next st, move up
marker,** htr in next st, (htr2tog)
twice; rep from * to **. Cont in a
spiral moving markers up, work
last round a further - (-: -: 7: 8)
times. [- (-: -: 246: 246) sts]
Remove all markers except the
one before the beg of round.
Sizes 6-8 and 10-12 only
Dec round 2 (15htr, htr2tog) 14
times, 4htr. [228 sts]
Sizes 14-16,18-20 and 22-24 only
Dec round 2 (Htr2tog, 11htr, htr2tog,
12htr) 9 times, 3htr. [228 sts]
All sizes
YOKE SHAPING
Round 1 (RS) Working in the
round, Ch1, *1dc, 3htr, 2tr, 3tr in
next st, 2tr, 3htr; rep from * to end,
turn. [19 chevrons, 266 sts]
Round 2 Ss, ch2, 4htr, 3htr in next
st, 5htr, dc3tog, *5htr, 3htr in next
st, 5htr, dc3tog; rep from * to end,
ss to beg st, turn. [266 sts]
Fasten off.
Join Yarn D with ss in first st.
Round 3 Working in back loops
only, ch1, *dc3tog, 11htr; rep from *
to end, ss to beg st, turn. [228 sts]
Round 4 Ss, ch2, 3htr, 3htr in next
st, 4htr, dc3tog, *4htr, 3htr in next
st, 4htr, dc3tog; rep from * to end,
ss to beg st, turn.
Fasten off.
Join Yarn B with ss in first st.
Round 5 Working in back loops
only, ch1, *dc3tog, 4htr, 3htr in
next st, 4htr; rep from * to end, ss
to beg st, turn.
Round 6 As Round 4.
Fasten off.
Join Yarn C with ss in first st.
Round 7 Ch1, *dc3tog, 9htr; rep
from * to end, ss to beg st, turn.
[190 sts]
!" BHG KNIT#&#CROCHET#COLLECTION#$%$&
Round 8 Ss, ch2, 2htr, 3htr in next
st, 3htr, dc3tog, *3htr, 3htr in next
st, 3htr, dc3tog; rep from * to end,
ss to beg st, turn.
Fasten off.
Join Yarn D with ss in first st.
Round 9 Ch1, *dc3tog, 3htr, 3htr in
next st, 3htr; rep from * to end, ss
to beg st, turn.
Round 10 As Round 8.
Fasten off.
Join Yarn B with ss in first st.
Round 11 Ch1, *dc3tog, 7htr; rep
from * to end, ss to beg st, turn.
[152 sts]
Round 12 Ss, ch2, 1htr, 3htr in next
st, 2htr, dc3tog, *2htr, 3htr in next
st, 2htr, dc3tog; rep from * to end,
ss to beg st, turn.
Fasten off.
Join Yarn C with ss in first st.
Round 13 Ch1, *dc3tog, 5htr; rep
from * to end, ss to beg st join,
turn. [114 sts]
Round 14 Ss, ch2, 3htr in next st,
1htr, dc3tog, *1htr, 3htr in next st,
1htr, dc3tog; rep from * to end, ss
to beg st, turn. [114 sts]
Fasten off.
Join Yarn B with ss in first st.
Cont working in a spiral without
turning at the end of each round,
and moving marker up as you
work.
Round 15 (RS) Ch2, htr in each st
around, pm in beg st.
Round 16 (RS) *Htr3tog, 3htr; rep
from * to end. [76 sts]
Round 17 Htr in each st around.
Round 18 *Dc2tog, 2htr; rep from *
to end. [57 sts]
Round 19 Htr in each st to 2 sts
before marker, htr2tog. [56 sts]
From the foll round, close the end
of the round with a ss and turn
a"er every round.
Round 20 Htr in each st around,
ss in marked st, turn.
Round 21 (WS) Ch2, FPhtr (htr,
FPhtr) rep around, ss in beg htr,
turn.
Round 22 (RS) Ch2, BPhtr (htr,
BPhtr) rep around, ss in beg htr,
turn.
Rounds 23-32 Repeat Rounds
21-22 another 5 times.
Round 33 Ch2, htr in each st
around.
TO#MAKE#UP
Fasten off and weave in all ends.
Block to measurements on diagam
following any yarn care
instructions on the ball band.
Using the image as a guide,
embroider snowflakes to the main
band (Yarn A) on front of Jumper
using Yarn D and chain and lazy
daisy stitches with a cross stitch in
the centre. Work 3 snowflakes
centrally on the same band of the
pa!ern across each Sleeve.
From page 12
COLLEGE!COOL
YOU#WILL#NEED
Scheepjes Stone Washed (DK,
78% co!on, 22% acrylic,
50g/130m) in Yarn A Moon Stone
(801); Yarn B Enstatite (832); Yarn
C Lemon Quartz (812) and Yarn D
Peridot (827). For yarn quantities
and measurements see size table
■ A pair of 3mm kni!ing needles
■ A pair of 3.25mm needles
■ Stitch holders
■ Yarn needle
■
TENSION
22 sts and 30 rows to measure
10x10cm over st st using 3.25mm
needles
22 sts and 40 rows to measure
10x10cm over pa! using 3.25mm
needles
ABBREVIATIONS
Sl 1pw Slip 1 st purlwise
For a full list see page 73
NOTE#
To maintain your tension, do not
pull the yarn tightly across the back
of the work when slipping stitches.
STRIPE SEQUENCE
Work 1 row in Yarn A, then work in
2 rows each in Yarn D, B, C and
then 1 row in Yarn A. Note that the
stripe sequence repeats every 8
rows and the slip-stitch pa!ern
sequence repeats every 6 rows. A
complete repeat of both the
stripes and slip-stitch pa!ern
sequences is 24 rows long.
BACK
Cast on 110 (122: 134: 146: 158: 170:
182: 194) sts using 3mm needles and
Yarn A.
Rib Row 1 (RS) K2, (P2, K2) to end.
Rib Row 2 P2, (K2, P2) to end.
These 2 rows form the rib.
Work a further 15 rows in rib as set,
ending a"er a RS row.
Change to 3.25mm needles.
Work in slip-stitch pa! as folls:
Row 1 (WS) Using Yarn A, P to end.
PATTERNS
XS
S
M
L
1XL
2XL
3XL
4XL
TO#FIT#CHEST
cm
81-86
91-97
102-107
112-117
122-127
132-137
142-147
152-157
ACTUAL#CHEST
cm
98
109
120
131
142
153
164
175
LENGTH
cm
66
68
70
72
74
76
78
80
SLEEVE#LENGTH
cm
48
48
49
49
50
50
51
51
6
7
YARN
Yarn A Moon Stone (801)
SLEEVE
Scheepjes Stone Washed (DK, 50g/130m)
4
4
4
5
5
6
Yarn B Enstatite (832)
3
3
3
4
4
4
5
5
Yarn C Lemon Quartz (812)
3
3
3
4
4
4
5
5
Yarn D Peridot (827)
3
3
3
4
4
4
5
5
SIZING!COLOUR!KEY!So you can re-use this pattern, we’ve colour-coded the sizing
instructions. Simply follow our colour-coded measurements and you’re off.
Row 2 Using Yarn D, K2, (Sl 1pw, K2)
to end.
Row 3 Using Yarn D, P to end.
Row 4 Using Yarn B, K1, Sl 1pw, (K2,
Sl 1pw) to last 3 sts, K3.
Row 5 Using Yarn B, P to end.
Row 6 Using Yarn C, K3, Sl 1pw,
(K2, Sl 1pw) to last st, K1.
These 6 rows form the pa".
Refer to Chart (right). Beg with 1
row in Yarn C, cont in slip-stitch
pa! and stripe sequence until Back
measures 44 (45: 46: 47: 48: 49: 50:
51)cm from cast-on edge, ending
a"er a WS row. Make a note of
which row of stripe pa!ern you
ended on so that you can match
this on the Sleeves. There is no
need to match the exact row of the
slip-stitch pa!ern as it won’t show.
SHAPE ARMHOLES
Cast off 6 (8: 10: 12: 14: 16: 18: 20)
sts at beg of next 2 rows. [98 (106:
114: 122: 130: 138: 146: 154) sts]
Next row K2tog, pa! to last 2 sts,
skpo. [2 sts dec’d]
Next row P to end.
Rep the last 2 rows another 6 (7: 8:
9: 10: 11: 12: 13) times. [84 (90: 96:
102: 108: 114: 120: 126) sts]**
Work straight until Back measures
64 (66: 68: 70: 72: 74: 76: 78)cm
from cast-on edge, ending a"er a
WS row.
SHAPE BACK NECK
Next row Pa! 26 (28: 30: 32: 34:
36: 38: 40), skpo, turn and work on
these 27 (29: 31: 33: 35: 37: 39: 41)
sts for first side of neck shaping.
Next row P2togtbl, pa! to end. [1
st dec’d]
Next row Pa! to last 2 sts, skpo. [1
st dec’d]
Rep the last 2 rows once more. [23
(25: 27: 29: 31: 33: 35: 37) sts]
Work 1 row straight.
SHAPE SHOULDER
Cast off 11 (12: 13: 14: 15: 16: 17: 18)
sts at beg of the next row. [12 (13:
14: 15: 16: 17: 18: 19) sts]
Work 1 row straight.
Cast off rem 12 (13: 14: 15: 16: 17: 18:
19) sts.
With RS facing place centre 28
(30: 32: 34: 36: 38: 40: 42) sts on a
holder, rejoin yarn to rem sts,
k2tog, pa! to end. [27 (29: 31: 33:
35: 37: 39: 41) sts]
Next row Pa! to last 2 sts, p2tog. [1
st dec’d]
Next row K2tog, pa! to end. [1 st
dec’d]
Rep the last 2 rows once more. [23
(25: 27: 29: 31: 33: 35: 37) sts]
Work 2 rows straight.
SHAPE SHOULDER
Cast off 11 (12: 13: 14: 15: 16: 17: 18)
sts at beg of the next row. [12 (13:
14: 15: 16: 17: 18: 19) sts]
Work 1 row straight.
Cast off rem 12 (13: 14: 15: 16: 17: 18:
19) sts.
FRONT
Work as for Back until 30 rows
fewer have been worked than on
Back to shoulder shaping. [84 (90:
96: 102: 108: 114: 120: 126) sts]
SHAPE FRONT NECK
Next row Pa! 28 (30: 32: 34: 36:
38: 40: 42), skpo, turn and work on
these 29 (31: 33: 35: 37: 39: 41: 43)
sts for first side of neck shaping.
Next row Pa! to end.
Next row Pa! to last 2 sts, skpo. [1
st dec’d]
Rep the last 2 rows another 5
times. [23 (25: 27: 29: 31: 33: 35: 37)
sts]
Work 17 rows straight, ending a"er
a WS row.
SHAPE SHOULDER
Cast off 11 (12: 13: 14: 15: 16: 17: 18)
sts at beg of the next row. [12 (13:
66 (68: 70: 72: 74: 76: 78: 80)cm
SIZE
48 (48: 49: 49: 50: 50: 51: 51)cm
COLLEGE COOL SIZE TABLE
FRONT#&#BACK
14: 15: 16: 17: 18: 19) sts]
Work 1 row straight.
Cast off rem 12 (13: 14: 15: 16: 17: 18:
19) sts.
With RS facing place centre 24
(26: 28: 30: 32: 34: 36: 38) sts on a
holder, rejoin yarn to rem sts,
k2tog, pa! to end. [29 (31: 33: 35:
37: 39: 41: 43) sts]
Next row Pa! to end.
Next row K2tog, pa! to end. [1 st
dec’d]
Rep the last 2 rows another 5 times.
[23 (25: 27: 29: 31: 33: 35: 37) sts]
Work 18 rows straight.
SHAPE SHOULDER
Cast off 11 (12: 13: 14: 15: 16: 17: 18)
sts at beg of the next row. [12 (13:
14: 15: 16: 17: 18: 19) sts]
Work 1 row straight.
Cast off rem 12 (13: 14: 15: 16: 17: 18:
19) sts.
SLEEVES
Cast on 46 (54: 58: 66: 70: 78: 82:
90) sts using 3mm needles and
Yarn A.
Rib Row 1 (RS) K2, (P2, K2) to end.
Rib Row 2 P2, (K2, P2) to end.
These 2 rows form the rib.
Work a further 15 rows in rib as set,
ending a"er a RS row and inc
4 (2: 4: 2: 4: 2: 4: 2) sts evenly across
last row. [50 (56: 62: 68: 74: 80: 86:
92) sts]
49 (54.5: 60: 65.5: 71: 76.5: 82: 87.5)cm
COLLEGE COOL
CHART
HOW TO USE OUR CHARTS
Start at the bo!om right-hand
corner. Read right side rows
from right to le" and wrong
side rows from le" to right. A
row of squares represents a
row of kni!ing.
24
23
22
21
20
19
18
17
16
15
14
13
12
11
10
9
8
7
6
5
4
3
2
1
5
Change to 3.25mm needles.
Work in slip-stitch pa! as folls:
Row 1 (WS) Using Yarn A, P to end.
Row 2 Using Yarn D, K2, (Sl 1pw, K2)
to end.
Row 3 Using Yarn D, P to end.
Row 4 Using Yarn B, K1, Sl 1pw, (K2,
Sl 1pw) to last 3 sts, K3.
Row 5 Using Yarn B, P to end.
Row 6 Using Yarn C, K3, Sl 1pw,
(K2, Sl 1pw) to last st, K1.
These 6 rows form the patt.
Refer to Chart (right). Beg with 1
KEY
Yarn A
Yarn B
Yarn C
Yarn D
K on RS; P on WS
Sl 1pw
Repeat
KNIT!&!CROCHET!COLLECTION!"#"$ BHG %&
row in Yarn C, cont in slip-stitch
pa! and stripe sequence AND AT
THE SAME TIME inc 1 st at each
each end of the next row and then
the 13 foll 8th rows, taking new sts
into pa!. [78 (84: 90: 96: 102: 108:
114: 120) sts]
From page 12
Cont straight until Sleeve
measures 48 (48: 49: 49: 50: 50: 51:
51) cm from cast-on edge, ending
a"er a WS row, and ensuring you
end with the same row of the stripe
sequence as on Back and Front
before armhole shaping.
SHAPE SLEEVEHEAD
Cast off 6 (8: 10: 12: 14: 16: 18: 20)
sts at beg of next 2 rows. [66 (68:
70: 72: 74: 76: 78: 80) sts]
Next row (RS dec) K2tog, pa! to
last 2 sts, skpo. [2 sts dec’d]
Work 1 row straight.
Rep the last 2 rows another 10
times. [44 (46: 48: 50: 52: 54: 56:
58) sts]
Next row (RS dec) K2tog, pa! to
last 2 sts, skpo. [2 sts dec’d]
Work 3 rows straight.
Rep the last 4 rows another 2 (3: 4:
5: 6: 7: 8: 9) times. [38 sts]
Next row (RS dec) K2tog, pa! to
last 2 sts, skpo. [2 sts dec’d]
Work 1 row straight.
Rep the last 2 rows another 6 times
and the dec row once more. [22 sts]
Cast off 3 sts at beg of next 4
rows. [10 sts]
Cast off rem 10 sts.
NECKBAND
Join right shoulder seam.
With RS facing, using 3.25mm
needles and Yarn A pick up and
knit 24 sts down le" side of Front
neck, K24 (26: 28: 30: 32: 34: 36:
38) sts from front neck holder, pick
up and knit 24 sts up right side of
Front neck, pick up and knit 9 sts
down right side of Back neck, K28
(30: 32: 34: 36: 38: 40: 42) sts from
Back neck holder, pick up and knit
9 sts up le" side of Back neck. [118
(122: 126: 130: 134: 138: 142: 146) sts]
Rib Row 1 (WS) P2, (K2, P2) to end.
Rib Row 2 K2, (P2, K2) to end.
These 2 rows form the rib.
Work a further 5 rows as set.
Change to 3mm needles.
Work a further 2 rows as set.
Cast off in rib.
From page 12
ON!THE!EDGE
YOU#WILL#NEED
Rico Essentials Co!on DK (100%
co!on, 50g/120m) 3 balls of each:
Yarn A Azalea (68) and Yarn B
Grass Green (66); 2 balls of Yarn
D Banana (63); 1 ball of each: Yarn
C Dark Green (67); Yarn E Rose
(01) and Yarn F Pale Blue (105)
See Notes about yarn quantities
■ A 4mm crochet hook
■ Stitch markers
■ Tablecloth, 140x230cm
■ Yarn needle
■
DOLLY!MIXTURE
YOU#WILL#NEED
8 ply (known as DK or double
kni!ing) yarn (mixed fibres)
Approx 20g of each colour Yarn
A Red; Yarn B Grey; Yarn C
Purple; Yarn D Pale Pink; Yarn E
Green; Yarn F Dark blue; Yarn G
Dark pink and Yarn H Pale blue
■ A pair of 4mm kni!ing needles
■ Yarn needle
■
MEASUREMENTS
Headband measures 60cm
circumference x 5.5cm width.
Circumference is adjustable.
Measurements may vary slightly
depending on the heaviness of the
DK used
TENSION
13 sts and 11 rows over 5x5cm using
4mm needles. Tension may vary
slightly depending on the
heaviness of the DK yarn used
ABBREVIATIONS
For a full list see page 73
NOTE#
The pa!ern of this Headband has
been created by kni!ing two
colours per row, alternating the
colour for each stitch. Then two
different colours are worked for
the next row, and so on. When you
have worked through all four
colour pairings, return to the first
pairing and start again. It’s
traditionally recommended that
you run your yarns up the side of
your work with colour changes
such as this, but there are too
TO MAKE UP
Join le" shoulder and neckband.
Set in the Sleeves. Join the side
and Sleeve seams. Block gently to
measurements, following any yarn
care instructions on the ball band.
"" BHG KNIT#&#CROCHET#COLLECTION#$%$&
many yarns to contend with here,
and the twisting of yarns will
quickly become frustrating. Don’t
worry about your yarn ends
though as this Headband is sewn
up as a tube; all your ends will be
hidden inside the middle of the
Headband.
Cast on 30 stitches using 4mm
needles and Yarn A.
Row 1 (RS) Knit into the back of all
stitches.
Join in Yarn B.
Row 2 (P1A, P1B) rep until end of
row.
Break off Yarns A and B. Join in
Yarns C and D.
Row 3 (K1C, K1D) rep until end of
row.
Break off Yarns C and D. Join in
Yarns E and F.
Row 4 (P1E, P1F) rep until end of
row.
Break off Yarns E and F. Join in
Yarns G and H.
Row 5 (K1G, K1H) rep until end of
row.
Continue in stocking stitch as set,
repeating Rows 2 to 5 until your
Headband measures approx
60cm, or long enough to wrap
around your head.
Cast off.
TO FINISH
With WS facing, ma!ress stitch
the row ends together to form a
tube enclosing all yarn ends. Fold
the Headband over and ma!ress
stitch the cast-on and cast-off
edges together to form a ring.
TOP TIP
When choosing colours for your headband, take them all
out and lay them next to each other. If you have more than
one blue or pink shade, rotate them into place until you get
the best combination.
MEASUREMENTS
Measurements can be adapted to
any size tablecloth
TENSION
Tension is not critical, but it may
affect the yarn quantities required
ABBREVIATIONS
For a full list see page 68
NOTES
Edging is worked in short rows
and sewn to the tablecloth at the
end. The yarn quantities listed are
for a 140x230cm tablecloth. If
embellishing a cloth of a different
size, the yarn quantities needed
will vary. Change colour on the
final yrh of row before colour
change is indicated. Carry the
unused colours up the edge ready
to use again. When working the
edging, work over the carried
yarns to conceal them. Flowers
are worked in a continuous spiral
without closing off each round
with a slip stitch. You may find it
useful to mark the first st of the
round, moving the marker up as
you go.
TABLECLOTH EDGING
Using Yarn A, ch15.
Row 1 (WS) Tr in fourth ch from
hook, tr in next 11 sts, change to
Yarn B, turn. [13 sts]
Row 2 (RS) Ch1 (does not count as
st throughout), dc in first st, (ch3,
skip 2 sts, 3-tr cl in next st, ch3,
skip 2 sts, dc in next st) twice,
turn. [5 sts, 4 ch-3 sps]
Row 3 Ch5 (counts as ch-5 sp), dc
PATTERNS
TENSION
22 sts and 30 rows to measure
10x10cm over stocking stitch using
4mm needles
Edging
in first ch-3 sp, ch3, skip next st,
3-tr cl in next ch-3 sp, ch3, skip
next st, dc in next ch-3 sp, ch3,
skip next st, 3-tr cl in next ch-3 sp,
tr in final st, change to Yarn A,
turn. [5 sts, 3 ch-3 sps, 1 ch-5 sp]
Row 4 Ch3 (counts as tr
throughout), skip next st, 3tr in
next ch-sp, (skip 1 st, 3tr in next
ch-sp) 3 times, turn. [13 sts]
Row 5 Ch3, tr in each st across,
change to Yarn B, turn.
Rows 2-5 set the pattern. Repeat
Rows 2-5 until Edging measures
length of one side of tablecloth.
Fasten off.
Make 3 more lengths of Edging to
the measurements of your
tablecloth allowing extra for
mitreing at each corner.
TOP EDGING
With RS facing, join Yarn C into
end of Row 1.
Row 1 (RS) Ch2 (counts as htr), htr
in Row 1 end, 2htr in each row-end
across.
Fasten off.
Repeat for each Edging.
TO MAKE UP
Pin the Tablecloth Edging around
your tablecloth, folding in the
corners at 45-degree angles. Sew
the Edging to the tablecloth over
the Top Edging.
LOWER SHELL EDGING
With RS facing, join Yarn D in any
row-end along edge.
Row 1 (RS) Ch1, dc in same
row-end, *skip next row, 10tr in
end of next Row 3 rep, skip next
row-end, dc in next row-end; rep
from * around skipping the folded
in edge at corner, ss to beg dc.
Fasten off.
FLOWERS
Make 1 using Yarn E and 1 using
Yarn F for every 2 pa!ern repeats
on Edging or as desired.
Make a magic loop.
Round 1 (RS) Ch1, 6dc in loop.
[6 sts]
Round 2 (RS) 2dc in each st
around. [12 sts]
Rounds 3-8 Dc in each st around.
Round 9 *(Htr, tr, htr) in next st, ss
ABBREVIATIONS
Flowers
For a full list see page 73
BACK
Cast on 98 (102: 110: 114: 122: 126:
134: 138) sts with 3.25mm needles
and Yarn A.
in next st; rep from * 5 times more.
Fasten off.
TO FINISH
Sew the Flowers onto the Edging.
You can use the image as a guide.
Weave in all ends.
Sizes XS, S, L, XL and 2XL only
Rib row 1 (RS) P2, *K2, P2; rep
from * to end.
Rib row 2 (WS) K2, *P2, K2; rep
from * to end.
Next row (WS) Purl.
Rep the last 2 rows 5 (6: 7: 7: 8: 9:
9: 10) times more. [72 (76: 80: 84:
88: 92: 96: 100) sts]
Cont in st st until armhole
measures 18 (19: 20: 21: 22: 23: 24:
25)cm, ending with a WS row.
SHAPE SHOULDERS
Cast off 8 (8: 9: 9: 10: 10: 11: 11) sts
at beg of next 2 rows. [56 (60: 62:
66: 68: 72: 74: 78) sts]
Cast off 8 (9: 9: 10: 10: 11: 11: 12) sts
at beg of foll 2 rows.
Leave rem 40 (42: 44: 46: 48: 50:
52: 54) sts on a holder.
LEFT FRONT
Cast on 49 (53: 55: 59: 61: 65: 67:
71) sts with 3.25mm needles and
Yarn A.
Sizes M, 3XL and 4XL only
Rib row 1 (RS) K2, *P2, K2; rep
from * to end.
Rib row 2 (WS) P2, *K2, P2; rep
from * to end.
SLEEVE
All sizes
These 2 rows form the rib.
Work a further 10 rows in rib, inc
0 (2: 0: 2: 0: 2: 0: 2) sts across last
row. [98 (104: 110: 116: 122: 128: 134:
140) sts]
From page 13
JOYS!OF!SPRING
YOU"WILL"NEED
Change to 4mm needles.
Beg with a K row, work in st st
until Back measures 37cm from
cast-on edge, ending with a WS
row.
Sirdar Country Classic DK (50%
wool, 50% acrylic, 50g/125m) in
Yarn A Oat Beige (851); Yarn B
Spring Green (868) and Yarn C
Chartreuse (866)
■ Sirdar Snuggly DK (55% nylon,
45% acrylic, 50g/165m) in Yarn D
Aqua (490) and Yarn E Pumpkin
(508). For yarn quantities and
measurements see size table
■ A pair of 3.25mm kni!ing needles
■
55 (56: 57: 58: 59: 60: 61: 62)cm
■
45 (45: 45: 45: 45: 45: 45: 45)cm
A pair of 4mm needles
Stitch holders
■ 8 bu!ons, 1.8cm diameter
■ Yarn needle
■
FRONTS"&"BACK
SHAPE ARMHOLES
Cast off 7 (7: 7: 8: 8: 8: 9: 9) sts at
beg of next 2 rows. [84 (90: 96:
100: 106: 112: 116: 122) sts]
Next row (RS) K2, skpo, K to last 4
sts, k2tog, K2. [2 sts dec’d]
43.5 (46.5: 49: 52: 54.5: 57: 60: 63)cm
JOYS OF SPRING SIZE TABLE
SIZE
XS
S
M
L
1XL
2XL
3XL
4XL
82
86
92
97
102
107
112
117
TO!FIT!BUST
cm
ACTUAL!BUST
cm
87
93
98
103.5
109
114.5
120
125.5
LENGTH
cm
55
56
57
58
59
60
61
62
SLEEVE!LENGTH
cm
45
45
45
45
45
45
45
45
YARN
Sirdar Country Classic DK (50g/125m)
Yarn A Oat Beige (851)
5
6
6
6
7
7
7
8
Yarn B Spring Green (868)
3
3
4
4
4
4
5
5
Yarn C Chartreuse (866)
1
1
1
1
1
1
1
1
Yarn D Aqua (490)
1
1
1
1
1
1
1
1
Yarn E Pumpkin (508)
1
1
1
1
1
1
1
1
YARN
Sirdar Snuggly DK (50g/165m)
SIZING!COLOUR!KEY!So you can re-use this pattern, we’ve colour-coded the sizing
instructions. Simply follow our colour-coded measurements and you’re off.
KNIT!&!CROCHET!COLLECTION!"#"$ BHG %&
JOYS OF SPRING CHART
HOW TO USE OUR CHARTS
Start at the bo!om right-hand corner. Read right side rows from right
to le" and wrong side rows from le" to right. A row of squares
represents a row of kni!ing.
29
28
27
26
25
24
23
22
21
20
19
18
17
16
15
14
Repeat
3
2
SHAPE NECK
Next row (RS) K to last 10 (11: 12:
13: 14: 15: 16: 17) sts, turn and cont
on these 27 (28: 29: 30: 31: 32: 33:
34) sts only, leave rem sts on a
holder.
Next row (WS) Purl.
K on RS; P on WS
5
4
SHAPE ARMHOLE
Next row (RS) Cast off 7 (7: 7: 8: 8:
8: 9: 9) sts, K to end. [43 (46: 49:
51: 54: 57: 59: 62) sts]
Next row (WS) Purl.
Next row (RS) K2 skpo, K to end.
[1 st dec’d]
Rep the last 2 rows 5 (6: 7: 7: 8: 9:
9: 10) more times. [37 (39: 41: 43:
45: 47: 49: 51) sts]
Work straight in st st until armhole
measures 8 (9: 10: 11: 11: 12: 13: 14)
cm, ending with a WS row.
Yarn E
7
6
Change to 4mm needles.
Beg with a K row, work in st st until
Front measures 37cm from cast-on
edge, ending with a WS row.
Yarn D
9
8
All sizes
These 2 rows form the rib.
Work a further 10 rows in rib, inc 1
(0: 1: 0: 1: 0: 1: 0) sts across last
row. [50 (53: 56: 59: 62: 65: 68: 71)
sts]
Yarn C
11
10
Sizes M, L, 3XL and 4XL only
Rib row 1 (RS) *K2, P2; rep from *
to last 3 sts, K3.
Rib row 2 (WS) P3, *K2, P2; rep
from * to end.
Yarn B
13
12
Sizes XS, S, XL and 2XL only
Rib row 1 (RS) P2, *K2, P2; rep
from * to last 3 sts, K3.
Rib row 2 (WS) P3, *K2, P2; rep
from * to end.
KEY
1
Next row (RS) K to last 2 sts, skpo.
[1 st dec’d]
Rep the last 2 rows 10 more times.
[16 (17: 18: 19: 20: 21: 22: 23) sts]
Work straight in st st until Front
measures the same as Back to
shoulder shaping, ending at
armhole edge.
SHAPE SHOULDER
Cast off 8 (8: 9: 9: 10: 10: 11: 11) sts
at beg of next row. [8 (9: 9: 10: 10:
11: 11: 12) sts]
Work 1 row.
Cast off rem 8 (9: 9: 10: 10: 11: 11:
12) sts.
RIGHT FRONT
Cast on 49 (53: 55: 59: 61: 65: 67:
71) sts with 3.25mm needles and
Yarn A.
Sizes XS, S, XL and 2XL only
Rib row 1 (RS) K3, P2, *K2, P2; rep
from * to end.
Rib row 2 (WS) K2, *P2, K2; rep
from * to last 3 sts, K3.
Sizes M, L, 3XL and 4XL only
Rib row 1 (RS) K3, *P2, K2; rep
from * to end.
Rib row 2 (WS) *P2, K2; rep from *
to last 3 sts, P3.
All sizes
These 2 rows form the rib.
Work a further 10 rows in rib, inc 1
(0: 1: 0: 1: 0: 1: 0) sts across last
row. [50 (53: 56: 59: 62: 65: 68: 71)
sts]
Change to 4mm needles.
Beg with a K row, work in st st
until Front measures 37cm from
cast-on edge, ending with a RS
row.
!" BHG KNIT#&#CROCHET#COLLECTION#$"$%
SHAPE ARMHOLE
Next row (WS) Cast off 7 (7: 7: 8:
8: 8: 9: 9) sts, P to end. [43 (46: 49:
51: 54: 57: 59: 62) sts]
Next row (RS) K to last 4 sts,
k2tog, K2. [1 st dec’d]
Next row (WS) Purl.
Rep the last 2 rows 5 (6: 7: 7: 8: 9:
9: 10) more times. [37 (39: 41: 43:
45: 47: 49: 51) sts]
Work straight in st st until armhole
measures 8 (9: 10: 11: 11: 12: 13: 14)
cm, ending with a WS row.
SHAPE NECK
Next row (RS) K10 (11: 12: 13: 14: 15:
16: 17) sts, place these sts on a
holder, K to end. [27 (28: 29: 30:
31: 32: 33: 34) sts]
Next row (WS) Purl.
Next row (RS) K2tog, K to end. [1
st dec’d]
Rep the last 2 rows 10 more times.
[16 (17: 18: 19: 20: 21: 22: 23) sts]
Work straight in st st until Front
measures the same as Back to
shoulder shaping, ending at
armhole edge.
SHAPE SHOULDER
Cast off 8 (8: 9: 9: 10: 10: 11: 11) sts
at beg of next row. [8 (9: 9: 10: 10:
11: 11: 12) sts]
Work 1 row.
Cast off rem 8 (9: 9: 10: 10: 11: 11:
12) sts.
SLEEVES
Cast on 38 (42: 46: 50: 54: 58: 62:
66) sts with 3.25mm needles and
Yarn B.
Rib row 1 (RS) K2, *P2, K2; rep
from * to end.
Rib row 2 (WS) P2, *K2, P2; rep
from * to end.
These 2 rows form the rib.
Work a further 10 rows in rib.
Change to 4mm needles.
Beg with a K row, work in st st for
2 rows.
SET CHART
Join in yarns as required and cont
in st st throughout while working
in pa! from Chart (above).
Row 1 (RS) Pa! 3 (1: 3: 1: 3: 1: 3: 1)
sts before pa! rep, (work 8-st pa!
rep) 4 (5: 5: 6: 6: 7: 7: 8) times, pa!
3 (1: 3: 1: 3: 1: 3: 1) sts a"er pa! rep.
Row 2 Pa! 3 (1: 3: 1: 3: 1: 3: 1) sts
before pa! rep, (work 8-st pa!
rep) 4 (5: 5: 6: 6: 7: 7: 8) times, pa!
3 (1: 3: 1: 3: 1: 3: 1) sts a"er pa! rep.
These 2 rows set Chart patt.
Pa! 2 more rows straight.
Inc and work into pa! 1 st at each
end of the next row and 12 foll 8th
rows. [64 (68: 72: 76: 80: 84: 88:
92) sts]
Cont straight in pa! until Sleeve
measures 45cm from cast-on edge
or preferred length, ending with a
WS row.
SHAPE SLEEVE TOP
Cast off 7 (7: 7: 8: 8: 8: 9: 9) sts at
beg of next 2 rows. [50 (54: 58: 60:
64: 68: 70: 74) sts]
Next row (RS) K2tog, pa! to last 2
sts, skpo. [2 sts dec’d]
Next row (WS) Pa! to end.
Rep the last 2 rows 6 (7: 8: 8: 9: 10:
10: 11) more times. [36 (38: 40: 42:
44: 46: 48: 50) sts]
Next row (RS) K2tog, pa! to last 2
sts, skpo. [2 sts dec’d]
Patt 3 rows.
Rep the last 4 rows 3 more times.
[28 (30: 32: 34: 36: 38: 40: 42) sts]
Next row (RS) K2tog, pa! to last 2
sts, skpo. [2 sts dec’d]
Next row (WS) Pa! to end.
Rep the last 2 rows once more. [24
(26: 28: 30: 32: 34: 36: 38) sts]
Cast off 3 sts at beg of next 4
rows. [12 (14: 16: 18: 20: 22: 24: 26)
sts]
Cast off.
POCKETS (MAKE 2)
Cast on 28 (28: 28: 28: 32: 32: 32:
32) sts with 4mm needles and
Yarn B.
Beg with a K row work in st st for
32 rows.
Join in Yarn E as required.
Next row (RS) K3 with Yarn B, *K2
with Yarn E, K2 with Yarn B; rep
from * to last 5 sts, K2 with Yarn E,
K3 with Yarn B.
Next row (WS) P3 with Yarn B,
*P2 with Yarn E, P2 with Yarn B;
rep from * to last 5 sts, P2 with
Yarn E, P3 with Yarn B.
Next row K3 with Yarn E, *K2 with
Yarn B, K2 with Yarn E; rep from *
to last 5 sts, K2 with Yarn B, K3
with Yarn E.
Next row P3 with Yarn E, *P2 with
Yarn B, P2 with Yarn E; rep from *
to last 5 sts, P2 with Yarn B, P3
with Yarn E.
Break off E.
With Yarn B, work 2 rows in st st.
Change to 3.25mm needles.
Rib row 1 (RS) K3, *P2, K2; rep
from * to last 5 sts, P2, K3.
Rib row 2 (WS) P3, *K2, P2; rep
from * to last 5 sts, K2, P3.
These 2 rows form the rib.
Work a further 4 rows in rib.
Cast off in rib.
TO MAKE UP
Weave in ends and block gently to
measurements, following any yarn
care instructions on the ball band.
Join shoulder seams.
PATTERNS
NECK EDGING
With RS facing, using 3.25mm
needles and Yarn B, pick up and
knit 6 sts from row ends of
Bu"onhole Band, K10 (11: 12: 13: 14:
15: 16: 17) sts from Right Front
holder, pick up and knit 22 sts up
Right Front neck edge, K40 (42:
44: 46: 48: 50: 52: 54) sts from
Back holder, pick up and knit 22
sts down Le# Front neck edge,
K10 (11: 12: 13: 14: 15: 16: 17) sts from
Le# Front holder, pick up and knit
6 sts from row ends of Bu"on
Band. [116 (120: 124: 128: 132: 136:
140: 144) sts]
Rib row 1 (WS) P3, *K2, P2; rep
from * to last 5 sts, K2, P3.
Rib row 2 (RS) K3, *P2, K2; rep
from * to last 5 sts, P2, K3.
These 2 rows form the rib.
Work a further 2 rows in rib.
Buttonhole row (WS) Rib to last 6
sts, p2tog, yo, K1, P3.
Work a further 4 rows in rib.
Cast off in rib.
TO FINISH
Sew in Sleeves. Join side and
Sleeve seams. Sew on the Pockets
using the photograph as a guide
for placement. Sew on bu"ons.
Weave in any rem ends.
From page 15
RAINBOW!RUSH
YOU!WILL!NEED
West Yorkshire Spinners,
ColourLab DK (100% British
wool, 100g/225m) in Yarn A Zesty
Orange (476) and Yarn B Prism
Brights (894). For yarn quantities
and measurements see size table
■ A pair of 3.75mm kni"ing needles
■ A pair of 4mm needles
■ A 3.75mm circular needle,
40-60cm long
■ Stitch holders
■ Removable stitch markers
■ Yarn needle
■
TENSION
21 sts and 28 rows to measure
10x10cm over st st using 4mm
needles
ABBREVIATIONS
For a full list see page 73
DIAMOND TEXTURE PANEL
Row 1 (RS) K4, *P1, K8; rep from *
to last 5 sts, P1, K4.
Row 2 P3, *K3, P6; rep from * to
last 6 sts, K3, P3.
Row 3 K2, *P5, K4; rep from * to
last 7 sts, P5, K2.
Row 4 P1, *K7, P2; rep from * to
last 8 sts, K7, P1.
Row 5 Purl.
Row 6 P1, *K7, P2; rep from * to
last 8 sts, K7, P1.
Row 7 K2, *P5, K4; rep from * to
last 7 sts, P5, K2.
Row 8 P3, *K3, P6; rep from * to
last 6 sts, K3, P3.
Last 8 rows form patt and are
repeated.
Rep Rows 1 to 8 four more times.
Rep Row 1 once more.
Next row (WS) Purl to end, inc 0
(1: 0: 1) st at beg of row. [90 (100:
108: 118) sts]
Change to Yarn B. Starting with a
K row, work in st st until Back
measures 35 (35: 36: 36)cm from
cast-on edge.
SHAPE ARMHOLES
Cast off 11 (12: 12: 13) sts at beg of
next 2 rows. [68 (76: 84: 92) sts]
Cont in st st until armholes
measures 18 (19: 20: 21)cm, ending
with a WS row.
BACK
Cast on 91 (99: 109: 117) sts using
3.75mm needles and Yarn A.
Row 1 (RS) K1, *P1, K1; rep from *
to end.
Row 2 P1, *K1, P1; rep from * to
end.
This row sets rib.
Work 4 more rows in rib, ending
a#er a RS row.
Next row (WS) Rib to end, dec 1
(0: 1: 0) st at end of row. [90 (99:
108: 117) sts]
Change to Yarn B and 4mm
needles. Starting with a K row,
work 40 rows in st st.
SLEEVE
SHAPE SHOULDERS
Cast off 16 (18: 21: 24) at beg of
next 2 rows. Place rem 36 (40: 42:
44) sts on hold for back neck.
FRONT
Work as for Back, until 30 fewer
rows have been worked to
beginning of shoulder shaping. [68
(76: 84: 92) sts]
SHAPE LEFT FRONT NECK
K25 (28: 32: 34), turn and work on
these sts for first side of neck
shaping, leaving rem sts on a spare
needle.
Dec 1 st at neck edge on next row
and 9 (10: 10: 9) foll WS rows. [15
(17: 21: 24) sts]
Work 10 (8: 8: 10) further rows
without shaping.
Cast off.
SHAPE RIGHT FRONT NECK
With RS facing, place centre 18
(20: 20:24) sts on a stitch holder,
rejoin yarn and dec at neck edge,
knit to end. [24 (27: 31: 33) sts]
Dec 1 st at neck edge on 9 (10: 10:
9) foll RS rows. [15 (17: 21: 24) sts]
Work 10 (8: 8: 10) further rows
without shaping.
Cast off.
53 (54: 56: 57)cm
BUTTONHOLE BAND
With RS facing, using 3.25mm
needles and Yarn A, pick up and
knit 96 (100: 100: 104: 104: 108:
108: 112) sts evenly up Right Front
edge.
Rib row 1 (WS) K1, P2, *K2, P2; rep
from * to last st, K1.
Rib row 2 (RS) K3, *P2, K2; rep
from * to last 5 sts, P2, K3.
These 2 rows form the rib.
Work 1 more row in rib.
Buttonhole row (RS) Rib 3 (3: 3: 3:
3: 4: 4: 4), *yo, rib 2tog, rib 12 (13:
13: 13: 13: 14: 14: 14), yo, rib 2tog, rib
13 (13: 13: 14: 14: 14: 14: 15); rep from
* twice more, yo, rib 2tog, rib 4 (5:
5: 6: 6: 6: 6: 7).
Work 3 more rows in rib.
Cast off in rib.
Change to Yarn A. Work 2 rows in
st st, ending with a WS row.
44.5 (45: 45: 45)cm
BUTTONBAND
With RS facing, using 3.25mm
needles and Yarn A, pick up and
knit 96 (100: 100: 104: 104: 108:
108: 112) sts evenly down Le#
Front edge.
Rib row 1 (WS) K1, P2, *K2, P2; rep
from * to last st, K1.
Rib row 2 (RS) K3, *P2, K2; rep
from * to last 5 sts, P2, K3.
These 2 rows form the rib.
Work a further 5 rows in rib.
Cast off in rib.
FRONT!&!BACK
42 (46: 50.5: 55)cm
RAINBOW RUSH SIZE TABLE
4-6
8-10
12-14
16-18
TO!FIT!CHEST
cm
71-76
81-86
92-97
102-107
ACTUAL!CHEST
cm
84
92.5
101
109.5
LENGTH
cm
53
54
56
57
SLEEVE!LENGTH
cm
44.5
45
45
45
SIZE
YARN
West Yorkshire Spinners ColourLab DK (100g/225m)
Yarn A Zesty Orange (476)
2
2
2
2
Yarn B Prism Brights (894)
3
3
4
4
SIZING!COLOUR!KEY!So you can re-use this pattern, we’ve colour-coded the sizing
instructions. Simply follow our colour-coded measurements and you’re off.
KNIT!&!CROCHET!COLLECTION!"#"$ BHG %&
SLEEVES (MAKE 2)
Cast on 49 (53: 57: 61) sts using
3.75mm needles and Yarn A.
Work 6 rows in rib as for Back,
ending with a WS row.
Change to Yarn B and 4mm
needles.
Next row (RS) Knit to end, inc 1 st
at end of row. [50 (54: 58: 62) sts]
Starting with a P row, work 5 rows
in st st.
Inc row (RS) K1, M1, knit to last st,
M1, K1. [2 sts inc’d]
Rep last 6 rows 5 more times. [62
(66: 70: 74) sts]
Work 3 more rows in st st, ending
with a WS row.
Change to Yarn A. Work 2 rows in
st st, ending with a WS row.
RAINBOWS"
EVERYDAY
WORK IN PATT
Read ahead as patt and shaping
is worked at the same time.
Work 41 rows in Diamond Texture
Panel pa!, ending a"er a Row 1 of
pa! AND AT THE SAME TIME inc
1 st at each end of next row and 6
foll 6th rows. [76 (80: 84: 88) sts]
Next row (WS) With Yarn A, purl.
Change to Yarn B.
Tension is not critical for this
project, but it may affect the
yarn quantities required
Sizes 4-6 and 8-10 only
Using Yarn B, inc 1 st at each end
of next row and foll 6th rows until
you have 80 (84: -: -) sts.
All sizes
Using Yarn B, cont in st st without
shaping until work measures
44 (45: 45: 45)cm or your
preferred length.
Cast off loosely.
TO MAKE UP
Join right shoulder seam.
NECKBAND
With RS facing, using 3.75mm
circular needle and Yarn A, pick
up and knit 33 sts down le" front
neck, K18 (20: 20: 24) sts from
Front holder, pick up and knit 32
sts up right front neck, knit across
36 (40: 42: 44) from back neck
held sts. [119 (125: 127: 133) sts]
Next row (WS) P1, (K1, P1) to end.
Next row (RS) K1, (P1, K1) to end.
These 2 rows form rib.
Rib a further 7 rows.
Cast off in rib.
TO FINISH
Weave in ends. Join neckband
and le" shoulder seam. Fold
Sleeve in half lengthwise and mark
centre point of cast-off edge.
Matching marker to shoulder
seam, sew Sleeves in place. Join
side and Sleeve seams. Block
gently to measurements, following
any yarn care instructions on the
ball band.
YOU$WILL$NEED
Lion Brand Wool Ease Thick
& Quick (80% acrylic, 20%
wool, 170g/97m) 1 ball of
each: Yarn A Navy (110); Yarn
B Grass (131); Yarn C Mustard
(158); Yarn D Pumpkin (133);
Yarn E Cranberry (138) and
Yarn F Blossom (103)
■ A 6.5mm crochet hook
■ Yarn needle
■
MEASUREMENTS
Scarf measures approx
19x145cm
TENSION
ABBREVIATIONS
herringbone st Insert hook
through post of previous st,
insert hook in next st across
(working from back to front
on WS rows and as standard
on RS rows), yrh and pull up a
loop, yrh and pull through all
3 loops on hook
For a full list see page 68
NOTES
Scarf is worked in long rows.
Leave a 20cm tail at the
beginning and end of each
row to form the fringe. You
can substitute any super
chunky yarn into this pa!ern.
SCARF
Using Yarn A, ch136.
Row 1 (RS) Dc in bl of second
ch from hook, herringbone st
in bl of each ch to end, turn.
[135 sts]
Row 2 (WS) Ch1, dc in first st
working from back to front,
134 herringbone sts across,
turn.
Change to Yarn B.
Row 3 (RS) Ch1, dc in first st,
134 herringbone sts across,
turn.
Rows 2-3 set the pattern.
Cont in patt changing colour
at end of every WS row in
sequence as shown in image.
Fasten off.
TO FINISH
Cut 2 strands of each colour,
40cm long. Fold strand in half
and add to the matching tail
to form a fuller fringe. Trim to
desired length.
!" BHG KNIT#&#CROCHET#COLLECTION#"$"%
From page 14
PATTERNS
rounds. You would need to adjust
the armhole and neckline edging
to get a good fit. This would affect
the finished length of the top as
well as the yarn quantities
required.
from page 16
CHECK!MATE
YOU!WILL!NEED
Stylecra! Naturals Organic
Co"on (100% co"on, 50g/105m)
in Yarn A Indigo Wash (7201); Yarn
B Poppy (7170); Yarn C Flamingo
(7179); Yarn D Blush (7177); Yarn E
Carrot (7181); Yarn F Bone (7173);
Yarn G Coral (7180); Yarn H
Citronelle (7175); Yarn I Bu"ermilk
(7174); Yarn J Amethyst (7185);
Yarn K Jade (7191); Yarn L
Peppermint (7172) and Yarn M
Coffee Bean (7190)
For yarn quantities and
measurements see size table
■ A 4mm crochet hook
■ Yarn needle
■
TENSION
See table for Motif measurements
Motifs are made using a 4mm
hook, or hook size needed to
obtain correct tension/motif size
ABBREVIATIONS
For a full list see page 68
NOTES
Tank Top is made up of 20 Motifs
and 4 Corner Motifs. The Corner
Motifs are used to shape the
armhole opening. Once the Motifs
have been joined together,
extensions are worked across the
upper back and either side of the
front, leaving a space for the
neckline. To make a larger sized
top you could increase the size of
the Motif by working additional
Round 3, and Yarn A for all rem
rounds.
Make 2 using Yarn L for Round 1,
Yarn K for Round 2, Yarn F for
Round 3, and Yarn A for all rem
rounds.
Make 1 using Yarn E for Round 1,
Yarn B for Round 2, Yarn C for
Round 3, and Yarn A for all rem
rounds.
Make 1 using Yarn K for Round 1,
Yarn H for Round 2, Yarn J for
Round 3, and Yarn A for all rem
rounds.
PLAIN MOTIF (MAKE 10)
Using Yarn A, ch4 and ss in last ch
from hook to form a loop.
Round 1 (RS) Ch3 (counts as tr
throughout), 11tr in loop, ss to top
of beg ch-3, turn. [12 sts]
Round 2 (WS) Ch3, tr in st at base
of ch-3, 2tr in each st around, ss to
top of beg ch-3, turn. [24 sts]
Round 3 Ss into sp between first 2
sts, ch3, 2tr in same sp, ch1, skip 2
sts, (3tr in sp between 2 sts, ch1,
skip 2 sts) 11 times, ss to top of beg
ch-3, turn. [12 3-tr groups, 12 ch-1
sps]
Round 4 Ss into ch-1 sp, ch3, (2tr,
ch2, 3tr) in same sp, 3htr in next 2
ch-1 sps, *(3tr, ch2, 3tr) in next
ch-sp, 3htr in each of next two
ch-sps; rep from * twice more, ss to
top of beg ch-3, ss into ch-2 sp,
turn. [48 sts, 4 ch-2 sps]
Round 5 Ch3, (2tr, ch2, 3tr) in same
sp, 3tr in space between each 3-st
group to next ch-2 sp, *(3tr, ch2,
3tr) in ch-2 sp, 3tr in space
between each 3-st group to next
ch-2 sp; rep from * twice more, ss
to top of beg ch-3, ss into ch-2 sp,
turn.
Rep Round 5 another 0 (1: 2) times
more.
Fasten off.
TO MAKE UP
Block all Motifs to measurements
listed and following any yarn care
instructions on the ball band. Using
the images as a guide for colour
placement, whipstitch 9 Motifs
together in a 3x3 formation to form
the Front and repeat to form the
Back. Use the 2 remaining Motifs
to join the Front and Back together
across the lowest row of Motifs.
CORNER MOTIF (MAKE 4)
Using Yarn A, ch4 and ss in last ch
from hook to form a loop.
Round 1 (RS) Ch3, 3tr in loop, ch2,
4tr in loop, turn. [8 sts, 1 ch-2 sp]
Round 2 (WS) Ch3, 2tr in st at
base of ch-3, skip 3 sts (3tr, ch2,
3tr) in ch-2 sp, skip 3 sts, 3tr in final
st, turn. [12 sts, 1 ch-2 sp]
Round 3 Ch3, 2tr in st at base of
ch-3, 3tr in sp before next 3-tr
group, (3tr, ch2, 3tr) in ch-2-sp, 3tr
in sp between next 2 3-tr groups,
3tr in final st, turn. [18 sts, 1 ch-2 sp]
Fasten off size S only.
Round 4 Ch3, 2tr in st at base of
ch-3, (3tr in sp between 3-tr
groups) twice, (3tr, ch2, 3tr) in ch-2
sp, (3tr in sp between 3-tr groups)
twice, 3tr in final st.
Fasten off.
Sew 2 Corner Motifs to the top of
the Motifs used to join the Front
and Back. The longest edges
should be sewn to the Front or
Back panels, with the diagonal
edge shaping the armhole opening.
COLOURFUL MOTIF (MAKE 10)
Work as pa"ern for Plain Motif
using the following colours:
Make 2 using Yarn H for Round 1,
Yarn D for Round 2, Yarn E for
Round 3, and Yarn A for all rem
rounds.
Make 2 using Yarn G for Round 1,
Yarn M for Round 2, Yarn I for
Round 3 and Yarn A for all rem
rounds.
Make 2 using Yarn C for Round 1,
Yarn J for Round 2, Yarn L for
HEM
With RS facing, join Yarn A in
base of joined Motifs.
Round 1 (RS) Ch1 (does not count
as a st throughout), dc in each st
and ch-sp around, ss to beg dc.
[136 (160: 184) sts]
The remaining Hem is worked in
short rows and joined to Round 1
with a slip stitch.
Row 2 Ch12, dc in second ch from
hook and each ch across, ss in next
2 sts from Round 1, turn.
Row 3 Dc in bl of each st across,
turn.
Row 4 Ch1, dc in bl of each st
across, ss in next 2 sts from
Round 1.
Rep Rows 3-4 until each st from
Round 1 has been worked into.
Fasten off.
Whipstitch the short edges of the
Hem together.
BACK SHAPING
With RS facing, join Yarn G in top
right corner of Back.
Row 1 (RS) Ch3, tr in same corner
sp, *(skip 3 sts, 3tr in sp between 2
3-tr groups) to corner of Motif,
skip corner space, 3tr in joining
seam, skip corner of next square;
rep from * across to final 3 sts, skip
3 sts, 2tr in corner sp, turn. [46 (55:
64) sts]
Change to Yarn I.
Row 2 (WS) Ch3, 3tr in sp before
each 3-tr group, 3tr in sp before
final 2 sts, tr in final st, turn. [47
(56: 65) sts]
Change to Yarn A.
Row 3 Ch3, tr in st at base of ch-3,
(skip 3 sts, 3tr in sp between 2 3-tr
groups) rep across to final 4 sts,
skip 3 sts, 2tr in final st, turn. [46
(55: 64) sts]
Change to Yarn B.
Row 4 As Row 2. [47 (56: 65) sts]
Fasten off.
RIGHT SHOULDER
With RS facing, join Yarn B in
first st.
Row 5 (RS) Ch3, tr in st at base of
CHECK MATE SIZE TABLE
XS
S
M
TO!FIT!BUST
cm
71-76
81-86
91-96
ACTUAL!BUST!$APPROX%
cm
80
92
104
LENGTH
cm
45
49.5
54
MOTIF
cm
10x10
11.5x11.5
13x13
SIZE
b
YARN
a
Width a: 40 (46: 52)cm
Length b: 45 (49.5: 54)cm
Stylecra& Naturals Organic Co"on (50g/105m)
Yarn A
7
8
10
Yarns B-M
1
1
1
SIZING!COLOUR!KEY!So you can re-use this pattern, we’ve colour-coded the sizing instructions.
Simply follow our colour-coded measurements and you’re off.
KNIT#&#CROCHET#COLLECTION#$%$& BHG '(
ch-3, (skip 3 sts, 3tr in sp between
3-tr groups) 1 (1: 2) times, skip 3 sts,
2tr in next sp, turn. [10 (10: 13) sts]
Change to Yarn E.
Row 6 As Row 2.
Change to Yarn A.
Row 7 As Row 3.
Change to Yarn K.
Row 8 As Row 2.
Fasten off.
LEFT SHOULDER
With WS of Back facing, join Yarn
B in first st.
Work Rows 5-8 of Right Shoulder;
the RS and WS rows will be
reversed.
LEFT FRONT SHOULDER
With RS facing, join Yarn C in
corner across top of Front.
Row 1 (RS) Ch3, tr in same sp, (skip
3 sts, 3tr in sp between next 2 3-tr
groups) 1 (1: 2) times, skip 3 sts, tr in
next sp, turn. [9 (9: 12) sts]
Change to Yarn J.
Row 2 (WS) Ch3, 3tr in next 3 sps
between groups, tr in final st, turn.
[11 (11: 14) sts]
Change to Yarn L.
Rows 3-8 Rep Rows 1-2 using the
foll colour sequence: Yarn L, Yarn
A, Yarn H, Yarn D, Yarn E, Yarn A.
Fasten off.
RIGHT FRONT SHOULDER
With WS of Front facing you, work
as Le" Front Shaping; the RS and
WS rows will be reversed.
TO MAKE UP
With WS facing, sew the
shoulders together.
NECKBAND
With RS facing, join Yarn A in any
st around neckline.
Round 1 Ch1, dc evenly around,
working 1 st in each tr and 2 sts
around each row-end, ss to beg dc.
The Neckband is worked in short
rows as for the Hem.
Row 2 Ch6, dc in second ch from
hook and each ch across, ss in next
2 sts from Round 1, turn. [5 dc]
Row 3 Dc in bl of each dc across,
turn.
Row 4 Ch1, dc in bl of each st
across, ss in next 2 sts from
Round 1.
Rep Rows 3-4 until each st from
Round 1 has been worked into.
Fasten off.
Whipstitch the short edges of the
Neckband together.
from page 18
BEST!OF!THE!REST
YOU#WILL#NEED
Stylecra! Special DK (100%
acrylic, 100g/295m) 2 balls
Graphite (1063); 1 ball of each:
Magenta (1084); Turquoise
(1068); Sunshine (1114); Violet
(1277); Spice (1711) and Lime (1712)
■ A 4mm crochet hook
■ Elastic, 5mm thick
■ Stool, 40x30cm
■ Yarn needle
■
MEASUREMENTS
To fit stool measuring 40x30x12cm
over seat section
TENSION
Square measures 10x10cm using a
4mm hook, or size needed to
obtain correct tension
ABBREVIATIONS
2-tr cluster Yrh, insert in st/sp
indicated, yrh and pull up loop,
yarn round hook and draw through
two loops (2 loops le" on hook).
Key
ARM BANDS
Using Yarn A work as for
Neckband around each armhole
opening.
Weave in all ends.
"# BHG KNIT$&$CROCHET$COLLECTION$%&%#
Motif (mixed colours)
Join
Rep this again pu!ing the hook in
the same st /sp indicated (3 loops
le" on hook) yarn around hook
and draw through all 3 loops on
hook.
3-tr cluster Yrh, insert in st
indicated, yrh, pull loop through (3
loops on hook) yrh, pull through
first 2 loops on hook (2 loops on
hook), yrh, insert hook in the same
st/sp, yrh, pull loop through (4
loops on hook), yrh and pull
through first 2 loops (3 loops on
hook). Rep once more then finish
all tr tog: yrh, pull loop through all
loops on hook
For a full list see page 68
NOTES
Stool Cover is made up of motifs
which are joined together at the
end. You can adapt the pa!ern to
other square- or rectangle-shaped
stools. Measure the top sections
and divide the result by 10 to find
out how many motifs you will need
for the width and length of the top
section. If the measurements
don’t divide near enough to 10cm
then you can adjust the size of the
Squares; either by changing your
hook size or working extra rounds.
If you do this measure the motif
and divide your stool
measurements by this number.
Refer to Diagram below when
making up the Cover.
SQUARE (MAKE 26)
You can use any colours for
Rounds 1-4. Change colour where
indicated.
Using any colour, make a magic
loop.
Round 1 (RS) Ch2 (counts as htr
throughout), 7htr in loop, ss to top
of beg ch-2. [8 sts]
Round 2 (RS) Ch2, htr in st at base
of beg ch-2, 2htr in each st around,
ss to beg ch-2. [16 sts]
Fasten off.
Join next colour in any st.
Round 3 Ch3, tr in st at base of
ch-3 (counts as 2-tr cl), ch1, (2-tr cl,
ch1) in each st around, ss to beg cl.
[16 sts, 16 ch-1 sps]
Fasten off.
Join next colour in any ch-1 sp.
Round 4 Ch3, 2-tr cl in ch-sp at
base of ch-3 (counts as 3-tr cl), ch1,
(3-tr cl, ch1) in each ch-1 sp around,
ss to top of beg cl.
Fasten off.
Join Graphite in any ch-1 sp.
Round 5 Ch4 (counts as dtr), (2dtr,
ch2, 3dtr) in same ch-sp, *ch1, 3tr
in next ch-1 sp, ch1, 3htr in next
ch-1 sp, ch1, 3tr in next ch-1 sp, ch1,
(3dtr, ch2, 3dtr) in next ch-1 sp; rep
from * 3 times more omi!ing final
corner, ss to top of beg ch-4. [60
sts, 4 ch-2 sps, 16 ch-1 sps]
Fasten off and weave in ends.
Block Squares to measurements
listed taking care to follow any
yarn care instructions on the ball
band.
TO MAKE UP
Refer to the Diagram below when
making up the Stool Cover. With
RS facing, dc the Squares together
working through the bl only.
LOWER EDGING
Join Graphite in any st around
base of Cover.
Round 1 (RS) Ch3 (counts as tr), tr
in each st and ch-2 sp around, skip
all ch-1 sps, ss to top of beg ch-3.
Round 2 Ch3 (counts as tr), tr in
each st around, ss to top of beg
ch-3.
Rep Round 2 until Cover
measures desired depth.
Fasten off.
TO FINISH
Weave in all ends. Thread elastic
through the sts on final round of
Lower Edging. Place Cover over
stool and pull elastic to size
needed. Sew ends of elastic
together and trim any excess.
PATTERNS
ABBREVIATIONS
incR K2tog using next 2 sts but
don’t drop st off le# needle, yo, K1
again in same st, drop st. [1 st
inc’d]
incL Ssk using next 2 sts but don’t
drop st off le# needle, yo, K1 again
in same st, drop st. [1 st inc’d]
w&t = wrap and turn: When you
are wrapping a knit st: With yarn
back, slip the next stitch on your
le# needle purlwise onto the right
needle, bring your working yarn to
the front between the needles,
slip the stitch back to le# needle
(this completes the wrap). Turn
your work to begin next row.
When you are wrapping a purl st:
With yarn in front, slip the next
stitch on your le# needle purlwise
onto the right needle, bring your
working yarn to the back between
the needles, slip the stitch back to
le# needle (this completes the
wrap). Turn your work to begin
next row
For a full list see page 73
from page 19
FLORAL!FANCY
YOU!WILL!NEED
West Yorkshire Spinners
ColourLab DK (100% wool,
100g/225m) Yarn A Silver Grey
(137). For yarn quantities and
measurements see size table.
For the embroidery you will need:
■ Rowan Alpaca Classic (DK, 100%
wool, 25g/120m) 1 ball each of
Yarn B Green Moss (111) and Yarn
D Sun Valley (113)
■ Rowan Kidsilk Haze (lace ,70%
mohair, 30% silk, 25g/210m), 1 ball
of Yarn C Jelly (597)
■ Small amounts in different
colours as desired of Rowan
Alpaca Classic and Rowan Kidsilk
Haze for floral embroidery.
Choose any colours you like for
petals
■ A 3.25mm circular needle, 40cm
long for neck edging, plus longer
circular needles for hem
■ A 4mm circular needle, 40cm
long, plus longer circular needles
to use over raglan shaping and
body
■ A set of 3.25mm DPNs
(double-pointed needles) for
sleeves
■ A set of 4mm DPNs
(double-pointed needles) for
sleeves
■ Stitch markers
■ Stitch holders
■ Chenille needle
■ 16cm diameter (or smaller)
embroidery hoop
■ Yarn needle
■
now mrkA.
Set-up round Slip mrkA, K12 (12:
12: 14: 14: 14: 16: 16: 16) (Le#
Sleeve), place mrkB, K36 (38: 40:
40: 42: 44: 44: 46: 48) (Back),
place mrkC, K12 (12: 12: 14: 14: 14:
16: 16: 16) (Right Sleeve), place
mrkD, K36 (38: 40: 40: 42: 44: 44:
46: 48) (Front).
WORK SHORT ROWS AND
RAGLAN SHAPING
NOTE When working across
wraps, work wrap together with
wrapped st.
Row 1 (RS) Knit to 3 sts past mrkD,
w&t.
Row 2 Purl to 3 sts past mrkA,
w&t.
Row 3 (Inc) *Knit to 2 sts before
next mrk, incR, sl SM, incL; rep
from * another 3 times, K2 (2: 2: 2:
3: 3: 3: 4: 4), w&t. [104 (108: 112: 116:
120: 124: 128: 132: 136) sts]
Row 4 Purl to 5 (5: 5: 5: 6: 6: 6: 7: 7)
sts past mrkA, w&t.
Row 5 (Inc) *Knit to 2 sts before
next mrk, incR, sl SM, incL; rep
from * another 3 times, K4 (4: 4: 4:
5: 5: 5: 6: 6), w&t. [112 (116: 120: 124:
.5:
5
NOTE
3(
3: 3
.5:
4
:4
:4
.5:
4
For a video tutorial of incR and
incL see www.instagram.com/p/
B4pJO1GJwkv/
NECK EDGING
Cast on 96 (100: 104: 108: 112: 116:
120: 124: 128) sts using 3.25mm
circular needles and a stretchy
method. Join to work in the round,
taking care not to twist sts. PM for
beg of round.
Rib round (K2, P2) to end.
Work another 5 rounds in 2x2 rib
as set.
128: 132: 136: 140: 144) sts]
Row 6 Purl to 7 (7: 7: 7: 8: 8: 8: 9: 9)
sts past mrkA, w&t.
Row 7 (Inc) *Knit to 2 sts before
next mrk, incR, sl SM, incL; rep
from * another 3 times, K6 (6: 6: 6:
7: 7: 7: 8: 8), w&t. [120 (124: 128: 132:
136: 140: 144: 148: 152) sts]
Row 8 Purl to 9 (9: 9: 9: 10: 10: 10:
11: 11) sts past mrkA, w&t.
Row 9 (Inc) *Knit to 2 sts before
next mrk, incR, sl SM, incL; rep
from * another 3 times, K8 (8: 8: 8:
9: 9: 9: 10: 10), w&t. [128 (132: 136:
140: 144: 148: 152: 156: 160) sts]
Row 10 Purl to 11 (11: 11: 11: 12: 12: 12:
13: 13) sts past mrkA, w&t.
Row 11 (Inc) *Knit to 2 sts before
next mrk, incR, sl SM, incL; rep
from * another 3 times, K10 (10: 10:
10: 11: 11: 11: 12: 12), w&t. [136 (140:
144: 148: 152: 156: 160: 164: 168) sts]
Row 12 Purl to 13 (13: 13: 13: 14: 14:
14: 15: 15) sts past mrkA, w&t.
Row 13 (Inc) *Knit to 2 sts before
next mrk, incR, sl SM, incL; rep
from * another 3 times, K12 (12: 12:
12: 13: 13: 13: 14: 14), w&t. [144 (148:
152: 156: 160: 164: 168: 172: 176) sts]
Row 14 Purl to 15 (15: 15: 15: 16: 16:
VE
EE
L
S
48.5 (49: 51: 53: 55: 57: 58: 60: 62)cm
19 sts and 31 rows/rounds to
measure 10x10cm over stocking
stitch using 4mm needles
: 5)
cm
TENSION
FRONT!&!BACK
Change to 4mm circular needles.
You will now place markers for
raglan increases.
NOTE Marker at beg of round is
42 (47.5: 53: 58: 63.5: 68.5: 74: 78: 83.5)cm
FLORAL FANCY SIZE TABLE
SIZE
XS
S
M
L
1XL
2XL
3XL
4XL
5XL
TO!FIT!BUST
cm
71-76
81-86
91-97
102-107
112-117
122-127
132-137
142-147
152-157
ACTUAL!BUST
cm
84
95
105.5
116
126.5
137
147.5
156
166.5
LENGTH
cm
48.5
49
51
53
55
57
58
60
62
SLEEVE!LENGTH
cm
3
3
3.5
4
4
4.5
4.5
5
5
5
6
YARN
Yarn A Silver Grey (137)
West Yorkshire Spinners Colourlab DK (100g/225m)
3
3
3
4
4
5
5
SIZING!COLOUR!KEY!So you can re-use this pattern, we’ve colour-coded the sizing instructions.
Simply follow our colour-coded measurements and you’re off.
KNIT!&!CROCHET!COLLECTION!"#"$ BHG %&
from page 24
TIME!FOR!TEA
YOU!WILL!NEED
8 ply (also known as DK or double
kni"ing) yarn (100% acrylic) 30g
of Yarn A Blue and 10g each of
Yarn B Pink; Yarn C Cream; Yarn
D Purple; Yarn E Peach and Yarn
F Green
■ A pair of 4mm kni"ing needles
■ A yarn needle
■
The embroidery stitches used here are simple, but take your time if you’re new to this particular cra#
16: 17: 17) sts past mrkA, w&t.
Short rows are now complete.
Continue working in the round
from this point onwards.
When working across remaining
wraps, work wrap together with
wrapped st.
RAGLAN SHAPING
Next round (Partial) Knit to
mrkA.
Next round (Inc) *Sl SM, incL, knit
to 2 sts before next mrk, incR; rep
from * another 3 times. [8 sts
inc’d]
Next round Knit to end.
Rep last 2 rounds another 8 (10: 12:
12: 14: 16: 14: 17: 18) times. [216 (236:
256: 260: 280: 300: 288: 316: 328)
sts]
Rep inc round only another 2 (3: 4:
5: 5: 6: 10: 8: 10) times. [232 (260:
288: 300: 320: 348: 368: 380:
408) sts]
Size XS only
Next round (Sleeve raglan inc) *sl
SM, incL, knit to 2 sts before next
mrk, incR, sl SM, knit to next mrk;
rep from * once more. [4 sts inc’d]
Rep this round only twice more.
[244 (-: -: -: -: -: -: -: -) sts]
Sizes L to 5XL only
Next round (Body raglan inc) *sl
SM, knit to next mrk, sl SM, incL,
knit to 2 sts before next mrk, incR;
rep from * once more. [4 sts inc’d]
Rep this round only another - (-: -:
2: 4: 4: 7: 8: 9) times. [- (-: -: 312:
340: 368: 400: 416: 448) sts]
All sizes
Raglan shaping is now complete.
You should have a total of 244
(260: 288: 312: 340: 368: 400: 416:
448) sts; 70 (78: 86: 94: 104: 112:
122: 128: 138) sts per Back/Front
and 52 (52: 58: 62: 66: 72: 78: 80:
86) sts per Sleeve.
Knit 1 round, slipping all markers.
DIVIDE BODY FROM SLEEVES
You will now separate the Body
and Sleeve sts, casting on sts
between them for the underarm
as follows:
Set-up round K52 (52: 58: 62: 66:
72: 78: 80: 86) sts for Le# Sleeve
and slip these sts to a holder, cast
on 10 (12: 14: 16: 16: 18: 18: 20: 20)
sts across underarm, K70 (78: 86:
94: 104: 112: 122: 128: 138) sts for
Back, K52 (52: 58: 62: 66: 72: 78:
80: 86) sts for Right Sleeve and
slip these sts to a holder, cast on
10 (12: 14: 16: 16: 18: 18: 20: 20) sts
across underarm, K70 (78: 86: 94:
104: 112: 122: 128: 138) sts for Front.
[160 (180: 200: 220: 240: 260:
280: 296: 316) sts for Body]
BODY
Knit every round until Body
measures approx 27cm from
underarm, or 3.5cm less than
desired finished length.
Change to 3.25mm circular
needles.
Rib round (K2, P2) to end.
Work another 10 rounds in 2x2 rib
as set.
Cast off in rib.
SLEEVES (both alike)
With RS facing and 4mm DPNs,
pick up and knit 8 (12: 14: 14: 14: 16:
18: 20: 18) sts across the 10 (12: 14:
16: 16: 18: 18: 20: 20) sts cast on at
underarm, knit across held 52 (52:
58: 62: 66: 72: 78: 80: 86) sts and
PM for beg of round. [60 (64: 72:
76: 80: 88: 96: 100: 104) sts]
Knit another 0 (0: 1: 3: 3: 5: 5: 7: 7)
!" BHG KNIT#&#CROCHET#COLLECTION#$%$&
rounds straight.
Change to 3.25mm DPNs.
Rib round (K2, P2) to end.
Work another 7 rounds in 2x2 rib
as set.
Cast off in rib.
INTERIM FINISHING
Weave in ends, using yarn tails
where you joined in yarn to close
any holes at underarms. Block
gently to measurements, following
any yarn care instructions on the
ball band.
EMBROIDERY
Embroidery is worked around the
lower edge of the garment, above
the rib hem (see image for a
guide). We recommend using an
embroidery hoop to keep the
kni"ed fabric at an even tension,
but take care not to stretch the
garment too much because that
might distort your embroidery.
Trace outlines using backstitch
before beginning each section
(see image for a guide). Work the
following stitches and colours over
the following sections, using the
image as a guide: Satin stitch, Split
stitch, French knots, Backstitch.
For examples of embroidery
stitches turn to page 77.
STEMS AND LEAVES
Use 1 strand of Yarns B and C
together and work using split
stitch.
PETALS
Satin stitch and straight stitch
using any colours desired.
FLOWER CENTRES
Using Yarn D and various colours,
work French knots.
MEASUREMENTS
Mug hug measures 22x7.5cm laid
flat before seams are joined. Note
measurements may vary slightly
depending on the heaviness of the
8 ply (DK) used.
TENSION
12 sts and 12 rows to measure
10x10cm over pa" using 4mm
needles.
ABBREVIATIONS
Daisy stitch P3tog leaving the
stitches on the le#-hand needle,
yo, p3tog dropping stitches from
le#-hand needle.
For a full list see page 73
MUG HUG
Cast on 52 stitches using a Yarn A
and 4mm needles.
Row 1 Knit into the back of all sts.
Row 2 to 5 Knit to end.
Daisy row 1 (WS) Join in Yarn B,
*(P3 in Yarn A, daisy st with Yarn
B); rep from * to last 4 sts, P4.
Row 7 Knit to end.
Daisy row 2 Join in Yarn C, P6 in
Yarn A (daisy st with Yarn C, P3 in
Yarn A); rep from * to last 4 sts,
P4.
Row 9 Knit to end.
Row 10 Rep Daisy Row 1, using
yarn D instead of yarn B.
Row 11 Knit to end.
Row 12 Rep Daisy Row 2, using
PATTERNS
yarn E instead of yarn C.
Row 13 Knit to end.
Row 14 Rep Daisy Row 1, using
yarn F instead of yarn B.
Row 15 Knit to end.
Row 16 Rep Daisy Row 2, using
yarn B instead of yarn C.
Row 17 to 20 Knit to end.
Cast off.
TO FINISH
Weave in all ends. With RS facing
together, sew the row-end edges
together at the very top and bo"om
corners. The andle will slot into
the space in between. Turn RS out
and place onto your mug.
from page 20
POM!APPEAL!
YOU!WILL!NEED
Stylecra! Special DK (100%
acrylic, 100g/295m) 2 balls of
Cream (1005) and 1 ball of each:
Matador (1010); Dandelion (1856);
Aspen (1422); Fiesta (1257);
Fondant (1241); Grass Green (1821)
and Turquoise (1068)
■ A 4mm crochet hook
■ Pompom and tassel tool or thick
cardboard
■ Polystyrene wreath, 35cm
■ Yarn needle
■
MEASUREMENTS
Wreath measures 35cm in
diameter
TENSION
14 sts and 17 rows measures
10x10cm over double crochet
using a 4mm hook, or size needed
to obtain correct tension
ABBREVIATIONS
For a full list see page 68
NOTES
Base is made first and sewn
around the polystyrene wreath.
Leaves, Pompoms and Tassels are
made separately and sewn into
position at the end.
BASE
Using Turquoise, ch31.
Row 1 (RS) Dc in second ch from
hook and each ch across, turn. [30
sts]
Row 2 Ch1 (does not count as st),
dc in each st across, turn.
Rep Row 2 until Base measures
the circumference of your wreath.
Fasten off.
Sew the Base around the
polystyrene wreath.
LEAVES (MAKE 28)
Using Grass Green, ch10.
Round 1 (RS) Dc in second ch
from hook and next ch across, htr
in next ch, tr in next ch, dtr in next
ch, tr in next ch, htr in next ch, dc
in next ch, (dc, ch1, dc) in final ch,
turn to work down opposite edge
of foundation ch, dc in next ch, htr
in next ch, tr in next ch, dtr in next
ch, tr in next ch, htr in next ch, dc
in next 2 ch, ch1, ss to beg dc.
Fasten off leaving a 20cm tail.
POMPOM (MAKE 20)
To make each Pompom use
strong cardboard to cut two
circles or if using a tool, follow the
manufacturer’s instructions. Each
Pompom uses Cream plus a
combination of any other 3
colours. You can refer to the
image when making your
Pompoms.
Once you have wound your
Pompom, cut a 60cm length of
Cream and tie it around the
centre of the Pompom. Remove
the Pompom from the cardboard
discs or tool. For a good finish, we
recommend we"ing each
Pompom and leaving to dry before
trimming to shape.
TASSELS (MAKE 5)
Using a different colour for each
Tassel. You can refer to the image
when making your Tassels.
Follow ‘How to Make a Tassel’ on
page 78 or use a tassel-making
tool. Wrap yarn around about 20
times. Cut two 20cm lengths of
yarn; wrap the first through the
top of the Tassel and secure with
a knot. Wrap the second to form
the ‘waist’ approx 1cm from the
top of the Tassel; secure with a
knot. Trim the ends at the base of
each Tassel.
TO MAKE UP
Refer to the image when making
up the Wreath. Sew the Tassels to
the lower edge of the Wreath,
approx 6cm apart. Pin the Leaves
and Pompoms onto the Wreath.
Once happy with the position, use
the tails to sew into place. Weave
in all ends.
from page 20
PICK!‘N’!MIX!FOR!
SIX
YOU!WILL!NEED
Cygnet Silcaress DK (100%
acrylic, 100g/245m) 2 balls of
each: Raspberry (2278); Velvet
(2777); Clementine (2093);
Sherbert (2723); Bu"ercup (2887)
and Apple (2956); 1 ball of
Fondant (2837)
■ A 4mm crochet hook
■ Yarn needle
■
MEASUREMENTS
Sherbert and Apple, 6 in
Clementine and Bu"ercup, and 4
in Fondant.
Make a magic loop.
Round 1 (RS) Ch3 (counts as tr
throughout), tr in loop, ch2, (2tr in
loop, ch2) 5 times, ss to top of beg
ch-3. [12 sts]
Round 2 (RS) Ch3, *tr in each st to
ch-2 sp, (tr, ch2, tr) in ch-2 sp; rep
from * around, ss to top of beg
ch-3. [24 sts]
Rounds 3-9 As Round 2.
[108 sts at end of Round 9]
Fasten off and weave in ends.
Blanket measures approx
116x157cm a#er blocking
TENSION
Each Hexagon measures 23cm in
diameter across widest points
a#er blocking
ABBREVIATIONS
For a full list see page 68
NOTES
Blanket is made up of 49
Hexagons, which are joined
together at the end. Each
Hexagon is worked in rounds with
RS facing throughout. We
recommend blocking the
Hexagons to the measurements
listed before joining, making sure
to follow any yarn care
instructions on the ball band.
HEXAGON MOTIF (MAKE 49)
Make 9 in Raspberry, 8 in Velvet,
TO MAKE UP
Use the image as a guide when
joining the Hexagons together.
Block the Hexagons to the
measurements specified making
sure to follow any yarn care
instructions on the ball band. Join
the Hexagons with WS facing you
by working a dc seam through the
bl only. Use the same colour as
used in one of the Hexagons being
joined. Weave in all ends.
KNIT"&"CROCHET"COLLECTION"#$#% BHG &'
124
123
122
60
58
56
54
52
50
48
46
44
42
40
38
36
34
32
30
28
26
24
22
20
18
16
14
12
10
8
6
4
2
30
25
20
15
10
59
120
57
118
55
116
53
114
51
112
49
110
47
108
45
106
43
104
41
102
39
100
37
98
35
96
33
94
31
92
29
90
27
88
25
86
23
84
21
82
19
80
17
78
15
76
13
74
11
72
9
70
7
68
5
66
3
64
121
119
117
115
113
111
109
107
105
103
101
99
97
95
93
91
87
85
83
81
79
77
75
73
71
69
67
65
63
62
5
61
30
25
20
15
DESERT DREAMS CHARTS
184
179
178
177
176
175
174
171
170
167
166
165
164
163
162
161
160
159
158
157
156
153
152
151
150
149
148
147
146
145
144
143
142
141
140
139
138
137
136
135
134
133
132
131
130
129
128
127
126
125
30
25
20
15
10
!" BHG KNIT#&#CROCHET#COLLECTION#$%$&
5
Panel measures: 20cm width;
length can be adapted to size of
blanket used
NOTES
155
154
MEASUREMENTS
bobble Using colour indicated,
*yrh, insert hook in st, yrh and pull
up a loop, yrh and pull through 2
loops on hook; rep from * 4 times
more, yrh and pull through all
loops on hook
For a full list see page 68
169
168
Cygnet DK (100% acrylic,
100g/298m) 1 ball of each:
Barley (4884); Sunshine (184);
Jaffa (6632); Fuchsia (676); Mocha
(432); Black (217); Fern (2759);
Apple (6711) and Kiwi (303)
■ A 4mm crochet hook
■ Co#on muslin blanket,
108x108cm
■
ABBREVIATIONS
173
172
5
YOU!WILL!NEED
15 sts and 17 rows measure
10x10cm over double crochet
using a 4mm hook, or size needed
to obtain correct tension
181
180
10
DESERT!DREAMS
TENSION
183
182
from page 20
89
Key
Kiwi
Fuchsia
Jaffa
Barley
Fern
Sunshine
Apple
Black
Mocha
Bobble stitch
The Panel is worked in rows
throughout. There are Charts
(le$), which you will need to refer
to when making the Panel. Each
small square represents 1dc. Read
all RS rows from right to le$ and
WS rows from le$ to right. A
square marked with an x
represents a bobble. The first few
rows of the Chart have been
wri#en out to guide you.
Rather than carrying the yarn
across your work, wind off smaller
balls of each colour. When
changing colour leave the unused
colour on the WS ready to use
again on the next row.
PATTERNS
The charted area should measure
108cm long. If you need to make a
shorter edge, use the tension to
select the number of rows you
need to work. To make the edging
longer, you can work the rows of
the Chart backwards from the end
until you reach the desired length.
PANEL
Using Barley, ch31.
Border row (RS) Dc in second ch
from hook and each ch across,
turn. [30 dc]
Change to Fuchsia and complete
Row 2 of Chart as follows:
Row 2 (WS) Ch1 (does not count
as st throughout), dc in next 12 sts,
change to Jaffa, dc in next 6 sts,
change to Barley, dc in next 2 sts,
change to Black, dc in next 6 sts,
change to Mocha, dc in final 4 sts,
turn.
Row 3 Ch1, dc in first 4 sts, change
to Black, dc in next 6 sts, change
to Barley, dc in next 3 sts, change
to Jaffa, dc in next st, change to
Fern, dc in next 2 sts, change to
Jaffa, dc in next 2 sts, change to
Fuchsia, dc in next 12 sts, turn.
Cont to follow the Charts to
desired length.
Fasten off and weave in all ends.
EDGING
Row 1 worked in Barley counts as
one side of the Edging.
Row 1 (RS) Ch1, *dc in each st and
row-end to next corner, (dc, ch1,
dc) in corner; rep from * twice
more.
Fasten off.
TO FINISH
Using Black, Fern and Barley,
embroider details on the cacti.
You can use the images as a guide.
Sew the Panel to a long edge of
your blanket.
from page 21
RIGHT!AT!HOME
YOU"WILL"NEED
Stylecra! Special DK (100%
acrylic, 100g/295m) 6 balls of
Cream (1005); 1 ball of each: Spice
(1711); Cornish Blue (1841); Apple
(1852); Pomegranate (1083);
Empire (1829); Sunshine (1114);
Violet (1277); Turquoise (1068);
Raspberry (1023) and Pale Rose
(1080)
■ A 4mm crochet hook
■ Yarn needle
■
MEASUREMENTS
Blanket measures approx
85x135cm
TENSION
Tension is not critical, but it may
affect the yarn quantities required
ABBREVIATIONS
For a full list see page 68
NOTES
Blanket is made up of 60 Squares.
All Squares are made first then
joined together with a dc seam.
SQUARES (MAKE 60)
Make 9 using Spice, Cornish Blue,
Apple and Pomegranate.
Make 8 using Empire, Sunshine
and Violet.
Make a magic loop.
Round 1 (RS) Ch3 (counts as tr
throughout), 2tr in loop, ch3, (3tr
in loop, ch3) 3 times, ss to top of
beg ch-3. [4 3-tr groups]
Fasten off.
Join Cream in any ch-3 sp.
Round 2 (RS) Ch3, (2tr, ch3, 3tr) in
same sp, (3tr, ch3, 3tr) in each ch-3
sp around, ss to top of beg ch-3. [8
3-tr groups, 4 ch-3 sps]
Round 3 Ss to next ch-3 sp, ch3,
(2tr, ch3, 3tr) in same space, *3tr in
sp between 3-tr groups, (3tr, ch3,
3tr) in next ch-3 sp; rep from *
twice more, 3tr in sp between 3-tr
groups, ss to top of beg ch-3 [12
3-tr group, 4 ch-3 sps]
Fasten off.
Join same colour used in Round 1
in bl of any st.
Round 4 (Working in bl
throughout) Ch1 (does not count
as st throughout), *dc in each st to
ch-3 sp, dc in next ch, (dc, ch1, dc)
in next ch, dc in next ch; rep from
* around, ss to beg dc. [52 dc, 4
ch-1 sps]
Fasten off.
Join Cream in any ch-3 sp from
Round 3. Work the next round
over in the sps from Round 3,
working over the sts from Round 4.
Round 5 Ch3, (2tr, ch3, 3tr) in
same sp, *3tr in each sp between
3-tr groups to ch-3 sp, (3tr, ch3,
3tr) in ch-3 sp; rep from * twice
more, 3tr in each sp between 3-tr
groups across to end, ss to top of
beg ch-3 [16 3-tr groups, 4 ch-3 sps]
Round 6 Ss to next ch-3 sp and
rep Round 5. [20 3-tr groups, 4
ch-3 sps]
Round 7 Ch2 (counts as htr), *htr
into each st to ch-3 sp, (2htr, ch1,
2htr) in ch-3 sp; rep from * around,
ss to top of beg ch-2. [76 htr, 4 ch-1
sps]
Fasten off and weave in ends.
Block each Square following yarn
care instructions on the ball band.
TO MAKE UP
Using the image as a guide, seam
the Squares together using dc and
Turquoise.
BORDER
With RS facing, join Turquoise in
any corner.
Round 1 (RS) Ch1, *(2dc, ch1, 2dc)
in corner, dc in each st and join
across to next corner; rep from *
around, ss to beg dc.
Fasten off.
Join Raspberry in any st.
Round 2 Ch2 (counts as htr), *htr
in each st to corner, (htr, ch1, htr)
in ch-1 sp; rep from * around, ss to
top of beg ch-2.
Fasten off.
Join Pale Rose in any st.
Round 3 Ch1, *dc in each st to
corner, (dc, ch1, dc) in ch-1 sp; rep
from * around, ss to beg dc.
Fasten off and weave in ends.
from page 22
BUTTERFLY!
WINGS
YOU"WILL"NEED
KC Collection Naturally So! 4
Ply (90% Bluefaced Leicester
wool, 10% Afghan cashmere,
50g/190m) in Sunset (6027). For
yarn quantities and
measurements see size table
■ A pair of 3.25mm kni#ing needles
■ Stitch holders
■ Spare needle
■ Yarn needle
■
TENSION
28 sts and 36 rows to measure
10x10cm over reverse stocking
stitch using 3.25mm needles
28 sts and 56 rows to measure
10x10cm over slip stitch pa#ern
using 3.25mm needles
ABBREVIATIONS
For a full list see page 73
BACK
Cast on 134 (146: 162: 174: 190) sts
using 3.25mm needles.
Rib row 1 (RS) *P2, K2; rep from *
to last 2 sts, P2.
Rib row 2 (WS) *K2, P2; rep from
* to last 2 sts, K2.
These 2 rows form rib.
Rib until work measures 4cm,
ending a$er a RS row.
Dec row (WS) K2, p2tog, rib 62
(57: 71: 82: 91), p2tog, rib to last 4
sts, p2tog, K2. [131 (143: 159: 171:
187) sts] **
Work in rev st st, starting with a
RS purl row, until Back measures
47 (48: 49: 50: 51)cm from cast-on
edge, ending a$er a WS row.
SHAPE SHOULDERS
Cast off 9 (10: 12: 13: 15) sts at beg
of next 6 rows. [77 (83: 87: 93: 97)
sts]
Cast off 10 (12: 13: 15: 16) sts at beg
of next 2 rows. [57 (59: 61: 63: 65)
sts]
Leave rem sts on a holder for
neckband.
FRONT
Work as given for Back to **.
KNIT"&"CROCHET"COLLECTION"#$#% BHG &&
BUTTERFLY WINGS SIZE TABLE
S
M
L
1XL
2XL
TO!FIT!BUST
cm
81-86
92-97
102-107
112-117
122-127
ACTUAL!BUST
cm
92
100.5
112
120.5
132
LENGTH
cm
47
48
49
50
51
SLEEVE!LENGTH
cm
48
48
48
48
48
SIZE
YARN
from page 20
KC Collection Naturally So" 4 Ply (50g/190m)
Sunset (6027)
6
7
7
8
9
SIZING!COLOUR!KEY!So you can re-use this pattern, we’ve colour-coded the sizing instructions.
Simply follow our colour-coded measurements and you’re off.
RAINBOW!
LANYARD
YOU!WILL!NEED
Schachenmayr Regia 6ply Color
(75% wool, 25% polyamide,
150g/375m) 1 ball of Rainbow
(6367)
■ A pair of 3.5mm kni#ing needles
■ Yarn needle
SLEEVE
48 (48: 48: 48: 48)cm
FRONT!&!BACK
47 (48: 49: 50: 51)cm
■
46 (51: 56: 61: 66)cm
SET BUTTERFLY-STITCH
PATTERN
Row 1 (RS) P0 (2: 2: 0: 0), *P3, sl 5
with yarn in front; rep from * to
last 3 (5: 5: 3: 3) sts, P3 (5: 5: 3: 3).
Row 2 (WS) Knit.
Rows 3 and 4 Rep Rows 1 and 2.
Row 5 Rep Row 1.
Row 6 K3 (5: 5: 3: 3), *K2, li" the 3
strands from the previously
slipped sts up onto the LH needle
and knit these together with the
next st to create a tuck st, K5; rep
from * to last 0 (2: 2: 0: 0) sts, K0
(2: 2: 0: 0).
Row 7 Purl.
Row 8 Knit.
These 8 rows form pa# and are
repeated.
Cont in pa# until Front measures
2 rows less than Back to shape
shoulders, ending a"er a WS row.
SHAPE SHOULDERS AND
NECKLINE
Next row (RS) Pa# 37 (42: 49: 54:
61) sts and turn, leave rem sts on a
spare needle.
Next row (WS) Pa# to end.
***Cast off 9 (10: 12: 13: 15) sts at
beg of next row and 2 foll alt rows.
[10 (12: 13: 15: 16) sts]
Patt 1 row.
Cast off rem 10 (12: 13: 15: 16) sts.
Slip central 57 (59: 61: 63: 65) sts
!"" BHG KNIT#&#CROCHET#COLLECTION#$"$%
onto a stitch holder for front neck.
With RS facing, rejoin yarn at
neck edge to rem 37 (42: 49: 54:
61) sts and pa# 3 rows. Complete
as for first shoulder from *** to
end.
SLEEVES (both the same)
Cast on 70 (74: 74: 78: 78) sts
using 3.25mm needles.
Work in 2x2 rib as given for Back
for 4cm, ending a"er a WS row.
Work in rev st st, starting with a
RS purl row, and AT THE SAME
TIME inc 1 st at each end of next
row and 18 (18: 19: 19: 20) foll 6th
rows. [108 (112: 114: 118: 120) sts]
Cont in rev st st without shaping
until Sleeve measures 48cm from
cast-on edge, ending a"er a WS
row.
Cast off 8 sts at beg of next 10
(10: 10: 12: 12) rows. [28 (32: 34: 22:
24) sts]
Cast off rem sts.
TO MAKE UP
Join le" shoulder seam with
ma#ress stitch.
NECKBAND
With RS facing and using 3.25mm
needles, knit across 57 (59: 61: 63:
65) sts from Back holder, pick up
and knit 8 sts down le" front neck,
knit across 57 (59: 61: 63: 65) sts
from Front holder, pick up and
knit 8 sts up right front neck. [130
(134: 138: 142: 146) sts]
Starting with a WS row, work in
2x2 rib as given for Back for 7
rows.
Cast off in rib.
TO FINISH
Weave in ends. Join right shoulder
and neckband seam with ma#ress
stitch. Set in Sleeves. Join side
and Sleeve seams with ma#ress
stitch. Block to measurements,
following any yarn care
instructions on the ball band.
MEASUREMENTS
Lanyard measures 10x90cm
ABBREVIATIONS
For a full list see page 73
RAINBOW LANYARD
Cast on 9 sts using 3mm needles.
Row 1 (RS) Knit.
Row 2 Purl.
Row 3 K1, *sl 1 purlwise, K1; rep
from * to end of row.
Row 4 K1 *yf, sl 1, yb, K1; rep from *
to end of row.
Rep the 4 rows until kni#ing
measures 90cm.
Cast off.
TO MAKE UP
Weave in all loose ends. Place the
kni#ing right-side facing up and
slip a D-ring and a clasp onto the
lanyard. Sew together the cast-on
and cast-off ends, move the join
up by 2cm and sew in place to
make a li#le loop.
from page 23
GRANNY!TO!THE!
RESCUE
YOU!WILL!NEED
■
King Cole Merino Blend DK
(100% wool, 50g/104m) 2 balls of
White (001); 1 ball of each:
Turquoise (018); Gold (055); Pale
Pink (1532); Sage (853) and
Lavender (927)
PATTERNS
4mm crochet hook
3.5mm hook
■ A dropped-sleeved jumper
■ Yarn needle
■
■
MEASUREMENTS
Pa!ern can be adapted to
measurements of jumper
TENSION
5 rounds measure 10x10cm of
Square pa!ern using a 4mm hook,
or size needed to obtain correct
tension
ABBREVIATIONS
For a full list see page 68
NOTES
To begin, measure the front of
your jumper from the shoulder
seam to the hem and across the
bust. Cut the front from your
jumper up to the shoulder and
armhole seams cu!ing close to
the side, arm and shoulder seams.
Squares are made to fit across the
front of your jumper. Each Square
should be 1⁄4 of the width of the
front. You can adapt the pa!ern
for the Square by working fewer
rounds, or by working additional
rounds. Each dc round should add
approx 1cm to the measurements
and each tr round should add
approx 2cm to the measurements.
JUMPER EMBELLISHMENT
SQUARE (MAKE 12)
For Rounds 1, 2, 3 and 5 you can
use any colour. For Rounds 4 and
6 use the colours listed.
Using a 4mm hook and any colour,
ch4 and ss in last ch from hook to
form a loop.
Round 1 (RS) Ch3 (counts as tr
throughout), 2tr in loop, ch2, (3tr
in loop, ch2) 3 times, ss to beg
ch-3. [4 3-tr groups, 4 ch-2 sps]
Fasten off.
Join any colour in a ch-2 sp.
Round 2 (RS) Ch3, (2tr, ch2, 3tr,
ch1) in same sp, (3tr, ch2, 3tr, ch1)
in each ch-2 sp around, ss to top
of beg ch-3. [8 3-tr groups, 4 ch-2
sps, 4 ch-1 sps]
Fasten off.
Join any colour in a ch-2 sp.
Round 3 Ch3, (2tr, ch2, 3tr, ch1) in
same sp, *3tr in ch-1 sp, ch1, (3tr,
ch2, 3tr, ch1) in ch-2 sp; rep from *
twice more, 3tr in ch-1 sp, ch1, ss to
top of beg ch-3.
[12 3-tr groups, 8 ch-1 sps, 4 ch-2
sps]
Fasten off.
Join White in a ch-2 sp.
Round 4 Ch3, (2tr, ch2, 3tr, ch1) in
same sp, *(3tr, ch1) in each ch-1 sp
across to next corner, (3tr, ch2, 3tr,
ch1) in ch-2 sp; rep from * 3 times
more omi!ing corner on final rep,
ss to top of beg ch-3. [16 3-tr
groups, 12 ch-1 sps, 4 ch-2 sps]
Fasten off.
Join any colour in a ch-2 sp.
Round 5 As Round 4. [20 3-tr
groups, 16 ch-1 sps, 4 ch-2 sps]
Fasten off.
Join Turquoise in any ch-2 sp.
Round 6 As Round 4. [24 3-tr
groups, 20 ch-1 sps, 4 ch-2 sps]
Fasten off.
You may need to work extra
rounds as Round 4 to reach
measurements required.
Join White in any ch-2 sp.
Final round Ch1 (does not count
as st throughout), *(dc, ch1, dc) in
ch-2 sp, dc in each st and ch-1 sp
to next corner; rep from * 3 times
more, ss to beg dc.
Fasten off and block to
measurements following any yarn
care instructions on the ball band.
Sew the Squares together in a 3x4
formation.
SHOULDER EXTENSIONS
Place markers on the top of the
joined Squares to mark out the
neckline sp. We recommend a
neck space of approx 17-23cm
depending on your size. If there is
neck shaping on the back of your
jumper you should use this
measurement.
You will need to have a multiple of
3 sts for the Shoulder Extensions.
RIGHT SHOULDER
Using a 4mm hook, join White in
top right-hand corner of joined
Squares.
Row 1 (RS) Ch3, 2tr in st at base of
ch-3, skip 4 sts, (3tr in next st, skip
2 sts) across to marker, 3tr in final
st, turn.
Row 2 (WS) Ch3, 3tr in sp
between each 3-tr group, tr in final
st, turn.
Row 3 Ch3, 2tr in st at base of
ch-3, skip first 3-tr group, 3tr in sp
between each 3-tr group across to
final group, skip final group, 3tr in
final st, turn.
Repeat Rows 2-3 until piece
measures 5cm less than the
Jumper.
Fasten off.
LEFT SHOULDER
Join White in next marked st and
work as Right Shoulder
Extensions.
Fasten off and weave in all ends.
HEM
Using 3.5mm hook, join Gold in
first corner across bo!om of
joined Squares.
Row 1 (RS) Ch3, tr in each st
across, turn.
Rep Row 1 until piece measures
same length as Jumper.
Fasten off and weave in ends.
TO MAKE UP
Pin the piece to the shoulder,
armhole and side edges of the
front of your jumper. Once happy,
sew motifs into place using
matching thread and sewing over
the seam below to hide any raw
edges and prevent any unravelling.
NECKLINE EDGING
Using a 3.5mm hook, join Gold in
any st around neckline.
Round 1 (RS) Ch1, dc evenly
around working into the back of
the jumper, pm in sts in line with
base of Shoulder Extensions, ss to
beg dc.
Round 2 (RS) Ch1, dc in each st
around, move markers up as you
work, ss to beg dc.
Round 3 Ch3, *tr in each st to
marker, tr2tog next 2 sts, move
marker up; rep from * to end, ss to
top of beg ch-3.
Round 4 As Round 3.
Fasten off and weave in ends.
10mm straight needles.
Rib row 1 P2, (K2, P2) to end.
Rib row 2 K2, (P2, K2) to end.
Rep the last 2 rows another 5
times, inc 3 (1: 3: 1) sts across last
row. [53 (59: 65: 71) sts]
Work in pa! as folls:
Row 1 (RS) K5 (3: 6: 4), (P1, K1, P1,
K7) to last 8 (6: 9: 7) sts, P1, K1, P1,
K5 (3: 6: 4).
Row 2 P5 (3: 6: 4), (K3, P7) to last 8
(6: 9: 7) sts, K3, P5 (3: 6: 4).
Rows 3 and 4 As Rows 1 and 2.
Row 5 As Row 1.
Row 6 K to end.
Row 7 K1 (1: 0: 0), (P1, K1) to last 0
(0: 1: 1) sts, P0 (0: 1: 1).
Row 8 K to end.
Rows 9 to 12 Rep Rows 1 and 2
twice more.
These 12 rows form the pa! and
are repeated.
Work another 0 (0: 2: 2) rows in
pa! as set.
SHAPE SIDES
Taking new sts into pa!, inc 1 st at
each end of the next and 12 foll RS
rows. [79 (85: 91: 97) sts]
Work 1 row straight.
Change to 10mm circular needle.
Continue working backwards and
forwards in rows.
SHAPE SLEEVES
Cast on 7 sts at beg of next 4 rows.
[107 (113: 119: 125) sts]
Work 14 (16: 16: 18) rows straight,
ending a%er a WS row.
SHAPE UPPER ARMS AND
SHOULDERS
Cast off 12 sts at beg of next 2
rows, 8 (9: 10: 11) sts at beg of foll 6
rows, then 8 sts at beg of next 2
rows. [19 sts]
Cast off.
from page 25
ORANGE!CRUNCH
YOU$WILL$NEED
Stylecra! Special XL Tweed
(super chunky, 97% acrylic, 3%
viscose, 100g/68m) in Spice (1711)
For yarn quantities and
measurements see size table
■ A pair of 9mm kni!ing needles
■ A pair of 10mm needles
■ A 9mm circular needle, 80cm long
■ A 10mm circular needle, 80cm long
■
TENSION
9 sts and 12 rows to measure
10x10cm over pa! using 10mm
needles
ABBREVIATIONS
For a full list see page 73
BACK
Cast on 50 (58: 62: 70) sts using
LEFT FRONT
Cast on 17 (21: 21: 25) sts using
10mm needles.
Rib row 1 P2, (K2, P2) to last 3 sts,
K3.
Rib row 2 P3, K2, (P2, K2) to end.
Rep the last 2 rows another 5
times, inc 0 (0: 2: 1) sts or dec 0 (1:
0: 0) sts evenly across last row. [17
(20: 23: 26) sts]
Work in pa! as follows:
Row 1 K5 (3: 6: 4), (P1, K1, P1, K7) 1 (1:
1: 2) times, P1, K1, P0 (1: 1: 0), K0 (4:
4: 0).
Row 2 P0 (4: 4: 0), K2 (3: 3: 2), (P7,
K3), 1 (1: 1: 2) times, P5 (3: 6: 4).
Rows 3 and 4 As Rows 1 and 2.
Row 5 As Row 1.
Row 6 K to end.
Row 7 K1 (1: 0: 0), (P1, K1) to last 0 (1:
1: 0) sts, P0 (1: 1: 0).
Row 8 K to end.
KNIT"&"CROCHET"COLLECTION"#$#% BHG &$&
ORANGE CRUNCH SIZE TABLE
SIZE
S
M
L
XL
TO!FIT!BUST
cm
82-86
92-97
102-107
112-117
BACK!WIDTH!AT!UNDERARM
cm
88
94.5
101
108
LENGTH!TO!SHOULDER
cm
65
67
68.5
70
CUFF!TO!CUFF
cm
140.5
147
154
160.5
YARN
Stylecra" Special XL Tweed (100g/68m)
Spice (1711)
9
10
11
12
65 (67: 68.5: 70)cm
SIZING!COLOUR!KEY!So you can re-use this pattern, we’ve colour-coded the sizing instructions.
Simply follow our colour-coded measurements and you’re off.
FRONT!
&!BACK
from
page 27
88 (94.5: 101: 108)cm
Rows 9 to 12 Rep Rows 1 and 2
twice more.
These 12 rows form the pa# and
are repeated.
Work another 0 (0: 2: 2) rows in
pa# as set.
SHAPE SIDE
Taking new sts into pa#, inc 1 st at
beg of next and 12 foll RS rows. [30
(33: 36: 39) sts]
Work 1 row straight.
SHAPE SLEEVE
Cast on 7 sts at beg of next and foll
RS row. [44 (47: 50: 53) sts]
Work 15 (17: 17: 19) rows straight,
ending a"er a WS row.
SHAPE UPPER ARM AND
SHOULDER
Cast off 8 (9: 10: 11) sts at beg of
next and 2 foll RS rows. [20 sts]
Work 1 row straight.
Cast off 8 sts at beg of next row.
[12 sts]
Work 1 row.
Cast off rem 12 sts.
RIGHT FRONT
Cast on 17 (21: 21: 25) sts using
10mm needles.
Rib row 1 K3, P2, (K2, P2) to end.
Rib row 2 K2, (P2, K2) to last 3 sts,
P3.
Rep the last 2 rows another 5
times, inc 0 (0: 2: 1) sts or dec 0 (1:
0: 0) sts evenly across last row. [17
(20: 23: 26) sts]
(K7, P1, K1, P1) 1 (1: 1: 2) times, K5 (3:
6: 4).
Row 2 P5 (3: 6: 4), (K3, P7) 1 (1: 1: 2)
times, K2 (3: 3: 2), P0 (4: 4: 0).
Rows 3 and 4 As Rows 1 and 2.
Row 5 As Row 1.
Row 6 K to end.
Row 7 P0 (1: 1: 0), (K1, P1) to last 1 (1:
0: 0) sts, K1 (1: 0: 0).
Row 8 K to end.
Rows 9 to 12 Rep Rows 1 and 2
twice more.
These 12 rows form the pa# and
are repeated.
Work another 0 (0: 2: 2) rows in
pa# as set.
Taking new sts into pa#, inc 1 st at
end of next and 12 foll RS rows. [30
(33: 36: 39) sts]
SHAPE SLEEVE
Cast on 7 sts at beg of next and foll
WS row. [44 (47: 50: 53) sts]
Work 15 (17: 17: 19) rows straight.
SHAPE UPPER ARM AND
SHOULDER
Cast off 8 (9: 10: 11) sts at beg of
next and 2 foll WS rows. [20 sts]
Work 1 row straight.
Cast off 8 sts at beg of next row.
[12 sts]
Work 1 row straight.
Cast off rem 12 sts.
RIGHT FRONT BAND
With RS facing and using 9mm
circular needle, pick up and knit 60
(64: 68: 72) sts up right-front edge
to shoulder seam, turn and cast on
14 sts. [74 (78: 82: 86) sts]
Work backwards and forwards in
rows.
Rib row 1 P2, (K2, P2) to end.
Rib row 2 K2, (P2, K2) to end.
Work in patt as follows:
Row 1 K0 (4: 4: 0), P0 (1: 1: 0), K1, P1,
"#$ BHG KNIT%&%CROCHET%COLLECTION%$#$&
These 2 rows form the rib.
Work another 5 rows as set.
Cast off in rib.
LEFT FRONT BAND
With RS facing, using 9mm circular
needle, cast on 14 sts, then pick up
and knit 60 (64: 68: 72) sts down
le"-front edge to cast-on edge. [74
(78: 82: 86) sts]
Work backwards and forwards in
rows.
Rib row 1 P2, (K2, P2) to end.
Rib row 2 K2, (P2, K2) to end.
These 2 rows form the rib.
Work another 5 rows as set.
Cast off in rib.
CUFFS
Join shoulder seams.
With RS facing and 9mm straight
needles pick up and knit 30 (34:
34: 38) sts evenly along row ends
of Sleeves.
Row 1 (WS) P2, (K2, P2) to end.
Row 2 K2, (P2, K2) to end.
Work another 5 rows as set.
Row 8 K2, (p2tog, K2) to end. [23
(26: 26: 29) sts]
Work another 5 rows in rib as
follows:
Row 9 (WS) P2, (K1, P2) to end.
Row 10 K1 (P1, K2) to end.
Rows 11 and 12 As Rows 9 and 10.
Row 13 As Row 9.
Cast off in rib.
TO MAKE UP
Join the cast-on row-ends of the
front bands, and sew the band to
the back neck edge. Join the side
and underarm seams. Block gently
to measurements, following any
yarn care instructions on the ball
band.
WHY!NOT!TRY…
Circular needles are mainly for kni!ing in the round, but
they are also a practical solution for the back panel and
ribbed front edgings of this cardi, as they are long enough
to comfortably hold the large number of stitches in this
bulky super chunky yarn.
HEAR!ME!ROAR
YOU!WILL!NEED
Cygnet DK (100% acrylic;
100g/298m) Yarn A Indigo (6505).
1 ball of each for all sizes: Yarn B
Jaffa (6632); Yarn C Aqua (211) and
Yarn D Peppermint (178). For
quantities of Yarn A and
measurements see size table
■ A 4mm crochet hook
■ A 4.5mm hook
■ Stitch marker
■ Yarn needle
■
TENSION
16sts and 10.5 rounds over
extended double crochet measures
10x10cm using a 4mm hook or size
needed to obtain tension
16sts and 14 rows over double
crochet colourwork measures
10x10cm using a 4.5mm hook or
size needed to obtain tension
ABBREVIATIONS
edc (extended double crochet)
Insert hook in st, yrh and draw
through st, yrh and draw through
first loop on hook, yrh and draw
through both loops on hook
For a full list see page 68
NOTES
This garment is worked from
bo#om up. The Rib is worked back
and forth in rows, then the Body is
worked in the round from the Rib,
from RS only, to the armholes. At
the armholes it is divided for Back
and Front, and worked back and
forth in rows. Sleeves are worked
separately from bo#om up with Rib
in rows and main Sleeve in rounds
from RS as for the Body. A neckline
Rib is worked separately and sewn
to the neckline before the seams
are sewn to finish.
There is a Chart opposite that
you will need to refer to for the
Yoke. On the Chart, each square
represents 1edc stitch. Read RS
rows from right to le", and WS
rows from le" to right, changing
colour in last yrh of previous st.
Carry unused yarn across the WS
of the work, being careful not to
pull the floats too tight. For Yarns
B and D, you may wish to use
PATTERNS
separate small balls of yarn for
each patch of colour so you don’t
need to carry these shades across
the entire row.
BACK
RIB
Using a 4mm hook and Yarn A,
ch11.
Row 1 (RS) Dc in second ch from
hook and in each ch to end, turn.
[10 sts]
Row 2 Ch1 (does not count as st
throughout), dcbl across, turn.
Rep Row 2 until you have worked
148 (164: 180: 196: 212: 228: 244)
rows in total, do not fasten off.
Sew sts of last row to opposite side
of foundation ch to form a ring.
BODY
Work in the round from the RS to
Yoke. Use a marker in the first st of
the round if you wish, moving it up
as you work.
Round 1 (RS) Using Yarn B, ch1, dc
in each row end across, ss to first
dc to join into the round. [148 (164:
180: 196: 212: 228: 244) sts]
Round 2 Ch1, dc in each st around,
ss to first dc, changing to Yarn A.
Round 3 Ch2 (does not count as st
throughout), edc in each st around,
ss to first st.
Rep last round until work measures
approx. 30cm, ending with RS row.
Change to Yarn B.
Work 5 rounds as Round 3.
YOKE
At this point, Jumper is divided for
Back and Front, working in rows
back and forth.
The foll rows are worked from the
HERE ME ROAR CHART
Chart (right). Work sts 1-37 from
the Chart, then repeat from stitch
1. A"er the 1st (2nd: 2nd: 2nd: 2nd:
3rd: 3rd) repeat you will need to
work the first 35 (6: 14: 22: 30: 1: 9)
sts once more.
Change to a 4.5mm hook.
HOW TO USE OUR CHARTS
Start at the bo#om right-hand corner. Read right side
rows from right to le" and wrong side rows from le" to
right. Each square represents 1edc stitch.
40
33
32
31
30
29
28
27
26
25
24
23
22
21
20
19
18
17
16
15
14
13
12
11
10
FRONT YOKE
Leave 2 sts of Body unworked
a"er Back and rejoin Yarn C with
RS facing for Front Yoke. Work as
for Back Yoke, following Chart until
there are 10 fewer rows than the
Back.
9
8
7
6
5
4
2
37
35
30
25
20
Fasten off.
Skip centre 20 (22: 22: 24: 24: 26:
26) sts, rejoin Yarn in next st with
RS facing.
Row 1 (RS) Ch1, dc2tog, pa# in edc
to end, turn. [25 (28: 32: 35: 39: 42:
46) sts]
Row 2 Work in pa# to end, turn.
Rows 3-8 Rep last 2 rows 3 more
times. [22 (25: 29: 32: 36: 39: 43)
sts]
Rows 9-10 Work in pa# to end.
Fasten off.
NECK SHAPING
Row 1 (RS) Work in pa#, keeping
Chart correct, across 26 (29: 33:
36: 40: 43: 47) sts, turn leaving rem
sts unworked.
Row 2 Ch1 (does not count as st
throughout), dc2tog, pa# in edc to
end, turn. [25 (28: 32: 35: 39: 42: 46)
sts]
Row 3 Work in pa# to end, turn.
Rows 4-9 Rep last 2 rows 3 more
times. [22 (25: 29: 32: 36: 39: 43) sts]
Row 10 Work in pa# to end.
SLEEVES
Using a 4mm hook and Yarn A,
ch11.
Work Rib as for Body, until there
are 32 (36: 40: 44: 44: 48: 52) rows.
Join beg and end of Rib as before.
Now working from RS only in the
round. Use a marker in the first st
of the round if you wish, moving it
up as you work.
Round 1 (RS) Using Yarn B, ch1, dc
in each row end across, ss to first
dc to join into the round. [32 (36:
HEAR ME ROAR SIZE TABLE
SIZE
35
34
Bust width a: 46.5 (51.5: 56.5:
61.5: 66.5: 71.5: 76.5)cm
Length b: 57.5 (59: 60.5: 61.5:
61.5: 63: 64.5)cm
Sleeve length c: 48cm
a
37
36
c
b
39
38
BACK YOKE
Leave first st of round unworked
and join Yarn C in next st with RS
facing.
Row 1 (RS) Ch2, 72 (80: 88: 96: 104:
112: 120) dc, turn leaving rem sts
unworked. Once the Back has
been worked, there will be 2 sts of
Body le" unworked at each
underarm.
Work from Chart, in rows of dc as
Row 1, to end of Row 30 (32: 34: 36:
36: 38: 40).
Fasten off.
S
M
L
XL
2XL
3XL
4XL
TO!FIT!BUST
cm
81-86
91-97
102-107
112-117
122-127
132-137
142-147
ACTUAL!BUST!"APPROX#
cm
93
103
113
123
133
143
153
LENGTH
cm
57.5
59
60.5
61.5
61.5
63
64.5
SLEEVE!LENGTH
cm
48
48
48
48
48
48
48
11
12
YARN
Yarn A
Cygnet DK (100g/298m)
7
7
8
9
10
SIZING!COLOUR!KEY!So you can re-use this pattern, we’ve colour-coded the sizing instructions.
Simply follow our colour-coded measurements and you’re off.
15
10
KEY
Yarn A
Yarn B
3
Yarn C
1
Yarn D
5
40: 44: 44: 48: 52) sts]
Round 2 Ch1, dc in each st around,
ss to first dc, changing to Yarn A.
SLEEVE SHAPING
Inc round Ch1 (doesn’t count as st
throughout), 2edc in first st, edc in
each st to last st, 2edc in last st, ss
to first st. [34 (38: 42: 46: 46: 50:
54) sts]
Work 2 rounds as Round 3 of Body,
in edc without increases.
Rep last 3 rounds 11 more times
until there are 56 (60: 64: 68: 68:
72: 76) sts.
Rep Inc Round. [58 (62: 66: 70: 70:
74: 78) sts]
Cont in pa# without shaping until
Sleeve measures approx. 42cm.
Change to Yarn B.
Work 5 rounds in pa# with Yarn B.
Fasten off.
NECKBAND
Using a 4mm hook and Yarn C,
ch9.
Row 1 Starting in second ch from
hook, 8dc, turn. [8 sts]
Row 2 Ch1, dcbl in each st to end,
turn.
Rep Row 2 until Neckband fits
around neck opening when slightly
stretched. Ss last row to opposite
side of foundation ch to join into a
ring and sew neckband to neckline.
Fasten off.
TO FINISH
Weave in all ends. Sew shoulder
seams. Sew each Sleeve to Front
and Back Yoke, and to unworked
sts at base of armhole.
KNIT!&!CROCHET!COLLECTION!"#"$ BHG %#&
ABBREVIATIONS
For a full list see page 68
NOTES
from page 26
TOP!OF!THE!
WORLD
YOU!WILL!NEED
Scheepjes Merino So! (50%
Merino wool, 25% microfibre,
25% acrylic, 50g/105m) in Yarn A
Cezanne (617); Yarn B Malevich
(600); Yarn C Kahlo (626); Yarn D
Millais (631); Yarn E Lowry (604);
Yarn F Hogarth (605); Yarn G
Mondrian (611); Yarn H Magri"e
(614) and Yarn I Klimt (616). For
yarn quantities and
measurements see size table
■ A 3.5mm crochet hook
■ A 4.5mm hook
■ Yarn needle
■
TENSION
17 sts and 17 rows to measure
10x10cm over double crochet using
a 4.5mm hook or size needed to
obtain tension
Jumper is worked in rows as
separate pieces for Front, Back
and Sleeves, each worked from
bo"om up. Neckline rib is worked
once shoulder seams are joined.
On the Chart (see over page), each
square represents 1dc stitch. Read
all RS rows from right to le#, and
WS rows from le# to right. Pick up
the new colour in the last yrh of the
previous stitch. If necessary, wind
off separate small balls of yarn to
avoid carrying the yarn across the
WS of the work.
BACK
RIB
Using a 3.5mm hook and Yarn A,
ch13.
Row 1 Dc in second ch from hook
and in each ch to end, turn. [12 sts]
Row 2 Ch1 (does not count as st
throughout), dc in bl of each st to
end, turn.
Rep Row 2 until you have worked
82 (90: 98: 106) rows in total, do
not fasten off.
MAIN PART
Rotate to work in row-ends of Rib.
Row 1 (RS) Using a 4.5mm hook
and Yarn A, ch1, dc in each row-end
across, turn. [82 (90: 98: 106)sts]
b
c
a
Bust width a: 48 (53: 57.5: 62.5)cm
Length b: 52.5 (53.5: 55: 56)cm
Sleeve length c: 50 (49: 48: 48)cm
Row 2 Ch1, dc in each st to end, turn.
Rep the last row 0 (2: 4: 6) times
more.**
Repeating Row 2, follow Rows 1-67
of Chart for colour changes.
Continuing with Yarn I, work 7
more rows as Row 2.
SHAPE SHOULDERS
Row 1 Ss across 8 (9: 10: 12) sts, ch1,
dc in each st to last 8 (9: 10: 12) sts,
turn leaving rem sts unworked. [66
(72: 78: 82)sts]
Row 2 Ss across 8 (10: 10: 12) sts,
ch1, dc in each st to last 8 (10: 10:
12) sts, turn leaving rem sts
unworked. [50 (52: 58: 58)sts]
Row 3 Ss across 10 (10: 12: 12) sts,
ch1, dc in each st to last 10 (10: 12:
12) sts. [30 (32: 34: 34)sts]
Fasten off.
FRONT
Work as for Back to**.
Work Rows 1- 67 of Chart. If you
want the picture on the Front to be
the reverse of that on the Back as
shown in the image, then read the
RS rows of the Chart from le# to
right, and WS rows from right to le#.
Continuing with Yarn I:
SHAPE LEFT NECK
Row 1 (RS) Ch1, 30 (33: 36: 40) dc,
turn and work on these sts only for
Le# Front neck.
Row 2 Ch1, dc2tog, dc in each st to
end, turn. [29 (32: 35: 39)sts]
Row 3 Ch1, dc in each st to end, turn.
Rows 4-7 Rep last 2 rows twice
more. [27 (30: 33: 37)sts]
SHAPE LEFT SHOULDER
Row 8 Ch1, dc2tog, dc in each st to
last 8 (9: 10: 12) sts, turn leaving rem
sts unworked. [18 (20: 22: 24)sts]
Row 9 Ch1, dc in each st to end,
turn.
Row 10 Ch1, dc in each st to last 8
(10: 10: 12) sts, turn leaving rem sts
unworked. [10 (10: 12: 12)sts]
Fasten off.
TOP OF THE WORLD SIZE TABLE
SIZE
S
M
L
XL
91-97
101-107
111-117
TO!FIT!BUST
cm
81-86
ACTUAL!BUST
cm
96.5
106
115.5
124.5
LENGTH
cm
52.5
53.5
55
56
SLEEVE!LENGTH
cm
50
49
48
48
YARN
Scheepjes Merino So! (50g/105m)
YARN"I
3
3
4
4
YARN"A
2
3
3
3
YARN"B
2
3
3
3
YARNS"C-H
1
2
2
2
SIZING!COLOUR!KEY!So you can re-use this pattern, we’ve colour-coded the sizing instructions.
Simply follow our colour-coded measurements and you’re off.
$%& BHG KNIT"&"CROCHET"COLLECTION"'%'&
SHAPE RIGHT NECK
Skip 22 (24: 26: 26) sts and rejoin
Yarn I in next st with RS facing.
Row 1 (RS) Ch1, dc in each st to end,
turn. [30 (33: 36: 40)sts]
Row 2 Ch1, dc in each st to last 2 sts,
dc2tog, turn. [29 (32: 35: 39)sts]
Row 3 Ch1, dc in each st to end, turn.
Rows 4-7 Rep last 2 rows twice
more. [27 (30: 33: 37)sts]
SHAPE RIGHT SHOULDER
Row 8 Ss across 8 (9: 10: 12) sts, dc
in each st to last 2 sts, dc2tog, turn.
[18 (20: 22: 24)sts]
Row 9 Ch1, dc in each st to end, turn.
Row 10 Ss across 8 (10: 10: 12) sts,
dc in each st to end, turn. [10 (10: 12:
12)sts]
Fasten off.
SLEEVES
RIB
Using a 3.5mm hook and Yarn A,
ch13.
Row 1 Dc in second ch from hook
and in each ch to end, turn. [12 sts]
Row 2 Ch1, dc in bl of each st to
end, turn.
Rep Row 2 until you have worked 41
(45: 49: 53) rows in total, do not
fasten off.
MAIN PART
Rotate to work in row-ends of Rib.
Row 1 (RS) Using a 4.5mm hook and
Yarn A, ch1, dc in each row-end
across, turn. [41 (45: 49: 53)sts]
Row 2 Ch1, dc in each st to end, turn.
Work 4 (2: 0: 0) more rows as Row 2.
Follow the highlighted sleeve
section of Chart for Rows 1–67. On
first row of Chart, increase by
working 2dc in first and last st of
row. Cont increasing in this way
every foll 6th row until there are 63
(67: 71: 75)sts.
Continuing with Yarn I, work 2
more rows without shaping.
Fasten off.
Sew shoulder seams.
NECKBAND
Rib is worked back and forth in
rows with 2ss at the base of each RS
row. Work each of these ss in a
row-end, or in a st across the base
and back of neckline.
Using a 3.5mm hook and Yarn I, join
at right shoulder seam with RS
facing, ch9.
Row 1 (RS) Dc in second ch from
hook and in each ch to end, ss in next
2 row-ends or sts, turn. [8 dc, 2 ss]
Row 2 Ch1, skip 2 ss, dc in bl of each
st to end, turn.
Row 3 Ch1, dc in bl of each st to
end, ss in next 2 row-ends or sts.
Rep last 2 rows around the
neckline.
Fasten off.
PATTERNS
66
64
62
60
58
56
54
52
50
48
46
44
42
40
38
36
34
32
30
28
26
24
22
20
18
16
14
12
10
8
6
4
2
105
100
95
85
Sleeve guides
90
TO FINISH
Weave in all ends.
Align top centre of
each Sleeve with
shoulder seam and
sew in place. Sew
side, Neckband and
underarm seams.
Block to
measurements
following any yarn
care instructions on
the ball band.
80
75
70
65
60
55
50
45
40
35
30
TOP OF THE WORLD CHART
25
HOW TO USE OUR CHARTS
Start at the bo!om right-hand corner. Read right side
rows from right to le" and wrong side rows from le" to
right. Each square represents 1dc stitch.
15
Sleeve guides
20
10
5
67
65
63
61
59
57
55
53
51
49
47
45
43
41
39
37
35
33
31
29
17
19
21
23
25
Yarn H
Yarn G
Yarn F
Yarn E
Yarn D
Yarn C
Yarn B
Yarn A
KEY
15
Yarn I
27
13
XL
LARGE
MEDIUM
SMALL
11
9
7
5
3
1
KNIT!&!CROCHET!COLLECTION!"#"$ BHG %#&
QUICK!AS!
YOU!LIKE
from page 28
HAT
YOU!WILL!NEED
Lion Brand Wool Ease Thick &
Quick (86% acrylic, 10% wool, 4%
rayon, 170g/97m), 1 ball of each:
Fig (146) and Raspberry (112)
■ An 8mm crochet hook
■ A 10mm hook
■ Pompom maker 65mm or
cardboard
■
MEASUREMENTS
Hat measures 48cm in
circumference around lower edge
TENSION
9 sts and 5 rounds measures
10x10cm over pa"ern using a
10mm hook, or size needed to
obtain correct tension
NOTES
Hat is worked in rounds from the
top down.
from page 28
from page 28
from page 28
Using a 10mm hook and
Raspberry, ch4.
Round 1 (RS) 9tr in last ch from
hook, ss to top of beg ch-3. [10 sts]
Round 2 Ch3 (counts as tr
throughout), tr in st at base of
ch-3, 2tr in each st around, ss to
top of beg ch-3. [20 sts]
Round 3 As Round 2. [40 sts]
Round 4 Ch3, tr in st at base of
ch-3, *(skip 1 st, 2tr in next st) 4
times, 2tr in next 2 sts; rep from * 3
times more omi"ing final 2 tr on last
rep, ss to top of beg ch-3. [48 sts]
Round 5 Ss in sp between first 2
tr, ch3, tr in same sp, (skip 2 sts,
2tr in sp between 2 tr) rep around,
ss to top of beg ch-3.
Rounds 6-10 As Round 5.
Change to 8mm hook.
Round 11 Ch1 (does not count as st
throughout), dc in each st around,
ss to beg dc.
Round 12 Ch1, dc in bl of each st,
ss to beg dc.
Fasten off.
TO FINISH
Weave in all ends. Using Fig,
make a pompom (see page 74) and
secure to the top of the Hat.
CUSHION
YOU!WILL!NEED
Lion Brand Wool Ease Thick &
Quick (86% acrylic, 10% wool, 4%
rayon, 170g/97m), 2 balls of each:
Yarn A Fig (146) and Yarn B
Raspberry (112)
■ A 10mm crochet hook
■ Round cushion insert, 50cm
diameter
■ Yarn needle
■
MEASUREMENTS
Cushion measures 50cm in
!"# BHG KNIT$&$CROCHET$COLLECTION$%"%&
diameter
TENSION
Rounds 1-2 measure 12cm in
diameter
ABBREVIATIONS
reverse dc Insert hook in next st
to the right (or le# if le#-handed),
yrh and pull up a loop, yrh and pull
through both loops on hook
For a full list see page 68
NOTES
Cushion is made up of two Panels.
For one Panel use Fig as Yarn A
and Raspberry as Yarn B. For the
second Panel use Raspberry as
Yarn A and Fig as Yarn B.
PANEL (MAKE 2)
Using Yarn A, make a magic loop.
Round 1 Ch3 (counts as tr
throughout) 11tr in loop, ss to top
of beg ch-3. [12 sts]
Fasten off.
Join Yarn B around the back post
of any st.
Round 2 Ch4 (counts as tr, ch1)
(BPtr, around next st, ch1) 11 times,
ss to third ch of beg ch-4. [12 sts,
12 ch-1 sps]
Round 3 Ch2 (does not count as
st), FPtr around first st, (change to
Yarn A, 2tr in next ch-1 sp, change
to Yarn B, FPtr around next tr) 11
times, change to Yarn A, 2tr in
next ch-1 sp, change to Yarn B, ss
to top of beg tr. [36 sts]
Round 4 Ch1 (does not count as st
throughout), FPhtr around first st,
*change to Yarn A, dc in same st
as prev FP st, dc in next 2 sts,
change to Yarn B, FPhtr around
next FPtr; rep from * 10 times
more, change to Yarn A, dc in
same st as prev FP st, dc in next 2
sts, change to Yarn B, ss to top of
beg htr. [48 sts]
Round 5 Ch1, dc in each st around,
ss to beg dc.
Round 6 Ch1, (BPtr around next
st, ch1) 48 times, ss to beg BP st.
[48 sts, 48 ch-1 sps]
Round 7 Ch1, dc in each ch-1 sp
around, ss to beg dc. [48 sts]
Round 8 Ch3, tr in st at base of
ch-3, (tr in next st, 2tr in next st)
23 times, tr in final st, ss to top of
beg ch-3. [72 sts]
Join Yarn A in first st.
Round 9 Ch1, FP"r around post to
right from Round 6, *FP"r around
post to le# from Round 6, skip 1 st
on current round, dc in next 2 sts,
FP"r around same st as prev
FP"r; rep from * 22 times more,
FP"r around same st as beg FP,
skip 1 st on current round, dc in
next 2 sts, ss to beg FP st. [96 sts]
Round 10 Ch1, dc in each st
around, ss to beg dc.
Round 11 Ch1, dc in first 2 sts,
*change to Yarn B, 3-tr cl around
post of 2 FP sts 2 rounds below,
change to Yarn A, skip 1 st, dc in
next 3 sts; rep from * around, ss to
beg dc.
Fasten off Yarn B only.
Round 12 Ch3, tr in next st, (2tr in
next st, tr in next 7 sts) 11 times, 2tr
in next st, tr in final 5 sts, ss to top
of beg ch-3.
Fasten off and weave in ends.
TO MAKE UP
You can use any colour for joining.
Place Panels together with RS
facing out and join with a round of
reverse dc, inserting the cushion
pad as you work. Fasten off and
weave in ends.
SLIPPERS
YOU!WILL!NEED
Lion Brand Wool Ease Thick &
Quick (86% acrylic, 10% wool, 4%
rayon, 170g/97m) 1 ball of each:
Fig (146) and Raspberry (112)
■ A 9mm crochet hook
■ Stitch marker
■ Yarn needle
■
MEASUREMENTS
To fit shoe size 6-9 (AU); Slippers
measure 22cm in circumference
TENSION
17 sts and 18 rows measure
20x20cm over pa"ern using a
9mm hook, or size needed to
obtain correct tension
ABBREVIATIONS
loop st Wrap yarn around the
index finger on your yarn-holding
hand, insert hook in st, yrh with
strands below index finger and
pull through, yrh and pull through
all loops on hook, remove loop of
yarn from index finger.
For a full list see page XX
NOTES
Slippers are worked from the toe
up in rounds. From Round 3
onwards they are worked using
the amigurumi method. Work in a
continuous spiral without closing
off each round with a slip stitch.
You may find it helpful to place a
marker in the first st of each
round, moving it up as you work.
Using Raspberry, make a magic
loop.
Round 1 (RS) Ch3 (counts as tr
throughout), 11tr in loop, ss to top
of beg ch-3. [12 tr]
Round 2 Ch3, 2tr in next st, (tr in
next st, 2tr in next st) 5 times, ss to
top of beg ch-3. [18 tr]
Round 3 Ch1 (does not count as
PATTERNS
st), dc in first st, ch1, skip 1 st, (dc in
next st, ch1, skip 1 st) 8 times, dc in
ss from Round 2. [10 dc and 9 ch-1
sps]
Round 4 Ch1 (counts as ch-1 sp),
skip first dc, (dc in next ch-1 sp,
ch1, skip next dc) 9 times. [9 dc
and 10 ch-1 sps]
Round 5 Dc in first ch-1 sp, (ch1,
skip next dc, dc in next ch-1 sp) 9
times. [10 dc and 9 ch-1 sps]
Rounds 6-13 Repeat Rounds 4-5
another 4 times.
Round 14 (Htr, tr) in first dc, (tr in
next ch-1 sp, tr in next st) 4 times,
(tr, htr) in next ch-1 sp, (ch1, skip
next dc, dc in next ch-1 sp) 4 times,
ch1, skip last dc. [21 sts]
Round 15 (Htr, tr) in first htr, tr in
next 10 sts, (tr, htr) in next htr, (dc
in next ch-1 sp, ch1, skip next dc) 4
times, dc in last ch-1 sp. [23 sts]
Round 16 Htr in first htr, tr in next
12 sts, htr in next htr, (ch1, skip
next dc, dc in next ch-1 sp) 4 times,
ch1, skip last dc. [23 sts]
Round 17 Dc in first htr, htr in next
st, tr in next 10 sts, htr in next st,
ch1, skip next htr, (dc in next ch-1
sp, ch1, skip next dc) 4 times, dc in
last ch-1 sp. [23 sts]
Round 18 Ch1, skip first dc, dc2tog
next htr and tr, htr in next st, tr in
next 6 sts, htr in next st, dc2tog
next tr and htr, (dc in next ch-1 sp,
ch1, skip next dc) 5 times. [21 sts]
Round 19 Dc2tog first ch-1 sp and
dc2tog, (ch1, skip next st, dc in
next st) 3 times, ch1, skip next st,
dc2tog next htr and dc2tog, (ch1,
skip next dc, dc in next ch-1 sp) 5
times. [19 sts]
Fasten off and weave in ends.
TRIM
With WS facing, join Fig in st at
back of Slipper.
Rounds 1-3 (WS) Ch1 (does not
count as st), loop st in each st
around, ss to beg st. [19 loop sts]
Fasten off and weave in ends.
NECKLACE
YOU!WILL!NEED
Lion Brand Wool Ease Thick &
Quick (86% acrylic, 10% wool, 4%
rayon, 170g/97m) 1 ball of each:
Fig (146) and Raspberry (112)
■ A 6mm crochet hook
■
MEASUREMENTS
Necklace measures 100cm long
TENSION
Tension is not critical for this
project, but it may affect the yarn
quantities required
NOTES
Neckline is worked around a
strand of yarn. Ensure that approx
10cm of yarn protrudes from each
end at the end of Row 1.
Cut a length of Fig, 100cm long.
Row 1 (WS) Join Fig around strand
of yarn and work 30dc across,
turn. [30 sts]
Row 2 (RS) Ch1 (does not count as
st throughout), dc in each st
across.
Fasten off.
Turn to work into base of sts from
Row 1.
Join Raspberry in sp between first
and second st.
Row 3 (RS) Ch1, 2dc in same sp as
join, *ch3, ss in third ch from hook,
skip sp between next 2 sts, 2dc in
sp between next 2 sts; rep from *
across to end.
Fasten off and weave in all ends.
TO FINISH
Block the Necklace following any
yarn care instructions on the ball
band. Secure the Necklace with a
small bow.
SCARF
YOU!WILL!NEED
Lion Brand Wool Ease Thick &
Quick (86% acrylic, 10% wool, 4%
rayon, 170g/97m), 2 balls of each:
Fig (146) and Raspberry (112)
■ A 10mm crochet hook
■ Yarn needle
■
MEASUREMENTS
Scarf measures 28x170cm
excluding tassels
TENSION
Tension is not critical for this
project, but it may affect the yarn
quantities required
NOTES
Scarf is worked in rows
throughout.
Usng Fig, ch21.
Row 1 Dc in second ch from hook
and each ch across, turn. [20 sts]
Change to Raspberry.
Row 2 Ch1 (does not count as st
throughout), dc in first 4 sts, htr in
next 2 sts, tr in next 2 sts, htr in
next 2 sts, dc in next 6 sts, htr in
next 2 sts, tr in next 2 sts, turn.
Change to Fig.
Row 3 Ch1, dc in each st across,
turn.
Change to Raspberry.
Row 4 Ch4 (counts as dtr
throughout), dtr in next st, tr in
next 2 sts, htr in next 2 sts, dc in
next 2 sts, htr in next 2 sts, tr in
next 2 sts, dtr in next 2 sts, tr in
next 2 sts, htr in next 2 sts, dc in
next 2 sts, turn.
Change to Fig.
from page 29
Row 5 As Row 3.
Change to Raspberry.
Row 6 Ch1, dc in first 2 sts, htr in
next 2 sts, tr in next 2 sts, dtr in
next 2 sts, tr in next 2 sts, htr in
next 2 sts, dc in next 2 sts, htr in
next 2 sts, tr in next 2 sts, dtr in
next 2 sts, turn.
Change to Fig.
Row 7 As Row 3.
Rep Rows 4-7 until Scarf
measures approx 167cm, ending on
a Row 7 rep.
Change to Raspberry.
Next row Ch3, tr in same st, htr in
next 2 sts, dc in next 6 sts, htr in
next 2 sts, tr in next 2 sts, htr in
next 2 sts, dc in final 4 sts.
Fasten off and weave in ends.
TO MAKE UP
Cut a length of Fig, approx 15cm
long. Fold in half and thread
through any st from final row,
thread tails through folded end
and pull tight to secure. Repeat
across both short edges of the
Scarf.
KNIT!&!CROCHET!COLLECTION!"#"$ BHG %#&
INTO!THE!BLUE
YOU!WILL!NEED
BACK
Cast on 121 (133: 145: 155: 167) sts
using 3.25mm needles.
Row 1 (RS) K2, (P1, K1) to last st, K1.
Row 2 K1, (P1, K1) to end.
Rep these 2 rows until rib
measures 5cm, ending a#er Row 1.
Next row (WS) P6, *M1P, P10 (11:
12: 13: 14); rep from * to last 5 (6: 7:
6: 7) sts, M1P, P to end. [133 (145:
157: 167: 179) sts]
West Yorkshire Spinners
ColourLab DK (100% British
wool, 100g/225m) in Harbour
Blue (746). For yarn quantities
and measurements see size
table
■ A pair of 3.25mm kni"ing
needles
■ A pair of 4mm needles
■ A set of 3mm DPNs (doublepointed needles) or a circular
needle, 60cm long
■ A set of 3.25mm DPNs
(double-pointed needles) or a
circular needle, 60cm long
■ A cable needle (cn)
■ 1 stitch holder
■ Safety pin or locking st marker
■ Yarn needle
■
SHAPE SHOULDERS
Cast off loosely 7 sts at beg of
next 6 rows, then 5 (6: 7: 8: 10) sts
at beg of next 2 rows.
Slip rem 37 (41: 45: 47: 49) sts on a
stitch holder.
Change to 4mm needles.
Row 1 (RS) K2, P2, TW2, P2, K4
(10: 16: 21: 27), (P1, TW2, P2, K6, P2,
TW2, P1, work 15 sts from Row 1 of
Gansey Panel) 3 times, P1, TW2,
P2, K6, P2, TW2, P1, K4 (10: 16: 21:
27), P2, TW2, P2, K2.
Row 2 P15 (21: 27: 32: 38), K2, P6,
K2, P3, (work Row 2 of Gansey
Panel, P3, K2, P6, K2, P3) 3 times,
P to end.
Rows 3 to 6 Rep Rows 1 and 2
twice but working Rows 3 to 6 of
Gansey Panel.
Row 7 K2, P2, TW2, P2, K4 (10: 16:
21: 27), (P1, TW2, P2, C6F, P2, TW2,
P1, work row 7 of Gansey Panel) 3
times, P1, TW2, P2, C6F, P2, TW2,
P1, K4 (10: 16: 21: 27), P2, TW2, P2,
K2.
Row 8 As Row 2 but working Row
8 of Gansey Panel.
These 8 rows set pa".
TENSION
22 sts and 28 rows to measure
10x10cm over st st using 4mm
needles
15-st Gansey panel 7cm wide
ABBREVIATIONS
M1P Pick up and purl into back of
horizontal strand lying before next
st
C6F Slip next 3 sts on cn and hold
at front of work, K3, now K3 from
cable needle
TW2 Slip next st knitways, K1, pass
slipped st over st just kni"ed and
knit into back of it
For a full list see page 73
from page 30
Rep the last 2 rows 1 (2: 2: 3: 3)
times more, then first of these
rows again. [99 (103: 111: 115: 123)
sts]
Now dec 1 st at each end as
before on every foll RS row only
until 89 (95: 101: 105: 111) sts rem.
Work straight until Back measures
23 (24: 25: 27: 28)cm from marker,
ending a#er a WS row.
These 8 rows form Gansey Panel.
FRONT
Work as Back to **.
SHAPE ARMHOLES
NOTE!The Front armhole shaping
is different from the Back to allow
greater movement in the Front
armholes.
Cast off loosely 14 (16: 18: 19: 21)
sts at beg of next 2 rows. [105 (113:
121: 129: 137) sts]
Next row (RS) K1, k2tog tbl, pa"
to last 3 sts, k2tog, K1. [2 sts dec’d]
Next row P1, p2tog, pa" to last 3
sts, p2tog tbl, P1. [2 sts dec’d]
Rep these 2 rows another 3 (3: 4:
5: 5) times. [89 (97: 101: 105: 113)
sts]
SIZES M and 2XL ONLY
Next row (RS) K1, k2tog tbl, pa"
to last 3 sts, k2tog, K1. [2 sts dec’d]
Work 1 row straight.
Cont in pa" until work measures
42 (43: 43: 42: 42)cm from cast-on
edge, measured through centre of
work and ending a#er a WS row.
Place a marker at centre of last
row.**
GANSEY PANEL (worked over 15
sts)
Row 1 (WS) K7, P1, K7.
Row 2 P6, K1, P1, K1, P6.
Row 3 K5, P1, (K1, P1) twice, K5.
Row 4 P4, K1, (P1, K1) 3 times, P4.
Row 5 K3, (P1, K1, P1, K3) twice.
Row 6 P2, K1, P1, K1, P5, K1, P1, K1,
P2.
Row 7 (K1, P1) twice, K7, (P1, K1)
twice.
Row 8 P15.
ALL SIZES
[89 (95: 101: 105: 111) sts]
SHAPE ARMHOLES
Cast off 12 (14: 16: 17: 19) sts at beg
of next 2 rows. [109 (117: 125: 133:
141) sts]
Next row (RS) K1, k2tog tbl, pa"
to last 3 sts, k2tog, K1. [2 sts dec’d]
Next row P1, p2tog, pa" to last 3
sts, p2tog tbl, P1. [2 sts dec’d]
SHAPE NECK
Next row (RS) Pa" across 44 (47:
50: 52: 55) sts, turn.
Cont on this group of 44 (47: 50:
52: 55) sts for le# half of neck.
****Dec 1 st neatly at neck edge
on next row, then on every foll RS
row until 31 (31: 32: 33: 34) sts rem,
INTO THE BLUE SIZE TABLE
FRONT!&!BACK
65 (67: 68: 69: 70)cm
SIZE
S
M
L
1XL
2XL
TO!FIT!CHEST
cm
91-97
102-107
112-117
122-127
132-137
ACTUAL!CHEST
cm
102
113
124
133.5
144
LENGTH
cm
65
67
68
69
70
YARN
Harbour Blue (746)
West Yorkshire Spinners ColourLab DK (100g/225m)
4
5
5
5
6
SIZING!COLOUR!KEY!So you can re-use this pattern, we’ve colour-coded the sizing instructions.
Simply follow our colour-coded measurements and you’re off.
51 (56.5: 62: 66.8: 72)cm
!"# BHG KNIT$&$CROCHET$COLLECTION$%"%&
PATTERNS
then on every foll 4th row until 26
(27: 28: 29: 31) sts rem.
Work a few rows straight until
Front measures same as Back to
start of shoulder shaping, ending
at armhole edge.
SHAPE SHOULDER
Cast off loosely 7 sts at beg of
next row and the 2 foll alt rows.
Work 1 row straight.
Cast off rem 5 (6: 7: 8: 10) sts.
With RS facing, slip next st
(centre st) on a safety pin or
locking stitch marker and leave.
Rejoin yarn neatly at neck edge to
rem 44 (47: 50: 52: 55) sts.
Work 2 rows straight.
Complete as le! half working
from **** to end but working 1 row
more before shaping shoulder.
NECKBAND
Join shoulders. With RS facing,
using 3mm DPNs or a circular
needle, leaving centre stitch le!
on safety pin free, rejoin yarn
neatly at centre front and pick up
and K56 (58: 62: 64: 64) sts evenly
up right side of neck, knit across
37 (41: 45: 47: 49) sts of Back, pick
up and K55 (57: 61: 63: 63) sts
evenly down le! side of neck,
finally K1 from centre front st le!
on safety pin. [149 (157: 169: 175:
177) sts]
Change to 3.25mm needles.
Working back and forth in rows
not rounds, and beginning Row 2
work 6 rows in rib as on Back.
Cast off evenly in rib.
ARMHOLE BORDERS
With RS facing, using 3mm DPNs
or a circular needle, pick up and
knit 141 (151: 163: 171: 177) sts evenly
round armhole.
Change to 3.25mm needles and
beginning row 2 work 6 rows in rib
as on Back.
Cast off evenly in rib.
TO MAKE UP
Overlapping le! side edge over
right edge, stitch down the edges
of Neckband to base of ribbing.
Join side seams, including
Armhole Borders. Weave in ends
and gently block to
measurements, following any yarn
care instructions on the ball band.
from page 32
FRENCH!
MUSTARD
YOU"WILL"NEED
Stylecra! ReCreate (40%
wool, 30% acrylic, 30%
polyester, 100g/350m), 2 balls
of Dijon (1947)
■ A pair of 4mm kni#ing needles
■
MEASUREMENTS
Cowl measures 117cm
circumference x 21.5cm deep
TENSION
21 sts and 30 rows to measure
10x10cm over pa#ern using
4mm needles
ABBREVIATIONS
For a full list see page 73
ZIGZAG!AND!LACE!COWL
Cast on 45 sts using 4mm
needles.
Row 1 (RS) K7, yo, K2, ssk, P7,
k2tog, K2, yo, K1, yo, K2, ssk, P7,
k2tog, K2, yo, K7.
Row 2 K5, P6, K7, P9, K7, P6, K5.
Row 3 K8, yo, K2, ssk, P5, k2tog,
K2, yo, K3, yo, K2, ssk, P5, k2tog,
K2, yo, K8.
Row 4 K5, P7, K5, P11, K5, P7,
K5.
Row 5 K6, *k2tog, yo, K1, yo, K2,
ssk, P3, k2tog, K2, yo, k2tog, yo;
rep from * once more, K7.
Row 6 K5, P8, K3, P13, K3, P8,
K5.
Row 7 K7, k2tog, yo, K1, yo, K2,
ssk, P1, k2tog, K2, (yo, k2tog) 3
times, yo, K1, yo, K2, ssk, P1,
k2tog, K2, yo, k2tog, yo, K8.
Row 8 K5, P9, K1, P15, K1, P9, K5.
Row 9 K6, P4, k2tog, K2, yo, K1,
yo, K2, ssk, P7, k2tog, K2, yo, K1,
yo, K2, ssk, P4, K6.
Row 10 K5, P1, K4, P9, K7, P9,
K4, P1, K5.
Row 11 K6, P3, k2tog, K2, yo,
k2tog, yo, K1, yo, K2, ssk, P5,
k2tog, K2, yo, k2tog, yo, K1, yo,
K2, ssk, P3, K6.
Row 12 K5, P1, K3, P11, K5, P11,
K3, P1, K5.
Row 13 K6, P2, k2tog, K2, (yo,
k2tog) twice, yo, K1, yo, K2, ssk,
P3, k2tog, K2, (yo, k2tog) twice,
yo, K1, yo, K2, ssk, P2, K6.
Row 14 K5, P1, K2, P13, K3, P13,
K2, P1, K5.
Row 15 K6, *P1, k2tog, K2, (yo,
k2tog) 3 times, yo, K1, yo, K2,
ssk; rep from * once more, P1,
K6.
Row 16 K5, P1, (K1, P15) twice, K1,
P1, K5.
Rows 1 to 16 form patt, rep
these 16 rows until work
measures approx 117cm, ending
with Row 16.
Cast off.
TO MAKE UP
Sew cast-on and cast-off edges
together. Weave in ends. See
ball band for further care
instructions.
FRENCH MUSTARD CHART
16
15
14
12
10
8
6
4
KEY
13
K on RS; P on WS
11
P on RS; K on WS
9
Yo
7
Ssk
5
K2tog
3
2
1
45
40
35
30
25
20
15
10
5
HOW TO USE OUR CHARTS
Start at the bo#om right-hand corner. Read right side rows from right to le! and
wrong side rows from le! to right. A row of squares represents a row of kni#ing.
KNIT"&"CROCHET"COLLECTION"#$#% BHG &$'
which you can refer to.
Tunic
CABLE PATTERN A
Stitch pa%ern is worked over 7 sts.
Row 1 (RS) FPdtr around st 2 rows
below, skip 1 st on current row, dc
in next st, FPdtr around next 3 sts 2
rows below, skip 3 sts on current
row, dc in next st, FPdtr around
next st 2 rows below, skip 1 st on
current row.
Row 2 and all WS rows Dc in next
7 sts.
Row 3 FPdtr around FP st 2 rows
below, skip 1 st on current row, dc
in next st, skip 1 FP st 2 rows below,
FPdtr around next 2 sts 2 rows
below, FPdtr around skipped FP st
2 rows below (working in front of
prev 2 FP sts), skip 3 sts on current
row, dc in next st, FPdtr around
next FP st 2 rows below, skip 1 st on
current row.
Row 4 As Row 2.
Rep Rows 1-4 as required.
from page 33
CHIC!TUNIQUE
YOU!WILL!NEED
West Yorkshire Spinners The
Cro! (100% wool, 100g/166m)
Sullom (010). See table for
measurements and yarn
quantities
■ A 4mm crochet hook
■ A 4.5mm hook
■ Stitch markers
■ Yarn needle
■
TENSION
15 sts and 16 rows measure
10x10cm over pa% using 4.5mm
hook
CABLE PATTERN B
Stitch pa%ern is worked over 10 sts.
Row 1 (RS) Dc in next 4 sts, skip 1 st
2 rows below, FPdtr around next st
2 rows below, FPdtr around
skipped st 2 rows below, skip 2 sts
on current row, dc in next 4 sts.
Row 2 and all WS rows Dc in next
10 sts.
Row 3 Dc in next 3 sts, FPdtr
around FP st 2 rows below, skip 1
st on current row, dc in next 2 sts,
FPdtr around FP st 2 rows below,
skip 1 st on current row, dc in next
3 sts.
Row 5 Dc in next 2 sts, FPdtr
around next FP st 2 rows below,
skip 1 st on current row, dc in next
4 sts, FPdtr around next FP st 2
rows below, skip 1 st on current
row, dc in next 2 sts.
Row 7 Dc in next st, FPdtr around
FP st 2 rows below, skip 1 st on
current row, dc in next 2 sts,
ABBREVIATIONS
3-dtr cl *Yrh twice, insert hook in
st indicated, yrh and pull up loop,
(yrh and pull through 2 loops on
hook) twice; rep from * twice more,
yrh and pull through all loops on
hook
For a full list see page 68
NOTES
The Tunic is made up of a Back
and Front piece. Both pieces
are worked from four separate
Cable Stitch Pa%erns. The stitch
pa%erns are wri%en out first and
referred to throughout the pa%ern
for the Tunic. The Back is approx
8cm longer than the Front due
to a larger Rib. You can slightly
adjust the length of the Front or
Back by working a longer or
shorter ch at the start of the Rib.
There is a Stitch Chart (right),
3-dtr cl in next st, dc in next 3 sts,
FPdtr around next FP st 2 rows
below, skip 1 st on current row,
dc in next st.
Row 9 Dc in first st, FPdtr around
next FP st 2 rows below, skip 1 st
on current row, dc in next 6 sts,
FPdtr around next FP st 2 rows
below, skip 1 st on current row, dc
in next st.
Row 11 Dc in next 2 sts, FPdtr
around next FP st 2 rows below,
skip 1 st on current row, dc in next
4 sts, FPdtr around next FP st 2
rows below, skip 1 st on current
row, dc in next 2 sts.
Row 13 Dc in next 3 sts, FPdtr
around next FP st 2 rows below,
skip 1 st on current row, dc in next 2
sts, FPdtr around next FP st 2 rows
below, skip 1 st on current row, dc
in next 3 sts.
Row 15 Dc in next 4 sts, FPdtr
around next 2 FPdtr 2 rows below,
skip 2 sts on current row, dc in next
4 sts.
Rep Rows 1-16 as required.
CABLE PATTERN C
Stitch pa%ern is worked over 8 sts.
Row 1 (RS) FPdtr around st 2 rows
below, skip 1 st on current row, dc
in next st, FPdtr around next 4 sts
2 rows below, skip 4 sts on current
row, dc in next st, FPdtr around
next st 2 rows below, skip 1 st on
current row.
Row 2 and all WS rows Dc in next 8
sts.
Row 3 FPdtr around FP st 2 rows
below, skip 1 st on current row, dc
in next st, skip 2 FP sts 2 rows
below, FPdtr around next 2 FP sts
2 rows below, FPdtr around 2
skipped FP sts 2 rows below
working in front of FPdtr prev
worked, skip 4 sts on current row,
dc in next st, FPdtr around next FP
st 2 rows below, skip 1 st on current
row.
Row 5 FPdtr around FP st 2 rows
below, skip 1 st on current row, dc
in next st, FPdtr around next 4 FP
sts 2 rows below, skip 4 sts on
current row, dc in next st, FPdtr
around next FP st 2 rows below,
skip 1 st on current row.
Rep Rows 1-6 as required.
CHIC TUNIQUE CHART
CABLE PATTERN D
Note. Only RS rows are shown on the Chart; all WS rows are worked in
dc sts. Read all RS rows from right to le$.
19
17
15
13
11
9
7
5
KEY
3
Double crochet (dc)
Front Post Double Treble (FPdtr)
1
CHIC TUNIQUE SIZE TABLE
b
SIZE
Width a: 58 (63: 68.5: 74: 79)cm
Front length b: 60 (61: 63: 66: 68)cm
M
L
XL
XXL
TO!FIT!BUST
cm
81-86
91-96
102-107
112-117
122-127
ACTUAL!BUST!"APPROX#
cm
116
126.5
137
147.5
158
FRONT!LENGTH!"SEE!NOTES#
cm
60
61
63
66
68
YARN
a
S
Sullom (010)
West Yorkshire Spinners The Cro$ (100% wool, 100g/166m)
8
9
10
12
13
SIZING!COLOUR!KEY!So you can re-use this pattern, we’ve colour-coded the sizing instructions.
Simply follow our colour-coded measurements and you’re off.
""# BHG KNIT$&$CROCHET$COLLECTION$%#%&
PATTERNS
CABLE PATTERN D
Stitch pa!ern is worked over 20
sts.
There is a Stitch Chart on page 110
which you can refer to. Only RS
rows are shown on the Chart; all
WS rows are worked in plain dc sts.
Read all RS rows from right to le".
Row 1 (RS) Dc in next 5 sts, FPdtr
around next 4 sts 2 rows below,
skip 4 sts on current row, dc in next
2 sts, FPdtr around next 4 sts 2
rows below, skip 4 sts on current
row, dc in next 5 sts.
Row 2 and all WS rows Dc in each
st across.
Row 3 Dc in next 4 sts, FPdtr
around next 2 FP sts 2 rows below,
skip 2 sts on current row, dc in next
2 sts, FPdtr around next 4 FP sts 2
rows below, skip 4 sts on current
row, dc in next 2 sts, FPdtr around
next 2 FP sts 2 rows below, skip 2
sts on current row, dc in next 4 sts.
Row 5 Dc in next 3 sts, FPdtr
around next 2 FP sts 2 rows below,
skip 2 sts on current row, dc in next
3 sts, skip 2 FP sts 2 rows below,
FPdtr around next 2 FP sts, FPdtr
around 2 skipped FP sts, skip 4 sts
on current row, dc in next 3 sts,
FPdtr around next 2 FP sts 2 rows
below, skip 2 sts on current row, dc
in next 3 sts.
Row 7 *Dc in next 2 sts, FPdtr
around next 2 FP sts 2 rows below,
skip 2 sts on current row, dc in next
3 sts, FPdtr around next 2 FP sts 2
rows below, skip 2 sts on current
row; rep from * once more, dc in
next 2 sts.
Row 9 Dc in next st, *FPdtr around
next 2 FP sts 2 rows below, skip 2
sts on current row, dc in next 3 sts,
FPdtr around next 2 FP sts 2 rows
below, skip 2 sts on current row**,
dc in next 4 sts; rep from * to **
once more, dc in next st.
Row 11 As Row 9.
Row 13 As Row 7.
Row 15 Dc in next 3 sts, FPdtr
around next 2 FP sts 2 rows below,
skip 2 sts on current row, dc in next
3 sts, FPdtr around next 4 FP sts 2
rows below, skip 4 sts on current
row, dc in next 3 sts, FPdtr around
next 2 FP sts 2 rows below, skip 2
sts on current row, dc in next 3 sts.
Row 17 Dc in next 4 sts, FPdtr
around next 2 FP sts 2 rows below,
skip 2 sts on current row, dc in next
2 sts, skip 2 FP sts 2 rows below,
FPdtr around next 2 FP sts 2 rows
below, FPdtr around 2 skipped sts
2 rows below, skip 4 sts on current
row, dc in next 2 sts, FPdtr around
next 2 FP sts 2 rows below, skip 2
sts on current row, dc in next 4 sts.
Row 19 Dc in next 5 sts, *FPdtr
around next 4 FP sts 2 rows below,
skip 4 sts on current row, dc in next
2 sts; rep from * once more, dc in
next 3 sts.
Rep Rows 1-20 as required.
BACK
RIB
Using a 4mm hook, ch21.
Row 1 (WS) Dc in second ch from
hook and each ch across, turn. [20
sts]
Row 2 (RS) Ch1 (does not count as
st throughout), dc in bl of each st
across, turn.
Rep Row 2 another 74 (82: 90: 98:
106) times.
Do not fasten off.
MAIN BODY
Change to a 4.5mm hook.
Turn to work into row-ends of Rib.
Row 1 (RS) Ch1, dc in each row
end across, turn. [76 (84: 92: 100:
108) sts]
Row 2 Ch1, dc in each st across, turn.
CABLE SECTION
Work from the Cabled Pa!erns
listed.
Row 1 (RS) Ch1, dc in first 3 (7: 11: 15:
19) sts, work Row 1 of Cable Pa!ern
A, work Row 1 of Cable Pa!ern B,
work Row 1 of Cable Pa!ern C,
work Row 1 of Cable Pa!ern D,
work Row 1 of Cable Pa!ern C,
work Row 1 of Cable Pa!ern B,
work Row 1 of Cable Pa!ern A, dc
in final 3 (7: 11: 15: 19) sts, turn.
Row 2 and all WS rows Ch1, dc in
each st across.
Row 3 Ch1, dc in first 3 (7: 11: 15: 19)
sts, work Row 3 of Cable Pa!ern A,
work Row 3 of Cable Pa!ern B,
work Row 3 of Cable Pa!ern C,
work Row 3 of Cable Pa!ern D,
work Row 3 of Cable Pa!ern C,
work Row 3 of Cable Pa!ern B,
work Row 3 of Cable Pa!ern A, dc
in final 3 (7: 11: 15: 19) sts, turn.
Cont in pa!, repeating the Cable
Stitch pa!erns until Back measures
57 (58: 60: 63: 65)cm, ending on a
WS row.
PM in row-end to mark end of
Main Body.
SHAPE SHOULDERS
Next row (RS) Ss in first 4 (5: 5: 6:
6) sts, ch1, work in established
Cable Pa!erns to final 4 (5: 5: 6: 6)
sts, turn leaving sts unworked. [68
(74: 82: 88: 96) sts]
Rep prev row until 28 (44: 42: 40:
36) sts remain.
SIZES M, L AND XL ONLY
Next row Ss across first – (4: 6: 5: -)
sts, ch1, pa! across to last – (4: 6: 5:
-) sts, turn leaving sts unworked.
[- (36: 30: 30: -) sts]
Rep prev row – (1: 0: 0: -) times.
[- (28: 30: 30: -) sts]
Fasten off all sizes.
FRONT
RIB
Using a 4mm hook, ch11.
Row 1 (WS) Dc in second ch from
hook and each ch across, turn. [10
sts]
Row 2 (RS) Ch1 (does not count as
st throughout), dc in bl of each st
across, turn.
Rep Row 2 another 74 (82: 90: 98:
106) times.
Do not fasten off.
MAIN BODY
Work as Main Body for Back until
Front measures 44cm from base of
Rib, ending on a WS row. [76 (84:
92: 100: 108) sts]
Do not fasten off.
LEFT SIDE NECK SHAPING
Next row (RS) Ch1, dc in first 3 (7:
11: 15: 19) sts, work in established
pa!ern over next 35 sts, turn
leaving rem sts unworked. [38 (42:
46: 50: 54) sts]
Next row (WS) Ch1, dc2tog first 2
sts, dc in each st to end, turn.
Next row Ch1, dc in first 3 (7: 11: 15:
19) sts, pa! across to end, turn.
Rep prev 2 rows until 24(28: 31: 35:
36) sts remain.
Continue in pa!ern without
decreasing until the same number
of rows have been worked up to
the marked row on Back (before
shoulder shaping).
SHAPE SHOULDERS
Next row Ss across first 4 (5: 5: 6:
6) sts, pa! across to end, turn. [20
(23: 26: 29: 30) sts]
Next row Work in pa!ern to final 4
(5: 5: 6: 6) sts, turn leaving final sts
unworked. [16 (18: 21: 23: 24) sts]
Rep prev 2 rows once more. [8 (8:
11: 11: 12) sts]
Next row Ss across first 4 (4: 5: 5: 6)
sts, pa! across to end. [4 (4: 6: 6: 6)]
Fasten off.
RIGHT SIDE NECK SHAPING
With the RS of work facing you,
join yarn in first unworked st a"er
Le" Side Neck Shaping.
Next row (RS) Ch1, pa! across to
final 3 (7: 11: 15: 19) sts, dc in each st
to end, turn. [38 (42: 46: 50: 54)
sts]
Next row (WS) Ch1, dc in each st
to final 2 sts, dc2tog, turn. [37 (41:
45: 49: 53) sts]
Rep prev 2 rows until 24 (28: 31: 35:
36) sts remain.
Continue in pa!ern without
decreasing until the same number
of rows have been worked as Le"
Front.
SHAPE SHOULDERS
Next row (RS) Ch1, pa!ern across
to final 4 (5: 5: 6: 6) sts, turn leaving
sts unworked. [20 (23: 26: 29: 30)
sts]
Next row (WS) Ss in first 4 (5: 5: 6:
6) sts, ch1, dc in each st across,
turn. [16 (18: 21: 23: 24) sts]
Rep prev 2 rows once more. [8 (8:
11: 11: 12) sts]
Next row Ch1, pa! across to final 4
(4: 5: 5: 6) sts. [4 (4: 6: 6: 6)]
Fasten off leaving final sts
unworked.
TO MAKE UP
Place Front and Back together
with WS facing out and sew the
shoulder seams. Turn so RS is
facing out.
SIDE EDGING
Side Edging is worked in the same
pa!ern as the Rib but is joined to
the Front and Back of the Vest as
you work. The Side Edging is
worked across the row-end edges
of Front and Back.
Using a 4mm hook and with RS
facing you, join yarn in lower
le"-hand side of Back Rib and ch9.
Row 1 (WS) Dc in second ch from
hook and each ch across, ss in next
2 row-ends of Back, turn. [8 dc]
Row 2 (RS) Dc in bl of each dc
across, turn.
Row 3 Ch1, dc in bl of each dc
across, ss in next 2 row ends, turn.
Rep Rows 2-3 until all row-ends up
the Back and down the Front have
been ss into.
Fasten off.
Join yarn in lower le"-hand side of
Front and repeat Side Edging.
NECKLINE EDGING
Neckline Edging is worked as Side
Edging.
With RS facing, join yarn at centre
of neck opening at Front and ch9.
Row 1 (WS) Dc in second ch from
hook and each ch across, ss in next
row-ends, turn. [8 dc]
Row 2 (RS) Dc in bl of each dc
across, turn.
Row 3 Ch1, dc in bl of each dc
across, ss in next 2 row-ends or sts
around neckline opening, turn.
Rep Rows 2-3 around neckline back
to centre of Front.
Fasten off.
TO FINISH
Place one end of Neckline Edging
under the other at centre front and
sew in place. You can use the image
as a guide. Place markers at edge of
Side Edging at Front and Back, 25
(25: 27: 27: 29)cm from shoulder
seam. Sew the side seams together
from the markers to approx 10cm
from base of Front. Weave in all
ends.
KNIT!&!CROCHET!COLLECTION!"#"$ BHG %%%
FRONT and BACK (both alike)
Cast on 33 sts using 10mm
needles.
Next row (RS) Knit.
from page 31
SHOPPING!CHIC
YOU!WILL!NEED
Paintbox Yarns Super Chunky
Wool Mix (50% wool, 50%
acrylic, 100g/55m) 3 balls of
Stormy Grey (904)
■ A pair of 10mm kni"ing needles
■ Yarn needle
■ Lining fabric, 38x63cm
■ Sewing needle and matching
thread
■ Faux leather handles
■
MEASUREMENTS
Bag measures width 35cm; depth
30cm
TENSION
9 sts and 12 rows to measure
10x10cm over main pa" using
10mm needles
WORK IN PATT
Row 1 (WS) P2, (K2, P5, K2, P1) 3
times, P1.
Row 2 (RS) K1, K1 tbl, (P2, C2B, K1,
C2F, P2, K1 tbl) 3 times, K1.
Rows 3 to 10 Rep Rows 1 and 2
four times.
Row 11 P4, K2, P1, K2, (P5, K2, P1,
K2) twice, P4.
Row 12 K2, (C2F, P2, K1 tbl, P2,
C2B, K1) 3 times, K1.
Rows 13 to 20 Rep Rows 11 and 12
four times.
Rep these 20 rows until work
measures approx 26cm from
cast-on edge, ending a#er a Row 1
or 11.
TOP BORDER
Next row (RS) K2tog, knit to end.
[32 sts]
Eyelet row (WS) K5, (k2tog, yo,
K3) 4 times, k2tog, yo, K5.
Row 1 (RS) *K2, P2; rep from * to
end.
This row forms rib. Rib until Top
Border measures 4cm, ending
a#er a WS row.
Cast off.
TO MAKE UP
Weave in ends. Block pieces,
following any yarn care
instructions on the ball band. Pin
and join bo"om and side seams.
ABBREVIATIONS
For a full list see page 73
TOP!TIP
Add a unique touch to your bag, by swapping the braided
tie for an i-cord one? Super-quick to knit, you could even
create one in a bold, contrasting colour for that special,
individual finish. See page 72 for i-cord instructions.
Lining
1 Cut a piece of lining fabric to the
width of the bag plus seam
allowances, and twice the depth
of the bag plus seam allowances.
2 Fold over one of the top edges
of lining and stitch hem.
3 Put lining inside the bag, fold
over and pin the second top edge
hem to fit just below the top of the
bag. It is be"er for the lining to be
slightly shorter than the bag to
stop it being loose at the top.
Stitch this hem.
4 Pin side seams of lining, try
inside bag and adjust to fit. It is
be"er to have the lining slightly
narrower than the bag to stop it
being loose, so that the kni"ed
piece is eased to fit the lining
piece.
5 Sew side seams then pin the
lining into kni"ed bag and hand
sew in place. Sew the handles
onto the finished bag.
6 Cut 6 lengths of yarn 100cm
long, and plait to form a tie. Thread
the tie through the eyelets.
!!" BHG KNIT#&#CROCHET#COLLECTION#"$"%
BONUS PATTERN
PUT!YOUR!FEET!UP
YOU!WILL!NEED
Paintbox Simply Chunky
(100% acrylic, 100g/136m) 7
balls of Vintage Pink (355)
■ A pair of 6mm kni"ing
needles, 30cm long
■ A cable needle (cn)
■ A yarn needle
■
MEASUREMENTS
Footstool cover measures:
width 40cm; depth 40cm
To fit a cubed footstool
measuring 40 x 40 x 40cm
(although the cover will
stretch to cover a footstool up
to 44 x 44 x 44cm)
TENSION
19 sts and 20 rows to measure
10x10cm over cable pa" using
6mm needles
ABBREVIATIONS
C4B slip next 2 sts to cn and
hold at back, K2; K2 from cn
For a full list see page XX
SIDES/TOP (MAKE 5)
Cast on 75 sts using 6mm
needles
Row 1 (RS) K1, P3, *K4, P3; rep
from* to the last st, K1.
Row 2 K4, *P4, K3; rep from *
to the last st, K1.
Rows 3 and 5 K1, P3, *K4, P3;
rep from* to the last st, K1.
Rows 4 and 6 K4, *P4, K3; rep
from * to the last st, K1.
Row 7 K1, P3, *C4B, P3; rep
from * to the last st, K1.
Row 8 K4, *P4, K3; rep from *
to the last st, K1.
Rep these 8 rows until work
measures 40cm from beg,
ending with a RS row.
Cast off in pa" on the WS.
TO MAKE UP
1 Block each piece gently to
measurements, following any
yarn care instructions on the
ball band.
2 Join two side pieces
together along one side seam.
Rep for the other two side
pieces.
3 Join all 4 side pieces
together at the final 2 side
seams, forming a tube.
4 Take the top piece and join
to the cast-off edges of all 4
side pieces to form a cube, as
shown in the photo. Neaten all
ends and pull over your
footstool.
PATTERNS
FIT!AND!FLARE!SIZE!TABLE
SIZE
XS
S
M
L
XL
2XL
TO!FIT!BUST
cm
76-81
86-91
97-102
107-112
117-122
127-132
ACTUAL!BUST
cm
106
117
124
136
149
160
LENGTH
cm
58
58
60
60
61
61
SLEEVE!LENGTH
cm
27
27
28
29
29
30
YARN
Yarn A English Rose (2813)
King Cole Finesse Co!on Silk DK (50g/120m)
10
11
12
13
14
15
SIZING!COLOUR!KEY!So you can re-use this pattern, we’ve colour-coded the sizing instructions. Simply
follow our colour-coded measurements and you’re off.
58 (58: 60: 60: 61: 61)cm, ending
a#er a WS row.
King Cole Finesse Co'on Silk
DK (77% co!on, 23% silk,
50g/120m) in English Rose (2813)
For yarn quantities and
measurements see size table
■ A pair of 3mm kni!ing needles
■ A pair of 3.25mm needles
■ A pair of 4mm needles
■ Stitch holders
■ Stitch markers
■ Yarn needle
SHAPE SHOULDERS
Cast off 6 (7: 7: 7: 8: 9) sts loosely
at beg of next 8 rows, then 6 (7: 9:
10: 11: 11) sts at beg of next 2 rows.
Slip rem 49 (49: 53: 63: 65: 69) sts
on a stitch holder.
YOU"WILL"NEED
■
TENSION
22 sts and 28 rows to measure
10x10cm over st st using 4mm
needles
19 sts and 30 rows to measure
10x10cm over lace pa! using 4mm
needles
ABBREVIATIONS
M1p With le# needle, li# strand
between needles from back to
front, and purl it through the front
loop. (1 st inc’d)
For a full list see page 73
NOTES"
The cast-on edge for Back and
Front needs to be loose to allow
the centre panel to curve naturally
along the bo!om edge of the
garment. Use your preferred
stretchy cast-on method or cast
on over 2 needles.
BACK
Cast on 109 (119: 127: 139: 151: 163)
sts loosely using 4mm needles.
Purl 2 rows.
Set pattern
Row 1 (RS) K23 (23: 27: 28: 29: 35),
(P3, K1, yo, skpo, P1, k2tog, yo, K1)
6 (7: 7: 8: 9: 9) times, P3, K23 (23:
27: 28: 29: 35).
Row 2 (WS) Purl.
These 2 rows set pa! and are
repeated.
Cont in patt until work measures
SLEEVE
FRONT"&"BACK
FRONT
Work as for Back until Front
measures 14 (16: 18: 20: 22: 24)
rows fewer than Back before start
of shoulder shaping, ending a#er a
WS row.
DIVIDE FOR FRONT NECK
Next row (RS) Pa! 35 (40: 42: 43:
48: 52) sts, turn, and leave rem sts
on hold.
SHAPE LEFT FRONT NECK
**Dec 1 st at neck edge on next 5
rows. [30 (35: 37: 38: 43: 47) sts]
Work 8 (10: 12: 14: 16: 18) rows
straight, ending at side edge.
SHAPE SHOULDER
Cast off 6 (7: 7: 7: 8: 9) sts loosely
at beg of next row and 3 foll alt
rows. [6 (7: 9: 10: 11: 11) sts]
Patt 1 row straight.
Cast off rem 6 (7: 9: 10: 11: 11) sts.
SHAPE RIGHT FRONT NECK
With RS facing, slip next 39 (39:
43: 53: 55: 59) sts on a separate
holder for neckband, rejoin yarn
to rem 35 (40: 42: 43: 48: 52) sts
and pa! to end.
Complete as for le# front neck
from **, working 1 more row before
shaping shoulder to end at side
edge.
SLEEVES
Cast on 43 (45: 49: 51: 55: 57) sts
using 3.25mm needles.
Row 1 (RS) K2, (P1, K1) to last st, K1.
Row 2 (WS) K1, (P1, K1) to end.
These 2 rows form rib.
Cont in rib until work measures
58 (58: 60: 60: 61: 61)cm
FIT!AND!FLARE
27 (27: 28: 29: 29: 30)cm
from page 36
53 (58.5: 62: 68: 74.5: 80)cm
6cm, ending a#er a RS row.
Next row (WS) P1, (M1p, P2) 21
(22: 24: 25: 27: 28) times. [64 (67:
73: 76: 82: 85) sts]
Change to 4mm needles.
Beg with a knit row, work 2 rows in
st st.
SHAPE SLEEVES
Inc row (RS) K3, M1, knit to last 3
sts, M1, K3.
Next row (WS) Purl.
Cont in st st, working inc row on
next row and foll alt rows until
there are 82 (93: 95: 98: 104: 113)
sts, then on every foll 4th row until
there are 98 (105: 111: 116: 122: 129)
sts.
Work a few rows straight until
Sleeve measures 27 (27: 28: 29: 29:
30) cm or desired length, ending
a#er a WS row.
Cast off loosely.
TO MAKE UP
Block gently to measurements,
following any instructions on the
ball band and making sure to allow
cast-on edge of Back and Front to
curve naturally. Join le# shoulder.
NECK EDGING
With RS facing and using 3mm
needles, knit and dec 0 (0: 0: 4: 4:
6) sts evenly across 49 (49: 53: 63:
65: 69) sts from Back holder, pick
up and knit 18 (21: 21: 24: 24: 25)
sts evenly down le# front neck,
knit and dec 0 (0: 0: 3: 3: 5) evenly
across 39 (39: 43: 53: 55: 59) sts
from Front holder, and finally pick
up and knit 18 (21: 21: 24: 24: 25)
sts evenly up right front neck. [124
(130: 138: 157: 161: 167) sts]
Change to 3.25mm needles.
Knit 4 rows.
Next row (WS) Purl.
Next row (RS) Knit, dec 9 (9: 9: 12:
12: 13) sts evenly across. [115 (121:
129: 145: 149: 154) sts]
Next row Purl.
Change to 3mm needles.
Knit 3 rows.
Cast off evenly and firmly
knitwise.
TO FINISH
Join right shoulder and neck
edging. Place a marker on side
edges of Back and Front approx.
22 (23.5: 25: 26: 27.5: 29)cm down
from shoulder seams. Stitch
cast-off edge of Sleeves between
markers. Join side and Sleeve
seams. Weave in ends.
KNIT!&!CROCHET!COLLECTION!"#"$ BHG %%&
For Daisy Stitch Hair Clip:
■ Alligator hair clip, 7.5cm
■ Cream felt, 9.5x2.5cm
For Aran Braid Hair Clip:
■ Alligator hair clip, 6.5cm
■ Cream felt, 6.5x2cm
MEASUREMENTS
Daisy Stitch Hair Clip measures
9.5x2.5cm
Aran Braid Hair Clip measures
8x2cm
from page 38
HAPPY!HAIRDOS
YOU!WILL!NEED
Paintbox Yarns Simply DK (100%
acrylic, 100g/276m) 1 ball each of
Yarn A Washed Teal (132); Yarn B
Vanilla Cream (107) and Yarn C
Slate Green (126)
■ A pair of 3.5mm kni"ing needles
■ A cable needle (cn)
■ Sewing thread in cream
■ Glue (all-purpose, strong hold
glue or hot glue gun)
■
TENSION
24 sts and 28 rows to measure
10x10cm over stocking stitch using
3.5mm needles
ABBREVIATIONS
For a full list see page 73
DAISY STITCH HAIR CLIP
Cast on 25 sts using 3.5mm
needles and Yarn A.
Row 1 (RS) Knit.
Row 2 K1, *(p3tog, yo, p3tog) all
into the same next 3 sts, dropping
all of the original sts once the
second p3tog has been worked,
K1; rep from * to end of row.
Break off Yarn A and join in Yarn B.
Row 3 Knit.
Row 4 K1, P1, K1, *(p3tog, yo,
p3tog) all into the same next 3 sts,
dropping all of the original sts
once the second p3tog has been
worked, K1; rep from * to the last 2
sts, P1, K1.
Break off Yarn B and join in Yarn C.
Rows 5 and 6 As Rows 1 and 2
using Yarn C.
Cast off purlwise.
piece. Glue the felted side of the
piece to the alligator hair clip.
ARAN BRAID HAIR CLIP
Cast on 8 sts using 3.5mm needles
and Yarn B.
Row 1 (WS) Purl.
Row 2 (C4B) twice.
Row 3 Purl.
Row 4 K2, C4B, K2.
Rows 5 to 24 Work Rows 1 to 4 five
times more.
Row 25 P1, p2togtbl, P2, p2tog, P1.
[6 sts]
Cast off.
TO MAKE UP
Block the work gently to
measurements, following any yarn
care instructions on the ball band.
Weave in all ends. Using matching
sewing thread, sew a piece of felt
to the wrong side of the kni"ed
piece. Glue the felted side of the
piece to the alligator clip.
TO MAKE UP
Block the work gently to
measurements, following any yarn
care instructions on the ball band.
Weave in all ends. Using matching
sewing thread, sew a piece of felt
to the wrong side of the kni"ed
Row 15 K1, k2togtbl, yo, k2togtbl,
yo, k2togtbl, K6. [12 sts]
Row 17 K1, k2togtbl, yo, k2togtbl,
yo, k2togtbl, K3, yo, K2tog. [11 sts]
Row 19 K1, k2togtbl, yo, k2togtbl,
yo, k2togtbl, K4. [10 sts]
Row 20 Knit.
Rep Rows 1 to 20 a further 9 (14)
more times or until length
required.
Knit 1 row.
Cast off.
Knit 1 row.
from page 38
FRILLY!FLOURISH
ABBREVIATIONS
King Cole Giza Co!on 4ply
(100% mercerised co"on,
50g/158m), 1 ball in Yarn A Calico
(2427)
■ A pair of 3.25mm kni"ing needles
■ Matching sewing thread
■ All-purpose needle
NOTE!
YOU!WILL!NEED
■
MEASUREMENTS
Edging measures: Width 4cm at
narrowest point, 5cm at widest
point; Length 50cm (75cm)
TENSION
15 sts and 20 rows to measure
5x5cm over pa" using 3.25mm
needles.
For a full list see page 73
The edgings are worked in garter
stitch with yarn overs creating
both shaping and decorative
elements. As there are so few
stitches, this makes it an ideal
choice for practising lace kni"ing.
You may follow the pa"ern on the
Chart provided or follow the
wri"en instructions. If using the
Chart, remember RS (odd) rows
are worked from right to le#, and
WS (even) rows from le# to right.
Cast on 10 sts using 3.25mm
needles and Yarn A.
BEGIN PATTERN
(Rows 1 to 20 are also shown in the
Chart.)
Row 1 (RS) K2, yo, k2tog, yo, K4,
yo, k2tog. [11 sts]
Row 2 and every WS row Knit.
Row 3 K2, yo, k2tog, yo, K7. [12 sts]
Row 5 K2, yo, k2tog, yo, K6, yo,
k2tog. [13 sts]
Row 7 K2, yo, k2tog, yo, K3, yo,
k2togtbl, K4. [14 sts]
Row 9 K2, yo, k2tog, yo, k2, k2tog,
yo, k1, yo, k2togtbl, K1, yo, K2tog.
[15 sts]
Row 11 K1, k2togtbl, yo, k2togtbl,
yo, k2togtbl, K2, yo, k2togtbl, K4.
[14 sts]
Row 13 K1, k2togtbl, yo, k2togtbl,
yo, k2togtbl, K5, yo, k2tog. [13 sts]
FRILLY FLOURISH CHART
HOW TO USE OUR CHARTS
Start at the bo"om right-hand corner. Read right side rows from
right to le# and wrong side rows from le# to right. A row of squares
represents a row of kni"ing.
20
18
16
KEY
19
17
Knit
15
14
Lace is transformed once blocked so it’s worth taking your
time to get this right. Before blocking, make sure your fabric
is soaked for 10 - 30 mins, depending how quickly water is
absorbed. Gently squeeze out any air bubbles so the fabric
is properly submerged. For instructions see page 79.
""# BHG KNIT$&$CROCHET$COLLECTION$%&%#
Yo
13
12
TOP TIP
TO MAKE UP
Weave in all yarn ends. Block your
lace gently to measurements,
following any yarn care
instructions on the ball band.
To fit edging for a pot, check
length against pot, then remove
and join edges.
10
K2togtbl
9
8
7
6
5
4
2
K2tog
11
3
1
PATTERNS
FOLKSY FOOTWORK CHART
from page 38
HOW TO USE OUR CHARTS
Each square represents 1dc stitch. Start at the bo#om right-hand corner.
Read all RS rows from right to le$, and WS rows from le$ to right.
88
87
86
85
84
83
82
81
80
79
78
77
76
75
74
73
72
71
70
FOLKSY!
FOOTWORK
■
60
Rug measures approx 70x108cm
TENSION
59
57
55
54
53
52
51
50
49
48
47
46
45
44
ABBREVIATIONS
38
FOLK RUG
Using Yarn A, ch60.
Row 1 (RS) Dc in second ch from
hook and each ch across, turn.
[59 sts]
Change to Yarn B.
Row 2 Ch1 (does not count as st
throughout), dc in each st across,
turn.
Change to Yarn A.
Rows 3-13 As Row 2, using Yarn B
for Row 4, Yarn A for Row 5, Yarn
B for Row 6 and Yarn A for Rows
7-12.
Cont with Yarn A.
61
56
42
NOTES
Rug is worked in rows from the
bo#om. There is a Chart (right),
which you will need to refer to
when making the Rug. Each small
square represents 1dc. Read all RS
rows from right to le$ and WS
rows from le$ to right. The first
few rows of the Chart have been
wri#en out to guide you. Change
colour on the final yrh of st before
colour change is indicated. Carry
the unused colours across the top
of your stitches, enclosing the
strand as you work. Carry the
second colour from Row 1 to
ensure an even fabric is achieved.
63
58
Tension is not critical, but it may
affect the yarn quantities required
For a full list see page 68
65
64
62
MEASUREMENTS
67
66
YOU!WILL!NEED
Novita Hygge (100% wool,
100g/60m) 8 balls of Yarn A Fog
(075) and 4 balls of Yarn B Wheat
(024)
■ A 7mm crochet hook
■ Yarn needle
69
68
43
41
40
39
37
36
35
34
33
32
31
30
29
28
27
26
25
24
23
22
21
20
19
18
17
16
15
14
13
12
11
10
9
8
7
6
5
4
3
2
1
59
55
50
45
Row 13 Ch1, dc in first 29 sts,
change to Yarn B, dc in next st,
change to Yarn A, dc in each st
across, turn.
Rows 14-15 Ch1, dc in each st
across, turn.
Rows 16-18 As Row 13.
Rows 19-20 Ch1, dc in first 28 sts,
change to Yarn B, dc in next 3 sts,
change to Yarn A, dc in final 28
sts, turn.
40
35
30
25
20
Rows 21-88 Cont in pa#, following
Chart for all colour changes.
Fasten off and weave in ends.
15
10
5
KEY
Yarn A
Yarn B
KNIT!&!CROCHET!COLLECTION!"#"$ BHG %%&
times, yrh and draw through all
loops on hook
For a full list see page 68
from page 38
NOTES
from page 39
KEEP!IT!SIMPLE
affect the final measurements and
the yarn quantities required
LOVE!THE!LACE
Lion Brand Hometown USA
(100% acrylic, 140g/74m) 3 balls
of Los Angeles Tan (099) or any
super chunky yarn
■ A 10mm crochet hook
■ Yarn needle
HANGING BASKET
Ch6.
Round 1 (RS) Dc in second ch
from hook, dc in next 3 ch, 2dc in
final ch, turn to work down
opposite side of foundation ch, dc
in next 4 ch, ss to beg dc. [10 sts]
Round 2 (RS) Ch1 (does not count
as st throughout), 2dc in each st
around, ss to beg dc. [20 sts]
Round 3 Ch1, (htr in next st, 2htr
in next st) 10 times, ss to beg htr.
[30 sts]
Round 4 Ch1, htr in third bl of
each st around, ss to beg htr.
Round 5 Ch1, dc in each st around,
ss to beg dc.
Round 6 Ch1, htr in each st
around, ss to beg htr.
Rounds 7-10 Rep Rows 4-6, then
rep Row 4.
Round 11 (Working in third bl
throughout) Ch1, dc in first 5 sts,
htr in next 5 sts, tr in next 10 sts,
htr in next 5 sts, dc in next 5 sts, ss
to beg dc.
Round 12 Ch1, ss in each st around
to end, ch6, ss in ss at base of
ch-6. [30 sts, 1 hanging loop]
Fasten off and weave in ends.
■
YOU"WILL"NEED
■
MEASUREMENTS
Basket measures approx 40cm in
circumference and 14cm tall
TENSION
Tension is not critical, but it may
affect the yarn quantities required
ABBREVIATIONS
third bl The htr st has 2 loops at
the top of the stitch as well as a
third loop that wraps around the
centre; work st in the third loop at
the back of the fabric
For a full list see page 68
NOTES
Baskets are worked in rounds with
RS facing throughout. Three balls
of Lion Brand Hometown USA
yarn makes three baskets. You
can substitute any super chunky
yarn into this pa#ern. This may
YOU"WILL"NEED
Stylecra! Batik DK (80% acrylic,
20% wool, 50g/138m) Storm
(1913). For yarn quantities and
measurements see size table
■ A 4mm crochet hook
■ Stitch markers
■ Yarn needle
TENSION
18.5 sts and 12 rows to measure
10x10cm over half treble crochet
pa#ern using a 4mm hook or size
needed to obtain tension.
Alternatively, you could measure
37 sts to 20cm.
1 repeat of Lace Flower Pa#ern (2
ch-5 sps of Row 3 and 4) to
measure 6.5x6cm
ABBREVIATIONS
2-dtr cl (2-dtr cluster) Work dtr
st as normal, up until the last yrh
of the st, leaving 2 loops on hook;
work another dtr in same st up to
last yrh, yrh , draw through all
loops on hook
qtr (quadruple treble) (Yrh) 4
times, insert hook into st, yrh and
draw through st, (yrh and draw
through first 2 loops on hook) 4
The Jumper is worked from
bo#om up in separate pieces for
Front and Back. The central half
treble section is worked first, then
a lace pa#ern inset is worked
across the row-ends of the central
section on each side, at right
angles to the half treble rows. Half
treble are worked across the
entire piece for the bust width,
and then the row length increases
for Sleeve Shaping towards the
armholes. At the armholes, 2 chain
extension pieces are added to
make the Sleeves, and Sleeve
shaping is added by using short
rows, fastening off a$er every row
over the short row section. You
will then work across the full
Sleeve and Body width in all
unworked sts of previous rows,
continuing towards the shoulders
where another lace pa#ern repeat
is worked. Join yarn in the htr Pa#
rather than the lace pa# where
possible and count sts at intervals
to keep track of the correct
number of sts over the short row
section.
HTR PATTERN
Foundation row Ch2 (does not
count as st throughout), htr in
each st to end, turn.
Row 1 (WS) Ch2, htr in fl of each st
to end, turn.
Row 2 (RS) Ch2, htr in bl of each
st to end, turn.
LACE FLOWER PATTERN
Multiple of 12 + 7 sts.
Foundation row (WS) Ch5
(counts as tr, ch2), skip 2 sts, (tr in
next st, ch2, skip 2 sts) rep to last
st, tr in last st, turn.
Row 1 Ch1 (does not count as st),
HOW TO WORK HTR IN THE THIRD LOOP
STEP 1
STEP 1 The half treble crochet
has the standard 2 loops at the top
of the stitch as well as a third loop
that wraps around the centre. Yrh
and insert hook into the third loop
at the back of the fabric.
STEP 2
STEP 2 From the WS of the work
you can see the third loop si#ing
just below the top of the stitch.
Continue to work the half treble in
the normal way; yrh and pull up a
loop.
""# BHG KNIT$&$CROCHET$COLLECTION$%&%'
STEP 3
STEP 3 Yrh and pull through all
3 loops on the hook. Repeat Steps
1-3 to the end of the row.
Depending on the pa#ern, you may
also work the htr into the third loop
at the front of your work.
STEP 4
STEP 4 This is how your fabric will
look if you work into the third loop
at the back with RS facing
throughout.
PATTERNS
LOVE THE LACE SIZE TABLE
SIZE
c
b
Direction
of work
a
Bust width a: 57.5 (64.5: 72.5: 77)cm
Length b: 60 (60: 65: 67)cm
Sleeve length c: 38 (41: 43: 43)cm
*ch9, skip next tr, (dc, ch4, 2-dtr cl)
in next tr, skip next tr, (2-dtr cl,
ch4, dc) in next tr; rep from * to
last 2 tr, ch9, skip next tr, dc in top
of beg ch-3, turn.
Row 2 Ch10 (counts as qtr, ch4),
dc in ch-9 sp, *ch4, (2-dtr cl, ch4,
ss, ch4, 2-dtr cl) in top of 2-dtr cl,
ch4, dc in next ch-9 sp; rep from *
to last dc, ch4, qtr in last dc, turn.
Row 3 Ch1 (does not count as st),
dc in first st, (ch5, dc in next 2-dtr
cl) rep to last 2 ch-4 sps, ch5, dc in
6th ch of beg ch-10, turn.
Row 4 Ch5 (counts as tr, ch2), *tr
in next ch-5 sp, ch2, tr in next dc,
ch2; rep from * to end, omi!ing
ch2 on final repeat, turn.
Rows 1-4 set pa!.
BACK
Using a 4mm hook, ch50 (63: 52:
60).
Work in Htr Patt until there are a
total of 36 rows.
Rotate to work into row-ends of
htr section and follow Foundation
row of Lace Flower Pa!, working
first tr into corner of htr piece,
then working each foll tr in alt
row-ends, finishing with last tr in
corner. [19 tr]
Work (Rows 1-4 of Lace Flower
Patt) 2 (2: 3: 3) times.
Fasten off.
Rotate to work in row-ends on
opposite side of htr section and
repeat Lace Flower Pa! as before,
working Foundation row with WS
facing.
Fasten off.
SLEEVES
Rotate to work across top edge of
lace panel, htr section and second
lace panel with RS facing.
Row 1 (RS) Ch2, 22 (22: 33: 33) htr
evenly across lace panel, htr in
each st across htr section, 23 (23:
34: 34) htr evenly across lace
section, turn. [96 (109: 120: 128) sts]
Row 2 (Working in fl only) Ch2, htr
in same st, htr in each st to last st,
2htr in last st, turn. [98 (111: 122:
S
M
L
XL
81-86
91-97
102-107
112-117
TO$FIT$BUST
cm
ACTUAL$BUST%APPROX&
cm
115
129
145
154
LENGTH
cm
60
60
65
67
SLEEVE$LENGTH
cm
38
41
43
43
Stylecra# Batik DK (50g/138m)
YARN
Yarn A Storm (1913)
10
11
13
15
SIZING$COLOUR$KEY$So you can re-use this pattern, we’ve colour-coded the sizing instructions.
Simply follow our colour-coded measurements and you’re off.
unworked, turn.**
Rep Shaping row 10 (10: 11: 12)
times more. [126 (149: 164: 162) sts]
Next row Rejoin yarn at
outermost wrist edge with WS
(WS: RS: WS) facing and keeping
Htr Pa! as set, work across all sts,
working in unworked sts at beg
and ends of shaping rows, to the
other wrist edge, turn. [246 (269:
294: 302) sts]
SIZE L ONLY
Work 1 row in Htr Pa! without
shaping across all sts, turn.
130) sts]
Cont working in Htr Patt as set,
and increasing by 1 st at beg and
end of every row as set in Row 2,
for a further 4 (4: 6: 6) rows.
Do not fasten off. [106 (119: 134:
142) sts]
SLEEVE EXTENSIONS
With a separate piece of yarn,
ch70 (75: 80: 80).
Fasten off and set aside.
Cont with working yarn, ch71 (76:
81: 81), htr in third ch from hook
and in each ch of extension, htr in
each st across body section and in
each ch of separate extension ch,
turn. [246 (269: 294: 302) sts]
Working in Htr Pa! as set, work 8
(8: 10: 12) more rows on all of these
sts.
Fasten off.
SLEEVE SHAPING
Next row (WS) Skip 5 sts, *2ss,
2dc, tr in next st, Htr Pa! to last 10
sts, tr in next st, 2dc, 2ss, fasten
off leaving rem 5 sts unworked,
turn. [236 (259: 284: 292) sts]
Shaping row Place markers in the
2 tr of the previous row, and rep
prev row from *, working in Htr
Pa! to 5 sts before marker, tr in
next st, 2dc, 2ss. [226 (249: 274:
282) sts]
Fasten off leaving rem sts
ALL SIZES
To work an inc in the foll row,
work 2 htr in 1 st, and to work a
dec, htr2tog.
Next row (RS) Working in Htr
Pa!, inc 1 (dec 10: dec 11: dec 7)
spread evenly across the row to
make the stitch count correct for
the Lace Flower Pa!, turn. [247
(259: 283: 295) sts]
Work Foundation row and Rows
1-4 of Lace Flower Pa!. [20 (21: 23:
24) pa! reps]
Fasten off.
FRONT
ork as for Back to **.
Rep Shaping row 6 (6: 6: 8) times
more. [166 (189: 214: 202) sts]
NECKLINE FIRST SIDE
Row 1 (WS) Rep Shaping row,
skipping first 5 sts as set, then
working next 61 (73: 85: 77) sts,
turn leaving rem sts unworked. [61
(73: 85: 77) sts]
Row 2 Rep Shaping row, and also
dec 2 sts at neckline edge by
working htr3tog, turn. [54 (66: 78:
70) sts]
Row 3 Rep Shaping row, and also
dec 1 st at neckline edge by
working htr2tog, turn. [48 (60: 72:
64) sts]
Rep Row 3 a further 1 (1: 2: 1) times.
[42 (54: 60: 58) sts]
Next row Rejoin yarn at edge with
WS (WS: RS: WS) facing and
keeping Htr Pa! as set, work
across all sts, working in unworked
sts at beg of shaping rows, turn.
[102 (114: 125: 128) sts]
SIZE L ONLY
Work 1 row in Htr Pa! without
shaping across all sts, turn.
ALL SIZES
To work an inc in the foll row,
work 2 htr in 1 st.
Next row (RS) Dec 1 st at neckline
edge by working htr2tog, and also
inc evenly 2 (2: 3: 0) times across
the rem row to make the stitch
count correct for the Lace Flower
Pa!, turn. [103 (115: 127: 127) sts]
Work Foundation row and Rows
1-4 of Lace Flower Pa!. [8 (9: 10:
10) pa! reps]
Fasten off.
NECKLINE SECOND SIDE
Skip central 34 (33: 34: 38) sts at
base of neckline and rejoin yarn in
next st with WS facing.
Row 1 (WS) Rep Shaping row,
working 61 (73: 85: 77) sts, then
turn leaving rem 5 sts unworked.
[61 (73: 85: 77) sts]
Work remaining Neckline as for
Row 2 of First Side to end.
TO FINISH
Weave in ends and block pieces
to measurements following any
yarn care instructions on the ball
band. Sew shoulder and top of
Sleeve seams matching Lace
Flower Pa!. Sew underarm and
side seams.
NECKLINE EDGING
Starting at shoulder seam, work in
reverse dc evenly around the
neckline, working each dc st to
the right of the prev st for
right-handed crocheters and the
opposite for le#-handed
crocheters.
Fasten off.
KNIT!&!CROCHET!COLLECTION!"#"$ BHG %%&
STORM CHASER SIZE TABLE
SIZE
S
M
L
TO!FIT!BUST
cm
81-91
97-107
112-127
ACTUAL!HEM
cm
145
162
175
LENGTH
cm
60
61.5
63.5
YARN
Silt (216)
Rowan Denim Revive (DK, 50g/100m)
10
11
12
SIZING!COLOUR!KEY!So you can re-use this pattern, we’ve colour-coded the sizing instructions.
Simply follow our colour-coded measurements and you’re off.
STORM!CHASER
YOU!WILL!NEED
Rowan Denim Revive (8ply/DK,
95% co"on, 5% other,
50g/100m) in Silt (216). For yarn
quantities and measurements
see size table
■ A 3.75mm circular kni"ing
needle, no more than 40cm long
■ A 3.75mm circular needle, 80cm
long
■ Open stitch markers
■ Yarn needle
■
TENSION
22 sts and 29 rows to measure
10x10cm over st st using 3.75mm
needles
ABBREVIATIONS
For a full list see page 73
NOTE!
Poncho is worked in one piece,
beg at neck edge.
Cast on 128 (132: 136) sts using
3.75mm circular needle, 40cm
long.
Taking care not to twist cast-on
edge, work in rounds as folls:
Round 1 (RS) *K2, P2, rep from *
to end.
This round forms rib.
Work in rib for a further 5 rounds.
Next round (RS) [K1 and place
marker on this st, K31 (32: 33)]
4 times.
Now work shaping as folls:
Round 1 (RS) (K marked st, K1,
yfwd, K to within 1 st of next
marked st, yfwd, K1) 4 times. [136
(140: 144) sts]
Round 2 Knit.
Rep last 2 rounds 4 (6: 10) times
more. [168 (188: 224) sts]
Changing to 3.75mm circular
needle, 80cm long, when
required, cont as folls:
Next round (K marked st, K1,
FRONT!&!BACK
yfwd, K to within 1 st of next
marked st, yfwd, K1) 4 times.
Next round Knit.
Next round (K marked st, K1,
yfwd, sl 1, K1, psso, K to within 3
sts of next marked st, k2tog, yfwd,
K1) 4 times.
Next round Knit.
Rep last 4 rounds 4 (10: 8) times
more. [208 (276: 296) sts]
Next round (K marked st, K1,
yfwd, K to within 1 st of next
marked st, yfwd, K1) 4 times.
Next round Knit.
Next round (K marked st, K1,
yfwd, sl 1, K1, psso, K to within 3
sts of next marked st, k2tog, yfwd,
K1) 4 times.
Next round Knit.
Rep last 2 rounds once more.
Rep last 6 rounds 5 (1: 2) times
more. [256 (292: 320) sts]
Next round (K marked st, K1,
yfwd, K to within 1 st of next
marked st, yfwd, K1) 4 times.
Next round Knit.
Next round (K marked st, K1,
yfwd, sl 1, K1, psso, K to within 3
sts of next marked st, k2tog, yfwd,
K1) 4 times.
Next round Knit.
Rep last 2 rounds twice more.
Rep last 8 rounds twice more.
[280 (316: 344) sts]
Next round (K marked st, K1,
yfwd, K to within 1 st of next
!!" BHG KNIT#&#CROCHET#COLLECTION#$%$&
60 (61.5: 63.5)cm
from page 34
72.5 (81: 87.5)cm
marked st, yfwd, K1) 4 times. [288
(324: 352) sts]
Next round Knit.
Next round (K marked st, K1,
yfwd, sl 1, K1, psso, K to within 3
sts of next marked st, k2tog, yfwd,
K1) 4 times.
Next round Knit.
Rep last 2 rounds 3 times more.
Next round (K marked st, K1,
yfwd, K to within 1 st of next
marked st, yfwd, K1) 4 times. [296
(332: 360) sts]
Next round Knit.
Next round (K marked st, K1,
yfwd, sl 1, K1, psso, K to within 3
sts of next marked st, k2tog, yfwd,
K1) 4 times.
Next round Knit.
Rep last 2 rounds 4 times more.
Next round (K marked st, K1,
yfwd, K to within 1 st of next
marked st, yfwd, K1) 4 times. [304
(340: 368) sts]
Next round Knit.
Next round (K marked st, K1,
yfwd, sl 1, K1, psso, K to within 3
sts of next marked st, k2tog, yfwd,
K1) 4 times.
Next round Knit.
Rep last 2 rounds 6 times more.
**Next round (K marked st, K1,
yfwd, K to within 1 st of next
marked st, yfwd, K1) 4 times. [312
(348: 376) sts]
Next round Knit.
Next round (K marked st, K1,
yfwd, sl 1, K1, psso, K to within 3
sts of next marked st, k2tog, yfwd,
K1) 4 times.
Next round Knit.
Rep last 2 rounds 7 times more.
Rep from ** once more. [320 (356:
384) sts] (Work should measure
59 (60.5: 62.5)cm.)
Next round *K1, P1, rep from * to
end.
Now work fancy cast off as folls:
K1, P1, take yarn to back of work,
li# 2nd st on right needle over first
st and off right needle, *slip next
st on le# needle onto right needle,
bring yarn to front of work and
then slip both sts on right needle
back onto le# needle, take yarn to
back of work, k2tog, P1, take yarn
to back of work, li# 2nd st on right
needle over first st and off right
needle, rep from * to end and
fasten off.
TO MAKE UP
Weave in ends. Block gently
to measurements, following
any yarn care instructions on the
ball band.
PATTERNS
Row 3 K3, *TWK, K2; rep from * to
last st, K1.
Row 4 Purl.
These 4 rows set main patt.
Cont straight in pa" until Back
measures 43cm, ending a%er a WS
row.
LH needle, then K into first st
again slipping both sts off needle
For a full list see page 73
from page 35
COUNTRY!
CASUAL
YOU!WILL!NEED
King Cole Chunky Tweed (72%
acrylic, 25% wool, 3% viscose;
100g/138m) in Lewis (1082)
For yarn quantities and
measurements see size table
■ A pair of 4.5mm kni"ing needles
■ A pair of 5mm needles
■ A pair of 6mm needles
■ 1 set of 5mm DPNs
(double-pointed needles)
■ 3 bu"ons
■ Yarn needle
■
TENSION
16 sts and 22 rows to measure
10x10cm over main pa" using 6mm
needles
ABBREVIATIONS
SLEEVE
47 (48: 48: 49: 49)cm
TWP p2tog and do not slip sts off
LH needle, then P into first st
again slipping both sts off needle
TWK k2tog and do not slip sts off
POCKETS (MAKE 2)
Cast on 20 sts using 6mm
needles.
Purl 1 row.
Row 1 (RS) K1, (TWP, K2) 4 times,
TWP, K1.
Row 2 (WS) P$, P to last st, p$.
[2 sts inc’d]
Row 3 K4, (TWK, K2) 4 times, K2.
Row 4 As Row 2. [24 sts]
Row 5 K3, (TWP, K2) 4 times,
TWP, K3.
Row 6 Purl.
Row 7 K1, (TWK, K2) 5 times,
TWK, K1.
Row 8 Purl.
Rep Rows 5 to 8 only until Pocket
measures 12cm at centre, ending
a%er a RS row.
Sl 1 purlwise, P1, K2.
Patt 2 rows straight.
Rep dec row. [1 st dec’d]
Rep last 4 rows another 3 times,
ending a%er a dec row. [39 (43: 47:
51: 55) sts]
Patt 1 row straight, ending a%er a
WS row.
SHAPE ARMHOLES
Cast off loosely 5 (6: 6: 7: 9) sts at
beg of next 2 rows. [74 (80: 88: 94:
98) sts]
Dec 1 st at each end of next 6 (6: 8:
8: 8) rows. [62 (68: 72: 78: 82) sts]
SHAPE ARMHOLE
NOTE" READ AHEAD – neck and
armhole shaping are worked AT
THE SAME TIME.
Cast off 5 (6: 6: 7: 9) sts at beg of
next row. [34 (37: 41: 44: 46) sts]
**Cont dec at front edge as set on
4th row a%er last front edge dec,
then on every foll 4th row AND AT
THE SAME TIME dec 1 st at
armhole edge on next RS row and
foll 5 (5: 7: 7: 7) rows.
When armhole decs are complete,
cont to dec at front edge only on
every 4th row until there are 18
(20: 22: 24: 25) sts.
Patt straight until Back measures
65 (66: 67: 69: 70)cm, ending a%er
a WS row.
SHAPE SHOULDERS
Cast off loosely 6 (7: 7: 8: 8) sts at
beg of next 4 rows, then 6 (6: 8: 8:
9) sts at beg of next 2 rows. [26
(28: 28: 30: 32) sts]
Cast off rem sts.
Change to 5mm needles.
Work 2 rows in garter st.
Cast off firmly knitwise.
RIGHT FRONT
Cast on 44 (48: 52: 56: 60) sts
firmly using 4.5mm needles.
Purl 2 rows.
Change to 6mm needles.
POCKET EDGING
With RS facing and using 5mm
DPNs, pick up and knit 22 sts
evenly down LH edge of Pocket,
then pick up and knit 20 sts from
cast-on edge, and finally pick up
and knit 22 sts up RH edge of
Pocket. Do not join. [64 sts]
Working back and forth in rows,
work 2 rows in garter st.
Patt straight until Front measures
same as Back to shoulder shaping,
ending at armhole edge.
SHAPE SHOULDER
Cast off loosely 6 (7: 7: 8: 8) sts at
beg of next row and foll alt row. [6
(6: 8: 8: 9) sts]
Work 1 row straight.
Cast off rem sts.
SET PATTERN
Row 1 (RS) P2, K3, P1, K1, *K2,
TWP; rep from * to last st, K1.
Row 2 (WS) P to last 6 sts, K1, P1,
Sl 1 purlwise, P1, K2.
Row 3 P2, K3, P1, K1, *TWK, K2;
rep from * to last st, K1.
Row 4 As Row 2.
These 4 rows set main patt.
Change to 6mm needle.
Cast off knitwise.
LEFT FRONT
Cast on 44 (48: 52: 56: 60) sts
firmly using 4.5mm needles.
Purl 2 rows.
Cont straight in pa" until Front
measures 18 rows shorter than
Back before armhole shaping,
ending a%er a WS row.
BACK
Cast on 84 (92: 100: 108: 116) sts
firmly using 4.5mm needles.
Purl 2 rows.
Change to 6mm needles.
Change to 6mm needles.
SET PATTERN
Row 1 (RS) K1, *TWP, K2; rep from
* to last 7 sts, K1, P1, K3, P2.
Row 2 (WS) K2, P1, Sl 1 purlwise,
P1, K1, P to end.
Row 3 K3, *TWK, K2; rep from * to
last 9 sts, TWK, K1, P1, K3, P2.
SHAPE FRONT SLOPE
Dec row (RS) P2, K3, P1, k2tog tbl,
pa" to end as set, keeping pa"
correct. [1 st dec’d]
Next row P to last 7 sts, P1, K1, P1,
SET PATTERN
Row 1 (RS) K1, *TWP, K2; rep from
* to last 3 sts, TWP, K1.
Row 2 (WS) Purl.
COUNTRY CASUAL SIZE TABLE
FRONTS!&!BACK
65 (66: 67: 69: 70)cm
SIZE
M
L
XL
XXL
TO!FIT!CHEST
cm
91-97
102-107
112-117
122-127
132-137
BACK!WIDTH
cm
52.5
57.5
62.5
67.5
72.5
LENGTH
cm
65
66
67
69
70
SLEEVE!LENGTH
cm
47
48
48
49
49
YARN
Lewis (1082)
52.5 (57.5: 62.5: 67.5: 72.5)cm
S
King Cole Chunky Tweed (100g/138m)
10
10
11
12
12
SIZING!COLOUR!KEY!So you can re-use this pattern, we’ve colour-coded the sizing instructions.
Simply follow our colour-coded measurements and you’re off.
KNIT!&!CROCHET!COLLECTION!"#"$ BHG %%&
Row 4 As Row 2.
These 4 rows set main patt.
Cont straight in pa! until Front
measures 18 rows shorter than
Back before armhole shaping,
ending a"er a WS row.
SHAPE FRONT SLOPE
Dec row (RS) Pa! to last 8 sts,
k2tog, P1, K3, P2. [1 st dec’d]
Next row K2, P1, Sl 1 purlwise, P1,
K1, P to end.
Patt 2 rows straight.
Rep dec row. [1 st dec’d]
Rep last 4 rows another 3 times,
ending a"er a RS row. [39 (43: 47:
51: 55) sts]
Patt 2 rows straight, ending a"er a
RS row.
SHAPE ARMHOLE
Cast off 5 (6: 6: 7: 9) sts at beg of
next row. [34 (37: 41: 44: 46) sts]
Complete as for Right Front from
** to end.
SLEEVES
Cast on 36 (40: 44: 44: 48) sts
firmly using 4.5mm needles.
Purl 2 rows.
Change to 6mm needles.
Work 4 rows in main pa! as set
for Back.
SHAPE SLEEVE
Cont in pa!, inc 1 st at each end of
next row, then on every foll 6th
row until there are 54 (54: 68: 70:
74) sts, then on every foll 8th row
until there are 64 (68: 72: 76: 80)
sts, working new sts in pa!.
Patt straight until Sleeve
measures 47 (48: 48: 49: 49)cm,
ending a"er a WS row.
SHAPE TOP
Cast off 5 (6: 6: 7: 9) sts at beg of
next 2 rows. [54 (56: 60: 62: 62)
sts]
Work 0 (0: 2: 4: 6) rows straight.
Dec 1 st at each end of next row,
then every foll RS row until 32 (32:
38: 40: 40) sts rem, then on every
row until 22 (22: 28: 30: 30) sts
rem.
Cast off loosely.
TO FINISH
LEFT BORDER
With RS facing and using 5mm
needles, pick up and knit 60 sts
evenly along the straight section
of le" front to start of front slope.
Rows 1 to 3 Knit.
Row 4 (RS buttonhole row) K5,
(cast off 4 sts, K10 including st on
RH needle a"er cast-off) twice,
cast off 4 sts, K to end.
Row 5 K to end, casting on 4 sts
over gap where sts were cast off.
Rows 6 to 10 Knit.
Cast off firmly knitwise.
from page 40
RIGHT!BORDER
Work as for le" border omi!ing
bu!onholes.
RIGHT COLLAR
Join both shoulders. Place a
marker at centre of final back neck
cast-off sts.
Cast on 8 sts using 5mm needles.
Work 2 rows in garter st.
Inc row K1, M1, K to end. [1 st inc’d]
Work 3 rows in garter st.
** Rep the last 4 rows until there
are 12 sts.
Rep inc row on every foll 6th row
until there are 15 sts, then on
every foll 8th row until there are
20 sts.
Work straight until shaped edge
of collar fits up shaped edge to
shoulder seam, ending at straight
edge of collar.
Row 1 K to last 3 sts, turn.
Row 2 Sl 1 firmly, K to end.
Rows 3 to 8 Knit.
Rep the last 8 rows until these
rows, when slightly stretched, fit
round to centre of back neck,
ending on any of Rows 3 to 8.
Cast off loosely.
LEFT COLLAR
Cast on 8 sts using 5mm needles.
Work 2 rows in garter st.
Inc row K to last st, M1, K1. [1 st
inc’d]
Work 3 rows in garter st.
Complete as for Right Collar from
** to end.
TO MAKE UP
1 With WS facing, block pa!ern
pieces to size and shape by
pinning out round edges and
following yarn care instructions on
ball band.
2 Tack pockets in position using
photograph as a guide, then stitch
pockets in place using an oddment
of finer, toning yarn and leaving
cast-off edges of the pocket
edgings free.
3 Join cast-off edges of collar
sections. Stitch the 2 groups of 8
cast-on sts of collar to the upper
side edges of borders, then stitch
shaped edges neatly in place all
round.
4 Sew in Sleeves. Join side and
Sleeve seams. Sew on bu!ons.
Weave in any rem ends.
!"# BHG KNIT$&$CROCHET$COLLECTION$"#"%
PEEKABOO
YOU$WILL$NEED
Cygnet DK (100% acrylic,
100g/298m) in Chiffon (709)
For yarn quantities and
measurements see size table
■ A pair of 3.25mm kni!ing needles
■ A pair of 4mm needles
■ A set of 4mm DPNs
(double-pointed needles) or
straight cable needles for forming
pleats
■ Stitch markers
■ Stitch holders or waste yarn
■ Crochet hook
■ 1 flower bu!on, 18mm diameter
■ Yarn needle
■
FOLD!PLEAT
Folding row (RS) Knit to 6 sts
before first marker, slip next 6 sts
onto one DPN (A), remove marker,
then slip next 6 sts onto another
DPN (B), remove marker. Turn B
so that the last st on this needle is
parallel with the first stitch on A,
making sure A is in front, B is in
the centre and your LH needle is
at the back, parallel to A and B.
Using your RH needle, knit the
first sts on each DPN and the LH
needle together. Knit 1 st from
each needle together as set
another 5 times.
Slip next 6 sts onto one DPN (C),
remove marker, slip next 6 sts
onto another DPN (D), remove
marker. Turn D so that the last st
on this needle is parallel with the
first st on C, making sure C is at
the back, D is in the centre and
your LH needle is in front. Using
your RH needle, knit the first sts
on the LH needle and each DPN
together. K 1 st from each needle
together as set another 5 times,
knit to end. [56 (58: 60: 64: 66) sts]
Next row Purl.
TENSION
23.5 sts and 32 rows to measure
10x10cm over st st using 4mm
needles
ABBREVIATIONS
For a full list see page XX
FRONT
Cast on 80 (82: 84: 88: 90) sts
using 3.25mm needles.
Work in garter st (K every row)
until piece measures 2cm, ending
a"er a WS row.
Change to 4mm needles.
NOTE Sl all markers as you come
to them, unless otherwise noted.
Set up row (RS) K27 (28: 29: 31:
32), sl1 wyib, PM, K5, sl1 wyif, PM,
K12, PM, sl1 wyif, K5, PM, sl1 wyib,
K27 (28: 29: 31: 32).
Next row Purl.
SET!CENTRE!LACE!PANEL
Row 1 (RS) K27 (28: 29: 31: 32), sl1
wyib, sl SM, K5, sl1 wyif, sl SM,
work Row 1 of Chart (page 121), sl
SM, sl1 wyif, K5, sl SM, sl1 wyib,
K27 (28: 29: 31: 32).
Row 2 (WS) Purl to centre Chart
section, work Row 2 from Chart,
purl to end.
Rep last 2 rows, working Chart
rows 3 to 20, and then rep Chart
rows 1 to 20 until piece measures
17.5 (19.5: 23.5: 30: 32.5)cm from
cast-on edge, ending a"er a WS
row.
ARMHOLE!SHAPING
Cast off 4 (5: 5: 5: 5) sts at beg of
next 2 rows. [48 (48: 50: 54: 56)
sts]
Dec row (RS) K1, ssk, knit to last 3
sts, k2tog, K1. [2 sts dec’d]
Next row Purl.
SIZE!"-$M!ONLY
Work 2 more rows in st st, then
rep Dec row on next row and 6 foll
RS rows. [32 (-: -: -: -) sts].
Next row Purl.
SIZES!%-&M'!!&-()M'!(*-)+M!
AND!)-$YRS!ONLY
Work 2 more rows in st st, then
rep Dec row on next row and foll
- (1: 2: 2: 3) 4th rows, then every RS
row 4 times. [- (34: 34: 38: 38) sts]
Next row Purl.
ALL!SIZES
SHAPE!NECK!AND!RAGLAN
Next row (RS) K1, ssk, K9 (9: 9: 11:
11), place rem 20 (22: 22: 24: 24) sts
onto st holder, turn. [11 (11: 11: 13: 13)
sts]
PATTERNS
SIZE
Cont in st st throughout, rep Row 1
every 4th (4th: 6th: 8th: 10th) row
another 8 (8: 7: 7: 6) times, then
rep Row 1 every RS row 3 (3: 4: 4:
5) times. [56 (58: 60: 64: 66) sts]
Continue to work in st st until
piece measures 18.5 (19.5: 24: 30:
32.5)cm from cast-on edge, ending
a!er WS row.
ARMHOLE!SHAPING
Cast off 4 (5: 5: 5: 5) sts at beg of
next 2 rows. [48 (48: 50: 54: 56)
sts]
Dec row K1, ssk, knit to last 3 sts,
k2tog, K1. [2 sts dec’d]
Next row Purl.
SIZE!"-$M!ONLY
Rep last 2 rows twice more. [42 (-:
-: -: -) sts]
SIZES!%-&'M(!&)-'*M!AND!
'-$YRS!ONLY
Work 2 more rows in st st, then
rep Dec row on next row and - (-:
0: 0: 1) foll 4th rows. [- (-: 46: 50:
50) sts]
Next row Purl.
ALL!SIZES
SPLIT!BACK
Row 1 (RS) K1, ssk, K18 (20: 20: 22:
22), turn, leaving rem 21 (23: 23: 25:
25) sts on holder. [20 (22: 22: 24:
24) sts]
Row 2 Purl.
Row 3 K1, ssk, knit to end. [19 (21:
21: 23: 23) sts]
Row 4 Purl.
Rep last two rows until 9 (10: 10: 11:
6-9m
9-12m
18-24m
2-3yrs
TO$FIT$CHEST
cm
43
47
48.5
52
53.5
ACTUAL$CHEST
cm
46
47.5
49.5
53
54.5
LENGTH
cm
28
30
35.5
42.5
46
SLEEVE$LENGTH
cm
15.5
17.5
19.5
24.5
27
3
3
YARN
Yarn A Chiffon (709)
Cygnet DK (100g/298m)
2
2
2
SIZING!COLOUR!KEY!So you can re-use this pattern, we’ve colour-coded the sizing instructions.
Simply follow our colour-coded measurements and you’re off.
BACK
Cast on 80 (82: 84: 88: 90) sts
using 3.25mm needles.
Work in garter st (K every row)
until piece measures 2cm, ending
a!er a WS row.
Change to 4mm needles.
Row 1 (RS dec) K1, ssk, knit to last
3 sts, k2tog, K1.
Rows 2 to 4 Beg with a purl row,
work in st st.
0-3m
SLEEVE
11) sts rem, ending a!er WS row.
Place sts on hold.
With RS facing, rejoin yarn to rem
[21 (23: 23: 25: 25) sts]
Next row Knit to last 3 sts, k2tog,
K1. [20 (22: 22: 24: 24) sts]
Next row Purl.
Rep last two rows until 9 (10: 10: 11:
11) sts rem, ending a!er WS row.
Place sts on hold.
SLEEVES!+MAKE!',
Cast on 28 (28: 30: 32: 36) sts
using 3.25mm needles.
Work in garter st (K every row)
until piece measures 2cm, ending
a!er WS row.
Change to 4mm needles.
Row 1 (RS) Knit.
Row 2 (WS) Purl.
Inc row K1, M1, K to last 2 sts, M1,
K1. [30 (30: 32: 34: 38) sts]
Continue to work in st st
throughout, working inc row on
next RS row and 3 (4: 4: 4: 4) foll
4th (4th: 6th: 8th: 10th) rows. [38
(40: 42: 44: 48) sts]
Work straight in st st without
shaping until Sleeve measures 15.5
(17.5: 19.5: 24.5: 27)cm from cast-on
edge, ending with a WS row.
SHAPE!RAGLAN
Cast off 4 (5: 5: 5: 5) sts at beg of
next 2 rows. [30 (30: 32: 34: 38)
sts]
Dec 1 st at each end of next row
and 4 (4: 5: 5: 5) foll 4th (4th: 4th:
4th: 4th) rows, then dec 1 st at
each end of 6 (6: 6: 7: 9) foll RS
rows. [8 (8: 8: 8: 8) sts]
Put rem sts on holder.
23.5 (24.5: 25.5: 27: 28)cm
FRONT$&$BACK
NECKBAND
Join raglan seams.
With 3.25mm needles and RS
facing, starting at le! back, K9 (10:
10: 11: 11) held le! back sts, K8 (8:
8: 8: 8) held le! sleeve sts, pick up
and knit 11 (11: 11: 13: 13) sts from le!
side front neck, K8 (10: 10: 10: 10)
held centre front sts, pick up and
knit 11 (11: 11: 13: 13) sts from right
side front neck, K8 (8: 8: 8: 8) held
right sleeve sts, K9 (10: 10: 11: 11)
held right back sts. [64 (68: 68: 74:
74) sts]
Rows 1 to 5 Knit.
Cast off loosely using a sewn cast
off.
TO!MAKE!UP
Sew side and sleeve seams. Using
a crochet hook, chain 8 sts at le!
back neck edge and a#ach to
make a loop. Sew bu#on securely
on the opposite side. Weave in
ends and block to measurements
following any yarn care
instructions on the ball band.
PEEKABOO CHART
HOW TO USE OUR
CHARTS
Start at the bo#om
right-hand corner. Read
right side rows from right
to le! and wrong side
rows from le! to right. A
row of squares
represents a row of
kni#ing.
20
19
18
17
16
15
14
13
12
11
10
9
8
7
6
5
4
3
2
1
10
5
KEY
K on RS; P on WS
P on RS; K on WS
Ssk
K2tog
Yo
K1tbl
KNIT!&!CROCHET!COLLECTION!"#"$ BHG %"%
28 (30: 35.5: 42.5: 46)cm
Slip centre 8 (10: 10: 10: 10) sts
onto holder. With RS facing rejoin
yarn to rem sts and knit to last 3
sts, k2tog, K1. [11 (11: 11: 13: 13) sts]
Next row Purl to last 2 sts, p2tog.
[10 (10: 10: 12: 12) sts]
Complete second side to match
first from **.
PEEKABOO SIZE TABLE
15.5 (17.5: 19.5: 24.5: 27)cm
Next row P2tog, purl to end. [10
(10: 10: 12: 12) sts]
**Dec 1 st at each end of next row
and foll 3 (3: 3: 4: 4) RS rows. [2
sts]
Next row Purl.
Next row K2tog.
Fasten off.
SOFT!ELEGANCE
YOU!WILL!NEED
Cygnet DK (100% acrylic,
100g/298m) Yarn A Heather (150)
See table for measurements and
yarn quantities; 1 ball of Yarn B
Stone (874)
■ A 4.5mm crochet hook
■ Stitch markers
■ Yarn needle
■
TENSION
15 sts and 9 rows measure
10x10cm over treble crochet using
a 4.5mm hook or size needed to
obtain correct tension
ABBREVIATIONS
ftr (foundation treble) Ch4 (counts
as first st), yrh, insert hook in last
ch from hook, *yrh and pull up a
loop, yrh and pull through one loop
(this loop will sit at base of #r), (yrh
and pull through 2 loops) twice,
yrh, insert hook in loop at base of
prev #r; rep from * as required
c
b
Direction
of work
a
Width a: 52 (57.5: 62.5: 68: 73: 78.5)cm
Length b: 51 (53: 53: 55.5: 57.5: 60)cm
Sleeve length c: 23.5 (23.5: 23.5: 23.5:
22.5: 22.5)cm
Top is made up of 2 identical panels
worked from the bo"om up. The
Sleeves are worked at the top of
each panel using a chain extension
or oundation stitches. Use Yarn B
for all 5-dtr cl sts only. All other
stitches are worked in Yarn A.
PANEL (MAKE 2)
Using Yarn A, make 79 (87: 95:
103: 111: 119) #r.
Row 1 (WS) Ch3 (counts as st
throughout), (BPtr around next st,
FPtr around next st) rep across to
final st, tr in final st, turn. [79 (87:
95: 103: 111: 119) sts]
Row 2 (RS) Ch3, (FPtr around
next st, BPtr around next st) rep
across to final st, tr in final st, turn.
Rows 3-5 Rep Rows 1-2, ending on
a Row 1 rep.
Row 6 Ch3, tr in each st across,
turn.
Row 7 Ch3, tr in next 10 sts, (5-dtr
cl in Yarn B, tr in next 7 sts) 8 (9:
10: 11: 12: 13) times, tr in final
4 sts, turn.
Row 8 As Row 6.
Row 9 Ch3, tr in next 6 sts, (5-dtr
cl in Yarn B, tr in next 7 sts) 9 (10:
11: 12: 13: 14) times, turn.
Rows 10-11 Rep Rows 6-7.
Rep Row 6 until Panel measures
38cm for all sizes, ending on a WS
row.
Do not fasten off.
SLEEVE EXTENSIONS
Row 1 (RS) Ch32 (32: 32: 32: 30:
30), tr in fourth ch from hook and
each ch across, pm in last st, tr in
each st across Panel, 30 (30: 30:
30: 28: 28) #r, pm in first #r, turn.
[139 (147: 155: 163: 167: 175) sts]
Move the markers up as you work.
Row 2 Ch3, tr in each st across,
turn.
SOFT ELEGANCE SIZE TABLE
SIZE
SLEEVE CUFFS
Edging is added to the base of
each Sleeve before joining the
Panels together.
With RS facing join Yarn A into
the top-le# corner of Panel to
work into the row-end of the
Sleeve Extension section.
Row 1 (RS) Ch3, 28 (32: 32: 36: 42:
46) tr evenly down edge of Sleeve,
turn. [29 (33: 33: 37: 43: 47) sts]
Row 2 (WS) Ch3, (BPtr around
next st, FPtr around next st)
across to final st, tr in final st, turn.
Row 3 Ch3, (FPtr around next st,
BPtr around next st) across to
final st, tr in final st, turn.
Rows 4-5 Rep Rows 2-3 once more.
Fasten off.
Rep Rows 1-5 on the edge of each
Sleeve Extension.
M
L
XL
2XL
3XL
122-127
132-137
TO!FIT!BUST
cm
81-86
91-96
101-107
111-117
ACTUAL!BUST
cm
104
115
125
135.5
146
156.5
LENGTH
cm
51
53
53
55.5
57.5
60
SLEEVE!LENGTH
cm
23.5
23.5
23.5
23.5
22.5
22.5
4
4
6
6
Yarn A Heather (150)
BUILDING!
BLOCKS
YOU!WILL!NEED
Caron Simply So! (aran, 100%
acrylic, 170g/288m) in Strawberry
(0015). For yarn quantities and
measurements see size table
■ A pair of 4.5mm kni"ing needles
■ A pair of 5mm needles
■ Stitch holders
■ Yarn needle
■
TENSION
18 sts and 24 rows to measure
10x10cm over stocking stitch using
5mm needles
17 sts and 27 rows to measure
10x10cm over Main Pa"ern using
5mm needles.
ABBREVIATIONS
For a full list see page 73
SLEEVE
TO MAKE UP
Pin the pieces together with WS
facing out. Using a slip stitch seam,
join the side, sleeve and shoulder
seams, leaving the central 20 (20:
22: 22: 24: 24)cm open for the
neckline. Weave in all ends.
S
YARN
from page 41
FRONT!&!BACK
Cygnet DK (100g/298m)
5
5
SIZING!COLOUR!KEY!So you can re-use this pattern, we’ve colour-coded the sizing instructions.
Simply follow our colour-coded measurements and you’re off.
"## BHG KNIT$&$CROCHET$COLLECTION$#%#&
32.5 (35.5: 38.5: 40.5)cm
35.5 (39.5: 45: 49)cm
NOTES
Rep Row 2 another 2 (2: 2: 4: 4: 6)
times.
Next row Ch3, tr in next 4 (4: 4: 4:
2: 2) sts, (5-dtr cl in Yarn B, tr in
next 7 sts) 4 times, tr in each st
across to next marker, (5-dtr cl in
Yarn B in marked st, tr in next 7
sts) 3 times, 5-dtr cl in next st, tr in
each st to end, turn.
Next row As Row 2.
Next row Ch3, tr in next 8 (8: 8: 8:
6: 6) sts, (5-dtr cl in Yarn B, tr in next
7 sts) 3 times, tr in each st across to
next marker, tr in next 4 sts, (5-dtr cl
in Yarn B, tr in next 7 sts) 3 times, tr
in final 1 (1: 1: 1: 0: 0) sts, turn.
Next row As Row 2.
Next row Ch3, tr in next 4 (4: 4: 4:
2: 2) sts, (5-dtr cl in Yarn B, tr in
next 7 sts) 4 times, tr in each st
across to next marker, (5-dtr cl in
Yarn B in marked st, tr in next 7
sts) 3 times, 5-dtr cl in next st, tr in
each st to end, turn.
Next row As Row 2.
Rep last row another 2 (4: 4: 4: 6:
6) times.
Fasten off.
24 (29: 33: 37)cm
5-dtr cl *Yrh twice, insert hook in
st indicated, yrh and pull up a
loop, (yrh and pull through two
loops) twice; rep from * 4 times
more, yrh and pull through all
loops, ch1 to close
For a full list see page 68
from page 37
PATTERNS
BACK
Cast on 57 (61: 67: 71) sts using
4.5mm needles.
Rib row 1 (RS) *K1, P1; rep from *
to last st, K1.
Rib row 2 (WS) P1, *K1, P1; rep
from * to end.
These 2 rows form rib.
Rib until Back measures 4cm,
ending a!er a WS row.
more. [17 (19: 21: 21) sts]
Slip sts onto a stitch holder or
spare needle.
FRONT
Work as given for Back to **. [25
(27: 29: 33) sts]
Change to 5mm needles.
SET MAIN PATTERN
Row 1 (RS) K3 (0: 3: 0), *K4, (P1,
K1) twice, K2; rep from * to last 4
(1: 4: 1) sts, K4 (1: 4: 1).
Row 2 (WS) K1 (0: 1: 0), P3 (1: 3: 1),
*P2, (K1, P1) 3 times, P2; rep from *
to last 3 (0: 3: 0) sts, P2 (0: 2: 0), K1
(0: 1: 0).
Rows 3 to 4 Rep Rows 1 to 2.
Row 5 Rep Row 1.
Row 6 P1 (0: 1: 0), K1 (0: 1: 0), P1 (0:
1: 0), K1, *P1, K1, P5, K1, P1, K1; rep
from * to last 3 (0: 3: 0) sts, P1 (0:
1: 0), K1 (0: 1: 0), P1 (0: 1: 0).
Row 7 K2 (0: 2: 0), P1 (0: 1: 0), *K1,
P1, K7, P1; rep from * to last 4 (1: 4:
1) sts, K1, P1 (0: 1: 0), K2 (0: 2: 0).
Rows 8 to 9 Rep Rows 6 to 7.
Row 10 Rep Row 6.
These 10 rows form pa". Pa" until
Back measures 23 (26: 31: 34)cm
from cast-on edge, ending a!er a
WS row.
SHAPE RAGLAN
Keep pa" correct as set
throughout.
Cast off 3 (3: 4: 4) sts at beg of
next 2 rows. [51 (55: 59: 63) sts]
Patt 2 rows straight.
Dec row (RS) K1, ssk, pa" to last 3
sts, k2tog, K1. [2 sts dec’d]
Patt 1 row.
Rep last 2 rows another 12 (13: 14:
14) times. [25 (27: 29: 33) sts]**
!-#$YRS$ONLY
Dec row 1 (RS) K1, ssk, pa" to last
3 sts, k2tog, K1. [- (-: -: 31) sts]
Dec row 2 (WS) P1, p2tog, pa" to
last 3 sts, p2tog tbl, P1. [- (-: -: 29
sts]
ALL$SIZES
SHAPE$LEFT$NECKLINE
Next row (RS) K1, ssk, pa" 4 sts,
turn and cont on these sts only for
le! front neck, placing unworked
18 (20: 22: 22) sts onto a stitch
holder. [6 sts]
Next row (WS) P2tog, pa" 1 st,
p2tog tbl, P1. [4 sts]
Next row Ssk, k2tog. [2 sts]
Next row P2.
Next row K2tog. [1 st]
Fasten off rem st.
SHAPE RIGHT NECKLINE
With RS facing, slip central 11 (13:
15: 15) sts onto another holder for
neckband and place rem sts on LH
needle, ready to work. [7 sts]
Next row (RS) Pa" to last 3 sts,
k2tog, K1. [6 sts]
Next row (WS) P1, p2tog, pa" 1 st,
p2tog tbl. [4 sts]
Next row Ssk, k2tog. [2 sts]
Next row P2.
Next row K2tog. [1 st]
Fasten off rem st.
SLEEVES
Cast on 35 (37: 39: 41) sts using
4.5mm needles.
Work in rib as for Back until
Sleeve measures 3cm, ending a!er
a WS row.
Change to 5mm needles.
Beg with a K row, work 4 rows in st
st.
SHAPE SLEEVE
Inc row (RS) K1, M1, K to last st,
M1, K1. [2 sts inc’d]
Work 9 rows in st st without
shaping.
Rep these 10 rows another 3 (4: 5:
6) times, then rep inc row once
more. [45 (49: 53: 57) sts]
Cont straight in st st until Sleeve
measures 24 (29: 33: 37)cm from
cast-on edge, ending a!er a WS
row.
SHAPE RAGLAN
NOTE Due to the difference in
row tension, there are fewer
raglan rows on the Sleeve than on
the Front and Back.
Cont in st st throughout.
Cast off 3 (3: 4: 4) sts at beg of
next 2 rows. [39 (43: 45: 49) sts]
Work 2 rows straight.
Dec row (RS) K1, ssk, K to last 3
sts, k2tog, K1. [2 sts dec’d]
Patt 1 row.
Rep last 2 rows another 12 (12: 13:
14) times. [13 (17: 17: 19) sts]
SIZES$%-&'$(-)$AND$!-#$YRS$
ONLY
Dec row 1 (RS) K1, ssk, pa" to last
3 sts, k2tog, K1. [- (15: 15: 17) sts]
Dec row 2 (WS) P1, p2tog, pa" to
last 3 sts, p2tog tbl, P1. [- (13: 13: 15)
sts]
ALL$SIZES
Slip rem sts onto a stitch holder.
Dec row 1 (RS) K1, ssk, pa" to last
3 sts, k2tog, K1. [2 sts dec’d]
Dec row 2 (WS) P1, p2tog, pa" to
last 3 sts, p2tog tbl, P1. [2 sts
dec’d]
Rep these 2 rows 1 (1: 1: 2) times
TO MAKE UP
Block pieces gently, following any
yarn care instructions on the ball
band. Join le! back raglan seam
2-3yrs
4-5yrs
6-7yrs
8-9yrs
TO$FIT$CHEST
cm
56
61
66
71
ACTUAL$CHEST
cm
65
69.5
76.5
81
LENGTH$TO$BACK$NECK
cm
35.5
39.5
45
49
SLEEVE$LENGTH
cm
24
29
33
37
YARN
Strawberry (0015)
NECKBAND
With RS facing and 4.5mm
needles, K17 (19: 21: 21) sts from
Back holder, K13 (13: 13: 15) sts
from le! Sleeve, pick up and knit 4
(4: 4: 6) sts down le! front neck
shaping, K11 (13: 15: 15) sts from
Front holder, pick up and knit 4 (4:
4: 6) sts up right front neck
shaping, K13 (13: 13: 15) sts from
right Sleeve. [62 (66: 70: 78) sts]
Next row (WS) *P1, K1; rep from *
to end.
Next row (RS) *P1, K1; rep from *
to end.
These 2 rows form rib.
Rib 2 more rows.
Cast off in rib.
TO FINISH
Join right back raglan and
neckband seam. Join side and
Sleeve seams. Weave in ends.
from page 42
ONE$OF$THE$
GIRLS
YOU$WILL$NEED
DMC Petra 5 (100% co"on,
100g/400m) 1 ball of each: red
(5321); pink (53608); black (5310);
gold (5742) and green (5700)
■ A 1.75mm crochet hook
■ A plain co"on T-shirt
■ Embroidery needle
■ Washable fabric pen
■
MEASUREMENTS
Motif measures approx 16cm tall
TENSION
Tension is not critical, but it may
affect the yarn quantities required
BUILDING BLOCKS SIZE TABLE
SIZE
and both front seams, leaving right
back seam open.
Caron Simply So! (170g/288m)
2
2
3
3
SIZING$COLOUR$KEY$So you can re-use this pattern, we’ve colour-coded the sizing instructions.
Simply follow our colour-coded measurements and you’re off.
ABBREVIATIONS
surface crochet Position yarn on
WS of work, insert hook from RS
to WS where you wish the surface
crochet to begin, yrh and pull up
loop to RS, *insert hook to WS in
next hole across, yrh and pull up
loop and pull through first loop on
hook; rep from * as required
French knot Thread yarn onto a
needle and secure yarn on WS,
bring needle through to RS, using
your thumb and forefinger. Hold
the yarn below the needle taut,
KNIT!&!CROCHET!COLLECTION!"#"$ BHG %"&
twist the needle around the yarn 4
times, insert the needle back
through to the WS (close to where
the needle came through but not
the exact space.)
For a full list see page 68
If working surface crochet, use a
needle to create small holes at
0.5cm intervals along all solid
black lines. If using the
embroidery method, refer to the
step-by-step on page 77.
across, turn. [14 sts]
Row 8 (RS) Ch1 (does not count as
st throughout), ss in first st, (3tr in
next st, ss in next st) 6 times, ss in
final st.
Fasten off.
NOTES
DRESS
Using red, ch8.
Row 1 (RS) Tr in third ch from
hook and each ch across, turn.
[6 sts]
Row 2 (WS) Ch3 (counts as tr
throughout), tr in st at base of
ch-3, tr in each st to final st, 2tr in
final st, turn. [8 sts]
Rows 3-5 As Row 2. [14 sts]
Row 6 (Working in bl throughout)
Ch3, tr in st at base of ch-3, 2tr in
next st, tr in next 10 sts, 2tr in final
2 sts, do not turn. [18 sts]
Fasten off.
With WS facing, join pink in first
unused fl from Row 5.
Row 7 (WS) Ch3, tr in fl of each st
SLEEVES
With RS facing, join red with a ss
in top-le% corner of Dress.
Row 1 (Dc, htr, tr) in row-end of
Row 1, (dtr, 2"r) in row-end of
Row 2.
Fasten off.
With RS facing join red around
post of Row 2 on right-hand side
of Dress.
Row 1 Ch5 (counts as "r), ("r, dtr)
in row-end of Row 2, (tr, htr, dc) in
row-end of Row 1, ss in top-right
corner of Dress.
Fasten off.
To begin, transfer the Diagram
below onto your top using a
washable fabric pen, about 5-8cm
below the neckline. The solid lines
denote where you will work
surface crochet or embroider the
design; the broken lines show
where the crochet pieces will be
added. Leave long tails on the
crochet pieces as they can be
used to sew the parts onto to the
top.
LITTLE GIRL MOTIF
Using black, either work surface
crochet or chain stitch embroidery
to cover the solid lines of design.
Actual size
!"# BHG KNIT$&$CROCHET$COLLECTION$"%"#
NUTS!ABOUT!YOU
YOU!WILL!NEED
King Cole Merino Blend DK
(100% wool, 50g/104m) Yarn A
Aran (46); Yarn B Fuchsia (787)
and Yarn C Walnut (3393). For
yarn quantities and
measurements see size table.
■ King Cole Moments DK (100%
polyester, 50g/90m) 1 ball of Yarn
D Ginger (1876)
■ A pair of 3.25mm kni"ing needles
■ A pair of 4mm needles
■ A 3.25mm circular needle or
DPNs (double-pointed needles)
for neckband
■ Locking stitch markers
■ Stitch holders
■ Oddments of Black DK yarn or 3
small round bu"ons (for eyes and
nose)
■ Yarn needle
■
COLLAR
With RS facing, join pink in first
ch from foundation ch of Dress.
Row 1 (RS) Ch2, htr in ch at base
of ch-2, 2htr in next ch, ss in next 2
ch, 2htr in next 2 ch.
Fasten off.
LARGE FLOWER
Using pink, make a magic loop.
Round 1 (RS) Ch1, 10dc in loop, ss
to beg dc. [10 sts]
Fasten off.
Join gold in any st.
Round 2 (RS) Ch1, *(dc, htr, tr, dtr)
in next st, (dtr, tr, htr, dc) in next
st; rep from * 4 times more, ss to
beg dc. [5 petals]
Fasten off.
ONE OF THE GIRLS
DOLL DIAGRAM
from page 43
HEADBAND
Using red, ch21.
Row 1 (RS) Ss in second ch from
hook, ss in next ch, dc in next ch,
htr in next ch, (tr in next ch, 2tr in
next ch) 3 times, (2tr in next ch, tr
in next ch) 3 times, htr in next ch,
dc in next ch, ss in final 2 ch.
Fasten off.
TENSION
SMALL FLOWER
Using pink, make a magic loop.
Round 1 (RS) Ch1, (dc, htr, tr, htr,
dc) 5 times in loop, ss to beg dc.
Fasten off.
Using red, embroider a French
knot in the centre of the Small
Flower.
NOTES!
TO MAKE UP
Using the images as a guide, sew
the Dress, Large Flower,
Headband and Small Flower to
the design. Using green, surface
crochet or embroider a chain
stitch for the stem of the Large
Flower. Using red, make 2 small
bows for the shoelaces and sew
onto the design.
22 sts and 30 rows to measure
10x10cm over st st using 4mm
needles
ABBREVIATIONS
S2kpo Sl 2 tog knitwise, K1, pass
slipped sts over (2 sts dec’d)
For a full list see page 73
This sweater has a nice close fi"ing
neck, so be areful not to cast off
too tightly. It is highly recommended
to use Elizabeth Zimmermann’s
sewn bind off method.
BACK
Cast on 72 (76: 84: 88: 96) sts
using pair of 3.25mm needles and
Yarn A.
Row 1 (RS) *K2tbl, P2; rep from *
to end.
Row 2 (WS) *K2, P2tbl; rep from *
to end.
Rep Rows 1 and 2 another 3 (4: 5:
6: 6) times.**
Change to 4mm needles and Yarn B.
PATTERNS
NUTS ABOUT YOU SIZE TABLE
35.5 (39: 45: 49: 53)cm
SIZE
FRONT!&!BACK
SLEEVE
31.5 (33.5: 37: 41: 45)cm
31.5 (33.5: 37.5: 39: 42.5)cm
2-3yrs
4-5yrs
6-7yrs
8-9yrs
10-11yrs
TO!FIT!CHEST
cm
56
61
67
71
76
ACTUAL!CHEST
cm
63.5
67
74.5
78
85.5
LENGTH
cm
35.5
39
45
49
53
SLEEVE!LENGTH
cm
3 1.5
33.5
37
41
45
YARN
King Cole Merino Blend DK (50g/104m)
Yarn A Aran (46)
5
6
7
7
8
Yarn B Fuchsia (787)
1
1
1
1
1
Yarn C Walnut (3393)
1
1
1
1
1
SIZING!COLOUR!KEY!So you can re-use this pattern, we’ve colour-coded the sizing instructions.
Simply follow our colour-coded measurements and you’re off.
NUTS ABOUT YOU CHART
59
58
Rows 1 to 4 Using Yarn B and beg
with a knit row, work 4 rows in st st.
57
56
55
54
53
52
Change to Yarn A.
Rows 5 to 8 Using Yarn A and beg
with a knit row, work 4 rows in
st st.
Cont in st st stripe sequence as
set until Back measures 23 (25.5:
30: 32: 34.5)cm from cast-on edge,
ending with a RS row.
ARMHOLE!SHAPING
Cast off 3 (4: 5: 6: 6) sts at beg of
next 2 rows. [66 (68: 74: 76: 84) sts]
51
50
49
48
47
46
45
44
43
42
41
40
39
38
37
36
35
34
33
32
31
30
Cont in st st stripe sequence as
set until piece measures 35.5
(39.5: 45: 49: 53)cm from cast-on
edge, ending with a RS row.
29
28
27
26
25
24
23
22
Next row (WS) P17 (17: 19: 18: 22),
PM, P32 (34: 36: 40: 40), PM, P17
(17: 19: 18: 22).
20
Cast off, keeping markers in place.
14
21
19
18
17
16
15
13
12
FRONT
Work as Back to **.
Change to 4mm needles and work
2 rows in st st. Commence working
from Chart as follows:
11
10
9
8
7
6
5
4
3
2
Row 1 (RS) Using Yarn A K11 (13: 17:
19: 23), work Row 1 from Chart,
using Yarn A K11 (13: 17: 19: 23).
Row 2 (WS) Using Yarn A P11 (13:
17: 19: 23), work Row 2 from Chart,
using Yarn A P11 (13: 17: 19: 23).
Cont working as set to complete
Chart, then cont in st st using only
1
50
45
KEY
Yarn A
Yarn B
Yarn D
40
35
30
25
20
15
10
5
HOW TO USE OUR CHARTS
Start at the bo"om right-hand corner. Read right side rows from right to le# and
wrong side rows from le# to right. A row of squares represents a row of kni"ing.
KNIT!&!CROCHET!COLLECTION!"#"$ BHG %"&
Yarn A, work until piece measures
23 (25.5: 30: 32: 34.5)cm from
cast-on edge, ending with a WS
row.
ARMHOLE!SHAPING
Cast off 3 (4: 5: 6: 6) sts at beg of
next 2 rows. [66 (68: 74: 76: 84) sts]
Cont in st st until piece measures
28 (32: 37.5: 41.5: 45.5)cm from
cast-on edge, ending a"er a WS
row.
Cast off.
SLEEVES
STRIPE PATTERN FOR SLEEVE A
**Using Yarn B, beg with a K row,
work 6 rows in st st.
Using Yarn A, work 6 rows in st st.
Repeat from ** twice more.
Cont in st st using only Yarn A to
end.
STRIPE PATTERN FOR SLEEVE B
***Using Yarn B, beg with a K row,
work 4 rows in st st.
Using Yarn A, work 4 rows in st st.
Repeat from *** another 4 times.
Cont in st st using only Yarn A to
end.
Cast on 40 (44: 48: 52: 56) sts
using 3.25mm needles and Yarn A.
Row 1 (RS) *K2tbl, P2; rep from *
to end.
Row 2 (WS) *K2, P2tbl; rep from *
to end.
Rep Rows 1 and 2 another 3 (4: 5:
6: 6) times.
NECK SHAPING
Next row (RS) K28 (28: 31: 31: 35),
turn, leave rem 38 (40: 43: 45: 49)
sts on holder.
Next row (WS) P to end.
Working on these 28 (28: 31: 31:
35) sts only cont as follows:
Dec 1 st at neck edge on next
5 (5: 6: 6: 6) rows. [23 (23: 25: 25:
29) sts]
Dec 1 st at neck edge every alt RS
row 6 (6: 6: 7: 7) times. [17 (17: 19: 18:
22) sts]
Cont in st st until piece measures
same as Back, ending a"er a WS
row.
Cast off.
With RS facing, and working on
rem 38 (40: 43: 45: 49) sts, slip
next 10 (12: 12: 14: 14) sts onto
stitch holder, rejoin Yarn A to rem
28 (28: 31: 31: 35) sts and K to end.
Next row P to end.
Working on these 28 (28: 31: 31:
35) sts only, cont as follows:
Dec 1 st at neck edge on next
5 (5: 6: 6: 6) rows. [23 (23: 25: 25:
29) sts]
Dec 1 st at neck edge every alt RS
row 6 (6: 6: 7: 7) times. [17 (17: 19: 18:
22) sts]
Cont in st st until piece measures
same as Back, ending a"er a WS
row.
Change to 4mm needles and Yarn
B.
Working in stripe patt for
Sleeves (A or B), work Sleeve
shaping AT THE SAME TIME as
follows:
Inc 1 st at each end of next row
and every foll 6th row 2 (3: 0: 4: 4)
times.
Then inc 1 st at each end of every
foll 8th row 5 (5: 8: 7: 8) times. [56
(62: 66: 76: 82) sts]
HEAD
Cast on 13 sts using 4mm needles
and Yarn C.
Row 1 and all WS rows (WS) Purl.
Row 2 (RS) K1, M1, K to last st, M1,
K1. [15 sts]
Row 4 K1, M1, K to last st, M1, K1.
[17 sts]
Row 6 Knit.
Row 8 K1, M1, K to last st, M1, K1.
[19 sts]
Row 10 Knit.
Row 12 K1, M1, K to last st, M1, K1.
[21 sts]
Row 14 Knit.
Row 16 (RS) K1, ssk, K to last 3 sts,
k2tog, K1. [19 sts]
Row 17 (WS) Purl.
Rep last 2 rows until 7 sts remain.
Cut yarn leaving a long tail, thread
through rem 7 sts and pull tight to
form Nose, and secure with sts.
EARS (MAKE TWO)
Cast on 7 sts using 4mm needles
and Yarn C.
Row 1 (WS) Purl.
Row 2 (RS) K2, s2kpo, K2. [5 sts]
Row 3 Purl.
Row 4 K1, s2kpo, K1. [3 sts]
Cut yarn leaving a long tail, thread
through rem 3 sts and pull tight to
form Ear tip, and secure with sts.
Embroider a small triangle to
centre front using Yarn B.
Row 1 (WS) *P2tbl, K2; rep from *
to end.
Row 2 (RS) *P2, K2tbl; rep from *
to end.
Rep last 2 rows another 2 (2: 2: 3:
4) times.
Cast off using Elizabeth
Zimmermann’s sewn bind off, or a
stretchy cast off of your choice.
"#$ BHG KNIT%&%CROCHET%COLLECTION%#&#'
WHEELY!GREAT!
YOU#WILL#NEED
Stylecra! Bellisima (DK, 100%
acrylic, 100g/268m) in Yarn A
Single Cream (3921); Yarn B
Toasted Almond (3922); Yarn C
Bashful Blue (3930) and Yarn D
Mellow Yellow (3925). For yarn
quantities and measurements see
size table
■ A pair of 3.25mm kni!ing needles
■ A pair of 3.75mm needles
■ A pair of 4mm needles
■ 2 stitch holders
■ 3 bu!ons
■ Yarn needle
■
TENSION
22 sts and 30 rows to measure
10x10cm over st st using 4mm
needles
ABBREVIATIONS
For a full list see page 73
NOTE#
Use separate balls of yarn for each
area of colour and twist yarns on
wrong side of work to avoid a hole
(intarsia).
Cont working in st st as set until
piece measures 31.5 (33.5: 37: 41:
45)cm from cast-on edge, ending
a"er a WS row.
Cast off.
NECKBAND
Join right shoulder seam.
With RS facing, using 3.25mm
circular needle or DPNs and Yarn
A, pick up and knit 23 (23: 24: 23:
23) sts evenly along le" side neck,
work across 10 (12: 12: 14: 14) sts
from front neck holder, pick up
and knit 23 (23: 24: 23: 23) sts
evenly along right side neck, pick
up and knit 32 (34: 36: 40: 40)
from cast-off stitches at back
neck. [88 (92: 96: 100: 100) sts]
from page 44
TO FINISH
Using the image as a guide, sew
on Head, then sew on Ears. Add
eyes and nose using bu!ons or
embroidering with oddments of
Black yarn. Join le" shoulder and
neckband seams. Hold Sleeves in
half lengthwise and place stitch
marker at centre point. Use this
marker to line the centre of the
Sleeve cap with the shoulder
seam and pin Sleeve into place.
Once happy, sew into position.
Join side and sleeve seams. Block
sweater gently to measurements,
following any instructions on the
ball band.
BACK
Cast on 66 (70: 74: 78: 82: 86) sts
using 3.75mm needles and Yarn B .
Rib row 1 (RS) K2, (P2, K2) to end.
Rib row 2 P2, (K2, P2) to end.
These 2 rows form the rib.
Cut off Yarn B.
Join on Yarn A.
Work a further 4 (4: 4: 6: 6: 6)
rows.
Change to 4mm needles.
Beg with a K row work 6 (6: 8: 8:
10: 10) rows in st st.
Begin Car Chart (over page) as
folls:
Row 1 K7 (9: 10: 12: 13: 15) in Yarn A,
knit across Row 1 of Chart, K8 (8:
10: 10: 12: 12) in Yarn A, knit across
Row 1 of Chart, K7 (9: 10: 12: 13: 15)
in Yarn A.
Row 2 P7 (9: 10: 12: 13: 15) in Yarn
A, purl across Row 2 of Chart, P8
(8: 10: 10: 12: 12) in Yarn A, purl
across Row 2 of Chart, P7 (9: 10:
12: 13: 15) in Yarn A.
These 2 rows set the charts.
PATTERNS
AGE
6-12m
12-18m
18-24m
2-3yrs
3-4yrs
4-5yrs
45.5-48
48-53
53-56
56-58.5
58.5-61
TO!FIT!CHEST
cm
43-45.5
ACTUAL!CHEST
cm
58
62
65.5
69
73
76
LENGTH
cm
29
32
35
39
43
47
SLEEVE!LENGTH
cm
19
22
24
26
29
32
3
3
YARN
SLEEVE
Stylecra" Bellisima (DK, 100g/268m)
Yarn A Single Cream (3921)
2
2
3
3
19 (22: 24: 26: 29: 32)cm
WHEELY GREAT SIZE TABLE
Plus 1 ball each of: Yarn B Toasted Almond (3922), Yarn C Bashful Blue (3930) and Yarn D Mellow Yellow (3925)
SIZING!COLOUR!KEY!So you can re-use this pattern, we’ve colour-coded the sizing instructions.
Simply follow our colour-coded measurements and you’re off.
HOW TO USE OUR CHARTS
Start at the bo$om right-hand corner. Read
right side rows from right to le" and wrong side
rows from le" to right. A row of squares
represents a row of kni$ing.
KEY
14
Yarn B
12
Yarn C
10
Yarn D
11
9
7
6
5
4
3
2
1
10
FRONT!&!BACK
21
20
19
18
17
15
14
13
8
23
22
16
SLEEVE CHART
Yarn A
CAR CHART
13
12
11
10
9
8
7
6
29 (31: 33: 34.5: 36.5: 38)cm
5
4
3
2
1
20
15
10
5
5
Rep the last 2 rows another 2
times and the first row again. [18
(20: 21: 23: 24: 26) sts]
BUTTONHOLE BAND
Work 2 rows straight, ending at
armhole edge.
Buttonhole row K6 (8: 8: 10: 10:
11), k2tog, yo, K5 (5: 6: 6: 7: 8),
k2tog, yo, K3.
Purl 1 row.
Knit 3 rows.
Cast off knitwise.
Cont in patt as set until all 23
rows of Car Chart have been
worked.
Beg with a P row, cont in st st in
Yarn A only until Back measures
29 (32: 35: 39: 43: 47)cm from
cast-on edge, ending with a P row.
SHAPE SHOULDERS
Next row Cast off 18 (20: 21: 23:
24: 26) sts for right shoulder, K
until 30 (30: 32: 32: 34: 34) sts are
on RH needle and leave these sts
on a holder for back neck, K to
end. [18 (20: 21: 23: 24: 26) sts]
BUTTON BAND
29 (32: 35: 39: 43: 47)cm
WHEELY GREAT CHART
Work 4 rows st st, ending with a K
row.
Cast off knitwise.
FRONT
Work as given for Back until 14
rows fewer have been worked
than on Back to shoulders.
SHAPE FRONT NECK
Next row K25 (27: 28: 30: 31: 33),
turn and work on these sts for first
side of neck.
Next row P2togtbl, P to end. [1 st
dec’d]
Next row K to last 2 sts, skpo. [1 st
dec’d]
With RS facing, place next 16 (16:
18: 18: 20: 20) sts on a holder,
rejoin yarn to rem sts, knit to end.
Next row P to last 2 sts, p2tog. [1
st dec’d]
Next row K2tog, k to end. [1 st
dec’d]
Rep the last 2 rows another 2
times and the first row again. [18
(20: 21: 23: 24: 26) sts]
Work 7 rows straight.
Cast off.
SLEEVES
Cast on 38 (38: 42: 42: 46: 46) sts
using 3.75mm needles and Yarn D.
Row 1 K2, (P2, K2) to end.
Row 2 P2, (K2, P2) to end.
These 2 rows form the rib.
Cut off Yarn D.
Join on Yarn A.
Work a further 6 (6: 8: 8: 10: 10)
rows, inc 0 (2: 0: 2: 0: 2) sts evenly
across last row. [38 (40: 42: 44: 46:
48) sts]
Change to 4mm needles.
Beg with a K row work in st st.
Work 4 (4: 4: 6: 6: 6) rows.
Inc row K3, M1, K to last 3 sts, M1,
K3. [2 sts inc’d]
Work 5 rows.
Rep the last 6 rows another 1 (1: 2:
2: 3: 3) times and the inc row
again. [44 (46: 50: 52: 56: 58) sts]
Next row P to end.
Work from Sleeve Chart as folls:
Row 1 K3 (4: 0: 1: 3: 4) in Yarn A,
(work across Row 1 of Sleeve
Chart) 3 (3: 4: 4: 4: 4) times, K5 (6:
2: 3: 5: 6) in Yarn A.
Row 2 P5 (6: 2: 3: 5: 6) in Yarn A,
(work across Row 2 of Sleeve
Chart) 3 (3: 4: 4: 4: 4) times, P3 (4:
0: 1: 3: 4) in Yarn A.
These 2 rows set the Sleeve
Chart.
KNIT!&!CROCHET!COLLECTION!"#"$ BHG %"&
Round 9 Ch3 (counts as first tr of
popcorn), 4tr in same st and
complete as popcorn, *(ch6, skip 5
sts, popcorn in next st) across to
final 4 sts, ch5, skip 4 sts, popcorn
in ch-2 sp, ch5, skip next 4 sts,
popcorn in next st; rep from *
around, ss to beg popcorn. [20
popcorn, 20 ch-5 sps]
Work a further 2 rows.
Inc 1 st at each end of the next
row and foll 6th row, working inc
sts in Yarn A. [48 (50: 54: 56: 60:
62) sts]
Work 3 rows. This completes the
Sleeve Chart.
Cont in Yarn A only.
Work 2 rows.
Inc row K3, M1, K to last 3 sts, M1,
K3. [2 sts inc’d]
Work 5 rows.
Rep the last 6 rows 0 (1: 1: 2: 2: 3)
times and the inc row again. [52
(56: 60: 64: 68: 72) sts]
Cont straight until Sleeve
measures 19 (22: 24: 26: 29: 32)cm
from cast-on edge, ending with a P
row.
SHAPE TOP
Cast off 5 sts at beg of next 4
rows and 5 (6: 7: 8: 9: 10) sts at beg
of foll 4 rows. [12 sts]
Cast off.
NECKBAND
Join right shoulder seam.
With RS facing, using 3.25mm
needles and Yarn A pick up and
knit 20 sts down le" side of front
neck, knit across 16 (16: 18: 18: 20:
20) sts from front neck, pick up
and knit 20 sts up right side of
front neck, knit 30 (30: 32: 32: 34:
34) sts from back neck holder, pick
up and knit 4 sts along row ends of
bu%onband. [90 (90: 94: 94: 98:
98) sts]
Row 1 K3, (P2, K2), to last 3 sts, P2,
K1.
Row 2 K3, (P2, K2) to last 3 sts, P2,
K1.
Buttonhole row Rib to last 5 sts,
k2tog, yo, P2, K1.
Rib 1 row.
Cut off Yarn A.
Join on Yarn C.
Rib 2 rows.
Cast off in rib.
TO MAKE UP
Lap bu%onhole band over bu%on
band and tack in place. Sew on the
Sleeves. Using Yarn B, embroider
French knots for door handles.
Join the side and Sleeve seams.
from page 45
CUDDLE!UP"!
BUTTERCUP
YOU!WILL!NEED
Cascade Heritage (75% wool,
25% nylon, 100g/400m) 2 skeins
of Steel (5602) and 1 skein of
Mustard (5652)
■ A 3mm crochet hook
■ A 3.5mm hook
■ Stitch marker
■ Yarn needle
■
MEASUREMENTS
Blanket measures approx 75x75cm
a"er blocking
TENSION
Tension is not critical for this
project, but it may affect the yarn
quantities required
ABBREVIATIONS
popcorn 5tr in same st, remove
live loop from hook, insert hook in
top of beg tr, place loop on hook
and pull through, ch1 to close
reverse dc Working opposite
direction, insert hook into next st
to the right (or le" if le"-handed),
yrh and pull up a loop, yrh, pull
through 2 loops on the hook
For a full list see page 68
NOTES
Blanket is worked in rounds. To
save weaving in ends, place the
live loop of Steel on a stitch
marker on WS of work when
changing colour.
!"# BHG KNIT$&$CROCHET$COLLECTION$"%"&
BLANKET
Using 3mm hook and Steel, make
a magic loop.
Round 1 (RS) Ch5 (counts as tr,
ch2 throughout), (3tr in loop, ch2)
3 times, 2tr in loop, ss to third ch
of beg ch-5, ss into ch-2 sp. [12 sts,
4 ch-2 sps]
Round 2 (RS) Ch5, 2tr in same sp,
*tr in each st to next ch-2 sp, (2tr,
ch2, 2tr) in ch-2 sp; rep from *
twice more, tr in each st to beg
ch-5, tr in same sp as beg ch-5, ss
to third ch of beg ch-5, ss in ch-2
sp. [28 sts, 4 ch-2 sps]
Rounds 3-5 As Round 2. [76 sts, 4
ch-2 sps]
Place loop of Steel on stitch
marker.
Join Mustard in first st across any
side.
Round 6 Ch1 (does not count as st
throughout), *dc in each st to ch-2
sp, ch2, skip ch-sp; rep from *
around, ss to beg dc.
Fasten off.
Pick up live loop of Steel.
Round 7 Work behind the ch-2 sps
from round below and into the
ch-2 sps 2 rounds below, ch5, 2tr
in same sp, *BPhtr around each dc
to next ch-2 sp, (2tr, ch2, 2tr) in
ch-2 sp 2 rounds below; rep from *
twice more, BPhtr around each dc
across final side, tr in same sp as
beg ch-5, ss to third ch of beg
ch-5, ss into ch-2 sp. [92 sts, 4 ch-2
sps]
Round 8 As Round 2. [108 sts, 4
ch-2 sps]
Place loop of Steel on stitch
marker.
Join Mustard in fi"h st across any
side.
Fasten off.
Pick up live loop of Steel and work
in front of the ch-sps from prev
round.
Round 10 Ch3 (counts as tr
throughout), *(FPdc, ch2, FPdc)
around corner popcorn, tr in ch-2
sp from 2 rounds below, (tr in each
st 2 rounds down to popcorn,
FPdc around popcorn) across to
next ch-2 sp, tr in ch-2 sp from 2
rounds below; rep from * 3 times
more omi%ing final tr, ss to top of
beg ch-3. [124 sts, 4 ch-2 sps]
Round 11 Ss into ch-2 sp, work as
Round 2. [140 sts, 4 ch-2 sps]
Place loop of Steel on stitch
marker.
Join Mustard in any st across side.
Round 12 As Round 6.
Fasten off.
Pick up live loop of Steel.
Round 13 As Round 7. [156 sts]
Rounds 14-20 As Round 2. [268
sts]
Repeat Rounds 6-20, then repeat
Rounds 6-15. [572 sts, 4 ch-2 sps]
Next round Ch1, *(dc, ch2, dc) in
corner, dc in each st across to
next corner; rep from * around, ss
to beg dc. [580 sts]
Fasten off.
BORDER
Using 3.5mm hook, join Mustard
in any ch-2 sp.
Round 1 (RS) Ch1 *(dc, ch2, dc) in
ch-2 sp, (skip 1 st, dc in next st)
across to next corner; rep from *
around, ss into beg dc, turn. [292
sts, 288 ch-1 sps, 4 ch-2 sps]
Round 2 (WS) Ch1, (dc in next st,
ch1, skip ch-1 sp) across to ch-2 sp,
ch1, (dc, ch2, dc) in ch-2 sp, ch1;
rep from * around, ss to beg dc,
turn.[300 sts, 292 ch-1 sps, 4 ch-2
sps]
Round 3 Ch1, (dc in next dc, ch1,
skip ch-1 sp) across to ch-2 sp, (dc,
ch2, dc) in ch-2 sp; rep from *
around, ss to beg dc. [308 sts, 292
ch-1 sps, 4 ch-2 sps]
Round 4 As Round 2.
Round 5 Ch1, (reverse dc in next
ch-1 sp, ch1, skip dc) across to ch-2
sp, (reverse dc, ch1, reverse dc) in
ch-2 sp; rep from * around, ss to
beg dc.
Fasten off and weave in ends.
Block to measurements listed
following any yarn care
instructions on the ball band.
PATTERNS
from
page 47
SWEET!SQUEAK
YOU!WILL!NEED
DMC Natura Just Co!on (4 ply,
100% co"on, 50g/155m) 1 ball of
Yarn A Gris Argent (09); A small
amount of each: Yarn B Lobelia
(82); Yarn C Canelle (37); Yarn D
Nacar (35) and Yarn E Star Light
(27)
■ A 2.5mm crochet hook
■ Stitch markers
■ Black stranded co"on
■ Pipe cleaner, 30cm (optional)
■ 2 safety eyes, 10mm
■ Toy stuffing
■ Yarn needle
■
MEASUREMENTS
Julius measures approx 20cm tall.
Lovey measures approx 7.5x7.5cm
TENSION
Tension is not critical for this
project, but it may affect the yarn
quantities required
ABBREVIATIONS
picot Ch3, ss in last ch from hook.
For a full list see page 68
NOTES
Pa"ern is worked in the amigurumi
method. Work stitches
continuously in a spiral without
closing off each round with a slip
stitch. It may help to use a stitch
marker in the first stitch of each
round, moving it up as you work. If
you are making this toy for a child
under 36 months, do not use safety
eyes; instead, embroider eyes with
stranded co"on.
JULIUS THE MOUSE
ARMS (MAKE 2)
Using Yarn B, make a magic loop.
Round 1 (RS) Ch1 (does not count
as st throughout), 6dc into loop. [6
sts]
Round 2 (RS) (Dc in next st, 2dc in
next st) 3 times. [9 sts]
Round 3 Dc in each st around.
Round 4 (Dc in next 2 sts, 2dc in
next st) 3 times. [12 sts]
Round 5 Dc in each st around.
Round 6 (Dc in next 3 sts, 2dc in
next st) 3 times. [15 sts]
Round 7 (Dc in next 3 sts, dc2tog) 3
times. [12 sts]
Round 8 (Dc in next 2 sts, dc2tog)
3 times. [9 sts]
Change to Yarn A.
Round 9 Dc in each st around.
Round 10 As Round 4.
Rounds 11-19 Dc in each st around.
[12 sts]
Flatten final round and work 6dc
across opening to close.
Fasten off.
LEGS (MAKE 2)
Using Yarn A, make a magic loop.
Round 1 (RS) Ch1, 6dc into loop. [6
sts]
Round 2 (RS) 2dc in each st
around. [12 sts]
Round 3 (Dc in next st, 2dc in next
st) 6 times. [18 sts]
Rounds 4-8 Dc in each st around.
Round 9 (Dc in next 4 sts, dc2tog)
3 times. [15 sts]
Rounds 10-12 Dc in each st around.
Fasten off first Leg only, leaving a
long tail.
BODY
Body is worked from the Legs.
Short rows are worked across one
Leg to form the gusset.
Cont with Yarn A on second Leg.
Row 1 (RS) Dc in next 4 sts, turn. [4
sts]
Rows 2-3 Ch1, dc in next 4 sts, turn.
Position first Leg next to sts from
Row 3. Work through WS on first
Leg and RS on second Leg for first
4 sts to join.
Round 4 Ch1, dc through 4 sts on
both Legs, 2dc in next st on first
Leg, (dc in next st, 2dc in next st)
twice, dc in next 6 sts, 3dc across
row ends of Rows 1-3, dc in next 5
sts on second Leg, (dc in next st,
2dc in next st) 3 times, 3dc across
row ends of Rows 1-3. [34 sts plus 4
sts for gusset]
Rounds 5-6 Dc in each st around,
skipping gusset. [34 sts]
Use the tail from the first Leg to
close any opening at Leg join.
Round 7 (2dc in next st, dc in next
2 sts) 3 times, dc in next 13 sts, (2dc
in next st, dc in next 2 sts) 3 times,
dc in final 3 sts. [40 sts]
Round 8 Dc in each st around.
Round 9 (2dc in next st, dc in next
3 sts) 3 times, dc in next 13 sts, (2dc
in next st, dc in next 3 sts) 3 times,
dc in final 3 sts. [46 sts]
Round 10 Dc in each st around.
Stuff Legs and Body and cont
stuffing as you work.
Round 11 (2dc in next st, dc in next
4 sts) 3 times, dc in next 13 sts, (2dc
in next st, dc in next 4 sts) 3 times,
dc in final 3 sts. [52 sts]
Rounds 12-16 Dc in each st around.
Round 17 (Dc in next 11 sts, dc2tog)
4 times. [48 sts]
Rounds 18-19 Dc in each st around.
Round 20 (Dc in next 6 sts, dc2tog)
6 times. [42 sts]
Rounds 21-22 Dc in each st around.
Round 23 (Dc in next 5 sts, dc2tog)
6 times. [36 sts]
Rounds 24-25 Dc in each st
around.
Round 26 (Dc in next 4 sts, dc2tog)
6 times. [30 sts]
Rounds 27-28 Dc in each st
around.
Round 29 (Dc in next 3 sts, dc2tog)
6 times. [24 sts]
Arms are joined to the Body over
the next round.
Round 30 Dc in next 6 sts, position
Arm against next 6 sts of Body, 6dc
through Body and Arm to join, dc
in next 6 sts, position Arm against
next 6 sts of Body, 6dc through
Body and Arm to join.
Do not fasten off.
HEAD
Head is worked from the Body.
Cont with Yarn A.
Round 1 (RS) Dc in each st around.
[24 sts]
Round 2 (RS) (Dc in next 3 sts, 2dc
in next st) 6 times. [30 sts]
Round 3 (Dc in next 4 sts, 2dc in
next st) 6 times. [36 sts]
Round 4 (Dc in next 5 sts, 2dc in
next st) 6 times. [42 sts]
Round 5 (Dc in next 6 sts, 2dc in
next st) 6 times. [48 sts]
Round 6 (Dc in next 7 sts, 2dc in
next st) 6 times. [54 sts]
Rounds 7-11 Dc in each st around.
Round 12 (Dc in next 7 sts, dc2tog)
6 times. [48 sts]
Rounds 13-15 Dc in each st around.
Round 16 (Dc in next 6 sts, dc2tog)
6 times. [42 sts]
Round 17 Dc in each st around.
Round 18 (Dc in next 5 sts, dc2tog)
6 times. [36 sts]
Position safety eyes between
Rounds 12-13, approx 11 sts apart.
Round 19 (Dc in next 4 sts, dc2tog)
6 times. [30 sts]
Round 20 (Dc in next 3 sts, dc2tog)
6 times.[24 sts]
Round 21 Dc in each st around.
Round 22 (Dc in next 2 sts, dc2tog)
6 times. [18 sts]
Round 23 (Dc in next st, dc2tog) 6
times. [12 sts]
Round 24 (Dc2tog) 6 times. [6 sts]
Fasten off.
Thread tail through final 6 sts and
pull tight to close.
SNOUT
Using Yarn B, make a magic loop.
Rounds 1-2 (RS) As Rounds 1-2 of
Legs. [12 sts]
Change to Yarn A.
Round 3 2dc in next 6 sts, dc in rem
6 sts. [18 sts]
Round 4 Dc in each st around.
Round 5 (2dc in next st, dc in next
st) 6 times, dc in rem 6 sts. [24 sts]
Round 6 Dc in each st around.
Round 7 (2dc in next st, dc in next
2 sts) 6 times, dc in rem 6 sts. [30
sts]
Round 8 Dc in each st around.
Fasten off leaving a long tail.
Stuff the Snout and sew to the
centre of the Head, between the
eyes.
EARS (MAKE 2)
Each Ear is made up of 2 pieces: an
inner part and an outer part.
INNER EAR
Using Yarn B, make a magic loop.
Round 1 (RS) Ch1, 6dc in loop. [6
sts]
Round 2 (RS) 2dc in each st
around. [12 sts]
Round 3 (Dc in next st, 2dc in next
st) 6 times. [18 sts]
Round 4 (Dc in next 2 sts, 2dc in
next st) 6 times. [24 sts]
Fasten off and weave in ends.
OUTER EAR
Using Yarn A, make a magic loop.
Rounds 1-4 (RS) As Rounds 1-4 of
Inner Ear. [24 sts]
Position the Inner and Outer
pieces together with RS facing out.
Work next round through both
pieces to join.
Round 5 (Dc in next 5 sts, 2dc in
next st) 4 times. [28 sts]
Round 6 Dc in next 23 sts, leave
rem 5 sts unworked.
Fasten off leaving a long tail.
Sew the Ears to the sides of the
Head over Rounds 14-18.
TAIL
Using Yarn A, make a magic loop.
Round 1 (RS) Ch1, 4dc in loop. [4
sts]
Round 2 (RS) Dc in each st around.
Round 3 (Dc in next st, 2dc in next
st) twice. [6 sts]
Rounds 4-40 Dc in each st around.
Fasten off.
Thread the pipe cleaner through
sp at back of Body where you want
the Tail. Thread the two ends of
the pipe cleaner into the tail and
sew Tail into place.
KNIT"&"CROCHET"COLLECTION"#$#% BHG &#'
TO FINISH
Using black stranded co!on,
embroider straight lines to form
the eyebrows. You can use the
image as a guide.
LOVEY THE BEAR
ARMS (MAKE 2)
Using Yarn C, make a magic loop.
Round 1 (RS) Ch1, 4dc in loop. [4
sts]
Round 2 2dc in each st around. [8
sts]
Rounds 3-10 Dc in each st around.
Fla!en final round and work 4dc
through both layers to close.
Fasten off.
HEAD
Using Yarn C, make a magic loop.
Rounds 1-3 (RS) As Rounds 1-3 of
Mouse Legs. [18 sts]
Round 4 Dc in each st around.
Round 5 (Dc in next 2 sts, 2dc in
next st) 6 times. [24 sts]
Rounds 6-10 Dc in each st around.
Arms are joined to the Head over
the next round.
Round 11 *Position an Arm against
next 4 sts of Head, work next 4 sts
through Arm and Head to join, dc
in next 2 sts, dc2tog, working
through Head only, (dc in next 2
sts, dc2tog) twice; rep from * once
more. [18 sts]
Stuff Head.
Round 12 (Working in bl only) (Dc
in next st, dc2tog) 6 times. [12 sts]
Round 13 (Dc2tog) 6 times.
Fasten off.
Thread tail through final 6 sts,
pulling tight to close.
EARS (MAKE 2)
Using Yarn C, make a magic loop.
Round 1 (RS) Ch1, 5dc in loop. [5
sts]
Round 2 (RS) 2dc in each st
around. [10 sts]
Rounds 3-4 Dc in each st around.
Fasten off.
Sew the opening closed and sew
the Ears to the Head.
BLANKET
Using Yarn D, make a magic loop.
Round 1 (RS) Ch5 (counts as tr and
ch2), (3tr in loop, ch2) 3 times, 2tr in
loop, ss to third ch of beg ch-5. [12
sts, 4 ch-2 sps]
Fasten off.
Join Yarn E in any ch-2 sp.
Round 2 (RS) Ch5, 3tr in same sp,
ch1, (3tr, ch2, 3tr, ch1) in each ch-2
sp around, 2tr in same ch-2 sp as
beg ch-5, ss to third ch of beg ch-5.
[24 sts, 4 ch-2 sps, 4 ch-1 sps]
Fasten off.
Join Yarn D in any ch-2 sp.
Round 3 Ch5, 3tr in same sp, ch1,
*(3tr, ch1) in each ch-1 sp, (3tr, ch2,
3tr, ch1) in each ch-2 sp; rep from *
around, 2tr in same sp as beg ch-5,
ss to third ch of beg ch-5. [36 sts, 4
ch-2 sps, 8 ch-1 sps]
Fasten off.
Join Yarn E in any ch-2 sp.
Rounds 4-5 As Round 3, changing
to Yarn D for Round 5. [60 sts, 16
ch-1 sps, 4 ch-2 sps at end of Round
5]
Fasten off.
Join Yarn E in any ch-2 sp.
Round 6 Ch1, *(dc, picot, dc) in ch-2
sp, (dc in next 3 sts, dc in next ch-1
sp, picot, dc in same ch-1 sp as prev
dc) across to next ch-2 sp; rep from
* 3 times more, ss to beg dc.
Fasten off.
TO FINISH
Using black stranded co!on,
embroider facial features. You can
use the image as a guide. Sew the
Bear to the Blanket. Join Yarn E
with a ss to back of Bear’s Head,
ch15, ss to Blanket. Fasten off and
weave in all ends. Hang the Lovey
from the Mouse’s hand by the ch-15
loop.
from
page 47
"#$ BHG KNIT%&%CROCHET%COLLECTION%&$&'
from page 48
KING!OF!THE!CRIB
YOU#WILL#NEED
DROPS Co!on Merino (DK, 50%
wool, 50% co!on, 50g/110m) 1
ball of each: Yarn A Mustard (15);
Yarn B Rust (25); Yarn C Off
White (01) and Yarn D Black (02)
■ A 4mm crochet hook
■ Thin circular cardboard, 15cm in
diameter (eg. from a cereal box)
■ Sewing thread to match Yarn B
■ Yarn needle
■
in next dc, dc in next 6 dc) 5 times,
2dc in next dc, dc in next 4 dc, ss
to beg dc. [48 dc]
Round 9 Ch1, (dc in next 7 dc, 2dc
in next dc) 6 times, ss to beg dc.
[54 dc]
Round 10 Ch1, dc in next 3 dc, 2dc
in next dc, (dc in next 8 dc, 2dc in
next dc) 5 times, dc in next 5 dc, ss
to beg dc. [60 dc]
Round 11 Ch1, (dc in next 9 dc, 2dc
in next dc) 6 times, ss to beg dc.
[66 dc]
Round 12 Ch1, dc in next 4 dc, 2dc
in next dc, (dc in next 10 dc, 2dc in
next dc) 5 times, dc in next 6 dc, ss
to beg dc. [72 dc]
Round 13 Ch1, (dc in next 11 dc,
2dc in next dc) 6 times, ss to beg
dc. [78 dc]
Round 14 Ch1, dc in first 5 dc, 2dc
in next dc, (dc in next 12 dc, 2dc in
next dc) 5 times, dc in next 7 dc, ss
to beg dc. [84 dc]
Round 15 Ch1, (dc in next 13 dc,
2dc in next dc) 6 times, ss to beg
dc. [90 dc]
Fasten off and weave in ends.
MEASUREMENTS
Wall Hanging measures approx
25cm including fringing
TENSION
Tension is not critical, but it may
affect the yarn quantities required
ABBREVIATIONS
For a full list see page 68
NOTES
Wall Hanging is made up of
separate parts, which are sewn
together at the end.
FRONT
Using Yarn A, make a magic loop.
Round 1 (RS) Ch1 (does not count
as st throughout), 6dc in loop, ss
to beg dc. [6 dc]
Round 2 Ch1, 2dc into each dc
around, ss to beg dc. [12 dc]
Round 3 Ch1, (1dc, 2dc in next dc)
6 times, ss to beg dc. [18 dc]
Round 4 Ch1, (2dc in next st, dc in
next 2 sts) 6 times, ss to beg dc.
[24 dc]
Round 5 Ch1, (dc in next 3 sts, 2dc
in next st) 6 times, ss to beg dc.
[30 sts]
Round 6 Ch1, dc in first dc, 2dc in
next dc, (dc in next 4 dc, 2dc in
next dc) 5 times, dc in next 3 dc, ss
to beg dc. [36 dc]
Round 7 Ch1, (dc in next 5 dc, 2dc
in next dc) 6 times, ss to beg dc.
[42 dc]
Round 8 Ch1, dc in first 2 dc, (2dc
BACK
Using Yarn B, work as for Front.
MUZZLE
Using Yarn C, work Rounds 1-9 of
Front. [54 dc]
Fasten off, leaving a 50cm tail.
NOSE
Using Yarn D, make a magic loop.
Round 1 Ch1, 6dc in loop, ss to beg
dc. [6 dc]
Round 2 Ch1, dc in first dc, (2dc,
ch1, 2dc) in next dc, *dc in next dc,
(2dc, ch1, 2dc) in next dc; rep from
* once more, ss to beg dc. [15 dc, 3
ch-1 sps]
Fasten off, leaving a 50cm tail.
EYES (MAKE 2)
Using Yarn D, make a magic loop.
Round 1 Ch1, 6dc into loop, ss to
beg dc. [6 dc]
Fasten off, leaving a 20cm tail.
EARS (MAKE 2)
Using Yarn A, make a magic loop.
Row 1 (RS) Ch1, 3dc in loop, turn.
[3 dc]
PATTERNS
Round 2 Ch1, 2dc in each dc
across, turn. [6 dc]
Round 3 Ch1, dc in first dc, 2dc in
next dc, (dc in next dc, 2dc in next
dc) twice, turn. [9 dc]
Round 4 Ch1, dc in first 2 dc, 2dc
in next dc, (dc in next 2 dc, 2dc in
next dc) twice. [12 dc]
Fasten off, leaving a 30cm tail.
(828); Sailor Blue (839) and Dusty
Lilac (846)
■ A 4.5mm crochet hook
■ Toy filling
■ Stitch markers
■ Yarn needle
TO MAKE UP
Use the image as a guide to sew
the Muzzle and Eyes in place on
the Front. Sew the Nose near the
top of the Muzzle. Embroider
straight stitches to form the
mouth from the base of the Nose.
Sew the Ears in place at the top of
the Front. Cut a strand of Yarn A,
approx 25cm long. Secure to the
top-centre on the WS of Front to
form the hanging loop.
TENSION
MANE
Cut 180 lengths of Yarn A, 11cm
long and 180 lengths of Yarn B,
11cm long.
*Pair up one length of Yarn A with
one of Yarn B and fold in half.
Insert your hook under the front
loop only of any stitch from Round
15 of the Front, place folded end
on hook and pull through, thread
tails through folded end and pull
to secure. Repeat this on the bl of
the same stitch. Repeat from * in
each stitch of the final round of
Front.
TO FINISH
Weave in all ends. Place the Front
and Back together with RS facing
out. Stitch together making sure
the hanging loop can still emerge
from the top and without trapping
any of the Mane.
from
page 48
CLOWNING"
AROUND
YOU!WILL!NEED
■
Paintbox Yarns Wool Mix Aran
(50% wool, 50% acrylic,
100g/180m) 1 ball of each:
Champagne White (802); Rose
Red (813); Blood Orange (819);
Daffodil Yellow (821); Lime Green
MEASUREMENTS
Clown measures approx 30cm tall
Round 10 (2dc, 2dc in next st) 6
times. [24 sts]
Round 11 Dc in each st around.
Round 12 (3dc, 2dc in next st) 6
times. [30 sts]
Round 13 Dc in each st around.
Round 14 (4dc, 2dc in next st) 6
times. [36 sts]
Round 15 Dc in each st around.
Fasten off leaving a long tail.
leaving at least 40cm to thread the
Circles for the Arms. Cut an 80cm
length of Daffodil Yellow, fold in
half and sew to the opening of the
Hand. You will now have three
strands of yarn on which to thread
the Circles. Thread the Circles in
the following order: Dusty Lilac,
Sailor Blue, Lime Green, Daffodil
Yellow, Blood Orange, Rose Red,
Dusty Lilac, Sailor Blue, Lime
Green, Daffodil Yellow and Blood
Orange. Repeat for the second
arm and put to one side.
Tension is not critical for this
project, but it may affect the yarn
quantities required
ABBREVIATIONS
For a full list see page 68
NOTES
You may find it helpful to mark the
first st of the round with a stitch
marker for the amigurumi sections,
moving it up as you work. The
Body, Arms and Legs are made
from Circles, which are threaded
onto strands of yarn.
CLOWN HEAD
Using Champagne White, ch2.
Round 1 (RS) 6dc in second ch
from hook. [6 sts]
Round 2 2dc in each st around. [12
sts]
Round 3 (1dc, 2dc in next st) 6
times. [18 sts]
Round 4 (2dc, 2dc in next st) 6
times. [24 sts]
Round 5 (3dc, 2dc in next st) 6
times. [30 sts]
Round 6 (4dc, 2dc in next st) 6
times. [36 sts]
Rounds 7-12 Dc in each st around.
Round 13 (4dc, dc2tog) 6 times.
[30 sts]
Round 14 (3dc, dc2tog) 6 times.
[24 sts]
Round 15 (2dc, dc2tog) 6 times.
[18 sts]
Round 16 (dc, dc2tog) 6 times.
[12 sts]
Stuff Head.
Round 17 (Dc2tog) 6 times. [6 sts]
Fasten off.
Thread tail through final 6 sts,
pulling tight to close.
HAT
Using Dusty Lilac, ch2
Round 1 (RS) 6dc in second ch
from hook. [6 sts]
Round 2 (1dc, 2dc in next st) 3
times. [9 sts]
Round 3 Dc in each st around.
Round 4 (2dc, 2dc in next st) 3
times. [12 sts]
Round 5 Dc in each st around.
Round 6 (3dc, 2dc in next st) 3
times. [15 sts]
Round 7 Dc in each st around.
Round 8 (4dc, 2dc in next st) 3
times. [18 sts]
Round 9 Dc in each st around.
HAIR
Using Daffodil Yellow, ch29.
Row 1 (RS) 3tr in fourth ch from
hook, 4tr in each ch to end.
Fasten off leaving a long tail.
SPOTS (MAKE 2)
Make one in Sailor Blue and one in
Lime Green.
Ch2.
Round 1 (RS) 6dc in second ch
from hook, ss to beg dc. [6 sts]
Fasten off leaving a long tail.
CIRCLES (MAKE 57)
Make 10 in each: Blood Orange,
Daffodil Yellow, Lime Green, Sailor
Blue and Dusty Lilac. Make 7 in
Rose Red.
Ch4.
Round 1 (RS) 11tr in fourth ch from
hook, ss to top of beg ch-3 to join.
[12 sts]
Round 2 Ch3, tr in same st as beg
ch-3, 2tr in each st around, ss to
top of beg ch-3. [24 sts]
Fasten off and weave in ends.
FEET AND LEGS (MAKE 2)
Using Blood Orange, ch2.
Rounds 1-8 As Rounds 1-8 of
Hands. [5 sts]
Fasten off leaving a 50cm tail.
Use the tail to close the opening
leaving at least 40cm to thread the
Circles for the Legs. Cut an 80cm
length of Blood Orange, and
repeat as for Arms using the
following colour sequence: Dusty
Lilac, Sailor Blue, Lime Green,
Daffodil Yellow, Blood Orange,
Rose Red, Dusty Lilac, Sailor Blue,
Lime Green, Daffodil Yellow, Blood
Orange and Rose Red. Repeat for
the second leg.
BODY
Holding the strands from both
Legs together, thread 11 Circles to
form Body in the same order as for
the Arms. Knot the Arm and Leg
threads at the top of the Body,
then thread all strands through the
Ruffle. Pull the strands through the
base of the Head and out of the
top, being careful not too pull too
tightly. Secure strand with a few
sts. Fasten off.
RUFFLE
Using Rose Red, ch4.
Rounds 1-2 As Rounds 1-2 of Circle.
[24 sts]
Round 3 Ch2 (counts as htr), 3htr
in same st, 4htr in each st around,
ss to top of beg ch-2. [96 sts]
Fasten off and weave in ends.
HANDS AND ARMS (MAKE 2)
Using Daffodil Yellow, ch2.
Round 1 (RS) 5dc in second ch
from hook. [5 sts]
Round 2 2dc in each st around.
[10 sts]
Round 3 (1dc, 2dc in next st)
5 times. [15 sts]
Rounds 4-6 Dc in each st around.
Round 7 (1dc, dc2tog) 5 times.
[10 sts]
Stuff Hands.
Round 8 (Dc2tog) 5 times. [5 sts]
Fasten off leaving a 50cm tail.
Use the tail to close the opening
TO MAKE UP
Using the tails, sew the Hat to the
Head and then sew the Hair
around the join, with a gap of
approx 12 sts at the front. Sew the
Spots to the Hat. Using Sailor Blue,
embroider 2 crosses for the eyes.
Using Rose Red, embroider a small,
wide U-shape for the mouth.
Weave in all ends.
KNIT"&"CROCHET"COLLECTION"#$#% BHG &'&
from
page 48
CLOUD!PLEASER
YOU!WILL!NEED
Sirdar Happy Co!on (100%
co"on, 20g/43m) 2 balls of each:
Shower (762); Pebble (759); 1 ball
of each: Giggle (795); Sorbet
(793); Melon (794); Laundry
(782); Bunting (797) and Currant
Bun (756)
■ A 3.5mm crochet hook
■ Yarn needle
■
MEASUREMENTS
Each Cloud Motif measures
approx 7x4cm; length of Bunting
with 30 Motifs measures approx
282cm
BUNTING
CLOUD MOTIF (MAKE 30)
Using Shower, ch12.
Round 1 (RS) Tr in fourth ch from
hook (skipped chs counts as tr), tr
in next 7 chs, 5tr in next ch, turn
and work along opposite side of
foundation ch, tr in next 7 chs, 3tr
in next ch, ss to top of beg ch-3.
[24 sts]
Round 2 Ss in next st, (skip next st,
6tr in next st, skip next st, ss in
next st) twice, skip next st, 8tr in
next st, skip next st, ss in next st,
(skip next st, 6tr in next st, skip
next st, ss in next st) twice, skip
next st, 8tr in next st, skip next st,
ss in beg ss.
Fasten off and weave in ends.
CLOUD EDGING
Using Pebble, join yarn for surface
crochet around post of any tr.
Work surface crochet around
edges of Cloud Motif.
Fasten off.
Rep for each Cloud Motif.
FRINGING
Using Giggle, Sorbet, Melon,
Laundry, Bunting and Currant
Bun, cut 60 x 10-cm lengths of
each yarn. Using the image as a
guide, take 2 lengths of each
colour and fold in half. Insert hook
through stitch at base of Cloud,
pull folded ends of yarn through
and thread the tails through the
folded loop to secure. Repeat with
each colour across to form a
rainbow effect. Trim to desired
length. (See page 78 Hooking
Fringing.) Rep to trim rem Cloud
Motifs.
TENSION
The yarn quantities listed will
make approx 30 Cloud Motifs.
Clouds are worked in rounds
throughout.
YOU!WILL!NEED
Rico Ricorumi DK (100% co"on,
25g/58m) 2 balls of Cream (002);
1 ball of each: Blue Pegasus:
Light Blue (033); Aqua (074);
Patina (038); Denim (034) and
Mustard(064). Pink Pegasus:
Pink (011); Violet (018); Mauve
(019) and Sand (071)
■ Rico Ricorumi Lamé (62%
polyester, 38% nylon, 10g/50m) 1
ball of Silver (001)
■ A 2.5mm crochet hook
■ Stitch marker
■ Black stranded co"on
■ Toy filling
■ Sewing pins
■ Pink blusher (optional)
■ Yarn needle
■
MEASUREMENTS
Pegasus measures approx 16cm
tall
Tension is not critical, but it may
affect the yarn quantities required
ABBREVIATIONS
NOTES
MYTHICAL!MATES
TENSION
Tension is not critical, but it may
affect the yarn quantities required
surface crochet Position yarn on
WS of work, insert hook from RS
to WS where you wish the surface
crochet to begin, yrh and pull loop
up to RS, *insert hook back
through to WS in direction you
wish the surface crochet to travel,
yrh and pull up a loop, pull
through first loop on hook; rep
from * as required. When
fastening off, pull the final tail
through the last ss, thread onto a
yarn needle and weave through to
the WS
For a full list see page 68
from page 49
ABBREVIATIONS
bl and bh When working into the
htr st, insert the hook into the
back loop and third back loop that
sits on the WS, leaving the front
loop unworked
For a full list see page 68
NOTES
TO MAKE UP
Using Pebble, sew the Clouds
together on the WS, leaving
approx 2-3cm between each
Motif. Make sure to leave approx
15cm of yarn at the beginning and
end of the Bunting to hang.
"#$ BHG KNIT%&%CROCHET%COLLECTION%$&$'
Parts of this pa"ern are worked in
the amigurumi method. Work
stitches in a continuous spiral
without closing off each round
with a slip stitch. You may find it
helpful to mark the first stitch of
the round, moving the marker up
as you go. The pa"ern is made in 2
colourways: blue and pink. The
instructions for the Blue Pegasus
are wri"en first with the Pink
Pegasus in brackets. Where a
single colour is listed, use the
same for both colorways. This
pa"ern has been worked using the
yarn under method. When
working your stitches, insert the
hook into the stitch, turn the hook
so it’s facing down and pull the
yarn through under the hook
before completing the stitch
indicated.
PEGASUS
BODY
Using Cream, make a magic loop.
Round 1 (RS) Ch1 (does not count
as st throughout), 7dc in loop. [7
sts]
Round 2 (RS) 2dc in each stitch
around. [14 sts]
Round 3 (1dc, 2dc in next st) 7
times. [21 sts]
Round 4 (1dc, 2dc in next st, 1dc) 7
times. [28 sts]
Round 5 (3dc, 2dc in next st) 7
times. [35 sts]
Round 6 (2dc, 2dc in next st, 2dc)
7 times. [42 sts]
Round 7 (5htr, 2htr in next st) 6
times, 5htr, (htr, dc) in the next
stitch. [49 sts]
Round 8 Dc in bl and bh of each st
around.
Rounds 9-13 Dc in each st around.
Round 14 Dc in next 19 sts, change
to Light Blue (Pink), dc in next 2
sts, change to Cream, dc in next
28 ts.
Round 15 Dc in next 19 sts, change
to Light Blue (Pink), dc in next 2
sts, change to Patina (Violet), dc in
next st, change to Cream, dc in
next 27 sts.
Round 16 Dc in next 18 sts, change
to Light Blue (Pink), dc in next 2
sts, change to Patina (Violet), dc in
next 2 sts, change to Aqua
(Mauve), dc in next st, change to
Cream, dc in next 26 sts.
Round 17 Dc in next 13 sts, dc2tog,
dc in next st, change to Light Blue
PATTERNS
(Pink), dc in next 3 sts, change to
Patina (Violet), dc in next 2 sts,
change to Aqua (Mauve), dc in
next 2 sts, change to Cream, dc in
next 8 sts, dc2tog, dc in next 14
sts, dc2tog. [46 sts]
Round 18 Dc in next 8 sts, change
to Light Blue (Pink), dc in next 2
sts, change to Cream, dc in next
st, dc2tog, dc in next st, change to
Light Blue (Pink), dc in next 3 sts,
change to Patina (Violet), dc in
next 2 sts, change to Aqua
(Mauve), dc in next 2 sts, change
to Cream, dc in next st, dc2tog,
(dc in next 9 sts, dc2tog) twice. [42
sts]
Round 19 Dc in next 9 sts, change
to Light Blue (Pink), dc in next 6
sts, change to Patina (Violet), dc in
next 3 sts, change to Aqua
(Mauve), dc in next 2 sts, change
to Cream, dc in next 22 sts.
Round 20 Dc in next 9 sts, change
to Patina (Violet), dc in next st,
change to Light Blue (Pink), dc in
next 3 sts, change to Patina
(Violet), dc in next 4 sts, change to
Aqua (Mauve), dc in next 2 sts,
change to Cream, dc in next 23
sts.
Round 21 Dc2tog, dc in next 4 sts,
dc2tog, dc in next st, change to
Patina (Violet), dc in next 4 sts,
dc2tog, dc in next st, change to
Aqua (Mauve), dc in next 3 sts,
change to Cream, (dc2tog, dc in
next 4 sts) 3 times, dc2tog, dc in
next 3 sts. [35 sts]
Round 22 Dc in next 8 sts, change
to Patina (Violet), dc in next 4 sts,
change to Aqua (Mauve), dc in
next 3 sts, change to Cream, dc in
next 20 sts.
Stuff Body as you work.
Round 23 Dc in next 8 sts, change
to Aqua (Mauve), dc in next st,
change to Patina (Violet), dc in
next 2 sts, change to Aqua
(Mauve), dc in next 3 sts, change
to Cream, dc in next 21 sts.
Round 24 Dc in next 3 sts, dc2tog,
dc in next 3 sts, change to Aqua
(Mauve), dc in next st, dc2tog, dc
in next 2 sts, change to Cream, dc
in next st, (dc2tog, dc in next 3 sts)
3 times, dc2tog, dc in next 2 sts,
dc2tog. [28 sts]
Round 25 Dc in next 8 sts, change
to Aqua (Mauve), dc in next 2 sts,
change to Cream, dc in next 18 sts.
Fasten off all colours except
Cream.
Rounds 26-27 Dc in each st
around.
Do not fasten off.
TO MAKE PEGASUS STAND
Top up the stuffing to the end of
Round 27. Thread a length of
Cream onto a darning needle.
*Insert the needle down the
centre of the Body and out next to
the magic loop, insert the needle
through the centre of the magic
loop and up to the top of the
Body, pull tight so the base
indents; rep from * twice more.
Knot the beg and end tail together
and weave into the edge of the
Body.
[20 sts]
Round 32 (1dc, dc2tog, 1dc) 5
times. [15 sts]
Round 33 (1dc, dc2tog) 5 times.
[10 sts]
Round 34 (Dc2tog) 5 times. [5 sts]
Fasten off.
Thread tail through the fl of final
round and pull tight to close.
times, 6dc. [22 sts]
Round 5 (3dc, 2dc in next st) 4
times, 6dc. [26 sts]
Change to Light Blue (Pink).
Round 6 (4dc, 2dc in next st) 4
times, 6dc. [30 sts]
Fold the Wing in half and ss the
edge closed.
Fasten off.
BODY CONTINUED
Continue with Cream.
Round 28 (1dc, dc2tog, 1dc) 7
times. [21 sts]
Round 29 Dc in each st around.
Round 30 (1dc, dc2tog) 7 times. [14
sts]
Round 31 (Working in fl only) Ch1,
(tr in next st, 2tr in next st) 7 times,
ss to beg tr. [21 sts]
Fasten off.
Fold Round 31 down to create
neck.
EARS (MAKE 2)
Using Cream, make a magic loop.
Round 1 (RS) Ch1, 5dc in loop. [5
sts]
Round 2 2dc in next st, 4dc. [6 sts]
Round 3 (2dc, 2dc in next st)
twice. [8 sts]
Round 4 (3dc, 2dc in next st)
twice. [10 sts]
Round 5 Dc in each st around.
Round 6 (4dc, 2dc in next st)
twice. [12 sts]
Round 7 (2dc, 2dc in next st) 4
times. [16 sts]
Fasten off.
Fold the final round in half to form
the Ear shape and sew closed to
secure.
STARS (MAKE 3)
Make 1 using Mustard (Sand) and
2 using Silver.
Round 1 (RS) Ch1, 5dc in loop. [5
sts]
Round 2 2dc in each st around. [10
sts]
Round 3 *(Dc, htr, tr, htr, dc) in the
next st, ss in next st; rep from * 4
times more. [30 sts]
Fasten off.
Pinch the points of the Stars to
accentuate the corners.
Sew the Mustard (Sand) Star to
the Body over Rounds 11-19, using
the image as a guide.
HEAD
Using Cream, make a magic loop.
Round 1 (RS) Ch1, 6dc in loop. [6
sts]
Round 2 (RS) (1dc, 2dc in next 2
sts) twice. [10 sts]
Round 3 *1dc, (1dc, 2dc in next st)
twice; rep from * once more. [14
sts]
Round 4 Dc in each st around.
Round 5 (2dc, 2dc in next 3 sts,
2dc) twice. [20 sts]
Round 6 2dc, 2dc in next st, 1dc,
2dc in next 2 sts, 1dc, 2dc in next
st, 4dc, (dc2tog) 3 times, 2dc. [21
sts]
Pm in the eighth st of last round to
mark front-centre of Head.
Round 7 (2dc, 2dc in next st) 7
times. [28 sts]
Round 8 4dc, (2dc, 2dc in next st)
3 times, 10dc, 2dc in next st, 4dc.
[32 sts]
Round 9 7dc, (2dc in next st, 3dc)
3 times, 13dc. [35 sts]
Round 10 2dc, (2dc in next st, 4dc)
5 times, 8dc. [40 sts]
Round 11 7dc, (2dc in next st, 3dc)
5 times, 13dc. [45 sts]
Round 12 Dc in each st around.
Stuff the Head as you work.
Round 13 7dc, (2dc in next st, 4dc)
5 times, 13dc. [50 sts]
Rounds 14-23 Dc in each st
around.
Round 24 (4dc, dc2tog, 4dc) 5
times. [45 sts]
Round 25 Dc in each st around.
Round 26 (7dc, dc2tog) 5 times.
[40 sts]
Round 27 Dc in each st around.
Round 28 (3dc, dc2tog, 3dc) 5
times. [35 sts]
Round 29 (5dc, dc2tog) 5 times.
[30 sts]
Round 30 (2dc, dc2tog, 2dc) 5
times. [25 sts]
Round 31 (3dc, dc2tog) 5 times.
MANE (MAKE 3)
Each piece of Mane is made up of
5 strands.
Make 1 using Denim (Pink), and
make 2 using Light Blue (Violet).
Strand 1 Ch40. Ss in second ch
from hook, (3dc in next ch, dc in
next ch) twice, dc in next 34 ch.
Strand 2 *Ch40, ss in second ch
from hook, (3dc in next ch, dc in
next ch) twice, dc in next 33 ch,
leave last ch unworked.
Rep from * 3 times more to
complete strands 3, 4 and 5.
Fasten off.
Wrap the strands around your
hook to curl.
WINGS (MAKE 2)
Using Cream, make a magic loop.
Round 1 (RS) Ch1, 7dc in loop. [7
sts]
Round 2 (RS) 2dc in each st
around. [14 sts]
Round 3 (1dc, 2dc in next st) 4
times, 6dc. [18 sts]
Round 4 (2dc, 2dc in next st) 4
TAIL
Using Denim (Violet), ch40.
*Ss in second ch from hook, (3dc
in next ch, dc in next ch) twice, dc
in next 34 ch, ch45, ss in second
ch from hook, (3dc in next ch, dc
in next ch) twice, dc in next 39
ch**, ch40; rep from * to ** once
more.
Fasten off.
Make one more using Light Blue
(Pink) omi"ing final ch-45 strand
so only 3 strands are worked.
TO MAKE UP
Refer to the images when making
up. Sew Rounds 16-22 of Head to
top of Body, behind the round
that has been folded down. Sew
the Ears over Rounds 20-21 of the
Head, 14 sts apart. Sew Mane to
the top of the Head, so the curled
ends are positioned between the
Ears and the straight strands run
down the back of the Head. Sew
the Wings either side of the Body.
Sew the Silver Stars below one
Ear. Using black stranded co"on,
embroider the eyes between
Rounds 9-11, the eyebrows approx
4 rounds above each eye, then
nostrils and mouth. Sew the Tail to
the back of the Body, over Round
9.
KNIT!&!CROCHET!COLLECTION!"#"$ BHG %&&
from page 50
LIFE’S!A!BEACH
YOU!WILL!NEED
Paintbox Yarns Co!on Aran
(100% co"on, 50g/85m) 1 ball of
each: Pillar Red (615); Blood
Orange (620); Daffodil Yellow
(622); Light Caramel (609);
Bubblegum Pink (651);
Champagne White (603); Sailor
Blue (640) and Pure Black (602)
■ A 4mm crochet hook
■ 6 safety eyes, 8mm
■ Yarn needle
■ A 45mm or 55mm pompom tool
or thick cardboard
■ Beach bag
■
MEASUREMENTS
Motifs measure approx 12cm tall
TENSION
Tension is not critical, but it may
affect the yarn quantities required
ABBREVIATIONS
For a full list see page 68
NOTES
Each Motif is made separately and
sewn to the bag at the end. Refer
to the images as a guide when
joining the pieces together.
MOTIFS
CRAB
Using Blood Orange, make a
magic loop.
Round 1 (RS) Ch3 (counts as tr
throughout), 11tr in loop, ss to top
of beg ch-3. [12 tr]
Round 2 Ch3, tr in st at base of
ch-3, 2tr in each st around, ss to
top of beg ch-3. [24 tr]
Round 3 Ch3, (2tr in next st, tr in
next st) 8 times, 2tr in next st, 6tr
in next st, skip 1 st, ss in next 2 sts,
skip 1 st, 6tr in final st, ss to top of
beg ch-3. [39 tr, 2 ss]
Round 4 Ch1 (does not count as st
throughout), dc in first 2 sts, ch8,
ss in second ch from hook, dc in
next ch, htr in next ch, ss in next
ch, ch4, ss in second ch from
hook, dc in next ch, htr in next ch,
ss in next 3 ch of ch-8, dc in next 2
sts from Round 3, *dc in next st,
ch6, ss in second ch from hook, ss
in next 4 ch, dc in next st; rep from
* twice more**, dc in next 6 sts,
rep from * to **, dc in next 2 sts,
ch8, ss in second ch from hook, dc
in next ch, htr in next ch, ss in next
ch, ch4, ss in second ch from
hook, dc in next ch, htr in next ch,
ss in next 3 ch of ch-8, dc in next
st, ss in next st.
Fasten off.
EYES (MAKE 2)
Using Champagne White, make a
magic loop.
Round 1 Ch2 (counts as htr), 11htr in
loop, ss to top of beg ch-2. [12 htr]
Fasten off leaving a long tail.
Insert a safety eye through the
centre of each Eye, and through
the base of each 6-tr group from
Round 3 of Crab. Use the tail from
the Eye to sew into position.
CHEEKS (MAKE 2)
Using Bubblegum Pink, make a
magic loop.
Round 1 Ch1, 6dc in loop, ss to beg
dc. [6 dc]
Fasten off leaving a long tail.
Sew the Cheeks to the Crab.
Using Pure Black, embroider the
mouth.
SUN
Using Daffodil Yellow, make a
magic loop.
Rounds 1-2 (RS) As Rounds 1-2 of
Crab. [24 tr]
Round 3 Ch3, (2tr in next st, tr in
next st) 11 times, 2tr in final st, ss to
top of beg ch-3. [36 tr]
Round 4 Ch1, (dc in next st, ch4, ss
in second ch from hook and next 2
ch, dc in next st) 18 times, ss to
beg dc.
Fasten off.
CHEEKS (MAKE 2)
Make Cheeks as for Crab.
TO MAKE UP SUN
Insert safety eyes between
Rounds 2-3, approx 7 sts apart.
Sew the Cheeks to the Sun. Using
Pure Black, embroider the mouth.
STARFISH
Using Pillar Red, make a magic
loop.
Rounds 1-2 (RS) As Rounds 1-2 of
Crab. [24 tr]
"#$ BHG KNIT%&%CROCHET%COLLECTION%&'&$
Round 3 *Ch7, ss in second ch
from hook, dc in next ch, htr in
next ch, tr in next 2 ch, dtr in final
ch, skip 3 sts, ss in next 2 sts from
Round 2; rep from * 4 times more
omi"ing last ss on last rep.
from page 51
Fasten off.
CHEEKS (MAKE 2)
Make Cheeks as for Crab.
SHINE!BRIGHT
YOU!WILL!NEED
Sirdar Happy Co!on (100%
co"on, 20g/43m) 1 ball of each:
Lemonade (770) and Juicy (792)
■ Brown stranded co"on
■ A 2.5mm crochet hook
■ Stitch markers
■ Small amount toy filling
■ Yarn needle
■ Split ring
■
TO MAKE UP STARFISH
Insert safety eyes over Round 2,
approx 7 sts apart. Sew the
Cheeks to the Starfish. Using Pure
Black, embroider the mouth.
ICE CREAM
Using Bubblegum Pink, make a
magic loop.
Rounds 1-2 (RS) As Rounds 1-2 of
Crab. [24 tr]
Round 3 (Skip 1 st, 6tr in next st,
skip 1 st, ss in next st) 3 times.
Fasten off leaving a long tail.
CONE
Using Light Caramel, make a
magic loop.
Row 1 (RS) Ch1, 2dc in loop, turn.
[2 dc]
Row 2 (WS) Ch1, dc in each st
across, turn.
Row 3 Ch1, 2dc in each st across,
turn. [4 dc]
Rows 4-5 As Row 2.
Row 6 Ch1, 2dc in first dc, dc in
each st to final st, 2dc in final st,
turn. [6 dc]
Rows 7-12 As Rows 4-6. [10 dc]
Rows 13-14 As Row 2.
Fasten off.
TO MAKE UP ICE CREAM
Sew the Ice Cream to the top of
the Cone. Using Daffodil Yellow
and Champagne White,
embroider the sprinkles onto the
Ice Cream.
POMPOMS
If desired, using Sailor Blue make
your own pompoms using
cardboard or a store-bought tool.
Stitch each to top edge of tote.
TO FINISH
Weave in all ends and block each
Motif. Pin the Motifs onto the bag
and sew in place.
MEASUREMENTS
Sun measures approx 8cm in
diameter
TENSION
Tension is not critical for this
project
ABBREVIATIONS
surface crochet Position yarn on
WS of work, insert hook through
from RS to WS, yrh and pull up
loop to RS, *insert hook back
through to WS in direction you
wish surface crochet to travel, yrh
and pull up a loop, pull through
first loop on hook; rep from * as
required
For a full list see page 68
NOTES
Parts of the pa"ern are worked in
a continuous spiral without closing
off each round with a slip stitch.
You may find it helpful to mark the
first stitch of the round, moving
the marker up as you go.
FRONT AND BACK (MAKE 2)
Using Lemonade, make a magic
loop.
Round 1 (RS) Ch1 (does not count
as st throughout), 6dc in loop.
[6 sts]
Round 2 2dc in each st around.
[12 sts]
Round 3 (1dc, 2dc in next st) 6
times. [18 sts]
Round 4 (2dc, 2dc in next st) 6
times. [24 sts]
PATTERNS
Round 5 (3dc, 2dc in next st) 6
times. [30 sts]
Round 6 (4dc, 2dc in next st) 6
times, ss in beg dc. [36 sts]
Fasten off and weave in ends.
TO MAKE UP
Place Front and Back together
with RS facing out. Work the next
round through both pieces to join.
Join Lemonade through any st.
Round 1 (RS) Ch1, dc in each st
around, stuffing lightly as you go,
ss to beg dc. [36 sts]
Row 2 (RS) Ch1, dc in first st, dc in
next 3 sts, turn. [4 sts]
Row 3 (WS) Ch1, skip first st, dc in
each st across, turn. [3 sts]
Rows 4-5 As Row 3. [1 st at end of
Row 5]
Row 6 Ch1, ss down le" side of
point, dc in next 4 sts from Round
1, turn.
Repeat Rows 3-6 another 7 times,
then repeat Rows 3-5.
Next row Ch1, ss down edge of
point, ss to beg dc from Row 2.
Fasten off.
Using Juicy, surface crochet
around the sts from Round 2 and
around points of Sun. Fasten off
and weave in ends. Using brown,
embroider the eyes and mouth.
Stitch Pa%ern throughout. Both
stitch pa%erns are wri%en out first
and referred to within each
pa%ern. We recommend blocking
the Vest and Cardigan once
finished following any yarn care
instructions on the ball band.
TWIN SET
SHELL STITCH PATTERN
Row 1 (WS) Ch3 (counts as htr,
ch1), dc in first st, *(tr, ch2, tr) in
next ch-3 sp, (dc, ch3, dc) in next
ch-2 sp; rep from * across to final
st, (dc, ch1, htr) in final st, turn.
Row 2 (RS) Ch3 (counts as tr), tr in
st at base of ch-3, *(dc, ch3, dc) in
next ch-2 sp, (tr, ch2, tr) in next
ch-3 sp; rep from * across to final
st, 2tr in final st, turn.
Rows 1-2 set the pattern.
Change colour a"er every Row 2
repeat.
from page 52
TWO!OF!A!KIND
YOU$WILL$NEED
Scheepjes Metropolis (75%
Merino, 25% nylon, 50g/200m) in
Yarn A Dubai (047) and Yarn B
Bangalore (052). For yarn
quantities and measurements see
size table
■ A 3.75mm crochet hook
■ Stitch markers
■ Yarn needle
■
TENSION
3.5 pa%ern repeats and 12 rows
measure 10x10cm over Shell Stitch
Pa%ern using a 3.75mm hook, or
size needed to obtain the correct
tension
3 pa%ern repeats and 9 rows
measure 10x10cm over Catherine
Wheel Stitch Pa%ern using a
3.75mm hook, or size needed to
obtain correct tension
ABBREVIATIONS
For a full list see page 68
NOTES
Twin Set is made up of a Vest and
Cardigan. The Vest is made using
the Shell Stitch Pa%ern for the
Front and Back. Pieces are sewn
together at the end. The Cardigan
is worked in the Catherine Wheel
CATHERINE WHEEL STITCH
PATTERN
Row 1 (WS) Ch3, skip first st,
tr3tog next 3 sts, ch3, dc in next
st, *ch3, tr7tog next 7 sts, ch3, dc
in next st; rep from * across to
final 4 sts, ch3, tr3tog, tr in final st,
turn.
Row 2 (RS) Ch3, 3tr in next st, *dc
in next dc, 7tr in next tr7tog; rep
from * across to final dc, dc in final
dc, 4tr in last st, turn.
Row 3 Ch1, dc in first st, *ch3,
tr7tog next 7 sts, ch3, dc in next
st; rep from * across to final st, dc
in final st, turn.
Row 4 Ch1, dc in first st, (7tr in
next tr7tog, dc in next dc) rep
across to end, turn.
Rows 1-4 set the pattern.
TWO OF A KIND SIZE TABLE
S
M
L
XL
cm
81-86
91-96
101-106
111-117
ACTUAL$BUST$)APPROX*
cm
82
93
105
117
LENGTH
cm
50
52
54
54
SIZE
TO$FIT$BUST
b
VEST
a
Scheepjes Metropolis (50g/200m)
YARN
Yarn A
2
2
3
3
Yarn B
2
2
2
3
c
CARDIGAN
b
ACTUAL$BUST$)APPROX*
cm
90
100
117
131
LENGTH
cm
56
58
60
60
SLEEVE$LENGTH
cm
40
40
40
40
Scheepjes Metropolis (50g/200m)
YARN
Yarn A
8
9
10
11
Yarn B
1
2
2
3
SIZING!COLOUR!KEY!So you can re-use this pattern, we’ve colour-coded the sizing instructions.
Simply follow our colour-coded measurements and you’re off.
a
VEST
Width a: 41 (46.5: 52.5: &'(&)cm
Length b: 50 (52: 54: 54)cm
CARDIGAN
Width a: 45 (50: 58.5: 65.5)cm
Length b: 56 (58: 60: 60)cm
Sleeve length c: 40cm
KNIT!&!CROCHET!COLLECTION!"#"$ BHG %&'
VEST
BACK
Using Yarn A, ch113 (129: 145: 161).
Foundation row Tr in fourth ch
from hook, *skip 3 ch, (dc, ch3, dc)
in next ch, skip 3 ch, (tr, ch2, tr) in
next ch; rep from * 12 (14: 16: 18)
times more, skip 3 ch, (dc, ch3, dc)
in next ch, 2tr in final ch, turn. [14
(16: 18: 20) shell pa! reps]
Rep Rows 1-2 of Shell Stitch
Pa!ern until piece measures 33
(33: 33: 31) cm, ending on a Row 1
rep.
ARMHOLE SHAPING
Continue to change colour at the
end of every second row.
Row 1 Ss in first (htr, dc, 2tr, 2dc,
tr), ch3, tr in st at base of ch-3,
skip next ch-2 sp, *(tr, ch2, tr) in
next ch-3 sp, (dc, ch3, dc) in next
ch-2 sp; rep from * 9 (11: 13: 15)
times more, *(tr, ch2, tr) in next
ch-3 sp, skip next tr, skip next ch-2
sp, 2tr in next st, turn. [10 (12: 14:
16) shell pa! reps]
Row 2 Ch3, skip next tr, *(dc, ch3,
dc) in next ch-2 sp, (tr, ch2, tr) in
next ch-3 sp; rep from * across to
final 2 sts, skip next st, tr in final st,
turn.
Row 3 Ch3, tr in first ch-3 sp, *(dc,
ch3, dc) in next ch-2 sp, (tr, ch2, tr)
in next ch-3 sp; rep from * across
to final ch-3 sp, tr in final ch-3 sp,
tr in final st, turn. [9 (11: 13: 15) shell
pa! reps]
SIZES L AND XL ONLY
Row 4 Ch3, skip next tr, tr in next
ch-3 sp, *(dc, ch3, dc) in next ch-2
sp, (tr, ch2, tr) in next ch-3 sp; rep
from * across to final ch-3 sp, tr in
final ch-3 sp, tr in final st, turn. [- (-:
12: 14) shell pa! reps]
Rep last row – (-: 0: 1) more time.
[- (-: 12: 13) shell pa! reps]
ALL SIZES
Cont following Shell Stitch
Pa!ern until Back measures 49
(51: 53: 53)cm, ending on a Row 2
rep.
NECKLINE SHAPING
SIZE S ONLY
Row 1 (WS) Ch3, tr in st at base of
ch-3, (dc, ch3, dc) in next ch-2 sp,
(tr, ch2, tr) in next ch-3 sp, (dc,
ch3, dc) in next ch-2 sp, 2tr in next
ch-3 sp, turn.
Row 2 Ch3, skip next tr, (tr, ch2, tr)
in next ch-3 sp, (dc, ch3, dc) in
next ch-2 sp; rep across to final 2
sts, skip next st, (dc, ch1, htr) in
final st.
Fasten off.
With WS facing, join yarn in
fourth ch-sp from end.
Row 1 (WS) Ch3, tr in same ch-3
sp, (dc, ch3, dc) in next ch-2 sp, (tr,
ch2, tr) in next ch-3 sp, (dc, ch3,
dc) in next ch-2 sp, tr in final st,
turn.
Row 2 Ch3, skip next tr, (tr, ch2, tr)
in next ch-3 sp, (dc, ch3, dc) in
next ch-2 sp; rep across to final 2
sts, skip next st, (dc, ch1, htr) in
final st.
Fasten off.
SIZES M, L AND XL ONLY
Row 1 Ch3, tr in st at base of ch-3,
*(dc, ch3, dc) in next ch-2 sp, (tr,
ch2, tr) in next ch-3 sp; rep from *
- (1: 1: 1) times more, (dc, ch3, dc) in
next ch-2 sp, 2tr in next ch-3 sp,
turn.
Row 2 Ch3, skip next tr, (tr, ch2, tr)
in next ch-3 sp, (dc, ch3, dc) in
next ch-2 sp; rep across to final 2
sts, skip next st, (dc, ch1, htr) in
final st.
Fasten off.
With WS facing, join yarn in
– (6th: 6th: 6th) ch-sp from end.
Row 1 (WS) Ch3, tr in same ch-3
sp, *(dc, ch3, dc) in next ch-2 sp,
(tr, ch2, tr) in next ch-3 sp; rep
from * to final ch-2 sp, (dc, ch3, dc)
in next ch-2 sp, 2tr in final st, turn.
Row 2 Ch3, skip next tr, (tr, ch2, tr)
in next ch-3 sp, (dc, ch3, dc) in
next ch-2 sp; rep across to final 2
sts, skip next st, (dc, ch1, htr) in
final st.
Fasten off.
FRONT
Work as Back to end of Armhole
Shaping and until piece measures
39 (41: 43: 43)cm, ending on a Row
2 repeat.
NECKLINE SHAPING
SIZE S ONLY
Row 1 (WS) Ch3, tr in st at base of
ch-3, (dc, ch3, dc) in next ch-2 sp,
(tr, ch2, tr) in next ch-3 sp, (dc,
ch3, dc) in next ch-2 sp, 2tr in next
ch-3 sp, turn.
Row 2 Ch3, skip next tr, (tr, ch2, tr)
in next ch-3 sp, (dc, ch3, dc) in
next ch-2 sp; rep across to final 2
sts, skip next st, (dc, ch1, htr) in
final st.
!"# BHG KNIT$&$CROCHET$COLLECTION$%&%'
Continue in pa! until Front
measures same length as Back.
Fasten off.
With WS facing, join yarn in
fourth ch-sp from end.
Row 1 (WS) Ch3, tr in same ch-3
sp, (dc, ch3, dc) in next ch-2 sp, (tr,
ch2, tr) in next ch-3 sp, (dc, ch3,
dc) in next ch-2 sp, tr in final st,
turn.
Row 2 Ch3, skip next tr, (tr, ch2, tr)
in next ch-3 sp, (dc, ch3, dc) in
next ch-2 sp; rep across to final 2
sts, skip next st, (dc, ch1, htr) in
final st.
Continue in pa! until Front
measures same length as Back.
SIZES M, L AND XL ONLY
Row 1 Ch3, tr in st at base of ch-3,
*(dc, ch3, dc) in next ch-2 sp, (tr,
ch2, tr) in next ch-3 sp; rep from *
- (1: 1: 1) times more, (dc, ch3, dc) in
next ch-2 sp, 2tr in next ch-3 sp,
turn.
Row 2 Ch3, skip next tr, (tr, ch2, tr)
in next ch-3 sp, (dc, ch3, dc) in
next ch-2 sp; rep across to final 2
sts, skip next st, (dc, ch1, htr) in
final st.
Continue in pa! until Front
measures same length as Back.
Fasten off.
With WS facing, join yarn in
– (6th: 6th: 6th) ch-sp from end.
Row 1 (WS) Ch3, tr in same ch-3
sp, *(dc, ch3, dc) in next ch-2 sp,
(tr, ch2, tr) in next ch-3 sp; rep
from * to final ch-2 sp, (dc, ch3, dc)
in next ch-2 sp, 2tr in final st, turn.
Row 2 Ch3, skip next tr, (tr, ch2, tr)
in next ch-3 sp, (dc, ch3, dc) in
next ch-2 sp; rep across to final 2
sts, skip next st, (dc, ch1, htr) in
final st.
Continue in pa! until Front
measures same length as Back.
Fasten off.
TO MAKE UP
Sew the side and shoulder seams
together.
ARMHOLE EDGING
With RS facing, join Yarn A in
underarm seam.
Round 1 (RS) Ch1, dc evenly
around armhole opening, ss to beg
dc.
Round 2 (RS) Ch1, dc in each st
around, ss to beg dc.
Rep Round 2 another 0 (0: 1: 1)
times.
Fasten off and repeat on second
armhole.
NECKLINE EDGING
With RS facing, join Yarn A in
shoulder seam.
Round 1 (RS) Ch1, dc evenly
around neckline opening, ss to
beg dc.
Round 2 (RS) Ch1, dc in each st
around, ss to beg dc.
Rep Round 2 another 0 (0: 1: 1)
times.
Fasten off and weave in all ends.
CARDIGAN
BACK
Using Yarn A, ch80 (92: 104: 116)
Foundation row (RS) Dc in
second ch from hook, (skip 2 ch,
7tr in next ch, skip 2 ch, dc in next
ch) rep across to end, turn. [13 (15:
17: 19) pa! reps]
Work in Catherine Wheel Stitch
Pa!ern using the following colour
sequence: 4 rows in Yarn A, 2 rows
in Yarn B, 2 rows in Yarn A, 2 rows
in Yarn B, 6 rows in Yarn A, 2 rows
in Yarn B. Then work in Yarn A
until Back measures 38 (38: 38:
36) cm, ending on a Row 3 repeat.
Fasten off.
ARMHOLE SHAPING
With RS facing, join Yarn A in
second dc.
Next row Ch1, dc in first st, (7tr in
next tr7tog, dc in next dc) rep
across to penultimate dc, dc in dc,
turn leaving last tr7tog and dc
unworked. [11 (13: 15: 17) pa! reps]
Cont in pa! until Back measures
56 (58: 60: 60)cm.
Fasten off.
FRONTS
Work in the same colour
sequence as for Back.
RIGHT FRONT
Using Yarn A, ch38 (44: 50: 56).
Foundation row (RS) Dc in
second ch from hook, (skip 2 ch,
7tr in next ch, skip 2 ch, dc in next
ch) rep across to end, turn. [6 (7: 8:
9) pa! reps]
Work as Back to Armhole
Shaping, ending on a WS row.
Do not fasten off.
ARMHOLE SHAPING
Next row Ch1, dc in first st, (7tr in
next tr7tog, dc in next dc) rep
across to penultimate dc, dc in dc,
turn leaving last tr7tog and dc
PATTERNS
unworked, turn. [5 (6: 7: 8) pa"
reps]
Continue in pa" until Right Front
measures 46 (48: 50: 50)cm,
ending on a row 3 repeat.
Fasten off.
NECKLINE SHAPING
With RS facing, join Yarn A in 3rd
(3rd: 4th: 4th) dc.
Next row (RS) Ch1, dc in first st,
(7tr in next tr7tog, dc in next dc)
rep across to end, turn. [3 (4: 4: 5)
pa" reps]
Continue in pa" until Right Front
measures 56 (58: 60: 60)cm.
Fasten off.
LEFT FRONT
Work as Right Front to Armhole
Shaping.
Fasten off.
ARMHOLE SHAPING
With RS facing, join Yarn A in
second dc.
Next row Ch1, dc in first st, (7tr in
next tr7tog, dc in next dc) rep
across to end, turn. [5 (6: 7: 8) pa"
reps]
Cont in pa" until Le# Front
measures 46 (48: 50: 50)cm,
ending on a row 3 repeat.
Do not fasten off.
NECKLINE SHAPING
Next row (RS) Ch1, dc in first st,
(7tr in next tr7tog, dc in next dc) 3
(4: 4: 5) times, turn. [3 (4: 4: 5) pa"
reps]
Cont in pa" until Le# Front
measures 56 (58: 60: 60)cm.
Fasten off.
SLEEVES (MAKE 2)
Using Yarn A, ch56 (62: 74: 80)
Foundation row (RS) Dc in
second ch from hook, (skip 2 ch,
7tr in next ch, skip 2 ch, dc in next
ch) rep across to end, turn. [9 (10:
12: 13) pa" reps]
Work in pa" until Sleeve
measures 38cm for all sizes.
Fasten off.
TO MAKE UP
Sew the Fronts to the Back at the
shoulders and sides. Sew the
Sleeves into place and seam the
sleeve seams.
CUFFS
With RS facing, join Yarn A into
end of Sleeve.
Round 1 (RS) Ch1, dc in each ch
around, ss to beg dc. [55 (61: 73:
79) sts]
Round 2 Ch1, *dc in next 9 (8: 4: 4)
sts, dc2tog; rep from * to end, ss
to beg dc. [50 (55: 61: 66) sts]
from
page 54
CLUB!TROPICANA
YOU!WILL!NEED
Rowan Felted Tweed (DK, 50%
Merino wool, 25% viscose, 25%
alpaca, 50g/175m) in Yarn A
Alabaster (197) and Yarn B
Vaseline Green (204). For yarn
quantities and measurements see
size table (over page).
■ A pair of 3.25mm kni"ing needles
■ A pair of 3.75mm needles
■ Stitch holders
■ Stitch markers
■ Yarn needle
■
SIZES L AND XL ONLY
Round 3 Ch1, dc in first – (- : 0: 3)
sts, (dc2tog, dc in next 8 sts) 6
times, dc in each st to end, ss to
beg dc. [- (- : 55: 60) sts]
ALL SIZES
Change to Yarn B.
Next round Ch1, dc in each st
around, ss to beg dc.
Rep last round once more in Yarn
B and twice more in Yarn A.
Fasten off.
Repeat on second Sleeve.
FRONT EDGING
With RS facing, join Yarn A in
bo"om-right corner of Front
opening.
Row 1 (RS) Ch1, 6dc in each 4-row
rep up to top corner, 3dc in
top-corner (pm in second dc of
3-dc group), dc evenly around
Neckline Opening to next corner,
pm in dc of both row-ends of first
row of neckline shaping, 3dc in
top-le# corner (pm in second dc
of 3-dc group), 6dc in each 4-row
rep to bo"om le# corner, turn. [4
markers]
Row 2 (WS) Ch1, dc in each st to
first marker, 3dc in first marked st,
move marker to second dc of 3-dc
group, dc in each st to next
marker, skip marked st, dc in next
st, pm in last st, dc in each st to
next marker, skip marked st, pm in
last dc, dc in each st to next
marker, 3dc in marked st, move
marker to second dc of 3-dc
group, dc in each st to end, turn.
Change to Yarn B.
Rows 3-4 As Row 2.
Change to Yarn A.
Round 5 (RS) As Row 2 to end, do
not turn, 3dc in corner, dc in each
ch around hem of Cardigan, 3dc in
next corner, ss to beg dc.
Round 6 As Row 2 to final st, dc in
each st around Hem, ss to beg dc.
Fasten off and weave in all ends.
TENSION
24 sts and 32 rows to measure
10x10cm over stocking stitch using
3.75mm needles
ABBREVIATIONS
For a full list see page 73
NOTES!
Use separate balls of yarn for each
area of colour and twist yarns on
wrong side of work to avoid a hole
(intarsia method).
CHART!NOTES!
For Back and Front begin the
Chart with the rib rows, then
switch to stocking stitch (working
RS rows as K and WS rows as P). If
you want the design on the Back
to be the reverse of the Front, as
shown, when working the Body
Chart for the Back read oddnumbered (RS) rows from le# to
right and read even-numbered
(WS) rows from right to le#; this is
opposite to the usual way and
creates the mirror image. Do the
same for the Sleeve Chart for
Right Sleeve. When working the
Body Chart for the Front and
Sleeve Chart for Le# Sleeve, read
odd-numbered (RS) rows from
right to le# and even-numbered
(WS) rows from le# to right.
BACK
Cast on using 3.25mm needles
and the cable cast-on method
changing yarns as instructed, 4
(10: 16: 22) sts with Yarn A, PM,
cast on another 36 sts with Yarn
A, join Yarn B and cast on 79 sts
with Yarn B, PM, join a separate
ball of Yarn A and cast on 3 (9: 15:
21) sts with Yarn A. [122 (134: 146:
158) sts]
Markers denote start and end of
Body Chart.
BEGIN CHART AND WORK IN
RIB
Reading RS rows from le# to right
(see Chart Notes), next row is
Body Chart Row 1.
Rib row 1 (RS) Working colours as
set, K2, (P2, K2) to end, slipping
mrks.
Rib row 2 (WS) Cont with colours
as set, P2, (K2, P2) to end, slipping
mrks.
These 2 rows set rib and Chart pa".
Working in Yarn A at edges and in
pa" from Body Chart between
mrks, work a further 8 rows in rib.
Change to 3.75mm needles and st
st.
Row 11 (RS) With Yarn A, K to mrk,
sl SM, K across Row 11 of Body
Chart, sl SM, with Yarn A, K to
end.
Row 12 (WS) With Yarn A, P to
mrk, sl SM, P across Row 12 of
Body Chart, sl SM, with Yarn A, P
to end.
These 2 rows set st st and cont
Body Chart pa".
Cont as set to complete Body
Chart, ending a#er Row 145,
removing mrks on final row.
With Yarn A only, cont in st st
(next row is a P row) until Back
measures 52 (54: 56: 58)cm from
cast-on edge, ending a#er a P row.
SHAPE RIGHT BACK NECK
Row 1 (RS) K39 (43: 47: 51), skpo,
turn and work on these 40 (44: 48:
52) sts for right back neck. [40
(44: 48: 52) sts]
Row 2 (WS) P2togtbl, P to end.
[39 (43: 47: 51) sts]
Row 3 K to last 2 sts, skpo. [38 (42:
46: 50) sts]
Row 4 P2togtbl, P to end. [37 (41:
45: 49) sts]
SHAPE RIGHT SHOULDER
Next row (RS) Cast off 9 (10: 11: 12)
sts, K to end.
Next row (WS) P to end.
Rep the last 2 rows twice more.
[10 (11: 12: 13) sts]
Cast off.
SHAPE LEFT BACK NECK
With RS facing, place centre 40
(44: 48: 52) sts on a holder, rejoin
Yarn A to rem sts. [41 (45: 49: 53) sts]
Row 1 (RS) K2tog, K to end. [1 st
dec’d]
Row 2 (WS) P to last 2 sts, p2tog.
[1 st dec’d]
Rep the last 2 rows once more. [37
(41: 45: 49) sts]
KNIT!&!CROCHET!COLLECTION!"#"$ BHG %&'
CLUB TROPICANA SIZE TABLE
53.5 (55.5: 57.5: 59.5)cm
SIZE
FRONT%&%BACK
51 (56: 61: 66)cm
S
M
L
1XL
TO%FIT%BUST
cm
81-86
92-97
101-107
112-117
ACTUAL%BUST
cm
100
110
120
130
LENGTH
cm
53.5
55.5
57.5
59.5
SLEEVE%LENGTH
cm
46
46
46
46
YARN
Rowan Felted Tweed (DK, 50g/175m)
Yarn A Alabaster (197)
5
5
6
6
Yarn B Vaseline Green (204)
3
3
3
3
SLEEVE
46 (46: 46: 46)cm
SIZING!COLOUR!KEY!So you can re-use this pattern, we’ve colour-coded the sizing instructions.
Simply follow our colour-coded measurements and you’re off.
SHAPE LEFT SHOULDER
Next row (RS) K to end.
Next row (WS) Cast off 9 (10: 11:
12) sts, P to end.
Rep the last 2 rows twice more.
[10 (11: 12: 13) sts]
Knit 1 row.
Cast off.
FRONT
Cast on using 3.25mm needles and
the cable cast-on method changing
yarns as instructed, 3 (9: 15: 21) sts
with Yarn A, PM, join Yarn B and
cast on 79 ts with Yarn B, join a
separate ball of Yarn A and cast on
36 sts with Yarn A, PM, cast on
another 4 (10: 16: 22) sts with Yarn
A. [122 (134: 146: 158) sts]
Markers denote start and end of
Body Chart.
BEGIN CHART AND WORK IN
RIB
Reading RS rows from right to le#
(see Chart notes), next row is
Body Chart Row 1.
Rib row 1 (RS) Working colours as
set, K2, (P2, K2) to end, slipping
mrks.
Rib row 2 (WS) Cont with colours
as set, P2, (K2, P2) to end, slipping
mrks.
These 2 rows set rib.
Working in Yarn A at edges and in
pa$ from Body Chart between
mrks, work a further 8 rows in rib.
Change to 3.75mm needles and st
st.
Row 11 (RS) With Yarn A, K to mrk,
sl SM, K across Row 11 of Body
Chart, sl SM, with Yarn A, K to end.
Row 12 (WS) With Yarn A, P to
mrk, sl SM, P across Row 12 of
Body Chart, sl SM, with Yarn A, P
to end.
These 2 rows set st st and cont
Body Chart pa$.
Cont as set to complete Body
Chart, ending a#er Row 145,
removing mrks on final row.
With Yarn A only, cont in st st
(next row is a P row) until 16 fewer
rows have been worked than on
Back to shoulder shaping.
SHAPE LEFT FRONT NECK
Row 1 (RS) K43 (47: 51: 55), skpo,
turn and work on these 44 (48: 52:
56) sts for le# front neck. [44 (48:
52: 56) sts]
Row 2 (WS) P to end.
Row 3 K to last 2 sts, skpo. [1 st
dec’d]
Row 4 P to end.
Rep the last 2 rows 6 times more.
[37 (41: 45: 49) sts]
SHAPE LEFT SHOULDER
Next row (RS) Cast off 9 (10: 11: 12)
sts, K to end.
Next row (WS) P to end.
Rep the last 2 rows twice more.
[10 (11: 12: 13) sts]
Cast off.
SHAPE RIGHT FRONT NECK
With RS facing, place centre 32
(36: 40: 44) sts on a holder, rejoin
Yarn A to rem sts. [45 (49: 53: 57)
sts]
Next row (RS) K2tog, K to end. [1
st dec’d]
Next row (WS) P to end.
Rep the last 2 rows 7 times more.
[37 (41: 45: 49) sts]
SHAPE SHOULDER
Next row (RS) K to end.
Next row (WS) Cast off 9 (10: 11:
12) sts, P to end.
Next row K to end.
Rep the last 2 rows twice more.
[10 (11: 12: 13) sts]
Cast off.
!"# BHG KNIT$&$CROCHET$COLLECTION$%&%'
LEFT SLEEVE
Cast on 54 (58: 62: 66) sts with
3.25mm needles and Yarn A.
Rib row 1 (RS) K2, (P2, K2) to end.
Rib row 2 (WS) P2, (K2, P2) to
end.
These 2 rows form the rib.
Work a further 8 rows in rib.
Change to 3.75mm needles.
Beg with a K row, work 2 rows in
st st.
SET SLEEVE CHART
Reading RS rows from right to le#
(see Chart notes), next row is
Sleeve Chart Row 1.
Row 1 (RS) K2 in Yarn A, PM, K19
(21: 23: 25) in Yarn A, join Yarn B
and K9 in Yarn B, join a separate
ball of Yarn A and K22 (24: 26: 28)
in Yarn A, PM, K2 in Yarn A.
Row 2 (WS) P2 in Yarn A, sl SM,
P22 (24: 26: 28) in Yarn A, P11 in
Yarn B, P17 (19: 21: 23) in Yarn A, sl
SM, P2.
These 2 rows set Sleeve Chart.
**Working in Yarn A at edges and
in pa$ from Sleeve Chart between
mrks, pa$ 2 rows.
Inc row (RS) K2, sl SM, K2, M1,
pa$ to last 4 sts, M1, K2, sl SM, K2.
[2 sts inc’d]
Patt 5 rows.
Cont in pa$, rep the last 6 rows 19
times more, then rep inc row again
to complete Sleeve Chart,
removing mrks on final row. [96
(100: 104: 108) sts]
With Yarn A only, cont in st st (next
row is a P row) without shaping until
Sleeve measures 46cm from cast-on
edge, ending a#er a P row.
Cast off.
RIGHT SLEEVE
Cast on 54 (58: 62: 66) sts with
3.25mm needles and Yarn A.
Rib row 1 (RS) K2, (P2, K2) to end.
Rib row 2 (WS) P2, (K2, P2) to end.
These 2 rows form the rib.
Work a further 8 rows in rib.
Change to 3.75mm needles.
Beg with a K row, work 2 rows in
st st.
SET SLEEVE CHART
Reading RS rows from le# to right
(see Chart notes), next row is
Sleeve Chart Row 1.
Row 1 (RS) K2 in Yarn A, PM, K22
(24: 26: 28) in Yarn A, join Yarn B
and K9 in Yarn B, join a separate
ball of Yarn A and K19 (21: 23: 25)
in Yarn A, PM, K2.
Row 2 (WS) P2 in Yarn A, sl SM,
P17 (19: 21: 23) in Yarn A, P11 in
Yarn B, P22 (24: 26: 28) in Yarn A,
sl SM, P2.
These 2 rows set Sleeve Chart.
Complete as for Le# Sleeve from
**.
TO MAKE UP
Join right shoulder seam.
NECKBAND
With RS facing, 3.25mm needles
and Yarn A, pick up and knit 18 sts
down le# front neck, K32 (36: 40:
44) sts from Front holder, pick up
and knit 18 sts up right front neck,
pick up and knit 9 sts down right
back neck, K40 (44: 48: 52) from
back holder, pick up and knit 9 sts
up le# back neck. [126 (134: 142:
150) sts]
Rib row 1 (WS) P2, (K2, P2) to end.
Rib row 2 (RS) K2, (P2, K2) to end.
These 2 rows form the rib.
Work a further 10 rows in rib.
Cast off in rib.
TO FINISH
Using chain stitch (see page 77)
and Yarn A, embroider the veins
on the leaves following the
photos. Join le# shoulder and
neckband seam. Mark a point 64
(67: 69: 72) rows down from
shoulder on both Back and Front.
Matching centre of Sleeve cast-off
edge to shoulder seam, sew in
Sleeves between mrks. Join side
and Sleeve seams.
PATTERNS
145
144
143
142
141
140
139
138
137
136
135
134
133
132
131
130
129
128
127
126
125
124
123
122
121
120
119
118
117
116
115
114
113
112
111
110
109
108
107
106
105
104
103
102
101
100
99
98
97
96
95
94
93
92
91
90
89
88
87
86
85
84
83
82
81
80
79
78
77
76
75
74
73
72
71
70
69
68
67
66
65
64
63
62
61
60
59
58
57
56
55
54
53
52
51
50
49
48
47
46
45
44
43
42
41
40
39
38
37
36
35
34
33
32
31
30
29
28
27
26
25
24
23
22
21
20
19
18
17
16
15
14
13
12
11
10
9
8
7
6
5
4
3
2
1
115
110
105
100
95
90
85
80
75
70
65
60
55
50
45
CLUB TROPICANA CHART
HOW TO USE OUR CHARTS
Start at the bo!om right-hand corner. Read right side rows from right to le" and
wrong side rows from le" to right. A row of squares represents a row of kni!ing.
40
35
30
25
20
15
10
5
KEY
Yarn A
Yarn B
Rows 1-10 work rib as set
KNIT!&!CROCHET!COLLECTION!"#"$ BHG %&'
KEY
CLUB TROPICANA SLEEVE CHART
Yarn A
HOW TO USE OUR CHARTS
Start at the bo!om right-hand corner. Read right side rows from right to le" and
wrong side rows from le" to right. A row of squares represents a row of kni!ing.
125
124
123
122
121
120
119
118
117
116
115
114
113
112
111
110
109
108
107
106
105
104
103
102
101
100
99
98
97
96
95
94
93
92
91
90
89
88
87
86
85
84
83
82
81
80
79
78
77
76
75
74
73
72
71
70
69
68
67
66
65
64
63
62
61
60
59
58
57
56
55
54
53
52
51
50
49
48
47
46
45
44
43
42
41
40
39
38
37
36
35
34
33
32
31
30
29
28
27
26
25
24
23
Yarn B
Rows 1-10 work rib as set
76
75
74
73
72
71
70
69
68
67
66
65
64
63
62
61
60
59
58
57
56
55
54
53
22
21
20
19
18
17
28
27
26
25
24
23
16
15
14
13
12
11
10
9
8
7
6
5
4
3
2
1
4
3
2
1
Size S
Size M
Size L
Size 1XL
!"# BHG KNIT$&$CROCHET$COLLECTION$%#%"
Size S
Size M
Size L
Size 1XL
10
9
8
7
6
5
16
15
14
13
12
11
22
21
20
19
18
17
52
51
50
49
48
47
46
45
44
43
42
41
40
39
38
37
36
35
34
33
32
31
30
29
88
87
86
85
84
83
82
81
80
79
78
77
125
124
123
122
121
120
119
118
117
116
115
114
113
112
111
110
109
108
107
106
105
104
103
102
101
100
99
98
97
96
95
94
93
92
91
90
89
PATTERNS
ABBREVIATIONS
For a full list see page 68
NOTES
Cardigan is worked in rows
throughout. The upper Back and
part of the Sleeves are worked
first. The Fronts and Sleeves are
worked from the opposite side of
the foundation ch to the end of
the Sleeve section. Once the
Sleeves have been seamed
together the Body is worked in
one piece over the rem sts. The
4mm hook is used for the majority
of the pa"ern with the 3.75mm
used for the Sleeve Edging and
Bu"on Band only. If you don’t
have a 3.75mm hook we
recommend using a 3.5mm hook
for these sections.
from page 54
CARDI!CALLING
YOU!WILL!NEED
The Fibre Co. Luma (DK 50%
wool, 25% organic co"on, 15%
linen, 10% silk, 50g/125m) Yarn A
Sangria (LUM170). For yarn
quantities and measurements
see size table
■ A 4mm crochet hook
■ A 3.75mm hook
■ Stitch markers
■ 6 bu"ons, 19mm
■ Yarn needle
■
CARDIGAN
BACK
Using a 4mm hook, ch95 (103: 113:
121: 131: 139: 149).
Foundation row (WS) Tr in fourth
ch from hook (skipped chs count
as tr), tr in each ch across, turn.
[93 (101: 111: 119: 129: 137: 147) sts]
Row 1 (RS) Ch3 (counts as tr
throughout), tr in next 19 (23: 28:
32: 37: 41: 46) tr, *ch5, skip 5 tr, 3-tr
cl in next tr, ch5, skip 5 tr, tr in
next 3 tr; rep from * 3 times more,
tr in each tr to end, turn.
TENSION
17 sts and 11 rows measure
10x10cm over treble crochet using
a 4mm hook, or size needed to
obtain correct tension
c
Row 2 (WS) Ch3, tr in each tr to
ch-5 sp, *ch4, dc in ch-5 sp, ch1,
skip cl, dc in next ch-5 sp, ch4, tr
in next 3 tr; rep from * 3 times
more, tr into each tr to end, turn.
Row 3 Ch3, tr in each tr to ch-4 sp,
*ch5, skip ch-4 sp, skip dc, 3-tr cl
into ch-1 sp, ch5, skip dc, skip ch-4
sp, tr in next 3 tr; rep from * 3
times more, tr into each tr to end,
turn.
Row 4 Ch3, tr in each tr to ch-5 sp,
*5tr in ch-5 sp, tr in cl, 5tr in ch-5
sp, tr in next 3 tr; rep from * 3 times
more, tr into each tr to end, turn.
Row 5 Ch3, tr in each tr across,
turn.
Rep Row 5 another 13 (13: 15: 17: 17:
19: 21) times more.
Do not fasten off.
Place live loop on stitch marker to
use when joining later in the
pa"ern.
RIGHT FRONT
With RS facing and using a 4mm
hook, join yarn in first st on
right-hand side of foundation ch.
Row 1 (RS) Ch3, tr in next 19 (23:
28: 32: 37: 41: 46) sts, ch5, skip 5
sts, 3-tr cl into next st (this should
align with the 3-tr cl worked on
Row 1 of Back), ch5, skip 5 sts, tr in
next 3 sts, turn. [34 (38: 43: 47: 52:
56: 61) sts]
Row 2 (WS) Ch3, tr in next 2 tr,
ch4, dc in ch-5 sp, ch1, skip cl, dc
in next ch-5 sp, ch4, tr in each tr
across, turn.
NECK SHAPING
Row 3 (inc row) Ch3, tr in each tr
to 1 st before ch-4 sp, 2tr into next
tr, ch5, skip ch-4 sp, skip dc, 3-tr cl
in ch-1 sp, ch5, skip dc, skip ch-4
sp, tr in final 3 tr, turn. [35 (39: 44:
48: 53: 57: 62) sts]
Row 4 Ch3, tr in each st to ch-5
sp, 5tr in ch-5 sp, tr in cl, 5tr in
ch-5 sp, pm in last tr of 5-tr group,
tr in each tr across, turn.
Row 5 (inc row) Ch3, tr to st
before marker, 2tr in st before
marker, ch5, skip 5 sts, 3-tr cl in
next st, ch5, skip 5 sts, tr in final 3
sts, turn. [36 (40: 45: 49: 54: 58:
63) sts]
b
direction
of work
a
Width a: 44.5 (48.5: 55: 60: 65.5: 70.5: 75)cm
Length b: 56 (56: 56: 60: 60: 60: 63.5)cm
Sleeve c: 5.6 (6: 6: 6: 6: 6: 6.5)cm
Row 6 Ch3, tr in next 2 tr, ch4, dc
in ch-5 sp, ch1, skip cl, dc in ch-5
sp, ch4, tr in each tr across, turn.
Rep Rows 3-6 another 3 (3: 4: 4: 4:
5: 5) times. [42 (46: 53: 57: 62: 68:
73) sts]
SIZES XS, S, L, XL AND XXXL
ONLY
Rep Rows 3-4 of Neck Shaping
once more. [43 (47: -: 58: 63: -: 74)
sts]
ALL SIZES
SEAM SLEEVES
Fold piece at foundation ch so the
Right Front and Back line up and
WS are facing out. Dc through first
9 (10: 10: 10: 10: 10: 11) sts.
Fasten off.
LEFT FRONT
With RS of Back foundation chain
facing and using a 4mm hook, skip
25 sts a#er Right Front and join
yarn in next st.
Row 1 (RS) Ch3, tr in next 2 sts,
ch5, skip 5 sts, 3-tr cl in next st,
ch5, skip 5 sts, tr in each st across,
turn. [34 (38: 43: 47: 52: 56: 61) sts]
Row 2 (WS) Ch3, tr into each tr to
next ch-5 sp, ch4, dc into ch-5 sp,
ch1, skip cl, dc in next ch-5 sp, ch4,
tr in final 3 tr, turn.
NECK SHAPING
Row 3 (inc row) Ch3, tr in next 2
tr, ch5, skip ch-4 sp, skip dc, 3-tr cl
in ch-1 sp, ch5, skip dc, skip ch-4
sp, 2tr in next st, tr in each tr
across, turn. [35 (39: 44: 48: 53: 57:
62) sts]
Row 4 Ch3, tr in next 2 tr, 5tr in
ch-5 sp, tr in cl, 5tr in ch-5 sp, tr
into each tr across, turn.
Row 5 (inc row) Ch3, tr in next 2
sts, ch5, skip 5 sts, 3-tr cl in next
st, ch5, skip 5 sts, 2tr in next st, tr
into each tr across, turn. [36 (40:
45: 49: 54: 58: 63) sts]
Row 6 Ch3, tr into each tr to ch-5
sp, ch4, dc in ch-5 sp, ch1, skip cl,
dc in ch-5 sp, ch4, tr in final 3 tr,
turn.
Rep Rows 3-6 another 3 (3: 4: 4: 4:
5: 5) times. [42 (46: 53: 57: 62: 68:
73) sts]
CARDI CALLING SIZE TABLE
SIZE
XS
S
M
L
XL
XXL
XXXL
TO!FIT!BUST
cm
71-76
81-86
91-97
102-107
112-117
122-127
132-137
ACTUAL!BUST
cm
89
97
110
120
130.5
141
149.5
LENGTH
cm
56
56
56
60
60
60
63.5
SLEEVE!LENGTH
cm
5.5
6
6
6
6
6
6.5
11
12
The Fibre Co. Luma (50g/125m)
YARN
Yarn A
7
7
8
9
10
SIZING!COLOUR!KEY!So you can re-use this pattern, we’ve colour-coded the sizing instructions.
Simply follow our colour-coded measurements and you’re off.
KNIT!&!CROCHET!COLLECTION!"#"$ BHG %$%
SIZES XS, S, L, XL AND XXXL
ONLY
Work Rows 3-4 of Neck Shaping
once more. [43 (47: -: 58: 63: -: 74)
sts]
Place live loop on hook ready to
pick up again when working the
Body.
ALL SIZES
SEAM SLEEVES
Using a 4mm hook, place live loop
from end of Back on hook.
Fold piece at foundation ch so the
Le# Front and Back line up and
WS are facing out. Dc through first
9 (10: 10: 10: 10: 10: 11) sts.
Fasten off.
BODY
NECK SHAPING CONT
With RS facing, place live loop
from Le# Front on hook.
NOTE On the first row a tr2tog is
worked over the sts next to the
Sleeve to prevent a hole forming.
Work a leg of each tr2tog in the
final tr from Sleeve Seam at
underarm.
SIZES XS, S, L AND XL ONLY
Row 1 (inc row) Ch3, tr in next 2 tr,
ch5, skip 5 tr, 3-tr cl in next tr, ch5,
skip 5 tr, 2tr in next tr, tr in each st
to final st on Front, tr2tog next st
and first joined st from Sleeve
Seam at Front, tr2tog final tr of
Sleeve Seam at Back and next
unworked st from Back, tr in each
st across Back to final st, tr2tog,
tr2tog next tr and first tr of Sleeve
Seam, tr2tog last tr of Sleeve
Seam at Front and next st from
Right Front, tr to final 15 sts, 2tr in
next st, ch5, skip 5 tr, 3-tr cl in
next tr, ch5, skip 5 tr, tr in final 3
sts, turn. [145 (157: -: 197: 217: -: -)
sts]
Row 2 (WS) Ch3, tr into next 2 tr,
ch4, dc into ch-5 sp, ch1, skip cl, dc
in next ch-5 sp, ch4, tr in each tr to
next ch-5 sp, dc into ch-5 sp, ch1,
skip cl, dc in next ch-5 sp, ch4, tr
in final 2 tr, turn.
Row 3 (inc row) Ch3, tr in next 2
tr, ch5, skip ch-4 sp, skip dc, 3-tr cl
in ch-1 sp, ch5, skip dc, skip ch-4
sp, 2tr in next tr, tr into each tr to 1
st before next ch-4 sp, 2tr in next
tr, ch5, skip ch-4 sp, skip dc, 3-tr cl
in ch-1 sp, ch5, skip dc, skip ch-4
sp, tr in final 3 sts, turn. [147 (159: -:
199: 219: -: -) sts]
Row 4 Ch3, *tr in each st to ch-5
sp, 5tr in ch-5 sp, tr in cl, 5tr in
ch-5 sp; rep from * once more, tr
in final 3 sts, turn.
Do not fasten off.
SIZES M AND XXL ONLY
Row 1 (RS) (inc row) Ch3, tr in
next 2 tr, ch5, skip ch-4 sp, skip dc,
3-tr cl in ch-1 sp, ch5, skip ch-4 sp,
skip dc, 2tr in next tr, tr in each st
to final st on Front, tr2tog next st
and first joined st from Sleeve
Seam at Front, tr2tog final tr of
Sleeve Seam at Back and next
unworked st from Back, tr in each
st across Back to final st, tr2tog
next tr and first tr of Sleeve Seam,
tr2tog last tr of Sleeve Seam at
Front and next st from Right
Front, tr to st before ch-4 sp, 2tr in
next st, ch5, skip ch-4 sp, skip dc,
3-tr cl in ch-1 sp, ch5, skip ch-4 sp,
skip dc, tr in final 3 sts, turn. [- (-:
179: -: -: 235: -)
Row 2 Ch3, *tr in each st to ch-5
sp, 5tr in ch-5 sp, tr in cl, 5tr in
ch-5 sp; rep from * once more, tr
in final 3 sts, turn.
SIZES XS, S AND M ONLY
Rep Rows 1-4 of Body Neck
Shaping as shown for Sizes XS, S,
L and XL once more. [151 (163: 183:
-: -: -) sts]
SIZE L ONLY
Rep Rows 1-2 of Body Neck
Shaping as shown for Sizes XS, S,
L and XL.
Next row Ch3, tr in next 2 tr, ch5,
skip ch-4 sp, skip dc, 3-tr cl in ch-1
sp, ch5, skip dc, skip ch-4 sp, tr in
each st to ch-4 sp, ch5, skip ch-4
sp, skip dc, 3-tr cl in ch-1 sp, ch5,
skip dc, skip ch-4 sp, tr in final 3
sts, turn. [- (-: -: 201: -: -: -) sts]
Rep Row 4 of Body Neck Shaping
as shown for Sizes XS, S, L and XL.
SIZE XXXL ONLY
Row 1 (RS) Ch3, tr in next 2 tr, ch5,
skip 5 tr, 3-tr cl in next tr, ch5, skip
5 tr, tr in each st to final st on
Front, tr2tog next st and first
joined st from Sleeve Seam at
Front, tr2tog final tr of Sleeve
Seam at Back and next unworked
st from Back, tr in each st across
Back to final st, tr2tog next tr and
first tr of Sleeve Seam, tr2tog last
tr of Sleeve Seam at Front and
next st from Right Front, tr to final
14 sts, ch5, skip 5 tr, 3-tr cl in next
tr, ch5, skip 5 tr, tr in final 3 sts,
turn. [- (-: -: -: -: -: 251) sts]
Row 2 Ch3, tr into next 2 tr, ch4,
dc into ch-5 sp, ch1, skip cl, dc in
next ch-5 sp, ch4, tr in each tr to
next ch-5 sp, dc into ch-5 sp, ch1,
dc into next ch-5 sp, ch4, tr in final
3 tr, turn.
Row 3 Ch3, tr in next 2 tr, ch5,
skip ch-4 sp, 3-tr cl in ch-1 sp, ch5,
skip ch-4 sp, tr in each tr to next
ch-4 sp, ch5, skip ch-4 sp, 3-tr cl in
ch-1 sp, ch5, skip ch-4 sp, tr in final
3 tr, turn.
Row 4 Ch3, *tr in each st to ch-5
sp, 5tr in ch-5 sp, tr in cl, 5tr in
"#$ BHG KNIT%&%CROCHET%COLLECTION%$&$#
ch-5 sp; rep from * once more, tr
in final 3 sts, turn.
ALL SIZES
Next row (RS) Ch3, tr in next 2
sts, ch5, skip 5 sts, 3-tr cl into next
tr, ch5, skip 5 sts, tr in each st to
final 13 sts, ch 5, skip 5 sts, 3-tr cl
into next tr, ch 5, skip 5 sts, tr into
each of the last 2 sts, turn. [151
(163: 183: 201: 219: 235: 251) sts]
Next row Ch3, tr into next 2 tr,
ch4, dc into ch-5 sp, ch1, skip cl, dc
in next ch-5 sp, ch4, tr in each tr to
next ch-5 sp, dc into ch-5 sp, ch1,
dc into next ch-5 sp, ch4, tr in final
3 tr, turn.
Next row Ch3, tr in next 2 tr, ch5,
skip ch-4 sp, 3-tr cl in ch-1 sp, ch5,
skip ch-4 sp, tr in each tr to next
ch-4 sp, ch5, skip ch-4 sp, 3-tr cl in
ch-1 sp, ch5, skip ch-4 sp, tr in final
3 tr, turn.
Next row Ch3, *tr in each st to
ch-5 sp, 5tr in ch-5 sp, tr in cl, 5tr
in ch-5 sp; rep from * once more,
tr in final 3 sts, turn.
Rep prev 4 rows until Body
measures 37 (37: 35: 36.5: 36.5: 35:
37)cm from Sleeve Join, ending on
a Row 4 rep.
Fasten off and weave in ends.
Block to measurements listed and
following any yarn care
instructions on the ball band.
SLEEVE EDGING
Using a 3.75mm hook and with RS
facing, join yarn in st at end of
Sleeve.
Round 1 (RS) Ch1 (does not count
as st throughout), 2dc in each
row-end, ss to beg dc.
Fasten off and rep on second
Sleeve.
BUTTON BAND
Position 6 stitch markers evenly
spaced along the Right Front
opening. These mark the position
of the bu"onholes.
Using a 3.75mm hook and with RS
facing join yarn in bo"om
right-hand corner of opening.
Row 1 (RS) Ch3, *2tr in each
row-end to next marker, ch3, skip 1
row-end; rep from * 5 times more,
2tr in each row-end to final row of
Front, tr3tog final st of Front,
corner and first st of Back, tr in
each st to final st of Back, tr3tog
final st of Back, corner and next
row-end of Le# Front, 2tr in each
row-end to end.
Fasten off and weave in all ends.
Sew the bu"ons in line with the
bu"onholes.
from page 54
FRUIT!SORBET
YOU!WILL!NEED
Rico Design Creative Co!on
Colour Coated (Aran, 50%
co"on, 50% acrylic, 50g/125m) in
Pastel Mix 003. For yarn
quantities and measurements see
size table
■ A pair of 4.5mm kni"ing needles
■ A pair of 5mm needles
■ 3 stitch holders
■ 8 split-ring markers
■ Yarn needle
■
TENSION
17 sts and 28 rows to measure
10x10cm over Lace Pa"ern 1 using
5mm needles
18 sts and 30 rows to measure
10x10cm over Lace Pa"ern 2 using
5mm needles
ABBREVIATIONS
Dec1 (decrease 1 st) On a RS row,
work K2, skpo at the beginning
and k2tog, K2 at the end. On a WS
row, work P2, p2tog at the
beginning and p2tog through the
back of the loop, P2 at the end
For a full list see page XX
PATTERN STITCHES
LACE PATTERN 1
Worked over multiples of 10 plus 1
sts and 14 rows.
Row 1 (RS) K1, *yfwd, skpo, k2tog,
yfwd, K1; rep from * to end.
Row 2 and all WS rows Purl.
Row 3 K1, *K1, yfwd, skpo, K3,
k2tog, yfwd, K2; rep from * to end.
Row 5 K1, *K2, yfwd, skpo, K1,
k2tog, yfwd, K3; rep from * to end.
Row 7 K1, *K3, yfwd, sk2po, yfwd,
K4; rep from * to end.
Row 9, 11 and 13 K1, *skpo, K2,
yfwd, K1, yfwd, K2, k2tog, K1; rep
from * to end.
Row 14 Purl.
LACE PATTERN 2
Worked over multiples of 2 plus 1
sts and 10 rows.
FRONT$&$
BACK
54 (55: 56: 57: 58: 59: 60: 60) cm
PATTERNS
46.5 (49: 51: 54.5: 57: 60.5: 63: 65.5) cm
Row 1 (RS) Knit.
Row 2 Knit.
Row 3 *K2tog, yfwd; rep from * to
last st, K1.
Row 4 Knit.
Row 5, 7 and 9 Knit.
Row 6 and 8 Purl.
Row 10 Purl.
BACK
Cast on 81 (85: 89: 95: 99: 105:
109: 113) sts using 4.5mm needles.
Knit one row.
Change to 5mm needles and work
in Lace Pa!ern 1 as follows:
Row 1 (RS) K0 (2: 4: 2: 4: 2: 4: 1),
Lace Pa!ern 1 Row 1 across 81 (81:
81: 91: 91: 101: 101: 111) sts, K0 (2: 4:
2: 4: 2: 4: 1).
Row 2 P0 (2: 4: 2: 4: 2: 4: 1), Lace
Pa!ern 1 Row 2 across 81 (81: 81: 91:
91: 101: 101: 111) sts, P0 (2: 4: 2: 4: 2:
4: 1).
These 2 rows set the position of
the pa!ern: the side 0 (2: 4: 2: 4: 2:
4: 1) sts worked in st st (K on the
RS and P on the WS), and the
central 81 (81: 81: 91: 91: 101: 101: 111)
sts worked in Lace Pa!ern 1. Cont
in pa! until work measures 30cm,
ending with Row 14 and measured
from the cast-on edge.
Place a marker at the beg and end
of the next row to indicate the
start of the armholes, and work
the following inc row:
Next row (RS) (inc) K17 (17: 12: 13:
14: 15: 15: 16), *M1, K16 (17: 13: 14: 14:
15: 16: 16) rep from * to last 16 (17:
12: 12: 15: 15: 14: 17) sts, M1, knit to
end. [85 (89: 95: 101: 105: 111: 115:
119) sts]
Next row Purl.
Work in Lace Pa!ern 2 across all
sts until armhole measures 20 (21:
22: 23: 24: 25: 26: 26)cm, measured
from the markers at the start of
the armholes and ending with a
WS row.
FRUIT SORBET SIZE TABLE
SIZE
8
10
12
14
16
18
20
22
81
86
91
97
102
107
112
117
TO$FIT$BUST
cm
ACTUAL$BUST
cm
93
98
102
109
114
121
126
131
LENGTH
cm
54
55
56
57
58
59
60
60
YARN
Pastel Mix 003
Rico Design Creative Co!on Colour Coated Aran (50g/125m)
7
7
8
8
8
9
9
9
SIZING"COLOUR"KEY"So you can re-use this pattern, we’ve colour-coded the sizing instructions.
Simply follow our colour-coded measurements and you’re off.
SHAPE SHOULDERS
NOTE Make sure that each
decrease within the pa! is
matched by an increase. If there
are insufficient sts to work the
increase and decrease, work sts in
st st.
Cont in patt and cast off 3 (3: 3: 4:
4: 4: 4: 5) sts at the beg of the next
14 (10: 6: 14: 12: 6: 4: 14) rows.
Cont in patt and cast off 0 (4: 4:
0: 5: 5: 5: 0) sts at the beg of the
next 0 (4: 8: 0: 2: 8: 10: 0) rows.
Put the remaining 43 (43: 45: 45:
47: 47: 49: 49) sts on a stitch
holder.
LEFT FRONT
Cast on 61 (63: 67: 69: 71: 73: 77:
79) sts using 4.5mm needles.
Knit one row.
Change to 5mm needles and work
in Lace Pa!ern 1 as follows:
Row 1 (RS) K0 (2: 6: 8: 0: 2: 6: 8),
Lace Pa!ern 1 Row 1 across 61 (61:
61: 61: 71: 71: 71: 71) sts.
Row 2 Lace Pa!ern 1 Row 2 across
61 (61: 61: 61: 71: 71: 71: 71) sts, P0 (2:
6: 8: 0: 2: 6: 8).
These 2 rows set the position of
the pa!ern: the underarm edge
0 (2: 6: 8: 0: 2: 6: 8) sts worked in
st st, and the centre 61 (61: 61: 61:
71: 71: 71: 71) sts worked in Lace
Pa!ern 1.
Cont in patt until work measures
30cm, ending with Row 14 and
measured from the cast-on edge.
Place a marker at the beg of the
next row to indicate the start of
the armhole, and work the
following inc row:
Next row (RS) (inc) K13 (13: 14: 15:
14: 15: 16: 16), *M1, K12 (12: 13: 13: 14:
14: 15: 16); rep from * to last 12 (14:
14: 15: 15: 16: 16: 15) sts, M1, k to
end. [65 (67: 71: 73: 75: 77: 81: 83)
sts]
Next row Purl.
Work in Lace Pa!ern 2 across all
sts until armhole measures 15 (16:
17: 18: 18: 19: 20: 20)cm, measured
from the marker at the start of the
armhole and ending with a WS
row.
SHAPE NECKLINE
Next row (RS) Pa! to last 34 (34:
36: 35: 36: 35: 38: 38) sts, turn and
put these sts on a stitch holder. [31
(33: 35: 38: 39: 42: 43: 45) sts]
Dec 1 st at the neck edge on the
next 4 rows. [27 (29: 31: 34: 35: 38:
39: 41) sts]
Dec 1 st at the neck edge on the
next 6 RS rows AT THE SAME
TIME, when work measures the
same as the Back to the shoulder,
and ending with a WS row, work
shoulder shaping as follows:
NOTE Make sure that each
decrease within the pa! is
matched by an increase. If there
are insufficient stitches to work
the increase and decrease, work
sts in st st.
Cont in patt and cast off 3 (3: 3: 4:
4: 4: 4: 5) sts at the beg of the next
7 (5: 3: 7: 6: 3: 2: 7) RS rows.
Cont in patt and cast off 0 (4: 4:
0: 5: 5: 5: 0) sts at the beg of the
next 0 (2: 4: 0: 1: 4: 5: 0) RS rows.
RIGHT FRONT
Cast on 61 (63: 67: 69: 71: 73: 77:
79) sts using 4.5mm needles.
Knit one row.
Change to 5mm needles and work
in Lace Pa!ern 1 as follows:
Row 1 (RS) Lace Pa!ern 1 Row 1
across 61 (61: 61: 61: 71: 71: 71: 71)
sts, K0 (2: 6: 8: 0: 2: 6: 8).
Row 2 P0 (2: 6: 8: 0: 2: 6: 8), Lace
Pa!ern 1 Row 2 across 61 (61: 61: 61:
71: 71: 71: 71) sts.
These 2 rows set the position of
the pa!ern: the underarm edge
0 (2: 6: 8: 0: 2: 6: 8) sts worked in
st st (K on the RS and P on the
WS), and the centre 61 (61: 61: 61:
71: 71: 71: 71) sts worked in Lace
Pa!ern 1.
Cont in pa! until work measures
30cm, ending with Row 14 and
measured from the cast-on edge.
Place a marker at the end of the
next row to indicate the start of
the armhole, and work the
following inc row:
Next row (RS) (inc) K13 (13: 14: 15:
14: 15: 16: 16), *M1, K12 (12: 13: 13: 14:
14: 15: 16); rep from * to last 12 (14:
14: 15: 15: 16: 16: 15) sts, M1, knit to
end. [65 (67: 71: 73: 75: 77: 81: 83)
sts]
Next row Purl.
Work in Lace Pa!ern 2 across all
sts until armhole measures 15 (16:
17: 18: 18: 19: 20: 20)cm, measured
from the marker at the start of the
armhole and ending with a WS row.
SHAPE NECKLINE
Next row (RS) Break yarn and slip
the first 34 (34: 36: 35: 36: 35: 38:
38) sts onto your holder. Re-join
yarn and pa! to end. [31 (33: 35:
38: 39: 42: 43: 45) sts]
Dec 1 st at the neck edge on the
next 4 rows. [27 (29: 31: 34: 35: 38:
39: 41) sts]
KNIT!&!CROCHET!COLLECTION!"#"$ BHG %$&
Dec 1 st at the neck edge on the
next 6 RS rows AT THE SAME
TIME, when work measures the
same as the Back to the shoulder,
and ending with a RS row, work
shoulder shaping as follows:
FRONT
HEXAGONS (MAKE 23)
Using the Template, cut 23
Hexagons from the scrap denim.
Using a leather punch, make holes
around each shape as shown on
the Template. With RS of fabric
facing you, join yarn in any corner
of Hexagon with a ss.
Round 1 (RS) Ch1 (does not count
as st), *(2dc, ch2, 2dc) in corner
hole, 2dc in each hole to next
corner; rep from * around, ss to
beg dc. [72 sts, 6 ch-2 sps]
Fasten off.
NOTE Make sure that each
decrease within the pa" is
matched by an increase. If there
are insufficient stitches to work
the increase and decrease, work
sts in st st.
Cont in patt and cast off 3 (3: 3: 4:
4: 4: 4: 5) sts at the beg of the next
7 (5: 3: 7: 6: 3: 2: 7) WS rows.
Cont in patt and cast off 0 (4: 4:
0: 5: 5: 5: 0) sts at the beg of the
next 0 (2: 4: 0: 1: 4: 5: 0) WS rows.
TO MAKE UP
Weave in ends and block pieces
lightly following any yarn care
instructions on the ball band.
NECKLINE EDGING
Join both shoulder seams. With
RS facing, using 4.5mm needles
and starting at the Right Front
stitch holder, knit the 34 (34: 36:
35: 36: 35: 38: 38) sts from the
holder, pick up and knit 18 (18: 18:
19: 19: 20: 20: 20) sts evenly across
the right neck curve, knit the 43
(43: 45: 45: 47: 47: 49: 49) sts from
the Back stitch holder, pick up and
knit 18 (18: 18: 19: 19: 20: 20: 20) st
evenly across the le% neck curve,
and knit the 34 (34: 36: 35: 36: 35:
38: 38) sts from the holder. [147
(147: 153: 153: 157: 157: 165: 165) sts]
Knit 2 rows.
Cast off on the WS.
FRONT EDGINGS
With the Right Front RS facing,
using 4.5mm needles, pick up and
knit 75 (77: 79: 81: 81: 83: 85: 85) sts
evenly along the front edge.
from page 55
SUPER!STARS
YOU!WILL!NEED
Schachenmayr Baby Smiles
Bravo Baby (100% acrylic,
50g/184m) 1 ball of Confe"i Print
(00181)
■ Leather punch
■ A 2.75mm crochet hook
■ Denim 65x45cm
■ Scrap pieces of denim (see
Notes)
■ Cushion insert, 45x45cm
■ Yarn needle
■
MEASUREMENTS
Cushion measures 45x45cm
TENSION
ABBREVIATIONS
For a full list see page 68
NOTES
Cushion is made up of 2 pieces.
The Back is made from a single
square of denim and the Front is
made from 23 Hexagons and 44
Triangles. You will need approx
75x75cm of denim in total to cut
shapes from. Cut shapes using the
Templates below. Punch holes
around the edge of each shape
and crochet borders into the
holes. When making up the Front
refer to the Layout Diagram over
page.
TRIANGLES (MAKE 44)
Using the Template, cut 44
Triangles from the scrap denim.
Using a leather punch, make holes
around each shape as shown on
the Template. With RS of fabric
facing you, join yarn in any corner
of Triangle with a ss.
Round 1 (RS) Ch1 (does not count
as st), *(3dc, ch3, 3dc) in corner
hole, 2dc in each hole to next
corner; rep from * around, ss to
beg dc. [36 sts, 3 ch-3 sps]
Fasten off.
JOIN SHAPES
Using the Layout Diagram on
page 145, sew the shapes together
to form the Front. See How to
oversew motifs together (page
145).
Tension is not critical, but it may
affect the yarn quantities required
Next row (WS) Knit.
Next row (RS) *K2tog, yfwd: rep
from * to last st, K1.
Next row Knit.
Next row Knit.
Cast off on the WS.
Repeat for the Le% Front.
SLEEVE EDGINGS
With RS facing, using 4.5mm
needles, pick up and knit 66 (68:
72: 76: 80: 82: 86: 86) sts between
markers. Knit 2 rows.
Cast off on the WS.
Repeat for the other Sleeve Edging.
TO FINISH
Sew Sleeve and side seams. See
ball band for further care
instructions.
!"" BHG KNIT#&#CROCHET#COLLECTION#$%$"
HEXAGON TEMPLATE
TRIANGLE TEMPLATE
PATTERNS
TO MAKE UP
Take the large piece of denim and
lay flat with WS facing you. Fold
over 10cm on both ends of the
longer sides so piece measures
45x45cm. Place the Front on top
of the back with RS facing you,
lining up the zigzag edge with the
folded edge on the back. You will
need to fold edges of Hexagons to
the inside of the cushion cover.
Whipstitch the zigzag edges in
place. Use the leather punch to
make 52 holes evenly across the
top and bo!om edge of back
piece. With RS of back facing you,
join yarn in first hole across top of
back and work 2dc in each hole
across. [104 sts]
Fasten off.
Repeat on the bo!om edge.
Position cushion insert and
whipstitch the rows to the Front of
the Cushion. Weave in all ends.
SUPER STARS LAYOUT DIAGRAM
HOW TO OVERSEW MOTIFS TOGETHER
STEP 1
STEP 1 Also known as whip stitch.
With WS together, thread needle
with yarn and insert into the back
loops only of the corner stitches
on both pieces. Leave a fairly long
tail.
STEP 2
STEP 2 *Insert needle from
bo!om to top into the back loops
of the next 2 sts. Repeat from *
along the motif edges, sewing
together the inner loops of
corresponding stitches.
STEP 3
STEP 3 When you reach the next
corner, you could fasten off. Or
carry on with the next 2 motifs for
a continuous seam that forms a
strong join on blankets and means
there are fewer ends to weave in.
STEP 4
STEP 4 Once you’ve oversewn all
the rows in one direction, repeat
the process in the other direction.
Cross over the seam you
previously created for a neat finish
where corners meet.
KNIT!&!CROCHET!COLLECTION!"#"$ BHG %$&
THE"IMPORTANT"BITS
WHERE TO BUY
Caron
woolwarehouse.co.uk
Cascade Yarns
Li!le Woolly Makes Yarn Store
Hastings, Victoria 3915
Ph: (03) 5979 7259
li!lewoolliemakes.com.au
Cygnet Yarns
woolwarehouse.co.uk
DMC
Birch Creative
Ph: (03) 9450 8900
birchcreative.com.au/stockists
Drops
woolwarehouse.co.uk
Hoooked
textiletransitions.com.au
King Cole
For yarn stockists in Australia contact:
Extraordinary Yarns
Ph: (03) 5979 1555
info@extraordinaryyarns.com
Lion Brand
Cra"2U
Narooma, NSW 2546
Ph: (02) 4402 3101
cra"2u.com.au
Novita Knits
lovecra"s.com
Rowan
Morris & Sons Sydney Ph: (02) 9299 8588
Morris & Sons Melbourne Ph: (03) 9654 0888
morrisandsons.com.au
Schachenmayr (Regia Colour 6ply)
Morris & Sons Sydney Ph: (02) 9299 8588
Morris & Sons Melbourne Ph: (03) 9654 0888
morrisandsons.com.au
Schachenmayr (Baby Smiles Bravo Baby)
lovecra"s.com
Scheepjes
scheepjes.com/en
To find a store, search “Australia” on website.
There are many websites and/or stores in
Australia listed.
Sirdar
For yarn stockists in Australia contact
Extraordinary Yarns
Ph: (03) 5979 1555
info@extraordinaryyarns.com
Stylecra! yarns
Kni!y Gri!y Yarn and More
Taree NSW 2430
Ph: (02) 5591 8144
kni!ygri!yyarnandmore.com
West Yorkshire Spinners
Yarn Trader
Port Adelaide, SA 5015
Ph: (08) 7222 0525 www.yarntrader.com.au
Paintbox Yarns
lovecra"s.com
Regia
Morris & Sons Sydney Ph: (02) 9299 8588
Morris & Sons Melbourne Ph: (03) 9654 0888
morrisandsons.com.au
Rico Essentials
woolwarehouse.co.uk
lovecra"s.com
!"# BHG KNIT$&$CROCHET$COLLECTION$%&%"
All information correct
at time of printing.
Colours may vary due
to printing.
ARE MEDIA PRIVACY NOTICE This issue of Knit and Crochet
Collection 2023 is published by Are Media Pty Limited (Are
Media). Are Media may use and disclose your information in
accordance with our Privacy Policy, including to provide you with
your requested products or services and to keep you informed
of other Are Media publications, products, services and events.
Our Privacy Policy is located at www.aremedia.com.au/privacy/.
It also sets out on how you can access or correct your personal
information and lodge a complaint. Are Media may disclose your
personal information offshore to its owners, joint venture
partners, service providers and agents located throughout the
world, including in New Zealand, USA, the Philippines and the
European Union. In addition, this issue may contain Reader
Offers, being offers, competitions or surveys. Reader Offers may
require you to provide personal information to enter or to take
part. Personal information collected for Reader Offers may be
disclosed by us to service providers assisting Are Media in the
conduct of the Reader Offer and to other organisations
providing special prizes or offers that are part of the Reader
Offer. An opt-out choice is provided with a Reader Offer. Unless
you exercise that opt-out choice, personal information collected
for Reader Offers may also be disclosed by us to other
organisations for use by them to inform you about other
products, services or events or to give to other organisations
that may use this information for this purpose. If you require
further information, please contact Are Media’s Privacy Officer
either by email at privacyofficer@aremedia.com.au or mail at
Privacy Officer, Are Media Pty Limited, 54 Park Street, Sydney
NSW 2000.
Project rating
= easy
=medium
=hard
Stay inspired
WITH THE latest
Homes
trends
SAVE
UP TO
36%
+ Free delivery
T&C’s: *Savings based on Home Beautiful, Australian House
& Garden, Country Style, and Inside Out cover price of $9.99.
Offer valid from 01/04/2024 – 31/01/2025. Australian residents
only. Not available inconjunction with any other offer. For
Are Media Group’s Privacy Notice and for full terms and
conditions, visit magshop.com.au/INSPO. If you do not want
your information provided to any organisation not associated
with this promotion, please indicate this clearly at the time
of subscription. Subscription copies do not receive gifts
offered at retail. Your subscription will be subject to continued
autorenewal. Your credit card will continue to be charged as
per the above rate and term unless you cancel and is subject
to any price increases notified to you in accordance with the
Magshop terms and conditions. For full Magshop terms and
conditions including auto renewal payment plan terms please
visit www.magshop.com.au/terms.
2 EASY WAYS TO ORDER
ONLINE:
magshop.com.au/INSPO
PHONE: 136 116
and quote M 2 4 I N S P O
EASY TO
GROW
SCAN TO SHOP
T R E AT YO U R S E L F O R S O M E O N E S P E C I A L