/


Text
Best yarns
for lace
Revealed!
EasTer
BunNy
PATTERNS IDEAS YARN INSPIRATION TECHNIQUES
6 science-inspired makes!
foR
Baby
Little dinosaur
Cardigan
er ect
■ LACE MOTIF JUMPER ■ CUTE EGG COSIES ■ IRISH BLANKET ■ MOSAIC CUSHION ■ & MUCH MORE
ISSUE ONE HUNDRED & FORTY SEVEN
100% Falkland Islands Wool
Introducing Rock Pool, Water Lily,
Lily Pad & Rainfall.
Discover the 16 shade Pure DK collection
and find your local stockist at wyspinners.com
01535 664500
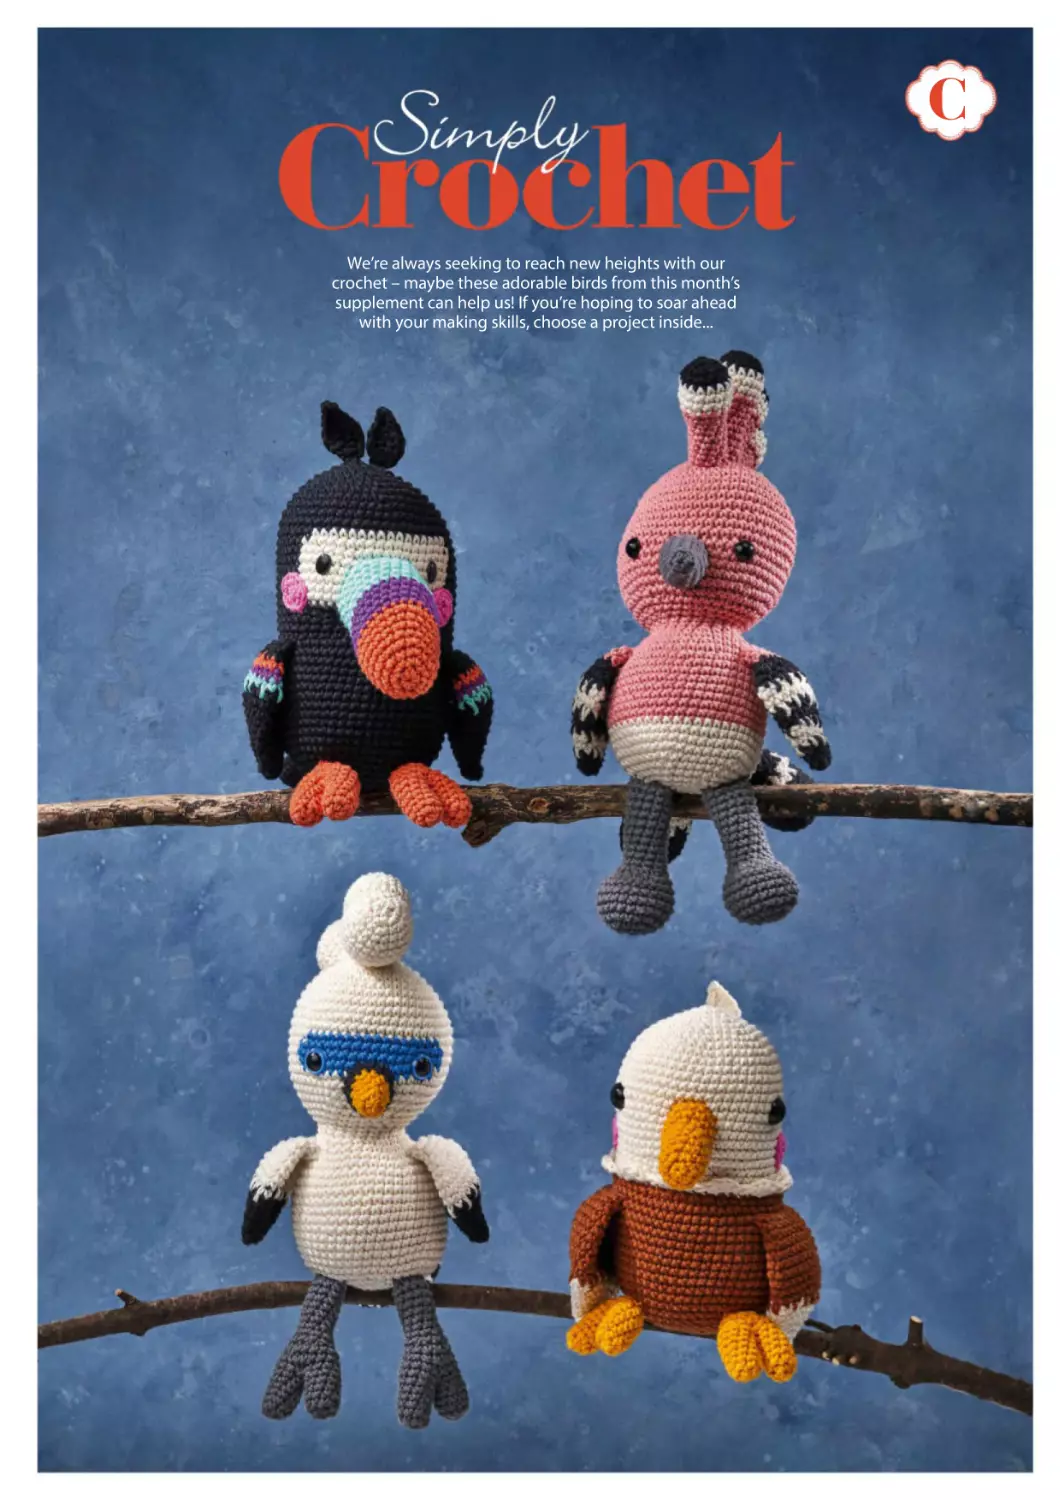
C
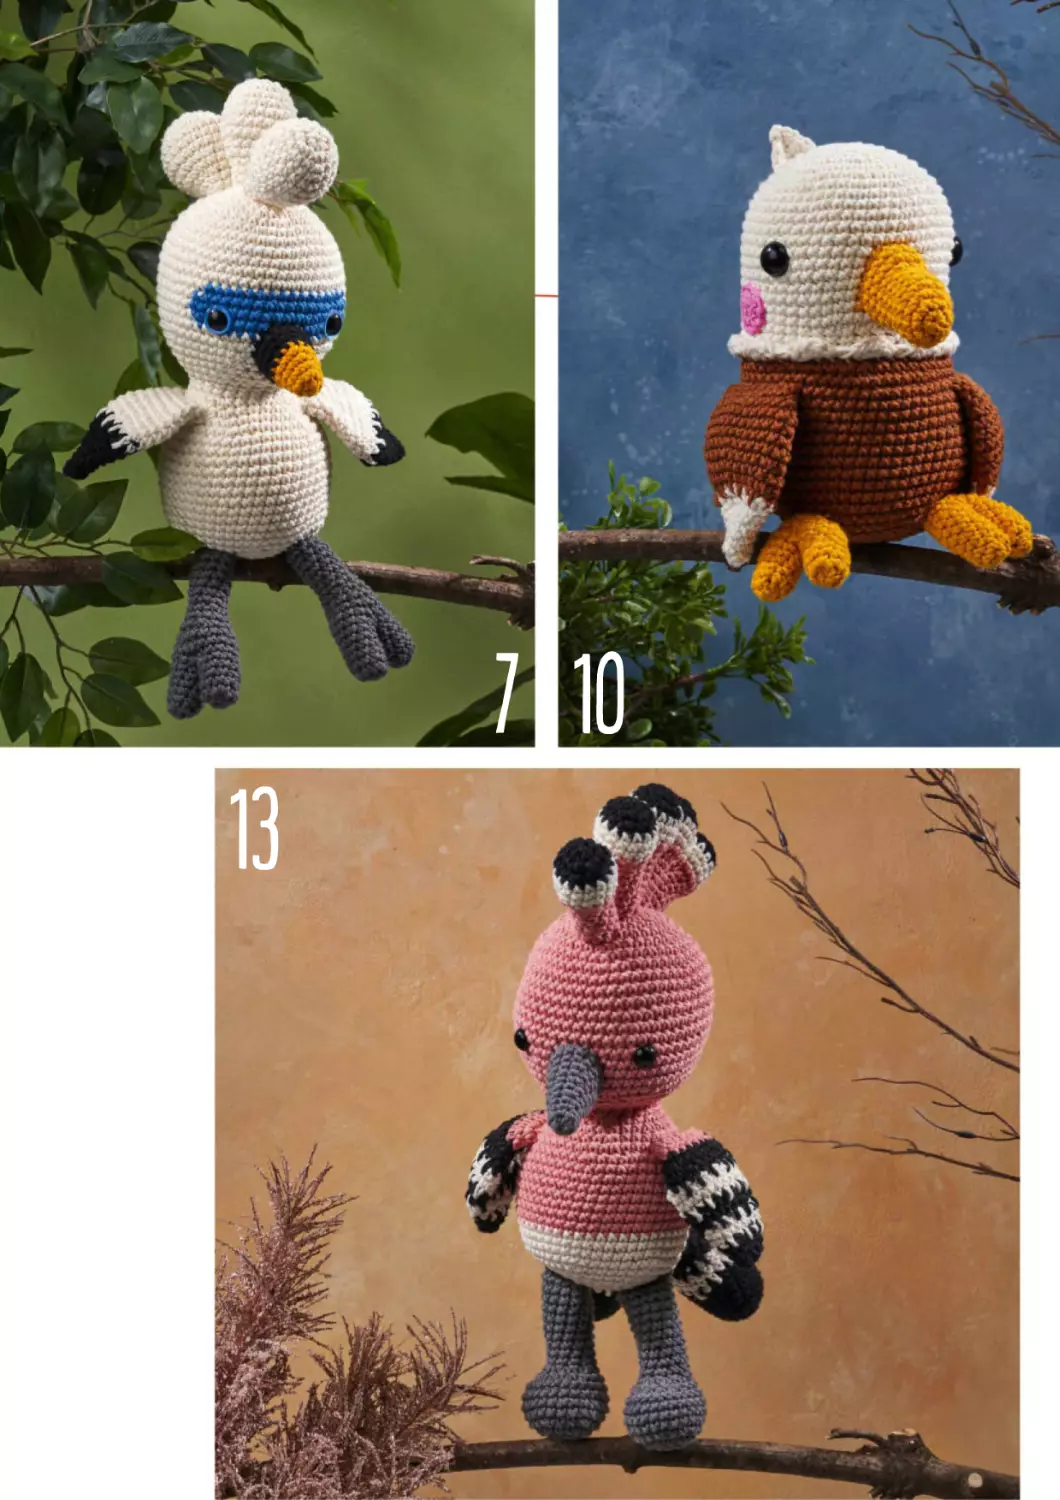
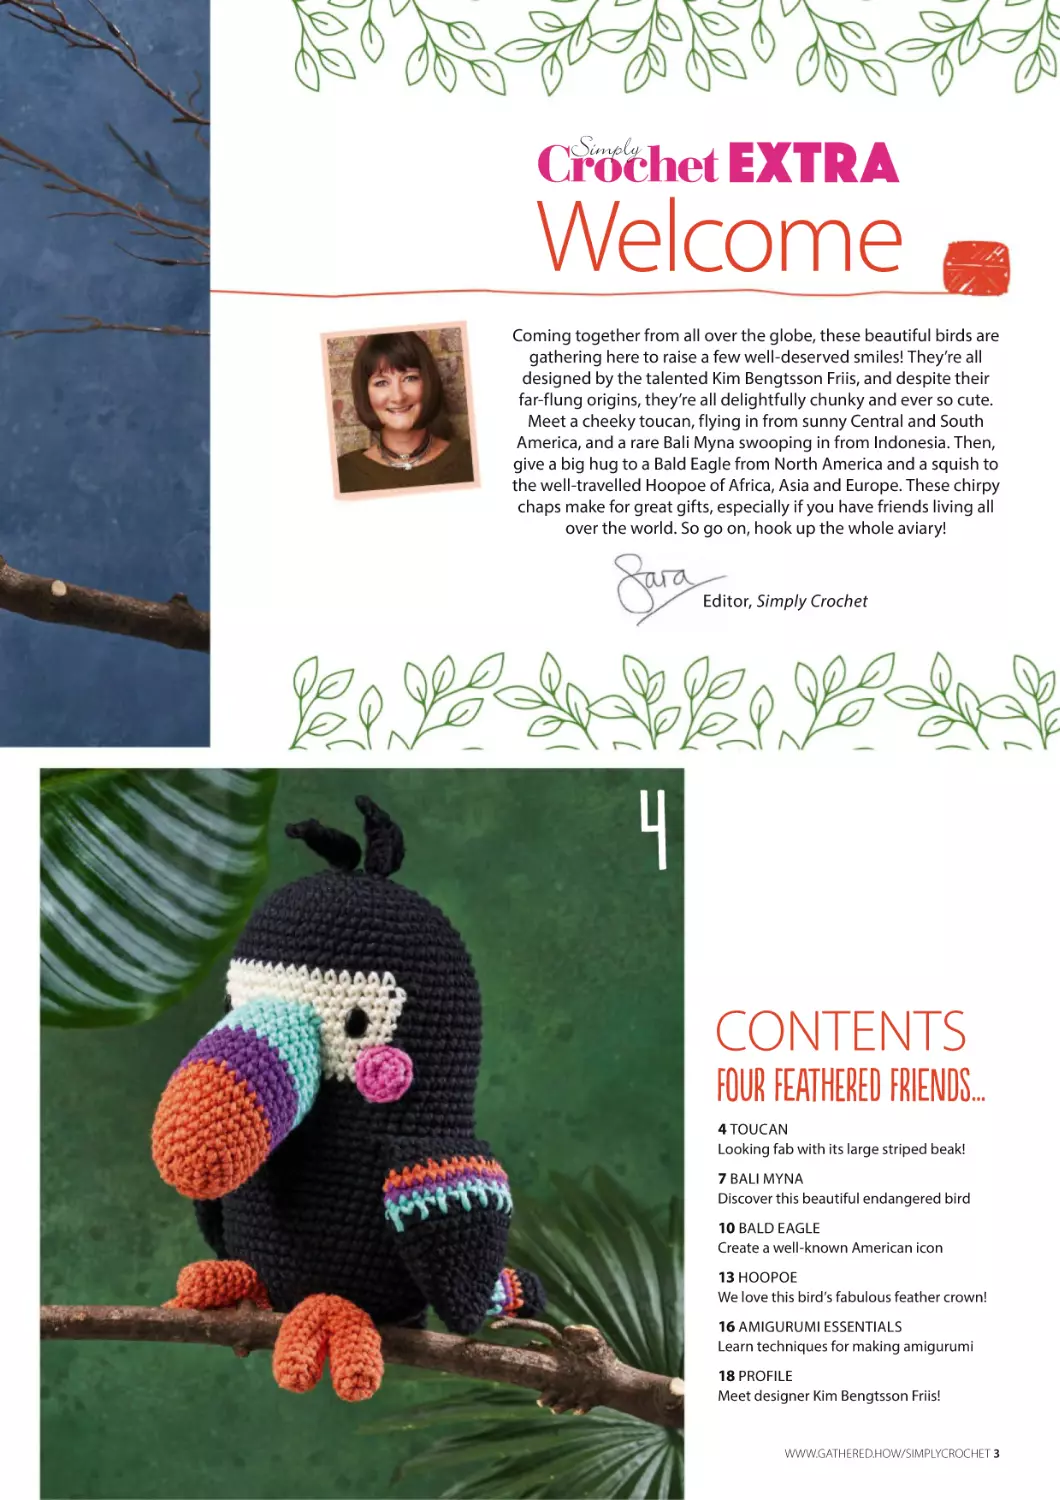
We’re always seeking to reach new heights with our
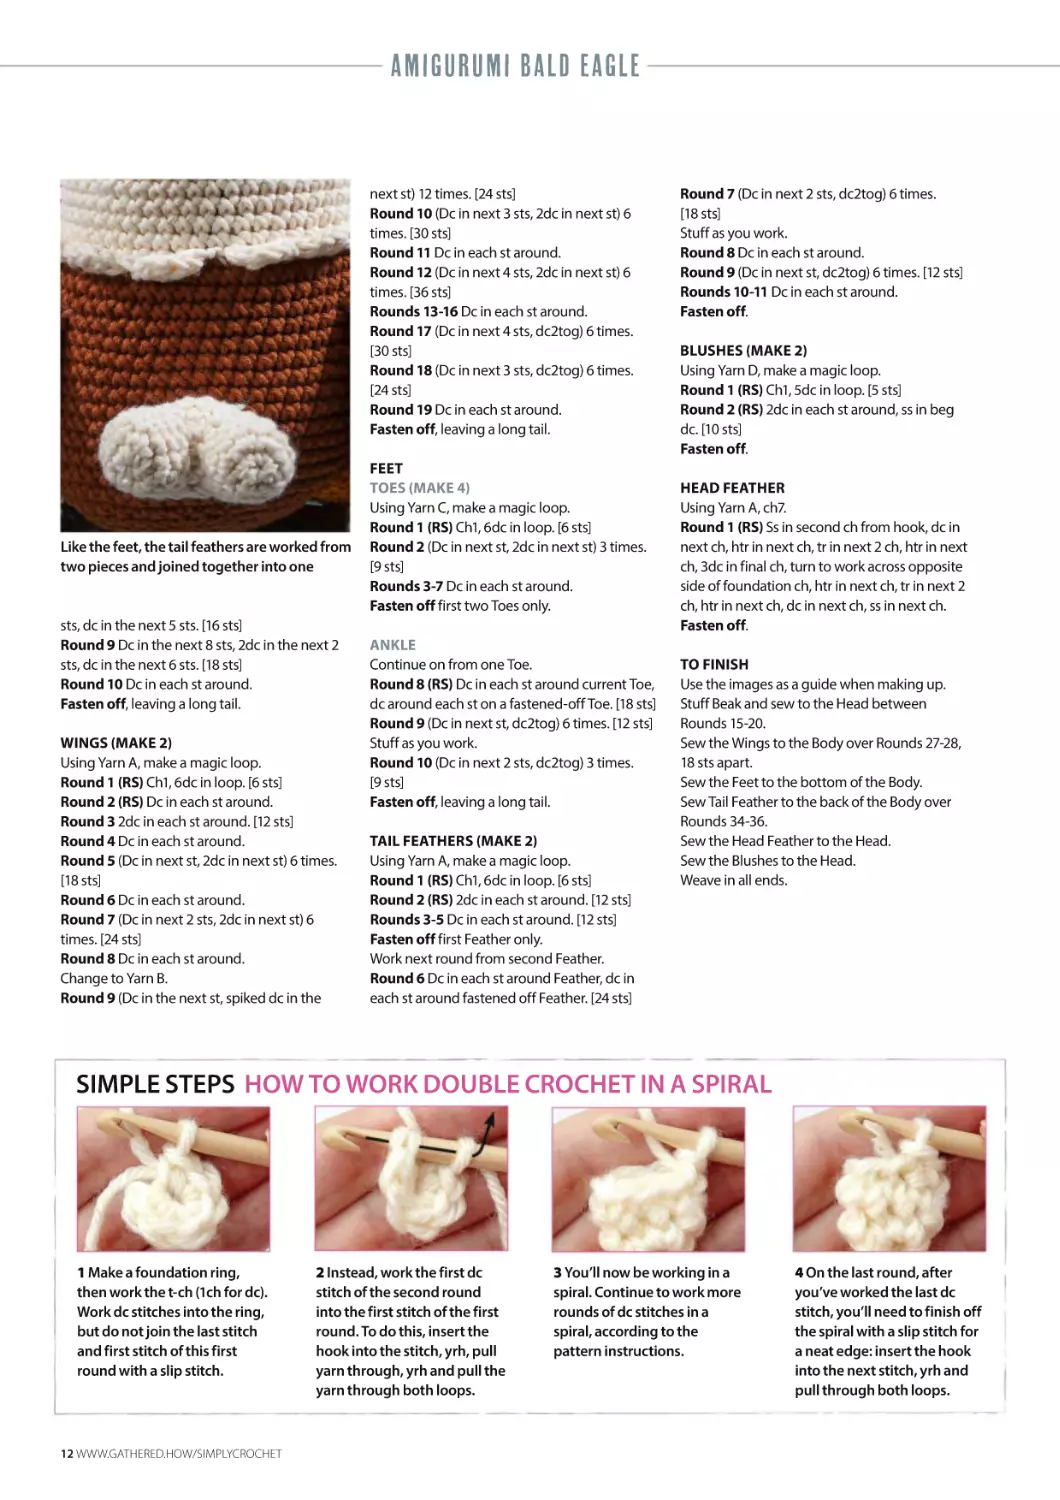
crochet – maybe these adorable birds from this month’s
supplement can help us! If you’re hoping to soar ahead
with your making skills, choose a project inside...
le
Make moolnecpu14!
coasters
ISSUE ONE HUNDRED & FORTY SEVEN
CONTENTS
27
ColOuRwoRk
WaiStCoat
SciEnce
ColLeCtiOn
P14
Cover
star!
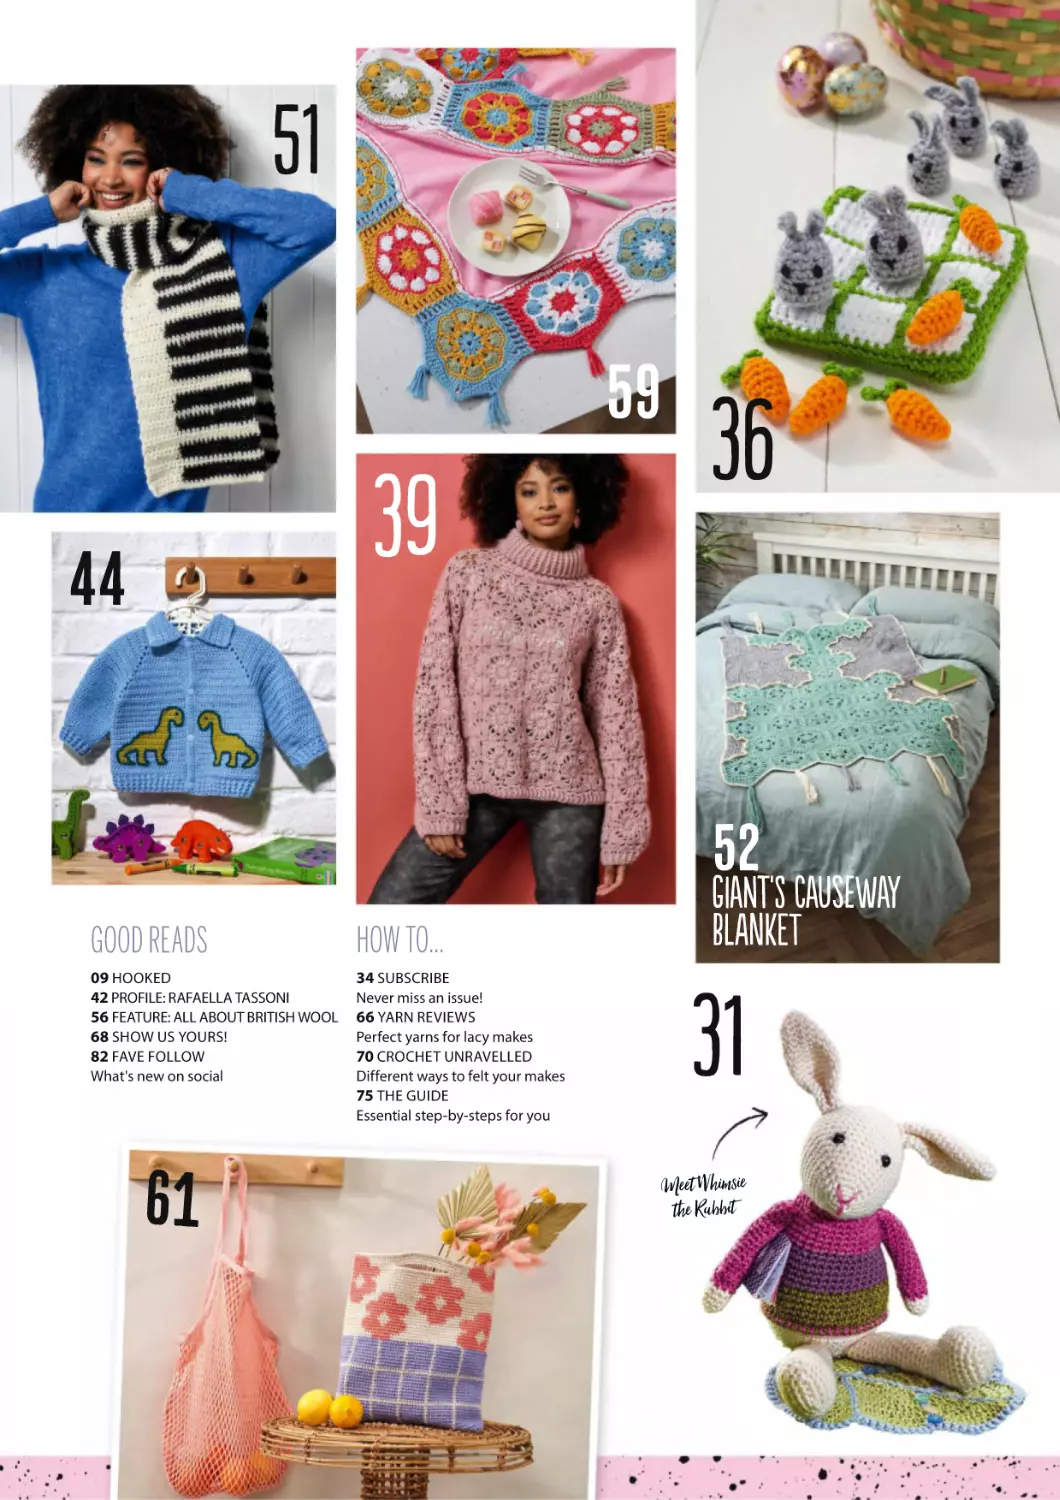
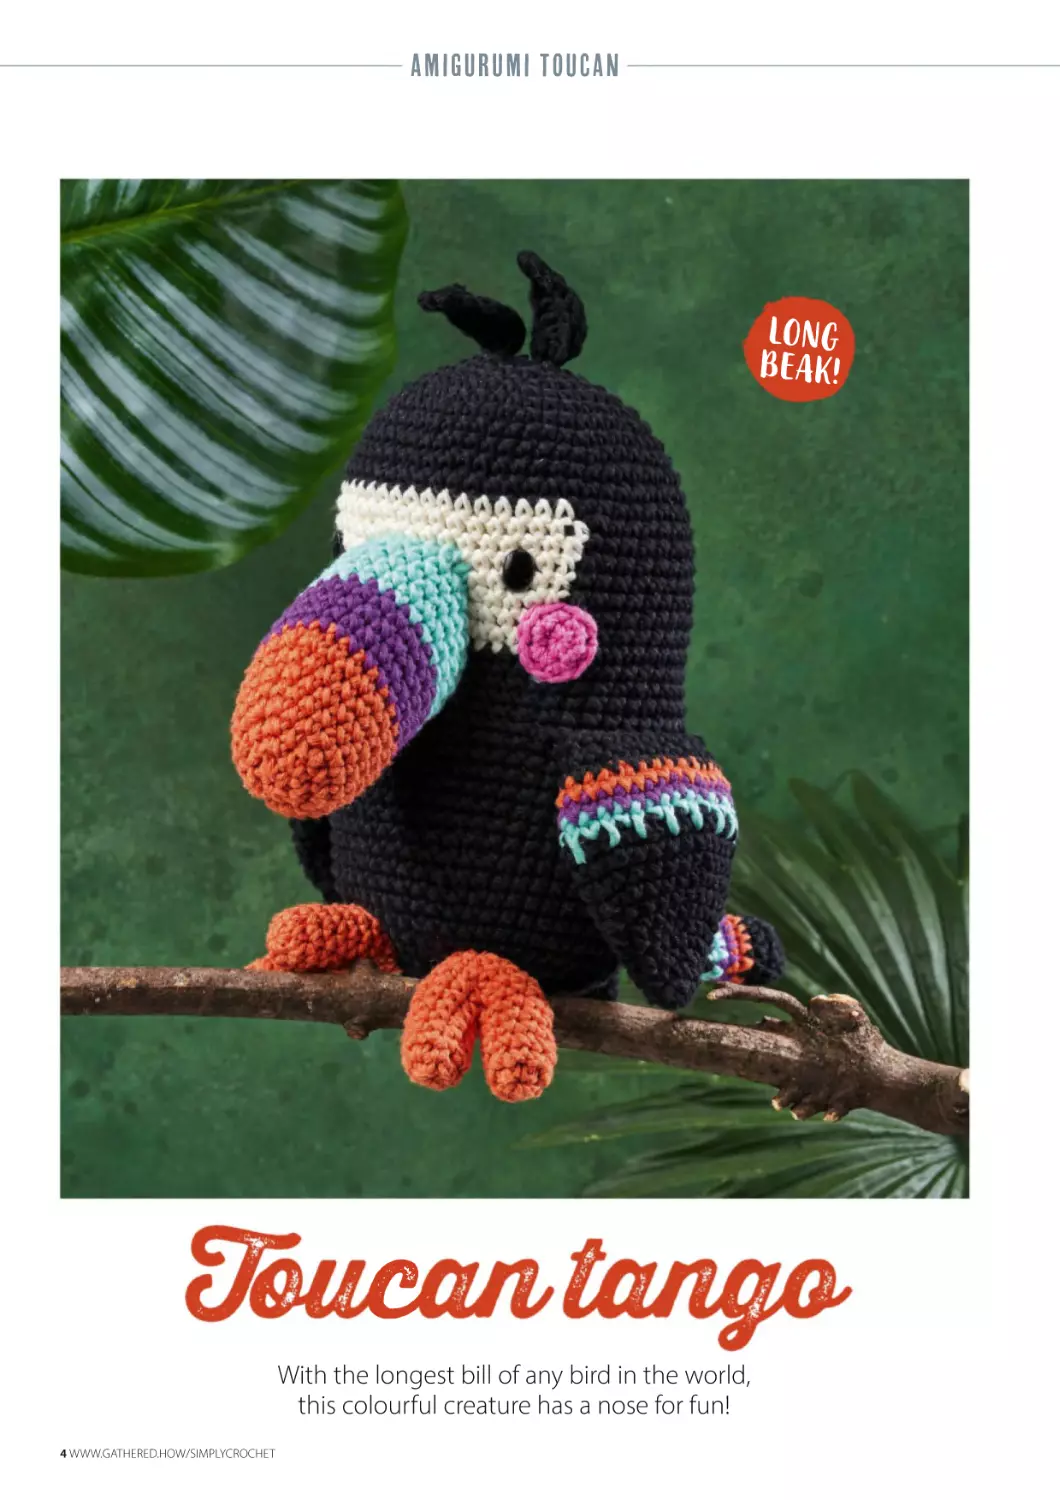
EXCITING CROCHET IDEAS TO INSPIRE YOU
14 SCIENCE COLLECTION
27 COLOURWORK WAISTCOAT
31 AMIGURUMI WHIMSIE THE RABBIT
36 TIC-TAC-TOE MINI GAME
39 FLORAL MOTIF JUMPER
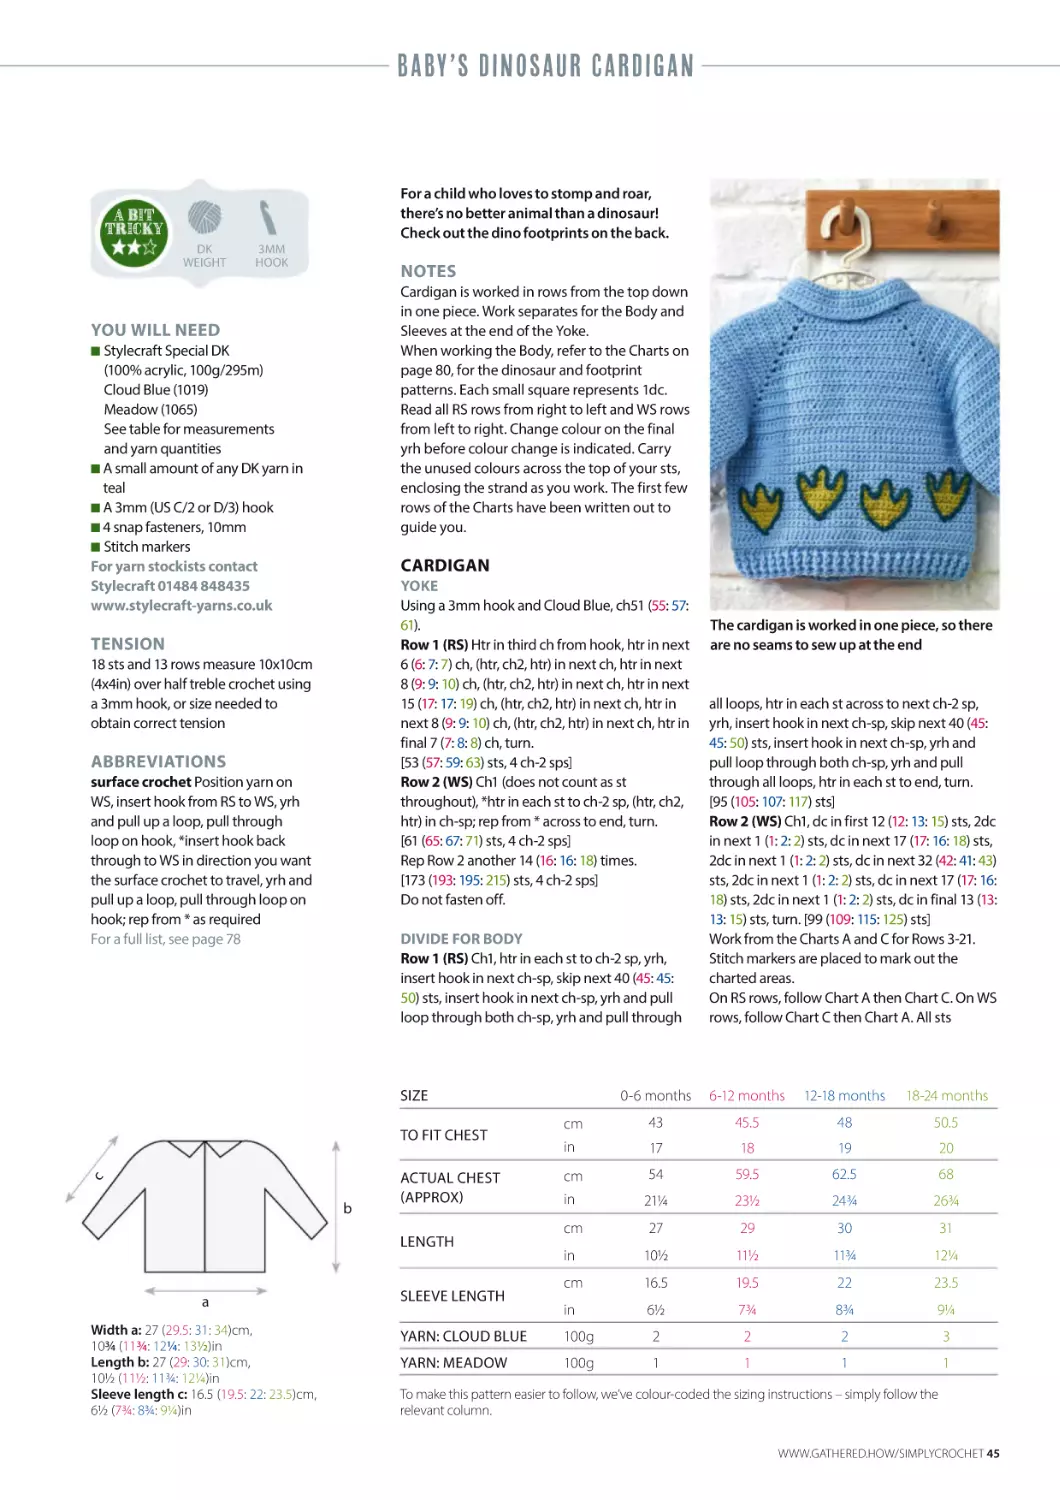
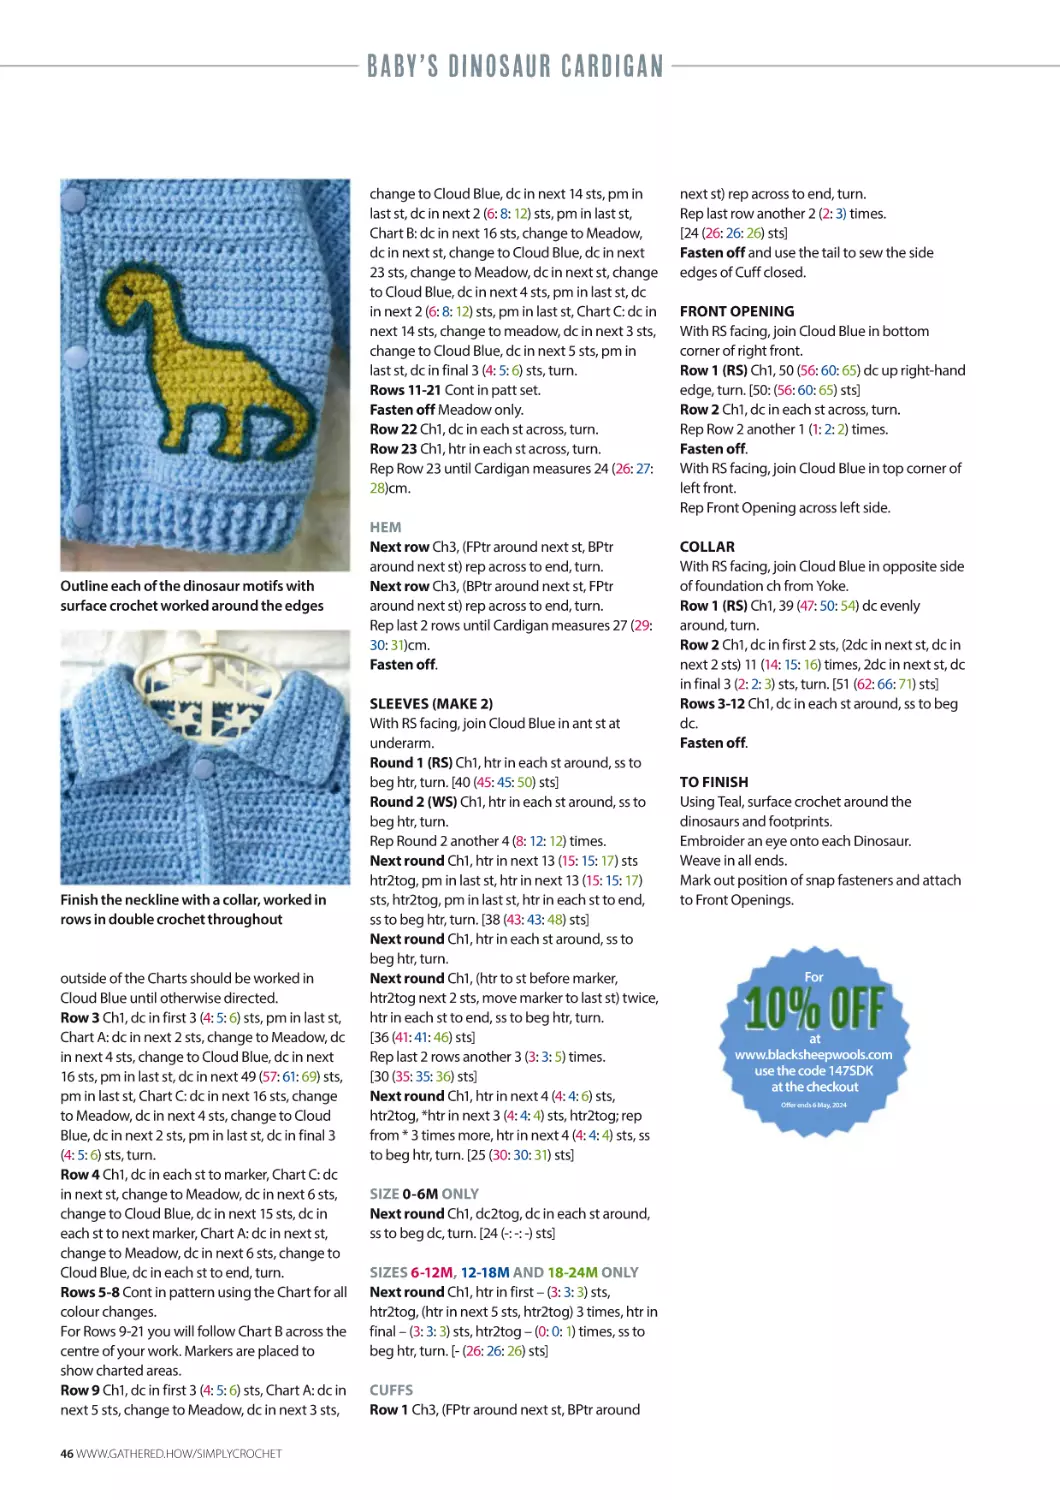
44 BABY'S DINOSAUR CARDIGAN
47
64
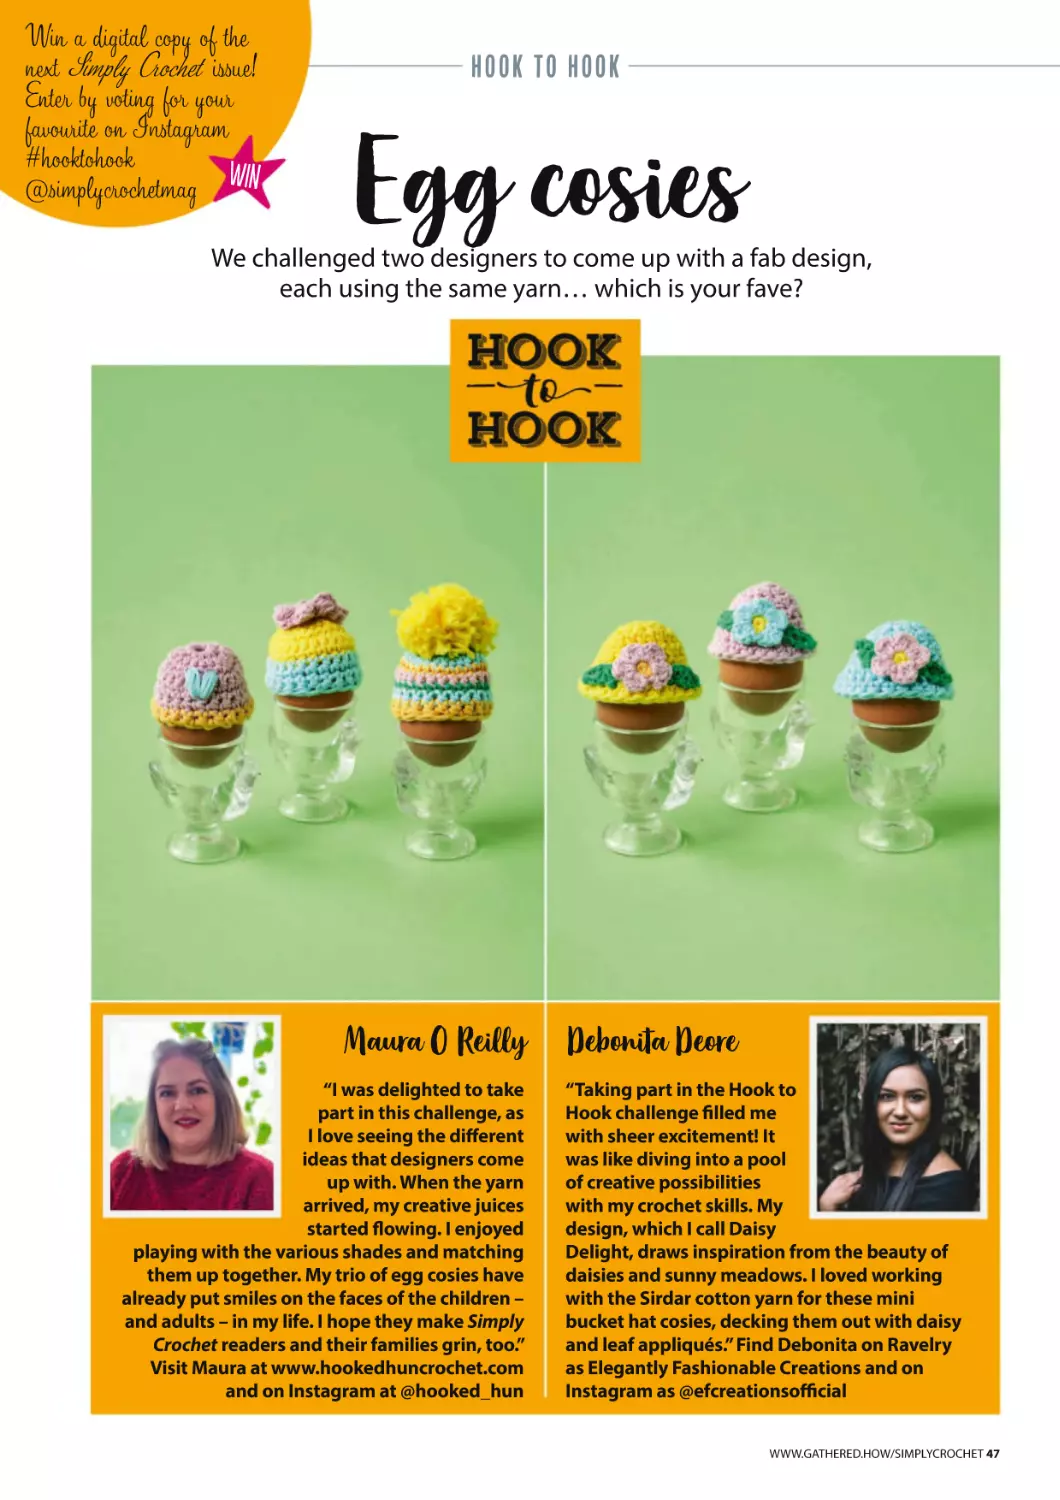
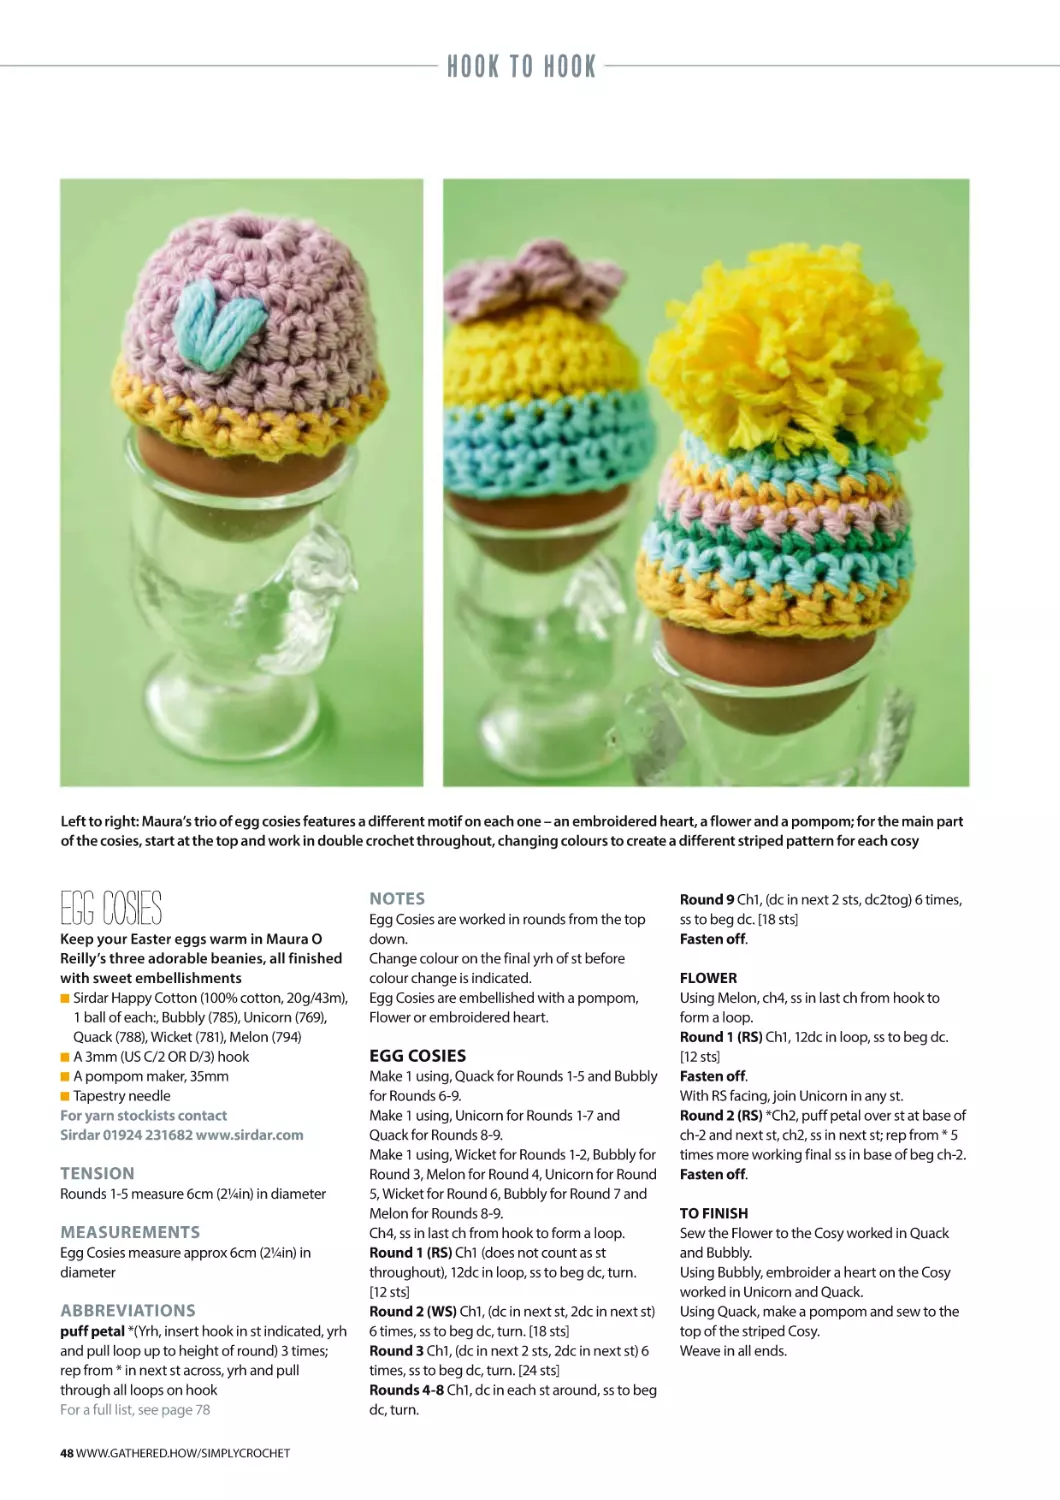
47 HOOK TO HOOK: EGG COSIES
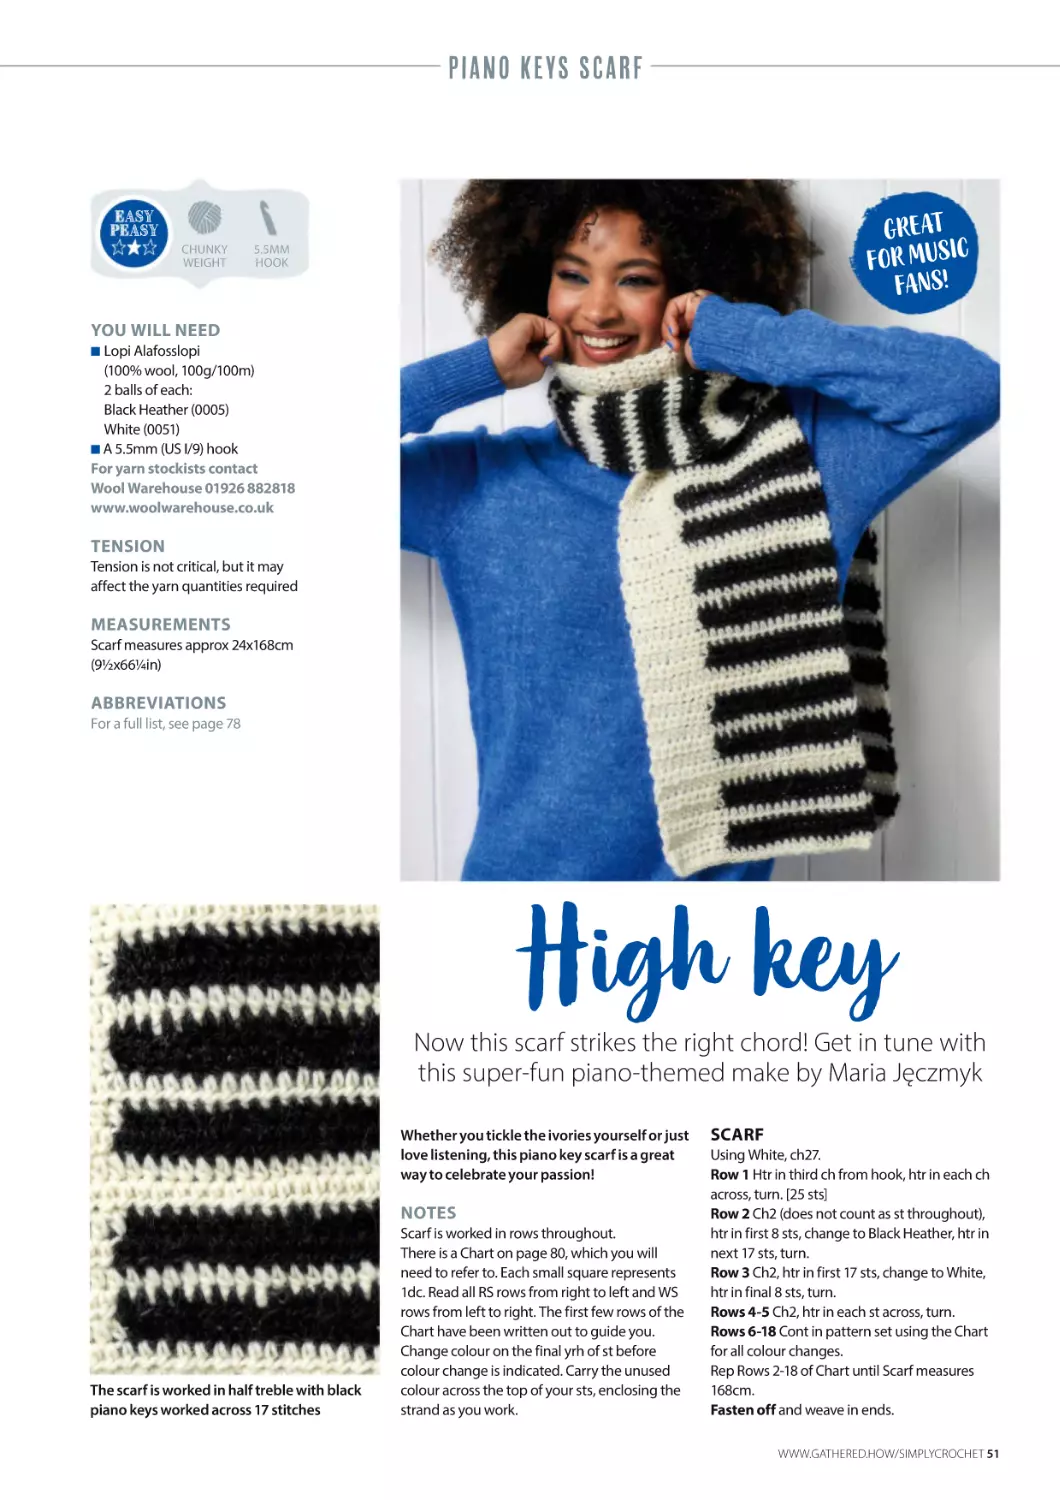
51 PIANO KEYS SCARF
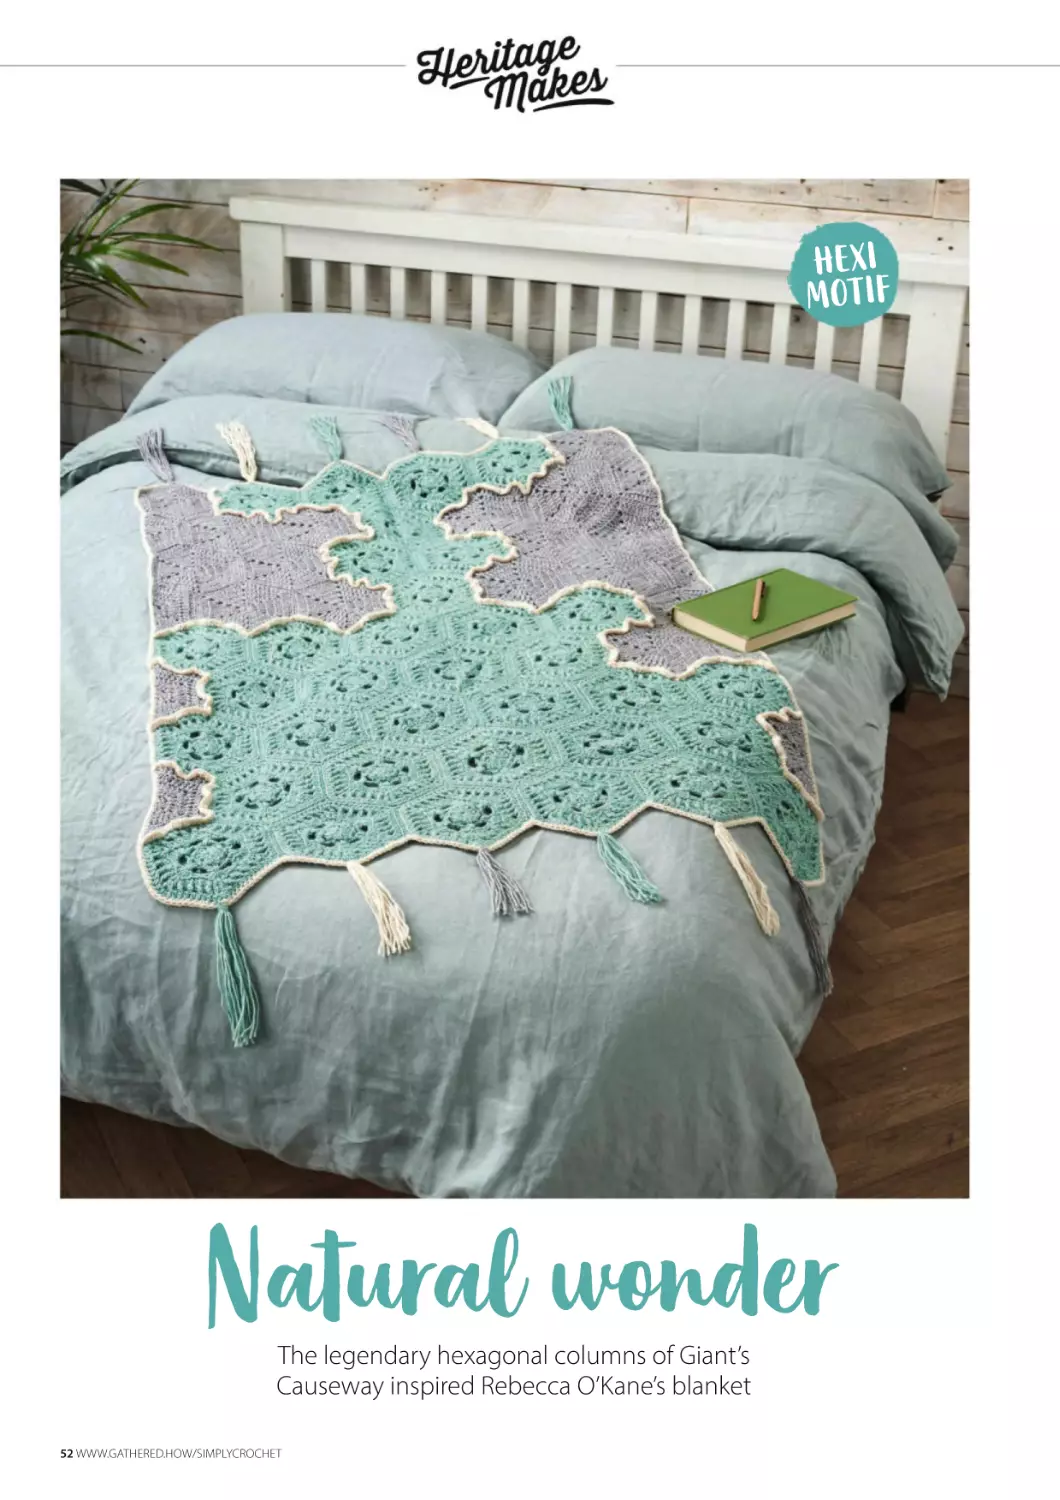
52 HERITAGE MAKES: GIANT'S CAUSEWAY
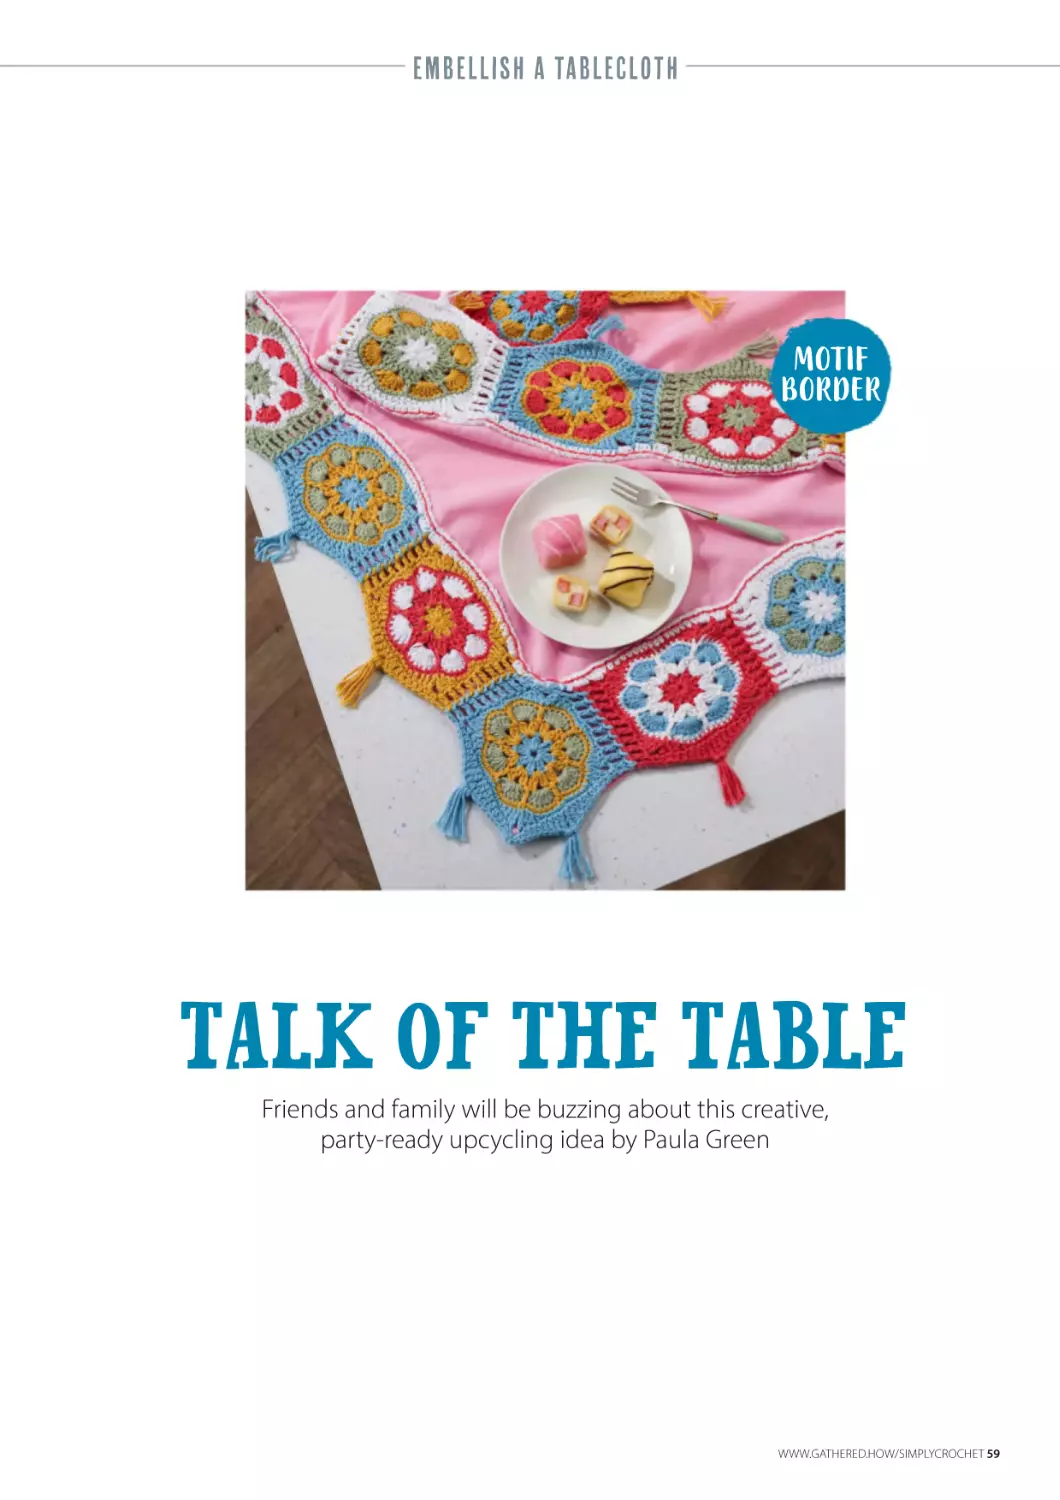
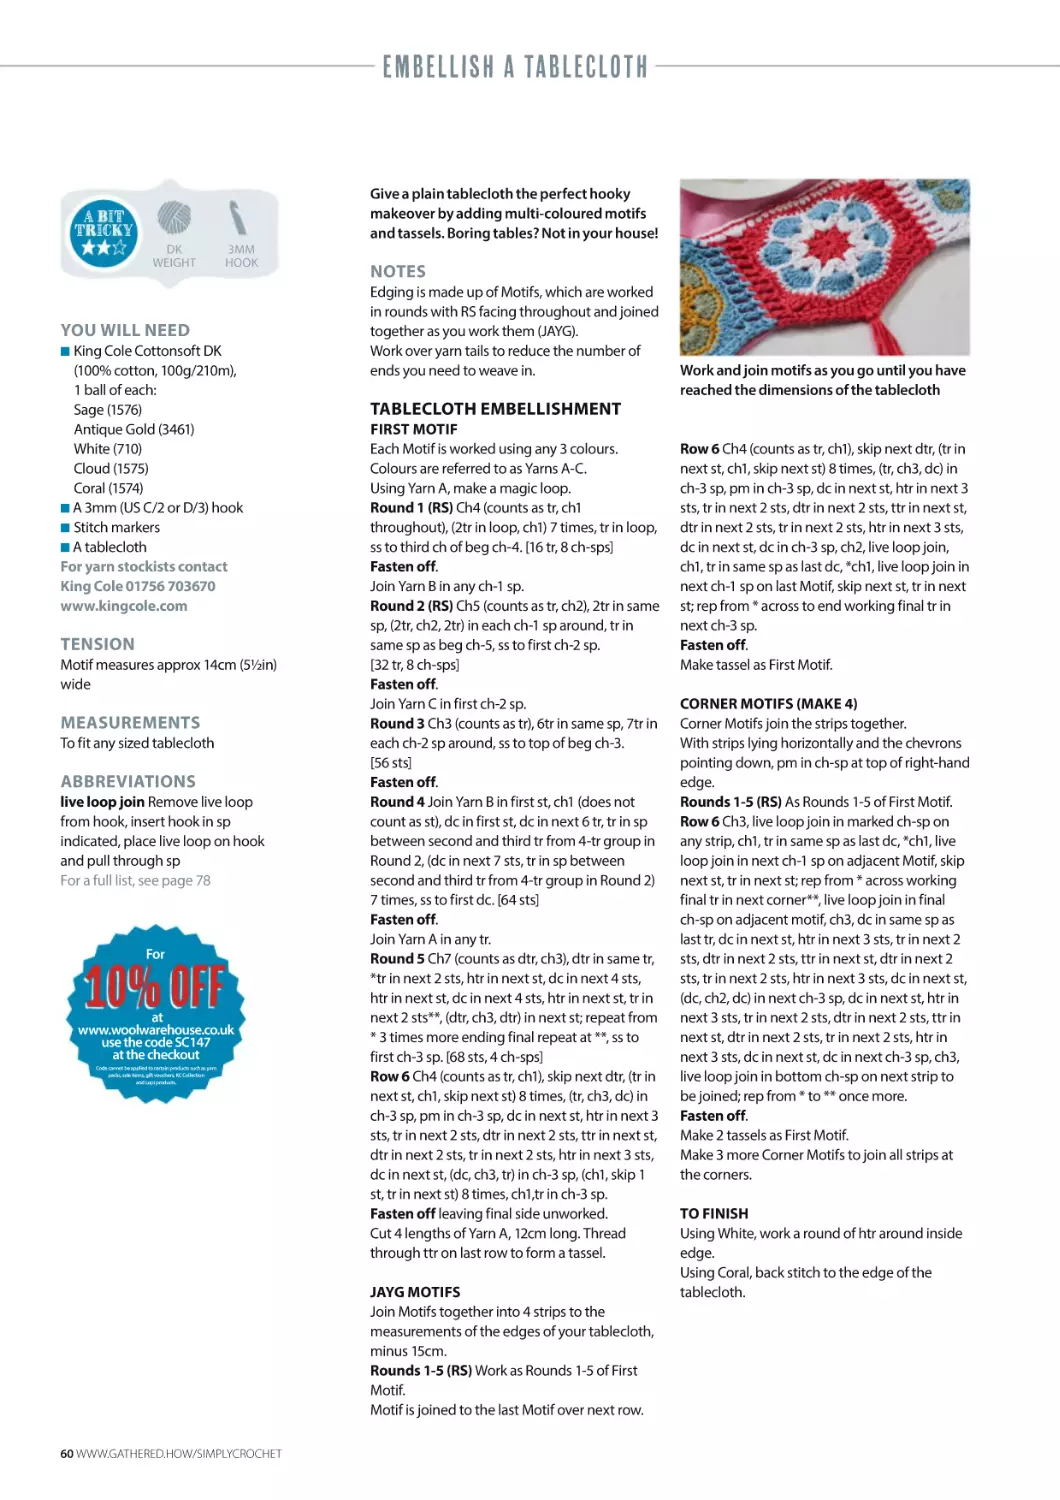
59 EMBELLISH: TABLECLOTH
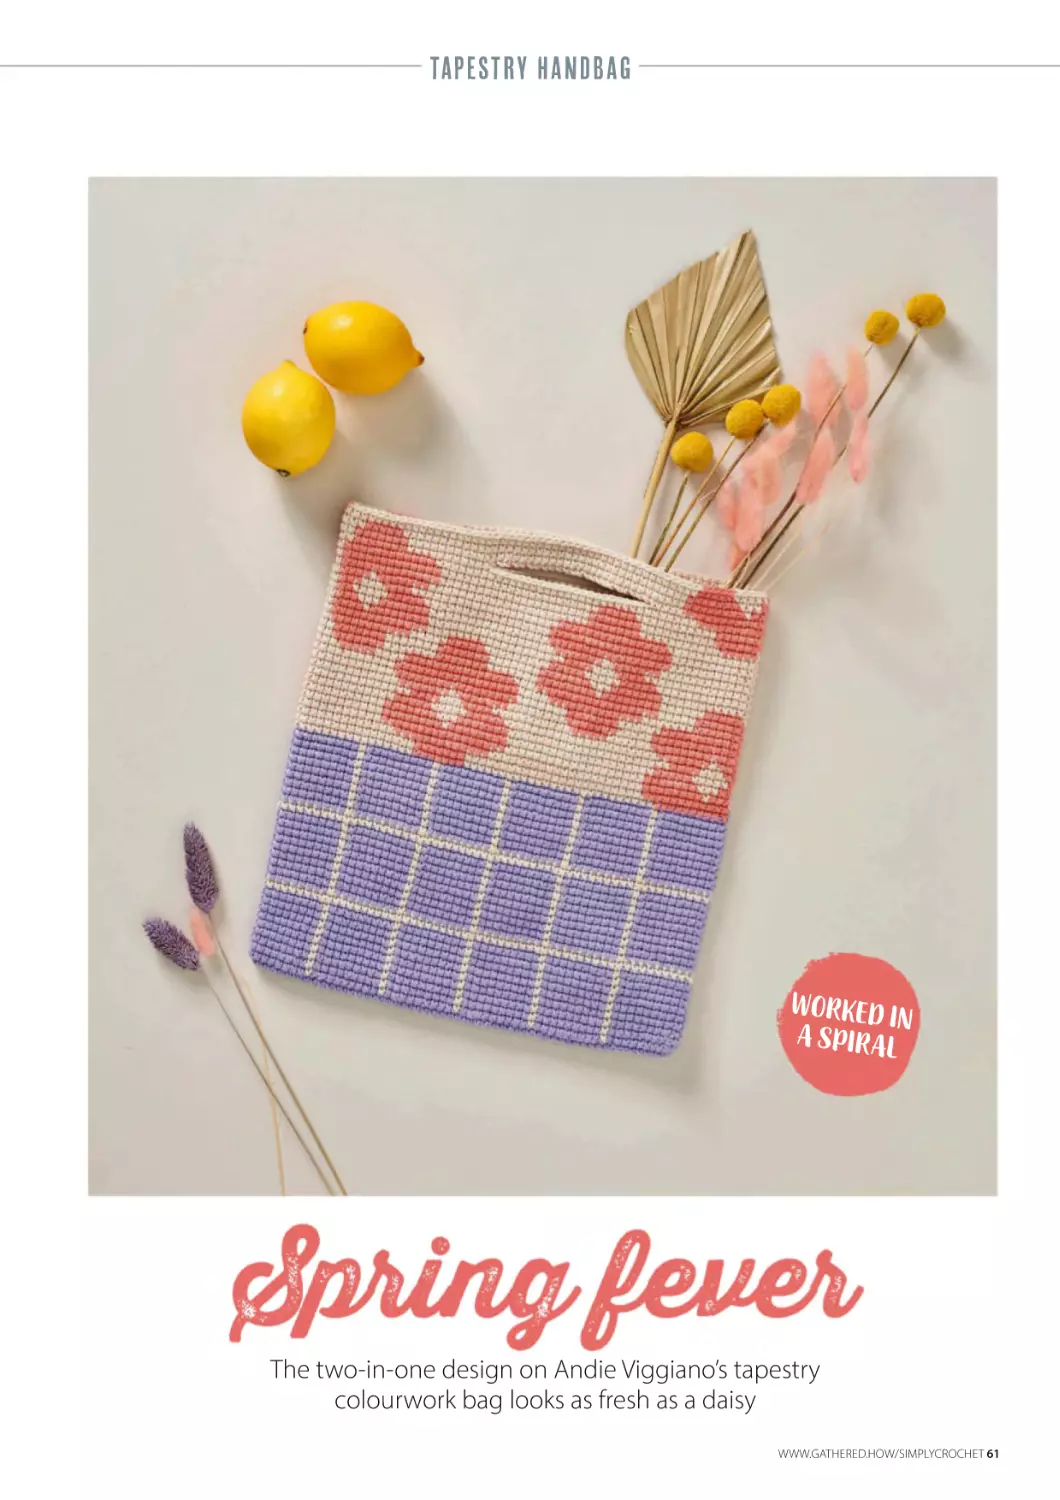
61 TAPESTRY HANDBAG
64 MOSAIC CUSHION
51
59
39
44
36
52
GOOD READS
HOW TO…
09 HOOKED
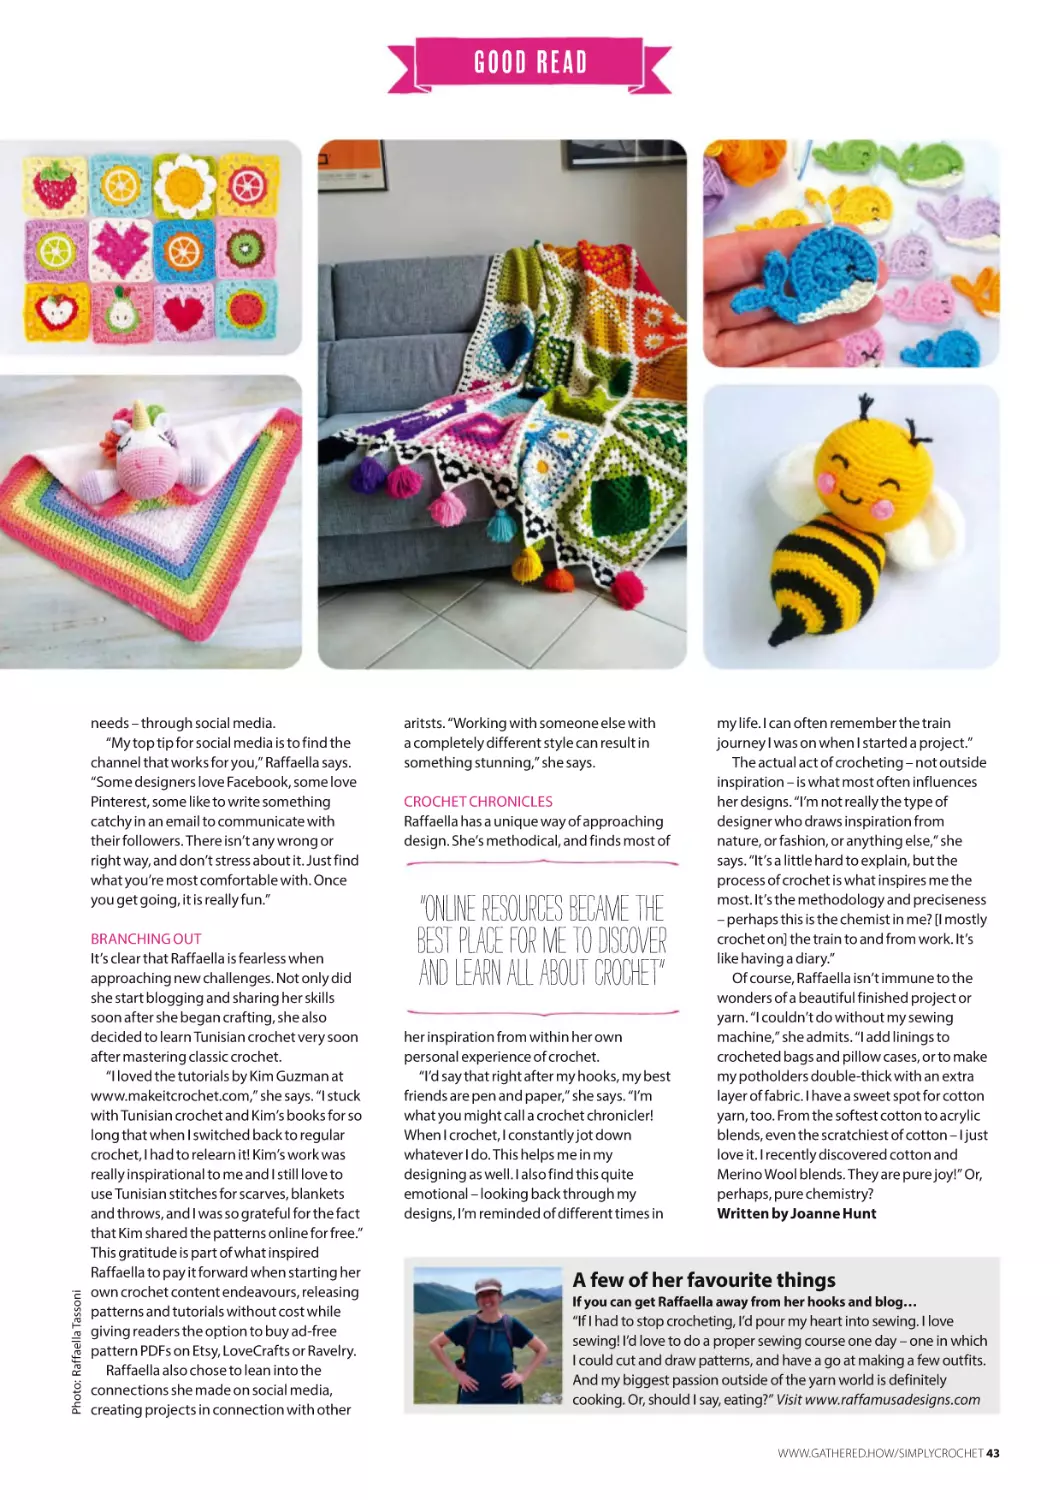
42 PROFILE: RAFAELLA TASSONI
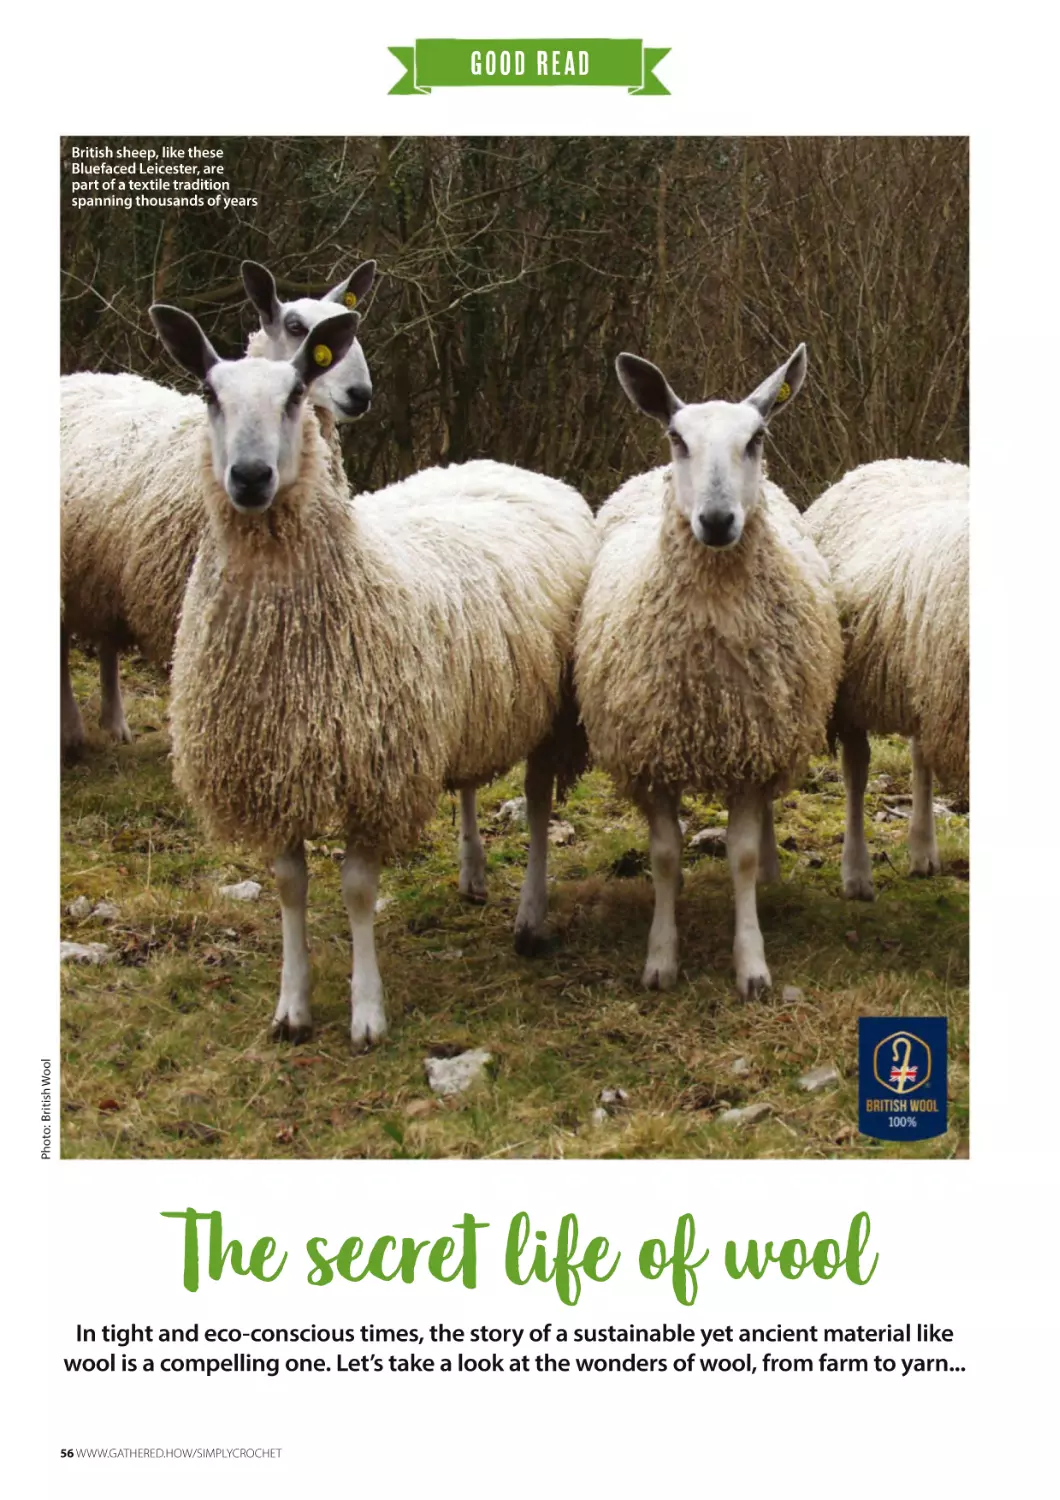
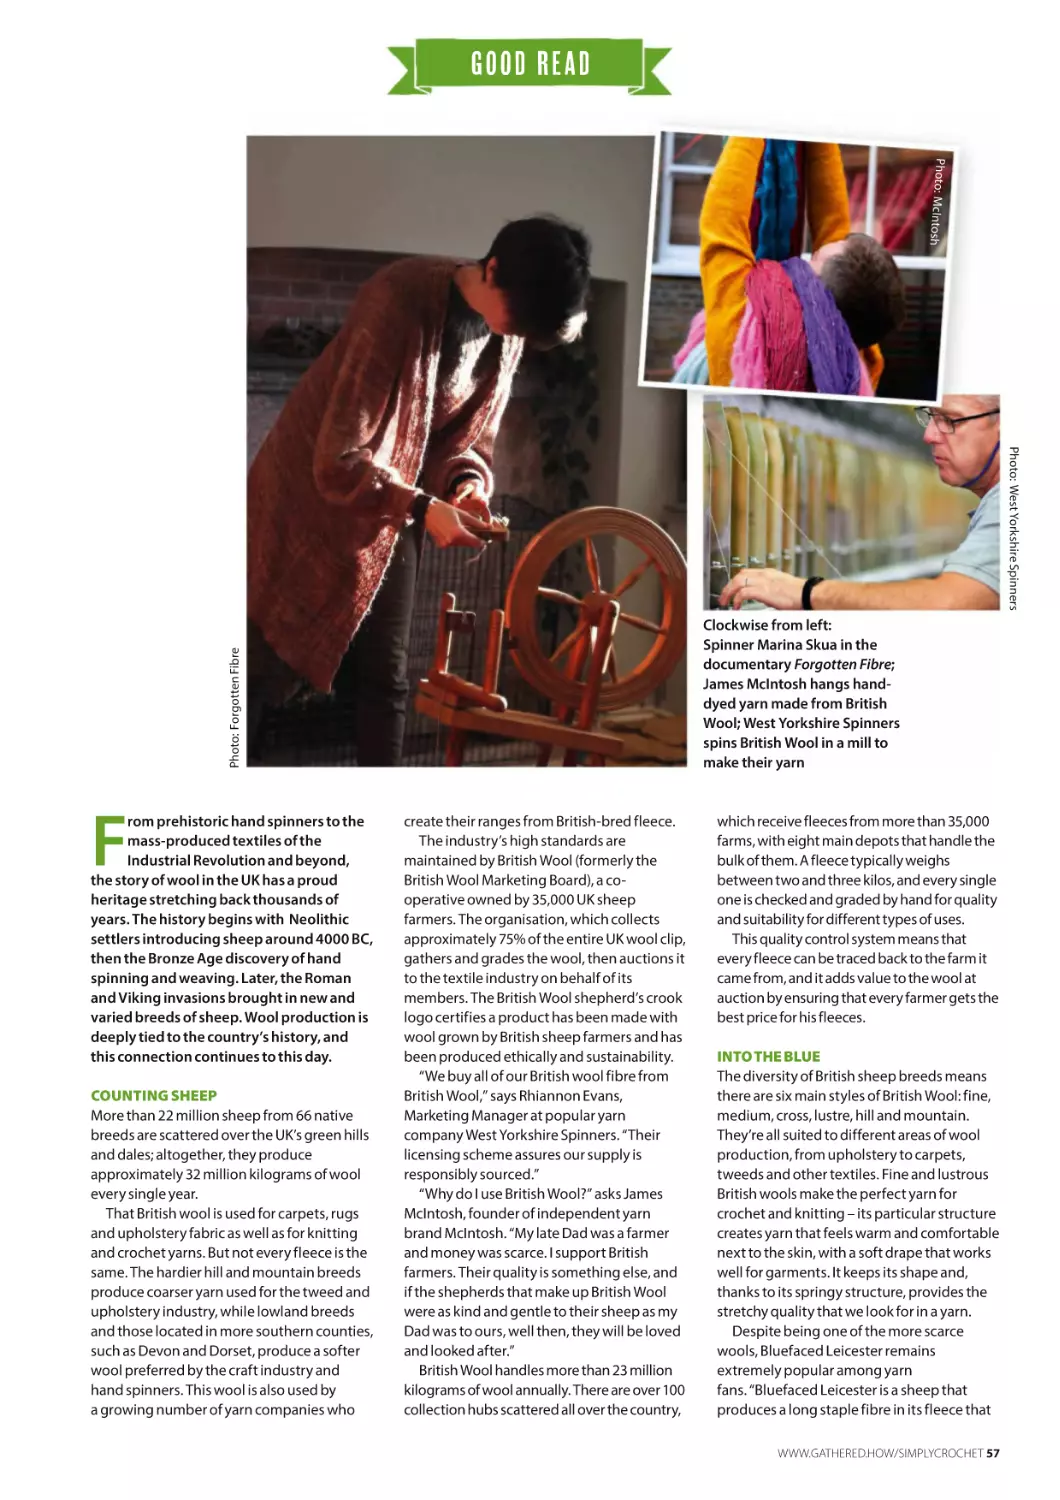
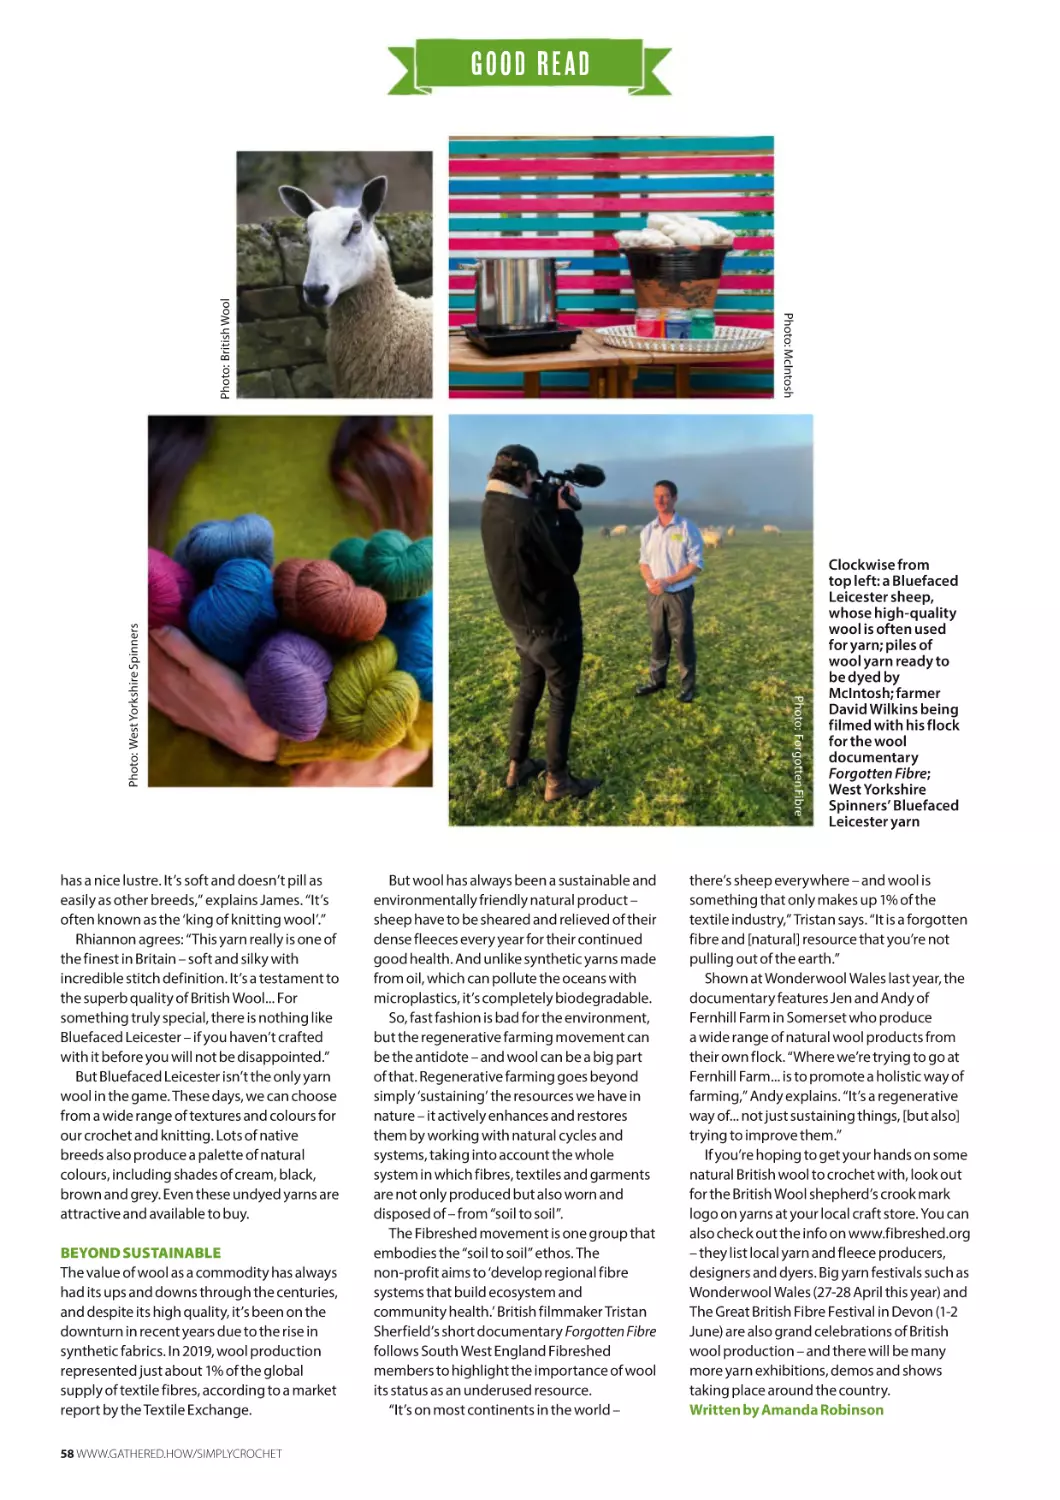
56 FEATURE: ALL ABOUT BRITISH WOOL
68 SHOW US YOURS!
82 FAVE FOLLOW
34 SUBSCRIBE
What's new on social
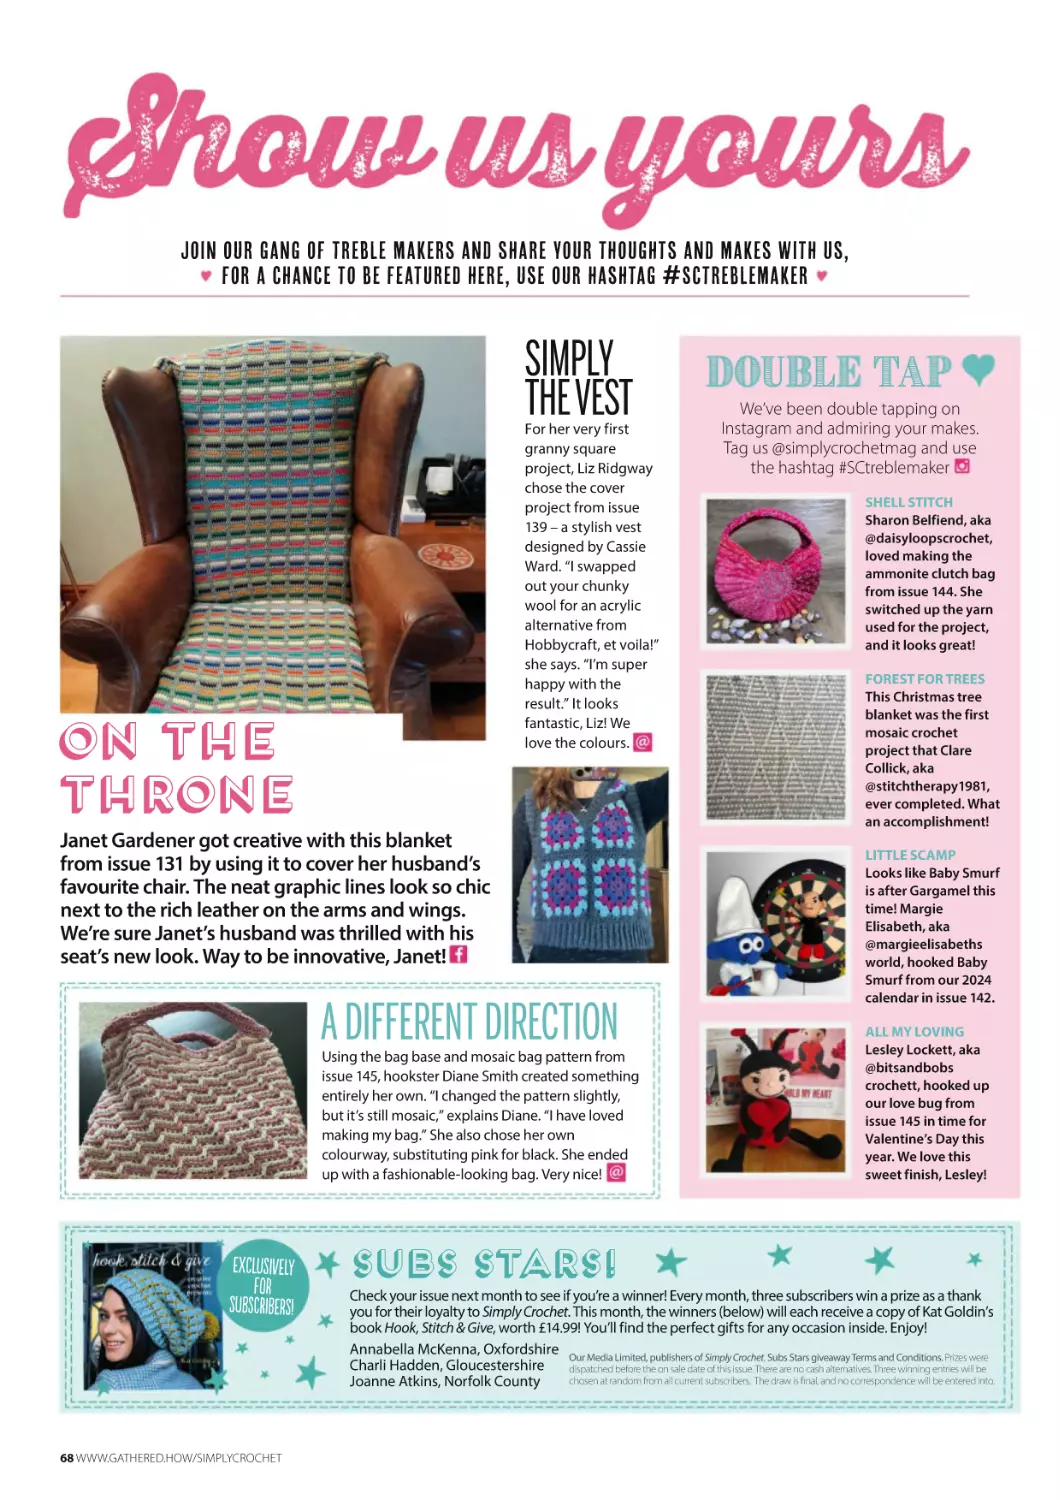
Different ways to felt your makes
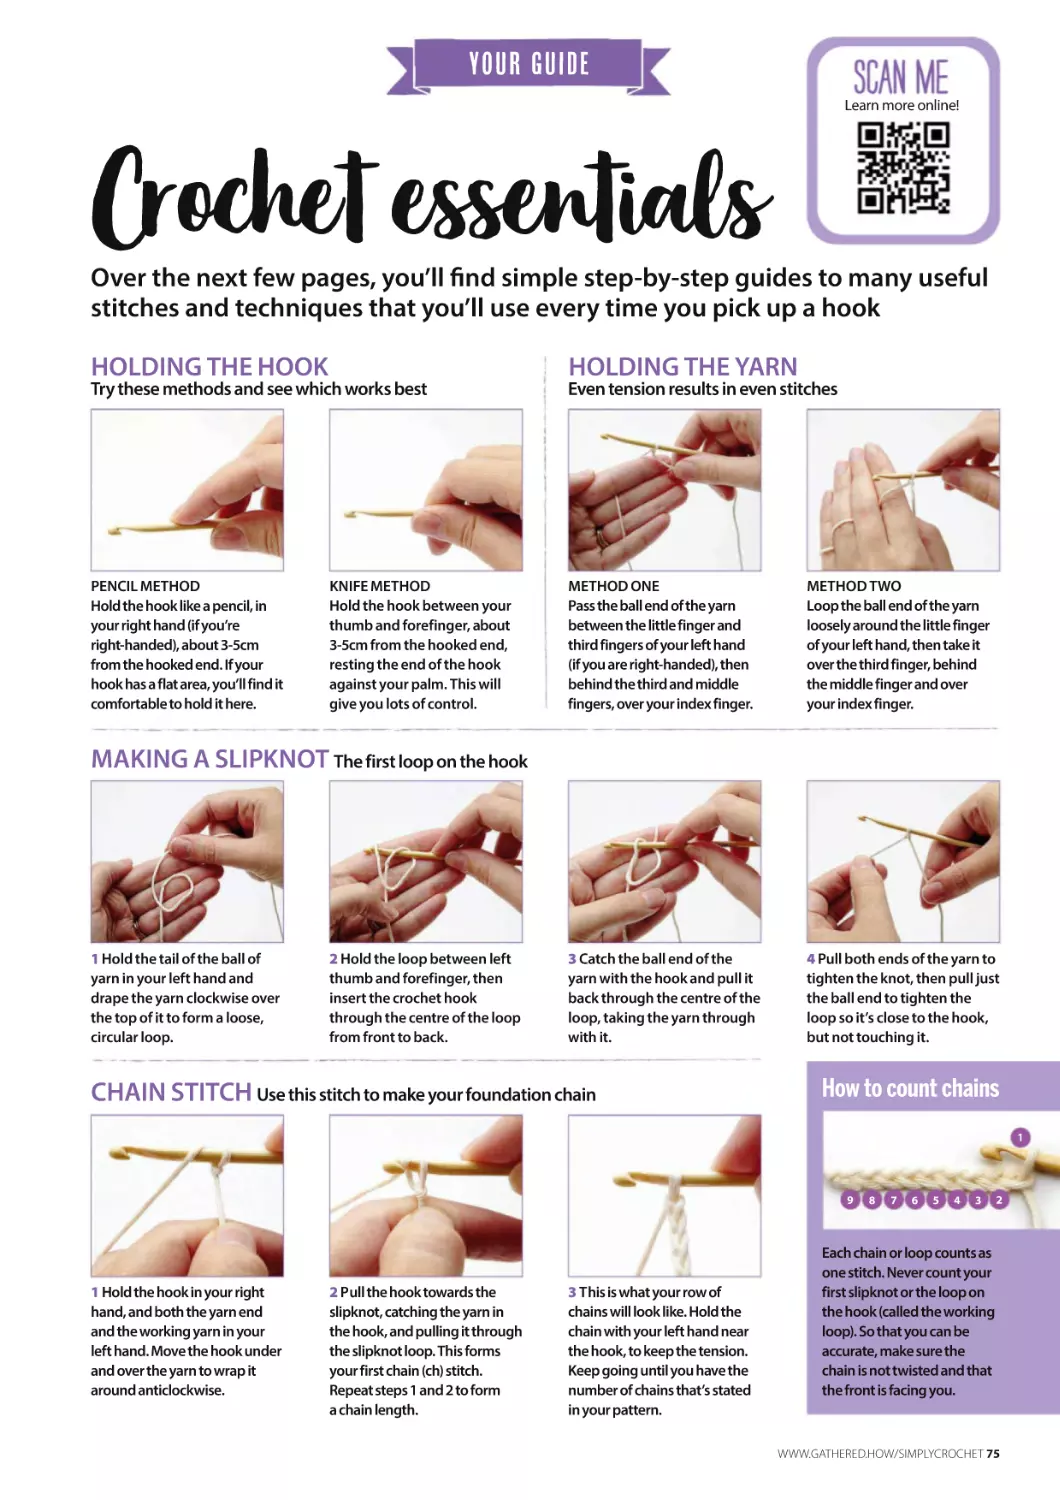
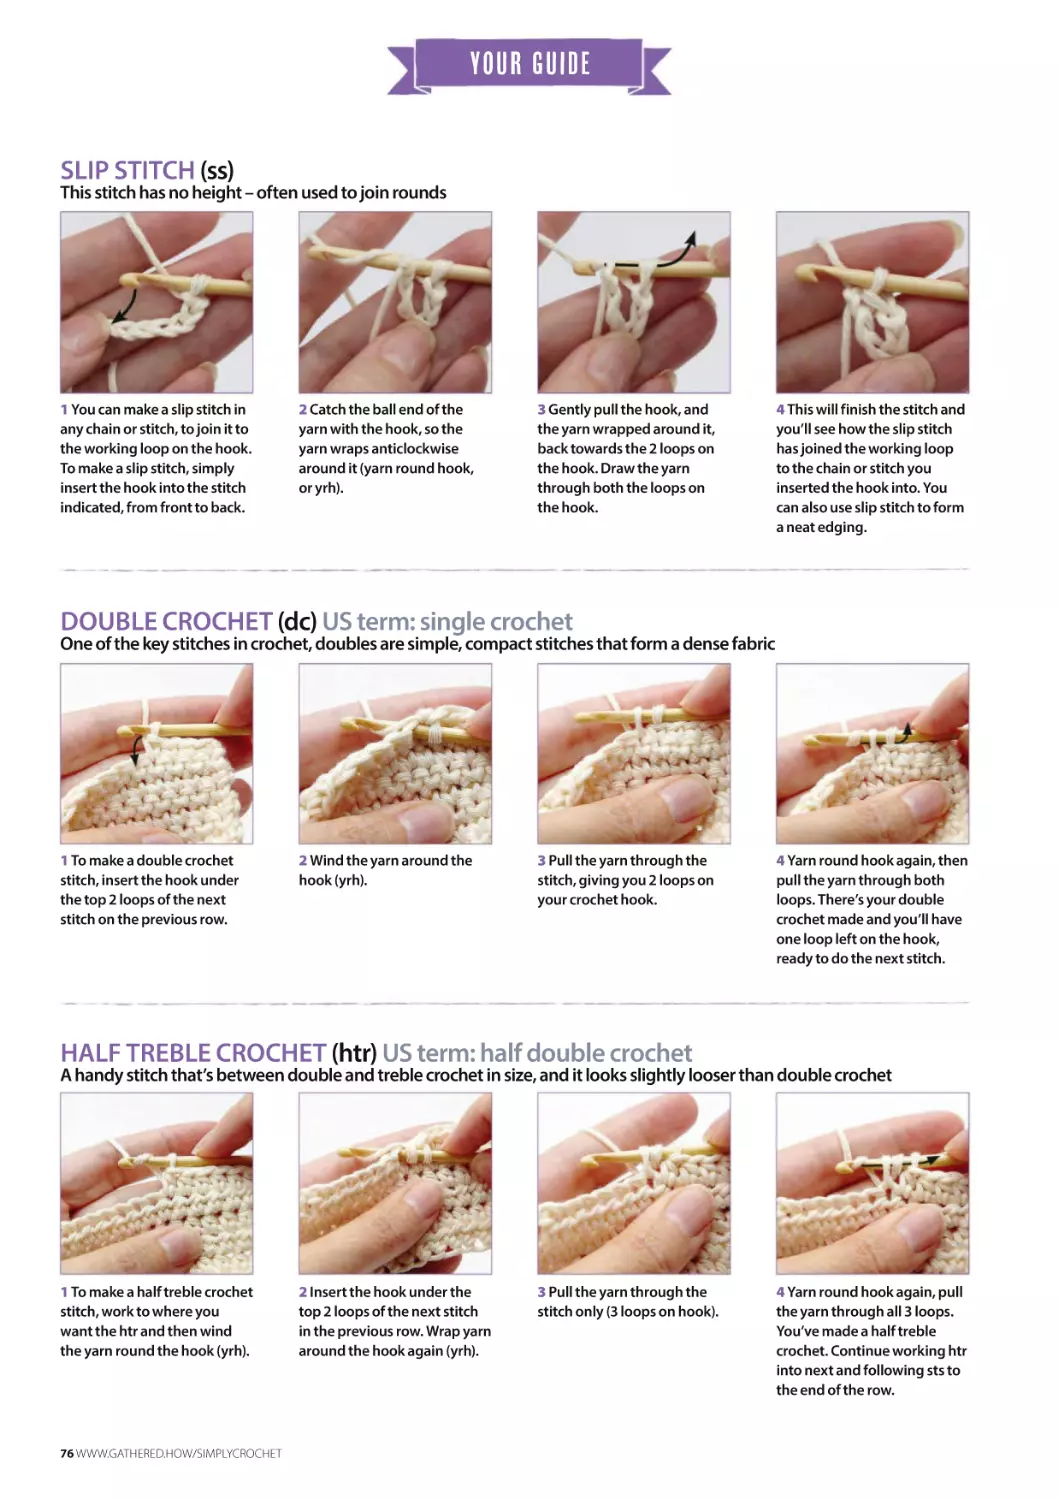
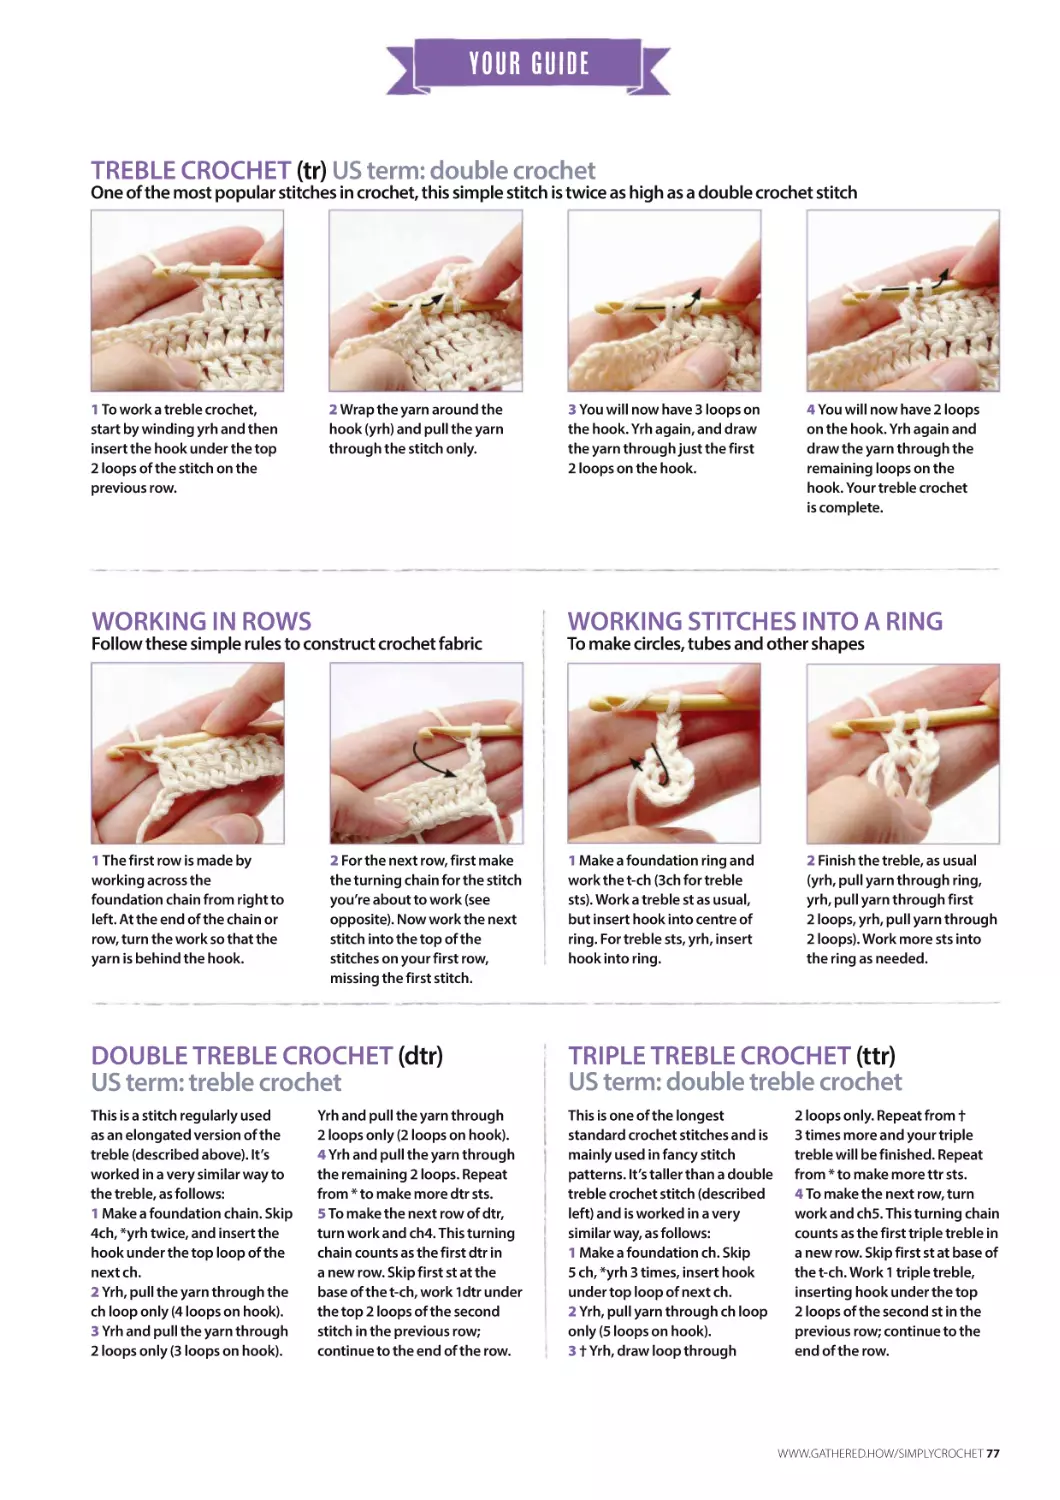
75 THE GUIDE
Essential step-by-steps for you
61
Never miss an issue!
66 YARN REVIEWS
Perfect yarns for lacy makes
70 CROCHET UNRAVELLED
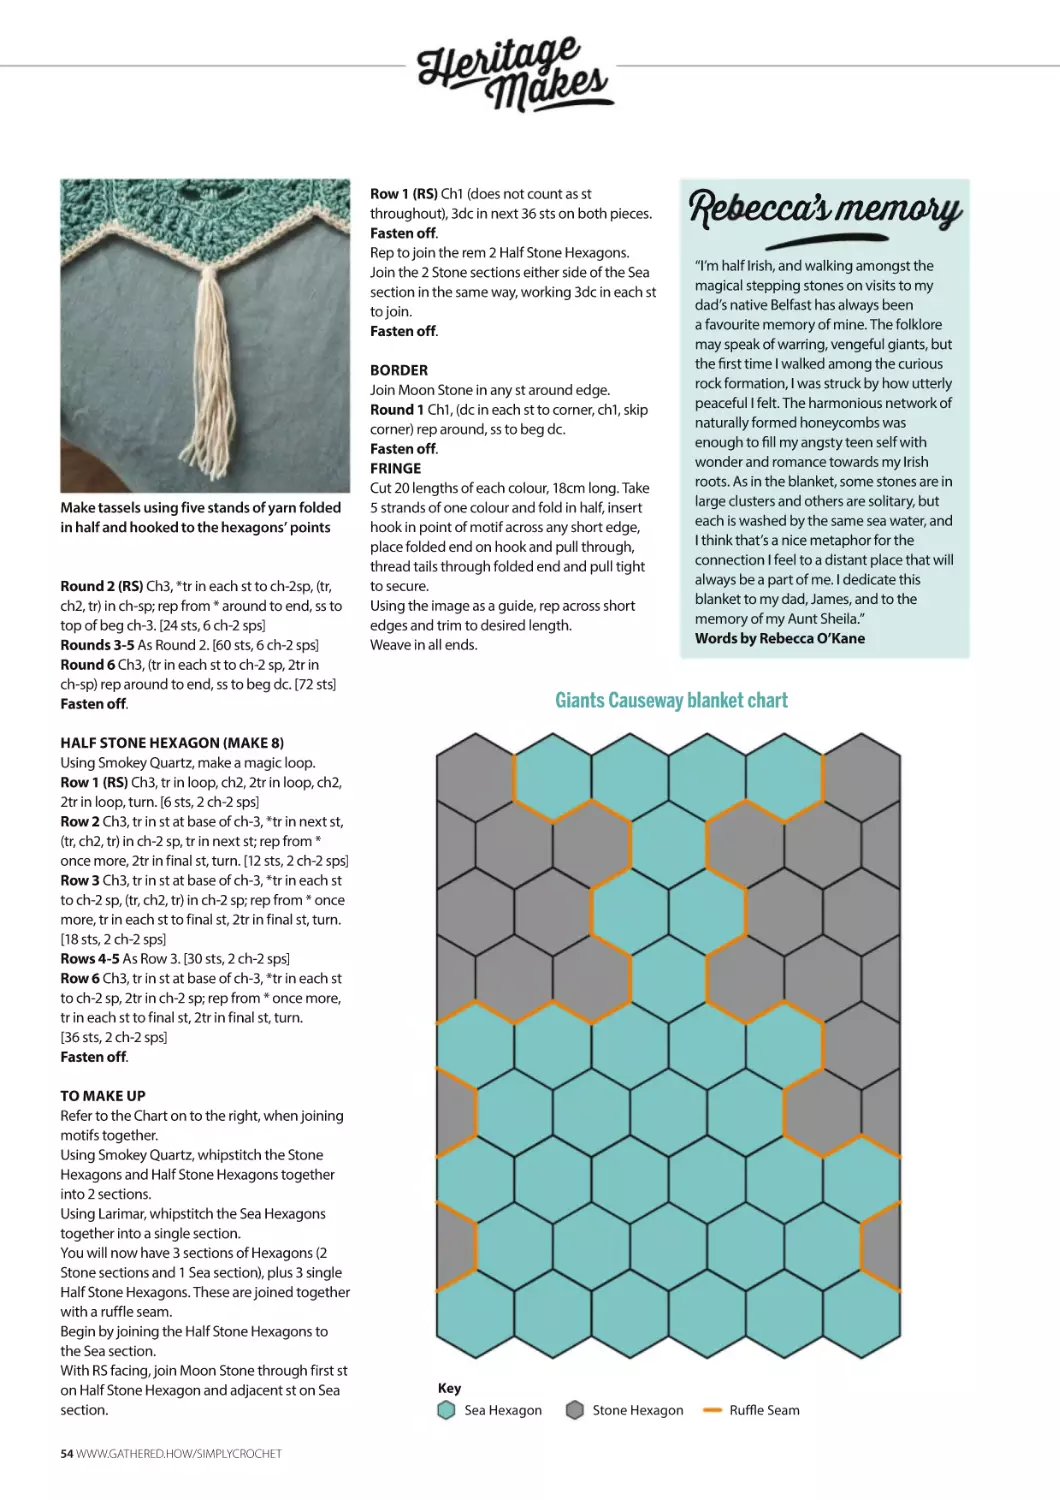
giaNt'S caUsewaY
BlankeT
31
Meet Whimsie
the Rabbit
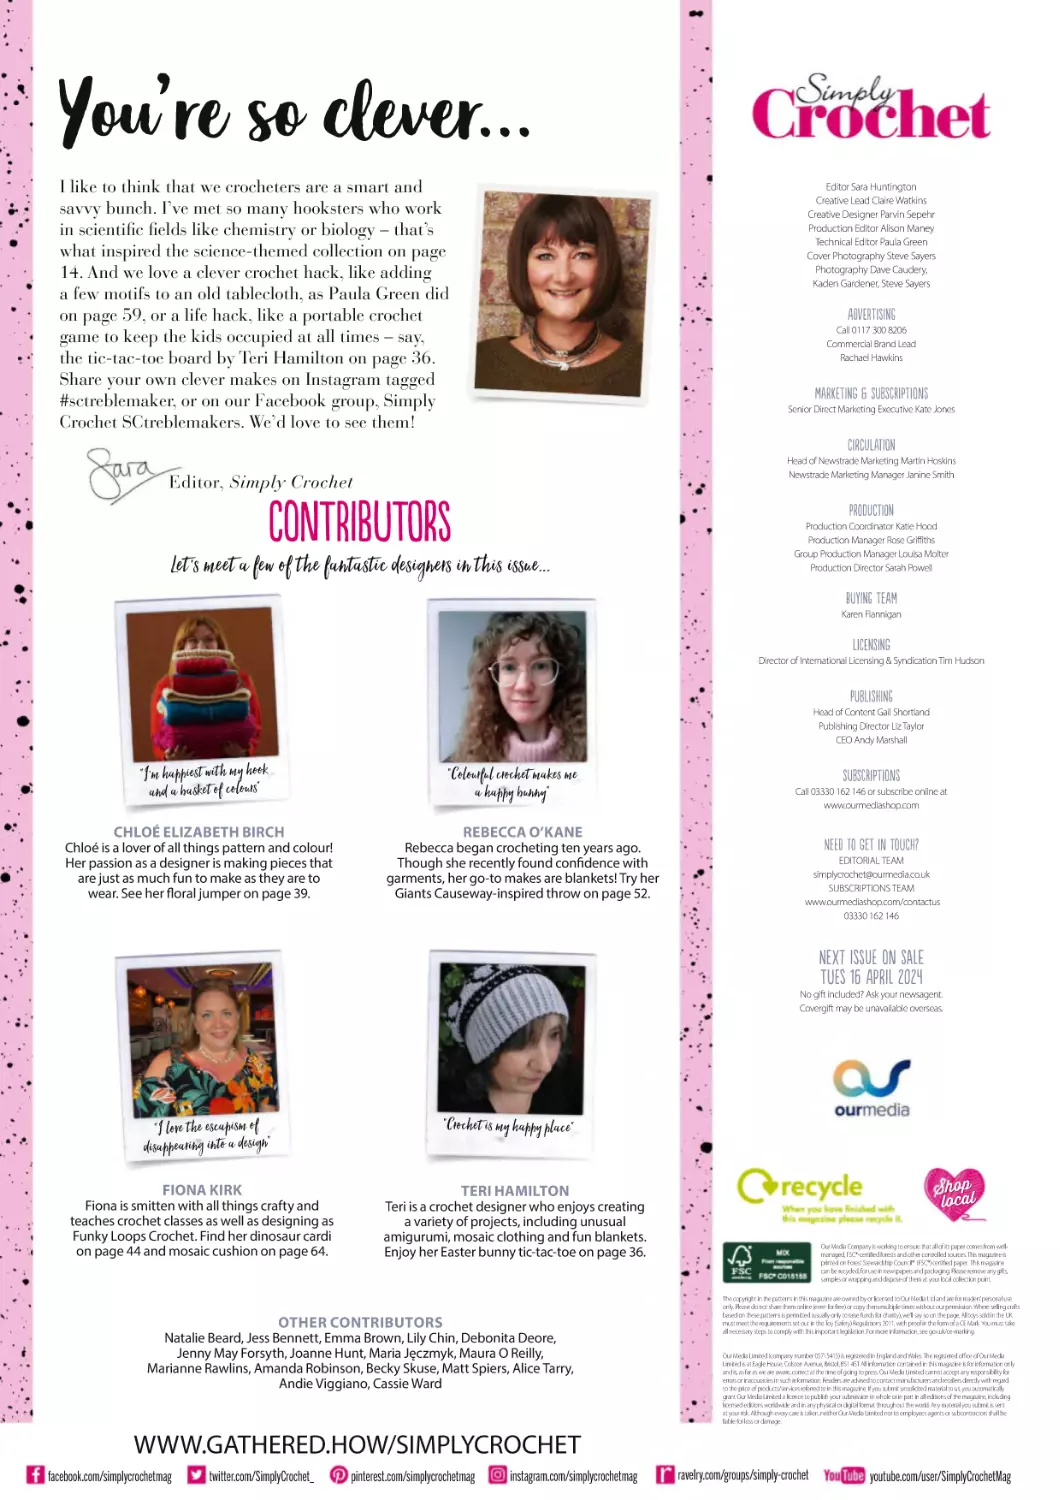
You’re so clever...
I like to think that we crocheters are a smart and
savvy bunch. I’ve met so many hooksters who work
in scientific fields like chemistry or biology – that’s
what inspired the science-themed collection on page
14. And we love a clever crochet hack, like adding
a few motifs to an old tablecloth, as Paula Green did
on page 59, or a life hack, like a portable crochet
game to keep the kids occupied at all times – say,
the tic-tac-toe board by Teri Hamilton on page 36.
Share your own clever makes on Instagram tagged
#sctreblemaker, or on our Facebook group, Simply
Crochet SCtreblemakers. We’d love to see them!
Editor Sara Huntington
Creative Lead Claire Watkins
Creative Designer Parvin Sepehr
Production Editor Alison Maney
Technical Editor Paula Green
Cover Photography Steve Sayers
Photography Dave Caudery,
Kaden Gardener, Steve Sayers
AdvErTisInG
Call 0117 300 8206
Commercial Brand Lead
Rachael Hawkins
MarKeTing & SubScRipTions
Senior Direct Marketing Executive Kate Jones
CirCuLatIon
Head of Newstrade Marketing Martin Hoskins
Newstrade Marketing Manager Janine Smith
Editor, Simply Crochet
ConTrIbuTors
ProDuCtiOn
Let 's meet a few of the fantastic designers in this issue...
Production Coordinator Katie Hood
Production Manager Rose Griffiths
Group Production Manager Louisa Molter
Production Director Sarah Powell
BuyIng Team
Karen Flannigan
LicEnSing
Director of International Licensing & Syndication Tim Hudson
PubLiShiNg
Head of Content Gail Shortland
Publishing Director Liz Taylor
CEO Andy Marshall
“I'm happiest with my hook
and a basket of colours”
“Colourful crochet makes me
a happy bunny”
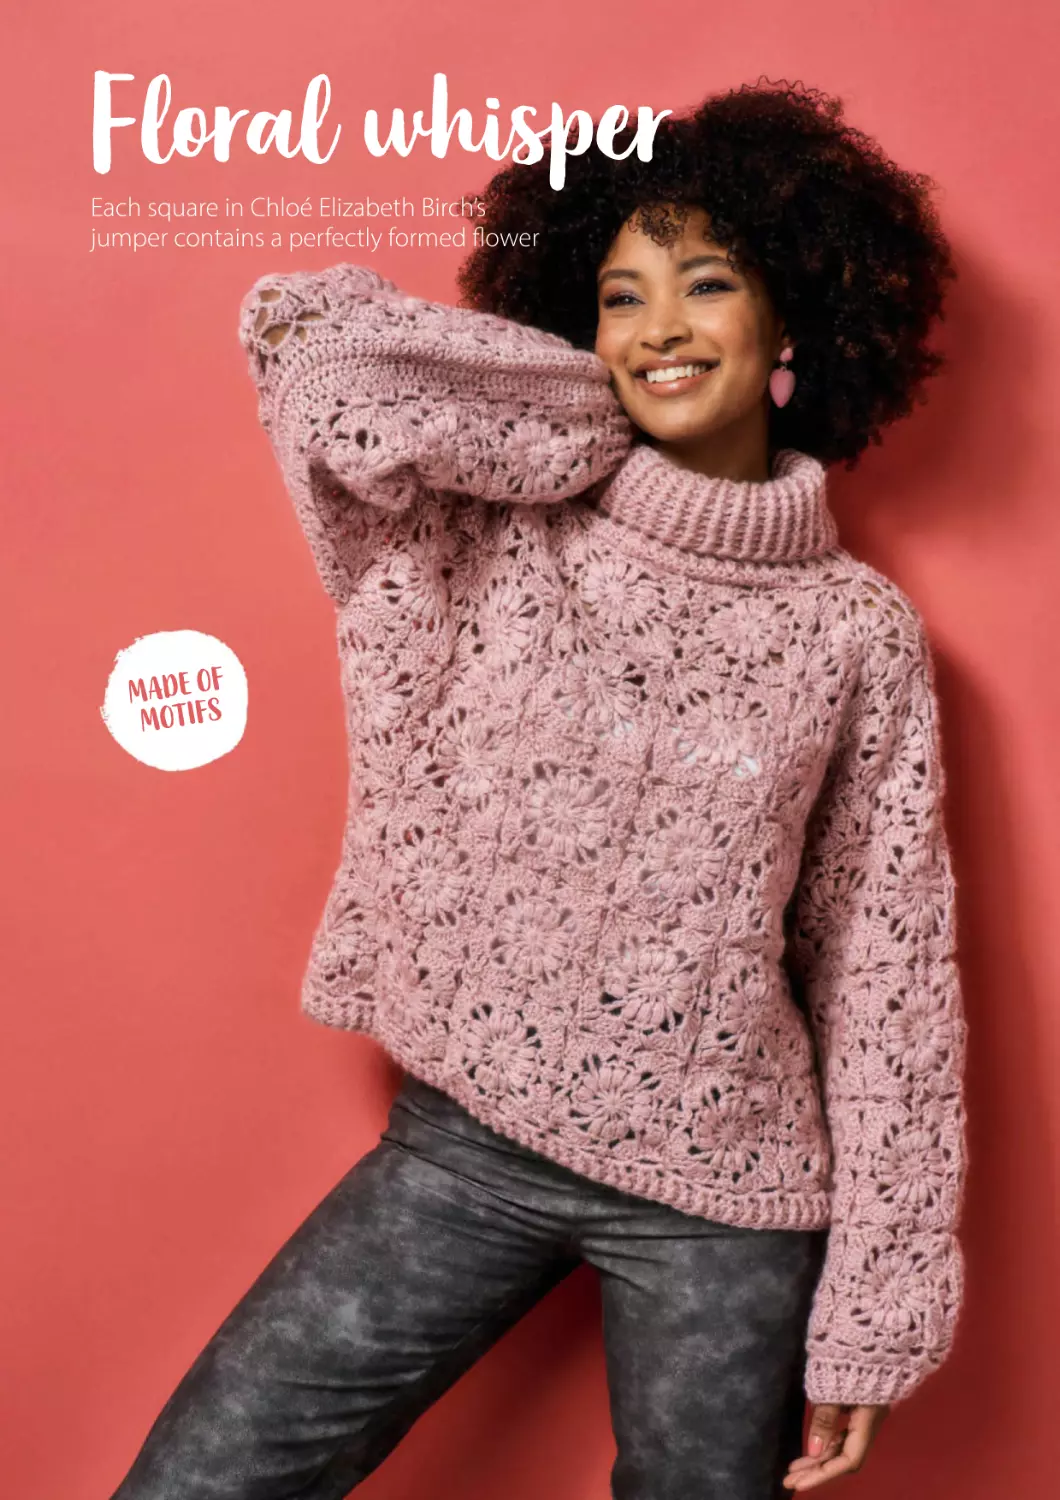
CHLOÉ ELIZABETH BIRCH
REBECCA O’KANE
Chloé is a lover of all things pattern and colour!
Her passion as a designer is making pieces that
are just as much fun to make as they are to
wear. See her floral jumper on page 39.
Rebecca began crocheting ten years ago.
Though she recently found confidence with
garments, her go-to makes are blankets! Try her
Giants Causeway-inspired throw on page 52.
SubScRipTions
Call 03330 162 146 or subscribe online at
www.ourmediashop.com
Need to get in TouCh?
EDITORIAL TEAM
simplycrochet@ourmedia.co.uk
SUBSCRIPTIONS TEAM
www.ourmediashop.com/contactus
03330 162 146
Next IssUe on Sale
Tues 16 AprIl 2024
No gift included? Ask your newsagent.
Covergift may be unavailable overseas.
“Crochet is my happy place”
“I love the escapism of
disappeari ng into a design”
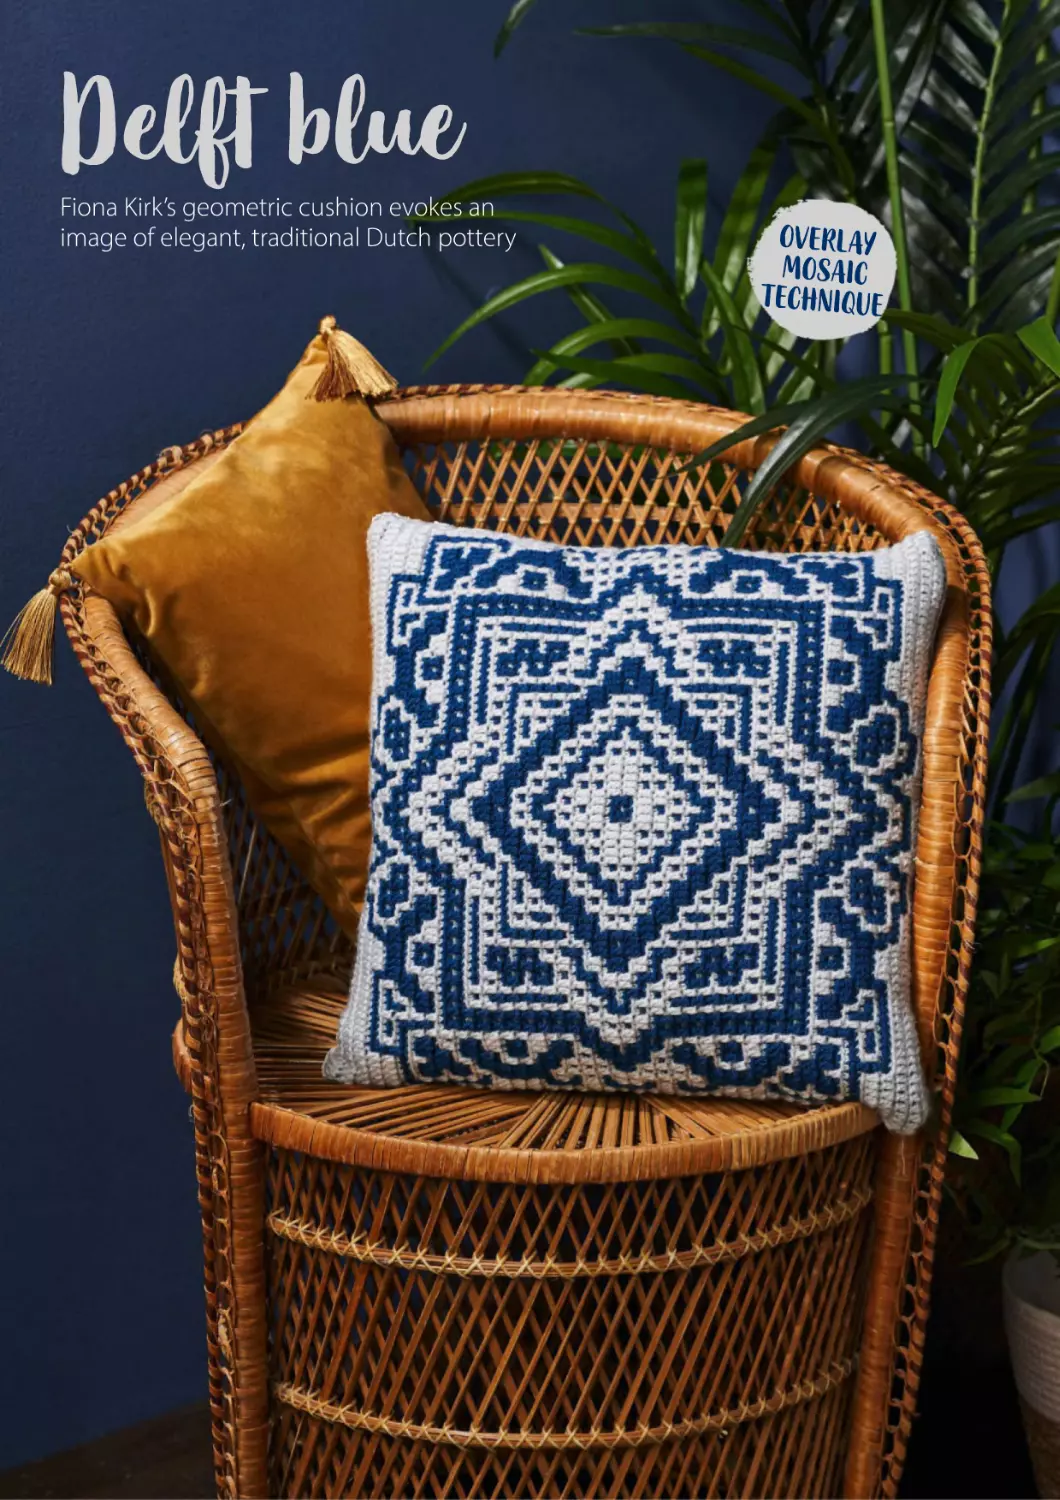
FIONA KIRK
TERI HAMILTON
Fiona is smitten with all things crafty and
teaches crochet classes as well as designing as
Funky Loops Crochet. Find her dinosaur cardi
on page 44 and mosaic cushion on page 64.
Teri is a crochet designer who enjoys creating
a variety of projects, including unusual
amigurumi, mosaic clothing and fun blankets.
Enjoy her Easter bunny tic-tac-toe on page 36.
OTHER CONTRIBUTORS
Natalie Beard, Jess Bennett, Emma Brown, Lily Chin, Debonita Deore,
Jenny May Forsyth, Joanne Hunt, Maria Jęczmyk, Maura O Reilly,
Marianne Rawlins, Amanda Robinson, Becky Skuse, Matt Spiers, Alice Tarry,
Andie Viggiano, Cassie Ward
opp
ho
Sh
all
locca
lo
Our Media Company is working to ensure that all of its paper comes from wellmanaged, FSC®-certified forests and other controlled sources. This magazine is
printed on Forest Stewardship Council® (FSC®) certified paper. This magazine
can be recycled, for use in newspapers and packaging. Please remove any gifts,
samples or wrapping and dispose of them at your local collection point.
The copyright in the patterns in this magazine are owned by or licensed to Our Media Ltd and are for readers’ personal use
only. Please do not share them online (even for free) or copy them multiple times without our permission. Where selling crafts
based on these patterns is permitted (usually only to raise funds for charity), we’ll say so on the page. All toys sold in the UK
must meet the requirements set out in the Toy (Safety) Regulations 2011, with proof in the form of a CE Mark. You must take
all necessary steps to comply with this important legislation. For more information, see gov.uk/ce-marking.
Our Media Limited (company number 05715415) is registered in England and Wales. The registered office of Our Media
Limited is at Eagle House, Colston Avenue, Bristol, BS1 4ST All information contained in this magazine is for information only
and is, as far as we are aware, correct at the time of going to press. Our Media Limited cannot accept any responsibility for
errors or inaccuracies in such information. Readers are advised to contact manufacturers and retailers directly with regard
to the price of products/services referred to in this magazine. If you submit unsolicited material to us, you automatically
grant Our Media Limited a licence to publish your submission in whole or in part in all editions of the magazine, including
licensed editions worldwide and in any physical or digital format throughout the world. Any material you submit is sent
at your risk. Although every care is taken, neither Our Media Limited nor its employees agents or subcontractors shall be
liable for loss or damage.
WWW.GATHERED.HOW/SIMPLYCROCHET
facebook.com/simplycrochetmag
twitter.com/SimplyCrochet_
pinterest.com/simplycrochetmag
instagram.com/simplycrochetmag
ravelry.com/groups/simply-crochet
youtube.com/user/SimplyCrochetMag
DK
Yar
n
az
e
s
Pebble H
th s
mi
£3.20
ry
Me , Croc
nit
h
f
e
per 100g ball
1 0 0 % A c r y li c
d S c a r À e Li
te
an
l
oo
%A
c r y li c , 2 0 % W
an
Br
Ar
80
n
ra
per 100g ball
e DK
£5.29
St ylec
£3.39
tM
tK
c
, 33 % A
Li o
tt o n
C
Cy
li
c
Co
olo u r R ush
nky
67
%
C
et
hu
gn
per 100g ball
£7.99
Wo o l
K
Ric
7%
n,
cr
y li
lo
A
u m i N il l i N
ill
iD
R
r
ic o
43%
o
per 100g ball
c, 4
9%
1% P
o l ye s t e r,
N
y
£1.59
per 25g ball
100
% P o ly e s t e r
FREE
DELIVERY
on orders
over £30
Get
10%
See the all new Yarnsmiths yarn on our website:
OFF EVERYTHING!*
www.yarnsmiths.co.uk
Discount code:
SC147
www.woolwarehouse.co.uk
Phone us: 01926 882818 or 0800 505 3300
Email us: hello@woolwarehouse.co.uk
No minimum order. FREE delivery on UK orders over £30. £2.95 delivery charge for UK orders under £30.
* Discount code not valid on yarn packs, sale items, KC Collection and Lopi products.
Order online: www.woolwarehouse.co.uk
Phone us: 01926 882818 or 0800 505 3300
Email us: hello@woolwarehouse.co.uk
FREE delivery on UK orders over £30
Ideas
Inspiration
Accessories
Websites
Events
Stuff
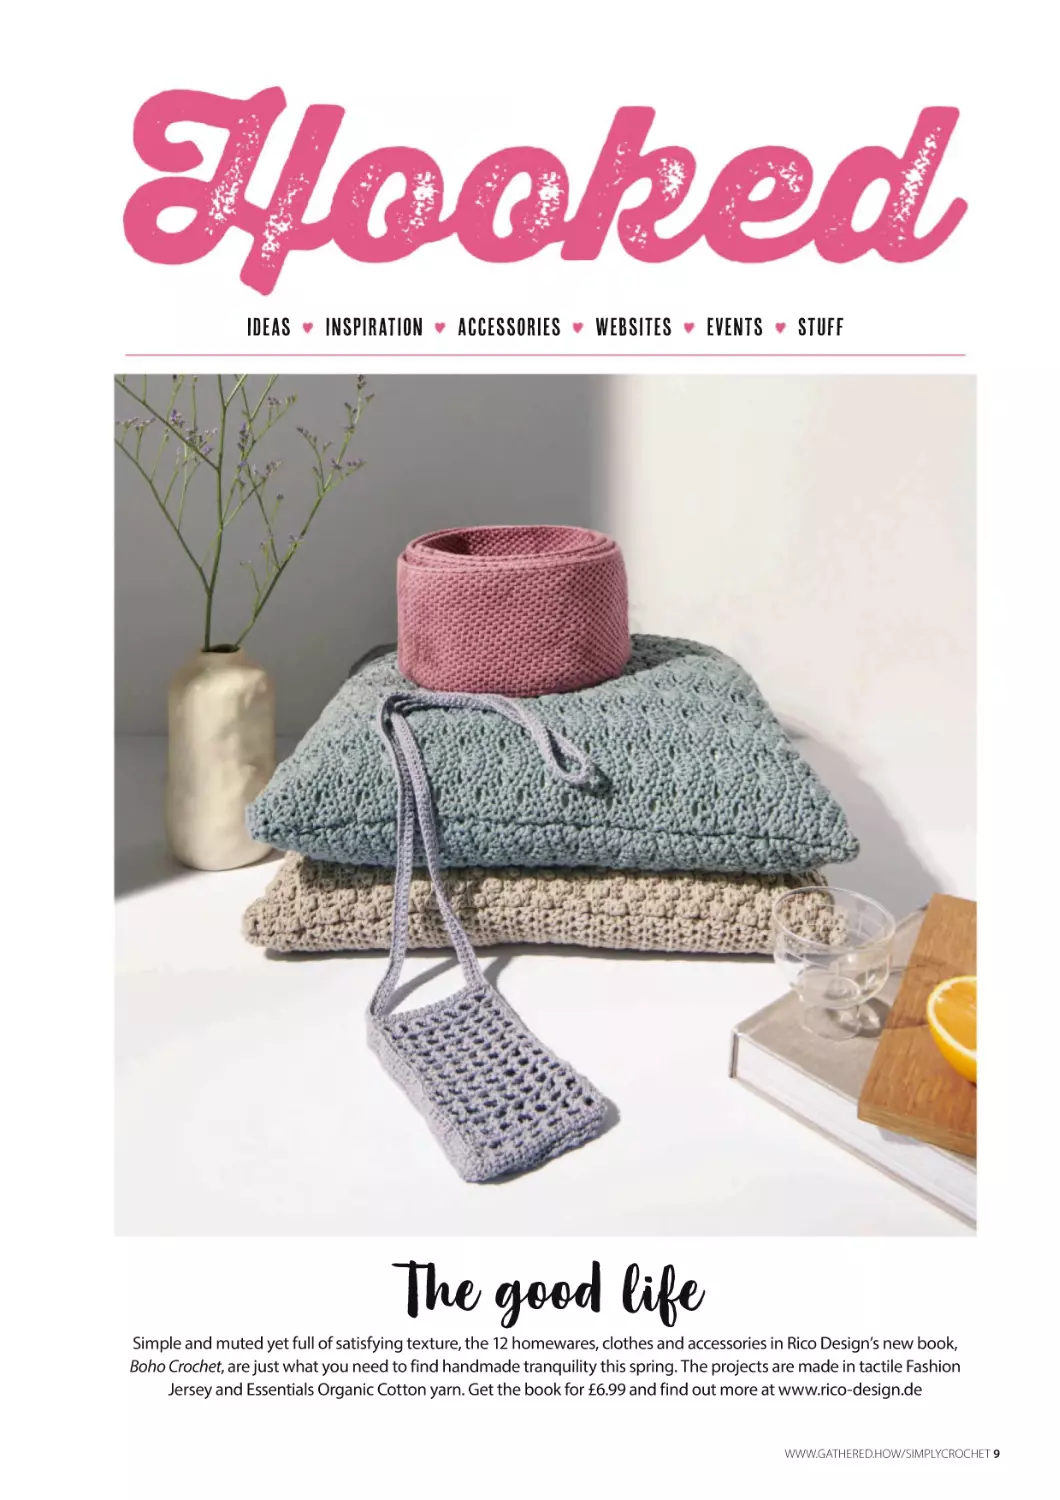
The good life
Simple and muted yet full of satisfying texture, the 12 homewares, clothes and accessories in Rico Design’s new book,
Boho Crochet, are just what you need to find handmade tranquility this spring. The projects are made in tactile Fashion
Jersey and Essentials Organic Cotton yarn. Get the book for £6.99 and find out more at www.rico-design.de
WWW.GATHERED.HOW/SIMPLYCROCHET 9
FOLLOW
YOUR HEART
WSupport Heart
Research UK with
these Heart Bag
Crochet kits from
Wool Couture! Twenty
percent of each
£19.99 sale goes to
the charity as part of
the women-focused
HER Disease initiative.
Visit www.wool
couturecompany.com
wave pool
Take to the sea! The Fibre Co’s new Almanac
Series III is inspired by the tranquility and
mystery of the ocean. Dive into the luxurious
ripples of this Maris Wrap, crocheted
lengthwise with open-wave stitches and
reverse shells in Meadow, a heavy laceweight yarn. This premium kit costs £121 at
www.thefibreco.com, where you can find
two other crochet kits from the collection.
ALL DRESSED UP
The Little World of Whimsy has released
a new free amiugurmi doll, and she’s all
dressed up and looking fabulous in
a traditional red qipao (also known as
a cheongsam). The Lunar New Year Doll is
a great ami’ make for beginners, though
designer Julia Chiang admits she went
through a lot of trial and error to perfect the
collar on the qipao! The dress is made almost
entirely in one piece and wraps around like
a robe. “Honestly, I feel like I knocked it out of
the park with this one,” says Julia. Find the
pattern at www.littleworldofwhimsy.com
l s
Sock salute
Looking for jazzy yarn that’s great for socks? Give West Yorkshire
Spinners’ new ColourLab Sock DK a try. This British Wool yarn is
full of of fast colour changes, resulting in delightfully busy sets
of toe-tappers. Find stockists at www.wyspinners.com
a Stone’S thrOw
Natural-looking mottled colourways hook into multi-dimensional
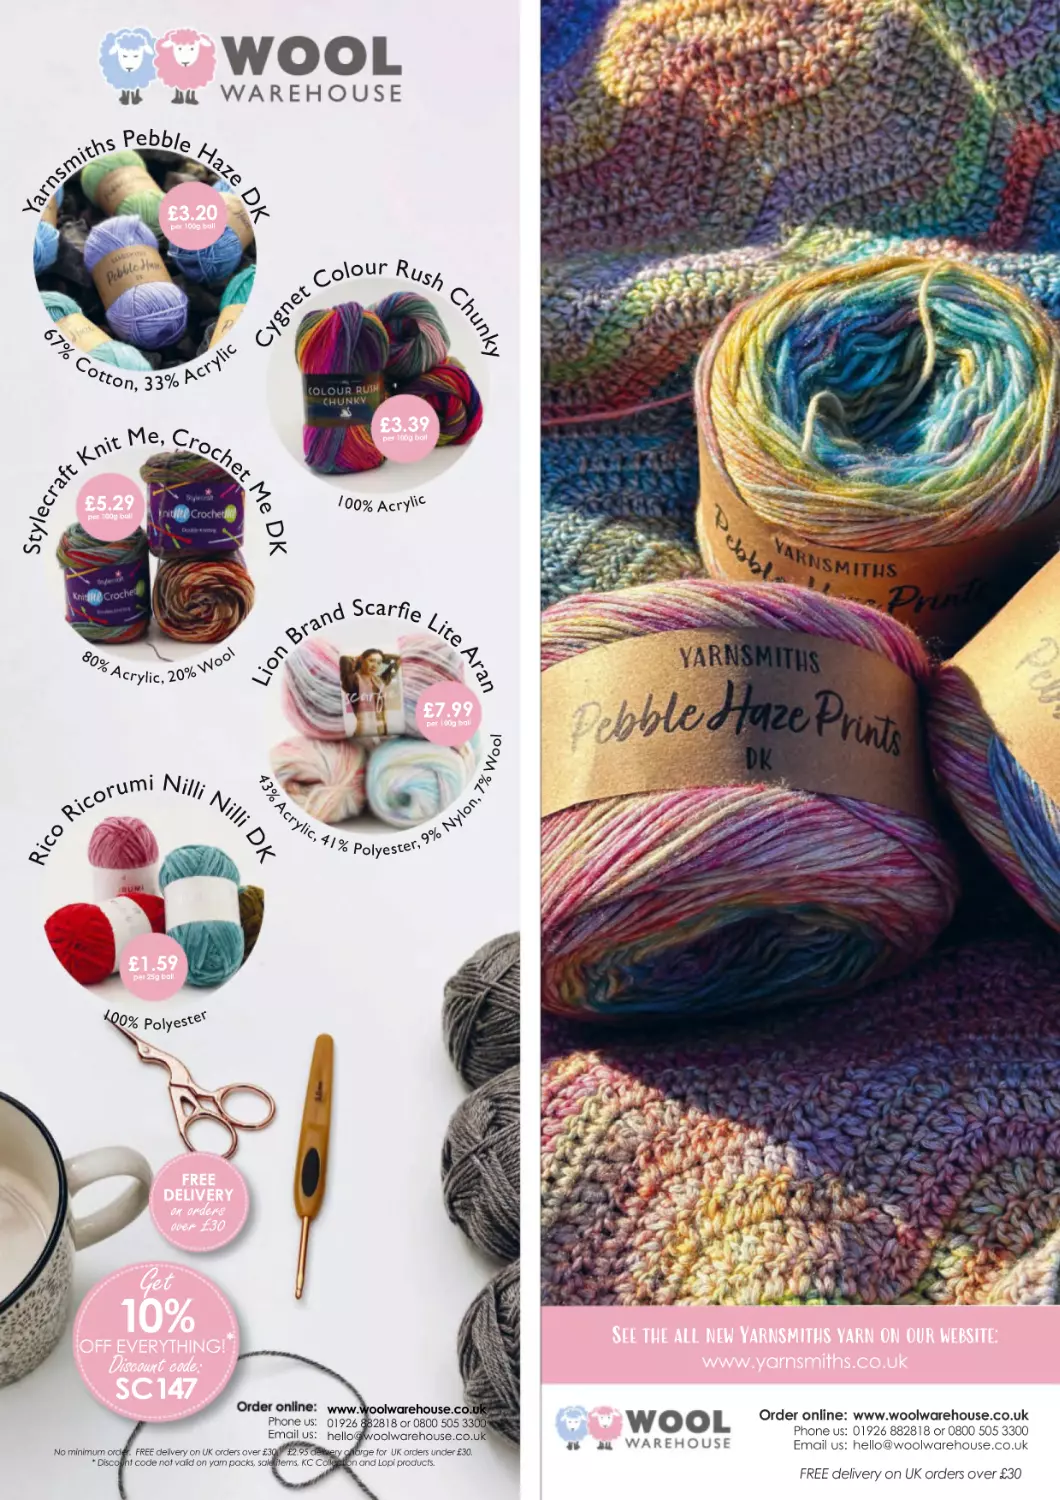
swatches with Yarnsmiths’ new Pebble Haze DK, a yarn that calls
forth images of stony beaches and translucent tidepools. The extrasquishy cakes and skeins are delightfully soft, making them ideal
for hooky shawls and garments as well as sophisticated blankets
and unique-looking toys. Choose from 10 print shades and 20
complementary solids – Pebble Haze Prints come in cakes and cost
£10, while Pebble Haze Solids come in 50g skeins and cost £3.20
each. Visit www.yarnsmiths.com for more information.
10 WWW.GATHERED.HOW/SIMPLYCROCHET
HOOKED
c
c s i
il
in
HOW TO DROP AND
JOIN ROUNDS
I’m Lily, and I’ve been teaching
yarncrafts internationally
since 1989. I was named to the Crochet Hall
of Fame in 2015 and have been involved
in some aspect of the fashion industry
since age 13, designing for magazines and
yarn companies since 1982 and working
for designers such as Ralph Lauren and
Diane von Fürstenberg. I was officially
named ‘fastest crocheter in the world’
in a 2002 international competition and
have authored books on knitting and
crochet since 1999. I’ve made hundreds
of appearances on television and in print
media and am on the season 13 and 14 cast
of PBS’ Knit and Crochet Now. But most of
all, I’m proud of my teaching skills. Come
learn something new with me!
One of my least favorite tasks is having to hide
those pesky ends after a project has been
completed. But what’s the best way to do it?
A
I know plenty of crocheters who work them
in as they go by working over the strands, but
that results in a straight line that’s akin to
a running stitch in embroidery. This means the
yarn ends can work their way out pretty easily.
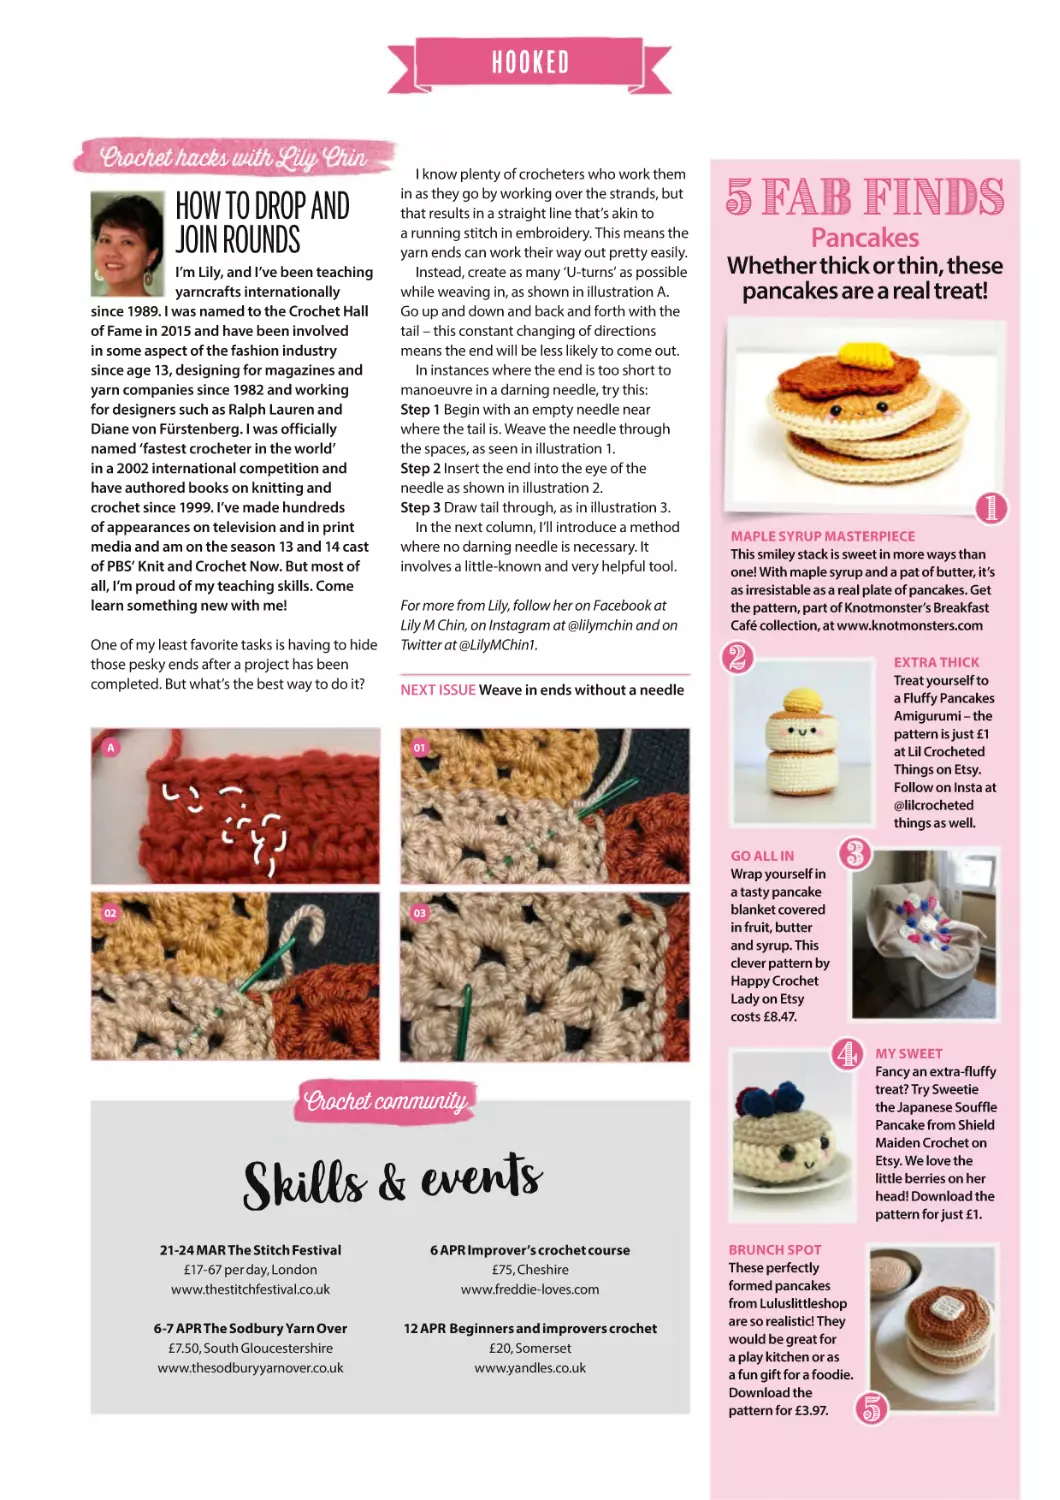
Instead, create as many ‘U-turns’ as possible
while weaving in, as shown in illustration A.
Go up and down and back and forth with the
tail – this constant changing of directions
means the end will be less likely to come out.
In instances where the end is too short to
manoeuvre in a darning needle, try this:
Step 1 Begin with an empty needle near
where the tail is. Weave the needle through
the spaces, as seen in illustration 1.
Step 2 Insert the end into the eye of the
needle as shown in illustration 2.
Step 3 Draw tail through, as in illustration 3.
In the next column, I’ll introduce a method
where no darning needle is necessary. It
involves a little-known and very helpful tool.
For more from Lily, follow her on Facebook at
Lily M Chin, on Instagram at @lilymchin and on
Twitter at @LilyMChin1.
5 FA FIN S
Pancakes
Whether thick or thin, these
pancakes are a real treat!
1
MAPLE SYRUP MASTERPIECE
This smiley stack is sweet in more ways than
one! With maple syrup and a pat of butter, it’s
as irresistable as a real plate of pancakes. Get
the pattern, part of Knotmonster’s Breakfast
Café collection, at www.knotmonsters.com
2
EXTRA THICK
Treat yourself to
a Fluffy Pancakes
Amigurumi – the
pattern is just £1
at Lil Crocheted
Things on Etsy.
Follow on Insta at
@lilcrocheted
things as well.
NEXT ISSUE Weave in ends without a needle
01
02
GO ALL IN
Wrap yourself in
a tasty pancake
blanket covered
in fruit, butter
and syrup. This
clever pattern by
Happy Crochet
Lady on Etsy
costs £8.47.
03
4
Crochet community
Skills & events
21-24 MAR The Stitch Festival
£17-67 per day, London
www.thestitchfestival.co.uk
6 APR Improver’s crochet course
£75, Cheshire
www.freddie-loves.com
6-7 APR The Sodbury Yarn Over
£7.50, South Gloucestershire
www.thesodburyyarnover.co.uk
12 APR Beginners and improvers crochet
£20, Somerset
www.yandles.co.uk
BRUNCH SPOT
These perfectly
formed pancakes
from Luluslittleshop
are so realistic! They
would be great for
a play kitchen or as
a fun gift for a foodie.
Download the
pattern for £3.97.
MY SWEET
Fancy an extra-fluffy
treat? Try Sweetie
the Japanese Souffle
Pancake from Shield
Maiden Crochet on
Etsy. We love the
little berries on her
head! Download the
pattern for just £1.
5
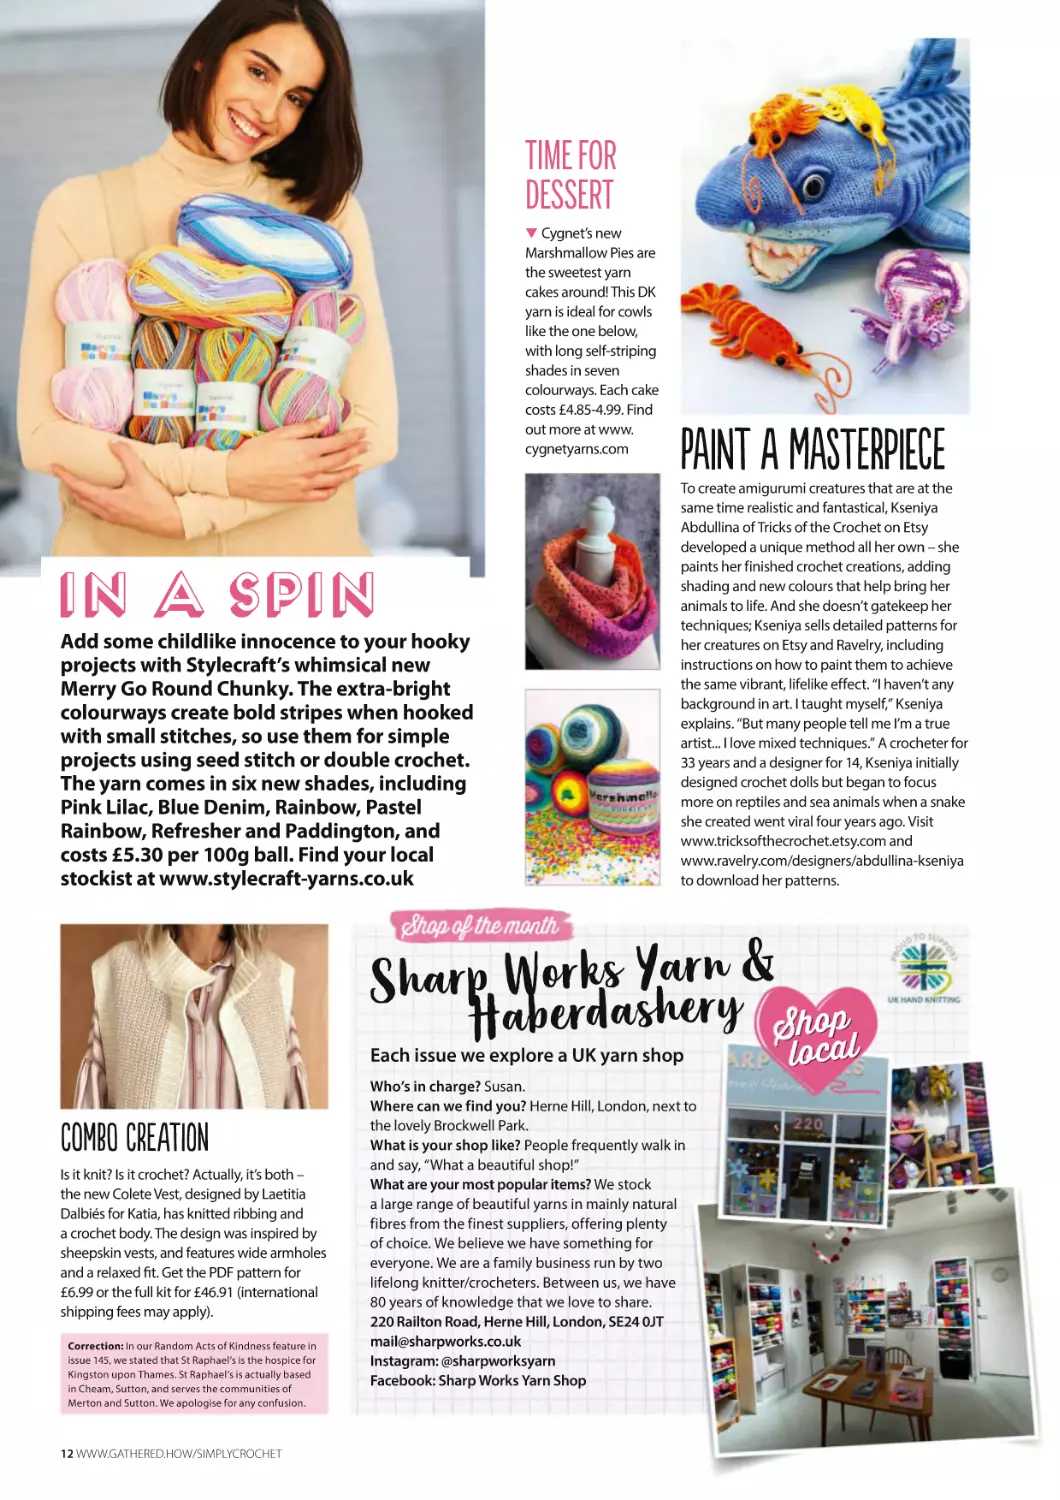
TIME FOR
DESSERT
WCygnet’s new
Marshmallow Pies are
the sweetest yarn
cakes around! This DK
yarn is ideal for cowls
like the one below,
with long self-striping
shades in seven
colourways. Each cake
costs £4.85-4.99. Find
out more at www.
cygnetyarns.com
PaiNt a MasTeRpiEce
To create amigurumi creatures that are at the
same time realistic and fantastical, Kseniya
Abdullina of Tricks of the Crochet on Etsy
developed a unique method all her own – she
paints her finished crochet creations, adding
shading and new colours that help bring her
animals to life. And she doesn’t gatekeep her
techniques; Kseniya sells detailed patterns for
her creatures on Etsy and Ravelry, including
instructions on how to paint them to achieve
the same vibrant, lifelike effect. “I haven’t any
background in art. I taught myself,” Kseniya
explains. “But many people tell me I’m a true
artist... I love mixed techniques.” A crocheter for
33 years and a designer for 14, Kseniya initially
designed crochet dolls but began to focus
more on reptiles and sea animals when a snake
she created went viral four years ago. Visit
www.tricksofthecrochet.etsy.com and
www.ravelry.com/designers/abdullina-kseniya
to download her patterns.
in a spin
Add some childlike innocence to your hooky
projects with Stylecraft’s whimsical new
Merry Go Round Chunky. The extra-bright
colourways create bold stripes when hooked
with small stitches, so use them for simple
projects using seed stitch or double crochet.
The yarn comes in six new shades, including
Pink Lilac, Blue Denim, Rainbow, Pastel
Rainbow, Refresher and Paddington, and
costs £5.30 per 100g ball. Find your local
stockist at www.stylecraft-yarns.co.uk
n
Sharp Works sYhaerrny &
opp
Haberda
ho
Sh
all
a
Each issue we explore a UK yarn shop
ComBo CreAtion
Is it knit? Is it crochet? Actually, it’s both –
the new Colete Vest, designed by Laetitia
Dalbiés for Katia, has knitted ribbing and
a crochet body. The design was inspired by
sheepskin vests, and features wide armholes
and a relaxed fit. Get the PDF pattern for
£6.99 or the full kit for £46.91 (international
shipping fees may apply).
Correction: In our Random Acts of Kindness feature in
issue 145, we stated that St Raphael’s is the hospice for
Kingston upon Thames. St Raphael’s is actually based
in Cheam, Sutton, and serves the communities of
Merton and Sutton. We apologise for any confusion.
12 WWW.GATHERED.HOW/SIMPLYCROCHET
Who’s in charge? Susan.
Where can we find you? Herne Hill, London, next to
the lovely Brockwell Park.
What is your shop like? People frequently walk in
and say, “What a beautiful shop!”
What are your most popular items? We stock
a large range of beautiful yarns in mainly natural
fibres from the finest suppliers, offering plenty
of choice. We believe we have something for
everyone. We are a family business run by two
lifelong knitter/crocheters. Between us, we have
80 years of knowledge that we love to share.
220 Railton Road, Herne Hill, London, SE24 0JT
mail@sharpworks.co.uk
Instagram: @sharpworksyarn
Facebook: Sharp Works Yarn Shop
occ
llo
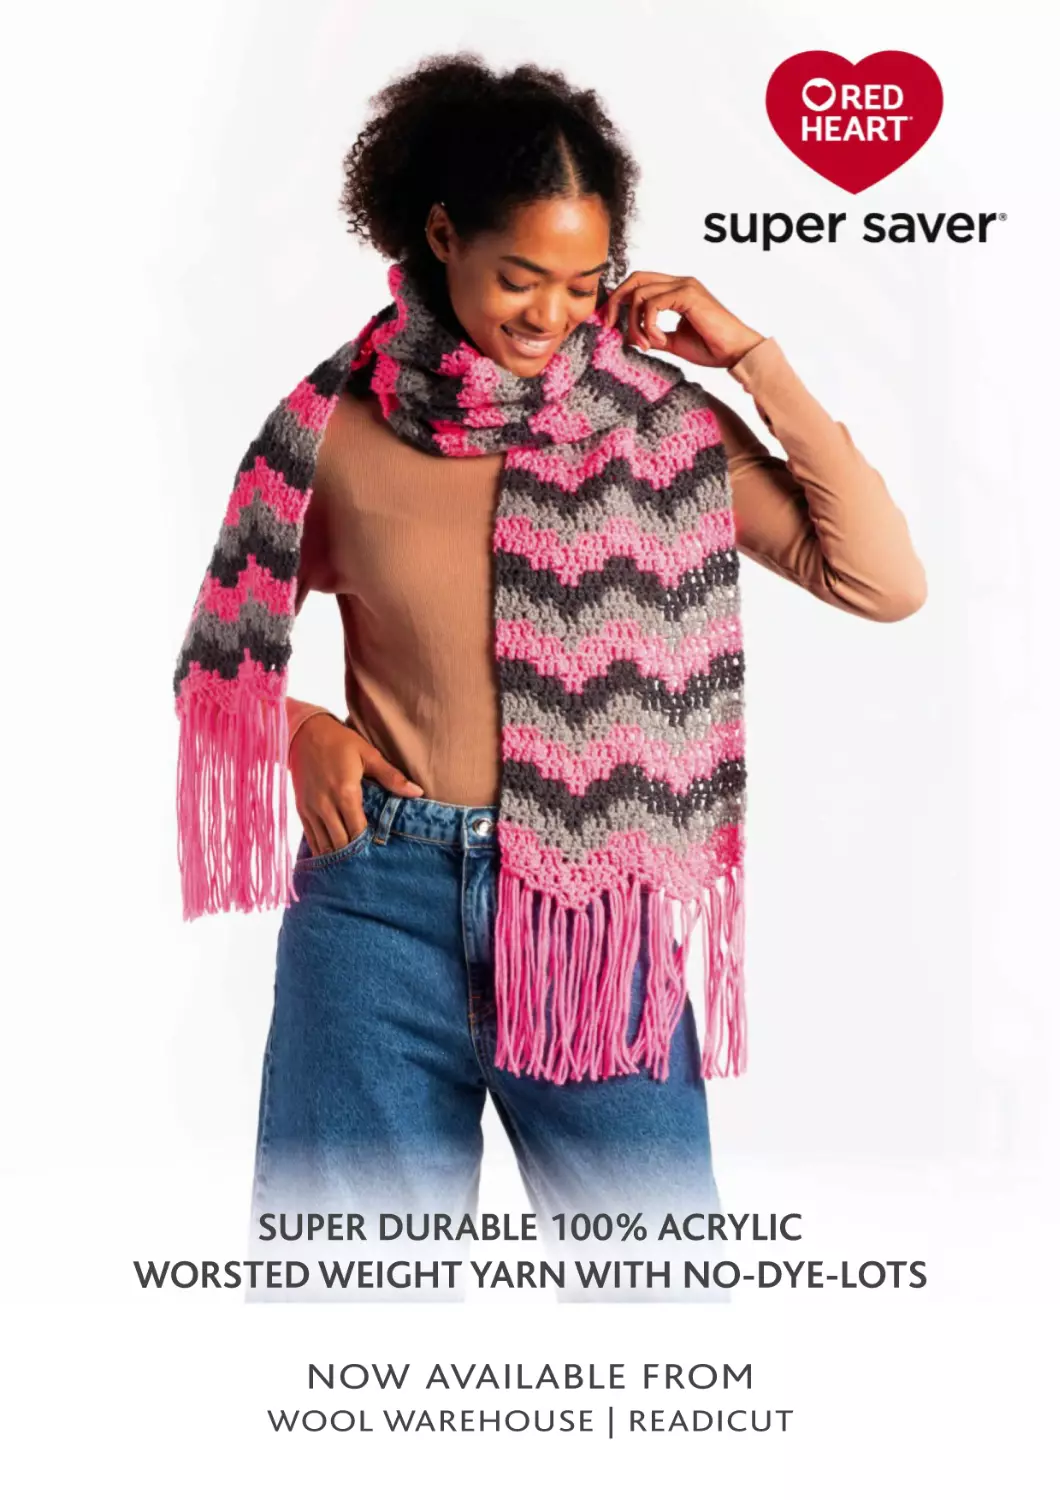
SUPER DURABLE 100% ACRYLIC
WORSTED WEIGHT YARN WITH NO-DYE-LOTS
NOW AVAILABLE FROM
WOOL WAREHOUSE | READICUT
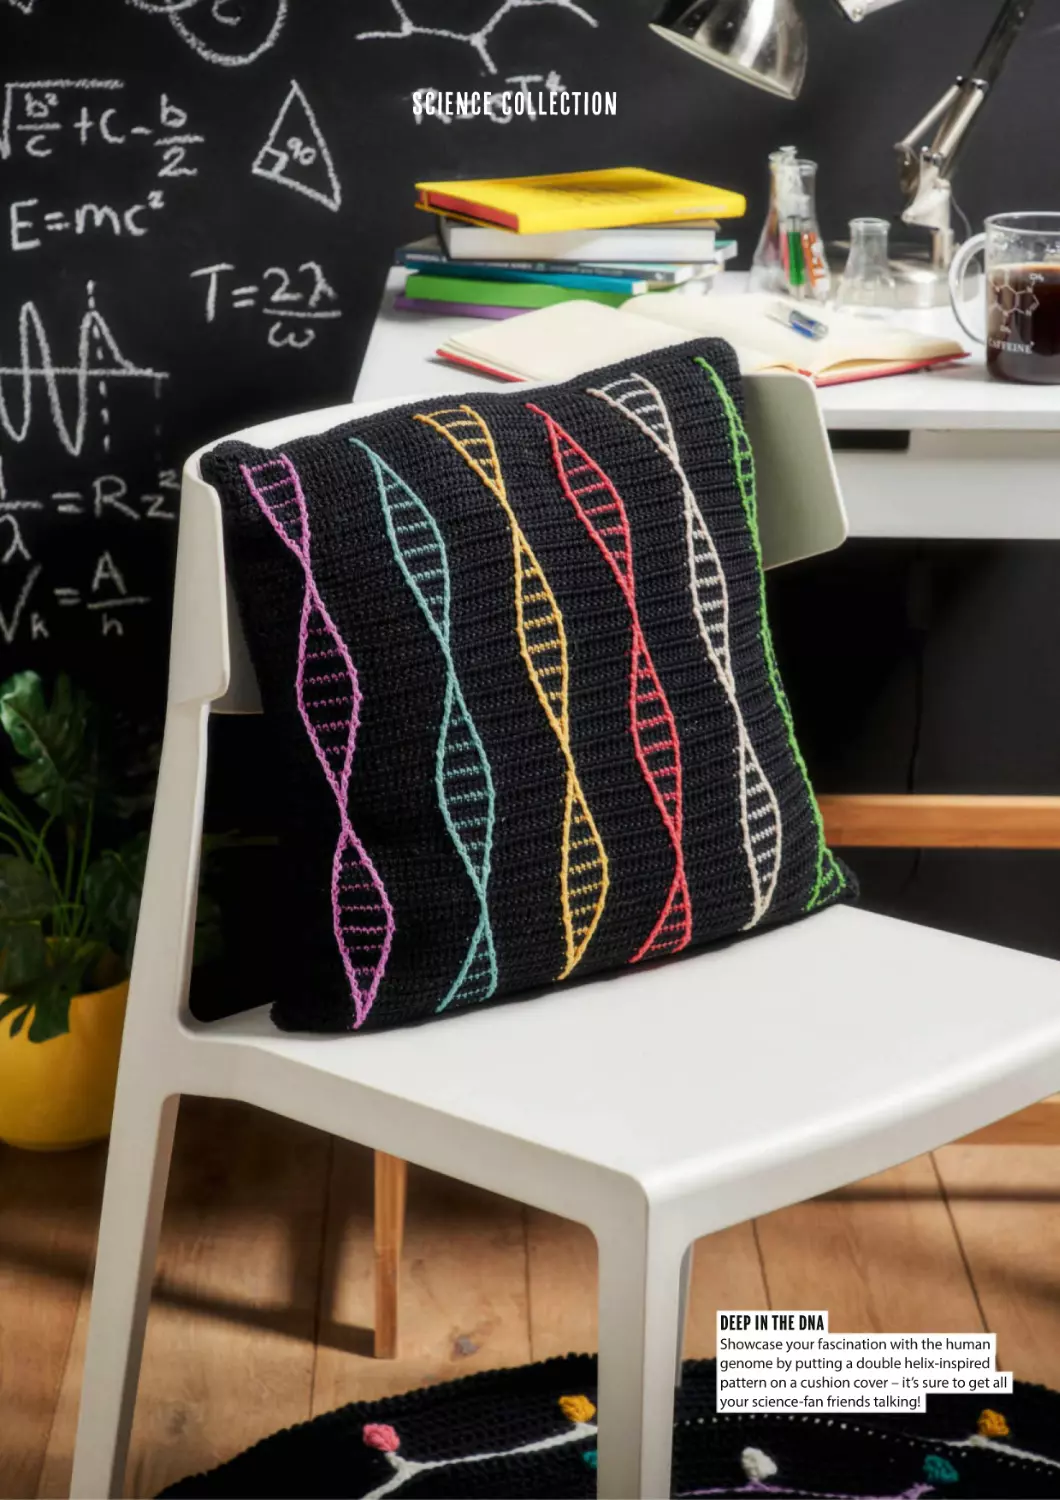
SCIENCE COLLECTION
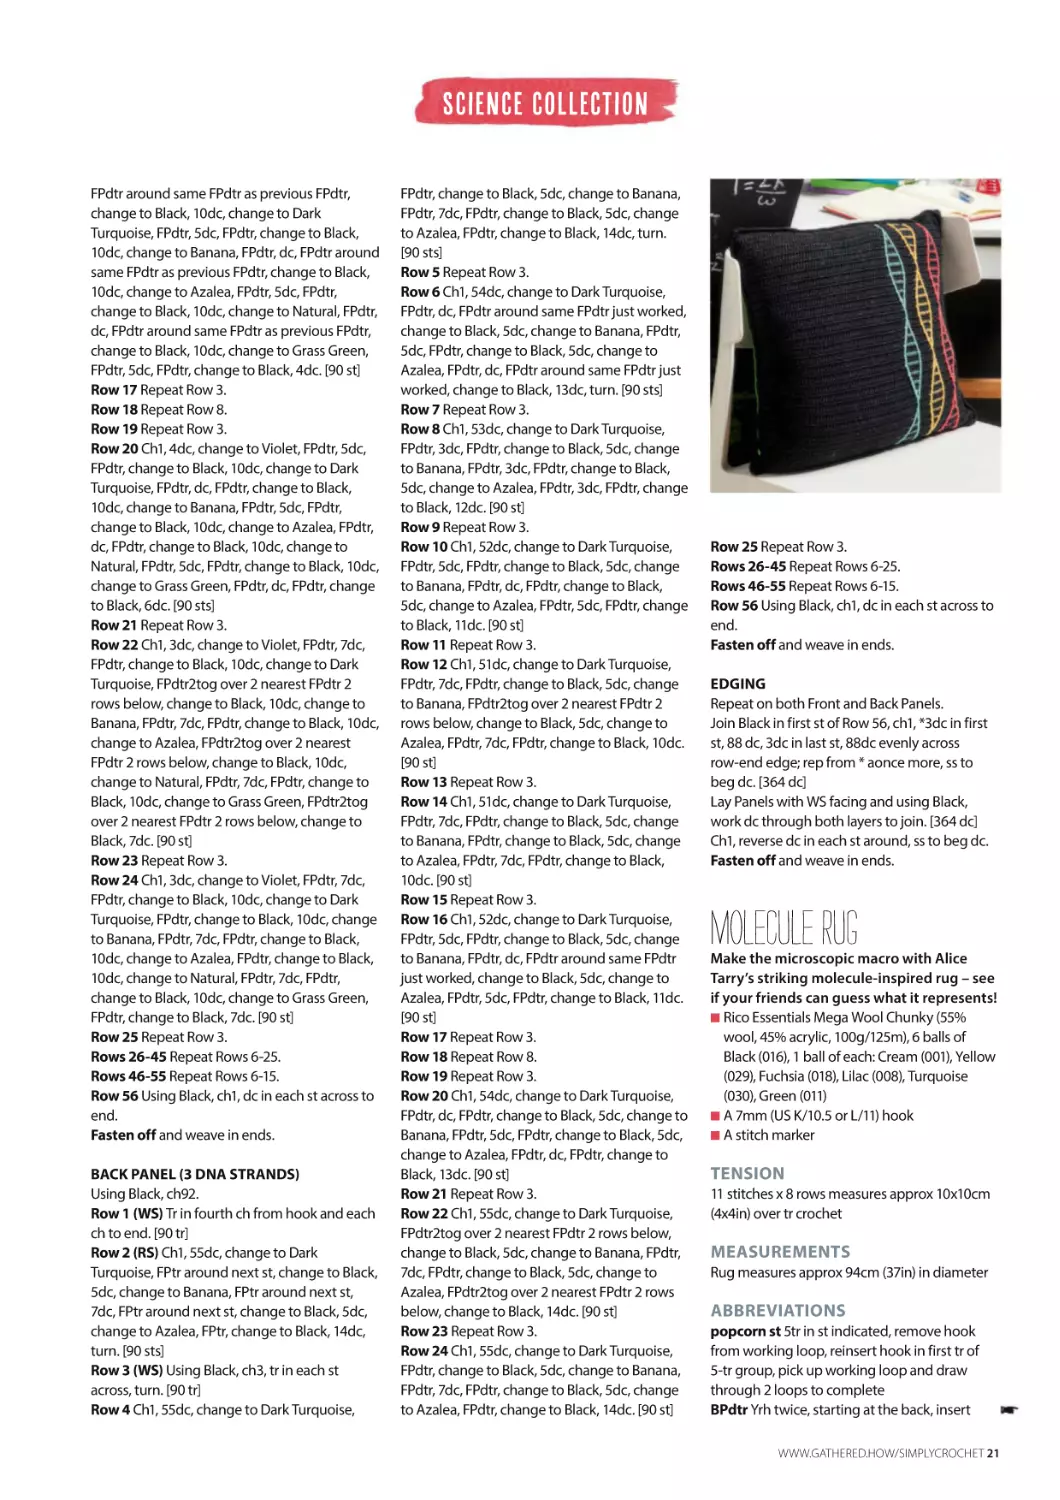
DEEP IN THE DNA
Showcase your fascination with the human
genome by putting a double helix-inspired
pattern on a cushion cover – it’s sure to get all
your science-fan friends talking!
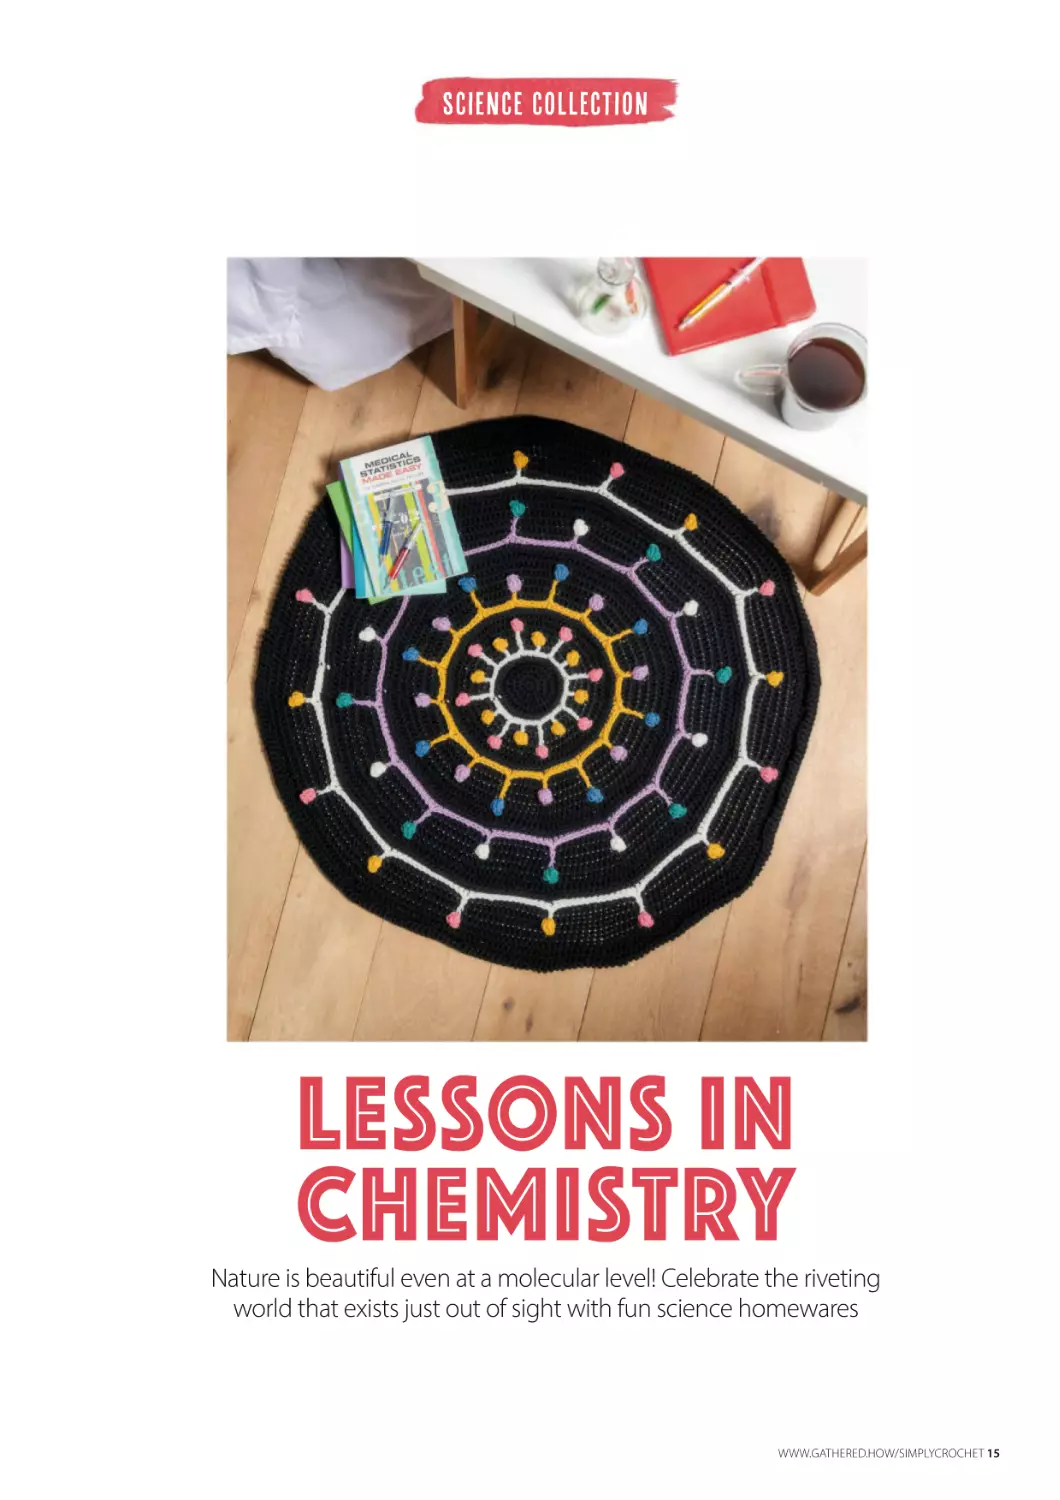
SCIENCE COLLECTION
Lessons in
Chemistry
Nature is beautiful even at a molecular level! Celebrate the riveting
world that exists just out of sight with fun science homewares
WWW.GATHERED.HOW/SIMPLYCROCHET 15
SCIENCE COLLECTION
CHAIN REACTION
Gift these molecular coasters to a friend who works
in a science-related field in order to celebrate the
(covalent) bond you share. It’s a great way to show
you care at the most fundamental level.
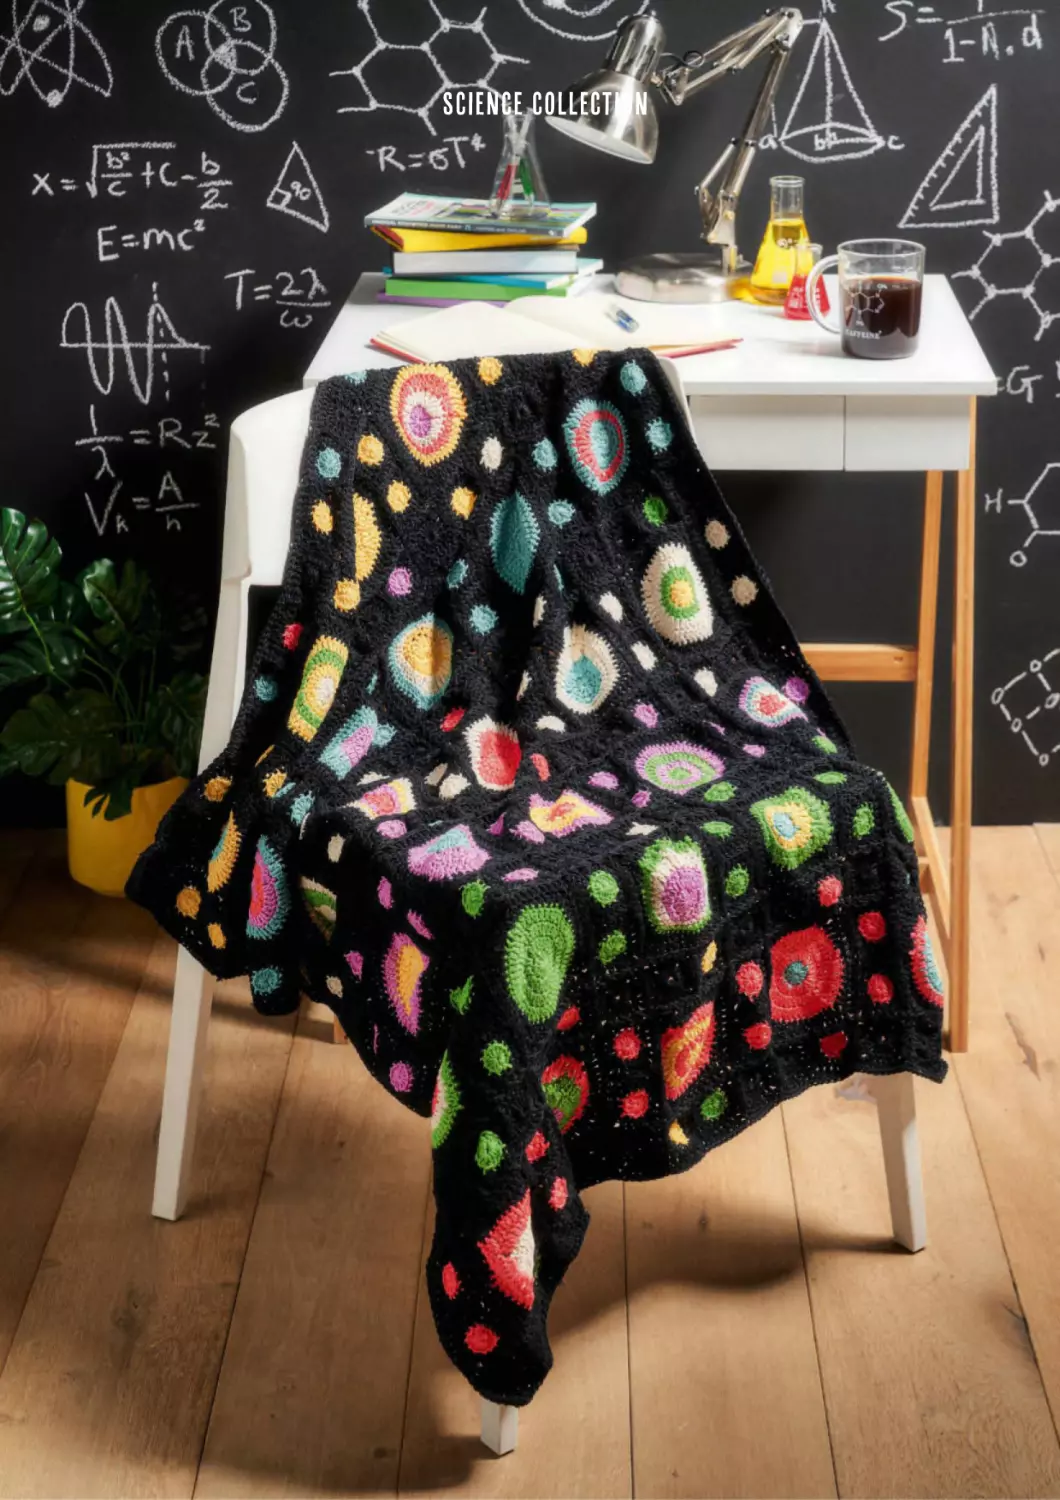
CELL-EBRATE GOOD TIMES
It’s basic biology – we’re all made of cells, just like this
motif blanket! Each square contains a natural-looking
shape that mimics the organic look of a cell. It’s like
peering into a giant rectangular microscope!
16 WWW.GATHERED.HOW/SIMPLYCROCHET
SCIENCE COLLECTION
SCIENCE COLLECTION
SCIENCE COLLECTION
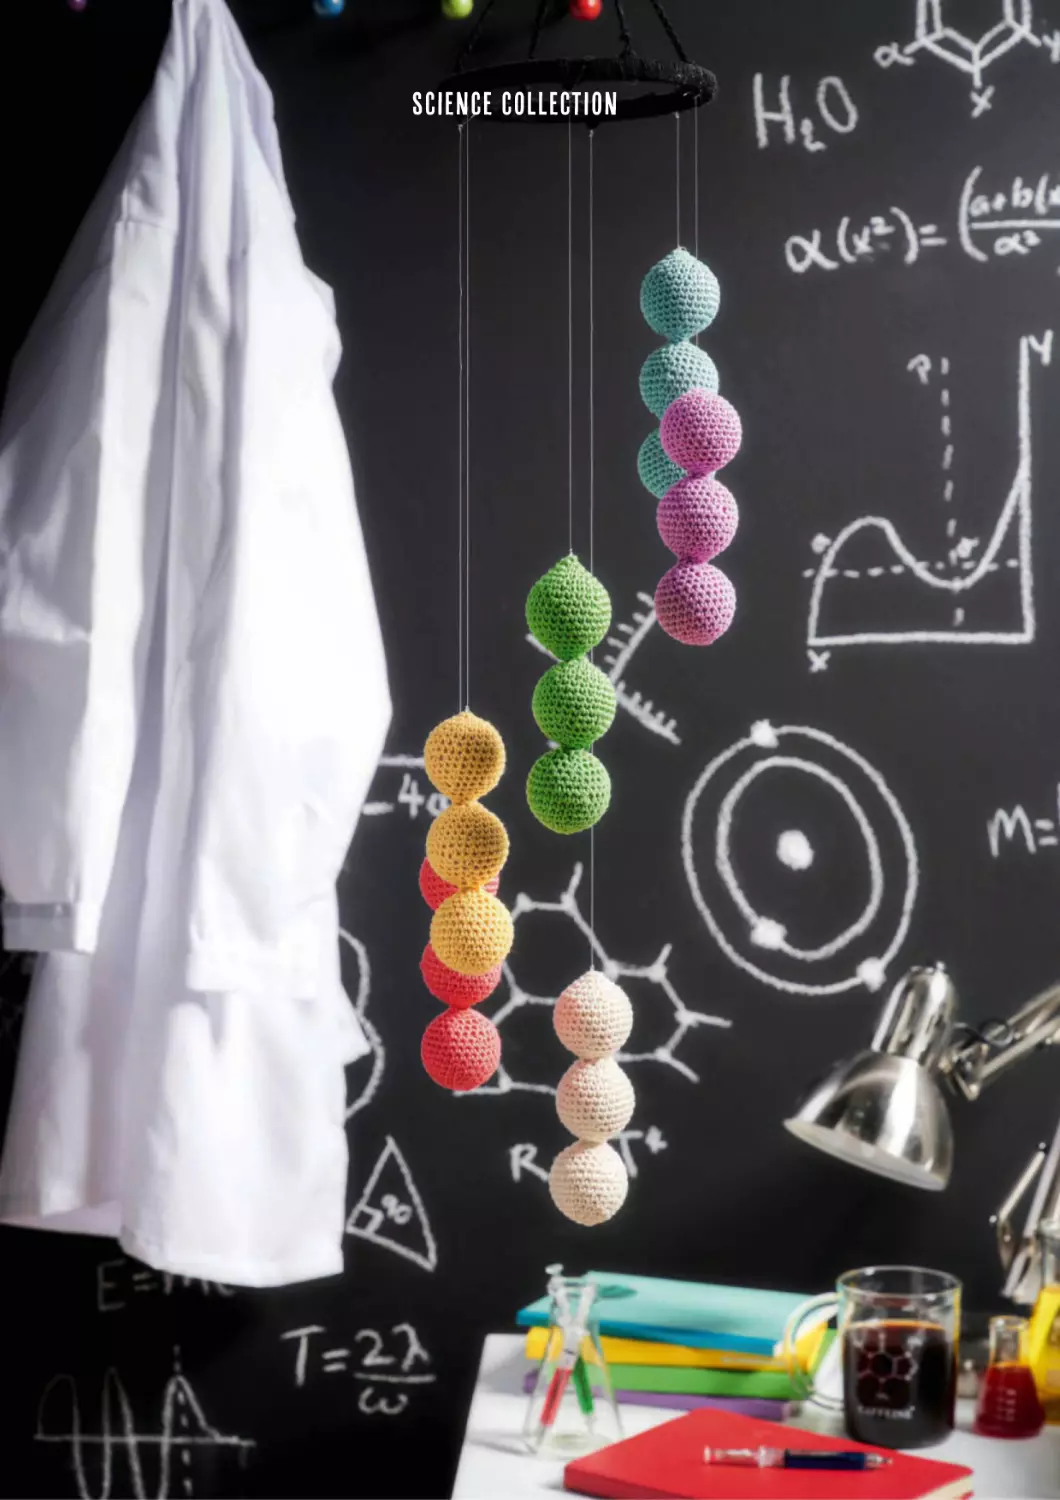
MIND OVER MATTER
Hanging in a DNA-esque spiral, these
chains of spheres have an abstract
scientific look that would brighten up
the corner of any laboratory.
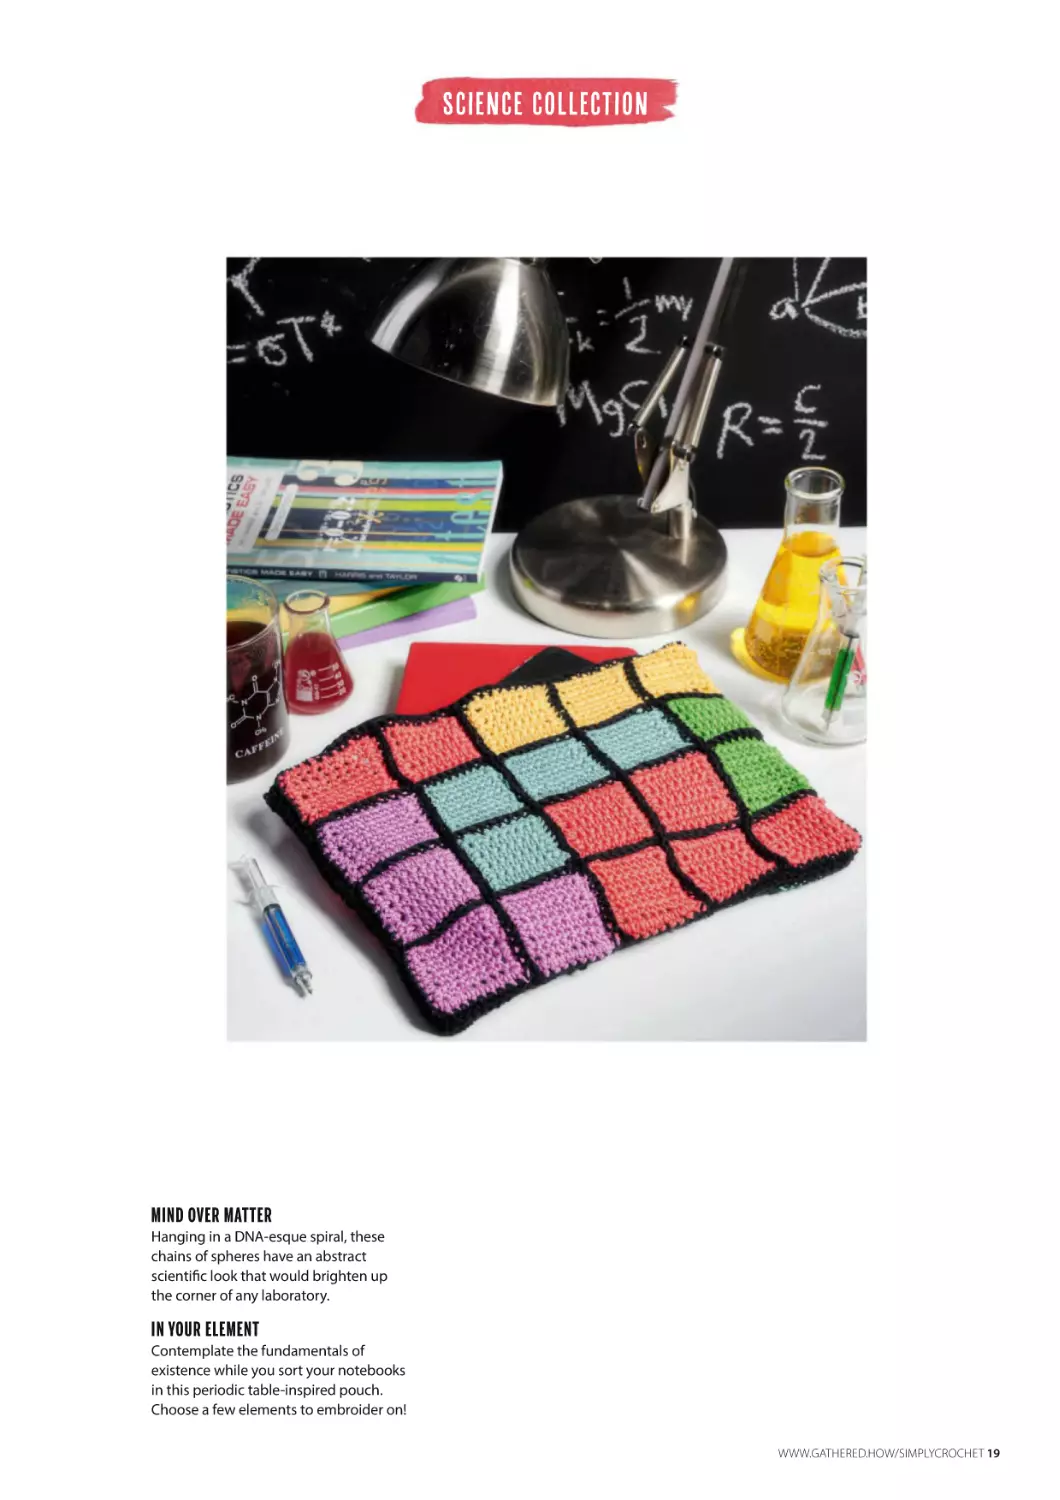
IN YOUR ELEMENT
Contemplate the fundamentals of
existence while you sort your notebooks
in this periodic table-inspired pouch.
Choose a few elements to embroider on!
WWW.GATHERED.HOW/SIMPLYCROCHET 19
SCIENCE COLLECTION
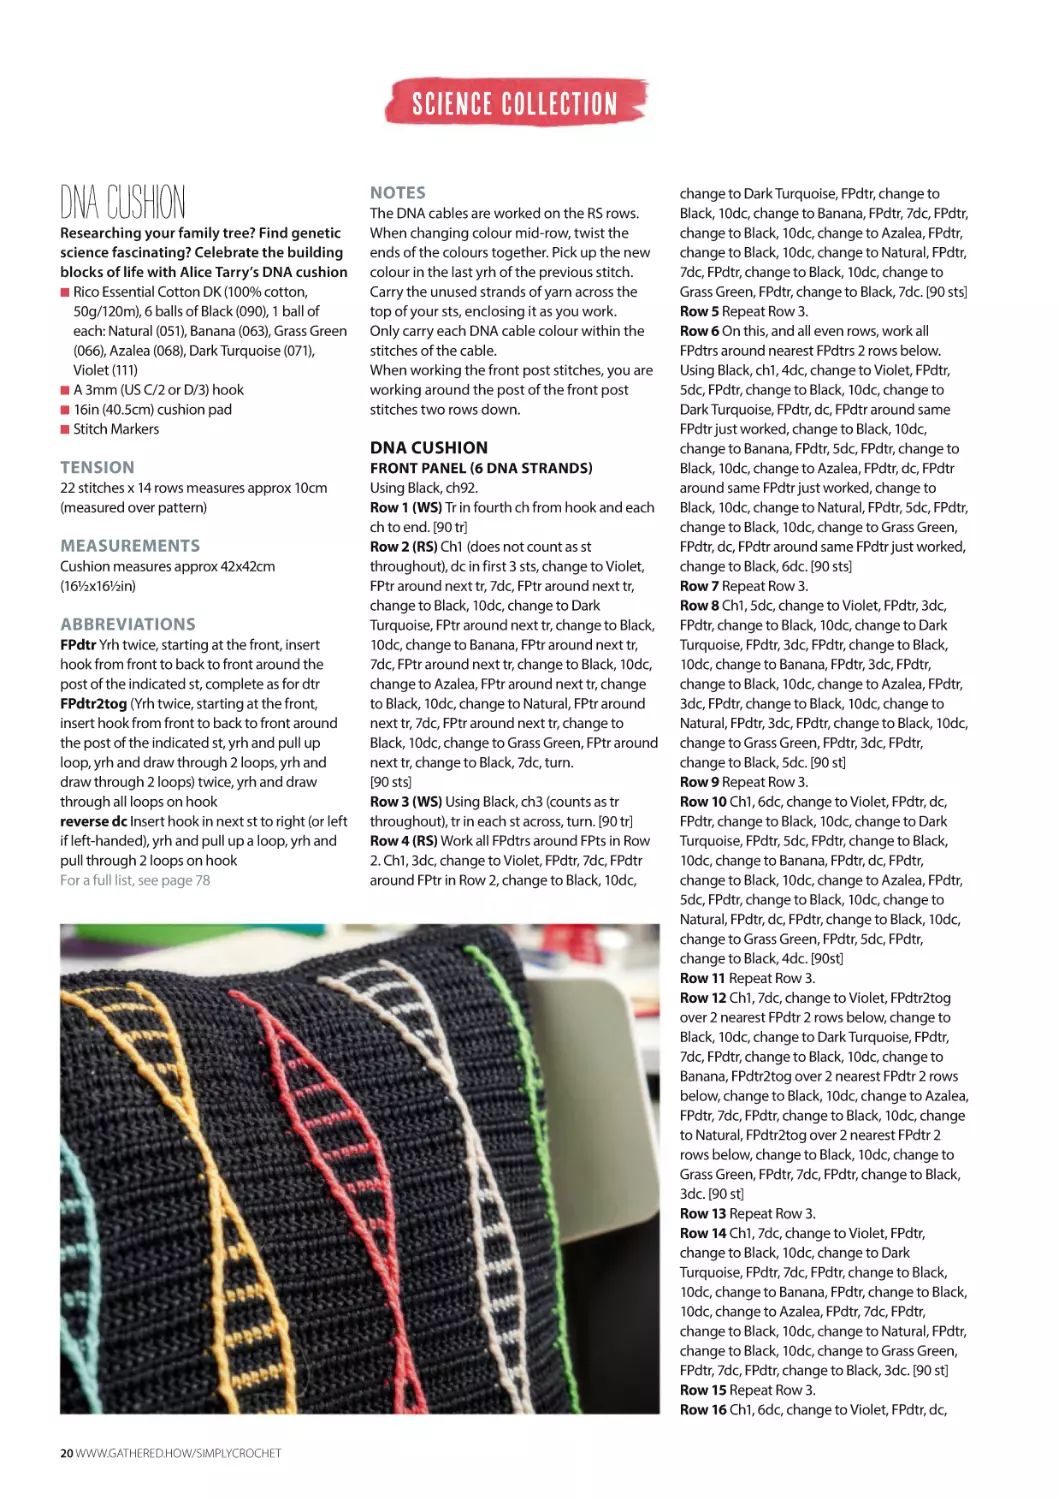
DNA CUSHION
Researching your family tree? Find genetic
science fascinating? Celebrate the building
blocks of life with Alice Tarry’s DNA cushion
QRico Essential Cotton DK (100% cotton,
50g/120m), 6 balls of Black (090), 1 ball of
each: Natural (051), Banana (063), Grass Green
(066), Azalea (068), Dark Turquoise (071),
Violet (111)
QA 3mm (US C/2 or D/3) hook
Q16in (40.5cm) cushion pad
QStitch Markers
NOTES
The DNA cables are worked on the RS rows.
When changing colour mid-row, twist the
ends of the colours together. Pick up the new
colour in the last yrh of the previous stitch.
Carry the unused strands of yarn across the
top of your sts, enclosing it as you work.
Only carry each DNA cable colour within the
stitches of the cable.
When working the front post stitches, you are
working around the post of the front post
stitches two rows down.
DNA CUSHION
TENSION
22 stitches x 14 rows measures approx 10cm
(measured over pattern)
MEASUREMENTS
Cushion measures approx 42x42cm
(16½x16½in)
ABBREVIATIONS
FPdtr Yrh twice, starting at the front, insert
hook from front to back to front around the
post of the indicated st, complete as for dtr
FPdtr2tog (Yrh twice, starting at the front,
insert hook from front to back to front around
the post of the indicated st, yrh and pull up
loop, yrh and draw through 2 loops, yrh and
draw through 2 loops) twice, yrh and draw
through all loops on hook
reverse dc Insert hook in next st to right (or left
if left-handed), yrh and pull up a loop, yrh and
pull through 2 loops on hook
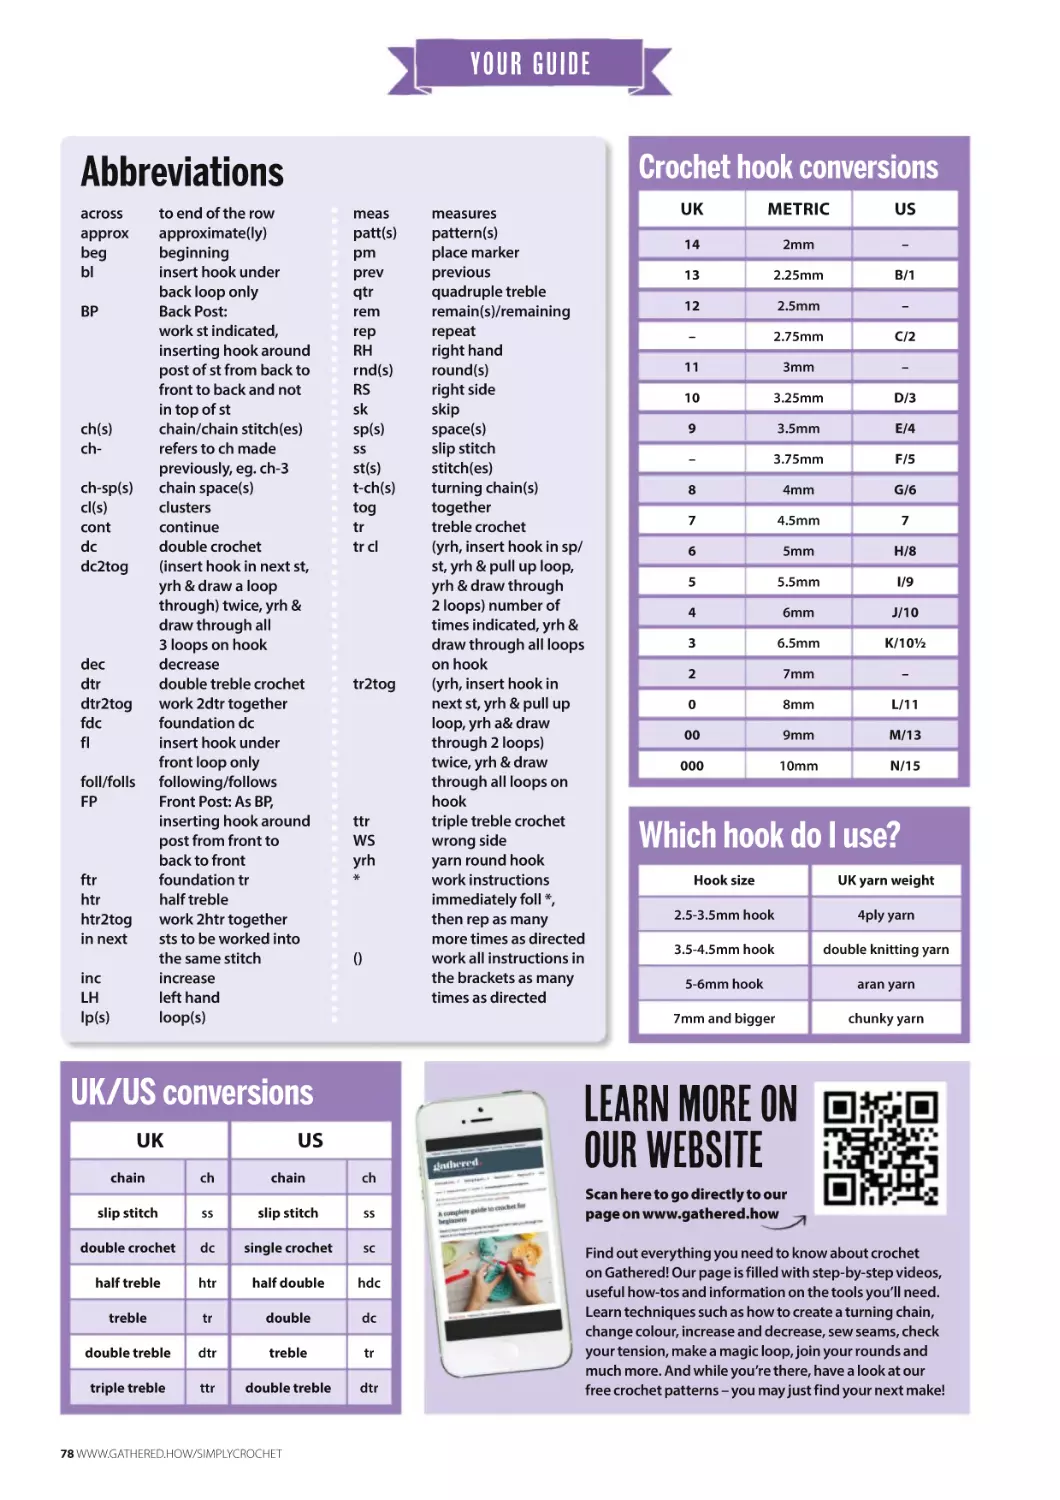
For a full list, see page 78
20 WWW.GATHERED.HOW/SIMPLYCROCHET
FRONT PANEL (6 DNA STRANDS)
Using Black, ch92.
Row 1 (WS) Tr in fourth ch from hook and each
ch to end. [90 tr]
Row 2 (RS) Ch1 (does not count as st
throughout), dc in first 3 sts, change to Violet,
FPtr around next tr, 7dc, FPtr around next tr,
change to Black, 10dc, change to Dark
Turquoise, FPtr around next tr, change to Black,
10dc, change to Banana, FPtr around next tr,
7dc, FPtr around next tr, change to Black, 10dc,
change to Azalea, FPtr around next tr, change
to Black, 10dc, change to Natural, FPtr around
next tr, 7dc, FPtr around next tr, change to
Black, 10dc, change to Grass Green, FPtr around
next tr, change to Black, 7dc, turn.
[90 sts]
Row 3 (WS) Using Black, ch3 (counts as tr
throughout), tr in each st across, turn. [90 tr]
Row 4 (RS) Work all FPdtrs around FPts in Row
2. Ch1, 3dc, change to Violet, FPdtr, 7dc, FPdtr
around FPtr in Row 2, change to Black, 10dc,
change to Dark Turquoise, FPdtr, change to
Black, 10dc, change to Banana, FPdtr, 7dc, FPdtr,
change to Black, 10dc, change to Azalea, FPdtr,
change to Black, 10dc, change to Natural, FPdtr,
7dc, FPdtr, change to Black, 10dc, change to
Grass Green, FPdtr, change to Black, 7dc. [90 sts]
Row 5 Repeat Row 3.
Row 6 On this, and all even rows, work all
FPdtrs around nearest FPdtrs 2 rows below.
Using Black, ch1, 4dc, change to Violet, FPdtr,
5dc, FPdtr, change to Black, 10dc, change to
Dark Turquoise, FPdtr, dc, FPdtr around same
FPdtr just worked, change to Black, 10dc,
change to Banana, FPdtr, 5dc, FPdtr, change to
Black, 10dc, change to Azalea, FPdtr, dc, FPdtr
around same FPdtr just worked, change to
Black, 10dc, change to Natural, FPdtr, 5dc, FPdtr,
change to Black, 10dc, change to Grass Green,
FPdtr, dc, FPdtr around same FPdtr just worked,
change to Black, 6dc. [90 sts]
Row 7 Repeat Row 3.
Row 8 Ch1, 5dc, change to Violet, FPdtr, 3dc,
FPdtr, change to Black, 10dc, change to Dark
Turquoise, FPdtr, 3dc, FPdtr, change to Black,
10dc, change to Banana, FPdtr, 3dc, FPdtr,
change to Black, 10dc, change to Azalea, FPdtr,
3dc, FPdtr, change to Black, 10dc, change to
Natural, FPdtr, 3dc, FPdtr, change to Black, 10dc,
change to Grass Green, FPdtr, 3dc, FPdtr,
change to Black, 5dc. [90 st]
Row 9 Repeat Row 3.
Row 10 Ch1, 6dc, change to Violet, FPdtr, dc,
FPdtr, change to Black, 10dc, change to Dark
Turquoise, FPdtr, 5dc, FPdtr, change to Black,
10dc, change to Banana, FPdtr, dc, FPdtr,
change to Black, 10dc, change to Azalea, FPdtr,
5dc, FPdtr, change to Black, 10dc, change to
Natural, FPdtr, dc, FPdtr, change to Black, 10dc,
change to Grass Green, FPdtr, 5dc, FPdtr,
change to Black, 4dc. [90st]
Row 11 Repeat Row 3.
Row 12 Ch1, 7dc, change to Violet, FPdtr2tog
over 2 nearest FPdtr 2 rows below, change to
Black, 10dc, change to Dark Turquoise, FPdtr,
7dc, FPdtr, change to Black, 10dc, change to
Banana, FPdtr2tog over 2 nearest FPdtr 2 rows
below, change to Black, 10dc, change to Azalea,
FPdtr, 7dc, FPdtr, change to Black, 10dc, change
to Natural, FPdtr2tog over 2 nearest FPdtr 2
rows below, change to Black, 10dc, change to
Grass Green, FPdtr, 7dc, FPdtr, change to Black,
3dc. [90 st]
Row 13 Repeat Row 3.
Row 14 Ch1, 7dc, change to Violet, FPdtr,
change to Black, 10dc, change to Dark
Turquoise, FPdtr, 7dc, FPdtr, change to Black,
10dc, change to Banana, FPdtr, change to Black,
10dc, change to Azalea, FPdtr, 7dc, FPdtr,
change to Black, 10dc, change to Natural, FPdtr,
change to Black, 10dc, change to Grass Green,
FPdtr, 7dc, FPdtr, change to Black, 3dc. [90 st]
Row 15 Repeat Row 3.
Row 16 Ch1, 6dc, change to Violet, FPdtr, dc,
SCIENCE COLLECTION
FPdtr around same FPdtr as previous FPdtr,
change to Black, 10dc, change to Dark
Turquoise, FPdtr, 5dc, FPdtr, change to Black,
10dc, change to Banana, FPdtr, dc, FPdtr around
same FPdtr as previous FPdtr, change to Black,
10dc, change to Azalea, FPdtr, 5dc, FPdtr,
change to Black, 10dc, change to Natural, FPdtr,
dc, FPdtr around same FPdtr as previous FPdtr,
change to Black, 10dc, change to Grass Green,
FPdtr, 5dc, FPdtr, change to Black, 4dc. [90 st]
Row 17 Repeat Row 3.
Row 18 Repeat Row 8.
Row 19 Repeat Row 3.
Row 20 Ch1, 4dc, change to Violet, FPdtr, 5dc,
FPdtr, change to Black, 10dc, change to Dark
Turquoise, FPdtr, dc, FPdtr, change to Black,
10dc, change to Banana, FPdtr, 5dc, FPdtr,
change to Black, 10dc, change to Azalea, FPdtr,
dc, FPdtr, change to Black, 10dc, change to
Natural, FPdtr, 5dc, FPdtr, change to Black, 10dc,
change to Grass Green, FPdtr, dc, FPdtr, change
to Black, 6dc. [90 sts]
Row 21 Repeat Row 3.
Row 22 Ch1, 3dc, change to Violet, FPdtr, 7dc,
FPdtr, change to Black, 10dc, change to Dark
Turquoise, FPdtr2tog over 2 nearest FPdtr 2
rows below, change to Black, 10dc, change to
Banana, FPdtr, 7dc, FPdtr, change to Black, 10dc,
change to Azalea, FPdtr2tog over 2 nearest
FPdtr 2 rows below, change to Black, 10dc,
change to Natural, FPdtr, 7dc, FPdtr, change to
Black, 10dc, change to Grass Green, FPdtr2tog
over 2 nearest FPdtr 2 rows below, change to
Black, 7dc. [90 st]
Row 23 Repeat Row 3.
Row 24 Ch1, 3dc, change to Violet, FPdtr, 7dc,
FPdtr, change to Black, 10dc, change to Dark
Turquoise, FPdtr, change to Black, 10dc, change
to Banana, FPdtr, 7dc, FPdtr, change to Black,
10dc, change to Azalea, FPdtr, change to Black,
10dc, change to Natural, FPdtr, 7dc, FPdtr,
change to Black, 10dc, change to Grass Green,
FPdtr, change to Black, 7dc. [90 st]
Row 25 Repeat Row 3.
Rows 26-45 Repeat Rows 6-25.
Rows 46-55 Repeat Rows 6-15.
Row 56 Using Black, ch1, dc in each st across to
end.
Fasten off and weave in ends.
BACK PANEL (3 DNA STRANDS)
Using Black, ch92.
Row 1 (WS) Tr in fourth ch from hook and each
ch to end. [90 tr]
Row 2 (RS) Ch1, 55dc, change to Dark
Turquoise, FPtr around next st, change to Black,
5dc, change to Banana, FPtr around next st,
7dc, FPtr around next st, change to Black, 5dc,
change to Azalea, FPtr, change to Black, 14dc,
turn. [90 sts]
Row 3 (WS) Using Black, ch3, tr in each st
across, turn. [90 tr]
Row 4 Ch1, 55dc, change to Dark Turquoise,
FPdtr, change to Black, 5dc, change to Banana,
FPdtr, 7dc, FPdtr, change to Black, 5dc, change
to Azalea, FPdtr, change to Black, 14dc, turn.
[90 sts]
Row 5 Repeat Row 3.
Row 6 Ch1, 54dc, change to Dark Turquoise,
FPdtr, dc, FPdtr around same FPdtr just worked,
change to Black, 5dc, change to Banana, FPdtr,
5dc, FPdtr, change to Black, 5dc, change to
Azalea, FPdtr, dc, FPdtr around same FPdtr just
worked, change to Black, 13dc, turn. [90 sts]
Row 7 Repeat Row 3.
Row 8 Ch1, 53dc, change to Dark Turquoise,
FPdtr, 3dc, FPdtr, change to Black, 5dc, change
to Banana, FPdtr, 3dc, FPdtr, change to Black,
5dc, change to Azalea, FPdtr, 3dc, FPdtr, change
to Black, 12dc. [90 st]
Row 9 Repeat Row 3.
Row 10 Ch1, 52dc, change to Dark Turquoise,
FPdtr, 5dc, FPdtr, change to Black, 5dc, change
to Banana, FPdtr, dc, FPdtr, change to Black,
5dc, change to Azalea, FPdtr, 5dc, FPdtr, change
to Black, 11dc. [90 st]
Row 11 Repeat Row 3.
Row 12 Ch1, 51dc, change to Dark Turquoise,
FPdtr, 7dc, FPdtr, change to Black, 5dc, change
to Banana, FPdtr2tog over 2 nearest FPdtr 2
rows below, change to Black, 5dc, change to
Azalea, FPdtr, 7dc, FPdtr, change to Black, 10dc.
[90 st]
Row 13 Repeat Row 3.
Row 14 Ch1, 51dc, change to Dark Turquoise,
FPdtr, 7dc, FPdtr, change to Black, 5dc, change
to Banana, FPdtr, change to Black, 5dc, change
to Azalea, FPdtr, 7dc, FPdtr, change to Black,
10dc. [90 st]
Row 15 Repeat Row 3.
Row 16 Ch1, 52dc, change to Dark Turquoise,
FPdtr, 5dc, FPdtr, change to Black, 5dc, change
to Banana, FPdtr, dc, FPdtr around same FPdtr
just worked, change to Black, 5dc, change to
Azalea, FPdtr, 5dc, FPdtr, change to Black, 11dc.
[90 st]
Row 17 Repeat Row 3.
Row 18 Repeat Row 8.
Row 19 Repeat Row 3.
Row 20 Ch1, 54dc, change to Dark Turquoise,
FPdtr, dc, FPdtr, change to Black, 5dc, change to
Banana, FPdtr, 5dc, FPdtr, change to Black, 5dc,
change to Azalea, FPdtr, dc, FPdtr, change to
Black, 13dc. [90 st]
Row 21 Repeat Row 3.
Row 22 Ch1, 55dc, change to Dark Turquoise,
FPdtr2tog over 2 nearest FPdtr 2 rows below,
change to Black, 5dc, change to Banana, FPdtr,
7dc, FPdtr, change to Black, 5dc, change to
Azalea, FPdtr2tog over 2 nearest FPdtr 2 rows
below, change to Black, 14dc. [90 st]
Row 23 Repeat Row 3.
Row 24 Ch1, 55dc, change to Dark Turquoise,
FPdtr, change to Black, 5dc, change to Banana,
FPdtr, 7dc, FPdtr, change to Black, 5dc, change
to Azalea, FPdtr, change to Black, 14dc. [90 st]
Row 25 Repeat Row 3.
Rows 26-45 Repeat Rows 6-25.
Rows 46-55 Repeat Rows 6-15.
Row 56 Using Black, ch1, dc in each st across to
end.
Fasten off and weave in ends.
EDGING
Repeat on both Front and Back Panels.
Join Black in first st of Row 56, ch1, *3dc in first
st, 88 dc, 3dc in last st, 88dc evenly across
row-end edge; rep from * aonce more, ss to
beg dc. [364 dc]
Lay Panels with WS facing and using Black,
work dc through both layers to join. [364 dc]
Ch1, reverse dc in each st around, ss to beg dc.
Fasten off and weave in ends.
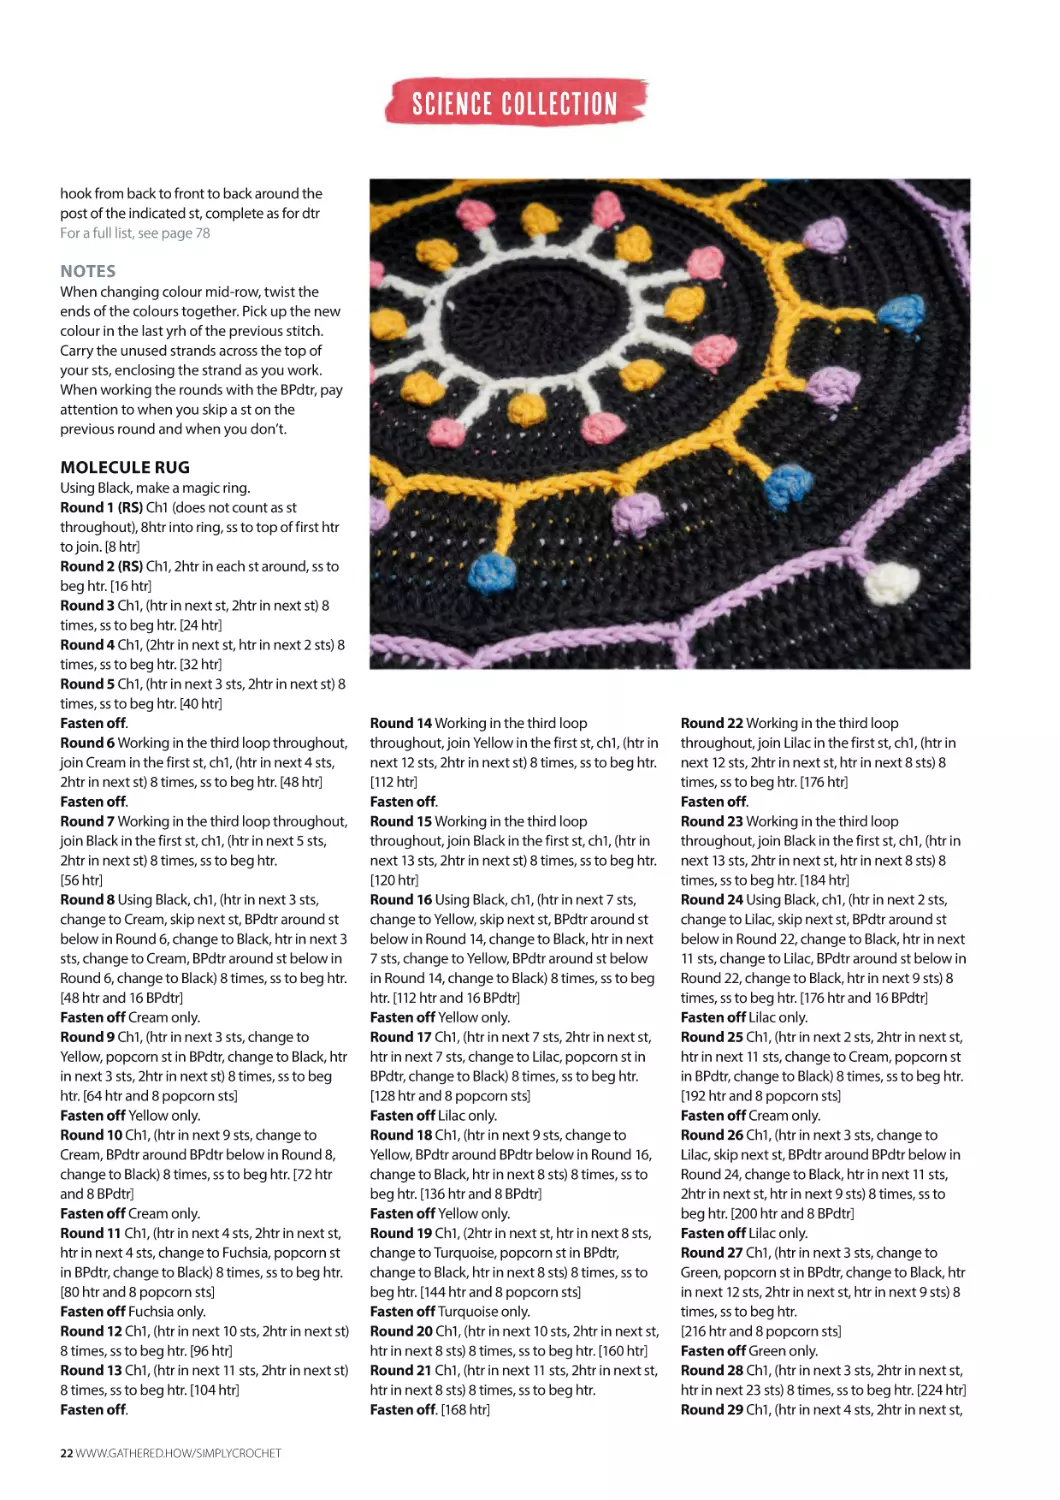
MOLECULE RUG
Make the microscopic macro with Alice
Tarry’s striking molecule-inspired rug – see
if your friends can guess what it represents!
QRico Essentials Mega Wool Chunky (55%
wool, 45% acrylic, 100g/125m), 6 balls of
Black (016), 1 ball of each: Cream (001), Yellow
(029), Fuchsia (018), Lilac (008), Turquoise
(030), Green (011)
QA 7mm (US K/10.5 or L/11) hook
QA stitch marker
TENSION
11 stitches x 8 rows measures approx 10x10cm
(4x4in) over tr crochet
MEASUREMENTS
Rug measures approx 94cm (37in) in diameter
ABBREVIATIONS
popcorn st 5tr in st indicated, remove hook
from working loop, reinsert hook in first tr of
5-tr group, pick up working loop and draw
through 2 loops to complete
BPdtr Yrh twice, starting at the back, insert
WWW.GATHERED.HOW/SIMPLYCROCHET 21
SCIENCE COLLECTION
hook from back to front to back around the
post of the indicated st, complete as for dtr
For a full list, see page 78
NOTES
When changing colour mid-row, twist the
ends of the colours together. Pick up the new
colour in the last yrh of the previous stitch.
Carry the unused strands across the top of
your sts, enclosing the strand as you work.
When working the rounds with the BPdtr, pay
attention to when you skip a st on the
previous round and when you don’t.
MOLECULE RUG
Using Black, make a magic ring.
Round 1 (RS) Ch1 (does not count as st
throughout), 8htr into ring, ss to top of first htr
to join. [8 htr]
Round 2 (RS) Ch1, 2htr in each st around, ss to
beg htr. [16 htr]
Round 3 Ch1, (htr in next st, 2htr in next st) 8
times, ss to beg htr. [24 htr]
Round 4 Ch1, (2htr in next st, htr in next 2 sts) 8
times, ss to beg htr. [32 htr]
Round 5 Ch1, (htr in next 3 sts, 2htr in next st) 8
times, ss to beg htr. [40 htr]
Fasten off.
Round 6 Working in the third loop throughout,
join Cream in the first st, ch1, (htr in next 4 sts,
2htr in next st) 8 times, ss to beg htr. [48 htr]
Fasten off.
Round 7 Working in the third loop throughout,
join Black in the first st, ch1, (htr in next 5 sts,
2htr in next st) 8 times, ss to beg htr.
[56 htr]
Round 8 Using Black, ch1, (htr in next 3 sts,
change to Cream, skip next st, BPdtr around st
below in Round 6, change to Black, htr in next 3
sts, change to Cream, BPdtr around st below in
Round 6, change to Black) 8 times, ss to beg htr.
[48 htr and 16 BPdtr]
Fasten off Cream only.
Round 9 Ch1, (htr in next 3 sts, change to
Yellow, popcorn st in BPdtr, change to Black, htr
in next 3 sts, 2htr in next st) 8 times, ss to beg
htr. [64 htr and 8 popcorn sts]
Fasten off Yellow only.
Round 10 Ch1, (htr in next 9 sts, change to
Cream, BPdtr around BPdtr below in Round 8,
change to Black) 8 times, ss to beg htr. [72 htr
and 8 BPdtr]
Fasten off Cream only.
Round 11 Ch1, (htr in next 4 sts, 2htr in next st,
htr in next 4 sts, change to Fuchsia, popcorn st
in BPdtr, change to Black) 8 times, ss to beg htr.
[80 htr and 8 popcorn sts]
Fasten off Fuchsia only.
Round 12 Ch1, (htr in next 10 sts, 2htr in next st)
8 times, ss to beg htr. [96 htr]
Round 13 Ch1, (htr in next 11 sts, 2htr in next st)
8 times, ss to beg htr. [104 htr]
Fasten off.
22 WWW.GATHERED.HOW/SIMPLYCROCHET
Round 14 Working in the third loop
throughout, join Yellow in the first st, ch1, (htr in
next 12 sts, 2htr in next st) 8 times, ss to beg htr.
[112 htr]
Fasten off.
Round 15 Working in the third loop
throughout, join Black in the first st, ch1, (htr in
next 13 sts, 2htr in next st) 8 times, ss to beg htr.
[120 htr]
Round 16 Using Black, ch1, (htr in next 7 sts,
change to Yellow, skip next st, BPdtr around st
below in Round 14, change to Black, htr in next
7 sts, change to Yellow, BPdtr around st below
in Round 14, change to Black) 8 times, ss to beg
htr. [112 htr and 16 BPdtr]
Fasten off Yellow only.
Round 17 Ch1, (htr in next 7 sts, 2htr in next st,
htr in next 7 sts, change to Lilac, popcorn st in
BPdtr, change to Black) 8 times, ss to beg htr.
[128 htr and 8 popcorn sts]
Fasten off Lilac only.
Round 18 Ch1, (htr in next 9 sts, change to
Yellow, BPdtr around BPdtr below in Round 16,
change to Black, htr in next 8 sts) 8 times, ss to
beg htr. [136 htr and 8 BPdtr]
Fasten off Yellow only.
Round 19 Ch1, (2htr in next st, htr in next 8 sts,
change to Turquoise, popcorn st in BPdtr,
change to Black, htr in next 8 sts) 8 times, ss to
beg htr. [144 htr and 8 popcorn sts]
Fasten off Turquoise only.
Round 20 Ch1, (htr in next 10 sts, 2htr in next st,
htr in next 8 sts) 8 times, ss to beg htr. [160 htr]
Round 21 Ch1, (htr in next 11 sts, 2htr in next st,
htr in next 8 sts) 8 times, ss to beg htr.
Fasten off. [168 htr]
Round 22 Working in the third loop
throughout, join Lilac in the first st, ch1, (htr in
next 12 sts, 2htr in next st, htr in next 8 sts) 8
times, ss to beg htr. [176 htr]
Fasten off.
Round 23 Working in the third loop
throughout, join Black in the first st, ch1, (htr in
next 13 sts, 2htr in next st, htr in next 8 sts) 8
times, ss to beg htr. [184 htr]
Round 24 Using Black, ch1, (htr in next 2 sts,
change to Lilac, skip next st, BPdtr around st
below in Round 22, change to Black, htr in next
11 sts, change to Lilac, BPdtr around st below in
Round 22, change to Black, htr in next 9 sts) 8
times, ss to beg htr. [176 htr and 16 BPdtr]
Fasten off Lilac only.
Round 25 Ch1, (htr in next 2 sts, 2htr in next st,
htr in next 11 sts, change to Cream, popcorn st
in BPdtr, change to Black) 8 times, ss to beg htr.
[192 htr and 8 popcorn sts]
Fasten off Cream only.
Round 26 Ch1, (htr in next 3 sts, change to
Lilac, skip next st, BPdtr around BPdtr below in
Round 24, change to Black, htr in next 11 sts,
2htr in next st, htr in next 9 sts) 8 times, ss to
beg htr. [200 htr and 8 BPdtr]
Fasten off Lilac only.
Round 27 Ch1, (htr in next 3 sts, change to
Green, popcorn st in BPdtr, change to Black, htr
in next 12 sts, 2htr in next st, htr in next 9 sts) 8
times, ss to beg htr.
[216 htr and 8 popcorn sts]
Fasten off Green only.
Round 28 Ch1, (htr in next 3 sts, 2htr in next st,
htr in next 23 sts) 8 times, ss to beg htr. [224 htr]
Round 29 Ch1, (htr in next 4 sts, 2htr in next st,
SCIENCE COLLECTION
htr in next 23 sts) 8 times, ss to beg htr. [232 htr]
Fasten off.
Round 30 Working in the third loop
throughout, join Cream in the first st, ch1, (htr in
next 5 sts, 2htr in next st, htr in next 23 sts) 8
times, ss to beg htr. [240 htr]
Fasten off.
Round 31 Working in the third loop
throughout, join Black in the first st, ch1, (htr in
next 6 sts, 2htr in next st, htr in next 23 sts) 8
times, ss to beg htr. [248 htr]
Round 32 Using Black, ch1, (htr in next 8 sts,
change to Cream, BPdtr around st below in
Round 30, change to Black, htr in next 15 sts,
change to Cream, skip next st, BPdtr around st
below in Round 30, change to Black, htr in next
7 sts) 8 times, ss to beg htr.
[240 htr and 16 BPdtr]
Fasten off Cream.
Round 33 Ch1, (htr in next 8 sts, change to
Yellow, popcorn st in BPdtr, change to Black, htr
in next 15 sts, 2htr in next st, htr in next 7 sts) 8
times, ss to beg htr.
[256 htr and 8 popcorn sts]
Fasten off Yellow only.
Round 34 Ch1, (htr in next 26 sts, change to
Cream, BPdtr around BPdtr below in Round 32,
change to Black, htr in next 7 sts) 8 times, ss to
beg htr. [264 htr and 8 BPdtr]
Fasten off Cream only.
Round 35 Ch1, (htr in next 9 sts, 2htr in next st,
htr in next 16 sts, change to Yellow, popcorn st
in BPdtr, change to Black, htr in next 7 sts) 8
times, ss to beg htr.
[272 htr and 8 popcorn sts]
Fasten off Yellow only.
Round 36 Ch1, (htr in next 10 sts, 2htr in next st,
htr in next 24 sts) 8 times, ss to beg htr. [288 htr]
Round 37 Ch1, (htr in next 11 sts, 2htr in next st,
htr in next 24 sts) 8 times, ss to beg htr. [296 htr]
Round 38 Ch4 (counts as dtr), dtr in fl of each st
around, ss to top of beg ch-4 to join. [296 dtr]
Round 39 Ch1, dc in each st around, working
through bl of Round 38 and unworked bl of
Round 37, ss to first dc to join. [296 dc]
Fasten off and weave in ends.
MOLECULE COASTERS
The structures might be simple, but they’re
the basis for everything in existence!
Natalie Beard’s molecule coasters make
great gifts for chemistry fans
QRico Essential Cotton DK (100% cotton,
50g/120m), 1 ball of each: Azalea (068), Dark
Turquoise (071), Black (090), Grass Green
(066), Banana (063)
QA 3.5mm (US E/4) hook
TENSION
Tension is not critical, but it may affect the yarn
quantities required
MEASUREMENTS
Coaster measures approx 11x11cm (4¼x4¼in)
NOTES
Main section of Coaster is worked in rows. A
Border is worked around the edges at the end.
The Molecules are made separately and sewn
to the RS of the Coasters.
MOLECULE COASTERS
COASTERS (MAKE 4)
Using Black, ch19.
Row 1 (RS) Dc in second ch from hook, dc into
each cg to the end, , turn. [18 dc]
Rows 2-20 Ch1 (does not count as st
throughout), dc in each st to the end, turn.
Do not fasten off.
BORDER
Cont with Black.
Round 1 (RS) Ch1, dc in next 18 sts, 2dc in
corner, 20dc evenly across row-end edge, 2dc
in corner; rep from * once more, ss to beg dc.
[84 sts]
Fasten off.
Work the final round in a different colour on
each Coaster, using the rem four colours.
Join next colour in any st.
Round 2 Ch1, dc in each st around, ss to beg dc.
Fasten off and weave in ends.
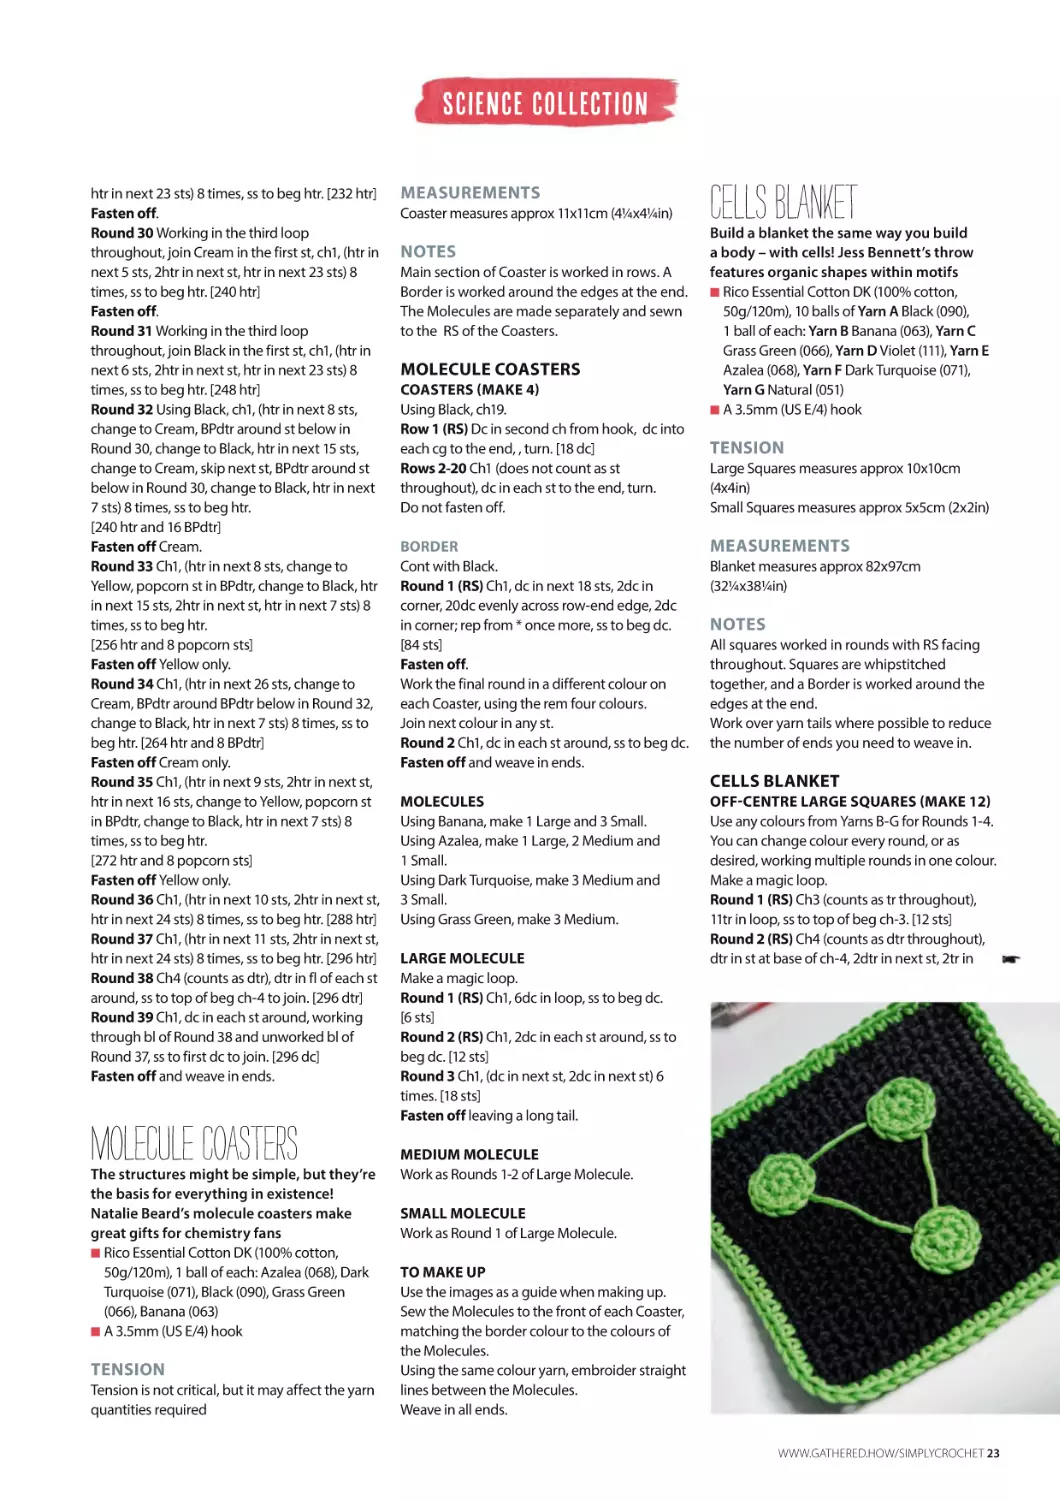
Cells Blanket
Build a blanket the same way you build
a body – with cells! Jess Bennett’s throw
features organic shapes within motifs
QRico Essential Cotton DK (100% cotton,
50g/120m), 10 balls of Yarn A Black (090),
1 ball of each: Yarn B Banana (063), Yarn C
Grass Green (066), Yarn D Violet (111), Yarn E
Azalea (068), Yarn F Dark Turquoise (071),
Yarn G Natural (051)
QA 3.5mm (US E/4) hook
TENSION
Large Squares measures approx 10x10cm
(4x4in)
Small Squares measures approx 5x5cm (2x2in)
MEASUREMENTS
Blanket measures approx 82x97cm
(32¼x38¼in)
NOTES
All squares worked in rounds with RS facing
throughout. Squares are whipstitched
together, and a Border is worked around the
edges at the end.
Work over yarn tails where possible to reduce
the number of ends you need to weave in.
CELLS BLANKET
MOLECULES
Using Banana, make 1 Large and 3 Small.
Using Azalea, make 1 Large, 2 Medium and
1 Small.
Using Dark Turquoise, make 3 Medium and
3 Small.
Using Grass Green, make 3 Medium.
LARGE MOLECULE
Make a magic loop.
Round 1 (RS) Ch1, 6dc in loop, ss to beg dc.
[6 sts]
Round 2 (RS) Ch1, 2dc in each st around, ss to
beg dc. [12 sts]
Round 3 Ch1, (dc in next st, 2dc in next st) 6
times. [18 sts]
Fasten off leaving a long tail.
OFF-CENTRE LARGE SQUARES (MAKE 12)
Use any colours from Yarns B-G for Rounds 1-4.
You can change colour every round, or as
desired, working multiple rounds in one colour.
Make a magic loop.
Round 1 (RS) Ch3 (counts as tr throughout),
11tr in loop, ss to top of beg ch-3. [12 sts]
Round 2 (RS) Ch4 (counts as dtr throughout),
dtr in st at base of ch-4, 2dtr in next st, 2tr in
MEDIUM MOLECULE
Work as Rounds 1-2 of Large Molecule.
SMALL MOLECULE
Work as Round 1 of Large Molecule.
TO MAKE UP
Use the images as a guide when making up.
Sew the Molecules to the front of each Coaster,
matching the border colour to the colours of
the Molecules.
Using the same colour yarn, embroider straight
lines between the Molecules.
Weave in all ends.
WWW.GATHERED.HOW/SIMPLYCROCHET 23
SCIENCE COLLECTION
next 2 sts, 2htr in next 2 sts, 2dc in next 2 sts,
2htr in next 2 sts, 2tr in next 2 sts, ss to top of
beg ch-4. [24 sts]
Round 3 Ch4, 2dtr in next st, dtr in next st, 2dtr
in next st, (2tr in next st, tr in next st) twice, (2htr
in next st, htr in next st) twice, (2dc in next st, dc
in next st) twice, (2htr in next st, htr in next st)
twice, (2tr in next st, tr in next st) twice, ss to top
of beg ch-4. [36 sts]
Round 4 Ch4, dtr in next st, 2dtr in next st, dtr
in next 2 sts, 2dtr in next st, (tr in next 2 sts, 2tr
in next st) twice, (htr in next 2 sts, 2htr in next
st) twice, (dc in next 2 sts, 2dc in next st) twice,
(htr in next 2 sts, 2htr in next st) twice, (tr in next
2 sts, 2tr in next st) twice, ss to top of beg ch-4.
[48 sts]
Fasten off.
Join Yarn A in any st.
Round 5 (RS) Ch3, *tr in next st, ch1, tr in next
st, tr in next 2 sts, htr in next 2 sts, dc in next 2
sts, htr in next 2 sts, tr in next 2 sts; rep from * 3
times more omitting final st on last rep, ss to
top of beg ch-3. [48 sts, 4 ch-1 sps]
Round 6 (RS) Ch3, *tr in each st to ch-1 sp, (tr,
ch1, tr) in ch-sp; rep from * around to end, ss to
top of beg ch-3. [56 sts, 4 ch-1 sps]
Fasten off.
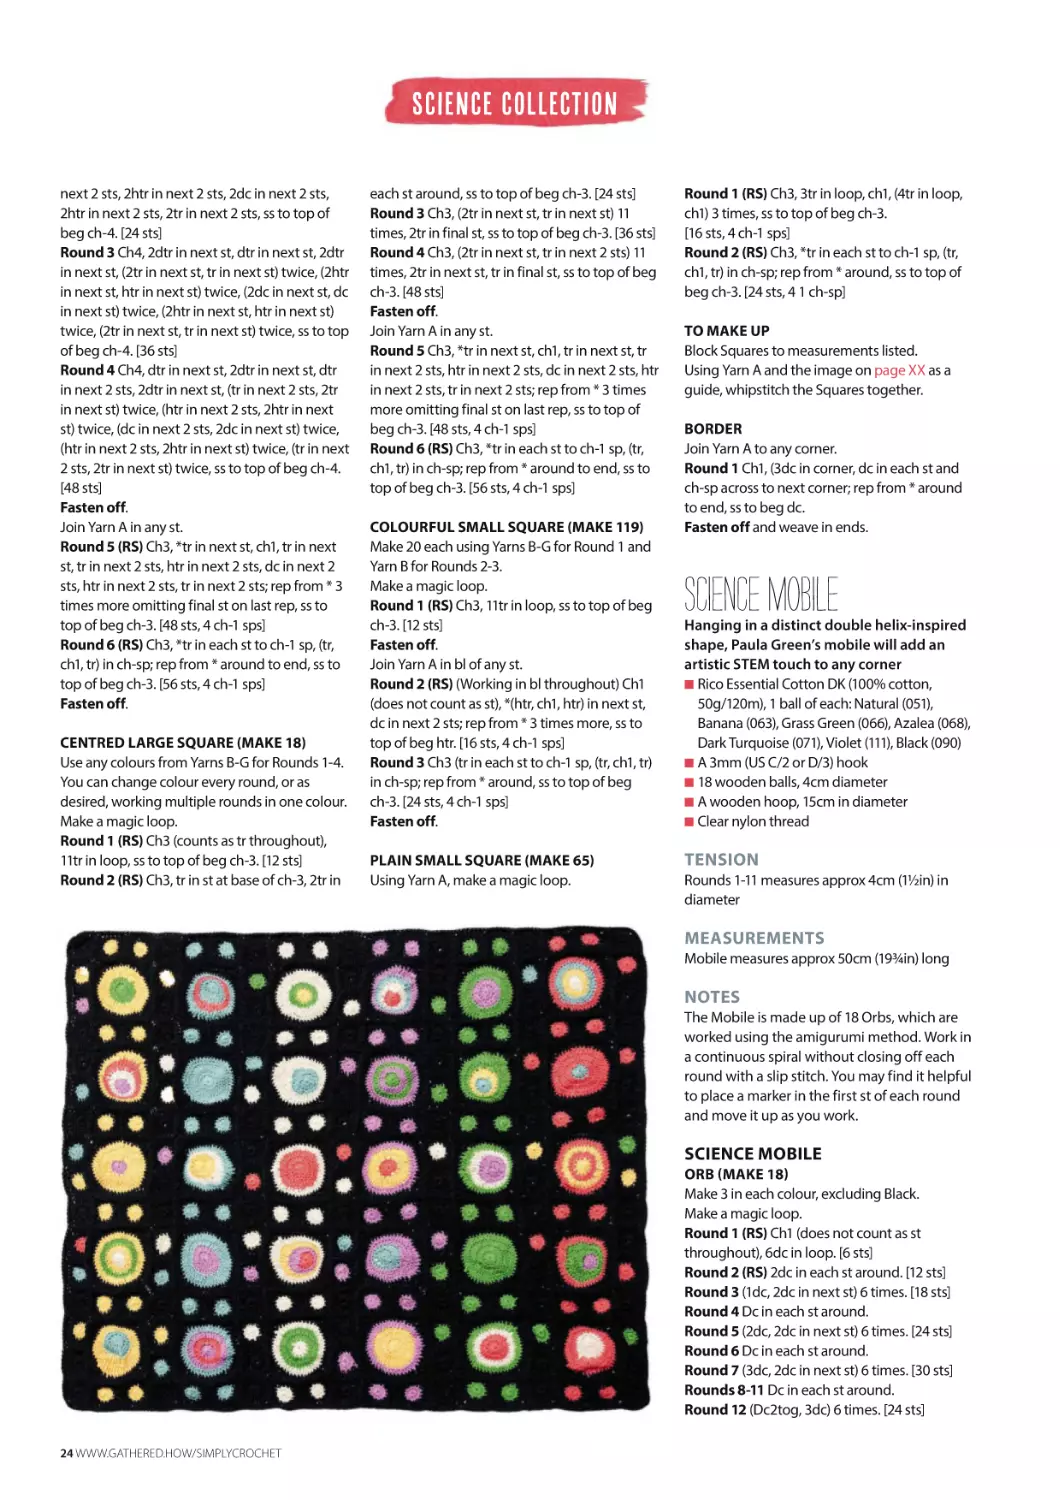
CENTRED LARGE SQUARE (MAKE 18)
Use any colours from Yarns B-G for Rounds 1-4.
You can change colour every round, or as
desired, working multiple rounds in one colour.
Make a magic loop.
Round 1 (RS) Ch3 (counts as tr throughout),
11tr in loop, ss to top of beg ch-3. [12 sts]
Round 2 (RS) Ch3, tr in st at base of ch-3, 2tr in
each st around, ss to top of beg ch-3. [24 sts]
Round 3 Ch3, (2tr in next st, tr in next st) 11
times, 2tr in final st, ss to top of beg ch-3. [36 sts]
Round 4 Ch3, (2tr in next st, tr in next 2 sts) 11
times, 2tr in next st, tr in final st, ss to top of beg
ch-3. [48 sts]
Fasten off.
Join Yarn A in any st.
Round 5 Ch3, *tr in next st, ch1, tr in next st, tr
in next 2 sts, htr in next 2 sts, dc in next 2 sts, htr
in next 2 sts, tr in next 2 sts; rep from * 3 times
more omitting final st on last rep, ss to top of
beg ch-3. [48 sts, 4 ch-1 sps]
Round 6 (RS) Ch3, *tr in each st to ch-1 sp, (tr,
ch1, tr) in ch-sp; rep from * around to end, ss to
top of beg ch-3. [56 sts, 4 ch-1 sps]
COLOURFUL SMALL SQUARE (MAKE 119)
Make 20 each using Yarns B-G for Round 1 and
Yarn B for Rounds 2-3.
Make a magic loop.
Round 1 (RS) Ch3, 11tr in loop, ss to top of beg
ch-3. [12 sts]
Fasten off.
Join Yarn A in bl of any st.
Round 2 (RS) (Working in bl throughout) Ch1
(does not count as st), *(htr, ch1, htr) in next st,
dc in next 2 sts; rep from * 3 times more, ss to
top of beg htr. [16 sts, 4 ch-1 sps]
Round 3 Ch3 (tr in each st to ch-1 sp, (tr, ch1, tr)
in ch-sp; rep from * around, ss to top of beg
ch-3. [24 sts, 4 ch-1 sps]
Fasten off.
PLAIN SMALL SQUARE (MAKE 65)
Using Yarn A, make a magic loop.
Round 1 (RS) Ch3, 3tr in loop, ch1, (4tr in loop,
ch1) 3 times, ss to top of beg ch-3.
[16 sts, 4 ch-1 sps]
Round 2 (RS) Ch3, *tr in each st to ch-1 sp, (tr,
ch1, tr) in ch-sp; rep from * around, ss to top of
beg ch-3. [24 sts, 4 1 ch-sp]
TO MAKE UP
Block Squares to measurements listed.
Using Yarn A and the image on page XX as a
guide, whipstitch the Squares together.
BORDER
Join Yarn A to any corner.
Round 1 Ch1, (3dc in corner, dc in each st and
ch-sp across to next corner; rep from * around
to end, ss to beg dc.
Fasten off and weave in ends.
SCIENCE MOBILE
Hanging in a distinct double helix-inspired
shape, Paula Green’s mobile will add an
artistic STEM touch to any corner
QRico Essential Cotton DK (100% cotton,
50g/120m), 1 ball of each: Natural (051),
Banana (063), Grass Green (066), Azalea (068),
Dark Turquoise (071), Violet (111), Black (090)
QA 3mm (US C/2 or D/3) hook
Q18 wooden balls, 4cm diameter
QA wooden hoop, 15cm in diameter
QClear nylon thread
TENSION
Rounds 1-11 measures approx 4cm (1½in) in
diameter
MEASUREMENTS
Mobile measures approx 50cm (19¾in) long
NOTES
The Mobile is made up of 18 Orbs, which are
worked using the amigurumi method. Work in
a continuous spiral without closing off each
round with a slip stitch. You may find it helpful
to place a marker in the first st of each round
and move it up as you work.
SCIENCE MOBILE
ORB (MAKE 18)
Make 3 in each colour, excluding Black.
Make a magic loop.
Round 1 (RS) Ch1 (does not count as st
throughout), 6dc in loop. [6 sts]
Round 2 (RS) 2dc in each st around. [12 sts]
Round 3 (1dc, 2dc in next st) 6 times. [18 sts]
Round 4 Dc in each st around.
Round 5 (2dc, 2dc in next st) 6 times. [24 sts]
Round 6 Dc in each st around.
Round 7 (3dc, 2dc in next st) 6 times. [30 sts]
Rounds 8-11 Dc in each st around.
Round 12 (Dc2tog, 3dc) 6 times. [24 sts]
24 WWW.GATHERED.HOW/SIMPLYCROCHET
SCIENCE COLLECTION
Round 13 Dc in each st around.
Insert wooden ball.
Round 14 (Dc2tog, 2dc) 6 times. [18 sts]
Round 15 (Dc2tog, 1dc) 6 times. [12 sts]
Round 16 (Skip 1 st, dc in next st) 6 times. [6 sts]
Fasten off leaving a long tail.
Thread tail through fl of final 6 sts and pull tight
to close, leave tails for joining.
HOOP COVER
Join Black around loop and dc around until it’s
completely covered, ss to first dc to join.
Fasten off and weave in ends.
Periodic table bag
You’ll be ready to conduct research at
a moment’s notice if you keep your laptop
in Marianne Rawlins’ periodic table bag
QRico Essential Cotton DK (100% cotton,
50g/120m), 1 ball of each: Azalea (068), Dark
Turquoise (071), Black (090), Grass Green
(066), Banana (063), Violet (111)
QA 3mm (US C/2 or D/3) hook
QA black zip, 26cm
TENSION
Square measures approx 5.5x5.5cm (2¼x2¼in)
HANGING CHAINS (MAKE 4)
Using Black, ch25.
Fasten off.
TO MAKE UP
Sew the Orbs together into groups of 3 of the
same colour using the image as a guide.
Place 6 stitch markers evenly around loop to
mark when the strands will be joined.
Using nylon thread, sew the Dark Turquoise
group approx 8cm below one of the markers.
Sew the Violet group to next marker 14cm
below the hoop, sew the Grass Green group to
the next marker 20cm below the hoop, sew the
Banana group to the next marker 26cm below
the hoop, sew the Azalea group to the next
marker 32cm below the hoop and sew the
Natural group to the final marker 38cm below
the hoop.
Sew one end of each Hanging Chain to the
inside of the Hoop Cover and tie the ends
together at the centre.
MEASUREMENTS
Bag measures approx 28x22cm (11x8¾in)
NOTES
Bag is made up of 40 Squares. Squares are
worked in rows in colours specified. Work all
edging and joining in Black.
PERIODIC TABLE BAG
SQUARES (MAKE 40)
Make 7 each in Banana and Violet.
Make 8 in Grass Green.
Make 9 each in Azalea and Dark Turquoise.
Ch 9
Row 1 (RS) Dc in second ch from hook, dc in
each ch across, turn. [8 dc]
Row 2 Ch1 (does not count as st throughout),
dc in each st across, turn.
Rows 3-8 As Row 2.
Fasten off.
EDGING
Join Black in any corner.
Round 1 (RS) Ch1, *3dc in corner, skip next
row-end/dc, dc in next 6 row-end/sts; rep from
* 3 times more, ss to beg dc. [36 sts]
Fasten off.
TO MAKE UP
Using the image as a guide, dc 20 Squares
together into a 5x4 panel. Work all joining with
RS facing and working through the bl only.
With RS facing, join Black into top-left corner on
any Panel.
Row 1 (RS) Ch1, 36dc across side, 3dc in corner,
43dc across lower edge, 3dc in corner, 36dc
across side.
Fasten off.
Rep on second Panel.
Place Panels together and dc together across 3
sides, leaving top open.
Turn so WS in facing, pin the zip across the
centre of the top edge. Once happy with the
position, sew in place. Sew the edges either
side of the zip closed.
Weave in all ends.
YARN STOCKISTS
Rico Design
www.rico-design.com/en/home
WWW.GATHERED.HOW/SIMPLYCROCHET 25
Scan for more info
www.scheepjes.com
instagram.com/scheepjes
facebook.com/scheepjes
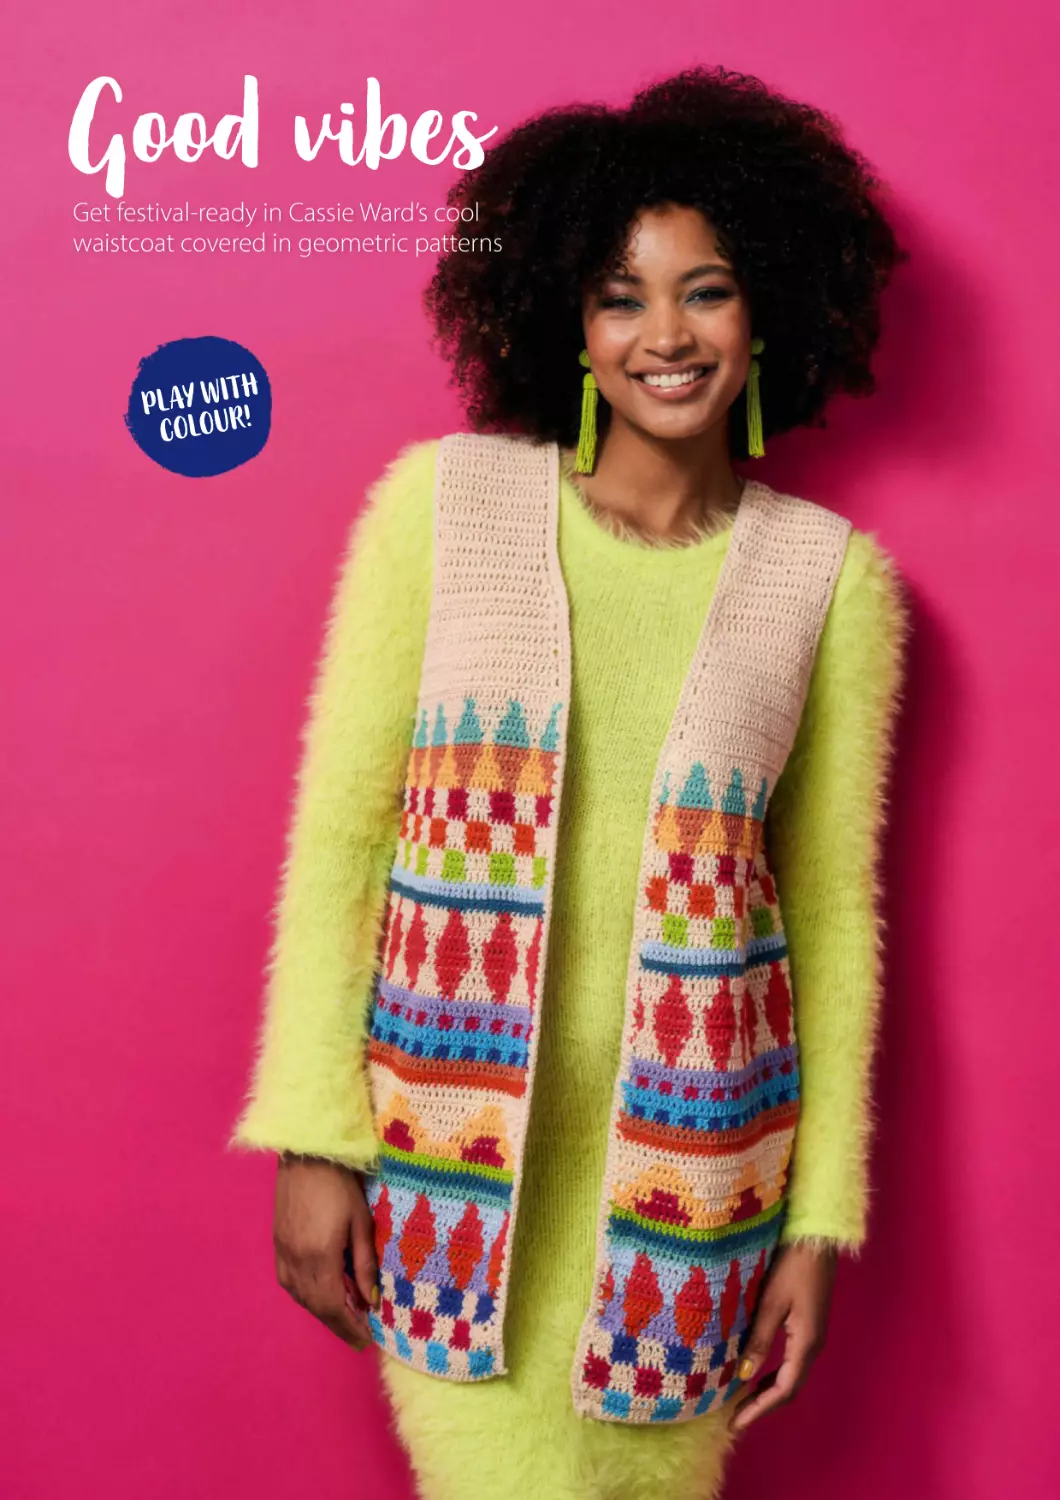
Good vibes
Get festival-ready in Cassie Ward’s cool
waistcoat covered in geometric patterns
play wuitrh!
colo
COLOURWORK WAISTCOAT
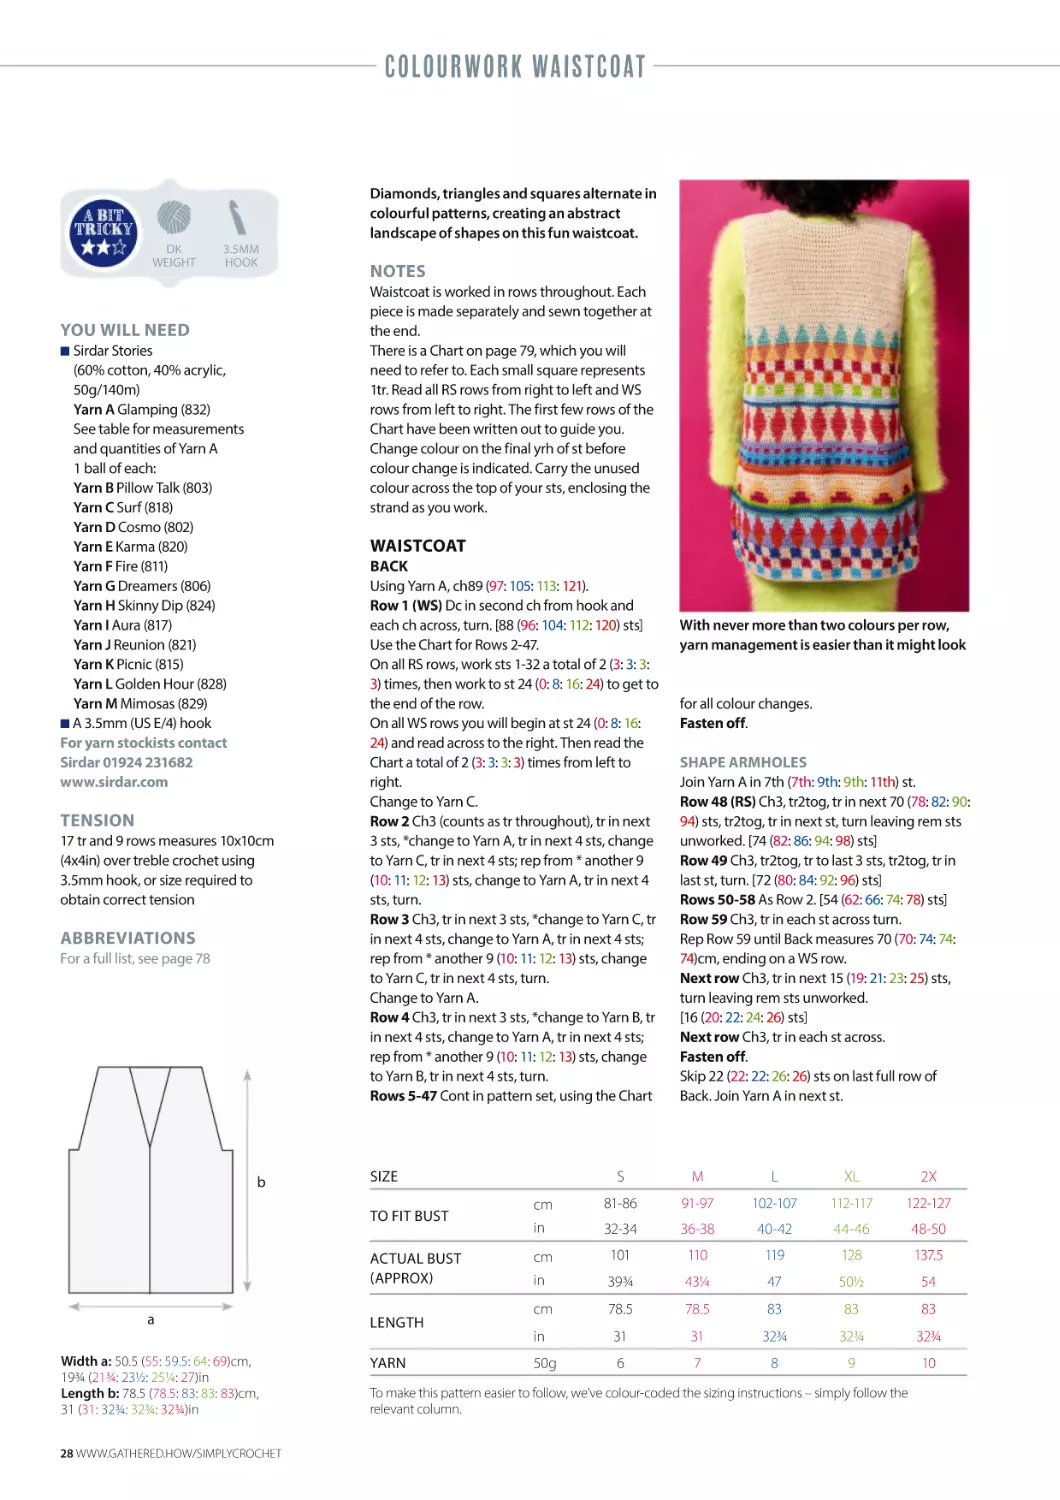
Diamonds, triangles and squares alternate in
colourful patterns, creating an abstract
landscape of shapes on this fun waistcoat.
A IT
T IC Y
DK
WEIGHT
3.5MM
HOOK
NOTES
Waistcoat is worked in rows throughout. Each
piece is made separately and sewn together at
the end.
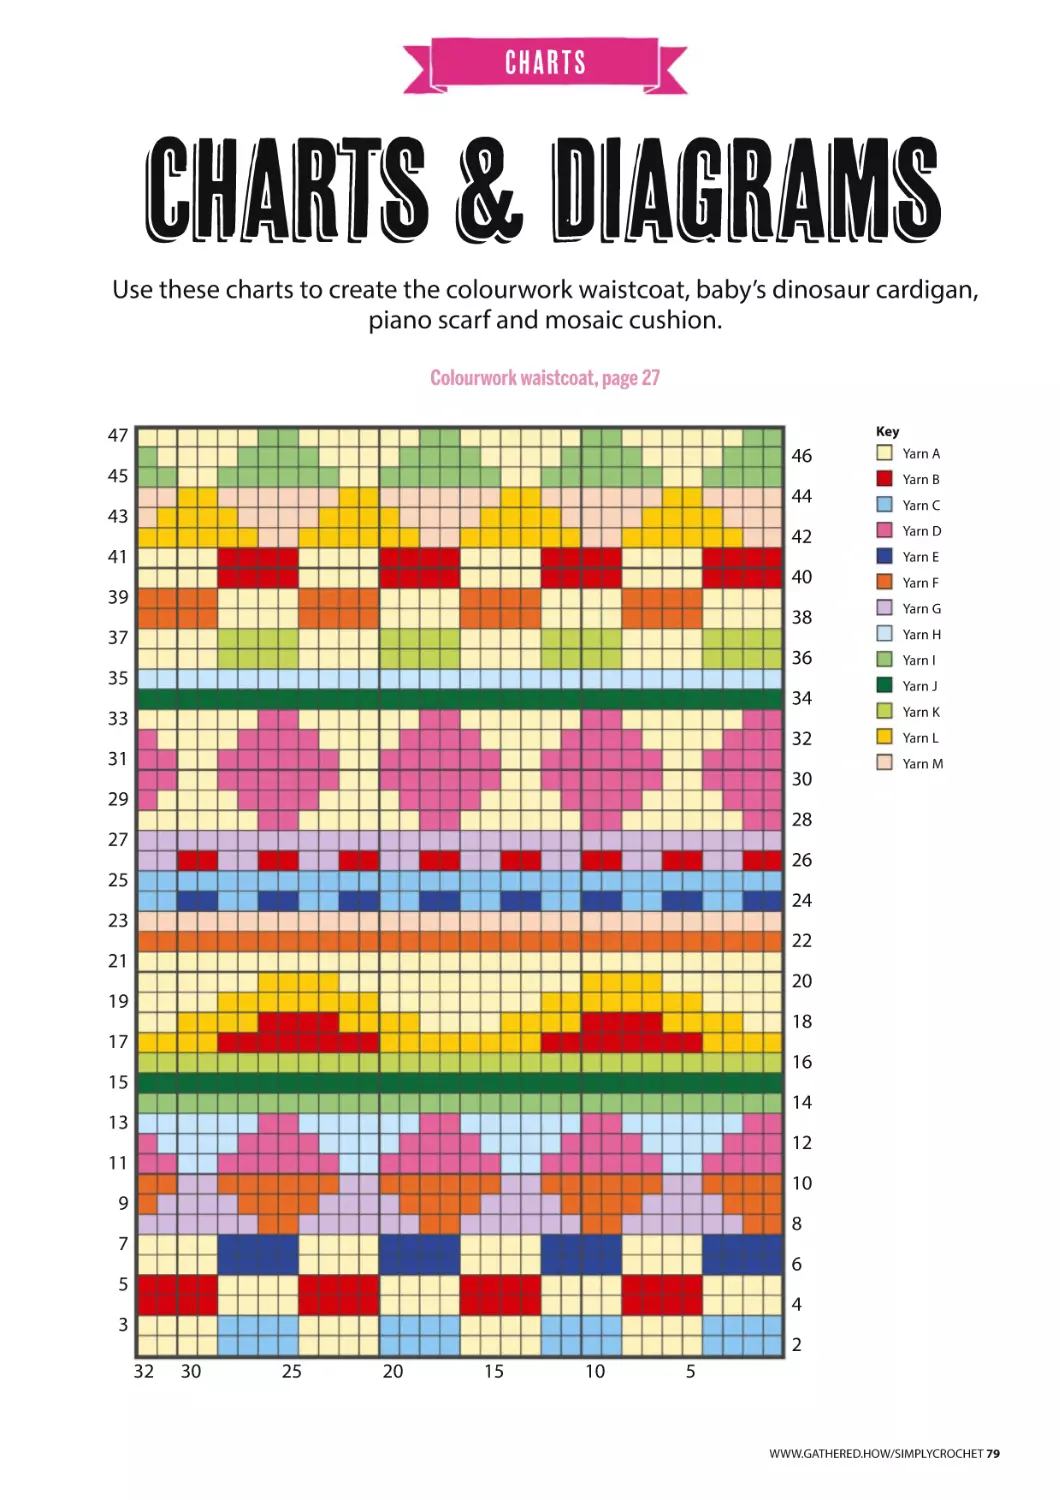
There is a Chart on page 79, which you will
need to refer to. Each small square represents
1tr. Read all RS rows from right to left and WS
rows from left to right. The first few rows of the
Chart have been written out to guide you.
Change colour on the final yrh of st before
colour change is indicated. Carry the unused
colour across the top of your sts, enclosing the
strand as you work.
YOU WILL NEED
QSirdar Stories
(60% cotton, 40% acrylic,
50g/140m)
Yarn A Glamping (832)
See table for measurements
and quantities of Yarn A
1 ball of each:
Yarn B Pillow Talk (803)
Yarn C Surf (818)
Yarn D Cosmo (802)
Yarn E Karma (820)
Yarn F Fire (811)
Yarn G Dreamers (806)
Yarn H Skinny Dip (824)
Yarn I Aura (817)
Yarn J Reunion (821)
Yarn K Picnic (815)
Yarn L Golden Hour (828)
Yarn M Mimosas (829)
QA 3.5mm (US E/4) hook
For yarn stockists contact
Sirdar 01924 231682
www.sirdar.com
WAISTCOAT
TENSION
17 tr and 9 rows measures 10x10cm
(4x4in) over treble crochet using
3.5mm hook, or size required to
obtain correct tension
ABBREVIATIONS
For a full list, see page 78
b
BACK
Using Yarn A, ch89 (97: 105: 113: 121).
Row 1 (WS) Dc in second ch from hook and
each ch across, turn. [88 (96: 104: 112: 120) sts]
Use the Chart for Rows 2-47.
On all RS rows, work sts 1-32 a total of 2 (3: 3: 3:
3) times, then work to st 24 (0: 8: 16: 24) to get to
the end of the row.
On all WS rows you will begin at st 24 (0: 8: 16:
24) and read across to the right. Then read the
Chart a total of 2 (3: 3: 3: 3) times from left to
right.
Change to Yarn C.
Row 2 Ch3 (counts as tr throughout), tr in next
3 sts, *change to Yarn A, tr in next 4 sts, change
to Yarn C, tr in next 4 sts; rep from * another 9
(10: 11: 12: 13) sts, change to Yarn A, tr in next 4
sts, turn.
Row 3 Ch3, tr in next 3 sts, *change to Yarn C, tr
in next 4 sts, change to Yarn A, tr in next 4 sts;
rep from * another 9 (10: 11: 12: 13) sts, change
to Yarn C, tr in next 4 sts, turn.
Change to Yarn A.
Row 4 Ch3, tr in next 3 sts, *change to Yarn B, tr
in next 4 sts, change to Yarn A, tr in next 4 sts;
rep from * another 9 (10: 11: 12: 13) sts, change
to Yarn B, tr in next 4 sts, turn.
Rows 5-47 Cont in pattern set, using the Chart
SIZE
TO FIT BUST
ACTUAL BUST
(APPROX)
a
Width a: 50.5 (55: 59.5: 64: 69)cm,
19¾ (21¾: 23½: 25¼: 27)in
Length b: 78.5 (78.5: 83: 83: 83)cm,
31 (31: 32¾: 32¾: 32¾)in
28 WWW.GATHERED.HOW/SIMPLYCROCHET
LENGTH
YARN
With never more than two colours per row,
yarn management is easier than it might look
for all colour changes.
Fasten off.
SHAPE ARMHOLES
Join Yarn A in 7th (7th: 9th: 9th: 11th) st.
Row 48 (RS) Ch3, tr2tog, tr in next 70 (78: 82: 90:
94) sts, tr2tog, tr in next st, turn leaving rem sts
unworked. [74 (82: 86: 94: 98) sts]
Row 49 Ch3, tr2tog, tr to last 3 sts, tr2tog, tr in
last st, turn. [72 (80: 84: 92: 96) sts]
Rows 50-58 As Row 2. [54 (62: 66: 74: 78) sts]
Row 59 Ch3, tr in each st across turn.
Rep Row 59 until Back measures 70 (70: 74: 74:
74)cm, ending on a WS row.
Next row Ch3, tr in next 15 (19: 21: 23: 25) sts,
turn leaving rem sts unworked.
[16 (20: 22: 24: 26) sts]
Next row Ch3, tr in each st across.
Fasten off.
Skip 22 (22: 22: 26: 26) sts on last full row of
Back. Join Yarn A in next st.
S
M
L
XL
2X
cm
81-86
91-97
102-107
112-117
122-127
in
32-34
36-38
40-42
44-46
48-50
cm
101
110
119
128
137.5
in
39¾
43¼
47
50½
54
cm
78.5
78.5
83
83
83
in
31
31
32¾
32¾
32¾
50g
6
7
8
9
10
To make this pattern easier to follow, we’ve colour-coded the sizing instructions – simply follow the
relevant column.
COLOURWORK WAISTCOAT
Next row Ch3, tr in each st to end, turn.
[16 (20: 22: 24: 26) sts]
Next row Ch3, tr in each st to end, turn.
Fasten off.
LEFT FRONT
Using Yarn A, ch45 (49: 53: 57: 61).
Row 1 (WS) Dc in second ch from hook and
each ch across, turn. [44 (48: 52: 56: 60) sts]
Use the Chart for Rows 2-47. On all RS rows,
begin at st 25 (1: 9: 17: 25) and read across to the
left, repeating complete Chart to end. On all WS
rows begin at st 28 (16: 4: 24: 12) and read across
to the right, repeating complete Chart to end.
Change to Yarn C.
FRONT (MAKE 2)
Fronts are worked the same to the armhole
shaping, then pattern will separate for Right
and Left Front.
Using Yarn A, ch45 (49: 53: 57: 61).
Row 1 (WS) Dc in second ch from hook and
each ch across, turn. [44 (48: 52: 56: 60) sts]
Use the Chart for Rows 2-47.
On all RS rows, work sts 1-32 once, then work to
st 12 (16: 20: 24: 28) to get to the end of the row.
On all WS rows you will begin at st 12 (16: 20: 24:
28) and read across to the right. Then read the
Chart once from left to right.
Change to Yarn C.
SIZES S, L AND 2X ONLY
Row 2 Ch3 (counts as tr throughout), tr in next
3 sts, *change to Yarn A, tr in next 4 sts, change
to Yarn C, tr in next 4 sts; rep from * another 4 (-:
5: - : 6) times, turn. [44 (-: 52: -: 60) sts]
Row 3 As Row 2.
Change to Yarn A.
Rows 4-47 Cont in pattern set, using the Chart
for all colour changes.
Fasten off.
SIZES M AND XL ONLY
Row 2 Ch3 (counts as tr throughout), tr in next
3 sts, *change to Yarn A, tr in next 4 sts, change
to Yarn C, tr in next 4 sts; rep from * another - (4:
-: 5: -) times, change to Yarn A, tr in next 4 sts,
turn. [- (48: -: 56: -) sts]
Row 3 Ch3 (counts as tr throughout), tr in next 3
sts, *change to Yarn C, tr in next 4 sts, change to
Yarn A, tr in next 4 sts; rep from * another - (4: -:
5: -) times, change to Yarn C, tr in next 4 sts, turn.
Change to Yarn A.
Rows 4-47 Cont in pattern set, using the Chart
for all colour changes.
Fasten off.
LEFT FRONT ARMHOLE SHAPING
Join Yarn A in 7th (7th: 9th: 9th: 11th) st.
Row 48 (RS) Ch3, tr2tog, tr in each st to final 3
sts, tr2tog, tr in final st, turn. [36 (40: 42: 46: 48) sts]
Rep Row 48 until you have 16 (20: 22: 24: 26) sts.
Next row Ch3, tr in each st to end, turn.
Rep last row until Front has the same number
of rows as Back.
Fasten off.
RIGHT FRONT ARMHOLE SHAPING
Join Yarn A in first st.
Row 48 Ch3, tr2tog, tr in next 32 (36: 38: 42: 44)
sts, tr2tog, tr in next st, turn leaving rem sts
unworked. [36 (40: 42: 46: 48) sts]
Row 49 Ch3, tr2tog, tr in each st to final 3 sts,
tr2tog, tr in final st, turn. [34 (38: 40: 44: 46) sts]
Rep Row 49 until you have 16 (20: 22: 24: 26) sts.
Next row Ch3, tr in each st to end, turn.
Rep last row until Front has the same number
of rows as Back.
Fasten off.
TO MAKE UP
With WS facing, whipstitch the shoulder and
side seams together. Weave in all ends.
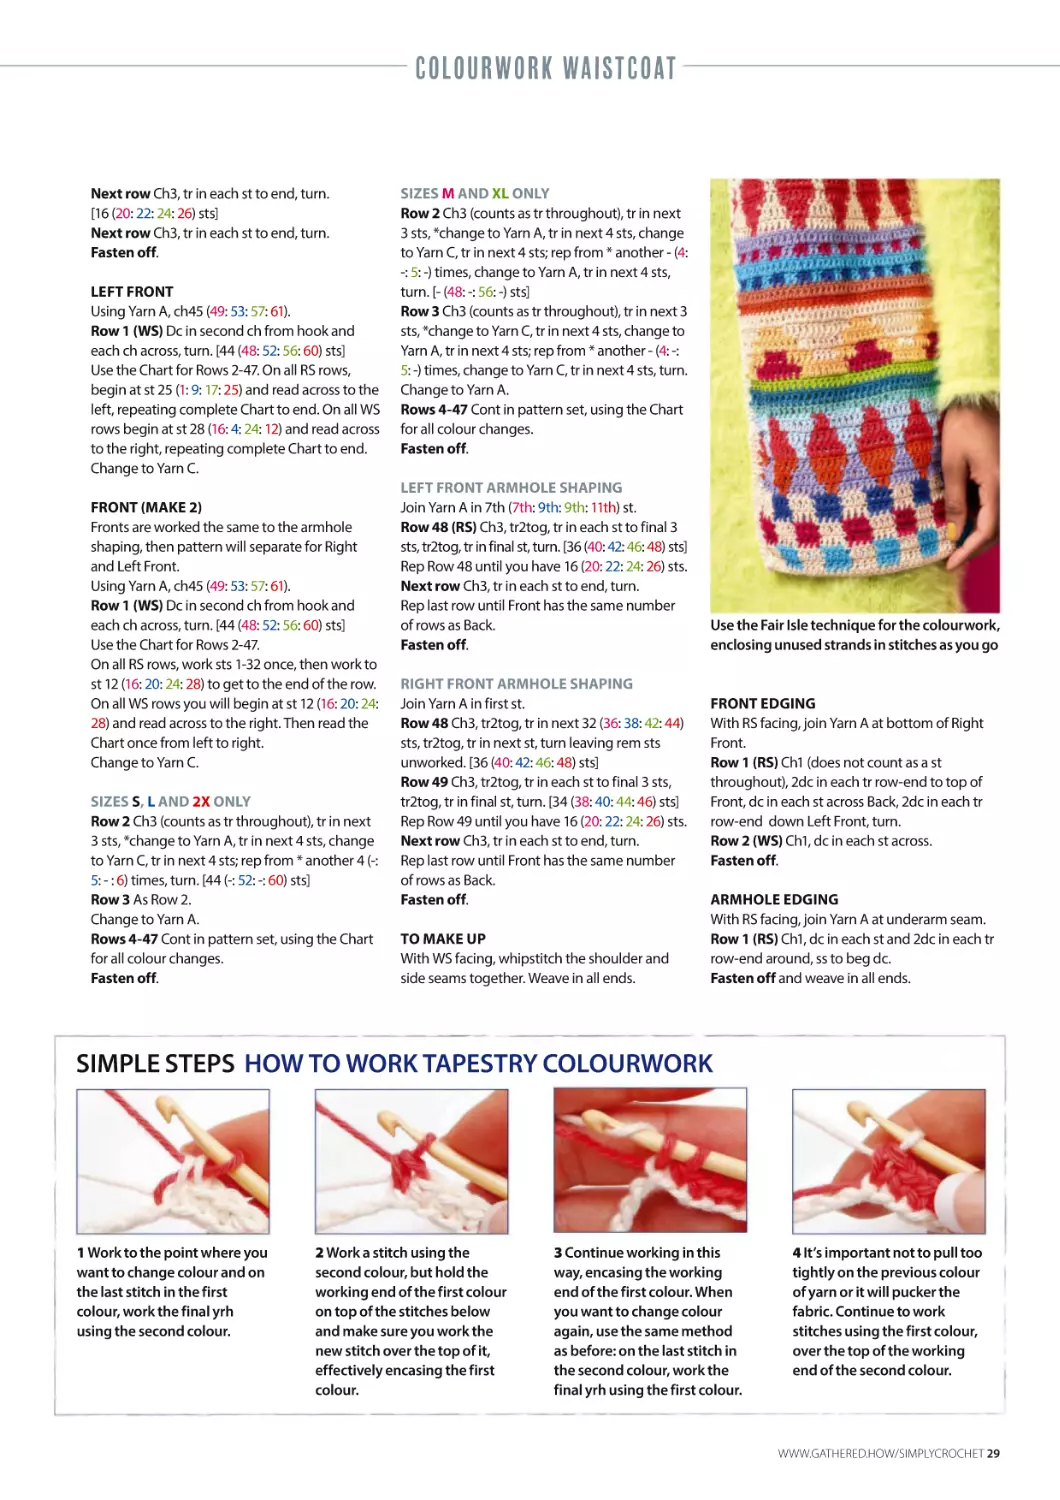
Use the Fair Isle technique for the colourwork,
enclosing unused strands in stitches as you go
FRONT EDGING
With RS facing, join Yarn A at bottom of Right
Front.
Row 1 (RS) Ch1 (does not count as a st
throughout), 2dc in each tr row-end to top of
Front, dc in each st across Back, 2dc in each tr
row-end down Left Front, turn.
Row 2 (WS) Ch1, dc in each st across.
Fasten off.
ARMHOLE EDGING
With RS facing, join Yarn A at underarm seam.
Row 1 (RS) Ch1, dc in each st and 2dc in each tr
row-end around, ss to beg dc.
Fasten off and weave in all ends.
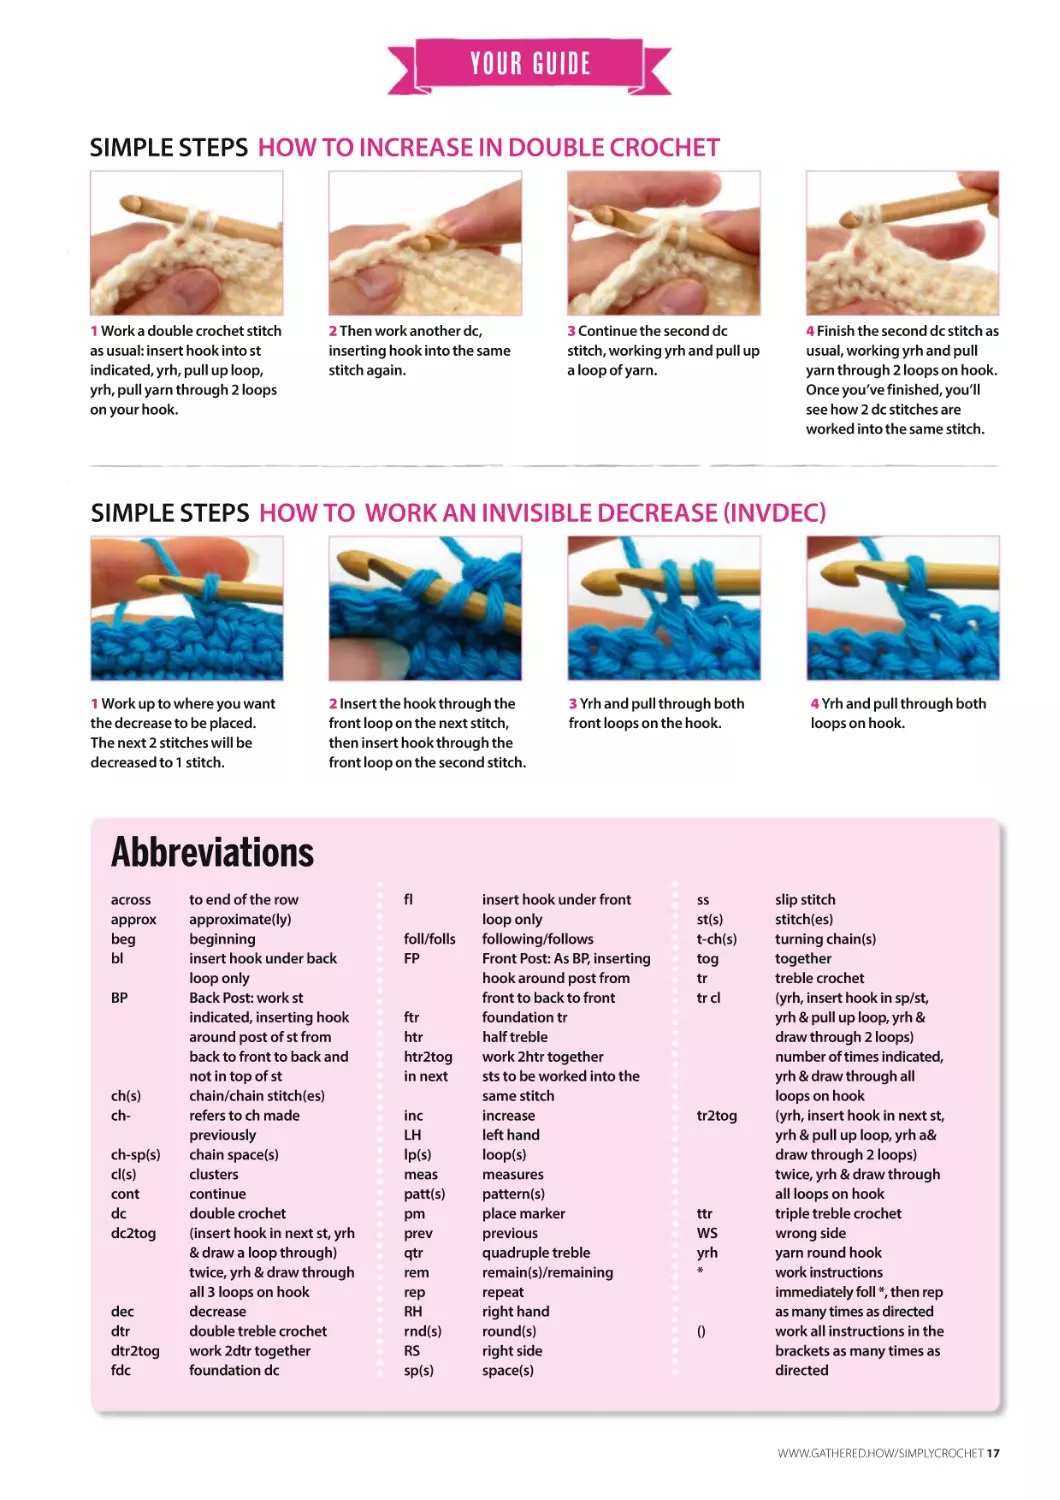
SIMPLE STEPS HOW TO WORK TAPESTRY COLOURWORK
1 Work to the point where you
want to change colour and on
the last stitch in the first
colour, work the final yrh
using the second colour.
2 Work a stitch using the
second colour, but hold the
working end of the first colour
on top of the stitches below
and make sure you work the
new stitch over the top of it,
effectively encasing the first
colour.
3 Continue working in this
way, encasing the working
end of the first colour. When
you want to change colour
again, use the same method
as before: on the last stitch in
the second colour, work the
final yrh using the first colour.
4 It’s important not to pull too
tightly on the previous colour
of yarn or it will pucker the
fabric. Continue to work
stitches using the first colour,
over the top of the working
end of the second colour.
WWW.GATHERED.HOW/SIMPLYCROCHET 29
Lile Box Crochet
The
Possibilities
are
Endless
If you love crochet, you are going to love receiving this little box
every month. Filled with a crochet project and treats, it’s one not
to miss.
Whether it’s for yourself or a gift for a crochet lover, you won’t be
disappointed.
All the details are on our website www.littleboxofcrochet.com
or you can follow us on Facebook and Instagram
@newlittleboxofcrochet
@littleboxofcrochet
Recycle your magazine and seven days
later it could come back as your newspaper
www.recyclenow.com
NEW
1,000s of free
patterns
Step-by-step
tutorials
Video guides
Discover easy-to-follow
patterns and tutorials for
crochet, knitting, sewing,
quilting, papercraft and
stitching with the brand
new website for makers
everywhere.
AMIGURUMI RABBIT
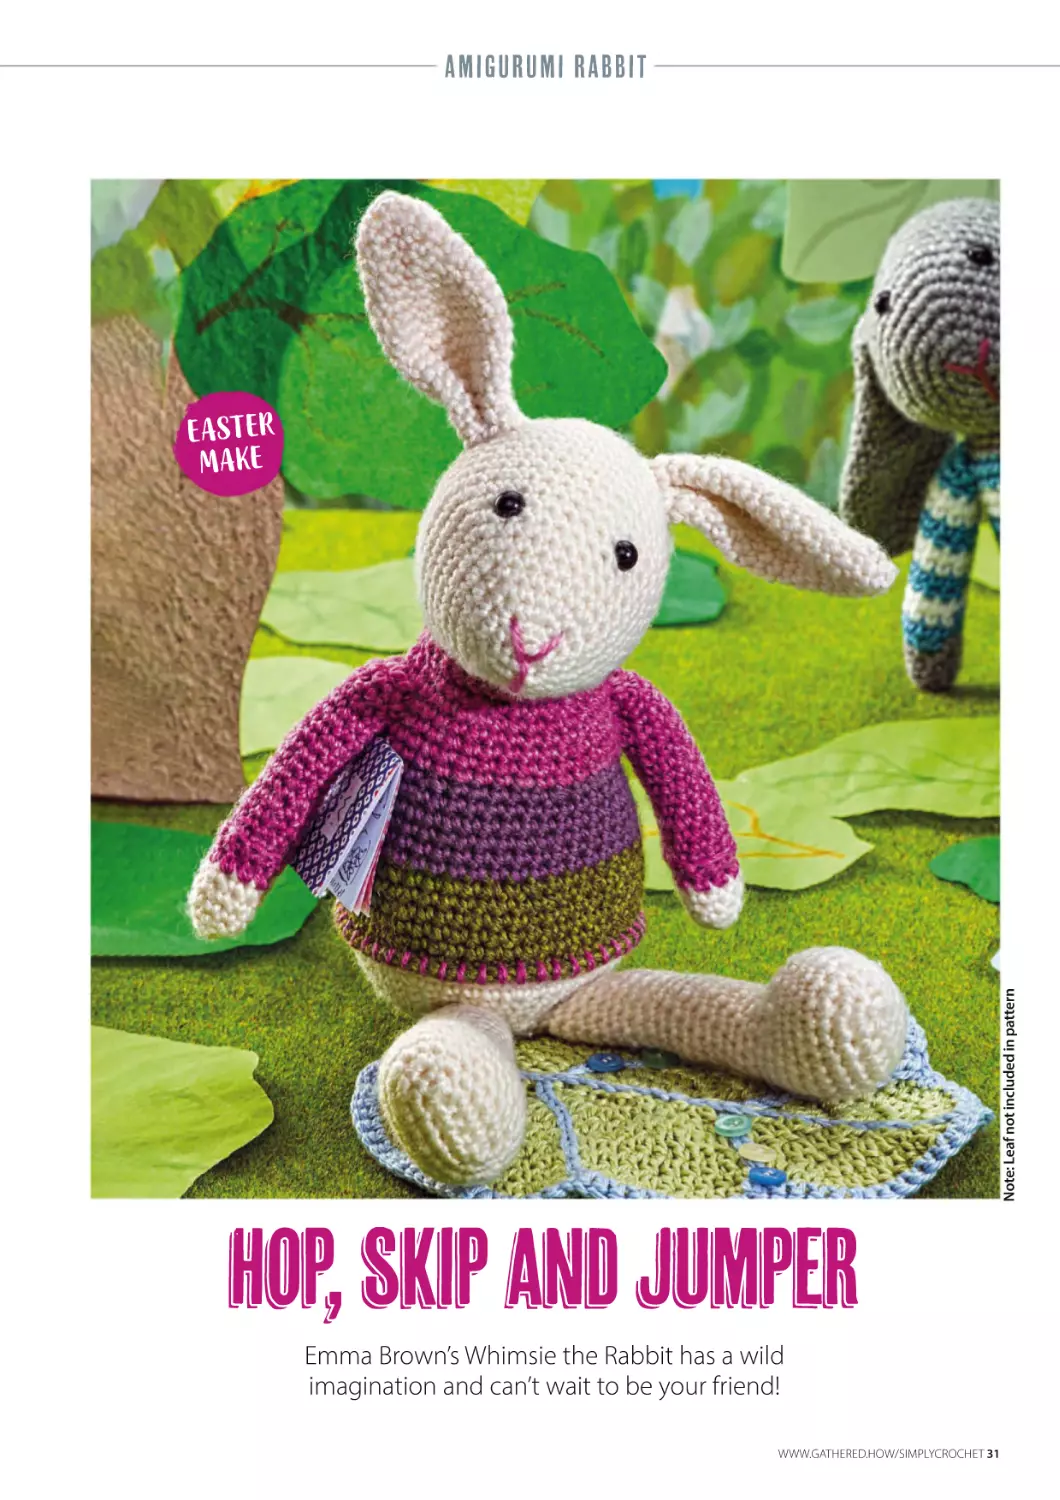
Note: Leaf not included in pattern
E As t er
m a ke
Hop, skip and jumper
Emma Brown’s Whimsie the Rabbit has a wild
imagination and can’t wait to be your friend!
WWW.GATHERED.HOW/SIMPLYCROCHET 31
AMIGURUMI RABBIT
Here’s a snuggly friend who loves crochet
jumpers just as much as we do! Let a little
one’s imagination run wild with Whimsie.
A IT
T IC Y
DK
WEIGHT
3MM
HOOK
YOU WILL NEED
QAny DK yarn in:
Yarn A cream
Yarn B green
Yarn C purple
Yarn D fuchsia
Yarn E white
QA 3mm (US C/2 or D/3) hook
Q2 safety eyes, 7mm
QPolyester fibre filling
Q1 cream button, 1cm in diameter
(optional)
Q1.3x1.3cm purple fabric for button
patch (optional)
QA stitch marker
NOTES
Rabbit is made up of different pieces, which
are joined together at the end. Leave long tails
when fastening off to use when joining.
Parts of this pattern are worked using the
amigurumi method. Work stitches
continuously in a spiral without closing off
each round with a slip stitch. It may help to use
a stitch marker in the first stitch of each round,
moving it up as you work.
Some sections being with a partial row
worked into the foundation ring, then Round
2 is worked into the foundation ring and the
sts of Row 1.
If you are making this as a toy for a child under
36 months, do not use buttons or safety eyes;
instead, embroider eyes using black stranded
cotton.
TENSION
RABBIT
Tension is not critical, but it may
affect the yarn quantities required
HEAD
Using Yarn A, ch4 and ss in last ch from hook to
form a loop.
Row 1 (RS) 2dc in next 2 ch. [4 sts]
Round 2 (RS) 2dc in next 2 ch, 2dc in next 4 sts.
[12 sts]
Round 3 (Dc in next st, 2dc in next st) 6 times.
[18 sts]
Round 4 (Dc in next 5 sts, 2dc in next st) 3
times. [21 sts]
Round 5 (Dc in next 6 sts, 2dc in next st) 3
times. [24 sts]
Round 6 (Dc in next 7 sts, 2dc in next st) 3
times. [27 sts]
Round 7 (Dc in next 8 sts, 2dc in next st) 3
times. [30 sts]
Round 8 (Dc in next 9 sts, 2dc in next st) 3
times. [33 sts]
Round 9 (Dc in next 10 sts, 2dc in next st) 3
times. [36 sts]
Round 10 (Dc in next 11 sts, 2dc in next st) 3
times. [39 sts]
Round 11 (Dc in next 12 sts, 2dc in next st) 3
times. [42 sts]
Rounds 12-19 Dc in each st around.
Round 20 (Dc in next 5 sts, dc2tog) 6 times.
[36 sts]
Insert safety eyes between Rounds 9-10.
Stuff Head firmly as you work.
Round 21 (Dc in next 4 sts, dc2tog) 6 times.
[30 sts]
Round 22 (Dc in next 3 sts, dc2tog) 6 times.
[24 sts]
Round 23 (Dc in next 2 sts, dc2tog) 6 times.
[18 sts]
Round 24 (Dc in next st, dc2tog) 6 times.
[12 sts]
Round 25 (Dc2tog) 6 times. [6 sts]
Round 26 (Skip next st, ss in next st) twice,
MEASUREMENTS
Rabbit measures approx 26cm
(10¼in) tall
ABBREVIATIONS
reverse dc Insert hook in next st to
right (or left if left-handed), yrh and
pull up a loop, yrh and pull through
2 loops on hook
For a full list, see page 78
SCAN ME
Scan this code to
learn more
about making
amigurumi toys
Looking for more
cute toys to hook,
like Ronnie the
Bear and Breeze
the Owl? The book
Crocheted Animal
Friends by Emma
Brown is on sale
now! (£14.99,
Cico Books)
32 WWW.GATHERED.HOW/SIMPLYCROCHET
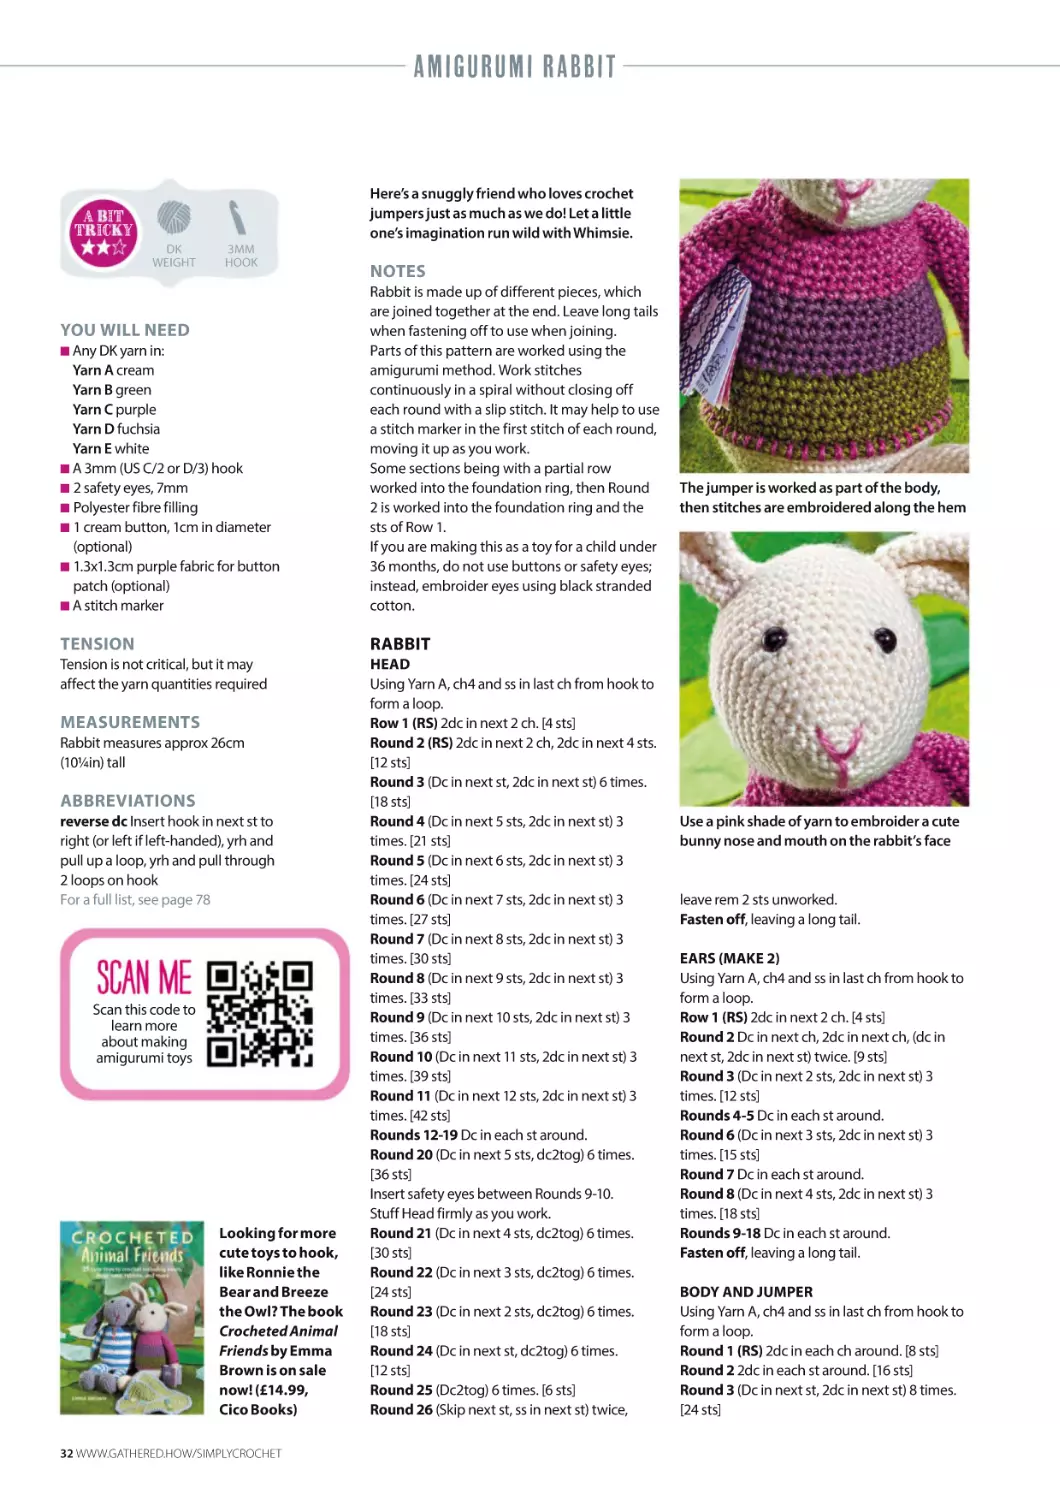
The jumper is worked as part of the body,
then stitches are embroidered along the hem
Use a pink shade of yarn to embroider a cute
bunny nose and mouth on the rabbit’s face
leave rem 2 sts unworked.
Fasten off, leaving a long tail.
EARS (MAKE 2)
Using Yarn A, ch4 and ss in last ch from hook to
form a loop.
Row 1 (RS) 2dc in next 2 ch. [4 sts]
Round 2 Dc in next ch, 2dc in next ch, (dc in
next st, 2dc in next st) twice. [9 sts]
Round 3 (Dc in next 2 sts, 2dc in next st) 3
times. [12 sts]
Rounds 4-5 Dc in each st around.
Round 6 (Dc in next 3 sts, 2dc in next st) 3
times. [15 sts]
Round 7 Dc in each st around.
Round 8 (Dc in next 4 sts, 2dc in next st) 3
times. [18 sts]
Rounds 9-18 Dc in each st around.
Fasten off, leaving a long tail.
BODY AND JUMPER
Using Yarn A, ch4 and ss in last ch from hook to
form a loop.
Round 1 (RS) 2dc in each ch around. [8 sts]
Round 2 2dc in each st around. [16 sts]
Round 3 (Dc in next st, 2dc in next st) 8 times.
[24 sts]
AMIGURUMI RABBIT
Round 4 (Dc in next 2 sts, 2dc in next st) 8
times. [32 sts]
Round 5 (Dc in next 3 sts, 2dc in next st) 8
times. [40 sts]
Rounds 6-9 Dc in each st around.
Round 10 (Dc in next 4 sts, 2dc in next st) 8
times. [48 sts]
Round 11 Dc in each st around.
Change to Yarn B.
Round 12 Dc in fl of each st of Round 12.
Round 13 Dc in bl of each st of Round 12.
Rounds 14-17 Dc in each st around.
Round 18 (Dc in next 6 sts, dc2tog) 6 times.
[42 sts]
Change to Yarn C.
Rounds 19-23 Dc in each st around.
Round 24 (Dc in next 5 sts, dc2tog) 6 times.
[36 sts]
Change to Yarn D.
Rounds 25-29 Dc in each st around.
Stuff Body as you work.
Round 30 (Dc in next 4 sts, dc2tog) 6 times,
turn. [30 sts]
Round 31 Reverse dc in each st around, ss to
beg dc.
Fasten off, leaving a long tail.
Using Yarn D, embroider vertical sts around
Rounds 12-13. You can use the image as a guide.
Stuff Body firmly.
ARMS (MAKE 2)
Using Yarn A, ch4 and ss in last ch from hook to
form a loop.
Row 1 (RS) 2dc in next 2 ch. [4 sts]
Round 2 Dc in next ch, 2dc in next ch, (dc in
next st, 2dc in next st) twice. [9 sts]
Rounds 3-5 Dc in each st around.
Change to Yarn D.
Round 6 2dc in next st, dc in next 8 sts. [10 sts]
Rounds 7-8 Dc in bl of each st around.
Round 9 Dc in each st of around.
Stuff Arm as you work.
Rounds 10-19 Dc in each st around.
Round 20 Dc2tog, dc in next 8 sts. [9 sts]
Round 21 Dc in each st around, ss to beg dc.
Fasten off, leaving a long tail.
LEGS (MAKE 2)
Using A, ch7.
Round 1 2dc in second ch from hook, dc in
next 4 ch, 2dc in last ch, turn to work in
opposite side of foundation ch, dc in next 4 ch.
[12 sts]
Round 2 (2dc in next 2 sts, dc in next 4 sts)
twice. [16 sts]
Round 3 (2dc in next st, 3dc in next st, 2dc in
next st, dc in next 5 sts)
twice. [24 sts]
Rounds 4-8 Dc in each st around.
Round 9 (Dc2tog) 4 times, dc in next 16 sts.
[20 sts]
Round 10 (Dc2tog) 4 times, dc in next 10 sts,
dc2tog. [15 sts]
Round 11 (Dc2tog) twice, dc in next 11 sts.
[13 sts]
Round 12 Dc2tog, dc in next 11 sts. [12 sts]
Rounds 13-17 Dc in each st around.
Stuff Legs as you work.
Rounds 18-24 Dc in each st around.
Round 25 Dc2tog, dc in next 10 sts. [11 sts]
Round 26 Dc in each st around.
Round 27 Dc2tog, dc in next 9 sts. [10 sts]
Round 28 Dc in each st around, ss in beg dc.
Fasten off, leaving a long tail.
TAIL
Using Yarn E, ch4 and ss in last ch from hook to
form a loop.
Rounds 1-3 (RS) As Rounds 1-3 of Head. [18 sts]
Stuff Tail.
Round 4 (Dc2tog) 9 times, ss to beg dc. [9 sts]
Fasten off, leaving a long tail.
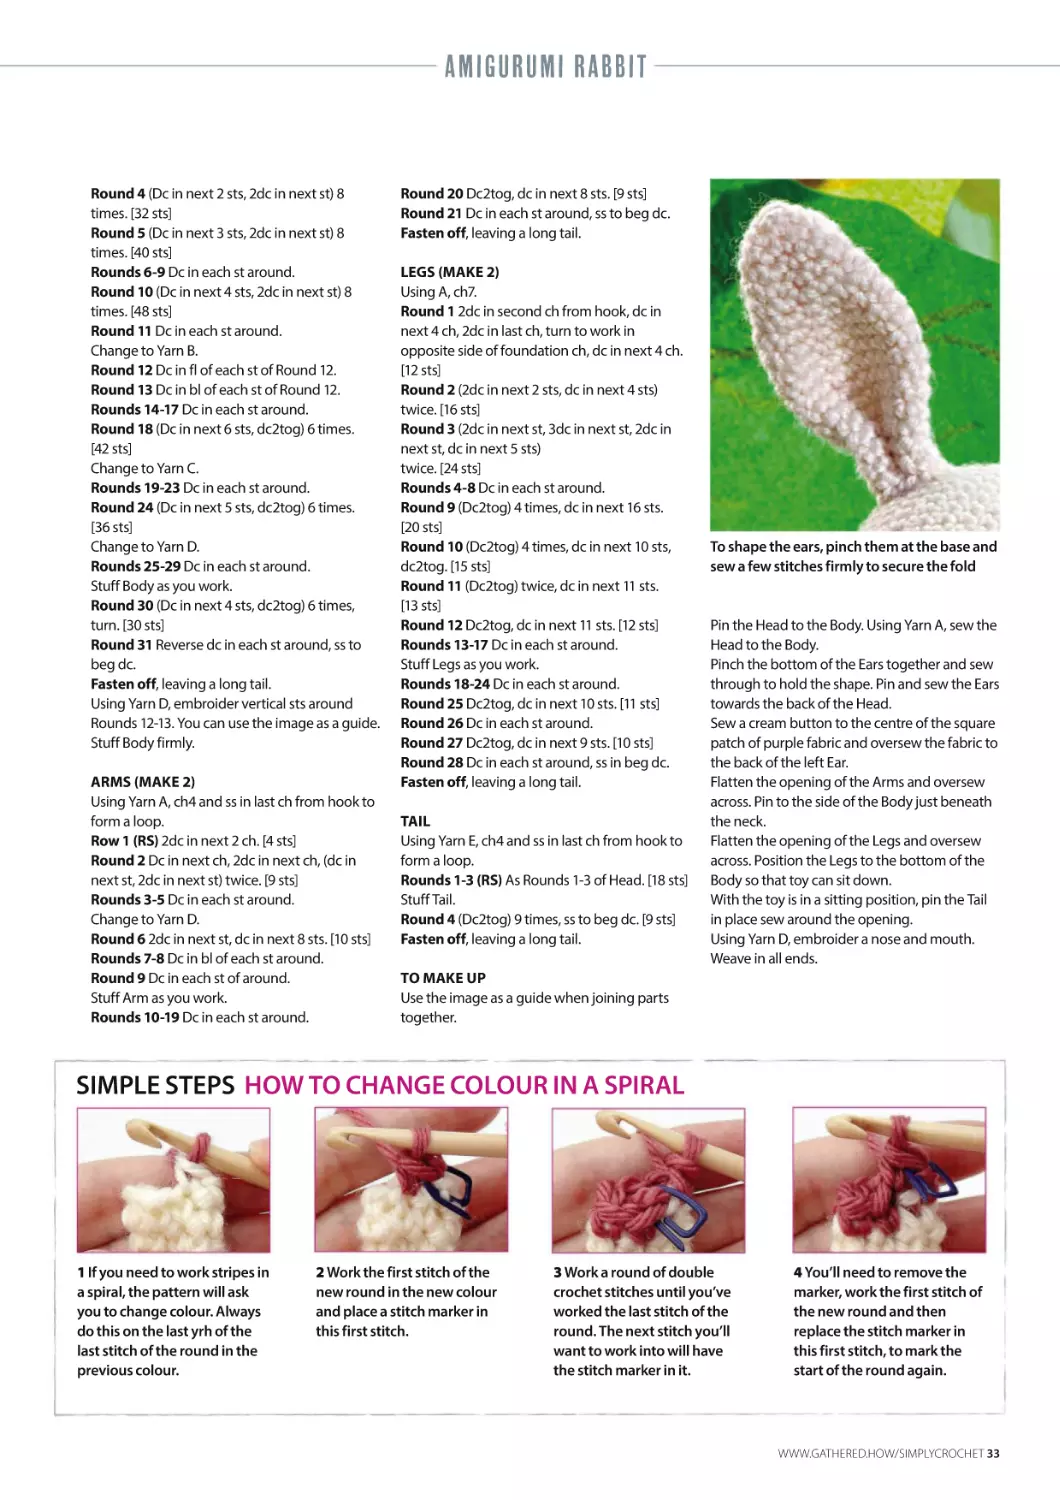
To shape the ears, pinch them at the base and
sew a few stitches firmly to secure the fold
Pin the Head to the Body. Using Yarn A, sew the
Head to the Body.
Pinch the bottom of the Ears together and sew
through to hold the shape. Pin and sew the Ears
towards the back of the Head.
Sew a cream button to the centre of the square
patch of purple fabric and oversew the fabric to
the back of the left Ear.
Flatten the opening of the Arms and oversew
across. Pin to the side of the Body just beneath
the neck.
Flatten the opening of the Legs and oversew
across. Position the Legs to the bottom of the
Body so that toy can sit down.
With the toy is in a sitting position, pin the Tail
in place sew around the opening.
Using Yarn D, embroider a nose and mouth.
Weave in all ends.
TO MAKE UP
Use the image as a guide when joining parts
together.
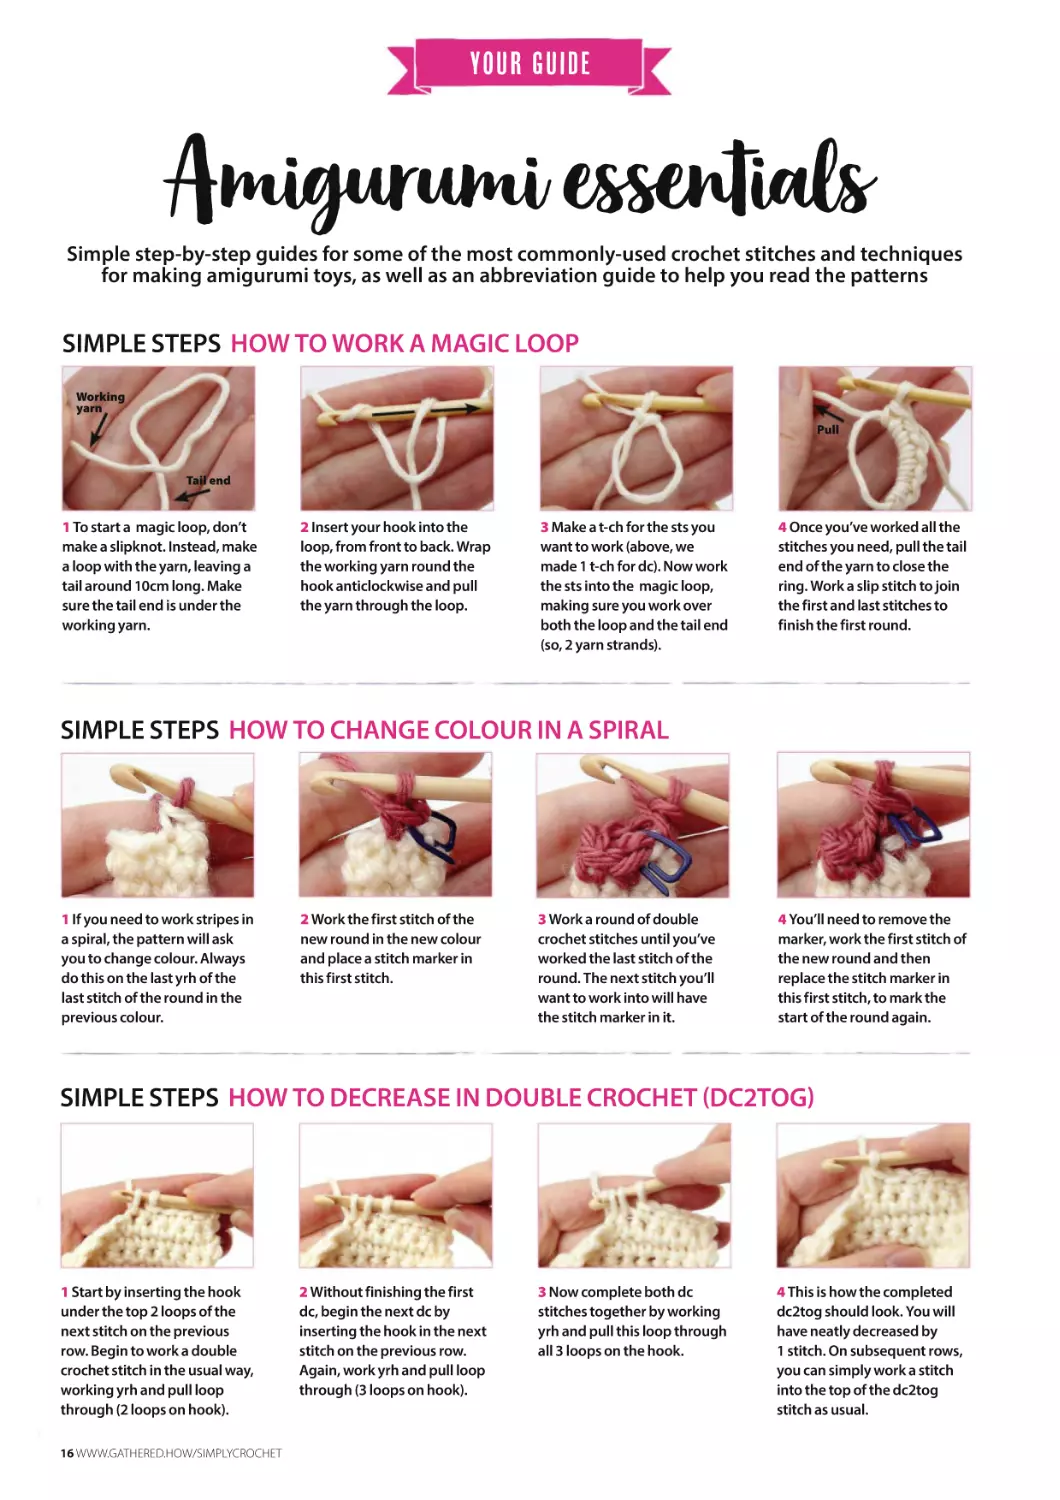
SIMPLE STEPS HOW TO CHANGE COLOUR IN A SPIRAL
1 If you need to work stripes in
a spiral, the pattern will ask
you to change colour. Always
do this on the last yrh of the
last stitch of the round in the
previous colour.
2 Work the first stitch of the
new round in the new colour
and place a stitch marker in
this first stitch.
3 Work a round of double
crochet stitches until you’ve
worked the last stitch of the
round. The next stitch you’ll
want to work into will have
the stitch marker in it.
4 You’ll need to remove the
marker, work the first stitch of
the new round and then
replace the stitch marker in
this first stitch, to mark the
start of the round again.
WWW.GATHERED.HOW/SIMPLYCROCHET 33
saVe tiMe, moNey aNd haSsle With aN
anNual SimplY crochEt subsCriptioN
QDownload the latest issue
straightaway
QGet a further 12 issues in
your first year
QAll issues download
automatically
QDownload it once…
read it offline forever
iPad is a trademark of Apple Inc., registered in the U.S. and other countries. App Store is a service mark of Apple Inc.
NOOK is a registered trademark of Barnes & Noble, Inc. NOOK Tablet is a trademark of Barnes & Noble, Inc
To subscribe simply visit:
www.ourmediashop.com/simply-crochet-magazine-wmonam23bs
The digital version of the magazine does not include the cover gift that you would find on newsstand copies
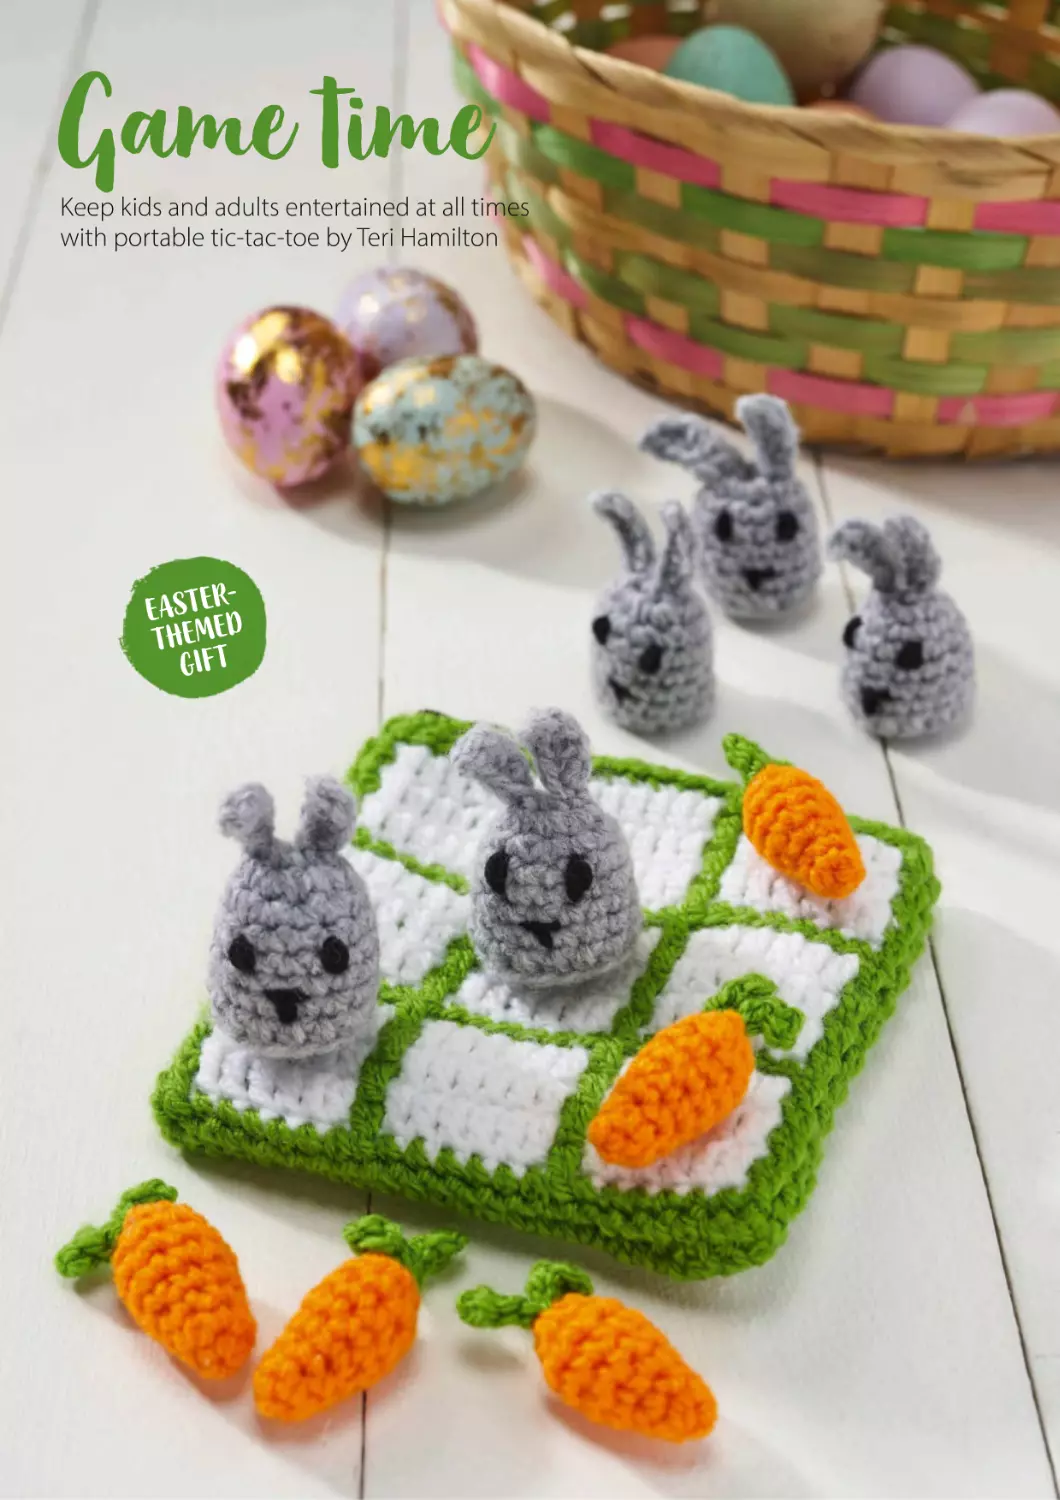
Game time
Keep kids and adults entertained at all times
with portable tic-tac-toe by Teri Hamilton
Eastere-d
them t
gif
TIC-TAC-TOE MINI GAME
A IT
T IC Y
DK
WEIGHT
3MM
HOOK
YOU WILL NEED
QHayfield Bonus DK
(100% acrylic, 100g/280m)
A small amount of each:
Light Grey Mix (0814)
White (0961)
Cantaloupe (0577)
Lemongrass (0699)
Black (0965)
QA 3mm (US C/2 or D/3) hook
QA zipped canvas bag, 10x11cm
or a 10cm zip
QStitch markers
For yarn stockists contact
Sirdar 01924 231682
www.sirdar.com
TENSION
20 sts and 18 rounds measure
10x10cm (4x4in) over pattern using
a 3mm hook, or size needed to
obtain correct tension
The game board forms a bag
to keep the game pieces in
MEASUREMENTS
Bag measures approx 10x11cm
(4x4¼in)
ABBREVIATIONS
3rd loop Third loop positioned at
back of half treble sts
5-tr cl Change to White, (yrh, insert
hook in st/sp indicated, yrh and pull
up a loop, pull through 2 loops) 5
times, yrh with Light Grey Mix and
pull through all loops on hook
For a full list, see page 78
For
at
www.blacksheepwools.com
use the code 147BDK
at the checkout
Keep everyone entertained with a fun
activity you can carry in your handbag. It
makes for a great Easter basket treat, too!
NOTES
The Board is worked in rounds from the zip or
canvas bag.
For the Main Bag Body, work all dc sts in the bl
and all tr sts in the fl 2 rounds below, unless
otherwise instructed.
Change colour on the beg ch of the round.
Twist the strands together after changing and
leave the unused colour on the WS of the work,
ready to use again when directed.
Parts of this pattern are worked using the
amigurumi method. Work stitches continuously
in a spiral without closing off each round with a
slip stitch. It may help to use a stitch marker in
the first stitch of each round, moving it up as
you work.
Offer ends 6 May, 2024
TIC-TAC-TOE GAME
PREPARATION
Mark centre of front and back of zip or zip on
bag, and halfway between ends and markers.
There should be 3 markers on front and back.
Using Lemongrass, embroidery ch st and
working from the centre of the zipped canvas
bag/zip, work 6 slightly loose sts in each
segment as marked.
Join and restart as necessary leaving a
minimum of 2cm tail when finishing a length to
start another.
When you have finished the embroidery ch sts
you will have 48sts.
TIC-TAC-TOE BOARD
Join Lemongrass in chain st at one end of zip.
Round 1 (RS) Ch1 (does not count as st
throughout), dc in each chain st around, ss to
beg dc. [48 sts]
Round 2 (RS) Ch1, dc in each st around, ss to
beg dc.
Change to White.
Round 3 Ch1, dc in bl of each st around, ss to
beg dc.
Change to Lemongrass.
Round 4 Ch1, tr in fl of next 2 sts 2 rounds
below, (dc in bl of next 6 sts, tr in fl of next 2 sts
2 rounds below) 3 times, tr in fl of next 2 sts 2
rounds below, dc in bl of each st to end, ss to
beg tr.
Change to White.
Round 5 Ch1, dc in bl of next st, (tr in fl of next 6
sts 2 rounds below, dc in bl of next st) 3 times,
dc in bl of each st to end, ss to beg dc.
Rounds 6-9 Repeat Rounds 4-5 twice more.
Change to Lemongrass.
Round 10 As Round 4.
Rounds 11-26 Repeat Rounds 3-10 twice more.
WWW.GATHERED.HOW/SIMPLYCROCHET 37
TIC-TAC-TOE MINI GAME
Change to Lemongrass.
Round 27 Ch1, dc in each st around, ss to beg
dc.
Fasten off leaving a 30cm tail.
If using a canvas bag, the Board should end just
below lower seam.
Flatten the final round of Board and mattress
stitch across to close.
Start the rabbits at the top, beginning with the
ears, worked from two sets of chain stitches
CARROTS (MAKE 5)
Using Cantaloupe, ch2.
Round 1 (RS) Ch1, 4dc in second ch from hook.
[4 sts]
Round 2 (RS) (Dc in next st, 2dc in next st)
twice. [6 sts]
Round 3 Dc in each st around.
Round 4 (Dc in next st, 2dc in next st) 3 times.
[9 sts]
Rounds 5-7 Dc in each st around.
Stuff Carrot.
Round 8 (Dc in next st, dc2tog) 3 times. [6 sts]
Fasten off leaving a 15cm tail.
Round 2 Dc in next 2 ch, dc in base of first ear,
turn to work in opposite side of ch-2, dc in next
2 ch, dc in base of second ear. [6 sts]
Round 3 2dc in each st around. [12 sts]
Round 4 (Dc in next 3 sts, 2dc in next st) 3
times. [15 sts]
Round 5 Dc in each st around.
Round 6 Dc in next 12 sts, 5-tr cl in next st, dc in
next 2 sts.
Round 7 Dc in each st around.
Round 8 Htr in each st around.
Round 9 (Work in 3rd loop throughout) (Dc in
next st, dc2tog) 5 times. [10 sts]
Stuff Rabbit.
Round 10 (Dc2tog) 5 times. [5 sts]
Fasten off leaving a 15cm tail.
Thread tail through fl of final 5 sts and pull tight
to close.
TO FINISH
Using the images as a guide and Black,
embroider eyes and mouth onto each Rabbit.
Weave in all ends.
LEAVES
Join Lemongrass in bl of any st from Round 8,
leaving a 10cm beg tail.
Round 1 (RS) Ch5, ss in fourth ch from hook,
ss in next 3 ch, ss in bl of next st from Round 8,
Ch5, ss in fourth ch from hook, ss in next 3 ch,
ss in bl of next st. [2 leaves]
Fasten off leaving a 10cm tail.
Thread tail of Cantaloupe through fl of final 6
sts from Round 8 and pull tight to close.
Work the game board from embroidery
stitches worked into the bag or zip
RABBITS (MAKE 5)
When working the cluster st on Round 5, refer
to the Abbreviations on the previous page for
colour changes.
Using Light Grey Mix, ch5.
Round 1 (RS) Htr in second ch from hook, htr in
next 2 ch, ss in next ch, ch7, htr in second ch
from hook, htr in next 2 ch, ss in next ch, leave
rem 2 ch unworked. [2 ears]
SIMPLE STEPS HOW TO WORK A MATTRESS STITCH SEAM
1 Lay the pieces out flat with
RS facing up. Line up the
edges you want to join,
matching up each crochet
stitch or row-end carefully.
It’s best to work the mattress
stitch seam vertically from
bottom to top, so start at the
bottom. Thread the needle
with yarn and insert it into the
right-hand piece, from back to
front, 1 stitch up from its
bottom edge and 1 stitch in
from its left edge.
38 WWW.GATHERED.HOW/SIMPLYCROCHET
2 Insert needle into the front
of the left-hand piece in the
same position, 1 stitch up
from the bottom edge and
1 stitch in from the right edge.
Continue working the seam
1 stitch in from the edges that
you’re joining, as follows:
bring needle up from back to
front on left-hand piece, 1
stitch up (2 stitches up from
bottom edge). Insert needle
into front of right-hand piece,
into the hole you started from.
3 *Bring needle up from back
to front on right-hand piece,
1 stitch up. Insert needle into
front of left-hand piece in
same position. Bring needle
up from back to front on
left-hand piece, 1 stitch up.
Insert needle into front of
right-hand piece, into the hole
you started from at *. Repeat
from *, pulling yarn tight
every few stitches to pull the
fabric pieces together. Fasten
off securely.
06
05
03
04
02
01
Floral whisper
Each square in Chloé Elizabeth Birch’s
jumper contains a perfectly formed flower
Made osf
motif
FLORAL MOTIF JUMPER
With a cosy polo neck, soft ribbed edging
and pretty flowers in every motif, this
beautiful finish is both creative and classic.
A IT
T IC Y
ARAN
WEIGHT
5.5MM
6MM
NOTES
Jumper is made up of Motifs. All Motifs are
worked in rounds with RS facing throughout.
Block Motifs to measurements listed before
joining them together into panels.
Widening rounds are worked around the edges
of the panels on some sizes to reach the
required bust measurement.
Edging is worked on all panels to help when
joining them together.
YOU WILL NEED
QStylecraft Grace
(85% acrylic, 10% mohair,
5% wool, 100g/295m)
Petals (2150)
See table for measurements
and yarn quantities
QA 5.5mm (US I/9) hook
QA 6mm (US J/10) hook
QStitch markers
For yarn stockists contact
Stylecraft 01484 848435
www.stylecraft-yarns.co.uk
JUMPER
TENSION
Motif measures 10x10cm (4x4in)
using a 5.5mm hook, or size needed
to obtain correct tension
ABBREVIATIONS
ch-3 picot Ch3, ss in last ch from
hook
ch-5 picot Ch5, ss in last ch from
hook
4-puff (Yrh, insert hook in st/sp
indicated, yrh and pull up a loop) 4
times, yrh and pull through all loops
on hook
3-puff (Yrh, insert hook in st/sp
indicated, yrh and pull up a loop) 3
times, yrh and pull through all loops
on hook
For a full list, see page 78
MOTIF (MAKE 82 (92: 100: 110: 118: 128))
Using a 5.5mm hook, ch4 and ss in last ch from
hook to form a loop.
Round 1 (RS) Ch4 (counts as tr, ch1), (tr in loop,
ch1) 11 times, ss to third ch of beg ch-4, ss into
first ch-1 sp. [12 sts, 12 ch-1 sps]
Round 2 Ch2 (counts as leg of puff), 3-puff in
same sp, ch2, 4-puff in next ch-sp, ch3, *dtr in tr,
ch3, (4-puff in next ch-sp, ch2) twice, 4-puff in
next ch-sp, ch3; rep from * twice more, dtr in
next tr, ch3, 4-puff in next ch-sp, ch2, ss in top
of beg ch-2. [16 sts, 8 ch-3 sps, 8 ch-2 sps]
Round 3 Ch1, *dc in cl, ch-5 picot, ch2, skip next
cl, 5tr in ch-3 sp before dtr, ch1, dtr in dtr, 3-ch
picot, ch1, 5tr in next ch-3 sp, ch2, skip next cl;
rep from * 3 times more, ss to beg dc.
Fasten off.
next corner ch-3 picot; rep from * when joining
strips together.
Fasten off.
SIZES M AND XL ONLY
WIDENING ROWS
Work Widening rows on both Front and Back
Panels.
Using a 5.5mm hook, join yarn in corner picot at
top-right corner to work down the 5-Motif side
edge.
Row 1 (WS) *Ch4, ss into third tr of next 5-tr
group, ch4, ss in next ch-5 picot, ch4, ss into
third tr of next 5-tr group, ch4, ss into next ch-3
picot, ss in next ch-3 picot of next Motif; rep
across to next corner, turn. [20 ch-4 sps, 25 ss]
Row 2 (RS) Ch3 (counts as tr), 4tr in each ch-sp
FRONT AND BACK (MAKE 2)
Join Motifs together in 5 rows of 5 (6: 6: 7: 7: 8)
Squares. Join Motifs together into strips, then
join the strips together across the long edges.
With WS facing and using a 5.5mm hook, join
yarn in ch-3 picots at corner of both Motif to be
joined.
Row 1 (WS) *Ch4, ss in third tr of next 5-tr
groups on both Motifs, ch4, ss in ch-5 picots,
ch4, ss in third tr on next 5-tr groups, ch4, ss in
SIZE
TO FIT BUST
ACTUAL BUST
(APPROX)
b
The stylish textured cowl neck is made up of
stitches worked into the front and back posts
c
XS
S
M
L
XL
2X
cm
71-76
81-86
91-97
102-107
112-117
122-127
in
28-30
32-34
36-38
40-42
44-46
48-50
cm
100
120
132
140
152
160
in
39¼
47¼
52
55
59¾
63
cm
55
55
55
55
55
55
in
21¾
21¾
21¾
21¾
21¾
21¾
cm
45
45
45
45
45
45
in
17¾
17¾
17¾
17¾
17¾
17¾
6
6
7
8
8
9
LENGTH
a
Width a: 50 (60: 66: 70: 76: 80) cm,
19¾ (23¾: 26: 27½: 30: 31½) in
Length b: 55cm, 21¾in
Sleeve length c: 45cm, 17¾in
40 WWW.GATHERED.HOW/SIMPLYCROCHET
SLEEVE LENGTH
YARN
100g
To make this pattern easier to follow, we’ve colour-coded the sizing instructions – simply follow the
relevant column.
FLORAL MOTIF JUMPER
to end, tr in last ss, turn. [82 sts]
Row 3 Ch3, tr in each st across to end.
Fasten off.
Join yarn in bottom-left corner and repeat
Rows 1-3.
SIZES XS, S, L AND 2X ONLY
SIDE EDGE
Work Side Edge on Front and Back Panels.
Using a 5.5mm hook, join yarn in corner picot at
top-left corner to work down the 5-Motif side
edge.
Work as Row 1 of Widening rows.
Join yarn in bottom-right corner and repeat
Row 1.
HEM
Work on Front and Back Panels.
SIZES XS, S, L AND 2X ONLY
Work as Row 1 of Widening rows across base of
Front and Back.
Row 2 (RS) Ch3 (counts as tr), 4tr in each ch-sp
to end, tr in last ss, turn. [82 (98: -: 114: -: 130) sts]
Do not fasten off.
SIZES M AND XL ONLY
Using a 5.5mm hook, join yarn in bottom
corner to work across lower edge.
Row 1 (WS) Ch1, 2dc in next 2 row-ends of
Widening rows, ss in ch-3 picot on first Motif,
*ch4, ss into third tr of next 5-tr group, ch4, ss in
next ch-5 picot, ch4, ss into third tr of next 5-tr
group, ch4, ss into next ch-3 picot, ss in next
ch-3 picot of next Motif; rep across to end of
last Motif, 2dc in next 2 row-ends, turn.
Row 2 Ch3, tr in each st to first ch-4 sp, 4tr in
each ch-4 sp across, tr in final 4 sts, turn.
[- (-: 104: -: 120: -) sts]
Do not fasten off.
ALL SIZES
Row 3 (RS) Ch3 (counts as tr), (FPtr around next
st, BPtr around next st) rep across to end, turn.
Row 4 Ch3, (FPtr around next st, BPtr around
next st) rep across to end.
Fasten off.
TOP EDGING
Work as Rows 1-2 of Hem for your size.
SLEEVES (MAKE 2)
Sleeves are 4 Motifs long and 4 (4: 5: 5: 6: 6)
wide across the top and bottom edges.
Join Motifs in the same way you joined Motifs
for Front and Back.
Using a 5.5mm hook, join yarn in corner picot at
top-left corner to work across top edge.
Row 1 (WS) *Ch4, ss into third tr of next 5-tr
group, ch4, ss in next ch-5 picot, ch4, ss into
third tr of next 5-tr group, ch4, ss into next ch-3
picot, ss in next ch-3 picot of next Motif; rep
across to next corner.
TOP EDGE
Note: This row is worked to make the pieces
easier to sew up.
With a 5.5mm hook and RS facing, join yarn to
top-right corner to work along bottom edge,
*ss into ch-3 picot corner, ch4, ss into third tr,
ch4, ss into ch-5 picot, ch4, ss into third tr, ch4,
ss into ch-3 picot; rep 3 (3: 4: 4: 5: 5) times more
into each square along top edge.
Fasten off.
SIZES S, L AND 2X ONLY
WIDENING ROWS
Widening rows are worked down the 4-Motif
side edges.
Work as Widening rows on Front and Back.
[66 sts at end of Row 3]
CUFF
SIZES XS, M AND XL ONLY
Using a 5.5mm hook, join yarn in corner picot at
to work across lower edge of Sleeve.
Row 1 (WS) *Ch4, ss into third tr of next 5-tr
group, ch4, ss in next ch-5 picot, ch4, ss into
third tr of next 5-tr group, ch4, ss into next ch-3
picot, ss in next ch-3 picot of next Motif; rep
across to next corner, turn.
Row 2 Ch1, dc in first st, 4dc in each ch-4 sp
across to final st, dc in final st, turn.
[66 (-: 82: -: 98: -) sts]
Row 3 Ch1, dc in first st, skip 1 st, dc in next st,
(dc2tog) 30 (-: 38: -: 46: -) times, dc in final 3 sts,
turn. [35 (-: 43: -: 51: -) sts]
Do not fasten off.
SIZES S, L AND 2X ONLY
Using a 5.5mm hook, join yarn in corner picot at
to work across lower edge of Sleeve.
Row 1 (WS) Ch1, 2dc in each row-end to first
picot, *ss in picot, ch4, ss into third tr of next 5-tr
group, ch4, ss in next ch-5 picot, ch4, ss into
third tr of next 5-tr group, ch4, ss into next ch-3
picot; rep across to next corner, turn.
[- [72: -: 88: -: 104] sts]
Row 2 Ch1, dc in first st, 4dc in each ch-4 sp
across to final st, dc in final st, turn.
[- (72: -: 88: -: 104) sts]
Row 3 Ch1, dc in first st, (dc2tog) – (35: -: 43: -:
51) times, dc in final st, turn. [- (37: -: 45: -: 53) sts]
ALL SIZES
Row 4 Ch3, tr in each st across, turn.
Row 5 Ch3, (FPtr around next st, BPtr around
next st) rep across to last st, tr in last st, turn.
Row 6 Ch3, (BPtr around next st, FPtr around
next st) rep across to last st, tr in last st, turn.
Row 7 As Row 4.
Fasten off.
Half treble puff stitches give 3D depth to the
flower petals in the centre of the motifs
For the sleeves, join motifs as for front and
back pieces, then add a seven-row cuff
in the centre for the neck opening.
Measure 20 (23: 25: 28: 30: 33)cm down from
either side of Front and Back and place a marker
to mark armholes. Join Sleeves to armhole
space, then whipstitch the side and Sleeve
seams together.
COWL NECK
With RS facing and using a 5.5mm hook, join
yarn to either side of neckline opening.
Round 1 (RS) Ch3, tr in each st around neckline
opening, ss to top of beg ch-3.
[72 (76: 80: 84: 88: 92) sts]
Round 2 (RS) Ch3, (FPtr around next st, BPtr
around next st) rep around to end, ss to beg
ch-3.
Rep Round 2 until Cowl measures 9cm long.
Change to a 6mm hook.
Rep Round 2 until Cowl measures 20cm long.
Fasten off.
TO MAKE UP
Weave in all ends and block to measurements
listed.
TO MAKE UP
Whipstitch the Front and Back together at the
shoulders, joining 23 (30: 32: 36: 38: 42) sts
either side and leaving 36 (38: 40: 42: 44: 46) sts
WWW.GATHERED.HOW/SIMPLYCROCHET 41
GOOD READ
After using free tutorials and
patterns to learn crochet online,
Raffaella began creating her own
versions as Raffamusa Designs
Free and easy
Meet the crocheting chemist! When Italian designer Raffaella Tassoni isn’t at her job as a
biochemist, she’s a crochet blogger who generously shares free patterns and tutorials online
owadays, Raffaella Tassoni is known
in the crochet world for her eclectic
and informative blog, Raffamusa
Designs, which she regularly
updates with new designs and
how-tos. But about seven years ago,
Rafaella was deeply immersed in her
chemistry studies as she worked towards
her PhD. She was so stressed that she was
hardly sleeping, so she decided to try
crafting to sooth her mind. She initially
thought she’d get into cross stitch,
a passion of hers from childhood, but
when she popped to the local craft store
to stock up on supplies, she quickly
found herself drawn to crochet instead.
“The hooks and yarns were great value,
and I initially thought it might be a cheaper
way to start a new hobby,” says Raffaella.
“I followed the little guide that came with
N
42 WWW.GATHERED.HOW/SIMPLYCROCHET
the hooks, often crocheting at night as I was
so busy in the day with my studies.” Though
this didn’t help with her lack of sleep – she
stayed up many a night with a hook and
yarn in hand – she did learn how to crochet,
and a passion for the craft was born.
SOCIAL STITCHING
Raffaella absorbed everything she could
about crochet, mostly using blogs and
online tutorials.
“Online resources really became the best
place for me to discover and learn all about
crochet,” she says. “I was over the moon that
so many people would spend their time
writing and sharing their knowledge. So,
I just started doing the same!”
Before long, she had set up an Instagram,
Facebook and Youtube channel of her own.
“I started my blog very early in my crochet
journey. I think I had only been crocheting
for less than a year when I started www.
raffamusadesigns.com. This led on to me
presenting my designs on Youtube.
Although I’m not naturally a very talkative
person, and each video takes a lot of
thought and energy, I’m very aware that
there are a lot of visual learners out there
who benefit so much from seeing the
stitches in action.”
Helping people learn is a huge
motivation for Raffaella. “Regardless of
styles of learning, everyone should be able
to find the best way to learn in a way that is
accessible,” she says. “Although filmed
content is amazing, I do try to make sure
I make photo tutorials on my blog, too, with
as many photos as I can produce, especially
for a difficult pattern.”
Raffaella gets to know her fans – and their
GOOD READ
Photo: Raffaella Tassoni
needs – through social media.
“My top tip for social media is to find the
channel that works for you,” Raffaella says.
“Some designers love Facebook, some love
Pinterest, some like to write something
catchy in an email to communicate with
their followers. There isn’t any wrong or
right way, and don’t stress about it. Just find
what you’re most comfortable with. Once
you get going, it is really fun.”
BRANCHING OUT
It’s clear that Raffaella is fearless when
approaching new challenges. Not only did
she start blogging and sharing her skills
soon after she began crafting, she also
decided to learn Tunisian crochet very soon
after mastering classic crochet.
“I loved the tutorials by Kim Guzman at
www.makeitcrochet.com,” she says. “I stuck
with Tunisian crochet and Kim’s books for so
long that when I switched back to regular
crochet, I had to relearn it! Kim’s work was
really inspirational to me and I still love to
use Tunisian stitches for scarves, blankets
and throws, and I was so grateful for the fact
that Kim shared the patterns online for free.”
This gratitude is part of what inspired
Raffaella to pay it forward when starting her
own crochet content endeavours, releasing
patterns and tutorials without cost while
giving readers the option to buy ad-free
pattern PDFs on Etsy, LoveCrafts or Ravelry.
Raffaella also chose to lean into the
connections she made on social media,
creating projects in connection with other
aritsts. “Working with someone else with
a completely different style can result in
something stunning,” she says.
CROCHET CHRONICLES
Raffaella has a unique way of approaching
design. She’s methodical, and finds most of
“Online resources became the
best place for me to discover
and learn all about crochet”
her inspiration from within her own
personal experience of crochet.
“I’d say that right after my hooks, my best
friends are pen and paper,” she says. “I’m
what you might call a crochet chronicler!
When I crochet, I constantly jot down
whatever I do. This helps me in my
designing as well. I also find this quite
emotional – looking back through my
designs, I’m reminded of different times in
my life. I can often remember the train
journey I was on when I started a project.”
The actual act of crocheting – not outside
inspiration – is what most often influences
her designs. “I’m not really the type of
designer who draws inspiration from
nature, or fashion, or anything else,” she
says. “It’s a little hard to explain, but the
process of crochet is what inspires me the
most. It’s the methodology and preciseness
– perhaps this is the chemist in me? [I mostly
crochet on] the train to and from work. It’s
like having a diary.”
Of course, Raffaella isn’t immune to the
wonders of a beautiful finished project or
yarn. “I couldn’t do without my sewing
machine,” she admits. “I add linings to
crocheted bags and pillow cases, or to make
my potholders double-thick with an extra
layer of fabric. I have a sweet spot for cotton
yarn, too. From the softest cotton to acrylic
blends, even the scratchiest of cotton – I just
love it. I recently discovered cotton and
Merino Wool blends. They are pure joy!” Or,
perhaps, pure chemistry?
Written by Joanne Hunt
A few of her favourite things
If you can get Raffaella away from her hooks and blog…
“If I had to stop crocheting, I’d pour my heart into sewing. I love
sewing! I’d love to do a proper sewing course one day – one in which
I could cut and draw patterns, and have a go at making a few outfits.
And my biggest passion outside of the yarn world is definitely
cooking. Or, should I say, eating?” Visit www.raffamusadesigns.com
WWW.GATHERED.HOW/SIMPLYCROCHET 43
Dino-mite!
Capture a child’s imagination with
a prehistoric-style cardi by Fiona Kirk
BABY’S DINOSAUR CARDIGAN
For a child who loves to stomp and roar,
there’s no better animal than a dinosaur!
Check out the dino footprints on the back.
A IT
T IC Y
DK
WEIGHT
3MM
HOOK
NOTES
Cardigan is worked in rows from the top down
in one piece. Work separates for the Body and
Sleeves at the end of the Yoke.
When working the Body, refer to the Charts on
page 80, for the dinosaur and footprint
patterns. Each small square represents 1dc.
Read all RS rows from right to left and WS rows
from left to right. Change colour on the final
yrh before colour change is indicated. Carry
the unused colours across the top of your sts,
enclosing the strand as you work. The first few
rows of the Charts have been written out to
guide you.
YOU WILL NEED
QStylecraft Special DK
(100% acrylic, 100g/295m)
Cloud Blue (1019)
Meadow (1065)
See table for measurements
and yarn quantities
QA small amount of any DK yarn in
teal
QA 3mm (US C/2 or D/3) hook
Q4 snap fasteners, 10mm
QStitch markers
For yarn stockists contact
Stylecraft 01484 848435
www.stylecraft-yarns.co.uk
CARDIGAN
YOKE
Using a 3mm hook and Cloud Blue, ch51 (55: 57:
61).
Row 1 (RS) Htr in third ch from hook, htr in next
6 (6: 7: 7) ch, (htr, ch2, htr) in next ch, htr in next
8 (9: 9: 10) ch, (htr, ch2, htr) in next ch, htr in next
15 (17: 17: 19) ch, (htr, ch2, htr) in next ch, htr in
next 8 (9: 9: 10) ch, (htr, ch2, htr) in next ch, htr in
final 7 (7: 8: 8) ch, turn.
[53 (57: 59: 63) sts, 4 ch-2 sps]
Row 2 (WS) Ch1 (does not count as st
throughout), *htr in each st to ch-2 sp, (htr, ch2,
htr) in ch-sp; rep from * across to end, turn.
[61 (65: 67: 71) sts, 4 ch-2 sps]
Rep Row 2 another 14 (16: 16: 18) times.
[173 (193: 195: 215) sts, 4 ch-2 sps]
Do not fasten off.
TENSION
18 sts and 13 rows measure 10x10cm
(4x4in) over half treble crochet using
a 3mm hook, or size needed to
obtain correct tension
ABBREVIATIONS
surface crochet Position yarn on
WS, insert hook from RS to WS, yrh
and pull up a loop, pull through
loop on hook, *insert hook back
through to WS in direction you want
the surface crochet to travel, yrh and
pull up a loop, pull through loop on
hook; rep from * as required
For a full list, see page 78
DIVIDE FOR BODY
Row 1 (RS) Ch1, htr in each st to ch-2 sp, yrh,
insert hook in next ch-sp, skip next 40 (45: 45:
50) sts, insert hook in next ch-sp, yrh and pull
loop through both ch-sp, yrh and pull through
all loops, htr in each st across to next ch-2 sp,
yrh, insert hook in next ch-sp, skip next 40 (45:
45: 50) sts, insert hook in next ch-sp, yrh and
pull loop through both ch-sp, yrh and pull
through all loops, htr in each st to end, turn.
[95 (105: 107: 117) sts]
Row 2 (WS) Ch1, dc in first 12 (12: 13: 15) sts, 2dc
in next 1 (1: 2: 2) sts, dc in next 17 (17: 16: 18) sts,
2dc in next 1 (1: 2: 2) sts, dc in next 32 (42: 41: 43)
sts, 2dc in next 1 (1: 2: 2) sts, dc in next 17 (17: 16:
18) sts, 2dc in next 1 (1: 2: 2) sts, dc in final 13 (13:
13: 15) sts, turn. [99 (109: 115: 125) sts]
Work from the Charts A and C for Rows 3-21.
Stitch markers are placed to mark out the
charted areas.
On RS rows, follow Chart A then Chart C. On WS
rows, follow Chart C then Chart A. All sts
SIZE
0-6 months
6-12 months
12-18 months
18-24 months
cm
43
45.5
48
50.5
in
17
18
19
20
cm
54
59.5
62.5
68
in
21¼
23½
24¾
26¾
cm
27
29
30
31
in
10½
11½
11¾
12¼
cm
16.5
19.5
22
23.5
in
6½
7¾
8¾
9¼
c
TO FIT CHEST
b
ACTUAL CHEST
(APPROX)
LENGTH
a
Width a: 27 (29.5: 31: 34)cm,
10¾ (11¾: 12¼: 13½)in
Length b: 27 (29: 30: 31)cm,
10½ (11½: 11¾: 12¼)in
Sleeve length c: 16.5 (19.5: 22: 23.5)cm,
6½ (7¾: 8¾: 9¼)in
The cardigan is worked in one piece, so there
are no seams to sew up at the end
SLEEVE LENGTH
YARN: CLOUD BLUE
100g
2
2
2
3
YARN: MEADOW
100g
1
1
1
1
To make this pattern easier to follow, we’ve colour-coded the sizing instructions – simply follow the
relevant column.
WWW.GATHERED.HOW/SIMPLYCROCHET 45
BABY’S DINOSAUR CARDIGAN
change to Cloud Blue, dc in next 14 sts, pm in
last st, dc in next 2 (6: 8: 12) sts, pm in last st,
Chart B: dc in next 16 sts, change to Meadow,
dc in next st, change to Cloud Blue, dc in next
23 sts, change to Meadow, dc in next st, change
to Cloud Blue, dc in next 4 sts, pm in last st, dc
in next 2 (6: 8: 12) sts, pm in last st, Chart C: dc in
next 14 sts, change to meadow, dc in next 3 sts,
change to Cloud Blue, dc in next 5 sts, pm in
last st, dc in final 3 (4: 5: 6) sts, turn.
Rows 11-21 Cont in patt set.
Fasten off Meadow only.
Row 22 Ch1, dc in each st across, turn.
Row 23 Ch1, htr in each st across, turn.
Rep Row 23 until Cardigan measures 24 (26: 27:
28)cm.
Outline each of the dinosaur motifs with
surface crochet worked around the edges
Finish the neckline with a collar, worked in
rows in double crochet throughout
outside of the Charts should be worked in
Cloud Blue until otherwise directed.
Row 3 Ch1, dc in first 3 (4: 5: 6) sts, pm in last st,
Chart A: dc in next 2 sts, change to Meadow, dc
in next 4 sts, change to Cloud Blue, dc in next
16 sts, pm in last st, dc in next 49 (57: 61: 69) sts,
pm in last st, Chart C: dc in next 16 sts, change
to Meadow, dc in next 4 sts, change to Cloud
Blue, dc in next 2 sts, pm in last st, dc in final 3
(4: 5: 6) sts, turn.
Row 4 Ch1, dc in each st to marker, Chart C: dc
in next st, change to Meadow, dc in next 6 sts,
change to Cloud Blue, dc in next 15 sts, dc in
each st to next marker, Chart A: dc in next st,
change to Meadow, dc in next 6 sts, change to
Cloud Blue, dc in each st to end, turn.
Rows 5-8 Cont in pattern using the Chart for all
colour changes.
For Rows 9-21 you will follow Chart B across the
centre of your work. Markers are placed to
show charted areas.
Row 9 Ch1, dc in first 3 (4: 5: 6) sts, Chart A: dc in
next 5 sts, change to Meadow, dc in next 3 sts,
46 WWW.GATHERED.HOW/SIMPLYCROCHET
HEM
Next row Ch3, (FPtr around next st, BPtr
around next st) rep across to end, turn.
Next row Ch3, (BPtr around next st, FPtr
around next st) rep across to end, turn.
Rep last 2 rows until Cardigan measures 27 (29:
30: 31)cm.
Fasten off.
SLEEVES (MAKE 2)
With RS facing, join Cloud Blue in ant st at
underarm.
Round 1 (RS) Ch1, htr in each st around, ss to
beg htr, turn. [40 (45: 45: 50) sts]
Round 2 (WS) Ch1, htr in each st around, ss to
beg htr, turn.
Rep Round 2 another 4 (8: 12: 12) times.
Next round Ch1, htr in next 13 (15: 15: 17) sts
htr2tog, pm in last st, htr in next 13 (15: 15: 17)
sts, htr2tog, pm in last st, htr in each st to end,
ss to beg htr, turn. [38 (43: 43: 48) sts]
Next round Ch1, htr in each st around, ss to
beg htr, turn.
Next round Ch1, (htr to st before marker,
htr2tog next 2 sts, move marker to last st) twice,
htr in each st to end, ss to beg htr, turn.
[36 (41: 41: 46) sts]
Rep last 2 rows another 3 (3: 3: 5) times.
[30 (35: 35: 36) sts]
Next round Ch1, htr in next 4 (4: 4: 6) sts,
htr2tog, *htr in next 3 (4: 4: 4) sts, htr2tog; rep
from * 3 times more, htr in next 4 (4: 4: 4) sts, ss
to beg htr, turn. [25 (30: 30: 31) sts]
SIZE 0-6M ONLY
Next round Ch1, dc2tog, dc in each st around,
ss to beg dc, turn. [24 (-: -: -) sts]
SIZES 6-12M, 12-18M AND 18-24M ONLY
Next round Ch1, htr in first – (3: 3: 3) sts,
htr2tog, (htr in next 5 sts, htr2tog) 3 times, htr in
final – (3: 3: 3) sts, htr2tog – (0: 0: 1) times, ss to
beg htr, turn. [- (26: 26: 26) sts]
CUFFS
Row 1 Ch3, (FPtr around next st, BPtr around
next st) rep across to end, turn.
Rep last row another 2 (2: 3) times.
[24 (26: 26: 26) sts]
Fasten off and use the tail to sew the side
edges of Cuff closed.
FRONT OPENING
With RS facing, join Cloud Blue in bottom
corner of right front.
Row 1 (RS) Ch1, 50 (56: 60: 65) dc up right-hand
edge, turn. [50: (56: 60: 65) sts]
Row 2 Ch1, dc in each st across, turn.
Rep Row 2 another 1 (1: 2: 2) times.
Fasten off.
With RS facing, join Cloud Blue in top corner of
left front.
Rep Front Opening across left side.
COLLAR
With RS facing, join Cloud Blue in opposite side
of foundation ch from Yoke.
Row 1 (RS) Ch1, 39 (47: 50: 54) dc evenly
around, turn.
Row 2 Ch1, dc in first 2 sts, (2dc in next st, dc in
next 2 sts) 11 (14: 15: 16) times, 2dc in next st, dc
in final 3 (2: 2: 3) sts, turn. [51 (62: 66: 71) sts]
Rows 3-12 Ch1, dc in each st around, ss to beg
dc.
Fasten off.
TO FINISH
Using Teal, surface crochet around the
dinosaurs and footprints.
Embroider an eye onto each Dinosaur.
Weave in all ends.
Mark out position of snap fasteners and attach
to Front Openings.
For
at
www.blacksheepwools.com
use the code 147SDK
at the checkout
Offer ends 6 May, 2024
Win a digital copy of the
next Simply Crochet iue!
Ente by voting fo you
favouite on Intagram
#hooktohook
@simplycochetmag win
HOOK TO HOOK
Egg cosies
We challenged two designers to come up with a fab design,
each using the same yarn… which is your fave?
Maura O Reilly
“I was delighted to take
part in this challenge, as
I love seeing the different
ideas that designers come
up with. When the yarn
arrived, my creative juices
started flowing. I enjoyed
playing with the various shades and matching
them up together. My trio of egg cosies have
already put smiles on the faces of the children –
and adults – in my life. I hope they make Simply
Crochet readers and their families grin, too.”
Visit Maura at www.hookedhuncrochet.com
and on Instagram at @hooked_hun
Debonita Deore
“Taking part in the Hook to
Hook challenge filled me
with sheer excitement! It
was like diving into a pool
of creative possibilities
with my crochet skills. My
design, which I call Daisy
Delight, draws inspiration from the beauty of
daisies and sunny meadows. I loved working
with the Sirdar cotton yarn for these mini
bucket hat cosies, decking them out with daisy
and leaf appliqués.” Find Debonita on Ravelry
as Elegantly Fashionable Creations and on
Instagram as @efcreationsofficial
WWW.GATHERED.HOW/SIMPLYCROCHET 47
HOOK TO HOOK
Left to right: Maura’s trio of egg cosies features a different motif on each one – an embroidered heart, a flower and a pompom; for the main part
of the cosies, start at the top and work in double crochet throughout, changing colours to create a different striped pattern for each cosy
EGG COSIES
Keep your Easter eggs warm in Maura O
Reilly’s three adorable beanies, all finished
with sweet embellishments
QSirdar Happy Cotton (100% cotton, 20g/43m),
1 ball of each:, Bubbly (785), Unicorn (769),
Quack (788), Wicket (781), Melon (794)
QA 3mm (US C/2 OR D/3) hook
QA pompom maker, 35mm
QTapestry needle
For yarn stockists contact
Sirdar 01924 231682 www.sirdar.com
TENSION
Rounds 1-5 measure 6cm (2¼in) in diameter
MEASUREMENTS
Egg Cosies measure approx 6cm (2¼in) in
diameter
ABBREVIATIONS
puff petal *(Yrh, insert hook in st indicated, yrh
and pull loop up to height of round) 3 times;
rep from * in next st across, yrh and pull
through all loops on hook
For a full list, see page 78
48 WWW.GATHERED.HOW/SIMPLYCROCHET
NOTES
Egg Cosies are worked in rounds from the top
down.
Change colour on the final yrh of st before
colour change is indicated.
Egg Cosies are embellished with a pompom,
Flower or embroidered heart.
EGG COSIES
Make 1 using, Quack for Rounds 1-5 and Bubbly
for Rounds 6-9.
Make 1 using, Unicorn for Rounds 1-7 and
Quack for Rounds 8-9.
Make 1 using, Wicket for Rounds 1-2, Bubbly for
Round 3, Melon for Round 4, Unicorn for Round
5, Wicket for Round 6, Bubbly for Round 7 and
Melon for Rounds 8-9.
Ch4, ss in last ch from hook to form a loop.
Round 1 (RS) Ch1 (does not count as st
throughout), 12dc in loop, ss to beg dc, turn.
[12 sts]
Round 2 (WS) Ch1, (dc in next st, 2dc in next st)
6 times, ss to beg dc, turn. [18 sts]
Round 3 Ch1, (dc in next 2 sts, 2dc in next st) 6
times, ss to beg dc, turn. [24 sts]
Rounds 4-8 Ch1, dc in each st around, ss to beg
dc, turn.
Round 9 Ch1, (dc in next 2 sts, dc2tog) 6 times,
ss to beg dc. [18 sts]
Fasten off.
FLOWER
Using Melon, ch4, ss in last ch from hook to
form a loop.
Round 1 (RS) Ch1, 12dc in loop, ss to beg dc.
[12 sts]
Fasten off.
With RS facing, join Unicorn in any st.
Round 2 (RS) *Ch2, puff petal over st at base of
ch-2 and next st, ch2, ss in next st; rep from * 5
times more working final ss in base of beg ch-2.
Fasten off.
TO FINISH
Sew the Flower to the Cosy worked in Quack
and Bubbly.
Using Bubbly, embroider a heart on the Cosy
worked in Unicorn and Quack.
Using Quack, make a pompom and sew to the
top of the striped Cosy.
Weave in all ends.
HOOK TO HOOK
Left to right: work the egg cosies in half treble stitches throughout, starting from the top with a magic loop; Debonita was inspired by
daisy-filled meadows – the five-petalled flowers are worked in treble stitches, while the leaves are worked in one row of double crochet
BUCKET HATS
Put your breakfast in an Easter bonnet
bucket hat by Debonita Deore, each
featuring a flared brim and big flower
QSirdar Happy Cotton (100% cotton, 20g/43m),
1 ball of each: Bubbly (785), Unicorn (769),
Quack (788), Wicket (781), Melon (794)
QA 5mm (US H/8) hook
QA 2mm (US A/0) hook
QA 3mm (US C/2 or D3) hook
For yarn stockists contact see Egg Cosies
TENSION
Rounds 1-5 measure 5cm (2in) in diameter
MEASUREMENTS
Hat measures approx 5cm (2in) in diameter
ABBREVIATIONS
For a full list, see page 78
NOTES
Hats are worked in rounds with RS facing
throughout.
Flowers and Leaves are made separately and
sewn to the Hats at the end.
BUCKET HAT (MAKE 3)
Make 1 each in Quack, Bubbly and Unicorn.
Using a 5mm hook, make a magic loop.
Round 1 (RS) Ch1 (does not count as st
throughout), 6htr in loop, ss to beg htr. [6 sts]
Round 2 2htr in each st around, ss to beg htr.
[12 sts]
Round 3 Ch1, (2htr in next st, htr in next st) 6
times, ss to beg htr. [18 sts]
Rounds 4-5 Ch1, htr in each st around, ss to
beg htr.
Round 6 Ch1, (htr in next 2 sts, 2htr in next st) 6
times, ss to beg htr. [24 sts]
Round 7 Ch1, htr in each st around, ss to beg htr.
Fasten off.
DAISIES (MAKE 3)
Using a 2mm hook and Quack, make a magic
loop.
Round 1 (RS) Ch1, 5dc in loop, ss to beg dc.
[5 sts]
Fasten off.
Change to a 3mm hook any colour except
Wicket.
Round 2 (RS) (Ch2, 2tr, ch2, ss) in same st as
join, (ss, ch2, 2tr, ch2, ss) in next 4 sts.
Fasten off.
LEAVES (MAKE 6)
Using a 3mm hook and Wicket, ch5.
Row 1 (RS) Ss in second ch from hook, dc in
next ch, htr in next ch, tr in next ch.
Fasten off.
TO FINISH
Use the image as a guide.
Sew a Flower and 2 Leaves to each Hat.
Weave in all ends.
For
at
www.woolwarehouse.co.uk
use the code SC147
at the checkout
Code cannot be applied to certain products such as yarn
packs, sale items, gift vouchers, KC Collection
and Lopi products.
WWW.GATHERED.HOW/SIMPLYCROCHET 49
! " #
$ % &
' ( ! #
&
( # & ! ! #
PIANO KEYS SCARF
ASY
ASY
CHUNKY
WEIGHT
Great
for music
fans!
5.5MM
HOOK
YOU WILL NEED
QLopi Alafosslopi
(100% wool, 100g/100m)
2 balls of each:
Black Heather (0005)
White (0051)
QA 5.5mm (US I/9) hook
For yarn stockists contact
Wool Warehouse 01926 882818
www.woolwarehouse.co.uk
TENSION
Tension is not critical, but it may
affect the yarn quantities required
MEASUREMENTS
Scarf measures approx 24x168cm
(9½x66¼in)
ABBREVIATIONS
For a full list, see page 78
High key
Now this scarf strikes the right chord! Get in tune with
this super-fun piano-themed make by Maria Jęczmyk
Whether you tickle the ivories yourself or just
love listening, this piano key scarf is a great
way to celebrate your passion!
NOTES
The scarf is worked in half treble with black
piano keys worked across 17 stitches
Scarf is worked in rows throughout.
There is a Chart on page 80, which you will
need to refer to. Each small square represents
1dc. Read all RS rows from right to left and WS
rows from left to right. The first few rows of the
Chart have been written out to guide you.
Change colour on the final yrh of st before
colour change is indicated. Carry the unused
colour across the top of your sts, enclosing the
strand as you work.
SCARF
Using White, ch27.
Row 1 Htr in third ch from hook, htr in each ch
across, turn. [25 sts]
Row 2 Ch2 (does not count as st throughout),
htr in first 8 sts, change to Black Heather, htr in
next 17 sts, turn.
Row 3 Ch2, htr in first 17 sts, change to White,
htr in final 8 sts, turn.
Rows 4-5 Ch2, htr in each st across, turn.
Rows 6-18 Cont in pattern set using the Chart
for all colour changes.
Rep Rows 2-18 of Chart until Scarf measures
168cm.
Fasten off and weave in ends.
WWW.GATHERED.HOW/SIMPLYCROCHET 51
he xi
mot i f
Natural wonder
The legendary hexagonal columns of Giant’s
Causeway inspired Rebecca O’Kane’s blanket
52 WWW.GATHERED.HOW/SIMPLYCROCHET
Rebecca celebrates her family’s connection
to Northern Ireland with an artistic
interpretation of an amazing rock fomation.
A IT
T IC Y
4PLY
WEIGHT
5MM
HOOK
YOU WILL NEED
QScheepjes Stone Washed
(78% cotton 22% acrylic,
50g/130m)
7 balls of Larimar (828)
4 balls of Smokey Quartz (802)
1 ball of Moon Stone (801)
QA 5mm hook (US H/8) hook
For yarn stockists contact
Scheepjes
www.scheepjes.com/en
TENSION
Tension is not critical, but it may
affect the yarn quantities required
MEASUREMENTS
Blanket measures approx 76x114cm
(30x45in)
ABBREVIATIONS
puff st (Yrh, insert hook in st
indicated, yrh and pull up a loop to
height of current round) 3 times, yrh
and pull through all 7 loops on hook
For a full list, see page 78
NOTES
Blanket is made up of 50 Hexagons and 8 Half
Hexagons. Hexagons are worked in rounds
with RS facing throughout. Half Hexagons are
worked in rows throughout.
Motifs are joined together with a mixture of a
whipstitch join and a ruffled double crochet
seam.
There is a Chart on page 54, which you will
need to refer to when joining motifs together.
Where motifs are whipstitched together they
create a flat, smooth surface with a soft drape
GIANT’S CAUSEWAY BLANKET
SEA HEXAGONS (MAKE 34)
Using Larimar, make a magic loop.
Round 1 (RS) Ch3 (counts as tr throughout), tr
in loop, ch2, (2tr in loop, ch2) 5 times, ss to top
of beg ch-3. [12 sts, 6 ch-2 sps]
Round 2 (RS) *Ch4, skip (1tr, ch-2 sp), dc in next
tr) 6 times, ss into first ch-4 sp. [6 sts, 6 ch-4 sps]
Round 3 Ch2 (does not count as st), (puff st in
ch-4 sp, ch5, skip dc) 6 times, ss to beg puff st.
[6 sts, 6 ch-5 sps]
Round 4 Ch3, 4tr in same st, (3dc in ch-sp, 5tr in
next puff st) 5 times, 3dc in final ch-sp, ss to top
of beg ch-3. [48 sts]
Round 5 Ch3, tr in bl of next st, (2tr in next st, tr
in bl of next 7 sts) 5 times, 2tr in next st, tr in bl
of final 5 sts, ss to top of beg ch-3. [54 sts]
Round 6 Ch4 (counts as FPtr, ch1), skip next st,
*(tr, ch1, tr) in space between 2-tr group, (ch1,
skip 1 st, FPtr around next st) 4 times, ch1; rep
from * around to end, ss to third ch of beg ch-4.
[36 sts, 36 ch-1 sps]
Round 7 Ch2 (counts as htr), htr in next ch-sp,
skip next st, *2htr in next corner ch-sp, (htr in
next ch-sp, htr in next st) 5 times, skip next
ch-sp; rep from * around to end, ss to top of beg
ch-2. [72 sts]
Fasten off.
STONE HEXAGONS (MAKE 16)
Using Smokey Quartz, make a magic loop.
Round 1 (RS) Ch3 (counts as tr throughout),
tr in loop, ch2, (2tr in loop, ch2) 5 times, ss to top
of beg ch-3. [12 sts, 6 ch-2 sps]
WWW.GATHERED.HOW/SIMPLYCROCHET 53
Row 1 (RS) Ch1 (does not count as st
throughout), 3dc in next 36 sts on both pieces.
Fasten off.
Rep to join the rem 2 Half Stone Hexagons.
Join the 2 Stone sections either side of the Sea
section in the same way, working 3dc in each st
to join.
Fasten off.
Make tassels using five stands of yarn folded
in half and hooked to the hexagons’ points
Round 2 (RS) Ch3, *tr in each st to ch-2sp, (tr,
ch2, tr) in ch-sp; rep from * around to end, ss to
top of beg ch-3. [24 sts, 6 ch-2 sps]
Rounds 3-5 As Round 2. [60 sts, 6 ch-2 sps]
Round 6 Ch3, (tr in each st to ch-2 sp, 2tr in
ch-sp) rep around to end, ss to beg dc. [72 sts]
Fasten off.
BORDER
Join Moon Stone in any st around edge.
Round 1 Ch1, (dc in each st to corner, ch1, skip
corner) rep around, ss to beg dc.
Fasten off.
FRINGE
Cut 20 lengths of each colour, 18cm long. Take
5 strands of one colour and fold in half, insert
hook in point of motif across any short edge,
place folded end on hook and pull through,
thread tails through folded end and pull tight
to secure.
Using the image as a guide, rep across short
edges and trim to desired length.
Weave in all ends.
Re ecca’s memor
“I’m half Irish, and walking amongst the
magical stepping stones on visits to my
dad’s native Belfast has always been
a favourite memory of mine. The folklore
may speak of warring, vengeful giants, but
the first time I walked among the curious
rock formation, I was struck by how utterly
peaceful I felt. The harmonious network of
naturally formed honeycombs was
enough to fill my angsty teen self with
wonder and romance towards my Irish
roots. As in the blanket, some stones are in
large clusters and others are solitary, but
each is washed by the same sea water, and
I think that’s a nice metaphor for the
connection I feel to a distant place that will
always be a part of me. I dedicate this
blanket to my dad, James, and to the
memory of my Aunt Sheila.”
Words by Rebecca O’Kane
Giants Causeway blanket chart
HALF STONE HEXAGON (MAKE 8)
Using Smokey Quartz, make a magic loop.
Row 1 (RS) Ch3, tr in loop, ch2, 2tr in loop, ch2,
2tr in loop, turn. [6 sts, 2 ch-2 sps]
Row 2 Ch3, tr in st at base of ch-3, *tr in next st,
(tr, ch2, tr) in ch-2 sp, tr in next st; rep from *
once more, 2tr in final st, turn. [12 sts, 2 ch-2 sps]
Row 3 Ch3, tr in st at base of ch-3, *tr in each st
to ch-2 sp, (tr, ch2, tr) in ch-2 sp; rep from * once
more, tr in each st to final st, 2tr in final st, turn.
[18 sts, 2 ch-2 sps]
Rows 4-5 As Row 3. [30 sts, 2 ch-2 sps]
Row 6 Ch3, tr in st at base of ch-3, *tr in each st
to ch-2 sp, 2tr in ch-2 sp; rep from * once more,
tr in each st to final st, 2tr in final st, turn.
[36 sts, 2 ch-2 sps]
Fasten off.
TO MAKE UP
Refer to the Chart on to the right, when joining
motifs together.
Using Smokey Quartz, whipstitch the Stone
Hexagons and Half Stone Hexagons together
into 2 sections.
Using Larimar, whipstitch the Sea Hexagons
together into a single section.
You will now have 3 sections of Hexagons (2
Stone sections and 1 Sea section), plus 3 single
Half Stone Hexagons. These are joined together
with a ruffle seam.
Begin by joining the Half Stone Hexagons to
the Sea section.
With RS facing, join Moon Stone through first st
on Half Stone Hexagon and adjacent st on Sea
section.
54 WWW.GATHERED.HOW/SIMPLYCROCHET
Key
Sea Hexagon
Stone Hexagon
Ruffle Seam
Simply
Magazine
th
25 0
Knits for
ALL THE
FAMILY
CONTENTS SUBJECT TO CHANGE
Inside:
CABLE JUMPER • BRIOCHE JUMPER
YOGA TEA COSY• EMBROIDERED KIDS’
CARDI • FAIR ISLE CUSHION • MEN’S
JUMPER • PASTEL SOCKS • GARTER
STITCH KIDS’JUMPER • CAFETIÈRE
COSY • AND SO MUCH MORE…
DOUBLE GIFTS!
NEEDLES
PLUS
ARAN KNITS
BOOK
from all good newsagents and supermarkets
GOOD READ
Photo: British Wool
British sheep, like these
Bluefaced Leicester, are
part of a textile tradition
spanning thousands of years
The secret life of wool
In tight and eco-conscious times, the story of a sustainable yet ancient material like
wool is a compelling one. Let’s take a look at the wonders of wool, from farm to yarn...
56 WWW.GATHERED.HOW/SIMPLYCROCHET
GOOD READ
Photo: McIntosh
Photo: West Yorkshire Spinners
Photo: Forgotten Fibre
Clockwise from left:
Spinner Marina Skua in the
documentary Forgotten Fibre;
James McIntosh hangs handdyed yarn made from British
Wool; West Yorkshire Spinners
spins British Wool in a mill to
make their yarn
F
rom prehistoric hand spinners to the
mass-produced textiles of the
Industrial Revolution and beyond,
the story of wool in the UK has a proud
heritage stretching back thousands of
years. The history begins with Neolithic
settlers introducing sheep around 4000 BC,
then the Bronze Age discovery of hand
spinning and weaving. Later, the Roman
and Viking invasions brought in new and
varied breeds of sheep. Wool production is
deeply tied to the country’s history, and
this connection continues to this day.
COUNTING SHEEP
More than 22 million sheep from 66 native
breeds are scattered over the UK’s green hills
and dales; altogether, they produce
approximately 32 million kilograms of wool
every single year.
That British wool is used for carpets, rugs
and upholstery fabric as well as for knitting
and crochet yarns. But not every fleece is the
same. The hardier hill and mountain breeds
produce coarser yarn used for the tweed and
upholstery industry, while lowland breeds
and those located in more southern counties,
such as Devon and Dorset, produce a softer
wool preferred by the craft industry and
hand spinners. This wool is also used by
a growing number of yarn companies who
create their ranges from British-bred fleece.
The industry’s high standards are
maintained by British Wool (formerly the
British Wool Marketing Board), a cooperative owned by 35,000 UK sheep
farmers. The organisation, which collects
approximately 75% of the entire UK wool clip,
gathers and grades the wool, then auctions it
to the textile industry on behalf of its
members. The British Wool shepherd’s crook
logo certifies a product has been made with
wool grown by British sheep farmers and has
been produced ethically and sustainability.
“We buy all of our British wool fibre from
British Wool,” says Rhiannon Evans,
Marketing Manager at popular yarn
company West Yorkshire Spinners. “Their
licensing scheme assures our supply is
responsibly sourced.”
“Why do I use British Wool?” asks James
McIntosh, founder of independent yarn
brand McIntosh. “My late Dad was a farmer
and money was scarce. I support British
farmers. Their quality is something else, and
if the shepherds that make up British Wool
were as kind and gentle to their sheep as my
Dad was to ours, well then, they will be loved
and looked after.”
British Wool handles more than 23 million
kilograms of wool annually. There are over 100
collection hubs scattered all over the country,
which receive fleeces from more than 35,000
farms, with eight main depots that handle the
bulk of them. A fleece typically weighs
between two and three kilos, and every single
one is checked and graded by hand for quality
and suitability for different types of uses.
This quality control system means that
every fleece can be traced back to the farm it
came from, and it adds value to the wool at
auction by ensuring that every farmer gets the
best price for his fleeces.
INTO THE BLUE
The diversity of British sheep breeds means
there are six main styles of British Wool: fine,
medium, cross, lustre, hill and mountain.
They’re all suited to different areas of wool
production, from upholstery to carpets,
tweeds and other textiles. Fine and lustrous
British wools make the perfect yarn for
crochet and knitting – its particular structure
creates yarn that feels warm and comfortable
next to the skin, with a soft drape that works
well for garments. It keeps its shape and,
thanks to its springy structure, provides the
stretchy quality that we look for in a yarn.
Despite being one of the more scarce
wools, Bluefaced Leicester remains
extremely popular among yarn
fans. “Bluefaced Leicester is a sheep that
produces a long staple fibre in its fleece that
WWW.GATHERED.HOW/SIMPLYCROCHET 57
has a nice lustre. It’s soft and doesn’t pill as
easily as other breeds,” explains James. “It’s
often known as the ‘king of knitting wool’.”
Rhiannon agrees: “This yarn really is one of
the finest in Britain – soft and silky with
incredible stitch definition. It’s a testament to
the superb quality of British Wool... For
something truly special, there is nothing like
Bluefaced Leicester – if you haven’t crafted
with it before you will not be disappointed.”
But Bluefaced Leicester isn’t the only yarn
wool in the game. These days, we can choose
from a wide range of textures and colours for
our crochet and knitting. Lots of native
breeds also produce a palette of natural
colours, including shades of cream, black,
brown and grey. Even these undyed yarns are
attractive and available to buy.
BEYOND SUSTAINABLE
The value of wool as a commodity has always
had its ups and downs through the centuries,
and despite its high quality, it’s been on the
downturn in recent years due to the rise in
synthetic fabrics. In 2019, wool production
represented just about 1% of the global
supply of textile fibres, according to a market
report by the Textile Exchange.
58 WWW.GATHERED.HOW/SIMPLYCROCHET
Photo: Forgotten Fibre
Photo: West Yorkshire Spinners
Photo: McIntosh
Photo: British Wool
GOOD READ
But wool has always been a sustainable and
environmentally friendly natural product –
sheep have to be sheared and relieved of their
dense fleeces every year for their continued
good health. And unlike synthetic yarns made
from oil, which can pollute the oceans with
microplastics, it’s completely biodegradable.
So, fast fashion is bad for the environment,
but the regenerative farming movement can
be the antidote – and wool can be a big part
of that. Regenerative farming goes beyond
simply ‘sustaining’ the resources we have in
nature – it actively enhances and restores
them by working with natural cycles and
systems, taking into account the whole
system in which fibres, textiles and garments
are not only produced but also worn and
disposed of – from “soil to soil”.
The Fibreshed movement is one group that
embodies the “soil to soil” ethos. The
non-profit aims to ‘develop regional fibre
systems that build ecosystem and
community health.’ British filmmaker Tristan
Sherfield’s short documentary Forgotten Fibre
follows South West England Fibreshed
members to highlight the importance of wool
its status as an underused resource.
“It’s on most continents in the world –
Clockwise from
top left: a Bluefaced
Leicester sheep,
whose high-quality
wool is often used
for yarn; piles of
wool yarn ready to
be dyed by
McIntosh; farmer
David Wilkins being
filmed with his flock
for the wool
documentary
Forgotten Fibre;
West Yorkshire
Spinners’ Bluefaced
Leicester yarn
there’s sheep everywhere – and wool is
something that only makes up 1% of the
textile industry,” Tristan says. “It is a forgotten
fibre and [natural] resource that you’re not
pulling out of the earth.”
Shown at Wonderwool Wales last year, the
documentary features Jen and Andy of
Fernhill Farm in Somerset who produce
a wide range of natural wool products from
their own flock. “Where we’re trying to go at
Fernhill Farm... is to promote a holistic way of
farming,” Andy explains. “It’s a regenerative
way of... not just sustaining things, [but also]
trying to improve them.”
If you’re hoping to get your hands on some
natural British wool to crochet with, look out
for the British Wool shepherd’s crook mark
logo on yarns at your local craft store. You can
also check out the info on www.fibreshed.org
– they list local yarn and fleece producers,
designers and dyers. Big yarn festivals such as
Wonderwool Wales (27-28 April this year) and
The Great British Fibre Festival in Devon (1-2
June) are also grand celebrations of British
wool production – and there will be many
more yarn exhibitions, demos and shows
taking place around the country.
Written by Amanda Robinson
EMBELLISH A TABLECLOTH
motif
border
Talk of the table
Friends and family will be buzzing about this creative,
party-ready upcycling idea by Paula Green
WWW.GATHERED.HOW/SIMPLYCROCHET 59
EMBELLISH A TABLECLOTH
Give a plain tablecloth the perfect hooky
makeover by adding multi-coloured motifs
and tassels. Boring tables? Not in your house!
A IT
T IC Y
DK
WEIGHT
3MM
HOOK
YOU WILL NEED
QKing Cole Cottonsoft DK
(100% cotton, 100g/210m),
1 ball of each:
Sage (1576)
Antique Gold (3461)
White (710)
Cloud (1575)
Coral (1574)
QA 3mm (US C/2 or D/3) hook
QStitch markers
QA tablecloth
For yarn stockists contact
King Cole 01756 703670
www.kingcole.com
TENSION
Motif measures approx 14cm (5½in)
wide
MEASUREMENTS
To fit any sized tablecloth
ABBREVIATIONS
live loop join Remove live loop
from hook, insert hook in sp
indicated, place live loop on hook
and pull through sp
For a full list, see page 78
For
at
www.woolwarehouse.co.uk
use the code SC147
at the checkout
Code cannot be applied to certain products such as yarn
packs, sale items, gift vouchers, KC Collection
and Lopi products.
NOTES
Edging is made up of Motifs, which are worked
in rounds with RS facing throughout and joined
together as you work them (JAYG).
Work over yarn tails to reduce the number of
ends you need to weave in.
TABLECLOTH EMBELLISHMENT
FIRST MOTIF
Each Motif is worked using any 3 colours.
Colours are referred to as Yarns A-C.
Using Yarn A, make a magic loop.
Round 1 (RS) Ch4 (counts as tr, ch1
throughout), (2tr in loop, ch1) 7 times, tr in loop,
ss to third ch of beg ch-4. [16 tr, 8 ch-sps]
Fasten off.
Join Yarn B in any ch-1 sp.
Round 2 (RS) Ch5 (counts as tr, ch2), 2tr in same
sp, (2tr, ch2, 2tr) in each ch-1 sp around, tr in
same sp as beg ch-5, ss to first ch-2 sp.
[32 tr, 8 ch-sps]
Fasten off.
Join Yarn C in first ch-2 sp.
Round 3 Ch3 (counts as tr), 6tr in same sp, 7tr in
each ch-2 sp around, ss to top of beg ch-3.
[56 sts]
Fasten off.
Round 4 Join Yarn B in first st, ch1 (does not
count as st), dc in first st, dc in next 6 tr, tr in sp
between second and third tr from 4-tr group in
Round 2, (dc in next 7 sts, tr in sp between
second and third tr from 4-tr group in Round 2)
7 times, ss to first dc. [64 sts]
Fasten off.
Join Yarn A in any tr.
Round 5 Ch7 (counts as dtr, ch3), dtr in same tr,
*tr in next 2 sts, htr in next st, dc in next 4 sts,
htr in next st, dc in next 4 sts, htr in next st, tr in
next 2 sts**, (dtr, ch3, dtr) in next st; repeat from
* 3 times more ending final repeat at **, ss to
first ch-3 sp. [68 sts, 4 ch-sps]
Row 6 Ch4 (counts as tr, ch1), skip next dtr, (tr in
next st, ch1, skip next st) 8 times, (tr, ch3, dc) in
ch-3 sp, pm in ch-3 sp, dc in next st, htr in next 3
sts, tr in next 2 sts, dtr in next 2 sts, ttr in next st,
dtr in next 2 sts, tr in next 2 sts, htr in next 3 sts,
dc in next st, (dc, ch3, tr) in ch-3 sp, (ch1, skip 1
st, tr in next st) 8 times, ch1,tr in ch-3 sp.
Fasten off leaving final side unworked.
Cut 4 lengths of Yarn A, 12cm long. Thread
through ttr on last row to form a tassel.
JAYG MOTIFS
Join Motifs together into 4 strips to the
measurements of the edges of your tablecloth,
minus 15cm.
Rounds 1-5 (RS) Work as Rounds 1-5 of First
Motif.
Motif is joined to the last Motif over next row.
60 WWW.GATHERED.HOW/SIMPLYCROCHET
Work and join motifs as you go until you have
reached the dimensions of the tablecloth
Row 6 Ch4 (counts as tr, ch1), skip next dtr, (tr in
next st, ch1, skip next st) 8 times, (tr, ch3, dc) in
ch-3 sp, pm in ch-3 sp, dc in next st, htr in next 3
sts, tr in next 2 sts, dtr in next 2 sts, ttr in next st,
dtr in next 2 sts, tr in next 2 sts, htr in next 3 sts,
dc in next st, dc in ch-3 sp, ch2, live loop join,
ch1, tr in same sp as last dc, *ch1, live loop join in
next ch-1 sp on last Motif, skip next st, tr in next
st; rep from * across to end working final tr in
next ch-3 sp.
Fasten off.
Make tassel as First Motif.
CORNER MOTIFS (MAKE 4)
Corner Motifs join the strips together.
With strips lying horizontally and the chevrons
pointing down, pm in ch-sp at top of right-hand
edge.
Rounds 1-5 (RS) As Rounds 1-5 of First Motif.
Row 6 Ch3, live loop join in marked ch-sp on
any strip, ch1, tr in same sp as last dc, *ch1, live
loop join in next ch-1 sp on adjacent Motif, skip
next st, tr in next st; rep from * across working
final tr in next corner**, live loop join in final
ch-sp on adjacent motif, ch3, dc in same sp as
last tr, dc in next st, htr in next 3 sts, tr in next 2
sts, dtr in next 2 sts, ttr in next st, dtr in next 2
sts, tr in next 2 sts, htr in next 3 sts, dc in next st,
(dc, ch2, dc) in next ch-3 sp, dc in next st, htr in
next 3 sts, tr in next 2 sts, dtr in next 2 sts, ttr in
next st, dtr in next 2 sts, tr in next 2 sts, htr in
next 3 sts, dc in next st, dc in next ch-3 sp, ch3,
live loop join in bottom ch-sp on next strip to
be joined; rep from * to ** once more.
Fasten off.
Make 2 tassels as First Motif.
Make 3 more Corner Motifs to join all strips at
the corners.
TO FINISH
Using White, work a round of htr around inside
edge.
Using Coral, back stitch to the edge of the
tablecloth.
TAPESTRY HANDBAG
worked in
a spiral
The two-in-one design on Andie Viggiano’s tapestry
colourwork bag looks as fresh as a daisy
WWW.GATHERED.HOW/SIMPLYCROCHET 61
TAPESTRY HANDBAG
Carry your essentials in style with this pretty
springtime tote. Best of all, it’s worked in one
continuous spiral – no sewing required!
A IT
T IC Y
DK
WEIGHT
3.25MM
HOOK
YOU WILL NEED
QKing Cole Cottonsoft DK
(100% cotton, 100g/210m)
1 ball of each:
Yarn A Lavender (1849)
Yarn B Ecru (711)
Yarn C Coral (1574)
QA 3.25mm (US D/3) hook
QStitch markers
For yarn stockists contact
King Cole 01756 703670
www.kingcole.com
NOTES
The Tote Bag is worked in the amigurumi style.
Work continuously in a spiral without closing
off each round with a slip stitch. Stitch markers
are used to mark the start of the round and the
halfway point. These denote the two pattern
repeats, move these markers up as you work.
All stitches use the yarn under technique, this
produces a tighter stitch which sits more
vertically than a normal dc – see Abbreviations
for instructions.
Change colour on the final yrh of st before
colour change is indicated. Carry the unused
colour across the top of your sts, enclosing the
strand as you work.
TENSION
TOTE BAG
21 sts and 19 rounds measure
10x10cm (4x4in) over double
crochet using a 3.25mm hook, or
size needed to obtain correct
tension
BAG BASE
Using Yarn A, ch60.
Round 1 (RS) Dc in second ch from hook, dc in
each ch to end, turn to work in opposite side of
foundation ch, dc in each ch to end. [118 sts]
Pm in the first and 60th st, moving them up as
you work.
MEASUREMENTS
Bag measures approx 28x31cm
(11x12¼in)
ABBREVIATIONS
Yarn under technique (dc) Insert
hook in st, wrap yarn under hook
and pull through st, yarn under
hook and pull through 2 loops
For a full list, see page 78
SCAN ME
Scan this code to
find out more
about tapestry
colourwork
62 WWW.GATHERED.HOW/SIMPLYCROCHET
BAG SIDES
Carry Yarn B from the beg of round for an even
tension.
Round 2 (RS) *(Dc in next 9 sts, change to Yarn
B, dc in next st, change to Yarn A) 5 times, dc in
next 9 sts; rep from * once more.
Rounds 3-10 As Round 1.
Round 11 Change to Yarn B, dc in each st
around, change to Yarn A.
Rounds 12-20 As Round 1.
Round 21 As Round 10.
Rounds 22-30 As Round 1.
Fasten off Yarn A only.
Change to Yarn C.
Round 31 *Dc in next 10 sts, change to Yarn B,
dc in next 26 sts, change to Yarn C, dc in next 7
sts, change to Yarn B, dc in next 16 sts, change
to Yarn C; rep from * once more.
Round 32 *Dc in next 12 sts, change to Yarn B,
dc in next 24 sts, change to Yarn C, dc in next 7
sts, change to Yarn B, dc in next 16 sts, change
to Yarn C; rep from * once more.
Round 33 *Dc in next 3 sts, change to Yarn B,
dc in next st, change to Yarn C, dc in next 8 sts,
change to Yarn B, dc in next 21 sts, change to
Yarn C, dc in next 13 sts, change to Yarn B, dc in
next 13 sts, change to Yarn C; rep from * once
more.
Round 34 *Dc in next 2 sts, change to Yarn B,
dc in next 3 sts, change to Yarn C, dc in next 7
sts, change to Yarn B, dc in next 19 sts, change
to Yarn C, dc in next 17 sts, change to Yarn B, dc
in next 11 sts, change to Yarn C; rep from * once
more.
The yarn under technique creates a textured
stitch pattern that’s perfect for colourwork
To work handles, chain 23 stitches and skip
23 stitches before continuing the round
Round 35 *Dc in first st, change to Yarn B, dc in
next 5 sts, change to Yarn C, dc in next 5 sts,
change to Yarn B, dc in next 20 sts, change to
Yarn C, dc in next 8 sts, change to Yarn B, dc in
next st, change to Yarn C, dc in next 8 sts,
change to Yarn B, dc in next 11 sts, change to
Yarn C; rep from * once more.
Round 36 *Dc in first 2 sts, change to Yarn B, dc
in next 3 sts, change to Yarn C, dc in next 4 sts,
change to Yarn B, dc in next 22 sts, change to
Yarn C, dc in next 7 sts, change to Yarn B, dc in
next 3 sts, change to Yarn C, dc in next 7 sts,
change to Yarn B, dc in next 11 sts, change to
Yarn C; rep from * once more.
Round 37 *Dc in first 3 sts, change to Yarn B, dc
in next st, change to Yarn C, dc in next 7 sts,
change to Yarn B, dc in next 21 sts, change to
Yarn C, dc in next 5 sts, change to Yarn B, dc in
next 5 sts, change to Yarn C, dc in next 5 sts,
change to Yarn B, dc in next 12 sts, change to
Yarn C; rep from * once more.
TAPESTRY HANDBAG
Round 38 *Dc in first 12 sts, change to Yarn B,
dc in next 6 sts, change to Yarn C, dc in next 5
sts, change to Yarn B, dc in next 11 sts, change
to Yarn C, dc in next 4 sts, change to Yarn B, dc
in next 3 sts, change to Yarn C, dc in next 4 sts,
change to Yarn B, dc in next 14 sts, change to
Yarn C; rep from * once more.
Round 39 *Dc in first 12 sts, change to Yarn B,
dc in next 5 sts, change to Yarn C, dc in next 7
sts, change to Yarn B, dc in next 8 sts, change to
Yarn C, dc in next 7 sts, change to Yarn B, dc in
next st, change to Yarn C, dc in next 7 sts,
change to Yarn B, dc in next 12 sts, change to
Yarn C; rep from * once more.
Round 40 *Dc in first 11 sts, change to Yarn B,
dc in next 6 sts, change to Yarn C, dc in next 7
sts, change to Yarn B, dc in next 7 sts, change to
Yarn C, dc in next 17 sts, change to Yarn B, dc in
next 11 sts, change to Yarn C; rep from * once
more.
Round 41 *Dc in first 7 sts, change to Yarn B, dc
in next 7 sts, change to Yarn C, dc in next 13 sts,
change to Yarn B, dc in next 4 sts, change to
Yarn C, dc in next 17 sts, change to Yarn B, dc in
next 11 sts, change to Yarn C; rep from * once
more.
Round 42 *Dc in first 7 sts, change to Yarn B, dc
in next 5 sts, change to Yarn C, dc in next 17 sts,
change to Yarn B, dc in next 3 sts, change to
Yarn C, dc in next 15 sts, change to Yarn B, dc in
next 4 sts, change to Yarn C, dc in next 5 sts,
change to Yarn B, dc in next 3 sts, change to
Yarn C; rep from * once more omitting final
colour change.
Round 43 *Change to Yarn B, dc in first st,
change to Yarn C, dc in next 5 sts, change to
Yarn B, dc in next 6 sts, change to Yarn C, dc in
next 8 sts, change to Yarn B, dc in next st,
change to Yarn C, dc in next 8 sts, (change to
Yarn B, dc in next 7 sts, change to Yarn C, dc in
next 7 sts) twice, change to Yarn B, dc in next 2
sts; rep from * once more.
Round 44 *Dc in first 12 sts, change to Yarn C,
dc in next 7 sts, change to Yarn B, dc in next 3
sts, (change to Yarn C, dc in next 7 sts, change
to Yarn B, dc in next 7 sts) twice, change to Yarn
C, dc in next 7 sts, change to Yarn B, dc in next 2
sts; rep from * once more.
Round 45 *Dc in first 13 sts, change to Yarn C,
dc in next 5 sts, change to Yarn B, dc in next 5
sts, change to Yarn C, dc in next 5 sts, change to
Yarn B, dc in next 9 sts, change to Yarn C, dc in
next 5 sts, change to Yarn B, dc in next 5 sts,
change to Yarn C, dc in next 11 sts, change to
Yarn B, dc in next st; rep from * once more.
Round 46 *Dc in first 15 sts, change to Yarn C,
dc in next 4 sts, change to Yarn B, dc in next 3
sts, change to Yarn C, dc in next 4 sts, change to
Yarn B, dc in next 19 sts, change to Yarn C, dc in
next 13 sts, change to Yarn B, dc in next st; rep
from * once more.
Round 47 *Dc in first 13 sts, change to Yarn C,
dc in next 7 sts, change to Yarn B, dc in next st,
change to Yarn C, dc in next 7 sts, change to
Yarn B, dc in next 17 sts, change to Yarn C, dc in
next 8 sts, change to Yarn B, dc in next st,
change to Yarn C, dc in next 4 sts, change to
Yarn B, dc in next st; rep from * once more.
Round 48 *Dc in first 12 sts, change to Yarn C,
dc in next 17 sts, change to Yarn B, dc in next 16
sts, change to Yarn C, dc in next 7 sts, change to
Yarn B, dc in next 3 sts, change to Yarn C, dc in
next 3 sts, change to Yarn B, dc in next st; rep
from * once more.
Round 49 *Dc in first 12 sts, change to Yarn C,
dc in next 17 sts, change to Yarn B, dc in next 17
sts, change to Yarn C, dc in next 5 sts, change to
Yarn B, dc in next 5 sts, change to Yarn C, dc in
next 2 sts, change to Yarn B, dc in next st; rep
from * once more.
Round 50 *Dc in first 13 sts, change to Yarn C,
dc in next 15 sts, change to Yarn B, dc in next 20
sts, change to Yarn C, dc in next 4 sts, change to
Yarn B, dc in next 3 sts, change to Yarn C, dc in
next 3 sts, change to Yarn B, dc in next st; rep
from * once more.
Round 51 *Dc in first st, change to Yarn C, dc in
next 5 sts, change to Yarn B, dc in next 11 sts,
change to Yarn C, dc in next 7 sts, change to
Yarn B, dc in next 22 sts, change to Yarn C, dc in
next 7 sts, change to Yarn B, dc in next st,
change to Yarn C, dc in next 4 sts, change to
Yarn B, dc in next st; rep from * once more.
Round 52 *Change to Yarn C, dc in first 7 sts,
change to Yarn B, dc in next 10 sts, change to
Yarn C, dc in next 7 sts, change to Yarn B, dc in
next 21 sts, change to Yarn C, dc in next 13 sts,
change to Yarn B, dc in next st; rep from * once
more.
Round 53 *Change to Yarn C, dc in first 7 sts,
change to Yarn B, dc in next 11 sts, change to
Yarn C, dc in next 5 sts, change to Yarn B, dc in
next 22 sts, change to Yarn C, dc in next 13 sts,
change to Yarn B, dc in next st; rep from * once
more.
Round 54 *Change to Yarn C, dc in first 10 sts,
change to Yarn B, dc in next 36 sts, change to
Yarn C, dc in next 12 sts, change to Yarn B, dc in
next st; rep from * once more.
Round 55 *Change to Yarn C, dc in first 12 sts,
change to Yarn B, dc in next 5 sts, ch23, skip 23
sts, dc in next 10 sts, change to Yarn C, dc in
next 7 sts, change to Yarn B, dc in next 2 sts; rep
from * once more.
Round 56 *Change to Yarn C, dc in first 3 sts,
change to Yarn B, dc in next st, change to Yarn
C, dc in next 8 sts, change to Yarn B, dc in next
38 sts/chs, change to Yarn C, dc in next 7 sts,
change to Yarn B, dc in next 2 sts; rep from *
once more.
Round 57 *Change to Yarn C, dc in first 2 sts,
change to Yarn B, dc in next 3 sts, change to
Yarn C, dc in next 7 sts, change to Yarn B, dc in
next 39 sts, change to Yarn C, dc in next 5 sts,
change to Yarn B, dc in next 3 sts; rep from *
once more.
Working in the round along both sides of
a foundation chain = no seams!
Round 57 *Change to Yarn C, dc in first st,
change to Yarn B, dc in next 5 sts, change to
Yarn C, dc in next 5 sts, change to Yarn B, dc in
next 48 sts; rep from * once more, ss in beg dc.
Fasten off.
TO FINISH
Weave in all ends.
Block the Bag to the measurements listed.
WWW.GATHERED.HOW/SIMPLYCROCHET 63
Delft blue
Fiona Kirk’s geometric cushion evokes an
image of elegant, traditional Dutch pottery
Overlay
mosaic
technique
OVERLAY MOSAIC CUSHION
These overlapping geometric shapes give
your cushion an almost three-dimensional
effect. It feels traditional yet ever so modern!
DK
WEIGHT
3MM
HOOK
YOU WILL NEED
QPaintbox Yarns Simply DK
(100% acrylic, 100g/276m)
1 ball of each:
Yarn A Misty Grey (103)
Yarn B Rich Teal (064)
QA 3mm (US C/2 or D/3) hook
QA cushion cover, 40x40cm
For yarn stockists contact
LoveCrafts 01409 404010
www.lovecrafts.com
TENSION
Tension is not critical, but it may
affect the yarn quantities required
NOTES
The Panel is worked in the overlay mosaic
technique and sewn to the front of a plain
cushion cover at the end.
Work with RS facing throughout. Fasten off at
the end of each row and join the next colour in
the first st of the row.
There is a Chart on page 81, which you will
need to refer to when working the motifs. Each
plain small square represents 1dc worked in the
bl. Each x represents a tr2d (see Abbreviations).
One colour only is used on each row and is
shown by the colour of the first and last st.
Where a second colour appears in the row it is
worked as a tr2d on the next row in that colour.
The first few rows of the Chart have been
written out to guide you.
CUSHION COVER
MEASUREMENTS
Panel measures 40x40cm
(15¾x15¾in)
ABBREVIATIONS
standing dc Place slip knot on
hook, insert hook in st/sp indicated,
yrh and pull up a loop, yrh and pull
through 2 loops on hook
tr2d tr in fl of st 2 rows below
For a full list, see page 78
SCAN ME
Scan this code to
learn more
about overlay
mosaic crochet
PANEL
Using Yarn A, ch84.
Row 1 (RS) Dc in bl of second ch from hook and
each ch across. [83 sts]
Fasten off.
Join Yarn B in first st with a standing dc.
Row 2 Dc in bl of each st to final st, dc in final st.
Fasten off.
Join Yarn A in first st with a standing dc.
Row 3 Tr2d in each st across to final st, dc in
final st.
Fasten off.
Join Yarn B in first st with a standing dc.
Row 4 As Row 2.
Fasten off.
Join Yarn A in first st with a standing dc.
Row 5 Tr2d in next 29 sts, dc in bl of next 5 sts,
tr2d in next 3 sts, dc in bl of next 7 sts, tr2d in
next 3 sts, dc in bl of next 5 sts, tr2d in next 29
sts, dc in final st.
Fasten off.
Although it gives the illusion of being worked
in the round, this project is worked in rows
Join Yarn B in first st with a standing dc.
Row 6 Dc in bl of next 29 sts, (tr2d in next st, dc
in bl of next 3 sts) twice, tr2d in next st, dc in bl
of next 5 sts, (tr2d in next st, dc in bl of next 3
sts) twice, tr2d in next st, dc in bl of next 29 sts,
dc in final st.
Fasten off.
Join Yarn A in first st with a standing dc.
Rows 7-81 Cont in patt set, referring to the
Chart as you work.
Fasten off.
TO FINISH
Weave in all ends and block to measurements
listed.
Using Misty Grey, sew the Panel to the front of a
plain cushion cover.
SIMPLE STEPS HOW TO WORK IN THE BL OF YOUR FOUNDATION CH
1 Make a chain to the desired
length. The chain has 3 loops:
top, back and bottom. In this
example we’ve marked the
back loop.
2 For a dc stitch, skip the first
ch and insert your hook
through the back loop only on
the second ch from hook. Yrh
and pull up a loop.
3 Yrh and pull through 2 loops
on hook. Continue working
dc stitches in each bl across.
4 Working in the back loop
leaves the 2 remaining loops
sitting at the base of your
work.
WWW.GATHERED.HOW/SIMPLYCROCHET 65
yarn
wss
Reevviieew
R
02
01
L is for . . .
Lacy makes
Flowy, luxurious and graceful – lacy projects always
catch our eye, especially if they’re made in a lovely yarn
03
04
Jo
alphabinetoCurA
L!
06
05
‘L’ PATTERN
Ch8.
ROW 1 Dc in second ch from hook,
dc in each ch across, turn. [7 dc]
66 WWW.GATHERED.HOW/SIMPLYCROCHET
ROW 2 Ch4, dc in second ch from
hook, dc in next 2 ch, ss to last dc
from Row 1.
FASTEN OFF and weave in ends.
The leftover yarns from this yarn review
will be donated to Knit for Peace. Learn
more at www.knitforpeace.org.uk and
go to www.gathered.how for more yarn
donation ideas.
YARN REVIEWS
DROPS
ANCHOR
kid-silk
Baby pure Cotton
WEIGHT Lace
CONTENT 75% mohair, 25% silk
BALL 25g/210m
HOOK 3.5mm
RRP £4.60
WEIGHT 4ply
CONTENT 100% cotton
BALL 50g/165m
HOOK 3mm
RRP £3.69
As soft and as light as cloud, this
yarn will make you feel like
you’re crocheting with air! Just
use a larger hook than you
usually would for a lace-weight
yarn, as the halo makes the yarn
thicker. With a larger hook, your
lace fabric will also work up
more quickly, which is great for
01
garments. As you’d expect with
mohair, the stitch definition is
beautifully hazy. Bonus: this
particular mohair yarn barely
sheds! There are 52 colours in
the range – combine with other
yarns to add fluff to any project.
Handwash at 30˚C and dry flat.
www.garnstudio.com
This yarn is gentle enough for
sensitive newborn skin, making it
perfect for special lacy creations
to celebrate a precious new life.
Whether you’re making a
christening outfit or a filet-lace
cardigan, this is a great yarn to
use as it’s hypoallergenic,
saliva-resistant and machine
02
washable at 60°C. The cotton
fibres are combed rather than
mercerised, which makes it a joy
to hook as it flows easily through
your hands, without splitting, to
create a fabric with clear stitch
definition. Choose from 36 solid
colours or six marl shades.
www.anchorcrafts.com
STYLECRAFT
EDEN COTTAGE YARNS
Grace
titus lace
WEIGHT Aran
CONTENT 85% acrylic, 10% mohair,
5% wool
BALL 100g/295m
HOOK 4-6mm
RRP £4.99
03
WEIGHT Lace
CONTENT 75% superwash superfine
Merino wool, 25% mulberry silk
BALL 100g/800m
HOOK 2.5-4mm
RRP £24
04
Soft and stylish, Grace is as easy
to hook as a standard acrylic
yarn, but the finished fabric has
a snuggly, furry finish. The aran
thickness makes it a great
choice for speedy lace cardigans
and other elegant garments. But
don’t stop there – the light,
warm feel and barely-there
stitch definition makes this
a great all-rounder for all sorts
of cosy projects, from scarves to
gloves. There are 12 trendy
jewel tones available, including
pinks, oranges, greens and
blues. It’s machine washable at
30˚C. Tumble dry on cool.
www.stylecraft-yarns.co.uk
Everything about this yarn
shouts quality, making it ideal
for a special lace scarf or cardi
that you’ll want next to your
skin every day. It feels dreamy to
hook with and has a loose twist
that adds texture to the
fabulous stitch definition. The
blend of wool and silk makes it
shiny and strong, yet also soft
and squashy. The mulesing-free
wool has been treated to make
it ‘superwash’ so it’s machine
washable at 30˚C (but handwashing is best). Dry flat.
Colours are hand-dyed in small
batches so the shades may vary.
www.edencottageyarns.co.uk
WEST YORKSHIRE SPINNERS
JAMES C BRETT
Exquisite lace
Shhh
WEIGHT Lace
CONTENT 80% Falklands wool,
20% mulberry silk
BALL 100g/800m
HOOK 2.75mm
RRP £17.99
WEIGHT DK
CONTENT 80% acrylic, 20% wool
BALL 100g/550m
HOOK 4mm
RRP £3.99
‘Wow’ is the only way to
describe this yarn! The luxurious
blend of wool and silk takes the
feel beyond soft and into
heavenly. It has a loose twist
and a subtle fuzz, which gives it
natural warmth and bounce.
A little goes a long way, so it’s
perfect for a lace shawl or wrap.
05
The finished stitch definition
and drape are both beautiful, as
you’d expect from a fine yarn
– and there’s also a 4ply version.
Choose from 18 shades and
wind it into a ball before you use
it. Hand wash at 30˚C and air dry,
reshaping while damp.
www.wyspinners.com
This feathery yarn’s mix of
acrylic and wool has fluffy
goodness on the outside of the
strands, giving it a delightful
brushed quality. Combine the
ultra-soft feel with a choice of 18
dreamy variegated colourways
and it’s hard to resist! Each ball
changes to a new shade
06
gradually, making it ideal for
lacy granny square makes and
cosy shawls – but be warned,
you won’t want to stop hooking!
Whatever you make will have
subtle stitch definition and
a gentle touch. Machine wash at
30˚C, and don’t tumble dry.
www.jamescbrett.co.uk
WWW.GATHERED.HOW/SIMPLYCROCHET 67
Join our gang of Treble Makers and share your thoughts and makes with us,
for a chance to be featured here, use our hashtag #Sctreblemaker
SIMPLY
THE VEST
For her very first
granny square
project, Liz Ridgway
chose the cover
project from issue
139 – a stylish vest
designed by Cassie
Ward. “I swapped
out your chunky
wool for an acrylic
alternative from
Hobbycraft, et voila!”
she says. “I’m super
happy with the
result.” It looks
fantastic, Liz! We
love the colours.
on the
throne
Janet Gardener got creative with this blanket
from issue 131 by using it to cover her husband’s
favourite chair. The neat graphic lines look so chic
next to the rich leather on the arms and wings.
We’re sure Janet’s husband was thrilled with his
seat’s new look. Way to be innovative, Janet!
A DIFFERENT DIRECTION
Using the bag base and mosaic bag pattern from
issue 145, hookster Diane Smith created something
entirely her own. “I changed the pattern slightly,
but it’s still mosaic,” explains Diane. “I have loved
making my bag.” She also chose her own
colourway, substituting pink for black. She ended
up with a fashionable-looking bag. Very nice!
ExcLuSivEly
for
SubScRibErS!
68 WWW.GATHERED.HOW/SIMPLYCROCHET
U L TA
We’ve been double tapping on
Instagram and admiring your makes.
Tag us @simplycrochetmag and use
the hashtag #SCtreblemaker
SHELL STITCH
Sharon Belfiend, aka
@daisyloopscrochet,
loved making the
ammonite clutch bag
from issue 144. She
switched up the yarn
used for the project,
and it looks great!
FOREST FOR TREES
This Christmas tree
blanket was the first
mosaic crochet
project that Clare
Collick, aka
@stitchtherapy1981,
ever completed. What
an accomplishment!
LITTLE SCAMP
Looks like Baby Smurf
is after Gargamel this
time! Margie
Elisabeth, aka
@margieelisabeths
world, hooked Baby
Smurf from our 2024
calendar in issue 142.
ALL MY LOVING
Lesley Lockett, aka
@bitsandbobs
crochett, hooked up
our love bug from
issue 145 in time for
Valentine’s Day this
year. We love this
sweet finish, Lesley!
SUBS STARS!
Check your issue next month to see if you’re a winner! Every month, three subscribers win a prize as a thank
you for their loyalty to Simply Crochet. This month, the winners (below) will each receive a copy of Kat Goldin’s
book Hook, Stitch & Give, worth £14.99! You’ll find the perfect gifts for any occasion inside. Enjoy!
Annabella McKenna, Oxfordshire Our Media Limited, publishers of Simply Crochet, Subs Stars giveaway Terms and Conditions. Prizes were
Charli Hadden, Gloucestershire
dispatched before the on sale date of this issue. There are no cash alternatives. Three winning entries will be
chosen at random from all current subscribers. The draw is final, and no correspondence will be entered into.
Joanne Atkins, Norfolk County
@ SIMPLYCROCHET
LET IT GROW
Hookster Martine Cole recently
finished this flower blanket from
issue 138. She enjoyed making this
pattern so much that she made
315 motifs instead of the pattern’s
original 169! The end result looks
like a whole field of wildflowers.
Well done, Martine – you’ve done
beautiful work. We wonder if you
have any other motif or floral
projects lined up!
ALWAYS
WITH YOU
For Debbie Cooney, this Elmer toy
from issue 138 was a meaningful make.
Though she’s fairly new to crochet, she
tried her hand at this complex project
for her granddaughter. Debbie had
recently lost both her parents, so
she used their pillows to stuff
the toy. How touching!
T is
If you’re looking to socialise
with like-minded crocheters,
then make sure you join our
SCtreblemakers Facebook
group – the place to share
pictures of your makes, get
pattern recommendations
and advice, and generally talk
about how much you love
Simply Crochet magazine.
With over 6.7k members, it’s
a bustling crochet forum full
of friendly fellow hooksters.
We look forward to chatting
with you on there!
...
s
n
JOIN US ONLINE!
S/YA N S
C A ITY S
C AIN C AFT S
21
L CAL YA N S
2
47
NLIN
A S
Where do you buy
your yarn?
TALK TO US!
takE 1,000s
Of paTternS
WhereveR
You go!
*
Search for Simply
Crochet on your
chosen app store
Available on Apple,
Google Play, Zinio and Nook
iPad is a trademark of Apple Inc., registered
in the U.S. and other countries. App Store is a
service mark of Apple Inc. NOOK is a registered
trademark of Barnes & Noble, Inc. NOOK Tablet
is a trademark of Barnes & Noble Inc. *Free trial
is for new users on annual subscriptions only.
Cancel at any point during the trial to avoid
being charged. Free trial not available on Zinio.
Post a pic on our Facebook page
facebook.com/simplycrochetmag
Tweet us @SimplyCrochet_
twitter.com/SimplyCrochet_
Add to our Finished Projects board
ravelry.com/groups/simply-crochet
Use the hashtag #SCtreblemaker
instagram.com/simplycrochetmag
Email us at:
simplycrochet@ourmedia.co.uk
*
g
a
crochet
avveelllleed
nrra
Un
ith
Becky Skuse
how can i felt my fabric?
Brush up on your technique with our simple guide...
Felting is a magical way to transform fluffy
wool into a thick mat of fibres – many of us
discover it by accident when we shrink
a woollen make in the wash! But did you
know that there are different ways to ‘felt’
your wool on purpose?
There’s wet felting, which involves
placing the wool in hot soapy water (in
a bowl or a washing machine) to make it
felt. Tumble dryer felting is a variation of
this, where you place the wet wool project
in your tumble dryer to felt it. Then there’s
dry felting, or needle felting, where you
use a sharp needle to entangle specific
fibres and mat them together.
Each method is useful for different
purposes, ranging from purses and bags
to toy faces and decorations. The secret to
all felting is the animal fibres in your yarn.
They have cuticles or scales along the
length, and when they’re subjected to
heat and/or agitation, the fibres get closer
and the cuticles can lock together. Read on
for a brief overview of each technique...
What’s needle felting?
Needle felting or dry felting is a fab way to decorate your
crochet fabric – you can fuse a felt shape or motif straight onto
it without sewing. You need to use special supplies and
a stabbing motion to tangle the fibres together. Here’s how:
Step 1 First, get some needle-felting needles – they come in
different shapes and sizes or gauges, which are good for
different jobs. Up close, they have tiny barbs along the sharp
edges to push the fibres together. Start with a size 36 triangular.
You can use it on its own or use several within a larger handle.
Step 2 You also need wool roving, sometimes called tops,
which is a wool where all the fibres run in the same direction
(horizontally here). You can also use batting, where the wool
fibres run in different directions. Carefully pull a small piece of
01
70 WWW.GATHERED.HOW/SIMPLYCROCHET
02
roving off a larger piece – never cut it! Use your hands to
gently form it into the shape you want, such as a circle.
Step 3 Place your crochet fabric onto a foam felting block or
a felting pad with bristles to protect your work surface.
Position the shaped roving on top. Put on protective gloves or
finger protectors for safety. Use the needle to stab the roving
shape near the edge, moving the needle in and out at the
same angle so you don’t break it. Stab gently but firmly,
through the shape and into the crochet fabric.
Step 4 Continue to stab around the shape until the fibres are fused
as much as you want – it will shrink quite a lot. Add more layers
if you want to. Some fibres will naturally emerge on the other side
of the crochet fabric, but you can stab them back through.
03
04
Find out more about Becky at makemedo.wordpress.com
Stab your way to felted fabrics...
a
What’s wet felting?
Create magic with hot water...
Wet felting involves crocheting an item and then washing it to
felt the fibres together. Here’s how:
Step 1 Crochet a small swatch or project using a feltable yarn
made of 100% animal fibres, such as wool or alpaca. Avoid
a ‘superwash’ wool because these are treated to resist felting.
Most stitch definition disappears during felting, so stick to
simple stitches. Weave in ends and work any seaming
before felting.
Step 2 To wet felt by hand, fill a bowl with hot water and
a little hand or dish soap. Put on rubber gloves, then soak your
fabric for ten minutes. Now rub, rub, rub the fabric until the
fibres mat together and it’s the size you want.
Step 3 To wet felt in a washing machine, place your dry fabric
in a mesh bag or pillowcase inside your machine. Add a mild
01
02
detergent and some old towels to increase agitation. Set it to
a 40˚C wash, but without a rinse or spin. Check on the fabric
after 10 minutes. Put it back in the machine for a few minutes,
then check again. Repeat until it’s the size you want.
Step 4 When you’re happy with the fabric, rinse in cold water to
‘set’ the fibres. Place onto a towel and roll up to squeeze out excess
water. Block if needed and leave to dry.
Note When the fibres mat together into felt, the fabric shrinks.
(This process is actually called fulling, but felting is the
umbrella term that tends to be used more.) The ‘shrink factor’
is important with projects where finished size is important,
like slippers. If you’re planning a project, make a swatch (and
note how you made it), then felt it and write down exactly
what you did so you can reproduce the results for your project.
03
04
11cm
13cm
13cm
10cm
What’s tumble dryer felting?
Try this simple felting shortcut...
Using your tumble dryer is a quick and easy variation on the
above that involves less rubbing...
Step 1 Crochet a fabric as in Step 1 above. Soak it in a bowl of
warm, soapy water for five minutes.
Step 2 Place in an old pillowcase, secure with a safety pin and
place in your tumble dryer. Add two old, damp cotton bath
towels – these will help to rub the fibres together. Set your
dryer to a high heat and start it – set a timer for 20 minutes
while you relax! (Avoid using the last 10 minutes of the dryer’s
01
02
timer, which are usually cool.)
Step 3 Check your fabric after 20 minutes. If it needs more
felting, dunk it in soapy water again and rub it if you want to.
Pop it back in the pouch and into your tumble dryer with the
old towels – dampen the towels if needed. Let it run on a high
heat for 20 minutes again.
Step 4 Repeat Step 3, until your piece has felted as much as you
want. If you’re aiming for a certain size, stop felting when you get
there. Finish off as in Step 4 above.
03
04
6.5cm
8.5cm
7.5cm
6cm
Let Becky solve your hooky conundrums!
Crochet Unravelled aims to dive deep into the techniques, tutorials and terminology that
will make you a better hookster. Have you got a question you want Becky to unravel?
Send it in to us at simplycrochet@ourmedia.co.uk
Don’t miss the next
workshop…
I’ll talk about adding
character to your
amigurumi!
WWW.GATHERED.HOW/SIMPLYCROCHET 71
C
coquette collection
plaid tank top
amigurumi scarecrow
slavic-style cushion
spring lace cowl
Easy coloeur
chang
technique
pocket organisers
flamingo bag
wide-neck cardigan
zuri the zebra toy
striped blanket
diamond scarf
& much more
u
o
r
o
f
t
s
u
* Contents subject to change
PROJECTS TO HOOK FOR
FOUR-LEGGED FRIENDS!
The home of
Learn
something
new with
Boost your skills with…
• FREE how to guides and expert advice
• FREE video tutorials that help you every step
• FREE craft classes
• FREE seasonal patterns
www.gathered.how
YOUR GUIDE
SCAN ME
Learn more online!
Crochet essentials
Over the next few pages, you’ll find simple step-by-step guides to many useful
stitches and techniques that you’ll use every time you pick up a hook
HOLDING THE HOOK
HOLDING THE YARN
Try these methods and see which works best
Even tension results in even stitches
PENCIL METHOD
Hold the hook like a pencil, in
your right hand (if you’re
right-handed), about 3-5cm
from the hooked end. If your
hook has a flat area, you’ll find it
comfortable to hold it here.
KNIFE METHOD
Hold the hook between your
thumb and forefinger, about
3-5cm from the hooked end,
resting the end of the hook
against your palm. This will
give you lots of control.
METHOD ONE
Pass the ball end of the yarn
between the little finger and
third fingers of your left hand
(if you are right-handed), then
behind the third and middle
fingers, over your index finger.
METHOD TWO
Loop the ball end of the yarn
loosely around the little finger
of your left hand, then take it
over the third finger, behind
the middle finger and over
your index finger.
3 Catch the ball end of the
yarn with the hook and pull it
back through the centre of the
loop, taking the yarn through
with it.
4 Pull both ends of the yarn to
tighten the knot, then pull just
the ball end to tighten the
loop so it’s close to the hook,
but not touching it.
MAKING A SLIPKNOT The first loop on the hook
1 Hold the tail of the ball of
yarn in your left hand and
drape the yarn clockwise over
the top of it to form a loose,
circular loop.
2 Hold the loop between left
thumb and forefinger, then
insert the crochet hook
through the centre of the loop
from front to back.
CHAIN STITCH Use this stitch to make your foundation chain
How to count chains
1
9
1 Hold the hook in your right
hand, and both the yarn end
and the working yarn in your
left hand. Move the hook under
and over the yarn to wrap it
around anticlockwise.
2 Pull the hook towards the
slipknot, catching the yarn in
the hook, and pulling it through
the slipknot loop. This forms
your first chain (ch) stitch.
Repeat steps 1 and 2 to form
a chain length.
3 This is what your row of
chains will look like. Hold the
chain with your left hand near
the hook, to keep the tension.
Keep going until you have the
number of chains that’s stated
in your pattern.
8
7
6
5
4
3
2
Each chain or loop counts as
one stitch. Never count your
first slipknot or the loop on
the hook (called the working
loop). So that you can be
accurate, make sure the
chain is not twisted and that
the front is facing you.
WWW.GATHERED.HOW/SIMPLYCROCHET 75
YOUR GUIDE
SLIP STITCH (ss)
This stitch has no height – often used to join rounds
1 You can make a slip stitch in
any chain or stitch, to join it to
the working loop on the hook.
To make a slip stitch, simply
insert the hook into the stitch
indicated, from front to back.
2 Catch the ball end of the
yarn with the hook, so the
yarn wraps anticlockwise
around it (yarn round hook,
or yrh).
3 Gently pull the hook, and
the yarn wrapped around it,
back towards the 2 loops on
the hook. Draw the yarn
through both the loops on
the hook.
4 This will finish the stitch and
you’ll see how the slip stitch
has joined the working loop
to the chain or stitch you
inserted the hook into. You
can also use slip stitch to form
a neat edging.
DOUBLE CROCHET (dc) US term: single crochet
One of the key stitches in crochet, doubles are simple, compact stitches that form a dense fabric
1 To make a double crochet
stitch, insert the hook under
the top 2 loops of the next
stitch on the previous row.
2 Wind the yarn around the
hook (yrh).
3 Pull the yarn through the
stitch, giving you 2 loops on
your crochet hook.
4 Yarn round hook again, then
pull the yarn through both
loops. There’s your double
crochet made and you’ll have
one loop left on the hook,
ready to do the next stitch.
HALF TREBLE CROCHET (htr) US term: half double crochet
A handy stitch that’s between double and treble crochet in size, and it looks slightly looser than double crochet
1 To make a half treble crochet
stitch, work to where you
want the htr and then wind
the yarn round the hook (yrh).
76 WWW.GATHERED.HOW/SIMPLYCROCHET
2 Insert the hook under the
top 2 loops of the next stitch
in the previous row. Wrap yarn
around the hook again (yrh).
3 Pull the yarn through the
stitch only (3 loops on hook).
4 Yarn round hook again, pull
the yarn through all 3 loops.
You’ve made a half treble
crochet. Continue working htr
into next and following sts to
the end of the row.
YOUR GUIDE
TREBLE CROCHET (tr) US term: double crochet
One of the most popular stitches in crochet, this simple stitch is twice as high as a double crochet stitch
1 To work a treble crochet,
start by winding yrh and then
insert the hook under the top
2 loops of the stitch on the
previous row.
2 Wrap the yarn around the
hook (yrh) and pull the yarn
through the stitch only.
3 You will now have 3 loops on
the hook. Yrh again, and draw
the yarn through just the first
2 loops on the hook.
4 You will now have 2 loops
on the hook. Yrh again and
draw the yarn through the
remaining loops on the
hook. Your treble crochet
is complete.
WORKING IN ROWS
WORKING STITCHES INTO A RING
Follow these simple rules to construct crochet fabric
To make circles, tubes and other shapes
1 The first row is made by
working across the
foundation chain from right to
left. At the end of the chain or
row, turn the work so that the
yarn is behind the hook.
1 Make a foundation ring and
work the t-ch (3ch for treble
sts). Work a treble st as usual,
but insert hook into centre of
ring. For treble sts, yrh, insert
hook into ring.
2 For the next row, first make
the turning chain for the stitch
you’re about to work (see
opposite). Now work the next
stitch into the top of the
stitches on your first row,
missing the first stitch.
DOUBLE TREBLE CROCHET (dtr)
US term: treble crochet
This is a stitch regularly used
as an elongated version of the
treble (described above). It’s
worked in a very similar way to
the treble, as follows:
1 Make a foundation chain. Skip
4ch, *yrh twice, and insert the
hook under the top loop of the
next ch.
2 Yrh, pull the yarn through the
ch loop only (4 loops on hook).
3 Yrh and pull the yarn through
2 loops only (3 loops on hook).
Yrh and pull the yarn through
2 loops only (2 loops on hook).
4 Yrh and pull the yarn through
the remaining 2 loops. Repeat
from * to make more dtr sts.
5 To make the next row of dtr,
turn work and ch4. This turning
chain counts as the first dtr in
a new row. Skip first st at the
base of the t-ch, work 1dtr under
the top 2 loops of the second
stitch in the previous row;
continue to the end of the row.
2 Finish the treble, as usual
(yrh, pull yarn through ring,
yrh, pull yarn through first
2 loops, yrh, pull yarn through
2 loops). Work more sts into
the ring as needed.
TRIPLE TREBLE CROCHET (ttr)
US term: double treble crochet
This is one of the longest
standard crochet stitches and is
mainly used in fancy stitch
patterns. It’s taller than a double
treble crochet stitch (described
left) and is worked in a very
similar way, as follows:
1 Make a foundation ch. Skip
5 ch, *yrh 3 times, insert hook
under top loop of next ch.
2 Yrh, pull yarn through ch loop
only (5 loops on hook).
3 † Yrh, draw loop through
2 loops only. Repeat from †
3 times more and your triple
treble will be finished. Repeat
from * to make more ttr sts.
4 To make the next row, turn
work and ch5. This turning chain
counts as the first triple treble in
a new row. Skip first st at base of
the t-ch. Work 1 triple treble,
inserting hook under the top
2 loops of the second st in the
previous row; continue to the
end of the row.
WWW.GATHERED.HOW/SIMPLYCROCHET 77
YOUR GUIDE
Crochet hook conversions
Abbreviations
across
approx
beg
bl
to end of the row
approximate(ly)
beginning
insert hook under
back loop only
Back Post:
work st indicated,
inserting hook around
post of st from back to
front to back and not
in top of st
chain/chain stitch(es)
refers to ch made
previously, eg. ch-3
chain space(s)
clusters
continue
double crochet
(insert hook in next st,
yrh & draw a loop
through) twice, yrh &
draw through all
3 loops on hook
decrease
double treble crochet
work 2dtr together
foundation dc
insert hook under
front loop only
following/follows
Front Post: As BP,
inserting hook around
post from front to
back to front
foundation tr
half treble
work 2htr together
sts to be worked into
the same stitch
increase
left hand
loop(s)
BP
ch(s)
chch-sp(s)
cl(s)
cont
dc
dc2tog
dec
dtr
dtr2tog
fdc
fl
foll/folls
FP
ftr
htr
htr2tog
in next
inc
LH
lp(s)
meas
patt(s)
pm
prev
qtr
rem
rep
RH
rnd(s)
RS
sk
sp(s)
ss
st(s)
t-ch(s)
tog
tr
tr cl
tr2tog
ttr
WS
yrh
*
()
UK/US conversions
UK
UK
METRIC
US
14
2mm
–
13
2.25mm
B/1
12
2.5mm
–
–
2.75mm
C/2
11
3mm
–
10
3.25mm
D/3
9
3.5mm
E/4
–
3.75mm
F/5
8
4mm
G/6
7
4.5mm
7
6
5mm
H/8
5
5.5mm
I/9
4
6mm
J/10
3
6.5mm
K/10½
2
7mm
–
0
8mm
L/11
00
9mm
M/13
000
10mm
N/15
Which hook do I use?
Hook size
UK yarn weight
2.5-3.5mm hook
4ply yarn
3.5-4.5mm hook
double knitting yarn
5-6mm hook
aran yarn
7mm and bigger
chunky yarn
Learn more on
our website
US
chain
ch
chain
ch
slip stitch
ss
slip stitch
ss
double crochet
dc
single crochet
sc
half treble
htr
half double
hdc
treble
tr
double
dc
double treble
dtr
treble
tr
triple treble
ttr
double treble
dtr
78 WWW.GATHERED.HOW/SIMPLYCROCHET
measures
pattern(s)
place marker
previous
quadruple treble
remain(s)/remaining
repeat
right hand
round(s)
right side
skip
space(s)
slip stitch
stitch(es)
turning chain(s)
together
treble crochet
(yrh, insert hook in sp/
st, yrh & pull up loop,
yrh & draw through
2 loops) number of
times indicated, yrh &
draw through all loops
on hook
(yrh, insert hook in
next st, yrh & pull up
loop, yrh a& draw
through 2 loops)
twice, yrh & draw
through all loops on
hook
triple treble crochet
wrong side
yarn round hook
work instructions
immediately foll *,
then rep as many
more times as directed
work all instructions in
the brackets as many
times as directed
Scan here to go directly to our
page on www.gathered.how
Find out everything you need to know about crochet
on Gathered! Our page is filled with step-by-step videos,
useful how-tos and information on the tools you’ll need.
Learn techniques such as how to create a turning chain,
change colour, increase and decrease, sew seams, check
your tension, make a magic loop, join your rounds and
much more. And while you’re there, have a look at our
free crochet patterns – you may just find your next make!
CHARTS
Charts & Diagrams
Use these charts to create the colourwork waistcoat, baby’s dinosaur cardigan,
piano scarf and mosaic cushion.
Colourwork waistcoat, page 27
47
Key
46
45
44
43
42
41
40
39
38
37
36
35
33
31
Yarn B
Yarn C
Yarn D
Yarn E
Yarn F
Yarn G
Yarn H
Yarn I
34
Yarn J
32
Yarn L
30
29
Yarn A
Yarn K
Yarn M
28
27
26
25
24
23
22
21
20
19
18
17
16
15
14
13
12
11
10
9
8
7
6
5
4
3
2
32
30
25
20
15
10
5
WWW.GATHERED.HOW/SIMPLYCROCHET 79
CHARTS
Baby’s dinosaur cardigan, page 44
Chart A
Chart C
21
20
19
18
7
6
5
4
9
8
7
6
11
10
9
8
13
12
11
10
15
14
13
12
17
16
15
14
19
18
17
16
21
20
5
4
3
3
Chart B
21
20
19
18
17
16
15
14
13
12
11
10
9
Key
Cloud Blue
Meadow
Piano scarf, page 51
18
17
16
15
14
13
12
11
10
9
8
7
6
5
4
3
2
Key
White
25
80 WWW.GATHERED.HOW/SIMPLYCROCHET
20
15
10
5
1
Black Heather
CHARTS
Mosaic cushion, page 63
81
80
79
78
77
76
75
74
73
72
71
70
69
68
67
66
65
64
63
62
61
60
59
58
57
56
55
54
53
52
51
50
49
48
47
46
45
44
43
42
41
40
39
38
37
36
35
34
33
32
31
30
29
28
27
26
25
24
23
22
21
20
19
18
17
16
15
14
13
12
11
10
9
8
7
6
5
4
3
2
1
83
80
75
70
65
60
55
50
45
40
35
30
25
20
15
10
5
Key
Yarn B
Yarn A
x Tr2d
s Standing dc
WWW.GATHERED.HOW/SIMPLYCROCHET 81
FAVE FOLLOW
here’s who we’re
following on
socials!
app
a s
Six reasons to follow Cassie of HappyCamperbyCassie
and her youthful, imaginative clothing and accessories
Etsy: HappyCamperbyCassie
Sales: 57
Instagram: @happycamperbycassie
Followers: 30.6K
IF YOU LIKE... wearable pieces in
vibrant, saturated colours and unique
patterns, you’ll love Cassie’s makes!
#dreamoutfits #fantasticalyetfunctional
IF YOU WANNA... take it slow when
you hook, you’ll be inspired. “Listen to
yourself and make sure what you’re
doing is bringing you joy.” #takebreaks
IF YOU LOVE... anything from
summer-ready tops to sultry openweave skirts and dresses, you’ll find it
here. #expandyouroptions #cuteandcool
IF YOU NEED... more colour, here it is!
“As an art teacher, I do find a lot of
inspiration from artworks I include in my
curriculum,” says Cassie. #trueartistry
IF YOU ARE... a “self-taught, clueless,
experimental crocheter,” Cassie is your
kindred spirit. “I never once followed
a crochet pattern.” #differentstrokes
IF YOU HAVE... a feeling of joy when
you look at your favourite crochet piece,
Cassie knows how you feel. Her favourite
piece is a pair of #rainbowoveralls.
It’s all over...
@_frogart
LITTLE AMIGURUMI FROGS
@ackycrochetcreations
@thekawaiistofficial
82 WWW.GATHERED.HOW/SIMPLYCROCHET
Trending this month on Instagram
@huggablehandmades
Try thiS
Trend!
#RICORUMICAL
RICORUMI SHIPMATES
PROUD TO SUPPORT
YOUR YARN SHOP
RICO-DESIGN.DE/EN/HOME/
Join the fun and crochet seven adorable
Ricorumi characters for Spring. From
22nd March and for the following seven
weeks (with Easter break) we will launch
a brand new FREE Ricorumi character
available exclusively from our Rico Design
website. Breaking News – you can also
purchase all of the yarn you need in our
new limited edition Spring CAL Box with
themed maritime stripes from your favourite Ricorumi retailer. Share on Instagram
on @ricorumi with #ricorumical
@ R ICORUMI #R ICORUMICAL
issuE 146
Step into spring with
colourful and creative
patterns for your home,
your wardrobe, gifts and
more! Try a Ossetianinspired scarf, heart
coasters, a toy tool set,
an overlay mosaic wrap
and a whole collection of
fairy tale-themed makes!
Try colourwork, mosaic
crochet, filet stitch, simple
garment work and more!
see our Back
IssUe ProJects in
DetAil on RavEl
bit.ly/RavSiMplYry
c
RETURN TO THE APP TO BUY YOUR BACK ISSUES
All issues of Simply Crochet are available as digital editions, ready to read whenever you want. Every purchase is
permanently stored in your magazine library. Once your magazine has downloaded, an internet connection is
not required, so you can take your magazine with you wherever you go.
issuE 145
issuE 144
issuE 143
issuE 142
issuE 141
Art house collection,
stripes and motifs
cardi, simple baby
toys, ami’ love bug,
one-ball scarf.
Swirl collection, stripy
jumper, ami’ party
granny, gym bag, ear
muffs, baby toys, cosy
socks, winter blankets.
Old-fashioned
Christmas collection,
granny square hoodie,
ami’ mistletoe and
holly, jumbo wrap.
Nordic Christmas
collection, Tunisian
snowflake jumper, ami’
holly and mistletoe,
robin blanket, shawl.
Artfully mismatched
collection, tweed
jacket, ami’ moth and
butterfly, official Elmer
poncho, quilt blanket.
issuE 140
issuE 139
issuE 138
issuE 137
issuE 136
Animal homewares
collection, Tunisian
entrelac hat & scarf,
ami’ blue cat, clothes
line bunting, poncho.
Variegated collection,
granny square tank
top, ami’ koala, intarsia
shawl, felted hanging,
two blue blankets.
Fun retro collection,
granny triangle cardi,
ami’ footballer, kids’
hopscotch rug, bottle
holder, summer skirt.
Beach holiday
collection, blockbuster
vest, ami’ sunflower,
summer shawls, pride
badge, mandala décor.
Showtime collection,
popcorn and lace
jumper, ami’ pink fairy
armadillo, passion fruit
throw, jacket sleeves.
issuE 135
issuE 134
issuE 133
Zigzag florals
collection, shortsleeved jumper, ami’
King Charles III, filet
stitch curtains.
Embroidered crochet
collection, granny
circles cardi, ami’
duckling, ripple vest
and scarf, fun pouffe.
Mini motifs collection,
stripy poncho, ami’
peas in a pod, dolly
mixture blanket,
checked cardigan.
Sign Up foR a
DigitAl suBscriPtion
And yOu’Ll neVer misS
AnothEr isSue
Crochet Extra
Simply
IN ASSOCIATION WITH
EVEN MORE PATTERNS TO HOOK!
ro
roun t e
orl
4 CUTE PATTERNS
❀ EURASIAN HOOPOE
❀ COSTA RICAN TOUCAN
❀ BALI MYNA
❀ BALD EAGLE
7 10
13
Crochet Extra
Simply
Welcome
Coming together from all over the globe, these beautiful birds are
gathering here to raise a few well-deserved smiles! They’re all
designed by the talented Kim Bengtsson Friis, and despite their
far-flung origins, they’re all delightfully chunky and ever so cute.
Meet a cheeky toucan, flying in from sunny Central and South
America, and a rare Bali Myna swooping in from Indonesia. Then,
give a big hug to a Bald Eagle from North America and a squish to
the well-travelled Hoopoe of Africa, Asia and Europe. These chirpy
chaps make for great gifts, especially if you have friends living all
over the world. So go on, hook up the whole aviary!
Editor, Simply Crochet
4
CONTENTS
Four FeathEred FrienDs...
4 TOUCAN
Looking fab with its large striped beak!
7 BALI MYNA
Discover this beautiful endangered bird
10 BALD EAGLE
Create a well-known American icon
13 HOOPOE
We love this bird’s fabulous feather crown!
16 AMIGURUMI ESSENTIALS
Learn techniques for making amigurumi
18 PROFILE
Meet designer Kim Bengtsson Friis!
WWW.GATHERED.HOW/SIMPLYCROCHET 3
AMIGURUMI TOUCAN
lo n g
be ak !
c
With the longest bill of any bird in the world,
this colourful creature has a nose for fun!
4 WWW.GATHERED.HOW/SIMPLYCROCHET
AMIGURUMI TOUCAN
With its bright colours and fascinating
appearance, this rainforest-dweller is one of
the most popular birds around!
A IT
T IC Y
ARAN
WEIGHT
4MM
HOOK
YOU WILL NEED
QYarn and Colors Epic
(100% cotton, 50g/75m)
3 balls of Yarn A Black (100)
1 ball of each:
Yarn B Bronze (018)
Yarn C Cream (002)
Yarn D Grape (054)
Yarn E Green Ice (075)
Yarn F Lollipop (036)
QA 4mm (US G/6) hook
Q2 oval safety eyes, 14mm
QToy stuffing
For yarn stockists contact
Yarn and Colors
www.yarnandcolors.com
TENSION
Tension is not critical, but it may
affect the yarn quantities required
MEASUREMENTS
Toucan measures approx 20cm
(7¾in) tall
ABBREVIATIONS
spiked dc Insert hook in next st 2
rounds below, yrh and pull loop up
to height of current round, yrh and
pull through 2 loops on hook
For a full list, see page 78 of
Simply Crochet magazine
NOTES
Parts of this pattern are worked using the
amigurumi method. Work stitches continuously
in a spiral without closing off each round with a
slip stitch. It may help to use a stitch marker in
the first stitch of each round, moving it up as
you work.
If you are making this as a toy for a child under
36 months, do not use safety eyes; instead,
embroider eyes using black stranded cotton.
TOUCAN
HEAD AND BODY
Using Yarn A, make a magic loop.
Round 1 (RS) Ch1 (does not count as st
throughout), 6dc in a loop.[6 sts]
Round 2 (RS) 2dc in each st around. [12 sts]
Round 3 (Dc in next st, 2dc in next st) 6 times.
[18 sts]
Round 4 (Dc in next 2 sts, 2dc in next st) 6
times. [24 sts]
Round 5 (Dc in next 3 sts, 2dc in next st) 6
times. [30 sts]
Round 6 (Dc in next 4 sts, 2dc in next st) 6
times. [36 sts]
Round 7 (Dc in next 5 sts, 2dc in next st) 6
times. [42 sts]
Round 8 (Dc in next 6 sts, 2dc in next st) 6
times. [48 sts]
Round 9 (Dc in next 7 sts, 2dc in next st) 6
times. [54 sts]
Rounds 10-12 Dc in each st around.
Round 13 Dc in next 19 sts, change to Yarn C,
dc in next 16 sts, change to Yarn A, dc in next 19
sts.
Rounds 14-19 Dc in next 18 sts, change to Yarn
C, dc in next 18 sts, change to Yarn A, dc in next
18 sts.
Round 20 Dc in next 19 sts, change to Yarn C,
dc in next 16 sts, change to Yarn A, dc in next 19
sts.
Fasten off Yarn C and cont with Yarn A.
Round 21 Dc in each st around.
Round 22 Dc in next 21 sts, (dc2tog) 6 times, dc
in next 21 sts. [48 sts]
Rounds 23-25 Dc in each st around.
Insert safety eyes between Rounds 16-17, 10 sts
apart. Stuff as you work.
Round 26 Dc in next 20 sts, 2dc in next 6 sts, dc
in next 20 sts. [54 sts]
Rounds 27-38 Dc in each st around.
Round 39 (Dc in next 7 sts, dc2tog) 6 times.
[48 sts]
Round 40 (Dc in next 6 sts, dc2tog) 6 times.
[42 sts]
Round 41 (Dc in next 5 sts, dc2tog) 6 times.
[36 sts]
Round 42 (Dc in next 4 sts, dc2tog) 6 times.
[30 sts]
Make the beak separately, starting at the tip;
stuff it firmly, then stitch it to the head
Three rows of stripes, including one row of
spiked double crochet, decorate each wing
Round 43 (Dc in next 3 sts, dc2tog) 6 times.
[24 sts]
Round 44 (Dc in next 2 sts, dc2tog) 6 times.
[18 sts]
Round 45 (Dc in next st, dc2tog) 6 times.
[12 sts]
Round 46 (Dc2tog) 6 times. [6 sts]
Fasten off.
Thread tail through final 6 sts and pull tight to
close.
BEAK
Using Yarn B, make a magic loop.
Round 1 (RS) Ch1, 6dc in a loop. [6 sts]
Round 2 (RS) 2dc in each st around. [12 sts]
Round 3 (Dc in next st, 2dc in next st) 6 times.
[18 sts]
Round 4 Dc in next 8 sts, 2dc in next 2 sts, dc in
next 8 sts. [20 sts]
Round 5 Dc in each st around.
Round 6 Dc in next 9 sts, 2dc in next 2 sts, dc in
next 9 sts. [22 sts]
WWW.GATHERED.HOW/SIMPLYCROCHET 5
AMIGURUMI TOUCAN
Tail feathers are worked in the round along
both sides of a foundation chain
Round 7 Dc in each st around.
Round 8 Dc in next 10 sts, 2dc in next 2 sts, dc
in next 10 sts. [24 sts]
Change to Yarn D.
Rounds 9-12 Dc in each st around.
Change to Yarn E.
Rounds 13-17 Dc in each st around.
Fasten off.
WINGS (MAKE 2)
Using Yarn A, make a magic loop.
Round 1 (RS) Ch1, 6dc in a loop.[6 sts]
Round 2 (RS) Dc in each st around.
Round 3 2dc in each st around. [12 sts]
Round 4 Dc in each st around.
Round 5 (Dc in next st, 2dc in next st) 6 times.
[18 sts]
Round 6 Dc in each st around.
Round 7 (Dc in next 2 sts, 2dc in next st) 6
times. [24 sts]
Round 8 Dc in each st around.
Round 9 (Dc in next 3 sts, 2dc in next st) 6
times. [30 sts]
Round 10 Dc in each st around.
Round 11 (Dc in next 4 sts, 2dc in next st) 6
times. [36 sts]
Round 12 Dc in each st around.
Change to Yarn E.
Round 13 (Dc in next st, spiked dc in next st) 18
times.
Change to Yarn D.
Round 14 Dc in each st around.
Change to Yarn B.
Round 15 Dc in each st around.
Change to Yarn A.
Round 16 (Dc in next 4 sts, dc2tog) 6 times.
[30 sts]
Round 17 (Dc in next 3 sts, dc2tog) 6 times.
[24 sts]
Round 18 Dc in each st around.
Fasten off, leaving a long tail.
TAIL FEATHERS (MAKE 3)
Make 1 Feather with colours as written.
Make 2 Feathers using Yarn A throughout.
Using Yarn A, ch7.
Round 1 (RS) Dc in second ch from hook, dc in
next 4 ch, 2dc in final ch, turn to work down
opposite side of foundation ch, dc in next 5 ch.
[12 sts]
Rounds 2-3 Dc in each st around.
Change to Yarn B for one Feather only.
Rounds 4-12 As Round 2, using Yarn D for
Round 5, Yarn E for Round 6 and Yarn A for
Rounds 7-12.
Fasten off, leaving a long tail.
ANKLE
Continue from one Toe.
Round 8 Dc in each st around current Toe, dc
around each st on one fastened-off Toe. [18 sts]
Stuff as you work.
Round 9 (Dc in next st, dc2tog) 6 times. [12 sts]
Round 10 (Dc in next 2 sts, dc2tog) 3 times.
[9 sts]
Fasten off, leaving a long tail.
BLUSHES (MAKE 2)
Using Yarn F, make a magic loop.
Round 1 (RS) Ch1, 5dc in loop. [5 sts]
Round 2 (RS) 2dc in each st around, ss to beg
dc. [10 sts]
HEAD FEATHERS (MAKE 2)
Using Yarn A, ch7.
Round 1 (RS) Ss in second ch from hook, dc in
next ch, htr in next ch, 2tr in next ch, htr in next
ch, 3dc in final ch, turn to work down opposite
side of foundation ch, htr in next ch, 2tr in next
ch, htr in next ch, dc in next ch, ss in final ch.
Fasten off.
TO FINISH
Use the images as a guide when making up.
Stuff Beak and sew to the Head between
Rounds 16-24.
Sew the Wings to the Body over Rounds 26-27,
18 sts apart.
Sew Feet to the bottom of the Body.
Sew Tail Feathers to the back of the Body over
Rounds 33-36.
Sew Head Feathers and Blushes to the Head.
FEET
TOES (MAKE 4)
Using Yarn B, make a magic loop.
Round 1 (RS) Ch1, 6dc in loop. [6 sts]
Round 2 (RS) (Dc in next st, 2dc in next st) 3
times. [9 sts]
Rounds 3-7 Dc in each st around.
Fasten off first two Toes only.
SIMPLE STEPS HOW TO USE STITCH MARKERS IN SPIRALS
In this pattern, you’ll work the
stitches in spiral rounds. If
you’ve never done this before,
don’t worry, it’s easy! At the
end of a round, don’t join the
first and last stitches with a slip
stitch. Instead, just work the
first stitch of a new round into
the top of the first stitch on the
previous round. Using stitch
markers will help you to keep
track of spiral rounds. Our
step-by-step guide (right) will
show you how to do this.
6 WWW.GATHERED.HOW/SIMPLYCROCHET
1 Work the first stitch of a
round and place a stitch
marker in this first stitch.
2 Work a spiral round of
double crochet stitches until
you’ve worked the last stitch
of the round. The next stitch
you’ll want to work into will
have the stitch marker in it.
3 You’ll need to remove the
marker, work the first stitch of
the new round and then
replace the stitch marker in
this first stitch, to mark the
start of the round again.
AMIGURUMI BALI MYNA
big
c re s t
The rare Bali Myna can only be spotted high in
the treetops in Indonesia – or on your hook!
WWW.GATHERED.HOW/SIMPLYCROCHET 7
AMIGURUMI BALI MYNA
Only about 60 Bali Mynas still live in the wild
– raise awareness about this endangered yet
ever-elegant bird with a cute crested stuffie.
A IT
T IC Y
ARAN
WEIGHT
4MM
HOOK
YOU WILL NEED
QYarn and Colors Epic
(100% cotton, 50g/75m)
3 balls of Yarn A Cream (002)
1 ball of each:
Yarn B Pacific Blue (067)
Yarn C Black (100)
Yarn D Graphite (098)
Yarn E Mustard (015)
QA 4mm (US G/6) hook
Q2 blue safety eyes, 18mm
QToy stuffing
For yarn stockists contact
Yarn and Colors
www.yarnandcolors.com
TENSION
Tension is not critical, but it may
affect the yarn quantities required
MEASUREMENTS
Bali measures approx 24cm (9½in)
ABBREVIATIONS
spiked dc Insert hook in next st 2
rounds below, yrh and pull loop up
to height of current round, yrh and
pull through 2 loops on hook
For a full list, see page 78 of
Simply Crochet magazine
8 WWW.GATHERED.HOW/SIMPLYCROCHET
NOTES
Parts of this pattern are worked using the
amigurumi method. Work stitches continuously
in a spiral without closing off each round with a
slip stitch. It may help to use a stitch marker in
the first stitch of each round, moving it up as
you work.
If you are making this as a toy for a child under
36 months, do not use safety eyes; instead,
embroider eyes using black stranded cotton.
BALI MYNA
HEAD AND BODY
Using Yarn A, make a magic loop.
Round 1 (RS) Ch1 (Does not count as st
throughout), 6dc in a loop.[6 sts]
Round 2 (RS) 2dc in each st around. [12 sts]
Round 3 (Dc in next st, 2dc in next st) 6 times.
[18 sts]
Round 4 (Dc in next 2 sts, 2dc in next st) 6
times. [24 sts]
Round 5 (Dc in next 3 sts, 2dc in next st) 6
times. [30 sts]
Round 6 (Dc in next 4 sts, 2dc in next st) 6
times. [36 sts]
Round 7 (Dc in next 5 sts, 2dc in next st) 6
times. [42 sts]
Round 8 (Dc in next 6 sts, 2dc in next st) 6
times. [48 sts]
Round 9 (Dc in next 7 sts, 2dc in next st) 6
times. [54 sts]
Rounds 10-13 Dc in each st around.
Round 14 Dc in the next 19 sts, change to Yarn
B, dc in the next 16 sts, change to Yarn A,
dc in the next 19 sts.
Rounds 15-16 Dc in the next 18 sts, change to
Yarn B, dc in the next 18 sts, change to Yarn A,
dc in the next 18 sts.
Round 17 As Round 14.
Fasten off Yarn B.
Rounds 18-19 Dc in each st around.
Attach the safety eyes between Rows 15-16, 9
sts apart. Stuff as you work.
Round 20 (Dc in next 7 sts, dc2tog) 6 times.
[48 sts]
Round 21 (Dc in next 6 sts, dc2tog) 6 times.
[42 sts]
Round 22 (Dc in next 5 sts, dc2tog) 6 times.
[36 sts]
Round 23 (Dc in next 4 sts, dc2tog) 6 times.
[30 sts]
Round 24 (Dc in next 3 sts, dc2tog) 6 times.
[24 sts]
Round 25 Dc in the fl of each st around.
Round 26 Dc in each st around.
Round 27 (Dc in next 3 sts, 2dc in next st) 6
times. [30 sts]
Round 28 (Dc in next 4 sts, 2dc in next st) 6
times. [36 sts]
Stuff the head feathers as you work and leave
long tails for sewing them to the head
Work the Myna’s classic blue face detail over
four rounds, changing yarn colour mid-row
Round 29 (Dc in next 5 sts, 2dc in next st) 6
times. [42 sts]
Round 30 (Dc in next 6 sts, 2dc in next st) 6
times. [48 sts]
Rounds 31-42 Dc in each st around.
Round 43 (Dc in next 6 sts, dc2tog) 6 times.
[42 sts]
Round 44 (Dc in next 5 sts, dc2tog) 6 times.
[36 sts]
Round 45 (Dc in next 4 sts, dc2tog) 6 times.
[30 sts]
Round 46 (Dc in next 3 sts, dc2tog) 6 times.
[24 sts]
Round 47 (Dc in next 2 sts, dc2tog) 6 times.
[18 sts]
Round 48 (Dc in next st, dc2tog) 6 times.
[12 sts]
Round 49 (Dc2tog) 6 times. [6 sts]
Fasten off.
Thread tail through final 6 sts and pull tight to
close.
AMIGURUMI BALI MYNA
Work the tail feather along both sides of
a foundation chain and then stuff firmly
Round 6 Dc in each st around.
Round 7 (Dc in next 2 sts, 2dc in next st) 6
times. [24 sts]
Round 8 Dc in each st around.
Change Yarn A.
Round 9 (Dc in the next st, spiked dc in next st
2 rounds down, skip st on current round) 12
times.
Round 10 (Dc in next 3 sts, 2dc in next st) 6
times. [30 sts]
Rounds 11-12 Dc in each st around.
Round 13 (Dc in next 3 sts, dc2tog) 6 times.
[24 sts]
Round 14 Dc in each st around.
Round 15 (Dc in next 2 sts, dc2tog) 6 times.
[18 sts]
Rounds 16-17 Dc in each st around.
Fasten off, leaving a long tail.
BEAK
Using Yarn E, make a magic loop.
Round 1 (RS) Ch1, 6dc in a loop. [6 sts]
Round 2 (RS) (Dc in next 2 sts, 2dc in next st)
twice. [8 sts]
Round 3 (Dc in next 3 sts, 2dc in next st) twice.
[10 sts]
Round 4 (Dc in next 4 sts, 2dc in next st) twice.
[12 sts]
Round 5 (Dc in next 5 sts, 2dc in next st) twice.
[14 sts]
Change to Yarn C.
Rounds 6-8 Dc in each st around.
Fasten off, leaving a long tail.
HEAD FEATHERS (MAKE 3)
Using Yarn A, make a magic loop.
Rounds 1-3 (RS) As Rounds 1-3 of Head. [18 sts]
Round 4 Dc in each st around.
Round 5 (Dc in next 2 sts, 2dc in next st) 6
times. [24 sts]
Rounds 6-8 Dc in each st around.
Round 9 (Dc in next 2 sts, dc2tog) 6 times.
[18 sts]
Stuff as you work.
Round 10 Dc in each st around.
Round 11 (Dc in next st, dc2tog) 6 times.
[12 sts]
Rounds 12-13 Dc in each st around.
Fasten off, leaving a long tail.
WINGS (MAKE 2)
Using Yarn C, make a magic loop.
Round 1 (RS) Ch1, 6dc in a loop.[6 sts]
Round 2 (RS) Dc in each st around.
Round 3 2dc in each st around. [12 sts]
Round 4 Dc in each st around.
Round 5 (Dc in next st, 2dc in next st) 6 times.
[18 sts]
FEET AND LEGS
TOES (MAKE 4)
Using Yarn D, make a magic loop.
Round 1 (RS) Ch1, 6dc in loop. [6 sts]
Round 2 (Dc in next st, 2dc in next st) 3 times.
[9 sts]
Rounds 3-7 Dc in each st around.
Fasten off first two Toes only.
LEGS
Continue on from one Toe.
Round 8 (RS) Dc in each st around current Toe,
dc around each st on one fastened-off Toe.
[18 sts]
Round 9 Dc in each st around.
Round 10 (Dc in next st, dc2tog) 6 times.
[12 sts]
Round 11 Dc in each st around.
Stuff Feet and Legs as you work.
Round 12 (Dc in next 2 sts, dc2tog) 3 times.
[9 sts]
Rounds 12-18 Dc in each st around.
Fasten off, leaving a long tail.
TAIL FEATHER
Using Yarn C, ch13.
Round 1 Dc in second ch from hook, dc in next
10 ch, 4dc in final ch, turn to work down
opposite edge of foundation ch, dc in next 10
ch, 3dc in same ch as beg dc. [28 sts]
Rounds 2-4 Dc in each st around.
Change to Yarn A.
Round 5 (Dc in the next st, spiked dc in the
next st 2 rounds below) 14 times [28 sts]
Round 6 (Dc in next 12 sts, dc2tog, pm in last
st) twice. [26 sts]
Rounds 7-9 (Dc to 1 st before marker, dc2tog,
move marker to last st) twice. [20 sts]
Rounds 10-11 Dc in each st around.
Fasten off.
TO FINISH
Use the images as a guide when making up.
Stuff Beak and sew to the Head between
Rounds 17-21.
Sew the Wings to the Body over Rounds 29-30,
10 sts apart.
Sew the Legs to the bottom of the Body.
Stuff Tail Feather and sew to the back of the
Body over Rounds 40-42.
Sew the Head Feathers to the Head.
SIMPLE STEPS HOW TO WORK A SPIKED DC
1 Work to the point where you
want the spiked dc (we worked
ch1 and 2 dc).
2 Work the next dc as a spiked
dc stitch: don’t insert your
hook into the top of the next
stitch or ch-sp, but into the st
or ch-sp in the row below that
(or further down, as instructed
in the pattern).
3 Work yrh and pull up a loop.
Lengthen the loop to bring
the st up to the height of the
current row, making sure the
fabric doesn’t pucker.
4 Complete the stitch as usual
for a double crochet: yrh and
pull through 2 loops.
WWW.GATHERED.HOW/SIMPLYCROCHET 9
AMIGURUMI BALD EAGLE
USA
icon
c
The majestic bald eagle serves as the United
States’ animal mascot – a famous bird indeed!
10 WWW.GATHERED.HOW/SIMPLYCROCHET
AMIGURUMI BALD EAGLE
A bird of prey has never looked so sweet!
This bald eagle, with its signature whitefeathered head, is ready to fly into your heart.
A IT
T IC Y
ARAN
WEIGHT
4MM
HOOK
YOU WILL NEED
QYarn and Colors Epic
(100% cotton, 50g/75m)
2 balls of each:
Yarn A Cream (002)
Yarn B Satay (026)
1 ball of each:
Yarn C Mustard (015)
Yarn D Lollipop (036)
QA 4mm (US G/6) hook
Q2 safety eyes, 16mm
QToy stuffing
For yarn stockists contact
Yarn and Colors
www.yarnandcolors.com
TENSION
Tension is not critical, but it may
affect the yarn quantities required
MEASUREMENTS
Bald Eagle measures approx 20cm
(7¾in) tall
ABBREVIATIONS
spiked dc Insert hook in next st 2
rounds below, yrh and pull loop up
to height of current round, yrh and
pull through 2 loops on hook
For a full list, see page 78 of
Simply Crochet magazine
NOTES
Parts of this pattern are worked using the
amigurumi method. Work stitches continuously
in a spiral without closing off each round with a
slip stitch. It may help to use a stitch marker in
the first stitch of each round, moving it up as
you work.
If you are making this as a toy for a child under
36 months, do not use safety eyes; instead,
embroider eyes using black stranded cotton.
BALD EAGLE
HEAD AND BODY
Using Yarn A, make a magic loop.
Round 1 (RS) Ch1 (does not count as st
throughout), 6dc in loop. [6 sts]
Round 2 (RS) 2dc in each st around. [12 sts]
Round 3 (Dc in next st, 2dc in next st) 6 times.
[18 sts]
Round 4 (Dc in next 2 sts, 2dc in next st) 6
times. [24 sts]
Round 5 (Dc in next 3 sts, 2dc in next st) 6
times. [30 sts]
Round 6 (Dc in next 4 sts, 2dc in next st) 6
times. [36 sts]
Round 7 (Dc in next 5 sts, 2dc in next st) 6
times. [42 sts]
Round 8 (Dc in next 6 sts, 2dc in next st) 6
times. [48 sts]
Round 9 (Dc in next 7 sts, 2dc in next st) 6
times. [54 sts]
Rounds 10-21 Dc in each st around.
Round 22 Dc in the next 21 sts, (dc2tog) 6
times, dc in the next 21 sts. [48 sts]
Rounds 23-24 Dc in each st around.
Change to Yarn B.
Round 25 Dc in bl of each st around.
Round 26 Dc in the next 21 sts, 2dc in the next
6 sts, dc in the next 21 sts. [54 sts]
Insert safety eyes between Rounds 15-16, 18 sts
apart. Position them above the decreases from
Round 22.
Rounds 27-38 Dc in each st around.
Round 39 (Dc in next 7 sts, dc2tog) 6 times.
[48 sts]
Round 40 (Dc in next 6 sts, dc2tog) 6 times.
[42 sts]
Stuff as you work.
Round 41 (Dc in next 5 sts, dc2tog) 6 times.
[36 sts]
Round 42 (Dc in next 4 sts, dc2tog) 6 times.
[30 sts]
Round 43 (Dc in next 3 sts, dc2tog) 6 times.
[24 sts]
Round 44 (Dc in next 2 sts, dc2tog) 6 times.
[18 sts]
Round 45 (Dc in next st, dc2tog) 6 times.
[12 sts]
Round 46 (Dc2tog) 6 times.
Wings are left unstuffed – fold them flat and
sew them securely to the sides of the body
For each foot, work two toes, then join them
together to form a short ankle
Fasten off.
Thread tail through final 6 sts and pull tight to
close.
COLLAR
Join Yarn A to any unused fl from Round 24.
Round 1 (RS) (5htr in next st, skip 1 st, ss in next
st, skip 1 st) 12 times, ss to beg htr.
Fasten off.
BEAK
Using Yarn C, make a magic loop.
Round 1 (RS) Ch1, 6dc in loop. [6 sts]
Round 2 (RS) 2dc in each st around. [12 sts]
Round 3 Dc in the next 5 sts, 2dc in the next 2
sts, dc in the next 5 sts. [14 sts]
Round 4 Dc in the next 6 sts, 2dc in the next 2
sts, dc in the next 6 sts. [16 sts]
Round 5 Dc2tog, dc in the next 12 sts, dc2tog.
[14 sts]
Rounds 6-7 Dc in each st around.
Round 8 Dc in the next 7 sts, 2dc in the next 2
WWW.GATHERED.HOW/SIMPLYCROCHET 11
AMIGURUMI BALD EAGLE
next st) 12 times. [24 sts]
Round 10 (Dc in next 3 sts, 2dc in next st) 6
times. [30 sts]
Round 11 Dc in each st around.
Round 12 (Dc in next 4 sts, 2dc in next st) 6
times. [36 sts]
Rounds 13-16 Dc in each st around.
Round 17 (Dc in next 4 sts, dc2tog) 6 times.
[30 sts]
Round 18 (Dc in next 3 sts, dc2tog) 6 times.
[24 sts]
Round 19 Dc in each st around.
Fasten off, leaving a long tail.
Like the feet, the tail feathers are worked from
two pieces and joined together into one
sts, dc in the next 5 sts. [16 sts]
Round 9 Dc in the next 8 sts, 2dc in the next 2
sts, dc in the next 6 sts. [18 sts]
Round 10 Dc in each st around.
Fasten off, leaving a long tail.
WINGS (MAKE 2)
Using Yarn A, make a magic loop.
Round 1 (RS) Ch1, 6dc in loop. [6 sts]
Round 2 (RS) Dc in each st around.
Round 3 2dc in each st around. [12 sts]
Round 4 Dc in each st around.
Round 5 (Dc in next st, 2dc in next st) 6 times.
[18 sts]
Round 6 Dc in each st around.
Round 7 (Dc in next 2 sts, 2dc in next st) 6
times. [24 sts]
Round 8 Dc in each st around.
Change to Yarn B.
Round 9 (Dc in the next st, spiked dc in the
FEET
TOES (MAKE 4)
Using Yarn C, make a magic loop.
Round 1 (RS) Ch1, 6dc in loop. [6 sts]
Round 2 (Dc in next st, 2dc in next st) 3 times.
[9 sts]
Rounds 3-7 Dc in each st around.
Fasten off first two Toes only.
ANKLE
Continue on from one Toe.
Round 8 (RS) Dc in each st around current Toe,
dc around each st on a fastened-off Toe. [18 sts]
Round 9 (Dc in next st, dc2tog) 6 times. [12 sts]
Stuff as you work.
Round 10 (Dc in next 2 sts, dc2tog) 3 times.
[9 sts]
Fasten off, leaving a long tail.
TAIL FEATHERS (MAKE 2)
Using Yarn A, make a magic loop.
Round 1 (RS) Ch1, 6dc in loop. [6 sts]
Round 2 (RS) 2dc in each st around. [12 sts]
Rounds 3-5 Dc in each st around. [12 sts]
Fasten off first Feather only.
Work next round from second Feather.
Round 6 Dc in each st around Feather, dc in
each st around fastened off Feather. [24 sts]
Round 7 (Dc in next 2 sts, dc2tog) 6 times.
[18 sts]
Stuff as you work.
Round 8 Dc in each st around.
Round 9 (Dc in next st, dc2tog) 6 times. [12 sts]
Rounds 10-11 Dc in each st around.
Fasten off.
BLUSHES (MAKE 2)
Using Yarn D, make a magic loop.
Round 1 (RS) Ch1, 5dc in loop. [5 sts]
Round 2 (RS) 2dc in each st around, ss in beg
dc. [10 sts]
Fasten off.
HEAD FEATHER
Using Yarn A, ch7.
Round 1 (RS) Ss in second ch from hook, dc in
next ch, htr in next ch, tr in next 2 ch, htr in next
ch, 3dc in final ch, turn to work across opposite
side of foundation ch, htr in next ch, tr in next 2
ch, htr in next ch, dc in next ch, ss in next ch.
Fasten off.
TO FINISH
Use the images as a guide when making up.
Stuff Beak and sew to the Head between
Rounds 15-20.
Sew the Wings to the Body over Rounds 27-28,
18 sts apart.
Sew the Feet to the bottom of the Body.
Sew Tail Feather to the back of the Body over
Rounds 34-36.
Sew the Head Feather to the Head.
Sew the Blushes to the Head.
Weave in all ends.
SIMPLE STEPS HOW TO WORK DOUBLE CROCHET IN A SPIRAL
1 Make a foundation ring,
then work the t-ch (1ch for dc).
Work dc stitches into the ring,
but do not join the last stitch
and first stitch of this first
round with a slip stitch.
12 WWW.GATHERED.HOW/SIMPLYCROCHET
2 Instead, work the first dc
stitch of the second round
into the first stitch of the first
round. To do this, insert the
hook into the stitch, yrh, pull
yarn through, yrh and pull the
yarn through both loops.
3 You’ll now be working in a
spiral. Continue to work more
rounds of dc stitches in a
spiral, according to the
pattern instructions.
4 On the last round, after
you’ve worked the last dc
stitch, you’ll need to finish off
the spiral with a slip stitch for
a neat edge: insert the hook
into the next stitch, yrh and
pull through both loops.
AMIGURUMI HOOPOE
cool
lo o k
This flambouyantly ‘crowned’ bird is well
travelled – spot it in Africa, Asia and Europe!
WWW.GATHERED.HOW/SIMPLYCROCHET 13
AMIGURUMI HOOPOE
With a pinkish-brown body and bold black
and white stripes, the hoopoe is one of the
most exotic-looking birds around!
A IT
T IC Y
ARAN
WEIGHT
4MM
HOOK
YOU WILL NEED
QYarn and Colors Epic
(100% cotton, 50g/75m)
2 balls of Yarn A Old Pink (047)
1 ball of each:
Yarn B Cream (002)
Yarn C Black (100)
Yarn D Graphite (098)
QA 4mm (US G/6) hook
Q2 safety twice, 14mm
QToy stuffing
For yarn stockists contact
Yarn and Colors
www.yarnandcolors.com
TENSION
Tension is not critical, but it may
affect the yarn quantities required
MEASUREMENTS
Hoopoe measures approx 36cm
(14¼in) tall
ABBREVIATIONS
spiked dc Insert hook in next st 2
rounds below, yrh and pull loop up
to height of current round, yrh and
pull through 2 loops on hook
For a full list, see page 78 of
Simply Crochet magazine
14 WWW.GATHERED.HOW/SIMPLYCROCHET
NOTES
Parts of this pattern are worked using the
amigurumi method. Work stitches continuously
in a spiral without closing off each round with a
slip stitch. It may help to use a stitch marker in
the first stitch of each round, moving it up as
you work.
If you are making this as a toy for a child under
36 months, do not use safety eyes; instead,
embroider eyes using black stranded cotton.
HOOPOE
HEAD AND BODY
Using Yarn A, make a magic loop.
Round 1 (RS) Ch1 (Does not count as st
throughout), 6dc in a loop.[6 sts]
Round 2 (RS) 2dc in each st around. [12 sts]
Round 3 (Dc in next st, 2dc in next st) 6 times.
[18 sts]
Round 4 (Dc in next 2 sts, 2dc in next st) 6
times. [24 sts]
Round 5 (Dc in next 3 sts, 2dc in next st) 6
times. [30 sts]
Round 6 (Dc in next 4 sts, 2dc in next st) 6
times. [36 sts]
Round 7 (Dc in next 5 sts, 2dc in next st) 6
times. [42 sts]
Round 8 (Dc in next 6 sts, 2dc in next st) 6
times. [48 sts]
Round 9 (Dc in next 7 sts, 2dc in next st) 6
times. [54 sts]
Rounds 10-19 Dc in each st around.
Insert safety eyes between Rounds 16-17,
approx 10 sts apart.
Round 20 (Dc in next 7 sts, dc2tog) 6 times.
[48 sts]
Round 21 (Dc in next 6 sts, dc2tog) 6 times.
[42 sts]
Round 22 (Dc in next 5 sts, dc2tog) 6 times.
[36 sts]
Round 23 (Dc in next 4 sts, dc2tog) 6 times.
[30 sts]
Round 24 (Dc in next 3 sts, dc2tog) 6 times.
[24 sts]
Round 25 Dc in the fl of each st around.
Round 26 Dc in each st around.
Round 27 (Dc in next 3 sts, 2dc in next st) 6
times. [30 sts]
Round 28 (Dc in next 4 sts, 2dc in next st) 6
times. [36 sts]
Round 29 (Dc in next 5 sts, 2dc in next st) 6
times. [42 sts]
Round 30 (Dc in next 6 sts, 2dc in next st) 6
times. [48 sts]
Round 31-38 Dc in each st around.
Change to Yarn B.
Rounds 39-42 Dc in each st around.
Round 43 (Dc in next 6 sts, dc2tog) 6 times.
[42 sts]
The head feathers are worked in the round
starting with a magic loop
Black and white stripes worked in spiked
double crochet decorate the wings
Round 44 (Dc in next 5 sts, dc2tog) 6 times.
[36 sts]
Round 45 (Dc in next 4 sts, dc2tog) 6 times.
[30 sts]
Stuff as you work.
Round 46 (Dc in next 3 sts, dc2tog) 6 times.
[24 sts]
Round 47 (Dc in next 2 sts, dc2tog) 6 times.
[18 sts]
Round 48 (Dc in next st, dc2tog) 6 times.
[12 sts]
Round 49 (Dc2tog) 6 times. [6 sts]
Fasten off.
Thread tail through final 6 sts and pull tight to
close.
BEAK
Using Yarn D, make a magic loop.
Round 1 (RS) Ch1, 6dc in a loop.[6 sts]
Round 2 (RS) Dc in each st around.
Round 3 (Dc in the next 2 sts, 2dc in next st)
twice. [8 sts]
AMIGURUMI HOOPOE
With all parts, leave long tails when fastening
off to use for sewing the pieces together
Round 4 Dc in each st around.
Round 5 (Dc in the next 3 sts, 2dc in next st)
twice. [10 sts]
Round 6 Dc in each st around.
Round 7 (Dc in the next 4 sts, 2dc in next st)
twice. [12 sts]
Round 8 Dc in each st around. [12 sts]
Round 9 (Dc in the next 5 sts, 2dc in next st)
twice. [14 sts]
Rounds 10-12 Dc in each st around.
Fasten off, leaving a long tail.
WINGS (MAKE 2)
Using Yarn C, make a magic loop.
Round 1 (RS) Ch1, 6dc in a loop.[6 sts]
Round 2 (RS) Dc in each st around.
Round 3 2dc in each st around. [12 sts]
Round 4 Dc in each st around.
Change to Yarn B.
Round 5 (Dc in next st, spiked dc in next st 2
rounds below) 6 times.
Round 6 (Dc in next st, 2dc in next st) 6 times.
[18 sts]
Round 7 Dc in each st around.
Change to Yarn C.
Round 8 (Dc in next st, spiked dc in next st 2
rounds below) 9 times.
Round 9 (Dc in next 2 sts, 2dc in next st) 6
times. [24 sts]
Round 10 Dc in each st around.
Change to Yarn B.
Round 11 (Dc in next st, spiked dc in next st 2
rounds below) 12 times.
Round 12 (Dc in next 3 sts, 2dc in next st) 6
times. [30 sts]
Round 13 Dc in each st around.
Change to Yarn C.
Round 14 (Dc in next st, spiked dc in next st 2
rounds below) 15 times.
Round 15 (Dc in next 3 sts, dc2tog) 6 times.
[24 sts]
Round 16 Dc in each st around.
Change to Yarn A.
Round 17 (Dc in next 2 sts, dc2tog) 6 times.
[18 sts]
Rounds 18-19 Dc in each st around.
Fasten off, leaving a long tail.
HEAD FEATHERS (MAKE 5)
Using Yarn C, make a magic loop.
Round 1 (RS) Ch1, 5dc in a loop. [5 sts]
Round 2 (RS) 2dc in each st around. [10 sts]
Round 3 (Dc in next st, 2dc in next st) 5 times.
[15 sts]
Change to Yarn B.
Rounds 4-6 Dc in each st around.
Change to Yarn A.
Round 7 Dc in each st around.
Round 8 (Dc in next st, dc2tog) 6 times. [10 sts]
Rounds 9-15 Dc in each st around.
Fasten off, leaving a long tail.
Rounds 1-3 (RS) As Rounds 1-3 of Head and
Body. [18 sts]
Rounds 4-10 Dc in each st around.
Change to Yarn B.
Round 11 (Dc in the next st, spiked dc in next st
2 rounds below) 9 times. [18 sts]
Rounds 12-13 Dc in each st around.
Change to Yarn C.
Round 14 As Round 11.
Rounds 15-16 Dc in each st around.
Fasten off, leaving a long tail.
LEGS (MAKE 2)
Using Yarn D.
Rounds 1-4 (RS) As Rounds 1-4 of Head and
Body. [24 sts]
Rounds 5-8 Dc in each st around.
Round 9 Dc in the next 6 sts, (dc2tog) 6 times,
dc in the next 6 sts. [18 sts]
Stuff as you work.
Round 10 Dc in the next 3 sts, (dc2tog) 6 times,
dc in the next 3 sts. [12 sts]
Rounds 11-20 Dc in each st around.
Fasten off, leaving a long tail.
TO FINISH
Use the images as a guide when making up.
Stuff the Beak and sew the Beak to the Head
between Rounds 16-20.
Sew the Wings to the Body over Rounds 30-31,
14 sts apart.
Sew the Legs to the bottom of the Body.
Stuff Tail Feathers and sew to the back of the
Body over Rounds 39-42.
Stuff Head Feathers and sew to the Head.
TAIL FEATHERS (MAKE 3)
Using Yarn C.
SIMPLE STEPS HOW TO JOIN AMIGURUMI PARTS
1 Thread the yarn onto a
tapestry needle. Secure the
yarn to one piece with a small
stitch. Insert the needle into
the second piece where you
wish to make the join.
2 Insert the needle through
the first piece and back out.
Next work through the
second piece in the same way.
3 Repeat Step 2 until the
pieces are securely joined.
Insert the needle through and
out at the back of one piece.
4 Weave the final tail inside
one of the pieces.
WWW.GATHERED.HOW/SIMPLYCROCHET 15
YOUR GUIDE
Amigurumi essentials
Simple step-by-step guides for some of the most commonly-used crochet stitches and techniques
for making amigurumi toys, as well as an abbreviation guide to help you read the patterns
SIMPLE STEPS HOW TO WORK A MAGIC LOOP
Working
yarn
Pull
Tail end
1 To start a magic loop, don’t
make a slipknot. Instead, make
a loop with the yarn, leaving a
tail around 10cm long. Make
sure the tail end is under the
working yarn.
2 Insert your hook into the
loop, from front to back. Wrap
the working yarn round the
hook anticlockwise and pull
the yarn through the loop.
3 Make a t-ch for the sts you
want to work (above, we
made 1 t-ch for dc). Now work
the sts into the magic loop,
making sure you work over
both the loop and the tail end
(so, 2 yarn strands).
4 Once you’ve worked all the
stitches you need, pull the tail
end of the yarn to close the
ring. Work a slip stitch to join
the first and last stitches to
finish the first round.
SIMPLE STEPS HOW TO CHANGE COLOUR IN A SPIRAL
1 If you need to work stripes in
a spiral, the pattern will ask
you to change colour. Always
do this on the last yrh of the
last stitch of the round in the
previous colour.
2 Work the first stitch of the
new round in the new colour
and place a stitch marker in
this first stitch.
3 Work a round of double
crochet stitches until you’ve
worked the last stitch of the
round. The next stitch you’ll
want to work into will have
the stitch marker in it.
4 You’ll need to remove the
marker, work the first stitch of
the new round and then
replace the stitch marker in
this first stitch, to mark the
start of the round again.
SIMPLE STEPS HOW TO DECREASE IN DOUBLE CROCHET (DC2TOG)
1 Start by inserting the hook
under the top 2 loops of the
next stitch on the previous
row. Begin to work a double
crochet stitch in the usual way,
working yrh and pull loop
through (2 loops on hook).
16 WWW.GATHERED.HOW/SIMPLYCROCHET
2 Without finishing the first
dc, begin the next dc by
inserting the hook in the next
stitch on the previous row.
Again, work yrh and pull loop
through (3 loops on hook).
3 Now complete both dc
stitches together by working
yrh and pull this loop through
all 3 loops on the hook.
4 This is how the completed
dc2tog should look. You will
have neatly decreased by
1 stitch. On subsequent rows,
you can simply work a stitch
into the top of the dc2tog
stitch as usual.
YOUR GUIDE
SIMPLE STEPS HOW TO INCREASE IN DOUBLE CROCHET
1 Work a double crochet stitch
as usual: insert hook into st
indicated, yrh, pull up loop,
yrh, pull yarn through 2 loops
on your hook.
2 Then work another dc,
inserting hook into the same
stitch again.
3 Continue the second dc
stitch, working yrh and pull up
a loop of yarn.
4 Finish the second dc stitch as
usual, working yrh and pull
yarn through 2 loops on hook.
Once you’ve finished, you’ll
see how 2 dc stitches are
worked into the same stitch.
SIMPLE STEPS HOW TO WORK AN INVISIBLE DECREASE (INVDEC)
1 Work up to where you want
the decrease to be placed.
The next 2 stitches will be
decreased to 1 stitch.
2 Insert the hook through the
front loop on the next stitch,
then insert hook through the
front loop on the second stitch.
3 Yrh and pull through both
front loops on the hook.
4 Yrh and pull through both
loops on hook.
Abbreviations
across
approx
beg
bl
BP
ch(s)
chch-sp(s)
cl(s)
cont
dc
dc2tog
dec
dtr
dtr2tog
fdc
to end of the row
approximate(ly)
beginning
insert hook under back
loop only
Back Post: work st
indicated, inserting hook
around post of st from
back to front to back and
not in top of st
chain/chain stitch(es)
refers to ch made
previously
chain space(s)
clusters
continue
double crochet
(insert hook in next st, yrh
& draw a loop through)
twice, yrh & draw through
all 3 loops on hook
decrease
double treble crochet
work 2dtr together
foundation dc
fl
foll/folls
FP
ftr
htr
htr2tog
in next
inc
LH
lp(s)
meas
patt(s)
pm
prev
qtr
rem
rep
RH
rnd(s)
RS
sp(s)
insert hook under front
loop only
following/follows
Front Post: As BP, inserting
hook around post from
front to back to front
foundation tr
half treble
work 2htr together
sts to be worked into the
same stitch
increase
left hand
loop(s)
measures
pattern(s)
place marker
previous
quadruple treble
remain(s)/remaining
repeat
right hand
round(s)
right side
space(s)
ss
st(s)
t-ch(s)
tog
tr
tr cl
tr2tog
ttr
WS
yrh
*
()
slip stitch
stitch(es)
turning chain(s)
together
treble crochet
(yrh, insert hook in sp/st,
yrh & pull up loop, yrh &
draw through 2 loops)
number of times indicated,
yrh & draw through all
loops on hook
(yrh, insert hook in next st,
yrh & pull up loop, yrh a&
draw through 2 loops)
twice, yrh & draw through
all loops on hook
triple treble crochet
wrong side
yarn round hook
work instructions
immediately foll *, then rep
as many times as directed
work all instructions in the
brackets as many times as
directed
WWW.GATHERED.HOW/SIMPLYCROCHET 17
GOOD READ
Kim is known for her cute
amigurumi animals and
designed the adorably
chunky birds in this issue
Need for speed
After taking quickly to amigurumi, Swedish designer Kim Bengtsson Friis dove
full-force into the wild world of crochet design, experimentation and self-promotion
isit the Crochet by Kim website
you’ll encounter page after page of
amigurumi toys, each one distinct
but all with exaggerated, round
bodies and adorable wide-set
eyes. It’s clear that Swedish designer Kim
Bengtsson Friis has a distinct style, and
can apply it to anything – dolls, pets,
jungle animals, foods and, of course,
birds. Kim lends her super-chunky,
perfectly rounded amigurumi style to
the Birds of the World in this issue. She
agreed to speak with us about her
crochet journey, her inspirations, her
future as a designer and more.
When Kim first started to crochet in 2017,
she was a Swedish emergency services
dispatcher looking for a unique baby gift for
a friend. Fatefuly, her colleague told her:
“You need to crochet a teddy bear.”
V
18 WWW.GATHERED.HOW/SIMPLYCROCHET
“It took me two evenings to crochet
a teddy bear,” says Kim. “And I was hooked
right away. I remember the time went by so
quickly when I crocheted it, and when it was
finished, I immediately said to myself, ‘I have
to do this again!’”
DESIGN TIME
Once she hooked that initial teddy bear, Kim
didn’t wait long to start designing. After
only a couple of weeks, she realised she
wanted to create her own animals.
“I found it difficult to find patterns that
I wanted to make,” says Kim. “I quickly
realised that what I wanted to create was in
my head. I wanted to challenge myself, learn
new techniques and see how my creations
would turn out.” She wrote out her first
pattern on a piece of paper, and by 2017 she
had several crochet patterns in her shop.
FLY AWAY
“I think it’s a lot of fun to crochet birds,” Kim
says of her designs for this issue. “It’s
inspiring to see all the different colours, and
there are so many different types of birds to
choose from.”
The birds were a chance for her to try new
techniques, as well. “I recently discovered
spiked stitch and thought, ‘I need to do
something with those stitches!’” she says.
“That’s why I designed four different birds
with spiked stitch. I think they turned out
very cute with those spiked details!”
It’s that freedom to try new things that
keeps crochet design exciting for Kim. “The
absolute most fun thing about being a
designer is that I can do exactly what I want,”
explains Kim. “I don’t think much about
what other people think about my work.
Instead, I try to do what I fund fun to create.”
GOOD READ
Photo: Kim Bengtsson Friis
KEEPING UP
Of course, when you’re a designer in the
modern era, online presence is everything,
and Kim is working hard to refine her social
media skills.
“The biggest challenge is keeping up the
work of being on social media frequently,”
she says. “My goal for 2024 is to create
videos on YouTube. I’m not entirely
comfortable with this right now, but I hope
that a little practise can give me the
confidence to create videos.”
The actual process of designing
amigurumi, though, comes much more
easily. “I find inspiration in most things,” says
Kim. “Sometimes I’ll see a children’s movie
or toy and think, ‘I just have to crochet that!’
Children in my family have also asked me for
a specific animal.”
When she has a particular creature in
mind, Kim draws a prototype while looking
at reference photos. “Once I come up with
a new animal, I have to crochet it right
away,” says Kim, “preferably the same day!
I have the whole pattern in my head, and
I have to get it down on paper, because
otherwise I’ll forget how I first envisioned
the different parts of that animal.”
T OOLS OF THE TRADE
Kim’s favourite yarn is a thick cotton from
Yarn and Colors, which she uses with a 4mm
crochet hook. “The best thing about that
yarn is that there are over 100 different
shades, and the crocheted animals are
machine washable.”
But that doesn’t mean she doesn’t branch
out with her materials. “I’ve also fallen into
the chenille trend,” says Kim, referring to the
current popularity of making super-sized
amigurumi toys out of chunky chenille yarn.
“The animals become fantastically soft and
cuddly with that yarn. However, I haven’t
“Once I come up with a new
animal, I have to crochet it
right away, Preferably the same
day!”
really become friends with that type of yarn
yet!” She describes her time using chenille
yarns as “a whole journey”.
“I’m still not done with it,” she says. “The
yarn comes off, it fluffs, it gets messy
everywhere, it’s not possible to sew the
parts of the stuffed animal together like
with other types of yarn, and so on.
“What I’m doing right now is trying to
come up with new designs for animals that
are crocheted with chenille yarn. Patterns
called ‘no sew’ or ‘low sew’, which means
you either don’t need to sew anything onto
the animal, or only need to sew a little bit.”
She admits that chenille yarn can be useful
when trying to make amigurumi toys
quickly, though.
And over the years, Kim has developed
her own tips and tricks. Her favourite
crochet tool is “a bobby pin or a bent yarn
needle,” she says. “I use a bobby pin as
a stitch marker. It’s very easy to pull out and
put back in.”
Her bent yarn needles, in turn, have
“really helped me not to have mental
breakdowns about the stuffing coming out
between the stitches,” she says. “If you
know, you know.”
At the moment, Kim is focusing on
preparing to attend a series of craft fairs in
Sweden. “I sell my patterns, amigurumi kits
and safety eyes, and I also hold workshops
on how to make amigurumi,” she says. So if
you’re at a craft fair in Sweden, keep an eye
out for Kim and her amigurumi creations!
Written by Alison Maney
A few of her favourite things
When Kim isn’t busy dreaming up new amigurumi animals…
“I like to do other creative things. I enjoy sewing, especially clothes
for my son. I also like to grow my own plants! I prefer tomatoes,
cucumbers and peppers as well as flowers like dahlias. I have pansy
and pepper plants in my greenhouse.” Visit www.crochetbykim.com,
www.kimfriis.etsy.com or Kim Bengtsson Friis on Ravelry.
WWW.GATHERED.HOW/SIMPLYCROCHET 19
AVAILABLE AT
WANT TO MAKE THE PROJECTS FROM THIS SUPPLEMENT? BUY OUR EPIC,
MUST-HAVE, AMAZING OR BABY FABULOUS YARN EASILY IN THE UK!
GO TO WWW.LOVECRAFTS.COM OR SCAN THE QR CODE.