/


Text
C
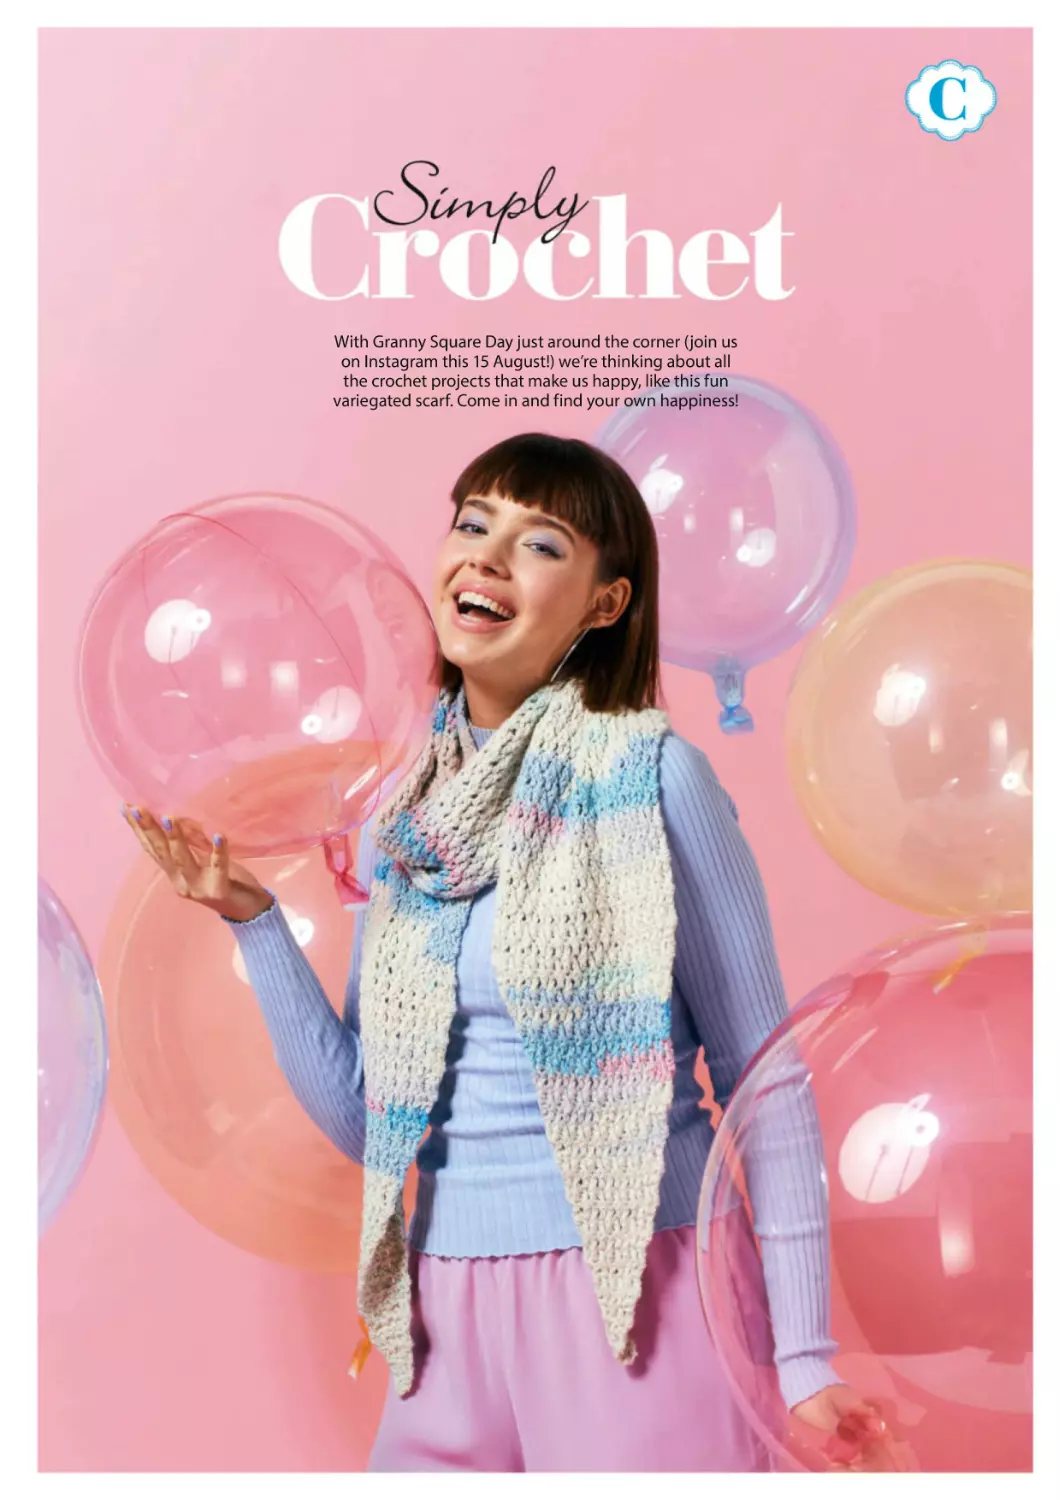
With Granny Square Day just around the corner (join us
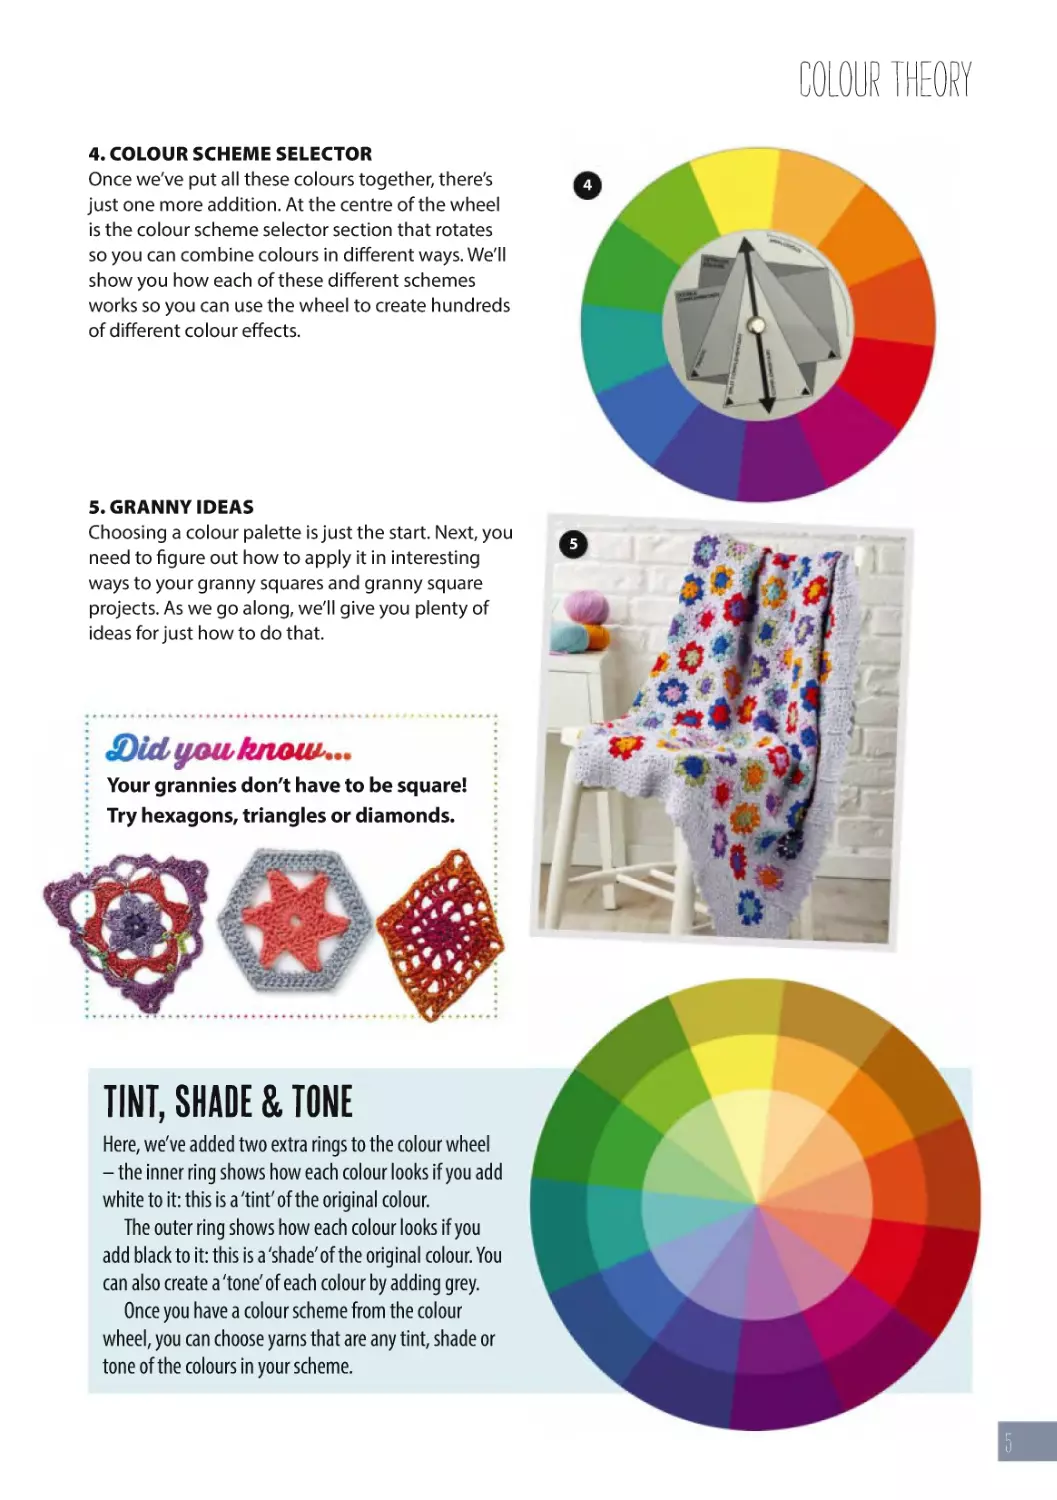
on Instagram this 15 August!) we’re thinking about all
the crochet projects that make us happy, like this fun
variegated scarf. Come in and find your own happiness!
f
0_RNaRNT_pVñ28!
koala on
ISSUE ONE HUNDRED & THIRTY NINE
CONTENTS
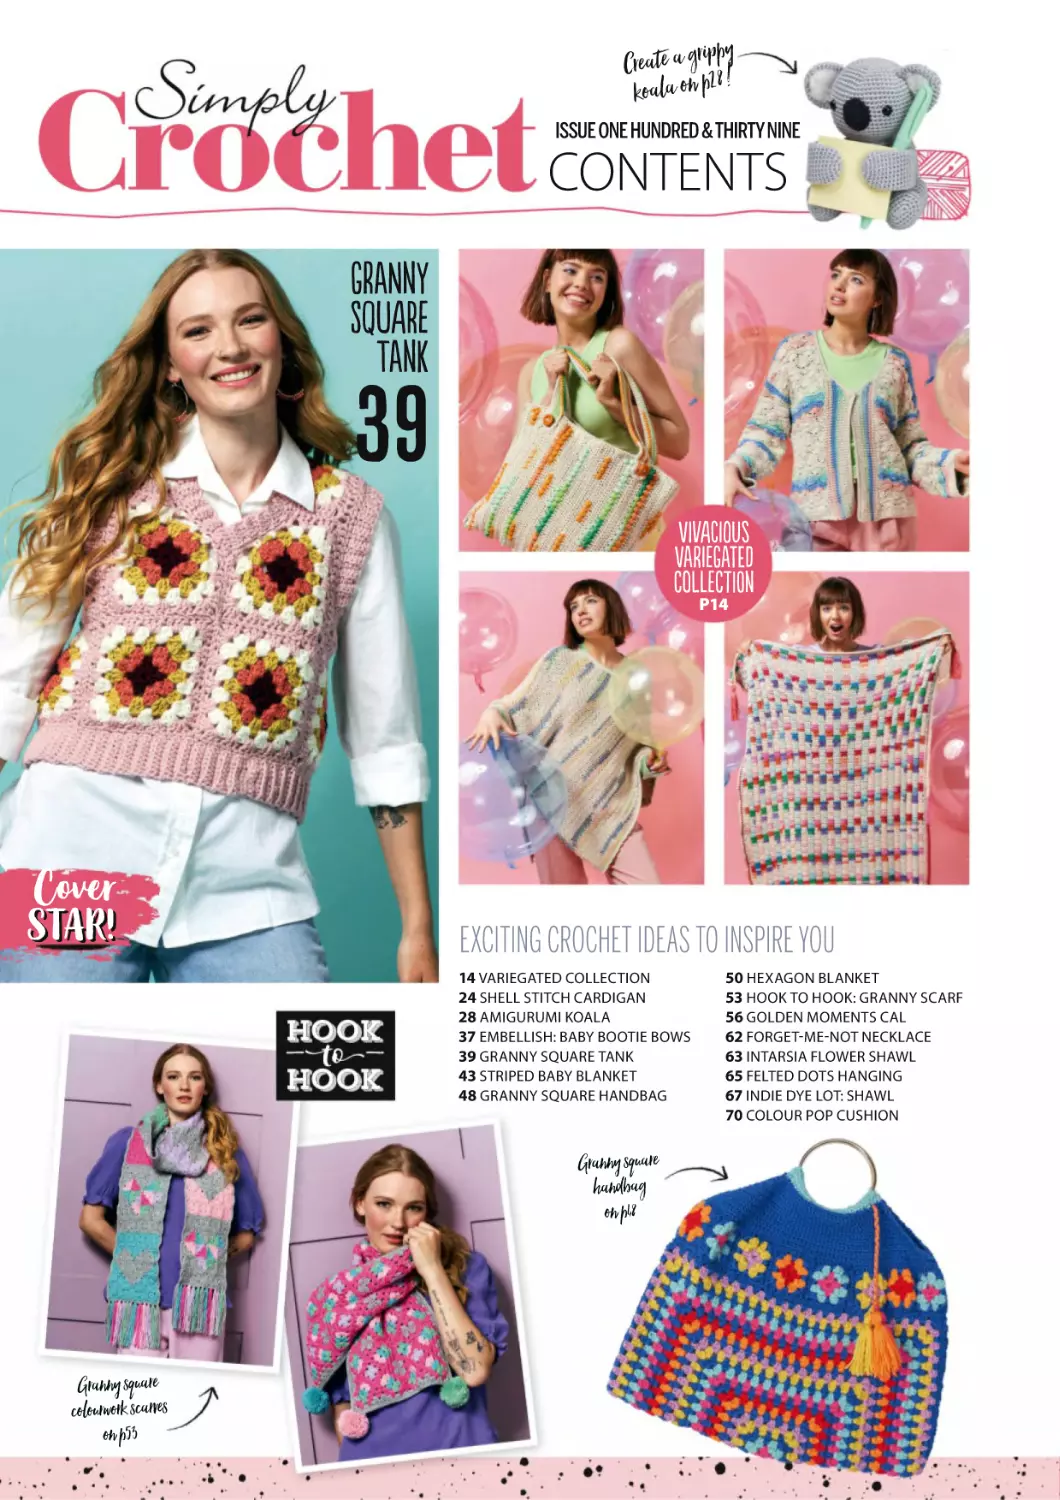
GraNny
SquAre
Tank
39
VivAcIous
VarIeGatEd
ColLeCtiOn
P14
Cover
star!
EXCITING CROCHET IDEAS TO INSPIRE YOU
14 VARIEGATED COLLECTION
24 SHELL STITCH CARDIGAN
28 AMIGURUMI KOALA
37 EMBELLISH: BABY BOOTIE BOWS
39 GRANNY SQUARE TANK
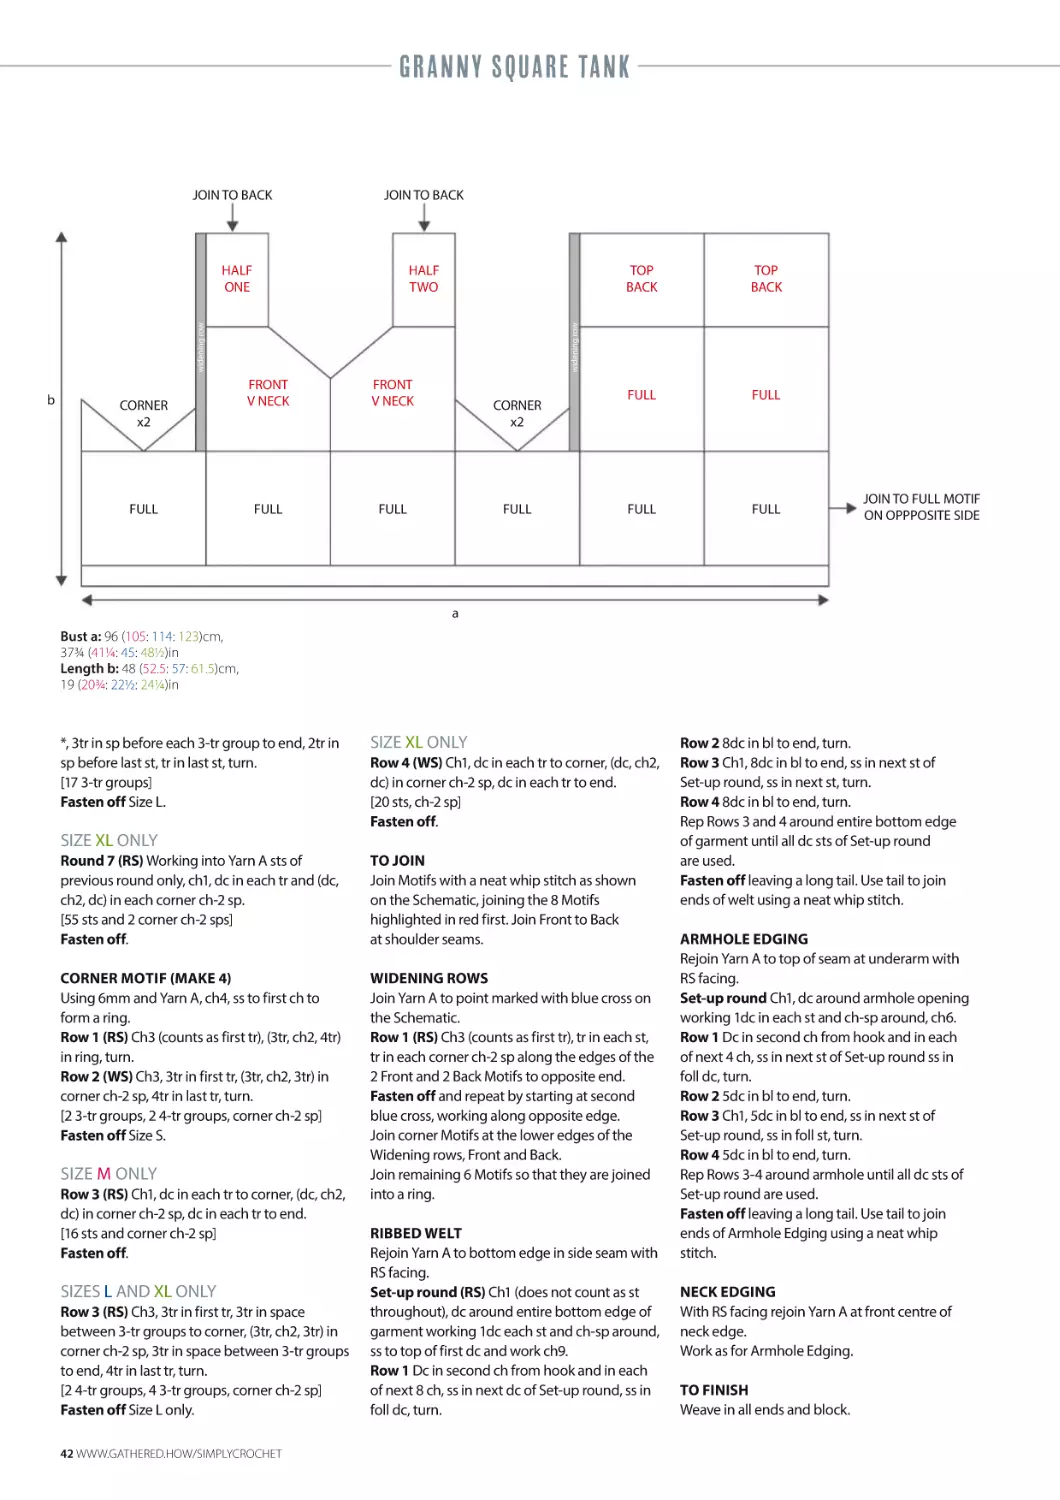
43 STRIPED BABY BLANKET
48 GRANNY SQUARE HANDBAG
4_N[[f`^bN_R
handbag
on p48
4_N[[f`^bN_R
P\Y\b_d\_X`PN_cR`
on p53
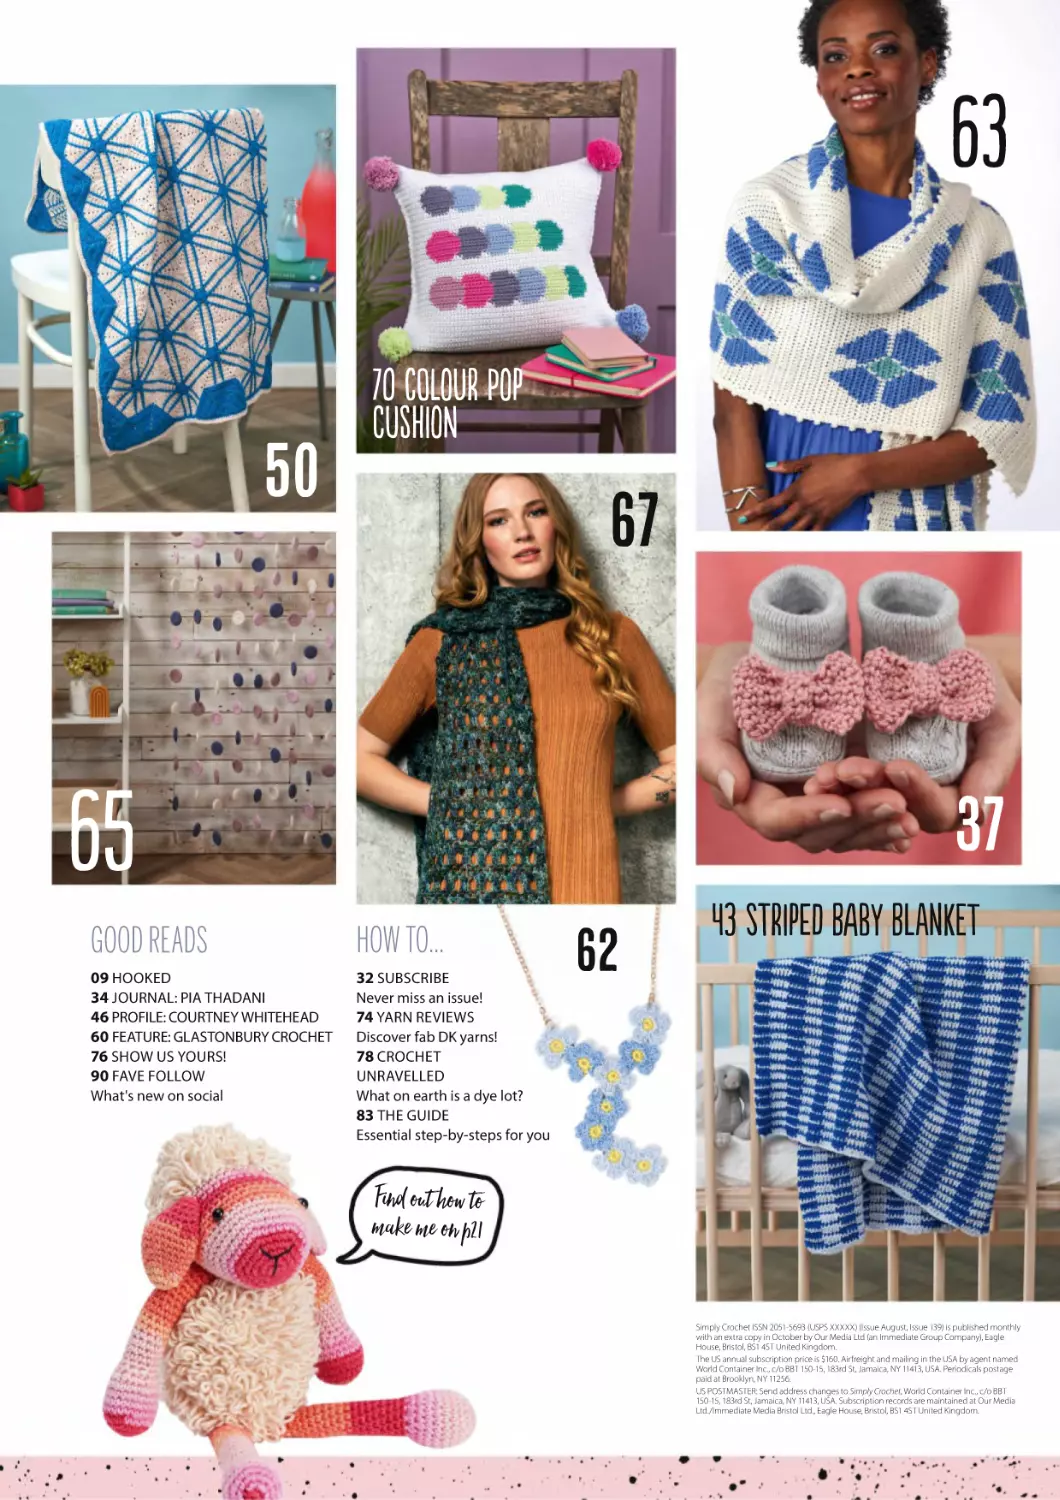
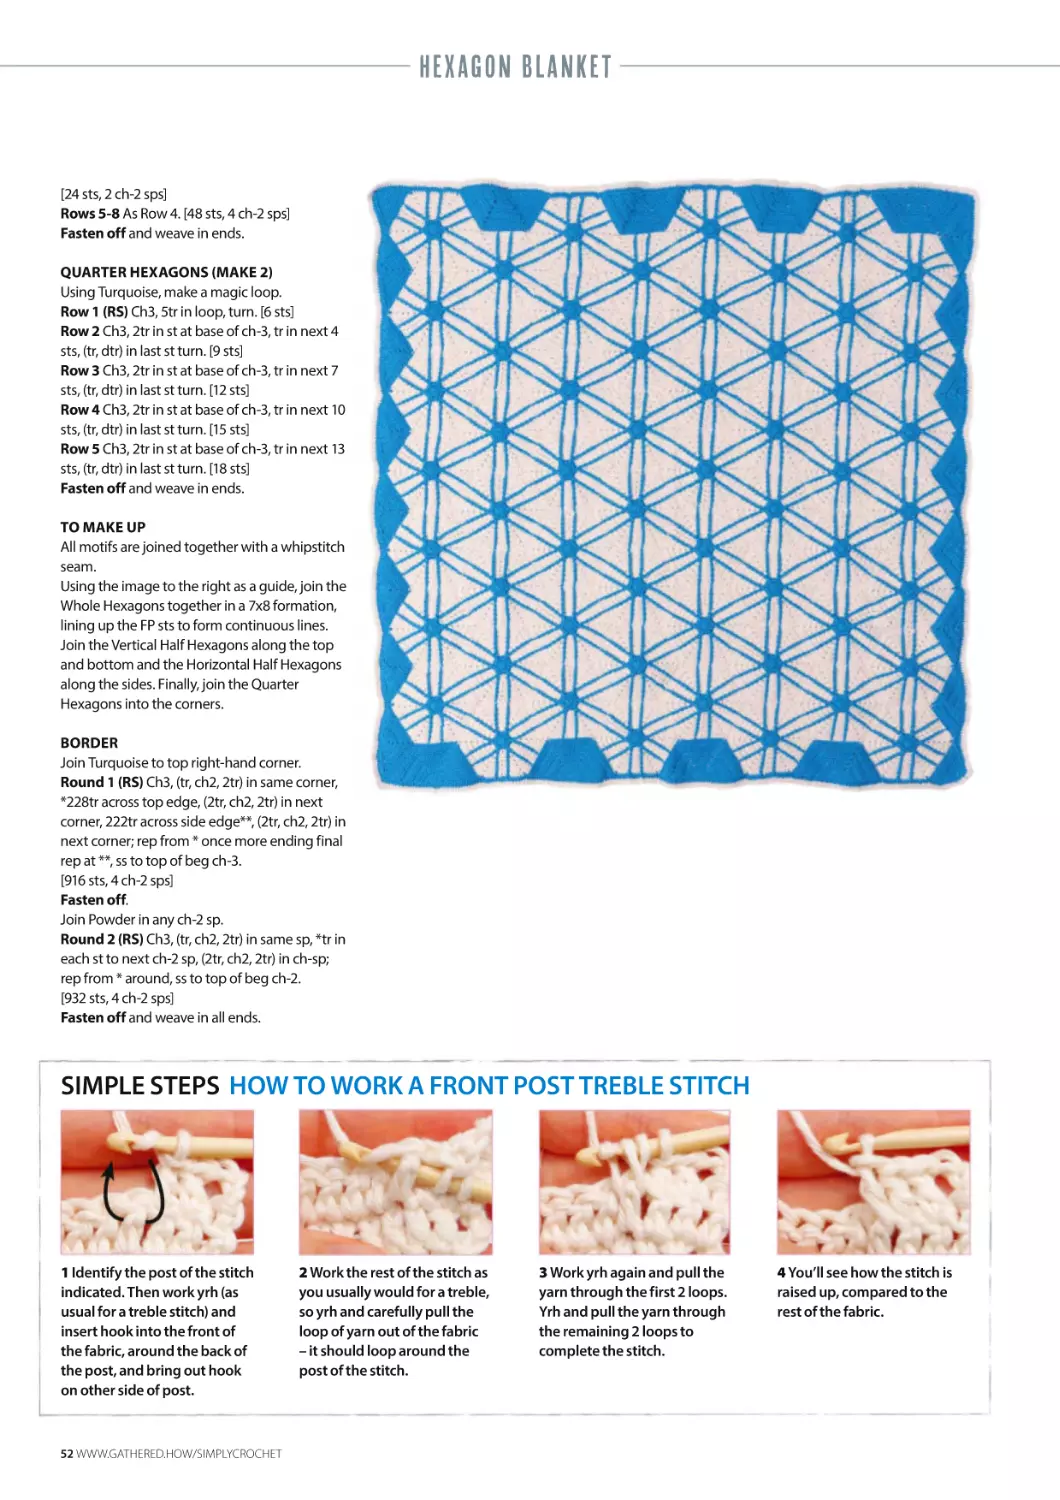
50 HEXAGON BLANKET
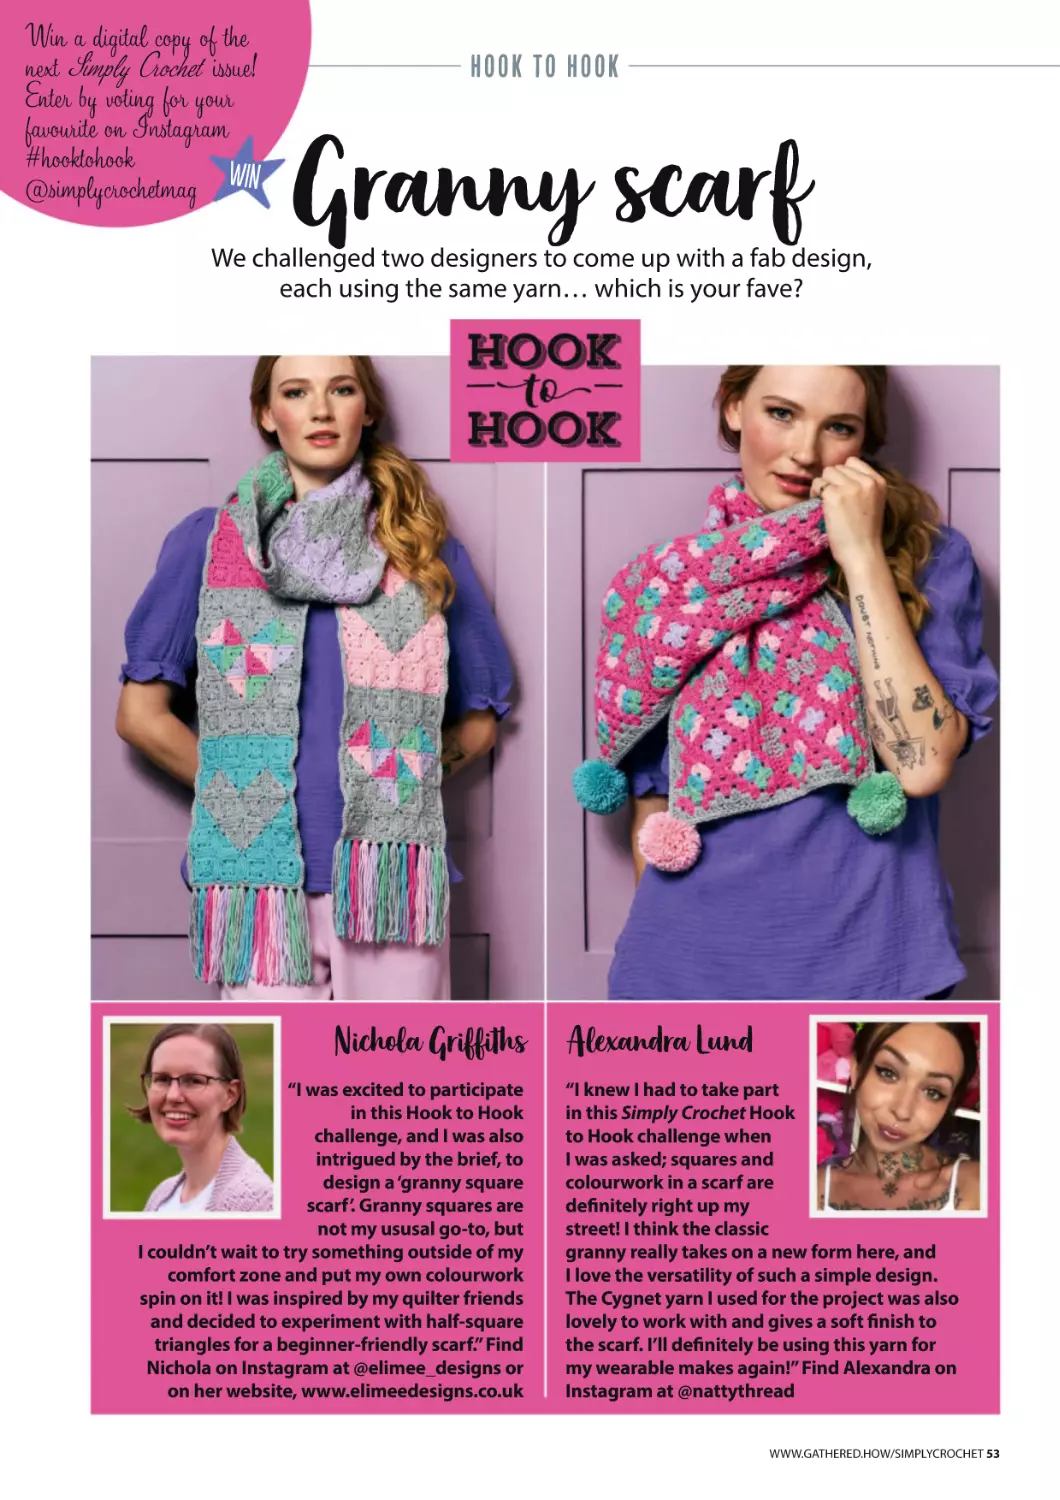
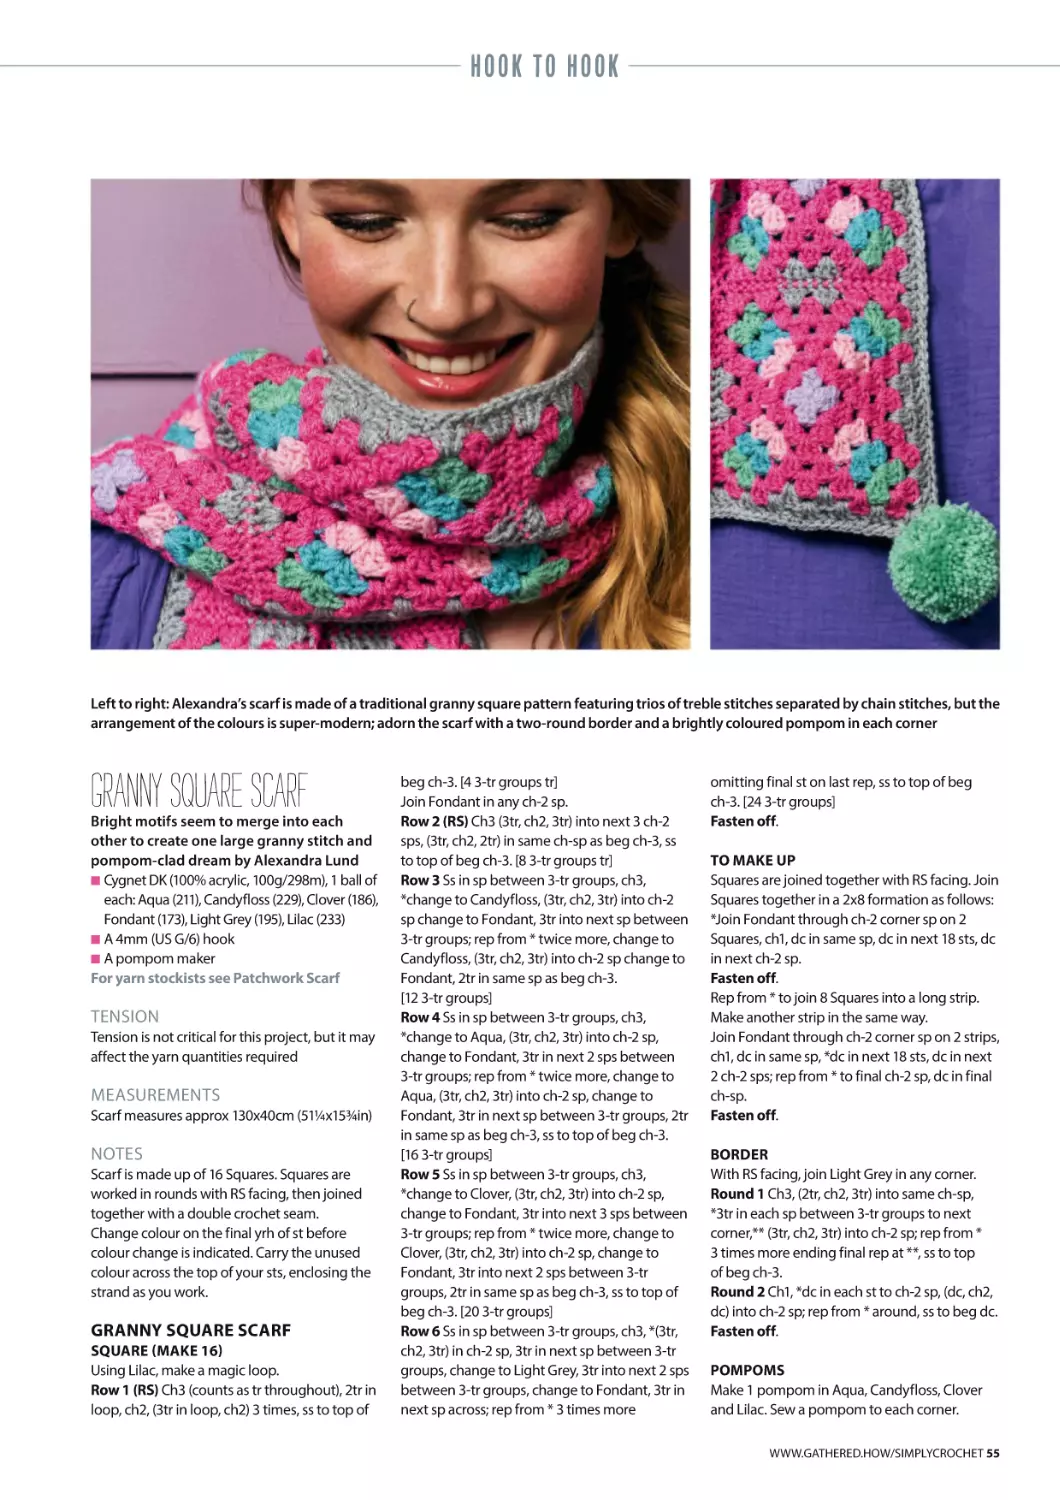
53 HOOK TO HOOK: GRANNY SCARF
56 GOLDEN MOMENTS CAL
62 FORGET-ME-NOT NECKLACE
63 INTARSIA FLOWER SHAWL
65 FELTED DOTS HANGING
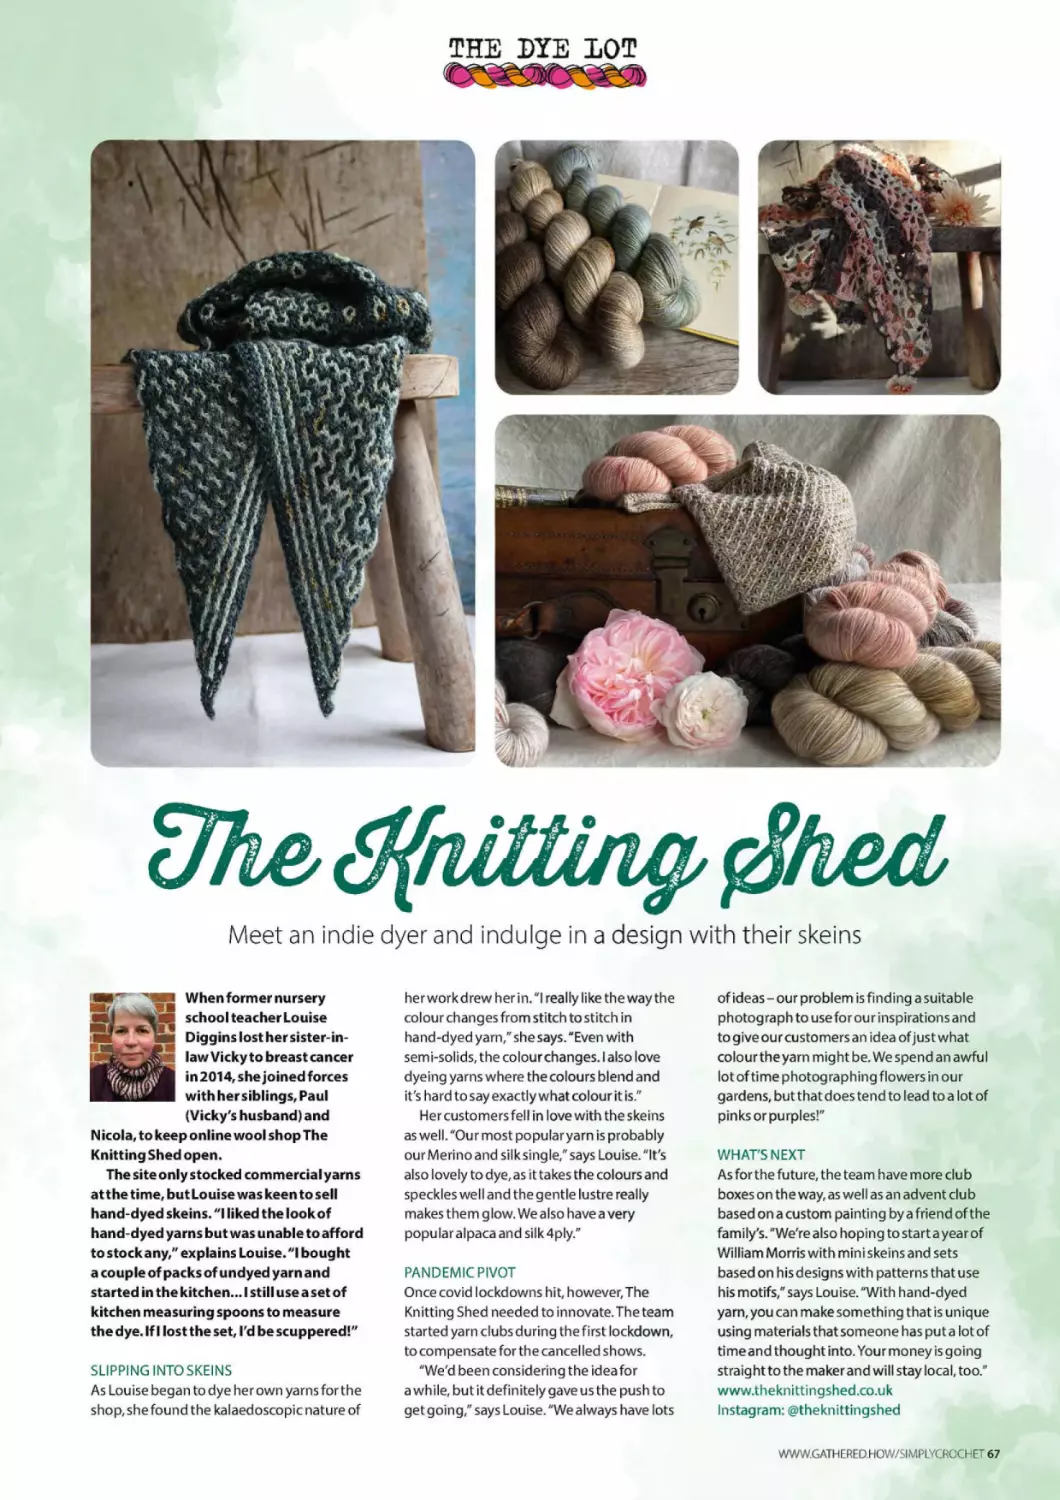
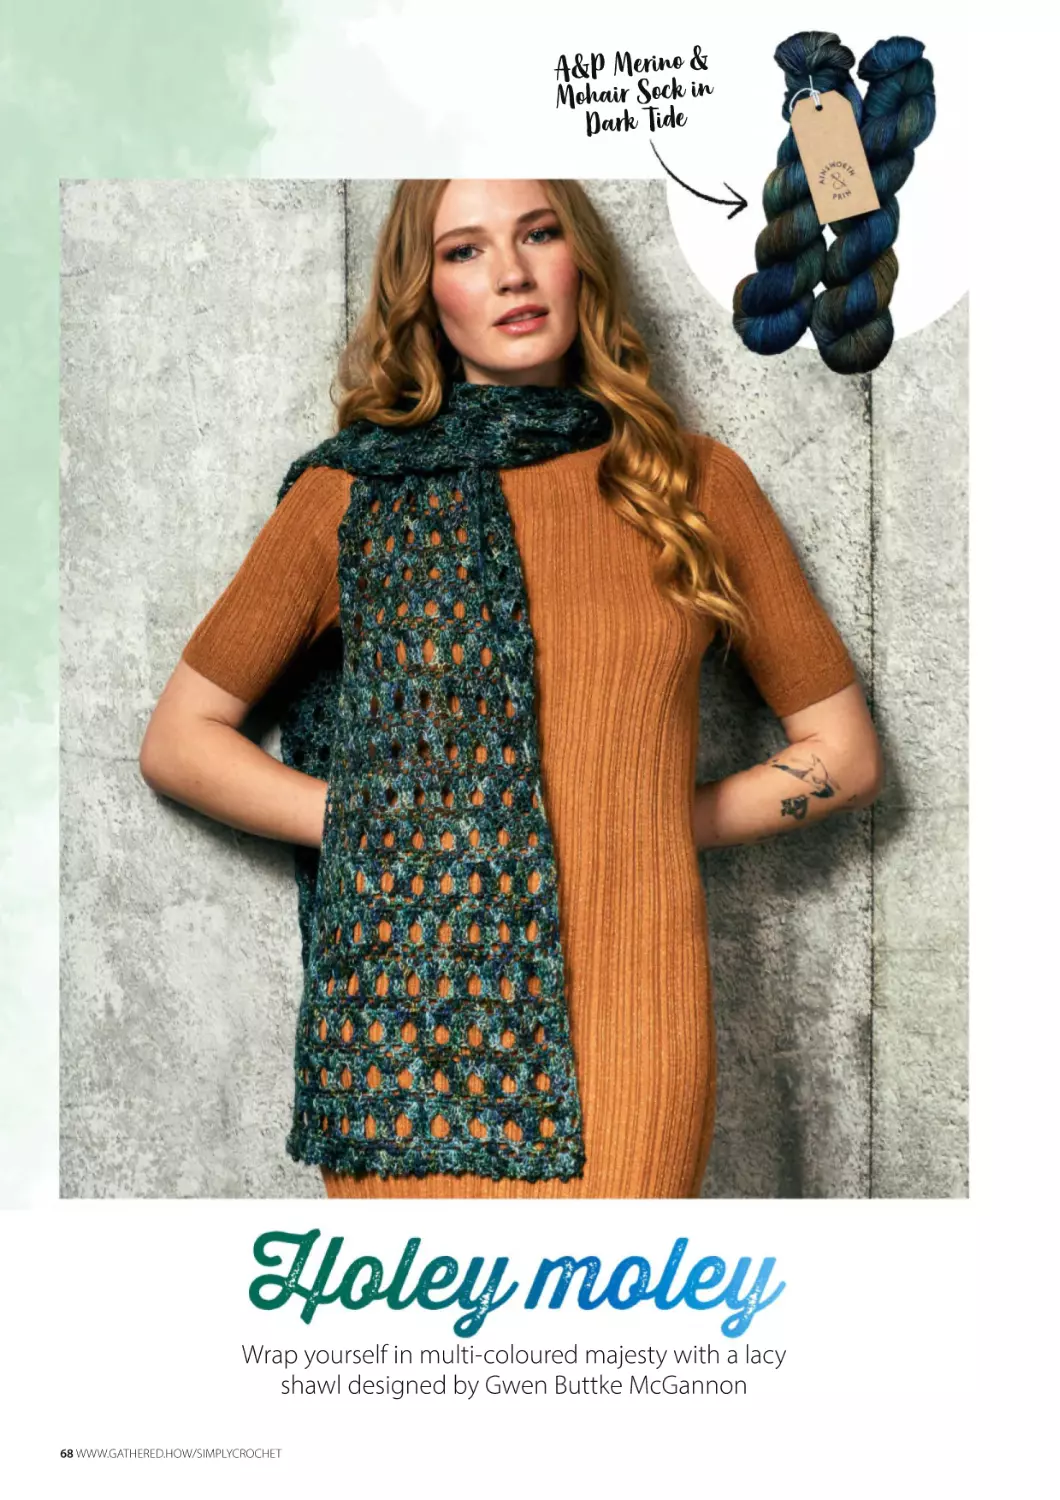
67 INDIE DYE LOT: SHAWL
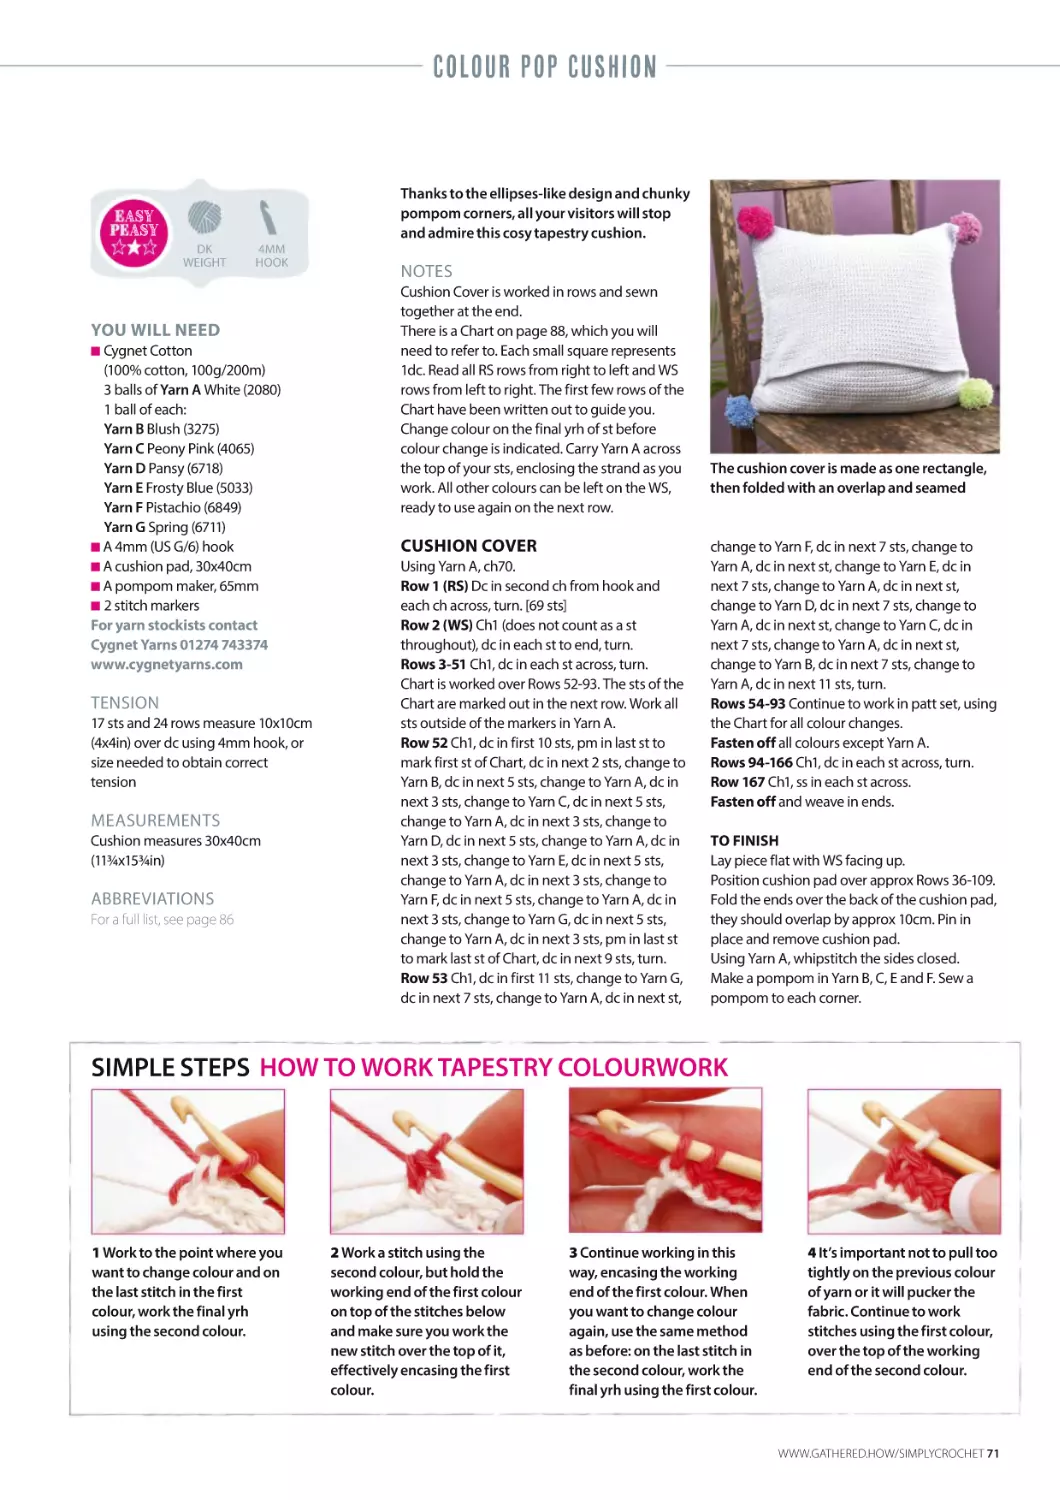
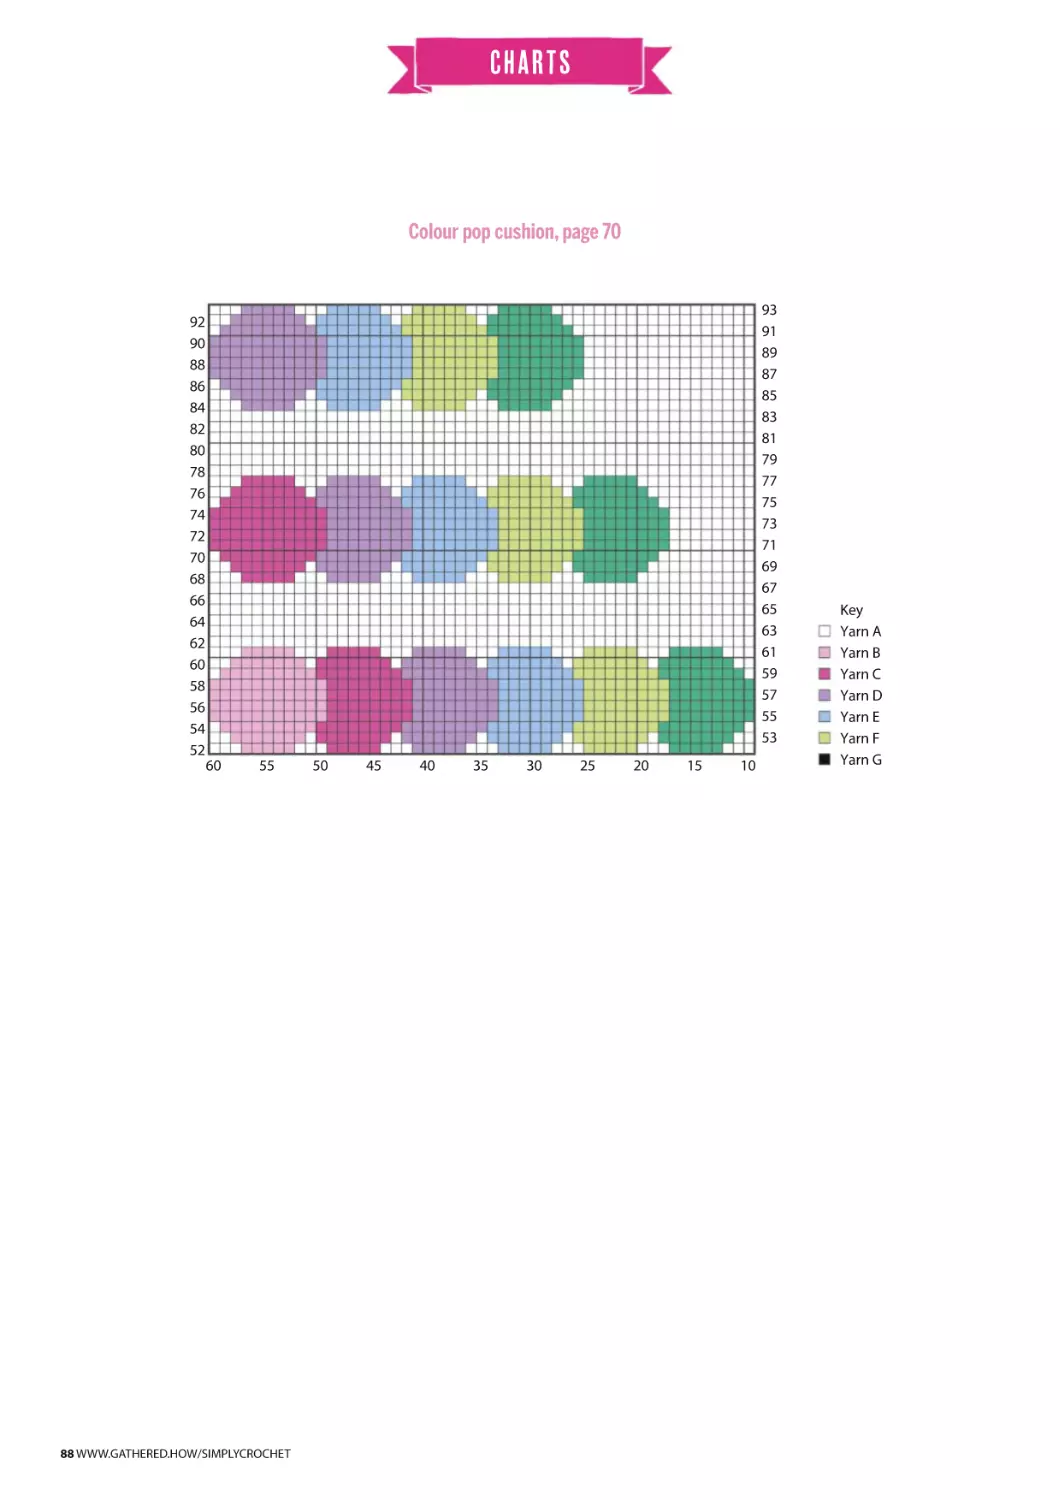
70 COLOUR POP CUSHION
63
70 coloUr poP
CushioN
50
67
65
37
GOOD READS
HOW TO…
09 HOOKED
34 JOURNAL: PIA THADANI
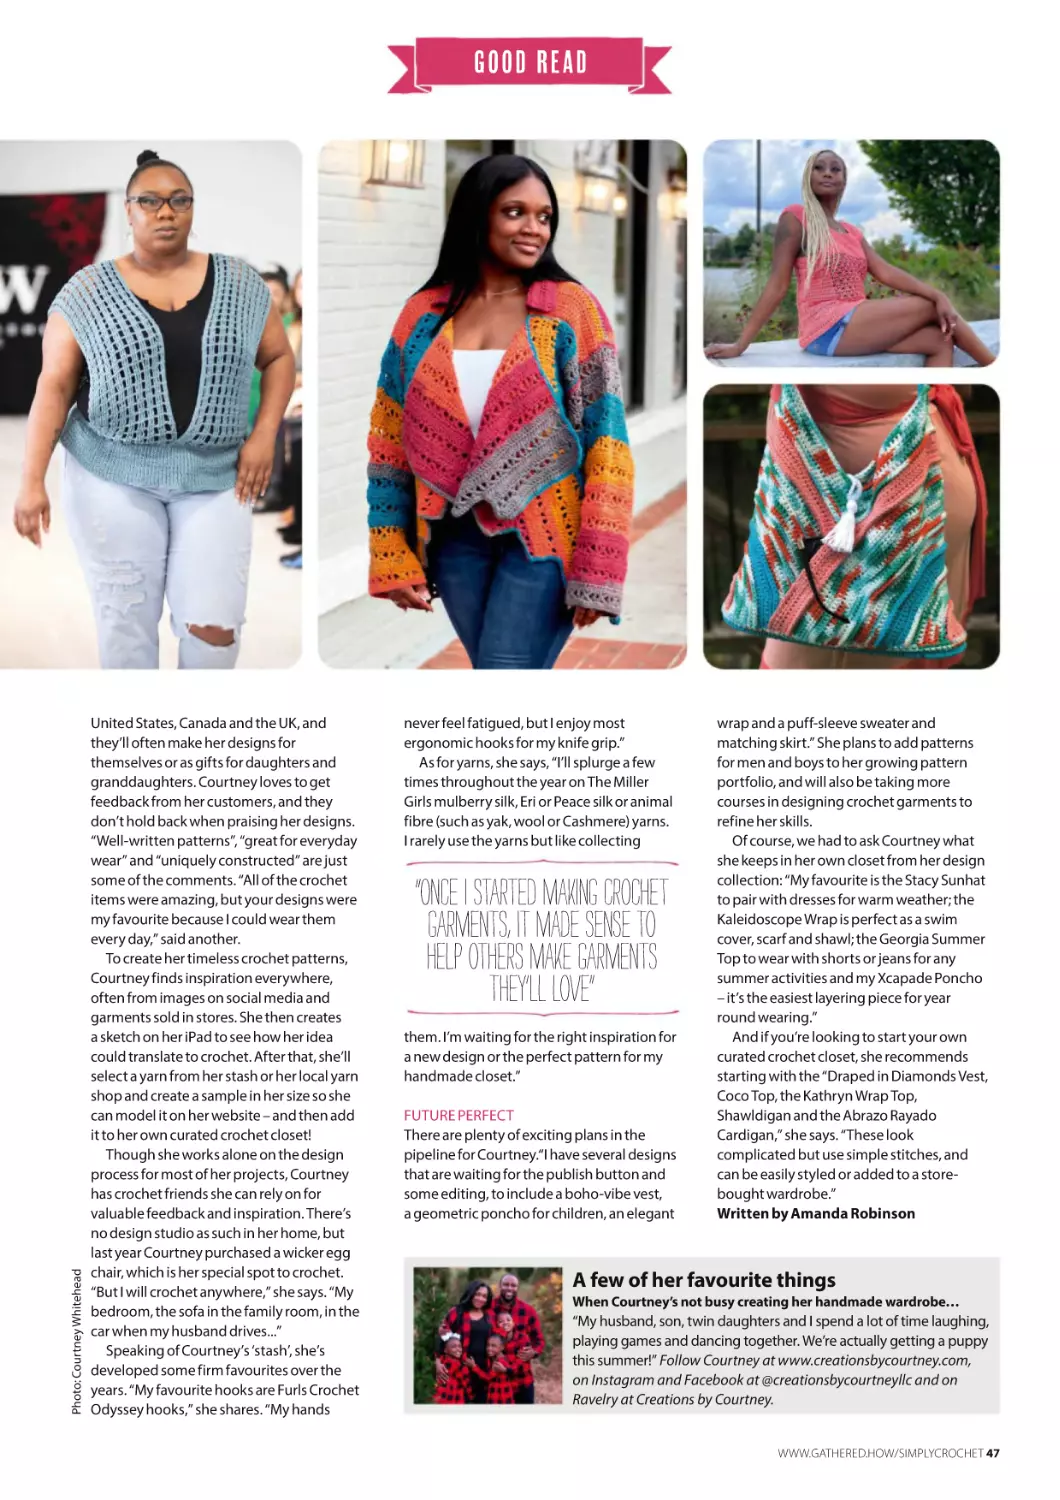
46 PROFILE: COURTNEY WHITEHEAD
60 FEATURE: GLASTONBURY CROCHET
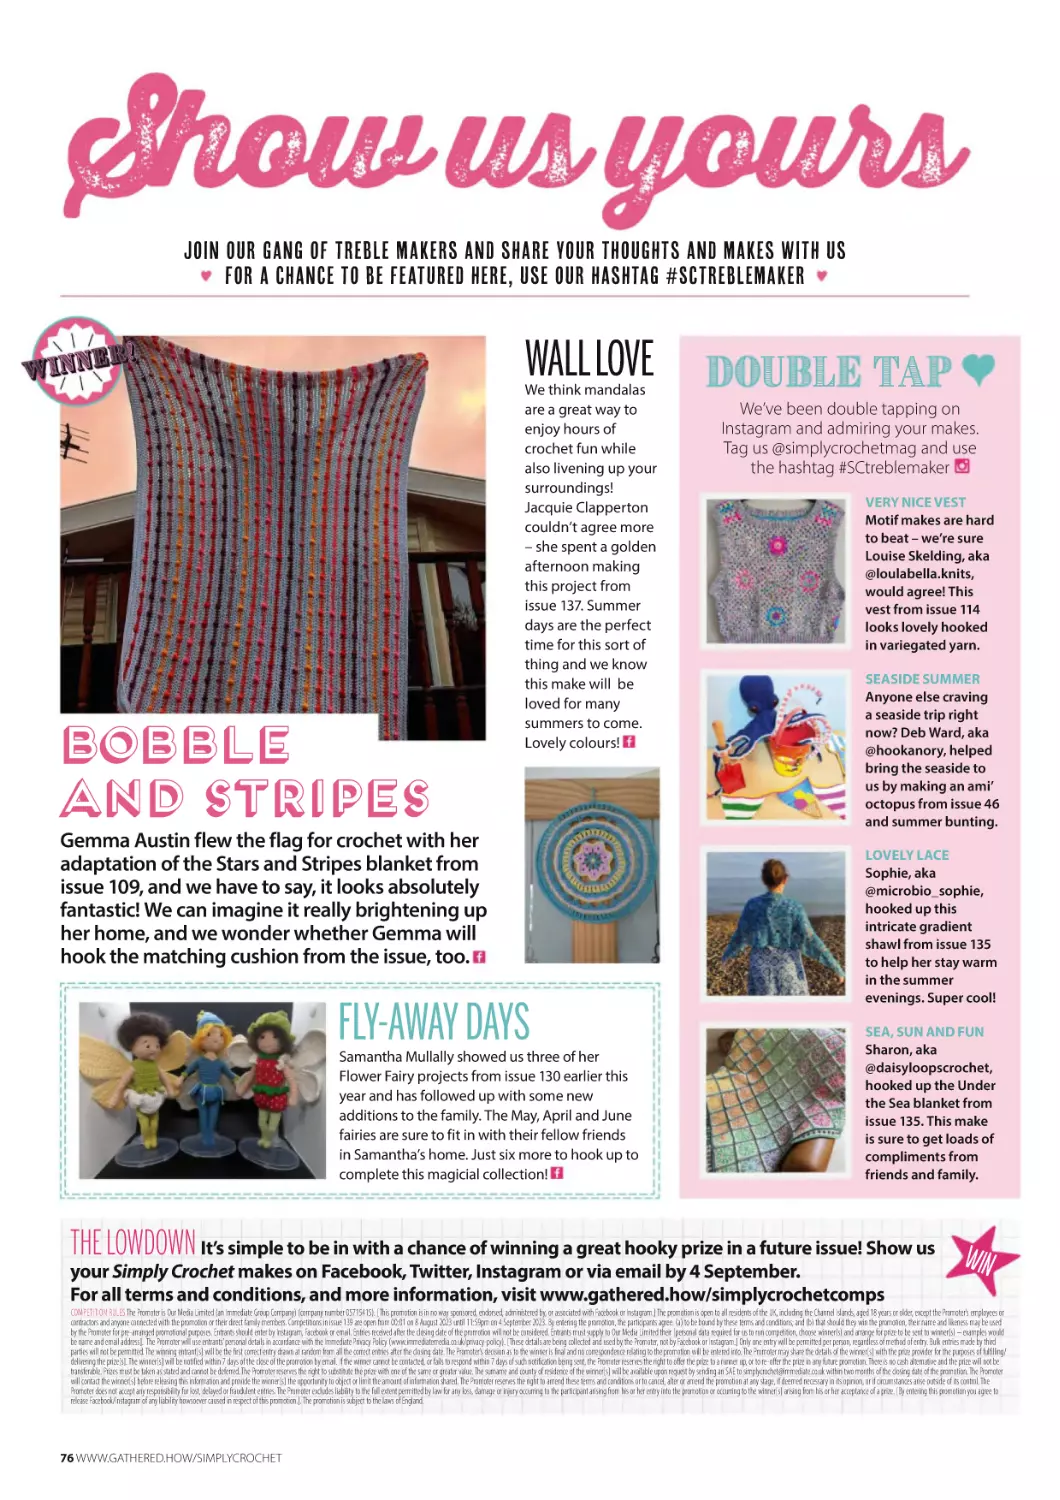
76 SHOW US YOURS!
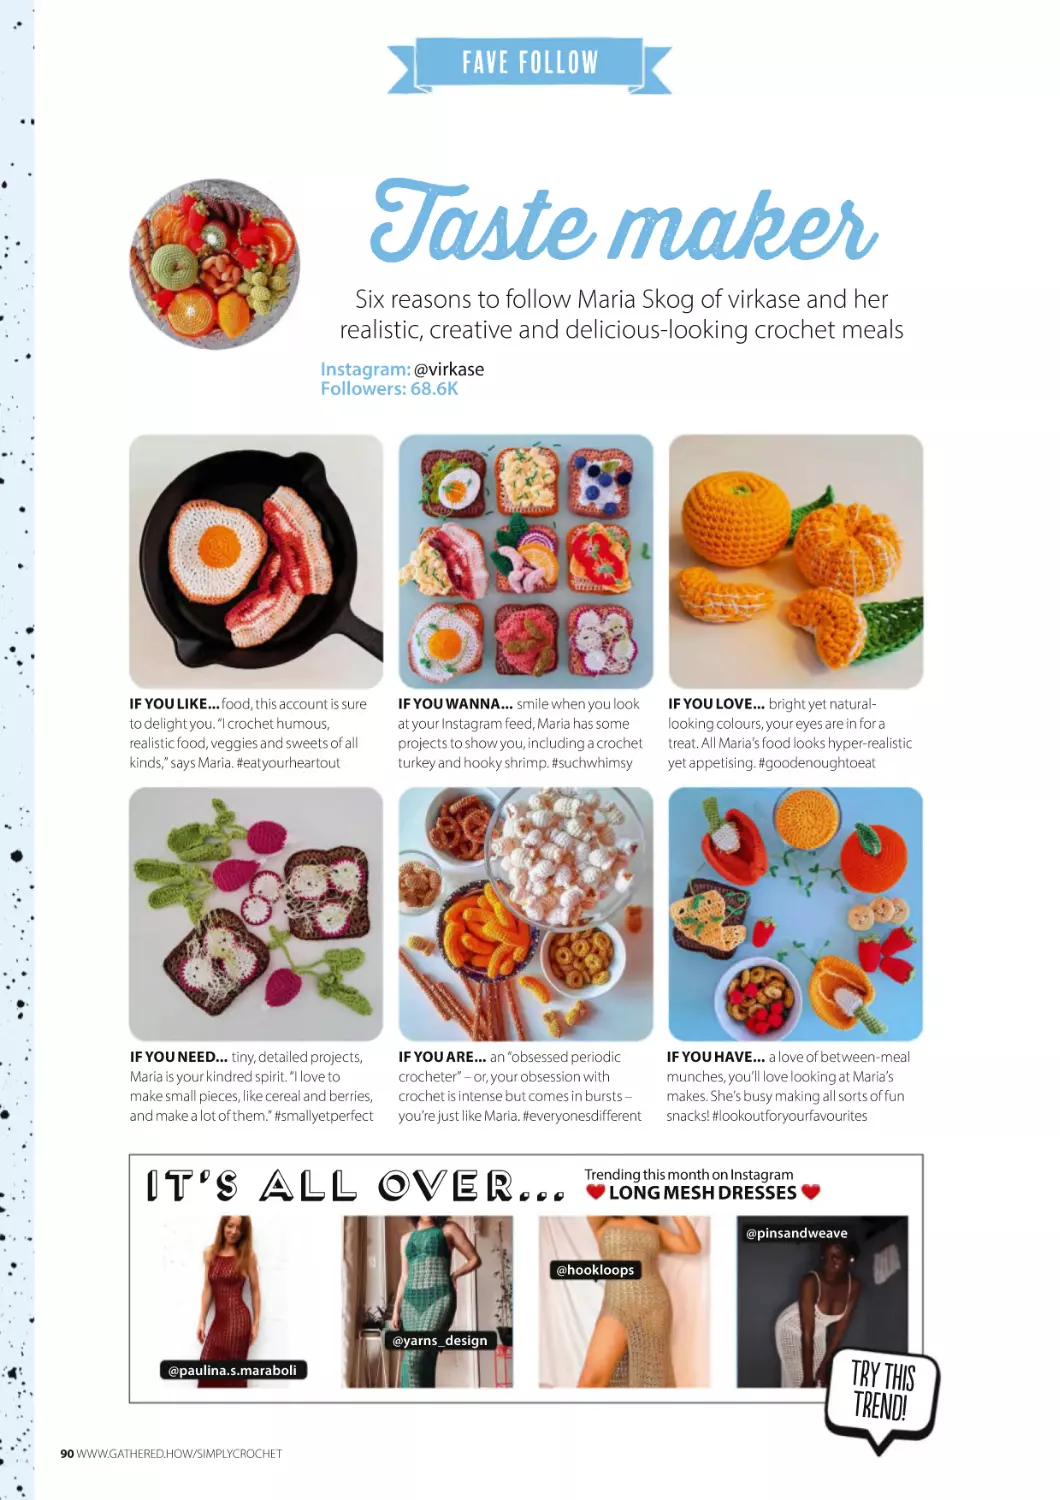
90 FAVE FOLLOW
32 SUBSCRIBE
What's new on social
62
43 striPed bAby bLankeT
Never miss an issue!
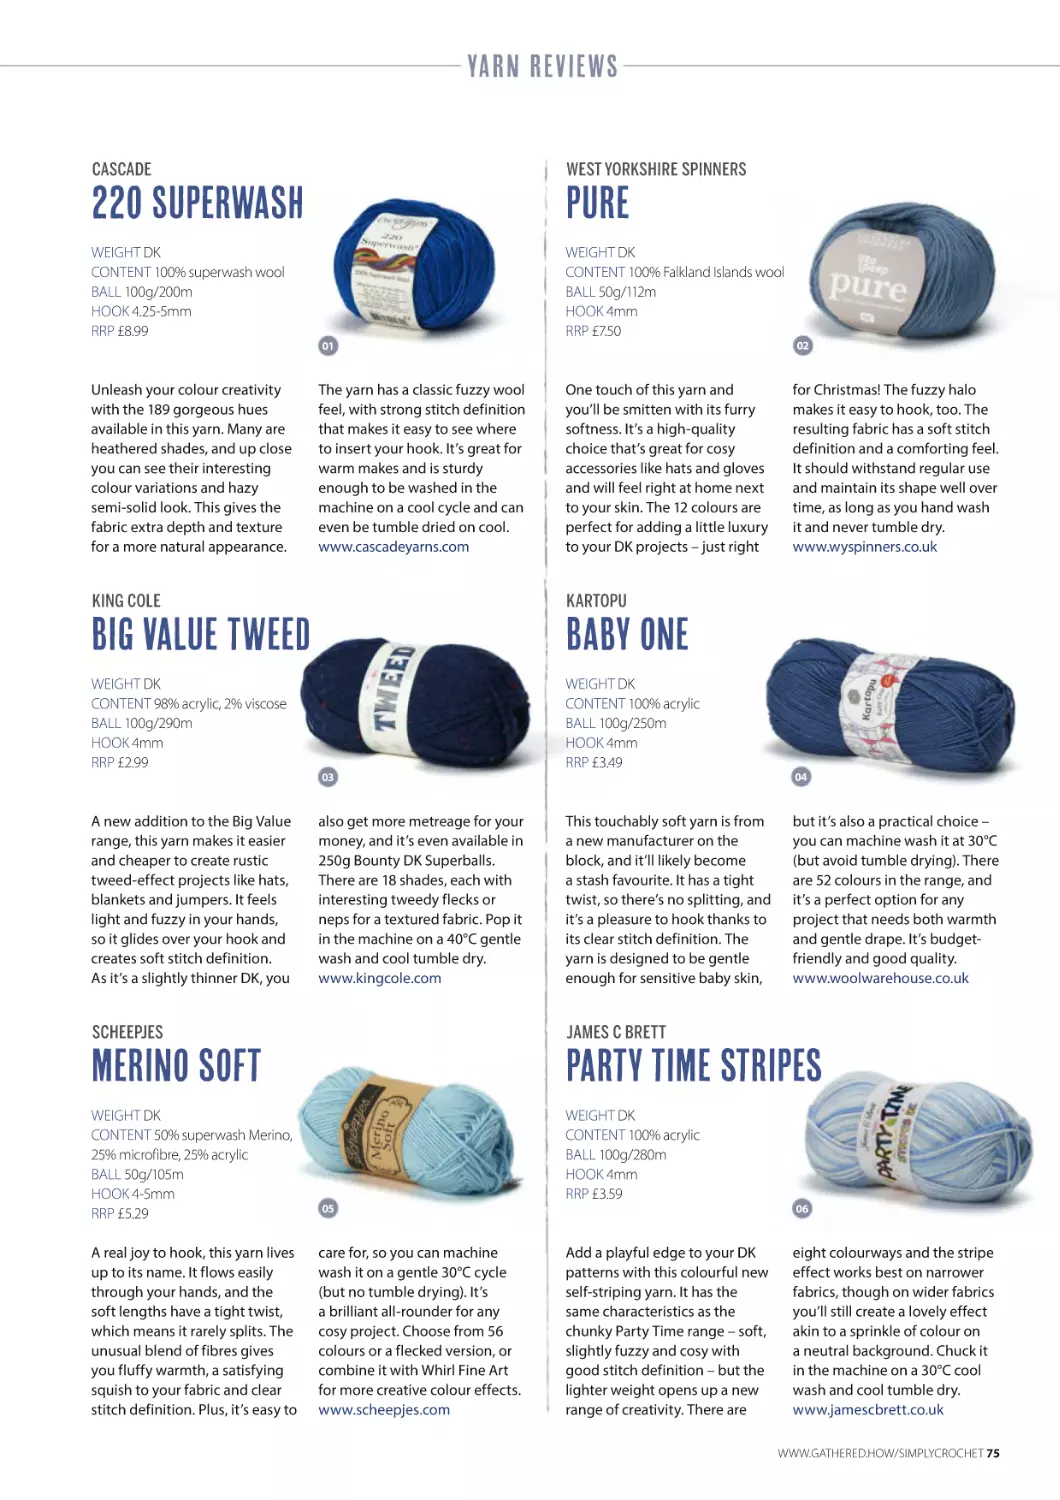
74 YARN REVIEWS
Discover fab DK yarns!
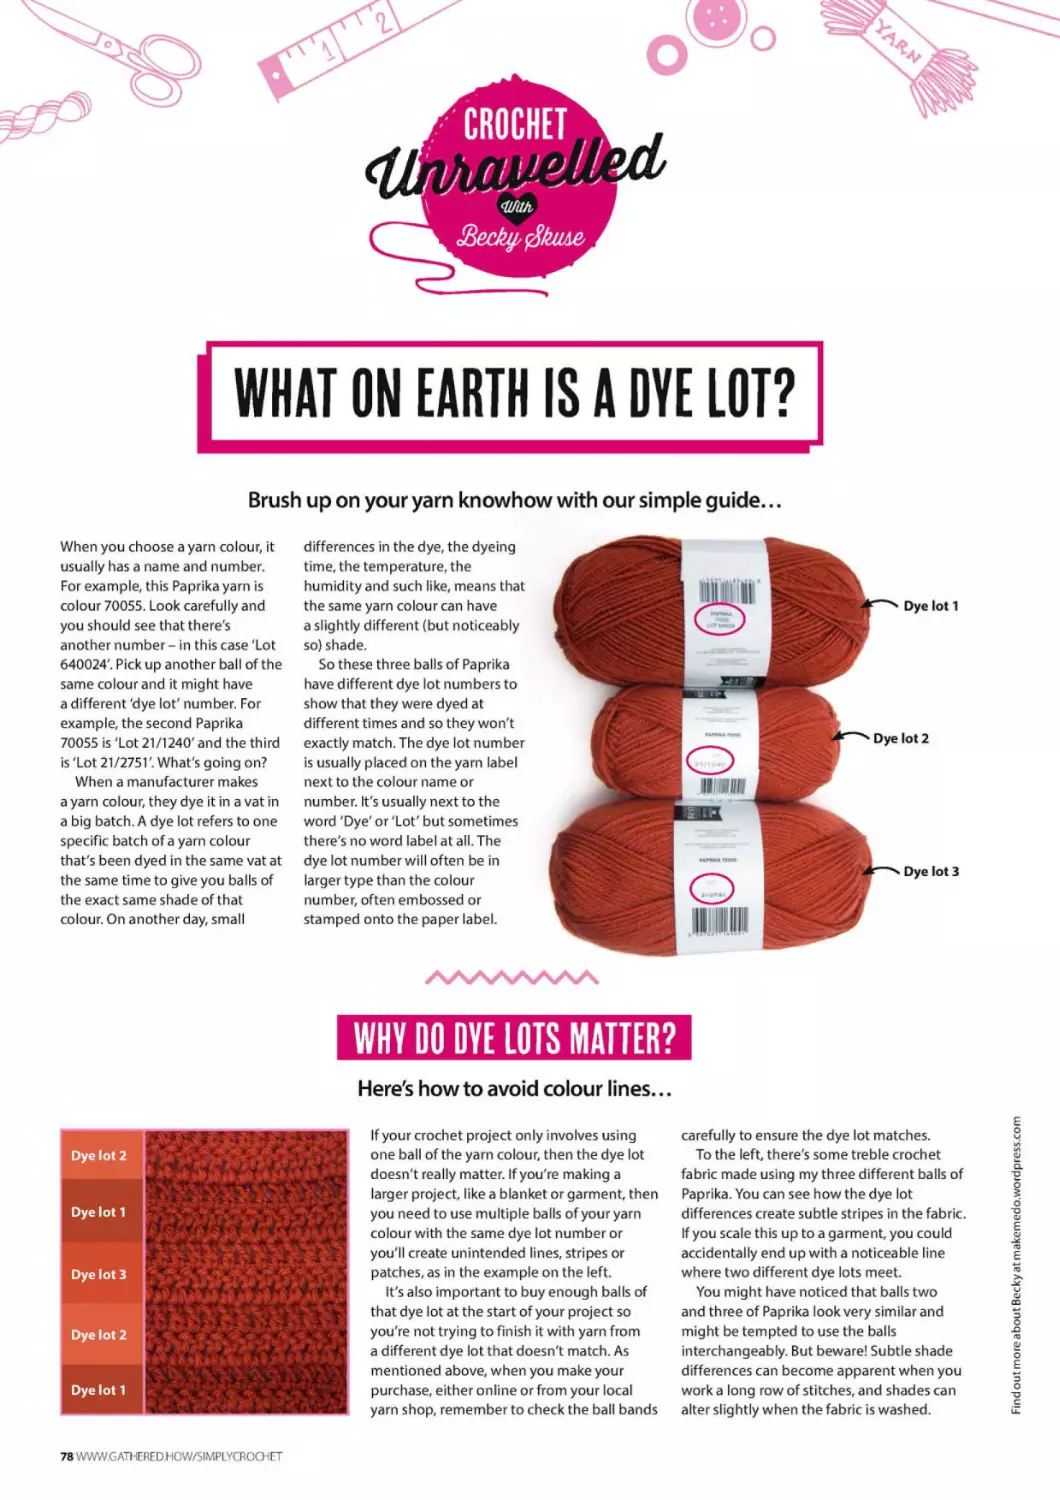
78 CROCHET
UNRAVELLED
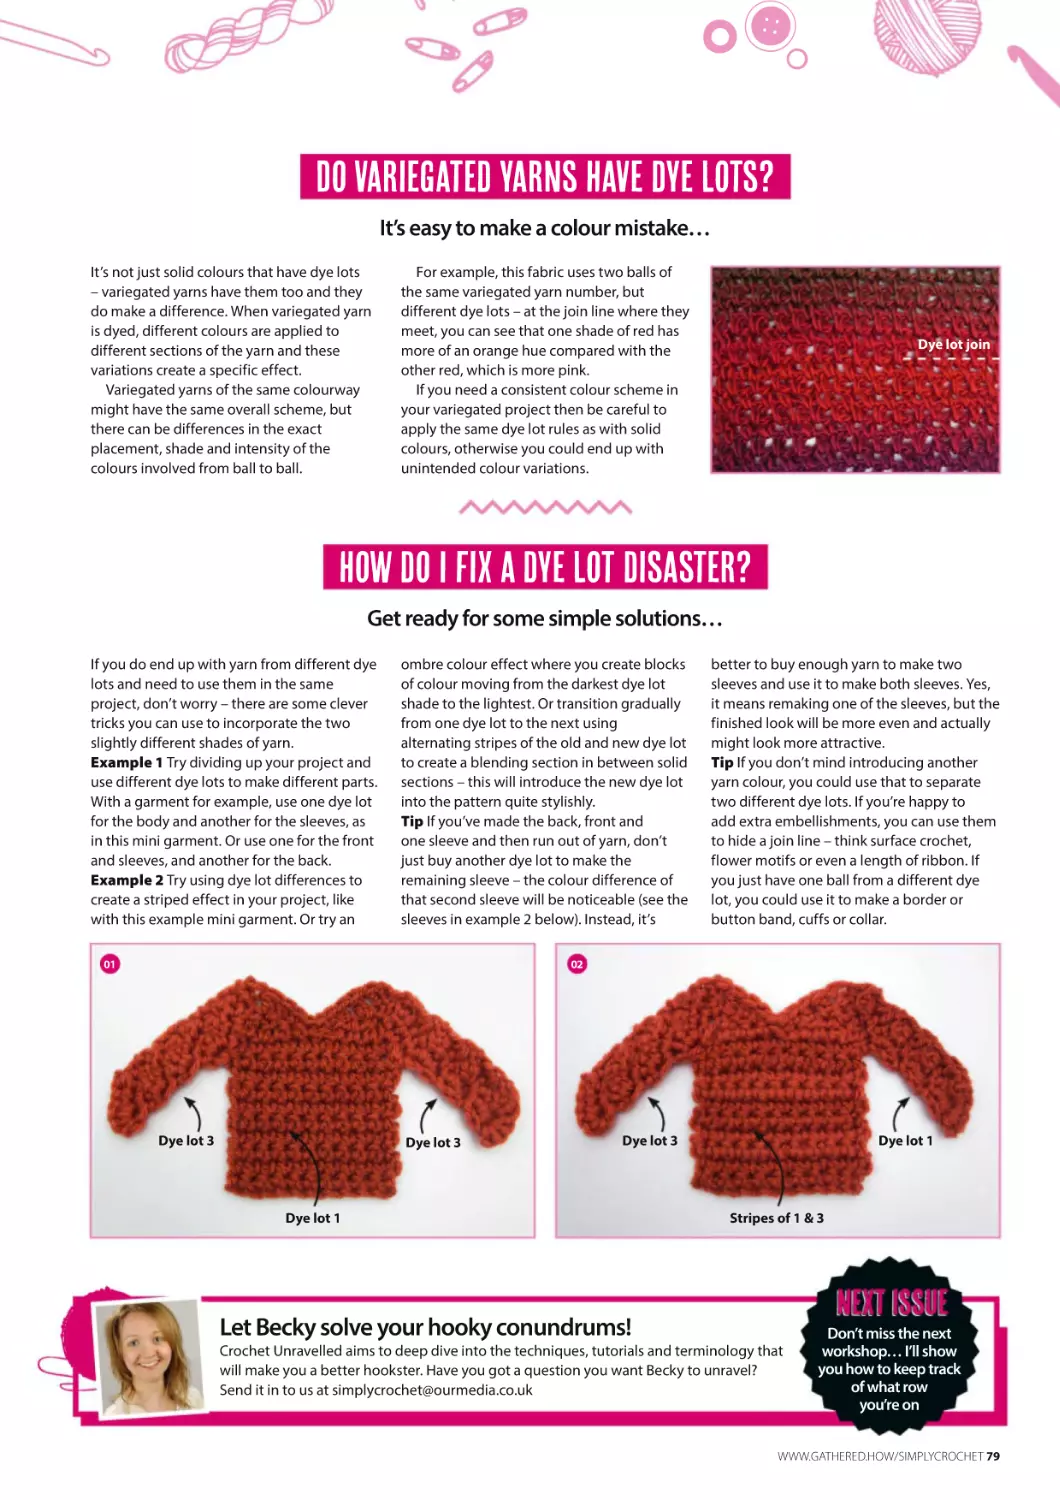
What on earth is a dye lot?
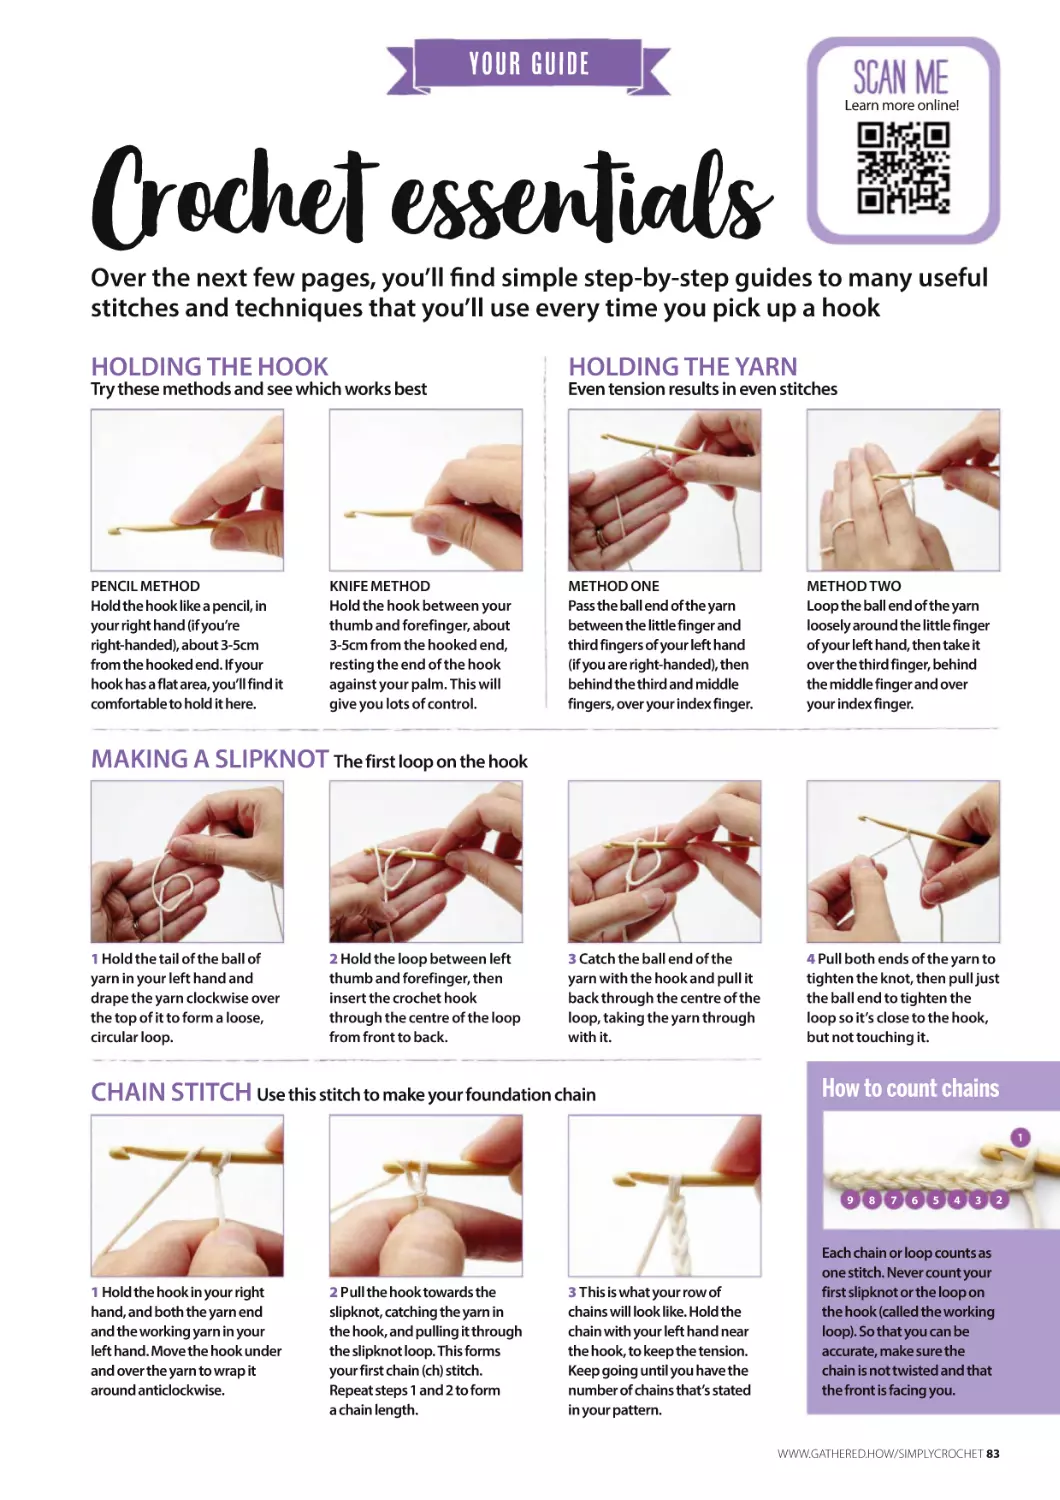
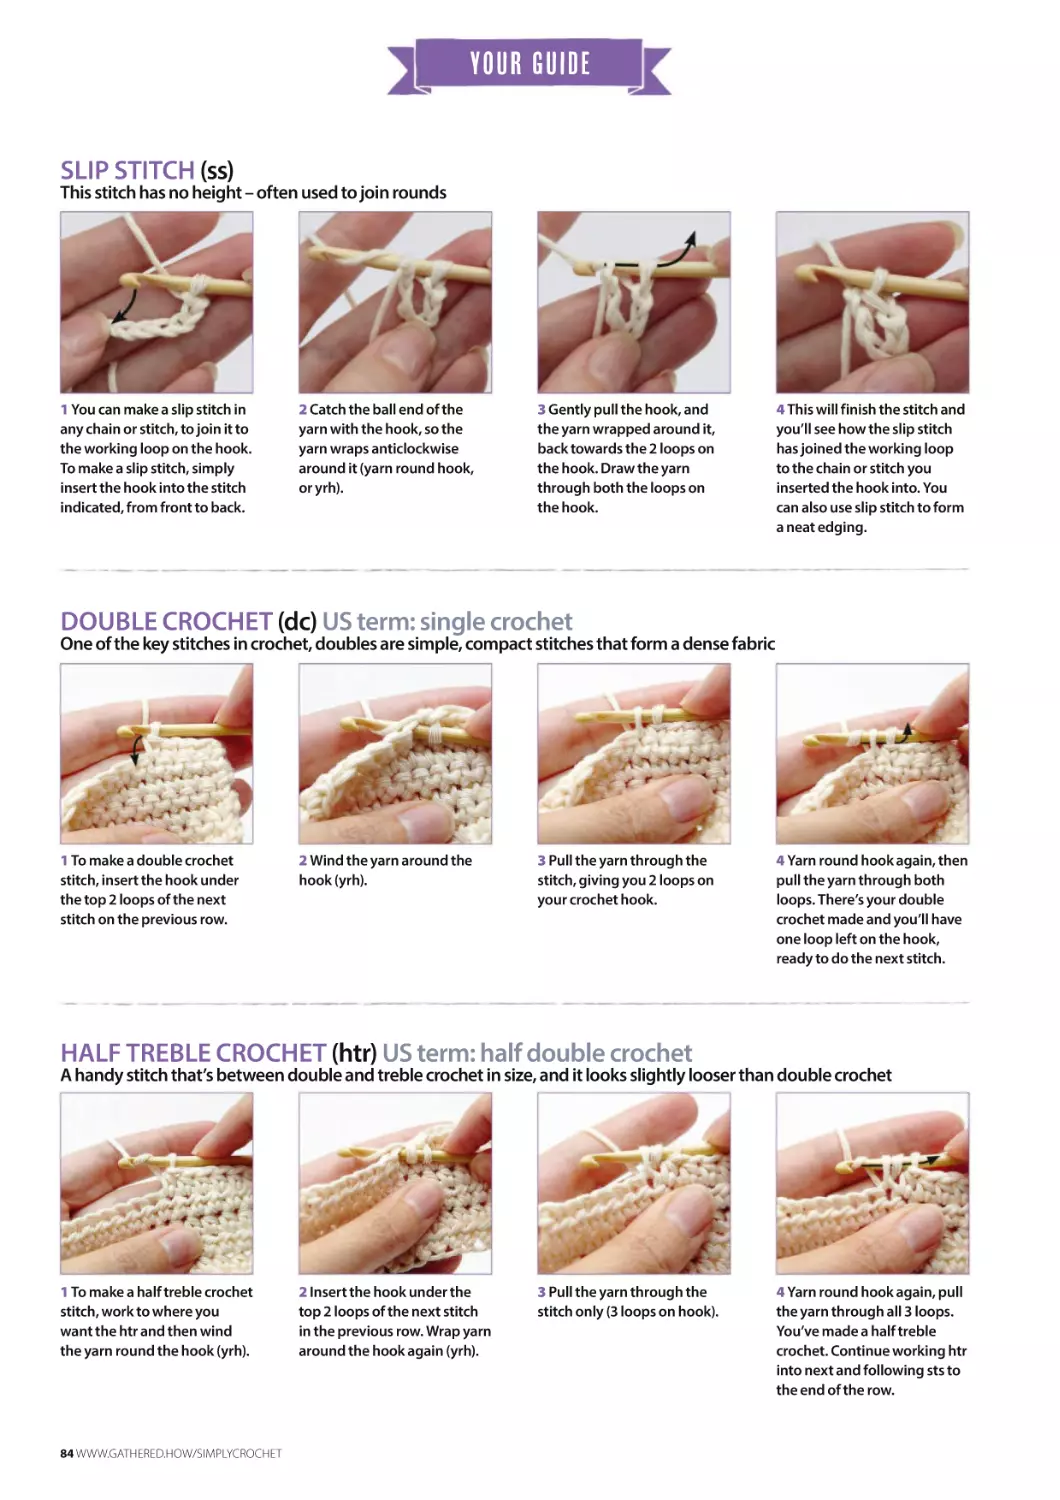
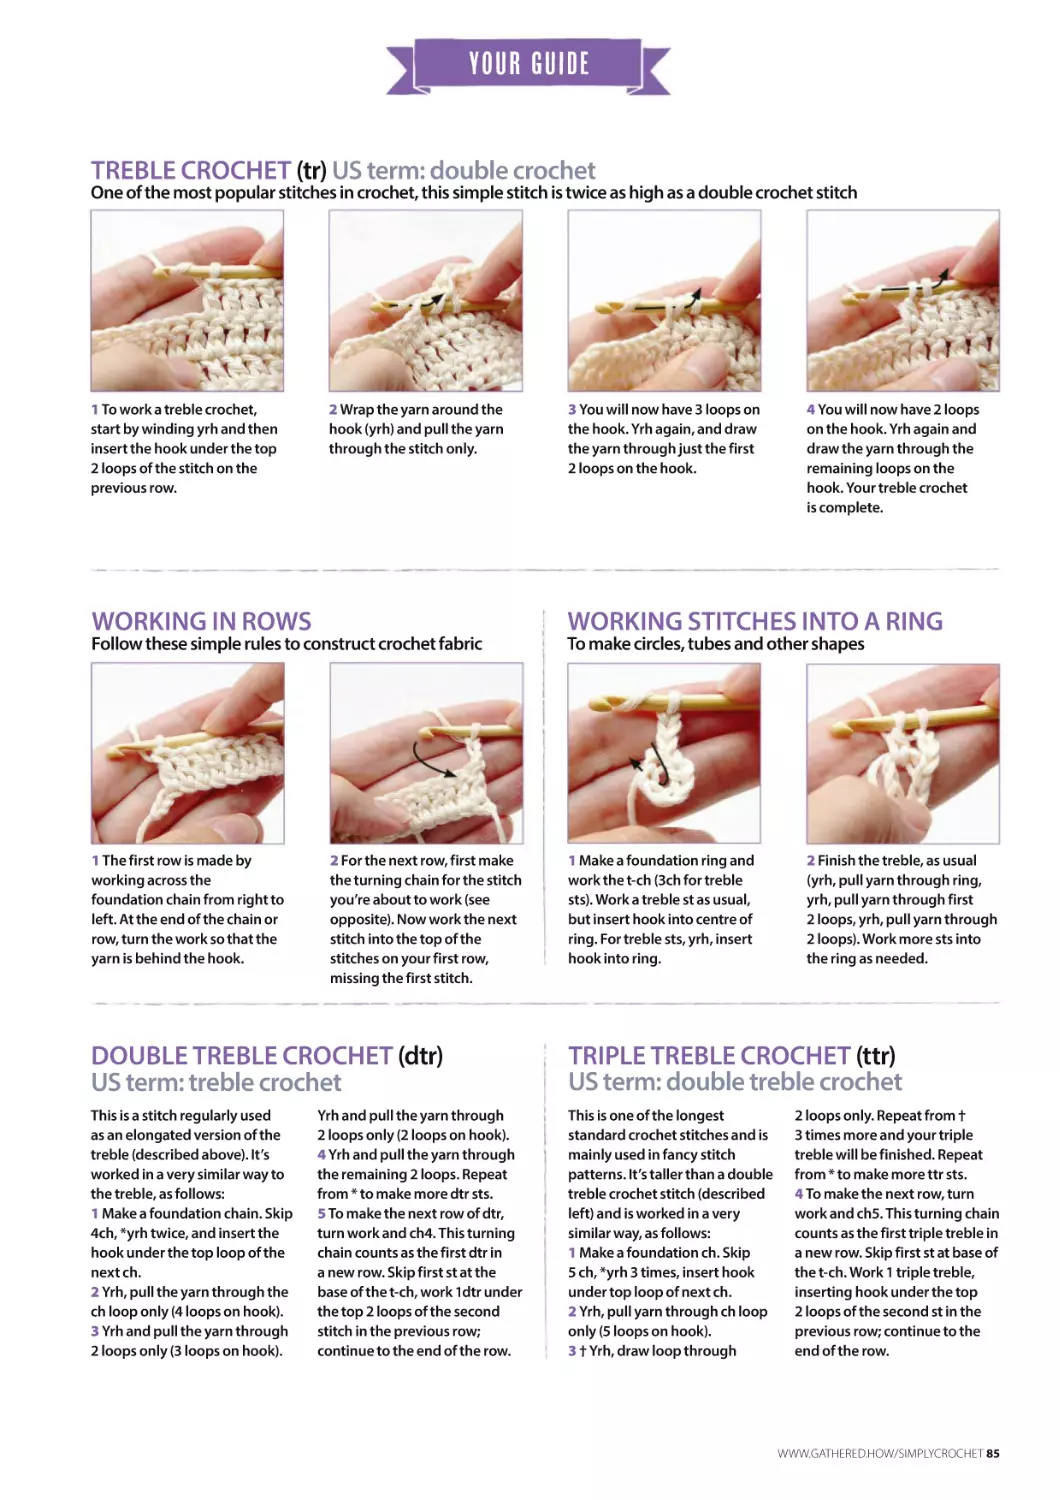
83 THE GUIDE
Essential step-by-steps for you
3V[Q\baU\da\
make me on p21
Simply Crochet ISSN 2051-5693 (USPS XXXXX) (Issue August, Issue 139) is published monthly
with an extra copy in October by Our Media Ltd (an Immediate Group Company), Eagle
House, Bristol, BS1 4ST United Kingdom.
The US annual subscription price is $160. Airfreight and mailing in the USA by agent named
World Container Inc., c/o BBT 150-15, 183rd St, Jamaica, NY 11413, USA. Periodicals postage
paid at Brooklyn, NY 11256.
US POSTMASTER: Send address changes to Simply Crochet, World Container Inc., c/o BBT
150-15, 183rd St, Jamaica, NY 11413, USA. Subscription records are maintained at Our Media
Ltd./Immediate Media Bristol Ltd., Eagle House, Bristol, BS1 4ST United Kingdom.
Granny Square Day
It’s the most wonderful time of the year – 15 August
is Granny Square Day, the biggest holiday on the
Simply Crochet social calendar (join us on Insta at
@simplycrochetmag for a day of fun!). To celebrate,
we have a whole collection of 52 brand-new squares
for you to make, plus granny square-themed projects
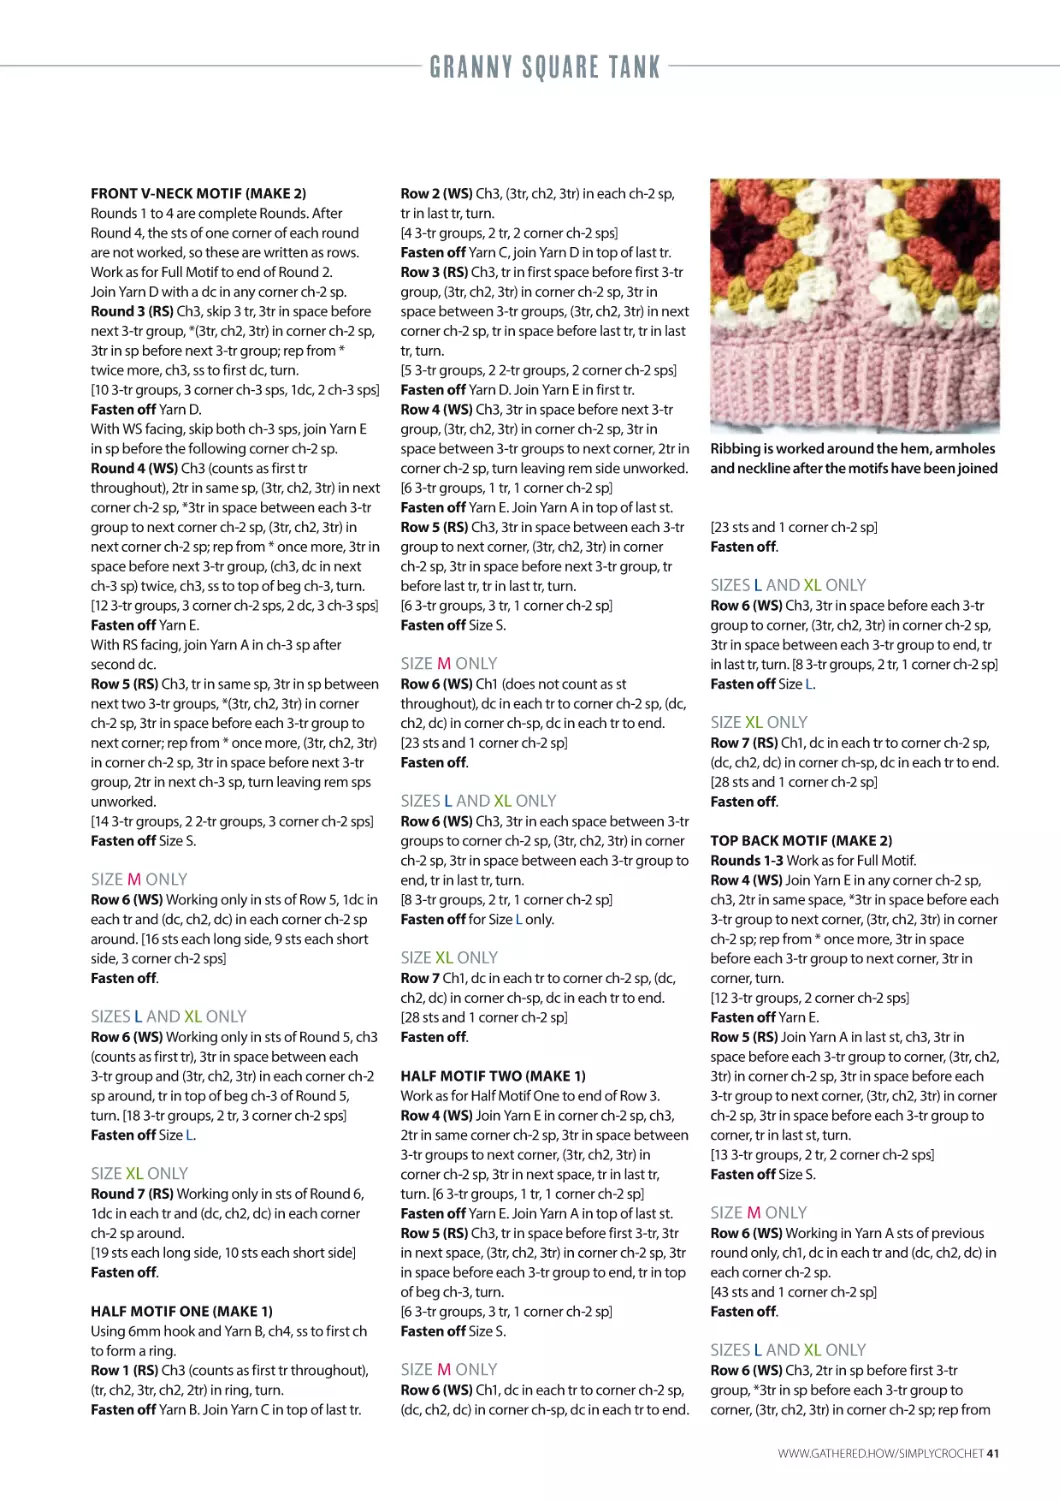
inside like Cassie Ward’s tank top on page 39. Of
course,we have plenty of other projects too, including
a forget-me-not necklace by Lisa Hendry on page
62. And share your makes on Instagram tagged
#sctreblemaker, or on our Facebook group, Simply
Crochet SCtreblemakers, as we love to see them!
Editor Sara Huntington
Art Editors Claire Watkins, Kimberly Price, Jude Curle
Production Editor Alison Maney
Technical Editor Paula Green
Editorial and Digital Assistant Claudia Trotman
Cover Photography Steve Sayers
Photography Dave Caudery, Kaden Gardener,
Steve Sayers
AdvErTisInG
Call 0117 300 8206
Business Development Manager UK and International
Rachael Hawkins
Brand Sales Executive Jessie Dolman
MarKeTing & SubScRipTions
Senior Direct Marketing Executive Kate Jones
CirCuLatIon
Head of Newstrade Marketing Martin Hoskins
Newstrade Marketing Manager Janine Smith
International Account Manager Richard Jefferies
ConTrIbuTors
ProDuCtiOn
Senior Production Coordinator Lauren Morris
Production Manager Rose Griffiths
Group Production Manager Louisa Molter
Production Director Sarah Powell
Let 's meet a few of our talented designers..
BuyIng Team
Karen Flannigan
LicEnSing
Director of International Licensing & Syndication Tim Hudson
PubLiShiNg
“I can't resist quick make s
and seasonal projects”
“Always do more than you
very
thinktherapeutic”
you can”
Head of Content Gail Shortland
Publishing Director Liz Taylor
Managing Director, Bristol Andy Marshall
Executive Chairman Tom Bureau
SubScRipTions
JANE HOWARTH
TUULA KYRÖLÄ
Jane has been crocheting for over 15 years.
She specialises in projects that are fun to
make and easy to wear. Create her little bow
embellishment for baby booties on page 37.
Tuula is a Finnish designer trained in loom
weaving. Eventually, her love of crochet –
a passion she’s had since childhood – took over!
Make her fun felted dots hanging on page 65.
Call 03330 162 146 or subscribe online at
www.buysubscriptions.com/craft
Need to get in TouCh?
EDITORIAL TEAM
simplycrochet@ourmedia.co.uk
SUBSCRIPTIONS TEAM
www.buysubscriptions.com/contactus
03330 162 146
Next IssUe on Sale
Tues 5 SepTeMber 2023
No gift included? Ask your newsagent.
Covergift may be unavailable overseas.
“I love exploring crochet 's
infin ite possi bilities”
“It 's a grey day without
crochet !”
GWEN BUTTKE MCGANNON
KELLY WILSON MOORE
Gwen has a real passion for creating with
crochet. It all started when she made ponytail
holders and hair clips for her daughter! Check
out her pretty shawl on page 67.
Kelly describes herself as a crochet addict,
blogger and designer. She gets her design
inspiration from nature, colour and her little
boy. Find her hexagon blanket on page 50.
OTHER CONTRIBUTORS
Helen Anderson, Lily Chin, Jenny May Forsyth, Simone Francis,
Nichola Griffiths, Lisa Hendry, Victoria Kairis, Emma Leith, Alexandra Lund,
Cara Medus, Fran Morgan, Amanda Robinson, Matt Spiers, Becky Skuse,
Pat Strong, Pia Thadani, Eleonora Tully, Cassie Ward
opp
ho
Sh
all
locca
lo
Our Media Company is working to ensure that all of its paper comes from wellmanaged, FSC®-certified forests and other controlled sources. This magazine is
printed on Forest Stewardship Council® (FSC®) certified paper. This magazine
can be recycled, for use in newspapers and packaging. Please remove any gifts,
samples or wrapping and dispose of them at your local collection point.
The copyright in the patterns in this magazine are owned by or licensed to Our Media Ltd (an Immediate Group Company)
and are for readers’ personal use only. Please do not share them online (even for free) or copy them multiple times without
our permission. Where selling crafts based on these patterns is permitted (usually only to raise funds for charity), we’ll say
so on the page. All toys sold in the UK must meet the requirements set out in the Toy (Safety) Regulations 2011, with proof
in the form of a CE Mark. You must take all necessary steps to comply with this important legislation. For more information,
see gov.uk/ce-marking.
Our Media Limited (company number 05715415) is registered in England and Wales. The registered office of Our Media
Limited is at Vineyard House, 44 Brook Green, London W6 7BT. All information contained in this magazine is for information
only and is, as far as we are aware, correct at the time of going to press. Our Media Limited cannot accept any responsibility
for errors or inaccuracies in such information. Readers are advised to contact manufacturers and retailers directly with regard
to the price of products/services referred to in this magazine. If you submit unsolicited material to us, you automatically
grant Our Media Limited a licence to publish your submission in whole or in part in all editions of the magazine, including
licensed editions worldwide and in any physical or digital format throughout the world. Any material you submit is sent
at your risk. Although every care is taken, neither Our Media Limited nor its employees agents or subcontractors shall be
liable for loss or damage.
WWW.GATHERED.HOW/SIMPLYCROCHET
facebook.com/simplycrochetmag
twitter.com/SimplyCrochet_
pinterest.com/simplycrochetmag
instagram.com/simplycrochetmag
ravelry.com/groups/simply-crochet
youtube.com/user/SimplyCrochetMag
R I CO R UM I
E L EME NT H E ADS
PROUD TO SUPPORT
YOUR YARN SHOP
RICO-DESIGN.CO.UK
The lovely world of
RICORUMI
100% Cotton
Element Heads
CROCHET RICORUMI FIGURES FROM
T H E IM AGI NAT I V E WORLD OF T H E FOU R E LEME N T S
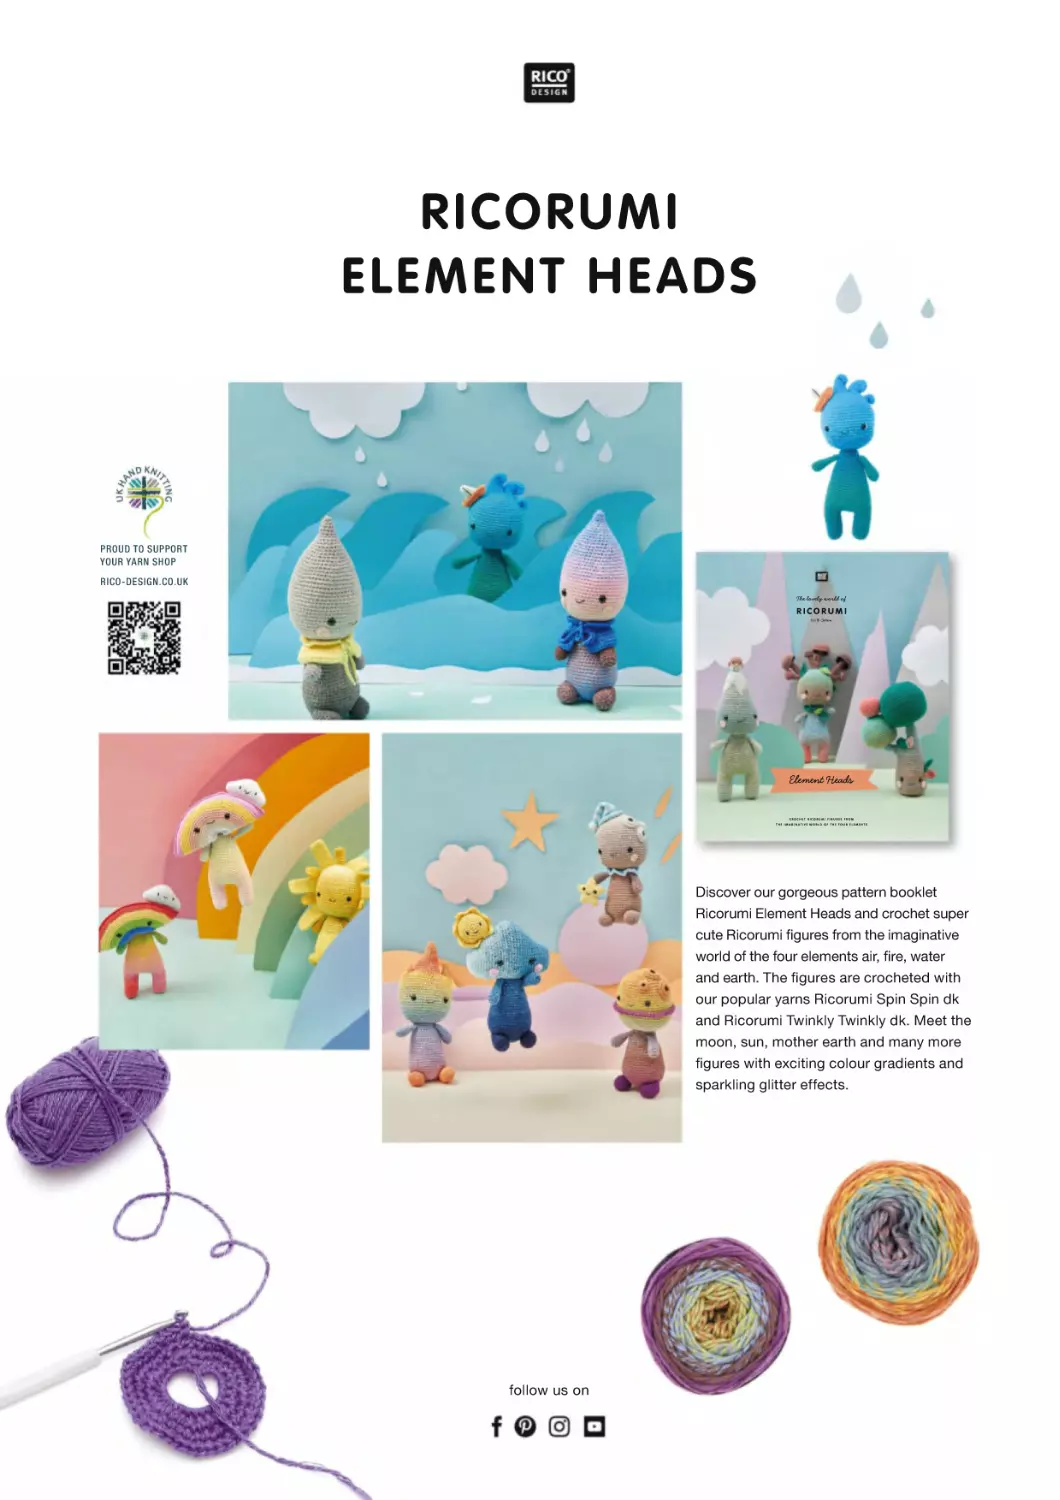
Discover our gorgeous pattern booklet
Ricorumi Element Heads and crochet super
FXWH5LFRUXPLJXUHVIURPWKHLPDJLQDWLYH
ZRUOGRIWKHIRXUHOHPHQWVDLUUHZDWHU
DQGHDUWK7KHJXUHVDUHFURFKHWHGZLWK
our popular yarns Ricorumi Spin Spin dk
and Ricorumi Twinkly Twinkly dk. Meet the
moon, sun, mother earth and many more
JXUHVZLWKH[FLWLQJFRORXUJUDGLHQWVDQG
sparkling glitter effects.
follow us on
yarn
patterns & books
needles & hooks
fabric
haberdashery
buttons
Get
10%
OFF EVER
YTHING! *
Discount code:
SC139
£3.79
per 100g ball
£4.50
per 50g bal
l
Wendy Supreme Cotton Love DK
50% Acrylic, 50% Cotton
ns Aran
Rowan Four Se40aso
% Acrylic
60% Cotton,
£4.29
per 100g ball
£7.99
per 200g ball
ran
StylecraCoftttoLon, 40ve%YAcourylicA
60%
James C Brett Swurlywurly DK
100% Acrylic
£2.19
per 100g ball
£3.29
per 100g ball
Yarnsmiths Create Baby 4 Ply
100% Acrylic
Pop Chunky
Cygnet Sprin%kleAcrs ylic
et
O
e DR P S As s
o
en
Co
pl
rtm
m
100
.d
m
t
ww
w
ro p
s d e sig n
.c
o
™
We’re proud to stock all these
leading brands
see the all new yarnsmiths yarn on our website:
www.yarnsmiths.co.uk
Order online: www.woolwarehouse.co.uk
Phone us: 01926 882818 or 0800 505 3300
Email us: hello@woolwarehouse.co.uk
FREE delivery on UK orders over £30
FREE UKY
R
DELIVE s
on orrd£e3r0
ove
Order online: www.woolwarehouse.co.uk
Phone us: 01926 882818 or 0800 505 3300
Email us: hello@woolwarehouse.co.uk
No minimum order. FREE delivery on UK orders over £30. £2.95 delivery charge for UK orders under £30.
* Discount code not valid on yarn packs, sale items, Lopi and KC Collection products.
Ideas
Inspiration
Accessories
Websites
Events
Stuff
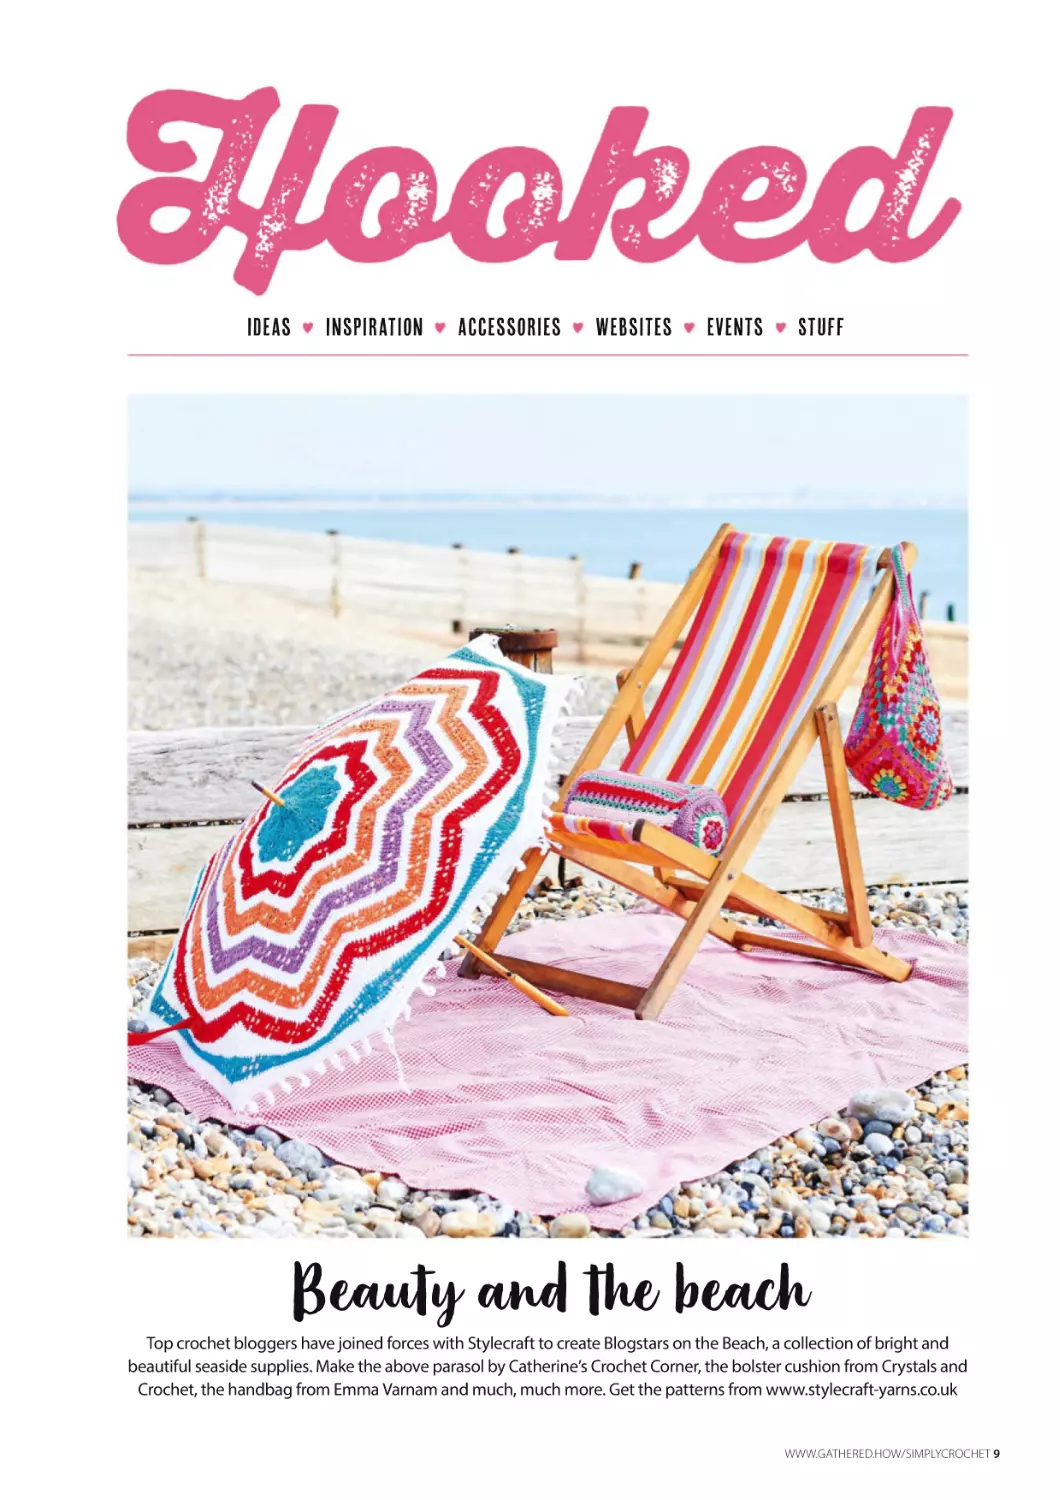
Beauty and the beach
Top crochet bloggers have joined forces with Stylecraft to create Blogstars on the Beach, a collection of bright and
beautiful seaside supplies. Make the above parasol by Catherine’s Crochet Corner, the bolster cushion from Crystals and
Crochet, the handbag from Emma Varnam and much, much more. Get the patterns from www.stylecraft-yarns.co.uk
WWW.GATHERED.HOW/SIMPLYCROCHET 9
BOBBLE
BABIES
W The newest kids’
ylor Hill/TAS23
© GettyImages/Ta
Dolled up!
So far, 23 lucky celebrities have their own
crochet mini-mes thanks to Ellen Siegert, aka
Crazy Hippo Crochet. The teen creates 4in
dolls of her favourite TV characters, actors
and singers and, when she has the chance,
gifts them to the celebs in question (such as
Strictly dancers and Ed Sheeran). “My biggest
dream would be to one day meet Taylor Swift
and give her a mini Taylor,” says Ellen.
l s
Shift gears
Now this is a yarn with a unique look! Rico
Design has twisted two threads with different
colour gradients together in this new DK yarn,
creating shifting areas of colour as you work.
(Use small stitches to get an almost rippleesque effect.) Choose from six colourways,
including lighter shades Snow and Pastel
and darker options Berries, Terra,
Rainbow and Stones. All are composed
of 70% acrylic and 30% mulesing-free
wool, and cost £5.45 per 50g ball. Use
this yarn to create comfortable, fairly
lightweight garments and winter
accessories. Thanks to the durable
acrylic, you can machine wash items
made out of this yarn at 30°C. Pick up the
whole range – or just your favourites –
when you visit www.rico-design.de/en
10 WWW.GATHERED.HOW/SIMPLYCROCHET
cardi by Lorraine
Catterall, aka Lillia
Seren on Ravelry, is
pure texture-filled
fun! “The ‘bobbles’ are
created with simple
double crochet and
double treble crochet
stitches without the
extra time and yarn
needed for traditional
bobble stitches,” says
Lorraine. “It was
originally designed as
a gift for my sister’s
little toddler (my
nephew) and was
inspired by our joint
love of bright colours,
generous sleeves and
cosy hoods for our
kids!” Download the
pattern for £4.50.
STRING ME TO LIFE
Cheltenham-based String. is
not only a brand-new wool
shop and craft hub – it’s also
an indie dyeing facility where
hooksters can pick up
colourful, small-batch skeins
from Vicki Brown Designs, all of which will be
hand-dyed on-site in the back of the shop.
Vicki herself is the owner of String. and is
a crochet designer who plans to host
workshops, classes and craft-based social
gatherings in her new shop. She’ll also sell
her clothing line, Stitchers Tees, which
includes T-shirts, sweatshirts and bags with
crafty slogans on them. The shop will also
stock commercial yarns. Learn more at
www.stringcraft.co.uk or see Vicki’s yarn at
www.vickibrowndesigns.com
HOOKED
c
c s i
il
in
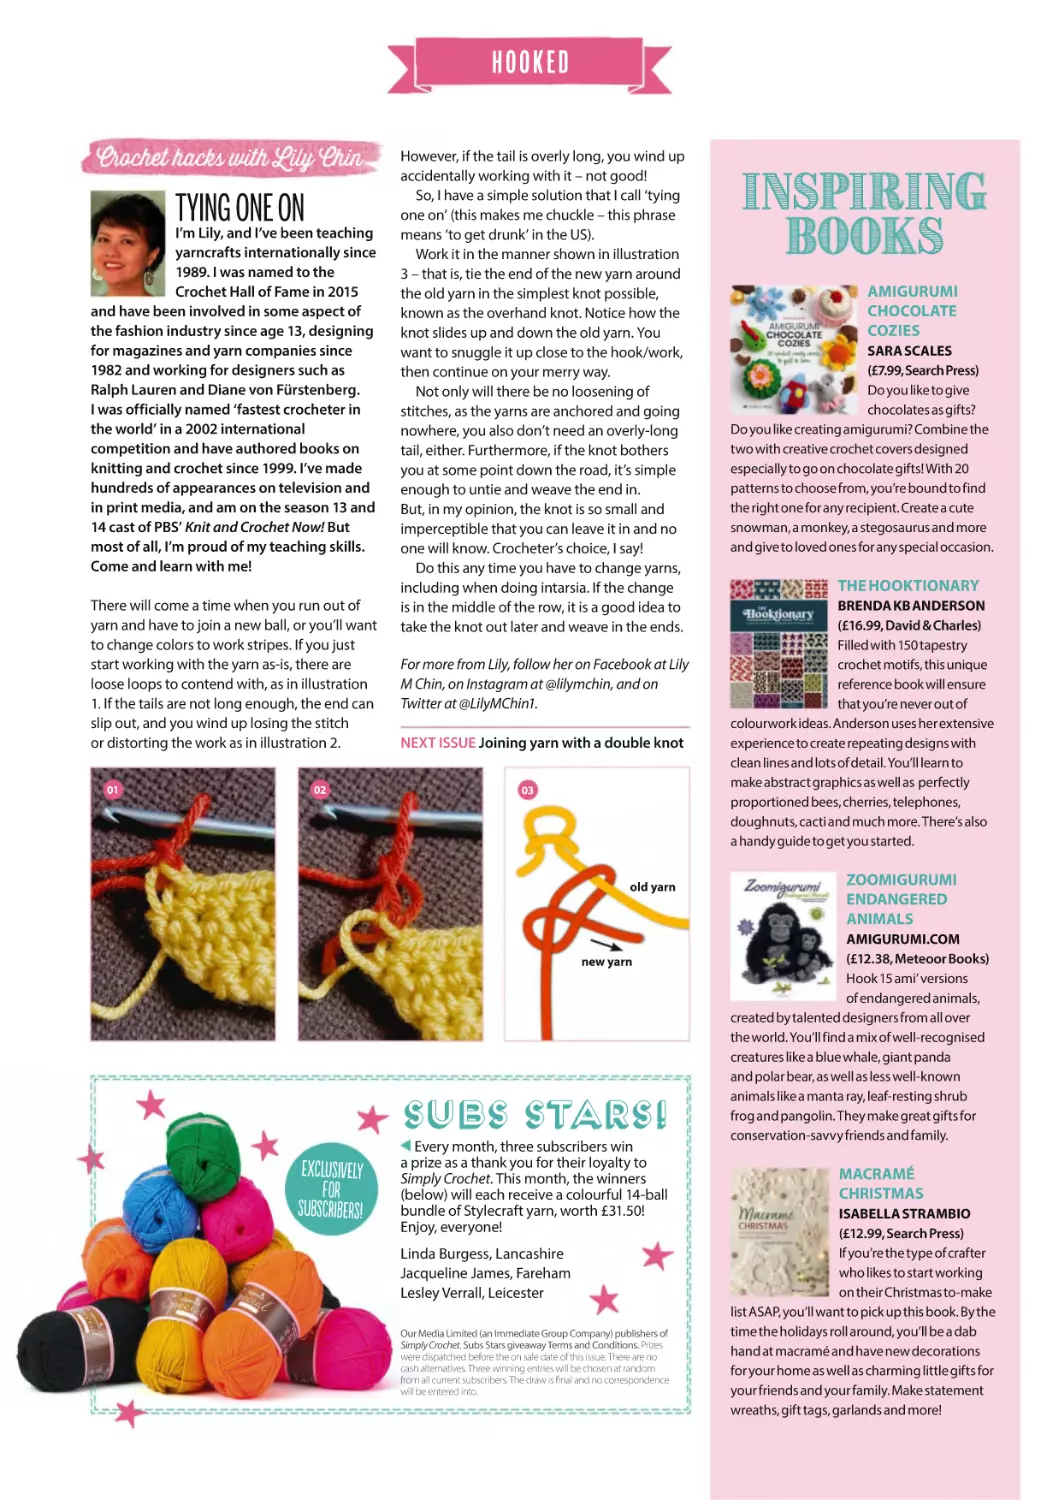
TYING
ONE ON
I’m Lily, and I’ve been teaching
yarncrafts internationally since
1989. I was named to the
Crochet Hall of Fame in 2015
and have been involved in some aspect of
the fashion industry since age 13, designing
for magazines and yarn companies since
1982 and working for designers such as
Ralph Lauren and Diane von Fürstenberg.
I was officially named ‘fastest crocheter in
the world’ in a 2002 international
competition and have authored books on
knitting and crochet since 1999. I’ve made
hundreds of appearances on television and
in print media, and am on the season 13 and
14 cast of PBS’ Knit and Crochet Now! But
most of all, I’m proud of my teaching skills.
Come and learn with me!
There will come a time when you run out of
yarn and have to join a new ball, or you’ll want
to change colors to work stripes. If you just
start working with the yarn as-is, there are
loose loops to contend with, as in illustration
1. If the tails are not long enough, the end can
slip out, and you wind up losing the stitch
or distorting the work as in illustration 2.
01
02
However, if the tail is overly long, you wind up
accidentally working with it – not good!
So, I have a simple solution that I call ‘tying
one on’ (this makes me chuckle – this phrase
means ‘to get drunk’ in the US).
Work it in the manner shown in illustration
3 – that is, tie the end of the new yarn around
the old yarn in the simplest knot possible,
known as the overhand knot. Notice how the
knot slides up and down the old yarn. You
want to snuggle it up close to the hook/work,
then continue on your merry way.
Not only will there be no loosening of
stitches, as the yarns are anchored and going
nowhere, you also don’t need an overly-long
tail, either. Furthermore, if the knot bothers
you at some point down the road, it’s simple
enough to untie and weave the end in.
But, in my opinion, the knot is so small and
imperceptible that you can leave it in and no
one will know. Crocheter’s choice, I say!
Do this any time you have to change yarns,
including when doing intarsia. If the change
is in the middle of the row, it is a good idea to
take the knot out later and weave in the ends.
For more from Lily, follow her on Facebook at Lily
M Chin, on Instagram at @lilymchin, and on
Twitter at @LilyMChin1.
NEXT ISSUE Joining yarn with a double knot
03
old yarn
new yarn
SUBS STARS!
ExcLuSivEly
for
SubScRibErS!
Every month, three subscribers win
a prize as a thank you for their loyalty to
Simply Crochet. This month, the winners
(below) will each receive a colourful 14-ball
bundle of Stylecraft yarn, worth £31.50!
Enjoy, everyone!
Linda Burgess, Lancashire
Jacqueline James, Fareham
Lesley Verrall, Leicester
Our Media Limited (an Immediate Group Company) publishers of
Simply Crochet, Subs Stars giveaway Terms and Conditions. Prizes
were dispatched before the on sale date of this issue. There are no
cash alternatives. Three winning entries will be chosen at random
from all current subscribers. The draw is final and no correspondence
will be entered into.
INS I IN
S
AMIGURUMI
CHOCOLATE
COZIES
SARA SCALES
(£7.99, Search Press)
Do you like to give
chocolates as gifts?
Do you like creating amigurumi? Combine the
two with creative crochet covers designed
especially to go on chocolate gifts! With 20
patterns to choose from, you’re bound to find
the right one for any recipient. Create a cute
snowman, a monkey, a stegosaurus and more
and give to loved ones for any special occasion.
THE HOOKTIONARY
BRENDA KB ANDERSON
(£16.99, David & Charles)
Filled with 150 tapestry
crochet motifs, this unique
reference book will ensure
that you’re never out of
colourwork ideas. Anderson uses her extensive
experience to create repeating designs with
clean lines and lots of detail. You’ll learn to
make abstract graphics as well as perfectly
proportioned bees, cherries, telephones,
doughnuts, cacti and much more. There’s also
a handy guide to get you started.
ZOOMIGURUMI
ENDANGERED
ANIMALS
AMIGURUMI.COM
(£12.38, Meteoor Books)
Hook 15 ami’ versions
of endangered animals,
created by talented designers from all over
the world. You’ll find a mix of well-recognised
creatures like a blue whale, giant panda
and polar bear, as well as less well-known
animals like a manta ray, leaf-resting shrub
frog and pangolin. They make great gifts for
conservation-savvy friends and family.
MACRAMÉ
CHRISTMAS
ISABELLA STRAMBIO
(£12.99, Search Press)
If you’re the type of crafter
who likes to start working
on their Christmas to-make
list ASAP, you’ll want to pick up this book. By the
time the holidays roll around, you’ll be a dab
hand at macramé and have new decorations
for your home as well as charming little gifts for
your friends and your family. Make statement
wreaths, gift tags, garlands and more!
FLOPPY HAT
FANTASY
W As you bask in the
In the sun
Designer Anitha Domacin of A Little
Love Everyday always manages to raise
a smile with her cheerful designs, bright
photography and positive attitude. She
recently posted a free pattern for these palmsized sunflowers, which can be made into
key rings. We love making tiny gifts just like
these to brighten a special someone’s day!
Visit www.littleloveeveryday.com to find the
pattern, and discover other sweet amigurumi
designs at Littleloveeveryday on Etsy.
last of the summer
rays, keep your face
and head protected
with a chic floppybrimmed hat. Part of
yarn brand Rowan’s
Summertime Crochet
Collection, this trendy
topper is an ideal
quick summer project
– just the thing to sink
your hooks into for
the last month of sun.
You can get all the
Rowan Cotton Glacé
yarn you need, plus
the pattern, for £24.75
at www.knitrowan.
com – use the
suggested Ecru and
Dijon shades, or
choose your own.
WhiLe in the IslEs
Our Golden Moments CAL on page 56 may
be ending this issue, but we have good news
– the designer, Eleonora Tully, is about to
release a brand-new blanket design inspired
by the Northern Irish coastline! Eleonora plans
to reveal the Causeway Coast Blanket at the
Spinning Yarns Festival in Northern Ireland on
2 September, and she was kind enough to
share a sneak peek of the blanket’s motifs with
us. We’re automatically struck by how they
mimic natural forms, calling to mind barnacles,
rock pools, seaweed, crags and waves. If you’re
a fan of the coast, this is one blanket pattern
you won’t want to miss! And if you’re attending
the Spinning Yarns Festival, you can go to
Eleonora’s talk about the inspiration behind the
blanket and how she translated it into crochet.
Visit www.coastalcrochet.com more info.
n
Eden cottage
yarns
Cottontail Crafts
Each issue we explore a UK yarn shop
LifElong FriEnds
The magical world of Disney is right at your
fingertips with these new Knitty Critters
crochet kits from Creative Crafting World.
For £89.99 each, hook up cuddly favourites
including Mickey Mouse, Minnie Mouse,
Dumbo and Olaf from Frozen. These timeless
plushies are hooked in premium super
chunky chenille-style yarn, making them
quick to hook as well as soft and squeezable.
Visit www.creativecraftingworld.co.uk
12 WWW.GATHERED.HOW/SIMPLYCROCHET
Who’s in charge? Sue Amphlett.
Where can we find you? Settle, in North Yorkshire, at the
start of the famous Settle Carlisle railway and three peaks.
What is your shop like? It’s not very big, but it’s packed
full of goodness. I have so much choice to offer and
a wealth of experience. The shop has been in the
family for 66 years – I was born five weeks after it
opened, so I can say I’ve been involved all my life!
What are your most popular products? King Cole yarn
and Prym ergonomic crochet hooks.
What support do you offer? We have an active
Facebook page, and customers can message me with
queries and questions. I’ve been knitting and crafting
for over 50 years and have a lifetime of experience,
which I happily share.
Cottontail Crafts, 16 Duke Street, Settle, BD24 9DN
www.cottontailcrafts.co.uk
opp
ho
Sh
all
occa
llo
HOOKED
5 FA FIN S
IN TECHNICOLOUR
Looking for a simple blanket
project with an eye-catching
finish? Check out the Ellie
Blanket Crochet Kit from
Wool Couture – made with
the brand’s Cheeky Chunky
Rainbow Twist yarn, this
£179.99 kit earns its luxury
price tag with 14 100g balls,
all 100% Merino wool, plus
patterns and a tapestry
needle. You’ll end up with
a modern rainbow-hued
blanket that’s super warm
and fairly large – about
100cm wide and 160cm
long. Display it in your living
room or bedroom, or give it
as a heirloom gift. Find out
more when you visit www.
woolcouturecompany.com
Best In bambOo
Cotton and bamboo blend together to
create Cascade Yarns’ new light, soft and
silky Pandamonium yarn. Available in
a wide selection of 34 solids and eight
multi-shades, this beautiful and cool DK
yarn is ideal for garments, accessories
and home décor. It’s so soft that it’s even
on the approved list for Knitted Knockers,
an organisation that provides breast
cancer survivors with handmade inserts
to fill out their bras after mastectomies.
That means that this 55% cotton and 45%
bamboo viscose yarn is easy on the skin.
Visit www.cascadeyarns.com to find your
local stockist as well as free patterns for
scarves, shawls, cardigans and more that
you can make with this new yarn.
Mini amigurumi
These teeny tiny treasures
are blowing our minds!
1
JUST BEE YOURSELF
These bumblebees are so lifelike – and so
small! Challenge yourself to create a truly tiny
creature by Amigurumi Patterns LV on Etsy.
You can even add little translucent wings to
your finished bee – get the pattern for £2.44.
2
DESERT DARLING
Make someone smile
with this Heart
Cactus from Little
World of Whimsy.
Get the pattern for
free on blog www.
littleworldofwhimsy.
com or for £6.85 on
the Etsy shop.
Crochet community
Skills &
events
19 AUG Popup Wool Show
£4, Wirral
www.coastal-colours.co.uk
19 AUG Crochet workshop for beginners
£49, Ilkley
www.duttonsforbuttons.co.uk
ALL SMALL
Hook 24 super-tiny
animals, snacks,
plants and more
with this collection
from The Wandering
Deer on Etsy. The
whole set only costs
£3.97; make a teensy
ami’ for everyone!
4
HAMSTER HUGS
Minigurumi’s Etsy
shop is full of cute
creatures to hook,
but these Hungry
Hamsters might be
the most adorable
option! Get the
pattern to make
four for £1.98.
2-3 SEP September Southern Wool Show
£5-10, Newbury
www.southernwoolshow.co.uk
5 SEP Eastern Jewels crochet blanket
£69, Sussex
www.madeandmaking.co.uk
9-10 SEP The Scottish Yarn Festival
£13-19.50, Perth
www.thescottishyarnfestival.com
POP-UP TOP
These Itty Bitty Mini
Pops from Cable and
Canvas on Etsy have
a secret – they’re
actually fidget toys
whose caps ‘pop’ up
and down! Get this
3-in-1 stash-busting
pattern for £3.47.
5
WWW.GATHERED.HOW/SIMPLYCROCHET 13
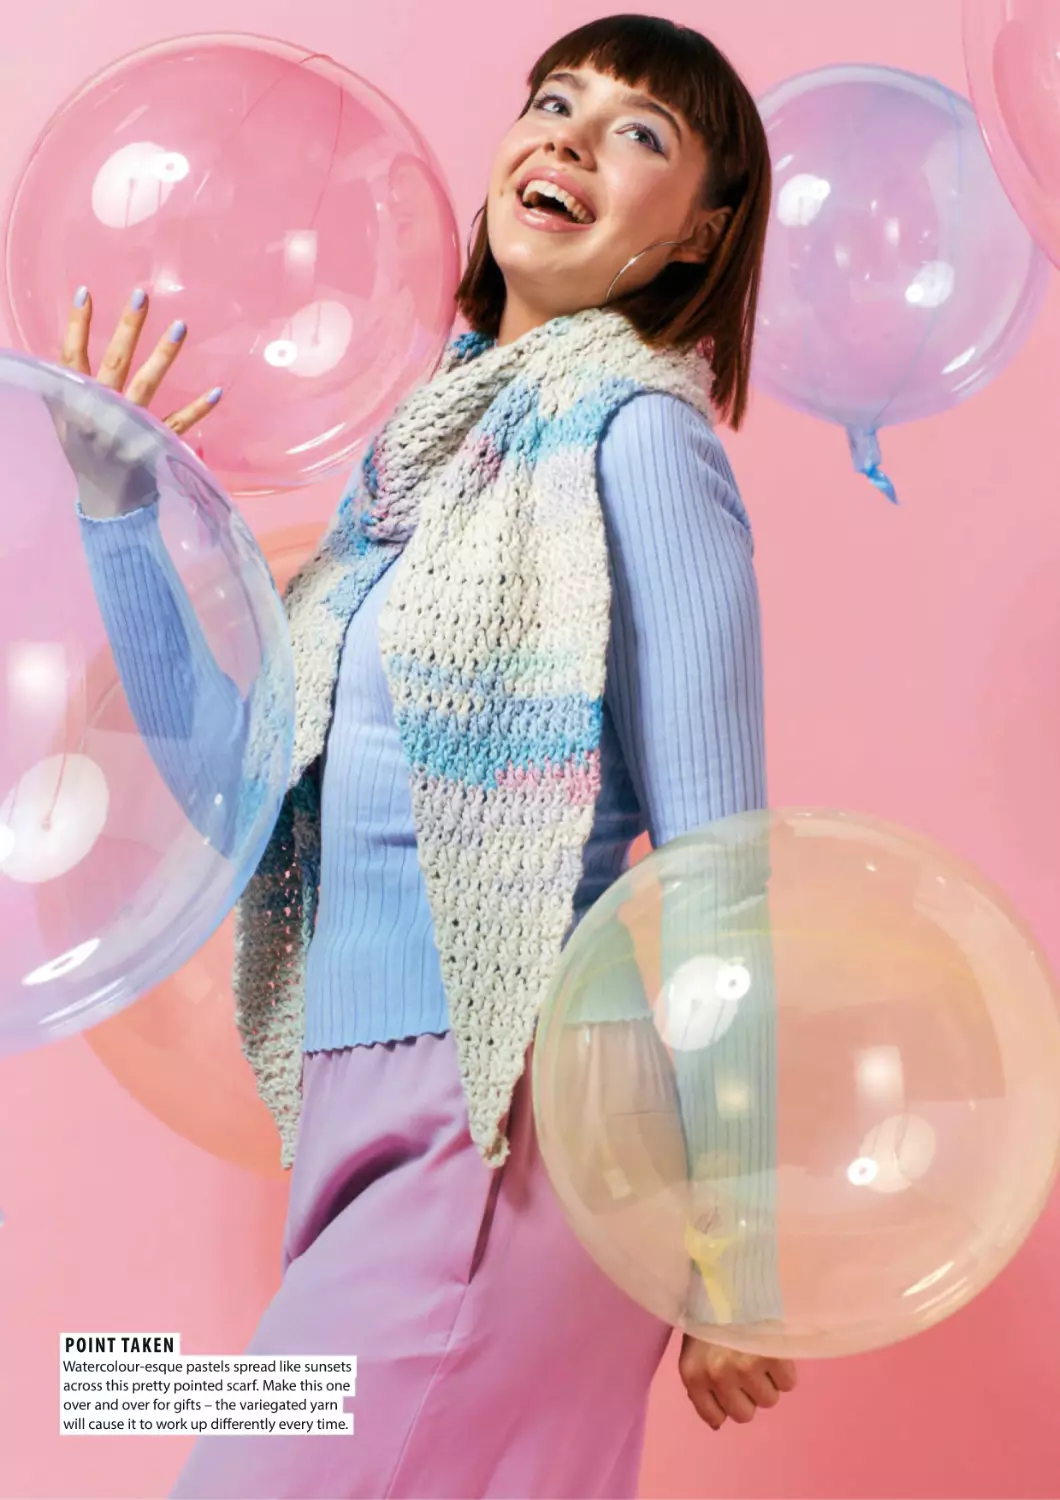
POINT TAKEN
Watercolour-esque pastels spread like sunsets
across this pretty pointed scarf. Make this one
over and over for gifts – the variegated yarn
will cause it to work up differently every time.
VIVACIOUS VARIEGATED COLLECTION
Use vareigated yarn in new and exciting ways with projects
that make the most of dynamic colour changes
WWW.GATHERED.HOW/SIMPLYCROCHET 15
VIVACIOUS VARIEGATED COLLECTION
LOOPY LAMB
Believe it or not, this lamb is made by cutting up a cake of yarn! The limbs, face and
ears are made from the colourful sections,
while the ecru is used for the loopy fleece.
COME IN WAVES
Stripes of colour ripple through this
gorgeous shell and wave-stitch cardigan.
Make it now and have this feminine fancy
ready in time for cooler weather.
16 WWW.GATHERED.HOW/SIMPLYCROCHET
VIVACIOUS VARIEGATED COLLECTION
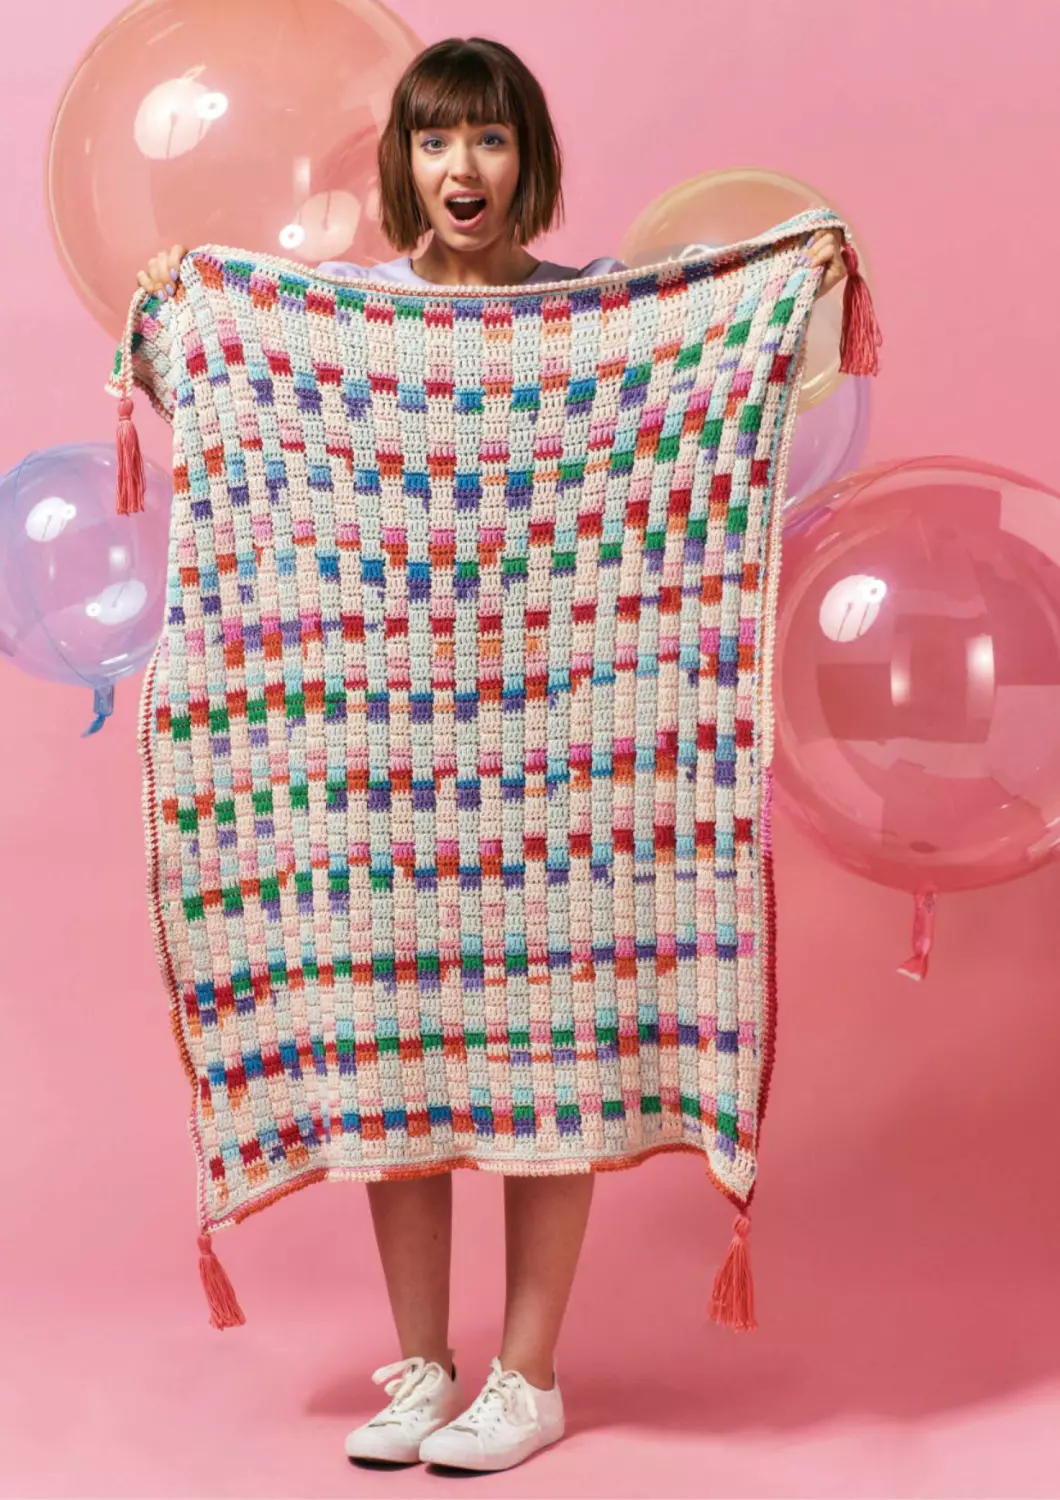
CHOCK-A-BLOCK
Colours are arranged to create a mosaicesque effect in this stunning blanket
project. Top off the corners with long
tassels for a super-fun finish!
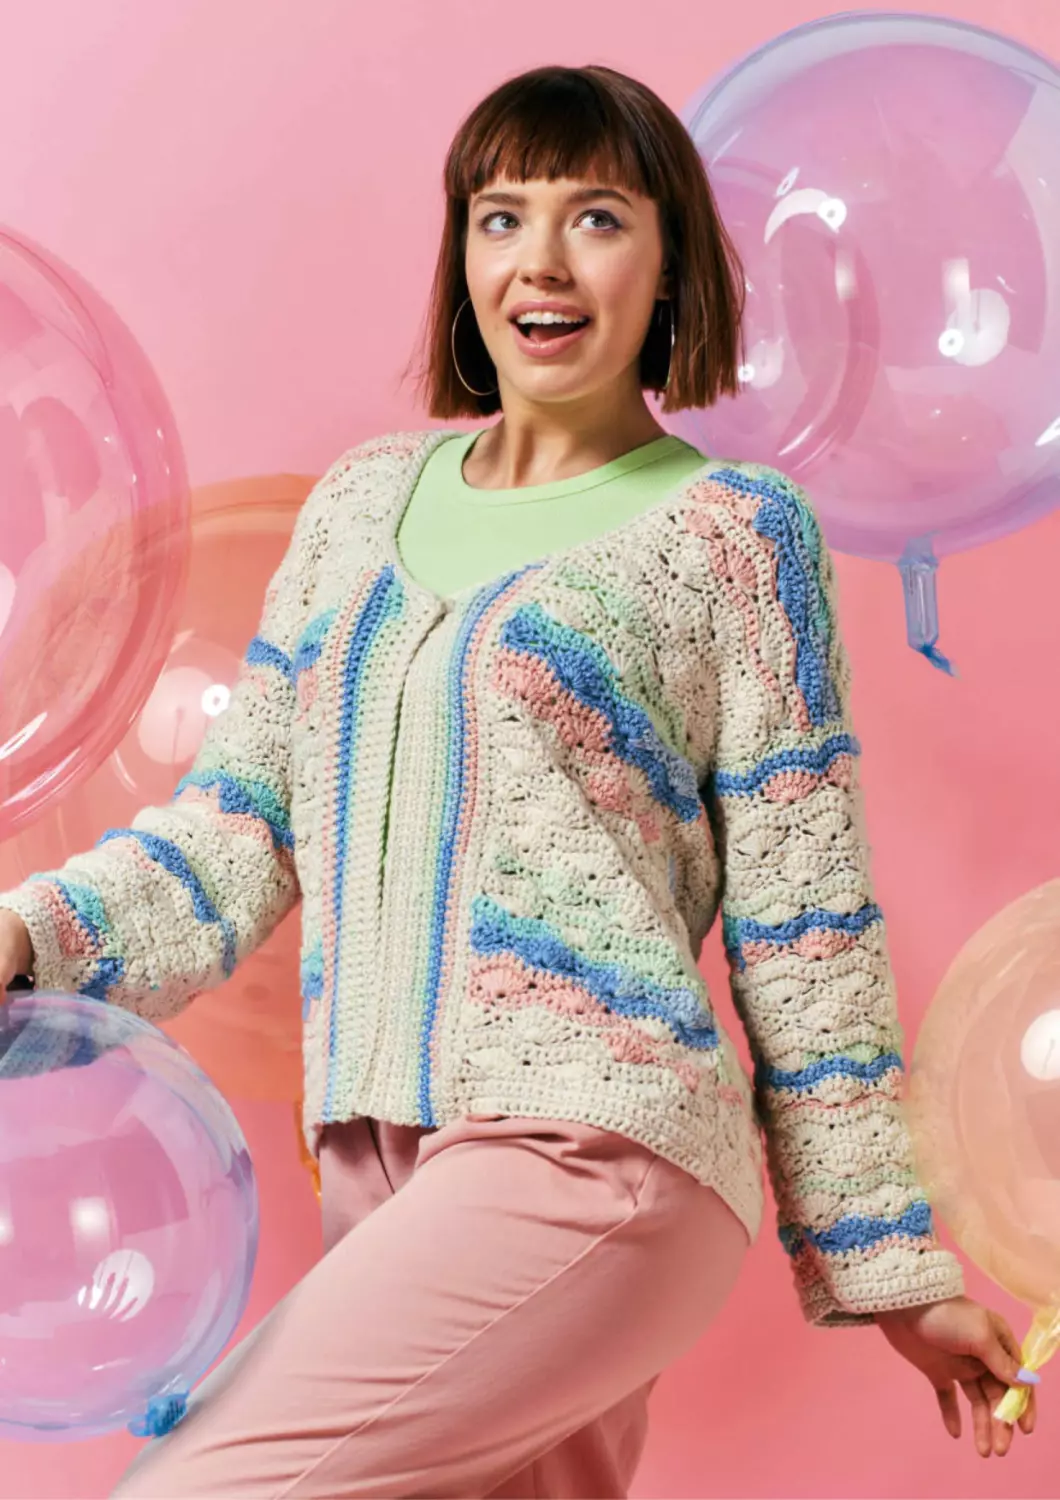
GET CARRIED AWAY
The stitches in this poncho naturally
create diagonal stripes when hooked with
variegated yarn. It’s an exciting effect that
requires very little effort to make!
WWW.GATHERED.HOW/SIMPLYCROCHET 19
VIVACIOUS VARIEGATED COLLECTION
SCARF
The long colour changes in this yarn create
clouds of pastel shades throughout this
pointed scarf by Emma Leith
QStylecraft Savannah (100% cotton,
165m/100g), 1 ball of Tundra (3792)
QA 4.5mm (US 7) hook
QStitch markers
TENSION
16 sts and 8 rows to measure 10x10cm (4x4in)
MEASUREMENTS
Scarf measures approx 20x196cm (8x77in)
NOTES
Scarf is worked in rows throughout.
Increases and decreases are made at the
beginning of each row only.
SCARF
Ch5.
Row 1 (WS) Tr in fourth ch from hook, tr in next
ch, turn. [3 tr]
Row 2 (RS) Ch3 (counts as tr throughout), tr in
st at base of ch-3, tr in next 2 sts, turn. [4 sts]
Row 3 Ch3, tr in st at base of ch-3, tr in each st
across to end, turn. [5 sts]
Row 4 Ch3, tr in st at base of ch-3, (FPtr around
next st, tr in next st) twice, turn. [6 sts]
Row 5 Ch3, tr in st at base of ch-3, (tr in next st,
BPtr around next st) twice, tr in last st, turn.
[7 sts]
Row 6 Ch3, tr in st at base of ch-3, (tr in next st,
FPtr around next st) twice, tr in last 2 sts. [8 sts]
Row 7 Ch3, tr in st at base of ch-3, (BPtr around
next st, tr in next st) rep to last st, tr in last st,
turn. [9 sts]
Row 8 Ch3, tr in st at base of ch-3, (FPtr around
next st, tr in next st) rep to end, turn. [10 sts]
Row 9 Ch3, tr in st at base of ch-3, (tr in next st,
BPtr around next st) rep to last st, tr in last st,
turn. [11 sts]
Row 10 Ch3, tr in st at base of ch-3, (tr in next st,
FPtr around next st) rep to last 2 sts, tr in last 2
sts, turn. [12 sts]
Rows 11-26 Repeat Rows 7-10 four times.
[28 sts]
Rows 27-28 Repeat Rows 7-8 once more.
[30 sts]
Row 29 Ch3, tr in next st, *BPtr around next st,
tr in next st: repeat from * across, turn.
Row 30 Ch3, tr in next st, *FPtr around next st,
tr in next st; repeat from * across, turn.
Rows 31-100 Repeat Rows 29-30.
Row 101 Ch2 (does not count as st throughout),
skip first st, tr in next st, (BPtr around next st, tr
in next st) rep to end, turn. [29 sts]
Row 102 Ch2, skip first st, tr in next st, (FPtr
around next st, tr in next st) rep to final st, tr in
last st, turn. [28 sts]
Row 103 Ch2, skip first st, tr in next 2 sts, (BPtr
around next st, tr in next st) rep to last st, tr in
last st, turn. [27 sts]
Row 104 Ch2, skip first st, tr in next 2 sts, (FPtr
around next st, tr in next st) rep to end, turn.
[26 sts]
Rows 105-124 Repeat Rows 101-104 five times.
[6 sts]
Row 125 Repeat Row 101. [5 sts]
Row 126 Ch2, tr2tog, tr in next 2 sts. [3 sts]
Row 127 Ch2, tr2tog. [1 st]
Fasten off and weave in ends.
BAG
Create bobbles whenever colour appears
and stop when you hit cream in this fun
improvised handbag by Fran Morgan
QStylecraft Savannah (100% cotton,
100g/165m), 3 balls of Desert (3790)
QA 4.5mm (US 7) hook
Q4 buttons, 25mm
QA cushion cover 40x40cm
TENSION
15 sts and 10.5 rows measure 10x10cm (4x4in)
over half treble crochet using a 4.5mm hook, or
size needed to obtain correct tension
MEASUREMENTS
Bag measures approx 37x40cm (14½x15¾in)
excluding handles
NOTES
Bag is worked in rows in one piece and
seamed together at the sides. Handles are
made separately and sewn on at the end.
A cushion cover is used to line the Bag.
For the stitch pattern, work in half treble
crochet when using the cream-coloured
sections of yarn. When you reach a colour
change, work in the Cluster Stitch Pattern until
the yarn reverts to the cream base colour.
BAG
CLUSTER STITCH PETTERN
(4-tr cl in next st, dc in next st) rep until yarn
reverts to cream base colour.
MAIN PART
Ch107.
20 WWW.GATHERED.HOW/SIMPLYCROCHET
VIVACIOUS VARIEGATED COLLECTION
in each st to marker, (2dc in next st, dc in next
st) twice, ss to beg dc.
Round 4 Ss in each st around.
Fasten off.
TO FINISH
Using the image as a guide, sew the Handles to
either side of the Bag.
Sew a button over the end of each Handle.
Weave in all ends.
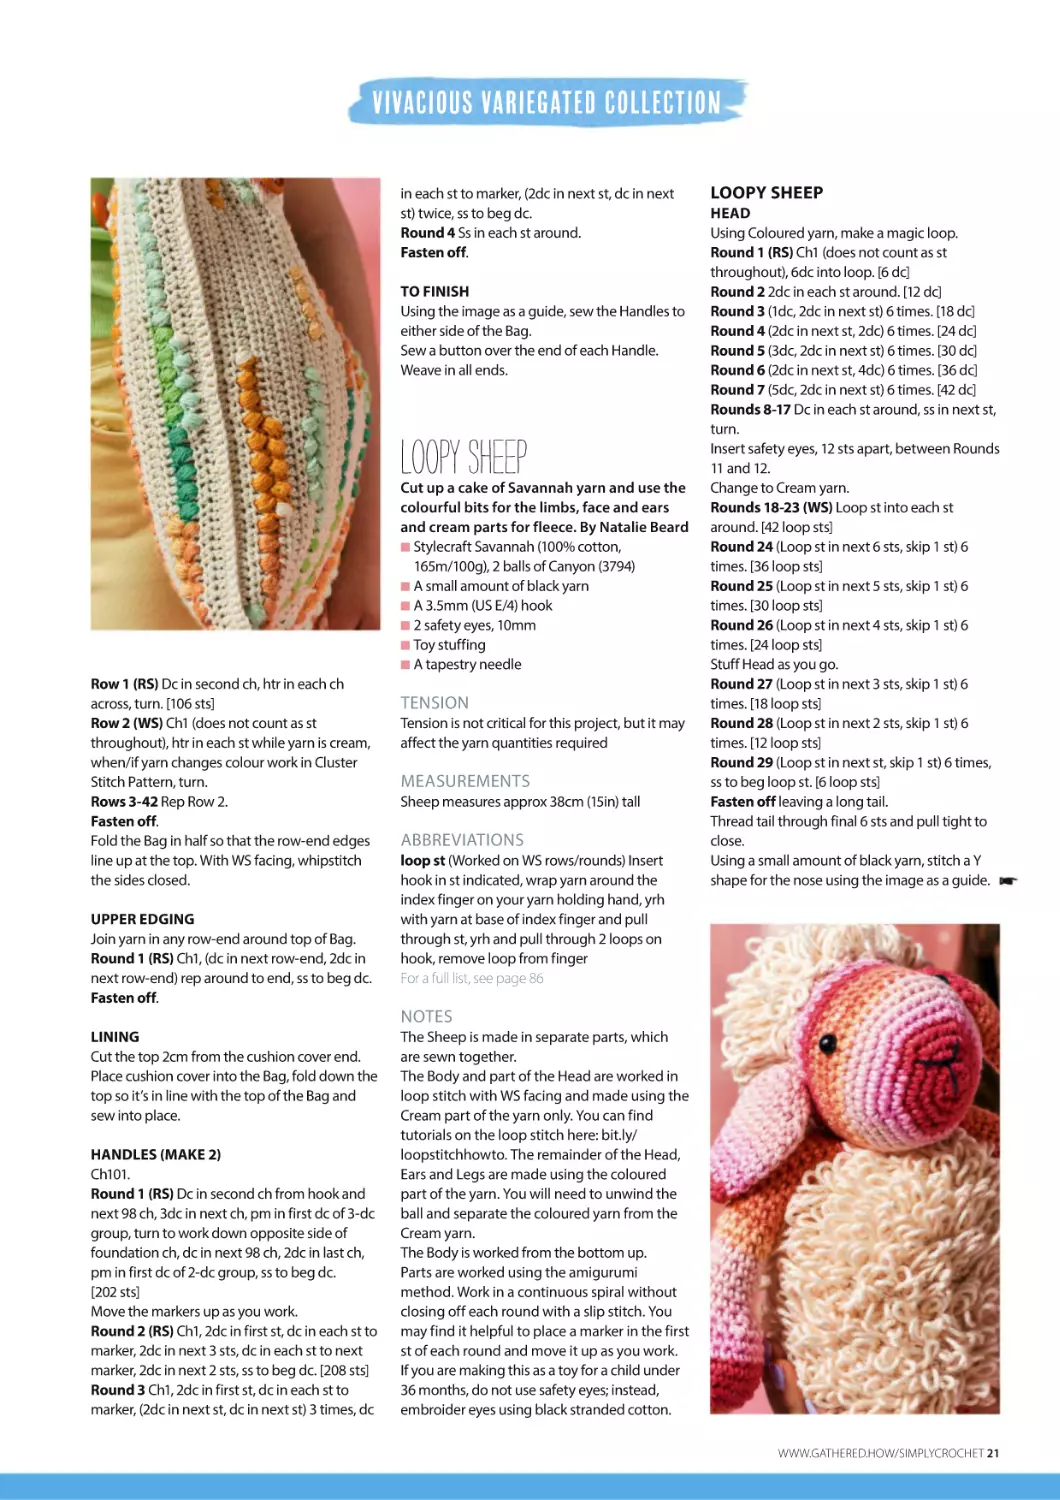
Loopy Sheep
Cut up a cake of Savannah yarn and use the
colourful bits for the limbs, face and ears
and cream parts for fleece. By Natalie Beard
QStylecraft Savannah (100% cotton,
165m/100g), 2 balls of Canyon (3794)
QA small amount of black yarn
QA 3.5mm (US E/4) hook
Q2 safety eyes, 10mm
QToy stuffing
QA tapestry needle
Row 1 (RS) Dc in second ch, htr in each ch
across, turn. [106 sts]
Row 2 (WS) Ch1 (does not count as st
throughout), htr in each st while yarn is cream,
when/if yarn changes colour work in Cluster
Stitch Pattern, turn.
Rows 3-42 Rep Row 2.
Fasten off.
Fold the Bag in half so that the row-end edges
line up at the top. With WS facing, whipstitch
the sides closed.
UPPER EDGING
Join yarn in any row-end around top of Bag.
Round 1 (RS) Ch1, (dc in next row-end, 2dc in
next row-end) rep around to end, ss to beg dc.
Fasten off.
TENSION
Tension is not critical for this project, but it may
affect the yarn quantities required
MEASUREMENTS
Sheep measures approx 38cm (15in) tall
ABBREVIATIONS
loop st (Worked on WS rows/rounds) Insert
hook in st indicated, wrap yarn around the
index finger on your yarn holding hand, yrh
with yarn at base of index finger and pull
through st, yrh and pull through 2 loops on
hook, remove loop from finger
For a full list, see page 86
LOOPY SHEEP
HEAD
Using Coloured yarn, make a magic loop.
Round 1 (RS) Ch1 (does not count as st
throughout), 6dc into loop. [6 dc]
Round 2 2dc in each st around. [12 dc]
Round 3 (1dc, 2dc in next st) 6 times. [18 dc]
Round 4 (2dc in next st, 2dc) 6 times. [24 dc]
Round 5 (3dc, 2dc in next st) 6 times. [30 dc]
Round 6 (2dc in next st, 4dc) 6 times. [36 dc]
Round 7 (5dc, 2dc in next st) 6 times. [42 dc]
Rounds 8-17 Dc in each st around, ss in next st,
turn.
Insert safety eyes, 12 sts apart, between Rounds
11 and 12.
Change to Cream yarn.
Rounds 18-23 (WS) Loop st into each st
around. [42 loop sts]
Round 24 (Loop st in next 6 sts, skip 1 st) 6
times. [36 loop sts]
Round 25 (Loop st in next 5 sts, skip 1 st) 6
times. [30 loop sts]
Round 26 (Loop st in next 4 sts, skip 1 st) 6
times. [24 loop sts]
Stuff Head as you go.
Round 27 (Loop st in next 3 sts, skip 1 st) 6
times. [18 loop sts]
Round 28 (Loop st in next 2 sts, skip 1 st) 6
times. [12 loop sts]
Round 29 (Loop st in next st, skip 1 st) 6 times,
ss to beg loop st. [6 loop sts]
Fasten off leaving a long tail.
Thread tail through final 6 sts and pull tight to
close.
Using a small amount of black yarn, stitch a Y
shape for the nose using the image as a guide.
NOTES
LINING
Cut the top 2cm from the cushion cover end.
Place cushion cover into the Bag, fold down the
top so it’s in line with the top of the Bag and
sew into place.
HANDLES (MAKE 2)
Ch101.
Round 1 (RS) Dc in second ch from hook and
next 98 ch, 3dc in next ch, pm in first dc of 3-dc
group, turn to work down opposite side of
foundation ch, dc in next 98 ch, 2dc in last ch,
pm in first dc of 2-dc group, ss to beg dc.
[202 sts]
Move the markers up as you work.
Round 2 (RS) Ch1, 2dc in first st, dc in each st to
marker, 2dc in next 3 sts, dc in each st to next
marker, 2dc in next 2 sts, ss to beg dc. [208 sts]
Round 3 Ch1, 2dc in first st, dc in each st to
marker, (2dc in next st, dc in next st) 3 times, dc
The Sheep is made in separate parts, which
are sewn together.
The Body and part of the Head are worked in
loop stitch with WS facing and made using the
Cream part of the yarn only. You can find
tutorials on the loop stitch here: bit.ly/
loopstitchhowto. The remainder of the Head,
Ears and Legs are made using the coloured
part of the yarn. You will need to unwind the
ball and separate the coloured yarn from the
Cream yarn.
The Body is worked from the bottom up.
Parts are worked using the amigurumi
method. Work in a continuous spiral without
closing off each round with a slip stitch. You
may find it helpful to place a marker in the first
st of each round and move it up as you work.
If you are making this as a toy for a child under
36 months, do not use safety eyes; instead,
embroider eyes using black stranded cotton.
WWW.GATHERED.HOW/SIMPLYCROCHET 21
VIVACIOUS VARIEGATED COLLECTION
Round 28 (RS) (1dc, dc2tog) 6 times. [12 sts]
Round 29 (RS) (Dc2tog) 6 times. [6 sts]
Fasten off leaving a long tail.
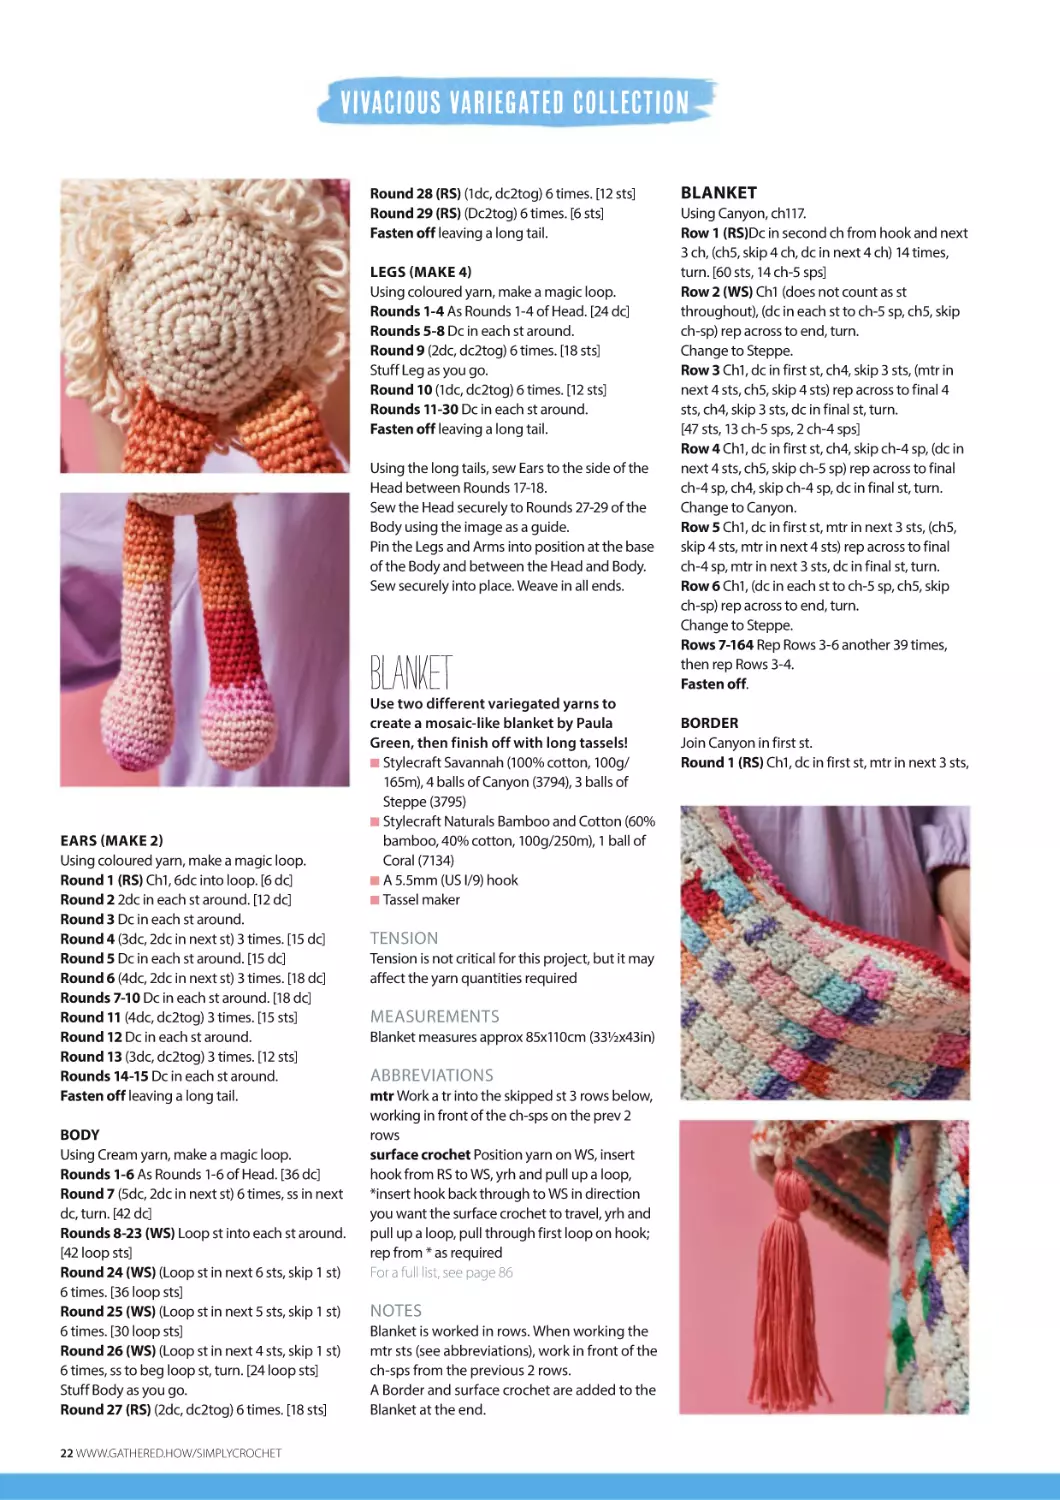
LEGS (MAKE 4)
Using coloured yarn, make a magic loop.
Rounds 1-4 As Rounds 1-4 of Head. [24 dc]
Rounds 5-8 Dc in each st around.
Round 9 (2dc, dc2tog) 6 times. [18 sts]
Stuff Leg as you go.
Round 10 (1dc, dc2tog) 6 times. [12 sts]
Rounds 11-30 Dc in each st around.
Fasten off leaving a long tail.
Using the long tails, sew Ears to the side of the
Head between Rounds 17-18.
Sew the Head securely to Rounds 27-29 of the
Body using the image as a guide.
Pin the Legs and Arms into position at the base
of the Body and between the Head and Body.
Sew securely into place. Weave in all ends.
BLANKET
EARS (MAKE 2)
Using coloured yarn, make a magic loop.
Round 1 (RS) Ch1, 6dc into loop. [6 dc]
Round 2 2dc in each st around. [12 dc]
Round 3 Dc in each st around.
Round 4 (3dc, 2dc in next st) 3 times. [15 dc]
Round 5 Dc in each st around. [15 dc]
Round 6 (4dc, 2dc in next st) 3 times. [18 dc]
Rounds 7-10 Dc in each st around. [18 dc]
Round 11 (4dc, dc2tog) 3 times. [15 sts]
Round 12 Dc in each st around.
Round 13 (3dc, dc2tog) 3 times. [12 sts]
Rounds 14-15 Dc in each st around.
Fasten off leaving a long tail.
BODY
Using Cream yarn, make a magic loop.
Rounds 1-6 As Rounds 1-6 of Head. [36 dc]
Round 7 (5dc, 2dc in next st) 6 times, ss in next
dc, turn. [42 dc]
Rounds 8-23 (WS) Loop st into each st around.
[42 loop sts]
Round 24 (WS) (Loop st in next 6 sts, skip 1 st)
6 times. [36 loop sts]
Round 25 (WS) (Loop st in next 5 sts, skip 1 st)
6 times. [30 loop sts]
Round 26 (WS) (Loop st in next 4 sts, skip 1 st)
6 times, ss to beg loop st, turn. [24 loop sts]
Stuff Body as you go.
Round 27 (RS) (2dc, dc2tog) 6 times. [18 sts]
22 WWW.GATHERED.HOW/SIMPLYCROCHET
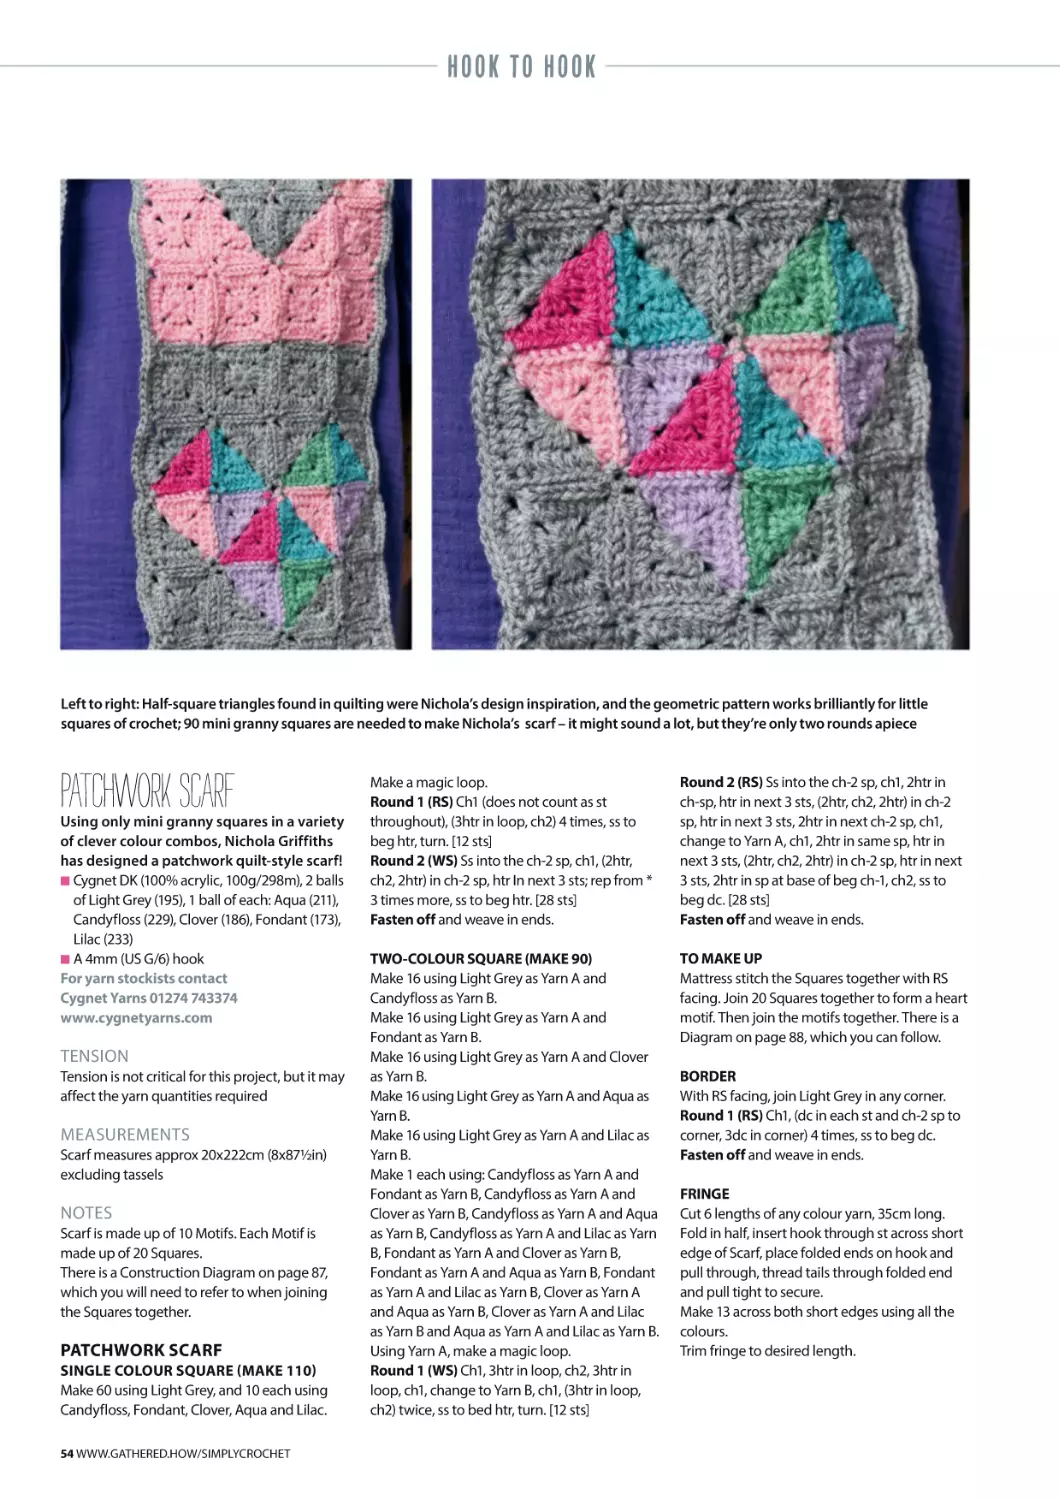
Use two different variegated yarns to
create a mosaic-like blanket by Paula
Green, then finish off with long tassels!
QStylecraft Savannah (100% cotton, 100g/
165m), 4 balls of Canyon (3794), 3 balls of
Steppe (3795)
QStylecraft Naturals Bamboo and Cotton (60%
bamboo, 40% cotton, 100g/250m), 1 ball of
Coral (7134)
QA 5.5mm (US I/9) hook
QTassel maker
TENSION
Tension is not critical for this project, but it may
affect the yarn quantities required
MEASUREMENTS
Blanket measures approx 85x110cm (33½x43in)
ABBREVIATIONS
mtr Work a tr into the skipped st 3 rows below,
working in front of the ch-sps on the prev 2
rows
surface crochet Position yarn on WS, insert
hook from RS to WS, yrh and pull up a loop,
*insert hook back through to WS in direction
you want the surface crochet to travel, yrh and
pull up a loop, pull through first loop on hook;
rep from * as required
For a full list, see page 86
NOTES
Blanket is worked in rows. When working the
mtr sts (see abbreviations), work in front of the
ch-sps from the previous 2 rows.
A Border and surface crochet are added to the
Blanket at the end.
BLANKET
Using Canyon, ch117.
Row 1 (RS)Dc in second ch from hook and next
3 ch, (ch5, skip 4 ch, dc in next 4 ch) 14 times,
turn. [60 sts, 14 ch-5 sps]
Row 2 (WS) Ch1 (does not count as st
throughout), (dc in each st to ch-5 sp, ch5, skip
ch-sp) rep across to end, turn.
Change to Steppe.
Row 3 Ch1, dc in first st, ch4, skip 3 sts, (mtr in
next 4 sts, ch5, skip 4 sts) rep across to final 4
sts, ch4, skip 3 sts, dc in final st, turn.
[47 sts, 13 ch-5 sps, 2 ch-4 sps]
Row 4 Ch1, dc in first st, ch4, skip ch-4 sp, (dc in
next 4 sts, ch5, skip ch-5 sp) rep across to final
ch-4 sp, ch4, skip ch-4 sp, dc in final st, turn.
Change to Canyon.
Row 5 Ch1, dc in first st, mtr in next 3 sts, (ch5,
skip 4 sts, mtr in next 4 sts) rep across to final
ch-4 sp, mtr in next 3 sts, dc in final st, turn.
Row 6 Ch1, (dc in each st to ch-5 sp, ch5, skip
ch-sp) rep across to end, turn.
Change to Steppe.
Rows 7-164 Rep Rows 3-6 another 39 times,
then rep Rows 3-4.
Fasten off.
BORDER
Join Canyon in first st.
Round 1 (RS) Ch1, dc in first st, mtr in next 3 sts,
VIVACIOUS VARIEGATED COLLECTION
(dc in next 4 sts, mtr in next 4 sts) rep across to
final st, dc in final st, ch2, 140dc evenly down
long edge, ch2, dc in each ch across, base, ch2,
140dc evenly across next long edge, ch2, ss to
beg dc. [512 sts]
Round 2 (RS) Ch1, *dc in each st to ch-2 sp, (dc,
ch2, dc) in ch-sp; rep from * around, ss to beg
dc. [520 sts]
Round 3 Ch1, *(dc, ch1) in each st to final st
before ch-2 sp, (dc, ch3) in last st across side,
skip ch-2 sp; rep from * around, ss to beg dc.
Fasten off.
Using Steppe, surface crochet around the sts
from Round 1 of Border.
Fasten off.
TO FINISH
Using Coral, make 4 tassels, approx 20cm long.
Sew the tassels around the ch-sps from Rounds
2-3 of the Border. Trim to desired length.
Weave in all ends.
PONCHO
the first 60 row-ends of the second Panel and
whipstitch together. Align the last row of the
second Panel with the last 60 row-ends of the
first Panel to create the Poncho shape and
whipstitch together.
NECK EDGING
Place a marker at the centre front and centre
back of the neckline.
Join yarn at first marker.
Round 1 (RS) Ch1, evenly work 51dc to next
marker, 51dc evenly to next marker, ss to first dc
to join, move markers up as you work. [102 sts]
Round 2 Ch1, (dc2tog, dc around to 2 sts before
next marker, dc2tog) twice, ss to beg dc. [98 sts]
Rounds 3-4 Repeat Round 2. [90 sts]
BOTTOM EDGING
Join Yarn anywhere around bottom edge.
Round 1 (RS) Ch1, dc in each st and row-end
around working 3dc in both points, ss to beg
dc.
Round 2 (RS) Ch1, (dc in next 3 sts, picot) rep
around, ss to beg dc.
Fasten off and weave in ends.
SCAN ME
Scan this code to
learn how to do
a loop stitch for
the loopy sheep
YARN STOCKISTS
Stylecraft
www.stylecraft-yarns.co.uk
The stitches in Marianne Rawlins’ stylish
wide-necked poncho create beatufiul
stripes of colour at random
QStylecraft Savannah (100% cotton,
165m/100g), 5 balls of Pampas (3791)
QA 4mm (US G/6) hook
QStitch markers
TENSION
13 sts and 11 rows measure 10x10cm (4x4in)
over pattern using a 4mm hook, or size needed
to obtain correct tension
MEASUREMENTS
Poncho measures 95cm (37½in) across widest
point and approx 65cm (25½in) long
ABBREVIATIONS
picot Ch3, ss to third ch from hook
For a full list, see page 86
NOTES
Poncho is made up of 2 Panels. Each Panel is
worked in rows and sewn together at the end.
PONCHO
PANELS (MAKE 2)
Ch61.
Row 1 Dc in second ch from hook, tr in next ch,
(dc in next ch, tr in next ch) across to end, turn.
[60 sts]
Rows 2-120 Ch1 (does not count as st), (dc in
next tr, tr in next dc) across to end, turn.
Fasten off and weave in ends.
TO MAKE UP
Align the starting chain of the first Panel with
WWW.GATHERED.HOW/SIMPLYCROCHET 23
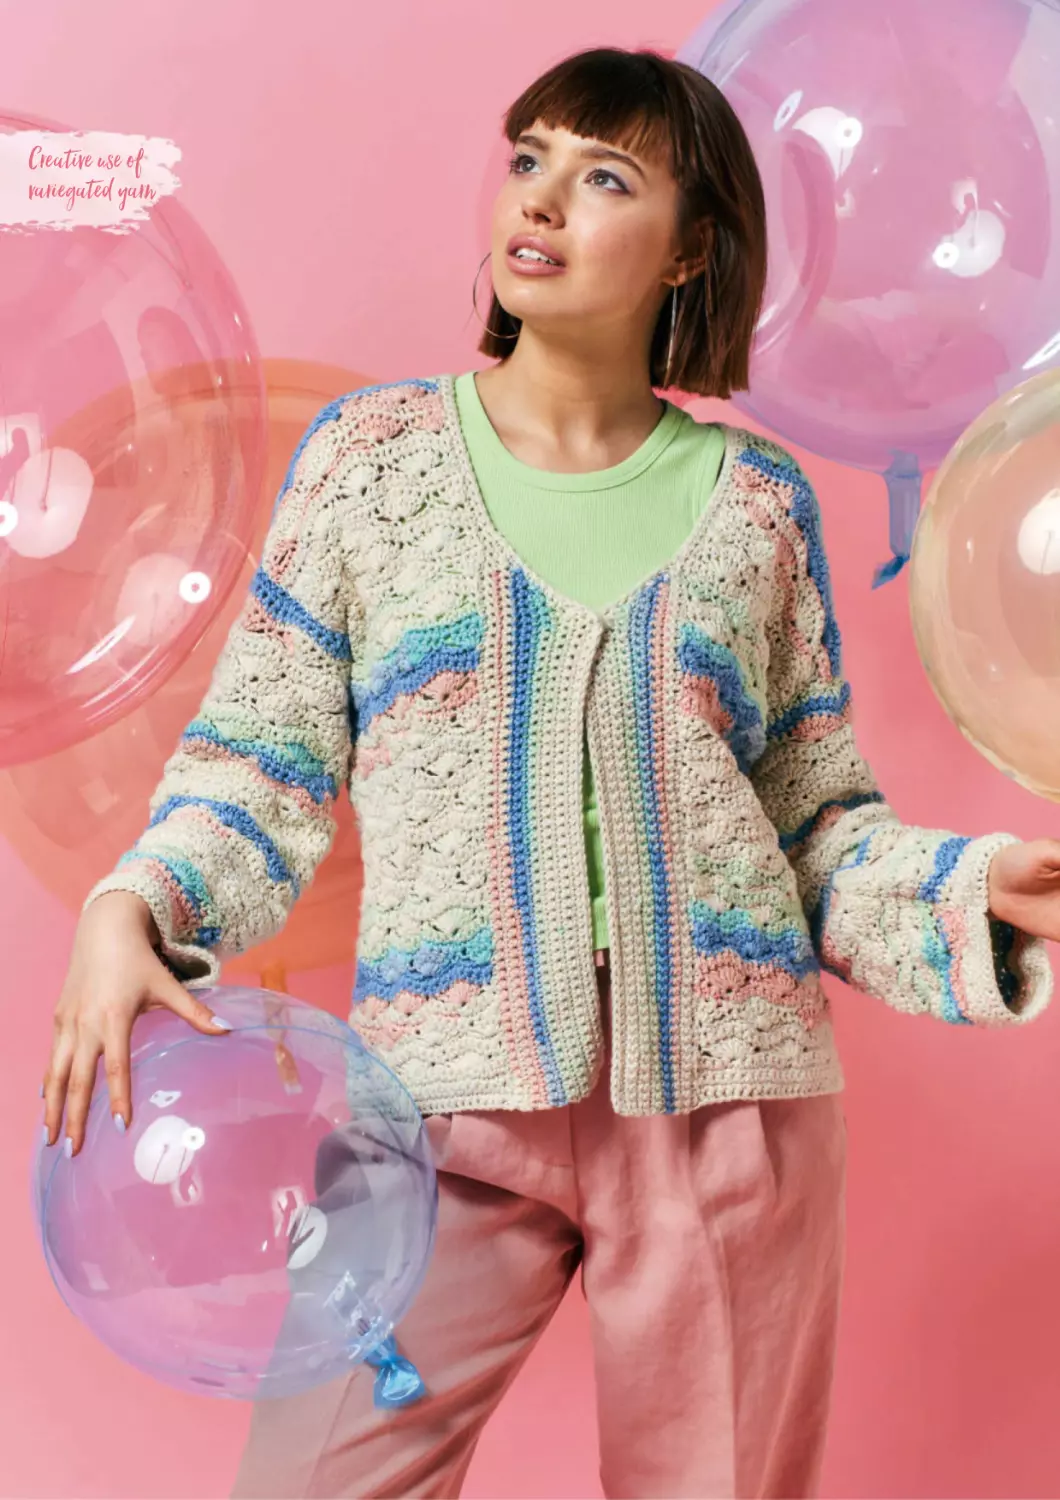
Creative use of
variegated yarn
SHELL STITCH CARDIGAN
we
love
Ups & downs
Stripes run both horizontally and vertically in this
creative cardi designed by Simone Francis
WWW.GATHERED.HOW/SIMPLYCROCHET 25
SHELL STITCH CARDIGAN
This lightweight cardigan uses different
stitches and techniques to create striped
effects with variegated yarn.
A IT
T IC Y
ARAN
WEIGHT
4.5MM
5MM
NOTES
Cardigan is made in separate pieces, which are
joined together with a slip stitch seam.
The stitch pattern is written out first, with the
patterns for the Cardigan written after.
YOU WILL NEED
QStylecraft Savannah
(100% cotton, 100g/160m)
Prairie (3793)
See table for measurements
and yarn quantities
QA 4.5mm (US 7) hook
QA 5mm (US H/8) hook
Q2 snap fasteners
Q4 stitch markers or scrap yarn
For yarn stockists contact
Stylecraft 01484 848435
www.stylecraft-yarns.co.uk
CARDIGAN
SHELL STITCH PATTERN
Row 1 (RS) Ch3 (counts as tr throughout), 3tr in
st at base of ch-3, skip 3 sts, dc in next st, *skip 3
sts, 7tr in next st, skip 3 sts, dc in next st; rep
from * across to last 4 sts, skip 3 sts, 4tr into final
st, turn.
Rows 2-3 Ch1 (not counted as st throughout),
dc into each st across, turn.
Row 4 Ch1, dc in first st, *skip 3 sts, 7tr in next
st, skip 3 sts, dc in next st; rep from * across to
end, turn.
Rows 5-6 Ch1, dc into each st to end, turn.
TENSION
2 fans and 12 rows measure
10x10cm (4x4in) over patt using a
5mm hook, or size needed to obtain
correct tension
Due to the nature of variegated yarn, stripes
will be uniquely placed in each garment made
BACK
RIB
Using a 5mm hook, fdc 73 (81: 89: 97: 105: 113).
Row 1 (RS) Ch1 (does not count as st
throughout), dc in each st across turn.
[73 (81: 89: 97: 105: 113) sts]
Rows 2-4 As Row 1.
ABBREVIATIONS
For a full list, see page 86
For
LEFT FRONT
CUFF
Using a 5mm hook, fdc 29 (33: 37: 41: 45: 49).
Row 1 Ch1, dc in each st across turn.
[29 (33: 37: 41: 45: 49) sts]
Rows 2-4 As Row 1.
MAIN BODY
Work in Shell Stitch Pattern until Back measures
approx 56 (56: 61: 61: 66: 66)cm ending on a
Row 3 rep. [9 (10: 11: 12: 13: 14) shells]
Next row Ss in first 6 sts, *dc in next 5 sts, htr in
next st, tr in next st, htr in next st; rep from *
across to final 11 sts, dc in next 5 sts, ss in final
6 sts.
Fasten off.
Pm 18 (19: 21: 22: 24: 27)cm down from final row
to mark underarm on either side.
at
www.blacksheepwools.com
use the code SAV139
at the checkout
Offer ends 25 September 2023
SIZE
TO FIT BUST
b
c
ACTUAL BUST
(APPROX)
LENGTH
a
SLEEVE LENGTH
Width a: 47 (52: 57.5: 62.5: 67.5: 73)cm,
18½ (20½: 22½: 24¾: 26¾: 28¾)in
Length b: 56 (56: 61: 61: 66: 66)cm,
22 (22: 24: 24: 26: 26)in
Sleeve length c: 40 (40: 40: 40: 38: 38)cm,
15¾ (15¾: 15¾: 15¾: 15: 15)in
26 WWW.GATHERED.HOW/SIMPLYCROCHET
YARN
MAIN BODY
SIZES XS, M AND XL ONLY
Row 1 (RS) Ch3, 3tr into base st, skip 3 sts, dc in
next st, *skip 3 sts, 7tr in next st, skip 3 sts, dc in
next st; rep from * to end, turn.
[3 (-: 4: -: 5: -) shells, 1 half shell]
Rows 2-3 Ch1, dc in each st across turn.
Rep Rows 1-3 until Front Left measures approx
56 (-: 61: -: 66: -)cm, working the same number
of rows as Back.
XS
S
M
L
XL
2XL
cm
71-76
81-86
91-97
102-107
112-117
122-127
in
28-30
32-34
36-38
40-42
44-46
48-50
cm
94
104.5
115
125.5
136
146
in
37
41
45¼
49¼
53½
57½
cm
56
56
61
61
66
66
in
22
22
24
24
26
26
cm
40
40
40
40
38
38
in
15¾
15¾
15¾
15¾
15
15
7
8
9
10
11
12
100g
To make this pattern easier to follow, we’ve colour-coded the sizing instructions – simply follow the
relevant column.
SHELL STITCH CARDIGAN
SIZES S, L AND 2XL ONLY
Work in Shell Stitch Pattern until Left Front
measures approx - (56: -: 61: -:66)cm, working
the same number of rows as Back.
[- (4: - : 5: -: 6) shells]
ALL SIZES
Next row (WS) Ss in first 6 sts, dc in next st, *htr
in next st, tr in next st, htr in next st, dc in next 5
sts; rep from * to final 3 sts, dc in final 3 sts.
Fasten off.
With RS facing, pm 18 (19: 21: 22: 24: 27)cm
down right edge to mark underarm.
RIGHT FRONT
Row 7 Ch1, dc in first st, *skip 3 sts, 7tr in next
st, skip 3 sts, dc in next st; rep from * to end,
turn. [7 (7: 7: 7: 8: 8) shells]
Rows 8-9 Ch1, dc in each st to end, turn.
Rep Rows 1-9 another 0 (0: 1: 1: 1: 2) times.
[57 (57: 65: 65: 73: 81) sts or 7 (7: 8: 8: 9: 10 shells]
Work in Shell Stitch Pattern, beginning on
Row 4 (4: 1: 1: 1: 4: 4) until Sleeve measures
40 (40: 40: 40: 38: 38)cm, ending on a Row 3 or
Row 6 rep.
Next row Ch1, dc in first 3 sts, *htr in next st, tr
in next st, htr in next st, dc in next 5 sts; rep
from * to final 6 sts, htr in next st, tr in next st,
htr in next st, dc in final 3 sts.
Fasten off.
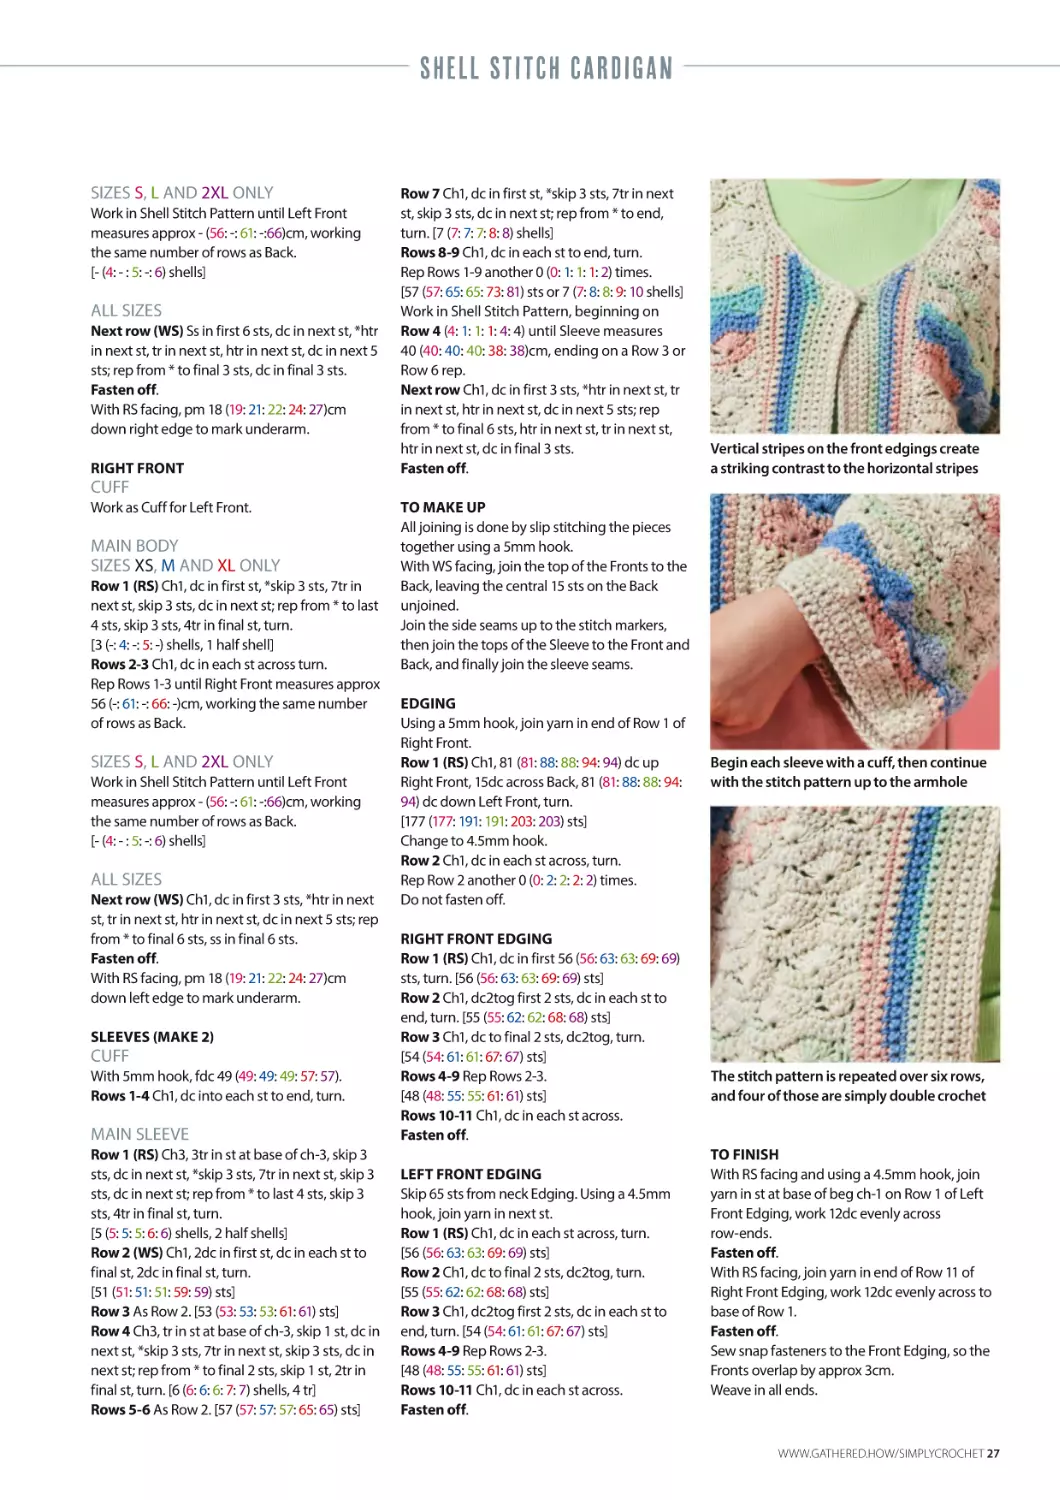
Vertical stripes on the front edgings create
a striking contrast to the horizontal stripes
CUFF
Work as Cuff for Left Front.
MAIN BODY
SIZES XS, M AND XL ONLY
Row 1 (RS) Ch1, dc in first st, *skip 3 sts, 7tr in
next st, skip 3 sts, dc in next st; rep from * to last
4 sts, skip 3 sts, 4tr in final st, turn.
[3 (-: 4: -: 5: -) shells, 1 half shell]
Rows 2-3 Ch1, dc in each st across turn.
Rep Rows 1-3 until Right Front measures approx
56 (-: 61: -: 66: -)cm, working the same number
of rows as Back.
SIZES S, L AND 2XL ONLY
Work in Shell Stitch Pattern until Left Front
measures approx - (56: -: 61: -:66)cm, working
the same number of rows as Back.
[- (4: - : 5: -: 6) shells]
ALL SIZES
Next row (WS) Ch1, dc in first 3 sts, *htr in next
st, tr in next st, htr in next st, dc in next 5 sts; rep
from * to final 6 sts, ss in final 6 sts.
Fasten off.
With RS facing, pm 18 (19: 21: 22: 24: 27)cm
down left edge to mark underarm.
TO MAKE UP
All joining is done by slip stitching the pieces
together using a 5mm hook.
With WS facing, join the top of the Fronts to the
Back, leaving the central 15 sts on the Back
unjoined.
Join the side seams up to the stitch markers,
then join the tops of the Sleeve to the Front and
Back, and finally join the sleeve seams.
EDGING
Using a 5mm hook, join yarn in end of Row 1 of
Right Front.
Row 1 (RS) Ch1, 81 (81: 88: 88: 94: 94) dc up
Right Front, 15dc across Back, 81 (81: 88: 88: 94:
94) dc down Left Front, turn.
[177 (177: 191: 191: 203: 203) sts]
Change to 4.5mm hook.
Row 2 Ch1, dc in each st across, turn.
Rep Row 2 another 0 (0: 2: 2: 2: 2) times.
Do not fasten off.
MAIN SLEEVE
RIGHT FRONT EDGING
Row 1 (RS) Ch1, dc in first 56 (56: 63: 63: 69: 69)
sts, turn. [56 (56: 63: 63: 69: 69) sts]
Row 2 Ch1, dc2tog first 2 sts, dc in each st to
end, turn. [55 (55: 62: 62: 68: 68) sts]
Row 3 Ch1, dc to final 2 sts, dc2tog, turn.
[54 (54: 61: 61: 67: 67) sts]
Rows 4-9 Rep Rows 2-3.
[48 (48: 55: 55: 61: 61) sts]
Rows 10-11 Ch1, dc in each st across.
Fasten off.
Row 1 (RS) Ch3, 3tr in st at base of ch-3, skip 3
sts, dc in next st, *skip 3 sts, 7tr in next st, skip 3
sts, dc in next st; rep from * to last 4 sts, skip 3
sts, 4tr in final st, turn.
[5 (5: 5: 5: 6: 6) shells, 2 half shells]
Row 2 (WS) Ch1, 2dc in first st, dc in each st to
final st, 2dc in final st, turn.
[51 (51: 51: 51: 59: 59) sts]
Row 3 As Row 2. [53 (53: 53: 53: 61: 61) sts]
Row 4 Ch3, tr in st at base of ch-3, skip 1 st, dc in
next st, *skip 3 sts, 7tr in next st, skip 3 sts, dc in
next st; rep from * to final 2 sts, skip 1 st, 2tr in
final st, turn. [6 (6: 6: 6: 7: 7) shells, 4 tr]
Rows 5-6 As Row 2. [57 (57: 57: 57: 65: 65) sts]
LEFT FRONT EDGING
Skip 65 sts from neck Edging. Using a 4.5mm
hook, join yarn in next st.
Row 1 (RS) Ch1, dc in each st across, turn.
[56 (56: 63: 63: 69: 69) sts]
Row 2 Ch1, dc to final 2 sts, dc2tog, turn.
[55 (55: 62: 62: 68: 68) sts]
Row 3 Ch1, dc2tog first 2 sts, dc in each st to
end, turn. [54 (54: 61: 61: 67: 67) sts]
Rows 4-9 Rep Rows 2-3.
[48 (48: 55: 55: 61: 61) sts]
Rows 10-11 Ch1, dc in each st across.
Fasten off.
SLEEVES (MAKE 2)
CUFF
With 5mm hook, fdc 49 (49: 49: 49: 57: 57).
Rows 1-4 Ch1, dc into each st to end, turn.
Begin each sleeve with a cuff, then continue
with the stitch pattern up to the armhole
The stitch pattern is repeated over six rows,
and four of those are simply double crochet
TO FINISH
With RS facing and using a 4.5mm hook, join
yarn in st at base of beg ch-1 on Row 1 of Left
Front Edging, work 12dc evenly across
row-ends.
Fasten off.
With RS facing, join yarn in end of Row 11 of
Right Front Edging, work 12dc evenly across to
base of Row 1.
Fasten off.
Sew snap fasteners to the Front Edging, so the
Fronts overlap by approx 3cm.
Weave in all ends.
WWW.GATHERED.HOW/SIMPLYCROCHET 27
Koala clutch
Let this cutie by Victoria Kairis hold your
desk supplies with its snap-bracelet arms!
desk
décor
AMIGURUMI KOALA
Your post-it notes and pens will be safe in the
arms of this cuddly koala. Why not make one
for a friend who’s starting a new job?
A IT
T IC Y
MIXED
WEIGHTS
2MM
3MM
YOU WILL NEED
QKing Cole Cottonsmooth DK
(100% cotton, 100g/200m)
1 ball of Silver (3525)
QKing Cole Truffle DK
(100% polyamide, 100g/180m)
1 ball of Coconut (4365)
QKing Cole Giza 4ply
(100% cotton, 50g/158m)
1 ball of Black (2201)
QA 3mm (C/2 or D/3) hook
QA 2mm (US B/1) hook
QA stitch marker
QToy stuffing
QA snap band bracelet, 22cm long
and up to 2.5cm wide
For yarn stockists contact
King Cole 01756 703670
www.kingcole.com
NOTES
Pattern is worked in the amigurumi style. Work
stitches in a continuous spiral without closing
off each round with a slip stitch. You may find it
helpful to mark the first st of the round, moving
it up as you work.
All parts are made separately. Use the images as
a guide when joining parts together.
If you are making this as a toy for a child under
36 months, do not use safety eyes; instead,
embroider eyes using black stranded cotton.
KOALA
ARMS (MAKE 2)
Using a 3mm hook and Silver, make a magic
loop.
Round 1 (RS) Ch1 (does not count as st
throughout), 6dc in loop. [6 sts]
Round 2 2dc in each st around. [12 sts]
Round 3 (Dc in next st, 2dc in next st) 6 times.
[18 sts]
Rounds 4-23 Dc in each st around.
Fasten off.
All of the parts are worked separately and
joined to the body as you work each one
TENSION
Tension is not critical, but it may
affect the yarn quantities required
MEASUREMENTS
Koala measures approx 15cm (6in)
tall
ABBREVIATIONS
invdec Insert hook in front loop of
first st to be decreased, insert hook
into front loop of second st to be
decreased, yrh, pull through 2 sts,
yrh and pull through 2 loops on
hook
For a full list, see page 86
SCAN ME
Scan this code to
discover even
more amigurumi
patterns
BODY
Using a 3mm hook and Silver, ch5.
Round 1 (RS) Dc in second ch from hook, dc in
next 2 ch, 3dc in last ch, turn to work across
opposite side of foundation ch, dc in next 2 ch,
2dc in next ch. [10 sts]
Round 2 (2dc in next st, dc in next 2 sts, 2dc in
next 2 sts) twice. [16 sts]
Round 3 *Dc in next st, 2dc in next st, dc in
next 2 sts, (dc in next st, 2dc in next st) twice;
rep from * once more. [22 sts]
Round 4 *Dc in next 2 sts, 2dc in next st, dc in
next 2 sts, (dc in next 2 sts, 2dc in next st) twice;
rep from * once more. [28 sts]
Round 5 *2dc in next st, dc in next 5 sts, (2dc in
next st, dc in next 3 sts) twice; rep from * once
more. [34 sts]
Round 6 *Dc in next 4 sts, 2dc in next st, dc in
next 2 sts, (dc in next 4 sts, 2dc in next st) twice;
rep from * once more. [40 sts]
Round 7 *2dc in next st, dc in next 7 sts, (2dc in
next st, dc in next 5 sts) twice; rep from * once
more. [46 sts]
Round 8 *Dc in next 6 sts, 2dc in next st, dc in
next 2 sts, (dc in next 6 sts, 2dc in next st) twice;
rep from * once more. [52 sts]
Round 9 *2dc in next st, dc in next 9 sts, (2dc in
next st, dc in next 7 sts) twice; rep from * once
more. [58 sts]
Round 10 *Dc in next 8 sts, 2dc in next st, dc in
next 2 sts, (dc in next 8 sts, 2dc in next st) twice;
rep from * once more. [64 sts]
Rounds 11-18 Dc in each st around.
Arms are joined to Body over the next 2 rounds.
On the first round you will join the inside of the
When stuffing the body, make sure you get
the bottom flat so the koala will sit upright
Arm, meaning you will insert your hook from
WS to RS on the Arm sts.
Round 19 Dc in next 10 sts, *place Arm next to
Body, (dc through any st of Arm and next st on
Body) 9 times, dc in next 17 sts of Body; rep
from * once more, dc in final 2 sts.
Round 20 Dc in next 10 sts, *dc in next 9
unworked stitches of Arm, skip 9 joining sts of
prev round, dc in next 17 sts of Body; rep from *
once more, dc in next 2 sts of Body.
Round 21 (Dc in next 2 sts, invdec, dc in next 16
sts, invdec, dc in next 5 sts, invdec, dc in next 3
sts) twice. [58 sts]
Round 22 (Dc in next st, invdec, dc in next 15
sts, invdec, dc in next 4 sts, invdec, dc in next 3
sts) twice. [52 sts]
Round 23 (Dc in next st, invdec, dc in next 14
sts, invdec, dc in next 3 sts, invdec, dc in next 2
sts) twice. [46 sts]
Round 24 *Invdec, dc in next 13 sts, (invdec, dc
in next 2 sts) twice; rep from * once more.
[40 sts]
WWW.GATHERED.HOW/SIMPLYCROCHET 29
AMIGURUMI KOALA
Fasten off and weave in ends.
Insert the snap band bracelet into the Arms and
stuff the Body.
Flatten the Ears and Inner Ears. Sew the Inner
Ears to one side of the Ears. Pinch into shape
and sew to the Head.
TUMMY
Using a 3mm hook and Coconut, make a magic
loop.
Round 1 (WS) Ch1, 6dc in loop. [6 sts]
Round 2 (2dc in next st, dc in next st, 2dc in
next st) twice. [10 sts]
Rounds 3-7 Rep Rounds 2-6 of Body. [40 sts]
Fasten off leaving a long tail.
Sew the Tummy to final round of Body.
NOSE
Using a 2mm hook and Black, ch5.
Rounds 1-4 (RS) Rep Rounds 1-4 of Body.
[28 sts]
Round 5 Dc in each st around.
Fasten off leaving a long tail.
Sew the Nose to the Head, add a little stuffing
as you join.
HEAD
Using a 3mm hook and Silver, make a magic
loop.
Rounds 1-3 (RS) As Rounds 1-3 of Arms. [18 sts]
Round 4 (Dc in next 2 sts, 2dc in next st) 6
times. [24 sts]
Round 5 (Dc in next 3 sts, 2dc in next st) 6
times. [30 sts]
Round 6 (Dc in next 4 sts, 2dc in next st) 6
times. [36 sts]
Round 7 (Dc in next 5 sts, 2dc in next st) 6
times. [42 sts]
Round 8 (Dc in next 6 sts, 2dc in next st) 6
times. [48 sts]
Round 9 (Dc in next 7 sts, 2dc in next st) 6
times. [54 sts]
Round 10 (Dc in next 8 sts, 2dc in next st) 6
times. [60 sts]
Rounds 11-20 Dc in each st around.
Round 21 (Dc in next 8 sts, invdec) 6 times.
[54 sts]
Round 22 (Dc in next 7 sts, invdec) 6 times.
[48 sts]
Round 23 (Dc in next 6 sts, invdec) 6 times.
[42 sts]
Round 24 (Dc in next 5 sts, invdec) 6 times.
[36 sts]
Round 25 (Dc in next 4 sts, invdec) 6 times.
[30 sts]
Fasten off leaving a long tail.
Secure safety eyes in the gap between Rounds
15-16, 13 stitches apart.
Stuff the Head and sew to the top of the Body.
EARS (MAKE 2)
Using a 3mm hook and Silver, make a magic
loop.
Rounds 1-5 Rep Rounds 1-5 of Head.
Rounds 6-10 Dc in each st around. [30 sts]
Round 11 (Dc in next 3 sts, invdec) 6 times.
[24 sts]
Fasten off leaving a long tail.
INNER EARS (MAKE 2)
Using a 3mm hook and Coconut, make a magic
loop.
Rounds 1-3 (RS) Rep Rounds 1-3 of Arms.
[18 sts]
Fasten off leaving a long tail.
30 WWW.GATHERED.HOW/SIMPLYCROCHET
LEGS (MAKE 2)
Using a 3mm hook and Silver, ch5.
Rounds 1-4 (RS) Rep Rounds 1-4 of Body.
[28 sts]
Rounds 5-7 Dc in each st around.
Round 8 (Invdec) twice, dc in next 18 sts,
(invdec) 3 times. [23 sts]
Round 9 (Invdec) twice, dc in next 13 sts,
(invdec) 3 times. [18 sts]
Rounds 10-11 Dc in each st around.
Round 12 (2dc in next 2 sts, dc in next 5 sts, 2dc
in next 2 sts) twice. [26 sts]
Round 13 Dc in each st around.
Round 14 2dc in next st, dc in next 24 sts, 2dc
in next st. [28 sts]
Rounds 15-17 Dc in each st around.
Round 18 (Invdec, dc in next 10 sts, invdec)
twice. [24 sts]
Round 19 (Invdec, dc in next 8 sts, invdec)
twice. [20 sts]
Stuff the foot firmly, then lightly stuff the upper
Leg.
Round 20 *(Invdec) twice, dc in next 2 sts,
(invdec) twice; rep from * once more. [12 sts]
Round 21 (Invdec) 6 times. [6 sts]
Fasten off.
Thread the tail through the fl of final 6 sts,
pulling tight to close.
Weave in ends.
Sew the Legs to the Body.
The huggy arms are held in place by inserting
snap bands inside the crochet pieces
For the inner ears, work three rounds in fluffy
yarn, flatten and sew to the outer ears
BAMBOO+COTTON
100% Natural
Now in 47 shades!
9993
4)*73(74(-*90.98N247*I
Discover our range of bright and bold modern crochet kits & patterns
Save 15% at www.thelefthookery.co.uk with code SIMPLYCROCHET
Find us @thelefthookery
Offer ends 31 August 2023
The
Possibilities
are
Endless
Member of the UK Hand Knitting Association
For all our latest patterns & yarns visit
www.stylecraft-yarns.co.uk
Recycle your magazine and seven days
later it could come back as your newspaper
www.recyclenow.com
For your nearest stockist telephone
01484 848435
saVe tiMe, moNey aNd haSsle With aN
anNual SimplY crochEt subsCriptioN
QDownload the latest issue
straightaway
QGet a further 12 issues in
your first year
QAll issues download
automatically
QDownload it once…
read it offline forever
iPad is a trademark of Apple Inc., registered in the U.S. and other countries. App Store is a service mark of Apple Inc.
NOOK is a registered trademark of Barnes & Noble, Inc. NOOK Tablet is a trademark of Barnes & Noble, Inc
To subscribe simply visit:
www.gathered.how/magazines-simply-crochet
The digital version of the magazine does not include the cover gift that you would find on newsstand copies
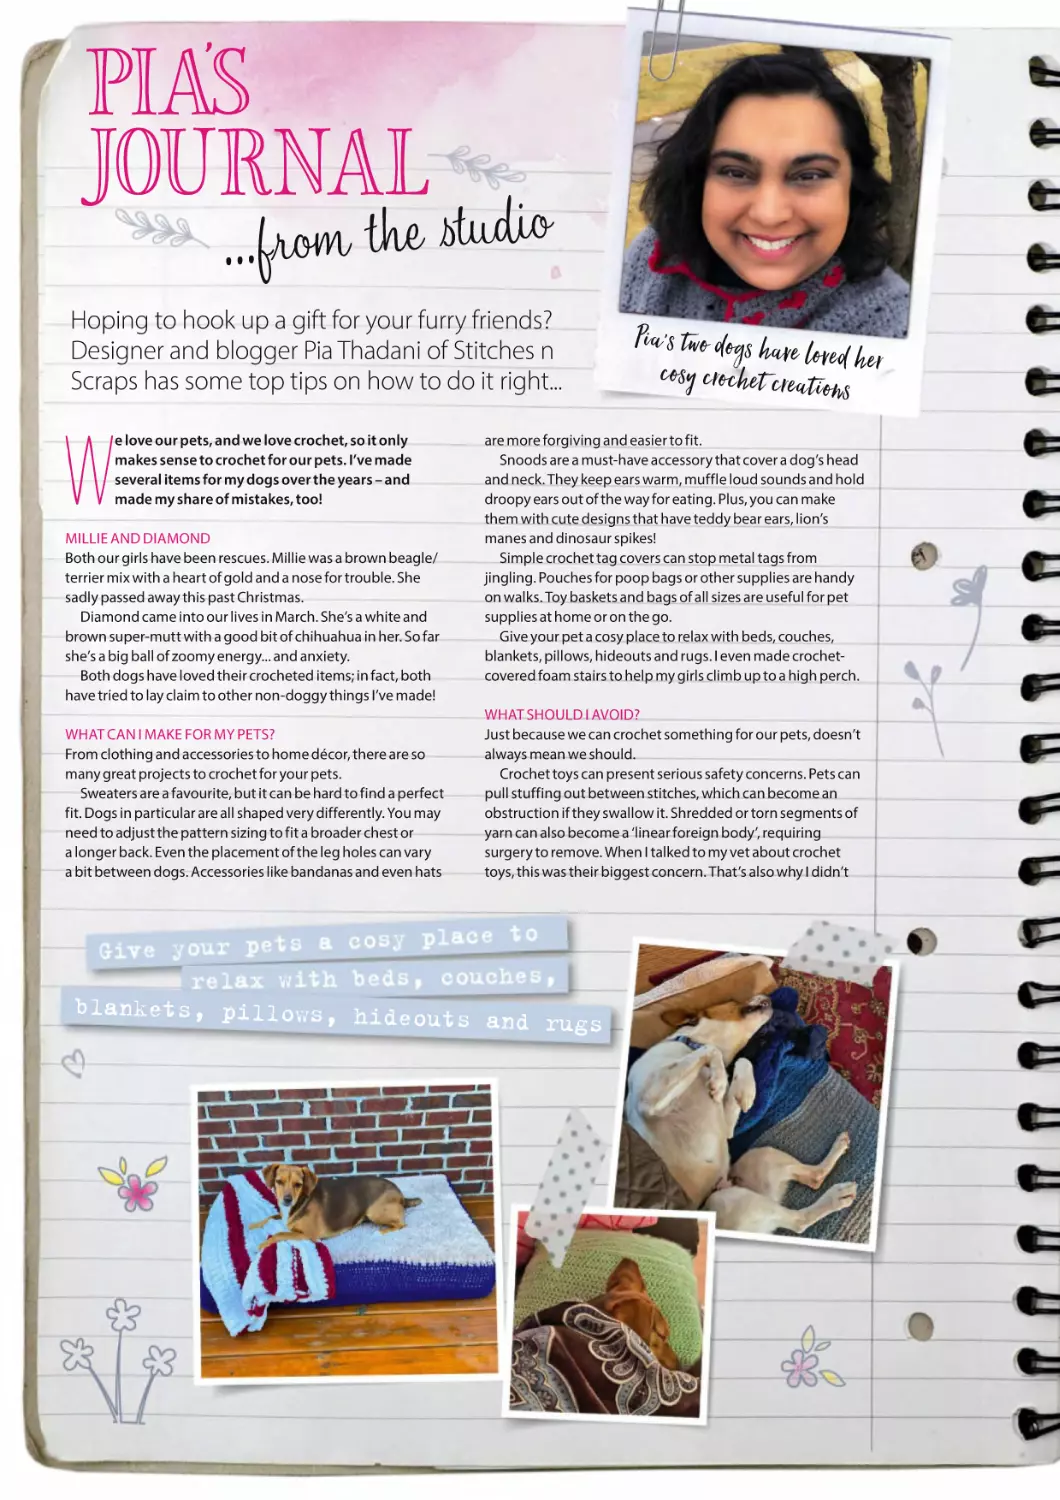
PIA’S
JOURNAL studio
...f rom the
Hoping to hook up a gift for your furry friends?
Designer and blogger Pia Thadani of Stitches n
Scraps has some top tips on how to do it right...
W
e love our pets, and we love crochet, so it only
makes sense to crochet for our pets. I’ve made
several items for my dogs over the years – and
made my share of mistakes, too!
MILLIE AND DIAMOND
Both our girls have been rescues. Millie was a brown beagle/
terrier mix with a heart of gold and a nose for trouble. She
sadly passed away this past Christmas.
Diamond came into our lives in March. She’s a white and
brown super-mutt with a good bit of chihuahua in her. So far
she’s a big ball of zoomy energy... and anxiety.
Both dogs have loved their crocheted items; in fact, both
have tried to lay claim to other non-doggy things I’ve made!
WHAT CAN I MAKE FOR MY PETS?
From clothing and accessories to home décor, there are so
many great projects to crochet for your pets.
Sweaters are a favourite, but it can be hard to find a perfect
fit. Dogs in particular are all shaped very differently. You may
need to adjust the pattern sizing to fit a broader chest or
a longer back. Even the placement of the leg holes can vary
a bit between dogs. Accessories like bandanas and even hats
Pi a 's two dog s h a ve lo
c o sy c roc h et c re a ti veonds h er
are more forgiving and easier to fit.
Snoods are a must-have accessory that cover a dog’s head
and neck. They keep ears warm, muffle loud sounds and hold
droopy ears out of the way for eating. Plus, you can make
them with cute designs that have teddy bear ears, lion’s
manes and dinosaur spikes!
Simple crochet tag covers can stop metal tags from
jingling. Pouches for poop bags or other supplies are handy
on walks. Toy baskets and bags of all sizes are useful for pet
supplies at home or on the go.
Give your pet a cosy place to relax with beds, couches,
blankets, pillows, hideouts and rugs. I even made crochetcovered foam stairs to help my girls climb up to a high perch.
WHAT SHOULD I AVOID?
Just because we can crochet something for our pets, doesn’t
always mean we should.
Crochet toys can present serious safety concerns. Pets can
pull stuffing out between stitches, which can become an
obstruction if they swallow it. Shredded or torn segments of
yarn can also become a ‘linear foreign body’, requiring
surgery to remove. When I talked to my vet about crochet
toys, this was their biggest concern. That’s also why I didn’t
blankets, pillows, hideouts
and rugs
?DA?GSEPDUKQNRAPNOP
crochet my girls a snuffle mat (a popular enrichment toy).
Crochet can easily snag a tooth or claw, too, so it’s not
a great idea for cat scratching devices. It also doesn’t behave
the same way as commercial leashes, harnesses, collars and
muzzles; crochet has more stretch, so it can be pulled off
more easily, snag or become too tight.
When in doubt, always check with your vet first. They
would much prefer to answer questions than to treat
unexpected injuries.
CHOOSING YOUR YARN
Choose yarns that are durable and easy to clean. Be mindful
of scents, textures or materials that your pet might find
unpleasant or even be allergic to. Avoid any embellishments,
like beads or buttons, that could come off and be swallowed.
Before crocheting a large project, try making a swatch in the
same yarn and see how your pet behaves with it.
Millie was very gentle with anything soft and silky, so she
loved the faux fur yarn on the top of her bed. Diamond bites
at it and pulls up fuzz, so I have to keep it covered with
a blanket for her. Both of them scratch and tug at their
blankets, so I use a sturdy, basic acrylic to make them.
Pay attention to filling materials too. Millie tended to dig
and started to tear up the foam inside her stairs. But I flipped
the foam over for Diamond, and she doesn’t bother it at all!
I hope I’ve inspired you to hook some fun – and safe –
projects for your pets. I’m sure they’ll love your makes!
Keep up with Pia online at www.stitchesnscraps.com and
follow her on Instagram at @StitchesnScraps, and follow
Diamond at @prairie_diamond
.dominoscraftcorner.co
Photo and pattern: www
“Most of the pat terns available are
for cats or dogs, but crochet can be
just as fun for other pets too! I've
seen cute crochet snake cosies, reptile
hammocks, rodent nests and ferret
sweaters, beds and hammocks.”
Photo and pattern: www.WiwyCrochet.etsy.com
beyond cats & dogs
m
Photo and pattern: www.ToxicWitchWeavery.etsy.com
y.com
.enchantingcreations7.ets
Photo and pattern: www
rs/sarah-petersen
www.ravelry.com/designe
EMBELLISH BABY BOOTIES
Great
gift
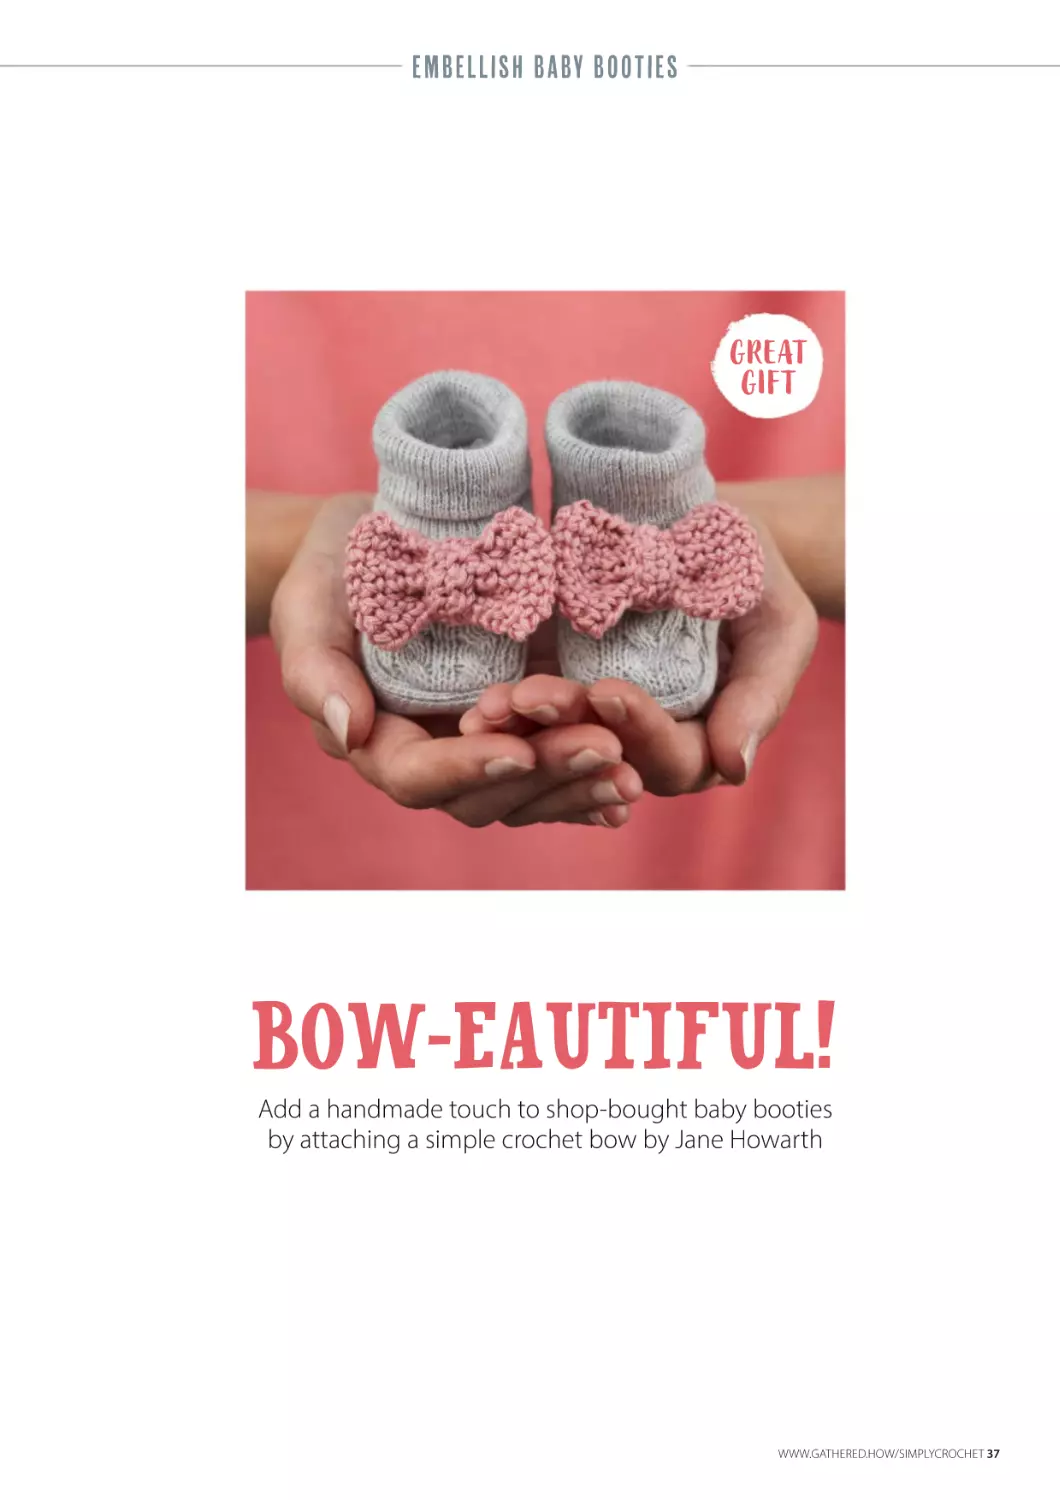
bow-eautiful!
Add a handmade touch to shop-bought baby booties
by attaching a simple crochet bow by Jane Howarth
WWW.GATHERED.HOW/SIMPLYCROCHET 37
EMBELLISH BABY BOOTIES
ASY
ASY
DK
WEIGHT
3.5MM
HOOK
Use these chunky bows to personalise baby
gifts and decorate cards, or attach a clip to
the back to make an adorable hair accessory.
You could even get everyone at a baby
shower to make them! Just sew them on
securely so little fingers can’t pry them loose.
YOU WILL NEED
NOTES
QRico Baby Cotton Soft DK
Pattern is worked using the amigurumi
method. Work stitches in a continuous spiral
without closing off each round with a slip stitch.
It may help to use a stitch marker in the first
stitch of each round, moving it up as you work.
Each Bow is created in a tube shape, which you
will sew together.
Ensure that separate pieces and completed
Bows are firmly attached.
(50% cotton, 50% acrylic,
50g/125m)
1 ball of Dark Pink (061)
QA 3.5mm (US E/4) hook
QA stitch marker
QA pair of baby booties
For yarn stockists contact
Rico Design
www.rico-design.com/en/home
BABY BOOTIE BOWS
TENSION
Tension is not critical for this project,
but it may affect the yarn quantities
required
MEASUREMENTS
Bow measures 5.5x4cm (2¼x1½in)
ABBREVIATIONS
For a full list, see page 86
BOW
Ch20.
Round 1 (RS) Dc in second ch from hook and
each ch across, do not turn. [20 sts]
Round 2 (RS) Dc in first dc and each dc around.
Rounds 3-7 Dc in each st around.
Fasten off.
The bows are made in the round over 20
double crochet stitches for seven rounds
BAND
Ch10.
Row 1 (RS) Dc in second ch from hook and
each ch across, turn. [9 sts]
Row 2 (WS) Ch1 (does not count as a st), dc in
each st to end.
Fasten off.
TO MAKE UP
Flatten Bow and whipstitch the upper and
lower edges to close. Pinch centre to form bow
shape and secure with a few sts.
Wrap the Band around centre and sew in place.
Sew the Bows to the booties, making sure they
are securely attached.
For the centre band, work a strip, wrap it
around the main piece and stitch in place
SIMPLE STEPS HOW TO WORK DOUBLE CROCHET IN A SPIRAL
1 Make a foundation ring,
then work the t-ch (1ch for dc).
Work dc stitches into the ring,
but do not join the last stitch
and first stitch of this first
round with a slip stitch.
38 WWW.GATHERED.HOW/SIMPLYCROCHET
2 Instead, work the first dc
stitch of the second round
into the first stitch of the first
round. To do this, insert the
hook into the stitch, yrh, pull
yarn through, yrh and pull the
yarn through both loops.
3 You’ll now be working in a
spiral. Continue to work more
rounds of dc stitches in a
spiral, according to the
pattern instructions.
4 On the last round, after
you’ve worked the last dc
stitch, you’ll need to finish off
the spiral with a slip stitch for
a neat edge: insert the hook
into the next stitch, yrh and
pull through both loops.
GRANNY SQUARE TANK
great for
layering
Tanks a lot
Take summery granny squares into the workplace with
this professional-looking yet fun tank top by Cassie Ward
WWW.GATHERED.HOW/SIMPLYCROCHET 39
GRANNY SQUARE TANK
Show off your passion for granny squares
with this pulled-together look. Layer this top
over a button-down or wear it on its own!
CHUNKY
WEIGHT
6MM
HOOK
YOU WILL NEED
QStylecraft Softie
(80% acrylic, 20% wool,
100g/170m)
See table for measurements
and quantities of Yarn A
Yarn A Peony (3986)
1 ball of each for all sizes:
Yarn B Rose Hip (3984)
Yarn C Coral (2361)
Yarn D Zest (3985)
Yarn E Cream (3982)
QA 6mm (US J/10) hook
For yarn stockists contact
Stylecraft 01484 848435
www.stylecraft-yarns.co.uk
TENSION
Full Motifs measure approx 16 (17.5,
19, 20.5)cm, 6¼ (7: 7½: 8)in square
ABBREVIATIONS
For a full list, see page 86
For
at
www.woolwarehouse.co.uk
use the code SC139
at the checkout
Code cannot be applied to certain products such as yarn
packs, sale items, gift vouchers, KC Collection
and Lopi products.
NOTES
Tank Top is made of Motifs, which are varied
slightly according to their position. Refer to the
Chart on page 42 to see how the different
Motifs fit together. The Motifs written in red will
need to be joined first, and then a widening
row is worked along each side of these before
the rest of the Motifs are joined.
A hem rib, armhole and neckline edgings are
added afterwards.
TANK TOP
FULL MOTIF (MAKE 8)
Using 6mm hook and Yarn B, ch4, ss to first ch
to form a ring.
Round 1 (RS) Ch3 (counts as first tr here and
throughout), 2tr in ring, ch2, (3tr, ch2) three
times in ring, ss to top of beg ch-3 to join, turn.
[4 3-tr groups, 4 ch-2 sps]
Fasten off Yarn B.
Join Yarn C in any corner ch-2 sp.
Round 2 (WS) Ch3, (2tr, ch2, 3tr) in same ch-2
sp, (3tr, ch2, 3tr) in each corner ch-2 sp around,
ss to top of beg ch-3 to join, turn.
[8 3-tr groups, 4 ch-2 sps]
Fasten off Yarn C.
Join Yarn D in any corner ch-2 sp.
Round 3 (RS) Ch3, (2tr, ch2, 3tr) in same ch-2 sp,
3tr in space between next two 3-tr groups,
*(3tr, ch2, 3tr) in next corner ch-2 sp, 3tr in space
between next two 3-tr groups; rep from * twice
more, ss to top of beg ch-3 to join, turn.
[12 3-tr groups, 4 ch-2 sps]
Fasten off Yarn D.
Join Yarn E in any corner ch-2 sp.
Round 4 (WS) Ch3, (2tr, ch2, 3tr) in same ch-2
sp, 3tr in space between each 3-tr group to
next corner ch-2 sp, *(3tr, ch2, 3tr) in corner ch-2
sp, 3tr in space between each 3tr group to next
corner ch-2 sp; rep from * twice more, ss to top
of beg ch-3 to join, turn. [16 3-tr groups]
Fasten off Yarn E.
Join Yarn A in any corner ch-2 sp.
Round 5 (RS) Rep Round 4. [20 3-tr groups]
SIZE
TO FIT BUST
ACTUAL BUST
(APPROX)
LENGTH
YARN A
S
Motifs at the neckline are not full squares to
create the curve at the back and V at the front
SIZE S ONLY
Fasten off.
SIZE M ONLY
Round 6 (WS) Ch1, *dc in each tr to ch-sp (dc,
ch2, dc) in ch-2 sp, skip first tr on next side; rep
from * around, ss to first dc to join.
[16 sts each side, ch-2 sp each corner]
Fasten off.
SIZES L AND XL ONLY
Round 6 (WS) Ss into corner ch-2 sp, rep Round 4.
[24 3-tr groups]
Fasten off for Size L only.
SIZE XL ONLY
Round 7 (RS) Ch1, *dc in each tr to ch-sp (dc,
ch2, dc) in ch-2 sp, skip first tr on next side; rep
from * around, ss to first dc to join.
[19 sts each side, ch-2 sp each corner]
Fasten off.
M
L
XL
cm
81-86
91-97
102-107
112-117
in
32-34
36-38
40-42
44-46
cm
96
105
114
123
in
37¾
41¼
45
48½
cm
48
52.5
57
61.5
in
19
20¾
22½
24¼
100g
2
2
2
3
To make this pattern easier to follow, we’ve colour-coded the sizing instructions – simply follow the
relevant column.
40 WWW.GATHERED.HOW/SIMPLYCROCHET
GRANNY SQUARE TANK
FRONT V-NECK MOTIF (MAKE 2)
Rounds 1 to 4 are complete Rounds. After
Round 4, the sts of one corner of each round
are not worked, so these are written as rows.
Work as for Full Motif to end of Round 2.
Join Yarn D with a dc in any corner ch-2 sp.
Round 3 (RS) Ch3, skip 3 tr, 3tr in space before
next 3-tr group, *(3tr, ch2, 3tr) in corner ch-2 sp,
3tr in sp before next 3-tr group; rep from *
twice more, ch3, ss to first dc, turn.
[10 3-tr groups, 3 corner ch-3 sps, 1dc, 2 ch-3 sps]
Fasten off Yarn D.
With WS facing, skip both ch-3 sps, join Yarn E
in sp before the following corner ch-2 sp.
Round 4 (WS) Ch3 (counts as first tr
throughout), 2tr in same sp, (3tr, ch2, 3tr) in next
corner ch-2 sp, *3tr in space between each 3-tr
group to next corner ch-2 sp, (3tr, ch2, 3tr) in
next corner ch-2 sp; rep from * once more, 3tr in
space before next 3-tr group, (ch3, dc in next
ch-3 sp) twice, ch3, ss to top of beg ch-3, turn.
[12 3-tr groups, 3 corner ch-2 sps, 2 dc, 3 ch-3 sps]
Fasten off Yarn E.
With RS facing, join Yarn A in ch-3 sp after
second dc.
Row 5 (RS) Ch3, tr in same sp, 3tr in sp between
next two 3-tr groups, *(3tr, ch2, 3tr) in corner
ch-2 sp, 3tr in space before each 3-tr group to
next corner; rep from * once more, (3tr, ch2, 3tr)
in corner ch-2 sp, 3tr in space before next 3-tr
group, 2tr in next ch-3 sp, turn leaving rem sps
unworked.
[14 3-tr groups, 2 2-tr groups, 3 corner ch-2 sps]
Fasten off Size S.
SIZE M ONLY
Row 6 (WS) Working only in sts of Row 5, 1dc in
each tr and (dc, ch2, dc) in each corner ch-2 sp
around. [16 sts each long side, 9 sts each short
side, 3 corner ch-2 sps]
Fasten off.
SIZES L AND XL ONLY
Row 6 (WS) Working only in sts of Round 5, ch3
(counts as first tr), 3tr in space between each
3-tr group and (3tr, ch2, 3tr) in each corner ch-2
sp around, tr in top of beg ch-3 of Round 5,
turn. [18 3-tr groups, 2 tr, 3 corner ch-2 sps]
Fasten off Size L.
SIZE XL ONLY
Round 7 (RS) Working only in sts of Round 6,
1dc in each tr and (dc, ch2, dc) in each corner
ch-2 sp around.
[19 sts each long side, 10 sts each short side]
Fasten off.
HALF MOTIF ONE (MAKE 1)
Using 6mm hook and Yarn B, ch4, ss to first ch
to form a ring.
Row 1 (RS) Ch3 (counts as first tr throughout),
(tr, ch2, 3tr, ch2, 2tr) in ring, turn.
Fasten off Yarn B. Join Yarn C in top of last tr.
Row 2 (WS) Ch3, (3tr, ch2, 3tr) in each ch-2 sp,
tr in last tr, turn.
[4 3-tr groups, 2 tr, 2 corner ch-2 sps]
Fasten off Yarn C, join Yarn D in top of last tr.
Row 3 (RS) Ch3, tr in first space before first 3-tr
group, (3tr, ch2, 3tr) in corner ch-2 sp, 3tr in
space between 3-tr groups, (3tr, ch2, 3tr) in next
corner ch-2 sp, tr in space before last tr, tr in last
tr, turn.
[5 3-tr groups, 2 2-tr groups, 2 corner ch-2 sps]
Fasten off Yarn D. Join Yarn E in first tr.
Row 4 (WS) Ch3, 3tr in space before next 3-tr
group, (3tr, ch2, 3tr) in corner ch-2 sp, 3tr in
space between 3-tr groups to next corner, 2tr in
corner ch-2 sp, turn leaving rem side unworked.
[6 3-tr groups, 1 tr, 1 corner ch-2 sp]
Fasten off Yarn E. Join Yarn A in top of last st.
Row 5 (RS) Ch3, 3tr in space between each 3-tr
group to next corner, (3tr, ch2, 3tr) in corner
ch-2 sp, 3tr in space before next 3-tr group, tr
before last tr, tr in last tr, turn.
[6 3-tr groups, 3 tr, 1 corner ch-2 sp]
Fasten off Size S.
SIZE M ONLY
Row 6 (WS) Ch1 (does not count as st
throughout), dc in each tr to corner ch-2 sp, (dc,
ch2, dc) in corner ch-sp, dc in each tr to end.
[23 sts and 1 corner ch-2 sp]
Fasten off.
SIZES L AND XL ONLY
Row 6 (WS) Ch3, 3tr in each space between 3-tr
groups to corner ch-2 sp, (3tr, ch2, 3tr) in corner
ch-2 sp, 3tr in space between each 3-tr group to
end, tr in last tr, turn.
[8 3-tr groups, 2 tr, 1 corner ch-2 sp]
Fasten off for Size L only.
SIZE XL ONLY
Row 7 Ch1, dc in each tr to corner ch-2 sp, (dc,
ch2, dc) in corner ch-sp, dc in each tr to end.
[28 sts and 1 corner ch-2 sp]
Fasten off.
HALF MOTIF TWO (MAKE 1)
Work as for Half Motif One to end of Row 3.
Row 4 (WS) Join Yarn E in corner ch-2 sp, ch3,
2tr in same corner ch-2 sp, 3tr in space between
3-tr groups to next corner, (3tr, ch2, 3tr) in
corner ch-2 sp, 3tr in next space, tr in last tr,
turn. [6 3-tr groups, 1 tr, 1 corner ch-2 sp]
Fasten off Yarn E. Join Yarn A in top of last st.
Row 5 (RS) Ch3, tr in space before first 3-tr, 3tr
in next space, (3tr, ch2, 3tr) in corner ch-2 sp, 3tr
in space before each 3-tr group to end, tr in top
of beg ch-3, turn.
[6 3-tr groups, 3 tr, 1 corner ch-2 sp]
Fasten off Size S.
Ribbing is worked around the hem, armholes
and neckline after the motifs have been joined
[23 sts and 1 corner ch-2 sp]
Fasten off.
SIZES L AND XL ONLY
Row 6 (WS) Ch3, 3tr in space before each 3-tr
group to corner, (3tr, ch2, 3tr) in corner ch-2 sp,
3tr in space between each 3-tr group to end, tr
in last tr, turn. [8 3-tr groups, 2 tr, 1 corner ch-2 sp]
Fasten off Size L.
SIZE XL ONLY
Row 7 (RS) Ch1, dc in each tr to corner ch-2 sp,
(dc, ch2, dc) in corner ch-sp, dc in each tr to end.
[28 sts and 1 corner ch-2 sp]
Fasten off.
TOP BACK MOTIF (MAKE 2)
Rounds 1-3 Work as for Full Motif.
Row 4 (WS) Join Yarn E in any corner ch-2 sp,
ch3, 2tr in same space, *3tr in space before each
3-tr group to next corner, (3tr, ch2, 3tr) in corner
ch-2 sp; rep from * once more, 3tr in space
before each 3-tr group to next corner, 3tr in
corner, turn.
[12 3-tr groups, 2 corner ch-2 sps]
Fasten off Yarn E.
Row 5 (RS) Join Yarn A in last st, ch3, 3tr in
space before each 3-tr group to corner, (3tr, ch2,
3tr) in corner ch-2 sp, 3tr in space before each
3-tr group to next corner, (3tr, ch2, 3tr) in corner
ch-2 sp, 3tr in space before each 3-tr group to
corner, tr in last st, turn.
[13 3-tr groups, 2 tr, 2 corner ch-2 sps]
Fasten off Size S.
SIZE M ONLY
Row 6 (WS) Working in Yarn A sts of previous
round only, ch1, dc in each tr and (dc, ch2, dc) in
each corner ch-2 sp.
[43 sts and 1 corner ch-2 sp]
Fasten off.
SIZES L AND XL ONLY
SIZE M ONLY
Row 6 (WS) Ch1, dc in each tr to corner ch-2 sp,
(dc, ch2, dc) in corner ch-sp, dc in each tr to end.
Row 6 (WS) Ch3, 2tr in sp before first 3-tr
group, *3tr in sp before each 3-tr group to
corner, (3tr, ch2, 3tr) in corner ch-2 sp; rep from
WWW.GATHERED.HOW/SIMPLYCROCHET 41
GRANNY SQUARE TANK
JOIN TO BACK
JOIN TO BACK
b
CORNER
x2
FULL
TOP
BACK
TOP
BACK
FULL
FULL
FULL
FULL
widening row
HALF
TWO
widening row
HALF
ONE
FRONT
V NECK
FRONT
V NECK
FULL
FULL
CORNER
x2
FULL
JOIN TO FULL MOTIF
ON OPPPOSITE SIDE
a
Bust a: 96 (105: 114: 123)cm,
37¾ (41¼: 45: 48½)in
Length b: 48 (52.5: 57: 61.5)cm,
19 (20¾: 22½: 24¼)in
*, 3tr in sp before each 3-tr group to end, 2tr in
sp before last st, tr in last st, turn.
[17 3-tr groups]
Fasten off Size L.
SIZE XL ONLY
Row 4 (WS) Ch1, dc in each tr to corner, (dc, ch2,
dc) in corner ch-2 sp, dc in each tr to end.
[20 sts, ch-2 sp]
Fasten off.
SIZE XL ONLY
Round 7 (RS) Working into Yarn A sts of
previous round only, ch1, dc in each tr and (dc,
ch2, dc) in each corner ch-2 sp.
[55 sts and 2 corner ch-2 sps]
Fasten off.
TO JOIN
Join Motifs with a neat whip stitch as shown
on the Schematic, joining the 8 Motifs
highlighted in red first. Join Front to Back
at shoulder seams.
CORNER MOTIF (MAKE 4)
Using 6mm and Yarn A, ch4, ss to first ch to
form a ring.
Row 1 (RS) Ch3 (counts as first tr), (3tr, ch2, 4tr)
in ring, turn.
Row 2 (WS) Ch3, 3tr in first tr, (3tr, ch2, 3tr) in
corner ch-2 sp, 4tr in last tr, turn.
[2 3-tr groups, 2 4-tr groups, corner ch-2 sp]
Fasten off Size S.
WIDENING ROWS
Join Yarn A to point marked with blue cross on
the Schematic.
Row 1 (RS) Ch3 (counts as first tr), tr in each st,
tr in each corner ch-2 sp along the edges of the
2 Front and 2 Back Motifs to opposite end.
Fasten off and repeat by starting at second
blue cross, working along opposite edge.
Join corner Motifs at the lower edges of the
Widening rows, Front and Back.
Join remaining 6 Motifs so that they are joined
into a ring.
SIZE M ONLY
Row 3 (RS) Ch1, dc in each tr to corner, (dc, ch2,
dc) in corner ch-2 sp, dc in each tr to end.
[16 sts and corner ch-2 sp]
Fasten off.
SIZES L AND XL ONLY
Row 3 (RS) Ch3, 3tr in first tr, 3tr in space
between 3-tr groups to corner, (3tr, ch2, 3tr) in
corner ch-2 sp, 3tr in space between 3-tr groups
to end, 4tr in last tr, turn.
[2 4-tr groups, 4 3-tr groups, corner ch-2 sp]
Fasten off Size L only.
42 WWW.GATHERED.HOW/SIMPLYCROCHET
RIBBED WELT
Rejoin Yarn A to bottom edge in side seam with
RS facing.
Set-up round (RS) Ch1 (does not count as st
throughout), dc around entire bottom edge of
garment working 1dc each st and ch-sp around,
ss to top of first dc and work ch9.
Row 1 Dc in second ch from hook and in each
of next 8 ch, ss in next dc of Set-up round, ss in
foll dc, turn.
Row 2 8dc in bl to end, turn.
Row 3 Ch1, 8dc in bl to end, ss in next st of
Set-up round, ss in next st, turn.
Row 4 8dc in bl to end, turn.
Rep Rows 3 and 4 around entire bottom edge
of garment until all dc sts of Set-up round
are used.
Fasten off leaving a long tail. Use tail to join
ends of welt using a neat whip stitch.
ARMHOLE EDGING
Rejoin Yarn A to top of seam at underarm with
RS facing.
Set-up round Ch1, dc around armhole opening
working 1dc in each st and ch-sp around, ch6.
Row 1 Dc in second ch from hook and in each
of next 4 ch, ss in next st of Set-up round ss in
foll dc, turn.
Row 2 5dc in bl to end, turn.
Row 3 Ch1, 5dc in bl to end, ss in next st of
Set-up round, ss in foll st, turn.
Row 4 5dc in bl to end, turn.
Rep Rows 3-4 around armhole until all dc sts of
Set-up round are used.
Fasten off leaving a long tail. Use tail to join
ends of Armhole Edging using a neat whip
stitch.
NECK EDGING
With RS facing rejoin Yarn A at front centre of
neck edge.
Work as for Armhole Edging.
TO FINISH
Weave in all ends and block.
Baby blue
Welcome a new arrival with a chic yet cosy
striped blanket designed by Pat Strong
simple to
make
STRIPED BABY BLANKET
Expecting a new little one in your life? This
all-purpose, durable baby blanket is just the
project to make for them. The unusual stripes
in this throw are simple to replicate, and you
can easily swap in a different colourway, too!
ASY
ASY
DK
WEIGHT
4MM
HOOK
NOTES
YOU WILL NEED
Blanket is worked in rows. Work over the tails
when changing colour to reduce the number of
ends you need to weave in.
You can adapt the width of the Blanket by
altering the foundation ch, making sure you
work a ch that’s a multiple of 10+6.
QWendy Supreme Cotton Love DK
(50% cotton, 50% acrylic,
100g/330m)
2 balls of each:
Yarn A Icy Blue (WCT05)
Yarn B Royal (WCT10)
QA 4mm (US G/6) hook
For yarn stockists contact
James C. Brett
www.jamescbrett.co.uk
BABY BLANKET
Using Yarn A, ch156.
Row 1 (RS) (Work into the bl of the foundation
ch) Dc in second ch from hook and next 4 ch, (tr
in next 5 ch, dc in next 5 ch) rep across to end.
[155 sts]
Change to Yarn B.
Row 2 (WS) Ch2 (does not count as st
throughout), tr in first 5 sts, (dc in next 5 sts, tr
in next 5 sts) rep across to end, turn.
Change to Yarn A.
Row 3 Ch1 (does not count as st throughout),
dc in first 5 sts, (tr in next 5 sts, dc in next 5 sts)
rep across to end, turn.
Change to Yarn B.
Rep Rows 2-3 until Blanket measures 93cm (or
to desired length), ending on a Row 3 rep.
Fasten off and weave in ends.
TENSION
Tension is not critical, but it may
affect the yarn quantities required
MEASUREMENTS
Blanket measures approx 85x93cm
(33½x36½in)
ABBREVIATIONS
For a full list, see page 86
SAV
AV
S LU
For a more luxurious make, try West
Yorkshire Spinners Bo Peep Luxury Baby DK,
6 balls of each: Yarn A Sailboat (144), Yarn B
Space Hopper (725). Check hook size, tension
and ball length if you use a different yarn.
For yarn stockists contact
www.wyspinners.com
The stitch pattern is a repeat of five trebles
followed by five double crochet stitches
Instead of changing yarn every few stitches,
you change it once at the end of every row
SIMPLE STEPS HOW TO WORK IN THE BL OF YOUR FOUNDATION CH
1 Make a chain to the desired
length. The chain has 3 loops:
top, back and bottom. In this
example we’ve marked the
back loop.
44 WWW.GATHERED.HOW/SIMPLYCROCHET
2 For a dc stitch, skip the first
ch and insert your hook
through the back loop only on
the second ch from hook. Yrh
and pull up a loop.
3 Yrh and pull through 2 loops
on hook. Continue working
dc stitches in each bl across.
4 Working in the back loop
leaves the 2 remaining loops
sitting at the base of your
work.
GOOD READ
Courtney poses while
wearing one of her
crochet pieces
Ready to wear
Designer Courtney Whitehead is building a crochet wardrobe for all, with stylish
size-inclusive garments, minimal seaming and wearable yet unique-looking designs
hen Courtney Whitehead’s
mum taught her to crochet at
the age of eight, Courtney had
no idea that it would become
her passion in life. She became
so frustrated by a crochet blanket that
didn’t work out that she didn’t return to
the craft until 2002, when she started
making custom hats. However, her true
return to crochet came in 2006 – the craft
became her creative outlet while she
studied for her doctorate in Chicago. The
Georgia native started hooking hats and
scarves for herself and for others in order
to survive the frigid northern winters.
She started her business, Creations by
Courtney, in 2011, making and selling
completed crochet pieces such as
accessories, babywear and women’s
clothing. More than anything, she loved
W
46 WWW.GATHERED.HOW/SIMPLYCROCHET
creating unique items for her wardrobe, and
in 2017 she began designing crochet
patterns with a mission to ‘help modern
crocheters curate a handmade closet’.
“I love fashion!” Courtney explains. “Once
I started making crochet garments, it made
sense to help others make garments they’ll
love.” From eye-catching vests and sweaters
to sleek and sophisticated dresses,
Courtney’s colourful, wearable designs are
designed for all bodies – the patterns
include sizes up to 5X, as well as creative tips
on customisation, making them accessible
to a wider-than-usual range of hooksters.
“Every body is beautiful, regardless of size or
shape,” says Courtney. “And it’s important to
help others feel confident.”
In order to create accurate extended
sizes, Courtney took a course with
a well-established designer to learn
a complex grading technique that involves
using a spreadsheet. “Some patterns are
easy, but many are time-consuming, and
the secret is to ensure it’s a good fit for all
sizes – but it should above all be easy to
follow in the written pattern,” she says.
Courtney’s not a fan of seams, either, so
they’re kept to a minimum in her creations
– she’ll even avoid or figure out how to
reduce seaming when following patterns by
other designers. As a bonus, this also helps
make her patterns more accessible by
reducing their complexity.
JUST FOR YOU
Courtney’s designs are mostly for women,
but you’ll also find some patterns for kids as
well as home accessories, hats and bags that
are easy to carry. Many of her customers are
in the 35-55 age bracket, hailing from the
Photo: Courtney Whitehead
GOOD READ
United States, Canada and the UK, and
they’ll often make her designs for
themselves or as gifts for daughters and
granddaughters. Courtney loves to get
feedback from her customers, and they
don’t hold back when praising her designs.
“Well-written patterns”, “great for everyday
wear” and “uniquely constructed” are just
some of the comments. “All of the crochet
items were amazing, but your designs were
my favourite because I could wear them
every day,” said another.
To create her timeless crochet patterns,
Courtney finds inspiration everywhere,
often from images on social media and
garments sold in stores. She then creates
a sketch on her iPad to see how her idea
could translate to crochet. After that, she’ll
select a yarn from her stash or her local yarn
shop and create a sample in her size so she
can model it on her website – and then add
it to her own curated crochet closet!
Though she works alone on the design
process for most of her projects, Courtney
has crochet friends she can rely on for
valuable feedback and inspiration. There’s
no design studio as such in her home, but
last year Courtney purchased a wicker egg
chair, which is her special spot to crochet.
“But I will crochet anywhere,” she says. “My
bedroom, the sofa in the family room, in the
car when my husband drives...”
Speaking of Courtney’s ‘stash’, she’s
developed some firm favourites over the
years. “My favourite hooks are Furls Crochet
Odyssey hooks,” she shares. “My hands
never feel fatigued, but I enjoy most
ergonomic hooks for my knife grip.”
As for yarns, she says, “I’ll splurge a few
times throughout the year on The Miller
Girls mulberry silk, Eri or Peace silk or animal
fibre (such as yak, wool or Cashmere) yarns.
I rarely use the yarns but like collecting
“Once I started making crochet
garments, it made sense to
help others make garments
they’ll love”
them. I’m waiting for the right inspiration for
a new design or the perfect pattern for my
handmade closet.”
FUTURE PERFECT
There are plenty of exciting plans in the
pipeline for Courtney.“I have several designs
that are waiting for the publish button and
some editing, to include a boho-vibe vest,
a geometric poncho for children, an elegant
wrap and a puff-sleeve sweater and
matching skirt.” She plans to add patterns
for men and boys to her growing pattern
portfolio, and will also be taking more
courses in designing crochet garments to
refine her skills.
Of course, we had to ask Courtney what
she keeps in her own closet from her design
collection: “My favourite is the Stacy Sunhat
to pair with dresses for warm weather; the
Kaleidoscope Wrap is perfect as a swim
cover, scarf and shawl; the Georgia Summer
Top to wear with shorts or jeans for any
summer activities and my Xcapade Poncho
– it’s the easiest layering piece for year
round wearing.”
And if you’re looking to start your own
curated crochet closet, she recommends
starting with the “Draped in Diamonds Vest,
Coco Top, the Kathryn Wrap Top,
Shawldigan and the Abrazo Rayado
Cardigan,” she says. “These look
complicated but use simple stitches, and
can be easily styled or added to a storebought wardrobe.”
Written by Amanda Robinson
A few of her favourite things
When Courtney’s not busy creating her handmade wardrobe…
“My husband, son, twin daughters and I spend a lot of time laughing,
playing games and dancing together. We’re actually getting a puppy
this summer!” Follow Courtney at www.creationsbycourtney.com,
on Instagram and Facebook at @creationsbycourtneyllc and on
Ravelry at Creations by Courtney.
WWW.GATHERED.HOW/SIMPLYCROCHET 47
Mixed bag
Cassie Ward’s granny square tote is
a quick-make colourburst sensation
mega
granny
square
GRANNY SQUARE HANDBAG
This tote is full of personality! Show off your
love for classic granny squares with a bag
that has room for an entire project inside.
A IT
T IC Y
DK
WEIGHT
3.5MM
HOOK
YOU WILL NEED
QCaron Simply Soft
(100% acrylic, 170g/288m)
2 balls of Yarn A Royal Blue (9767)
1 ball of each:
Yarn B Fuchsia (9764)
Yarn C Robin’s Egg (9780)
Yarn D Lemonade (9776)
Yarn E Orchid (9717)
Yarn F Neon Orange (9774)
Yarn G Red (9729)
QA 3.5mm (US E/4) hook
Q2 ring bag handles, 11cm
QA tassel maker
For yarn stockists contact
Wool Warehouse 01926 882818
www.woolwarehouse.co.uk
TENSION
Small Granny Square measures
6.5x6.5cm (2½x2½in)
Large Granny Square measures
52x52cm (20½x20½in)
MESUREMENTS
Bag measures approx 52x40cm
(20½x15¾in)
ABBREVIATIONS
For a full list, see page 86
SCAN ME
Scan this code to
discover more
projects using
granny squares
NOTES
Bag is made up of one Large Square and 16
Small Squares. Squares are worked in rounds
and whipstitched together.
Edging is worked around the top of the Bag
and the Handles are joined at the end.
GRANNY SQUARE TOTE
LARGE SQUARE
Change colour at the end of each round and
work in the following colour sequence: *Yarn B,
Yarn C, Yarn A, Yarn D, Yarn E, Yarn A, Yarn F,
Yarn G, Yarn A; rep from * to end.
Using Yarn B, ch4 and ss to first ch to form ring.
Round 1 (RS) Ch3 (counts as tr throughout) 2tr
in ring, ch2, (3tr in ring, ch2) 3 times, ss to top of
beg ch-3, turn. [4 3-tr groups, 4 ch-2 sps]
Fasten off.
Join Yarn C in any ch-2 sp.
Round 2 (WS) Ch3, (2tr, ch2, 3tr) in same ch-2
sp, (3tr, ch2, 3tr) in each ch-2 sp around, ss to
top of beg ch-3, turn. [8 3-tr groups, 4 ch-2 sps]
Fasten off.
Join Yarn A in any ch-2 sp.
Round 3 Ch3, (2tr, ch2, 3tr) in same sp, *3tr in sp
between 3-tr groups, (3tr, ch2, 3tr) in next ch-2
sp; rep from * twice more, 3tr in sp between 3-tr
groups, ss to top of beg ch-3, turn.
[12 3-tr groups, 4 ch-2 sps]
Fasten off.
Join Yarn D in any ch-2 sp.
Round 4 Ch3, (2tr, ch2, 3tr) in same sp, *3tr in
each sp between 3-tr groups across to corner,
(3tr, ch2, 3tr) in next ch-2 sp; rep from * twice
more, 3tr in each sp between 3-tr groups across
to end, ss to top of beg ch-3, turn.
[16 3-tr groups, 4 ch-2 sps]
Fasten off.
Join Yarn E in any ch-2 sp.
Rounds 5-24 As Round 4.
[96 3-tr groups, 4 ch-2 sps]
Fasten off and weave in ends.
SMALL SQUARES (MAKE 16)
Make 6 using Yarn B for Round 1 and Yarn C for
Round 2.
Make 5 using Yarn E for Round 1 and Yarn D for
Round 2.
Make 5 using Yarn G for Round 1 and Yarn F for
Round 2.
Rounds 1-2 Work as Rounds 1-2 of Large
Square. [8 3-tr groups, 4 ch-2 sps]
Fasten off.
Join Yarn A in any ch-2 sp.
Round 3 Ch2 (counts as htr), (htr, ch2, 2htr) in
same sp, *3htr in sp between 3-htr groups, (3htr,
ch2, 3htr) in ch-2 sp; rep from * twice more, 3htr
in sp between 3-htr groups, ss to top of beg ch-2.
Fasten off.
The main part of the tote is made from one
large granny square folded in half
TO MAKE UP
Whipstitch 8 Small Squares across one edge of
the Large Square, alternating the colourways.
Join the rem 8 Squares to the opposite Edge.
Fold the Large Square in half so the Small
Squares line up at the top. With WS facing,
whipstitch the sides closed.
UPPER EDGING
Join Yarn A in first htr across opening.
Row 1 (RS) Ch1 (does not count as st
throughout), dc in corner sp, dc in each htr
across 8 Squares (skipping all ch-sps), dc in next
corner sp, turn. [74 sts]
Row 2 (WS) Ch1, dc in first st, dc2tog, dc in each
st to final 3 sts, dc2tog, dc in final st, turn.
[72 sts]
Row 3 Ch1, dc in first 3 sts, (dc2tog, dc in next 7
sts) 7 times, dc2tog, dc in final 4 sts, turn. [64 sts]
Rows 4-17 As Row 2. [36 sts]
Change to Yarn C.
Rows 18-23 Ch1, dc in each st across, turn.
Fasten off.
Rep Rows 1-23 on opposite side of Bag
opening.
TO FINISH
Fold the final 3 rows of the Upper Edging
around a handle and whipstitch in place.
Repeat on opposite side.
Make 3 tassels using Yarns B, D and F.
Plait the ends together to join all tassels
together and attach to a handle.
WWW.GATHERED.HOW/SIMPLYCROCHET 49
Take shape
Hexagon motifs join together to make
triangles in a throw by Kelly Wilson Moore
HEXAGON BLANKET
Watch as the blue lines radiating out from
each hexagon’s centre connect with each
other and create a striking geometric effect.
A IT
T IC Y
4PLY
WEIGHT
3.5MM
HOOK
YOU WILL NEED
QDROPS Baby Merino
(100% wool, 50g/175m)
8 balls of Powder (44)
6 balls of Turquoise (32)
QA 3.5mm (US E/4) hook
For yarn stockists contact
Wool Warehouse 01926 882818
www.woolwarehouse.co.uk
TENSION
Tension is not critical, but it may
affect the yarn quantities required
MEASUREMENTS
Hexagons measure approx 14x14cm
(5½x5½in)
Blanket measures 100x90cm
(39¼x35½in)
ABBREVIATIONS
For a full list, see page 86
For
at
www.woolwarehouse.co.uk
use the code SC139
at the checkout
Code cannot be applied to certain products such as yarn
packs, sale items, gift vouchers, KC Collection
and Lopi products.
NOTES
Blanket is made up of 56 Whole Hexagons,
14 Horizontal Half Hexagons, 8 Vertical Half
Hexagons and 2 Quarter Hexagons.
The Whole Hexagons are worked in rounds
and the rem motifs are all worked in rows.
Change colour on the final yrh before colour
change is indicated. Carry the unused colour
across the WS of your work, being careful to
keep an even tension.
HEXI BLANKET
WHOLE HEXAGONS (MAKE 56)
Using Turquoise, make a magic loop.
Round 1 (RS) Ch3 (counts as tr throughout),
11tr in loop, ss to top of beg ch-3, turn. [12 sts]
Round 2 (RS) Ch3, tr in st at base of ch-3, 2tr in
each st around, ss to top of beg ch-3. [24 sts]
Join Powder in any st. Do not fasten off
Turquoise.
Round 3 Ch3, tr in st at base of ch-3, *tr in next
st, change to Turquoise, (FPtr, ch2, FPtr) around
next st, change to Powder, tr in next st, 2tr in
next st; rep from * 5 times more omitting final 2
sts on last rep, ss to top of beg ch-3. [36 sts]
Round 4 Ch3, *tr in each st to FPtr, change to
Turquoise, FPtr around next FPtr, change to
Powder, (tr, ch2, tr) in ch-2 sp, change to
Turquoise, FPtr around next FPtr, change to
Powder; rep from * 5 times more, tr in each st to
end, ss to top of beg ch-3. [48 sts]
Round 5 Ch3, *tr in each st to FPtr, change to
Turquoise, FPtr around next FPtr, change to
Powder, tr in next st, (tr, ch2, tr) in ch-2 sp, tr in
next st, change to Turquoise, FPtr around next
FPtr, change to Powder; rep from * 5 times
more, tr in each st to end, ss to top of beg ch-3.
[60 sts]
Round 6 Ch3, *tr in each st to FPtr, change to
Turquoise, FPtr around next FPtr, change to
Powder, tr in each st to ch-2 sp, (tr, ch2, tr) in
ch-2 sp, tr in each st to next FPtr, change to
Turquoise, FPtr around next FPtr, change to
Powder; rep from * 5 times more, tr in each st to
end, ss to top of beg ch-3. [72 sts]
Rounds 7-8 As Round 6. [96 sts]
Fasten off and weave in ends.
HORIZONTAL HALF HEXAGONS (MAKE 14)
Using Turquoise, make a magic loop.
Row 1 (RS) Ch3, 4tr in loop, ch2, 5tr in loop,
turn. [10 sts]
Row 2 Ch3, 2tr in st at base of ch-3, tr in next 4
sts, (tr, ch2, tr) in ch-2 sp, tr in next 4 sts, (2tr, dtr)
in last st, turn. [16 sts, 1 ch-2 sp]
Row 3 Ch3, 2tr in st at base of ch-3, tr in next 7
sts, (tr, ch2, tr) in ch-2 sp, tr in next 7 sts, (2tr,
1dtr) in last st, turn. [22 sts, 1 ch-2 sp]
Row 4 Ch3, 2tr in st at base of ch-3, tr in next 10
The blanket is made up of four motif shapes,
ranging from full hexagons to quarter size
All motifs begin with a magic circle, but some
are worked in the round and others in rows
sts, (tr, ch2, tr) in ch-2 sp, tr in next 10 sts,
(2tr, 1dtr) in last st, turn. [28 sts, 1 ch-2 sp]
Row 5 Ch3, 2tr in st at base of ch-3, tr in next 13
sts, (tr, ch2, tr) in ch-2 sp, tr in next 13 sts, 3tr in
last st, turn. [34 sts, 1 ch-2 sp]
Fasten off and weave in ends.
VERTICAL HALF HEXAGONS (MAKE 8)
Using Turquoise, make a magic loop.
Row 1 (WS) Ch3, 5tr in loop, turn. [6 sts]
Row 2 (RS) Ch3, tr in st at base of ch-3, 2tr in
next 5 sts, turn. [12 sts]
Row 3 Ch3, tr in st at base of ch-3, tr in next st,
2tr in next st, tr in next st, ch2, 2tr in next st, tr in
next st, 2tr in next st, tr in next st, ch2, tr in next
st, 2tr in next st, tr in next st, 2tr in next st, turn.
[18 sts, 2 ch-2 sps]
Row 4 Ch3, tr in st at base of ch-3, *tr in each st
to ch-2 sp, (tr, ch2, tr) in ch-2 sp; rep from * once
more, tr in each st to final st, 2tr in last st, turn.
WWW.GATHERED.HOW/SIMPLYCROCHET 51
HEXAGON BLANKET
[24 sts, 2 ch-2 sps]
Rows 5-8 As Row 4. [48 sts, 4 ch-2 sps]
Fasten off and weave in ends.
QUARTER HEXAGONS (MAKE 2)
Using Turquoise, make a magic loop.
Row 1 (RS) Ch3, 5tr in loop, turn. [6 sts]
Row 2 Ch3, 2tr in st at base of ch-3, tr in next 4
sts, (tr, dtr) in last st turn. [9 sts]
Row 3 Ch3, 2tr in st at base of ch-3, tr in next 7
sts, (tr, dtr) in last st turn. [12 sts]
Row 4 Ch3, 2tr in st at base of ch-3, tr in next 10
sts, (tr, dtr) in last st turn. [15 sts]
Row 5 Ch3, 2tr in st at base of ch-3, tr in next 13
sts, (tr, dtr) in last st turn. [18 sts]
Fasten off and weave in ends.
TO MAKE UP
All motifs are joined together with a whipstitch
seam.
Using the image to the right as a guide, join the
Whole Hexagons together in a 7x8 formation,
lining up the FP sts to form continuous lines.
Join the Vertical Half Hexagons along the top
and bottom and the Horizontal Half Hexagons
along the sides. Finally, join the Quarter
Hexagons into the corners.
BORDER
Join Turquoise to top right-hand corner.
Round 1 (RS) Ch3, (tr, ch2, 2tr) in same corner,
*228tr across top edge, (2tr, ch2, 2tr) in next
corner, 222tr across side edge**, (2tr, ch2, 2tr) in
next corner; rep from * once more ending final
rep at **, ss to top of beg ch-3.
[916 sts, 4 ch-2 sps]
Fasten off.
Join Powder in any ch-2 sp.
Round 2 (RS) Ch3, (tr, ch2, 2tr) in same sp, *tr in
each st to next ch-2 sp, (2tr, ch2, 2tr) in ch-sp;
rep from * around, ss to top of beg ch-2.
[932 sts, 4 ch-2 sps]
Fasten off and weave in all ends.
SIMPLE STEPS HOW TO WORK A FRONT POST TREBLE STITCH
1 Identify the post of the stitch
indicated. Then work yrh (as
usual for a treble stitch) and
insert hook into the front of
the fabric, around the back of
the post, and bring out hook
on other side of post.
52 WWW.GATHERED.HOW/SIMPLYCROCHET
2 Work the rest of the stitch as
you usually would for a treble,
so yrh and carefully pull the
loop of yarn out of the fabric
– it should loop around the
post of the stitch.
3 Work yrh again and pull the
yarn through the first 2 loops.
Yrh and pull the yarn through
the remaining 2 loops to
complete the stitch.
4 You’ll see how the stitch is
raised up, compared to the
rest of the fabric.
Win a digital copy of the
next Simply Crochet iue!
Ente by voting fo you
favouite on Intagram
#hooktohook
@simplycochetmag win
HOOK TO HOOK
Granny scarf
We challenged two designers to come up with a fab design,
each using the same yarn… which is your fave?
Nichola Griffiths
“I was excited to participate
in this Hook to Hook
challenge, and I was also
intrigued by the brief, to
design a ‘granny square
scarf’. Granny squares are
not my ususal go-to, but
I couldn’t wait to try something outside of my
comfort zone and put my own colourwork
spin on it! I was inspired by my quilter friends
and decided to experiment with half-square
triangles for a beginner-friendly scarf.” Find
Nichola on Instagram at @elimee_designs or
on her website, www.elimeedesigns.co.uk
Alexandra Lund
“I knew I had to take part
in this Simply Crochet Hook
to Hook challenge when
I was asked; squares and
colourwork in a scarf are
definitely right up my
street! I think the classic
granny really takes on a new form here, and
I love the versatility of such a simple design.
The Cygnet yarn I used for the project was also
lovely to work with and gives a soft finish to
the scarf. I’ll definitely be using this yarn for
my wearable makes again!” Find Alexandra on
Instagram at @nattythread
WWW.GATHERED.HOW/SIMPLYCROCHET 53
HOOK TO HOOK
Left to right: Half-square triangles found in quilting were Nichola’s design inspiration, and the geometric pattern works brilliantly for little
squares of crochet; 90 mini granny squares are needed to make Nichola’s scarf – it might sound a lot, but they’re only two rounds apiece
PATCHWORK SCARF
Using only mini granny squares in a variety
of clever colour combos, Nichola Griffiths
has designed a patchwork quilt-style scarf!
Q Cygnet DK (100% acrylic, 100g/298m), 2 balls
of Light Grey (195), 1 ball of each: Aqua (211),
Candyfloss (229), Clover (186), Fondant (173),
Lilac (233)
QA 4mm (US G/6) hook
For yarn stockists contact
Cygnet Yarns 01274 743374
www.cygnetyarns.com
TENSION
Tension is not critical for this project, but it may
affect the yarn quantities required
MEASUREMENTS
Scarf measures approx 20x222cm (8x87½in)
excluding tassels
NOTES
Scarf is made up of 10 Motifs. Each Motif is
made up of 20 Squares.
There is a Construction Diagram on page 87,
which you will need to refer to when joining
the Squares together.
PATCHWORK SCARF
SINGLE COLOUR SQUARE (MAKE 110)
Make 60 using Light Grey, and 10 each using
Candyfloss, Fondant, Clover, Aqua and Lilac.
54 WWW.GATHERED.HOW/SIMPLYCROCHET
Make a magic loop.
Round 1 (RS) Ch1 (does not count as st
throughout), (3htr in loop, ch2) 4 times, ss to
beg htr, turn. [12 sts]
Round 2 (WS) Ss into the ch-2 sp, ch1, (2htr,
ch2, 2htr) in ch-2 sp, htr In next 3 sts; rep from *
3 times more, ss to beg htr. [28 sts]
Fasten off and weave in ends.
Round 2 (RS) Ss into the ch-2 sp, ch1, 2htr in
ch-sp, htr in next 3 sts, (2htr, ch2, 2htr) in ch-2
sp, htr in next 3 sts, 2htr in next ch-2 sp, ch1,
change to Yarn A, ch1, 2htr in same sp, htr in
next 3 sts, (2htr, ch2, 2htr) in ch-2 sp, htr in next
3 sts, 2htr in sp at base of beg ch-1, ch2, ss to
beg dc. [28 sts]
Fasten off and weave in ends.
TWO-COLOUR SQUARE (MAKE 90)
Make 16 using Light Grey as Yarn A and
Candyfloss as Yarn B.
Make 16 using Light Grey as Yarn A and
Fondant as Yarn B.
Make 16 using Light Grey as Yarn A and Clover
as Yarn B.
Make 16 using Light Grey as Yarn A and Aqua as
Yarn B.
Make 16 using Light Grey as Yarn A and Lilac as
Yarn B.
Make 1 each using: Candyfloss as Yarn A and
Fondant as Yarn B, Candyfloss as Yarn A and
Clover as Yarn B, Candyfloss as Yarn A and Aqua
as Yarn B, Candyfloss as Yarn A and Lilac as Yarn
B, Fondant as Yarn A and Clover as Yarn B,
Fondant as Yarn A and Aqua as Yarn B, Fondant
as Yarn A and Lilac as Yarn B, Clover as Yarn A
and Aqua as Yarn B, Clover as Yarn A and Lilac
as Yarn B and Aqua as Yarn A and Lilac as Yarn B.
Using Yarn A, make a magic loop.
Round 1 (WS) Ch1, 3htr in loop, ch2, 3htr in
loop, ch1, change to Yarn B, ch1, (3htr in loop,
ch2) twice, ss to bed htr, turn. [12 sts]
TO MAKE UP
Mattress stitch the Squares together with RS
facing. Join 20 Squares together to form a heart
motif. Then join the motifs together. There is a
Diagram on page 88, which you can follow.
BORDER
With RS facing, join Light Grey in any corner.
Round 1 (RS) Ch1, (dc in each st and ch-2 sp to
corner, 3dc in corner) 4 times, ss to beg dc.
Fasten off and weave in ends.
FRINGE
Cut 6 lengths of any colour yarn, 35cm long.
Fold in half, insert hook through st across short
edge of Scarf, place folded ends on hook and
pull through, thread tails through folded end
and pull tight to secure.
Make 13 across both short edges using all the
colours.
Trim fringe to desired length.
HOOK TO HOOK
Left to right: Alexandra’s scarf is made of a traditional granny square pattern featuring trios of treble stitches separated by chain stitches, but the
arrangement of the colours is super-modern; adorn the scarf with a two-round border and a brightly coloured pompom in each corner
granny square scarf
Bright motifs seem to merge into each
other to create one large granny stitch and
pompom-clad dream by Alexandra Lund
QCygnet DK (100% acrylic, 100g/298m), 1 ball of
each: Aqua (211), Candyfloss (229), Clover (186),
Fondant (173), Light Grey (195), Lilac (233)
QA 4mm (US G/6) hook
QA pompom maker
For yarn stockists see Patchwork Scarf
TENSION
Tension is not critical for this project, but it may
affect the yarn quantities required
MEASUREMENTS
Scarf measures approx 130x40cm (51¼x15¾in)
NOTES
Scarf is made up of 16 Squares. Squares are
worked in rounds with RS facing, then joined
together with a double crochet seam.
Change colour on the final yrh of st before
colour change is indicated. Carry the unused
colour across the top of your sts, enclosing the
strand as you work.
GRANNY SQUARE SCARF
SQUARE (MAKE 16)
Using Lilac, make a magic loop.
Row 1 (RS) Ch3 (counts as tr throughout), 2tr in
loop, ch2, (3tr in loop, ch2) 3 times, ss to top of
beg ch-3. [4 3-tr groups tr]
Join Fondant in any ch-2 sp.
Row 2 (RS) Ch3 (3tr, ch2, 3tr) into next 3 ch-2
sps, (3tr, ch2, 2tr) in same ch-sp as beg ch-3, ss
to top of beg ch-3. [8 3-tr groups tr]
Row 3 Ss in sp between 3-tr groups, ch3,
*change to Candyfloss, (3tr, ch2, 3tr) into ch-2
sp change to Fondant, 3tr into next sp between
3-tr groups; rep from * twice more, change to
Candyfloss, (3tr, ch2, 3tr) into ch-2 sp change to
Fondant, 2tr in same sp as beg ch-3.
[12 3-tr groups]
Row 4 Ss in sp between 3-tr groups, ch3,
*change to Aqua, (3tr, ch2, 3tr) into ch-2 sp,
change to Fondant, 3tr in next 2 sps between
3-tr groups; rep from * twice more, change to
Aqua, (3tr, ch2, 3tr) into ch-2 sp, change to
Fondant, 3tr in next sp between 3-tr groups, 2tr
in same sp as beg ch-3, ss to top of beg ch-3.
[16 3-tr groups]
Row 5 Ss in sp between 3-tr groups, ch3,
*change to Clover, (3tr, ch2, 3tr) into ch-2 sp,
change to Fondant, 3tr into next 3 sps between
3-tr groups; rep from * twice more, change to
Clover, (3tr, ch2, 3tr) into ch-2 sp, change to
Fondant, 3tr into next 2 sps between 3-tr
groups, 2tr in same sp as beg ch-3, ss to top of
beg ch-3. [20 3-tr groups]
Row 6 Ss in sp between 3-tr groups, ch3, *(3tr,
ch2, 3tr) in ch-2 sp, 3tr in next sp between 3-tr
groups, change to Light Grey, 3tr into next 2 sps
between 3-tr groups, change to Fondant, 3tr in
next sp across; rep from * 3 times more
omitting final st on last rep, ss to top of beg
ch-3. [24 3-tr groups]
Fasten off.
TO MAKE UP
Squares are joined together with RS facing. Join
Squares together in a 2x8 formation as follows:
*Join Fondant through ch-2 corner sp on 2
Squares, ch1, dc in same sp, dc in next 18 sts, dc
in next ch-2 sp.
Fasten off.
Rep from * to join 8 Squares into a long strip.
Make another strip in the same way.
Join Fondant through ch-2 corner sp on 2 strips,
ch1, dc in same sp, *dc in next 18 sts, dc in next
2 ch-2 sps; rep from * to final ch-2 sp, dc in final
ch-sp.
Fasten off.
BORDER
With RS facing, join Light Grey in any corner.
Round 1 Ch3, (2tr, ch2, 3tr) into same ch-sp,
*3tr in each sp between 3-tr groups to next
corner,** (3tr, ch2, 3tr) into ch-2 sp; rep from *
3 times more ending final rep at **, ss to top
of beg ch-3.
Round 2 Ch1, *dc in each st to ch-2 sp, (dc, ch2,
dc) into ch-2 sp; rep from * around, ss to beg dc.
Fasten off.
POMPOMS
Make 1 pompom in Aqua, Candyfloss, Clover
and Lilac. Sew a pompom to each corner.
WWW.GATHERED.HOW/SIMPLYCROCHET 55
CROCHET-ALONG
l en
Moments
BLANKETT
Cherish the small yet special experiences that
make life worth living with Eleonora Tully's ode to
time spent with family, nature and your passions
Final part!
CROCHET-ALONG
A IT
T IC Y
DK
WEIGHT
4.5MM
5MM
Where do you find your joy? Is it in a beautiful
sunset, a hug from a loved one or a favourite
song? Celebrate the moments that bring you
happiness with a blanket made of beautifully
detailed rectangle motifs. The pattern is
spread over six issues. Crochet along with us!
YOU WILL NEED
NOTES
Materials are for the whole Blanket
QRico Design Essentials Merino DK
(100% virgin wool, 50g/120m)
5 balls Yellow (65)
3 balls Mustard (70)
2 balls of each:
Green (42)
Light Blue (34)
Cobalt Blue (29)
Pearl Pink (16)
Orchid (07)
Navy (28)
1 ball of each:
Red (05)
Light Mint (33)
QA 4.5mm (US 7) hook
QA 5mm (US H/8) hook
For yarn stockists contact
Rico Design www.rico-design.de
CAL consists of six parts.
The Blanket is constructed by combining
Rectangles that are joined together to form
long panels. Panels are separated by sections
worked in rows.
The 5mm hook is only used in Part 3; the
remainder is worked using a 4.5mm hook.
Change colour on the final yrh of st before
colour change is indicated. If using 2 colours in
one row, carry unused colour across the top of
the sts, enclosing the strand as you work.
We recommend blocking the Rectangles to
the measurements listed before joining.
TENSION
19 sts and 12 rows to meas 10x10cm
(4x4in) over treble crochet using a
4.5mm hook
MEASUREMENTS
The finished Blanket measures
approximately 90x115cm (35x45in)
Autumn Fruits Square measures
16x20cm (6¼x11in)
ABBREVIATIONS
BPtr3tog *Yrh, insert hook around
post of next st working from back to
front to back, yrh and pull up a loop,
yrh and pull through 2 loops; rep
from * twice more in next 2 sts, yrh
and pull through all loops on hook
ss join Join yarn in ch-sp on first
Rectangle, ch1, ss in ch-sp on
adjacent Rectangle, ch1, *ss in next
st on first Rectangle, ch1, skip 1 st on
adjacent Rectangle, ss in next st, ch1,
skip 1 st on first Rectangle; rep from
* across to next corner, ss in ch-sp on
adjacent Rectangle, ch1, ss in ch-sp
on first Rectangle
third back loop On half treble sts a
third loop wraps around the centre
of the st, insert hook into this third
loop and not into the top of the sts
For a full list, see page 86
58 WWW.GATHERED.HOW/SIMPLYCROCHET
BLANKET
PART 6
AUTUMN FRUITS RECTANGLE
Using Green ch37.
Row 1 (RS) Tr in fourth ch from hook, tr in each
ch to end, turn. [35 sts]
Row 2 (WS) Ch3 (counts as tr throughout), tr in
each st to end, turn.
Change to Light Mint.
Rows 3-4 Ch3, tr in each st to end, turn.
Change to Red.
Row 5 Ch3, tr in next 4 sts, 3FPdtr around next
st, (tr in next 5 sts, 3FPdtr around next st) 4
times, tr in next 5 sts, turn. [45 sts]
Change to Green.
Row 6 Ch2 (counts as htr throughout), FPtr
around next 4 sts, BPtr3tog, (FPtr around next 5
sts, BPtr3tog) 4 times, FPtr around next 4 sts, htr
in final st, turn. [35 sts]
Change to Light Mint.
Rows 7-8 Ch3, tr in each st across, turn.
Change to Navy.
Row 9 Ch3, tr in next 7 sts, 3FPdtr around next
st, (tr in next 5 sts, 3FPdtr around next st) 3
times, tr in next 8 sts, turn. [43 sts]
Change to Green.
Row 10 Ch2, FPtr around next 7 sts, BPtr3tog,
(FPtr around next 5 sts, BPtr3tog) 3 times, FPtr
around next 7 sts, htr in final st, turn. [35 sts]
Change to Light Blue.
Rows 11-12 Ch3, tr in each st across, turn.
Change to Mustard.
Rows 13-16 Rep Rows 5-8, changing to Green at
end of Row 13 and Light Blue at end of Row 14.
Rows 17-18 Ch3, tr in each st across, turn.
Fasten off.
BORDER
With RS facing, join Mustard in top-right corner.
Round 1 (RS) Ch1 (does not count as st
throughout), dc in each st across top edge, ch2,
rotate to work down row-end edge, 25dc
evenly across side, ch2, rotate to work across
bottom edge, dc in each st across, ch2, rotate to
work down row-end edge, 25dc evenly across
side, ch2, ss to beg dc.
[120 dc, 4 ch-2 sps]
Round 2 Ch3, *tr in each st to ch-2 sp, (tr, ch2, tr)
in ch-sp; rep from * around, ss to top of beg
ch-3. [128 sts]
Fasten off and weave in all ends.
TO JOIN
The Autumn Fruits Rectangle is joined to the 2
remaining Sunsets on the Beach Rectangles
made in Part 1.
With RS facing and using Mustard or Yellow, ss
join the Sunsets on the Beach Rectangles,
either side of the Autumn Fruits Rectangle.
The panel is now joined to the top of Part 5.
Lay the panel in place above Part 5 with WS
facing outwards. Insert hook into outer corner
ch-sp of Sunset on the Beach Rectangle and
through first st of Part 5.
Using Yellow, dc across to join.
Fasten off.
BORDER
With RS facing, join Yellow into top-right corner.
Round 1 (RS) Ch3, (2tr, ch2, 3tr) in same ch-sp,
*(skip 2 sts, 3tr in next st) rep to final st at end of
first Sunsets on the Beach Rectangle, skip
corner ch-sp of Sunsets on the Beach
Rectangle, 3tr in corner ch-sp of Autumn Fruits
Rectangle, (skip 2 sts, 3tr in next st) until final 2
sts of Autumn Fruits Rectangle, skip final 2 sts,
3tr in corner ch-sp of Autumn Fruits Rectangle,
skip corner ch-sp on next Sunsets on the Beach
Rectangle, 3tr in first st of Sunsets on the Beach
Rectangle, (skip 2 sts, 3tr in next st) rep to final 2
sts, skip final 2 sts, (3tr, ch2, 3tr) in corner
ch-sp**, continue down long side of blanket,
skip first st of Rectangle, 3tr in next st, (skip 2
sts, 3tr in next st) until final st of Rectangle, skip
final st, 8 3-tr groups evenly spaced across the
row edges of Music Strip, skip first st of next
Rectangle, 3tr in next st, (skip 2 sts, 3tr in next
st) until final st of Rectangle, skip final st, 9 3-tr
groups evenly spaced across the row edges of
shell strip, skip first st of next Rectangle, 3tr in
next st, (skip 2 sts, 3tr in next st) to ch-sp, 3tr in
ch-sp, 8 3-tr groups evenly spaced across the
row edges of Music Strip, skip first st of next
Rectangle, 3tr in next st, (skip 2 sts, 3tr in next
st) until final st of Rectangle, skip final st, (3tr,
ch2, 3tr) in corner of Blanket, rep from * to **
once more, skip first st of Rectangle, 3tr in next
st, (skip 2 sts, 3tr in next st) until final st of
Rectangle, skip final st, 8 3-tr groups evenly
spaced across the row edges of Music Strip, 3tr
in corner sp on Moments Rectangle, (skip 2 sts,
3tr in next st) until final st of Rectangle, skip
final st, 9 3-tr groups evenly spaced across the
row edges of shell strip, skip first st of next
CROCHET-ALONG
The final rectangle slots in
between the Sunset rectangles
Once all the squares and rectangles are
joined, work a border all around the blanket
Rectangle, 3tr in next st, (skip 2 sts, 3tr in next
st) skip final st, 8 3-tr groups evenly spaced
across the row edges of Music Strip, skip first st
of next Rectangle, 3tr in next st, (skip 2 sts, 3tr in
next st) until final st of Rectangle, skip final st, ss
to top of beg ch-3. [230 3-tr groups, 4 ch-2 sps]
Fasten off.
Join Orchard in any ch-2 sp.
Round 2 (RS) Ch3, (2tr, ch2, 3tr) in same sp, *3tr
in sp between each 3-tr group to next corner,
(3tr, ch2, 3tr) in ch-3 sp; rep from * around, ss to
top of beg ch-3. [234 3-tr groups, 4 ch-2 sps]
Fasten off.
Join Pearl Pink in any ch-2 sp.
Rounds 3-4 As Round 2, changing to Cobalt
Blue for Round 4. [242 3-tr groups, 4 ch-2 sps]
Fasten off.
Jon Yellow in any ch-2 sp.
Round 5 Ch2, 2htr in same sp, 3htr in each sp
between 3-tr groups, 3htr in each ch-2 sp
around, ss to top of beg ch-2.
[246 3-htr groups, 4 ch-2 sps]
Fasten off.
Join Mustard in third bl of any st.
Round 6 Ch2, *htr in third bl of each st to ch-2
sp, ch2, skip ch-sp; rep from * around, ss to top
of beg ch-2.
Fasten off and weave in all ends.
SHOW US YOURS!
Share your progress with us!
Join our group at www.facebook.com/
groups/SCtreblemakers and tag your
pics on Facebook and Instagram
as #goldenmomentsCAL
IN ASSOCIATION WITH
WWW.GATHERED.HOW/SIMPLYCROCHET 59
aine Forres
t, Gett y Im
ages
Alt-pop singer Caroline Polachek
performs on Day Five in a
Monique Fei outfit that combines
crochet with screenprinted latex
Celebs love crochet too!
Model Stella Jones sports
a crochet bag at the festival
Photo: Alys Tomlins
Photo: Mark Bo
Photo: Shirl
land, Getty Im
ages
GOOD READ
on, Getty Images
E
very summer, in the throngs of
music fans looking to let loose
and bask in the positive vibes
of the Glastonbury Festival, you’ll
always see one thing – lots and lots of
crochet. Strappy crop tops, granny
square bags, mesh-like dresses and
bucket hats pop up in every corner of
festival photos, taking our favourite
craft into the centre of the British
summertime. Two of our team
members were lucky enough to visit
Glastonbury this year, and captured
the photos, the vibrancy and the
community spirit that radiated from
crochet-wearing festival-goers.
Katie Hall handmakes all the crochet
creations for sale at the iconic, colourful
Katie’s Funky Things stall at Glastonbury
60 WWW.GATHERED.HOW/SIMPLYCROCHET
Poppy Delevingne and
her striped crochet dress
became a symbol of
Glastonbury this year
Photo: Mark Boland, Getty Images
rochet at
lasto
GOOD READ
Friends
of earth
The shop Not Just for
Nanas sells handmade
mandalas at the festival,
which fits in perfectly
with the mindful, Earthfocused feel of the event
G
lastonbury was greener than ever this year.
The festival used only renewable energy
and renewable fuels, and the venue was
full of Oxfam shops selling recycled clothing –
including some premium crochet garments! The
sustainable initiative aligned perfectly with the
festival’s DIY bohemian spirit.
Crochet garments for
sale at some of the
festival’s Oxfam shops
Photo: Alys Tomlinson, Getty Images
you wore
it well
Esther Akatwijuka hooked her
own crochet trousers using
a pattern by Alanna Miall
Dom Channing Williams
bought his long, flowing
crochet coatigan from
Oxfam at the festival
O
Photo: Esth
er Akat wiju
ka, ig: @ya
ur team managed to get a few snaps
of festival-goers looking fabulous in
crochet garments! Duster cardigans,
crop tops, chain stitch mesh and stipes were
big this year. Whether they made, bought or
were given their festival garments, absolutely
everyone looked fantastic!
Sophie Brousa’s mother-inlaw made this cardi using
a Fran Morgan design from
Simply Crochet issue 134!
rnpil33
Jackie da Silva’s mum
made her this maroon
web top – she says
her mum can design
anything just by
looking at a photo!
Megan Graburn’s friend
Nicole made her this top
WWW.GATHERED.HOW/SIMPLYCROCHET 61
FORGET-ME-NOT NECKLACE
THREAD
WEIGHT
micro
crochet
0.75MM
HOOK
YOU WILL NEED
QGütermann Top Stitch Thread
(100% polyester, 30m)
1 spool of each:
Primrose Yellow (852)
Baby Blue (143)
Beach Glass (075)
QA 0.75mm (US 13 steel) hook
QDr Bechman’s Spray Starch
Q2 jewellery wire snips
Q2 needle nose jewellery pliers
QA belcher chain, 50cm
Q4 jump rings, 4mm
QA lobster clasp, 11mm
For yarn, contact
William Gee
www.williamgee.co.uk
TENSION
Tension is not critical, but it may
affect the yarn quantities required
MEASUREMENTS
Each Flower measures 1.5cm (½in)
ABBREVIATIONS
invisible join Fasten off, pull loop
so tail comes out of the top of the st,
thread onto a darning needle, insert
needle through top of second st of
round , insert needle through back
of final st, pull until loop is the same
tension as sts of round, weave in end
For a full list, see page 86
Remember me
Tiny floral motifs make up this necklace by Lisa Hendry,
designed for World Alzheimer’s Day on 21 September
A trail of delicate flowers wander like
thoughts in this meaningful necklace. Gift it
to a loved one as a reminder of good times.
NOTES
Necklace is made up from 9 Flower motifs.
You can substitute any thread into this pattern.
FORGET-ME-NOT NECKLACE
The flowers are made in just two rounds
using double crochet and treble stitches
62 WWW.GATHERED.HOW/SIMPLYCROCHET
FLOWERS (MAKE 9)
For Round 2, make 5 using Baby Blue and
4 using Beach Glass.
Using Primrose, make a magic loop.
Round 1 (RS) Ch1 (does not count as st
throughout), 10dc in loop. [10 sts]
Fasten off with the invisible join.
Join next colour in any st with a ss.
Round 2 (RS) *(Ch3, tr) in same dc as ss, ch1,
(tr, ch3, ss) in next dc, ss in next dc; rep from *
4 times more.
Fasten off and weave in ends.
Pin the Flowers out and spray with starch.
TO MAKE UP
Using the image as a guide, sew the Flowers
together. Sew 5 into a row, then sew 4 from
the centre Flower.
Cut 2 pieces of chain to your desired length.
Attach a length of chain to either side of the
row of 5 Flowers using a jump ring.
Attach a jump ring to each end of the chains,
and then join the clasp to the right-hand end.
INTARSIA FLOWER SHAWL
pret ty
textured
trim
Daisy, daisy
Beautiful graphic flowers burst from a white
background in Helen Anderson’s shawl
WWW.GATHERED.HOW/SIMPLYCROCHET 63
INTARSIA FLOWER SHAWL
This colourwork wrap is the best of both
worlds – its dense stitches protect you from
wind while the bamboo yarn keeps you cool.
A IT
T IC Y
DK
WEIGHT
4MM
HOOK
YOU WILL NEED
QSirdar Snuggly Baby Bamboo
(80% bamboo, 20% wool,
50g/95m)
10 balls of Yarn A Cream (131)
4 balls of Yarn B Dinky Denim (117)
1 ball of Yarn C Tickety Boo (092)
QA 4mm (US G/6) hook
For yarn stockists contact
Sirdar 01924 231682
www.sirdar.com
TENSION
Tension is not critical for this project,
but it may affect the yarn quantities
required
MEASUREMENTS
Shawl measures approx 170x48cm
(67x19in)
ABBREVIATIONS
picot Ch3, ss in third ch from hook
(does not count in stitch count)
For a full list, see page 86
For
at
www.blacksheepwools.com
use the code SNUG139
at the checkout
NOTES
Shawl is worked in rows.
There is a Chart on page 87, which you will
need to refer to. Each small square represents
1htr. Read all RS rows from right to left and WS
rows from left to right. The Chart is repeated 3
times across each row. The first few rows of the
Chart have been written out to guide you.
Change colour on the final yrh of st before
colour change is indicated. Carry Yarn A across
the top of your sts, enclosing the strand as you
work. All other colours should not be carried
Use different balls of yarn for each section of
colour or wind off smaller balls of each colour.
You can substitute any DK yarn into this
pattern.
For the colourwork, divide the blue and green
yarns into smaller balls to work each section
SHAWL
Using Yarn A, ch84.
Row 1 (WS) Htr in second ch from hook and
each ch across, turn. [83 sts]
Row 2 (RS) Ch1 (does not count as a st
throughout), htr in each st across, turn.
Rows 3-11 Rep Row 2.
Refer to the Chart for Rows 12-30.
Row 12 Ch1, htr in first 5 sts, *htr in next 6 sts,
change to Yarn B, htr in next 2 sts, change to
Yarn A, htr in next 5 sts, change to Yarn B, htr in
next 2 sts, change to Yarn A, htr in next 11 sts;
rep from * twice more, turn.
Row 13 Ch1, *htr in next 10 sts, change to Yarn
B, htr in next 3 sts, change to Yarn A, htr in next
5 sts, change to Yarn B, htr in next 3 sts, change
to Yarn A, htr in next 5 sts; rep from * twice
more, htr in final 5 sts, turn.
Rows 14-30 Cont in patt set, using the Chart for
all colour changes.
Cont with Yarn A.
Rows 31-41 Ch1, htr in each st across, turn.
Rows 42-221 Rep Rows 12-41 another 6 times.
Do not fasten off.
BORDER
Round 1 (RS) Ch1, *dc in next 2 row ends, 2dc
in next row end; rep from * to last 2 row ends,
dc in last 2 row ends, ch1, dc in each ch across,
ch1, turn to work along shawl side, **dc in next
2 row ends, 2dc in next row end; rep from ** to
last 2 row ends, dc in last 2 row ends, ch1, dc in
each st across, ch1, ss to first dc.
Round 2 (RS) Ch1, *(dc in next 4 sts, picot) rep
to ch-1 sp, (dc, picot) in ch-sp; rep from *
around, ss to beg dc.
Fasten off and weave in ends.
Offer ends 25 September 2023
SIMPLE STEPS HOW TO WASH YOUR CROCHET PIECES
1 Keep the yarn’s ball band
safe and check it for care
information. The band will tell
you what temperature to
wash the yarn at and whether
it can go in the machine or if it
needs to be handwashed.
64 WWW.GATHERED.HOW/SIMPLYCROCHET
2 To handwash, soak for
around 30 minutes in a bowl
of lukewarm water with a mild
detergent. Don’t rub or you
may felt the piece. Then rinse,
unless you’ve used a
non-rinsing detergent, such
as Soak or Eucalan.
3 Lay the crochet item on top
of a towel and roll up the
towel to squeeze out excess
moisture, making sure you do
not wring.
4 Gently reshape the crochet
item. Leave it to dry on a towel
somewhere flat, such as on a
board or a folded blanket. Pin
out if needed. Never hang up
an item to dry because its
weight may stretch the yarn.
Decorate your pad with a wall or doorway
hanging made of felted dots by Tuula Kyrölä
FELTED DOTS HANGING
Using only felted circles in four colours, this
unique hanging calls forth visions of both
falling raindrops and bohemian salons.
ASY
ASY
SUPER
CHUNKY
9MM
HOOK
YOU WILL NEED
NOTES
Hanging is made up from Circle motifs. The
Circles are felted and then threaded onto
cotton yarn.
QDROPS Andes
(65% wool, 35% alpaca,
100g/90m)
3 balls of each:
Powder Pink (3145)
Minty Rose Mix (4276)
Twilight Blue Mix (6343)
Off white (0100)
QAny 4ply cotton yarn
QA 9mm (US M/13) hook
QA wooden dowel, 60cm
QA large sharp needle, minimum
7cm long
QEnzyme-free detergent
For yarn stockists contact
Wool Warehouse 01926 882818
www.woolwarehouse.co.uk
TENSION
Tension is not critical, but it may
affect the yarn quantities required
MEASUREMENTS
Each felted motif measures approx
5cm (2in) in diameter
ABBREVIATIONS
For a full list, see page 86
HANGING
CIRCLES (MAKE 180)
Make 45 in each colour.
Make a magic loop.
Round 1 Ch5, 14dtr in loop, ss to top of beg
ch-5. [15 sts]
Fasten off and weave in ends.
TO FELT
Place up to 50 Circles into your washing
machine with a towel. Wash at 40ºC on a
normal spin cycle.
Once the cycle has finished, pin out the Circles
to help maintain a flat, circular shape.
Repeat until all Circles have been felted.
TO MAKE UP
Cut 10 pieces of cotton yarn, approx 230cm
long.
Thread a length onto a sharp needle, making a
large knot at the other end. Pass a Circle over
the needle making sure the cotton yarn is not
visible from either side and pull down to the
end of the cotton. *Pass another Circle through
in the same way, leaving 15cm from the
previous Circle; rep from * until 18 Circles have
been threaded. Knot the end.
Make 4 more in the same way.
Make the final 5 strands as above but leave a
5cm from the lower knot to the first Circle so
the motifs sit at different heights.
Tie the strands to a dowel, leaving approx 5cm
gap between them.
Make circles in one round of double treble,
then felt them in a washing machine
If you prefer, you can felt the circles by hand
– to do that, follow the walkthrough below
SIMPLE STEPS HOW TO FELT YOUR CROCHET
1 Make sure you use a wool
yarn that’s suitable for felting
(not superwash). Crochet with
a hook that’s bigger than
usual (we used a 6mm hook
on 4ply yarn to give the fibres
room to move during felting).
66 WWW.GATHERED.HOW/SIMPLYCROCHET
2 Wearing rubber gloves, put
the piece in water with a little
detergent. Rub it vigorously
and the yarn will start to mat.
You could also use a washing
machine on a hot wash (but
you can’t control the size).
3 Continue until the piece has
shrunk slightly and the yarn is
well matted together. You
may need to crochet a test
swatch to work out how much
it’s likely to shrink (see above
for before and after).
4 While the work is still wet,
pull it into the desired shape
and pin it out onto a towel or
a blocking board to dry.
A&P Merino &
Mohair Sock in
Dark Tide
Wrap yourself in multi-coloured majesty with a lacy
shawl designed by Gwen Buttke McGannon
68 WWW.GATHERED.HOW/SIMPLYCROCHET
THE DYE LOT
Whether you’re hooking it for a gift or for
yourself, this long, simple-to-make shawl will
be a joy to create. Just look at those colours!
ASY
ASY
4PLY
WEIGHT
3.75MM
HOOK
YOU WILL NEED
QA&P Merino & Mohair Sock
(55% Merino wool, 25% nylon,
20% mohair, 100g/400m)
2 skeins of Dark Tide
QA 3.75mm (US F/5) hook
For yarn stockists contact
www.theknittingshed.com
TENSION
Tension is not critical, but it may
affect the yarn quantities required
MEASUREMENTS
Shawl measures approx 30x145cm
(11¾x57in)
ABBREVIATIONS
shell 5tr in st/sp indicated
For a full list, see page 86
NOTES
Shawl is worked in rows.
The first half of the Shawl is worked from the
foundation ch. Yarn is then fastened off and
rejoined to the base of Row 1 to repeat the
first half.
After working half the length of the scarf,
return to the foundation row and repeat
SHAWL
FIRST HALF
Ch64.
Row 1 Tr in sixth ch from hook, (counts as tr,
ch1), tr in next 2 ch, *ch3, skip 3 ch, tr in next 3
ch; rep from * 8 times more, ch1, skip 1 ch, tr in
last ch, turn. [32 tr, 9 ch-3 sps, 2 ch-1 sps]
Row 2 Ch1 (does not count as st throughout),
dc in first st, ch3, skip 2 sts, dc in next tr, *ch3, dc
in next ch-3 sp, ch3, skip 1 tr, dc in next tr, skip
next tr; rep from * 8 times more, ch3, skip next
(tr, ch1) dc in last st, turn.
[21 dc, 20 ch-3 sps]
Row 3 Ch4 (counts as tr, ch1 throughout), (dc in
next ch-3 sp, ch3) 19 times, dc in next ch-3 sp,
ch1, tr in last st, turn.
[2 tr, 20 dc, 19 ch-3 sps, 2 ch-1 sps]
Row 4 Ch1, dc in first st, ch1, shell in next ch-3
sp, *ch1, dc in next ch-3 sp, ch1, shell in next
ch-3 sp; rep from * 8 times more, ch1, dc in last
st, turn. [11 dc, 9 shells, 20 ch-1 sps]
Row 5 Ch4, skip first tr of shell, tr in next 3 tr,
skip final tr of shell, *ch3, skip first tr of shell, tr
in next 3 tr, skip final tr of shell; rep from * 8
times more, ch1, tr in last st, turn.
[32 tr, 9 ch-3 sps, 2 ch-1 sps]
Rows 6-89 Rep Rows 2-5.
Rows 90-92 Rep Rows 2-4.
Row 93 Ch1, dc in first st, *(ss, ch3, ss) in next tr,
ss in next tr, (ss, ch3, ss) in next tr, ss in next tr,
After all your hard work, blocking is essential
to show off the detail of the stitch pattern
(ss, ch3, ss) in next tr, ss in dc; rep from * across
to final st, dc in final st.
Fasten off.
SECOND HALF
With RS facing, join yarn in base of Row 1 to
work across opposite side of foundation ch.
Row 1 (RS) Ch4, skip next ch, tr in next 3 ch,
*ch3, skip 3 ch, *ch3, skip 3 ch, tr in next 3 ch;
rep from * 8 times more, ch1, skip next ch, tr in
last ch, turn. [32 tr, 9 ch-3 sps, 2 ch-1 sps]
Repeat Rows 2-93.
Fasten off and weave in ends.
Block to measurements listed.
SIMPLE STEPS HOW TO BLOCK YOUR CROCHET PIECES
1 Check the yarn’s ball band
for advice on whether to dry,
wet or steam block your item.
To wet block, wash the item
before pinning. For dry and
steam blocking, pin out when
dry. To pin out, lay the item
flat on a towel over a blanket.
2 Using long, rust-proof pins
or blocking wires, pin out to
the measurements in the
pattern (check the schematic
for garments). Start at the
corners, then move evenly
around the edges. You can
reposition pins if needed.
3 Place pins inside the last row
or round of stitches, not in the
actual stitches or you risk
distorting them. Insert the
pin’s point towards the centre
of the fabric, away from the
edge, to balance out the
forces involved.
4 For wet blocking, just leave
to dry. To dry block, spritz
with cold water and leave to
dry. To steam block, hover a
steaming iron over the fabric
(don’t touch it) until damp,
then leave to dry. Once dry,
you can remove the pins.
WWW.GATHERED.HOW/SIMPLYCROCHET 69
Time goes by
Pause and appreciate the joyful colourwork
and pompoms in Helen Anderson’s cushion
For your
home
COLOUR POP CUSHION
Thanks to the ellipses-like design and chunky
pompom corners, all your visitors will stop
and admire this cosy tapestry cushion.
ASY
ASY
DK
WEIGHT
4MM
HOOK
YOU WILL NEED
QCygnet Cotton
(100% cotton, 100g/200m)
3 balls of Yarn A White (2080)
1 ball of each:
Yarn B Blush (3275)
Yarn C Peony Pink (4065)
Yarn D Pansy (6718)
Yarn E Frosty Blue (5033)
Yarn F Pistachio (6849)
Yarn G Spring (6711)
QA 4mm (US G/6) hook
QA cushion pad, 30x40cm
QA pompom maker, 65mm
Q2 stitch markers
For yarn stockists contact
Cygnet Yarns 01274 743374
www.cygnetyarns.com
TENSION
17 sts and 24 rows measure 10x10cm
(4x4in) over dc using 4mm hook, or
size needed to obtain correct
tension
MEASUREMENTS
Cushion measures 30x40cm
(11¾x15¾in)
ABBREVIATIONS
For a full list, see page 86
NOTES
Cushion Cover is worked in rows and sewn
together at the end.
There is a Chart on page 88, which you will
need to refer to. Each small square represents
1dc. Read all RS rows from right to left and WS
rows from left to right. The first few rows of the
Chart have been written out to guide you.
Change colour on the final yrh of st before
colour change is indicated. Carry Yarn A across
the top of your sts, enclosing the strand as you
work. All other colours can be left on the WS,
ready to use again on the next row.
CUSHION COVER
Using Yarn A, ch70.
Row 1 (RS) Dc in second ch from hook and
each ch across, turn. [69 sts]
Row 2 (WS) Ch1 (does not count as a st
throughout), dc in each st to end, turn.
Rows 3-51 Ch1, dc in each st across, turn.
Chart is worked over Rows 52-93. The sts of the
Chart are marked out in the next row. Work all
sts outside of the markers in Yarn A.
Row 52 Ch1, dc in first 10 sts, pm in last st to
mark first st of Chart, dc in next 2 sts, change to
Yarn B, dc in next 5 sts, change to Yarn A, dc in
next 3 sts, change to Yarn C, dc in next 5 sts,
change to Yarn A, dc in next 3 sts, change to
Yarn D, dc in next 5 sts, change to Yarn A, dc in
next 3 sts, change to Yarn E, dc in next 5 sts,
change to Yarn A, dc in next 3 sts, change to
Yarn F, dc in next 5 sts, change to Yarn A, dc in
next 3 sts, change to Yarn G, dc in next 5 sts,
change to Yarn A, dc in next 3 sts, pm in last st
to mark last st of Chart, dc in next 9 sts, turn.
Row 53 Ch1, dc in first 11 sts, change to Yarn G,
dc in next 7 sts, change to Yarn A, dc in next st,
The cushion cover is made as one rectangle,
then folded with an overlap and seamed
change to Yarn F, dc in next 7 sts, change to
Yarn A, dc in next st, change to Yarn E, dc in
next 7 sts, change to Yarn A, dc in next st,
change to Yarn D, dc in next 7 sts, change to
Yarn A, dc in next st, change to Yarn C, dc in
next 7 sts, change to Yarn A, dc in next st,
change to Yarn B, dc in next 7 sts, change to
Yarn A, dc in next 11 sts, turn.
Rows 54-93 Continue to work in patt set, using
the Chart for all colour changes.
Fasten off all colours except Yarn A.
Rows 94-166 Ch1, dc in each st across, turn.
Row 167 Ch1, ss in each st across.
Fasten off and weave in ends.
TO FINISH
Lay piece flat with WS facing up.
Position cushion pad over approx Rows 36-109.
Fold the ends over the back of the cushion pad,
they should overlap by approx 10cm. Pin in
place and remove cushion pad.
Using Yarn A, whipstitch the sides closed.
Make a pompom in Yarn B, C, E and F. Sew a
pompom to each corner.
SIMPLE STEPS HOW TO WORK TAPESTRY COLOURWORK
1 Work to the point where you
want to change colour and on
the last stitch in the first
colour, work the final yrh
using the second colour.
2 Work a stitch using the
second colour, but hold the
working end of the first colour
on top of the stitches below
and make sure you work the
new stitch over the top of it,
effectively encasing the first
colour.
3 Continue working in this
way, encasing the working
end of the first colour. When
you want to change colour
again, use the same method
as before: on the last stitch in
the second colour, work the
final yrh using the first colour.
4 It’s important not to pull too
tightly on the previous colour
of yarn or it will pucker the
fabric. Continue to work
stitches using the first colour,
over the top of the working
end of the second colour.
WWW.GATHERED.HOW/SIMPLYCROCHET 71
R
FE
F
YO
R
O
CT
U
OD
R
INT
%
6
7
O
T
P
U
E
V
A
S
SUMMER
TRY 3 ISSUES
("
!3
+1
$",#,2/$/"
1&+1/,!2 1,/6,ƛ"/0
Or why not
3 ISSUES FOR £9.99
3 ISSUES FOR £9.99
3 ISSUES FOR £9.99
3 ISSUES FOR £6
Great reasons to subscribe:
/&
)6,2/Ɯ/013 issues#/,*
0)&11)"
0£5*
Save up to 41%
ƞ"/6,2/1/&
)-"/&,!
")&3"/"!01/
&$%11,6,2/!,,/
"3"/*&00
+&002"
"/#" 102**"//"
!&+$
This offer closes on 31st August 2023 and is valid for UK delivery addresses and by Direct Debit only. The discounts shown are savings calculated as a percentage of the full shop price. For overseas rates visit www.
buysubscriptions.com. Should the magazine ordered change in frequency; we will honour the number of issues and not the term of the subscription. You are free to cancel your subscription at any time – if you cancel
within 2 weeks of receiving your penultimate issue you will pay no more than the trial rate. These rates are correct at time of printing. We run trial offers throughout the year to give our customers an opportunity to try a
new title before committing to a long term subscription. These are introductory offers and we reserve the right to reject or cancel any application for a trial subscription offer if the customer has previously purchased a trial
SJJIVJSVXLIWEQIQEKE^MRISVER]SXLIVQEKE^MRIMRXLI3YV1IHMETSVXJSPMSų9/GEPPW[MPPGSWXXLIWEQIEWSXLIVWXERHEVHƤ\IHPMRIRYQFIVW WXEVXMRKSV ERHEVIMRGPYHIHEWTEVXSJER]MRGPYWMZISVJVIIQMRYXIW
EPPS[ERGIW MJSJJIVIHF]]SYVTLSRIXEVMJJ 3YXWMHISJJVIIGEPPTEGOEKIWGEPPGLEVKIWJVSQQSFMPITLSRIW[MPPGSWXFIX[IIRTERHTTIVQMRYXI0MRIWEVISTIR1SRXS*VM
EQũTQ
SAVINGS
FROM JUST £5
*
+!02 0 /& "1,6,2/#
3,2/&1"*
$
7&+"1,!
6ǽ
try a new one?
3 ISSUES FOR £6
3 ISSUES FOR £6
3 ISSUES FOR £6
3 ISSUES FOR £6
3 ISSUES FOR £5
3 ISSUES FOR £5
3 ISSUES FOR £5
3 ISSUES FOR £5
2 EASY WAYS TO ORDER
Visit buysubscriptions.com/SSOM23HA
Call 0330 053 8660† quote code SSOM23HA
yarn
wss
Reevviieew
R
01
02
.
.
.
r
o
f
s
i
D
DK yarns
Ah, the ever-versatile DK yarn – use it for blanket, toys,
garments and more! Here are a few to add to your stash
Join ouCr AL!
alphabet
03
04
05
06
‘D’ PATTERN
Ch22.
ROUND 1 Dc in second ch from
hook, (dc2tog) 8 times, dc in next
4 ch. [5 dc, 8 dc2tog]
FASTEN OFF leaving a long tail.
74 WWW.GATHERED.HOW/SIMPLYCROCHET
Use the long tail to sew the end to
the top of the first 2 sts.
Join yarn in any st around edge
and ss evenly around working
ch-1 over both corners.
The leftover yarns from this yarn review
will be donated to Knit for Peace.Learn
more at www.knitforpeace.org.uk and
go to www.gathered.how
for more yarn donation ideas.
YARN REVIEWS
CASCADE
WEST YORKSHIRE SPINNERS
220 Superwash
Pure
WEIGHT DK
CONTENT 100% superwash wool
BALL 100g/200m
HOOK 4.25-5mm
RRP £8.99
WEIGHT DK
CONTENT 100% Falkland Islands wool
BALL 50g/112m
HOOK 4mm
RRP £7.50
Unleash your colour creativity
with the 189 gorgeous hues
available in this yarn. Many are
heathered shades, and up close
you can see their interesting
colour variations and hazy
semi-solid look. This gives the
fabric extra depth and texture
for a more natural appearance.
01
The yarn has a classic fuzzy wool
feel, with strong stitch definition
that makes it easy to see where
to insert your hook. It’s great for
warm makes and is sturdy
enough to be washed in the
machine on a cool cycle and can
even be tumble dried on cool.
www.cascadeyarns.com
One touch of this yarn and
you’ll be smitten with its furry
softness. It’s a high-quality
choice that’s great for cosy
accessories like hats and gloves
and will feel right at home next
to your skin. The 12 colours are
perfect for adding a little luxury
to your DK projects – just right
KING COLE
KARTOPU
Big Value Tweed
Baby one
WEIGHT DK
CONTENT 98% acrylic, 2% viscose
BALL 100g/290m
HOOK 4mm
RRP £2.99
WEIGHT DK
CONTENT 100% acrylic
BALL 100g/250m
HOOK 4mm
RRP £3.49
A new addition to the Big Value
range, this yarn makes it easier
and cheaper to create rustic
tweed-effect projects like hats,
blankets and jumpers. It feels
light and fuzzy in your hands,
so it glides over your hook and
creates soft stitch definition.
As it’s a slightly thinner DK, you
03
also get more metreage for your
money, and it’s even available in
250g Bounty DK Superballs.
There are 18 shades, each with
interesting tweedy flecks or
neps for a textured fabric. Pop it
in the machine on a 40°C gentle
wash and cool tumble dry.
www.kingcole.com
This touchably soft yarn is from
a new manufacturer on the
block, and it’ll likely become
a stash favourite. It has a tight
twist, so there’s no splitting, and
it’s a pleasure to hook thanks to
its clear stitch definition. The
yarn is designed to be gentle
enough for sensitive baby skin,
02
for Christmas! The fuzzy halo
makes it easy to hook, too. The
resulting fabric has a soft stitch
definition and a comforting feel.
It should withstand regular use
and maintain its shape well over
time, as long as you hand wash
it and never tumble dry.
www.wyspinners.co.uk
04
but it’s also a practical choice –
you can machine wash it at 30°C
(but avoid tumble drying). There
are 52 colours in the range, and
it’s a perfect option for any
project that needs both warmth
and gentle drape. It’s budgetfriendly and good quality.
www.woolwarehouse.co.uk
SCHEEPJES
JAMES C BRETT
merino soft
Party time stripes
WEIGHT DK
CONTENT 50% superwash Merino,
25% microfibre, 25% acrylic
BALL 50g/105m
HOOK 4-5mm
RRP £5.29
WEIGHT DK
CONTENT 100% acrylic
BALL 100g/280m
HOOK 4mm
RRP £3.59
A real joy to hook, this yarn lives
up to its name. It flows easily
through your hands, and the
soft lengths have a tight twist,
which means it rarely splits. The
unusual blend of fibres gives
you fluffy warmth, a satisfying
squish to your fabric and clear
stitch definition. Plus, it’s easy to
05
care for, so you can machine
wash it on a gentle 30°C cycle
(but no tumble drying). It’s
a brilliant all-rounder for any
cosy project. Choose from 56
colours or a flecked version, or
combine it with Whirl Fine Art
for more creative colour effects.
www.scheepjes.com
Add a playful edge to your DK
patterns with this colourful new
self-striping yarn. It has the
same characteristics as the
chunky Party Time range – soft,
slightly fuzzy and cosy with
good stitch definition – but the
lighter weight opens up a new
range of creativity. There are
06
eight colourways and the stripe
effect works best on narrower
fabrics, though on wider fabrics
you’ll still create a lovely effect
akin to a sprinkle of colour on
a neutral background. Chuck it
in the machine on a 30°C cool
wash and cool tumble dry.
www.jamescbrett.co.uk
WWW.GATHERED.HOW/SIMPLYCROCHET 75
Join our gang of Treble Makers and share your thoughts and makes with us
for a chance to be featured here, use our hashtag #Sctreblemaker
INN
WALL LOVE
!
bobble
and stripes
We think mandalas
are a great way to
enjoy hours of
crochet fun while
also livening up your
surroundings!
Jacquie Clapperton
couldn’t agree more
– she spent a golden
afternoon making
this project from
issue 137. Summer
days are the perfect
time for this sort of
thing and we know
this make will be
loved for many
summers to come.
Lovely colours!
Gemma Austin flew the flag for crochet with her
adaptation of the Stars and Stripes blanket from
issue 109, and we have to say, it looks absolutely
fantastic! We can imagine it really brightening up
her home, and we wonder whether Gemma will
hook the matching cushion from the issue, too.
FLY-AWAY DAYS
Samantha Mullally showed us three of her
Flower Fairy projects from issue 130 earlier this
year and has followed up with some new
additions to the family. The May, April and June
fairies are sure to fit in with their fellow friends
in Samantha’s home. Just six more to hook up to
complete this magicial collection!
U L TA
We’ve been double tapping on
Instagram and admiring your makes.
Tag us @simplycrochetmag and use
the hashtag #SCtreblemaker
VERY NICE VEST
Motif makes are hard
to beat – we’re sure
Louise Skelding, aka
@loulabella.knits,
would agree! This
vest from issue 114
looks lovely hooked
in variegated yarn.
SEASIDE SUMMER
Anyone else craving
a seaside trip right
now? Deb Ward, aka
@hookanory, helped
bring the seaside to
us by making an ami’
octopus from issue 46
and summer bunting.
LOVELY LACE
Sophie, aka
@microbio_sophie,
hooked up this
intricate gradient
shawl from issue 135
to help her stay warm
in the summer
evenings. Super cool!
SEA, SUN AND FUN
Sharon, aka
@daisyloopscrochet,
hooked up the Under
the Sea blanket from
issue 135. This make
is sure to get loads of
compliments from
friends and family.
THE LOWDOWN It’s simple to be in with a chance of winning a great hooky prize in a future issue! Show us wi
n
your Simply Crochet makes on Facebook, Twitter, Instagram or via email by 4 September.
For all terms and conditions, and more information, visit www.gathered.how/simplycrochetcomps
COMPETITION RULES The Promoter is Our Media Limited (an Immediate Group Company) (company number 05715415). [This promotion is in no way sponsored, endorsed, administered by, or associated with Facebook or Instagram.] The promotion is open to all residents of the UK, including the Channel Islands, aged 18 years or older, except the Promoter’s employees or
contractors and anyone connected with the promotion or their direct family members. Competitions in issue 139 are open from 00:01 on 8 August 2023 until 11:59pm on 4 September 2023. By entering the promotion, the participants agree. (a) to be bound by these terms and conditions; and (b) that should they win the promotion, their name and likeness may be used
by the Promoter for pre-arranged promotional purposes. Entrants should enter by Instagram, Facebook or email. Entries received after the closing date of the promotion will not be considered. Entrants must supply to Our Media Limited their [personal data required for us to run competition, choose winner(s) and arrange for prize to be sent to winner(s) – examples would
be name and email address]. The Promoter will use entrants’ personal details in accordance with the Immediate Privacy Policy (www.immediatemedia.co.uk/privacy-policy). [These details are being collected and used by the Promoter, not by Facebook or Instagram.] Only one entry will be permitted per person, regardless of method of entry. Bulk entries made by third
parties will not be permitted. The winning entrant[s] will be the first correct entry drawn at random from all the correct entries after the closing date. The Promoter’s decision as to the winner is final and no correspondence relating to the promotion will be entered into. The Promoter may share the details of the winner[s] with the prize provider for the purposes of fulfilling/
delivering the prize[s]. The winner[s] will be notified within 7 days of the close of the promotion by email. If the winner cannot be contacted, or fails to respond within 7 days of such notification being sent, the Promoter reserves the right to offer the prize to a runner up, or to re-offer the prize in any future promotion. There is no cash alternative and the prize will not be
transferable. Prizes must be taken as stated and cannot be deferred. The Promoter reserves the right to substitute the prize with one of the same or greater value. The surname and county of residence of the winner[s] will be available upon request by sending an SAE to simplycrochet@immediate.co.uk within two months of the closing date of the promotion. The Promoter
will contact the winner[s] before releasing this information and provide the winner[s] the opportunity to object or limit the amount of information shared. The Promoter reserves the right to amend these terms and conditions or to cancel, alter or amend the promotion at any stage, if deemed necessary in its opinion, or if circumstances arise outside of its control. The
Promoter does not accept any responsibility for lost, delayed or fraudulent entries. The Promoter excludes liability to the full extent permitted by law for any loss, damage or injury occurring to the participant arising from his or her entry into the promotion or occurring to the winner[s] arising from his or her acceptance of a prize. [By entering this promotion you agree to
release Facebook/Instagram of any liability howsoever caused in respect of this promotion.]. The promotion is subject to the laws of England.
76 WWW.GATHERED.HOW/SIMPLYCROCHET
@ SIMPLYCROCHET
GARDEN GLORY
If there’s one thing our community
loves, it’s a good flower motif –
and we can absolutely see why!
Emma Lucas gave her outdoor
furniture a complete upgrade by
adding this blanket from the
supplement in issue 121. Emma
wanted to use up some of her
stash and is absolutely thrilled with
the outcome. It’s a summer project
that can be used all year round!
LET’S FACE
THE SUN
Mother Nature as you make your own
amigurumi sunflower and watch it
JOIN US ONLINE!
a smile, this make will add a cheery
touch to any room. Yohann Dieul
will smile every time he sees this
cutie from issue 137 in
his home.
T is
...
s
n
Which new technique
would you like to try?
If you’re looking to socialise
with like-minded crocheters,
then make sure you join our
SCtreblemakers Facebook
group – the place to share
pictures of your makes, get
pattern recommendations
and advice, and generally talk
about how much you love
Simply Crochet magazine.
With over 6.5k members, it’s
a bustling crochet forum full
of friendly fellow hooksters.
We look forward to chatting
with you on there!
15
STIC
LAC
15
ST Y
SAIC
25
TA
TUNISIAN
45
TALK TO US!
takE 1,000s
Of paTternS
WhereveR
You go!
*
Search for Simply
Crochet on your
chosen app store
Available on Apple,
Google Play, Zinio and Nook
iPad is a trademark of Apple Inc., registered
in the U.S. and other countries. App Store is a
service mark of Apple Inc. NOOK is a registered
trademark of Barnes & Noble, Inc. NOOK Tablet
is a trademark of Barnes & Noble Inc. *Free trial
is for new users on annual subscriptions only.
Cancel at any point during the trial to avoid
being charged. Free trial not available on Zinio.
Post a pic on our Facebook page
facebook.com/simplycrochetmag
Tweet us @SimplyCrochet_
twitter.com/SimplyCrochet_
Add to our Finished Projects board
ravelry.com/groups/simply-crochet
Use the hashtag #SCtreblemaker
instagram.com/simplycrochetmag
Email us at:
simplycrochet@ourmedia.co.uk
*
a
Do variegated yarns have dye lots?
It’s easy to make a colour mistake…
It’s not just solid colours that have dye lots
– variegated yarns have them too and they
do make a difference. When variegated yarn
is dyed, different colours are applied to
different sections of the yarn and these
variations create a specific effect.
Variegated yarns of the same colourway
might have the same overall scheme, but
there can be differences in the exact
placement, shade and intensity of the
colours involved from ball to ball.
For example, this fabric uses two balls of
the same variegated yarn number, but
different dye lots – at the join line where they
meet, you can see that one shade of red has
more of an orange hue compared with the
other red, which is more pink.
If you need a consistent colour scheme in
your variegated project then be careful to
apply the same dye lot rules as with solid
colours, otherwise you could end up with
unintended colour variations.
Dye lot join
How do I fix a dye lot disaster?
Get ready for some simple solutions…
If you do end up with yarn from different dye
lots and need to use them in the same
project, don’t worry – there are some clever
tricks you can use to incorporate the two
slightly different shades of yarn.
Example 1 Try dividing up your project and
use different dye lots to make different parts.
With a garment for example, use one dye lot
for the body and another for the sleeves, as
in this mini garment. Or use one for the front
and sleeves, and another for the back.
Example 2 Try using dye lot differences to
create a striped effect in your project, like
with this example mini garment. Or try an
ombre colour effect where you create blocks
of colour moving from the darkest dye lot
shade to the lightest. Or transition gradually
from one dye lot to the next using
alternating stripes of the old and new dye lot
to create a blending section in between solid
sections – this will introduce the new dye lot
into the pattern quite stylishly.
Tip If you’ve made the back, front and
one sleeve and then run out of yarn, don’t
just buy another dye lot to make the
remaining sleeve – the colour difference of
that second sleeve will be noticeable (see the
sleeves in example 2 below). Instead, it’s
01
better to buy enough yarn to make two
sleeves and use it to make both sleeves. Yes,
it means remaking one of the sleeves, but the
finished look will be more even and actually
might look more attractive.
Tip If you don’t mind introducing another
yarn colour, you could use that to separate
two different dye lots. If you’re happy to
add extra embellishments, you can use them
to hide a join line – think surface crochet,
flower motifs or even a length of ribbon. If
you just have one ball from a different dye
lot, you could use it to make a border or
button band, cuffs or collar.
02
Dye lot 3
Dye lot 3
Dye lot 3
Dye lot 1
Dye lot 1
Stripes of 1 & 3
Let Becky solve your hooky conundrums!
Crochet Unravelled aims to deep dive into the techniques, tutorials and terminology that
will make you a better hookster. Have you got a question you want Becky to unravel?
Send it in to us at simplycrochet@ourmedia.co.uk
Don’t miss the next
workshop… I’ll show
you how to keep track
of what row
you’re on
WWW.GATHERED.HOW/SIMPLYCROCHET 79
C
fun & furry animal
homewares collection
soft merino
jumper
blue ami' kitty
clothes line
bunting
umbrella motif cardi
autumn hat
& scarf set
gorgeous textured
cushion
sleevelss duster
handy travel bag
entrelac blanket
& more...
ExcLuSive
PatTern Book
From BlaCk SheE
p
WooLs
ON SALE 5 SEPTMEBER
* Contents subject to change
Learn Tunisian
cable stitch
doWnload
siMply crOchet !
You can buy a digital edition of
Simply Crochet, ready to read
whenever you want. Single issues
and subscriptions are available
and every issue you purchase is
stored in your magazine library
permanently. Once your magazine
has downloaded, an internet
connection is not required so you
can take your magazine with you,
wherever you go.
To buy your digital copy of Simply Crochet visit
www.gathered.how/digital-issues
iPad is a trademark of Apple Inc., registered in the U.S. and other countries. App Store is a service mark of Apple Inc.
NOOK is a registered trademark of Barnes & Noble, Inc. NOOK Tablet is a trademark of Barnes & Noble, Inc
YOUR GUIDE
SCAN ME
Learn more online!
Crochet essentials
Over the next few pages, you’ll find simple step-by-step guides to many useful
stitches and techniques that you’ll use every time you pick up a hook
HOLDING THE HOOK
HOLDING THE YARN
Try these methods and see which works best
Even tension results in even stitches
PENCIL METHOD
Hold the hook like a pencil, in
your right hand (if you’re
right-handed), about 3-5cm
from the hooked end. If your
hook has a flat area, you’ll find it
comfortable to hold it here.
KNIFE METHOD
Hold the hook between your
thumb and forefinger, about
3-5cm from the hooked end,
resting the end of the hook
against your palm. This will
give you lots of control.
METHOD ONE
Pass the ball end of the yarn
between the little finger and
third fingers of your left hand
(if you are right-handed), then
behind the third and middle
fingers, over your index finger.
METHOD TWO
Loop the ball end of the yarn
loosely around the little finger
of your left hand, then take it
over the third finger, behind
the middle finger and over
your index finger.
3 Catch the ball end of the
yarn with the hook and pull it
back through the centre of the
loop, taking the yarn through
with it.
4 Pull both ends of the yarn to
tighten the knot, then pull just
the ball end to tighten the
loop so it’s close to the hook,
but not touching it.
MAKING A SLIPKNOT The first loop on the hook
1 Hold the tail of the ball of
yarn in your left hand and
drape the yarn clockwise over
the top of it to form a loose,
circular loop.
2 Hold the loop between left
thumb and forefinger, then
insert the crochet hook
through the centre of the loop
from front to back.
CHAIN STITCH Use this stitch to make your foundation chain
How to count chains
1
9
1 Hold the hook in your right
hand, and both the yarn end
and the working yarn in your
left hand. Move the hook under
and over the yarn to wrap it
around anticlockwise.
2 Pull the hook towards the
slipknot, catching the yarn in
the hook, and pulling it through
the slipknot loop. This forms
your first chain (ch) stitch.
Repeat steps 1 and 2 to form
a chain length.
3 This is what your row of
chains will look like. Hold the
chain with your left hand near
the hook, to keep the tension.
Keep going until you have the
number of chains that’s stated
in your pattern.
8
7
6
5
4
3
2
Each chain or loop counts as
one stitch. Never count your
first slipknot or the loop on
the hook (called the working
loop). So that you can be
accurate, make sure the
chain is not twisted and that
the front is facing you.
WWW.GATHERED.HOW/SIMPLYCROCHET 83
YOUR GUIDE
SLIP STITCH (ss)
This stitch has no height – often used to join rounds
1 You can make a slip stitch in
any chain or stitch, to join it to
the working loop on the hook.
To make a slip stitch, simply
insert the hook into the stitch
indicated, from front to back.
2 Catch the ball end of the
yarn with the hook, so the
yarn wraps anticlockwise
around it (yarn round hook,
or yrh).
3 Gently pull the hook, and
the yarn wrapped around it,
back towards the 2 loops on
the hook. Draw the yarn
through both the loops on
the hook.
4 This will finish the stitch and
you’ll see how the slip stitch
has joined the working loop
to the chain or stitch you
inserted the hook into. You
can also use slip stitch to form
a neat edging.
DOUBLE CROCHET (dc) US term: single crochet
One of the key stitches in crochet, doubles are simple, compact stitches that form a dense fabric
1 To make a double crochet
stitch, insert the hook under
the top 2 loops of the next
stitch on the previous row.
2 Wind the yarn around the
hook (yrh).
3 Pull the yarn through the
stitch, giving you 2 loops on
your crochet hook.
4 Yarn round hook again, then
pull the yarn through both
loops. There’s your double
crochet made and you’ll have
one loop left on the hook,
ready to do the next stitch.
HALF TREBLE CROCHET (htr) US term: half double crochet
A handy stitch that’s between double and treble crochet in size, and it looks slightly looser than double crochet
1 To make a half treble crochet
stitch, work to where you
want the htr and then wind
the yarn round the hook (yrh).
84 WWW.GATHERED.HOW/SIMPLYCROCHET
2 Insert the hook under the
top 2 loops of the next stitch
in the previous row. Wrap yarn
around the hook again (yrh).
3 Pull the yarn through the
stitch only (3 loops on hook).
4 Yarn round hook again, pull
the yarn through all 3 loops.
You’ve made a half treble
crochet. Continue working htr
into next and following sts to
the end of the row.
YOUR GUIDE
TREBLE CROCHET (tr) US term: double crochet
One of the most popular stitches in crochet, this simple stitch is twice as high as a double crochet stitch
1 To work a treble crochet,
start by winding yrh and then
insert the hook under the top
2 loops of the stitch on the
previous row.
2 Wrap the yarn around the
hook (yrh) and pull the yarn
through the stitch only.
3 You will now have 3 loops on
the hook. Yrh again, and draw
the yarn through just the first
2 loops on the hook.
4 You will now have 2 loops
on the hook. Yrh again and
draw the yarn through the
remaining loops on the
hook. Your treble crochet
is complete.
WORKING IN ROWS
WORKING STITCHES INTO A RING
Follow these simple rules to construct crochet fabric
To make circles, tubes and other shapes
1 The first row is made by
working across the
foundation chain from right to
left. At the end of the chain or
row, turn the work so that the
yarn is behind the hook.
1 Make a foundation ring and
work the t-ch (3ch for treble
sts). Work a treble st as usual,
but insert hook into centre of
ring. For treble sts, yrh, insert
hook into ring.
2 For the next row, first make
the turning chain for the stitch
you’re about to work (see
opposite). Now work the next
stitch into the top of the
stitches on your first row,
missing the first stitch.
2 Finish the treble, as usual
(yrh, pull yarn through ring,
yrh, pull yarn through first
2 loops, yrh, pull yarn through
2 loops). Work more sts into
the ring as needed.
DOUBLE TREBLE CROCHET (dtr)
US term: treble crochet
TRIPLE TREBLE CROCHET (ttr)
US term: double treble crochet
This is a stitch regularly used
as an elongated version of the
treble (described above). It’s
worked in a very similar way to
the treble, as follows:
1 Make a foundation chain. Skip
4ch, *yrh twice, and insert the
hook under the top loop of the
next ch.
2 Yrh, pull the yarn through the
ch loop only (4 loops on hook).
3 Yrh and pull the yarn through
2 loops only (3 loops on hook).
This is one of the longest
standard crochet stitches and is
mainly used in fancy stitch
patterns. It’s taller than a double
treble crochet stitch (described
left) and is worked in a very
similar way, as follows:
1 Make a foundation ch. Skip
5 ch, *yrh 3 times, insert hook
under top loop of next ch.
2 Yrh, pull yarn through ch loop
only (5 loops on hook).
3 † Yrh, draw loop through
Yrh and pull the yarn through
2 loops only (2 loops on hook).
4 Yrh and pull the yarn through
the remaining 2 loops. Repeat
from * to make more dtr sts.
5 To make the next row of dtr,
turn work and ch4. This turning
chain counts as the first dtr in
a new row. Skip first st at the
base of the t-ch, work 1dtr under
the top 2 loops of the second
stitch in the previous row;
continue to the end of the row.
2 loops only. Repeat from †
3 times more and your triple
treble will be finished. Repeat
from * to make more ttr sts.
4 To make the next row, turn
work and ch5. This turning chain
counts as the first triple treble in
a new row. Skip first st at base of
the t-ch. Work 1 triple treble,
inserting hook under the top
2 loops of the second st in the
previous row; continue to the
end of the row.
WWW.GATHERED.HOW/SIMPLYCROCHET 85
YOUR GUIDE
Crochet hook conversions
Abbreviations
across
approx
beg
bl
to end of the row
approximate(ly)
beginning
insert hook under
back loop only
Back Post:
work st indicated,
inserting hook around
post of st from back to
front to back and not
in top of st
chain/chain stitch(es)
chain space(s)
refers to ch made
previously, eg. ch-3
clusters
continue
double crochet
(insert hook in next st,
yrh & draw a loop
through) twice, yrh &
draw through all
3 loops on hook
decrease
double treble crochet
work 2dtr together
foundation dc
foundation tr
insert hook under
front loop only
following/follows
Front Post: As BP,
inserting hook around
post from front to
back to front
half treble
work 2htr together
sts to be worked into
the same stitch
increase
left hand
loop(s)
BP
ch(s)
ch-sp(s)
chcl(s)
cont
dc
dc2tog
dec
dtr
dtr2tog
fdc
ftr
fl
foll/folls
FP
htr
htr2tog
in next
inc
LH
lp(s)
meas
patt(s)
pm
prev
qtr
rem
rep
RH
rnd(s)
RS
sk
sp(s)
ss
st(s)
t-ch(s)
tog
tr
tr cl
tr2tog
ttr
WS
yrh
*
()
UK/US conversions
UK
UK
METRIC
US
14
2mm
–
13
2.25mm
B/1
12
2.5mm
–
–
2.75mm
C/2
11
3mm
–
10
3.25mm
D/3
9
3.5mm
E/4
–
3.75mm
F/5
8
4mm
G/6
7
4.5mm
7
6
5mm
H/8
5
5.5mm
I/9
4
6mm
J/10
3
6.5mm
K/10½
2
7mm
–
0
8mm
L/11
00
9mm
M/13
000
10mm
N/15
Which hook do I use?
Hook size
UK yarn weight
2.5-3.5mm hook
4ply yarn
3.5-4.5mm hook
double knitting yarn
5-6mm hook
aran yarn
7mm and bigger
chunky yarn
Learn more on
our website
US
chain
ch
chain
ch
slip stitch
ss
slip stitch
ss
double crochet
dc
single crochet
sc
half treble
htr
half double
hdc
treble
tr
double
dc
double treble
dtr
treble
tr
triple treble
ttr
double treble
dtr
86 WWW.GATHERED.HOW/SIMPLYCROCHET
measures
pattern(s)
place marker
previous
quadruple treble
remain(s)/remaining
repeat
right hand
round(s)
right side
skip
space(s)
slip stitch
stitch(es)
turning chain(s)
together
treble crochet
(yrh, insert hook in sp/
st, yrh & pull up loop,
yrh & draw through
2 loops) number of
times indicated, yrh &
draw through all loops
on hook
(yrh, insert hook in
next st, yrh & pull up
loop, yrh a& draw
through 2 loops)
twice, yrh & draw
through all loops on
hook
triple treble crochet
wrong side
yarn round hook
work instructions
immediately foll *,
then rep as many
more times as directed
work all instructions in
the brackets as many
times as directed
Scan here to go directly to our
page on www.gathered.how
Find out everything you need to know about crochet
on Gathered! Our page is filled with step-by-step videos,
useful how-tos and information on the tools you’ll need.
Learn techniques such as how to create a turning chain,
change colour, increase and decrease, sew seams, check
your tension, make a magic loop, join your rounds and
much more. And while you’re there, have a look at our
free crochet patterns – you may just find your next make!
CHARTS
Charts & Diagrams
Use these charts when creating the patchwork scarf, intarsia flower shawl
and colour pop cushion.
Patchwork scarf, page 53
Key
Light Grey
Candyfloss
Clover
Lilac
Fondant
Aqua
Two-coloured square
Intarsia flower shawl, page 63
29
27
25
23
21
19
17
15
13
11
30
28
26
24
22
20
18
16
14
12
25
20
15
10
5
Key
Yarn A
Yarn B
Yarn C
WWW.GATHERED.HOW/SIMPLYCROCHET 87
CHARTS
Colour pop cushion, page 70
93
91
89
87
85
83
81
79
77
75
73
71
69
67
65
63
61
59
57
55
53
92
90
88
86
84
82
80
78
76
74
72
70
68
66
64
62
60
58
56
54
52
60
55
88 WWW.GATHERED.HOW/SIMPLYCROCHET
50
45
40
35
30
25
20
15
10
Key
Yarn A
Yarn B
Yarn C
Yarn D
Yarn E
Yarn F
Yarn G
FAVE FOLLOW
Taste maker
Six reasons to follow Maria Skog of virkase and her
realistic, creative and delicious-looking crochet meals
Instagram: @virkase
Followers: 68.6K
IF YOU LIKE... food, this account is sure
to delight you. “I crochet humous,
realistic food, veggies and sweets of all
kinds,” says Maria. #eatyourheartout
IF YOU WANNA... smile when you look
at your Instagram feed, Maria has some
projects to show you, including a crochet
turkey and hooky shrimp. #suchwhimsy
IF YOU LOVE... bright yet naturallooking colours, your eyes are in for a
treat. All Maria’s food looks hyper-realistic
yet appetising. #goodenoughtoeat
IF YOU NEED... tiny, detailed projects,
Maria is your kindred spirit. “I love to
make small pieces, like cereal and berries,
and make a lot of them.” #smallyetperfect
IF YOU ARE... an “obsessed periodic
crocheter” – or, your obsession with
crochet is intense but comes in bursts –
you’re just like Maria. #everyonesdifferent
IF YOU HAVE... a love of between-meal
munches, you’ll love looking at Maria’s
makes. She’s busy making all sorts of fun
snacks! #lookoutforyourfavourites
It’s all over...
Trending this month on Instagram
LONG MESH DRESSES
@pinsandweave
@hookloops
@yarns_design
@paulina.s.maraboli
90 WWW.GATHERED.HOW/SIMPLYCROCHET
Try thiS
Trend!
issuE 138
Our July issue is full of
rainbow delights! Create
our multi-coloured
triangle cardi, floral
blanket and rainbow
nursery set. Plus, add
some extra fun to your
home with a hopscotch
rug and retro homewares,
or give your summer
wardrobe a boho vibe
with a tote, lacy poncho
and upcycled skirt.
see our Back
IssUe ProJects in
DetAil on RavEl
bit.ly/RavSiMplYry
c
RETURN TO THE APP TO BUY YOUR BACK ISSUES
All issues of Simply Crochet are available as digital editions, ready to read whenever you want. Every purchase is
permanently stored in your magazine library. Once your magazine has downloaded, an internet connection is
not required, so you can take your magazine with you wherever you go.
EVERY ISSUE IS AVAILABLE DIGITALLY, STARTING FROM ISSUE ONE!
issuE 137
issuE 136
issuE 135
issuE 134
issuE 133
Beach holiday
collection, blockbuster
vest, ami’ sunflower,
summer shawls, pride
badge, mandala décor.
Showtime collection,
popcorn and lace
jumper, ami’ pink fairy
armadillo, passion fruit
throw, jacket sleeves.
Zigzag florals
collection, shortsleeved jumper, ami’
King Charles III, filet
stitch curtains.
Embroidered crochet
collection, granny
circles cardi, ami’
duckling, ripple vest
and scarf, fun pouffe.
Mini motifs collection,
stripy poncho, ami’
peas in a pod, dolly
mixture blanket,
checked cardigan.
issuE 132
issuE 131
issuE 130
issuE 129
issuE 128
Stained glass
collection, tessellation
jumper, ami’ Highland
cow, textured blanket,
lacy necklace.
Unisex style collection,
peacock jumper, ami’
orca, mohair scarf,
baby jumper, yin-yang
heart cushion.
Upcycled Christmas
collection, granny stitch
cardi, holiday jumper,
ami’ echidna, loom
blanket, festive hat.
Neon Christmas
collection, festive star
jumper, ami’ Santa
pug, Advent calendars,
chunky blanket.
Happy little gifts
collection, sunflower
cardi, ami’ alien, leaf
motifs, space bunting,
fan stitch jumper.
issuE 127
issuE 126
issuE 125
Street style collection,
polo-neck jumper,
ami’ bookworm, kids’
Halloween jumper,
mushroom blanket.
Chequerboard
collection, floral motif
blouse, ami’ hookster
granny, chic scarf,
upcycled bikini top.
Alpaca collection,
ripple jumper, ami’
hula flamingo, floral
flip-flops, lacy poncho,
sheep baby blanket.
Sign Up foR a
DigitAl suBscriPtion
And yOu’Ll neVer misS
AnothEr isSue
se it
our ree i t
GRANNY SQUARE
HOW TO...
Choose the best shades for your makes
CreAte OmbrÉ
ColOur SchEmes
try ComPlEmeNtary
PalEttes
Learn how to use
NP\Y\b_dUàY
Work 3-ColOur
ComBiNatIons
PLUS! COLOUR SCHEMES, WARM & COOL TONES AND MORE!
Colour theory
If you’re making a granny square
blanket – or any project, really –
choosing the right colours can be
tricky. That’s why we’ve asked
technical expert Becky Skuse to
write this super-helpful guide to
colour theory, or the art of
putting colours together in the most pleasing way
possible. Use the colour wheel that came with this
issue of Simply Crochet to help you select the best
yarns for your chosen project – just use the windows
in the wheel to match your yarn shades to the correct
colours, then follow the arrows to find out which
shades are complementary, triadic, double
complementary or create a tetradic square. Have fun!
Contents
02 Choosing yarn
Find out what yarn we used here!
03 Colour coding
The history of the colour wheel
04 What is a colour wheel?
How the wheel is put together
06 Dark to light
Make an ombré colour scheme
07 Stick together
All about analogous colour schemes
08 How complementary
Try complementary colour schemes
09 Double the fun
Use double complementary colours
10 Let’s split it
Split complementary colour scheme
12 A trio of colour
How to use triadic colour schemes
Editor, Simply Crochet
14 Fantastic four
Learn about tetradic colour schemes
CHOOSING YARN
Our thanks to Stylecraft Special DK…
All our samples were
made using Stylecraft
Special DK (100% acrylic;
100g/295m), which
comes in 100 colours. We
used the colours shown
on the wheel here. If
you want to use a yarn
range with less choice,
try combining strands
of different shades; for
example, one strand
of blue held together
with one strand of violet
makes blue-violet.
2
meet Becky skuse
Becky writes all our technical features
and yarn reviews, and she also designs
for the magazine and runs a crochet
tutoring business. She’s well known
for her vibrant designs. “I like colour,
so [I like] anything with a colourful
scheme, like rainbow stripes, colourful
squares, letters or motifs – especially
blankets where you can really show off
gorgeous colours!” she says.
Visit makemedo.wordpress.com
Colour theory
COLOUR CODING
P
utting together colour schemes for your
projects can sometimes be a daunting
challenge. Which colours do you choose? How
do you know they’ll work together? What if you
get it wrong and waste your time and yarn?
The human eye is amazing; it can perceive
over 2.8 million different colours! Some people
(and Mother Nature) seem to instinctively
know which of these colours to put together,
but for us mere mortals, it helps to have some
science to help with our artistic choices. The
colour wheel is exactly that!
THANKS TO NEWTON
Originally developed by Sir Isaac Newton in the
late 1600s and early 1700s (when he wasn’t busy
discovering gravity), the colour wheel simply
sets out colours in a circle or ring to show the
relationships between different colours.
The exact colours and their positions have been
modified many times since 1704 and today there
are several variations of the colour wheel. The one
that came with your copy of Simply Crochet is the
most useful to us when we’re choosing colour
schemes and yarn for our crochet projects.
The colour theory contained in this wheel aims
to turn the art of choosing colour schemes into
a science. You can use the wheel to devise many,
many colour schemes – but you still need to
use your artistic judgement about what colour
groupings you think are attractive and how you
want to use them in your crochet projects.
In this booklet, we’ll introduce you to some
simple colour theory, explain how to use your
colour wheel and give you some examples of colour
schemes that you can use for your granny squares
or adapt to suit you.
So, without further ado, let’s get colourful!
Quick start tip
Here’s how to get started quickly with your colour wheel
– just place one of the arrows or a corner of the triangle,
square or rectangle shapes onto a colour you like. Then
have a look at what other colours are suggested on the
other arrows or shape corners.
3
Colour theory
WHAT IS A COLOUR WHEEL?
Discover this handy scientific tool…
Our wheel has 12 colours, made up of the
following shades:
1
1. PRIMARY COLOURS
We start with three primary colours: red, yellow and
blue. These core colours are spread evenly around
the wheel. Some colour wheels might look different
to ours if they use green as a primary colour instead
of blue. We think the RYB (red, yellow, blue) model is
best for crochet projects.
2. SECONDARY COLOURS
Then we add three secondary colours in between
the primaries, which are the results of mixing
together two of the primary colours: orange (red
plus yellow), green (yellow plus blue) and violet
(blue plus red). These are spread evenly between
the primary colours used to make them.
2
3
3. TERTIARY COLOURS
Then we add six tertiary colours in between the
primary and secondary colours, which are the result
of mixing together a primary and secondary colour:
red-orange, yellow-orange, yellow-green, bluegreen, blue-violet and red-violet. These are placed
between the colours used to make them.
Warm or cool
Are you naturally drawn to certain colours? It could be that you prefer
either warm or cool colours. Warm colours are associated with the sun, fire,
energy and action – they generally run from red-violet on the colour wheel
through red to yellow-green (plus brown). Cool colours are associated with
water, calm and relaxation – they flow from blue-green through blue into
violet (plus grey). Green can vary in tone from cool bottle green to warm
grass green, and many people consider green to be neutral.
A winter blanket might feel cosier in warm colours, while a summer wrap
might feel fresher in cool colours. It’s fine to combine warm and cool colours
in the same project, but warm yarn colours will tend to stand out more.
4
Warm
Cool
Colour theory
4. COLOUR SCHEME SELECTOR
Once we’ve put all these colours together, there’s
just one more addition. At the centre of the wheel
is the colour scheme selector section that rotates
so you can combine colours in different ways. We’ll
show you how each of these different schemes
works so you can use the wheel to create hundreds
of different colour effects.
5. GRANNY IDEAS
Choosing a colour palette is just the start. Next, you
need to figure out how to apply it in interesting
ways to your granny squares and granny square
projects. As we go along, we’ll give you plenty of
ideas for just how to do that.
4
5
Your grannies don’t have to be square!
Try hexagons, triangles or diamonds.
Tint, shade & tone
Here, we’ve added two extra rings to the colour wheel
– the inner ring shows how each colour looks if you add
white to it: this is a ‘tint’ of the original colour.
The outer ring shows how each colour looks if you
add black to it: this is a ‘shade’ of the original colour. You
can also create a ‘tone’ of each colour by adding grey.
Once you have a colour scheme from the colour
wheel, you can choose yarns that are any tint, shade or
tone of the colours in your scheme.
5
Colour theory
DARK TO LIGHT
Here’s how to create an ombré colour scheme…
An ombré colour scheme is one of the simplest
and most visually pleasing colour schemes you
can put together because you use shades, tints
or tones of the same colour.
All you need to do is choose one colour from
the wheel that you like, and then combine it
with darker shades (strong, saturated colours)
and lighter tints (muted, pastel colours) of the
OMBRÉ PALETTES TO TRY…
1. Sunburst Yellow – start with yellow and use it
with mustard and pale lemon for a happy hooking
experience. It’s sure to raise a smile(y face)!
2. Blue Waves – start with blue-green and combine
it with dark teal and pale aquamarine to evoke the
refreshing freedom of the open ocean.
3. Hot Stuff – start with a bright crimson red and
use it with deep ruby red and pale rose for a sultry
combination that glows with warmth.
SLOW SATURATION
You can use this colour scheme in all sorts of ways
with your granny squares. Within each square, you
could work rounds from dark to light (see 1 below),
or light to dark (see 2 below), to create depth and
dimension. Or, on a larger square, work the colours
from light to dark to light to dark and repeat for an
eye-popping effect (see 3 below).
Within a granny project, you could combine light
and dark squares randomly or arrange them to
create an effect where the shades gradually move
from light at the top to dark at the bottom. Or work
in diagonal rows, where one corner is dark and
the opposite corner is light. Or place the light yarn
colour at the centre, gradually moving to darker
shades as you move outward. So many possibilities!
6
same colour. Pretty easy, right?
A crochet project with an ombré colour
scheme feels like a deep dive into that
particular colour and how it looks or feels
different when it’s lighter or darker.
The varying tones create depth and texture,
and you can use them cleverly to create
geometric effects.
1
2
3
1
2
3
Saturation
actually refers
to how intense
or vibrant
a colour looks –
saturated colours
are stronger
and seem
brighter, while
desaturated
colours are paler
or duller.
Colour theory
STICK TOGETHER
Here’s how to create analogous colour schemes…
Analogous colour schemes are really easy to
put together and can look stunning. Creating
them involves combining colours that sit next
to each other on the colour wheel – this could
be two or three colours or as many colours
as you like. These schemes tend to look more
natural and calming.
All you need to do is choose one colour from
the wheel that you like, and then combine it
with colours that sit on either side of it. On
your colour wheel, use the rotating scheme
selector at the centre of your wheel to align
the ‘Analogous’ label with three colours that
you think look good.
1
ANALOGOUS PALETTES TO TRY…
1. Flower Garden – start by selecting violet on the colour
wheel and then add shades of red-violet and blue-violet to
create an attractive scheme with a floral feel. You could also use
tints and shades of these colours to add variety.
2. Summer Holiday – choose a warm orange colour, then
combine it with red-orange and yellow-orange. If you’re
making a large project like a blanket, you could add more
colours from either side of these three, such as red and yellow.
2
1
SOLID GRANNIES
Once you’ve chosen a colour
scheme, one of the easiest ways to
create a project with it is to hook
up grannies in solid colours. You’ll
soon have a pile of squares in each
yarn colour. Don’t forget, you can
use darker shades and lighter tints
of the core colours in your scheme
to add variety.
When you’re ready, you can
join them together in a random
arrangement or in specific
rows – horizontally, vertically or
diagonally. You can also join solid
squares together with squares
that contain a mix of those colours
for an interesting contrast. Either
method will convey your colour
scheme in a unique, stylish way.
2
7
Colour theory
HOW COMPLEMENTARY
It’s easy to create a complementary colour scheme…
A complementary colour scheme is really
straightforward and just involves two colours
that are opposite each other on the colour
wheel. Opposites attract, after all!
On the rotating scheme selector at the
centre of your wheel, point the arrow next
to the word ‘complementary’ at a colour you
know you like, then follow the arrow to see
what colour it suggests putting with it – you
can expect to see a contrasting effect, but
together they should create tonal harmony.
1
COMPLEMENTARY PALETTES TO TRY…
1. Nectar Rich – start with yellow and combine it
with violet to create a summery feeling that calls to
mind flowers and natural abundance.
2. Festive Fun – start with green and you’ll get red,
which looks surprisingly natural and highly festive!
3. Ocean Sunset – start with blue and add orange
for a beautifully balanced scheme where the
warmth of the sun meets the cool saltwater of the
sea. It’s great for nautical-themed makes!
ALL CHANGE
Don’t be afraid to change colour between stitches
on your granny squares to express your colour
scheme in a whole new way. You’ll be able to turn
a plain square into a colourful one with some
simple colour changing.
For example, you could create a square with
a diagonal colour split to create a triangular look
(see image 1 in the Nectar Rich colour scheme). Or,
split each round into four segments to create
a square with four colourful sides (see example 2 in
the Festive Fun colour scheme).
When you’re ready, try some more complex
colour changes to create themed motifs within
your squares (see example 3 in the Ocean Sunset
colour scheme), or other geometric effects that will
be bring a whole new dimension to your granny
squares. It’s like drawing with yarn!
8
2
3
1
2
3
Colour theory
DOUBLE THE FUN
Try a double complementary colour scheme…
A double complementary scheme is another
variation on the complementary effect and
involves using a pair of complementary
colours that are fairly close to each other on
the colour wheel.
On the rotating scheme selector at the
centre of your wheel, locate the rectangle
shape and the words ‘double complementary’.
Point this corner of the rectangle at a colour
DOUBLE COMPLEMENTARY PALETTES
TO TRY…
1. Flower Fields – start with yellow-green and add
its complementary red-violet, then add yelloworange and its complementary blue-violet. You’ll
evoke a bright spring day with the warm yellowgreen, lifted by the bold tulip colours of red-violet,
blue-violet and yellow-orange.
2. Tropical Island – start with yellow-orange and
add its complementary blue-violet, then add redorange and its blue-green complementary colour.
You’ll evoke an exotic glow with the oranges, cooled
by the watery blue-green and the deep blue-violet
of a stormy sky.
you know you like, then follow the lines of
the rectangle to the other three colours at the
corners of the rectangle – these three are the
colours it suggests putting with the original
colour. You can expect to see a combination of
complementary and contrasting colours from
across the colour wheel, which should create
a sense of balance and harmony.
1
2
FLOWER POWER
Many granny square patterns have a motif at the
centre, like a flower, and then outer rounds, which
become the ‘background’. Plan your colour choices
carefully to make sure the motif doesn’t get lost,
and make sure your colour scheme looks attractive
in both the motifs and the background.
For example, with the Flower Fields colour
scheme, you could use a yellow-green yarn for the
‘background’ and red-violet, blue-violet and yelloworange for the flower motifs (as well as a neutral
cream). Tone down the background colour by
using a lighter shade of yellow-green, so it doesn’t
become too dominant.
9
Colour theory
LET’S SPLIT IT
Try a split complementary colour scheme…
A split complementary colour scheme is
a variation on the complementary effect and
involves varying one of the complementary
colours by using the two colours on either side
of it instead.
On the rotating scheme selector at the
centre of your wheel, point the arrow at the
top of the tall triangle to a colour you know
you like. Follow the tall triangle along the line
where it says ‘split complementary’ to the two
colours at the base of the triangle – these two
are the colours it suggests putting with the
original colour. You can expect to see a softer
contrast than the complementary scheme.
SPLIT COMPLEMENTARY PALETTES TO TRY…
1. Autumn Lake – start with red-orange,
reminiscent of autumn leaves, and add the
evergreen of conifers and the blue of a calm lake
for a beautiful balance of shades.
2. Summer Meadow – start with red-violet and
then add sunny yellow and grass green to create
a wildflower-esque colour scheme to excite your
senses all year round.
1
2
Yellow: happiness, new life, creativity,
optimism, curiosity.
You can use the secrets of colour psychology
to infuse your projects with feelings…
Red: power, strength, passion.
Orange: comfort, adventure, friendliness,
other uplifting emotions.
10
Green: balance, nature, growth.
Blue: peace, calm, spirituality, patience, order,
trust, responsibility.
Violet: healing, wisdom, luxury.
Colour theory
You can use variegated yarns
in your granny squares. There
are many different kinds, and it
turns out that some are easier
to incorporate than others...
Semi-solid: subtly different
tones of the same hue. Use in
the same way as a solid of the
same overall colour for
a heathered effect.
Subtle variegated: fast changes
to an analogous colour. Use
alone or combine with solid
yarn colours.
Strong variegated: fast changes
to a contrasting colour. Use
sparingly and tone down
a ‘noisy’ effect by combining
with solid yarn colours.
Self-striping: long lengths of
colour which then change to
a different colour. Use alone to
create a unique colour effect.
NEUTRAL STANCE
The more complicated your colour schemes get,
the more important it is that you include neutral
colours, especially in the background. This is really
important for ensuring that your colour scheme
has space to breathe and stand out. A neutral yarn
colour is one that’s not on your colour wheel, such
as white, cream, beige, brown, grey or black.
In your granny squares, this could mean working
the final round or two in the same neutral colour
(see 1 below in the Autumn Lake scheme). Or, add
an extra border round, joining round or joining line
in that neutral colour to give each square a narrow,
neutral frame.
1
Alternatively, use a colour from your scheme as
the ‘background’ colour, but bear in mind that this
can become the dominant colour (see 2 below in
the Summer Meadow scheme).
If you want to use variegated yarns to make your
granny squares, then a neutral background is even
more important. Alternatively, use a neutral yarn
colour to make your granny squares and use
a variegated yarn for the background.
2
11
Colour theory
A TRIO OF COLOUR
Here’s how to create a triadic colour scheme…
12
A triadic colour scheme is slightly more
complicated and uses colours from around
the colour wheel. It involves combining three
different colours that are evenly spaced
around the wheel.
On the rotating scheme selector at the
centre of your wheel, use the triangle shape
to select different colour schemes. Point the
arrow corner of the triangle at a colour you
know you like, then look at the other corners
of the triangle to see what colours it suggests
you use with it – you can expect to see colours
that contrast, but overall they create tonal
harmony together.
TRIADIC PALETTES TO TRY…
1. Primary – a colour scheme with the three
primary colours of red, yellow and blue, which will
be bold and strong.
2. Secondary – a colour scheme with the three
secondary colours of orange, green and violet,
which will evoke a summer garden.
3. Deep Tertiary – a colour scheme made up of the
tertiary colours red-orange, yellow-green and blueviolet, which will look rich.
4. Fresh Tertiary – a colour scheme made up of the
tertiary colours yellow-orange, blue-green and redviolet, which will look fresh.
1
3
2
4
Colour theory
VARIABLE ROUNDS
Try hooking up granny squares by making each
round a different yarn colour from your scheme.
You can make each square in the same way with
the yarn colours in the same order, or vary which
colour appears on each round. For instance, in
example 1 below, I’ve used Deep Tertiary colours to
make six squares in all the different colour orders
possible. This gives your project tonal harmony
while also giving it variety.
If your square involves more rounds than you
have colours in your scheme, you could use the
same yarn colour to hook more than one round.
Or you could repeat the same yarn colours later on
in the square – you can do this in the same order
(see example 2A below using the Primary colour
scheme) or use a random order (see example 2B
below using the Primary colour scheme).
1
2A
2B
Hue is just another
word for colour; it
means any colour
on the wheel.
13
Colour theory
FANTASTIC FOUR
Try a tetradic colour scheme…
A tetradic scheme is another variation on the
complementary effect and involves using
a pair of complementary colours that are
evenly spaced out on the colour wheel.
On the rotating scheme selector at the
centre of your wheel, locate the square shape
and the words ‘Tetradic Square’. Point this
corner of the square at a colour you know
you like, then follow the lines of the square to
the other three colours at the other corners
of the square – these three are the colours
your wheel suggests putting with the original
colour. You can expect to see a visually
pleasing combination of complementary and
contrasting colours from across the colour
wheel. Give it a try!
1
TETRADIC COLOUR PALETTES TO TRY…
1. Fruity Fun – start with yellow-orange and add its
complementary colour, blue-violet. Then add red
and its green complementary hue. You’ll create
a mouthwateringly fruity feel for your project.
2
2. Nursery Style – start with blue and add its
complementary colour, orange. Then, add red-violet
and its complementary colour, yellow-green. Pastel
shades of these colours will make this scheme really
child friendly and great for nurseries.
3
3. Pool party – start with cool blue-green and warm
it up with its complementary colour, red-orange,
then add zesty yellow and a complementary violet.
It’s perfect for capturing the fun of summer days by
the pool, complete with delicious cocktails!
14
Colour theory
THREE OUT OF FOUR
If you have more colours in your scheme than you
have rounds on your granny square, don’t worry.
It’s ok to create granny squares where each square
includes just two or three colours from a four or
five-colour scheme – the overall colour scheme will
be clear in the overall effect of the project once the
entire thing has been completed. For an example,
see image 1 below in the Fruity Fun scheme.
You can also add extra dimension to any colour
scheme by adding shades and tints of each colour.
So, you could use a light and dark shade of each
colour within your project, or a light, mid and dark
of each colour. The overall colour scheme should
still be clear in the overall project. See image
2 below with the Nursery Style colour scheme –
I used dark, mid and pale yarns in blue, orange, redviolet and yellow-green.
2
1
If you have a lot of colours
in your scheme, it can work
well to choose one or two
to be dominant and use the
others as accents.
15
Simply
Presented by Simply Crochet.
Printed in the UK.
ear
all new
designs!
52 origInal Motif pattErns – makE one for Every week of tHe yeAr!
Crochet
Simply
ear
Granny squares
coMe anD jOin
Us onLine
facebook.com/simplycrochetmag
twitter.com/SimplyCrochet_
Ready, set, hook!
pinterest.com/simplycrochetmag
It’s motif-making time! We’re hosting our annual Granny
Square Day celebrations on Instagram again this year, and
we can’t wait. This time, we’re partnering with Amoami,
an organisation that creates communities so Ukrainian
refugees can come together and crochet. Join us on
15 August by hooking a granny square and posting it to
Instagram with the hashtag #GrannySquareDay2023 – together we’ll turn
the grid into the biggest granny square blanket of all time! Need ideas? This
booklet contains 52 brand-new, all-original motifs for you to make. Choose
your favourites and get hooking – and posting! Happy Granny Square Day!
Hook, snap and share your
square to be part of an
infinite Insta-blanket on
15 August! Use the hastag
#GrannySquareDay2023
instagram.com/simplycrochetmag
ravelry.com/groups/simply-crochet
youtube.com/GatheredMakes
gathered.how
Thank you to al
l the
wonderful des
igners
who contribute
d
squares to this
collection
and generousl
y donated
their fees to Am
oami
52 granny squares
to make and share
1
2
3
4
5
6
7
8
9
10
11
12
13
14
15
16
2 WWW.GATHERED.HOW/SIMPLYCROCHET
A YEAR OF GRANNY SQUARES
17
18
19
20
21
22
23
24
25
26
27
28
29
30
31
32
33
34
35
36
37
38
39
40
41
42
43
44
45
46
47
48
49
50
51
52
WWW.GATHERED.HOW/SIMPLYCROCHET 3
A YEAR OF GRANNY SQUARES
heaRt
diAmond
by Maria Jęczmyk
by Maria Jęczmyk
1
SKILL LEVEL
Tricky
YOU WILL NEED
QAny 4ply yarn in Yarn A white,
Yarn B red
QA 3mm (US C/2 or D/3) hook
MEASUREMENTS
Square measures approx 10x10cm
(4x4in)
2
st throughout), htr in first 10 sts,
change to Yarn B, FPtr around next
st, change to Yarn A, htr in 10 final
sts, turn.
Row 3 (WS) Ch1, htr in first 8 sts,
change to Yarn B, BPtr around next
5 sts, change to Yarn A, htr in final
8 sts, turn.
Rows 4-13 Cont in patt, following
Chart for all colour and stitch
changes.
Do not fasten off.
NOTES
Square is worked in rows.
There is a Chart on page 38, which
you should refer to for all colour
changes. Each white square
represents 1htr and each red
square represent 1FPtr on RS rows
and BPtr on WS rows. Read all RS
rows from right to left and WS
rows from left to right. The first
few rows of the Chart have been
written out to guide you.
Change colour on the final yrh of
st before colour change is
indicated. Carry the unused colour
across the top of your sts if used
again on the same row, enclosing
the strand as you work.
Split Yarn A into 2 balls rather than
carrying the yarn across your work.
SKILL LEVEL
Tricky
YOU WILL NEED
QAny 4ply yarn in Yarn A white,
Yarn B red
QA 3mm (US C/2 or D/3) hook
MEASUREMENTS
Square measures approx 10x10cm
(4x4in)
NOTES
BORDER
Continue with Yarn A.
Round 1 Ch1, *3dc in first st, dc in
next 19 sts, 3dc in next st, 19dc
evenly down side; rep from * once
more, ss to beg dc. [88 sts]
Fasten off and weave in ends.
Square is worked in rows.
There is a Chart on page 38, which
you should refer to for all colour
changes. Each white square
represents 1htr and each red
square represent 1FPtr on RS rows
and BPtr on WS rows. Read all RS
rows from right to left and WS
rows from left to right. The first
few rows of the Chart have been
written out to guide you.
Change colour on the final yrh of
st before colour change is
indicated. Carry the unused colour
across the top of your sts if used
again on the same row, enclosing
the strand as you work.
Split Yarn A into 2 balls rather than
carrying the yarn across your work.
HEART
DIAMOND
SQUARE
Using Yarn A, ch23.
Row 1 (WS) Htr in third ch from
hook and in each ch across, turn.
[21 sts]
Row 2 (RS) Ch1 (does not count as
SQUARE
Using Yarn A, ch23.
Row 1 (WS) Htr in third ch from
hook and in each ch across, turn.
[21 sts]
Row 2 (RS) Ch1 (does not count as
4 WWW.GATHERED.HOW/SIMPLYCROCHET
st throughout), htr in first 10 sts,
change to Yarn B, FPtr around next
st, change to Yarn A, htr in 10 final
sts, turn.
Row 3 (WS) Ch1, htr in first 9 sts,
change to Yarn B, BPtr around next
3 sts, change to Yarn A, htr in final
9 sts, turn.
Rows 4-13 Cont in patt, following
Chart for all colour and stitch
changes.
Do not fasten off.
BORDER
Continue with Yarn A.
Round 1 Ch1, *3dc in first st, dc in
next 19 sts, 3dc in next st, 19dc
evenly down side; rep from * once
more, ss to beg dc. [88 sts]
Fasten off and weave in ends.
A YEAR OF GRANNY SQUARES
clUb
spadE
by Maria Jęczmyk
by Maria Jęczmyk
3
SKILL LEVEL
Tricky
YOU WILL NEED
QAny 4ply yarn in Yarn A white,
Yarn B black
QA 3mm (US C/2 or D/3) hook
MEASUREMENTS
Square measures approx 10x10cm
(4x4in)
NOTES
Square is worked in rows.
There is a Chart on page 38, which
you should refer to for all colour
changes. Each white square
represents 1htr and each black
square represent 1FPtr on RS rows
and BPtr on WS rows. Read all RS
rows from right to left and WS
rows from left to right. The first
few rows of the Chart have been
written out to guide you.
Change colour on the final yrh of
st before colour change is
indicated. Carry the unused colour
across the top of your sts if used
again on the same row, enclosing
the strand as you work.
Split Yarn A into 3 balls rather than
carrying the yarn across large
sections. You will need to carry
Yarn A across 1-3 sts on Rows 4-8.
4
[21 sts]
Row 2 (RS) Ch1 (does not count as
st throughout), htr in first 8 sts,
change to Yarn B, FPtr around next
5 sts, change to Yarn A, htr in 8
final sts, turn.
Row 3 (WS) Ch1, htr in first 9 sts,
change to Yarn B, BPtr around next
3 sts, change to Yarn A, htr in final
9 sts, turn.
Rows 4-13 Cont in patt, following
Chart for all colour and stitch
changes.
Do not fasten off.
BORDER
Continue with Yarn A.
Round 1 Ch1, *3dc in first st, dc in
next 19 sts, 3dc in next st, 19dc
evenly down side; rep from * once
more, ss to beg dc. [88 sts]
Fasten off and weave in ends.
SKILL LEVEL
Tricky
YOU WILL NEED
QAny 4ply yarn in Yarn A white,
Yarn B black
QA 3mm (US C/2 or D/3) hook
MEASUREMENTS
Square measures approx 10x10cm
(4x4in)
NOTES
Square is worked in rows.
There is a Chart on page 38, which
you should refer to for all colour
changes. Each white square
represents 1htr and each black
square represent 1FPtr on RS rows
and BPtr on WS rows. Read all RS
rows from right to left and WS
rows from left to right. The first
few rows of the Chart have been
written out to guide you.
Change colour on the final yrh of
st before colour change is
indicated. Carry the unused colour
across the top of your sts if used
again on the same row, enclosing
the strand as you work.
Split Yarn A into 3 balls rather than
carrying the yarn across large
sections. You will need to carry
Yarn A across 1 sts on Rows 4-5.
CLUB
SPADE
SQUARE
Using Yarn A, ch23.
Row 1 (WS) Htr in third ch from
hook and in each ch across, turn.
SQUARE
Using Yarn A, ch23.
Row 1 (WS) Htr in third ch from
hook and in each ch across, turn.
[21 sts]
Row 2 (RS) Ch1 (does not count as
st throughout), htr in first 8 sts,
change to Yarn B, FPtr around next
5 sts, change to Yarn A, htr in 8
final sts, turn.
Row 3 (WS) Ch1, htr in first 9 sts,
change to Yarn B, BPtr around next
3 sts, change to Yarn A, htr in final
9 sts, turn.
Rows 4-13 Cont in patt, following
Chart for all colour and stitch
changes.
Do not fasten off.
BORDER
Continue with Yarn A.
Round 1 Ch1, *3dc in first st, dc in
next 19 sts, 3dc in next st, 19dc
evenly down side; rep from * once
more, ss to beg dc. [88 sts]
Fasten off and weave in ends.
WWW.GATHERED.HOW/SIMPLYCROCHET 5
A YEAR OF GRANNY SQUARES
glItter cupcaKe
by Alice Tarry
5
SKILL LEVEL
GLITTER CUPCAKE
Tricky
SQUARE
Using yellow, make a magic loop.
Round 1 (RS) Ch1 (does not count
as st throughout), 8htr in loop. [8
sts]
Round 2 (RS) 2htr in each st
around. [16 sts]
Round 3 (1htr, 2htr in next st) 8
times. [24 sts]
Round 4 (2htr, 2htr in next st) 8
times. [32 sts]
Dc in next st, ss in next st (to move
start of round).
Fasten off.
With RS facing, join blue in third bl
of next st.
Round 5 (Working in third bl
throughout) Ch5 (counts as tr, ch2),
*tr in next st, htr in next st, dc in
next 4 sts, htr in next st**, tr in next
st, ch2; rep from * 3 times more
ending last rep at **, ss to third ch
of beg ch-5. [32 sts, 4 ch-2 sps]
Round 6 Ch2 (counts as htr
throughout), *(2htr, ch2, 2htr) in
ch-2 sp, htr in each st to next ch-2
sp; rep from * around, ss to top of
beg ch-2.
[48 sts, 4 ch-2 sps]
Round 7 As Round 6.
[64 sts, 4 ch-2 sps]
YOU WILL NEED
QAny DK yarn in yellow, white,
blue and pink
QA 3.5mm (US E/4) hook
MEASUREMENTS
Square measures approx 12x12cm
(4¾x4¾in)
ABBREVIATIONS
third back loop Loop the sits on
WS of htr st, not the 2 loops at the
top of the st
For a full list, see page 86 of
Simply Crochet magazine
NOTES
Square is worked in rounds with
RS facing throughout.
Icing and Star Flower are made
separately and sewn the Square at
the end.
Parts of this pattern are worked
using the amigurumi method.
Work sts continuously in a spiral
without closing off each round
with a ss. It may help to use a stitch
marker in the first st of each round,
moving it up as you work.
6 WWW.GATHERED.HOW/SIMPLYCROCHET
Round 8 Ch1, *dc in each st to ch-2
sp, 3dc in ch-sp; rep from * around,
ss to beg dc. [60 sts]
Fasten off and weave in ends.
ICING
Icing is made in a mixture of
rounds and rows.
Using white, make a magic loop.
Round 1 (RS) Ch1, 8htr in loop, ss
to beg htr. [8 sts]
Row 2 Ch2, htr in st at base of ch-2,
2htr in next 5 sts, turn leaving rem
sts unworked. [12 sts]
Row 3 Ch2, htr in st at base of ch-2,
(2htr in next st, htr in next st) 5
times, 2htr in final st, turn.
[19 sts]
Round 4 Ch2, htr in st at base of
ch-2, (htr in next 2 sts, 2htr in next
st) 6 times, turn to work across
Row end edge, 5tr in end of Row 3,
ss in end of Row 2, 5tr in second
unworked st from Round 1, ss in
end of Row 2, 5tr in end of Row 3,
ss in top of beg ch-2.
Fasten off.
STAR FLOWER
Using pink, make a magic loop.
Round 1 (RS) Ch1, 5dc in loop, ss
to beg dc. [5 sts]
Round 2 Ch1, 2dc in each st
around, ss to beg dc. [10 sts]
Round 3 Skip first st, *(htr, tr, htr) in
next st, ss in next st; rep from * 4
times more.
Fasten off.
TO FINISH
Sew the Icing and the Star Flower
to the Square.
Weave in all ends.
A YEAR OF GRANNY SQUARES
reTro cuBe
FrothY blooM
by Kelly Wilson Moore
by Liz Pugh
6
SKILL LEVEL
Easy peasy
YOU WILL NEED
QAny DK yarn in black, yellow,
green, red, blue, white and
orange
QA 3.5mm (US E/4) hook
MEASUREMENTS
Square measures approx 10x10cm
(4x4in)
NOTES
Small Squares are worked
separately and joined together
with a double crochet seam.
RETRO CUBE
MINI SQUARES (MAKE 9)
Make 2 using red, yellow and blue.
Make 1 using orange, white and
green.
Make a magic loop.
Row 1 (RS) Ch3 (counts as tr), 2tr in
loop, (ch1, 3tr in loop) 3 times, ch1,
ss to top of beg ch-3. [12 sts]
Row 2 Ch2 (counts as a htr), *htr in
each st to ch-1 sp, (htr, ch2, htr) in
ch-sp; rep from * around, ss to top
of beg ch-2. [20 sts]
Fasten off and weave in ends.
TO MAKE UP
Use the image as a guide when
joining the Mini Squares together.
With RS facing join black through
7
ch-2 corner sps on 2 Mini Squares,
work next row through both
Squares to join.
Row 1 (RS) Ch1, dc in ch-sp, dc in
bl of next 5 sts, dc in next ch-sp.
Fasten off.
Rep Row 1 once more to form a
strip of 3 Mini Squares.
Join the rem Squares together so
you have 3 strips made up of 3
Mini Squares.
Position the strips to join them
together to form the 3x3 layout.
With RS facing join black through
ch-2 corner sps on 2 strips to work
across long edges. Work next row
through both strips to join.
Row 2 (RS) Ch1, *dc in ch-sp, dc in
next bl of 5 sts, dc in next ch-sp;
rep from * twice more.
Fasten off.
Rep Row 2 once more to join the
final strip.
EDGING
Join Black in any corner.
Round 1 (RS) Ch1, (dc, ch2, dc) in
corner, 21dc evenly across to next
corner; rep from * 3 times more, ss
to beg dc. [92 sts]
Fasten off and weave in all ends.
SKILL LEVEL
Easy peasy
YOU WILL NEED
QAny DK yarn in yellow, white and
blue
QA 4mm (US G/6) hook
MEASUREMENTS
Square measures approx 10x10cm
(4x4in)
NOTES
Square is worked in rounds with
RS facing throughout.
Petals are worked onto the Square
at the end.
FROTHY BLOOM
SQUARE
Using yellow, make a magic loop.
Round 1 (RS) Ch1 (does not count
as st throughout), 6dc in loop, ss to
beg dc. [6 sts]
Round 2 (RS) Ch1, 2dc in each st
around, ss to beg dc. [12 sts]
Change to white.
Round 3 Ch1, (1dc, 2dc in next st) 6
times, ss to beg dc. [18 sts]
Rounds 4-6 are worked in the bl
only.
Round 4 Ch1, (2dc, 2dc in next st)
6 times, ss to beg dc. [24 sts]
Round 5 Ch1, (3dc, 2dc in next st)
6 times, ss to beg dc. [30 sts]
Change to blue.
Round 6 Ch1, (4dc, 2dc in next st)
6 times, ss to beg dc. [36 sts]
Round 7 Ch5 (counts as tr, ch2
throughout), tr in same st, *tr in
next st, htr in next 2 sts, dc in next
2 sts, htr in next 2 sts, tr in next
st**, (tr, ch2, tr) in next st; rep from
* 3 times more ending final rep at
**, ss to third ch of beg ch-5, ss into
ch-2 sp. [40 sts, 4 ch-2 sps]
Round 8 Ch5, tr in same sp, *tr in
each st to next ch-2 sp, (tr, ch2, tr)
in ch-sp; rep from * around to end,
ss to third ch of beg ch-5.
[48 sts, 4 ch-2 sps]
Fasten off and weave in ends.
PETALS
Join white in any unused fl from
Round 4.
Round 1 (RS) (Ch4, ss in next fl)
rep around working final ss in base
of beg ch-4. [24 ch-4 sps]
Fasten off.
Join white in any unused fl from
Round 5.
Round 2 (Ch6, ss in next fl) rep
around working final ss in base of
beg ch-6. [30 ch-6 sps]
Fasten off.
Join white in any unused fl from
Round 6.
Round 3 As Round 2. [36 ch-6 sps]
Fasten off and weave in all ends.
WWW.GATHERED.HOW/SIMPLYCROCHET 7
A YEAR OF GRANNY SQUARES
BobblE burSt ButteRfly DisplAy
by Heather C Gibbs
8
SKILL LEVEL
Easy peasy
YOU WILL NEED
QAny DK yarn in 4 colours
QA 3.5mm (US E/4) hook
MEASUREMENTS
Square measures approx 10x10cm
(4x4in)
ABBREVIATIONS
pc 5tr in st/sp indicated, remove
live loop from hook, insert hook in
top of first tr, place loop on hook
and pull through st, ch1 to close
For a full list, see page 86 of
Simply Crochet magazine
NOTES
Square is worked in rounds with RS
facing throughout.
Change colour on the final yrh of st
before colour change is indicated.
Carry the unused colour across the
top of your sts, enclosing the
strand as you work.
Colours are referred to as Yarns
A-D.
BOBBLE BURST
Using Yarn A, make a magic loop.
Round 1 (RS) Ch3 (counts as tr
throughout), 11tr in loop, ss to top
of beg ch-3. [12 sts]
Fasten off.
Join Yarn B in any st.
Round 2 Ch3, tr in st at base of
8 WWW.GATHERED.HOW/SIMPLYCROCHET
by Sarah-Jane Hicks
9
ch-3, *change to Yarn C, pc in next
st, change to Yarn B**, 2tr in next
st; rep from * 5 times more ending
last rep at **, ss to top of beg ch-3.
[18 sts]
Round 3 Ch3, tr in st at base of
ch-3, 2tr in each st around, ss to
top of beg ch-3. [36 sts]
Fasten off.
Join Yarn C in sp between any 2
sts.
Round 4 Ch3, (2tr, ch3, 3tr) in sp at
base of ch-3, *(skip 3 sts, 3tr in next
sp between sts) twice, skip 3 sts**,
(3tr, ch3, 3tr) in next sp; rep from *
3 times more ending final rep at **,
ss to top of beg ch-3. [48 sts, 4 ch-3
sps]
Fasten off.
Join Yarn D in any ch-3 sp.
Round 5 Ch3 (2tr, ch3, 3tr) in same
sp, *3tr in next 3 sps between 3-tr
groups**, (3tr, ch3, 3tr) in ch-3 sp;
rep from * 3 times more ending
final rep at **, ss to top of beg ch-3.
[60 sts, 4 ch-3 sps]
Fasten off and weave in all ends.
SKILL LEVEL
Easy peasy
YOU WILL NEED
QAny DK yarn in 7 colours
QA 3mm (US C/2 or D/3) hook
MEASUREMENTS
Square measures approx 10x10cm
(4x4in)
NOTES
Square is worked in rows.
Colours are referred to as Yarns
A-G. Change colour on the final
yrh of st before colour change is
indicated. Carry the unused colour
across the top of your sts if used
again on the same row, enclosing
the strand as you work.
There is a Chart on page 39, which
you should refer to for all colour
changes. Each square represents
1tr. Read all RS rows from right to
left and WS rows from left to right.
The first few rows of the Chart have
been written out to guide you.
BUTTERFLY DISPLAY
SQUARE
Using Yarn A, ch24.
Row 1 (RS) Tr in fourth ch from
hook (skipped ch-3 counts as st), tr
in each ch to end, turn. [22 tr]
Row 2 Ch3 (counts as tr
throughout), tr in each st across,
turn.
Row 3 Ch3, tr in next 3 sts, change
to Yarn B, tr in next 2 sts, change to
Yarn C, tr in next st, change to Yarn
B, tr in next 2 sts, change to Yarn A,
tr in next 4 sts, change to Yarn D, tr
in next 2 sts, change to Yarn C, tr in
next st, change to Yarn D, tr in next
2 sts, change to Yarn A, tr in next 4
sts, turn.
Rows 4-10 Cont in patt using the
Chart for all colour changes.
BORDER
Cont with Yarn A.
Round 1 Ch1, dc in each st to
corner, ch2, 20dc down edge, ch2,
dc in each st across base, ch2, 20dc
up row-end edge, ch2, ss to beg dc.
Fasten off and weave in ends.
Using Yarn C, embroider antennae
onto each Butterfly.
A YEAR OF GRANNY SQUARES
BirthDay caKe
by Jess Bennett
10
SKILL LEVEL
Tricky
YOU WILL NEED
QAny DK yarn in Yarn A white,
Yarn B blue, Yarn C brown, Yarn
D cream, Yarn E pink, Yarn F red,
Yarn G yellow
QA 4mm (US G/6) hook
QA 3mm (US C/2 or D/3) hook
MEASUREMENTS
Square measures approx 12x12cm
(4¾x4¾in)
ABBREVIATIONS
spiked dc Insert hook in st directly
below next st on row specified, yrh
and pull loop up to height of
current row, yrh and pull through
2 loops, skip next st on current row
For a full list, see page 86 of
Simply Crochet magazine
NOTES
Square is worked in rows
throughout.
Change colour on the final yrh of
st before colour change is
indicated. Carry the unused colour
across the top of your sts,
enclosing the strand as you work.
Birthday Cake is made separately
and sewn to the Square at the end.
*change to Yarn B, tr in next 3 sts,
change to Yarn A, tr in next 3 sts;
rep from * twice more, tr in final st,
turn.
Rows 4-10 Rep Rows 2-3, ending
on a Row 2 rep.
Fasten off.
BIRTHDAY CAKE
BORDER
Join Yarn E in first st across top
edge.
Round 1 (RS) Ch1, *(dc, ch1, dc) in
first st, dc in next 21 sts, (dc, ch1,
dc) in next st, 20dc evenly down
row-end edge; rep from * once
more, ss to beg dc. [90 sts]
Fasten off.
SQUARE
Using a 3mm hook and Yarn A,
ch25.
Row 1 (RS) Tr in fourth ch from
hook (skipped ch count as tr), tr in
next 2 ch, *change to Yarn B, tr in
next 3 ch, change to Yarn A, tr in
next 3 ch; rep from * twice more, tr
in final ch, turn. [23 sts]
Change to Yarn B.
Row 2 Ch3 (counts as tr
throughout), tr in next 3 sts,
*change to Yarn A, tr in next 3 sts,
change to Yarn B, tr in next 3 sts;
rep from * twice more, tr in final st,
turn.
Change to Yarn A.
Row 3 Ch3, tr in next 3 sts,
BIRTHDAY CAKE
Using a 4mm hook and Yarn C,
ch11.
Row 1 (RS) Dc in second ch from
hook and each ch across, turn. [10
sts]
Row 2 (WS) Ch1 (does not count
as st throughout), dc in each st
across, turn.
Rows 3-10 As Row 2, changing to
Yarn D at the end of Row 4 and
Yarn C at the end of Row 6.
Change to Yarn E.
Row 11 Ch1, dc in first st, spiked dc
2 rows below, spiked dc 3 rows
below, (spiked dc 2 rows below)
twice, spiked dc 3 rows below,
spiked dc 4 rows below, spiked dc
3 rows below, spiked dc 2 rows
below, dc in final st.
Fasten off.
TO FINISH
Use the image as a guide.
Sew the Birthday Cake to the
Square.
Using Yarn F, embroider the
candle.
Using Yarn G embroider the flame.
Weave in all ends.
WWW.GATHERED.HOW/SIMPLYCROCHET 9
A YEAR OF GRANNY SQUARES
CoronAtion dAy leMon mEringUe
by Teri Hamilton
12
11
SKILL LEVEL
Easy peasy
YOU WILL NEED
QAny DK yarn in 2 colours
QA 4mm (US G/6) hook
QA 3mm (US C/2 or D/3) hook
MEASUREMENTS
Square measures approx 10x10cm
(4x4in)
NOTES
Square is worked in rows.
Crown is made separately and
sewn to the Square at the end.
Colours are referred to as Yarns
A-B.
CORONATION DAY
SQUARE
Using a 4mm hook and Yarn A,
ch14.
Row 1 (RS) Dc in second ch from
hook and each ch across, turn. [13
sts]
Rows 2-15 Ch1 (does not count as
st throughout), dc in each st
across, turn.
Fasten off.
by Joanne Fowler
htr. [64 sts]
Fasten off and weave in ends.
CROWN
Using a 3mm hook and Yarn B,
ch10.
Row 1 (RS) Tr in third ch from
hook, tr in next 7 ch, turn. [8 sts]
Row 2 (WS) Ch8, ss in sp between
fourth and fifth tr from Row 1, ch8,
ss in top of first tr, turn.
Row 3 Ch1, 7dc in first ch-8 sp, ch3,
dc in second ch from hook and
next ch, dc2tog first ch-8 sp and
next ch-8 sp, 7dc in same ch-8 sp.
Fasten off.
TO FINISH
Sew the Crown to the Square.
Weave in all ends.
SKILL LEVEL
Tricky
YOU WILL NEED
QAny DK yarn in 2 colours
QA 3.5mm (US E/4) hook
MEASUREMENTS
Square measures approx 10x10cm
(4x4in)
ABBREVIATIONS
v-st (Tr, ch1, tr) in st/sp indicated
beg v-st Ch4 (counts as tr, ch1), tr
in st at base of ch-4
pc 5tr in st/sp indicated, remove
live loop from hook, insert hook in
top of first tr, place loop on hook
and pull through st
beg pc Ch3, 4tr in st/sp indicated,
remove live loop from hook, insert
hook in top of beg ch-3, place loop
on hook and pull through st
For a full list, see page 86 of
Simply Crochet magazine
NOTES
Square is worked in rounds with
RS facing throughout.
LEMON MERINGUE
BORDER
Using a 4mm hook, join Yarn B in
top-right corner with a ss.
Round 1 (RS) 13ss across top, ss in
corner, 14ss along edge, 14ss
across base, 14ss along next edge,
ss in beg ss. [56 ss]
Change to a 3mm hook.
Round 2 Ch1, (htr in next 13 ss,
3htr in next ss) 4 times, ss to beg
10 WWW.GATHERED.HOW/SIMPLYCROCHET
Using Yarn A, ch4 and ss to in last
ch from hook to form a loop.
Round 1 (RS) Beg pc, ch3, (pc in
ring, ch3) 3 times, ss to first pc. [4
pc, 4 ch-3 sps]
Round 2 Beg v-st in first st, ch2, dc
in ch-3 sp, ch2, (v-st in pc, ch2, dc
in ch-3, ch2) 3 times, ss to third ch
of beg ch-4.
[4 v-sts, 4 dc, 8 ch-2 sps]
Fasten off.
Join Yarn B in any v-st.
Round 3 Beg v-st in v-st, (ch1, dtr,
ch1, dtr, ch1, dtr, ch1, dtr, ch1, dtr,
ch1) in dc, *v-st in v-st, (ch1, dtr,
ch1, dtr, ch1, dtr, ch1, dtr, ch1, dtr,
ch1) in dc; rep from * twice more,
ss to third ch of beg ch-4.
[4 v-sts, 20 dtr, 24 ch-1 sps]
Round 4 Ch1 (does not count as st
throughout), *dc in first tr of v-st,
(dc, htr, dc) in centre of v-st, dc in
second tr of v-st, dc in next ch-1
sp, skip dtr, dc in next ch-1 sp, ch2,
ss in side of last dc, ch1, skip dtr, dc
in next ch-1 sp, ch2, ss in side of
last dc, ch1, skip dtr, dc in next ch-1
sp, ch2, ss in side of last dc, ch1,
skip dtr, dc in next ch-1 sp, ch2, ss
in side of last dc, ch1, skip dtr, dc in
next ch-1 sp; rep from * 3 times
more, ss to beg dc. [44 sts, 12 ch-2
picots, 16 ch-1 sps]
Fasten off.
Join Yarn A in any htr.
Round 5 Ch1, *dc in htr, ch2, skip 2
dc, tr in next dc, skip 1 dc, ch2,
BPdtr around next dc, ch1, (dtr,
ch3, dtr) in sp before next dc,
BPdtr around next dc, ch2, skip 1
dc, tr in next dc, ch2, skip 2 dc; rep
from * 3 times more, ss to beg dc.
Fasten off and weave in ends.
A YEAR OF GRANNY SQUARES
Pink Donut
by Amy Ting
13
SKILL LEVEL
Tricky
YOU WILL NEED
QAny DK yarn in pink, beige,
green, blue, white and yellow
QA 4mm (US G/6) hook
QA small amount of stuffing
QA stitch marker
MEASUREMENTS
Square measures 10x10cm (4x4in)
NOTES
Square is worked in rounds with
RS facing throughout.
Donut is worked onto the Square.
PINK DONUT
SQUARE
Using green, make a magic loop.
Round 1 (RS) Ch3, 11tr in loop, ss
to top of beg ch-3. [12 sts]
Round 2 (Working in bl
throughout) Ch3, tr in st at base of
ch-3, 2tr in each st around, ss to
top of beg ch-3. [24 sts]
Round 3 Ch3, 2tr in next st, (tr in
next st, 2tr in next st) 11 times, ss
to top of beg ch-3. [36 sts]
Round 4 (Working in bl
throughout) Ch3, tr in st at base of
ch-3, *ch2, 2tr in next st, htr in next
2 sts, dc in next 3 sts, htr in next 2
sts, 2tr in next st; rep from * 3
times more omitting final 2 sts on
last rep, ss to top of beg ch-3.
[44 sts, 4 ch-2 sps]
Round 5 Ch3, *tr in each st to ch-2
sp, (2tr, ch2, 2tr) in ch-sp; rep from
* around, ss to top of beg ch-3.
[60 sts, 4 ch-2 sps]
Fasten off.
TO FINISH
Using yellow, white and blue, sew
small sts over Rounds 1-2 of Donut
for the sprinkles.
Using the long tail, sew final round
of Donut to the unused fl from
Round 3 stuffing as you join.
Weave in all ends.
DONUT
Join pink to any unused fl from
Round 1.
Round 1 (RS) Ch3, tr in st at base
of ch-3, 2tr in each fl around, ss to
top of beg ch-3. [24 sts]
Round 2 Ch3, 2tr in next st, (tr in
next st, 2tr in next st) 11 times, ss
to top of beg ch-3. [36 sts]
Change to beige.
Round 3 Ss in bl of each st around.
Round 4 Ch1, dc in bl of each ss
around, ss to beg dc.
Fasten off leaving a long tail.
WWW.GATHERED.HOW/SIMPLYCROCHET 11
A YEAR OF GRANNY SQUARES
coUrthoUse stePs daIsy fOr aliCe
by Jess Bennett
14
SKILL LEVEL
Tricky
YOU WILL NEED
QAny DK yarn in 4 colours
QA 4mm (US G/6) hook
Q2 stitch markers
MEASUREMENTS
Square measures approx 12x12cm
(4¾x4¾in)
NOTES
Square is worked in a mixture of
rounds and rows. Work with RS
facing throughout.
Work over yarn tails where
possible to reduce the number of
ends you need to weave in.
Colours are referred to as Yarns
A-D.
COURTHOUSE STEPS
Using Yarn A, make a magic loop.
Round 1 (RS) Ch3, 2tr in loop, ch2,
(3tr in loop, ch2) 3 times, ss to top
of beg ch-3. [12 sts, 4 ch-2 sps]
Fasten off.
Join Yarn B in any ch-2 sp.
Row 2 Ch3, tr in same sp, tr in next
3 sts, 2tr in next ch-2 sp, pm in last
st. [7 sts]
Fasten off.
Skip 3 sts and join Yarn B in next
ch-2 sp. Rep Row 2.
Join Yarn A in either marked st.
Turn to work into row-end.
Row 3 Ch3, 3tr around post of st, tr
12 WWW.GATHERED.HOW/SIMPLYCROCHET
by Becky Skuse
15
in ch-2 sp at base of Yarn B tr, tr in
next 3 sts from Round 2, tr in next
ch-sp, 4tr around post of next st,
pm in last st. [13 sts]
Fasten off.
Join Yarn A in next marked st. Rep
Row 3.
Join Yarn C in either marked st.
Row 4 Ch3, 3tr around post of st, tr
in ch-2 sp, tr in next 5 sts, tr in next
ch-sp, 4tr around post of next st,
pm in last st. [15 sts]
Fasten off.
Join Yarn C in next marked st. Rep
Row 4.
Join Yarn A in either marked st
Row 5 Ch3, 3tr around post of st, tr
in ch-2 sp, tr in next 9 sts, tr in next
ch-sp, 4tr around post of next st,
pm in last st. [19 sts]
Fasten off.
Join Yarn A in next marked st. Rep
Row 5.
Join Yarn D in any corner.
Round 6 Ch1, *(dc, ch1, dc) in
corner, 18dc evenly across to next
corner; rep from * 3 times more, ss
to beg dc. [80 sts]
Fasten off and weave in ends.
SKILL LEVEL
Tricky
YOU WILL NEED
QAny DK yarn in yellow, white and
green
QA 4mm (US G/6) hook
MEASUREMENTS
Square measures approx 10x10cm
(4x4in)
NOTES
Square is worked in the rounds
with RS facing throughout.
DAISY FOR ALICE
Using yellow, make a magic loop.
Round 1 (RS) Ch1 (does not count
as a st throughout), 6dc into the
loop, ss to beg dc. [6 dc]
Fasten off.
Join White in bl of any st.
Round 2 (Working in bl
throughout) Ch3, dtr in dc at base
of ch-3 (counts 2-dtr cl), ch2, 2-dtr
cl in next st, ch2, dtr2tog second
and third dc, ch2, 2-dtr cl in third
and fourth dc, ch2, dtr2tog fourth
and fifth dc, ch2, 2-dtr cl in fifth
and sixth dc, dtr2tog last dc and
first dc, ch2, ss to beg cl.
[9 sts, 9 ch-2 sps]
Fasten off.
Join green in any ch-2 sp.
Round 3 Ch1, 4dc in each ch-sp
around, ss to beg dc. [36 sts]
Round 4 Ch1, dc in first 2 sts, *htr
in next 2 sts, tr in next st, (tr, dtr,
ch2, dtr, tr) in next st, tr in next st,
htr in next 2 sts, dc in next 2 sts;
rep from * 3 times more omitting
final 2 sts on last rep, ss to beg dc.
[48 sts, 4 ch-2 sps]
Round 5 Ch1, *dc in each st to
ch-sp, (2dc, ch1, 2dc) in ch-sp; rep
from * around, ss to beg dc.
Fasten off and weave in ends.
A YEAR OF GRANNY SQUARES
FirewOrk fInale
by Alice Tarry
16
SKILL LEVEL
Go pro
YOU WILL NEED
QAny DK yarn in yellow, black,
orange, coral, pink and red
QA 3.5mm (US E/4) hook
MEASUREMENTS
Square measures approx 12x12cm
(4¾x4¾in)
ABBREVIATIONS
puff st (Yrh, insert hook in st
indicated, yrh and pull up a loop) 4
times, yrh and pull through all
loops
For a full list, see page 86 of
Simply Crochet magazine
NOTES
Square is worked in rounds with
RS facing throughout.
FIREWORK FINALE
Using yellow, make a magic loop.
Round 1 (RS) Ch2, tr in loop
(counts as 2-tr cl), (ch3, 2-tr cl in
loop) 7 times, ch3, ss to top of first
ch. [8 sts, 8 ch-3 sps]
Round 2 (RS) Change to black, ch1
(does not count as st throughout),
(2htr next ch-sp, ch1, skip cl, 2htr
next ch-sp, ch3, skip cl) 4 times, ss
to first htr.
[16 sts, 4 ch-3 sps, 4 ch-1 sps]
Work all odd numberd rounds in
the bl, and all even numbered
rounds in the fl.
Round 3 Change to orange, ch1,
dc in first 2 sts, *FPtr around cl
from Round 1, dc in next 2 sts,
(FPdtr, ch1, FPdtr, ch1, FPdtr)
around next cl from Round 1**, dc
in next 2 sts; repeat from * 3 times
more ending final rep at **, ss to
first dc. [32 sts, 8 ch-1 sps]
Round 4 Change to black, ch1, *htr
in next 2 sts from Round 2, ch1,
skip 1 st, htr in next 2 sts from
Round 2, ch1, skip 1 st, 2htr in ch-1
sp, ch1, skip 1 st, 2htr in ch-1 sp,
ch1, skip 1 st; repeat from * around,
ss to first htr. [32 sts, 16 ch-1 sps]
Round 5 Change to coral, ch1, dc
in first 2 sts, *working in front of
ch-sp from Round 4 puff st in FPtr
from Round 3, dc in next 2 sts, FPtr
around FPdtr from Round 3, dc in
next 2 sts, ch1, FPtr around FPdtr
from Round 3, ch1, dc in next 2 sts,
FPtr around FPdtr from Round 3,
dc in next 2 sts; repeat from *
around, ss to first st.
[48 sts, 8 ch-1 sps]
Round 6 Change to black, ch1, *htr
in next 2 sts from Round 4, FPdc
around puff, htr in next 2 sts from
Round 4, ch1, skip 1 st, htr in next 2
sts from Round 4, 2htr in ch-1 sp,
ch1, skip 1 st, 2htr in ch-1 sp, htr in
next 2 sts from Round 4, ch1, skip 1
st; repeat from *around, ss to first
st. [52 sts, 12 ch-1 sps]
Round 7 Change to pink, ch1, *dc
in next 5 sts from Round 6, FPtr
around FPtr from Round 5, dc in
next 4 sts from Round 6, ch1,
working in front of ch-sp from
Round 6 puff st into FPtr, ch1, dc in
next 4 sts from Round 5, FPtr
around FPtr from Round 6; rep
from * around, ss to beg dc.
[64 sts, 8 ch-1 sps]
Round 8 Change to black, ch1, *htr
in next 5 sts from Round 6, ch1,
skip 1 st, htr in next 4 sts from
Round 6, 2htr in ch-sp from Round
7, FPtr around puff, 2htr in ch-sp
from Round 7, htr in next 4 sts
from Round 6, ch1, skip 1 st; repeat
from * around, ss to first st.
[72 sts, 8 ch-1 sps]
Round 9 Change to red, ch1, *dc in
next 5 sts from Round 7, working
in front of ch-sp from Round 8 puff
st into FPtr, dc in next 6 sts from
Round 7, ch2, skip 1 st, dc in next 6
sts from Round 7, puff into FPtr;
repeat from * around, ss to first st.
[76 sts, 4 ch-2 sps]
Round 10 Change to black, ch1
*htr in next 5 sts from Round 8,
FPdc around puff, htr in next 6 sts
from Round 8, (htr tr, htr) into FPtr,
htr in next 6 sts from Round 8,
FPdc around puff; repeat from *
around ss to first st. [88 sts]
Fasten off and weave in ends.
WWW.GATHERED.HOW/SIMPLYCROCHET 13
A YEAR OF GRANNY SQUARES
exTravaGanza
FloweR fiesTa
by Karen Tate
by Heather C Gibbs
18
17
SKILL LEVEL
Tricky
YOU WILL NEED
QAny 4ply cotton yarn in 7 colours
QA 3mm (US C/2 or D/3) hook
MEASUREMENTS
Square measures approx 10x10cm
(4x4in)
ABBREVIATIONS
crossed tr Skip 1 st, tr in next st, tr
in skipped st
crossed tr inc Tr in next 2 sts, tr in
same st as first tr
For a full list, see page 86 of
Simply Crochet magazine
NOTES
Square is worked in rounds with
RS facing throughout.
Colours are referred to as Yarns
A-G.
EXTRAVAGANZA
Using Yarn A, make a magic loop.
Round 1 (RS) Ch3 (counts as tr
throughout), 9tr in loop, ss to top
of beg ch-3. [10 sts]
Change to Yarn B.
Round 2 (RS) Ch3, FPtr around st
at base of ch-3, (tr in next st, FPtr
around same st) 9 times, ss to beg
dc. [20 sts]
Change to Yarn C.
Round 3 Ch3, tr in st at base of
14 WWW.GATHERED.HOW/SIMPLYCROCHET
ch-3, FPtr around next FPtr, (2tr in
tr, FPtr around next FPtr) 9 times,
ss to beg dc. [30 sts]
Change to Yarn D.
Round 4 Ch3, tr in next st, tr in st
at base of beg ch-3, FPtr around
next FPtr, (crossed tr inc, FPtr
around next FPtr) 9 times, ss to
beg dc. [40 sts]
Fasten off.
Join Yarn E in any FPtr.
Round 5 Ch4 (counts as dtr), (dtr,
ch2, 2dtr) in st at base of ch-4, *dtr
in next st, tr in next 2 sts, htr in
next 3 sts, tr in next 2 sts, dtr in
next st**, (2dtr, ch2, 2dtr) in next st;
rep from * 3 times more ending
final rep at **, ss to top of beg ch-4.
[52 sts, 4 ch-2 sps]
Fasten off.
Join Yarn F in any ch-sp.
Round 6 Ch4, (dtr, ch2, 2dtr) in
same sp, *dtr in next st, tr in next
st, (crossed tr) twice, tr in next st,
(crossed tr) twice, tr in next st, dtr
in next st, (2dtr, ch2, 2dtr) in ch-sp;
rep from * 3 times more ending
final rep at **, ss to top of beg ch-4.
[68 sts, 4 ch-2 sps]
Fasten off.
Join Yarn G in any st.
Round 7 Ch1 (does not count as st
throughout), *dc in each st to
ch-sp, (2dc, ch2, 2dc) in ch-sp; rep
from * around, ss to beg dc.
[84 sts, 4 ch-2 sps]
Fasten off and weave in ends.
SKILL LEVEL
Tricky
YOU WILL NEED
QAny DK cotton yarn in 3 colours
QA 3.5mm (US E/4) hook
MEASUREMENTS
Square measures approx 10x10cm
(4x4in)
ABBREVIATIONS
beg tr2tog Ch2, tr in next st
(counts as one st)
For a full list, see page 86 of
Simply Crochet magazine
NOTES
Square is worked in rounds with
RS facing throughout.
Change colour on the final yrh of
st before colour change is
indicated. Carry the unused colour
across the top of your sts,
enclosing the strand as you work.
Colours are referred to Yarns A-C.
FLOWER FIESTA
Using Yarn A, make a magic loop.
Round 1 (RS) Ch3 (counts as tr
throughout), 11tr in loop, ss to top
of beg ch-3. [12 sts]
Fasten off.
Join Yarn B in any st.
Round 2 (RS) Ch3, tr in st at base
of ch-3, *tr in next 2 sts, (2tr, ch3,
2tr) in next st; rep from * twice
more, tr in next 2 sts, (2tr, ch3) in st
at base of beg ch-3, ss to top of
beg ch-3.
[24 sts, 4 ch-3 sps]
Round 3 Beg tr2tog, *tr in next 2
sts, tr2tog, change to Yarn C, (4tr,
ch3, 4tr) in ch-sp, change to Yarn B,
tr2tog next 2 sts; rep from * 3
times more omitting final st on last
rep, ss to top of beg tr2tog.
[48 sts, 4 ch-3 sps]
Round 4 Beg tr2tog, *tr2tog,
change to Yarn C, 2tr in next st, tr
in next 3 sts, (2tr, ch3, 2tr) in ch-sp,
tr in next 3 sts, 2tr in next st**,
change to Yarn B, tr2tog; rep from
* 3 times more ending last rep at
**, ss to top of beg tr2tog.
[64 sts, 4 ch-3 sps]
Fasten off Yarn B.
Round 5 Ch1 (does not count as
st), *dc2tog, dc in next 7 sts, (dc,
ch2, dc) in ch-sp, dc in next 7 sts;
rep from * 3 times more, ss to beg
dc. [68 sts, 4 ch-2 sps]
Fasten off and weave in ends.
A YEAR OF GRANNY SQUARES
SparkleR
heCtor heDgehog
by Caroline Warren
by Sarah-Jane Hicks
19
SKILL LEVEL
Easy peasy
YOU WILL NEED
QAny DK yarn in yellow, orange
and blue
QA 3.5mm (US E/4) hook
MEASUREMENTS
Square measures approx 10x10cm
(4x4in)
NOTES
Square is worked in rounds with
RS facing throughout.
Change colour on the final yrh of
st before colour change is
indicated. Carry the unused colour
across the top of your sts,
enclosing the strand as you work.
SPARKLER
Using yellow, make a magic loop.
Round 1 (RS) Ch3 (counts as tr
throughout), 2tr in loop, ch2, (3tr in
loop, ch2) 3 times, ss to top of beg
ch-3. [12 sts, 4 ch-2 sps]
Round 2 (RS) Ch3, *tr in next 2 sts,
change to orange, tr in ch-2 sp,
change to blue, (tr, ch2, tr) in same
ch-sp, change to orange, tr in same
ch-sp, change to yellow, tr in next
st; rep from * 3 times more
omitting final st on last rep, ss to
top of beg ch-3. [28 sts, 4 ch-2 sps]
Round 3 Ch2, change to blue, ch1
(completes beg ch-3), *tr in next st,
20
change to yellow, tr in next 2 sts,
change to orange, tr in next st,
change to blue, (2tr, ch2, 2tr) in
ch-2 sp, change to orange, tr in
next st, change to yellow, tr in next
2 sts, change to blue; rep from * 3
times more omitting final st on last
rep, ss to top of beg ch-3.
[44 sts, 4 ch-2 sps]
Round 4 Change to blue, ch3, *tr
in next 2 sts, change to yellow, tr in
next 2 sts, change to orange, tr in
next st, change to blue, tr in next
st, tr in ch-2 sp, change to yellow,
(tr, ch2, tr) in same ch-sp, change
to blue, tr in same sp, tr in next st,
change to orange, tr in next st,
change to yellow, tr in next 2 sts,
change to blue, tr in next st; rep
from * 3 times more omitting final
st on last rep, ss to top of beg ch-3.
[60 sts, 4 ch-2 sps]
Fasten off yellow and orange.
Round 5 Ch3, *tr in each st to ch-2
sp, (2tr, ch2, 2tr) in ch-sp; rep from
* around, ss to top of beg ch-3.
[76 sts, 4 ch-2 sps]
Fasten off and weave in ends.
SKILL LEVEL
Tricky
YOU WILL NEED
QAny DK cotton in: Yarn A cream,
Yarn B green, Yarn C brown,
Yarn D orange, Yarn E yellow,
Yarn F black
QA 3.5mm (US E/4) hook
MEASUREMENTS
Square measures approx 10x10cm
(4x4in)
NOTES
Square is worked in rounds with
RS facing throughout. The nose
and mouth are embroidered over
Round 1 at the end.
HECTOR HEDGEHOG
st), dc in first 2 sts, htr in next st, tr
in next st, *(2tr, ch2, 2tr) in bl of
next st, tr in bl of next st, htr in bl
of next st, dc in bl of next 4 sts, htr
in bl of next st, tr in bl of next st;
rep from * twice more, (2tr, ch2,
2tr) in bl of next st, tr in next st, htr
in next st, dc in final 2 sts, ss to beg
dc. [48 dc]
Fasten off.
Join Yarn D in any st.
Round 6 Ch2, *htr in each st to
ch-2 sp, (2htr, ch2, 2htr) in ch-sp;
rep from * around, ss to beg htr.
[64 htr]
Fasten off.
Join Yarn E in any st.
Round 7 As Round 6. [80 htr]
Fasten off and weave in ends.
Using Yarn F, embroider the nose
and eyes.
Using Yarn A, ch3.
Round 1 (RS) 9htr in third ch from
hook, ss to top of first htr. [9 htr]
Round 2 (RS) Ch2 (does not count
as st throughout), 2htr in each st
around, ss to first htr. [18 htr]
Round 3 Ch2, (1htr, 2htr in next st)
9 times, ss to first htr. [27 htr]
Change to Yarn B.
Round 4 Ch2, (2htr, 2htr in next st),
change to Yarn C, (2htr, 2htr in
next st) 7 times, change to Yarn B,
(2htr, 2htr in next st), ss to first htr.
[36 htr]
Fasten off Yarn C.
Round 5 Ch1 (does not counts as
WWW.GATHERED.HOW/SIMPLYCROCHET 15
A YEAR OF GRANNY SQUARES
Bonfire
Night fUn
MemorIes oF
ProvenCe
by Michelle Wray
by Asia Zaslavskaia
21
22
SKILL LEVEL
SKILL LEVEL
Easy peasy
Tricky
MEMORIES OF PROVENCE
rep from * 6 times more, ss to third
ch of beg ch-5, ss into ch-2 sp.
[16 sts, 16 ch-2 sps]
Round 4 Ch3, (2tr, ch2, 3tr) in same
sp, *3tr in next 3 ch-2 sps, (3tr, ch2,
3tr) in next ch-3 sp; rep from *
twice more, 3tr in next 3 ch-2 sps,
ss to top of beg ch-3, ss to first ch-2
sp. [60 sts, 4 ch-2 sps]
Round 5 Ch3, (2tr, ch2, 3tr) in same
sp, *(skip 3 sts, 3tr in sp between
3-tr groups) 4 times, (3tr, ch2, 3tr)
in next ch-2 sp; rep from * twice
more, (skip 3 sts, 3tr in sp between
3-tr groups) 4 times, ss to top of
beg ch-3. [72 sts, 4 ch-2 sps]
Fasten off and weave in ends.
SQUARE
Using Yarn A, ch4 and ss in last ch
to form a loop.
Round 1 (RS) Ch1 (does not count
as st throughout), 8dc in loop, ss to
beg dc. [8 sts]
Round 2 Ch3 (counts as tr
throughout), (tr, ch5, tr) in st at
base of ch-3, (2tr, ch5, tr) in each st
around, ss to top of beg ch-3.
[24 sts, 8 ch-5 sps]
Fasten off.
Join Yarn B in first st.
Round 3 Ch5 (counts as tr, ch2), tr
in st at base of ch-5, ch2, *skip (tr,
ch5, tr), (tr, ch2, tr, ch2) in next tr;
SPIKES (MAKE 8)
Cut a 50cm length of Yarn C and
fold in half.
Insert hook through any ch-5 on
Round 2, place folded end of yarn
on hook and pull through, using
both ends of yarn held double, ch6.
Fasten off.
Repeat on each ch-5 sp from
Round 6.
Thread the tails around the base of
the corner groups from Round 5
and secure on the WS knotting 2
spike tails together. You can use
the image as a guide.
YOU WILL NEED
YOU WILL NEED
QAny DK cotton yarn in black,
QAny DK yarn in 3 colours
green and white
QA 4mm (US G/6) hook
QA 4mm (US G/6) hook
MEASUREMENTS
MEASUREMENTS
Square measures approx 10x10cm
(4x4in)
NOTES
Square is worked in rows
throughout.
Fireworks are embroidered onto
the Square using the image as a
guide.
BONFIRE NIGHT FUN
Using black, ch18.
Row 1 (RS) Dc in second ch from
hook and each ch across, turn.
[17 sts]
Rows 2-18 Ch1, dc in each st
across, turn.
Fasten off.
Using green, embroider the large
firework with long straight sts.
Using white, embroider the small
firework.
Weave in all ends.
16 WWW.GATHERED.HOW/SIMPLYCROCHET
Square measures 10x10cm (4x4in)
NOTES
Square is worked in rounds with
RS facing. Spikes are worked onto
the Square at the end. Colours
referred to as Yarns A-C.
A YEAR OF GRANNY SQUARES
roYal gArden
by Emma Leith
23
SKILL LEVEL
Tricky
YOU WILL NEED
QAny DK yarn in purple, dark pink,
light pink, dark green and light
green
QAny DK gold lamé yarn
QA 3.5mm (US E/4) hook
MEASUREMENTS
Square measures approx 8x8cm
(3¼x3¼in)
ABBREVIATIONS
beg pc Ch3, 2tr in st/sp indicated,
remove live loop from hook, insert
hook in top of beg ch-3, place loop
on hook and pull through st
pc 3tr in st/sp indicated, remove
live loop from hook, insert hook in
top of first tr, place loop on hook
and pull through st
For a full list, see page 86 of
Simply Crochet magazine
NOTES
Square is worked in rounds with RS
facing throughout.
ROYAL GARDEN
Using gold lamé, make a magic
loop.
Round 1 (RS) Ch1 (does not count
as st throughout), 8dc in loop, ss to
beg dc. [8 sts]
Fasten off.
Join purple in any st.
Round 2 Ch2 (counts as htr
throughout), htr in st at base of
ch-2, 2htr in each st around, ss to
top of beg ch-2. [16 sts]
Fasten off.
Join gold lamé in any st.
Round 3 Ch1, (dc in next st, ch2,
skip 1 st) 8 times, ss to beg dc.
[8 sts, 8 ch-2 sps]
Fasten off.
Join dark pink in any ch-2 sp.
Round 4 Ch3 (counts as tr
throughout), (3dtr, tr) in same ch-2
sp, FPdc around next dc, *(tr, 3dtr,
tr) in ch-2 sp, FPdc around next dc;
rep from * 6 times more, ss to top
of beg ch-3. [48 sts]
Fasten off.
Join dark green in top of any dc
from Round 3 (you may need to
pull the top back to work behind
the FPdc from Round 4.
Round 5 (Ch3, ss in next dc) 8
times. [8 ch-3 sps]
Round 6 Ch1, (4dc in next ch-3 sp,
3dc in next ch-3 sp) 4 times, ss to
beg dc. [28 sts]
Round 7 Beg pc in first st, ch2, *pc
in next st, ch5, pc in next st, ch2, pc
in next st, ch2, skip 1 st, ss in next
st, ch2, skip 1 st**, pc in next st,
ch2; rep from * 3 times ending last
rep at **, ss to top of beg pc.
[16 pc, 4 ss, 4 ch-5 sps, 16 ch-2 sps]
Fasten off.
Join light green in any ch-5 sp.
Round 8 Ch2, (2htr, ch2, 3htr) in
same sp, *FPtr around next pc, ch1,
FPtr around next pc, ch2, FPtr
around next pc, ch1, FPtr around
next pc**, (3htr, ch2, 3htr) in next
ch-5 sp; rep from * 3 times more
ending last rep at **, ss to top of
beg ch-2.
[40 sts, 8 ch-2 sps, 8 ch-1 sps]
Fasten off.
Join light pink in first ch-2 sp.
Round 9 Ch2, (htr, ch2, 2htr) in
same sp, *htr in next 4 sts, htr in
ch-1 sp, htr in next st, 2htr in ch-2
sp, htr in next st, htr in ch-1 sp, htr
in next 4 sts**, (2htr, ch2, 2htr) in
ch-2 sp; rep from * 3 times ending
last rep at **, ss to top of beg ch-2.
[72 sts, 4 ch-2 sps]
Fasten off and weave in ends.
WWW.GATHERED.HOW/SIMPLYCROCHET 17
A YEAR OF GRANNY SQUARES
Fried egg
by Amy Ting
24
SKILL LEVEL
Tricky
Keep away from children under 36
months; alternatively, embroider
eyes instead of using safety eyes.
YOU WILL NEED
QAny DK yarn in yellow, white,
grey and green
QA 4mm (US G/6) hook
QA 2.75mm (US C/2) hook
QBrown stranded cotton
Q2 safety eyes, 4mm
QA small amount of stuffing
QA stitch marker
MEASUREMENTS
Square measures 10x10cm (4x4in)
NOTES
Square is worked in rounds with
RS facing throughout.
Egg is worked separately and sewn
to the centre of the Square.
Parts of this pattern are worked
using the amigurumi method.
Work stitches continuously in a
spiral without closing off each
round with a slip stitch. It may help
to use a stitch marker in the first
stitch of each round, moving it up
as you work.
18 WWW.GATHERED.HOW/SIMPLYCROCHET
FRIED EGG
SQUARE
Using a 4mm hook and grey, make
a magic loop.
Round 1 (RS) Ch3, 11tr in loop, ss
to top of beg ch-3. [12 sts]
Round 2 Ch3, tr in st at base of
ch-3, 2tr in each st around, ss to
top of beg ch-3. [24 sts]
Round 3 Ch3, 2tr in next st, (tr in
next st, 2tr in next st) 11 times, ss
to top of beg ch-3. [36 sts]
Round 4 Ch1 (does not count as st
throughout), dc in fl of each st
around, ss to beg dc, ch5, htr in
second ch from hook and next 3
ch, ss in second st from beg of
Round 4. [40 sts]
Fasten off.
Join green in bl of any st from
Round 3.
Round 5 Ss in each bl around.
[36 sts]
Round 6 Ch3, tr in st at base of
ch-3, *ch2, 2tr in next st, htr in next
2 sts, dc in next 3 sts, htr in next 2
sts, 2tr in next st; rep from * 3
times more omitting final 2 sts on
last rep, ss to top of beg ch-3.
[44 sts, 4 ch-2 sps]
Round 7 Ch3, *tr in each st to ch-2
sp, (2tr, ch2, 2tr) in ch-sp; rep from
* around, ss to top of beg ch-3.
[60 sts, 4 ch-2 sps]
Fasten off.
EGG
Using a 2.75mm hook and yellow,
make a magic loop.
Round 1 (RS) Ch1, 6dc in loop.
[6 sts]
Round 2 2dc in each st around.
[12 sts]
Round 3 Dc in each st around, ss
to beg dc.
Fasten off.
Join White in bl of any st.
Round 4 Ss in each bl around.
Round 5 (1dc, 2dc in next st) 6
times. [18 sts]
Round 6 Htr in next st, 2tr in next
st, htr in next 2 sts, leave rem sts
unworked.
Fasten off.
Thread tail through next st from
Round 5.
TO FINISH
Insert safety eyes between Rounds
2-3.
Using brown stranded cotton,
embroider the mouth.
Sew the Egg to the Square, lightly
stuffing the yoke as you join.
Weave in all ends.
A YEAR OF GRANNY SQUARES
confEtti Party a MorniNg walK
PoppeR
In prOvencE
by Catherine Venner
25
SKILL LEVEL
Easy peasy
26
Rounds 3-4 As Round 2.
[56 sts, 4 ch-2 sps]
Fasten off.
YOU WILL NEED
QAny DK yarn in white, yellow,
light purple, dark purple, green
and pink
QA 4mm (US G/6) hook
MEASUREMENTS
Square measures approx 11x11cm
(4¼x4¼in)
NOTES
Square is worked in rounds with
RS facing throughout.
Party Popper is made separately
and sewn to the Square at the end.
CONFETTI PARTY POPPER
SQUARE
Using white, make a magic loop.
Round 1 (RS) Ch3 (counts as tr
throughout), tr in loop, ch1, (2tr in
loop, ch1) 3 times, ss to top of beg
ch-3. [8 sts, 4 ch-1 sps]
Round 2 Ch3, *tr in each st to ch-1
sp, (2tr, ch2, 2tr) in ch-sp; rep from
* around, ss to top of beg ch-3.
[24 sts, 4 ch-2 sps]
by Asia Zaslavskaia
SKILL LEVEL
Easy peasy
YOU WILL NEED
PARTY POPPER
Using yellow, make a magic loop.
Row 1 Ch3, tr in loop, turn. [2 sts]
Row 2 (WS) Ch1 (does not count
as st throughout), dc in first st, 2dc
in next st, turn. [3 sts]
Change to light purple.
Row 3 Ch1, dc in each st to final st,
2dc in final st, turn. [4 sts]
Row 4 As Row 3. [5 sts]
Change to yellow.
Rows 4-10 As Row 3, changing to
light purple at the end of Row 5,
yellow at the end of Row 7 and
dark purple at the end of Row 9.
[12 sts]
Fasten off.
TO FINISH
Use the image as a guide.
Sew the Party Popper to the
Square.
Using all colours, embroider the
confetti.
QAny DK yarn in 3 colours
QA 4mm (US G/6) hook
MEASUREMENTS
Square measures approx 10x10cm
(4x4in)
NOTES
Square is worked in rounds with
RS facing throughout.
Colours are referred to as Yarns
A-C.
A MORNING WALK IN
PROVENCE
Using Yarn A, ch4 and ss in last ch
to form a loop.
Round 1 (RS) Ch1 (does not count
as st throughout), 8dc in loop, ss to
beg dc. [8 sts]
Round 2 Ch3 (counts as tr
throughout), (tr, ch5, tr) in st at
base of ch-5, (2tr, ch5, tr) in each st
around, ss to top of beg ch-3. [24
sts, 8 ch-5 sps]
Fasten off.
Join Yarn B in first st.
Round 3 Ch5 (counts as tr, ch2), tr
in st at base of ch-5, ch2, *skip (tr,
ch5, tr), (tr, ch2, tr, ch2) in next tr;
rep from * 6 times more, ss to third
ch of beg ch-5, ss into ch-2 sp.
[16 sts, 16 ch-2 sps]
Round 4 Ch3, (2tr, ch2, 3tr) in
same sp, *3tr in next 3 ch-2 sps,
(3tr, ch2, 3tr) in next ch-3 sp; rep
from * twice more, 3tr in next 3
ch-2 sps, ss to top of beg ch-3. [60
sts, 4 ch-2 sps]
Fasten off.
Join Yarn C in any ch-2 sp.
Round 5 Ch3, (2tr, ch2, 3tr) in
same sp, *(skip 3 sts, 3tr in sp
between 3-tr groups) 4 times, (3tr,
ch2, 3tr) in next ch-2 sp; rep from *
twice more, (skip 3 sts, 3tr in sp
between 3-tr groups) 4 times, ss to
top of beg ch-3. [72 sts, 4 ch-2 sps]
Fasten off and weave in ends.
WWW.GATHERED.HOW/SIMPLYCROCHET 19
A YEAR OF GRANNY SQUARES
hoLi
PasteL blocKs
by Dorien van den Bosch
by Jess Bennett
28
27
SKILL LEVEL
Tricky
YOU WILL NEED
QAny DK cotton yarn in red,
green, gold, blue, orange and
pink
QA 3.5mm (US E/4) hook
QA stitch marker
MEASUREMENTS
Square measures approx 10x10cm
(4x4in)
NOTES
Square is worked in rounds with
RS facing throughout.
Where 2 colours are used in the
same round, carry the unused
colour across the top of your sts,
enclosing the strand as you work.
HOLI
Using red, make a magic loop.
Round 1 (RS) Ch3 (counts as tr
throughout), 15tr in loop, ss to top
of beg ch-3. [16 sts]
Fasten off.
Join gold in sp between any 2 sts.
Work next round in sps between
sts of Round 1.
Round 2 (RS) Ch3, (tr, ch1, 2tr) in
same sp, pm in ch-1 sp, *skip next
sp, (tr, ch1, tr) in next sp, skip next
sp**, (2tr, ch1, 2tr) in next sp; rep
20 WWW.GATHERED.HOW/SIMPLYCROCHET
from * 3 times more ending final
rep at **, ss to top of beg ch-3. [24
sts, 8 ch-1 sps]
Fasten off.
Join blue in marked ch-sp with a ss.
Round 3 *(6tr, ch2, 6tr) in next ch-1
sp, ss in next ch-sp; rep from * 3
times more. [48 sts, 4 ss, 4 ch-2 sps]
Fasten off.
Join orange in ch-1 sp from Round
2, before a ss from Round 3.
Round 4 Ch5 (counts as ttr), 3ttr in
same sp, *ch3, 4ttr in same sp after
the ss from Round 3, (ss, ch1, ss) in
next ch-2 sp**, 4ttr in next ch-1 sp
from Round 2 before the ss from
Round 3; rep from * 3 times more
ending final rep at **, ss to top of
beg ch-5.
[32 sts, 8 ss, 4 ch-3 sps, 4 ch-1 sps]
Fasten off.
Join pink in any ch-3 sp.
Round 5 Ch3, (2tr, ch2, 3tr) in same
sp, change to green, skip 2 sts, 4tr
in sp between second and third ttr,
change to pink, 3tr in ch-2 sp from
Round 3 working over the ch-1 sp
from Round 4, change to green, 4tr
in sp between second and third ttr,
change to pink**, (3tr, ch2, 3tr) in
next ch-3 sp; rep from * 3 times
more ending final rep at **, ss to
top of beg ch-3.
Fasten off and weave in ends.
SKILL LEVEL
Easy peasy
YOU WILL NEED
QAny DK yarn in 4 colours
QA 4mm (US G/6) hook
MEASUREMENTS
Square measures approx 12x12cm
(4¾x4¾in)
NOTES
Square is worked in rounds with
RS facing throughout.
Yarns are referred to as Yarns A-D.
PASTEL BLOCKS
Using Yarn A, make a magic loop.
Round 1 (RS) Ch3, 2tr in loop, ch2,
(3tr in loop, ch2) 3 times, ss to top
of beg ch-3. [12 sts, 4 ch-2 sps]
Fasten off.
Join Yarn B in any ch-2 sp.
Round 2 Ch4 (counts as dc, ch3),
dc in same sp, *ch3, skip 3 sts, (dc,
ch3, dc) in ch-2 sp; rep from * twice
more, ch3, ss to first ch of beg
ch-4. [8 sts, 8 ch-3 sps]
Fasten off.
Join Yarn C in any corner ch-3 sp.
Round 3 Ch3, (2tr, ch3, 3tr) in same
sp, *ch1, skip 1 dc, 3tr in next ch-3
sp, ch1, skip dc**, (3tr, ch3, 3tr) in
next ch-3 sp; rep from * 3 times
more ending final rep at **, ss to
top of beg ch-3.
[36 sts, 4 ch-3 sps, 8 ch-1 sps]
Fasten off.
Join Yarn B in any ch-2 sp.
Round 4 Ch4, dc in same sp, *(ch3,
skip 3 sts, dc in next ch-1 sp) twice,
ch3**, (dc, ch3, dc) in ch-3 corner
sp; rep from * 3 times more ending
final rep at **, ss to first ch of beg
ch-4. [16 sts, 16 ch-3 sps]
Fasten off.
Join Yarn D in any ch-3 corner sp.
Round 5 Ch3, (2tr, ch3, 3tr) in same
sp, *(ch1, skip 1 dc, 3tr in next ch-3
sp) 3 times, ch1, skip dc**, (3tr, ch3,
3tr) in next ch-3 sp; rep from * 3
times more ending final rep at **,
ss to top of beg ch-3.
[60 sts, 4 ch-3 sps, 16 ch-1 sps]
Fasten off and weave in ends.
A YEAR OF GRANNY SQUARES
Fur bAbies
by HAE Barker
29
SKILL LEVEL
Easy Peasy
YOU WILL NEED
QAny DK yarn in 4 colours
QA 4mm (US G/6) hook
MEASUREMENTS
Square measures approx 10x10cm
(4x4in)
NOTES
Square is worked in rounds with
RS facing throughout.
Cat is made separately and sewn
to the Square at the end.
FUR BABIES
SQUARE
Using Yarn A, make a magic loop.
Round 1 (RS) Ch3 (counts as tr
throughout), 2tr in loop, ch2, (3tr in
loop, ch2) 3 times, ss to top of beg
ch-3. [12 sts, 4 ch-2 sps]]
Fasten off.
Join Yarn B in any ch-2 sp.
Round 2 Ch3, (2tr, ch2, 3tr, ch1) in
same sp, (3tr, ch2, 3tr, ch1) in each
ch-2 sp around, ss to top of beg
ch-3. [24 sts, 4 ch-2 sps, 4 ch-1 sps]
Fasten off.
Join Yarn C in any ch-2 sp.
Round 3 Ch3, (2tr, ch2, 3tr, ch1) in
same sp, *(3tr, ch1) in next ch-1 sp,
(3tr, ch2, 3tr, ch1) in next ch-2 sp;
rep from * twice more, (3tr, ch1) in
final ch-1 sp, ss to top of beg ch-3.
[36 sts, 4 ch-2 sps, 8 ch-1 sps]
Fasten off.
Join Yarn A in any ch-2 sp.
Round 4 Ch3, (2tr, ch2, 3tr, ch1) in
same sp, *(3tr, ch1) in next 2 ch-1
sps, (3tr, ch2, 3tr, ch1) in next ch-2
sp; rep from * twice more, (3tr, ch1)
in final 2 ch-1 sps, ss to top of beg
ch-3. [48 sts, 4 ch-2 sps, 12 ch-1 sps]
Fasten off.
Join Yarn B in any st.
Round 5 Ch1 (does not count as st
throughout), *dc in each st and
ch-1 sp to corner sp, 3dc in ch-2 sp;
rep from * around, ss to beg dc.
[72 sts]
Fasten off.
CAT
Using Yarn D, ch11.
Row 1 (RS) Dc in second ch from
hook and each ch across, turn.
[10 sts]
Row 2 (WS) Ch1, dc in each st
across, turn.
Row 3 Ch1, dc2tog, dc in each st to
final 2 sts, dc2tog, turn. [8 sts]
Rows 4-7 Rep Rows 2-3 twice
more. [4 sts]
Row 8 As Row 2.
Row 9 (Dc2tog) twice. [2 sts]
Row 10 As Row 2.
Row 11 Ch1, 2dc in each st across,
turn. [4 sts]
Row 12 Ch1, 2dc in first st, dc in
each st to final st, 2dc in final st,
turn. [6 sts]
Row 13 As Row 12. [8 sts]
Rows 14-15 As Row 2.
Rows 16-17 As Row 3. [4 sts]
Row 18 (Ch2, tr, ch2, ss) in first st,
ss in next 2 sts, (ch2, tr, ch2, ss) in
final st.
Fasten off.
Fasten off.
Sew to the bottom-right corner of
the Cat.
TO FINISH
Using the image as a guide, sew
the Cat to the Square.
Weave in all ends.
TAIL
Using Yarn D, ch15.
Row 1 (RS) Ss in second ch from
hook and each ch across, turn.
[14 sts]
WWW.GATHERED.HOW/SIMPLYCROCHET 21
A YEAR OF GRANNY SQUARES
PawsoMe petS
PopcoRn parTy
by Sarah Reed
by Munira Rasul
31
30
SKILL LEVEL
Easy
YOU WILL NEED
Rows 2-15 Ch1 (does not count as
st throughout), htr in each st
across, turn.
Fasten off.
QA 3.5mm (US E/4) hook
MEASUREMENTS
Square measures approx 10x10cm
(4x4in)
NOTES
Square is worked in rows
throughout.
Paw is made separately and sewn
to the Square at the end.
Parts of this pattern are worked
using the amigurumi method.
Work stitches continuously in a
spiral without closing off each
round with a slip stitch. It may help
to use a stitch marker in the first
stitch of each round, moving it up
as you work.
Colours are referred to as Yarns
A-B.
PAWSOME PETS
SQUARE
Using a 4mm hook and Yarn A,
ch20.
Row 1 (RS) Htr in third ch from
hook and in each ch across, turn.
[18 sts]
22 WWW.GATHERED.HOW/SIMPLYCROCHET
YOU WILL NEED
QAny DK yarn in 3 colours
QAny DK cotton yarn in 2 colours
QA 4mm (US G/6) hook
SKILL LEVEL
Easy Peasy
PAW CENTRE
Using a 3.5mm hook and Yarn B,
make a magic loop.
Round 1 (RS) Ch1, 6dc in loop.
[6 sts]
Round 2 (RS) 2dc in each st
around. [12 sts]
Round 3 (1dc, 2dc in next st) 6
times. [18 sts]
Round 4 (2dc, 2dc in next st) 6
times. [24 sts]
Round 5 (3dc, 2dc in next st) 6
times, ss to beg dc. [30 sts]
Fasten off.
QA 4mm (US G/6) hook
TOES (MAKE 4)
Using a 3.5mm hook and Yarn B,
make a magic loop.
Round 1 (RS) Ch1, 6dc in loop.
[6 sts]
Round 2 (RS) 2dc in each st
around, ss to beg dc. [12 sts]
Square is worked in rounds with
RS facing throughout.
Colours are referred to as Yarns
A-C.
MEASUREMENTS
Square measures approx 11x11cm
(4¼x4¼in)
ABBREVIATIONS
pc 5tr in st/sp indicated, remove
live loop from hook, insert hook in
top of first tr, place loop on hook
and pull through st, ch1 to close
For a full list, see page 86 of
Simply Crochet magazine
NOTES
TO FINISH
Use the image as a guide.
Sew the Paw pieces to the Square.
Weave in all ends.
POPCORN PARTY
Using Yarn A, make a magic loop.
Round 1 (RS) Ch3 (counts as tr
throughout), 11tr in loop, ss to top
of beg ch-3. [12 sts]
Fasten off.
Join Yarn B in any st.
Round 2 Ch3, tr in st at base of
ch-3, 2tr in next 5 sts, (pc, ch1) in
next 6 sts, ss to top of beg ch-3.
[18 sts, 6 ch-1 sps]
Fasten off.
Join Yarn C in first st.
Round 3 Ch3, tr in st at base of
ch-3, (tr in next st, 2tr in next st) 5
times, tr in next st, (2tr in pc, pc in
ch-1 sp) 6 times, ss to top of beg
ch-3. [36 sts]
Fasten off.
Join Yarn A in 13th st from Round 3.
Round 4 Ch1 (does not count as st
throughout), dc in first st, *dc in
next st, htr in next st, tr in next st,
(2tr, ch2, 2tr) in next st, tr in next st,
htr in next st, dc in next 3 sts; rep
from * 3 times more omitting final
st on last rep, ss to beg dc.
[48 sts, 4 ch-2 sps]
Fasten off.
Join Yarn C in any st.
Round 5 Ch1, *dc in each st to ch-2
sp, (dc, ch2, dc) in ch-sp; rep from *
around, ss to beg dc.
[56 sts, 4 ch-2 sps]
Fasten off.
A YEAR OF GRANNY SQUARES
PerfeCt popPy
In thE preseNt
by Sara Scales
by Caroline Warren
32
SKILL LEVEL
Easy peasy
YOU WILL NEED
QAny DK yarn in black, red and
green
QA 3.5mm (US E/4) hook
MEASUREMENTS
Square measures approx 11x11cm
(4¼x4¼in)
33
Row 2 (WS) Ch1, dc in first st, htr in
next 2 sts, 2tr in next 2 sts, htr in
next 2 sts, dc in final st, turn.
[10 sts]
Row 3 Ch1, dc in first st, htr in next
2 sts, tr in next 4 sts, htr in next 2
sts, dc in final st, turn.
Fasten off.
*Join red in fl of next unworked st
from Round 2, and work Rows 1-3
to make next Petal; rep from twice
more.
PERFECT POPPY
CENTRE
Using black, make a magic loop.
Round 1 (RS) Ch1 (does not count
as st throughout), 8dc in loop.
[8 sts]
Round 2 2dc into each dc around,
ss to beg dc. [16 sts]
Fasten off.
FIRST PETAL
Join red in fl of any st.
Row 1 (RS) Ch1, 2dc in next 4 sts,
turn. [8 sts]
YOU WILL NEED
QAny DK yarn in 3 colours
QA 3.5mm (US E/4) hook
QA 4mm (US G/6) hook
MEASUREMENTS
Square measures approx 10x10cm
(4x4in)
NOTES
NOTES
Parts of this pattern are worked
using the amigurumi method.
Work stitches continuously in a
spiral without closing off each
round with a slip stitch. It may help
to use a stitch marker in the first
stitch of each round, moving it up
as you work.
SKILL LEVEL
Easy peasy
SQUARE
Join green in any unused bl from
Round 2.
Round 3 (RS) Ch3 (counts as first tr
throughout) tr in the next 3 sts,
ch3, (tr in the next 4 st, ch3) 3
times, ss to top of beg ch-3.
[16 sts, 4 ch-3 sps]
Round 2 Ch3, *tr in each st to ch-3
sp, (3tr, ch3, 3tr) in ch-sp; rep from *
around, ss to top of beg ch-3.
[40 sts, 4 ch-3 sps]
Rounds 3-4 As Round 2.
[88 sts, 4 ch-3 sps]
Fasten off.
Join black in any st.
Round 5 Ch1, *dc in each st to
ch-sp, 3dc in ch-sp; rep from *
around, ss to beg dc.
Fasten off and weave in ends.
Square is worked in rounds with
RS facing throughout.
Colours are referred to as Yarns
A-C.
Change colour on the final yrh of
st before colour change is
indicated. Carry the unused colour
across the top of your sts,
enclosing the strand as you work.
IN THE PRESENT
SQUARE
Using a 3.5mm hook and Yarn A,
make a magic loop.
Round 1 (RS) Ch3 (counts as tr
throghout), 2tr in loop, ch2, (3tr in
loop, ch2) 3 times, ss to top of beg
ch-3. [12 sts. 4 ch-sps]
Round 2 Ch3, *tr in next 2 sts,
change to Yarn B, (2tr, ch2, 2tr) into
ch-2 sp, change to Yarn A, tr in
next st; rep from * 3 times more
omitting final st on last rep, ss to
top of beg ch-3.
[28 sts, 4 ch-3 sps]
Round 3 Ch3, *tr in next 2 sts,
change to Yarn B, tr in next 2 sts
(2tr, ch2, 2tr) into ch-2 sp, tr in next
2 sts, change to Yarn A, tr in next
st; rep from * 3 times more
omitting final st on last rep, ss to
top of beg ch-3. [44 sts, 4 ch-3 sps]
Fasten off.
Join Yarn C in any ch-2 sp.
Round 4 Ch3, (tr, ch2, 2tr) in same
sp, *tr in each st across to next
ch-sp, (2tr, ch2, 2tr) in ch-sp; rep
from * around, ss to top of beg
ch-3. [60 sts, 4 ch-2 sps]
Round 5 Ch3, *tr in each st across
to ch-2 sp, (2tr, ch2, 2tr) in ch-sp;
rep from * around, ss to top of beg
ch-3.
Fasten off.
BOW
Using a 4mm hook and Yarn A, ch6
and ss in last ch from hook.
Row 1 Ch1, (does not count as st),
10dc into ring, ss to beg dc, ch6, ss
in last ch from hook, turn.
Row 2 Ch1, 10dc in ch-6 sp, ss in last
dc on Row 1.
Fasten off leaving a 20cm tail.
Wrap the tail around the centre of
the Bow and sew to Round 4, using
the image as a guide.
WWW.GATHERED.HOW/SIMPLYCROCHET 23
A YEAR OF GRANNY SQUARES
gaRden Party
by Kelly Wilson Moore
34
SKILL LEVEL
GARDEN PARTY
Easy peasy
SQUARE
Using light blue, ch19.
Row 1 (WS) Dc in second ch from
hook and each ch across, turn.
[18 sts]
Row 2 Ch1 (does not count as st
throughout), dc in each st across,
turn.
Rows 3-18 Repeat Row 2. [18 sts]
Fasten off.
YOU WILL NEED
QAny DK yarn in light blue, white
and an assortment of stash
colours for the bunting
QA 4mm (US G/6) hook
MEASUREMENTS
Square measures 12x12cm
(4¾x4¾in)
ABBREVIATIONS
surface crochet Position yarn on
WS, insert hook from RS to WS, yrh
and pull up a loop, *insert hook
back through to WS in direction
you want to travel, yrh and pull up
a loop, pull through loop on hook;
rep from * as required
For a full list, see page 86 of
Simply Crochet magazine
NOTES
Main Square is worked in rows.
Bunting Flags are made separately
and attached with surface crochet.
24 WWW.GATHERED.HOW/SIMPLYCROCHET
BORDER
With RS facing, join white in any
corner.
Round 1 (RS) Ch1, 18dc, ch2, 18dc
evenly down left side, ch2, 18dc
along the bottom, ch2, 18dc
evenly up right side, ch2, ss to first
dc. [72 sts]
Round 2 Ch3, (counts as a tr),
*(skip 1 st, tr in next st, tr in
skipped st) 8 times, tr in next st,
(2tr, ch2, 2tr) in ch-2 sp, tr in next st;
rep from * 3 times more omitting
last tr on final st, ss to top of beg
ch-3. [88 sts]
Fasten off and weave in ends.
BUNTING FLAGS (MAKE 8)
Using any colour, make a magic
loop.
Row 1 (RS) Ch1, dc in loop, turn.
[1 st]
Row 2 Ch1, 2dc in st, turn. [2 sts]
Row 3 Ch1, 1dc, 2dc in last st, turn.
[3 sts]
Row 4 Ch1, 2dc, 2dc in last st, turn.
[4 sts]
Row 5 Ch1, 3dc, 2dc in last st.
[5 sts]
Fasten off and weave in ends.
TO FINISH
Use the image as a guide.
Pin the Bunting Flags to the
Square. Using white, surface
crochet across the top of the Flags
to secure them to the Square.
Fasten off and weave in ends.
A YEAR OF GRANNY SQUARES
PrettY lattiCe Neon stArburSt
by Munira Rasul
by Munira Rasul
36
35
SKILL LEVEL
Tricky
YOU WILL NEED
QAny DK in 2 colours
QA 4mm (US G/6) hook
MEASUREMENTS
Square measures approx 10x10cm
(4x4in)
ABBREVIATIONS
puff st Yrh, (insert hook in st/sp
indicated, yrh and pull up a loop) 4
times, yrh and pull through all
loop on hook
spiked tr Yrh, insert hook in st sp
indicated, yrh and pull loop up to
height of current row, (yrh and pull
through 2 loops) twice
For a full list, see page 86 of
Simply Crochet magazine
NOTES
Square is worked in rounds with
RS facing throughout.
Colours are referred to as Yarns
A-B.
PRETTY LATTICE
Using Yarn A, make a magic loop.
Round 1 (RS) Ch5 (counts as tr,
ch2), (tr in loop, ch2) 7 times, ss to
third ch of beg ch-5.
[8 sts, 8 ch-2 sps]
Round 2 Ss into ch-2 sp, ch1 (does
not count as a st throughout),
(puff st in ch-2 sp, ch2) 8 times,
ss to beg puff st.
Fasten off.
Join Yarn B in any ch-2 sp.
Round 3 Ch3 (counts as tr
throughout), (tr, ch3, 2tr) in same
sp, ch2, skip puff st, FPtr around tr
in Round 1, ch2, skip next puff st,
*(2tr, ch3, 2tr) in ch-3 sp, ch2, skip
next puff st, FPtr around tr in
Round 1, ch2, skip next puff st; rep
from * twice more, ss to top of beg
ch-3. [20 sts, 4 ch-3 sps, 8 ch-2 sps]
Fasten off.
Join Yarn A in any ch-2 sp.
Round 4 Ch3, (2tr, ch3, 3tr) in
same sp, *ch3, spike tr in ch-3 sp in
Round 2 working behind FPtr in
Round 3, ch3, (3tr, ch3, 3tr) in next
ch-3 sp; rep from * 3 times more
omitting final corner on last rep, ss
to top of beg ch-3.
[28 sts, 12 ch-3 sps]
Round 5 Ch2 (counts as htr), *htr
in next 2 sts, (htr, ch2, htr) in ch-3
sp, htr in next 3 sts, 3dc in next 2
ch-3 sp, htr in next st; rep from * 3
times more omitting final st on
last rep, ss to top of beg ch-2.
[56 sts, 4 ch-3 sps]
Fasten off and weave in ends.
SKILL LEVEL
Easy peasy
YOU WILL NEED
QAny DK yarn in 3 colours
QA 4mm (US G/6) hook
MEASUREMENTS
Square measures approx 10x10cm
(4x4in)
NOTES
Square is worked in rounds with
RS facing throughout.
Colours are referred to as Yarns
A-C.
Fasten off.
Join Yarn C in first dc.
Round 5 Ch1, dc in first 2 sts, *htr
in next 2 sts, tr in next 2 sts, ch2, tr
in next 2 sts, htr in next 2 sts, dc in
next 4 sts; rep from * 3 times more
omitting final 2 sts on last rep, ss to
beg dc. [48 sts, 4 ch-2 sps]
Round 6 Ch2 (counts as htr), *htr
in each st to ch-2 sp, (2htr, ch2,
2htr) in ch-sp; rep from * around, ss
to top of beg ch-2.
[64 sts, 4 ch-2 sps]
Fasten off and weave in ends.
NEON STARBURST
Using Yarn A, make a magic loop.
Round 1 (RS) Ch3 (counts as tr
throughout), 2tr in loop, ch2, (3tr in
loop, ch2) 5 times, ss to top of beg
ch-3. [18 sts, 6 ch-2 sps]
Round 2 *Ch4, dc in second ch
from hook, htr in next ch, tr in next
ch, ss in ch-2 sp; rep from * 5 times
more. [6 star points]
Fasten off.
Join Yarn B in top of any star point.
Round 3 (Ch3, tr in ss between
points, ch3, ss in next point) 6
times working final ss in base of
beg ch-3. [12 ch-3 sps, 6 tr, 6 ss]
Round 4 Ch1, 4dc in each ch-3 sp
around, ss to beg dc. [48 sts]
WWW.GATHERED.HOW/SIMPLYCROCHET 25
A YEAR OF GRANNY SQUARES
Home Sweet home
by Karen Hubbard
37
SKILL LEVEL
Tricky
find tutorials on these embroidery
techniques here: bit.ly/3DplXSt
YOU WILL NEED
HOME SWEET HOME
QAny DK yarn in olive green, blue,
SQUARE
Using olive green, ch20.
Row 1 (RS) Dc in second ch from
hook and each ch across, turn.
[19 sts]
Row 2(WS) Ch1 (does not count as
a st throughout), dc in each st
across, turn.
Rows 3-4 As Row 2.
Change to blue.
Row 5 Ch1, dc in next 3 sts, change
to cream, dc in next 13 sts, change
to blue, dc in next 3 sts, turn.
Rows 6-19 Cont in pattern using
the Chart for all colour changes.
Fasten off.
cream, red, brown, emerald and
purple
QA 4mm (US G/6) hook
MEASUREMENTS
Square measures approx 10c10cm
(4x4in)
NOTES
Square is worked in rows.
There is a Chart on page 39, which
you will need to refer to. Each
small square represents 1dc. Read
all RS rows from right to left and
WS rows from left to right. The first
few rows of the Chart have been
written out to guide you. Change
colour on the final yrh of st before
colour change is indicated. Carry
the unused colour across the top
of your sts, enclosing the strand as
you work.
Square is embellished with
embroidery at the end. You can
26 WWW.GATHERED.HOW/SIMPLYCROCHET
BORDER
Join cream in top-right corner.
Round 1 Ch1, *3dc in corner, dc in
each st across, 3dc in corner, dc in
each row end; rep from * once
more, ss to first dc. [88 sts]
Fasten off and weave in ends.
DOOR
Using brown, ch5.
Row 1 (RS) Dc in second ch from
hook and each ch across. [4 sts]
Fasten off.
TO FINISH
Use the image as a guide
throughout.
Sew the Door to the Square.
Using brown, embroider the
windows.
Using emerald, embroider small
straight sts around the Door for
the plant.
Using purple, embroider flowers
with French knots.
Weave in all ends.
SCAN ME
Scan this code to
find tutorials on
the embroidery
techniques used
A YEAR OF GRANNY SQUARES
SunflOwer Smiles
SunshiNe
by Jo Hill
by Munira Rasul
39
38
SKILL LEVEL
Easy peasy
YOU WILL NEED
QAny DK yarn in black, brown,
yellow and green
QA 3.5mm (US E/4) hook
MEASUREMENTS
Square measures approx 10c10cm
(4x4in)
(ch2, 3-tr cl) in each sp around, ch2,
ss to beg cl. [16 sts, 16 ch-2 sps]
Fasten off.
Join green in any ch-2 sp.
Round 4 Ch4 (counts as dtr), (2dtr,
ch2, 3dtr) in same sp, *3tr in next
ch-2 sp, 3htr in next ch-2 sp, 3tr in
next ch-2 sp**, (3dtr, ch2, 3dtr) in
next ch-2 sp; rep from * 3 times
more ending final rep at **, ss to
top of beg ch-4. [60 sts, 4 ch-2 sps]
Fasten off and weave in ends.
SKILL LEVEL
Easy peasy
YOU WILL NEED
QAny DK yarn in dark blue, light
blue, white and yellow
QA 4mm (US G/6) hook
MEASUREMENTS
Square measures approx 11x11cm
(4¼x4¼in)
NOTES
NOTES
Square is worked in rounds with
RS facing throughout.
Square is worked in rounds with
RS facing throughout.
Sun is made separately and sewn
to the Square at the end.
Colours are referred to as Yarns A-D.
SUNFLOWER SMILES
Using black, make a magic loop.
Round 1 Ch3 (counts as tr
throughout), 15tr in loop, ss to top
of beg ch-3. [16 sts]
Fasten off.
Join brown in sp between any 2
sts, work next round in sps
between sts.
Round 2 Ch3, 2-tr cl in same sp,
ch1, (3-tr, ch1) in each sp around, ss
to beg cl. [16 sts, 16 ch-1 sps]
Fasten off.
Join yellow in any ch-1 sp.
Round 3 Ch3, 2-tr cl in same sp,
SUNSHINE
SQUARE
Using dark blue, make a magic
loop.
Round 1 (RS) Ch3 (counts as tr
throughout), 3tr in loop, ch3, (4tr in
loop, ch3) 3 times, ss to top of beg
ch-3. [16 sts, 4 ch-3 sps]
Round 2 Ch3, *tr in each st to ch-3
sp, (tr, ch3, tr) in ch-sp; rep from *
around, ss to top of beg ch-3.
[24 sts, 4 ch-3 sps]
Round 3 As Round 2.
[32 sts, 4 ch-3 sps]
Fasten off.
Join light blue in any st.
Round 4 Ch3, *tr in each st to ch-3
sp, (2tr, ch3, 2tr) in ch-sp; rep from
* around, ss to top of beg ch-3.
[48 sts, 4 ch-3 sps]
Fasten off.
Join white in any st.
Round 5 Ch1, (dc in each st to ch-3
sp, 3dc in ch-sp) rep around, ss to
beg dc. [60 sts]
Fasten off.
SUN
Using yellow, make a magic loop.
Round 1 (RS) Ch1 (does not count
as st throughout), 6dc in loop, ss to
beg dc. [6 sts]
Round 2 Ch1, 2dc in each st
around, ss to beg dc. [12 sts]
Round 3 *Ch6, ss in second ch
from hook, ss in next 4 ch, ss
around BP of next dc from Round
2; rep from * 11 times more.
Fasten off leaving a 50 tail.
Using the image as a guide, sew
the Sun to the centre of the
Square.
WWW.GATHERED.HOW/SIMPLYCROCHET 27
A YEAR OF GRANNY SQUARES
SummeR sun
Up, up aNd awAy
by Jo Hill
by Sarah Reed
41
40
SKILL LEVEL
Easy peasy
YOU WILL NEED
QAny DK yarn in yellow, blue and
white
QA 4mm (US G/6) hook
MEASUREMENTS
Square measures approx 10x10cm
(4x4in)
ABBREVIATIONS
puff st (Yrh, insert hook in sp
indicated, yrh and pull up a loop)
4 times, yrh and pull through all
loops on hook
For a full list, see page 86 of
Simply Crochet magazine
NOTES
Square is worked in rounds with RS
facing throughout.
Work into the sps between sts and
not into the top of the st.
Join blue in any ch-1 sp.
Round 3 Ch3, (2tr, ch2, 3tr) in same
sp, *3tr in next 3 ch-1 sps, (3tr, ch2,
3tr) in next sp; rep from * twice
more, 3tr in next 3 ch-1 sps, ss to
top of beg ch-3. [60 sts, 4 ch-2 sps]
Fasten off.
Join white in sp between any 2 tr.
Round 4 Ch3, *tr in each sp to ch-2
sp, (3tr, ch2, 3tr) in ch-2 sp; rep from
* around, ss to top of beg ch-3.
[80 sts, 4 ch-2 sps]
Fasten off and weave in ends.
SKILL LEVEL
Easy peasy
YOU WILL NEED
QAny cotton DK yarn in blue,
white and pink
QA 4mm (US G/6) hook
QA 3.5mm (US E/4) hook
MEASUREMENTS
Square measures approx 10x10cm
(4x4in)
NOTES
Square is worked in rows.
Balloons are made separately and
sewn to the Square at the end.
Parts of this pattern are worked
using the amigurumi method.
Work stitches continuously in a
spiral without closing off each
round with a slip stitch. It may help
to use a stitch marker in the first
stitch of each round, moving it up
as you work.
SUMMER SUN
UP, UP AND AWAY
Using yellow, make a magic loop.
Round 1 (RS) Ch3 (counts as tr
throughout), 15tr in loop, ss to top
of beg ch-3. [16 sts]
Round 2 Ss in sp between 2 tr, ch2
(does not count as st), (puff st, ch1)
in each sp around, ss to beg puff.
[16 sts, 16 ch-1 sps]
Fasten off.
SQUARE
Using a 4mm hook and blue, ch20.
Row 1 (RS) Htr in third ch from
hook and in each ch across, turn.
[18 sts]
Rows 2-15 Ch1 (does not count as
st throughout), htr in each st
across, turn.
Fasten off.
28 WWW.GATHERED.HOW/SIMPLYCROCHET
BALLOONS
Make 2 using pink and 1 using
white.
Using a 3.5mm hook, make a
magic loop.
Round 1 (RS) Ch1, 6dc in loop.
[6 sts]
Round 2 (RS) 2dc in each st
around. [12 sts]
Round 3 (1dc, 2dc in next st) 6
times, turn. [18 sts]
Round 4 (WS) Ch1, dc in next st,
leave rem sts unworked.
Fasten off leaving a 20cm tail.
TO FINISH
Use the image as a guide.
Sew the Balloons to the Square.
Thread the tail from each Balloon
through the centre of Row 1 and
secure on the WS.
Weave in all ends.
A YEAR OF GRANNY SQUARES
Sweet valiMa
Very Cherry
by Krisztina Matejcsok-Edömér
by Helen Anderson
43
42
SKILL LEVEL
Tricky
YOU WILL NEED
QAny DK yarn
QA 4mm (US G/6) hook
MEASUREMENTS
Square measures approx 12x12cm
(4¾x4¾in)
ABBREVIATIONS
FPdtr2tog *Yrh twice, insert hook
around post of st indicated
working from front to back to
front, yrh and pull up a loop, (yrh
and pull through 2 loops) twice,
rep from * once more, yrh and pull
through all loops on hook
For a full list, see page 86 of
Simply Crochet magazine
NOTES
Square is worked in rounds with
RS facing throughout.
Slip stitches are not included in
stitch counts.
SWEET VALIMA
Make a magic loop.
Round 1 (RS) Ch1 (does not count
as st throughout), (2-tr cl in loop,
ch2) 6 times, ss to top of beg cl.
[6 sts, 6 ch-2 sps]
Round 2 Ss to ch-sp, ch1, *(2-tr cl,
ch2, 2-tr cl) in ch-sp, ch1, skip 1 st;
rep from * 5 times more, ss to beg
cl. [12 sts, 6 ch-2 sps, 6 ch-1 sps]
Round 3 Ch1, FPtr around first st,
3tr in ch-2 sp, FPtr around next st,
tr in ch-1 sp, *FPtr around next st,
3tr in ch-2 sp, FPtr around next st,
tr in ch-1 sp; rep from * 4 times
more, ss to beg FPtr. [36 sts]
Round 4 Ch1, 2htr in first st, htr in
next st, (2htr in next st, htr in next
st) 17 times, ss to beg htr. [54 sts]
Round 5 Ch1, dc in first 5 sts,
FPdtr2tog around first and second
FPtr from Round 3, *dc in next 9
sts, FPdtr2tog around next 2 FP sts
from Round 3; rep from * 4 times
more, dc in final 4 sts, ss to beg dc.
[60 sts]
Round 6 Ch1, *2dc in next st, dc in
next 4 sts, FPhtr around FPtr2tog,
dc in next 4 sts, ; rep from * 5 times
more, ss to beg dc. [66 sts]
Round 7 Ch1, dc in first 6 sts, 2dc
in next st, *dc in next 10 sts, 2dc in
next st; rep from * 4 times more, dc
in next 4 sts, ss to beg dc. [72 sts]
Round 8 Ch3 (counts as tr), *tr in
next 2 sts, htr in next 2 sts, dc in
next 5 sts, htr in next 2 sts, tr in
next 3 sts, dtr in next st, (2dtr, ch2,
2dtr) in next st, dtr in next st, tr in
next st; rep from * 3 times more
omitting final st on last rep, ss to
top of beg ch-3.
Fasten off and weave in all ends.
SKILL LEVEL
Easy peasy
YOU WILL NEED
QAny DK yarn in Yarn A white,
Yarn B pink, Yarn C green
QA 3mm (US C/2 or D/3) hook
MEASUREMENTS
Square measures approx 10x10cm
(4x4in)
NOTES
Square is worked in rows.
There is a Chart on page 39, which
you will need to refer to. Each
small square represents 1dc. Read
all RS rows from right to left and
WS rows from left to right. The first
few rows of the Chart have been
written out to guide you.
Change colour on the final yrh of
st before colour change is
indicated. Carry the unused colour
across the top of your sts,
enclosing the strand as you work.
change to Yarn A, dc in next 12 sts,
turn.
Row 3 Ch1, dc in first 11 sts,
change to Yarn B, dc in next 6 sts,
change to Yarn A, dc in final 3 sts,
turn.
Row 3 Ch1, dc in first 2 sts, change
to Yarn B, dc in next 8 sts, change
to Yarn A, dc in final 10 sts, turn.
Rows 4-18 Cont in patt, using the
Chart for all colour changes.
Fasten off Yarns B and C.
Rows 19-20 Ch1, dc in each st
across, turn.
Do not fasten off.
BORDER
Cont with Yarn A.
Round 1 (RS) Ch1, *dc in each st
across, ch1, dc in each row-end
down side, ch1; rep from * once
more, ss to beg dc.
[80 sts, 4 ch-1 sps]
Fasten off and weave in ends.
VERY CHERRY
SQUARE
Using Yarn A, ch21.
Row 1 (RS) Dc in second ch from
hook and in each ch across, turn.
[20 sts]
Change to Yarn B.
Row 2 (WS) Ch1, dc in first 4 sts,
*change to Yarn B, dc in next 4 sts,
WWW.GATHERED.HOW/SIMPLYCROCHET 29
A YEAR OF GRANNY SQUARES
WindmiLl
yAy!
by Maria Jęczmyk
by Deb Ward
45
44
SKILL LEVEL
Easy peasy
YOU WILL NEED
QAny DK weight yarn in yellow,
blue, teal and green
QA 3 mm (US C/2 or D/3 hook)
MEASUREMENTS
Square measures approx 10x10cm
(4x4in)
NOTES
Square is worked in turned rounds.
WINDMILL
Using yellow, ch5, ss to first ch to
make a ring, turn.
Round 1 (RS) Ch3 (counts as st
here and throughout), 2tr, ch1,
change to blue, *ch1, 3tr, ch1*,
change to teal, rep *-*, change to
green, rep *-*, ch1, ss top top of
beg ch-3, turn. [20 sts]
Round 2 (WS) Ss in ch-sp, ch3, tr, tr
in 3 sts of previous row, 2tr in
ch-sp, ch1, change to teal, *ch1, 2tr
in ch-sp, 3tr, 2tr in ch-sp, ch1*,
change to blue, rep *-*, change to
yellow, rep *-*, ch1, ss top top of
beg ch-3, turn. [36 sts]
Round 3 (RS) Ss in ch-sp, ch3, tr, tr
30 WWW.GATHERED.HOW/SIMPLYCROCHET
in 7 sts of previous row, 2tr in
ch-sp, ch1, change to blue, *ch1, 2tr
in ch-sp, 7tr, 2tr in ch-sp, ch1*,
change to teal, rep *-*, change to
green, rep *-*, ch1, ss top top of
beg ch-3, turn. [52 sts]
Round 4 (WS) Ss in ch-sp, ch3, tr, tr
in 11 sts of previous row, 2tr in
ch-sp, ch1, change to teal, *ch1, 2tr
in ch-sp, 11tr, 2tr in ch-sp, ch1*,
change to blue, rep *-*, change to
yellow, rep *-*, ch1, ss top top of
beg ch-3, turn. [68 sts]
Round 5 (RS) Ss in ch-sp, *2dc in
ch-sp, dc in next 15 st, 2dc in
ch-sp*, change to blue, rep *-*,
change to teal, rep *-*, change to
green, rep *-*, ss to first st. [76 sts]
Fasten off and weave in ends.
SKILL LEVEL
Easy peasy
YOU WILL NEED
QAny DK yarn in white, black,
raspberry, green, yellow, orange,
blue and red
QA 3mm (US C/2 or D/3) hook
MEASUREMENTS
Square measures approx 10x10cm
(4x4in)
NOTES
Square is worked in rows.
There is a Chart on page 39, which
you will need to refer to. Each
small square represents 1dc. Read
all RS rows from right to left and
WS rows from left to right. The first
few rows of the Chart have been
written out to guide you.
Change colour on the final yrh of
st before colour change is
indicated. Carry the unused colour
across the top of your sts,
enclosing the strand as you work.
YAY!
Using white, ch26.
Row 1 (RS) Dc in second chain
from hook and in each across, turn.
[25 sts]
Change to raspberry.
Row 2 (WS) Ch1, dc in first st,
*change to white, dc in next 3 sts,
change to raspberry, dc in next st;
rep from * 5 times more, turn.
Change to white.
Row 3 Ch1, dc in first st, (change to
raspberry, dc in next st, change to
white, dc in next st) 12 times, turn.
Rows 4-24 Continue in pattern
using the Chart for all colour
changes.
Fasten off and weave in ends.
A YEAR OF GRANNY SQUARES
shinY jellY
by Jess Bennett
46
SKILL LEVEL
SHINY JELLY
Row 2 Ch3 (counts as tr
throughout), tr in next 3 sts,
*change to Yarn A, tr in next 3 sts,
change to Yarn B, tr in next 3 sts;
rep from * twice more, tr in final st,
turn.
Change to Yarn A.
Row 3 Ch3, tr in next 3 sts,
*change to Yarn B, tr in next 3 sts,
change to Yarn A, tr in next 3 sts;
rep from * twice more, tr in final st,
turn.
Row 4-10 Rep Rows 2-3, ending on
a Row 2 rep.
Fasten off.
SQUARE
Using a 3mm hook and Yarn A,
ch25.
Row 1 (RS) Tr in fourth ch from
hook (skipped ch count as tr), tr in
next 2 ch, *change to Yarn B, tr in
next 3 ch, change to Yarn A, tr in
next 3 ch; rep from * twice more, tr
in final ch, turn. [23 sts]
Change to Yarn B.
BORDER
Join Yarn C in first st across top
edge.
Round 1 (RS) Ch1, *(dc, ch1, dc) in
first st, dc in next 21 sts, (dc, ch1,
dc) in next st, 20dc evenly down
row-end edge; rep from * once
more, ss to beg dc. [90 sts]
Fasten off.
Easy peasy
YOU WILL NEED
QAny DK yarn in Yarn A white,
Yarn B blue, Yarn C pink
QA 4mm (US G/6) hook
QA 3mm (US C/2 or D/3) hook
MEASUREMENTS
Square is worked in rows.
Jelly is made separately in 2 pieces
and sewn to the Square at the end.
JELLY BASE
Using a 4mm hook and Yarn C,
ch14.
Row 1 (WS) Dc in second ch from
hook and each ch across, turn.
[13 sts]
Row 2 (RS) Ch1 (does not count as
st throughout), dc in each st
across, turn.
Rows 3-5 AS Row 2.
Row 6 Ch1, dc in first st, (skip next
st, 5tr in next st, skip next st, dc in
next st) 3 times.
Fasten off.
st, 5tr in next st, skip next st, dc in
next st) twice.
Fasten off.
TO FINISH
Use the image as a guide.
Using Yarn A, embroider highlights
over 3 sts on each 5-tr group on
both Jelly pieces.
Sew the Jelly Base and Top to the
Square.
Weave in all ends.
JELLY TOP
Using a 4mm hook and Yarn C,
ch10.
Row 1 (RS) Dc in second ch from
hook and each ch across, turn.
[9 sts]
Row 2 (WS) Ch1, dc in each st
across, turn.
Rows 3-8 AS Row 2.
Row 9 Ch1, dc in first st, (skip next
WWW.GATHERED.HOW/SIMPLYCROCHET 31
A YEAR OF GRANNY SQUARES
koLa thE koaLa
by Sarah Reed
47
SKILL LEVEL
Tricky
YOU WILL NEED
QAny DK yarn in grey, white, black
and blue
QA 4mm (US G/6) hook
QA 3.5mm (US E/5) hook
MEASUREMENTS
Square measures 10x10cm (4x4in)
sewn to the Square at the end.
Parts of this pattern are worked
using the amigurumi method.
Work stitches continuously in a
spiral without closing off each
round with a slip stitch. It may help
to use a stitch marker in the first
stitch of each round, moving it up
as you work.
When fastening off, use the
invisible join (see Abbreviations).
ABBREVIATIONS
KOLA THE KOALA
inv join Fasten off without closing
off round with a ss. Pull the final
loop so that the tail comes out of
the top of the final st, thread the
tail onto a darning needle. Insert
the needle into the top of the
second st of the round, from front
to back. Turn your work over so WS
is facing, thread the needle
through the back of the final st.
Pull until the loop of yarn that is
carried over the first st of the
round has the same tension as the
other sts, weave in end
For a full list, see page 86 of
Simply Crochet magazine
SQUARE
Using a 4mm hook and grey, make
a magic loop.
Round 1 (RS) Ch1 (does not count
as st throughout), 6dc in loop.
[6 sts]
Round 2 (RS) 2dc in each st
around. [12 sts]
Round 3 (1dc, 2dc in next st) 6
times. [18 sts]
Round 4 (2dc, 2dc in next st) 6
times. [24 sts]
Round 5 (3dc, 2dc in next st) 6
times. [30 sts]
Round 6 (4dc, 2dc in next st) 6
times. [36 sts]
Round 7 (5dc, 2dc in next st) 6
times. [42 sts]
Round 8 (6dc, 2dc in next st) 6
times. [48 sts]
Inv join.
NOTES
Square is worked in rounds with
RS facing throughout.
Diamond is made separately and
32 WWW.GATHERED.HOW/SIMPLYCROCHET
Join blue in any st.
Round 9 Ch6 (counts as dtr, ch2),
dtr in st at base of ch-6, *dtr in next
st, tr in next 2 sts, htr in next 2 sts,
dc in next st, htr in next 2 sts, tr in
next 2 sts, dtr in next st, (dtr, ch2,
dtr) in next st; rep from * 3 times
more ending final rep at **, ss to
fourth ch of beg ch-6.
[52 sts, 4 ch-2 sps]
Round 10 Ch3 (counts as tr), *(2tr,
ch2, 2tr) in ch-sp, tr in each st to
next ch-sp; rep from * 3 times
more, ss to top of beg ch-3.
[68 sts, 4 ch-2 sps]
Fasten off and weave in ends.
Change to grey.
Row 5 Ch1, (3dc, 2dc in next st) 3
times. [15 sts]
Fasten off.
MOUTH
Using a 3.5mm hook and white,
make a magic loop.
Row 1 (RS) Ch1, 3dc in loop, turn.
Row 2 (WS) Ch1, 2dc in each st
across, turn. [6 sts]
Row 3 Ch1, (1dc, 2dc in next st) 3
times. [9 sts]
Fasten off.
EYES (MAKE 2)
Using a 3.5mm hook and black,
make a magic loop.
Round 1 (RS) Ch1, 4dc in loop, ss
to beg dc.
Inv join.
EARS (MAKE 2)
Using a 3.5mm hook and white,
make a magic loop.
Rows 1-3 As Rows 1-3 of Mouth.
[9 sts]
Row 4 Ch1, (2dc, 2dc in next st) 3
times. [12 sts]
NOSE
Using a 3.5mm hook and black,
ch5.
Round 1 (RS) Dc in second ch
from hook, dc in next 2 ch, 3dc in
next ch, turn to work in opposite
side of foundation ch, dc in next 2
ch, 2dc in final ch. [10 sts]
Round 2 (2dc in next st, 2dc, 2dc
in next st, 1dc) twice, ss to beg dc.
[14 sts]
TO FINISH
Using the image as a guide, sew
the Ears, Eyes, Nose and Mouth to
the Square.
Weave in all ends.
A YEAR OF GRANNY SQUARES
MakerS gonnA
Make
by Hae Barker
48
SKILL LEVEL
MAKERS GONNA MAKE
Tricky
SQUARE
Using Yarn A, make a magic loop.
Round 1 (RS) Ch3 (counts as tr
throughout), 2tr in loop, ch2, (3tr in
loop, ch2) 3 times, ss to top of beg
ch-3. [12 sts, 4 ch-2 sps]]
Fasten off.
Join Yarn B in any ch-2 sp.
Round 2 Ch3, (2tr, ch2, 3tr, ch1) in
same sp, (3tr, ch2, 3tr, ch1) in each
ch-2 sp around, ss to top of beg
ch-3. [24 sts, 4 ch-2 sps, 4 ch-1 sps]
Fasten off.
Join Yarn C in any ch-2 sp.
Round 3 Ch3, (2tr, ch3, 3tr, ch1) in
same sp, *(3tr, ch1) in next ch-1 sp,
(3tr, ch2, 3tr, ch1) in next ch-1 sp;
rep from * twice more, (3tr, ch1) in
final ch-1 sp, ss to top of beg ch-3.
[36 sts, 4 ch-2 sps, 8 ch-1 sps]
Fasten off.
Join Yarn A in any ch-2 sp.
Round 4 Ch3, (2tr, ch3, 3tr, ch1) in
same sp, *(3tr, ch1) in next 2 ch-1
sps, (3tr, ch2, 3tr, ch1) in next ch-1
YOU WILL NEED
QAny DK yarn in 4 colours
QA 4mm (US G/6) hook
QToy stuffing
MEASUREMENTS
Square measures approx 10x10cm
(4x4in)
NOTES
Square is worked in rounds with
RS facing throughout.
Yarn Ball and Hook are made
separately and sewn to the Square
at the end.
Parts of this pattern are worked
using the amigurumi method.
Work stitches continuously in a
spiral without closing off each
round with a slip stitch. It may help
to use a stitch marker in the first
stitch of each round, moving it up
as you work.
sp; rep from * twice more, (3tr, ch1)
in final 2 ch-1 sps, ss to top of beg
ch-3. [48 sts, 4 ch-2 sps, 12 ch-1 sps]
Fasten off.
Join Yarn B in any st.
Round 5 Ch1 (does not count as st
throughout), *dc in each st and
ch-1 sp to corner ch-2 sp, 3dc in
ch-2 sp; rep from * around, ss to
beg dc. [72 sts]
Fasten off.
Row 1 (RS) Ss in second ch from
hook and each ch across.
Fasten off.
TO FINISH
Use the image as a guide.
Stuff the Yarn Ball and sew to the
Square. Wrap yarn chain around
the ball and across the Square,
securing with a few small sts.
Sew the Hook to the Square.
YARN BALL
Using Yarn C, make a magic loop.
Round 1 (RS) Ch1, 6dc in loop.
[6 sts]
Round 2 (RS) 2dc in each st
around. [12 sts]
Round 3 (1dc, 2dc in next st) 6
times. [18 sts]
Rounds 4-6 Dc in each st around.
Ch75.
Fasten off.
HOOK
Using Yarn D, ch16.
WWW.GATHERED.HOW/SIMPLYCROCHET 33
A YEAR OF GRANNY SQUARES
DiamoNd riNg
by Sarah Reed
49
SKILL LEVEL
Easy
other sts, weave in end
For a full list, see page 86 of
Simply Crochet magazine
YOU WILL NEED
QAny DK yarn in yellow, silver and
NOTES
blue
QA 4mm (US G/6) hook
QA 3.5mm (US E/5) hook
Square is worked in rounds with
RS facing throughout.
Diamond is made separately and
sewn to the Square at the end.
Parts of this pattern are worked
using the amigurumi method.
Work stitches continuously in a
spiral without closing off each
round with a slip stitch. It may help
to use a stitch marker in the first
stitch of each round, moving it up
as you work.
When fastening off, use the
invisible join (see Abbreviations).
MEASUREMENTS
Square measures 10x10cm (4x4in)
ABBREVIATIONS
inv join Fasten off without closing
off round with a ss. Pull the final
loop so that the tail comes out of
the top of the final st, thread the
tail onto a darning needle. Insert
the needle into the top of the
second st of the round, from front
to back. Turn your work over so WS
is facing, thread the needle
through the back of the final st.
Pull until the loop of yarn that is
carried over the first st of the
round has the same tension as the
34 WWW.GATHERED.HOW/SIMPLYCROCHET
DIAMOND RING
SQUARE
Using blue, make a magic loop.
Round 1 (RS) Ch1 (does not count
as st throughout), 6dc in loop.
[6 sts]
Round 2 (RS) 2dc in each st
around. [12 sts]
Round 3 (1dc, 2dc in next st) 6
times. [18 sts]
Round 4 (2dc, 2dc in next st) 6
times. [24 sts]
Fasten off.
Join yellow in any st.
Round 5 Ch1, (3dc, 2dc in next st)
6 times. [30 sts]
Round 6 (4dc, 2dc in next st) 6
times. [36 sts]
Fasten off.
Join blue in any st.
Round 7 Ch1, (5dc, 2dc in next st)
6 times. [42 sts]
Round 8 (6dc, 2dc in next st) 6
times. [48 sts]
Round 9 Ch6 (counts as dtr, ch2),
dtr in st at base of ch-6, *dtr in next
st, tr in next 2 sts, htr in next 2 sts,
dc in next st, htr in next 2 sts, tr in
next 2 sts, dtr in next st, (dtr, ch2,
dtr) in next st; rep from * 3 times
more ending final rep at **, ss to
fourth ch of beg ch-6.
[52 sts, 4 ch-2 sps]
Round 10 Ch3 (counts as tr), *(2tr,
ch2, 2tr) in ch-sp, tr in each st to
next ch-sp; rep from * 3 times
more, ss to top of beg ch-3.
[68 sts, 4 ch-2 sps]
Fasten off and weave in ends.
DIAMOND
Using a 3.5mm hook and silver,
ch4.
Row 1 (RS) Dc in second ch from
hook, dc in next 2 ch, turn. [3 sts]
Row 2 (WS) Ch1, dc in first 2 sts,
2dc in next st, turn. [4 sts]
Row 3 Ch1, dc in first 3 sts, 2dc in
next st. [5 sts]
Fasten off leaving a long tail.
Using the image as a guide, sew
the Diamond to the Square.
A YEAR OF GRANNY SQUARES
Sweet sparklE
by Alice Tarry
50
SKILL LEVEL
NOTES
Tricky
Square is worked in rounds with
RS facing throughout.
Wrapper Ends are worked in rows
off the Square at the end.
Parts of this pattern are worked
using the amigurumi method.
Work stitches continuously in a
spiral without closing off each
round with a slip stitch. It may help
to use a stitch marker in the first
stitch of each round, moving it up
as you work.
Colours are referred to as Yarns
A-C.
YOU WILL NEED
QAny DK yarn in 3 colours
QA 3.5mm (US E/4) hook
MEASUREMENTS
Square measures approx 12x12cm
(4¾x4¾in)
ABBREVIATIONS
third back loop Loop the sits on
WS of htr st, not the 2 loops at the
top of the st
surface crochet Position yarn on
WS, insert hook from RS to WS, yrh
and pull up a loop, *insert hook
back through to WS in direction
you want the surface crochet to
travel, yrh and pull up a loop, pull
through loop on hook; rep from *
as required
For a full list, see page 86 of
Simply Crochet magazine
SWEET SPARKLE
SQUARE
Using Yarn A, make a magic loop.
Round 1 (RS) Ch1 (does not count
as st throughout), 8htr in loop.
[8 sts]
Round 2 (RS) 2htr in each st
around. [16 sts]
Round 3 (1htr, 2htr in next st) 8
times. [24 sts]
Round 4 (2htr, 2htr in next st) 8
times. [32 sts]
Dc in next st, ss in next st, pm in fl
of ss (to move start of round).
Fasten off.
With RS facing, join Yarn B in third
bl of next st.
Round 5 (Working in third bl
throughout) Ch5 (counts as tr, ch2),
*tr in next st, htr in next st, dc in
next 4 sts, htr in next st, tr in next
st, ch2; rep from * 3 times more, ss
to third ch of beg ch-5.
[32 sts, 4 ch-2 sps]
Round 6 Ch2 (counts as htr
throughout), *(2htr, ch2, 2htr) in
ch-2 sp, htr in each st to next ch-2
sp; rep from * around, ss to top of
beg ch-2.
[48 sts, 4 ch-2 sps]
Round 7 AS Round 6.
[64 sts, 4 ch-2 sps]
Round 8 Ch1, *dc in each st to ch-2
sp, 3dc in ch-sp; rep from * around,
ss to beg dc. [60 sts]
Fasten off and weave in ends.
WRAPPER ENDS (MAKE 2)
Join Yarn A in fl of marked ss.
Row 1 (RS) Ch2 (counts as htr), tr in
st at base of ch-2, 2tr in next st, 3tr
in next st, 2tr in next st, (tr, htr) in
next st, turn. [11 sts]
Row 2 (WS) Skip first st, 5htr in
next st, skip next st, ss in next st,
skip next st, 5tr in next st, skip next
st, ss in next st, skip next st, 5htr in
next st, ss in final st. [15 sts]
Fasten off.
Skip 11 sts from Round 4. Join Yarn
A in fl of next st and rep Rows 1-2.
TO FINISH
Using Yarn C, surface crochet
around the post of sts from
Rounds 1-3.
Fasten off and weave in all ends.
WWW.GATHERED.HOW/SIMPLYCROCHET 35
A YEAR OF GRANNY SQUARES
maRy'S squarE
by Pauline Morgan
51
SKILL LEVEL
Go pro
YOU WILL NEED
round with a slip stitch. It may help
to use a stitch marker in the first
stitch of each round, moving it up
as you work.
QAny DK yarn in Yarn A black,
Yarn B white, Yarn C pink,
Yarn D yellow
QA 4.5mm (US 7) hook
MEASUREMENTS
Square measures approx 10x10cm
(4x4in)
NOTES
Square is worked in rounds.
Change colour on the final yrh of
st before colour change is
indicated. Carry the unused colour
across the top of your sts,
enclosing the strand as you work.
Parts of this pattern are worked
using the amigurumi method.
Work stitches continuously in a
spiral without closing off each
36 WWW.GATHERED.HOW/SIMPLYCROCHET
MARY'S SQUARE
Using Yarn A, make a magic loop.
Round 1 (RS) Ch1 (does not count
as a st throughout), 5dc in loop.
[5 sts]
Round 2 2dc in each st around.
[10 sts]
Round 3 As Round 2. [20 sts]
Place live loop of Yarn A on marker
ready to use again. Position on the
WS.
Join Yarn B in fl of any st.
Round 4 Ss in fl of each st around,
ss in bl of next ss.
Round 5 Ss in bl of each ss around,
ss to beg ss.
Fasten off Yarn B.
Place loop of Yarn A back on hook.
Fasten off Yarn B and invisibly sew
end through to the back.
Work next round into fl from
Round 3 (same loops Round 4
were worked into).
Round 6 (1dc, 2dc in next st) 10
times, ss in next st. [30 sts]
Round 7 (Skip 2 sts, 7dtr in next st,
skip 2 sts, ss in next st) 5 times.
Fasten off Yarn A.
Join Yarn C in an unused bl from
Round 3, in line with a 7-dtr group
from Round 7.
Round 8 (RS) Ch1, dc in first 3 sts,
change to Yarn D, dc in same st as
last dc, dc in next 2 sts, ch2, dc in
next 3 sts, change to Yarn C, dc in
same st as last dc, dc in next 2 sts,
ch2, dc in next 3 sts, change to
Yarn D, dc in same st as last dc, dc
in next 2 sts, ch2, dc in next 3 sts,
change to Yarn C, dc in same st as
last dc, dc in next 2 sts, ch2, ss to
beg dc, turn. [24 sts, 4 ch-2 sps]
Work Rounds 8-12 using the same
colour as the st below. When you
get to a Yarn D st, change to Yarn
D, and when you get to a Yarn C st,
change to Yarn C.
Round 9 (WS) Ss into ch-2 sp, ch4
(counts as htr, ch2 throughout), htr
in same sp, *htr in each st to ch-2
sp, (htr, ch2, htr) in ch-sp; rep from
* around, ss to second ch of beg
ch-2, turn. [32 sts]
Rounds 10-11 As Round 9. [48 sts]
Round 12 Ch1, *dc in each st to
ch-2 sp, (dc, ch2, dc) in ch-sp; rep
form * around, ss to beg dc.
Fasten off and weave in ends.
A YEAR OF GRANNY SQUARES
The sTart Of spriNg
by HAE Barker
52
SKILL LEVEL
Go pro
YOU WILL NEED
Square at the end.
Flower is made separately and
sewn to the Square at the end.
Colours are referred to as Yarns
A-C.
QAny DK yarn in 3 colours
QA 4mm (US G/6) hook
MEASUREMENTS
Square measures approx 10x10cm
(4x4in)
ABBREVIATIONS
FPtr2tog *Yrh, insert hook around
post of FPtr to left 2 rows below
(working from front to back to
front), yrh and pull up a loop, yrh
and pull through 2 loops; rep from
* around next FPtr 2 rows below,
yrh and pull through 3 loops on
hook
For a full list, see page 86 of
Simply Crochet magazine
NOTES
Square is worked in rows.
A Border is worked around the
THE START OF SPRING
SQUARE
Using Yarn A, ch16.
Row 1 (WS) Dc in second ch from
hook and each ch across, turn.
[15 dc]
Row 2 (RS) Ch1 (does not count as
a st throughout), dc in first 3 sts,
(FPtr around next st, skip 1 st on
current row, dc in next 3 sts) 3
times, turn. [12 dc, 3 FPtr]
Row 3 Ch1, dc in each st across,
turn. [15 dc]
Row 4 Ch1, dc in first st, FPtr
around first FPtr 2 rows below, skip
1 st on current row, (dc in next 3
sts, FPtr2tog prev FP st and next FP
st, skip 1 st on current row) twice,
dc in next 3 sts, FPtr around next
st, skip 1 st on current row, dc in
next st, turn.
[11 dc, 2 FPtr, 2 FPtr2tog]
Row 5 As Row 3. [15 dc]
Row 6 Ch1, dc in first st, (FPtr
around FPtr 2 rows below, skip 1 st
on current row, dc in next 3 sts) 3
times, FPtr around FPtr 2 rows
below, skip 1 st on current row, dc
in next st, turn. [11 dc, 4 FPtr]
Row 7 As Row 3. [15 dc]
Row 8 Ch1, dc in next 3 sts,
(FPtr2tog prev FP st and next FP st,
skip 1 st on current row, dc in next
3 sts) 3 times, turn.
[12 dc, 3 FPtr2tog]
Row 9 As Row 3. [15 dc]
Rows 10-15 Repeat Rows 2-7.
Fasten off.
BORDER
Join Yarn B in any corner.
Round 1 (RS) Ch1, (3dc in corner,
13dc evenly across to next corner)
4 times, ss to beg dc. [64 sts]
Fasten off.
Join Yarn C in second dc of any
3-dc corner.
Round 2 Ch1, (3dc in corner, dc in
next 15 sts) 4 times, ss to beg dc.
[72 sts]
Fasten off and weave in ends.
FLOWER
Using Yarn C, make a magic loop.
Round 1 (RS) Ch1, 10dc into the
loop, ss to beg dc. [10 sts]
Change to Yarn B.
Round 2 *Ch3, (yrh, insert hook in
st at base of ch-3, yrh and pull up
loop) twice, (yrh, insert hook in
next st, yrh and pull up loop) 3
times, yrh and pull through all the
loops on the hook, ch2, ss in next
st; rep from * 4 times more.
Fasten off.
Using the image as a guide, sew
the Flower to the Square.
WWW.GATHERED.HOW/SIMPLYCROCHET 37
GRANNY SQUARE CHARTS
Charts
Follow these charts for the heart, diamond, club and spade playing card designs, as
well as the butterfly display, home sweet home, very cherry and yay! squares.
Diamond, page 4
Heart, page 4
13
12
11
10
9
8
7
6
5
4
3
2
1
13
12
11
10
9
8
7
6
5
4
3
2
1
20
15
10
5
20
15
Key
Key
Yarn B
Yarn B
Yarn A
Yarn A
Club, page 5
10
5
Spade, page 5
13
13
12
12
11
11
10
10
9
9
8
8
7
7
6
6
5
5
4
4
3
3
2
2
1
1
20
15
10
5
20
Key
Key
Yarn B
Yarn B
Yarn A
Yarn A
38 WWW.GATHERED.HOW/SIMPLYCROCHET
15
10
5
GRANNY SQUARE CHARTS
Home sweet home, page 26
Butterfly display, page 8
19
Key
10
18
17
Yarn A
9
16
15
Yarn B
8
14
13
Yarn C
7
12
11
Yarn D
6
10
9
Yarn E
5
8
7
Yarn F
4
6
5
Yarn G
3
4
3
2
2
1
1
22
20
15
10
15
5
10
5
Key
red
blue
olive green
cream
Very cherry, page 29
Yay!, page 30
24
18
17
16
23
22
21
15
20
13
18
11
16
9
14
7
12
5
10
3
8
14
12
10
19
17
15
13
8
6
4
2
20
15
10
5
11
9
7
6
5
4
Key
Yarn A
3
2
1
25
20
15
10
5
Yarn B
Yarn C
Key
blue
yellow
green
raspberry
white
WWW.GATHERED.HOW/SIMPLYCROCHET 39
Presented with issue 139
Presented with issue 139
Presented
with issue 139
of
Simply Crochet.
Presented
with issue 139
of
Simply Crochet.
Presented
with
issue 139
of
Simply
Crochet.
Printed
in
the
UK.
Presented
with
issue 139
of
Simply
Crochet.
Printed
in
the
UK.
Presented
with
issue 139
of
Simply
Crochet.
Printed
in
the
UK.
Presented
with
issue 139
of
Simply
Crochet.
Printed
in
the
UK.
Simply
Presented
with
issue 139
of
Simply
Crochet.
Printed
in
the
UK.
Simply
Presented
with
issue 139
of Simply
Crochet.
Printed
in
the
UK.
Simply
of
Simply
Crochet.
Printed
in
the
UK.
Simply
of
Simply
Crochet.
Printed
in
the
UK.
Simply
Printed in the UK.
Simply
Printed in the UK.
Simply
Croch
et
Croch
et
Croch
et
Croch
et
Croch
et
Simply
Croch
et
Simply
Croch
etet
Simply
Croch
Croch
Crochet
et