/


Text
This is a book you’ll refer to again and again. Open it up, and get ready
to crochet!
T HE C OMPLETE G UIDE TO
Crochet Dolls AND Animals
This authoritative guide gives you the information and techniques you
need for any amigurumi project—fuzzy critters, rosy-cheeked dolls,
adorable monsters, and so much more. Illustrated step-by-step lessons
take you through the entire process, from choosing the best stitches,
to assembly, to finishing up. Inspirational photos of what you can do
with these techniques will fuel your own creativity.
The Japan
Amigurumi
Association
Founded in 2002, THE JAPAN AMIGURUMI ASSOCIATION is a community of
enthusiasts sharing their designs and techniques with one another and the
world. The association supports writers on amigurumi and holds workshops,
exhibits and other events each year. Its activities and newsletters support
other needleworking and toymaking events.
The Complete Guide to
Crochet Dolls
and Animals
Amigurumi Techniques Made Easy
Over
1500
Color
Photos
THE JAPAN AMIGURUMI ASSOCIATION
T UT T L E
www.tuttlepublishing.com
Printed in China
2106EP
US $19.99
T UT T L E
ISBN 978-0-8048-5412-2
T UT T L E
The Complete Guide to
Crochet Dolls
and Animals
Amigurumi Techniques Made Easy
The Japan Amigurumi Association
T U T T L E Publishing
Tokyo Rutland, Vermont Singapore
Chapter 2
Contents
Basic Crochet Techniques
Why We Wrote This Book
7
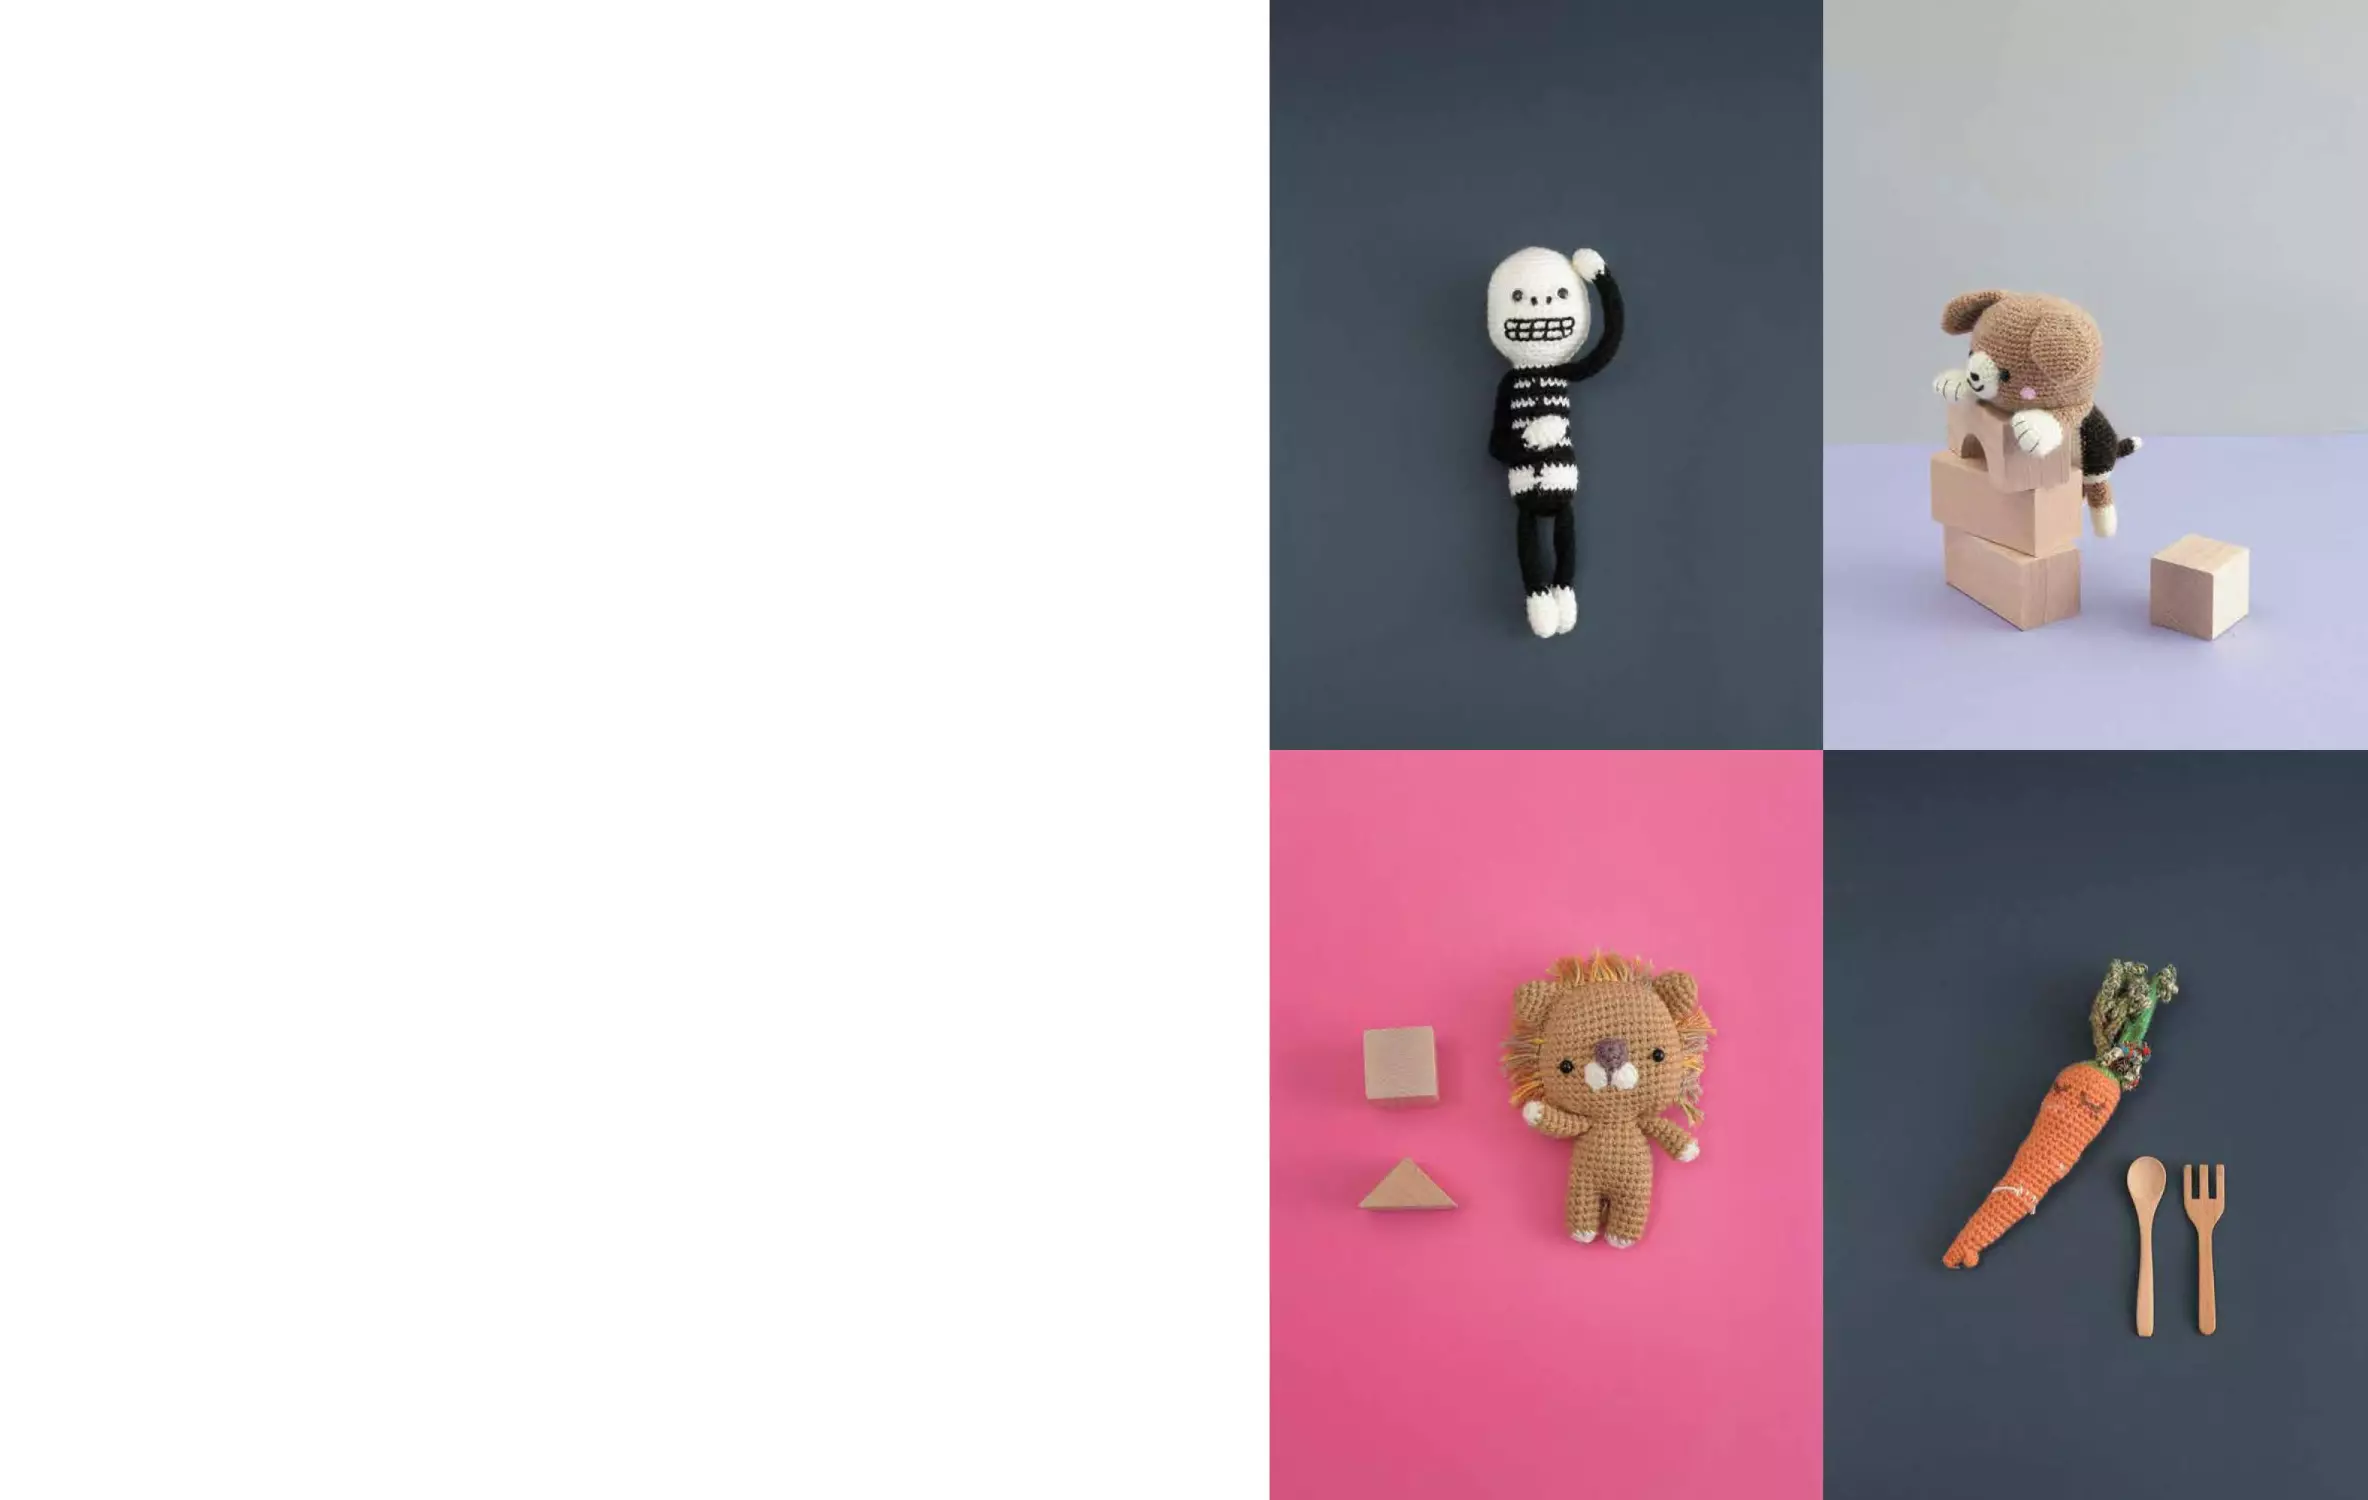
An Amigurumi Gallery 1
8
Chapter 1
The Basics of
Making Amigurumi
Amigurumi Tools
Basic Tools
Useful Tools to Have
Crochet Hook Sizes
Amigurumi Materials
Yarn and Thread
Eye and Nose Parts
Other Frequently Used Items
Items Used to Make Zakka
Yarn Weights and Textures
Yarn Weight
Yarn Content and Texture
Names of Amigurumi Parts
Amigurumi
Crocheted Fabric
How to Read a Crochet Diagram
Amigurumi Gauge
Skew
List of Crochet Symbols
14
14
15
16
18
18
18
19
20
21
21
21
22
22
23
24
25
25
26
Before Starting to Crochet
Magic Circle
Foundation Chain
Chain Stitch
Circular Foundation Chain
Oval Foundation Chain
Single Crochet
Single Crochet into Foundation
Chain
Working Flat
Half Double Crochet
The Basics of Turning Posts
Hdc Turning Post
Double Crochet
Treble Crochet
Slip Stitch
Crossed Single Crochet
Crab Stitch
Inverse Single Crochet
Working Through Back Loop
Only
Working Through Front Loop
Only
Front Post Stitch
Back Post Stitch
Creating a Hole
Picots
Loop Stitch
Making Edging Neat
Extension
Increasing Stitches
Decreasing Stitches
Skipping Stitches (Decrease
method)
28
29
34
35
36
38
40
41
42
43
44
45
46
48
50
51
52
53
54
55
56
57
58
60
61
62
63
64
65
67
Special Feature
Differences Between Increases
and Decreases
Left-handed Crochet
68
68
An Amigurumi Gallery 2
69
Chapter 3
More Crochet Techniques
Changing Color at the Start
of a Row or Round
Changing Color Mid-row or
Mid-round
Intarsia
Working a Partial Round
Joining Yarn to Add New Stitches
Creating a Mouth
Increasing and Decreasing
with Clusters
Creating a Foot by Decreasing
Creating a Foot with a Boot
Afterthought Foot
Crocheting Fingers
Joining Pieces
Folded Seam
Fringe
Ruffle Edging Made with Picots
Making a Crisp Edge
Making a Cupped Shape
Inserting Beads
Crocheting Cords
74
75
76
78
79
80
82
85
86
88
89
90
91
92
94
95
96
97
99
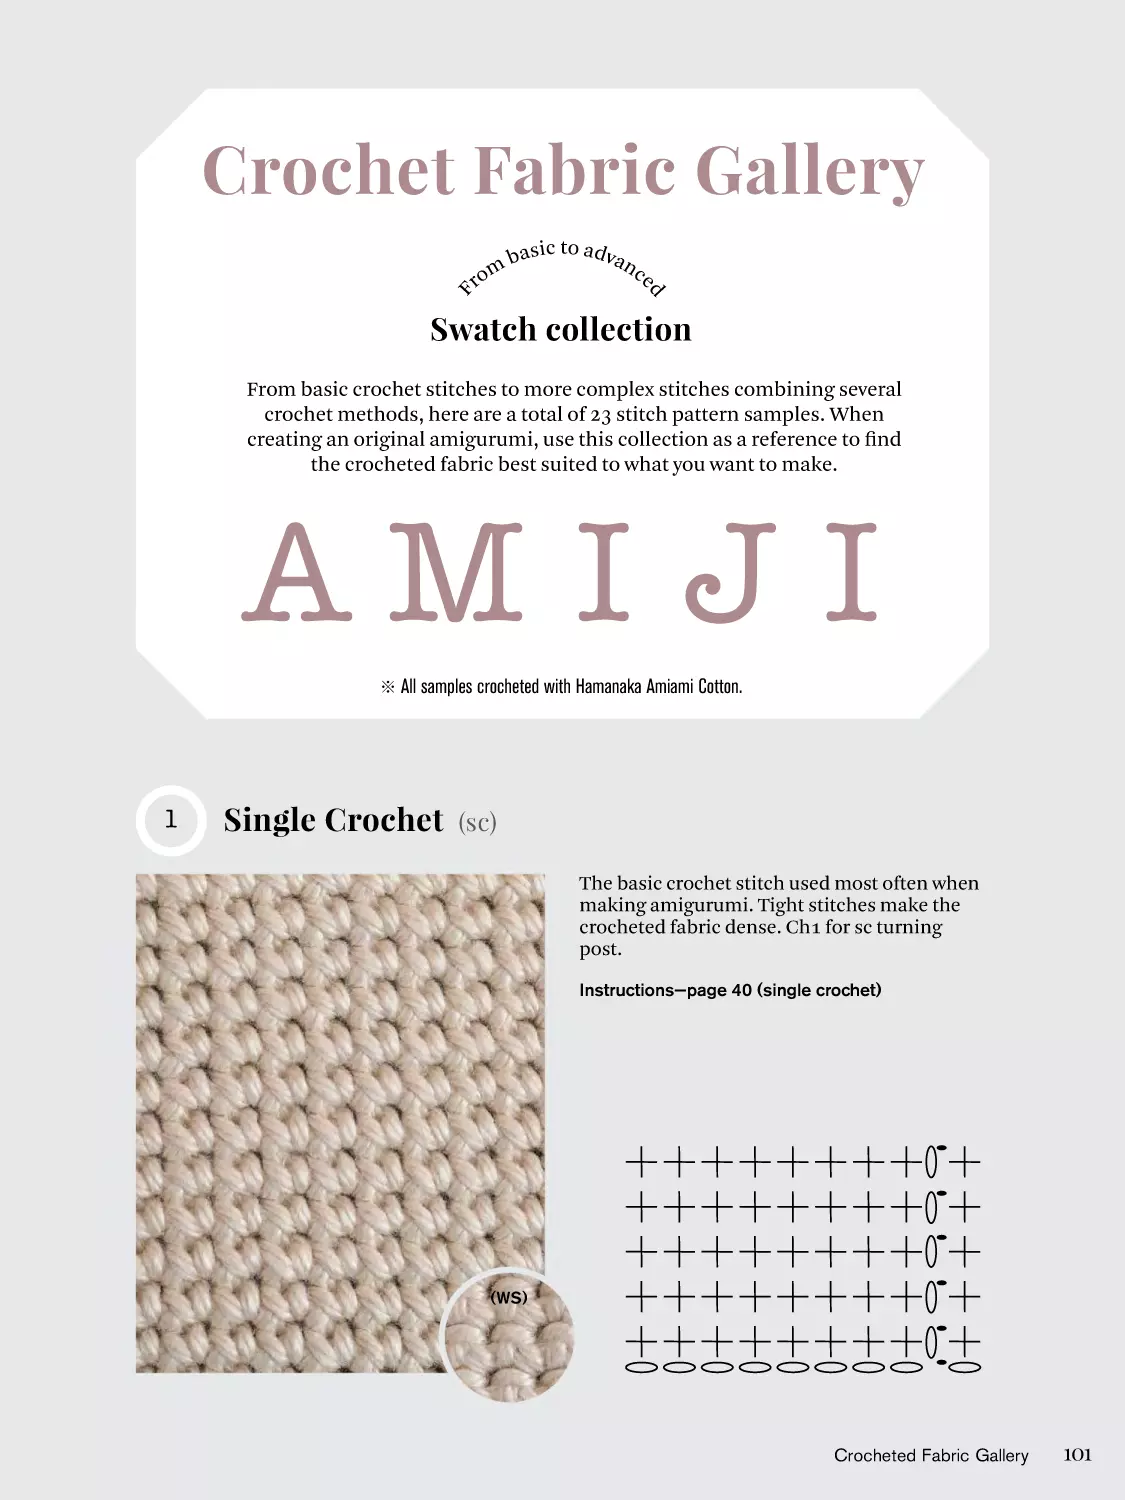
Crocheted Fabric Gallery
1. Single Crochet
2. Half Double Crochet
3. Double Crochet
4. Single Crochet Through
Back Loop Only
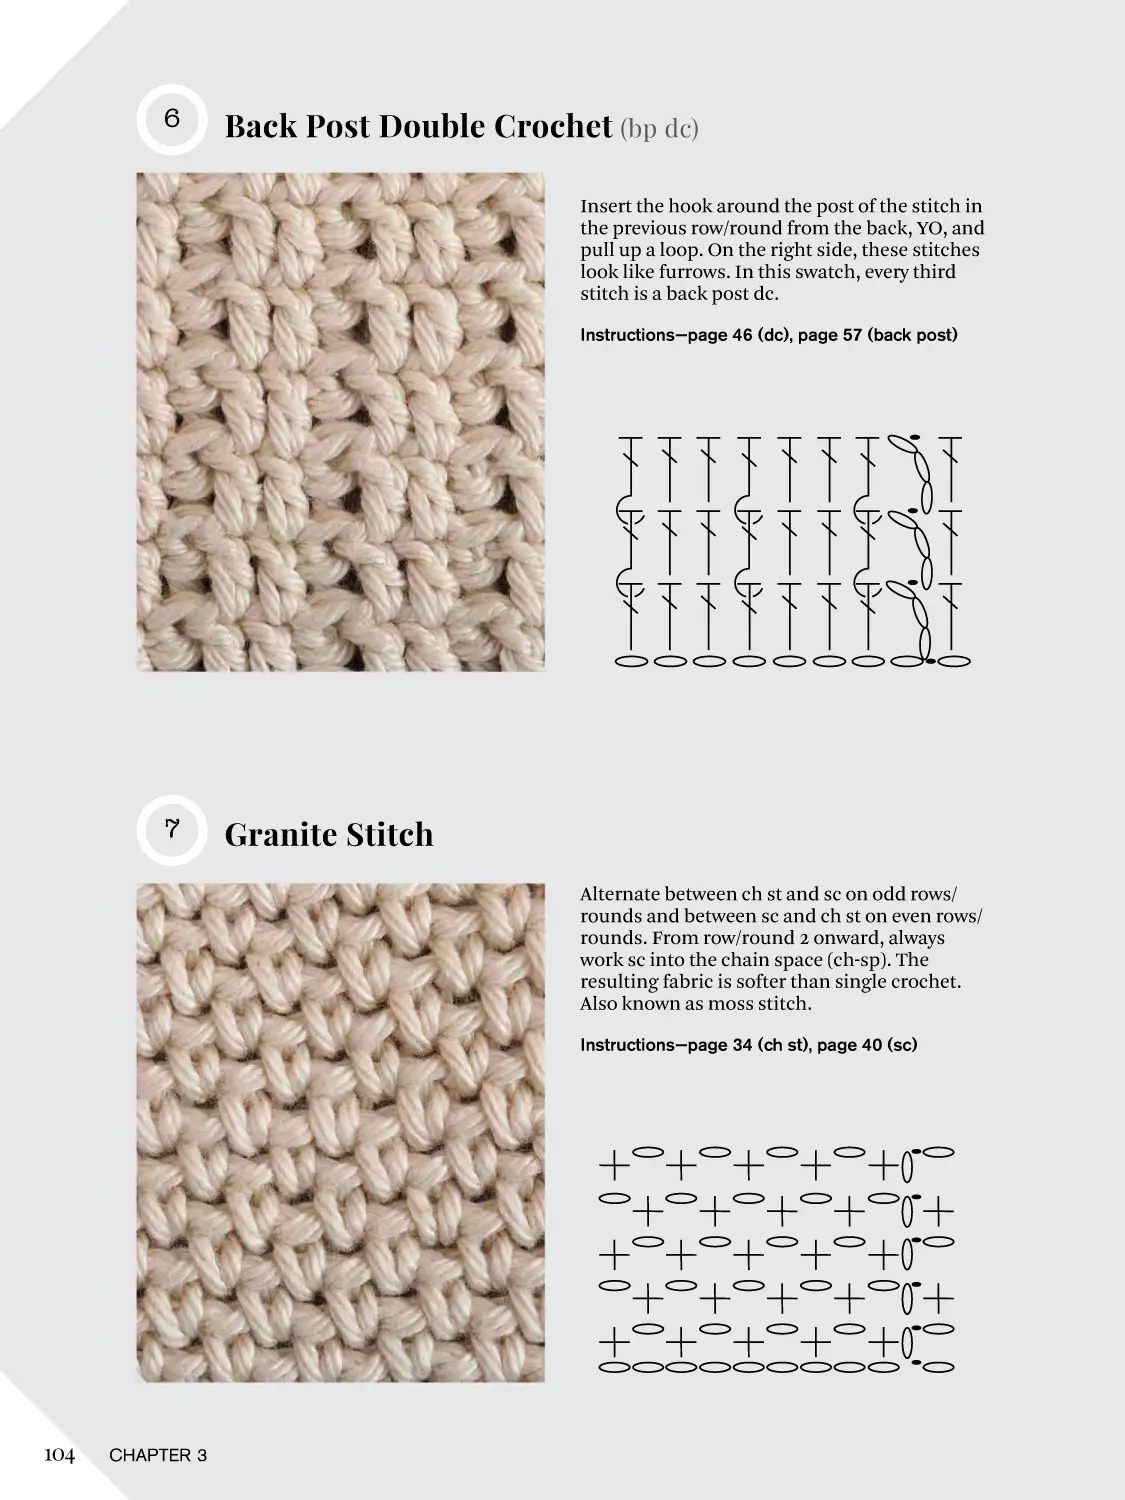
5. Front Post Double Crochet
6. Back Post Double Crochet
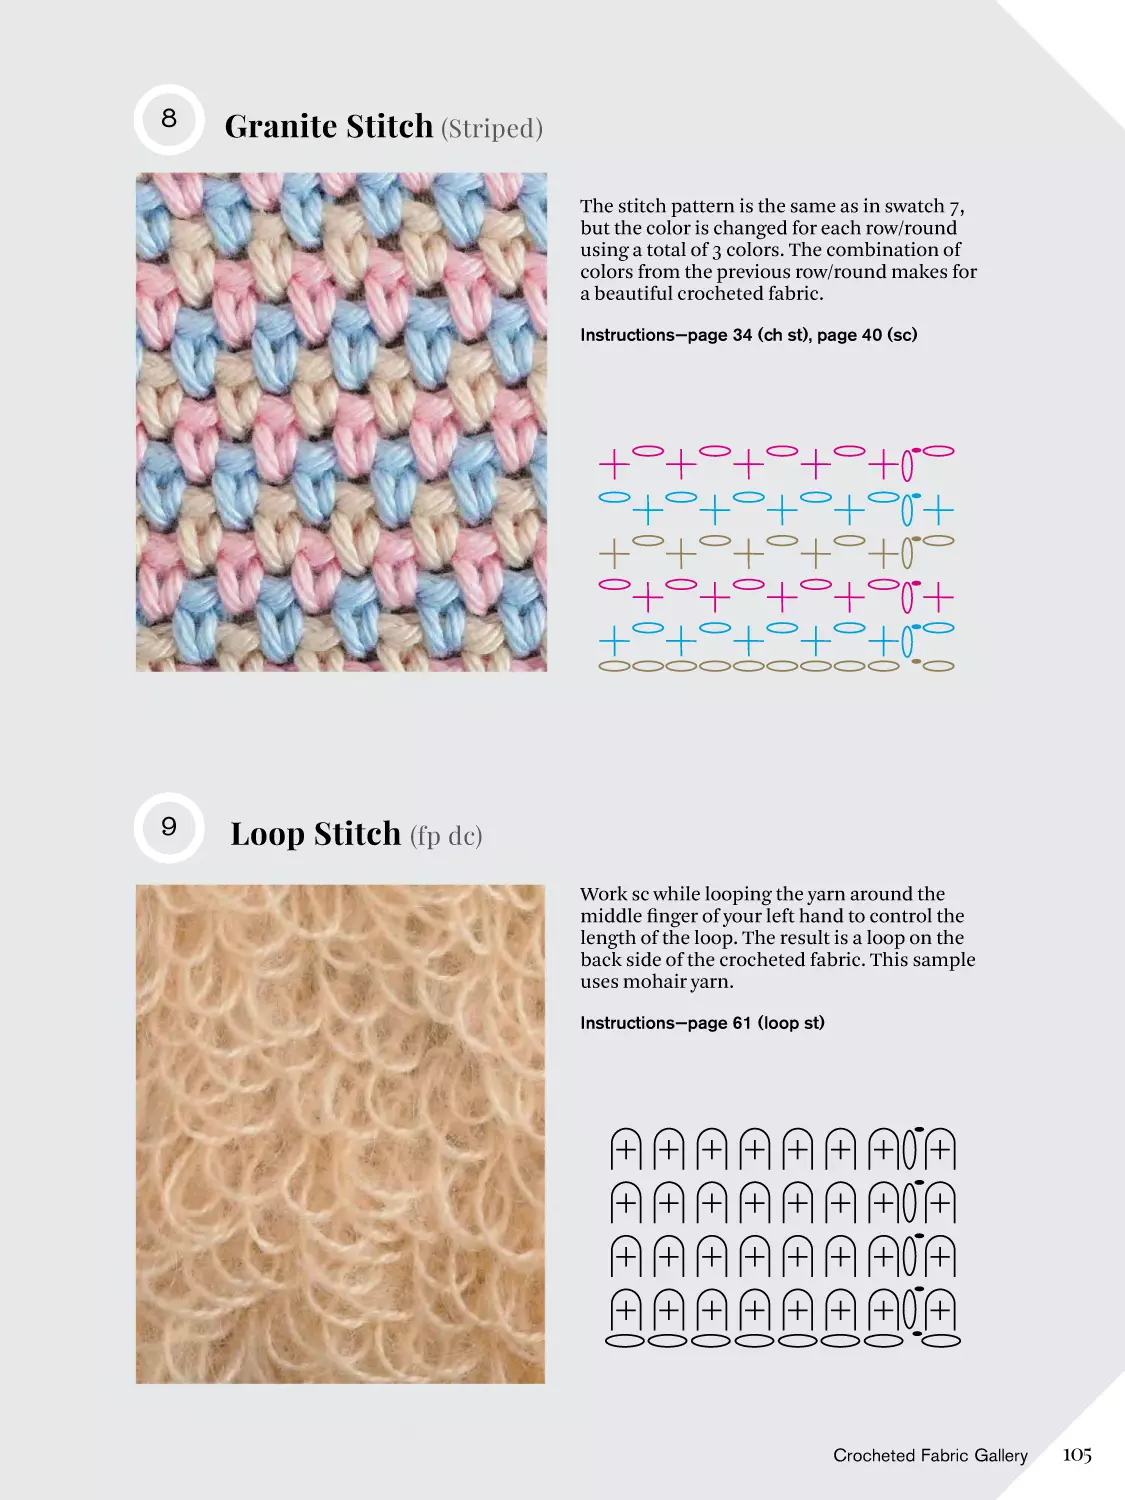
7. Granite Stitch
8. Granite Stitch (Striped)
9. Loop Stitch
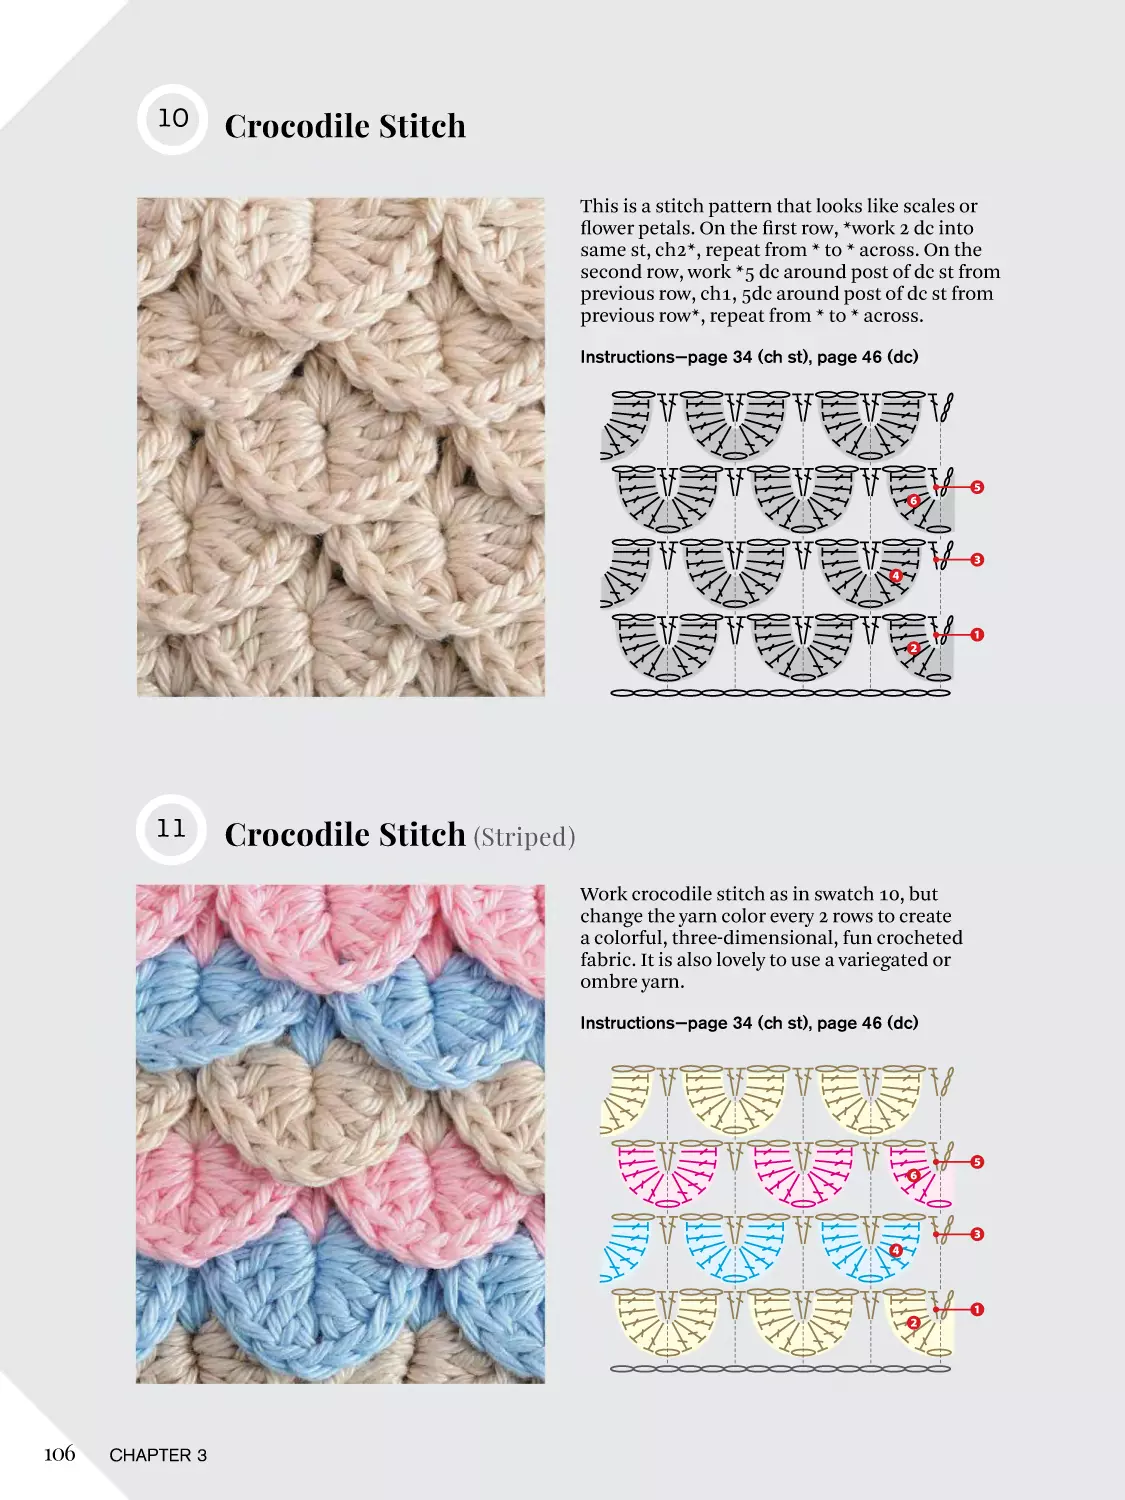
10. Crocodile Stitch
11. Crocodile Stitch (Striped)
12. Bobbles
13. Bobbles (In color)
14. Shell Stitch
15. Three-color Shell Stitch
16. Brushed Single Crochet
17. Tapestry Crochet
18. Intarsia
19. Bobbles
20. Waffle Stitch
21. Staggered Three-color dc
Spike Stitch
22. Three-color dc Spike Stitch
23. Inverse Single Crochet
101
101
102
102
103
103
104
104
105
105
106
106
107
107
108
108
109
109
110
110
111
111
112
112
Chapter 4
Assembling Your Models
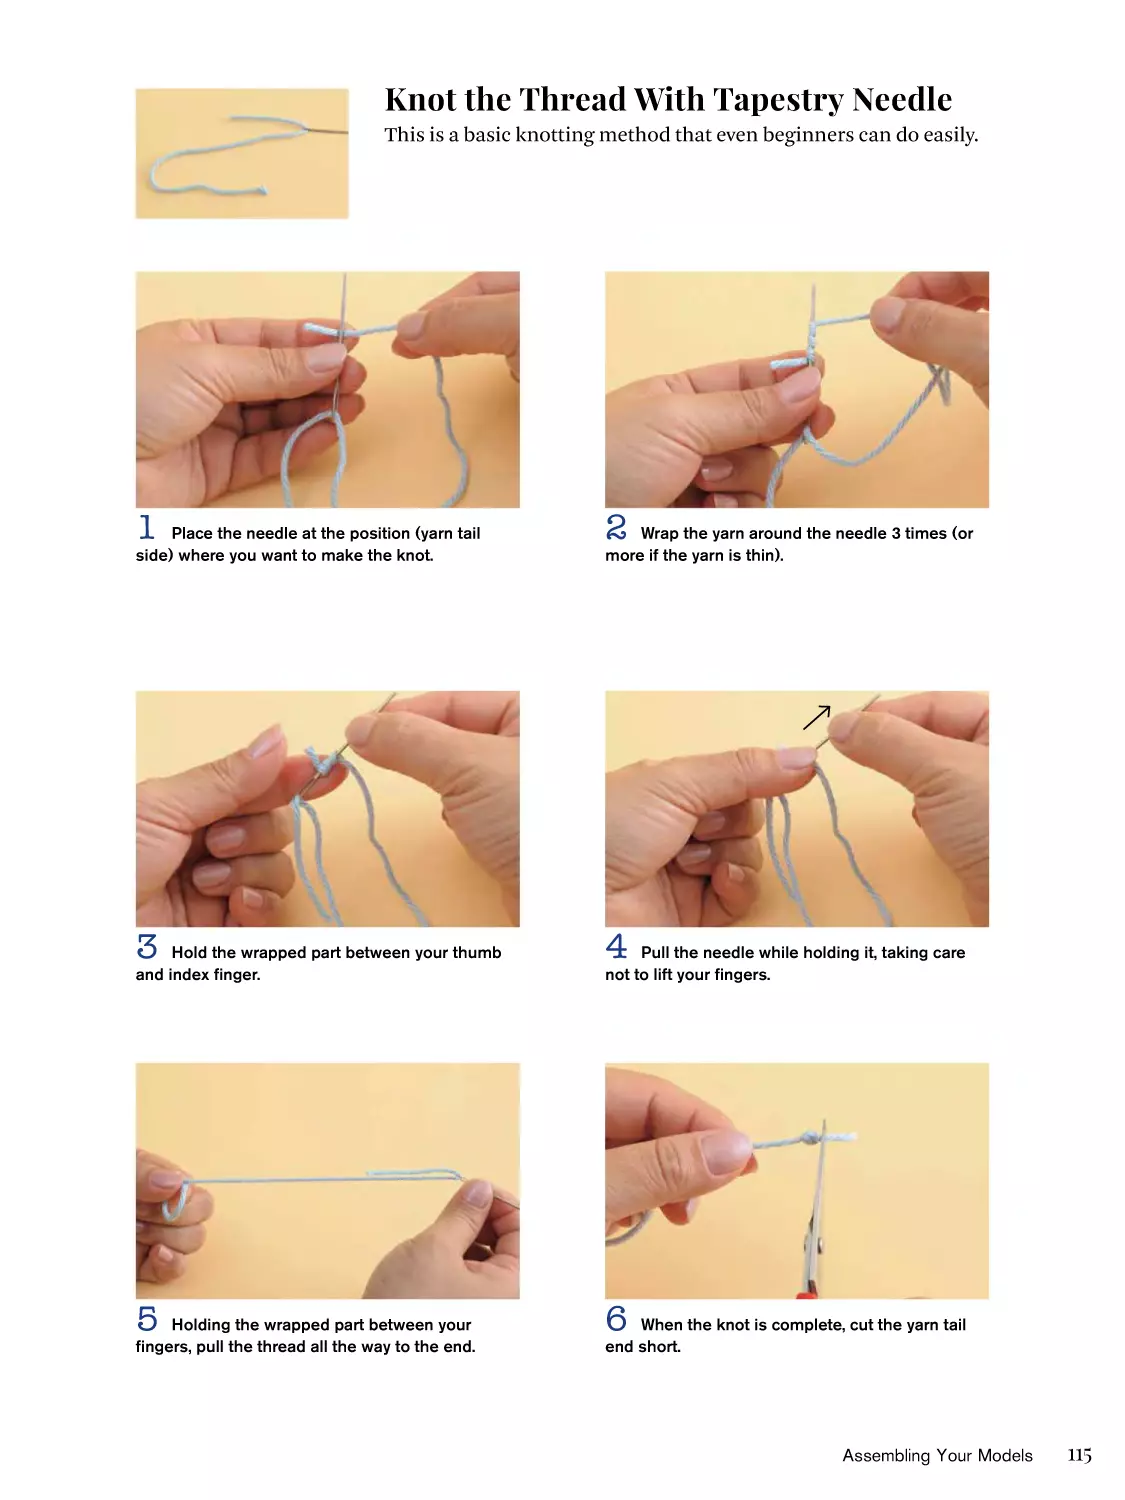
Threading a Tapestry Needle
114
Knot the Thread with Tapestry
Needle
115
116
Seaming Methods
117
Seaming Two Bound-off Edges
Seaming Bound-off Edge
to Another Surface
118
Woven seam
118
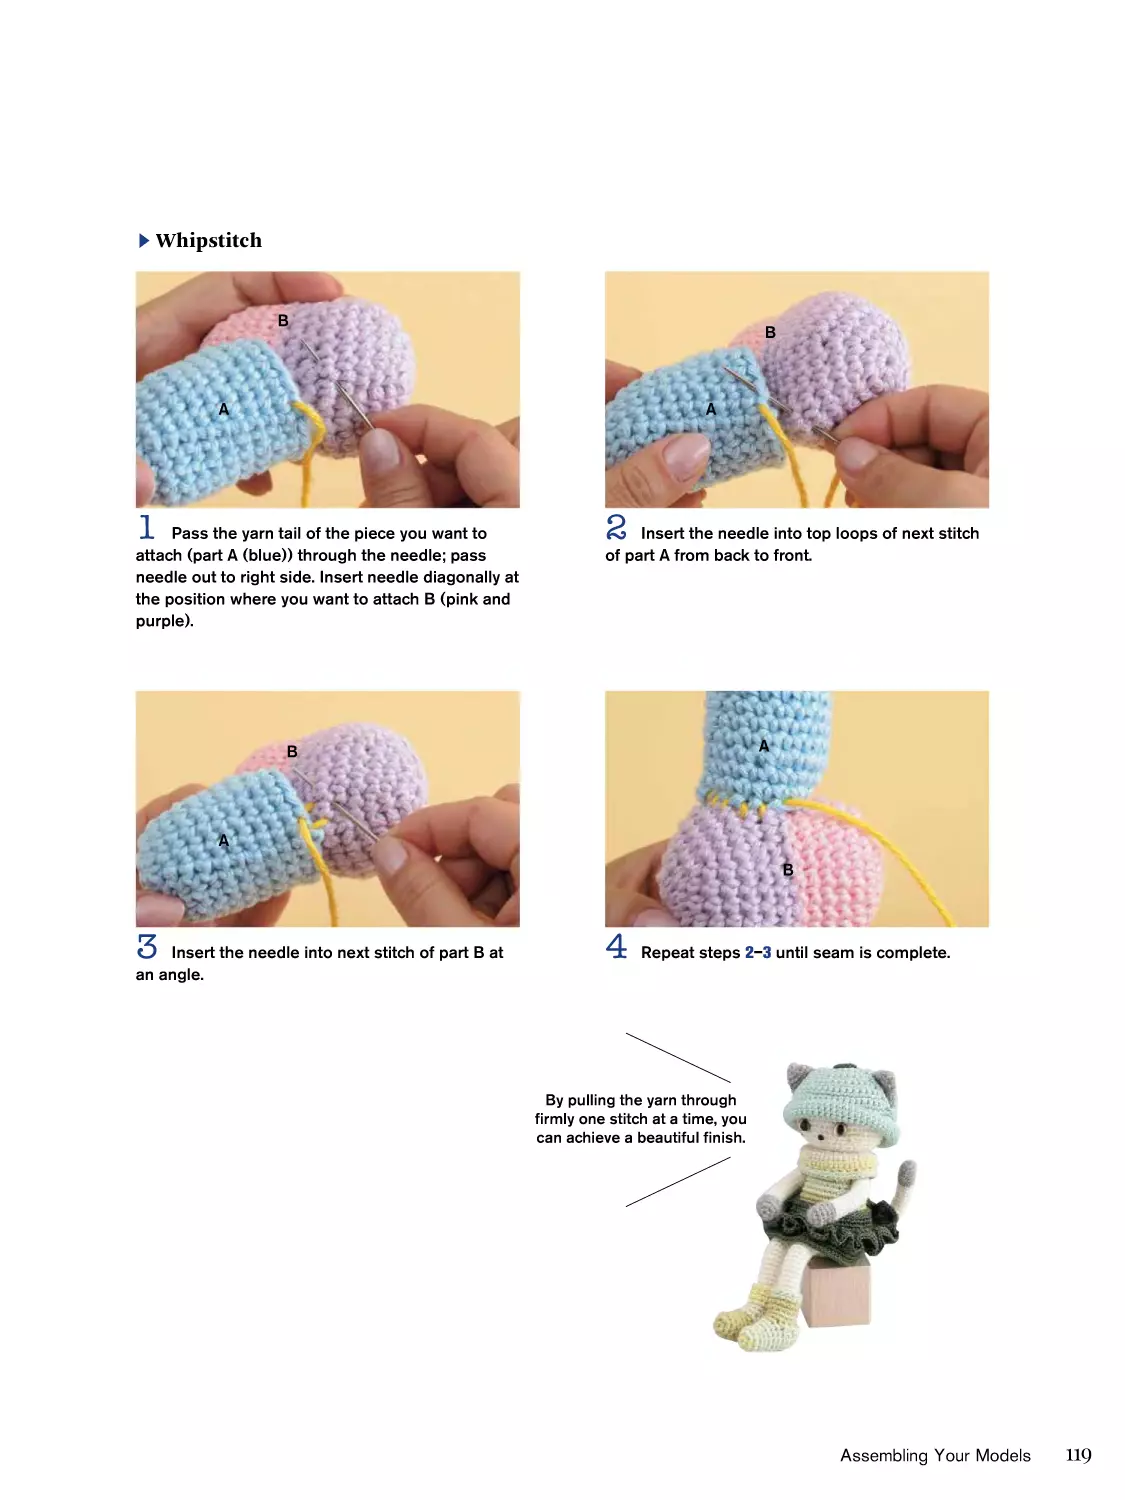
Whipstitch
119
120
Folded seam
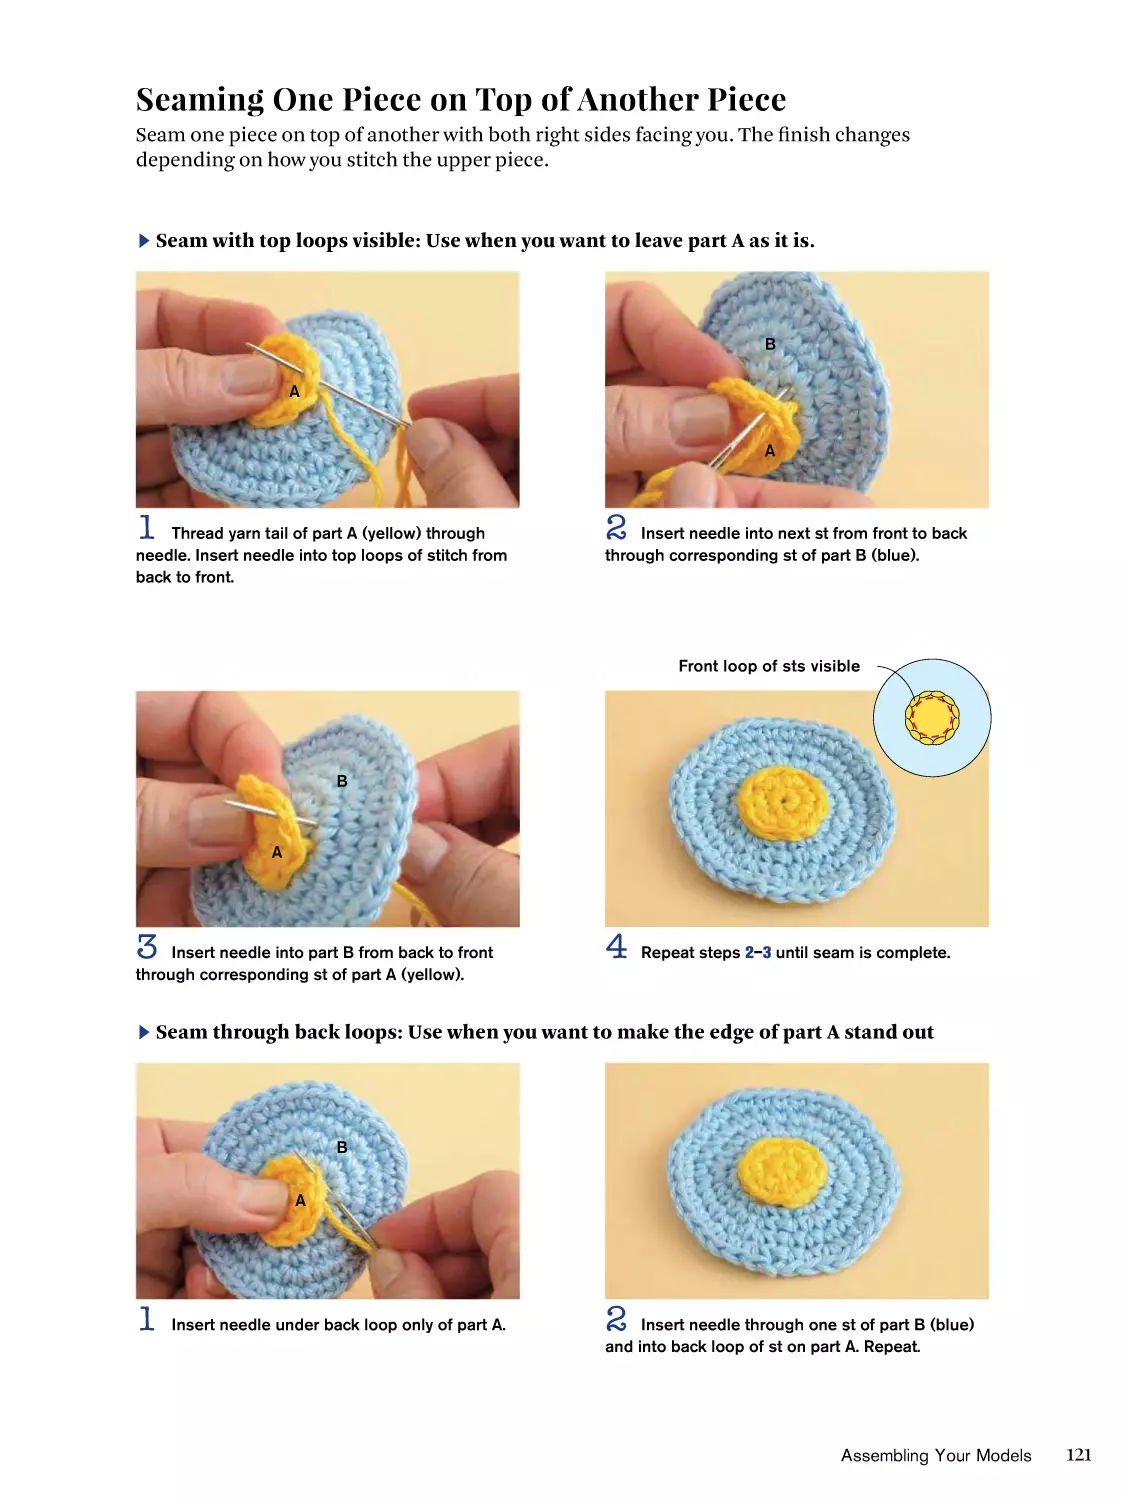
Seaming One Piece on Top of
Another Piece
121
Seam with top loops visible
122
122
Seam through back loops
Seam through front loops
122
Seam through top loop
122
Seam Sides Together
123
Seam through front loops
123
Seam through top loops
123
Seam through back loops
123
Seam through back loop
on one edge and front
loops on other edge
124
Woven seam
125
Woven seam through top loops 126
Attaching a Pocket
127
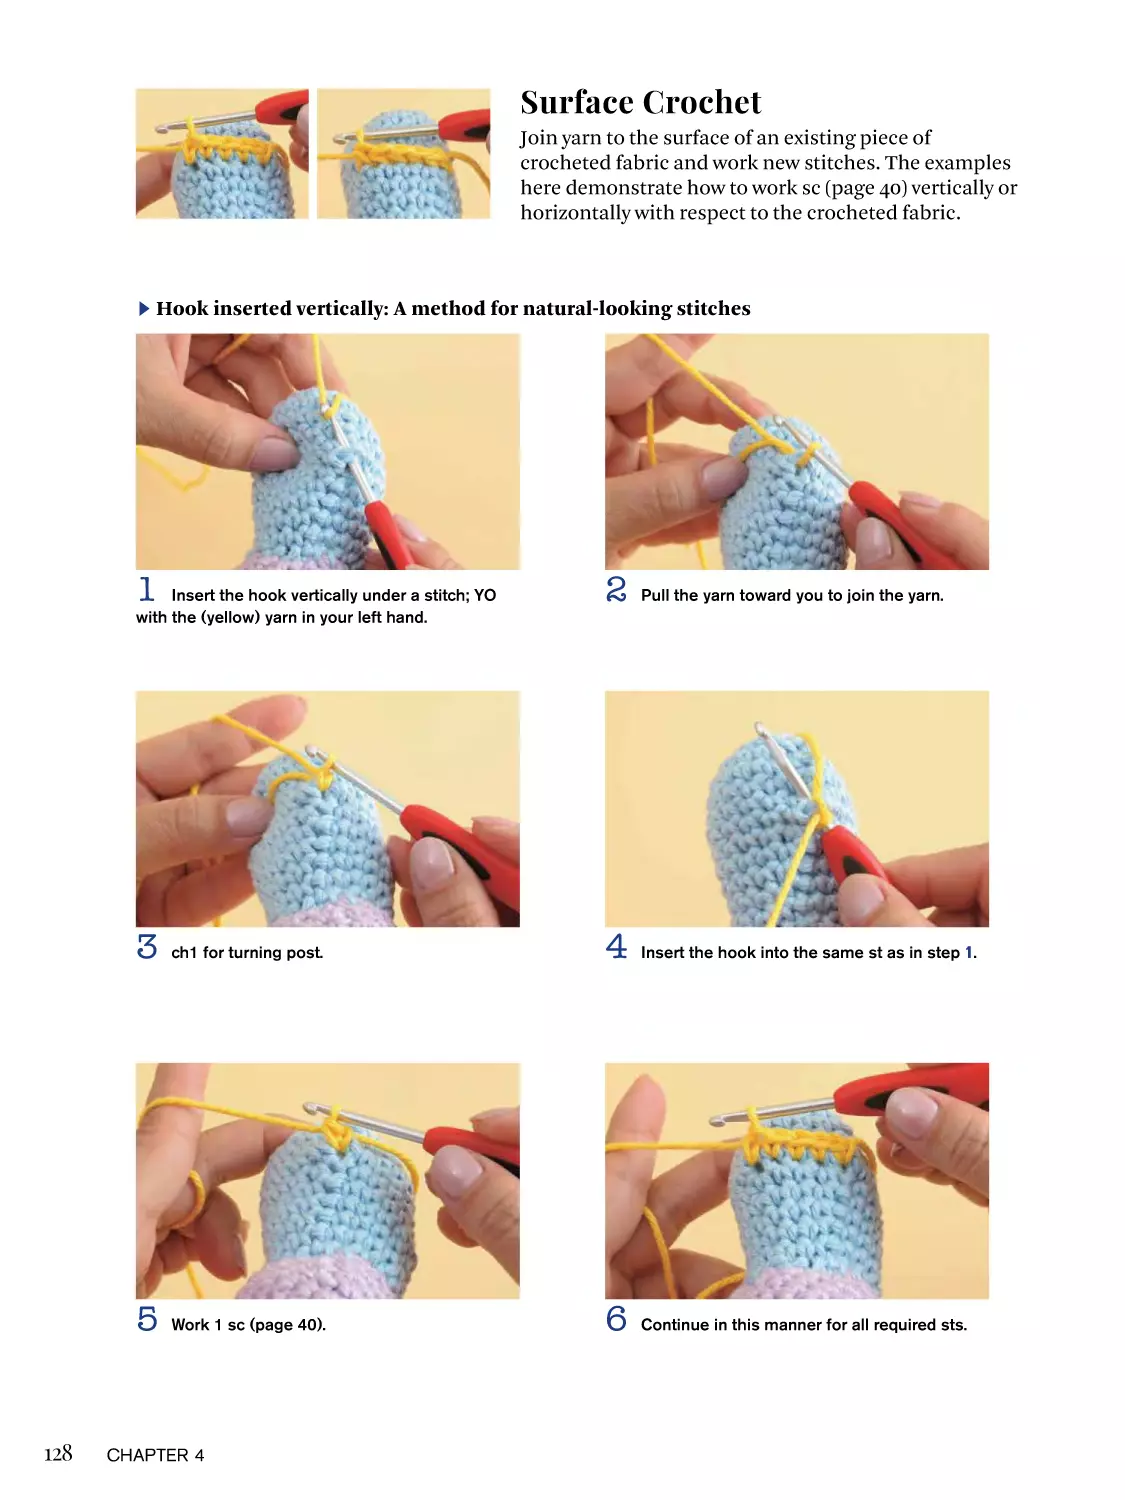
Surface crochet (vertical /
horizontal)
128
Combining Pieces
130
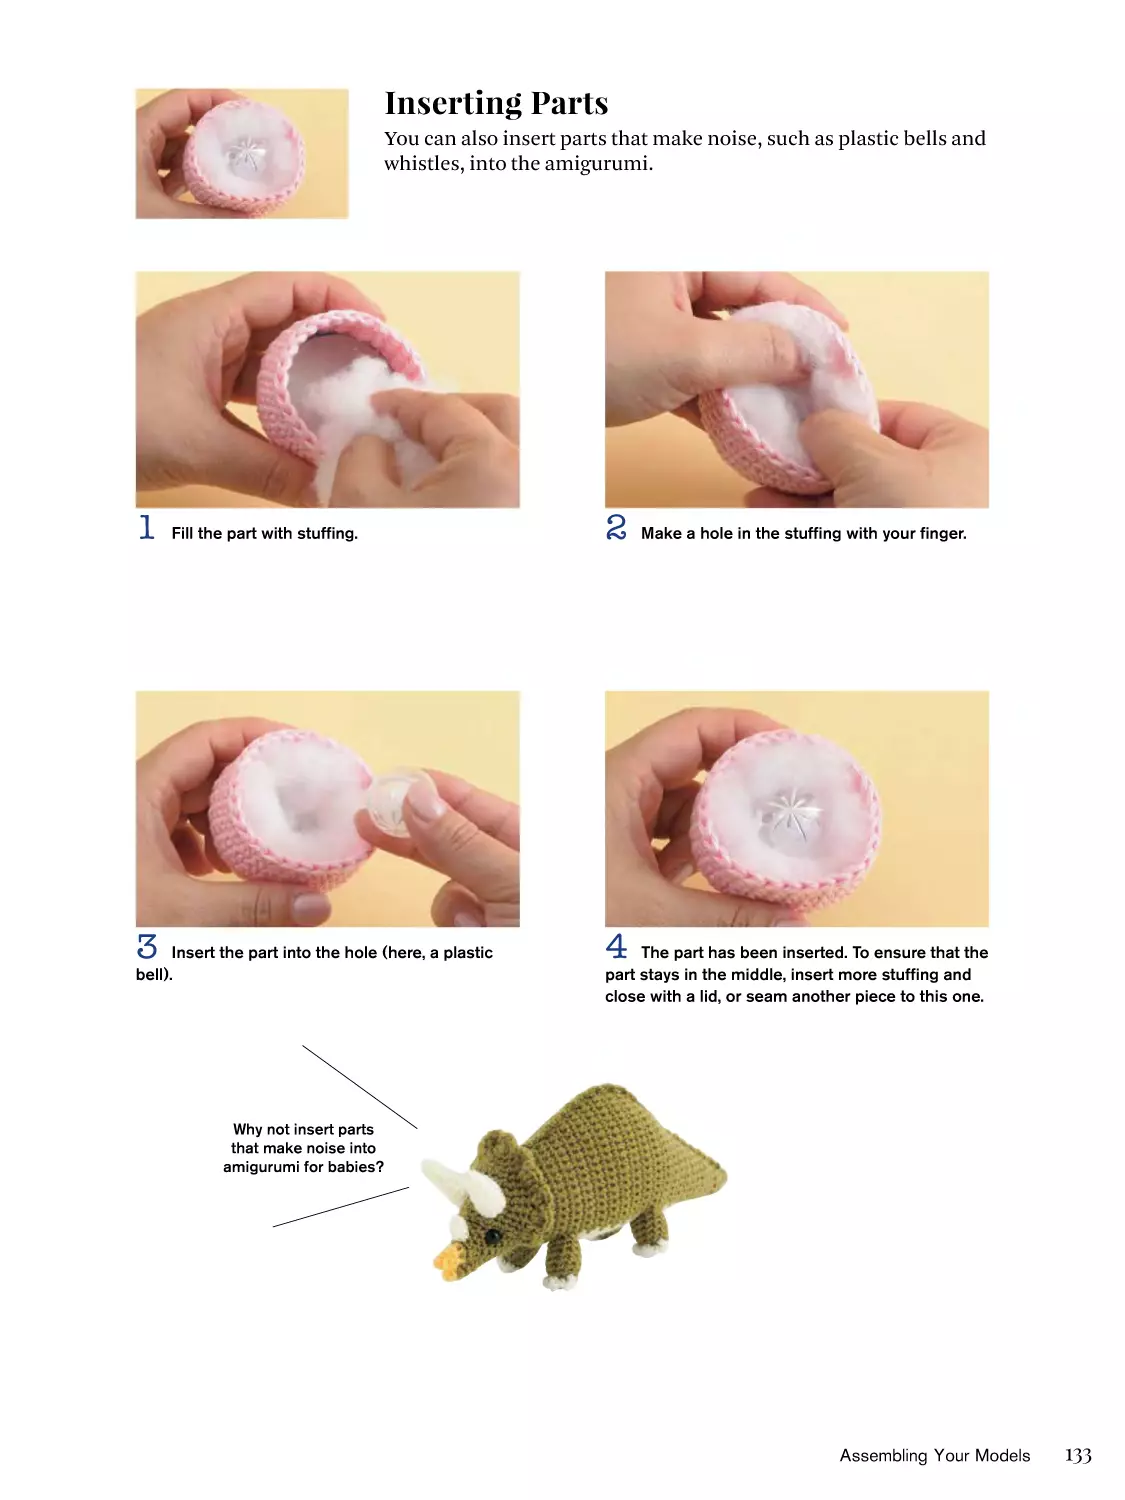
Inserting Stuffing
131
Cinching Shut
132
Inserting Parts
133
Inserting Cardboard
134
Attaching a Lid
135
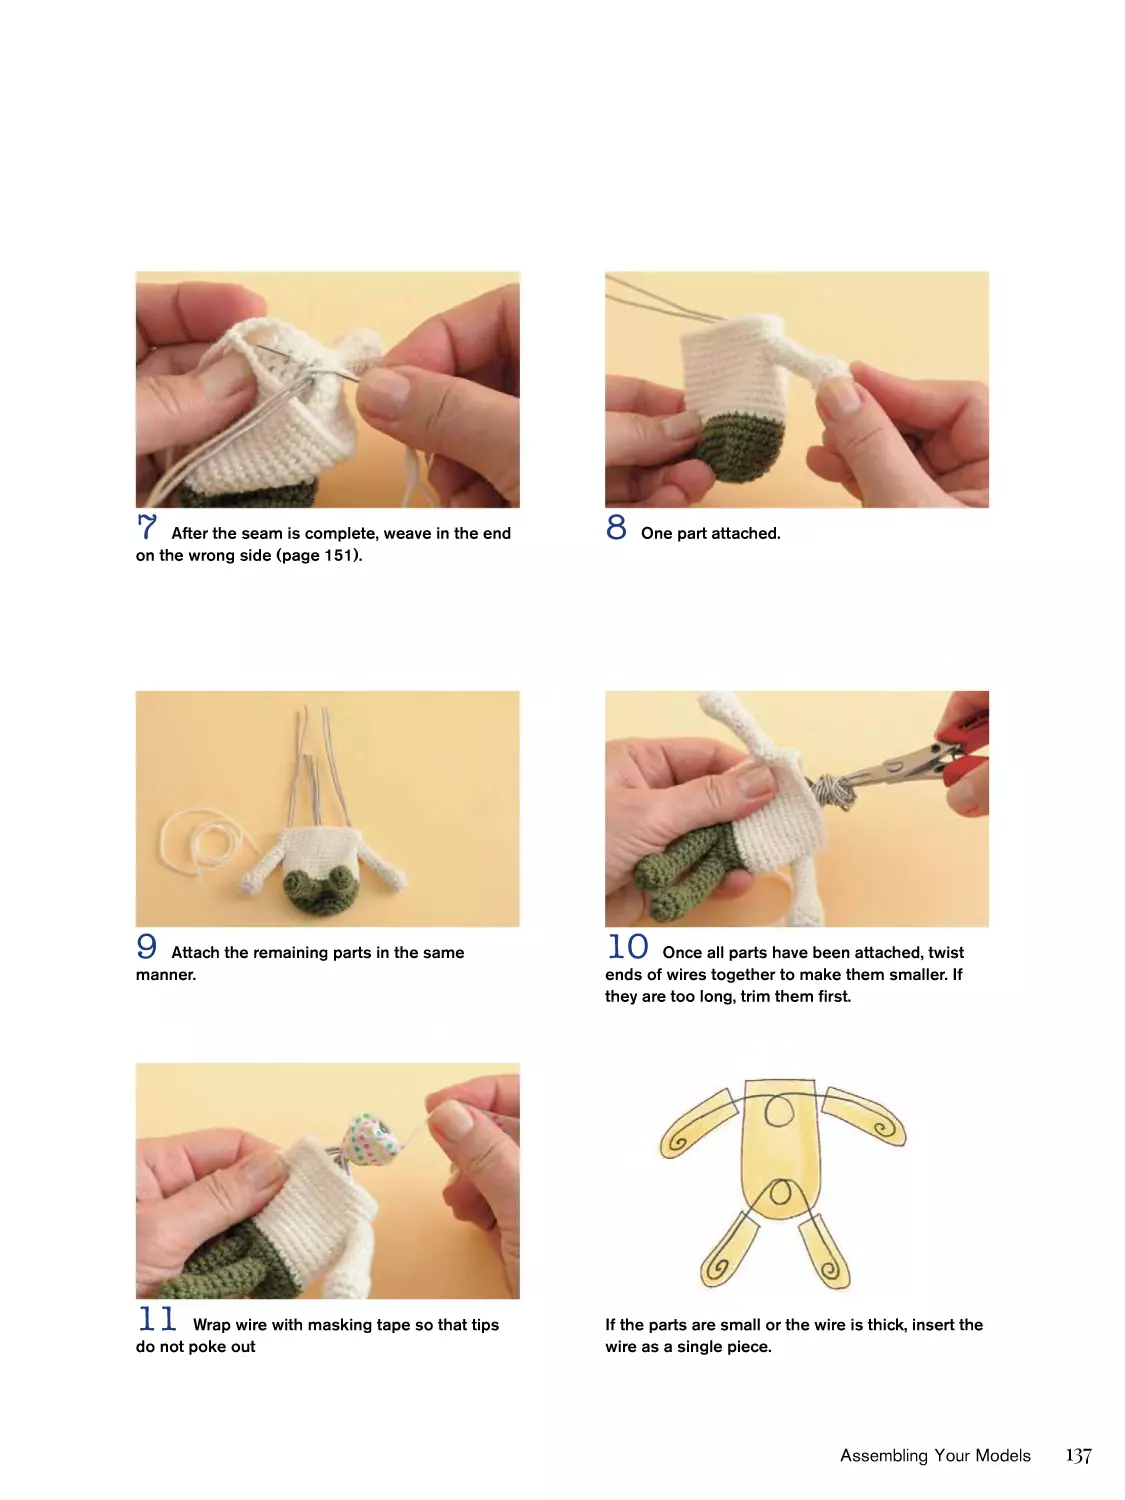
Inserting Wire
136
An Amigurumi Gallery 3
138
Chapter 5
Finishing
Finishing
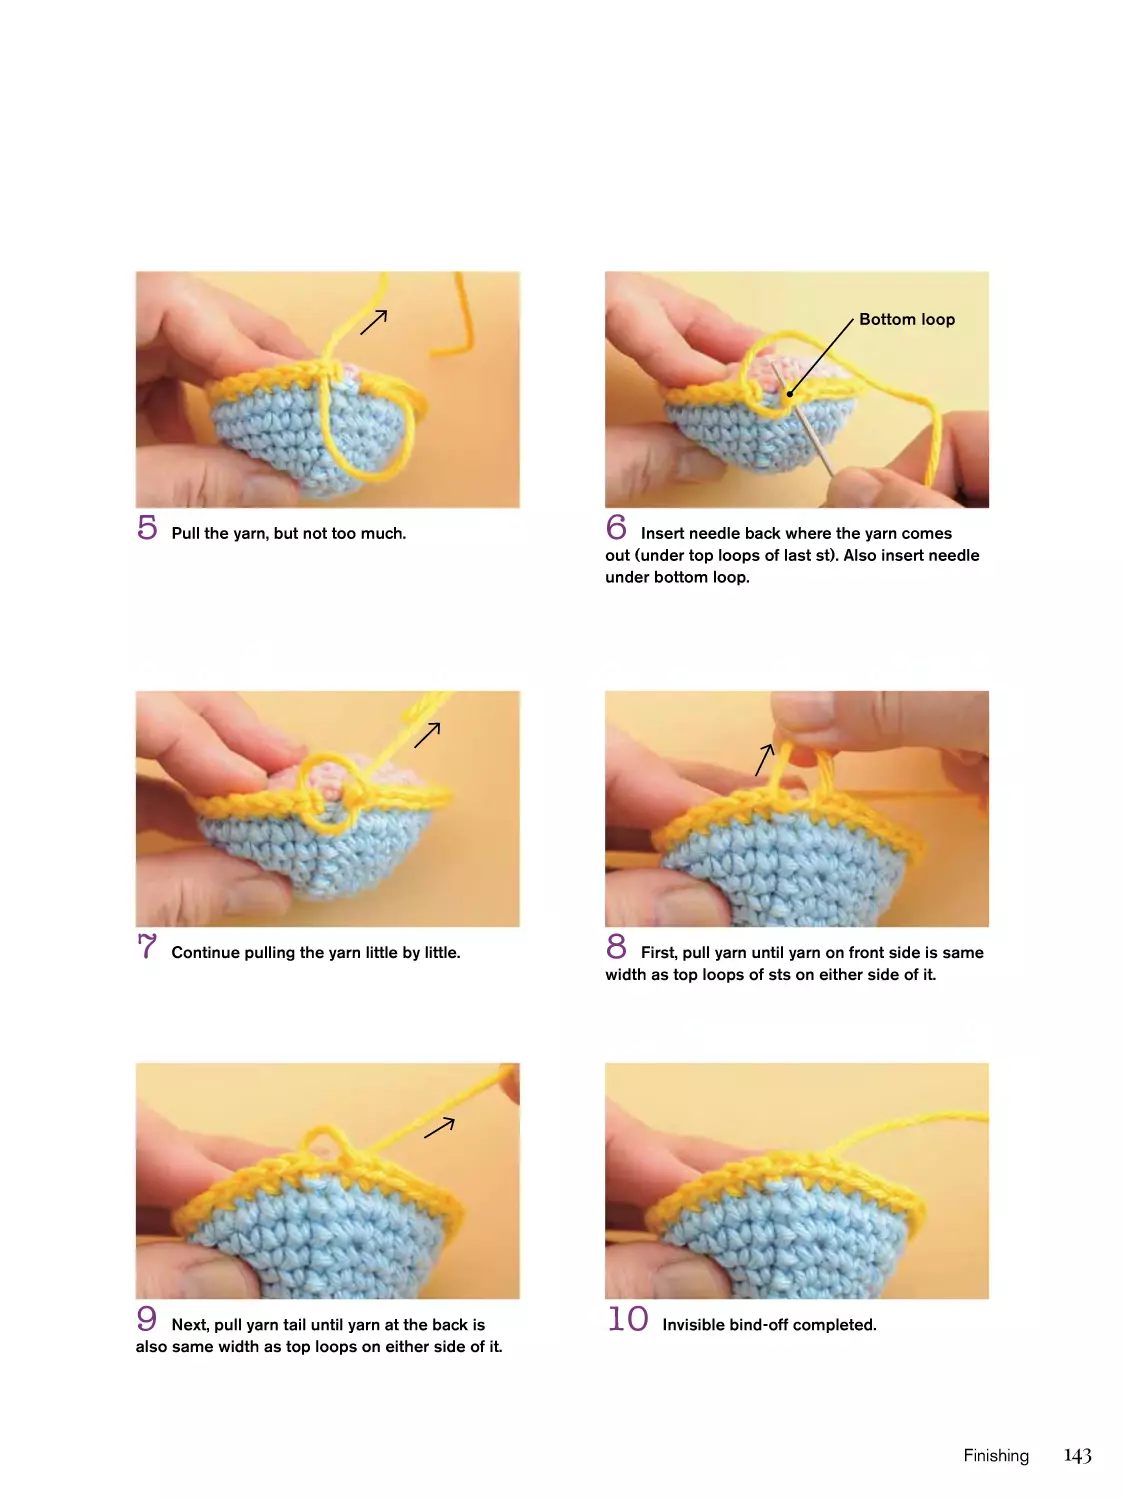
Binding Off
Invisible bind-off
Standard bind-off
Hookless method
Slip stitch bind-off
Securing Yarn Tails ①
Double Knot
Securing Yarn Tails ②
Crochet Over Yarn Tail
Weaving in Ends ①
Pass Through Stuffing
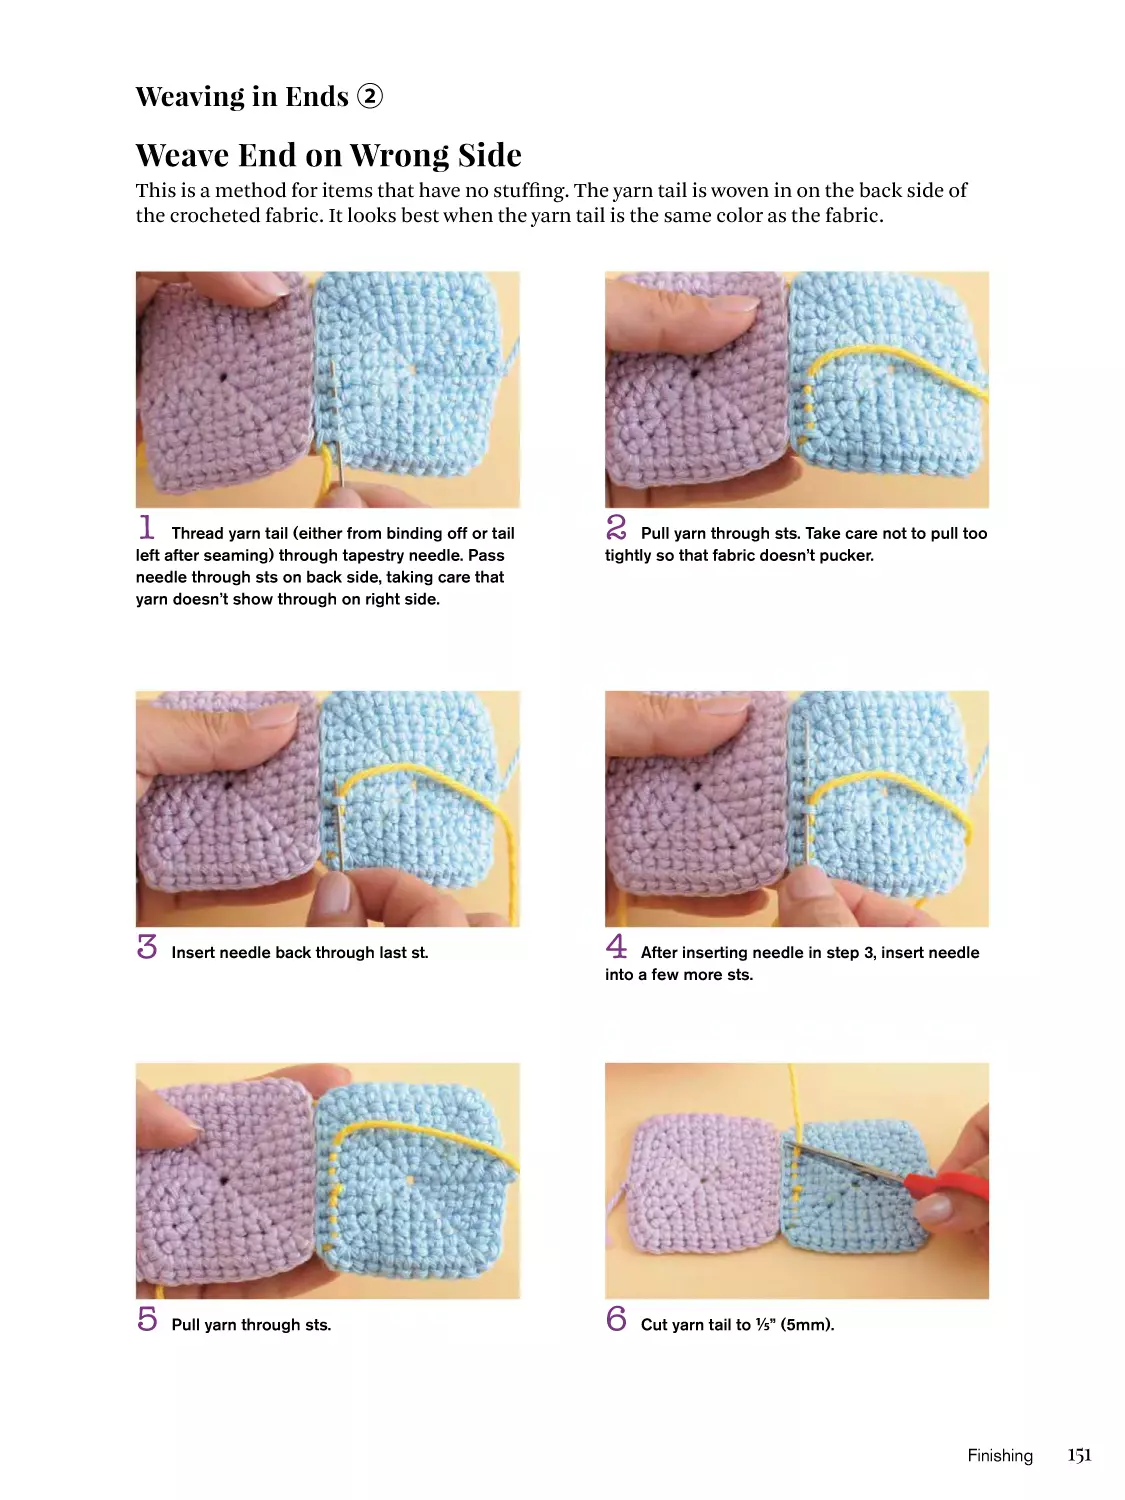
Weaving in Ends ②
Weave End on Wrong Side
Weaving in Ends ③
Weave End on Wrong Side,
Folded Back
Embellishments
How to Get Started with
Embroidery
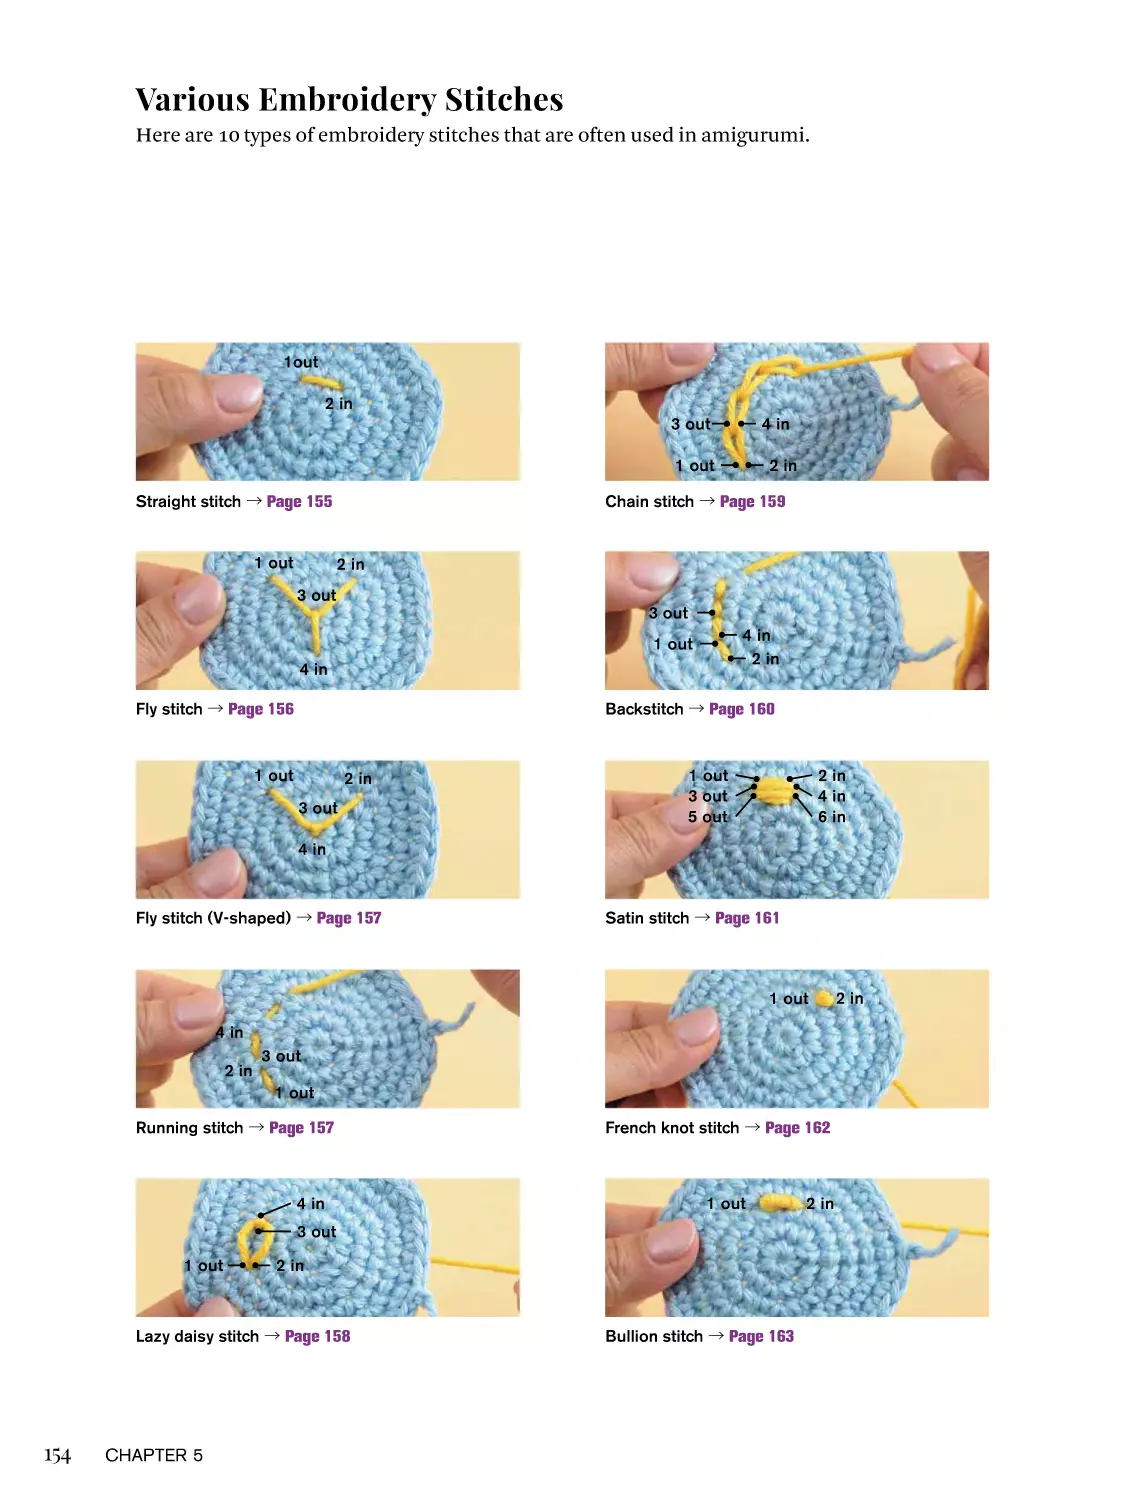
Various Embroidery Stitches
Straight Stitch
Fly Stitch
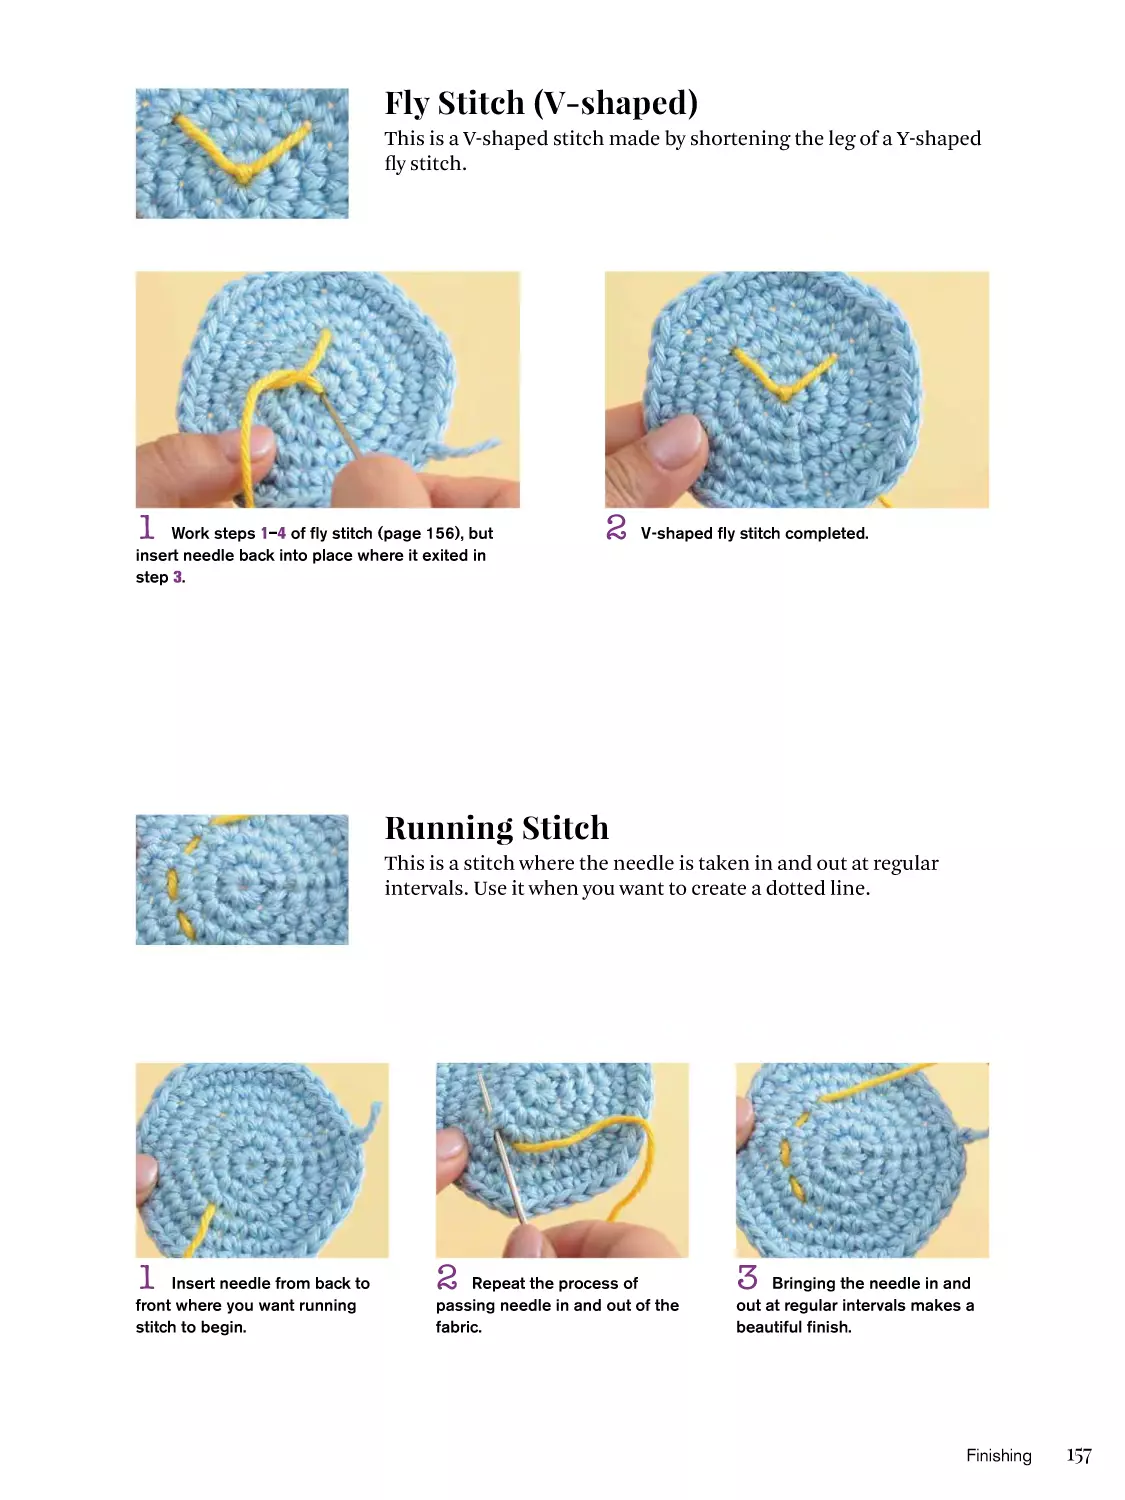
Fly Stitch (V-shaped)
Running Stitch
Lazy Daisy Stitch
Chain Stitch
Backstitch
Satin Stitch
French Knot Stitch
Bullion Stitch
Attaching Notions
Gluing Thread Down
142
142
142
144
144
145
146
148
149
151
152
153
153
154
155
156
157
157
158
159
160
161
162
163
164
165
Chapter 6
Create Original Designs
Attach Hair
Crocheted-in Hair
Make “Helmet” Wig and Attach
to Head
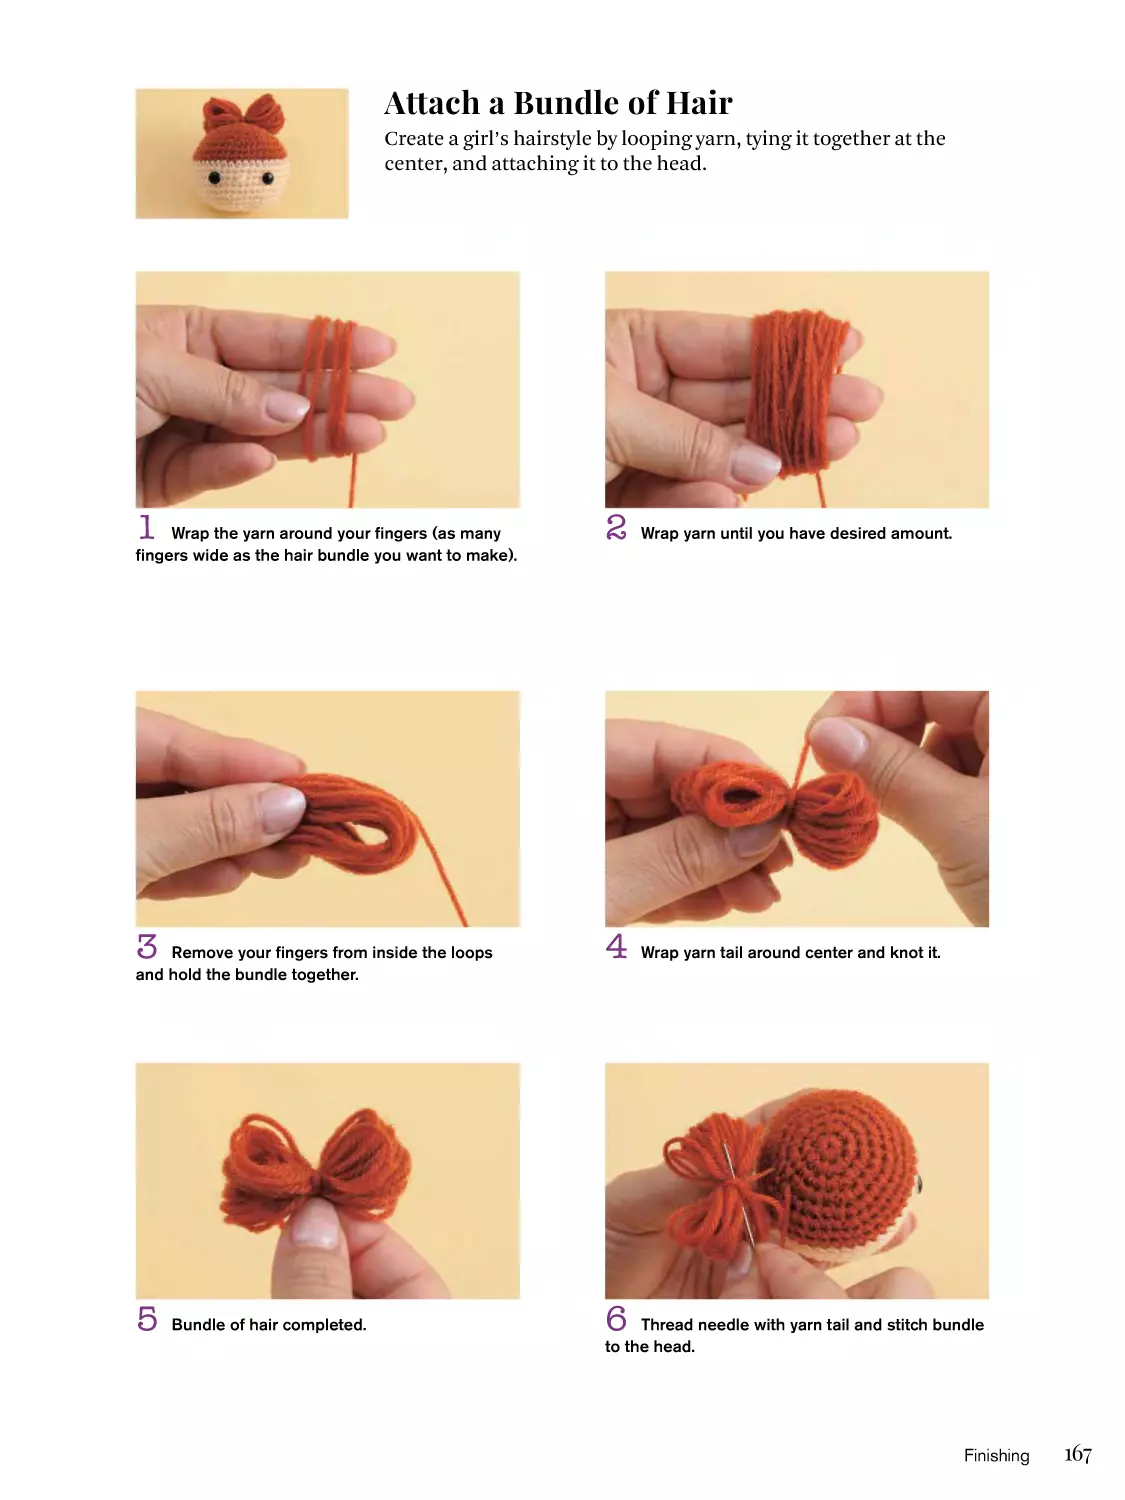
Attach a Bundle of Hair
Make a Ponytail
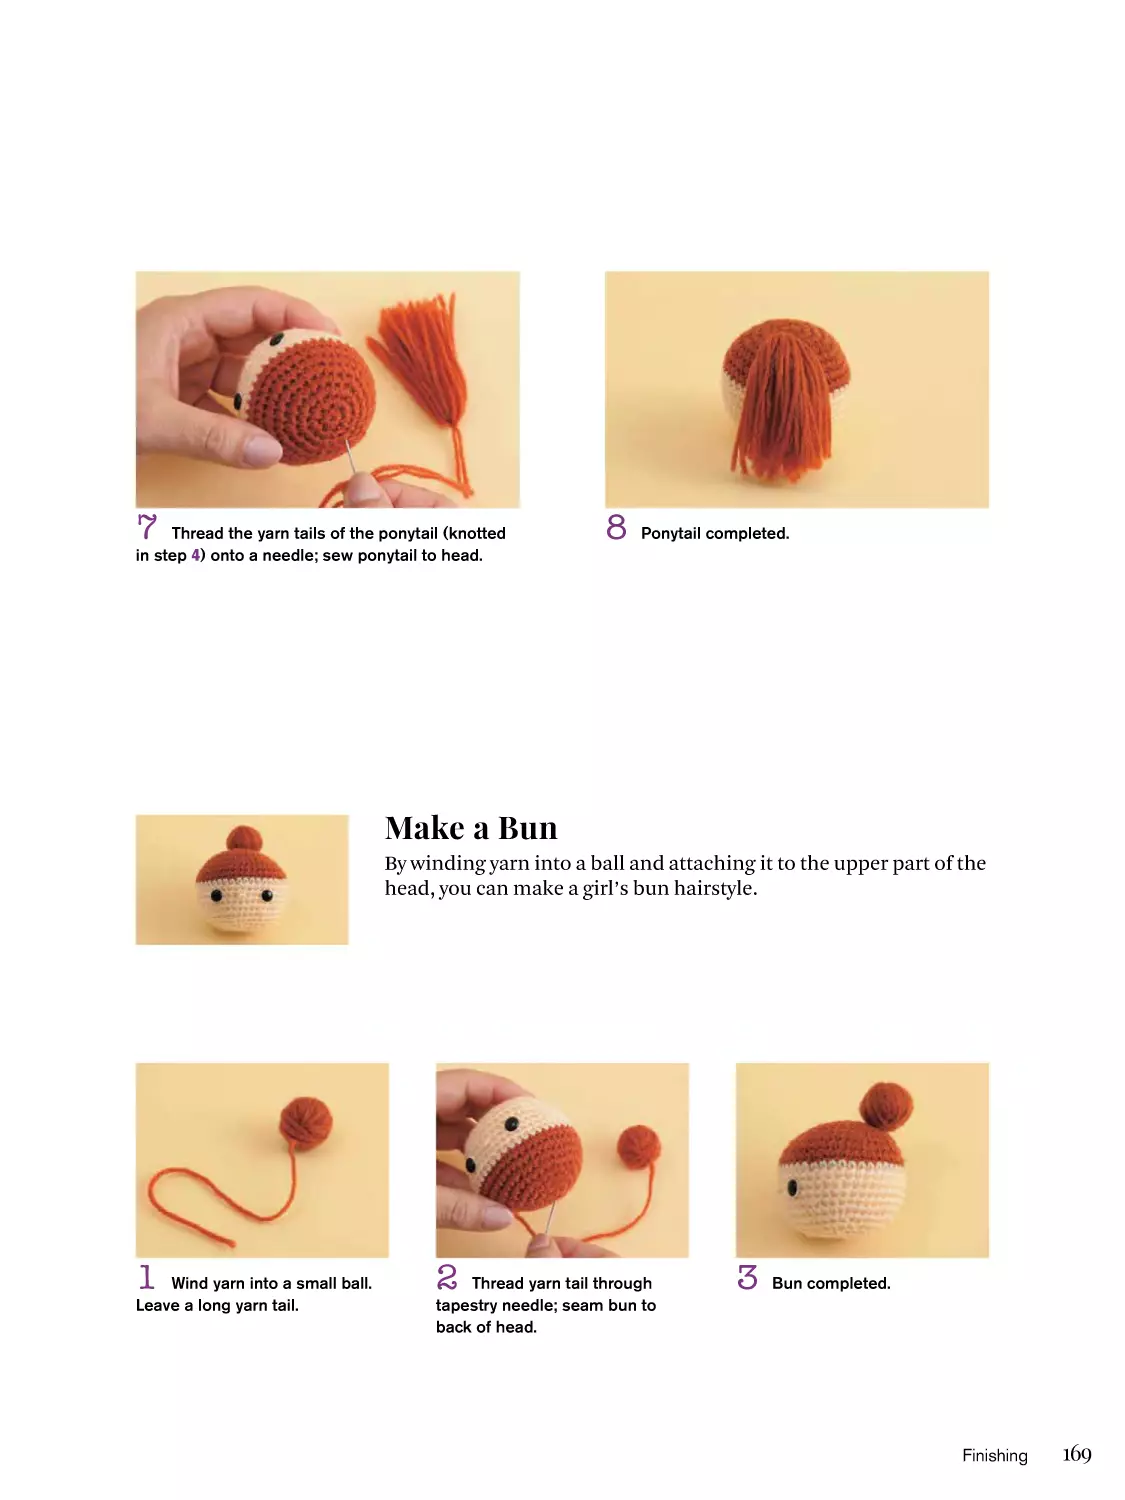
Make a Bun
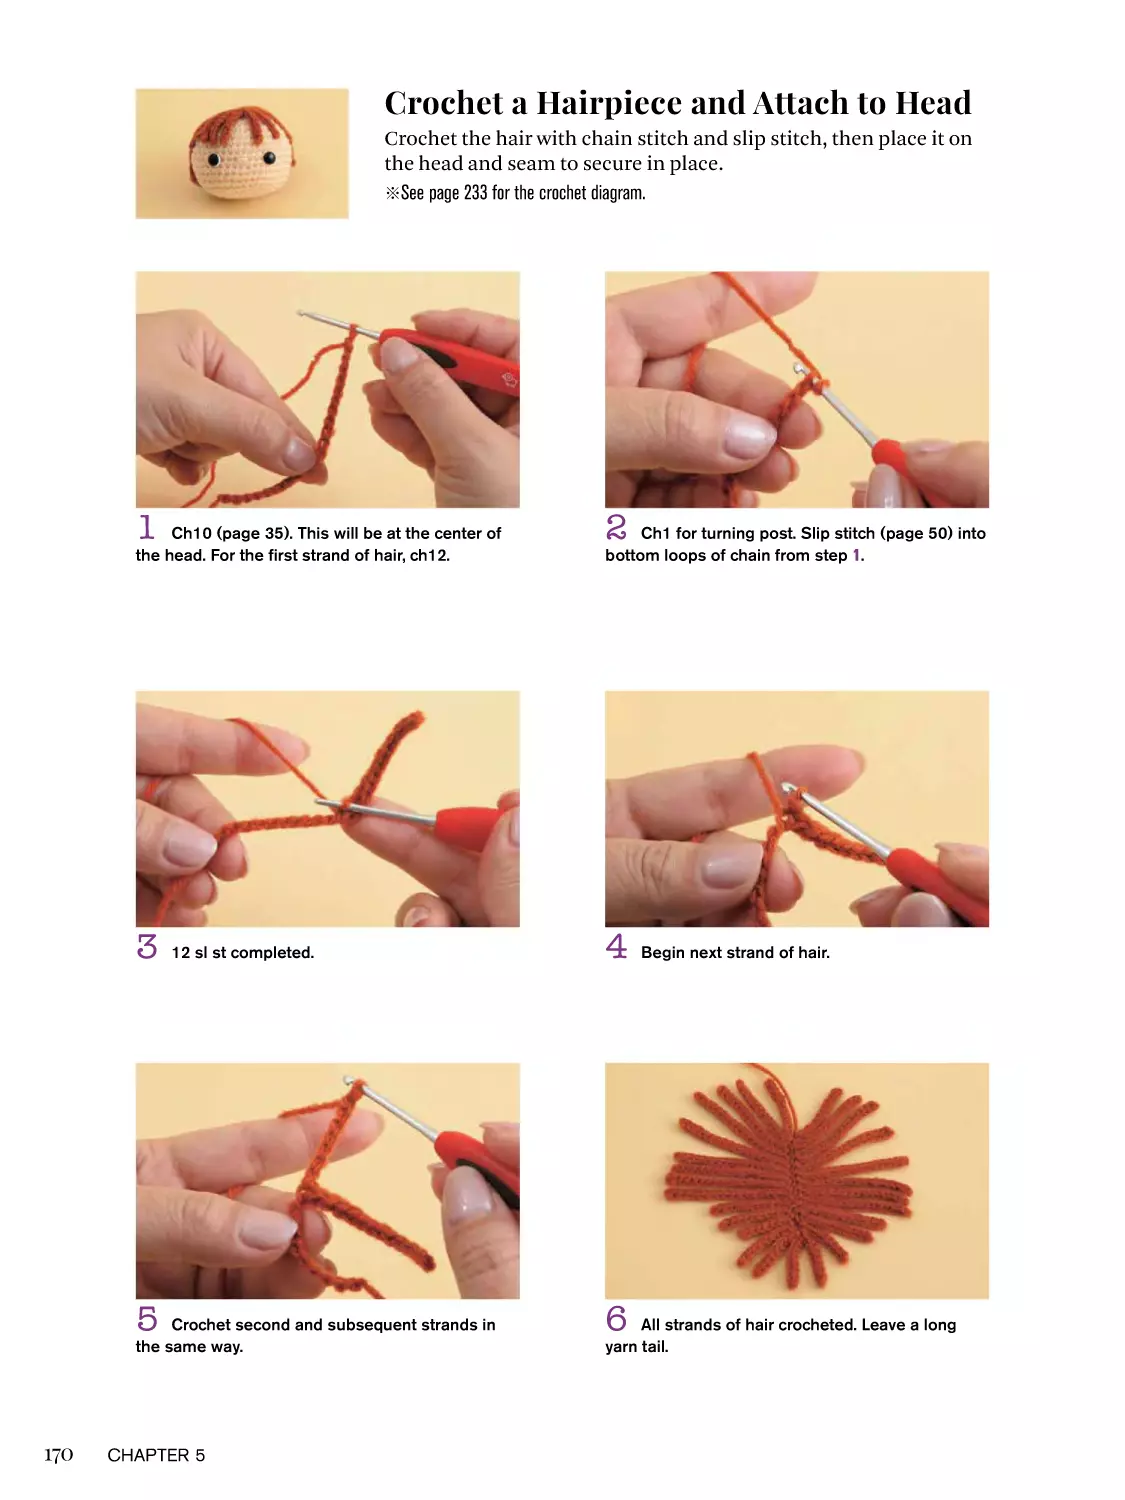
Crochet a Hairpiece and Attach
to Head
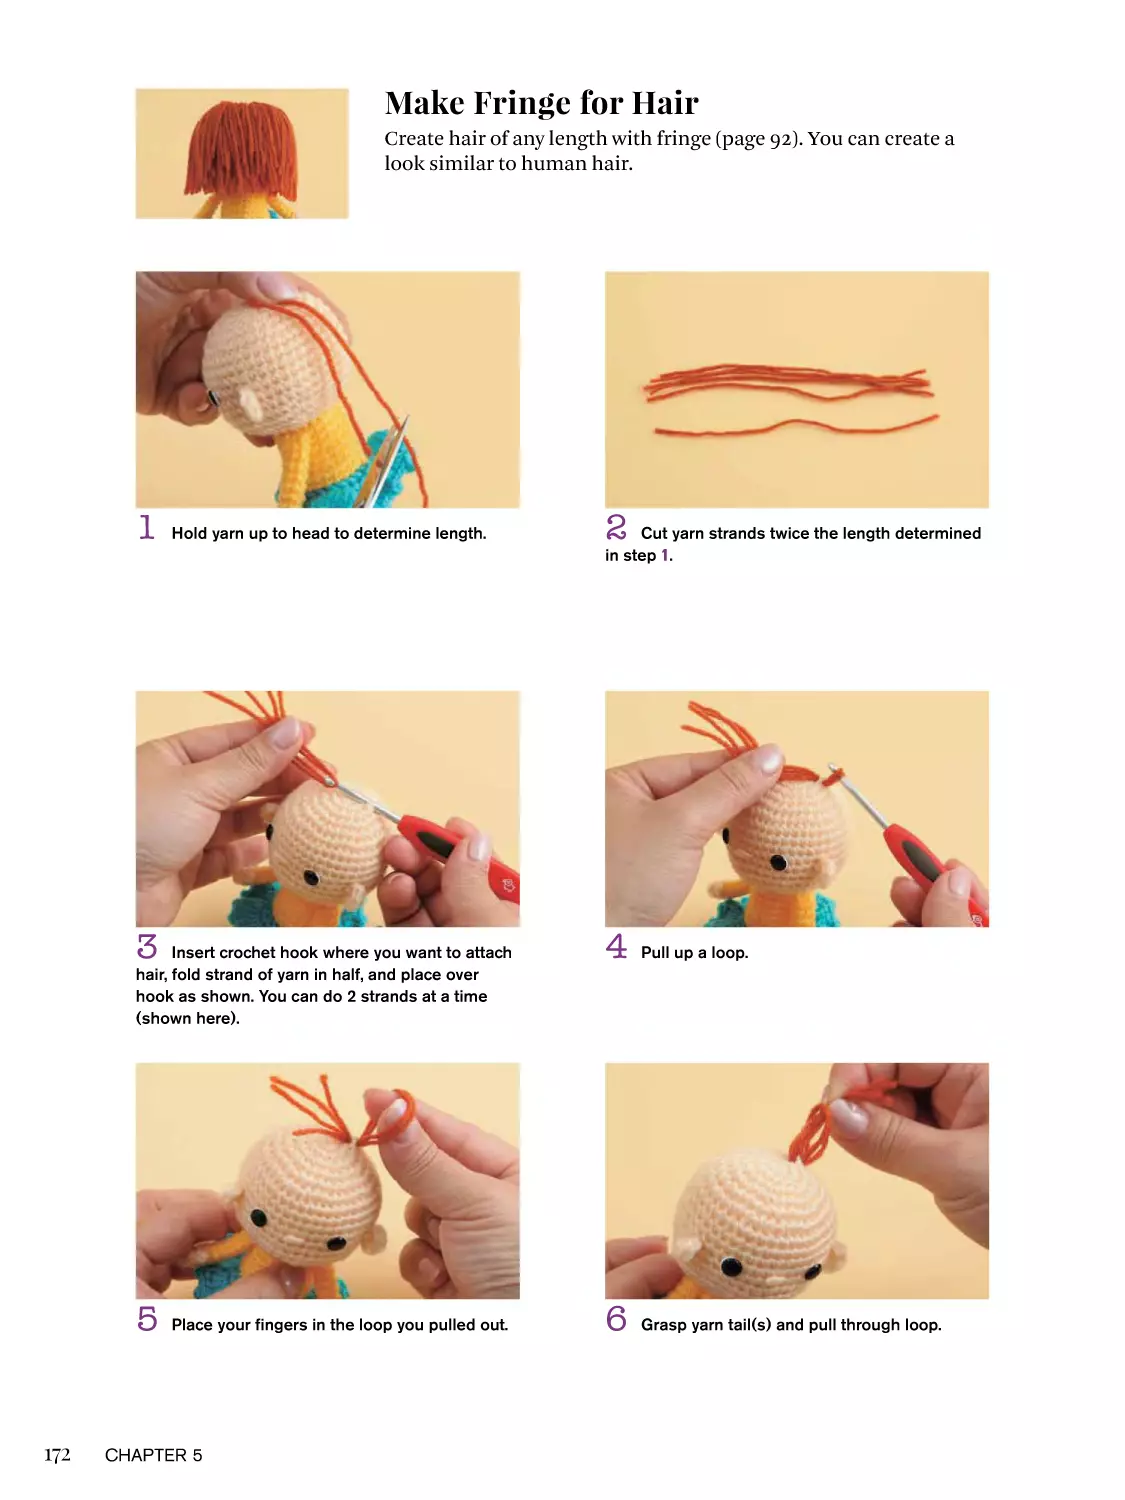
Make Fringe for Hair
Embroidering Hair
Tint Cheeks with Embroidery
Attach Felt
Tint Fabric with Cosmetics
Add Color with Acrylic Roving
Make Zakka
Attaching a Purse Frame
with Glue
Attaching a Purse Frame with
Sewing Needle
Make a Cozy
Insert a Zipper
Insert a Lining
Attach Metal Findings (O-ring)
166
166
166
167
168
169
170
172
174
175
175
176
176
177
178
179
180
181
183
184
Thinking About the Parts of
the Face
Eye Placement
Eye Type
Eye Size and Color
Nose and Mouth Variants
Ear Variants
Body Proportions and Color
Schemes
Let’s Think About the Size of the
Head and Body
Various Color Schemes
186
186
186
187
188
188
189
189
189
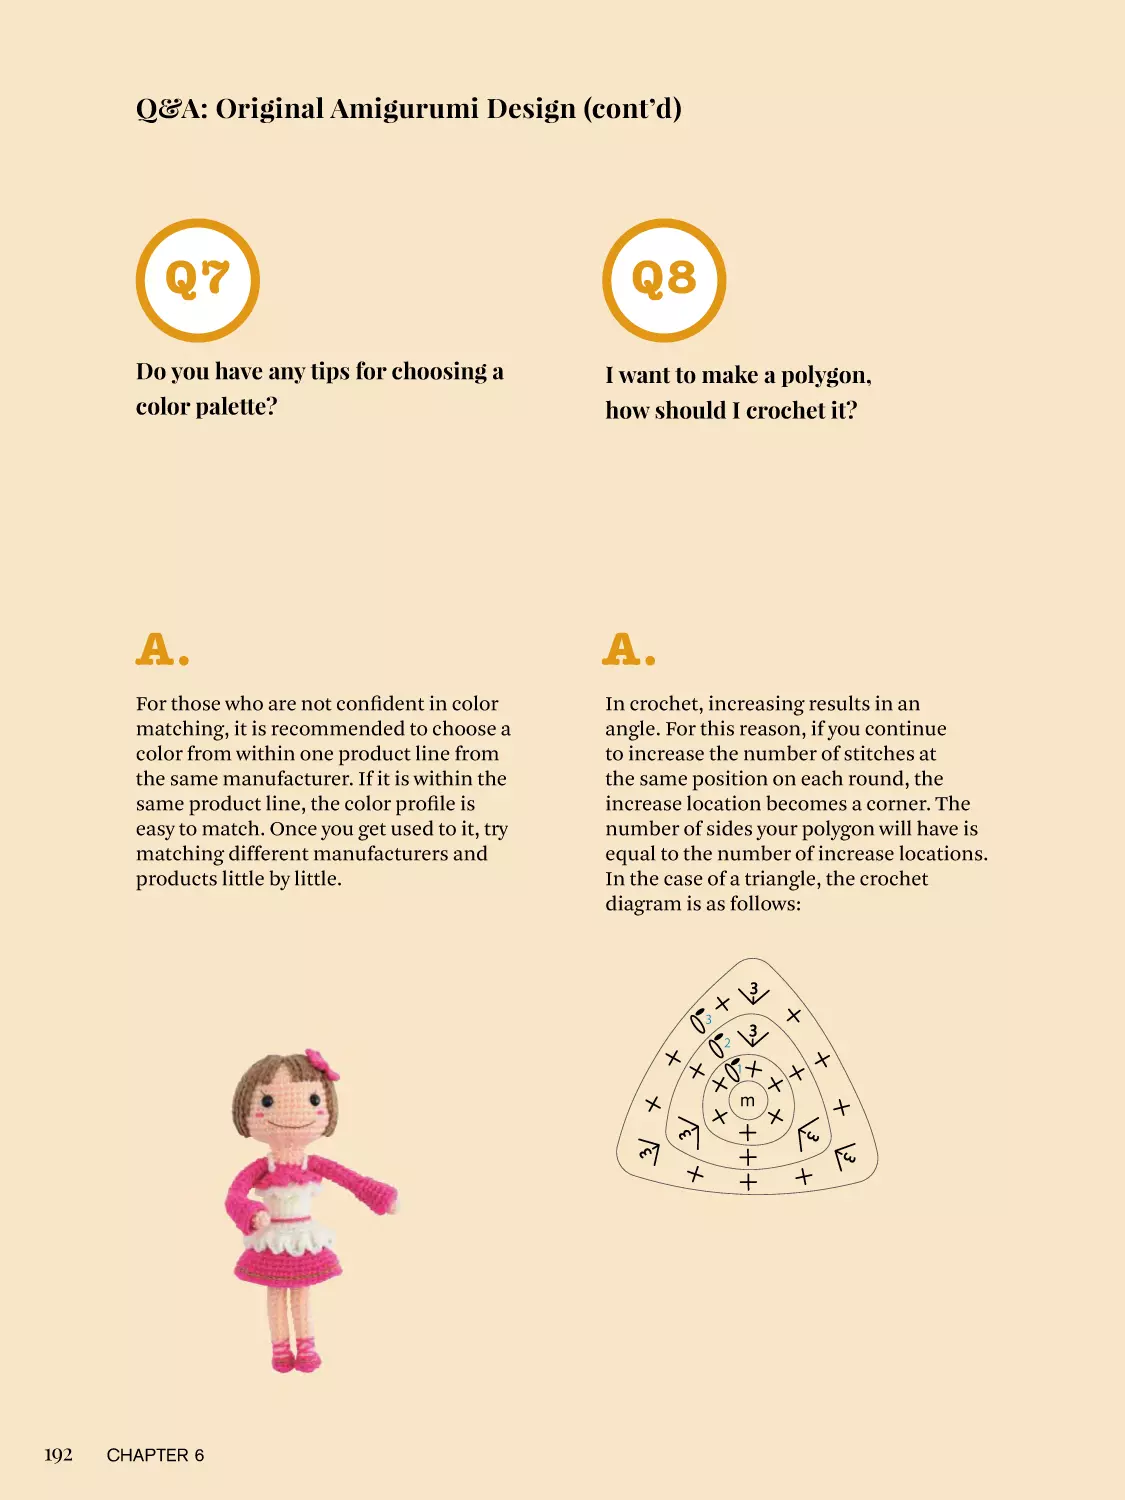
Q and A: Original Amigurumi
Design
190
An Amigurumi Gallery 4
193
Chapter 7
Let’s Try It!
Diagrams for Parts in this Book
198
210
223
232
Index
235
The Resources Section
237
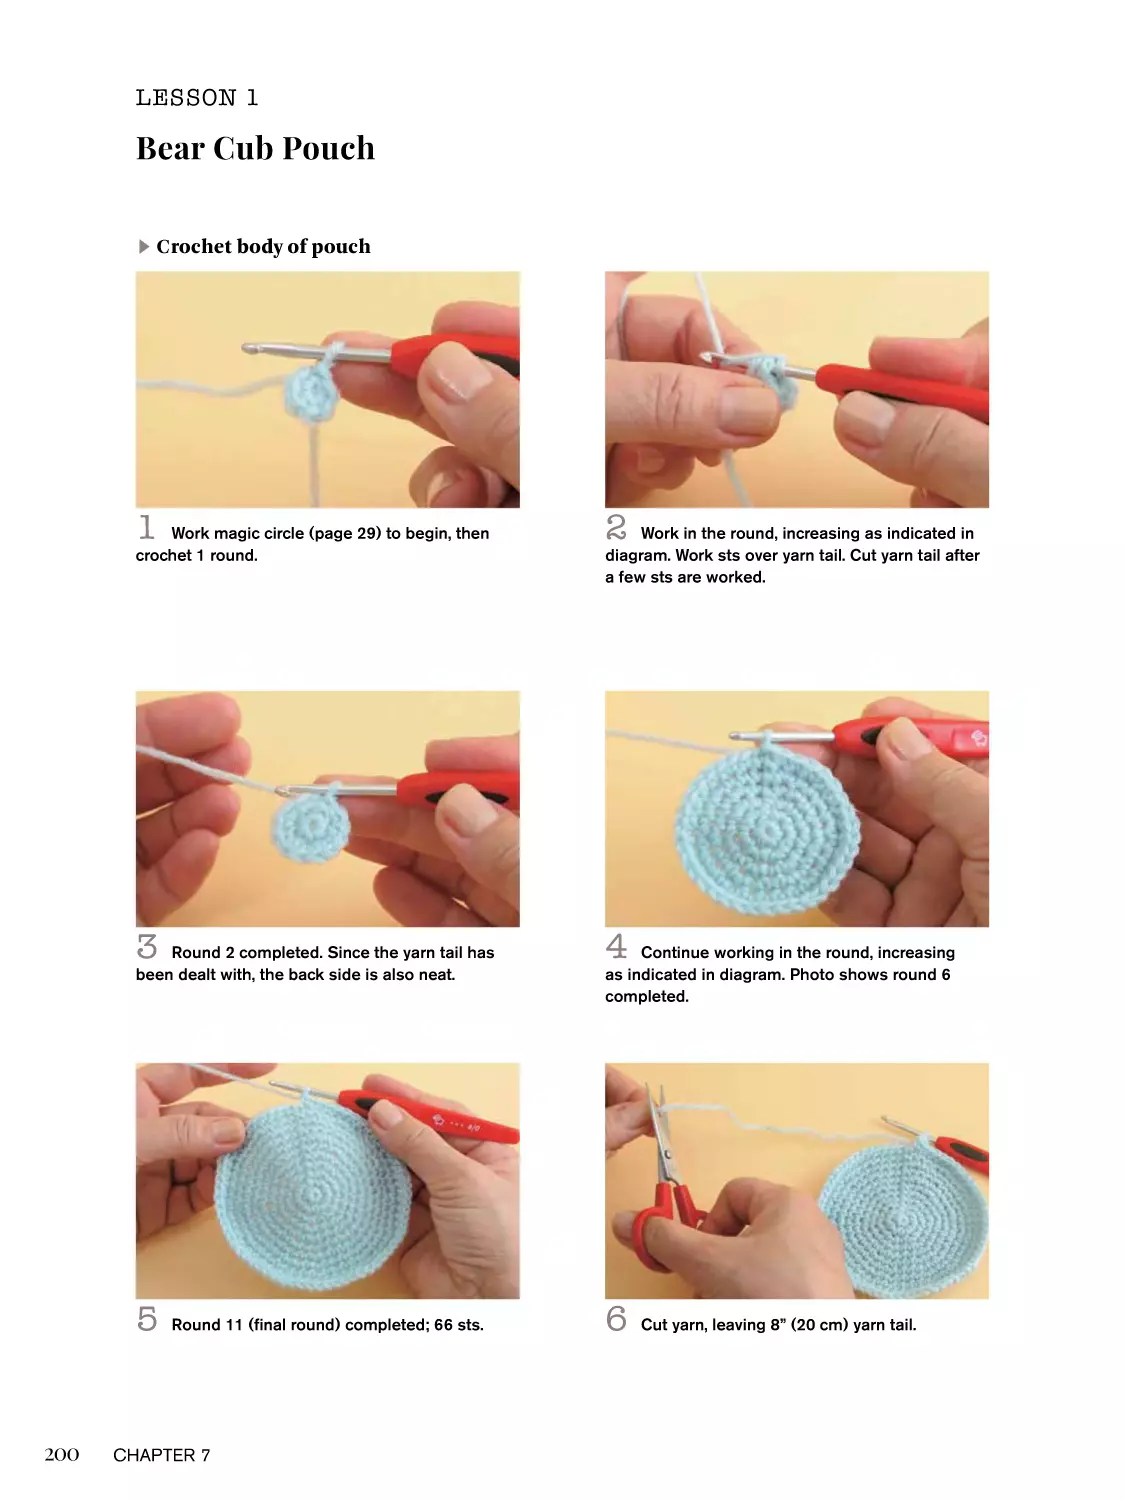
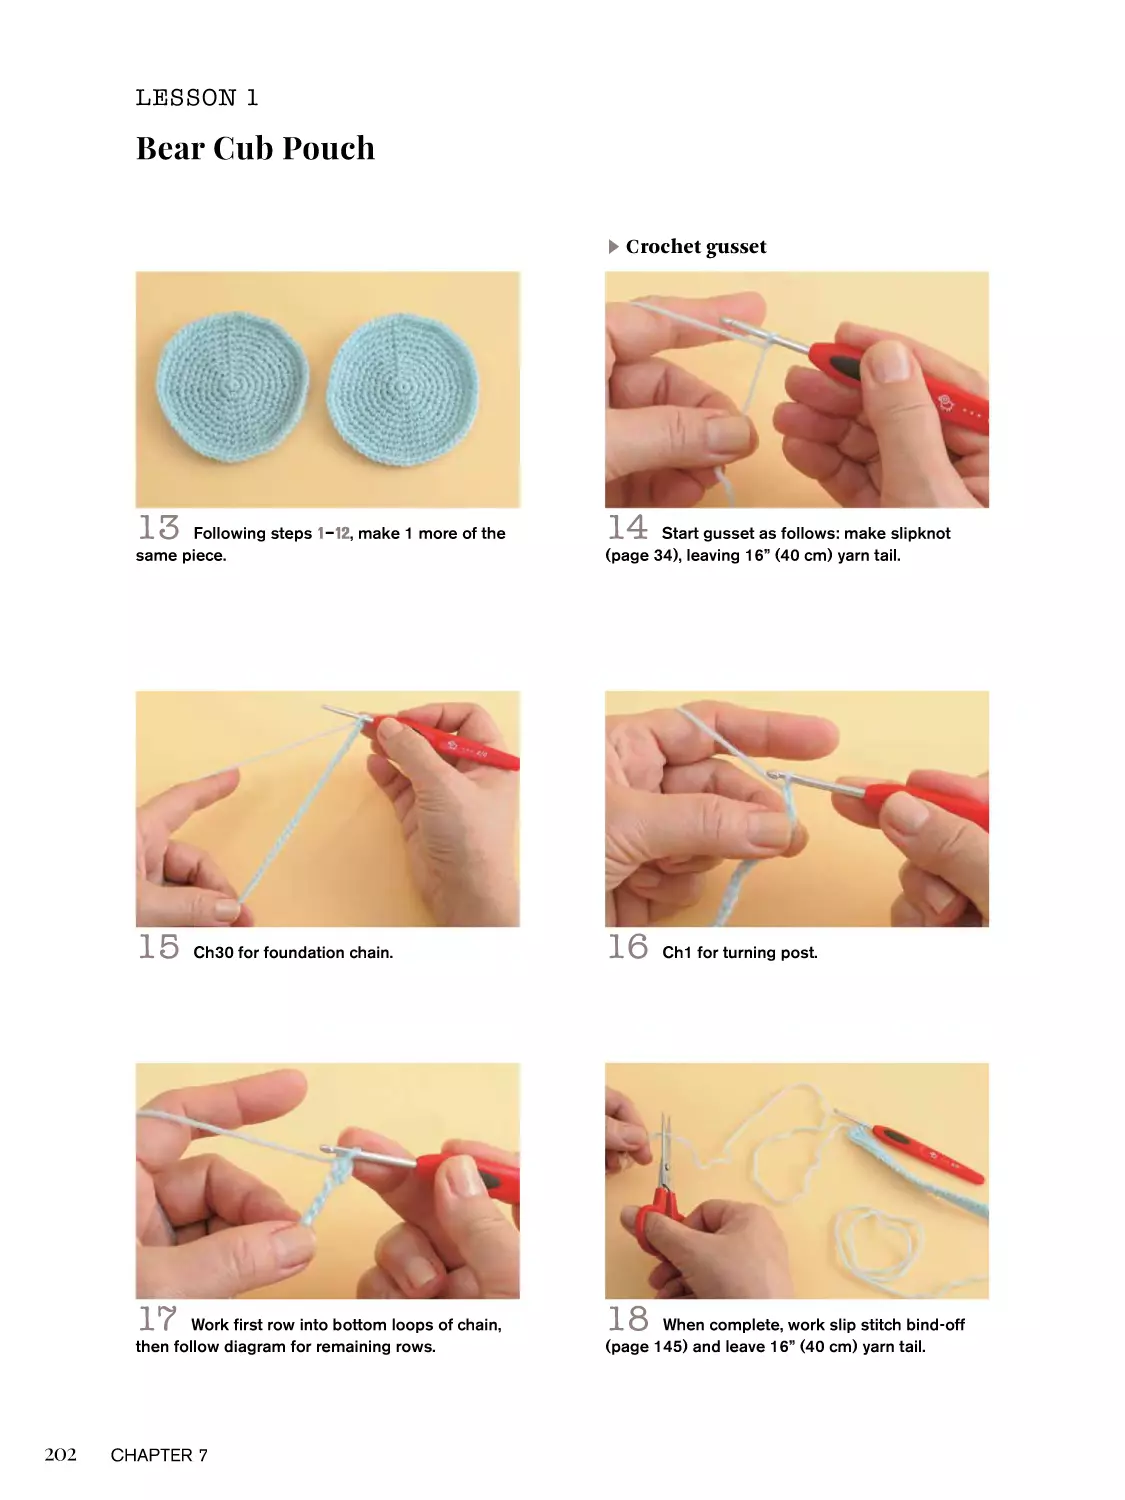
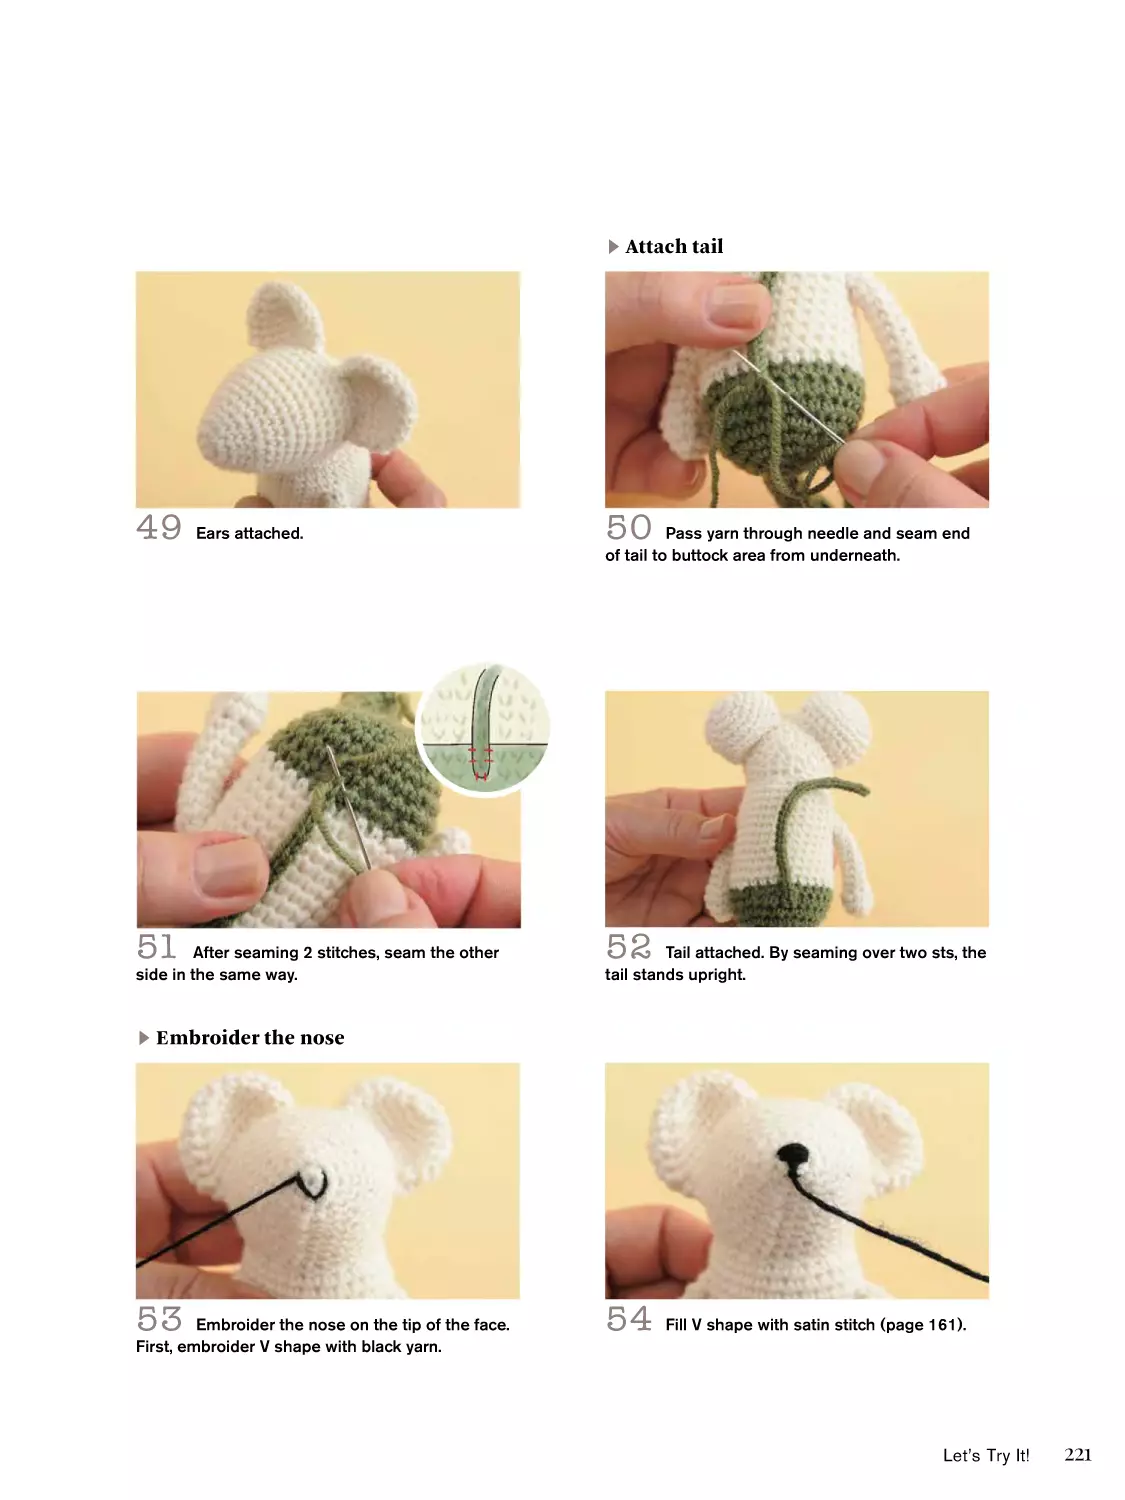
LESSON 1: Bear Cub Pouch
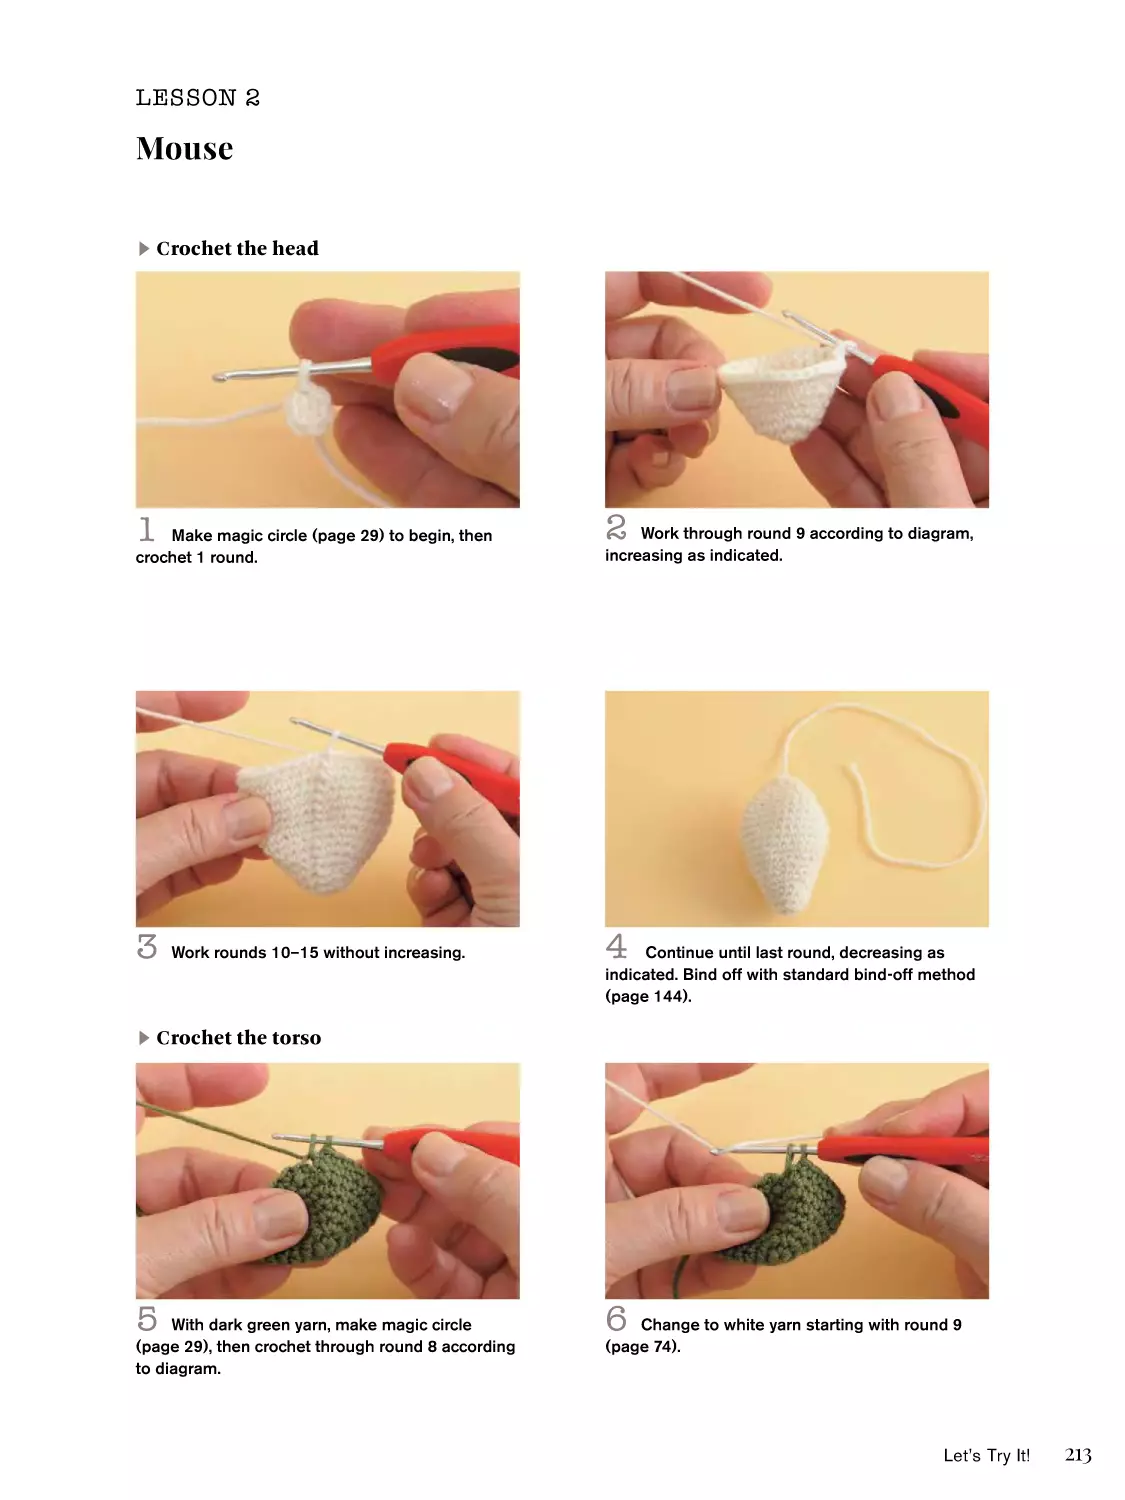
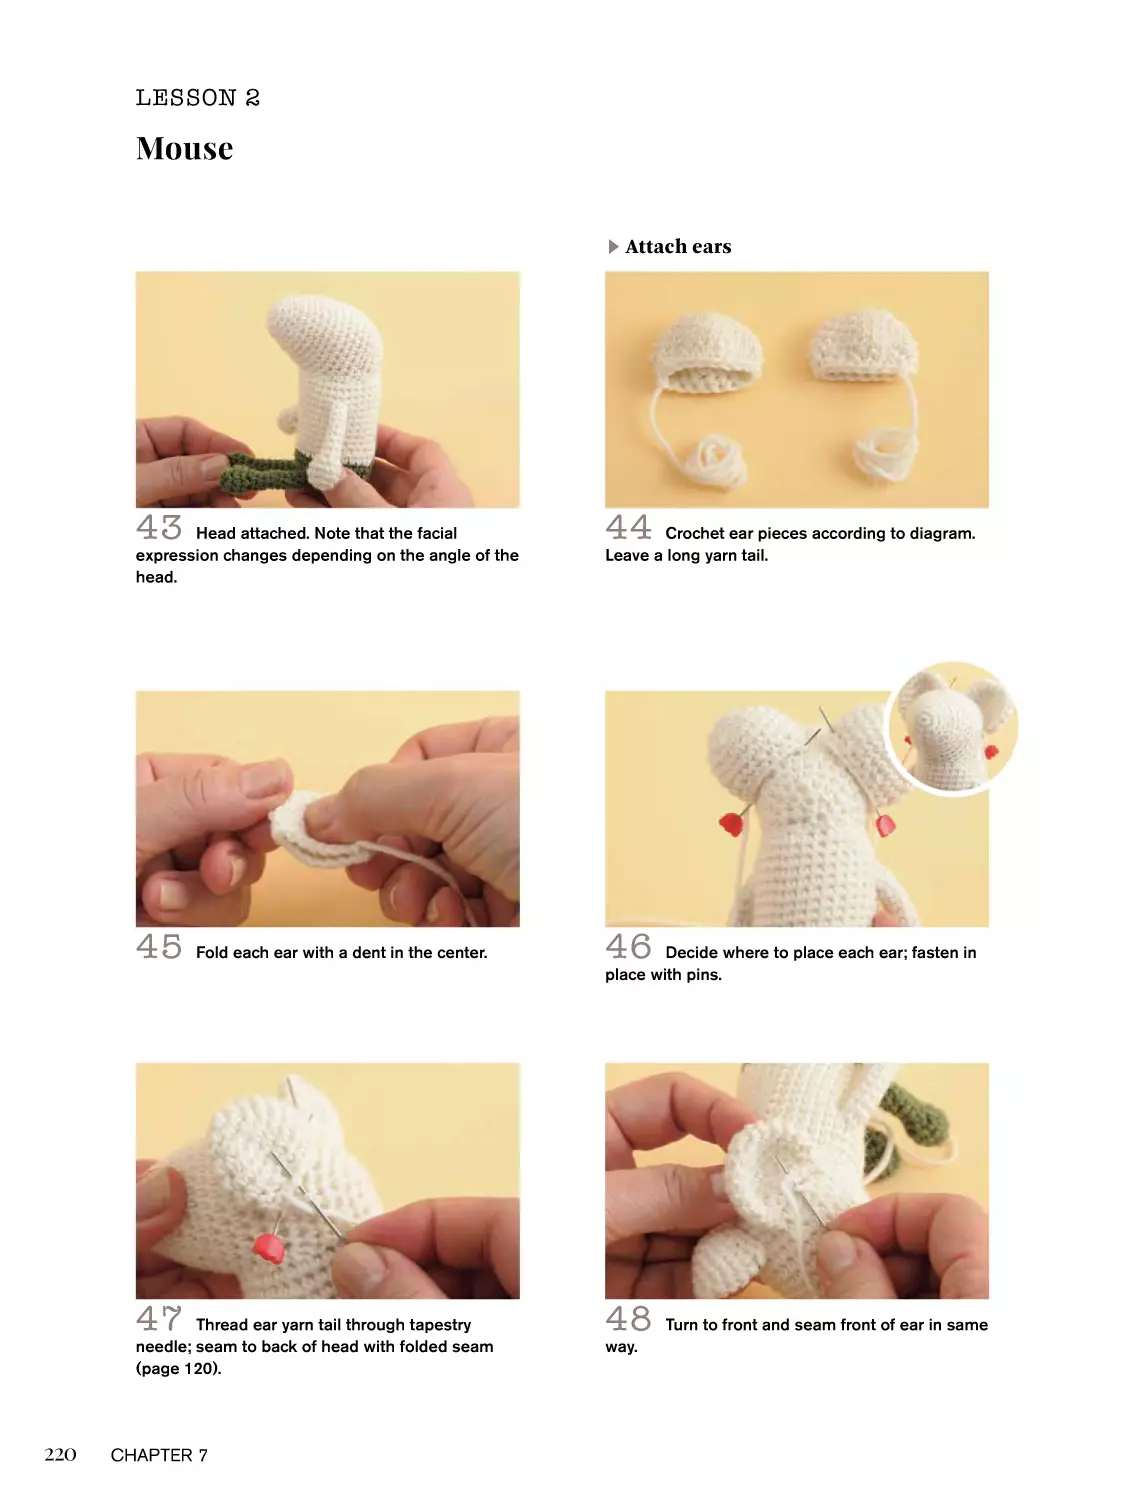
LESSON 2: Mouse
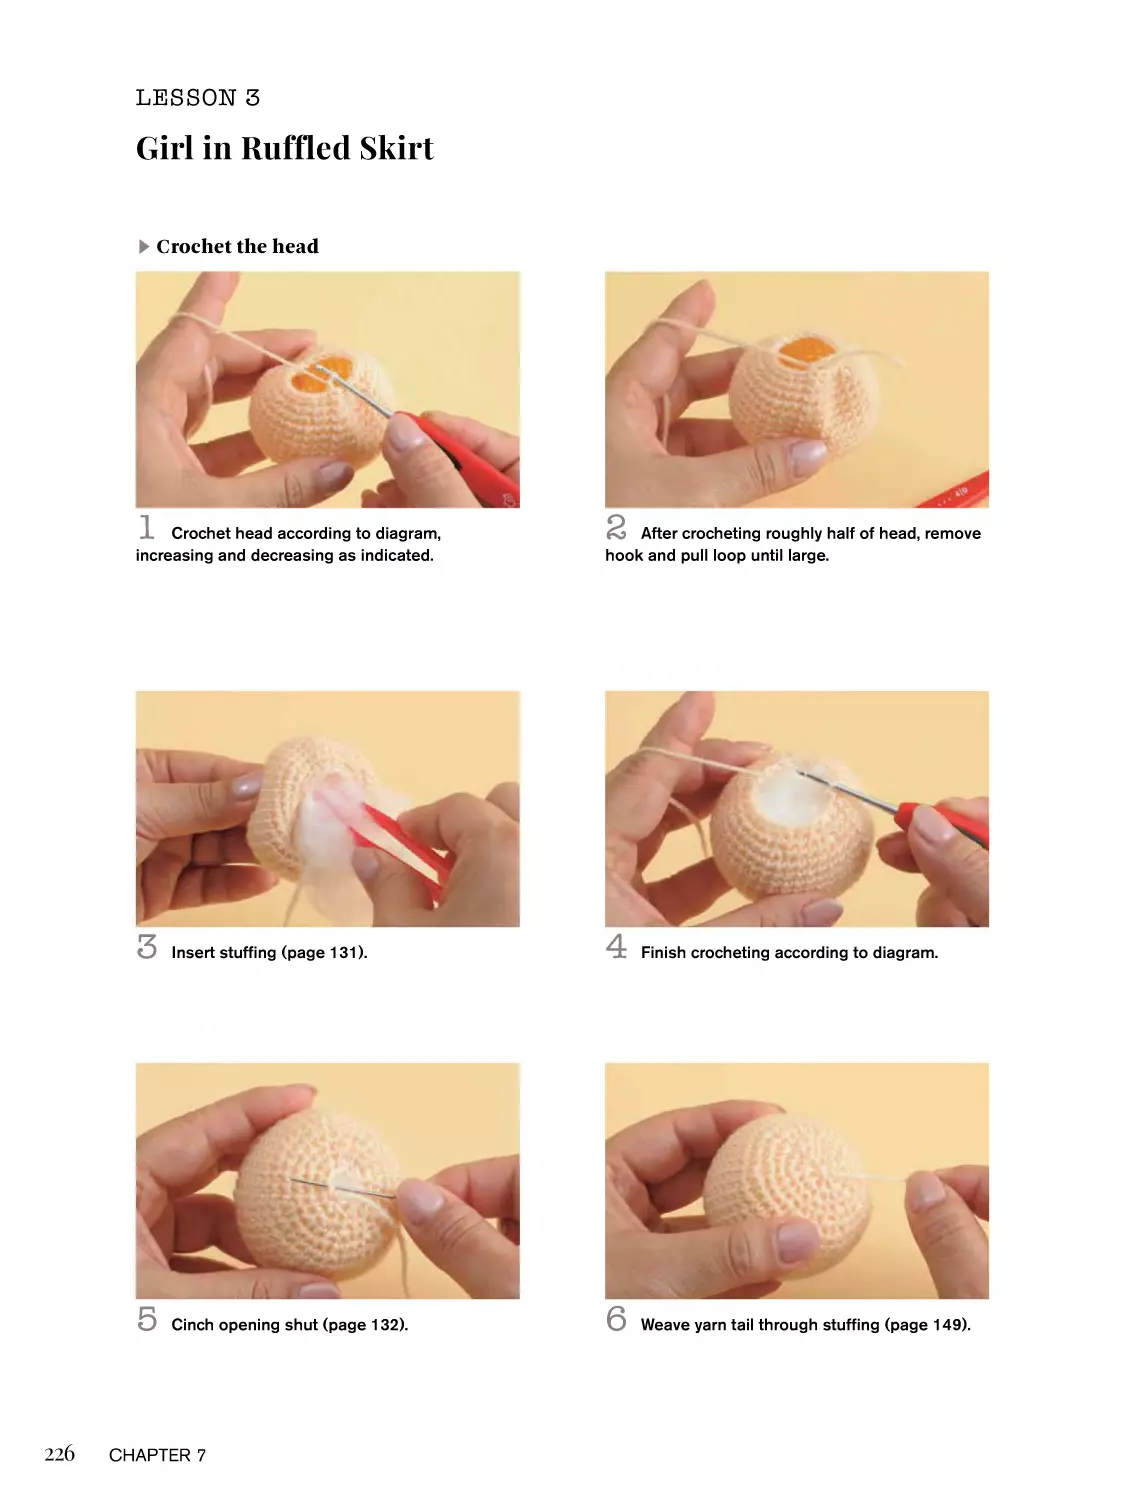
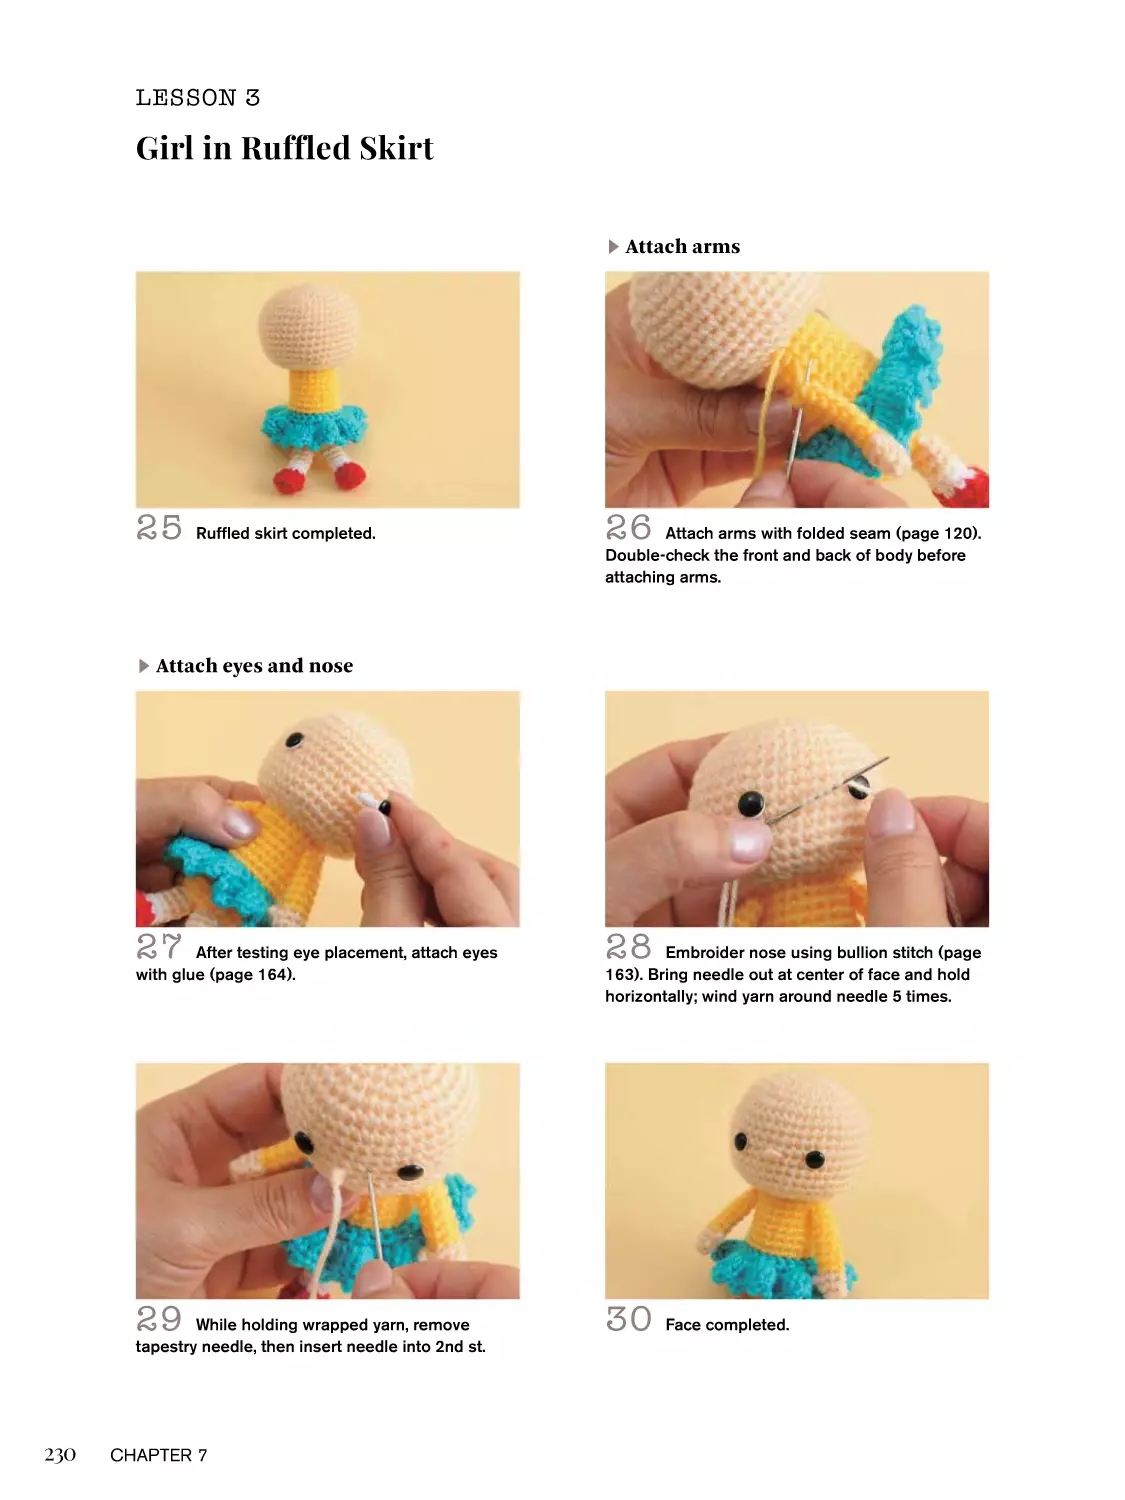
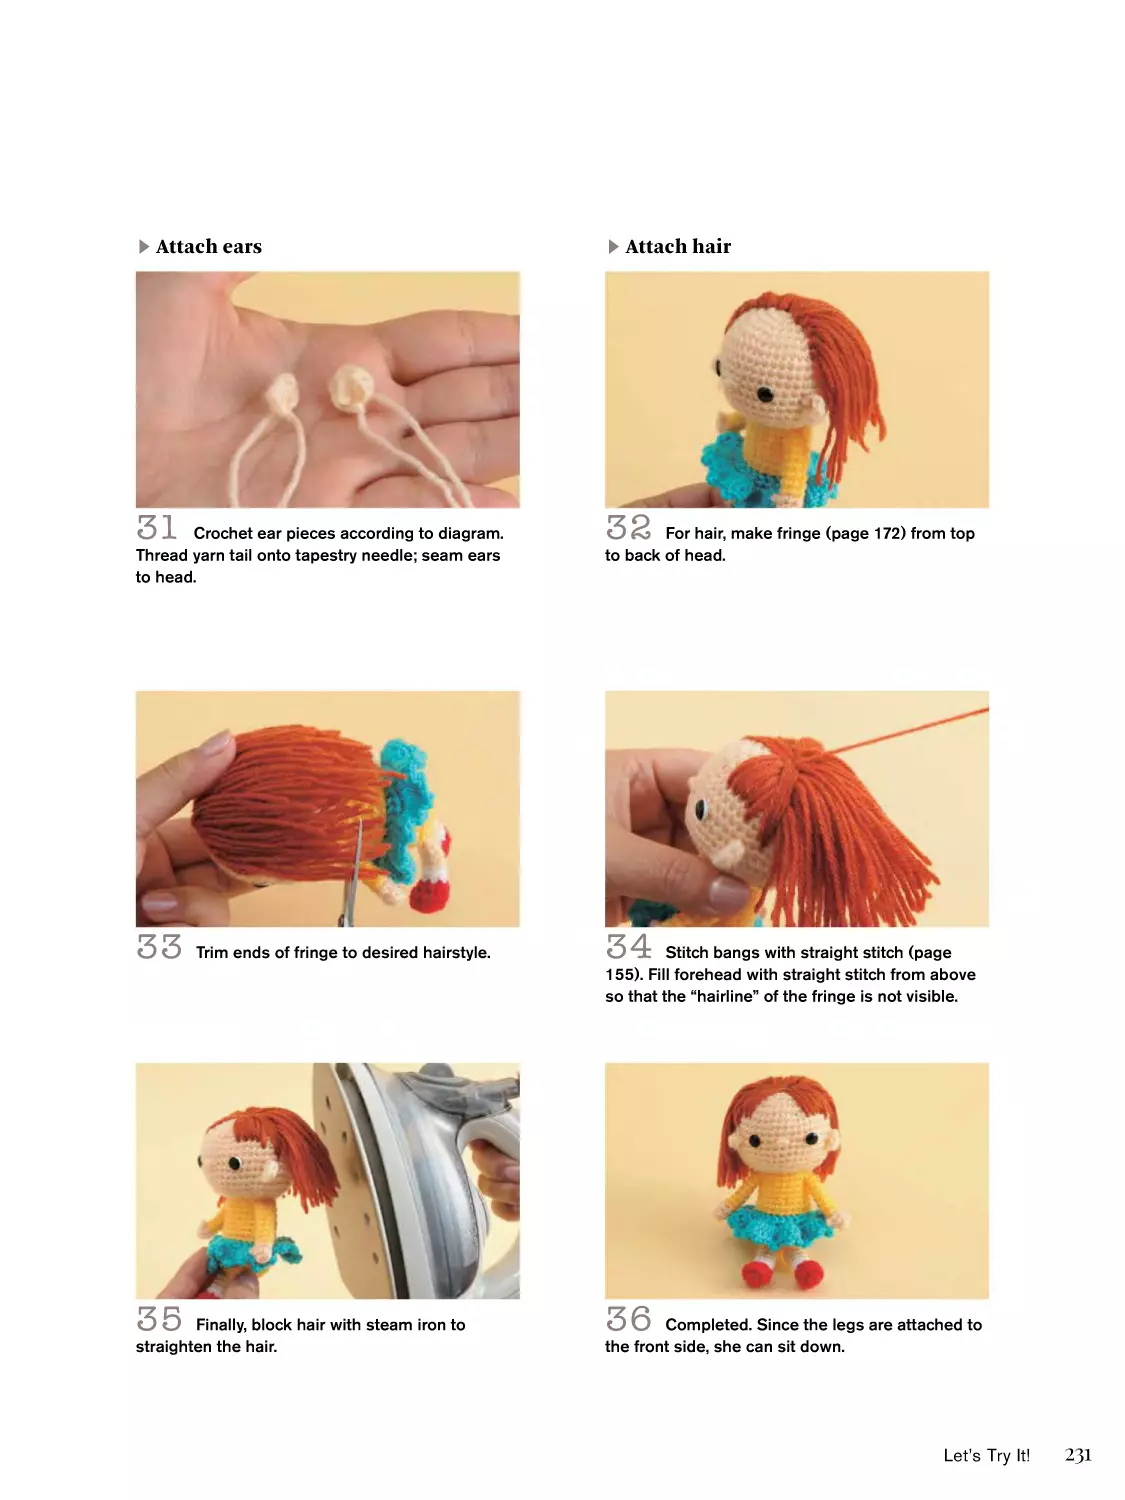
LESSON 3: Girl in Ruffled Skirt
Please note that with the exception of the toys
featured in Chapter 7, all samples shown in
this book are for illustration purposes only.
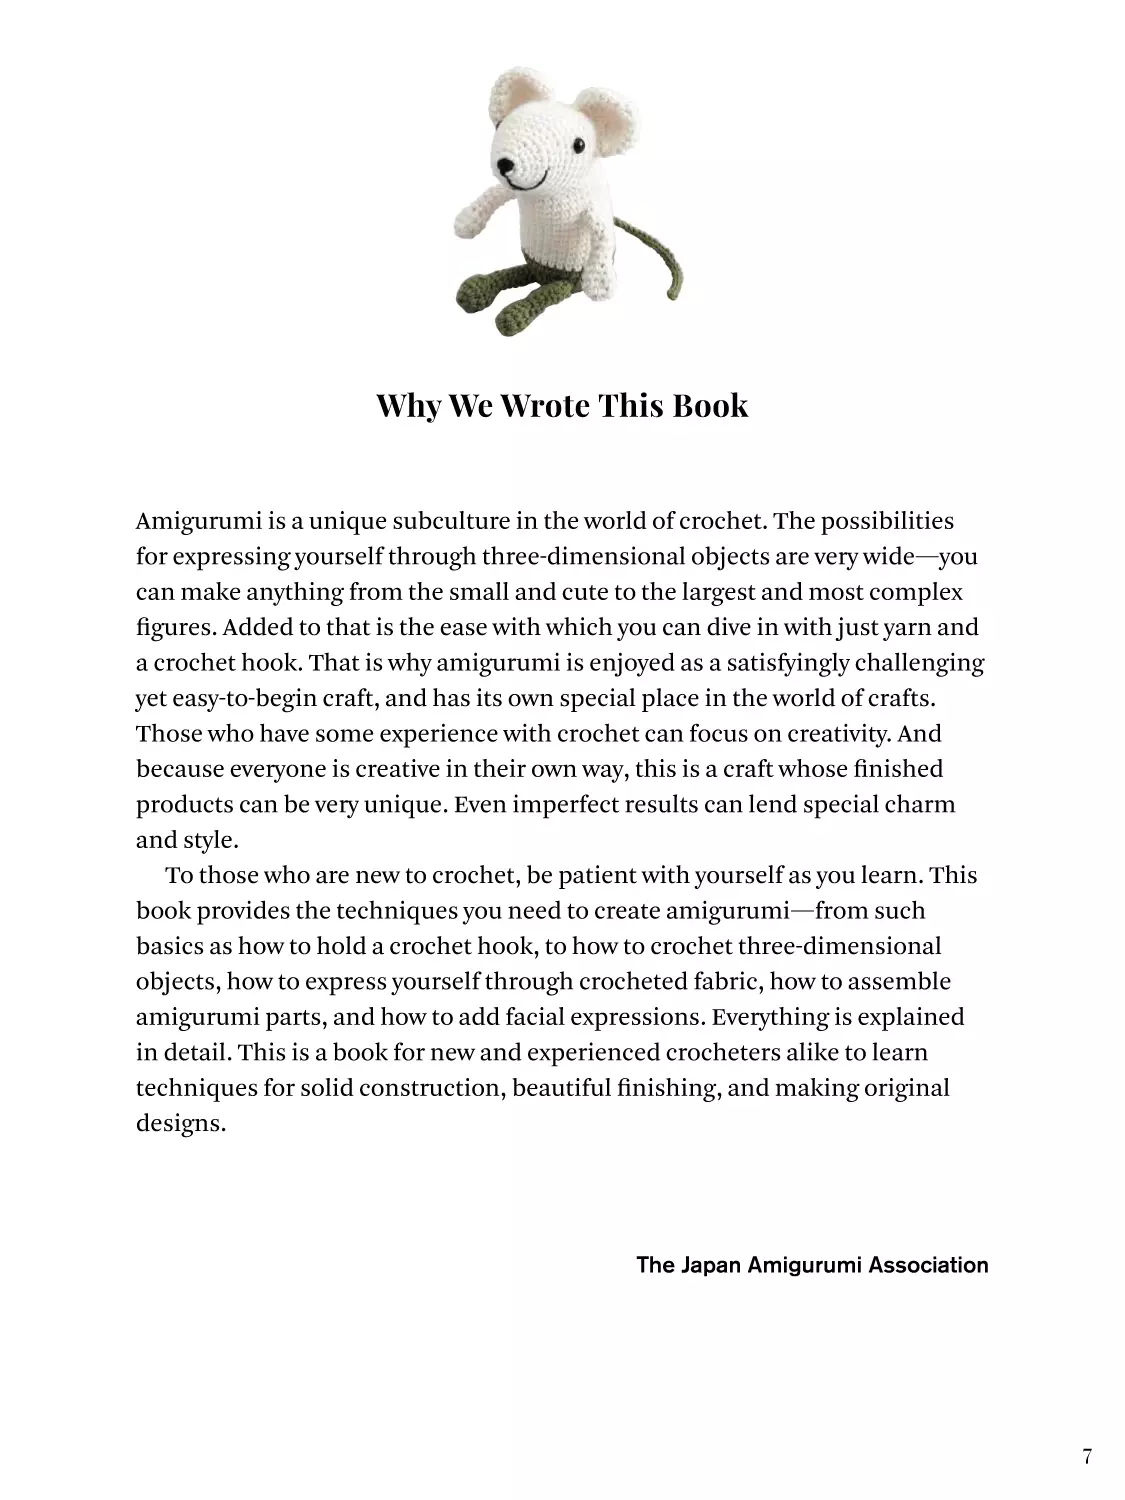
Why We Wrote This Book
Amigurumi is a unique subculture in the world of crochet. The possibilities
for expressing yourself through three-dimensional objects are very wide—you
can make anything from the small and cute to the largest and most complex
figures. Added to that is the ease with which you can dive in with just yarn and
a crochet hook. That is why amigurumi is enjoyed as a satisfyingly challenging
yet easy-to-begin craft, and has its own special place in the world of crafts.
Those who have some experience with crochet can focus on creativity. And
because everyone is creative in their own way, this is a craft whose finished
products can be very unique. Even imperfect results can lend special charm
and style.
To those who are new to crochet, be patient with yourself as you learn. This
book provides the techniques you need to create amigurumi—from such
basics as how to hold a crochet hook, to how to crochet three-dimensional
objects, how to express yourself through crocheted fabric, how to assemble
amigurumi parts, and how to add facial expressions. Everything is explained
in detail. This is a book for new and experienced crocheters alike to learn
techniques for solid construction, beautiful finishing, and making original
designs.
The Japan Amigurumi Association
7
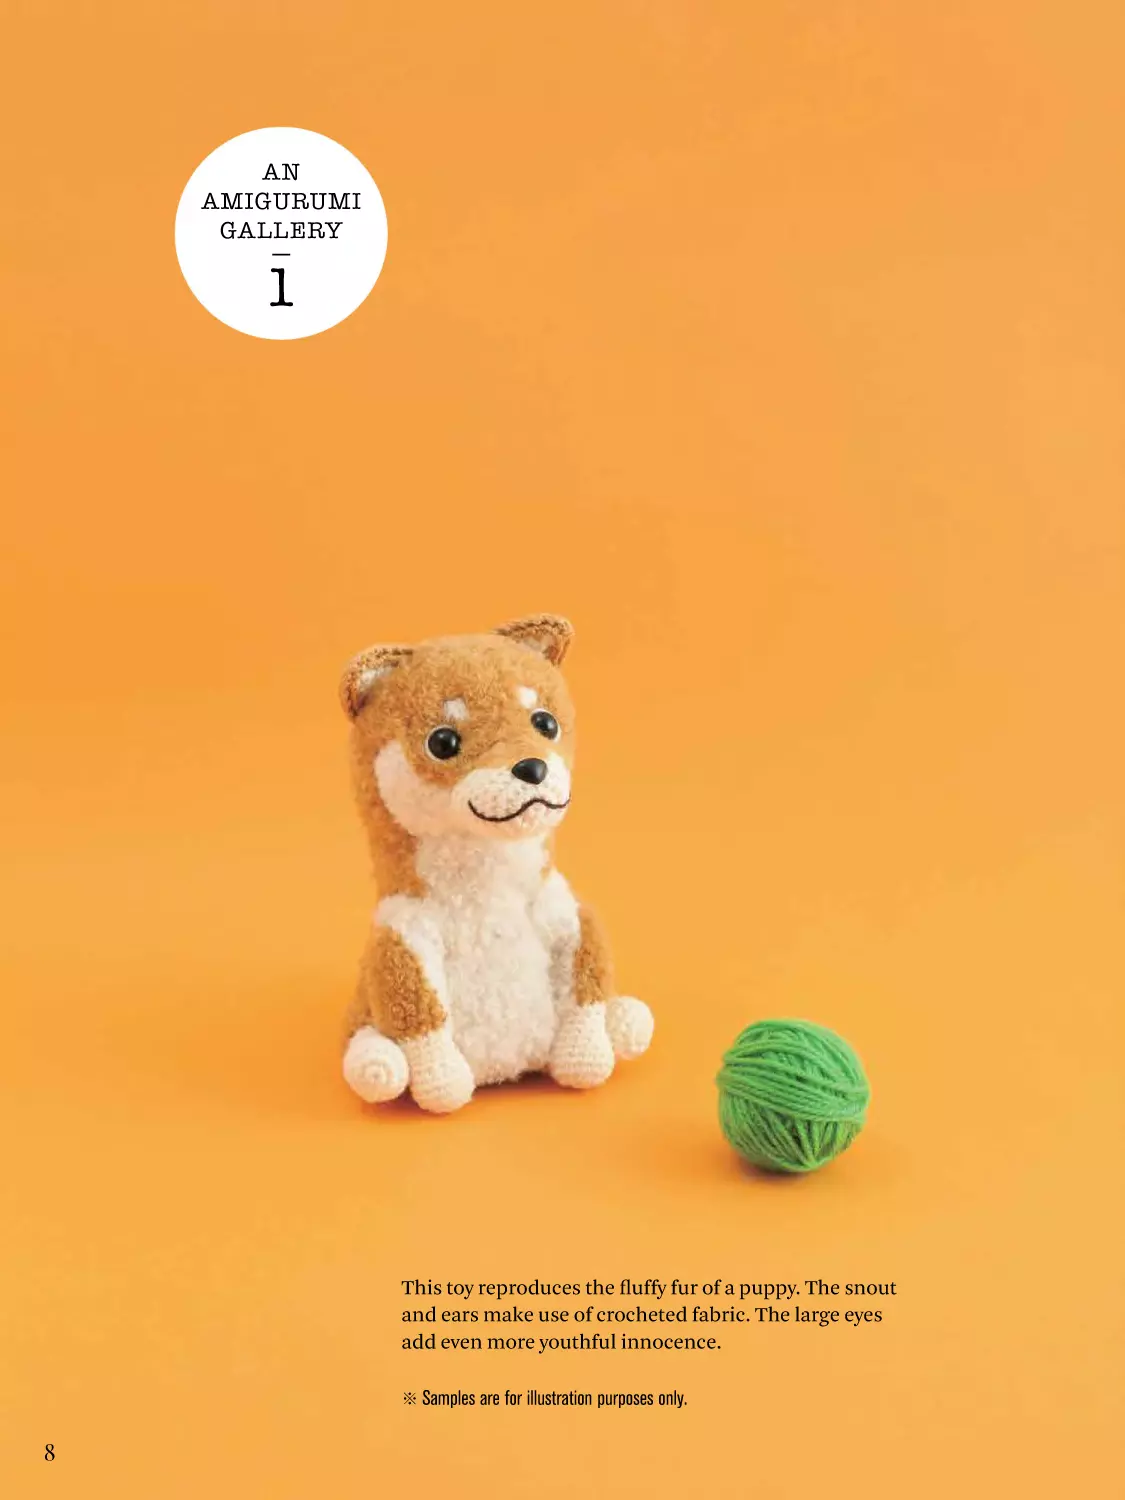
AN
AMIGURUMI
GALLERY
1
This toy reproduces the fluffy fur of a puppy. The snout
and ears make use of crocheted fabric. The large eyes
add even more youthful innocence.
※ Samples are for illustration purposes only.
8
This critter has weights in its head and
paws so it can hang off the edges of
tables and boxes.
Bears climbing Mt. Fuji! Since the bears are
small, you could use them to decorate lots of
little things, such as a child’s backpack, but you
can also enjoy placing them in a scene like this.
9
The size of the baby’s head adds extra character.
The dog is crocheted similarly in soft hues.
10
Pretty girls who seem to have jumped
out of the world of anime. All parts of
these figures, including facial features,
are crocheted.
11
Crocheted with particular attention to the
wedding dress, tuxedo, and bouquet.
Dressing it up and forming it into a sitting shape make
this elephant especially charming.
12
Chapter 1
The Basics of
Making Amigurumi
Here we’ve summarized the basic information you
need to know, such as the tools and materials used
to make amigurumi, the names of each part, and
how to read the crochet diagrams.
Amigurumi Tools
Basic Tools
First of all, let’s gather the essential tools for making amigurumi.
Crochet hooks
Scissors
Needles
Ballpoint pins
Bodkin
Tweezers
Measuring tape
Strong glue
Steam iron
The hooks typically used for
amigurumi range in size from steel
hook #4 (2.0mm) to J (6.0mm). The
higher the letter in the alphabet,
the thicker the hook (steel hooks
excepted). Very large hooks are often listed according to their metric
size (mm) only, not a letter. Choose
a hook size appropriate for the
yarn weight being used (see page
16 for more details).
Ballpoint pins are used when
seaming parts together or for
holding parts in place temporarily
to determine placement. The tips
are rounder than dressmaking pins,
and the shafts are thicker so they’ll
hold in place even with thick fabric.
It is used to measure the size of an
item and the gauge of the fabric.
14
Chapter 1
Mainly used to cut yarn and other
materials. A pair with pointy tips
is most useful.
Used to pierce a hole the
crocheted fabric or lift it when
gluing pieces inside. It is also
used to shape the amigurumi
when inserting filling.
It is used when attaching parts
such as eyes and nose, and when
attaching yarn or felt.
Used for seaming and embroidery.
Choose a needle appropriate for
the yarn or thread you’re using.
They are used when stuffing
filling into elongated parts such
as arms or into narrow openings.
Apply steam to curled or crimped
fabric with a steam iron for a neat
result.
Useful Tools to Have
Depending on what you make, these tools may be necessary or just nice to have.
Pliers
Curved scissors
Seam ripper
Yarn threader
Marking pen
Stitch markers
Calipers
Safety eye sample set
Needle felting needle
Nap brush
Pompom maker
Awl
Used when attaching
metal parts such as
O-rings and when
bending wires.
Used to make marks
when cutting felt and
attaching parts.
A needle used for needle
felting with wool or acrylic
roving.
Since the tips of the
blades are curved,
you can cut without
damaging the
crocheted fabric.
When counting stitches,
place a marker over any
stitch you want to mark.
You can fluff up the
crocheted fabric by
brushing it with a brush
with metal bristles.
When you want to
remove a seam, a seam
ripper can do it more
easily than scissors.
This is a tool that can
accurately measure the
size of parts such as
the eyes and nose.
A foolproof way to
make pompoms neatly.
Used when threading
yarn through a tapestry
needle. You can thread
a needle without it, but
this makes it very easy.
A set of safety eyes in
different sizes so you can
try them out.
The tip is thinner and
sharper than the tip of
a bodkin. It is mainly
used for making holes.
The Basics of Making Amigurumi
15
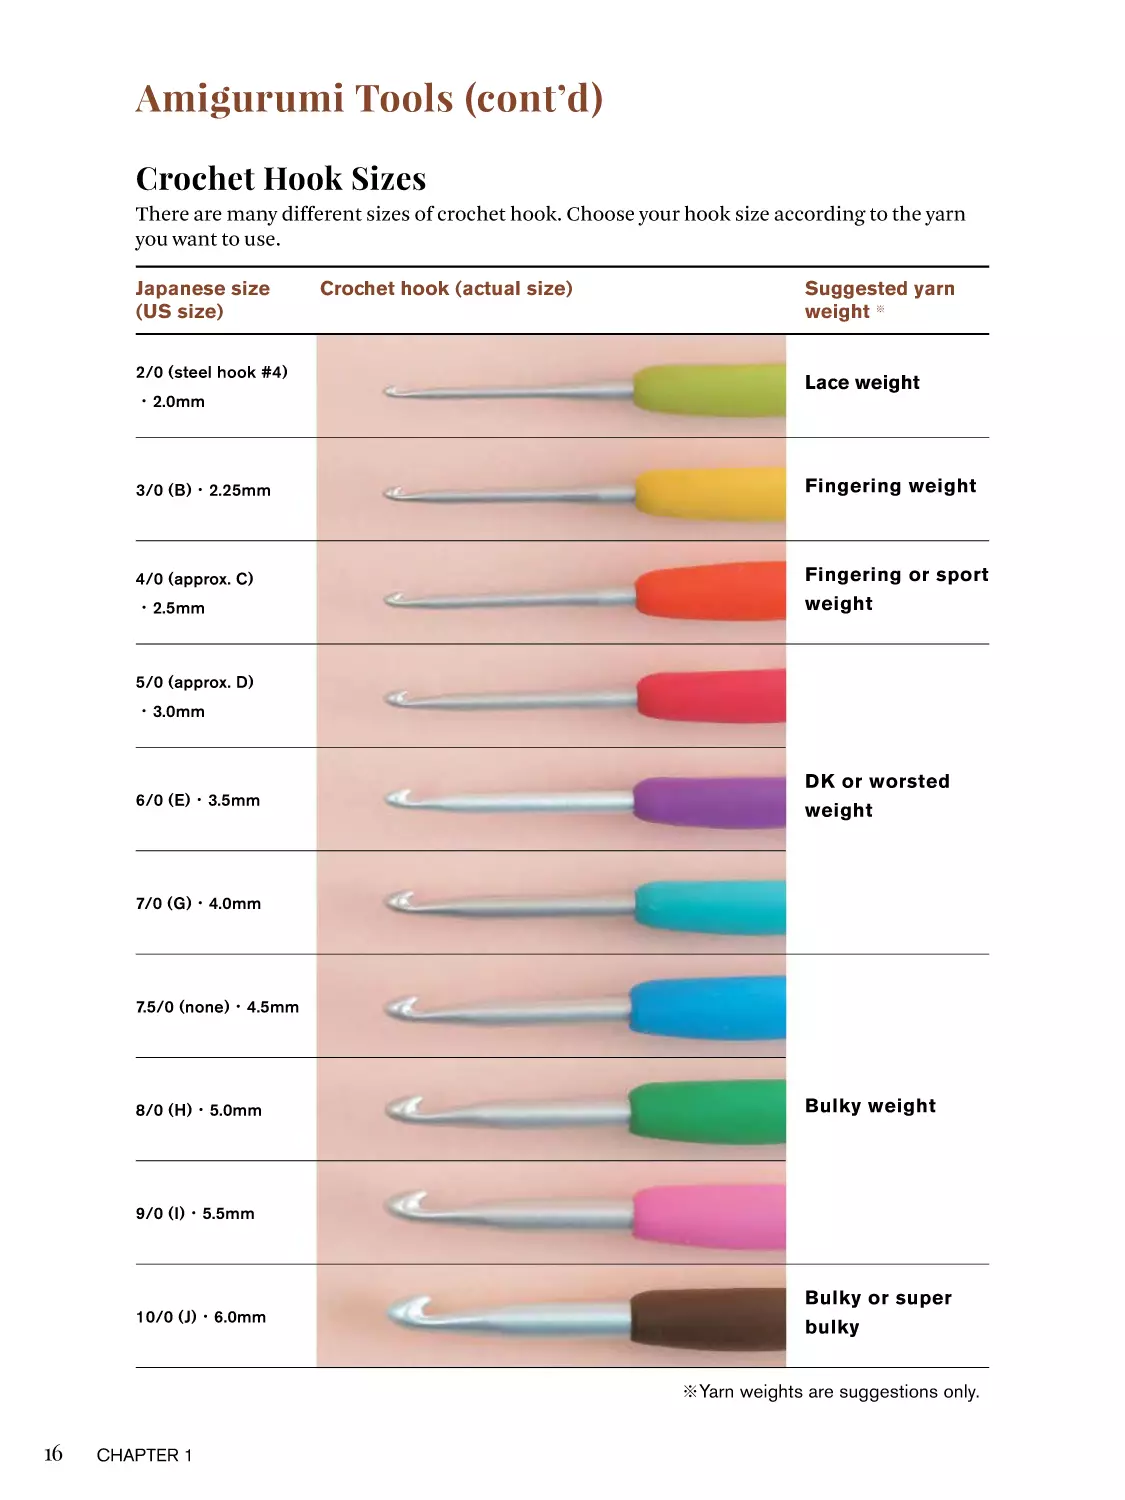
Amigurumi Tools (cont’d)
Crochet Hook Sizes
There are many different sizes of crochet hook. Choose your hook size according to the yarn
you want to use.
Japanese size
(US size)
2/0 (steel hook #4)
・2.0mm
Crochet hook (actual size)
Suggested yarn
weight ※
Lace weight
3/0 (B)・2.25mm
Fingering weight
4/0 (approx. C)
Fingering or sport
weight
・2.5mm
5/0 (approx. D)
・3.0mm
6/0 (E)・3.5mm
DK or worsted
weight
7/0 (G)・4.0mm
7.5/0 (none)・4.5mm
8/0 (H)・5.0mm
Bulky weight
9/0 (I)・5.5mm
10/0 (J)・6.0mm
Bulky or super
bulky
※Yarn weights are suggestions only.
16
Chapter 1
Note that Japan does not assign sizes to jumbo hooks; they are noted by metric size only.
Japanese size
(US size)
Crochet hook (actual size)
Suggested yarn
weight※
(none)・7mm
(L)・8mm
(N/P) ・10mm
Super bulky or
jumbo weight
(none) ・12mm
(P/Q) ・15mm
※Yarn weights are suggestions only.
The Basics of Making Amigurumi
17
Amigurumi Materials
Yarn and Thread
Yarn is the foundation of amigurumi. Choose yarn according to the size of the amigurumi you
want to make.
Yarn
Crochet thread
Yarns are available in various
fibers and weights (see page
21 for details). Select a hook
size suitable for the weight and
characteristics of the yarn you
have chosen.
Crochet thread is thinner
than yarn. It is used when
making small amigurumi or for
embroidery.
Embroidery thread
When embroidering the face,
etc., embroidery thread allows
you to create more clear, delicate
expressions than yarn.
Eye and Nose Parts
Parts made for the eyes and nose.
Attach using glue or thread.
B
A
D
C
A. Nose parts
B. Eye parts (novelty eyes)
C. Eye parts (glass eyes)
D. Eye parts (solid eyes)
18
Chapter 1
Screw
Straight
Button
Differences between insertable eye types
These three types of eyes are inserted into the
crocheted fabric. Button-type eye parts are sewn in
with thread without using a washer.
Other Frequently Used Items
These materials are often used in amigurumi.
Fiber fill
Pellets
Wire
Felt
Acrylic roving
Beads
Buttons
Pipe cleaners
Pompoms
Fiber fill stuffing for handicrafts.
Even a small amigurumi figure
uses more stuffing than it might
seem to (see page 131 for
stuffing method).
Used by sticking it on the
crocheted fabric with glue or
seaming it in place.
In addition to being sewn on as
an eyes, they can also be useful
as decorations.
Pellets can be packed into an
amigurumi to add weight and
make it sit more easily. They’re
available in various materials
such as glass, stainless steel, and
resin.
Acrylic fibers adhere faster than
wool fibers. Use it by piercing it
with a needle (see page 176 for
instructions).
Use them as decorations. They
have a wire inside.
If you insert wire into the body
or limbs, you can pose the
amigurumi (see page 136 for
how to insert it). Select the wire
thickness (gauge) according to
the size of the parts.
In addition to sewing beads onto
finished items with thread, if
you thread beads onto your yarn
before you crochet, the beads
will appear on back side of the
crocheted fabric (see page 97 for
bead crocheting method).
Used as an animal nose or as
decoration. They come in a variety
of colors and shapes.
The Basics of Making Amigurumi
19
Amigurumi Materials (cont’d)
Other Frequently Used Items (cont’d)
Cardboard
When you want to make the
bottom firm, cut cardboard to the
desired size (see page 134 for
insertion instructions).
Plastic bell and whistle
By putting these noisemakers inside,
you can make sound by shaking or
squeezing the amigurumi (see page
133 for insertion instructions).
Items Used to Make Zakka
See below for a collection of items typically used when making amigurumi into zakka.
D
Zippers
E
F
A
B
C
For pouches and card cases. Sew
a zipper to the crocheted fabric
with thread (see page 181 for
instructions).
G
Straps, chains, etc.
Metal findings for making straps and accessories.
A. Braided cord
B. Plain cord
C. Ball chain
D. Lobster claw clasp
E. Split ring
F. O-ring
G. Brooch pin
20
Chapter 1
Purse frames
Used for pouches, bags, etc.
There are two types: one is sewn
in place and the other is glued
(see page 178 for instructions).
Yarn Weights and Textures
Yarn Weight
These are the yarn weights most frequently used for amigurumi. Choose a hook size
appropriate for the desired yarn weight.
Actual size
Yarn weight
Suggested hook size
Metric size
Bulky weight
7/0—8/0 (US G-H)
4–5mm
Worsted weight
6/0 (US E)
3.5mm
DK weight
5/0 (approx. US D)
3mm
Sport weight
4/0 (approx. US C)
2.5mm
Fingering weight
3/0 (approx. US B)
2.3mm
Lace weight
2/0 (US steel hook #4)
2mm
Yarn Content and Texture
Yarns come in a variety of types as shown below. Each type of yarn results in a different finish
of the crocheted fabric, so you may want to try different ones to determine those you like best.
Yarn can be made of various materials such as cotton and linen.
B
C
D
E
F
A
A. Smooth yarns: These have good stitch definition.
Suitable for beginners.
B. Nubby yarns: These have nubs (specks, knots,
decorations, etc.) which become part of the crocheted
fabric.
C. Mohair yarns: Soft, fluffy brushed yarns. Originally
made of angora goat hair, but mohair made of acrylic
fiber is now also available.
D. Lamé yarns: Metallic yarns you can use to make
shiny crocheted fabric.
E. Chenille yarns: Lustrous yarns that are generally
fuzzy and soft to the touch. Many chenille yarns are
on the larger side.
F. Novelty yarns: Yarns made by combining threads
of different types, colors, and thicknesses. There are
various types such as those with nubs or fur.
The Basics of Making Amigurumi
21
Names Of Amigurumi Parts
Amigurumi
Below are the names of various parts of amigurumi figures.
Ear
Beak
Inner Ear
Head
Eye
Nose/
Snout
Stomach
Arm
Torso
Hand
Leg
Foot
22
Chapter 1
Crocheted Fabric
These terms refer to parts of the crocheted fabric or the method of making it.
Loop
Post
Top of stitch
Hook
Rows
Yarn
Stitch
Magic
circle
Number of stitches
Rounds
End
Turning post
Number of stitches
Begin
Opening
Back loop
Front loop
The Basics of Making Amigurumi
23
How to Read a Crochet Diagram
20
Round St count
20 30
5
St count
4
White
3
2
9 30
8 30
1
m
5
4
3
2
1
Crochet diagram
Begin
① Crochet each part according to diagrams.
② Insert stuffing into head.
③ Insert wire into arms and legs while
stuffing them, then seam to body.
④ After putting the wires together, fill the
body with stuffing.
⑤ Seam head to body.
⑥ Seam ears to head.
⑦ Seam the tail to the back of the torso.
⑧ Embroider nose and mouth.
⑨ Glue the eyes in place.
7–8 rounds
9 rounds
Begin
2 rounds
Finishing schematic
Explanation of crochet instructions
1 out
※ sc tbl
The table shows the number of stitches per round.
Increases and decreases are written in parentheses.
If there are color changes, the colors are shown on
the right side.
Instructions
Begin
Dark green
Table of round numbers and stitch counts
The center of the circle is where you begin to
crochet. Each round is marked off by a line. Within
each round, read the symbols counterclockwise
from the turning post.
Embroider mouth
30 (inc 6 sts)
24 (inc 6 sts)
18 (inc 6 sts)
12 (inc 6 sts)
16
A finishing schematic explains where and
how to assemble the parts.
1 round
2 in
3 out
2 sts
4 in
24
Chapter 1
Tip
Explains embroidery, points to pay particular
attention to, etc.
Amigurumi Gauge
Tightly crocheted fabric
Standard crocheted fabric
Even the same item can end up in completely different
finished sizes depending on your gauge (that is, how tightly
or loosely you crochet). Before you start crocheting, be sure
to test your gauge.
If you achieve fewer stitches per inch (cm) than the
recommended gauge, it means that you crochet loosely;
if you get more stitches, it means that you crochet tightly.
Either adjust the pattern to suit your gauge or choose a
smaller/larger hook size to achieve the recommended
gauge.
Please refer to the instructions or crochet diagrams for
the amigurumi gauge.
Round
6
5
4
3
2
1
Stitch count
36 (inc 6 sts)
30 (inc 6 sts)
24 (inc 6 sts)
18 (inc 6 sts)
12 (inc 6 sts)
6
Loosely crocheted fabric
6
5
4
3
2
1
m
0”/cm
Skew
When crocheting in the round, the turning posts gradually
shift to the right. This is a phenomenon called “skew” that
occurs no matter what. Due to the nature of crochet, the
top and post of the stitch are not aligned vertically but
diagonally. There are individual differences in the degree of
skew depending on how firmly you pull the yarn. Although
there are individual differences, on average, the angle of
inclination is about 10 degrees with respect to the vertical.
If you experience skew greater than this, or if your turning
posts skew to the left, your turning post method may be
wrong, so check page 44 to adjust.
The Basics of Making Amigurumi
25
List of Crochet Symbols
Chain stitch (ch) → P.35
2 sc into same stitch → P.64
Single crochet (sc) → P.40
3 sc into same stitch → P.64
Half double crochet (hdc) → P.43
Same method as for sc into same
st. Work 2 hdc into the same st
on the previous row/round.
Double crochet (dc) → P.46
Treble crochet (tr) → P.48
Double treble crochet (dtr) (Like dc,
but wrap yarn around hook 3 times.)
Bullion stitch (Wrap the yarn around the
hook the specified number of times,
insert the hook where indicated, YO and
pull up a loop. YO and pull the yarn
through all remaining loops on hook.)
Slip stitch → P.50
Crab stitch → P.52
Single crochet through back loop only
(working in the round) → P.54
Half double crochet through back loop
only → P.54
Double crochet through back loop only
→ P.54
Single crochet through back loop only
(working in rows)
It is worked the same way as sc tbl, but when crocheting back and forth in
rows, lines appear alternately on the front and back to form a ridge pattern.
Front post single crochet (fp sc) → P.56
Front post half double crochet (fp hdc)
→ P.56
Front post double crochet (fp dc)
→ P.56
Back post single crochet (bp sc) → P.57
Chapter 1
3 hdc into same stitch (Same
method as for sc into same st.
Work 3 hdc into the same st on
the previous row/round.)
2 dc into same stitch (Same
method as for sc into same st.
Work 2 dc into the same st on
the previous row/round.)
3 dc into same stitch (Same
method as for sc into same st.
Work 3 dc into the same st on
the previous row/round.
3 dc into chain space
Work 3 dc into chain space
indicated.
sc2tog → P.65
sc3tog → P.66
hdc2tog → P.66
hdc3tog → P.66
dc2tog → P.66
dc3tog → P.66
3-hdc cluster stitch (Work 3 partial
hdc [omitting last step] into same
st in the previous row; YO and pull
yarn through all loops on hook.)
Back post double crochet (bp dc) → P.57
3-dc cluster stitch (Work 3
partial dc [omitting last step]
into same st in the previous row;
YO and pull yarn through all
loops on hook.)
Single crochet loop stitch → P.61
Invisible bind-off → P.142
Back post half double crochet (bp hdc)
→ P.57
26
US terminology is used throughout this book.
Chapter 2
Basic Crochet
Techniques
Here we’ve gathered the basic crochet methods
used in making amigurumi, including how to hold
the hook and yarn, and how to get started. Master
these first for best results.
Before Starting to Crochet
Before you start crocheting, prepare the yarn and master how to hold the hook,
how to hold the yarn and do a yarn over (YO). These form the basis of all crochet methods.
▶
Finding the end of the yarn
Pull the yarn out from the center of the skein to
use it. For yarns that unravel easily, such as lace
yarns and summer yarns, unwind yarn from the
outside of the skein.
▶
▶
How to hold the hook
Place your thumb on the grip and lightly hold the
hook with your index and middle fingers.
Basic method of holding the yarn
1
Holding the end of the yarn with your right
hand, pull it between the little finger and ring
finger of your left hand.
2
As it is, bring the yarn from the back to the
front of your index finger, wrapping it over your
index finger.
Left-handed people
should reverse the
instructions (see page 68).
3
Hold about 2” (5 cm) from the end of the yarn
with your thumb and middle finger. Raise your
index finger so that the thread is taut.
28
Chapter 2
Magic Circle
This is the most commonly used method for starting amigurumi
parts. The example shown here features single crochet (page 40).
1
2
3
4
5
6
About 15¾” (40 cm) from the end of the yarn,
wrap the yarn over your index finger as in steps
1–2 of “Basic method of holding the yarn” (page
28).
Place the end of the yarn between your little
finger and ring finger. Lightly grasp your middle
finger, ring finger, and little finger.
Grab the yarn lying on your index finger with
the hook.
Place your ring finger and middle finger
together and wrap the yarn around them twice.
Insert the hook into the section with two
loops.
Pull the yarn through the double loop.
Basic Crochet Techniques
29
Magic Circle (cont’d)
▶
7
The “m” section of the crochet diagram is now
complete.
9
Ch1 turning post is now complete.
11
Pull the yarn through the double loop as
shown. There are now 2 loops on the hook.
30
Chapter 2
Round 1
8
Yarn over and pull up a loop (as shown by the
arrow in step 7).
10
As in step 4, insert hook under the double
loop and grab the yarn on your index finger with
the hook.
12
Yarn over again.
6
5
4
3
2
1
13
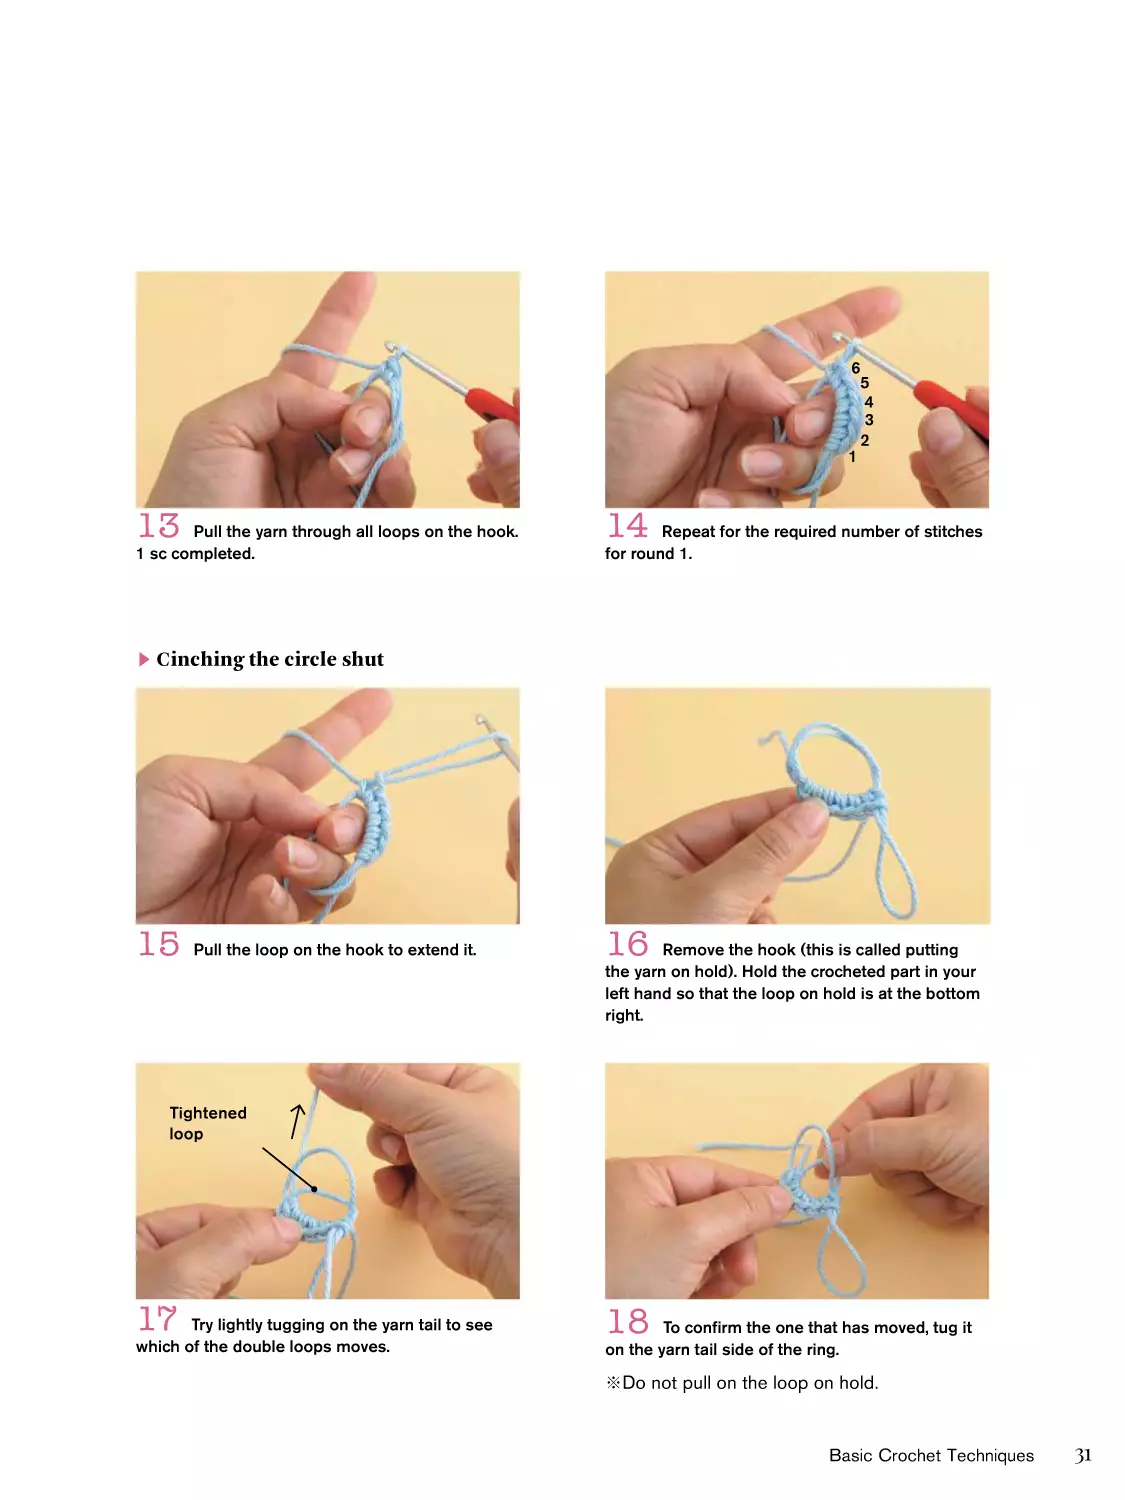
Pull the yarn through all loops on the hook.
1 sc completed.
▶
14
Repeat for the required number of stitches
for round 1.
Cinching the circle shut
15
Pull the loop on the hook to extend it.
16
Remove the hook (this is called putting
the yarn on hold). Hold the crocheted part in your
left hand so that the loop on hold is at the bottom
right.
Tightened
loop
17
Try lightly tugging on the yarn tail to see
which of the double loops moves.
18
To confirm the one that has moved, tug it
on the yarn tail side of the ring.
※Do not pull on the loop on hold.
Basic Crochet Techniques
31
Magic Circle (cont’d)
19
20
21
22
Pull in a clockwise direction (the direction
of the arrow).
Pull on the yarn tail to make the other loop
smaller as well. This completes the magic circle.
Pull until the center of the loop has
become small.
Place the loop you put on hold in step 15
back onto the hook.
Wrong
Yarn tail
23
Pull the working yarn (that is, the yarn
coming out of the skein) to shorten the loop.
24
Make sure you have properly replaced the
loop on the hook. The loop is correctly seated if
the working yarn on the index finger forms the left
leg of the loop on the hook.
※If the right leg of the loop is closer to you,
the loop is seated incorrectly.
32
Chapter 2
▶
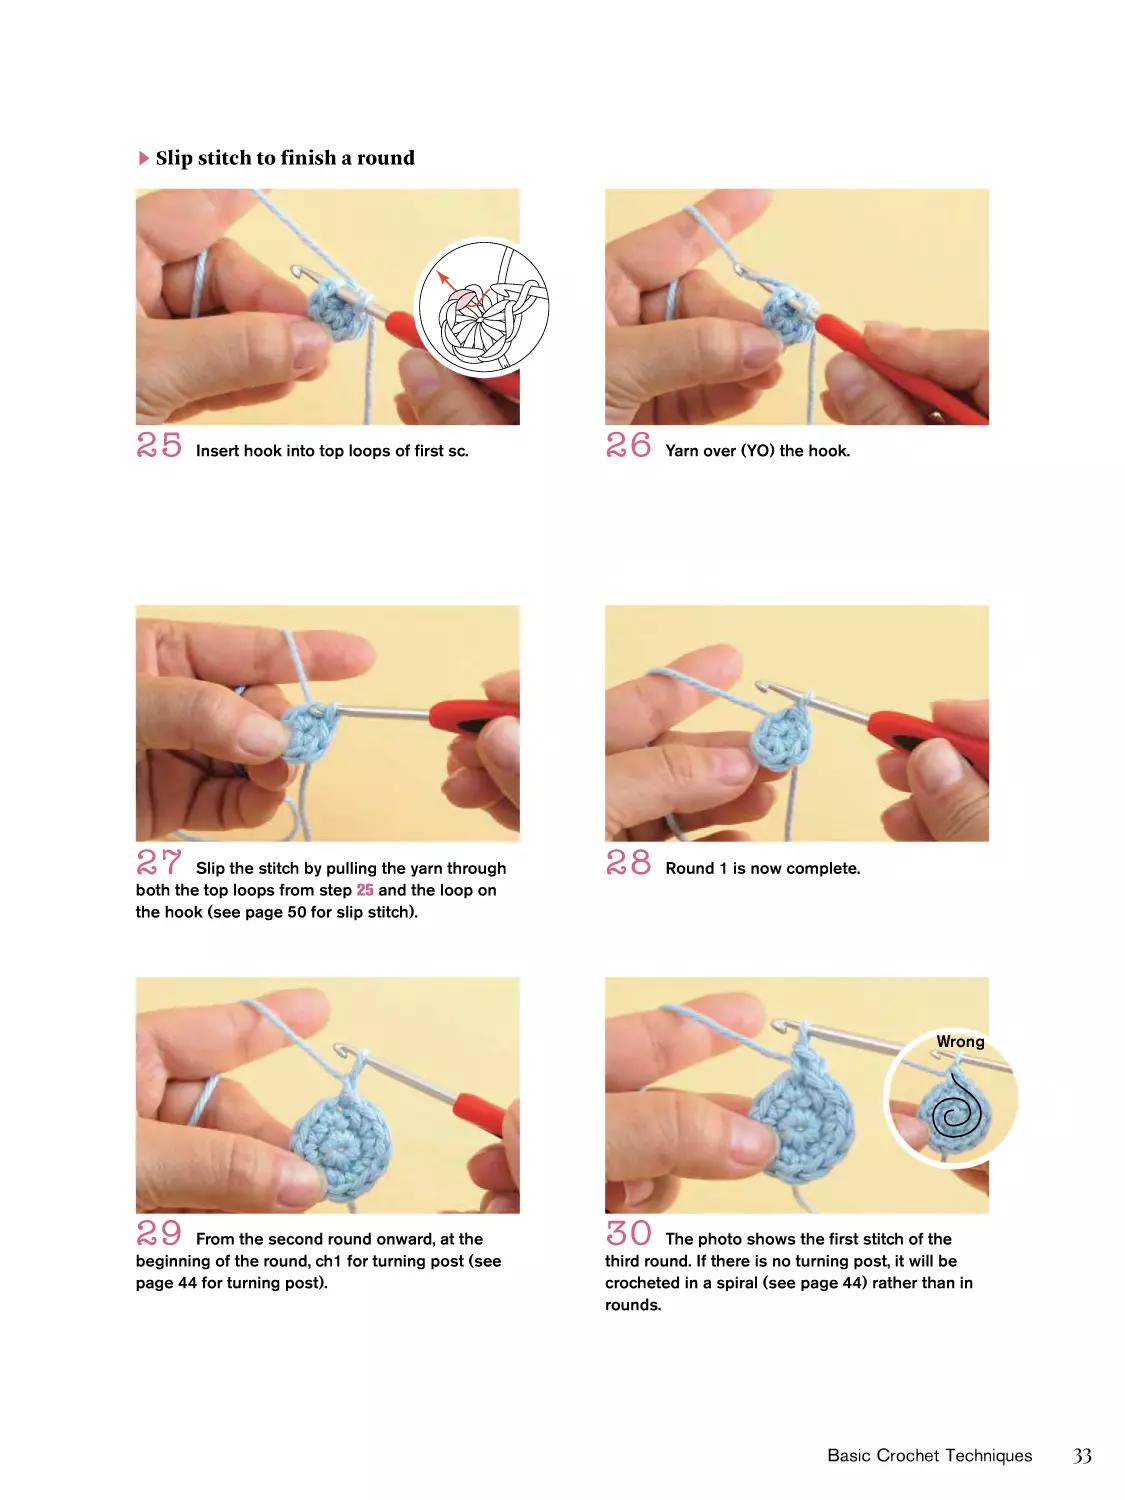
Slip stitch to finish a round
25
Insert hook into top loops of first sc.
27
Slip the stitch by pulling the yarn through
both the top loops from step 25 and the loop on
the hook (see page 50 for slip stitch).
26
Yarn over (YO) the hook.
28
Round 1 is now complete.
Wrong
29
From the second round onward, at the
beginning of the round, ch1 for turning post (see
page 44 for turning post).
30
The photo shows the first stitch of the
third round. If there is no turning post, it will be
crocheted in a spiral (see page 44) rather than in
rounds.
Basic Crochet Techniques
33
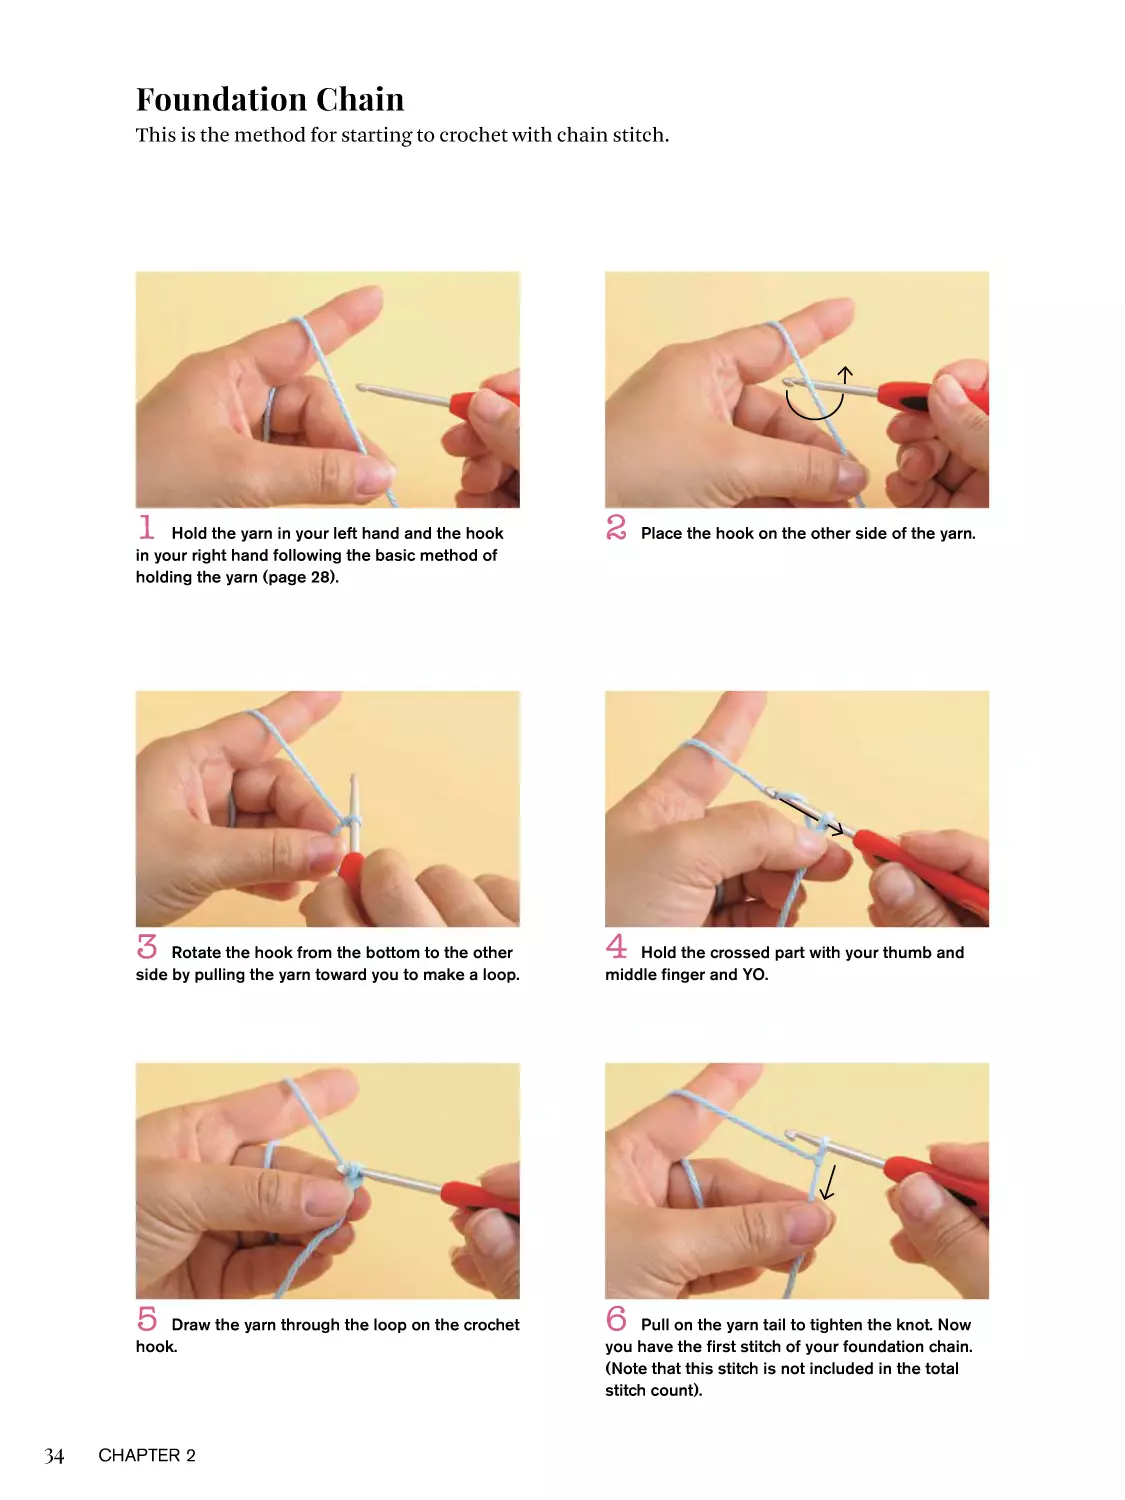
Foundation Chain
This is the method for starting to crochet with chain stitch.
1
2
3
4
5
6
Hold the yarn in your left hand and the hook
in your right hand following the basic method of
holding the yarn (page 28).
Rotate the hook from the bottom to the other
side by pulling the yarn toward you to make a loop.
Draw the yarn through the loop on the crochet
hook.
34
Chapter 2
Place the hook on the other side of the yarn.
Hold the crossed part with your thumb and
middle finger and YO.
Pull on the yarn tail to tighten the knot. Now
you have the first stitch of your foundation chain.
(Note that this stitch is not included in the total
stitch count).
Chain Stitch (ch)
It is used when crocheting back and forth in rows, starting with an
oval foundation chain, and when adding new stitches. It is also used
to create turning posts for the next row or round when working in sc
or other stitches (see page 44).
1
2
Hold the yarn tail firmly and YO.
Pull the yarn through the loop on the hook.
1 chain st completed. Repeat for the required
number of stitches.
Top and bottom loops
A crochet chain has top and bottom loops. When crocheting into a
foundation chain, the finished stitch will differ depending on whether
you insert the hook into the top loops or the bottom loop, so if the
instructions specify which to use, follow the instructions. It’s important
to remember the difference between the top and bottom loops.
Top
loops
Front
Top loops
Bottom
loop
Back
Bottom loop
Basic Crochet Techniques
35
Circular Foundation Chain
This is a method by which you create a foundation chain and then make it into a
loop. It is used when you want to make a hole at the center of the crocheted item.
S id
e view
Front loop
Bottom loop
1
2
3
4
Foundation chain joined into the round.
6
Insert hook into hole at the center.
Crochet the number of stitches that is stated
at the center of the loop. Here we ch6.
YO and pull the yarn through all loops on the
hook.
▶
Work round 1.
5
36
This slip st (sl st) will be the first stitch. Insert
the hook into the back loop only (so the front loop
and bottom loop are separated from the back
loop).
Ch1 for turning post.
Chapter 2
7
YO.
9
YO one more time.
8
Pull up a loop.
10
Pull the yarn through all remaining loops
on the hook. 1 sc completed.
11
Repeat, crocheting as many stitches as
shown in the crochet diagram for the first round.
At the end of the round, work slip st to finish the
round (see page 50).
Basic Crochet Techniques
37
Oval Foundation Chain
When you want to crochet an oval, work a foundation chain and
then increase the number of stitches on both sides of the chain.
Turning post
ch5
1
2
3
4
5
6
Work required number of ch sts (ch5 in this
example), then ch1 for turning post.
Sc 1 into the same stitch. This is a type of
increase (working 2 sts into the same st).
Sc 2 into the edge st, working into the bottom
loop.
38
Chapter 2
Turn chain over. Insert hook into bottom loop
of second st from hook. Work 1 sc (page 40).
Sc into back loop of each of the next 3 sts.
2 sc sts worked into the end of the foundation
chain.
3
2
1
7
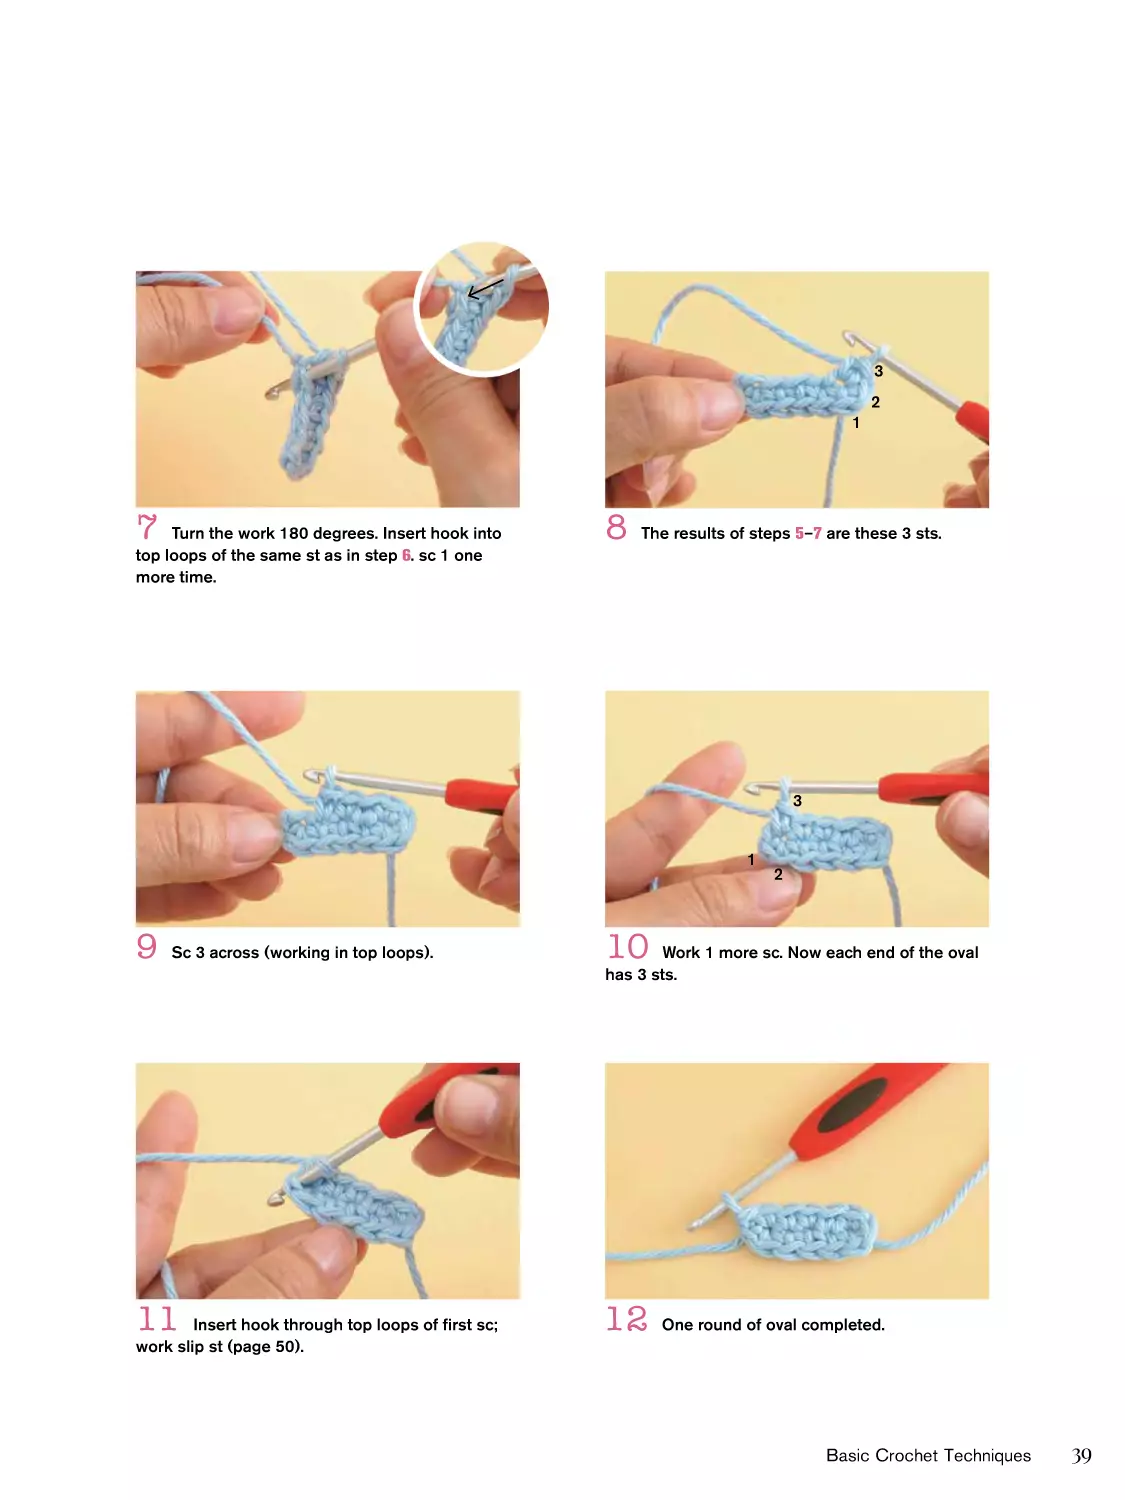
Turn the work 180 degrees. Insert hook into
top loops of the same st as in step 6. sc 1 one
more time.
8
The results of steps 5–7 are these 3 sts.
3
1
9
Sc 3 across (working in top loops).
11
Insert hook through top loops of first sc;
work slip st (page 50).
2
10
Work 1 more sc. Now each end of the oval
has 3 sts.
12
One round of oval completed.
Basic Crochet Techniques
39
Single Crochet (sc)
This is the most basic crochet method used for amigurumi.
1
Having already done a magic circle or circular
foundation chain and the subsequent first round of
sts, ch1 for turning post.
3
Yarn over (YO).
5
YO again and draw the yarn through all
remaining loops on the hook.
40
Chapter 2
2
Insert hook into top loops of next st.
4
Pull the yarn over the hook (step 3) through
the top loops. Make sure the two loops on the
hook are the same height.
6
1 sc st completed.
Single Crochet into Foundation Chain
Used when you’re making a flat object, so a magic circle wouldn’t be appropriate. Shown here
with sc (page 40).
Bottom loop of
turning post
Bottom loop
of first st
1
After working foundation chain, ch1 for turning
post. Insert hook into bottom loop of first st.
3
Pull up a loop.
2
YO.
4
YO again.
Width of top
loops of 1 sc
Width of 1 ch
5
Pull the yarn through both loops on the hook.
1 sc now completed.
6
1 row completed. A properly crocheted fabric
that is neither too tight nor too loose will have
chain sts and sc sts of the same width.
Basic Crochet Techniques
41
Working Flat
When crocheting a flat object, when one row is finished, turn it
over and crochet the next row, and so on. Here we will explain
using sc (page 40).
Row 1 completed.
2
ch1 for turning post. Turn the fabric 180
degrees counterclockwise as shown in the upper
right photo.
n from ab o
As
ee
3
Turned fabric with turning post on the right.
4
5
Ready to crochet the last stitch of the second
6
row.
42
Chapter 2
Work sc (page 40) into top loops.
Row 2 completed. Repeat for each additional
row required.
v
e
s
1
Half Double Crochet (hdc)
This is a stitch one increment taller than a single crochet stitch.
Ch2 for its turning post. The turning post counts as 1 hdc.
Loop from step 1
1
YO.
2
3
YO.
4
5
YO.
6
With the YO still on the hook, insert hook into
top loops of next st.
Pull up the loop from step 3. There are now 3
loops on the hook.
Pull the yarn through all remaining loops on
the hook. 1 hdc completed.
Basic Crochet Techniques
43
The Basics of Turning Posts
Turning posts almost always appear in amigurumi. They are made
of chain stitches at the beginning of a round.
sc
Turning
post: ch3
= 1 dc
Turning
post: ch2
= 1 hdc
Turning
post: ch1
hdc
Turning
post: ch4
= 1 tr
dc
tr
The height of a crochet stitch depends on how it’s crocheted. When you start crocheting after
your magic circle or foundation chain, you need to “rise” to a height that matches the stitch
height of the row/round using what we call a turning post. (Note that it’s called a turning post
even if you never need to turn the fabric.) This is because if you omit the turning post at the
beginning of the row/round, the stitches at the beginning of the row/round won’t match the
height of the rest of the stitches and they will look like they have been crushed.
The number of stitches needed for a turning post changes according to the stitch you’re
using. Always count the turning post as one stitch except when working in sc.
Working in a Spiral (No Turning Posts)
If you are working in the round but there are no
turning posts indicated in the crochet diagram,
the stitches will form a spiral. It can be difficult
to see the boundary between the rounds, so we
recommend that you use a stitch marker to mark
the first stitch of the round.
44
Chapter 2
Hdc Turning Post
Here we will explain turning posts using hdc.
1
2
Now start working hdc sts. First start by doing
3
4
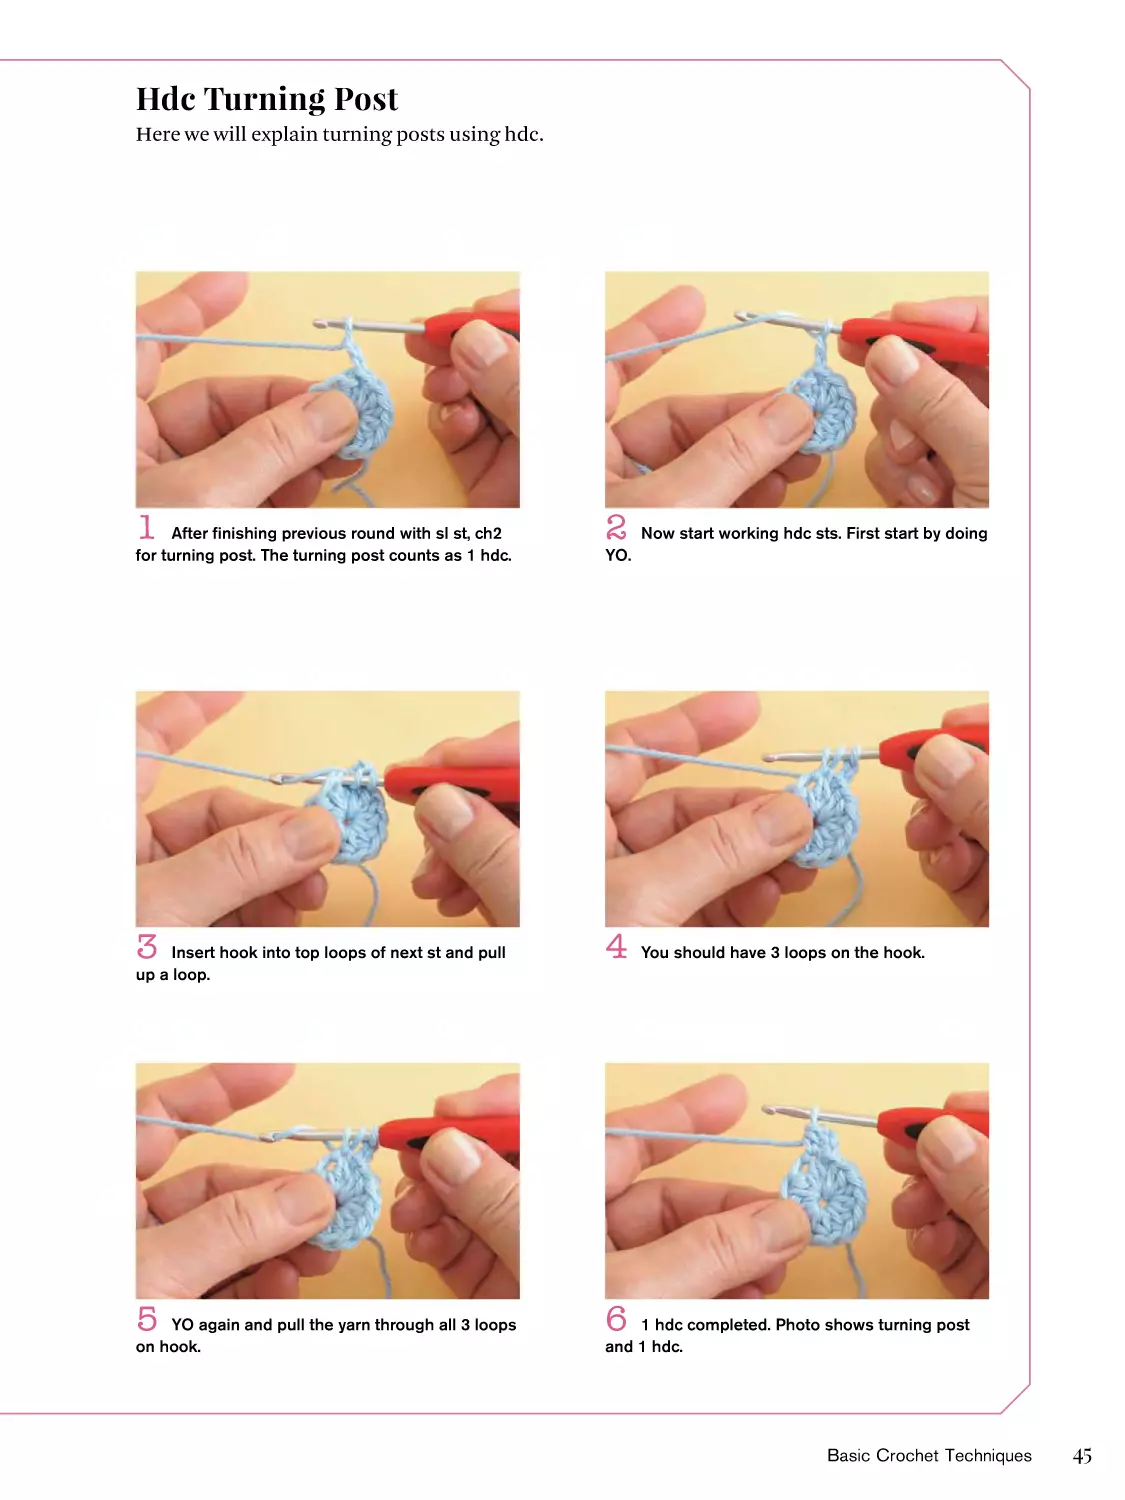
You should have 3 loops on the hook.
5
6
After finishing previous round with sl st, ch2
for turning post. The turning post counts as 1 hdc.
Insert hook into top loops of next st and pull
up a loop.
YO again and pull the yarn through all 3 loops
on hook.
YO.
1 hdc completed. Photo shows turning post
and 1 hdc.
Basic Crochet Techniques
45
Double Crochet (dc)
Instructions for working dc after completing a ch-3 turning post.
The height of the stitches is increased by one increment compared
to hdc.
1
Ch-3 turning post completed after previous
round. This turning post counts as first dc st.
46
2
YO.
3
Insert hook into top loops of next st.
4
YO.
5
Pull up a loop. (3 loops now on hook).
6
YO again.
Chapter 2
7
Pull the yarn through first two loops on hook.
9
YO again.
Now you should have 2 loops on hook.
10
As
Pull the yarn through all remaining loops
on hook. 1 dc completed.
se
o
en fr m ab o
To finish the round with sl st (page 50),
insert hook into third ch of turning post.
ve
11
8
12 Sl st; 1 round completed.
Basic Crochet Techniques
47
Treble Crochet (tr)
Instructions for working tr after completing a ch-4 turning post.
The height of the stitches is increased by one increment compared
to dc.
1
Ch-4 turning post completed after previous
round. This turning post counts as first tr st.
48
2
YO twice.
3
Insert hook into top loops of next st.
4
YO.
5
Pull up a loop (4 loops now on hook).
6
YO again.
Chapter 2
7
Pull the yarn through first two loops on hook.
(3 loops remaining on hook.)
8
YO again.
[TIP]
9
Since the st is long,
pulling the yarn through
can be difficult. Hold
the base of the st while
crocheting.
Pull the yarn through first two loops on hook.
(2 loops remaining on hook.)
11
Pull the yarn through all remaining loops
on hook.
10
YO again.
12
1 tr completed.
Basic Crochet Techniques
49
Slip Stitch (sl st)
Pull the yarn on the hook through the stitch all in one go. Slip stitch is frequently used, such
as at the end of the round when crocheting in the round or at the end of a project when you
bind off.
1
You will work the sl st that finishes the round
into the first st of the round.
50
3
YO.
5
1 sl st completed.
Chapter 2
2
Insert hook through top loops.
4
Pull the yarn through all loops on hook.
Crossed Single Crochet
Single crochet with a twisted post. On the right side, the post looks
crossed.
Wrong
1
Insert hook into top loops of next st.
3
After pulling the yarn through the stitch, you
should now have 2 loops on the hook.
5
Pull the yarn through both loops on hook.
2
YO, but instead of doing it in the usual way,
hook the yarn from the top so that it is sitting on
the hook in the opposite direction for a normal sc
(page 40). The “wrong” photo above shows how to
YO for normal sc.
4
YO again, this time using the standard YO
method.
6
1 crossed sc completed.
Basic Crochet Techniques
51
Crab Stitch
52
1
Ch1 for turning post.
2
3
YO.
4
5
YO again.
6
Chapter 2
se
en from ab
Insert the hook into the top loops of the st to
the right of the turning post.
Pull up a loop.
Pull the yarn through all remaining loops on
hook. Continue, working into the next st on the
right.
o
ve
As
Normally we crochet from right to left, but for crab stitch, we work
sc from left to right. It’s used for finishing the edge. Also called
reverse single crochet.
Inverse Single Crochet
This stitch is used when working flat and you want the front side
to look like the back side. Work a regular sc (page 40) but in mirror
image. Insert the hook from back to front and do yarn overs (YO) in
reverse.
1
Ch1 for turning post.
3
YO with yarn coming from above hook
instead of below.
5
Insert hook from under the yarn; YO.
2
Work a sc with its front and back reversed:
insert hook into top loops from back to front.
4
Pull up a loop on the back side.
6
Pull the yarn through both loops on hook.
Basic Crochet Techniques
53
Working Through Back Loop Only
Working through only the back loop instead of both top loops, you
can create a ridge pattern on the front side of the crocheted fabric.
1
Find the back loop (the top loop furthest from
you).
54
2
Insert hook into back loop only.
3
Work sc (page 40): YO and pull up a loop.
4
YO again.
5
Pull the yarn through both loops on hook.
6
1 sc tbl completed.
Chapter 2
Working Through Front Loop Only
Just like working through the back loop only, except that you work
through the front loops only instead. The resulting crochet fabric
will curve toward you.
Wrong
1
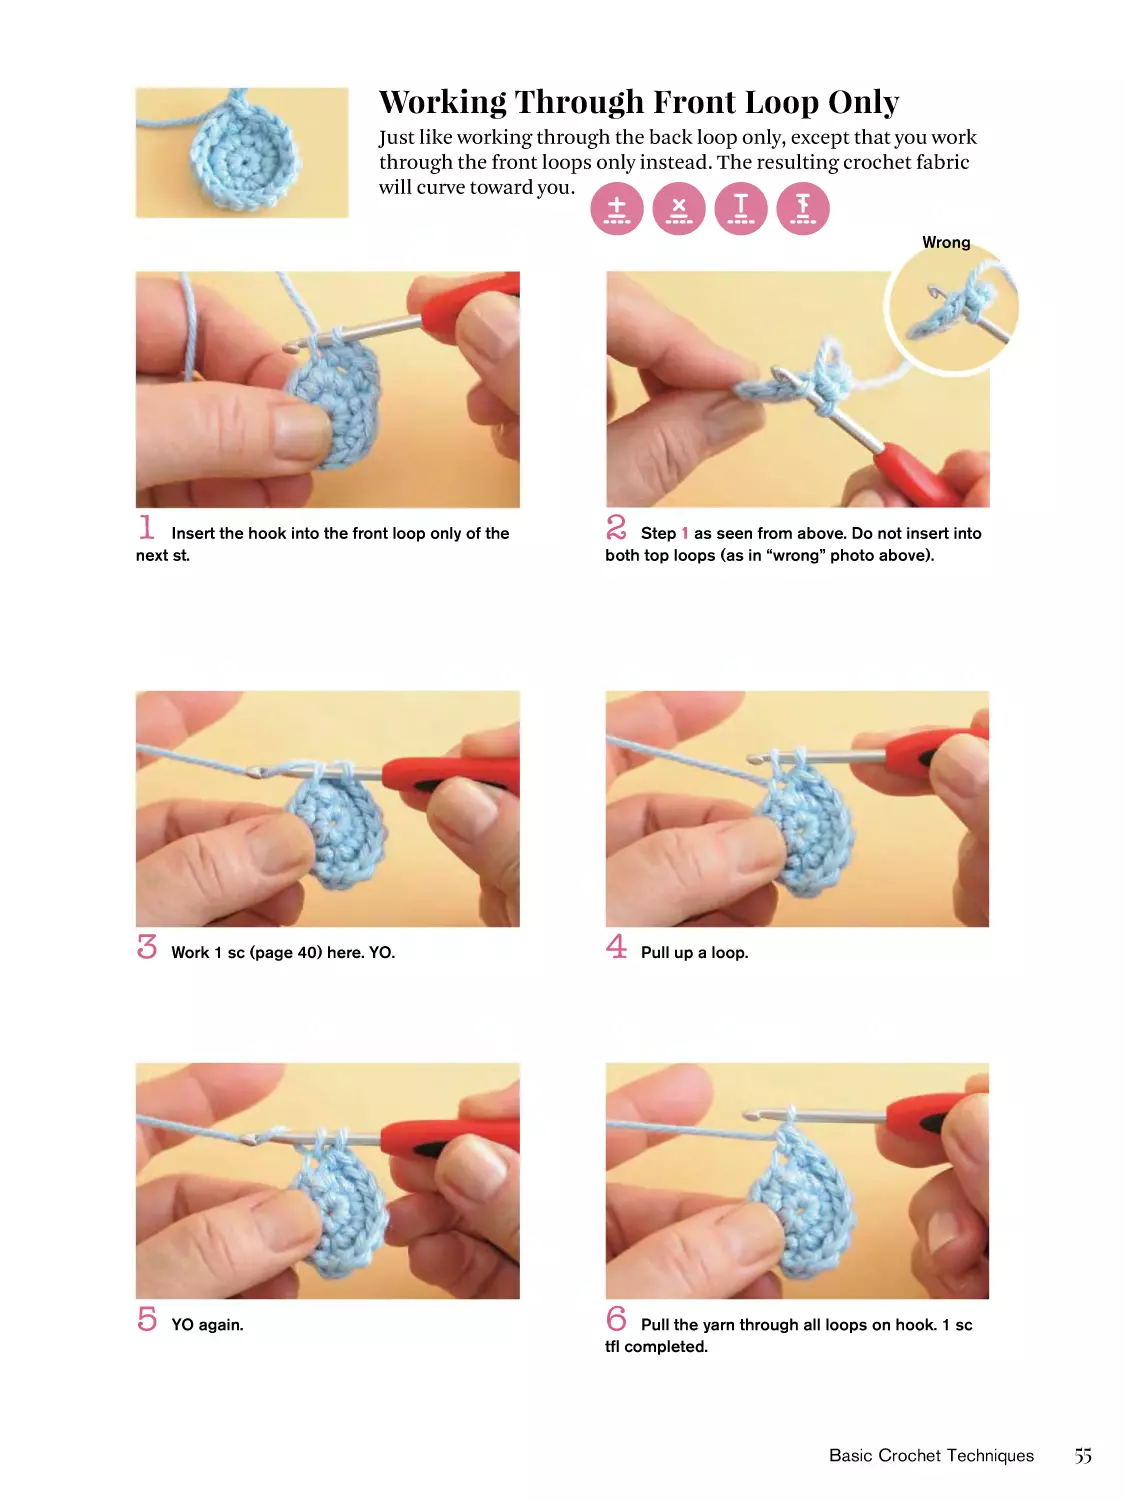
Insert the hook into the front loop only of the
next st.
2
Step 1 as seen from above. Do not insert into
both top loops (as in “wrong” photo above).
3
Work 1 sc (page 40) here. YO.
4
5
YO again.
6
Pull up a loop.
Pull the yarn through all loops on hook. 1 sc
tfl completed.
Basic Crochet Techniques
55
Front Post Stitch
This is a crochet stitch that creates a pattern that looks like
vertical lines. Here, it is explained using hdc (page 43), but you
can work any stitch as a front post (fp) st, including sc (page 40)
and dc (page 46).
56
1
YO.
2
3
YO.
4
5
YO again.
6
Chapter 2
Insert hook behind post as shown by arrow in
step 1 so that the post is in front of the hook.
Pull up a loop.
Pull the yarn through all loops on hook. If you
work a fp hdc every other stitch, it will look like the
sample above.
Back Post Stitch
If you work around the posts of the previous row/round from the
back, the sts of the previous row/round will be pulled up for a
three-dimensional texture. Here, back post st is explained using
hdc (page 43), but you can work any stitch as a back post (bp) st,
including sc (page 40) and dc (page 46).
1
YO, then insert hook from back to front
between posts as shown.
2
Take hook back out between next two posts
so that the post is behind the hook.
3
YO.
4
Pull up a loop.
5
YO again.
6
Pull the yarn through all loops on hook.
Basic Crochet Techniques
57
Creating a Hole
Used for buttonholes and such, this crochet
method is used when you want to make a hole in
the fabric. It is also sometimes used to make limbs.
1
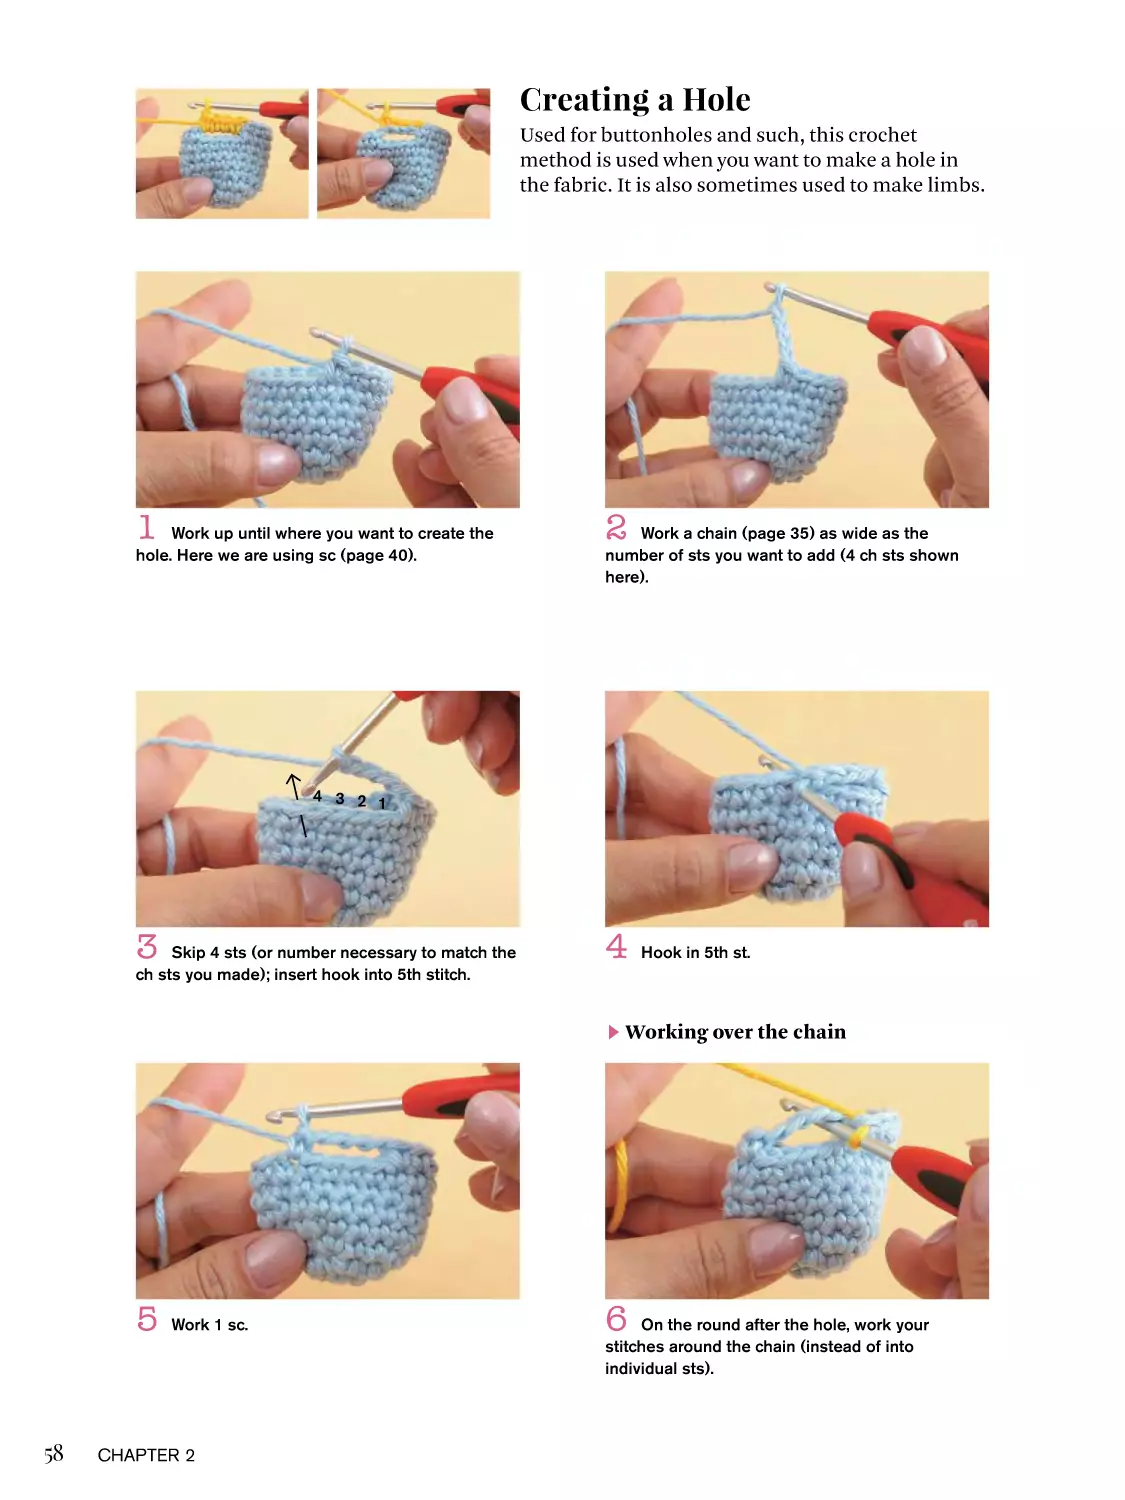
Work up until where you want to create the
hole. Here we are using sc (page 40).
2
Work a chain (page 35) as wide as the
number of sts you want to add (4 ch sts shown
here).
4 3 2 1
3
Skip 4 sts (or number necessary to match the
ch sts you made); insert hook into 5th stitch.
4
▶
5
58
Work 1 sc.
Chapter 2
Hook in 5th st.
Working over the chain
6
On the round after the hole, work your
stitches around the chain (instead of into
individual sts).
7
YO and work sc.
8
1 sc completed.
▶
Working into the bottom loops of the
chain
9
4 sc worked into the hole created.
11
YO and work sc.
10
The round after hole (continued from step
5). Insert hook into bottom loop of next ch st.
12
4 sc worked into bottom loops of ch-4.
This method keeps the chain loops visible.
Basic Crochet Techniques
59
Picots
Used for decorative edgings, etc. We explain here using a ch-3 picot.
1
Ch3 (page 35).
3
Also insert hook into left front “leg” of the
post.
2
Insert hook into front loop of the sc right
before the chain.
4
YO and pull the yarn through all loops on
hook.
[TIP]
5
60
Hold the fabric
with your left
hand while
pulling yarn
through.
1 picot completed.
Chapter 2
The composition
and shape will
change depending
on the number of
ch sts.
Loop Stitch
s
se
en from a
b
ov
A
By catching the yarn with the index finger of the left hand, a loop
forms on the back side of the crocheted fabric.
e
1
Insert the hook into the st as for regular sc
(page 40).
2
Push the yarn down with the middle finger of
your left hand. How far you push down determines
the length of the loop. Hold the fabric while
pushing the yarn down with your finger.
3
YO.
4
5
YO again.
6
Pull up a loop.
Pull the yarn through all remaining loops. A
loop has been formed on the wrong side of the
fabric.
Basic Crochet Techniques
61
Making Edging Neat
This is how to make tidy vertical lines at the edges of the crocheted
fabric when working the edging.
1
Insert hook into st at edge of last row; YO.
2
Pull up a loop.
※ Note: if you have not yet bound off after
working final st of last row, skip steps 1–2.
3
Ch1 for turning post.
5
For next st, insert hook into st one row below
previous st.
62
Chapter 2
4
Work 1 sc (page 40) into the same st from
step 3.
6
Similarly, insert hook in gap between rows so
as to wrap the first st on the edge, and pull up a
loop.
Extension
This crochet method is used to make a part that looks like it pops
out of the crocheted fabric. It can be used for tails, horns, hair, etc.
1
Crochet up until the place where you want to
add the extension.
3
5
Work a st into bottom loop of chain.
Continue working across chain, working a st
into bottom loop of each ch st.
2
Work chain (page 35) for the length of desired
extension.
4
You can choose sts of desired height
(demonstrated here with sc).
6
When you reach the end of the chain, resume
working original piece.
Basic Crochet Techniques
63
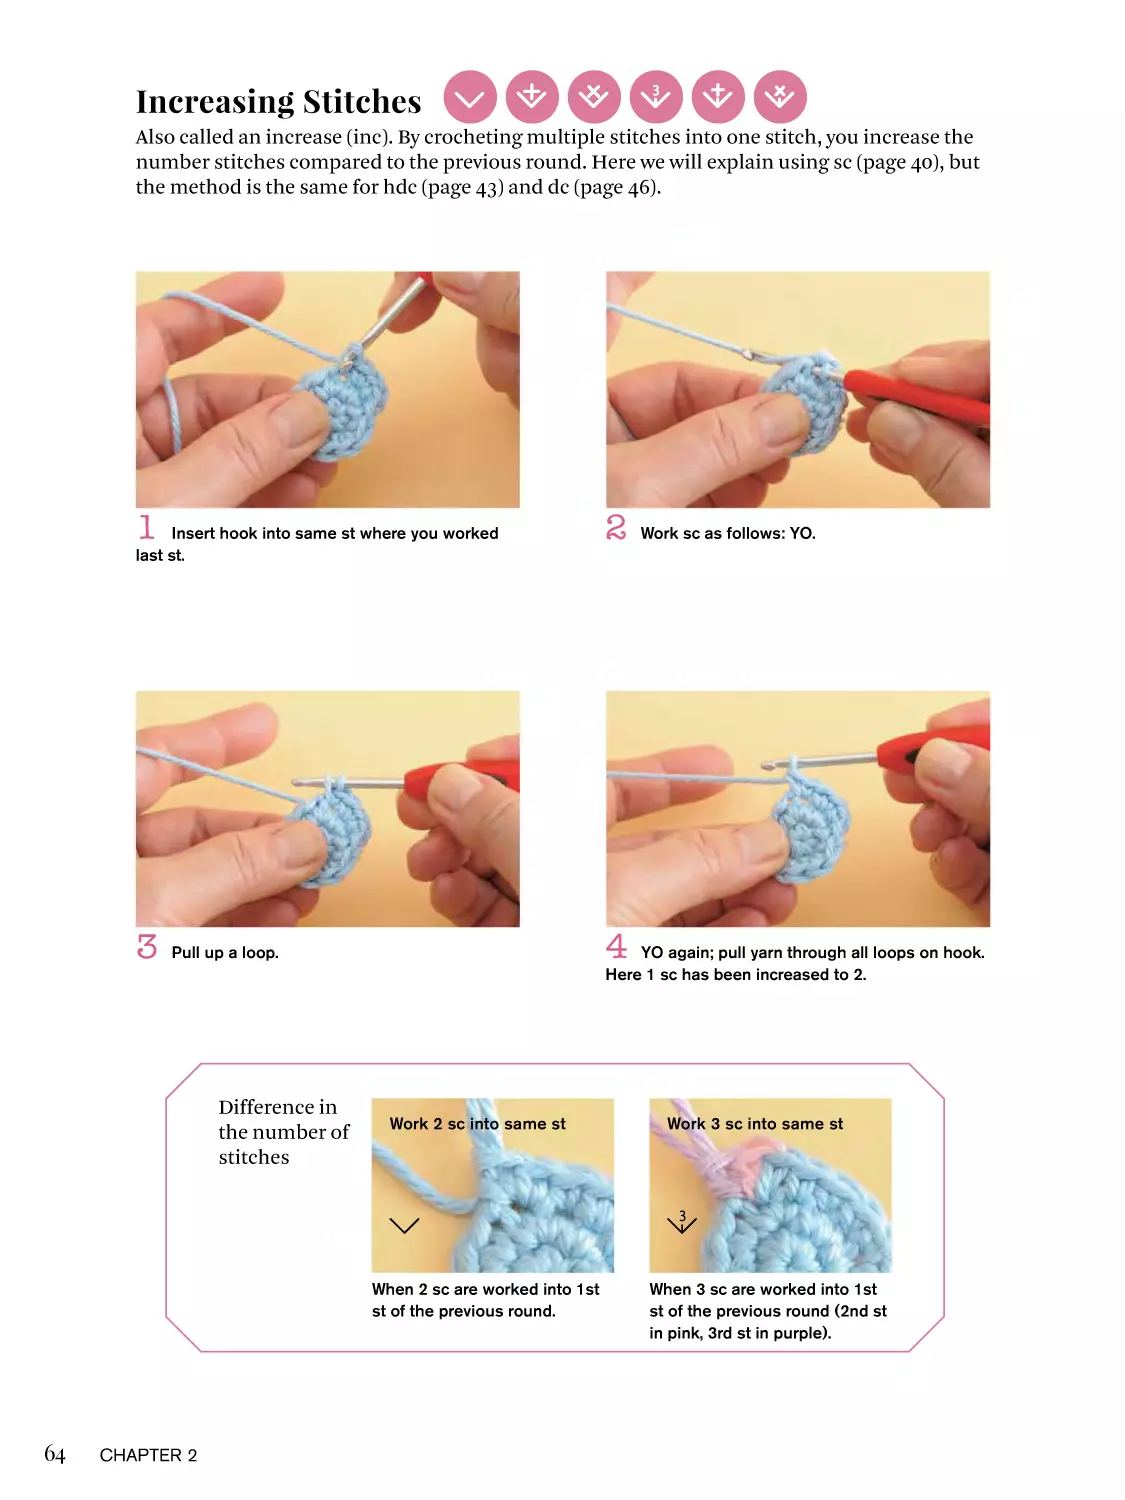
Increasing Stitches
Also called an increase (inc). By crocheting multiple stitches into one stitch, you increase the
number stitches compared to the previous round. Here we will explain using sc (page 40), but
the method is the same for hdc (page 43) and dc (page 46).
1
Insert hook into same st where you worked
last st.
3
YO again; pull yarn through all loops on hook.
Here 1 sc has been increased to 2.
Work 2 sc into same st
When 2 sc are worked into 1st
st of the previous round.
64
Chapter 2
Work sc as follows: YO.
4
Pull up a loop.
Difference in
the number of
stitches
2
Work 3 sc into same st
When 3 sc are worked into 1st
st of the previous round (2nd st
in pink, 3rd st in purple).
Decreasing Stitches
Also called a decrease (dec). This crochet method reduces 2 stitches to 1, 3 stitches to 1, and
so on.
1
Insert hook as for sc. (Here we explain
sc2tog, which decreases from 2 sc to 1 sc.)
2
YO.
3
Pull up a loop. 1 incomplete sc.
4
Insert hook into next st.
5
Hook shown in next st.
6
YO and pull up a loop.
Basic Crochet Techniques
65
Decreasing Stitches (cont’d)
3 2
1
7
You should now have 3 loops on the hook.
8
9
Pull the yarn through all loops on hook.
10
YO again.
1 sc2tog completed.
Decrease symbols
There are decrease symbols for sc, hdc, and dc.
66
Chapter 2
sc2tog
See pages 65–66 for instructions.
hdc3tog
Work 3 incomplete hdc, then YO and
pull yarn through all loops on hook.
sc3tog
Work 3 incomplete sc, then YO and
pull yarn through all loops on hook.
dc2tog
Work 2 incomplete dc, then YO and
pull yarn through all loops on hook.
hdc2tog
Work 2 incomplete hdc, then YO and
pull yarn through all loops on hook.
dc3tog
Work 3 incomplete dc, then YO and
pull yarn through all loops on hook.
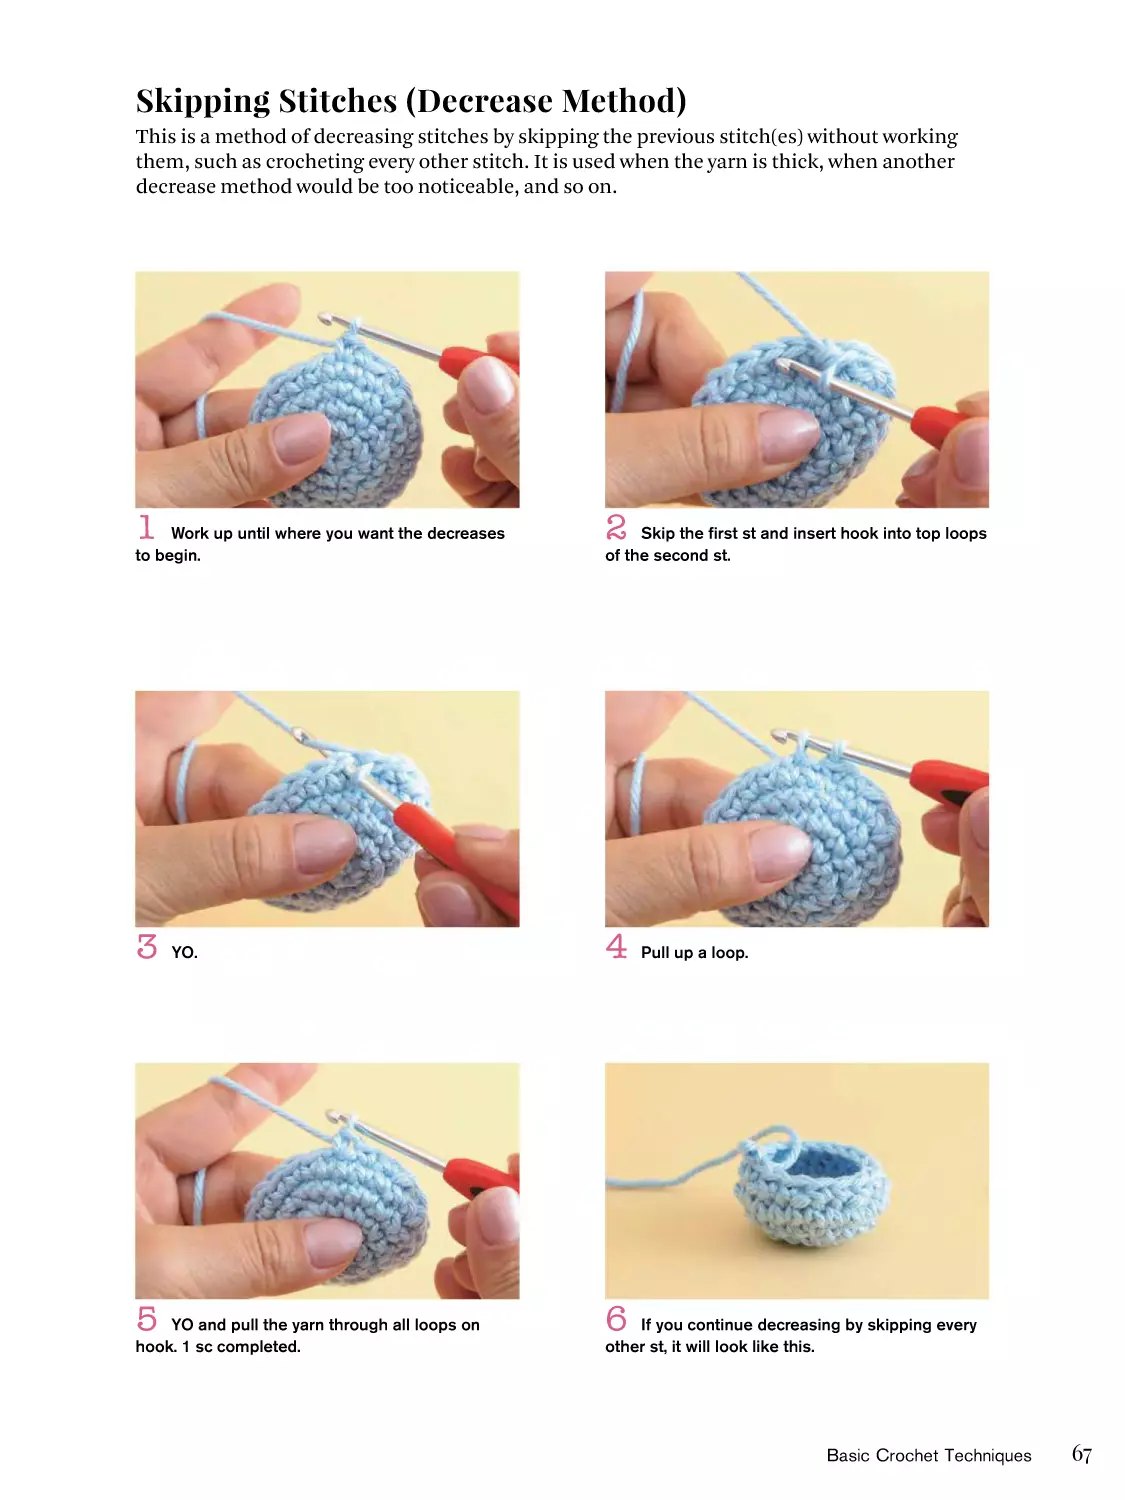
Skipping Stitches (Decrease Method)
This is a method of decreasing stitches by skipping the previous stitch(es) without working
them, such as crocheting every other stitch. It is used when the yarn is thick, when another
decrease method would be too noticeable, and so on.
1
Work up until where you want the decreases
to begin.
3
5
YO.
YO and pull the yarn through all loops on
hook. 1 sc completed.
2
Skip the first st and insert hook into top loops
of the second st.
4
Pull up a loop.
6
If you continue decreasing by skipping every
other st, it will look like this.
Basic Crochet Techniques
67
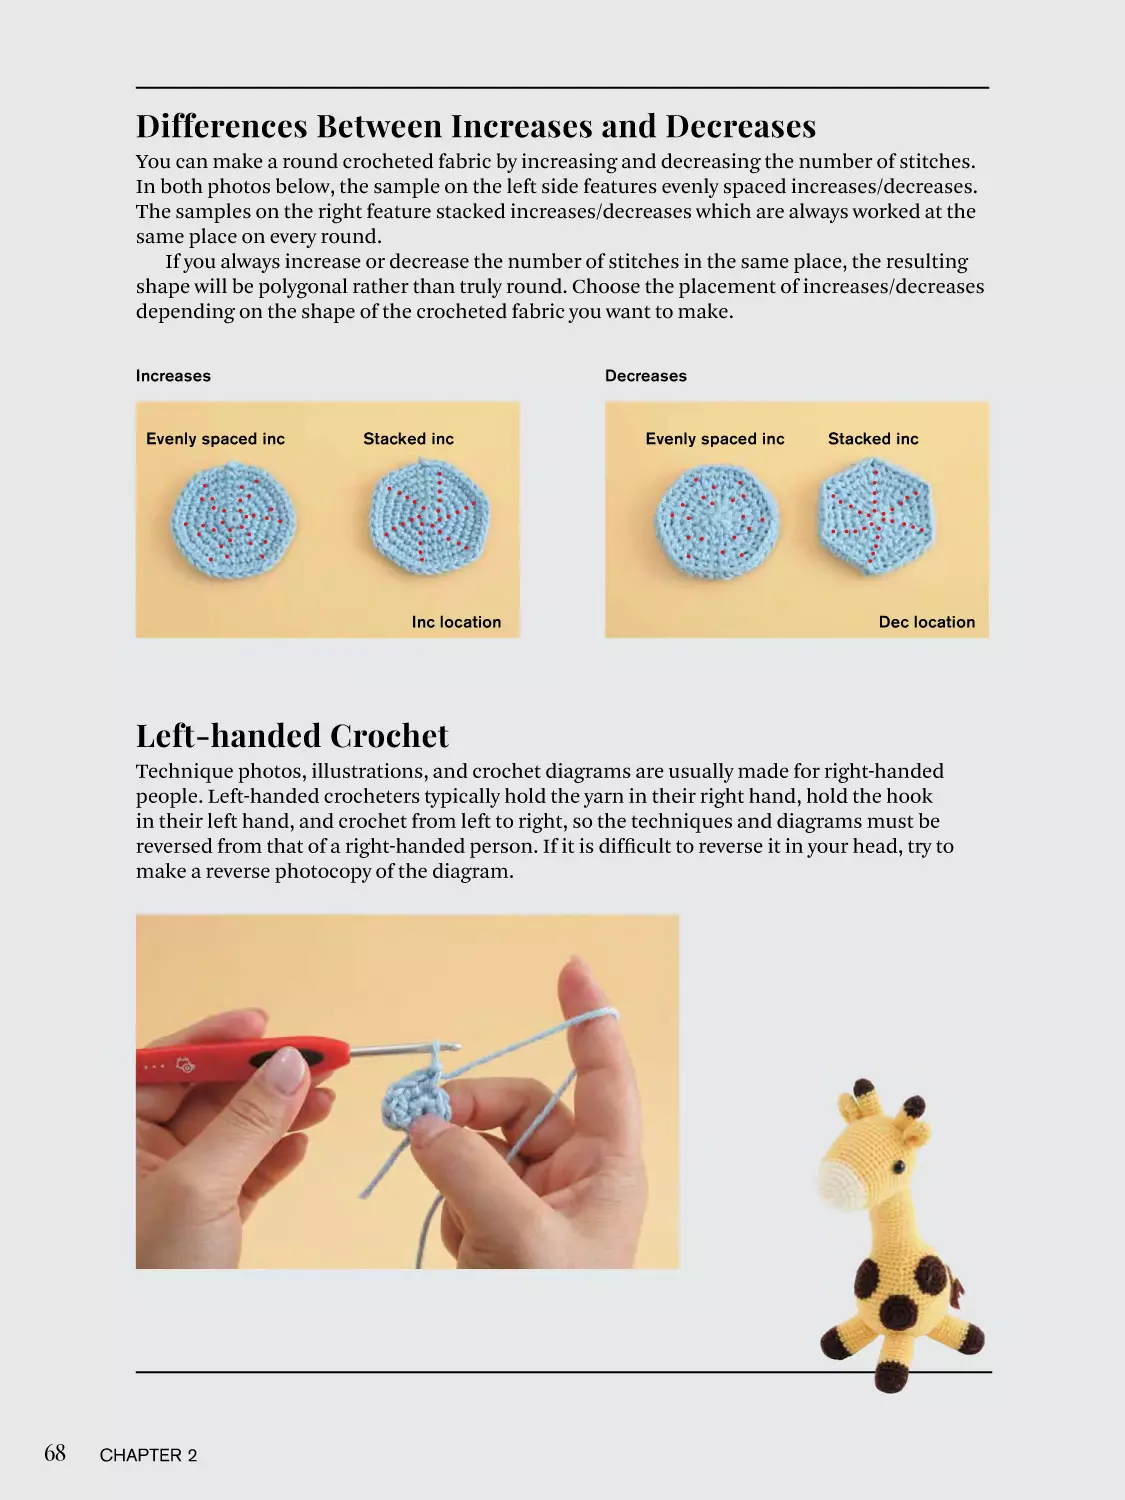
Differences Between Increases and Decreases
You can make a round crocheted fabric by increasing and decreasing the number of stitches.
In both photos below, the sample on the left side features evenly spaced increases/decreases.
The samples on the right feature stacked increases/decreases which are always worked at the
same place on every round.
If you always increase or decrease the number of stitches in the same place, the resulting
shape will be polygonal rather than truly round. Choose the placement of increases/decreases
depending on the shape of the crocheted fabric you want to make.
Increases
Evenly spaced inc
Decreases
Stacked inc
Inc location
Evenly spaced inc
Stacked inc
Dec location
Left-handed Crochet
Technique photos, illustrations, and crochet diagrams are usually made for right-handed
people. Left-handed crocheters typically hold the yarn in their right hand, hold the hook
in their left hand, and crochet from left to right, so the techniques and diagrams must be
reversed from that of a right-handed person. If it is difficult to reverse it in your head, try to
make a reverse photocopy of the diagram.
68
Chapter 2
AN
AMIGURUMI
GALLERY
2
This cute, chubby red demon is cleverly
constructed from fingers to toes. Lots of
ingenuity, from tiger pants to horns and
even hair!
※ Samples are for illustration purposes only.
69
There are no rules for amigurumi. Kokeshi
dolls and sake bottles are also fair game.
You can give them their own unique designs.
Sleeping Ms. Carrot. She’s bumpy, dirty,
and her leaves are curled up. She looks
like a carrot should.
This unique toy is full of character.
By carefully crocheting with thin
yarn, you can reproduce fine details.
70
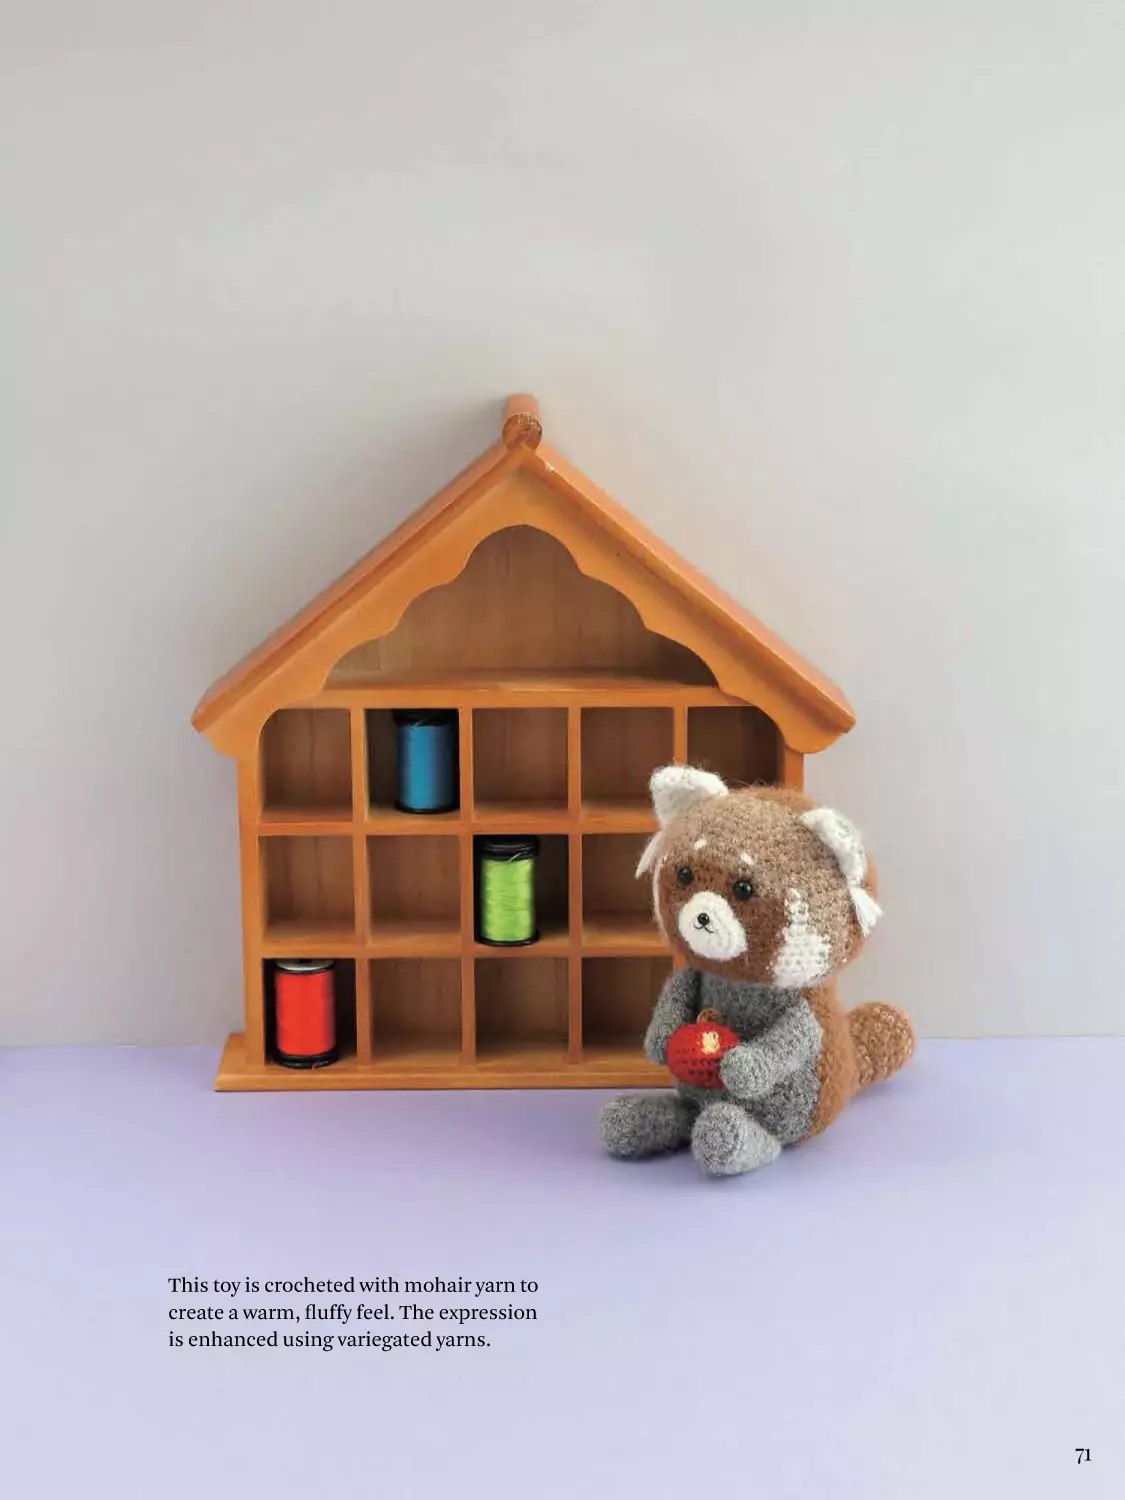
This toy is crocheted with mohair yarn to
create a warm, fluffy feel. The expression
is enhanced using variegated yarns.
71
Everything about this toy stands out,
from its silver lamé body, to its pose,
to the expression on its face. The
face is made using felt, pompoms,
embroidery, and eye and nose parts.
72
You can do a lot with just black and
white. This toy has a unique body
composition and facial expression—
and a great fashion sense!
73
Chapter 3
More Crochet
Techniques
Here we’ve collected methods for making your
amigurumi more individualized and fun,
such as shaping the crocheted fabric and
changing the yarn color.
Changing Color at the Start of a Row or
Round
This is the method for changing the yarn color at the beginning of
a new row or round. If the same color will be used again, such as
when crocheting stripes, drop it without cutting the yarn.
1
We will change the color in the last st of the
previous round. Stop after pulling up a loop for
the sc.
2
Hold the new color in your left hand. Leave a
yarn tail of about 4” (10 cm).
[TIP]
(WS)
3
Hold the old yarn (blue)
and the new yarn (pink)
together at the back.
5
74
If you don’t
keep hold of the
blue yarn, the st
will loosen and
become difficult
to crochet.
Pull the pink yarn through all loops on hook.
Chapter 3
4
6
YO with the pink yarn.
The final loop of the round should be pink.
If you won’t use the old color (blue) again, cut it,
leaving about 4” (10 cm) for weaving in the end.
Changing Color Mid-row or Mid-round
This is the method for changing the yarn color in the middle of a
row or round. If you want to use the same color again soon, simply
drop that strand without cutting it.
1
Change the yarn color in the middle of the st
before you want the color change to begin.
2
Hold the new color in your left hand, leaving a
yarn tail approximately 4” (10 cm) long.
[TIP]
(WS)
3
Hold the blue
yarn firmly so
the yarn on the
hook does not
come loose.
Hold the old yarn (blue)
and the new yarn (pink)
together at the back.
5
Pull the yarn through both loops on hook.
4
YO with the pink yarn.
6
Color change completed.
More Crochet Techniques
75
Intarsia
This is a method to create a design by inlaying color(s) in the
middle of the row/round. The method is the same whether you
want to change the color of one stitch at a time or ten.
1
Work up to the second st before the color
change.
3
Pull up a loop (1 incomplete sc).
5
While holding both old yarn and new yarn at
the back, YO and continue the sc.
76
Chapter 3
2
Insert hook into the st one st before you want
the color to change; YO.
4
Hold the new yarn (pink) in your left hand at
back of the crocheted fabric.
6
Once the sc is completed, the color has
changed. Do not cut the blue yarn.
7
Sc with the new color.
8
Continue, working as many
sc as you need.
9
Pick up the non-working
(blue) yarn with your left hand
and change the color back to
blue following steps 5 and 6.
Managing the back of colorwork
For the intarsia colorwork on pages 76–77, when changing from blue to pink, the
blue yarn should be dropped at the back, then picked up again when changing
back to blue. If working in the round, the non-working yarn will cross sideways at
the back as in A (these are called “floats”). This method works well if you change
colors frequently. If the floats would be quite long, or if you want the back to
be tidy, you can hide the working yarn inside your stitches as in B (this is called
tapestry crochet).
(RS)
(WS)
(RS)
(WS)
A. Carrying the yarn
Please note that if the floats (that is,
the yarn being carried) are too tight,
the fabric will pucker. Likewise, if
the floats are too loose, the stitches
at the color boundaries will loosen.
B. Working over the yarn
(tapestry crochet)
Depending on the type of yarn, you
may be able to see the non-working
yarn through the stitches.
More Crochet Techniques
77
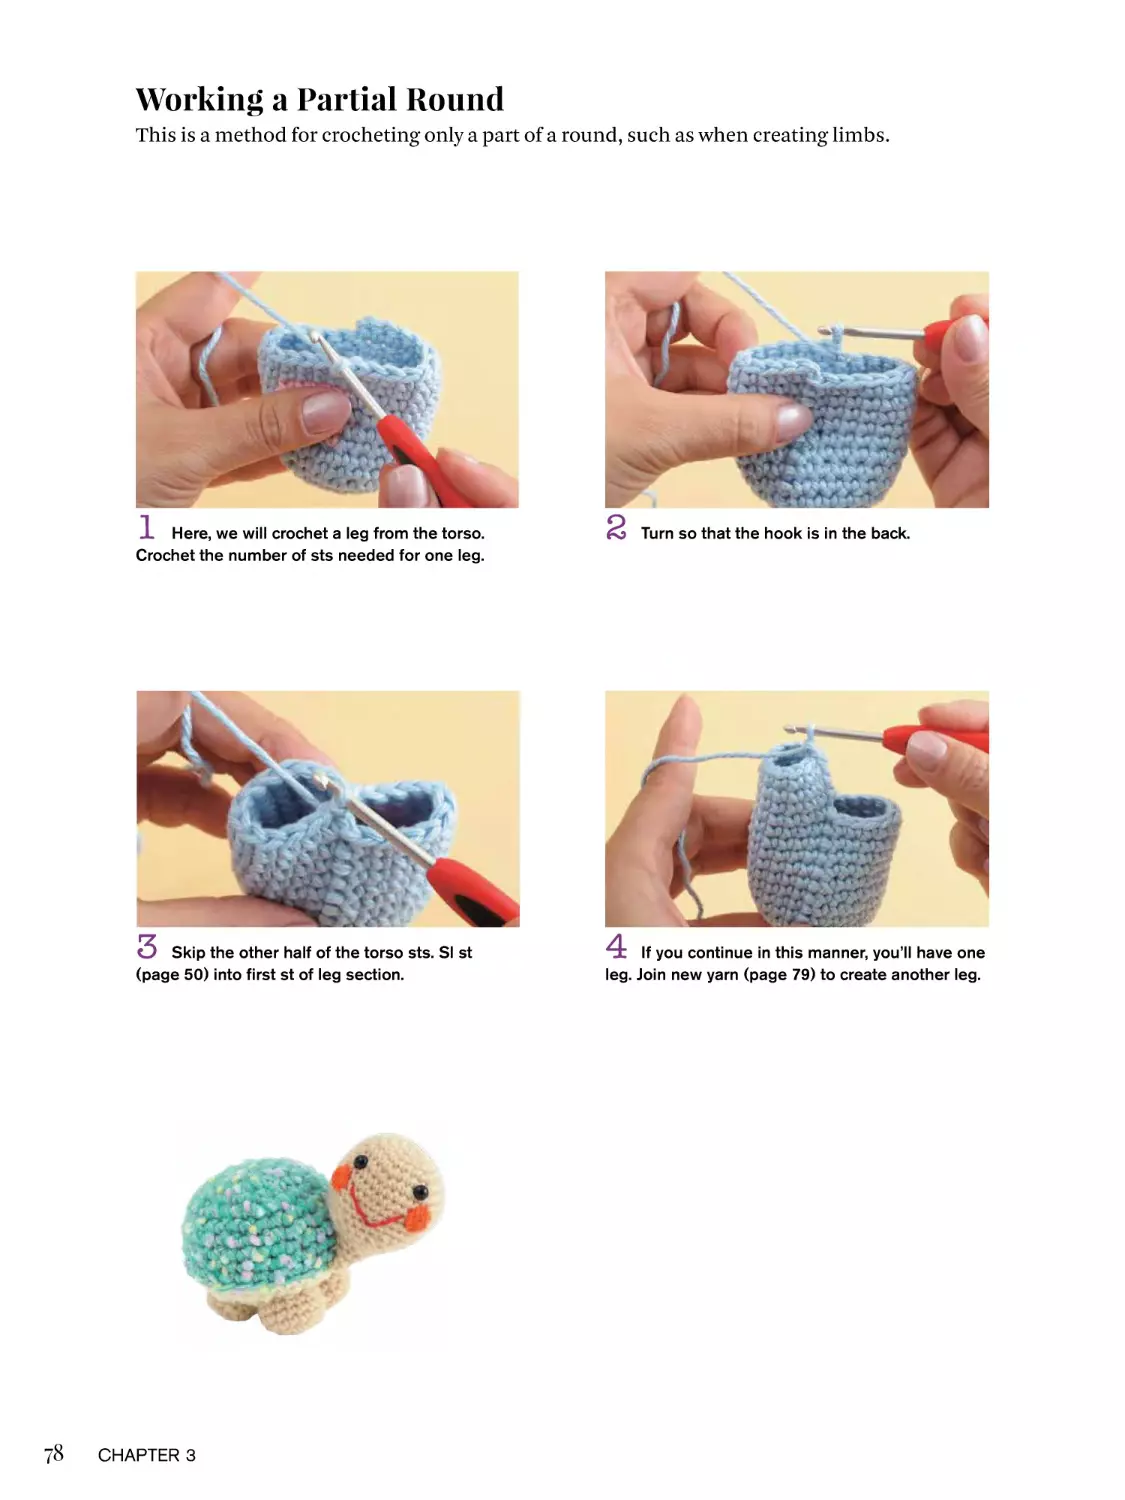
Working a Partial Round
This is a method for crocheting only a part of a round, such as when creating limbs.
1
2
3
4
Here, we will crochet a leg from the torso.
Crochet the number of sts needed for one leg.
Skip the other half of the torso sts. Sl st
(page 50) into first st of leg section.
78
Chapter 3
Turn so that the hook is in the back.
If you continue in this manner, you’ll have one
leg. Join new yarn (page 79) to create another leg.
Joining Yarn to Add New Stitches
This is when you attach a new strand of yarn to a piece where there is no working yarn and
start crocheting.
▶
Join yarn
1
Insert hook where you want to begin. In this
example, insert into the st right next to the leg just
worked as a partial round (page 78).
2
▶
Resume crocheting
3
4
5
6
Pull up a loop. Hold the yarn snug at the back
so that the loop won’t loosen.
Sc (page 40) into the same st—the st from
step 1—where you just joined the yarn.
YO with yarn in left hand.
Ch1 for turning post (page 35).
Continue crocheting according to pattern.
(Here, the pink part is the new leg worked in the
round.)
More Crochet Techniques
79
Part A
Part B
Part C
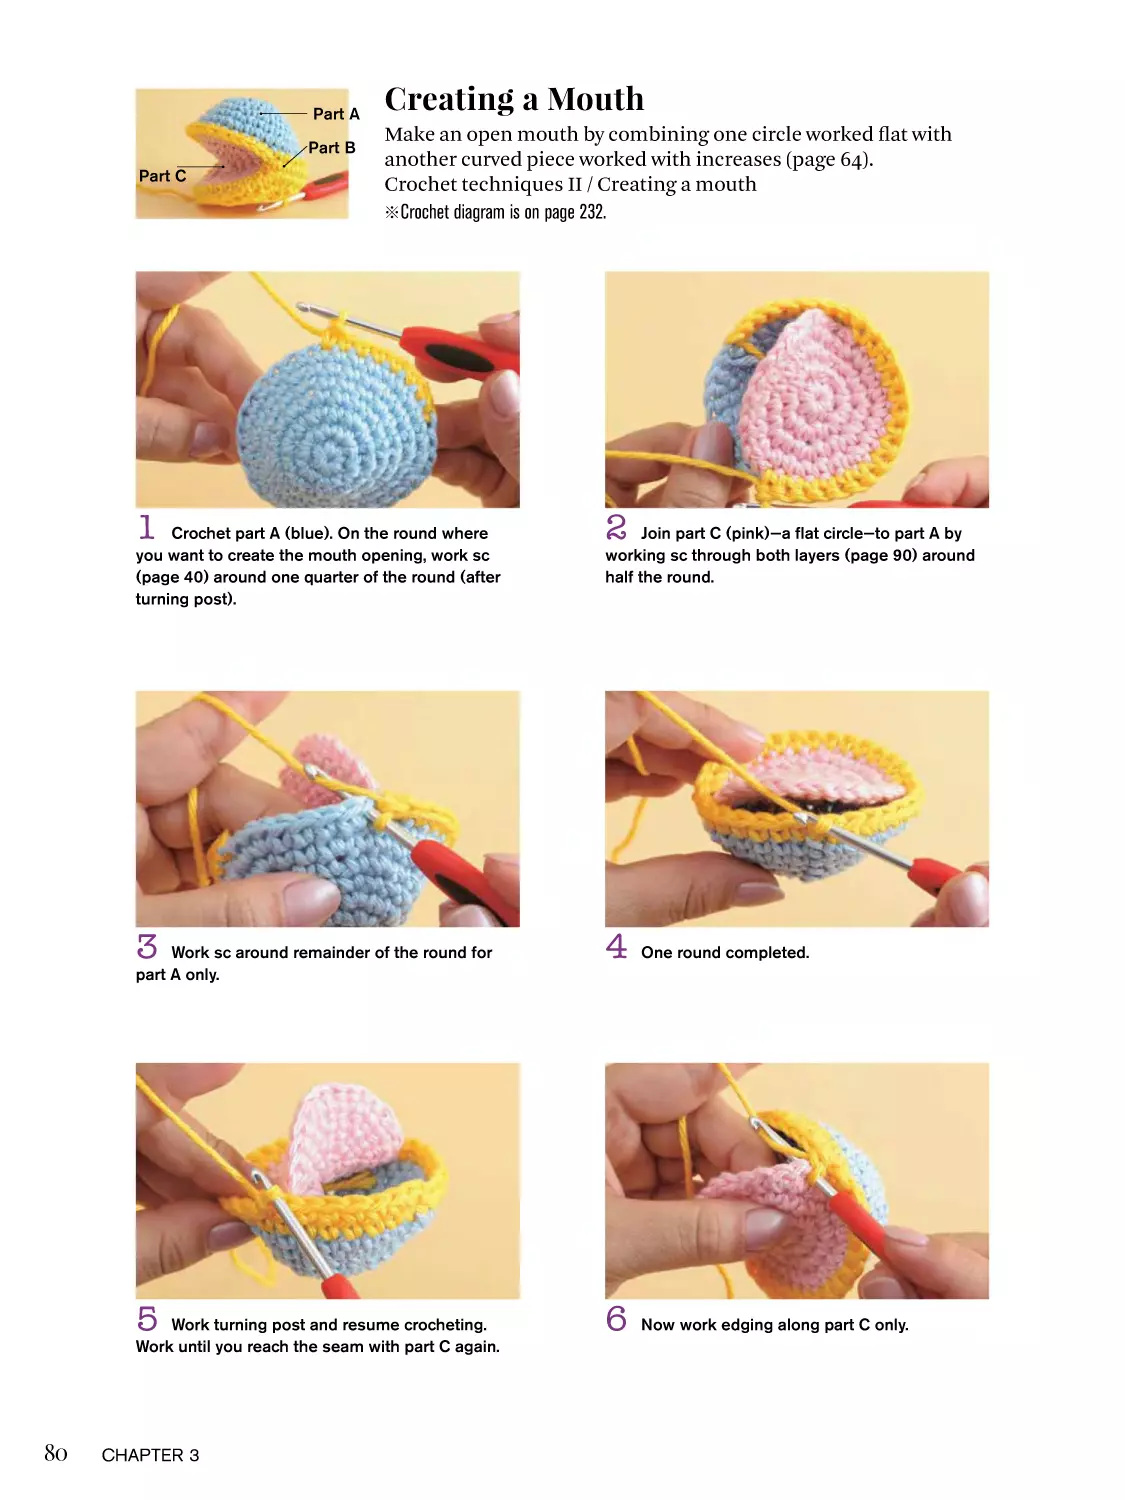
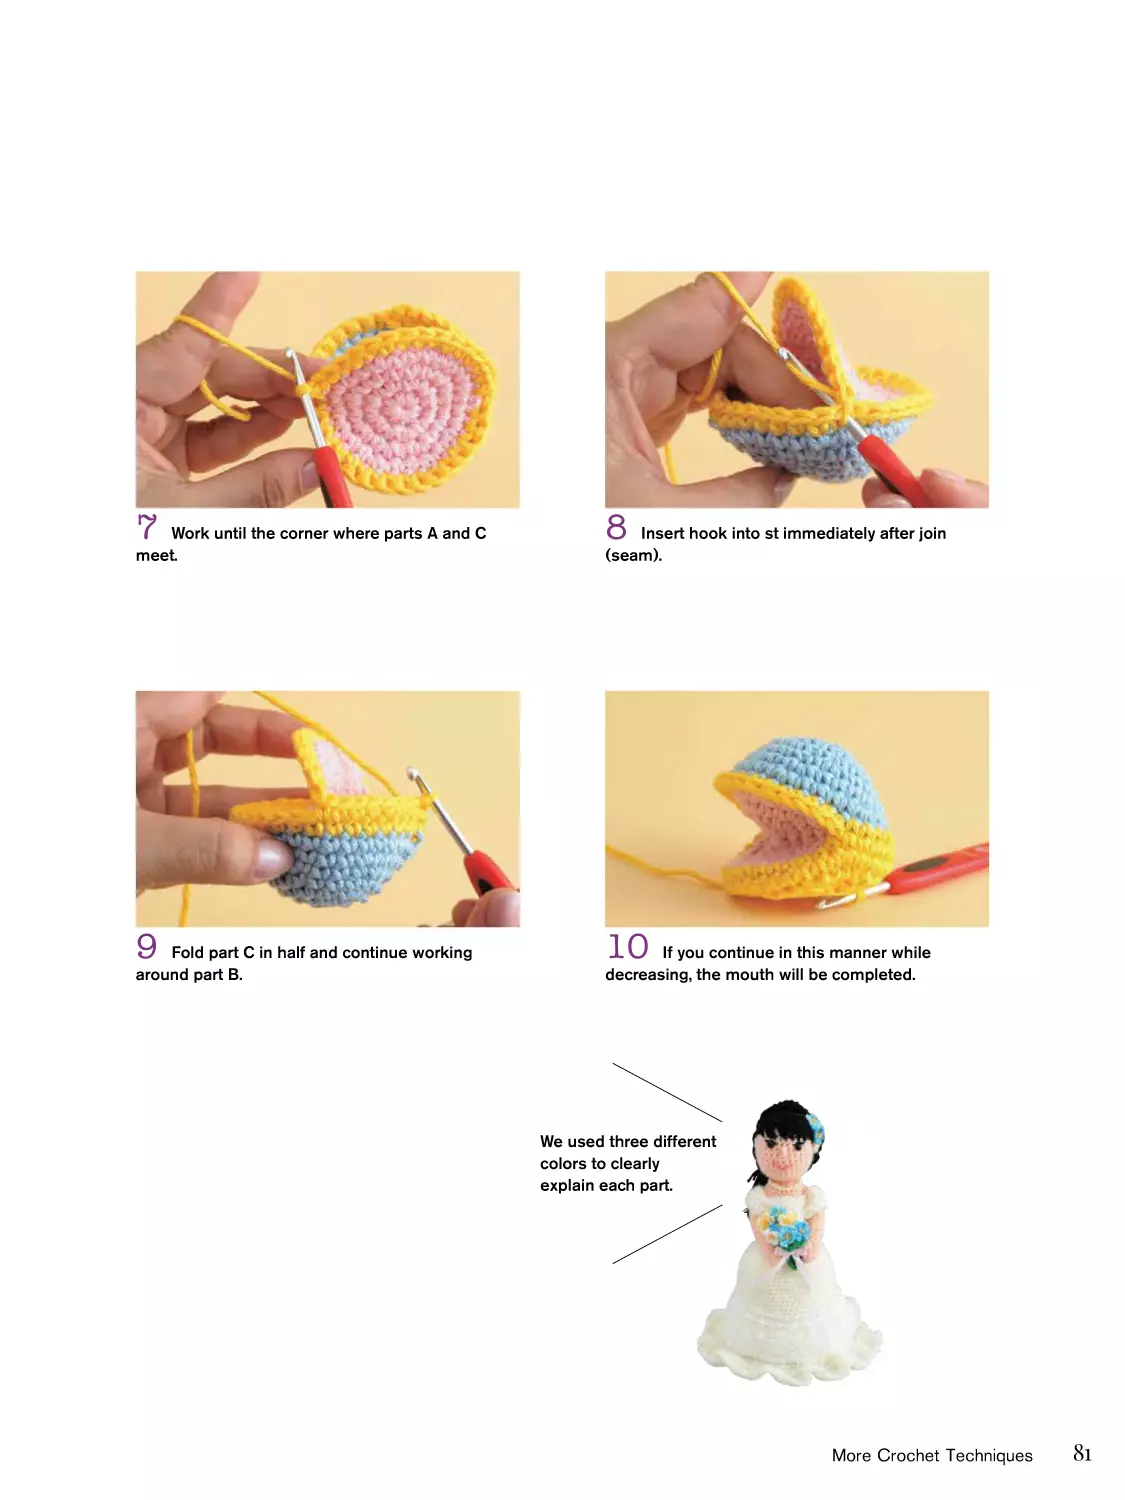
Creating a Mouth
Make an open mouth by combining one circle worked flat with
another curved piece worked with increases (page 64).
Crochet techniques II / Creating a mouth
※Crochet diagram is on page 232.
1
2
3
4
One round completed.
5
6
Now work edging along part C only.
Crochet part A (blue). On the round where
you want to create the mouth opening, work sc
(page 40) around one quarter of the round (after
turning post).
Work sc around remainder of the round for
part A only.
Work turning post and resume crocheting.
Work until you reach the seam with part C again.
80
Chapter 3
Join part C (pink)—a flat circle—to part A by
working sc through both layers (page 90) around
half the round.
7
8
9
10
Work until the corner where parts A and C
meet.
Fold part C in half and continue working
around part B.
Insert hook into st immediately after join
(seam).
If you continue in this manner while
decreasing, the mouth will be completed.
We used three different
colors to clearly
explain each part.
More Crochet Techniques
81
Increasing and Decreasing
with Clusters
You can make three-dimensional crocheted fabric by increasing
(page 64) and decreasing (page 65) the number of stitches in the
next round. This can be applied to crocheting ears, noses, etc. by
adjusting the number and size of stitches.
1
2
Work 5 dc (page 46) into next st.
3
4
Decrease dc sts as follows: first, YO.
6
Pull up a loop; 3 loops on hook.
Work sc (page 40) up until the location where
you want to work the cluster.
Continue working sc until just before the
cluster worked in step 2 (in the photo, a cluster
has been worked on the opposite side as well).
5
82
Insert hook into next st and YO.
Chapter 3
7
YO again; pull the yarn through first two loops
on hook. 1 partial dc completed.
9
Insert hook and YO.
8
Work 1 more partial dc; YO.
10
Pull up a loop, then YO again.
6
11
3 loops on hook (2 partial dc sts).
5 43
21
12
Continue in this manner, working a total of
5 partial dc sts (6 loops on hook).
More Crochet Techniques
83
Increasing and Decreasing with Clusters (cont’d)
13
YO.
14
Pull the yarn through all 6 loops on hook.
15
Continue working in sc. Here a cluster
and dec was worked on both right and left sides,
creating two ears.
Increase (cluster) on first round.
84
Chapter 3
Decrease on second round.
Creating a Foot by Decreasing
There are several ways to make feet, but here we will explain how to make them with decreases
(page 65).
Toe
Heel
1
Continue increasing in sc (page 40). We will
decrease starting on this round. The turning post
will be at the back of the heel.
2
Decrease on toe side.
Toe
3
Left side shows toe section.
5
After decreasing, continue ankle in sc.
4
Decrease at toe section until foot is desired
shape.
More Crochet Techniques
85
Creating a Foot with a Boot
Crochet an oval for the sole, work a partial round to make an ankle,
and then continue crocheting to make a foot shape. You can make
shoes and boots in the same way.
1
Start with oval foundation chain (page 38).
3
Working decreases (page 65) only at toe,
continue in sc.
5
86
Continue working ankle in the round.
Chapter 3
2
Work 1 round of sc tbl (page 54) and sl st to
finish round.
4
After working up until instep, skip sts to form
a partial round for ankle.
6
Join yarn to seam instep with whipstitch.
7
8
Whipstitch the edge, inserting needle into
outermost loop of each st as shown.
Pull the yarn to close up the hole.
9
Instep seam completed. Weave in ends on
wrong side.
Round no.
7
6
5
4
3
2
1
Stitch count
8
8
8 (dec 7 sts)
15 (dec 3 sts)
18
18 (inc 6 sts)
12
This “boot”
method yields
a clearer foot
shape than other
methods.
7
6
5
1
2
3
4
ch5 to begin
More Crochet Techniques
87
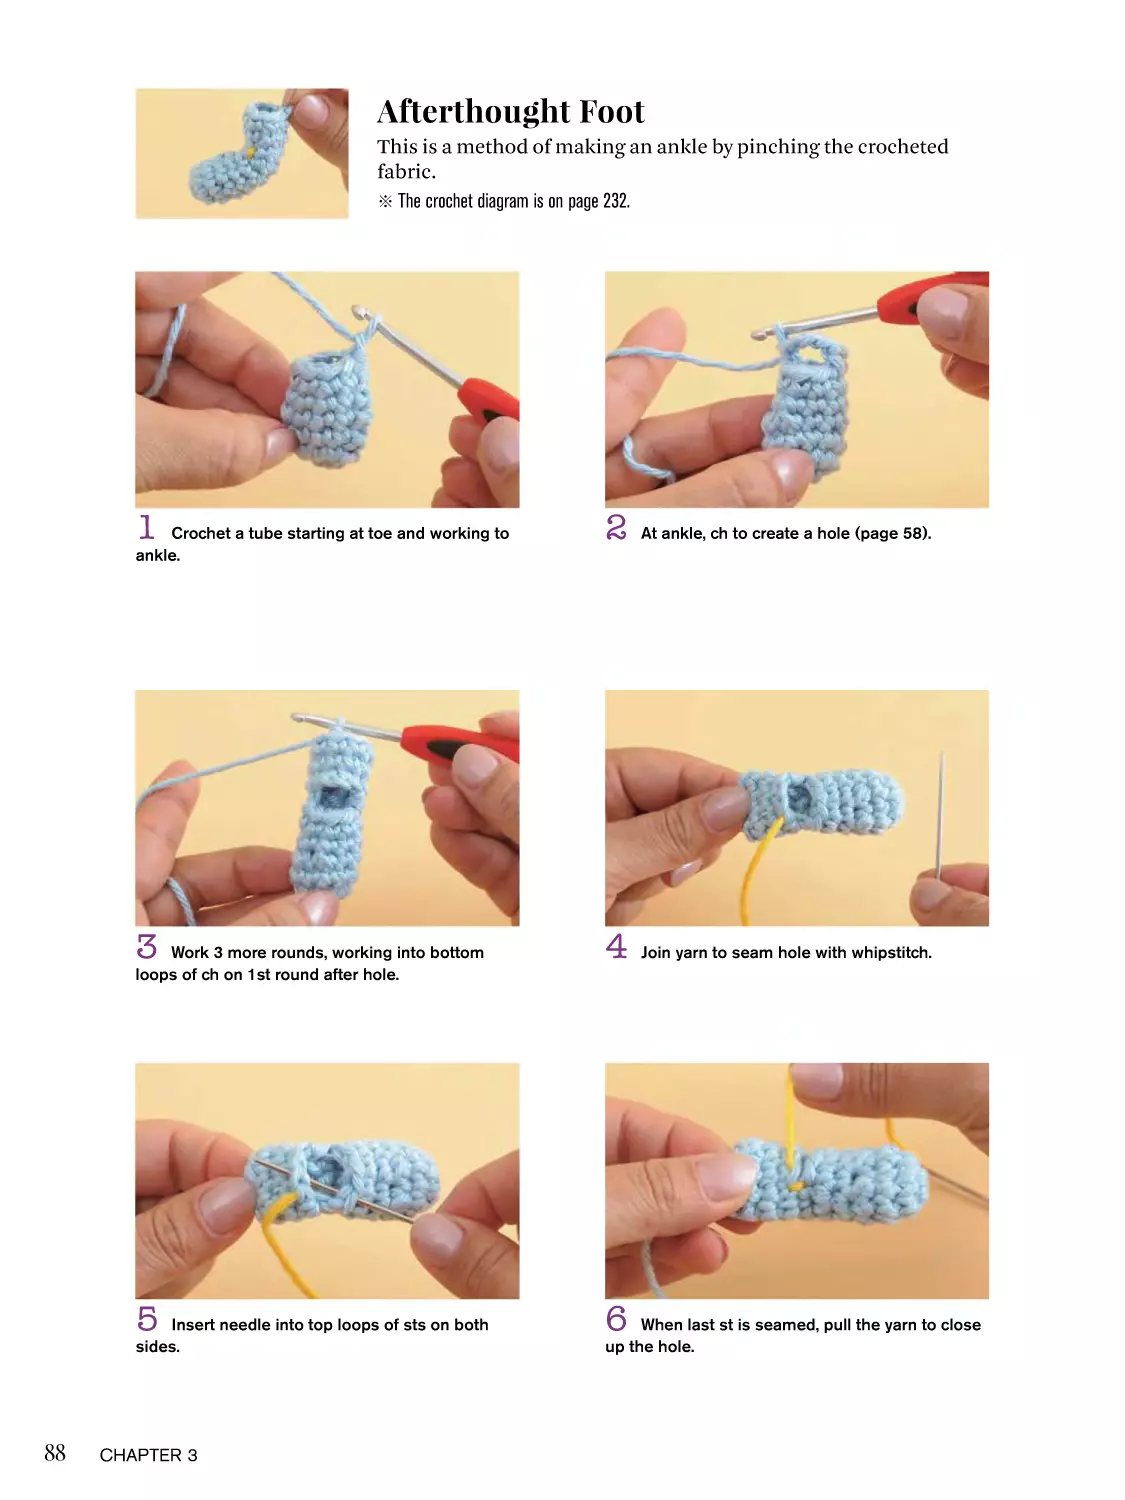
Afterthought Foot
This is a method of making an ankle by pinching the crocheted
fabric.
※ The crochet diagram is on page 232.
1
2
At ankle, ch to create a hole (page 58).
3
4
Join yarn to seam hole with whipstitch.
5
6
Crochet a tube starting at toe and working to
ankle.
Work 3 more rounds, working into bottom
loops of ch on 1st round after hole.
Insert needle into top loops of sts on both
sides.
88
Chapter 3
When last st is seamed, pull the yarn to close
up the hole.
Crocheting Fingers
Make small fingers using picots (page 60). This is used when
making small amigurumi fingers and so on.
※ The crochet diagram is on page 225.
1
2
3
4
After working magic circle (page 29), crochet
1 round. Begin fingers midway through round 2.
Insert hook into top loops of base of picot
worked in step 1; sl st. 1 finger completed.
5
Work picot as follows: ch1 (page 35), then sl
st (page 50) into first st.
Work remaining sc, then sl st to finish round.
Continue working in the round to create wrist.
More Crochet Techniques
89
Joining Pieces
This is a method for joining (seaming) two parts with a crochet
hook while crocheting them instead of seaming them with a
tapestry needle. It is used when you want to make the seam stand
out, or when you want to work a decorative edging after the seam.
※ Yellow is used for the seam here to make it easy to understand. If you will be seaming with
the same color yarn as the base piece, simply continue to seaming without cutting the yarn.
1
Pink piece will form lid of blue piece.
3
Aligning the turning posts of the lid and the
base, insert hook through base and lid with wrong
sides together.
5
90
Pull up a loop.
Chapter 3
2
First, join yarn to blue piece (page 79), ch1 for
turning post (page 34), and insert hook into first st.
4
6
YO.
YO again and pull yarn through all loops on
hook; 1 sc (page 40) completed. Continue in this
manner until the two pieces are seamed together.
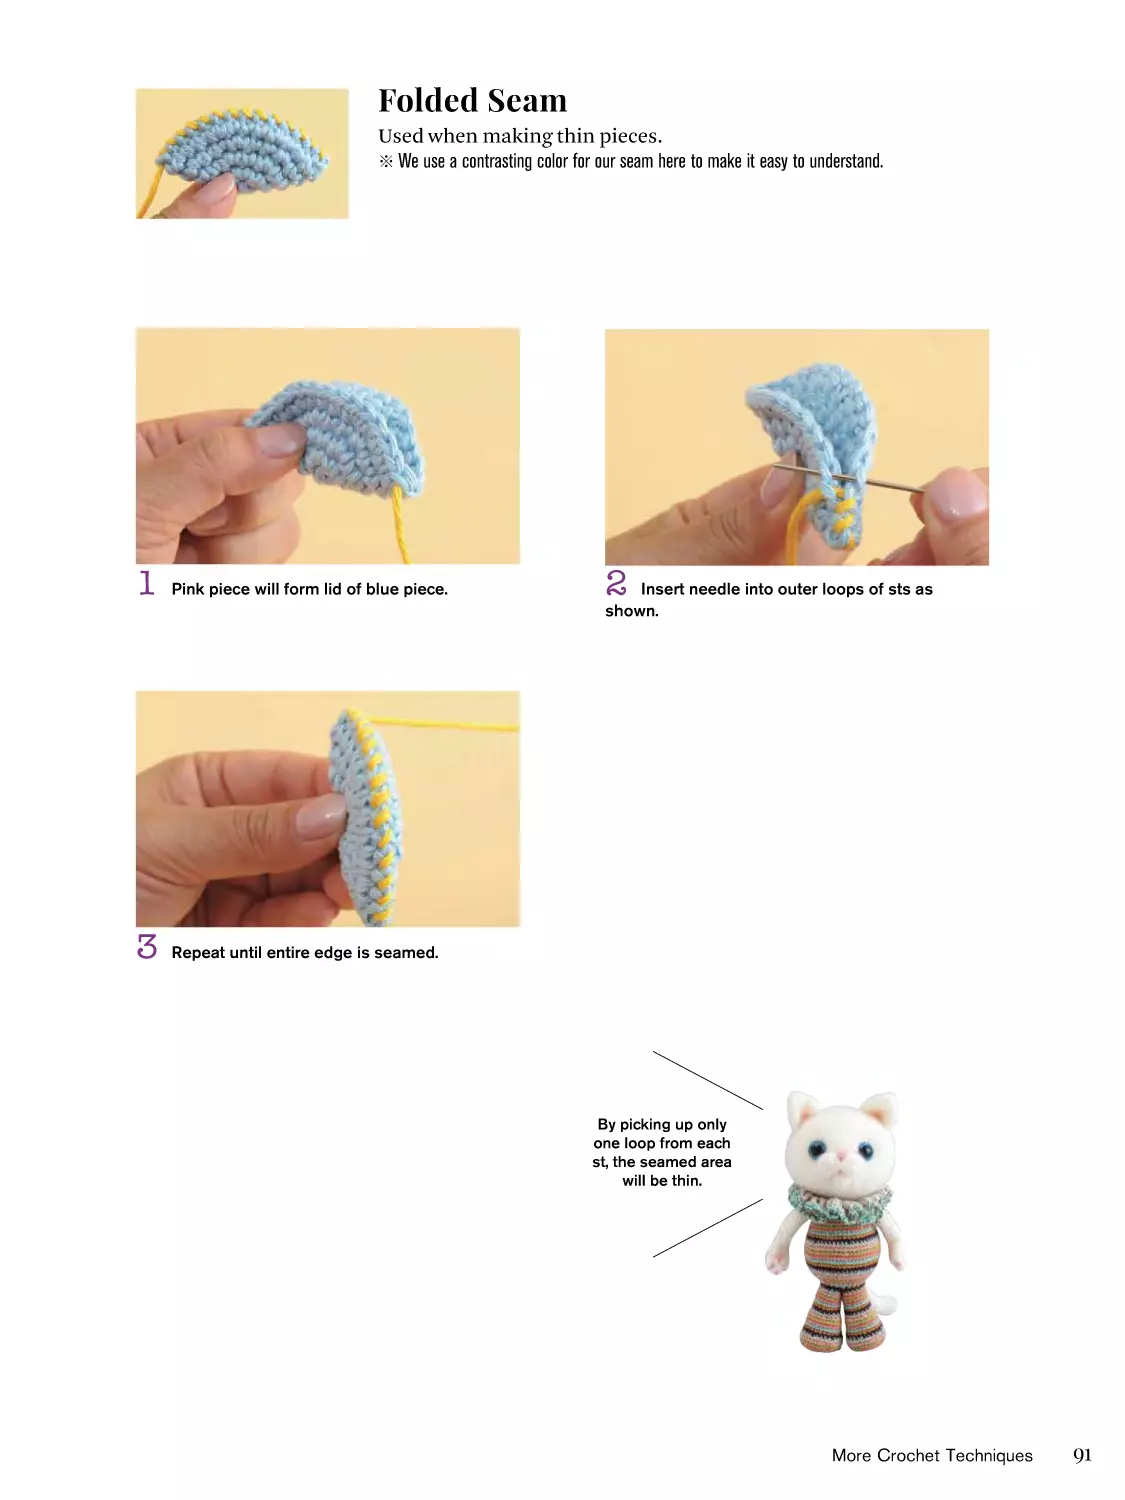
Folded Seam
Used when making thin pieces.
※ We use a contrasting color for our seam here to make it easy to understand.
1
Pink piece will form lid of blue piece.
3
Repeat until entire edge is seamed.
2
Insert needle into outer loops of sts as
shown.
By picking up only
one loop from each
st, the seamed area
will be thin.
More Crochet Techniques
91
Fringe
This is a method of attaching a bundle of threads to the end of the
crocheted fabric. It is used when making hair, tails, etc.
1
Insert hook into st where you want to add
fringe from back to front.
92
2
Fold a cut piece of yarn in half; place loop on
hook.
3
Pull yarn through st.
4
5
Grab the two yarn tails; pull through loop.
6
Chapter 3
Remove hook; insert thumb and index finger
into loop.
Pull on yarn tails to make fringe snug.
7
8
Repeat for as many fringes as you need.
After you have attached as much fringe as
you need, trim ends to correct length.
How to write a crochet diagram
Amigurumi is basically worked in a round shape, so most crochet diagrams for amigurumi show
concentric rings. You should write a diagram from the center outward.
❶ The “m” at the center represents a magic circle. To make sure that it’s not confused for a
foundation chain joined into the round, be sure to include “m” here.
❷ On the first round, within the boundary lines for the first round, first include the ch st(s) needed
for the turning post; then insert the number of stitches to be crocheted in the first round using the
appropriate crochet symbols. Write them counterclockwise and spread them out evenly. From the
second round onward, place the symbols so that you can see into which stitch in the lower row you
should work.
❸ The small horizontal black circle to the right of the turning post is the symbol for a slip st. When
your design requires turning posts, always include a slip st to finish the round.
❹ If there are two or more rounds without increases or decreases, you can omit them from the
diagram using dotted lines to show that they should be worked even. In that case, label the round
numbers clearly.
❺ When it comes to large items, it may be difficult to see them in circular crochet diagram, so
sometimes they are depicted in this expanded manner.
❻ In this table, write the
number of stitches in
each round, including any
increases/decreases in
the number of stitches
from the previous round in
parentheses. In addition,
include any special
instructions for stitches.
Also note any color
changes here. A crochet
diagram is a blueprint for
your amigurumi—try to
write it so that anyone can
envision it just by looking
at it.
(Crochet diagram)
9
❺
❹
5
4
3
❷
2
1
❶m
❸
(Table of rounds and stitch counts) ❻
Round no.
9
8
6
5
4
3
2
1
Stitch count
7
7
7
7
7 (dec 4 sts)
11 (dec 3 sts)
14 (inc 7 sts)
7
Beige
White
Red
Round boundary
More Crochet Techniques
93
Ruffle Edging Made with Picots
It is used as a decorative edging when finishing the crocheted
fabric.
1
2
Work ch sts (page 35). (Here you see ch2.)
3
4
YO and pull up a loop (page 50).
5
6
Finish with invisible bind-off (page 142).
Here, we will make a ruffle with a 3-st picot.
First sc 2 (page 40).
[TIP]
Left loop of
post
Front loop
Pay attention
to where you
insert the hook.
Insert hook between the heads of the base,
including the front loop and left loop of post, as
shown by arrow.
Picot (page 60) completed. Continue in the
same manner, working 2 sc between each picot.
94
Chapter 3
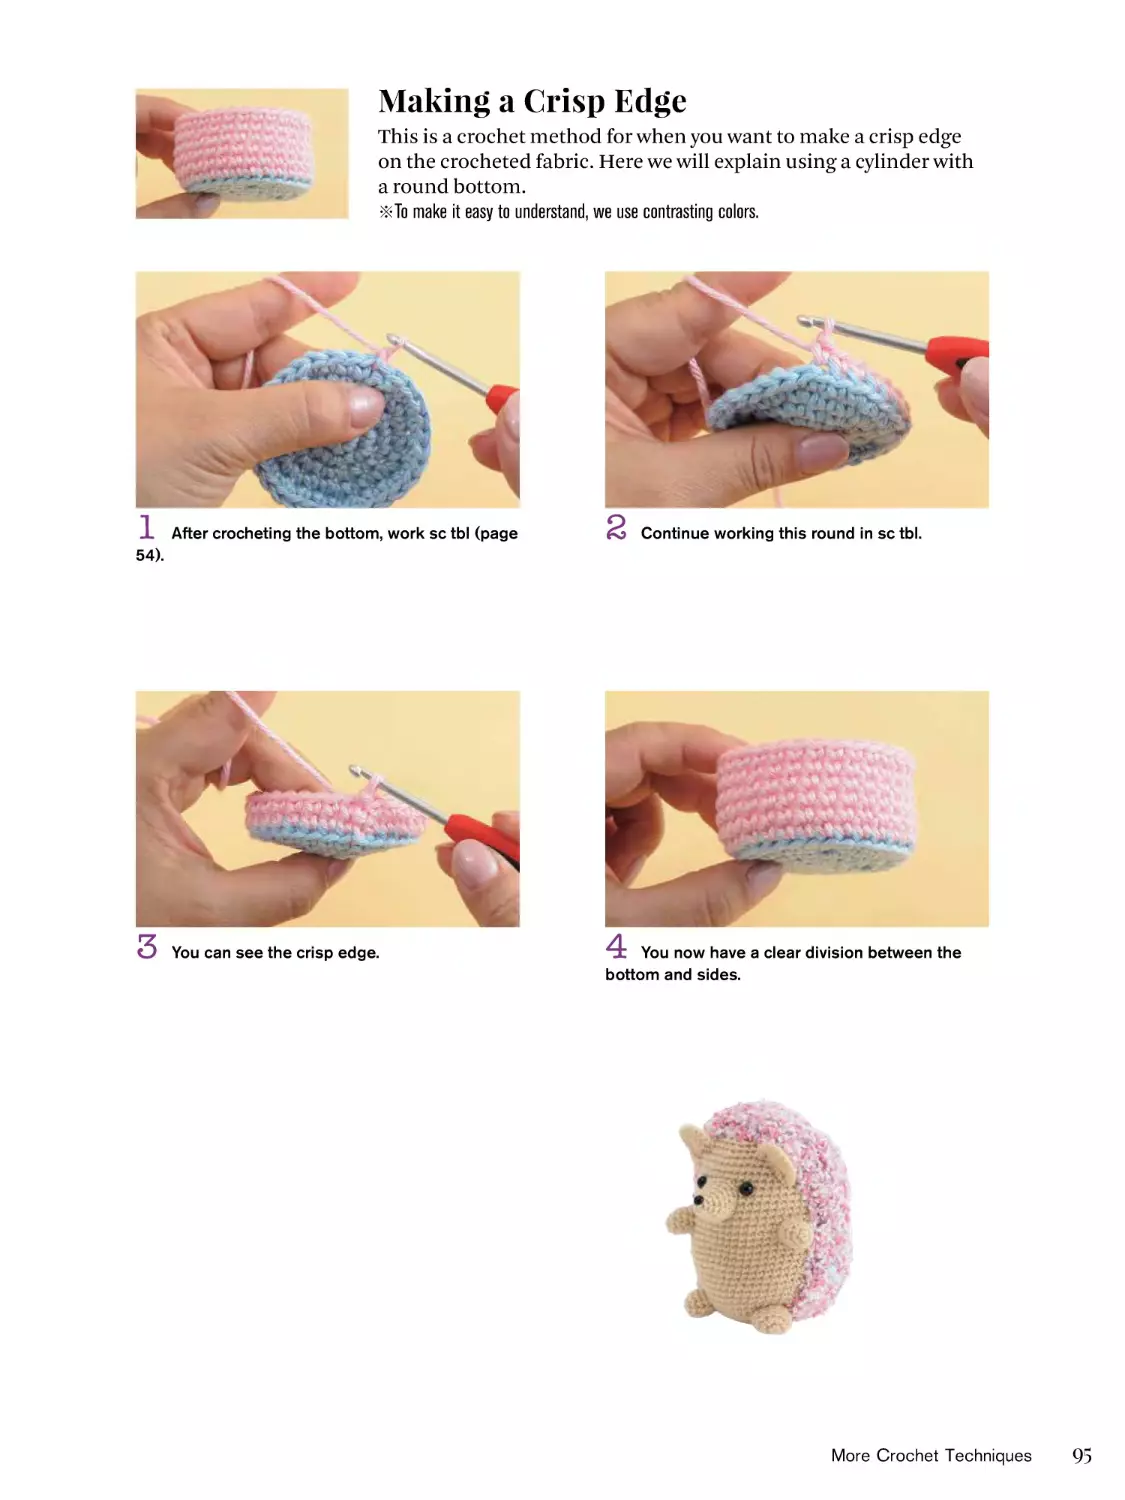
Making a Crisp Edge
This is a crochet method for when you want to make a crisp edge
on the crocheted fabric. Here we will explain using a cylinder with
a round bottom.
※To make it easy to understand, we use contrasting colors.
1
After crocheting the bottom, work sc tbl (page
2
3
You can see the crisp edge.
4
54).
Continue working this round in sc tbl.
You now have a clear division between the
bottom and sides.
More Crochet Techniques
95
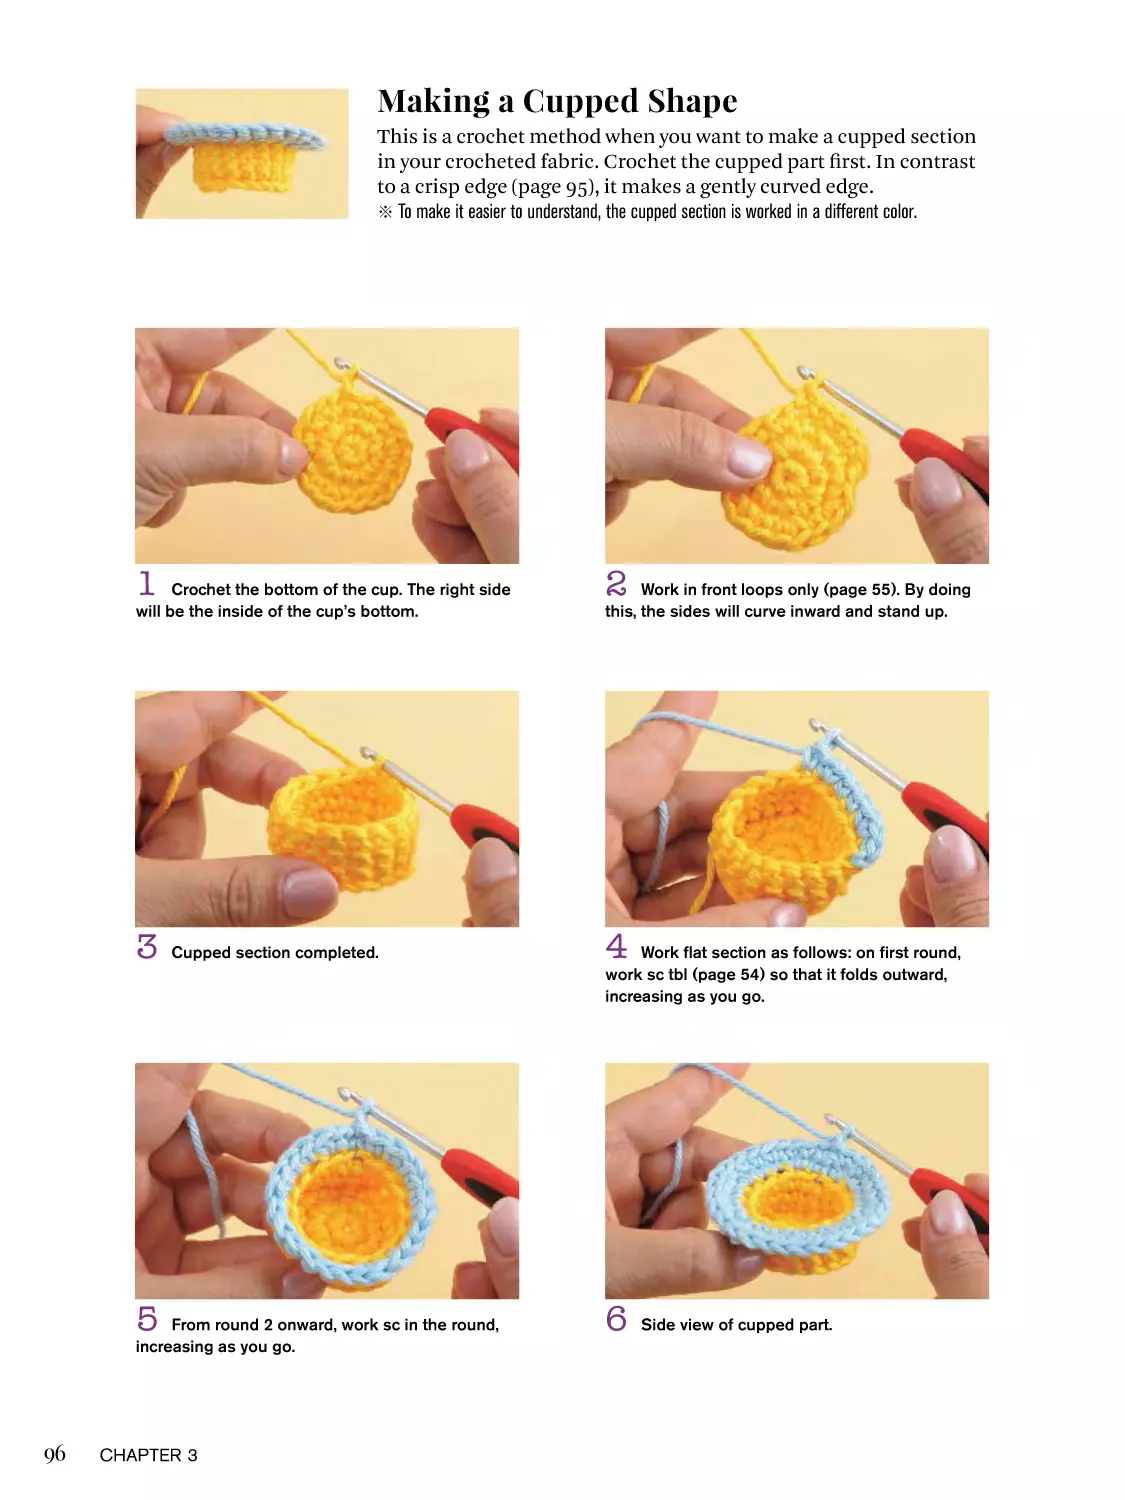
Making a Cupped Shape
This is a crochet method when you want to make a cupped section
in your crocheted fabric. Crochet the cupped part first. In contrast
to a crisp edge (page 95), it makes a gently curved edge.
※ To make it easier to understand, the cupped section is worked in a different color.
1
Crochet the bottom of the cup. The right side
will be the inside of the cup’s bottom.
3
Cupped section completed.
5
From round 2 onward, work sc in the round,
increasing as you go.
96
Chapter 3
2
Work in front loops only (page 55). By doing
this, the sides will curve inward and stand up.
4
Work flat section as follows: on first round,
work sc tbl (page 54) so that it folds outward,
increasing as you go.
6
Side view of cupped part.
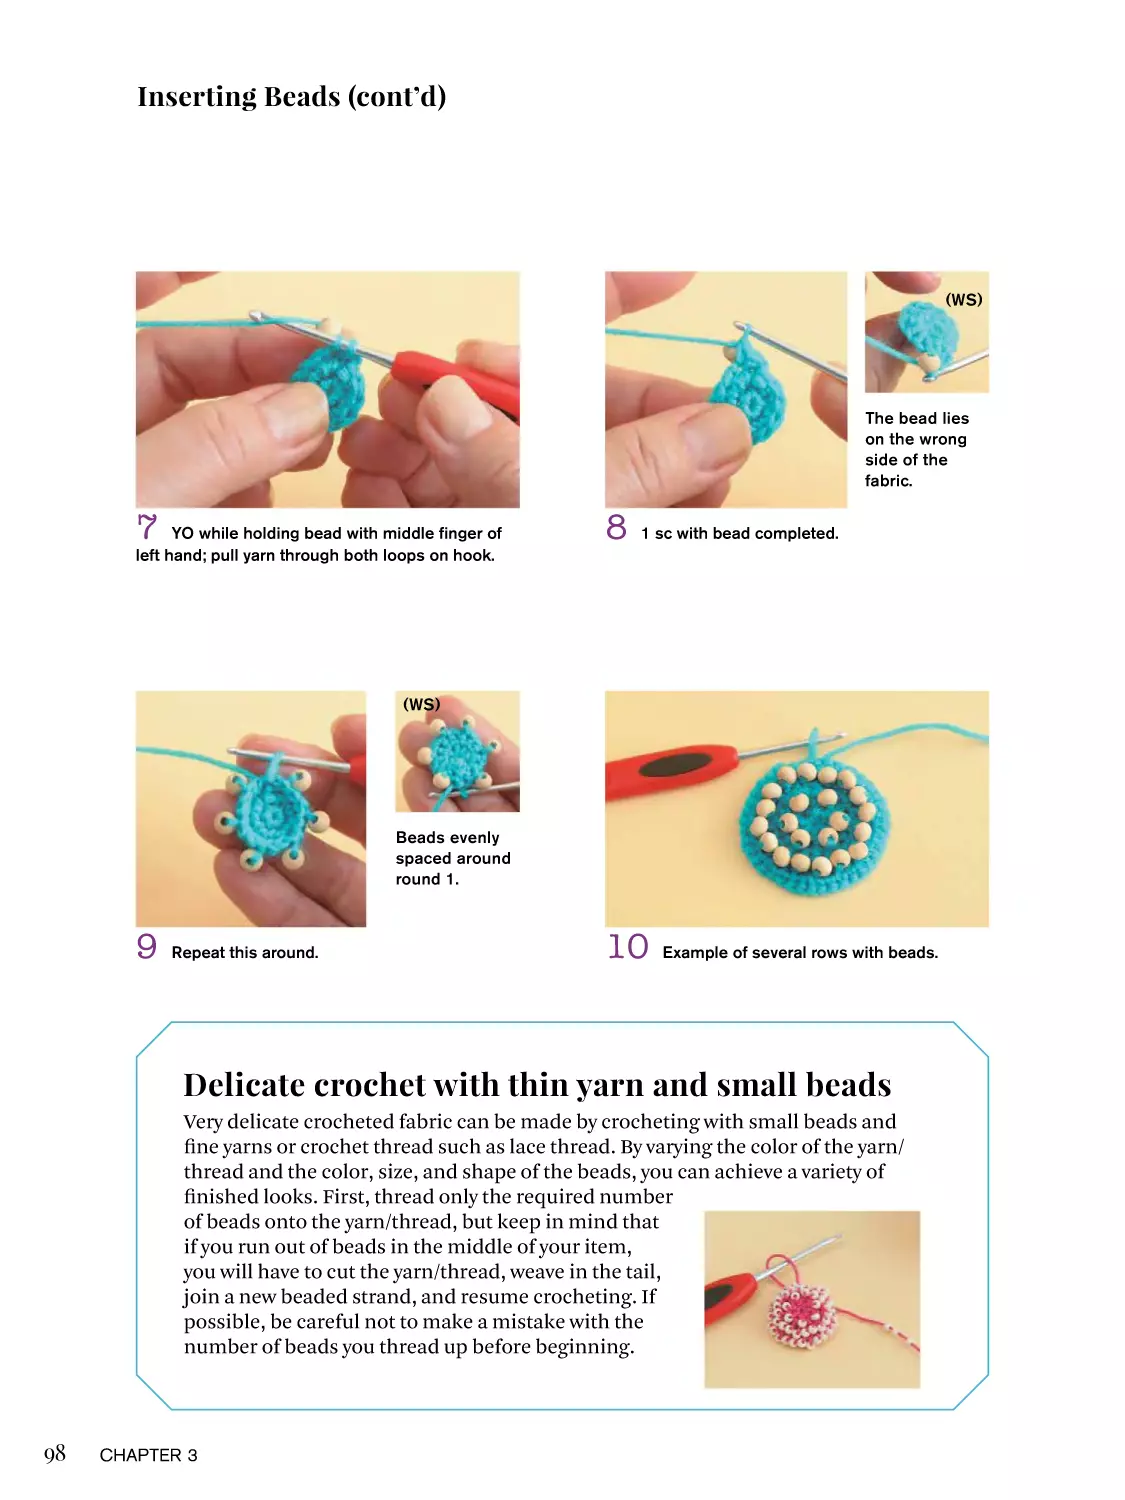
Inserting Beads
This is a crochet method in which beads are worked into the
crocheted fabric. You can use any type of beads that can be
threaded onto your yarn with a needle.
1
Prepare a needle that fits through the holes in
the beads. Thread the yarn through the needle.
3
Thread required number of beads onto the
5
Pull up a loop.
yarn.
2
Thread a bead.
4
Crochet up until you want to insert first bead.
Slide a bead close to the hook and YO (for sc in
this example).
6
Now bring the bead snug up against the
fabric.
More Crochet Techniques
97
Inserting Beads (cont’d)
(WS)
The bead lies
on the wrong
side of the
fabric.
7
YO while holding bead with middle finger of
left hand; pull yarn through both loops on hook.
8
1 sc with bead completed.
(WS)
Beads evenly
spaced around
round 1.
9
Repeat this around.
10
Example of several rows with beads.
Delicate crochet with thin yarn and small beads
Very delicate crocheted fabric can be made by crocheting with small beads and
fine yarns or crochet thread such as lace thread. By varying the color of the yarn/
thread and the color, size, and shape of the beads, you can achieve a variety of
finished looks. First, thread only the required number
of beads onto the yarn/thread, but keep in mind that
if you run out of beads in the middle of your item,
you will have to cut the yarn/thread, weave in the tail,
join a new beaded strand, and resume crocheting. If
possible, be careful not to make a mistake with the
number of beads you thread up before beginning.
98
Chapter 3
Crocheting cords
We would like to introduce you to three types of cords featuring chain st and single crochet
(sc). All of them are strong and sturdy, so you can also use them when making zakka.
▶
Slip stitch cord
1
Crochet a chain as long
as you require. Insert hook into
bottom loop of second ch from
hook as shown.
▶
2
YO and pull up a loop. (1 sl
st completed.)
3
Repeat steps 1–2, working
1 sl st into bottom loop of each
ch st.
Romanian point lace cord
Yarn tail
Yarn tail
1
Leaving a yarn tail about 3
times the length of the cord you
want to make, make a slip knot.
4
1 st completed
2
3
5
6
Place the yarn tail over the
hook as shown in the illustration.
Repeat steps 2–3 until cord
is desired length.
YO and pull the yarn through
both loops on hook.
Completed Romanian point
lace cord.
More Crochet Techniques
99
Crocheting Cords (cont’d)
▶
Lobster cord
1
2
3
4
5
6
7
8
9
Make a slip knot and then
ch1. Insert hook where shown by
arrow. YO and pull up a loop.
On back side, insert hook
into 2 loops as shown by arrow.
Rotate the cord in the
direction of the arrow so the back
is facing you.
100
Chapter 3
YO again and pull up a loop
(1 sc completed).
YO and pull up a loop as
shown by arrow.
Insert hook into 2 loops
shown and work 1 sc as in steps
5–6.
Rotate the cord in the
direction of the arrow so the back
is facing you.
YO again and pull yarn
through both loops on hook
(1 sc completed).
Repeat, turning work after
each st, until cord is desired
length.
m
ro
basic
to adv
an
ce
d
F
Crochet Fabric Gallery
Swatch collection
From basic crochet stitches to more complex stitches combining several
crochet methods, here are a total of 23 stitch pattern samples. When
creating an original amigurumi, use this collection as a reference to find
the crocheted fabric best suited to what you want to make.
AM I J I
※ All samples crocheted with Hamanaka Amiami Cotton.
1
Single Crochet
(sc)
The basic crochet stitch used most often when
making amigurumi. Tight stitches make the
crocheted fabric dense. Ch1 for sc turning
post.
Instructions—page 40 (single crochet)
(WS)
Crocheted Fabric Gallery
101
2
Half Double Crochet (hdc)
Similar to single crochet, but YO and pull the
yarn through the loops one additional time. It
allows the yarn’s personality to shine through,
and you can make a soft, fluffy crocheted
fabric. Ch2 for hdc turning post.
Instructions—page 43 (half double crochet)
3
Double Crochet (dc)
This stitch is three times as tall as a single
crochet stitch. Ch3 for dc turning post.
Instructions—page 46 (double crochet)
102
Chapter 3
4
Single Crochet Through Back Loop Only (sc tbl)
By working single crochet through the back
loops only, you create horizontal ridges. It can
also be used when you want to create a crisp
edge.
Instructions—page 54 (sc tbl)
5
Front Post Double Crochet (fp dc)
Front post stitches are stitches where you
insert the hook behind the post of the stitch
on the previous row/round, YO, and pull up a
loop. The stitches create vertical ridges. In this
swatch, every third stitch is a front post dc.
Instructions—page 46 (dc), page 56 (front post)
Crocheted Fabric Gallery
103
6
Back Post Double Crochet (bp dc)
Insert the hook around the post of the stitch in
the previous row/round from the back, YO, and
pull up a loop. On the right side, these stitches
look like furrows. In this swatch, every third
stitch is a back post dc.
Instructions—page 46 (dc), page 57 (back post)
7
Granite Stitch
Alternate between ch st and sc on odd rows/
rounds and between sc and ch st on even rows/
rounds. From row/round 2 onward, always
work sc into the chain space (ch-sp). The
resulting fabric is softer than single crochet.
Also known as moss stitch.
Instructions—page 34 (ch st), page 40 (sc)
104
Chapter 3
8
Granite Stitch (Striped)
The stitch pattern is the same as in swatch 7,
but the color is changed for each row/round
using a total of 3 colors. The combination of
colors from the previous row/round makes for
a beautiful crocheted fabric.
Instructions—page 34 (ch st), page 40 (sc)
9
Loop Stitch (fp dc)
Work sc while looping the yarn around the
middle finger of your left hand to control the
length of the loop. The result is a loop on the
back side of the crocheted fabric. This sample
uses mohair yarn.
Instructions—page 61 (loop st)
Crocheted Fabric Gallery
105
10
Crocodile Stitch
This is a stitch pattern that looks like scales or
flower petals. On the first row, *work 2 dc into
same st, ch2*, repeat from * to * across. On the
second row, work *5 dc around post of dc st from
previous row, ch1, 5dc around post of dc st from
previous row*, repeat from * to * across.
Instructions—page 34 (ch st), page 46 (dc)
❻
❸
❹
❷
11
❺
❶
Crocodile Stitch (Striped)
Work crocodile stitch as in swatch 10, but
change the yarn color every 2 rows to create
a colorful, three-dimensional, fun crocheted
fabric. It is also lovely to use a variegated or
ombre yarn.
Instructions—page 34 (ch st), page 46 (dc)
❻
❸
❹
❷
106
Chapter 3
❺
❶
12
Bobbles
Between sc sts, ch2 and work 2 hdc into first ch.
The hdc sections create a three-dimensional
pattern.
Instructions—page 34 (ch st), page 40 (sc), page
43 (hdc)
13
Bobbles (In color)
The same as the bobbles in swatch 12, but with
the bobbles worked in different colors. The
colored bobbles look like polka dots against
the background.
Instructions—page 34 (ch st), page 40 (sc), page
43 (hdc)
Crocheted Fabric Gallery
107
14
Shell Stitch
A stitch pattern that looks like a seashell. *Sc
1, skip 2 sts, work 5 dc into same st, skip 2 sts*,
repeat from * to * across. From the second row
onward, dc 5 into the sc st of the previous row.
Instructions—page 40 (sc), page 46 (dc)
15
Three-color Shell Stitch
The same shell stitch as in swatch 15 but
changing the color every row, using a total of
3 colors. The color changes look complicated,
but they are easy because they are just a
combination of sc and dc.
Instructions—page 40 (sc), page 46 (dc)
108
Chapter 3
16
Brushed Single Crochet
This is sc worked in a mohair yarn and then
brushed to make it fluffier. Even using just
the same plain sc sts, by changing the yarn
and fluffing it up with a brush, the result can
change dramatically.
Instructions—page 40 (sc)
17
Tapestry Crochet
In this stitch pattern, work 3 sc in the main
color and then 1 sc in a contrasting color. Here,
the contrasting color alternates between light
blue and pink every other row.
Instructions—page 40 (sc)
Crocheted Fabric Gallery
109
18
Intarsia
This is a method for inserting a colored design
against a background of another color. You can
insert your own design by planning out how
many stitches you’ll need.
Instructions—page 40 (sc)
19
Bobbles (Increase/decrease method)
You can create bobbles against a background
of sc by working 5 dc into one sc to increase
and then working dc5tog on the next row to
decrease again. The front has bobbles while
the fabric looks pitted from the back.
Instructions—page 40 (sc), page 46 (dc), page 82
(clusters)
(WS)
110
Chapter 3
20
Waffle Stitch
This stitch pattern combines dc, front post dc,
and back post dc to create a textured fabric
with strong vertical elements.
Instructions—page 46 (dc), page 56 (fp dc), page
57 (bp dc)
21
Staggered Three-color dc Spike Stitch
This stitch features a combination of 3 dc sts
and 1 ch st. After the second row, work the
second dc in each 3-dc cluster into the st two
rows below. If you change the color every row, it
will look quite intricate.
Instructions—page 34 (ch st), page 46 (dc)
Crocheted Fabric Gallery
111
22
Three-color dc Spike Stitch
A combination of dc2tog decreases, ch sts, and
sc sts. It’s a multiple of 2 sts where you work
dc2tog into the st two rows below. Change the
color every two rows to create a complicated
pattern.
Instructions—page 34 (ch st), page 40 (sc), page
46 (dc)
23
Inverse Single Crochet
This stitch is sc worked in the opposite
direction so that the “back” of sc appears on
the front side. Insert the hook from the back
side and work the yarn over (YO) in reverse. The
resulting fabric will be as dense as regular sc.
Instructions—page 53 (inverse sc)
112
Chapter 3
Chapter 4
Assembling
Your Models
In this section we’ve summarize techniques for
assembling crocheted parts, either flat or in
three dimensions.
Threading a Tapestry Needle
Use a tapestry needle to seam crocheted fabric together. Thread
needles for embroidery in the same manner.
1
2
3
4
5
6
Place the yarn or thread on your finger with
the needle over it so that you can see the thread
through the eye of the needle.
Hold yarn firmly around the needle between
your thumb and index finger.
With the thread folded, pass it through the
eye of the needle.
114
Chapter 4
Fold the end of the thread over the needle.
While holding the thread between your
fingers, pull out the needle and press the folded
part of the thread into the eye of the needle.
Pull the thread coming out of the eye of the
needle. Leave a yarn tail of about 4” (10 cm).
Knot the Thread With Tapestry Needle
This is a basic knotting method that even beginners can do easily.
1
2
3
4
5
6
Place the needle at the position (yarn tail
side) where you want to make the knot.
Hold the wrapped part between your thumb
and index finger.
Holding the wrapped part between your
fingers, pull the thread all the way to the end.
Wrap the yarn around the needle 3 times (or
more if the yarn is thin).
Pull the needle while holding it, taking care
not to lift your fingers.
When the knot is complete, cut the yarn tail
end short.
Assembling Your Models
115
Seaming Methods
After crocheting the amigurumi parts, we assemble them. In this book, the seaming
methods are organized by type below.
116
Seaming two bound-off edges
Seaming bound-off edge to another
surface
Seaming the stitches at the bound-off
edges of two pieces.
Seaming the end of one threedimensional piece to another threedimensional piece. There are three
methods: whipstitch, woven, and folded.
Seam sides together
Grafting
Seaming the sides edges of two surfaces.
The seam finish varies depending on how
you pick up the stitches.
Seaming the edges of a single piece
together.
Chapter 4
Seaming Two Bound-off Edges
This is a method of seaming two pieces with yarn or thread.
※Here we use a contrasting color to seam for ease of understanding.
1
2
3
4
Thread the needle with the yarn tail of the
purple piece. Insert needle into last stitch from
inside to outside.
Pass the needle from inside of the stitch next
to the stitch in step 1 to the outside.
Align purple and pink pieces at their turning
posts; pass the needle from the outside of the
next stitch to the inside.
1 stitch seamed.
5
Pull the yarn through one stitch at a time to
sew pieces together. 4 sts seamed.
Assembling Your Models
117
Seaming Bound-off Edge to Another Surface
Methods for attaching pieces to the side of the crocheted fabric. There are differences in the
finish depending on technique, so use the method that best suits your needs.
▶
Woven seam
Seam location
Column of
turning posts
A
1
Thread yarn tail of part A (blue) through
needle; pass needle out through first st as shown.
2
Check the position of the pieces. Place them
so that their turning posts are inconspicuous.
B
B
1 stitch
A
A
3
Pass needle through 1 st of part B (pink and
purple).
4
Insert needle into top loops of st on part
A (blue) from outside to inside.
A
B
A
B
5
Return the needle to the position where the
yarn comes out of B; pull the needle out through
the stitch one over from the first stitch.
118
Chapter 4
6
Repeat steps 4–5 until entire piece is seamed.
▶
Whipstitch
B
B
A
A
1
Pass the yarn tail of the piece you want to
attach (part A (blue)) through the needle; pass
needle out to right side. Insert needle diagonally at
the position where you want to attach B (pink and
purple).
2
Insert the needle into top loops of next stitch
of part A from back to front.
A
B
A
B
3
Insert the needle into next stitch of part B at
an angle.
4
Repeat steps 2–3 until seam is complete.
By pulling the yarn through
firmly one stitch at a time, you
can achieve a beautiful finish.
Assembling Your Models
119
Seaming Bound-off Edge to Another Surface (cont’d)
▶
Folded seam
B
B
A
A
1
You will fold part A (pink) and seam it as
follows: Thread part A’s yarn tail through needle.
Insert needle into st on part B (blue) at the
position where you want to attach A.
2
B
B
A
A
3
Flatten part A so that the sts of bound-off
edge line up. Insert needle through 2 sts at once
as shown.
B
A
5
120
Seam completed.
Chapter 4
Yarn threaded from A to B.
4
Insert needle into st next to st from step 1.
Seaming One Piece on Top of Another Piece
Seam one piece on top of another with both right sides facing you. The finish changes
depending on how you stitch the upper piece.
▶
Seam with top loops visible: Use when you want to leave part A as it is.
B
A
A
1
Thread yarn tail of part A (yellow) through
needle. Insert needle into top loops of stitch from
back to front.
2
Insert needle into next st from front to back
through corresponding st of part B (blue).
Front loop of sts visible
B
A
3
Insert needle into part B from back to front
through corresponding st of part A (yellow).
▶
4
Repeat steps 2–3 until seam is complete.
Seam through back loops: Use when you want to make the edge of part A stand out
B
A
1
Insert needle under back loop only of part A.
2
Insert needle through one st of part B (blue)
and into back loop of st on part A. Repeat.
Assembling Your Models
121
Seaming One Piece on Top of Another Piece (cont’d)
▶
Seam through front loops: Use to blend the edge of part A into the other piece because
it is thin.
A
1
▶
B
Insert needle under front loop only of part A.
2
Insert needle through one st of part B (blue)
and into front loop of st on part A. Repeat.
Seam through top loops: Use when you want to attach part A firmly.
A
1
B
Insert needle under both top loops of stitch.
2
Insert needle through top loops of part B
(blue) and then top loops of st on part A. Repeat.
Change the way you insert
the needle depending on
the finish you want.
122
Chapter 4
Seam Sides Together
Join two adjacent flat pieces together. The impression of the finished product changes
depending on how you insert the needle into the stitches.
▶
Seam through front loops
1
Insert needle through front
loops of st on each piece as
shown.
▶
2
Yarn tail
Pull yarn through, leaving
a tail approximately 6” (15 cm)
long.
3
Repeat, inserting needle
into front loop of right side st
and then front loop of left side st,
pulling yarn snug as you go.
Seam through top loops: Use when you want to attach the pieces together securely.
Yarn tail
1
Insert needle under both
top loops of right side st and left
side st.
▶
2
Pull yarn through, leaving
a tail approximately 6” (15 cm)
long.
3
Repeat, inserting needle
into top loops of right side st
and then top loops of left side st,
pulling yarn snug as you go.
Seam through back loops: Use when you want to make the edges of the fabric stand out.
1
Insert needle through
back loops of st on each
piece as shown. Leave a tail
approximately 6” (15 cm) long.
2
Pull yarn through.
3
Repeat, inserting needle as
in step 1, until seam is complete.
The finished seam will have clear
lines.
Assembling Your Models
123
Seam Sides Together (cont’d)
▶
Seam through back loop on one side and top loops on other side: Use for a finish with a
ridge similar to sc tbl
1
On one side (light blue), insert needle into
back loop only. On the other side (purple), insert
needle into top loops.
3
124
Insert the needle again as in step 1.
Chapter 4
2
Pull yarn through.
4
Repeat until seam is complete.
▶
Woven seam: Use when you do not want to make the seam stitches to stand out.
1
2
3
4
Insert needle through front loops of each
piece as shown.
Insert needle through front loop of next st on
purple side, then through front loop of next st on
blue side.
Yarn tail
Pull yarn through, leaving a tail approximately
6” (15 cm) long.
Repeat, making U-shaped sts.
5
Pulling the yarn snugly to tighten up the
seam.
Assembling Your Models
125
Seam Sides Together (cont’d)
▶
Woven seam through top loops
1
2
Pull yarn through.
3
4
Pull yarn through.
6
Pull the yarn snugly to tighten up the seam.
Insert needle through top loops of both left
and right side sts.
Insert needle through top loops of sts next to
the ones you just sewed.
5
126
Repeat, making U-shaped sts.
Chapter 4
Attaching a Pocket
Attach pockets to amigurumi clothes or so that you can tuck items
into your zakka.
1
Crochet pocket and piece to which you want
to attach it. Leaving a long yarn tail on pocket,
thread tail through tapestry needle.
2
With pocket’s yarn tail on the right side, seam
pocket to main piece. Do not sew opening at top
of pocket.
3
Pocket attached. In this sample, needle has
been inserted through top loops of each st.
The detailed method for
seaming one piece on top
of another can be found on
pages 121–122.
Assembling Your Models
127
Surface Crochet
Join yarn to the surface of an existing piece of
crocheted fabric and work new stitches. The examples
here demonstrate how to work sc (page 40) vertically or
horizontally with respect to the crocheted fabric.
▶
Hook inserted vertically: A method for natural-looking stitches
1
Insert the hook vertically under a stitch; YO
with the (yellow) yarn in your left hand.
128
2
Pull the yarn toward you to join the yarn.
3
ch1 for turning post.
4
Insert the hook into the same st as in step 1.
5
Work 1 sc (page 40).
6
Continue in this manner for all required sts.
Chapter 4
▶
Hook inserted horizontally: For surface crochet with a slim finish
1
Insert the hook horizontally into the st where
you want to add surface crochet.
2
YO with the (yellow) yarn in your left hand to
join the yarn.
3
ch1 for turning post.
4
5
Work 1 sc (page 40).
6
Insert hook into next st.
Continue, always working sideways into the
next st.
Assembling Your Models
129
Combining Pieces
A method of crocheting two parts side by side. You continue crocheting with the yarn used for
one of the pieces.
B
A
A
B
1
Crochet part A (blue) you want to connect
first; crochet part B (pink) up to the front of the
part you want to connect.
B
Continue working part A; 1 round of part A
completed.
B
A
Since the boundary between A and B has
disappeared, now you can just continue crocheting
in one piece.
130
Chapter 4
Continue crocheting with the yarn from part B.
Insert hook into the st you want to work on part A.
A
3
5
2
B
4
A
Work 1 sl st (page 50) to return to part B. A
and B now connected.
Inserting Stuffing
After crocheting the parts, stuff them with cotton or other stuffing such as polyfiber filling to
complete each part. Use tweezers for small parts.
1
Taking the stuffing little by little, gather it
lightly and grab it with tweezers.
3
You will need stuffing equal to about 3 times
the size of the piece. Make sure that the stuffing is
even, inserting more if necessary.
2
Insert stuffing into the hole at the bind-off
edge. Push it in deeply in order to fill the inside of
the piece.
If you don’t use
enough stuffing,
your item won’t
retain its shape, so
pack it firmly.
Assembling Your Models
131
Cinching Shut
Cinch the opening shut after stuffing the item.
1
Pass the needle through the front loops of
each st.
3
Insert needle into front loop only of next st.
5
Pull yarn firmly to cinch the hole shut; weave
in the end (page 149).
132
Chapter 4
2
Insert needle under top loops of first st from
back to front.
4
Continue around all sts. (Shown here with
yellow yarn for clarity.)
Inserting Parts
You can also insert parts that make noise, such as plastic bells and
whistles, into the amigurumi.
1
Fill the part with stuffing.
3
Insert the part into the hole (here, a plastic
bell).
2
Make a hole in the stuffing with your finger.
4
The part has been inserted. To ensure that the
part stays in the middle, insert more stuffing and
close with a lid, or seam another piece to this one.
Why not insert parts
that make noise into
amigurumi for babies?
Assembling Your Models
133
Inserting Cardboard
When you want to stabilize the bottom or another surface, insert a
piece of cardboard.
1
Cut a piece of cardboard slightly smaller than
the piece you want to insert it into.
3
Push the cardboard to the bottom.
2
Insert the cut piece of cardboard into the
crocheted piece.
4
If you want to make a cylinder, insert stuffing
after bottom cardboard piece, then insert another
piece of cardboard on top before attaching lid.
It’s a good idea to use
sturdy craft cardboard.
134
Chapter 4
Attaching a Lid
This is a method of crocheting a lid as a separate piece rather than
using decreases.
1
2
3
4
Leave a long yarn tail when binding off lid.
Thread yarn tail onto tapestry needle and pass
needle to right side of fabric.
Repeat step 2 around the edge. If inserting
cardboard into lid, insert cardboard when seam is
about halfway complete.
Insert needle into top loops of st on bottom
piece, then into back loop only of corresponding
st on lid.
Completed lid.
Assembling Your Models
135
Inserting Wire
Put a wire inside to allow you to pose the amigurumi. Here we will explain how to insert wires
into arms and legs.
1
2
3
4
5
6
The wire should be 18 to 16 gauge (1mm to
1.5mm thick) and about 5 times longer than the
arm & leg pieces. Roll middle into a ring so that it
doesn’t poke out of the sts, then fold it in half.
Fill the gap between the fabric and the wire
with stuffing.
Insert wire between sts at the position where
you want to attach the piece.
136
Chapter 4
Insert the wire so that the rounded end is at
the bottom of the arm/leg.
Thread the yarn tail from the beginning of the
piece through the needle (or use a new strand of
yarn); bring it out at the tip of that piece. Pass the yarn
on the needle through the piece 2–3 times (page
149), making sure it passes through the wire loop.
Use the yarn tails left after binding off to
seam pieces together.
7
8
9
10
After the seam is complete, weave in the end
on the wrong side (page 151).
Attach the remaining parts in the same
manner.
11
Wrap wire with masking tape so that tips
do not poke out
One part attached.
Once all parts have been attached, twist
ends of wires together to make them smaller. If
they are too long, trim them first.
If the parts are small or the wire is thick, insert the
wire as a single piece.
Assembling Your Models
137
AN
AMIGURUMI
GALLERY
3
Frankenstein with a face you just can’t
resist! By embroidering eyelids above the
glued-on googly eyes, you can tailor the
expression any way you like.
※Samples for illustration purposes only.
138
The mane is made of multicolored
fringe. The technique of working
the legs as one piece with the torso
creates a look of sweet simplicity.
Even with a lion, if the shape is
different, the overall impression
changes completely. The frilly
mane enhances this lion’s gentle
expression.
This fish’s charming, chubby shape
is accented with a scale pattern
worked in different colors.
A kitten with an impressively long
tail and blue glass eyes. A mohair
hat adds a sense of cozy warmth.
139
The classic folk craft wooden
bear carving, sold as a souvenir
in Hokkaido, is so cute when
made into an amigurumi.
140
Chapter 5
Finishing
A beautiful finish can be achieved by properly
mastering bind-off and methods for weaving in
yarn tails. We have also summarized finishing
methods such as how to attach pieces and hair.
Finishing
There are various methods for binding off crochet
and weaving in the ends after seaming.
The invisible bindoff has a beautiful
finish because
it blends into
the surrounding
stitches.
Binding Off
Here we explain three ways to bind off (also known
as fastening off). The invisible bind-off is a method
of making your bind-off blend in with the stitches.
The standard bind-off and slip stitch bind-off
methods are very simple.
▶
Invisible bind-off
Yarn
tail
1
Cut the yarn, leaving a tail approximately 8”
(20 cm).
3
142
Thread tapestry needle with yarn tail.
Chapter 5
2
Remove hook and pull out yarn tail side of
the loop.
4
Insert needle into top loops of first st.
Bottom loop
5
Pull the yarn, but not too much.
6
7
Continue pulling the yarn little by little.
8
9
Next, pull yarn tail until yarn at the back is
also same width as top loops on either side of it.
Insert needle back where the yarn comes
out (under top loops of last st). Also insert needle
under bottom loop.
First, pull yarn until yarn on front side is same
width as top loops of sts on either side of it.
10
Invisible bind-off completed.
Finishing
143
Binding Off (cont’d)
▶
Standard bind-off method: A basic bind-off method that doesn’t come loose
1
Work 1 sl st (page 50) as in steps 1–3 of slip
st bind-off (page 145), then YO.
3
▶
Pull the end of the yarn.
Ch 1 (page 35) with the yarn on hook from
step 1.
4
This is a secure method of binding off. It’s the
most common bind-off method.
Hookless method
1
Work 1 sl st (page 50) as in steps 1–3 of slip
st bind-off (page 145), then enlarge loop and
remove hook.
144
2
Chapter 5
2
Pull yarn tail through middle of loop and
tighten it firmly until loop is closed.
▶
Slip stitch bind-off: This bind-off will loosen over time, so it’s essential to weave in the
yarn tail with a tapestry needle.
1
You will sl st (page 50) to bind off. Insert hook
into first st.
2
YO.
3
Pull yarn through all loops on hook.
4
Remove hook; cut yarn, leaving 8” (20 cm) tail.
5
Pull on the loop on yarn tail side.
6
Pull out the yarn tail.
Finishing
145
Securing Yarn Tails ①
Double Knot
If you change the yarn during a project, tie the yarn tails at the back of the work to secure
them. They won’t unravel easily because the yarn will be knotted twice.
1
2
3
4
Trim the yarn tails (from binding off and color
changes) to 4” (10 cm) each.
Wrap one strand around the other as shown
by the arrow in 2.
5
146
Pull both strand, knotting close to fabric.
Chapter 5
Cross the 2 strands shown.
Wrap the strands again as shown by the
arrow in 3.
6
Cross the 2 strands again.
7
Repeat step 3.
8
9
Pull the 2 strands to the left and right.
10
Knot firmly on surface of fabric.
12
Finishing complete.
11
Trim yarn tails to ⅜” (1 cm).
Repeat step 4.
Finishing
147
Securing yarn tails ②
Crochet Over Yarn Tail
This is a method of crocheting over the yarn tail when changing the yarn.
※The explanation here is for single crochet, but the same method works for other stitches.
1
After changing to the new color (pink), insert
hook into next st.
3
YO with the pink yarn.
5
After working 5 sc in the same way, trim blue
strand to ³/16” (5mm).
148
Chapter 5
2
Place the yarn (blue) you want to weave in
over the hook.
4
6
Work 1 sc (page 40).
The end of the blue strand is now enclosed in
the pink sts.
Weaving in Ends ①
Pass Through Stuffing
After cinching a piece shut or seaming amigurumi parts together, weave in the end by passing
it through the stuffing.
1
2
3
4
5
6
Thread tapestry needle with yarn tail. If
cinching shut, after binding off, insert needle into
center.
Pull the yarn through, taking care not to pull
too hard so that you don’t pucker the fabric.
While pressing wrapped yarn with finger, pull
out the needle, creating a French knot.
Pass needle through the stuffing and pull out
from between sts. If the yarn tail is the same color
as the section where you’re weaving it in, it won’t
be noticeable.
Lay needle over place where you took needle
out; wrap yarn around needle 3 times.
Insert needle back into the same place where
yarn was pulled out in step 3; bring it out from a
different place.
Finishing
149
Weaving in Ends ① Pass Through Stuffing (cont’d)
7
Slowly pull the yarn.
9
Insert needle back into place where the yarn
was pulled out. Pass through the stuffing and back
out as shown; pull the yarn. Do not tie a knot.
11
When finished, cut the yarn close to the
surface of the fabric.
150
Chapter 5
8
Pull yarn until the knot goes beneath surface
of fabric.
10
Repeat step 9 once or twice.
Weaving in Ends ②
Weave End on Wrong Side
This is a method for items that have no stuffing. The yarn tail is woven in on the back side of
the crocheted fabric. It looks best when the yarn tail is the same color as the fabric.
1
Thread yarn tail (either from binding off or tail
left after seaming) through tapestry needle. Pass
needle through sts on back side, taking care that
yarn doesn’t show through on right side.
2
Pull yarn through sts. Take care not to pull too
tightly so that fabric doesn’t pucker.
3
Insert needle back through last st.
4
5
Pull yarn through sts.
6
After inserting needle in step 3, insert needle
into a few more sts.
Cut yarn tail to ⅕” (5mm).
Finishing
151
Weaving in Ends ③
Weave End on Wrong Side, Folded Back
This is a method for finishing the ends that is essentially the same as weaving the ends on
the wrong side (page 151), but if there is not enough room to weave through a long section of
stitches, you can turn and weave in two directions.
1
2
3
4
5
6
Thread yarn tail through tapestry needle.
Insert needle into sts on wrong side as in steps
1–2 of weaving in ends ② (page 151).
Insert needle into sts in opposite direction as
in step 1.
Pull yarn through sts. Take care not to pull too
tightly so that fabric doesn’t pucker.
152
Chapter 5
Pull yarn through sts.
Stop when you have returned to the first st
from step 1.
Cut yarn tail to ⅕” (5mm).
Embellishment
Let’s finish the assembled amigurumi by adding facial
expressions and hair with embroidery and notions.
When embroidering
amigurumi, it can
also be cute to
use yarn instead of
embroidery thread.
How to Get Started with Embroidery
Always begin with this method when embroidering faces,
limbs, etc. The embroidery thread will not unravel, and the
finish is beautiful.
1
2
3
4
Thread embroidery thread (or yarn) through
needle and knot the end. Insert needle between
sts; bring it back out between sts a few sts away.
Pull thread slowly until knot is inside. Make
sure the thread is secure.
Slowly pull yarn through.
Insert needle into place where the thread
emerges; bring it back out where you want to
begin embroidery.
Finishing
153
Various Embroidery Stitches
Here are 10 types of embroidery stitches that are often used in amigurumi.
1out
2 in
3 out
4 in
1 out
Straight stitch → Page 155
1 out
2 in
Chain stitch → Page 159
2 in
3 out
3 out
4 in
2 in
1 out
4 in
Fly stitch → Page 156
Backstitch → Page 160
1 out
2 in
3 out
1 out
3 out
5 out
2 in
4 in
6 in
4 in
Fly stitch (V-shaped) → Page 157
Satin stitch → Page 161
1 out
4 in
2 in
3 out
1 out
Running stitch → Page 157
4 in
French knot stitch → Page 162
1 out
3 out
1 out
2 in
Lazy daisy stitch → Page 158
154
Chapter 5
Bullion stitch → Page 163
2 in
2 in
Straight Stitch
This is a stitch where you insert the needle straight across from
where you brought it out. Use it when you want to create a line.
1
Insert needle from back of fabric to the front.
2
Insert needle from front to back.
3
1 straight st (2 crochet sts wide) completed.
4
1 straight st (2 rounds high) completed.
My toes and whiskers
are also worked in
straight stitch.
Finishing
155
Fly Stitch
This is a stitch that makes a Y shape. It is often used for animal
noses and such.
1
2
Insert needle into upper right part of Y.
3
4
Pull yarn to form Y shape.
5
6
Fly stitch completed.
Insert needle from back to front at upper left
part of the Y.
Insert needle from back to front at center of Y.
Make sure it is above the yarn from steps 1–2.
Insert needle into lower part of Y shape.
Choose a length appropriate for the expression
you want to make.
156
Chapter 5
Fly Stitch (V-shaped)
This is a V-shaped stitch made by shortening the leg of a Y-shaped
fly stitch.
1
Work steps 1–4 of fly stitch (page 156), but
insert needle back into place where it exited in
step 3.
2
V-shaped fly stitch completed.
Running Stitch
This is a stitch where the needle is taken in and out at regular
intervals. Use it when you want to create a dotted line.
1
Insert needle from back to
front where you want running
stitch to begin.
2
Repeat the process of
passing needle in and out of the
fabric.
3
Bringing the needle in and
out at regular intervals makes a
beautiful finish.
Finishing
157
Lazy Daisy Stitch
Stitches that create petal-like patterns. It’s easy if you follow steps
for inserting the needle in order.
1
Insert the needle from back to front at starting
position.
3
Wrap yarn under needle as shown.
5
Secure loop by inserting needle back through
position where needle came out in step 2.
158
Chapter 5
2
Insert needle into same position as in step
1; take it back out at position which will be tip of
stitch.
4
Pull yarn through.
6
Lazy daisy stitch completed.
Chain Stitch
Like lazy daisy stitch, the stitches will be connected like a chain.
1
Work steps 1–3 of lazy daisy st (page 158).
3
Insert needle into same location it came out
in step 1.
5
Wrap yarn under needle as shown.
2
Pull yarn through. 1 stitch completed.
4
Bring needle out at tip of next stitch. Make
stitch same length as in 1 so sts will be the same
size.
6
Repeat. Finish embroidery as in lazy daisy
step 5.
Finishing
159
Backstitch
You can achieve a clean line without any gaps by repeating “out 1
stitch back, in 2 stitches forward.”
1
2
3
4
Pull yarn through. 1 stitch completed.
5
6
Repeat.
Insert needle from the back to front one stitch
ahead of the start position; pull yarn through.
Bring needle out at the position where you
brought it out in step 1.
Insert needle where it was brought out in step
1; bring it out 1 st ahead of the position where the
needle was brought out in step 3.
160
Chapter 5
Go back one stitch and insert the needle from
front to back. The width between the yarn and
needle will be the width of the stitch.
Satin Stitch
This is a stitch used to fill a surface. It is often used on the tips of
animal noses.
1
3
Insert needle from back to front.
Pull yarn through. Your st should cover the
entire width of the area you want to fill from edge
to edge.
2
Insert needle to width you want to fill with
embroidery; bring it out just below where you
brought it out in step 1.
4
Insert needle just below the position where
needle was pulled out in step 2; repeat the same
procedure to fill the surface.
The key to a clean finish
is not to pull the thread
too much.
Finishing
161
French Knot Stitch
This is a stitch featuring a French knot. It is used when
embroidering the eyes of a small amigurumi, for example.
1
Insert needle from back to front where you
want the knot to be.
3
Wrap the yarn around the needle 2–3 times.
5
Insert needle back into the position where
you pulled it out in step 1.
162
Chapter 5
2
Place needle alongside place where you
brought yarn out in step 1; hold needle with left
hand.
4
Holding wrapped section down with your
thumb, pull needle through.
6
French knot stitch completed.
Bullion Stitch
The stitch you make will be as long as the wrapped section on your
needle. Use it when you want to make an embroidered nose a little
more three-dimensional.
1
Insert needle from back to front.
3
While holding the wrapped yarn around the
needle with your left finger, slowly pull out the
needle.
2
Holding needle at place where needle came
out in step 1, wind yarn around needle (photo
shows 5 wraps). The stitch will be as wide as the
yarn wrapped around the needle.
4
Needle pulled out.
5
Insert needle at end of wrapped section from
front to back to complete bullion stitch.
Finishing
163
Attaching Notions
Notions such as eyes and noses can be attached using an adhesive.
If you follow this procedure properly, they will not be easy to
remove.
1
2
3
4
For notions with posts, first try inserting them
into the amigurumi without glue to determine
the best position. (Use a sewing pin to mark the
location of notions to be pasted or sewn into
place).
Apply adhesive to post of the notion. You can
prevent over-application of glue by putting the
post into the nozzle.
5
Insert bodkin from under the crocheted fabric;
lift fabric to bond the notion to the fabric firmly.
164
Chapter 5
Firmly make a hole with a bodkin at the
position where you want to insert the notion.
2.
Insert the notion into the hole created in step
Gluing Thread Down
By gluing yarn to the surface, you can make mouths, noses, and so
on. Sew the beginning and end points of the desired shape, then
tack down the yarn with glue to affix it to the amigurumi.
1
2
3
4
5
6
Thread a tapestry needle with the yarn you
want to glue onto the amigurumi. Bring needle out
from endpoint and insert needle on opposite end.
Making sure the yarn placement is wellbalanced, insert pins to create the shape you want.
Weave in the ends (page 149).
Gather some of the glue from step 4 onto a
fine-tipped object, apply it to the yarn, and press
it down.
Pull yarn through, leaving as much as you
need to glue down.
Put some glue on a piece of paper.
In the same way, apply glue under the yarn to
paste it down.
Finishing
165
Attach Hair
There are various methods of applying hair to amigurumi. Each
one makes a different impression, so find the one you like best.
Crocheted-in Hair
Hair can be made by changing the yarn color while
crocheting the head instead of adding the hair
afterwards.
You can create a typical boy’s hairstyle just by
crocheting with a suitable yarn color.
Make “Helmet” Wig and Attach to Head
Crochet a wig shaped like a helmet, place it on the head, and
secure it in place.
※See page 233 for the crochet diagram.
1
Crochet a helmet-shaped
wig separately from the head.
166
Chapter 5
2
Decide where to put the
hair and pin it in place. Sew into
wrong side of wig so the stitches
won’t show.
3
Sew wrong side of bangs
to forehead. The bangs will look
more natural if you sew a little bit
in from the edge.
Attach a Bundle of Hair
Create a girl’s hairstyle by looping yarn, tying it together at the
center, and attaching it to the head.
1
2
Wrap yarn until you have desired amount.
3
4
Wrap yarn tail around center and knot it.
Wrap the yarn around your fingers (as many
fingers wide as the hair bundle you want to make).
Remove your fingers from inside the loops
and hold the bundle together.
5
Bundle of hair completed.
6
Thread needle with yarn tail and stitch bundle
to the head.
Finishing
167
Make a Ponytail
Make a tassel from a bundle of hair and attach it to the top of the
head to make a girly ponytail.
1
2
3
4
5
6
Wrap the yarn around your fingers to make a
hair bundle as in steps 1 and 2 in “attach a bundle
of hair” (page 167).
Pass a separate strand of yarn through center
of bundle.
Cut the loop with scissors at the end opposite
the knot.
168
Chapter 5
Remove the bundle from your fingers.
Knot center of bundle. Tie it tightly several
times to prevent it from coming loose.
Steam ponytail with a steam iron.
7
Thread the yarn tails of the ponytail (knotted
in step 4) onto a needle; sew ponytail to head.
8
Ponytail completed.
Make a Bun
By winding yarn into a ball and attaching it to the upper part of the
head, you can make a girl’s bun hairstyle.
1
Wind yarn into a small ball.
Leave a long yarn tail.
2
Thread yarn tail through
tapestry needle; seam bun to
back of head.
3
Bun completed.
Finishing
169
Crochet a Hairpiece and Attach to Head
Crochet the hair with chain stitch and slip stitch, then place it on
the head and seam to secure in place.
※See page 233 for the crochet diagram.
1
Ch10 (page 35). This will be at the center of
the head. For the first strand of hair, ch12.
3
12 sl st completed.
5
Crochet second and subsequent strands in
the same way.
170
Chapter 5
2
Ch1 for turning post. Slip stitch (page 50) into
bottom loops of chain from step 1.
4
6
Begin next strand of hair.
All strands of hair crocheted. Leave a long
yarn tail.
7
8
9
10
Place the hair on the head, position it as
desired, and pin it in place.
Center sewn in place. After this, we will sew
down the strands one by one.
11
Stitch hair to face one strand at a time.
Thread needle with yarn tail from step 6. Sew
center of hairpiece to head.
Bring needle out near end of hair strand;
insert needle through back of strand.
12
Hair has been attached to head.
Finishing
171
Make Fringe for Hair
Create hair of any length with fringe (page 92). You can create a
look similar to human hair.
1
Hold yarn up to head to determine length.
3
Insert crochet hook where you want to attach
hair, fold strand of yarn in half, and place over
hook as shown. You can do 2 strands at a time
(shown here).
5
172
Place your fingers in the loop you pulled out.
Chapter 5
2
Cut yarn strands twice the length determined
in step 1.
4
Pull up a loop.
6
Grasp yarn tail(s) and pull through loop.
7
Pull yarn tail(s) to close the loop.
9
Repeat until you get the volume of hair you
want. Here, we used fringe on the back of the head
and embroidery for the bangs.
11
8
One piece of fringe attached.
10
When you have finished adding fringe, trim
the ends of the hair to desired length.
Hair fringe (on back of head) completed.
Finishing
173
Embroidering Hair
Here we embroider straight stitches directly into the head to
create hair. We also recommended combining it with fringe
(page 92).
1
In this example, the back of the hair is fringe
and the bangs are embroidered on. Take a long
piece of yarn, pull it out from the top of the head,
and insert it where you want bangs to end.
3
The bangs are completed.
5
Cover the boundary with straight stitches so
that the base of the fringe is not visible.
174
Chapter 5
2
Fill the area one stitch at a time. Don’t pull too
tightly on the yarn. Too much tension will spoil the
head’s shape.
4
In a case where you’re combining embroidery
with fringe, bring needle out at boundary between
embroidery and fringe.
6
The finished look.
Tint Cheeks with Embroidery
Just by adding a line of embroidery, you create the impression that
the cheeks are slightly tinted.
Have fun with color!
You can dye the yarn, add color with embroidery or felt, or
you can tint the crocheted fabric with household items.
Things that can dye
crocheted fabric
Thread embroidery needle with
yarn or thread in the color you
want to use. Take needle out
from the position where you
want the stitch to begin; work
a straight stitch. Satin stitch
may also be used depending
on the size of the area to be
embroidered.
• Cosmetics (eyeshadow, blush, etc.)
• Crayons
• Permanent marker
Attach Felt
You can also attach felt to the face. Here we use it for the girl’s
cheeks.
1
Cut felt into the size and
shape you want.
2
Here we cut two cheek
pieces.
3
After determining best
placement, apply the felt pieces,
then attach them with adhesive.
Finishing
175
Tint Fabric with Cosmetics
If you want to color only a small part of the crocheted fabric, such
as a girl’s cheek, you can also tint it with cosmetics.
1
Put some makeup in your favorite color on tip
of applicator. We use eyeshadow here to color the
cheeks.
2
Apply color where you want it.
Add Color with Acrylic Roving
Add color to the crocheted fabric by attaching roving to it with a
felting needle. You can even mix several colors of roving to create
your own color.
1
Tear off a small piece of
acrylic roving, roll it to the size
you want, and decide where to
put it.
176
Chapter 5
2
While holding the felt with
one hand, pierce it with a felting
needle through to the crocheted
fabric behind it.
3
Continue piercing it while
shaping it until it’s attached to
the crocheted fabric.
A cat card case with an L-shaped
frame. Easy to finish because it
doesn’t have a gusset.
Mittens for a child which are
crocheted in the round and
seamed only at the thumbs. The two squirrels
are connected by a crocheted cord (page 99).
Make Zakka
After crocheting designs such as animals, why
not attach zippers, purse frames, metal findings,
and so on to make them into portable amigurumi
zakka? Be together with your favorites always….
ZAKKA
Bear cub coin purse with a purse frame.
You can enjoy different results by using
different yarn colors.
※See page 234 for the crochet diagram.
Whale shark card case. The bottom
is flat, and the back is stuffed to
make it three-dimensional.
Finishing
177
Attaching a Purse Frame with Glue
Put adhesive in the groove of the purse frame and adhere it to the
crocheted fabric. It slips easily, so this method is recommended
for intermediate crocheters and above.
1
Prepare a purse frame (without holes), glue,
pliers, bodkin, and a wooden craft stick.
3
Spread the glue evenly with the stick.
5
Use the bodkin for the back side as well,
checking that the fabric is properly inserted.
178
Chapter 5
2
Apply glue inside the groove on one side of
the frame.
4
Making sure the frame is centered, insert
crocheted fabric into the groove, pushing it in with
a bodkin.
6
Hold just the corner of the frame (at hinge)
with pliers and squeeze. The corner grips the
fabric and holds it firmly in place.
Attaching a Purse Frame with Sewing Needle
Use a purse frame with holes for sewing with thread. Even beginners can
easily attach one.
1
2
3
4
5
6
Thread a needle with sewing thread. The
color of the thread is generally the same as
the crocheted fabric, but you can also use a
contrasting color.
Insert needle through center of fabric on
wrong side; backstitch to secure thread.
Pull the thread to draw the fabric up into the
groove of the purse frame.
Mark the center of the purse’s mouth.
In order to balance the left and right sides,
bring needle out from the center of the fabric from
back to front (wrong side to right side).
While inserting fabric into the groove of the
frame, secure it with backstitch. Insert needle 1
hole to the right from front to back.
Finishing
179
Attaching a Purse Frame with Sewing Needle (cont’d)
7
8
9
10
Bring out needle from the hole 1 to the left of
where the needle was pulled out in step 4.
On the wrong side, the seam is visible just
beneath the frame.
Make a Cozy
If you crochet a cylinder but do not insert
any stuffing, it can be a lovely zakka item.
You can use it as a cozy, for example, or a
drawstring bag to hold a water bottle.
180
Chapter 5
Insert needle into the hole from step 4.
Continue in this manner, bringing the yarn out 2
holes to the left and back in 1 hole to the right.
Purse frame attached. Attach the other
side in the same way.
Insert a Zipper
Sew a zipper onto the crocheted fabric to make a pouch. We
suggest using thread that matches the color of the crocheted
fabric.
1
2
3
4
5
6
Align one side of pouch with zipper and pin
in place.
Tie thread knot and insert needle so knot is
hidden by the crocheted fabric. First, insert needle
through back loop of first st.
Insert needle from front to back under back
loop of next st.
Pin along entire length of zipper.
On zipper side, sew 1 st ahead of st in
crocheted fabric.
Repeat steps 4–5.
Finishing
181
Insert a zipper (cont’d)
7
8
9
10
Seam the other side in the same way.
11
12
Zipper insertion completed.
One side of zipper inserted. The sts are
visible on the wrong side.
Also be sure to seam gussets through back
loops of sts.
Sew each end of zipper 3–4 times on
wrong side to secure in place.
182
Chapter 5
Open zipper and pin remaining side to pouch.
Insert a Lining
You can use crocheted fabric as-is, but if you insert a proper lining,
you can put small items in it without catching the stitches.
1
Turn the crocheted fabric inside out. Make a
lining the same size as the main body.
3
5
Pin evenly across.
Push corners of gusset out; sew gusset
to main body. As in step 3, pin the other side of
gusset and then sew.
2
Insert main body upside down into lining; pin
them together.
4
Blind stitch lining to main body with sewing
thread.
6
Lining inserted.
Finishing
183
Attach Metal Findings (O-ring)
This is how to attach the most basic metal finding, an O-ring.
Here, a lobster claw clasp is attached to the O-ring so it can be
attached to a strap.
1
2
3
4
5
6
With open end of the O-ring facing up, hold
both sides with pliers.
Hold the O-ring with pliers and insert through
crocheted fabric. A single stitch will be too weak,
so it’s a good idea to insert the ring through 2 sts
(or 2 rounds).
Holding left and right sides of O-ring with
pliers again, twist in the opposite direction as in
step 2 to close the ring.
184
Chapter 5
Twist the left and right pliers in the opposite
direction to open O-ring.
Thread lobster claw clasp onto O-ring.
Attach lobster claw clasp to a strap finding to
make it a strap. Attaching a lobster claw clasp to
the amigurumi side is convenient because it can
be attached to other things as well.
185
Chapter 6
Create Original
Designs
Here we’ve collected hints such as how to add
facial expressions or decide on body proportion
when planning your own toys.
In the Q & A, we tackle common questions
about making original designs.
Thinking about the Parts of the Face
Eye Placement
Depending on where you attach the eyes to the face, you may achieve a more mature
or child-like look.
Close set
Average
Wide set
Snappy and adult-like
Cute and child-like
Eye Type
There are four main types of eyes. Make the best use of each feature.
Novelty eyes
Solid eyes
The white of the eye is small with a large
black iris. Impressively expressive eyes.
7.5mm
9mm
Googly eyes
The middle of the eye moves around within
the eyeball, giving it a unique appearance.
10mm
186
Chapter 6
6mm
These are single-colored eyes which
come in a variety of sizes and colors. For
animals and humans, use round eyes.
Colored 7.5mm
Black 7.5mm
Glass eyes
The clear material is colored for a
transparent and realistic finish.
8mm
Orange
6mm
Saxe blue
Eye Size and Color
Even with the same type of eye parts, different sizes will change the impression of the face.
Large
Small
Impression of the face
Strong
Weak
Size
All are solid black eyes.
7.5mm
6mm
5mm
Large
2.5mm
Tiny
Color
All are 6mm solid eyes.
Brown
Forest green
Grape
Chili pepper
Light blue
Create Original Designs
187
Thinking about the Parts of the Face (cont’d)
Nose and Mouth Variants
Animal noses (or snouts, beaks, etc.) come in so many varieties! There are various types, such
as crocheted pieces seamed together, embroidered, and using nose pieces.
A standard oval or
circular nose.
Two-piece nose for a
comical look.
Make oval nostrils for
a pig.
Make the beak smaller
for a chick.
Add a beak to it to
make it a bird.
Ear Variants
There are various possibilities for ears. Try various shapes and sizes when crocheting.
Frog
Rabbit
Dog
188
Chapter 6
Mouse
Cat
Panda bear,
etc.
Body Proportions and Color Schemes
Let’s Think About the Size of the Head and Body
There are no rules for amigurumi, so consider the proportions needed for the image you want
to create, such as one with a large head and a small body, one with long limbs, and one with a
head and body that are about the same size and shape. You can do a lot of interesting things,
even if they don’t have the proportions of real humans or animals.
Small head
Large head
Shortened torso and
limbs
Snappy and adult-like
Cute and child-like
Various Color Schemes
Especially in the case of animals, the head, torso, and limbs may often be the same color. You
can make it look like your amigurumi are wearing clothes or change its appearance, not only
by crocheting separate clothing items, but also by changing the yarn color in certain areas.
Simple, 1-color
design.
If you change the color
only for the lower torso
and legs, it looks like it
is wearing pants.
Using a different color
for the upper body and
upper arms gives the
impression of a T-shirt.
The body is striped,
which creates a
unique atmosphere.
You can also do
realistic color changes,
such as for a panda.
Create Original Designs
189
Q&A: Original Amigurumi Design
Q1
Q2
If I want to make an original design,
Until now, I have only used medium-
what should I start with?
weight yarn. Is there anything I need
to watch out for when using thin or
thick yarns?
A.
A.
First, decide on what colors and kind
of yarn to use. There are many different
materials, textures, and colors for yarn,
so start by buying your favorite yarn at a
handicraft store. It is important to look
and touch the yarn before selecting it.
Thin yarns are not suitable for beginners,
but they show details well. Thick yarns
tend to have a rough feel, so choose the
one that best suits your needs. With any
weight of yarn, be sure to use the correct
size of crochet hook (see crochet hook
sizes (pages 16–17).
Q3
I don’t know when to increase
or decrease the number of
stitches when crocheting a
three-dimensional object.
190
Chapter 6
A.
Even if items have the same degree of
increases or decreases, the resulting
shape can change depending on their
arrangement, so just crochet and see
what happens. The fastest way is to try
crocheting from a number of crochet
diagrams until you’ve mastered shaping.
Q4
Q5
I would like to change the crocheted
Do you have any tips to make the
fabric. What methods are there?
finishing look beautiful?
A.
A.
Try changing the color and combining
various stitch patterns (see Swatch
Collection, pages 101–112). Even if you
do not change the stitch pattern, you can
create completely different results by
combining yarns of different weights and
colors.
First of all, it is important to align
the stitches when seaming. Insert
stuffing tightly and pay attention to
the proportions and balance when
assembling. When seaming, pin pieces
together and take care with each stitch. If
you think the stitches aren’t neat, you can
unravel them and start over. One of the
nice things about amigurumi is that it’s
easy to start over.
Q6
Are there any precautions to take
when making zakka that will dangle,
such as mobile phone straps?
A.
In the case of zakka, not limited to just
hanging items, sew seams firmly. When
attaching an O-ring in order to attach the
metal findings of the strap directly to the
amigurumi, pick up two or more stitches
and stitch them firmly (see page 184 for
attaching the metal findings).
Create Original Designs
191
Q&A: Original Amigurumi Design (cont’d)
Q7
Q8
Do you have any tips for choosing a
I want to make a polygon,
color palette?
how should I crochet it?
A.
A.
For those who are not confident in color
matching, it is recommended to choose a
color from within one product line from
the same manufacturer. If it is within the
same product line, the color profile is
easy to match. Once you get used to it, try
matching different manufacturers and
products little by little.
In crochet, increasing results in an
angle. For this reason, if you continue
to increase the number of stitches at
the same position on each round, the
increase location becomes a corner. The
number of sides your polygon will have is
equal to the number of increase locations.
In the case of a triangle, the crochet
diagram is as follows:
3
2
1
m
192
Chapter 6
AN
AMIGURUMI
GALLERY
4
The stitch pattern expresses the fleece
of a fluffy sheep’s body. The plump little
ears are a sweet feature.
※ Samples for illustration purposes only.
193
This imperturbable figure is an elite
sumo wrestler. Note the fine details on
the ceremonial mawashi belt done in
embroidery and beads!
194
A fun pose that creates a sense of
animation. Although it has a big head,
this toy is made with exquisite balance
so that it can stand on its own.
195
Crocheted with fun fur yarn to create a
soft, fluffy look. The orange carrot is a
nice finishing touch!
This realistically crocheted frog was made
by studying how to increase or decrease
ovals and the joints of limbs.
196
Chapter 7
Let’s Try It!
Three projects for beginner to intermediate crocheters
that mainly use basic crochet techniques. For detailed
explanations on how to crochet and assemble
amigurumi, go back to chapters 1–5.
LESSON 1
Bear Cub Pouch
This bear cub with ears and nose attached to a round crocheted
face is decorated with googly eyes and embroidery. The round
shape is just right for a pouch. This project is suitable for
beginners because it requires only basic crochet techniques.
198
Chapter 7
Materials
Tools
Medium-weight yarn such as DK (light blue)
Medium-weight yarn such as DK (white)
Medium-weight yarn such as DK (black)
Zipper
Lining fabric
Googly eyes
US E (3.5mm) crochet hook
Tapestry needle
Sewing needle and thread
Scissors
Sewing pins
Glue
Instructions
Folded seam
for ear
① Crochet each piece following the diagrams.
② Seam body pieces to gusset.
③ Seam snout piece to face.
④ Embroider nose.
⑤ Attach googly eyes with glue.
⑥ Make lining same size as pouch; insert lining.
⑦ Insert zipper.
⑧ Seam ears to pouch.
Googly eyes
Zipper
Gusset
Satin stitch
Seam snout
to face
Straight
stitch
Body of pouch (make 2)
Gusset (make 1)
• Light blue
• Light blue
Invisible bind-off
11
11
10
10
9
9
8
8
7
7
6
6
5
5
4
4
3
3
2
2
1
1
m
Round
11
10
9
8
7
6
5
4
3
2
1
11
11
10
11
10
10
99
98
8
87
7
76
6
65
5
54
4
43
3
32
2
21
1
1
St count
66 (+6 sts)
60 (+6 sts)
54 (+6 sts)
48 (+6 sts)
42 (+6 sts)
36 (+6 sts)
30 (+6 sts)
24 (+6 sts)
18 (+6 sts)
12 (+6 sts)
6
Begin
※ ch30 for foundation chain
Ear (make 2)
Snout (make 1)
• Light blue
• White
5
5
4
4
3
3
2
2
1
1
m
55
54
4
43
3
32
2
21
1
1
Round
5
4
3
2
1
St count
12
12
12
12 (+6 sts)
6
1
1
2
2
3
3
11
221
Round
3
2
1
St count
22 (+6 sts)
16 (+6 sts)
10
233
3
Begin
※ ch4 for foundation chain
Let’s Try It!
199
LESSON 1
Bear Cub Pouch
▶
Crochet body of pouch
1
2
3
4
Work magic circle (page 29) to begin, then
crochet 1 round.
Round 2 completed. Since the yarn tail has
been dealt with, the back side is also neat.
5
200
Round 11 (final round) completed; 66 sts.
Chapter 7
Work in the round, increasing as indicated in
diagram. Work sts over yarn tail. Cut yarn tail after
a few sts are worked.
Continue working in the round, increasing
as indicated in diagram. Photo shows round 6
completed.
6
Cut yarn, leaving 8” (20 cm) yarn tail.
7
8
9
10
Insert needle through last st.
11
12
Weave in end on wrong side (page 151).
Pull loop as shown, then pull yarn tail through
loop.
Work invisible bind-off (page 142). Insert
needle through top loops of first st of last round.
Pull yarn until st you’re creating is the
same size as the other top loops.
Thread yarn tail through tapestry needle.
Let’s Try It!
201
LESSON 1
Bear Cub Pouch
▶
13
Following steps 1–12, make 1 more of the
same piece.
15
Ch30 for foundation chain.
17
Work first row into bottom loops of chain,
then follow diagram for remaining rows.
202
Chapter 7
Crochet gusset
14
Start gusset as follows: make slipknot
(page 34), leaving 16” (40 cm) yarn tail.
16
18
Ch1 for turning post.
When complete, work slip stitch bind-off
(page 145) and leave 16” (40 cm) yarn tail.
▶
Seam gusset
19
20
21
22
Thread yarn tail on one end of gusset
through tapestry needle.
On gusset piece, also insert needle
through back loops only.
23
Seam final st twice as well.
Seam gusset to one of the pouch pieces.
On main piece, insert needle through back loops
only.
To achieve a firm edge, seam each crochet
st twice.
24
Weave in end on wrong side (page 151).
Let’s Try It!
203
LESSON 1
Bear Cub Pouch
25
Thread the other yarn tail through tapestry
needle.
27
Seam other side of gusset to second main
piece as in steps 20–24.
▶
Pass needle through end of gusset on
wrong side as shown so that thread will be on the
right side for seaming.
28
Gusset inserted between 2 main pieces.
Insert zipper
29
Insert zipper (page 181). Align end of
zipper with end of crocheted fabric and pin
securely in place close to zipper.
204
26
Chapter 7
30
After pinning entire length of gusset, insert
needle through back loop to begin seaming.
31
Gradually remove pins as you sew gusset
seam.
33
Open zipper, then seam second gusset
side in the same way.
▶
32
One gusset side seamed to zipper.
34
When finished seaming, knot thread
on wrong side where it won’t be visible. Zipper
insertion completed.
Attach face
35
Crochet ears and snout. Leave 12” (30 cm)
yarn tail on each.
36
Decide where to put the and pin in place.
Thread yarn tail through tapestry needle.
Let’s Try It!
205
LESSON 1
Bear Cub Pouch
37
Insert needle through st on face piece. Be
careful to choose a st just below the edge of the
snout.
39
Snout seamed to face.
41
After embroidering a V shape with straight
stitch (page 155), insert needle back out through
starting position.
206
Chapter 7
38
Insert needle through both top loops of st
on snout edge; seam (page 122).
40
Thread needle with black yarn and tie
thread knot at one end. Bring yarn from back to
front at nose starting position.
42
Embroider with satin stitch (page 161) to
fill the triangle.
43
Satin stitch triangle completed.
44
Embroider line down from nose using
straight st. Bring yarn out at edge of mouth.
45
46
47
48
Pass needle under line coming down from
nose, then insert at other edge of mouth.
Place googly eyes on face to determine
best position.
Nose and mouth embroidered.
Once the position is decided, attach eyes
with glue.
Let’s Try It!
207
LESSON 1
Bear Cub Pouch
▶
49
Eyes attached.
51
Insert pouch into lining. While folding seam
allowance inward, pin lining in place. Seam to
pouch with whipstitch.
▶
50
Make a lining the same size as the main
piece and gusset. Turn crocheted pouch insideout.
52
After inserting lining, turn right-side-out.
Attach ears
53
Determine position of ears and pin in
place.
208
Insert lining
Chapter 7
54
Attach ears with folded seam (page 120).
First, insert needle through top loops on face
piece and front side of ear.
55
57
Front side of one ear seamed.
One ear completed. Seam other ear in
same manner.
56
Seam back side in same manner.
58
Pouch completed.
Let’s Try It!
209
LESSON 2
Mouse
After crocheting the six body parts—head, torso,
ears, arms, legs, and tail—sew each part together
to finish. It’s easy because you only need to crochet
in two colors. This project is packed with basic
amigurumi techniques.
210
Chapter 7
Materials
Tools
Medium-weight yarn such as DK (white)
Medium-weight yarn such as DK (dark green)
Medium-weight yarn such as DK (black)
Eye parts (solid eyes)
Stuffing
Wire
US B or C (2.5mm) crochet hook
Tapestry needle
Scissors
Glue
Sewing pins
Pliers
Masking tape
Instructions
① Crochet each piece following the diagrams.
② Insert stuffing into head; cinch opening shut.
③ Insert wire & stuffing into arms & legs. Seam to body.
④ Finish wire ends neatly; insert stuffing into body.
⑤ Seam head to body.
⑥ Seam ears to head with folded seam.
⑦ Seam tail to lower back body.
⑧ Embroider nose and mouth.
⑨ Fasten eyes to head with glue.
Head (make 1)
White
Round
21
20
19
18
17
16
15
21
20
19
18
17
16
15
...........
...........
10
St count
8 (-4 sts)
12 (-4 sts)
16 (-4 sts)
20 (-4 sts)
24 (-4 sts)
28 (-4 sts)
32
9
8
10
9
8
7
6
5
4
3
2
1
7
6
5
4
3
2
1
m
32
32 (+4 sts)
28 (+4 sts)
24
24 (+4 sts)
20 (+4 sts)
16
16 (+4 sts)
12 (+4 sts)
6
Tail (make 1)
Dark green
Arm/leg (make 2 of each)
Arm: white
Leg: dark green
Round St count
12 6
...........
...........
5
4
3
2
1
6
6 (-6 sts)
12
12 (+6 sts)
6
12
5
4
Begin
ch1 for turning post
※ ch30 for foundation chain
3
2
1
m
Use same
diagram
for arms &
legs.
Let’s Try It!
211
Body (make 1)
White, dark green
20
5
2
1
4
3
3
2
2
1
1
9 30
8 30
...........
5
4
m
Ear (make 2)
White, dark green
Color
White
Dark green
...........
5
Round St count
20 30
...........
3
20
...........
4
20
5
4
3
2
1
30 (+6 sts)
24 (+6 sts)
18 (+6 sts)
12 (+6 sts)
6
Round
8
7
6
5
4
3
2
1
St count
18
18 (-6 sts)
24
24
24 (+6 sts)
18 (+6 sts)
12 (+6 sts)
6
7
6
5
4
3
2
1
7
7
6
6
5
5
4
4
3
3
2
2
1
1
m
Fold ears to create dent in the middle;
seam to head with folded seam.
9 rounds
Start
Start
7–8 rounds
9 rounds
6 rounds
1 round
2–3 rounds
Start
2 rounds
212
Chapter 7
LESSON 2
Mouse
▶
Crochet the head
1
Make magic circle (page 29) to begin, then
crochet 1 round.
3
▶
Work rounds 10–15 without increasing.
2
Work through round 9 according to diagram,
increasing as indicated.
4
Continue until last round, decreasing as
indicated. Bind off with standard bind-off method
(page 144).
Crochet the torso
5
With dark green yarn, make magic circle
(page 29), then crochet through round 8 according
to diagram.
6
Change to white yarn starting with round 9
(page 74).
Let’s Try It!
213
LESSON 2
Mouse
7
YO with white yarn and pull up a loop.
8
Slip first st (page 50); color change
completed. Crochet round 9.
▶
9
1 round white sts completed. Continue in
white for remainder of torso.
11
Crochet round 2 according to diagram,
increasing as indicated.
214
Chapter 7
Crochet arms and legs
10
Make magic circle (page 29) with green
yarn to begin leg, then crochet 1 round.
12
Crochet round 3 according to diagram,
increasing as indicated.
13
Crochet round 4, decreasing as indicated.
14
Work rounds 5–12 even (no increases or
decrease). After last round, bind off with standard
bind-off method (page 144).
▶
15
Work arms in same way with white yarn.
Leave long yarn tails.
17
Ch30 (page 35).
Crochet the tail
16
With green yarn, make slipknot to begin.
18
Ch1 for turning post.
Let’s Try It!
215
LESSON 2
Mouse
19
Insert hook into bottom loop of chain st;
20
21
Continue across chain.
22
YO.
After crocheting 30 sts, work slip stitch
bind-off.
▶
23
216
Leave 6” (15 cm) yarn tail.
Chapter 7
Pull yarn through (slip st, page 50).
Insert stuffing
24
Insert stuffing into head (page 131).
25
Pack stuffing firmly.
27
Insert needle from outside to inside into
each st in final round to cinch shut (page 132).
26
Thread yarn tail onto tapestry needle;
insert needle from inside to outside as shown.
28
▶
29
Weave yarn tail into stuffing (page 149).
Head completed.
Cinch opening shut tightly.
Attach arms and legs
30
Prepare two arms, two legs, torso, and
four wires.
Let’s Try It!
217
LESSON 2
Mouse
31
Roll wire once at center to form a loop,
then fold in half (page 136).
218
32
33
Insert stuffing through gap.
34
35
Do the same for all four arm and leg parts.
36
Chapter 7
Insert ring end of wire into one arm.
With the long yarn tail (or a new strand
threaded on a tapestry needle and knotted), insert
needle into tip of the arm and through the wire
loop 2–3 times to secure in place. Knot securely.
Thread wire between sts in crocheted
fabric where you want to attach arm.
37
Thread bind-off yarn tail through tapestry
needle; seam arm to torso.
38
▶
Attach the head
39
40
41
42
Roll all wire ends together and wrap with
tape so that tips do not poke out of the fabric.
Place head on torso and fasten in place
with pins.
Arms and legs attached.
Insert stuffing into body so that it is as
firm as the head.
Seam head to torso using yarn tail(s)
remaining after seaming other body part(s) to
torso.
Let’s Try It!
219
LESSON 2
Mouse
▶
43
Head attached. Note that the facial
expression changes depending on the angle of the
head.
45
Fold each ear with a dent in the center.
47
Thread ear yarn tail through tapestry
needle; seam to back of head with folded seam
(page 120).
220
Chapter 7
Attach ears
44
Crochet ear pieces according to diagram.
Leave a long yarn tail.
46
Decide where to place each ear; fasten in
place with pins.
48
way.
Turn to front and seam front of ear in same
▶
49
Ears attached.
51
After seaming 2 stitches, seam the other
side in the same way.
▶
Attach tail
50
Pass yarn through needle and seam end
of tail to buttock area from underneath.
52
Tail attached. By seaming over two sts, the
tail stands upright.
Embroider the nose
53
Embroider the nose on the tip of the face.
First, embroider V shape with black yarn.
54
Fill V shape with satin stitch (page 161).
Let’s Try It!
221
LESSON 2
Mouse
55
Embroider line beneath nose with straight
stitch (page 155); bring needle out where corner
of mouth will be.
▶
Pass needle under line beneath nose, then
insert needle at other side of mouth. Weave yarn
tail through stuffing (page 149).
Attach eyes
57
Insert eye pieces to determine best
position.
59
222
56
58
Once position is decided, apply glue to
posts of eyes and insert into head (page 164).
Mouse completed. With wires in its limbs, you can make it sit, stand, raise its hands, and bend its legs.
Chapter 7
LESSON 3
Girl in Ruffled Skirt
In addition to basic crochet methods, you can make items such as
this cute girl by incorporating detailed techniques to add features
such as skirts, fingers, and hair. It’s fun to make original designs
with different hairstyles and colorful clothing.
Materials
Tools
Medium-weight yarn such as DK (pale orange)
Medium-weight yarn such as DK (yellow)
Medium-weight yarn such as DK (light blue)
Medium-weight yarn such as DK (brown)
Medium-weight yarn such as DK (white)
Medium-weight yarn such as DK (red)
Comic eyes
Stuffing
US B or C (2.5mm) crochet hook
Tapestry needle
Scissors
Glue
Sewing pins
Let’s Try It!
223
Instructions
① Crochet head & body following the diagrams;
insert stuffing.
② Seam head to body.
③ Crochet arms & legs following the diagrams;
insert stuffing.
④ Seam legs to body.
⑤ Crochet skirt onto surface of body.
⑥ Seam arms to body.
⑦ Fasten eyes to head using glue.
⑧ Embroider nose on face.
⑨ Seam ear to head with folded seam.
⑩ Make hair for top and back of head using
fringe method; make hair for bangs area with
embroidery method.
Body (make 1)
Yellow
15
14
15
13
14
12
13
10
4
1
2
1
m
...........
2
3
11 21 (-3 sts)
10 24
4
3
2
1
...........
3
4
...........
10
11
...........
11
12
Round St count
15 21
24 (+3 sts)
21 (+7 sts)
14 (+7 sts)
7
Ear (make 2)
Pale orange
Begin
Skirt
Light blue
※ Work surface crochet between rounds 8 and 9 of body.
Round
4
3
2
1
224
Chapter 7
St count
see diagram
72 (+48 sts)
24
24
On round 4, work *sc, ch2* into
hdc of round 3 (a 3-st multiple).
19
19
18
18
19 17
19
17
18 16
18
16
17 15
17
19
16 15
16
14
18
15 14
15
Head (make 1)
Pale orange
14
Round
19
18
17
16
15
14
17
14
6
16
6
...........
3
4
4
3
3 62 3
2
6
5
4
3
2
1
2 51 2
1
4
1
1
3
2
1
m
Arm (make 2)
Leg (make 2)
Pale orange and yellow
Pale orange, white and red
10
10
9
9
8
1010
9 98
77
5 8 5
66
4 7 4
3 65 53
2
1
m
54
4
32
43
3
1
22
21 1
4
3
2
1
...........
88
6 9 6
...........
7 10 7
Round St
Color
count
10 6
6
6
6
6
Yellow
Pale
orange
9
9
8
989
7
6
5
7
88
96
77
85
66
4
7
3
3
544
2
2
1
545
6
33
41
m322
211
...........
5
15
5
6
4
14
5
5
4
6
St count
7 (-7 sts)
14 (-7 sts)
21 (-7 sts)
28 (-7 sts)
35 (-7 sts)
42
42 (+7 sts)
35 (+7 sts)
28 (+7 sts)
21 (+7 sts)
14 (+7 sts)
7
Round St
Color
count
9 7
8 7
Pale
orange
7 7
6 7
White
5 7
4 7 (-4 sts)
3 11 (-3 sts)
Red
2 14 (+7 sts)
1 7
1
1
Let’s Try It!
225
LESSON 3
Girl in Ruffled Skirt
▶
Crochet the head
1
Crochet head according to diagram,
increasing and decreasing as indicated.
226
2
After crocheting roughly half of head, remove
hook and pull loop until large.
3
Insert stuffing (page 131).
4
Finish crocheting according to diagram.
5
Cinch opening shut (page 132).
6
Weave yarn tail through stuffing (page 149).
Chapter 7
▶
7
Head completed.
8
Crochet body according to diagram. Bind off
with slip stitch bind-off method (page 145).
▶
9
Insert stuffing.
Crochet the body
Seam head to torso
10
Thread yarn tail from step 8 through
tapestry needle; seam body to head (page 118).
Turning posts
11
Be sure to align turning posts of head and
body when seaming.
12
Head seamed to body.
Let’s Try It!
227
LESSON 3
Girl in Ruffled Skirt
▶
Crochet arms and legs
13
14
15
16
Crochet from tip of hand upward according
to diagram. Round 1 completed.
When round 3 is complete and hand is
finished, change to yellow yarn and crochet arm.
Work picot (page 60) as indicated in
diagram to create a thumb.
▶
17
Crochet legs according to diagram in the
same way. 2 arms and 2 legs completed.
228
Chapter 7
Arm completed.
Attach legs
18
Thread leg yarn tail through tapestry
needle; seam leg using folded seam (page 120)
on underside and front of body.
▶
Crochet the skirt
19
Both legs attached.
20
21
Work 1 round of sc around body.
22
23
After ch2, insert hook into top loops;
slip st and work picot (page 60). Photo shows 1
completed ruffle stitch.
Join light blue yarn to body between 8th
and 9th rounds. Insert hook horizontally (page
129) and work sc.
Work 3-stitch ruffle pattern (page 94). First
sc 2.
24
After working one round of ruffle edging,
cut yarn, leaving 4” (10 cm) tail; pass it through
tapestry needle and work invisible bind-off (page
142).
Let’s Try It!
229
LESSON 3
Girl in Ruffled Skirt
▶
25
▶
Ruffled skirt completed.
26
Attach arms with folded seam (page 120).
Double-check the front and back of body before
attaching arms.
Attach eyes and nose
27
28
29
30
After testing eye placement, attach eyes
with glue (page 164).
While holding wrapped yarn, remove
tapestry needle, then insert needle into 2nd st.
230
Attach arms
Chapter 7
Embroider nose using bullion stitch (page
163). Bring needle out at center of face and hold
horizontally; wind yarn around needle 5 times.
Face completed.
▶
Attach ears
31
Crochet ear pieces according to diagram.
Thread yarn tail onto tapestry needle; seam ears
to head.
33
35
Trim ends of fringe to desired hairstyle.
Finally, block hair with steam iron to
straighten the hair.
▶
Attach hair
32
For hair, make fringe (page 172) from top
to back of head.
34
Stitch bangs with straight stitch (page
155). Fill forehead with straight stitch from above
so that the “hairline” of the fringe is not visible.
36
Completed. Since the legs are attached to
the front side, she can sit down.
Let’s Try It!
231
Diagrams for parts in this book
A
Page 80
[Creating a mouth]
11
10
9
8
7
6
5
4
3
2
1
11
11
10
10
9
9
8
8
7
7
6
6
5
5
4
4
3
3
2
2
Round
11
10
9
8
7
6
5
4
3
2
1
St count
8 (-8 sts)
16 (-8 sts)
24 (-8 sts)
32
32
32
32
32 (+8 sts)
24 (+8 sts)
16 (+8 sts)
8
1
1
m
B
4
3
2
1
A&B
Page 88
[Afterthought foot]
A only
B only
9
8
7
6
5
4
3
2
1
232
Chapter 7
9
8
7
6
5
4
3
2
1
9
4
3
2
1
4
3
2
1
m
Round
4
3
2
1
St count
32 (+8 sts)
24 (+8 sts)
16 (+8 sts)
8
Round
10
9
8
7
6
5
4
3
2
1
St count
8
8
8
8 (create hole)
8
8
8 (-2 sts)
10
10 (+5 sts)
5
8
7
6
5
4
3
2
1
m
Page 166
[Make “Helmet” wig & attach to head]
Invisible bind-off
m
1
2
3
4
5
6
7
Round St count
16 editing (red)
15 23
8
ch8
Begin
...........
...........
Page 170
[Crochet hairpiece and attach to head]
8
7
6
5
4
3
2
1
23 (-19 sts)
42
42 (+7 sts)
35 (+7 sts)
28 (+7 sts)
21 (+7 sts)
14 (+7 sts)
7
ch8
ch8
ch10
ch8
ch10
ch12
ch12
ch16
(each)
ch16
(each)
ch14
ch14
ch12
ch12
Let’s Try It!
233
Page 177
[Bear Cub Coin Purse]
Body (make 2), Cotton, 3.5mm hook
Nose (make 1)
Beige
White
6
5
4
3
1
2
1
2
3
Round
3
2
1
St count
16 (+4 sts)
12 (+4 sts)
8
m
ch3 to being
Ear (make 2)
Light purple
m
Attach purse frame
to these 22 sts.
234
Chapter 7
Sc 6 into magic circle. End
round without joining to
complete round as usual.
Index
arms 22
awl 15
back loop 23, 54, 103
backstitch 154,160
ball chain 20
beads 19, 97
beak 22
bells 20
bind-off
fastening 144
invisible 142
slip stitch 145
standard 144
bobbles 107
bodkin 14
brooch pin 20
brushed single crochet 109
bullion stitch 154,163
buttons 19
calipers 15
cardboard 20, 134
chain stitch 35,
in embroidery 154, 159
chain
back and front of 35
foundation 34
circular foundation 36
cinching shut 132
clasp 20
clusters 82
color
adding with acrylic roving 176
changing 74, 75
colorwork 78
combining pieces 130
cord
braided 20
crocheting 99
lobster 100
plain 20
Romanian point lace 99
cozy 180
crab stitch 52
crocodile stitch 106
crossed single crochet 51
cupped shape 96
curved scissors 15
decreases 65, 67, 68, 82, 85, 110
diagrams 24, 234–235
diagrams (creating) 93
double crochet (dc) 46, 102, 111, 112
ears 22
edges 95
edging 62, 94
embroidery
getting started 153
thread 18
end 23
ends weaving in 149, 151, 152
extension 63
eye(s) 22–23
color 187
comic 186
crystal 186
googly 186
parts 18
placement 186
safety 15
felt, 19
attaching 175
felting needle 15
fingers 89
finishing schematic 24
fly stitch 154, 156–127
folded seam 91, 120
foot 22
as an afterthought 88
creating by decreasing 85
with boot 86
French knot stitch 154, 162
fringe 92, 172
front loop 23, 55
gauge 25
glue 14
gluing thread/yarn down 165
grafting 116
granite stitch 104, 105
hair
bundle 167
crocheted-in 166
embroidered 174
helmet 166
bun 169
hairpiece 170
fringe 172
ponytail 168
half double crochet (hdc) 43, 45, 102
hand 22
head 2
hook 14, 16, 17, 23
holding 28
235
holes 58, 88
increases 64, 68, 82, 110
increasing and decreasing with clusters
82
inserting parts 133
intarsia 76, 110
inverse single crochet 53, 112
joining pieces 90
knotting 115
lazy daisy stitch 154, 158
leg 22
lid attaching 135
lining 183
loop 23
loop stitch 61, 105
magic circle 23, 29
magic ring, see magic circle
marking pen 15
measuring tape 14
moss stitch, see granite stitch
mouth 80
nap brush 15
noisemaker 20
nose 18
nose 22
notions, attaching 164
O-ring 20, 184
opening 23
oval foundation chain 38
paw 22
paw, see hand
pellets 19
picots 60, 89, 94
pins (sewing) 14
pipe cleaners 19
pliers 15
pocket 127
pompoms 19
maker 15
post 23
post stitch (back) 57, 104
post stitch (front) 56, 103
purse frames 20, 178–179
rounds 23
rounds, table of 24
roving (acrylic) 19
rows 23
ruffle edging 94
running stitch 154, 157
236
satin stitch 154, 161
scissors 14
seam ripper 15
seam sides together 116, 121–123
seaming 116, 117, 121
shell stitch 108
single crochet (brushed), see brushed
single crochet
single crochet (sc) 40, 101
into foundation chain 41
size 187
solid 186
type 186
skew 25
skipping stitches (decrease method) 67
slip stitch (sl st) 50
cord 99
snout, see nose
spike stitch, see double crochet (dc)
split ring 20
starting 23
steam iron 14
stitch count 23
stitch counts, table of 24
stitch markers 15
stomach/belly 22
stranded crochet, see tapestry crochet
stuffing 19, 131
surface crochet 128–129
symbols 26
tapestry crochet 109
tapestry needle 14, 114
threader 15
tinting
with cosmetics 176
with embroidery 175
top loop(s) 23
top of stitch, see top loop(s)
torso 22
treble crochet (tr) 48
turning post 23, 44, 45
tweezers 14
waffle stitch 111
whipstitch 119
wire 19, 136
woven seam 118,125
through top loop 126
yarn 18
finding end of 28
holding 28
joining to add stitches 79
securing 146, 148
zipper 20, 181
THE RESOURCES SECTION
If you’re new to crochet, here are some websites (some with shops) you may want to explore.
These are just some of the many sites made available to the needle crafting community
through the work of passionate individuals and groups. Many include blogs, free tutorials,
free patterns and galleries full of ideas. Some focus primarily on amigurumi. Others focus on
helping crafters new to crochet and providing new inspiration to seasoned crocheters. And
many more sites are out there for you to explore.
Ami Amour Cute Crochet Creatures
(www.amiamour.com) Includes free patterns.
Heart & Sew
(heartandsew.co.uk) A blog that includes
free patterns.
Amigurumi Food
(www.amigurumifood.com) Free patterns
and video tutorials. Focuses primarily on
veggies, fruits and sweets, but also features the occasional animal or plant.
Jenny and Teddy
(www.jennyandteddy.com) Includes video
stitch tutorials and free patterns.
Amigurumi To Go
(www. amigurumitogo.com) Includes free
patterns and video tutorials.
Amigurumi Today
(www.amigurumi.today) Includes free
patterns plus a section on tips and tricks.
Amy’s Crochet Cave
(www.amyscrochetcave.com) A blog that
includes free amigurimi patterns.
BHooked
(www.bookedcrochet.com) Includes video
tutorials, patterns (free and for purchase)
and podcast links.
Craftsy
(www.craftsy.com) An online resource for
needleworkers.
CraftyBits.co
(www.craftbits.com) Ideas and patterns
for sewists, knitters and crocheters.
Crochet Concupiscence
(www.crochetconcupiscence.com) A resource for learners. Includes links to free
patterns.
Furls Crochet
(www.furlscrochet.com) Vendor of yarns,
hooks and needles. Also offers free patterns, plus video tutorials.
Keep Calm and Crochet On U.K
(www. keepcalmandcrochetonuk.com)
Includes free patterns and tutorials.
Knitty
(www.knitty.com) An online resource that
includes articles on crochet and yarn.
Lilliliis
(www.lilleliis.com) Includes free patterns
and illustrated/video tutorials.
Lion Brand Yarn
(www.lionbrand.com) Vendor of yarns,
hooks, needles and free patterns, plus
video tutorials.
Little Muggles
(www.littlemuggles.com) An amigurimi
blog that includes free patterns.
Mama in a Stitch
(www.mamainastitch.com) Includes free
patterns and video/illustrated tutorials.
Ravelry
(www.ravelry.com) A comprehensive online resource for knitters, crocheters and
fiber artists.
Supergurumi
(www.supergurimi.com) Patterns (both
free and for purchase) plus some illustrated step-by-step stitch tutorials.
237
The Creative Crochet Corner
(www.creativecrochetcorner.com) Includes video tutorials, tips and techniques
for all levels.
The Crochet Crowd
(www.thecrochetcrowd.com) Free patterns and video tutorials for crocheters
and weavers.
Tiny Rabbit Hole
(blog.tinyrabbithole.com) A blog that
includes free patterns.
We Crochet
(www.crochet.com)
An online vendor that includes a learning
center with tips and tutorials.
Your local craft shops—both large and
small—will carry a variety of yarns, hooks,
and other tools and materials you’ll need
for making great toys. Here are a few of
the many online vendors carrying either
a wide range of supplies or some hard-tofind yarns you might like to try.
Fabulous Yarn
(www.fabulousyarn.com)
Hobby Lobby
(www.hobbylobby.com)
Joann
(www.joann.com)
LoveCrafts
(www.lovecrafts.com)
Paradise Fibers
(www.paradisefibers.com)
Michaels
(www.michaels.com)
Purl Soho
(www.purlsoho.com)
CA
Knitca
(www.knitca.com.ca)
The Wool Queen
(www.thewoolqueen.ca)
238
The Yarn Guy
(www. theyarnguy.com)
True North Yarn Co.
(www.truenorthyarn.com)
Yarn Canada
(www.yarncanada.ca)
UK
Backstitch
(www.backstitch.co.uk)
Deramores
(www.deramores.com)
Tangled Yarn
(www.tangled-yarn.co.uk)
The Wool Factory
(www.thewoolfactory.co.uk)
Wool Warehouse
(www.woolwarehouse.co.uk)
AUS
CraftOnline
(www.craftonline.com.au)
I Wool Knit
(www.iwoolknit.com.au)
Skein Sisters
(www.skeinsisters.com.au)
The Aussie Knitting Company
(theaussieknittingco.com)
The Yarn Store
(www.theyarnstore.com.au)
NZ
Knit World
(www.knitworld.co.nz)
Knitnstitch
(www.knitnstitch.co.nz)
Skeinz Natural Yarn Store
(www.skeinz.com)
Wild and Wooly Yarns
(www.wildandwoollyyarns.co.nz)
Woolworx
(www.woolworx.co.nz)
The Japan Amigurumi Association
The Japan Amigurumi Association was established in 2002 with the aim of fostering the
craft and culture of amigurumi through nationwide events promoting exchanges between
writers and enthusiasts and spreading the word about amigurumi overseas. Among its various
other activities, the Association established an amigurumi certification course in 2018, and
currently manages galleries for artists. Its online shop sells the Association’s original crochet
tools and notions as well as amigurumi kits.
Amigurumi Credits (alphabetical order)
Amigurumi Forest / Amimono Workshop K-Knit / BULL / happysmile / haru*maki / Hiroko
Takeda / Hiroyuki Murata / hitoko hausu / House of Tanaka / Ichigo Choco / kerorin /
kumaneko / Kyoko Tsuritani / lemo / Mamezooya Nyantar / Marumi / Maruniya / Meow-Meow
Ururitto / Miyuki Ichikawa / qupi / shimami / Spoonland / SUNNY SUNDAY / utata*
239
“Books to Span the East and West”
Tuttle Publishing was founded in 1832 in the small New England town of Rutland, Vermont
[USA]. Our core values remain as strong today as they were then—to publish best-in-class books
which bring people together one page at a time. In 1948, we established a publishing office in
Japan—and Tuttle is now a leader in publishing English-language books about the arts, languages
and cultures of Asia. The world has become a much smaller place today and Asia’s economic
and cultural influence has grown. Yet the need for meaningful dialogue and information about
this diverse region has never been greater. Over the past seven decades, Tuttle has published
thousands of books on subjects ranging from martial arts and paper crafts to language learning
and literature—and our talented authors, illustrators, designers and photographers have won
many prestigious awards. We welcome you to explore the wealth of information available on Asia
at www.tuttlepublishing.com.
Published by Tuttle Publishing, an imprint of
Periplus Editions (HK) Ltd.
www.tuttlepublishing.com
AMIGURUMI NO GIHOSHO
Copyright© 2018, Japan Amigurumi Association
English translation rights arranged with
Seibundo Shinkosha Publishing Co., Ltd. through
Japan UNI Agency, Inc., Tokyo
English Translation ©2021 by Periplus Editions (HK)
Ltd.
Translated from Japanese by Linda Lanz
ISBN 978-0-8048-5412-2
ISBN 978-1-4629-2276-5 (ebook)
All rights reserved. No part of this publication may
be reproduced or utilized in any form or by any
means, electronic or mechanical, including
photocopying, recording, or by any information
storage and retrieval system, without prior written
permission from the publisher.
Original Japanese edition
Editor Yuichi Ogawa
Photography Kimiko Kaburaki
Format & design Akira Sato
Diagrams & illustrations Yuriho Koike
Editing Kayo Taguchi
In cooperation with:
Hamanaka Co, Ltd / Clover Co, Ltd / Naito Shoji Co,
Ltd
The copyright of material published in this
document belongs to the author. It is prohibited
to use this publication to hold exhibitions, sales,
rentals, workshops, etc without permission
Unauthorized copying, scanning, digitization,
etc of this document is prohibited, except
as permitted under copyright law Under
copyright law, it is not permitted to request
a third party such as an agent to scan or
digitize this document on your behalf, even for
personal or home use JCOPY (Japan Publishers
Copyright Organization). Unauthorized
copying of this document is prohibited,
except as permitted under copyright law If
you wish to copy this work, please contact
Japan Publishers Copyright Organization
(telephone: 03-5244-5088 / fax: 03-5244-5089 /
e-mail: info@jcopy or jp) in advance to obtain
permission
Distributed by
North America, Latin America & Europe
Tuttle Publishing
364 Innovation Drive
North Clarendon, VT 05759-9436 U.S.A.
Tel: 1 (802) 773-8930; Fax: 1 (802) 773-6993
info@tuttlepublishing.com
www.tuttlepublishing.com
Asia Pacific
Berkeley Books Pte. Ltd.
3 Kallang Sector #04-01
Singapore 349278
Tel: (65) 6741 2178; Fax: (65) 6741 2179
inquiries@periplus.com.sg
www.tuttlepublishing.com
24 23 22 21
10 9 8 7 6 5 4 3 2 1
Printed in China
2106EP
TUTTLE PUBLISHING® is a registered
trademark of Tuttle Publishing, a division of
Periplus Editions(HK) Ltd.
240