/


Text
PROVISIONAL OPERATION AND SERVICING
MANUAL
TO THE
WALTH E R
SUB-MACHINE GUN 9x19 mm WITH FOLDING STOCK
MODEL L & MODEL S
(long) (short)
CARL WALTHER-WAFFENFABRIK-ULM/DONAU
INDEX
Des с г i p t i on_
Page Illustration
Foreword ................................................ 3
Index to Illustrations................................... 4
WALTHER MP, long model, short model...................... 5 1 & 2
Technical Data .......................................... 6
Special characteristics.................................. 7
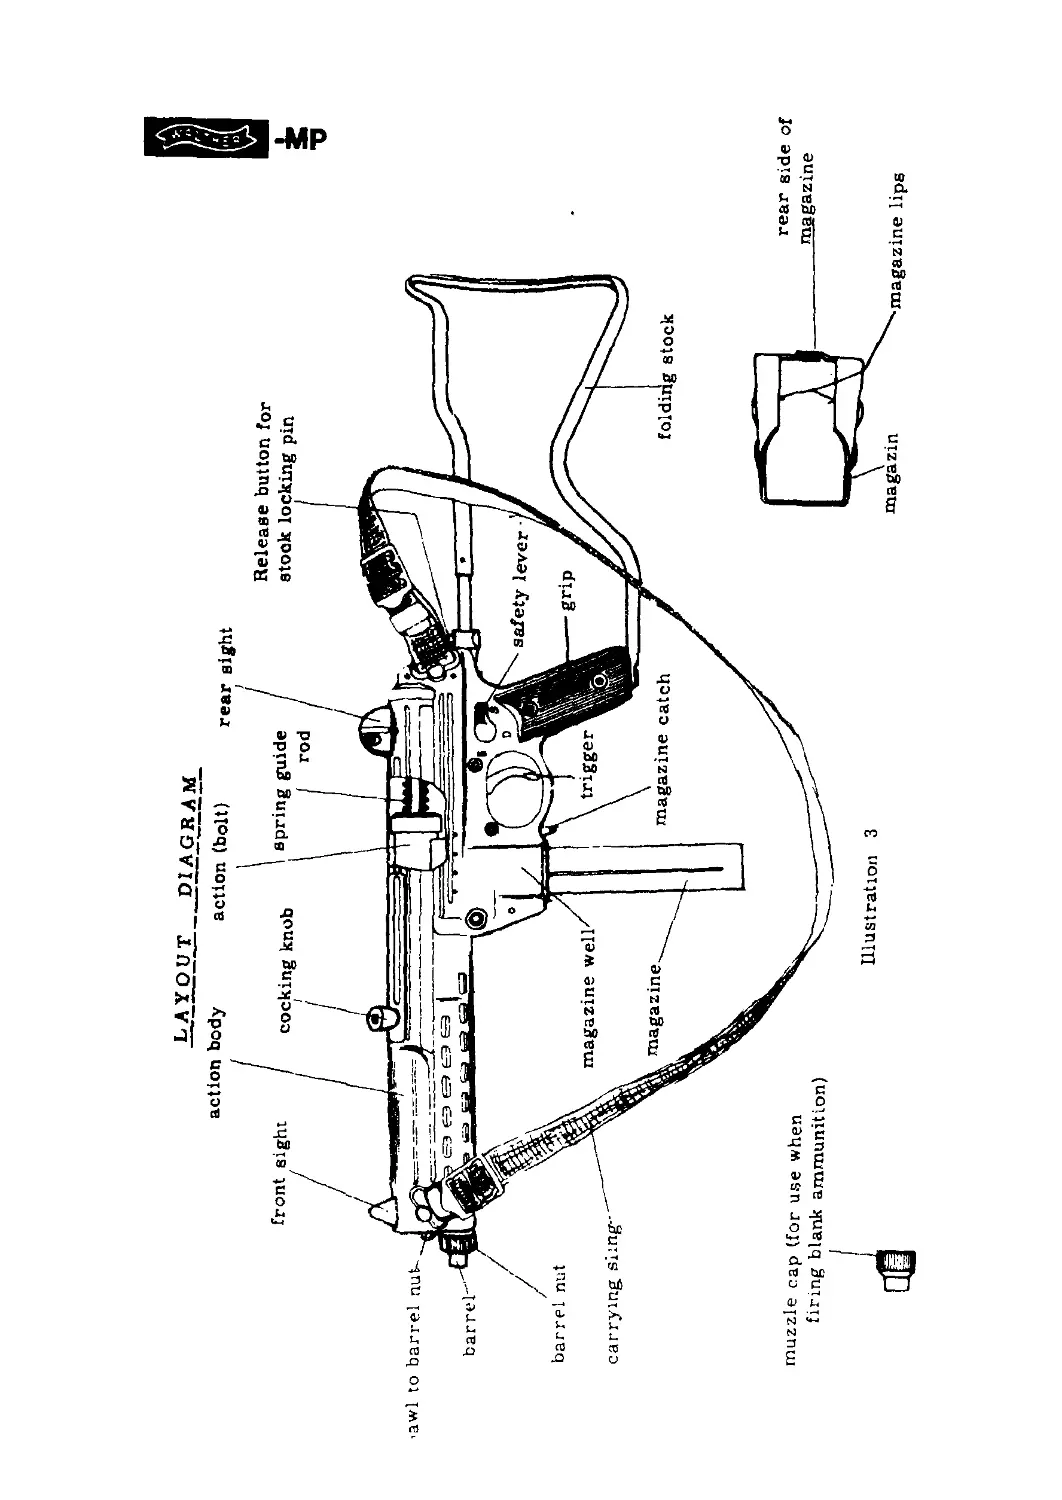
Layout diagram.......................................... 8 3
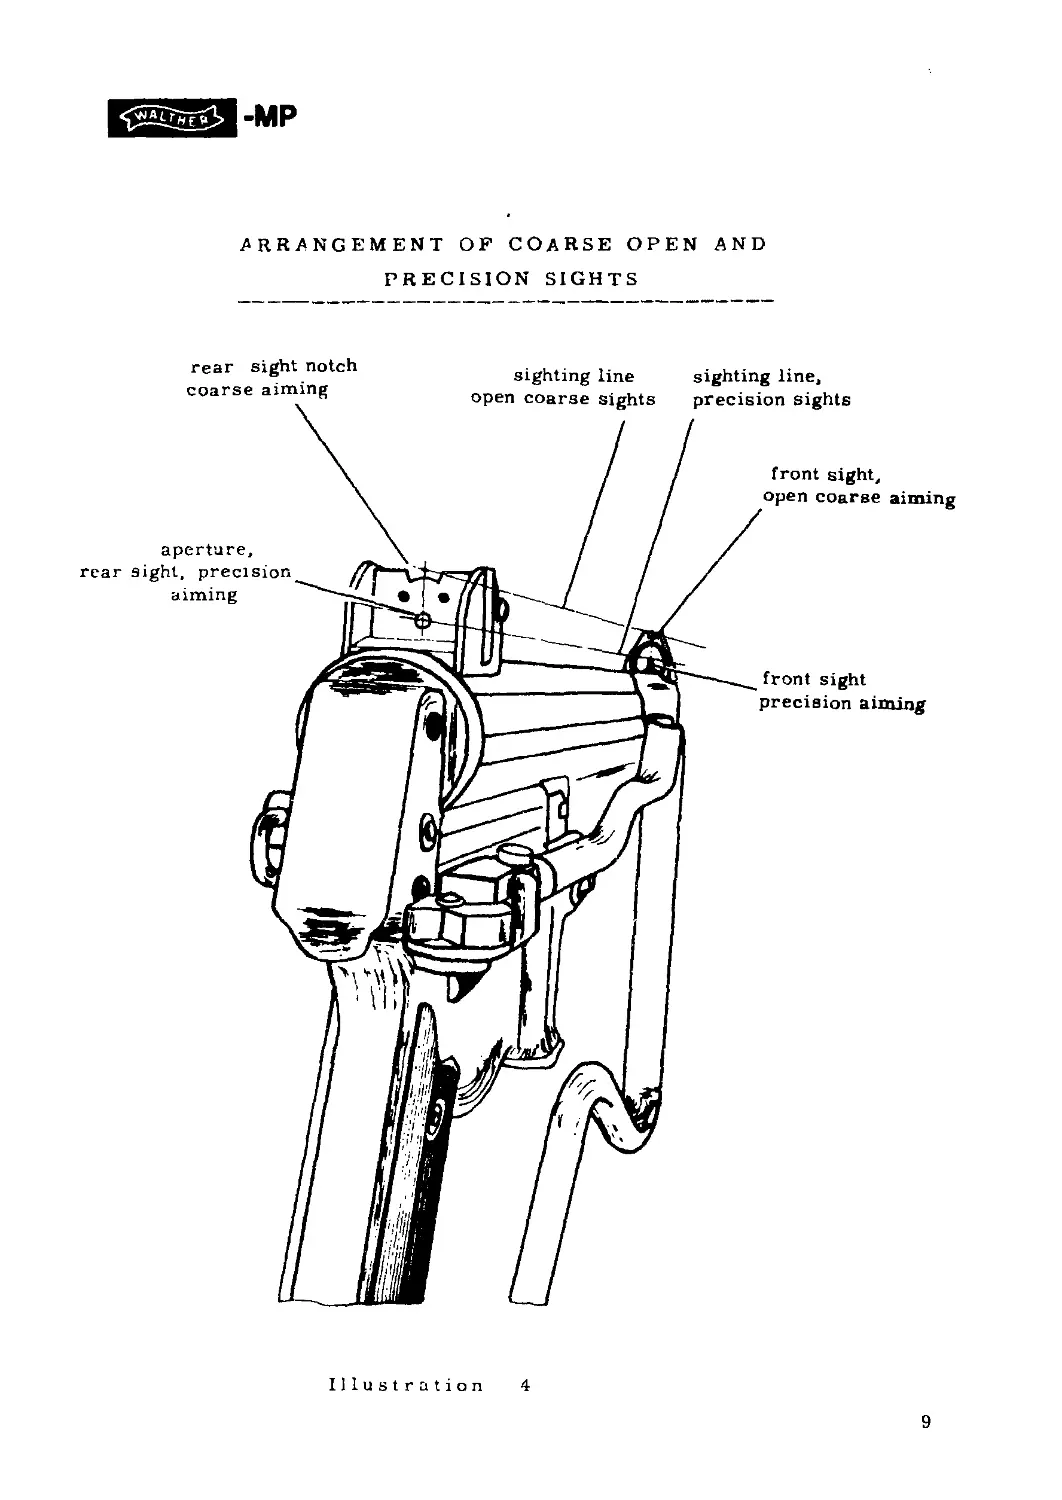
Arrangement of coarse and precision sights................ 9 4
Survey of action and trigger mechanism .................. Io 5
Op e r a t ion
Prefatory Notice........................................ 11
Applying the Safety device............................. 11 6
Change-over from ’’Safe” to "Automatic Fire"............. 11 7a
Change-over from "Safe" to "Single Shot"................. 11 7b
Folding Stock, extended....„............................. 11 8
Folding Stock, folded up................................. 11 9
Filling the magazine..................................... 12 lo
Emptying the magazine .................................. 12
Preparing to fire ...................................... 12
Inserting the magazine ............................. . . 12 11
Cocking the action..................................... 12 12
Bolt safety device..................................... 13 13
Shooting................................................. 13 14
Continuous Fire......................... .............. 13
Short bursts........................................... 13
Single shots.......................................... 13
Change of magazines ..................................... 13 15
Un-cockmg the action ................................... 14 1G
Firing with blank ammunition........................... 14 17
"Shake-Through" to clear action . ....................... 34 18
Dismantling the MP for cleaning....................... 15
Preparing to dismantle ................................. 15
Removing the connecting pin............................ 15 19 & 2o
Dismantling the action body.............................. 15 21 & 22
Dismantling the action (bolt) ........................... 16 23
Dismantling the spring guide rod ........................ 16 24 & 25
Dismantling the barrel .................................. 16 26 & 27
Survey of dismantled parts............................... 17 28
Cleaning ............................................... 17
Assembling the dismantled components.................... 18
Prefatory Note relating to Assembly..................... 18
Mounting the barrel.................................... 18 27
Assembling the spring guide rod........................ 18 25
Assembling the action (bolt)............................. 18 23
Assembling the action body........................... 19 21 & 22
Replacing the connecting pin ............................ 19 29
Appendix
Test card................................................ 2o 3o
Ballistic Data ......................................... 2o
2
F O_ R E_ WORD
The design and construction of the new WALTHER sub-machine gun Model MP
are based upon decades of practical experience in the development and manufacture
of self-loading handfuns. Due regard has been paid to the wishes expressed by
various authorities, - wishes necessitated partly by tactical considerations, -
and the practicability of the various demands has been proved eventually in actual
performance. The WALTHER MP is available in two sizes, i.e. Model MP long
and Model MP short, and incorporates the following advantageous propertiest-
Steady holding during firing, despite the moderate weight.
Design of the sighting devices completely new.
Open coarse sights as well as aperture sights. An
optical light - point aiming device for shooting in
twilight or at night can be mounted additionally at
any time.
Folding stock to fit right-handed and left-handed shooters.
Safety to suit right-handed and left-handed shooters.
Loading through can be carried out readily while the weapon is made safe.
Cocking knob remains stationary, but may readily interlocked with the bolt.
This is important, since the weapon can be rendered functional
again in any instance of clogging with dirt.
Bolt safety device becomes effective automatically if during cocking the hand
should inadvertently lose its hold on the cocking knob.
Component parts are made so as to be readily interchangeable.
Simple in manipulation and operation.
To clean, the weapon may be readily dismantled by means of a few manipulations
without causing any parts to fall out.
3
INDEX TO ILLUSTRATIONS
Page Illustration
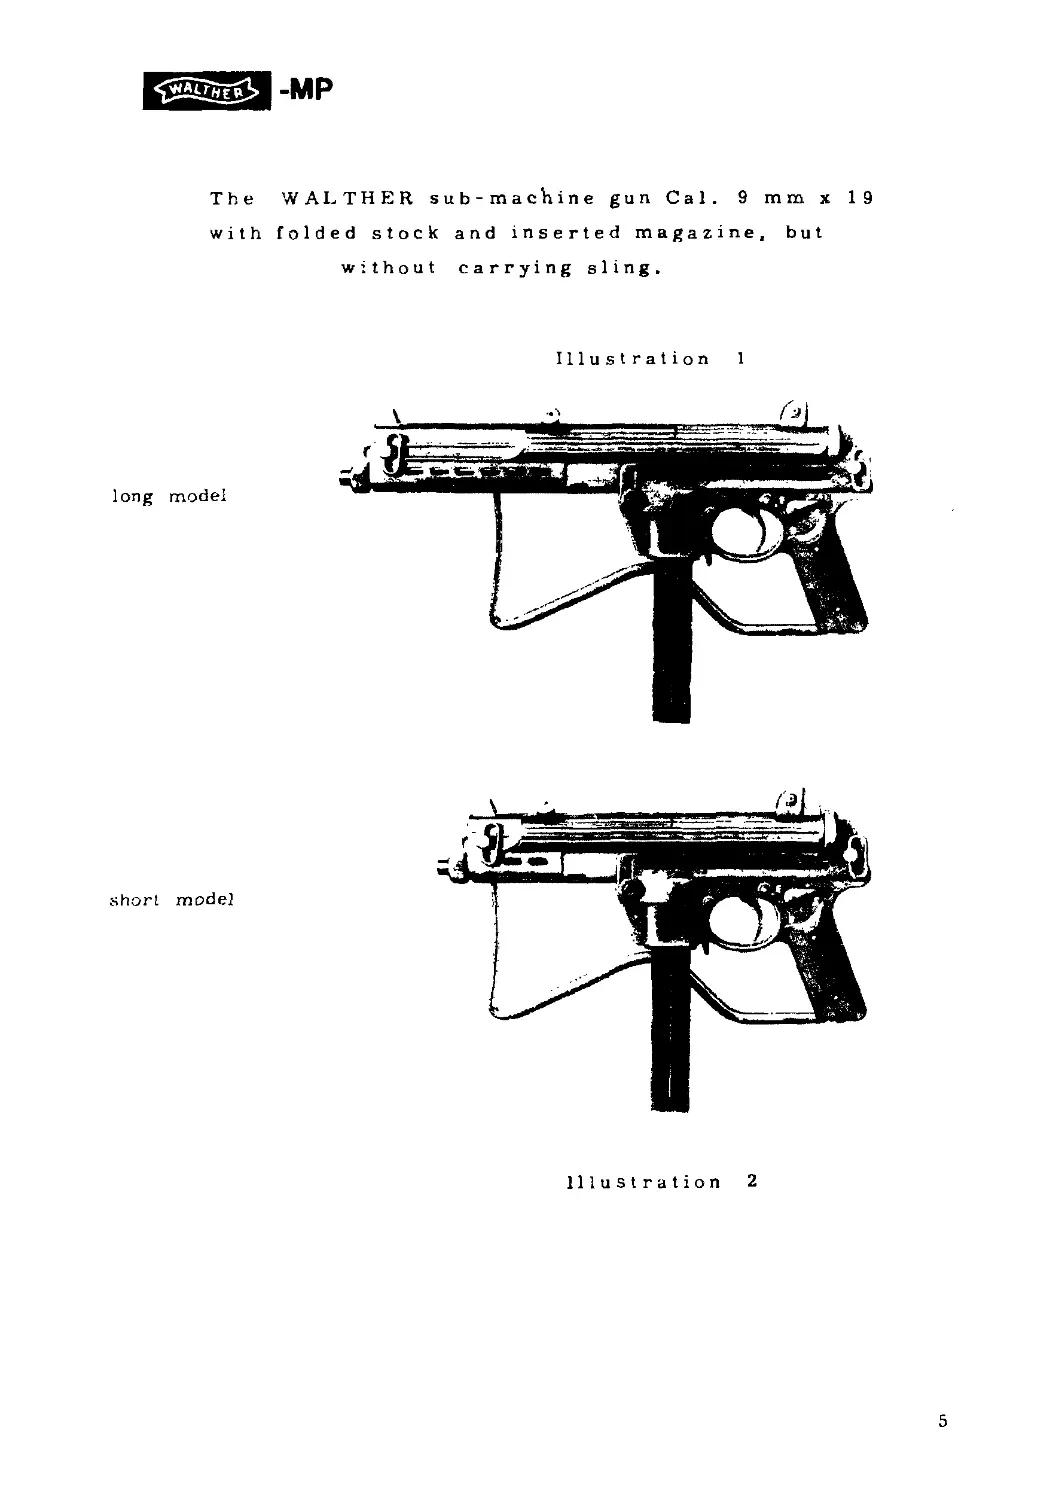
5 1 WALTHER - MP Cal. 9x19mm, with folded-up stock, magazine inserted; long model.
5 2 WALTHER - MP Cal. 9x19mm, with folded-up stock, magazine inserted; short model.
8 3 Layout diagram.
9 4 Arrangement of coarse and precision sights.
lo 5 Arrangement of action and trigger mechanism.
11 6 Applying the safety device.
11 7a Change-over from ’’Safe” to "Automatic Fire"
11 7b Change-over from "Safe" to "Single Shot"
11 8 Extending the folding stock
1 1 9 Folding the stock.
12 lo Filling the magazine
12 11 Inserting the magazine.
12 12 Cocking the action (bolt).
13 13 Bolt safety device.
13 14 Shooting
13 1 5 Change of magazines.
14 16 Un-cocking the action.
14 17 Shooting with blank ammunition
14 18 ;Shake-through; operation to clear action.
15 19 Connecting pin: - depressing the locking spring.
15 2o Withdrawing the connecting pin.
15/19 21 Lifting the action body, and/or replacing.
15/19 22 Removing the action body upward and forward, and/or re-mounting the action body.
16/18 23 Withdrawing the bolt unit to rearward, and/or re-inserting the bolt unit.
16 24 Spring guide rod: - despressing the locking spring
16/18 25 Removing and/or inserting the spring guide rod.
16 26 Barrel: - depressing the locking pawl, unscrewing the barrel locking nut.
16/18 27 Removing and/or re-inserting the barrel.
17 28 Survey of dismantled parts.
19 29 Inserting the connecting pin.
2o 3o Test Card.
4
The WALTHER sub-machine gun Cal. 9 mm x 19
with
folded stock and inserted magazine, but
without
carrying sling.
long model
short model
Illustration 2
5
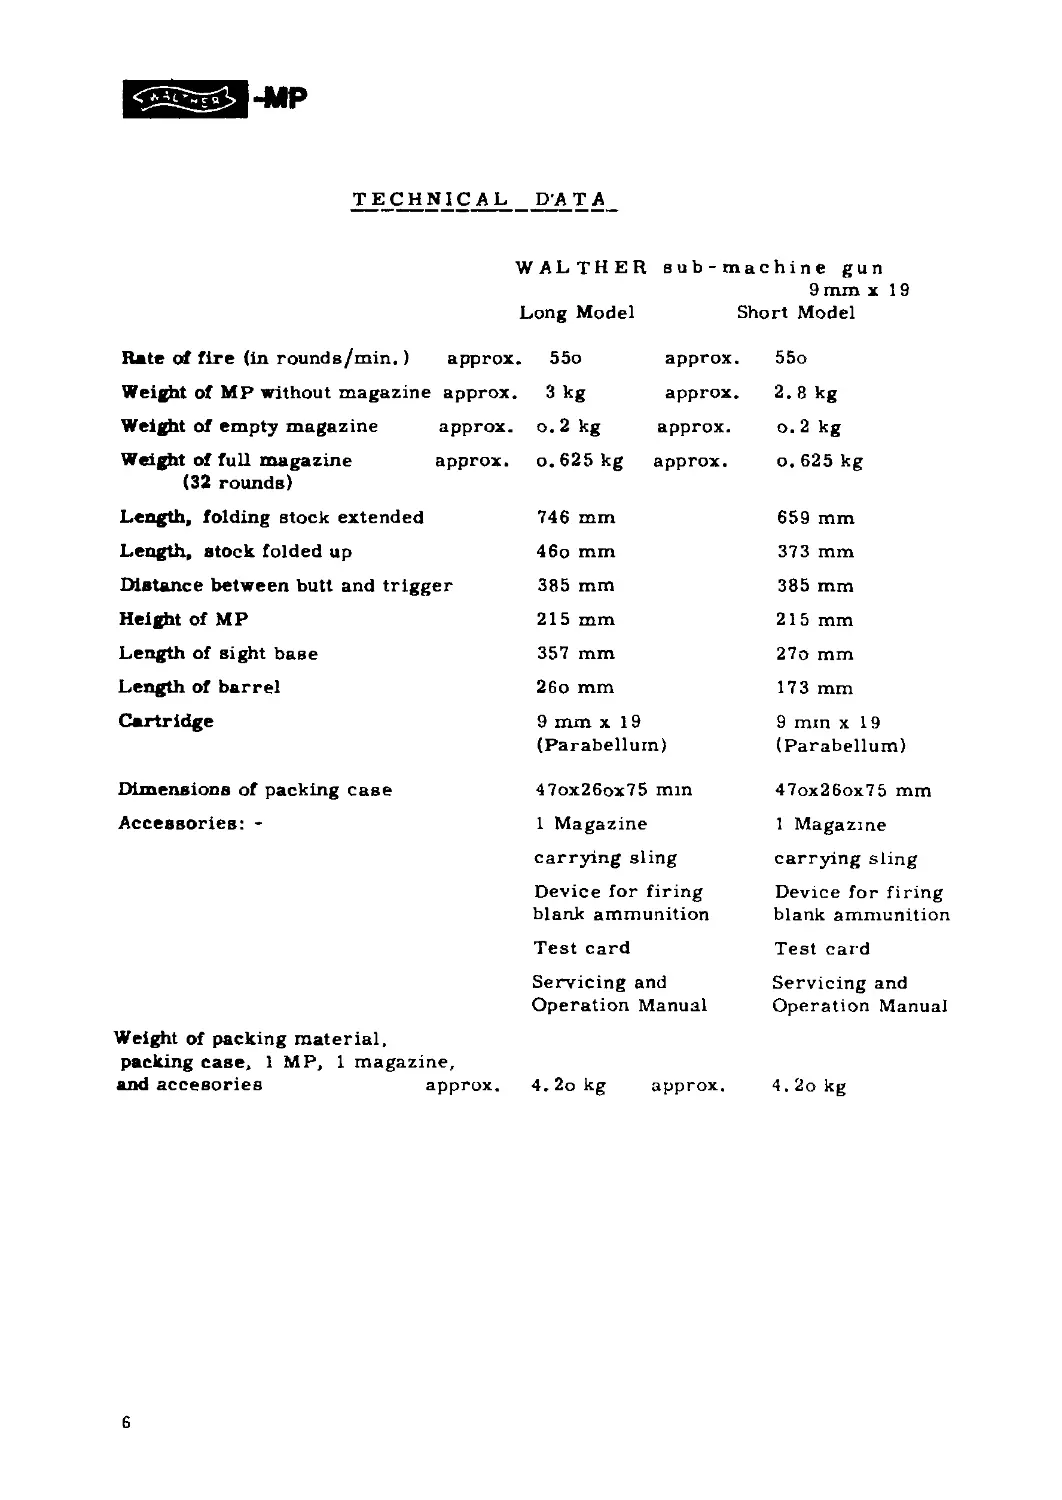
TECHNICAL D-А ТА
WALTHER sub-machine gun
9 mm x 19
Long Model Short Model
Rate of fire (in round в/min.) approx. 55o approx. 55o
Weight of MP without magazine approx. 3 kg approx. 2.8 kg
Weight of empty magazine approx. o. 2 kg approx. o. 2 kg
Weight of full magazine approx. o. 625 kg approx. o. 625 kg
(32 rounds) Length, folding stock extended Length, stock folded up Distance between butt and trigger Height of MP Length of sight base Length of barrel Cartridge 746 mm 46o mm 385 mm 215 mm 357 mm 26o mm 9 mm x 19 (Parahelium) 659 mm 373 mm 385 mm 215 mm 27o mm 173 mm 9 mm x 19 (Parabellum)
Dimensions of packing case 47ox26ox75 min 47ox26ox75 mm
Accessories: - 1 Magazine 1 Magazine
carrying sling carrying sling
Device for firing blank ammunition Device for firing blank ammunition
Test card Test card
Servicing and Operation Manual Servicing and Operation Manual
Weight of packing material, packing case, 1 MP, 1 magazine, and accesories approx. 4.2o kg approx. 4.2o kg
6
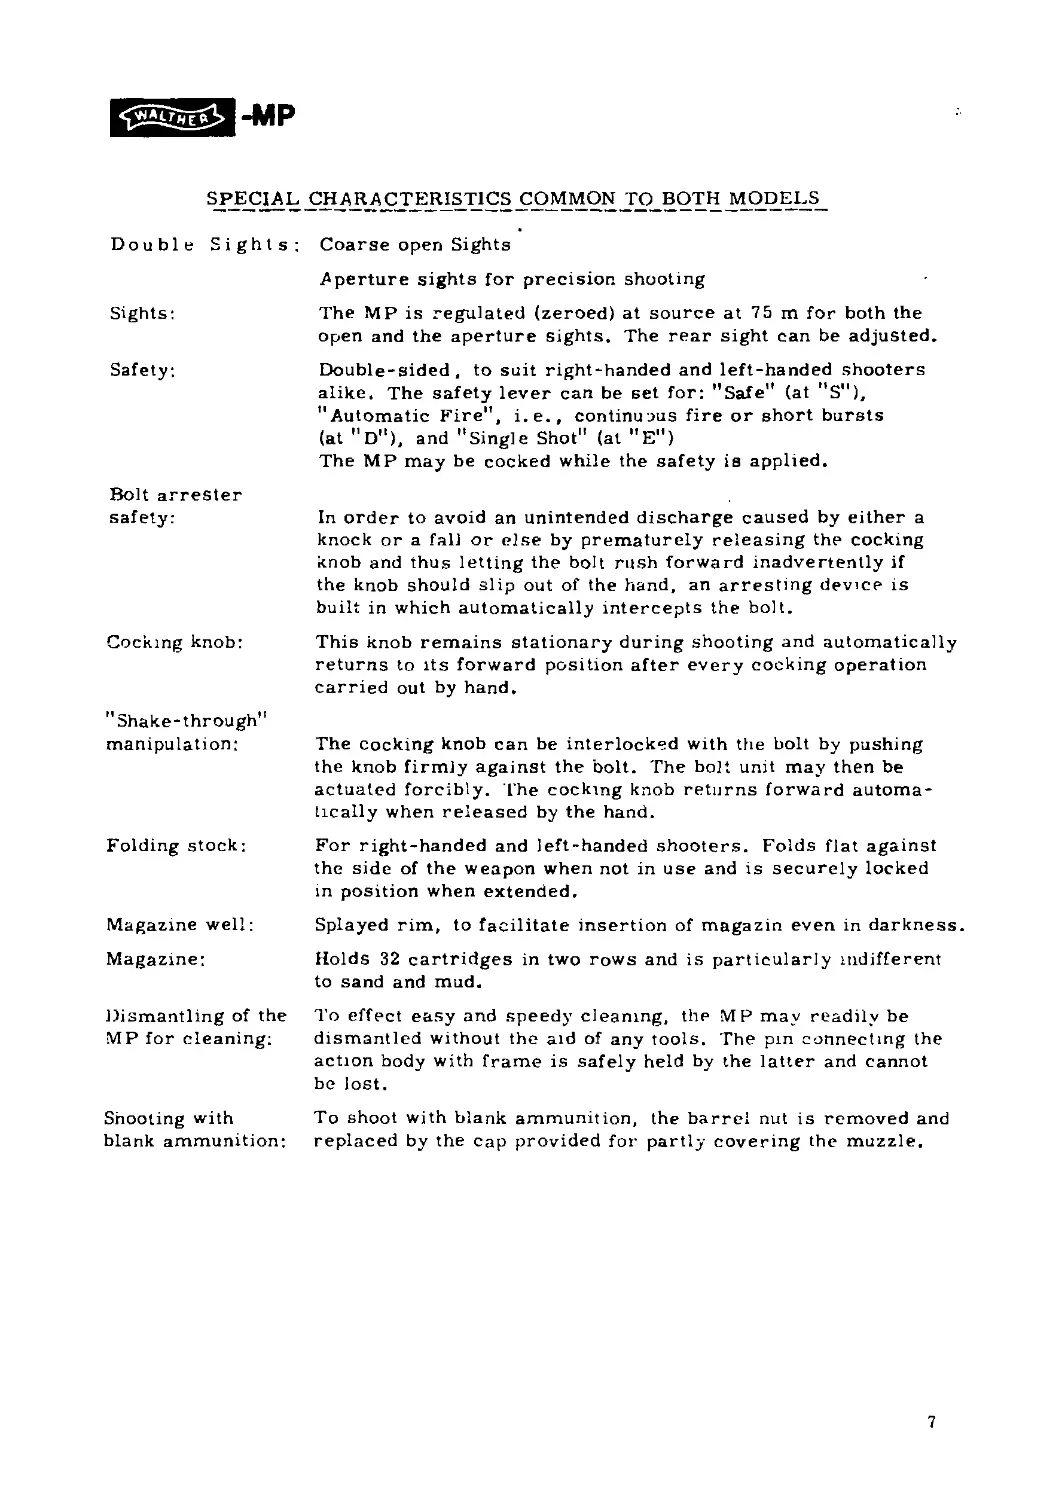
SPECIAL CHARACTERISTICS COMMON TO BOTH MODELS
Double Sights: Coarse open Sights Aperture sights for precision shooting
Sights: The MP is regulated (zeroed) at source at 75 m for both the open and the aperture sights. The rear sight can be adjusted.
Safety; Double-sided, to suit right-handed and left-handed shooters alike. The safety lever can be set for: ’’Safe" (at "S"), "Automatic Fire", i.e., continuous fire or short bursts (at "D"), and "Single Shot" (at "E") The MP may be cocked while the safety is applied.
Bolt arrester safety: In order to avoid an unintended discharge caused by either a knock or a fall or else by prematurely releasing the cocking knob and thus letting the bolt rush forward inadvertently if the knob should slip out of the hand, an arresting device is built in which automatically intercepts the bolt.
Cocking knob: This knob remains stationary during shooting and automatically returns to its forward position after every cocking operation carried out by hand.
"Shake*through” manipulation: The cocking knob can be interlocked with the bolt by pushing the knob firmly against the bolt. The bolt unit may then be actuated forcibly. The cocking knob returns forward automa- tically when released by the hand.
Folding stock: For right-handed and left-handed shooters. Folds flat against the side of the weapon when not in use and is securely locked in position when extended.
Magazine well: Splayed rim, to facilitate insertion of magazin even in darkness.
Magazine: Holds 32 cartridges in two rows and is particularly indifferent to sand and mud.
Dismantling of the MP for cleaning: To effect easy and speedy cleaning, the MP may readily be dismantled without the aid of any tools. The pin connecting the action body with frame is safely held by the latter and cannot be lost.
Shooting with blank ammunition: To shoot with blank ammunition, the barrel nut is removed and replaced by the cap provided for partly covering the muzzle.
7
9
EBBS -MP
Arrangement of Action and Trigger Mechanism
The MP, rendered safe, full magazine inserted, action
cocked
Ulustration 5
OPERATION
Prefatory Notice: -
To avoid accidents, always regard the MP as being loaded.
Before handling the MP, always apply the safety first.
/
Whenever handling oi- manipulating the MP, always hold the weapon in such way
as to cause the muzzle to point forward and downward.
Before dismantling the MP, always make sure that there is no live round in the
chamber.
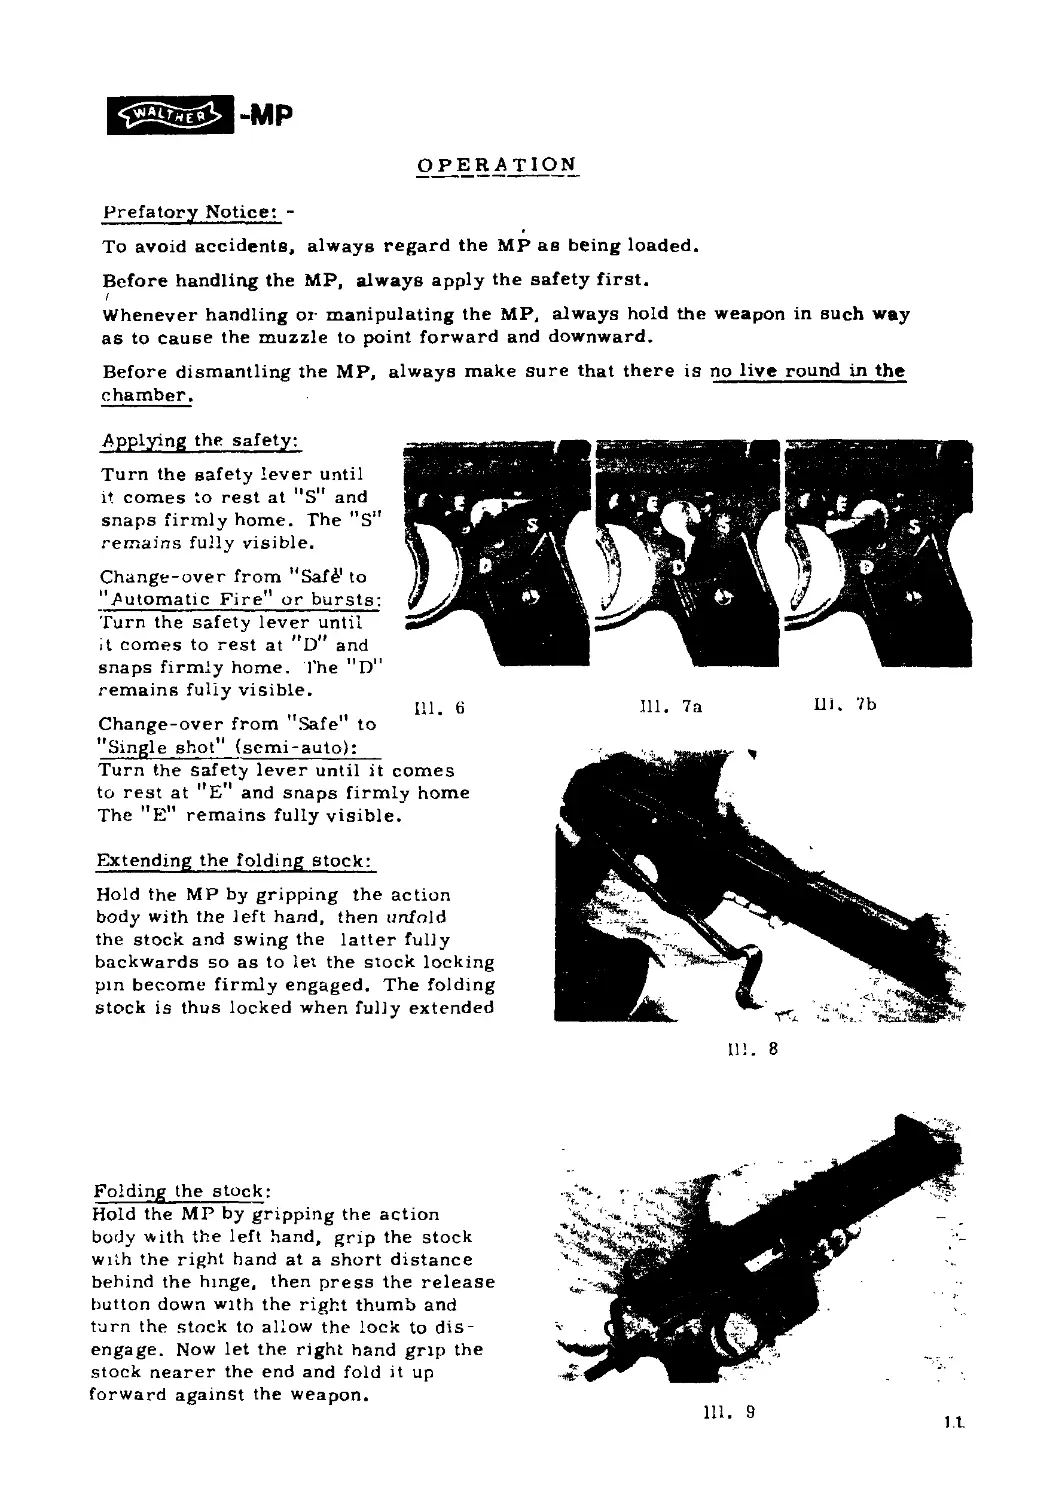
Applying the safety:
Turn the safety lever until
it comes to rest at "S" and
snaps firmly home. The "S”
remains fully visible.
Change-over from ”Saf£ to
"Automatic Fire'* or bursts:
Turn the safety lever until
it comes to rest at "D" and
snaps firmly home. The ”D"
remains fully visible.
Change-over from "Safe” to
"Single shot” (semi-auto):
Turn the safety lever until it comes
to rest at ”E" and snaps firmly home
The "E” remains fully visible.
Extending the folding stock:
Hold the MP by gripping the action
body with the left hand, then unfold
the stock and swing the latter fully
backwards so as to let the stock locking
pin become firmly engaged. The folding
stock is thus locked when fully extended
Folding the stock:
Hold the MP by gripping the action
body with the left hand, grip the stock
with the right hand at a short distance
behind the hinge, then press the release
button down with the right thumb and
turn the stock to allow the lock to dis-
engage. Now let the right hand grip the
stock nearer the end and fold it up
forward against the weapon.
Ill. 8
It
111. 9
ES5SS3-MP
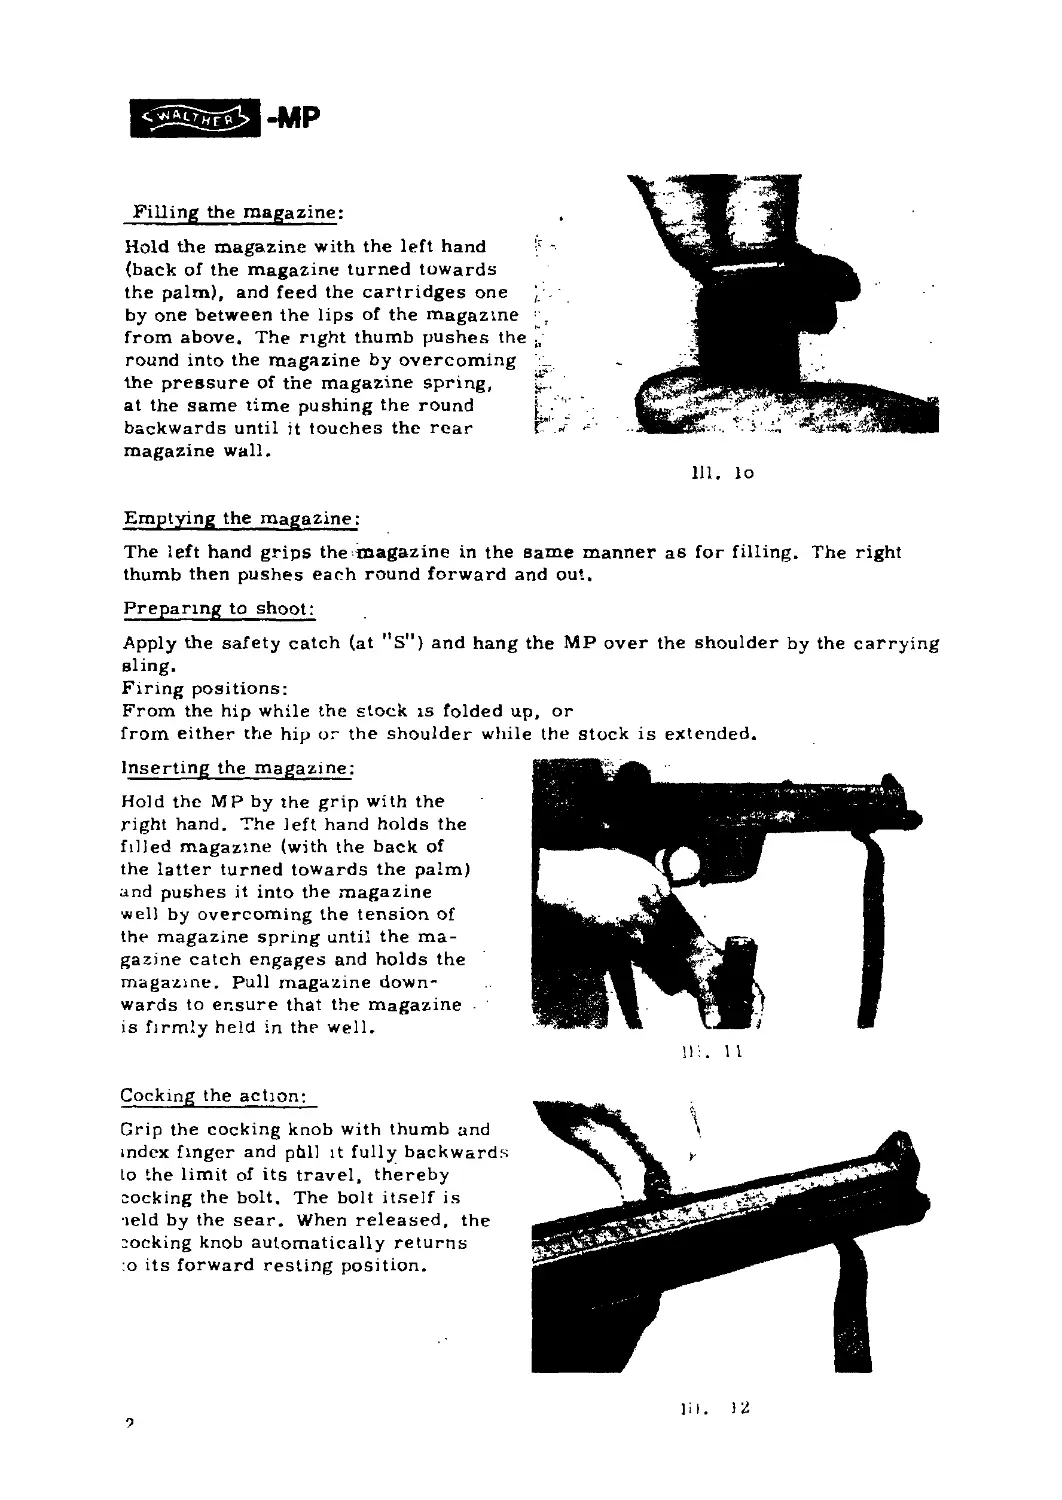
Filling the magazine:
Hold the magazine with the left hand ~
(back of the magazine turned towards
the palm), and feed the cartridges one ‘ -
by one between the lips of the magazine **T
from above. The right thumb pushes the u
round into the magazine by overcoming _
the pressure of the magazine spring,
at the same time pushing the round I .
backwards until it touches the rear
magazine wall.
Emptying the magazine:
The left hand grips the magazine in the same manner aS for filling. The right
thumb then pushes each round forward and out.
Preparing to shoot:
Apply the safety catch (at ”S") and hang the MP over the shoulder by the carrying
sling.
Firing positions:
From the hip while the stock is folded up, or
from either the hip or the shoulder while the stock is extended.
Inserting the magazine:
Hold the MP by the grip with the
right hand. The left hand holds the
filled magazine (with the back of
the latter turned towards the palm)
and pushes it into the magazine
well by overcoming the tension of
the magazine spring until the ma-
gazine catch engages and holds the
magazine. Pull magazine down-
wards to ensure that the magazine
is firmly held in the well.
Cocking the action:
Grip the cocking knob with thumb and
index finger and pbll it fully backwards
to the limit of its travel, thereby
cocking the bolt. The bolt itself is
ield by the sear. When released, the
cocking knob automatically returns
:o its forward resting position.
1Г. И
]il. 12
9
-MP
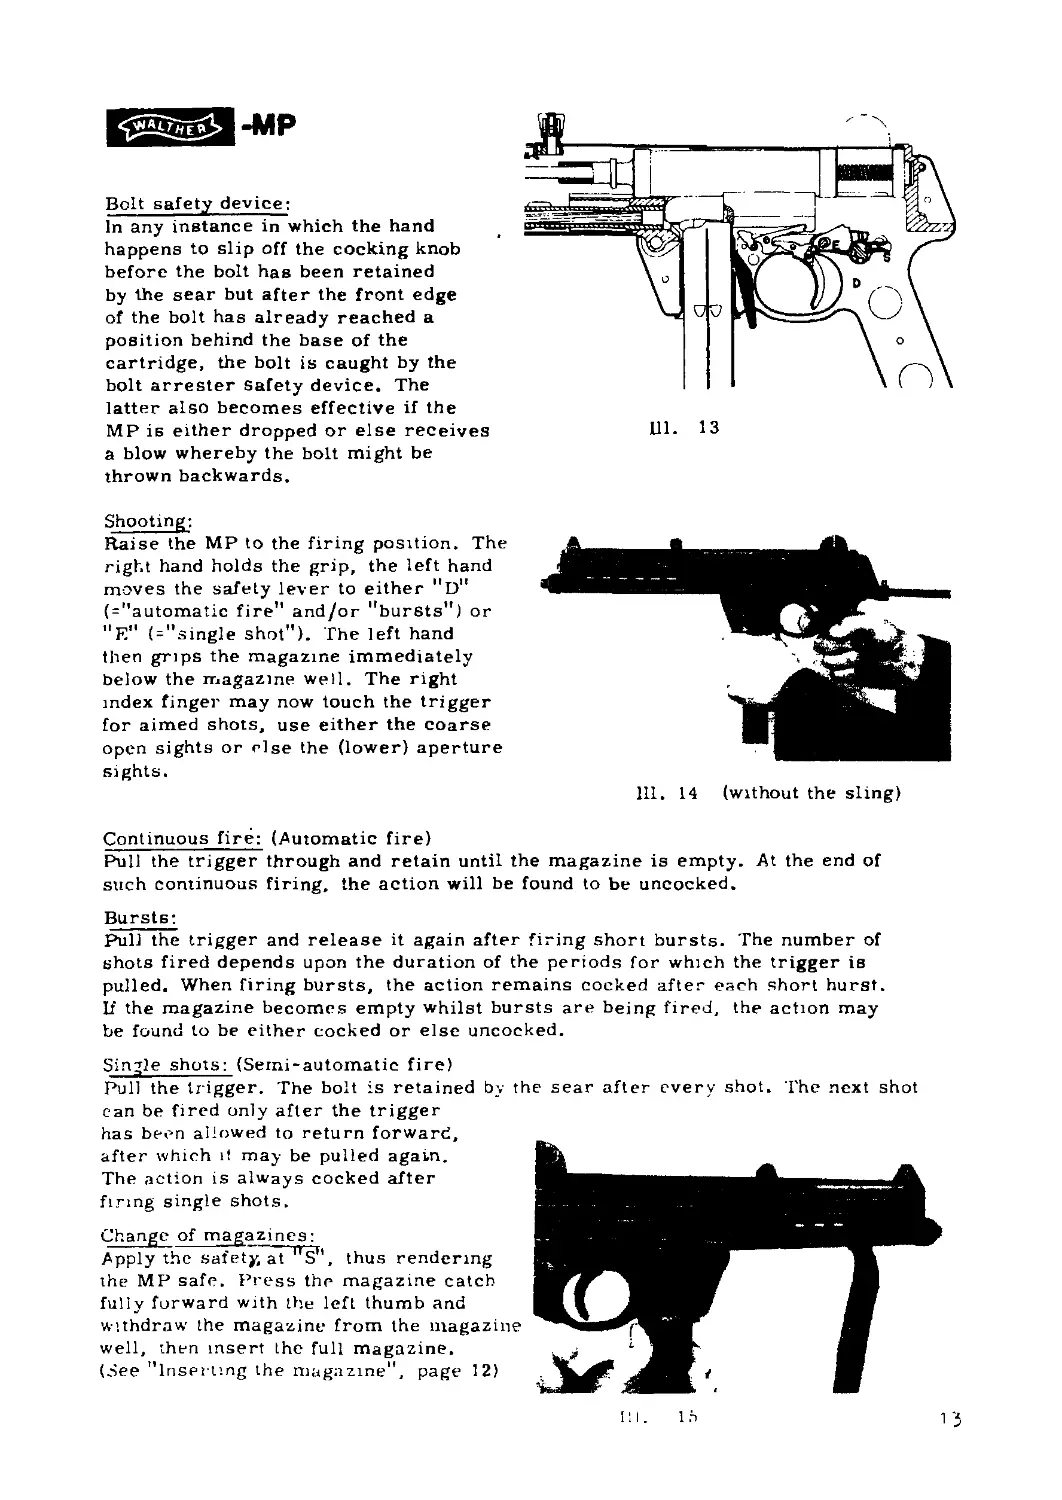
Bolt safety device:
In any instance in which the hand
happens to slip off the cocking knob
before the bolt has been retained
by the sear but after the front edge
of the bolt has already reached a
position behind the base of the
cartridge, the bolt is caught by the
bolt arrester Safety device. The
latter also becomes effective if the
MP is either dropped or else receives
a blow whereby the bolt might be
thrown backwards.
Shooting:
Haise the MP to the firing position. The
right hand holds the grip, the left hand
moves the safety lever to either "d”
( = ”automatic fire” and/or "bursts”) or
"E" (^"single shot”). The left hand
then grips the magazine immediately
below the magazine well. The right
index finger may now touch the trigger
for aimed shots, use either the coarse
open sights or rise the (lower) aperture
sights.
Continuous fire: (Automatic fire)
Pull the trigger through and retain until the magazine is empty. At the end of
such continuous firing, the action will be found to be uncocked.
Bursts:
Pull the trigger and release it again after firing short bursts. The number of
shots fired depends upon the duration of the periods for which the trigger is
pulled. When firing bursts, the action remains cocked after each short hurst.
If the magazine becomes empty whilst bursts are being fired, the action may
be found to be either cocked or else uncocked.
Single shots: (Semi-automatic fire)
Pull the trigger. The bolt is retained by the sear after every shot. The next shot
can be fired only after the trigger
has been allowed to return forward,
after which it may be pulled agatn.
The action is always cocked after
firing single shots.
Change of magazines:
Apply the safety, at "s”, thus rendering
the MP safe. Press the magazine catch
fully forward with the left thumb and
withdraw' the magazine from the magazine
well, then insert the full magazine.
(.See ’’Inserting the magazine", page 12)
III. lb
13
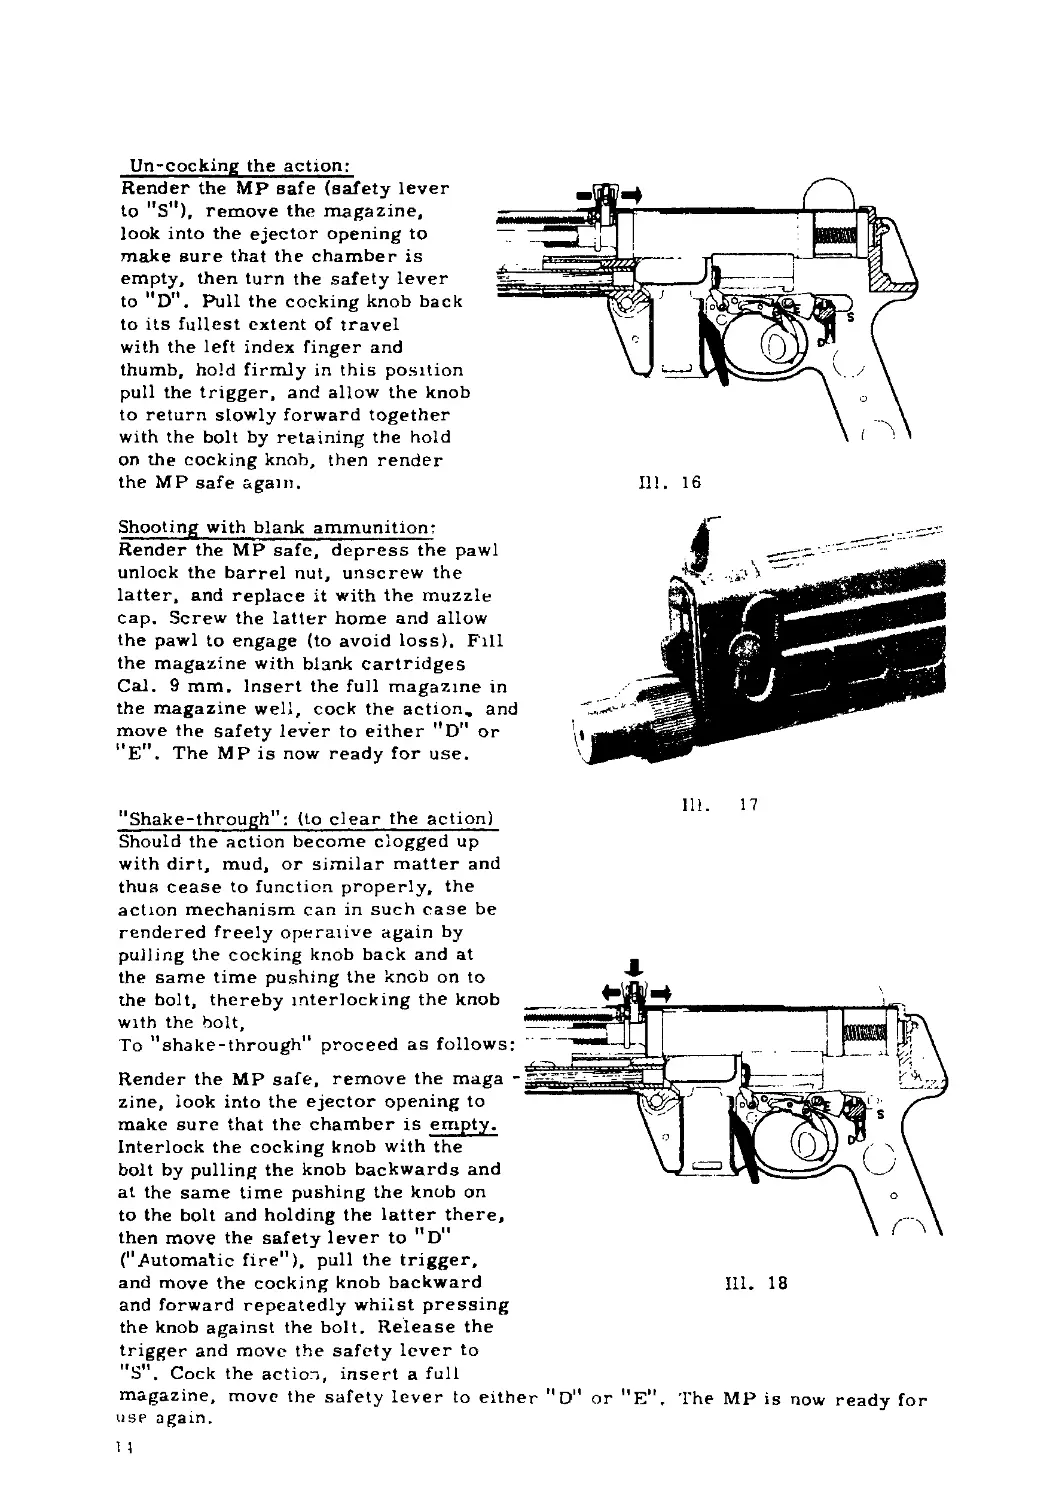
Un-cocking the action:
Render the MP safe (safety lever
to "S”), remove the magazine,
look into the ejector opening to
make sure that the chamber is
empty, then turn the safety lever
to "D”, Pull the cocking knob back
to its fullest extent of travel
with the left index finger and
thumb, hold firmly in this position
pull the trigger, and allow the knob
to return slowly forward together
with the bolt by retaining the hold
on the cocking knob, then render
the MP safe again.
Ill. 16
Shooting with blank ammunition:
Render the MP safe, depress the pawl
unlock the barrel nut, unscrew the
latter, and replace it with the muzzle
cap. Screw the latter home and allow
the pawl to engage (to avoid loss). Fill
the magazine with blank cartridges
Cal. 9 mm. Insert the full magazine in
the magazine well, cock the action, and
move the safety lever to either "D" or
“E”. The MP is now ready for use.
111. 17
"Shake-through"; (to clear the action)
Should the action become clogged up
with dirt, mud, or similar matter and
thus cease to function properly, the
action mechanism can in such case be
rendered freely operative again by
pulling the cocking knob back and at
the same time pushing the knob on to
the bolt, thereby interlocking the knob
with the bolt.
To "shake-through" proceed as follows:
Render the MP safe, remove the maga
zine, look into the ejector opening to
make sure that the chamber is empty.
Interlock the cocking knob with the
bolt by pulling the knob backwards and
at the same time pushing the knob on
to the bolt and holding the latter there,
then move the safety lever to "D"
(".Automatic fire"), pull the trigger,
and move the cocking knob backward
and forward repeatedly whilst pressing
the knob against the bolt. Release the
Ill. 18
trigger and move the safety lever to
"S". Cock the action, insert a full
magazine, move the safety lever to either "d" or "E". The MP is now ready for
use again.
I 1
Еёр*553-мр
D i s m a n tling the MP for cleanin
Preparing to dismantle:
Render the MP safe, remove the magazine, unload by cocking the action. Look
into the ejector opening to make sure that the chamber is empty. Move safety
lever from ’’S’* to ''D'*, uncock the action (see page 14), then render the MP safe
again.
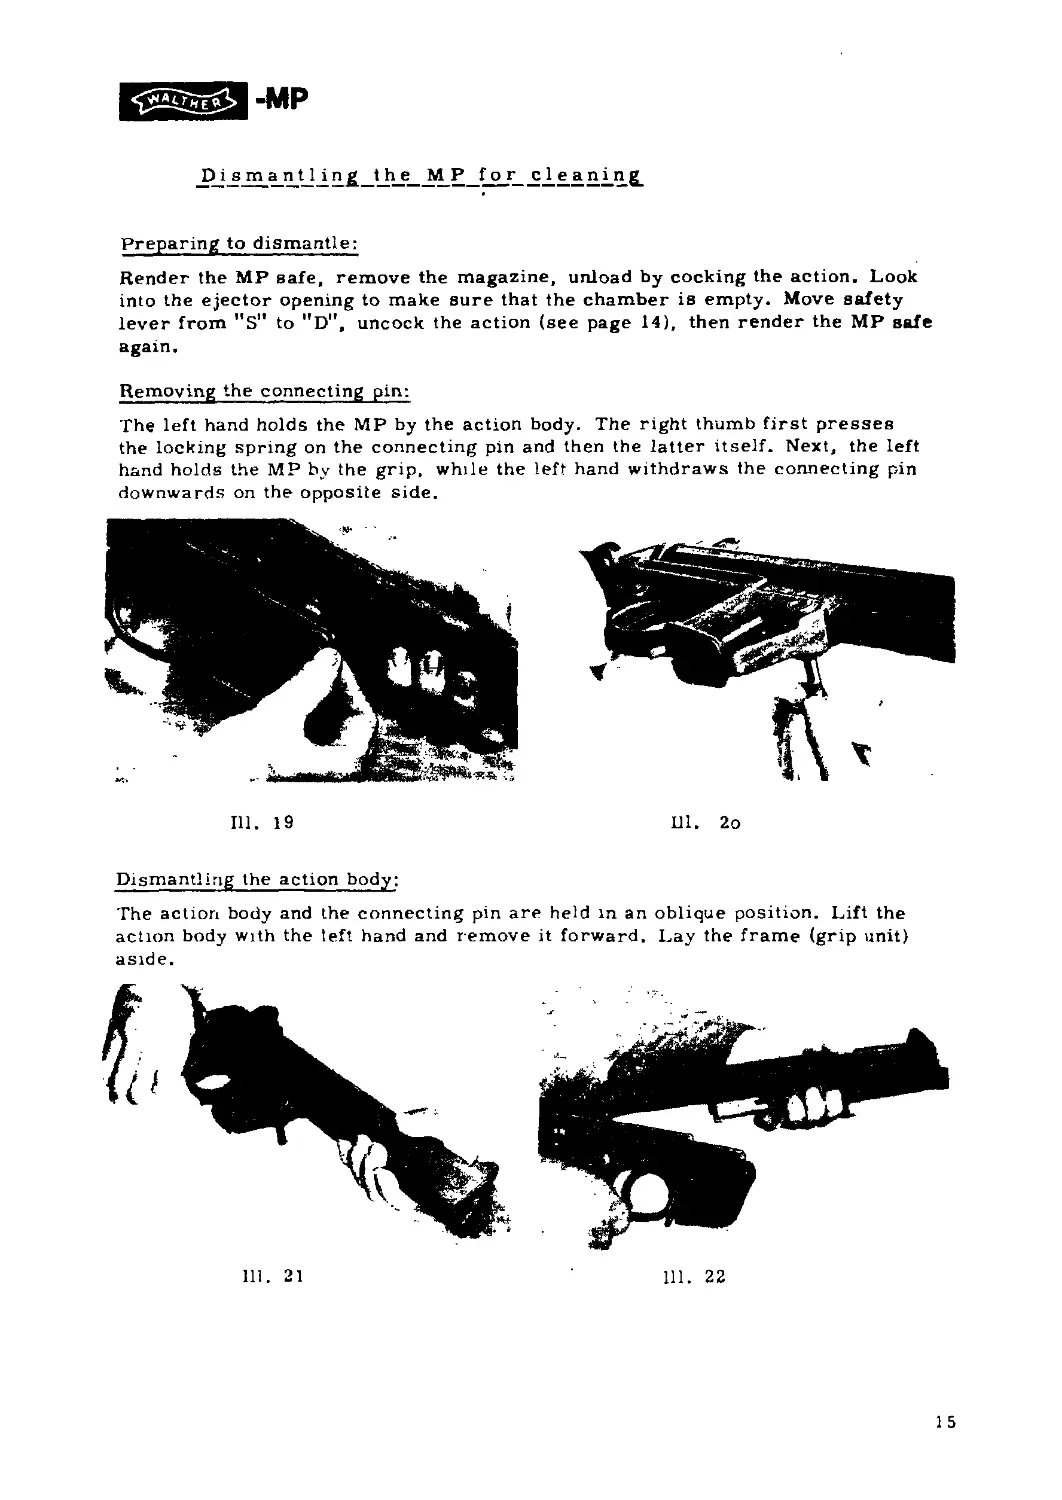
Removing the connecting pin:
The left hand holds the MP by the action body. The right thumb first presses
the locking spring on the connecting pin and then the latter itself. Next, the left
hand holds the MP by the grip, while the left hand withdraws the connecting pin
downwards on the opposite side.
Ill. 19
DI. 2o
Dismantling the action body:
The action body and the connecting pin are held in an oblique position. Lift the
action body with the left hand and remove it forward. Lay the frame (grip unit)
aside.
15
-MP
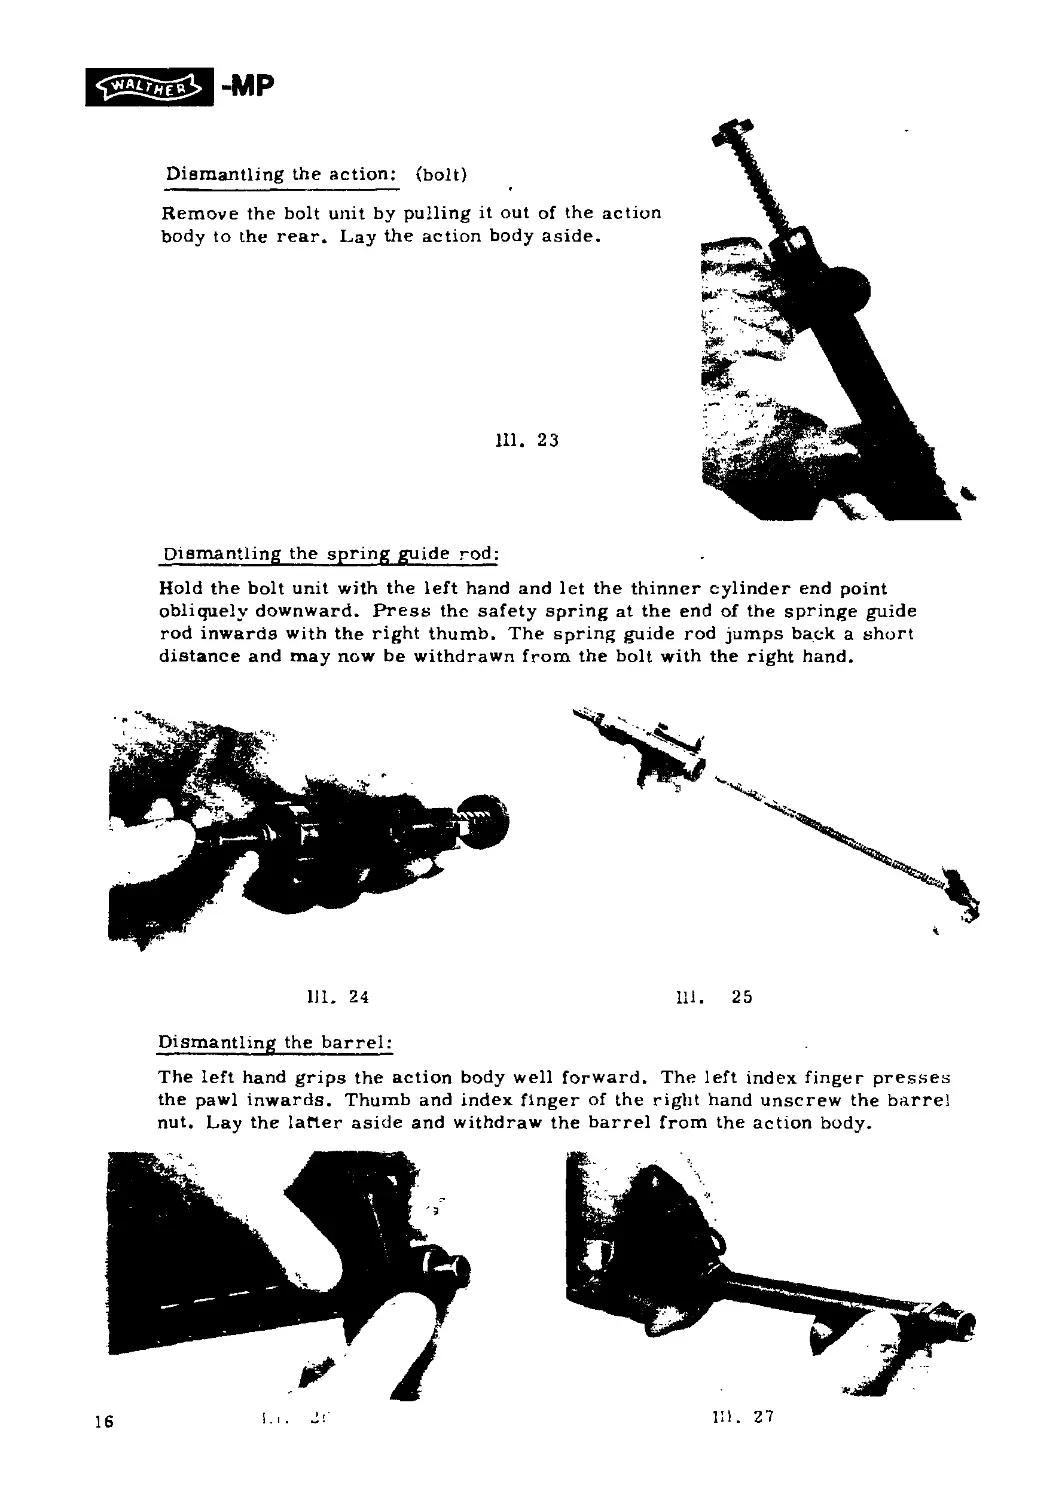
Dismantling the action: (bolt)
Remove the bolt unit by pulling it out of the action
body to the rear. Lay the action body aside.
111. 23
Dismantling the spring guide rod:
Hold the bolt unit with the left hand and let the thinner cylinder end point
obliquely downward. Press the safety spring at the end of the springe guide
rod inwards with the right thumb. The spring guide rod jumps back a short
distance and may now be withdrawn from the bolt with the right hand.
111. 24 111. 25
Dismantling the barrel:
The left hand grips the action body well forward. The left index finger presses
the pawl inwards. Thumb and index finger of the right hand unscrew the barrel
nut. Lay the latter aside and withdraw the barrel from the action body.
16
III. 27
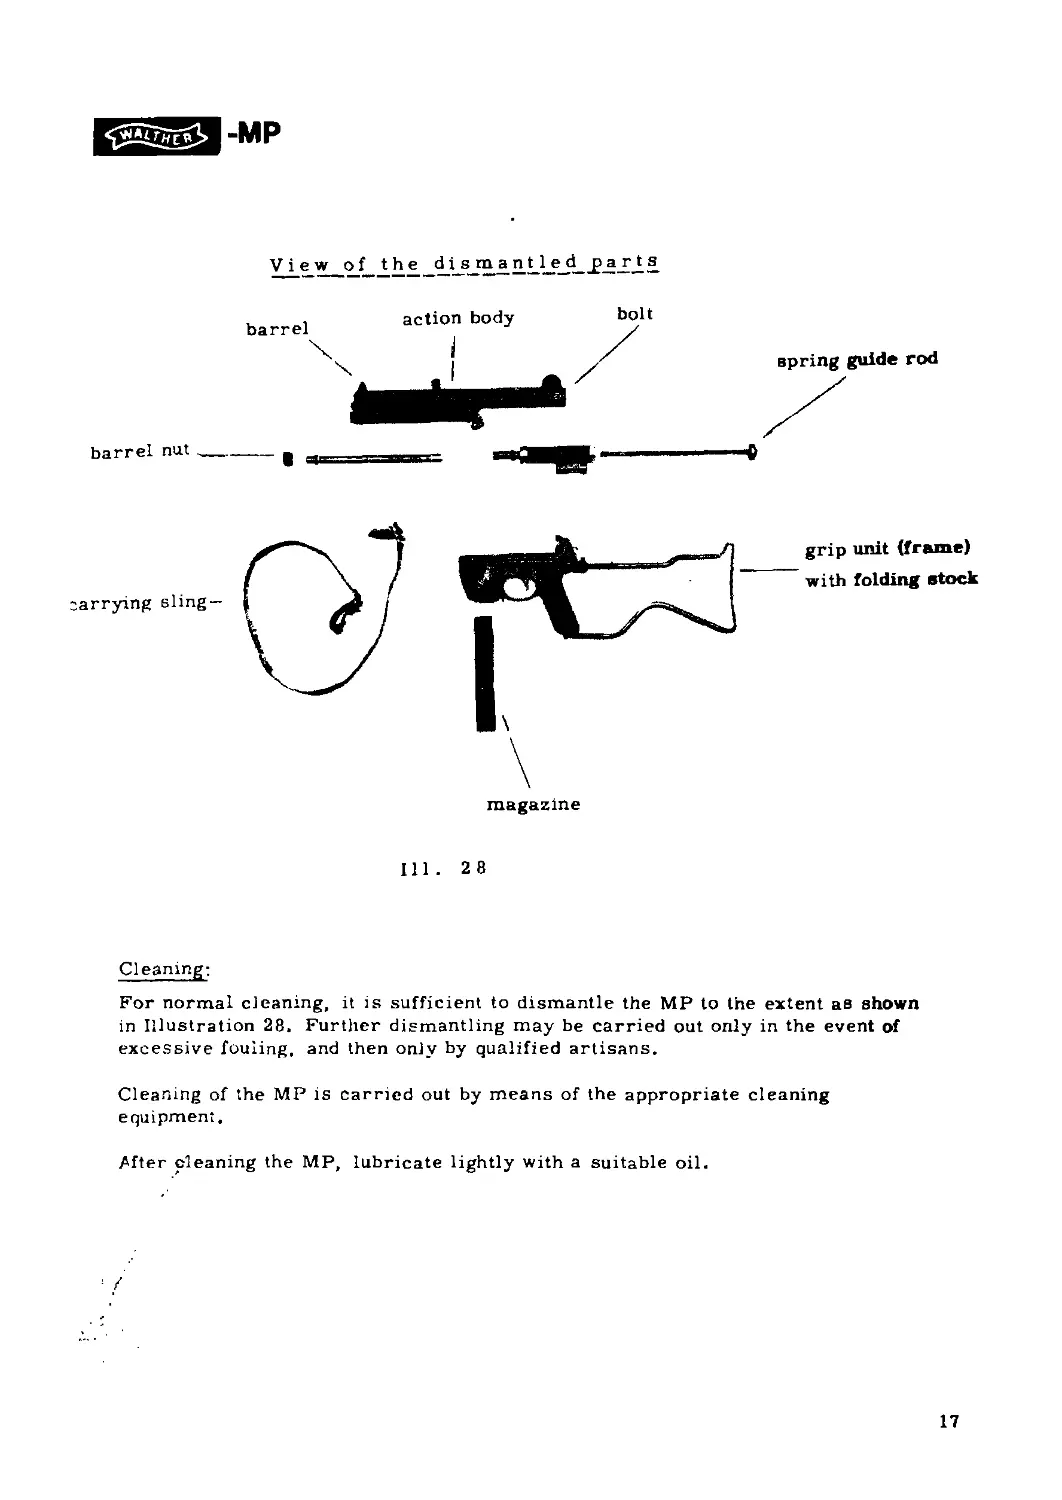
barrel nut
View of the dismantled j>arts
spring guide rod
carrying sling-
magazine
grip unit (frame)
with folding stock
«
Ill. 28
Cleaning:
For normal cleaning, it is sufficient to dismantle the MP to the extent as shown
in Illustration 28. Further dismantling may be carried out only in the event of
excessive fouling, and then only by qualified artisans.
Cleaning of the MP is carried out by means of the appropriate cleaning
equipment.
ЛПег cleaning the MP, lubricate lightly with a suitable oil.
17
Ass ern b i i ng the d i s_m a in £l_e d___________£_2_£rLQ_2_rL£_,LL_s
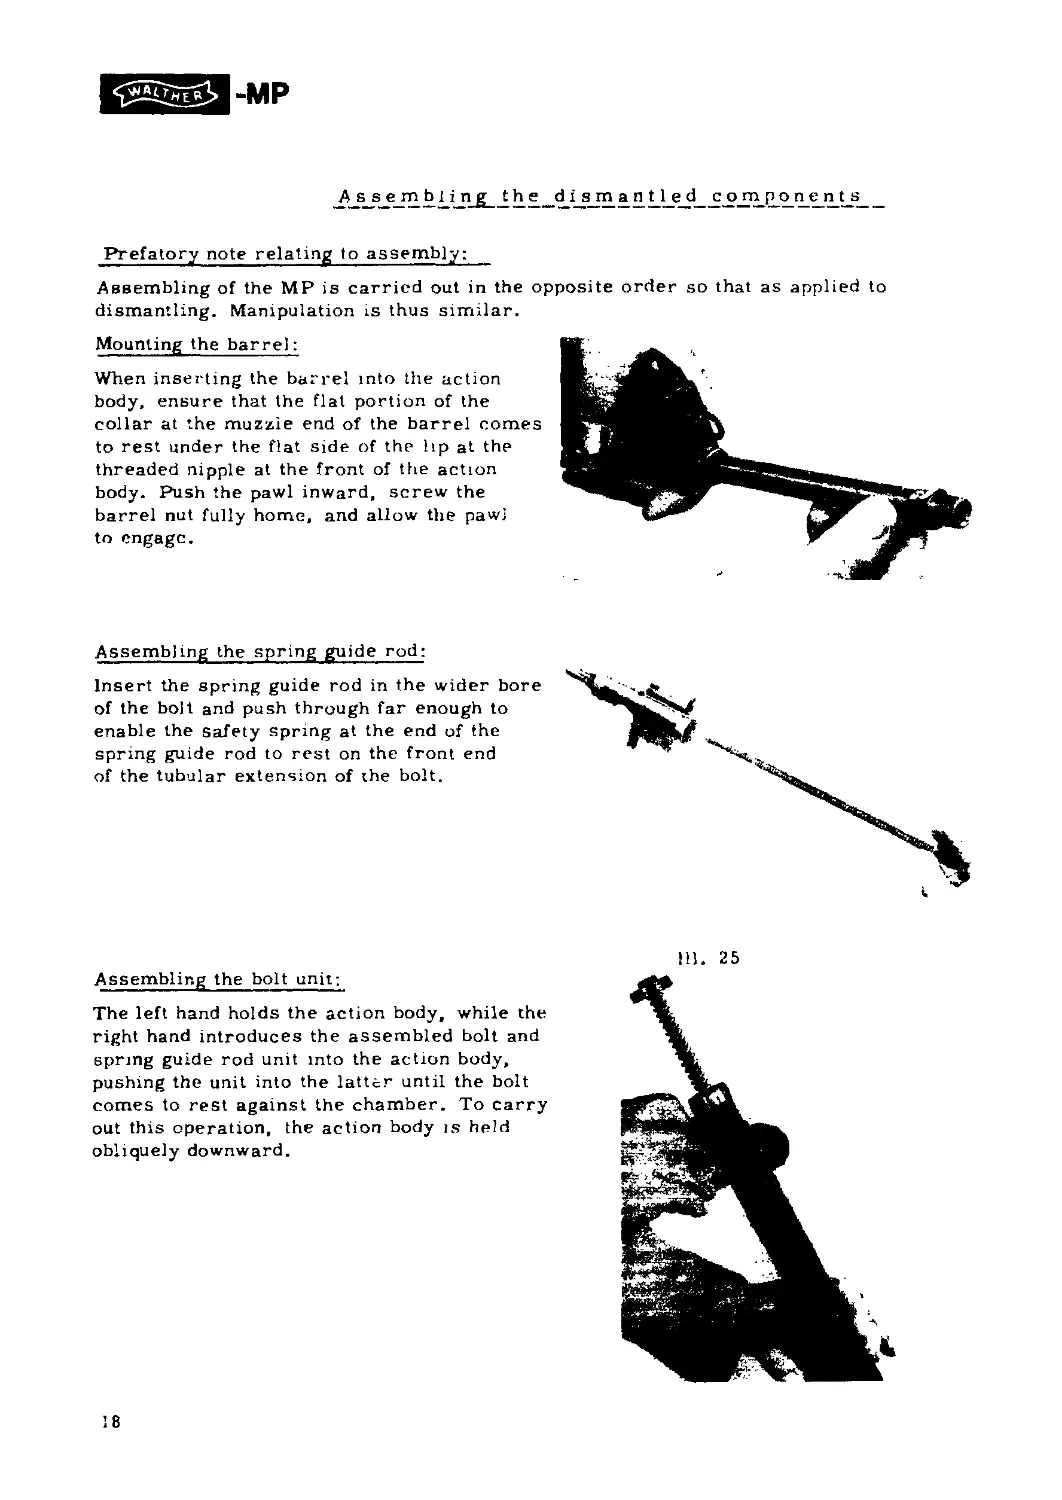
Prefatory note relating to assembly:
Assembling of the MP is carried out in the opposite order so that as applied to
dismantling. Manipulation is thus similar.
Mounting the barrel:
When inserting the barrel into the action
body, ensure that the flat portion of the
collar at the muzzle end of the barrel comes
to rest under the flat side of the lip at the
threaded nipple at the front of the action
body. Push the pawl inward, screw the
barrel nut fully home, and allow the pawl
to engage.
Assembling the spring guide rod:
Insert the spring guide rod in the wider bore
of the bolt and push through far enough to
enable the safety spring at the end of the
spring guide rod to rest on the front end
of the tubular extension of the bolt.
Assembling the bolt unit:
The left hand holds the action body, while the
right hand introduces the assembled bolt and
spring guide rod unit into the action body,
pushing the unit into the latter until the bolt
comes to rest against the chamber. To carry
out this operation, the action body is held
obliquely downward.
Hl. 25
18
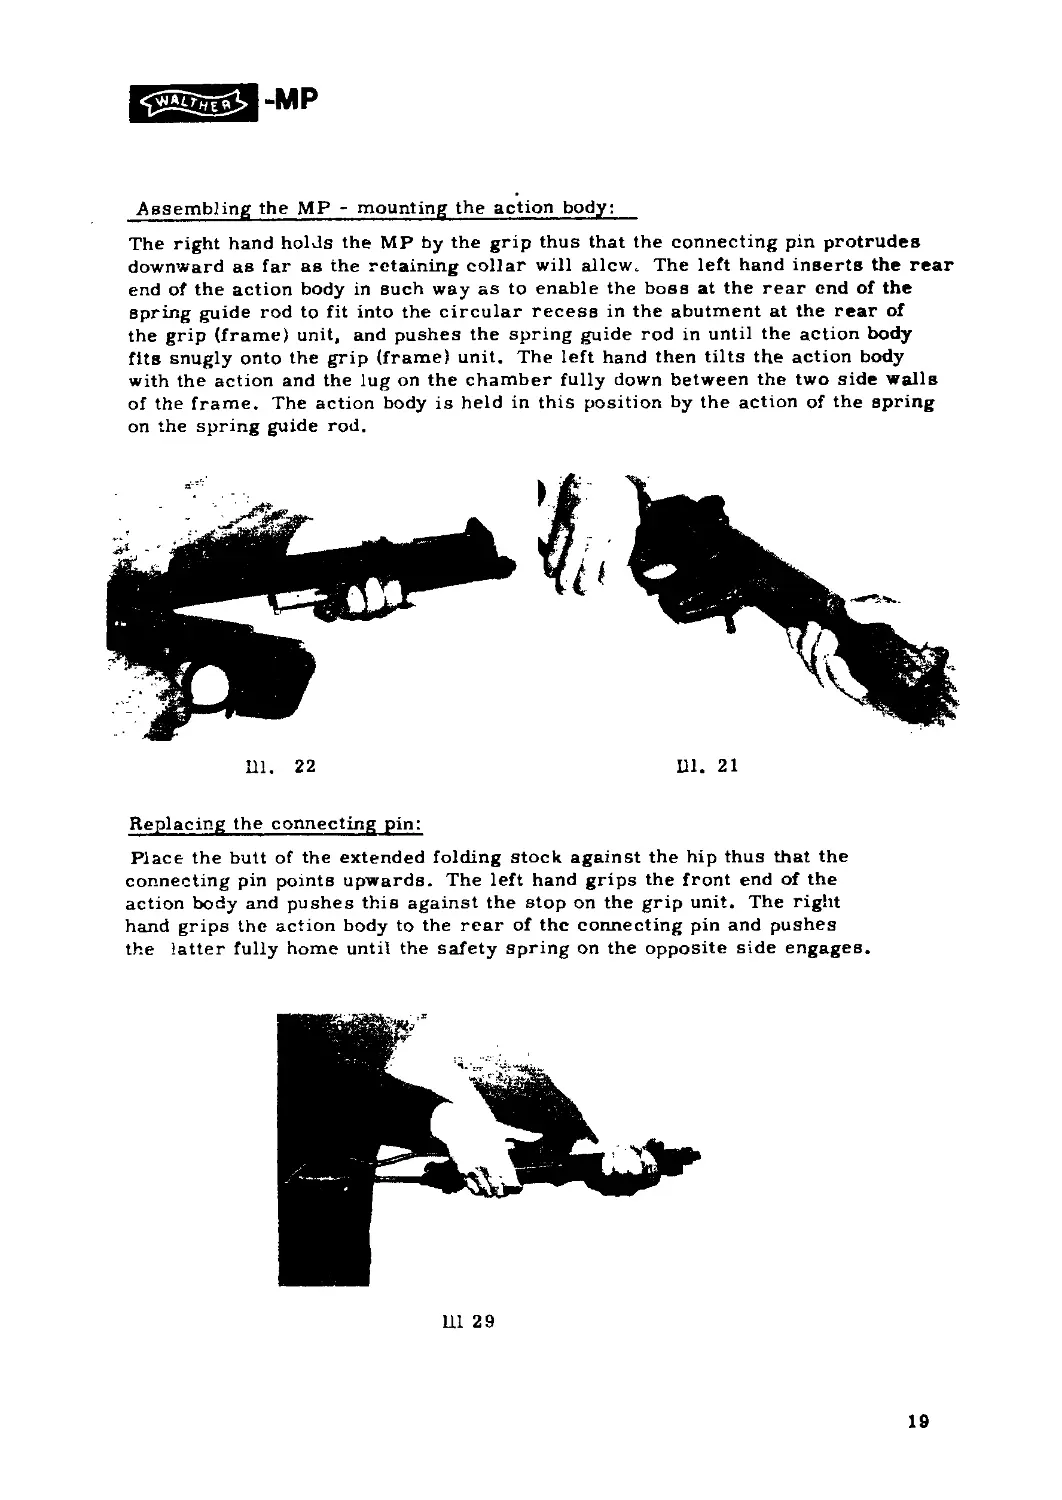
Assembling the MP - mounting the action body:
The right hand holds the MP by the grip thus that the connecting pin protrudes
downward as far as the retaining collar will allcw. The left hand inserts the rear
end of the action body in such way as to enable the boss at the rear end of the
spring guide rod to fit into the circular recess in the abutment at the rear of
the grip (frame) unit, and pushes the spring guide rod in until the action body
fits snugly onto the grip (frame) unit. The left hand then tilts the action body
with the action and the lug on the chamber fully down between the two side walls
of the frame. The action body is held in this position by the action of the spring
on the spring guide rod.
Replacing the connecting pin:
Place the butt of the extended folding stock against the hip thus that the
connecting pin points upwards. The left hand grips the front end of the
action body and pushes this against the stop on the grip unit. The right
hand grips the action body to the rear of the connecting pin and pushes
the latter fully home until the safety spring on the opposite side engages.
Ш 29
19
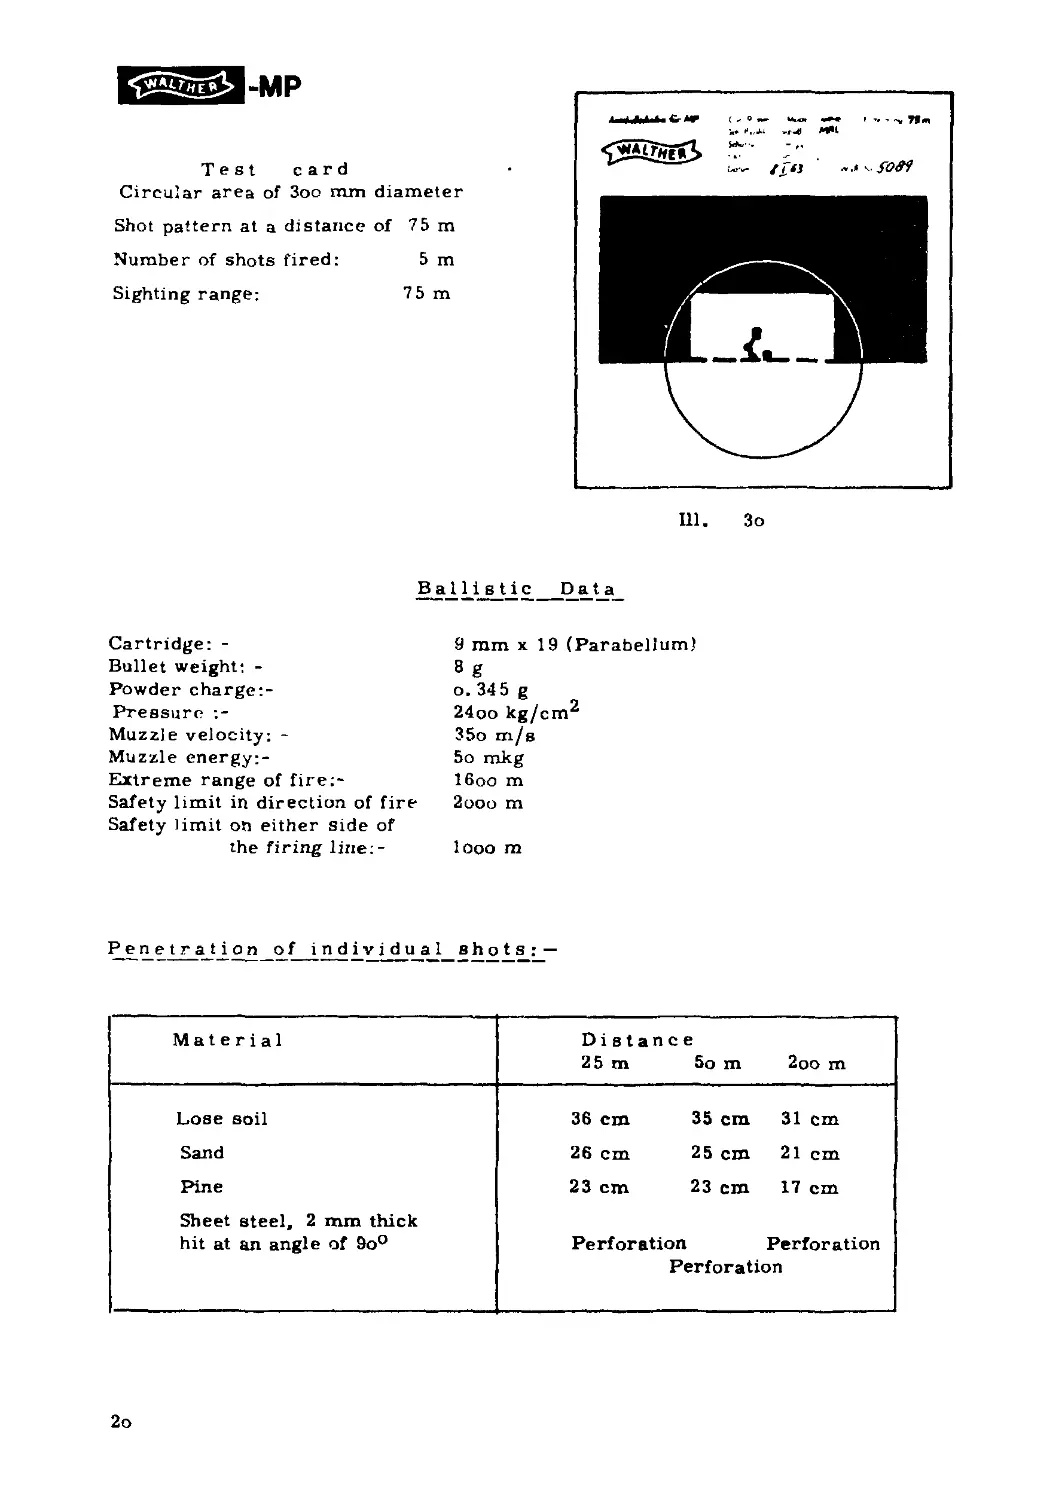
Test card
Circular area of 3oo mm diameter
Shot pattern at a distance of 75 m
Number of shots fired: 5 m
Sighting range: 75 m
Ba 1 list i c Data
Cartridge: -
Bullet weight: -
Powder charge:-
Pressure
Muzzle velocity: -
Muzzle energy:-
Extreme range of fire;-
Safety limit in direction of fire
Safety limit on either side of
the firing line:-
9 mm x 19 (Parahelium)
8 g
o. 34 5 g
24oo kg/cm^
35o m/s
5o mkg
16oo m
2ooo m
looo m
Penetration of individual shots:—
Material Distance
25 m 5o m 2oo m
Lose soil 36 cm 35 cm 31 cm
Sand 26 cm 25 cm 21 cm
Pine Sheet steely 2 mm thick 23 cm 23 cm 17 cm
hit at an angle of 9o° Perforation Perforation Perforation
2o