/


Author: Dowde J.
Tags: knitting needlework


Text
Freeform
JENNY DOWDE
Wk
Contents
Acknowledgements 8
About This Book 9
‘Taking Your Yarn for a Walk’ —
The Technique of Scrumbling 10
What is scrambling?
Colour 12
The basics of colour theory
Colour interaction
Tips for livening up a colour scheme
Developing a colour scheme
Design 27
Colour
Contrast
Unity
Value
Texture
Generating design ideas on the computer
Creating garment templates on the computer
Fragments — An Introduction 31
Crochet hook sizes
Knitting needle sizes
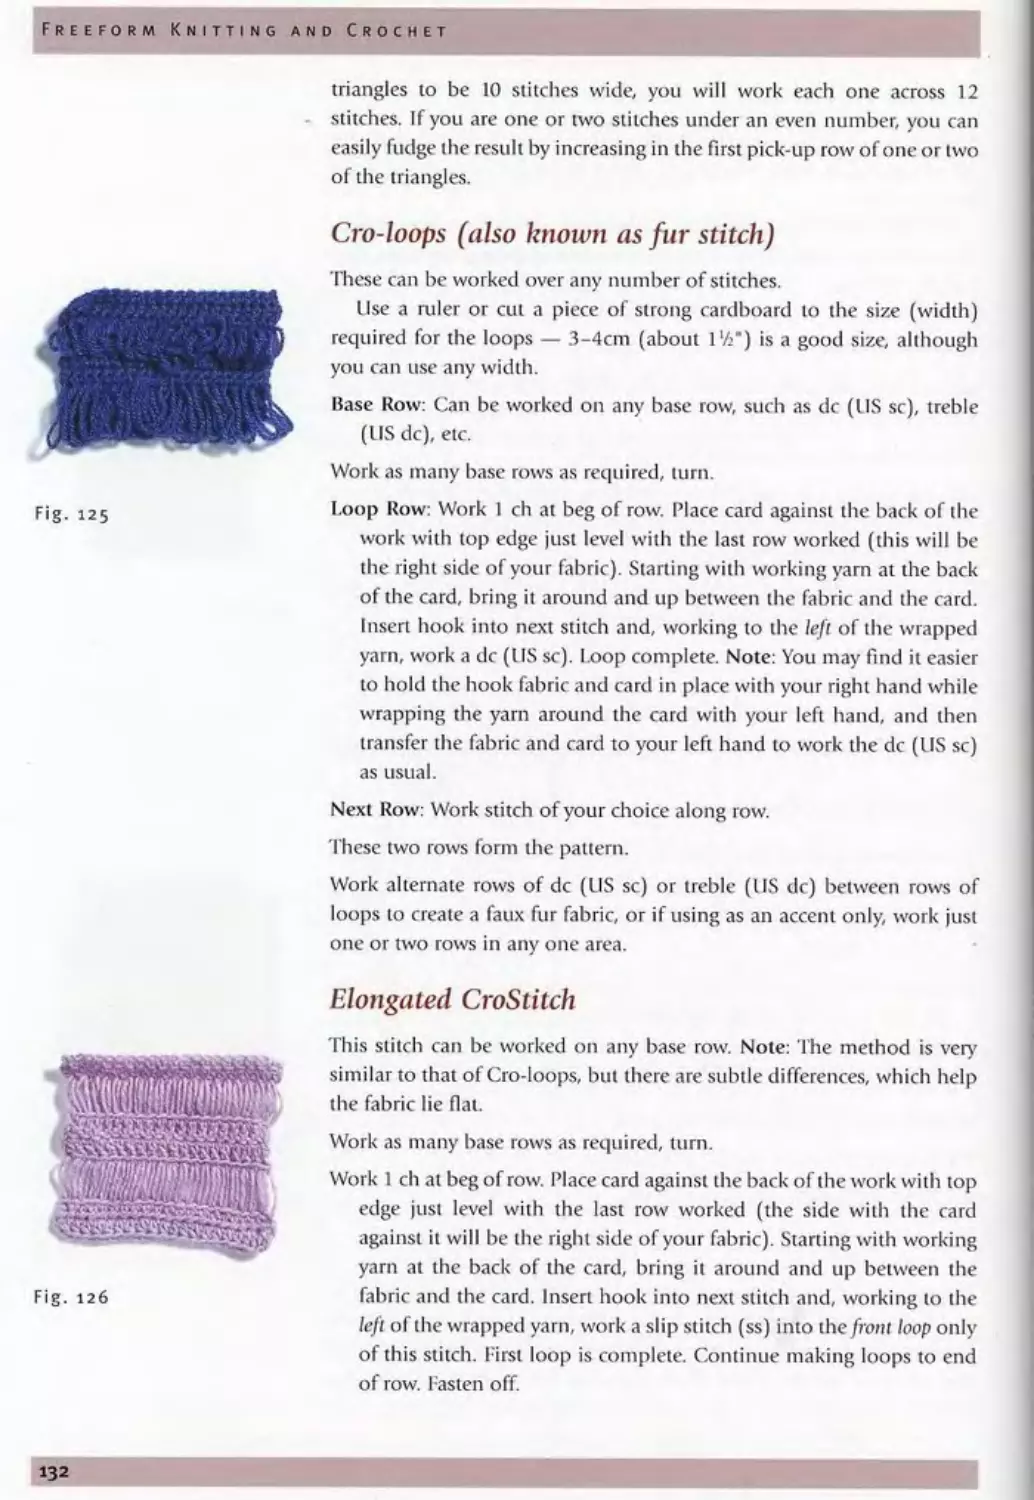
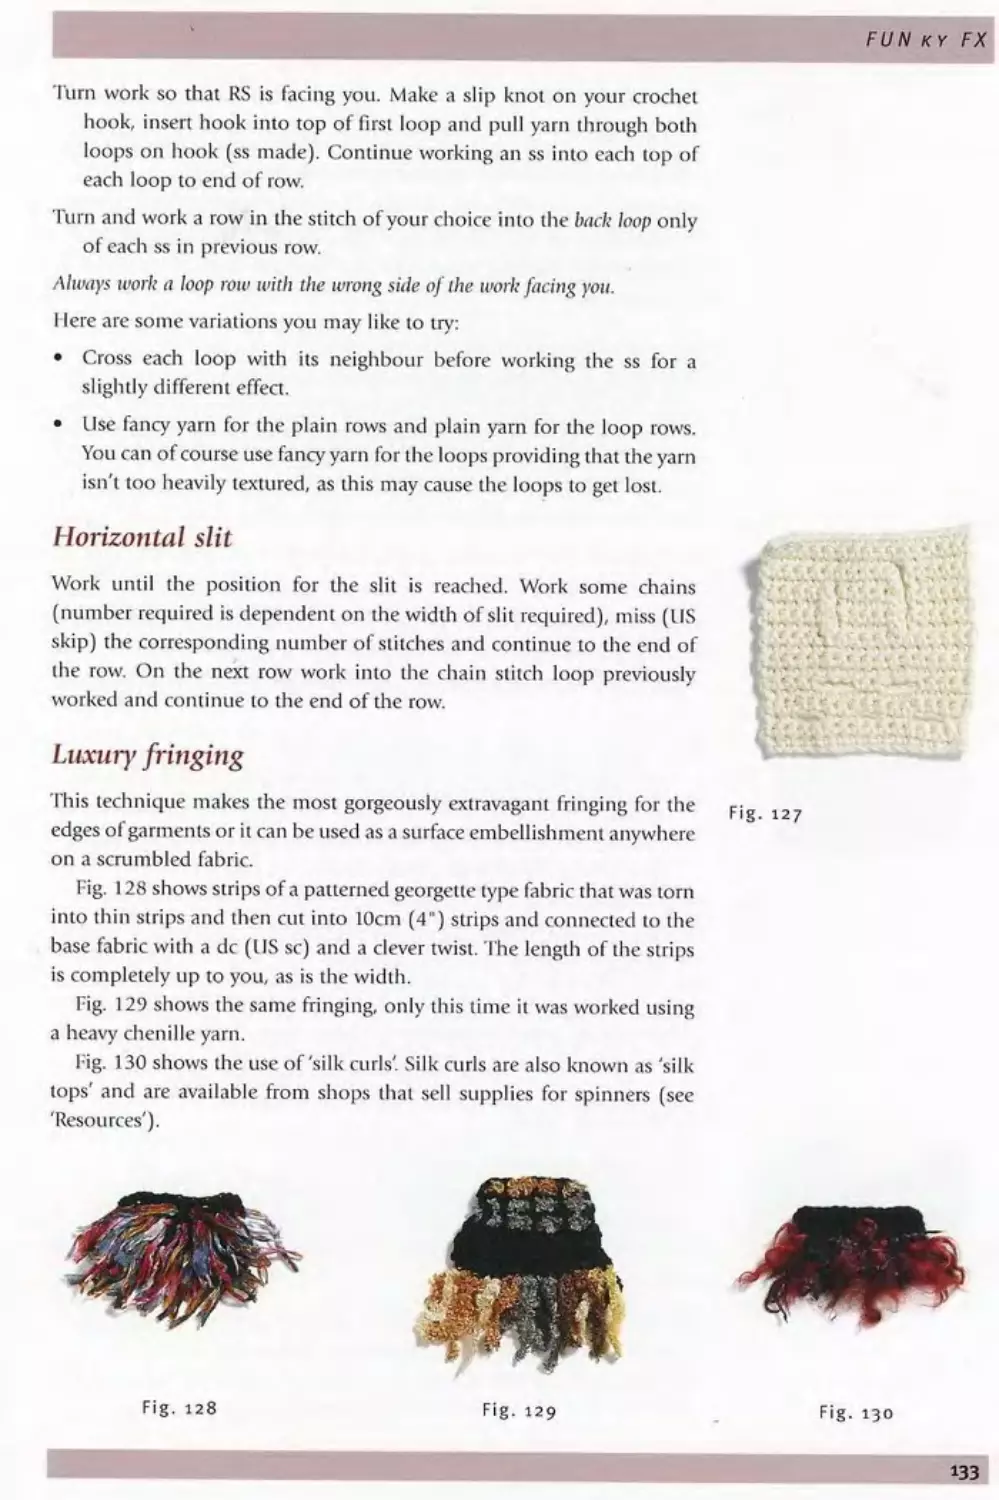
Crochet Fragments 33
Crochet fragment 1
Crochet fragment 2
Crochet fragment 3
Crochet fragment 4
Knit Fragments 40
Knit fragment 1
Knit fragment 2
Creating your own knit fragments
Projects 46
Special contributions 46
Crochet Fragment Beret 48
Knit Fragment Bag 51
Log Cabin Knitted Bag 54
Knitted Fragmented Strips Bag 57
Crocheted Fragmented Strips Bag 64
Scarf d’Opulence 69
Easy Crochet (or Knit) T-Square Shawl 72
Chain Loop Beret 75
Basic Crocheted Bag 78
Crocheted Wire Amulet Bag 82
Knit Bead Amulet Bag 90
Ruana Collar 93
The Scarf That Grew 97
Zebra Bag 102
Fold ’n Rolled Hat 107
Native Blossom Hat 111
Metallic Tunic with Floral Applique 115
Buttons and Closures 118
Polymer clay fragment buttons 119
Moulded buttons 122
Carved closures 124
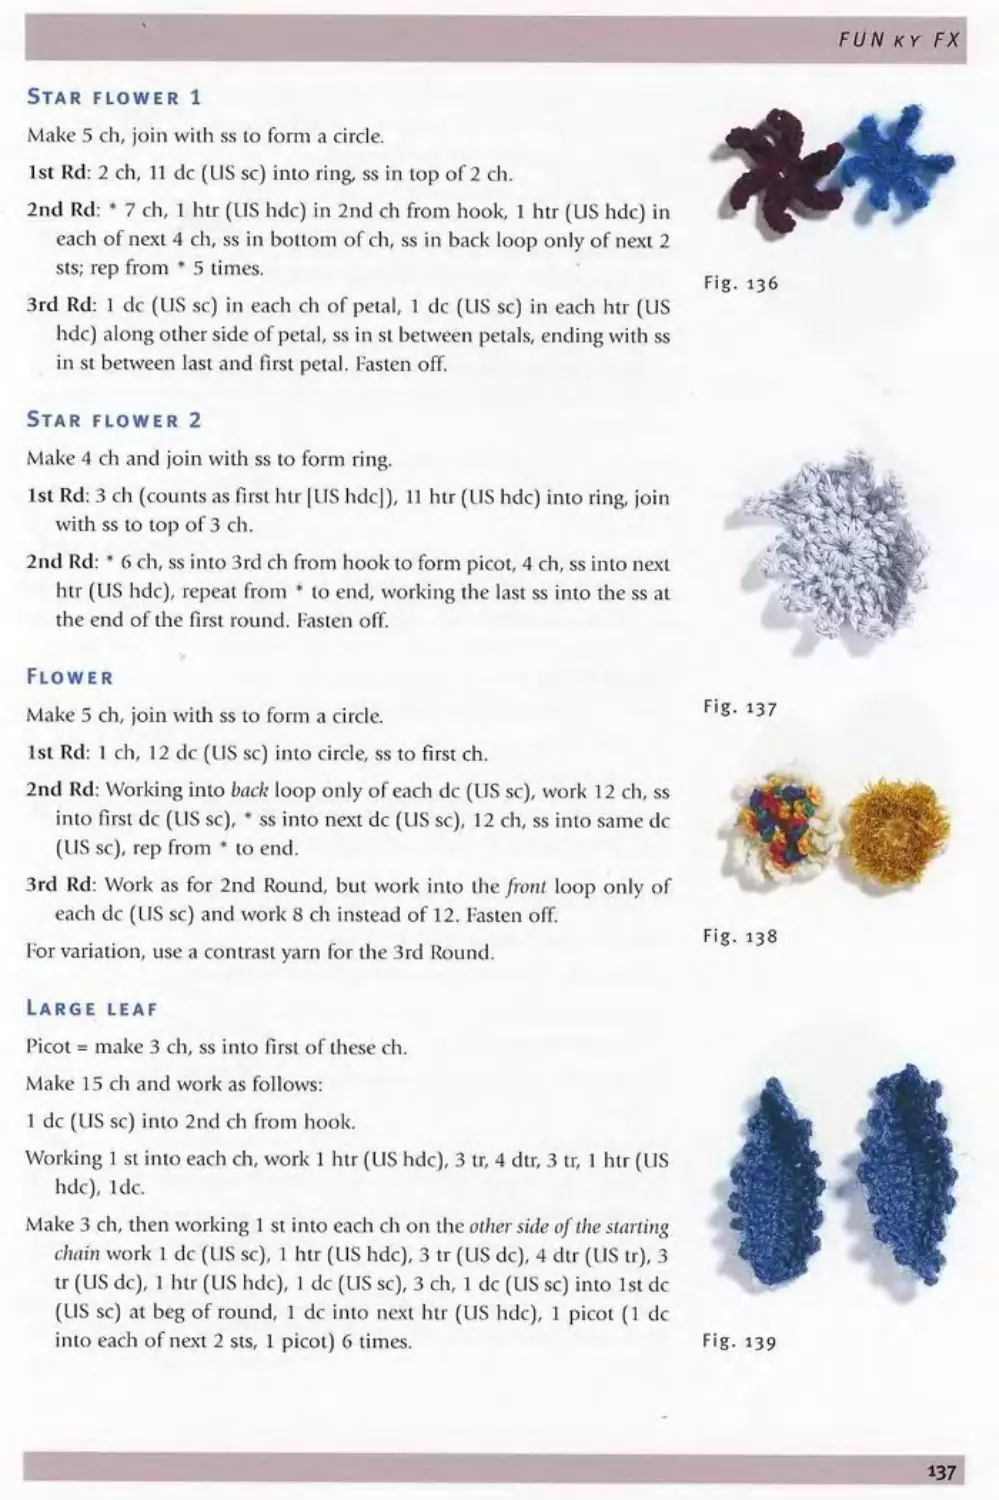
FUNkyFX 127
Crochet FX 127
Knitting FX 139
Crochet Stitch Collection 148
Corded rib (or crab stitch)
Back raised ridge
Front raised ridge
Trailing stitch
Spiral
Surface crochet — Method 1
Surface crochet — Method 2
Five treble bobble
Bent bobbles
Popcorn stitch
Limpets
3D circles
Crumpled stitch
Chain loop pile stitch
Ruffle
Roundells
Flutterby wings (or Lazy J stitch)
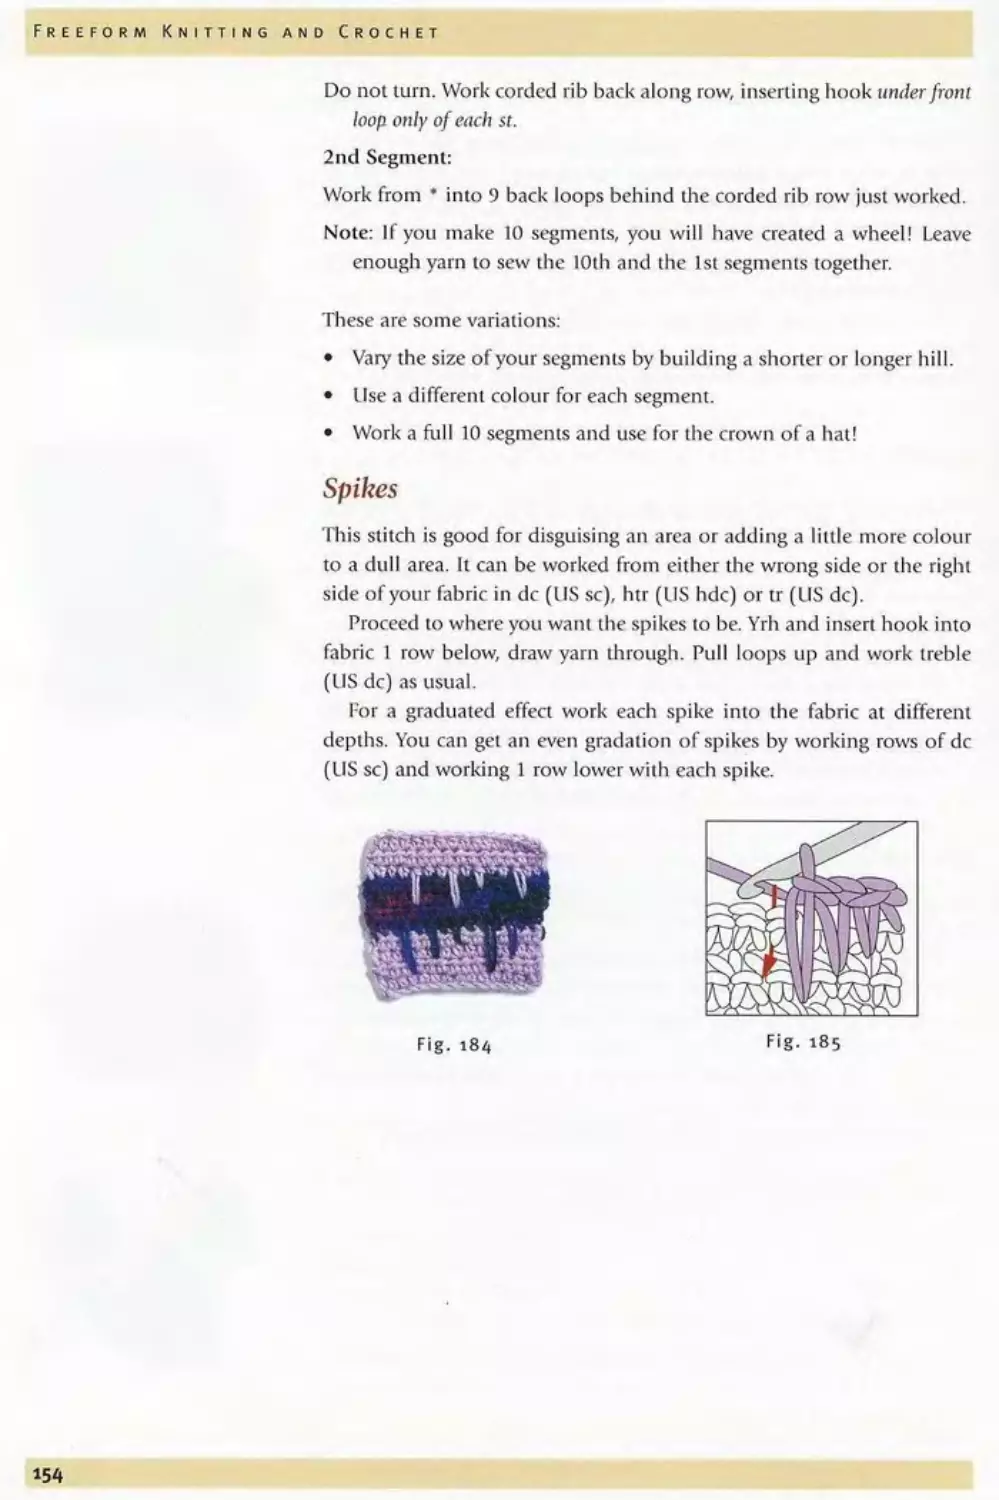
Spikes
How to
Thumb cast-on
Tassels
Right bias strip
Left bias strip
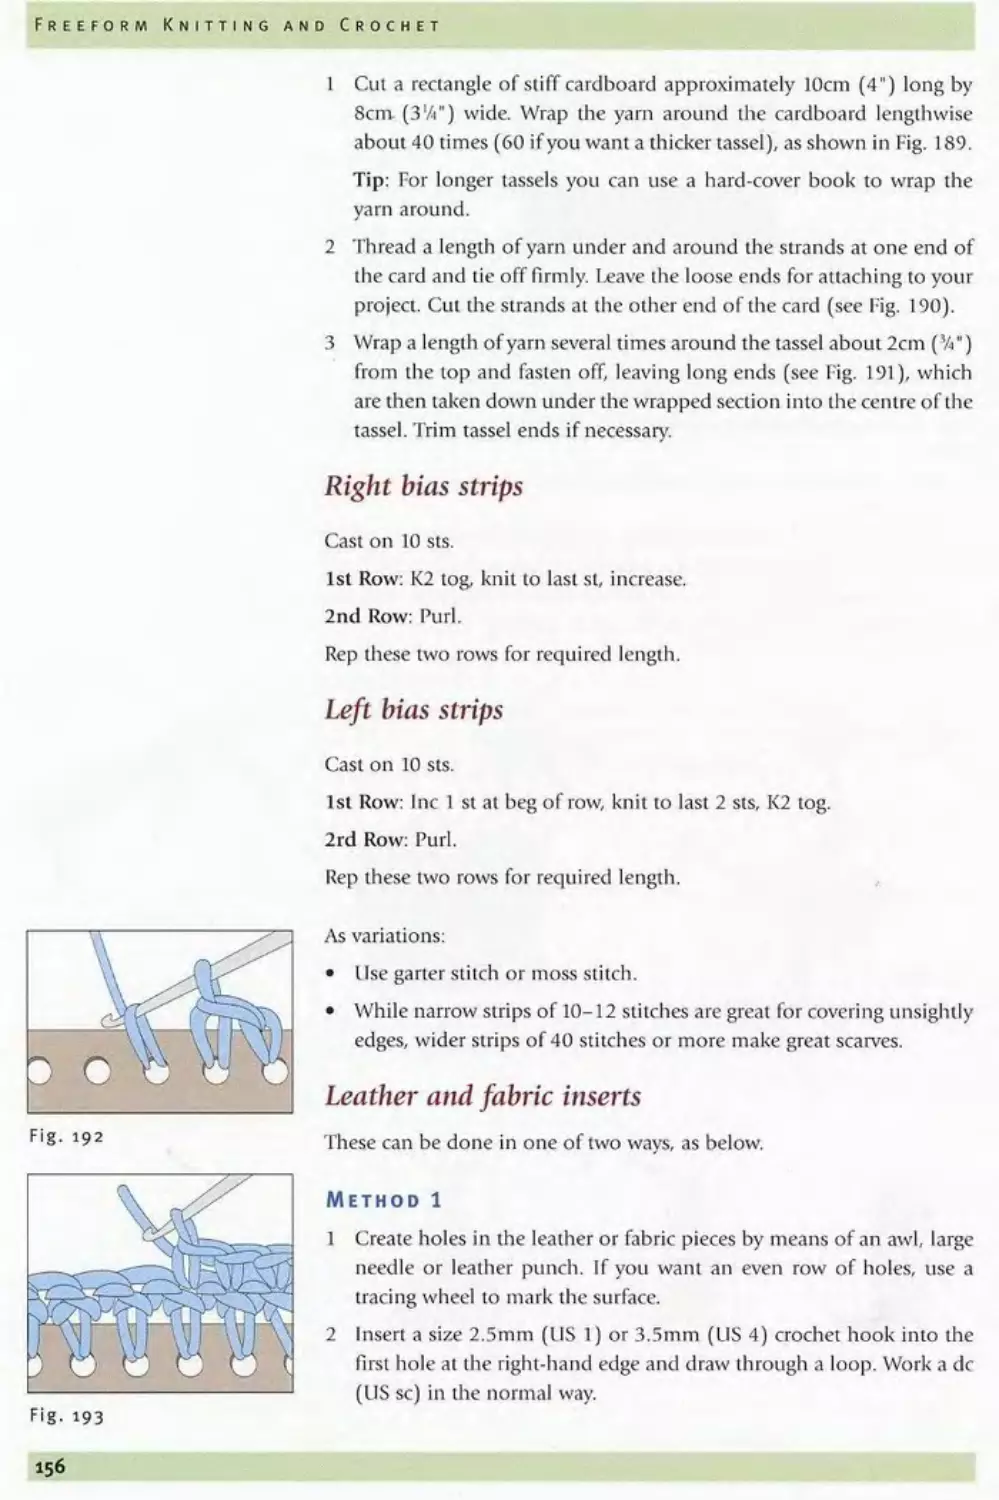
Leather and fabric inserts
Short row (or partial knitting)
Twisted fringe
Attaching a fringe
Mattress stitch
Beading
Lining bags
Putting It All Together
Creating a garment template
Assembling crochet or knit fabrics
Sewing freeform garments together
Using a template for fragmented strips fabric
Using your template as a permanent lining
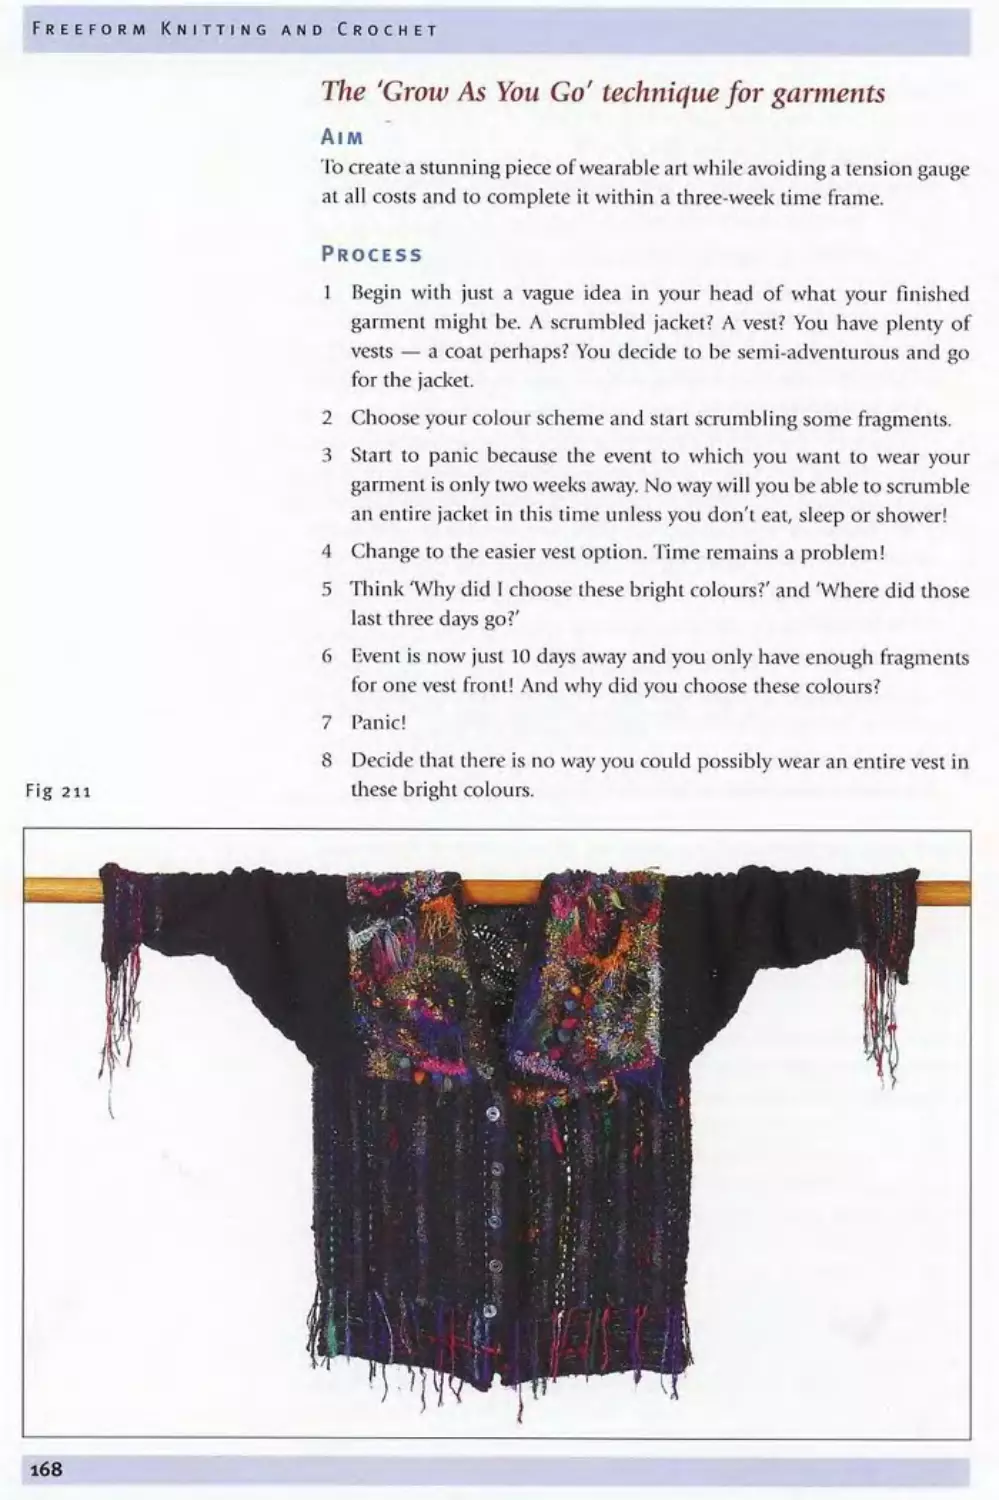
The 'Grow As You Go' technique for garments
It’s Time to Spread Your Wings
Gallery
Bibliography and Suggested Reading
Resources
‘Taking Your Yarn
for a Walk’ -
The Technique of Scrumbling
once used the words 'taking a line for a walk’ when talking about his
painting and drawing. It so aptly describes scrumbling.
1 first discovered the technique of scrambling in 1997 when 1
attended a workshop called The Fabric of Landscape' held at Mittagong
Textile Fibre Forum, 'lite tutors were Sylvia Cosh and James Walters from
the United Kingdom and they changed my creative life.
What is 'scrumbling'?
' It is all about peeling off the layers of household grime which have
accumulated around the infinitely popular, but limited, "painting by
numbers " tradition of domestic crochet. It is a brilliantly simple and
expressive technique: starting with a hook and a continuous thread
of some kind, each of us can make fabrics and structures in two and
three dimensions, allowing our eyes, hands and heart all to work
together to create intuitively and immediately.’
James Walters
1 had been a knit designer for many years, mainly machine knits, and I
creating unique designs easily! I was never one for doing swatches; in
fact, I hated making them and avoided it wherever possible. Il was this
that led to a design approach slightly less technical than the norm.
Many of my designs, both of necessity and by preference, evolved on
the machine. Il was impossible to adhere to the original design idea
because more often than not the lack of a swatch and therefore the lack
of a stitch gauge meant that my garments were usually loo small. It was
inevitable, therefore, that I began to think outside the square and this
'Taking your Yarn for a Wa
grew to be a wonderfully liberating experience. It mattered not in the
least that a jacket was too short or too narrow. Adding a contrasting yoke
or panels soon fixed this, and I found that by throwing the rules out the
window 1 could create wonderful wearables that were even more
unusual than the original idea — and without having to follow a
pattern!
I have given this approach to making garments the title 'Grow As You
Go' and you can read about it at the end of the 'Putting It All Together1
Scrumbling is like that. It offers total design freedom, and for me this
is the most compelling characteristic of the technique. You need only the
basics of crochet to scramble. Chains, double crochet (US sc), trebles
(US de), etc. — these form the basis of all the textured stitches. And since
you don't have to follow rules or patterns, or worry about the edges
being even and so on, you don't ever need to worry about the technical
side of crochet.
While my introduction to scrambling came through the medium of
crochet, I have for some time now been scrumbling with my knitting
needles as well, just as 1 once did on my knitting machine. Once again,
you can throw out the rales and let your yarns and needles work for you.
As with crochet, you really only need the basics — casting on, casting
off, and knit and purl stitches! With knitted scrumbling you can use
'fragments', as discussed in 'Knit Fragments'; you can knit geometrical or
amorphous shapes and scramble over the top; or you can just start
knitting and let the yarn and needles take you where they will.
Although total design freedom is the key factor in scrambling, I have
discovered in my workshops that the concept is not always obvious to
the learner. Therefore, it is hoped that this book will help bridge the gap
between the technical side of knitting and crochet and the design
freedom of the scrambling technique by means of simple patterns for
what I call 'fragments'. Once the concept has been understood, your
creative spirit will be free to soar and explore to its heart's content.
Colour
' Color possesses me. There is no need to seize it. It possesses me. I
know. Here is the meaning of the happy moment: color and I are one.
Paul Klee
Lolour is my passion! Not only is it the most exciting design
element, it is also the most important and the most complex! How
we use colour can determine the success or failure of a design.
colour in the environment that surrounds us. Combining colours
successfully can be a huge challenge, especially for someone new to it.
of colour theory and the importance of interpreting it successfully tn
Unfortunately, we are conditioned by outside influences as we grow
time we painted it, we wanted that tree to be blue and the grass orange,
and so we painted what was in our hearts. Because we once worked so
freely with colour, we are all capable of recapturing that childhood
magic. It's just a matter of reaching down inside your 'self and finding
that wonderful freedom once more. It might take a little time and a lot
of experimenting but it will be well worth the effort.
To begin your journey, take a trip to your local library and borrow
some books on colour (see 'Bibliography"). There is a wonderful book
called Intertidal Wilderness by Ann Wertheim that has some
a copy for your own collection of inspirational books. Look at the art of
Cezanne, Klee. Kandinsky, Monel and Van Gogh, to name a few. Surf the
Internet for sites that deal with colour. Check out rocks and crystals: the
colours in some of these are breathtaking! Take a walk around your
myriad shades of green, together with shades of red and yellow.
The basics of colour theory
' It is not quantity which counts [with colours J, but choice and
organization.'
Henri Matisse
There are a number of terms that you should familiarise yourself with
Primary colours
Secondary colours
These occur when any two primaries are mixed together, for example:
Red + Yellow = Orange
Blue + Yellow = Green
Red + Blue « Purple
These occur when any primary colour is combined with any secondary
colour, for example:
Red + Orange = Red-Orange
This refers to the pure colour with nothing added to lighten or darken
Fig 2: Secondary colours
Fig 3: Tertiary colours
Fig 4: Tint
Any colour that has had white added to it.
Any colour that has had black or another dark colour added to it.
Tone or value
Every colour has a value, i.e. a specific degree of lightness or darkness.
Perhaps the most important issue to consider when combining colours
is the tonal value of each colour in relation to another. This more than
anything else determines the success or failure of your colour choices.
Changing the tonal value of a colour can cause a marked difference in
how one colour interacts with another. When colours of the same tonal
value are used together, they can become confusing and
indistinguishable. Pig. 6, for example, shows that colours of similar
tonal value lack visual impact. Pig. 7 shows how colours of different
tonal value create a vibrant and more interesting colour scheme.
Using too many colours, or introducing colours that are tonally
incorrect, can result in a colour scheme that has an unsettling effect on
Fig 5: Shade
Freeform Knitting ano Crochet
Warm colours
This term describes colours such as red. yellow and orange and also
includes red-violet. Warm colours have a tendency to move forward in a
colour scheme.
This term describes colours such as blues and greens and also includes
violet. Cool colours have a tendency to recede in a colour scheme.
Achromatic
and refers to black, greys and
Using an achromatic colour scheme doesn't mean that your work will
be boring. For example, in 'Homage to a Magpie’ (see 'Gallery'), 1
combined both matte and shiny whites and blacks with soft silvery greys
and the merest touches of soft blues and reds, and then added a little
metallic yarn for some extra interest.
it,
I
Colour
Monochromatic
This refers to a scheme of one colour only plus its tints and shades.
High key
A high-key colour scheme is one in which most or all of the colours are
light or pale in value. Colours mixed with white, i.e. pastels or tints, are
high key.
Average or medium key
Л medium-key colour scheme is one in which most or all of the colours
sit somewhere between tints or shades.
LOW KEY
A low-key colour scheme is one in which most or all of the colours are
dark in value. Colours mixed with black, i.e. shades, are low key.
Analogous colours
This refers to colours that are adjacent to a key colour with one colour
in common. In the example in Fig. 17, red is the common colour.
Complementary colours
T hese are colours that are directly opposite each other on the colour
wheel, such as orange and blue, red and green, yellow and purple.
T he relationship between these opposing colours and their effects is
especially important. T his is because the closer two colours approach a
'complementary relationship', the greater the stimulation to the eye.
Each colour appears brighter against its complement than when
standing alone in a neutral or weaker background, (Fig 18b).
colours
Fig. 19: Split complements
Key colour (purple) with
the two colours that are
next to its complement
(yellow)
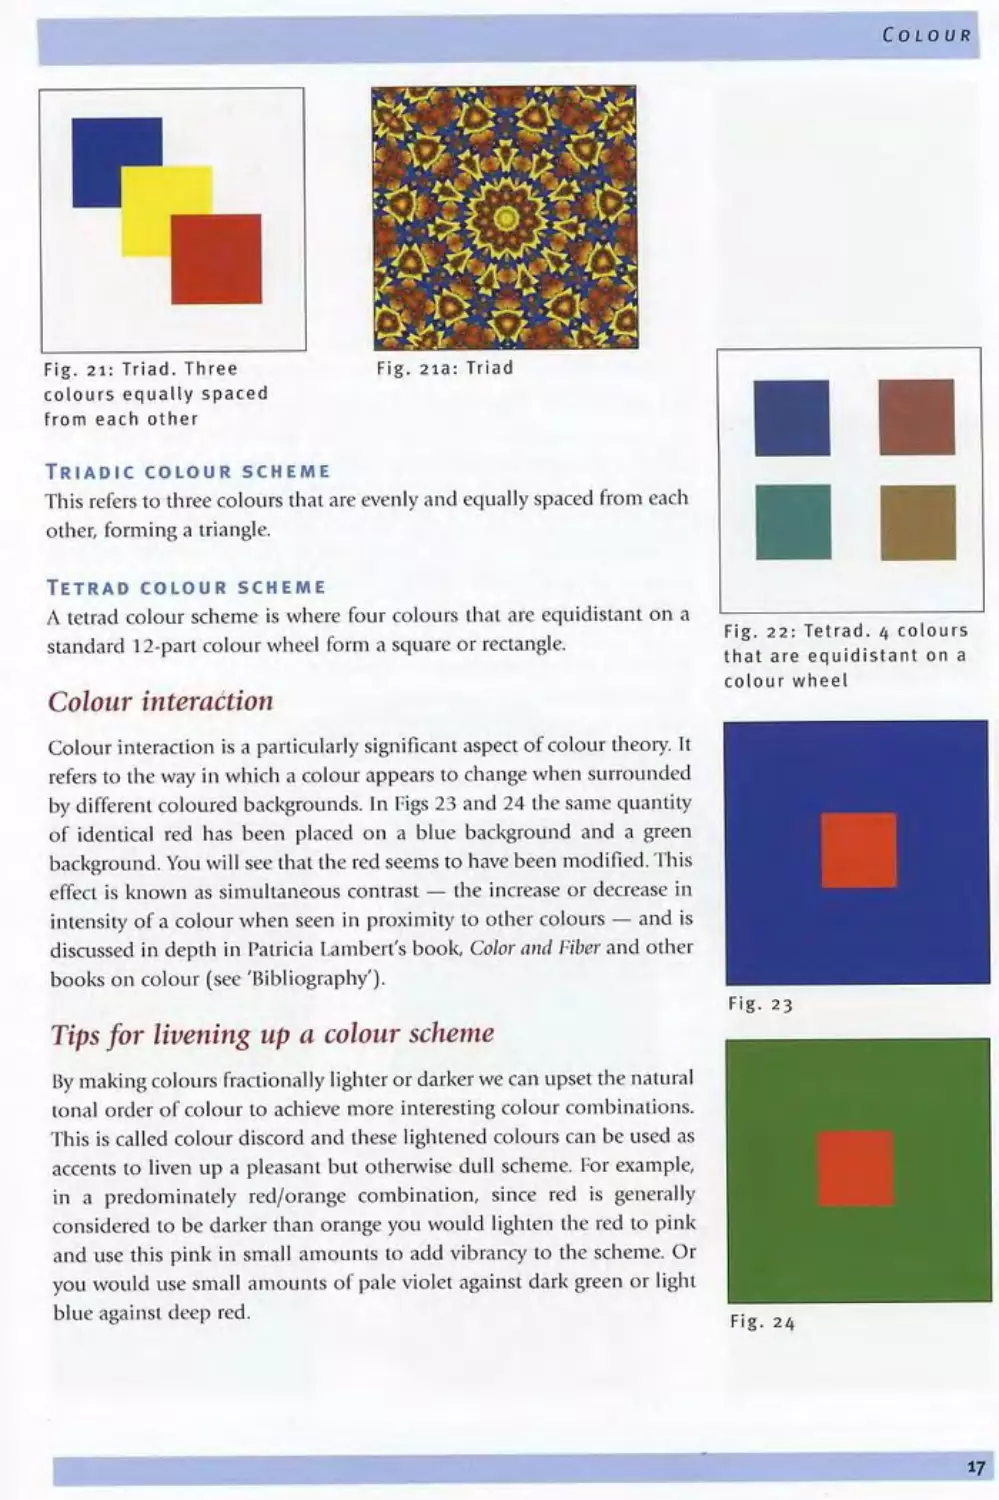
Fig. 21: Triad. Three
colours equally spac
from each other
Fig. 21a: Triad
This refers to three colours that are evenly and equally spaced from each
other, forming a triangle.
A tetrad colour scheme is where four colours that are equidistant on a
standard 12-part colour wheel form a square or rectangle.
Colour interaction
Colour interaction is a particularly significant aspect of colour theory. It
refers to the way in which a colour appears to change when surrounded
by different coloured backgrounds. In Figs 23 and 24 the same quantity
of identical red has been placed on a blue background and a green
background. You will see that the red seems to have been modified. This
effect is known as simultaneous contrast — the increase or decrease in
intensity of a colour when seen in proximity to other colours — and is
books on colour (see 'Bibliography').
Tips for livening up a colour scheme
By making colours fractionally lighter or darker we can upset the natural
tonal order of colour to achieve more interesting colour combinations.
This is called colour discord and these lightened colours can be used as
accents to liven up a pleasant but otherwise dull scheme. For example,
considered to be darker than orange you would lighten the red to pink
and use this pink in small amounts to add vibrancy to the scheme. Or
you would use small amounts of pale violet against dark green or light
Using more than one accent colour
In larger projects you may need to add more than one accent. For
example, in a predominately blue/green combination, try adding flashes
of yellow, pink and orange.
If another colour doesn't seem to solve the problem, the careful addition
of black and white may work. This can be extremely effective, but do be
wary of using too much of either colour. In this particular case, less is
definitely more.
Using complementary colours
The colours opposite each other on the colour wheel exert the greatest
change, or reaction, to each other and create the greatest intensity. To
add vibrancy to a colour scheme try combining orange against blue, red
against green and yellow against purple.
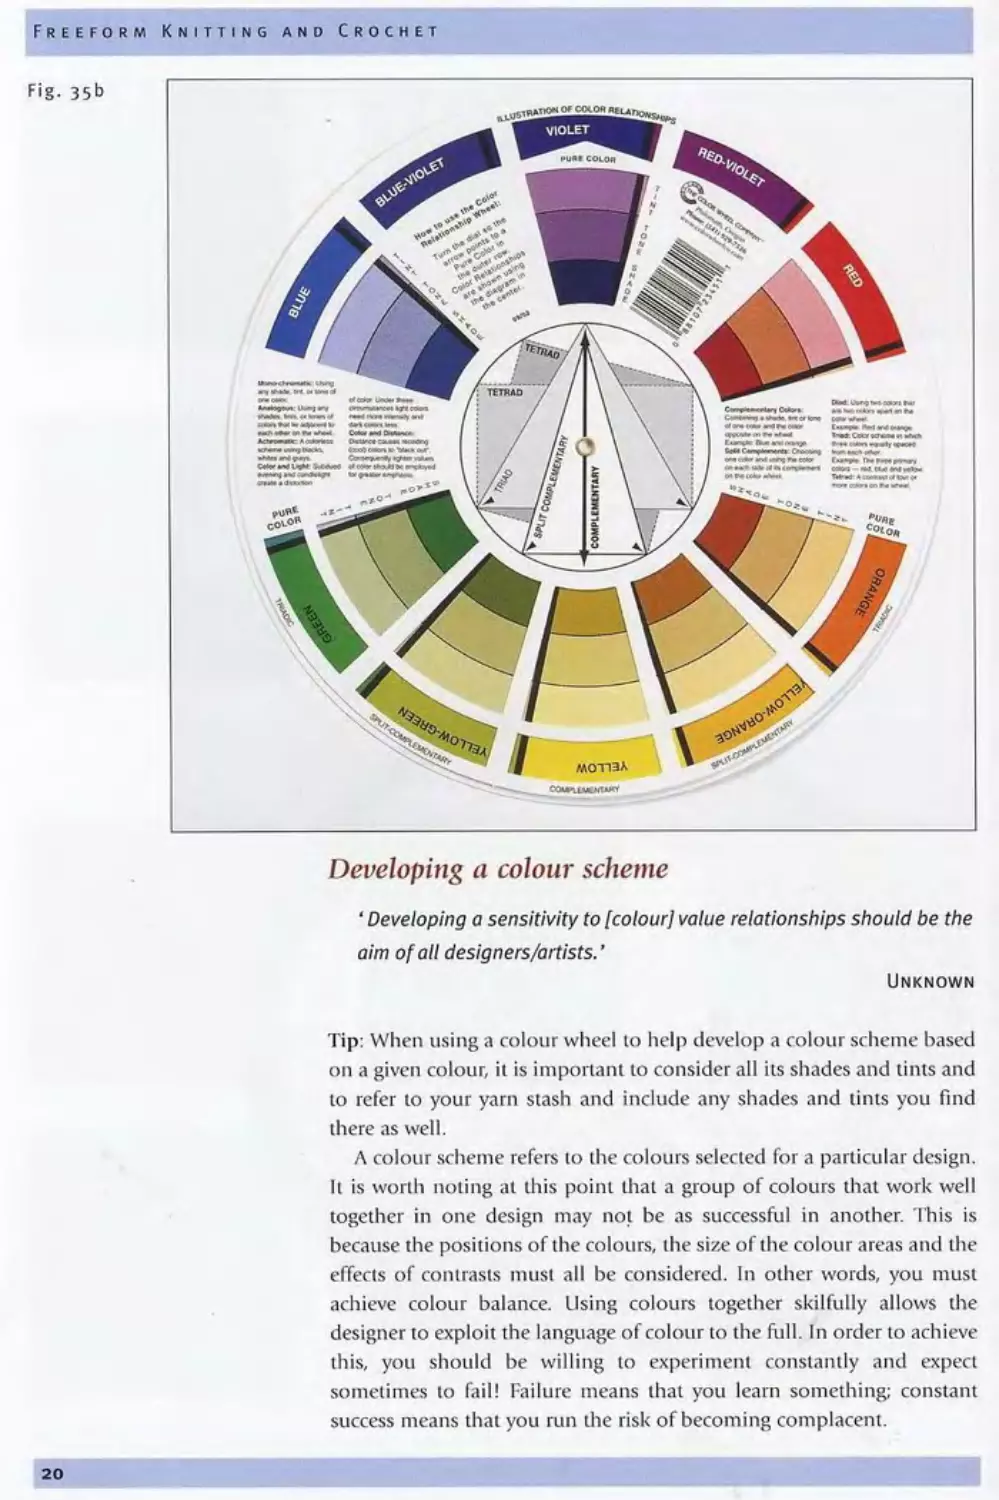
Using a colour wheel
' Remember, objectively there is really no such thing as a "bad"
colour scheme. Taste really is a matter of personal preference.'
Unknown
Putting a little time and effort into learning colour theory can have a
suggestions). If you are new to or unsure of how to use colour, buy an
artist's colour wheel, as it is probably one of the most useful things you
can have in your toolbox. You can find them at art supply shops for
around $20 for the large size, and it really is money well spent. Figs. 35a
The information on the wheel includes explanations of key
terminology, as discussed above, including definitions of primary
It is constructed to allow you to immediately see various colour
combinations, such as triadic and analogous colour schemes.
Fig. 35a
Developing a colour scheme
' Developing a sensitivity to [colour] value relationships should be the
aim of all designers/artists. ’
Unknown
on a given colour, it is important to consider all its shades and lints and
to refer to your yarn stash and include any shades and tints you find
Л colour scheme refers to the colours selected for a particular design.
together in one design may not be as successful in another. This is
because the positions of the colours, the size of the colour areas and the
achieve colour balance. Using colours together skilfully allows the
designer to exploit the language of colour to the full. In order to achieve
this, you should be willing to experiment constantly and expect
success means that you run the risk of becoming complacent.
The obvious place to start looking for colour combinations is in nature.
We are surrounded by colour every day and it will really help you to start
'seeing' your surroundings. Other elements to consider are fabrics — a
favourite skirt or dress perhaps.
Study the work of KalTe Hassett, l ie is a master colourist who uses
easily accessed sources, such as stone walls, vegetation and landscapes,
as colour inspiration. Ix>ok through your own photographs, as well as
those in magazines, particularly publications such as National
Geographic.
Fig. 36 shows a photograph of a sunset that was used as inspiration
for the 'Red Sky at Night' knitted bag (see Fig. 68 in 'Knit Fragments').
Computer software generated colour schemes
While there is no substitute for learning as much as you can about
colour theory from books and doing colour exercises of your own, there
is no reason why you can’t take short cuts to help you achieve your aims
and have some fun at the same time.
If you have a computer, there are some very useful yet inexpensive
programs available that will help you create colour scheme ideas. Some
I have worked with are: Gliftic and Repligator, Color Schemer and Color
another, they will very quickly generate colour ideas for you to build on.
(See ’Design' for more about Gliftic and Repligator.)
Both Color Impact and Color Schemer are wonderful little tools,
originally intended to help Web designers create visually pleasing
websites. However, they can be just as useful for textile artists, as you will
see from the examples discussed below.
I
colour wheel in Color Impact, and then generate a colour scheme based
on that colour using the program.
For my base colour I chose violet (purple). The scheme chosen from
a drop-down menu containing 27 options was Triad. The other two
colours in this particular Triadic selection were a blue-based green and a
red-based yellow. This meant that on the colour wheel they were
I then generated 16 similar colours relating to those in Fig. 37, which
tints and shades based on those 16 pure colours.
From these selections I could then choose yarns from my stash that
were within the range of the colours generated. Of coutse, you would
not have exactly the same colours in your stash; however, careful
selection from those yarns that did fall within this range would result in
a perfectly harmonious colour scheme.
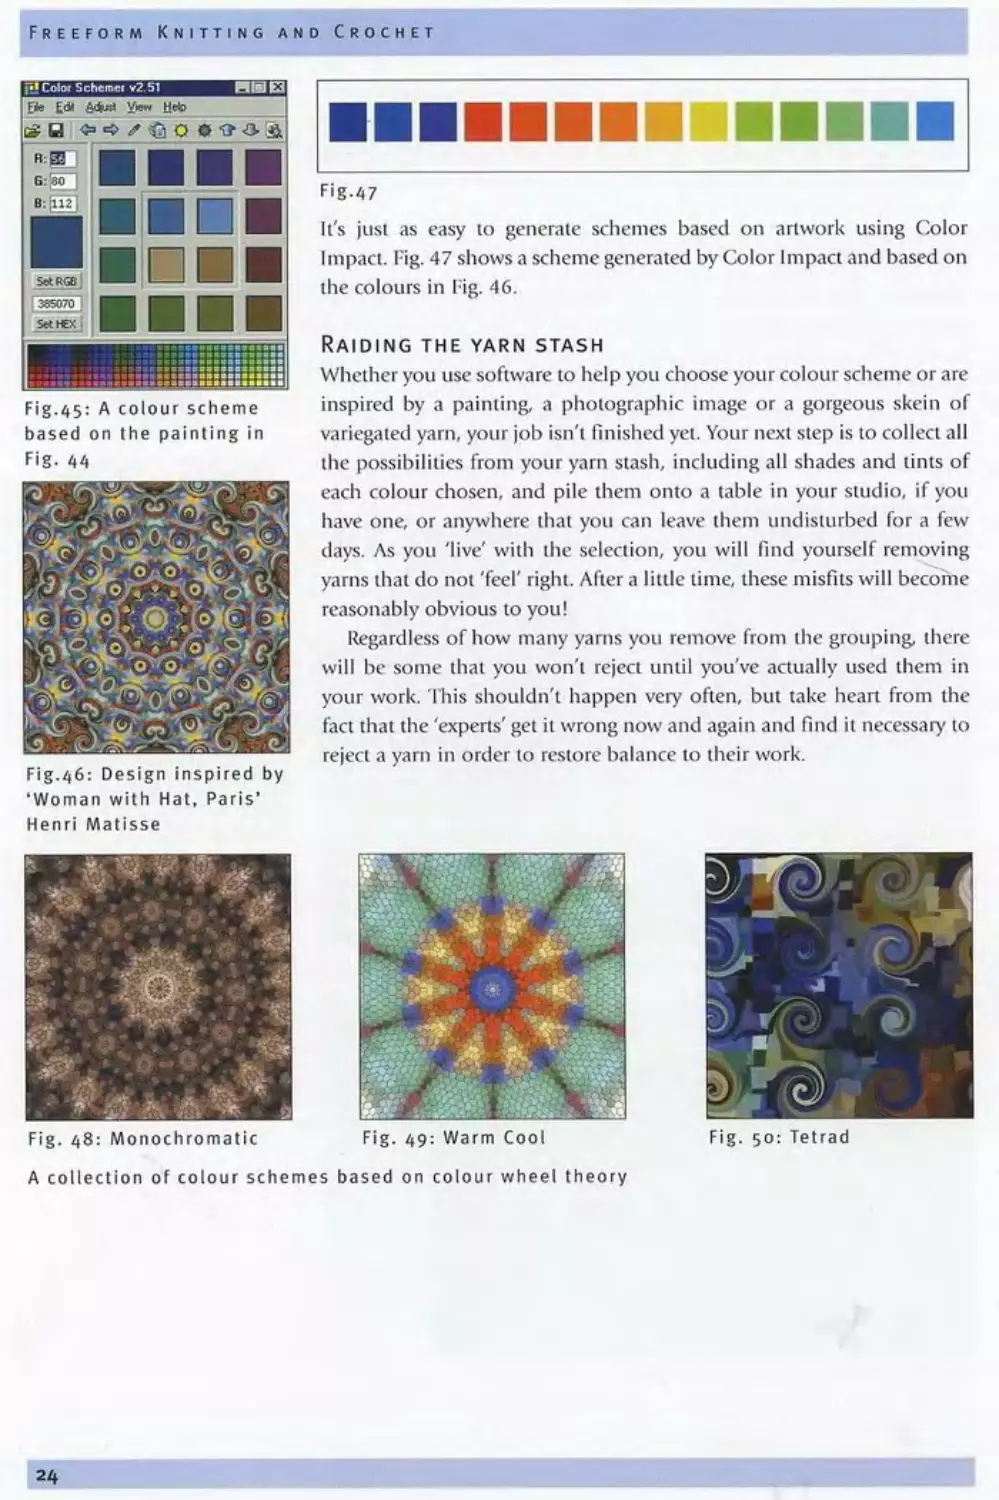
Color Schemer
When you first open Color Schemer, you are presented with a small
screen that shows a group of 16 colours (see Fig. 41), You can choose
others from a collection of included samples or click on a colour in the
colour palette to generate a new one based on that colour.
choose one of the in-built colour schemes as a starting point. Fig. 42
shows a scan of yarn used as the source for the colour scheme in Fig. 43.
Fig-
•42
Tlie ability to choose a colour from a scan or existing image opens up all
kinds of possibilities for creating colour schemes from any source,
including photographs, fabrics and paintings. Imagine a colour scheme
based on a painting by a favourite artist (see Fig. 46), a child's painting
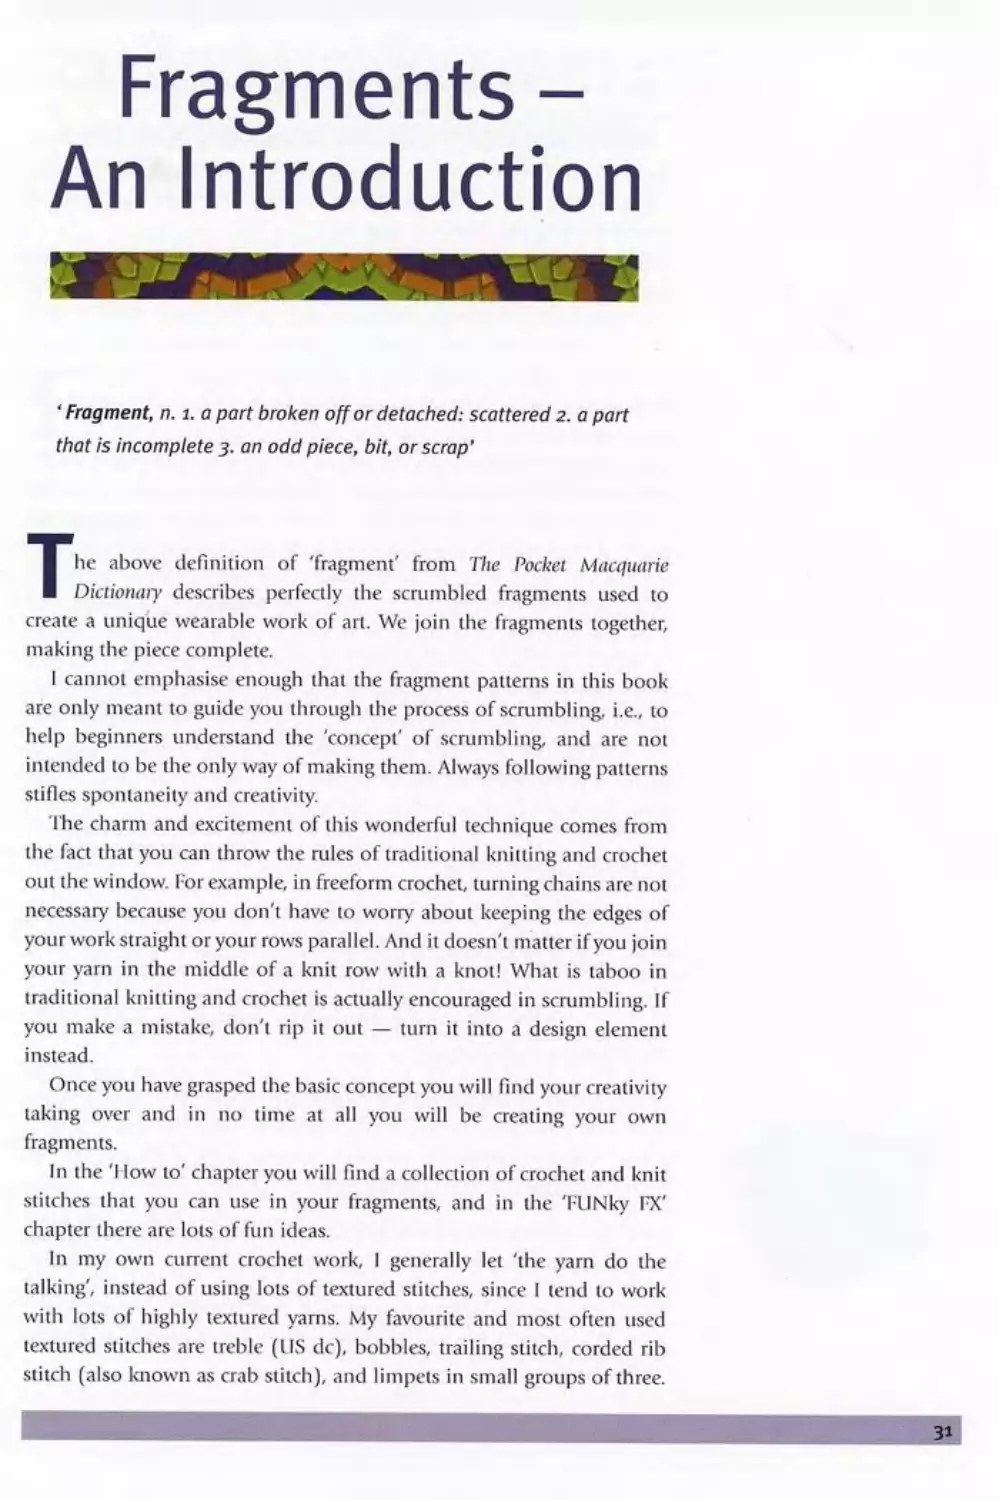
Il's just as easy to generate schemes based on artwork using Color
Impact. Fig. 47 shows a scheme generated by Color Impact and based on
the colours in Fig. 46.
Raiding the yarn stash
Whether you use software to help you choose your colour scheme or are
inspired by a painting, a photographic image or a gorgeous skein of
variegated yarn, your job isn't finished yet. Your next step is to collect all
the possibilities from your yarn stash, including all shades and tints of
each colour chosen, and pile them onto a table in your studio, if you
have one, or anywhere that you can leave them undisturbed for a few
days. As you 'live' with the selection, you will find yourself removing
yarns that do not 'feel' right. After a little time, these misfits will become
reasonably obvious to you!
Regardless of how many yarns you remove from the grouping, there
will be some that you won't reject until you’ve actually used them in
your work. This shouldn't happen very often, but take heart from the
fact that the 'experts' get it wrong now and again and find it necessary to
reject a yarn in order to restore balance to their work.
Fig. 49: Warm Cool
A collection of colour schemes based on colour wheel theory
makes us wonder a few months down the track why on earth we did so!
Mostly they just end up sitting around taking up room or being given
yarns into ones that you will use.
Start by collecting all the yarns you think you won't ever use in their
present state. Arrange them in their own colour groupings, as that will
say a 12 to 14 ply (I leavy Worsted), it may not be possible to 'salvage'
diem, without resorting to overdyeing the yarns, so for now discard
finer yarns to work with.
Perhaps you have an extremely bright orange colour that is just too
vivid to use alone. By choosing a mustard tone of yellow and plying
them together, it's possible that the orange will be toned down enough
to use in small areas. If not, add two strands of the mustard and see how
that works. You can do this with any of the bright colours, gradually
adding strands of finer yarns until the brightness is suitably muted. The
perfect yams for doing this are some of the thinner coned machine
could tty adding sewing threads to the thicker yarns. Work with the
yams you have but be aware that combining several thicker yams will
create a very chunky new yam.
Tip: When toning down brights you should look for yams with a tonal
Too blue? Combine with purples or a deep rusty orange, or several
other shades of blue.
thread or something textured, such as a fine boucle.
Fig- 53
As you can see from the knitted samples in Figs 51, 52 and 53, the
original yarn at the left of each sample was transformed into something
much more interesting as each new yam was added. Several of the
variations in each example work rather well and are much more visually
1 find that garter stitch or the purl side of stocking stitch fabric looks
more interesting when using this technique; however, this is a personal
choice. You could also experiment with moss stitch or blackberry stitch
or any number of knit or crochet stitches.
All the 'added' yams in the examples were normal plies (weights),
from 4 ply (Fingering) to 8 ply (DK), and in order to avoid fabric that
was too dense I changed the knitting needle size as 1 went. In my
samples the red and yellow original yams were 8 ply (DK) and the blue
one was a chunky 10 ply (Worsted) yarn.
them is to make garments or accessories using large gauge knitting
needles or crochet hooks. Not only does this help create a fabric with
some drape, it also makes for much speedier knitting or crocheting!
Tip: Try using the finer machine knitting yams to recreate your own. Or
if you prefer not to create chunky yarns, try adding sewing thread instead
of yam.
I cannot emphasise enough how important it is to experiment. As the
words of the following quote indicate, experimenting need never be a
chore!
‘ I never practise; I always play.'
Wanda Landowska
Design
'How can I qualify my faith in the inviolability of the design
principles? Their virtue is demonstrated. They work. ’
Edgar Whitney
the best place to begin is in the art section of your local library. The
Internet is another very good resource, and there are many informative
sites available for you to explore.
The principles of design are:
Contrast - Emphasis - Balance - Unity - Pattern - Movement -
Rhythm
The elements of design are:
Colour - Line - Value - Shape and Form - Space - Texture
The important principles and elements to think about in freeform
work are colour, contrast, unity, value and texture.
Colour
See chapter on 'Colour'.
Contrast
This refers to the contrast between textured areas and non-textured areas.
Contrast in materials immediately brings to mind all the wonderful
contrasting yarns available to us. While it is perfectly acceptable to use
plain, smooth yarns in your freeform work, for me the combination of
plain and fancy is much more visually exciting.
Unity
Unity means harmony and without it chaos can rule. Think about the
Rather than slapping on a single circular motif just because you feel like
it, think about balancing it by using similar elements elsewhere in your
If you choose to knit or crochet a plain back for a vest or plain sleeves
for a jacket, it's a good idea to add some of the yarn used for them
within the scrumbled areas as this will help tie the overall design
together.
Balance or consistency is something that should always be
considered, although if you achieve unity in your work, then balance
should occur naturally.
Value
Illis was also discussed in the chapter on 'Colour' but it is worth
discussing again as it is perhaps the most elusive of the design elements.
Between the whitest white and the blackest black there are limitless
degrees of light and dark values. Too many values used in combination
can be confusing and result in a weak design. Within a range of values,
such as light, medium and dark, you can find a useful variety. Colours
that are close in value appear to merge together, for example, dark green
and black. If you want more contrast, one of the chosen colours should
be lighter in value, for example, dark green and mid grey.
Texture
Texture is the quality of a surface, whether it's smooth or rough, faded
or bright, soft or hard. Scrambling gives us the ultimate excuse for
indulging our passion for this particular design element through the use
of textured stitches and/or yarns.
Generating design ideas on the computer
As mentioned in the previous chapter, there is some wonderful,
inexpensive software available that is fun to use and extremely useful for
those moments when creativity abandons us, as it does from time to
Gliftic
Ulis program allows you to create your own unique designs quickly,
intuitively and easily.
Designs consist of three parts:
I, form (the general layout of the image)
2. Colour scheme (how the image is coloured)
Interpretation (how the form is interpreted)
Gliftic allows you to create an image by quickly experimenting with
Repligator
With this program you can quickly create striking and original new
images based on your own images. You start with an image (which you
create in Gliftic or a paint program, or scan in) and apply effects to it.
There is an internal Wizard, which can automatically select various
settings for you, so that all you have to do is import an image and push
1-7 a few times. Nothing could be easier!
Examples of imagery generated by Gliftic and Repligator are included
in Pigs 54-60.
Creating garment templates on the computer
There are several software packages on the market that will generate
sewing patterns and/or knitting and crochet instructions, but the one I
am most familiar with is Garment Designer by Cochenille Design Studio
in California, which 1 will briefly describe.
I use Garment Designer for creating my freeform garment templates
as it's so fast and easy. You can input your own measurements if you like
or use any of the built-in standard sizes for women, men, children and
babies. Ute program includes many design options, and you can add to
these with Style Set 'plug-ins', as the developer creates new styles, lite
in Repligator for a colour
outline to create almost any shape you wish.
join the sheets together with the aid of registration marks and numbered
use. See the 'Putting It All Together' chapter for more about using
Fig. 61 is a screen shot of a garment created in Garment Designer. I
making my garment 'asymmetrical' in design. Because I turned on the
piece simultaneously, eliminating the possibility of error. If this option
on the front left piece.
Fig. 61: Asymmetrical
shawl collared jacket
'ITiis design would look great with the body knitted, crocheted or sewn,
From this brief overview of just some of the software options
available, you can see that the computer is a valuable tool in helping to
achieve your creative aims. If, like me, you enjoy working with them.
computer magazines for other programs that may appeal to your sense
of 'design play!
Other pattern-making software programs include: Fittingly Sew, Dress
'Resources’ for information on where to obtain these programs.
30
Fragments -
An Introduction
' Fragment, n. i. a part broken off or detached: scattered 2. a part
that is incomplete 3. an odd piece, bit, or scrap'
I he above definition of 'fragment' from The Pocket Macquarie
I Dictionary describes perfectly the scrambled fragments used to
create a unique wearable work of art. We join the fragments together,
making the piece complete.
I cannot emphasise enough that the fragment patterns in this book
are only meant to guide you through the process of scrumbling, i.e., to
help beginners understand the concept of scrambling, and are not
intended to be (he only way of making them. Always following patterns
The charm and excitement of this wonderful technique comes from
the fact that you can throw the rules of traditional knitting and crochet
out the window. For example, in freeform crochet, turning chains are not
necessary because you don’t have to worry about keeping the edges of
your work straight or your rows parallel. And it doesn't matter if you join
your yarn in the middle of a knit row with a knot! What is taboo in
traditional knitting and crochet is actually encouraged in scrambling. If
you make a mistake, don't rip it out — turn it into a design element
Once you have grasped the basic concept you will find your creativity
taking over and in no time at all you will be creating your own
fragments.
In the 'How to' chapter you will find a collection of crochet and knit
stitches that you can use in your fragments, and in the 'FUNky FX'
In my own current crochet work, 1 generally let 'the yam do the
talking', instead of using lots of textured stitches, since I tend to work
with lots of highly textured yams. My favourite and most often used
textured stitches are treble (US de), bobbles, trailing stitch, corded rib
stitch (also known as crab stitch), and limpets in small groups of three.
I very occasionally use a treble (US de) circle (see 'How to' chapter) for
covering small gaps that appear after stitching the fragments together or
to add interest to an otherwise flat area of work.
When adding knitting to crocheted fragments I almost always use
garter stitch or stocking stitch. This makes it easy to change the shape of
a fragment that is perhaps becoming too linear by using short row or
partial knitting (see 'How to' chapter).
If you wish to use home spun or plain yarns only, you may like to use
more textured stitches; on the other hand, you may prefer to use the
basic stitches and change direction often to give your work a free-
flowing, abstract feel. You should do whatever feels right for you! Since
there is no right or wrong way to scramble you can choose whatever
method you like to create your own style.Individuality of expression is
what it's all about!
As mentioned previously, the appeal of scrambling comes from the
design freedom the technique offers. This means that it is not absolutely
crucial that your end results look exactly the same as the fragment
patterns illustrated in this book. In fact, it will be virtually impossible
for them to do so if for no other reason than you will be using totally
different yarns from those I used! Your interpretation of the instructions
may also differ, and that is fine! 1 encourage you not to rip out stitches
or worry if you don't end up with exactly the same number of stitches
that 1 had. And if at any time while following my instructions you feel
that you must add another bobble or use another textured stitch, then
do so! Remember, too, that although the instructions call for at least six
different yarns, those six may come from a total of 50 or more if you
have that many in your selection to choose from.
Crochet hook sizes
I generally work with a size 5 mm (US 7) crochet hook as it tends to suit
most of the yarns I use. Occasionally I change to a 5.5 mm (US 8) or
6 mm (US 9) if the yarn I want to use is particularly bulky, or down to
a size 4.5 mm (US 6) if it's finer than an 8 ply (DK).
Knitting needle sizes
I use a variety of needle sizes depending on the effect I want and the
thickness of the yarn. I also use two needles of different sizes because it
adds a little extra texture to the fabric. A good range is 4.5 mm (US 7),
5 mm (US 8) and 6 mm (US 10‘A).
Note: The hook and needle sizes mentioned here are a guide only and
you should use whatever you feel comfortable with.
Tip: If you cast off (bind off) with a smaller sized needle, the fabric will
curve in slightly; if you cast off with a larger size, the fabric will curve
outwards.
Crochet Fragments
Closing our minds to ideas slams the door on all life's possibilities. ’
realise that following patterns for creating freeform fragments is
contradictory to the freeform principle and may be a somewhat
difficult idea for you to get your head around. I lowever, if you think of
the patterns as a means to an end, you will see that the end does, after
All the stitches used are in the 'Crochet Stitch Collection'.
Crochet fragment 1
This first fragment has no textured stitches in it at all. Rather, I chose to
option if you don't want to use textured stitches in your work, or you
may prefer to use just one textured stitch as a feature, as I did in the
Tracks' shawl (see 'Gallery'). Tracks' was created using the basic stitches
Stitches used were de (US sc), htr (US hdc), tr (US de), dtr (US tr), tr tr
(US dtr) and ganer stitch.
YOU WILL NEED
An assortment of five yarns with varying textures in your chosen colour
scheme
Crochet hook and knitting needles in the size of your choice
Abbreviations
ch chain
st(s) stitch(es)
dc(sc) double crochet (single crochet)
htr(hdc) half treble (half double crochet)
tr(dc) treble (double crochet)
dtr(tr) double treble (treble)
tr tr(dtr) triple treble (double treble)
1st Row: Chain 10 then work 1 de (US sc) in 2nd ch from hook, 1 htr
(US hdc) in next 2 sts, 1 tr (US de) in next 3 sts and Idtr (US tr) in
next 3 sts (9 sts). Turn.
Change yam.
2nd Row: 5 tr (US de) in first st. 1 htr (US hdc) in next 3 sts, 1 tr (US de)
along the original cast-on chain.
Transfer the stitch on your hook to a knitting needle, then pick up
and knit 10 sis along the original cast-on edge (11 sts in all).
Change yam and knit two more rows. Cast off (bind off) all but the
last stitch. Transfer this stitch to your crochet hook but do not turn.
Working down the side of the fragment make 3 ch, then work 6 tr
(US de) along the edge. TUm.
Change yam, 3 ch, work 6 tr (US de) to end, then 4 tr (US de) in
corner, 1 hlr (US hdc) in next st, then de (US sc) to end. Turn.
Change yam, 1 ch, then work 1 de (US sc), 1 tr (US de), 1 dtr (US tr),
1 tr tr (US dtr), 2 dtr (US tr), 2 tr (US de), 1 de (US sc) along row.
Fasten off.
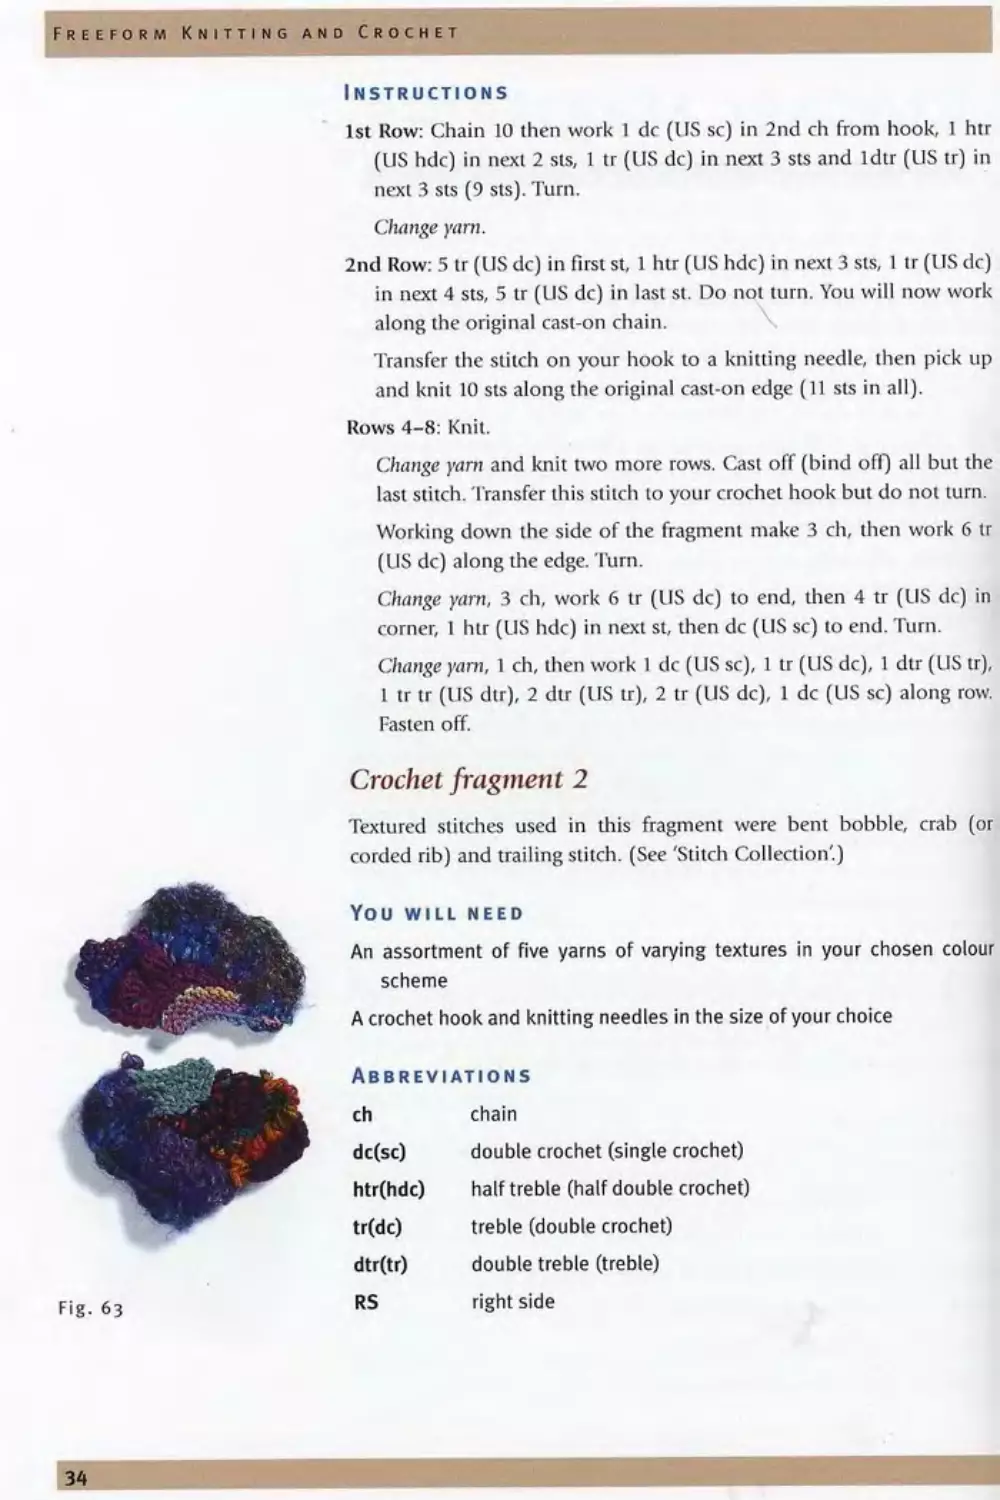
Crochet fragment 2
Textured stitches used in this fragment were bent bobble, crab (or
corded rib) and trailing stitch. (See 'Stitch Collection'.)
An assortment of five yarns of varying textures in your chosen colour
scheme
A crochet hook and knitting needles in the size of your choice
Abbreviations
ch chain
dc(sc) double crochet (single crochet)
htr(hdc) half treble (half double crochet)
tr(dc) treble (double crochet)
dtr(tr) double treble (treble)
RS right side
1st Row: Chain 10.
2nd Row: 1 de (US sc) into 2nd ch from hook, 2 htr (US hdc), 3 tr (US
de), 3 dtr (US tr) (9 sts). Turn.
3rd Row: 2 ch, 1 bent bobble in 2nd ch from hook, ' 1 de in next st, 1
bent bobble in next st'. Rep from • to ' one more time, then de (US
sc) to end of row.
4th Row: Change yam. 2 ch, then work 14 tr along top of previous
bobble row (see tip below). Do not turn.
5th Row: Work corded rib st (crab st) back along the top of treble (US
de) row just worked making sure to work into the front loop only (this
is important as you will see in the next row).
6th Row: Change yam. Work a 'hill' into loops behind the row of corded
rib as follows: 2 ch, 4 htr (US hdc), 5 tr, 4 dtr (US tr). Fasten off.
7th Row: With RS facing, flip fragment so that the original starting chain
is at the top and RS is facing.
With knitting needles, pick up and knit 9 sts evenly along the original
starting chain. This counts as 1 row. Knit 5 more rows. Right side of
work should be facing you. Cast off, transferring last stitch to crochet
hook. Do not шт.
14th Row: Change yam. 2 ch, work a row of 9 htr (US hdc) along side of
work to ridge of crab st. TUrn.
15th Row: 2 ch, work a row of de (US sc) to end. Turn.
16th Row: Change yam. 2 ch, 1 tr in 2nd ch from hook, 1 tr (US de) in
next st, 1 Trailing St. 1 tr (US de) in next two sts, I Trailing St, 1 tr
(US de) in each of last 4 sts. Break yarn and fasten off.
Tip: When working stitches on top of bobbles, work into the stitch just
before the 1st bobble, then into a loop at the top of the bobble, then
into the loop at the left-hand side of the bobble. Work one stitch
between any two bobbles before proceeding as above to the end.
Crochet fragment 3
Textured stitches used in this fragment were bent bobble and corded rib.
An assortment of six yarns of varying textures in your chosen colour
scheme
A crochet hook and knitting needles in the size of your choice
Abbreviations
ch chain
dc(sc) double crochet (single crochet)
htr(hdc) half treble (half double crochet)
tr(dc) treble (double crochet)
dtr(tr) double treble (treble)
RS right side
cast off bind off
Instructions
1st Row: 4 ch, join into a circle with a slip stitch.
2nd Row: Chain 3. Work 12 tr (US de) into circle. Slip stitch to top of
3 ch.
3rd Row: Change yam. 3 ch, 1 tr (US de) into same place as 3 ch, 2 tr (US
de) into next st, 1 dtr (US tr) into next st. Turn.
4th Row: 2 ch, 1 bent bobble into next st, 1 de (US sc) into next st, 1
bent bobble into next st, Idc.Tum.
5th Row: Change yam. 2 ch, then work 6 tr (US de) along the top of the
book. Do not turn.
Sth Row: Continuing in the same direction work 1 ch, then work the
following sequence of stitches down the side of your work:
1 de (US sc) into each of next 2 spaces
1 htr (US hdc) into each of next 2 spaces
1 tr (US de) into next space, 2 tr (US de) into next space (you have
2 dtr (US tr) into next space (another increase)
2 tr (US de) tr (US de) into next space. Turn.
7th Row: Change yam. Work 1 de (US sc) into each of next 10 sts. Turn.
8th Row: Work 1 de (US sc) into next stitch, and then:
1 htr (US hdc) into each of next 2 sts
1 tr (US de) into each of next 2 sis
1 dtr (US tr) into each of next 3 sts.
Do not Him.
9th Row: Change yam. Work corded rib stitch back along the row just
worked, making sure to work into front loop only.
Do not turn, transfer stitch to knitting needle.
10th Row: Pick up 9-10 stitches (one more or less won't really matter),
using the loops behind the row of corded rib just worked.
Rows 11-14: Knit. Cast off.
Turn fragment so that the treble (US de) circle is at the top, and with
RS facing, join in new yam to first free stitch at right-hand side of
15th Row: With crochet hook, make 3 ch, then work 1 tr (US de) into
same place as 3 ch. Work 2 tr (US de) into each stitch around circle.
Slip stitch to top of first stitch behind bobble. Do not turn.
Transfer stitch to knitting needles.
16th Row: Change yarn. Pick up 12-13 sts.
Rows 17-22: Knit
23rd Row: Cast off.
Crochet fragment 4
Textured stitches used in this fragment were bent bobble and trailing
You WILL NEED
An assortment of five yarns with varying textures in your chosen colour
scheme
A crochet hook and knitting needles in the size of your choice
Abbreviations
ch
sts
Kztog
ss
dc(sc)
htr(hdc)
tr(dc)
dtr(tr)
RS
stitches
knit two together
slip stitch
double crochet (single crochet)
half treble (half double crochet)
treble (double crochet)
double treble (treble)
right side
7th Row: Change yarn, K2 tog, knit to end.
Fig. 65
8th Row: Knit to last 2 sts, K2 tog.
9th Row: K2 tog, knit to end.
10th Row: As 8th Row.
11th Row: As 9th Row.
12th Row: As 8th Row.
13th Row: Cast off, leaving last stitch and transfer to crochet hook. Do
14th Row: Change yarn. Continue along the left-hand side of fragment,
working the following sts between the bumps formed by the garter
stitch rows:
1 de in space (as close to hook as you can)
I htr (US hdc) in next space
1 tr (US de) in next space
2 tr (US de) in next space
1 dtr (US tr) in next space.
Him.
15th Row: 2 ch, then in 3rd ch from hook work 1 bent bobble, I de
(US sc), 1 bent bobble, 1 de (US sc). Treble to end.
Him.
16th Row: Change yam. Work a 'hill' along the row and behind the
bobbles as follows:
Ide in first st
1 htr (US hdc) in each of next 2 sts
I tr (US de) in each of next 2 sts.
Then continue in htr (US hdc) until you are just to the right of the first
bobble worked in the previous row. Into the top of this bobble work:
1 tr (US de), then
1 tr (US de) into loop at side of bobble
1 dtr (US tr) in de (US sc) between bobbles
1 dtr (US tr) into top of next bobble
1 dtr (US tr) into side of bobble.
Do not turn. Continue working in the same direction. Work 3 dtr (US tr)
into same place as last dtr (US tr) was worked to make turning the
corner easier.
Working along the side of previously crocheted rows, work:
3 dtr (US tr) into next space
3 tr (US de) along stem of dlr (US tr) in row below.
Work 1 htr (US hdc), 1 de (US sc) into next space and ss into next space
to create a gentle end to the taper. Do not turn. Continue working in the
same direction along the edge of the fragment.
Change yam. Work the following:
1 trailing st using 3 or 4 wraps (see 'Stitch Collection’), picking up
anchor loops from below knitted section
I trailing st as before
1 de (US sc) into next two spaces. Turn.
17th Row: Work a 'hill' as follows:
1 de (US sc) in first stitch
1 htr (US hdc) in next st
1 tr (US de) in each of next 2 sts
1 htr (US hdc) in next, 1 de (US sc) in next and ss in next st.
Break yarn and fasten off.
If you prefer, you can crochel fragments using plain yarns in de (US sc),
htr (US hdc) or treble (US de) and surface crochet over the top of them
later. Let your yarn and hook ramble at will and remember that an
organic or amorphous shape is what you are after, not necessarily a
geometric or linear shape, although if you want to work in a linear
fashion then there is no rule to say you can't! Have a look at the pre-
drawn template ideas in the following chapter — they would also make
great crochet templates!
Knit Fragments
‘ We keep moving forward, opening new doors, and doing new
things, because we're curious and curiosity keeps leading us down
new paths.'
Walt Disney
As with the crocheted fragments, I have included patterns for two
knitted fragments for you to practise on. Further on in this section
I will talk about other ways of creating your own knit fragments.
You will need an assortment of yarns in your chosen colour scheme
(US Ю’Л).
You may choose to use a pair of needles of the same size or one 4 mm
(US 6) and one 6.5 mm (US IO'/j).
Work in garter stitch throughout and don't worry if the number of
stitches you have at any given stage differs from mine. It really won't
You may choose to leave long ends to use for surface crocheting at
each yarn change, or you may introduce yarns of your choice after the
fragment is complete.
Knit fragment 1
Abbreviations
Kz tog knit two together
st(s) stitch(es)
rem remaining
inc increase
Instructions
Cast on 10 sts.
6th Row: K2 tog. knit 6 sts, K2 tog (8 sts rem).
7th Row: K2 tog, knit 4, K2 tog (6 sts rem).
8th Row: Knit I, inc one st in next st, knit to end (7 sts rem).
9th Row: Knit to last stitch and inc 1 st (8 sts).
10th Row: Knit.
Hth Row: K2 tog. Knit to last stitch and inc 1 st.
12th Row: Cast on 3 sts (11 sts) and knit 2 rows. Change yarn.
15th Row: Knit 4 rows.
20th Row: Cast off, leaving last stitch on needle and pick up 8-9 stitches
along side of work.
Row 21-24: Knit 4 rows. Change yarn.
Rows 25-28: Knit 4 rows. Change yarn.
Rows 29-36: Knit 8 rows. Cast off.
Knit fragment 2
Abbreviations
Kz tog knit two together
st(s) stitch(es)
rem remaining
inc increase
Instructions
3rd Row: Knil.
6th Row: Knit 2 log, knit to last 2 sts, knit 2 tog.
7th Row: Knit.
8th Row: Knit 2 tog. knit to last 2 sts, knit 2 tog.
4t
Freeform Knitting and Crochet
9th Row: As 7th row.
10th Row: As 8th row.
Rows 11-14: Repeat last 2 rows until 2 sts rem.
15th Row: Knit 2 tog, leaving last stitch on needle. Change yarn, then
Rows 16-20: Knit 5 rows, increasing 1 st at beginning of each altemale
Rows 21-26: Change yam and knit 6 rows.
27th Row: Cast off, leaving last stitch on needle. Change yarn, then pick
up 7 sts alongside of work (you should have 8 sts).
Rows 28-35: Knit 8 rows.
36th Row: Knit 3, knit 2 tog, knit 3 (7 sts).
37th Row: Knit 3, knit 2 tog, knit 2 (6).
38th Row: Knit 2, knit 2 tog, knit 2 (5).
39th Row: Cast off remaining 5 Sts.
If you chose to use plain yams and leave long ends, you can now use
these to work surface crochet randomly over the surface of the
fragments. Or you could embellish your fragments with freeform
embroidery (couched threads, chain stitch, French knots), or add beads,
buttons, tassels etc., or a combination of both surface crochet and
embroidery. Or you could use knitted add-ons (see funky fx chapter).
A combination of the above two fragments was used to make the 'Red
Sky at Night' bag, shown in Fig. 68 as a work in progress, to illustrate
how the knit fragments are assembled working from the centre out.
Creating your own knit fragments
Knit fragments are easier to construct than crocheted fragments since
they are basically worked in garter stitch with random shaping. I don’t
use any stitch patterns at all, preferring to let die textures of the yarns I'm
using do all the work or to add surface embellishment afterwards.
Version 1
Fig. 69 shows a sample of knitting in the 'any which way1 method that
illustrates how changing yarns and direction often creates interesting
and unique fabrics without the need for complicated stitch patterns.
Version 2
While working with pre-drawn shapes isn't necessary, it can be fun to
work that way. A new approach will 'grow" your creative repertoire and
will certainly help that dreaded creative block we all experience from
time to time.
The shapes in Fig. 70 were created using Paint Shop Pro; however, you
can freehand draw them if you prefer.
Figs 71 and 72 show a drawn shape and the resultant knitted
fragment. You can see that artistic licence has been employed in that the
knitted shape isn't an exact replica of the drawn one, nor does it have to
be. Since we are working in a freeform manner it becomes almost
mandatory that you view artistic licence as a creative tool and not be
afraid to use it.
If you are worried about the short rows being visible in your knit
fragments remember that they will be disguised by surface
embellishment or be less noticeable when the fragments are knitted in
Knitted fragments can be hand stitched together in the same manner
as the crochet fragments (see 'Putting It All Together') or crocheted
together. Surface crochet or embroidery can be added to disguise the
seams if required. Meandering lines of surface chain along the seams can
also make an effective contrast (see 'How to' chapter, 'Surface crochet
method Г).
Of course, you don't need to create randomly shaped knit fragments.
In the 'Log Cabin Knitting' section we look at using squares.
Experiment!
Projects
ОШ»
Special contributions
1 gratefully acknowledge the generosity of my very talented friends who
contributed to the projects in the following chapter.
THE SCARF THAT GREW® 2003
THE ZEBRA BAG® 2003
Alison Vincent, Sydney, Australia
I first met Alison when she attended one of my scrum bling workshops a
few years ago and she has become a steadfast and very supportive friend.
Her creative talent has been an absolute joy to observe. She has an
unerring ability to take what one teaches her and transform the
knowledge into a style uniquely her own, something I as a tutor
NATIVE BLOSSOM HAT® 2002
FOLD'N ROLLED HAT® 2002
Lynne Johnson, Canberra, Australia
Lynne is an extremely talented knitter whose work 1 admire enormously
and whose friendship 1 value highly. Her techniques fit perfectly into the
'taking your yarn for a walk' genre and I am thrilled that she chose to
'publish' her techniques for the first time in this book.
If you have the chance to take a workshop with Lynne, do so! They
are great fun and she is a very knowledgeable woman, who does not
hesitate to share her expertise! You can contact her at:
Tel: 02 6281 6771
Email: johnos@cyberone.com.au
Website: www.womenoffibre.com.au
METALLIC TUNIC WITH FLORAL APPLIQUE®
2002
Margaret Hubert, Pawling NY, USA
Margaret is proof of just how wonderful technology is and I wouldn't
have met her if it hadn't been for the Internet! We share membership on
a number of textile related email lists and it’s through those lists that we
got to know one another. 1 was lucky enough to meet her in person in
October 2003 when she travelled to Australia to attend the 2003
Geelong Fibre Forum. Margaret is yet another very talented person who
kindly let me use her 'Metallic Tunic' idea.
Margaret teaches freeform knitting and crochet in the US and in 2003
released her Freeform Crochet and Freeform Knitting videos. You can
Email: MHDesigner@aol.com
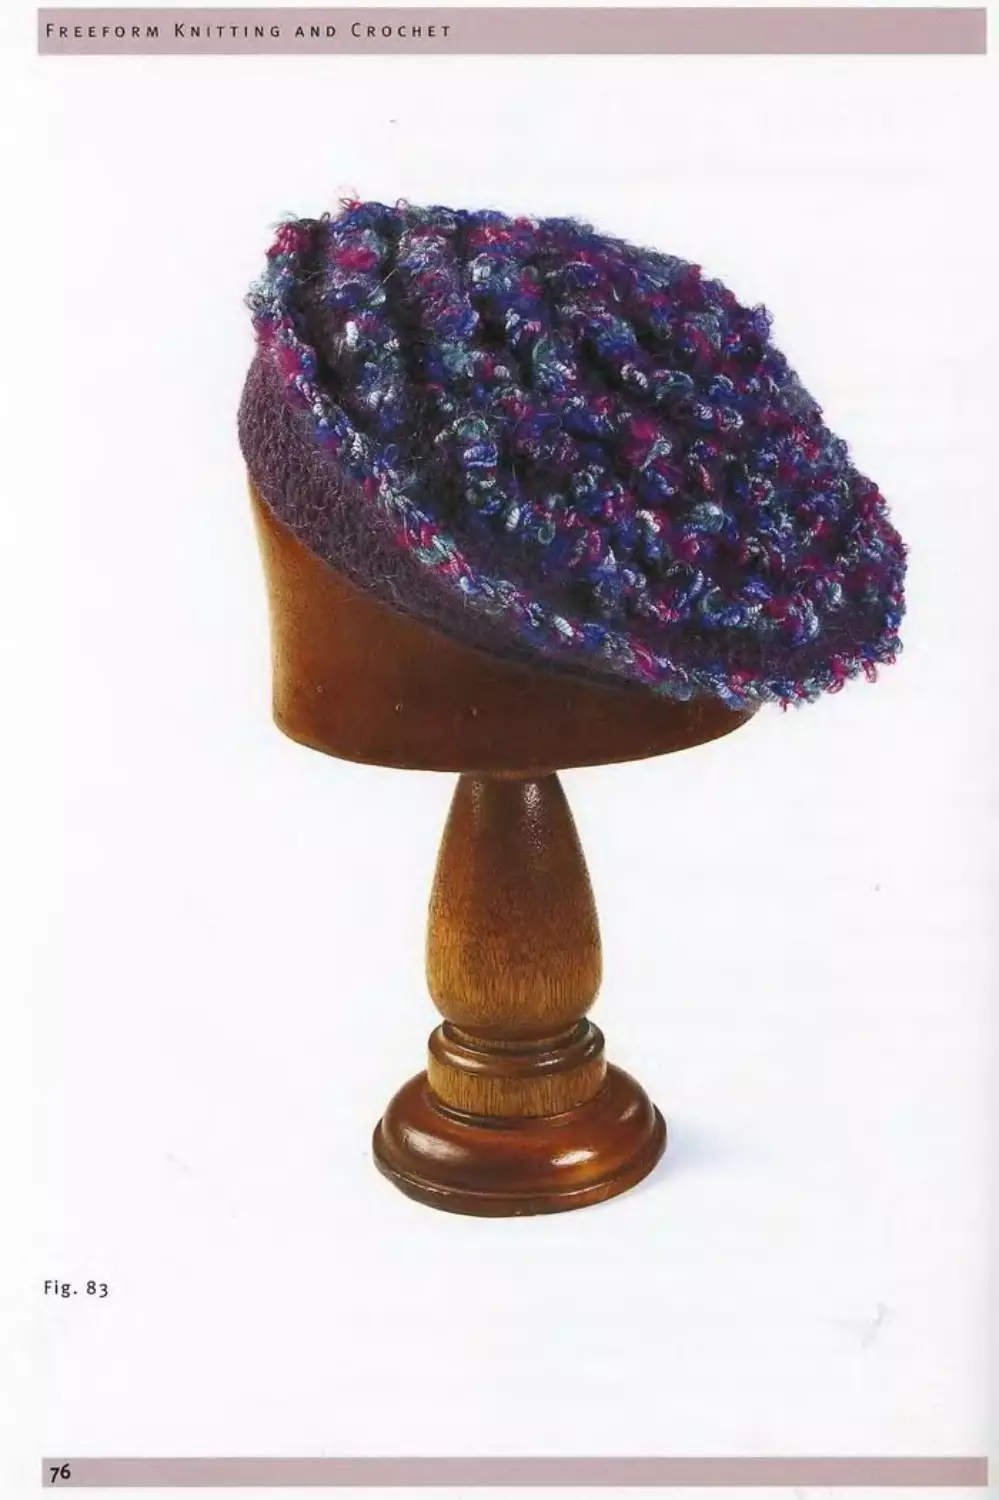
Crochet
Fragment Beret
template. You can either
fullness to the joined fragments) or cut yourself a template from calico
This beret is based on Crochet Fragment 2. For my beret (see Fig. 74)
I used nine full fragments and one half fragment, but this depends to a
certain extent on the yarns used. Thicker yarns will of course make the
fragments larger and vice versa with thinner yarns. You may also find
that, once you start pinning your fragments to the template, it will be
harder to 'fit' the fragments into the remaining spaces. If this is the case,
choose some thinner yams from your colour scheme for the final one or
two fragments.
Place the fragments onto the template, moving them around until
you are happy with the arrangement. Remember that it is unlikely that
your fragments will completely fill the template shape and that perhaps
a half fragment will be required to complete the circle.
arrangement you can pin the fragments down with safety pins before
you can pin the fragments together at their edges to give some stability
while you stitch, or you may choose to begin stitching without pinning.
This technique is fine providing that you keep the plate under your work
as a guide.
For your stitching yarn, choose a plain yarn from your colour scheme
With right side facing, begin stitching the fragments together using a
simple overhand stitch. The stitches won't be obvious in the finished
beret because they will blend into the background fabric. I sew all my
scrumbled garments together like this and no-one can ever tell me where
If you find that small areas between the fragments don't quite join
up, don't worry — this is easily fixed later. Leave them for now and
Pro/ects
continue somewhere else. Conversely, if you find two fragments are
join them with crochet. The resultant bump or ridge will just add to the
texture of the fabric.
When all the fragments are joined, it's lime to fill in any gaps around
fix the edges is to pick up the fabric and fill in the spaces using simple
The easiest way to cover gaps in the centre of the fabric is to stitch a
small treble (US de) circle to the top of the fabric. You may like to add
balance the overall design. In time you will discover your own easy
solutions to any problems you may encounter in your work. This is yet
another indication of the design freedom inherent to the scrambling
technique.
should nevertheless keep an eye on the shape in order to avoid enlarging
'Putting It All Together' chapter.
Adding the band
Once again, choose a plain yam that compliments the overall colour
for 8 ply (DK) you would probably use a 4 mm (US 5) or 4.5 mm (US 6)
Work a row of de (US sc) evenly around the edge of the fabric. When
place a thread or a safety pin at this join to indicate the beginning and
Continue working in rounds, decreasing evenly until the beret fits
course depends a little on your head size and design preference. If you
(US sc) in the first round and then divide it evenly. For example, if you
first decrease row and then every 9th, 8th, 7th, etc.
with a slip stitch, break off the yarn and sew in the ends.
Knit Fragment Bag
(‘Red Sky at Night’ - see Fig. 68)
A combination of Knit Fragments 1 and 2 were used to make this
bag. You can use these for your bag or create your own fragments.
You will need
A selection of yarns in your chosen colour scheme
Knitting needles, one of size 4mm (US 6), one of size 6.5mm (US 10'Z) and
a pair of 3.5mm (US 4) (you will be knitting with different sized needles
throughout)
Crochet hook, 4.5mm (US 6)
Template, 30cm (12") x 30cm (12")
Safety pins
Suitable fabric for lining
You will need approximately six to seven whole fragments, although this
will depend somewhat on the yarns you use.
When you have at least six fragments made, start laying them out on
the template until you are happy with the arrangement, making sure you
have a good balance of colour and texture. It's a little like putting the
pieces of a jigsaw puzzle together. You should find that the odd-shaped
pieces do fit together reasonably well, with just a little coaxing required.
Tip: I find it easier to work from the centre of the template out. rather
than the other way around.
If you find fragments want to overlap, let them do so, stitching one
down on top of the other. Conversely, if you are left with small gaps,
leave them for now. We'll get to those later. You will certainly have gaps
around the edges, as these cannot be avoided.
When you have enough fragments to fill in the major part of the
template and you have arranged the fragments to your satisfaction, pin
them down with safety pins so that they won't move around too much
as you stitch them together. It's easier to use a simple overstitch and sew
them together from the right side, so choose a yarn that is compatible
with the overall colour scheme of your bag. The yam will blend in and
be indistinguishable once all the fragments have been joined together.
The act of stitching the fragments together, whether they be crocheted or
knit fragments, will tend to compact your work slightly. This is normal
and is addressed in the following paragraph.
Once you have the main area of your bag completed, it’s time to start
knitting smaller fragments to fill the outside gaps caused by the
inevitable compaction mentioned above and by the fragments not
easy to knit — it's just a matter of casting on a number of stitches,
stitches, and knitting a shape that roughly compares to each gap. You
the shape onto the paper to use as a mini template.
Tip: It's safer to have a stitch or two more than you think you will need,
knitting and shaping, all the while checking the fragments against the
and all that is left to do is perhaps fill one or two small gaps in the centre
the gap.
filled with a few des (US scs), as this is sometimes easier than picking up
to filling in gaps and, once you've done it a couple of times, you will find
that the process isn't as fiddly as it appears when just reading about it.
Finishing
To complete the bag knit or crochet a plain back or make more
fragments if you want a double-sided bag. Stitch the front and back
together using mattress stitch and line the bag according to the
instructions in the 'How to' chapter.
Strap
these, and plait them together to make a really firm strap. Stitch down
5cm (2‘) of the strap to each side of the bag making sure that it is stitched
securely. Add a tassel or other embellishment to the end of each strap.
You can use a Caterpillar Braid or Crochet l-Cord (see 'FUNky FX'
chapter) if you prefer.
If a closure is required, cast on 3 stitches and knit a 10cm (4‘) length
of garter stitch for a loop. Fold in half and stitch securely to the centre
Л firmer, wider strap can be made by working des (LIS scs) over 12-15
chain in 8 ply (DK) with a smaller hook than is generally
recommended.
Log Cabin
Knitted Bag
his fun and easy technique, inspired by a picture of a log cabin
quilt, is a follow-on from the knitted fragment idea where the
shapes were knitted and then embellished with embroidery' stiches, such
as chain stitch, French knots, couching and cross stitch. In fact, any of
your favourite stitches can be used, as well as surface crochet and/or
knitted 'bits'. (See the 'FUNky FX' chapter for some ideas.)
Garter stitch was used throughout this item. No gauge is required.
As with all the freeform 'patterns' in this book, you don’t need to
worry if the number of stitches you find on your needles is the same as
the number of stitches in the instructions, as long as the variance isn't
great. One or two stitches more or less is perfectly acceptable.
Note: It's important that you cast off loosely when you have completed
your log cabin segments. You may choose to leave long ends at each yarn
Log cabin crochet follows the same principles as the knitted version
except that you just tie in a new yarn at the beginning of each new
You will need
A colour scheme of 12-15 yams in a variety of textures and thicknesses
Knitting needles, 5mm (US 8)
Crochet hook, 5mm (US 7)
Abbreviations
st(s) stitch (es)
dc(sc) double crochet (single crochet)
Instructions
Cast on 10 sts, knit 5 rows. Cast off, leaving last stitch on needle.
Change yarn, turn work a quarter turn to the right and pick up 3 sts
have 4 sts in total (this includes the last stitch from the cast off row).
Knit 5 rows.
Cast off, leaving last stitch on needle, change yarn, and turn work a
quarter turn to the right, pick up 13 sts (you should have a total of
Cast off, leaving last stitch on needle, change yarn, and turn work a
quarter turn to the right, pick up 7 sts (8) and knit 5 rows.
Cast off, leaving last stitch on needle, change yarn, and turn work a
quarter turn to the right, pick up a stitch from each of the "bumps' as
Continue in this manner until your square is the size required.
lite bag in 14g. 75 measures 28cm (If) x 28cm (If) give or take a
millimetre or two. If distortion has occurred al the edges, you can work
some de (IIS sc) along the edge to even things out.
If you prefer, you can knit a plain or striped background as your base
fabric. The end result would still be very effective.
Finishing
To complete the back of the bag, you can work another square using the
same technique as the front or knit one in garter stitch (using a slightly
smaller gauge needle to create a firmer fabric) or crochet one in one of
the basic stitches. If you use garter stitch, you can knit a tension swatch
or use the template as a guide for your stitches and rows.
Using mattress stitch, stitch the sides and one edge together. Line bag
according to the basic instructions in the 'How to' chapter.
Strap
You can knit or crochet a strap (see the 'How to’ chapter for
56
Knitted Fragmented
Strips Bag
Working in strips is a wonderful technique for using up scrap
yarns or for indulging yourself in the joy of using an expensive
yarn in the knowledge that it won't cost you a fortune. It is also one of
my favourite ways of creating unique accessories, cushions and garments
and a perfect way to 'take your yarn for a walk'.
Because you will be using so many different yarns of different plies
and textures, it is impossible to determine a correct gauge. Therefore, as
with the scrumbling technique, you will be able to let your creativity
flow, unhindered by the traditional rules. Instead of working small
fragments that are later joined, with the strip technique you knit or
crochet lengths of fabric of whatever length and width you please.
Tip: Because you are using yarns of different weights and thicknesses you
may need to occasionally double any thinner yarns in order to avoid
major distortion at the edges of your strips.
Here are some suggestions for knitting and crocheting fragmented
• Vary the number of stitches used for each strip.
• Vary the number of rows worked, or work exactly the same for each
strip. Again, depending on the yarns used, each strip will be a
different length. You can use this to your advantage in a garment to
create an interesting, asymmetrical hemline.
• Use a combination of knitted strips and crocheted strips.
• Vary the hook and/or needle size as you knit the strips. For bags it is
advisable to use a slightly smaller needle than normal to achieve a
tighter fabric.
• Use two different sized needles when working the knitted strips. This
has a tendency to create its own texture.
• Use garter stitch throughout or be adventurous and add your
favourite stitch patterns. There are literally hundreds of stitch
patterns available in as many books. Be aware, though, that a stitch
pattern won't be shown to full advantage if worked in a heavily
textured yam.
To get you started here are instructions for a small knitted bag that takes
no time at all to knit, yet looks a million dollars when finished.
The finished bag measures approximately 19cm (7‘Zr") x 19cm (7‘Л").
If you want a larger bag simply add more stitches to the instructions as
given — just a few more per strip will make the bag a few centimetres
larger. Or, if you want a much larger size, make extra strips.
Garter stitch was used throughout this bag plus selected FUNky FX
was used randomly (see 'FUNky FX' chapter). No tension gauge is
required for this project.
You will need
A selection of specialty yarns in your chosen colour combination, plus
some plain coordinating yarn that will add contrast and achieve unity.
(Use any finer yarns doubled or even trebled to avoid significant
differences in strip widths. I call this ‘edge creep’!)
Knitting needles, 5.5mm (US 9) (suggestion only) — since you will be
using many different yarns it's difficult to ascertain which size needles
should be used; as a general rule of thumb, when making fabric for
bags or cushions use a size smaller than that indicated on the wrapper
of your heavier yarns)
Crochet hook, 4.5mm (US 6)
Knitting needle, one of size 6.5mm (US 10%) for casting off
Lining of your choice
Button or bead
stitch (es)
Ki
yfwd/wyif
Кг tog
yarn forward/with yarn in front
knit two together
rep
yarn over
Instructions — first strip
Cast on 10 sis with any yarn and knit 4-6 rows. The thicker the yarn, the
fewer rows you will need. If a yarn is extremely chunky and brightly
coloured, you may prefer to knit only 2 rows with it.
for each strip is up to you. 1 seldom knit more than 6 rows).
Change yarn and knit 5 stitches, turn and knit a further 4 rows on this
first group of stitches. Break yarn. Place these 5 stitches onto a holder.
59
Transfer held stitches back to working needle.
Join in yarn to beginning of row and knit across both groups of
stitches, securing loose thread to the working yarn as you knit across the
Change yarn and knit 4 rows.
Make a row of eyelets as follows:
KI, • yfwd, K2 tog.’ Repeat from • to to end.
Knit 1 row.
Choose a yam that is not too bulky (a smooth ribbon works well) and
continue as follows in elongated stitch:
Knit 1 row.
Next row: KI, • yo twice, KI.* Rep from * to • until last stitch. KI.
Next row: Knit to end, dropping extra loops as you go.
Knit 3 rows and change yarn.
Continue knitting in stripes as above, interspersing plain knitted rows
with any FUNky FX you like.
When your work measures 43cm (17"), cast off loosely using the size
6.5mm (US 10'/;) needle. Using a slightly larger needle will ensure that
the cast-off edge remains loose.
Instructions — second strip
With right side of first strip facing, turn the work and pick up and knit
14 stitches (you can either pick up each 'bump' from the end of the
previously worked garter stitch rows in the first strip, or between each
"bump', but not from both). From the schematic diagram in Fig. 77 you
can see by the direction of the arrows just where 1 picked up for my 2nd
and 3rd strips.
Knit 2-4 rows.
Stripe 2
Change yarn and knit an eyelet row as in first strip (stripe 5).
Change yarn and knit a row of elongated stitch as in first strip (stripe 6),
then knit 2 more rows of garter stitch.
Stripes 4-7
Knit 4 more stripes of garter stitch, changing yarn for each one.
Measure the width of your bag It should be approximately 19cm
(7‘Z>"). If it’s a little wider, that's fine — don't worry about it. If it's
narrower than you would like it to be, work another stripe.
Instructions — third strip
Turn your work again and this time pick up stitches from the side of the
strip just completed. I needed to pick up 16 stitches to ensure that 1
filled in the space created by knitting the second strip onto the side of
the first strip. You may need to pick up more or less, depending on the
yarns you have used.
Continue knitting stripes as before for the length of the bag — 43cm
(17") in total.
I
Finishing
Fold the bag at 38cm (15") and sew sides using mattress stitch, leaving
a 5cm (2") flap.
Lining
Tip: Remember to pre-shrink any lining fabric that may have a tendency
to shrink when washed.
Since this is a freeform bag and you will certainly have used different
yarns from those I used, it is likely that your bag won't measure exactly
the same as mine. The general procedure for determining the size of the
lining is as follows:
Measure the total length of the bag less the length of the flap, and then
add 4cm (I'A") for the hem.
Measure the width of the bag and add 4cm (llZt") for a seam
allowance.
Fold lining in half and sew the sides together. Without turning inside
out, insert the lining into the bag. Fold under the top 2cm (%”) of the
lining and slip stitch to the top of the bag, just below the edge.
Note: I didn't line the flaps of my bags, but if you choose to do so, you
will need to cut out a pattern to include this extra length and stitch the
lining down accordingly.
Flap
Finish off the flap as follows:
1st Row: Measure in approx. 2cm (%") from edge of flap and with yarn
of your choice pick up stitches evenly across work until you gel to
within 2cm (Vi") from other edge.
2nd Row: Knit.
3rd Row: K2 tog, knit to last 2 sts, K2 tog.
4th Row: Change yam and repeat 2nd row.
5th Row: Same as 2nd row.
Continue in this manner until the flap extension measures 3.5cm
(IV)
6th Row: Cast off.
Work 1 row of de (US sc) along side of flap. When you reach the cast
off edge at the top of the flap make a chain loop across the top for a
button closure, then continue along the other side of the flap.
Work 1 row of de (US sc) along top edge of bag and fasten off. Sew
on button.
Make a strap measuring 115cm (45") using two ends of yarn as per the
instructions for Caterpillar Braid in the 'FlINky FX' chapter and attach
securely to the sides of tire bag.
Note: This bag is designed to be worn across the chest rather than over
the shoulder.
Crocheted
Fragmented
Strips Bag
he finished bag measures approximately 19cm (7'4") wide by
21cm (8'Zi") high, with an 8cm (3 'k’) Пар. If you want a larger bag
simply add more stitches to the instructions as given - just a few more
per strip will make the bag a few centimetres larger. Or, if you want a
The crocheted strips for this bag were worked using mainly de (IIS sc)
and half treble (LIS hdc) or trebles (US de), together with highly textured
yarns and some FlINky FX to add interest.
ideas on how to make fragmented strips.
You will need
A selection of specialty yarns in your chosen colour combination, plus
some plain coordinating yarn that will add contrast and achieve unity.
(Use any finer yarns doubled or even trebled to avoid significant
differences in strip width.)
Crochet hooks, 4.5mm (US 6) and 5mm (US 7). The larger hook should be
used for any bulky yarns. When making fabric for a bag, use a smaller
sized hook than usual to ensure a firmer fabric.
Lining of your choice
Button or bead
Abbreviations
ch chain
dc(sc) double crochet (single crochet)
dtr(tr) double treble (treble)
htr(hdc) half treble (half double crochet)
tr(dc) treble (double crochet)
tr tr (dtr) triple treble (double treble)
st(s) stitch(es)
RS right side
Fig 79: Diagram showing
how bag was constructed
Instructions — first strip
The crocheted version of this bag was constructed using the follow»
diagram. You may of course change any of the components to suit yot
own design.
Note: Turning chains aren't always necessary when working in:
freeform manner. At the beginning of each row, work 1 chain (nt
counted as a stitch), and then work into each loop of the previous
worked row. Initially, it may help to keep count as you work until yo
determine that you are keeping a constant number of stitches in you
Stripes 1 & 2: Ch 10, miss (US skip) 1 ch and work 2 rows of htr (11
hdc) (9 sts).
Stripe 3: Work 1 row of trebles (US de), turn. Work 4 de (US sc), chi
miss (skip) 3sts, de (US sc) to end. This makes a horizontal slit. 1
Stripe 4: 1 row of de (US sc), 1 row of loop stitch, and then 1 row oft
(US sc).
Stripe 5: 2 rows of trebles (US de).
Stripe 6: Work 3 de (US sc), 1 trailing stitch, 2 de (US sc), 1 trailin
stitch, 2 de (US sc).
Stripe 7: 1 row of de (US sc), 1 row of crumpled stitch — instead
using double treble (US tr) you can use tr tr (triple treble) (US dt
for a more textured effect. This is sometimes necessary when usit
finer yarns. Then 1 row of de (US sc).
Stripe 8: 2 rows of trebles (US de).
Stripe 9: 1 row de (US sc), 1 row wrapped bobble and 1 row de (US sc).
Stripe 10: 1 row tr (US de), 1 row de (US sc) with horizontal slit, 1 row
tr (US de).
Stripe 11: 1 row dtr (US tr), I row de (US sc).
Stripe 12: 2 rows htr (US hdc).
Stripe 13: 1 row tr (US de) if using a heavily textured yarn, otherwise
work 2 rows of tr (US de).
Stripe 14: 1 row de (US sc). Do not turn. Work 1 row of corded rib stitch
into front loop only of previous row.
Stripe 15: 1 row tr (US de) into back loops left in previous row, 1 row tr
(US de). Strip 16:1 row long loop stitch, 1 row de (US sc).
Instructions — second strip
To make the second strip, turn the first strip sideways, and with RS of
work facing, work a row of treble (US de) along 20 st (or number
required to measure 15cm (6"]). Continue working stripes as before,
using plain stitches together with an occasional row of a FUNky FX
stitch until the work measures 9cm (З'Л") or width desired.
Instructions — third strip
The third strip is added by working across 7 stitches starting at the
junction of where the first strip meets the second strip (approximately
6cm [2%’| in width). Work stripes as before.
Instructions — fourth strip
The fourth strip is added by working across the remainder of the stitches
at the side of the first strip. Work stripes as before.
Before adding the fifth strip, you will need to stitch the third strip to
the first strip and the fourth strip to the third strip.
Instructions — fifth strip
Now work the fifth strip by working across the top of the already joined
third and fourth strips. Continue in stripes as before until this final
section is the same length as the first strip. Stitch strip 5 to strip 1 and
finish off according to the following instructions.
Lining
Tip: Remember to pre-shrink any lining fabric that may have a tendency
to shrink when washed.
Since this is a freeform bag and you will certainly have used different
the same as mine.
The general procedure for determining the size of the lining is as
follows:
• Measure the total length of the bag less the length of the flap, and
then add 4cm (1%“) for the hem,
• Measure the width of the bag and add 4cm (!'/") for the seam
allowance.
Fold bag at 29cm (11 'A"), leaving 8cm (3’) for a flap. Sew sides together.
Fold lining in half and sew sides together. Without turning bag inside
out, insert the lining into the bag. Fold under the top 2cin (%") of the
lining and slip stitch to the top of the bag just below the edge.
Note: I didn't line the flaps of my bags, but if you choose to do so you
will need to cut out a pattern to include this extra length and stitch the
lining down accordingly.
Flap
in de (US sc) until within 1.5cm (Z/) of centre. Work a chain loop to
measure Зап (l'A"J from 1.5cm ('/;") past the centre, insert hook into
the fabric and continue working de (US sc) to the end. Sew on button.
Strap
instructions for Caterpillar Braid in the 'FUNky FX' chapter and attach
securely to the sides of the bag.
Note: This bag is designed to be worn across the chest rather than over
the shoulder.
Scarf d’Opulence
While I have stipulated the yarns to be used for this project, it is
by no means necessary to use the same ones in your scarf. The
designer, may use whatever yarns you wish to complete a project.
The simple stitches (garter and elongated) used in this scarf enable
you to easily adjust the length and/or width. No tension gauge is
required for this project.
You will need
50 g (13/ oz) ribbon yarn (I used Katia by Cleckheaton)
50 g (i»4 oz) Cleckheaton Faux Fur
50 g (i3Z oz) Fingering Metallic Mix, approx. 3 or 4 ply (Faux Fur and
Metallic Mix are used together and referred to in the instructions as
'combo yarn’)
Knitting needles, one each of 15mm (US 19) and 10mm (US 15) (you will be
using one of each size needle throughout). Note: Using the larger
needle for the cast on will ensure a looser edge, or you can use the
thumb cast-on method (see 'How to' chapter)
Tip: Ribbon yarn has a tendency to twist during knitting. For this scarf,
it is easier to ignore than to fix, as once the loops have been released and
tugged gently downwards, it straightens itself out quue satisfactorily.
Abbreviations
st(s) stitch(es)
yo yarn over
Ki knit one
Instructions
With combo yarn and size 15mm (IIS 19) needle cast on 20 sts.
Knit 3 rows, Break off combo yarn leaving a 12 cm (4’A") tail. Join in
ribbon yarn leaving a 12cm (4’A") tail and proceed as follows, making
sure that each yo row is worked using the ribbon yarn (and the size
10mm (US 15] needle) and the three knit rows are worked using
combo yarn.
1st Row: KI, * yo twice, KI. Repeat from • across row.
3rd Row: Knit.
4th Row: Knit.
Continue in pattern until work measures length required, ending wi
knit rows. Cast off using a 15mm (US 19) needle to ensure a lo,
cast off.
Note: Because the nature of this scarf makes it difficult to hide the ends
from each yarn change I have chosen to turn them into a design element
by leaving them to hang loose along the edges.
Fringe
Alternate 24cm (9'Л") lengths of combo yam and ribbon yarn across the
ends of the scarf. Attach by folding the lengths in half and pulling the
folded edge through the fabric and feeding the two ends through this
loop. Pull firmly to tighten. (See 'How to' chapter.)
Easy Crochet
(or Knit)
T-Square Shawl
. 81
The 'Homage to a Magpie' shawl (see 'Gallery") was created by
crocheting individual fragments and linking them together with
chains to form the triangular shape. Using a simple background as a
base and embellishing it as you go or after you finish the fabric is the
easiest method.
Stitch used may be either half trebles (half double crochet) or trebles
(double crochet). No tension gauge is required for this project.
You will need
200-250 g (7-9 02) of yarn (wool, wool blend or mohair)
Crochet hook, 5mm (US 7)
Instructions
Work htr (US hdc) or treble (US de) until work measures 55cm (2114").
until the long side of your work measures 140cm (55"). Fasten off.
Variations for shawl
Chain Loop Beret
something special through the use of an unusual stitch as
embellishment. It will fit an average head size.
What you need
100 g (3%oz) of 8 ply (DK)
i ball contrast yarn (use a fancy yarn with texture for the best effect)
Crochet hook, 4mm (US 5)
Abbreviations
ch chain
Rd round
st(s) stitch(es)
ss slip stitch
tr(dc) treble (double crochet)
Instructions
Note: Hie 3 ch at beg of each round count as 1st stitch.
To start: Make 4 ch, ss to 1st ch to form circle.
1st Rd: 3 ch, 11 tr (US de) into circle (12 sts), ss to the top of 1st tr (US de).
2nd Rd: 3 ch, 1 tr (US de) in 1st, 2 tr (US de) in each tr (US de) to end
(24 sts), ss to top of 1st tr (US de).
3rd Rd: 3 ch, inc 1 tr (US de) in every 2nd tr (US de) (36 sts), ss to top
of 1st tr (US de).
4th Rd: 3 ch, inc 1 tr (US de) in every 3rd tr (US de) (48 Sts), ss to top
of 1st tr (US de) (work should measure approx, 10cm (4") in
diameter)
Rep the 4th round 7 limes increasing one stitch in the 4th, 5th, 6th, 7th,
8th, 9th and 10th sts respectively (132 sts and 11 rounds).
12th Rd: 3 cli, evenly dec 12 tr (US de) (see formula below), ss to top of
1st tr (US de).
It
formula for decreasing 12 sts evenly in each round:
12th Rd: Work 10 tr, tr2 tog 12 times.
13th Rd: Work 9 tr, tr2 tog 12 times.
14th Rd: Work 8 tr, tr2 tog 12 times.
15th Rd: Work 7 tr, 2tr tog 12 times.
Repeat 12th Rd 3 more times (84 sts and 15 rounds).
Work 3 rounds of de (US sc) and fasten off.
Embellishment
of each of the treble (US de) in the 1st, 3rd, 5th, 7th, 9th and 11th
rounds and work a round of chain loops (see 'FUNky FX' chapter), one
Other hat ideas
Knit or crochet a plain beret or cloche and add embellishment to the
surface using crochet, knitted add-ons, embroidery, etc.
Make a crown of four identical segments and crochet a band or brim.
Basic
Crocheted Bag
his basic bag can be made with or without the circular base ai
pockets. Fig. 84 shows the components of the bag and Fig. I
shows the bag made without the base or pockets and embellished wi
an appliqu&l decorative chain (see 'Funky FX' chapter). Fig. 86 sho
the bag made with the base (no pockets) and embellished with floi
motifs. Or you can make the bag with pockets and embellish thei
instead of the bag itself, with ideas from the 'FUNky FX' chapter. ]
Half Treble (US hdc) was used throughout. Note: Correct tens!
isn't a requirement for this project!
Tip: For a knitted version of this bag you would need to make a sv
in your preferred stitch and calculate the stitches and rows reqi
using the measurements shown below.
Fig. 85 (right) and
Fig. 86 (left)
Bag measurements
Width of bag — 30cm (12")
Length to where shaping for handle starts— 17cm (6>4")
Length of handle — 34cm (13'/")
Pockets — approx. 12cm (43%“) x 13.5cm (5%”) (placed evenly on the side
seams approx. 3.8cm (1%") from bottom of bag)
Circular base (optional) — approx. 19cm (7’/") in diameter
You will need
200 g (7 oz) of 8 ply (DK) yarn
Small amounts of specialty or contrasting yarns for embellishing
(beads and/or buttons may also be used if desired)
Crochet hook, 4.5mm (US 6)
Lining if required
Abbreviations
htr(hdc)
inc 1 htr (US hdc)
htratog (hdcztog
half treble (half double treble)
2 htr (US hdc) in next stitch
decrease is worked as follows: work the first stitch as
an unfinished double crochet (US single crochet) and
the second stitch as an unfinished half treble (US half
double crochet), then pull the yarn through four loops
to complete
Instructions
Special note: Begin each row with 1 ch as a turning chain and work the
first stitch of each row directly into the stitch nearest the hook. The 1 ch
does not count as a stitch and is used only to facilitate turning.
Chain 46.
Repeat 2rd row until work measures 17cm (6’4‘) or depth required for
the body of the bag (approx. 23 rows altogether).
Shaping handles
1st Row: htr2tog (US hdc2tog), htr (hdc) to last 2 sts, htr2tog
(US hdc2tog), 1 ch, turn.
2nd Row: Work htr (US hdc) to end, 1 ch, turn.
Repeat rows 1 and 2 until 4 stitches remain.
Fasten off.
Back
Repeat as for front.
80
I
Base (optional)
Chain 16.
1st Row: From 3rd chain from hook, work 14 htr (US hdc), Ich, turn.
2nd Row: Inc Ihtr (US hdc) twice (i.e., work 2hlr (US hdc) in each of
first 2 sts (you are increasing 2 sts al each end of row), htr (US hdc)
to last 2 sts, inc Ihtr (US hdc) twice, Ich, turn (18 sts).
3rd Row: Inc 1 htr (US hdc), htr (US hdc) to last st, inc I htr (US hdc),
Ich, turn (20 sts).
4th Row: As 2rd row (24 sts).
5th Row: As 3rd row (26 sts).
6th Row: As 3rd Row (28 Sts).
Work 10 rows of htr (US hdc) without shaping.
17th Row: htr2tog (US hdc2tog), htr (US hdc) to last 2 sts, htr2tog (US
hdc2tog), Ich, turn (26 sts).
18th Row: As 17lh row (24 sts).
19th Row: (htr2tog/US hdc2tog) twice, htr (US hdc) to last 4 sts,
(htr2tog/US hdc2tog) twice, 1 ch, turn (20 sts).
20th Row: As 17th row (18 sts).
21st Row: As 19th row (14 sts).
22nd Row: Work htr (US hdc) to end.
Fasten off.
Pockets (optional)
Chain 22.
1st Row: From 3rd chain from hook, work 20 htr (US hdc), Ich, turn.
2nd Row: Work htr (US hdc) to end, 1 ch, turn.
Repeat 2nd row until pocket measures approx. 12cm (5'A").
Fasten off.
Finishing
Complete all embellishments and stitch on all motifs before attaching
the lining.
'rhe handles of the bag may be lined if you wish; however, it's easier
to line the bottom section only.
Cut a lining for all pieces as required, adding 1.5cm (!4") all round
for seams and hem. Sew seams, insert lining into bag, fold hem and slip
stitch the lining to the fabric just below the point where the shaping
begins.
Crocheted Wire
Amulet Bag
To create a perfect freeform piece negates the very spirit of freeform!
Jenny Dowde
Гог some time artists have been using wire to create wearable art.
While most of them make jewellery pieces, it's also possible to
create articles that can be worn as garments, provided a soft and flexible
wire is used (see 'Bibliograph/ for titles on this subject).
pattern for a simple crocheted wire and bead amulet.
Once you get a feel for working with wire, you'll find that creating
freeform pieces is easy!
Using wire instead of yarn does create some problems that you need
to find solutions to. the main one being that wire has no stretch factor,
unlike yarn, so that has to be taken into consideration when creating a
Fig. 87
body. Vou may therefore prefer to make a swatch and work to a gauge.
However, you can also freeform with wire, developing your design as
you go.
with a small circle of 4 chains. I then worked round and round until I
reached the size 1 wanted. The circle isn't perfectly round, and wasn't
ever intended to be so.
1 started 'Crossing Circles’ (Fig. 88) by crocheting around a rubber 'O'
ring and then worked in rounds until I felt that it was big enough. 1 then
worked around just over half the outside of the circle, stopped the round
and continued straight up for the strap and back again, securing it to the
other side.
'Verdigris' (Fig, 89) evolved as I worked. I had no preconceived idea
it aside for some weeks, 1 picked it up one day and started bending and
stitched the 3D circle over the top, added the strap and suddenly it:
looked OK!
The hooks or needles you choose to use for your wire work are up to
Fig. 88
you. In her book. Knitting with Wire, Nancie Wiseman advocates using
wooden or bamboo needles, as the wire tends to slip over these far more
easily. As I don't have any wooden needles, or hooks for that matter, I
use metal ones. So far I’ve not encountered any problems.
Choosing the right wire
There are several wires available that you can choose from (see
'Resources' for more information).
Artistic and craft wires
Artistic wire comes in a range of gauges and colours; craft wire is
available in gold (more like brass), silver, black, red and green.
For most knitting and crochet projects I recommend that you choose
a gauge between 28 and 34 as any heavier would be torture to use. You
can use 26 gauge, but it’s hard on your hands and takes longer to work.
Fig 89
Note: 'Cascade' (see 'Gallery1) was made using gold (brass) craft wire
and it did leave some black residue on my fingers as 1 worked, which I
thought might be a problem down the track. Fortunately, it hasn't
proven to be so. It doesn't leave marks on clothing and it's actually
mellowed over a few years to a lovely 'antique' looking piece.
Copper winding wire
This wire is my favourite, but it only comes in one colour. To overcome
this, it is fun to use a coloured sewing thread with it to create colour
shifts. I also like the fact that 1 can use this wire doubled to constmct a
slightly heavier 'fabric'.
It is available in several diameters (not gauges) and my preference is
0.2 mm (approximately 34 gauge). Anything higher than 0.3 mm may
prove too difficult to work with. The 0.2mm is very fine, and while it will
tolerate a reasonable amount of forceful handling, it can snap if treated
roo roughly.
Hints on working with wire
The size of each stitch or loop will be decided by the size of die hook
or needle you use and some experimentation may be needed to
determine which size suits which gauge wire. The type of project you
are working on will also be a factor in your choice of hook or needle
When casting on, use a loose slip knot and then slip diis onto your
hook or needle. Do not pull it tight as this will make it impossible to
continue. For a knitting cast-on you may prefer to twist a loop onto
your right-hand index finger and slide it onto the left-hand needle.
Allow some slack in die wire as you do the cast-on row so that each
stitch doesn't become too tight.
Work loosely throughout the entire project! It's virtually impossible
to get a needle or hook to slip through a tight loop.
When crocheting you are bound to occasionally lose sight of the
loops of each stitch as you work each round or row unless you are
prepared to work very slowly and very deliberately, forcing each stitch
to sit 'just so' as it is worked. If you find that you are beginning to
worry about your work looking less than perfect, remind yourself that
you are working in a freeform manner and stop worrying about it.
If you do prefer to work precisely, you will have to work slowly and,
before commencing the next row, manipulate each loop of each
stitch on the previous row so that it sits up and away from the 'fabric'.
1 have found with some wires that the loops tend to lean downwards,
making both loops hard to see in the previous row.
It is not necessary to pick up both loops from each previously
crocheted stitch; just pick up a loop where you can and continue
working. If you are working in a freeform manner it doesn't really
matter.
When making items with straight sides, such as the 'Crocheted Wire
Amulet Bag', keep a check on how many stitches you have at the end
of each row. If you find that you are one short or have one more than
you should, just increase or decrease at the end of the row.
Working with wire has lots of potential. As with any new medium,
practice is essential, but it's even more important that you experiment!
This, above all else, whether you are using yarn or wire, is how you will
gain not only confidence and proficiency but also make new discoveries.
Why not begin your exploration into working with wire by making
the Crocheted Wire Amulet Bag, instructions for which are given below.
You will need
Copper winding wire, size 0.2mm (available from motor rewinding shops)
or use 32 or 34 gauge (see ‘Resources’)
Crochet hook, 3mm (US 2)
Seed beads in main and contrast colours of your choice. Note: Any seed
beads can be used for this bag, but do make sure that you have enough
to finish it. I used roughly 650 beads for the main colour, about 200
beads in a contrast colour and 13 larger accent beads for the fringe.
Nymo beading thread (or other strong thread)
Beading needle, No. 10 (or a needle that will fit through your selected
beads)
86
Abbreviations
me main colour
cc contrast colour
ch chain
WS wrong side
ss slip stitch
dc(sc) double crochet (single crochet)
htr(hdc) half treble (half double crochet)
i bdc(sc) i bead double crochet (single crochet)
3 bhtr(hdc) з bead half treble (half double crochet)
z bch 2 bead chain
Instructions
Before starling, thread 3 me beads and I cc bead onto wire until you
have approx. 120cm (47") of strung beads in a sequence of 3 and I.Do
not cut wire!
Note: Beads have a tendency to do their own thing, so always work
your beaded rows from the wrong side so that they fall naturally to the
right side.
Fig. 93: bead half treble
(half double crochet)
Chain 14.
2 ch, turn.
2nd Row: 1 htr (US hdc) in first ch, * 1 bhtr (US hdc) in next ch, 3 bhtr
(US hdc) in next ch. Rep from • to last ch, work Ihtr (US hdc)
without bead. 1 ch, turn.
3rd Row: Work de (US sc) to end.
4th Row: Work 1 htr (US hdc) in first ch. • 3 bhtr (US hdc) in next ch,
1 bhtr (US hdc) in next ch. Rep from • to last ch, work 1 htr (US hdc)
without bead. 2ch, turn.
5th Row: Work de (US sc) to end.
Rows 2 to 5 form pattern. Continue working these two rows until bag
measures 6cm
6th & 7th Rows: Work de (US sc) to end.
This finishes the front and folding rows of die bag.
87
Fig 94
Fig. 95
Fold bag in half at the two de (US sc) rows previously worked.
With back of bag facing you, crochet the sides together as follows:
Work 1 ch, then, working through both thicknesses of the bag, work
|US sc|). Work 2 de (US sc) into the corner, continue along bottom edge
of bag (8 sets), 2 de (US sc) in next corner, and 10 sets of 4 bdc (US sc)
along the other side of the bag.
With WS of bag facing you, work 1 de (US sc) in corner of bag, then
work • 2 ch, 2 bch *. Rep from • to • until strap is required length
(approx. 66 cm |26"|), ending with 2 ch.
to twist the strap.
Work 2 bch at corner. 2 ch, 2 bch in next ch loop ‘. Rep from • to '
until the second side of the strap measures the same as the first.
Turn work so that WS is facing you, then along the top of the front of
the bag only, work one row of 3 bdc (US sc) (11 sets). Fasten off.
To finish off any ends of wire, either cut them off flush with the bag, or
turn them into an embellishment by twisting them firmly around a
3.5mm (US 4) knitting needle to make a tight coil. Remove needle and
Fringing
Firstly, lake a look al the lower edge of your bag and mentally „work out
how far apart each fringe row will need to be. You don't need to be exact
— just make sure that you have enough spaces for all 9 rows of fringe.
Secure the beading thread to one corner of the bag by knotting it a
String beads onto your thread, according to the graph in Fig. 94.
Run the thread back up all but the three beads at the end of the row —
this creates a little loop and negates the need to tie off each fringe end.
Take your thread to the position of your next row and thread up the
beads for this row.
Repeal for all fringe rows.
When the last row has been worked, take the thread as before up
through all but the bottom three beads and secure it to the bottom of
the bag. You may like to take the thread through several of the beads on
the bottom row of the bag for extra security.
89
Knit Bead
Amulet Bag
I
Projects
Cast on 12 sts.
1st Row: (WS facing) KI, • bring 1 bead up, KI, rep from • to last st, KI.
2nd Row: Knit.
6th Row: KI, • yo, KI, rep from • to last st, KI.
7th Row: KI, • drop extra loop, bring 1 bead up, KI, rep from
st, KI.
22nd Row: Knit.
23rd Row: As 1st.
24th Row: Knit.
25th Row: As 1st.
Freeform Knitting and Crochet
Continue knitting for back of bag:
26th Row: Inc 1 stitch at each end of this row. Note: These extra two
stitches balance the fabric to match the front which has been slightly
reduced in size by the addition of the beads.
Continue in garter stitch until back measures the same as the front. Cast
off.
Sew sides together using mattress stitch.
Strap
With 3.5mm (IIS 4) hook, ch 1, *3 bch, ch 4, rep from * until strap
measures length required.
Working back along the chain length just worked and with the WS
facing, ch 3, 2 bch in the 2nd of 4th ch in previous row, * 4 ch, 1 bch in
2nd ch of 4 ch. Rep from * to end of strap. To finish this row, work 2 ch,
then ss between the 1st 3 bead cluster to secure. Attach strap to bag,
fasten off.
Note: If you prefer, you can knit the strap over 3 sts bringing up beads
as required on each wrong side row.
Fringing
You can follow the graph in Fig. 98 or design your own fringe! See the
Crocheted Wire Amulet Bag instructions for how to attach fringing.
Fig- 97, Fig 98
92
Ruana Collar
A ‘Grow As You Go’ Project
A .row as you go' project is one that evolves or .rows' as you work.
This eliminates the need for a tension gauge and allows you total
design freedom - a perfect way to let your creative spirit soar! The collar
in Fig. 100 is worked in the same technique as the 'Knitted Fragmented
Strips Bag' but you could create any fabric you like from the ideas in this
book since it is an easy project to experiment with.
To work the collar using the fragmented strips technique you will
need to gather up at least 20 different yarns (more if you have them) in
your chosen colour scheme.
Choose needles that suit the weight/lhickness of your chosen yarns.
If you want to use fine yams in the mix, remember to double them to
avoid 'edge creep', as discussed in the 'Knitted Fragmented Strips Bag'
project.
The basic stitch used throughout is garter stitch, with loop stitch,
wrap stitch, elongated stitch and eyelets from the 'FUNky FX' chapter.
I lowever, I mostly let the texture of the chosen yarns do the work and
knitted most of the strips in plain garter stitch.
Before you start, you will need a template of the garment on which
you will base your collar. 1 used a basic boat neck with square arm holes
(Fig. 99), which is possibly the easiest option since there is no armhole
or neck curve to worry about, but you could use any of your favourite
patterns as a guide.
12 cm
U-75")
17 cm
(6.5 м)
17 cm
(6.5")
Total width: 46 cm (18")
Fig- 99
93
Freeform Knitting and Crochet
Fig. loo
Constructing the collar
Decide how long you want your collar to be. Mine is 32cm (12’Z?”) and
falls a little below the shoulder blades.
rhe width is determined by the width between your shoulder points.
With a square armhole template, this is easy, as you just have to ignore
the underarm extension and work with the width of the top section
only, as is indicated by the red line in Fig. 101. The armhole depth can
be used as a guide for the length of your collar but, if it isn't long
enough, just add the extra length as required.
Since this is a 'grow as you go' project, you can now cast on some stitches
for your first strip and commence knitting. You can choose to knit each
of the strips in the correct length for the back of your collar or you can
stop short of the total measurement and add more later on. It all
94
Projects
Fig. 101
depends on how you want to 'grow' your collar. Because you aren't
working with a tension gauge it's almost inevitable that your strips won't
match the template exactly.
The back of my collar was constructed as shown in Pig. 102. The
arrows indicate which way the knitting lies in each segment and not
necessarily the direction in which each was knitted.
Both fronts were single strips knitted vertically and measured 32cm
(12’/2") long by 17cm (6%") wide which, when stitched to the back, left
a 12cm space for my neck. In other words, 1 didn't make the
fronts exactly half the size of the back.
To finish off your collar, all you need to do is stitch the strips together,
join the back to the fronts and add some fringing (see 'I low to' chapter).
95
You have total freedom in the way you construct your collar and it's by
no means necessary to follow my diagram, which is only one of many
ways to do it. You may even choose to knit the entire back in one piece,
pick up enough stitches at the shoulder edge for a front and continue
knitting.
The Scarf
That Grew
You will need
There is no tension to work to on this garment so choose yarns that will
give you a light, lace-like look.
The project illustrated here was made with ioog/2oom (3‘/oz/22oyds) of
12 ply (Heavy Worsted) mohair and 200 g/300 m (?oz/33oyds) of a
boucle novelty yarn.
join front to back matching points A & В and C & D
Fig. 104a
Check the labels on the different yarns. If the manufacturers
recommend using roughly the same size knitting needles, you can be
reasonably certain that the yarns will work together.
To achieve a draped fabric, use a 6.5 mm (US IO1/;) crochet hook. If
you are concerned about tension, work a small square, alternating the
yarns you want to use and experimenting with the size of the hook —
you may need to use a different sized hook with each yarn.
The idea is to use simple stitches and to let the texture of the yarn
speak for itself. The only stitches used are de (US sc) for the mohair
strips and treble (US de) for the novelty yarn.
Instructions — Part A
Before you begin, drape a tape measure around your neck and work out I
roughly how long you want the front edge to be. These instructions are I
worked on a length of 145cm (57") from the bottom of the left front to I
the bottom of the right front.
you approximately the length you desire. Remember that the length will
vary once you work stitches into this chain so always chain more than
In the example illustrated, I chained 117 stitches to achieve the length
1 wanted. If you make an odd number of stitches, it will make it easier
(US de).
2nd Row: Hirn work, and with the same yarn work another row of tr
(US de).
Rows 3 & 4: Change to mohair and work two rows of de (US sc).
1 chose de (US sc) for the mohair rows because that tended to make the
(US de) rows with both yarns.
Part A forms the two front panels and the top half of the back. Work
in the striped pattern, alternating two rows of de (US sc) mohair with
one row tr (US de) boucle until the strip is about 30-33cm (12-13")
wide, finishing with a mohair row.
Now try it around your neck, draping it over your shoulders like a
stole. Pull it upon the back of your neck so that the two front edges meet
like a cardigan. Do you Want to fold the edge over at the back of your
neck to make a roll collar or just have it sit fiat? At this stage, the back
more rows, just do one at a time and check the length as you go. When
the strip is the right width, break yarn and fasten off.
To finish the back, you will need to pick up stitches along the bottom
edge of this strip and work a straight panel in the striped pattern until
the back is the length you want. Take time to think about this now. In
my garment, the finished back is shorter than the front, finishing at
waist length. Measure roughly how much longer you want the back to
From these measurements, I calculated that the back section. Part B,
needed to be about 27cm (10'/;") wide and 23cm (9") long.
Instructions — Part В
1 1лу Part Л flat, right side up, and find the middle of the last row. This
the middle was the 58th stitch from the beginning.
99
Freeform Knitting and Crochet
2 Now you need to measure half the width of the back either side of
the centre point — in my case approximately 13.5cm (5’A”) either
side of the 58th stitch — and mark with a pin.
3 Count up the number of stitches on each side, making sure that you
have die same number of stitches either side of the centre. In the case
of my scarf, 27cm (IO1//) approximated 23 stitches — the centre
Now join in yarn, keeping the sequence of strips, and crochet across
these stitches. Continue in the striped pattern until the back is the
length you want — try it on from time to time to check. Fasten off.
Finishing
front. More decisions! Try the garment on. If the back is shorter than the
is 1.5cm ('Л") longer than the back.
Work out, also, how long you want the join to be, as this will
determine the depth of the armhole. Since I like to wear loose-fitting
shins, I wanted a deep armhole, and so I chose to make the side seam
Before you do anything else, think about how you want to join the
back and the front. I crocheted the side seam and decided to put three
small buttons on the front. You might want to use buttons at the side
If you want to use buttons at the sides, determine whether you want
the front to overlap the back or vice versa and where the buttonholes
need to be. Similarly, if you want buttons on the front, determine where
the buttonholes need to be.
With the right side of the T facing you, join the novelty yarn into the
edge and de (IIS sc) evenly around the whole garment, taking a little
care with the edge down the sides of section В so that it doesn't become
loo wavy and uneven. Work the buttonholes where necessary and to the
size required. You could choose to do this final edging in a contrasting
buttons.
side seams first and then do the bottom and front edges and the
armhole edges separately
I laving made this pattern up pretty much as you have gone along, no
doubt you have already thought about how you would do it differently
next lime.
This example was based on simple stitches and textured yarns. Why
rows with shells, for example, or alternate tr (US de) rows with rows of
bobbles. 1 have used only two yarns, but ifyou have a good stash of bits
and pieces, every row could be a different yarn or a different colour —
or both.
Now that your garment is finished try turning it upside down. Put it
on so that the side seams become the shoulder seams. One top becomes
two — or just another idea for next time?
Note: This fun garment works equally well knitted (see Fig. 105). Use
some fun yarns and large needles to achieve the draped effect!
Zebra Bag
© Alison Vincent 2003
his bag is made using a technique that I think of as geometric
scrumbling. The striped effect is achieved by using a variety of
yarns, working in straight rows and changing yarn often.
Please read through the instructions before commencing this project
You will need
Small bags, approx. 20cm x 15cm (8" x 6"), similar to those illustrated
here require about 50 g (134 oz) of oddments of yarn. I like to make my
bags with a plain back and use the same yarn for both the back and the
edging, in this case you would need at least 25 g (approx. 1 oz) of the
majority of yarns to be roughly equivalent to 8 ply (DK), with some
thicker and thinner yarns thrown in here and there. This weight of yam
made up with a 4.5mm (US 6) crochet hook produces a firm, dense
The 'zebra' look comes from contrasting two colours, but there is no
restriction on the colour palette you can use to create an interesting
You may need buttons to use as closures and material for lining (both
Abbreviations
ch chain
dc(sc) double crochet (single crochet)
dtr(tr) double treble (treble)
htr(hdc) half treble (half double crochet)
tr(dc) treble (double crochet)
Instructions — Back
many stitches as you need to match the width you require.
Tip: It is a good idea to make the chain slightly longer than you think
you will need. Check the width again after you have completed the first
Work the first row in de (US sc) and then alternate rows of de (US sc)
could work all de (US sc) or all tr (US de) — the choice is yours.
Instructions — Front
Using the back as a template, make a chain the required length to match
the width of the back — the stripes will run horizontally.
Tip: Because working with different yarns and different stitches on the
front tends to make the work spread, you may want to decrease the
length of the rows on the front by two or three stitches. However, if the
finished front is slightly wider than the back, this is not a problem!
The first row of the front is worked in de (US sc) without changing yarn,
lor the second and all subsequent rows the rule is that there are no rules.
I Ising the basic idea of crumpled stitch, i.e. alternating short and long
stitches (see 'FUNky FX' chapter), work each row in any combination of
stitches that comes into your head, with no more than any two adjacent
stitches being the same. Add the odd bent bobble or popcorn stitch (see
'FUNky FX' chapter) here and there and change yarn frequently, say
every 10 or 12 stitches, so that you get the striped effect and build up a
wonderful dense texture at the same time.
1st Row: Worked in de (US sc) without changing yarn.
2nd Row: 2 de (US sc), 1 dtr (US tr), 1 de (US sc), 1 dtr (US tr ), 2 de
(US sc), 2 htr (US hdc), 1 de (US sc), change yarn, 1 de (US sc), 1 dtr
(US tr), 1 de (US sc), 5 tr (US de), bobble. 1 de (US sc), 1 tr (US de),
2 de (US sc), 1 dtr (US tr), 1 de (US sc), 1 ch.
3rd Row: 2 de (US sc), change yarn, 1 dtr (US tr), 2 de (US sc), 1 tr (US
de), 1 de (US sc), 1 htr (US hdc), 2 de (US sc), 2 htr (US hdc), 1 de
(US sc), 1 dtr (US tr), 2 de (US sc), change yarni 1 tr (US de), 1 de
(US sc), 1 dtr (US tr), 1 de (US sc), 1 ch.
Make sure that you push all the lumps and bumps to the front of the
Note: It is important that you keep the same number of stitches
throughout, so you do need to do a turning chain at the end of each row.
Working with different yarns and different stitches it is easy to lose track
of the number of stitches in each row. So that you don't get lost, it is a
good idea every now and again to work a row in plain yarn so that you
can easily count the stitches and adjust if necessary.
Tip: Work randomly, checking from time to time to make sure that the
colour changes aren't starting to look too uniform.
Continue with the front until it is the same length as the back.
Finishing
1 Using a contrasting colour, pick up stitches and work at least one row
of de (US sc) evenly along the sides and bottom of the front,
remembering to do three de (US sc) at the corners so that the piece
stays even and flat. If you want a wider border work more rows of de
(US sc) until you are happy with the result.
2 Now compare the back with the front. If the front is significantly
wider titan the back, don't panic. Work the same number of rows of
de (US sc) around the sides and bottom of the back, and then work
extra rows of de (US sc) down the sides until the two pieces are
roughly the same width.
3 Next pick up stitches across the top of the back and work rows of de
(US sc) to make a border. If you are using buttons as a closure, the
depth of this border will be determined by the size of your buttons.
Otherwise, it can be any depth that balances with the border at the
bottom and sides.
4 Work a border on the top of the front piece to correspond with the
back, working in evenly spaced buttonholes if you want to use
buttons as closures for the finished bag.
Tip: If you want to line the bag, it is easier to measure the pieces now to
get the dimensions for the lining, 'litis will give you more accurate
measurements.
5 Place the wrong sides of the front and back together, loining in your
yarn at the top right-hand comer, crochet the two pieces together
with a row of de (US sc).
6 Finally, make and attach a strap and the lining if required.
For the examples illustrated here (Fig. 107), I used upholstery fabric for
the back of the bag. Cut a piece of fabric slightly smaller than the size
you want the finished bag. Stabilise the edge of the fabric with a couple
of rows of zigzag stitch. Then, using a large needle and the yam you have
used for the border, work an even row of either blanket stitch or running
stitch, about 5mm ('A") in from the edge, around all four edges of the
fabric. Using this row of stitching as your base 'chain', work rows of de
(US sc) around all sides of the back until it is the right size.
Variations
For a fancier finish, why not add a picot edging to the finished bag!
Joining the front and back together with a yarn that contrasts with
the borders would add another original finishing touch.
Think about which way you want the stripes to run — horizontally
or vertically. To make the stripes run vertically, you need to work the
front from side to side rather than from bottom to top.
Think about how you might change the direction so that pan of the
front would have horizontal stripes and part would have vertical
stripes.
If you have lots of scraps of yam, make both the back and the front
striped — perhaps horizontal stripes on one side and vertical on the
Fold ’n Rolled Hat
hese hats are fun to make and easy to wear. Basically, you knit a
shaped rectangle, sew up a seam, fasten the top end, roll up the
using short rows. The brim end also has some short row shaping to
make it snug when rolled. Stranded garter stitch (instructions below and
in 'FlINky FX' chapter) makes the fabric elastic and helps hold the shape
well. The same set of instructions is used for the adult's and the child's
version of this hat. In the child's version thinner yarns and finer needles
are used.
You will need
For the adult hats I used contrasting yarns and 5.5mm (US 9) knitting
needles.
Yarn A for the brightly coloured hat (Fig. 110) is a multicoloured
looped Burraweave mohair and Yarn В is a multicoloured Wendy Dennis
4 ply (Fingering) yam — 75-100 g (З’Л-З'Л oz) of each is plenty, with
yarn to spare for trimming. Yarn A for the lighter coloured hat (Fig. Ill)
is a Collinette yarn, Tagliatelli, and Yarn В is a Cleckheaton 5 ply.
Sportweight — 85-100 g (about 3 oz) of the Tagliatellli and 50 gm
(l-'A oz) of the 5 ply (Sporlweight) will give you yarn to spare for
trimming. The weight of the Yarn Bs in both of these hats is equivalent
to the weight of US sock yarn.
For each of the child versions (Figs. 108 and 109) I used two balls of
the same yarn and 4mm (US 6) knitting needles. There is about 50 g
(17, oz) of Fibreworks, 3ply (Fingering) yarn, in the brightly coloured
hat and about the same weight of Littlewood Fleece, 4 ply (Fingering)
yarn, in the paler hat. The weight of both of these yarns is equivalent to
the weight of most sock yarns in the US.
Note: See 'Resources' for listings on where to obtain the yarns used in
these projects.
Abbreviations
st(s) stitch(es)
SG stranded garter stitch
yfd yarn forward (US wyif - with yarn in front)
YA yarn A
YB yarn В
Instructions — Stranded garter stitch
Note: It is advisable to work a sample in this technique before starting
one of these hats (see below and/or in the 'FUNky FX' chapter).
This technique involves knitting every row with two yarns alternately
— we've called them Yarn A and Yarn B. These instructions will make a
sample of the technique.
Cast on 20 sis loosely witli Yam A. Add in Yam B.
1st Row: Knit YA, YB, YA. YB to die end of the row.
2nd Row: Same as Row 1. As you start each row, give both yams a gentle
tug to lake up any slack involved in the turn.
Rows 3-20: Same as Row 1. Cast off.
In Row 2 and onwards you will notice that stitches that were knitted
with Yarn A in the previous row will be knitted with Yarn H in the current
row and vice versa. Those of you who have done Fair Isle or stranded
knitting before will recognise what you are doing — except that there
aren't any purl rows and the floats are short.
For those of you unfamiliar with Fair Isle, 'floats' are those bits of the
yarn that sit on the purl side of the fabric between the stitches knitted
with that particular yarn. Because this is garter stitch — every row is a
plain knit row — there will be short floats on both sides and these can
become a feature of the stitch, depending on the way the yams are
carried as you knit.
Lynne says:
I do stranded gorier with one yam above my right index finger and the other
below. The one I cany above shows more prominently on the finished fabric.
Sometimes I carry a textured yam above and sometimes a smooth one — it
depends on the effect I want, it's worth playing around using different yarns
and combinations and seeing what effects you gel and like.
Once you have your 20 stitch by 20 row sample you'll be able to
estimate your overall gauge or tension.
Instructions — Hat
Cast on 80 sts loosely.
1st Row: Work SG (see below) to brim end.
2nd Row: SG to last 5 sts at crown end, yarns forward, slip next st purl
wise, yarns back, slip stitch back onto left-hand needle, turn, yarns
back, (litis is called 'short row' or 'partial’ knitting and is included in
the '1 low to' chapter.)
3rd Row: SG to brim end.
4th Row: SG to last 10 sts al crown end, work short row as in Row 2.
5th Row: SG to last 10 sts at brim end, turn.
6th Row: SG to crown end.
Rows 7-10: As rows 1-4.
Rows 11 & 12: SG to end.
To finish die hat you will need to repeat row 1-12 eight times ami then check and
see how well it fits. Do more rows as needed then cast off loosely. Sew the cast on
and off edges togcdicr using a flat seam. Run a thread through die crown edge and
fasten then trim lite top of the hat however you wish.
Native Blossom Hat
© Lynne Johnson 2002
I his is a loose-fitting hat to be worn over the ears, with the wider
1 section of the band to the front, the side or the back, according to
The band is made in stranded garter stitch (see 'FLINky FX' chapter)
using two yarns, one smooth and one textured. The crown is made with
short lengths of lots of different yams, many of them highly textured,
and the technique used is one 1 call 'shaggy reverse stocking stitch' (see
'FUNky EX' chapter). The colours and textures of the yarns, together with
the shaggy reverse stocking stitch, produce a hat that reminds me of the
blossoms of some of our gorgeous flowering native plants.
Band — You will need
50 g (1’Z oz) of a space-dyed 5 ply yarn (sock ply) for Yarn A
50 g (1'Z oz) of a multicoloured mohair, or mohair loop yarn, for Yarn В
Knitting needles, 3.75mm (US 5)
Gauge = 26 stitches to 10cm (4") both ways
Instructions — Band
Note: It is advisable to work a sample in stranded garter stitch before
starting this project (see the 'FUNky FX' chapter).
The band varies in width from 2-3cm (’A-lVT) on one side to about
13cm (5") on the other.
Cast on 10 sts (not too loose, not too tight) with Yam A. Join in Yarn B.
1st Row: Knit YA, YB, to the end of the row.
2nd Row: Knit YA, YB to the last stitch. Increase in the last stitch by
knitting into the front with YB and into the back of it with YA.
(Increasing at the end of the row in stranded garter makes it easier to
see how the next row starts.)
3rd Row: Knit YB, YA to the end of the row.
4th Row: Knit YA, YB to the last stitch. Increase in last stitch. Because the
last stitch was a YB stitch, increase into the front of it with YA and
into the back of it with YB.
5th Row: As Row 1.
6th Row: As Row 2.
7th Row: As Row 3.
8th Row: As Row 4 (14 sts).
Repeat Rows 1-4 until you have done 50 rows and have 35 stitches on
your needle.
Rows 51-100: Do SG with no increases, alternating Yarns A and В as
101st Row: Knit YA, YB to the end of the row.
102nd Row: Knit YA, YB to the last two stitdies. K2 tog with YA.
103rd Row: Knit YB, YA to the end of the row.
104lh Row: Knit YA, YB to the last two stitches. K2 tog with YB.
Repeat Rows 101-104 until 10 sts remain. Cast off.
Sew the two narrow ends of the band together using a top stitch. This
Crown — You will need
Approx. 30 g (i 02) of Yarn A or any other thinnish yarn for the base yarn
Approx. 40 g (1% oz) of textured and novelty yarns (including Yarn B) for
the shaggy effect
Set of double pointed needles, 5mm (US 8) or a circular needle, 5mm
(US 8)
Instructions — Crown
lire crown is knitted in the round. Knit up 120 stitches evenly around
the increase/decrease edge of the band, with 40 stitches each on three of
the dpns or all 120 on the circular needle. Place a marker after the last
As mentioned above, 1 used shaggy reverse stocking stitch (RSS) (see
'FlINky FX' chapter) to get the plush effect for the crown. Hie RSS
technique involves knitting with two yarns as though they were one —
a thinnish yarn as the base and novelty and textured yarns providing the
plush, or shaggy, effect. The novelty and textured yarns are cut into
pieces roughly 15-20cm (6-8") long and are knitted one at a time with
About 4-6 stitches are knitted with the two yarns, leaving about
every second row (round).
1st Row: Purl with the base yarn adding in pieces of yarn as you go
Rows 3 & 4, 5 & 6: Same as Rows I and 2. Place markers every 20 sts if
using a circular needle.
sts together twice on each of the 3 dpns or once between each marker
if using a circular needle. Hie decreasing can be done randomly or
regularly.
As the number of stitches decrease those of you using circular needles
may need to change to dpns.
Continue decreasing at the same rate until 6 stitches remain.
Break off the base yarn and thread it through the remaining 6 stitches,
pull it up and tie it off, trimming it to a length about the same as those
of your shaggy pieces. Il becomes part of the plush!
Enjoy your Blossom Hat!
Metallic Tunic with
Floral Applique
© Margaret Hubert Originals 2002
Note: There is no tension gauge for this garment. Instead, you should
use a template to check how many chains arc required for the
foundation row using the pattern instructions as a starting point.
Yoh will need
150 g (5%" oz) each of gold, silver, copper and black metallic or shiny yarn,
5 ply (US sport weight)
Crochet hook, 3.75mm (US 5 or F)
Beads of your choice for flower centres
Abbreviations
ch
st(s)
tr(dc)
dc(sc)
chain
stitch (es)
treble (double crochet)
double crochet (single crochet)
skip
continue
Instructions — Back and front
Foundation Row: Chain 124 (130,136). Make 1 tr (US de) in 5th chain
from hook (counts as 1 tr (US de), ch 2 throughout) • miss 2 ch, 1 tr
1st Row: Ch 5 to turn, • 1 tr (US de) in next tr (US de), ch 2, repeat from
• ending 1 tr (US de) in the 3rd ch of the turning ch 5.
Repeal Row 1. using several colours, changing colours every 4 or 5 rows.
Change in different places on row. not necessarily at edges, to create the
uneven striping effect. Work until 58.5cm (23’), 61cm (24‘), 63.5cm
(25") or desired length to shoulder. Fasten off.
Instructions — Sleeves
(Make 2). Chain 70 (76, 82). Work as for back until sleeve measures
25.5cm (10"), 28 cm(ll”), 30.5cm (12") or desired length.
Finishing
Sew shoulder seams about 11.5cm (4’6’), 12.5cm (5’) or 14cm (5‘6“)
from outside edge.
Fold sleeves in half, set in place and sew in.
Sew underarm seams leaving a 10cm (4’) opening at bottom edge for
Embellishments
Make at least 50 flowers and leaves (more flowers than leaves), or as
many as you wish, and stitch to top of mesh background (see Fig. 115).
116
Chain 4, join with a slip stitch to form a ring, make 10 de (US sc) in ring,
join with a slip stitch.
Next round: " Chain 2, make 3 tr (US de) in next st, ch 2, slip stitch in
next st. Repeat from • 4 times more (5 petals). Hasten off.
Chain 12, de (US sc) in the back loop of each ch to last ch, 3 de (US sc)
in last ch. Now, working on other side of chain, de (US sc) in next 8 de
(US sc), ch 1 and turn. Working in back loop, de (US sc) in 8 de (US sc),
3 de (US sc) in next st, cont around other side, de (US sc) in 8. End off.
Add beads to flower centres.
Buttons and
Closures
here have been many times when I have heard a knitter or a textile
118
Buttons and Closures
1. Always follow the manufacturers temperature recommendation.
2. Always check your oven with an oven thennometer to ensure that the
4. Always clean your oven after each use.
again for food preparation. All clay artists use items for their clay
basis, it is also advisable to buy a small oven dedicated to polymer
Polymer clay fragment buttons
1 love using polymer clay to simulate ancient artefacts. These 'fragment
buttons' are super easy to make too. The tools required are minimal, and
You will need
6o g package of white or beige polymer clay, or you can use dark clay and
lighter coloured paints to create the 'aged' look if you prefer. Since
buttons come under a reasonable amount of stress during their
lifetime, I advise using a strong, flexible clay, such as Modelene, Premo
Work surface: Ceramic or glass tile or small piece of laminated timber
(a manila folder will work just as well if nothing else is available)
Textures: Your texture source could be anything you have around the
house, such as old lace, jewellery, cutlery handles, print blocks, etc.
Small amount of cornstarch
Old baking tray, or ceramic tile lined with paper (baking paper or sheet of
paper)
Wooden skewer or knitting needle for making buttonholes
Acrylic paints (Burnt Umber, Raw Umber, Raw Sienna, Cool Blue, Gold or
Copper Metallic, or your favourite antiquing colours
Small amount of dirt (optional)
Tub of water
Small flat-ended paintbrush
Paper towel
Container of water for sanding
Wet and dry sandpaper in 400,600 and 1000 grits
119
Freeform Knitting and Crochet
Buffing wheel or denim for polishing
Sealant: You can use any of the specialist polymer clay glazes or products
available from the companies listed in 'Resources') or you can use
Johnson’s One Go, which is available from supermarkets, or Future
Floor Polish if you are in the United States.
Instructions
Note: If you arc new to polymer clay, it is ccrj* important that you check
your oven with an oven thermometer to make sure that the temperature
is correct before attempting to cure your items. Too low a temperature
will result in under-cured clay and may cause your work to crack or
break. Too high a temperature will result in fumes that are unpleasant to
some people.
At the correct temperature, you will notice a slight smell. This is
normal and, although perfectly safe, it is advisable during the curing
process that you have good cross-ventilation.
I Condition your clay and roll into a roughly shaped ball. If you are
new to polymer clay, 'conditioning' just means making it soft and
malleable to use. Ibis is done by breaking off small pieces from the
block of clay and kneading it until it becomes soft. Л good guide as
to whether it has been sufficiently conditioned is to roll the clay into
a fat snake and bend it in half. If it cracks, it needs more work.
2 Tear off a piece about the size of your thumbnail and flatten with your
because each fragment is different and they are not meant to match
exactly. You will soon work out how much clay you need for each
3 To texture the fragments, lightly dust some cornstardi onto your
textured source. If you are using lace or other fabric, brush the
cornstarch onto the clay and then press the scrap of clay against the
sure that you don't use an area of texture that is fully representational
of the image. That is, if you are using a spiral stamp, press the clay
up half the flower and a leaf or two.
4 Carefully remove the fragment from the textured source and place it
(I use baking paper, which is available from supermarkets). The
temperature you will be curing at — 130°C (250“F) — is perfectly
safe and the paper will not burn.
done by piercing the fragment with a knitting needle or wooden
skewer. Pick the fragment up, push the needle or skewer through
from one side and then from the other, being careful not to squash
shape won't really matter, since it will only add to the realism of the
one with points that are the same length, as they make perfectly
spaced holes suitable for all but the smallest buttons.
6 Once you have made the buttonholes, cure according to the clay
7 Once cool, you can scratch the surface of each piece with a needle
tool to add to the antique look if you wish.
Instructions — Antiqueing your fragments
1 Depending on the effect you want, choose the colour paint that best
Wet your fingers and rub some dirt into the I
Squeeze out some paint onto your work surface or a plastic lid, and
with your paintbrush or fingers work it into the texture so that you
some paper towel. If you were too heavy-handed with the paint, a
quick wipe with dump paper towel will remove some of it.
depressions of the texture, use the paintbrush to get into those
Instructions - Sanding and polishing
When dry, sand gently with wet sandpaper, starting with >100, then
the 600 and finally the 1000 grit. Note: You should always sand
polymer clay using water to minimise dust particles. Sanding will
Sanding cured polymer clay results in a beautifully smooth, shiny
which is the fastest and easiest way to do it. I lowever, not everyone
has one of these at his or her disposal. If you do use one of these
wheels, you must wear safety goggles and a dust mask! Л good
easier if you are actually wearing a pair of jeans!
To protect your buttons you can now add a coal or two of sealant.
Moulded buttons
buttons is also great fun. You can use old buttons or jewellery, shells,
rubber stamps or any other small, interesting objects that you may find.
It's better to choose objects without undercuts, as it's virtually
Buttons and Closures
You will need
Scrap clay (only use your good, clean clay if you must)
Armor-All or cornflour
Small paintbrush
Baking paper
Rubber stamps, old buttons, charms, jewellery, etc.
Instructions
until it's soft and pliable, fudging how much clay to use will take a
around the depression, at the same time not having too much excess
around the outer edges. A thick original will need a fair depth of clay,
say 2cm 04"). Flatter objects don't need so much. Between 1.5cm
own moulds.
2 Brush a little Armor-All or dust some cornflour onto the original and
press it into the prepared clay, making sure that you embed the entire
piece into the clay. Gently work your thumbs over it to make sure
that you reach all the recesses. TUrn the piece over and press it down
Freeform Knitting and Crochet
prevent sticking). This helps flatten out the surface of the mould, at
the same time ensuring that the object is totally embedded. Now
gently peel the clay away from the object. If it resists, gently lift one
edge with your fingernail to aid release. If it won't release, it means
that you didn't use enough release agent. If you aren't totally happy
with the result, wipe away any excess release agent and try again.
3 Cure your mould at the recommended temperature, increasing the
probably won't need to cure for much longer than 45-60 minutes for
thicker objects.
Now you have a negative of the original that you can keep forever. To
make a positive you just need to repeat the above steps.
To antique or 'age' your moulded buttons, follow the steps in the
polymer clay fragment button instructions.
Carved closures
Carving polymer day is another of my favourite techniques. This
involves transferring an image to clay and then carving and antiquing
that image.
Buttons and Closur
You will need
Conditioned clay in the colour of your choice, rolled flat and cut to the
desired shape
Baking paper
Copyright-free image (see ’Resources’)
Carving tool with a small V shaped cutter (I use a Speedball, but any
carving tool will do)
Small chisel-type paintbrush
Wet and dry sandpaper, 400,600,1000 and 1200 grits
Paper towel
Buffing wheel or piece of denim
Instructions — Transferring an image
perfectly flat and smooth. Dedicated clay artists use a pasta machine to
preferably Atlas brand. Imperia is quite good also, but doesn't have as
many settings as the Atlas. Look for them at kitchen supply shops or
that expense, the easy alternative is to use two wooden skewers of
medium thickness and a smooth glass jar.
skewers.
3 Roll the glass jar over the clay until it is the same height as the
4. Transfer your image to the piece of clay using one of the methods
described below, ordraw it directly onto cured clay with a soft pencil.
minutes. To check on transfer, gently lift one corner — if the image has
clear to facilitate the carving process.
Trace your image onto tracing paper with a soft lead pencil. Place traced
image face down onto raw clay and burnish gently with your fingers. The
image should transfer quickly using this method.
Instructions — Carving and painting
cool. You can begin carving as soon as the piece is cool enough to
handle safely.
Don't carve too deeply into the image at your first attempt. You can
always work over the whole image again if you want, but you cannot
correct a deeply gouged area. Always carve away from your fingers as
much as possible in order to avoid injury, slowly rotating the piece
as you work. 'litis rotational method works very well when carving
'u' shaped cutter. I only ever use the small V cutter for this particular
technique, but that is my personal preference. Some images,
Once you have carved the image, you can apply the paint, which will
highlight the carved lines, following the same instructions as for the
button fragments.
When you have applied enough paint, set the piece aside to dry.
When dry, you can sand the piece to remove excess paint from the
surface, using wet and dry sandpaper. Start with the 400 grit, and
then use the 600, 1000 and, finally, the 1200 grit. (See also
instructions for the button fragments.)
Polymer clay is a very versatile medium for making buttons, jewellery
and other items, and the techniques described here are just a few of the
countless possibilities (see books in 'Bibliography' for further ideas).
126
FUNky FX
he special embellishments in this chapter will add a little touch of
knitting and crochet so that you will have lots of choice when creating
your freeform fabrics. Some need to be worked over a complete row to
or as the mood strikes.
Crochet FX
Abbreviations
Rd round
ch chain
st(s) stitch(es)
tr treble
dtr double treble
ttr triple treble
dc(sc) double crochet (single crochet)
htr(hdc) half treble (half double crochet)
tr(dc) treble (double crochet)
dtr(tr) double treble (treble)
tr tr(dtr) triple treble (double treble)
ss slip stitch
yoh yarn over hook
WS wrong side
RS right side
beg beginning
dec decrease
inc
increase
Applied decorative chain
a crocheted chain with textured elements added at any time as you work
accessories or garments. Fig. 120 shows a hand-knitted garter stitch vest
that has been embellished with applied decorative chain.
FUNky FX
of3 ch to finish.'I'his will create a flat motif. If you want one that is more
These are some variations:
For smaller motifs work de (US sc) or htr (US hdc) instead of trebles
1 tr (US de), 1 ch into ring 8 times. Slip stitch to 3rd chain of
beginning 4 ch to finish,
From die point in your chain that you want the flaps to sit, work 4 more
chains. Into 2nd ch from hook work 1 de (IIS sc), then work 1 de (US
sc) into next 4 sts. Work a few more ch sts then repeat. The number of
flaps in any one section of the chain length is up to you. Continue with
You can also use these variations:
Work htr (US hdc) or even tr (US de) to make wider flaps.
Work Ide, 1 htr. (US hdc), 3 tr (US de) to create shaped flaps.
Experiment with this variation to create your own shapes.
From the point in your chain that you want the bobbles to sit, work 4
more chains, in the 5th chain from the hook, work a bobble, as shown
in the 'How to’ chapter. As with the flaps, you can work a group of these
together along the chain length or separate them with as many chain sts
from the point in your chain that you want the shape to sit, work 10
more chains. Working back along the 10 chains just worked, complete
Into 2nd ch from hook work 1 de (US sc), 1 htr (US hdc) into each
of next 2 sts, I tr (US de) into each of next 3 sts, I dtr (US tr) into each
of stitches back along the other side of the 10 chain section. Continue
working your chain length to die position of your next decorative
element.
To attach the ADC to your work stitch it down using a small running
129
Crocheted caterpillar braid
Make 2 ch.
1 de (US sc) in 2nd ch from hook, turn.
• Insert hook in 2 side loops, yoh, draw through 2 loops, yoh, draw
through remaining 2 loops, turn.
Rep from • for required length.
This cord can be used for bag straps — you need to use thick yarn and a
size 5mm (US7) or 6mm (US9) hook for single straps, or 8 ply (US DK)
yam and a 4.5mm (US6) hook to make three single cords that can then
be plaited together to make a more substantial strap.
As variations:
Work 1 chain in between each turn and weave a contrasting yarn or
ribbon through the resultant small holes.
Work 2, 3 or even 5 chains between each turn for an interesting
13°
I
Crochet I-Cord
Make 4 or 5 ch, ss into 1st ch to make a circle. Using de (US sc) and with
WS always facing, work round and round in a spiral formation for the
length required.
I-Cords can be plaited together to make bag straps or used as surface
decoration on a base fabric. Or thread thick cord through to make firm
handles for bags.
Crochet flaps
Worked with the RS of the work facing, on a base row of de (US sc), htr
(US hdc) or tr (US de).
Ide into st, ch 6, Ide into 2nd ch from hook, 1 de (US sc) in each of next
4 ch (Пар made), * miss (skip) 1 st, Ide (US sc) in next 2 sts, make
flap as before, rep from ' to end.
one stitch into the space below each flap.
Try these variations:
•- Use htr (US hdc) or tr (US de) instead of de (US sc) for wider flaps.
Crochet triangles
Work some surface crochet using either of the methods described in the
'Crochet Stitch Collection' chapter to form a base for your triangle(s).
1st Row: At the position of your first triangle work 1 de (US sc) into each
2nd Row: Dec 1 st as follows (insert hook into next st, yoh and draw
through yarn) twice, yoh and draw through all 3 loops on hook, 1 de
(US sc) in next 2 sts, dec 1 st, turn.
3rd Row: de (US sc) in each st to end, turn.
5th Row: de (US sc) in each st to end, turn.
6th Row: dec final 2 sts and fasten off.
Repeat as required.
add interest to the hemline, or to add additional length. You will need
to estimate the number of stitches there are available across the bottom
required. Гог instance, if you have 120 stitches and you want your.
triangles to be 10 stitches wide, you will work each one across 12
stitches. If you are one or two stitches under an even number, you can
easily fudge the result by increasing in the first pick-up row of one or two
of tire triangles.
Cro-loops (also known as fur stitch)
These can be worked over any number of stitches.
Use a ruler or cut a piece of strong cardboard to the size (width)
required for the loops — 3-4cm (about 1'//) is a good size, although
you can use any width.
Base Row: Can be worked on any base row, such as de (US sc), treble
(US de), etc.
Work as many base rows as required, turn.
Loop Row: Work 1 ch at beg of row. Place card against the back of the
work with top edge just level with the last row worked (this will be
the right side of your fabric). Starting with working yam at the back
of the card, bring it around and up between the fabric and the card.
Insert hook into next stitch and, working to the left of the wrapped
yarn, work a de (US sc). Loop complete. Note: You may find it easier
to hold the hook fabric and card in place with your right hand while
wrapping the yarn around the card with your left hand, and then
transfer the fabric and card to your left hand to work the de (US sc)
as usual.
Next Row: Work stitch of your choice along row.
These two rows form the pattern.
Work alternate rows of de (US sc) or treble (US de) between rows of
loops to create a faux fur fabric, or if using as an accent only, work just
one or two rows in any one area.
Elongated CroStitch
This stitch can be worked on any base row. Note: The method is very
similar to that of Cro-loops, but there are subtle differences, which help
the fabric lie flat.
Work as many base rows as required, turn.
Work 1 ch at beg of row. Place card against the back of the work with top
edge just level with the last row worked (the side with the card
against it will be the right side of your fabric). Starting with working
yarn at the back of the card, bring it around and up between the
fabric and the card. Insert hook into next stitch and, working to the
left of the wrapped yarn, work a slip stitch (ss) into the front loop only
of this stitch. First loop is complete. Continue making loops to end
of row. Fasten off.
FUNкг FX
Turn work so that RS is facing you. Make a slip knot on your crochet
hook, insen hook into top of first loop and pull yarn through both
TUrn and work a row in the stitch of your choice into the bach loop only
Use fancy yarn for the plain rows and plain yarn for the loop rows.
You can of course use fancy yarn for the loops providing that the yarn
isn't too heavily textured, as this may cause the loops to get lost.
Horizontal slit
Work until the position for the slit is reached. Work some chains
(number required is dependent on the width of slit required), miss (US
skip) the corresponding number of stitches and continue to the end of
the row. On the next row work into the chain stitch loop previously
worked and continue to the end of the row.
Luxury fringing
This technique makes the most gorgeously extravagant fringing for the
Pig. 128 shows strips of a patterned georgette type fabric that was torn
into thin strips and then cut into 10cm (4") strips and connected to the
base fabric with a de (US sc) and a clever twist. The length of the strips
is completely up to you, as is the width.
Pig. 129 shows the same fringing, only this time it was worked using
Fig. 130 shows the use of'silk curls'. Silk curls are also known as 'silk
tops' and are available from shops that sell supplies for spinners (see
'Resources').
Fig. 128
Im
Fig. 130
43
Strips of fabric
Thick luxury yarn or silk curls cut into the required lengths
Note: If you are intending to work an entire yoke or panel in this
technique, the yarn for the base fabric should be the same as for the
rest of your garment, unless you do a separate swatch for a lighter or
heavier yarn.
Instructions
This technique is always worked with the wrong side facing you.
Work a foundation chain of the length required for your project, or if
you are working this fringing within the body of freeform fabric place
it wherever you want the texture to be.
Work two rows of de (US sc), turn.
1 ch (this ch does not count as first stitch), work Ide in first de (US sc)
of previous row.
• lay fabric length over work, from front to back, up close to the stitch
just worked and under the working yarn.
Insert hook into next stitch, yoh and draw yarn through. Two loops on
Take the end of the fabric strip that is sitting on the side of the work
facing you (wrong side of work) and twist it up and around the hook
so that it sits on top of the working yarn (both ends of the strip are
now on the right side. i.e. the side facing away from you), yoh and
draw through both loops on the hook, 1 de (US sc) in next stitch.*
Rep from • to ’.
Work a row of de (US sc) or htr (US hdc) between each row of fringing
to bring you back to the wrong side.
How luxuriously thick your fringe is will depend on how many rows you
want to work. I used four rows in the fabric strip sample, one row in the
chenille sample and two rows in the silk curls sample.
Slip stitch cord
This is used as a surface embellishment.
Make a chain length to required measurement. Slip stitch into 2nd ch
from hook, then into each chain to end. Fasten off.
The cord can now be stitched or couched to base fabric in a decorative
manner.
Note: In all the following directions, any base row instructions at the
beginning of a pattern refer to starting that pattern from scratch. In
freeform work the base row can be anything at all, providing it gives you
a suitable base to work from and unless otherwise stated.
I
Work uniil the position for the slit is reached. Work several rows
(number required is dependent on the length of slit required) on these
stitche, ending at inner edge. Work in slip stitch down inner edge to
bottom of slit, work across the remaining stitches for the same-number
of rows, and then continue across all stitches to complete.
background fabric which, once stitched to the back of the overlay, will
peep through the openings, or make little knots of fabric and stitch these
to the inside top edge of the vertical slits so that they appear to be
coming out through the fabric. Pick up some stitches across the top and
bottom, or down each side of the slits, and knit a few rows of stocking
Woven crochet
for woven crochet you will need to create a base fabric or 'warp' of
crochet mesh, l-or example, you could use a background worked in
trebles (US de), separated by I ch, or use de (US sc) instead of trebles
(US de).
Strips of your chosen weaving fabric or yarn are then woven
honzoniallv or vertically in a basic under and over configuration.
'Ibis is a technique with loads of potential. Experiment!
Motifs
Although not strictly freeform, motifs can be very useful. They provide
an easy way to cover gaps between your fragments after these have been
stitched together; they are a means of disguising an area of your fabric
that has perhaps too much of one colour or that may look a bit 'fiat' and
uninteresting; and the)' can be used very effectively as surface
embellishment on plain crocheted or knitted backgrounds, as in
Margaret Hubert's Metallic Tunic on page 116.
The simplest circular motif is a treble circle worked as follows:
Work 3 ch, then 12 treble (US de) into circle. Slip stitch into lop of 3rd
chain to dose. Pull the slip knot slightly to close centre.
To attach circle to fabric, work a running stitch into the top chain of each
Combine the components in the following section to create unique and
zany embellishments using some of your speciality yarns and threads.
Be aware that the thicker the yarn used the larger the motifs will be. Add
some beads for a little extra pizzazz!
Make 6 ch, join with ss to form circle, 1 ch.
1st Row: 6 de (US sc) into circle, 3 ch, turn.
2nd Row: Ur (US de) into each of first 2 sts, 2 tr (US de) into each of
next 2 sts, 1 tr (US de) into each of last 2sts, 1 ch, turn.
3rd Row: Ide (US sc) into each of first 3 sts, 2 de (US sc) into each of
next 2 sts, ide (US sc) into each of last 3 sts, 3 ch, turn.
4th Row: (1 tr |US dc| into next st. 2 tr |US de] into next st) 5 limes, ich,
Fig- 133
5th Row: • (1 de |US sc| into next st, 2 de | US sc| into next st) twice, 1
de (US sc) into next st, rep from • twice more, 3 ch, turn.
6th Row: • (1 tr |US de] into each of next 2 sts, 2 tr |US de) into next st)
twice, 1 tr (US de) into next st, rep from • twice more. Fasten off.
Spiral shell
Make 29 ch.
1st Row: 2 de (US sc) into 2nd ch from hook, 2 de (US sc) into next ch.
2 htr (US hdc) into next ch, 2 tr (US de) into each of next 22 ch, 2
htr (US hdc) into next ch, 2 de (US sc) into each of next 2 ch. Fasten
off.
'IWist strip to form long thin spiral. You may need to coax the spiral into
a shell shape.
*36|
Star flower 1
Make 5 ch, join with ss to form a circle.
1st Rd: 2 ch, 11 de (US sc) into ring, ss in top of 2 ch.
2nd Rd: • 7 ch, I htr (US hdc) in 2nd ch from hook, 1 htr (US hdc) in
each of next 4 ch, ss in bottom of ch, ss in back loop only of next 2
sts; rep from • 5 times.
3rd Rd: 1 de (US sc) in each ch of petal, 1 de (US sc) in each htr (US
hdc) along other side of petal, ss in st between petals, ending with ss
in st between last and first petal. Fasten off.
Fig. 136
Star flower 2
Make 4 ch and join with ss to form ring.
1st Rd: 3 ch (counts as first htr |US hdc]), 11 htr (US hdc) into ring, join
with ss to top of 3 ch.
2nd Rd: 6 ch, ss into 3rd ch from hook to form picot, 4 ch, ss into next
htr (US hdc), repeat from * to end, working (he last ss into the ss at
the end of tire first round. Fasten off.
Make 5 ch, join with ss to form a circle.
1st Rd: I ch, 12 de (US sc) into circle, ss to first ch.
2nd Rd: Working into back loop only of each de (US sc), work 12 ch, ss
into first de (US sc), • ss into next de (US sc), 12 ch, ss into same de
(US sc), rep from * to end.
3rd Rd: Work as for 2nd Round, but work into the front loop only of
each de (US sc) and work 8 ch instead of 12. Fasten off.
Ik>r variation, use a contrast yarn for the 3rd Round.
Picot = make 3 ch, ss into first of these ch.
Make 15 ch and work as follows:
1 de (US sc) into 2nd ch from hook.
Working 1 st into each ch, work 1 htr (US hdc), 3 tr, 4 dtr, 3 tr, 1 htr (US
hdc), Ide.
Make 3 ch, then working 1 st into each ch on the other side of the starting
chain work 1 de (US sc), 1 htr (US hdc), 3 tr (US de), 4 dtr (US tr), 3
tr (US de), I htr (US hdc), 1 de (US sc), 3 ch, 1 de (US sc) into 1st de
(US sc) at beg of round, 1 de into next htr (US hdc), 1 picot (1 de
into each of next 2 sts, 1 picot) 6 times.
Into 3 ch space at point of leaf work (1 de, 4 ch, ss into 3rd ch from
hook, 1 ch, 1 de), (1 picot, 1 de into each of next 2 sts) 7 times, ss
into 3 ch space to finish. Fasten off.
You can omit the picot row if you prefer!
Small leaves can be constructed by starling with a shorter chain length
and using fewer stitches for each side of the leaf.
For large petals, follow directions for the large leaf, omitting the picot
Small petals can be constructed in the same way as large petals by
starting with a shorter chain length (say 10) and using fewer stitches for
each side.
Make 15 ch.
1st Row: Into 3rd ch from hook work 1 de (US sc), 1 htr (US hdc) into
next ch, 1 tr into each of next 9 ch, 1 htr (US hdc) into next ch, 1 de
into last ch. Fasten off.
Make 5 ch, join with ss to form circle.
1st Rd: 3 ch, work 12 tr (US de) into circle. Join with ss into top of first
3 ch. Fasten off.
For a smaller, more dome-like centre, work only 8 tr (US de) into circle.
Turn dome upside down for a cup-shaped centre.
Flower cup
Make 4 ch, join with ss to form circle.
1st Rd: 1 ch, 7 de into circle, join with ss into first ch.
2nd Rd: 1 ch, 1 de into same st, ‘ 2 de into next de, rep from • to end.
Join with ss into first ch.
3rd Rd: Ich, • I de into next de, rep from • to end. Join with ss into first
ch.
4th Rd: As 3rd.
5th Rd: 3 ch, 1 tr into same st, * 2 tr into next de, rep from • to end. Join
with ss into 3rd of first 3 chs. Fasten off.
For a shallower cup, stop at the 3rd round and then work the 5th round.
Fasten off.
For a deeper cup, work two extra rounds as per the 3rd round after the
4th Round. Then work one round as per the 5th round to complete the
FUN KY FX
1st Rd: 3 ch, work 13 tr (US de) into circle, join with ss into top of first
8 ch, 1 de (US sc) into each of next 2 tr (US de), rep from
3rd Rd: Work 15 de (US sc) into each loop. Fasten off.
To make up your flowers layer the components, beginning with the leaf
base, then the petals and finally the flower centre, stitching each layer as
There are many fun motif patterns available, so check out your stitch
pattern dictionaries for more options.
Found objects
your work! Here are just a few suggestions: buttons; rubber О rings or
lengths of plastic tubing that can be crocheted over and used as design
elements in clothing, jewellery or wall hangings; fine copper or coloured
wire; beads; raffia; strips of fabric ribbons; feathers and felt.
Experiment!
Knitting FX
Abbreviations
Col colour
st(s) GS double pointed needles stitch(es) garter stitch
St St stocking stitch
rep tog RS repeat together right side
WS wrong side
YA yarn A
YB yarn В
yfwd/wyif yarn forward/with yarn in front
yon yarn over needle
139
Elongated stitch With Col A, cast on required number of stitches and knit 1 row. Counts as 1st Row. 2nd Row: KI, • yon twice, Ki ' Rep from * to * until last stitch. KI. 3rd Row: Knit to end, dropping extra loops as you go. Knit 3 rows with Col B.
Fig. 14ц 'file last 5 rows form the pattern. Rep as required. 'lite Scarf d'Opulence (Fig. 80) was made using this stitch. Woven elongated stitch
w 0 Ж Cast on an odd number of stitches and knit 4 rows in either garter stitch or stocking stitch. 2nd Row: KI, • yon once, Ki.* Rep from ’ to • until last stitch, К1. 3rd Row: Knit to end, dropping extra loops as you go.
Fig- 145 Knit 2 rows (the number of rows you knit depends on how close you want the woven strips to be). The last 4 rows form the pattern. Rep as required. The weaving yam is woven in and out through the elongated stitches created in Row 2. Weaving yam suggestions: wool tops (which can be lightly felted later if desired), ribbon, chunky yam or several ends of an interesting yarn, heavy chenille, fabric strips, etc. Wrap stitch
'Ibis stitch is best worked on non-lexlured background fabric. While it can be worked from either side of the fabric, work your first
few stitches with the RS facing to get used to the process. Knit along the row to where you want the wrapped stitch to be. Thread a wool needle or bodkin with some contrasting yarn and insert it from the back of your work between the 3rd and 4th stitch on the left-hand needle, leaving a
Fig. 146 tail of approximately 8cm (3'ZT). Wrap the contrast yam firmly, but not too tightly, around these 3 stiches 3 or 4 times, depending on the thickness of the wrapping yarn, and then cut and tie off using a simple overhand knot at the back of the work. Continue knitting to the end of the row. Work a few more stitches and repeat. Or, ifyou are working over a small number of stitches, work one wrap only on each row, either randomly or evenly spaced, or staggered. These are some variations: • Wrap across more stitches to create a larger wrap. • Tie ends off on RS of fabric, leaving a short tail to make a small tassel effect. You can also add beads to the tassel.
Use ribbon, tie off on RS of fabric, and then lie into a liny bow. You
will need to leave longer tails for bows.
Vertical windows
Knit to where you want the window to be in the row, turn and knit a
further 6 or 8 rows on this first group of stitches. Break yarn. Place
these stitches onto a holder.
loin in yarn to the 2nd group of stitches, knit 4 rows and break off yam.
Transfer held stitches back to working needle.
loin in yarn to beginning of row and knit across both groups of stitches,
securing loose thread to the working yarn as you knit across the slit.
For variation:
Knit each side of the window in different yarns.
Work windows at intervals across any number of stitches.
Work the window fabric in a lightweight yarn and knit a backing of
patterned or contrasting fabric to sit behind it.
Use the 'window' concept to create purposely knit 'holes’ in your
fabric and decorate them with knots or flaps, as in the WhatKnot
Vest, which is featured in the Gallery.
Horizontal windows
These are worked in the same way as you would make a horizontal
buttonhole.
Knit to where you want your window to be. Cast off at least 6 stitches.
Knit to the end of the row. Knit back to where you cast your stitches off,
cast on 6 stitches and knit to end.
As a variation on both the vertical and the horizontal windows, you
can pick up the edges of the windows and knit some stocking stitch rows
that will form little rolls of fabric (see 'Stocking stitch rolls’ below).
WhatKnots
WhatKnots can be seen on the WhatKnot Vest in the 'Gallery".
Choose a yarn that is not too thick unless you particularly want
jumbo knots.
Cast on 4 sts and knit several rows on these 4 stitches until the strip
measures at least 5cm (2")
Note: The number of rows is dependent on how heavy your yarn is. You
must be able to tie the knot comfortably. Cast off (bind off) and tie the
strip into a knot.
Try these variations:
141
To make the knot appear to be coming out from behind a window,
stitch one end of the knot tail to the inside top edge of the window.
Make longer strips and tie two or more knots along their length.
Attached knotted strips
Attached knotted strips are easier to work on garter stitch or on the
reverse side of stocking stitch.
They can be used as a randomly placed embellishment anywhere on
the surface of your fabric. Pick up some stitches (how many depends on
how large you want your knot to be, and is somewhat dependent on the
thickness of your yam) and knit a strip in either stocking stitch or garter
stitch that measures approximately 5cm (2‘). Cast off. Tie into a knot.
Stocking stitch rolls
Stocking stitch rolls are easier to work on garter stitch or on the reverse
side of stocking stitch (see also 'Horizontal windows' above). Use
contrast yam for maximum impact.
Pick up some stitches at the position chosen for the roll and knit
several rows of slocking stitch. Cast off.
Note: If the first row after the pick-up row is a knit row, the roll will
curl up. If you purl this first row, the roll will curl down. You may need
to 'coax’ the roll to help it curl.
Garter stitch flaps
'lltese flaps can be used to add length to a garment or as a decorative
embellishment. Unlike stocking stitch, garter stitch flaps will notroll up.
These are easier to work in garter stitch or the reverse side of stocking
At the position chosen for your flap, pick up as many stitches as
required for the width of your flap and knit in garter stitch for length
required. Cast off.
Applied strips
'lltese can be knitted in garter stitch or stocking stitch (see Fig. 152 and
the WhatKnot Vest in the 'Gallery).
As your base fabric choose one of the following:
• contrasting garter stitch strips (the strips can be any width)
• garter stitch fabric in one colour
• purl side of stocking stitch strips
• stocking stitch fabric with a row of garter stitch at intervals of a
predetermined depth, which will facilitate the even spacing of the
garter stitch fabric with a contrasting row at intervals of a
predetermined depth
Applied strips look most effective when knitted in a contrast colour.
They can be any width but look best when narrow, i.e. 5-10 stitches
wide. You can work them evenly across the entire face of the fabric or
randomly.
If you want symmetrically placed strips, divide your base fabric into
sections that are determined by the desired width of your applied strips
(for example, base fabric of 40 stitches = strips of either 5 or 8 stitches
in width).
Instructions
Work the base fabric in your preferred method, making sure you finish
with the right side facing. Leave the fabric on the needle or transfer the
stitches to a stitch holder or safety pin.
With RS facing, join in the strip yarn to the right-hand bottom edge
of the base fabric.
Pick up and knit 5 (or 10) sts from the cast-on row of the base fabric.
Continue knitting these stitches until the applied strip sits flat over
the width of the first strip or pre-determined section without puckering
or pulling.
Join top of applied strip to bottom of next strip as follows. Slip first
st from left-hand needle onto right-hand needle, then pick up a loop
from the base fabric where the strips meet, or from the contrast colour
row, depending on which method you are using, and knit both stitch
and loop together. Rep until all the applied strip stitches are joined to
the base fabric (see WhatKnot Vest in 'СаПегу").
Continue knitting and joining the strips until you reach the top of the
base fabric. Place the strip stitches onto a stitch holder.
Continue knitting the remainder of the applied strips across and up
the base fabric as required and, when completed, transfer all the strip
stitches from the holder to a knitting needle, making sure that the right
sides of both the base fabric and the strips are facing you.
With a 3rd needle (you may find it easier with a dpn), knit one stitch
from the first strip with corresponding stitch from the base fabric across
the row, Cast off.
If you want to place the strips in the middle of the fabric rather than
starling at the lower edge and finishing at the top edge, join the strip in
as already instructed but cast off at the same time as you attach the other
end to the fabric as follows. Slip first stitch from left-hand needle onto
right-hand needle, pick up a loop from the base fabric and knit stitch
and loop together. Repeal with next stitch on left-hand needle, and then
pass the 1st stitch over the 2nd as in normal casting off. Repeat until all
stitches have been cast off. If you prefer, you can just cast off the applied
strip stitches, leaving a long end, which you can stitch down later.
an odd row (lhe needle holding the strip should be pointing to the left),
and twist each strip once clockwise before joining to the next section of
base fabric.
Loop stitch (or fur stitch)
Cast on required number of stitches or use randomly in your work.
1st Row: KI, insert the needle into the next stitch as if you were going to
knit it, keeping it on the right-hand needle and without slipping the
stitch off the left-hand needle, pass the yarn to the front (as for purl
Fig-153
back over your thumb and back between the needles. Knit into the
same stitch and slip off. Pass the first stitch over the second to secure
2nd Row: Knit.
I-Cord
1 Using dpns cast on 3-6 stitches and knit 1 row.
2 Without turning the work, push the stitches to the other end of the
3 Knit, pulling the yarn lightly when working 1st stitch.
Rep steps 2 and 3 for length required. To finish, work a multiple
Maxi mesh
'litis can be achieved in a number of ways. One of my favourite ways to
with size 20mm (US36) needles for a feather-light scarf or wrap.
Л variation that would enable you to weave other yarns or ribbons
through the mesh is creating a simple eyelet mesh as follows:
You need 12mm (LIS 15) knitting needles and the yarn should be a
fine mohair or similar. 'Ihis mesh can be worked over any number of
1st Row: KI, • yfwd, K2 tog, rep from * to end.
2nd Row: Purl.
FUNky FX
Bows
Work to where you want your first bow to be. 'lltrn work and • cast on
10 sts, then cast off 10 sts.* Repeat from * to ’. 'lie a knot to form the
These little bows can be worked randomly within your knitted or
crochet fabric, or for a more uniform effect work them into your knitted
fabric at regular intervals.
Shaggy reverse stocking stitch
the fabric. Note: It doesn't matter if these shaggy bits seem to be
clumping together roughly in the same places — you will find that they
tend to even out after a few rows.
1st Row: Purl with the base yarn, adding in pieces of yarn as you go
depending on taste and interest.
Blossom Hat ('Projects'), or anywhere within your freeform fabric to add
texture and interest.
Reverse stocking stitch — purl each row.
Cut the textured yam into lengths roughly 15-20cm (6-8") long,
lltese will be knitted one at a time with the base yam.
Stranded Garter Stitch
'Illis technique involves knitting every row with two yams alternately —
1st Row: Knit YA, YB, YA, YB to the end of the row.
2nd Row: Same as Row 1. As you start each row give both yams a gentle
tug to lake up any slack involved in the turn.
Rows 3-20: Same as Row 1. Cast off (bind off).
In Row 2 and onwards you will notice that stitches that were knitted
with'Yarn A in the previous row will be knitted with Yarn В in the current
row and vice versa. Those of you who have done Fair Isle or stranded
knitting before will recognise what you are doing, except that there
aren't any purl rows and the floats are short.
For those of you unfamiliar with Fair Isle, 'floats' are those bits of the
yarn that sit on the purl side of the fabric between the stitches knitted
with that particular yarn. Because this is garter stitch there will be short
floats on both sides and these can become a feature of the stitch
depending on the way the yarns are carried as you knit.
Lynne says:
I work stranded garter with one yarn above my right index finger and the other
below. The one I carry above shows more prominently on the finished fabric.
Sometimes I carry a textured yarn above and sometimes a smooth one — it
depends on the effect I want, h's worth playing around using different yams
and combinations and seeing what effects you get and like.
Once you have your 20 stitch by 20 row sample you'll be able to
estimate your overall gauge or tension.
Knit flower 1
Cast on 7 sts.
1st Row: Knit.
2nd Row: Purl.
3rd Row: KI, K2 tog. KI, K2 tog. KI.
4th Row: As 2nd.
5th Row: K2 tog, KI, K2 tog.
6th Row: As 2nd.
7th Row: КЗ tog. Fasten off.
Make 4 more petals.
Sew 5 petals together at the centre (cast off edge, overlapping each one
slightly).
With a contrasting colour, stitch a French knot into flower centre, or sew
on a bead.
Knit flower 2
Cast on 3 sts. Beginning with a knit row, cont in st st, inc 1 st at each end
of the 1st and following alternate rows (7 sts).
Work 3 rows, ending with a purl row.
Next row: Slip 6 sts over 1st stitch on LU needle. Break yarn and pull
through remaining stitch. Fasten off.
Make 2 more petals.
To finish: Sew 3 petals together in a circle, overlapping each one a little
to form the flower. Stitch a French knot or sew a bead into the centre
of the flower.
Crochet Stitch
Collection
Abbreviations
ch chain
st(s) stitchfes)
dc(sc) double crochet (single crochet)
dtr(tr) double treble (treble)
htr(hdc) half treble (half double crochet)
tr(dc) treble (double crochet)
tr tr(dtr) triple treble (double treble)
yarn over hook
yarn round hook
Corded rib (or crab stitch)
Ibis stitch is usually used as a decorative edging or textured stitch, but
works wonderfully well as an isolated texture within your fragments.
Stop at the end of a right side row. Do not turn, work one chain to give
yourself working room, then insert hook into front loop of the 2nd
stitch to the right, from front to back (see Fig. 162). With the hook
pointing downwards, grasp the yarn and pull it through and under the
working loop (not through the loop). There should be 2 loops on the
hook. Yam over and pull the yarn through the 2 loops on the hook.
Repeat along row.
IMPORTANT: When working corded rib stitch in your freeform
fragments, it is essential that you work into the front loop only, and not
through both loops, as shown in Fig. 163 — you will need the back loop
later to complete the effect.
Crochet Stitch Collection
Back raised ridge
Ulis is worked around the stem of the stitches in die preceding row, but
otherwise as normal.
Make a row of tr (US de). Ch 2, turn. Mark as right side of work.
Row 2: Yrh, from back of work, insert hook between 1st and 2nd sts
of previous row and bring it out between 2nd and 3rd sts. Yrh and
draw through a loop, yrh and draw dirough 2 loops, yrh and draw
through last 2 loops. Rep from • along the row.
Fig. 164
Front raised ridge
Make a row of tr (US de). Ch 3, turn. Mark as wrong side of work.
Row 2: " Yrh, from front of work, insert hook between 1st and 2nd Sts
of previous row and take it around the back and out between 2nd
and 3rd sts. Yrh and draw through a loop, yrh and draw through 2
loops, yrh and draw through last 2 loops. Repeat from • along the
Trailing stitch
Wrap yarn several times around hook, pick up a loop from the front of
your fragment and pull yarn through this loop. " Yrh and pull through
2 sts, repeat from * until all loops have been worked off. Work a few
stitches, then repeat. You can place these randomly or in V shapes as
illustrated. The more wraps you do, depending on how far down the
fabric you go, the more 'wriggly' the stitch will be. You may find that
your fabric will pucker if you go too deep with only 3 wraps, in which
case you may prefer to undo this and add another wrap or two.
149
Fig. 168
Spiral
Work 24 ch, 3 tr (US de) into 4th ch from hook • 4 tr (US de) into next
ch, rep from
to project.
Surface crochet — Method 1
tambour beading, litis method was also used for the Meandering Shawl
Fig. 169
Pull yarn through edge of fabric or tie yarn to edge of work if you prefer.
I lold working yarn behind fabric and insert hook from front to back
through the first space between stitches. Pull yarn through fabric and
the loop on hook.
Insert hook into background fabric again, pull yam through fabric and
then through the loop on the hook to complete another surface
Repeat across fabric in any direction you wish to go.
Surface crochet — Method 2
Keep the hook and yarn on the right side of the background fabric.
• Insert hook and pick up a loop of fabric, yoh and make 1 de (US sc).
Rep from • for the required distance .
Tip: If you alternate the yarn from right to left for each stitch, you will
prevent the row from slanting to the left or right.
You can now use this row of de (US sc) as a base for adding triangles,
[laps, ruffles etc. to your fabric.
15°
Crochet Stitch Collection
Five treble bobble
Work to where you want the bobble to be.
Work 5 treble (US de) into the same stitch, leaving the last loop of each
treble (US de) on the hook.
Yarn over and draw through all the loops on lire hook. Work 1 ch to
Bent bobbles
Bent bobbles should be worked with wrong side of work facing you.
Work as for five treble bobbles (above). After working the 1 chain to
secure, insert the hook back into the base of the bobble (the bobble is
actually bending away from you) and draw the yarn through the loop on
tile hook (a slip stitch worked). Work a de (US sc) in next stitch. In
freeform crochet these bobbles are normally worked in groups of 3-5. If
you work too many in any one row without spacing, you will find that
the fabric gets wider and this may cause'ruffling' in your fabric. (Fig. 176)
Popcorn stitch
Proceed to where you want your popcorn to be. Work 5 complete trebles
(US de) into the same stitch. Remove hook from last working stitch.
Insert hook through the top loop of the first treble (US de) worked, then
pick up the working stitch, yoh and pull yarn through. (Fig. 174)
>51
Limpets
worked on a base row of any crochet stitch or knitted edge.
method (see 'How to' chapter — the same procedure as shown is used
whether you are using a hook or a needle), loosely cast on 8 stitches, yoh
and pull through all loops on hook, 1 ch. Work 1 de (IIS sc) in next
3D circles
These can be worked on a base row of de (US sc), htr (US hdc) or treble
(US de), or introduced anywhere in your freeform work.
followed by 1 htr (US hdc) into the space between the next two stitches
Proceed as follows:
stem of the next stitch on the previous row, inserting hook from front
2 To work the second half of the circle, turn and work 6 treble (US de)
around the stem of next stitch on the previous row, inserting the
hook from front to back as before.
3 Remove hook from working loop (taking care not to lose the loop),
and insert it into the top of the first treble (US de) worked in the first
half of the circle, pick up the working loop and pull it through to join
the circle. Then work 1 htr (US hdc) in space between next 2 stitches.
To do an entire row of 3D circles, you will need to space them by
working several htr (US hdc) between each circle. To add to freeform
Fig- 179
Crumpled stitch
This is a super easy way of creating a bobble effect!
Work 1 dtr (US tr) in first stitch and 1 de (US sc) in next stitch along
the row. The shorter stitch makes the taller stitch 'crumple', forming a
'bobble'. You can work this stitch on either side of your work, but you
may have to push it through to the right side of the fabric if it should
want to fall the opposite way.
Experiment with different thicknesses of yarn.
152
Crochet Stitch Collection
Chain loop pile stitch
This stitch begins the same way as the trailing stitch, but instead of
working down into the surface of the fabric you work along the top of
the previously worked row.
Wrap yarn 5-7 times around hook. Insert hook into next stitch on
previous row, yrh and draw through two loops. Rep from • until all
loops are worked off.
Work a row of de (US sc) between any two rows of chain loop pile
'this stitch may also be worked as an isolated texture anywhere in your
Ruffle
Л ruffle can be worked on the surface of your fabric or along the edges.
If you work it on an edge of a fragment, make sure that when you stitch
die fragments together you stitch at the base of the ruffle so that it sits
on top of the fabric.
At the edge: Needs a base row of either de (US sc) or trebles (US de).
Work at least 6 tr (US de) or htr (US hdc) into each base stitch.
On the surface: Work a row of ch st or de (US sc) (see surface crochet
above) on fabric surface. Then work at least 6 htr (US hdc) or tr (US de)
Using a heavy yarn creates a deep ruffle. Unless that is what you want,
it's better to use finer yarns or threads to achieve a more subtle effect.
Roundells
These are worked on a base row of de (US sc), htr (US hdc) or treble (US
Work to where you want the roundell to be. In next stitch work (1 tr
|US dc| Ich) 9 times. Remove hook from working loop, being careful
not to lose the stitch, insen hook from back of work into top of first
treble (US de) worked, pick up working loop again, yrh and draw
through both loops on hook. Work some treble (US de) between each
roundell to separate them.
These would look great as a trim around the edge of a sleeve!
Flutterby wings (or lazy J stitch)
Make 10 ch.
1st Segment:
Miss ch nearest hook, over next 9 ch work:
• Ide (US sc), I htr (US hdc), 1 tr (US de), 2 tr (US de), 1 tr (US de), 2
dtr (US tr), 1 dtr (US tr), 2 tr tr (US dtr), 1 tr tr (US dtr) (you have
increased 3 sts across row).
153
Freeform Knitting ano Crochet
Do not turn. Work corded rib back along row, inserting hook under front
loop only of each st.
2nd Segment:
Work from • into 9 back loops behind the corded rib row just worked.
Note: If you make 10 segments, you will have created a wheel! Leave
enough yarn to sew the 10th and the 1st segments together.
These are some variations:
• Vary the size of your segments by building a shorter or longer hill.
• Use a different colour for each segment.
• Work a full 10 segments and use for the crown of a hat!
Spikes
Tliis stitch is good for disguising an area or adding a little more colour
to a dull area. It can be worked from either the wrong side or the right
side of your fabric in de (US sc), htr (US hdc) or tr (US de).
Proceed to where you want the spikes to be. Yrh and insert hook into
fabric 1 row below, draw yarn through. Pull loops up and work treble
(US de) as usual.
For a graduated effect work each spike into the fabric at different
depths. You can get an even gradation of spikes by working rows of de
(US sc) and working 1 row lower with each spike.
154
How to
Thumb cast-on
'rhumb cast-on works the same way with a knitting needle or a crochet
Place a slip knot on hook or needle and wind yarn around thumb, as
shown in Pig. 186.
Slide the hook or needle up along the thumb and under the loop,
releasing the loop onto the hook or needle, as shown in Fig. 187.
Continue making loops on the right-hand hook or needle until the
Tassels
155
Freeform Knitting ano Crochet
1 Cui a rectangle of stiff cardboard approximately 10cm (4") long by
about 40 times (60 if you want a thicker tassel), as shown in Fig. 189.
2 Thread a length of yarn under and around the strands at one end of
project. Cut the strands at the other end of the card (see Fig. 190).
3 Wrap a length of yarn several times around the tassel about 2cm ('A")
from the top and fasten off, leaving long ends (see Fig. 191), which
tassel. Trim tassel ends if necessary.
Right bias strips
Cast on 10 sts.
1st Row: K2 tog, knit to last st, increase.
2nd Row: Purl.
Left bias strips
Cast on 10 sts.
1st Row: Inc 1 st at beg of row, knit to last 2 sts, K2 tog.
Rep these two rows for required length.
As variations:
• Use garter stitch or moss stitch.
• While narrow strips of 10-12 stitches are great for covering unsightly
edges, wider strips of 40 stitches or more make great scarves.
Leather and fabric inserts
Create holes in the leather or fabric pieces by means of an awl, large
tracing wheel to mark the surface.
(US sc) in the normal way.
How To
Method 2
Make holes and stitch a row of blanket stitch around the insert and then
crochet into the top loop of each stitch. This approach is easier to use
when the insert material is stiffer inflexible.
Short row (or partial knitting)
Tltis is great for creating new shapes within your freeform work. It works
in either stocking stitch or garter stitch.
To practise this technique, cast on 30 sts and work 4 rows.
Knit until 5 sts remain on your left needle.* Slip the next st in a purlwise
direction to your right needle. Take yam to other side of work and
slip the stitch back onto left needle. Turn work and continue knitting
to end of row. •
Knit until 7 stitches remain on your left needle. Rep from * to *.
Knit until 9 stitches remain on your left needle. Rep from ' to '.
To avoid the holes created by short row shaping, look at your sample
with the right side facing and you will see a loop across the bottom
of each of the stitches you previously slipped. To clean up the holes
you need to knit that loop with its accompanying stitch as follows.
(If you are knitting one row between each short row, as you work that
one row stop before the stitch with the loop.)
Knit side facing: Pick up the loop and knit it with the stitch above it as
shown in Pig. 196. Continue to the end of the row.
Purl side facing: Pick up the loop and knit it with the stitcli above it as
shown in Fig. 197. Continue to the end of the row.
Note: If you are knitting several rows between each short row, pick up
the loop from below the slipped stitch on the first row worked after the
short row, and then knit the rest of your row sequence.
Experiment with the way you work your short rows as you can achieve
some fun results! Change the number of rows worked between each
short row and play with the number of stitches worked before each short
row turn.
’57
Twisted fringe
Make any number of ch.
1st Row: 1 htr (IIS hdc) into 3rd ch from hook, 1 htr (US hdc) into each
ch to end. Turn.
(US sc) into next st. Extend loop on hook for 10cm (4"). Hold stitch
being worked with left hand and twist yarn on hook approx. 24
times in clockwise direction, fold twisted yarn in half, ss into top of
stitch just worked. Rep from • to end, working last de (US sc) into
top of turning chain. Easten off.
JI*
Attaching a fringe
Cut multiple strands of yarn twice the length of the finished fringe.
fringe to be and on the thickness of the yam you are using. Don't
skimp on the amount used if you can help it as a skimpy fringe will
do nothing for your finished item.
Divide the strands into groups of 4 or more and fold them in half.
Using a crochet hook and with the WS of the work facing, draw the
folded loops through the edge of the fabric.
4 Place all the ends over the hook and draw them through the loops
on the hook, and pull up tightly.
5 Repeat evenly along the edge of the fabric.
Mattress stitch
158
How To
1 Place the two pieces of fabric together, right sides up.
2 Secure yarn to one side of the seam with two small stitches. Insert
tapestry needle under the horizontal bar or loop between the two
stitches.
3 Take yarn over to the other side and pick up a bar (knitting) or loop
(crochet).
4 Every 5cm (2') or so pull yarn gently to close the seam. Continue
alternating from one side to the other until seam is finished. Each
time you close a section of the seam pull on both ends of the sewn
fabric to help prevent puckering the fabric.
Beading
Before you start: If you are working from a pattern chart or in a certain
design configuration, your beads must be pre-threaded in the correct
order, remembering that the first bead threaded will be the final bead in
the order.
Transferring beads to working thread where bead
HOLES ARE SMALL
1 Make a loop of thread through a fine beading needle so that both
ends pass from either side through the eye. Loop the working yarn
through the thread.
2 Slip the fiist bead over the needle, along the thread and onto double
end of working yarn. Continue until all beads are threaded. Keep one
bead over double end of working yarn at all times to help keep the
yarn in place over the loop.
Transferring pre-strung beads to working thread
1 Take care when removing strands of beads from the hank. Do not
undo the knot or you will end up with beads everywhere!
2 Remove one strand only from the knot at the top of the hank.
3 Make a slip knot at one end of the strand, taking care not to drop
beads from the open end of the strand. You may like to put a peg or
other obstacle at the open end to prevent the beads slipping off as
you do the transfer.
4 Thread the working yam through the slip knot loop for about 12cm
(4%-).
5 Tighten the slip knot until it is holding the working yarn firmly.
6 Push the beads onto the working yarn. Repeal with the remainder of the
strands until enough beads have been transferred. It's always a good
idea to transfer more than you think you may need for freeform work.
7 If you encounter a bead that has too small a hole for your working
yam, carefully 'break' the bead with long-nosed pliers. Safety Tip:
Hold the bead strand under a towel before 'breaking' the offending
bead to prevent injury!
Tip: If you aren’t working to a pattern and don't have pre-stranded
beads, using a bead spinner makes threading the beads a breeze (see
'Resources').
Knitting with beads
Garter stitch is the easiest stitch to use for bead knitting and is the
method I've described here.
1st Row: With the wrong side of your work facing you. slide up a bead (or
beads) after each stitch for a uniform row of beads, or randomly for
a freeform effect.
2nd Row: Knit 1 row.
Rep these two rows as required.
Note: You can of course use beads with other knit stitches and you may
like to explore this technique further. Montse Stanley's Knitter's
Handbook is a good source of information (see 'Bibliography').
How To
Crocheting with beads
Note: In crochet, always work your bead rows from the wrong side so
that they fall naturally to the right side.
Beaded chain stitch
Work a chain st. slide bead or beads down, yrh and pull yarn through.
Continue to end.
Beaded double crochet (US sc)
1st Row: Cast on required number of stitches. Turn.
2nd Row: 1 ch, insert hook in 2nd ch from hook and draw yarn through,
slide down bead or beads, yrh and draw through both loops. Cont to
end of row. Tbrn.
3rd Row: 1 ch, work de (LIS sc) to end. Turn.
Repeal rows 2 and 3.
Fig. 2o8
Beaded trebles (US dc)
1st Row: Cast on required number of stitches. Turn,
2nd Row: 3 ch, yrh and draw loop up. Slide down bead or beads, (yrh
and draw through two loops on hook), twice. Cont to end of row.
3rd Row: 3 ch, work tr (US dc) to end. 'him.
Repeat rows 2 and 3.
Fig. 209
Lining bags
Remember to pre-shrink any lining fabrics that may have a tendency to
shrink when washed.
The general procedure for determining the size of the lining and
inserting lining is as follows:
I Measure the total length of the bag less the length of flap if any, and
then add 4cm (l’/i") for hem.
2 Measure the width of lite bag and add 4cm (1'A") for seam
allowance.
3 Fold lining in half and sew sides. Without turning inside out. insert
the lining into the bag. Fold under (he top 2cm (%') of the lining
and slip stitch to the top of the bag, just below the edge.
Note: I didn't line the flaps of my bags, but if you choose to do so, you
will need to cut out a pattern to include this extra length and stitch the
lining down accordingly.
Tip: For your fragment bags you can sew the fragments directly onto a
suitable lining fabric.
161
Putting It All
Together
Once you have created lots of fragments or completed some
fragmented strips, you can start thinking about turning them into
a unique piece of wearable art. If you haven't already made yourself a
template, read through this section before proceeding.
Creating a garment template
To create a template, you can use an existing garment and draw around
the shape directly onto your template fabric. Note: If you use paper first
for the template, you will need to recut it using fabric, since a paper
template won't hold up to the constant pinning and unpinning of your
fragments or strips.
You can also use a favourite commercial paper pattern or a pattern-
making software program such as Cochenille's Garment Designer, or
one of the many others that are available (see 'Design' chapter).
For a beret, use a large dinner plate to draw the shape onto your
fabric; for a bag, a simple square or rectangle of fabric is all you need.
Experiment with different shapes!
You will need to check your template often if working in one piece
(rather than with fragments) whether you are knitting in the 'Any
Which Way' method or crocheting the fabric. It's very easy to get
carried away when working this way, only to find that your vest or
jacket front is too wide for the template.
If you are working with fragmented strips and don't wish to bother
turned back to form a 'lapel'.
Use your overlocker to cut out (he neck shaping and apply a bias strip
(see 'How to' chapter) to hide the edge.
162
Putting It All Together
For a simple lop, a straight boat neckline is a good choice.
For a jacket, a drop shoulder with straight sleeves is the easiest design
to begin with.
Assembling crochet or knit fragments
Tip: If making a vest or a jacket, «/ways work with both fronts at the same
time to ensure a good balance of colour and texture.
When you have a reasonable number of fragments, you can start laying
them randomly onto your template. 1 generally start somewhere in the
middle and work outwards; however, there is no hard and fast rule
about this, so do what feels right for you. If you aren't sure where to
start, drop a handful of fragments onto the template and let them lie
where they fall, adding and taking away from them until you begin to
like the composition. If two fragments that perhaps contain exactly the
same colour(s) in a similar quantity land together, you might want to
move one. If two neighbouring fragments contain the same yarn, then
one should probably be moved. It's all a matter of making sure that you
have a balance of colour, texture/yarn and stitch structure throughout
the entire garment.
Don’t pin the fragments down yet as you will probably want to move
them around a bit.
Tip: Sometimes a particular fragment will suggest a shape to you, such
as the point of a vest front or the slope of a neckline. That's always a
good place to start.
This stage of the process is a little like putting a jigsaw puzzle together,
although the edges of the fragments won't 'fit' together in the same way
as puzzle pieces do, and you may have to use a little ingenuity to get
some of them to behave.
I'll give you tips later in this chapter on how to solve some of the
problems you may encounter.
Keep moving the fragments around on the template until you are
completely happy with the way they are looking. Once they are
positioned to your satisfaction, pin them down.
What about all the empty space?
1 low many fragments you started with will determine how much space
there is around the edges of your work. If you made a lot of fragments
before putting them onto the template, chances are that you won't have
much filling in to do at all, except around the very edges. In fact it's
possible that you may find you have too many fragments, or that some
are loo big to be useful, especially as you get near the edges. Don't worry
— they can be used in another project, such as a hat or a bag.
I lere are some useful lips:
Freeform Knitting and Crochet
For any larger gaps you have at the edge, you can create more
fragments to fit the spaces. A good tip is to lay a sheet of paper in the
gap area, and draw around the 'empty' area. You can then use this as
a little template.
For smaller gaps at the edges, it's easier to fill them in after you have
stitched all the main fragments together. This can be done in a variety
of ways, the easiest being to work some dc (US sc), htr (US hdc) or
treble (US dc) into the area. Small, straight gaps are easy in that a row
of suitable stitches of an appropriate height will do the job.
Curved or V shaped spaces will require a variation in the height of
the stitches used. To fill a V shaped gap, start at the very bottom of
the V with a dc (US sc) and then work a slip stitch into the side of
the V. Turn and work 2 dc (US sc) (or however many it requires)
back along the row and work a slip stitch into the other side of the
V. Turn and work some treble (US dc) across the row, once again slip
stitching into the other side of the V. Continue working this way
until the gap is filled. If you find you've worked too many stitches
and have 'ruffled' the fabric, it's not always necessary to undo it —
just fold or pleat the fabric until it sits flat and stitch it down.
To fill a curved gap, start at one side of the gap and work a row of
stitches, beginning with the shortest stitch, i.e. a dc (US sc), gradually
increasing the height until you reach the centre of the curve, and then
reversing the sequence to finish filling the space.
It would be very unusual if you were able to avoid at least one small
gap somewhere in the middle of your work because the fragments
you make aren't constructed to fit together perfectly. Some solutions
Work some stitches as described for the outer edges.
Work bridges of chain stitch across the gap.
Make a little treble (US dc) circle and stitch that over the gap.
Knit or crochet a separate triangle and stitch that down to cover
the gap.
If it doesn't feel quite right ...
The process of assembling your fragments onto your template will
become easier with experience. If, when you've finished, it doesn't feel
quite right, try the following tips:
• Leave the project for a few hours, or even a day or two, and come
back to it with fresh eyes.
• If possible, leave it where you can see it each day, as it's quite usual
for an obvious solution to come to you when you least expect it.
• Prop it up somewhere so that you can stand well back from it, and
even turn it upside down to get a different perspective.
Once you are perfectly happy with how everything looks, you can begin
stitching the fragments together. Note that during the 'stitching together
process', the fragments will bunch up a little. The reason for this is that
the act of stitching them together causes them to take up less space on
<o become larger. 'Illis is easily fixed by making some smaller fragments.
template, and work some rows of suitable stitches directly onto it.
Tip: If at any time you find two fragments are crowding each other,
overlapping one with the other, or holding the sides together and
crocheting them together, will force them to share the same space.
Conversely, if two fragments don’t quite fit together, you can either fill
in the gap with some de (US sc) or make a treble (US de) circle to sew
If a fragment is too big for the space, you can do one of the following:
• Overlap one edge onto or under an adjoining fragment and stitch
down with a back stitch, slip stitch or embroidery chain stitch.
• Hold the edges of the 'too large' fragment and its adjoining fragment
with wrong sides together and crochet them together. The resultant
ridge will become 'just another texture'.
Tips for sewing the fragments together
• Leave the fragments pinned to the template for as long as you can as
Choose a reasonably strong, and preferably plain yarn from the
selection used in your project for your stitching thread — one that
blends in reasonably well with the other yams used is the best choice.
With the right side of the work facing, stitch the fragments together
with an evenly spaced overhand stitch.
Overlap one with the other, then stitch through them using a
backstitch, running stitch or crochet chain.
Hold the wrong sides of the two fragments together and crochet
through them — the resultant ridge will become just another texture.
Conversely, if two fragments don’t quite fit together, you can either
165
Freeform Knitting ano Crochet
fill in the gap with some de (US sc) or make a treble (US de) circle to
sew over it.
Ifyou have worked bobbles on the edge of a fragment, hold them out
of the way and stitch into the 'backs' of the bobbles. This ensures that
they will sit on top of the fabric and will not disappear into it.
If you have worked a ruffle on the edge of a fragment, catch a loop
from below the ruffle so that it sits on top of the fabric.
Uh, oh ... how did THAT happen?
Sometimes, no matter how careful you might be during the construction
process, you might find an area that you are not happy with once it’s all
stitched together. It might be that a colour is screaming at you — I low
did that get in there? Or perhaps there is a large, flat area that slicks out
like a sore thumb, or one area of a colour is just too big.
Fortunately, all these are very easy to fix! Here are just a few ideas:
• Choose an appropriate yam (in colour and texture) and work some
surface crochet over the offending area.
• Make a treble (US de) circle and attach it to the problem area.
• Weave some contrasting yarn through the area.
• Pick up some stitches from the surface of the area and knit some little
flaps or triangles in a contrast colour.
Experiment! Ask yourself'what if?' — there are many ways to disguise a
problem area!
Tip: If you introduce something new, whether it is colour or texture, you
may like to add one or two of the same design elements to other areas
to maintain a sense of overall unity and balance.
Sewing freeform garments together
To join the side seams of a scrambled garment, use mattress stitch, as
explained in the 'How to' chapter. 'Ibis makes an invisible seam on the
right side of your work and a ridge on the wrong side. Don't discount
the possibility of using this ridge as a design element!
Using a template for fragmented strips fabric
The Ruana Collar in the 'Projects’ chapter is an example of this
technique.
Once you have several strips finished, use your template as a guide to
see how things are looking. Lay them onto the template, moving them
around until you are happy with the arrangement. Now comes the fun
part! It's highly likely that you won’t actually fluke it and end up with
10 strips that fit your template width exactly. You may end up with a gap
of just, say, 2cm (%"), and finding a creative solution to the problem will
166
Putting It All Together
be your challenge. For such a small gap, edging each piece with a row of
If you want to add a feature that really stands out, make fewer strips
different technique or a different fabric, such as leather or a woven
fabric of a suitable weight.
If the sides of the strips are 'bumpy" because you have used a thicker
your advantage by turning it into another textured design element.
When you stitch the strips together, fold the wider bumpy section to
seam. You can eliminate this 'bumpy edge' problem somewhat by
using finer yarns.
Add short rows of dc (US sc) to even out the sides of the strips.
or fabric to that used for the strips.
knitted/crocheted fabric to the hemline to add length.
There are many different ideas you can use to finish off your fragmented
strips projects, some of which you will find in the 'FUNky FX' chapter.
Using your template as a permanent lining
Lining freeform garments doesn't seem to be necessary and it is not
something that I ever do. with the exception of bags. It appears that the
various directions the fabric takes after the fragments have been
assembled has a stabilising effect on the final garment. This, for me, is
another huge plus for this wonderful freeform technique!
If you do want to line your work, the usual way is to cut and sew the
lining from a special lining fabric. Another simpler approach is to do
what Margaret Hubert from the US sometimes does, and that is to stitch
your fragments directly onto a suitable fabric. In her Freeform video (sec
it up the middle to turn it into a jacket and stitches her fragments
straight onto it. She then covers the two front edges with a binding.
Perhaps in our Australian climate using this would not be quite so
practical, but the idea is a great one for those who do like to line their
garments. Margaret also uses this lining technique for her freeform bags.
Freeform Knitting ano Crochet
The ‘Crow As You Go' technique for garments
Aim
To create a stunning piece of wearable art while avoiding a tension gauge
at all costs and to complete it within a three-week time frame.
Process
Begin with just a vague idea in your head of what your finished
garment might be. Л scrumbled jacket? A vest? You have plenty of
vests — a coat perhaps? You decide to be semi-adventurous and go
for the jacket.
Choose your colour scheme and start scrumbling some fragments.
Start to panic because the event to which you want to wear your
garment is only two weeks away. No way will you be able to scramble
an entire jacket in this time unless you don't eat, sleep or shower!
Change to the easier vest option. Time remains a problem!
Think 'Why did I choose these bright colours?' and 'Where did those
last three days go?'
Event is now just 10 days away and you only have enough fragments
for one vest front! And why did you choose these colours?
Decide that there is no way you could possibly wear an entire vest in
these bright colours.
168
Putting It All Together
9 Refer to Plan В if you have one. if not, it's time you did.
10 There are enough fragments to make a yoke, which you know you
can get away with wearing, even in these bright colours, so proceed
to assemble said yoke. The vest once again reverts to a jacket since
there is now time to knit or crochet the body and sleeves in black.
This will help 'tone' down the brightness.
11 Pat yourself on the back. Problem solved.
12 Refer to template and make enough chains for length of jacket body.
Treble (US de) sideways until back and two fronts are finished. Just
six days to go!
13 Attach body to yoke. Try on.
14 Panic! It's too short!
15 Think! Light bulb goes on! Employ the 'Grow As You Go' technique.
16 Time is mnning out so utilise a fast technique. Obviously it has to be
garter stitch using largish needles — one slightly bigger than the
other. Pick up stitches across back section and knit furiously. Try on.
It's now long enough. Repeat for fronts.
17 With stilLfive days to go, there is enough time to crochet the sleeves
using a template as a shaping guide. Mission accomplished and there
are still three and a half days to go.
18 Try on. Hmmm ... bright yoke ... dull body. AND the sleeves are a
tad short.
19 Don't panic yet. Think hard instead. Knit some garter stitch rows to
’grow’ the sleeves while thinking about what will match the body,
making it look as though the add-on borders were always meant to
be. Light bulb goes on once again as eyes light on some recently
purchased sari silk yarn in stash. The colours match the yoke!
20 Weave sari silk through every 4th row of trebles in body sections. No
time to weave in all the ends so just let them hang loose. Looks great!
21 Try on again. At least it fits now, although those garter stitch borders
on the sleeves look loo ... well ... black.
22 Make coffee and eat cake while you ponder. Weaving won't work
again ... too much of the vertical. Light bulb explodes!
23 Couch sari silk in between garter stitch rows on sleeve borders.
Repeat on jacket borders. No time to weave in the ends so leave them
24 Sew on some buttons, tty on and admire!
Despite the above story being a humorous description of how this jacket
was made, creating garments using this method does require a little
ingenuity and a lot of'free' thinking, But it's great fun and the results can
be vety rewarding.
It’s Time to
Spread Your Wings
In the 'Fragments' chapter, 1 emphasised that those patterns were to
would like the challenge of working in larger pieces, rather than with
together with the basic stitches (see Tracks' in the 'Gallery'). 'Ute fabric
in this shawl is made up of trebles (US dc), half trebles (US hdc), and
just one textured stitch, the corded rib stitch. Or perhaps you would like
г way your creative endeavours may lead you always
If you hear a different drummer dreamer, take a chance.
The road you choose to travel means the difference in the dance.
170
Gallery
171
Freeform Knitting and Crochet
Outback' -Jenny Dowde
'WhatKnot Vest' —Jenny Dowde
172
Gallery
173
Bibliography and
Suggested Reading
Birren, Faber, Principles of Colour, Schiffer
Publishing, Atglen, PA, USA, 1987.
Chevreul, M. E., The Principles of Harmony •&
Contrast of Colours, Garland Publishing New
York, lune 1980.
Colour Harmony & Contrast for the Textiles Designer
website <wwtv.schoolofcolor.com> for
information concerning this and other useful
books on colour, or write to the School of
Colour, Gibbet Lane, Whitchurch, Bristol,
BS14 OBX, UK.
Hutchinson, London, 1985. Note: Kaffe Fassett
has had many books published and all are
Fisch, Arlene, Textile Techniques in Metal, Lark
Books, Asheville, NC, USA, 1996.
The Harmony Guides to Crochet and Knitting
Stitches, Lyric Books, London
Hughes, Victoria, Polymer — The Chameleon Clay.
Krause Publications, Iola, WI, USA, 2002.
Publishing Pa, USA, 1986.
Landsdowne's Crochet Designs, Landsdowne Press,
london, 1984.
Landsdowne's Knitting, Landsdowne Press, London,
1981.
McMillan, Dorothy, Creative Ways with Polymer
Clay, Sterling Publishing New York, 2001.
Messent, Jan, Wool'n Magic, Search Press, Kent,
UK, 1989.
Roche, Nan, The New Clay I, Flower Valley Press,
Maryland, USA, 1991
Roche, Nan, The New Clay II, Flower Valley Press,
Maryland, USA.
Sargent, Walter, The Enjoyment and Use of Colour.
Dover Publications, New York, 1964.
Charles, Devon, UK, 2001.
Stearns, Anne, Batsford Book of Crochet, Batsford,
Walters, lames, Crochet Workshop, Sidgwick &
Jackson, London, 1979.
Walters, lames & Cosh, Sylvia, Crochet Workbook,
Batsford, London, 1989.
Wertheim, Ann, Intertidal Wilderness, Sierra Club
Books, San Francisco, USA, 1984. Wertheim's
inspiration.
Wiseman, Nancie M., Knitting with Wire,
Interweave Press, Ixiveland, CO, USA, 2003.
174
Resources
Yarn suppliers - Australia
E. R. & E. M. Reynolds
26 Kennedy Street
Austinmer NSW 2515
Ph: 02 4267 1071
Mail order available for a huge range of fancy and
plain yarns for all fibre crafts.
Yarn Barn
Aaron Dickson
200 Reynard Street
Coburg Vic 3058
Ph: 03 9386 0361
Fax: 03 9386 0542
Mail order available for fancy and plain yarns for all
fibre crafts, including coned yarns for machine
knitting. Sample kits available.
Email: wendydennis@primus.com.au
PO Box 350
Euroa Vic 3666
Ph/Fax: 03 5795 1661
Fibreworks Yam
Textile Artist Gill Venn
RMB 7212
Horsham Vic 3401
Ph: 03 5383 6243
Email: gvenn@netconnect.com.au
Fibreworks yarn is also available at
<www.ozeyarn.com>
Mohair Curls (silk tops) and
Burraweave Yarn
Glenora Weaving Supplies
PO Box 9
Gerringong NSW 2534
Ph: 02 4234 0422
Software
Software for generating design
IDEAS AND COLOUR SCHEMES:
Gliftic and Repligalor
www.ransen.com
Color Schemer
www.colorschemer.com
Color Impact
Design software for knitting
AND SEWING:
Garment Designer
www.cochenille.com
Cochenille Design Studio
PO Box 234276
Encinitas, CA 92023-4276, USA
Wild Ginger
630 Fogg Street,
Nashville, TN 37203 USA
www.wildginger.com/PRODUCrS/cameo.htm
Fittingly Sew
www.softbyte.co.uk/fittngll .him
Softbyte Ltd
Quarry Lane
Nantmawr
Oswestry
Shropshire SY10 9HH, UK
Ph: +44 (1691) 828556
Fax: +44 (1691) 828195
Dress Shop 4
www.livingsoft.com
PO Box 819
605 Elm Street
Susanville CA 96130, USA
PatternMaker Home Studio www.pattemmaker.com PO Box 70306 Bellevue WA 98005, USA Premo and Fimo and other clay supplies wtvw.polymerclay.com.au Over the Rainbow Polymer Clay PO Box 495 Ascot Vale Vic 3032
Copyright free imagery Dover publications available from bookshops. Check out their website: Ph: 03 9376 0545 Fax: 03 9376 4489
www.doverpubications.com ZigZag Supplies www.zigzag.co.nz
Wire sources l-'ine gauge copper winding wire is available from shops that carry out repairs to electrical motors but not auto-electrical shops. A great selection of coloured wires and other magical things is available from: In the United States: Polymer Clay Express Polymer clay books and videos available from: Polka Dot Creations Email: lisa@polkadotcreations.com
The Thread Studio 6 Smith Street Perth WA 6000 Ph: 08 9227 1561 Website: www.lhethreadstudio.com/ Website: www.polkadotcreations.com In Australia: Nicola Veasey 25 g (approx. 1 oz) stranded beads in sizes ll/o
Artistic wire in Australia and New Zealand is available from: and 8/o — just right for small projects. Also, you can buy a wide range of unstranded
www.polymerclay.com.au www.zigzag.co.nz And in the US from: www.wigjig.com seed beads and larger accent beads from: www.stores.ebay.com.au/id=78511599 (You can use the Buy Now option!) Email: silkpainting@hotmail.com
Cruft wire, 32 gauge, in silver mid gold only, can be found at some bead shops. Bead spinner Jenny King PO Box 290
Polymer clay In Australia and New Zealand: Modelene www.modelene.com.au The Paper Place 197 Blackburn Road Syndal Vic 3149 Ph: 03 9802 4200 Email: sales@modelene.com.au Bli Bli Qld 4560 Website: www.jennykingdesigns.com Email: footyrug@squirrel.com.au A search for 'beads’ on the Internet yields hundred of sites in the US. Here are just three: www.beadcats.com/ www.shipwreckbeads.com www.7echoes.com/ (bead spinners and beads)