/


Tags: magazine magazine simply sewing
Year: 2024


Text
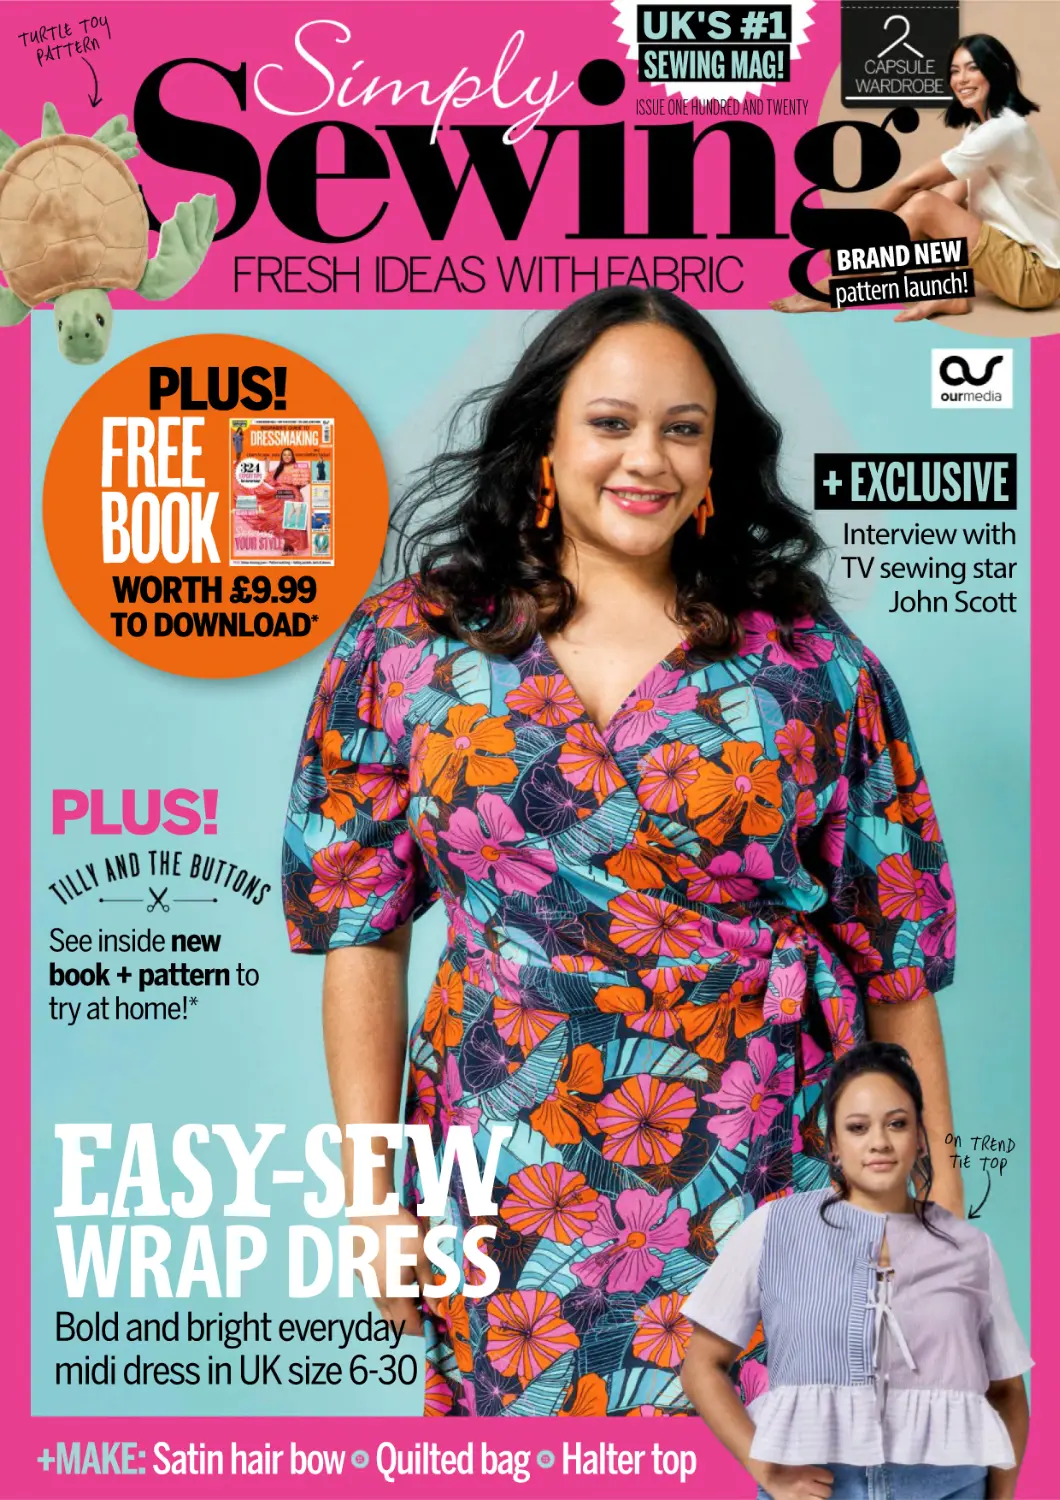
                    UK'S #1
SEWING MAG!

TOY
TURTTLETERN
PA

ISSUE ONE HUNDRED AND TWENTY

BRAND NEW
pattern launch!

PLUS!

free
book

WORTH £9.99

TO DOWNLOAD*

+ EXCLUSIVE
Interview with
TV sewing star
John Scott

PLUS!
See inside new
book + pattern to
try at home!*

EASY-SEW
WRAP DRESS

Bold and bright everyday
midi dress in UK size 6-30

+MAKE: Satin hair bow Quilted bag Halter top

ON TREND
TIE TOP

S

FRESH IDEAS WITH FABRIC
We are so excited to be launching our first ever
Capsule Wardrobe in this issue! Over the coming
months our 6-piece collection will be revealed,
pattern-by-pattern! Plus, this issue we look at
Tilly Walnes’ brand new pattern book Mini
Makes and have an exclusive interview with the
former Great British Sewing Bee star herself
(we’ve even got one of her new patterns for you to
try!) This month’s cover star, the Martha Dress,
is very likely going to be your new favourite
go-to dress in your summer wardrobe. Find out
what TV sewing star John Scott is up in his new
career venture, repurpose shirts with Portia
Lawrie’s refashion tutorial and turn denim into
a halter top with Matthew Dummigan’s selfdraft project. Plus, don’t miss the chance to
download your FREE bonus dressmaking book
− worth £9.99! All this and more to whet your
appetite for a whole summer of sewing.

WWW.GATHERED.HOW/SIMPLYSEWING #SIMPLYSEWINGMAG
facebook.com/simplysewingmagazine

twitter.com/simplysewing_

pinterest.com/simplysewingmag

instagram.com/simplysewingmag

Turn to p69 for
tie
our adorable Ber
Turtle soft toy
ISSUE ONE HUNDRED AND TWENTY

CONTENTS

FRESH IDEAS WITH FABRIC

16
ew
Meet your n - the
t
favourite outfip Dress
Martha Wra

Great projects for you

22 PATTERN: BRITTANY TEE

How to...

18 TREND TECHNIQUE: STRAPS,

30 REFASHION: TIE TOP
36 PATTERN: THE MARTHA DRESS

BOWS AND TIES

59 WORKSHOP: YOUR GUIDE TO

43 PIN UP: THE INDIGO DRESS
45 SELF DRAFT: HALTER TOP

At Simply Sewing, we want inclusivity to be at the heart of
what we do. We’re committed to creating content that
reflects and celebrates the diversity of the sewing
community. Sewing is for everyone, regardless of ethnicity,
age, size, ability, sexual orientation or gender identity. We
have begun work on a plan to drive meaningful change,
but we know it’s a work in progress. We want to listen to
you, our readers. Join the conversation on Instagram
@simplysewingmag, or get in touch with us at
simplysewing@ourmedia.co.uk.

73 SEWING GUIDE:

49 ACCESSORY: THE HAIR BOW

TECHNIQUES AND

51 BAG: QUILTED HOLDALL

SEWING GLOSSARY

63 HOME: STATEMENT CUSHION

Sewing is for everyone

SEWING MACHINES

77 TEMPLATES: TURTLE

67 STITCH: BASEBALL CAP

PLUSHIE TOY AND

69 TOY: BERTIE TURTLE PLUSHIE

BASEBALL CAP

Turn to p30 for
the refashioned,
on-trend tie top

51
54

tV star John sCoTT shaRes
hiS brand new VenTuRe

67

49

£599

WoRTh oF PrIZEs!

Enter today and you could win a brand
new DKS30 SE Janome Sewing Machine!

As we are now
officially into British
Summer Time (yes,
finally) we can look
forward to warmer
weather and longer summer
days − and what better way to
celebrate than to start making
your very own bespoke capsule
wardrobe! The team been
working behind the scenes for
months on this very special
sustainable collection and we
are so excited now that we can
start to share the patterns with
you. See page 16 for a peek!
There are six to collect, starting
with this issue's Brittany Tee
(page 22). If you are looking for
even more practical solutions for
sustainable fashion, you're not
going to want to miss our
feature on page 18, too. Enjoy!

Charlie Moorby, Editor

Find out more on p15

your gifts*:

✓ the MaRTha DresS
✓ the brittany tee
✓ the IndIGO DresS
✓ bOnus digItal boOk

Good reads & ideas

9 PINBOARD: IDEAS, EVENTS, NEW
FABRIC AND PATTERN RELEASES

15 WIN: JANOME SEWING MACHINE!
18 FEATURE: MADE TO LAST
34 COLUMN: ADAM SEWS
40 PROFLE: TILLY WALNES
54 PROFILE: JOHN SCOTT

82 MY FAVE THING: VICKY LAY

GREAT SUBS
OFFERS! P24
SAVE TIME, MONEY
AND HASSLE
WITH AN ANNUAL
SUBSCRIPTION

45

* GIFTS SUBJECT TO CHANGE. SOME PAPER GIFTS ONLY AVAILABLE ON UK NEWSSTAND. INDIGO DRESS PATTERN NOT AVAILABLE ON EXPORT COPIES. NEWSLETTER SIGN-UP REQUIRED FOR DIGITAL MAG DOWNLOAD.

Sustainable summer

CONTRIBUTORS

FRESH IDEAS WITH FABRIC

EDITORIAL

A huge thank you to this talented lot...

EDITOR Charlie Moorby
CREATIVE DESIGN LEAD Lisa Jones
CREATIVE DESIGNER Beth Giovanelli
PRODUCTION EDITOR Sarah Trevelyan
TECHNICAL EDITOR Sarah Taylor
PHOTOGRAPHY Dave Caudery, Kaden Gardener and Steve Sayers

SUBSCRIPTIONS

CALL +44 (0)3330 162 149
QUERIES ourmediashop.com/contactus
ORDER ourmediashop.com

ADVERTISING

Call 0117 300 8206
SENIOR SALES EXECUTIVE
Jessie Dolman jessie.dolman@ourmedia.co.uk +44(0)117 300 8133
CLIENT PARTNERSHIP MANAGER
Beckie Pring beckie.pring@ourmedia.co.uk +44(0)117 300 8205

MARKETING & CIRCULATION

SUBSCRIPTIONS DIRECTOR Jacky Perales-Morris
DIRECT MARKETING MANAGER Penny Clapp
HEAD OF NEWSTRADE MARKETING Martin Hoskins
NEWSTRADE MARKETING MANAGER John Lawton

BUYING

Paul Torre, Karen Flannigan

website
Visit Tilly’s ttons.com
ndthebu
shop.tillya

Follow Maya’
s on Instagra
m at
@latelier_de_
maya
MAYA PEREDA

TILLY WALNES

After rising to fame on the first series of The Great
British Sewing Bee, Tilly set up her own sewing
company Tilly and the Buttons designing jargonfree, easy-to-follow sewing patterns. Find out about
her latest book Mini Makes on page 40.

Originally from Peru, Maya is a London-based
designer who runs her own 100% handmade
accessories brand created L’Atelier de Maya. Stand
out from the crowd on your next trip with Maya’s
floral quilted holdall bag project on page 51.

PRODUCTION

PRODUCTION DIRECTOR Sarah Powell
GROUP PRODUCTION MANAGER Louisa Molter
JUNIOR PRODUCTION COORDINATOR Katie Hood

LICENSING

DIRECTOR OF INTERNATIONAL & LICENSING
Tim Hudson tim.hudson@immediate.co.uk
HEAD OF LICENSING
Tom Shaw tom.shaw@immediate.co.uk
HEAD OF SYNDICATION
Richard Bentley richard.bentley@immediate.co.uk

PUBLISHING

CHIEF EXECUTIVE OFFICER T Andy Marshall
MANAGING DIRECTOR Andrew Davies
BRAND LEAD Liz Taylor
HEAD OF CONTENT Gail Shortland

DISTRIBUTION

FRONTLINE Call +44 (0)1733 555161

PRINTED IN THE UK

BY WILLIAM GIBBONS

NEED TO GET IN TOUCH

EDITORIAL TEAM simplysewing@ourmedia.co.uk
SUBSCRIPTION QUERIES www.ourmediashop.com/contactus
DATA QUERIES dataprotection@ourmedia.co.uk
EDIORIAL COMPLAINTS editorialcomplaints@ourmedia.co.uk
DATA QUERIES dataprotection@ourmedia.co.uk
RIGHTS QUERIES rights@ourmedia.co.uk

NEXT ISSUE ON SALE

Take a look at mor
e of Adam’s
latest creations @
adamsews

t John’s new
Find out abou
adsoflife.tv
venture at thre

ADAM BURCH

JOHN SCOTT

For almost as long as Adam can remember, he has
sewn. It was a hobby that he got hooked on as
a child and will never put down, he hopes, in the
future. Turn to page 34 to find out all about who
and what inspired him to start sewing.

With 35 years’ experience in theatre, fashion, TV,
and film, John Scott shares the latest turn in his
eclectic career. Read all about his exciting new
sewing venture in our exclusive interview with the
TV sewing star on page 54.

OTHER CONTRIBUTORS
Sarah Corbett, Cath Dean, Matthew Dummingan, Mollie Johanson, Vicky Lay, Portia Lawrie, Becky Perry,
Angela Pressley, Michelle Rowley, Sophie Tarrant, Sarah Trevor, and Lucy Ward.

THURSDAY 9 MAY 2024
No gift included? Ask your newsagent.
Cover gift may be unavailable overseas.

The copyright in the patterns in this magazine are owned by or licensed to Our Media Ltd and are for
readers’ personal use only. Please do not share them online (even for free) or copy them multiple times
without our permission. Where selling crafts based on these patterns is permitted (usually only to raise
funds for charity), we’ll say so on the page.
All toys sold in the UK must meet the requirements set out in the Toy (Safety) Regulations 2011,
with proof in the form of a CE Mark. You must take all necessary steps to comply with this important
legislation. For more information, see gov.uk/ce-marking.
Our Media Limited (company number 05715415) is registered in England and Wales. The registered
office of Our Media Limited is at Eagle House, Colston Ave, Bristol BS1 4ST. All information contained
in this magazine is for information only and is, as far as we are aware, correct at the time of going to
press. Our Media Limited cannot accept any responsibility for errors or inaccuracies in such information.
Readers are advised to contact manufacturers and retailers directly with regard to the price of products/
services referred to in this magazine. If you submit unsolicited material to us, you automatically
grant Our Media Limited a licence to publish your submission in whole or in part in all editions of the
magazine, including licensed editions worldwide and in any physical or digital format throughout the
world. Any material you submit is sent at your risk. Although every care is taken, neither Our Media
Limited nor its employees agents or subcontractors shall be liable for loss or damage.
We abide by IPSO’s rules and regulations. To give feedback about our magazines, please visit ourmedia.
co.uk, email editorial.complaints@ourmedia.co.uk, or write to Legal, Our Media Ltd, Eagle House,
Bristol, BS1 4ST.
Sustainabiliy is at the heart of our values, and as a business, we are committed to reducing the impact
we have on the environment. Read more at ourmedia.co.uk/sustainability

WWW.GATHERED.HOW/SIMPLYSEWING
facebook.com/simplysewingmagazine

twitter.com/SimplySewing_

6 WWW.GATHERED.HOW/SIMPLYSEWING

pinterest.com/simplysewingmag

instagram.com/simplysewingmag

IDEAS

INSPIRATION

ACCESSORIES

WEBSITES

EVENTS

STUFF

CRAFTY PIE FABRICS

Brogan aka 'The Crafty Pie' is a young sewer, first-time mum, fashion-lover and recently featured as a finalist on series 8 (2022) of
The Great British Sewing Bee. It has always been Brogan's dream to launch her own fabric line and now she has! Launching under
the 'Visage Luxe' dress label, Brogan has carefully selected a range of fabrics and designs that best reflect her sewing style;
modern, bright, and fun with a touch of vintage. Turn to page 13 to find out more.
WWW.GATHERED.HOW/SIMPLYSEWING 9

Pinboard
COTTON REEL
STORAGE
TINS
Here's a great mini
▼

gift for those who
love to sew! These
adorable tins, from
Elite, are fab for
storing bits of
haberdashery.
Available in yellow,
green, pink, red,
purple and blue − it'll
be a challenge not to
buy the whole set!
Each tin is 8cm and
6.5cm wide at the
widest point. If you're
really planning
ahead, they'd make
perfect Christmas
Cracker gifts for your
sewing club! Shop for
both at thecracker
company.co.uk

FINDING A BALANCE

Welcome in flexible thoughts and quiet the
patterns of rigidity with the new Roo-tid fabric
collection − Fluidity. This breezy collection is
a celebration of a fluid mind encouraging you
to find a balance between comfort and change
possibilities. Shop the range at roo-tid.com

ATELIER BRUNETTE

Do you fancy brightening up your wardrobe
and others around you in the process? Try the
new Supremes collection from Atelier Brunette.
The divine set of Garbardine, Light Garbardines
and Cotton Viscose fabrics come in dopamine
Bubble Gum (as shown above), stylish Pecan Pie
and a classic Deep Charcoal. All with matching
buttons and thread to make sewing your next
garment a total breeze. atelierbrunette.com

SEASONAL
FLORALS
Do you dream of clear blue skies and
a warm breeze gently blowing across your
face, carrying with it the light scent of
freshly blooming flowers? Then these
prints are for you! Now all you have to do is
sew yourself something beautiful with
them! These stunning floral digital
linen-cotton prints are medium weight and
very easy to handle. Made up of 70% Linen
30% cotton, they are ideal for sewing
dresses, tops, skirts, trousers and jackets.
What will you make with them? Visit
oddies-textiles.co.uk for the full collection.
(Oddies Textiles are wholesale but they can
direct your towards your local retailer or
online store who stock them.)

10 WWW.GATHERED.HOW/SIMPLYSEWING

Go to oddies-textiles.co.uk
for the full spring and
summer collection

Pinboard

the pAttern edit
New patterns
Production Editor
Sarah Trevelyan's
pick of the recently
released patterns
JENNA SHIRT +
SHIRTDRESS
Nothing compares
to an oversized
menswear-inspired
shirt when it comes
to iconic wardrobe
staples, and the
Jenna Button-up
shirt ticks all the
boxes, featuring a loose fit, drop shoulder
and deep back yoke. closetcorepatterns.com

mini profile

SARAH CORBETT
@CRAFTIVISTS
@SARAHPCORBETT
"I never planned to be a craftivist (craft
+ activism). It happened by accident. I’m
self-taught in sewing. I love sewing bespoke
gifts for loved ones but never imagined using
my love of craft with my mission to help create
a happier, healthier, and more harmonious
world for all.
"I grew up in inner-city Liverpool, in the
fourth most disadvantaged ward in the UK in
the 1980s. I was brought into the world of
activism as I experienced first-hand my
community battling against the effects of
inequality. At my secondary school I created
a successful campaign to gain lockers for my
peers and the use of recycling bins before
they became mandatory. I learnt even more
from my failed campaign to eradicate ‘gym
knickers’ from our sports uniform. I went on to
work for International Development Agencies,
including as Activism Manager for Oxfam GB.
"I started merging my love of sewing and
cross-stitch with my activism in 2008 because
I was really burnt out and doubting the
effectiveness of quick, easy and often unkind
activism. I founded the Craftivist Collective in
January 2009 after demand from people
around the world to take part.
"I create projects, kits, books and tools for
individuals, groups and organisations around
the world to take part in our projects and
build confidence in skill to sometimes create

their own successful campaigns. Since then I
have delivered over 400 events to over 30,000
participants around the world, collaborated
with The Climate Coalition, Save the Children,
Unicef amongst others and helped
Girlguiding UK create their new craftivism
badge activities.
"I’ve worked with the V&A, Tate galleries,
Helsinki Design Week and currently the
Design Museum Danmark in Copenhagen is
exhibiting pieces of our work until December
this year. More importantly it works: the
global Craftivist Collective has helped change
hearts, minds, policies and laws around the
world as well as expand the view of what
activism can be.
"There are many ways people interpret and
do craftivism. I call the Craftivist Collective
approach ‘Gentle Protest’ because I see
gentleness as the golden thread and
superpower in our craftivism: I don’t mean
gentle as in passive or weak but gentle as in
a strategy delivered with compassion,
self-control and with a priority for craft to
serve the cause sensitivity and with nuance.
It’s a combination of art and science. It is not
art-therapy or solely awareness raising. It is
a form of slow, quiet, calm, focused, ego-less,
hopeful, and humble activism.
"I wrote my new book The Craftivist
Collective Handbook for everyone, wherever
you are in the world: whether you are a skilled
crafter or a burnt-out activist, new to activism,
an introvert, highly sensitive person, or
struggling with anxiety or overwhelm."
Turn to page 13 to read more about The
Craftivist Collective Handbook. Find out
more at craftivist-collective.com and on
Instagram @craftivists

OXBOW TOTE
A versatile zippered
top tote bag in two
sizes to sew - regular
and overnight!
Features an
easy-access front
pocket, reinforced
base, crossbody
strap, and a roomy interior with a slip
pocket. Customise yours by quilting! Get
your pattern and bag-making supplies from
noodle-head.com
METRO MIDDY
This blouse reflects
the military styling
of World War I
uniforms, as well as
the new interest in
comfortable and
practical two-piece
garments. The
easy-sew blouse features a breezy, loose fit;
slightly belled sleeves; flared hemline with
gentle downward curve at centre back;
V-neck and sailor collar. folkwear.com
BALKA DRESS
With Wardrobe By Me, newest
sewing pattern Balka, the
ultimate loose-fitting dress that
effortlessly combines comfort
and style. Every detail is
designed to make you feel like
a true fashion icon, from the
flowing silhouette to the
delicately-gathered sleeves. Get
ready to turn heads and embrace
your ethereal vibes with Balka!
wardrobebyme.com

WWW.GATHERED.HOW/SIMPLYSEWING 11

CAPSULE
COLLECTION
New woven
▼

labels from Kylie
and The Machine
that say Capsule
Collection - the
perfect addition
to our very own
debut 'Capsule
Wardrobe'
collection (see
page 16 for more
info). You get six
labels in a pack (3x
white background
with black text
andn 3x black
background with
white text) and
they are 53mm
x 14mm. Simply
fold over the ends
and sew them in.
kylieandthe
machine.com

THEa TROUSERS

Show the world you mean business by rocking your me-made
Thea trousers − a new pattern from Tilly and the Buttons. Sew
these wide-leg trousers with either welt pockets or curved
patch pockets at the back and two finished lengths to choose
from, with the help of the easy-to-follow step-by-step
instructions and a free accompanying video tutorIal. Available
from shop.tillyandthebuttons.com in size range UK 6-34.

3 of the best

MEND AND REPAIR

Do your bit for the environment by making your
clothes last that bit longer with some creativity

1. Turn your ripped jeans into unique designer jeans
with some attractive sashiko stitching, a trendy way
to recycle denim − gathered.how/sewing-andquilting/sewing/sashiko-mending
2 Learn how you can stitch beautiful designer
patches on your old loved woollies to create
colourful detail − gathered.how/homes-diy/
upcycling/visible-mending
3. Extend the life of your garments and do your but
for the environment by repairing broken zips with
this handy guide − gathered.how/sewing-andquilting/sewing/how-to-fix-a-zipper

12 WWW.GATHERED.HOW/SIMPLYSEWING

PATTERN DROP

Sew a classic denim skirt with the Xanthe
Skirt PDF Pattern! The Xanthe Skirt is
a woven fitted skirt with all the neat
characteristics of a classic denim skirt,
plus some extra Sew Over It touches.
Featuring a zip fly, waistband, belt loops
and a shaped back yoke, Xanthe is fitted
at the waist and hips, with a straight fit
on the legs. Choose between two
lengths, with a stylish front slit for ease
of movement. sewoverit.com

Pinboard

CRAFTIVIST
COLLECTIVE
HANDBOOK
Sarah Corbett
(Preorder £25,
Unbound)
This book is written for everyone: whether
you are a skilled crafter or a burnt-out activist,
new to activism or an introvert. There are 20
projects and tools to use the slow, soothing
and thoughtful process of craft to help
channel feelings encouraging effective
actions to help make hope possible.

CRAFTY PIE COLLECTION

Brogan, a finalist on the Great British
Sewing Bee, is best known for her
ultra-feminine style and creates content
to inspire a new generation of 'stylish
sewers' alongside sharing sustainable
fashion and lifestyle content. From
novice sewers to the more experienced
seamstresses, she has a little something
for everyone and aims to show just how
cool it can be to sew! Visit thecraftypie
shop.com to view the collection.

events

CRAFT SHOWS
& EXHIBITIONS
Feed your appetite for your sewing
hobby and put these in the diary.

hand aND lock

We love the new embroidery and tool cases
from Hand & Lock. This beautiful Peppermint
embroidery case would make a stunning
special gift. Lined with the beautiful Elysian
original Liberty fabric, it includes multiple
compartments for needles, beads, bullions,
tools, Fil a Gant threads and more, special
features are a removable needle flap and pin
cushion. Made with 100% Vegan Leather, it
measures 23cm x 15cm x 6cm. Embossing
available. handembroideryshop.com/products

GAMES WE PLAY
JULY 5 -17, 2024
10am to 5pm, free admission
Pond Gallery, Snape Maltings, IP17 1SP
Textile Art Group Suffolk returns once
more to Snape Maltings for its summer
exhibition. The work from this longestablished group is as fresh and thoughtprovoking as ever, in a variety of textile
media that includes embroidery, weaving,
felt-making, paper and quilting.
LIVING CRAFTS FESTIVAL
MAY 9-12, 2024
Hatfield Park, Hertforshire
This festival is one-stop creative shopping
experience, showcasing contemporary
arts and crafts and celebrating the
talents of British designer-makers. Watch
demonstrations and take part in enjoyable
crafts workshops in a beautiful setting.

ELEVATE YOUR SCRAP
SEWING PROJECTS
Sallieann Harrison
(£16.99 Landauer
Publishing)
Use your sewing scrap
fabrics to make impressive, out-of-the box
sewing projects that will wow. This book is
filled with 15 suberb projects, from wallets
and cushions to pouches, baskets, quilts,
soft toys and more, with step-by-step
instructions, coordinating photography,
and expert tips to ensure success.

THE MODERN
EMBROIDERY
HANDBOOK
Clare Albans
(£15.93, White Owl)
Unleash your creativity and
learn a whole variety of hand embroidery
techniques with Clare Albans from Hello!
Hooray!. The Modern Embroidery
Handbook is a perfect guide for stitchers of
all levels, and is something you’ll want to
pick up from your bookshelf time and again.

VISIBLE MENDING
Arounna Khounnora
(£13.27,
Quadrille Publishing Ltd)
Stitch over tears, dye stains
and celebrate a more
sustainable life with the help of this revised
edition. Learn how to pick up a needle and
rediscover the forgotten techniques and joy
of mending. Covering 12 core techniques,
10 key stitches and 12 projects, explore why
we should mend and how to mend a variety
of different fabrics using this book,
demystifying the mending techniques.

WWW.GATHERED.HOW/SIMPLYSEWING 13

Pdf patterns

The Simply Sewing pattern shop is open!

Now you can get instant access to your favourite patterns from the Simply
Sewing collection, alongside our latest releases. Each design comes with a
graded PDF pattern, step-by-step instructions and size chart.
Shop today at SimplySewingPatterns.etsy.com

THE MARIA DRESS

THE SPRING DRESS

SIZES
6-20

SIZES
6-22

US 4 -18
EUR 34-48

THE VERNA TOP
SIZES
6-20

THE VIVIAN DRESS
SIZES
6-20

US 4-20
EUR 34-50

US 4 -18
EUR 34-48

THE GrACE DresS
SIZES
6-30

DRESS A
FRONT

THe SOFIA drESS

DRESS A
FRONT

BACK

BACK

DRESS B

DRESS B

FRONT

FRONT

BACK

SIZES
6-32
US 4-30
EUR 34-60

US 4-28
EUR 34-58

US 4-18
EUR 34-48

JUST
£8.99

Front bodice
wrap detail
BACK

Two sleeve
and hem lengths

Optional hem frill

Find the collection online now at
SimplySewingPatterns.etsy.com or scan the QR code

Easy-sew grown on
raglan sleeves

competitions

Worth

Win a sewing machine £599!
One lucky reader will win this fabulous Janome DKS30 SE
sewing machine worth a whopping £599!

T

he Janome DKS30 SE is described as ‘probably the easiest-to-use machine we’ve ever made!’
This attractive machine has all the features to make sewing simple and enjoyable. Fully
computerised with a host a great features, including Janome’s new easy-set bobbin system,
this machine ticks all the buttons. With each stitch having its own illuminated selection key
and stitch width and length adjustment keys located just under the screen it just couldn’t be
easier. There’s even a special key which enables some stitches to be elongated up to 5 times
normal without losing stitch density! There’s also plenty of accessory storage and a hardcover for
protection. Find out more about this machine and others at janome.co.uk and to be in with
a chance of winning the DKS30 SE enter this competition at gathered.how/sew_comps

See gathered.how/sew_comps to enter today!
(Competition is open to UK residents, aged 18+. Closing date is 23.59 on 07/05/24.
Full T&Cs can be found here: gathered.how/competition-terms-and-conditions.)

WWW.GATHERED.HOW/SIMPLYSEWING 15

THE CAPSULE WARDROBE

W

e’re so excited to share with
you our very first Capsule
Wardrobe pattern collection, just
in time for SS24 and a summer of
sustainable sewing. This collection
of patterns has been curated by
the team as a versatile, wearable,
and functional mix-and-match
wardrobe to see you through the
summer months.
Our debut collection features six
patterns, in UK sizes 6-30. From
summer essentials such as a staple
T-shirt and shorts, to a strappy
sundress and wrap skirt, the
patterns are designed to be
beginner-friendly. We’ve kept the
silhouettes clean and classic, ready
for you to dress up or down
depending on the occasion.
The collection is designed so that
you can sew the various garments
and mix and match them together
with over 16 different looks.
Try the first, The Brittany Tee,
free with your issue (see page 22)
and keep a lookout for the rest of
the patterns coming soon!

p as a top
u
e
l
b
ou
d
suit can or wrap skirt
m
wi
s
e
Th
shorts
r
ou
r
e
d
un

on th e
d
e
t
r
get s t a t any Te e
to
2
2
e
pag - Th e Brit
to
n
r
Tu
at tern
p
t
s
r
fi

Our ca
p
brillia sule collecti
ntly as
on
a holid w ould wor
ay war
k
drobe

ore
Scan to see m nes
behind the scem
on instagra

In a world where the sustainability of our
clothes is becoming an increasingly urgent
issue we need practical solutions
Written by Portia Lawrie

A GOOD READ
he importance of conversations
around extending the life-span of our
garments cannot be overstated.
The growth in popularity of
disciplines such as visible mending
and refashioning within our sewing
community, is testament to our growing
collective awareness of this need, and our
willingness to engage with solutions that
address it.
But while disciplines such as these offer
solutions post
garment construction,
there are also steps
we can take as
garment makers
(before and during
the construction
process itself) to
increase the potential
life-span of our
garments; keeping them in use and on our
bodies long after we've tied off and buried
that last thread tail.
The choices we make about things like
materials, construction, fit and style; can
impact a garment's life-span as much as what
we do to maintain and care for it further
down the line.
The late Vivienne Westwood encapsulated
a neat philosophy for shopping consciously
when she famously advised people to "Buy
less. Choose well. Make it last."
There's an obvious takeaway here too, for
those of us that make our clothes. We can
make less, make it well, and make it to last.

We can approach garment construction with
a similarly neat and almost identical
philosophy.

CHOOSE WELL AND MAKE IT TO LAST

Clothes that are made to last, are clothes that
we can continue to wear because they
withstand repeated washing and wearing;
and can adapt to our changing needs over
time. We can bake these qualities into the
clothes we make by making sound choices
about how we make
them.
If we think in terms
of "future proofing"
our projects, we can
significantly
contribute to reducing
waste and increasing
sustainability within
our making practice.
Here are some key ways you can
futureproof your makes and keep them in
circulation longer:

“ Begin with the highest
quality fabrics and
threads you can afford"

CHOOSE THE RIGHT MATERIALS

Begin with the highest quality fabrics and
threads you can afford, that can withstand
the regular wear and tear and the type of
laundering that your lifestyle will expose
them to.
Textiles already in circulation such as
deadstock, destash sales and refashioning
existing garments, are all preferable to
consuming and creating demand for virgin
resources, where possible.

To future-proof your garments Portia recommends
starting with the highest quality materials that will
withstand wear, tear and regular laundering

WWW.GATHERED.HOW/SIMPLYSEWING 19

A GOOD READ
Natural fibres and blends such cotton,
linen, Tencel and wool, launder well on a 30°
cycle, and can withstand steam/high heat
when pressing. Their breathability, moisture
wicking and temperature regulating
properties make them comfortable to wear
and versatile across seasons.
Those kind of clothes are the kind of
clothes that we wear year after year.

CHOOSE NATURAL FIBRES

Natural fibres also take dye much more
readily than synthetics, meaning you can
refresh tired-looking garments periodically
and with ease. (Be sure
to sew with a nonsynthetic thread if
you’re going to want
the stitching to take
dye later on too).
Before you do
anything else,
pre-wash new fabrics
to prevent future
shrinkage.
Simple shapes with a loose or relaxed fit are
futureproofing for a number of reasons.

belted, tucked in or accessorized to create
different looks, making them adaptable to
various seasons and changing aesthetics.
The simplicity of their design allows for easy
pairing with other pieces, enhancing their
overall versatility in styling.
All of these characteristics make for staple
pieces we'll reach for time and time again.

TAKE A TIP FROM PROFESSIONAL TAILORS

Aside from hemming and zip repair, one of
the most common alterations asked for by
consumers is for a garment to be taken in or
let out. In tailoring it’s commonplace to
factor this in at the
pattern-cutting
stage, and additional
seam allowance is
often incorporated in
strategic areas to
allow for future
adjustments.
These strategic
additions to the SA
provide tailors with the flexibility to make
alterations without compromising the overall
structure and integrity of the garment. It's
a thoughtful practice that extends the
life-span and adaptability of tailored pieces.
Consider building in a little extra seam
allowance at the CB, CF, crotch, inseam and
side seams of your more fitted makes, and
"future you" may well thank you for your
foresight.
Just a few millimeters can really add up
when added or subtracted across all seams.
It's possible to nudge a garment up or down
a whole size this way.
There are also many design features that

“ CONSIDER BUILDING IN A
LITTLE EXTRA SEAM ALLOWANCE
OF YOUR MORE FITTED MAKES"

CHOOSE SIMPLE STYLES

Simple construction makes it easier to access
seams for repair or adjustment as needed
later on. These kinds of styles can also
accommodate changes to body shape and
size over time, meaning they can stay in
rotation even as more fitted garments fall
into disuse. They provide comfort and ease of
movement; and we naturally reach for
clothes with these qualities on a day-to-day
basis. Additionally, they can be easily-layered,

Design clothes with simple construction
to make it easier to repair or adjust the
garment later on

20 WWW.GATHERED.HOW/SIMPLYSEWING

A GOOD READ

Include adjustable elements like
drawstrings, ties, straps and buckles
and reinforce stress points

can be applied to a looser fitting garment to
give it some adjustable shaping and fit.
(Especially useful if you experience bloating
or weight fluctuations).
Incorporating elastic components (bands
or shirred panels) in strategic areas, such as
the waist or cuffs, builds in stretch and
adaptability, ensuring a comfortable fit for
various body shapes.

MAKE THEM ADJUSTABLE

Adjustable elements like drawstrings, ties,
straps and buckles at key points offer the
wearer the option to customize the look and
fit by tightening or loosening as needed.
These features can be used to modify both fit
and length.

USE REINFORCEMENTS

Reinforce stress points like seams, pockets,
and buttonholes by using interfacing, bias
tape, or double stitching. This helps
distribute tension and prevents fabric from
fraying or tearing.

CHOOSE THE RIGHT STITCH

Use the appropriate stitching techniques for
the fabric and the type of mechanical
stresses your garment will be subject to. Flat

fell seams on jeans are a good example of
this, as is the stretch stitch used on knit
fabrics. Seams prone to popping are not
conducive to keeping a garment in use.

HEMMING AND EDGING

Finish raw edges with suitable methods like
serging, binding, or using pinking shears to
prevent fraying. Hem garments wit
a double-folded hem or a blind hem for
added strength and a polished look.

CRAFT WITH INTENTION

By incorporating these techniques into your
garment-sewing projects, you'll find you end
up with clothes that just keep going, year
after year. As home sewers, let's commit to
shift our focus from quantity to quality.
Choose fabrics that withstand time, designs
that endure trends, and craftsmanship that
speaks of patience and time invested. It's
time to savour the joy of creating enduring
pieces that transcend seasons.
Start today − craft with intention, create
with purpose. Let's redefine the way we sew
and make a lasting impact on our wardrobes
and the planet. Let's sew for longevity,
quality, and a better tomorrow. Let's make
less, make it better, and make it to last.

Portia (she/her) is an Essex-based
remaker, designer and author. Her
easy- to-follow projects and
refashions are a favourite at Simply
Sewing. See more at @portialawrie.

WWW.GATHERED.HOW/SIMPLYSEWING 21

brittany tee

Launching our Capsule Wardrobe
series is the easy-to-sew t-shirt
with grown-on sleeves

brittany tee

G

ive your wardrobe a boost with an everyday
tee that you can style all year-round. You just
can't beat a classic and let's face it, t-shirts are
one of the most worn garments these days! Make
yours in a striking stripe print as a nod towards
the French Navy based in Brittany in 1858 who
inspired the Breton top. Stripes are still very
much in fashion today and remain the pinnacle
of casual stylish dressing − and come into their
own when you are besides the seaside! See more
of our Capsule Wardrobe @SimplySewingMag.

YOU WILL NEED
■ Knit fabric: 1.8mx140cm
■ Lightweight ribbing (optional): 50x75cm, for the
cuffs and neckband
■ Ballpoint sewing machine needle
■ Twin ballpoint sewing machine needle
(optional)
■ Matching thread
■ Basic sewing kit

CLASSIC DESIGN
Choose a stripe for
a smart casual t-shirt that
will go with anything

NOTES
■ Use a 1.5cm seam allowance, unless otherwise
stated.
■ Test various lengths and widths of zig zag or
stretch stitches on scraps of your fabric to make
sure the stitches won’t pop under stress.

FABRIC SUGGESTIONS
■ Light to medium-weight knit fabrics such as
cotton jersey, ponte roma and viscose jersey.

Why
s
new top at on
fav t
e? Cr
op
ea
fabri in many te yor
cs an
d pri diferent
nts
CUFFS
The sleeves are cuffed to
give the top a beautifully
finished look

WWW.GATHERED.HOW/SIMPLYSEWING 23

Simply
FRESH IDEAS WITH FABRIC

START YOUR FREE
TRIAL TODAY!*

UK'S

TOY
TURTLETERN
PAT

ISSUE ONE HUNDRED AND TWENTY

BRAND NEW
pattern launch!

PLUS!

free
book

WORTH £9.99

TO DOWNLOAD*

+ EXCLUSIVE
Interview with
TV sewing star
John Scott

Your next issue is free too

PLUS!
See inside new
book + pattern to
try at home!*

EASY-SEW
WRAP DRESS

Bold and bright everyday
midi dress in UK size 6-30

+MAKE: Satin hair bow Quilted bag Halter top

Download the latest issue
straightaway, for free

ON TREND
TIE TOP

Get a further 12 issues in
your first year
All issues download
automatically
Download it once…
read it offline forever

iPad is a trademark of Apple Inc., registered in the U.S. and other countries. App Store is a service mark of Apple Inc.
NOOK is a registered trademark of Barnes & Noble, Inc. NOOK Tablet is a trademark of Barnes & Noble, Inc
*Free trial not available on Zinio

SAVE TIME, MONEY AND HASSLE WITH AN
ANNUAL SIMPLY SEWING SUBSCRIPTION

just tap
HERE to
subscribe
today

UK'S

TOY
TURTLETERN
PAT

ISSUE ONE HUNDRED AND TWENTY

BRAND NEW
pattern launch!

PLUS!

free
book

WORTH £9.99

TO DOWNLOAD*

+ EXCLUSIVE
Interview with
TV sewing star
John Scott

PLUS!
See inside new
book + pattern to
try at home!*

EASY-SEW

ON TREND
TIE TOP

WRAP DRESS

Bold and bright everyday
midi dress in UK size 6-30

+MAKE: Satin hair bow Quilted bag Halter top

SEARCH SIMPLY SEWING IN THE APP STORE
* iPad is a trademark of Apple Inc., registered in the U.S. and other countries.
App Store is a service mark of Apple Inc.

THIS MONTH...

Get the measure of custom straps, bows,
and ties with our guide to making these
handy finishing touches.
Written by Sophie Tarrant

BESPOKE FIT
Tie straps on the shoulders
not only look cute but allow
for a custom-fit, too.

MATERIAL MATTERS
Sew these in any midweight fabric like a
corduroy or denim

BRITT DUNGAREES

This casual design from Melilot is available in
both English and Norwegian, and creates a pair
of comfortable and cute dungarees with bowties on the shoulders, deep pockets hidden
in the side seams, and two leg width options.
They’re easy to make and suitable for beginners,
and can be created in a wide variety of fabrics
and prints to suit the seasons. melilot.no

LITTLE AND LARGE
A matching children’s
pattern is also available,
so you can twin!

26 WWW.GATHERED.HOW/SIMPLYSEWING

PATTERN INSPIRATION

3

Get all tied up with our pick of the best patterns
featuring straps, bows, and more.

1

TO BOLDY BOW…
Top off your handmade outfit
with a beautiful bow

2

Of course, we’re always in favour of
making our own accessories here at
Simply Sewing - turn to page 49 and
follow Technical Editor Sarah Taylor's
pattern to create your own stunning
hair bow - but sometimes time is
against us and we need to buy premade. Ready-made fabric bows can
look perfectly pretty too.

4

6

5

If you do decide to go pre-made,
sometimes it helps to think outside
the box – this beautiful Liberty print
bow from Aisha & Joe is designed
as a hair clip, but with the hardware
carefully removed we think it'll look
just as gorgeous stitched onto your
latest garment too. Shop for this bow
at aishaandjoe.com. One of the great
things about being able to make your
own bows is that you can make them
to go with your me-made garments.

1 TIE BOW BLOUSE

3 COPPÉLIA CARDIGAN

5 GEORGIE BLOUSE

With a chic pussy-bow neckline and a classic
cut, this versatile blouse from The Assembly
Line is the perfect piece to dress up or down
to suit your mood. This sample sewn from
mulberry silk makes for a super luxurious
garment. It features a standing collar with
a button-attached tie, shapely bust darts, and
pleated sleeves with button cuffs. Pattern
from theassemblylineshop.com

This classic ballet-style wrap cardi from
Papercut Patterns features raglan sleeves and
a fully adjustable tie-through waist. It includes
two different design options, giving you the
choice of a full length top with a banded hem
and the wrap at the side seam, or a cropped
jersey with a long waist tie to wrap around
and make a bow. papercutpatterns.com

We adore the carefree summer vibes we
get from this clever design from VikiSews.
Georgie is a fitted cropped blouse with
puff sleeves and a cut-out front that closes
with a drawstring tie. The blouse has a deep
V-neckline on the front and back. It also
features a split back with additional long ties
that form a cute bow. vikisews.com

2 CHLOE DRESS

This stunning design from Sew Love Patterns
can be sewn as a midi or mini dress, with
a gathered bust detail and an optional skirt
slit. Choose from two strap options, with
either fixed straps sewn in place, or straps that
tie into pretty bows. It comes in two lengths,
midi or mini. Visit sewlovepatterns.com

4 GRETA DRESS AND TOP

This loose-fitting design by Bara Studio can be
made as either a casual dress or a flowing top
and features thin straps, side slits, and gathers
at the neckline. It closes in the back with a
bow for an extra touch of detail. As an added
bonus, a free downloadable pocket hack is
also available on Bara Studio’s website, too.
Get the pattern by visiting bara-studio.com

6 PINCHA OVERALLS

With options for a cross-body duffle bag (Taru
Maru) or a small and large tote set (Hebe
Maru), these embroidered bag designs from
Lasenby are the ideal meditative project to
while away an afternoon. Each one contains
instructions for creating your bag, including
information on working the traditional sashiko
embroidery technique. lasenby.co

WWW.GATHERED.HOW/SIMPLYSEWING 27

tips & tricks
Add neat and functional ties and straps to your me-mades using these top tips and tricks.
CONSIDER CUTTING ON THE BIAS
If you’re making thin spaghetti straps or ties,
cutting the fabric on the bias will allow your
straps to drape smoothly and stretch a little,
making them more comfortable to wear. To find
the bias, lay your fabric out and identify the
selvedge edge, then take a close look at the
weave of the material. The bias sits at a 45 degree
angle to the selvedge and the straight grain.

PICK THE RIGHT FABRIC
Straps and ties are usually functional as well as
decorative, so it’s important that you pick the
right type of fabric to make them – one that
looks nice, but is durable enough to withstand
being fastened, pulled, and knotted, too. For
sturdy straps, consider using strong woven
materials like cotton twill, denim, or canvas. For
more delicate ties, opt for lightweight fabrics
such as satin, or cotton lawn. Try to match your
ties to the rest of your garment for a truly
put-together look.

STAY STABLE
When making bows and ties that you don’t want
to stretch, it’s often a good idea to back the fabric
with interfacing or stabiliser before you begin
sewing. The extra layer of support will help your
straps and ties maintain their structure, and will
prevent them from becoming saggy or
misshapen over time.

PRESS YOUR SEAMS

TOP STITCH FOR EXTRA STRENGTH

Pressing is key to achieving crisp, well-defined seams, another
essential when making your own straps and ties. If your fabric can
withstand it, use a steam iron to press your seams and straps as
you go. If you’re working with a more delicate material, you can
use a pressing cloth to protect the fabric from high temperatures,
or even finger-press instead as a guaranteed safe option.

Top stitching along the edges of your straps and
ties not only reinforces the seams, but also adds
an extra decorative touch, too. Use a strong
coordinating thread and stitch close to the edge
for a polished finish that will withstand extra
wear and tear, or go for a contrast colour for
a pop of extra detail instead.

28 WWW.GATHERED.HOW/SIMPLYSEWING

INVEST IN QUALITY HARDWARE
Your pattern may call for additional hardware
such as D-rings, sliders, and buckles to make your
ties and straps adjustable. When purchasing
hardware, the old saying often rings true – if it’s
good, it’s not cheap, and if it’s cheap, it’s not
good. Investing in high-quality hardware not
only enhances the aesthetic appeal of your
finished pieces but also ensures that they will
withstand regular use and washing.

USE A ROTARY CUTTER
Never is achieving clean, neat cuts more essential than when sewing
straps and ties, which are almost exclusively made of straight edges.
Using a rotary cutter and a cutting mat to slice your fabric pieces will
make it much easier to cut accurately and efficiently, ensuring that
your straps and ties are uniform in size and shape.

TRICKS FOR TURNING

PRACTICE MAKES PERFECT

If you’ve ever made a thin spaghetti strap, you’ll
be all too familiar with the struggle of turning
them right-sides-out once they’ve been stitched.
Luckily, there are ways to make the process
easier. For example, did you know you can use a
bobby pin to quickly and easily turn your straps?
Make the strap a little longer than required,
stitching a long tube with right sides together.
Trim the seam allowance back, then make a small
slit along the folded edge, close to one end.
Thread a bobby pin onto the end of the tube,
with one side going inside the slit and the other
inside the end. This will catch the fabric and hold
it in place. Gently push the bobby pin through
the tube, pulling the fabric into itself as you go,
until it pops out the other end. Voila – your strap
should now be the right sides out!

Sewing straps and ties can be fiddly and requires
precision and patience, especially when working
with small seam allowances, delicate fabrics, and
miniature details. Take your time, measure
accurately, and don't hesitate to rip it all out and
start over if necessary. Practice on scraps of fabric
to ensure you have the right combination of
material, hardware, and interfacing, so that the
finished garment looks perfect first time.

RIGHT SIDES ONLY
Another alternative for creating neat straps
without the need for turning is to stitch them on
the right side from the start. To do this, cut your
fabric four times wider than you want the
finished strap to be, then fold it in half lengthwise
and finger press the crease to mark it. Open the
fabric back up and fold each long edge inwards,
to meet along the crease. Press along each fold
to hold the shape, then fold in half once again
and press a final time, sandwiching the raw
edges of the fabric within the strap. Top stitch
along the long open edge to hold the fabric in
place and create your finished tie.

Sophie (she/her) is a craft writer
and embroidery artist who lives
with her husband and four cats.
She loves dressmaking and
collecting way too much fabric.

WWW.GATHERED.HOW/SIMPLYSEWING 29

THRIFTY
MAKES

refashion

Three unworn and unloved pinstripe shirts get
the refashion treatment from Portia Lawrie in
this playful tie front blouse

refashion
01

02

03

07

08

09

YOU WILL NEED

■ 3 long-sleeved cotton shirts
■ Strips of lightweight interfacing
for plackets

■ Basic relaxed fit block/bodice
pattern

■ Basic sewing kit
NOTES
■ Use the seam allowance as directed
on your block/pattern.
■ The shirts should fit you loosely and
should be of a similar fabric weight.
Use plain or patterned shirts in
contrasting or complementary
colours or patterns. For the
purposes of this tutorial Shirt 1 =
blue/white stripe, Shirt 2 = pink/
white pinstripe and Shirt 3 = Pale
lilac stripe shirt. The pieces of this
project are cut from the shirt backs,
shirt fronts and sleeves.
■ Use a basic block or existing pattern
that has a relaxed boxy fit and a
simple round neckline. You'll need a
front, back and sleeve. The block
here is used as a template for the
armscye/sleeve and neckline/
shoulder shaping; with side and
centre front seams squared down
and straight with no shaping.

32 WWW.GATHERED.HOW/SIMPLYSEWING

PREPARATION
Step one Deconstruct all shirts into their
component parts as follows:
1) Cut away collars and cuffs close to the seamline
and remove all buttons
2) Cut or unpick the side and sleeve seams so the
whole shirt opens out flat
3) Remove the sleeves by cutting close to the
sleeve head seam
4) Separate the front and back shirt pieces from
the yoke by cutting close to the yoke seam front
and back
5) On the shirt fronts, unpick and open out the
button placket (traditionally right front if working
with mens’ shirts), and cut away the buttonhole
plackets (usually left front)
6) Press all shirt backs, shirt fronts and sleeves

CREATE THE BACK
Step one For the Back, start by sewing the right
fronts (the ones where you opened out the
button plackets) of Shirt 1 and Shirt 2 right sides
(RS) together at the centre front. Press seams
open and flat, then square off the bottom top
and sides so it’s one big rectangle with a
centred centre back seam. This is the basis of
your blouse back.
Step two For the Outer Yoke, from the sleeves of
Shirt 3, cut 2 smaller rectangles on the bias, so
that when joined together with a 1cm centre
front seam allowance, they are the same width

as the rectangle you made in step one and
around 15cm in height. (The available fabric will
dictate the height to a degree).
Step three For the Inner Yoke: Repeat step two
with the sleeves of Shirt 2. (Ours here is cut from
the remaining front of shirt 2 as the sleeves on
our shirt 2 were short. But ideally cut all yoke
pieces on the bias as this provides a little stretch
across the shoulders)
Step four Sandwich the top edge of your blouse
back between the bottom edges of the inner
and outer yoke pieces; with raw edges and
centre backs aligned 01
Step five Sew the yoke seam with a 1cm seam
allowance then press the yoke pieces upwards
and away from the main body so they enclose
the seam. Topstitch through all layers.
Step six Fold the entire blouse back in half along
the centre back and use your block to cut the
shape of the shoulder slope, back neck and
armhole curves. Cut your length to waist. 02
(**If you square down at the side seams like we
have here, note any additional width that ends
up getting added at the underarm curve as this
will need to be added to your sleeve seam).

CREATE THE FRONTS
Step one From the shirt backs of Shirt 1 and
Shirt 2, use your block to cut the shape of the
shoulder slope, back neck and armhole curves.
Cut the centre front line 4-5cm away from your

refashion
04

05

06

10

11

12

block centre front to create your placket
extensions. Cut your length to waist. 03 (**If you
square down at the side seams like we have
here, note any additional width that ends up
getting added at the underarm curve as this will
need to be added to your sleeve seam)
Step two Sew the Front RS together at shoulder
seams to the outer yoke only. Press seam
toward the back. Press shoulder seam allowance
of the inner yoke inward as pictured. 04
Step three Pin folded edge of inner yoke over
the front shoulder/outer yoke seam.Topstitch
through all layers close to seam on the RS.
Step four Finish the raw edges of the centre
front plackets.

CREATE THE SLEEVES
Step one Cut your sleeves** from the back
section of Shirt 3, folded in half across the
width. The available fabric will dictate the
length of your sleeves. Insert them into the
armscye RS together then press sleeves and
seams away from the body.
Step two Pin and stitch underarm and side
seams RS together. Press seams open. 05
Step three Finish, turn and stitch sleeve hems.

CREATE THE RUFFLE
Step one Cut the front pieces of Shirt 3 in half
across the grain, then square the edges so you
have a collection of narrow rectangles the same

height that you can then piece RS together into
one long strip. The available fabric will dictate
the depth and length (and therefore the
gathering ratio) of your ruffle.
Step two Finish the raw edge then turn and
stitch a scant hem at both short ends and the
bottom edge of your ruffle. Gather the top edge
RS together to the hem of the blouse, excluding
the plackets with a 1cm SA, as pictured. 06
Step three Overlock the SA of the ruffle and
hem together. Press the ruffle downwards and
the SA upwards.

FINISH THE FRONTS
Step one Interface both placket extensions. 07
Step two For the binding and ties, cut 4cm wide
bias strips from the remaining shirt scraps and
use them to create a strip of binding sufficient
to bind your neckline and at least 6 double
folded bias ties approx 15-20 cm long. The
available fabric will dictate quantity, colours,
and maximum length of ties. 08
Step three On each tie fold one short end
inwards and stitch the length closed along the
folded edges.
Step four On one side of the centre front, press
the placket over to the inside so it encloses the
corner of the ruffle/hem seam. Insert the
unfinished ends of your ties 5mm under the
placket edge in the desired position, then
edgestitch the placket down along the length,

the bottom and the folded edge, securing the
ties in the process.
Step five Flip the ties toward the opening and
box stitch to the placket. 09
Step six On the opposite centre front, press the
placket to the inside so it encloses the corner of
the ruffle/hem seam, but place the ties on the
outside in the same position as the other side,
and the unfinished ends aligned with the
placket edge underneath. Then edgestitch the
placket down along the length, bottom and
folded edge, securing the ties in the process. 10
Step seven Cut a rectangle from scraps and
press in all raw edges so that the finished
rectangle is approx 2.5 cm wide and long
enough to cover the unfinished ends of of your
ties. Topstitch this in position around all edges
so that the end of the ties are encased. 11

FINISHING OFF
Step one Apply bias binding to finish the
neckline, folding the ends under to encase the
top corners of the plackets. 12

Portia Lawrie (she/her) is an
Essex-based Remaker and
author. Her easy-to-follow
projects and refashions are
a favourite at Simply Sewing.
Follow her at @portialawrie.

WWW.GATHERED.HOW/SIMPLYSEWING 33

By Adam Sews
For as long as Adam can remember he has
sewn. He's a keen bagmaker, quilter and
has a popular vlogging sewing channel
hen I first started sewing, around the age of
12, I was hooked straight away and soon
jumped at the chance to attend a weekly
afterschool sewing club, run by Mrs Smith.
She was the best Textile teacher anyone
with an interest and passion for sewing
could ask for. With my grandad also being interested in
sewing, painting, crafting, it was soon apparent this was
also ‘my thing.'
Afterschool sewing club mainly consisted of trying
to tackle patterns and projects that were way above
my skill level at the time, but being a determined
learner, I always found a way of learning new
techniques and created things from fully-jointed
teddy bears to Dalmatian-printed dressing gowns.

F ollow A dam
o Ins
at @A damSe tagram
ws

ful
“Quilting to me is mind
all the worries of life."

REPRESENTATION COUNTS
Being a male sewist/quilter has, over the past few years,
made me very aware of how much representation
counts in the sewing/quilting world. Some of the best
designers and quilters are men, yet it can still sometimes
feel taboo for a man to quilt or to sew his own clothing.
Fast forward to present times, my sewing has changed
quite dramatically. I now consider myself less of
a garment sewist and more a bag-maker, patterndesigner, and quilter. That being said, I still love to
update my wardrobe, searching for fun new looks and
interesting patterns with fun construction details.
QUILTING IS THERAPY
Quilting is the mindful sewing that can take away all the
worries in life. It is accurate, repetitive and most of all
therapy! I spend most of my sewing time now, creating
new bag patterns in PDF format, creating YouTube
content and tutorials or custom order bags and most of
all, sewing caddy’s.
You’ll spot me occasionally gracing the #WeSewToo
catwalk at various sewing exhibitions, showing the
latest me-mades. You can also take a lesson to learn
a new skill in the stitching den workshops at some of the

34 WWW.GATHERED.HOW/SIMPLYSEWING

Adam was introduced
to sewing at school and
had 'the best' teacher

changed
s
a
h
g
n
ys his sewi
e years
A dam sa mat ically over t h
quit e dra

“Vlogging has opened up
a whole new community with
meaningful connections to me."

lourf u l
o
c
g
n
i
t
a
e
ves cr
A dam l o istlet p ouches
wr

Adam modelling his
self-drafted coat refashioned
from a waterproof tablecloth

On e o f A da
m's Tula
b ackpacks Pink

sewing exhibitions. Lockdown for me gave
me the big boost I needed to progress with
my sewing journey. It allowed me the time
to pull my machines out, set up a dedicated
space and with the encouragement of my
husband and family, make and create whatever
I desired. My first quilt was produced in lockdown and
unsurprisingly the first had to be one of the biggest
quilts I’ve made to date.
I free-motion quilted the king-sized quilt on a vintage
domestic Bernina 1230 and loved every minute of it!
I now have a very different approach and aim to be as
perfect and precise as possible, creating extremely
colourful quilts and bags, almost solely from my
favourite Tula Pink fabrics. Tula’s fabrics to me are just
perfection personified, her fabrics create rich vibrant
colours, the detail and the hidden gem prints just make
my heart sing.
MY NEXT VENTURE
Part of my current sewing journey includes being
a Vlogger. Vlogging has opened up a whole new
community, a community that I have now created some
of the most meaningful connections from. I have found
sewing friends all over the world through the online
sewing community. In all corners of the globe of which
I will forever be thankful for. I’ve had the pleasure of
meeting many of these friends spanning from Dorset to
Yorkshire and even Canada. My goal this year is to try
and meet sewing friends overseas and see what sewing
skills I can learn from them and share with them too.

Keeping me inspired...

Lisa Pa y
A r t doll from ourse
Masterclass c

Youtube and Instagram keep
me thinking and focused, they
allow me to share my love for
sewing and teach others the
craft, including my newest
student, my husband. The look
on another's face when they’ve
learnt a new skill you’ve had
the pleasure of teaching is the
ultimate win in life. You can
find me on all socials
@AdamSews

WWW.GATHERED.HOW/SIMPLYSEWING 35

PSSTor: fabric and

page f
e
h
t
e your
n
r
r
a
u
h
T
S
.
n
o
g
nspirati
styling i ess with us usin
Dr
g
Martha
ewingMa
S
y
l
p
m
i
S
#

martha dress

Sew the dress of the season! Elbow-length full
sleeves and petal-shaping at front of the skirt
sets this dress apart from other wrap dresses

Martha Dress

W

elcome to your new favourite dress! The
Martha Wrap Dress combines lots of
gorgeous styling details to make it your
new favourite go-to garment! Pefect for smart
work days, and comfortable enough to go
through to the evening. Pretty gathered tops to
the elbow-length sleeves create a comfortable
full sleeve. The V-neck shape and very nature of
the wrap tie makes it an easy fit − and and we
love the petal-shaping at the front of the skirt.
Time to get your tracing paper and fabric out!
And don't forget to share your Martha Dresses
with us at #SimplySewingMag on social media.

TO THE ELBOW
The full sleeves are
long enough for
smart wear

YOU WILL NEED

■ Main fabric: 3.5m x 150cm wide
■ Lightweight iron-on interfacing: 60cm
■ Two press stud (popper) fasteners
■ Matching thread
■ Basic sewing kit

FABRIC SUGGESTIONS

■ Viscose, silk, linen, rayon, soft fine cottons such
as cotton lawn.

FINISHED BACK LENGTH

■ Approx. 116cm

NOTES

■ Pin or tack the main pieces together first to
check the fit. Mark any alterations needed
before starting to sew.
■ Stitch all seams with right sides together.
■ All seam allowances are 1.5cm unless otherwise
stated.
■ Sleeve hems are 2cm.
■ Dress hem is 1.5cm.

The Ma
rth
offerin a Dress has a
g comfor
fu
t when ll skirt
s
ta
nding
and sitt
ing

BRIGHT AND
BEAUTIFUL
Sew this look with
Minerva's Floral
Jungle Viscose Challis

Pattern by Becky Perry (Pattern Paper Scissors) for Prima UK, March 2022.

martha dress
wear it with

Sevenberry petite garden
in purple, available
from sewmesunshine.co.uk

Abstract Blooms,
sewmesunshine.co.uk

style

Accessories to complement
your new favourite dress
Gorgeous gold and
pearl earrings,
£12.50 fatface.com

Sage green vintage cotton,
sewmesunshine.co.uk
Delivate trio Pearl
Bracelet, £14,
bettyandbiddy.com

Kew Gardens,
sewmesunshine.co.uk

Define your lips with
a PS Pro liner, £2
primark.com

FABRIC INSPIRATION

floral fancy

Who doesn't love flowers? There are so
many to choose from! Pick your fave and
use it as inspiration for your Martha Dress

Classic denim jacket
with stretch £69,
marks&spencer.com

Pink & Faux Tortoiseshell
Clubmaster Sunglasses, £24
oliverbonas.com
Hawaii Tropical Garden,
sewmesunshine.co.uk
A seasonal must-have - boxy
cross body bag, £24.99,
newlook.com

Lilac purple,
sewmesunshine.co.uk

Get a little extra height
with a wedge trainer £29.50
marks&spencer.com
Exdesigner floral

Alison Lewis for Liberty,
sewmesunshine.co.uk

viscose deadstock,
sewmesunshine.co.uk

WWW.GATHERED.HOW/SIMPLYSEWING 39

Take a look at Tilly Walnes'
latest Tilly and the Buttons
pattern book, Mini Makes
Written by Cath Dean

a good read
convinced me that it would work better to put
them together into a book, with more
guidance and options for variations – and they
were right!”
Wearability has always been at the heart of
Tilly and the Buttons collections, and this was
more important than ever when creating
children’s clothing. “The initial stages involved
a fair bit of research, including establishing
a size chart, and factoring in safety guidelines
for childrenswear, such as avoiding potentially
hazardous ties and drawstrings,” Tilly explains.
“I designed the projects to ensure they suit
a wide range of ages, from babies to tweens,
both in style and functionality. We adjusted
skirt lengths for crawlers, and added shoulder
openings to younger sizes to make it easier to
dress babies and toddlers.
“Above all, we made sure the designs were
practical – comfortable, washable, easy to get
on and off, and non-restrictive so kids can run
and play freely.”
Tilly headshot. Tilly Walnes has been on a mission
to make dressmaking more accessible to
everyone for more than 10 years.
ince launching onto the UK sewing scene
over a decade ago with an appearance
on series 1 of The Great British Sewing Bee
TV series, Tilly Walnes’ mission has been
to make dressmaking accessible to a new
generation of sewists. Tired of confusing
diagrams and patterns printed on thin tissue
with a tendency to rip, Tilly completely
rethought what sewing patterns could offer.
Since then, Tilly and the Buttons has pioneered
clear step-by-step photography, jargon-free
instructions and, most importantly, fresh,
trend-led designs that
women want to make
and wear.
With three
successful books
behind her and
countless women’s
patterns, Tilly is now
turning her attention
to children’s clothing with the launch of her
latest title, Mini Makes. Featuring six core
patterns designed for children aged between
0-12 years, each item has multiple
customisation options to make completely
unique pieces for the littles in your life.

variations or embellishments added.”
Another part of the appeal in creating
a collection of children’s patterns was that
they’re a brilliant place for beginner sewists
and dressmakers to start. “The great thing
about making clothing for kids is that the
pieces are smaller, making them easier to
handle and quicker to sew, explains Tilly.
“If you’ve made a few basic projects before,
you’ll be able to make most of the patterns in
this book with ease.”
She’s taken care to ensure her new book,
Mini Makes, includes a comprehensive guide
to measuring, pattern cutting and fabric
selection, making it an accessible way to get
into creating children’s clothes. She
recommends the Billie sweatshirt pattern for
beginners, due to the simple seams and
low-stretch fabric, while the Ridley leggings
are a great way to get to grips with sewing
jersey fabric as they have only the one pattern
piece to contend with.

CLOTHING MADE TO LAST
Tilly has first-hand experience of the
importance of durable children’s clothes – she
has two boys, aged six and two, who are
happy to put her makes through their paces.
“My kids are very active, so I usually reach for
stretch knit fabrics like cotton jersey,
sweatshirt fleece and French terry, which are
comfortable and allow for sofa acrobatics,”
she explains.
“The book includes a selection of knee and
elbow patch designs, which not only look cute
but are great for strengthening these areas
that come under a lot of strain. As for wovens,
I look for natural fibres such as cotton that feel
soft against the skin
and that wash well.
“Corduroy is a great
choice for the Sonny
jacket, while cotton
lawn, seersucker and
double gauze are
lovely options for the
Indigo dress. I usually
pick colours or prints that hide stains – my
youngest is the messiest eater, and my eldest
has a penchant for digging holes!”

"IT'S SUCH A FUN PROCESS STITCHIING
TOGETHER LITTLE PIECES OF FABRIC., ADDING
CUTE EMBELLISHMENTS”

WEARABLE DESIGNS
“I love making kids’ clothes, both as gifts for
others and for my own children,” says Tilly. “It’s
such a fun process stitching together little
pieces of fabric, adding cute embellishments,
and imagining them wearing them.
“Children’s patterns can be hit and miss, so
I wanted to create quality patterns with
wearable designs and comprehensive
instructions. The original plan was to release
the patterns individually, but Team Buttons

DESIGNED FOR EVERY CHILD
One of the key features of the book is that
most of the patterns are designed to be
gender neutral, and look equally good on girls
and boys. “I know I’m not the only one who
laments the prescriptively gendered offerings
of most ready-to-wear kids’ clothing – not all
children want to be pigeon-holed into
wearing a pink princess dress or a car-print
cargo pant!” explains Tilly.
“It was important to me to create unisex
designs that could be tailored to a child’s
individual taste and personality – whether
that comes through in the fabric choice,

Photography © Jane Looker

Tabitha Dress. Make mini versions of your
favourite Tilly and the Buttons designs for
matching looks!

WWW.GATHERED.HOW/SIMPLYSEWING 41

a good read
two of them they’ve been through a few
versions of it! They love the fact that I can add
cute embellishments such as the faces.”

Sonny jacket. Hardwearing pieces like the Sonny
jacket will become family favourites. We love the
different coloured sections to this cute jacket.
FIT FOR PURPOSE
“When it comes to sizing, kids’ measurements
vary wildly, but on the plus side, clothing
styles can be more forgiving!” Tilly explains.
“Measure the child if you can; otherwise pick
a size that matches
their ready-to-wear
clothes, and factor in
room for growth.
“You might want to
err on the side of
making sleeves and
legs longer than
initially needed, with
a turn-up, or make the adjustable buttonhole
elastic hack on the Ridley leggings waistband
so they last longer.”
Tilly also has some tips to maximise the
longevity of your makes: “Consider comfort
and practicality first – even if you’re making an
outfit for a special occasion. Strengthen seams
with an extra row of stitching on areas that
come under strain such as underarms and
crotch seam, and use an overlocker if you have
one to create a long-lasting finish.
“Avoid ties and drawstrings that could get
caught, and ensure any buttons or snaps are
securely attached. Bear in mind the child’s
sensory preferences too – some children don’t
like wearing hoods or shoulder straps, and
many will have skin sensitivities to think about
when picking fabrics."
It’s these little touches that have made the
patterns firm favourites in her own house –
the Billie sweatshirt with bear face detail is
a long-lasting hit with her two boys. “It began
life as a pattern I drafted for my first son to
wear when he was a toddler, and between the

NEW CHALLENGES
Tilly’s adventure into children’s clothing
doesn’t mean she’s moving away from
womenswear – she has big plans for Tilly and
the Buttons this year. “We have four gorgeous
womenswear patterns in the works,” she
shares. “They’re all very different, so there’s
something for everyone – and hopefully you’ll
love them all like I do!
“The style of our designs has changed to
reflect my own lifestyle – more comfortable,
everyday pieces, a bit less vintage, although I
can’t resist the occasional nod to the
Seventies! What has always stayed the same is
our mission and ethos – to get more people
sewing with inspiring, user-friendly resources,
and to give them a joyful experience doing so.
“We’re also planning to grow our collection
of online sewing workshops (shop.
tillyandthebuttons.com) – these video classes
are great because they allow people to learn
new sewing skills from home, at a time and
pace that suits them, and refer back to the
lessons anytime they need a refresher. Longer
term, I have lots of notes scribbled down for
two more books I’m itching to write… but
those are projects for one day, not right now!”
What won’t change is Tilly’s pride in
creating designs that
sewists will love to
make, over and over
again. “Seeing people
from all over the
world wearing outfits
they have made with
our patterns, and
hearing feedback that
we taught them to sew, sparked their
creativity, and brought joy to their lives is
absolutely priceless."

"Make the adjustable buttonhole
elastic hack on the ridley leggings
waistband so they last longer”

42 WWW.GATHERED.HOW/SIMPLYSEWING

Ridley leggings with knee patches. The Ridley
leggings have just one pattern piece, making
them a great beginners’ make.

Tilly and the Buttons: Mini Makes by Tilly
Walnes (Quadrille, £26). Photography © Jane
Looker

Billie sweatshirt with ruffles. The Mini Makes
patterns can be customised for a personalised
look, so you can design them for the individual.

Cath is a writer, editor and content
creator with a passion for creative
living. She lives in Bristol with her
husband, two small children and
a pair of badly-behaved cats.

Bonus gift – Tilly and
the Buttons Indigo
Dress from new book
Mini Makes

Photography © Jane Looker *NOT AVAILABLE ON EXPORT.

We have teamed up with Tilly and the
Buttons to offer you the Indigo Dress from
Tilly Walnes' latest book Mini Makes. The
book includes six full sewing patterns for
kids aged 0 to 12 years, plus multiple
variations totaling 24 projects. Cute,
comfortable, and practical, these are the
kinds of clothes children will want to wear
every day – and have crucially passed the
playground test. You can sew the Indigo
Dress pattern using your bonus gift* and
pre-order a signed copy of Tilly's book from
shop.tillyandthebuttons.com

WWW.GATHERED.HOW/SIMPLYSEWING 43

GET THE DIGITAL EDITION
OF YOUR FAVE MAG!

PRINT AT HAOKMINEG

THE suzann 2
e shirt dres
s

(Join to

ll Versi
ons
Dress
ack
before
ut one cutting out
fabric)
on fold

ALL DRESSM DED!
PATTERNS INCLU

DIGITAL BENEFITS
Instant access to brand new
issues on your device
Fully digitized dressmaking
patterns now included
Save storage space with your
digital magazine and patterns
Choose which dressmaking
patterns to print at home
Over 100 back issues of
Simply Sewing available
Complete your collection with
over 66 Special Editions

UK'S #1
SEWING MAG!

ISSUE ONE HUNDRE

E
SCAN M
p!
p
a
r
u
o
t
e
g
o
t

DOWNLOAD!
TODAY

D AND NINETEEN

The story behind TV star
Sarah Jessica Parker's
sustainable wardrobe

PLUS!

free
book

MIDI SKIRT

TO DOWNLO *
AD
WORTH £9.99

+ INSIDE

Expert gui
to embroide de
ry +
3 projects to try!

PLUS!

MAKE THIS
WEEKEND
6

quick-sew gift
for all the fam s
ily

EXCLUSIV

PEPLUM TOPE

Beginner-frien
dly
pattern in size blouse
s UK 6-30

Sew the trend!
Puffer tote

+INSIDE: WIN!
£250 prizes
Patchwork cus
hion Self-draf
t trousers

Search the Apple or Google Play store for
Simply Sewing, or scan the QR code, to download
the app on your device.

* iPad is a trademark of Apple Inc., registered in the U.S. and other countries.
App Store is a service mark of Apple Inc.

DRAFT YOUR
OWN!
✂

Jean-ius!

halter neck top from jeans, created by
designer Matthew Dummigan

Self-draft
01

02

03

07

08

09

YOU WILL NEED

■ T-shirt with your favourite fit
■ 2 pairs of trousers/jeans
■ 0.5m lining fabric
■ 0.5m interfacing
■ Pattern paper
■ Poppers
■ Matching or contrasting thread
■ Basic Sewing Kit
NOTES

■ Suggested seam allowance 1cm
■ You could use 1.5m of fabric and
lining, instead of the trousers.

46 WWW.GATHERED.HOW/SIMPLYSEWING

DRAFTING THE PATTERN
Step one With your t-shirt inside out, fold it in
half so the back meets back and the front neck
is visible and place on your paper making sure
you have space around your t-shirt. 01
Step two Now your t-shirt is flat, mark on your
paper the top of the neck, the shoulder, under
the arm and both corners of the bottom.
Remove the t-shirt and join the marks to create
the outline. 02
Step three Using your tape measure mark your
seam allowance of 1cm down the underarm
side and neckline. For the bottom seam
allowance, I suggest 2cm. 03
Step four Make a mark on the side seam,
I suggest 7.5cm from the top. Then 5cm from
the front centre on the neckline, make another
mark. Connect these marks using a curved line.
Add a 1cm seam allowance to this edge. 04
Step five It's time to make this top say
something about you. You can leave this curved
line as it is, or play with shapes to make it more
interesting. I added points to my line. Just make
sure if you do add shapes or a bit of flair, add
the seam allowance as well. 05
Step six Lay your front pattern piece on more
paper, trace the side seam, and mark the front
centre. Remove the pattern piece and focus on
what will become the back. The back is two
pieces that overlap in the centre back. Measure
7cm past the centre front mark and draw a line.

Step seven Connect the side seam and centre
back using curved lines. Then cut out your
paper pattern. 06

CUTTING OUT
Step one As I am recycling jeans, the first thing I
need to do is ensure I have enough fabric to
construct the front. Cut away the legs, unpick
the inside seam of both legs and iron the seam
allowances flat. Sew the pieces right sides (RS)
together. If you are using large fabric, you will
not need to do this.
Step two Align the front pattern piece with the
line of stitching, pin and cut around the piece. If
you are using large fabric, cut on the fold. 07
Step three Place the front pattern piece on top
of the lining and cut out, you don’t need the
whole piece, stop around 7.5cm below the
bottom of the open edge. 08
Step four On the interfacing, along the open
edge, between the neckline and side seam,
trace around your line and add 5cm below to
create a strip. Iron this onto the lining piece. 09
Step five With another pair of jeans, cut away
the legs and unpick the inside leg seams. Again,
iron flat. Lay one on top of the other, RS
together, and pin the back pattern piece on. Cut
around, then repeat with the lining.
Step six Unpick the waistband from the jeans,
leaving one central belt loop attached (you may
wish to remove all). Keep one of the other belt

Self-draft
04

05

06

10

11

12

CONSTRUCTING THE FRONT
Step one Turn up 1cm of the Front Lining
towards the wrong side and sew a hem. Then
iron on the interfacing to the top section.
Step two Align the Front and Front Lining, RS
together, sandwiching the detached belt loop
between the layers at the centre front. Pin and
sew along the top edge. Reinforce the stitching
over the belt loop. Only sew the top edge and
leave the side seams open.
Step three If you’ve added shapes into your top
edge make sure you snip the corners and notch
any curved edges. Turn the pieces out and use a
point turner to push out any points. Iron this
seam flat and topstitch in either a contrasting or
harmonising thread. 10
Step four Using your tape measure, measure
your neck, making sure it’s not too tight. Then
add 2.5cm, mark the measure on the waistband
making sure the attached belt loop is in the
centre. Cut the waistband, you may have to
unpick 1cm of the top edge either side. 11
Step five With RS together, sew down either end
of the waistband making sure to keep the
bottom seam allowance in. Snip the corners,
turn out and iron. Wrap the waistband around

your neck so it sits comfortably and mark the
end of the overlap with a pin. Add the poppers
at the overlap.
Step six With the neck on, hold up the front
piece by the belt loop and pin where you would
like it to sit on your body whilst attached to the
neckband. Put the belt loop inside the
neckband and close the bottom with a line of
topstitching. Stitch down the attached belt loop
to the top. The front and neck of the top are
now complete. 12
Step seven Hem the front to the length you
would like the top to finish.

CONSTRUCTING THE BACK
Step one Pin and sew the Back and Back Lining
pieces RS together, along the top, short sides
and bottom leaving the side seams open. Cut
the corners, turn out to the RS and iron flat.
Topstitch the edge.
Step two Turn in the seam allowance on the
open edge and press. This opening should be
longer than the side seam on the Front piece.
Slide the front side seam into the opening of
the back piece, when you’re happy, topstitch
down the side seams.
Step three Put on the top closing the neckband.
Then using the same method as your neckband,
overlap the back pieces, making sure it sits
comfortably and mark the overlap with pins.
Take off the top and place four poppers in the
marked overlap section.

Matthew (he/they) appeared
on series 9 of the Great
British Sewing Bee and is
focussed on designing
and making gender-free
garments. @hessewmatthew

WWW.GATHERED.HOW/SIMPLYSEWING 47

Headshot photo: Esther Wild @estherwild_photo

loops as you will need it later.
You should be left with one Front, one Front
Lining, one Waistband with one attached Belt
Loop, one separate Belt Loop, two Backs and
two Back Linings.

GA

RDEN

S

L

I

Here’s your chance to sample an issue
of Gardens Illustrated – the world’s most
beautiful gardens magazine – absolutely free

LU

D

CELEBRATING
RHS CHELSEA
FLOWER SHOW
ST R AT

E

Download your
digital edition here
or visit try.gardensillustrated.com/
chelsea24 quoting code GIHFR524

Offer ends
12 July 2024

DRAFT YOUR
OWN!
✂

Take a Bow

hair bow. Simply Sewing's Technical Editor
Sarah Taylor shows you how
Model: BETH GIOVANELLI

Self-draft
01

02

03

04

05

06

YOU WILL NEED

■ 0.5m fabric (ideally a light drapey
fabric such as silk, satin or rayon)

■ A small hair crocodile clip
■ Hot glue gun
■ Matching thread
■ Basic sewing kit
NOTES
■ Use a 1cm seam allowance

CUTTING OUT
Step one From main fabric, cut:
Bow: 35x20cm
Tails: 36x36cm
Centre: 15x8cm

MAKING THE BOW
Step one With right sides (RS) together, pin and
sew the long edges of the Bow to create a tube.
Step two Turn the Bow through to the RS and
press with the seam centred on the reverse.
Step three On the back of the Bow, bring the
two short edges to the middle and pin in place.
Step four Using a wide zig zag stitch, sew the
two short edges in place. 01

MAKING THE TAILS
Step one With RS together, fold the 36cm
square in half diagonally, to form a triangle. Pin
and sew around both sides, leaving a 5cm gap
for turning through. 02
Step two Trim corners and turn through to the
RS. Use a point turner to push out the corners.
Then press carefully.
Step three Ladder stitch the opening closed.
Step four Measure along the longest edge to
find the central point and draw a line from the
tip of the triangle to this point.
Step five Thread a hand-sewing needle and sew
a line of basting stitches on this line. Once you
reach the end, pull the thread tight to gather

50 WWW.GATHERED.HOW/SIMPLYSEWING

the fabric, but keep the needle attached. 03
Step six Continue hand basting through the
centre of the Bow, then pull tight to gather
again, placing the Bow on top of the Tails. Wrap
the threads around the middle a few times and
secure with a knot. 04

ADDING THE CLIP
Step one Take a plain crocodile clip and attach
the back of the clip to the back of the bow using
a hot glue gun. Keep the clip open as it dries. 05
Step two With RS together, pin and sew the
long edges of the Centre.
Step three Turn the Centre through to the RS
and press with the seam centred on the reverse.
Step four Wrap the Centre around the bow.
Open the clip and make sure the Centre is
between the jaws. Sew with RS together trying
to get as close as possible.
Step five Trim the seam allowance to 3-4mm.
Step six Turn the Centre so that the RS is facing
out and the seam is on the inside, between the
jaws of the clip. 06
Step seven Add some extra hot glue to secure.
Sewist and cat enthusiast,
Sarah Taylor (she/her), has
made her own clothes for
over 20 years and can be
found on Instagram at
@likesewamazing

quilted bag

Stand out from the crowd with this gorgeous
holdall, perfect for taking on a sewing retreat
or nights away, designed by Maya Pereda

quilted bag
01

02

03

07

08

09

YOU WILL NEED

CUTTING OUT

MAKING THE BAG OUTER

NOTES
■ Seam allowance is 1cm

Step one From main fabric, cut:
Bag Panel Main: one 42x76cm
Side Panel Main: two 22x22cm (4 rounded
corners of 5 cm radius)
Pocket Main: two 22x14.5cm (2 rounded
corners of 5 cm radius on one edge)
Step two From lining fabric, cut:
Bag Panel Lining: one 42x76cm
Side Panel Lining: two 22x22cm (4 rounded
corners of 5cm radius)
Pocket Lining: two 22x14.5cm (2 rounded
corners of 5cm radius on one edge)
Step three From wadding, cut:
Bag Panel Wadding: one 42x76cm
Side Panel Wadding: two 22x22cm (4 rounded
corners of 5cm radius)
Pocket Wadding: two 22x14.5cm (2 rounded
corners of 5cm radius on one edge)

Step one Fold the Bag Panel Main in half (on its
shorter edge) and mark the centre with a pin at
the top. Place the straps 7.5cm on each side of
the centre (there should be 15cm total gap
between the straps) and pin in place. The strap
will form one continuous loop with the join at
the base of the bag. 02
Step two Mark 13cm down from the shorter
edges of the Bag Panel Main along each Strap
and sew each Strap from that point until the
13cm mark from the opposite edge (actually
sewing between both 13cm marks). From each
mark, sew a square with an X to reinforce the
stitching of the Strap. 03
Step three Place the zip alongside one of the
shorter edges of the Bag Panel Main (with the
zip face down on the Bag Panel Main). Pin the
zip in place so it doesn't move when sewing,
then sew the zip. Switch to a zip foot on your
sewing machine for this step as it will allow you
to get close to the zip teeth. 04
Step four Place the opposite edge of the Bag
Panel Main on the other side of the zipper ,pin
in place and sew. 05
Step five Place the zipper slider, you can put one
at each end of the bag (optional). 06

■ Main fabric: 1m
■ Lining fabric: 1m
■ Wadding: 1m
■ Metal zip: 40cm
■ Webbing for strap: 2.5m
■ Matching thread
■ Basic sewing kit

RECOMMENDED FABRICS
■ Main fabric: Medium to heavy
weight fabrics such as canvas,
cotton or denim
■ Lining fabric: Medium weight
fabrics such as cotton or calico
FABRICS USED
■ Outer: Rifle Paper Co. Vintage
garden blue metallic Blossom
■ Lining: Natural cotton calico

52 WWW.GATHERED.HOW/SIMPLYSEWING

QUILTING THE OUTER PIECES
Step one Place the Bag Panel Main with the
wrong side (WS) facing the Bag Panel Wadding
to create a sandwich. Sew the two layers
together with parallel lines, leaving a space of
about 3 cm between lines (lines are parallel to
the longer edge). 01
Step two Repeat with Side Panel Main and Side
Panel Wadding pieces, and then with Pocket
Main and Pocket Wadding pieces until all the
outer pieces are quilted.

MAKING THE POCKETS
Step one Place the Pocket Main RS together on
top of the Pocket Lining and sew the top edge

quilted bag
04

05

06

10

11

12

(the non-rounded one).
Step two Place the pocket that you just sewed
on top of the Side Panel Main. Sew both pieces
using a zigzag seam along the three curved
edges of the Pocket Main. 07
Step three Repeat for other pocket.

ASSEMBLING THE BAG OUTER
Step one Turn the bag outer inside out and
place one Side Panel Main on each side of it, RS
together, connecting their edges. Hold the
pieces together using clips, rather than pins to
make sewing easier. 08
Step two Sew the Side Panel Main pieces to the
Bag Outer.

MAKING THE LINING
Step one Fold 1cm along one of the shorter
edges of the Bag Panel Lining to the WS and
press, repeat the same on the opposite edge. 09
Step two Fold the Bag Panel Lining in half along
the longer edge and make a mark. This will be a
helpful guide when placing the Side Panel
Lining into position.
Step three Connect the Bag Panel Lining to each
of the Side Panel Linings, connecting their
edges. Hold the pieces together using clips to
make sewing easier. 10
Step four Sew the Bag Panel Lining to the Side
Panel Linings.

ASSEMBLING THE BAG
Step one Turn the outer bag inside out and
place inside the Lining Bag. Pin along the
zipper, WS together. 11
Step two Turn the bag RS out, change the foot
to the zipper foot, and sew the Lining to the
Outer Bag along the zipper. 12

FINISHING THE BAG
Step one Hand sew the ends of the zipper on
the inside to reinforce the seams of the Lining.

TIP: onderclips,

using w , when
e
v
o
l
e
W
an pins
h
t
r
e
h
t
ra
bags.
making

Originally from Peru, Maya
(she/her) is a London-based
designer who runs her own
100% handmade accessories
brand L'Atelier de Maya. See
more @latelier_de_maya

WWW.GATHERED.HOW/SIMPLYSEWING 53

With 35 years’ experience in theatre,
fashion, TV, and film, John Scott shares
the latest turn in his eclectic career
Written by Sarah Trevor

a good read

ost of us can relate to that teenager
who dreams of being on the
television or perhaps working in the
bright lights of Hollywood, but John
Scott, a face you’ll recognise from
your TV screens for the past 24 years,
was all set to be a teacher before his career took
a different trajectory altogether. At 18 he began
studying English and Drama at Bretton Hall
College in Wakefield. “I trained to be a teacher
primarily because I didn’t know what else to do
and the careers advisors at school said it was
a good idea,” explains John. Known among his
peers for his kind and compassionate qualities,
he relished the challenge of working with kids,
especially those that otherwise might have
been overlooked.
“There were some
kids that, at age 13,
teachers would
decide they wouldn’t
take exams and think
‘they’re not worth
anything.’ They were
put on the scrap
heap; I loved them
the most.”
After rapidly becoming disillusioned with the
politics of the teachers’ staffroom, and the
prospect of “having another 45 years of this!”
John decided to jump ship and enroll as
a Costume Interpretation student at the
prestigious Wimbledon School of Art. “My
friend had studied there so I went ahead and
applied, but somehow, I didn’t realise it was the
pinnacle of most people’s training and I just
waltzed in there!”
It was a bold move, particularly for someone
whose entire experience of costumes was
based on a drama club he attended in the
school holidays. “Believe it or not, none of my
family are crafty,” he reveals.
“My dad was a pilot and my mum was

a personnel manager. We didn’t even have
a sewing box in the house!” he smiles.
THE RIGHT PATH
It didn’t take John very long to realise his future
was now swimming in the right direction. “At
Wimbledon, the teachers were all people who
worked in the industry, so within two weeks of
being there, we were being introduced to
people who worked on West End shows, at the
Opera House and all places like that,” he
remembers. “I knew from day one that I’d made
the right decision.”
After graduating, he began working as
a pattern cutter in the theatre. “I absolutely
loved it. It’s true what they say, you really cut
your craft working in
a theatre.” It felt like
a dream come true
when the next role
John landed meant
relocating to New York.
“Every job I had, I felt I’d
arrived, that this was it
and then something
else happened, and
that’s really been the story of my life!”
John got his first big break on a Hollywood
film as the Costume Supervisor on Being
Human, which starred the late Robin Williams.
“It never actually occurred to me that I was on
big blockbuster movies. I was just there to do
my job and I loved what I was doing.” Ironically,
he was so blasé about working with some of
Hollywood’s greats that it was actually British
soap stars that left him feeling truly starstruck.
After finishing work on Being Human, he went
to visit his close friend Helen, who was working
in the make-up department on Coronation
Street. “The cast were popping in and out and
I couldn’t speak; I was completely starstruck!”
With a CV that includes blockbusters Four
Weddings and a Funeral, Notting Hill, Tomb

"it never occurred to me that I was
on big blockbuster movies. i was just
there to do my job and loved it”

John made the leap from behind the scenes to
in front of the camera on TV channel Sewing
Quarter (left and top right), Facebook live from
his home (top left) and This Morning (above).

WWW.GATHERED.HOW/SIMPLYSEWING 55

a good read

After 10 years presenting the fashion segment on
This Morning, John now presents on shopping TV
channel Sewing Street, with demonstrators such
as textile designer Delphine Brooks (above).
Raider, Goldeneye and Tomorrow Never Dies,
to name a few, John established himself as an
extremely successful Costume Supervisor. “It
was hard work. When I did a James Bond film,
I was signing away my life for a whole year.”

THE NOT-SO-SMALL SCREEN
After so many years behind the scenes in the
theatre and on TV and film sets, John never
expected to be flung in front of the camera,
but like many of the career moves in his life
this turnaround was all about being in the
right place at the right time. In 1999, he was
working on a Bond film when the team
behind The Clothes Show came to interview
him in the costume department. He was a hit
and ITV producers invited him for a screen test
on This Morning. “I didn’t hear back for
a while, then suddenly I got a call saying, “can
you do a fashion segment tomorrow?”
Someone had obviously dropped out!”
Initially, John was content being a back-up
when the regular fashion expert was
unavailable. “It was never going to be my
career, but my bookings gradually increased
and they offered me a permanent slot, so
I decided to stay for one year before I was due

56 WWW.GATHERED.HOW/SIMPLYSEWING

to begin working on Richard Curtis’ next film,
Love Actually.” In fact, he ended up offering
fashion tips to the nation for a decade. “I got
so used to working for only six minutes a day!”
he confesses. “I was picked up in a car,
someone would do my make-up, someone
would make my breakfast, and someone
would iron my shirt! I never ever went back to
films.”

"I got SO used to working FOR only
six minutes a day! I NEVER EVER
WENT BACK TO FILMS”
It was the world of shopping TV that lured
John’s presenting skills next, selling jewellery
on Rocks and Co, before returning to the
sewing realm presenting craft shows on
Sewing Quarter and Sewing Street. “I can
genuinely say I know more about sewing than
I do about fashion, so it really does come as
second nature to me. I know the questions to
ask as I know what guests are about to do.”
It was on sewing TV that John developed an
ardent fan base, so in 2020 he set up his
Sewing World website, Facebook page and
YouTube channel to share his extensive

experience and further build the community.
John’s used the platform to share tutorials
ever since, and is particularly fond of the items
his talented group of sewers have made for
charities. “My friend, Francesca, works with
abused children. She uses dolls to offer
comfort and build trust with the kids to help
them talk about their experiences. I asked my
ladies if they could make some and we got
12,000 dolls sent in!”
Every Sunday John goes Live on Facebook.
“We talk about our weeks, what we’re having
for tea, what we’re watching and, obviously,
the weather comes up big time,” he smiles.
“I tried to stop them a few months back, but
one lady said, “you’re the only person I talk to
all week.” Testament to John’s giving nature
he has continued with these weekly catchups. “It takes nothing for me to give up an
hour on a Sunday afternoon and it obviously
means the world to them.”

CRAFT TOGETHER
It was the dedication of this community of
sewers that led him to launch his own video
platform, however John openly admits he still
lost many sleepless nights wondering if he’d
done the right thing. “I was terrified nobody
was going to join!” he says. Ready to take on
the giants of Netflix, Amazon Prime and
Disney+, John’s Threads Of Life subscription

a good read

Presenting his first-ever panel show, exclusive to
his new subscription channel Threads for Life
(left), and getting right to the nitty gritty during
the channel’s in-depth craft tutorials (above).
service launched in February. “Really, it works
out to less than £2 a week and members will
get 120 hours of content during the year,” he
reveals proudly. “Like Netflix, there’s an app
and members can download shows to watch
at their leisure on the aeroplane or the beach,
wherever they like.”
The varied schedule launched with eight
regular programmes to begin with, including
The Sewing Surgery,
with in-depth
tutorials;
a chance to meet
big-name designers in
Meet the Designer;
Behind the Seams, a
sneak peek at what
John’s been up to; and
lively chat show Loose Threads among others.
“Loose Threads was my business partner and
TV director Daniel’s idea,” he reveals.
“It’s just me and two guests sitting on a sofa,
chatting about anything and everything, but
I love it!”
Counting many of the celebrities he’s
worked with over the years now as close
friends, who can we expect to see as guests
on the channel's The A List show? “They’ll be
TV presenter Sarah Greene – she’s one of my
best friends – Fern Britton, Bonnie Langford,
Cheryl from Bucks Fizz, and Lucy Benjamin

and Gillian Wright, who have played Lisa
Fowler and Jean Slater in Eastenders.”
He’s also working on the idea of inviting
individual members of his dedicated
community into the studio to show their
makes. “I’ve given a lot of my followers
nicknames, so they’d all know who they were
and they can sit and talk about their sewing.”
As he approaches his mid-sixties, many of
his counterparts
might think of retiring
but John proudly
confesses he’s
“old-fashioned
workaholic.” “I know
I’m the oldest
shopping presenter
there is; I know I’m the
oldest stylist there is, but that’s who
I am, that’s what I am,” he smiles. “Inside, I’m
not 63, it’s only when
I glance in the mirror and I remember.” Friends
of a similar age are settling down to retire with
properties in sunny Spain or France, would he
consider doing the same? “I can’t think of
anything worse!” he laughs. “I think I’ll still be
working on the day I die because I enjoy it.
And, while I still enjoy it, why not?”
Find out more about how you can access
120 hours of content and become a member of
John's subscription channel at threadsoflife.tv

"it's just me and two guests sitting
on a sofa, chatting about anything
and everything, but I love it”

John Scott’s
Threads
of Life
A unique collection of sewing advice,
stories, memories, mantras and more

John's Threads of Life book (cover, above) is
a unique collection of sewing advice, memories,
mantras and more from TV's fave fashion guru.
Sarah Trevor (she/her) has worked
in the magazine industry for over
18 years, editing craft, food and
lifestyle titles. Now she relishes the
challengers of freelance writing.

WWW.GATHERED.HOW/SIMPLYSEWING 57

Beaker Button
In person, self guided online, and zoom craft workshops for a huge variety
of fibre crafts. Dorset buttons, slow stitching, knitting, crochet, spinning,
felting, weaving, macrame, pattern support and finishing techniques.

beakerbutton.co.uk

To learn more about advertising opportunities
please contact Jessie Dolman
Jessie.dolman@ourmedia.co.uk
0117 300 8133

We are a fabric shop and sewing school in the heart of the beautiful High Peak
Come and see us in our New Mills shop for all your
fabric, sewing, bag-making and haberdashery needs. We
organise and run a range of classes – group workshops,
sewing bees and 1-on-1 sessions – in our studio.

07792943332 | Shop 1, 2-6 Market Street, New Mills,
Derbyshire SK22 4AE | www.rubiesrags.com

We sell dressmaking fabric
from, amongst others, Fabric
Godmother, Lady McElroy and
Art Gallery

Rubies Rags

workshop

GET TO KNOW
YOUR MACHINE

Your handy guide to sewing machines and overlockers,
plus some of the most common troubleshooting fixes

TROUBLESHOOTING
Try these simple fixes for some of the
most common stitching issues.

PROBLEM: The needle breaks.
SOLUTION: Check the needle
has been inserted correctly and is
not blunt or bent. Don’t pull on
the fabric as you sew, as this can
break the needle.
In this month’s
workshop, Simply
Sewing’s Technical
Editor, Sarah Taylor, takes
a look at the anatomy of
a sewing machine and
overlocker.
ether you are starting out or
looking to upgrade, the world of
sewing machines can be daunting.
They can be a big investment, so
you want to be sure you are getting
the right machine for you. If you
have a local machine dealer, its a great idea to
go and try out a few in person, so you can get

a real feel for which you feel comfortable with
and has the features you require.
Think about what you will be using the
machine for: do you need certain functions such
as decorative stitches, free-motion embroidery
or an extension table for quilting?
If you already own a machine, but don't have
the manual for your particular model, try
a quick search on the internet and download
a PDF of the manual. It's always useful to keep
on hand to check which settings you should be
using or to troubleshoot any issues.
If you want to up your sewing game and
make the insides of your makes look as pretty as
the outsides or if you sew with stretch fabrics
regularly, check out our overlocker guide.

PROBLEM: The thread breaks.
SOLUTION: Check the machine is
correctly threaded. Unthread the
machine completely and
rethread. Check the needle. Use
high-quality thread.
PROBLEM: Skipped stitches.
SOLUTION: Check all needle and
thread issues above. Make sure
you are using the correct needle
type and stitch for your fabric.
PROBLEM: Puckered seams.
SOLUTION: Check the thread
tension isn’t too tight and the
machine is threaded correctly.

WWW.GATHERED.HOW/SIMPLYSEWING 59

workshop

YOUR MACHINE

Familiarise yourself with the basic functions of your
sewing machine with this handy at-a-glance guide.

PRESSER FOOT PRESSURE DIAL
Adjust the dial when working with particularly
fine or heavyweight fabrics.
1-3 for fine fabrics
3-6 for medium fabrics
5-6 for heavy fabrics.

THREAD FEED
Your spool of thread sits at the top of the
machine. The thread goes through
a series of guides before it reaches the needle.
These are usually numbered on the machine to
make this easier (your manual will show you in
detail how to thread your machine).

BACKSTITCHING

TENSION DIAL

NEEDLE
Most machines come with a needle already in
place (and a replacement), but your manual will
show you how to swap it for a different one.
When sewing speciality fabrics (for example,
jersey or denim) you should change to
a speciality needle to ensure the best results.

Use this dial to adjust the tension,
depending on your fabric. The higher the
number, the tighter the top thread
tension will be. Results will depend on
fabric type, number of layers and type of
stitch.

This button allows
you to stitch in
reverse. Sew a few
stitches at the start
and end of your seam
to secure the
stitching.

PRESSER FOOT
This attachment holds the fabric in place as you
sew. A lever moves it up to position the fabric,
and back down when sewing. The basic presser
foot is the one you’ll use most, though there are
also speciality feet, such as for buttonholes or
blind hems.

BOBBIN
This plastic or metal spool sits in
a unit underneath the sewing area. Check your
machine’s manual for how to load the bobbin.
And make sure you only use bobbins designed
for your specific machine.

you are thinking of upgrading your machine,
are some of my favourite extra features.
LUXURY FEATURES Ifthese
Thread cutter
This small button is an
absolute game changer
and huge time saver. Use
it cut your threads after
sewing each seam instead
of cutting it manually.

60 WWW.GATHERED.HOW/SIMPLYSEWING

Needle threader
If you struggle to see to
thread the needle, then
a machine that comes
with a needle threader is
an a really useful extra to
have on your machine.

LCD display
Having a computerised
machine allows for more
accuracy with stitch
selection and quite often
will highlight if anything
has gone wrong.

workshop
BOBBIN WINDER
Sewing machines use both a top thread and
bobbin thread to create stitches. Follow the
manual to wind your bobbin correctly.

HAND WHEEL
Use the hand wheel to move the needle up and
down manually. This is essential for controlling the
stitching line in tight spots and corners. To avoid
your thread getting caught or tangled, be sure to
always turn the wheel towards you. When
winding bobbins, you may need to disengage the
needle action by pulling out the hand wheel
(consult your manual for how to do this on your
individual machine).

STITCH WIDTH
This allows you to change the stitch width. You
can use this to widen or narrow a zigzag stitch or
move the needle position over.

STITCH LENGTH
This allows you to change the stitch length. For
standard seams, aim for a setting of 2.4 or 2.6. Use
a longer stitch length for tacking or gathering.

STITCH SELECTOR
The method used to change the type of stitch
varies between machines. For most projects, you’ll
just need to use the basic straight stitch and
zigzag stitch.

MUST-HAVE FEET

With these six feet in your collection, you can
tackle most sewing projects.

1 Walking foot
2 Buttonhole foot
3 Zip foot

1

2

4 Rolled hem foot
5 Invisible zip foot
6 Knit foot

3

5

4

6

WWW.GATHERED.HOW/SIMPLYSEWING 61

workshop

YOUR OVERLOCKER

Getting the best out of your overlocker
starts with knowing the names and uses
of its dials, settings and fixtures.
THREAD HOLDER
PRESSURE ADJUSTMENT SCREW
This is used to adjust the presser foot
tension. If your fabric is stretching this may
be the reason why. It is usually best to save
this adjustment until after you have tried
everything else. Consult your manual for
guidance and only adjust the screw a small
amount before testing the stitch again.

THREADS

The thread holder is used to ensure the
threads do not tangle and to correctly feed
them into the tension discs.

TOP THREAD GUIDES AND
REEL SUPPORTS
The spools sit on reel supports (coneshaped plastic pieces). The thread is then
taken up to the relevant guide in the thread
holder before being threaded through the
top guides and through the tension discs.

Thread your machine from right to left for
best results.
Lower looper: creates the back and forth
stitches on the back of your work.
Upper looper: creates the back and forth
stitches on the front of your work.
Right needle: a straight stitch that secures
the upper and lower stitches in place.
Left needle: a straight stitch that secures
the upper and lower stitches in place.

STITCH LENGTH

TENSION DIALS

This dial is used to
change the stitch
length; the higher the
number the longer
the stitch.

Used to change the tension of the loopers
and needles.

TENSION DISCS
It is important that the thread is securely
placed inside each tension disc as these
control the tension of the thread.

STITCH LENGTH
INDICATOR

DIFFERENTIAL
FEED INDICATOR

PRESSER FOOT LEVER
As with a sewing machine, this
is used to raise and lower the
presser foot.

UPPER BLADE
This cuts through the fabric
and works best when it is
sharp. It is important not to
put pins through your
overlocker as they will dent
the blade, causing it to snag
your fabric. The blade
should be changed if you
run over a pin to prevent
cutting issues. Refer to your
manual for how to do this.

62 WWW.GATHERED.HOW/SIMPLYSEWING

DIFFERENTIAL
FEED
Overlockers have
two sets of feed
dogs. When set
to 1.0 the feed
dogs move at the
same speed, but
can also be set to
move at different
speeds. Refer to
your manual for
the right setting
for your fabric.

HANDWHEEL
REMOVABLE
SIDE COVER

LOOPER COVER
This cover is lowered for threading the upper and lower
loopers. Some overlockers may also have a storage
compartment for tools.

Used to move the
needle up and
down. Turn
wheel towards
you to raise the
needles.

statement cushion
Add a personal touch to your home by
sewing your own statement cushion from
Angela Pressley's latest book

exclusive extract
01

02

04

05

YOU WILL NEED

■ Main fabric for the front: 43x63cm
(choose a heavyweight cotton such
as denim, cotton twill, linen, or
velvet)
■ Contrast fabric for the back:
43x63cm
■ Fusible fleece for the back: 43x63cm
■ 40 x 60cm pillow form
■ 50cm regular nylon zipper
■ Quilting guide bar
■ Matching thread
■ Basic sewing kit
NOTES
■ Download the template from
gathered.how/ss-templates
FINISHED MEASUREMENTS
■ 38x58cm

QUILTING THE BACK
Step one Iron the fusible fleece onto the wrong
side (WS) of the fabric for the back of the pillow.
Using a chalk marker and a ruler, draw two lines on
the right side (RS) of the fabric from corner to
corner to make a cross. Topstitch along both of
these lines. 01
Step two To start quilting, follow the
manufacturer’s instruction to insert the quilting
guide bar into the back of your sewing machine
foot. I lined up the bar 4cm away from my needle.
Place the fabric under the foot with the guide bar
at the start of one of your diagonal stitch lines.
Sew a line, keeping the guide bar running along
the first stitch line and making sure the bar follows
the line without wobbling. The needle will, in turn,
sew a straight line parallel to the first stitch line. It's
helpful to look at the bar rather than the needle as
you sew. Continue to sew lines on your fabric,
using each row of stitching as your guide for the
next. When you have finished sewing the lines on
one half of the fabric, rotate the fabric and use the
original stitch line you were following to sew the
lines on the other half of the pillow. Sew all the
lines in one direction first, then sew the lines in the
other direction to make the grid pattern. 02

ADDING THE ZIPPER
Step one Decide where you would like your zipper
to go − usually in the bottom long side of a pillow
cover. Sew a line of zigzag stitches on each fabric

64 WWW.GATHERED.HOW/SIMPLYSEWING

rectangle separately across the bottom long side,
using the right-hand side of your foot as your
guide on the edge of the fabric. It doesn’t matter
which side of the fabric you sew on.
Step two Place the two fabric rectangles RS
together with the bottom edges aligned. If the
quilted fabric has shrunk a little, pin the fabrics
together and trim the front piece so that it is the
same size as the quilted piece. Draw a line right
across the bottom edge, just below your zigzag
stitching and 1.5cm away from the raw edge. Find
the centre of the bottom edge of the fabrics by
folding them in half. Mark the centre with a pin.
Do the same to mark the centre of the zipper. Lay
your zipper down onto the quilted side, matching
the centre marks so the zipper is centred on the
fabric. Place two pins at right angles to the bottom
edge of the fabric, to mark where the zipper starts
and ends (not the zipper tape but where the
zipper itself starts and ends). 03
Step three Remove the zipper and the central pins
but leave the other pins in place. Sew directly on
the drawn line, starting with a normal stitch length
and reverse stitching at the start. When you get to
the first pin, sew a few reverse stitches. Then
change to a longer “basting” stitch and sew until
you get to the second pin. Change back to
a normal stitch length, sew for a few stitches, and
then do a few reverse stitches back to the second
pin. Then continue sewing until you get to the end
and reverse stitch at the finish. The longer basting

exclusive extract
03

06

stitches make the seam easier to unpick when we
reveal the zipper later, and the reverse stitches
next to the pins reinforce where the zipper will
open and close. 04
Step four Press the seam open. Lay the zipper RS
down on the open seam, with the zipper teeth on
the centre of the seam. Pin the zipper in place.
Hand-baste all along one side of the zipper, across
the teeth, and down the other side through all
layers, so that the stitches will show on the right
side of the fabrics. Remove the pins.
Step five Put the zipper foot on your machine. To
sew the zipper in place, we will stitch a long thin
rectangle around it on the RS. On the RS of the
fabric, use a pin to mark where the zipper pull is.
Also use a pin to mark on the RS of the fabric
where the other end of the zipper finishes (not the
zipper tape but where the zipper teeth finish). This
will make sure that you won’t sew over any metal
staples on the zipper.
Step six Starting on the RS of the fabric at the pin
that marks the zipper pull, sew across the zipper.
When you start and finish, you may need to
accommodate for the bulky zipper pull and sew
around it slightly. Pivot and then sew along the
first long side 0.5cm away from the seam. When
you get to where you’ve marked the end of the
zipper with a pin, pivot, sew carefully across the
zipper, and then pivot to sew back along the other
long side toward where you started. When you
get to the zipper pull end, overlap your stitches

where you started. When you are sewing down
one side and then up the other side, the fabric can
pull in different directions. To prevent this, as you
sew pull the fabric slightly out at right angles to
the zipper. 05
Step seven Use a seam ripper to remove all the
basting stitches and reveal the zipper. Remove all
the bits of thread so that they don’t get caught in
the zipper, and only unpick the seam within the
rectangle you have sewn.

SEWING UP THE PILLOW
Step one Open the zipper and place the back and
front fabrics together with the RS touching,
matching the raw edges. Make sure the seams
near the zipper lie together and are not folded
downward and pin all the way around. Sew along
the sides (except for the side with the zipper),
1.5cm away from the raw edges, using your throat
plate as a guide. Backstitch at the start and end. 06
Step two Zigzag stitch all around, in between the
straight stitching and the raw edge of the fabric,
and trim back to the zigzag. Do not zigzag stitch
along the side with the zipper. If the fabric is bulky,
you can trim the corners close to the stitching.
This will allow you to get your pointer into the
corners when you turn the pillow cover RS out, so
the finished pillow will have sharp corners. You
can also reinforce your straight stitching with
another line of straight stitches if necessary.
Step three Pull the RS of the fabric out through the

open zipper, to turn the pillow cover to the right
side. Use a pointer to push out the corners. Give
the pillow cover a good press, rolling the seams at
the edges so that you can see the stitching and
ensure no fabric is left tucked in.
Step four To finish off the edges, you can sew
“faux piping” by topstitching all the way around
the sides without the zipper, using the right-hand
side of the sewing-machine foot as a guide on the
edge of the pillow cover. Reverse stitch at the start
and finish. This gives a more finished look to your
cover when the pillow form is inserted.

TIP: n a plastic

shorte
th
You can
er it wi
v
o
g
n
i
ew
zip by s
ck
a bar ta
The Zippered Pillow is an
extract from new book Simple
Machine Sewing by Angela
Pressley, published by CICO
Books (£14.99). Photography:
James Gardiner © CICO Books

WWW.GATHERED.HOW/SIMPLYSEWING 65

FABULOUS IN FELT
The perfect collection for stitchers or crafters looking
for a new fave hobby – over 50 easy gifts,
accessories & toys to make today!

ON SALE
NOW!
JUST £9.99*
inc free UK P&P

WHAT'S INSIDE!

❤ Step-by-step guides

for stitched & needlefelted projects

❤ Helpful hand-stitch
guides to follow

❤ Gorgeous ideas
from top designers

ORDER YOUR COPY TODAY!

ORDER ONLINE www.ourmediashop.com/madeinfelt

OR CALL 03330 162 138+ AND QUOTE ‘Made in Felt 2024 Print 1’
+UK calls will cost the same as other standard fixed line numbers (starting 01 or 02) and are included as part of any inclusive or free minutes allowances
(if offered by your phone tariff). Lines open weekdays 9am to 5pm for orders and enquiries. Overseas please call +44 (0)1604 973 746. Price.
EUR price £11.99, ROW price £12.99. All prices include P&P. Please allow up to 28 days for delivery. Offer subject to availability.

No25
CAP PENNANT

CUT OUT & KEEP

Spruce up a baseball cap and give a cheer with this
cute embroidered felt pennant embellishment!
Mollie Johnson shows you how

stitch
01

02

03

04

05

06

YOU WILL NEED

■ Baseball Cap
■ Small piece of felt
■ Stranded cotton
■ Water-soluble stabiliser
■ Chenille needle
■ Craft glue
■ Basic sewing kit
NOTES
■ Download the template from
gathered.how/ss-templates

TRANSFER THE DESIGN
Step one Trace the Yay! pennant pattern onto the
water-soluble stabilizer. You only need to trace the
outside line and the word. The extra line is a guide
for step six. Peel off the backing and stick it onto
the felt. 01
Step two Using all six strands of stranded cotton,
embroider the word Yay! using back stitch. Secure
the beginning and end of your stitching with
a knot on the reverse. 02

PREPARE THE FELT
Step one Cut out the embroidered pennant on the
outside line. 03
Step two Soak the felt in cool water to remove the
water-soluble stabiliser. If any markings or
stabiliser remain, rinse them well. Lay the felt flat
to dry thoroughly. 04
Step three Decide where you want the pennant to
be positioned on the cap and use a small amount
of glue to hold it in place. Keep the glue away from
the edges. Allow the glue to dry thoroughly
before proceeding to the next step. 05

STITCH THE EDGES

code to head
Scan the QR embroidery
straight to the r website
hub on ou ow!
gathered.h
68 WWW.GATHERED.HOW/SIMPLYSEWING

Step one Stitch around the edges of the pennant
with three strands of stranded cotton using chain
stitch. Use the extra line on the template as
a general guide. Start each edge separately so the
two long sides are going in the same direction.
Hide the knots on the reverse of the cap. 06

Mollie Johanson (she/her)
lives near Chicago and is
happiest with a cup of coffee
and some stitching. She
specialises in contemporary
embroidery. Find her on
Instagram @molliejohanson

Dive in

Make a splash when you sew the adorable
Bertie Turtle plushie − he's a shell of a guy!
Lucy Ward shows you how

toy
YOU WILL NEED

■ Green cuddle plush fabric:
65x40cm
■ Ivory cuddle plush fabric: 55x37cm
■ Brown cuddle plush: 30x26cm
■ Light brown cuddle plush:
30x26cm
■ Brown wool felt: 4x4cm
■ Black wool felt: 3x3cm
■ Quilt wadding: 30x26cm
■ Length of elastic: 26cm
■ Black stranded cotton
■ Cream stranded cotton
■ Extra strong thread
■ Long doll making needle
■ Polyester toy filling: 200g
■ Basic sewing kit

01

02

06

07

NOTES
■ Download the template from
gathered.how/ss-templates
■ Size: Approximately 12cm tall
■ Fabric measurements are W x H.
■ Templates include 6mm seam
allowances.
■ Arrows on the templates indicate
direction of plush fabric pile.
■ Fasten off at the beginning and
end of stitching, unless otherwise
indicated.
■ Remove tacking stitches after
sewing.
FABRICS USED
■ Cuddle Plush in Olive, Ivory,
Cappuccino and Camel, all by
Shannon Fabrics

CUTTING OUT
Step one Download and print the templates.
Step two Pin the pattern pieces onto the reverse
side of the fabrics and draw around them. Cut
out as follows and transfer all markings..
Step three From the green plush, cut:
Body Back: one pair
Front Flipper: one pair
Back Flipper: one pair
Head Side: one pair
Upper Head Gusset: one
Tail: one pair
Step four From the ivory plush, cut:
Belly: one pair
Front Flipper: one pair
Back Flipper: one pair
Bottom Head Gusset: one
Step five From the brown plush, cut:
Shell Top: one pair
Step six From the light brown plush, cut:
Shell Bottom: one pair
Step seven From the brown felt, cut:
Eye: one pair
Step eight From the black felt, cut:
Pupil: one pair

70 WWW.GATHERED.HOW/SIMPLYSEWING

MAKING THE HEAD AND FACE
Step one Pin the Upper Head Gusset piece right
sides (RS) together with one Head Side piece.
Match at point A at the front and B at the back,
then ease the fabrics until they fit smoothly
together. Make sure to tack to make sewing
easier. Sew in place.
Step two Pin, tack and sew the second Head
Side piece to the opposite side of the Upper
Head Gusset between points A and B. Trim and
clip notches in both the seams to ease them. 01
Step three Pin the Bottom Head Gusset piece
with RS facing with the part you have just sewn,
from C to A and then across the front between
A and A, then to point C on the other side.
Match the centre mark at the front with that on
the Upper Head Gusset piece and ease the
fabrics to fit. Tack and sew, from the upper side.
Sew each seam separately, to avoid puckering
and trapped fabric. 02
Step four Turn the head RS out.
Step five Stuff the head firmly, using a stuffing
stick and your fingers. Turn the raw edge under
by 10mm. Hand sew some stitches to keep the
fold in place, your needle just picking up the
wrong side (WS) of the fabric so the stitches
don’t show through on the RS.
Step six Using three strands of the cream
stranded cotton, satin stitch a small oval shape
slightly off centre on one black Pupil piece. Sew
this piece centrally onto the brown Eye piece,

using small overstitches in matching thread.
Repeat to make the second eye. 03
Step seven Create a little shaping within the
head using extra strong thread and a long doll
needle. Knot the thread, then pull it through the
side of the head to the opposite side, at the
point where the eyes will sit. Use the images to
guide the position. Work back and forth several
times, pulling the thread taut, until happy with
the shaping. Fasten off the thread. 04
Step eight Pin one eye on each side of the head,
covering the place where the shaping thread
emerges. Sew in place with small overstitches
around the edge of the eye.
Step nine Mark the position of the nostrils using
pins or a disappearing marker. Check they are
level with one another. Use the images to guide
you. Using four strands of black stranded
cotton, satin stitch a small circle for each nostril.
Fasten off with a small stitch or two before
snipping off the thread somewhere away from
the face area. Set the head aside.

MAKING THE FLIPPERS AND TAIL
Step one Pin the pair of Tail pieces, RS together.
Sew, leaving the top edge open. Trim the seam
to reduce bulk. Turn RS out. Add a light amount
of stuffing into the tip of the tail and reduce the
amount as you work up, leaving the open end
free of stuffing by about 10-15mm. Tack over
the open end to neaten the edge.

toy
03

04

05

08

09

10

Step two Pin one pair of the Back Flipper pieces,
RS together. Sew, leaving the top end open and
an opening in the side, as marked. Clip notches
in the deep V shapes and trim the seam. Turn RS
out. Tack over the top open end. Make the
second Back Flipper in the same way.
Step three Take a pair of Front Flipper pieces
and pin RS together. Sew around, leaving the
top open and an opening in the side, where
indicated. Clip notches in the deep V areas to
ease the seam. Trim the seam and turn RS. 05
Step four Tack over the top open end. Make the
second front flipper in the same way. Set all four
flippers aside, leaving all unstuffed.

MAKING THE BODY
Step one Pin and sew the pair of Body Back
pieces RS facing, between points D and E.
Step two On the WS of one Belly piece, sew the
chest detail lines as shown on the template.
Sew without fastening on or off. Knot the loose
threads to secure. Repeat to sew the lines on
the second Belly piece. Then sew these two
pieces RS together, between D and E, matching
up the fabric edges and all the lines. 06
Step three On the Body Back piece, mark the
positions where the front and back flippers are
to be inserted. Lay all the flippers in place,
facing inwards. Make sure they will be facing
the correct way up. Insert the tail at the back,
where marked, the centre point of its top

matching up with the centre seam of the body
pieces. Tack all pieces in place. Fold into a neat
bundle to keep them safe when sewing. 07
Step four Lay the completed Belly piece RS
facing over the Body Back piece, sandwiching
the flippers and tail in between the two fabrics.
Match up the fabric edges and centre seams,
then pin and sew the seam, all around. Leave
the opening in the side for turning. Trim the
seam to reduce the fabric bulk and turn RS out.
Step five Using a small stick, stuff all the flippers,
lightly enough that you will be able to machine
sew the detail lines through the bulk. Stuff very
lightly towards the tops of the flippers, so they
remain a little floppy. Mark the lines with pins,
or draw using a disappearing pen or pencil. Sew
the lines without fastening on or off. 08
Step six Fasten off the loose threads by hand
once done. Add more stuffing if needed before
ladder stitching all the side openings closed.
Step seven Stuff the body, quite firmly. Ladder
stitch the side opening closed.
Step eight Pin the head to the body, using the
images to guide the position. The centre of the
upper head gusset should sit exactly halfway
between the centre seam of the body. Ladder
stitch all around, twice to ensure it is secure.

MAKING THE SHELL
Step one Lay a piece of same size wadding onto
the WS of one of the Shell Top pieces. Without

fastening on, sew the lines shown on the Shell
template, from the wadding side. Knot all loose
threads to fasten off and with a needle take any
loose threads from the RS through to the WS
before knotting them. Repeat to sew the lines
on the WS of the wadding placed on the second
Shell Top piece. 09
Step two Pin and sew the pair of Shell Top
pieces RS facing, between points F and G,
matching up the fabric edges and the detail
lines just sewn. Trim the seam.
Step three Pin and sew the pair of Shell Bottom
pieces RS together, between F and G.
Step four Pin the Shell Top and Shell Bottom
pieces, RS facing. Match up the centre seams
and fabric edges. Insert the piece of elastic
between the two fabrics, where indicated. 10
Step five Tack and sew, leaving a gap in the side
for turning. Turn the shell RS out. Ladder stitch
the opening closed. Topstitch around the outer
edge with a seam allowance of 1.5cm.
Step six Pull the shell onto the turtle’s back, with
the elastic strap around its middle.
Lucy Ward (she/her) is
a designer-maker based in
Shropshire, UK. See her
colourful toy creations on
Instagram, @thewhistling
cowgirl, and shop on Etsy
at TheWhistlingCowgirl.

WWW.GATHERED.HOW/SIMPLYSEWING 71

INCLUDES

£10.99

PAPER
GIFTS

PER ISSUE

ISSUE 119

Sew the feel-good Heather Top, Fuchsia skirt and
Avery Jumpsuit − plus free Stitch Guide download.

ISSUE 118

Make the Chloé Dress, the Anäis Top and The Easter
Bunny toy − plus, baby gifts pullout section.

ISSUE 117

Sew the Rowan Pinafore, The Blouse and The
Crossbody Bag − plus, six adorable makes for pets.

SOLD OUT

ISSUE 116

Don't miss The Suzanne Dress, The Molly Top and The
Backpack − plus, your homewares pull-out.

ISSUE 115

Don't miss The Cindy Coat, The Ruby Wrap Top and
our 14-page Christmas Gift pull-out section.

ISSUE 114

Add The Noelle Tea Dress, The Mara Top, Wrap Skirt,
Willow Dress and more to your me-made wardrobe.

TWO WAYS TO ORDER

Visit: www.ourmediashop.com/sewing-back-issues
or call 03330 162 149
*UK calls will cost the same as other standard fixed line numbers (starting 01 or 02) and are included as part of any inclusive or free minutes allowances (if offered by your phone tariff).
Outside of free call packages call charges from mobile phones will cost between 3p and 55p per minute. Lines are open Mon to Fri 9am–5pm.

Never miss an issue again; turn to page 24 and subscribe today!

FRESH IDEAS WITH FABRIC

TAPE MEASURE
take accurate
measurements.

techniques on these pages.

SEAM RIPPER
This sharp blade
cuts through and
unpicks stitches.

SHEARS
Keep a pair of
sharp shears just
for cutting out
your fabric.

THIMBLE
Wear to protect
your fingers when
handstitching.

MARKING PENCIL
Choose a colour
that shows up on
your fabric.

TAILOR’S CHALKS
Chalk temporarily marks
fabric and can be easily
brushed away.

SMALL SCISSORS
Use for snipping
threads and
cutting notches.

FABRIC CLIPS
Use these instead
of pins when sewing
thicker fabrics.

PINS
Stainless steel
pins with sharp
points are best.

PINKING SHEARS
These cut a
zigzag edge on
fabric to neaten.

THREAD
FABRIC WEIGHTS
Use instead of pins
to hold your
pattern in place.

BOBBINS
This forms the
underside of the
machine stitch.

This forms the
top side of the
machine stitch.

The guide
FRESH IDEAS WITH FABRIC

HOW TO MEASURE
YOURSELF ACCURATELY
ALWAYS MEASURE YOURSELF
BEFORE you choose a pattern size
to cut out. The sizes do vary greatly
from pattern to pattern, so it’s
always best to measure yourself
accurately and then refer to the
pattern’s size chart to find your
size. The chart will usually be
printed on the pattern envelope
or on the instructions inside.
Measure yourself in your
underwear and preferably in the
bra you’ll be wearing underneath

your garment as this can alter the
measurements slightly. Use a fabric
tape measure as it’ll curve around
your body well for accuracy. You
can measure on your own if you
stand in front of a mirror, but, for
best results, ask a friend to help so
they can check the tape measure is
sitting in the right places. Make
sure the tape measure sits snugly
around you but is not pulled tight.
Take the measurements shown in
the diagram and note them down.

HOW TO USE A PATTERN
Preparing your fabric and cutting
out your sewing pattern accurately
is just as important as the actual
sewing. Wash your fabric before
you begin as fabric can shrink and
run. Once dry, press it well.

PREPARING THE PATTERN
Patterns often come with several
options of different finishes so you
may have more pieces than you
need. The instruction sheet will tell
you which pieces to use. Roughly
cut out all of the pieces outside the
lines then press the pieces using
a dry iron on a low heat to remove
the folds and creases.
CUTTING OUT THE PATTERN
Choose your size using your
measurements and the size chart.
Cut along the corresponding lines
on your pattern. When you reach
any fiddly curves, take care to cut
along the correct size lines.
CUTTING LAYOUTS
Choose the correct one for the
width of fabric you’re using, the

74 WWW.GATHERED.HOW/SIMPLYSEWING

size you’re cutting and the style of
garment. Many patterns have more
than one option (or view) and each
one can have a different layout.
CUTTING OUT
Lay your fabric flat and smooth it
out. Fold or place the fabric as
shown on the cutting layout. Lay
the pattern pieces in the order and
right side or wrong side up as
shown. Check to make sure that
the grainlines on the pattern are
parallel with the selvedges by
measuring. Pin your pattern pieces
carefully in place and cut around
them through the fabric using
a pair of dressmaker’s shears.
TRANSFERRING MARKINGS
The markings on the pattern
pieces need to be transferred to
the fabric. They’re really important
for matching up fabric pieces later
and for positioning elements such
as darts and pockets. You can mark
these with chalk, fabric markers,
snips on the fabric, or with small
tacking stitches.

BACK WAIST LENGTH
From the top of your
spine at the base of
your neck to your
natural waist

HEIGHT:
Stand against a wall,
barefoot, then measure
from the top of your
head to the floor

HIGH BUST/CHEST:
Across the back,
under your arms and
above the bust

BUST
Around the
fullest part
of your bust

WAIST:
Your natural
waistline, around
the slimmest part
of your waist

HIPS
Around the fullest and
widest part of your
thighs and bottom

PATTERN MARKINGS

Pleats: These lines are matched Arrows: Grainline arrows are used
up to create pleats on the cut
to show which direction to pin the
out fabric pieces.
pattern on the fabric. The grainline
runs parallel to the fabric edge.

Darts: These
lines are for
matching up to
create darts
within the
fabric pieces.

Notches: Shown as
triangles or small
lines, these are
marked on the
edges and are
mainly used for
matching up
pattern pieces.

TRACING PATTERNS

Here at Simply Sewing HQ we’re working hard to
make our magazine a welcoming and inclusive place
for all members of the sewing community. One
aspect of this is to increase our pattern sizing. In
order to do this, we have decided to print our pattern
sheets double-sided so that we can fit as many pieces
and size ranges on the sheets and still fit them inside
their paper envelopes.
This means that you will need to trace off the
patterns if you want to make use of all sizes. We are
aiming to put all of a set size range on one side of
a sheet and any other size ranges on the reverse so that
if you fall into the 6–20 bracket or 18–30+ you can still
cut the pieces out if you’d like to. However this might
not always be possible so be sure to check your pattern
sheets before cutting into them.

FINISHING SEAMS
paper underneath the pattern and use
a tracing wheel to trace over your size. If you are
doing this make sure to protect your work surface
with a cutting mat.

TRACING THE PATTERN
Step one Mark the highlighted line with dots or
dashes – straight lines can be marked with a dot at
each end and connected later on with a ruler.
Marking curves in this way will also help you to
achieve a more accurate result than tracing directly
from the pattern.
Step two Connect your pencil markings and then trace
over them with a fine liner. Make sure to include all
pattern markings such as notches, darts, pivot points,
gathering lines etc.

PREPARING THE PATTERN

FINISHING

Before you begin, make sure your pattern is as flat as
possible. A crinkled pattern will be difficult to trace.
If need be you can iron your pattern on a low heat.
Step one Outline your size using a highlighter. Mark
pattern markings too (darts, grainlines, notches).
Step two Lay your pattern on a flat work surface.
Place the pattern paper on top and secure with
pattern weights. Weights are much better than pins
as they won’t mark your paper or get in the way.
Step three Alternatively you can place your pattern

Step one Label your pattern pieces with the pattern
name, piece name, cutting information and any
grainlines or foldlines to finish. This is important as it
will help you to see if a piece is missing.
Step two This method will give you a copy of your
pattern to use for your project. Once you have made
any necessary adjustments to the pattern (bust,
shoulder, stomach etc.) you could also trace a copy
onto manilla card. Card patterns can be used time
and time again and can be manoeuvred easily.

MACHINE NEEDLES

There are many different needle types and they vary
by the shape of the point, eye and shaft thickness.
Choose the correct one for smooth stitching.

UNIVERSAL

A great multi-purpose needle
which can be used for woven
fabrics and has a slightly rounded
point for stitching knit fabrics, too.

BALL POINT
This needle has a more rounded
point than the universal needle so
you won’t get snags, ladders or
holes. Perfect for knit fabrics.

JEANS
A strong needle, ideal for stitching
several layers of fabric or tightly
woven fabrics like denims.

SHARPS

With a sharp point, these are for
sewing very fine and delicate
fabrics and neat buttonholes.

LEATHER
This needle’s wedge-shaped
cutting point is used to work
strong seams on non-woven
fabrics like leather, suede and vinyl.

STRETCH
Designed for sewing two-way
stretch knits such as lycra and silk
jersey. It prevents skipped stitches
on fine knit fabrics.

ONCE YOU HAVE FINISHED
stitching your seam, it’s best to
press it open on the wrong side
so it lies flat. Sometimes it’s
better to press it to one side to
reduce bulk but the pattern
instructions will tell you this.
Usually the seam allowances
are left as they are as they help
to strengthen the seam, but
sometimes they cause too
much bulk so they are trimmed
to half their original width.
If your fabric has a tendency
to fray you should neaten the
raw edges after you have
worked the seam. There are
several ways of doing this. To
machine-finish them, set your
sewing machine to the zigzag
stitch then stitch close to the
raw edge all the way along. The
zigzag must be small enough to
stop the fabric from fraying but
large enough to enclose the
bulk of the fabric. Practise a few
lengths and widths before you
begin. Alternatively, you can
trim the raw fabric edges with
a pair of pinking shears. If you
have an overlocker then you
can stitch, cut and finish the
seams all in one process.

NEEDLE SIZE GUIDE
UK
SIZE

US
SIZE

FABRIC

60

8

Silks

70

10

75

11

80

12

90

14

100

16

TWIN

110

18

Used for parallel rows of stitching
such as pintucks and hems.

120

20

QUILTING
This will pierce multiple layers
whilst keeping straight stitches so
it is ideal for patchwork and
machine quilting.

TOPSTITCH
This has an extra-sharp point and
eye, so thicker topstitching thread
can be used. It’s perfect for straight
stitching with thicker threads on
any type of fabric.

Lightweight
fabrics
Medium
weight fabrics
Medium
weight fabrics
Medium
weight fabrics
Heavy weight
fabrics
Upholstery
fabrics/denim
Heavy canvas

WWW.GATHERED.HOW/SIMPLYSEWING 75

The home of

Learn
something
new with

Boost your skills with…
• FREE how to guides and expert advice
• FREE video tutorials that help you every step
• FREE craft classes
• FREE seasonal patterns

www.gathered.how

templates
Here are the full-size
templates for the toy turtle
and baseball cap in issue 120

TOY TURTLE

B
HEADSIDE
Cut one pair

PAGE 69

ACTUAL SIZE

C

A

s are
All template nload
w
o
available to d.how. Scan
from gatheredo straight to
the code to g s page!
the template

EYE
Cut one pair
EN

BACK FLIPPER
Cut two pairs
(upper + lower)

PUPIL
Cut one pair

OPEN

OP

EN

OP

TAIL
Cut one pair

WWW.GATHERED.HOW/SIMPLYSEWING 77

TEMPLATES

TOY TURTLE

D

PAGE 69

ACTUAL SIZE

IN

SE
FL R T F
IPP RO
ER NT

BODY BACK/BELLY
(Sew lines only on Belly pieces)
Cut one pair Belly
Cut one pair Body Back

A

OPEN

SE T

C

RE
ENT

S
AD GU
E
H
R
E
UPP Cut one

SEA

M

A

B

78 WWW.GATHERED.HOW/SIMPLYSEWING

B

E

TEMPLATES

TOY TURTLE
PAGE 69

ACTUAL SIZE

F

INSERTC
ELASTEI
HER

CENTRE SEAM

OPEN

SHELL
Cut two pairs
(One pair Top, One pair Bottom)
(Sew lines only on Top pieces)

G

WWW.GATHERED.HOW/SIMPLYSEWING 79

PAGE 69

ACTUAL SIZE

E
OP

EN

ER
P
IP airs r)
L
F p we
T
N two Lo
O
+
FR Cut per
p
(U

TOY TURTLE
OP

N

TEMPLATES

C

C

ET
BOTTOM HEAD GUSS
Cut one

BASEBALL CAP
PAGE 67

ACTUAL SIZE

Thank you for making these projects from Simply Sewing.
The copyright for these templates belongs to the designer of the project.
They work hard to create projects for you to enjoy, so please don’t re-sell or distribute their work without
permission. Please do not make any part of the templates or instructions available to others through your
website or a third party, or copy it multiple times without our permission. Copyright law protects creative
work and unauthorised copying is illegal.
We appreciate your help.

80 WWW.GATHERED.HOW/SIMPLYSEWING

Bonus gift – download
your free digital copy
of Beginner's Guide
to Dressmaking

Sign up to our newsletter to download your
bonus digital copy of Beginner's Guide to
Dressmaking – worth £9.99 – for free!
Inside this bumper 132-page special you'll
find step-by-step guides to fitting, fabrics,
using a sewing machine, inserting zips and
pockets, following pattern sheets and much
more! We also introduce you to working on
your own patternless creations, using your
own clothes as templates, with 15 stunning
designs to follow, from dresses and tops
and skirts and joggers. Download today at
try.simplysewingmag.com/bonus-gift.

WWW.GATHERED.HOW/SIMPLYSEWING 81

my favourite thing

Detailed Dreams
Vicky Lay had a clear vision for her handmade wedding
dress. So she went ahead and made it happen.

"I’ve been sewing since I was 11, I was lucky
enough to learn in school. I was an occasional
maker whilst at uni making the odd ballgown
or fancy dress outfit. After moving to Bristol in
2019 I found a sewing community and started
making most of my clothes. So, when I got
engaged in 2020, I knew I wanted to make my
own wedding dress.
I had a few requirements when I picked
a pattern, the most important to me was being
able to walk up and down stairs without having
to lift my hem. I picked Vogue 9327 because
I loved the sleeves and the vintage feel of the
high neckline. I wanted to get the fit perfect
so after a few toiles, I attended a bodice fitting
class. I used mostly deadstock silk, to try and
keep it sustainable, and added some personal

82 WWW.GATHERED.HOW/SIMPLYSEWING

touches like buttons covered with lace from my
Mum’s wedding dress. It was a labour of love to
hide in my sewing room with the dress, hand
stitching the appliqués on. I didn’t want my
husband to see the dress before I walked down
the aisle. Fortunately, whilst making his suit
I could do my hand stitching on the sofa.
I really loved learning all the skills to give both
garments their special details.
I was thrilled with the final results and I loved
swishing about in it. It felt so special to say ‘I do’
with us both in outfits I’d made for the occasion."
Vicky Lay (she/her) lives in Bristol with her
husband and their cat. When she isn’t sewing
you’ll find her knitting on the sofa. You can
follow more of her sewing adventures on
Instagram at @SeamsLikeVicky.

S
4-in-1 everyday top
Statement sleeves
Self-draft maxi dress
Floral festival bumbag
Win a sewing machine!
Patrick Grant's book
Multi-wear wrap top
Tiger plushie toy
4 sleeve types!

4 gifts
for
you!
everyday top set, summer dress,

4 GIFTS

WORTH

£32!

digital magazine + techniques book
hine skills ✓How

✓Sewing mac

s & more
Zips, hems, seam
to use patterns ✓

ers of
From the mak

G E T I N TO C R A F T

dressmaking zine
s
BonuESS

PDF DR
PATTERN!

ress
This dbe a
can too!
top

WORTH
£8.99
as
-make ide
quick-to

techniques booklet
GET INTO CRAFT

w
l know-ho
Essentia

37

UK sizes 6-30

£9.99

WWW.GATHERED.HOW/SIMPLYSEWING

ON SALE THURSDAY 9 MAY

* CONTENTS AND GIFTS SUBJECT TO CHANGE AND MAY VARY ACCORDING TO TERRITORY.
SOME GIFTS NOT AVAILABLE WITH DIGITAL EDITIONS.

Great Value

Great Value

Ask your local
retailer for details:

219S

Perfect for beginners!

8002DG
Great value, entry level
3 & 4 thread overlocker!

SAVE £40
SAVE £100

5270QDC

360DC

Easy to use, contemporary choice!

Exciting, refined features
to help your projects shine!

Promotion starts 2nd April until 3rd June 2024.
(All offers subject to stock availability)

THE MARTHA

WRAP DRESS
SIZES

6-30
(US 2–26/EUR 30–54)

DRESS
FRONT

BACK

MARTHA WRAP DRESS
Sew this petal-shaped wrap dress, with-elbow length
sleeves, perfect for the coming months

PACK INCLUDES

NOTES

■ Pattern sheets x2 (Tracing required)
■ Instruction sheet

■ Pin or tack the main pieces together
first to check the fit. Mark any
alterations needed before starting to
sew.
■ Stitch all seams with right sides
together.
■ All seam allowances are 1.5cm unless
otherwise stated.
■ Sleeve hems are 2cm.
■ Dress hem is 1.5cm.

YOU WILL NEED
■ Main fabric: 3.5m x 150cm wide
■ Lightweight iron-on interfacing: 60cm
■ Two press stud (popper) fasteners
■ Matching thread
■ Basic sewing kit

FABRIC SUGGESTIONS
■ Viscose, silk, linen, rayon, soft fine
cottons such as cotton lawn.

FINISHED BACK LENGTH
■ Approx. 116cm

f our
Shop more o patterns
ng
Simply Sewine shop at
in our onli gpatterns.
simplysewinom
etsy.c
BODY MEASUREMENTS
SIZE

TO FIT
BUST

TO FIT
WAIST

TO FIT
HIPS

UK

6

8

10

12

14

16

18

20

22

24

26

28

30

US

2

4

6

8

10

12

14

16

18

20

22

24

26

EUR

30

32

34

36

38

40

42

44

46

48

50

52

54

cm

82

86

90

94

99

104 109 114 119 124 129 134 139

in

32

34

35

37

39

41

43

45

47

49

cm

64

67

70

73

77

82

87

93

99

105 111 117 123

in

25

26

28

29

30

32

34

37

39

41

cm

89

93

97

101 106 111 116 121 126 131 136 141 146

in

35

37

38

40

42

44

46

48

50

52

51

44

54

53

46

56

55

48

57

WWW.GATHERED.HOW/SIMPLYSEWING
© Printed in the UK for Simply Sewing. Pattern by Becky Perry (Pattern Paper Scissors) for Prima UK, March 2022.
Supplied by Our Media Ltd, Bristol, BS1 4ST. For individual, private use only
and not for commercial or manufacturing purposes. Not for resale.

thE MARTHA
CUTTING LAYOUTS

DIAGRAMS

MAIN FABRIC (ALL SIZES)
150CM WIDE

FRONT

7

6
2

4

1

8
8

3

10

FOLD

SELVEDGE

5

BACK

5

9

11

INTERFACING (ALL SIZES)
150CM WIDE

6

FOLD

7

3

5

SELVEDGE

8
8

4

WWW.GATHERED.HOW/SIMPLYSEWING

© Printed in the UK for Simply Sewing. Design by Becky Perry (Pattern Paper Scissors) for Prima UK,
March 2022. Supplied by Our Media Ltd, Bristol BS1 4ST. For individual, private home use only.
Not for commercial/manufacturing purposes or resale.

WWW.GATHERED.HOW/SIMPLYSEWING

WRAP dress
01

02

03

04

05

06

FABRIC KEY - STEPS
Wrong side of fabric

STITCHING TERMS

Right side of fabric

RS/WS: Right side/wrong side of the fabric. The right side usually has the print,
design or texture and the wrong side is usually plain or duller in appearance.
Machine tack: Use a long stitch length to hold a section in place. Don’t
backstitch at the start and end.
Finish the seams: Finish the raw edges with a zigzag stitch or an overlocker.
Press: Pressing fabric is placing the iron down, holding it for a few seconds, lifting it
and placing it down again. Ironing is sliding the iron back and forth.
Understitch: Stitch close to the seam line usually on the side that will be on the
inside of the garment such as the facing. This will hold the seam allowance in
place when the garment is worn.
Staystitch: Stitching in areas prone to stretching, such as necklines, to hold the
fabric in shape while it is being worked on.
Topstitch: Stitching usually from the right side of the garment to hold seam
allowances in place or can be used for decorative purposes.
Toile: A test garment, often made from calico or muslin, to check the fit or test
a pattern before the real fabric is used. Known as a muslin in the US.

CUTTING OUT

Step one From main fabric, cut:
Bodice Front (1): one pair
Bodice Back (2): one on fold

Front Facing (3): one pair
Back Neck Facing (4): one on fold
Ties (5): two pairs
Left Front Waistband (6): one pair
Right Front Waistband (7): one pair
Back Waistband (8): two on fold
Front Skirt (9): one pair
Back Skirt (10): one on fold
Sleeve (11): one pair
Step two From interfacing, cut:
Front Facing (3): one pair
Back Neck Facing (4): one on fold
Ties (5): one pair
Left Front Waistband (6): one pair
Right Front Waistband (7): one pair
Back Waistband (8): two on fold

HOW TO MAKE THE DRESS
CREATING THE BODICE

Step one On the Bodice Front, match the notches and dart points and pin
along the dart lines. Sew the dart ensuring you don’t backstitch at the dart
point. Instead, leave long thread tails and knot them off by hand for
a smoother dart. Press the dart down towards the waistline. 01
Step two Create the darts in the Bodice Back in the same way and press the
darts towards the centre back. 02
Step three Attach the interfacing to the wrong side (WS) of the Front and Back
Facings, making sure it is glue side down.
Step four Pin and stitch Front Facings to Back Facing right sides (RS) together,

WWW.GATHERED.HOW/SIMPLYSEWING

thE MARTHA
07

08

09

13

14

15

at the shoulder seams. Trim seam allowances and press them open. 03
Step five Finish the outer edge of the facings, using either a zig zag stitch or
with an overlocker.
Step six Matching notches, pin and stitch the Bodice Fronts to the Bodice Back
RS together, at the side and shoulder seams. Finish the seam allowances and
press them open. 04
Step seven Matching notches and shoulder seams, pin and stitch the facing to
the neck edge of the Bodice Front and Back, RS together. Trim the seam
allowances, and snip around the curve of the neckline as shown. 05
Step eight Press the seam allowance towards the facing. Working from the RS
of the bodice, understitch close to the seam through the facing and seam
allowances only. Press facing onto WS. 06

CREATING THE WAISTBAND
Step one Attach interfacing to the WS of one Tie piece of each pair. Pin and
stitch Tie pieces RS together, leaving the short straight edge open. Trim seam
allowances and clip the corners. 07
Step two Turn RS out and press. 08
Step three Attach interfacing to the wrong side of the outer waistband pieces.
Pin and stitch outer waistband pieces together at side seams, ensuring Ties are
inserted as shown. Press the seam allowances open. 09
Step four Attach interfacing to the WS of the inner waistband pieces. Pin and
stitch inner waistband pieces RS together at side seams. Press the seam
allowances open. 10
Step five Pin the top edge of the outer waistband to the lower edge of the
bodice, RS together, matching notches and side seams. Then add the RS of the
inner waistband to the WS of the bodice, sandwiching the bodice between the
inner and outer waistband. Repin and stitch along the waistband seam and
across the end of waistband as shown. 11

WWW.GATHERED.HOW/SIMPLYSEWING

WRAP dress
10

11

12

16

17

18

CREATING THE SKIRT
Step one Matching notches, pin and stitch Skirt Fronts to Skirt Back RS together
at side seams. Finish seam allowances and press them open. 12
Step two Press under a double 7mm-wide hem around outer edge of skirt and
stitch in place. 13
Step three Matching notches and side seams, pin and stitch the top edge of the
skirt to the lower edge of the outer waistband, RS together. 14
Step four Press seam allowances towards waistband. Turn and press under the
seam allowance on the inner waistband and pin in place over waistband seam,
taking care to tuck in the corners at either end of the waistband. Working from
the RS, stitch in place, taking care to catch in the free edge of the waistband
underneath. Press. 15

ADDING THE SLEEVES
Step one Pin and stitch the underarm seams the Sleeves RS together. Finish the
seam allowances and press open.
Step two Insert two rows of long gathering stitches at the Sleeve head
between the notches.
Step three To hem the Sleeves, turn under a double 1cm hem and stitch. Press
to finish. 16
Step four Turn the dress inside out and keep the Sleeves RS out. Matching
notches, side seams and shoulder points, pin the Sleeves into the armholes,
drawing up gathers and arranging evenly. 17
Step five Stitch in place then trim seam allowances to 1cm and finish them
together. Press the seam allowances towards the sleeves.

FINISHING OFF
Step one Stitch two popper fastenings to the inside of right front waistband
and outside of left front waistband. See pattern pieces for placement. 18

WWW.GATHERED.HOW/SIMPLYSEWING

HOW TO PRINT THIS PATTERN
Print out the following pages on A4 paper at 100%.
Overlap the red lines and tape the sheets in place using the guide below.

© Printed in the UK for Simply Sewing. Designed by Becky Perry (Pattern Paper
Scissors) for Prima UK, March 2022. Supplied by Our Media Ltd, Bristol BS1 4ST.
For individual, private home use only. Not for commercial/manufacturing
purposes or resale.

© Printed in the UK for Simply Sewing. Designed by Becky Perry (Pattern Paper
Scissors) for Prima UK, March 2022. Supplied by Our Media Ltd, Bristol BS1 4ST.
For individual, private home use only. Not for commercial/manufacturing
purposes or resale.

SIDE 1 OF 4

SIDE 2 OF 4

Pattern sheets are printed double sided – you’ll need to trace your pattern
pieces onto pattern paper rather than cutting out directly from this sheet.
Find our guide to pattern tracing at gathered.how/tracing-patterns.
Scan the QR code to head to that page.

Pattern sheets are printed double sided – you’ll need to trace your pattern
pieces onto pattern paper rather than cutting out directly from this sheet.
Find our guide to pattern tracing at gathered.how/tracing-patterns.
Scan the QR code to head to that page.

Cut on fold

6
8
10
12
14

92

97

4

and interfacing

SIZE KEY

102

SIZE KEY

6
8

107

10
12
14

16

16

18

18

20

20

22

22

24

24

26

26

28

28

30

30

14
12

98

8
6

103

108

Sleeve
Cut one pair

10x10cm

10

94

99

104

95

100

105

16

18

20

7

Right Front Waistband

22

24

THE martha wrap dress

26

28

11

30

93

TEST SQUARe

109

1

6

8

10

12

14

Cut on fold

2

26

28

30

THE martha wrap dress

106

111

28

Left Front Waistband
Cut one pair in fabric and interfacing

6

101

8

26

96

Cut on fold

THE martha wrap dress

30

28

26

24

22

20 18

16

14 12

10 8

6

Bodice Back
Cut one on fold

THE martha wrap dress

6 8 1012 14 16 18 20 22 24 26 28 30

110

30
© Printed in the UK for Simply Sewing. Designed by Becky Perry (Pattern Paper
Scissors) for Prima UK, March 2022. Supplied by Our Media Ltd, Bristol BS1 4ST.
For individual, private home use only. Not for commercial/manufacturing
purposes or resale.

112

THE martha
wrap dress

SIDE 4 OF 4

9

Pattern sheets are printed double sided – you’ll need to trace your pattern
pieces onto pattern paper rather than cutting out directly from this sheet.
Find our guide to pattern tracing at gathered.how/tracing-patterns.
Scan the QR code to head to that page.

117

122

SIZE KEY

6
8

127

(Join to PART B before cutting out fabric)
Cut one pair

10

ric)
out fab
cutting e pair
Cut on

12
14
16

Back Skirt
Cut one on fold

18
20
22
24
26
28

30

30

TEST SQUARe

118

10x10cm

123

128

5
30

Cut on fold

114

119
26

115

28

28

26

24

22

20

18

16

14

12

10

8

6

124

129

125

130

126

131

30

120
Scissors) for Prima UK, March 2022. Supplied by Our Media Ltd, Bristol BS1 4ST.
For individual, private home use only. Not for commercial/manufacturing
purposes or resale.

SIDE 3 OF 4
6 8 10 12 14 16 18

Pattern sheets are printed double sided – you’ll need to trace your pattern
pieces onto pattern paper rather than cutting out directly from this sheet.
Find our guide to pattern tracing at gathered.how/tracing-patterns.
Scan the QR code to head to that page.

20 22

SIZE KEY

24
26
28 30

116

121

6
8
10
12
14
16
18
20
22
24
26
28
30

ATTACH PART B HERE BEFORE CUTTING OUT

Ties
Cut two pairs in fabric and
one pair in interfacing

113

SIZE KEY

30

28

26

24

22

20

18

16

14

12

10

8

6

Pattern sheets are printed double sided – you’ll need to trace your pattern
pieces onto pattern paper rather than cutting out directly from this sheet.
Find our guide to pattern tracing at gathered.how/tracing-patterns.
Scan the QR code to head to that page.

SIDE 1 OF 4

© Printed in the UK for Simply Sewing. Designed by Becky Perry (Pattern Paper
Scissors) for Prima UK, March 2022. Supplied by Our Media Ltd, Bristol BS1 4ST.
For individual, private home use only. Not for commercial/manufacturing
purposes or resale.

WWW.GATHERED.HOW/SIMPLYSEWING

Cut on fold

4
dress

and interfacing

30

28

30

28

26

24

22

20

ress

6

8

10

12

14

16

18

20

22

24

26

7

THE martha wrap dress
Right Front Waistband
Cut one pair in fabric and interfacing

6

8

10

12

6

30

6

THE martha wrap dress
Left Front Waistband
Cut one pair in fabric and interfacing

28

26

24

22

20

18

16

Cut on fold

THE martha

11
Sleeve
Cut one pair

11
Slee
Cut one

30

28

tha wrap dress

8

30

SIZE KEY

30

28

26

24

22

20

18

16

14

12

10

8

6

Pattern sheets are printed double sided – you’ll need to trace your pattern
pieces onto pattern paper rather than cutting out directly from this sheet.
Find our guide to pattern tracing at gathered.how/tracing-patterns.
Scan the QR code to head to that page.

SIDE 2 OF 4

© Printed in the UK for Simply Sewing. Designed by Becky Perry (Pattern Paper
Scissors) for Prima UK, March 2022. Supplied by Our Media Ltd, Bristol BS1 4ST.
For individual, private home use only. Not for commercial/manufacturing
purposes or resale.

WWW.GATHERED.HOW/SIMPLYSEWING

24
22

10x10cm

TEST SQUARe

30

28

26

24

22

20

24
22
20
18
16
14
12
10
8

TH
6

2

THE martha wrap dress
Bodice Back
Cut one on fold

6 8 1012 14 16 18 20 22 24 26 28 30

6

8 10 12

14

16

18

20

22

24

26

28

30

10

8

6

THE m

wrap

1
a
Bo
d
Cu ice F
to
ne ront
pa
ir

arth

dress

Back Skirt
Cut one on fold

THE martha
wrap dress

10

Cut one on fold

5

THE martha wrap dress
Ties
Cut two pairs in fabric and

s

Cut on fold

30

10x10cm

TEST SQUARe

ART B
P
t
r
i
k
S
Front
fore
e
b
A
T
PAR
(Join to out fabric)
cutting e pair
Cut on

THE ma ess
r
d
p
a
r
w

9 rtha

28

30

Pattern sheets are printed double sided – you’ll need to trace your pattern

SIDE 3 OF 4

© Printed in the UK for
Scissors) for Prima UK, March 2022. Supplied by Our Media Ltd, Bristol BS1 4ST.
For individual, private home use only. Not for commercial/manufacturing
purposes or resale.

WWW.GATHERED.HOW/SIMPLYSEWING

SIZE KEY

30

28

26

24

22

20

18

16

14

12

10

8

6

Pattern sheets are printed double sided – you’ll need to trace your pattern
pieces onto pattern paper rather than cutting out directly from this sheet.
Find our guide to pattern tracing at gathered.how/tracing-patterns.
Scan the QR code to head to that page.

SIDE 3 OF 4

Scissors) for Prima UK, March 2022. Supplied by Our Media Ltd, Bristol BS1 4ST.
For individual, private home use only. Not for commercial/manufacturing
purposes or resale.

WWW.GATHERED.HOW/SIMPLYSEWING

SIZE KEY

30

28

26

24

22

20

18

16

14

12

10

8

6

Pattern sheets are printed double sided – you’ll need to trace your pattern
pieces onto pattern paper rather than cutting out directly from this sheet.
Find our guide to pattern tracing at gathered.how/tracing-patterns.
Scan the QR code to head to that page.

SIDE 4 OF 4

© Printed in the UK for Simply Sewing. Designed by Becky Perry (Pattern Paper
Scissors) for Prima UK, March 2022. Supplied by Our Media Ltd, Bristol BS1 4ST.
For individual, private home use only. Not for commercial/manufacturing
purposes or resale.

WWW.GATHERED.HOW/SIMPLYSEWING

10x10cm

TEST SQUARe

30

28

26

24

22

20

8

6

Front Skirt PART A
(Join to PART B before cutting out fabric)
Cut one pair

THE martha wrap dress

9

20

22

UTTING OUT

ATTACH PART B HERE BEFORE CUTTING OUT

CAPSULE
WARDROBE

BRITTANY
TEE

SIZES

6-30
(US 2–26/EUR 30–54)

TEE
FRONT

BACK

THE BRITTANY TEE

The first pattern in your Simply Sewing Capsule Wardrobe
is this easy-to-sew t-shirt with grown-on sleeves
PACK INCLUDES

NOTES

QPattern sheets x1 (Tracing required)
QInstruction sheet

QUse a 1.5cm seam allowance, unless
otherwise stated.
QTest various lengths and widths of zig
zag or stretch stitches on scraps of your
fabric to make sure they work and the
stitches won’t pop under stress.

YOU WILL NEED
QKnit fabric: 1.8mx140cm
QLightweight ribbing (optional):
50x75cm, for the cuffs and neckband
QBallpoint sewing machine needle
QTwin ballpoint sewing machine needle
(optional)
QMatching thread
QBasic sewing kit

FABRIC SUGGESTIONS

f our
Shop more o patterns
ng
Simply Sewine shop at
in our onli gpatterns.
simplysewinom
etsy.c

QLight to medium-weight knit fabrics
such as cotton jersey, ponte roma and
viscose jersey.

BODY MEASUREMENTS
UK

SIZE

TO FIT
BUST

TO FIT
WAIST

TO FIT
HIPS

6

8

10

12

14

16

18

20

22

24

26

28

30

US

2

4

6

8

10

12

14

16

18

20

22

24

26

EUR

30

32

34

36

38

40

42

44

46

48

50

52

54

cm 74

78

82

86

91

96

101 106

111 116 121 126 131

in

29

31

32

34

36

38

40

42

44

46

cm 59

62

65

68

72

77

82

88

94

100 106 112 118

in

23

24

26

27

28

30

32

35

37

39

cm 82

86

90

94

99

104 109 114

119 124 129 134 139

in

34

35

37

39

41

47

32

43

45

49

48

42

51

CAPSULE
WARDROBE
WWW.GATHERED.HOW/SIMPLYSEWING
© Printed in the UK for Simply Sewing.
Supplied by Our Media Ltd, Bristol, BS1 4ST. For individual, private use only and not for
commercial or manufacturing purposes. Not for resale.

50

44

53

52

46

55

THE BRIT
CUTTING LAYOUTS
TOP
140CM WIDE

4

Selvedges

Foldline

1

2

3

CAPSULE
WARDROBE
WWW.GATHERED.HOW/SIMPLYSEWING
© Printed in the UK for Simply Sewing magazine. Supplied by
Immediate Media Company Ltd, Bristol, BS1 3BN. To be used
for individual, private home use only and not for commercial
or manufacturing purposes. Not for resale.

WWW.GATHERED.HOW/SIMPLYSEWING

TTANY TEE
01

02

03

04

STITCHING TErms
Finishing the seams: Use a zigzag or overlocking stitch or use an overlocker to
finish the raw edges to stop them fraying.
Press: Use an iron to press the sewn seam for a professional finish. You can use
a pressing cloth to protect your fabric from the direct heat of the iron. It is
always best to press jersey from the wrong side as it can burn or melt easily.
Always test a scrap of fabric before pressing your garment.
RS/WS: These refer to the right side (RS) or wrong side (WS) of the fabric.
Stabilise the seams: When working with stretch fabrics such as jersey it is
good idea to stabilise the seams to prevent stretched seams. Stabilising will
eliminate the telltale wavy seams of stretched jersey! There are several ways of
doing this but the most effective methods are using clear elastic, or using
specialist fusible edge tape. Both options will prevent the fabric from
stretching as it is sewn while still allowing it to stretch when worn.

Notes
Seam allowances are 1.5cm, unless otherwise stated.
Test various lengths and widths of zig zag or stretch stitches on some scraps of
your fabric to make sure they will work and the stitches won't pop under stress.

CUTTING OUT
Step one From the main fabric, cut:
Front bodice (1): one on fold
Back bodice (2): one on fold
Neckband (3): one on fold
Sleeve Cuff (4): one pair

making the top
STITCHING THE BODICE
Step one With the right sides (RS) of the fabric together, pin and stitch the
Front and Back Bodice pieces at the shoulder seams. Stablise the seams using
clear elastic to prevent stretching as you sew. Use a zig zag stitch or an
overlocker on all seams.
Step two Finish the seams together and press towards the back. 01

STITCHING THE NECKLINE
Step one With RS together, pin and stitch the two short ends of the Neckband
with a 1.5cm seam allowance and press open. 02
Step two With WS together, press the Neckband in half. Mark the quarter
points of the Neckband with pins
Step three Mark the Front and Back of the neckline of the bodice with pins.
Find the quarter points of the neckline and mark those with pins.
Step four With RS together, pin the Neckband to the neckline matching the
quarter point pins.
Step five Pin and stitch with a 1cm seam allowance. 03
Step four Finish the raw edge and press the seam allowance towards the
bodice. Use either a zig zag stitch or a twin needle, topstitch the bodice to the
neckband seam allowance. 04

STITCHING THE SIDE SEAMS
Step one With RS together, pin and stitch the side and underarm seams of the
bodice. Starting at the hem of the sleeve, stitch towards the hem of bodice,
making sure the notches match.
Step two Finish the seams together and then press towards the back. 05

WWW.GATHERED.HOW/SIMPLYSEWING

The Brit
05

06

07

08

DIAGRAMS

MAKING THE CUFFS
Step one With RS of the Sleeve Cuff together, pin and stitch the short edges.
Trim the seam allowance down by half and press open. 06
Step two Fold the Sleeve Cuff in half with WS together, matching the raw
edges, and press along the fold.
Step three With RS together, place the Sleeve Cuff around the sleeve hem,
matching the raw edges and underarm seam. Pin in place.
Step four Stitch in place with a 1cm seam allowance.
Step five Finish the seam allowance and then press it towards the sleeve. 07
Step six Topstitch the seam allowance to the sleeve at the cuff. 08
Step seven Repeat these steps to attach the other sleeve cuff.

FRONT

BACK

FINISHING THE HEMS
Step one Turn over 0.5cm and then a further 1.5cm of the t-shirt hem to the WS.

FINISHED GARMENT FITTED MEASUREMENTS
SIZE

UK

6

8

10

12

14

16

18

20

22

24

26

28

30

US

4

6

8

10

12

14

16

18

20

22

24

26

28

EUR

34

36

38

40

42

44

46

48

50

52

54

57

58

cm

93

97

101

105

110

115

120

125

130

135

140

145

150

in

37

38

40

41

43

45

47

49

51

53

55

57

59

cm

101.5

104.5

107.5

110.5

114.5

119.5

124.5

130.5

136.5

142.5

148.5

154.5

160.5

in

40

41

42

44

45

47

49

51

54

56

58

61

63

cm

102.5

106.5

110.5

114.5

119.5

124.5

129.5

134.5

139.5

144.5

149.5

154.5

159.5

in

40

42

44

45

47

49

51

53

55

57

59

61

63

BUST

WAIST

HIPS

WWW.GATHERED.HOW/SIMPLYSEWING

ttany Tee

Psst:

when
ability rsey
t
s
e
r
o
er je
For m
ut light ayer of
o
g
n
i
t
t
l
cu
place a
he
fabrics, r underneath t .
e
t
ap
ou
tissue p before cutting
c
i
fabr

WWW.GATHERED.HOW/SIMPLYSEWING

HOW TO PRINT THIS PATTERN
Print out the following pages on A4 paper at 100%.
Overlap the red lines and tape the sheets in place using the guide below.

Cut on fold
Cut on fold

140

145

150

141

146

151

154

155

SIDE 1 OF 2

30

156

28 30

Pattern sheets are printed double sided – you’ll need to trace your pattern
pieces onto pattern paper rather than cutting out directly from this sheet.
Find our guide to pattern tracing at gathered.how/tracing-patterns.
Scan the QR code to head to that page.

Cut on fold

CAPSULE
WARDROBE
© Printed in the UK for Simply Sewing. Supplied by Our Media Ltd, Bristol BS1 4ST.
For individual, private home use only. Not for commercial/manufacturing purposes
or resale.

28

26

24

22

20

18

16

14

12

10

8

6

Cut one on fold

149

2

144

Back Bodice PART A

139

CAPSULE
WARDROBE
© Printed in the UK for Simply Sewing. Supplied by Our Media Ltd, Bristol BS1 4ST.
For individual, private home use only. Not for commercial/manufacturing purposes
or resale.

SIZE KEY

SIDE 2 OF 2

6

Pattern sheets are printed double sided – you’ll need to trace your pattern
pieces onto pattern paper rather than cutting out directly from this sheet.

8

Scan the QR code to head to that page.

10
12
16
18
20

3

22
24
26

142

28
30

147

SIZE KEY

Neckband
Cut one on fold

THE BRITTANY tee

14

6
8
10
12

152

157

14
16
18
20
22
24
26
28
30

6
14 12 10 8

28

26

24

22

20

18

16

Front Bodice PART B
(Join to PART A before cutting out fabric)
Cut one on fold

THE BRITTANY tee

1

30 28

26

24

22 20

18 16

148

Sleeve Cuff
Cut one pair

4

THE BRITTANY tee

30

143

2

THE BRITTANY tee

153

14

12

10

8

6

Back Bodice PART B
Cut one on fold

158

ATTACH PART A HERE BEFORE CUTTING OUT

SIZE KEY

12

10

6

Pattern sheets are printed double sided – you’ll need to trace your pattern
pieces onto pattern paper rather than cutting out directly from this sheet.
Find our guide to pattern tracing at gathered.how/tracing-patterns.
Scan the QR code to head to that page.

SIDE 1 OF 2

© Printed in the UK for Simply Sewing. Supplied by Our Media Ltd, Bristol BS1 4ST.
For individual, private home use only. Not for commercial/manufacturing purposes
or resale.

WWW.GATHERED.HOW/SIMPLYSEWING

CAPSULE
WARDROBE

SIZE KEY

30

28

26

24

22

20

18

16

14

12

10

6

12

8

6

ATTACH PART A HERE BEFORE CUTTING OUT

1

THE BRITTANY tee

Front Bodice PART B
(Join to PART A before cutting out fabric)
Cut one on fold

TEST SQUARe

Cut on fold

10x10cm

THE
Fron
(Join to PART B
Cu

ATTACH

18

26 28 30

10

12 14 16

e

4

THE BRITTANY tee
Sleeve Cuff
Cut one pair

Cut on fold

3

THE BRITTANY tee
Neckband
Cut one on fold

6

8

30

28

26

24

22

20

18

16

14

12

10

8

Cut on fold

A

0

18

16

14

12

10

8

6

2

THE BRittany
Back Bodice PAR
(Join to PART B before cutti
Cut one on fol

ATTACH PART B

14
16
18
20
22
24
26
28
30

Pattern sheets are printed double sided – you’ll need to trace your pattern
pieces onto pattern paper rather than cutting out directly from this sheet.

SIDE 2 OF 2

© Printed in the UK for Simply Sewing. Supplied by Our Media Ltd, Bristol BS1 4ST.
For individual, private home use only. Not for commercial/manufacturing purposes
or resale.

WWW.GATHERED.HOW/SIMPLYSEWING

CAPSULE
WARDROBE

ATTACH PART A HERE BEFORE CUTTING OUT

10x10cm

TEST SQUARe

SIZE KEY

30

28

26

24

22

20

18

16

14

12

10

8

6

Find our guide to pattern tracing at gathered.how/tracing-patterns.
Scan the QR code to head to that page.

0

8

6

Back Bodice PART B
(Join to PART A before cutting out fabric)
Cut one on fold

THE BRITTANY tee

2

ATTACH PART A HERE BEFORE CUTTING OUT

AGES 0 MONTHS - 12 YEARS

DRESS
FRONT

BACK

EXCLUSIVE FROM

Photography © Jane Looker

WWW.GATHERED.HOW/SIMPLYSEWING

57½

60

152
146

52¾

55

140

50½

134
128

45¾

48

122

43½

116
110

38½

41

104

36¼

98

34

92

31½

86

29

80

26¾
24½

68
62
cm

in

25
24
23¼
22½
22
21¾
21¼
20¾
20
19½
19
18¼
17¾
17¼
in

45
cm 43.5

74

HEIGHT

26½
25½

67
65
63
61
59
57
56
55
54
52.5
51
49.5
48

28½
27¼
26
25
24
23¼
22½
21¾
21
20
19¼
18½
17¾
17

46.5

WAIST

30¾
29½

78
75
72
69
66
63
61
59
57
55
53
51

in

The Indigo Dress is one of
the patterns from Tilly
Walnes’s new book Mini
Makes (Quadrille, £26)

cm

similar to help you differentiate it from
the Front Skirt.
QSeam allowances are 1cm, unless
specified.

BODY MEASUREMENTS

QMark the notches on the interfacing
pieces.
QCut short snips (max. 5mm) for the
notches on the other pieces.
QMark the Back Skirt with a safety pin or

SIZE

NOTES

0–3
3–6
6-9 9–12 12–18 18–24
mths mths mths mths mths mths

2–3
yrs

QLight- to medium-weight woven
fabrics with drape, such as cotton lawn,
chambray, seersucker, double gauze,
Swiss dot, broderie anglaise or viscose.

49

3–4
yrs

FABRIC SUGGESTIONS

47

8–9
yrs
7–8
yrs
6–7
yrs
4–5
yrs

5–6
yrs

sizes 0–3 months to 3–4 years,
4 buttons for all other sizes
QMatching thread
QBasic sewing kit

45

YOU WILL NEED
QFabric (see fabric requirements chart
for amount)
Q0.4m iron on interfacing – similar
weight to your fabric
Q10mm wide elastic (see elastic chart for
amount)
Q8–10mm wide buttons: 3 buttons for

CHEST

PACK INCLUDES
QPattern sheet x1 (Tracing required)
QInstruction sheet

43

9–10 10–11 11–12
yrs
yrs
yrs

Sew this cute smock dress from Tilly and the Buttons’
brand new book Mini Makes

SHOP.TILLYANDTHEBUTTONS.COM

© Printed in the UK for Simply Sewing. Design: Tilly Walnes for Tilly and the Buttons. Supplied by Our Media
Company Ltd, Bristol, BS1 4ST. To be used for individual, private home use only
and not for commercial or manufacturing purposes. Not for resale.

indigo
01

02

03

07

08

09

STITCHING TERMS
Machine tack: Use a long stitch length to hold a section in place. Don’t
backstitch at the start and end.
Finish the seams: Finish the raw edges with a zigzag stitch or an overlocker.
Press: Pressing fabric is placing the iron down, holding it for a few seconds, lifting it
and placing it down again. Ironing is sliding the iron back and forth.
Understitch: Stitch close to the seam line usually on the side that will be on the
inside of the garment such as the facing. This will hold the seam allowance in
place when the garment is worn.
Staystitch: Stitching in areas prone to stretching, such as necklines, to hold the
fabric in shape while it is being worked on.
Topstitch: Stitching usually from the right side of the garment to hold seam
allowances in place or can be used for decorative purposes.

MAKING THE DRESS
CREATING THE BODICE

Step one From main fabric, cut:
Front Bodice (1): one on fold
Back Bodice (2): one pair
Sleeve (3): one pair
Front Skirt (4): one on fold

Step one Staystitch the necklines of the Back Bodices and Front Bodice 7mm
from the edge to help stop them stretching out of shape. 01
Step two Lay the Back Bodices over the Front Bodice, right sides (RS) together,
and pin them together at the shoulders. Stitch and finish the seam allowances
with zigzag stitch or an overlocker and press them towards the back. 02
Step three Lay the interfacing, glue (rough) side down, over the wrong side
(WS) of the Front and Back Facings. Cover with a press cloth and press with
a hot, dry iron for a few seconds to fuse it in place. Snip the notches.
Step four Lay the Front Facing over the Back Facings, RS together. Pin them
together at the shoulder seams, matching the notches. Stitch. Press the seam
allowances open. Finish the outside edge of the facing without trimming. 03
Step five Open out the bodice at the shoulders and lay it RS up. Pin the facing
to the bodice around the neckline and back openings, RS together, matching
the shoulder seams and notches. Stitch, with the interfacing side face up on
your sewing machine. 04
Step six Trim and grade the curved seam allowances around the neckline, clip
into them every 2–3cm, almost up to but not over the stitching line – this will
help the seam allowances sit flatter when we turn the facing to the inside. 05
Step seven Press the facing and seam allowances away from the bodice.
Understitch the seam allowances to the facing, close to the seam line – you

Back Skirt (5): one on fold
Front Facing (6): one on fold
Back Facing (7): one pair
Step two From interfacing, cut:
Front Facing (6): one on fold
Back Facing (7): one pair

won’t be able to get the presser foot right into the stitched corners, so sew as
much as you can, understitching back openings and neckline separately. 06
Step eight Fold the corners at the top of the back opening and use a point
turner to ease them out into right angles. Press the facing to the inside of the
bodice, rolling the seams in slightly so they’re invisible from the outside. 07
Step nine Pin the facing to the inside of the bodice along the shoulder seams.

CUTTING OUT

WWW.GATHERED.HOW/SIMPLYSEWING

dress
04

05

06

10

11

12

To help keep It in place, sew a few ‘stitches in the ditch’ – with the bodice face
up on your machine, sew with the needle running exactly along the shoulder
seam line so that the stitches end up hidden. If the facing is still trying to roll
out, you can secure it with a couple of hidden hand stitches on the inside of the
bodice at the centre front. 08
Step ten Lay the Back Bodices over the Front Bodice, RS together. Pin them
together along the side seams. Stitch. Finish the seam allowances and press
them open or towards the back. 09
Step eleven Lay the buttonhole markings guide over the RS of the back
opening on the right-hand back bodice as you’d wear it – the markings should
be 15mm from the back opening. Use a chalk pencil or washable pen to
transfer the markings to the RS of the fabric. The dots represent the tops of the
buttonholes – draw a vertical line down from each dot, making each line
2–3mm longer than your button. Stitch the buttonholes at the markings. Open
them up with a seam ripper or buttonhole chisel. 10
Step twelve Overlap the right back opening over the left by 30mm, smooth out
the fabric and pin in place. Mark the button positions on the left back bodice
by poking a chalk pencil or washable pen through the centre of the
buttonholes. Hand sew the buttons onto the markings. 11
Step thirteen Do the buttons up, smooth out the fabric and pin the overlapped
back bodice openings together at the waistline. Tack where they overlap at the
bottom, 7mm from the waistline.

CREATE THE SKIRT
Step one Lay the Back Skirt over the Front Skirt, RS together. Pin them together
along the side seams, matching the notches. Stitch. Finish the seam allowances
and press them open or towards the back. 12
Step two To sew the gather stitches, thread your machine in a contrast colour
and set it to a 4–5mm long stitch. Sew two or three parallel rows of stitches

WWW.GATHERED.HOW/SIMPLYSEWING

SHOP.TILLYANDTHEBUTTONS.COM

© Printed in the UK for Simply Sewing. Design: Tilly Walnes for Tilly and the Buttons. Supplied by Our
Media Company Ltd, Bristol, BS1 4ST. To be used for individual, private home use only and not for
commercial or manufacturing purposes. Not for resale.

SHOP.TILLYANDTHEBUTTONS.COM

indigo
13

14

15

19

20

21

along the top edge (the edge with the centre notches) of the Front Skirt,
around 4mm, 8mm and/or 12mm from the edge, without back tacking, and
leaving long, loose threads at each end. Repeat on the Back Skirt. 13
Step three With the skirt and bodice RS out, flip the skirt over the bodice so
they’re RS together, making sure the Front Skirt is against the Front Bodice. Pin
the waistlines together at the side seams and centre notches (the centre notch
on the Back Bodice is in line with the buttonholes). 14
Step four Starting at one end of the gather stitches, gently pull on the top three
threads until the skirt fits the bodice between one side seam and the centre
pin. Even out the distribution of the gathers with your fingers and pin to the
bodice. Repeat with all four quarters of the skirt. 15
Step five Tack the skirt to the bodice with a 7mm seam allowance, evening out
the gathers with your fingers as you sew. Check the gathers are smooth, then
rethread your machine in matching thread and stitch with a 10mm seam
allowance in a regular stitch length. Remove the tacking and gather stitching.
Finish seam allowances. Gently press the skirt away from the bodice and the
seam allowances towards the bodice, taking care not to squish the gathers. 16

ADD THE SLEEVES
Step one With a 4–5mm long stitch, sew two or three parallel rows of ease
stitches (sewn the same way as gather stitches, but they create much smaller
gathers) along the Sleeve heads between the front and back armhole notches,
around 4mm, 8mm and/or 12mm from the edge, without back tacking, leaving
loose threads at each end. 17
Step two Rethread the machine in a matching colour and reset to a regular
stitch length. Fold each sleeve lengthways, RS together. Pin together the
underarm seams, matching the notches. Stitch. Finish the seam allowances and
press them open or towards the back. 18
Step three Lay the smock and Sleeves RS out, each sleeve next to its matching

WWW.GATHERED.HOW/SIMPLYSEWING

armhole – the front sleeve and armholes are marked with single notches and
the backs with double notches. Flip the bodice over one of the Sleeves to bring
them RS together. Pin them together at the underarm, shoulder and notches.
Gently pull on the ease stitches until the sleeve fits the armhole. Even out the
small gathers created by the ease stitching and secure the rest of the sleeve in
place with plenty of pins. 19
Step four Tack the sleeve into the armhole in contrast thread with a 7mm seam
allowance, evening out the gathers with your fingers. Once the sleeve has gone
in smoothly, stitch in matching thread with a regular stitch length and a 10mm
seam allowance. Attach the other sleeve to the other armhole the same way.
Unpick the tacking and ease stitches. Finish seam allowances and press them
towards the sleeve, taking care not to press out the volume created. 20
Step five With Sleeves RS out, press the hems to the WS by 10mm, then another
15mm and pin in place. Leave a small opening for the elastic and topstitch the
rest of the hem 13mm from the edge, back tacking at each end. 21
Step six Cut a piece of elastic as per the elastic chart and cut this into two equal
pieces. Attach a safety pin to each end. Attach one of the safety pins to the
underarm seam allowance close to the opening on the sleeve hem and use the
other safety pin to thread the elastic through the channel and out the other
side. Remove the safety pins, check the elastic isn’t twisted, then, keeping the
fabric out of the way, overlap the ends by 10mm and join together with
a couple of rows of stitching, back tacking securely. 22
Step seven Topstitch the unstitched lower fold of the opening, 13mm from the
edge – stretch the elastic so that you can hold the fabric flat as you sew. Repeat
with the other sleeve. 23

FINISHING OFF
Step one Press the skirt hem to the wrong side by 7mm and then by another
7mm and pin in place. Topstitch close to the inside fold. 24

dress
16

17

18

22

23

24

FINISHED GARMENT MEASUREMENTS
SIZE

0-3 mths 3-6 mths 6-9 mths

9-12

12-18

18-24

mths

mths

mths

2-3 yrs

3-4 yrs

4-5 yrs

5-6 yrs

6–7 yrs

7–8 yrs

8–9 yrs 9–10 yrs 10–11 yrs 11-12 yrs

cm

50

52

54

56

58

60

62

64

66

68

70

73

76

79

82

85

in

19¾

20½

21¼

22

22¾

23¾

24½

25¼

26

26¾

27½

28¾

30

31

32¼

33½

cm

49

51

53

55

57

59

61

63

65

67

69

72

75

78

81

84

in

19¼

20

20¾

21¾

22½

23¼

24

24¾

25½

26½

27¼

28¼

29½

30¾

32

33

cm

38.5

41

43

44

46.5

49

51

54

57

60.5

63.5

66.5

70

73

76.5

80

15¼

16¼

17

17¼

18¼

19¼

20

21¼

22½

23¾

25

26¼

27½

28¾

30

31½

2-3 yrs

3-4 yrs

4-5 yrs

5-6 yrs

6–7 yrs

7–8 yrs

CHEST

WAIST

DRESS
LENGTH in

FABRIC REQUIREMENTS
SIZE

0-3 mths 3-6 mths 6-9 mths

9-12

12-18

18-24

mths

mths

mths

8–9 yrs 9–10 yrs 10–11 yrs 11-12 yrs

115CM m

1.2

1.2

1.2

1.2

1.3

1.3

1.3

1.3

1.9

1.9

1.9

1.9

2.3

2.3

2.3

2.3

140CM m

0.8

0.8

0.8

0.8

1.1

1.1

1.1

1.1

1.5

1.5

1.5

1.5

1.9

1.9

1.9

1.9

27

28

28.5

29

30

31

31.5

32

32.5

33

34

35

35.5

36.5

37

ELASTIC CHART
LENGTH cm

26

SHOP.TILLYANDTHEBUTTONS.COM

HOW TO PRINT THIS PATTERN
Print out the following pages on A4 paper at 100%.
Overlap the red lines and tape the sheets in place using the guide below.

on
e
ac old
f
Pl

Snip
notch
here

4–5y
5–6y
6–7y
7–8y
8–9y
9–10y
10–11y
11–12y

0–3m

4–5y

5–6y

6–7y

y
3–4y
y
2–3y
18–24m
12–18m
9–12m
6–9m
3–6m

7–8y

8–9y

9–10y

11–12y

10–11y

m er

u ld

4

2–3y
3–4y

9–10y
10–11y

18–24 m
12–18 m
9–12m
6–9m
3–6m
0–3m

m
2 18
12

6– 7y

2–3y

12–18m

184

0–3 m
3–6 m
6–9

11–12y

m
ne sea
wai stli
skir t
s bac k
– join

Back Bodice
Cut one pair

THE indigo dress

ole
back armh
notc hes

175

centre back
notch

1

8m
12 –1

m

9– 12
6 –9 m
3– m
6m

a m 0 –3

r se
ld e
ou

2
neckline

centre back
notch

180

185
Place on fold

10–11y

9–10y

11–12y
11–12y

9–10y

10–11y

7–8y

7–8y

g
cin
rfa

se am

Front Bodice
Cut one on fold

THE indigo dress
18

sh

armhole

9–12m

ld er

Snip
notch
t h h
here

3– 4y

7–8 y

y
8– 9y

9– 10

y
3y
2–3
3–4 y
4–5 y
5–6 y
6–7 y
7–8 y
8–9 y
9–1 0y
10– 11y
11–12 y

m
ne sea
wai stli
skir t
fron t
– join s

11– 12y

179

10–11y

5

s

h
10– 11y

side seam

9–10y

Back Skirt
Cut one on fold

dres

tc

174

11–12y

THE indigo dress

digo

no

Place on fold

169

10–11y

0–3m

3–4y

8–9y

3–6m

6–7y
5–6y

6–9m

7–8y

7–8y

18–24 m

9–10y

6–7y

8–9y

5–6y

3–4y

2–3y

6–9m

18–24m

3-6m

9–12m

5–6y

11–12y

10–11y

12–18m

bu
top of
buttonh ole 1
– all sizes

he in

y

Buttonho
Markings Guide
Sizes 0-3m to 3-4y

y)
inte
3-4
to and
-3m bric
s0
ize m fa
g (S fro
cin ir
Fa pa
e
ck
Ba t on
Cu
sh ou

9 10y

The indigleo dress

7T

necklin e
centr e
back
notch

8 9

centre
back
notch

3–4y
12–18m
18–24m
2–3y

0–3m
3–6m
6–9m
9–12m
12–18m
18–24m
2–3y
3–4y
4–5y
y
5–6y
6–7y

+ 18–24m

centr e
back
notch

0–3m

it) back opening
(as you’d wear
ith right-ha nd
2–3y
+ 3–4y

3–6m
6–9m
0–3m

Lengthen
or shorten
here

11–12y

10–11y

8–9y

0–3m

7–8y

183

11–12 y

4–5y

Snip
notch
here

9–12m

3–4y

9–10y
top of
buttonh ole 1
– all sizes

+ 5–6y

The indigo dress

Buttonhole
Markings Guide
Sizes 4-5y to 11-12y

6–7y
+ 7–8y

8–9y
+ 9–10y

10–11y
+ 11–12y

4–5y
+ 5–6y

6–7y
+ 7–8y

0–3m
+ 3–6m

12–18m

3–6m
6–9m
9–12m
12–18m
18–24m
2–3y

10–11 y
top of
ttonhol e 1
– all sizes

0–3m
+ 3–6m

6–9m
+ 9–12m

–3y
3–4y

6–9m
9–12m

10–11y

8–9y
+ 9–10y

178

0–3m
+ 3–6m

0–3m

2–3y
3–4y

18m

3-6m

6–9m

–3y

5-6y

6–7y

2–3y
3–4y

0–3m
3–6m
6–9m
9–12m
12–18m

2–3y

7–8y

8–9y

18–24m

10–11y
+ 11–12y

9–10y

12–18m

3–4y

4m
–2
8m
12 –1 m
2
9 –1 9 m
6– 6m
3–
3m
0–

170

10–11y

11–12y

9–12m

173

24m

centre
back
notch

6–9m

168

–12m

3–6m

6–7 y

9–12m
6–9m
3–6m
0–3m

5–6y
4–5y
3–4y
2–3y
18–24 m
12–18 m
0–3m

–4y

Grain line

to selved ges)

9–10y

6–9m
+ 9–12m

3–4y
18–24m

8–9y

6–7y

11–12y

10–11y

8–9y

9–10y

7–8y

7–8y

12–1 8m

11–12y

6–7y

172

Lengthen or shorten here

7–8y
8–9y

18–24 m

10x10cm

6–7y

2–3y

Sleeve
Cut one pair

3–6m

THE indigo dress

6–9m
9–12m

ess

Pla ce
on
fol d

o dr

underarm seam

5–6y

indig

5–6y

6–7y

182

12–18m
18–24m

4–5y

centre
back
notch

177

3–6m

y
3–4y
y
2–3y
18–24m
12–18m
9–12m
6–9m
3–6m

11–12y

5–6y

181

0–3m

0–3m

10–11y

176

SIZE KEY

o le

you’d
right-ha nd (as
Line up with
opening
wear it) back

Grainline

t
n ar
ot m
ch h

underarm seam

parallel to selvedges)

on

9–12m

167

8–9y

4–5y

SIDE 2 OF 2
Pattern sheets are printed double sided –
you’ll need to trace your pattern pieces
onto pattern paper rather than cutting
out directly from this sheet. Find our
guide to pattern tracing at gathered.how/
tracing-patterns. Scan the QR code to
head to that page.

7–8y

9–10y

Place on fold

o
h
m es
ar h
k tc
ac no
b

© Printed in the UK for Simply Sewing. Pattern design by Tilly
Walnes for Tilly and the Buttons. Supplied by Our Media
Limited, Eagle House, Bristol BS1 4ST. For individual, private
home use only. Not for commercial/manufacturing purposes
or resale.

fr

SIDE 1 OF 2

3–6m

0–3m

6–9m

9–12m

12–18m

18–24m

2–3y

6–7y

3–4y

The

5–6y

le

171

6–9m

Fro
Cu nt
an t o Fac
d ne in
in
g
te on (S
rfa fo ize
cin ld fr s 4
g
om -5y
fa to
bri 11
c -12
y)

4–5y

0–3m

shoulder notch

© Printed in the UK for Simply Sewing.
Pattern design by Tilly Walnes for Tilly and
the Buttons. Supplied by Our Media Limited,
Eagle House, Bristol BS1 4ST. For individual,
private home use only. Not for commercial/
manufacturing purposes or resale.

e

Lengthen
or shorten here

11–12y
10–11y
9–10y
8–9y
7–8y
6–7y
5–6y
4–5y
3–4y
2–3y
18– 24m
m
12–1 8m
9–12 m
9
6–9m
9m
3–6m
m

li n

11–12y

11– 12yy
10 –11 y
9– 10
8– 9y
7– 8y
6– 7y

ck

9–10y

ne

8–9y

4–5y

7–8y

e

6–7y

u ’r

er
sho uld
sea m

yo

5–6y

Front Facing
(Sizes 0-3m to 3-4y)
Cut one on fold from fabric
and interfacing

Pattern sheets are printed double sided – you’ll need to
trace your pattern pieces onto pattern paper rather than
cutting out directly from this sheet. Find our guide to
pattern tracing at gathered.how/tracing-patterns.
Scan the QR code to head to that page.

e

4–5y

ck l

4m
18 –2 m y
12– 18
9– 12m
6– 9m
3– 6m
0– 3m

10–11y

11–12y

166

Back facing
(sizes 4-5y to11-12 y)
Cut one pair from fabric
and interfacing

ns
5 –o6 yly
u tt n
B o
e –7y
e s6
th u
d al 7 – 8 y
an on
ly rs
8–9y
T il p e
r
Fo
9–10y

neckline

SIZE KEY

s iz

U

©

sh ou
ld
se am er

7
THE indigo dress
centre
back
notch

8– 9y

10– 11y
y
9– 10
11– 12y

sh

ou

ld

er

se

am

neckline

7
THE indigo dress

Fr
Cu ont

The

e

11–12y

in
kl

10–11y

c

9–10y

3
2 –– 4 y
18 3y sho
uld
1 –2
s
2
4
e
am er
9– –18 m
6 – 1 2 mm y
3– 9m
0 –6 m
3m

ind

11–12y

Front Facing
(Sizes 0-3m to 3-4y)
ric
Cut one on fold from fab
and interfacing

The indigo dress

10–11y

8–9y

e

9–10y

7–8y

lin

8–9y

6–7y

ck

7–8y

5–6y

ne

6–7y

4–5y

ne

der
shoul
seam
y
11–12
y
1
1
10– y
9–10
8 – 9 yy
7–8 y
6–7

4–5y
5–6y
6–7y
7–8y
8–9y
9–10y
10–11y
11–12y

Back facing
(sizes 4-5y to11-12 y)
Cut one pair from fabric
and interfacing

nec klin e

on
e
ac old
f

cen tre
bac k
not ch
5–6y

Grainline

4–5y

allel to selvedges)

3–4y

Pl

sho
uld
seam er

SIZE KEY
0–3m

3–6m

6–9m

9–12m

12–18m

18–24m

2–3y

Grainline

11–12y

8–9y

7–8y

6–7y

5–6y

centre
back
notch

0–3m

4–5y

10–11y

cen tre
bac k
not ch

parallel to selvedge

9–10y

8–9y

7–8y

6–7y

5–6y

4–5y

Lengthen
or shorten here

11–12y

9–10y

The

indig

o dr

ess

Fr
Cu ont
an t o Fac
d ne in
in
g
te on (S
rfa fo ize
cin ld f s 4
g rom -5y
fa to
br 11
ic -1
2y
)

0–3m

3–6m
6–9m
9 – 12 m
12 – 18 m
18 – 2 4 m
2–3y

3–4y

9 – 12 m

3–6m
6–9m

12 – 18 m

y
9–10
y
8–9 y
7–8 y
6–7

c
e

18 – 2 4 m

3–4y

8–9y

ne
in
kl

(p o s it

Place
on
fold

g
cin
Fa
ck
Ba t
Cu

2–3y
3–4y

uld

er
sea

y)
3-4
to

sho

-3m
s0
ze
(Si

m

9–10y

n e c k li n e
centre
back
notch

0–3m
3–6m
6–9m
9 – 12 m
12 – 18 m
18 – 2 4 m
2–3y

0–3m
3–6m
6–9m
9 – 12 m
12 – 18 m

s)
to s e lv e d g e

3–4y

Le ng th en
or sh or te n
he re

G r a in li n e

THE indigo dress

Front Bodice
Cut one on fold

1

WWW.GATHERED.HOW/SIMPLYSEWING

SHOP.TILLYANDTHEBUTTONS.COM

© Printed in the UK for Simply Sewing. Pattern design by Tilly
Walnes for Tilly and the Buttons. Supplied by Our Media
Limited, Eagle House, Bristol BS1 4ST. For individual, private
home use only. Not for commercial/manufacturing purposes
or resale.

SIDE 1 OF 2
Pattern sheets are printed double sided – you’ll need to
trace your pattern pieces onto pattern paper rather than
cutting out directly from this sheet. Find our guide to
pattern tracing at gathered.how/tracing-patterns.
Scan the QR code to head to that page.

SIZE KEY

0–3m

10x10cm

Sleeve
Cut one pair

THE indigo dress

2

THE indigo dress
Back Bodice
Cut one pair

WWW.GATHERED.HOW/SIMPLYSEWING

7–8y

6–7y

5–6y

3–4y

2–3y

18–24m

12–18m

9–12m

6–9m

3–6m

0–3m

Pattern sheets are printed double sided –
you’ll need to trace your pattern pieces
onto pattern paper rather than cutting
out directly from this sheet. Find our
guide to pattern tracing at gathered.how/
tracing-patterns. Scan the QR code to

SIDE 2 OF 2

TEST SQUARe

4

© Printed in the UK for Simply Sewing.
Pattern design by Tilly Walnes for Tilly and
the Buttons. Supplied by Our Media Limited,
Eagle House, Bristol BS1 4ST. For individual,
private home use only. Not for commercial/
manufacturing purposes or resale.

10x10cm

Front Skirt

SHOP.TILLYANDTHEBUTTONS.COM

Place on fold
e

Snip
notch
here

11–12y

10–11y

9–10y

8–9y

7–8y

6–7y

5–6y

3–4y

4–5y

2–3y

18–24m

12–18m

7–8y

5–6y
4–5y
3–4y
2–3y
18–24m
12–18m
9–12m
6–9m
3–6m
0–3m

wa ist lin e sea m – joi ns f

4
Front Skirt

side s
eam

Lengthen or shorten here

to p o f
b u tt o n h o le 1
– a ll si ze s

The indigo dress
7–8y
6–7y
5–6y

9–10y

10 –1 1y

11–12y

Buttonhole
Markings Guide
Sizes 0-3m to 3-4y

ce n tr e
b ac k
n ot ch

0 –3 m
+ 3– 6m
6– 9m
+ 9– 12 m

2– 3y
+ 3– 4 y

5 -6 y

0 –3 m
+ 3– 6m
6– 9m
+ 9– 12 m

2– 3y
+ 3– 4 y

0 –3 m

8–9y
+ 9 – 10 y

9 –1 2 m

10 – 11 y
+ 11 – 12 y

s yo u ’d
ri g h t- h a n d (a
L in e u p w it h
o p e n in g
w e a r it ) b a ck

11 – 12 y
10–11y

9 – 10 y

11 – 12 y
10 – 11 y
9 – 10 y
8–9y
7–8y
6–7y

10 – 11 y
+ 11 – 12 y

4–5y
3 -6 m
6 –9 m

12 –1 8 m

c e n tr e
back
n o tc h

6–7y
+ 7–8y

4–5y
+ 5–6y
8–9y
+ 9 – 10 y
4–5y
+ 5–6y

2 –3 y

6–7y
+ 7–8y

18 –2 4 m

3 –4 y
10 – 11 y
+ 11 – 12 y

8–9y
+ 9 – 10 y
6–7y
+ 7–8y

+ 5–6y

18–24m
12–18m
9–12m
6–9m
3–6m
0–3m

7–8y
6–7y
5–6y
4–5y
3–4y

9–10y

10 –1 1y

11–12y

am
side se

Lengthen or shorten here

Snip
notch
here

5

THE indigo dress
Back Skirt
Cut one on fold

Place on fold

0–3m

3–6m
6–9m
9–12m
12–18m

18 – 2 4 m
2–3y

5–6y

6–7y

+ 5–6y

onhole
Markings Guide
4-5y to 11-12y

i
n
digo dress
Butt
to p o f
b u tt o n h o le 1
– a ll si ze s

9–12m
12–18m

18 – 2 4 m
2–3y

y

5–6y

5–6y

6–7y

6–7y

7–8y

7 –8 y

8–9y

8–9y

9 – 10 y

9 – 10 y

10 – 11 y

10 – 11 y

11 – 12 y

11 – 12 y

0–3m

3– 6 m

6–9m
9 – 12 m
12 – 18 m

18–24m
2– 3y

3–