/


Tags: weapons military affairs machine gun
Year: 1940
Text
Notified in A.A.O's. dated 30th June, 1940.
NOT TO BE PUBLISHED
The information given In this document
is not to be communicated» either
directly or Indirectly» to the Press or to
any person not holding an official
position in His Majesty's Service.
M________
G.S. Publications
225
Small Arms Training
VOLUME I, PAMPHLET No. 4A
•303-inch Lewis
Machine Gun
(AUSTRALIA)
1940
Crown Copyright Reserved
By Authority: Arbuckle Waddell Pty. Ltd., 20 McKlllop St., Melbourne
(Reprinted with the permission of the Controller, His Majesty's
Stationery Office, London).
Notified in A.A.O's. dated 30th June, 1940.
NOT TO BE PUBLISHED
The information given in this document
is not to be communicated» either
directly or indirectly, to the Press or to
any person not holding an official
position in His Majesty’s Service.
Small Arms Training
VOLUME I, PAMPHLET No. 4A
•303-inch Lewis
Machine Gun
(AUSTRALIA)
1940
Crown Copyright Reserved
By Authority: Arbuckle Waddell Pty. Ltd., 20 McKlllop St.. Melbourne
(Reprinted with the permission of the Controller, His Majesty’s
Stationery Office, London).
Military Board.
Army Headquarters,
Melbourne,
June, 1940.
Issued by command of the Military Board.
Secretary to the Board.
THE WAR OFFICE,
6 th December, 1939.
3
CONTENTS
Page
General notes................................................ 5
Section 1. Holding, aiming and firing.—
Lesson 1. Magazine filling ... 7
„ 2. Loading, unloading and sight setting .. 7
„ 3. Holding and aiming ............... 8
„ 4. Firing ........................................ 10
Section 2. Stripping, cleaning and mechanism.—
Lesson 5. Piston group .................................. 12
„ 6. Body group .................................... 12
„ 7. Barrel group .................................. 13
„ 8. Changing parts with minimum stripping . 13
„ 9. Care and cleaning, daily and before firing..... 14
„ 10. Care and cleaning, during intervals of and
after firing and after gas attack ...... 15
„ 11. Mechanism ..................................... 15
Section 3. Elementary handling, immediate action,
stoppages and additional stripping.—
Lesson 12. Elementary handling ............................ 17
„ 13. Immediate action .............................. 20
„ 14. Stoppages ...................................... 21
„ 15. Additional stripping .......................... 25
Section 4. Advanced handling.—
Lesson 16. Advanced handling (use of cover) ............... 26
„ 17. Advanced handling (movement) ................... 27
Section 5. Section handling.—
Lesson 18. Duties of Nos. 3, 4, 5 and 6 ................... 29
„ 19. Section handling .............................. 31
Section 6. Tests of elementary training ................... 32
б
GENERAL NOTES
1. The general principles governing the employment of the
section in War are dealt with in F.S.R., Vol. 11, Cavalry and
Infantry Training, and Cavalry and Infantry Section Leading.
2. The chief characteristic of the weapon is its power of
delivering a volume of fire with the employment of few men.
When fired from the bipod, the effective range is 1,000 yards.
3. It is an air-cooled weapon, capable of a high rate of fire,
and is fired shoulder controlled from a bipod. To avoid over-
heating, strain and excessive expenditure of ammunition, and
at the same time to produce the necessary volume of fire as
well as to maintain accuracy, it is best to fire in bursts of
four or five rounds. The accuracy of the gun permits of only
a small margin of error in aiming, range estimation or allow-
ance for the effect of atmospheric conditions. Accurate ob-
servation of fire is therefore essential. If less than four or
five rounds are fired in a burst, observation will be possible
only in the most favourable circumstances.
4. Taking into account the time required to change maga-
zines, a trained man should be able to maintain an average
rapid rate of 120 rounds a minute with accuracy.
5. To ensure that the section can fulfil its role in war, the
personnel must be trained so that each individual is capable
of performing the following duties concerned with the handling
of the gun:—
i. To prepare the gun for firing and maintain it in action.
ii. To carry the gun and get it quickly into action on
any type of ground.
iii. To fire accurately at various rates up to 120 rounds
a minute according to the requirements of various
types of targets likely to be encountered in battle.
iv. To observe the fire and correct its application accord-
ingly.
v. To assist forward movement by fire whilst at the
same time ensuring that such fire does not endanger
his own troops.
vi. To fire with effect at low-flying aircraft.
vii. To perform the duties assigned to any member of the
section.
6
6. In this pamphlet, solely to make training easy, members
of a section are sometimes referred to by “Numbers?1 Every
man in a section, however, must be an efficient shot with the
L.M.G., and in addition be able to carry out every duty that
will maintain the gun in action under all conditions. All men,
in fact, will be interchangeable so far as duties with the LM.G.
are concerned.
7. System of training.—The principles of instruction laid
down in Pamphlet No. 1 of this series will be followed during
instruction in the Lewis Machine Gun. In addition, the
following points will be observed:—
Practice should be arranged in such a way as to ensure that
no time is wasted. This can be done by each individual carry-
ing out a cycle of action which leaves the gun ready for the
next man. Those not actually handling the gun will be con*
stantly questioned so that interest may be maintained. A fur-
ther demonstration should be given when it is apparent that a
point is not clear.
8. S.A.T., Vol. II., contains the following:—
(a) A detailed description and examination of the .303
inch LEWIS MACHINE GUN, Mks. I. and II. (vide
Appendix I.).
tn) The method of packing the Limbered G.S. Wagon of a
Company, and drill for loading and unloading (vide
Appendix II.).
(.c) Lewis Gun Packsaddlery and Equipment Drill for
loading and unloading (vide Appendix III.).
9. The information in this pamphlet supersedes pages 1 to
120 of S.A.T., Vol. II. (Modified Edition), 1938.
7
SECTION 1.—HOLDING, AIMING AND FIRING
The importance of correct holding of the gun will be im-
pressed on the soldier from the start. Efficiency cannot be
obtained until ball ammunition is fired, but instruction in
correct holding cannot be delayed until this period of training.
Any tendency to loose holding even during the most elementary
instruction must at all times be checked, otherwise marksman-
ship will be poor. Throughout this section the command
‘'Change Round” will be given whenever it is required to practise
another man on the L.M.G.
LESSON 1.—MAGAZINE FILLING
Instructors Notes
Stores.—
Magazine, 1 loading handle, if available, for each man.
Gun in chest. Ground sheets and dummy cartridges.
1. Explain and demonstrate.—
Insert the loading handle in the socket and press home,
releasing the magazine catch. See that the magazine is not
damaged and rotates freely. Insert the rounds one at a time
without leaving any vacant spaces, and ensure that the rims are
behind the retaining plate and the bullets between the separat-
ing pegs. After inserting each round rotate the magazine.
To fill by hand.—
Hold the magazine in the left hand and depress the magazine
catch with the first or second finger. Place a round in the
magazine and rotate the centre block with the thumb of the
right hand. When filling ensure that ammunition is kept clean.
To empty.—
Hold the magazine as for filling. Rotate it slowly and
remove each round.
2. Practise squad.
3. Demonstrate packing gun in chest.
4. Practise squad.
LESSON 2.—LOADING, UNLOADING AND
SIGHT SETTING
Instructor's Notes
Stores.—
Gun, magazines, dummies and ground sheets.
Explain and demonstrate.—
1. Position for loading.—Body straight behind gun, legs to-
gether. Left hand holds small of butt, right hand holds pistol
grip. First finger alongside trigger-guard when butt Is on
the ground.
2. Loading and unloading.—
i. Loading.—Ensure the cocking handle is forward. Place
a magazine on the gun catch to the right. Rotate the
magazine and pull back the cocking handle.
8
ii. Unloading—Remove the magazine by pressing in the
magazine catch, and pass it under the gun. Raise
the butt into the shoulder, press the trigger, cock the
gun and again press the trigger. During elementary
training or on the range stand up and report * ‘Gun
clear.”
3. Repeating Orders—If No. 1 fails to understand an execu-
tive order, he will call out “Repeat.”
4. Conditions of test.
5. Practise squad.
6. Unloading without firing.—This will often be required
when firing on the range. Remove the magazine, press a
bullet on the base of the round causing the front end to rise.
Draw the round forward, control the cocking handle and
trigger, remove the round and cock the gun. Press the
trigger, cock the gun and press the trigger. Report “Gun
clear.”
7. Practise squad.
8. Sight Setting.—Describe the back sight, odd numbers right,
even numbers left. Minimum range 100, maximum 2,000. To
adjust the back sight raise the leaf slightly, rotate the milled
head screw until the line on the slide is opposite the required
range, raise the sight. When not in use the leaf of the back
sight will be lowered.
9. Practise squad.
LESSON 3.—HOLDING AND AIMING
Instructors Notes
Stores.—
Gun magazines, aiming disc, landscape target (if necessary),
representative target and ground sheets.
1. Holding.—Explain that the light machine gun, unlike the
rifle, has little shock of recoil, but the automatic action of
the gun, when fired from the bipod, sets up vibration which,
unless controlled, throws the gun off its alignment. This control
can only be effected by correct holding, which is essential to
accurate shooting.
2. Aiming position.—Demonstrate and explain:—
Raise the butt into the shoulder and hold gun in shoulder
firmly with both hands, right hand on pistol grip, first finger
round trigger and left hand on the small of the butt, Both
hands exerting a backward and downward pressure. This
should be firm but not excessive, arms and shoulder muscles
should not be braced. The cheek will rest lightly on the butt.
The bipod should be vertical so as to allow equal backward
and forward movement of gun. On the command '‘Change
round” lower the butt and stand up.
9
3. Practise squad.
4. Aiming.—
i. Explain the rules (show diagram).
The first and second rules of aiming are the same as with
the rifle, but the third differs on account of the aperture back-
sight. To aim with the aperture sight look through the aper-
ture at the target. Align the top of the foresight on the centre
of the target, the point of contact thus made being in the
centre of the field of view through the aperture. With the
sights thus aligned look at the target. In firing at small or
large classification targets the bottom of the aiming mark
corresponds with the centre of the target.
ii. Draw or show a diagram as under:—
LEWIS GUN — CORRECT AIM — AT CENTRE OF TARGET
iii. Lay a correct aim on representative target, using suitable
support under butt; Squad view.
iv. Demonstrate how to obtain elevation and depression by
means of the elbows. If necessary the bipod legs will be
adjusted to suit the firer,
( At aiming disc (no magazine on gun).
5. Practise squad -j On landscape target or open country.
10
LESSON 4.—FIRING
Instructors Notes
Stores.—
Gun magazines and dummies, landscape targets (if necessary),
ground sheets.
1. Trigger pressing—Explain that the trigger has only one
pressure. As with the rifle the trigger must be pressed by a
squeezing action of the whole hand on the pistol grip.
2. Firing.—Explain:—
i. The normal rate of automatic fire is five bursts a minute.
Correct holding must be maintained throughout each burst.
ii. The sequence of firing is:—
AIM — FIRE — OBSERVE — RE-AIM
iii. After releasing the trigger observe the strike of the
shots with a minimum movement of the head and correct if
necessary.
iv. When in action, the firer is responsible for keeping a full
or nearly full, magazine on the gun.
v. The firer will always make allowance for side wind by
applying the rules for aiming off (see Rifle Lesson 11.)
3. Practise squad.
4. Types of fire.—Explain:—
Rapid fire is a reserve of fire and will only be used to gain
surprise effect against a vulnerable target, to cover movement,
or in an emergency (see Application of Fire, Pamphlet No. 2).
Firing will be in bursts of about five rounds with only euch
time between bursts as is necessary to observe and re-alm.
With practice a rate of 120 rounds a minute should be reached.
Accuracy must be maintained.
5. Moving targets.—Question squad on the method of en-
gaging moving targets as taught in the rifle instruction (Pam-
phlet No. 3, Lesson 12). Explain that the same method will
be applied in the case of the light machine gun, except that
as its swing is limited by the bipod mounting, it is necessary
to select some point in front and on the line of movement,
then just before the target has closed to the estimated lead
fire a long burst of eight or ten rounds. A succession of such
bursts will be fired. A new point ahead of the target being
selected each time. The correct grip with both hands must
be maintained and the elbows must not be moved.
Demonstrate in firing position.
6. Give conditions of test.
7. Practise squad in Lessons 2, 3 and 4.
11
SECTION 2.—STRIPPING, CLEANING AND MECHANISM
In the following lessons the instructor will explain and
demonstrate the stripping and assembling of each group. The
parts will be named and the squad frequently questioned about
them. After assembling, the correct functioning of the parts
will be tested. The instructor will ensure that proper care is
exercised in the removal of parts, particular attention being
paid to the lips of the barrel, screwed threads, etc.
LESSON 5.—THE PISTON GROUP
Instructor s Notes
Stores.—
Gun, spare parts, dummy cartridge, table.
1. Stripping.—
i. Cock the gun and press the trigger.
ii. Press the thumbpiece of the butt catch forward, rotate
the butt anti-clockwise and remove. With the No. 1 butt
catch use a dummy cartridge.
iii. Press the trigger and withdraw pistol grip slightly.
iv. Pull back the cocking handle and remove it. Draw out
the piston rod and bolt. Remove bolt and extractors. Unhook
the pinion casing.
v. Assemble in reverse order.
vi. Practise squad.
NOTE.—When replacing piston and bolt, ensure that the bolt
is correctly positioned on the piston rod, the feed arm is over to
the left and the actuating stud fully screwed up. If obstruction
is felt, press back the tail of the ejector.
LESSON 6.—THE BODY GROUP
Instructors Notes
Stores,—
As for Lesson 5.
1. Stripping.—Body cover.
i. Draw back body cover and remove. Using a dummy re-
move cartridge guide, stop pawl spring and stop pawls.
il. Assemble in reverse order, ensuring that the stop pawls,
which are numbered, are placed on the correct posts.
Hi. Practise squad.
12
2. Feed-arm.—
i. Using a dummy round, push back the feed-arm latch, move
the feed-arm round to the right and lift it from the magazine
post. Remove the feed-arm pawl and spring.
ii. Assemble in reverse order. If the piston and bolt are
in the body the underside of the tail of the feed-arm must
be placed over the actuating stud.
iii. Practise squad.
3. Body.—
i. Remove the body locking pin and pistol grip, and unscrew
the body.
ii. Assemble in reverse order.
iii. Practise squad.
LESSON 7.—THE BARREL GROUP
Instructor's Notes
Stores.—
As for Lesson 5.
1. Stripping.—
i. Using the spare gas regulator key or combination tool, un-
screw the clamp ring screw. Remove the clamp ring and front
radiator casing.
ii. Remove the bipod, the gas regulator key and gas regula-
tor. Remove the rear radiator casing.
iii. Assemble in reverse order. The small hole of the gas
regulator must be to the rear.
iv. Practise squad.
v. Unscrew the gas cylinder, using the piston rod if necessary.
Remove the gas chamber and barrel mouthpiece with the
spanner provided for the purpose.
vi. Assemble in reverse order.
vii. Practise squad.
LESSON 8.—CHANGING PARTS WITH
MINIMUM STRIPPING
Instructor's Notes
Stores.—
Guns, spare parts, dummy cartridge.
When carrying out any remedy no time should be wasted by
unnecessary stripping.
For this lesson, the gun will be placed on the ground, the man
adopting the service lying position behind it.
13
1. Explain and demonstrate.—
Part to be changed. i. Feed-arm pawl or spring, ii. Bolt. Stripping necessary. Butt and body cover. Butt, pistol grip withdrawn slightly, cocking handle re- moved.
iii. Piston. iv. Pinion casing. As for bolt. Butt. Withdraw pistol grip slightly.
2. Practise squad.
LESSON 9.—CARE AND CLEANING, DAILY AND
BEFORE FIRING
Instructor's Notes
Stores.—
Gun, magazine, holdall, cleaning materials and table.
The various articles of cleaning kit will be explained as they
are used.
Explain and demonstrate:—
1. Daily cleaning.—Cock the gun. Using the cleaning rod,
clean the barrel as for the rifle. Press the trigger.
NOTE.—If the gun has been used for instructional purposes
it may be necessary to strip the piston and body groups in
order to clean the working parts more thoroughly.
2. Before firing.—Strip completely. Clean and leave dry the
gas affected part, i.e., barrel group complete; gas cylinder
(using the cylinder cleaning rod and mop); head of piston
and rings, face of bolt. Clean remainder of gun and slightly
oil working parts. When assembling, set gas regulator to the
smallest hole and adjust both return springs to the correct
tension (from about 13 to 15 lbs. according to the known beha-
viour of the gun concerned) as follows:—
With the pistol grip disconnected, raise the pinion and pull back
the cocking handle about 2 inches. This increases the weight
by about 6 lb. Repeat as necessary and then test with the
spring balance.
To decrease: With the pinion disconnected, pull back the
cocking handle slightly, raise the pinion and connect up.
3. Clean and check spare parts and magazines.
4. Practise squad.
NOTE.—The striker post and inside the cam slot, having
been dried, should be smeared with graphited grease (if avail-
able, otherwise, well oiled). Flannelette should be wrapped
round the mop when cleaning the cylinder.
14
LESSON 10.—CLEANING DURING INTERVALS OF
FIRING, AFTER FIRING, AND AFTER GAS ATTACK
Instructor's Notes
Stores.—
As for Lesson 9.
Explain and demonstrate:—
1. During intervals of firing.—Unload. Check weight of return
spring. Tighten screws. Ensure damaged components adjusted.
Oil working parts as necessary. Check ammunition and fill any
partly filled magazines.
2. After firing.—Strip completely. Clean barrel as for rifle,
using boiling water if available, and gauze when necessary.
Clean gas cylinder with cylinder cleaning rod, wire brush and
mop. Clean with oily rag remaining parts, and, if necessary,
lightly scrape fouling from gas-affected parts, then dry, clean
and slightly oil. The weight on both return springs should be
reduced to about 4 lb. If it is not possible to clean as above
immediately after firing, the barrel and gas-affected parts will
be oiled. Further cleaning of gas-affected parts will only be
carried out when necessary; particular attention, however, will
be paid to the barrel, which will be cleaned and oiled daily until
fouling ceases. The use of Oil M A,” when available, should ob-
viate this daily attention. It is an advantage to keep the gun
stripped down for inspection purposes.
Clean spare parts and magazines. Replace breakages.
Pack gun in chest.
3. Practise squad.
4. Cleaning after gas attack.
Similar to that for rifle as laid down in Pamphlet No. 3,
1937, Lesson 4.
LESSON 11.—MECHANISM
Instructor's Notes
Stores.—
Gun, magazine, dummies, empty case, cut magazine, spare
piston, bolt, ejector and pinion group.
Demonstrate with explanation the action, and ask questions
at the end of each phase. The body cover or pistol grip may
be removed as required in order to show actions.
1. Backward action.—
Some of the gases following the bullet pass through the
gas vent and gas regulator into the gas cylinder. This forces
the piston and bolt to the rear. The rack on the piston
rotates the pinion and so winds the return spring. The empty
case being gripped by the extractors is carried to the rear on
the face of the bolt until it is struck by the ejector. The case
15
is then ejected through the ejection opening. The feed-arm
actuating stud moves the feed-arm from right to left. The
pawl on the feed-arm rotates the magazine. This action will
load the gun, the round being under the cartridge guide. The
magazine is prevented from rotating too far by the right stop
pawl.
2. Forward action.—
The return spring unwinding forces the piston and bolt for-
ward. The top extractor hits the rim of the cartridge, and
knocks it forward into the chamber, the extractors closing over
the rim. The feed-arm is moved back to the right. The
striker hits the cap of the cartridge, thus firing the round.
The magazine is held stationary by the left stop pawl. The
right stop pawl is pressed back clear of the magazine.
3. Trigger action.—
Pressure on the trigger disengages the sear from the bent
on the piston and the piston is allowed to go forward. As
long as the trigger is pressed the gun will continue to fire.
If the trigger is released, the bent will engage with the sear
the next time the piston comes to the rear, stopping its forward
movement.
4. Empty magazine.*—
When there are rounds in the magazine and the piston is
forward, the magazine cannot be rotated as the next round
to be fed is against the cartridge stop on the feed arm. When
the magazine becomes empty, the piston will stop forward,
and the magazine can be rotated freely.
SECTION 3.—ELEMENTARY HANDLING, IMMEDIATE
ACTION. STOPPAGES AND ADDITIONAL STRIPPING
ELEMENTARY HANDLING
1. This part is purely drill and will be carried out on any
piece of level ground. An aiming mark will always be indicated.
2. When each man has had sufficient practice to enable him
to carry out instinctively the correct action on any given word
of command, the instructor will introduce handling exercises.
The object of these exercises is to quicken Nos. 1 and 2 in
handling the gun. Accuracy must not be sacrificed for speed,
however, and mistakes in points of elementary training will
on no account be overlooked.
3. As progress is made in locating the causes of stoppages
and applying the correct remedy, practice in doing this will
be introduced into handling exercises.
4. Several squads or sections can be exercised collectively
under the control of one instructor, a supervisor being neces-
sary at each gun.
LESSON 12.—ELEMENTARY HANDLING
Instructor s Notes
Stores.—
Gun, magazine, spare parts, landscape target (if necessary),
and ground sheets.
Ground sheets placed to represent ACTION and CEASE
FIRING positions as under:—
(a) ACTION position—Two sheets side by side.
(b) CEASE FIRING position—Two sheets about 2 yards
apart and about 5 yards in rear of (a).
Gun magazines and holdall at CEASE FIRING position. The
gun on the right sheet, magazine carrier and holder on the left,
the holdall being on the left of the carrier.
Squad will fall in on right of the ACTION position and
number off.
1. Explain that invariably two numbers are required to
operate the gun. For purposes of instruction only, these
are referred to as Nos. 1 and 2. It will be the duty of the
No. 2 to assist No. 1 in operating the gun.
17
2. Prepare for action and clean gun.
(A) (i) Prepare for Action—
Explain actions of No. 2 as follows:—
(a) Lie down and examine magazines, passing one to No. 1
and fastening the carrier on completion.
(b) Examine spare parts holdall, opening outer flap to
ensure the pockets are fastened. Re-fasten outer flap.
(c) Report to No. 1 “Magazines and spare parts correct/*
h. Demonstrate and explain action of No. 1.
Lie down and examine the gun as follows:—
Barrel mouth piece tightly screwed up. Clamp ring
screw tight and head of the screw to the right. Foresight
undamaged. Gas regulator and key correctly assembled
and small hole of the regulator to the rear. Bipod; band
clamping screw on the right; leg clamping screws tight.
Try weight on return spring to ensure that the firing
weight has not been taken off. Pawls, springs and back-
sight undamaged. Places the magazine on the gun.
When No. 2 has reported, report “No............—Gun
ready.”
(B) Clear Gun.—Explain and demonstrate actions of Nos. as
under:—
No. 1.—Unload, as in Lesson 2.
No. 2—Replace magazine in carrier.
Stand up with No. 1.
Note.—No. 1 will not report until both he and No. 2 are stand*
ing up. Practise squad in pairs, by orders “Prepare for Action-
Clear Gun,’* the Instructor ordering “Fall Out 1 and 2” on com-
pletion. The Nos. concerned rejoining the left of the squad and
the squad re-numbering.
3. Action.—
Explain duties of No. 2:—
i. Jump up, pick up the holdall by the handle with the left
hand, wallet end to the front. Pick up the carrier with the
right hand. Double to the ACTION position on the left of
No. 1. Place the holdall on the ground, flap uppermost, wallet
end nearest the gun, and place the carrier in a convenient
position between the holdall and his body and remove a maga-
zine.
Lie down close to No. 1 without hindering his movements.
Watch for any signals.
ii. Instructor demonstrates action of No. 1 on command
“Action” giving detail as follows:—
18
Jump up quickly — carry the gun forward, right hand
grasping the small of the butt, left hand grasping bipod
with wrist clear of radiator casing — place the gun on
the ground, ensuring that no weight is placed on butt or
gun. Lie down behind the gun and load. Practise squad
in pairs. Commands “ACTION—UNLOAD”—the order “RE-
PLACE STORES” will be given to return the gun and gear
to the “Prepare for Action” position.
4. Aiming and firing and changing magazines.
i. Explain action of No. 2.
On the word “On” No. 2 places his right hand over
the back of No. 1.
On the order “Fire” No. 2 withdraws his right hand.
ii. Explain and demonstrate action of No. 1.
On range being given, adjust the sights to that ordered.
On target being indicated, he aims; when the aim is
correctly taken he shouts “On.”
On command “Fire” fire as already taught.
iii. Instructor explains, and demonstrates where necessary, the
actions of Nos. 1 and 2 on the command “Change” being
ordered.
No. 1—Presses in magazine catch and calls “Up,” re-
moves magazine and passes it under the gun to No. 2.
When fresh magazine is placed on the gun, he loads and
continues firing.
No. 2—Assists to remove the magazine by pressing with
his fingers on the centre block when No. 1 orders “Up.”
When magazine is removed, places a fresh magazine on
the gun.
Receives magazine from No. 1 and replaces it in the
carrier.
Note.—When working alone, No. 1 will call “Change-
Up” whenever it is necessary to change magazines.
5. “Stop” and “Go on.”—
i. Explain that when firing ball ammunition, on releasing
the trigger, provided there are rounds left in the magazine,
the working part will remain in the rear position. The action
taught is the correct one for service conditions.
ii. Demonstrate and explain action of No. 1.
On the command “Stop” change magazine if necessary
and lower the butt to the ground. Back sight remains
up.
On the command “. . . Target ... Go on,” aim and
fire.
19
6. Cease firing.—
i. Explain action of No. 2.
Assist in removing magazine, Return magazine to car-
rier, Place full magazine on when ordered.
Pick up holdall and magazine carrier, return to cease
firing position and lie down.
ii. Demonstrate and explain action of No. 1.
With the butt in the shoulder remove the magazine.
Clear gun. Order magazine on. Lower the backsight leaf,
pick up the gun and return to cease firing position and He
down.
Explain that if the command “Cease firing” Is given
before fire has been opened the gun must be unloaded
without firing.
iii. Practise squad In pairs.
“Action” — “Aiming and firing” — “Stop and go on”
and “Cease firing?
7. Signals.—
i. Demonstrate and explain:—
“Action” — both arms raised and lowered in line with
the shoulders.
“Stop” — hand waved horizontally.
“Cease firing” — arm circled from the shoulder.
“Prepare to fire” — hand raised above the head.
“Fire” hand dropped to side.
li. Practise squad using signals.
8. Anti-aircraft.—Appliances, Mounting and Dismounting
Gun.
Extra stores.—Anti-aircraft mounting, Holder, rifle Sling.
Squad on right of gun.
1. Description of Mounting.—
Question squad.
2. Description of Holder.—
Demonstrate and explain:—
To attach the anti-aircraft holder. Place the clamp ring
over the narrow part of the body, and slide forward until
it is between the mounting rings on the rear radiator
casing. The clamping screw to be on the right. Before
tightening the screw, see that the tube of the holder is in
line with the pinion casing. This ensures that the sights
are upright when the gun is mounted. Remove in reverse
order.
Practise squad.
20
3. Aircraft—Prepare for Action.—
Gun and equipment are placed out as for ground hand-
ling, the A.A. mounting being placed alongside the holdall.
On the above command being given, Nos. 1 and 2 assume
the kneeling position at their stores and carry out the neces-
sary inspection, No. 2 placing the holdall over his right
shoulder and including the mounting in his report to No. 1.
4. Mounting and Dismounting Gun.—
i. Action of No. 2. On the command “FOR AIRCRAFT,
MOUNT GUN”-
(a) Erect the mounting as quickly as possible immediately
in front of his position. See that the height of the
mounting is suitable to the firer.
(b) Assist No. 1 in mounting the gun, and place a magazine
on when ordered.
• ii. Action of No. 1 (One of the squad acting as No. 2).—
Mount the gun on the mounting — order “Magazine on”—
load — adjust sights to 500.
iii. “DISMOUNT GUN” — Dismount in reverse order, un-
loading the gun without firing.
iv. Practise squad.
5. Holding.—
i. Hold the gun as already taught, butt not to be in shoulder.
Balance the body on both feet with legs fairly well apart.
Instructor explains that, when moving round the mounting in
engaging aircraft, the feet should not be crossed.
ii. Practise squad.
LESSON 13.—IMMEDIATE ACTION
Instructor's Notes
Stores,—
Gun, magazine, spare parts, dummies landscape target (if
necessary), and ground sheets.
The causes of stoppages will not be taught until the men are
proficient in immediate action. They will be explained as set
out in the Summary.
1. Explain that, if the gun is properly balanced and cared
for stoppages other than an empty magazine will rarely occur;
also that immediate action is the action performed by the
firer to remedy a stoppage, It must be carried out quickly,
and with practice should become instinctive. Immediate action
is not considered complete until the gun has been re-aimed
and fired.
2. i. Explain and demonstrate, with full magazine on, that
the gun will stop with the cocking handle in one of two
positions.
1st Position.—Cocking handle right forward.
2nd Position.—Any position other than 1st.
21
ii. These positions can be quickly determined by feeling with
the hand as follows:—
With the butt in the shoulder, raise the hand straight
up from the pistol grip, fingers extended,
1st Position—If cocking handle is felt near tips of fingers,
2nd Position.—If felt on any other part of hand,
3. First position.—
i. Explain and demonstrate:—
If gun fails to fire or commences firing and stops:—
Feel for the cocking handle — try to rotate magazine,
if it rotates, change it, if it does not rotate cock the
gun, aim and fire.
ii. Practise squad by wTord of command.
4, Second position.—
i. Explain and demonstrate:—
If gun fails to fire or commences firing and stops:—
Feel for cocking handle — cock the gun — try to
counter-rotate the magazine — whether it counter-
rotates or not, aim and fire.
ii. Give conditions of test.
iii. Practise squad by word of command.
LESSON 14.—STOPPAGES.
Instructor’s Notes
Stores.—As for Lesson 13.
instructor questions squad on Lesson 13,
Note.—In teaching Immediate Action or Stoppages, the gun
will be loaded, the target indicated and fire opened. The in-
structor will state ‘‘Gun is firing all right.” He will then posi-
tion the cocking handle as required, and after resumption of
fire will state “Gun stops,” etc. On completion of the necessary
actions he will state “Gun is firing all right”—“Rest.”
When practising the squad a similar procedure will be fol-
lowed with the addition of ordering the flier to turn his head
aside and to remove his finger from the trigger whilst the cock-
ing handle, etc., are positioned by the instructor. When the
above arrangements are completed, the instructor will order
“Position,” when the firer will resume control of the trigger and
firing, the instructor stating “Gun stops,” etc., as required.
22
1> i. Explain and demonstrate:—
If after I.A. for 1st position the gun will not fire:—
Feel for cocking handle — try to rotate magazine—
if it does not rotate remove it and clear gun:—
(a) Examine feed-arm pawl and spring. If spring is
broken change it — if not.
(b) Change piston — load, aim and fire.
ii. Practise squad by word of command.
2. i. Explain and demonstrate:—
If after I.A. for 2nd position, the gun fires a few
rounds and stops:—
Feel for cocking handle — cock gun — try to counter-
rotate magazine — if magazine counter-rotates, change
magazine, aim and fire.
If magazine does not counter-rotate:—
Clear gun — take about 3 lb. off the return spring-
load, aim and fire.
ii. Practise squad by word of command.
NOTE.—The gun should be cleaned at the first opportunity,
and the return spring readjusted to its normal tension.
3. i. Explain and demonstrate:—
If after I.A. for 2nd Position the gun will not fire,
there will always be a live round in the feed-way:—
Feel for cocking handle — cock gun — counter-
rotate magazine — remove magazine and examine in-
side the body and chamber:—
(a) If live round in chamber — clear gun — change
magazine — load, aim and fire.
(b) If empty case in chamber or body — clear gun-
change the bolt — load, aim and fire.
ii. Practise squad by word of command.
4. i. If the gun stops either 1st or 2nd position and there is
no resistance on the cocking handle:—
Clear gun — change the pinion group — load, aim
and fire.
ii. Practise squad by word of command.
5. Explain causes of stoppages (see Summary).
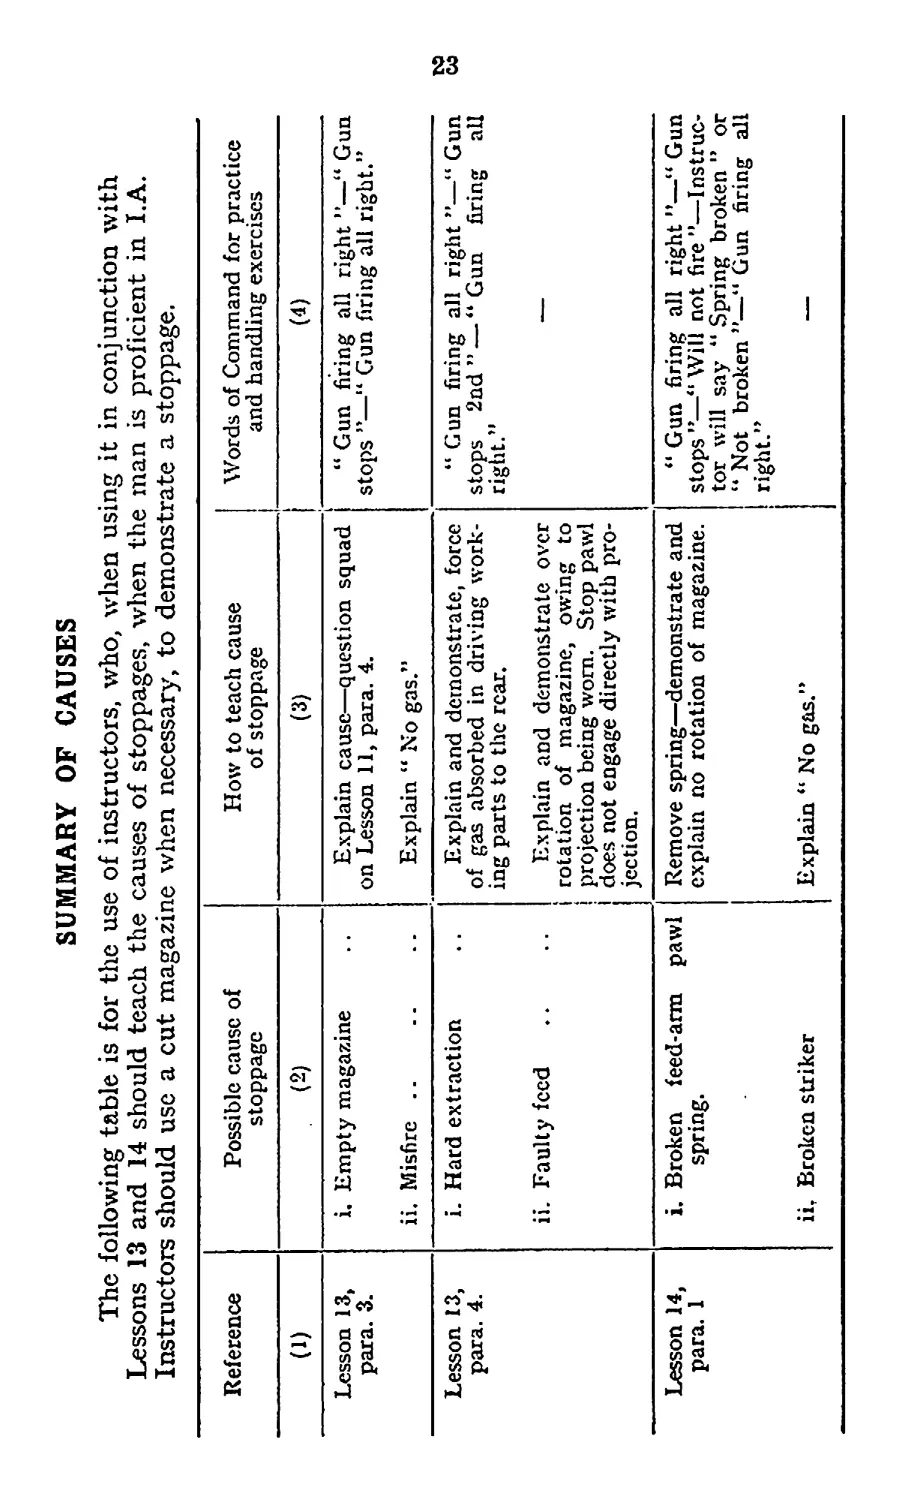
SUMMARY OF CAUSES
The following table is for the use of instructors, who, when using it in conjunction with
Lessons 13 and 14 should teach the causes of stoppages, when the man is proficient in LA.
Instructors should use a cut magazine when necessary, to demonstrate a stoppage.
Reference Possible cause of stoppage How to teach cause of stoppage Words of Command for practice and handling exercises
(1) . (2) (3) (4)
Lesson 13, para. 3. i. Empty magazine ii. Misfire .. Explain cause—question squad on Lesson 11, para. 4. Explain “ No gas.” “ Gun firing all right ”—44 Gun stops ”—“ Gun firing all right.”
Lesson. 13, para. 4. i. Hard extraction ii. Faulty feed Explain and demonstrate, force of gas absorbed in driving work- ing parts to the rear. Explain and demonstrate over rotation of magazine, owing to projection being worn. Stop pawl does not engage directly with pro- jection. 44 Gun firing all right ”—44 Gun stops 2nd ” —44 Gun firing all right.”
Lesson 14, para. 1 i. Broken feed-arm pawl spring. iiT Broken striker Remove spring—demonstrate and explain no rotation of magazine. Explain tf No gas.” 4‘ Gun firing all right ”—44 Gun stops ”—41 Will not fire ”—Instruc- tor will say 4‘ Spring broken ” or 44 Not broken ”—44 Gun firing all right.”
Reference Possible cause of stoppage How to teach cause of stoppage Words of command for practice and handling exercises
(1) (2) (3) (4)
Lesson 14, para. 2. i. Worn magazine ii. Friction Question squad on mechanism of right stop pawl. Explain that this stoppage will only occur after prolonged firing. Owing to fouling in gas cylinder and working parts being dry force of gas is absorbed in forcing the parts to the rear. Taking off weight lessens the work of the gas. “ Gun firing all right ”—" Gun stops 2nd ”—“ Fires a few rounds and stops again 2nd ”—“ Magazine counter rotates ”—“ Gun fires all right ” or “ Magazine docs not counter-rotate ”—“ Gun tires all right.” to
Lesson 14, para. 3. i. Worn magazine ii. Broken extractor Explain and demonstrate why gun will not fire having applied LA. Explain that empty case may be left in chamber, or partly extracted but not ejected. “ Gun fires all right ”—“ Gun stops 2nd ”—“ Will not fire 2nd.” Instructor then says : “ Live round in chamber ” or ” Empty case in chamber ”—“ Gun fires all right.”
Lesson 14, para. 4. Broken return spring Explain why the gun may stop with cocking handle in any position. “ Gun is firing all right ”—“ Gun stops ” Instructor then says: ** No resistance on cocking handle ”— " Gun fires all right.”
25
Notes.—1. The possible occurrence of other stoppages, e.g.,
Separator Case, will be mentioned by the Instructor, the method
of recognition and rectification also being included.
2, When Instructing N.C.Os. or other leaders, the instructor
will allot a period to “Method of Setting Up.”
LESSON 15.—ADDITIONAL STRIPPING.
Instructor's Notes
Stores.—
Gun, magazine and holdall, table.
The parts dealt with in this lesson will only be stripped
when necessary, and not for normal cleaning.
1. Pinion group.—
i. Raise the pinion pawl, rotate the pinion if necessary and
remove the tension screw. Remove the pinion from its casing.
Using a dummy cartridge remove the spring casing from the
pinion.
ii. Assemble in reverse order.
2. The trigger group.—
i. Remove the sear axis pin, and remove the sear. Place
one hand over the plunger and push out the trigger axis pin.
Remove the trigger, the plunger and the trigger spring.
ii. To assemble.—
Replace the trigger spring and the plunger.
Keeping the plunger depressed, place the front end of
the trigger bar into the slot in the plunger and replace
the trigger axis pin. Place the dove-tailed end of the
sear behind the rear end of the trigger bar and replace
the sear axis pin.
3. Ejector.—
i. Remove the ejector cover. Place the point of a dummy
cartridge in the hole under the left side of the body, press
up the ejector and remove.
ii. Assemble in reverse order.
iii. Practise squad.
26
SECTION 4.—ADVANCED HANDLING
1. This part is designed to teach and practise men as Nos. 1
and 2:—
i. To use ground correctly in occupying a fire position.
ii. To mount the gun so that full fire effect can be
obtained combined with a minimum of exposure for
Nos. 1 and 2.
2. This will be carried out on ground on which there are
minor irregular features, use being made of both natural and
artificial cover. Natural targets will be described.
LESSON 16.—ADVANCED HANDLING
(USE OF COVER)
Instructor’s Notes
Stores.—
Gun with carrying handle and sling, magazines, spare parts.
Demonstrate and explain how to attach carrying handle
and sling,
1. i. Instructor states that the object of the lesson is to teach
men acting as Nos. 1 and 2 the use of ground, so that in
occupying a fire position they can use the gun with full fire
effect with a maximum amount of cover for themselves.
ii. It will be the duty of No. 2 to assist the No. 1 as far as
is possible. He will, however, make use of the cover without
unnecessarily exposing the position of the gun. His main
duty will be to keep the gun supplied with ammunition.
iii. Question squad on the use of cover (rifle), and explain
that the principle of using cover with the light machine gun
is the same. After each demonstration the squad will practise
individually.
The position of No. 2 will be explained and one of squad
ordered to take up position.
2. The following will be included:—
i. Mounting the gun without the bipod legs. (The cover
should support the gun as near as possible at the
same place as the bipod legs normally support it—
otherwise the sighting of the gun will be affected.)
27
11. Mounting the gun using the bipod legs,
iii. Firing round cover.
iv. Use of low continuous cover.
v. Firing on the side of a slope.
vi. Using a fold in the ground.
vii. Using trench, with and without bipod.
LESSON 17.—ADVANCED HANDLING (MOVEMENT)
Instructors Notes
Stores.—
Gun with sling and carrying handle attached. Magazines
and holdall.
Ground sheets in position in ACTION and CEASE FIRING
positions.
1. Introduction.—
Ask questions on points taught in “Prepare for action”
(=: Lesson 12) and make it clear that these duties should be
carried out before a unit leaves camp, bivouacs or billets.
Explain that it is the duty of both numbers to use ground
in occupying a fire position and to mount the gun with re-
ference to the target to be engaged so that full fire effect can
be obtained with a minimum of exposure. The occupation of
a position will either be made quickly, such as a rush from
cover to cover, or cautiously when cover is inadequate. In the
latter case it may entail crawling.
2. Order two of the squad to “Prepare for action.”
Explain and demonstrate actions of No. 1 (one of squad
acting as No. 2):—
i. Position behind cover.—
This position is adopted in the same manner as in using
the rifle behind cover, i.e., complete concealment for both
Nos. 1 and 2 and the gun.
ii. Position of readiness (Gun Loaded).—
No. 1 will carry out the following action whenever a range
is ordered or, if acting apart from the section, when a target
is presented:—
Set sights—mount the gun on cover cautiously
—On completion of the fire order or decision to open
fire — FIRE.
28
iii. Cease firing.—
The following actions will be carried out:—
The same sequence of actions as performed in Elementary
Handling will be carried out, care being taken to avoid undue
movement in an exposed position. For instance, the gun drawn
cautiously down behind cover before being cleared, etc.
iv. Practise the squad in pairs on various types of cover,
no further explanation being given.
3. Position of observation (gun loaded).—
When the light machine gun is acting within the section,
the section leader will detail an individual to assume, a position
of observation but, when the gun is detached, No. 1 or his
No. 2 will remain in observation to observe signals, and move-
ments of the enemy or of his own troops. He will adopt a
comfortable position affording concealment and a view of the
front.
4. Method of crawling with the gun (gun unloaded).—
Lying on the left side with the left knee drawn up, turn the
gun over so that the top of the magazine rests on the inside
of the left knee. Holding one leg of the bipod with the right
hand, crawl to the desired place by exerting pressure on the
left forearm and at the same time pushing forward with the
right foot.
In certain circumstances No. 2 may be able to assist.
5. Practise squad.
29
SECTION 5.—SECTION HANDLING
This part is designed to:—
(a ) Train each man in a light machine gun section to
perform the duties of Nos. 3, 4, 5 and 6, and to be
able to undertake any of these duties at any moment.
(b ) Practise men in carrying out all the duties learnt in
previous stages when working as a team under a
leader.
LESSON 18.—DUTIES OP Nos. 3, 4, 5 and 6
Instructor's Notes
Stores.—
Gun, complete with sling and carrying handle, holdall, maga-
zines in pouch equipment, carriers (2), web equipment, rifles
and bayonets. (Special waist belts, brace attachments, pistols
and pouches for Nos. 1 and 2, when available).
NOTE.—Nos. 1 and 2 should be equipped with carriers,
cartridge, right, the brace attachment replacing the carriers,
cartridge, left,
1. As the number of men in a section at any particular
moment may vary, the system of carrying out these duties
must be sufficiently flexible to meet any variation in strength.
The necessity for training the extra numbers of a PACK light
machine gun section must also be borne in mind.
2. The main duties are:—
i. To carry and replenish ammunition.
ii. Protection. Scouting or other protective duties.
iii. Riflemen.
3. Normally they will be distributed as under:—
No. 3 responsible for ammunition supply between No. 2
and Nos. 4, 5 and 6. Nos. 4, 5 and 6 ammunition
carriers, protective duties and riflemen. (For light
machine gun sections when the gun is carried on pack.)
4. The following will be practised:—
i. Method of carrying ammunition.
ii. Transfer of full and empty magazines between Nos. 2
and 3.
iii. Collection by No. 3 of full magazines from other num-
bers, and disposal of empty magazines.
30
5. For training purposes the normal scale of ammunition to
be taken into action will be considered to be as follows:—
Carried by the section com-
mander ....................... 1 magazine in a pouch sus-
pended to belt on the left
end piece of the waist-belt.
Carried by No, 1 ............. 1 magazine on the gun.
„ „ No. 2 ............... 2 magazines in pouch equip-
ment connected by the
brace and hung round the
neck with both, magazines
in front.
„ No. 3 ........... )
„ „ No. 4 ........ ...„ I 4 magazines each in pouch
„ „ No. 5 ..............f equipment.
м м No. 6 ..............)
Total: 20 magazines — 940 rounds a gun.
Nos. 2 and 3 carry empty carriers for use when replenish-
ing ammunition.
No. 1 carries a revolver and 12 rounds ammunition.
No. 2 carries the holdall containing spare parts, a revolver,
and 12 rounds ammunition.
6. No. 3 will take up a position near the gun under cover,
if possible, and will transfer his magazines from his pouches
into his magazine carrier. In selecting his position he must
remember that unless the cover is exceptionally good he should
avoid being very close to the gun, while to be too far away
may draw attention owing to movement in supplying ammuni-
tion.
7. When No. 2’s supply of ammunition is finished, No. 3 will
hand over his carrier to No. 2 and take away his carrier
containing empty magazines.
8. No. 3 then goes to one of the other numbers, takes from
him four full magazines, which he puts in his own carrier,
and gives him the empty magazines. These will be refilled
as opportunity offers.
9. As regards their duties other than that of carrying am-
munition, Nos. 4, 5 and 6 will act in accordance with the
instructions laid down in Infantry Training. The individual
training in scouting and other protective duties comprises:—
i. Training as laid down in Infantry Training.
ii. Selecting suitable fire positions with particular refer-
ence to the requirements of a light machine gun sec-
tion.
31
iii. Observation, i.e., watching—
(a) The action of neighbouring sections and platoon
headquarters.
(b) Hostile movement, especially targets affording
opportunities for employment of enfilade fire.
LESSON 19.—SECTION HANDLING.
Instructor's Notes
Stores.—As for Lesson 18.
The lesson will follow the principles set out for the conduct
of fire discipline training (rifle — Pamphlet No. 3, Sec, 4) and
exercises will be framed so as to introduce the points men-
tioned therein.
1. Instructors will ensure that the members of a section
do not always act as the same number.
2, This form of exercise can also be applied as a test of
the efficiency of the men in the section to work as a team.
3. The action of removing guns and ammunition from the
company light machine gun limber or pack animals must be
practised to ensure that this will be done quickly and with the
minimum noise and confusion.
SECTION 6.—TESTS OF ELEMENTARY TRAINING
In each of the following tests the man will be allowed three attempts and, to pass, two
must be done correctly within the time limit.
Name of test and stores required Conditions before the test Time allowed Remarks
(1) (2) (3) (j)
No. 1. Loading.—Gun and one filled magazine. No. 1 in the correct position for loading—No. 2 in position holding the magazine. 3 seconds from command ” Load” until right hand is replaced on pistol grip. —.
No. 2. Sight setting—Aiming and firing.—Gun and aim- ing disc. Firer lying behind gun— butt on the ground—gun cocked, but no magazine on. Instructor orders RANGE ...” FIRE.” 6 secs, from the order ” FIRE ” until the trigger is pressed. Maximum alteration of sights 400 yards. Height of aiming disc to be varied Й for each aim.
No. 3. Immediate action.— Gun — magazines — land- scape target. Instructor will give RANGE and TARGET ” FIRE ” fol- lowed by “ Gun Firing all right ”—” Gun stops ” first or second—” Gun firing all right.’* No. 2 will be in position. 6 secs, from the command “ Gun stops ” until the firer has applied I.A., aimed and fired. —
No. 4. Anti-aircraft. — Gun- magazines — holdall — Anti-aircraft mounting. Both Nos. in the kneeling position. No. 1 behind the gun, No. 2 behind the maga- zine and AA. mounting which is folded. 15 secs, from the order “ For Aircraft Mount Gun ” until the gun has been loaded and the sights adjusted to 500 yards. —