/


Tags: weapons military affairs machine gun
Year: 1939
Text
NOT TO BB PUBLISHED
The information given in th^i document
It not to lie communicated, either directly
or Indirectly, to the Preus or to a^y person
not holding an official positive in His
Majesty * Service.
lb
<« fi I’lilms
142
Notified in
A.C»h. - for -b«
week ending
28th fun?
I9JQ
Small Arms Training
Volume I, Pamphlet No. 4
Light Machine Gun
1939
(Reprinted with Bxtracta from A.C.In.)
Crown Copyright Reserved
(
llfipdnfi 'l vs Illi (I»» jii’i misnkin id the ( <mf( oiler, Ни M.ijc.ity’s Stationery Office.
I i>iid<>n Пу AiiHiniliy I lii* Snelling Printing Works Pty. Ltd..
5 2 54 Buy Street. Sydney.
Extracts from A.C.L». 630, 658 and 763 of 1939 indicated by
dark line on pages 8 and 24 embodied in this reprint
NOT TO BB PUBLISHED
The information given in this document
Is not to be communicated» either directly
or indirectly, to the Press or to any person
not holding an official position in His
Majesty's Service.
26
G.S. Pubns.
142
Notified in
A.C.Is. for the
week ending
28th June.
1939.
Small Arms Training
Volume I, Pamphlet No. 4
Light Machine Gun
1939
(Reprinted with Extracts from A.C.Is.)
Crown Copyright Reserved
Reprinted with the permission of the Controller, His Majesty’s Stationery Office,
London. By Authority—The Snelling Printing Works Pty. Ltd..
52-54 Bay Street. Sydney.
By Command of the Army Council,
THE WAR OFFICE,
28th June, 1939.
3
CONTENTS
PAGE
General Notes . . . . . . . . .. 4
Section I. Holding, aiming and firing :—
Lesson 1. Introduction and magazine filling . . . . 7
„ 2. Loading, unloading and sight setting . . 10
„ 3. Holding and aiming . . . . . . 12
„ 4. Firing . . . . . . . . . , 15
Section 2. Stripping, cleaning and mechanism .. .. 17
Lesson 5. Piston group . . . . . . . . 18
„ 6. Barrel and butt group . . . . . . 19
„ 7. Body group and bipod . . . . . . 21
„ 8. Care and cleaning—Daily and before firing 22
„ 9. „ „ —During and after firing
and after gas attack . . . . . . 23
„ 10. Mechanism . . . . . . . . 25
Section 3. Elementary handling, immediate action and
stoppages . . . . . . . . . . . . 27
Lesson 1 1. Elementary handling (No. 1 acting alone) 28
„ 12. Elementary handling (No. 1 assisted by No.
2) ................................30
,. 13. Immediate action . . . . . . 32
14. Stoppages . . . . . . . . 33
Summary of Causes . . . . . . 34
„ 15. Additional stripping .. . . .. 36
., 16. „ „ (continued) , .. 37
Section 4. Light machine gun mounted on tripod . . 38
Lesson 17. Tripod, description and setting up (ground) 39
18. Mounting and dismounting gun on tripod 41
,, 19. Laying a fixed line . . . . . . 42
,, 20. Tripod (anti-aircraft) . . . . . . 44
Section 5. Advanced and section handling . . . . 47
Lesson 2 1. Advanced handling (use of cover) . . 49
„ 22. ,, „ (movement) . . 54
„ 23. „ „ (tripod) . . . . 56
24. Section handling (movement) . . . . 57
„ 25. „ „ (defence) . . . . 60
„ 26. „ „ mounted units (move-
ment) . . . . 63
„ 27. „ „ mounted units (defence) 66
Section 6. Tests of elementary training . . . . 67
2.
GENERAL NOTES.
I. The general principles governing the employment of the
section in war are dealt with in F.S.R., Vol. II, Cavalry and
Infantry Training, and Cavalry and Infantry Section Leading. The
tactical handling of the light machine gun, when in use by cavalry
and mounted on the tripod for direct fire, will follow the instruc'
tions laid down for the .303'in. Vickers machine gun and Cavalry
Training.
2. The chief characteristic of the weapon is its power of deliver
ing a volume of fire with the employment of few men. When
fired from the bipod, the effective range is 1,000 yards. When
fired from the tripod, given perfect conditions of visibility, this
distance may be increased.
3. It is an aircooled weapon, capable of a high rate of fire
(automatic or single rounds), and is fired either shouldercontrolled
from a bipod, or from a tripod. To avoid overheating, strain and
excessive expenditure of ammunition and at the same time to
produce the necessary volume of fire as well as to maintain accur-
acy, it is best, in employing automatic, to fire in bursts of four
or five rounds.
The accuracy of the gun permits of only a small margin of
error in aiming, range estimation or allowance for the effect of
atmospheric conditions. Accurate observation of fire is, therefore,
essential; if less than four or five rounds are fired in a burst,
observation will be possible only in the most favourable circunv
stances.
4. Taking into account the time required to change barrels
and magazines, a trained man should be able to maintain, if re*
quired, an average rapid rate of 120 rounds (or four magazines)
a minute with accuracy.
Bearing in mind the limited amount of ammunition available
with the gun during movement, a man can fire ten magazines,
at the above rate, using one barrel. After this, in order to preserve
the life of the barrel, it is advisable that the rate of fire should
be reduced or the barrel changed, provided that a spare is available.
If, however, this is not the case, the firer himself must decide, in
view of the situation, whether or not the rate of fire can be re-
duced.
5. To ensure that the section will fulfil its role in war, the
personnel must be trained so that each individual is capable of
5
performing the following duties concerned with the handling of
the gun
i. To prepare the gun for firing and maintain it in action.
ii. To carry the gun and get it quickly into action on any
type of ground.
iii. To fire accurately at various rates up to 120 rounds a
minute according to the requirements of various types
of targets likely to be encountered in battle,
iv. To observe fire and correct its application accordingly.
v. To assist forward movement by fire while at the same
time ensuring that such fire does not endanger his own
troops.
vi. To fire with effect at low'flying aircraft.
vii. To perform the duties assigned to any member of the
section.
6. General description of light machine gun and tripod*—
Weight of gun complete with bipod . . 23 lb.
Weight of spare barrel . , . . . . 6 „
Filled magazine (30 rounds) .. .. 2j „
Weight of magazine box with twelve filled
magazines . . . . . . . . 40 „
Length of gun overall , , . . . . 45% in.
Length of barrel . . . . . . . . 25 „ *
Type of sights.—
Backsight—aperture . .
Foresight—blade
Graduations—200 yards to 2,000 yards in 50-yard clicks.
Tripod particulars.—
Weight (with anti-aircraft leg 3J lb.) . . 30 lb.
Weight of gun and tripod . . . , . . 53 „
Maximum height to bore of gun , . . . 35 in.
Elevation by elevating gear . . ♦ , . . 19 deg.
Traverse given by arc . . . . . . 42 „
Effective Beaten Zone.
Range Bipod Tripod
500 yds. 175 yds. by 6 ft. 150 yds. by 4J ft.
1000 yds. 115 yds. by 12 ft. 100 yds. by 9 ft.
7. In this pamphlet, solely to make training easy, members of
a section are sometimes referred to by “numbers”. Every man in
a section, however, must be an effiicient shot with the L.M.G. and,
in addition, be able to carry out every duty that will maintain
the gun in action under all conditions. All men, in fact, will
be interchangeable so far as duties with the L.M.G. are concerned.
6
в. System of training.—-The principles of instruction laid
down in Pamphlet No. I of this series will be followed during
instruction in the light machine gun. In addition, the following
points will be observed:—
Whenever possible, the duties of No. I of the gun will be
dealt with before those of No. 2. Practice should be arranged
in such a way as to ensure that no time is wasted. This can be
done by each individual carrying out a cycle of actions which
leaves the gun ready for the next man. Those not actually
handling the gun will be constantly questioned so that interest
may be maintained.
A further demonstration should be given when it is apparent
that a point is not clear.
—Until the correct articles of Bren equipment arc avaib
able for issue, improvised means should be adopted for the carriage
of njagazines, e.g., Lewis gun pouch equipment and magazine
carriers.
* For A.M.F.
SECTION 1.—HOLDING, AIMING AND FIRING
The importance of correct holding of the gun will be impressed
on the soldier from the start, but efficiency cannot be obtained
until ball ammunition is fired. Instruction in correct bolding can-
not, however, be delayed until this period of training, and any
tendency to loose holding even during the most elementary in*
struction must at all times be checked; otherwise failure in marks-
manship will result
LESSON 1.—INTRODUCTION AND MAGAZINE
FILLING
Instructors Notes
Stores :—
Gun, tripod, magazine; dummies and chargers; one or more
magazine fillers; gun chest and ammunition box.
1. Introduction.—During the first ten minutes of the lesson
describe the gun briefly under the following headings:—
i. Name: Brief description of main groups (body, barrel,
butt and piston).
ii. Gun is easy to strip and it is impossible to assemble it
incorrectly.
iii. Gas operated: Rate of fire up to 120 rounds a minute
and can fire single rounds, which will be explained
later. Fed by magazine containing 30 rounds.
iv. Air cooled: After prolonged fire the barrel should be
changed, which operation takes about eight to ten
seconds.
v. Gun is normally fired from the bipod, and is shoulder
controlled. The tripod can be used in defence and is
convertible for anti-aircraft firing.
vi. Accurate weapon with an almost complete absence of
recoil or shock to the firer. Few stoppages, which are
all quickly remedied.
vii. Characteristics and duties (see paras. 2 to 5, pages 4
and 5).
2. Explain and demonstrate :—
i. Filling by hand (see Fig. I ).
When filling from chargers, hold the magazine and charger
in one hand, slip out rounds and fill with the other
hand.
8
Ensure that cartridges are not rim behind rim by placing
the base of the round welbback between the lips before
pressing it down and forward against the rim of the
preceding round or the rim of the top round already
tn the magazine.
Count the number of rounds (30).
In an emergency when the Bren magazines are kept fully
loaded for any length of time, the magazine spring is liable
to deteriorate and the magazines may eventually become utr
serviceable. In future, when it is necessary for magazines
to remain filled for any considerable time, they will be
loaded with 20 rounds only. In no circumstances will
magazines be filled to the full 30 rounds. The maximum
number of rounds to be filled until further instructions are
issued, will be 28. The ammunition necessary to load maga'
zines to this capacity, will be kept readily available.
9
When filling, ensure that ammunition is kept clean.
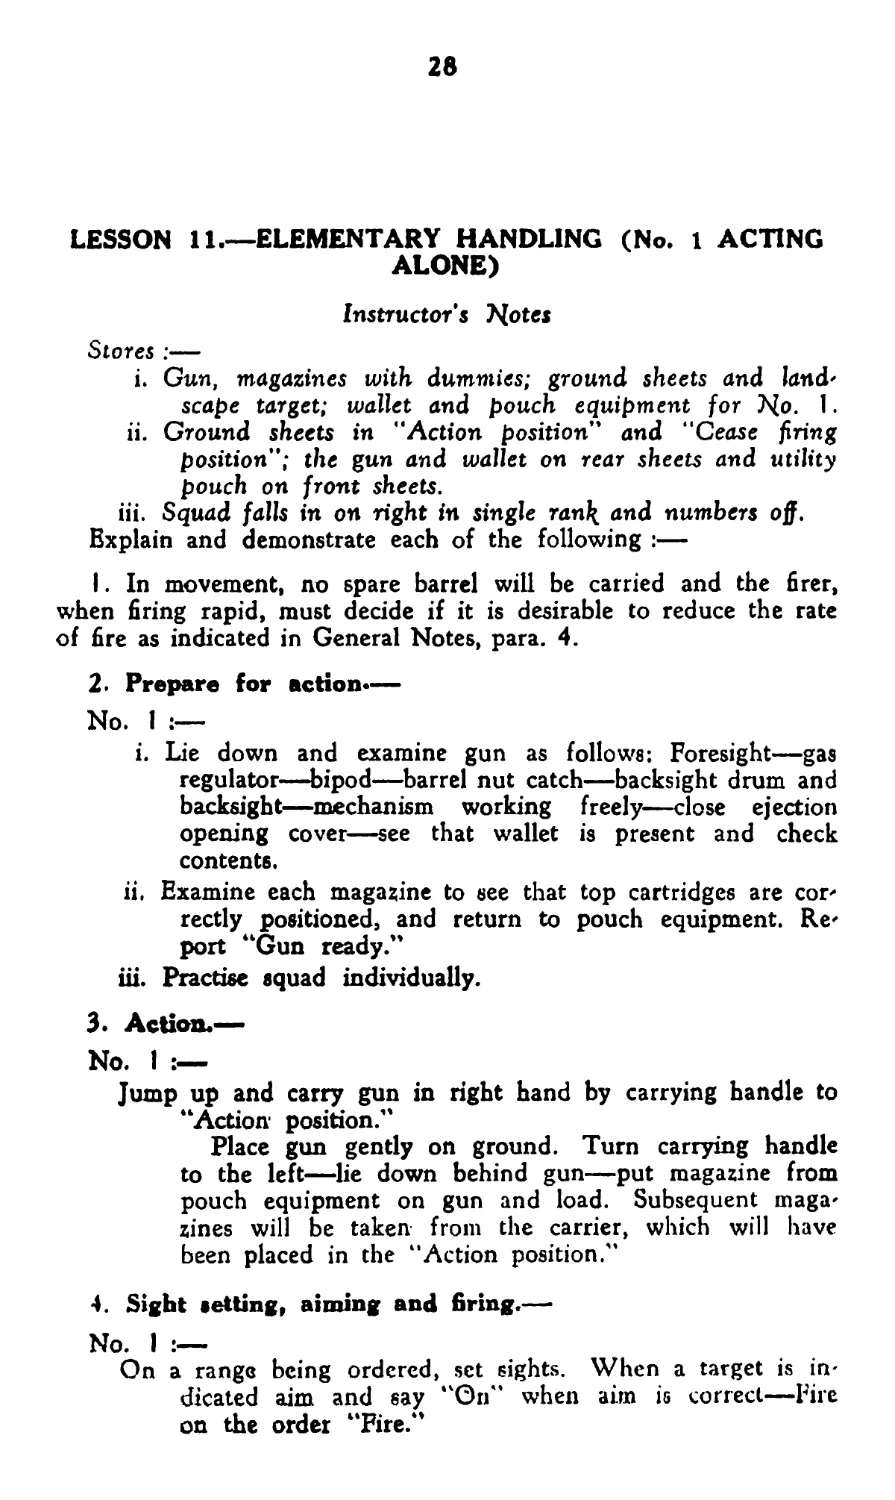
li. Filling by magazine filler (see Fig. 2).
Clamp filler to right end of ammunition box (or other
convenient surface) with magazine opening towards the
body.
Operating lever.
Clamping arm.
Magazine
, in position
for Filling.
perating lever tip.
/ Charger inserted
/ ready For loading
£2S9S?lne- catch. into magazine..
Fio. 2rrFilling by Magazine Filler.
TO FILL:
Turn the operating lever over to the right and push as
far forward as possible.
Pull out magazine catch.
Insert magazine, forward portion first and to the left.
Place charger in tray and pull handle sharply towards
the body.
Repeat five times with fresh chargers and remove maga-
zine by pressing in catch.
iii. Emptying.—
Press each round forward with the point of a bullet.
3. Give conditions of test.
4. Practise squad by hand and with the filler.
5. Demonstrate packing of gun chest. Practise squad.
10
LESSON 2.—LOADING, UNLOADING AND SIGHT-
SETTING
Instructor s Notei
Stores :—
Gun, magazines, dummies and ground sheets.
Explain and demonstrate :—
I. Position for loading.—Body straight behind gun, legs to*
gether'. Left hand holds butt handle; right hand holds pistol grip.
First finger alongside trigger^guard when butt is on the ground.
The gun can be loaded with the change lever at “S" (Safe),
“A" (Automatic) or "R" (Single rounds).
2. Loading and unloading.—
i. Loading.—Open magazine opening cover; put magazine
on, forward portion first; pull cocking handle back and
push forward. Put change lever to “Safe" if hot already
there.
ii. Unloading.— Press magazine catch with palm of hand and
remove magazine. Put change lever to "Automatic."
Press trigger, cock gun and press trigger again. Close
magazine and ejection opening covers. During elemen'
tary training or on the range stand up and report “Gun
clear."
и
3. Repeating orders.-^-lf at any time No. 1 fails to under-
stand an executive order, he will call out “Repeat."
4. Give conditions of ten.
5. Practise squad.
6. Sight setting.—Describe backsight drum and backsight. Turn
backsight drum until range required appears in the window. The
drum gives a maximum elevation of 2,000 yards and a minimum
of 200 yards. Each click gives an alteration of 50 yards. When
not in use, sights will be lowered.
7. Practise squad in loading, sight setting and unloading by
word of command.
Note.—In using dummy cartridges in the Bren L.M.G. it is
essential that care should be ta^en to ensure that the gun has been
cleared before the ejection opening cover is closed. If the cover
is closed and a dummy cartridge is left in the breech, when the
gun is reloaded the dummy round does not fall through the ejec-
tion opening, and as the bolt moves forward when the trigger is
pressed the dummy round is pushed forward into the well at the
front end of the slide, and the ejection opening cover jams over
it and the gun is put out of action. Should a gun become jammed
in this manner, it should be taken to the armourer to be cleared.
If it is known or suspected that a dummy round has been left
in the breech, the ejection opening cover must be opened before
the codling handle is pulled bac\; otherwise the gun may be
damaged.
It should be noted that this trouble cannot occur with live
ammunition.
12
LESSON 3.—HOLDING AND AIMING
Instructor's Notes
Stores .—
Gun, tripod, magazines, aiming disc, landscape target, repre'
sentative target and ground sheets.
1. Holding.—Explain that the light machine gun, unlike the
rifle, has little shock of recoil, but the automatic action of the gun,
when fired from the bipod, sets up vibration which, unless con-
trolled, throws the gun off its alignment. This control can only
be effected by correct bolding, which is essential to accurate shoot-
mg.
2. Aiming position.—Demonstrate (see Fig. 4).—Turn butt
strap to rear. Put change lever to “Automatic'* or “Single rounds,”
13
raise butt into shoulder, and hold gun in shoulder firmly with
both hands, right hand on pistol grip, first finger round trigger,
and left hand on butt handle, both exerting a backward and down'
ward pressure. This should be firm but not excessive; arms and
shoulder muscles should not be braced. The cheek will rest lightly
on butt. The bipod should be vertical so as to allow equal back'
ward and forward movement of gun. Butt strap will be put
forward before getting up from the gun and the change lever put
to “Safe."
3. Practise squad.
4. Aiming.—
i. Explain the rules :—
The first and second rules of aiming are the same as
with the rifle, but the third differs on account of
the aperture backsight.
Third rule of aiming (aperture).—Look through the
aperture at the target. Align the top of the foresight
on the centre of the target, the point of contact thus
made being in the centre of the field of view through
the aperture. With the sights thus aligned look at
the target.
In firing at the “small" or “large" classification
target, the bottom of the aiming mark corresponds with
the centre of the target.
ii. Draw or show a diagram as under :—
Fig. 5.—Correct Aim.
lit. Lay a correct aim (using the tripod) on a representative
target. The squad in turn view it, eye in the correct
firing position, i.e. about 2% in. to 3 in. behind the
aperture.
iv. Demonstrate how to use the elbows as a means of ob-
taining elevation or depression. If necessary, the bipod
legs will be adjusted to suit the fircr.
5. Give conditions of test.
6. Practise squad at aiming disc (no magazine on gun) and
on landscape targets.
15
LESSON 4.—FIRING
Instructor S Motel
Stores :—
Gun, magazines and dum?7n’es. Landscape targets.
I. Trigger pressing.—Explain that the trigger has only one
pressure, which is shorter for automatic than for repetition. As with
the rifle, the trigger must be pressed by a squeezing action of the
whole hand on the pistol grip.
2. Firing.—Explain and demonstrate in the firing position:
When “bursts" are ordered, set change lever at “A". Should
“single rounds" be required, set change lever at “R".
i. The normal rate of automatic fire is five bursts a minute.
Correct holding must be maintained throughout each
burst.
ii. The sequence of firing is :—
AIM—FIRE—OBSERVE—RE'AIM
iii. After releasing the trigger, observe the strike of the
shots with a minimum movement of the head and correct
if necessary.
iv. When in action, the firer is responsible for keeping a
full or nearly full magazine on the gun.
v. The firer will always make allowance for side winds by
applying the rules for aiming'off (see Rifle, Lesson 11).
vi. In single round firing, the trigger must be released after
each shot.
3. Practise squad.
4. Types of fire.—Explain :—
i. "Single round" firing will be employed when it is ad'
visablc to conceal the presence of an automatic weapon.
Up to 30 aimed shots can be fired in one minute ; these
should be 6red at such irregular intervals as to resemble
rifle fire.
ii. Rapid fire is a reserve of fire and will only be used to
gain surprise effect against a vulnerable target, to cover
movement or in an emergency (see Application of Fire,
Pamphlet No. 2). Firing will be in bursts of about
five rounds with only such time between bursts as is
necessary to observe and re--aim. With practice a rate
of 120 rounds (or four magazines) a minute should b?
reached. Accuracy must be maintained.
16
5. Moving targets.—Question squad on the method of en*
gaging moving targets, as taught in rifle instruction (Pamphlet No.
3, Lesson 12). Explain that the same method will be applied in
the case of the light machine gun, except that, as its swing is
limited by the bipod mounting, it is necessary to select some point
in front and on the line of movement. Then just before the
target has closed to the estimated lead, fire a long burst of eight
or ten rounds. A succession of such bursts will be fired, a new
point ahead of the target being selected each time. The correct
grip with both hands must be maintained and the elbows
not be moved.
6. Give conditions of test.
7. Practise squad in Lessons 2, 3 and 4.
17
SECTION 2.—STRIPPING, CLEANING AND MECHANISM
In the following lessons the instructor will explain and demon*
strate the stripping and assembling of each group. The parte will
be named and the squad frequently questioned about them.
The lessons may be carried out with the gun on a table.
After stripping and assembling, the correct functioning of the
parts will be tested.
18
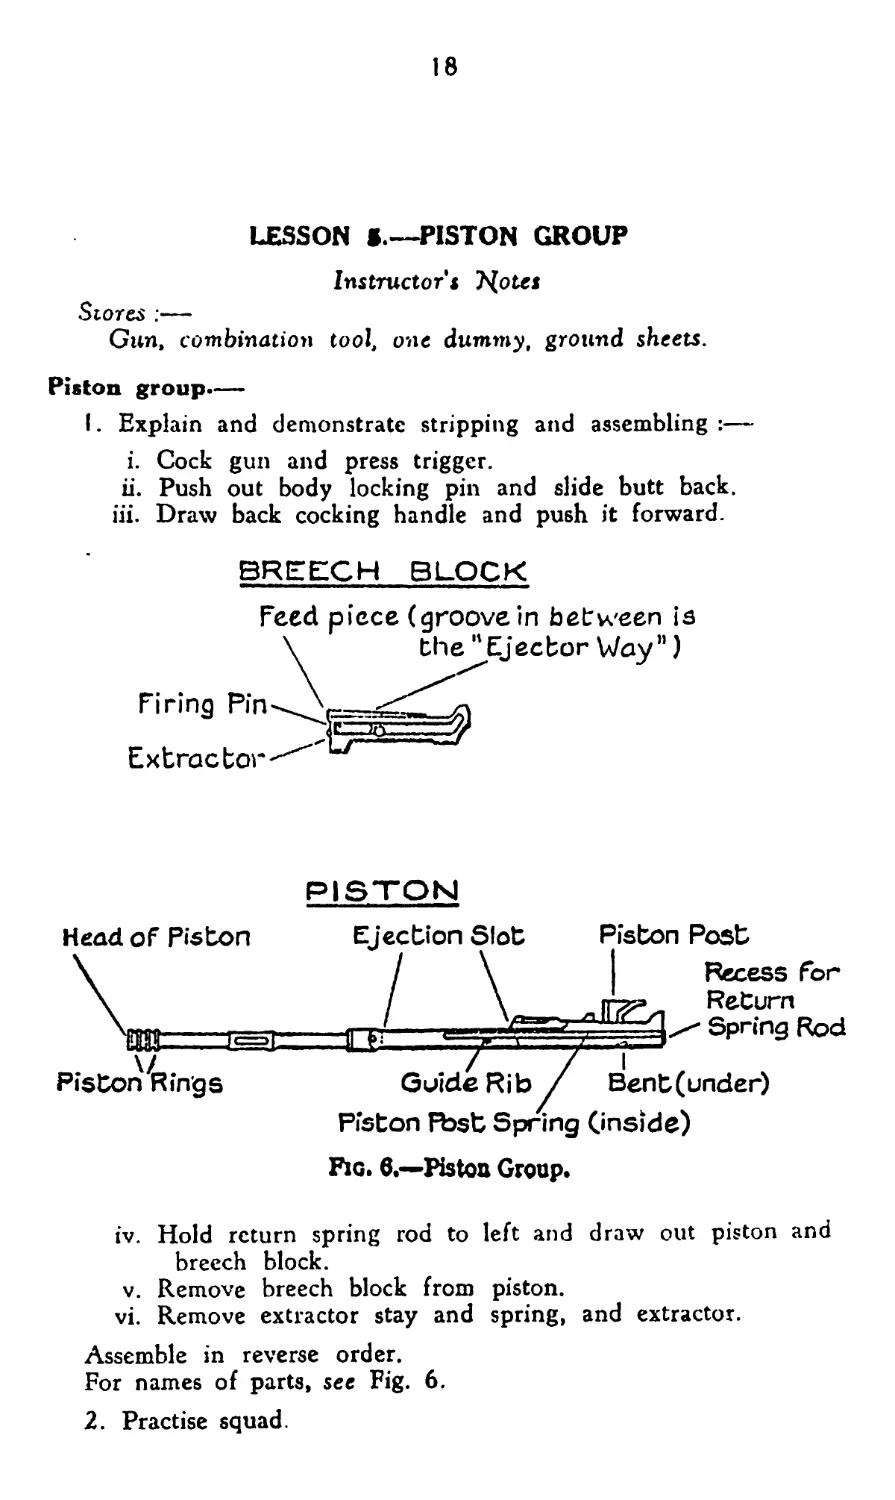
LESSON f.—PISTON GROUP
Instructor s Trotts
Stores :—
Gun, combination tool, one dummy, ground sheets.
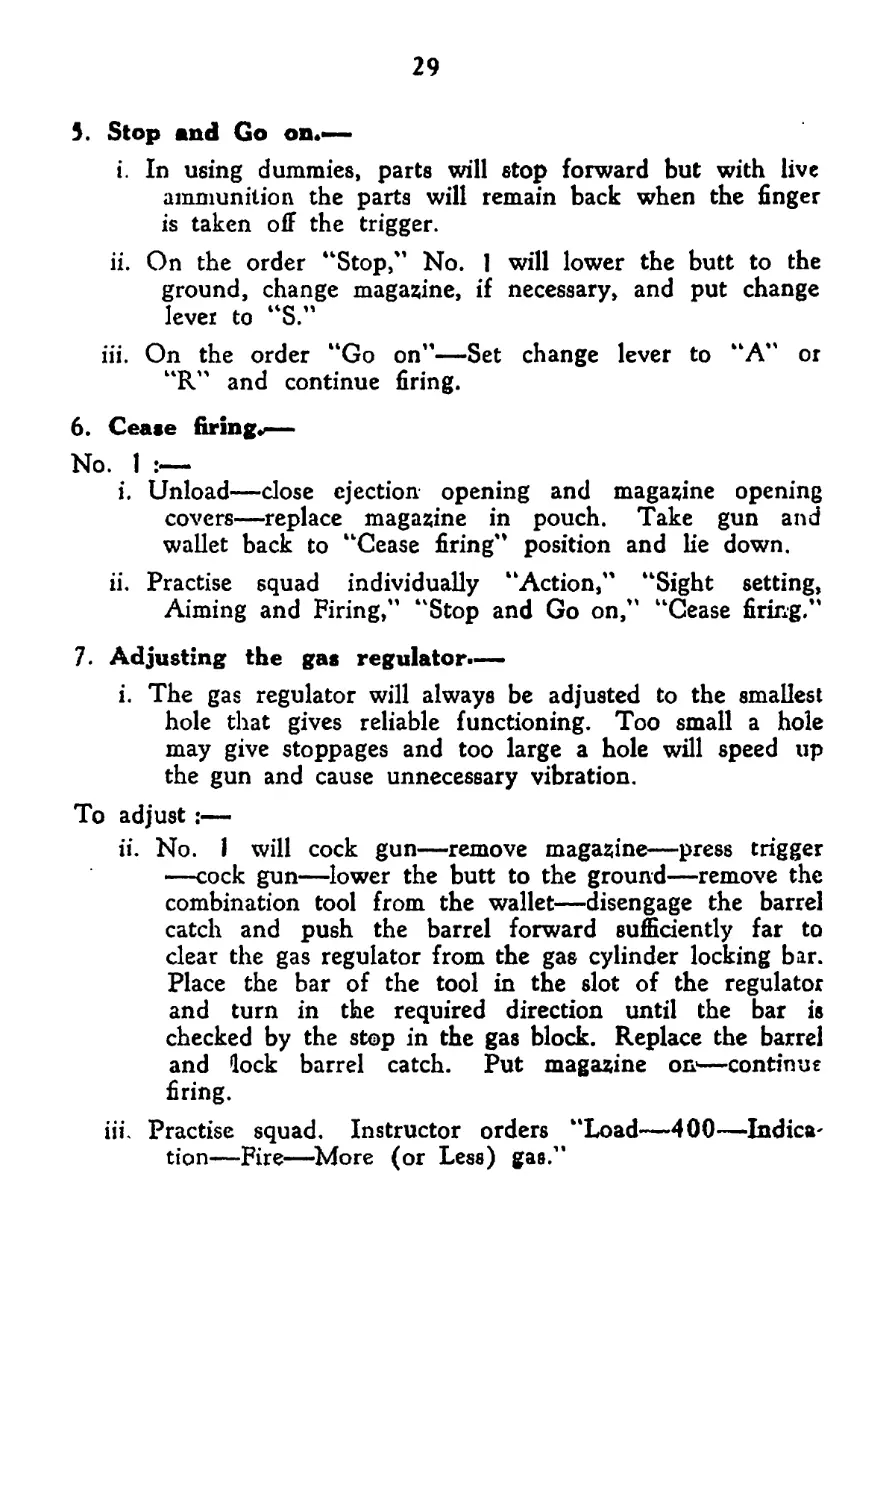
Piston group.—
I. Explain and demonstrate stripping and assembling :—
i. Cock gun and press trigger.
ii. Push out body locking pin and slide butt back,
iii. Draw back cocking handle and push it forward.
BREECH BL-OCK
Feed piece (groove in between is
\ the ''Ejector Way")
Extractor
PISTON
Head of Piston
г<аа
e. в. ve.
Piston Rings
Ejection Slot Piston Post
\l Recess for
ira® Return
Spring Rod
Guide Rib / Bent (under)
Piston Fbst Spring (.inside)
Fig. 6.—Piston Group.
iv. Hold return spring rod to left and draw out piston and
breech block.
v. Remove breech block from piston.
vi. Remove extractor stay and spring, and extractor.
Assemble in reverse order.
For names of parts, see Fig. 6.
2. Practise squad.
19
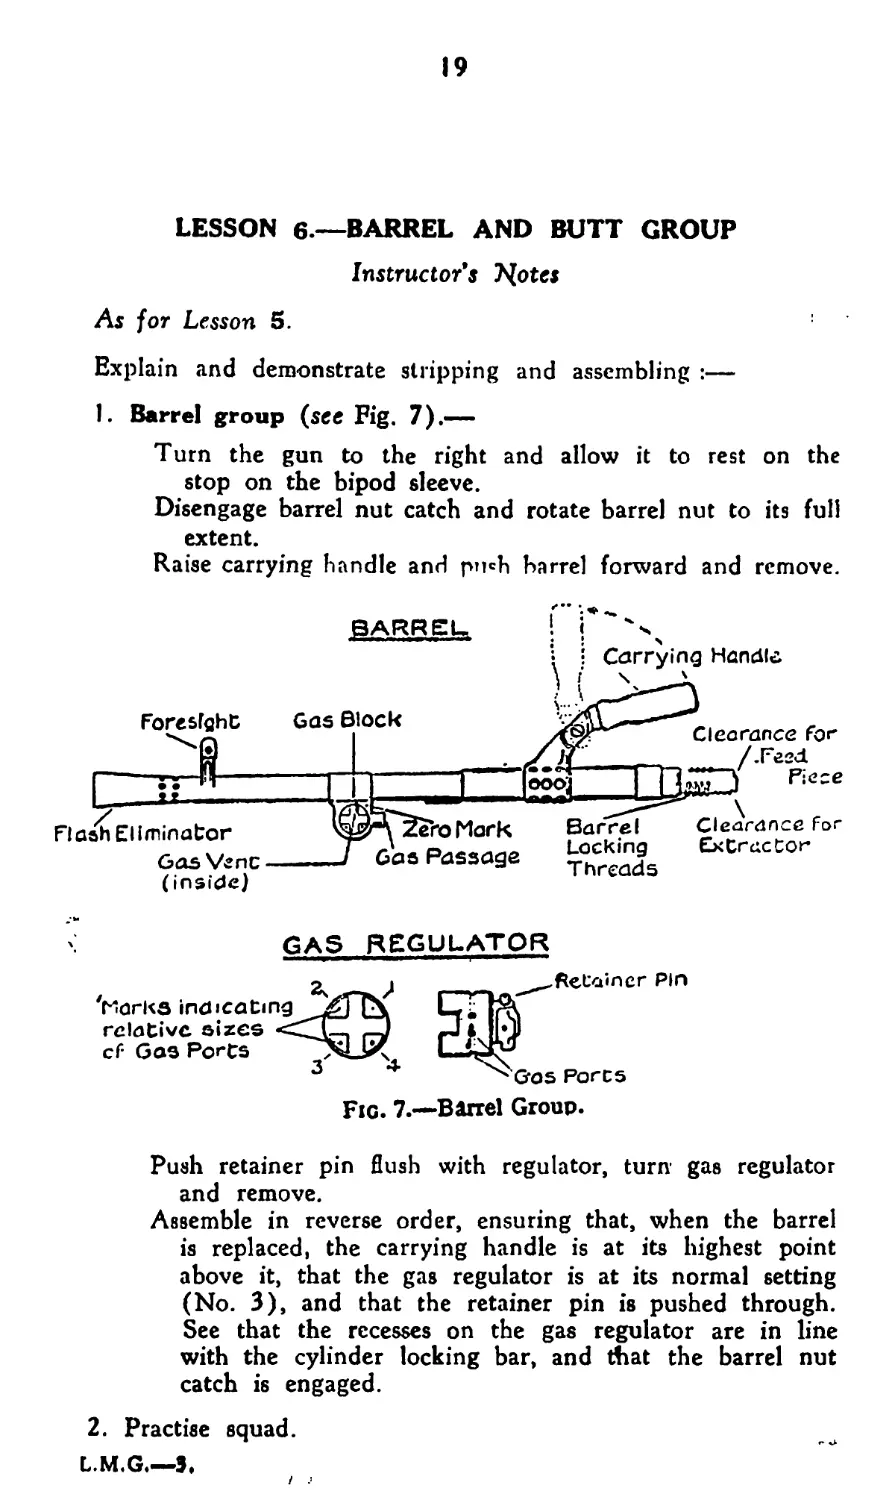
LESSON 6.—BARREL AND BUTT GROUP
Instructors "Notes
As for Lesson 5.
Explain and demonstrate stripping and assembling :—
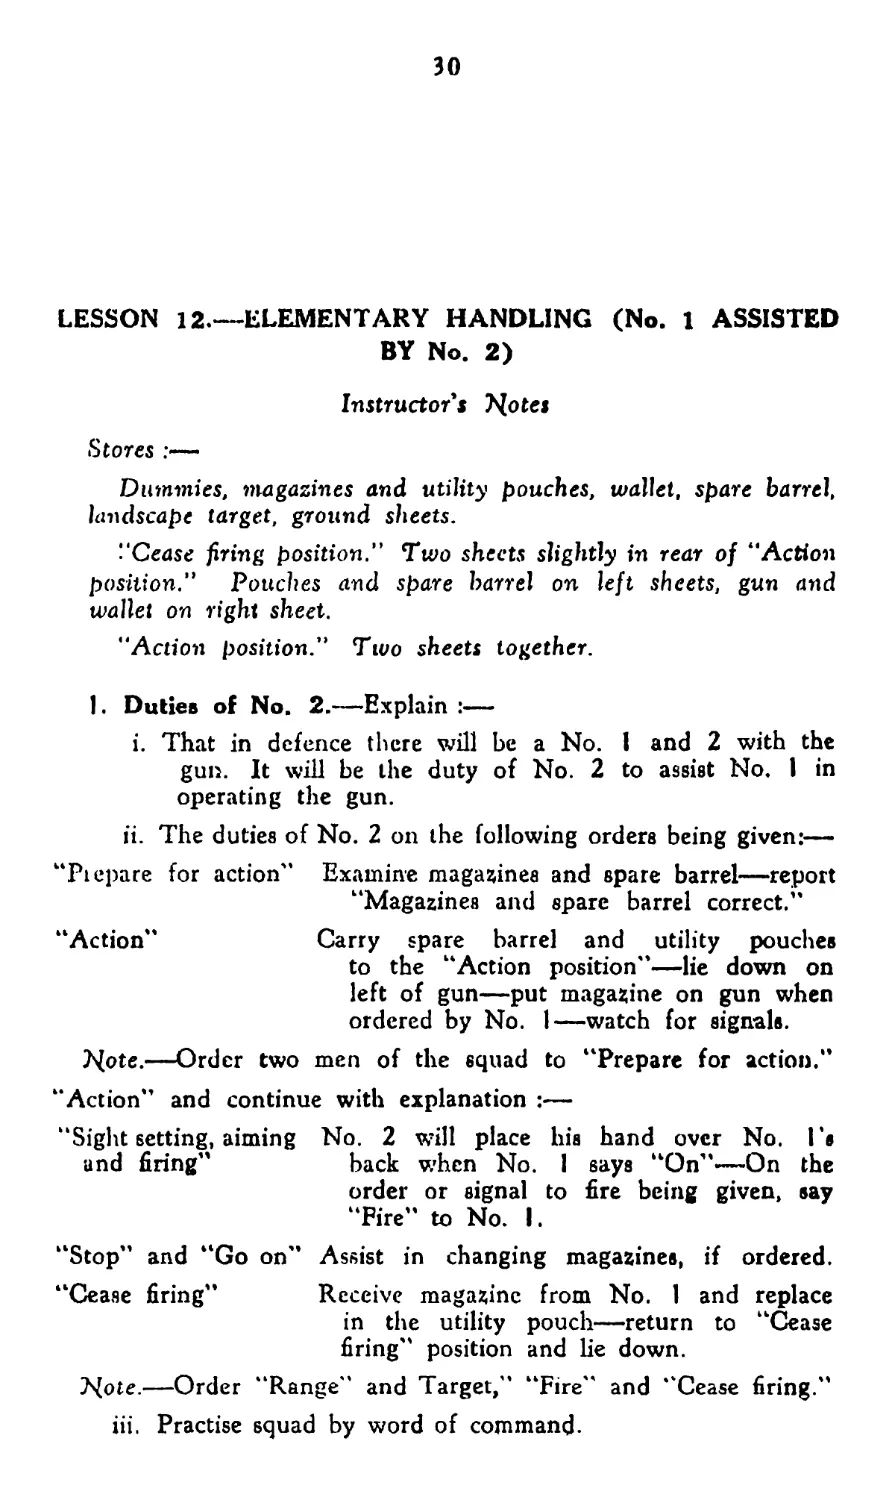
1. Barrel group (see Fig. 7).—
Turn the gun to the right and allow it to rest on the
stop on the bipod sleeve.
Disengage barrel nut catch and rotate barrel nut to its full
extent.
Raise carrying handle and рткЬ barrel forward and remove.
BARREL,
Carrying Handle
Foresight Gas Block
Flash Eliminator
Gas Venc
(inside)
Clearance for
JeboMark
Gas Passage
Pieze
Barre! Clearance For
Locking Extractor
Threads
GAS REGULATOR
Marks indicating
relative sizes <L
cf Gas Ports
Fic. 7.—-Barrel Group.
Push retainer pin flush with regulator, turn gas regulator
and remove.
Assemble in reverse order, ensuring that, when the barrel
is replaced, the carrying handle is at its highest point
above it, that the gas regulator is at its normal setting
(No. 3), and that the retainer pin is pushed through.
See that the recesses on the gas regulator are in line
with the cylinder locking bar, and that the barrel nut
catch is engaged.
2. Practise squad.
L.M.G___3.
20
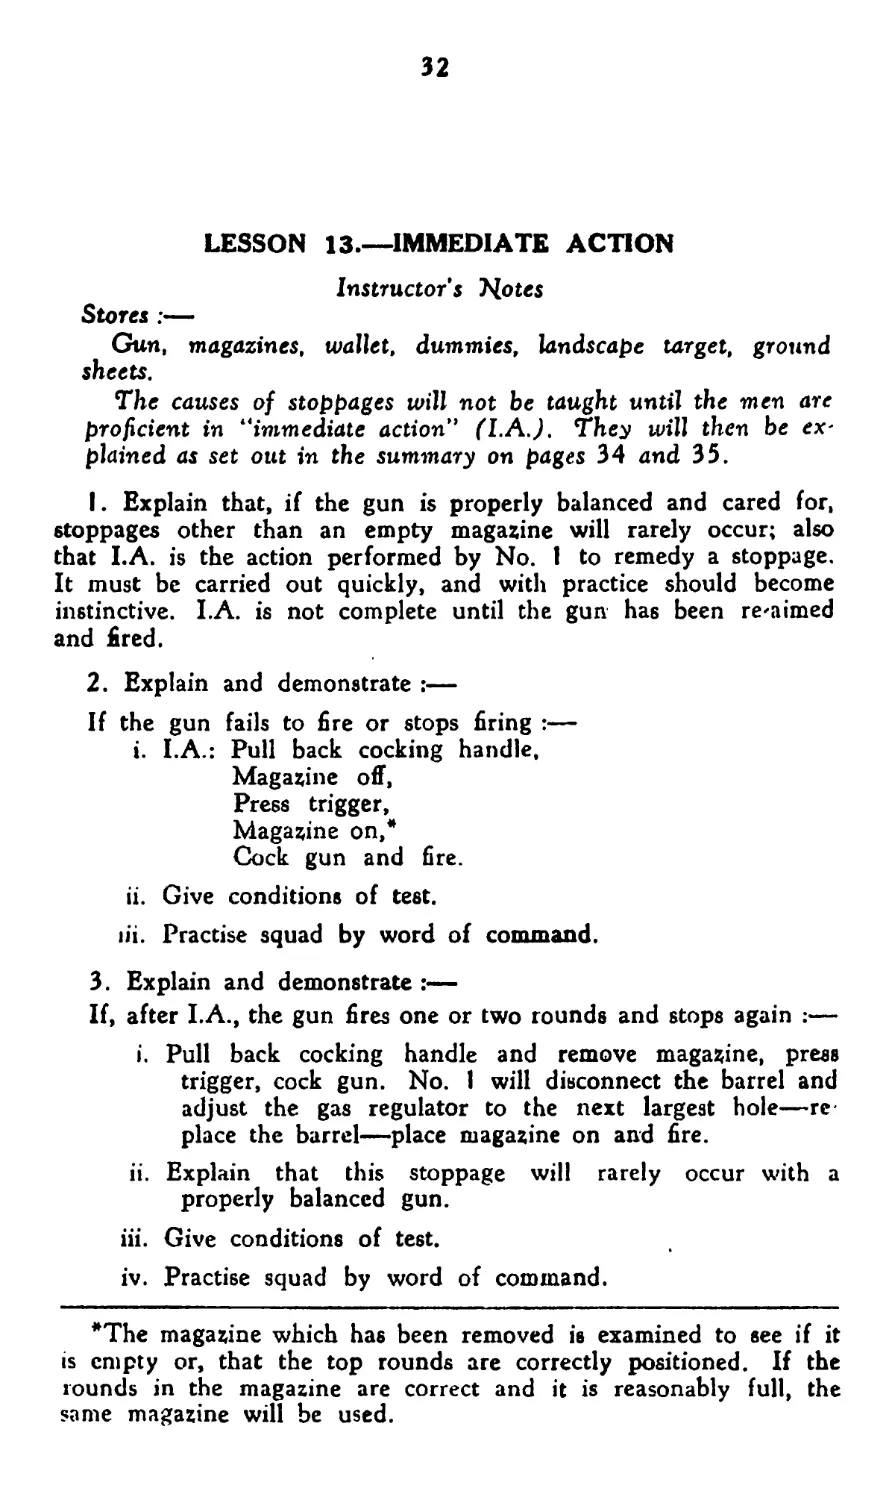
3. Butt group (see Fig. 8).—
Push out body locking pin.
Disengage barrel nut catch and rotate barrel nut to its
full extent.
MpunttnQ Pin
Butt Plate Catch
Slot for Body Locking Pin Jf
Piston Buffer and Spring Butt Scran f
Guide Ribs Return SpringRod Scar
Butt Slide |
Ejectionopening Cover
Mounting Pin Hahcile (under)
(on reverse side) Change Lever
Pistol Grip
Buffer Spring
Return Spring
Butt Swivel
Mounting Pin Handle
Mounting Pin
Fro. 8.
Butt HandIo Butt Plot©
Slide off butt, holding backsight drum with the left hand.
Assemble in reverse order.
4. Practise squad.
21
LESSON 7.—BODY GROUP AND BIPOD
Instructor's 7>{otes
As for Lesson 5.
Explain and demonstrate stripping and assembling:—
I. Body group and bipod (see Fig. 9).—
Press down barrel nut retainer plunger and withdraw barrel
nut.
Turn body to the left and withdraw it from bipod sleeve.
BODY GROUP
----— Body Peking РЙ
Fouling Holea Cocking Handle I
Gae Cylinder / Recess for Barre! Magazine ✓Z**Q‘/Magazlne I
Locking Nub^ Owning Coverf fl CaghtPin Д
Gas Shield-
Gas Escape Holes I /
Barre! Nub [ /
Retainer Plunger /
Ejector
BIPOD
Bracket^
Bipod
Swivel
Bipod
Catch
Aperture Backsight
Spring
Lower
Lea
Sleeve
—Upper teg
Spring Catch
Bipod
Shoe
el Locking Thread
—-’Barrel Nut Catch
BARREL NUT
Fig. 9.
Assemble in reverse order. Replace bipod.
Position the barrel nut with the barrel nut catch down'
wards, and tap down with the hand.
2. Practise squad.
3. Practise complete stripping and assembling.
22
LESSON 8.—CARE AND CLEANING, DAILY AND
BEFORE BRING.
Instructor's Notes
Stores :—
Gun, magazines, spare barrel, cleaning kit, wallet, ground
sheets, gun chest and dummies.
Cleaning hit consists of :—
Cleaning rod, M.G., Mh. IL
Double pulbthrough and gauze.
4 gauzes.
- Cylinder cleaning rod.
,, ,, wire brush.
,, .. mop.
Combination tool.
Oil container.
Flannelette.
The various articles of cleaning \it tcill be explained as they
are used.
Explain and demonstrate :—
I. Daily cleaning.—Clean both barrels, using the cleaning rod.
A dry piece of flannelette, 4 in. by 2 in., will be put half way
through the eye at the end of the cleaning rod. The rod will be
inserted from the breech end. When the "barrel has been cleaned
with dry flannelette, a slightly smaller piece of flannelette, well
oiled, will be similarly used to oil the barrel.
Note.—If the gun has been in use for instructional purposes,
it may be necessary to strip it completely in order to clean the
working parts thoroughly.
2. Before firing.—Strip completely. Clean and leave dry the
gas affected parts, i.e. barrel group complete; gas cylinder, using
the cylinder cleaning rod and mop; bipod sleeve; head of piston
and rings; face of breech block. Clean remainder of gun and
slightly oil working parts.
When assembling, set gas regulator to the smallest hole that
will give reliable functioning (normally No. 3). Clean and check
spare parts and magazines, paying particular attention to the
magazine platform. The magazine platform and spring will only
be removed when necessary.
3. Spare parte wallet.—This will always be carried with the
gun. The wallet contains oil can, combination tool, double pulp
through and gauze, clearing plug, flannelette and spare parts tin.
4. Practise squad.
23
LESSON 9.—CARE AND CLEANING, DURING INTERVALS
OF FIRING, AFTER FIRING AND AFTER GAS ATTACK
Instructor's Wotes
As for Lesson 8.
Explain and demonstrate :—
1. During intervals of firing.—
Unload.
Oil working parts as necessary.
Rotate gun in bipod sleeve to clear fouling from fouling holes.
In firing from the tripod, the catch on the bipod must be positioned
and the bipod rotated from the left side.
Most of the fouling which passes through the gas vent is
deposited in the chamber at the front of the gas cylinder. The
hard fouling chokes up the holes in this chamber and makes the
bipod sleeve stiff. Rotation of the gun in the bipod sleeve breaks
the fouling which, on firing, is blown out of the gas escape holes.
The gas shield protects No. 2 from this fouling and from the gas
exhaust.
When a hot barrel is removed from the gun, it can be quickly
cooled by submerging it in water, if this is available. Should this
be done, care must be taken to avoid the steam blast and also that
the bore is clear before use again.
Check ammunition and fill up partly used magazines.
2. Practise squad.
3. After firing.—
Strip completely. Clean barrel as for rifle, using boiling water
if available, and gauze when necessary. Clean gas cylinder with
cylinder cleaning rod, wire brush and mop.
With the nose of the bullet, remove any fouling that has cob
lected in the holes at the front end of the cylinder.
Assemble the brush to one section of the rod, well oil the
brush, insert the rod (handle first into the gas cylinder from the
breech end and draw the brush into the cylinder. Entry of the
brush and free working in the cylinders is facilitated by turning the
rod clockwise.
A few strokes of the brush will loosen all fouling.
Remove the brush, assemble the mop and complete internal
cleaning with the mop covered with flannelette, and finally lubricate
the cylinder with oiled flannelette.
Clean and oil the external portion.
Clean with oily rag remaining parts and lightly scrape, if ncces'
sary, fouling from gas affected parts, using the combination tool ;
then dry, clean and slightly oil.
If it is not possible to clean as above immediately after firing,
barrels and gas affected parts will be oiled.
24
Further cleaning of gas affected parts will only be carried out
when necessary; particular attention, however, will be paid to the
barrels, which will be cleaned and oiled daily until fouling ceases.
Clean spare parts and magazines.
Pack gun, wallet and spare barrel in gun chest.
4. Practise squad.
5. Cleaning after a gas attack.—
Similar to that for rifle as laid down in Pamphlet No. 3, Lesson 4.
Note.—Wear and damage to certain components of the Bren
gun result through excessive cleaning, e.g., it is essential that a
good fit is maintained between the bipod sleeve and the gas cylinder,
also between the nose of the gas block and the gas cylinder. The
use of abrasives, steel scraping implements or any method which
removes metal when cleaning surfaces which are required to fit
tightly, is strictly prohibited. In most cases it is necessary only to
clean the parts in question with an oily rag leaving the surfaces
oiled t® prevent rust.
25
LESSON 10.—MECHANISM
Instructor's Notes
Stores :—
Gun, magazines, dummies, empty case, ground sheets.
During the lesson, the gun will remain with the butt drawn
back, and the piston, breech block, magazine catch and ejector
removed.
Explain, demonstrate the action, and ask questions at the end
of each phase.
1. Backward action»—
Some of the gases following the bullet pass through the gas
vent and gas regulator into the gas cylinder. This forces the
piston to the rear and compresses the return spring until the
piston is stopped by the piston buffer. The empty case, being
gripped by the extractor, is carried to the rear on the face of
the breech block until its base meets the ejector. The case is then
ejected downwards through the ejection slot in the piston.
2. Forward action.—
The piston, having been stopped by the piston buffer, is forced
forward by the return spring, carrying the breech block with
it. The feed piece meets the base of the first round in the maga-
zine and forces it forward into the chamber, the extractor closing
over the rim.
The piston post in its final move forward drives the firing pin
against the cap of the cartridge, thus firing the round.
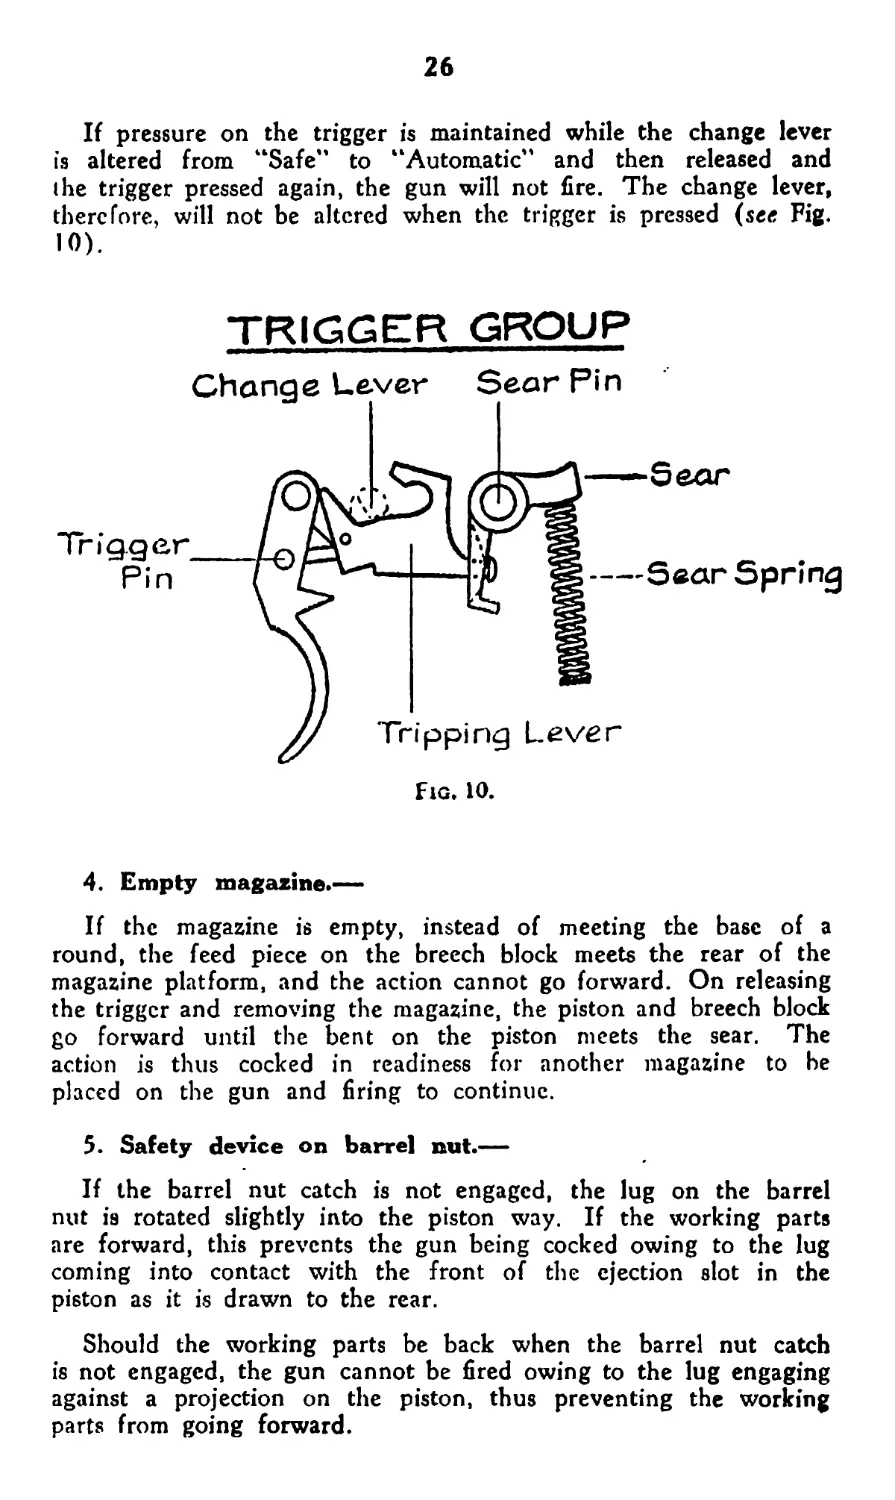
3. Trigger action.—
With the change lever at ‘ЛА," pressure on the trigger disengages
the sear from the bent on the piston, and the piston is allowed
to go forward. As long as the trigger is pressed, the gun will
continue to fire, but, if the trigger is released, the bent will engage
with the scar the next time the piston comes to the rear, stopping
its forward movement.
With the change lever at “R," the trigger must be pressed
each time a shot is to be fired, because the piston is held back
after each round.
With the change lever at “S," the trigger is disengaged from
the sear, and the gun cannot be fired.
26
If pressure on the trigger is maintained while the change lever
is altered from “Safe” to “Automatic” and then released and
the trigger pressed again, the gun will not fire. The change lever,
therefore, will not be altered when the trigger is pressed (see Fig.
Ю).
TRIGGER GROUP
Change Lever Sear Pin
4. Empty magazine.—
If the magazine is empty, instead of meeting the base of a
round, the feed piece on the breech block meets the rear of the
magazine platform, and the action cannot go forward. On releasing
the trigger and removing the magazine, the piston and breech block
go forward until the bent on the piston meets the sear. The
action is thus cocked in readiness for another magazine to be
placed on the gun and firing to continue.
5. Safety device on barrel nut.—
If the barrel nut catch is not engaged, the lug on the barrel
nut is rotated slightly into the piston way. If the working parts
are forward, this prevents the gun being cocked owing to the lug
coming into contact with the front of the ejection slot in the
piston as it is drawn to the rear.
Should the working parts be back when the barrel nut catch
is not engaged, the gun cannot be fired owing to the lug engaging
against a projection on the piston, thus preventing the working
parts from going forward.
27
SECTION 3.—ELEMENTARY HANDLING, IMMEDIATE
ACTION AND STOPPAGES
1. The characteristics of the light machine gun and its main'
tenance in action demand the performance of special duties by
certain men of the section (see General Notes, para. 8).
2. In elementary handling every man of the section is trained
in the duties of No. 1 and No. 2, as a drill. It is designed to
exercise the firer in handling the light machine gun on level
ground, either alone or when sufficient cover is available and the
situation demands, with the assistance of a No. 2. A target will
always be indicated. During movement there will be no spare
barrel with the gun and the only ammunition available will be the
magazines carried within the section.
3. When each man has had sufficient practice to enable him
to carry out instinctively the correct action on any given command,
the instructor will introduce handling exercises.
The object of these exercises is to quicken all numbers of the
section in the handling of the light machine gun. Accuracy must,
however, not be sacrificed for speed, and mistakes in points of
elementary training will on no account be overlooked.
4. Several squads or sections can be exercised collectively under
the control of one instructor. This introduces the. competitive
spirit. Instructors must have a carefully prepared programme of
items to be included in the exercise; and, when more than two
squads are being exercised simultaneously, a N.C.O. must super*
vise each squad.
28
LESSON 11.—ELEMENTARY HANDLING (No. 1 ACTING
ALONE)
Instructor's Notes
Stores :—
i. Gun, magazines with dummies; ground sheets and land'
scape target; wallet and pouch equipment for No. I .
ii. Ground sheets in "Action position" and "Cease firing
position"; the gun and wallet on rear sheets and utility
pouch on front sheets.
iii. Squad falls in on right in single rank and numbers off.
Explain and demonstrate each of the following :—
I. In movement, no spare barrel will be carried and the firer,
when firing rapid, must decide if it is desirable to reduce the rate
of fire as indicated in General Notes, para. 4.
2. Prepare for action*—
No. 1
i. Lie down and examine gun as follows: Foresight—gas
regulator—bipod—barrel nut catch—backsight drum and
backsight—mechanism working freely—close ejection
opening cover—see that wallet is present and check
contents.
ii. Examine each magazine to see that top cartridges are cor*
rectly positioned, and return to pouch equipment. Re*
port "Gun ready."
iii. Practise squad individually.
3. Action.—
No. 1
Jump up and carry gun in right hand by carrying handle to
"Action position."
Place gun gently on ground. Turn carrying handle
to the left—lie down behind gun—put magazine from
pouch equipment on gun and load. Subsequent maga*
zines will be taken from the carrier, which will have
been placed in the "Action position."
4. Sight setting, aiming and firing.—
No. I :—
On a range being ordered, set sights. When a target is in*
dicated aim and say "On" when aim is correct—Fire
on the order "Fire."
29
5. Stop and Go on.—
i. In using dummies, parts will stop forward but with live
ammunition the parts will remain back when the finger
is taken off the trigger.
ii. On the order “Stop," No. 1 will lower the butt to the
ground, change magazine, if necessary, and put change
lever to “S."
iii. On the order “Go on"—Set change lever to “A" or
“R" and continue firing.
6. Cease firing*—
No. 1 :—
i. Unload—close ejection opening and magazine opening
covers—replace magazine in pouch. Take gun and
wallet back to “Cease firing" position and lie down.
ii. Practise squad individually “Action," “Sight setting,
Aiming and Firing," “Stop and Go on," “Cease firing."
7. Adjusting the gas regulator—
i. The gas regulator will always be adjusted to the smallest
hole that gives reliable functioning. Too small a hole
may give stoppages and too large a hole will speed up
the gun and cause unnecessary vibration.
To adjust:—
ii. No. I will cock gun—remove magazine—press trigger
—cock gun—lower the butt to the ground—remove the
combination tool from the wallet—disengage the barrel
catch and push the barrel forward sufficiently far to
clear the gas regulator from the gas cylinder locking bar.
Place the bar of the tool in the slot of the regulator
and turn in the required direction until the bar is
checked by the stop in the gas block. Replace the barrel
and lock barrel catch. Put magazine on-—continue
firing.
iii. Practise squad. Instructor orders “Load—400—Indica^
tion—Fire—More (or Less) gas."
30
LESSON 12.—ELEMENTARY HANDLING (No. 1 ASSISTED
BY No. 2)
Instructor s Wotes
Stores :—
Dummies, magazines and utility pouches, wallet, spare barrel,
landscape target, ground sheets.
‘‘Cease firing position.” Two sheets slightly in rear of “Action
position.” Pouches and spare barrel on left sheets, gun and
wallet on right sheet.
“Action position.” Two sheets together.
1. Duties of No. 2.—Explain :—
i. That in defence there will be a No. I and 2 with the
gun. It will be the duty of No. 2 to assist No. I in
operating the gun.
ii. The duties of No. 2 on the following orders being given:—
“Prepare for action" Examine magazines and spare barrel—report
“Magazines and spare barrel correct."
“Action" Carry spare barrel and utility pouches
to the “Action position"—lie down on
left of gun—put magazine on gun when
ordered by No. 1—watch for signals.
Note.—Order two men of the squad to “Prepare for action."
“Action" and continue with explanation :—
“Sight setting, aiming No. 2 will place his hand over No. 1’s
and firing" back when No. 1 says “On"—On the
order or signal to fire being given, say
“Fire" to No. I.
“Stop" and “Go on" Assist in changing magazines, if ordered.
“Cease firing" Receive magazine from No. 1 and replace
in the utility pouch—return to “Cease
firing" position and lie down.
Note.—Order “Range" and Target," “Fire" and “Cease firing."
iii. Practise squad by word of command.
31
2. Changing the barrel (with gun in “Action position”)—
i. Explain that the barrel will be changed after firing ten
magazines at the rapid rate (120 rounds a minute),
(see General Notes, para. 4).
j^ote.—For the instructor's demonstration and the squad's prac*
tice, an empty magazine will be on the gun and, when the barrel
has been changed, a full magazine will be put on.
Give “Load" and a fire order.
Explain and demonstrate :—
Action of No. 1 —
ii. No. I will, when the tenth magazine is empty, pull back
the cocking handle, remove the magazine and say “Bar*
rel," at the same time closing the magazine opening cover.
No. 2 changes the barrel and, after No. I has opened
the magazine opening cover, places a magazine on the
gun. No. 1 continues firing.
Action of No, 2.—
iii. Demonstrate, with one of the squad acting as No. 1, the
action of No. 2 on the order “Carry on firing."
No. 2 then says: “Tenth magazine"—"Barrel,"*—re*
checks gas regulator—changes barrel when ordered—
places a full magazine on gun—takes empty magazine
from No. 1 and places it in box or utility pouch—takes
another full magazine.
iv. Give conditions of test.
v. Practise squad.
3. Signals.—
Explain and demonstrate :—
i. Signals will be a useful means of communication between
the section leader and the gun. The following signals
will be used when necessary.
“Action" Both aims raised in line with the shoulders and lowered.
“Prepare to fire" “Fire" or “Go on" “Stop" “Cease firing" ii. Practise, using Hand raised above the head. Hand dropped to the side. Hand waved horizontally. Arm circled from the shoulder, signals.
*In the case of a mounted section the spare barrel, when required,
will be taken from the spare barrel case and the hot one returned to
it.
32
LESSON 13.—IMMEDIATE ACTION
Instructor's Notes
Stores :—
Gun, magazines, wallet, dummies, landscape target, ground
sheets.
The causes of stoppages will not be taught until the men are
proficient in “immediate action ’ (LA.), They will then be ex*
plained as set out in the summary on pages 34 and 35.
I. Explain that, if the gun is properly balanced and cared for,
stoppages other than an empty magazine will rarely occur; also
that I.A. is the action performed by No. 1 to remedy a stoppage.
It must be carried out quickly, and with practice should become
instinctive. I.A. is not complete until the gun has been retimed
and fired.
2. Explain and demonstrate :—
If the gun fails to fire or stops firing :—
i. I.A.: Pull back cocking handle.
Magazine off,
Press trigger,
Magazine on,*
Cock gun and fire.
ii. Give conditions of test.
iii. Practise squad by word of command.
3. Explain and demonstrate :—
If, after I.A., the gun fires one or two rounds and stops again :—
i. Pull back cocking handle and remove magazine, press
trigger, cock gun. No. 1 will disconnect the barrel and
adjust the gas regulator to the next largest hole—re
place the barrel—place magazine on and fire.
ii. Explain that this stoppage will rarely occur with a
properly balanced gun.
iii. Give conditions of test.
iv. Practise squad by word of command.
*The magazine which has been removed is examined to see if it
is empty or, that the top rounds are correctly positioned. If the
rounds in the magazine are correct and it is reasonably full, the
same magazine will be used.
эз
LESSON 14.—STOPPAGES
Instructor’s J^otes
Stores :—
As for lesson 13.
Lesson 14 will start with a recapitulation of Lesson 13.
1. Explain and demonstrate :—
If, after I.A., the gun will not fire :—
Cock gun and remove magazine.
Examine for obstruction in the body or chamber.
i. If obstruction in the body, such as a jammed round or
empty case, remove it—load and fire.
ii. If no obstruction in the body—insert the clearing plug
into the chamber—press the trigger—cock gun—remove
clearing plug and separated portion—load and fire.
2. Practise squad by word of command.
' Explain cause of stoppages (see summary on pages 34 and
35).
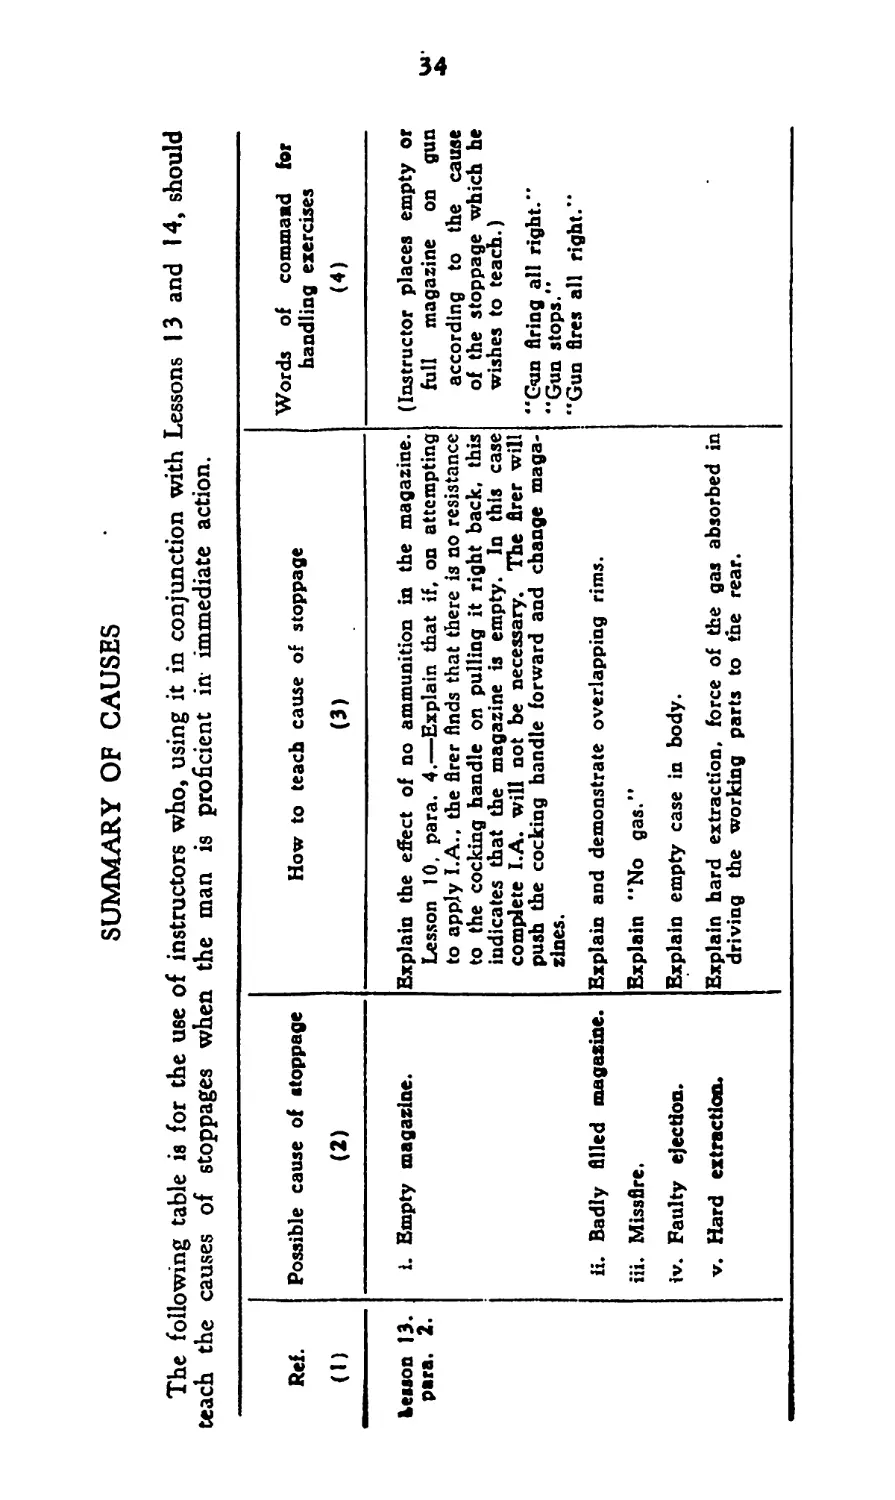
SUMMARY OF CAUSES
The following table is for the use of instructors who, using it in conjunction with Lessons 13 and 14, should
teach the causes of stoppages when the man is proficient in immediate action.
Ref. (1) Possible cause of stoppage (2) How to teach cause of stoppage (3) Words of command for handling exercises (4)
Leeson 13. para. 2. i. Empty magazine. ii. Badly filled magazine. iii. Missflre. iv. Faulty ejection. v. Hard extraction. Explain the effect of no ammunition in the magazine. Lesson 10, para. 4.—Explain that if, on attempting to apply I.A., the firer finds that there is no resistance to the cocking handle on pulling it right back, this indicates that the magazine is empty. In this case complete I.A. will not be necessary. The firer will push the cocking handle forward and change maga- zines. Explain and demonstrate overlapping rims. Explain "No gas." Explain empty case in body. Explain hard extraction, force of the gas absorbed in driving the working parts to the rear. (Instructor places empty or full magazine on gun according to the cause of the stoppage which he wishes to teach.) "Gun firing all right." "Gun stops." "Gun fires all right."
SUMMARY OF CAUSES—continued
Ref. (1) Possible cause of stoppage (2) How to teach cause of stoppage (3) Words of command for handling exercises W
Lesson 13, para. 3. Insufficient gas. This stoppage, will not occur when a gun is properly balanced, i.e. gas regulator correctly adjusted. Care must be taken not to start with too much gas, or excessive strain and unnecessary hammering of the working parts will occur. Explain that, through-lack of gas, the breech block may not be forced back far enough to engage behind the next round in the magazine or with sufficient force to ensure complete ejection of. the empty case. “ Gun firing all' right.” “ Gun stops—Fires one or two rounds and stops again—Gun fires all right.” V»
Lesson 14. i. Obstruction caused by mechanical breakdown. it Separated case. Not set up. Explain that a separated case in the chamber is a very rare occurrence, but can be removed by the use of the clearing plug.* “ Gun firing all right.” “ Gun stops—Will not fire.” Instructor will say :— “Obstruction in body “ or “ Obstruction in chamber.” “ Gun fires ail right.”
36
LESSON 15.—ADDITIONAL STRIPPING
Instructor s Notes
Stores :—
Gun, magazines, dummies, combination tool, ground sheets.
Explain that it will be necessary at times to take down parts
of the gun which are not stripped in ordinary cleaning, in
order to deal with possible breakage of parts or for thorough
cleaning after a gas attack-
Explain and demonstrate :—
I. Butt plate and return spring.—
i. Butt plate.—
To strip.—Turn the butt strap to the rear. Place the
nose of a bullet on the butt plate catch close to the butt
plate, and tap the base of the cartridge with the hand.
Remove the butt plate.
Mechanism.—The large buffer and spring in the centre of
the butt presses the butt plate to the rear. This is com*
pressed when the gun fires and eases the shock on the
shoulder of the firer.
ii. Return spring»—
To strip.—Insert the combination tool so that the recesses
engage in the projection on the return spring cap.
Press in, turn J turn to the left, and carefully with'
draw the return spring and rod.
To assemble.—Insert the rod and return spring in their
housing. Compress the spring by means of the cap held
in the combination tool. Guide the spring with the
fingers, being careful not to distort it. Press in the
cap and turn to the right to lock.
iii. Butt plate.—
To assemble.—Engage the stud on the toe of the butt
plate with its recess on the toe of the butt, and lift
the butt strap firmly upwards and forwards, pressing
the catch with the finger of the other hand.
iv. Practise squad.
2. Magazine platform.—
To strip.—Press in the stud on the bottom plate of the maga*
zine, and slide it off, controlling the spring as it comes out. Lift
out spring and platform.
To assemble.—Replace the platform and spring. Compress the
spring and slide on the bottom plate until the stud engages in
the hole in the plate. A tap with the hand on the thin side of
the magazine will assist it to engage.
Practise equad.
37
LESSON 16.—ADDITIONAL STRIPPING (continued)
Instructor's Hotes
As in Lesson 15.
Explain and demonstrate :—
1. Firing pin.—
To strip.—Press out the retainer pin, taking care that the
firing pin does not jump out of the back of the breech block.
Mechanism.—The firing pin spring holds the firing pin to the
rear. When the piston post strikes the rear of the firing pin, the
force is sufficient to overcome the spring and fire the cartridge.
As soon as the piston is withdrawn, the spring withdraws the
firing pin from the face of the breech block again1.
To assemble.—Hold the spring in compression with the recess
for the retainer pin corresponding with the retainer pin hole.
Replace the retainer pin.
2. Magazine catch and ejector.—
To strip.—Cock the gun, press the point of the magazine catch
pin and withdraw to the right to a stop. Slide magazine catch
and ejector forward. To separate, squeeze the magazine catch and
ejector together to compress the spring, slide the magazine catch
back along the ejector and lift off.
While the magazine catch and ejector are off, the magazine
opening cover can be removed by sliding to the rear.
Assemble in reverse order,
3. Trigger group.—
To strip.—All pins are removed from right to left. Press out
change lever. Press out sear pin and remove sear and spring.
Raise tripping lever, press out trigger pin, and remove trigger
and tripping lever. Do not strip further than this.
To assemble.—Keep trigger in position by holding tripping
lever vertical and replace trigger pin. Place sear and spring in
position, with the end of the tripping lever through the slot in the
sear, and insert sear pin. Hold down tripping lever slightly
press in change lever.
4. Practise equad.
38
SECTION 4.—LIGHT MACHINE GUN MOUNTED ON
TRIPOD
1. Each light machine gun is provided with a tripod to enable
the gun to be fired on a "‘fixed line” during darkness, fog or
smoke. The tactical employment of the gun in this role is laid
down in Infantry Training.
2. “Firing on fixed lines” is a term applied to defensive fire
denoting that measures have been taken during daylight for main*
taining elevation and direction in darkness, etc., so that fire will
fall on a previously selected area of ground. With the light
machine gun these measures consist of mounting the tripod and
clamping the elevating gear on the traversing arc in a fixed position
so that, when mounted, the fire from the gun will cover the selected
area, if possible in enfilade. No fixed lines will be laid within 5
degrees of any of our own troops.
3. Overhead fire should not be attempted unless exceptionally
favourable conditions exist.
4. The tripod can also be adapted for use as an anti-aircraft
mounting.
39
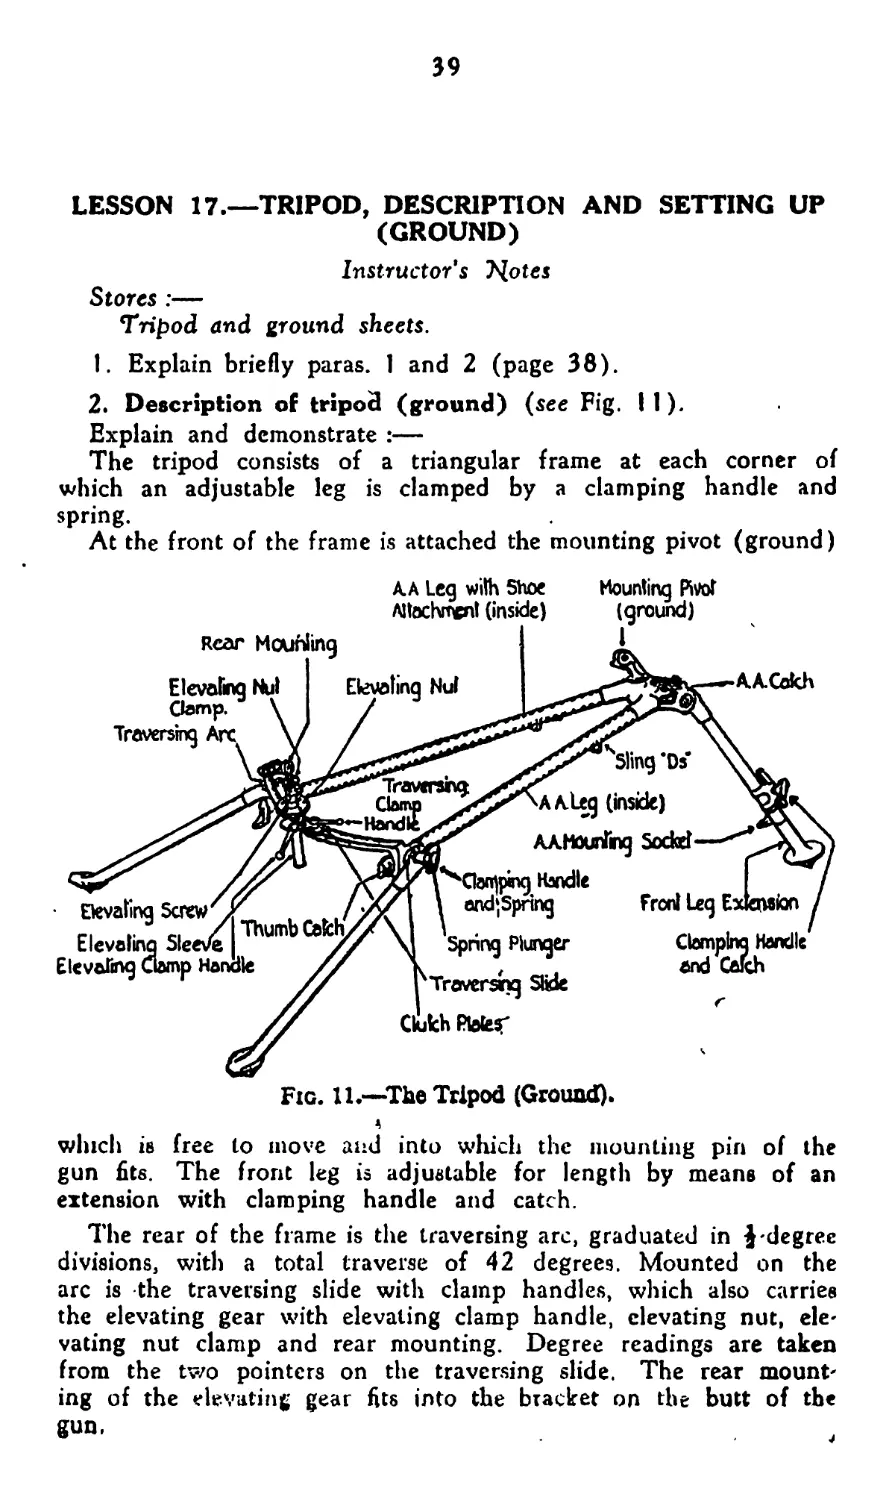
LESSON 17.—TRIPOD, DESCRIPTION AND SETTING UP
(GROUND)
Instructor’s Notes
Stores :—
Tripod and ground sheets.
I. Explain briefly paras. 1 and 2 (page 38).
2. Description of tripod (ground) (see Fig. II).
Explain and demonstrate :—
The tripod consists of a triangular frame at each corner of
which an adjustable leg is clamped by a clamping handle and
spring.
At the front of the frame is attached the mounting pivot (ground)
A.A leg with Shoe Mounting Pivot
A!tochn«nl (inside) (ground)
Fig. 11.*—The Tripod (Ground).
which is free to move and into which the mounting pin of the
gun fits. The front leg is adjustable for length by means of an
extension with clamping handle and catch.
The rear of the frame is the traversing arc, graduated in J'degree
divisions, with a total traverse of 42 degrees. Mounted on the
arc is the traversing slide with clamp handles, which also carries
the elevating gear with elevating clamp handle, elevating nut, ele-
vating nut clamp and rear mounting. Degree readings are taken
from the two pointers on the traversing slide. The rear mount'
ing of the elevating gear fits into the bracket on the butt of the
gun, 4
40
“Ds" and slots are provided for attachment of rifle slings for
transport.
Question squad.
3. Examination of tripod.—
i. Demonstrate the examination of the tripod, naming the
following parts and giving reasons :—
Clamping handles and legs . . Functioning correctly.
Front leg extension . . In working order.
Traversing slide . . . . Free to traverse on arc.
Elevating gear . . Free to move up and down—
ii. Practise squad.
clamping handles in* working
order. Elevating nut and eleva'
ting clamp nut free to rotate.
4. To mount the tripods—
Explain and demonstrate :—
i. Lay the tripod on the ground with the front leg under
neath. Lie or kneel behind the tripod, according to
the cover available, and loosen both rear leg clamping
handles. Swing legs back and damp in line with the
frame. Unclamp the front leg, swing it forward and
clamp. Loosen traversing clamp handle, move to the
centre of the arc and rcclamp. Loosen elevating clamp
handle, slide elevating sleeve forward to halfway and
clamp. Raise to vertical position.
ii. Obtain direction by aligning the mounting pivot and
top of elevating gear approximately on the target by
moving the rear legs. Ensure that legs are firm on
the ground and all clamps tight.
iii. It is of importance that the tripod be mounted so that
the traversing arc is horizontal both from right to left
and front to rear. Errors in this respect will affect
elevation and accuracy.
5. To dismount the tripod.—
Explain and demonstrate :—
Fold elevating gear forward. Loosen elevating clamp handle.
Slide the elevating sleeve to the rear until the projection on the
front of the traversing slide engages in the groove on the under*
side of the elevating nut. Reclamp. See that the elevating screw
is screwed fully down. Loosen traversing clamp handle and move
the traversing slide to left or right end of arc and reclamp. Fold
front leg under frame and clamp. With tripod frame on the
ground, fold and clamp rear lege.
6. Practise squad in mounting and dismounting tripod.
41
LESSON 18.—MOUNTING AND DISMOUNTING GUN
ON TRIPOD
Instructor's Notet
Stores :—
As for Lesson 17. With gun and magazines.
1. Explain and demonstrate :—
I. To mount the gun on the tripod*—
Disengage mounting pin and pull out to the right. Hold
the gun by the carrying handle with the left hand, and
the small of the butt with the right hand; place mount'
ing pin housing on mounting pivot and replace mount'
ing pin. Remove butt handle and attach butt to ele-
vating gear.
ii. To dismount the gun from the tripod.—
Disengage butt handle locking pin, and mounting pin and
remove gun. Replace locking and mounting pins, also
butt handle.
2., Practise squad in mounting and dismounting tripod, and
mounting and dismounting gun on tripod, in pairs. Detail two of
the squad and order “Mount gun" and “Dismount gun."
3. Aiming and firing.— Action of No. 1.
Explain and demonstrate :—
Order “Load.” On the range being given, adjust the back'
sight drum. On the target being indicated, aim the gun accurately
with the aid of the traversing slide and elevating gear, clamping
both when aim is accurate. The eye will be in the correct aiming
position. Adopt any convenient firing position behind the gun with
a minimum of exposure. (The butt need not be in the shoulder.)
On the command “Fire," fire as ordered.
4. Practise squad.
42
LESSON 19.—LAYING A FIXED LINE*
Instructor's Notes
Stores
As for Lesson 18, with the addition of an aiming peg and
night firing lamp.
I. Fixed Line.— State that, No. 2 having erected the tripod
with reference to the task, No. 1 will mount the gun on it and
continue to act as follows :—
Explain and demonstrate :—
i. When defensive fire is to be put down near our own
troops, i.e. the protection of a defended locality, lay on
the forward end of that locality, note the reading on
the traversing arc and lay off not less than 5 degrees.
The fixed line must not be within the limit of 5 degrees
of our own troops. With sights set at range required,
lay on the far end of the area to be covered. This is
the “fixed line” for the gun. The following table
provides a useful guide where the reading on the tra*
versing arc gives a lateral angle of 10 degrees from the
forward edge of the area to be protected and may be
taken for practical purposes as one-sixth о
At range of 400 yds. beaten zone will be approx. 70 yds.
,, 500 „ ,, ,, ,, 80 „
„ 600 „ ...............100 ,,
700 ,, „ ,, „ 120 „
800 ., ............... 140 „
f the range.
in
front
of the
F.D.L.
OR
When the safety of our own troops is not in question,
i.e. a bridge, defile, or likely avenue of approach in front
of the position, adjust sights to correct range and lay
on to the furthest point in the area to be swept.
ii. Clamp the elevating and traversing gear and note reading
on the arc.
iii. Raise sights to 1,800 yards and ensure the gun is un*
loaded.
iv. Order No. 2 to look along the sights and note where
“line of sight*' meets the ground.
43
v. No. 2 will then plant the aiming peg (or lamp) at the
point noted and, under the direction of No. 1, will
adjust its position until the aiming peg coincides with
the line of sight for direction. If the conformation of
the ground makes it impossible to put the peg in the
line of sight with sights at 1800, the adjusted
reading should be recorded. When this is correct, No. 2
will return to the gun.
The aiming peg should be at least 10 yards from
the gun.
The section commander should check aims to the
peg and target.
2. The gun may now be removed from the tripod for use in
its normal role during daylight.
3. Explain that:—
i. On service all men of the section must know the position
of the aiming peg or lamp so that any one of them can
fire in an emergency.
ii. The reading on the traversing slide will be noted as an
additional check for direction,
iii. Direction and elevation can be corrected by the aiming
peg or lamp at any time provided that the tripod is not
moved.
iv. If available, filled sandbags or sods of earth should be
placed on each leg of the tripod to ensure that it does
not move.
4 Practise squad in Lessons 17, 18 and 19.
44
LESSON 20,—TRIPOD (ANTI-AIRCRAFT)
Instructor** Xotei
Stores :—
Gun, tripod, magazines with dummies. Ground sheets. One
rifle.
Explain and demonstrate :—
I. Description of tripod, anti-aircraft (see Fig. 12).
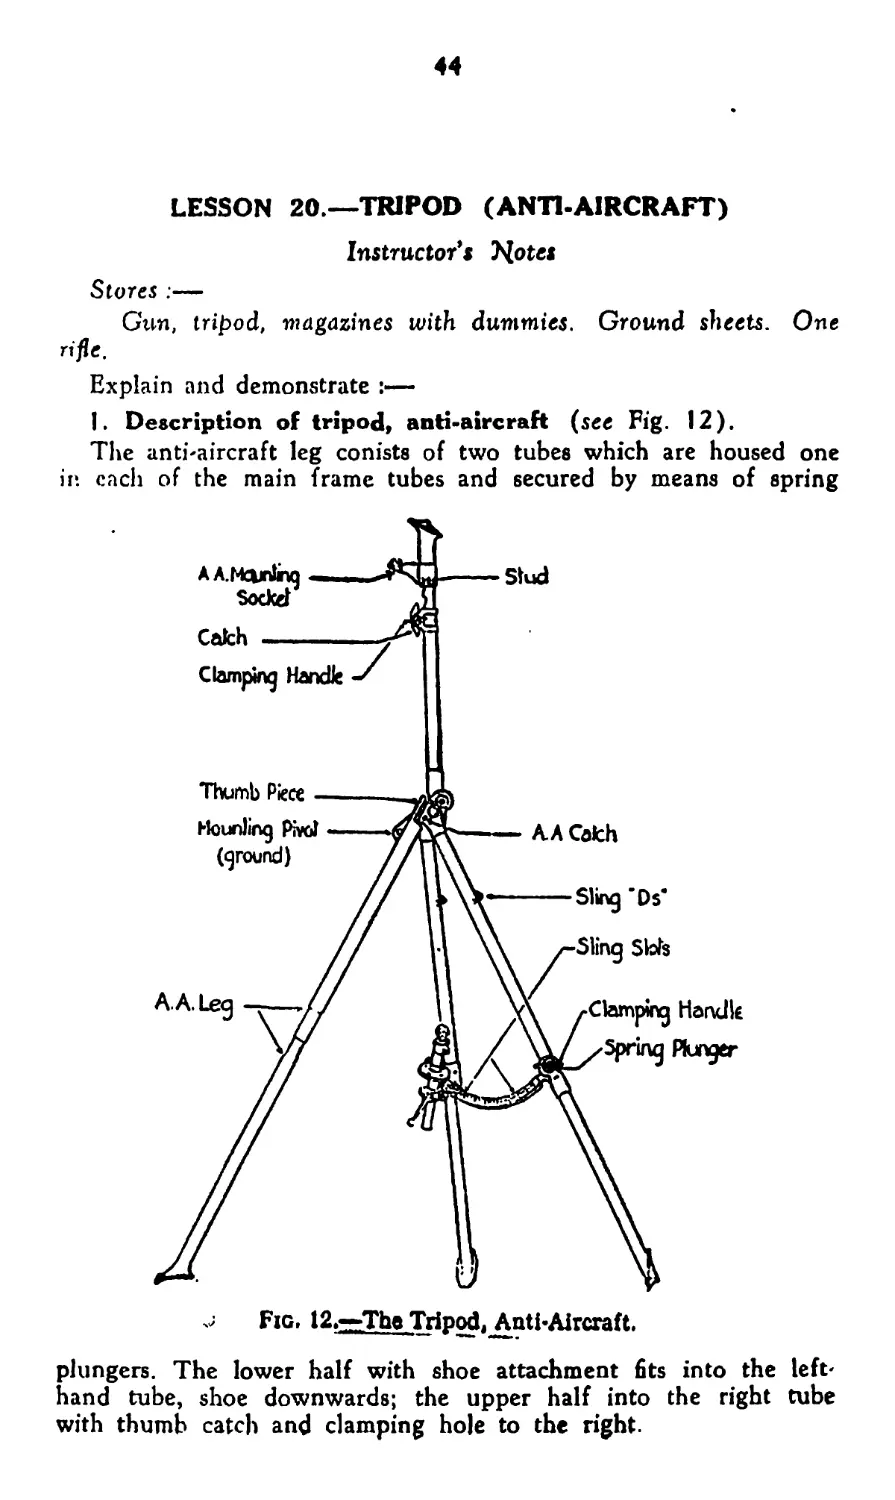
The anti-aircraft leg conists of two tubes which are housed one
in each of the main frame tubes and secured by means of spring
АА.МсцпЙпп
Socket
Cakh ------
Clamping Handle
Stud
Fig, 12.~The TripodMnti-Aircraft.
plungers. The lower half with shoe attachment fits into the left-
hand tube, shoe downwards; the upper half into the right tube
with thumb catch and clamping hole to the right.
45
Attached to the front leg extension is the anti-aircraft mounting
socket, which is free to rotate unless in its lowest position, when
it is held stationary by means of the stud engaging in the catch.
At the front of the frame is the anti-aircraft catch into which
lhe anti-aircraft leg (or bayonet standard of the rifle) fits.
2. Examination of tripod, anti-aircraft.—
i. Clamping handles and
legs.
ii. Front leg extension
iii. Anti-aircraft mounting
socket and anti-air-
craft catch.
iv. Anti-aircraft leg (both
halves).
Functioning correctly.
In working order.
Free from dirt and catch in work-
ing order.
Free to withdraw from frame
tubes.
3. Mounting tripod and gun for anti-aircraft.—
i. Duties of No. 2.—
Resting the tripod on its side, withdraw one half of anti-
aircraft leg; rotate corresponding rear leg in prolon-
gation of frame and clamp.
Reverse tripod and repeat.
Raise tripod, engage top half of anti-aircraft leg in anti-
aircraft catch; assemble anti-aircraft leg, shoe upwards.
Raise front leg to vertical position and clamp.
Loosen extension clamping screw and adjust extension so
that the stud is clear of the catch.
When gun is mounted, if necessary, adjust legs to suit
height of firer. When ordered by No. I, put magazine
on.
ii. Duties of Цо. I.—
Holding the gun, carrying handle with left hand and
small of butt with right hand, hook mounting pin
into the anti-aircraft mounting socket.
Keeping the carrying handle fully down, pull it out and
straighten. This will clamp it to the gun. Load. Put
change lever to “Safe." Set sights at 500.
Dismount in reverse order.
iii. Show use of rifle to replace anti-aircraft leg. Explain
that this method will ONLY be utilized when the
anti-aircraft leg is not available.
iv. Give conditions of test.
v. Practise squad in mounting and dismounting gun for
anti-aircraft.
46
4. Holding (see Fig. 13).—
i. Mold gun with right hand on pistol grip, and left hand
on carrying handle.
Balance the body on both feet with legs fairly well
apart. Do not cross the feet in moving round.
Fro. 13.—Holding.
ii. Raising and lowering of the front leg extension when
necessary.
iii. Practise squad in the lesson complete.
Wole.—See Pamphlet No. 6, Anti-Aircraft.
47
SECTION 5.—ADVANCED AND SECTION HANDUNG
1. The light machine gun is the principal weapon of the infantry
and every man will, therefore, be trained to use it.
2. The rifle is the personal protective weapon of the indi'
vidual. It may be needed, in an emergency, to augment the fire
of the section, or for local protection.
3. Each section in the platoon is equipped with a light machine
gun. The gun will normally be employed within the section under
the direct control of the section commander.
In the attack, it can be operated by one man, provided that
ammunition is within reach. To ensure this, a second member
of the section is required to maintain an adequate supply at the
gun.
4. The ammunition available in the platoon truck for the light
machine guns is 3,000 rounds, of which 750 rounds for each gun
is in magazines, the remainder being in boxes. The whole should
be regarded as a platoon pool.
5. The platoon is the unit on which infantry tactics are based.
Infantry will frequently have to fight its way forward, mainly with
its own fire power, using infiltration tactics. In action, it is essen-
tial to keep advancing as long as possible before resorting to the
employment of fire and manoeuvre and infiltration tactics.
This phase demands skill in the use of ground and a correct appre*
ciation of how to apply all the available fire power to penetrate
between localities held by the enemy and so force him to surrender.
During the attack sections may assist each other or may use
their own fire power to facilitate an advance, either by the light
machine guns advancing under cover of the riflemen and the sec-
tion subsequently following them up, or by the riflemen moving
forward under cover of the light machine guns in a similar mam
net.
This operation requires careful control, or sections may become
split up.
It must be understood clearly that the task of the section is to
get on to its own objective, and that, although it may have to take
up a fire position, it will be only a temporary one taken up until
the opportunity to advance occurs.
In no circumstances must section commanders allow themselves
to become involved in prolonged fire fights or disclose the fact
that they have an automatic weapon, as long as it is possible to
continue their forward movement by manoeuvre.
In defence, the principle of mutual support of defended localities
yyill be employed. Foremost sections will automatically engage
targets directly threatening them, and greater flexibility will be
48
obtained by firing from the bipod. In the foremost posts, there*
foie, guns will be given arcs of fire covering the approaches to their
position and will NOT be given fixed lines.
Guns which are protected from the front by the disposition of
their sections will generally be given arcs of fire and fixed lines,
arranged so that ground is adequately covered, preferably by
flanking fire. Alternative positions will be selected and prepared.
As sustained fire may be required, barrel changing may be neces-
sary. The firer will, therefore, require an assistant constantly at the
gun, whilst, if additional ammunition is available, other members
of the section will be required for filling magazines in addition to
protective duties.
6. In addition to the above, in the case of the light machine
gun with headquarter troops in cavalry regiments it may be found
necessary to employ the gun on its tripod for special tasks, such
as flanking fire, or to support mounted movement by direct fire
at longer ranges. In the event of the gun being employed as
indicated, where speed may not be essential, it will be mounted
on the tripod as taught in Lessons I 7 and 18, and cover utilized
as time and circumstances permit.
7. Training in handling began in Lessons II and 12 with
elementary handling, which dealt with the routine duties of the
Nos. I and 2 of the gun. The following lessons are called “advan-
ced and section handling." They are designed to produce :—
i. In the individual—rapid and accurate obedience to all
orders, and a correct and intelligent handling of the
light machine gun in all circumstances.
ii. In the section—good team work under its commander
based on intelligent use of ground, quick recognition of
targets, skilful handling and the confidence that each
individual has in himself, his commander and the other
men of the section.
8. Advanced handling (Lessons 21, 22 and 23) consists of
applying the training given in elementary handling to the use of
ground and the selection of suitable fire positions for the gun,
mounting it with or without the bipod or on the tripod ; using
various types of cover, including camouflage.
9. Section handling (Lessons 24, 25, 26 and 27) consists of
training the section with the light machine gun. It will take the
form of exercises designed to reproduce conditions which may exist
in attack and defence. The duties of all members of the section
will be practised.
10. The direction of the enemy will always be indicated. In
section handling the position of the instructor will be that of the
fire unit commander in battle until he has given orders. He will
then move about and check faults.
49
LESSON 21.—ADVANCED HANDUNG (MOUNTING THE
GUN ON VARIOUS TYPES OF COVER)
Instructor’s Notes
Gun with sling attached, and magazine on gun.
Before the lesson, which is designed to exercise men in the
duties of \o. I only, ground containing suitable types of cover
must be chosen.
Gun placed in rear of position and squad on right of gun.
Explain that various types of cover may be found on service
which will necessitate mounting the gun in different ways to
suit the cover and that the principle of using cover is the same
as with the rifle. Question the squad on the use of cover (rifle).
Explain and demonstrate that it will be the duty of No I to
mount the gun for firing on the following types of cover. After
each demonstration the squad will practise individually.
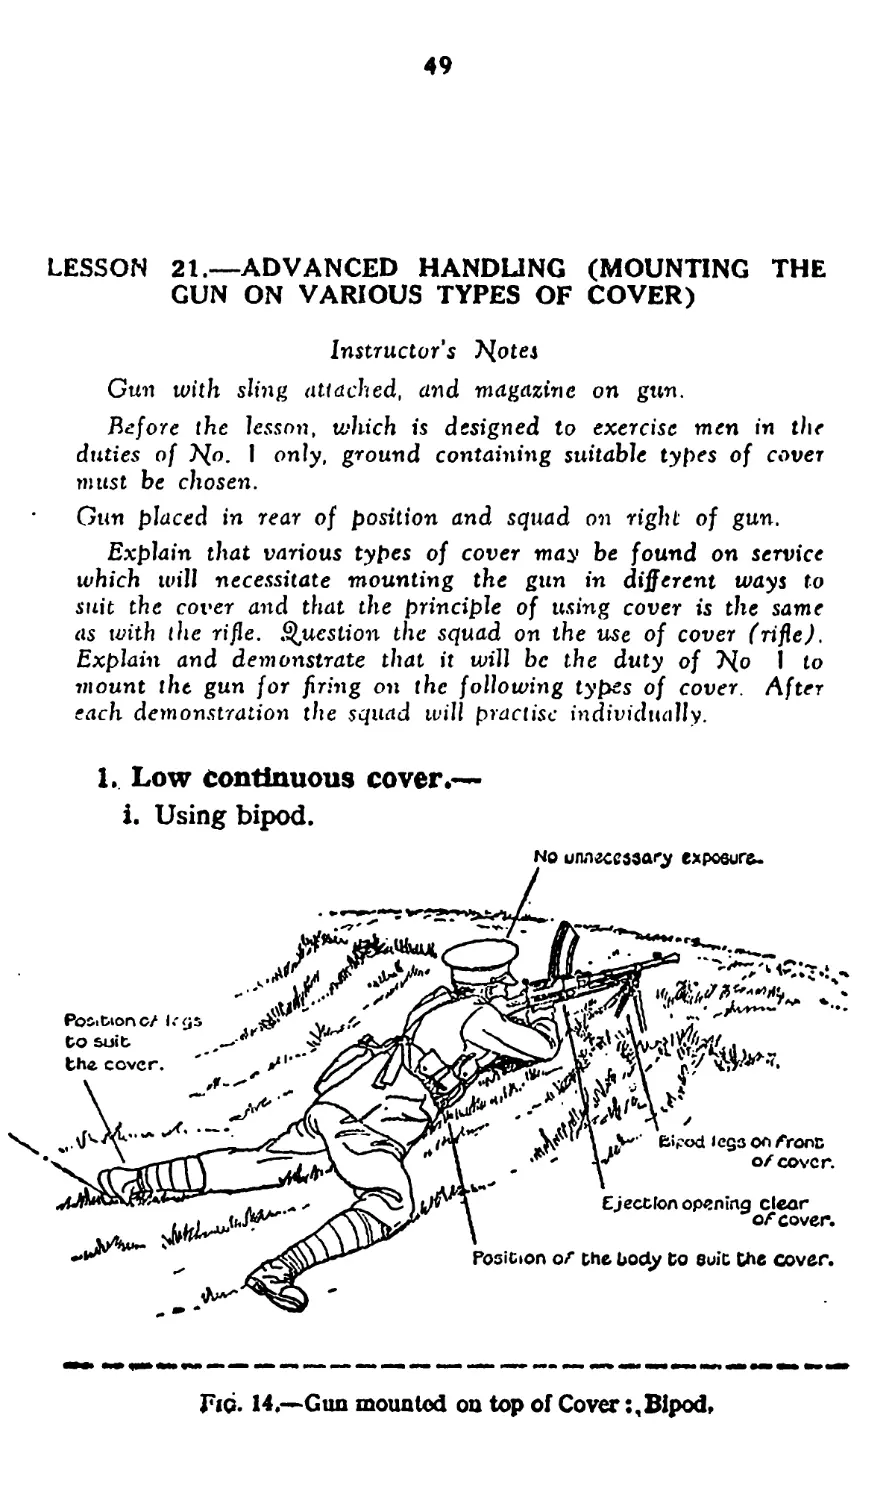
1, Low continuous cover.—
i. Using bipod.
Fig. 14.—Gun mounted on top of CoverBipod,
50
ii. Without use of bipod, if (i.) above is impossible.
Fig. 15.—Gun mounted without Bipod.
2. Using a fold in the ground.—
With bipod.
Fig. 16.—Gun mounted using Fold in Ground.
51
3. Using a trench,—
i. With bipod (Figs. 17 and 18).
Fig, 17.—Side View.
Fig. 18.—Emplacement
Я
и. Withoutbipod.
Fig. 19.-rGun mounted without Bipod.
4. Round cover.—
i. Round isolated cover (Fig. 20).
ii. Round continudufcdver.
Carrying Handle.
Fig. 20,—Isolated Cover.
53
5. On the side of a slopes-
Lengthening bipod leg.
Bipod leg lengthened to suit elope
Fig. 21,—Gun mounted ou a Slope.
54
LESSON 22.—ADVANCED HANDUNG (MOVEMENT)
Instructor's Notes
Stores :—
i. Gun and sling attached, magazines, wallet and pouch
equipment for No. 1.
ii. Gun in rear of position. Squad on the right.
iii. Men will only be exercised in the duties of No. I.
iv. This lesson will be carried out on ground with minor
irregular features, use being made of both natural and
artificial cover. Natural targets will be described.
I.. Introduction :—
i. Ask questions on points taught in “Prepare for action*'
(Lesson 11), and make it clear that these duties should
be carried out by No. 1 before a unit leaves camp,
bivouacs or billets.
ii. Explain that it is the duty of No. 1 to use ground in
occupying a fire position and to mount the gun with re-
ference to the target to be engaged so that full fire
effect can be obtained with a minimum of exposure. The
occupation of a position will either be made quickly, such
as a rush from cover to cover, or cautiously when cover
is inadequate. In the latter case it may entail crawling.
iii. Order one of the squad to “Prepare for action" as in
elementary handling.
2. Explain and demonstrate :—
i. Position behind cover.—
This position is adopted in the same manner as in using
the rifle behind cover, i.e. complete concealment for man
and gun. Normally the gun is ^mounted on its bipod
but, when cover is low, it may be laid on its side. Place
a magazine from pouch equipment on the gun.
ii. Position of readiness.—
No. 1 will carry out the following actions whenever a
range is ordered or, if acting apart from the section,
when a target is presented :—
Set sights,
Mount the gun on cover, cautiously if situation per-
nuts,
Cock gun.
On completion of the fire order or decision to open
fire—FIRE.
55
К
iii. Cease firing.—
The following actions will be carried out on the order
“Cease firing” :—
Draw gun cautiously back.
Set change lever at “Safe.”
.4 Magazine off~-unload.: • •
Place magazine in pouch.
3. Practise squad individually on various types of cover, no
further explanation being given.
4. Explain and demonstrate only :—
Position of observation.—
When the light machine gun is acting within the section,
the section leader will detail an -individual to assume
a position of observation but, w’hen the gun is detached,
No. 1 or his No. 2 will remain in observation to observe
signals, and-' movements- of the enemy or of his own
section. He will adopt a comfortable position affording
concealment and a view of the front.
5. Explain and demonstrate :—
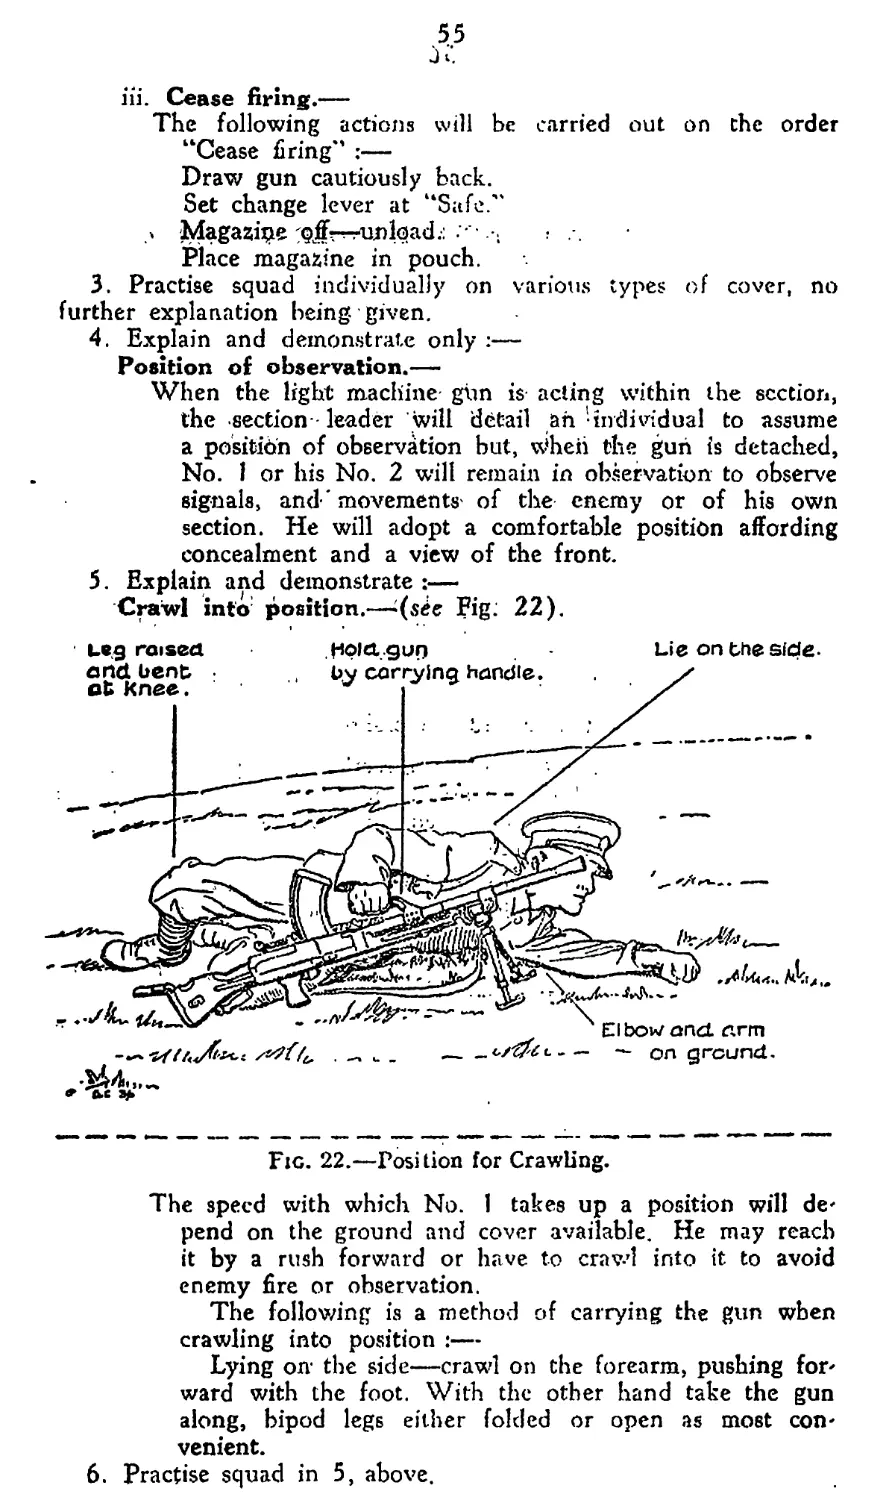
Crawl mto: position.— (sie Fig: 22).
Leg raised Hold, quo Lie on the side.
— ----— on ground.
2U..-
* Tix s#.
Fig. 22.—Position for Crawling.
The speed with which No. 1 takes up a position will de*
pend on the ground and cover available. He may reach
it by a rush forward or have to crawl into it to avoid
enemy fire or observation.
The following is a method of carrying the gun when
crawling into position :—
Lying on the side—crawl on the forearm, pushing for*
ward with the foot. With the other hand take the gun
along, bipod legs either folded or open as most con*
venient.
6. Practise squad in 5, above.
LESSON 23.—ADVANCED HANDLING (TRIPOD)
Instructors Notes
Stores :—
Gun, tripod, magazines. Wallet and spare barrel.
This lesson will be carried out on ground affording suitable
cover behind which the gun and tripod could be mounted for
firing on fixed lines.
The lesson is designed to exercise Nos. I and 2 in their
duties.
I. Introduction :—
Explain that, in defence, one of the tasks of the light machine
gun is that of firing on fixed lines, and both gun and tripod
must be mounted in a position from which full fire effect can be
obtained with a minimum exposure for the gun numbers.
2. Mounting the tripod and gun behind cover.—
i. Instructor points out the direction and probable line of
approach of the enemy, position of our own troops, or
the area to be protected and the area on which the
fixed line is to fall.
ii. Explain and demonstrate how the legs of the tripod must
be adjusted to suit the conformation of the ground and
height of cover.
iii (a) Instructor orders the gun to be mounted on the
tripod with reference to a definite task, making full use
of any cover, including camouflage (Lessons 17, 18
and 19).
(b) Squad views gun position from the front.
3. Practise squad in mounting the tripod and gun behind various
types of cover.
57
LESSON 24.—SECTION HANDLING (MOVEMENT)
Instructor's T^otes
Stores
Gun with sling attached, wallet, utility pouches and magazines
in pouch equipment of the section. (Ъ[о dummies.)
One fatigueman armed with rifle and blan\ S.A.A.
One fatigueman with dummy screen.
Signal flags.
I. The lesson should be carried out on ground having small undu'
lations and minor irregular features,
2. Situations should be prepared beforehand, if possible, with
fatiguemen or with suitable targets.
I. Explain i—
Brief summary of General Notes, para. 5, subparas. i to v, as
applicable. The principal duties of the section, as ordered by its
commander, will include
Mounting and maintaining the gun in action.
Carrying and replenishing S.A.A.
Selection of suitable positions for gun including alternative
positions.
The detailing of tasks to riflemen.
Protection.
Observation of neighbouring sections and hostile movement.
Concealment.
58
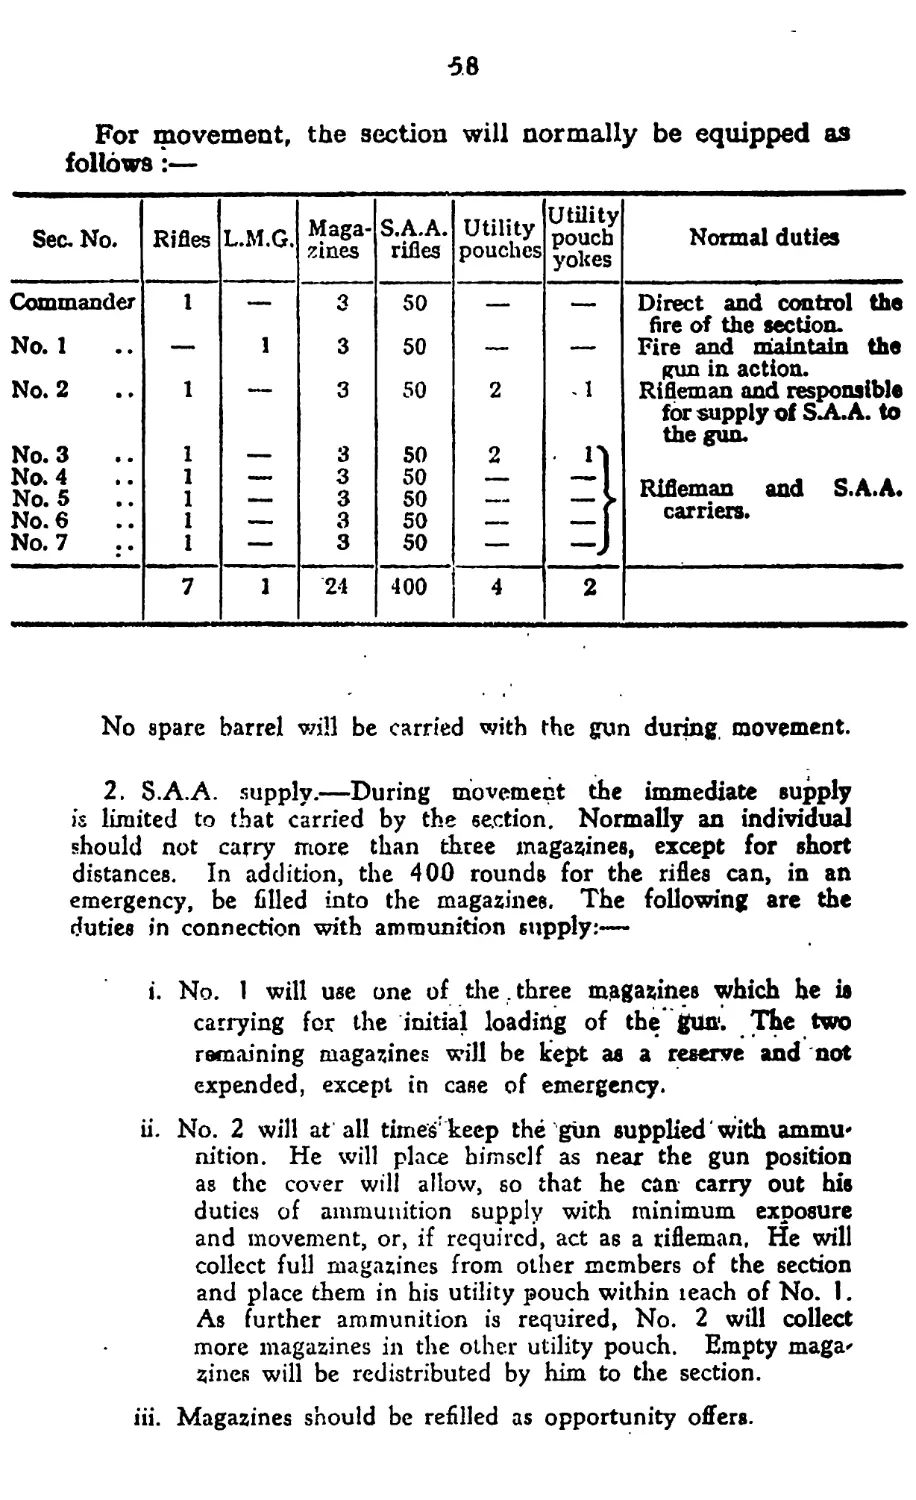
For movement, the section will normally be equipped as
follows:—
Sec. No. Rifles L.M.G. Maga- zines S.A.A. rifles Utility pouches Utility pouch yokes Normal duties
Commander 1 3 50 — Direct and control the
fire of the section.
No. 1 —• 1 3 50 —- Fire «nd maintain the
gun in action.
No. 2 1 3 50 2 . 1 Rifleman and responsible
for supply of SA.A. to
the gun.
No. 3 1 —— 3 50 2 n
No. 4 No. 5 1 1 3 3 50 50 — — Rifleman and S.A.A.
No. 6 1 — 3 50 carriers.
No. 7 1 — 3 50 —
7 1 24 400 4 2
No spare barrel will be carried with the gun during, movement.
2. S.A.A. supply.—During movement the immediate supply
is limited to that carried by the section. Normally an individual
should not carry more than three magazines, except for short
distances. In addition, the 400 rounds for the rifles can, in an
emergency, be filled into the magazines. The following are the
duties in connection with ammunition supply:—
i. No. 1 will use one of the. three mjagazines which he is
carrying for the initial loading of the gun1. The two
remaining magazines will be kept as a reserve and not
expended, except in case of emergency.
ii. No. 2 will at all times keep the gim supplied with ammu*
nition. He will place himself as near the gun position
as the cover will allow, so that he can carry out his
duties of ammunition supply with minimum exposure
and movement, or, if required, act as a rifleman, He will
collect fuU magazines from other members of the section
and place them in his utility pouch within leach of No. 1.
As further ammunition is required, No. 2 will collect
more magazines in the other utility pouch. Empty maga*
zines will be redistributed by him to the section.
iii. Magazines should be refilled as opportunity offers.
59
3. The method of conducting will be as follows—
i. A simple opening situation dealing with the action of a
section» as p^rt.of a platoon»,its general line of advance
and the direction of the enemy will be given.
ii. The section advances over the area selected for the exer-
cise in the formation best suited to the ground.
iii. Signal a pre-arranged situation to be presented and order
the occupation of a suitable position.
iv. Give a fire control order on which the section acts.
v. Check and comment on the action taken by each indi*
vidual.
4. As proficiency increases, more difficult situations should be
introduced, e.g.:—
i. When the gun is ordered forward from the remainder of
the section.'
ii. When the riflemen are sent forward.
iii. Action of other members as the result of casualties.
iv. Wearing the respirator in one or more situations.
—This lesson will require frequent repetition. It should
be possible to deal with at least two situations during the lesson
60
LESSON 25—SECTION HANDLING (DEFENCE)
Instructors Notes
Stores :—
Gun, wallet and spare barrel. Magazines in utility pouches.
Ammunition box. Magazine filler. Tripod, fixing line sight and
lamp. Camouflage.
I. Explain :—
i. In defence, the foremost position will consist of a belt
of defended localities arranged in depth, affording each
otner mutual support. They will comprise a number of
section posts. In front of this line is organized a co*
ordinated belt of fire of all apras to break up the enemy's
assault. So far as the light machine gun is concerned,
it may be employed in its bipod role or mounted on the
tripod and fired on a fixed line in darkness, smoke or
fog. In the most forward posts guns will be given arcs
of fire and will not be used on fixed lines.
ii In either role the gun should be mounted in a position
which will afford concealment and surprise. Concealment
is of the utmost importance, both from ground obser
vation and from the air. Camouflage may be used to
assist when natural cover is inadequate.
iii. The selection of a position* and an alternative will depend
on the lie of the ground, especially on the facilities which
it offers for flanking fire. As time permits, the position
will be strengthened and improved by the erection ol
obstacles and the digging of trenches.
iv The principal duties of the section under its commander
will include—
Commander . . Selects position and alternative position.
Is responsible that the equipment is
brought forward from the platoon truck
to the section position. Directs and
controls fire.
No. 1 .. .. Mounts the gun on the bipod or tripod
and maintains it in action.
No. 2 . . .. From a position beside the gun, assists
No. I to maintain it in action. Is re
sponsible for the spare barrel.
No. 3 Ensures that the gun is supplied with
S.A.A. and that magazines are kept
filled.
Nos. 4, 5, 6 & 7 Riflemen and observation duties.
61
v The following equipment will be placed with the gun in
its position, having been off'loaded from the platoon
truck—
One spare barrel. Tripod. Aiming lamp and box.
25 magazines. Magazine filler. Ammunition box.
Fixed line sight. Camouflage.
2. Bipod role.—
i. Point out the direction of the enemy, the area to be
protected and the section locality, then, acting as sec-
tion commander, select the position and alternative posi'
tion for the gun.
ii. Practise section in occupation of the position, firing and
ammunition supply, and duties given in para. I, iv,
above.
3. Tripod role on fixed lines.—
Explain that, after an action as above, orders are received to
prepare the gun for fixed lines. Details of the fire plan and the
positions of neighbouring defended localities are described.
i. Question squad on Lesson 19, laying a fixed line.
ii. Point out the defended locality or area to be protected
and the position in which the gun is to be mounted.
iii. Two members of the section not engaged with the gun
will collect the tripod, lamp and other necessary equip-
ment.
iv. No. 2 sets up the tripod.
v. As section commander, order No. I to lay the fixed line
as taught.
4. Explain that it is advisable to complete all arrangements
just before dark, so that the safety angle can be checked and the
aiming lamp placed in position. Features which are likely to
stand out in the failing light and which may assist in maintaining
direction must be noted during daylight. A compass bearing will
greatly assist. In fact, every precaution must be taken to ensure
that the fire from the light machine gun does not endanger our
own troops.
On a call for defensive fire, the rapid rate of 120 rounds (four
magazines) a minute should be employed for the first two minutes;
after this a slow rate of 30 rounds (one magazine) a minute for
three minutes. After a pause, the above should be repeated so far
as ammunition allows. To be effective, defensive fire must be pro'
duced immediately the signal calling for it is given. Arrangements
should be made to replenish at once ammunition so expended.
5. Practise section in duties and action on a call for defensive
fire, including replenishment of ammunition from the platoon truck.
ьг,
6. Tripod role in forward posts (i.e., guns nonprotected from
the front):—
i. Explain that in the most forward posts guns will be given
arcs of fire covering the main approach to their position.
At night or in conditions of bad visability where the
main approach is narrow,..guns can be suitably employed
by firing from the tripod and covering the approach by
sweeping through the arc of fire provided by the tripod
without altering .the elevation .of the gun.
ii. Explain that the principles outlined in para. 4 above
should be followed in setting up the tripod, but that
in this case fire will be under the control of the section
commander..
iii. Question section on Lesson 18, Mounting and Dismounting
Gun on Tripod : Aiming and Firing.
*iv. Point out the approach or arc on which fire is to be
brought to bear, indicating the limits of the traverse.
v. No. 2 sets up the tripod.
vi. As section commander, order No. I to lay on the ap*
proach or arc.
vii. Explain that the section commander will decide in accord*
ance with the situation whether the gun will remain on
the tripod after dark or be used in th.e bipod role until
he orders it on to the tripod.
7. Practise section in duties and action in using the tripod in
forward posts.
63
i-ESSON 26.—SECTION HANDUNG—MOUNTED UNITS
(MOVEMENT)
Instructor's Wotes
A section, mounted and equipped, is required for this lesson.
1. Duties.—
Explain ;—
Section leader—selects the position for his section, carries
the first supply of ammunition from the pack horse and
places it within reach of No. I when the gun is in
position.
No. 1—carries the gun, fires and maintains it in action.
No. 3—horse'holder.
Nos. 4 and 5—scouting and protective duties. When re'
quired, No. 4 will act as an ammunition link between
the gun and pack horse.
No. 6—Pack leader.
2. Loads.—
Explain and demonstrate :—
No. 1—Light machine gun carried in two parts, i.e. the
body and bipod in a bucket on the off side, the barrel
in a detachable case on the near side.
Ammunition . 3 magazines in a bandolier on rhe man;
4 magazines (reserve) in two wallets
on the front arch of the saddle.
No. 2 (section leader)-—Spare barrel and detachable case
on near side.
Ammunition . . As for No. 1.
Pack horse , . Top load—the tripod.
Wear side—4 magazine carriers, each
containing 6 magazines.
Off side—4 magazine carriers, each con'
taining 6 magazines.
Total: 48 magazines = 1,440 rounds,
Total ammunition carried in the section : 62 magazines
«=» 1,860 rounds.
64
The normal source of supply to the light machine gun
will be from the pack horse. The ammunition in the
wallets on the saddles of the section leader and No. 1
will be kept as a reserve; that in the bandoliers should
be used for the initial supply when speed in opening
fire is essential. When ammunition from the ban'
dolier is expended, it should be replenished from the
pack at the earliest opportunity.
3. Fitting of light machine gun equipment»—
No. 1. i. Fit the gun bucket «as high up as possible on the
off side, by passing the strap round the rear arch
of the saddle. Pass the surcingle through the loop
on the arm.
ii. Fit the barrel case on the near side in a similar
manner as above.
iii. Place the wallets over the front arch of the saddle.
The brass link on the front arch attachment
passes through the slot in the connecting band
and is secured by the releasable strap. The wallet
straps are passed through the slots and Ds on the
front of the saddle and buckled round the wallets.
No. 2. Fit the spare barrel case and wallets as in ii. and iii.,
above.
Pack horse—Place the tripod on the tree, traversing arc
to the front and clamp.
Suspend 4 magazine carriers on the near side and
4 on the off side of the pack saddle by the Ds. Secure
as follows :—
Top rear.—Pass through the loops on the pannels
and through the fairway of the rear suspenders. Buckle
round the magazine carriers which are attached to the
hooks of the pack'saddle by Ds.
Top front.—Pass through the loops on the pannels
and through the loops at the ends of the leather fitting
which is attached to the cross'bar of the tree. Buckle
round the magazine carriers.
Bottom.—Pass through the loops on the pannels
and buckle round the magazine carriers.
4. Practise squad in fitting equipment.
5, Mount—Explain rfnd demonstrate :—
Before mounting, No. I will remove the barrel from the
gun, place the body in the bucket and the barrel in the
case. The body must be pushed fully into the bucket.
65
6. Action from pack.—Explain and demonstrate :—
i. On the command “For action—Dismount,” the section
dismounts and hands over its horses as taught in Cavalry
* Training.
ii. Section leader removes two top magazine carriers from
the off side of the pack horse, selects and indicates the
gun position.
iii. No. I removes the gun body from the gun bucket and
barrel from its case, assembles the gun clear of the horses
and doubles with the gun to the gun position, as indi-
cated by the section leader.
Note.—From this point onwards action will be as taught in
Lesson 1 I.
7. On pack.—Explain and demonstrate :—
On the command “On pack,” the led horses are brought up
and No. I removes barrel from the gun and places it
in the case, and the gun body in the gun bucket.
Section leader returns two magazine carriers to the pack
horse and orders the section to mount. Before moving
off he will ensure that all equipment is properly secured
to the pack saddles.
8. Practise squad “Action from pack” and “On pack.”
66
LESSON 27.—SECTION HANDLING—MOUNTED UNITS
(DEFENCE)
Instructor's Note*
As for Lesson 24.
I. Explain that, when action involving the use of the tripod it
considered necessary, the following additional duties to those taught
in Lesson 26 will be carried out. Explain and demonstrate each
in turn—On the order “For action (tripod)—Dismount’*:—
_i. Section leader, in addition to carrying ammunition to the
gun position, takes the spare barrel with him.
ii. No. 1 acts as taught in Lesson 26 and mounts the gun
on the tripod (Lesson 18).
iii. No. 3—Horse holder.
iv. No. 4 removes the tripod from the pack horse and sets
it up as directed by the section leader (Lesson 17) and
assists No. 1 at the gun..
v. No. 5 takes two magazine carriers from the pack horse
and places them at the gun position and becomes avail'
able for protective duties or to act as an ammunition
link if required.
2. On pack.—
Explain and demonstrate —
i. Section leader and No. 1 act as previously taught (Lesson
26).
ii. No. 4 dismounts tripod and replaces it on pack horse
and, with the assistance of No. 5, is responsible for
returning all magazine carriers to the pack horse.
Before the section moves off, the leader will ensure that
everything is properly secured to the pack.
3. Practise squad “For action (tripod)—Dismount” and “On
pack” by word of command.
SECTION 6.—TESTS OF ELEMENTARY TRAINING
In each of the following tests the man will be allowed three attempts and, to pass, two must be correctly
carried out within the time limit.
(1) (2) (3) (4)
Name of test and stores required Conditions before test Time Remarks
No. 1 Magazine Ril- ing. (a) By filler. (b) By hand. Magazine filler. Ammunition box. Magazines. 6 chargers of dummy cart- ridges. (a) Filler clamped ready for use to ammunition box or other convenient surface. Magazine and chargers clear of filler. (b) Ammunition in chargers, loader in sit- ting or kneeling position, magazine on the ground. (a) 20 secs, from command “Go” un- til magazine is filled and removed. (b) 30 secs, from command “Go” un- til magazine is filled. о
No. 2 Loading. Gun and one filled magazine. Firer lying behind gun— gun unloaded—butt on ground — magazine on ground—change lever at “Automatic.” 6 secs, from command “Load” until left hand returns to butt. —
No. 3 Sight Setting, Aiming & Firing. Gun—aiming disc. Firer lying behind gun— butt on ground — gun cocked—change lever at “Safe”—no magazine on gun—butt strap back. 9 secs, from command ”... *Fire’ firer having been given range and “ Automatic ” or “Single rounds”— until firer presses trigger. Maximum alteration of sights 400 yards. Aiming disc held one yard in front of gun. Height ol disc to be varied for each aim.
(1) (2) (3)
Name of test and stores required Conditions before test Time
No. 4 Adjustment of Gas Regulator. Gun, 'filled maga- zine. Combina- tion tool in bag. Instructor will order “Load—Range—Target Fire.” “ Gun is firing all right ” —“ Gun stops ”—“ Gun fires ONE or TWO ROUNDS and stops AGAIN.” 25 secs.from command “ Again ” until No. 1 has -loaded and fired.
No. 5 Barrel Chang- ing by No. 2. Gun, spare barrel, one empty and one filled magazine. No. 1 in correct firing position—gun cocked— empty magazine on gun. No. 2 beside gun with spare barrel and full magazine. 12 secs, from com- mand “Barrel” until No. 2 has placed full magazine on gun and says “ Up.”
No. в Immediate Action by No. 1. Gun, full maga- zine. Any suitable aiming mark. Instructor will give range and target, “Fire” fol- lowed by “Gun is firing all right”—“Gun stops” —“ Gun is firing all right.” 9 secs, from command “ Gun stops ” until No. 1 has applied I.A. and pressed trigger again.
No. 7 Mounting Tri- pod and Gun, A.A. Tripod, gun. Nos. 1 and 2 to be in kneeling position. Tri- pod to be folded correct- ly. Gun unloaded on ground. Sights at 200 yards. 1 minute from com- mand “ Aircraft mount gun ” until gun is correctly mounted on tripod with carrying handle out. Gun loaded and sights set at 500 yards.
(4)
Remarks
Instructor ensures that gas regulator is set at
No. 3 bole at beginning of test.
No. 1 performs I.A. correctly, including gas
regulator set to next largkst hole.
Instructor says “ Magazine empty.” When No. 1
has pulled back cocking handle and removed
magazine, No. 1 then says “ Barrel.”
On command “ Barrel ”—No. 2 removes barrel
and places spare barrel and a full magazine on сь
gun.
Instructor will satisfy himself that firer has taken
an aim before pressing trigger again.
On command “ Fqe aircraft mount gun,” No. 2
will set up tripod for A.A. action and No. I will
mount gun on it.
Each number will be tested in complete test.
One number should not be penalized for slow
action of the other.
(Reprinted with the permission of the Controller. His Majesty's Stationery
Office, London.} By Authority — The Snelling Printing Works Pty. Ltd..
52-54 Bay Street. Sydney.
2
take, up its fixed-line role. This should be done
oefore dusk to enable the fixed line to be re-checked,
if possible.
Great care must be taken that the tripod is not moved
and that the elevating and traversing gear and
traversing stops are all kept firmly clamped.
x. On service, every man in the section should know the
reading on the sights and on the traversing arc, and
the point at which the gun is aimed.
2. Practise Squad.
2. Lesson 24, para. 1, line 2.
For “ General Notes, para. 5, sub-paras, i. to v.” sub-
stitute “ Section 5 paras. 1-5 ”.
Para. 1. Table—
• Against “ Commander ” delete “ 1 ” in column 2,
delete “ 50 ” in column 5,
'add in column 8 и Carries a sub-
machine gun and magazines as
necessary.”
In totals, column 2, for "7 ” read “ 6 ”,
column 5, for " 400 ” read “ 350 ”
Para. 2, line 4, for “ 400 ” read “ 350 ”
3. Lesson 25, Section Handling (Defence)
Under “ Instructor's Notes, Stores” delete “fixing line
sight and lamp ”
4. Lesson 25, para. 1, sub-para. v.—•
Delete “ Aiming lamp and box.”and “ Fixed-line sight.”
5. Lesson 25, para. 3, sub-para. iii.—
Delete “ lamp ” in line 2.
6. Lesson 25, para. 4.-1-
Delete from “ and ” in line 2 to “ position ” in line 3.
i. Sec. 6.—Tests of Elementary Training.
Delete Test No. 7.
By Command of the Army Council,
The War Office,
28/Л June, 1941
(Reprinted with the permission of the Controller, His Majesty's
Stationery Oflice, London.)
By Authority : H. E. Daw, Government Printer, Melbourne.
Notified in A.C.Is. 281Л June, 1941
NOT TO BE PUBLISHED
Ths information given in this document
is not to be communicated, either directly
or indirectly, co the Press or to any person
not holding an official position in His
Majesty's Service.
SMALL ARMS TRAINING
Vol. 1, Pamphlet No. 4, 1939
26/G.S. Ptibus./lSi ___________
AMENDMENTS (No. 1)
1. Delete Lessons 19 and 19a, as amended by Appendix C of
Weapon Training Memorandum No. 1, and substitute:—
LESSON 19—LAYING A FIXED LINE
Instructor* s Notes
Stores—Gun, tripod, magazines, ground sheets, sandbags. Arndt, i
1. Explain and demonstrate :— ?une‘ 1941
i. No. 2 erects the tripod with reference to the task,
No. 1 mounting the gun on it.
ii. Sandbags or sods of earth should be placed on each leg
of the tripod to ensure that it does not move.
iii . Using the gun sights, align on the edge of the forward
defended locality, the safety of which is involved.
iv . Note the reading on the traversing arc, and lay oft not
less than 5 degrees. The fixed line must not bo within
the limit’of 5 degrees of our own troops. It may be
necessary to lay oft a*greater amount in order to get
suitable ground for the line of fire and to avoid
obstacles.
v. With sights set at the range required, lay on the far
end of the area to be covered. This is the fixed line
for the gun.
vi. Clamp the elevating and traversing gear tight, (damp
both traversing stops firmly up against the traversing
slide.
vii. The ” dangerous zone,” as opposed to the “ beaten
zone,” is used in fixed-line firing.
vii i. Should it be permitted to remove the gun from the
tripod to resume its bipod role, this may now be done.
It will be replaced on the tripod when required to
[Notified in A. A.0’8. dated 30th November, 1941.]
SMALL ARMS TRAINING.
Vol. 1, Pamphlet No. 4, L.M.G. Bren, 1937.
Local Amendment No. 2.
1. Page 10, lesson 2, paragraph 2, sub-paragraph (1),
“ Loading ”—
After “ there ” in last line add—
“ Open ejection opening cover and ensure that the
catch is engaged in the opening position.”
The urgency of the foregoing amendment is stressed as
instances of explosions resulting from failure to observe this
drill movement have been reported.
2. Page 21, paragraph 1, Fig. 9—“Barrel Nut”—
Delete “ Safety Lug.”
3. Page 25—
Delete the whole of paragraph 5.
By Command of the Military Board,
0. B. LAFFAN,
Secretary to the Military Board.
1st December, 1941.
By Authority: H. E. Daw. Government Printer, Melbourne.
C. 13930/41.