/


Author: Koleoso T.
Tags: programming languages programming computer science microprocessors reverse engineering frameworks
Year: 2020
Similar


Text
Beginning
Quarkus
Framework
Build Cloud-Native Enterprise
Java Applications and Microservices
—
Tayo Koleoso
Beginning Quarkus
Framework
Build Cloud-Native Enterprise
Java Applications and
Microservices
Tayo Koleoso
Beginning Quarkus Framework: Build Cloud-Native Enterprise Java
Applications and Microservices
Tayo Koleoso
Silver Spring, MD, USA
ISBN-13 (pbk): 978-1-4842-6031-9
https://doi.org/10.1007/978-1-4842-6032-6
ISBN-13 (electronic): 978-1-4842-6032-6
Copyright © 2020 by Tayo Koleoso
This work is subject to copyright. All rights are reserved by the Publisher, whether the whole
or part of the material is concerned, specifically the rights of translation, reprinting, reuse of
illustrations, recitation, broadcasting, reproduction on microfilms or in any other physical
way, and transmission or information storage and retrieval, electronic adaptation,
computer software, or by similar or dissimilar methodology now known or hereafter
developed.
Trademarked names, logos, and images may appear in this book. Rather than use a
trademark symbol with every occurrence of a trademarked name, logo, or image we use the
names, logos, and images only in an editorial fashion and to the benefit of the trademark
owner, with no intention of infringement of the trademark.
The use in this publication of trade names, trademarks, service marks, and similar terms,
even if they are not identified as such, is not to be taken as an expression of opinion as to
whether or not they are subject to proprietary rights.
While the advice and information in this book are believed to be true and accurate at the
date of publication, neither the authors nor the editors nor the publisher can accept any
legal responsibility for any errors or omissions that may be made. The publisher makes no
warranty, express or implied, with respect to the material contained herein.
Managing Director, Apress Media LLC: Welmoed Spahr
Acquisitions Editor: Steve Anglin
Development Editor: Matthew Moodie
Coordinating Editor: Mark Powers
Cover designed by eStudioCalamar
Cover image by Shahadat Rahman on Unsplash (www.unsplash.com)
Distributed to the book trade worldwide by Apress Media, LLC, 1 New York Plaza,
New York, NY 10004, U.S.A. Phone 1-800-SPRINGER, fax (201) 348-4505, e-mail orders-ny@
springer-sbm.com, or visit www.springeronline.com. Apress Media, LLC is a California LLC
and the sole member (owner) is Springer Science + Business Media Finance Inc (SSBM
Finance Inc). SSBM Finance Inc is a Delaware corporation.
For information on translations, please e-mail booktranslations@springernature.com; for
reprint, paperback, or audio rights, please e-mail bookpermissions@springernature.com.
Apress titles may be purchased in bulk for academic, corporate, or promotional use. eBook
versions and licenses are also available for most titles. For more information, reference our
Print and eBook Bulk Sales web page at http://www.apress.com/bulk-sales.
Any source code or other supplementary material referenced by the author in this book is
available to readers on GitHub via the book’s product page, located at www.apress.
com/9781484260319. For more detailed information, please visit http://www.apress.com/
source-code.
Printed on acid-free paper
I dedicate this book to my grandma,
who with her grade school education would
constantly implore me to keep studying, up till today.
“You know I wasn’t a particularly brilliant student;
but you need to be far ahead of me;
never stop your education and passing your exams.”
—Mrs. Cecilia Vincent
Table of Contents
About the Author���������������������������������������������������������������������������������xi
About the Technical Reviewer�����������������������������������������������������������xiii
Acknowledgments������������������������������������������������������������������������������xv
Introduction��������������������������������������������������������������������������������������xvii
Chapter 1: Welcome to Quarkus�����������������������������������������������������������1
Write Once, Run Anywhere Predictably (WORP)����������������������������������������������������2
Supersonic Subatomic!�����������������������������������������������������������������������������������������3
A Brief Primer on JVM Internals����������������������������������������������������������������������3
Ahead-of-Time Compilation to the Rescue!�����������������������������������������������������5
Quarkus Feature Tour��������������������������������������������������������������������������������������������6
Native Image Support��������������������������������������������������������������������������������������6
Serverless and Container-Friendly������������������������������������������������������������������7
Hot Reload of Live Code����������������������������������������������������������������������������������8
Robust Framework Support�����������������������������������������������������������������������������8
Developer-Friendly Tooling������������������������������������������������������������������������������9
Reactive SQL�������������������������������������������������������������������������������������������������10
Cloud-Native and Microservices-Ready��������������������������������������������������������11
JVM Language Support: Scala and Kotlin������������������������������������������������������11
Getting Started with Quarkus������������������������������������������������������������������������������12
Java���������������������������������������������������������������������������������������������������������������12
IDEs���������������������������������������������������������������������������������������������������������������12
v
Table of Contents
Maven������������������������������������������������������������������������������������������������������������12
Starter Website����������������������������������������������������������������������������������������������16
Quarkus Maven Project Kit����������������������������������������������������������������������������16
Quarkus Main Class���������������������������������������������������������������������������������������17
Chapter 2: Dependency Injection��������������������������������������������������������21
Contexts and Dependency Injection��������������������������������������������������������������������22
Getting Started with CDI�������������������������������������������������������������������������������������23
Bean Scopes�������������������������������������������������������������������������������������������������������25
Producer and Disposer Methods�������������������������������������������������������������������������26
Qualifiers�������������������������������������������������������������������������������������������������������28
Bean Configuration File���������������������������������������������������������������������������������30
Aspect-Oriented Programming����������������������������������������������������������������������31
ArC CDI Engine����������������������������������������������������������������������������������������������33
Spring Framework����������������������������������������������������������������������������������������������41
Quarkus Spring Annotation Support��������������������������������������������������������������43
Mixing Beans�������������������������������������������������������������������������������������������������43
Substitute ApplicationContextAware and BeanFactory���������������������������������46
Substitute Spring Application Events������������������������������������������������������������48
Chapter 3: Microservices with Quarkus���������������������������������������������51
Get Started with Microservices���������������������������������������������������������������������������52
Basic Microservice Configuration������������������������������������������������������������������56
Use JSON in Your REST Resource������������������������������������������������������������������64
JAX-RS Exception Handling��������������������������������������������������������������������������������66
JAX-RS Filters and Interceptors��������������������������������������������������������������������������68
Logging Filter�������������������������������������������������������������������������������������������������68
Interceptors���������������������������������������������������������������������������������������������������70
vi
Table of Contents
Asynchronous RESTful Services in JAX-RS��������������������������������������������������������72
Generic Response Wrapper in JAX-RS����������������������������������������������������������76
Microservices, the RESTEasy Way����������������������������������������������������������������������77
Cache Control������������������������������������������������������������������������������������������������77
Asynchronous Batch Processing in RESTEasy����������������������������������������������78
Server-Side Caching�������������������������������������������������������������������������������������������80
Microservice Documentation with Swagger�������������������������������������������������������82
OpenAPI���������������������������������������������������������������������������������������������������������82
Swagger��������������������������������������������������������������������������������������������������������86
MicroProfile Support�������������������������������������������������������������������������������������������87
REST Client����������������������������������������������������������������������������������������������������88
Security���������������������������������������������������������������������������������������������������������96
Configuration�����������������������������������������������������������������������������������������������111
Health Checks����������������������������������������������������������������������������������������������112
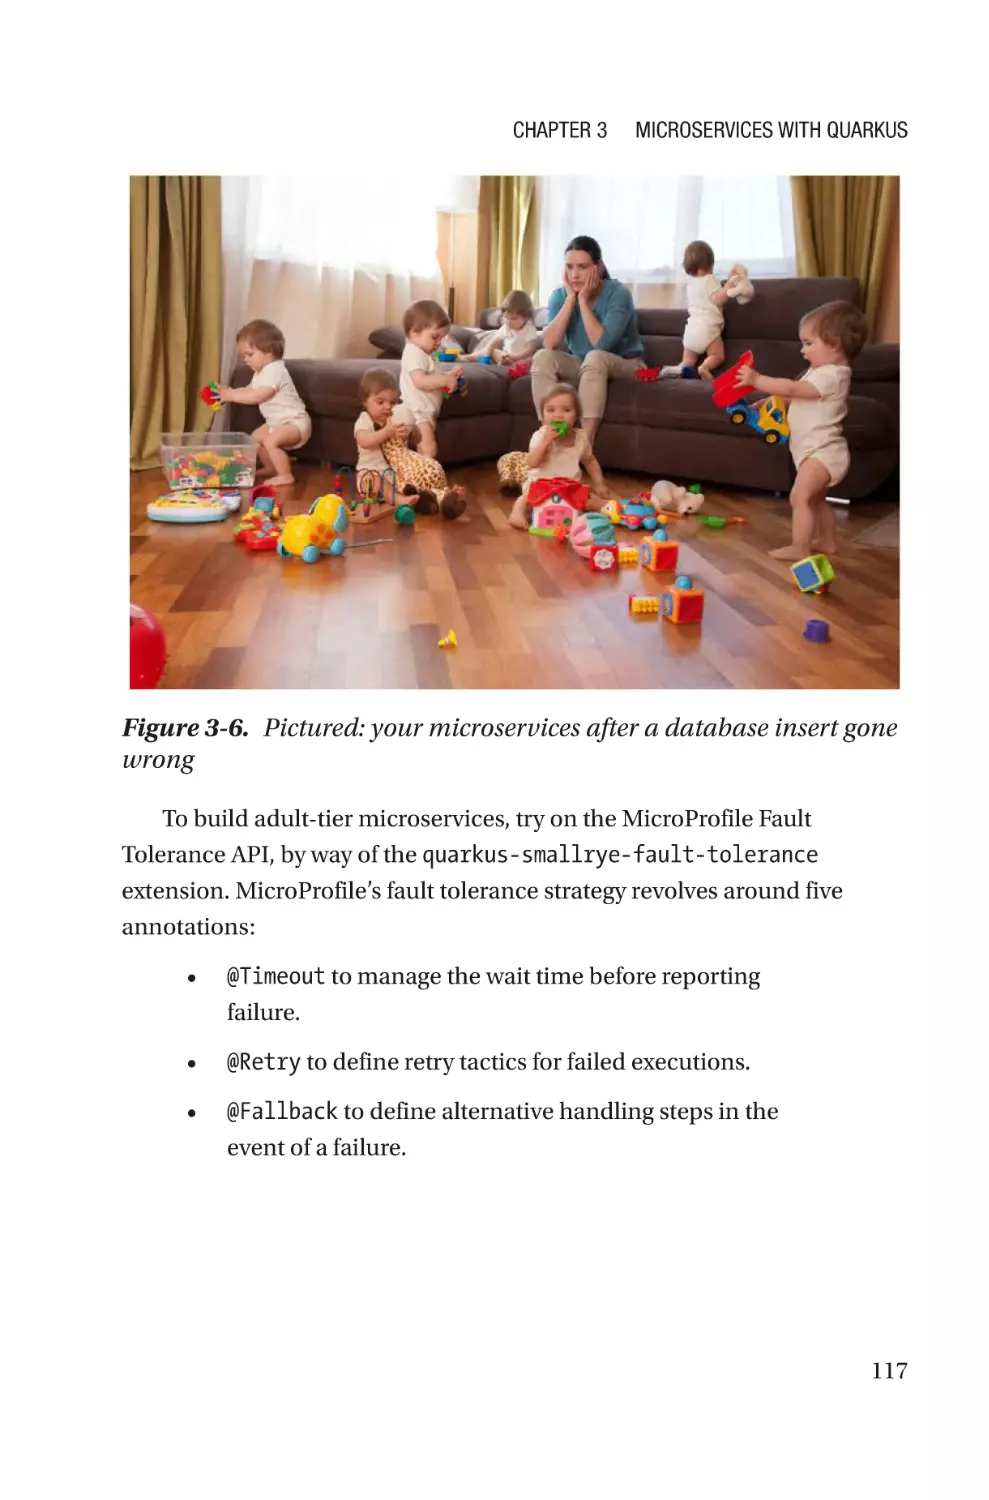
Fault Tolerance��������������������������������������������������������������������������������������������������116
Reactive Programming with Vert.x��������������������������������������������������������������������120
High-Performance Netty with Vert.x������������������������������������������������������������121
Reactive Messaging with Vert.x������������������������������������������������������������������123
Microservice Success with Quarkus�����������������������������������������������������������������130
Chapter 4: Packaging and Deploying Quarkus Applications������������133
JVM Mode���������������������������������������������������������������������������������������������������������135
Native Mode������������������������������������������������������������������������������������������������������136
GraalVM�������������������������������������������������������������������������������������������������������138
Native Java Image Limitations��������������������������������������������������������������������141
Native Imagery in DevOps���������������������������������������������������������������������������142
A Crash Course in Containerization�������������������������������������������������������������������144
Install Docker�����������������������������������������������������������������������������������������������146
Configure Docker�����������������������������������������������������������������������������������������146
vii
Table of Contents
Install the CentOS Image�����������������������������������������������������������������������������147
Run the CentOS Image��������������������������������������������������������������������������������148
Build Native Images Inside a Docker Container������������������������������������������150
Build Native Images with Maven: A Shortcut�����������������������������������������������152
SSL Support�������������������������������������������������������������������������������������������������153
Third-Party Class Support���������������������������������������������������������������������������153
Package a Quarkus App As a Docker Image������������������������������������������������155
Serverless Microservices����������������������������������������������������������������������������������160
Amazon Web Services Serverless Deployment�������������������������������������������162
Funqy Serverless Apps�������������������������������������������������������������������������������������177
AWS Serverless Success with Quarkus������������������������������������������������������������178
Chapter 5: Quarkus Data Access������������������������������������������������������181
SQL Data Sources���������������������������������������������������������������������������������������������182
Configure a JDBC Connection Pool Manager�����������������������������������������������185
Is Your Data Source Healthy?����������������������������������������������������������������������186
Using SQL Data Sources������������������������������������������������������������������������������189
Reactive ORM with Hibernate���������������������������������������������������������������������������212
NoSQL Data Sources�����������������������������������������������������������������������������������������215
With AWS DynamoDB�����������������������������������������������������������������������������������216
Manage Your DynamoDB Data Model����������������������������������������������������������220
Configure DynamoDB in Quarkus����������������������������������������������������������������224
CRUD in DynamoDB�������������������������������������������������������������������������������������226
Transactions������������������������������������������������������������������������������������������������������232
Quarkus Transactions����������������������������������������������������������������������������������235
Batch Operations����������������������������������������������������������������������������������������������243
Scheduled Jobs�������������������������������������������������������������������������������������������244
Security�������������������������������������������������������������������������������������������������������������247
viii
Table of Contents
Chapter 6: Test Quarkus Applications����������������������������������������������257
JUnit Primer������������������������������������������������������������������������������������������������������257
Unit Testing�������������������������������������������������������������������������������������������������������262
Unit Test CDI Beans�������������������������������������������������������������������������������������264
Unit Test CDI Components���������������������������������������������������������������������������266
Quarkus Mocking����������������������������������������������������������������������������������������������271
Integration Testing��������������������������������������������������������������������������������������������275
Slicing Integration Tests������������������������������������������������������������������������������281
Quarkus Test Profiles�����������������������������������������������������������������������������������285
Suppress Security for Integration Tests�������������������������������������������������������287
Native Mode Integration Testing������������������������������������������������������������������290
Index�������������������������������������������������������������������������������������������������295
ix
About the Author
Tayo Koleoso is a full-time technical lead and
consulting architect with a burning passion for
learning, because he knows there’s too much
he doesn’t know, and teaching, because it’s
the best way to reinforce knowledge. He’s an
in-person instructor and author, dedicated
to topics and technologies he’ll have to study
religiously to deliver. His journey started from
Lagos, in Nigeria, bringing him to the United
States as an immigrant software engineer. Across industries, from finance to
cybersecurity, he has led teams, architected complicated integrations, and
broken and built many fun and mission-critical projects in the enterprise
space, with Java and Python, in the cloud. Quarkus is his latest victim.
Outside of technology, he’s very passionate about personal finance and
the securities market. Throw a couple of habanero peppers in, and he’s
happy! You can watch and follow his courses on LinkedIn Learning.
xi
About the Technical Reviewer
Mouhamadou D. Sylla is an electrical and
software engineer with extensive experience
and works for a hi-technology, defense
and biomedical research company that
provides scientific, engineering, system
integration, and technical services. As a
senior software engineer, he is responsible
for the development integration products
produced by the company. Mouhamadou has
been working in software development for a
decade and has participated and led several
development projects in Java. His primary
interests include the integration of security into software development
lifecycles and emerging technologies such as Quarkus. Mouhamadou
graduated from the University of Maryland, College Park, with a BS in
Electrical Engineering and minor in Computer Science.
xiii
Acknowledgments
I want to thank God, my mother, and sister for all the support and
prodding to push this book through.
To my muse and #1 cheerleader, Keni, I say a huge thank you.
My technical reviewer, Mo Sylla, keeping me accurate and on target,
thank you so much; it was an honor working on this book with you.
To Eden and her mum, for granting my first book “interview,” thank you.
Finally, to the person that set me on this path so many years ago – he
probably doesn’t even remember – Femi Temowo, thank you so much.
Thanks to the Quarkus crew for building a game-changing platform!
Thank you Java for existi... [Cue the walk-off music].
xv
Introduction
Java is dead. Long live Java.
“Cloud-native” is being thrown around in the industry a lot these
days; many are joining the “microservice” train as well. Many are not
ready. To be truly microservice, cloud-native, or even “cloud-friendly”
takes a major mindset shift and technological realignment. Traditional
popular Java application design, frameworks, and thinking can no longer
deliver the goods.
Quarkus literally puts the “native” in “cloud-native”; this is not your
grandma’s web service framework.
This book is a view of how Java enterprise applications and
microservices will be built and deployed in the future. I’ve carefully
selected the extensions and practices to demonstrate in this text. The
intent is to cover the most common use cases in the enterprise, combined
with as many easily digestible and functional examples as possible. I aim
to demonstrate how to
•
Build scalable and cost-effective applications on
premises and in the cloud
•
Reliably deploy RESTful Java services in the
containerized world
•
Prepare you and your organization for the architectural
and operational changes that are necessary for a
successful migration to microservice architecture
xvii
Introduction
•
Run resource-efficient Java applications in deployment
form factors that were hitherto impractical
•
Reuse your existing code and components in the new
world of Quarkus
You’re not going to want to build Java the old way again. After seeing
how much more “performant” your web services can become with the
tools in this platform, you’ll find there are very few reasons to continue to
do Java as of old.
To get the most out of this book you’ll need
•
Familiarity with Java in an enterprise setting
•
A basic understanding of web services
•
A basic understanding of the cloud
This book is example-heavy; a lot of the examples can be copy-pasted
straight into your IDE and run. Because of the active development going
on in this book, it’s highly likely that by the time you’re reading it, some of
it is outdated or functioning differently. This is a good thing: the Quarkus
project is very actively developed.
After reading this book, you will be able to build and package a
production-strength Java application that is natively compiled and
deployable on-premise and in the cloud.
xviii
CHAPTER 1
Welcome to Quarkus
Quarkus is the latest entrant into the microservice arena, brought to
you by our friends over at Red Hat. Now it’s not like there aren’t enough
microservice frameworks out there, but ladies and gentlemen, this
one’s different. This is one of the precious few microservice frameworks
engineered from the ground up for… [drum roll] the cloud.
The market is dominated arguably by the Spring Framework, Spring
Boot being its flagship platform for microservices. The Spring Framework
does everything and a little more, but one thing needs to be said: its cloud
offerings are bolted on; afterthoughts added to a platform born before the
era of cloud-everything, serverless, and containerization.
Quarkus is a framework built with modern software development
in mind, not as an afterthought. It’s a platform built to excel as a cloud
deployment: as a containerized deployment, inside a stand-alone server,
or in one of the common serverless frameworks. Quarkus provides almost
everything we’ve grown accustomed to in a microservice framework like
Spring Boot or Micronaut, with a lot of added benefits that put it ahead
of the pack. You can run it on-premise, in the cloud, and everywhere in
between.
In this chapter, we’re going to take a window-shopper look at the
framework and even take it for a test drive. Thank you for purchasing this
book and choosing to explore this game-changing platform with me.
© Tayo Koleoso 2020
T. Koleoso, Beginning Quarkus Framework, https://doi.org/10.1007/978-1-4842-6032-6_1
1
Chapter 1
Welcome to Quarkus
rite Once, Run Anywhere
W
Predictably (WORP)
Write Once, Run Anywhere (WORA) was the original promise of Java:
you write your Java code one time, and it’s good to run on any platform
where. The way it fulfills that promise is by adding a lot of insulation
in the JVM that protects the code from all the peculiarities of various
operating systems and platforms. This is intended to mitigate any
platform-specific weirdness that might cause code to behave differently.1
The cost of that insulation is a degradation in the speed of execution,
not to mention the bloat in the Java platform code that causes the size
of deployment packages to swell considerably. Some even rewrote that
aphorism to become “Write Once, Break Everywhere” because among
other reasons, once you added application servers to the mix, things got
decidedly less predictable.
Enter the age of containerization. Technologies like Docker and
VMware Vagrant have rendered the need to write or run insulated code
basically unnecessary. Containerization, the cloud, and serverless
technology take a lot of the guesswork out of running code. Why should
you need to keep yourself guessing what platform your code will be
deployed to, when you can reliably deploy to a docker container? You no
longer need to “Write Once, Run Anywhere”; you need to “Write Once,
Run Predictably.” WORP code, baby! With a WORP mindset, we can shed
all the baggage of insulation that the JDK saddles us with. We can now
get much smaller deployment packages. Heck, maybe our code could run
a lot fas-.
The famous “...but it works on my machine?!”
1
2
Chapter 1
Welcome to Quarkus
Supersonic Subatomic!
Supersonic and Subatomic aren’t 1980s-era compliments (though Quarkus
is totally tubular and radical, dudes and dudettes!). No, it’s a tagline
that refers to two of Quarkus’ biggest differentiators: this framework will
usually generate much smaller deployment packages with small memory
footprints (subatomic) and deploy faster (supersonic) than most other
microservice frameworks on the market.
The folks over at Red Hat mean business with this framework. Quarkus
contains most of all the features you’ve come to expect from a modern
microservice framework in a shockingly compact deployment package,
a package that’s then engineered to start up faster than the competition
[hold for thunderous applause from the serverless crowd]. It’s truly a
container-first and cloud-native microservice platform, engineered for
•
Fast application startup times to enable quick scaling
up or down of applications in a container
•
Small memory footprint to minimize the cost of
running applications in the cloud
•
Predictable deployment scenarios
How is the package so small and fast? The secret sauce is a relatively
new Java feature known as ahead-of-time (AOT) compilation. A little
background on this feature, for the uninitiated (and a trip down memory
lane for the platform veterans).
A Brief Primer on JVM Internals
Today’s Java is both an interpreted and a compiled language platform.
Java started as an interpreted language platform: you save a source
file with the .java extension and run the javac command to generate
a .class file. That class file contains what’s called Java bytecode, a java
3
Chapter 1
Welcome to Quarkus
language-specific interpretation of all the java code that you wrote. When
you now run “java yourcode.class”, the class file is interpreted by
the JRE into the OS-specific CPU instructions. That intermediate step
of translating the class file into CPU-friendly instructions is carried out
every time the code is run – every method is reinterpreted for every time
it needs to be run. In the modern-day JVM, this would go on for a while,
until some methods in your program or chunks of code are marked as
“hotspots” – meaning the JVM has run these portions of the code many,
many times.
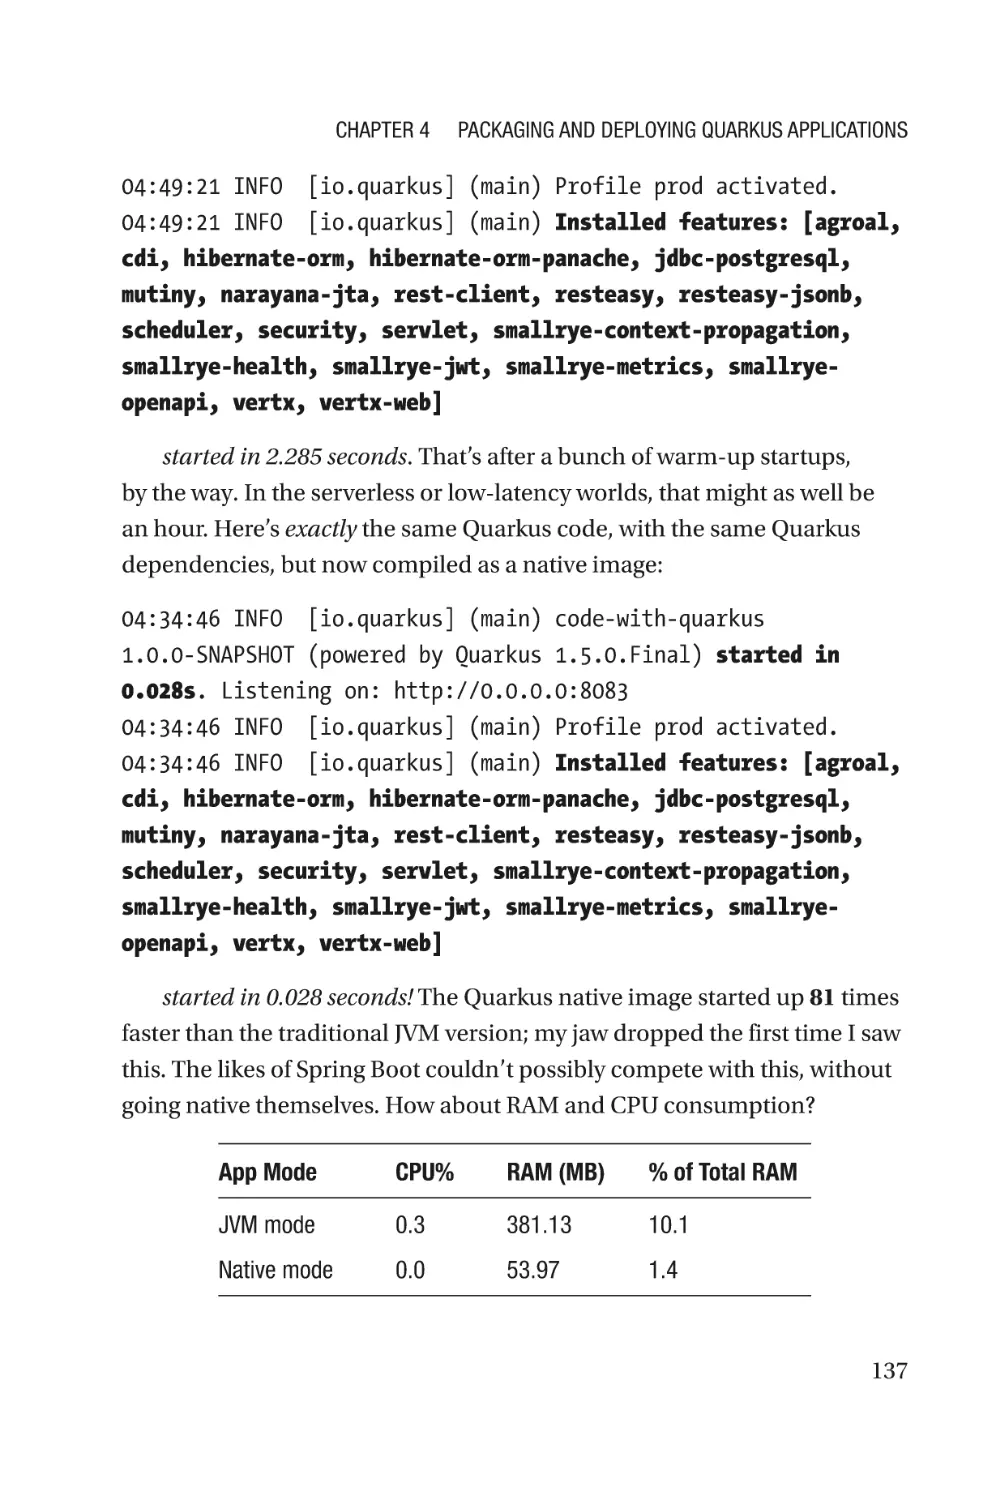
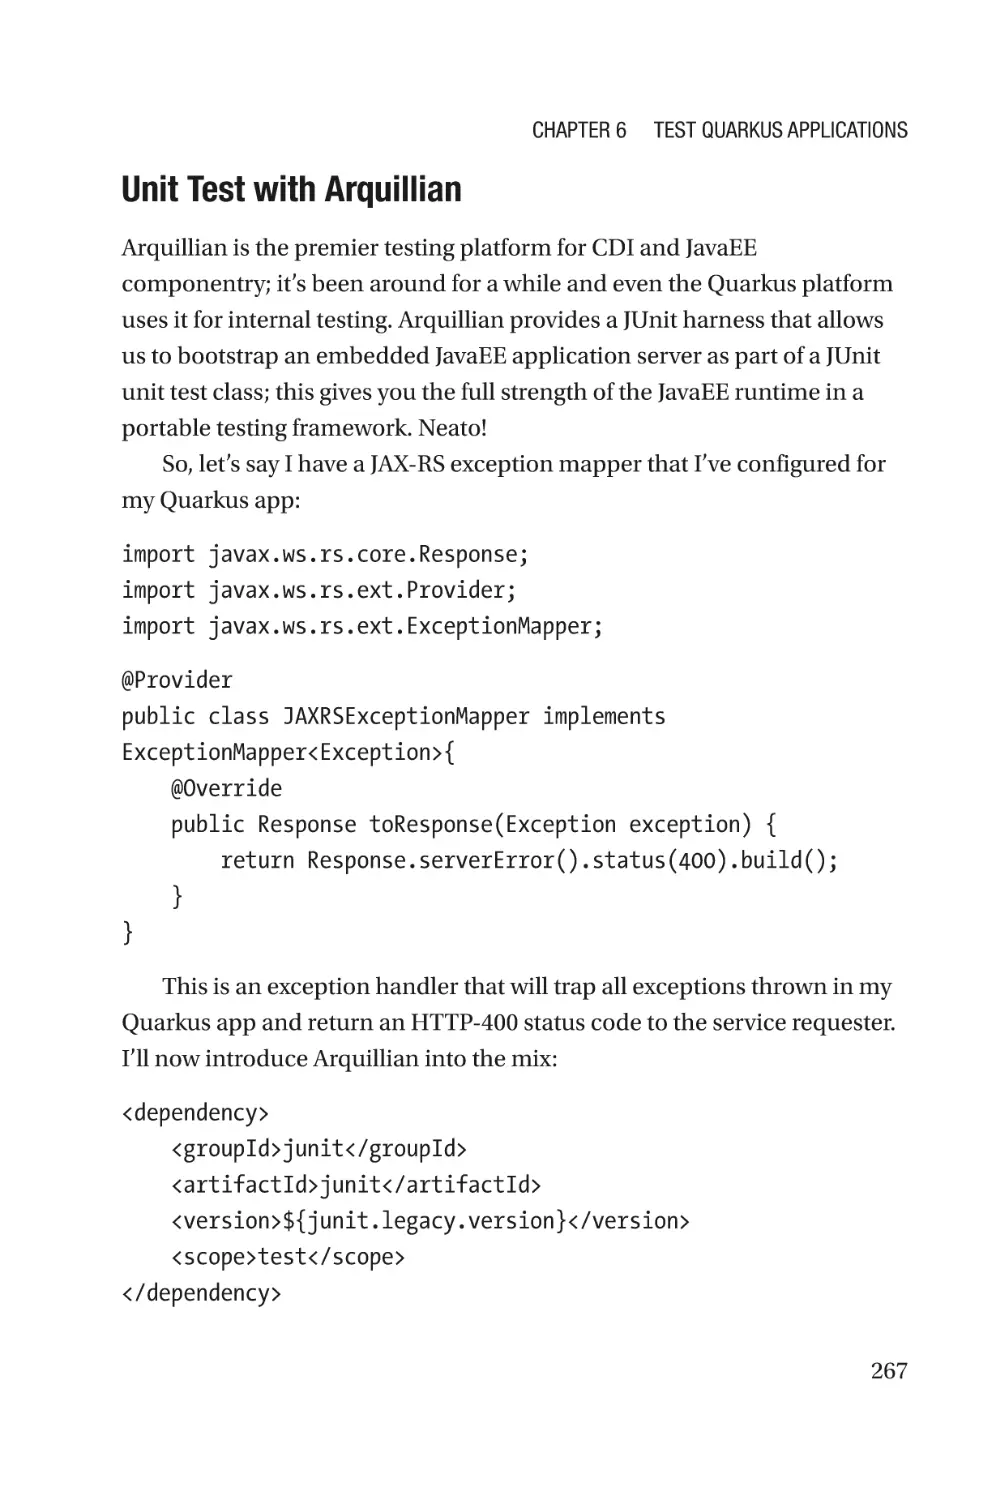
At this point, the JVM will then execute a Just-In-Time (JIT) compilation
of those hotspot portions. The thing is interpretation of the java bytecode
slows down the execution; JIT compilation produces durable assembly
instructions that can be executed directly by the CPU. This means that
there will be no need for the repeat interpretation. As you can imagine, that
speeds up those specific parts of the application. The JIT-compiled parts
(and only those parts) of the application will become faster to execute than
the interpreted parts.
Figure 1-1 illustrates the process.
Figure 1-1. Traditional Hotspot compilation
4
Chapter 1
Welcome to Quarkus
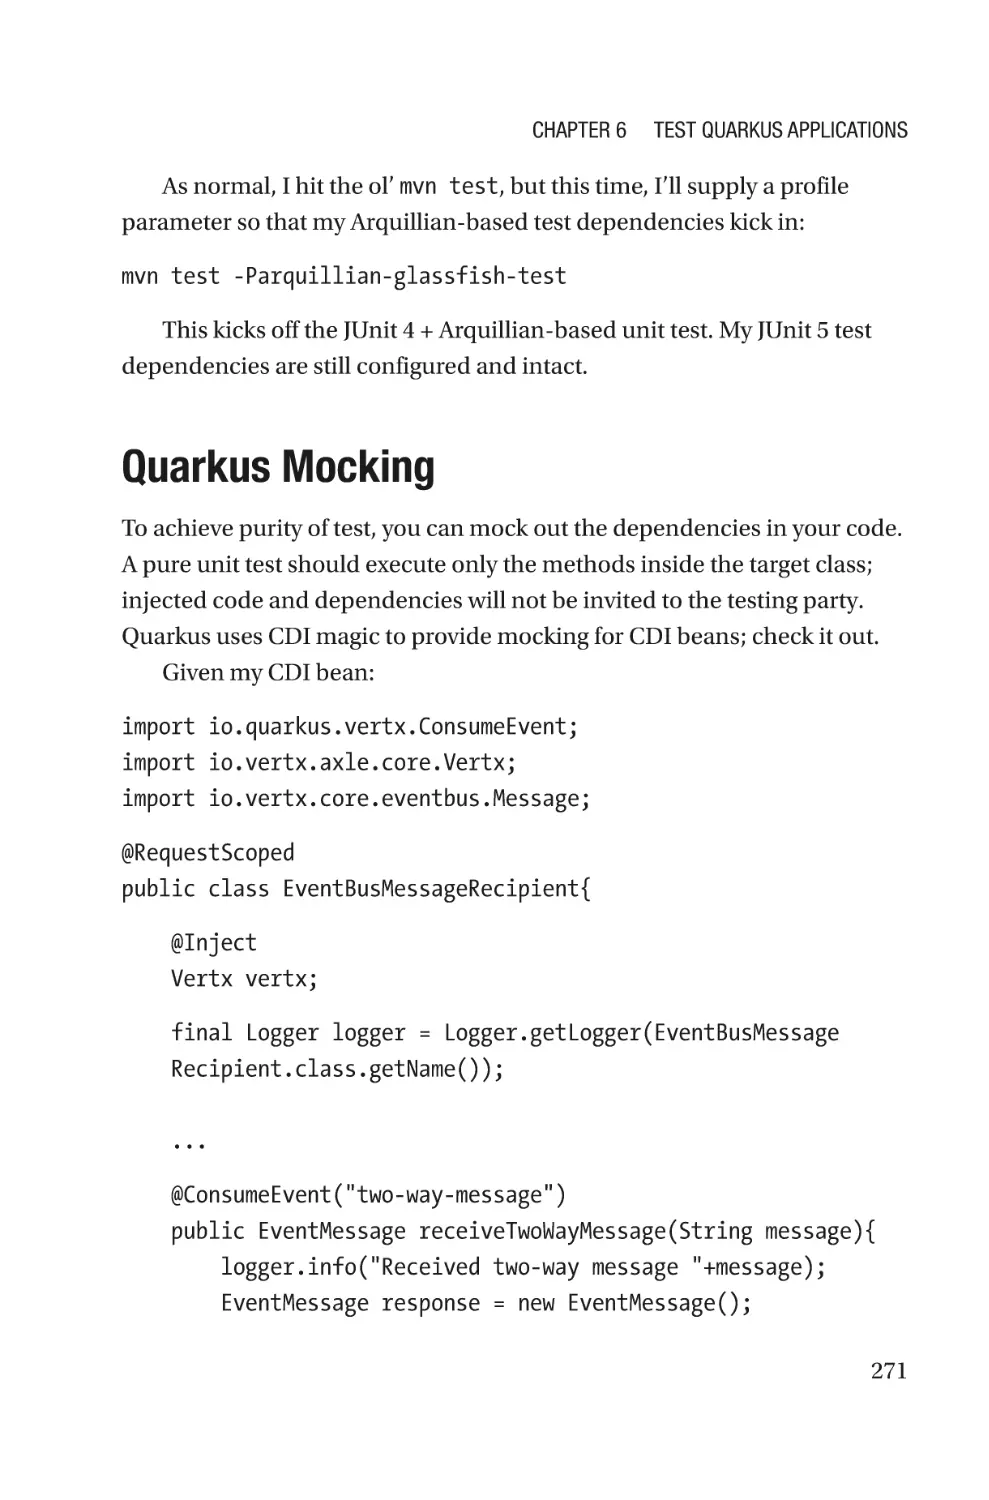
Ahead-of-Time Compilation to the Rescue!
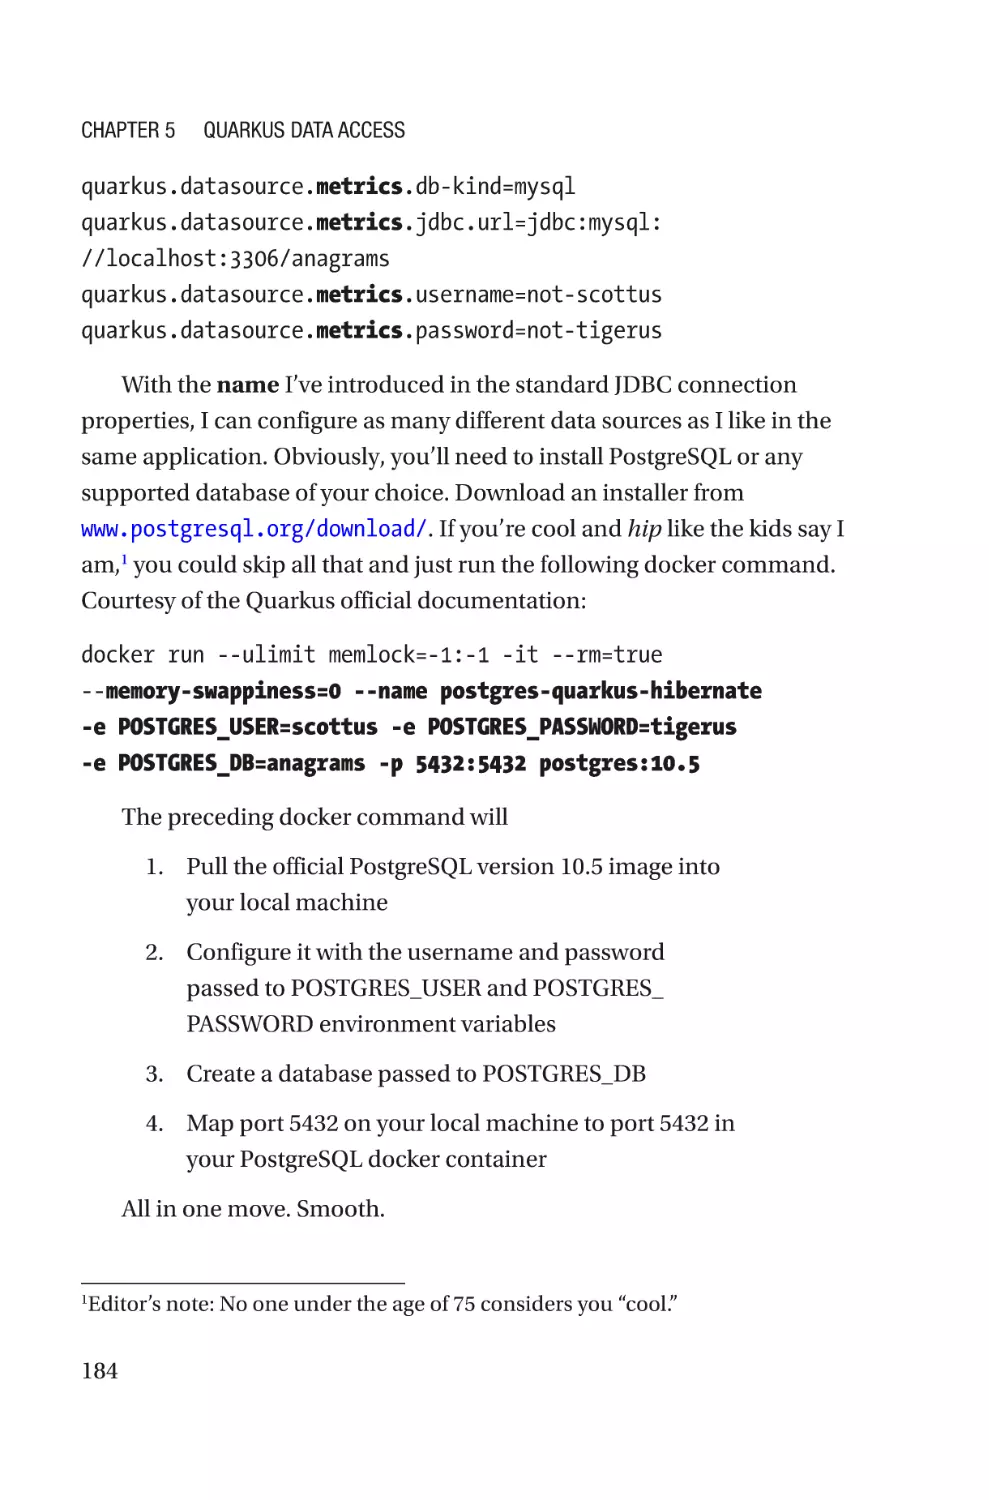
Ahead-of-time (AOT) compilation takes compilation further, or rather
brings it nearer. AOT compilation takes your .java files straight to
compiled native binaries that can be immediately executed by the
CPU, skipping the relentless interpretation step and passing the savings
on to you! Your application starts up significantly faster, and most of
the code enjoys the benefit of near immediate computability by the
CPU. Additionally, the memory usage drastically shrinks. The performance
gains from this process are comparable to what the likes of C++ can boast
of. Your entire application, if AOT-compiled, can even become a selfcontained executable, without the need for a running, OS-supplied JVM.
Figure 1-2. Ahead-of-Time compilation
But there are a few catches, because there’s no free lunch: Quarkus
and AOT compilation weave their performance sorcery by stripping the
Java runtime to the essentials. Code that’s compiled using AOT contains
only exactly what that code needs from the JDK, trimming a lot of fat. This
upfront compilation step means that it will take a little bit longer than most
Java devs are used to. Other time-consuming operations like using the
Reflection API are diminished somewhat. For example, if you plan to use
reflection, you’re going to have to configure your build to prepare to use
5
Chapter 1
Welcome to Quarkus
specific classes reflectively. It’s counterintuitive I know, but in practice, it’s
a minor inconvenience at worst. At best you’re guaranteeing the behavior
of your application at runtime! WORP WORP, baby!
There are some minor sacrifices that are made at the altar of
performance that we will examine later in this book. Writing WORP code
means deploying predictably. It means knowing what JVM features your
application might need ahead of deployment (TLS, Reflection, Injection,
etc.). At the end of it all, you’re still getting a lot of bang for your buck.
Quarkus Feature Tour
Any good microservice framework must provide a minimum set of
features, like running your application without a stand-alone server and
opinionated configurations with sensible defaults. Now I’m not going
to say that Quarkus is going to make you smarter, wealthier, or more
attractive,2 but I’m also not going to say it won’t do all those things. But
what else can it do?
Native Image Support
As I’ve mentioned before, a key feature of the Quarkus framework is the
ability to generate native images from Java code. The native image that’s
generated skips the interpretation stage of running regular java code,
helping it start faster and consume less system resources.3 The process of
generating a native image using AOT strips several layers of “fat” from the
JRE and Java code, allowing the finished image to operate with significantly
ditor’s note: It will not.
E
The performance gains manifest immediately during startup of the microservice
app. There are some special conditions where you may not get the most
performance benefits out of the framework, but on the whole, Quarkus is much
faster and lighterweight than most of the competition.
2
3
6
Chapter 1
Welcome to Quarkus
less resources than a traditional Java application. This isn’t the only
mode of Quarkus mind; you can run your Quarkus app as a traditional
Java application (so-called JVM mode) without any problems – and still
get significant performance boosts. It’s just that now, any talk of “Java is
too slow to do ${someUseCase}” or “Java is not suitable for embedded
deployment” is no longer valid. Cheers to that!
S
erverless and Container-Friendly
For the uninitiated, serverless deployment is an application deployment
environment available only in the cloud. It’s a deployment model
that’s offered by cloud providers where you don’t have to deal with the
application server onto which your microservice will be deployed. All
you’ll need to do as a customer of a serverless-providing vendor is to
supply your deployment package – a WAR or in the case of Quarkus, a JAR.
Kubernetes (K8s for short) deployment is a first love for Quarkus –
it was designed with K8s in mind, from the container orchestration
perspective.4 With the support for native compilation using GraalVM,
Quarkus yields
•
Dramatically smaller deployment units
•
Much lower memory demands
•
Quick startup times
These are factors that you should care about if you’re operating in
a containerized or serverless environment. You want your dockerized
application to start fast and utilize as little RAM as reasonably possible.
Why? So that your K8s, Elastic Container Service, or other container
management service can quickly scale out your microservice in response
ubernetes is a container management platform that allows you to scale and
K
manage the deployment of a containerized application.
4
7
Chapter 1
Welcome to Quarkus
to load. In a serverless scenario, you really want your application to start
up as quickly as possible; a delay in startup could prove expensive: some
cloud providers charge by the amount of time for which a serverless
application runs. The native compilation doesn’t apply to just your code;
many third-party libraries and frameworks that you’re used to (Kafka,
AWS libraries, etc.) have been engineered using Quarkus’ extension API to
make them native compilable. This means you can get container-friendly
levels of performance out of things like JDBC operations and dependency
injection. Even without native compilation, Quarkus as a framework does
a lot of upfront optimization to the deployment artifacts that improves
startup time. Quarkus ships with in-built support for Amazon Web
Services, Azure, and OpenShift.
Hot Reload of Live Code
Developer productivity is another focus of the Quarkus framework. The
hot reloading capability in Quarkus allows developers to see their changes
to code reflected live. So, when you crack open your favorite IDE (that’s
right, you get this feature regardless of IDE), and run the project, you don’t
need to shut down a server or kill the application to see further changes to
your code. Simply save the change in the IDE and keep testing the code –
no need to restart anything. Even config files! It’s pretty awesome to add
new dependencies to your Maven POM.xml in a running project and have
the new libraries pulled down, all without restarting the app!
Robust Framework Support
Quarkus supports a lot of frameworks out of the box. It also provides
a robust extension framework that allows you to add support for your
favorite third-party libraries and frameworks. If you’ve worked with any of
8
•
JavaEE
•
MicroProfile
Chapter 1
•
Apache Camel
•
And yes, Spring Framework5
Welcome to Quarkus
you can use all those frameworks inside your Quarkus-based code. As I’ll
cover in a little bit, Quarkus also covers a lot of the standards we’ve grown
accustomed to: JAX-RS, JAX-B, JSON-B, and so on. It’s built to enable fresh
microservice development, as well as migrating existing microservices
into a Quarkus project. Now as at the time of this writing, Quarkus is still
a pretty young platform, so the support for some frameworks is still in
preview mode, so your mileage may vary.
D
eveloper-Friendly Tooling
Quarkus provides a rich option set for working with and within
the framework. There are feature-rich plugins for both IntelliJ and
Microsoft’s Visual Studio Code for a GUI-led bootstrapping of a project.
There’s also the https://code.quarkus.io/ project starter page, like you
get with Spring Boot.
Once you’ve gotten the project going, there’s a healthy ecosystem
of extensions that cover most use cases in the microservice world. The
quarkus Maven plugin gives you handy access to all the functionality
you’ll need to manage your Quarkus project; my favorite function gives
you handy access to plugins just like Homebrew (for macOS) and Node
Package Manager (for Node.js). We see these tools and plugins in action
shortly.
In preview mode at the time of this writing.
5
9
Chapter 1
Welcome to Quarkus
R
eactive SQL
Now this one, I got excited when I first read about it. Many facets of Java
standard and enterprise programming have gotten the reactive treatment:
RESTful service endpoints, core Java,6 and so on. With Quarkus, database
programming is getting the reactive treatment also! Reactive programming
as a programming style provides a responsive, flow-driven, and message-
oriented approach to handling data. It’s designed for high-throughput,
robust error handling and a fluent programming style; and it’s a very
welcome addition to SQL. What does that buy you?
•
Being able to operate on database query results as a
streaming flow of data, instead of having to iterate over
the results one by one
•
Processing results of a query in an asynchronous,
event-driven manner
•
A publish-subscribe relationship between your
business logic and the database
•
All within a scalable, CPU-efficient, and responsive
framework
That’s the promise of reactive SQL with Quarkus. As at the time of this
writing, only MySQL, DB2 and PostgreSQL support are available in reactive
mode in Quarkus.
J DK 9 introduced core support for reactive programming with the Flow API, so
framework providers can now base their reactive implementations on core java.
6
10
Chapter 1
Welcome to Quarkus
C
loud-Native and Microservices-Ready
As anyone who’s had to decompose a monolithic application into
microservices can attest, it’s not a walk in the park. When your architecture
is built with the assumption that everything your application will ever
need is in a single deployment unit, you’re going to find some peculiar
challenges breaking it down into microservices. Then double that
trouble for pushing the application into the cloud. Quarkus is loaded
with extensions that make the transition to microservices a breeze. All of
Quarkus’ features are in support of a full application living in the highly
distributed and disconnected world of the cloud:
•
Foundationally, almost everything in Quarkus is
reactive for efficient CPU usage and flow control.
•
With OpenTracing, MicroProfile Metrics, and Health
Checks, you will have eyes and ears over everything
your application is doing, especially when a single
business process spans multiple independent
components “up there,” in the sky.
•
Your application doesn’t have to spontaneously
combust every time a black box dependency isn’t
available for whatever reason: fault tolerance is
supported, also via MicroProfile.
JVM Language Support: Scala and Kotlin
Now I’m neither a career Scala programmer nor a Kotlin one, and even
I think this is awesome: you can use Quarkus in your Scala and Kotlin
projects – and a handful of other JVM-compatible languages! Pretty hip
and with it, as the kids say.7
Editor’s note: “The kids” haven’t said this in over 3 decades. Please stop this.
7
11
Chapter 1
Welcome to Quarkus
Getting Started with Quarkus
Red Hat lets you have it your way – there are a few options for starting off
with a brand new Quarkus project. I’ll cover the usual suspects.
J ava
Quarkus deprecated JDK 8 support with version 1.4.1 (this book is based
on v1.6). The Quarkus team plans to drop support for JDK 8 altogether
version 1.6 of Quarkus. It’s JDK 11 from there on out.
I DEs
There are plugins for IntelliJ and Microsoft Visual Studio Code; for IntelliJ,
go to File ➤ Settings ➤ Plugins and search for “Quarkus” and follow the
instructions from there. Similarly, for VS Code hit File ➤ Preferences ➤
Settings and search for “Quarkus”. IntelliJ offers the trademark intuitive
interface for starting a project from the Quarkus plugin; my experience
with the Visual Studio Code plugin was not as intuitive. Nothing on the
Eclipse or NetBeans front as at the time of this writing. Boooo!
M
aven
With Apache Maven, you can bootstrap a project from the command line
with
mvn io.quarkus:quarkus-maven-plugin:1.6.0.Final:create
-DprojectGroupId=com.apress.samples
-DprojectArtifactId=code-with-quarkus
-DprojectVersion=1.0.0-SNAPSHOT
-DclassName=org.acme.ExampleResource
-Dpath=/hello
12
Chapter 1
Welcome to Quarkus
This command uses the quarkus-maven-plugin, version 1.6.0.Final
from the io.quarkus group. On that plugin, I’m using the create goal,
passing in additional properties like className to generate a REST
resource class and path to set the path on the REST resource class. The
command generates a project named “code-with-quarkus”.
The resulting kit is a completely functional application – you can run
basic maven commands on it immediately:
mvn clean install
Quarkus Plugin
The quarkus maven plugin is not your average framework plugin. It’s
loaded with way more functionality than one would expect. Apart from
using it to generate, test, and package a project, you also get to
•
Run your project in hot-reload mode with the dev goal.
In this mode, changes you make to your project’s code
will be reflected without needing to shut down and
restart the application. From within the welcome-to-
quarkus directory, run
mvn quarkus:dev
This starts your Quarkus project in development
mode:
[io.quarkus] (main) code-with-quarkus 1.0.0-SNAPSHOT
(running on Quarkus 1.6.0.Final) started in 2.012s.
Listening on: http://0.0.0.0:8080
[io.quarkus] (main) Profile dev activated. Live
Coding activated.
[io.quarkus] (main) Installed features: [cdi, resteasy]
13
Chapter 1
Welcome to Quarkus
Starting Quarkus in dev mode shows you the
extensions that are running as the final startup line.
•
List the available extensions8 within the Quarkus
ecosystem with the list-extensions goal
mvn quarkus:list-extensions
This produces a two-column list of all the available
extensions you can spice up your application with:
Current Quarkus extensions available:
Quarkus - Core quarkus-core
JAXB quarkus-jaxb
Jackson quarkus-jackson
JSON-B quarkus-jsonb
...
To get more information, append
-Dquarkus.extension.format=full to your command line.
Add an extension to your project by adding the
dependency to your pom.xml or use `./mvnw
quarkus:add-extension -Dextensions="artifactId"`
•
Add new extensions to your project with the
add-extension and add-extensions goals
mvn quarkus:add-extension
-Dextension=quarkus-spring-web
I t’s important to note that the Quarkus-supplied dependencies you add are
not your usual maven third-party libs – they’ve been engineered to fit into the
Quarkus platform, many of them re-engineered to make them compatible for
native compilation. They’re not your average add-ons.
8
14
Chapter 1
Welcome to Quarkus
[INFO] --- quarkus-maven-plugin:1.6.0.Final:addextension (default-cli) @ code-with-quarkus --? Adding extension io.quarkus:quarkus-spring-web
[INFO] ----------------------------------------[INFO] BUILD SUCCESS
The preceding command adds the Spring Web
extension to your project, without you having to go
fish out the maven coordinates yourself. The addextension and add-extensions goals will update
the POM.xml file with the Maven details of any
extensions you add without your intervention.
•
See a list of available options and other useful
information with help
mvn quarkus:help
This plugin has 12 goals:
quarkus:add-extension
Allow adding an extension to an existing pom.xml
file. Because you can add one or several extension
in one go, there are two mojos: add-extensions
and add-extension. Both support the extension and
extensions parameters.
quarkus:analyze-call-tree
Analyze call tree of a method or a
class based on an existing report
produced by Substrate when using
-H:+PrintAnalysisCallTree, and does a more
meaningful analysis of what is causing a
type to be retained...
15
Chapter 1
Welcome to Quarkus
S
tarter Website
For the ultimate in convenience, head on over to code.quarkus.io; point and
click your way through to set the multiple attributes about the eventual
Maven or Gradle9 project that it will generate. There, you can also select
all the extensions you want to include with the project. The starter page
generates a package containing all the basic project files.
Quarkus Maven Project Kit
Whichever approach you take to bootstrap, your generated project should
contain at least the following:
•
The standard Java project directory structure:
src/main/java, src/main/test, src/main/resources,
pom.xml, README.md
•
Docker artifacts: src/main/docker/Dockerfile.jvm,
src/main/docker/Dockerfile.native
•
Property file for holding application configuration
properties: src/main/resources/application.
properties
•
An informational page that you can just delete if you
don’t want it in your setup: src/main/META-INF.
resources/index.html
Tip Use the quarkus:generate-config maven goal to generate
an application.properties file that contains all available
Quarkus framework properties, all disabled. With this, you can have a
look at what’s available to be configured.
Gradle support is in preview mode.
9
16
Chapter 1
Welcome to Quarkus
You can go ahead and bootstrap your project; run
mvn quarkus:dev
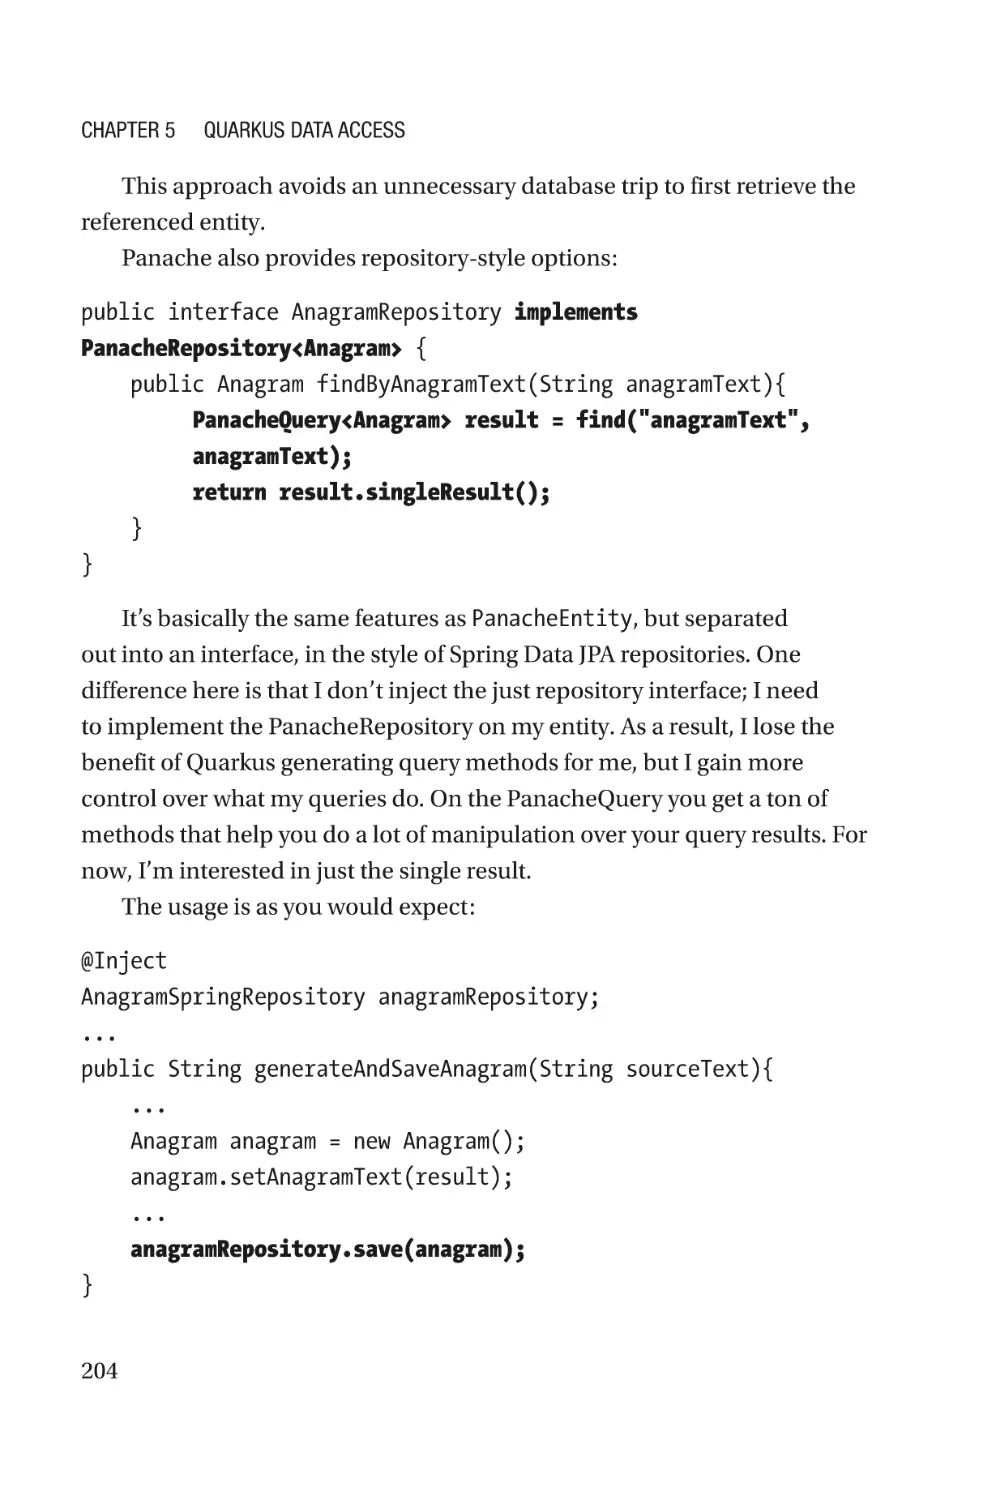
to start the project, without adding any code. Navigate to localhost:8080
and you should see the Quarkus welcome page as shown in Figure 1-3.
10
Figure 1-3. Quarkus app landing page10
Quarkus Main Class
If you’re coming from the Spring Boot world, you’re probably used to having
a main method that starts running your application. Quarkus doesn’t require
that; it implicitly uses io.quarkus.runner.GeneratedMain as the default
main class, so you generally don’t have to write a custom one. If you must
have control of the launch of your Quarkus application, you have a couple of
options, but just one of them is really worth the candle:
eah, it says v1.2, but that’s just because they haven’t gotten around to updating
Y
this page in a while.
10
17
Chapter 1
Welcome to Quarkus
import io.quarkus.runtime.Quarkus;
import io.quarkus.runtime.QuarkusApplication;
import io.quarkus.runtime.annotations.QuarkusMain;
@QuarkusMain (1)
public class CustomQuarkusRunner {
public static void main(String[] args) {
Quarkus.run(args);
}
public static class StartupHandler implements
QuarkusApplication {
@Override
public int run(String... args) throws Exception {
customStartupHandler(args);
Quarkus.waitForExit();
return 0; //or 1, depending on the termination
conditions
}
public static void customStartupHandler(String[]
parameters) {
//handle parameters or Quarkus.asyncExit();
}
}
}
It’s really a combination of two separate approaches:
1. I mark my CustomQuarkusRunner class with
@QuarkusMain to flag it to the Quarkus runtime as
a bootstrap class. The Quarkus team recommends
against performing any heavy-duty processing
directly inside the main method.
18
Chapter 1
Welcome to Quarkus
2. Instead, I provide a different class that implements
the QuarkusApplication interface. It’s inside the
run method of this interface I’m expected to do
my heavy lifting. It could be something as simple
as validating the input supplied as command-line
parameters. If things don’t look right, I can call the
Quarkus#asyncExit method, which will attempt a
graceful shutdown.
3. I can then use Quarkus#waitForExit to listen for
termination signals from any source.
You can get a hold of the command-line parameters anywhere else
inside your application with
@Inject
@CommandLineArguments
String[] commandLineArgs;
This now makes your Quarkus app a viable candidate for a purely
command-line interface (CLI) app. Otherwise, to run your project in
production mode, use good ol’ Java. First build the project with Maven:
mvn install
When that completes successfully, from the project folder, run the
completed project with vanilla Java:
java -jar target/code-with-quarkus-1.0.0-SNAPSHOT-runner.jar
And that’s it.
And let me tell you, I certainly felt more attractive after experimenting
with Quarkus, so take that, editors! So come watch me fill out the guts of
my Quarkus project with a bunch of neat tools and best practices, over the
next couple of chapters! By the end of this book, you too will look and feel
even more stunning than you already do.
19
CHAPTER 2
Dependency Injection
As the old saying goes, “Teach a man to fish, and dependency injection
will keep fresh fish coming,”1 dependency injection is the lifeblood of any
serious enterprise Java application.
Dependency injection (DI) is the mechanism by which java objects
are made available at specific points in your code by the runtime. It’s an
implementation of the inversion of control (IoC) design pattern that makes
it so that application code can be loosely coupled. So instead of non-DI
code:
MyDependency myDependency = new MyDependency();
//some business logic
myDependency.cleanUp();
myDependency = null;
you can have DI code:
@Inject
MyDependency myDependency;
The @Inject annotation indicates to the runtime that an instance of
MyDependency needs to be available, stat! You don’t need to worry about
how the object is instantiated, destroyed, or anything in between. There’s
quite a bit more to the topic and the mechanism, but that’s out of the scope
Editor’s note: Not how that saying goes. You could have googled this.
1
© Tayo Koleoso 2020
T. Koleoso, Beginning Quarkus Framework, https://doi.org/10.1007/978-1-4842-6032-6_2
21
Chapter 2
Dependency Injection
of this book. Suffice it to say that behind the scenes, a DI runtime provides
a service to you: providing you objects wherever you need them. There are
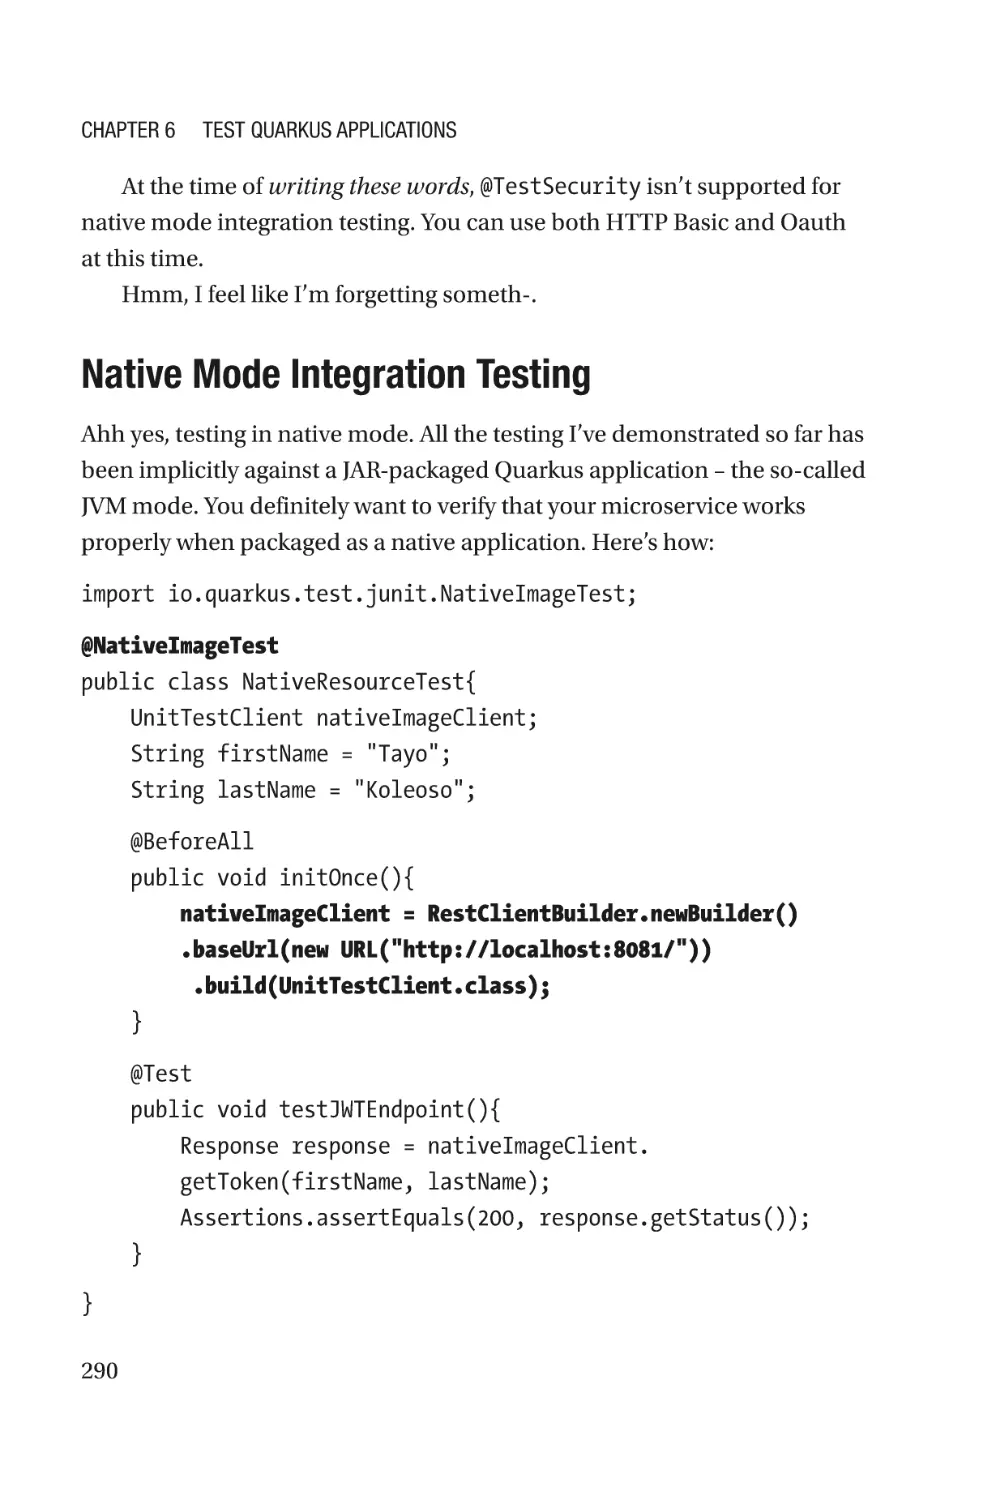
a few DI runtimes, and these are the top three in the Java ecosystem:
•
Contexts and Dependency Injection
•
Spring Framework (obviously)
•
Google Guice
Figure 2-1. Pictured: Dependency Injection
Quarkus provides support for the first two DI frameworks. Supersonic
Subatomic code that runs like greased lightning doesn’t fully implement
all available DI functionality. Full-fledged dependency injection requires
a lot of guesswork and usage of the JDK’s Reflection API. All of that gets
expensive with a full-fledged DI implementation, so the Quarkus team
made smart, intuitive decisions about what to support and what not to
support. But, fear not: where Quarkus closes a window, it opens a door.
Any functionality that’s had to be jettisoned, more than likely has a suitable
replacement elsewhere in the Quarkus extensions ecosystem.
22
Chapter 2
Dependency Injection
Contexts and Dependency Injection
Contexts and Dependency Injection (CDI) is the standard DI framework
for the Java ecosystem, derived largely from Red Hat’s Seam framework.
Note that I said framework. CDI is a JavaEE specification, officially called
JSR 365. What this means is that Java platform vendors like Red Hat,
Google, Spring, and others are free to implement their own interpretation
of CDI. This is what the Quarkus team at Red Hat has done in developing
ArC, the DI runtime built specifically for use in Quarkus.
Getting Started with CDI
Before we get into the meat of things with Quarkus, you should get a
fundamental understanding of the DI framework on which everything
is built. This isn’t going to be a deep dive into CDI. I’m going to show
you only just enough CDI for you to have a good time building Quarkus
applications. Hope you’ve brought an appetite, because we’re about to get
into some beans!
@ApplicationScoped (1)
@Named("deliciousVanilla") (2)
public class VanillaBean implements FlavorTown{
long flavorStrength;
String countryOfOrigin;
//other "stuff"
}
This is a “vanilla” CDI bean with
1. A scope: “Application” scope here
2. A name: “deliciousVanilla”
23
Chapter 2
Dependency Injection
And that’s really all it takes for a class to be known to CDI as a bean, in
Quarkus.2 Give it a scope or a name – with the @Named annotation. You can
then use this bean in another bean like so:
@RequestScoped (1)
public class VanillaCake{
@Inject (2)
@Named("deliciousVanilla")
VanillaBean vanillaBean;
@Inject
FlavorTown aFlavor; (3)
}
Here’s what’s going on here:
1. I’m using a different scope here, a narrower one –
the request scope.
2. Then I inject my VanillaBean into this class, using
the bean’s name as a qualifier.
3. I can also just inject the same bean, without
specifying a name or any kind of qualifier. Because
VanillaBean is annotated with @ApplicationScoped,
there’s only ever going to be one instance of it in the
entire context. So, aFlavor == vanillaBean will be
true.
Note that @Named is optional – it’s just a qualifier you can do without
in many situations. Also notice how I don’t have any getters or setters in
there, against the JavaBean convention? That’s because it’s not necessary
for injection in CDI. @Inject can also supply instances to methods:
lain CDI, like as you would find in a Jakarta EE application server like GlassFish,
P
actually doesn’t even require @Named or a scope annotation. Quarkus is more
restrictive for performance reasons.
2
24
Chapter 2
Dependency Injection
@Inject
public void gimmeSomeFlavor(FlavorTown flavor){
...
}
There’s also the @Context annotation. Use this annotation to obtain
instances of certain specialized components from the JavaEE world.
There’s a little bit of overlap between @Context and @Inject. There’s
currently talk about deprecating @Context in favor of @Inject. For what
it’s worth, @Context supplies REST components that @Inject doesn’t
currently supply,3 so it still has its uses. If you have bean classes packaged
in a JAR, add a file named beans.xml (more on this shortly) to the META-
INF directory of the package and CDI will find and supply the beans
present in that JAR.
B
ean Scopes
All you need to know about bean scopes is that they determine how long
your bean will live. They also determine how many instances of your bean
will be available at any given time. For the purposes of “Quarkusing,” here
are the scopes that matter in increasing order of lifespan:
1. @Dependent: Beans with this annotation don’t have a
lifespan of their own. They last as long as their injection
target. For example, inject a @Dependent bean into an
@ApplicationScoped bean, then the @Dependent bean
lives as long as the @ApplicationScoped bean.
Check out my LinkedIn Learning video on this very topic.
3
25
Chapter 2
Dependency Injection
2. @RequestScoped: Beans with this annotation are
created anew for every request to your web service.
This means that two injections of the same
@RequestScoped bean will get two different
instances of that same bean.
3. @ApplicationScoped: A bean with this scope will be
maintained for the entire uptime of the application.
There can only be one.
4. @Singleton: This technically isn’t a scope – it’s a
stereotype. In addition to limiting a bean to a single
instance within the application, this annotation can
get special treatment regarding transactions and
locking, for example. For Quarkus’ purposes though,
it’s functionally identical to @ApplicationScoped.
There are a couple of other scopes that are recommended in the CDI
specification. They’re not here in the hall of fame, because they have no
relevance in a non-web application framework like Quarkus. So, suck it,
scopes not invited to the party!
Producer and Disposer Methods
A CDI producer method lets you take control of the process of instantiating
a CDI bean. Check this out:
@Produces
@Named("boldVanilla")
@RequestScoped
public VanillaBean vanillaBean(){
VanillaBean vanillaBean = new VanillaBean();
vanillaBean.setFlavorStrength(30);
vanillaBean.setCountryOfOrigin("Madagascar");
return vanillaBean;
}
26
Chapter 2
Dependency Injection
With that method defined in any class, managed bean or not, the
following injection will obtain its bean instance from my producer method.
The optional @Named qualifier and @RequestScoped I’ve supplied there will
also kick in at the injection site. With those two annotations, I’ve defined the
default name and scope of the VanillaBean. I can override the name the bean
at the point of injection, as well as set my desired scope before injection:
@Inject
@Named("boldVanilla") @ApplicationScoped
VanillaBean vanillaBean;
Producer methods are particularly useful when you want to supply
non-managed beans, using CDI and managed bean components. Say you
need to provide a third-party class with some preconfigured variables, you
use a producer method.
The “destructive” counterpart to a producer method is the disposer
method:
public void compostVanillaBean(@Disposes VanillaBean
vanillaBean){
Composter composter = new Composter();
composter.compost(vanillaBean);
}
This method will be called by the CDI runtime whenever instances of
VanillaBean need to be destroyed. I get to do my cleanup here before the
bean goes kaput.
Caution A disposer method must be matched by a corresponding
producer method returning the same class. Without a matching
producer method, you will get a deployment exception. A producer
method on the other hand doesn’t require a disposer method.
27
Chapter 2
Dependency Injection
You can also get information about the destination where the
produced bean is to be injected, with javax.enterprise.inject.spi.
InjectionPoint:
@Produces
@Named("selectiveVanilla")
@RequestScoped
public VanillaBean vanillaBean(InjectionPoint injectionPoint){
...
injectionPoint.getType().getTypeName(); //the name of the
injection class
injectionPoint.getMembers() //other fields in the injection
class
injectionPoint.getQualifiers()//qualifier annotations on
the injection site
...
}
With these and all the other metadata available, you can build
conditional logic around what your producer method delivers for
injection. A producer method is also a fine option to inject lists of beans
into your application. Go nuts!
Quarkus doesn’t require @Produces on producer methods; I just prefer
it for completeness and conformity with the CDI specification – and also
because I like to type words.
Qualifiers
CDI provides qualifiers: custom annotations you can apply to your
managed beans that further help to distinguish them from other beans. So,
given these two beans
28
Chapter 2
Dependency Injection
@ApplicationScoped
public class VanillaBean implements FlavorTown{
...
}
@ApplicationScoped
public class BeaverVanilla implements FlavorTown{
...
}
the following injection will fail:
@Inject
FlavorTown beaverVanilla;
You will get an error message like
Ambiguous dependencies for type [FlavorTown] with qualifiers
[@Default] at injection point
This happens because the ArC CDI engine wouldn’t know which
implementation of FlavorTown it needs to deliver. I need to create a
qualifier that further distinguishes the class that I’m interested in injecting:
@Qualifier
@Retention(RUNTIME)
@Target({METHOD, FIELD, PARAMETER, TYPE})
public @interface Rare{}
A qualifier is just any custom annotation that itself is annotated with
@Qualifier. With this annotation, I can designate one of my FlavorTown
bean classes as “rare”:
@ApplicationScoped
@Rare
public class BeaverVanilla implements FlavorTown{
...
}
29
Chapter 2
Dependency Injection
I’ve now designated BeaverVanilla4 as a special implementation, by
applying my @Rare qualifier:
@Inject
@Rare
FlavorTown beaverVanilla;
This injection will sail right through! The CDI engine will know the
specific implementation of FlavorTown I’m interested in injecting. For
what it’s worth, CDI supplies a number of implicit qualifiers out of the box,
as does Quarkus. For example, @Named is a fine qualifier for many use cases.
Bean Configuration File
The CDI spec mandates a file named “beans.xml” as the configuration file
for establishing CDI functionality in a Java application. Making this file
available within a project, even without configuration, is what kick-starts
the CDI runtime. It’s this file that will cause the classpath to be scanned
and all the managed bean annotations picked up. Here’s what it looks:
<?xml version="1.0" encoding="UTF-8"?>
<beans xmlns="http://xmlns.jcp.org/xml/ns/javaee"
xmlns:xsi="http://www.w3.org/2001/XMLSchema-instance"
xsi:schemaLocation="http://xmlns.jcp.org/xml/ns/javaee
http://xmlns.jcp.org/xml/ns/javaee/beans_2_0.xsd"
bean-discovery-mode="all" version="2.0">
</beans>
Since JavaEE 7 however, this file is no longer necessary for the runtime
bootstrap. You now need it only for advanced configuration of managed
beans.
un fact: A very small percentage of the world’s vanilla supply comes from
F
beavers. Please don’t ask what part of the beaver produces the vanilla.
4
30
Chapter 2
Dependency Injection
Aspect-Oriented Programming
CDI provides some aspect-oriented programming to support
implementing cross-cutting concerns. Thankfully, CDI dispenses with the
fancy AOP lingo, and it’s all boiled down to two components:
•
Interceptor binding
•
Interceptor
Now stay with me: I’ll start with the interceptor binding. The
interceptor binding is the annotation I’ll use to mark methods that you
want to apply cross-cutting concerns to:
@Inherited (1)
@InterceptorBinding (2)
@Retention(RUNTIME)
@Target({METHOD, TYPE})
public @interface Audited{
}
1. @Inherited makes it so that this annotation can be
inherited by child classes.
2. @InterceptorBinding is what really makes this
an interceptor binding. Interceptor bindings can
declare interceptor bindings as well. That way, you
can combine more cross-cutting concerns in fewer
annotations.
I have the annotation, now for the class that will execute the cross-
cutting concern – the Interceptor [lightning and thunder sound effects]:
@Audited (1)
@Interceptor (2)
@Priority(Interceptor.Priority.APPLICATION)(3)
public class AuditingInterceptor implements Serializable {
31
Chapter 2
Dependency Injection
...
@AroundInvoke (4)
public Object logExecutions(InvocationContext
invocationContext) throws Exception {
logger.info("Method: "+ invocationContext.getMethod().
getName()); (5)
logger.info("Arguments: "+invocationContext.
getParameters());
logger.info("Executing the called method");
Object possibleReturn = invocationContext.proceed(); (6)
logger.info("The object the method was invoked on:
"+invocationContext.getTarget());
return possibleReturn;
}
}
Alrighty then, let’s dig in:
1. I apply my previously created @Audited interceptor
binding. This is how this annotation will become
effective as an AOP annotation.
2. @Interceptor marks this class as an interceptor.
3. @Priority gives this interceptor a numerical rank,
relative to other interceptors. The Interceptor.
Priority enum contains some presets, but any
integer will do.
4. The @AroundInvoke annotation will cause this
method to be invoked whenever a method with
@Audited is invoked. An interceptor class can have
any number of @AroundInvoke methods; they will all
be executed in order of appearance in the class.
32
Chapter 2
Dependency Injection
5. I get the javax.interceptor.InvocationContext
which gives me information about the intercepted
method.
6. I must call proceed on the InvocationContext, to
ensure that the intercepted method gets invoked.
All I need to do now is apply my annotation wherever I want the
auditing:
@ApplicationScoped
public class Generator{
....
@Audited
public String generateAnagram(String source){
logger.info("Generatin'");
...
}
}
ArC CDI Engine
In older versions of Quarkus, you would have had to add ArC support to
your Quarkus microservice, using the quarkus-arc extension. Now, it’s
bundled with the core of the framework.
Getting Started with ArC
Now, I’m showing this only for completeness of information. I’m not a
big fan of tight coupling with frameworks – JavaEE standards exist for
a reason,5 and we live in a society, dang it! You can directly access the
hat reason being flexibility: Better to use JavaEE standard annotations, instead of
T
implementation-specific constructs for portability and predictability of behavior.
5
33
Chapter 2
Dependency Injection
ArC (and by extension, CDI) context from a Quarkus extension or your
managed bean using io.quarkus.arc.ArcContainer – from within a
managed bean
ArcContainer arcContainer = Arc.container();
This is the ArC way of gaining access to the CDI runtime. It gives you
access to the BeanManager, among other core pieces of the CDI runtime. In
the CDI world, the BeanManager is the gateway to all the beans and scopes
available in the context. You can use it to create, search, and destroy all
available beans within the context.
As I’ve talked about, there are three main avenues to inject or obtain
resources:
•
@Inject
•
@Context
•
Producer methods and fields
Generally, you’ll use @Inject to supply objects of your own custom
classes. You need the @Context annotation to deliver some specialized,
container-managed objects that you’re not in control of. Go check out the
latest version of the CDI specification to see a complete list of specialized
objects that are available to you, courtesy of the CDI runtime. To be safe, I
recommend adding the quarkus-undertow extension to your microservice:
mvn quarkus:add-extension -Dextension=quarkus-undertow
This increases the variety of container-managed components you
can inject; Undertow brings with it several servlet-related components
like org.jboss.resteasy.spi.HttpRequest and javax.servlet.
ServletContext, among others:
34
Chapter 2
Dependency Injection
@Inject
ServletContext servletContext;
@Inject
HttpRequest httpRequest;
Note how I’m using @Inject to deliver the ServletContext object
here; that’s a personal preference that I recommend for you too, in
preparation for a probable retirement of the @Context annotation in the
future.
Heads Up Quarkus and its native image generation performs better
CDI work without private members. Dependency injection requires a
lot of Reflection API usage, which is very expensive. In the interest of
generating better-performing native images, don’t use the private
modifier for fields. Stick with package-level access for class-level
variables.
Quarkus-Only Enhancements to CDI
Quarkus enriches its implementation of CDI in ArC, by adding the
following features, among others.
Lazy Bean Initialization
All the bean initializations are lazy by default. So, given an
@ApplicationScoped bean like this
@ApplicationScoped
public class StartupConfigCheck {
Logger logger = Logger.getLogger(StartupConfigCheck.class.
getName());
35
Chapter 2
Dependency Injection
@PostConstruct
public void startupOperations(){
//heavy lifting startup business logic
}
@PreDestroy
public void shutdownOperations(){
//here goes your shutdown business logic
}
}
the heavy lifting I’m doing in the @PostConstruct method will not kick
in until the first time the bean is injected anywhere in the application.
In standard CDI behavior where all the beans are instantiated at startup,
your application could pay an unnecessary startup time cost due to long-
running initialization operations.
Tip You can still force eager initialization with the io.quarkus.
runtime.Startup annotation applied to the bean class. Be sure to
not confuse this one for the javax.ejb.Startup annotation that
does the same thing, but only for Enterprise JavaBeans (EJB).
Custom Lifecycle Events
You get the io.quarkus.runtime.StartupEvent and io.quarkus.
runtime.ShutdownEvent classes to hook into the ArC runtime’s startup
and shutdown steps, respectively. Here’s what that looks like:
@ApplicationScoped
public class StartupConfigCheck {
...
36
Chapter 2
Dependency Injection
public void startupOperations(@Observes StartupEvent
startup){
//here goes your startup business logic
}
public void shutdownOperations(@Observes ShutdownEvent
startup){
//here goes your shutdown business logic
}
}
The @Observes annotation will be used to deliver these event objects
where necessary. Beans that contain StartupEvent and ShutdownEvent
listeners will eagerly be instantiated. They trigger this behavior regardless
of the scope of the parent CDI bean.
Default Beans
What’s a @DefaultBean? It’s an annotation that lets you set a bean to be a
default option, in case of injections. It’s a little weird to explain, easier to
show. Here’s a producer method:
@Produces
@RequestScoped
@Named("simpleBatchProcessWorker")
@DefaultBean
public BatchProcessWorker customComponentProvider(){
return new SimpleBatchProcessWorker();
}
This producer method guarantees that there will always be an instance
of BatchProcessWorker available for injection. When there isn’t any
available source of BatchProcessWorker anywhere else in the Quarkus
code, io.quarkus.arc.DefaultBean will step in and supply the default. If
another implementation exists, that implementation takes precedence.
37
Chapter 2
Dependency Injection
Conditional Bean Supply
Use io.quarkus.arc.profile.IfBuildProfile and io.quarkus.arc.
DefaultBean to programmatically control when a bean is loaded. Check
this out:
public class BeanSupplier{
@Produces
@IfBuildProfile("test-east")(1)
public BatchProcessWorker eastRegionCustomComponent
Provider(){
return EastOnlyBatchProcessWorker();
}
@Produces
@UnlesBuildProfile("prod")
public BatchProcessWorker testingOnlyBean(){
...
}
@Produces
@DefaultBean (2)
public BatchProcessWorker customComponentProvider(){
return new SimpleBatchProcessWorker();
}
}
Here’s the voodoo going on:
1. This producer method will deliver a
EastOnlyBatchProcessWorker only if the Quarkus
application is deployed with the “test-east” profile active.
Conversely, Quarkus provides the @UnlessBuildProfile
annotation to exclude a specific profile. With
@UnlessBuildProfile("exclude-me"), the annotated
bean or producer method will be activated unless the
profile named “exclude-me” is active.
38
Chapter 2
Dependency Injection
2. Without the expected profile being active, the
customComponentProvider producer method kicks
in and supplies a SimpleBatchProcessWorker as the
default bean.
Lean Bean Cleaning Machine
Quarkus removes unused beans from the DI runtime during startup. This
leaves the runtime lightweight without any unnecessary beans to track.
Tip Add quarkus.log.category."io.quarkus.arc.
processor".level=DEBUG to the application.properties
file. This enables debug-level logging specifically for ArC. With this,
you can see all the optimizations ArC is doing during startup. A bonus
is that you can see all the unused CDI-injectable beans that ArC
removes from the runtime. Even more bonus: It shows you what you
can inject in the ArC world.
beans.xml
beans.xml is not required to activate dependency injection in Quarkus,
contrary to the CDI specification. The only scenario where this file will
become necessary is when you package bean classes in an archive like a
JAR, and you need those beans available in your Quarkus app. Packaging a
beans.xml file in such an archive will expose those beans to ArC and make
them injectable.
39
Chapter 2
Dependency Injection
L imitations of ArC
If you’re new to CDI, just skip this bit. You don’t know what you’re missing;
and you’ll find that you don’t need those things anyway. If you’re already
a CDI veteran, know ye this: ArC can do most things as stipulated by
JSR-365, but there are some things that it doesn’t do, mostly by design.
Remember, Quarkus is in the business of speed and predictability; some
CDI features just don’t jive with that:
•
No @ConversationScoped beans, or “passivation-
capable” beans:6 This should mean no beans that
implement Serializable or beans that will require
serialization to a file. But Quarkus supports the CDI
@SessionScoped, a passivation-capable bean. Curious.
•
As the contents of beans.xml are ignored,
•
•
No CDI portable extensions: The Quarkus
extension framework is all the extension framework
you’ll need. Trust me, vanilla CDI extensions
are overweight and suboptimal for the tier of
performance Quarkus aims for.
•
No beans.xml-based ordering of @Alternative
beans; and you don’t need it: Quarkus provides
io.quarkus.arc.AlternativePriority, an
annotation that designates a bean as an alternative,
as well as assigns a numerical priority.
No CDI’s Specialization with @Specializes: But
@Specializes is just an alternative that allows
inheritance of CDI qualifiers. For a replacement,
consider programmatically inheriting the available
Passivation-capable beans as defined in the CDI specification.
6
40
Chapter 2
Dependency Injection
qualifiers. An alternative approach is to dynamically
modify the qualifiers at the injection point,
guaranteeing that the desired implementation is
injected. This can be achieved with the Quarkus
extension framework.
•
No CDI decorators: You won’t be able to delegate
functionality to custom beans using @Decorator and
@Delegate.
S
pring Framework
Ah yes, the beloved Spring Framework. It’s a behemoth platform that
does a lot for the developer and the enterprise; Quarkus on its own is
not a replacement for Spring Boot.Yet. That feature parity comes with
Apache Camel. If you aren’t familiar with the Apache Camel Framework,
I can’t recommend it enough. So much so that, I’ve had colleagues that
call me “Mr. Camel”; even going as far as saying I share similarities with
them! How cool is that?. Apache Camel opens up a world of options for
integrating with many, many systems. With that in your stack, Quarkus
could easily rival Spring. The Apache Camel team has even forked off their
project into a branch focused on porting Camel extensions for Quarkus
support.
Don’t get me wrong, the Spring Framework is an awesome project; but,
if you want to try Quarkus out and still want to leverage the investments
you’ve made in Spring, this section is for you. This section is about
showing where Quarkus integrates elements of the Spring Framework.
There are features that are already easily reproducible with ArC. This bit is
so that you can drop in your existing Spring-based beans and configuration
into the Quarkus world. But really, check out this gorgeous fella:
41
Chapter 2
Dependency Injection
Figure 2-2. “Meow” – This handsome camel,7 probably
Wait, what? What do you mean that’s not a camel?
Figure 2-3. Camel
Oh. Well that’s just crEditor’s note: Not a camel.
7
42
7
Chapter 2
Dependency Injection
Quarkus Spring Annotation Support
Quarkus provides support for annotations from the following Spring
projects. What this means is that you can bring in most of the annotations
from these projects and more, and they’ll behave the way you expect them
to. It’s important to understand that under the hood, it’s Quarkus that’s
providing the services of these annotations, not the Spring framework. These
are some of the Spring modules supported. Visit the Quarkus website for an
up to date list of supported modules - they’re always adding more:
•
Spring Core
•
Spring Web
•
Spring Security
•
Spring Data JPA
•
Spring Boot Properties
I’ll add the core Spring Framework support extensions to my
Quarkus app:
mvn quarkus:add-extension -Dextension=spring-di
Pro Tip Remember, the list-extensions Maven goal will show
you all the available extensions in the Quarkus ecosystem; they’re
always adding more. add-extension will install the latest version too.
Mixing Beans
“Quarkus provides support for annotations” is an intentional statement:
Quarkus will recognize the documented Spring annotations and interfaces.
Then using ArC, it can provide the required services and functionality. What
this means is that you can bring the following bean into a Quarkus project:
43
Chapter 2
Dependency Injection
@Controller
@RestController
@RequestMapping
public class SpringController{
@Autowired
private AnotherSpringBean linkedBean;
@Autowired
ValueObjectRepository<ValueObject, Long> springJpa;
}
and Quarkus + ArC will provide the required REST endpoint, Spring
Boot JPA repository and injections, like nothing’s changed. Your Spring
configuration bean can also just be transplanted:
@Configuration
public class AppConfiguration {
@Bean(name = "anotherSpringBean")
public AnotherSpringBean anotherSpringBean() {
return new AnotherSpringBean();
}
}
That, however, is the extent of the Spring Framework support as at the
time of this writing. In Quarkus, there is no Spring ApplicationContext to
access, nor are there Spring context-based services available.
As you’ll see later chapters in this book, Quarkus has its own Jakarta EE
and MicroProfile-based support for web services, security, data access,
configuration, and so much more. The support for these annotations
in Quarkus is partly an avenue to encourage and support transition of
existing Spring applications into Quarkus. That bears repeating: Quarkus
is cool with your precious Spring Framework annotations, but it doesn’t
need them. So, you won’t be able to use org.springframework.context.
44
Chapter 2
Dependency Injection
ApplicationContextAware to key into the Spring context; nor will you
be able to process Spring context events. But you get to combine two
very powerful sets of annotations! Think about it: Spring and CDI beans
combined and seen as one! Check it out, it’s awesome:
@Named("aCdiBean")
@ApplicationScoped
public class CdiDao implements AnagramDao{
@Autowired
AnotherSpringBean springBean;
...
}
Given a Spring-annotated AnotherSpringBean, I can inject it into
a CDI-annotated CdiDao. I can also put a CDI-annotated bean into the
Spring-annotated one:
@Controller
@RestController
@RequestMapping
public class SpringController{
@Autowired
@Qualifier("aCdiBean")
AnagramDao aCdiBean;
...
}
Yeah, that’s right. Spring’s @Qualifier is equivalent to CDI’s @Qualifiers,
including @Named. What else would you need to bring Spring beans into the
CDI world?
45
Chapter 2
Dependency Injection
Substitute ApplicationContextAware
and BeanFactory
And again, not a fan of too close a coupling to framework code, but
there are CDI-based approaches to Spring functionality. The most
common direct developer use of org.springframework.context.
ApplicationContextAware is to access the Spring ApplicationContext.
Many ApplicationContext features are reproducible in CDI. The
fundamental use of the ApplicationContext is to directly access Spring
beans. Here’s how you get a hold of a specific bean in CDI:
@Inject
BeanManager beanManager; (1)
...
public void getBean(){
Bean namedCdiBean = null; (2)
HashSet<Bean<?>> beans = (HashSet<Bean<?>>) beanManager.
getBeans("aSpringOrCdiBean"); (3)
if(!beans.isEmpty()){
namedCdiBean = beans.iterator().next(); (4)
CreationalContext creationalContext = beanManager.
createCreationalContext(namedCdiBean); (5)
ASpringOrCdiBean bean= (ASpringOrCdiBean)
beanManager.getReference(namedCdiBean,namedCdiBean.
getBeanClass(),creationalContext); (6)
}
}
}
46
Chapter 2
Dependency Injection
It’s a fair bit more typing than what you’re probably used to, if you’re
coming from Spring. If you’re new to this, stay with me and let’s walk
through the steps:
1. I obtain an injection of the BeanManager object.
There’s only one, just like the ApplicationContext
in the Spring Framework.
2. Before I can get a hold of a named bean, I start with
the generic Bean interface.
3. I then use the BeanManager to search for and retrieve
the CDI bean by name.
4. If the search is successful, I simply pick up the first
and only item in the set.
5. Each CDI bean is associated with a context, but here’s
where things differ from Spring. In the CDI world,
beans and the context are somewhat disconnected.
In Spring, the context is tightly coupled with the
beans. Way more flexibility in CDI is what I’m
saying. For that reason, I need to manufacture a
CreationalContext object, to obtain a contextually
valid reference to the bean I’m interested in.
6. Finally, I use the BeanManager and the
CreationalContext to retrieve the bean from the
generic Bean container object.
I’ll admit, it’s more typing than one should want to do, but come on:
you really should only have to do this occasionally. @Inject wherever
you need your beans. The BeanManager sort of combines the features of
Spring’s ApplicationContext and the org.springframework.beans.
factory.BeanFactory interface. With the BeanManager however, you’ve
got a nice, healthy bowl of mixed Spring and CDI beans. Yum!
47
Chapter 2
Dependency Injection
Substitute Spring Application Events
Yes, CDIs got you covered here too. There are fancier, more high-
performing ways to handle inter-bean messaging in Quarkus, but here’s
how you do it with raw CDI.
As with any event-driven design, there are two parts to the operation:
firing the event and observing the event. Have a seat; I’ll start with firing
the event.
Fire CDI Events
Well, I need the event data to send first, don’t I?
public class InterestingEvent{
String eventMessage;
...
}
And now, to fire the event. The simplest way to fire an event is with the
trusty ol’ BeanManager:
@Inject
BeanManager beanManager;
...
public void sendInterestingEvent(String message){
InterestingEvent interestingEvent = new InterestingEvent();
beanManager.fireEvent(interestingEvent,null);
}
What I’ve done here is shoot off an InterestingEvent into the CDI
runtime. The event will be received by observers that have registered
interest in InterestingEvents. What’s that null bit? You noticed! I can
48
Chapter 2
Dependency Injection
optionally supply a list of CDI qualifiers (remember those?), to further
narrow the list of candidate observers. How about an asynchronous event
firing?
public void sendInterestingEvent(String message){
...
CompletionStage completionStage = beanManager.getEvent().
fireAsync(interestingEvent);
}
The async event firing gives you a standard JDK CompletionStage
that I could optionally use to manage the threading or handle exceptions
asynchronously. You’ve probably also noticed the inconsistency in the
interface – if there’s a fire method on BeanManager, there ought to be a
fireAsync method also. Looking at you, JSR-365 expert group.8
Subscribe to CDI Events
With the event firing taken care of, now I just need to be paying attention
with a CDI Observer:
public void listenForNews(@Observes InterestingEvent event (1))
{
logger.info("Got some interesting news:
"+event.getEventMessage();
}
public void listenForGossip(@Observes @Gossip InterestingEvent
event (2)){
logger.info("Got some interesting gossip:
"+event.getEventMessage();
}
Editor’s note: You could just open a pull request to contribute the change.
8
49
Chapter 2
Dependency Injection
public void listenForGossipAsync(@ObservesAsync @Gossip
InterestingEvent event (3)){
logger.info("Got some interesting gossip: "+event.
getEventMessage();
}
1. Here I use @javax.enterprise.event.Observes to
listen for events of the InterestingEvent type.
2. I’m interested in InterestingEvents only if they
were fired with the @Gossip qualifier.
3. I can also listen asynchronously for @Gossip
InterestingEvents.
So, bring your Spring beans in; let’s give them the Supersonic
Subatomic treatment!
50
CHAPTER 3
Microservices
with Quarkus
Ahh yes, the raison d’etre of Quarkus: building microservices. We’re
not going to go through too much of the rudiments of microservices
in Java. After going through this chapter however, you should gain an
understanding of how to build a standards-based microservice using
the Quarkus framework. If you’re considering a migration of an existing
service to Quarkus, you’ll get an introduction to how to support some of
the core microservice functionality, features, and configuration options
you’re probably already used to.
Note While this chapter is titled for microservices, please don’t
take that as precluding vanilla web service implementations –
“monoliths”. Quarkus provides all the features you’ll need in
service-oriented architecture in general. Microservices are all the
rage now, but spare a thought for the humble web service that’s
neither micro nor monolith. The Quarkus extension ecosystem will
cover all your bases.
© Tayo Koleoso 2020
T. Koleoso, Beginning Quarkus Framework, https://doi.org/10.1007/978-1-4842-6032-6_3
51
Chapter 3
Microservices with Quarkus
Get Started with Microservices
I was going to title this section “How to Train Your Quarkus,” but I had
to pull that, because lawyers. If you use any of the available options
for starting a Quarkus project, you’re already on your way to writing a
microservice. Like we saw earlier, you can get bootstrapped with the
Quarkus starter at code.quarkus.io or a maven command:
mvn io.quarkus:quarkus-maven-plugin:1.5.0.Final:create
-DprojectGroupId=com.apress.samples -DprojectArtifactId=code-
with-quarkus -DprojectVersion=1.0.0-SNAPSHOT -DclassName=org.
acme.ExampleResource -Dpath=/hello
and you can start it in dev mode
mvn quarkus:dev
You can then hit your microservice with your preferred testing tool. I’m
more of a Postman man myself, but there are many options. SoapUI is a
darn fine alternative tool. You could also just hit the sample endpoint in a
browser: http://localhost:8080/hello.
The Java API for RESTful Web Services or JAX-RS is the Java standard
for building RESTful web services. It defines a standard set of annotations
and classes that you use to implement RESTful or microservices in Java.
The expectation is that software vendors then implement concrete
libraries and frameworks based on the standard.
Quarkus supports the JAX-RS API by way of the RESTEasy library from
Red Hat; you can expect to use almost all the functionality recommended
by the JAX-RS specification and then some. You could also convert existing
JAX-RS projects from other implementations like Jersey (from Oracle). This
is the beauty of coding to standards: you can change the implementations
of these standards, and your code can remain intact.
JAX-RS provides annotations, interfaces, and packaged components
to handle all of the probable use cases you’ll encounter while building
52
Chapter 3
Microservices with Quarkus
microservices. We’ll see some of the more advanced componentry as we
saunter along this book, but for fundamental usage, you want to get to
know
1. @Path to designate a class or a method as a web API
endpoint
2. @Consumes and @Produces to designate what data
formats (JSON, XML, etc.) a web API resource
accepts and returns, respectively
3. The HTTP method annotations for handling
different HTTP request types, from the javax.ws.rs
package
a. @GET for GET requests
b. @POST for POST requests
c. @PUT for PUT requests
d. @PATCH for PATCH requests
e. @DELETE for DELETE requests
f. @HEAD for HEAD requests
4. The microservice request parameter handling
annotations
a. @QueryParam for accepting query parameters, for example,
http://yourservice.com/path/to/resource?someQueryPar
am=value
b. @PathParam for accepting parameters sent in web resource
path, for example, http://yourservice.com/path/
parameters/here
c. @MatrixParam for processing fragments of parameters sent in
the web resource path
53
Chapter 3
Microservices with Quarkus
d. @FormParam for processing HTML form parameters
e. @BeanParam for processing bean parameters
f. @HeaderParam and @CookieParam for accepting parameters
sent in the HTTP headers and cookies, respectively
The ExampleResource that was generated with the bootstrapping
provides a small sample that you can get going immediately:
import
import
import
import
javax.ws.rs.GET;
javax.ws.rs.Path;
javax.ws.rs.Produces;
javax.ws.rs.core.MediaType;
@Path("/hello")(1)
public class ExampleResource {
@GET (2)
@Produces(MediaType.TEXT_PLAIN)(3)
public String hello() {
return "hello";
}
}
What you get out of the box is an HTTP endpoint that allows a client
to send an HTTP GET request and receive the simple “Hello” string as the
response. JAX-RS can do a lot more. Here’s what’s going on here:
1. @Path defines the root URL “hello”, at which the
web service is available, relative to the deployment.
Therefore, for a project on your personal computer
named “code with quarkus”, you can access this web
service at http://localhost:8080/code-withquarkus/hello.
54
Chapter 3
Microservices with Quarkus
2. @GET designates that this method can be accessed
using an HTTP GET request method, making it
a REST resource; you can access it via a browser
URL load. It will not respond to any other HTTP
method. Because this method doesn’t carry its own
@Path annotation, it’s going default to the @Path
annotation set at the class level.
3. @Produces defines the content type that this REST
resource method will respond with. The MediaType
enum contains all valid HTTP response types.
With the work saved, I can see my changes immediately, running in
dev mode, as shown in Figure 3-1. I can now use a proper testing tool to try
some of it out.
Figure 3-1. The SoapUI interface for testing web services
You can get SoapUI from www.soapui.org and Postman from
www.getpostman.com. Both are very fine testing tools for web services.
55
Chapter 3
Microservices with Quarkus
Basic Microservice Configuration
According to the JAX-RS specification, you should subclass javax.ws.rs.
core.Application and use that to configure your RESTful web service.
Some of the basic configurations that would make javax.ws.rs.core.
Application necessary have been simplified as configuration properties
by Quarkus. All available Quarkus configurations are available and
searchable at https://quarkus.io/guides/all-config; check it out!
Pro Tip You can substitute OS-level properties into your Quarkus
configuration file with the some.quarkus.property=${<OS
property>:<default-value>} notation. This way, Quarkus will
substitute the OS property value for that Quarkus property. Otherwise,
it will use the default. Quarkus properties can also be overridden at
the command line with -Dsome.quarkus.property=value.
A
pplication URL
Configure the quarkus.resteasy.path property in application.
properties to control what name is used in the URL to access the web
service:
quarkus.resteasy.path=/hello-world
With that set, I can now access the microservice at http://
localhost:8080/hello-world/hello. The paths of the RESTful resource
endpoint will still be controlled by the JAX-RS-annotated class, with @Path.
56
Chapter 3
Microservices with Quarkus
Application Name
Set the quarkus.application.name property to configure the name of
the application. This affects the JAR artifact that’s produced by Maven (or
Gradle if that’s your speed).
HTTP Server Port
Quarkus uses the Netty server: a lightweight workhorse of an app server
with an adorable name and a can-do attitude. As with every other app
server in enterprise Java, it defaults to port 8080 for deployed applications.
Control that with quarkus.http.port and quarkus.http.ssl-port for
HTTP and HTTPS endpoints, respectively.
TLS Settings
You can configure SSL certificates (or keystores if you’re fancy) for use with
the HTTPS port:
# The file path to a server certificate or certificate chain in
PEM format.
quarkus.http.ssl.certificate.file=<ssl-cert>
# The file path to the corresponding certificate private key
file in PEM format.
quarkus.http.ssl.certificate.key-file=<path>
# An optional key store which holds the certificate information
instead of specifying separate files.
quarkus.http.ssl.certificate.key-store-file=<keystore>
# An optional parameter to specify type of the key store file.
If not given, the type is automatically detected based on the
file name.
quarkus.http.ssl.certificate.key-store-file-type=JKS|PEM
57
Chapter 3
Microservices with Quarkus
# A parameter to specify the password of the key store file. If
not given, the default ("password") is used.
quarkus.http.ssl.certificate.key-store-password=<password>
# An optional trust store which holds the certificate
information of the certificates to trust
quarkus.http.ssl.certificate.trust-store-file=<file>
# A parameter to specify the password of the trust store file.
quarkus.http.ssl.certificate.trust-store-password=<password>
Application Host Address
Configure quarkus.http.host to set up the address at which you want to
access your Quarkus microservice. This is a must-have for containerized
applications – setting up quarkus.http.host=0.0.0.0 allows this
microservice to listen on any network interface. Quarkus listens on 0.0.0.0
by default. Container-friendly!
Application Profiles
In Quarkus, you get one application.properties file to define your
application configuration parameters – no environment-specific
configuration file. Wait, wait; hear me out: you still get to define
configurations for different deployment environments – profiles. Observe
%dev.quarkus.application.name=hello-goodbye
%aws-qa.quarkus.application.name=hello-aws-qa-goodbye
The %dev prefix in this sample marks that configuration property for
the dev profile. Now, when I run my sample with java -jar /, only the
dev profiled configs are loaded. So, between dev and some other profile,
say aws-qa, my application can be named different things. This way,
instead of having to (remember to) update multiple files with the same
configuration parameter, you do it all in one place.
58
Chapter 3
Microservices with Quarkus
Quarkus provides three profiles out of the box:
•
dev: What you get out of the box, with quarkus:dev
•
test: What you get when running unit tests in Quarkus
•
prod: What you get when you simply run java -jar
your-quarkus-project.jar
You can start up in custom profiles by setting the QUARKUS_PROFILE
OS-level parameter for the same results. For Windows, from a terminal
window, set QUARKUS_PROFILE = aws-qa, and for *nix systems, export
QUARKUS_PROFILE = aws-qa. With that, you can start up the quarkus app
with
java -jar <quarkus jar name>-<version>-SNAPSHOT-runner.jar
You should see the correct profile displayed at startup:
INFO [io.quarkus] (main) Profile aws-qa activated.
You can also configure the default startup profile with quarkus.
profile=<desired-profile>.
Access Configuration Properties
Within the application itself, you have access to application properties with
the @ConfigProperty annotation:
@Inject
@ConfigProperty(name="quarkus.application.name",defaultValue
="my-app-name" )
String applicationName;
59
Chapter 3
Microservices with Quarkus
This also loads the profile-specific version of the named configuration
property. No, you can’t have expression language (EL) in there like in your
precious Spring Framework, for now. Properties can depend on each other
with EL, however:
external.dependency.root = external.service.com
create.anagram.path = ${external.dependency.root}/create/
anagram
In this case, Quarkus will resolve the placeholder and build the correct
path out for the dependent property.
Pro Tip Microsoft Visual Studio Code will flag incorrect types
supplied to properties file. For example, when I first tried out
the quarkus.log.console.color config property, I set it as
quarkus.log.console.color=purple. Because I can be daft
at times and purple is my favorite color. MS VS Code highlighted it
and showed me that that property is actually expecting a Boolean
value. Now, not all consoles support colorization, so in Windows, for
example, all you might see is the command-line equivalent of the
markup that’s supposed to effect the color change.
If you’re interested in programmatically accessing configuration
information:
String currentProfile = ProfileManager.getActiveProfile(); (1)
String appName = ConfigProvider.getConfig().getValue("quarkus.
application.name", String.class); (2)
60
Chapter 3
Microservices with Quarkus
What’s going on here?
1. Use ProfileManager.getActiveProfile() to
retrieve the currently active profile.
2. Use ConfigProvider.getConfig().getValue()
to manually retrieve profile-bound application
properties; you don’t need to qualify the property
names with the %profile prefix.
YAML Configuration Support
You can enable support for YAML format configuration by adding the
YAML config extension:
mvn quarkus:add-extension -Dextension= quarkus-config-yaml
Service Content Types
Microservices should be RESTful by nature. That doesn’t say anything
about the message format that they should support. The sample REST
resource that comes with the Quarkus starter responds with just a plain
text “Hello” when you hit http://localhost:8080/hello-world/hello
in a testing tool or in a browser (if you’ve configured the root path to be
“hello-world”).
For serious business, you need serious message formats like JSON
or XML.1 You can have JSON format support in Quarkus: use the JSON-B
standard as prescribed by Jakarta/JavaEE; or use the Jackson library. As
you already know, I’m a standards man, so JSON-B it is. I’ll start by adding
the JSON-B extension to my project:
mvn quarkus:add-extension -Dextension=quarkus-resteasy-jsonb
Editor’s note: …or Avro, Protobuf, etc. There are a lot of formats out there, man.
1
61
Chapter 3
Microservices with Quarkus
To further customize my JSON-B installation, I can supply an instance
of JsonbConfigCustomizer like so:
import javax.json.bind.JsonbConfig;
import io.quarkus.jsonb.JsonbConfigCustomizer;
public class JSONConfig implements JsonbConfigCustomizer {
public void customize(JsonbConfig config) {
config.withNullValues(false);
}
}
What I’ve done here is to define that null values should be ignored
when processing incoming or outgoing REST payloads. Use the quarkus-
resteasy-jaxb extension for XML support; use quarkus-jsonp for JSON-P
support.2
L ogging
There are JAX-RS specified ways to log. Then there are the simpler ways of
Quarkus. Inside my application.properties file:
quarkus.log.console.format=%d{HH:mm:ss} %-5p [%c{2.}] (%t)
%s%e%n (1)
quarkus.log.console.level=FINEST (2)
quarkus.log.handler.console.enable = true|false (3)
With the preceding configurations
1. Configure the formatting of the log line. Quarkus
provides a list of supported metacharacters that
help you design your log output.
J SON-P is a low-level JSON parsing API; JSON-B is a high-level functionality for
JSON in Java. It’s a little confusing since there’s a JSONP standard in JavaScript
land as well, and it doesn’t have as much to do with JSON.
2
62
Chapter 3
Microservices with Quarkus
2. Configure the level of detail for the logs. The options
are ALL,CONFIG,FINE,FINER,FINEST,OFF,SEVERE,
WARNING.
3. Quarkus will log to the console by default; you can
turn this off and send the log output directly to a file,
to improve the throughput in logging.
If you’d like to get even fancier, you can configure the logging to be
async, which will yield even better throughput performance, at the risk of a
loss in fidelity depending on how it’s configured:
quarkus.log.console.async=true (1)
quarkus.log.console.async.queue-length=1024 (2)
quarkus.log.handler.console.async.overflow=block|discard (3)
1. Enables asynchronous logging.
2. Sets the size of the buffer in memory, to which log
content will be sent before being flushed to the
console and visible.
3. Configures what to do when the in-memory buffer is
full: block to disallow new content to be submitted
to the buffer for logging; discard to...discard new
log content after the buffer is full.
Asynchronous logging can yield overall big performance gains if
configured and tuned properly. There are other config items for Quarkus
logging; visit https://quarkus.io/guides/all-config to filter for more
logging-specific configurations.
JSON logging is also on the table, folks! You’re going to enjoy JSON
logging in the cloud, particularly when integrated with log aggregators like
Splunk, Kibana, or even just AWS Cloudwatch. The structure of JSON is
readily digestible by both man and machine, and you know how we like
structure. Human beings too, I hear, like structure to some extent.
63
Chapter 3
Microservices with Quarkus
Add quarkus-logging-json extension to add support for JSON-
formatted log output. Then you can configure JSON for your desired profile
in application.properties:
%dev.quarkus.log.console.json=false
%test.quarkus.log.console.json=false
Omitting prod from this list leaves the logging in JSON format.
Additionally, you can enable pretty printing with quarkus.log.console.
json.pretty-print=true. Speaking of JSON...
Use JSON in Your REST Resource
So you’ve configured JSON for your microservice. How do you use it?
I’m going to go back to my REST resource class and make the following
changes:
@Path("/{name:[a-zA-Z]*}/scramble")(1)
@GET (2)
@Produces(MediaType.APPLICATION_JSON)(3)
public AnagramResponse getAnagram(@PathParam("name")(4)
final String nameToScramble){
AnagramResponse response= generateAnagram(nameToScramble);
return response;
}
@POST (5)
@Path("/scramble")
@Produces(MediaType.APPLICATION_JSON)
64
Chapter 3
Microservices with Quarkus
public AnagramResponse persistAnagram(AnagramRequest
anagramRequest){
AnagramResponse response = generateAndSaveAnagram(anagr
amRequest);
return response;
}
OK, there’s a little bit to unpack here, so stay with me:
1. I use the @Path annotation to configure the HTTP
URL that I’ll use to access this endpoint. In addition
to just specifying the desired URL, I’ve also thrown
in a bit of optional regex there - “[a-zA-Z]*”. Why?
Well, that expression acts as a validator. This REST
endpoint will scramble the name supplied in the
URL, and I’ve added validation to ensure that only
alphanumeric names are supplied in the URL and
that it’s case-sensitive.
2. @GET makes sure that this method responds only to
HTTP GET requests.
3. @Produces, together with MediaType.APPLICATION_
JSON value, configures this REST resource to return
JSON.
4. @PathParam picks up the text with the given
placeholder title off the path (thanks to @Path).
It then passes it into the method like a regular java
method argument.
5. The persistAnagram resource does something
like the getAnagram method. A difference here
is that this method will respond only to HTTP
POST requests sent to that URL. It accepts an
65
Chapter 3
Microservices with Quarkus
AnagramRequest request type and responds with
an AnagramResponse. The JSON-B in quarkus will
quietly serialize and deserialize the request and
response data objects, at no extra charge. This is
RESTEasy’s doing.
Check out the RESTEasy documentation to see more annotations that
can help you handle request parameters and data efficiently and safely. All
these annotations are courtesy of the JAX-RS specification. Praise JAX-RS.
What’s that? More JAX-RS? Well, if you insist.
JAX-RS Exception Handling
It happens to the best of us: an error or an exception occurs while your
application is trying to handle a request. It doesn’t even have to be a bug,
could just be that bad input was supplied. It’s tempting to pepper your
code with try-catch blocks and call it a day. The boss thing to do is to have
a focused component (or components) that will trap dedicated exception
types and respond appropriately. With the ExceptionMapper interface,
JAX-RS has you covered, friend:
import javax.ws.rs.core.Response;
import javax.ws.rs.ext.Provider;
import javax.ws.rs.ext.ExceptionMapper;
@Provider (1)
public class JAXRSExceptionMapper implements ExceptionMapper<Il
legalArgumentException> (2){
final String EXCEPTION_MESSAGE = "invalid request data: ";
final String RESPONSE_TYPE = "text/plain";
@Override
66
Chapter 3
Microservices with Quarkus
public Response toResponse(IllegalArgumentException
exception(3)){
return Response.serverError() .entity(EXCEPTION_
MESSAGE+"exception.getMessage()") (4a)
.type(RESPONSE_TYPE) (4b)
.status(400)(4c)
.build();
}
}
Okay then, come with me:
1. The class is annotated with @Provider to expose
this class to the JAX-RS runtime as a framework
enhancement.
2. I then implement the javax.ws.rs.ext.
ExceptionMapper as stipulated by the JAX-RS
specification. Together with the @Provider
annotation, this class is then automatically
registered with the runtime as the class that will
handle all IllegalArgumentException thrown
within the code of this web service.
3. The ExceptionMapper interface defines a single
method, toResponse, which accepts the thrown
exception as an argument.
4. I use the Response class builder to build the
response I want – in this case, I
a. Set the body of the response with the entity method
b. Set the encoding type of the response
c. Set the HTTP status of the response
67
Chapter 3
Microservices with Quarkus
No fuss, no muss. This class will be instantiated and used to process all
IllegalArgumentExceptions generated inside this Quarkus application.
JAX-RS Filters and Interceptors
The JAX-RS specification defines filters and interceptors:
•
Filters: To be able to modify parts of incoming requests
or outgoing responses from your microservice. Within
a filter, you have fine-grained access to the payloads
in and out of your service; so you can transform the
message or perform checks of the payload before or
after they’re handled by the resource methods.
•
Interceptors: To repackage the entirety of the inbound
or outbound messages of your microservice. This gives
broad control over message payloads. Concerns like
encryption and compression can be handled in here
(Quarkus has out of the box compression configuration,
so please don’t roll your own).
Here they are in action.
Logging Filter
Yes, more logging – I’m going to position a filter in the processing chain,
just to inspect and log the content of inbound and outbound messages in
my REST service:
@Provider (1)
@Priority(1) (2)
public class LoggingFilter implements ContainerRequestFilter,
ContainerResponseFilter{
68
Chapter 3
Microservices with Quarkus
private final Logger logger = LoggerFactory.
getLogger(LoggingFilter.class.getName());
@Override
public void filter(ContainerRequestContext requestContext,
ContainerResponseContext responseContext)
throws IOException {
logger.info("Message on the way out
"+responseContext.getEntity());
}
@Override
public void filter(ContainerRequestContext requestContext)
throws IOException {
BufferedInputStream iStream = new BufferedInputStream(r
equestContext.getEntityStream()); (3)
byte[] inputContent = new byte[iStream.available()];
iStream.read(inputContent);
String body = new String(inputContent, "utf-8");
logger.info("Inside request filter. Message size:
"+inputContent.length+"; Message on the way in: "+body);
requestContext.setEntityStream(new ByteArrayInputStream
(inputContent));(4)
}
}
1. The @Provider annotation marks this class as a JAX-RS
feature provider. Quarkus is contractually obligated to
register this class and execute whatever JAX-RS feature
it advertises. The @Priority annotation sets the priority
of this filter relative to any other filters available.
@Priority is provided by CDI.
69
Chapter 3
Microservices with Quarkus
2. The ContainerRequestFilter and
ContainerResponseFilter interfaces define the
contract for implementing inbound and outbound
message filters, respectively. I’ve implemented both
here so that I can use the same class to filter data in
both directions to the microservice.
3. I get a hold of the inbound data so that I can do
whatever I want with it.
4. I put the inbound data back where I found it. This
is important: you must reset the inbound message
stream; otherwise, the destination resource method
will not see anything when processing gets to that
point.
As you’ve probably deduced, JAX-RS filters are ideal for cross-cutting
concerns as well as command and control functionality. They’re available
for both JAX-RS services and service clients. Want to route messages
elsewhere based on the request content? Do it in a filter. Want to stop a
message from ever getting to the targeted java method? Do it in a filter.
Want to perform authentication manually? Do. It. In. a. Filter.
Interceptors
Use interceptors when you want to act on the messages as a whole; unlike
filters that give you fine-grained access to the payloads, interceptors are for
the business of general manipulation of inbound and outbound messages:
import
import
import
import
import
70
java.io.IOException;
java.io.OutputStream;
java.util.zip.GZIPOutputStream;
java.util.zip.GZIPInputStream;
javax.ws.rs.WebApplicationException;
Chapter 3
import
import
import
import
import
Microservices with Quarkus
javax.ws.rs.ext.ReaderInterceptor;
javax.ws.rs.ext.ReaderInterceptorContext;
javax.ws.rs.ext.WriterInterceptor;
javax.ws.rs.ext.WriterInterceptorContext;
javax.ws.rs.ext.Provider;
@Provider (1)
public class ReaderWriterInterceptor implements ReaderInterceptor,
WriterInterceptor (2){
@Override
public void aroundWriteTo(WriterInterceptorContext context)
throws IOException, WebApplicationException {
final OutputStream outputStream = context.
getOutputStream();
context.setOutputStream(encryptPayload(outputStream));
context.proceed();
}
@Override
public Object aroundReadFrom(ReaderInterc
eptorContext context) throws IOException,
WebApplicationException {
final OutputStream inputStream = context.
getInputStream();
context.setInputStream(decryptPayload(inputStream));
return context.proceed();
}
}
71
Chapter 3
Microservices with Quarkus
So what have we here?
1. @Provider again advertising to the Quarkus runtime
that this is a JAX-RS component and that the CDI
container had better take notice.
2. The ReaderInterceptor and WriterInterceptor
interfaces. Use ReaderInterceptor for access
to inbound messages to your web service; use
WriterInterceptor for outbound messages.
3. In the ReaderInterceptor#aroundReadFrom
method, I’m decrypting the entire inbound message
payload.
4. In the WriterInterceptor's aroundWriteTo
method, I’m encrypting the entire outbound
message.
Both interceptor types have the power to halt the flow of messages, in
or out, via their respective context objects. Speaking of flow...
Asynchronous RESTful Services in JAX-RS
JAX-RS (and Quarkus) operates REST services in synchronous mode by
default: a client sends a request to connect; the embedded app server
(Netty) uses a thread to serve the connection request. It uses that same
thread to reach all the way into your microservice code, to execute the
business logic that the client is requesting. Everything is brilliant, so
long as the business logic doesn’t take too long; “too long” is in the eye
of the beer holder. The Netty app server is configured with a fixed size
number of threads in a pool. With enough requests taking “too long,” your
72
Chapter 3
Microservices with Quarkus
microservice is going to go catatonic – the app server is going to run out of
threads and throughput3 nosedives.
The JAX-RS spec provides for asynchronous messaging from both the
client and service perspectives. Async messaging allows the app server to
execute business logic in a separate thread from the one that it uses to handle
connection requests. This way, it can just receive an incoming service request
in one thread and hand it off to a separate thread for actual business logic.
That second thread is free to take as long as it needs to handle the business
logic; the app server can quickly return its connection-handling thread back
into the thread pool so it can serve more customers. There are a couple of ways
to implement asynchronous messaging in JAX-RS. So what’s going to happ-4
@Inject
ManagedExecutor managedExecutor; (1)
@GET
@Path("/{name:[a-zA-Z]*}/scramble-async ")
public void getAnagramAsync(@Suspended final AsyncResponse
async (2),final @PathParam("name")String name){
final Future<?> toComplete = managedExecutor.
submit(new Runnable() (3){
@Override
public void run() {
logger.info("Executing in a different thread");
final AnagramResponse response =
getAnagram(name);
async.resume(response) (4));
});
}
hroughput is a measure of how many concurrent requests or “customers” a
T
service can handle at once.
4
Editor’s note: Enough talk! Show them the action!
3
73
Chapter 3
Microservices with Quarkus
@GET
@Path("/{name:[a-zA-Z]*}/scramble-rx")
public CompletionStage<AnagramResponse> getAnagramRx(final
@PathParam("name")String name){
final CompletionStage<AnagramResponse>
completionStageResponse = new CompletableFuture<>();
managedExecutor.submit(new Runnable(){
@Override
public void run() {
logger.info("Executing in different thread");
final AnagramResponse response =
getAnagram(name);
((CompletableFuture)completionStageResponse).
complete(response);
}
});
return completionStageResponse (3a);
}
1. I’m @Inject-ing a ManagedExecutorService;
I installed the quarkus-smallrye-contextpropagation Quarkus extension to support that.
This is the safe way to multithread inside a Java web
application. You will see a lot of examples online
manually spinning up thread instances. Don’t do
that, it’s not cool. The container will be able to
manage threads a lot more efficiently than your
custom code.
2. The @Suspended and AsyncResponse class are the
special sauce here. When a method contains these
two, it signals to the app container that “Hey, just
74
Chapter 3
Microservices with Quarkus
hand off the payload to the target method and
return immediately. Don’t wait for that method to
return!”. With that, all I need to do is
3. Submit a Runnable to the container’s
ExecutorService. Remember: Runnable is a JDK
interface that defines the basic unit of work for
a java thread to execute. Inside the runnable, I
am delegating the actual operation to an existing
resource method. Note that the return type of the
suspended method is void. The response is going to
go out on a different thread.
a. An alternative approach to signaling to the runtime that this
endpoint is an async endpoint is to return a CompletionStage.
Feels more natural, I guess. The plumbing remains the
same as for the AsyncResponse approach. A bonus is that
with CompletionStage and CompletableFuture, you get a
wholly reactive programming approach that allows you to
specify exception handling scenarios among other things.
Technically, this is a reactive approach to handling the
requests, hence the “rx” name I have in “scramble-rx” (rx is
the generally accepted shorthand for “Reactive”).
4. I then send the result of the operation into the
resume method of the AsyncResponse class, which
then sends the response object back to the user
on another thread. For the reactive approach, I
needed to downcast the CompletionStage to a
CompletableFuture and then call the complete
method on that; it has the same effect as
AsyncResponse#resume.
75
Chapter 3
Microservices with Quarkus
Now, this should be where everything ends: send a GET request to
/hello/scramble-async or /hello/scramble-rx; the Netty thread hands the
request over to a different thread and returns immediately. That second
thread should then send the response object back via the AsyncResponse
or CompletionStage. If I run this code as is, it’ll fail – take it from me, I tried
it first. For a couple of reasons, RESTEasy is no longer able to infer what the
response type is supposed to be. To reinform the RESTEasy JAX-RS engine
what the expected response type is, I need to use the generic Response
class to wrap the return value.
Generic Response Wrapper in JAX-RS
I need to give Quarkus a hint as to what kind of response needs to be
generated:
@GET
@Path("/{name:[a-zA-Z]*}/scramble-async")
@Produces(MediaType.APPLICATION_JSON)
public void getAnagramAsync(@Suspended final AsyncResponse
async,final @PathParam("name")String name){
final Future<?> toComplete = managedExecutor.
submit(new Runnable(){
@Override
public void run() {
logger.info("Executing in different thread");
final Response response = Response.ok(getAnag
ram(name)).type(MediaType.APPLICATION_JSON).
build();
async.resume(response);
}
});
}
76
Chapter 3
Microservices with Quarkus
The javax.ws.rs.core.Response class is what you use as a generic,
wrapper-type class for generating web service responses. Use it to build
a response object on which you can set the HTTP status code, response
type, and really anything that affects the output of the message. Using the
response class to wrap the AnagramResponse object, I’m able to add the
response type information as well as the desired HTTP status code. All’s
right with the world again.
Microservices, the RESTEasy Way
RESTEasy is Red Hat’s implementation of the JAX-RS specification. It
provides the features that the specification mandates and then enriches
it with some pretty neat additional features. Quarkus’ default REST API
implementation is based on RESTEasy.
Cache Control
The core tenet of REST is to deal with service functionality using HTTP
semantics. One of the things that HTTP defines is caching of responses
from HTTP resources. org.jboss.resteasy.annotations.cache.Cache is
a cheap way to introduce HTTP cache control semantics:
@GET
@Cache(maxAge = 30)
@Produces(MediaType.TEXT_PLAIN)
public String hello() {
...
}
This annotation lets you set different attributes that control how the
various client-side cache control headers like max-age, no-store, and so
on. Conversely, use @NoCache to disable setting these headers altogether.
77
Chapter 3
Microservices with Quarkus
Asynchronous Batch Processing in RESTEasy
This one’s a very neat set of features, albeit neither not JAX-RS compliant.
RESTEasy provides very cheap fire-and-forget service semantics. The
RESTEasy platform can support asynchronous messaging without a lot of
development effort. It’s ideal for batch operations where the service client
doesn’t need an immediate response or even no response at all; and it’s all
supported by configuration alone with RESTEasy. So instead of all that typing
we were doing per the JAX-RS standard, we could easily do the following.
Configure web.xml
Aye, Quarkus supports web.xml5 too! web.xml support depends on
Undertow, a web server.6 So, I’ll need to add the quarkus-undertow
extension to my project. Following that, I can create and drop the following
file into the META-INF directory of my project:
<web-app version="4.0"
xmlns="http://xmlns.jcp.org/xml/ns/javaee"
xmlns:xsi="http://www.w3.org/2001/XMLSchema-instance"
xsi:schemaLocation="http://xmlns.jcp.org/xml/ns/javaee
http://xmlns.jcp.org/xml/ns/javaee/web-app_4_0.xsd">
</web-app>
his is the configuration file for web applications in JavaEE. It’s as old as web
T
programming in Java.
6
Why is there an Undertow when Quarkus has Netty? They do different things:
Netty is more concerned with the low-level plumbing involved in efficient
network connection handling; Undertow uses Netty, but adds servlet support and
a general web server layer on top of Netty.
5
78
Chapter 3
Microservices with Quarkus
Now for the meat of things. The following context parameters will
bootstrap the RESTEasy async features:
<!-- How many batch jobs results can be held in memory at once? -->
<context-param>
<param-name>resteasy.async.job.service.max.job.
results</param-name>
<param-value>100</param-value>
</context-param>
<!-- Maximum wait time on a batch job when a client is
querying for it -->
<context-param>
<param-name>resteasy.async.job.service.max.wait
</param-name>
<param-value>300000</param-value>
</context-param>
<!-- Thread pool size of background threads that run the
batch job -->
<context-param>
<param-name>resteasy.async.job.service.thread.pool.
size</param-name>
<param-value>100</param-value>
</context-param>
<!-- Set the base path for the batch job uris -->
<context-param>
<param-name>resteasy.async.job.service.base.path
</param-name>
<param-value>/async/jobs</param-value>
</context-param>
79
Chapter 3
Microservices with Quarkus
With this, I can now request an endpoint, say, /hello/Eyitayo/
scramble?oneway=true, and because of oneway=true, the response
comes back immediately and the rest of the processing carries on on the
server-side. Instead of responding with a payload, the service responds
with HTTP-202, Accepted. This comes in very handy for kicking off batch
processes. Read the RESTEasy guide on asynchronous batch jobs for more
details on this feature.
S
erver-Side Caching
If you’re looking to do more than just HTTP-based window dressing, Quarkus
can cache the output from your microservice using io.quarkus.cache.
CacheResult. Along with @CacheInvalidate and @CacheInvalidateAll,
you can command and control the server-side cache. I'll add the cache
extension and then I can do this:
@GET
@Path("/{name:[a-zA-Z]*}/scramble")
@Produces(MediaType.APPLICATION_JSON)
@CacheResult(cacheName="anagramCache")
public AnagramResponse getAnagram(@PathParam("name") final
String nameToScramble) {
...
}
@CacheInvalidate(cacheName="anagramCache")
public void clearAnagramCache(String key){}
@CacheInvalidateAll(cacheName="anagramCache")
public void clearAnagramCache(){}
@CacheInvalidateAll(cacheName="anagramCache")
@CacheInvalidateAll(cacheName="anagramSourceCache")
public void clearAllCaches(){}
80
Chapter 3
Microservices with Quarkus
@CacheResult will cache the response from a given method using
Caffeine, a high performance cache provider. Quarkus will automatically
create a cache named for cacheName; it uses a combination of the name of
the method and the arguments supplied to it as the key.
When clearAnagramCache is invoked, it will clear the named cache, for
the given key; you just need to compute the cache key correctly.
@CacheInvalidateAll will purge the cache named for cacheName when
the annotated method is invoked. To control what constitutes the cache
key, use @CacheKey:
@GET
@Path("/{name:[a-zA-Z]*}/scramble")
@Produces(MediaType.APPLICATION_JSON)
@CacheResult(cacheName="anagramCache")
public AnagramResponse getAnagram(@PathParam("name") @CacheKey
final String nameToScramble, long userId) {
...
}
With the preceding implementation, I’m selecting only the name
passed in as a token for the cache key, intentionally excluding the other
userId parameter.
Each available cache can be configured with named properties:
#minimum number of items to maintain in the cache
quarkus.cache.caffeine."anagramCache".initial-capacity=10
#maximum number of items to maintain in the cache. More than
this number, items will start being evicted automatically.
quarkus.cache.caffeine."anagramCache".maximum-size=20
Caffeine uses the Window-TinyLFU (W-TinyLfu) algorithm as its
default cache eviction algorithm. It’s been proven to be a near-optimal
cache management algo, superior to the more popular Least Recently
81
Chapter 3
Microservices with Quarkus
Used (LRU) option. If for some reason you need to interrogate the caches
directly, you can get a hold of them by obtaining the single instance of
CacheRepository available:
@Inject
CacheRepository cacheRepository;
This grants you access to all the available caches in your Quarkus
application. With that, you can programmatically manage your caches and
their content.
Caution Manually accessing the cache isn’t an officially supported
operation, so proceed with caution. Looking at the implementation of
the CacheRepository class, it’s not built with an interface, so the
Quarkus team could break the implementation anytime.
Microservice Documentation with Swagger
I know, I know, writing documentation isn’t sexy. But you know what else
isn’t sexy? Capri pants. Even less sexy: not knowing what an API does.
That’s where Swagger and the OpenAPI specification come in.
OpenAPI
OpenAPI defines a JSON or YAML-based structure for describing your web
service to man and machine. You know how us machines like structure and
predictability, right, fellow machine? Information such as the acceptable
input types, expected output types, status codes, and so much more can be
defined in a lightweight YAML (or JSON) document. Here’s a small sample:
openapi: 3.0.1
info:
title: Anagrams - The Quarkus Way
82
Chapter 3
Microservices with Quarkus
description: This is an Anagram API. Send a string into one
of the 'scramble' endpoints
and it'll scramble the text
contact:
name: Tayo Koleoso
url: http://www.apress.com
email: tayo@somewhere.com
license:
name: Apache 2.0
url: http://localhost:8080
version: "0.0"
paths:
/hello:
get:
summary: say hello
description: says hello to you
responses:
"200":
description: OK
content:
text/plain:
schema:
type: string
/hello/hello-image:
get:
summary: Returns an image
responses:
"200":
description: OK
83
Chapter 3
Microservices with Quarkus
This document has several benefits, chief among which is that it
provides a consistent source of truth for man and machine. Based on what
your web service exposes as its OpenAPI documentation, tools can be used
to generate code based on the document; integration and testing tools can
navigate your API intelligently. Also, humans can just read the document
and know what’s going on. I’ll start by adding the SmallRye OpenAPI
extension quarkus-smallrye-openapi to my project.
Next, I’m going to configure the URL at which I want the
documentation to appear. Quarkus defaults it to the root of the web
service, but I’m a bit of a control...enthusiast, so I’d like to change it. Also,
this way, you can apply security constraints to that URL:
quarkus.smallrye-openapi.path=/docs/openapi
I can now visit http://localhost:8080/docs/openapi and get a
download of the OpenAPI specification. This is all well and good, but what
if I want is for people to be able to read this document and get human-
readable information in it? For that, I’ll turn to this suite of annotations
that Swagger offers for defining OpenAPI output. Now, all the annotations
don’t just go anywhere. @OpenAPIDefinition is applicable to subclasses of
javax.ws.rs.core.Application:
@OpenAPIDefinition (info =
@Info(
title = "Anagrams - The Quarkus Way",
version = "0.1",
description = "This is an Anagram API. Send a
string into one of the 'scramble' endpoints and
it'll scramble the text",
license = @License(name = "Apache 2.0", url =
"http://localhost:8080"),
contact = @Contact(url = "http://www.apress.com",
name = "Tayo", email = "tayo@somewhere.com")
84
Chapter 3
Microservices with Quarkus
)
)
public class AppConfig extends Application{
}
Pro Tip Your subclass of javax.ws.rs.core.Application
is where you have the most configuration control over your JAX-RS
microservice. Get to know it better!
For resource-specific OpenAPI documentation, we apply the Swagger
annotations on our REST methods:
@GET
@Path("/{name:[a-zA-Z]*}/scramble-async")
@Operation(summary = "scrambles the supplied username
asynchronously", description = "scrambles the name in the
path. There are no guarantees of uniqueness")
@APIResponses({@APIResponse(name = "Conversion
Response",responseCode = "200",description = "the scrambled
name. no uniqueness guarantees")})
public void getAnagramAsync(@Suspended final AsyncResponse
async,final @PathParam("name")String name){
final Future<?> toComplete = managedExecutorService.
submit(new Runnable(){
@Override
public void run() {
logger.info("Executing in different thread");
final Response response = Response.
ok(getAnagram(name)).type(MediaType.
APPLICATION_JSON).build();
85
Chapter 3
Microservices with Quarkus
async.resume(response);
}
});
}
So, when I open up http://localhost:8080/hello-world/docs/
openapi, I’ll see all the information I’ve placed in OpenAPI annotations in
the code.
S
wagger
Swagger, from the makers of SOAPUI, is an umbrella for a set of tools that
allow you to make the most out of OpenAPI. With the Swagger toolkit, we
can do sooo much more with our OpenAPI documentation. First check
out the Swagger UI (Figure 3-2) for your locally deployed Quarkus app at
http://localhost:<port>/swagger-ui/.
Figure 3-2. The Swagger UI interface bundled with Quarkus
Beautiful, isn’t it? With the Swagger toolkit,
•
86
You can generate code to interact with the REST service
based on the OpenAPI spec.
Chapter 3
Microservices with Quarkus
•
You can test an API using the Swagger UI, directly in the
browser.
•
You can modify the OpenAPI documentation live on
the web service.
It’s like the web service is carrying around its own portable testing and
documentation kit. You can control where the Swagger UI shows up by
setting quarkus.swagger-ui.path in the application.properties file;
disable it altogether by setting quarkus.swagger-ui.enable. Check out the
Swagger website for a deeper dive into its capabilities.
Fun Fact Swagger was the first community-provided7 extension for
the Quarkus platform. Talk about a ringing endorsement!
M
icroProfile Support
Eclipse MicroProfile is the cloud-native incarnation of Jakarta EE.8 It’s
targeted at those looking to deploy “JavaEE” features in a cloud environment,
but don’t want the famous baggage that “JavaEE” brings with it. And when
I titled this section “MicroProfile Support,” it’s a bit tongue-in-cheek as
quite a lot of Quarkus is underpinned by MicroProfile. MicroProfile is a set
of standards that are lightweight alternatives to anything you’re already
used to in the enterprise Java space (I refuse to type out JavaEE one more
time. Dang it!). Some of the standards it offers are
•
Configuration management
•
Health checks
w ww.infoq.com/news/2019/04/redhat-quarkus-qa/. Remember, Quarkus
extensions are specially engineered to support the performance goals of the
platform. This isn’t just a matter of jamming a maven dependency in there.
8
JavaEE is quickly becoming a dirty word.
7
87
Chapter 3
Microservices with Quarkus
•
Fault tolerance
•
Real-time performance metrics
•
Distributed tracing
•
Security
•
OpenAPI support
•
API client
As you may have guessed, the configuration management and
OpenAPI functionality in Quarkus are directly provided by MicroProfile
standard implementations. Let’s check out some of its other standards.
REST Client
Are you tired of having to write a bunch of boilerplate code, every time
your application needs to make a REST call to another service? The
same old error handling, authentication logic. Every. Single. Time. No
more! MicroProfile provides the REST client specification: minimal code,
annotations for everything, and developer comfort are just some of the
benefits of the MicroProfile REST client specification. Use the REST client
to call other REST services from inside your Quarkus service. Simple
enough, yeah? Think Spring Framework’s WebClient and RestTemplate
class rolled into one. The quarkus-rest-client extension supports the
MicroProfile REST client in Quarkus, so in it goes:
mvn quarkus:add-extension -Dextension= quarkus-rest-client
Now, let me create a MicroProfile REST client. It starts and ends with
an interface:
@RegisterRestClient(baseUri = "https://httpbin.org/")(1)
@RegisterProvider(LoggingFilter.class)(2)
88
Chapter 3
Microservices with Quarkus
public interface HttpBinServiceDAO{
@GET (3)
@Path("/image/jpeg") (4)
@Produces("image/jpeg")(5)
CompletionStage<byte[]> (6) getImageAsync();
@PATCH
@Path("/delay/{delay}")
@Produces(MediaType.APPLICATION_JSON)
Response patchRandom(@PathParam("delay") int delay) throws
Exception;
@POST
@Path("/anything/{anything}")
@Produces(MediaType.APPLICATION_JSON)
HttpBinAnythingResponse postAnything(
@PathParam("anything")(6) String anything);
}
Okay, stay with me here; there’s a bit to unpack:
1. @RegisterRestClient advertises this interface as a
rest client stub for MicroProfile/CDI to pick up. The
baseURI configuration is the target REST resource’s
base address. With this annotation, I can later @Inject
this interface wherever I need to connect to baseUri.
Shout out to Kenneth Reitz, the proprietor of
www.httpbin.org. Httpbin.org is an HTTP testing web
service for Requests (Reitz’s library), a python HTTP
library. It allows devs to test their code against what’s
essentially a mock web service. So, you can copy-paste
this code as is and it will have a service to talk to.
89
Chapter 3
Microservices with Quarkus
2. @RegisterProvider configures the supplied
class as a JAX-RS provider for this client interface.
Remember: I introduced providers in the JAXRS section earlier; here I’m now registering a
LoggingFilter as a provider.
3. @GET defines this method for executing a GET
request against the defined @Path. Remember, this
will be appended to the baseURI, so that the final
request URI in this example will read as https://
httpbin.org/image/jpeg.
4. @Produces defines the expected response type from
the target endpoint.
5. The CompletionStage return type signals to the
application runtime that this request is a reactive
one. I use it here to wrap the binary data in the
response from httpbin.org, for that specific
endpoint. Flagging this as reactive makes this
request asynchronous, event-driven, and
CPU-efficient. The best of three worlds.
6. @PathParam here will take the argument to that
method and patch it into the right position in the
@Path.
All that done, how do we use any of it? CDI, baby!
@Inject
@RestClient (1)
HttpBinServiceDAO httpBinService;
@GET
@Path("/hello-image")
@Cache(maxAge = 30)
90
Chapter 3
Microservices with Quarkus
@Operation(summary = "Returns an image")
@Produces("image/jpg")
public Response helloImage() throws InterruptedException,
ExecutionException {
CompletionStage<byte[]> futureImage = httpBinService.
getImageAsync() (2);
byte[] imageBytes = futureImage.toCompletableFuture().
get()(3);
return Response.ok().entity(new StreamingOutput(){ (4)
@Override
public void write(OutputStream output)
throws IOException, WebApplicationException {
output.write(imageBytes);
output.flush();
}
}).build()(5);
}
Here we go again. Hang on to your hoodies, nerds:
1. I inject the REST client interface and mark it with
the @RestClient annotation. Again, MicroProfile
REST clients are available in any part of the Quarkus
application; it doesn’t have to be inside of a JAX-RS
resource class.
2. In the helloImage method, I execute the
getImageAsync operation on the rest client. The
method returns a CompletionStage, because it’s a
reactive method. At this point, we’re back in vanilla
Java/JAX-RS. We’re done with any special Quarkus
or MicroProfile business.
91
Chapter 3
Microservices with Quarkus
3. I convert the CompletionStage to a
CompletableFuture; this is to make it simple to
retrieve the response object. Note that the use of
CompletionStage is to provide reactive java support.
4. I use the generic Response object (remember
that thing from back then?) to construct a HTTP
response fit to carry an image. This is supported
purely with the JAX-RS standard. Simply pass an
instance of StreamingOutput to the entity method
of Response.
5. Finally, I call the build method to construct the
actual response object.
So I can go to the browser and request http://localhost:8080/
hello/hello-image and it will go out to www.httpbin.org and fetch an
image to display in my browser. Feel free to use your preferred testing tool
to try out the other endpoints. You can control a fair bit of the client with
configuration properties.
Client Exception Handling
Look, I don’t know about you, but my code’s perfect – never fails. Never.
Now in case you need to handle exceptions in your MicroProfile rest client,
create a ResponseExceptionMapper:
import javax.ws.rs.core.Response;
import javax.ws.rs.ext.Provider;
import org.eclipse.microprofile.rest.client.ext.
ResponseExceptionMapper;
92
Chapter 3
Microservices with Quarkus
@Provider
public class HttpBinExceptionMapper implements ResponseExcepti
onMapper<ErrorMessage>{
@Override
public ExecutionException toThrowable(Response response) {
// do something with the content of the response and
rethrow the exception
String errorMessage = response.readEntity(String.
class);
return new Exception(errorMessage);
}
}
Then register the ResponseExceptionMapper on the rest client
interface:
@RegisterProvider(LoggingFilter.class)
@RegisterProvider(HttpBinExceptionMapper.class)
@RegisterRestClient(baseUri = "https://httpbin.org/")
public interface HttpBinServiceDAO{
...
}
The exception mapper will be triggered only if an HTTP status code of
400 or greater is returned by the service call. You can also skip this manual
registration entirely, adding @Provider to the exception handling class
itself; it’ll be picked automatically by the RESTEasy runtime. This class is
then able to take the failure response from the REST service – say an HTTP
403 response – and map it to an exception type you’re prepared to handle.
Sort of the inverse of the JAX-RS ExceptionMapper that maps exceptions
to Response objects. Note that by default, the MicroProfile REST client will
map all failures to javax.ws.rs.WebApplicationException.
93
Chapter 3
Microservices with Quarkus
Authentication
For some reason, some REST resources require authentication and
authorization. *shrug*. Obviously, if the auth credentials are expected
in the URL or request body, those are easy to add. For the header-based
authentication and really, any client headers that need to go out with
the request, use @ClientHeaderParam (or @ClientHeaderParams to add
multiple client headers at once):
@RegisterProvider(LoggingFilter.class)
@RegisterProvider(HttpBinExceptionMapper.class)
@RegisterRestClient(baseUri = "https://httpbin.org/")
@ClientHeaderParam(name="Authorization",value =
"{computeBasicAuthHeader}")(1)
public interface HttpBinServiceDAO{
...
default String computeBasicAuthHeader(){ (2)
LOGGER.info("Computing basic auth header ");
return "Basic " + Base64.getEncoder().encodeToString(
"username:password".getBytes());
}
}
Here’s what’s happening:
1. I’ve defined the @ClientHeaderParam for the
HTTP Basic authorization header. The value
attribute can be hard-coded, but in my case,
I’m delegating it to a custom method named
computeBasicAuthHeader.
2. The implementation of computeBasicAuthHeader as
a default method.
94
Chapter 3
Microservices with Quarkus
For any invocation of this MicroProfile rest client,
computeBasicAuthHeader will be executed to supply the value for that
header. I have the option of applying the @ClientHeaderParam annotation
to the individual methods in this REST client interface as well; each
method will have individual header computations. I’m also allowed to
obtain configured credentials using the MicroProfile config API, so you
don’t have to hard-code anything. I can also refer to classes outside of the
interface – value="{org.acme.headers.HeaderFactory}" will load header
values generated by the hypothetical HeaderFactory class.
For even greater control over the rest client, you can do away with
the annotations and use a org.eclipse.microprofile.rest.client.
RestClientBuilder to manually construct and utilize the REST client:
HttpBinServiceDAO binServiceDao = RestClientBuilder.
newBuilder()
.baseUrl(new URL("http://httpbin.org/"))
.build(HttpBinServiceDAO.class);
With this setup, you can configure
•
Connection timeouts
•
Providers
•
Interceptors
•
Filters
•
SSL parameters
•
JAX-RS feature classes
Truly powerful stuff.
95
Chapter 3
Microservices with Quarkus
Configure Client SSL
Again with this security business? Fine, if your target REST service is SSL-
secured, you can comply by configuring a custom Java Key Store (JKS)
file and the following configuration parameters. The values can be found
either by directly referencing the file with file:// or anywhere in the
classpath with classpath:/
#set the trust store location.
org.acme.rest.HttpBinDAO/mp-rest/trustStore =
[classpath|file]:/client-truststore.jks
#set the trust store password
org.acme.rest.HttpBinDAO/mp-rest/trustStorePassword =password
#set the key store location
org.acme.rest.HttpBinDAO/mp-rest/keyStore = [classpath |
file]:/client-keystore.jks
#set the keystore password
org.acme.rest.HttpBinDAO /mp-rest/keyStorePassword = password
#set the keystore type. JKS is the default
org.acme.rest.HttpBinDAO/mp-rest/keyStoreType=PEM
The configuration scheme here is an acquired taste. You use the fully
qualified class name (FQCN) – org.acme.rest.HttpBinDAO in this case –
as the base for the property. Then you follow it up with /mp-rest/ and
then the specific property you’d like to configure.
While we’re on the subject of security...
Security
First, let’s get the obvious out of the way: this is a Java-based platform that
supports the well-known web.xml, so you have access to “legacy” security
mechanisms that web.xml offers. We’re here for newer, shinier stuff.
96
Chapter 3
Microservices with Quarkus
C
ORS
Cross-origin resource sharing (CORS) is fancy HTTP-speak for “as a web
service or resource, I will allow only requests from the same web domain
as me to request data from me. Requests from a different domain will be
bounced. Unless that different domain is on a shortlist I maintain”.
This is typically enforced by a browser: a web page running on
www.yourwebapplication.com will not be allowed to request resources
from http://asubdomain.yourwebapplication.com. Unless it has been
specifically allowed by yourwebapplication.com via CORS HTTP headers,
the requests will be disallowed. It gets super specific too: you can filter
requests by HTTP method, allowed headers, and allowed origins (i.e., what
domains are even allowed to make CORS requests to yourwebapplication.
com).
Lesser frameworks might make you write your own filter to modify
an HTTP request to allow CORS. Quarkus makes it easy; here are the
configuration parameters to get that sorted out:
# Enable the CORS filter.
quarkus.http.cors=true
# HTTP headers exposed in CORS
# Comma separated list of valid headers. ex: X-Custom,Content#Disposition
quarkus.http.cors.exposed-headers=Content-Disposition
# HTTP methods allowed for CORS
# Comma separated list of valid methods. ex: GET,PUT,POST
# The filter allows any method if this is not set.
# default: returns any requested method as valid
quarkus.http.cors.methods=GET,PUT,PATCH,POST
97
Chapter 3
Microservices with Quarkus
# Origins allowed for CORS
# Comma separated list of valid URLs. ex:
#http://www.quarkus.io,http://localhost:3000
# The filter allows any origin if this is not set.
# default: returns any requested origin as valid
quarkus.http.cors.origins=asubdomain.yourwebapplication.com
Role-Based Authentication and Authorization
Quarkus delegates security to different extensions, based on how they
work:
•
OpenID
•
JSON Web Token (JWT)
•
Property file
•
JDBC
•
Keycloak
•
Built-in security mechanisms:
•
FORM
•
HTTP-BASIC
•
DIGEST
•
CLIENT-CERT
The built-in authentication mechanisms are easy enough to configure
using just properties. For development purposes, for example,
quarkus-elytron-security-properties-file allows you to configure
user credentials in your application.properties. To use industrial strength
authentication, you’ll need to go for adult authentication options like JWT,
SQL, or frameworks like OAuth and OpenID.
98
Chapter 3
Microservices with Quarkus
I’ll decide which authorization mechanism to demonstrate by the end
of this senten- I have decided: I will now demonstrate the JWT support in
MicroProfile.
JSON Web Tokens
The JSON Web Token (JWT) standard is an open source authentication
and authorization standard; it looks to provide those two services in a
distributed computing ecosystem (read: the Internet). It’s an industry
standard that provides signed and/or encrypted JSON objects, to be
used as credential tokens. I show a typical flow of a service-to-service
authentication that uses JWT in Figure 3-3.
Figure 3-3. A basic JWT authentication flow
Here’s how it works:
1. A subject (web service client, other service) will
authenticate against a JWT provider with regular
credentials like username/password.
2. The JWT provider will generate and issue a JWT to
an approved requester. Each JWT contains what is
known as claims. A claim is a piece of information
99
Chapter 3
Microservices with Quarkus
that can be used to correctly validate the
authenticity of entity that is presenting that claim.
So, “assume” that I, Tayo, am a web service client
machine. If I’m requesting a JWT, one of the claims
in that JWT could be “name: Tayo”.
3. The service client will then continue to present
the issued JWT to the service for every request; if
that JWT was signed or encrypted using the right
keys recognized by the service, the service client’s
request will be honored. So instead of re-presenting
the username/password every time, the client
presents the token.
JWTs can be signed, encrypted, validated, and revoked on schedule,
making them quite versatile. There are industry standard claim fields that
have been defined by the JWT governing body, but you’re free to define
your own. JWTs can also be used with other security protocols like OpenID
and OAuth. Read more about the JWT standard here.9
The MicroProfile specification has minimum security requirements
for using JWT: as at the time of this writing, JWTs must be signed with
the RSASSA-PKCS-v1_5, using the SHA256 algorithm with 2048-bit key
strength; there are other JWT implementations, and they might not be so
exacting. To demonstrate this will be in two stages.
Generate a JWT
Ideally, a central service or component in your architecture will be
responsible for generating a JWT. For this demonstration, I’ll just provide
lso check out my LinkedIn Learning video where I do a step-by-step walkA
through of generating and validating a JWT in a Jersey application.
9
100
Chapter 3
Microservices with Quarkus
a REST endpoint that generates a JWT, using the first and last names of the
requester as claims to add to the JWT:@Path("/"):
public class JWTIssuerResource{
final Logger logger = LoggerFactory.
getLogger(JWTIssuerResource.class.getName());
@GET
@Produces(MediaType.TEXT_PLAIN)
@Path("/{firstName}/{lastName}/generate-token-for")
public Response getJWT(@PathParam("firstName")String
firstName, @PathParam("lastName")String lastName){
String jwt= generateAndSignJWT(...);
return Response.ok(jwt).build();
}
}
Okay, so the generator endpoint skeleton is in place. I’ll take you on a
magic carpet ride of what the generateAndSignJWT method looks like. So
that I can sign and encrypt the JWT, I need a set of encryption keys. I’ll use
OpenSSL to generate keys. I’m downloading the OpenSSL utility for my OS
from (just web search “Openssl for <your OS>”).
After getting my OpenSSL unpacked onto my machine, I add the
unpacked download to my OS’s path, so that I can execute the tools from
any location. Then I open up a terminal window to
1. Generate a base key with the following command:
openssl genrsa -out baseKey.pem 2048. The base
key that is generated is a .pem file in the current folder.
2. Generate a PKCS#8 private key: openssl pkcs8
-topk8 -inform PEM -in baseKey.pem -out
privateKey.pem -nocrypt. This is what I’ll sign and
encrypt the JWT with.
101
Chapter 3
Microservices with Quarkus
3. Generate a public key: openssl rsa -in baseKey.
pem -pubout -outform PEM -out publicKey.pem.
I’ll stash the private key in resources directory of my Quarkus app – do
this more securely in a production application; the public key goes in the
META-INF directory. Next, there’s some configurin’ to do. First, I’ll add the
smallrye-jwt extension; then I’ll need to configure the key and my issuer
name:
mp.jwt.verify.publickey.location=META-INF/resources/publicKey.pem
mp.jwt.verify.issuer = SupersonicSubatomic
These are prerequisite configs per the MicroProfile specification.
All done with configuration, I start codin’, first with loading the private key:
PrivateKey loadPrivateKey() throws IOException,
InvalidKeySpecException, NoSuchAlgorithmException{
//load the raw file
byte[] keyFileBuffer = CustomJWTIssuerResource.class.
getResourceAsStream("/META-INF/privateKey.pem").
readAllBytes();
//strip marker text from the raw key text
String cleanKey = new String(keyFileBuffer, 0,
keyFileBuffer.length).replaceAll("-----BEGIN (.*)----", "")
.replaceAll("-----END (.*)----", "")
.replaceAll("\r\n", "")
.replaceAll("\n", "")
.trim();
//convert text to PKCS8/RSA key
102
Chapter 3
Microservices with Quarkus
return KeyFactory.getInstance("RSA").
generatePrivate(new PKCS8EncodedKeySpec(Base64.
getDecoder().decode(cleanKey)));
}
Then I use the key
String generateAndSignJWT(String firstName,
String lastName,List groups, Map roles) throws
InvalidKeySpecException, NoSuchAlgorithmException, IOException{
Map<String,Object> claimsMap = new HashMap<>();
claimsMap.put("firstName", firstName);
claimsMap.put("lastName", lastName);
JwtClaimsBuilder claims = Jwt.claims(claimsMap)(1)
.subject(firstName+"
"+lastName)
.claim("roleMappings", roles)
.claim("groups", groups)
.issuer(jwtIssuer)
.issuedAt(Instant.now().
toEpochMilli())
.expiresAt(Instant.now().
plus(2, ChronoUnit.DAYS).
toEpochMilli());
PrivateKey privateKey = loadPrivateKey();
return claims.jws().sign(privateKey); (2)
}
103
Chapter 3
Microservices with Quarkus
1. I start by generating a JWT object using the
JWTBuilder class. I bulk-add the first and last names
as custom claims, along with other claims. The
“groups” and “roles” claims must be set for rolebased authentication (RBAC) to work.
2. I then use the key to sign the generated JWT. At this
point, the JWT has been transformed into a string.
Here’s the complete operation as a REST resource:
Path("/")
public class JWTIssuerResource{
@Inject
@ConfigProperty(name="mp.jwt.verify.issuer",defaultValue
="my-issuer-name" )
String jwtIssuer;
final Logger logger = LoggerFactory.
getLogger(JWTIssuerResource.class.getName());
@GET
@Produces(MediaType.TEXT_PLAIN)
@Path("/{firstName}/{lastName}/generate-token-for")
public Response getJWT(@PathParam("firstName")String firstName,
@PathParam("lastName")String lastName){
String JWT = null;
try {
Map<String,Object> rolesMap = new HashMap<>();
rolesMap.put("role 1","VIP");
rolesMap.put("role 2","VVIP");
rolesMap.put("role 3","visitor");
List<String> groups = new ArrayList<>();
groups.add("Group 1");
104
Chapter 3
Microservices with Quarkus
JWT = generateAndSignJWT(firstName,
lastName,groups,rolesMap);
} catch (InvalidKeySpecException |
NoSuchAlgorithmException | IOException e) {
// TODO Auto-generated catch block
e.printStackTrace();
}
return Response.ok(JWT).build();
}
public String generateAndSignJWT(String firstName,
String lastName,List groups, Map roles) throws
InvalidKeySpecException, NoSuchAlgorithmException, IOException{
Map<String,Object> claimsMap = new HashMap<>();
claimsMap.put("firstName", firstName);
claimsMap.put("lastName", lastName);
JwtClaimsBuilder claims = Jwt.claims(claimsMap)
.subject(firstName+"
"+lastName)
.claim("roleMappings",
roles)
.claim("groups", groups)
.issuer(jwtIssuer)
.issuedAt(Instant.now().
toEpochMilli())
.expiresAt(Instant.now().
plus(2, ChronoUnit.DAYS).
toEpochMilli());
PrivateKey privateKey = loadPrivateKey();
return claims.jws().sign(privateKey);
}
105
Chapter 3
Microservices with Quarkus
PrivateKey loadPrivateKey() throws IOException,
InvalidKeySpecException, NoSuchAlgorithmException{
//load the raw file
byte[] keyFileBuffer = JWTIssuerResource.class.
getResourceAsStream("/META-INF/privateKey.pem").
readAllBytes();
//strip marker text from the raw text
String cleanKey = new String(keyFileBuffer, 0,
keyFileBuffer.length).replaceAll("-----BEGIN (.*)----", "")
.replaceAll("-----END (.*)----", "")
.replaceAll("\r\n", "")
.replaceAll("\n", "")
.trim();
//convert text to PKCS8/RSA key
return KeyFactory.getInstance("RSA").
generatePrivate(new PKCS8EncodedKeySpec(Base64.
getDecoder().decode(cleanKey)));
}
}
So, when I navigate to http://localhost:8080/hello/generate-jwt,
I’ll see the Base64-encoded JWT in the browser; to verify it’s legit, paste the
text into the debugger over at www.jwt.io. You should see the claims in the
box on the right side.
This is a rough approximation of the process of generating a token by
a proper token vendor in an enterprise architecture – the vendor could be
the microservice itself or a central system like Keycloak; architecturally,
it works best when a dedicated system vends the JWT token to service
clients. The token should be presented by the holder every time it needs
access to a protected resource – this resource just needs to use the private
key to verify that the token is legit.
106
Chapter 3
Microservices with Quarkus
Server-Side JWT-Protected Access
Let’s now see how you can use JWTs to protect access to your microservice.
It starts with the @RolesAllowed annotation. The @RolesAllowed
annotation is from the Jakarta EE specification for security; this isn’t a
Quarkus or JAX-RS supplied component:
@GET
@Path("/{name:[a-zA-Z]*}/scramble-async")
@RolesAllowed(“VIP”)
@Operation(summary = "scrambles the supplied name
asynchronously", description = "scrambles the name in the
path. There are no guarantees of uniqueness")
...
public void getAnagramAsync(@Suspended final AsyncResponse
async,final @PathParam("name")String name){
...
}
Having added @RolesAllowed("VIP") to that resource method,
I’m allowing only JWT claims with “VIP” in the role claim to access
that resource; therefore, it’s crucial that the role be set as a claim on the
JWT. The issuer claim also must match what’s configured for mp.jwt.
verify.issuer in the application.properties file:
mp.jwt.verify.issuer = SupersonicSubatomic
Next, I’ll slap the @LoginConfig annotation on the javax.ws.rs.core.
Application class to enable JWT protected access:
@LoginConfig(authMethod = "MP-JWT",realmName = "TCK-MP-JWT")
@OpenAPIDefinition (info =
@Info(title = "Anagrams - The Quarkus Way",
version = "0.0",
107
Chapter 3
Microservices with Quarkus
description = "This is an Anagram API. Send a
string into one of the 'scramble' endpoints and
it'll scramble the text",
license = @License(name = "Apache 2.0", url =
"http://localhost:8080"),
contact = @Contact(url = "http://www.apress.com",
name = "Tayo", email = "tayo@somewhere.com")
)
)
public class AppConfig extends Application{
}
The authMethod and realmName values are prescribed by MicroProfile –
they must be MP-JWT and TCK-MP-JWT, respectively. Now I should
be able to hit that endpoint with SoapUI. The JWT token is set in the
Authorization header as I demonstrate in Figure 3-4:
108
Chapter 3
Microservices with Quarkus
Figure 3-4. Sending the Base64-encoded JWT in the Authorization
HTTP header
Now that the request can be authorized to fulfillment, I can use the
SecurityContext and JsonWebToken objects to get more information
about the requesting client:
@Context
SecurityContext securityContext;
@Inject
JsonWebToken jsonWebToken;
109
Chapter 3
Microservices with Quarkus
@GET
@Path("/{name:[a-zA-Z]*}/scramble-async")
@RolesAllowed("VIP")
...
public void getAnagramAsync(@Suspended final AsyncResponse
async,final @PathParam("name")String name){
logger.info("Security Context Principal
"+securityContext.getUserPrincipal());
logger.info("From the JWT, claims: "+jsonWebToken.
getClaim("lastName"));
logger.info("From the JWT, subject: "+jsonWebToken.
getSubject());
final Future<?> toComplete = managedExecutorService.
submit(new Runnable(){
@Override
public void run() {
logger.info("Executing in different thread");
final Response response = Response.
ok(getAnagram(name)).type(MediaType.
APPLICATION_JSON).build();
async.resume(response);
}
});
}
The JsonWebToken object is provided by MicroProfile to access the JWT
object; the SecurityContext object is a JAX-RS component that allows you
to interrogate the platform for information about authenticated parties.
And that, team, is how I implement JWT role-based access (RBAC)
security in MicroProfile, by way of Quarkus. This is largely just an
authorization check. For authentication, consider combining this with a
credential check inside of a ContainerRequestFilter.
110
Chapter 3
Microservices with Quarkus
Ideally, you shouldn’t have to write a lot of this kind of authentication
and authorization by yourself. Consider using a canned service like
KeyCloak together with OAuth, to provide centralized management
and validation of your tokens and other security bits and bobs; Quarkus
provides both OAuth and Keycloak extensions. You only need to install the
extensions, configure and manage your authentication and authorization
in Keycloak.
C
onfiguration
I’ve been configuring in a couple of demonstrations so far, so hopefully
you’re not a stranger to code like this:
@Inject
@ConfigProperty(name="my.property",defaultValue ="default-
value" )
String myProperty;
There’s a little more to configuration in Quarkus. Quarkus’
configuration is supported by MicroProfile (like a bunch of other things in
Quarkus). So, in addition to the vanilla stuff, I can have
@Inject
@ConfigProperty(name="my.app.dynamic-property",defaultValue
="my-dynamic-ppty" )
Provider<String> myDynamicProperty;
...
public void readProperty(){
logger.info("Current property value: "+ myDynamicProperty.
get());
}
111
Chapter 3
Microservices with Quarkus
This approach will supply live values every time it’s looked up with
the get() method; it’s a lazy-loading approach. In a cloud setting, with a
centrally managed configuration system (maybe Spring cloud or even a flat
file somewhere), you can modify configurations and have the changes take
effect in a deployed application.
I can collect configuration items into collections like so:
my.app.list.of.admins=tayo,keni,kitti,eden
And in the code, that comma-separated list of configurations will be
collected into a collection:
@Inject
@ConfigProperty(name="my.app.list.of.admins")
Set<String> admins;
Matter of fact, Quarkus allows me to dispense with @Inject altogether:
@ConfigProperty(name="my.app.list.of.admins")
Set<String> admins;
Personally, I’m not a fan of skipping annotations, because it breaks the
CDI specification. Keeping with the specification ensures that everyone
reading the same code can immediately come to the same understanding,
without needing someone to explain quirks of a specific platform to them.
Or maybe I’m just an old man who isn’t as hip as he thought.
Health Checks
You’re not going to have a good time cloud deploying a microservice if
you’re not providing a health check endpoint. Think of the health check
endpoint as a way for anyone or anything to confirm that your service
hasn’t died and gone to microservice heaven. Successful container-based
application deployment and management (using Swarm or Kubernetes)
112
Chapter 3
Microservices with Quarkus
relies on being able to confirm the state of a microservice, with health
checks. Then when you’re talking about the cloud, services like the Elastic
Container Service (ECS) and Elastic Kubernetes Service (EKS) need health
checks for deployment. The MicroProfile Health Check specification
defines two categories of health checks:
•
Liveness: Use @Liveness check to indicate whether
the service is live, able to accept requests or not. In
a scenario where the service is down and is in the
process of starting up or healing from a failure, this
check should fail. The result of this check is available by
default at <approot>/health/live.
•
Readiness: This check is made available at <approot>/
health/ready. Use @Readiness to verify that the service
is ready. A service could be running, that is, still active
in the Java process, but might not be in a state to serve
requests. For example, a file storage service that has
run out of disk space: sure it’s up and running, but is it
ready? Nyet.
I’ll add the SmallRye Health extension to the project:
mvn quarkus:add-extension -Dextension=quarkus-smallrye-health
One way of implementing these health check annotations is to
decorate a CDI bean’s methods:
...
import org.eclipse.microprofile.health.HealthCheck;
import org.eclipse.microprofile.health.HealthCheckResponse;
import org.eclipse.microprofile.health.Readiness;
...
113
Chapter 3
Microservices with Quarkus
@ApplicationScoped (1)
public class HealthCheckProvider{
@Produces (2)
@Readiness (3)
@Named("diskSpaceHealth")
HealthCheck (5) getChecked(){
return new HealthCheck() {
@Override
public HealthCheckResponse call() {
return HealthCheckResponse.named
("diskSpaceCheck").state
(isDiskSpaceAvailable()).withData
("arbitraryVariable", "arbitraryValue").
build();
}
};
}
boolean isDiskSpaceAvailable(){
//dummy implementation, obviously
return Boolean.TRUE;
}
}
1. A CDI bean scoped with @ApplicationScoped
means there’s only one instance of it available in the
entire application. This makes sense from a design
perspective – you should have only one source of
truth in your entire application.
2. @Produces designates this method as a producer of
health check data.
114
Chapter 3
Microservices with Quarkus
3. @Readiness designates this method as producing
Readiness information.
4. @Named gives a custom name to this health check.
This is a matter of best practice, to help forestall any
ambiguity with other health check endpoints you
might introduce into your application.
5. I return an instance of HealthCheck, based on the
return value of a disk space checking method. I also
get to add arbitrary data and name the health check
itself.
The CDI runtime will automatically pick up this health check producer
and make it available at http://localhost:8080/health/ready. I’ll then
see the status “UP” or “DOWN” depending on the result of the check.
I’ll also find the data I chose to publish. Figure 3-5 shows what the ready
endpoint page looks like:
Figure 3-5. The response generated by the ready endpoint
To be clear, this isn’t the only way to implement health checks with
MicroProfile. I recommend this because it allows me to cleanly inject the
health check anywhere else in my Quarkus app:
@Inject
@Readiness
HealthCheck diskCheck;
115
Chapter 3
Microservices with Quarkus
...
void getDiskReadiness(){
logger.info("Disk check status:"+ diskCheck.call().
getState())
}
I’m able to inject the health check into other parts of the application
and use as I see fit. Neat!
Fault Tolerance
Can your microservice platform take a punch? Can it survive blips in
network connectivity? Will it fall apart during a momentary pause in
response from a dependency? How will it fail when it’s overwhelmed by
demand? These are just some of the rude surprises in store for application
designers that are new to highly distributed and cloud environments,
especially when you’re coming from an on-premise deployment of
monoliths, where you’re used to being in control of every piece of the
monolith. You can coordinate and deploy everything you need as a single
block. If you’re moving to the microservice architecture, your application
must be able to not implode after an HTTP request times out. No, several
layers of try-with-resources don’t count.
116
Chapter 3
Microservices with Quarkus
Figure 3-6. Pictured: your microservices after a database insert gone
wrong
To build adult-tier microservices, try on the MicroProfile Fault
Tolerance API, by way of the quarkus-smallrye-fault-tolerance
extension. MicroProfile’s fault tolerance strategy revolves around five
annotations:
•
@Timeout to manage the wait time before reporting
failure.
•
@Retry to define retry tactics for failed executions.
•
@Fallback to define alternative handling steps in the
event of a failure.
117
Chapter 3
Microservices with Quarkus
•
@Bulkhead to control the limits of concurrent access to
a method; helps to prevent overwhelming the resource.
This can help implement the Staged Event Driven
Architecture, one of my favorite design patterns. It’s a
solid way to manage the throughput to asynchronous
methods.
•
@CircuitBreaker to fail fast where applicable.
These annotations can all be inherited, so you can use these as a way
to enforce default behavior for failure conditions in a codebase. Here’s
some of that in action:
@GET
@Path("/hello-image")
@Operation(summary = "Returns an image")
@Produces("image/jpg")
@Retry(delay = 2000,delayUnit = ChronoUnit.MILLIS,maxRetries =
4, retryOn = {SocketTimeoutException.class, ConnectException.
class}) (1)
@Asynchronous (2a)
@Bulkhead(value = 10,waitingTaskQueue = 30) (2b)
@Timeout(value=5000,unit=ChronoUnit.MILLIS) (3)
public CompletionStage<byte[]> helloImage() throws
InterruptedException, ExecutionException {
CompletionStage<byte[]> futureImage = httpBinService.
getImageAsync();
byte[] imageBytes = futureImage.toCompletableFuture().get();
return Response.ok().entity(new StreamingOutput() {
@Override
public void write(OutputStream output)
throws IOException, WebApplicationException {
output.write(imageBytes);
118
Chapter 3
Microservices with Quarkus
output.flush();
}
}).build();
}
return futureImage
}
1. @Retry on this resource method stipulates that
this method should be retried four times, with
a delay of 2 seconds between each attempt.
The retries should be attempted only in the
event of a SocketTimeoutException or a
ConnectionException.
2. There are two parts to @Bulkhead usage. It can be
defined on its own or with
a. @org.eclipse.microprofile.faulttolerance.
Asynchronous to pool excess requests.
b. This will now allow ten concurrent requests and a
backlog of 30 waiting for processing. Any more and a
BulkHeadException will be thrown.
I use @Timeout to stipulate that this method should wait
five seconds before the execution is marked a failure.
The MicroProfile specification integrates this standard with the REST
client specification as well, so that I can have
@RegisterProvider(LoggingFilter.class)
@RegisterProvider(HttpBinExceptionMapper.class)
@RegisterRestClient(baseUri = "https://httpbin.org/")
@RegisterForReflection
public interface HttpBinServiceDAO{
119
Chapter 3
Microservices with Quarkus
@GET
@Path("/image/jpeg")
@Produces("image/jpeg")
@Timeout(value = 5000,unit = ChronoUnit.MILLIS)
CompletionStage<byte[]> getImageAsync();
}
@Timeout configures a 5000ms timeout for this REST client call,
after which a TimeoutException will be thrown. Be ready with an
ExceptionHandler and ExceptionMapper.
Reactive Programming with Vert.x
Eclipse’s Vert.x is a toolkit for building high-performing, scalable,
reactive applications. What’s reactive programming? Think of reactive
programming as a model of programming that combines
•
Asynchronous programming
•
A fluent API
•
Event-driven programming
•
CPU/core-efficient threading
If you’ve been through some of the chapters before this one, you may
have seen CompletionStage already – that’s a reactive class provided by
the JDK. One difference between CompletionStage and say java.util.
concurrent.Future is that with Future, you’re responsible for checking
that the operation is complete; CompletionStage will react to the presence
of the expected output data or execute any exception handling callbacks
you implement.
Vert.x operates in the same space as CompletionStage. Quarkus uses
a lot of Vert.x under the covers; you’ll see [vert.x-worker-thread] in
120
Chapter 3
Microservices with Quarkus
your console, for example. A core principle in Vert.x is non-blocking,
for that sweet, sweet performance boost. When you’re using anything
Vert.x related – within or outside of Quarkus – you should opt for a
reactive or asynchronous programming model. Vert.x can do everything
I’ve demonstrated so far in this book: rest clients, reactive rest service
endpoints, and so on. Let me show you some things that I haven’t tried yet.
High-Performance Netty with Vert.x
Like with most application servers, you have the option of using native
connectors. The connector is the component that helps your Tomcat, Jetty,
or Netty server accept and process incoming connections. Going with a
native connector is basically supercharging the process of connection thread
handling. Native connectors typically use the Java Native Interface (JNI)
to skip the middleman and deal directly with the operating system.
You can get Netty on steroids by adding the following maven
dependencies to your project:
<dependency>
<groupId>io.netty</groupId>
<artifactId>netty-transport-native-epoll</artifactId>
<classifier>linux-x86_64</classifier>
</dependency>
<dependency>
<groupId>io.netty</groupId>
<artifactId>netty-transport-native-kqueue</artifactId>
<classifier>osx-x86_64</classifier>
</dependency>
There’s currently only support for either Mac OS X or Linux operating
systems for these. Netty will select the appropriate connector based on the
deployment environment. You then enable native transport with quarkus.
121
Chapter 3
Microservices with Quarkus
vertx.prefer-native-transport=true in your application.properties.
Also in your application.properties, you can tune the following parameters:
122
•
quarkus.http.so-reuse-port=true controls how the
OS will provision listener threads for inbound sockets
on your web server. Enabling this allows Linux sockets
to independently monitor for incoming data, a possible
throughput boost.
•
quarkus.http.tcp-quick-ack controls the behavior
of packet sending by the OS. Typically, network
I/O in your machine will have either delayed
acknowledgment (DELAYED_ACK) or Nagle’s
algorithm to prevent immediate transmission of
small packets. Disabling delayed acknowledgment
with “quick ack” forces the machine to send packets
immediately available. This could be useful for low-
latency requirements.
•
quarkus.http.tcp-cork=true controls the behavior
of the network layer in conjunction with delaying
algorithms like Nagle’s algorithm. Nagle’s is a TCP/IP
algorithm that delays transmission of data until a buffer
has filled to a configurable limit – it’s the opposite
of “quick ack”. This makes it more efficient with
bandwidth as you’re not clogging the network with
too many small chunks of data. TCP corking will then
aggressively accumulate data into the buffer, waiting for
a max of 200ms before flushing.
•
quarkus.http.tcp-fast-open will enable TCP Fast
Open, a TCP feature that allows Netty skip some
formalities in the TCP handshake algorithm; this
improves latency.
Chapter 3
Microservices with Quarkus
Tip Quarkus provides the quarkus.thread-pool.core-
threads property (default = 1) to tune the number of threads in the
worker pool. Tune this and the other quarkus.thread-pool.*
properties to bang out even better throughput and latency from your
quarkus app.
Reactive Messaging with Vert.x
An event bus is like an information superhighway. It’s a trunk of
information that runs through an entire application. Interested parties just
need to plug in to the bus and
•
Publish messages to multiple receivers (publish-
subscribe)
•
Send messages in a fire-and-forget fashion
•
Send messages targeted at specific components or
destination
•
Send messages and expect a response (request-reply)
•
Receive messages at their desired addresses
The challenge usually is that traditional buses are resource-thirsty,
heavyweight components that require a bunch of infrastructural change.
The likes of CDI and Spring attempt something like this, but they’re type-
dependent and can’t be targeted that well. Not to mention the absence
of reactivity. No more! Vert.x provides an embeddable event bus that
embodies all the design goals of reactive programming. I’ll first add the
Vert.x extension to my project with quarkus-vertx.
123
Chapter 3
Microservices with Quarkus
Vert.x programming in Quarkus is underpinned by SmallRye Mutiny.
Mutiny is a streamlined and simplified reactive programming API. The
folks behind Mutiny took one look at the bajillion methods in RxJava and
the like, and said “Nyet”. Mutiny is a much more digestible and practical
approach to reactive programming in Java, supporting most common use
cases with none of the fat. I’ll add the Mutiny extension to my project with
quarkus-resteasy-mutiny.
At the core of Mutiny are the Uni and Multi classes, which provide the
entrypoints into its reactive API. I can return an instance of either one,
instead of returning a CompletionStage. So, my earlier reactive example
could be rewritten as
@GET
@Path("/{name:[a-zA-Z]*}/scramble-mutiny")
public Uni<Response> getMutinyAnagram(final @PathParam("name")
String name) {
return Uni.createFrom().item(name).onItem().
apply(toScramble -> {
return Response.ok(getAnagram(toScramble)).
type(MediaType.APPLICATION_JSON).build(); });
}
The general approach is to take a given data item – a String or a
Collection, whatever – and create a Uni or Multi from it. From there,
supply your desired business logic into the apply method. This is a more
comfortable reactive API – it has a very small fraction of the methods
that the bloated, popular APIs do – without sacrificing functionality. Uni
provides handling for single items. Use Multi for a collection of items. My
returning a Uni from getMutinyAnagram causes Quarkus to engage reactive
mode.
Mutiny is compatible with the popular reactive frameworks, like
RxJava, Standard JDK CompletionStage, and so on. For many other
components in Quarkus, you can return either of the two types and
124
Chapter 3
Microservices with Quarkus
Quarkus will implicitly engage reactive mode. SQL and NoSQL database
access, security functions, and message brokers all have reactive options
by way of Mutiny. Enjoy!
Vert.x Event Bus
And now, for my next trick, I’m going to show you how to send messages
reactively, across your application! First, I’ll get a hold of the event bus:
io.vertx.mutiny.core.eventbus.EventBus :
@Inject
EventBus eventBus;
I can now use this bus to send messages all over the Quarkus app,
across a cluster (if your app is deployed in a cluster) or just locally, all in a
very lightweight and CPU-efficient manner:
@POST
@Path("/send-event")
@Consumes("application/json")
public void sendEvent(EventMessage message) throws
InterruptedException, ExecutionException{
eventBus.publish("multi-cast", message); (1)
DeliveryOptions options = new DeliveryOptions(); (2)
options.addHeader("send-time", Instant.now().
toString())
.setLocalOnly(true)
.setSendTimeout(2000);
eventBus.request("one-way-message", message, options); (3)
eventBus.request("", message).on().item().
apply(responseMessage -> {
125
Chapter 3
Microservices with Quarkus
logger.info("Blocking two-way response received.
Address " + responseMessage.address() + ", message:
" + responseMessage.body()
);
return responseMessage.body();
}); (4)
Message<Object> response = eventBus.request(
"two-way-message", message.getMessage()).subscribe()
.asCompletionStage().get(); (5)
logger.info("Non-blocking two-way response: " +
response.body());
}
}
Alright, here goes:
1. This is a basic message publish, sending the
message to all listeners subscribed to the
"multi-cast" address.
2. Because Vertx’s event bus isn’t a pretender of a
messaging bus, you get the trappings of a proper
message-driven architecture. Here I’m preparing
metadata to send along with the actual message
payload.
3. I can send a one-way, fire-and-forget message to
an arbitrary endpoint called "one-way-message",
enriched with metadata.
4. All of this can be reactive as well – I can send to a
targeted endpoint in a reactive fashion.
126
Chapter 3
Microservices with Quarkus
5. Now I can send a message targeted at a single
endpoint with a request-reply model. Note how I
convert back to a CompletionStage, still a reactive
component.
This is all well and good for the sending of messages. How about the
receiving end?
...
import io.vertx.mutiny.core.Vertx;
import io.vertx.mutiny.core.eventbus.Message;
import io.quarkus.vertx.ConsumeEvent;
import org.acme.dto.EventMessage
...
@ApplicationScoped (1)
public class EventBusMessageRecipient{
@Inject
Vertx vertx;(2)
final Logger logger = LoggerFactory.getLogger(EventBus
MessageRecipient.class.getName());
@ConsumeEvent("one-way-message")(3)
public void receiveOneWayMessage(Message<EventMessage>
message){
logger.info("Received one way message: "+message.
body().getMessage());
}
127
Chapter 3
Microservices with Quarkus
@ConsumeEvent("two-way-message")
public EventMessage receiveTwoWayMessage(String message){
logger.info("Received two-way message "+message);
EventMessage response = new EventMessage(); //this is a
custom type, not a special Vert.x component
response.setMessage("Message received");
return response;
}
@ConsumeEvent("multi-cast")
public void coReceiveOneWayMessage(Message<EventMessage>
message){
logger.info("Received broadcast message");
}
@ConsumeEvent("multi-cast")
public void coReceiveOneWayMessage(EventMessage message){
logger.info("Received broadcast message "+message.
getMessage());
}
@ConsumeEvent("blocking-two-way-message",blocking=true)
public void receiveBlockingTwoWayMessage(Message<String>
message){
logger.info("Message received in blocking handler:
"+message.body());
vertx.setTimer(5, timeout ->{ (4)
logger.info("Sending response after "+timeout);
message.reply("Here's the response");
});
}
}
128
Chapter 3
Microservices with Quarkus
1. The @ApplicationScoped means there will be just
one instance of this bean in this context, effectively a
singleton.
2. The Vertx object is the entirety of Vert.x as made
available in Quarkus. It’s an immensely powerful
component. I can’t overstate how much you can do
with this component – the thing has an in-memory
File System. Check out the Vert.x documentation
for a glimpse of how powerful Vert.x is.
3. The @ConsumeEvent annotation defines the address
that this method will pick up messages from. You
have the option of
a. Not responding when a message is sent
b. Responding by returning a return value from the method
c. Responding by setting the response on the Message wrapper
class
4. I’m using the Vert.x engine here to simulate a delay
of 5 seconds, before sending back a response. Yes, I
know I could also do Thread.sleep(), but this is so
much cooler!
This is an extremely rudimentary example of what you can do with
the EventBus and Vert.x as a whole. Vert.x is programming-language
agnostic,10 can be clustered, and uses SSL all within a microservice. Power!
he official documentation recommends JSON as the preferred message format
T
so that anything downstream can read the message. I’m opting for a custom data
type here to show that you can send anything you want.
10
129
Chapter 3
Microservices with Quarkus
Microservice Success with Quarkus
Listen, this is a book on microservices quite alright, but you should
understand that going the microservice route is not a panacea. While it
solves specific challenges attributable directly to monoliths, it introduces
a new set of challenges directly attributable to the fine-grained nature
of microservices. Breaking a monolith into microservices is a sort of
balkanization of your platform: where you had just a handful of moving
parts, you’ll now have ten, hundreds, or even more, all vying for resources
and attention; they will all come up with a rich and diverse array of ways
to fail.
Figure 3-7. Pictured: your unsupervised microservices working
together
130
Chapter 3
Microservices with Quarkus
You’ll need to reconsider your approach to
•
Scalability and resiliency: A true microservice
architecture is more granular. You’re going to be
managing more endpoints and more black box
dependencies. Fault tolerance is a must if you’re
going the microservice route. Expect everything
your microservice depends on to fail. Consider using
highly available and resilient messaging with Apache
Kafka or something similar to help buffer inter-
service communication. It’s also no coincidence that
everything in Quarkus is reactive – that really is the best
option for scalability. Go reactive wherever you can
afford it.
•
Configuration management: With that many moving
parts, properly maintaining the properties and
configuration that your service depends on will need
to be a priority. One of the proposals of microservice
architecture is that you should be able to swap out a
microservice for a new version, without breaking flow.
Robust and secure configuration management needs to
be part of the conversation early on. Quarkus provides
extension support for HashiCorp’s Vault, a secure
storage and transport mechanism to help manage
artifacts like SSL certificates, credentials, and other
sensitive configuration items that your microservice
needs to function.
•
Production support: You’ll need to up your game
with regard to your operational support capabilities.
Effective logging, Mapped Diagnostic Context (MDC)
logging, and distributed traceability should be top
131
Chapter 3
Microservices with Quarkus
of the list if you’re going micro. That goes double for
machine-friendly logging with JSON. With so many
moving parts, it’s going to be more difficult to diagnose
production issues. Quarkus provides support for all
that and more. Consider the Quarkus support for
OpenTracing to enable distributed tracing in your
application. The Quarkus metrics extension provides
support for OpenMetrics as well, to give you a real-time
feed of the health of your applications. This data can
then be fed to application performance monitoring
platforms like Prometheus or Datadog.
TL;DR: Site reliability engineering (SRE) needs to be front and center
in your microservice transition.
Don’t think you must go all in on microservices either. There’s a middle
ground between the monolith and granular microservices. Quarkus has
you covered for the entire spectrum!
132
CHAPTER 4
Packaging
and Deploying
Quarkus Applications
Typically, technical textbooks save the “packaging and deployment” talk
for last, like vegetables on a dinner plate full of meat. I’m bringing it up
front, because when we’re talking Quarkus, the deployment options are
like half the point. This will be worth your while.
The cloud presents a new frontier and new challenges for packaging
and deploying microservices. Microservices are so hot right now, but way
too many aren’t prepared for the change. Now, the haters have said many
hurtful things about Java: how big java deployment kits are, how much
RAM a Java application needs, and how slow it is. Really unkind stuff. In
the cloud-everything world, these criticisms of Java become real hazards.
Take Amazon Web Services (AWS), for example: a lot of the pricing models
of their services revolve around two things.
•
CPU: How much CPU time your code or application
requires
•
RAM: How much RAM your code consumes; its
memory footprint
© Tayo Koleoso 2020
T. Koleoso, Beginning Quarkus Framework, https://doi.org/10.1007/978-1-4842-6032-6_4
133
Chapter 4
Packaging and Deploying Quarkus Applications
From the AWS Lambda service pricing page itself:
With AWS Lambda, you pay only for what you use. You are
charged based on the number of requests for your functions
and the duration, the time it takes for your code to execute
… Duration is calculated from the time your code begins executing until it returns or otherwise terminates, rounded up to
the nearest 100ms*…An increase in memory size triggers an
equivalent increase in CPU available to your function.
Translation: You’re going to spend, spend, spend, if your application
takes a “long” time to start or needs a bunch of RAM. Even CPU-efficient
code that requires more RAM will wind up costing more because more
RAM triggers more CPU allocation from AWS. Having code that starts
sharply and consumes relatively little RAM can be the difference between
running a service for free in AWS and skipping meals so you can afford to
fund your startup. At the scale of a large enterprise, the multiplier effect
is even more obvious. An organization that’s serving millions of requests
a day in cloud infrastructure will start to see the hit to their bottom line
when they’re spending a bunch of money in cloud operation costs. The
way cloud pricing models are written on paper, you’d think “it’s just
$0.0000008333 per GB/second. Doesn’t sound like much”. Multiply that
enough times at scale, and you’ll start seeing your departmental heads
asking questions about cost.
Let’s even leave the money out of it for now; suggesting that one can
run a Java application in an embedded deployment environment has
always raised eyebrows. “Are you sure Java is not too heavy to use in a
Raspberry Pi?”; “Java is too slow to use in low-latency systems”. Individuals
and organizations have had to make language and platform switches from
Java to others, after considering the historical resource requirements of the
Java platform.
134
Chapter 4
Packaging and Deploying Quarkus Applications
So here we are with a supersonic subatomic platform promising to
show them all. And show them, we shall. For my next demonstration, I’m
going to kit up my Quarkus project with the following features:
•
PostgreSQL driver
•
Hibernate, with all the trimmings
•
Agroal connection pool manager
•
MicroProfile health
•
MicroProfile metrics
•
MicroProfile REST client
•
REST support
•
Narayana transaction manager
•
JSON marshaling support
•
Reactive transport
•
JWT
•
Scheduled batch processing
Between all these, you have the ingredients for a production-strength
application. Let me show you the differences in outcome.
JVM Mode
There’s nothing fancy going on here. Deploying your Quarkus app in
JVM mode simply refers to the vanilla Java way of running a JAR-red up
application. You build the JAR:
mvn clean install
135
Chapter 4
Packaging and Deploying Quarkus Applications
and you run it:
java -jar <app name.jar>. quarkus.package.output-name
That’s it. Oh wait, one more thing: configure the quarkus.package.
output-name property in the application.properties file to control the
name of the output file from the build.
N
ative Mode
You know what a JAR is.1 Most, if not all, Java applications are
fundamentally composed of JARs. Sure, you’ll have your WAR, but really,
it’s still just an aggregation of JARs with some configuration files thrown
in. JARs containing Java classes are the way they are, because they were
conceived in a WORA world where the JVM is expected to lug a bunch of
fat around. You get to download/add a JAR to your project and just use it –
no need to worry about any OS-specific conditions that could cause your
code to work differently. At least that’s what the intention was. As you now
know, that flexibility comes at the cost of speed and resource efficiency.
Native code is what you get when you don’t have to worry about any
of that cross-OS overcompensation. You know all the classes and JVM
resources your application will need. You also know what your target
deployment environment is – serverless, containerized, embedded,
whatever – you should be able to target your code for that platform. On a
Windows machine, that’s a .exe in Window, and a .dimg in macOS. This is
what native code is all about. And it isn’t just sales-speak; Observe: this is a
traditional java-built Quarkus application’s startup:
04:49:21 INFO [io.quarkus] (main) code-with-quarkus
1.0.0-SNAPSHOT (powered by Quarkus 1.5.0.Final) started in
2.285s. Listening on: http://0.0.0.0:8081
Don’t you?
1
136
Chapter 4
Packaging and Deploying Quarkus Applications
04:49:21 INFO [io.quarkus] (main) Profile prod activated.
04:49:21 INFO [io.quarkus] (main) Installed features: [agroal,
cdi, hibernate-orm, hibernate-orm-panache, jdbc-postgresql,
mutiny, narayana-jta, rest-client, resteasy, resteasy-jsonb,
scheduler, security, servlet, smallrye-context-propagation,
smallrye-health, smallrye-jwt, smallrye-metrics, smallryeopenapi, vertx, vertx-web]
started in 2.285 seconds. That’s after a bunch of warm-up startups,
by the way. In the serverless or low-latency worlds, that might as well be
an hour. Here’s exactly the same Quarkus code, with the same Quarkus
dependencies, but now compiled as a native image:
04:34:46 INFO [io.quarkus] (main) code-with-quarkus
1.0.0-SNAPSHOT (powered by Quarkus 1.5.0.Final) started in
0.028s. Listening on: http://0.0.0.0:8083
04:34:46 INFO [io.quarkus] (main) Profile prod activated.
04:34:46 INFO [io.quarkus] (main) Installed features: [agroal,
cdi, hibernate-orm, hibernate-orm-panache, jdbc-postgresql,
mutiny, narayana-jta, rest-client, resteasy, resteasy-jsonb,
scheduler, security, servlet, smallrye-context-propagation,
smallrye-health, smallrye-jwt, smallrye-metrics, smallryeopenapi, vertx, vertx-web]
started in 0.028 seconds! The Quarkus native image started up 81 times
faster than the traditional JVM version; my jaw dropped the first time I saw
this. The likes of Spring Boot couldn’t possibly compete with this, without
going native themselves. How about RAM and CPU consumption?
App Mode
CPU%
RAM (MB)
% of Total RAM
JVM mode
0.3
381.13
10.1
Native mode
0.0
53.97
1.4
137
Chapter 4
Packaging and Deploying Quarkus Applications
Look at that. It bears repeating: this is the same Quarkus project, with
the same dependencies running in two different modes; both instances are
at rest, not serving any requests. These are Nürburgring-worthy numbers,
from the platform some would call “slow”. I feel like the lead character in
that movie, Moneyball (I think Brad Moneyball was his name2). It’s not
even close: while the traditional Java app is eating up 10.1% of available
memory,3 the native image is using 1.4%, a more than 700% difference in
memory consumption. Where the traditional Quarkus app is using 0.3%
of CPU, the native image is not even registering at all. It gets even more
impressive when you realize that, thanks to Quarkus optimizations for the
target JVM, JVM mode Quarkus apps are already better performing than
some of the competition.
What did I do to get the code to this point? Not too much. Let’s meet
the main player in all of this.
G
raalVM
GraalVM is a high-performance, polyglot JVM distributed by Oracle. You
can get it at www.graalvm.org/downloads. It aims to be the JVM for all
seasons and languages.
The secret sauce in GraalVM is an ability to take your .java file,
straight to operating system-specific machine code, the so-called native
image. For Windows, you’ll get a .exe; for *nix, you’ll get a Unix executable.
It is partially this wizardry that makes GraalVM unique among JVMs.
GraalVM works with a set of tools and utilities to generate an OS-specific
image that will do all that magic that I showed in the previous section.
With those OS-specific tools, GraalVM scans your project’s code and maps
out every class, method, and JVM feature that’s referenced in your code,
directly or indirectly. It’s then able to AOT-compile the entire dependency
ditor’s note: You haven’t watched that movie, have you?
E
This was captured from Unix’s top utility.
2
3
138
Chapter 4
Packaging and Deploying Quarkus Applications
tree and produce the native image that contains strictly what your code
needs and nothing else. With Quarkus, it can also include resource and
configuration files in that image. What you get at the end of it is a single
deployment unit that you can run on the target OS.
GraalVM started off as a component in the Hotspot VM – the VM
you’re probably most familiar with. Oracle then excised it from the
standard VM and made it its own stand-alone VM – so you now have the
privilege of paying for an “Enterprise” version. Don’t get me wrong, the
Community Edition of GraalVM is fine as a standard VM as well – you can
run any Java applications in it as normal without any of the native business
and still get superior performance to the standard Hotspot. The latest
incarnation of GraalVM now ships a Maven plugin that lets you cut out the
middleman a little bit. The Maven plugin allows you to compile your code
and generate a native image using the native image tool, all in one step.
Additionally, Red Hat has announced the Mandrel project, a Red Hat
sponsored and supported build of GraalVM. With Mandrel, Red Hat offers
features and support for Graal that you might not get from the
Oracle-supplied GraalVM.
Now back to Quarkus! Ideally, you should only need to download
and configure GraalVM and run the following Maven command on your
Quarkus project:
mvn package -Pnative
The reality is that reliably generating native images with Quarkus is not
as straightforward as I would like. Also, I don’t recommend doing it in the
standard “development environment” way and here’s why:
•
GraalVM as distributed directly by Oracle doesn’t “just
work” because you downloaded it. To get the native
image generation capability, there’s some configuration
to do – not to mention having to manually install some
of the tools it needs, which to me is a hassle.
139
Chapter 4
Packaging and Deploying Quarkus Applications
•
As at the time of this writing, support for Windows is
experimental (read: it’s probably not going to work
for you in many cases); Windows devs aren’t going to
have a good time. I should know: one of my personal
development computers’ Windows machine.4
•
WORP: You should be compiling the native image in
the operating system for which you’re targeting the
image. What’s going to be the point of building a native
image in Windows, for example, for an application
destined for a Unix environment? No es bueno.
Predictability is key.
So, to recap, trying to get Quarkus apps natively generated on my raw
Windows development environment was not fun. The first problem I ran
into was some video drivers conflicting with the native image generator
utility in Graal. Being the lazy developer that I am, I’m interested in this
only if it’s plug-n-play – everything should come bundled and ready to run.
Tip Java Reflection and Native mode are at odds: Native mode
operates on so-called “closed-world” basis; it requires being able
to compile all the classes and dependencies that a Java app needs
ahead of time. Wanton reflection is the opposite of that – it’s all
about dynamic class loading. Quarkus closes this gap by providing
the @RegisterForReflection annotation. Add this annotation
to classes that will be candidates for reflection, for example, DTO
classes that will be used for requests and responses in REST
endpoints.
Don’t judge me!
4
140
Chapter 4
Packaging and Deploying Quarkus Applications
Native Java Image Limitations
Because we can’t have nice things. We know by now that native imagery
requires upfront knowledge about what your Java application is going to
need. Some other things you should know about generating native images
with GraalVM are
•
Native images don’t do automatic heap or thread dump
capture, which sucks for the site reliability engineering
(SRE) folk.
•
Analyzing and AOT-compiling every class and
dependency your application needs takes time and
RAM. At a minimum, you’re going to need over 1G free
RAM to complete a native compilation of a relatively
small application. Configure quarkus.native.nativeimage-xmx in your application.properties to increase
the RAM allocation for the native image.
•
Monitoring and management via JMX is limited.
Fortunately, MicroProfile provides the Metrics API, so
you’re not flying blind. You will be able to expose your
microservices to Prometheus and any other platform
that implements the OpenMetrics standard. You can
also use VisualVM to monitor your native application;
you just won’t be able to trigger a heap dump
from it. Add -H:+AllowVMInspection or quarkus.
native.enable-vm-inspection=true to expose your
application to introspection.
•
At the time of this writing, there’s limited support for
the Java Flight Recorder (JFR) in GraalVM. JFR is my
favorite JDK tool, by the way. The GraalVM team is
working on improving support for JFR incrementally,
so I don’t expect this to be a long-lasting limitation.
141
Chapter 4
Packaging and Deploying Quarkus Applications
•
Native images aren’t suited for applications that will
trigger frequent garbage collection. Native imagery
uses a serial garbage collector which isn’t the most
efficient garbage collector. You can mitigate this by
sizing and partitioning your heap sufficiently, to
minimize the need for frequent garbage collection.
•
There could be a slight increase in latency when
running a Quarkus Java application in native mode.
Nothing too bad; the serial garbage collector is not
helping. You should performance test your native
image application.
•
To get past these limitations, you’ll need to pay Oracle5
for the enterprise version of GraalVM.
Overall, 9/10 recommend, #teamquarkus all the way. I pay a one-time
upfront cost for continuous resource savings in production? Sign me up!
The performance boost and cost savings make it all worth it.
Native Imagery in DevOps
Whether you’re running CircleCI, Jenkins, or something else, in most
enterprises, build servers are shared infrastructure. The disk space,
RAM, and CPU resources being used to build deployment kits need to be
managed across many users and build jobs.
Quarkus’ native compilation is a hungry hungry hippo as I’ve already
established. In a continuous integration/continuous deployment (CI/CD)
shop, y’all have got to be mindful of how your builds affect others. Already
it’s expected that an organization that takes CI/CD seriously must be
And may Larry Ellison be with you.
5
142
Chapter 4
Packaging and Deploying Quarkus Applications
prepared to allocate significant resources to a build server. This need will
increase significantly if you’re introducing native mode compilation. To
that end
•
Size your worker thread pools with the expectation that
a single native build job could hold onto one thread for
north of an hour. I’ve seen it happen. As a project grows
to use more extensions or even more code, the length of
time it’ll take to native compile is likely to grow. There’s
a risk that native build jobs will starve their neighbors
of CPU time.
•
The rate of growth of RAM requirements of a job is not
linear; it could be exponential. The more extensions
introduced to the project, the greater the thirst for
build-time RAM. Some extensions will require less than
others. Introducing some dependencies could double
the RAM requirement overnight. If you’ve followed
every example in this book up till this point, your
Quarkus project will require a minimum of 2.5GB of
free RAM to native compile.
•
If you run a pipeline where you run unit or integration
tests as part of the build process, consider using the
JVM mode deployment for the tests and only run the
native image tests at the tail end of the release train.
Alternatively, configure the quarkus.test.nativeimage-wait-time property to set a time limit for image
building during a test run.
•
Configure quarkus.native.native-image-xmx to
limit the maximum amount of memory native image
generation can consume.
143
Chapter 4
•
Packaging and Deploying Quarkus Applications
Consider containerized build jobs. This way, each build
in Jenkins is isolated and predictable. You can also
manage the RAM utilization per build job with more
granularity and oversight.
An ideal build setup will be able to bundle everything that you’ll ever
need for building native images in one neat package. The package should
contain
•
GraalVM, installed and configured
•
Maven, installed and configured
•
The native image tool, installed and configured
How does one get essentially a running operating system, with
software installed and preconfigured? Because really, all I want to do
is drop my code somewhere and have my code converted into a native
image, predictably and reliably. All of this stuff should…just work!
Enter containerization!
A Crash Course in Containerization
If you’re new to containerization and you’re a java developer, here’s the
elevator pitch using Docker as the basis.
Docker is like a JVM for whole operating systems. A near-complete
operating system environment is packaged as an “image” (like APIs and
Java applications are packaged as JARs) and you can download the images
to your local machine. An image you download to your local machine is a
near-complete operating system (OS) bundle, and there are thousands of
them. Just like you don’t need to worry about the implementation details
of a JAR most of the time, you are generally able to pull down docker
images and use them as is.
This concept is what the nerds call “containerization”: download
a Docker image of an OS configured with anything you desire; run an
144
Chapter 4
Packaging and Deploying Quarkus Applications
instance of that image – called a “container” – inside the docker runtime;
use it like you have another OS running inside your OS (your OS/machine
is called the “host” in Docker-speak).
“But isn’t that just virtualization with extra steps?”, you ask in an oddly
high-pitched voice, for some reason. Containerization with Docker serves
a similar purpose as virtualization, but it offers far more portability and
flexibility than vanilla virtualization. Think of the difference between
containerization and virtualization this way: containerization is like
using a JAR – on its own, a JAR is a completely functional, independent
unit and ready to use. Virtualization is more akin to handing a third party
your source code and the entire IDE you developed the code in. It’s not as
portable is what I’m saying.
Hint Just like JARs in Java, it can be used to either package
complete, functional applications that are ready to use or they can be
used to package APIs that you can build your own applications on;
Docker images are either complete and ready to use as is or you can
build your own images on top of other images.
How does any of this help with generating native Quarkus images?
Remember how much of a hassle it could be to set up a native image
capable GraalVM installation? And how counter-WORP it is to generate
native code on your local development OS? What I need now is a docker
image that comes preconfigured with GraalVM and all the tools it needs to
do its thing. With that, I should only need to
•
Download the image and run it as a container
•
Copy my code into the running container
•
Use it to generate a native image of my Quarkus
application
145
Chapter 4
Packaging and Deploying Quarkus Applications
Remember Container images are functional OSes, so when I generate a
native image, that image is targeted to the OS that the container is running.
First thing to do is to install Docker on your machine. Docker is the “JVM”
in this scenario; first we get the “JVM,” then we get the “JAR” or images to
use in it.
Don’t worry if you’ve never done this before – this is why you bought
this book.
I nstall Docker
www.docker.com is where you go for your Docker installation. To keep
things simple, just download Docker Desktop and follow the instructions
to install.
C
onfigure Docker
After successfully installing Docker, two things need configuring:
146
•
File System sharing: For me, to be able to transmit my
code, written inside my IDE, into a docker container,
I need to expose my local File System to the Docker
runtime. Go to Settings ➤ Resources ➤ File System to
configure the paths or path that you’d like to expose to
the Docker runtime.
•
Machine resource configuration: This one bit me.
The process of generating a native image is CPU and
RAM intensive and takes a lot longer than I’m used to
with traditional Java code compilation. For this reason,
it’s important to allocate enough RAM and CPU to the
Docker runtime. Without doing this, you may find that
the native image generation step seems to stall and
error out mysteriously. If you’re on a resource-poor
Chapter 4
Packaging and Deploying Quarkus Applications
machine, you can hold off on this until you hit that wall,
if you do at all. Otherwise, it’s something to be aware of.
Go to Settings ➤ Resources ➤ Advanced and tweak
the numbers there based on your needs.
Having installed Docker, I can validate my installation by opening a
terminal or command-line window and running the following command:
docker info
This command prints diagnostic information about the installation
and the OS environment. Now that I have my OS “JVM,” I need “JARs” or
docker images to run in it. You can also run docker run hello-world to
download and run a “hello-world” image, as proof that all is well.
Install the CentOS Image
Docker images are collected in image repositories or registries, much like
Java JARs are collected in Artifactory, Nexus, or the global Maven repo.
Traditionally, you would go to hub.docker.com to search for any images
you want. Images are created and published with relevant info to that site.
Vendors like Oracle, Redis, and even individuals like you and I can publish
images containing canned OSes with preconfigured distributions of their
products. Users can then go and “pull” those images into their deployment
machines and run the images as containers. What I want now is a complete
Linux distribution that comes with GraalVM, all its dependencies and
tooling preconfigured, native imager installed, and Maven.
Meet https://quay.io. The Quarkus team has distributed several
useful images to the docker images at the command line to see the list of
images available in the docker runtime. Here’s what it looks like for me:
147
Chapter 4
Packaging and Deploying Quarkus Applications
REPOSITORY
IMAGE ID
CREATED
quay.io/quarkus/centos-quarkus-maven
39d6594a5a6a
15 hours ago
quay.io/quarkus/ubi-quarkus-native-image
91fb19e82ebc
16 hours ago
TAG
SIZE
20.0.0-java11
1.86GB
20.0.0-java11
1.43GB
Now that we have an image, let’s start a container based on that image.
Run the CentOS Image
Let’s fire up a container from the CentOS image. When I “run” an image,
I’m telling the Docker runtime that I want a virtual operating system
running on my machine, using the image as the template. So, from my
CentOS image, I want CentOS and all the goodies bundled within to start
up on my PC. To make this a fulfilling run, I’d like a couple more things:
•
I want my Quarkus project code to be made available
inside the virtual OS. I want changes I make in my local
File System reflected inside the containerized OS.
•
Since the container I want to run is a fully self-contained
computer, running inside my own computer, I should
be able to run my Quarkus code inside the container.
Not just that, but from my own environment outside the
docker container, I should be able to send REST requests
to the Quarkus service running inside the container.
Here’s the command that does all that:
docker run -it --name my-quarkus-app -p 8080:8080 -v
//c/eclipse-workspace/code-with-quarkus:/my-quarkus/app quay.
io/quarkus/centos-quarkus-maven:20.0.0-java11 bash -l
Here’s the breakdown of “all that”:
1. docker is the actual docker tool – can’t do anything
without this.
148
Chapter 4
Packaging and Deploying Quarkus Applications
2. run command to run the image.
3. -it asks the tool for an interactive session.
4. -p stipulates that when a request hits 8080 on my
host machine, it should be forwarded to port 8080
inside the docker container. This way, I can initiate
REST resource requests from my dev environment
and have them executed by the code running inside
the fake computer I’m about to start.
5. -v tells the docker runtime to take C:\eclipseworkspace\code-with-quarkus and mirror it as
/my-quarkus/app, inside the virtual computer I’m
about to run. This option makes my project code
available inside the container. This way, changes
I make in C:\eclipse-workspace\code-withquarkus will be reflected inside /my-quarkus/app
directory in the container and vice versa.
6. quay.io/quarkus/centos-quarkus-maven is the
fully qualified name of the CentOS docker image,
kinda like saying javax.ws.rs.core.Application,
instead of just Application. 20.0.0-java11 is the
version of this image that I want to use. Be sure to
check quay.io for the latest version of this image, in
case version 20.0.0-java11 has been deprecated by
the time you get this book.
7. bash instructs the Docker engine to immediately
launch a bash shell session inside the container as
soon as it has been created.
You should be able to substitute your own values into the various
command positions and run the command as is.
149
Chapter 4
Packaging and Deploying Quarkus Applications
Inside the newly created container’s bash shell, I should be able
to check to be sure certain things are available and configured in this
OS. From inside the open bash shell:
1. Check that maven is installed with mvn -v:
OpenJDK 64-Bit Server VM warning: forcing
TieredStopAtLevel to full optimization because
JVMCI is enabled
Apache Maven 3.6.3
(cecedd343002696d0abb50b32b541b8a6ba2883f)
Maven home: /usr/share/maven
...
2. Check that GraalVM is installed with echo $JAVA_HOME:
[quarkus@1eaf2b1b569f project]$ echo $JAVA_HOME
/opt/graalvm
3. Confirm that my code is available inside the OS by
navigating to the directory I mounted.
If everything is looking good, on to the next step.
Build Native Images Inside a Docker Container
From this point on, it’s straightforward. First navigate to your project
directory inside the bash shell
cd /my-quarkus/app
then run the following command to generate the native image:
mvn package -Pnative -DskipTests
This is what begins the compilation and generation process. If you’re
the curious type, add -X and -e flags to the maven command to see
150
Chapter 4
Packaging and Deploying Quarkus Applications
debug-level information while the image generation executes. If it fails for
non-compilation or dependency-related reasons, the most likely suspect
is host OS resources. This is why I recommended that you allocate enough
RAM to the Docker Desktop app. The native image generation is RAM
intensive – it’s a lot of upfront hard work. Allocate more RAM and run it
again. When all goes well, you should have a native image generated in
the /target subdirectory (it’s the file without an extension). It’s the file
without an extension: code-with-quarkus-1.0.0-SNAPSHOT-runner.6
Hint Compare the sizes of the artifacts generated from native
images and what you get from JVM mode JARs. The native image is
slightly bigger than the complete JVM jar.
Native image secured. Fire it up:
./code-with-quarkus-1.0.0-SNAPSHOT-runner
I should now be able to hit the RESTful service deployed inside the
container, from within my host operating system. It’s this native image that
becomes your deployment package, targeted Unix/Linux environments.
I’ve personally validated the generated image, not only in CentOS but
also in Red Hat and Ubuntu Linux distros. Not only is this good to run in
related distros of Linux; it no longer needs the JDK or JRE to run – not even
GraalVM needs to be present once the native image has been generated.
It’s now a self-contained executable with amazing throughput. All of this to
lead to the holy grail: a small, lightweight java application that can run in
resource-starved environments. Quarkus gives you flexibility and control
of the native image generation process with a bunch of configuration
options.
emember: the quarkus.package.output-name property controls the name of
R
the output file.
6
151
Chapter 4
Packaging and Deploying Quarkus Applications
Build Native Images with Maven: A Shortcut
Muahahahahah! Yes, there’s a one-step way to generate native images,
using Docker, but without having to manually go inside the container and
execute mvn package -Pnative. Are you ready? Okay, here goes:
mvn package -Pnative -Dquarkus.native.container-build=true
-DskipTests
and that’s it. Simple, yes? A few things:
1. This example defaults to Docker for the image
generation; you still need to have Docker installed
and configured. Set the -Dquarkus.native.
container-runtime=<runtime-name> option to
select a different container runtime (otherwise,
Docker is used as default).
2. This is still targeted at a Linux Docker image,
specifically quay.io/quarkus/ubi-quarkusnative-image. So, while you can run this from
the comfort of, say, a Windows development
environment, the generated native artifact is still
runnable inside a *nix OS only. Use the quarkus.
native.builder-image property to select a
different image for use.
3. You can run into memory problems (typically java.
lang.OutOfMemoryError) during execution of this
command. For this, be sure to set MAVEN_OPTS as
an environment variable in your host machine, with
ample heap space settings for the JDK. Even more
fun when you realize it can fail for memory reasons,
and you might not get a satisfying exception or error
message indicating this specific problem.
152
Chapter 4
Packaging and Deploying Quarkus Applications
The result will still be the same, assuming all goes well for you – you
still get the native executable generated into the target subdirectory of
your Quarkus project.
S
SL Support
When your app’s going native, you’re going to need to be explicit about
a couple of things. This is so that the native image utility bundles the
dependencies necessary to support those features. One of them is SSL
support. To ensure your native executable can execute HTTPS calls, you need
quarkus.ssl.native = true
Third-Party Class Support
Kudos to the Quarkus team: they’ve gone ahead and ported a healthy
number of popular open source frameworks into Quarkus to provide native
imaging support. Then there’s the @RegisterForReflection annotation
that you can add to your custom classes to make them available for AOT
compilation. What about third-party classes that you have no control over
and haven’t been properly “Quarkused”?
When you inevitably try to use a library that doesn’t expose itself for
GraalVM’s AOT,7 you will need a way to manually expose that class to the
native image tool. You will get some variety of the following exception at
runtime, only when the application is packaged in native mode:
org.jboss.resteasy.spi.UnhandledException: io.smallrye.
jwt.build.JwtException: JwtProvider io.smallrye.jwt.build.
impl.JwtProviderImpl could not be instantiated: java.lang.
sually because it doesn’t have a public, no-arg constructor or it uses a lot of
U
reflection.
7
153
Chapter 4
Packaging and Deploying Quarkus Applications
InstantiationException: Type `io.smallrye.jwt.build.impl.
JwtProviderImpl` can not be instantiated reflectively as it
does not have a no-parameter constructor or the no-parameter
constructor has not been added explicitly to the native image
No biggie: you resolve this by manually declaring the class’s layout and
structure to the native image tool in GraalVM. Create a file named “reflectionconfig.json” in the resources directory of your Quarkus project. To address
the runtime exception earlier, here’s an example reflection-config.json:
[
{
"name" : "io.smallrye.jwt.build.impl.JwtProviderImpl",
"allDeclaredConstructors" : true,
"allPublicConstructors" : true,
"allDeclaredMethods" : true,
"allPublicMethods" : true,
"allDeclaredFields" : true,
"allPublicFields" : true
}
]
OK, what’s all this then? I’ve declared io.smallrye.jwt.build.impl.
JwtProviderImpl as a class that needs AOT compilation, specifically
requiring that all its constructors, public or private, all fields and all
its methods, all of them, should be imaged by the native image tool.
GraalVM will be well advised to pay attention to my declaration, for I am
a powerful man!8
Editor’s note: No you’re not.
8
154
Chapter 4
Packaging and Deploying Quarkus Applications
All that’s left is to deliver the instruction to GraalVM at maven build time:
<properties>
<quarkus.package.type>native</quarkus.package.type>
<quarkus.native.additional-build-args>-H:Reflection
ConfigurationFiles=reflection-config.json</quarkus.
native.additional-build-args>
</properties>
-H:ReflectionConfigurationFiles is a GraalVM parameter that you
use to pass the reflection-config.json file to the runtime; you can also set it
in the application.properties file. I prefer using the POM.xml, because it
keeps all the build-time configuration in one place. Now dance, build!
Package a Quarkus App As a Docker Image
The previous exercises were to show you how to turn your boring vanilla
JVM code into a blazing fast and lightweight (Linux)OS-native bundle
(Windows support is still experimental as at the time of this writing).
For true WORP goodness, you should bundle the whole thing as Docker
image unto itself. This is true WORP thinking, with a microservice twist:
it’s bundled as a functional unit, in its own little container bubble, and
you get to distribute it as a single package. Yeah, that’s right: we’re going to
package a Quarkus app as a Docker image.
Dockerfile
The Dockerfile is the instruction set for the Docker runtime for when
it’s creating an image. When you run the docker build command, the
Docker runtime will look for a Dockerfile in the current directory; using
instructions in the file, it will create a Docker image that you can publish or
run. For the purposes of this demo, you’ll use the Dockerfile to configure
155
Chapter 4
Packaging and Deploying Quarkus Applications
•
The operating system you want to base your Docker
image on.
•
File/directory sharing instructions – you need your
code to pass into this image somehow.
•
TCP ports to expose by default – the port on which your
microservice container will expose the microservice.
•
Shell commands, scripts, or programs to run
immediately after the container is started.
The Quarkus maven archetype generates two kinds of Dockerfile in the
/src/main/docker directory:
•
Dockerfile.jvm9 for creating a Docker image that runs
your Quarkus app in JVM mode (read: traditional java
application run)
•
Dockerfile.native for creating a Docker image that runs
your Quarkus app as a native image
Clearly, I’m in this only for native business, but the same steps apply
for JVM mode images. For the remainder of this section, I’ll be using the “.
native” Dockerfile alone. Here’s what’s going on inside the native Dockerfile:
FROM registry.access.redhat.com/ubi8/ubi-minimal:8.1
WORKDIR /work/
COPY target/*-runner /work/application
RUN chmod 775 /work /work/application
EXPOSE 8080
CMD ["./application", "-Dquarkus.http.host=0.0.0.0"]
he default filename is just “Dockerfile”; you need to use a -f flag if you need
T
to use Dockerfile with any extension you choose. The Quarkus gang just used “.
native” and “. jvm” to indicate which Dockerfile to use for native and JVM modes,
respectively.
9
156
Chapter 4
Packaging and Deploying Quarkus Applications
and this is what all of that means:
•
FROM stipulates the base image, that is, an existing
docker image on top of which I want to build my
own image.
•
WORKDIR defines a directory to hold transient
files and data that the entire image generation
process can use.
•
COPY asks that the files ending in “-runner” in the
directory “target” be moved into the /work/application
directory. Remember: I defined /work/ in the
WORKDIR directive immediately before this directive.
•
RUN will run the specified Unix command.
•
EXPOSE will ask that the container open up port 8080
on itself.
•
CMD will run the defined commands when the image
is launched as a container.
Don’t worry if some of this feels uncomfortable – go on and read this
section as many times as you like. If you’d like more formal definitions of
these Dockerfile commands, check out the Dockerfile reference.
Build a Docker Image
The native Dockerfile comes with some instructions and sensible defaults.
So sensible and instructional that you can take the instructions and
execute them as is. So, after you’ve built your native executable with either
mvn package -Pnative or the in-docker manual build, you should be able
to execute
docker build -f src/main/docker/Dockerfile.native -t apressquarkus/code-with-quarkus . (3)
157
Chapter 4
Packaging and Deploying Quarkus Applications
Breakdown time!
1. build is the command that the docker utility uses to
construct an image.
2. The -f flag directs the docker utility to a customnamed Dockerfile (src/main/docker/Dockerfile.
native in this case).
3. The -t flag tells the docker runtime what to name
and tag the image. The format I’m using here is
<namespace>/<application-name>. Pay attention
to the period at the end up there; it's important. The
build command has a tendency to choke without
that being there.
and that’s it. All goes well, you should have your very own docker-imaged
Quarkus app. This is an image based on Native mode Quarkus. If you
prefer, use Dockerfile.jvm for JVM mode quarkus. Verify that docker has
the image stored by running docker images in your terminal window.
what I get.
REPOSITORY
IMAGE ID
SIZE
lambci/lambda
3bc93227d833
421MB
quay.io/quarkus/centos-quarkus-maven
39d6594a5a6a
1.86GB
quay.io/quarkus/ubi-quarkus-native-image
91fb19e82ebc
1.43GB
lambci/lambda
81c66411cd01
698MB
quarkus/code-with-quarkus
0dc7b0de59d6
220MB
158
TAG
java11
20.0.0-java11
20.0.0-java11
provided
latest
Chapter 4
Packaging and Deploying Quarkus Applications
There I have quarkus/code-with-quarkus in my list of images.
It means I can run my entire Quarkus app as a “black-box” application,
preconfigured and contained inside a complete operating system. It also
means I can distribute the app as a canned, ready to drink run platform,
by publishing this image to the docker hub; just like you can create a Java
JAR, use it locally or send it to the central maven repository.
Run a Docker Container from an Image
With the app baked as an image, you can run a container from that
image with
docker run -i --rm -p 8081:8080 quarkus/code-with-quarkus
Here, I’m mapping port 8081 on my local machine to port 8080 on the
running container instance. This way, when I send an HTTP request to
port 8081 in my host machine’s browser, the request is forwarded to my
running container’s port 8080, on which the code-with-quarkus app is
listening for connections.
In a real-world application, there will be multiple instances of an app
like code-with-quarkus, running as containers. The containers could all
be running on one machine or spread out among multiple machines in a
cluster formation. When we start talking about multiple instances of the
same container, we need some sort of load balancer or orchestrator that
will sit and distribute incoming service requests among the containers.
Fundamentally, this is the promise of containers and microservices: the
ability to run insular deployments of software products in a fashion that
can automatically scale to a high degree of granularity. When demand
for a particular microservice increases, a container orchestration layer
can spawn new containers of that microservice alone to deal with the
increased demand.
159
Chapter 4
Packaging and Deploying Quarkus Applications
Docker provides Swarm as its orchestration and load balancing
module. An alternative and more sophisticated orchestrator is Kubernetes,
or K8s, as we cool kids call it. In the AWS cloud, you have
•
Elastic Container Service (ECS)
•
Elastic Kubernetes Service (EKS)
Microsoft Azure has Azure Kubernetes Service (AKS). They didn’t
come up with a clever name for their raw container orchestrator.
Serverless Microservices
I’ve been throwing “serverless” around all over this book so far, maybe
even defined it. Here it is once again.
The serverless deployment of an application means simply to
deploy your application without having to configure an application
server or a host server. You shouldn’t care about sizing the server,
securing the server, and clustering, scaling, monitoring, or managing it.
The actual machine, physical or virtual, that your application will
be deployed to is not your problem. In most cases, you only need to
provide the deployment unit (jar, .js, .java, .py, etc.) to the serverless
platform provider. Quarkus provides support for the major players in the
serverless/cloud space (Amazon, Microsoft, Red Hat).
Most serverless platforms are event-driven: you deploy your code in a
serverless platform and your code is triggered by events within the provider’s
cloud ecosystem. You could have your code triggered by an HTTP request
as in a vanilla web service; your code could be triggered by a database event
(insert, update, delete); your code could be triggered by messages from
a queueing service like SQS (from Amazon Web Services). These event
connections are typically provided by your cloud provider, and you should
only need to supply the code and configure the event connection.
160
Chapter 4
Packaging and Deploying Quarkus Applications
Serverless applications are designed to be focused, efficient, and
scalable. Quick in ‘n’ out. They’re not for long-running applications. In
general, you’ll find that most serverless providers use the term “serverless
functions” – this is important: serverless functions are treated like
functional programming implementations. They’re not supposed to
maintain persistent state (at least not without auxiliary storage like a
database or message queue); they’re not made to be long-lived. Your cloud
provider expects to trigger your application code with a supported event,
run your code, and exit the function, preferably with a brisk response time.
Now, the perks that a specific cloud provider can provide with
its serverless offering will vary from provider to provider – Microsoft,
Amazon, OpenShift, and so on – all provide their own unique perks in their
serverless services. On the whole though, the serverless deployment model
uniquely meshes well with microservice architecture:
•
Microservices being lightweight and narrowly focused
by design sit well in a serverless deployment model.
Think about it: “micro”service that executes a narrow
function, plus serverless deployment that’s lightweight
and brisk in execution.
•
Amazon Web Services (AWS) and Microsoft’s Azure
cloud platforms provide seamless versioning of
serverless functions so that you can update the
code, deployment after deployment, and maintain
reasonable backward compatibility and contract
stability with your service consumers.
•
In true WORP fashion, you won’t need to care about the
OS, server, or cluster you’re deploying your application
to. The native image is packaged as a completely selfsufficient deployment unit.
161
Chapter 4
Packaging and Deploying Quarkus Applications
Yawn. Okay, let’s try Amazon Web Services serverless deployments.10
Amazon Web Services Serverless Deployment
Traditional Java applications aren’t suited to serverless deployment. Don’t
take it from me; take it from the most popular cloud platform in the market:
•
Minimize your deployment package size to its
runtime necessities.
•
Minimize the complexity of your dependencies. Prefer
simpler frameworks that load quickly on execution
context startup. For example, prefer simpler Java
dependency injection (IoC) frameworks like Dagger or
Guice over more complex ones like Spring Framework.
•
Reduce the time it takes Lambda to unpack
deployment packages authored in Java by putting your
dependency .jar files in a separate /lib directory. This
is faster than putting all your function’s code in a single
jar with a large number of .class files.
Wow, harsh. But their words, not mine. All of these basically rule out:
•
Spring Boot
•
A fat JAR
•
Vanilla JavaEE
Quarkus is going to show them. Quarkus is going to show them all.
Don’t worry; you won’t have to wrangle “the cloud” for this
demonstration. I’m going to show you how to deploy a native Quarkus
application to a local simulation of Amazon’s serverless platform, running
Did you yawn too just now? I hope so! They’re supposed to be infectious!
10
162
Chapter 4
Packaging and Deploying Quarkus Applications
on your computer. Amazon Web Services (AWS) serverless platform is a
product called Lambda. To deploy code to Lambda, you’ll need to select
what’s called a “runtime”.
AWS Lambda Runtimes
You have your choice of different runtimes, roughly corresponding to the
programming language you’re working in; so there’s the PHP, JavaScript,
Python, Java, and so on runtimes. Because a native image is no longer
clearly bound to a programming language (at least to the OS), I’m going to
opt for what AWS calls the custom runtime.
Package Quarkus for Lambda
The Lambda execution environment treats your code like…code. By that,
I mean that it doesn’t treat your Quarkus application like a stand-alone,
independently deployable application. Rather, it sees it more like a java
method or class that it needs to call. So in this execution context, Lambda
doesn’t need your Quarkus application to “start up” in the way I’ve been
showing it: no need to start the embedded Netty app server, no need to
care about ports or host IPs or the REST URL paths I’ve defined per the
JAX-RS standards – in fact, it can’t use any of the JAX-RS REST annotations
I’ve defined. From the perspective of the AWS Lambda runtime, this is the
only question that needs answering:
When an event message is sent to Lambda, intended for your
Quarkus application, what method does Lambda need to call?
What we need is a…
Quarkus Lambda Event Handler
Remember: Serverless applications are event-driven. The events are
supplied as message payloads from other services in your cloud platform.
A database action (insert, update, delete), an HTTP/S request, and a
163
Chapter 4
Packaging and Deploying Quarkus Applications
messaging queue payload are all viable event sources (among others). The
actual data from these sources will be embedded inside the event payload
that will be delivered to your serverless function. I’ll need to define an
entrypoint for events to be delivered to my Quarkus application, separate
from the JAX-RS resource classes I have defined. To support Lambda event
handling, I need the Quarkus Lambda plugin:
mvn quarkus:add-extension -Dextension=quarkus-amazon-lambda
Then I can add a Lambda handler class to my Quarkus project:
import
import
import
import
javax.inject.Inject;
javax.inject.Named;
com.amazonaws.services.lambda.runtime.Context;
com.amazonaws.services.lambda.runtime.RequestHandler;
@Named("http-lambda-handler")
public class LambdaHandlerImpl implements RequestHandler<Hello
Request,HelloResponse> (1) {
@Inject
ExampleResource restResource; (2)
final Logger logger = Logger.getLogger(LambdaHandlerImpl.
class.getName());
@Override
public ConversionResponse handleRequest (3)(HelloRequest
input, Context context) {
logger.info("Received serverless request: "+context.
getAwsRequestId()+"; function version: "+context.
getFunctionVersion());
return restResource.hello(input));
}
}
164
Chapter 4
Packaging and Deploying Quarkus Applications
There’s not too much going on here:
1. The AWS Java SDK provides the RequestHandler
interface. Implementing this interface marks this
class as a Lambda handler class. It is typesafe – I’m
supplying the expected request and response classes
as parameters. The AWS SDK will extract the core
message data from the Lambda event payload and
cast it into the required types. There can be only one
active handler per serverless Quarkus deployment.
Using the @Named annotation from CDI to name this
Lambda handler bean class, I now need to configure
the handler in application.properties:
quarkus.lambda.handler=http-lambda-handler
This tells Quarkus to mount the named bean as the
Lambda event handler. You can then use profiles to
set up different handlers like
%test.quarkus.lambda.handler=test-httplambda-handler.
2. Because I’ve baked a lot of my business logic into the
ExampleResource JAX-RS REST resource class, I now
need to inject it into this handler so I can reuse the
business logic. This isn’t an ideal design, so let this be
a lesson to you! Encapsulate your core business logic
in reusable classes and patterns like the Data Access
Object (DAO) or Command patterns.
3. handleRequest is the method inherited from the
RequestHandler interface. It supplies the Lambda
event message payload, as well as some contextual
information about the Lambda runtime and the
function that was invoked.
165
Chapter 4
Packaging and Deploying Quarkus Applications
This concludes the code changes necessary to support AWS lambda
deployment. To be clear, none of this is native image deployment-specific;
it’s all standard Lambda stuff here.
“Monolambda” Serverless Application
Because Quarkus currently supports just one Lambda handler per app,
you might be wondering what to do when you have multiple API endpoints
to support via REST. This is what the so-called “monolambda” approach
solves. Treat the single Lambda handler as an entrypoint or Facade for the
rest of your application. From inside your handler, you are free to dispatch
the Lambda event to any other part of your application. You can use any
part of the context and metadata to decide on what to do with an incoming
event. This is what is sometimes known as a “monolambda.”
Tip Be mindful of the Quarkus extensions, producers, and beans
you define in your application. Quarkus spends some time during
startup to clear unused components out of memory. This can be a
couple of seconds, depending on how much clutter there is in your
application. You can control this behavior by setting the quarkus.
arc.remove-unused-beans to none or false. framework is
also an option so that only non-custom beans are removed.
To deploy your Quarkus project to Lambda, AWS mandates the
following:
1. The deployment unit must be named “bootstrap”,
if it is going to be using the custom runtime
(i.e., a native image).
2. The deployment unit must be packaged as a zip file.
You can also use a JAR if you’re deploying your app
in JVM mode.
166
Chapter 4
Packaging and Deploying Quarkus Applications
3. The deployment unit can be packaged with what is
called a Serverless Application Model (SAM) file, in
YAML format. This file provides crucial deploy-time
metadata about your serverless application to the
Lambda platform.
4. A LAMBDA_ROLE_ARN environment variable that
corresponds to the lambda execution role that you have
created in the Identity Access Manager, in the AWS
console. For the purposes of this book, you can ignore
this step – all of the samples here are locally executable.
When you add the quarkus-amazon-lambda extension to your project
and build it with mvn package, Quarkus automatically
•
Creates two files named sam.jvm.yaml and
sam.native.yaml.
•
Creates manage.sh and bootstrap-example.sh files
containing helpful shell scripting functions for deploying
and running your application in AWS Lambda.
•
Creates a “function.zip” file that is supposed to be the
complete deployable kit. You should be able to straight
up upload this file to Amazon’s S3 service and point a
Lambda function at it.
What your function.zip contains depends on the compilation mode;
what you’ll get inside for a JVM mode app is different for a native image
app. The JVM mode kit is not interesting (or recommended) for serverless
deployment, so I won’t go into detail about it. No, I’m here for that native
business.
167
Chapter 4
Packaging and Deploying Quarkus Applications
AWS requires that custom runtime serverless projects be supplied to
lambda
•
With the executable named “bootstrap”
•
And bootstrap be delivered in a zip file named
function.zip
And that’s what quarkus-amazon-lambda does. It will rename your
deployable output to bootstrap and then add it to a function.zip file; the
output being in the target directory. Additionally, you’ll find the utility
shell scripts, sam.jvm.yaml and sam.native.yaml in the same directory.
Let’s check it out.
AWS Serverless Application Model
This is the piece de resistance to all of this. The Serverless Application
Model (SAM) is a framework that AWS provides for defining metadata for
a serverless application. It’s mostly defined in a YAML file and consumed
by different AWS tools to provision a serverless application. I’m not going
to go into too much detail of the model – the whole thing is a robust
schema of options. Instead, I’ll show you only what you need to know to
get a simple Quarkus serverless deployment going. Here’s some SAM file
content you can use:
AWSTemplateFormatVersion: '2010-09-09'
Transform: AWS::Serverless-2016-10-31
Description: AWS Serverless Quarkus - com.apress.
samples::lambda
Globals:
Api:
168
Chapter 4
Packaging and Deploying Quarkus Applications
BinaryMediaTypes:
- "*/*"
Resources:
LambdaNativeFunction:
Type: AWS::Serverless::Function
Properties:
Handler: not.needed.for.provided.runtime
Runtime: provided
CodeUri: target/function.zip
MemorySize: 128
Policies: AWSLambdaBasicExecutionRole
Timeout: 15
ProvisionedConcurrencyConfig:
ProvisionedConcurrentExecutions: 5:
Environment:
Variables:
DISABLE_SIGNAL_HANDLERS: true
A lot of this is boilerplate stuff that won’t vary too much from
deployment to deployment; I’ve highlighted the salient bits:
1. Handler: If this were a JVM mode serverless
deployment, I would have io.quarkus.amazon.
lambda.runtime.QuarkusStreamHandler::hand
leRequest in there instead of the dummy text I’ve
placed there. The QuarkusStreamHandler class
(and the handleRequest method in that class) is a
dedicated Quarkus-provided class that’s required
for AWS serverless deployment. For the native
deployment scenario, any string will do. The field is
mandatory, per AWS.
169
Chapter 4
Packaging and Deploying Quarkus Applications
2. Runtime: This is where I would ordinarily specify
“java8” or “java11”, were this a JVM mode package.
Native mode packaging requires the “provided”
runtime, a.k.a. custom runtime.
3. CodeUri: The path to the deployment package. This
tells SAM where to find the deployment package/
code to load for a serverless deployment. Since my
deployment package is in the /target subdirectory
of the Quarkus project, that’s what I’ve configured
here. In a real AWS deployment, you would supply
a path to an Amazon S3 bucket where you would
have previously uploaded the zip file containing your
Quarkus app.
4. MemorySize: What’s the maximum amount of RAM
I’d like AWS to allocate to my serverless app?
5. ProvisionedConcurrencyConfig: This defines the
minimum amount of concurrent instances of this
Lambda I’d like to run. When you think of Lambdas
as threads, this option defines how many Lambda
instances should be pooled and ready to serve
requests. It’s a great choice for minimizing latency
or variability in the latency. This is what AWS calls
“Provisioned Concurrency.” This helps you blunt
the effects of Lambda cold starts. The downside is
that you’ll now always be paying for those lambdas,
whether or not they’re running. Note that this isn’t a
requirement – you can run a perfectly fine Lambda
function without this feature. I’m including it here
only for completeness, because AWS just introduced
this feature last December (2019).
170
Chapter 4
Packaging and Deploying Quarkus Applications
6. Environment: This section of the SAM template
defines environment variables that I expect the
Lambda runtime to load into whatever OS it’s using.
These variables are also available for consumption
by my code. Here, I’ve defined only the DISABLE_
SIGNAL_HANDLERS variable as recommended by
the Quarkus team. Disabling signal handlers means
that the native image will not respond to OS-level
instructions like SIGKILL and SIGABRT.
I simply save this template into a YAML file named sam.native.yaml
and go about my business. Finally, I can choose to now deploy my app
either to the AWS cloud or run it locally in a simulated Lambda runtime.
I’ll take #2 please; otherwise, you’ll need to go sign up for an AWS account
and configure stuff, which is out of the scope of this fine book. To the
simulated environment!
AWS SAM CLI Deployment
With my Quarkus application outfitted for serverless deployment for the
AWS Lambda platform, I have the choice of uploading my kit named
“function.zip” to the AWS online console. I could also just bring the
Lambda platform to my local machine for a simulated deployment.
The SAM command-line interface (CLI) is a portable serverless
application toolkit provided by AWS. Use it to test, deploy, and manage
your serverless applications both locally and in the AWS cloud.11 It’s
packaged as a Docker image (of course); you already have Docker Desktop
installed by now, don’t you? Download and install the CLI for your
operating system and let’s crack on!
nd also check out Localstack to replicate a lot of services and functions of the
A
AWS cloud, right on your local machine!
11
171
Chapter 4
Packaging and Deploying Quarkus Applications
Once your installation is complete, you should be able to run the
following command in a terminal window and get results:
sam –-version
With a correctly packaged serverless Quarkus application, the SAM CLI
will load and deploy my application, using the SAM template I supply.
It’ll use the sam.native.yaml file as the definition to launch the app.
I now need to trigger my app, simulating an actual Lambda event as it
would be triggered in the AWS cloud. Use the generate-event command
to use the SAM CLI to generate sample payloads for different AWS services.
Observe
sam local generate-event apigateway aws-proxy
Running the preceding command will generate a sample JSON
document that represents what will be passed to your Lambda by AWS’s
API Gateway service. API Gateway is a service that you can use as the front
facing entrypoint to your microservice. Think of it like a web server provided
by Amazon. Here’s a trimmed down version of the generated document:
{
"body": "This is the HTTP request body",
"resource": "/{proxy+}",
"path": "/path/to/resource",
"httpMethod": "POST",
"isBase64Encoded": true,
"queryStringParameters": {
"foo": "bar"
},
172
Chapter 4
Packaging and Deploying Quarkus Applications
"multiValueQueryStringParameters": {
"foo": [
"bar"
]
},
"pathParameters": {
"proxy": "/path/to/resource"
},
"headers": {
"Accept": "text/html,application/xhtml+xml,application/
xml;q=0.9,image/webp,*/*;q=0.8",
"Accept-Encoding": "gzip, deflate, sdch",
"Accept-Language": "en-US,en;q=0.8",
"Cache-Control": "max-age=0",
"Host": "1234567890.execute-api.us-east-1.amazonaws.com"
},
"multiValueHeaders": {
"Accept": [
"text/html,application/xhtml+xml,application/
xml;q=0.9,image/webp,*/*;q=0.8"
],
"Accept-Encoding": [
"gzip, deflate, sdch"
],
"Accept-Language": [
"en-US,en;q=0.8"
],
"Cache-Control": [
"max-age=0"
]
},
173
Chapter 4
Packaging and Deploying Quarkus Applications
"requestContext": {
"accountId": "123456789012",
"resourceId": "123456",
"stage": "prod",
"requestId": "c6af9ac6-7b61-11e6-9a41-93e8deadbeef",
"requestTime": "09/Apr/2015:12:34:56 +0000",
"requestTimeEpoch": 1428582896000,
"path": "/prod/path/to/resource",
"resourcePath": "/{proxy+}",
"httpMethod": "POST",
"apiId": "1234567890",
"protocol": "HTTP/1.1"
}
}
The generated JSON document shown here is a sample representing
a Lambda event coming from the API Gateway service. API Gateway is
another AWS service that you can use to provide HTTP/S interfaces to
applications deployed in AWS. This whole document is then converted
into a Java object and delivered to your code by the Lambda runtime.
I’ll save this sample as a file named payload.json. All that’s left to do is
to invoke my Lambda-packaged application using payload.json as the
event. For that, I’ll run the following command from within my Quarkus
project folder:
sam local invoke -t sam.native.yaml --event payload.json
Here’s what I’m doing with this command:
1. sam local invoke executes a local invocation of the
serverless application that’s…
174
Chapter 4
Packaging and Deploying Quarkus Applications
2. …defined in sam.native.yaml. The -t flag loads the
file for the SAM cli. If I wanted to deploy my app in JVM
mode, I’d use the generated sam.jvm.yaml instead.
3. The –event flag loads the JSON payload from the
file named payload.json, using it as the request
event payload to pass to my lambda function. This
effectively treats this interaction like a REST service
request. I have access to a lot of metadata in this
event, so I could add conditional logic to inspect the
URL or HTTP method that was invoked to generate
this event.
Here’s the result of my command execution:
[START RequestId: 4de58426-2477-1dc6-72f2-b5f4dc42b611 Version:
$LATEST]
{"timestamp":"2020-04-12T12:49:56.99Z","sequence":633,
"loggerClassName":"org.jboss.slf4j.
JBossLoggerAdapter","loggerName":"com.apress.samples.handlers.
LambdaHandlerImpl","level":"INFO",
"message":"Received serverless request: 4de58426-2477-1dc672f2-b5f4dc42b611; function version:
$LATEST","threadName":"Lambda Thread","threadId":15,"mdc":{},
"ndc":"","hostName":"4241f4c86237","processName":
"NativeImageGeneratorRunner$JDK9Plus","processId":488}
[END RequestId: 4de58426-2477-1dc6-72f2-b5f4dc42b611]
[REPORT RequestId: 4de58426-2477-1dc6-72f2-b5f4dc42b611
Init Duration: 799.91 ms
Duration: 17.88 ms
Billed Duration: 100 ms Memory Size: 128 MB
Max Memory
Used: 58 MB]
{"responsContent":"Hello Quarkus Person, Welcome to AWS
Lambda!"}
175
Chapter 4
Packaging and Deploying Quarkus Applications
This run of this command shows me a couple of things that are
specifically provided by the Lambda runtime:
1. I can see the running version of my Lambda app as
$LATEST, because I didn’t deliberately configure a
version number.
2. I can see how long it took for the Lambda runtime to
start up,12 “Init Duration” – 799.91ms.
3. It shows me how long my serverless function took to
completely execute, “Duration” – 17.88ms.
4. I can then see how much time I would be billed
for, “Billed Duration” (were these running in the
AWS cloud and not in my local machine) – 100ms.
How come? The minimum billable duration in AWS
is 100ms, regardless of how much less time your
serverless function runs for.
5. I see the maximum amount of RAM my app
consumed at any point during its execution,
“Max Memory Used” – 58MB.
And that, ladies and gents, is how you deploy an AWS Lambda function
in your local development environment. You can use the SAM CLI to
deploy your lambda to an actual AWS environment as well; you just need
to register for a free AWS account. Get a more comprehensive introduction
to SAM starting with the wonderful AWS documentation (seriously, Oracle
and AWS write some killer docs).
his is a little bit of a sore spot with serverless functions with any cloud provider:
T
the very first invocation of a function tends to be costly as the infrastructure
warms up to serve your code. AWS doesn’t bill for this cold start time, but it
still sucks for the unlucky first user. The Provisioned Concurrency setting was
introduced to address this issue.
12
176
Chapter 4
Packaging and Deploying Quarkus Applications
The model of deployment I’ve just walked through is the most flexible.
My serverless Quarkus application can field events from any other AWS
component – databases, message queues, CloudWatch, or anything.
My application doesn’t expose an HTTP endpoint, but it is kitted out for
flexibility. If I want to deploy my Lambda as a RESTful web application,
complete with a REST endpoint that can be hit with HTTP, I’m going to
need to get funky. Cue the bass!
Funqy Serverless Apps
Funqy – not a typo – is an effort by the Quarkus team to standardize the
deployment of serverless functions. With Funqy, you can write a REST
resource once, and Quarkus can make it readily deployable for multiple
different serverless platforms and deployment scenarios. So with code like
@Funq("generate-anagram")
public AnagramResponse getAnagram(AnagramRequest request) {
...
}
@Funq marks this method as a “function”. From this point, the only
question I need to answer is “what platform do I want to deploy this
function to?”. Here are some answers:
•
AWS Lambda? I just add the quarkus-funqy-amazonlambda extension to expose getAnagram as a Lambda
function. Additionally, I’ll configure quarkus.funqy.
export=generate-anagram. Funqy and the Quarkus
lambda extension will work to manage the handler for
receiving and unmarshalling Lambda events. You still
get just one @Funq per deployable however.
177
Chapter 4
•
Packaging and Deploying Quarkus Applications
Azure Function? I’ll need the quarkus-azurefunctions-http extension. The nice bit of this
extension is that it allows me to expose multiple
@Funq-decorated methods as proper REST endpoints,
complete with URL and all.
Funqy is still under development at this time of this writing, but watch
this space! It’s an exciting direction for the platform as a whole.
AWS Serverless Success with Quarkus
If deploying your code serverlessly feels a little strange to you, it’s
completely normal and you’re not alone. It requires a mindset shift that
might take some time. In addition to all that I’ve already talked about here,
bear these in mind:
178
•
There’s a default 5-minute limit imposed on Lambda
functions in AWS. This means that whatever you do,
your serverless app must complete its processing within
that time limit. This is not ideal for batch processes, so
be careful what you try to execute in a lambda.
•
Static variables, class-level variables, and singletons are
reused between invocations of a lambda function. So, get
really cozy with the @ApplicationScoped and @Singleton
annotations as there could be some serious savings there.
•
If you’re caching data inside your function (instead of
inside an externally managed cache), know that that
cache is isolated to that instance of your function. AWS
supports up to 1000 concurrent invocations of the same
Lambda function. There’s no guarantee that the same
instance of your function will be invoked successively
enough to make an internal cache worth it.
Chapter 4
Packaging and Deploying Quarkus Applications
•
If you’re caching data inside your function, you’re
spending RAM. Take that into account when sizing the
RAM usage of your function with your sam.yaml file.
Sure a bunch of Strings won’t cost too much,13 but if
you’re caching large objects like media content, size
appropriately.
•
Consider using AWS’s Simple Storage Service (S3) to
persist data between Lambda invocations. S3 offers
cheap replication, security, accelerated delivery, and
durability which could help in certain storage and
caching scenarios.
•
Brand new from AWS is the Elastic File System. When
I learned about this, I was shaking with excitement.
It’s a File System for Lambda functions that’s shared
between concurrent invocations of a Lambda function,
with locking and multi-availability zone access. This is
poised to be a game changer for managing state, data,
and configuration for Lambdas.
•
Avoid or minimize recursive invocations inside your
function code. Unchecked recursion will not only cost
you more financially – each invocation of Lambda is
billed – your function could simply just choke out on
memory as well.
•
Treat your lambda function exactly like a function: don’t
hold mutable state in it. Your function could be invoked
once or possibly multiple times for the same request.
The new-ish Compact Strings feature in the JVM certainly won’t hurt!
13
179
CHAPTER 5
Quarkus Data Access
I’ll admit, I was one of them. I was a data access purist: I like my DAOs
chilled, my PreparedStatements prepared, and my SQL handwritten with
the care and tenderness of a lover. The world moved on to Hibernate,
Java Persistence API (JPA), and everything in between; I clung to my
“SQL IS THE LAW” doctrine. Then came Spring Boot Data JPA. And even
then I relished in making my own life difficult. Not for nothing though, I
still believe in raw SQL – a well-crafted SQL statement will outperform
Object-Relational Mapping (ORM).
The fact is that ORM frameworks are a massive time saver and
wonderful for many use cases. Quarkus provides a lot of data access
support, not just SQL. In addition to SQL-based storage, Quarkus provides
extensions to access
•
NoSQL storage like MongoDB and DynamoDB
•
Message brokers like Kafka and AMQP
•
Plain Java Messaging Service (JMS) brokers like
RabbitMQ and ActiveMQ
© Tayo Koleoso 2020
T. Koleoso, Beginning Quarkus Framework, https://doi.org/10.1007/978-1-4842-6032-6_5
181
Chapter 5
Quarkus Data Access
In addition to the standard data access that you ought to expect from
any production-grade microservice framework, Quarkus sweetens the
deal with
•
Panache: Say what you will about the Quarkus
framework, but the authors know how to name a
product! Panache is a collection of augmentations
that Quarkus adds to standard ORM structures, aimed
at reducing the amount of code you need to write. If
you’re familiar with the Active Record pattern, that’s
about the gist of it.
•
Reactive SQL: A CPU-efficient, event-driven approach
to dealing with results from a database query.
Exquisite.
I’ll start with the fundamentals before we get to the good stuff.
SQL Data Sources
Obviously, the first thing to attend to is to configure the databases you’re
going to be interacting with. This is the story of configuring and managing
SQL data sources in Quarkus. Out of the box, Quarkus has extension
support for the following databases:
182
•
MySQL: Add the jdbc-mysql extension.
•
MSSQL: Add the jdbc-mssql extension.
•
PostgreSQL: Add the jdbc-postgresql extension.
•
Embedded databases – H2, MariaDB, and Derby:
Add the jdbc-h2, jdbc-mariadb, and jdbc-derby
extensions, respectively.
•
“Other”
Chapter 5
Quarkus Data Access
”Other” refers to support for the uncool databases. Nah, I’m just
kidding – it’s support for any database that doesn’t have a packaged Quarkus
extension. For the named databases in the preceding list, Quarkus has
repackaged their drivers for native mode compatibility. So you’re still free to
configure a JDBC connection with the following properties, for example:
quarkus.datasource.db-kind=other
quarkus.datasource.jdbc.driver=oracle.jdbc.driver.OracleDriver
quarkus.datasource.jdbc.url=jdbc:oracle:thin:@<ip>:<port>/ORCL_SVC
quarkus.datasource.username=scott
quarkus.datasource.password=tiger
Your Oracle database will be accessible with this config. Just don’t
count on native mode compatibility – JVM mode only. For the Quarkus-
packaged support, just configure the proper quarkus.datasource.db-kind
and provide the JDBC URL:
quarkus.datasource.db-kind=postgresql
quarkus.datasource.jdbc.url=jdbc:postgresql://localhost:5432/
anagrams
quarkus.datasource.username=scottus
quarkus.datasource.password=tigerus
This config will load the correct JDBC driver and guarantee correct
functioning in a native mode deployment. Why stop at one? You can throw
in more data sources in there by naming the data sources. Observe:
#anagram players data source
quarkus.datasource.players.db-kind=postgresql
quarkus.datasource.players.jdbc.url=jdbc:postgresql:
//localhost:5432/anagrams
quarkus.datasource.players.username=scottus
quarkus.datasource.players.password=tigerus
#anagram metrics data source
183
Chapter 5
Quarkus Data Access
quarkus.datasource.metrics.db-kind=mysql
quarkus.datasource.metrics.jdbc.url=jdbc:mysql:
//localhost:3306/anagrams
quarkus.datasource.metrics.username=not-scottus
quarkus.datasource.metrics.password=not-tigerus
With the name I’ve introduced in the standard JDBC connection
properties, I can configure as many different data sources as I like in the
same application. Obviously, you’ll need to install PostgreSQL or any
supported database of your choice. Download an installer from
www.postgresql.org/download/. If you’re cool and hip like the kids say I
am,1 you could skip all that and just run the following docker command.
Courtesy of the Quarkus official documentation:
docker run --ulimit memlock=-1:-1 -it --rm=true
--memory-swappiness=0 --name postgres-quarkus-hibernate
-e POSTGRES_USER=scottus -e POSTGRES_PASSWORD=tigerus
-e POSTGRES_DB=anagrams -p 5432:5432 postgres:10.5
The preceding docker command will
1. Pull the official PostgreSQL version 10.5 image into
your local machine
2. Configure it with the username and password
passed to POSTGRES_USER and POSTGRES_
PASSWORD environment variables
3. Create a database passed to POSTGRES_DB
4. Map port 5432 on your local machine to port 5432 in
your PostgreSQL docker container
All in one move. Smooth.
Editor’s note: No one under the age of 75 considers you “cool.”
1
184
Chapter 5
Quarkus Data Access
Configure a JDBC Connection Pool Manager
Rule of thumb: You need a connection pool in your life. You shouldn’t
deploy anything production-grade without using a connection pool
and, hence, a connection pool manager. A connection pool is any
configured number of resource connections that are pre-created and kept
in memory. The idea is that whenever client code needs access to that
resource, the running code just picks up a warm connection and goes.
In general, creating connections of any kind tends to be expensive and
time-consuming. Pooling those connections ahead of time translates into
significant latency improvements and even throughput gains.
The connection pool manager you select for your application
makes a lot of difference – they’re not all the same. The pool manager
is responsible for creating, maintaining, and retiring the connections
in the pool. The Quarkus squad chose Agroal over Hikari as the default
connection pool manager. Based on their testing, Agroal provides the high
level of efficient pool management befitting the Supersonic Subatomic
tagline; it also provides a great degree of flexibility and tunability. Add the
[agroal] Quarkus extension to introduce it to your kit. You can tweak your
connection pool settings with the following properties:
Property
Description
quarkus.datasource.jdbc. How many connections should the connection pool start
initial-size
out with? Too many would be wasteful and eventually be
a resource drag. To few and you might as well not have
a connection pool at all.
quarkus.datasource.jdbc. After the pool has been started, how many connections
min-size
should be maintained at any point?
quarkus.datasource.jdbc. What’s the most number of connections to be held in the
max-size
pool at any point?
(continued)
185
Chapter 5
Property
Quarkus Data Access
Description
quarkus.datasource.jdbc. How long should the connection pool manager wait to
acquisition-timeout
acquire a connection?
quarkus.datasource.jdbc. At what interval should the connection pool manager
background-validation-
validate the connections in the pool? Validation is the act
interval
of checking that a connection is viable and active.
quarkus.datasource.jdbc. An SQL query that the connection manager can use to
validation-query-sql
validate that the database is simple. Literally, a simple
query you can guarantee to always return a result to
indicate things are going well.
quarkus.datasource.jdbc. At what interval are we checking for leaks in the
leak-detection-interval
connections in the pool?
These properties also can be named to support multiple data sources.
The interval properties have a bit of a twist to them. They’re based
on the new-ish Duration class. So, to set quarkus.datasource.jdbc.
acquisition-timeout to 2 seconds, for example, it would be
quarkus.datasource.jdbc.acquisition-timeout = P2S
I know, it’s a bit of an acquired taste.
Is Your Data Source Healthy?
This is a really neat feature that ships with the Agroal extension. Together
with the quarkus-smallrye-health extension, it displays database health
check information at <host:port>/health, <host:port>/health/ready
Figure 5-1 shows what the response from the health check endpoint
looks like.
186
Chapter 5
Quarkus Data Access
Figure 5-1. The response from my custom health check metric
You can disable this endpoint with the quarkus.datasource.health.
enabled property set to false. This becomes important as you’ll see.
This is all well and good, but there are some scenarios in which the
data source health check can be even more useful. One gripe I have with
Quarkus is this: a broken database connection will not stop your Quarkus
app from starting up.2 In general, I don’t want my application to start up if
critical dependencies aren’t healthy. If you want to do something about it
though, here’s how:
import org.eclipse.microprofile.health.HealthCheckResponse;
import org.eclipse.microprofile.health.Readiness;
import org.eclipse.microprofile.health.HealthCheckResponse.
State;
import io.quarkus.agroal.runtime.health.DataSourceHealthCheck;
import io.quarkus.runtime.StartupEvent;
public class StartupConfigCheck {
Logger logger = Logger.getLogger(StartupConfigCheck.class.
getName());
I t’s probably for a good reason though – Quarkus is all about lazy loading
wherever practical.
2
187
Chapter 5
Quarkus Data Access
@Inject
@Readiness
DataSourceHealthCheck dbHealthCheck; (1)
public void failIfDBisBroken(@Observes StartupEvent (2)
startup){
HealthCheckResponse healthCheckResponse =
dbHealthCheck.call(); (3)
if(healthCheckResponse.getState().equals(State.DOWN)) (4){
logger.warning("Aborting startup: "+healthCheck
Response.getName()+"; message: "+healthCheck
Response.getData());
throw new IllegalStateException("Datasource
connection is broken; Aborting startup");
}
}
}
This bean will stop a Quarkus application from starting up, if the
given data source isn’t available. It also provides a nice, readable
message of your choosing and the freedom to execute custom logic if you
like. How does it work?
1. I inject an instance of io.quarkus.agroal.runtime.
health.DataSourceHealthCheck, the health check
class that Agroal provides. @Readiness is there to
reduce the chances of CDI injection errors due
to ambiguity with any other health check class
available.
2. I use the Quarkus lifecycle event class StartupEvent
to be notified when the application is starting.
188
Chapter 5
Quarkus Data Access
3. Using the health check class, I run the health check
myself and obtain a HealthCheckResponse.
4. I can then interrogate the HealthCheckResponse
object for the status of the health check and a
bunch of useful information. If the status is “DOWN”,
I throw an exception with my desired message. The
exception will terminate any startup in progress,
saving any runtime embarrassment.
This is how I can save myself from any runtime embarrassment due to
misconfiguration.
Caution This isn’t an officially documented feature of Quarkus. It’s
possible, though unlikely, that the bean that enables this is removed
without warning in future releases.
Using SQL Data Sources
I’ve configured an SQL database; now to use the darn thing.
The basic JDBC access is available like so:
@Inject
AgroalDataSource dataSource;
public void generateAndSaveAnagram(String source){
...
try(Connection connection = dataSource.getConnection()){
PreparedStatement statement = connection.
prepareStatement("insert into anagrams
(anagram_text,anagram_source_id) values(?,?)");
189
Chapter 5
Quarkus Data Access
statement.setString(1,response.getConversionResponse();
ResultSet results = statement.executeQuery();
}
...
}
You only need to inject the AgroalDataSource and you can get a
connection off it and follow JDBC semantics from there. Life’s since gotten
easier, with ORM. When you have named data sources, use @DataSource to
qualify it:
@Inject
@DataSource("users")
AgroalDataSource dataSource;
public void insertAnagram(ConversionResponse response){
...
}
With @DataSource, I can inject the specific data source named “users”.
Now, shall we try some ORM on for size?
With Object-Relational Mapping
If you’re an old fuddy duddy like I am, you’re still a fan of artisanal,
responsibly sourced, fair-trade SQL. Then there’s Object-Relational
Mapping (ORM) that will save you a bunch of time. IF you’re already
comfortable with the principles of ORM, you can skip this bit and GOTO
the Spring Data JPA section; else, IF you’re familiar with that too, GOTO the
Panache! bit. Otherwise, here’s a quick primer on ORM.
190
Chapter 5
Quarkus Data Access
The fundamental purpose of ORM is to abstract the database layer
away behind Java classes. Java classes for everything. Ideally, you’ll never
have to deal with raw or vendor-specific SQL anymore. Instead of manually
querying the database, picking off results from the ResultSet and then
possibly constructing a value object, you use an ORM layer.
An ORM layer will have you pre-create entity classes that map to
database tables; the fields of that class map to the table columns. This
way, you interact with the database only in object-oriented terms – the
ORM layer handles everything else like transactions, sequence number
generation, paginating and sorting results, and all the CRUD business.
There are two major players in this space:
•
Hibernate: Use the quarkus-hibernate-orm extension.
•
Java Persistence API (JPA).
The Java Persistence API is a specification from JavaEE that defines
components, behaviors, and annotations that make up an ORM layer. The
specification is then adopted and implemented by vendors like Eclipse.
It used to be that Hibernate had only its own set of annotations and
components. Hibernate then implemented the JPA specification, so now,
it’s more common to have JPA-looking classes used with the Hibernate
engine. I’m not going to explore either JPA or Hibernate separately – that’s
out of the scope of this book – rather, I’ll show you how well they both gel.
It all starts with an entity:
import javax.persistence.*;
@Entity (1)
public class Anagram{
@Id (2)
@GeneratedValue(strategy = GenerationType.IDENTITY,
generator = "anagram_source_id_seq")
191
Chapter 5
Quarkus Data Access
@Column(name = "anagram_id",nullable = false) (3)
private Long id;
private String source;
@ManyToOne(fetch = FetchType.LAZY) (4)
@JoinColumn(name = "anagram_source_id") (5)
AnagramSource anagramSource;
//getters and setters
}
...
@Entity
@Table(name = "anagram_source")
public class AnagramSource{
@Id
@GeneratedValue(strategy = GenerationType.IDENTITY,
generator="")
private Long id;
@Column(name = "anagram_source_text", unique = true,
nullable = false)
private String value;
private String anagramSourceText;
@OneToMany(mappedBy = "anagramSource",fetch = FetchType.
LAZY) (6)
List<Anagram> anagrams = new ArrayList<>();
}
192
Chapter 5
Quarkus Data Access
What is all this?
1. @Entity marks this class as a unit that Hibernate
should manage. Typically, Hibernate will
automatically match class name to the database
table name. You can still specify the table name with
the @Table annotation if you have specific naming
requirements for your tables. Otherwise, Hibernate
can infer the table name from the class name.
2. The @Id annotation marks this field as the primary
key for this entity class. It will map this field to
whatever the primary key column on the database
table is. @GeneratedValue bootstraps a default key
generation mechanism (or sequence). Hibernate
will thus use the existing sequence on my table to
handle the generation of the next ID to use for an
insert. At least, that is how it’s supposed to work.
There’s some hibernate weirdness I experienced
here:
a) Ideally, you should be able to set strategy to AUTO
and Hibernate will pick up on the sequence that
I configured for the ID column. This is not what
happened for me. Due to an inconsistency between
Hibernate and PostgreSQL, what I got instead were
negative numbers in the ID column. This is not the
case with MySQL based on my testing.
b) I had to set strategy to IDENTITY and then provide
the name of the PostgreSQL sequence in the
generator attribute. To be clear, this is because of a
disconnect between Hibernate and PostgreSQL, not
a Quarkus thing.
193
Chapter 5
Quarkus Data Access
3. @Column specifically maps this field on this class, to
the database table column in the name attribute.
4. @ManyToOne designates this field as one to be used
to establish a many-to-one join to a different table
and its associated entity. The fetchType attribute
stipulates whether this field should be populated
with the related entity instance immediately or
only when that field is called for. @JoinColumn will
designate that field as a join field. From this, it
will look up the referenced class and use the @Id
column in that class as a primary key. It therefore
automatically establishes a foreign key-primary key
relationship between the two classes. This in turn
lets Hibernate supply instances of the linked class
as entities loaded from the corresponding database
table:
a) FetchType is set to LAZY here as well, for pretty much
the same reasons. Also it helps to watch out for the
famous N+1 problem in SQL, where one executes
an additional query to retrieve data that could have
been retrieved in an earlier query.
5. @OneToMany helps to establish the other end of
the relationship. AnagramSource will have many
Anagrams. Here, I definitely don’t want all associated
Anagrams eagerly loaded every time I pull the
AnagramSource – for complex or large objects, that
could be a long-running query. The JPA spec has
some more sophisticated componentry to handle
complex table relationships; check them out.
194
Chapter 5
Quarkus Data Access
At this point, all I have is the vehicle to extract data from my PostgreSQL
database. A value object. What I need now are the actual CRUD3
components. If you’re already familiar with Hibernate, rejoice! You can
just start using everything you’re already used to: the EntityManager,
SessionFactory, Session, and .hbm.xml file (eww), all of these are
welcome in Quarkus.
If you’re not familiar with either raw Hibernate or raw JPA, well hello
there! Today’s your lucky day, bud: you get to see how easy it can be to pull
data with Hibernate and JPA together, courtesy of our old “friend,” Spring.
Learning ORM with Hibernate + JPA together is a great start that will help
you get a production-grade application going very quickly.
Tip Both Eclipse and IntelliJ provide JPA entity generation plugins.
With their respective plugins, you can generate entity classes from an
existing SQL database.
Configure Database Loading
Hibernate on its own brings a bunch of convenience with it, especially
when we take Quarkus’ dev mode into account. Observe: Quarkus provides
a quarkus.hibernate-orm.database.generation property, courtesy of
Hibernate. There are five supported options for this property:
•
create: On Quarkus startup, Hibernate will drop tables
and then create them.
•
validate: Hibernate will validate that the underlying
database schema matches the expectations of the Java-
side entity classes. It’ll throw an exception otherwise.
Create, Read, Update, and Delete.
3
195
Chapter 5
Quarkus Data Access
•
drop-and-create: On startup, your Quarkus app will
drop and recreate an entire database.
•
update: On startup, your Quarkus app will perform an
update on an existing database, using the entity classes
as a reference. If the database tables have deviated from
what the entity classes represent, the update will be
performed.
•
no-file: On startup, your Quarkus app will do nothing.
All you need to do is place a file named import.sql inside the resources
directory of your application. This file should contain the insert or update
statements that you want to populate the database with. How does
Hibernate know anything about the structure of your database? Your entity
classes. Hibernate will use all your @Entity classes to create your database
structure on the fly; then it uses the contents of your import.sql to seed the
database with data. When you combine this with the live reloading feature
of Quarkus in dev mode, your development process becomes buttery
smooth. Think about it: make changes to resources/import.sql, the
changes are executed, and you go on with your engineering without having
to pause and restart anything. Sweet! Here’s the schema I’m working with:
DROP DATABASE anagrams;
CREATE DATABASE anagrams WITH TEMPLATE = template0 ENCODING =
'UTF8' LC_COLLATE = 'English_United States.1252' LC_CTYPE =
'English_United States.1252';
ALTER DATABASE anagrams OWNER TO postgres;
SET
SET
SET
SET
SET
196
statement_timeout = 0;
lock_timeout = 0;
idle_in_transaction_session_timeout = 0;
client_encoding = 'UTF8';
standard_conforming_strings = on;
Chapter 5
SET
SET
SET
SET
SET
SET
Quarkus Data Access
check_function_bodies = false;
xmloption = content;
client_min_messages = warning;
row_security = off;
default_tablespace = '';
default_table_access_method = heap;
CREATE TABLE anagram (
anagram_text character varying(100) NOT NULL,
anagram_source_id bigint NOT NULL,
anagram_id bigint NOT NULL
);
ALTER TABLE anagram OWNER TO postgres;
CREATE SEQUENCE anagram_anagram_id_seq
START WITH 1
INCREMENT BY 1
NO MINVALUE
NO MAXVALUE
CACHE 1;
ALTER TABLE anagram_anagram_id_seq OWNER TO postgres;
ALTER SEQUENCE anagram_anagram_id_seq OWNED BY anagram.anagram_id;
CREATE TABLE anagram_source (
id bigint NOT NULL,
anagram_source_text character varying NOT NULL
);
ALTER TABLE public.anagram_source OWNER TO postgres;
CREATE SEQUENCE anagram_source_id_seq
START WITH 1
INCREMENT BY 1
197
Chapter 5
Quarkus Data Access
NO MINVALUE
NO MAXVALUE
CACHE 1;
ALTER TABLE anagram_source_id_seq OWNER TO postgres;
ALTER SEQUENCE anagram_source_id_seq OWNED BY anagram_source.id;
ALTER TABLE ONLY anagram ALTER COLUMN anagram_id SET DEFAULT
nextval('anagram_anagram_id_seq'::regclass);
ALTER TABLE ONLY anagram_source ALTER COLUMN id SET DEFAULT
nextval('anagram_source_id_seq'::regclass);
ALTER TABLE ONLY anagram_source
ADD CONSTRAINT anagram_source_pkey PRIMARY KEY (id);
ALTER TABLE ONLY anagram
ADD CONSTRAINT unique_anagram UNIQUE (anagram_text) INCLUDE
(anagram_source_id);
CREATE INDEX fki_anagram_source_fk ON anagram USING btree
(anagram_source_id);
ALTER TABLE ONLY anagram
ADD CONSTRAINT anagram_source_fk FOREIGN KEY (anagram_
source_id) REFERENCES anagram_source(id) NOT VALID;
Put that in your import.sql and let’s roll!
With Spring Data JPA
Spring Data JPA is data access the way God intended; and it’s all here in
Quarkus as well. It boils down to extending one of the repository (or DAO4)
interfaces supplied by Spring Data. For now, feast your eyes and code on:
Data Access Object.
4
198
Chapter 5
Quarkus Data Access
•
org.springframework.data.repository.Repository
•
org.springframework.data.repository.
CrudRepository
•
org.springframework.data.repository.
JpaRepository
•
org.springframework.data.repository.
PagingAndSortingRepository
First, add the spring-data-jpa extension. Following that, all you need
to do is extend one of those interfaces and a lot is taken care of behind the
scenes. A simple implementation:
import org.springframework.data.jpa.repository.JpaRepository;
public interface AnagramRepository extends
CrudRepository<Anagram,Long> (1) {
public Anagram findByAnagramText(String anagramText); (2)
}
1. I extend CrudRepository with the entity type I’m
looking to CRUD, plus the primary key type. This
simple act grants my code a lot of power implicitly.
I’ll show you what I mean shortly.
2. This method definition is a stub I plan to use for,
well, searching anagrams by their strings. Don’t
worry about the implementation for now – and
forever.
I can now…use the interface as is?
199
Chapter 5
Quarkus Data Access
That’s it. It’s basically magic. The CrudRepository interface – which all
the other *Repository interfaces extend from – looks like this:
public interface CrudRepository<T, ID> extends Repository<T, ID> {
<S extends T> S save(S entity);
Optional<T> findById(ID primaryKey);
Iterable<T> findAll();
long count();
void delete(T entity);
boolean existsById(ID primaryKey);
...
}
Those methods do exactly what they’re named for. Spring Boot – and
Quarkus by extension – has a lot of plumbing in place so that this interface
and any other that extends it is plug-n-play. So, by default, you get all the
CRUD operations for free. It gets even better: the findByAnagramText
method works without me having to implement the method in a class.
This is possible because Spring Boot can infer what kind of query I’m
trying to execute, given a string value that matches a database column or
class attribute. Defining methods named find...By..., count...By...,
findDistinct...By, or even find...By...IgnoreCase will cause the
Spring Data JPA module to infer the correct query and deliver results.
200
Chapter 5
Quarkus Data Access
However, not all Spring Data JPA features work in Quarkus. Currently,
there’s no support for
•
Future return type support; no async queries then
•
QueryDSL API support
•
Native queries – can’t supply raw SQL to @Query
•
QueryByExampleExecutor
With Panache!
The Panache toolkit is Quarkus’ own data access API. It’s similar enough to
the Spring Data JPA API that if you’re familiar with the latter, you can jump
straight into the former.
Start by adding the quarkus-hibernate-orm-panache extension.
Still with my Anagram entity, I can have
@Entity
public class Anagram extends PanacheEntityBase {
@Id
@GeneratedValue(strategy = GenerationType.
SEQUENCE,generator = "anagram_anagram_id_seq")
@Column(name = "anagram_id",nullable = false)
public Long id;
@ManyToOne(fetch = FetchType.LAZY)
@JoinColumn(name = "anagram_source_id")
public AnagramSource anagramSource;
public static List<AnagramSource> getAllAnagrams(){
return (List<AnagramSource)findAll
(Sort.ascending("anagram_source_text"));
}
}
201
Chapter 5
Quarkus Data Access
Hibernate with Panache places a lot of emphasis on removing
boilerplate code and improving developer comfort. Here’s how:
1. Extending PanacheEntityBase enriches my entity
class with the following methods, among others:
a) find, list – Use list for smaller datasets.
b) update
c) delete
d) persist
e) stream
These methods turn my vanilla entity class into
an Active Record – all the database operations I’ll
ever need will become static methods on the entity
class itself. I’m using PanacheEntityBase here
because I need to control the ID generation with
my custom sequence and also because PostgreSQL
is being weird. With other databases where
GenerationType.AUTO just works, you can use just
PanacheEntity instead.
2. I’ve set the fields on my entity to public access,
instead of private. The Quarkus team recommends
making fields non-private wherever possible to
improve the performance of the framework.
3. I’ve gotten rid of the getters and setters – Quarkus
will generate them on the fly.
202
Chapter 5
Quarkus Data Access
4. In addition to the static methods that I inherit from
PanacheEntityBase, I can now implement methods
unique to this entity, reusing the inherited methods to
a) Paginate
b) Sort
I can then use my Panache entity directly wherever I want it:
public String generateAndSaveAnagram(String sourceText){
String result = Scrambler.scramble(sourceText);
AnagramSource anagramSource = new AnagramSource();
anagramSource.setAnagramSourceText(sourceText);
Anagram anagram = new Anagram();
anagram.setAnagramText(result);
anagramSource.persist();
anagram.anagramSource = anagramSource; (1)
anagram.persist();
}
Note how I’m setting the AnagramSource on the Anagram (1), to
conform with the foreign key expectations of the database. When all you
have is the primary key, the correct way to persist the foreign key reference
is by obtaining a proxy from Hibernate using the EntityManager. You can
get a hold of it by regular injection:
@Inject
EntityManager entityManager;
...
Long sourceId = ...
AnagramSource proxy= entityManager.getReference(AnagramSource.
class,sourceId);
anagram.setAnagramSource(proxy);
203
Chapter 5
Quarkus Data Access
This approach avoids an unnecessary database trip to first retrieve the
referenced entity.
Panache also provides repository-style options:
public interface AnagramRepository implements
PanacheRepository<Anagram> {
public Anagram findByAnagramText(String anagramText){
PanacheQuery<Anagram> result = find("anagramText",
anagramText);
return result.singleResult();
}
}
It’s basically the same features as PanacheEntity, but separated
out into an interface, in the style of Spring Data JPA repositories. One
difference here is that I don’t inject the just repository interface; I need
to implement the PanacheRepository on my entity. As a result, I lose the
benefit of Quarkus generating query methods for me, but I gain more
control over what my queries do. On the PanacheQuery you get a ton of
methods that help you do a lot of manipulation over your query results. For
now, I’m interested in just the single result.
The usage is as you would expect:
@Inject
AnagramSpringRepository anagramRepository;
...
public String generateAndSaveAnagram(String sourceText){
...
Anagram anagram = new Anagram();
anagram.setAnagramText(result);
...
anagramRepository.save(anagram);
}
204
Chapter 5
Quarkus Data Access
I think that’s about it for Panache, for now. Do explore the
PanacheEntityBase class and PanacheEntityRepository interface, for a
look at the full power that ships with those two components.
With Reactive SQL
Finally, this right here is the way I want to write SQL from now on. Reactive
programming is all about
•
Scalability
•
Resilience
•
Message-driven programming
It’s the programming model built for high-throughput, event-driven,
and highly tunable architectures. Reactive SQL (rxSQL) delivers on that
by letting you write high-performing database access code. You can treat
the data being fetched from the database as events and react to them with
event handlers. Reactive SQL (and really, most of reactive programming)
is heavily based on functional interfaces – lambda functions. If you’re
comfortable with lambda functions in Java...still give this next section a
look-see. I promise, I’ll make it worth your while ;).
The Tools of the Reactive SQL Trade
Like I mentioned earlier, reactivity in Quarkus is driven by two classes from
the Mutiny library: io.smallrye.mutiny.Uni and io.smallrye.mutiny.
Multi. Uni is used to wrap and represent single items:
Uni<String> justOneString = Uni.createFrom().item("aString");
205
Chapter 5
Quarkus Data Access
And you can get a Multi to represent multiple items:
Multi<String> listOfStrings = Multi.createFrom().iterable(List.
of("string1","string2","string3","string4"));
Cool? Cool. Quarkus allows you to use both classes in many different
functional areas, but the usage follows a general pattern. Both of these
classes provide a suite of methods that accept lambda expressions. These
reactive methods will take the lambda function and apply them to the
Uni or Multi, based on a fluent and reactive pattern. For some, lambda
expressions are a little daunting, maybe unwieldy way of expressing
logic. While they’re an acquired taste, they’re not complicated and they’ll
significantly improve the readability of your code. Check it out: I can have
a method implementation like so:
public String generateAnagram(String anagramSource){
String anagram = Scrambler.scramble(anagramSource);
logger,info("The scrambled string:"+anagram);
return anagram;
}
To use this method as-is, I’ll need to create an object of the class that
contains generateAnagram and then use that object everywhere. If I have a
class that offers methods that accept lambda functions – like the Uni class
for example, I can do this instead:
Uni.createFrom().item("aString")
.map(theString -> Scrambler.
scramble(theString)) (1)
.subscribe() (2)
.with(successResult -> {
logger.info("The scrambled string:
" + successResult);
},
206
Chapter 5
Quarkus Data Access
failureResult -> {
failureResult.printStackTrace();
}); (3)
What’s all this then?
1. Right after creating a Uni to wrap the string “aString”,
I’m calling one of its lambda-accepting functions.
map is a common operation found in pretty much
every reactive and functional programming API in
the Java world and beyond. It’s in the JDK’s stream
API. So, map will accept any naked java method
body or function call. Inside the map method, I
expect a string to be available as a variable named
“theString”. From there, I’m using the scramble
utility to convert the passed in string to an anagram.
2. To actually execute anything in the chain of functions of
the reactive API, I must call the subscribe method. Any
method call before a subscribe call is lazily evaluated –
nothing will actually be invoked until subscribe is
called. This is what’s known as a terminating function
in rx programming parlance.
3. The object returned by the subscribe function
offers the with function. with accepts two lambda
expressions: one for when the operation was successful;
another for when the operation failed. As you can see,
they’re fully fledged method bodies as well. Contrast
that with what I passed to the map function. This
demonstrates two of the options available for passing
lambda expressions to functions. It can be a very
succinct function call like Scrambler#scramble; or a full
method body like what I’ve supplied to with.
207
Chapter 5
Quarkus Data Access
How’s that for an introduction to lambda expressions and reactive
programming? For rxSQL, these are the flavors of Java lambda functions
you’ll need to get comfy with:
•
Consumer: a lambda function that accepts arguments
and doesn’t return any value. The lambda functions I
passed to with are examples of consumers. They each
accept arguments (a string object and an exception
object respectively) but don’t return a value.
•
Function: a lambda function that accepts arguments
and returns a value. map accepts only functions. Data is
fed in from the preceding function item and I apply the
scramble function to that data, returning the result for
the next step.
•
Supplier: a supplier doesn’t accept arguments, but
returns a value
With rxSQL, there are going to be a lot of other reactive types, typically
based on the Uni and Multi classes. Also bear in mind that for single row
results, you’ll be dealing with some variant of Uni; for multi-row results,
you’ll be dealing with a variant of Multi. In some scenarios, it might be
useful or even necessary to convert a Uni to a Multi and vice versa, so stay
frosty!
To begin, I’ll add the quarkus-reactive-pg-client; there are specific
extensions supporting reactivity for specific database vendors. Currently,
only MySQL, PostgreSQL and DB2 have reactive client support. My data
source is already configured; I need to make just a couple of property
changes to support reactive SQL:
quarkus.datasource.reactive.url =
vertx-reactive:postgresql://localhost:5432/anagrams (1)
quarkus.datasource.jdbc=false (2)
208
Chapter 5
Quarkus Data Access
1. I’ve had to replace the standard Quarkus JDBC url
property with this reactive-specific version.
2. I’ve had to disable basic JDBC. Raw JDBC and rxSQL
currently cannot coexist enabled for the same data
source.
From here on, I get to roll my own SQL statements:
@Inject
PgPool reactivePgPool; (1)
...
public List<AnagramResponse> findAllAnagramsBySourceId(long id){
return reactivePgPool.preparedQuery("select * from
anagram where anagram_source_id = $1") (2)
.execute(Tuple.of(id)) (3)
.onItem()
.produceMulti(rows -> Multi.createFrom().
iterable(rows)) (4)
.emitOn(executor) (4a)
.onItem()
.apply(anagramRow -> {
logger.info("Anagram text is " +
anagramRow.getString("anagram_text"));
return AnagramResponse.fromRow(anagramRow);
}) (5)
.subscribe()
.asStream() (6)
.collect(Collectors.toList()); (7)
}
What I’m doing here should be thought of as individual,
high-performace steps of a process:
209
Chapter 5
Quarkus Data Access
1. I obtained an instance of io.vertx.mutiny.
pgclient.PgPool client (io.vertx.mutiny.
pgclient.MySQLPool for MySQL). This is the entry
point into the rx SQL world.
2. I use the pool object to prepare an SQL query.
The $1 notation is a positional marker for supplying
query parameters. This way, I’ve indicated that I’ll
be supplying a single query parameter.
3. The execute method is where I get to supply my
optional query parameter. The onItem method
is where I kick off the processing of any probable
results from the query.
4. The onItem function produces a Uni of that wraps
the output from the operation before it. In this case,
onItem will give me a Uni<RowSet<Row>>, a Uni
containing a rowset of rows. Because I’m expecting
multiple rows from this query, I’ve decided to call
the produceMulti function on the Uni produced
by the query. This function allows me to pass in a
lambda function that I can use to split the Rowset
object that I get from executing the query.
(a)
optionally, I can specify a custom executor
to process the results on multiple threads,
for a performance boost on a large number of
results
5. For each row/item that I produce from the
produceMulti function, I log the value of one column
from the SQL query. I also create an instance of
AnagramResponse. For this, I just call a static function
I’ve added to the AnagramResponse class to create
210
Chapter 5
Quarkus Data Access
an instance from a Row object. It’s important to pay
attention to the type of object you’re going to have
available inside your lambda function.
6. All the previous steps properly arranged, I call the
subscribe method. Remember: without a call to
subscribe or some other terminating function,
none of the previous steps will be executed. Here, I
want my subscription to yield a java Stream.
7. From my stream, I can then gather the results into a
list, using standard JDK stream collectors.
Part of the beauty of the fluent API of reactive flows is how you
can easily parallelize parts of the processing – what I did with emitOn.
Underneath all this (even without the emitOn), This addresses a major
deficiency of the standard JDK Streams feature: you can’t specify a custom
threadpool. Vert.x and Mutiny will efficiently manage threads for the
reactive message flow, as well as being able to split the processing across
multiple cores if available. Quarkus can handle reactive types natively, so
I could just avoid AnagramResponse.fromRow step altogether and return a
raw Uni . The Quarkus runtime will do all the unpacking behind the scenes
and send the JSON response to the client:
public Uni<List<AnagramResponse>>
findAllAnagramsBySourceId(long id){
...
.apply(AnagramResponse::fromRow)
.onItem()
.apply(anagramResponse -> {
logger.info("Anagram response" + anagramResponse);
return anagramResponse;
})
.collectItems()
.asList();
211
Chapter 5
Quarkus Data Access
I’m supplying the AnagramResponse#fromRow function with a different
style, to the apply function, but it’s still a lambda-style function call. Following
that, I still want to print the generated AnagramResponse, but I return the object
unmodified and send it down the chain to be collected with collectItems.
If this feels like the Streams API in the stock JDK, you’re not far off –
they’re really close in feel. Without getting into too many specifics, one
key difference between JDK streams and the reactive code: Streams are
pull-based, while reactive code is push-based. In this example, the query
results will be pushed into the handling code.
One thing to note is that you currently can’t combine reactive SQL
and standard JDBC, for the same data source. So you’ll need to configure
quarkus.datasource.jdbc=false for each data source you want to interact
with reactively. I have seen whispers of removing this barrier in pull requests
on the Quarkus repo, so I envisage this might not be a thing for long.
With the rxSQL API, I can control the rate at which new rows come in
with backpressure. I can add error handlers and other custom logic as part
of handling the results from the query. Behind the scenes, there’s efficient
task switching that happens to make this a very efficient use of CPU cycles.
All told, you wind up with a super scalable, resource-efficient SQL business
logic. But wait! There’s more!
Reactive ORM with Hibernate
Yass! There’s currently experimental support for reactive sql with
Hibernate. It goes a little something like this: first, I’ll add the quarkus-
hibernate-reactive extension.
Then, things get fluent:
public class AnagramResource{
...
@Inject
Uni<Mutiny.Session> mutinySession (1)
212
Chapter 5
Quarkus Data Access
...
@GET
@Path("/{text:[a-zA-Z]*}/anagram/{id}")
@Produces(MediaType.APPLICATION_JSON)
public Uni<Response> getAnagram2(@PathParam("id")
final int anagramSourceId) throws ExecutionException,
InterruptedException {
AnagramResponse response = mutinySession.flatMap(
session -> session.find(Anagram.class,
Long.valueOf(anagramSourceId))) (2)
.onItem()
.ifNull() (3)
.failWith(new IllegalArgumentException(
"No anagram found for that Id")) (3a)
.onItem()
.apply(AnagramResponse::fromAnagram)(4)
.await()
.indefinitely();
return Uni.createFrom()
.item(Response.ok()
.entity(response)
.build()); (5)
}
}
Woof. That’s a lotta typin’! This example is a little contrived, because
I’m taking extra steps to show you specific features. Here’s what’s going on:
1. I need to obtain a reactive instance of a Hibernate
session. This already presents a minor challenge,
because instances of REST resource classes are
singletons by default. What this means is that the
213
Chapter 5
Quarkus Data Access
same instance of AnagramResource will be used
to serve multiple requests in parallel. Hibernate
sessions are famously thread-unsafe, so they can’t
be shared between parallel requests. The only
alternative is to configure Quarkus to provide a new
REST resource object per request. That’s strike one.
2. With the injected ORM session, I can reactively
execute a query. Pretty straightforward.
3. The resulting Uni offers a ifNull function to handle
scenarios where no results are available for an operation.
3a.
Should there be no results, I can use the failWith
function to supply an appropriate exception.
4. I then apply my transformation function, converting
Anagrams returned by Hibernate, to AnagramResponses
that I’ll be sending in the HTTP response. The await
method is another way of terminating the reactive flow.
With this method call, I indicate that I’ll wait for the
completion of the execution of steps before this; I have
the option to specify a timeout, or wait indefinitely, as
I’m doing here.
5. Finally, because I want control over the HTTP response
being returned, but I also want to use the reactive Mutiny
API, I build a javax.ws.rs.core.Response object. I then
wrap the Response object in a Uni of its own. Quarkus is
going to be very chill about the whole thing.
So that’s rxSQL5 in a nutshell. And now, we’ve come to the end of my
second favorite part of this book? Noooooooo...
onorary mention to Spring Data’s ReactiveCrudRepository – rxSQL with an
H
ORM layer.
5
214
Chapter 5
Quarkus Data Access
NoSQL Data Sources
SQL and relational database management systems (RBDMS) are great
for the majority of use cases. They’re especially well-suited for analytical
work, known as Online Analytical Processing (OLAP). With OLAP, you get
to select rows based on any filter criteria you want: complex reporting,
rollups, and so on. When you need fine-grained access to data, SQL is
your Man Friday.
When you don’t need fine-grained access, just fast, constant time
retrieval of data on a large scale, you go NoSQL. If you’re new to the
concept, think of a NoSQL database as a gigantic, highly scalable, and
available Hash table. This is the kind of storage you want for large-scale
data use cases like gaming and media serving. Really, anything where
you want to be able to access large-scale data quickly. Call it Online
Transaction Processing (OLTP). You can store literally anything in there
and retrieve it by a key. Some key differentiators of NoSQL are
•
No schema: An RDBMS will need you to define a rigid
schema – a collection of tables, columns, sequences,
and so on that define the structure of your data storage.
A NoSQL database doesn’t need that much upfront
work. To start using a NoSQL database, all you’ll really
need is a table. After that, you can store objects in it,
with any number of fields and any internal structure.
You don’t need to know too much about the data
upfront is what I’m saying.
•
Performance at scale: For an RDBMS to start serving
millions of hits, you need to carefully plan your
database – the queries, the indices, partitioning tables,
and so on. The underlying storage needs to be tuned
for throughput and reliability. With NoSQL, you really
only need to worry about how much compute capacity
215
Chapter 5
Quarkus Data Access
you’ll need; in a cloud environment, your cloud
provider will take care of the scalability and resource
optimization.
•
No query language: There is no standard query
language (yet) for NoSQL. It’s right there in the name –
no Structured Query Language.6 The access API is
highly vendor-dependent.
There are a couple of players in this space: Neo4J, MongoDB, Redis,
and a couple others. They usually can sit in the cloud; you’re just going
to be responsible for managing the installation. A cloud service provider
could also provide NoSQL databases as a managed service, so yeah,
probably go with that instead. I’m going to pick a “random” cloud provider
and demonstrate how to use NoSQL in Quarkus.
With AWS DynamoDB
DynamoDB is AWS’s NoSQL offering. In addition to the features you’d
expect from a good NoSQL database, AWS offers
•
Full service management. You’ll never need to manage
a server, back up your own data, or security patch
anything.
•
Your data can be encrypted at rest.
•
Cross-region replication of your data, for fault
tolerance.
•
Backup and recovery of data.
•
Configurable content expiry.
his is just a happy coincidence; NoSQL is generally used to mean “Non SQL”, or
T
“Not Only SQL”, according to IBM.
6
216
Chapter 5
Quarkus Data Access
I’ll start by adding the DynamoDB Quarkus extension, as well as the
RestEasy Mutiny extension to support asynchronous DynamoDB clients:
mvn quarkus:add-extension -Dextensions=quarkus-amazon-dynamodb,
resteasy-mutiny
I could use my actual AWS account to configure an AWS-deployed
DynamoDB instance and then connect to it from my local machine. I could
also just run DynamoDB as a docker container on my local machine:7
docker run --publish 8000:8001 amazon/dynamodb-local
-jar DynamoDBLocal.jar -inMemory -sharedDb -port 8001
This docker command will
1. Pull the latest official DynamoDB image named
amazon/dynamodb-local to your local Docker
repository and attempt to start a local DynamoDB
container.
2. Expose port 8001 on the container using publish,
mapping port 8000 on your host machine to the
container’s 8001.
3. Process the arguments you supply to configure the
DynamoDB container. The DynamoDBLocal jar file
is what processes the flags that come after it. Don’t
worry; the file is bundled with the image.
ou can also run DynamoDB from a JAR file provided by AWS. The Docker
Y
approach is just more manageable and testable.
7
217
Chapter 5
Quarkus Data Access
4. Instruct the DynamoDB instance to keep all its data
in memory with inMemory. Should you terminate the
container, all the data is lost. Use -sharedDb so that
the in-memory data is shared between all clients
that connect to this instance of Dynamo. With
persisted data, you can use -dbPath to point to the
location of the database file (named shared-localinstance.db by default) on subsequent startups.
5. Configure DynamoDB to listen on port 8001 for
connections, using port; 8000 is the default, I just
want to shake things up a bit.
With this successfully completed, go to http://localhost:8000/shell
to view the interactive shell bundled with Dynamo. Figure 5-2 shows what
you should see.
Figure 5-2. The bundled JavaScript shell for interacting with
DynamoDB
218
Chapter 5
Quarkus Data Access
From this console, you can interact with the database with the AWS
DynamoDB JavaScript API. There’s also an actual studio where you can design
your table models and so forth. Download it here. Check it out in Figure 5-3,
it’s pretty sleek.
Figure 5-3. The landing screen of the DynamoDB data modeler
I prefer the data modeler. I’ll go to set up a connection to my local
running instance of Dynamo; in the top left corner, click the Operation
Builder ➤ Add Connection page as seen in Figure 5-4.
219
Chapter 5
Quarkus Data Access
Figure 5-4. Add a local DynamoDB connection. Remote databases
are right next to it
Manage Your DynamoDB Data Model
There is the database, and then there are the entities you’re going to store
in it. Fundamentally, there are three tiers of data to deal with:
•
220
Table: The logical grouping of the entities. Just
like in an RDBMS, you need a primary key. For my
Anagram app, I will need two tables: Anagram and
AnagramSource.
Chapter 5
Quarkus Data Access
•
Item: The actual entity, analogous to a row in a
RDBMS. This is the “value” in the key-value hashmap
analogy. My Anagram app will consist of items of the
Anagram type as well as the AnagramSource.
•
Attribute: The fields of the entity; what would be
columns in an RDBMS. Remember, for a NoSQL
database, there are no “column” restrictions. You can
add as many attributes as you want to an item after
the fact, with almost no consequence. Some items can
have some attributes, some can be missing them, while
some have other completely different attributes. It’s
all fine. This can be a scalar variable – integer, string,
boolean, y’know, the “flat” variables. It can also be a
whole object, with its own attributes.
I plan to store my entities as JSON objects; so it’s easy to predict what
it’ll look like in storage. An Anagram:
{
"id": 123974,
"anagramText": "eve"
}
Now to jam all this stuff into Dynamo. I’ll start with creating a schema
on the Data Modeler page. Hit “Create Model” and you should see
something like Figure 5-5.
221
Chapter 5
Quarkus Data Access
Figure 5-5. Creating a data model for my Anagram app
Next, I’ll create a table to hold my anagrams as in Figure 5-6.
Figure 5-6. Defining a table for my anagrams
222
Chapter 5
Quarkus Data Access
In here, I’m going to supply:
1. The name of the table, “anagram”.
2. The primary key or “Partition key” in DynamoDB-speak.
This is what I’ll use to pull objects out of Dynamo. I’m
choosing id from the Anagram class for this property.
Which field you select for this purpose is one of the
most important design decisions you’ll make in the
design of your NoSQL access.
Finally, I’ll need to commit my data model and its table to Dynamo. On
the Visualizer page, hit the “Commit to DynamoDB” button. It’ll prompt
you to select or configure a button for the connection:
Figure 5-7. Committing the data model to DynamoDB
Now, let’s configure access to this NoSQL database.
223
Chapter 5
Quarkus Data Access
Configure DynamoDB in Quarkus
First, I’ll pull in the AWS Java SDK for DynamoDB:
<dependency>
<groupId>software.amazon.awssdk</groupId>
<artifactId>url-connection-client</artifactId>
</dependency>
Per AWS, there are the following properties that need to be set for
DynamoDB connectivity:
224
•
The AWS region that your DynamoDB instance will be
running in. For Quarkus, use quarkus.dynamodb.aws.
region.
•
The security details. There are a couple of options
supported by AWS and how you configure them in
Quarkus depends on what you choose.
•
quarkus.dynamodb.aws.credentials.type
controls what the credential type turns out to be.
•
quarkus.dynamodb.aws.credentials.type=static
will require you to set quarkus.dynamodb.aws.
credentials.static-provider.access-key-id
and the quarkus.dynamodb.aws.credentials.
static-provider.secret-access-key properties.
These correspond to the access key and secret
access key properties that you will get from Amazon
when you sign up for an AWS account. Don’t worry
about this for local development.
Chapter 5
•
Quarkus Data Access
quarkus.dynamodb.aws.region=default will
look for the access key and secret access key in the
following order in your environment:
•
aws.accessKeyId and aws.secretKey as Java
environment launch variables.
•
AWS_ACCESS_KEY_ID and AWS_SECRET_
ACCESS_KEY as operating system variables,
corresponding to the respective key
credentials.
•
The key credentials present in a file at ~/.aws/
credentials in your machine.
•
The key credentials can be delivered by the
AWS EC2 metadata service. The EC2 metadata
service is a read-only service that provides
metadata to EC2 instances.8 Included in that
metadata are your credentials; all AWS SDKs
are hard-coded to check the metadata service’s
endpoint before any outbound service call.
For your local machine development pleasure however, only the
following properties are necessary:
•
quarkus.dynamodb.endpoint-override=http://
localhost:8001, corresponding to the exposed port on
your (hopefully) running container.
•
quarkus.dynamodb.aws.region=us-east-1. You can
use any valid AWS region; it doesn’t matter which you
pick for local development.
C2 is short for Elastic Compute…2, a type of server machine that AWS provides
E
on demand.
8
225
Chapter 5
•
Quarkus Data Access
quarkus.dynamodb.aws.credentials.type=static.
Consequently
•
quarkus.dynamodb.aws.credentials.staticprovider.access-key-id=anything-goes
•
quarkus.dynamodb.aws.credentials.staticprovider.secret-access-key=dummy-val
That done, I can now get to the codin’.
CRUD in DynamoDB
The AWS DynamoDB SDK supports three flavors of connecting to the
database:
•
Low level
•
Document-based
•
High level/ORM
The high-level API is the most convenient, with a suite of annotations that
map to structures in your DynamoDB database, just like you’d expect from an
ORM framework. All three APIs convert your method calls into HTTP requests
sent to the database for execution. Additionally, they all transparently handle
cryptography, handling retries and other convenience facilities.
At the time I’m typing these words, Quarkus is based on the v2 of
the AWS SDK which is still under development. The Document and
ORM flavors aren’t supported yet, so you get just the low-level API. The
good news is that v2 introduces non-blocking I/O, improved streaming
capabilities and your choice of HTTP client API – JDK or Apache
HTTPClient.
Interacting with DynamoDB at a low level uses these classes primarily:
•
226
software.amazon.awssdk.services.dynamodb.model.
GetItemRequest for retrieving data from the database
Chapter 5
Quarkus Data Access
•
software.amazon.awssdk.services.dynamodb.model.
PutItemRequest for adding data to the database
•
software.amazon.awssdk.services.dynamodb.model.
UpdateItemRequest for updating items
•
software.amazon.awssdk.services.dynamodb.model.
PutItemRequest for deleting items
•
software.amazon.awssdk.services.dynamodb.model.
AttributeValue for defining metadata about the
attributes you need to CRUD in the database
And now, for my next trick, I’m going to CRUD with the low-level
DynamoDB API.
Add an item to DynamoDB:
@Inject (1)
public void dynamoAdd(DynamoDbClient dynamoDbClient,Anagram
anagram){
Map<String, AttributeValue> anagramItem = new HashMap<>(); (2)
anagramItem.put("id", AttributeValue.builder().n
(anagram.getId()).build()); (3)
anagramItem.put("anagramText", AttributeValue.
builder().s(anagram.getAnagramText()).build()); (4)
PutItemRequest request = PutItemRequest.builder()
.tableName("anagram")
.item(anagramItem)
.build(); (5)
PutItemResponse putItemResponse = dynamoDbClient.
putItem(request); (6)
logger.info("operation response metadata
"+putItemResponse; (7)
}
227
Chapter 5
Quarkus Data Access
What sorcery is this?
1. I inject an instance of software.amazon.awssdk.
services.dynamodb.DynamoDbClient, the access
point to my locally running instance of Dynamo.
ArC will supply a thread-safe instance of the client
object as an argument to my method.
2. I prepare a HashMap of String to AttributeValue.
This is the map that will hold the attributes of the
items I want to commit to DynamoDB.
3. I set the id attribute, with the n() method on the
AttributeValue builder object. It’s…an interesting
API, definitely an acquired taste. See, you need to
specify the type as well as the name of the attribute
that you need to set. The DynamoDB SDK team
chose the first letters of types as their method
names. So, n here means I’m setting a numerical
field. Bold choice of API convention for sure.
4. I set the anagramText attribute, using the s()
method to indicate that this is a String field.
5. I build a PutItemRequest with the map of attributes
that constitute a complete Anagram entity. It’s at
this point I indicate the database table this put
request should go to.
6. I then pass the PutItemRequest to the putItem
method on the DynamoDbClient.
7. putItem returns a PutItemResponse, from which
you can pull a bunch of useful metadata about the
table and the operation.
228
Chapter 5
Quarkus Data Access
Retrieving an item from Dynamo? Here you go, buddy:
@Inject
public void dynamoGet(DynamoDbClient dynamoDbClient, String
anagramId){
Map<String, AttributeValue> anagramItem = new HashMap<>();
anagramItem.put("id", AttributeValue.
builder().n(anagramId).build()); (1)
GetItemRequest getItemRequest = GetItemRequest.builder()
.tableName("anagram")
.key(anagramItem)
.attributesToGet("anagramText").build(); (2)
GetItemResponse item = dynamoDbClient.getItem
(getItemRequest); (3)
String anagramText = item.getValueForField("anagramText",
String.class); (4)
item.item(); (5)
}
Here’s what I’m up to:
1. I built the map of AttributeValue to hold my query
parameters. Here, I’m interested in searching just by
the anagramId.
2. I built a GetItemRequest to hold the table and the
attribute I’m interested in retrieving.
3. The injected instance of DynamoDbClient, always at
the ready, will use getItem to execute the request.
4. I then get the specific attribute I want.
5. Or, I get the whole item.
229
Chapter 5
Quarkus Data Access
To update an item in the database:
@Inject
public void dynamoUpdate(DynamoDbClient dynamoDbClient,Anagram
anagram String newAnagramText) {
Map<String, AttributeValue> anagramItem = new
HashMap<>();
Map<String, AttributeValueUpdate> newAnagramAttributes =
new HashMap<>(); (1)
AttributeValueUpdate updateAnagramText = Attribute
ValueUpdate.builder()
.action(AttributeAction.PUT) (2)
.value(AttributeValue.builder()
.s(newAnagramText).build()) (3)
.build();
AttributeValueUpdate brandNewAttribute (4) =
AttributeValueUpdate.builder()
.action(AttributeAction.ADD)
.value(AttributeValue.builder()
.s(anagram.getAnagramText()).build())
.build();
newAnagramAttributes.put("anagramText",
updateAnagramText);
newAnagramAttributes.put("oldAnagramText",
brandNewAttribute);
anagramItem.put("id", AttributeValue.
builder().n(anagram.getId()).build());
anagramItem.put("anagramText", AttributeValue.
builder().s(anagram.getAnagramText()).build());
UpdateItemRequest updateItemRequest = UpdateItem
Request.builder().attributeUpdates(newAnagramAttributes).
tableName("anagram").key(anagramItem).build(); (5)
230
Chapter 5
Quarkus Data Access
UpdateItemResponse response = dynamoDbClient.
updateItem(updateItemRequest);
logger.info("Update successful: "+response.
sdkHttpResponse().isSuccessful()); (6)
}
Okay, things get a little bit spicier with the update operations. The
intent of this method is to update an anagram entity with a new value for
anagramText. It will also add a brand new attribute to the selected item,
named oldAnagramText. Walk with me:
1. In addition to the AttributeValue map that I
need to supply for Dynamo to be able to find
the target item, I’m now supplying a map of
AttributeValueUpdate. The update operation
depends on the values I set on objects of this type.
2. So, first I build the AttributeValueUpdate object to
handle the update of the existing field. Setting action to
AttributeAction.PUT is what makes the update click.
3. I still need to pass an AttributeValue object to the
AttributeValueUpdate, to account for the content
of the new data.
4. Then I build another AttributeValueUpdate to
handle the creation of a brand new attribute on the
existing item. Setting action to AttributeAction.ADD
is the clincher here. This is one of the things that sets
NoSQL apart. In the SQL world, this is analogous to
creating a new column in a table as part of an insert;
only, that column will apply to just a single row –
invisible to the rest. Not possible with an RDBMS eh?
231
Chapter 5
Quarkus Data Access
5. After building maps containing all the data that I
need to transmit, I build an UpdateItemRequest that
I will feed to the DynamoDB client.
6. I can then execute with the updateItem method
on DynamoDbClient. Following that, I can check
the status of the update with isSuccessful on
sdkHttpResponse. Remember: All these method
calls are wrappers around HTTP interactions with
DynamoDB. The API just translates the HTTP
response into convenience methods.
DynamoDB supports batch models of all the CRUD operations as well.
Bon appetit!
Transactions
Transactions: You’re gonna need ‘em. A data operation transaction is what
provides the ACID that gets your code to an elevated state:
232
•
Atomicity: When you mark any sequence of method
calls as transactional, they all must execute successfully
as one or fail as one. Any failure in the chain should
trigger an “undo” of the calls before the failure point, as
well as rolling back any data changes made prior to the
failure. All or nothing.
•
Consistency: Any transactional method should be able
to guarantee that the data changes being made to a
given data source obey the rules that data source has
in place. For example, an insert can only be successful
if it doesn’t violate any referential integrity constraints
set up in the data source – like primary key-foreign key
relationships. Sounds like a no-brainer, yeah?
Chapter 5
•
•
Quarkus Data Access
Isolation: A transactional operation should protect
the data being operated on from concurrency-related
corruption.9 So problems like the following can be
avoided:
•
Dirty reads: One thread reading uncommitted data
that was created by a different thread concurrently.
•
Non-repeatable reads: One thread reading the
same data twice and getting different values each
time, because another thread is operating on the
same data.
•
Phantom reads: One thread reading data that
“disappears” or ceases to exist after it has been
read, typically because another thread is operating
on the same data source concurrently.
Durability: A transactional operation must ensure that
data that has been committed to the data source stays
committed – even in the event of a systemic failure like
disk or power failures.
Implicitly, every update you make to a database occurs as a
transaction, at least as far as the database server layer is concerned. It’s
just that the scope of the implicit transaction is very narrow to the point
where it doesn’t provide too much benefit. Talking about transactions at
the application layer requires talking about boundaries. A boundary is the
chunk of your code that you want to wrap in a transaction. It’s the part of
your code where you use transaction APIs to buy yourself the protections
here are a few other isolation concerns that I’m not covering here. Check out
T
my LinkedIn Learning course on concurrency and data access. Vlad Milhacea
also goes into more detail about the various ways data access can go wrong in a
concurrent access situation.
9
233
Chapter 5
Quarkus Data Access
of ACID. The ACID guarantee is something that a transaction manager
will help you, broker, in partnership with a data source (read: your data
source needs to support specific transaction semantics, for you to be able
to rely on it). Things get even spicier when your application is distributed.
Managing transactions across physically or logically separate data
sources introduces the need for the disparate data sources10 to coordinate
individual operations. Not all data sources support this.
And now, because you’ve stayed with me this far, here’s a little
ad-break:
Figure 5-8. “Welcome to Borkus!”. They’re already here. “Uhhh...Woof!”
ake note of the fact that I’m using the phrase “data source” and not database –
T
you can get transactions out of JMS brokers, AMQP brokers, and more. It’s not
just a database thing, and Quarkus supports it all.
10
234
Chapter 5
Quarkus Data Access
Q
uarkus Transactions
Quarkus provides transaction support by way of the Java Transaction
API (JTA). Gotta love them standards, man. JTA provides two models for
implementing transactions:
•
Declarative using the javax.transaction.
Transactional annotation
•
Programmatic using the javax.transaction.
UserTransaction interface
These two models cannot be combined – you’ll get an
IllegalStateException if you try.
There’s a third framework for transactions in Quarkus, called Software
Transactional Memory (STM); it is based on Narayana (bet you can’t
say that fast, 5 times). STM is an intriguing proposition for transaction
management. Traditionally, transaction state is made durable by way
of storing the transaction data in, well, durable storage. This introduces
performance overhead that is avoidable in many situations. STM is a
transaction management framework that isn’t too strict on the durability
part of ACID. Built for high-performing environments, STM can give you
a lot of bang for your buck; removing the cost of persisting transaction
metadata in RAM gives all of the performance boost you would expect
from constant-time, non disk I/O-bound memory access.
For now, we focus on traditional transaction management with JTA. I’ll
start with adding the quarkus-narayana-jta extension.
D
eclarative Transactions
It’s simple: we kill the Batman I add @Transactional to wherever I want ACID:
@GET
@Path("/{name:[a-zA-Z]*}/scramble")
235
Chapter 5
Quarkus Data Access
@Produces(MediaType.APPLICATION_JSON)
@Transactional(value=Transactional.
TxType.REQUIRED,rollbackOn=
{SQLException.class,IOException.class})
public ConversionResponse generateAnagram(@
PathParam("name") final String nameToScramble){
...
}
Applying @javax.transaction.Transactional to this method
transparently initiates a transaction boundary. All the method calls along
the chain of this method execution also get the ACID guarantee, being part
of this transaction boundary. I also could have applied this annotation to
the parent class of this method, to add transactionality to all the methods
in this class.
Generally, it’s encouraged to apply this annotation as close to the top
of an execution chain as possible. As you can see here, I’m applying it to a
REST resource method. With regard to the options for this annotation
a) REQUIRED here stipulates that a transaction must
be started on entering this method, or an existing
one can be used. It’s also the default. There are a
couple of other options in JPA that dictate how the
transaction manager should propagate transactions.
The sexiest one in my opinion doesn’t exist in
JTA. It’s the NESTED option, available only in Spring.
This option makes it so that a so-decorated method
can act as a savepoint. If any subsequent method
calls fail as part of that transaction, the transaction is
only rolled back to the last savepoint. Pretty sweet.
236
Chapter 5
Quarkus Data Access
b) rollbackOn tells the transaction manager
which exceptions should cause a rollback of
previously executed database operations. By
default, JTA will roll back when a subclass of
RuntimeException is thrown. No automatic
rollbacks on checked exceptions, like IOException
and *gasp*, SQLException! Conversely, there’s the
dontRollbackOn attribute – “don’t roll back on these
exceptions”.
That’s it! A couple of things to be aware of with @Transactional:
•
You can’t apply it to lifecycle methods like
@PostConstruct or @PreDestroy.
•
You can’t apply it to static methods.
•
It only delivers on the A, C, and D in ACID. You cannot
configure Isolation on this annotation – dirty reads,
phantom reads, and so on are entirely possible with
this annotation.
That last point is crucial – with just the @Transactional annotation, you
have no expectation of read consistency in a concurrent scenario. Also be
wary of mixing I/O calls – it’s a code smell. By this, I mean that combining say a
web service call and a database call inside a method marked @Transactional
could become a problem, depending on how you order the calls:
@Transactional(value=Transactional.TxType.REQUIRED,rollbackOn={
SQLException.class,IOException.class})
public void combinedIOCalls(@PathParam("name") final
String anArgument){
writeDataFromDb();
longRunningCallToWebService();
}
237
Chapter 5
Quarkus Data Access
Putting both writeDataFromDb and longRunningCallToWebService
as part of the same transaction boundary could create problems. When
the transaction boundary is entered, the database connection and other
resources allocated to that transaction are held for the length of that
method call. Take too long and you can slowly deplete the connection pool
and other scarce resources.
Consistency in Concurrency
If you’re a fan of peace of mind and sleeping at night, you probably want
to guarantee that different threads won’t see different things when looking
at exactly the same data source. You need to configure the isolation levels
of your transactions. Because you can’t do this with JPA’s @Transactional,
you’ll need to go to the data source to provide the “I” in ACID. Configure
the quarkus.datasource.jdbc.transaction-isolation-level to one of
the five available options:
238
•
none: You don’t want read consistency.
•
read-uncommitted: Allows read access to data that
hasn’t been committed. It’s very permissive and has the
lowest burden. It also allows dirty, phantom, and non-
repeatable reads. Sooo, no.
•
read-committed: This allows access to only committed
data, preventing dirty reads. You’re still susceptible to
phantom and non-repeatable reads.
•
repeatable-read: Prevents dirty and non-repeatable
reads. You’re still liable to experience phantom reads.
This is the third highest level of isolation, with an
increased degree of protection overhead.
Chapter 5
•
Quarkus Data Access
serializable: This option is the highest level of
read isolation, guaranteeing protection against dirty,
phantom, and non-repeatable reads. This is at the cost
of concurrent access – synchronization is how this
mode protects read access. Only one thread will be able
to access the data table at a time. Any others must wait
their turn, so, not a great choice for scalability.
You can also configure a transaction timeout, within which all threads
must complete their transaction business:
quarkus.transaction-manager.default-transaction-timeout = P75S
It too uses that weird-patterned Duration class. In this example, I’ve
set the timeout to 75 seconds.
The isolation level you choose is one of the more crucial choices you’ll
make when configuring the data source access for your application. In a
serverless deployment, for example, things can quickly fall apart with the
wrong sort of isolation. Each run of your serverless function is effectively
a single thread – remember, serverless functions shouldn’t maintain state
in themselves. An overly permissive isolation level means that multiple
hits to your serverless function, accessing the same database, will lead to
corrupt data. Choose an expensive but thread-safe option, and you will
bottleneck your serverless function, causing it to run longer than it needs
to. A long-running serverless function will cost you more money in timing
costs; increased RAM and CPU costs are also going to become an issue.
You’ve got to get it juuuust right, like Goldilocks.
Database Update Locking
You can decide on how much protection you want to guarantee your
concurrent writes, on a query-by-query basis using row-level locking.
Consider the find method on the PanacheEntity class:
239
Chapter 5
Quarkus Data Access
@Entity
@Table(name = "anagram_source")
public class AnagramSource extends PanacheEntityBase {
@Id
@GeneratedValue(strategy = GenerationType.AUTO)
@Column(name = "anagram_id", unique = true,nullable = false)
public Long id;
public String value;
public static AnagramSource findByValue(String value){
return (AnagramSource) find("value",value,
LockModeType.PESSIMISTIC_READ);
}
}
Providing a LockModeType to find allows me to define the level of read
consistency I’m interested in for my database read operation. As you have
probably guessed, the highest level of read consistency is also the costliest.
Here are the options of LockModeType:
1. OPTIMISTIC: This is a type of locking that uses a
dedicated version field or column to coordinate
concurrent reads of the same entity. If your entity
doesn’t provide a version column, expect this to
not provide any protection. If you use this option
in an update operation, its version number will be
incremented. It prevents dirty and non-repeatable
reads by using a version column on your entity class
to coordinate liveness between multiple threads
accessing the same data.
240
Chapter 5
Quarkus Data Access
2. OPTIMISTIC_FORCE_INCREMENT: This rather exotic
option acts like OPTIMISTIC, even when the data
hasn’t been updated. That means that just accessing
a data in one thread makes it out of date for other
concurrent access.
3. PESSIMISTIC_READ: This is a lock mode that
completely prevents concurrent writes, but allows
concurrent reads. Using a write lock, once a thread
gets a hold of a row, it’s locked for writing. Other
threads that attempt to write to the same row will
catch an exception; they’re free to read without
consequence.
4. PESSIMISTIC_WRITE: Prevents both concurrent
reading and writing. Simply accessing a row
prevents another thread from doing anything with it.
5. PESSIMISTIC_FORCE_INCREMENT: This is
PESSIMISTIC_WRITE + OPTIMISTIC_FORCE_
INCREMENT. Really strict stuff.
6. NONE: No row locking, all concurrency problems
allowed.
These controls are particularly useful for preventing lost updates,
a spectacularly insidious class of concurrency problems with database
transactions. Lost updates occur when two threads are trying to modify
the same column, of the same row in a table. By default, most database
servers will be set to READ_COMMITTED isolation, meaning that two threads
accessing the same row will not see each other’s uncommitted updates.
The problem with that is that if they’re acting on the same column of the
same row, only one of them can have a successful update of that column.
The other thread will still “successfully” make the update, but it won’t
241
Chapter 5
Quarkus Data Access
know that another thread immediately overwrote its changes. This is
where choosing a locking mechanism pays off. With an OPTIMISTIC lock
mode, for example, the thread that tries to update the column last will
get an OptimistLockException. This will necessitate a reattempt of the
transaction, if it makes sense to do so.
Programmatic Transactions
This is transaction management where you manually define the
transaction boundaries and orchestrate the transaction itself. Use the
javax.transaction.UserTransaction to take charge of the situation:
@Inject
UserTransaction userTransaction;
...
@GET
@Path("/{name:[a-zA-Z]*}/scramble")
@Produces(MediaType.APPLICATION_JSON)
public ConversionResponse generateAnagram(@PathParam
("name") final String nameToScramble){
try{
userTransaction.begin();
//your sensitive business here
userTransaction.commit();
}catch(IOException exception){
userTransaction.rollBack();
}
}
I can then manually demarcate the transaction boundaries with
begin() and commit(). Additionally, I can manually trigger the rollback
when I please.
242
Chapter 5
Quarkus Data Access
Batch Operations
Database operations on an entity are batched by default in JPA. Calling
persist() on your panache entity in Quarkus adds the change to a
sort of queue. The changes to that entity are then batch applied when
a transaction ends or before a read on that same entity. If you’re on the
paranoid end of things like I am, sometimes, use persistAndFlush() to
commit your entity changes immediately. On a larger scale, you can make
bulk inserts using any of the following persist options:
•
persist(Iterable<Entity>)
•
persist(Stream<Entity>)
•
persist(Entity[])
These incarnations of persist allow you to save a Collection, Stream,
or array of entities, all in one operation. You can then call flush() on your
PanacheEntity right after:
public void generateAndSaveAnagrams(String source){
List<Anagram> anagrams = new ArrayList<>(30);
for(int i=0; i++; i<30){
Anagram anagram = generateAnagram(source);
anagrams.add(anagram);
}
Anagram.persist(anagrams);
Anagram.flush();
}
A couple of notes on best practice:
•
You should be careful to size your batches correctly:
too few items in the batch and you might as well
persistAndFlush() after each run; too many items and
you risk an OutOfMemoryError.
243
Chapter 5
Quarkus Data Access
•
The length of time you spend waiting to collect items
into a batch as well as the size of each item should be a
factor in how you size your batches.
•
The deployment context matters a lot as well: you
shouldn’t use serverless functions like AWS Lambda
for long-running batch operations. That is not what
Lambda is ideal for.
•
Managing read consistency and isolation contexts
becomes more important when you’re running batch
operations in a serverless context. Each serverless
invocation of your application is essentially a
thread – more concurrent invocations, more
contention of row locks.
Scheduled Jobs
You’re going to write a scheduled task at some point, for it is in your
destiny. Yes, you, specifically. Use the quarkus-scheduler extension to get
in on this action:
@Singleton (1)
public class TaskMaster{
@Inject
Scheduler scheduledTaskMaster; (2)
@Scheduled(every="3d", delay="5", delayUnit=TimeUnit.Hours,
identity="StopTheWorldTask")
public void pauseAllTasks() {
scheduledTaskMaster.pause(); (3)
}
@Scheduled(every="4d", delay="5", delayUnit=TimeUnit.Hours,
identity="ResumeTheWorldTask") (4)
244
Chapter 5
Quarkus Data Access
public void resumeAllTasks() {
if(!scheduledTaskMaster.isRunning()){
scheduledTaskMaster.resume(); (5)
((SimpleScheduledTask)scheduledTaskMaster).
checkTriggers();
}
@Scheduled(cron="0 15 10 * * ?",identity="EveryMorning
GramGenerator")
public void generateEveryMorning(ScheduledExecution
execution (6)) {
generateAndSaveAnagrams(reallyLongString);
logger.info("Scheduled for: "+execution.
getScheduledFireTime());
logger.info("Next execution: "+execution.getTrigger().
getNextFireTime(); (7)
}
}
Here’s what I’m up to over here:
1. I’ve marked the bean that’s going to host the
scheduled tasks a singleton, because I need just one
instance of this bean. This doesn’t really matter to
Quarkus, by the way. The @Scheduled annotation is
discovered by the runtime, regardless of whether the
parent class is a CDI managed bean or not.
2. I can inject the Scheduler, the component that
manages all the tasks in the runtime, for my own
nefarious purposes. You don’t need this in many
cases; just in case you do though, it’s here.
245
Chapter 5
Quarkus Data Access
3. With the scheduler in hand, I can manually pause
all tasks.
4. @Scheduled is going to be the most common use
case of this API. I can configure every to specify
the interval of runs, delay to specify a wait before
the first run of this method, delayUnit for the
unit of measurement of delay, and a unique name
for this scheduled task. I can also specify a cronformat schedule for the interval of execution. This
cron schedule can be supplied as a property from
application.properties as well.
5. I could also resume the scheduler, after pausing
it. This doesn’t mean that any suspended tasks
will be run immediately, so I can manually
trigger the execution of all scheduled tasks with
checkTriggers.
6. I can obtain metadata about a specific task run from
the provided ScheduledExecution object; from
there, I can log some useful info, like the next time
this task is to run.
For more advanced use cases, you can turn to the quartz extension
which lets you use the Quartz library in your Quarkus app. Additionally, if
you’re coming from the Spring framework world, Quarkus supports Spring
Scheduled Jobs.
Now this is all well and good for traditional use cases, but if we’re
talking cloud and serverless, this approach might not be necessary. AWS
Lambda, for example, can be easily configured as a scheduled task;
Microsoft Azure also supports step functions on a schedule.
246
Chapter 5
Quarkus Data Access
S
ecurity
How about we use database-stored credentials to authorize and
authenticate access to our web services? Sure JWT is nice, especially in a
distributed, cloud-computing world – you can combine JWT with OAuth,11
for example. But sometimes, you just need trusty old JDBC. More so if
you’re migrating your existing “legacy” APIs to Quarkus. Here’s how SQL-
backed security works in Quarkus.
Quarkus supports JDBC-backed authentication and authorization in
many ways you’d expect. However, there’s currently no support for Soteria,
the Jakarta EE standard on security.12 One place I am super impressed is the
ORM-based support for authentication. This has the trademark sleekness and
opinionated approach to features that I adore about Quarkus. Check it out.
Here’s a schema definition for a credential database that covers your
standard authentication and authorization needs:
CREATE TABLE user (
user_id integer NOT NULL,
user_name character varying(100) NOT NULL,
password_hash character varying(500) NOT NULL
);
CREATE SEQUENCE user_user_id_seq
AS integer
START WITH 1
INCREMENT BY 1
NO MINVALUE
NO MAXVALUE
CACHE 1;
heck out the Quarkus OAuth module.
C
I know right! They’ve finally gotten around to standardizing the plethora of
security specifications for enterprise Java!
11
12
247
Chapter 5
Quarkus Data Access
INSERT INTO user (user_id, user_name, password_hash) VALUES
(1, 'mynameiswhat', '$2a$10$nvPeasph1j4cPex3rUY4n.dbCs.
af3UUNLvnrf5FY.H39i5b5qh6e');
INSERT INTO user (user_id, user_name, password_hash) VALUES
(2, 'mynameiswho', '$2a$10$KxXhooqEAtyZ3pZSudtTje0fx0bfPpMnaXfU
2xmI3FtUq/v4fas/S');
ALTER TABLE ONLY users
ADD CONSTRAINT users_pkey PRIMARY KEY (user_id);
CREATE TABLE role (
role_id integer NOT NULL,
role_name character varying(25) NOT NULL
);
CREATE SEQUENCE role_role_id_seq
AS integer
START WITH 1
INCREMENT BY 1
NO MINVALUE
NO MAXVALUE
CACHE 1;
ALTER TABLE ONLY role ALTER COLUMN role_id SET DEFAULT
nextval('role_role_id_seq'::regclass);
ALTER TABLE ONLY role
ADD CONSTRAINT role_pkey PRIMARY KEY (role_id);
INSERT INTO role (role_name) VALUES ('VIP');
INSERT INTO role (role_name) VALUES ('HOYPOLOI');
CREATE TABLE user_role_mapping (
user_id bigint NOT NULL,
role_id bigint NOT NULL
);
248
Chapter 5
Quarkus Data Access
ALTER TABLE ONLY user_role_mapping
ADD CONSTRAINT role_id_ref FOREIGN KEY (role_id) REFERENCES
role(role_id);
ALTER TABLE ONLY user_role_mapping
ADD CONSTRAINT user_id_ref FOREIGN KEY (user_id) REFERENCES
user(user_id);
INSERT INTO user_role_mapping (user_id, role_id) VALUES (1, 1);
INSERT INTO user_role_mapping (user_id, role_id) VALUES (2, 1);
This schema definition provides
1. A role table that lists named roles that describe the
authorizations of users in this service.
2. A user table that holds the users that will have
access to the application in general.
3. A user-role mapping table that connects the user
and role tables. This way, a single user can have
multiple roles; a single role obviously will be
mapped to multiple users. A proper many-to-many
relationship.
4. Roles rows for roles “VIP” and “HOYPOLOI”.
5. Two users named “mynameiswhat” and
“mynameiswho”, both with password “password”.
A very safe and strong password that you should
totally put on a sticky note next to your work
station.13 Five out of five doctors recommend this.
Editor’s note: Do not do this! What is wrong with you?!
13
249
Chapter 5
Quarkus Data Access
Bueno! Now, I create my AuthenticatedUser JPA entity that will
stitch users and their roles together. What will my AuthenticatedUser
entity look like?
@UserDefinition (1)
@Entity
@Table(name = "user")
public class AuthenticatedUser extends PanacheEntityBase {
@Username (2)
@Column(name = "user_name", nullable = false, unique =
true)
public String username;
@Password (3)
@Column(name = "password_hash", nullable = false, length = 500)
public String password;
@Roles (4)
@ManyToMany (5)
@JoinTable( (6)
name = "user_role_mapping",
joinColumns = @JoinColumn(name = "user_id",
referencedColumnName = "user_id"),
inverseJoinColumns = @JoinColumn(name = "role_id",
referencedColumnName = "role_id"))
public List<Role> roles = new ArrayList<>();
}
Here are the pieces at play:
1. io.quarkus.security.jpa.UserDefinition marks
this entity class as the “user” class that will identify
the principal trying to connect to your service.
250
Chapter 5
Quarkus Data Access
2. io.quarkus.security.jpa.Username marks this
field as the “user name” field of the entity.
3. io.quarkus.security.jpa.Password designates
this field as the password field. The framework
expects this field to hold the hash of the password,
not the plain text version. BCrypt is the default
hashing function.
4. io.quarkus.security.jpa.Roles will use this field
to hold a list of entities that map to the roles or groups
that the parent entity has.
5. Because of the many-to-many relationships that I’ve
set up between the user and role tables using the
user_role_mapping table, I need the @ManyToMany
annotation here.
6. Along with the @ManyToMany annotation, I need
to use the @JoinTable annotation to establish the
relationship between the three tables.
Here’s the Role entity:
@Entity
public class Role extends PanacheEntityBase {
@Id
@GeneratedValue(strategy = GenerationType.
IDENTITY,generator = "role_role_id_seq")
@Column(name = "role_id",nullable = false, unique = false)
public Long id;
@Column(name = "role_name",nullable = false)
@RolesValue
public String name;
251
Chapter 5
Quarkus Data Access
@ManyToMany(mappedBy = "roles")
List<AuthenticatedUser> users;
}
io.quarkus.security.jpa.RolesValue marks this field as the name of
the role. The value in this field is what an authenticated entity will present
as its role. @ManyToMany annotation establishes the other side of the three-
way connection between user, user_role_mapping, and role.
Finally, I’ll throw this little piece in there to handle creating new users:
public static void add(String username, String password, Role
role) {
AuthenticatedUser user = new AuthenticatedUser();
user.username = username;
user.password = BcryptUtil.bcryptHash(password);
user.roles.add(role);
user.persist();
}
Quarkus provides the BcryptUtil#bcryptHash method to help
generate the hash value for use in the password field. Now let’s protect a
resource. I’ll add the following property to enable BASIC authentication for
my endpoint:
quarkus.http.auth.basic=true
Now I need to enforce security on an endpoint. I’ll use a GET endpoint
that returns an image:
@GET
@Path("/hello-image")
@Cache(maxAge = 30)
@Operation(summary = "Returns an image")
@Produces("image/jpg")
252
Chapter 5
Quarkus Data Access
@RolesAllowed("VIP")
public Response helloImage() throws InterruptedException,
ExecutionException {
...
}
The presence of @RolesAllowed makes Quarkus kick in an
authentication requirement for that endpoint. Any attempts to hit
that endpoint will enforce the need for credentials supplied via the
Authorization HTTP header. With all this in place and some user records
in the database, I can attempt to hit the endpoint in a browser. That
attempt will open up the authentication dialog that looks something like
Figure 5-9.
Figure 5-9. The Mozilla authentication dialog box
All I need to do is fill in the credentials and I’m granted access. For a
more “technical” test, I’ll use SoapUI. This requires me to have generated the
bearer token to fill into the Authorization HTTP header as in Figure 5-10.
253
Chapter 5
Quarkus Data Access
Figure 5-10. Testing my REST authentication in SoapUI
Tip You can get the value for the Authorization header from your
browser. Open the network console in your browser and attempt to
hit the secured endpoint. That will yield a dialog box like the one in
Figure 5-6. Fill it out and proceed to success. In the network tab of
your console, you can then view the request payload and copy the
authorization header off it, to use inside the API testing tool of your
choice.
Regardless of your testing tool of choice, you should get a successful
authentication response from your application, given the correct
authentication credentials.
254
Chapter 5
Quarkus Data Access
And that, ladies in gentlemen, is how you do data in Quarkus. There
are a many other data-relate cool things that I couldn’t include in this
chapter. I highly recommend you check some of them out, including:
•
Pub-sub to PostgreSQL database with reactive
SQL. PostgreSQL has the capability to notify you of
changes to the database and data using the reactive
connection.
•
Debezium also allows you to stream changes from your
database upward into your Quarkus application.
•
So. Much. Cloud. Quarkus provides support for
a lot of cloud-based data services like Amazon’s SQS,
SNS and S3.
•
For integration to cloud services though,
I recommend you go through Apache Camel
instead of connecting through naked Quarkus.
It opens up a wider variety of options and gives
more bang for buck.
255
CHAPTER 6
Test Quarkus
Applications
Okay, don’t start snoring just yet! I know testing isn’t the sexiest thing, but
we must talk about it. Because “testing is important” and “it’s the hallmark
of mature code and software engineers,” or “if you don’t write about
testing, we’ll launch you out of a cannon and set a flamethrower to your
book’s manuscript.1”
Quarkus’ testing support is based on JUnit version 5, JUnit Jupiter.
JUnit 5 is quite a different animal from JUnit 4, so even for a grizzled
veteran like yourself, a primer might be helpful.
JUnit Primer
The fundamental unit of the JUnit unit testing framework (see what I did
there?) is the @Test annotation:
public class BasicJUnit{
@Test
public void testOrdered1(){
Assertions.assertEquals(2,1+1,"1 and 1 is not 2 ??");
}
}
Editor’s note: We said no such thing ;).
1
© Tayo Koleoso 2020
T. Koleoso, Beginning Quarkus Framework, https://doi.org/10.1007/978-1-4842-6032-6_6
257
Chapter 6
Test Quarkus Applications
The @Test annotation is going to run the annotated method and
Assertions.assertEquals will validate that the result of that computation
is what is expected. Otherwise, the string message is displayed as a failure
message. There’s a whole host of tooling that JUnit provides; here’s a small
sampling of some of my favorite bits – mostly from the revamped Jupiter
platform:
@DisplayName(value = "A JUnit Jupiter Test Class ") (1)
@TestInstance(value = Lifecycle.PER_CLASS) (2)
@TestMethodOrder(OrderAnnotation.class)
public class SampleUnitTest {
@BeforeEach (3)
public void onePerTestTimeInit(){
//run some setup before each test method
}
@ParameterizedTest (4)
@Tag("tag1") (5)
@ValueSource(strings = {"Supersonic","Subatomic","Java!"})
public void loadValues(String values){
}
@ParameterizedTest
@Tag("tag1")
@CsvSource({
"Olamide, Koleoso",
"Mo, Sylla",
“Eden, Wassiamal
})
public void loadValuesFromCSV(String firstName, String
lastName){
258
Chapter 6
Test Quarkus Applications
assertNotNull(firstName);
assertNotEquals(lastName,"");
}
@Test
@Tag("tag2")
@Timeout(value = 3, unit = TimeUnit.SECONDS) (6)
public void testTimeoutException(){
try {
Thread.sleep(4000); //force a wait
} catch (InterruptedException e) {
// TODO Auto-generated catch block
e.printStackTrace();
}
}
@RepeatedTest(3) (7)
@DisplayName("It's a repeat!")
public void testDuplicateRequests(RepetitionInfo
repetitionInfo){
//test logic that will be executed repeatedly for the count
}
@Test
@Order(1) (8)
public void testOrdered1(){
Assertions.assertEquals(2,1+1,0,"1 and 1 is 2");
}
@Test
@Order(2)
public void testOrdered2(){
}
259
Chapter 6
Test Quarkus Applications
@AfterEach (8)
public void oneTimeCleanup(){
//perform cleanup tasks after each @Test method has run
}
}
1. @DisplayName to help IDEs render your JUnit test
classes with a fancy display name of your choice,
instead of just the class name.
2. @TestInstance to configure how JUnit should
handle instances of your test class. You can have
one instance of the test class for all the available
@Test methods, so you can share instance variables
between each method; or you can have a new
instance per test method, so that no sharing (or
corruption) of state occurs between test runs.
3. @BeforeEach to execute some code before each
run of any @Test method present in the class.
@BeforeAll is an alternative that will execute just
once, before all the available @Test methods run.
You can have both in the same unit test class.
4. @ParameterizedTest to designate a test method as
one that accepts parameters. You can then use one
of many @*Source annotations to designate where
the values can be supplied from – ranging from a
fixed list of String here to a CSV file. The given test
method will be run for each value available. There’s
even @MethodSource that you can use to supply
values from a method!
260
Chapter 6
Test Quarkus Applications
5. @Tag to categorize your test methods with the
configured names. This becomes useful when you
need to exclude some unit tests from a test run or
include only some tests.
6. @Timeout to validate response times. Use this
annotation to validate that the test case doesn’t
exceed the configured timeout.
7. @RepeatedTest to execute the given test method a
configurable number of times. This is particularly
useful in the microservice world where it’s
important to validate the behavior of an API
endpoint that might receive repeated or “phantom”
requests. Being RESTful means that one must
guarantee that an idempotent endpoint behaves
idempotently.
8. @Order and @TestMethodOrder together to
orchestrate between multiple @Test methods,
deciding the order in which they should execute.
This might encourage one to blur the lines between
unit, integration, and behavioral testing. Make of
that what you will ;).
9. @AfterEach to execute the method after each
invocation of a @Test method in the unit test class.
Also available: the @AfterAll annotation to execute
a method once after every @Test method has
completed.
So, that’s what I consider the JUnit starter kit for microservices. Now to
add a little bit of Quarkus flavor to things!
261
Chapter 6
Test Quarkus Applications
Unit Testing
To test in Quarkus at all, you’ll need the quarkus-junit5 extension. It’s the
only extension in the ecosystem that isn’t available via the quarkus maven
plugin (you can’t add the extension with quarkus:add-extension as at the
time of this writing). You’ll need to add the POM.xml entry manually:
<dependency>
<groupId>io.quarkus</groupId>
<artifactId>quarkus-junit5</artifactId>
<scope>test</scope>
</dependency>
To accommodate JUnit 5, you’ll need to update the Maven Surefire
plugin in your POM.xml. If you started this project using any of the
Quarkus tooling, you’ll find the version config property in the properties
section of your POM.xml. At this time, 3.0.0-M4 is the latest version:
<surefire-plugin.version>3.0.0-M4</surefire-plugin.version>
Otherwise, you can add the plugin afresh yourself:
<plugin>
<artifactId>maven-surefire-plugin</artifactId>
<version>${surefire-plugin.version}</version>
<configuration>
<systemProperties>
<java.util.logging.manager>org.jboss.logmanager.
LogManager</java.util.logging.manager>
</systemProperties>
</configuration>
</plugin>
262
Chapter 6
Test Quarkus Applications
Finally, I’ll add test engines, a prerequisite for Maven to run any unit
tests I define:
<dependency>
<groupId>org.junit.jupiter</groupId>
<artifactId>junit-jupiter</artifactId>
<version>5.6.2</version>
<scope>test</scope>
</dependency>
<dependency>
<groupId>org.junit.vintage</groupId>
<artifactId>junit-vintage-engine</artifactId>
<version>5.6.2</version>
<scope>test</scope>
</dependency>
The junit-jupiter dependency will pull in all I need for JUnit 5 tests;
junit-vintage-engine is there to allow me run the JUnit 4 unit tests.
Pro Tip The example classes in this book generally aren’t using
interfaces. These aren’t production or real-world classes. In your
actual day-to-day programming, you should be coding to interfaces
and, consequently, testing against interfaces. This way, your tests
aren’t tightly coupled to the classes. Brittle tests are a chore; don’t
write your beans this way!
263
Chapter 6
Test Quarkus Applications
Unit Test CDI Beans
Now for some Quarkus magic. Since Quarkus fundamentally operates in
a dependency injection context – CDI – being able to inject your CDI (or
Spring)-annotated beans is a basic need. Let’s take this CDI bean from
earlier:
import io.quarkus.vertx.ConsumeEvent;
import io.vertx.axle.core.Vertx;
import io.vertx.core.eventbus.Message;
@RequestScoped
public class EventBusMessageRecipient{
@Inject
Vertx vertx;
final Logger logger = Logger.getLogger(EventBusMessageRecip
ient.class.getName());
...
@ConsumeEvent("two-way-message")
public EventMessage receiveTwoWayMessage(String message){
logger.info("Received two-way message "+message);
EventMessage response = new EventMessage();
response.setMessage("Message received");
return response;
}
...
}
264
Chapter 6
Test Quarkus Applications
To be able to unit test this class, you need to be able to obtain a
managed instance of it inside our unit test class. This is where the
@QuarkusTest annotation comes in. This annotation bootstraps the
Arc CDI engine; it’ll then provide any managed beans you’ve defined,
along with any dependencies those beans use – with some limitations2:
import io.quarkus.test.junit.QuarkusTest;
...
import org.junit.jupiter.api.Assertions;
import org.junit.jupiter.api.Test;
@QuarkusTest (1)
public class ExampleResourceTest {
@Inject
EventBusMessageRecipient eventBusBean;
@Test (2)
@DisplayName("Test for two-way messaging with the Vert.x
event bus")
public void testEventBusTwoWay(){
String message = "message to send";
EventMessage eventResponse = eventBusBean.
receiveTwoWayMessage(message);
Assertions.assertNotNull(eventResponse);
Assertions.assertEquals("Message received",
eventResponse.getMessage());
}
}
I talk more about this a little later.
2
265
Chapter 6
Test Quarkus Applications
Here’s what’s going on:
1. @QuarkusTest is a JUnit 5 extension that starts up
an instance of your application to make your whole
Quarkus application available within the unit test.
2. With the application running, you can now inject
your CDI bean and validate the assumptions.
Note that the JUnit imports are from the org.junit.jupiter package,
indicating the JUnit 5 dependency; this will become an important point
shortly.
All that’s left now is to run the unit test. Now, I love the JUnit
integration in the VS Code IDE, but there is an idiomatic route to run tests
with Maven:
mvn test
This kicks off my unit tests and shows me the test results.
Note This isn’t a pure unit test. A “pure” unit test will isolate your
CDI bean code from any of its dependencies. Anything that your
CDI bean depends on should ideally be mocked using mocking
frameworks like Mockito and PowerMock.
Unit Test CDI Components
The Quarkus + JUnit 5 Combo is just splendid for unit testing standard CDI
beans that you created – CDI beans here mean beans you’ve annotated with
@Named, @RequestScoped, and @Singleton. Where things get dicey is where
you have to unit test components. By components, I’m talking about filters,
interceptors, exception mappers, and so forth. This isn’t supported by the
Quarkus unit testing framework. You also can’t inject components with
@Context with the Quarkus unit tester. But fear not! Arquillian to the rescue!
266
Chapter 6
Test Quarkus Applications
Unit Test with Arquillian
Arquillian is the premier testing platform for CDI and JavaEE
componentry; it’s been around for a while and even the Quarkus platform
uses it for internal testing. Arquillian provides a JUnit harness that allows
us to bootstrap an embedded JavaEE application server as part of a JUnit
unit test class; this gives you the full strength of the JavaEE runtime in a
portable testing framework. Neato!
So, let’s say I have a JAX-RS exception mapper that I’ve configured for
my Quarkus app:
import javax.ws.rs.core.Response;
import javax.ws.rs.ext.Provider;
import javax.ws.rs.ext.ExceptionMapper;
@Provider
public class JAXRSExceptionMapper implements
ExceptionMapper<Exception>{
@Override
public Response toResponse(Exception exception) {
return Response.serverError().status(400).build();
}
}
This is an exception handler that will trap all exceptions thrown in my
Quarkus app and return an HTTP-400 status code to the service requester.
I’ll now introduce Arquillian into the mix:
<dependency>
<groupId>junit</groupId>
<artifactId>junit</artifactId>
<version>${junit.legacy.version}</version>
<scope>test</scope>
</dependency>
267
Chapter 6
Test Quarkus Applications
<dependency>
<groupId>org.jboss.arquillian.junit</groupId>
<artifactId>arquillian-junit-container</artifactId>
<version>${arquillian.version}</version>
<scope>test</scope>
</dependency>
As at the time of this writing, there’s no official Arquillian support for
JUnit 5; junit.legacy.version needs to be the highest JUnit 4 version: 4.12;
for Arquillian, I’ll use the latest at this point: 1.6.0.Final. Finally, I need
to select the type of embedded JavaEE container that Arquillian will use
for the JUnit bootstrapping; there are a few options; I’m going with the
embedded Weld-EE container; it plays very well with the rest of Quarkus,
based on my test drive of it:
<dependency>
<groupId>org.jboss.spec</groupId>
<artifactId>jboss-javaee-7.0</artifactId>
<version>1.1.1.Final</version>
<type>pom</type>
<scope>provided</scope>
</dependency>
<dependency>
<groupId>org.jboss.arquillian.container</groupId>
<artifactId>arquillian-weld-ee-embedded-1.1</
artifactId>
<version>1.0.0.Final</version>
<scope>test</scope>
</dependency>
<dependency>
<groupId>org.jboss.weld</groupId>
<artifactId>weld-core</artifactId>
268
Chapter 6
Test Quarkus Applications
<version>2.4.8.Final</version>
<scope>test</scope>
</dependency>
With this setup, I can run JUnit 4 and 5 tests in the same mvn test run.
Arquillian is still sitting pretty. Configuration is done; all that’s left is the
actual unit test:
import
import
...
import
import
import
import
org.junit.Test;
static org.junit.Assert.assertEquals;
org.junit.runner.RunWith;
javax.ws.rs.core.Response;
javax.ws.rs.ext.ExceptionMapper;
javax.inject.Provider;
@RunWith(Arquillian.class)(1)
public class ExampleResourceTest {
@Inject
Provider<ExceptionMapper<IllegalArgumentException>>
exceptionMapperProvider; (2)
@Deployment
public static JavaArchive createDeployment() {
return ShrinkWrap.create(JavaArchive.class)
.addClass(JAXRSExceptionMapper.class)(4)
.addAsManifestResource(EmptyAsset.INSTANCE,
"beans.xml");
}
@Test
public void testMapper(){
ExceptionMapper<Exception> mapper =
exceptionMapperProvider.get(); (4)
269
Chapter 6
Test Quarkus Applications
Response response = mapper.toResponse(new Exception("A
generic failure"));
assertEquals(400, response.getStatus());
}
}
Pay attention to the import of @Test and assertEquals: they must
be from org.junit.Test and org.junit.Assert respectively. These are
the packages from the legacy version of JUnit. For the test itself, here’s
what’s up:
1. Using the @RunWith annotation from JUnit 4, I use
the Arquillian runner class.
2. Injecting javax.inject.Provider is how I get a
hold of my JAX-RS providers inside the unit test; this
is an idiomatic way of obtaining specific providers
in the CDI context. Anything annotated with
@Provider can be obtained this way.
3. This is a little splash of Arquillian sorcery over here:
@Deployment comes from the Arquillian kit; the
point of the entire createDeployment method is
to package artifacts of interest into a dynamically
generated JAR file. For most testing needs, this is all
mostly boilerplate code. The crucial part of all of this
is the addClass method. Use this method to package
the classes you’ll need to inject into your unit test.
There’s also an addClasses method to add multiple
classes in one go.
4. I then retrieve an instance of my specific provider
using the get method on the javax.inject.
Provider interface.
270
Chapter 6
Test Quarkus Applications
As normal, I hit the ol’ mvn test, but this time, I’ll supply a profile
parameter so that my Arquillian-based test dependencies kick in:
mvn test -Parquillian-glassfish-test
This kicks off the JUnit 4 + Arquillian-based unit test. My JUnit 5 test
dependencies are still configured and intact.
Quarkus Mocking
To achieve purity of test, you can mock out the dependencies in your code.
A pure unit test should execute only the methods inside the target class;
injected code and dependencies will not be invited to the testing party.
Quarkus uses CDI magic to provide mocking for CDI beans; check it out.
Given my CDI bean:
import io.quarkus.vertx.ConsumeEvent;
import io.vertx.axle.core.Vertx;
import io.vertx.core.eventbus.Message;
@RequestScoped
public class EventBusMessageRecipient{
@Inject
Vertx vertx;
final Logger logger = Logger.getLogger(EventBusMessage
Recipient.class.getName());
...
@ConsumeEvent("two-way-message")
public EventMessage receiveTwoWayMessage(String message){
logger.info("Received two-way message "+message);
EventMessage response = new EventMessage();
271
Chapter 6
Test Quarkus Applications
response.setMessage("Message received");
return response;
}
...
}
I can mock it out like so:
@Mock
@RequestScoped
public class MockEventBusMessageRecipient extends
EventBusMessageRecipient{
public EventMessage receiveTwoWayMessage(String message){
EventMessage response = new EventMessage();
response.setMessage("Mock Message received");
return response;
}
...
}
io.quarkus.test.Mock designates this class as a mock. @QuarkusTest
will inject the mock instead of the real bean:
import io.quarkus.test.junit.QuarkusTest;
...
import org.junit.jupiter.api.Assertions;
import org.junit.jupiter.api.Test;
@QuarkusTest
public class MockEventBusMessageRecipientTest {
@InjectMock
EventBusMessageRecipient eventBusBean;
272
Chapter 6
Test Quarkus Applications
@Test
public void testEventBusTwoWay(){
String message = "message to send";
EventMessage eventResponse = eventBusBean.
receiveTwoWayMessage(message);
Assertions.assertEquals("Mock Message received",
eventResponse.getMessage());
}
}
When you combine this with the @AlternativePriority feature,
you can have a suite of beans that can be transparently substituted for
one another, based on priority. Now, this isn’t an all-out replacement for
the mocking powerhouses like Mockito and PowerMock, but it’s a nice
supplement. Speaking of Mockito…
import
...
import
import
import
import
io.quarkus.test.junit.QuarkusTest;
org.junit.jupiter.api.Assertions;
org.junit.jupiter.api.Test;
io.quarkus.test.junit.mockito.InjectMock;
org.mockito.Mockito;
@QuarkusTest
@TestInstance(value = Lifecycle.PER_CLASS)
public class EventBusMessageRecipientTest {
@InjectMock
EventBusMessageRecipient eventBusBean; (1)
@InjectMock
@RestClient
HttpBinServiceDAO binServiceRestClient;(2)
273
Chapter 6
Test Quarkus Applications
@InjectMock
AnagramRepository anagramRepository; (3)
Anagram anagram = new Anagram();
@BeforeAll
public void init(){
anagram.setAnagramText("scrambledText");
Mockito.when(eventBusBean.receiveTwoWayMessage(
"Hey y'all!")).thenReturn(new EventMessage("Hello
yourself!")); (4a)
Mockito.when(binServiceRestClient.
postAnything("Say something")).thenReturn(new
HttpBinAnythingResponse("Hi, Drake!"); (4b)
Mockito.when(anagramRepository.count()).
thenReturn(23l); (4c)
PanacheMock.mock(Anagram.class); (5)
Mockito.when(Anagram.findById(100)).
thenReturn(anagram); (5a)
}
...
}
With the quarkus-junit5-mockito extension installed, I’ve been
able to
1. Mock out my actual EventBusMessageRecipient.
2. Mock out my MicroProfile REST client for the HTTP
Bin REST service. Note that I still had to decorate it
with the @RestClient annotation from MicroProfile.
274
Chapter 6
Test Quarkus Applications
3. Mock out my Panache repository.
4. Use raw Mockito to define the behavior I want for
the three mocks I injected earlier.
With the quarkus-panache-mock extension, I can use the PanacheMock
class to mock out my Panache entities, like the Anagram class . The way @
InjectMock works, it’ll replace the target bean with either a mock that you
supply with @Mock, or a dumb stub. The stub or mock will replace the real
deal throughout the test.
Tip Version 1.5 of Quarkus introduces @InjectSpy, with the
quarkus-junit5-mockito extension. This introduces support
for Mockito spies: when you just need to ensure that a method was
called, but not necessarily executed on a bean, use @InjectSpy.
Integration Testing
Okay, I know that my individual classes work because I can unit test them.
How about the entire application? How can I know that my API endpoints
will respond the way I expect? How do I know that my individual CDI
beans and other components all integrate correctly and work together to
produce the results I want? Integration testing, baby!
An integration test is going to activate your code and anything your
code depends on – within limits. Your application could depend on
Quarkus-provided components and CDI-provided components. It could
also depend on a database, an external web service, and other black box
systems; an integration test is the type of test that can help you activate that
whole string of dependencies. You could also engage selected execution
paths by mocking out specific components in a test class. Now, deciding
how deeply you should integration test has become a philosophical
debate in the software engineering business, so I’ll leave that up to you.
275
Chapter 6
Test Quarkus Applications
@QuarkusTest enables that by starting up your Quarkus application as
part of a JUnit test. Past that, all you have left to do is execute your API
endpoints. For this, most people turn to Restassured.
Restassured is arguably the most popular API testing and validation
library with an extremely robust API that you can use to
•
Validate the structure and content of an API’s HTTP
response
•
Work with both JSON and XML
•
Work with Scala and Kotlin
•
Integrate your tests with JUnit, Cucumber, SpringMVC,
and much more
•
Validate JSON and XML schemas
Here’s what it looks like in action:
import io.restassured.RestAssured;
...
@ParameterizedTest
@CsvSource({
"Olamide, Koleoso",
"Eden, Wassiamal
})
public void validate_that_valid_jwt_is_generated(String
firstName, String lastName) {
RestAssured.
.when().get("/hello-world/{firstName}/{lastName}/
generate-token-for",firstName,lastName)
.then()
.statusCode(200);
}
276
Chapter 6
Test Quarkus Applications
This simple snippet invokes my running Quarkus application – started
by the @QuarkusTest – and validates that for the given endpoint, the
expected status code is returned. This is a basic example of what can be
done with Restassured. There’s a lot of power in that library, maybe even
too much, especially if I’m looking to avoid introducing yet another library
to my project. Well, friend, I could just inject a MicroProfile client into my
unit test. Given a MicroProfile client interface like so:
@RegisterRestClient(baseUri = "http://localhost:8080/")
public interface HttpBinServiceDAO{
@GET
@Path("/hello-world/{firstName}/{lastName}/generate-token-
for")
@Produces("text/plain")
CompletionStage<byte[]> getTokenRx(@PathParam("firstName")
String firstName,@PathParam("lastName") String lastName );
@GET
@Path("/hello-world/{firstName}/{lastName}/generate-token-for")
@Produces("text/plain")
Response getToken(@PathParam("firstName") String
firstName,@PathParam("lastName") String lastName);
@POST
@Path("/hello-world/validate-token")
@Produces("text/plain")
Response validateToken(String jwtString);
}
277
Chapter 6
Test Quarkus Applications
I can now inject my client into a unit test like I would any other class
that uses a web service client:
@QuarkusTest
public class IntegrationTest {
@Inject
@RestClient
UnitTestClient unitTestClient;
String firstName;
String lastName;
...
@Test
public void validate_that_valid_jwt_is_generated() {
Response response = unitTestClient.getToken(firstName,
lastName);
Assertions.assertEquals(200, response.getStatus());
}
}
The two unit tests above are functionally similar, but the latter achieves
the same end without an additional library. Heck you could call it an
advantage that this could easily help integration-test the MicroProfile
client, period. When you combine the REST client injection with the test
ordering that JUnit provides, you could construct some very powerful
integration tests:
@TestMethodOrder(OrderAnnotation.class)(1)
@TestInstance(value = Lifecycle.PER_CLASS) (2)
@DisplayNameGeneration(DisplayNameGenerator.ReplaceUnderscores.
class)
public class JUnitIntegrationTest{
278
Chapter 6
Test Quarkus Applications
String generatedJWT;
...
@Test
@Order(1) (3)
@Tag("JWT")
public void validate_that_valid_jwt_is_generated() {
Response response = unitTestClient.getToken(firstName,
lastName);
Assertions.assertEquals(200, response.getStatus());
generatedJWT = response.readEntity(String.class);
}
@Test
@Order(2) (4)
@Tag("JWT")
public void validate_that_my_valid_jwt_is_valid() {
Response response = unitTestClient.
validateToken(generatedJWT)
Assertions.assertEquals(200, response.getStatus());
}
This snippet is a rudimentary integration test that I built purely in JUnit 5.
Observe:
1. @TestMethodOrder configures the ordering strategy
for this unit test class. OrderAnnotation.class
stipulates that the @Order annotation be used, with
respect to the number supplied to it.
2. @TestInstance defines how the instance of the
test class ought to be handled. Because my two test
methods need to share data, I’ve configured this
unit test class to maintain a single instance across all
test method invocations.
279
Chapter 6
Test Quarkus Applications
3. @DisplayNameGeneration configures how the
test cases will appear in IDEs, console output and
in the test report. With DisplayNameGenerator.
ReplaceUnderscores.class, my validate_that_
my_valid_jwt_is_valid will be displayed as
“validate that my valid JWT is valid” in Surefire’s test
report file and everywhere else.
4. @Order specifies the order in which the given
method will execute relative to the rest.
5. @Tag helps to categorize the test methods for buildtime filtering or inclusion/exclusion.
To run this integration test, I use the verify goal:
mvn verify
Hint @QuarkusTest will start your Quarkus application for testing
on port 8081 by default. You can control this behavior by configuring
quarkus.http.test-port in your application.properties file.
Also, you can control the profile that your tests start with using the
quarkus.test.profile.
So, pick between the vanilla REST client and restassured, depending
on the complexity of your integration testing needs. The complexity of your
integration tests is increased by the various things that your application
depends on. You could be interested in testing just the REST endpoint,
and maybe a specific database integration; but that REST endpoint also
injects a websocket endpoint, a Kafka client etc - a bunch of stuff that you
shouldn’t have to spin up to integration test just the CRUD. This is where
slicing comes in.
280
Chapter 6
Test Quarkus Applications
Slicing Integration Tests
The major hassle with integration testing, in my opinion, is all the
dependencies. Wanting to run an integration test usually means having to
bring up the whole application and all its dependencies. This always leads
to brittle integration tests and pain. The tests become more complicated to
maintain than the actual product.
Slicing is a technique that helps you focus your integration tests so
that you don’t have to worry about bringing up the entire application
and all its dependencies. Checkout this composition of a hypothetical
ExampleResource REST resource class:
Figure 6-1. A REST resource class and its dependent beans
@QuarkusTest will bring up the whole application – all the REST
resource classes, dependencies, the lot of them. If your testing operation is
going to scale, you’re not going to have a good time going on this way. With
281
Chapter 6
Test Quarkus Applications
slicing, you can select the string of classes and components that you want
to test together as part of an integration test. Figure 6-2 shows how the
previous example could be sliced for a more focused integration test:
Figure 6-2. A sliced integration test
After slicing, only the two components I’m interested in should be part
of the startup of my Quarkus application.
A couple of components in the standard Quarkus toolkit let you slice to
some extent. The cohort of @Mock, @AlternativePriority, @DefaultBean
etc can help you achieve something close.
But, what if you want to select a precise chain of classes to devise an
automated integration test case scenario? You don’t need the whole thing,
just one or two specific classes? If you want the Quarkus laser knife of slicing,
checkout the io.quarkus.test.QuarkusUnitTest class. Check it out:
282
Chapter 6
Test Quarkus Applications
public class SliceTest {
@RegisterExtension (1)
static QuarkusUnitTest runner = new QuarkusUnitTest() (2)
.setArchiveProducer(() -> ShrinkWrap.
create(JavaArchive.class) (3)
.addClasses(ExampleResource.
class,EventBusMessageRecipient.class) (4)
.addAsResource("test-profile-application.
properties","application.properties")); (5)
@Test
public void validate_that_valid_jwt_is_
generated() {
RestAssured
.when().get("/hello-world/
{firstName}/{lastName}/generate-token-
for","firstName","lastName")
.then()
.statusCode(200);
}
}
So, a little word of caution: this is an internal Quarkus team technique
that as at the time of this writing, they’re not yet advertising for external
use3. I’ve seen their internal debate about publishing this officially, so it’s
very likely you’ll see this in the near future. Now, what am I doing in this
JUnit test class?
1. org.junit.jupiter.api.extension.
RegisterExtension is a Jupiter annotation that lets
you customize the lifecycle of a test class.
The testing technique that “they” don’t want you to know!
3
283
Chapter 6
Test Quarkus Applications
2. QuarkusUnitTest is what I use to essentially start up
a standalone, empty Quarkus application. Consider
it your whole Quarkus application, minus all your
classes. This is the only required bit of this code
snippet.
3. The ShrinkWrap utility helps to portably package or
“shrinkwrap” a full Jakarta EE application. Past this
point, I only need to provide specific parts of my
application that I’m interested in including in my
integration test run. Does any of this look familiar?
I hope so – I introduced the ShrinkWrap in the unit
test section of this chapter.
4. Here, I just want my Example REST resource
endpoint and the event bus message recipient
implementation. I’m at liberty to include any kind of
class here, as long as I need it for my integration test.
5. Another customization I can apply, is my property
file. Without this step, QuarkusUnitTest will
load the application.properties that I have in
my application. With addResource, I can supply
an alternate property file, and I specify that my
alternate property file be treated like the standard
“application.properties”. You can apply this
treatment to any other resource files – import.sql,
web.xml etc can be overriden with this mechanism.
With all that, I’m now able to start a very narrowly focused version of
my app and integration test against it. Pretty neat, huh? Here’s some more
neatness that “they” do want you to know.
284
Chapter 6
Test Quarkus Applications
Quarkus Test Profiles
You can exert even more control over your test runs with a programmatic
test profiles. Here’s how that looks:
import io.quarkus.test.junit.QuarkusTestProfile;
...
public class SampleTestProfile implements QuarkusTestProfile (1){
@Override
public Map<String, String> getConfigOverrides()(2){
return Collections.singletonMap("quarkus.http.test-
port", "8009");
}
@Override
public Set<Class<?>> getEnabledAlternatives()(3){
return Collections.singleton(AlternativeExample
Resource.class);
}
@Override
public String getConfigProfile()(4){
return "special-test";
}
@AlternativePriority(1)
public class AlternativeExampleResource extends
ExampleResource
...
}
}
285
Chapter 6
Test Quarkus Applications
A test profile class allows me to do a sort of last-minute customization
of my test run:
1. I implement the QuarkusTestProfile interface.
This interface provides default implementations of
all its methods, so you don’t need to implement all,
or even any of them.
2. getConfigOverrides allows me to dynamically
override the properties I’ve already set in my
application.properties file.
3. getEnabledAlternatives allows me to manually
specify alternatives to classes that will be loaded
by my test run. It’s here you can manually specify
custom versions of components or mocks in
general.
4. getConfigProfile will let me override the default
“test” profile used by Quarkus.
Altogether, I can command and control my test run by applying my test
profile:
@TestProfile(SampleTestProfile.class)
@QuarkusTest
public class SliceTest {
...
}
So, take control of your automated testing!
286
Chapter 6
Test Quarkus Applications
Suppress Security for Integration Tests
New with Quarkus 1.7, you’ll be able to control the authentication and
authorization requirements for some lucky endpoints! Start by adding the
Quarkus Test Security dependency:
<dependency>
<groupId>io.quarkus</groupId>
<artifactId>quarkus-test-security</artifactId>
<scope>test</scope>
</dependency>
<dependency>
<groupId>io.quarkus</groupId>
<artifactId>quarkus-elytron-security-properties-file
</artifactId>
</dependency>
quarkus-test-security provides the @TestSecurity annotation;
quarkus-elytron-security-properties-file is a Quarkus extension that
allows you to define credentials inside your property file.
Are you thinking what I’m thinking? Let’s all have a smoothie bre- oh
that’s not what you were thinking. Fine. Here’s are some sample properties
file credentials configurations:
#Enable the embedded credential store for the test profile
alone
%test.quarkus.security.users.embedded.enabled=true
#Allow the credentials to be stored here in plaintext instead
of encrypted (which is also an option)
%test.quarkus.security.users.embedded.plain-text=true
287
Chapter 6
Test Quarkus Applications
#For a user named "tayo-1", set the password to "password".
#This line simultaneously creates the user and sets the
password
%test.quarkus.security.users.embedded.users.tayo-1=password
#Set the role for the named user
%test.quarkus.security.users.embedded.roles.tayo-1=VIP
#Enable BASIC authentication. This is currently the only
#supported mechanism for TestSecurity
%test.quarkus.http.auth.basic=true
This setup configures a user ID “tayo-1”, with a role “VIP” and a
password of “********”4, all in the test profile. All that’s left is for me to
introduce @TestSecurity to an integration test:
import io.quarkus.test.security.TestSecurity;
...
@QuarkusTest
class SampleSecurityTestCase {
@Test
@TestSecurity(authorizationEnabled = false) (1)
void testSecurityDisabledGet() {
RestAssured
.when().get("/hello-world/{username}/
scramble-async","tayo-1")
.then()
.statusCode(200);
}
Yeah, real secure, Tayo.
4
288
Chapter 6
Test Quarkus Applications
@Test
@TestSecurity (2)
void testSecurityEnabledGet() {
RestAssured
.when().get("/hello-world/{username}/
scramble-async","tayo")
.then()
.statusCode(401);
}
@Test
@TestSecurity(user = "tayo-1", roles = "VIP") (3)
void testGetWithUserAndRole() {
RestAssured
.when()
.get("/hello-world/{username}/
scramble-async","tayo")
.then()
.statusCode(200);
}
}
Let’s dig in, shall we?
1. With @TestSecurity#authorizationEnabled = false,
I can suppress the security requirement for this endpoint,
so I don’t need to do any additional security work.
2. With authorizationEnabled = true, I can expect the
endpoint to rightfully fail my connection request.
3. With the right username and role, I can then get a
successful response.
289
Chapter 6
Test Quarkus Applications
At the time of writing these words, @TestSecurity isn’t supported for
native mode integration testing. You can use both HTTP Basic and Oauth
at this time.
Hmm, I feel like I’m forgetting someth-.
Native Mode Integration Testing
Ahh yes, testing in native mode. All the testing I’ve demonstrated so far has
been implicitly against a JAR-packaged Quarkus application – the so-called
JVM mode. You definitely want to verify that your microservice works
properly when packaged as a native application. Here’s how:
import io.quarkus.test.junit.NativeImageTest;
@NativeImageTest
public class NativeResourceTest{
UnitTestClient nativeImageClient;
String firstName = "Tayo";
String lastName = "Koleoso";
@BeforeAll
public void initOnce(){
nativeImageClient = RestClientBuilder.newBuilder()
.baseUrl(new URL("http://localhost:8081/"))
.build(UnitTestClient.class);
}
@Test
public void testJWTEndpoint(){
Response response = nativeImageClient.
getToken(firstName, lastName);
Assertions.assertEquals(200, response.getStatus());
}
}
290
Chapter 6
Test Quarkus Applications
@NativeImageTest designates this test class as being one for a native
image. You’ll notice that I’m manually bootstrapping a MicroProfile REST
client, you eagle-eyed detective you. Well, native mode testing doesn’t
support dependency injection. What this means is that @Inject will not be
able to supply dependencies. Not a huge loss; just a tad inconvenient. All
that’s left is to run the darn thing:
mvn verify -Pnative
This command will kick off a native image build, as well as run the
native mode integration test. Bueno!
Integration Testing with TestContainers
I’ve been able to unit test my individual classes; I’ve also integration tested
my components strung together. The final frontier [drum roll] is testing my
application in containerized form. This is where TestContainers comes in.
TestContainers is a platform that supports all manner of integration
testing against containers. It’s hella powerful too; it
•
Provides throwaway containerized versions of popular
black box systems like databases, message queues, and
buses
•
Provides canned testing platform for UI integration
testing
•
Allows you to test your own containerization –
everything from generating Docker images to creating
containers straight from a Dockerfile or anything else
you have
•
Integrates nicely with JUnit and other testing
frameworks
291
Chapter 6
Test Quarkus Applications
If you’re going to truly WORP, this is a solid tool in the arsenal. It’s
really straightforward to use too. I’ll start by adding the dependency to ye
olde POM.xml:
<dependency>
<groupId>org.testcontainers</groupId>
<artifactId>junit-jupiter</artifactId>
<version>1.14.0</version>
<scope>test</scope>
</dependency>
And now, I test. Wish me luck:
@Testcontainers (1)
@QuarkusTest
public class ContainerIntegrationTest{
@Container (2)
GenericContainer containerFromDockerFile = new
GenericContainer(
new ImageFromDockerfile().withDockerfile(
Paths.get("src/main/docker/Dockerfile.native")
)
);
@Container
GenericContainer containerFromImage = new
GenericContainer("quarkus/code-with-quarkus"); (3)
@BeforeAll
public void initOnce(){
nativeImageClient = RestClientBuilder.newBuilder()
.baseUrl(new URL("http://localhost:8080/"))
.build(UnitTestClient.class);
}
292
Chapter 6
Test Quarkus Applications
@Test
public void verifyNativeContainerImage(){
Assertions.assertNotNull(containerFromImage);
Response response = unitTestClient.
getToken(firstName, lastName);
Assertions.assertEquals(200, response.getStatus());
}
}
So, what have I done here?
1. The @TestContainers annotation is what bootstraps
the TestContainers runtime. It allows it to start up
and shut down its internal docker runtime; it’s how
it manages images and containers.
2. @Container helps my instance of GenericContainer
key into the JUnit test lifecycle. TestContainers
allows me to create a container straight from a
supplied Dockerfile or
3. Create a container from an already existing Docker
image. Here, I’ve supplied the name of the image I
created for my local Quarkus app.
With my Quarkus app bootstrapped as part of the JUnit lifecycle,
I’m free to interact with it like any other container. In this integration
test, I’m hitting the containerized app on port 8080, because that’s the
port I’ve exposed in the Dockerfile. There’s so much more you can do
with TestContainers – unit testing your Dockerfile is the least you can
do. TestContainers will handle the startup, shutdown, and any cleanup
necessary as part of the unit test. Pretty sweet, eh?
293
Index
A
Ahead-of-time (AOT)
compilation, 3, 5
Amazon Web Services
(AWS), 133, 161
ArC CDI engine
avenues, 34
conditional bean supply, 38
container-managed
components, 34
custom lifecycle events, 36, 37
default beans, 37
io.quarkus.arc.ArcContainer, 34
lazy bean initializations, 35, 36
lean bean cleaning machine, 39
limitations, 40
Quarkus enriches, 35
@AroundInvoke annotation, 32
Arquillian, 267
Atomicity, 232
Azure Kubernetes Service
(AKS), 160
B
Batch operations
flush(), 243
notes, 243
persist options, 243
scheduled jobs, 244–246
BcryptUtil#bcryptHash
method, 252
C
@ClientHeaderParam
annotation, 95
Command-line interface (CLI), 171
Consistency, 232
@ConsumeEvent annotation, 129
@Context annotation, 25, 34, 35
Contexts and Dependency
Injection (CDI)
beans, 23, 24
bean scopes, 25, 26
definition, 23
Continuous integration/
continuous deployment
(CI/CD), 142
createDeployment method, 270
Cross-origin resource sharing
(CORS), 97
© Tayo Koleoso 2020
T. Koleoso, Beginning Quarkus Framework, https://doi.org/10.1007/978-1-4842-6032-6
295
Index
D
E
Data Access Object (DAO), 165
Dependency injection (DI)
definition, 21
runtimes, 22
Spring Framework (see Spring
Framework)
Durability, 233
DynamoDB
AWS
add extension, 217
bundled JavaScript shell, 218
database connection, 220
docker command, 217
features, 216
landing screen, 219
configuration, 224–226
CRUD
add item, 227, 228
flavors, 226
low level, 226
oldAnagramText, 231
retrieving item, 229
sorcery, 228
updating item, 230, 231
managing data model
Anagram, 221
attribute, 221
creation, 221, 222
item, 221
primary key, 223
table, 220, 222
DynamoDBLocal jar file, 217
Elastic Container Service (ECS), 7,
113, 160
Elastic Kubernetes Service (EKS),
113, 160
Enterprise JavaBeans (EJB), 36
296
F
findByAnagramText method, 200
Fully qualified class name
(FQCN), 96
G
GraalVM, 138–140
H
Hibernate, 191
I
@Inject annotation, 21
Integration testing
API, 276, 277
JUnit 5, 279
Microprofile REST clients, 278
native mode integration testing,
290, 291
@QuarkusTest, 276
TestContainers, 291–293
Inversion of control (IoC), 21
Isolation, 233
Index
J, K
Java Key Store (JKS), 96
Java Messaging Service (JMS), 181
Java Native Connector (JNI), 121
Java Persistence API (JPA), 181, 191
Java Transaction API (JTA), 235
JAX-RS exception handling
asynchronous RESTful
services, 72–77
ExceptionMapper
interface, 66, 67
filters, 68–70
interceptors, 68, 70, 72
RESTEasy way
asynchronous batch
processing, 78, 80
cache control, 77
JSON Web Token (JWT)
standard, 99
JUnit unit testing
framework, 257–261
Just-In-Time (JIT), 4
JVM mode, 135
containerization
CentOS image, 147–150
configure Docker, 146
Docker, 144, 145, 150, 151
Docker container, 159, 160
Dockerfile, 155–157
Docker image, 155, 157, 158
install Docker, 146
Maven, 152
SSL support, 153
third-party class
support, 153–155
deployment environment, 136
GraalVM, 138–140
native imagery,
DevOps, 142, 143
native java image,
limitations, 141, 142
Quarkus code, 137
RAM and CPU
consumption, 137
L
Lambda, 163
M
Mapped Diagnostic Context
(MDC), 131
Maven
command, 13
quarkus plugin, 13, 14
Quarkus project kit, 16
starter website, 16
Microprofile
configuration, 111, 112
definition, 87
fault tolerance, 116, 117, 119
health checks, 112, 113, 115
JavaEE, 87, 88
REST client
297
Index
Microprofile (cont.)
authentication, 94, 95
configure client SSL, 96
exception handling, 92, 93
Quarkus, 88–92
security
authentication/
authorization, 98
CORS, 97, 98
JWT standard, 99–101,
103–110
Vert.x, 120
Microservices
configurations
access configuration
properties, 59–61
application address, 58
application name, 57
application profiles, 58, 59
HTTP server port, 57
TLS settings, 517
URL, 56
HTTP endpoint, 54, 55
JAX-RS API, 52–54
JSON, REST resource, 64–66
maven command, 52
Quarkus, 130–132
YAML configuration support,
61–63
N
@Named annotation, 24
Netty server, Vert.x
298
application.properties, 122
event bus, 125–129
JNI, 121
reactive messaging, 123–125
NoSQL data sources
DynamoDB (see DynamoDB)
No query language, 216
No schema, 215
performance at scale, 215
O
Object-Relational Mapping
(ORM), 181
@Column, 194
database loading
DROP DATABASE anagrams,
196–198
import.sql, 196
options, 195, 196
entity, 191, 193
@Entity, 193
@Id, 193
@ManyToOne, 194
@OneToMany, 194
postgresql database, 195
pre-create entity classes, 191
purpose, 191
Online Analytical Processing
(OLAP), 215
Online Transaction Processing
(OLTP), 215
@Order annotation, 279
org.junit.jupiter package, 266
Index
P
Q
Packaging and deploying Quarkus
applications
AWS Lambda service, 134
features, 135
Microservices, 133
pricing models, 133
RAM, 134
Raspberry Pi, 134
Panache
AnagramSource, 203
definition, 182
EntityManager, 203
Hibernate, 202, 203
PanacheRepository, 204
PanacheEntityBase class, 203
quarkus-hibernate-orm-
panache extension, 201
repository-style options, 204
PanacheEntityBase class, 205
@PostConstruct method, 36
Producer and Disposer methods
annotations, 27
Arc CDI engine, 33
aspect-oriented programming,
31–33
bean, 26
configuration file, 30
@Produces, 28
qualifiers, 28, 29
Quarkus
cloud deployment, 1
cloud-native/microservices, 11
definition, 1
developer-friendly tooling, 9
framework support, 8, 9
hot reloading capability, 8
IDEs, 12
JAVA, 12
JVM-compatible languages, 11
JVM internals, 3–6
main method, 17–19
native images, 6, 7
reactive SQL, 10
serverless/container-friendly, 7, 8
Spring Framework, 1
Supersonic/Subatomic, 3
quarkus.application.name
property, 57
Quarkus mocking, 271–273
Quarkus security
AuthenticatedUser entity, 250
GET endpoint, 252
@ManyToMany annotation, 252
Mozilla authentication dialog
box, 253
new users, 252
pieces, 250, 251
role entity, 251, 252
299
Index
Quarkus security (cont.)
@RolesAllowed, 253
schema definition, 247–249
testing, 254
@QuarkusTest annotation, 265
Quarkus transactions
declarative, 235
consistency, concurrency,
238, 239
@javax.transaction.
Transactional, 236
LockModeType, 239–242
REQUIRED method, 236
rollbackOn method, 237
@Transactional, 235, 237
programmatic, 235, 242
STM, 235
R
Reactive SQL (rxSQL)
configuration, 208
definition, 182
quarkus-reactive-pg-client, 208
SQL statements, 209
vs.JDK streams, 212
@RegisterForReflection
annotation, 153
Relational database management
systems (RBDMS), 215
Role-based authentication
(RBAC), 104
@RolesAllowed annotation, 107
300
S
Serverless Application Model
(SAM), 168
Serverless microservices
applications, 161
architecture, 161
AWS
depolyment, 162
Lambda event handler,
163, 165
Lambda, Quarkus
application, 163
Lambda runtime, 163
Lambda, unit testing,
166, 167
monolambda, 166
SAM, 168–171
SAM CLI, 171, 172, 174–176
deployment, 160
Fungy serverless apps, 177
platform, 160
Quarkus, 178, 179
Server-Side caching
@CacheInvalidateAll, 81
extension, 80, 81
named properties, 81
OPenAPI, 82–85
Swagger, 86, 87
Site reliability engineering
(SRE), 132
Software Transactional Memory
(STM), 235
Index
Spring Data JPA
CrudRepository interface, 200
implementation, 199
repository, 198
spring-data-jpa
extension, 199
Spring Framework
annotations, 43
ApplicationContextAware/
BeanFactory, 46, 47
application events, 48–50
maxing beans, 43–45
SQL data sources
AgroalDataSource, 190
databases, 182
@DataSource, 190
docker command, 184
health check metric, 186–189
JDBC access, 189, 190
JDBC connection pool manager,
185, 186
JDBC URL, 183
naming, 183
ORM (see Object-Relational
Mapping (ORM))
Panache (see Panache)
properties, 183
rxSQL (see Reactive SQL
(rxSQL))
Spring Data JPA (see Spring
Data JPA)
T
@Test annotation, 257, 258
@TestContainers annotation, 293
Transactions, 232–234
U, V, W, X, Y, Z
Unit testing
Arquillian, 267–271
CDI bean, 264–266
CDI components, 266
extension, 262
junit-jupiter dependency, 263
301