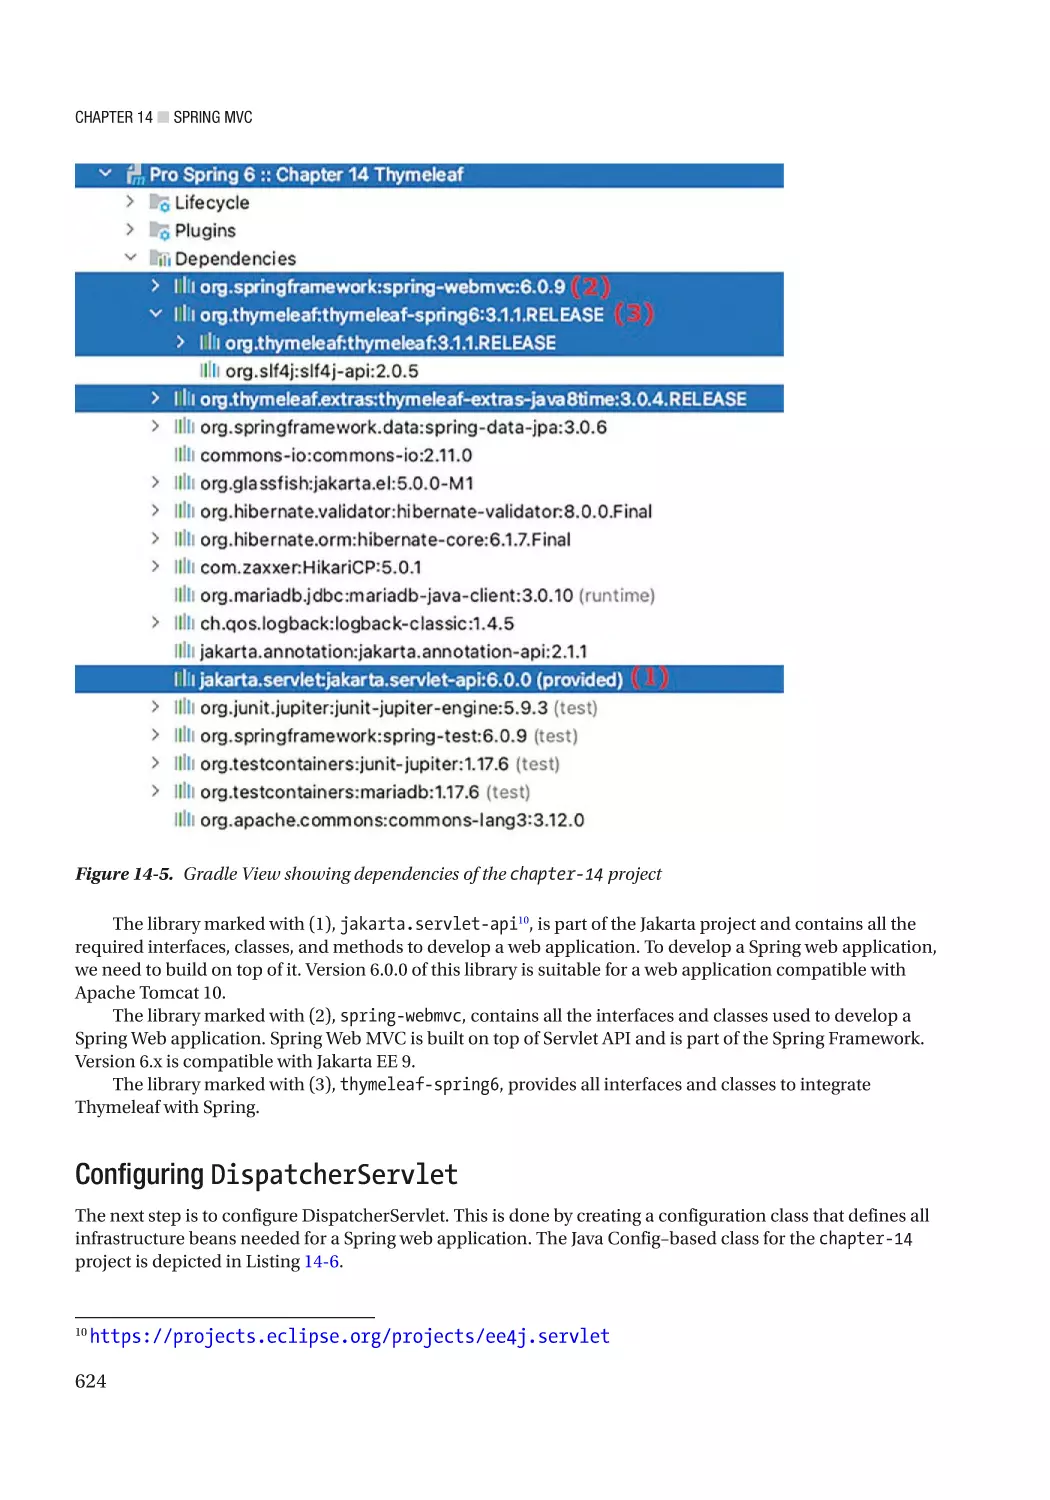
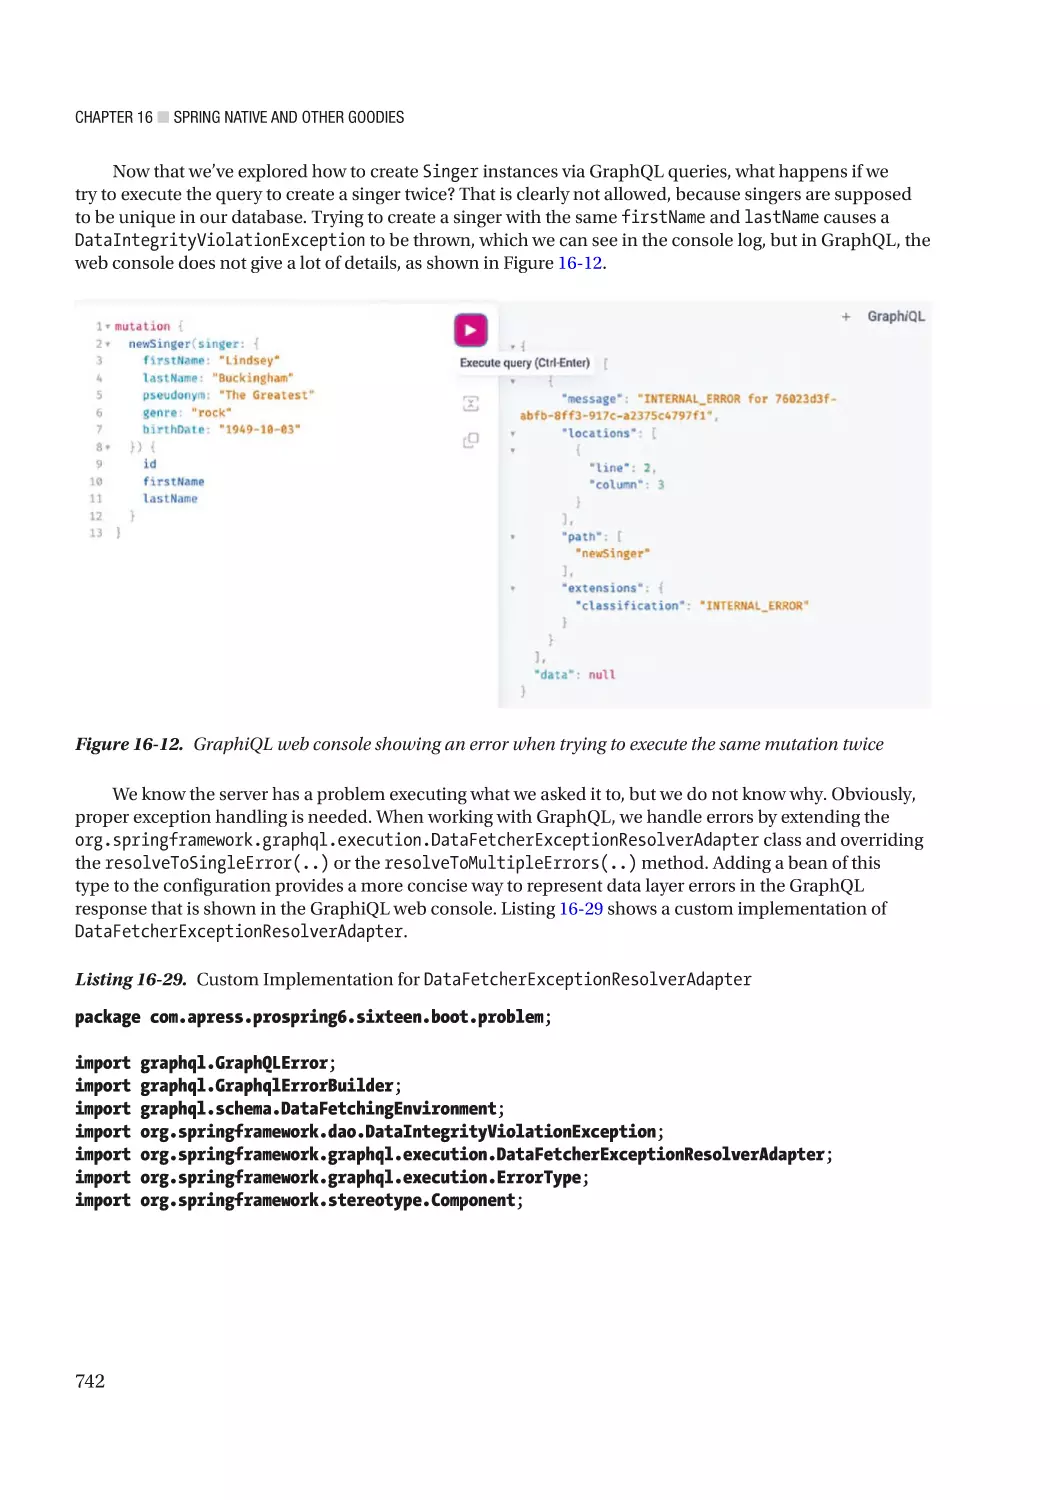
/


Similar


Text
Pro
Spring 6
An In-Depth Guide to the Spring Framework
—
Sixth Edition
—
Iuliana Cosmina
Rob Harrop
Chris Schaefer
Clarence Ho
Pro Spring 6
An In-Depth Guide to the Spring Framework
Sixth Edition
Iuliana Cosmina
Rob Harrop
Chris Schaefer
Clarence Ho
Pro Spring 6: An In-Depth Guide to the Spring Framework
Iuliana Cosmina
Kirkcaldy, UK
Rob Harrop
Reddish, UK
Chris Schaefer
Venice, FL, USA
Clarence Ho
Hong Kong, China
ISBN-13 (pbk): 978-1-4842-8639-5
https://doi.org/10.1007/978-1-4842-8640-1
ISBN-13 (electronic): 978-1-4842-8640-1
Copyright © 2023 by Iuliana Cosmina, Rob Harrop, Chris Schaefer, and Clarence Ho
This work is subject to copyright. All rights are reserved by the Publisher, whether the whole or part of the
material is concerned, specifically the rights of translation, reprinting, reuse of illustrations, recitation,
broadcasting, reproduction on microfilms or in any other physical way, and transmission or information
storage and retrieval, electronic adaptation, computer software, or by similar or dissimilar methodology now
known or hereafter developed.
Trademarked names, logos, and images may appear in this book. Rather than use a trademark symbol with
every occurrence of a trademarked name, logo, or image, we use the names, logos, and images only in an
editorial fashion and to the benefit of the trademark owner, with no intention of infringement of the
trademark.
The use in this publication of trade names, trademarks, service marks, and similar terms, even if they are not
identified as such, is not to be taken as an expression of opinion as to whether or not they are subject to
proprietary rights.
While the advice and information in this book are believed to be true and accurate at the date of publication,
neither the authors nor the editors nor the publisher can accept any legal responsibility for any errors or
omissions that may be made. The publisher makes no warranty, express or implied, with respect to the
material contained herein.
Managing Director, Apress Media LLC: Welmoed Spahr
Acquisitions Editor: Steve Anglin
Development Editor: Laura Berendson
Coordinating Editor: Mark Powers
Copy Editor: Bill McManus
Cover designed by eStudioCalamar
Cover image by Anton Darius on Unsplash (https://unsplash.com)
Distributed to the book trade worldwide by Apress Media, LLC, 1 New York Plaza, New York, NY 10004,
U.S.A. Phone 1-800-SPRINGER, fax (201) 348-4505, e-mail orders-ny@springer-sbm.com, or visit
www.springeronline.com. Apress Media, LLC is a California LLC, and the sole member (owner) is Springer
Science + Business Media Finance Inc. (SSBM Finance Inc). SSBM Finance Inc. is a Delaware corporation.
For information on translations, please e-mail booktranslations@springernature.com; for reprint,
paperback, or audio rights, please e-mail bookpermissions@springernature.com.
Apress titles may be purchased in bulk for academic, corporate, or promotional use. eBook versions and licenses are also available for most titles. For more information, reference our Print and eBook Bulk Sales web
page at https://www.apress.com/bulk-sales.
Any source code or other supplementary material referenced by the authors in this book is available
to readers on GitHub (https://github.com/Apress). For more detailed information, please visit
https://www.apress.com/source-code.
Printed on acid-free paper
I dedicate this book to my Evelyn Walker. Thank you for being
the friend I never knew I needed.
—Iuliana Cosmina
Table of Contents
About the Authors���������������������������������������������������������������������������������������������������xix
About the Technical Reviewer��������������������������������������������������������������������������������xxi
Acknowledgments������������������������������������������������������������������������������������������������xxiii
Introduction�����������������������������������������������������������������������������������������������������������xxv
■Chapter
■
1: Introducing Spring������������������������������������������������������������������������������� 1
About This Book��������������������������������������������������������������������������������������������������������������� 1
What Is Spring?���������������������������������������������������������������������������������������������������������������� 2
Evolution of the Spring Framework�������������������������������������������������������������������������������������������������������� 2
Spring Projects��������������������������������������������������������������������������������������������������������������������������������������� 4
Inverting Control or Injecting Dependencies?������������������������������������������������������������������ 6
Evolution of Dependency Injection��������������������������������������������������������������������������������������������������������� 7
Beyond Dependency Injection���������������������������������������������������������������������������������������������������������������� 9
The Spring Community��������������������������������������������������������������������������������������������������� 12
Alternatives to Spring����������������������������������������������������������������������������������������������������� 13
Summary������������������������������������������������������������������������������������������������������������������������ 13
■Chapter
■
2: Getting Started����������������������������������������������������������������������������������� 15
Conventions�������������������������������������������������������������������������������������������������������������������� 15
Who This Book Is For������������������������������������������������������������������������������������������������������ 16
What You Need for This Book����������������������������������������������������������������������������������������� 17
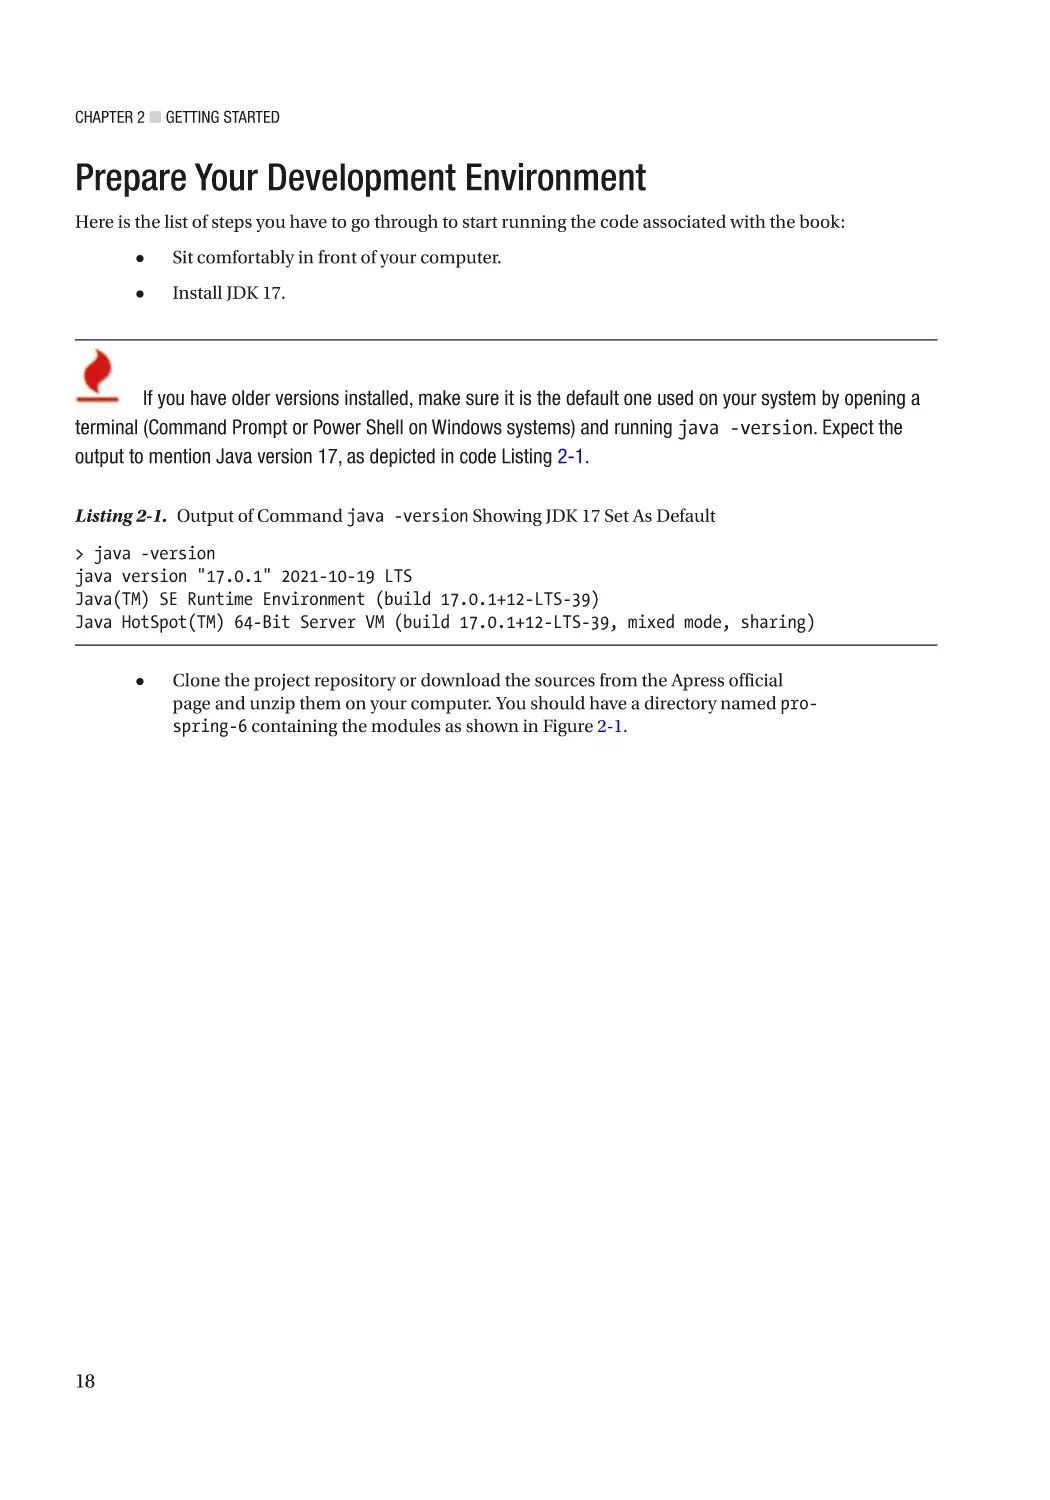
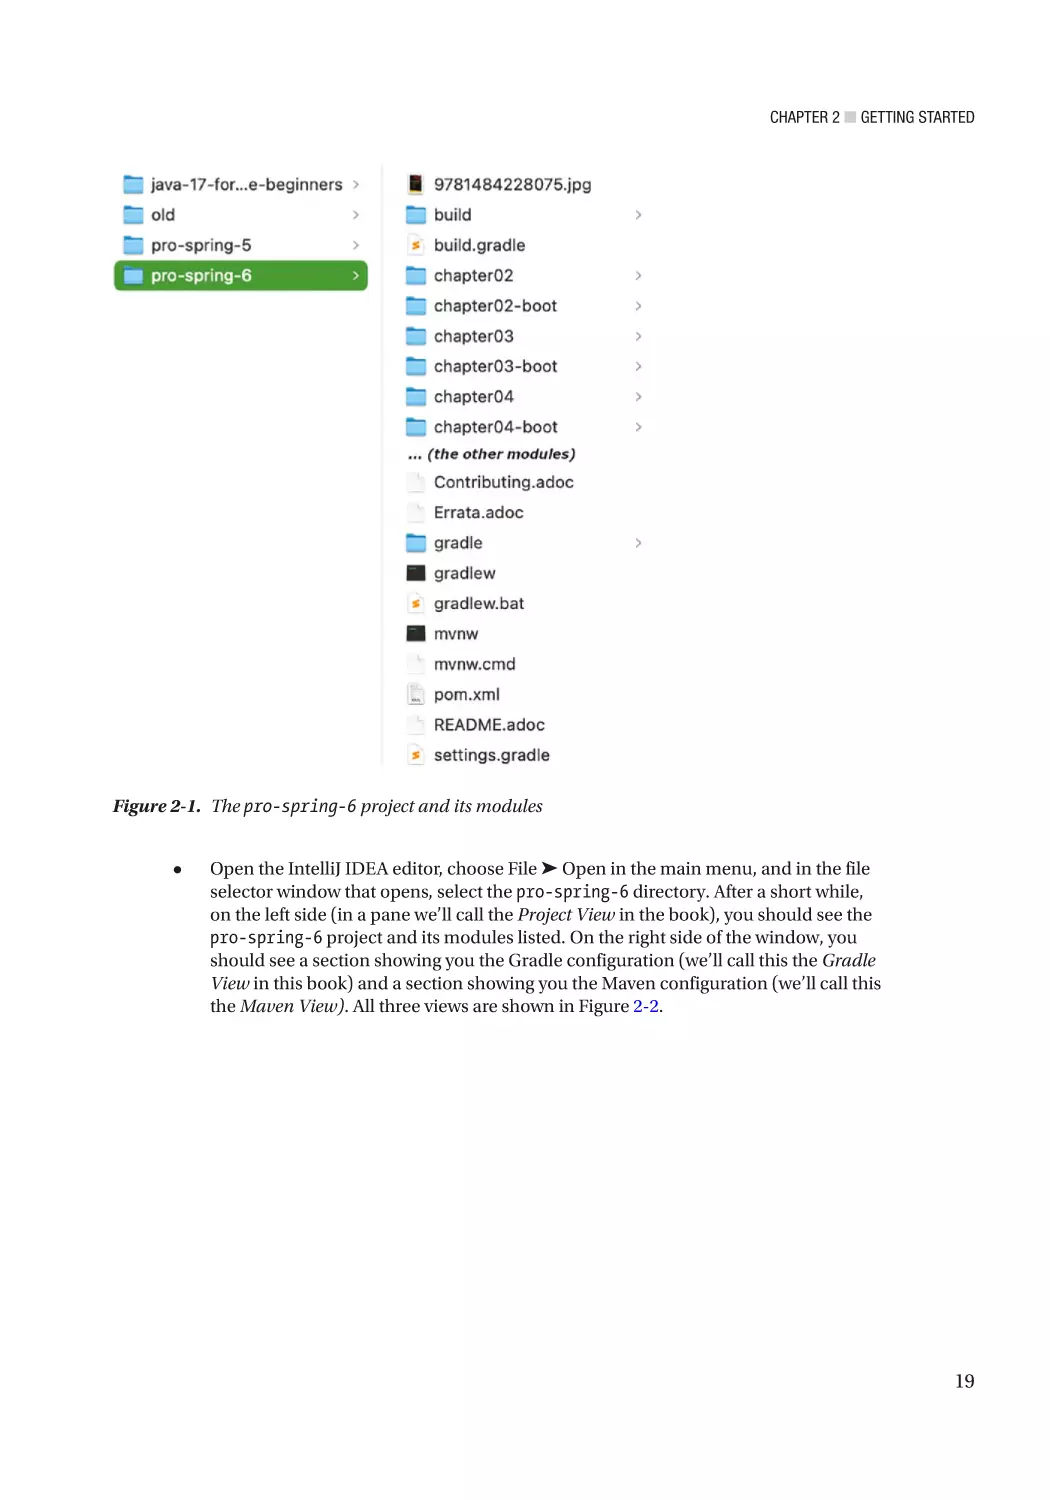
Prepare Your Development Environment������������������������������������������������������������������������ 18
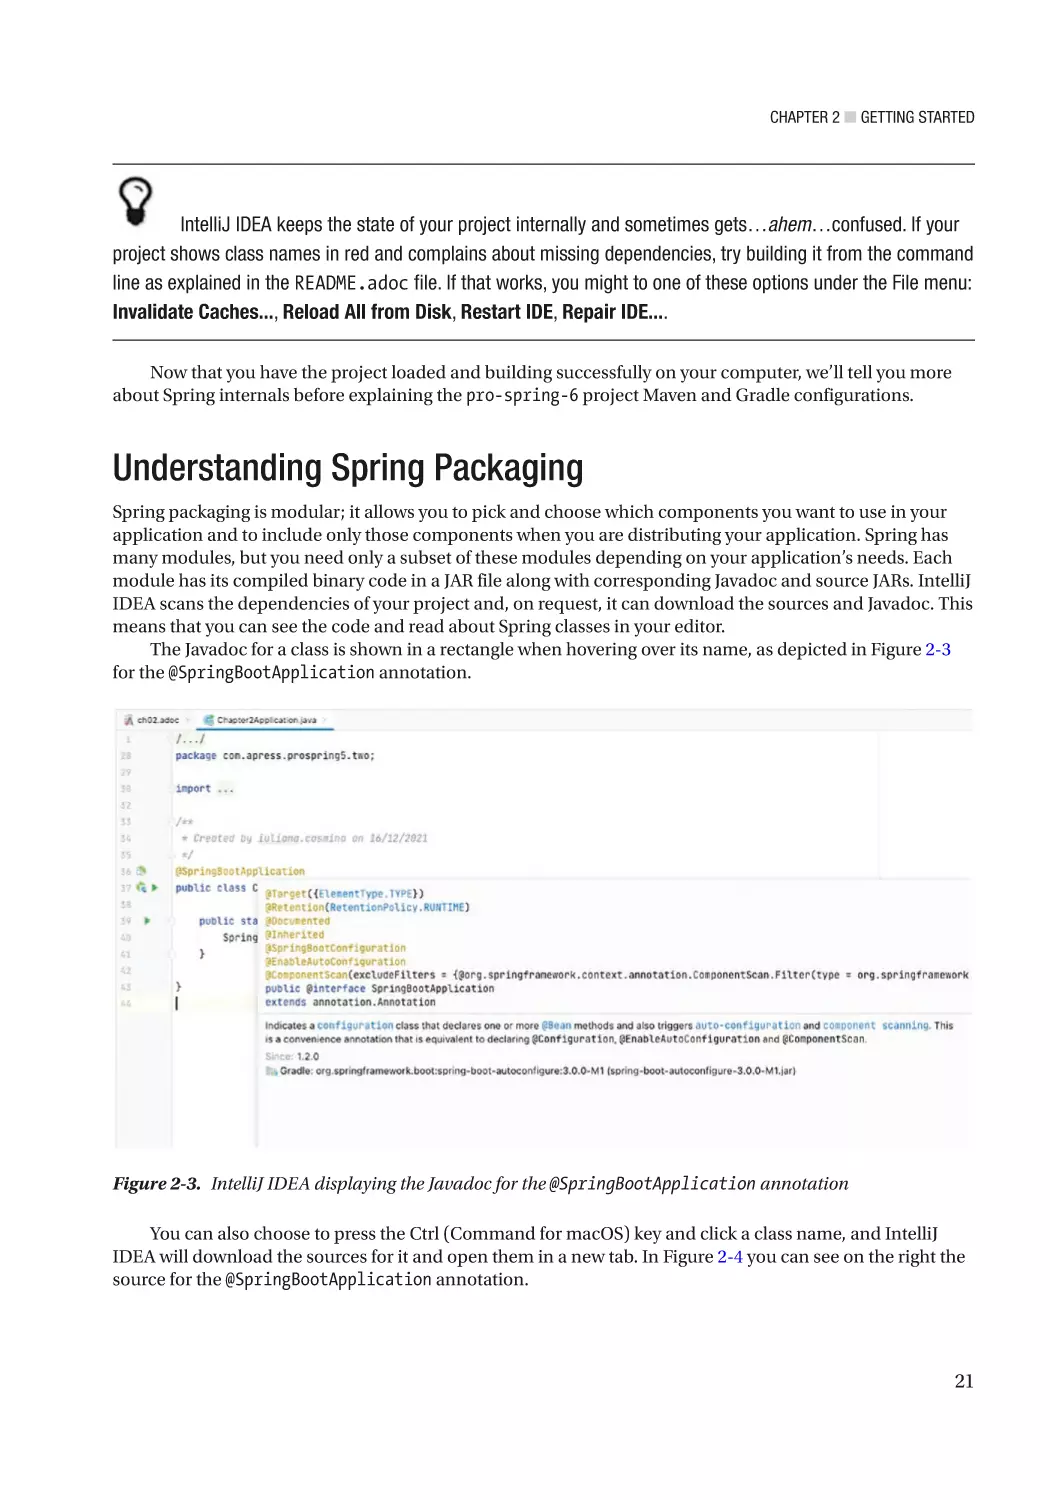
Understanding Spring Packaging����������������������������������������������������������������������������������� 21
v
■ Table of Contents
Choosing Modules for Your Application�������������������������������������������������������������������������� 25
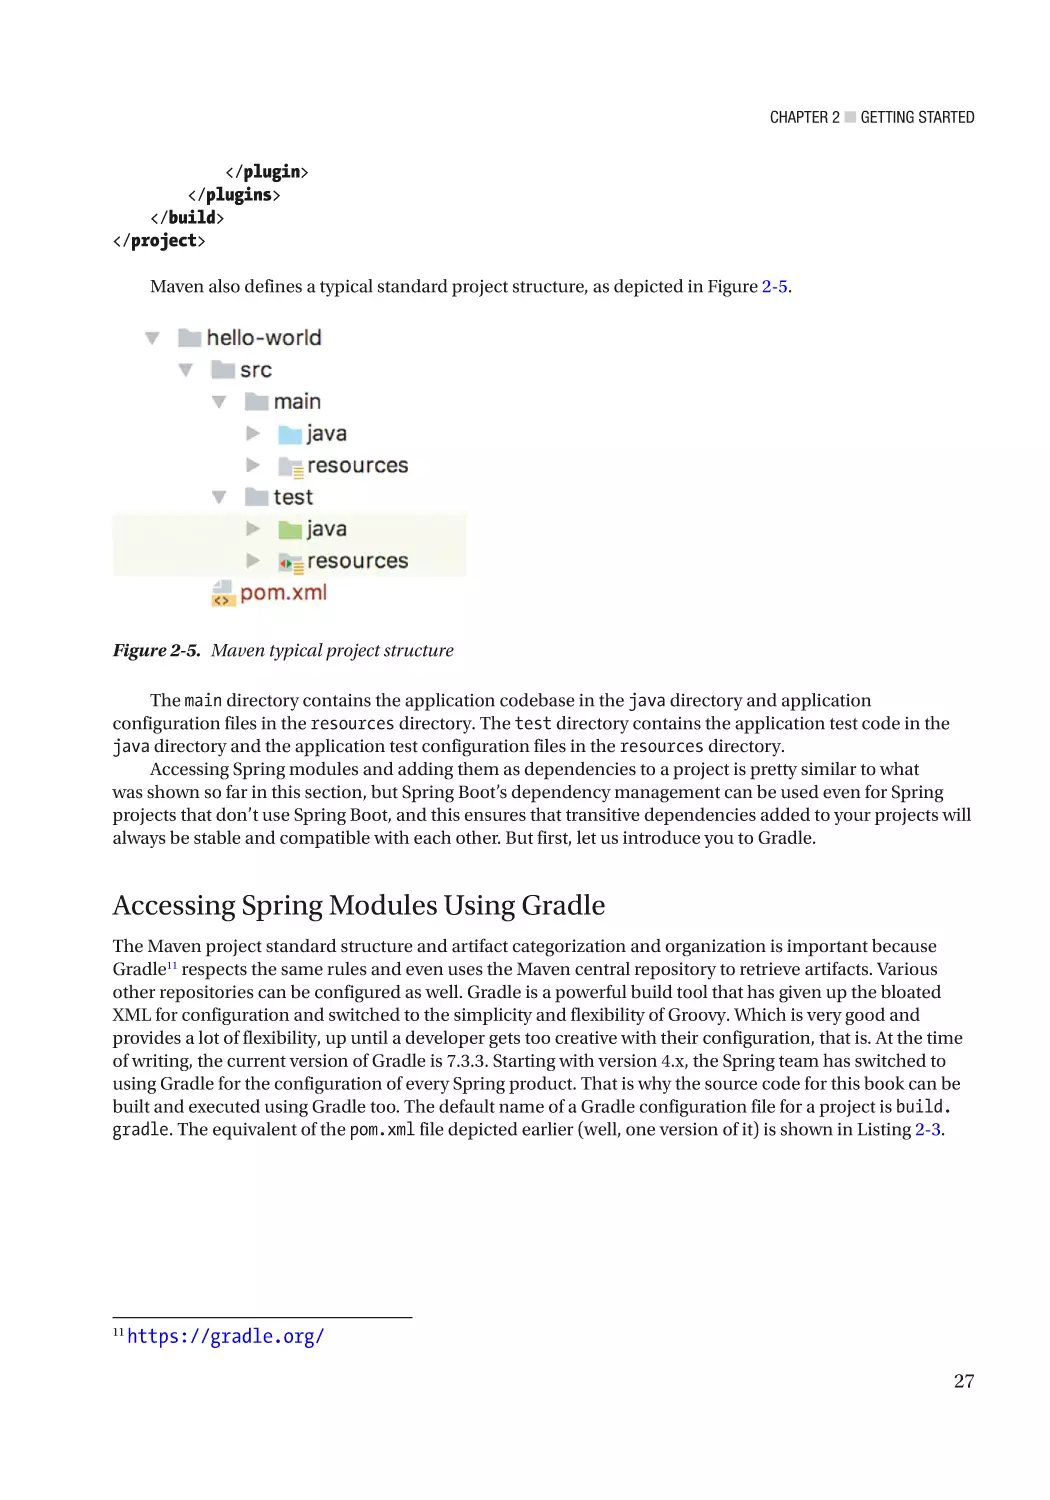
Accessing Spring Modules on the Maven Repository��������������������������������������������������������������������������� 25
Accessing Spring Modules Using Gradle���������������������������������������������������������������������������������������������� 27
Using Spring Boot Dependency Management�������������������������������������������������������������������������������������� 28
Using Spring Documentation������������������������������������������������������������������������������������������ 32
Putting a Spring into Hello World����������������������������������������������������������������������������������� 33
Building the Sample Hello World Application���������������������������������������������������������������������������������������� 33
Refactoring with Spring������������������������������������������������������������������������������������������������������������������������ 40
Summary������������������������������������������������������������������������������������������������������������������������ 44
■Chapter
■
3: Introducing IoC and DI in Spring�������������������������������������������������������� 45
Inversion of Control and Dependency Injection�������������������������������������������������������������� 46
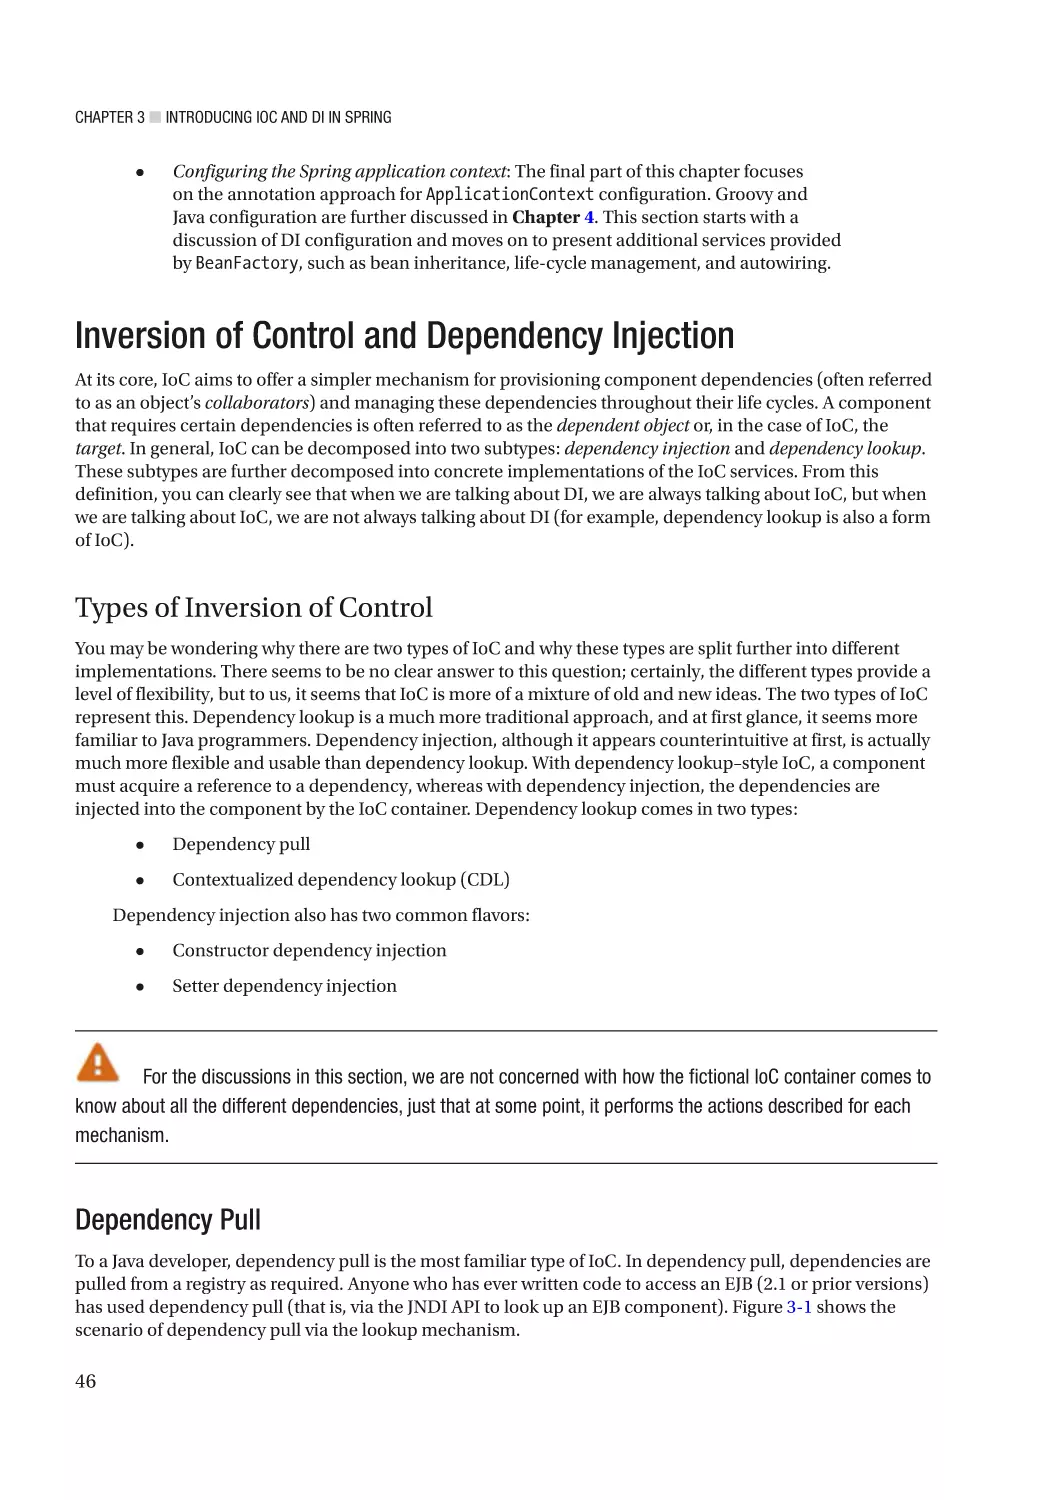
Types of Inversion of Control���������������������������������������������������������������������������������������������������������������� 46
Setter Dependency Injection����������������������������������������������������������������������������������������������������������������� 50
Setter Injection vs. Constructor Injection��������������������������������������������������������������������������������������������� 51
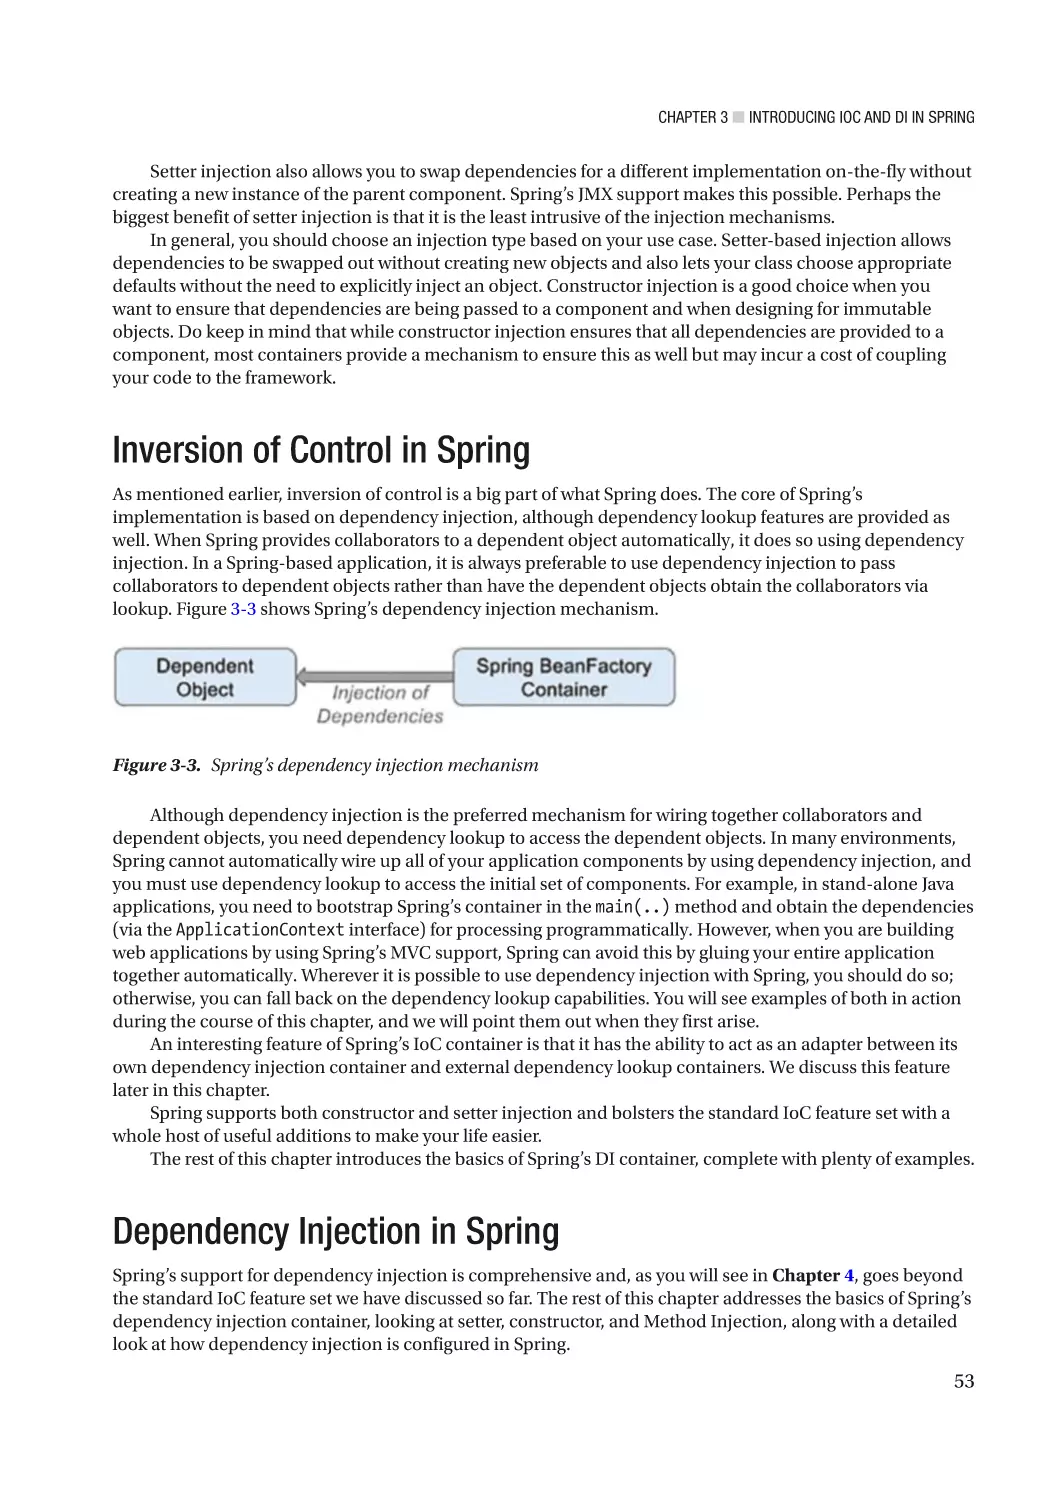
Inversion of Control in Spring����������������������������������������������������������������������������������������� 53
Dependency Injection in Spring�������������������������������������������������������������������������������������� 53
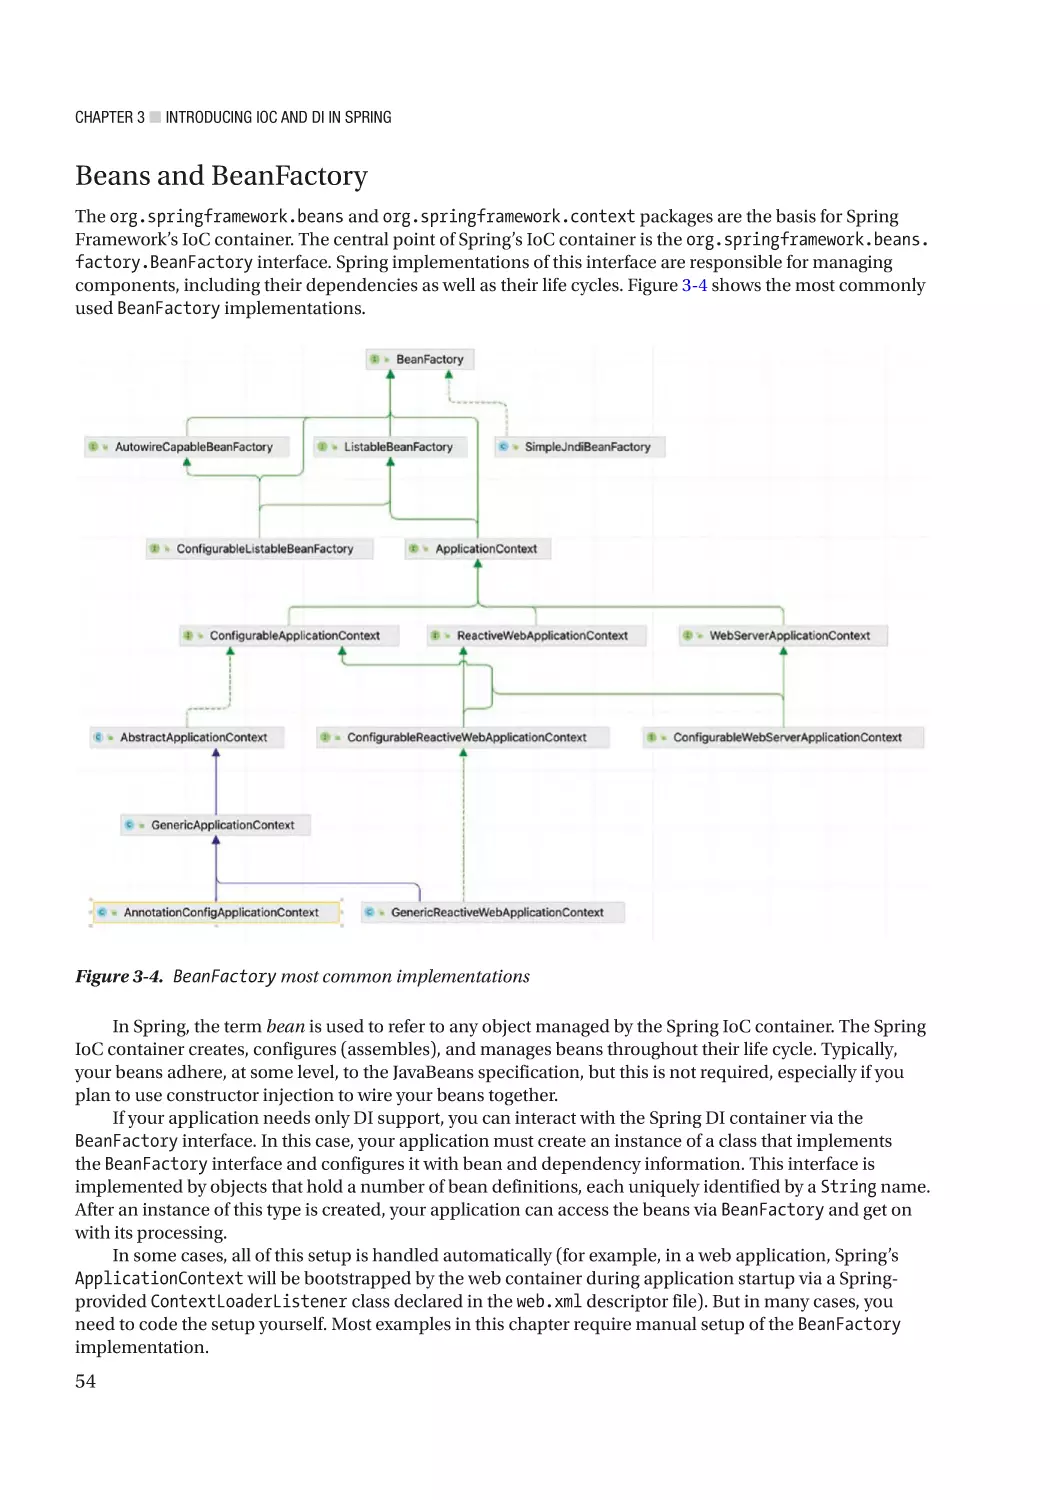
Beans and BeanFactory������������������������������������������������������������������������������������������������������������������������ 54
Configuring ApplicationContext������������������������������������������������������������������������������������������������������������ 55
Basic Configuration Overview�������������������������������������������������������������������������������������������������������������� 55
Declaring Spring Components�������������������������������������������������������������������������������������������������������������� 57
Using Setter Injection��������������������������������������������������������������������������������������������������������������������������� 59
Using Constructor Injection������������������������������������������������������������������������������������������������������������������ 60
Using Field Injection����������������������������������������������������������������������������������������������������������������������������� 63
Using Injection Parameters�������������������������������������������������������������������������������������������� 65
Injecting Simple Values������������������������������������������������������������������������������������������������������������������������ 65
Injecting Values Using SpEL����������������������������������������������������������������������������������������������������������������� 66
Injection and ApplicationContext Nesting��������������������������������������������������������������������������������������������� 68
Injecting Collections����������������������������������������������������������������������������������������������������������������������������� 73
Using Method Injection��������������������������������������������������������������������������������������������������� 75
Lookup Method Injection���������������������������������������������������������������������������������������������������������������������� 75
Considerations for Lookup Method Injection���������������������������������������������������������������������������������������� 79
vi
■ Table of Contents
Understanding Bean Naming����������������������������������������������������������������������������������������� 80
Default Bean Naming Style for Beans Declared with @Component����������������������������������������������������� 80
Customizing Bean Naming Style���������������������������������������������������������������������������������������������������������� 81
Bean Naming Style for Beans Declared with @Bean��������������������������������������������������������������������������� 83
Explicit Bean Naming��������������������������������������������������������������������������������������������������������������������������� 84
The @AliasFor Annotation�������������������������������������������������������������������������������������������������������������������� 86
Understanding Bean Instantiation Mode���������������������������������������������������������������������������������������������� 87
Choosing an Instantiation Mode������������������������������������������������������������������������������������� 90
Additional Bean Scopes������������������������������������������������������������������������������������������������� 91
Resolving Dependencies������������������������������������������������������������������������������������������������ 91
Autowiring Your Bean����������������������������������������������������������������������������������������������������� 93
Constructor Autowiring������������������������������������������������������������������������������������������������������������������������� 93
byType Autowiring�������������������������������������������������������������������������������������������������������������������������������� 96
byName Autowiring������������������������������������������������������������������������������������������������������������������������������ 98
Yet Another Pickle������������������������������������������������������������������������������������������������������������������������������� 100
When to Use Autowiring��������������������������������������������������������������������������������������������������������������������� 103
Summary���������������������������������������������������������������������������������������������������������������������� 104
■Chapter
■
4: Advanced Spring Configuration and Spring Boot����������������������������� 105
Spring’s Impact on Application Portability������������������������������������������������������������������� 106
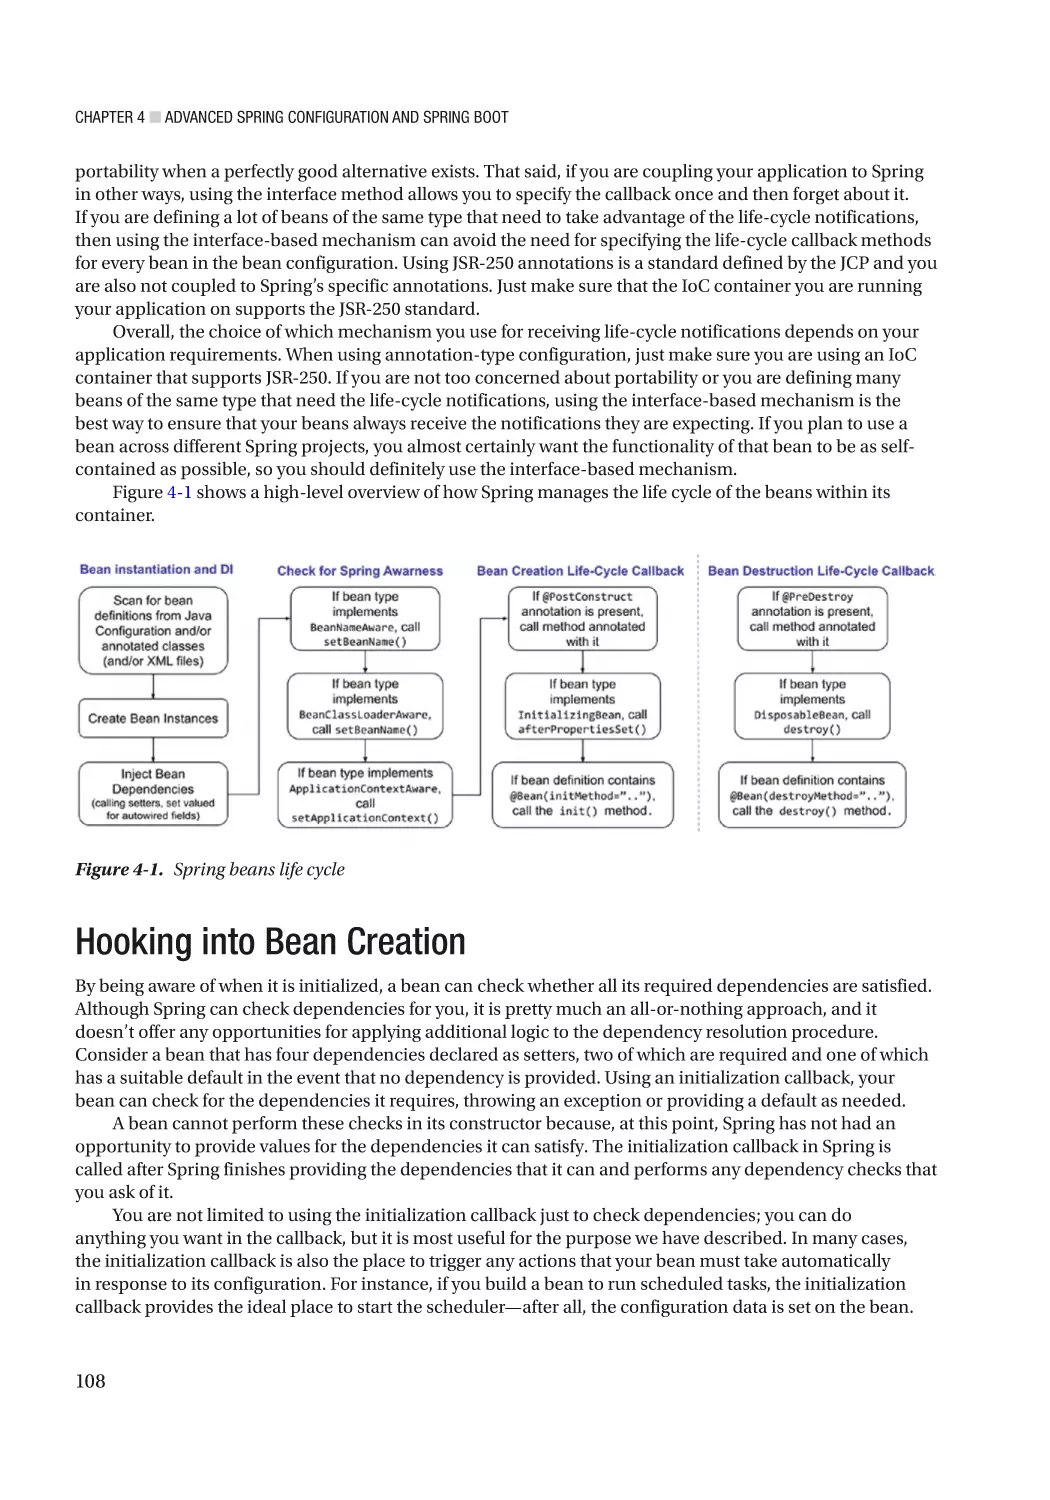
Bean Life-Cycle Management�������������������������������������������������������������������������������������� 107
Hooking into Bean Creation������������������������������������������������������������������������������������������ 108
Executing a Method When a Bean Is Created������������������������������������������������������������������������������������� 109
Implementing the InitializingBean Interface��������������������������������������������������������������������������������������� 112
Using the JSR-250 @PostConstruct Annotation��������������������������������������������������������������������������������� 114
Understanding Order of Resolution���������������������������������������������������������������������������������������������������� 116
Hooking into Bean Destruction������������������������������������������������������������������������������������� 119
Executing a Method When a Bean Is Destroyed����������������������������������������������������������� 119
Implementing the DisposableBean Interface�������������������������������������������������������������������������������������� 120
Using the JSR-250 @PreDestroy Annotation�������������������������������������������������������������������������������������� 121
Understanding Order of Resolution���������������������������������������������������������������������������������������������������� 122
Using a Shutdown Hook��������������������������������������������������������������������������������������������������������������������� 122
vii
■ Table of Contents
Making Your Beans “Spring Aware”����������������������������������������������������������������������������� 123
Using the BeanNameAware Interface������������������������������������������������������������������������������������������������� 123
Using the ApplicationContextAware Interface������������������������������������������������������������������������������������ 125
Use of FactoryBeans���������������������������������������������������������������������������������������������������� 127
FactoryBean Example: The MessageDigestFactoryBean�������������������������������������������������������������������� 127
Accessing a FactoryBean Directly������������������������������������������������������������������������������������������������������ 131
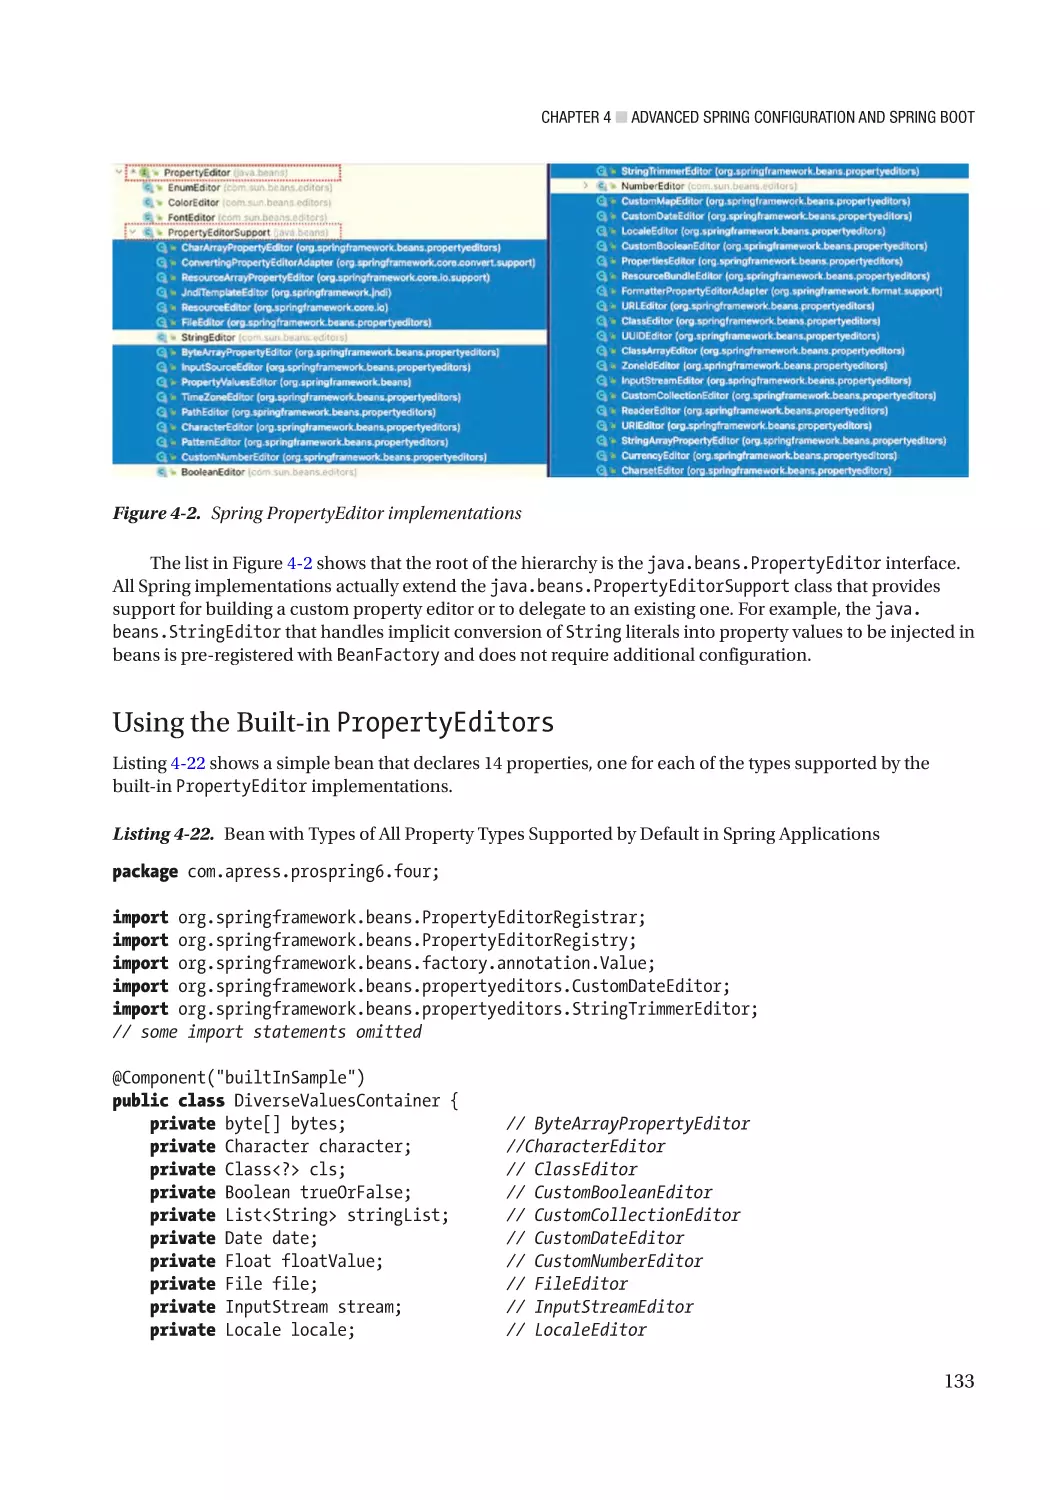
JavaBeans PropertyEditors������������������������������������������������������������������������������������������ 132
Using the Built-in PropertyEditors������������������������������������������������������������������������������������������������������ 133
Creating a Custom PropertyEditor������������������������������������������������������������������������������������������������������ 138
More Spring ApplicationContext Configuration������������������������������������������������������������ 140
Internationalization������������������������������������������������������������������������������������������������������ 141
Internationalization with MessageSource������������������������������������������������������������������������������������������ 141
Using the getMessage() Method��������������������������������������������������������������������������������������������������������� 143
Why Use ApplicationContext As a MessageSource?��������������������������������������������������������������������������� 144
Using MessageSource in Stand-Alone Applications��������������������������������������������������������������������������� 144
Events Publication������������������������������������������������������������������������������������������������������������������������������ 144
Using Application Events�������������������������������������������������������������������������������������������������������������������� 145
Considerations for Event Usage���������������������������������������������������������������������������������������������������������� 147
Accessing Resources��������������������������������������������������������������������������������������������������� 147
Advanced Java Configuration Classes������������������������������������������������������������������������� 149
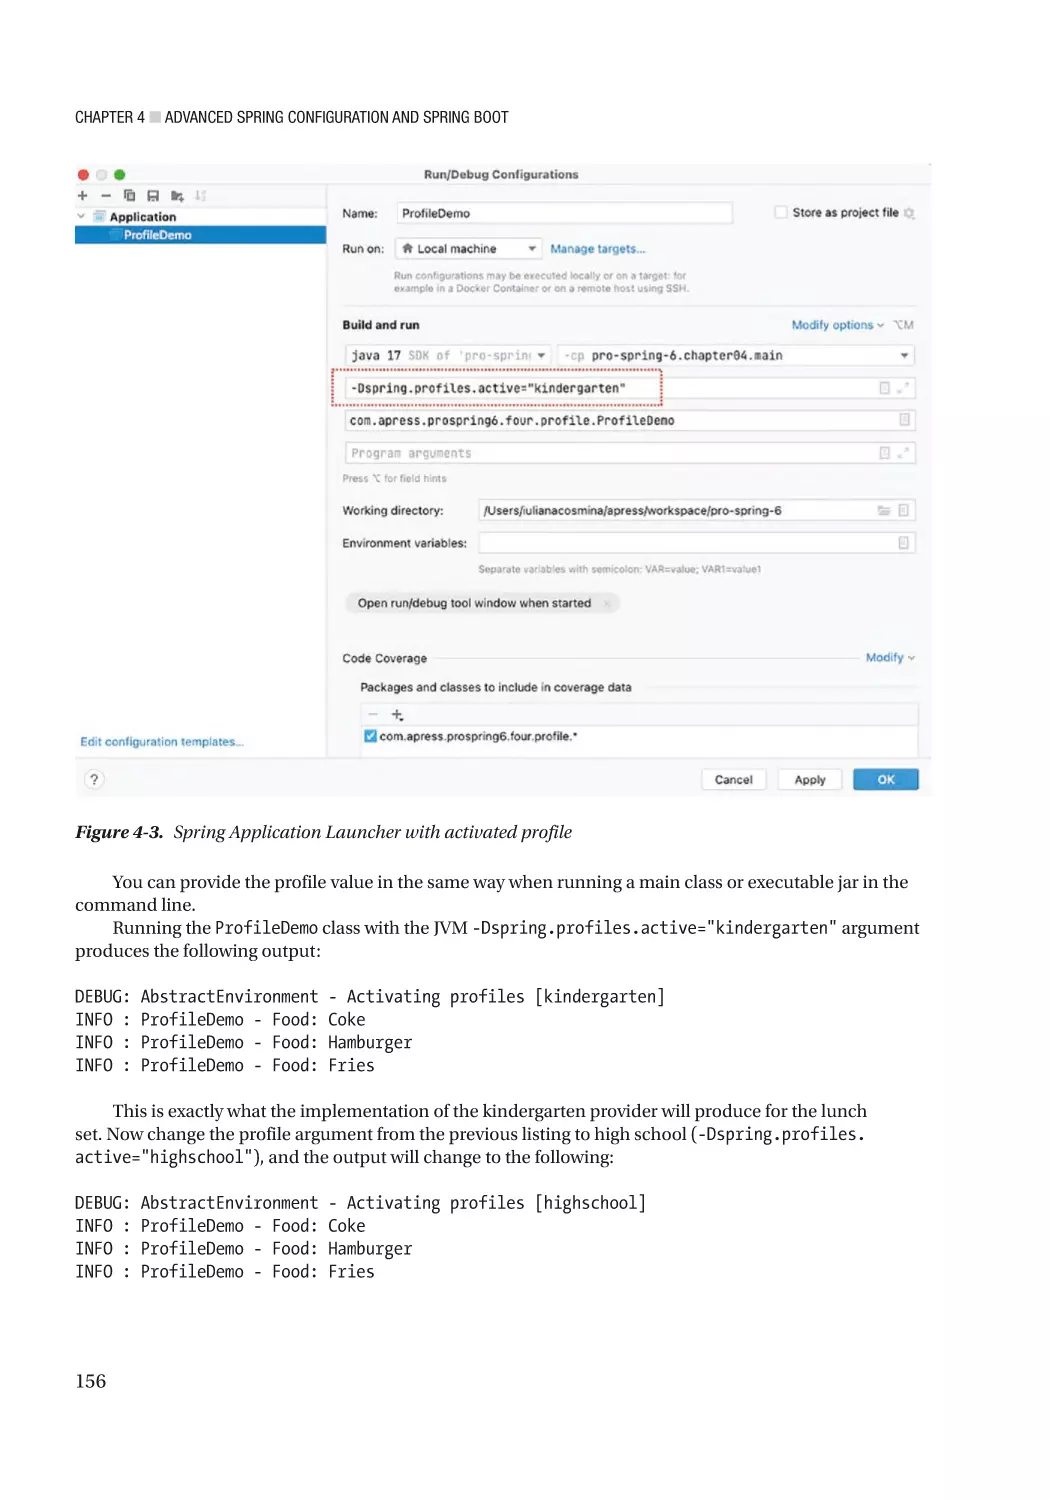
Profiles������������������������������������������������������������������������������������������������������������������������� 153
An Example of Using the Spring Profiles Feature������������������������������������������������������������������������������� 153
Considerations for Using Profiles������������������������������������������������������������������������������������������������������� 157
Environment and PropertySource Abstraction������������������������������������������������������������� 158
Testing Spring Applications������������������������������������������������������������������������������������������ 164
Using Spring Test Annotations������������������������������������������������������������������������������������������������������������ 165
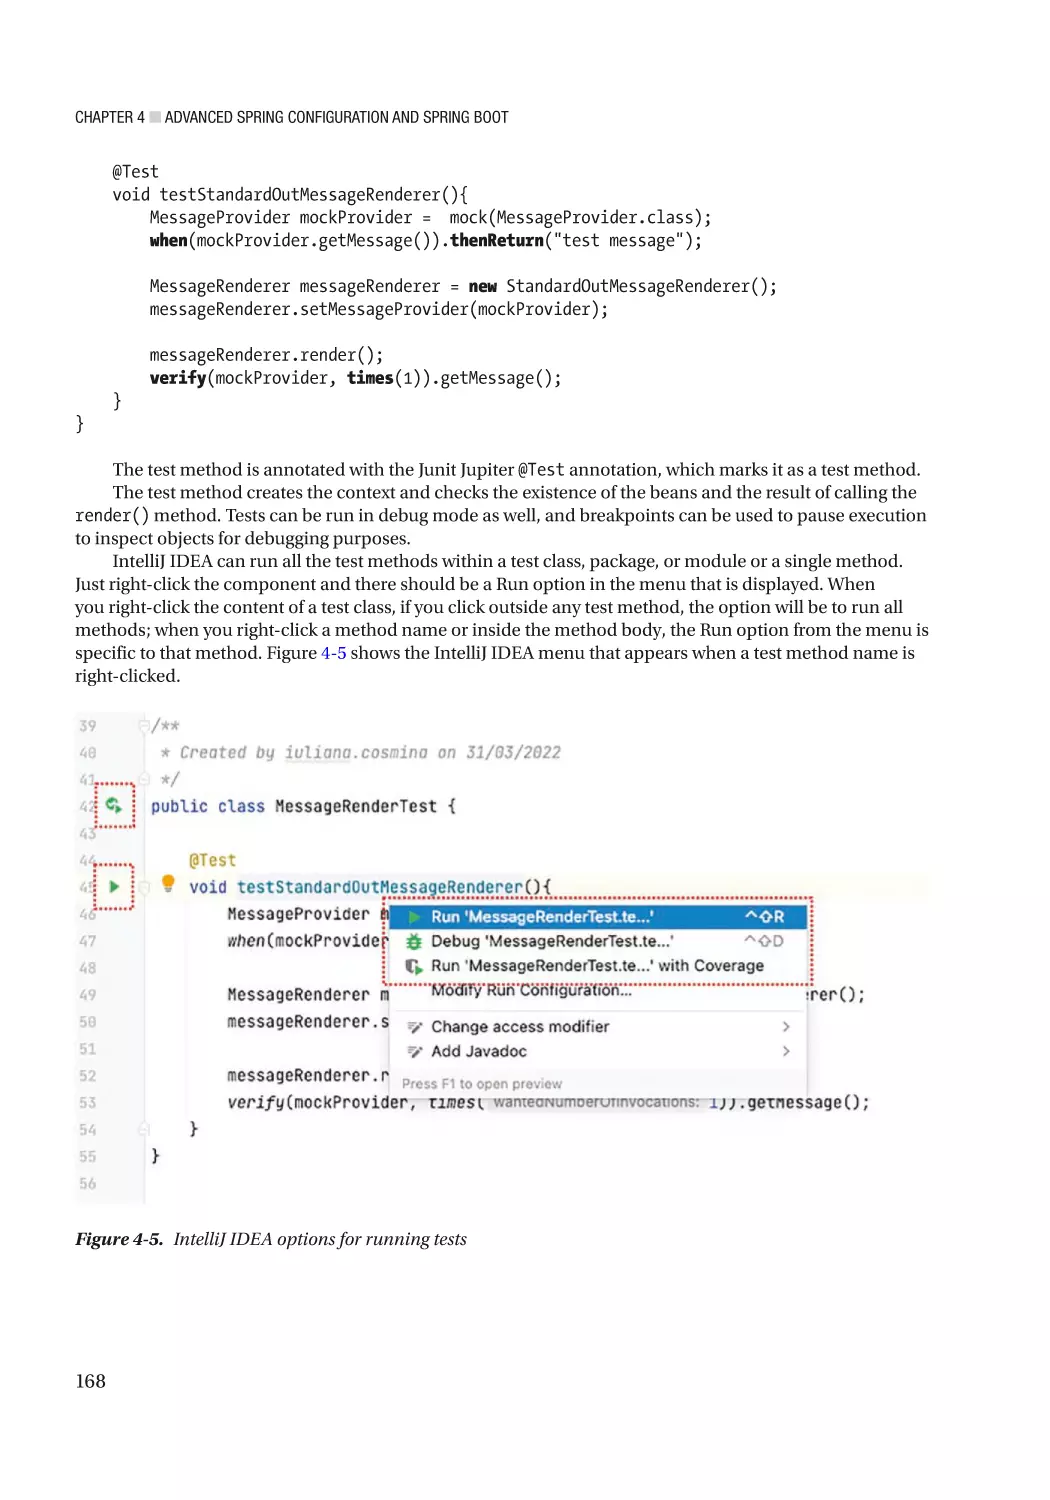
Implementing Logic Unit Tests������������������������������������������������������������������������������������������������������������ 167
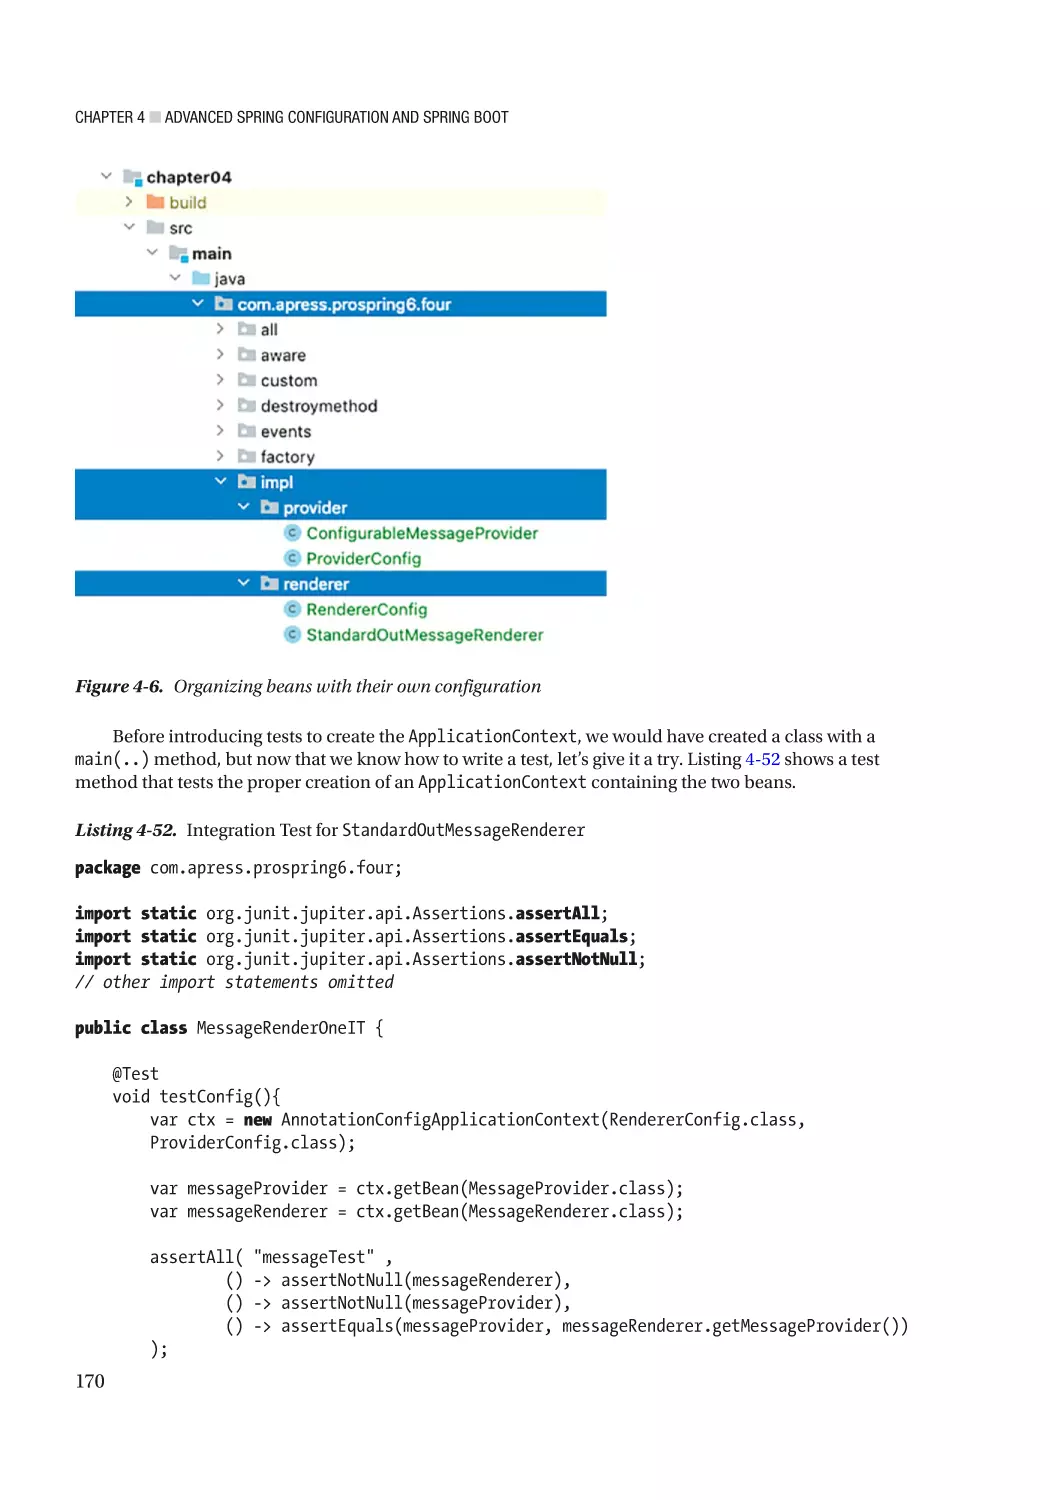
Implementing an Integration Test������������������������������������������������������������������������������������������������������� 169
Configuring Profile for Integration Testing�������������������������������������������������������������������� 173
Implementing a Front-End Unit Test��������������������������������������������������������������������������������������������������� 175
Introducing Selenium������������������������������������������������������������������������������������������������������������������������� 175
viii
■ Table of Contents
Configuration Using Groovy������������������������������������������������������������������������������������������ 176
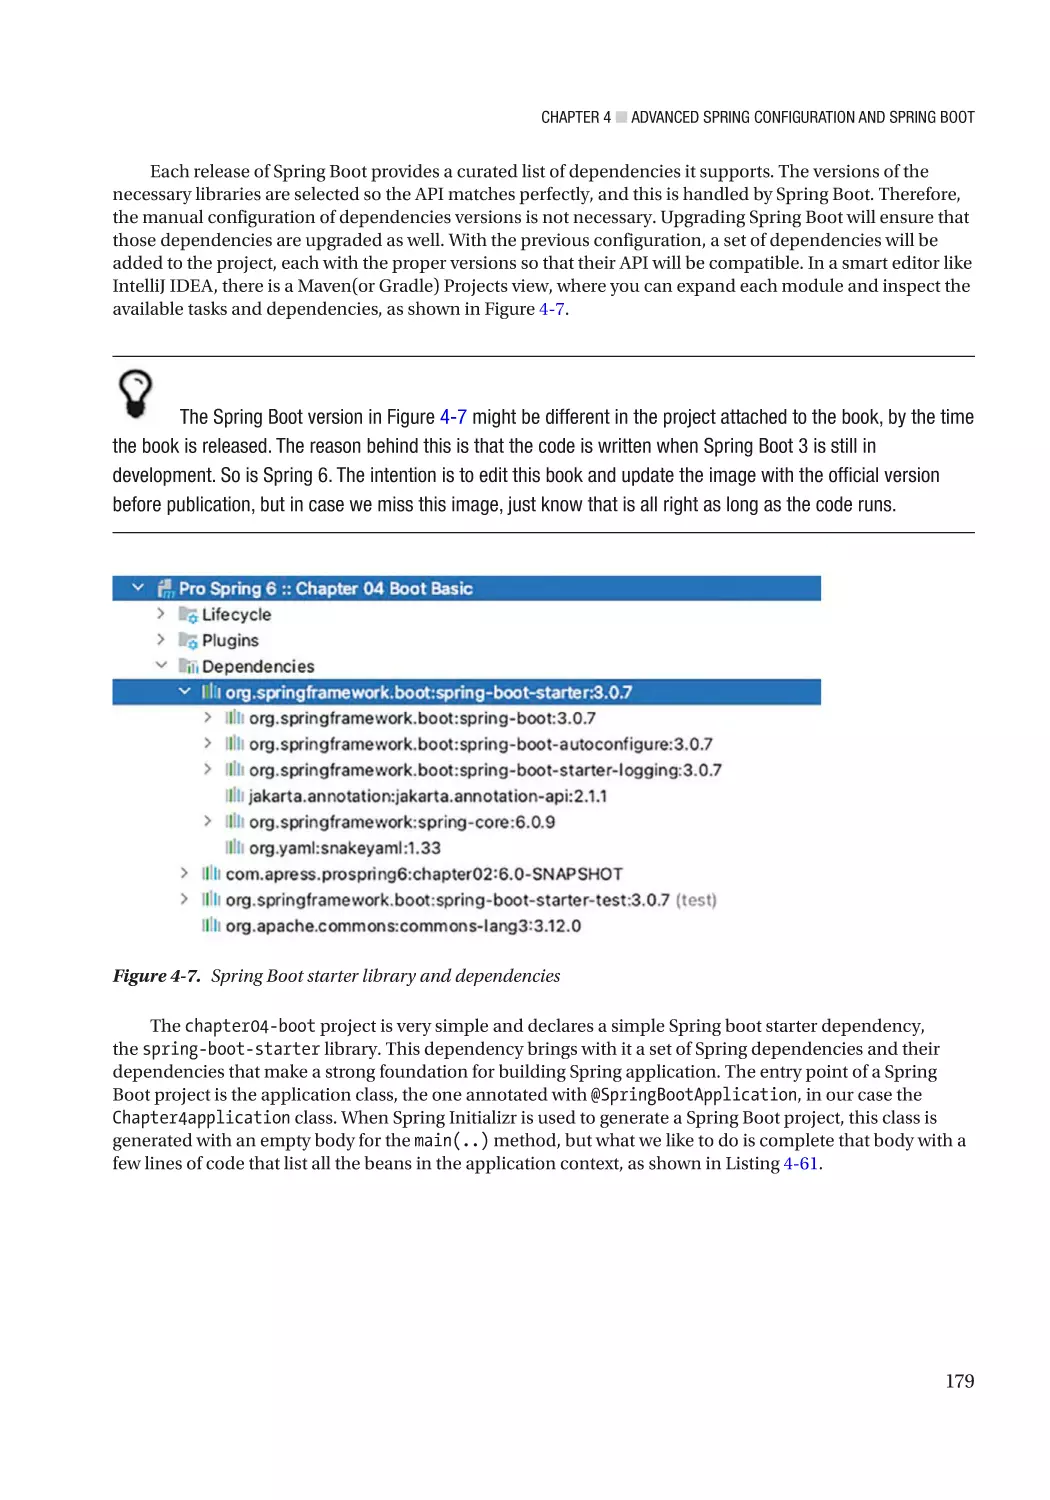
Using Spring Boot��������������������������������������������������������������������������������������������������������� 178
Summary���������������������������������������������������������������������������������������������������������������������� 186
■Chapter
■
5: Spring AOP��������������������������������������������������������������������������������������� 189
AOP Concepts��������������������������������������������������������������������������������������������������������������� 190
Types of AOP����������������������������������������������������������������������������������������������������������������� 191
Static AOP������������������������������������������������������������������������������������������������������������������������������������������� 191
Dynamic AOP�������������������������������������������������������������������������������������������������������������������������������������� 192
Choosing an AOP Type������������������������������������������������������������������������������������������������������������������������ 192
AOP in Spring��������������������������������������������������������������������������������������������������������������� 192
The AOP Alliance��������������������������������������������������������������������������������������������������������������������������������� 192
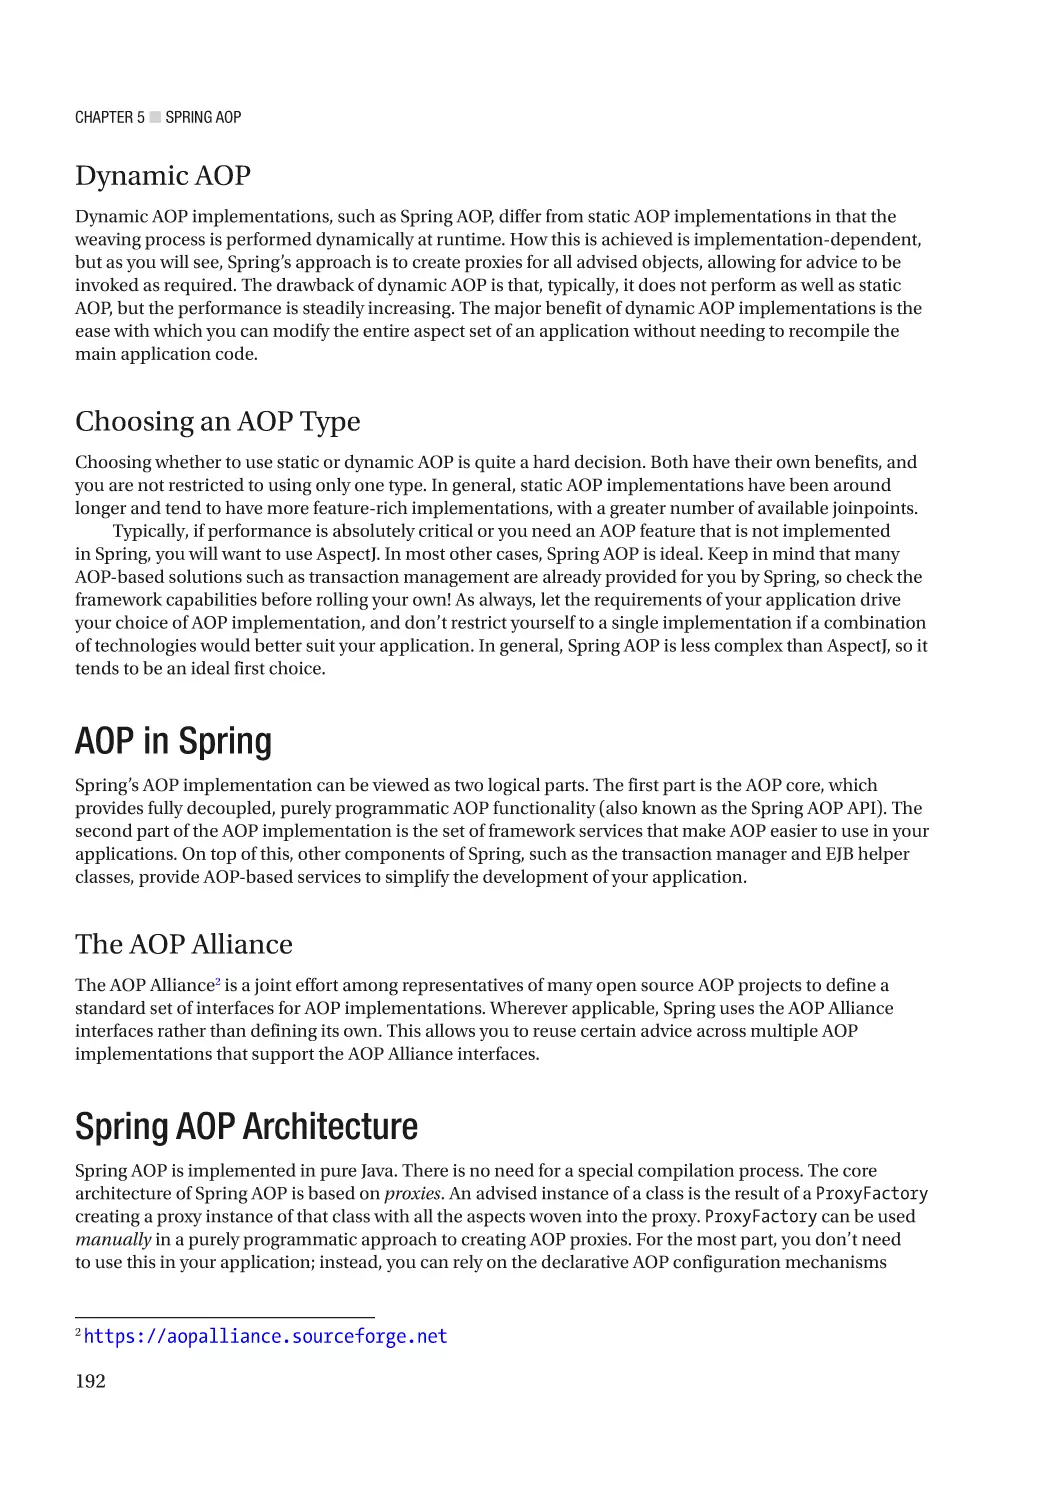
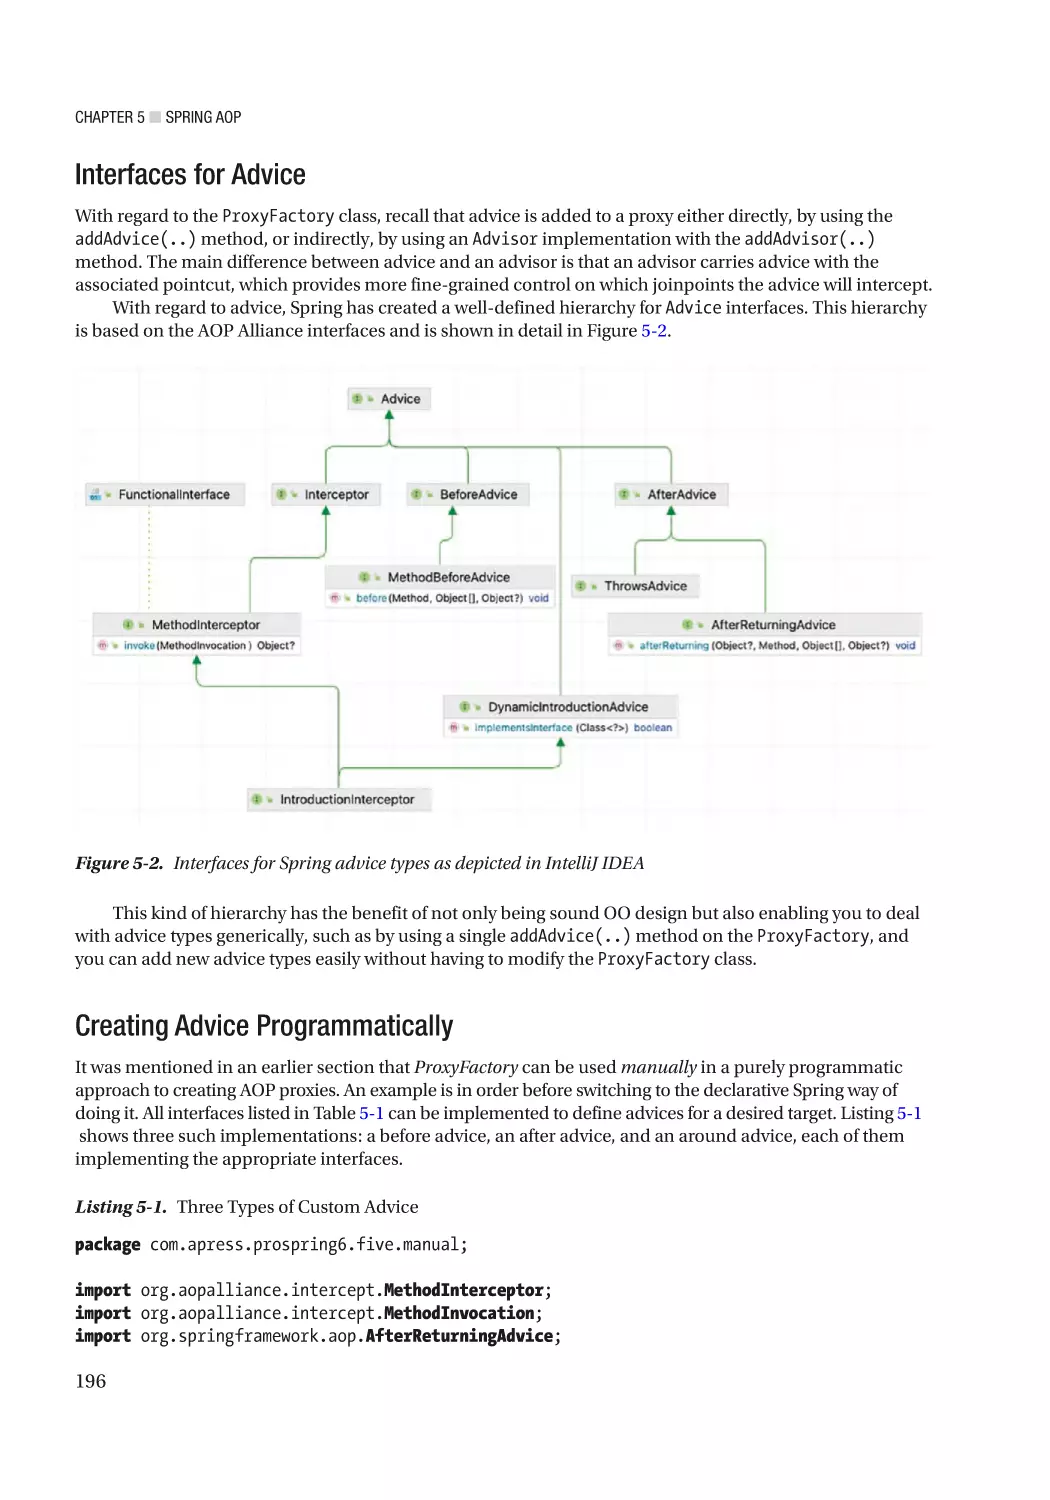
Spring AOP Architecture����������������������������������������������������������������������������������������������� 192
Joinpoints in Spring���������������������������������������������������������������������������������������������������������������������������� 193
Aspects in Spring�������������������������������������������������������������������������������������������������������������������������������� 193
Choosing an Advice Type�������������������������������������������������������������������������������������������������������������������� 200
Advisors and Pointcuts in Spring��������������������������������������������������������������������������������� 200
The Pointcut Interface������������������������������������������������������������������������������������������������������������������������ 201
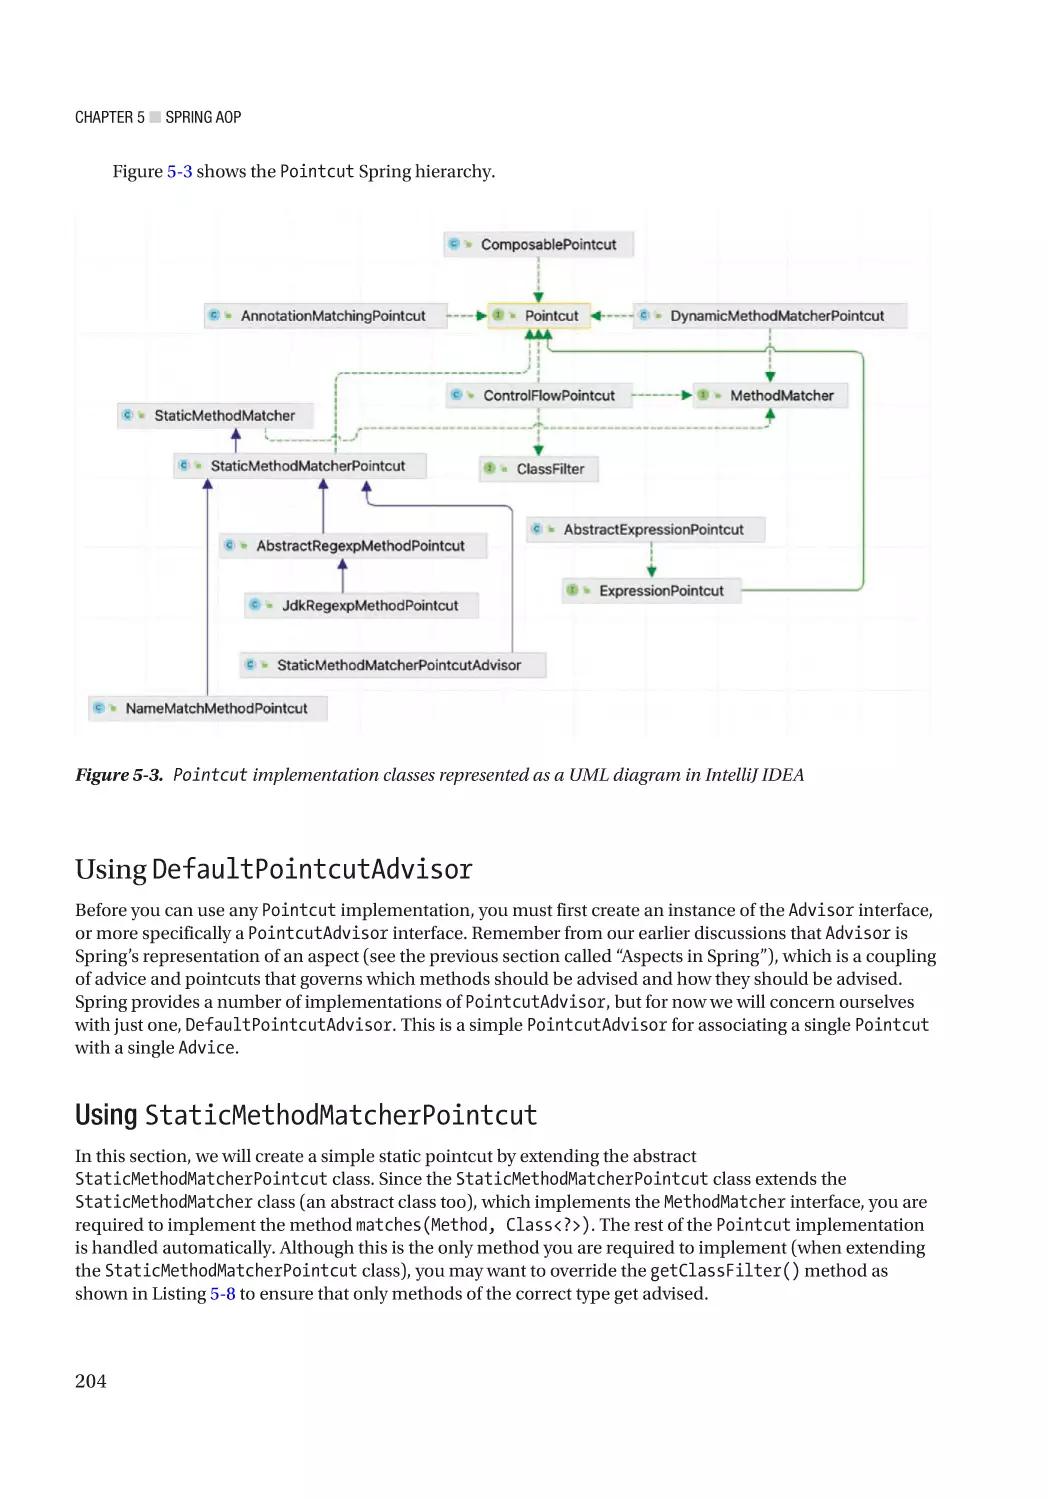
Available Pointcut Implementations��������������������������������������������������������������������������������������������������� 203
Using DefaultPointcutAdvisor������������������������������������������������������������������������������������������������������������� 204
Using DynamicMethodMatcherPointcut��������������������������������������������������������������������������������������������� 207
Using Simple Name Matching������������������������������������������������������������������������������������������������������������ 210
Creating Pointcuts with Regular Expressions������������������������������������������������������������������������������������� 213
Creating Pointcuts with AspectJ Pointcut Expression������������������������������������������������������������������������ 214
Creating Annotation Matching Pointcuts�������������������������������������������������������������������������������������������� 215
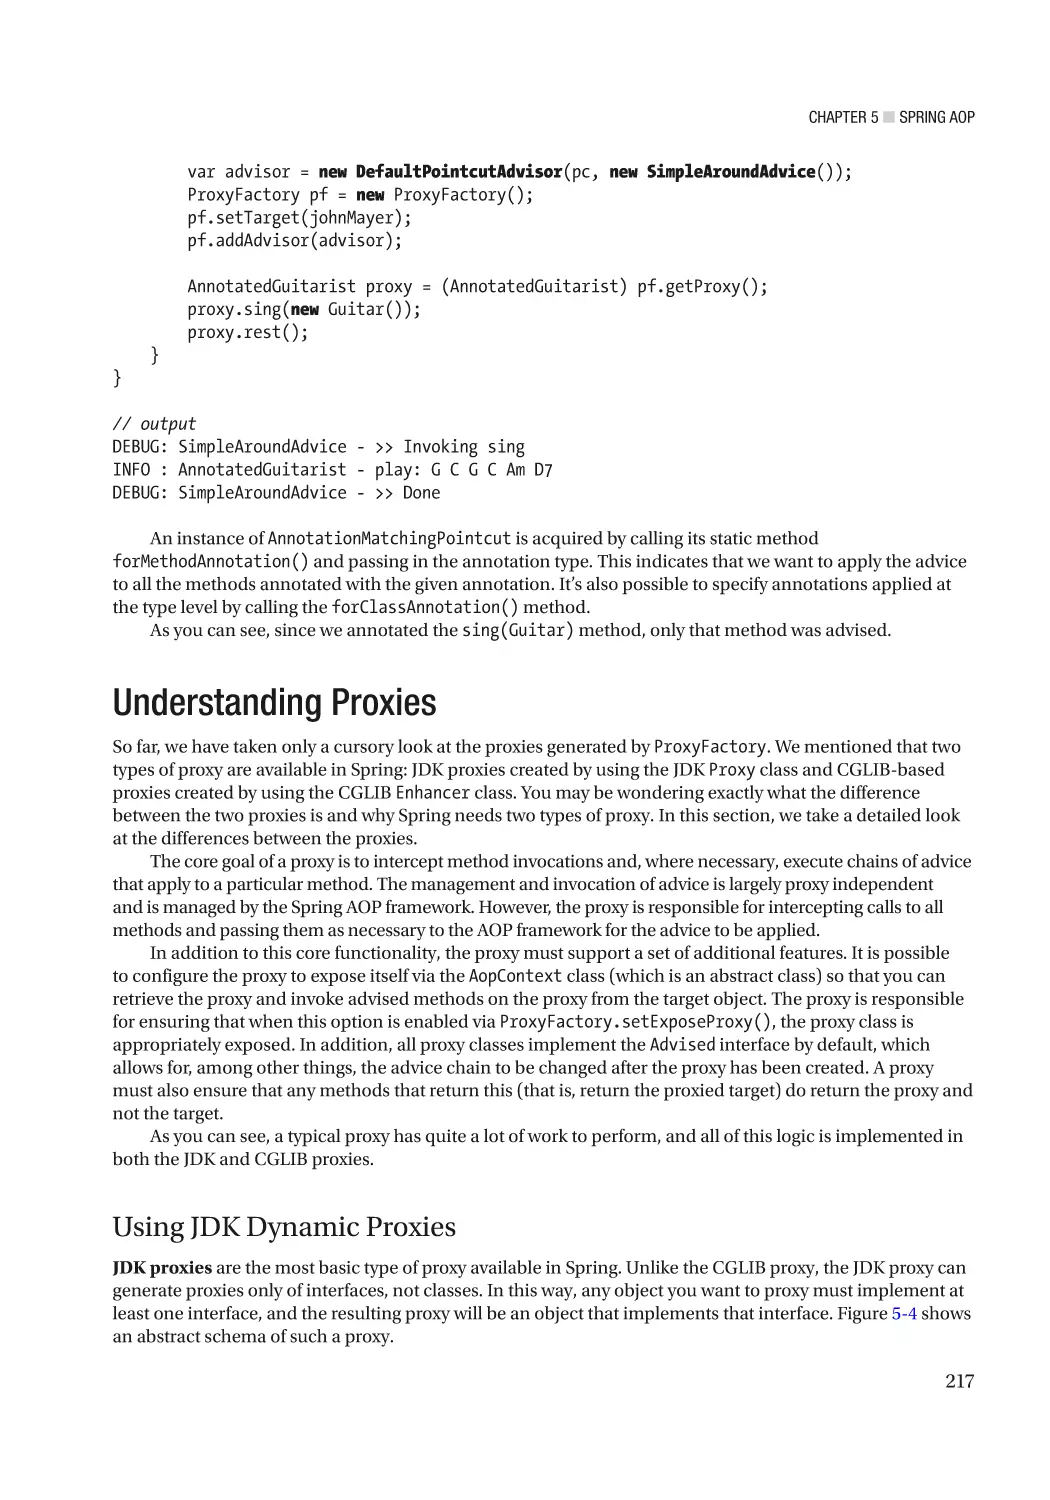
Understanding Proxies������������������������������������������������������������������������������������������������� 217
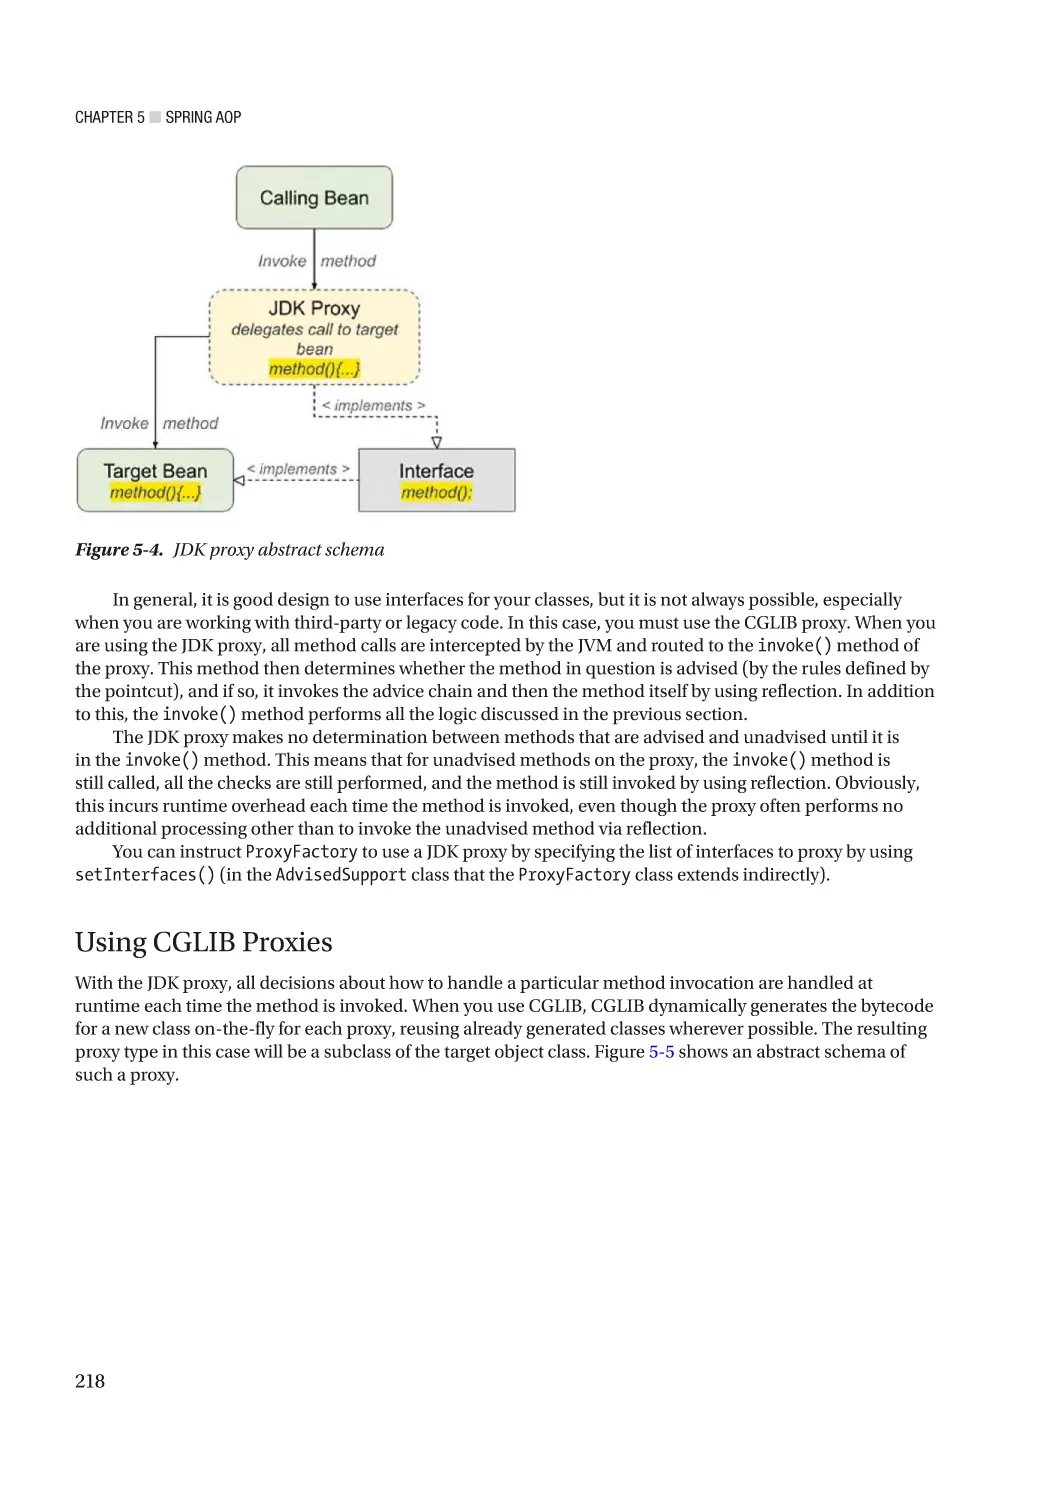
Using JDK Dynamic Proxies���������������������������������������������������������������������������������������������������������������� 217
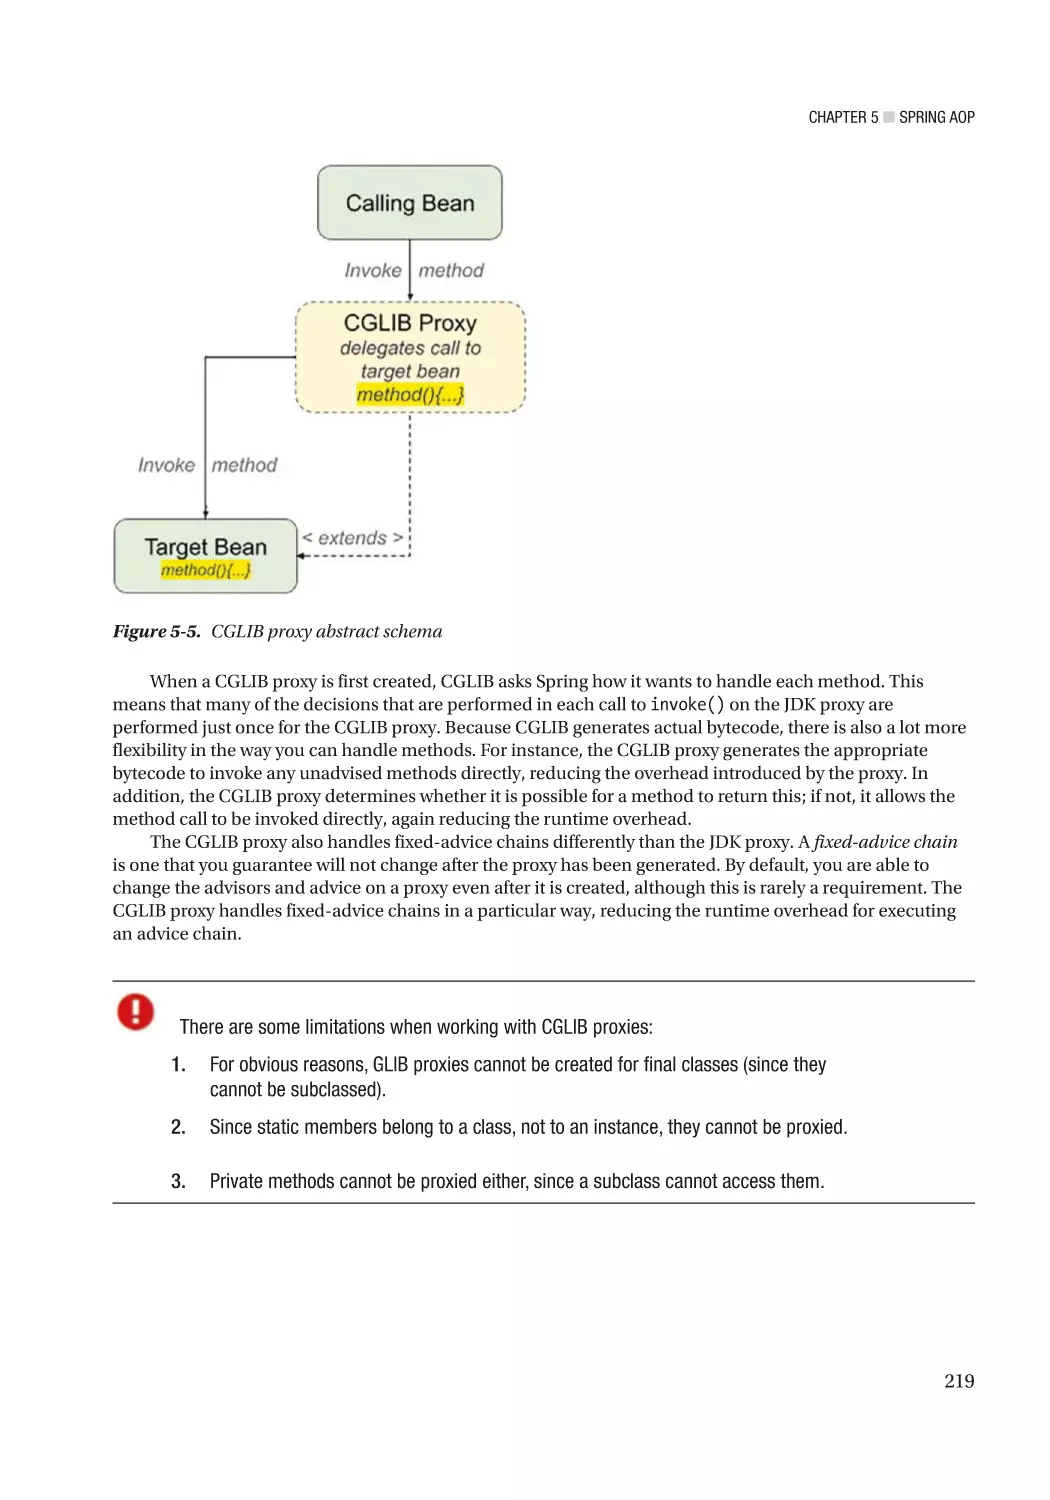
Using CGLIB Proxies��������������������������������������������������������������������������������������������������������������������������� 218
Comparing Proxy Performance����������������������������������������������������������������������������������������������������������� 220
Choosing a Proxy to Use��������������������������������������������������������������������������������������������������������������������� 224
ix
■ Table of Contents
Advanced Use of Pointcuts������������������������������������������������������������������������������������������� 224
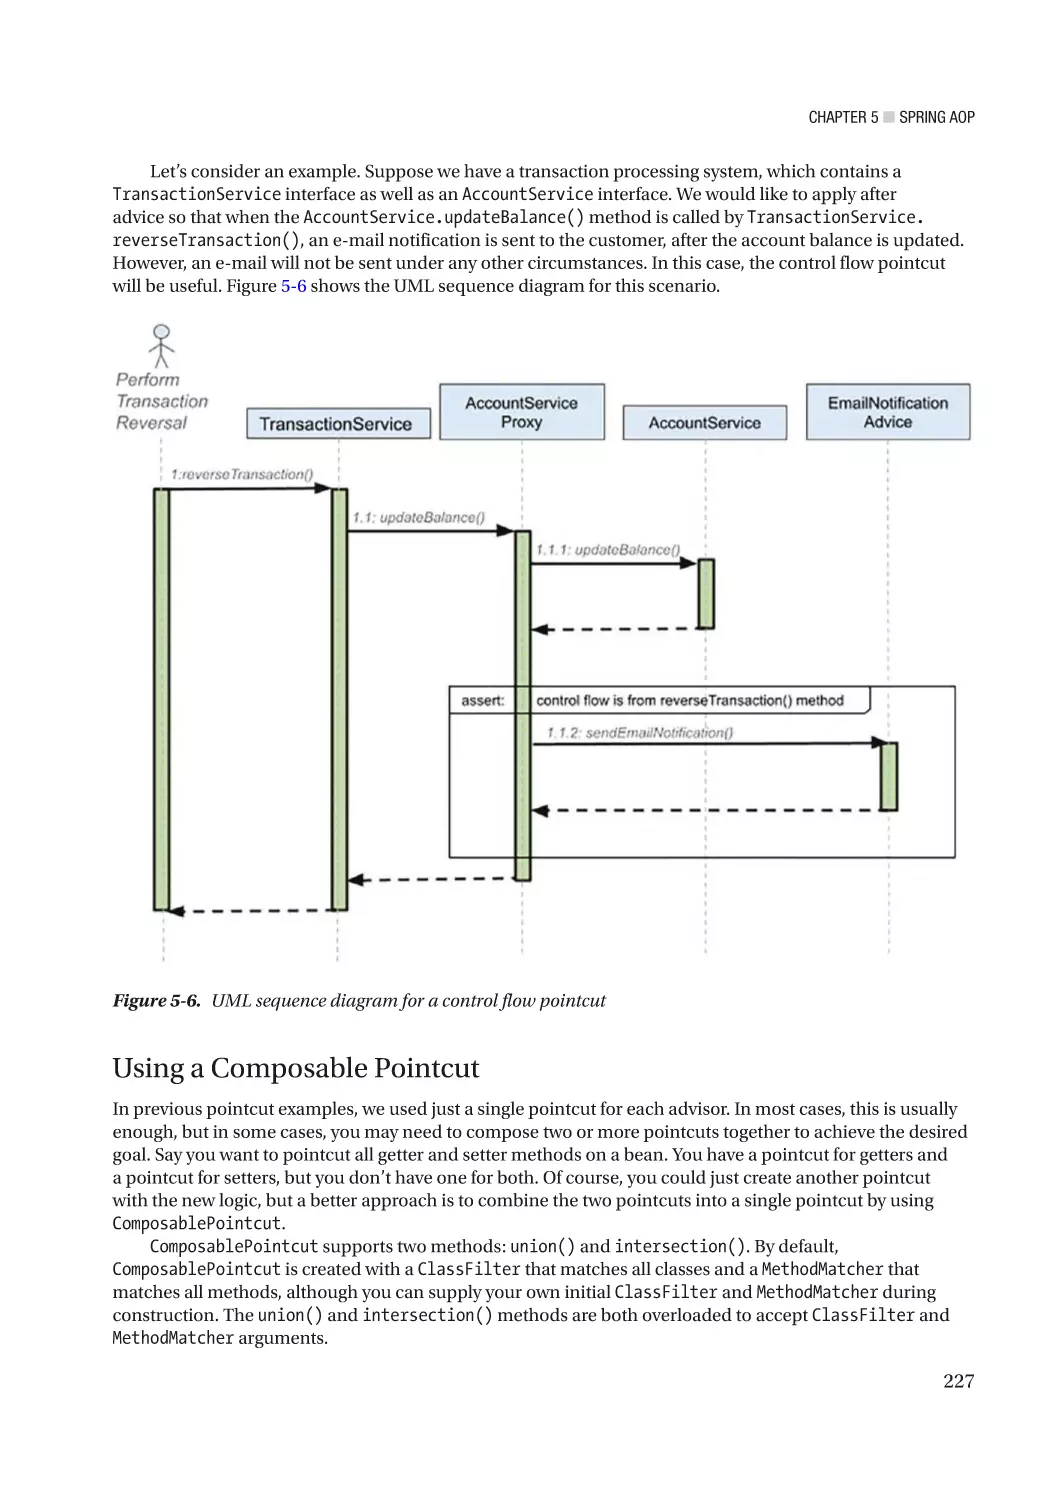
Using Control Flow Pointcuts�������������������������������������������������������������������������������������������������������������� 224
Using a Composable Pointcut������������������������������������������������������������������������������������������������������������� 227
Composition and the Pointcut Interface��������������������������������������������������������������������������������������������� 231
Pointcut Summary������������������������������������������������������������������������������������������������������������������������������ 231
Getting Started with Introductions������������������������������������������������������������������������������� 231
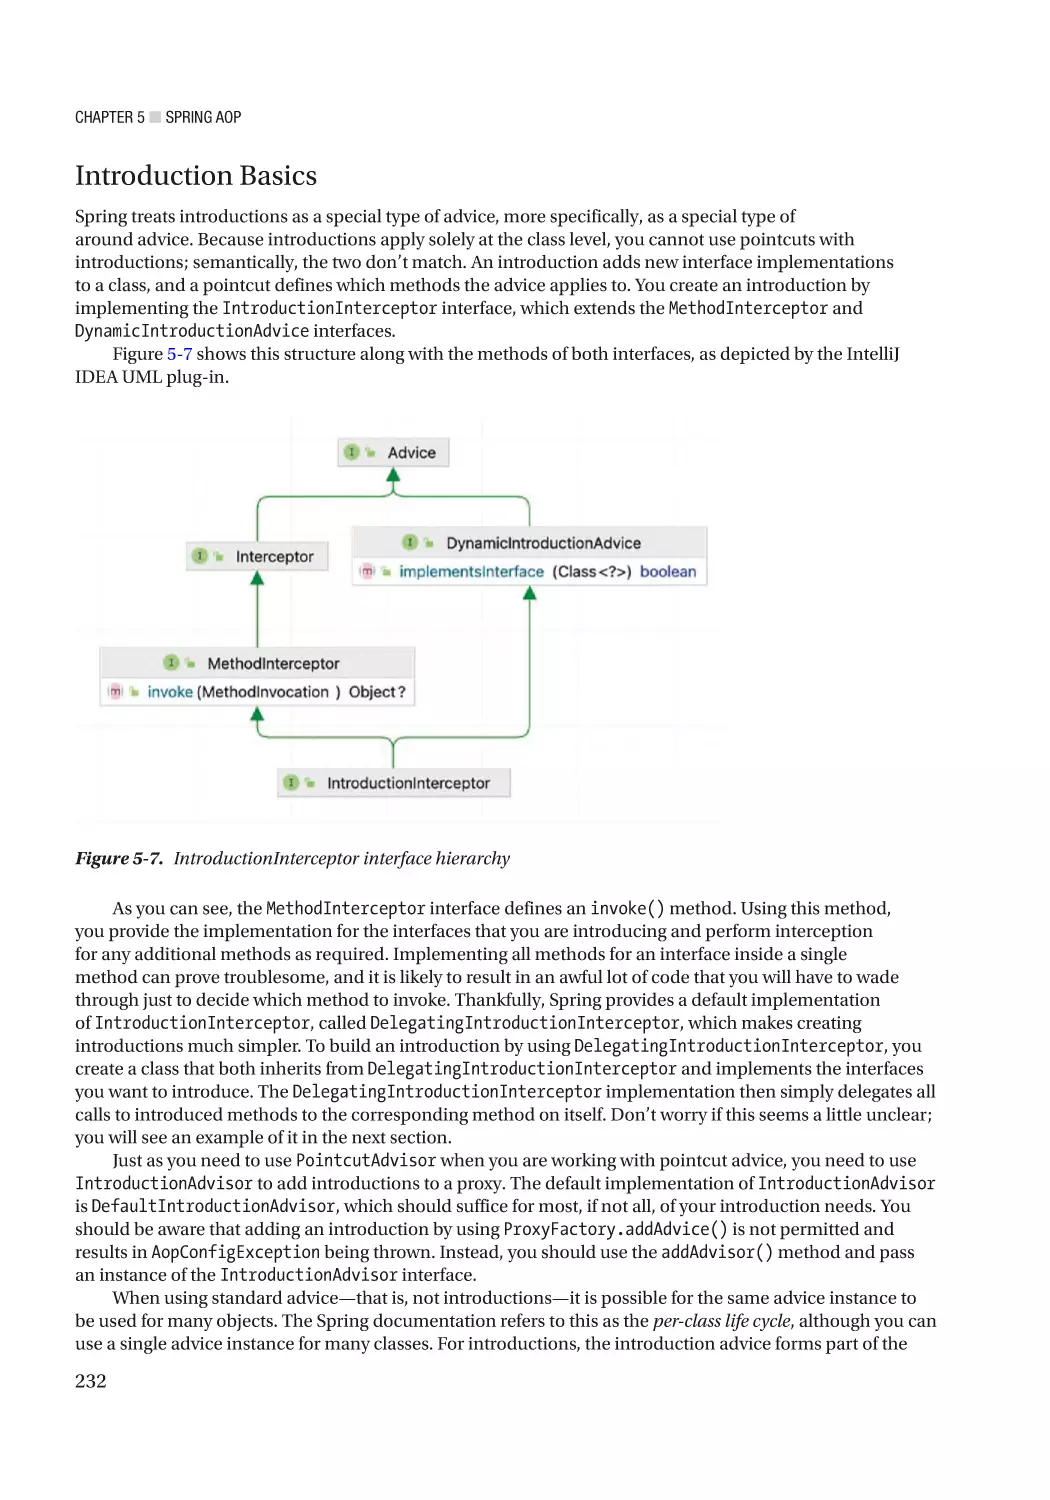
Introduction Basics����������������������������������������������������������������������������������������������������������������������������� 232
Object Modification Detection with Introductions������������������������������������������������������������������������������ 234
Creating an Advisor���������������������������������������������������������������������������������������������������������������������������� 236
Putting It All Together������������������������������������������������������������������������������������������������������������������������� 237
Introduction Summary������������������������������������������������������������������������������������������������������������������������ 238
Framework Services for AOP���������������������������������������������������������������������������������������� 239
Configuring AOP Declaratively������������������������������������������������������������������������������������������������������������ 239
Using ProxyFactoryBean��������������������������������������������������������������������������������������������������������������������� 239
Using ProxyFactoryBean for Introductions����������������������������������������������������������������������������������������� 244
ProxyFactoryBean Summary�������������������������������������������������������������������������������������������������������������� 245
Using @AspectJ-Style Annotations������������������������������������������������������������������������������ 245
Declarative Before Advice with AspectJ Annotations������������������������������������������������������������������������� 247
Declarative Around Advice with AspectJ Annotations������������������������������������������������������������������������ 252
Declarative After Advice with AspectJ Annotations���������������������������������������������������������������������������� 255
Declarative Introductions with AspectJ Annotations�������������������������������������������������������������������������� 259
Aspect Instantiation Models��������������������������������������������������������������������������������������������������������������� 261
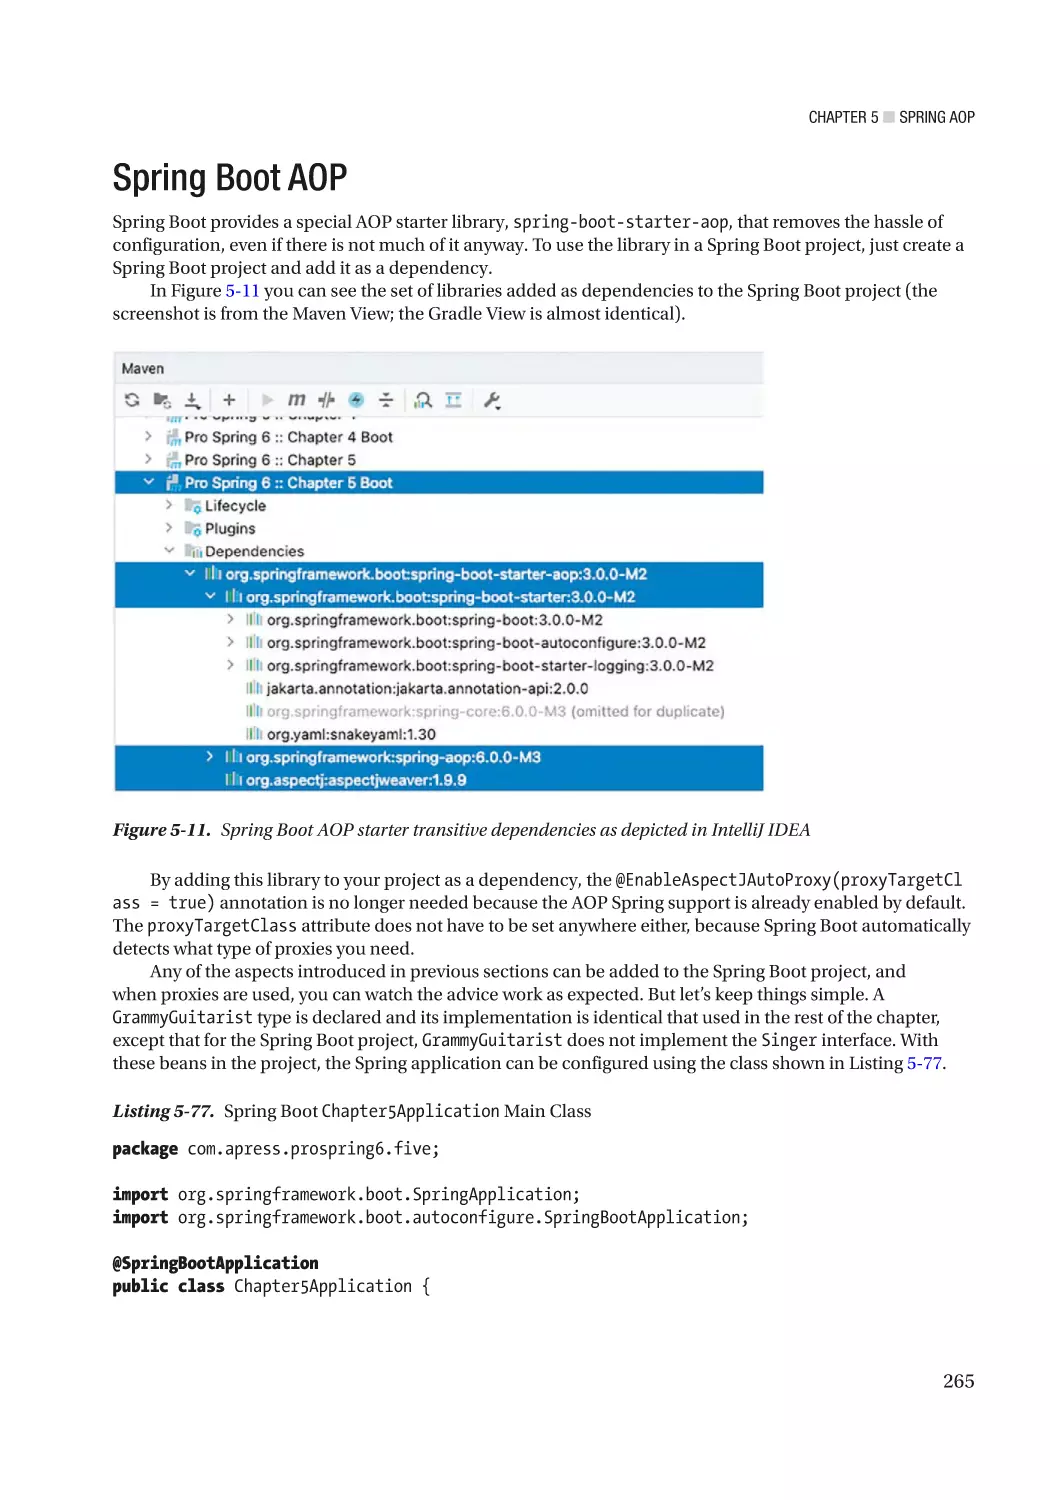
Spring Boot AOP����������������������������������������������������������������������������������������������������������� 265
Considerations for Declarative Spring AOP Configuration������������������������������������������������������������������ 267
Summary���������������������������������������������������������������������������������������������������������������������� 267
■Chapter
■
6: Spring Data Access with JDBC�������������������������������������������������������� 269
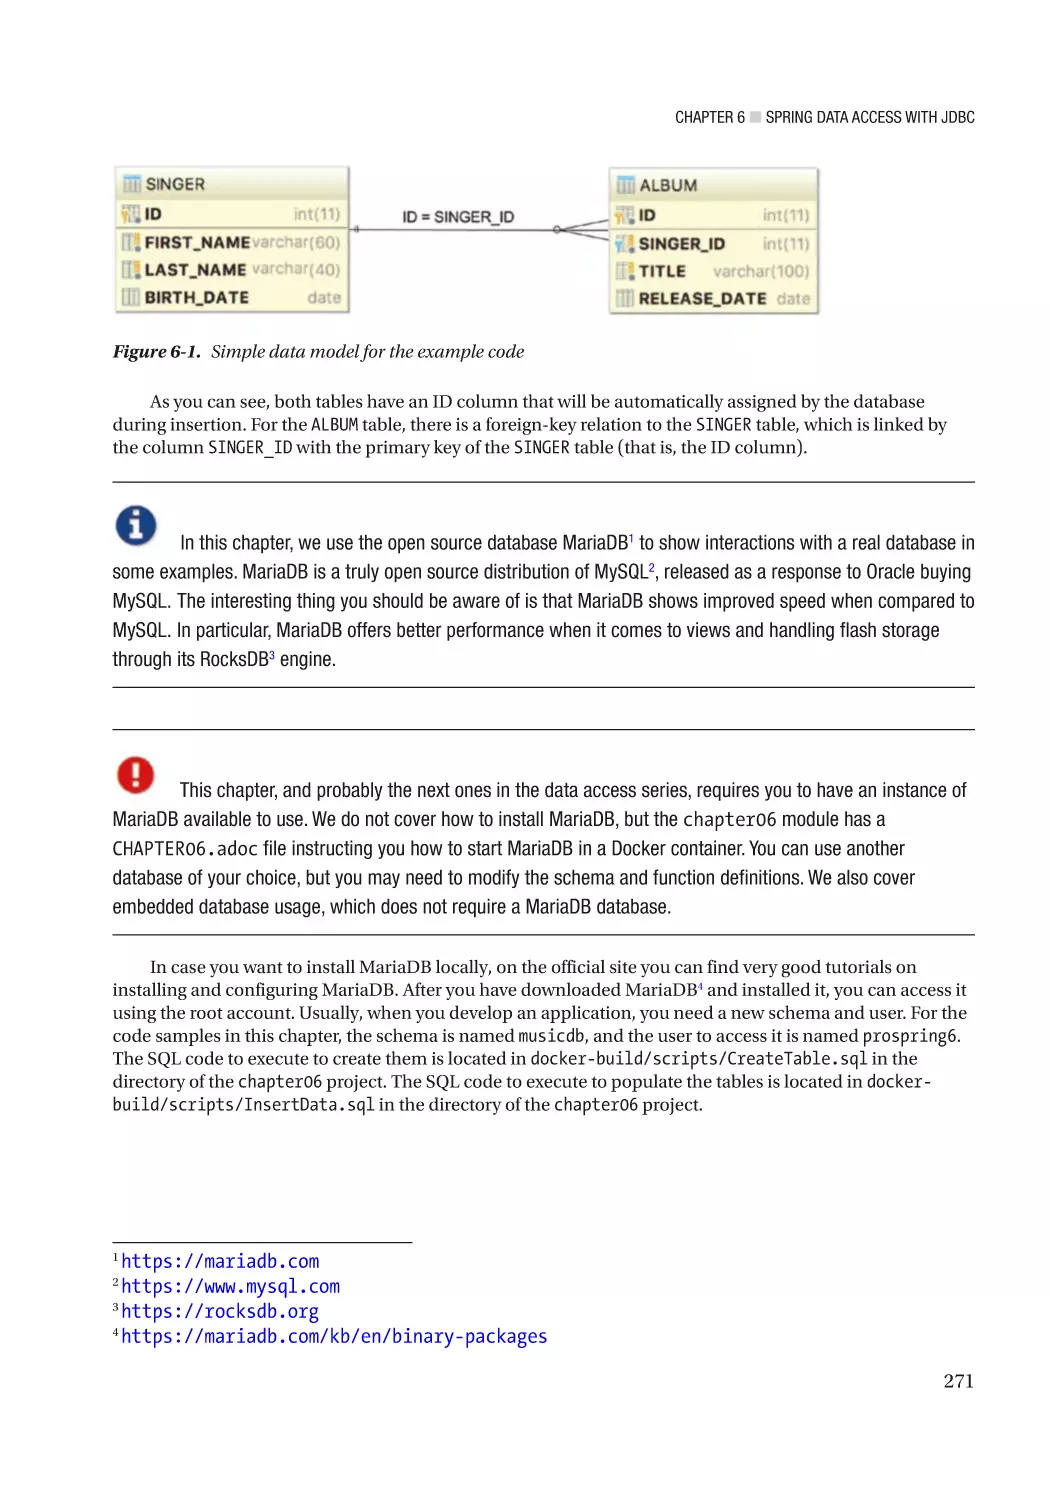
Sample Data Model for Example Code������������������������������������������������������������������������� 270
Exploring the JDBC Infrastructure�������������������������������������������������������������������������������� 275
Spring JDBC Infrastructure������������������������������������������������������������������������������������������ 280
Overview and Used Packages������������������������������������������������������������������������������������������������������������ 280
Database Connections and DataSources�������������������������������������������������������������������������������������������� 281
x
■ Table of Contents
Embedded Database Support������������������������������������������������������������������������������������������������������������� 284
Using DataSources in DAO Classes���������������������������������������������������������������������������������������������������� 285
Exception Handling����������������������������������������������������������������������������������������������������������������������������� 288
The JdbcTemplate Class��������������������������������������������������������������������������������������������������������������������� 290
Spring Classes That Model JDBC Operations������������������������������������������������������������������������������������� 299
Spring Data Project: JDBC Extensions������������������������������������������������������������������������������������������������ 316
Spring JDBC Testing Annotations������������������������������������������������������������������������������������������������������� 316
Introducing Testcontainers����������������������������������������������������������������������������������������������������������������� 321
Considerations for Using JDBC����������������������������������������������������������������������������������������������������������� 326
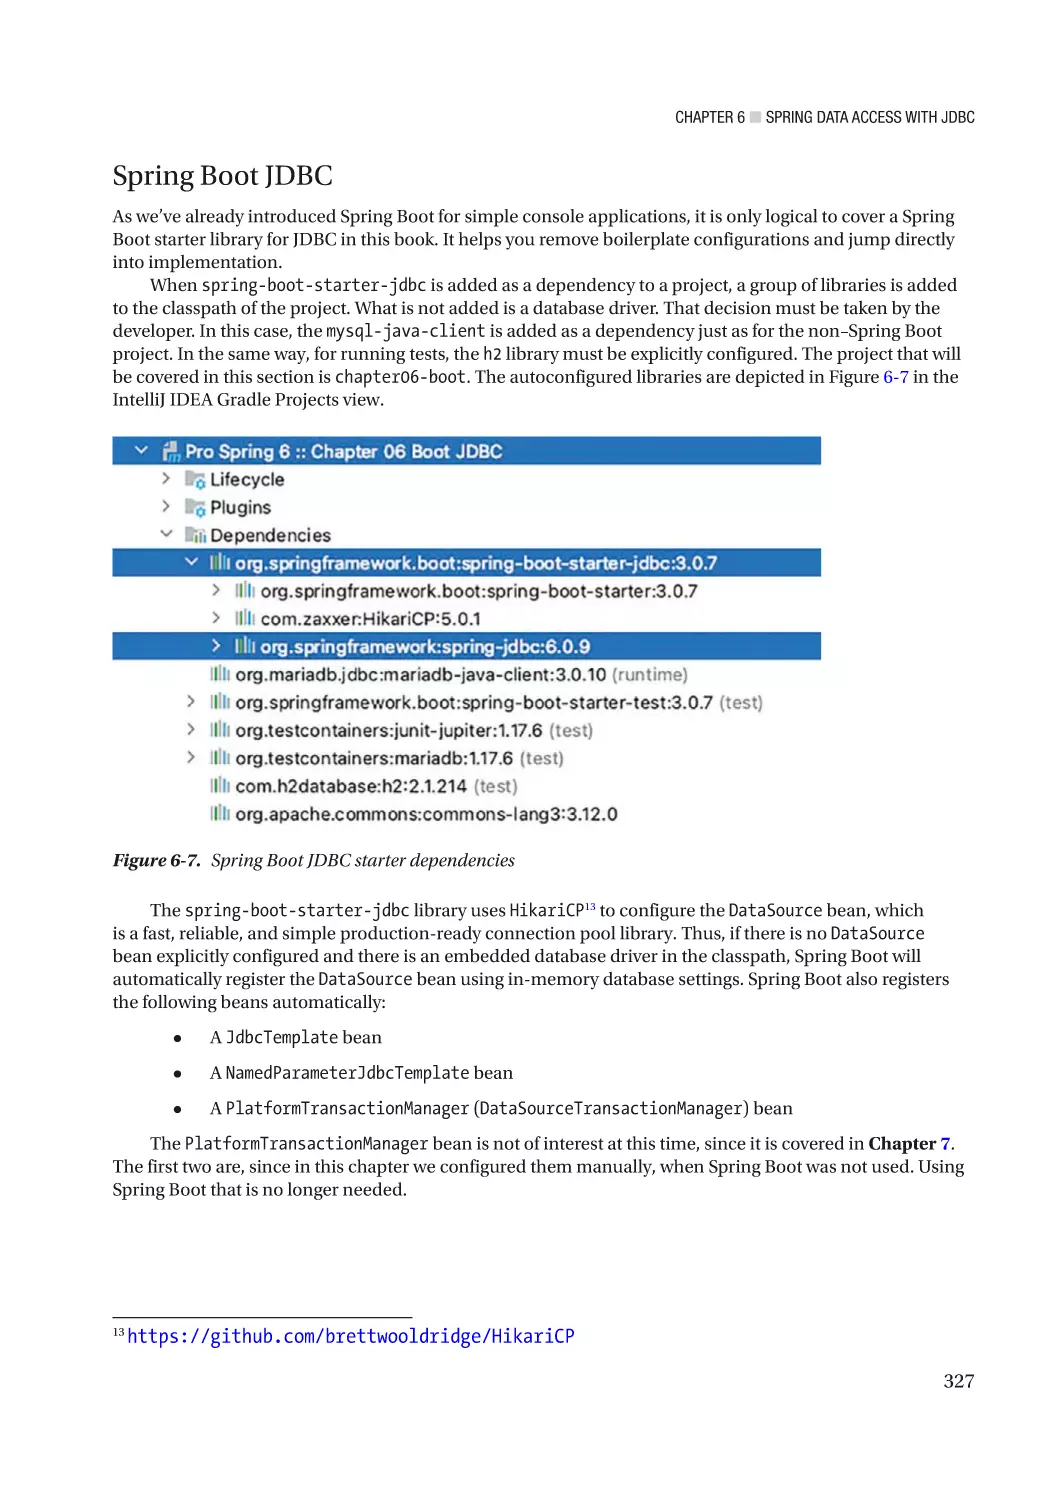
Spring Boot JDBC������������������������������������������������������������������������������������������������������������������������������� 327
Summary���������������������������������������������������������������������������������������������������������������������� 334
■Chapter
■
7: Spring with Hibernate���������������������������������������������������������������������� 335
Sample Data Model for Example Code������������������������������������������������������������������������� 336
Configuring Hibernate’s SessionFactory���������������������������������������������������������������������� 337
ORM Mapping Using Hibernate Annotations���������������������������������������������������������������� 342
Simple Mappings���������������������������������������������������������������������������������������������������������� 344
One-to-Many Mappings���������������������������������������������������������������������������������������������������������������������� 348
Many-to-Many Mappings������������������������������������������������������������������������������������������������������������������� 349
The Hibernate Session Interface�������������������������������������������������������������������������������������������������������� 350
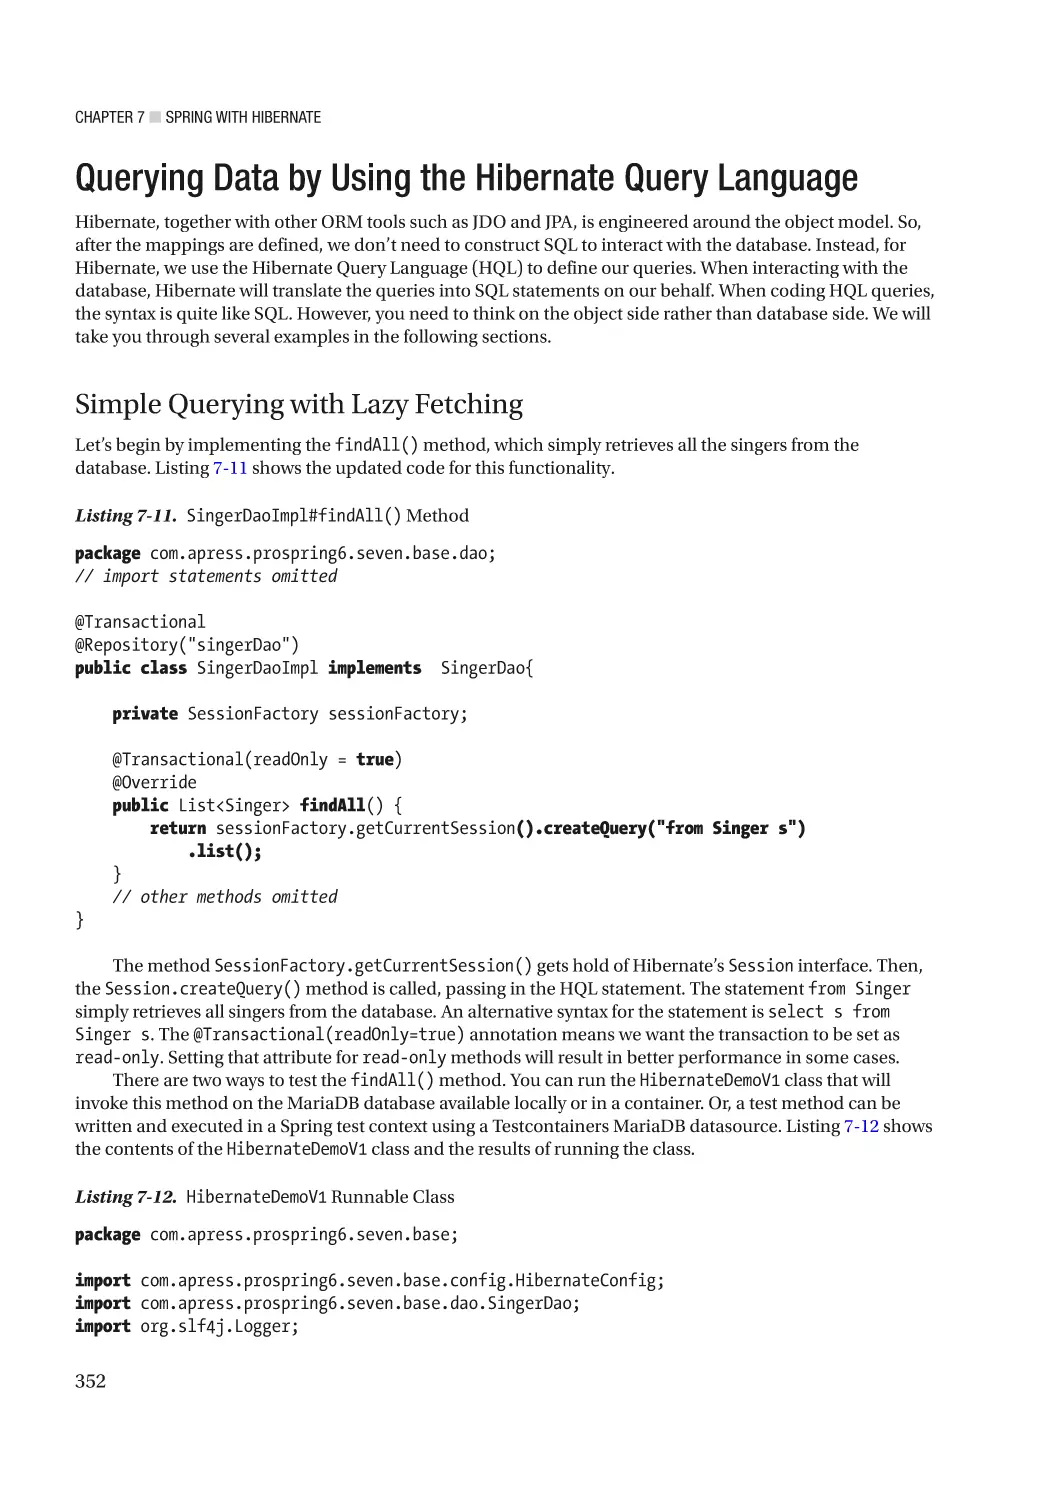
Querying Data by Using the Hibernate Query Language���������������������������������������������� 352
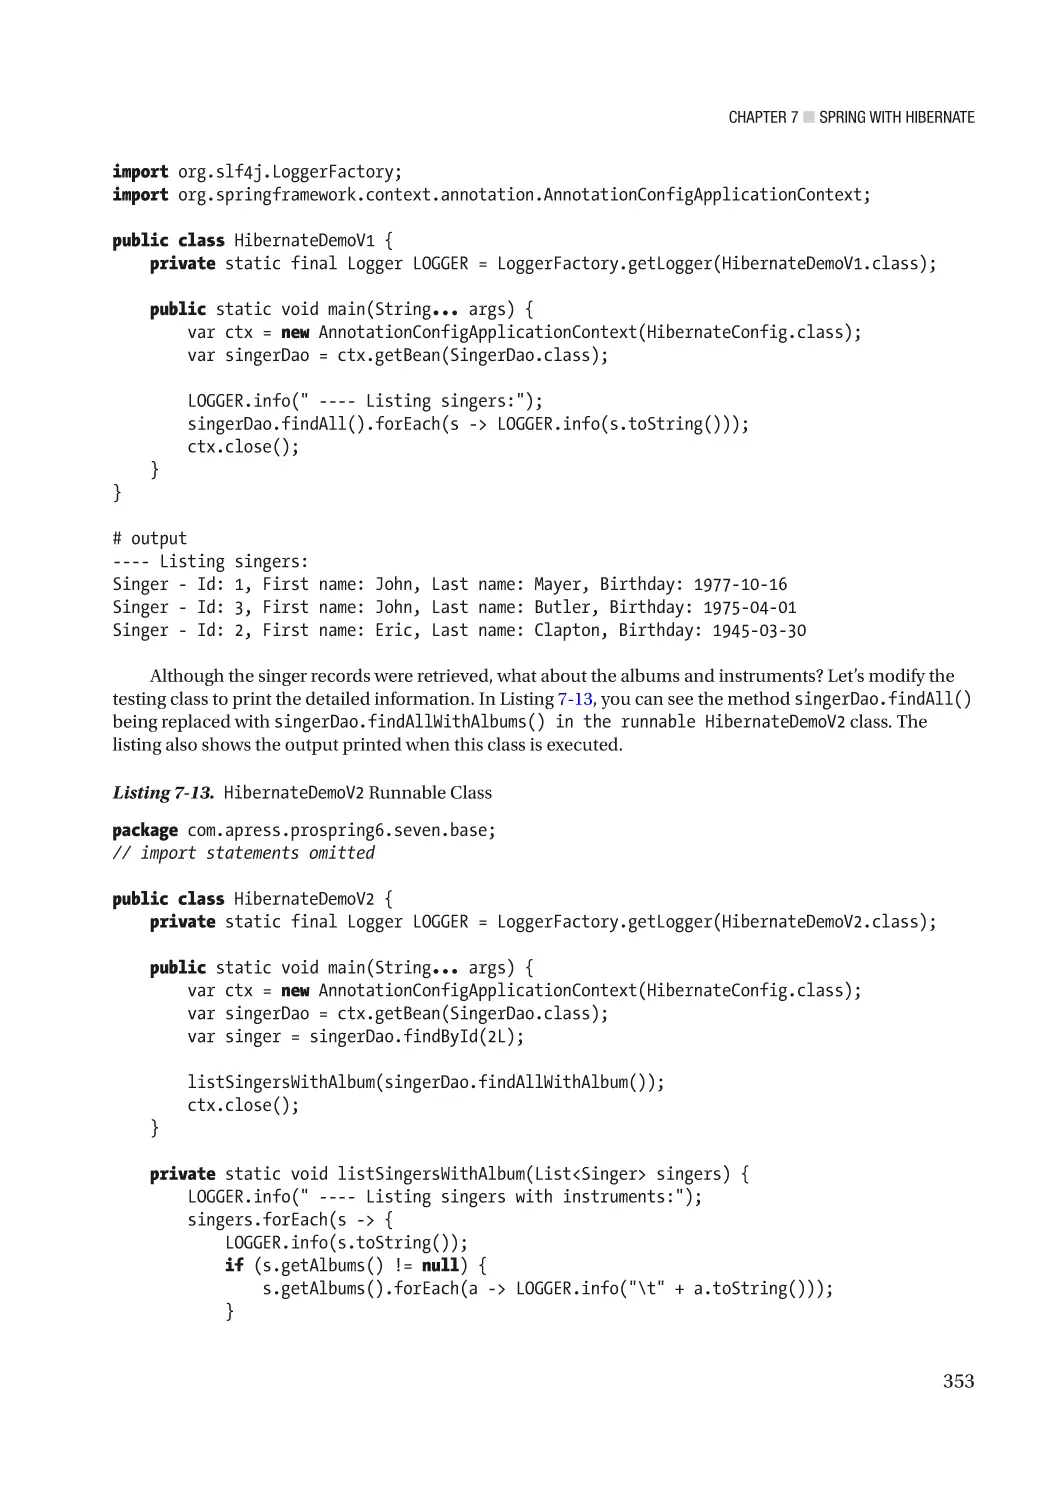
Simple Querying with Lazy Fetching�������������������������������������������������������������������������������������������������� 352
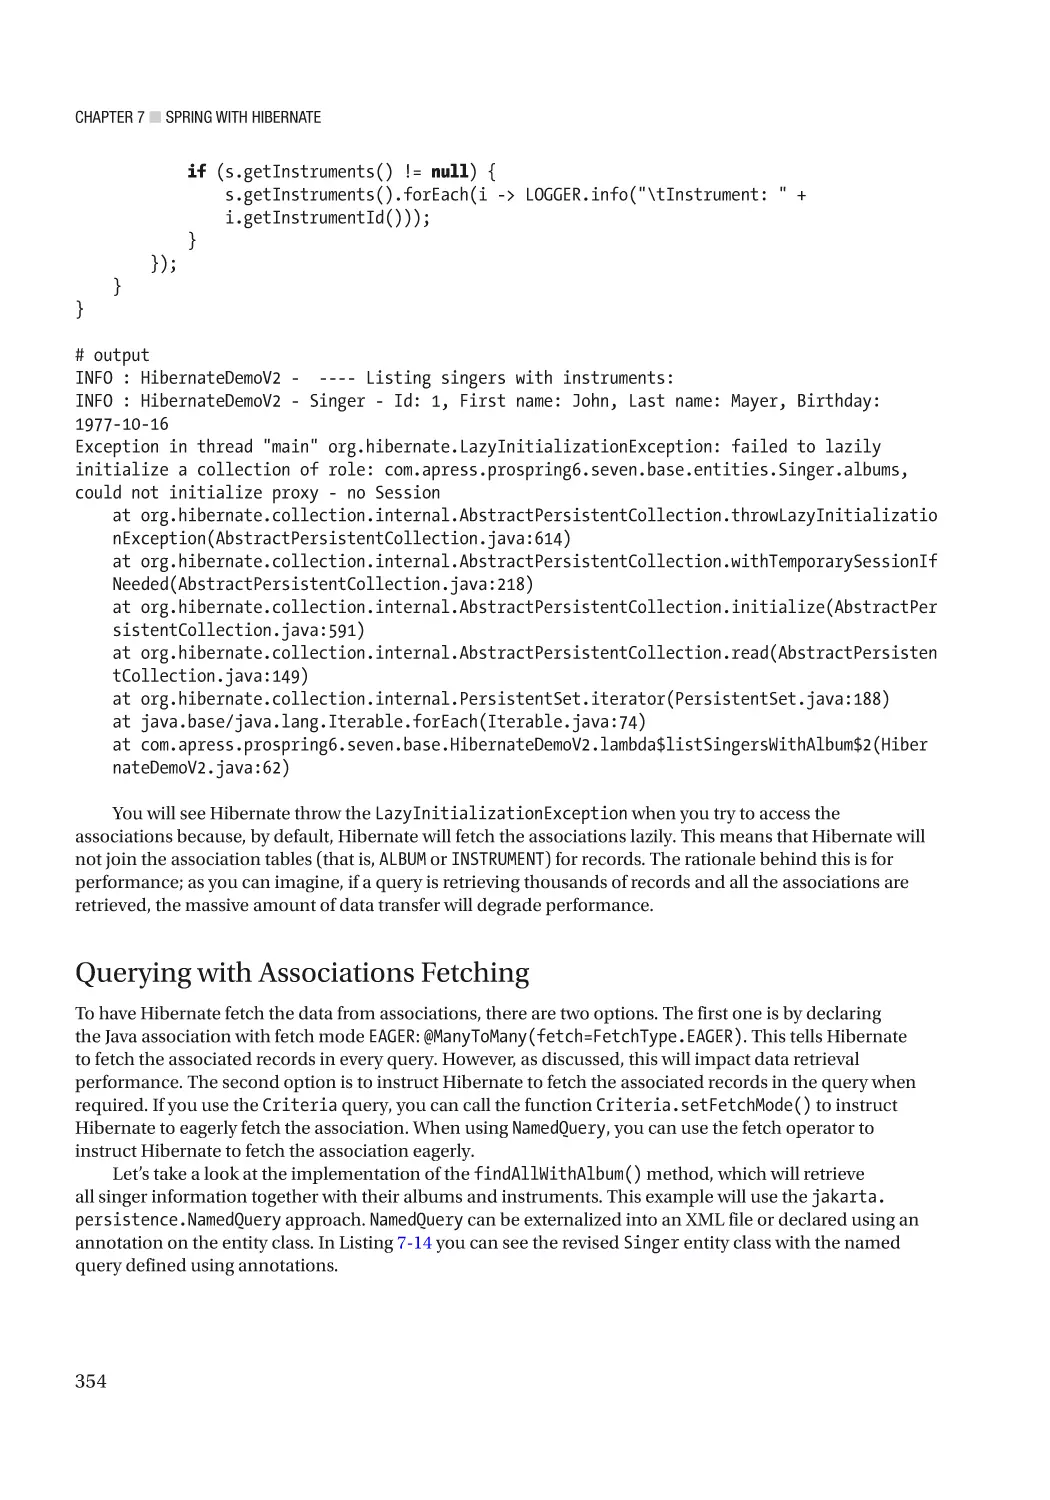
Querying with Associations Fetching������������������������������������������������������������������������������������������������� 354
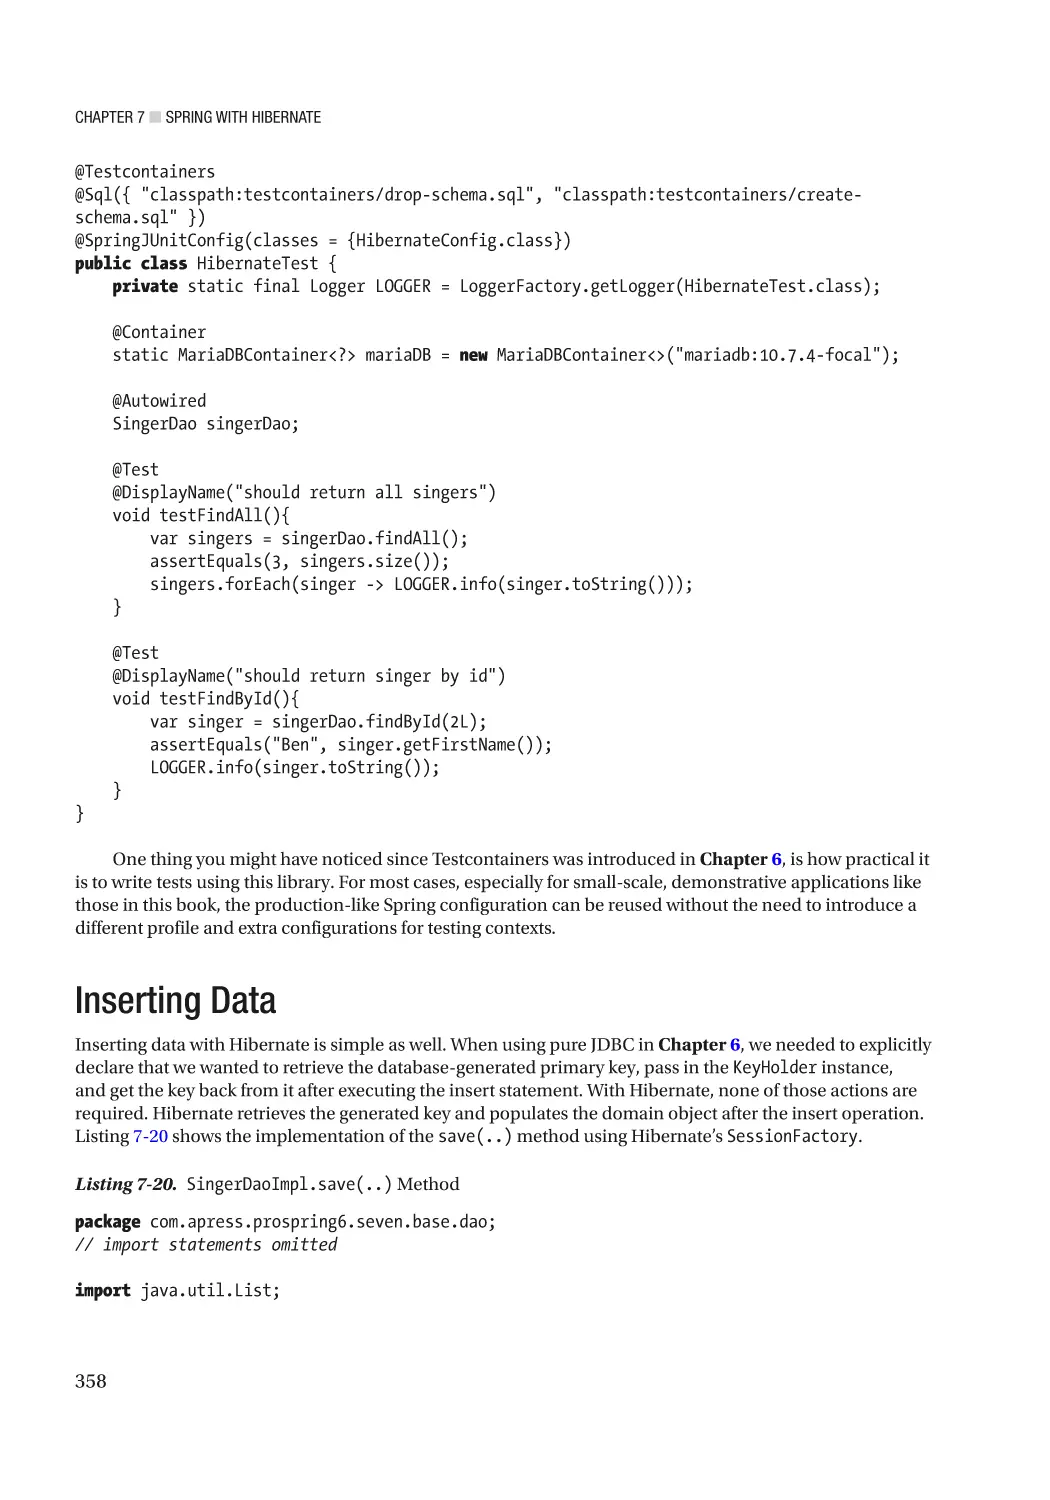
Inserting Data��������������������������������������������������������������������������������������������������������������� 358
Updating Data��������������������������������������������������������������������������������������������������������������� 362
Deleting Data���������������������������������������������������������������������������������������������������������������� 364
Executing SQL Native Queries�������������������������������������������������������������������������������������� 366
Executing Projections with Hibernate�������������������������������������������������������������������������� 368
Calling Stored Functions with Hibernate���������������������������������������������������������������������� 368
Configuring Hibernate to Generate Tables from Entities���������������������������������������������� 369
xi
■ Table of Contents
Annotating Methods or Fields?������������������������������������������������������������������������������������ 373
Considerations When Using Hibernate������������������������������������������������������������������������� 375
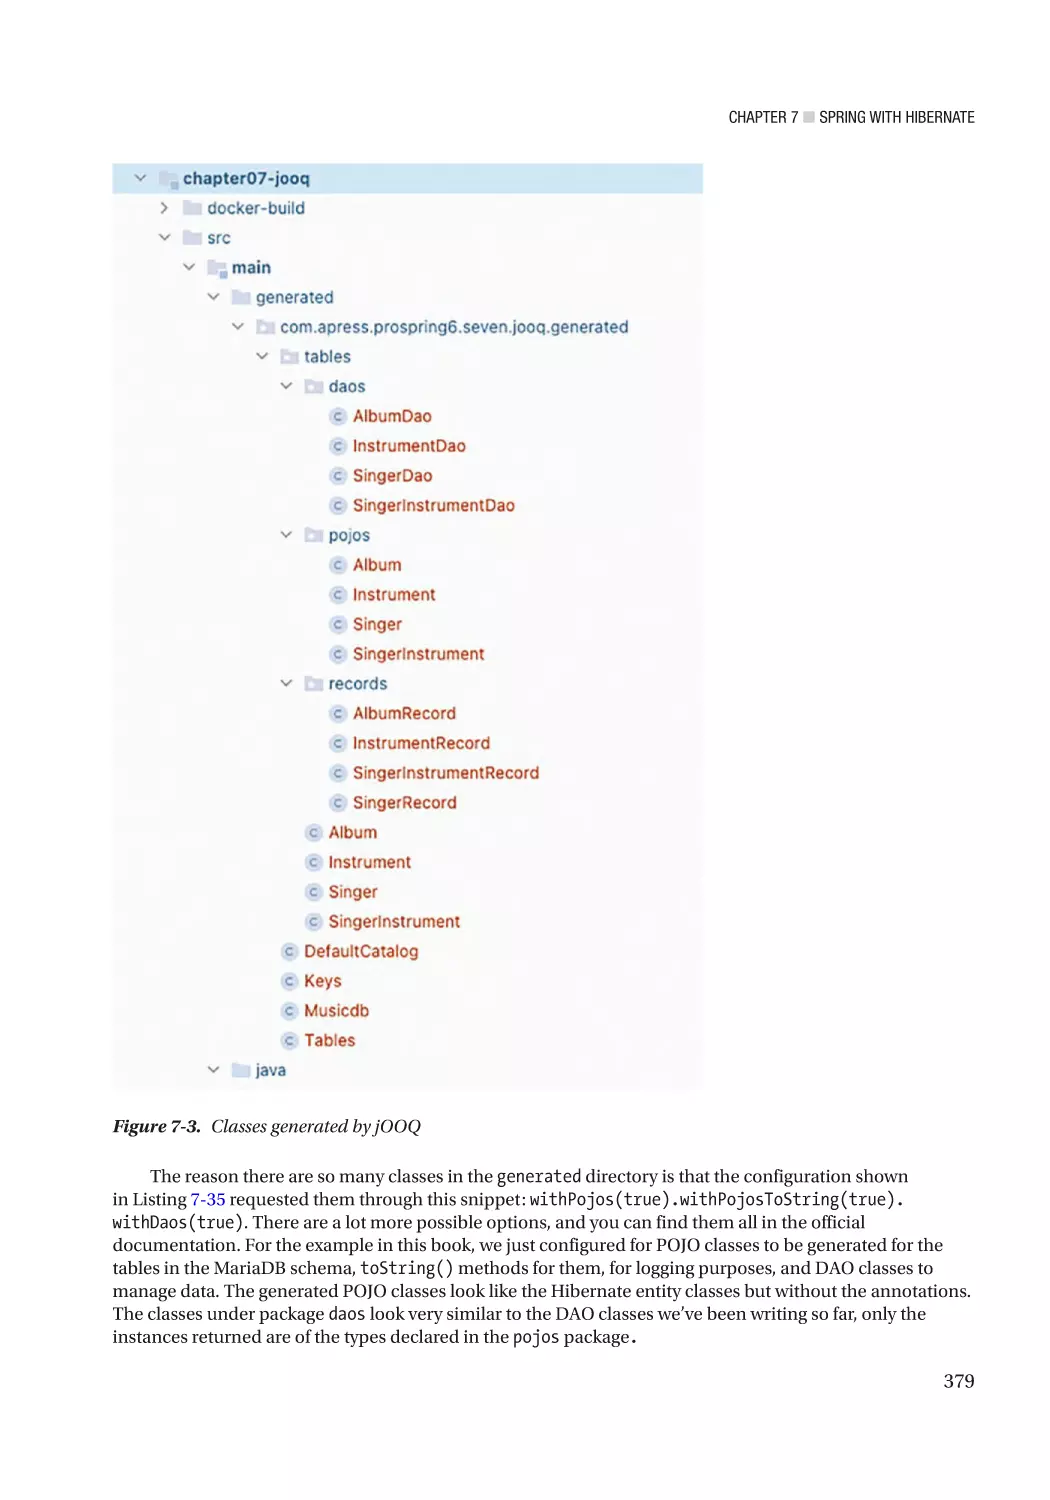
Introducing jOOQ���������������������������������������������������������������������������������������������������������� 376
Summary���������������������������������������������������������������������������������������������������������������������� 388
■Chapter
■
8: Spring with JPA������������������������������������������������������������������������������� 389
Introducing JPA 3.1������������������������������������������������������������������������������������������������������ 390
Sample Data Model for Example Code����������������������������������������������������������������������������������������������� 391
Configuring JPA’s EntityManagerFactory�������������������������������������������������������������������������������������������� 391
Using JPA Annotations for ORM Mapping������������������������������������������������������������������������������������������� 394
Performing Database Operations with JPA������������������������������������������������������������������ 396
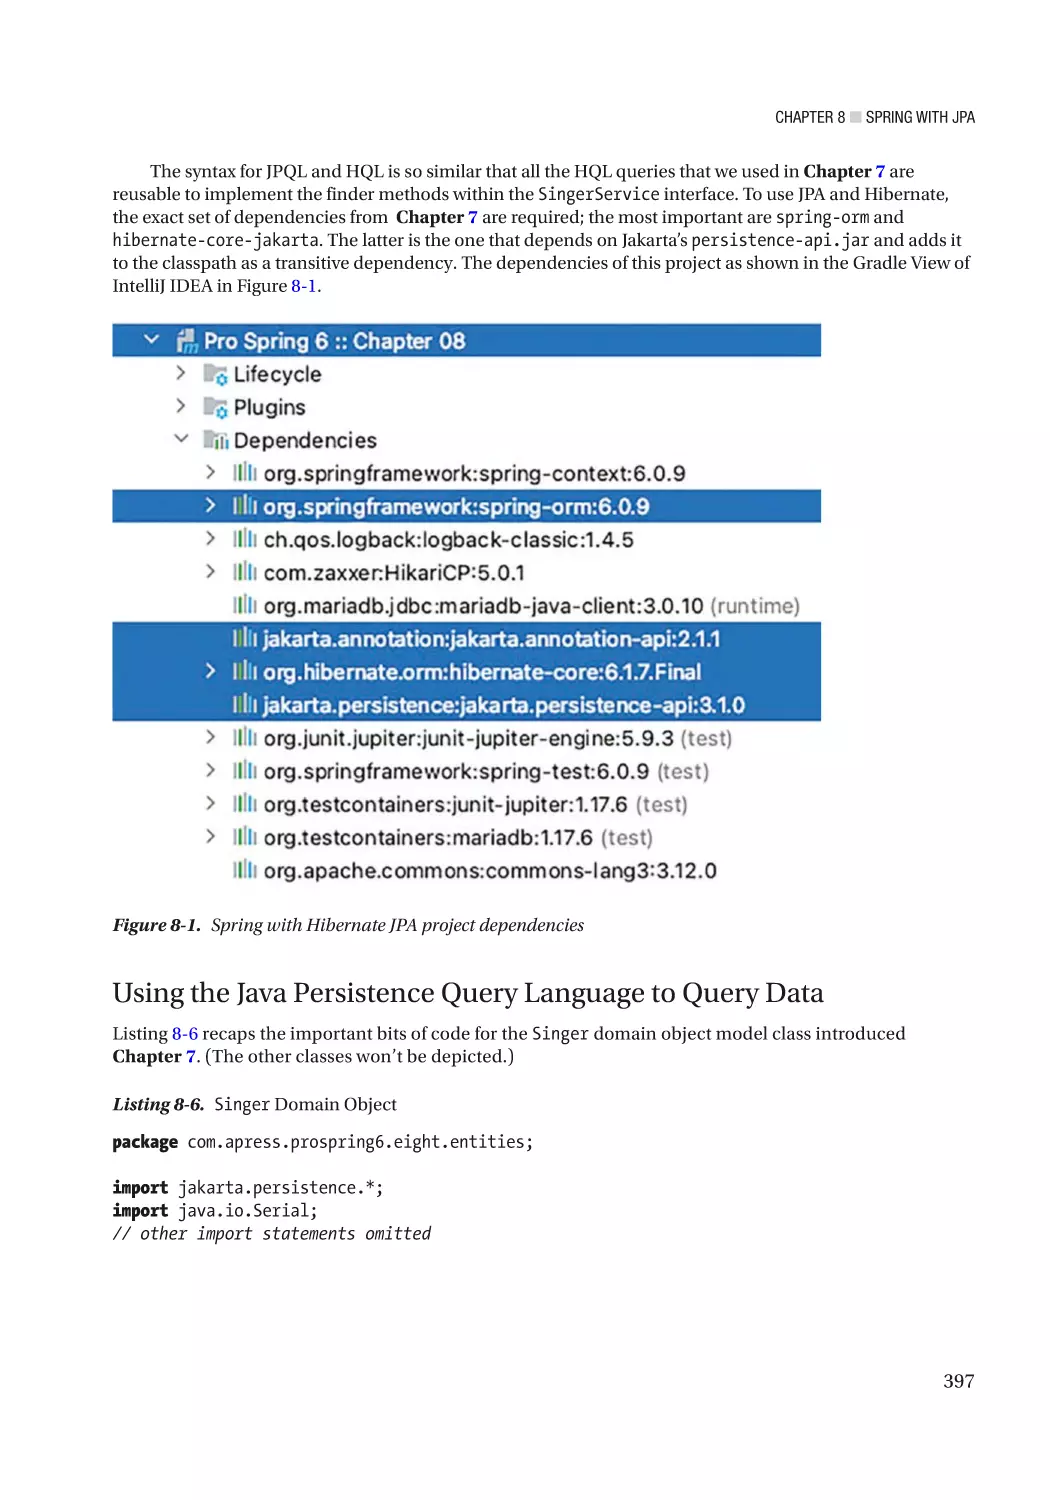
Using the Java Persistence Query Language to Query Data�������������������������������������������������������������� 397
Querying with Untyped Results���������������������������������������������������������������������������������������������������������� 405
Querying for a Custom Result Type with a Constructor Expression���������������������������������������������������� 407
Inserting Data������������������������������������������������������������������������������������������������������������������������������������� 409
Updating Data������������������������������������������������������������������������������������������������������������������������������������� 411
Deleting Data�������������������������������������������������������������������������������������������������������������������������������������� 413
Using a Native Query���������������������������������������������������������������������������������������������������� 414
Using a Simple Native Query�������������������������������������������������������������������������������������������������������������� 414
Native Querying with SQL ResultSet Mapping������������������������������������������������������������������������������������ 415
Executing Stored Functions and Procedures�������������������������������������������������������������������������������������� 416
Using the JPA Criteria API for a Criteria Query������������������������������������������������������������� 417
Summary���������������������������������������������������������������������������������������������������������������������� 422
■Chapter
■
9: Spring Transaction Management����������������������������������������������������� 423
Exploring the Spring Transaction Abstraction Layer����������������������������������������������������� 424
Transaction Types������������������������������������������������������������������������������������������������������������������������������� 424
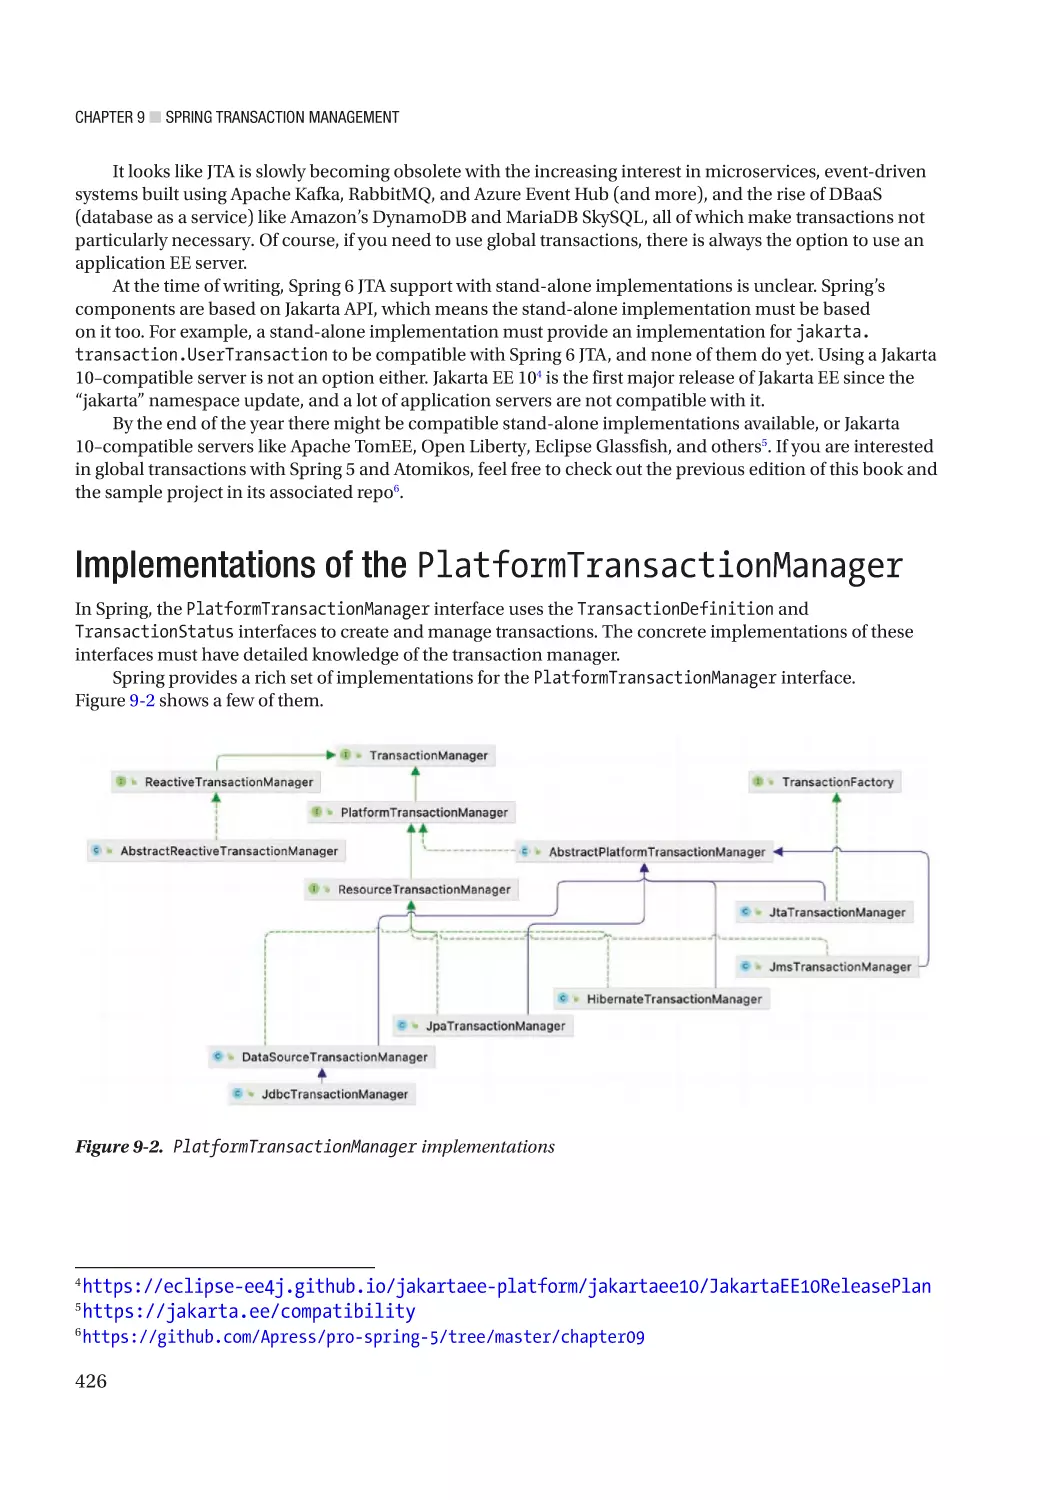
Implementations of the PlatformTransactionManager������������������������������������������������� 426
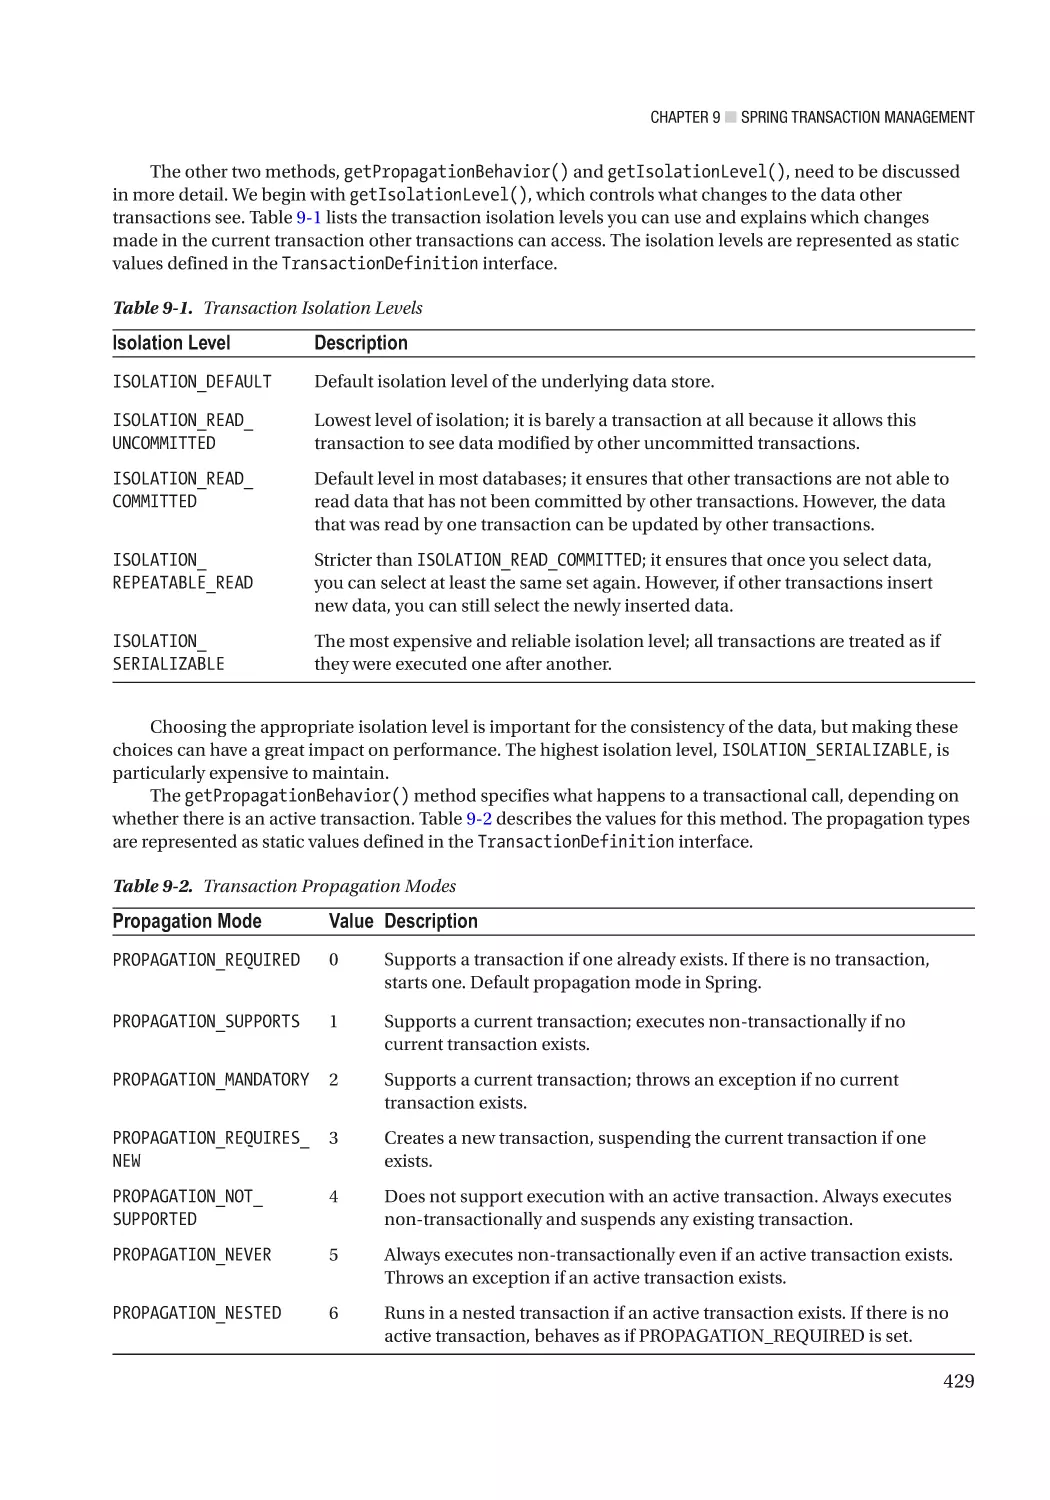
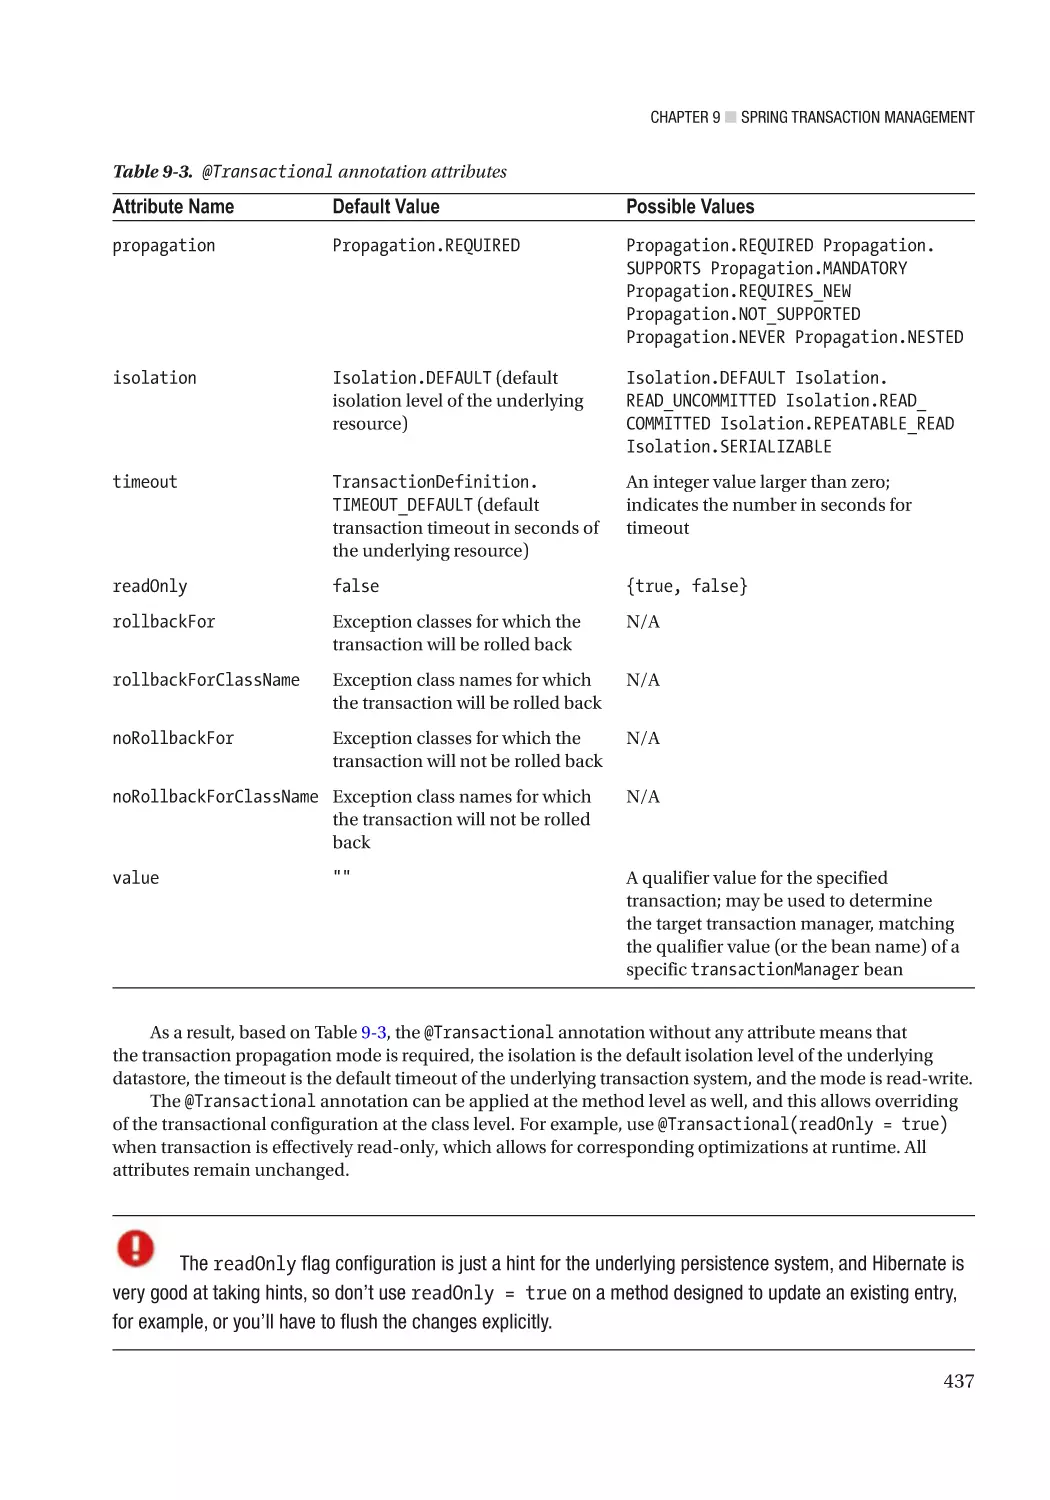
Analyzing Transaction Properties��������������������������������������������������������������������������������� 427
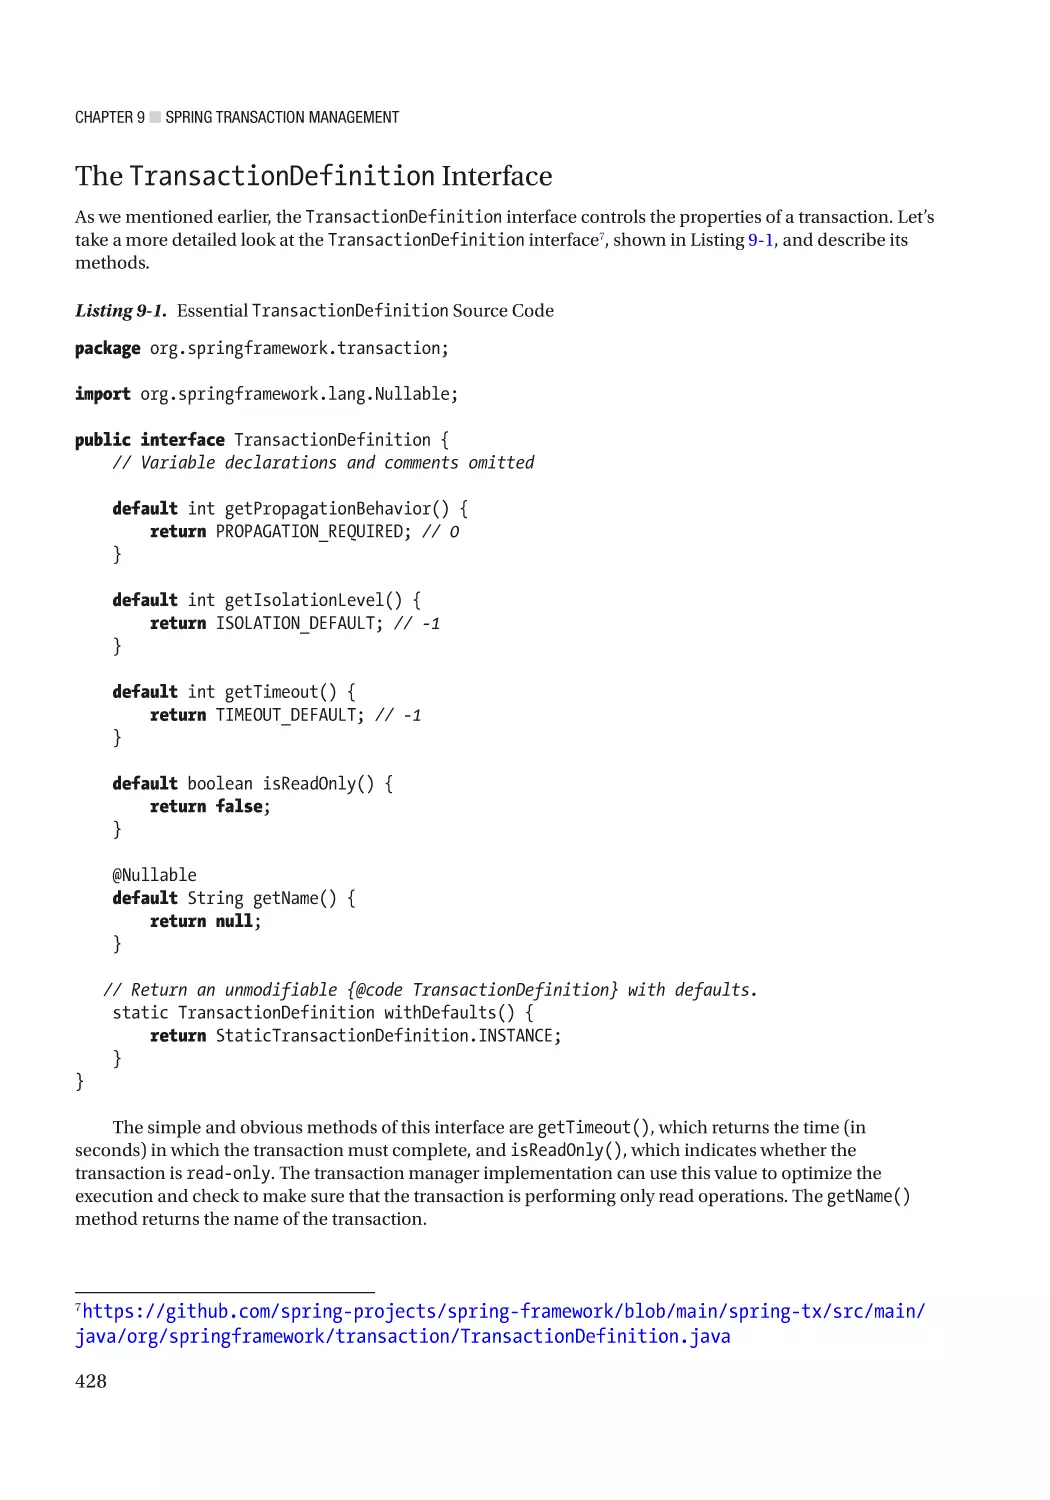
The TransactionDefinition Interface���������������������������������������������������������������������������������������������������� 428
The TransactionStatus Interface��������������������������������������������������������������������������������������������������������� 430
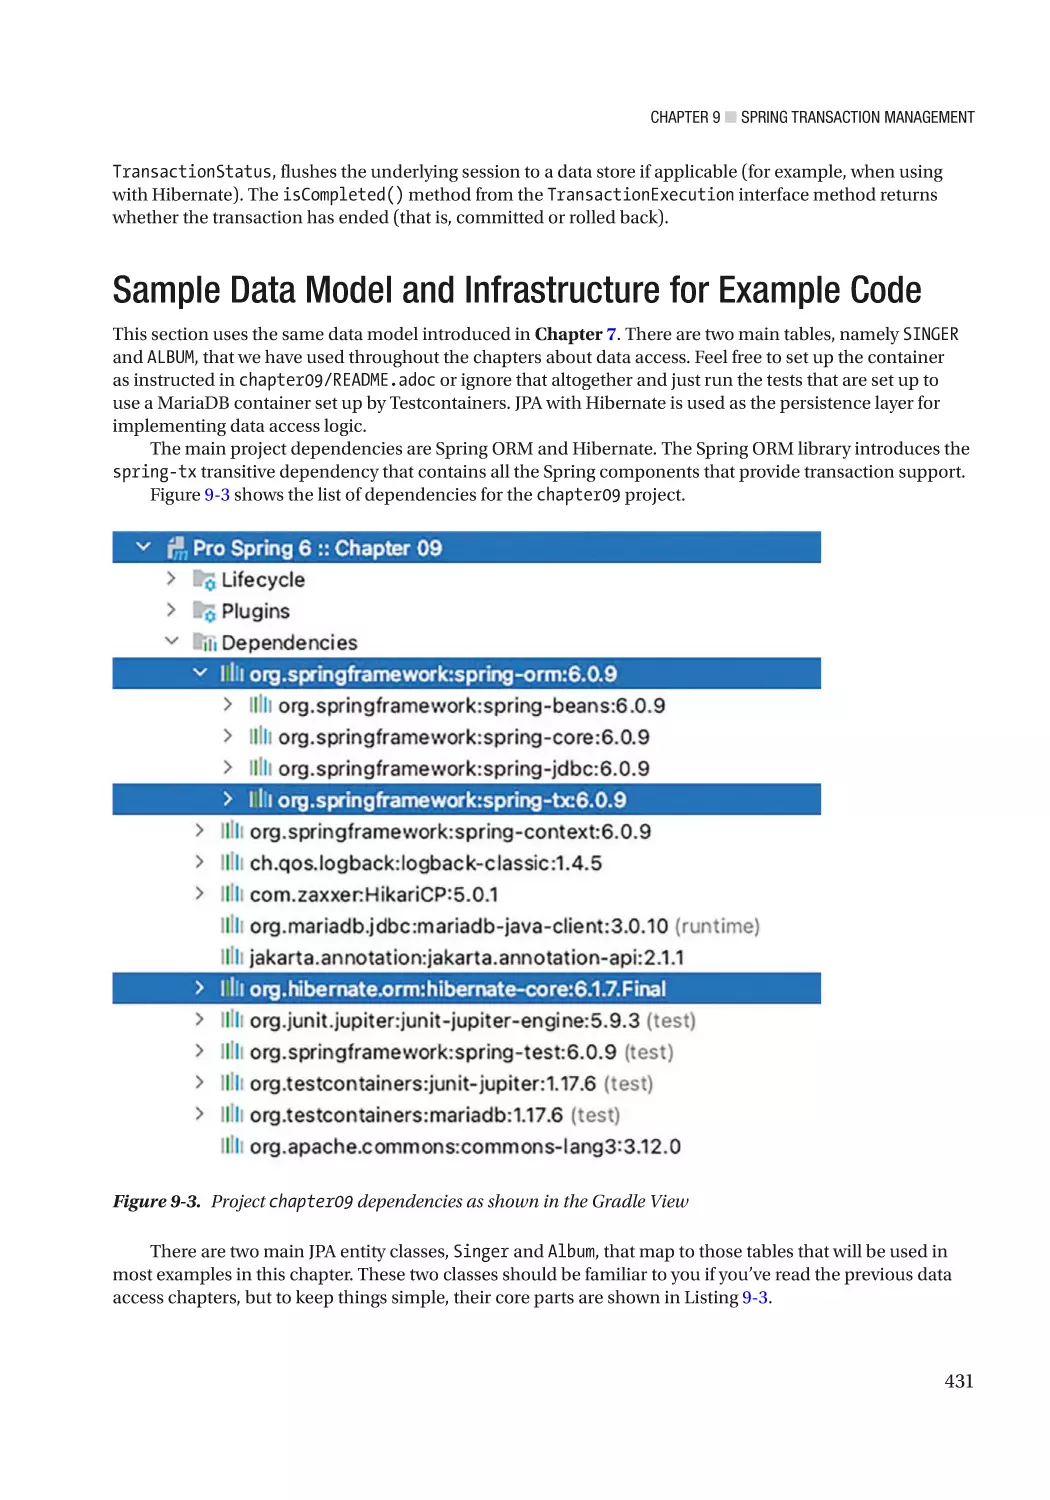
Sample Data Model and Infrastructure for Example Code������������������������������������������� 431
xii
■ Table of Contents
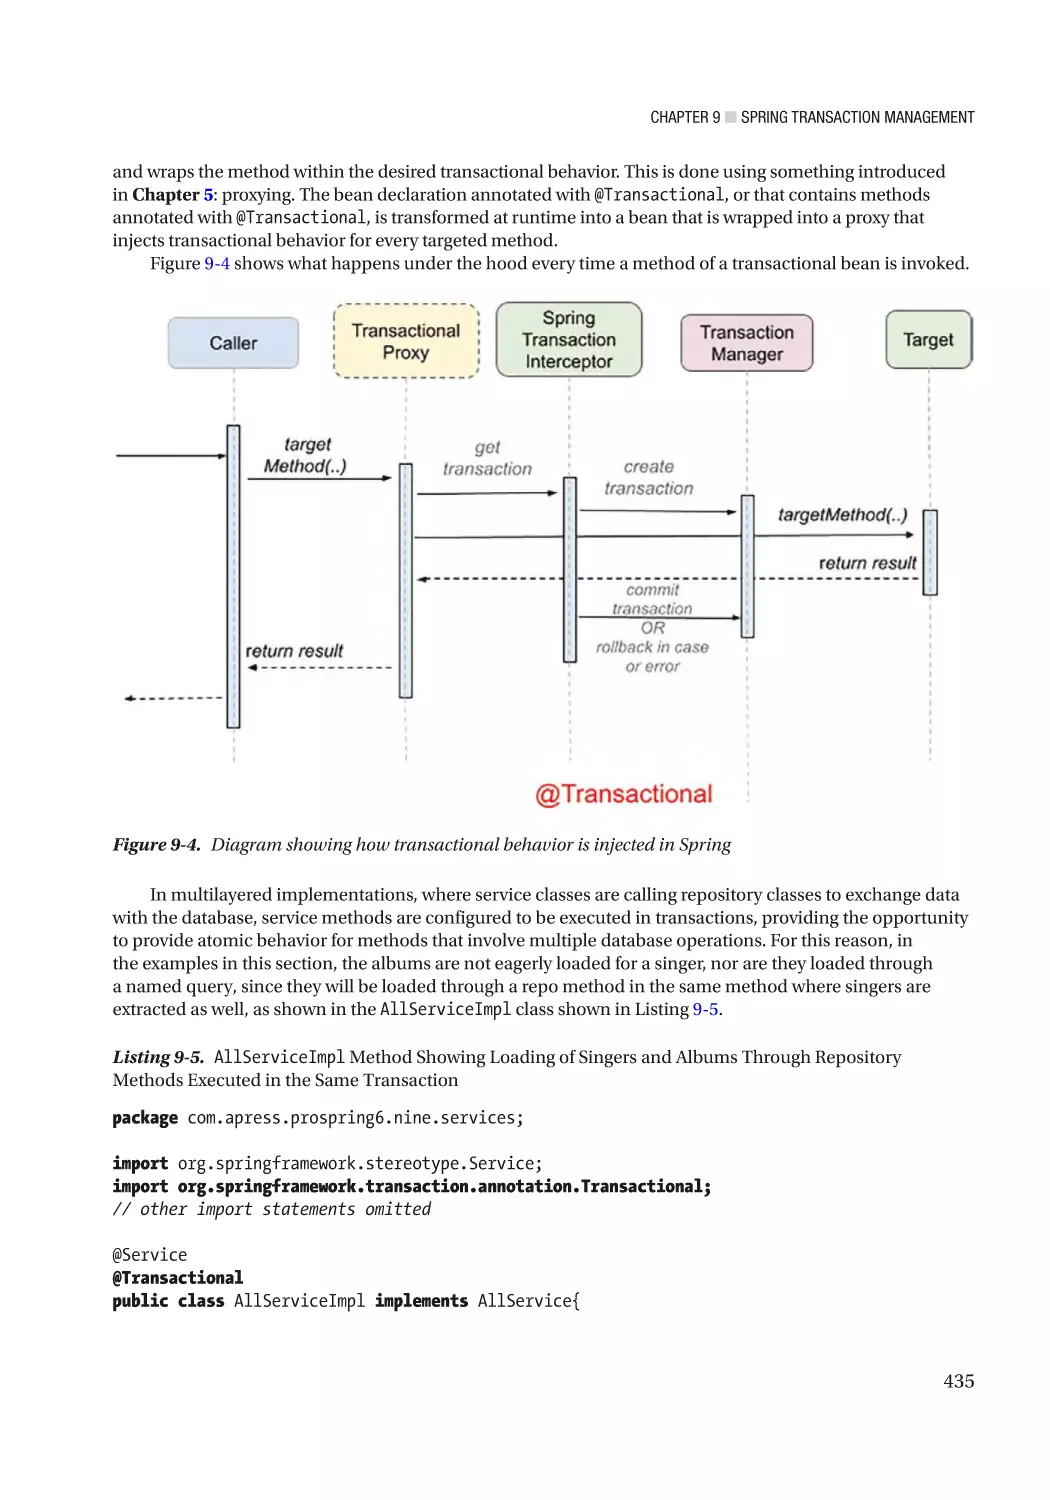
Using Declarative Transactions����������������������������������������������������������������������������������������������������������� 434
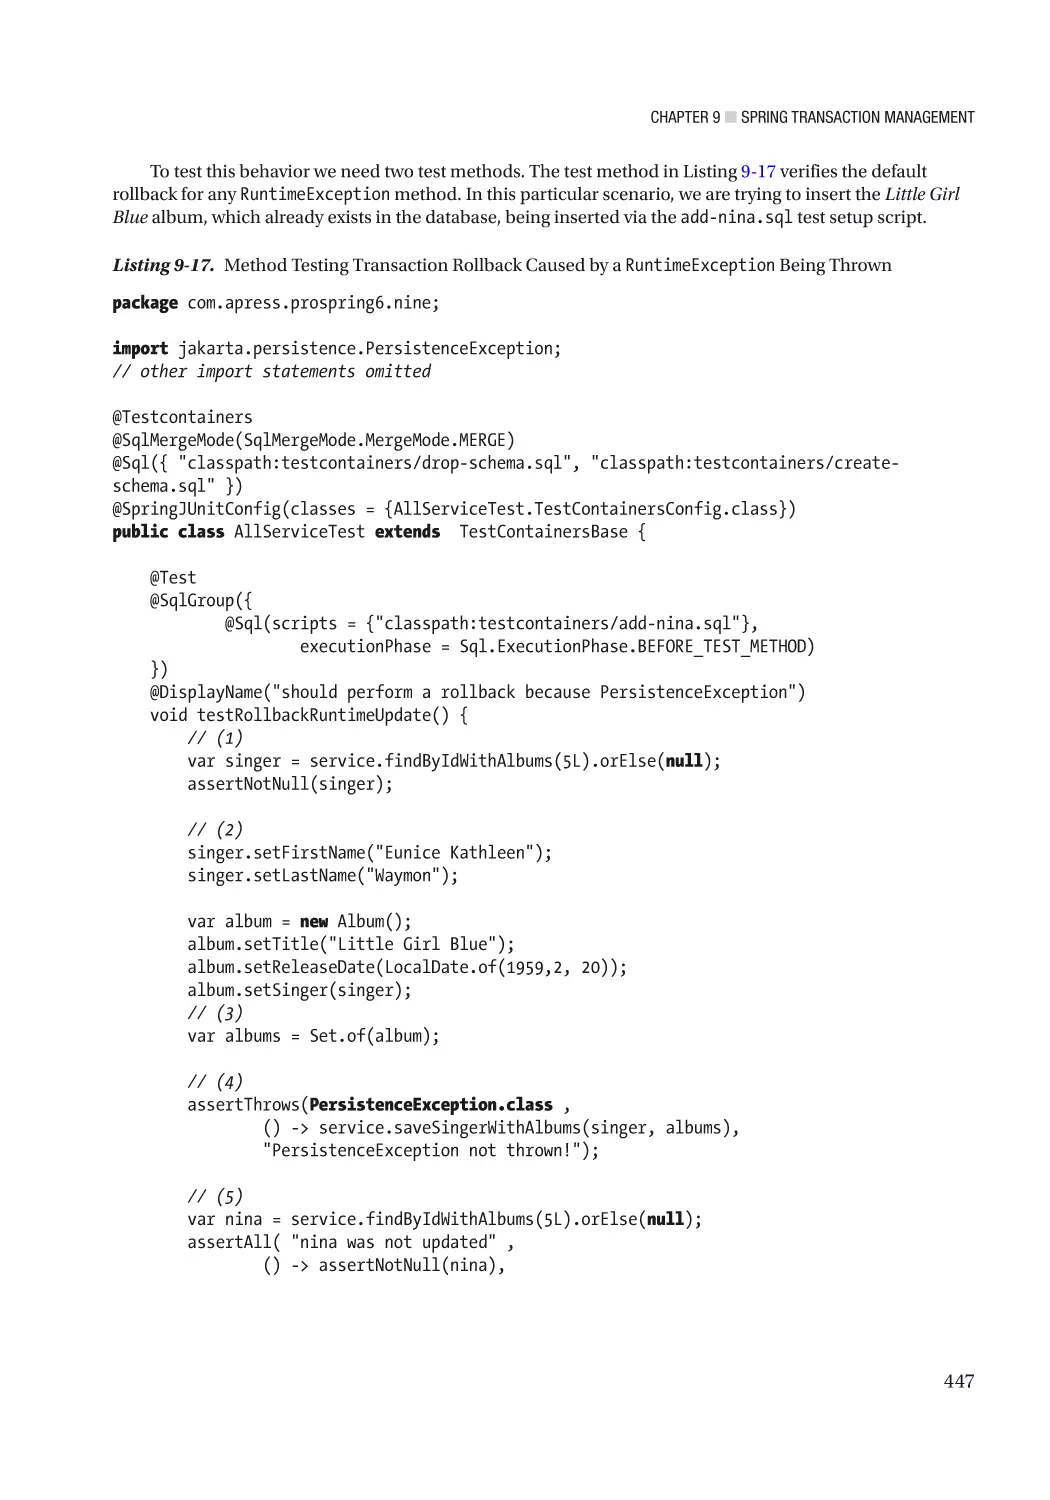
Rolling Back Transactions������������������������������������������������������������������������������������������������������������������� 444
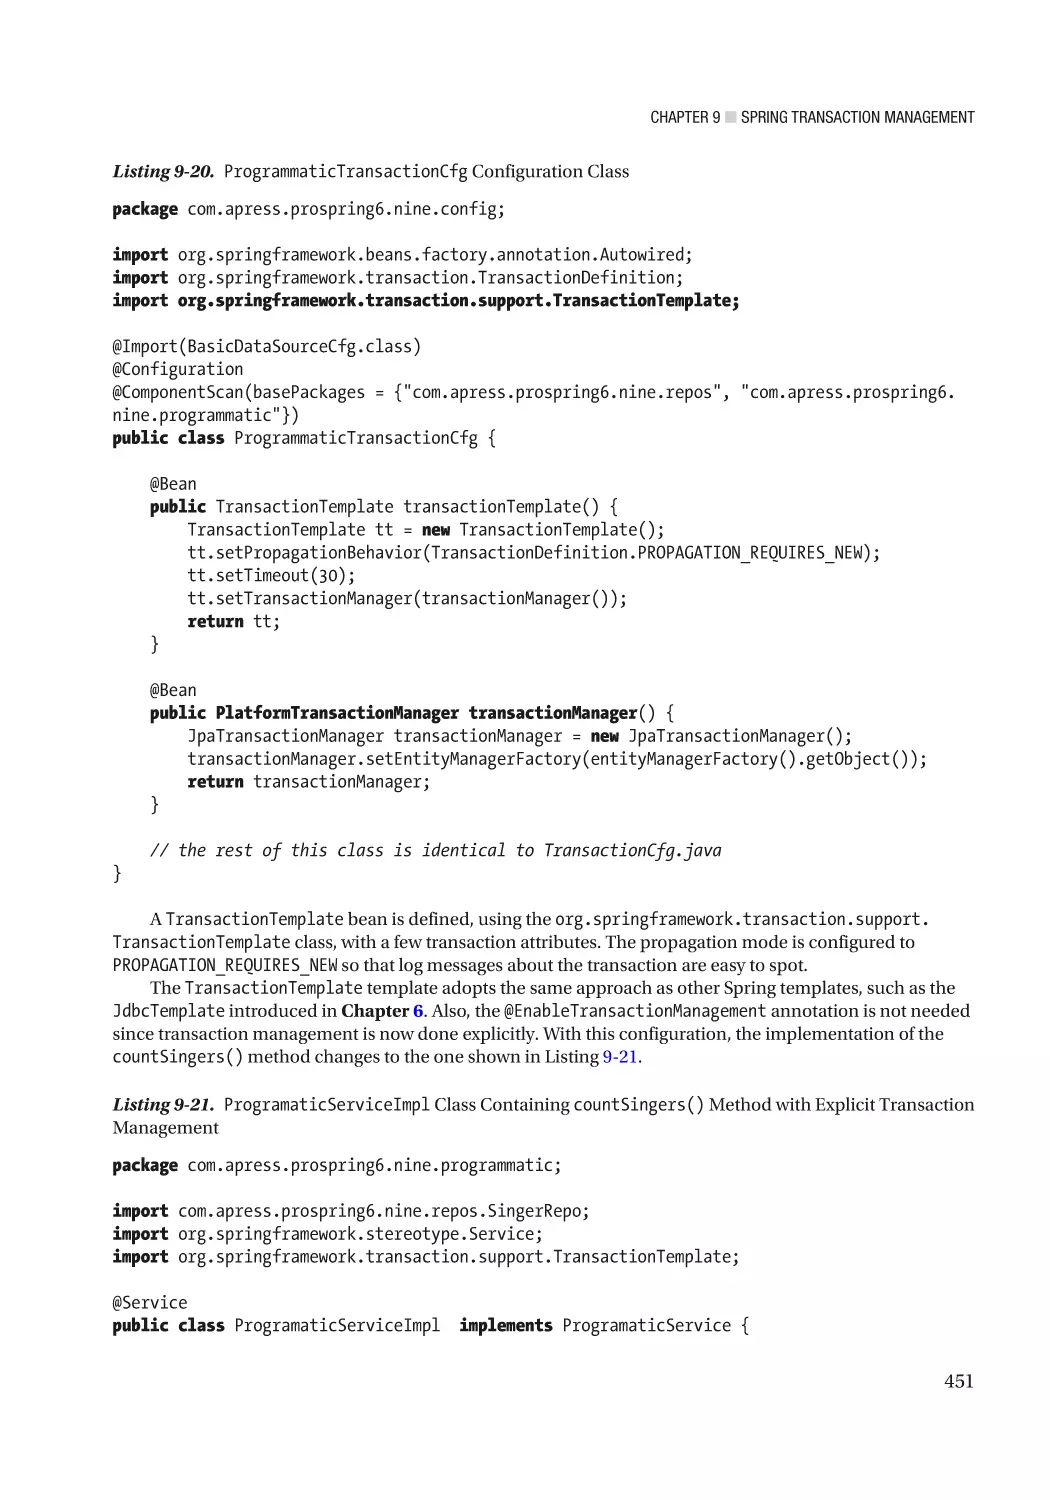
Using Programmatic Transactions������������������������������������������������������������������������������������������������������ 450
Considerations on Transaction Management�������������������������������������������������������������������������������������� 453
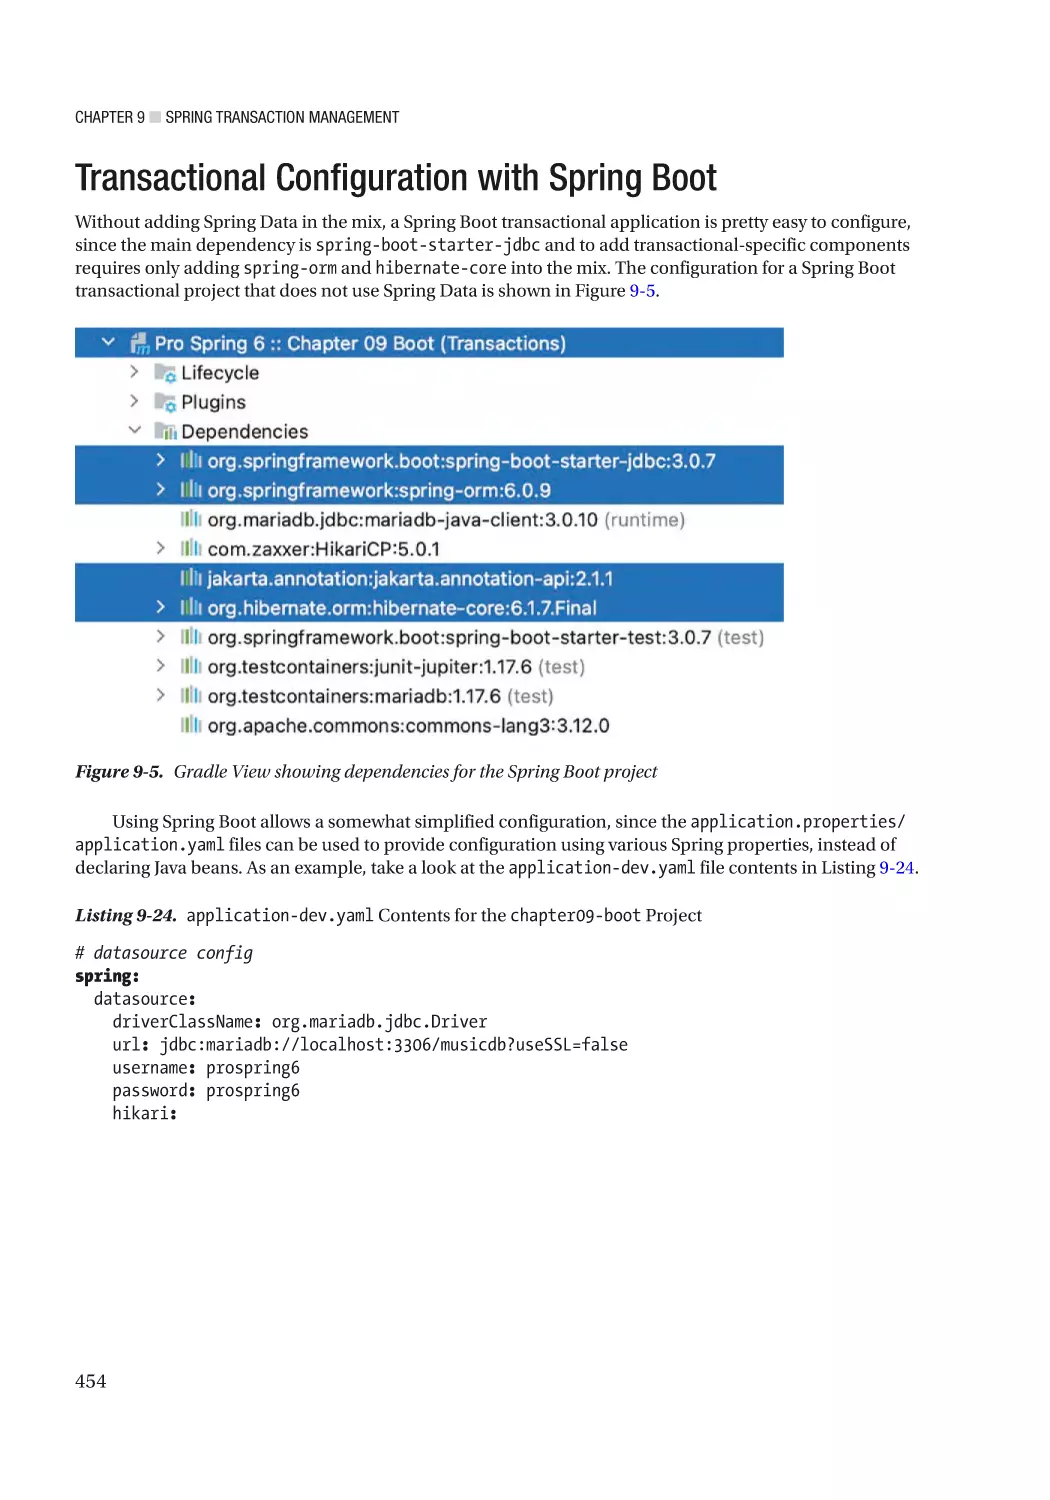
Transactional Configuration with Spring Boot�������������������������������������������������������������� 454
Transactional Tests����������������������������������������������������������������������������������������������������������������������������� 458
Considerations on Transaction Management�������������������������������������������������������������������������������������� 459
Summary���������������������������������������������������������������������������������������������������������������������� 459
■Chapter
■
10: Spring Data with SQL and NoSQL Databases��������������������������������� 461
Introducing Spring Data JPA���������������������������������������������������������������������������������������� 462
Using Spring Data JPA Repository Abstraction for Database Operations������������������������������������������� 463
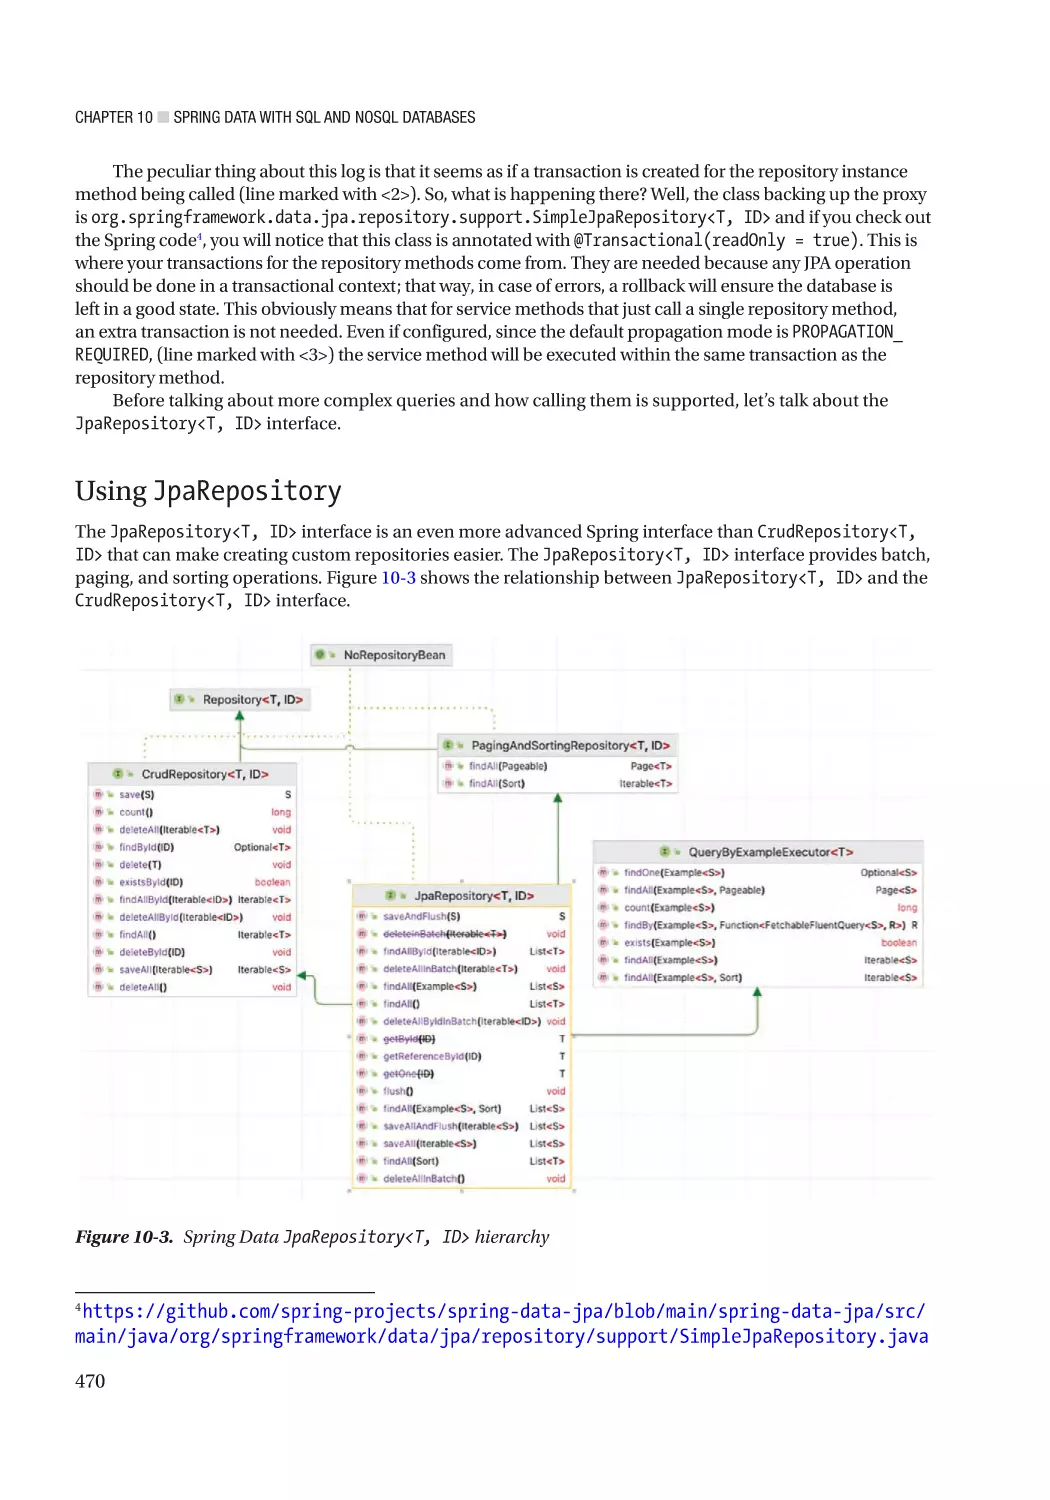
Using JpaRepository��������������������������������������������������������������������������������������������������������������������������� 470
Spring Data JPA with Custom Queries������������������������������������������������������������������������������������������������ 471
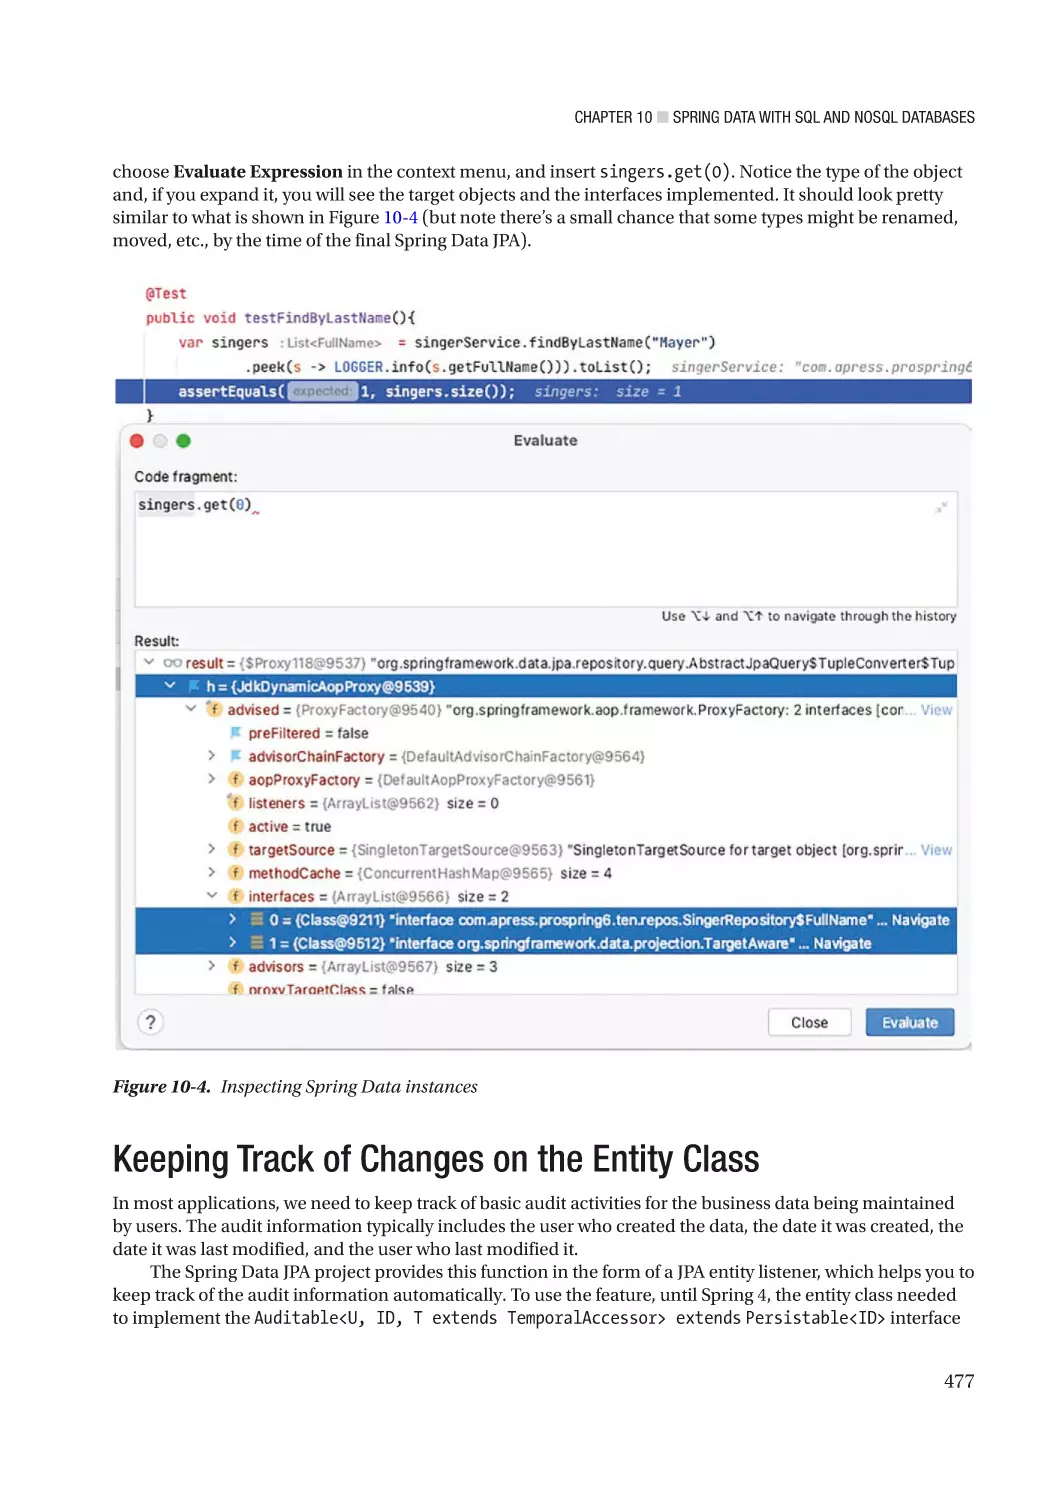
Projection Queries������������������������������������������������������������������������������������������������������������������������������ 476
Keeping Track of Changes on the Entity Class������������������������������������������������������������� 477
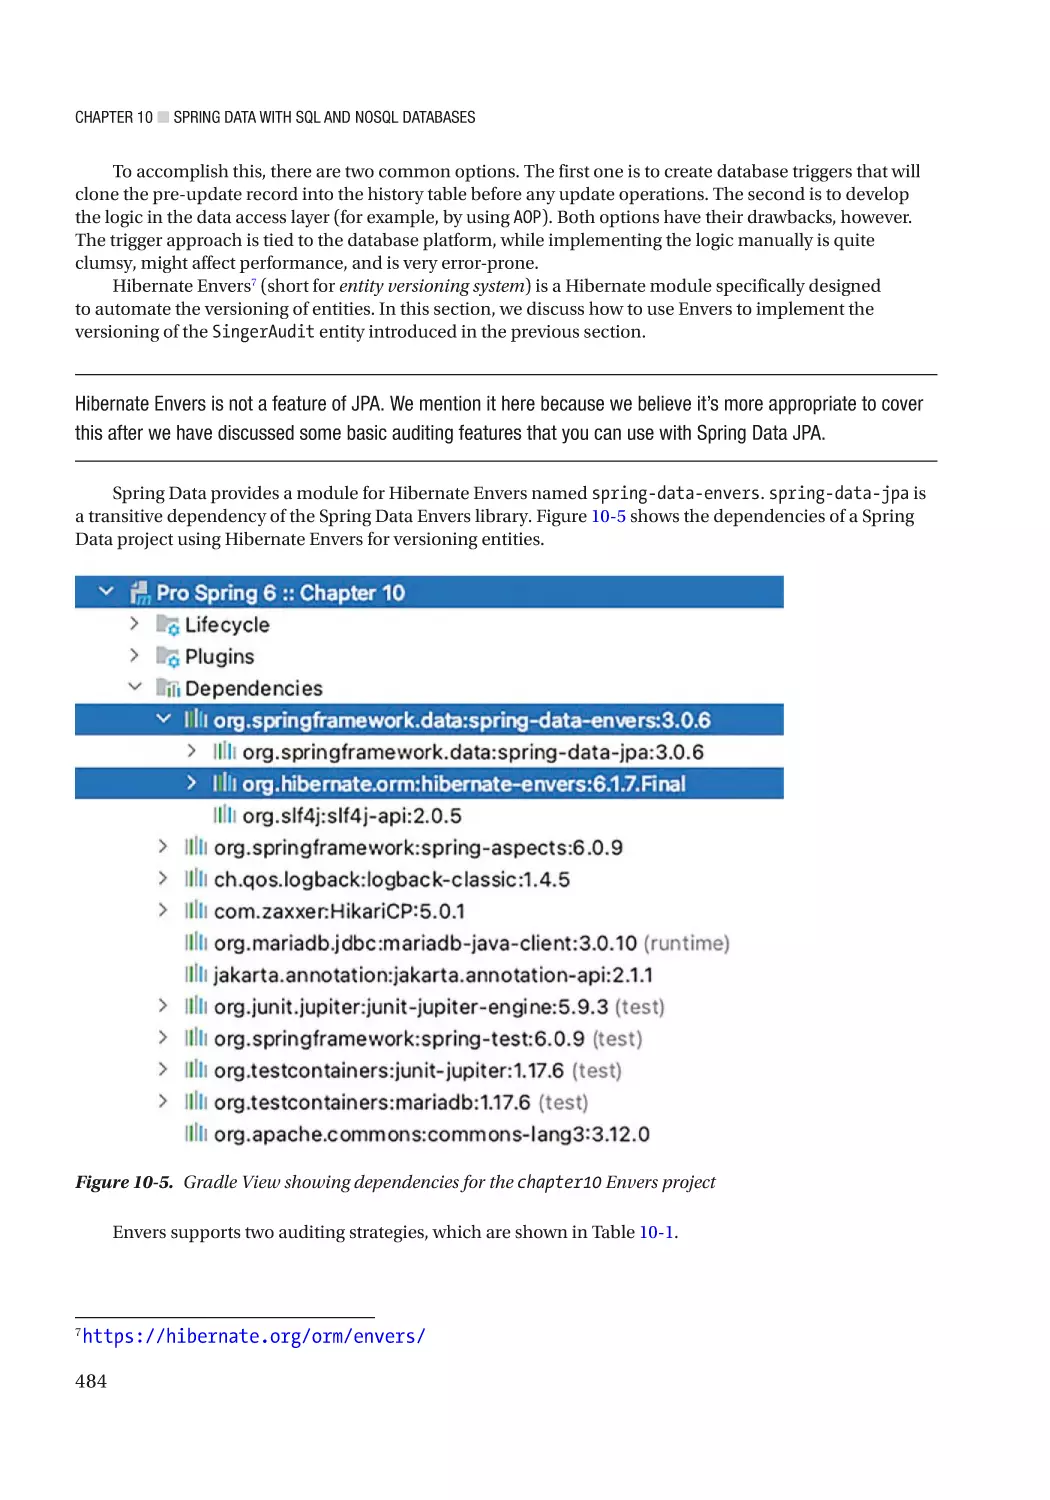
Keeping Entity Versions by Using Hibernate Envers����������������������������������������������������� 483
Adding Tables for Entity Versioning���������������������������������������������������������������������������������������������������� 485
Configuring EntityManagerFactory for Entity Versioning�������������������������������������������������������������������� 486
Enabling Entity Versioning and History Retrieval�������������������������������������������������������������������������������� 489
Custom Implementations for Spring Data Repositories���������������������������������������������������������������������� 490
Spring Boot Data JPA��������������������������������������������������������������������������������������������������� 495
Considerations Using Spring Data JPA����������������������������������������������������������������������������������������������� 502
Spring Data with MongoDB������������������������������������������������������������������������������������������ 502
MongoDB Concepts���������������������������������������������������������������������������������������������������������������������������� 503
Considerations Using Spring Data�������������������������������������������������������������������������������� 510
Summary���������������������������������������������������������������������������������������������������������������������� 511
xiii
■ Table of Contents
■Chapter
■
11: Validation, Formatting, and Type Conversion��������������������������������� 513
Converting String Values Using PropertyEditors����������������������������������������������������������� 514
Introducing Spring Type Conversion����������������������������������������������������������������������������� 518
Implementing a Custom Converter����������������������������������������������������������������������������������������������������� 518
Converting Between Arbitrary Types��������������������������������������������������������������������������������������������������� 519
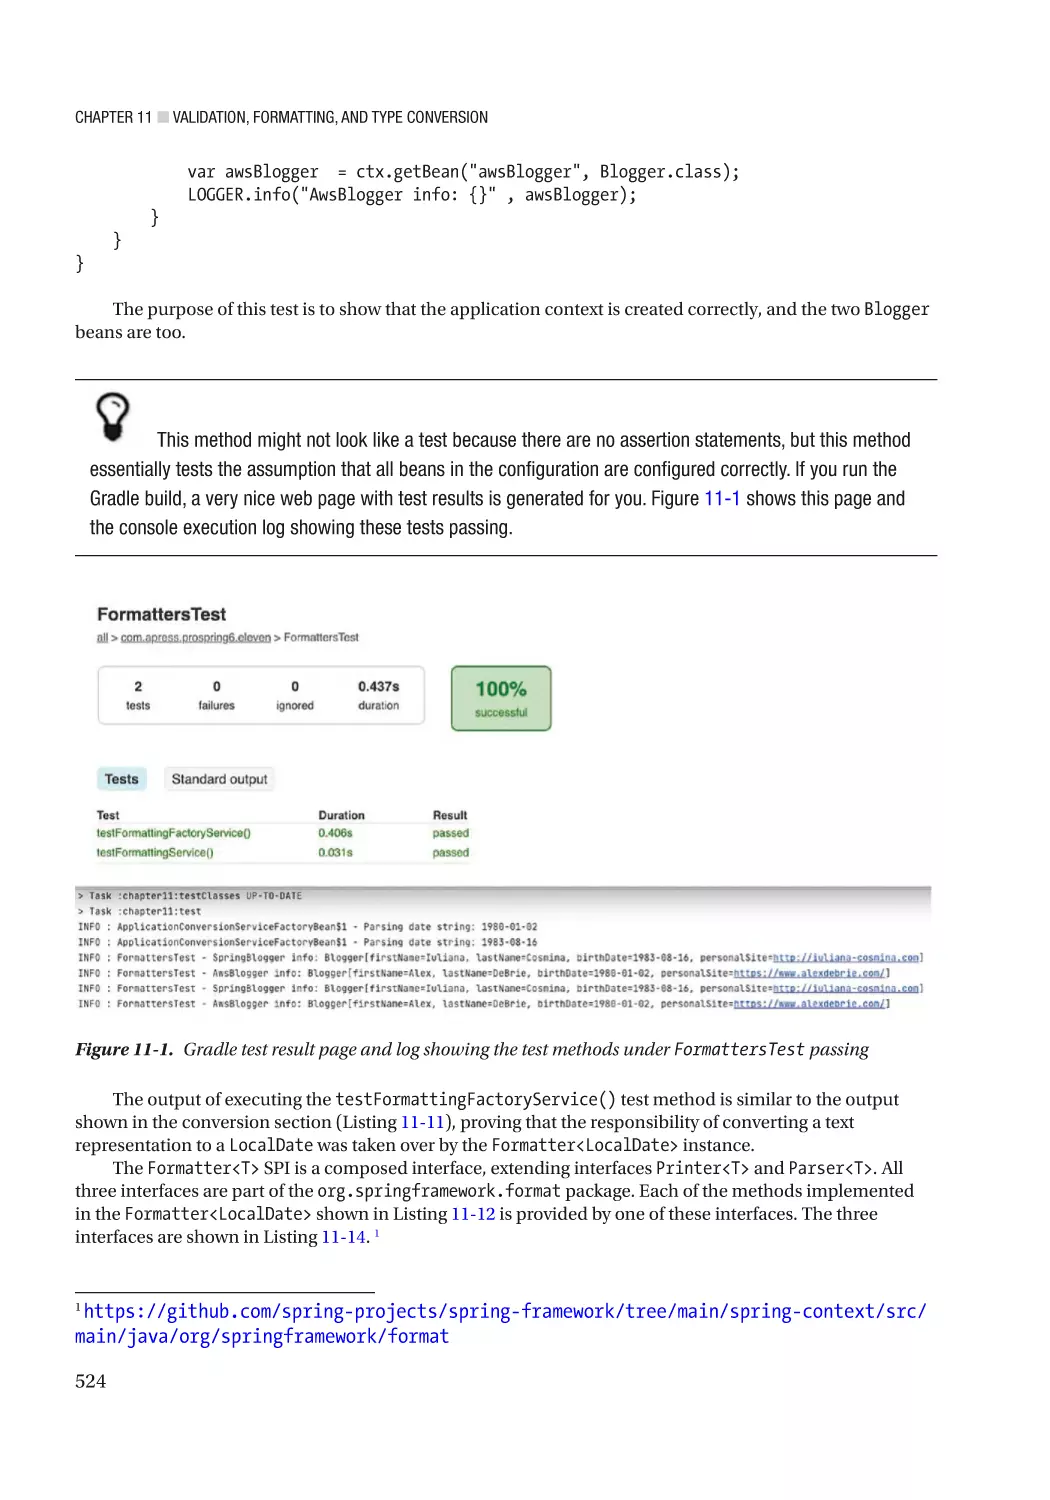
Field Formatting in Spring�������������������������������������������������������������������������������������������� 522
Validation in Spring������������������������������������������������������������������������������������������������������ 526
Using the Spring Validator Interface��������������������������������������������������������������������������������������������������� 527
Using JSR-349/Jakarta Bean Validation��������������������������������������������������������������������������������������������� 533
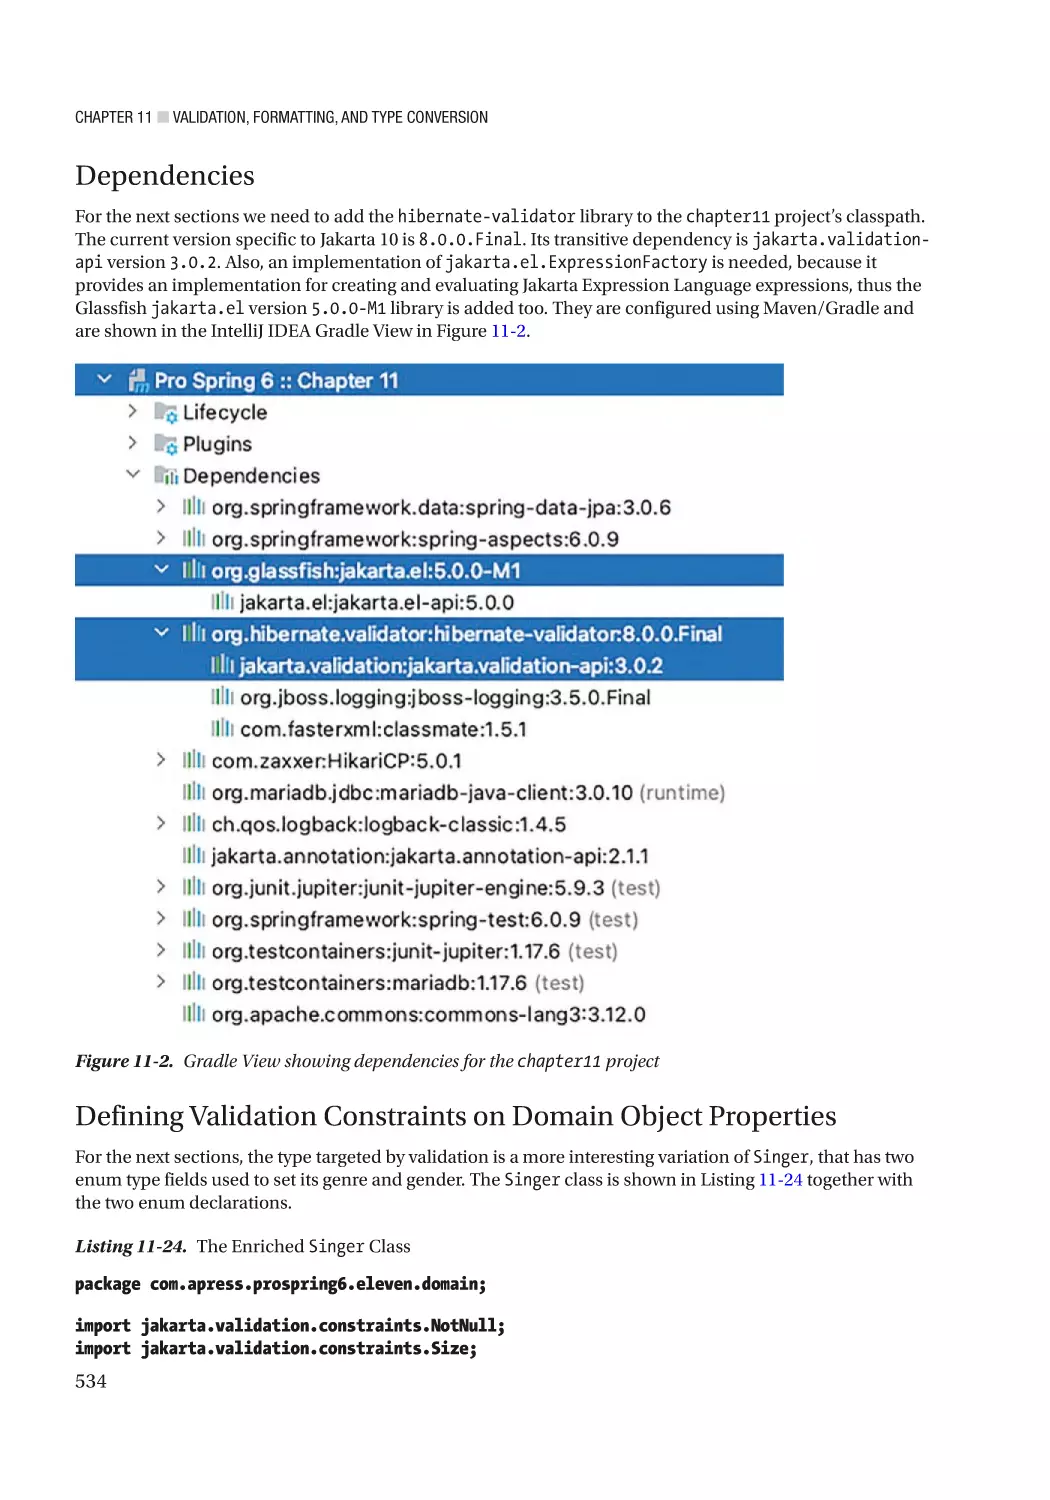
Dependencies������������������������������������������������������������������������������������������������������������������������������������� 534
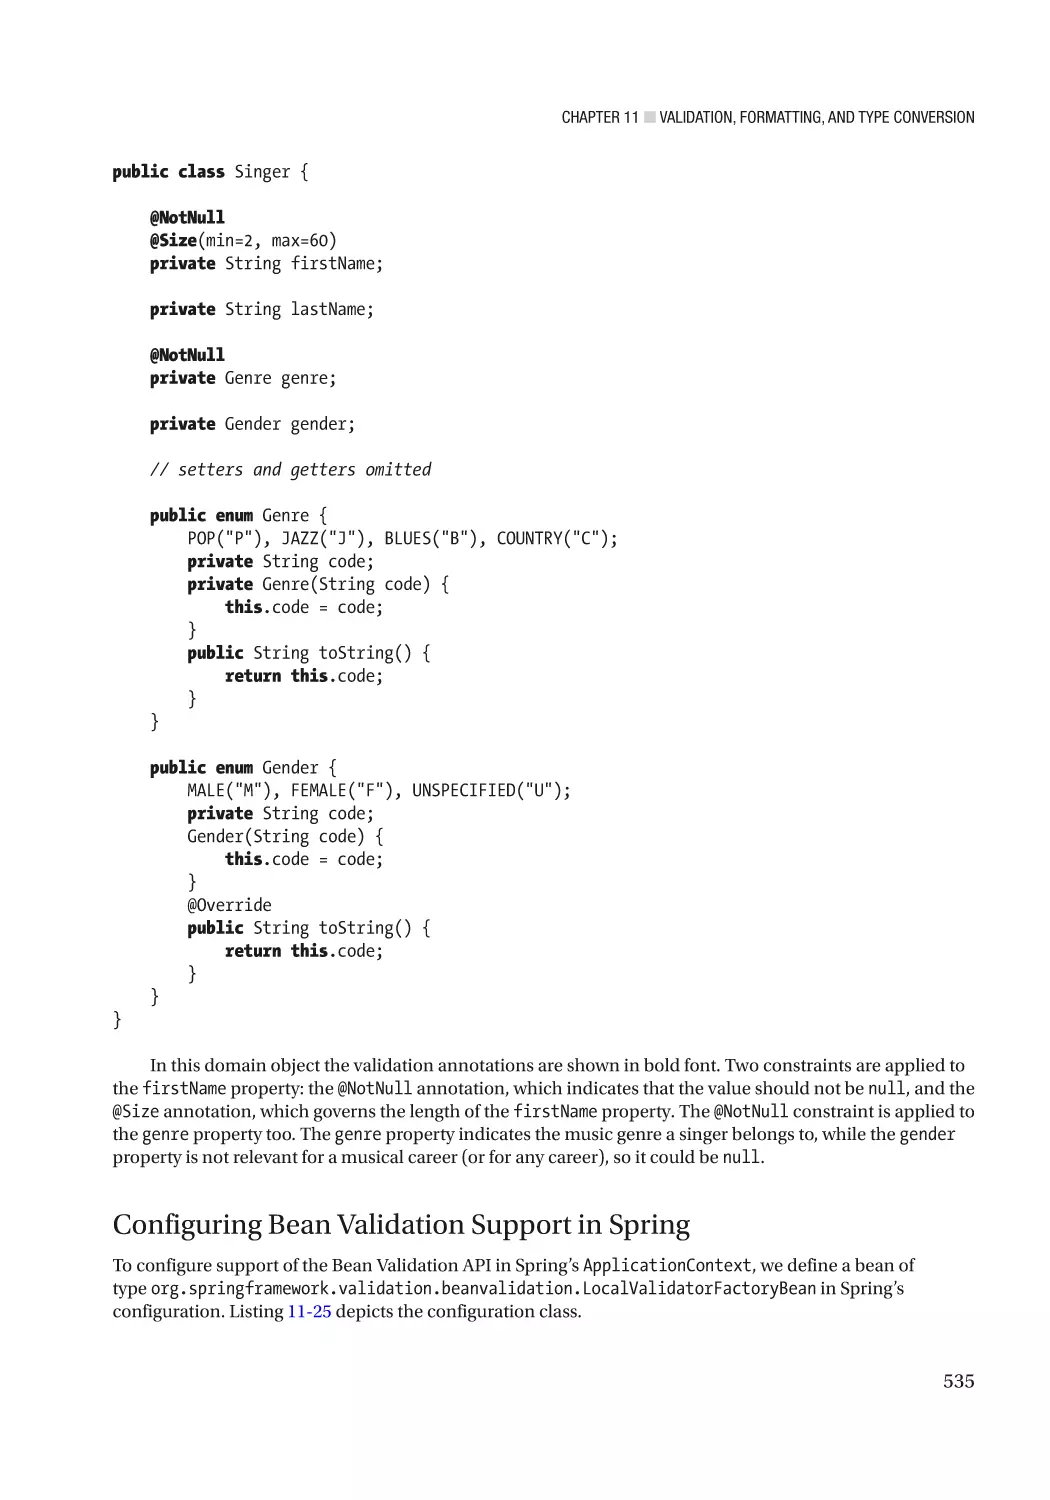
Defining Validation Constraints on Domain Object Properties������������������������������������������������������������ 534
Configuring Bean Validation Support in Spring����������������������������������������������������������������������������������� 535
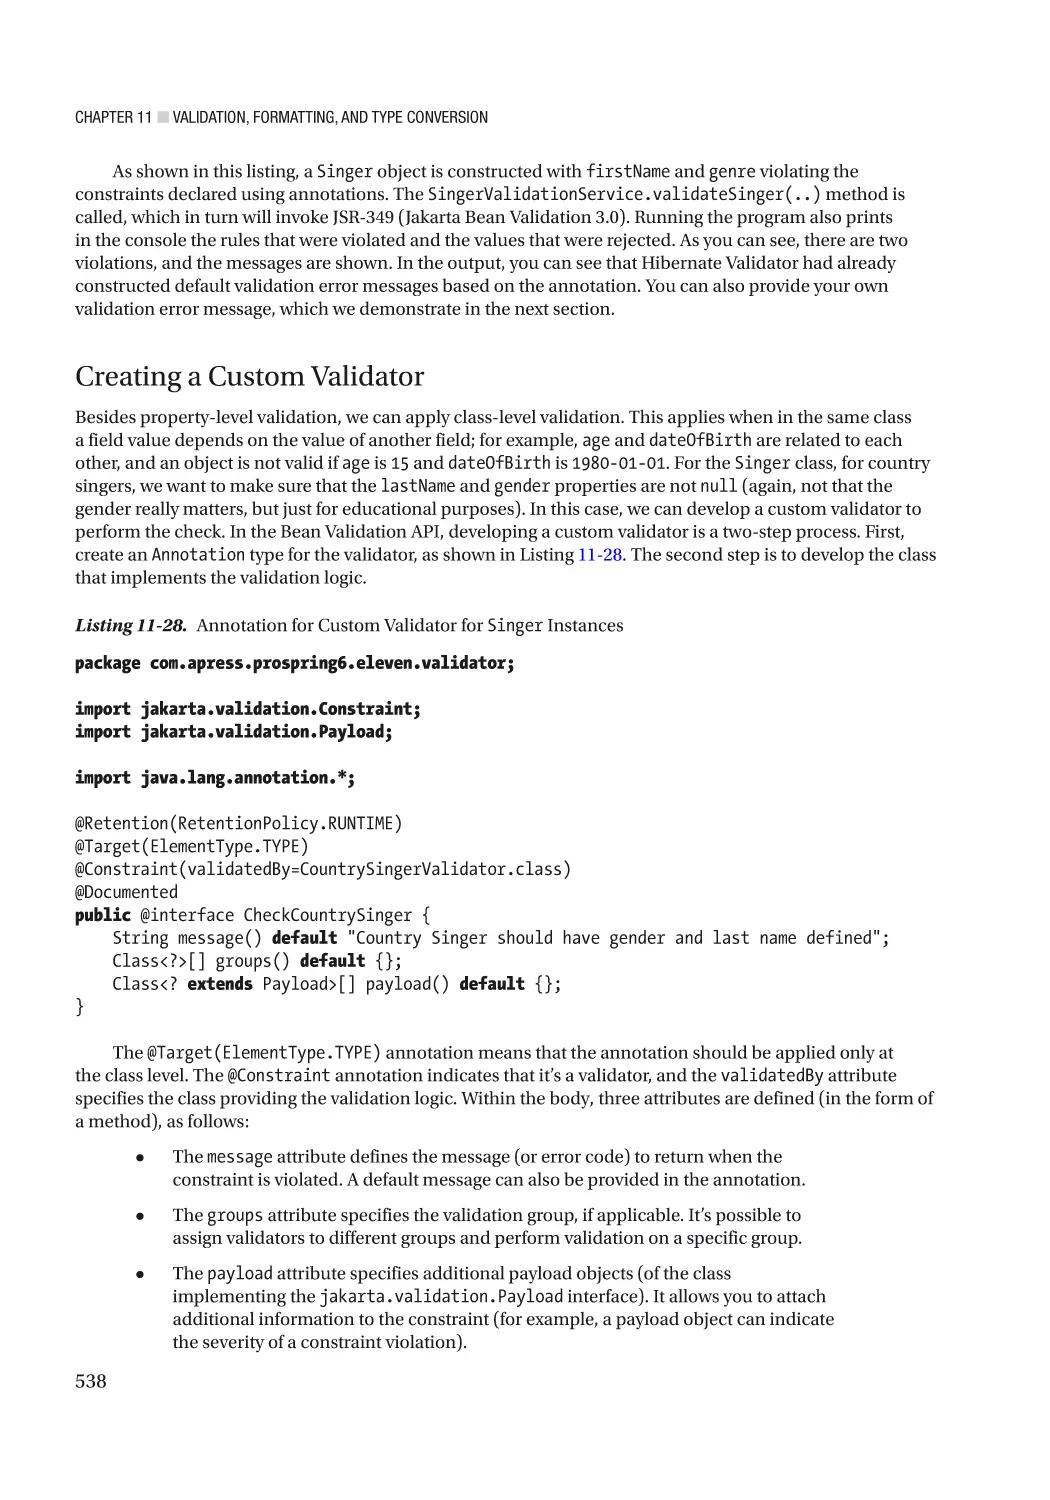
Creating a Custom Validator��������������������������������������������������������������������������������������������������������������� 538
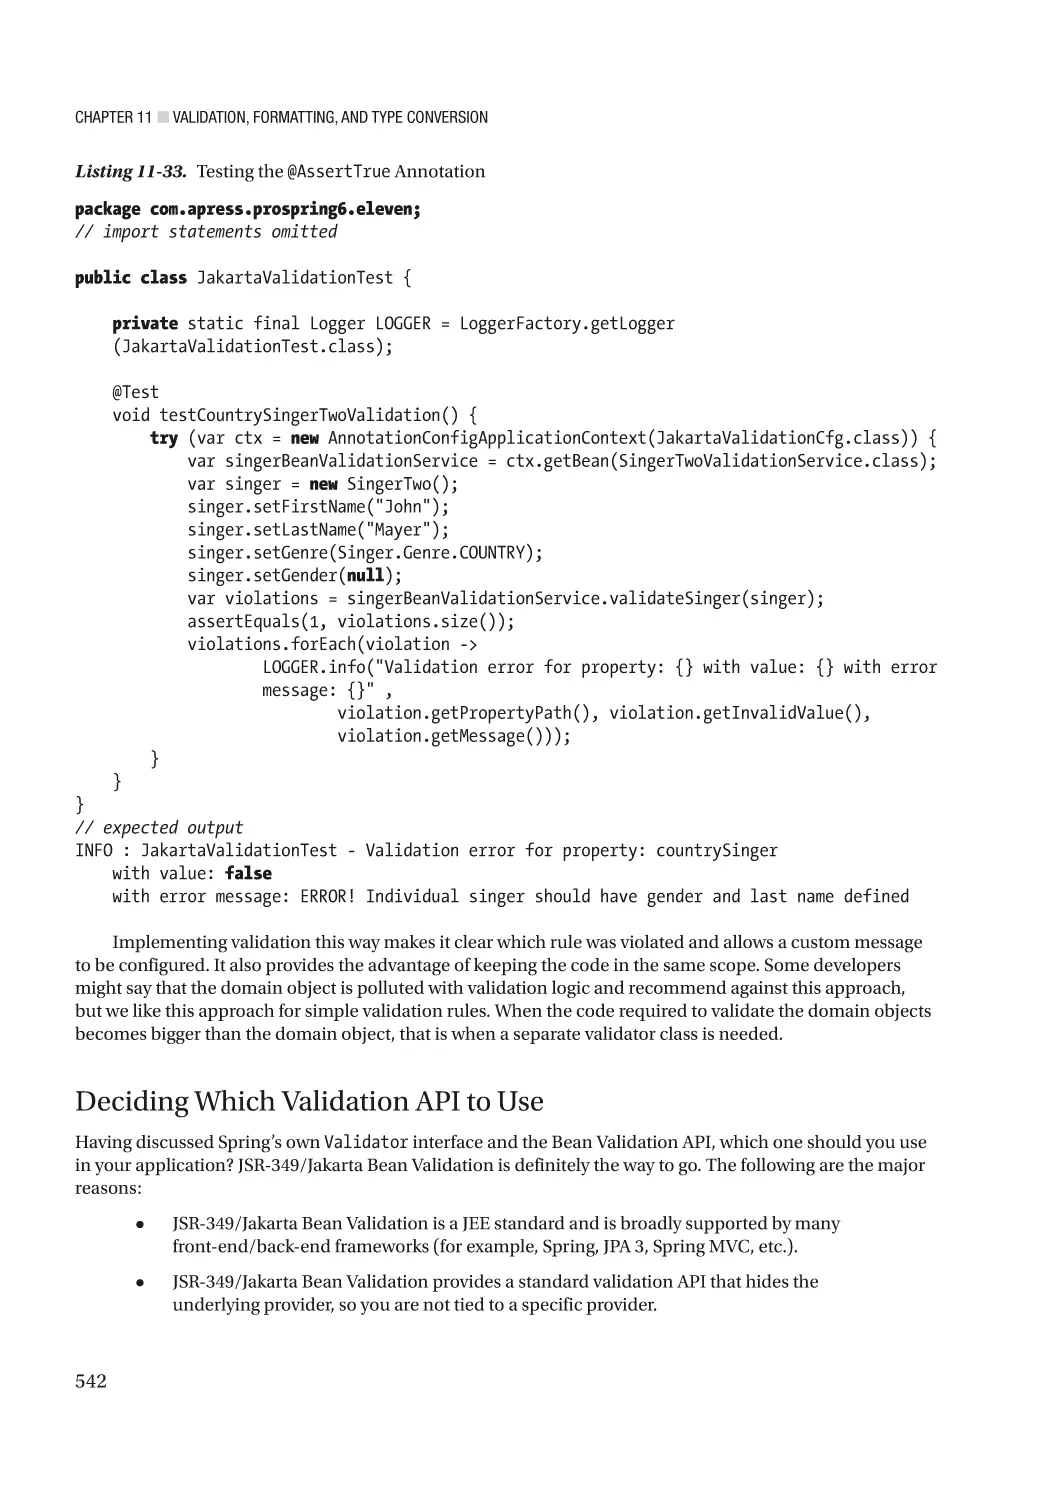
Using AssertTrue for Custom Validation���������������������������������������������������������������������������������������������� 541
Deciding Which Validation API to Use������������������������������������������������������������������������������������������������� 542
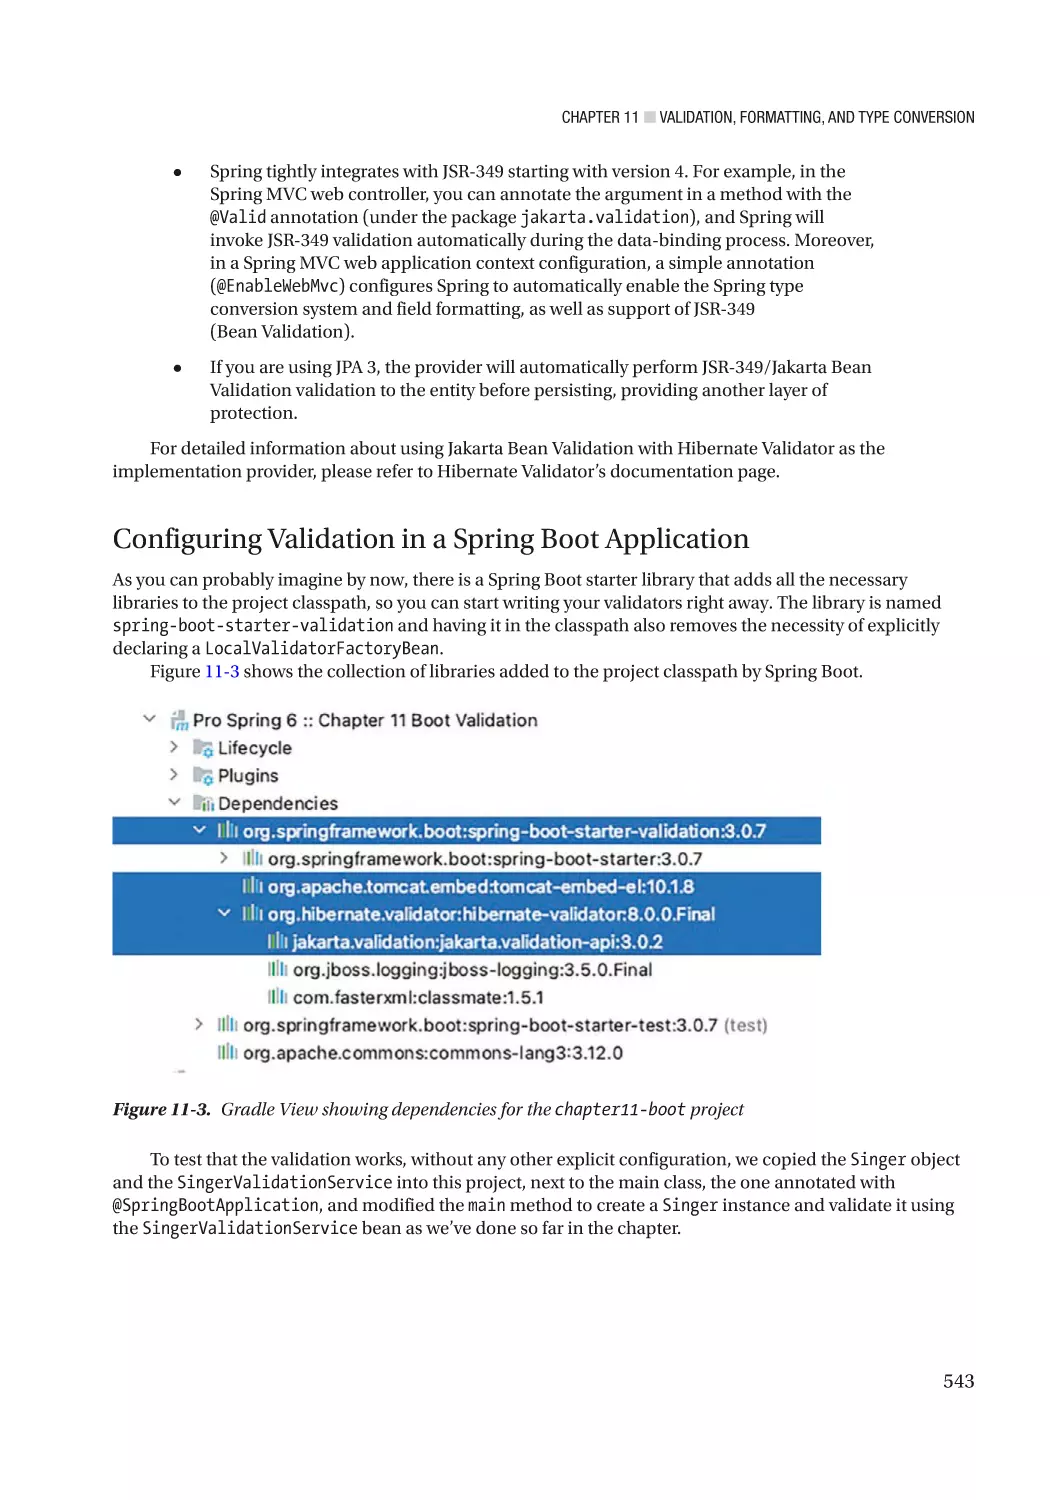
Configuring Validation in a Spring Boot Application��������������������������������������������������������������������������� 543
Summary���������������������������������������������������������������������������������������������������������������������� 545
■Chapter
■
12: Task Execution and Scheduling����������������������������������������������������� 547
Task Executing in Java������������������������������������������������������������������������������������������������� 548
Task Executing in Spring���������������������������������������������������������������������������������������������� 552
Task Scheduling in Spring�������������������������������������������������������������������������������������������� 555
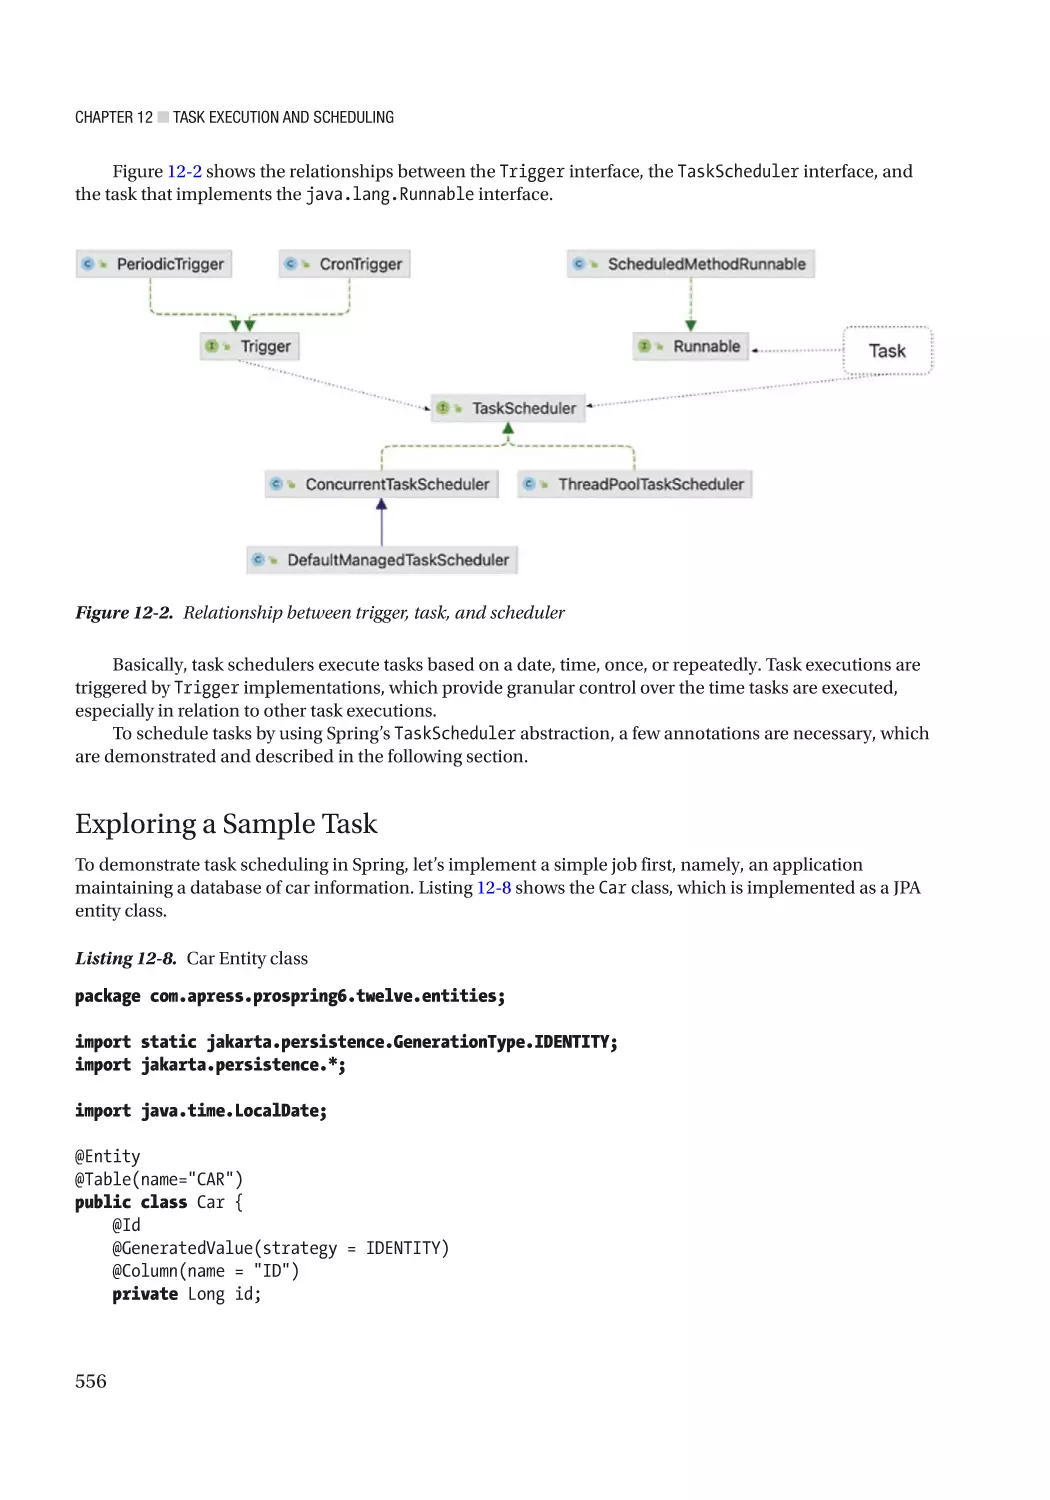
Introducing the Spring TaskScheduler Abstraction����������������������������������������������������������������������������� 555
Exploring a Sample Task��������������������������������������������������������������������������������������������������������������������� 556
Asynchronous Task Execution in Spring��������������������������������������������������������������������������������������������� 564
Summary���������������������������������������������������������������������������������������������������������������������� 571
■Chapter
■
13: Spring Remoting���������������������������������������������������������������������������� 573
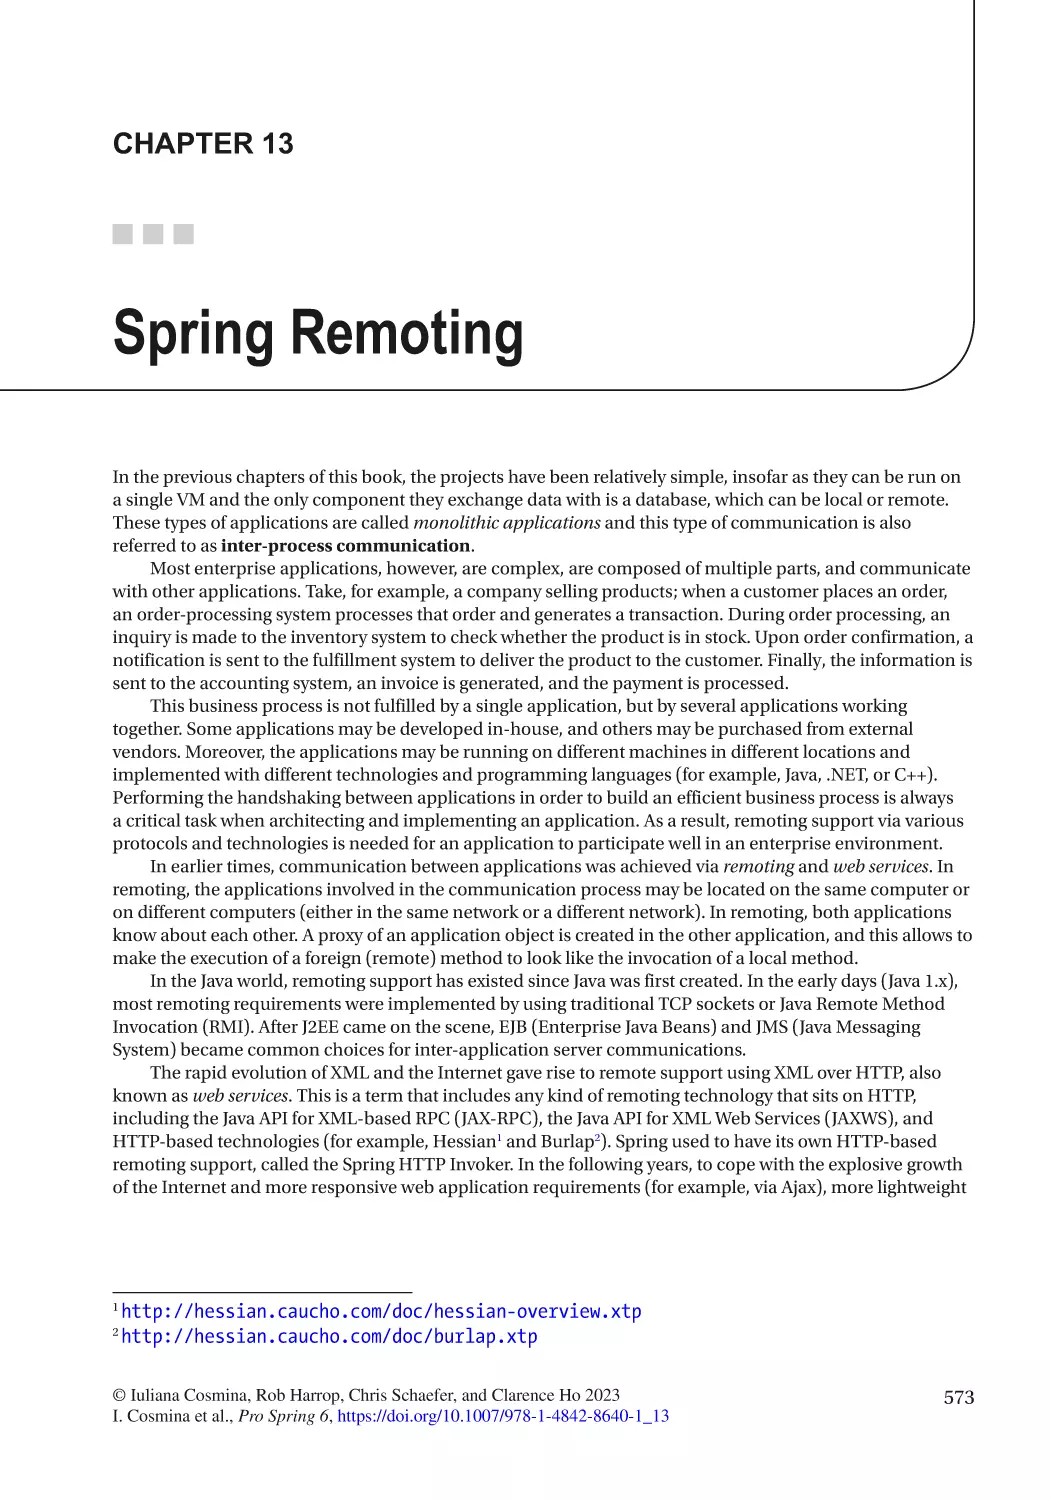
Communication via HTTP Using Spring REST��������������������������������������������������������������� 574
Using JMS in Spring����������������������������������������������������������������������������������������������������� 589
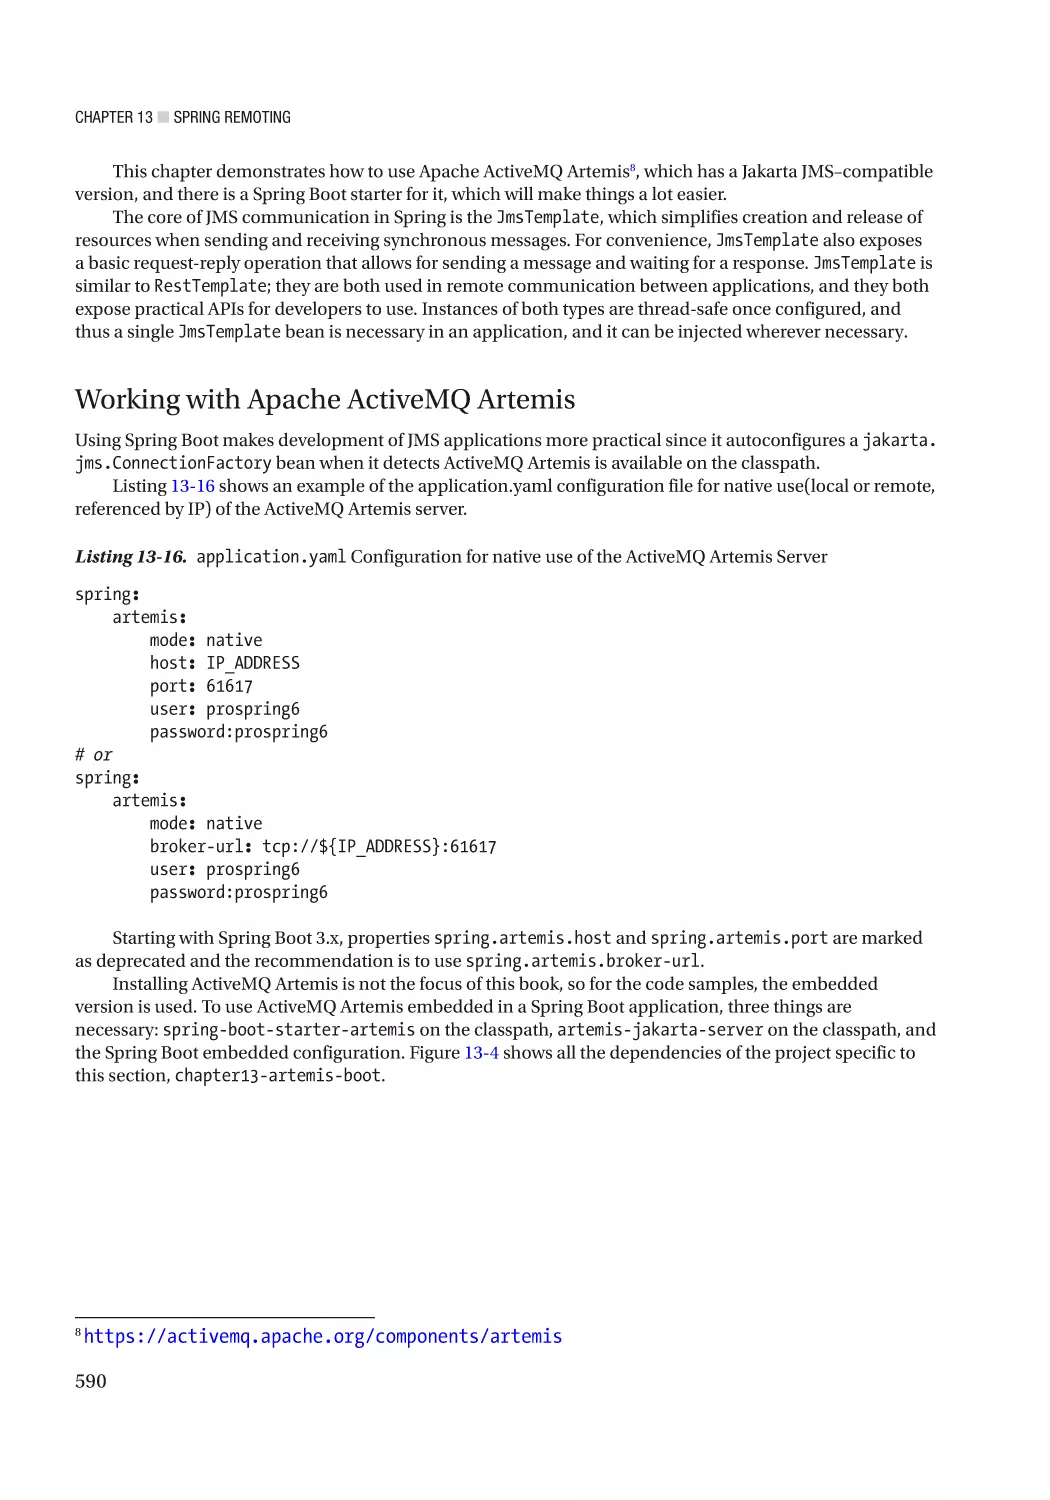
Working with Apache ActiveMQ Artemis��������������������������������������������������������������������������������������������� 590
xiv
■ Table of Contents
Using Spring for Apache Kafka������������������������������������������������������������������������������������� 597
Summary���������������������������������������������������������������������������������������������������������������������� 609
■Chapter
■
14: Spring MVC������������������������������������������������������������������������������������ 611
Setting Up the Data and Lower-Level Layers��������������������������������������������������������������� 612
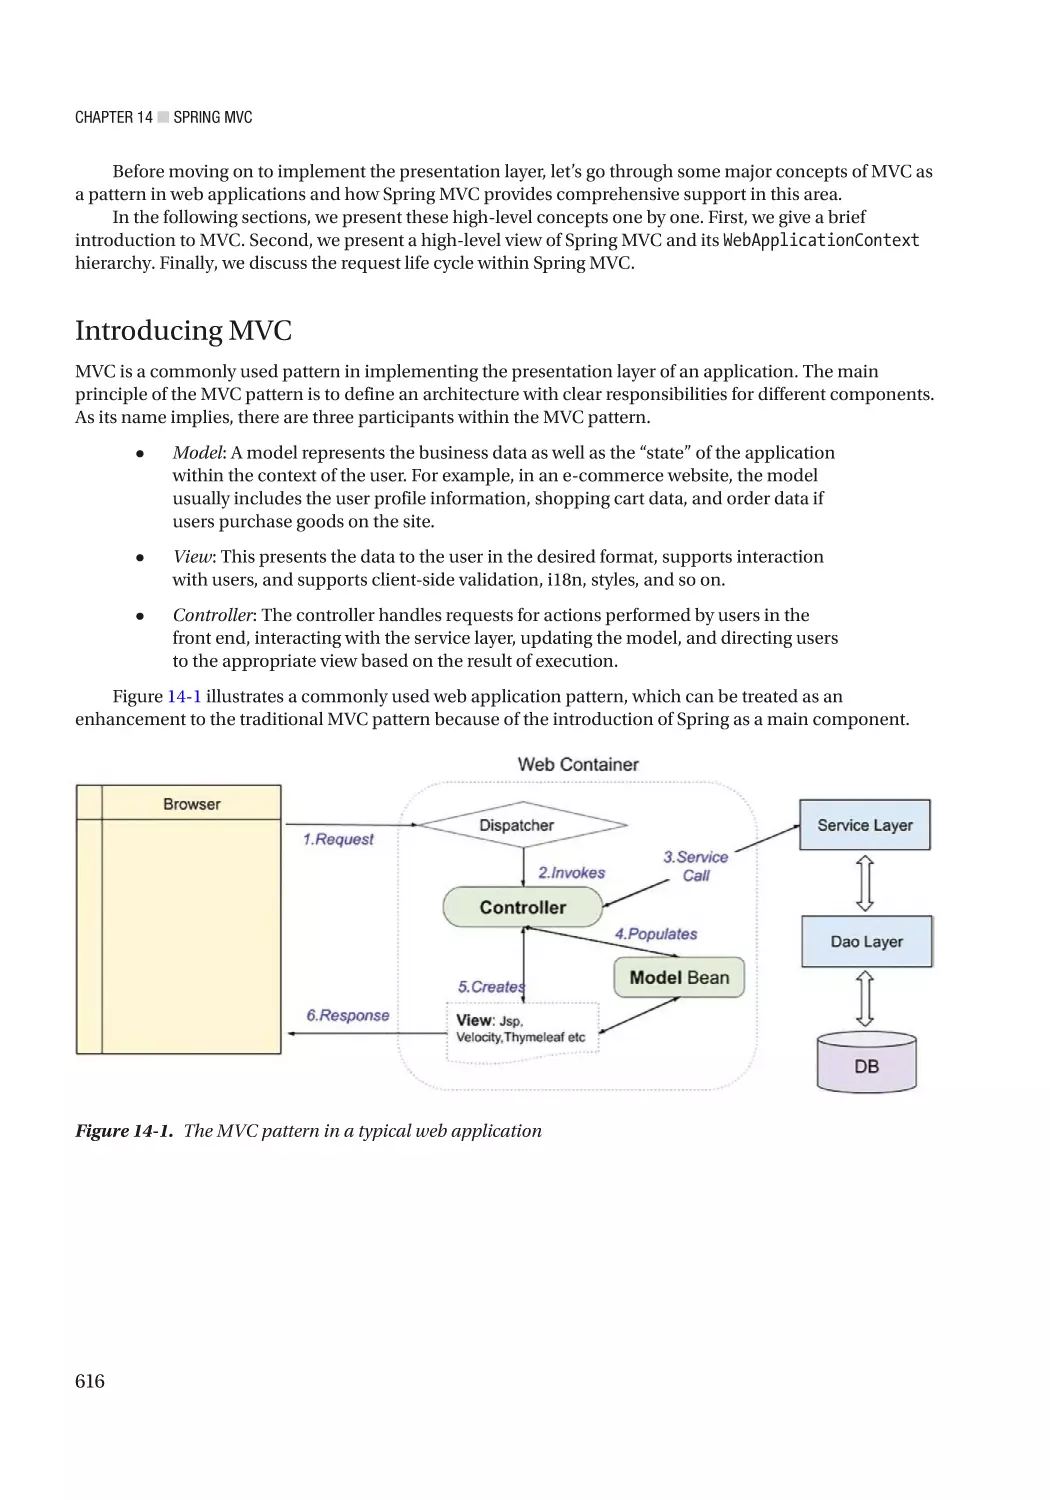
Introducing MVC��������������������������������������������������������������������������������������������������������������������������������� 616
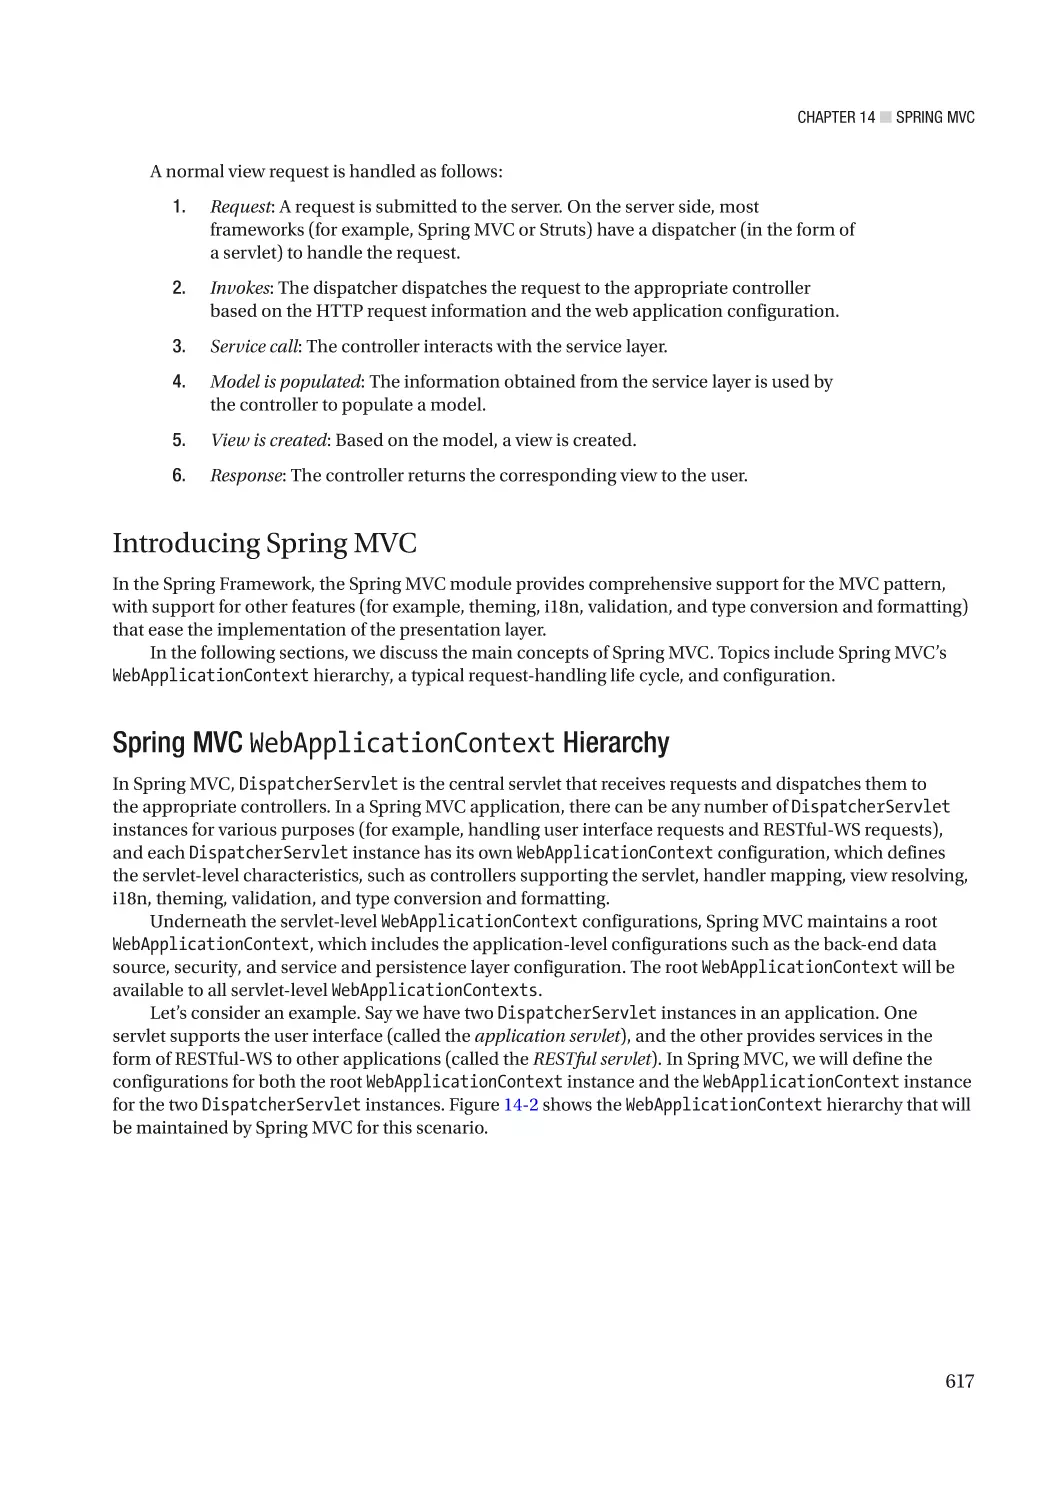
Introducing Spring MVC���������������������������������������������������������������������������������������������������������������������� 617
Enabling Internationalization (i18n)���������������������������������������������������������������������������������������������������� 634
Using Theming and Templating���������������������������������������������������������������������������������������������������������� 637
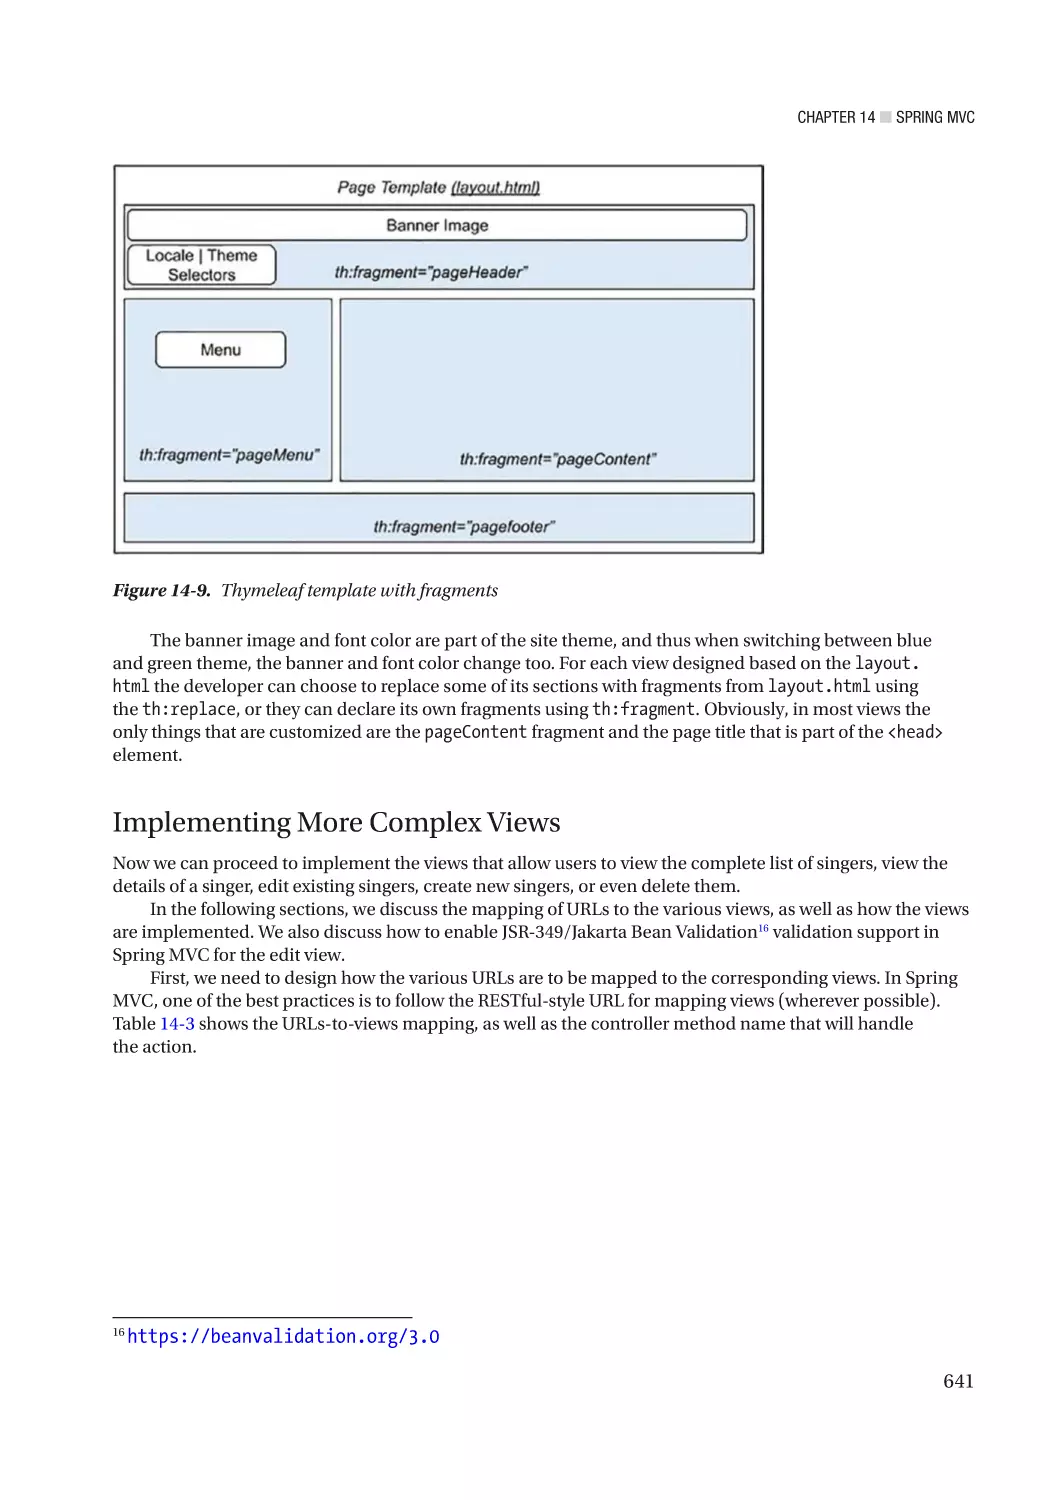
Implementing More Complex Views��������������������������������������������������������������������������������������������������� 641
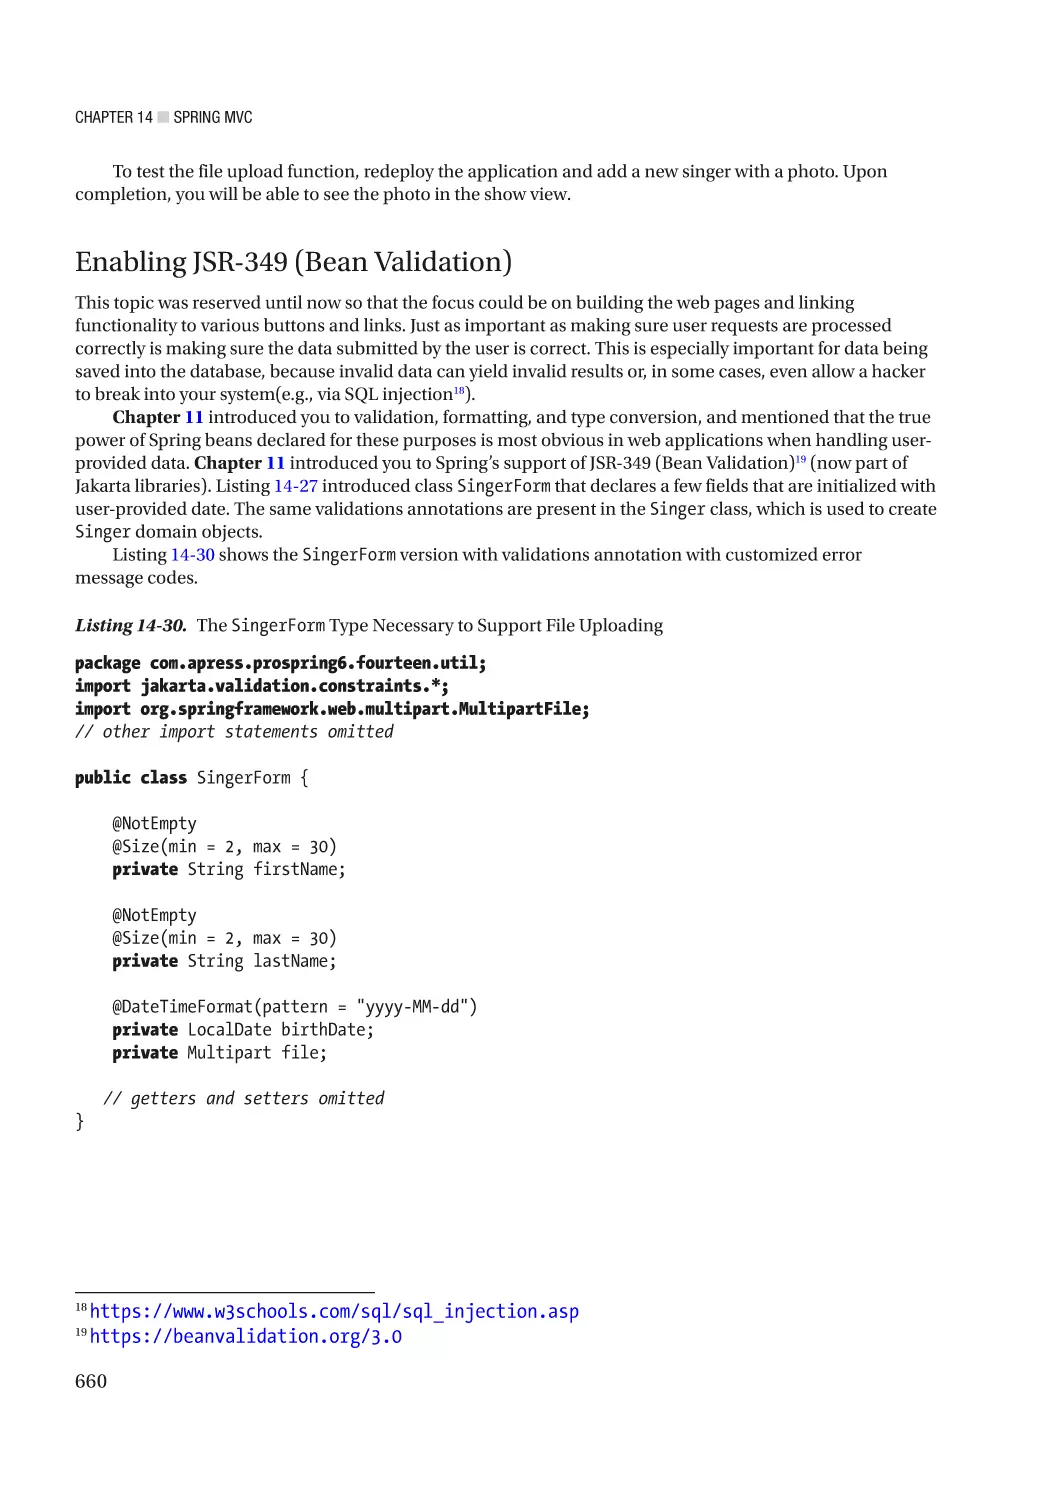
Enabling JSR-349 (Bean Validation)��������������������������������������������������������������������������������������������������� 660
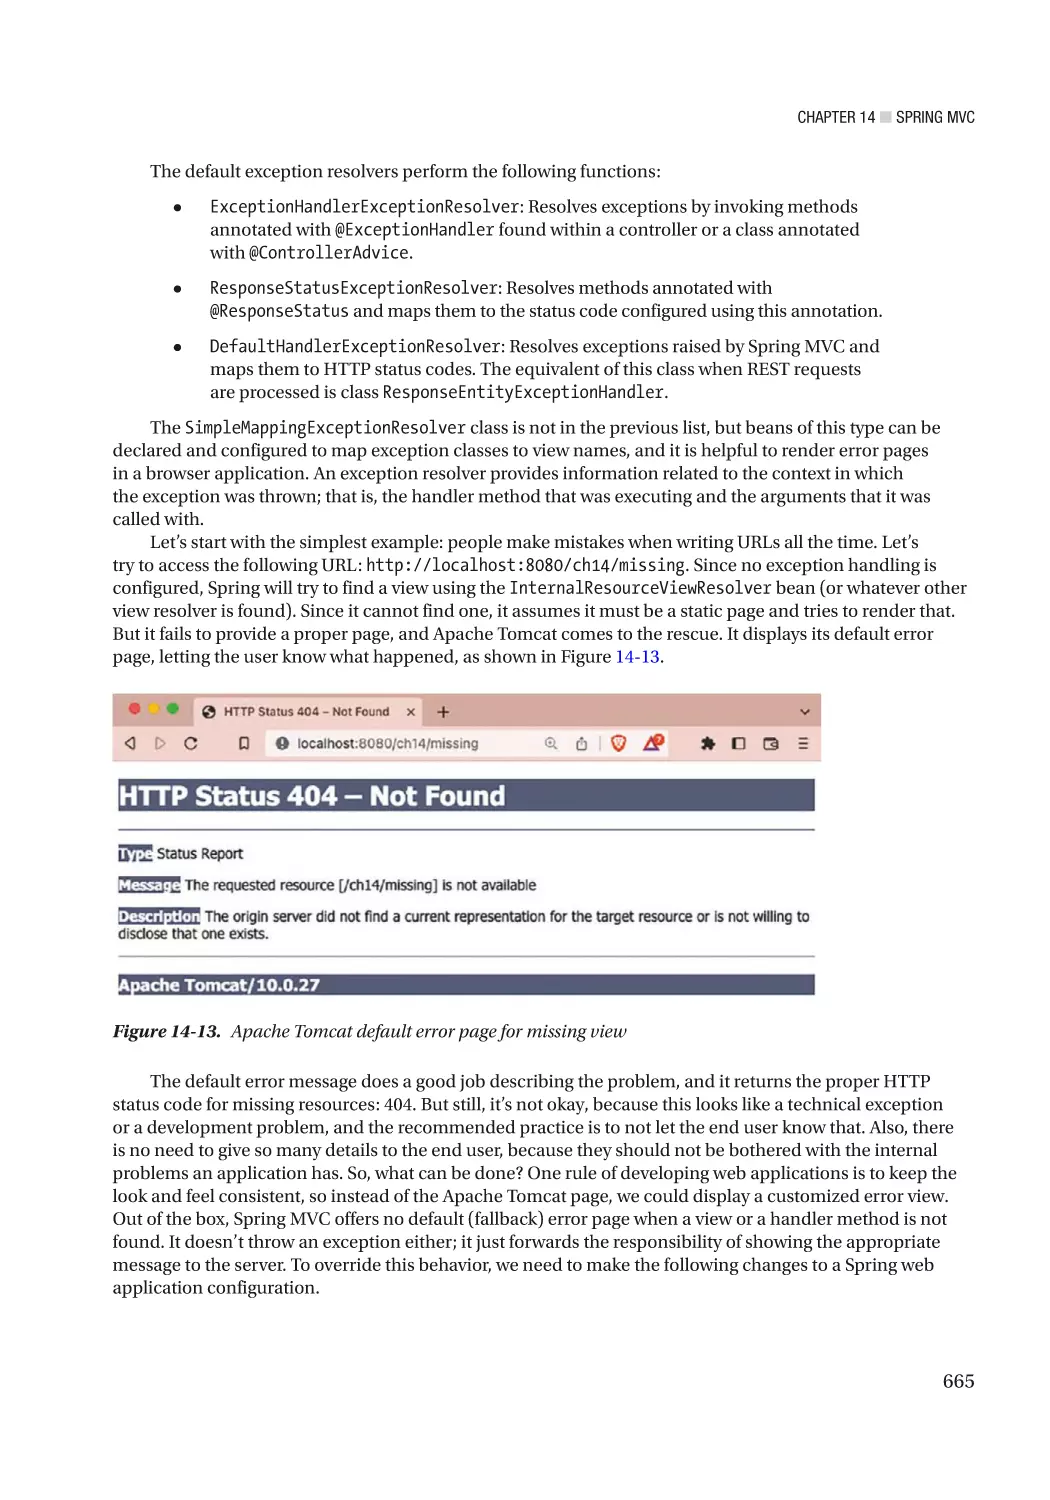
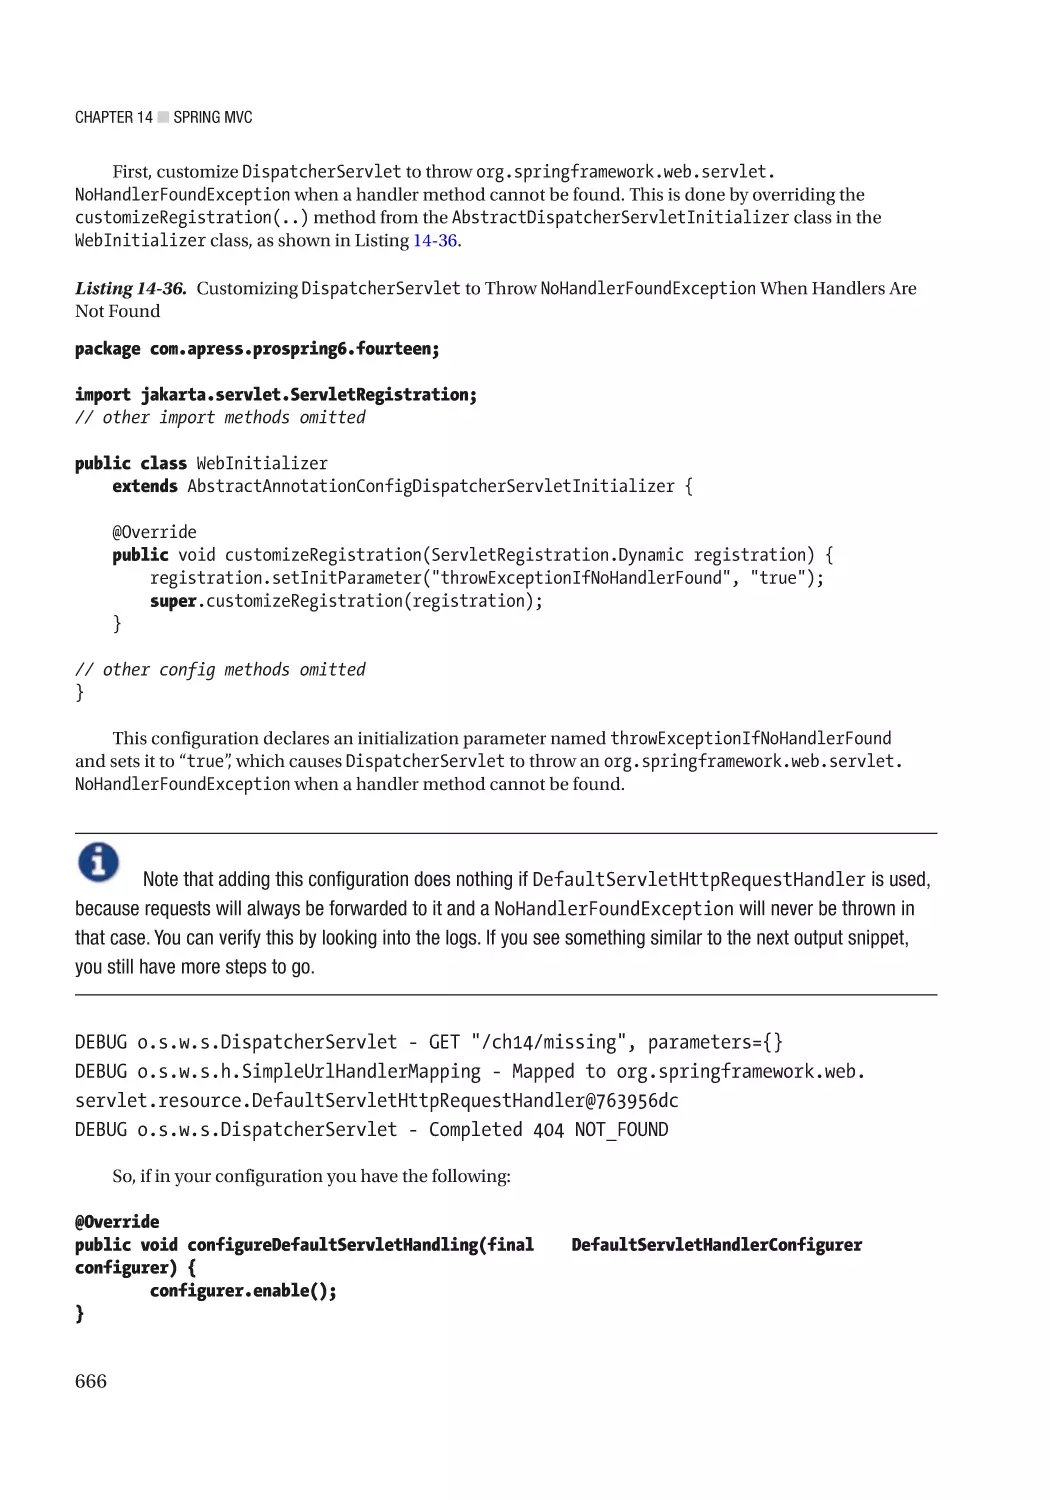
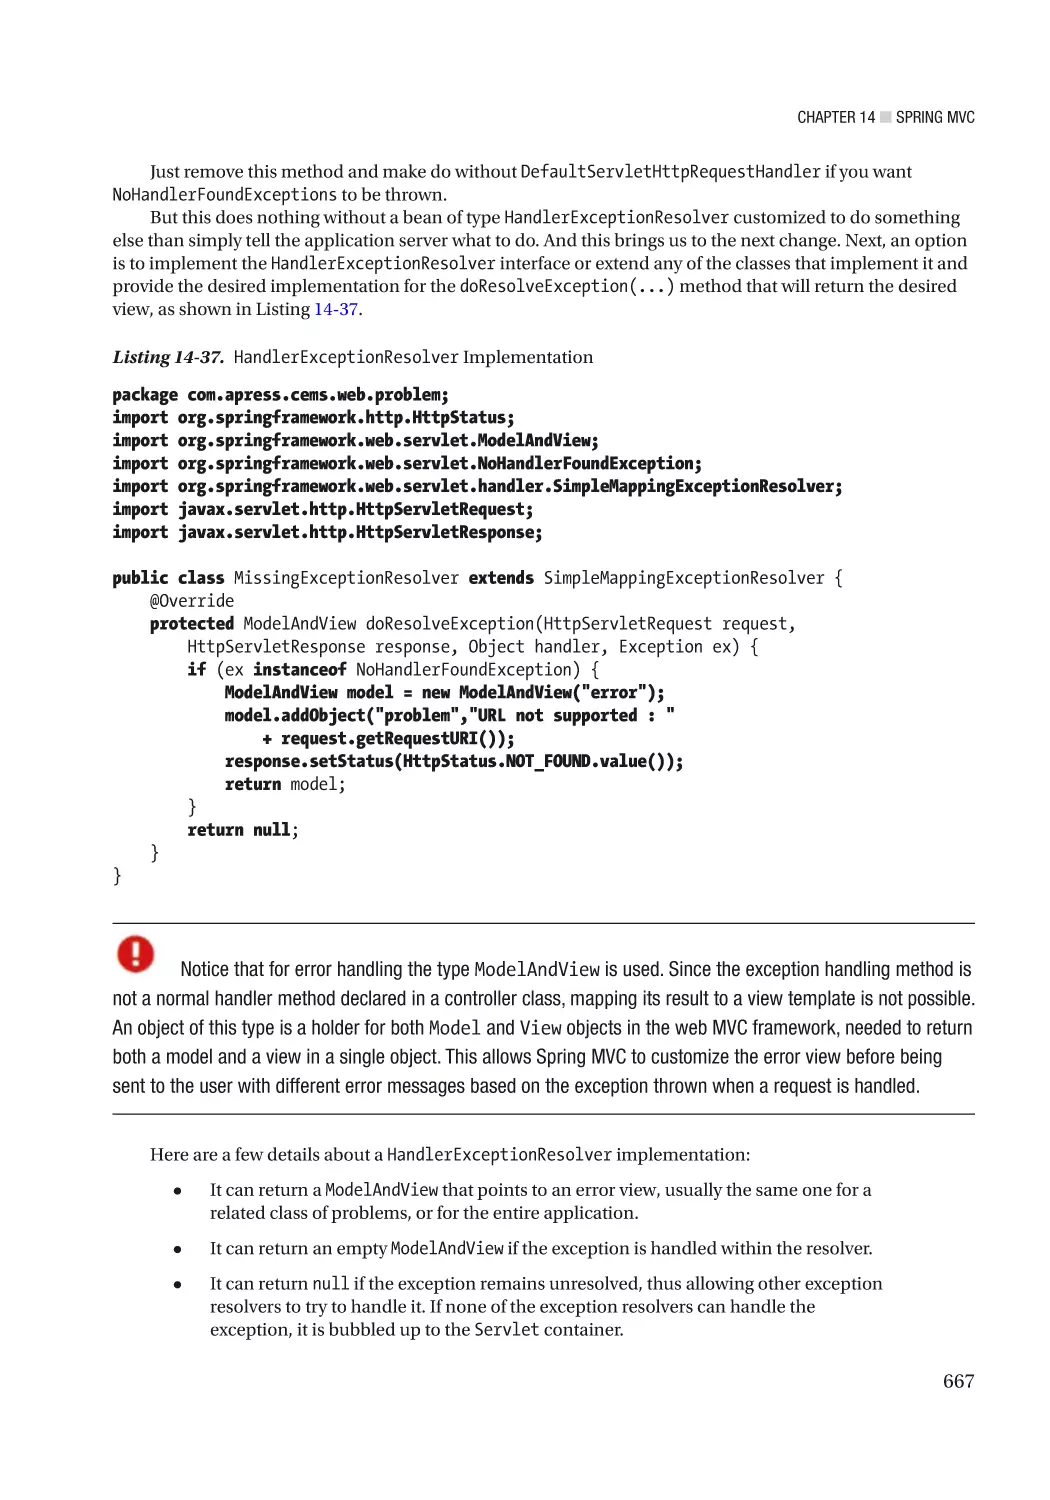
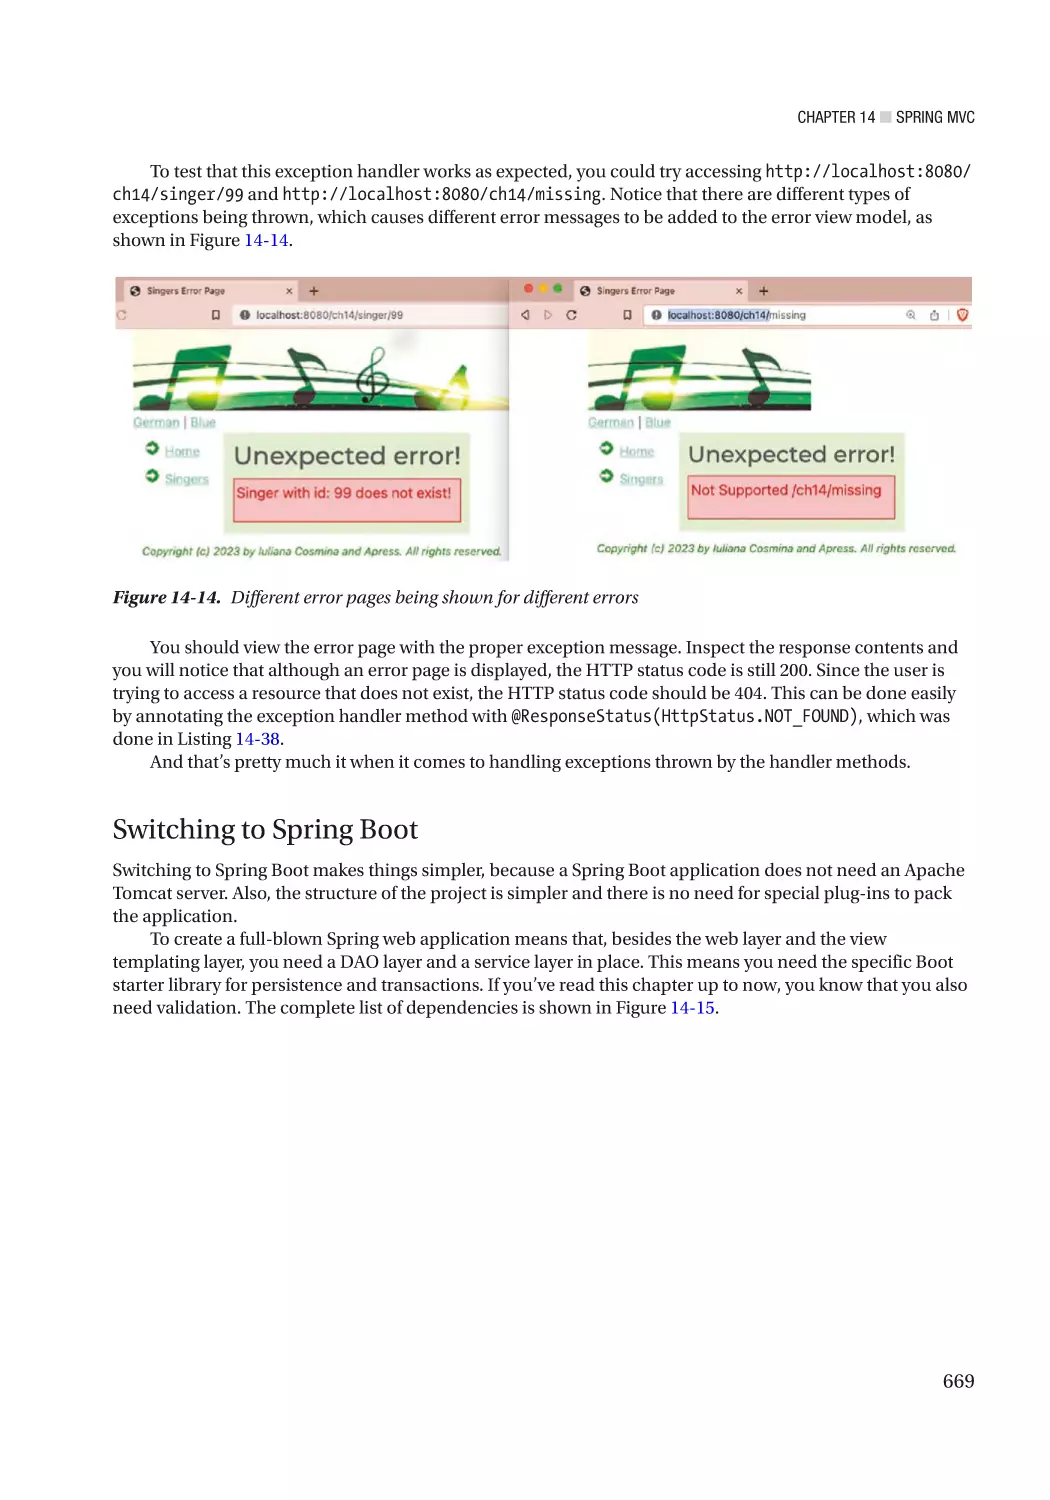
Exception Handling����������������������������������������������������������������������������������������������������������������������������� 664
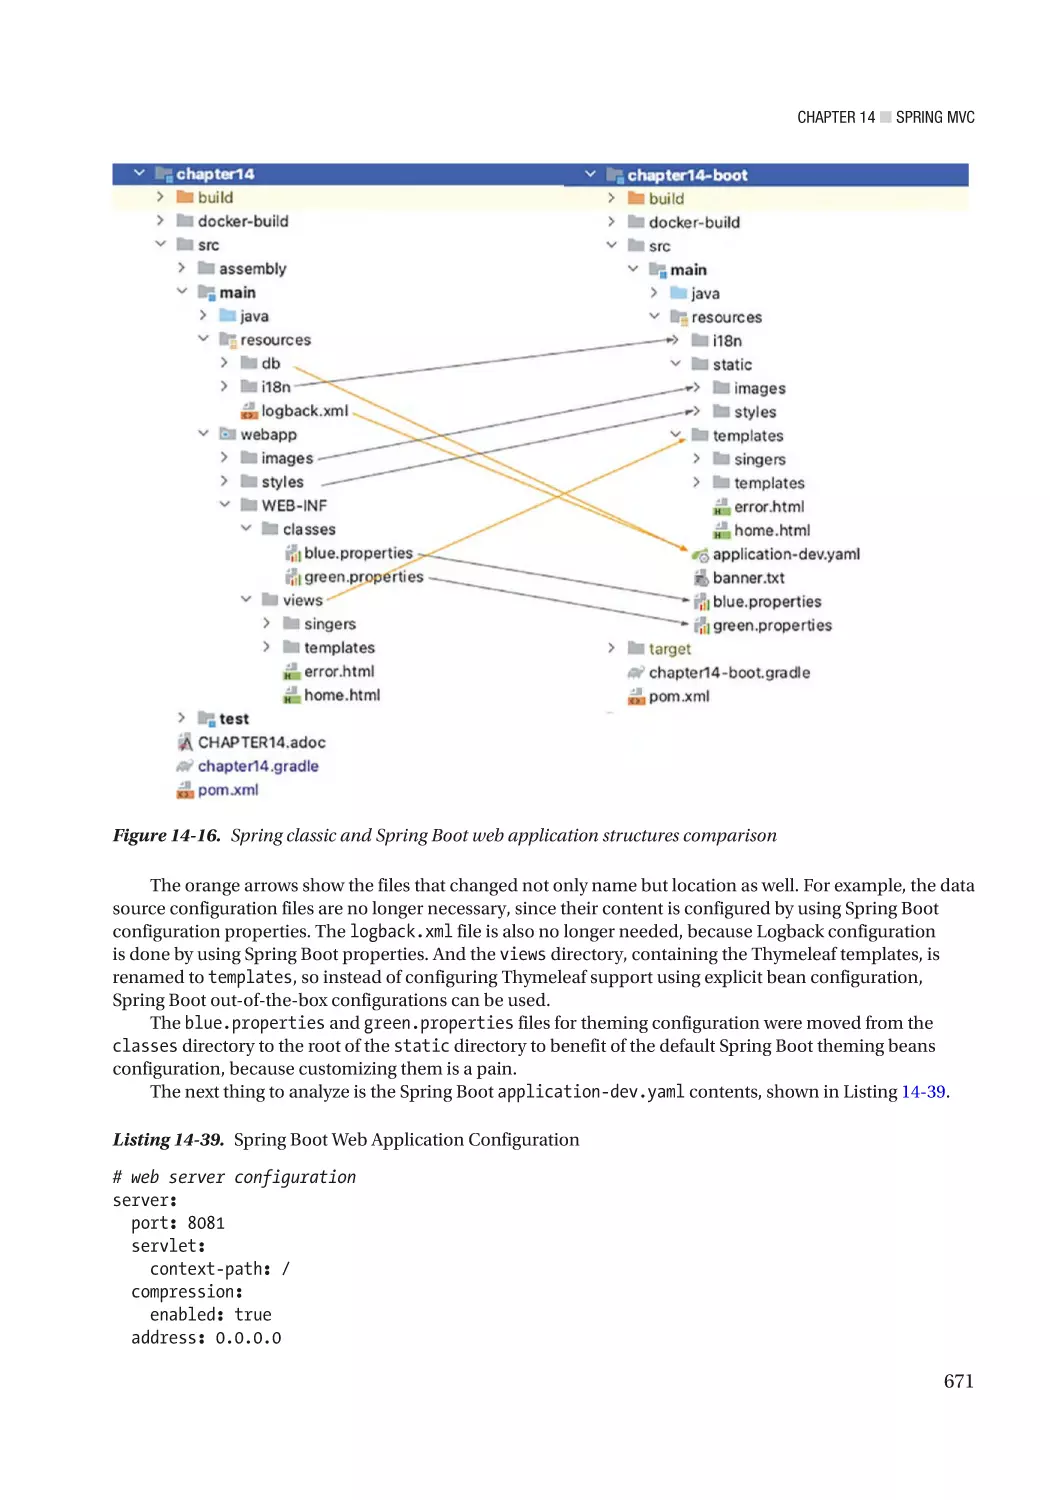
Switching to Spring Boot�������������������������������������������������������������������������������������������������������������������� 669
Summary���������������������������������������������������������������������������������������������������������������������� 678
■Chapter
■
15: Spring REST Support���������������������������������������������������������������������� 679
Introducing RESTful Web Services������������������������������������������������������������������������������� 679
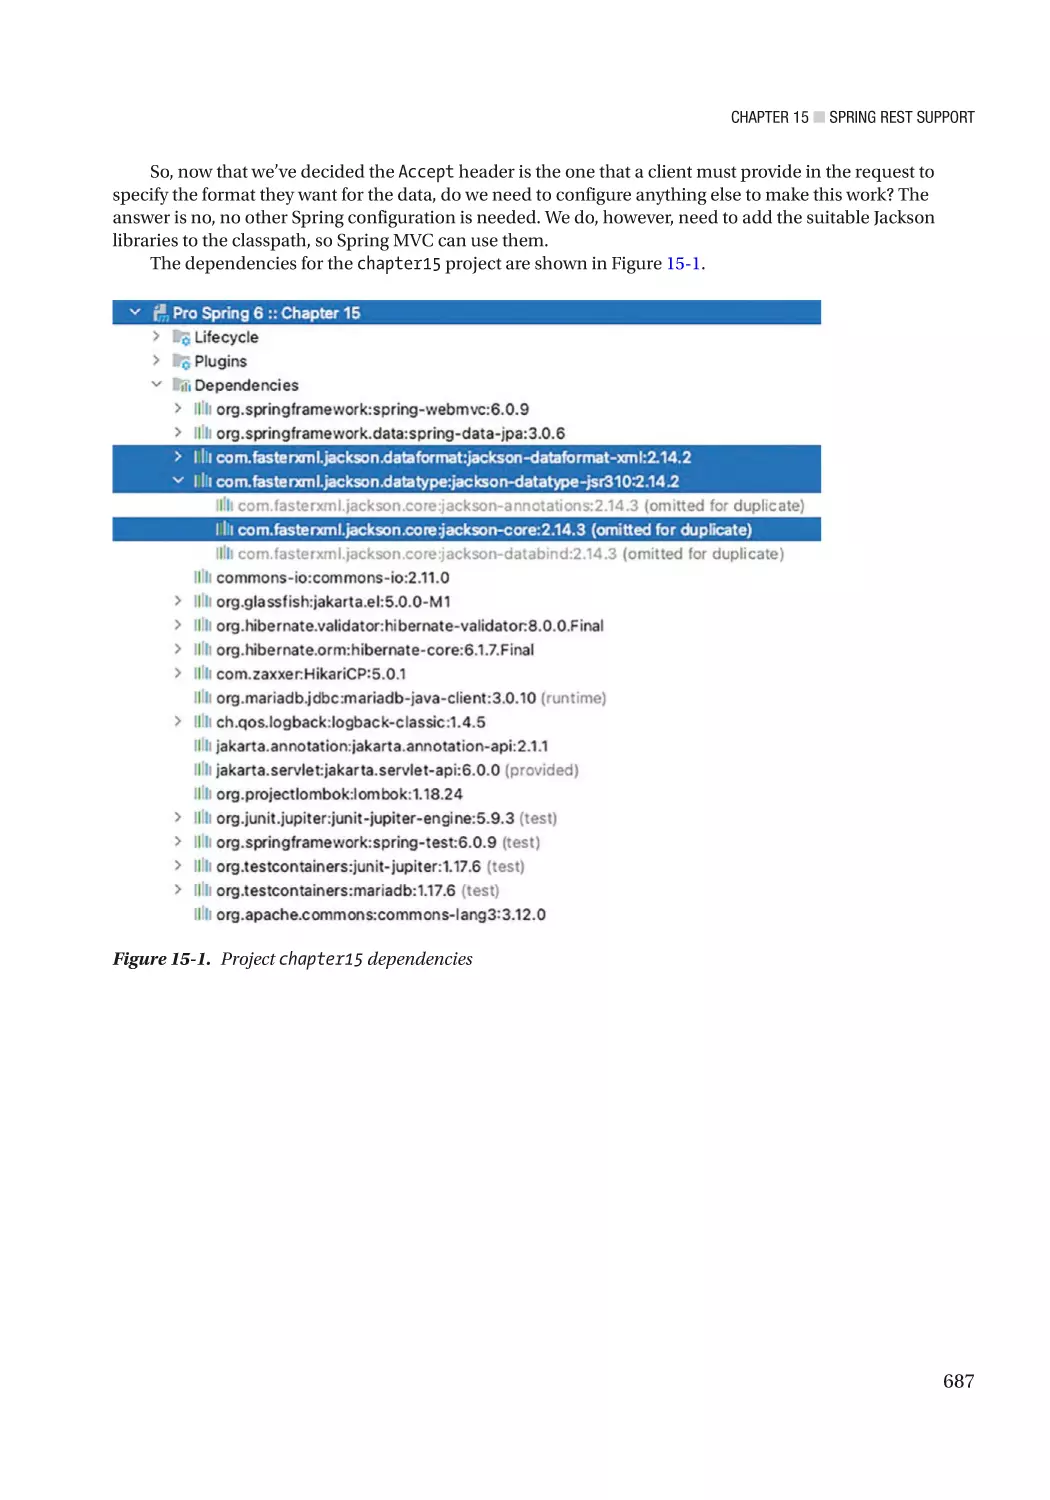
Using Spring MVC to Expose RESTful Web Services��������������������������������������������������������������������������� 680
Implementing SingerController����������������������������������������������������������������������������������������������������������� 681
Testing the RESTful-WS Application��������������������������������������������������������������������������������������������������� 688
REST Exception Handling Using ResponseEntity<t>�������������������������������������������������������������������������� 694
REST Exception Handling Using @RestControllerAdvice�������������������������������������������������������������������� 699
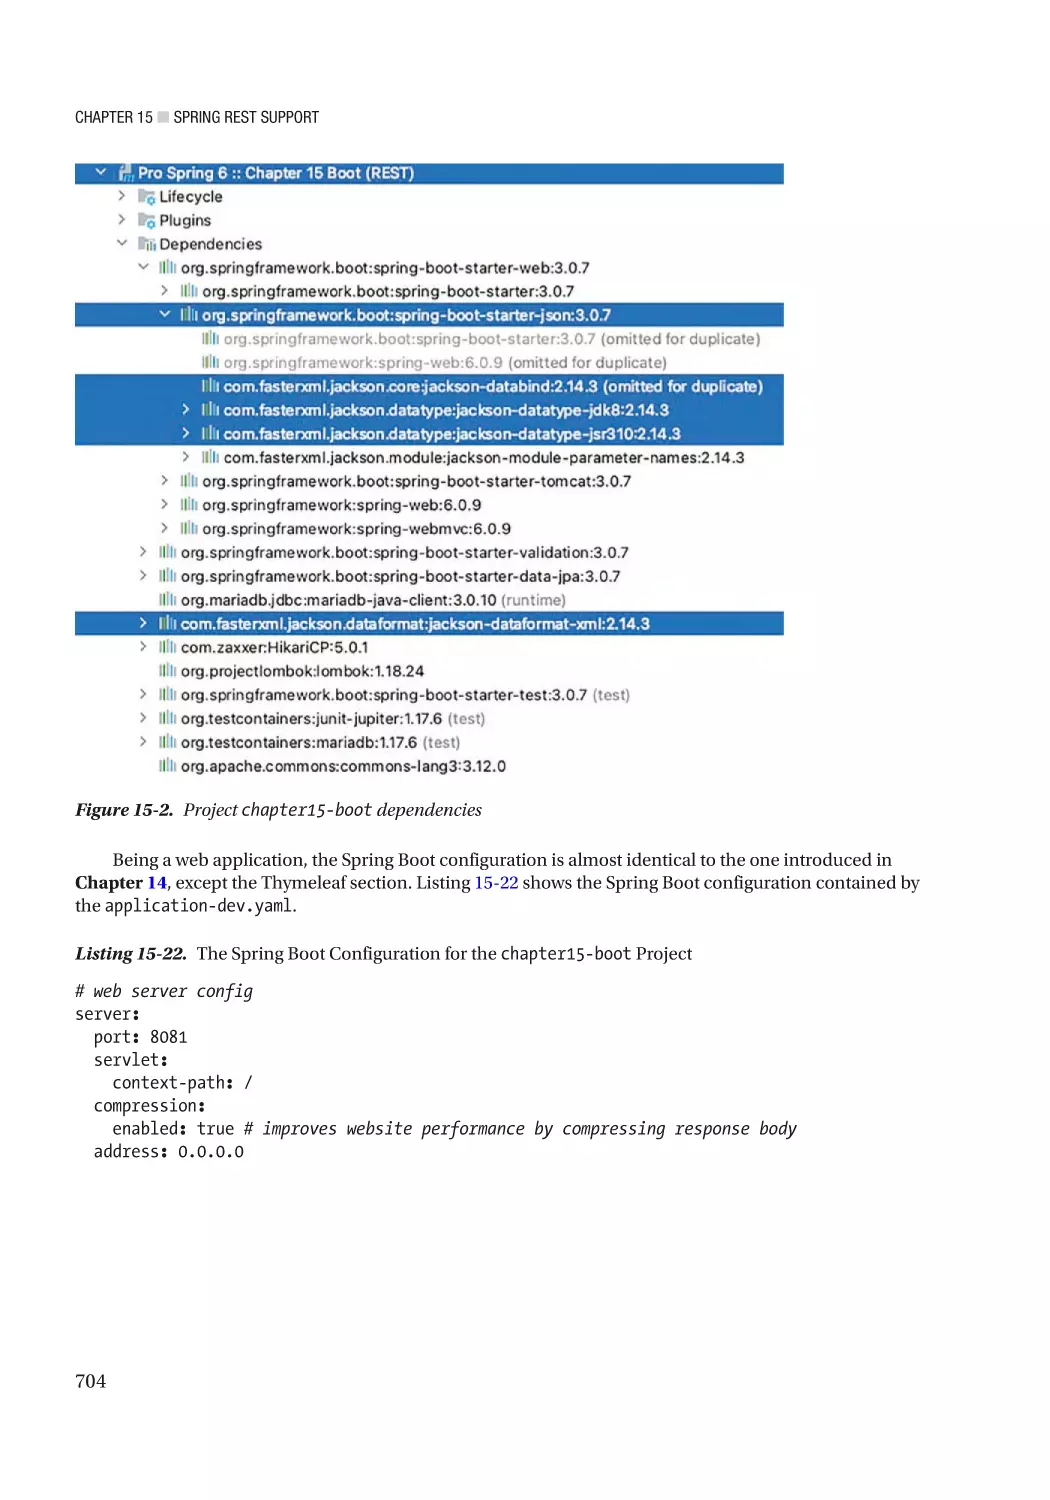
RESTful-WS with Spring Boot�������������������������������������������������������������������������������������� 703
Summary���������������������������������������������������������������������������������������������������������������������� 708
■Chapter
■
16: Spring Native and Other Goodies��������������������������������������������������� 709
Spring Native Images��������������������������������������������������������������������������������������������������� 710
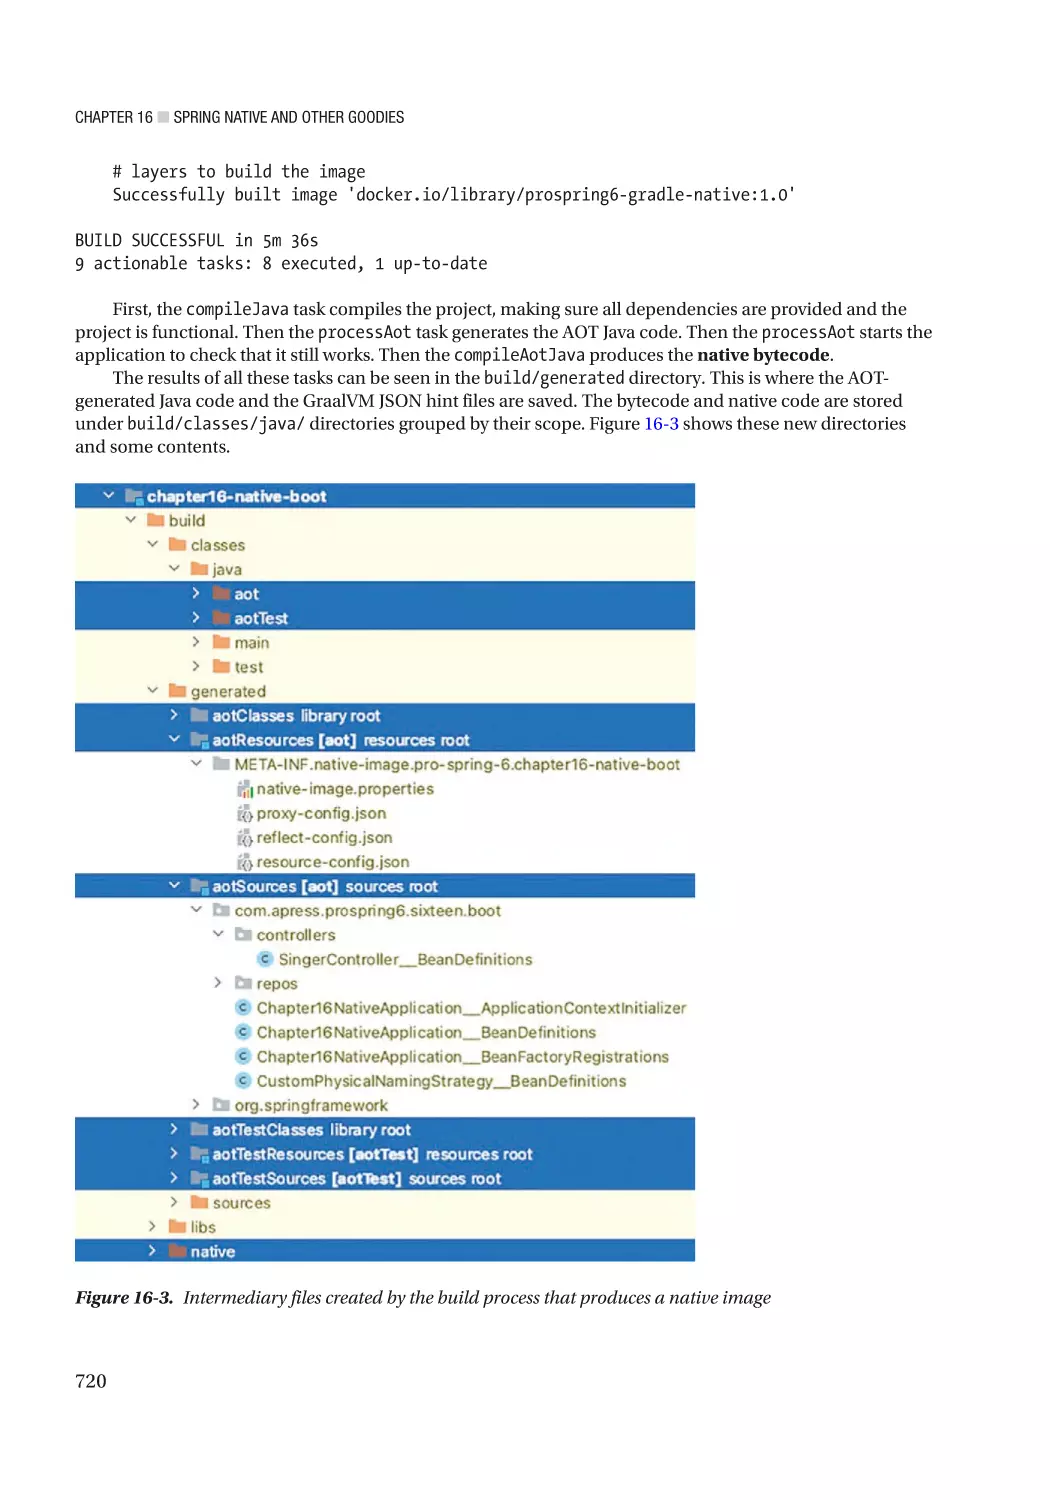
The Application����������������������������������������������������������������������������������������������������������������������������������� 712
The Configuration������������������������������������������������������������������������������������������������������������������������������� 715
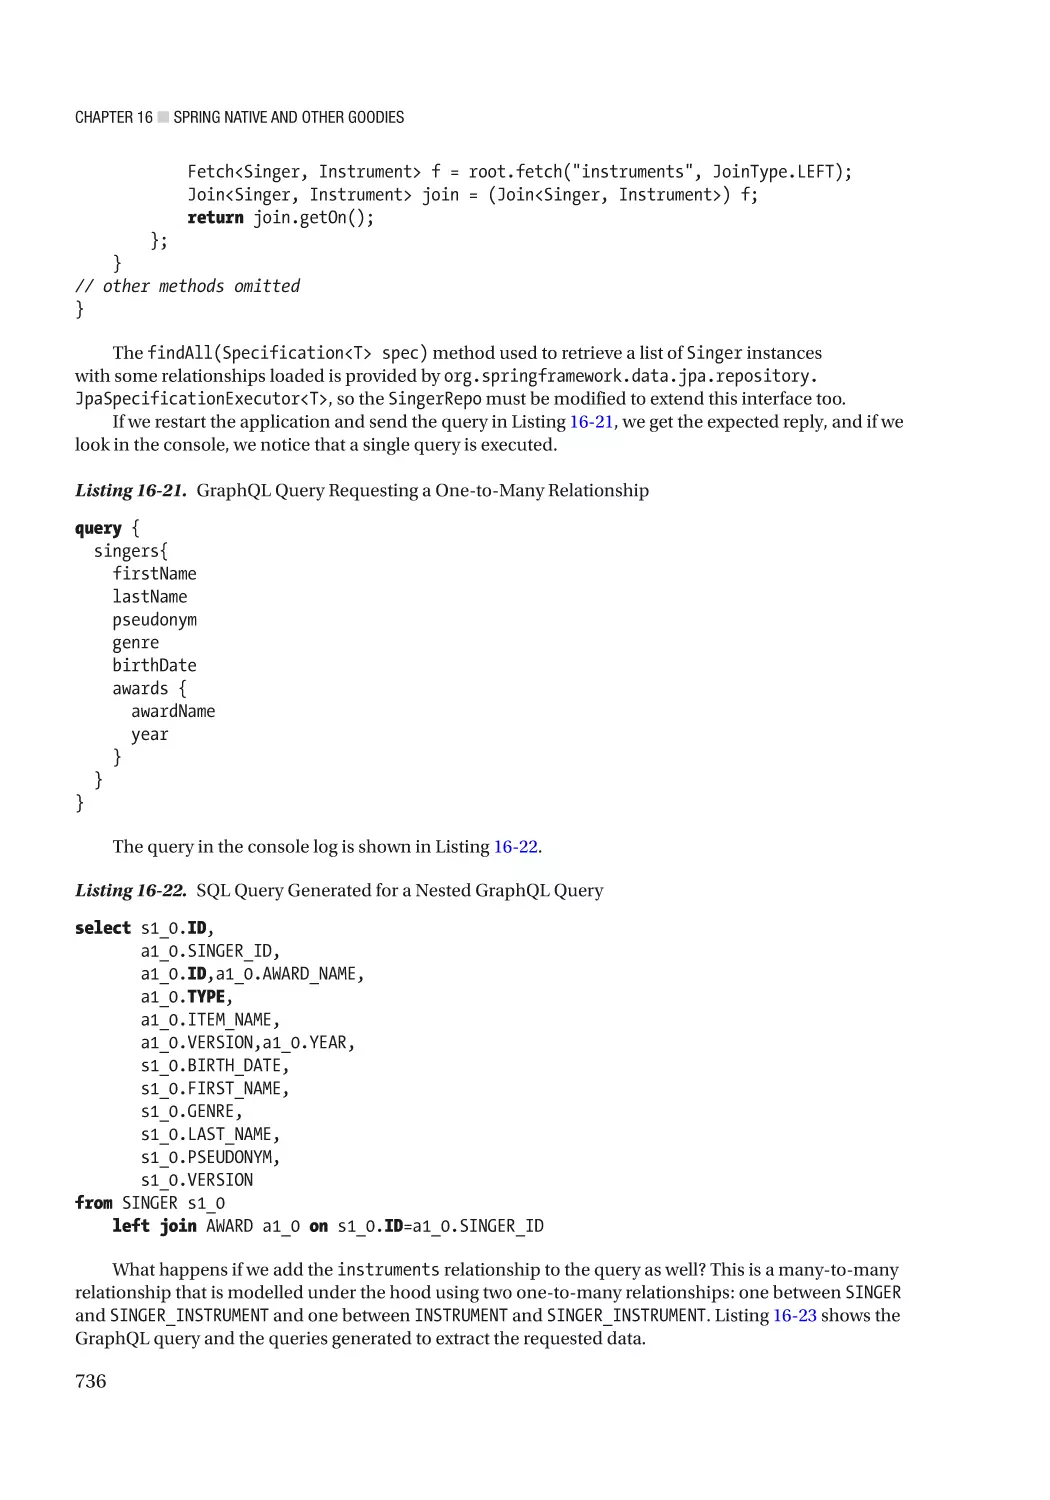
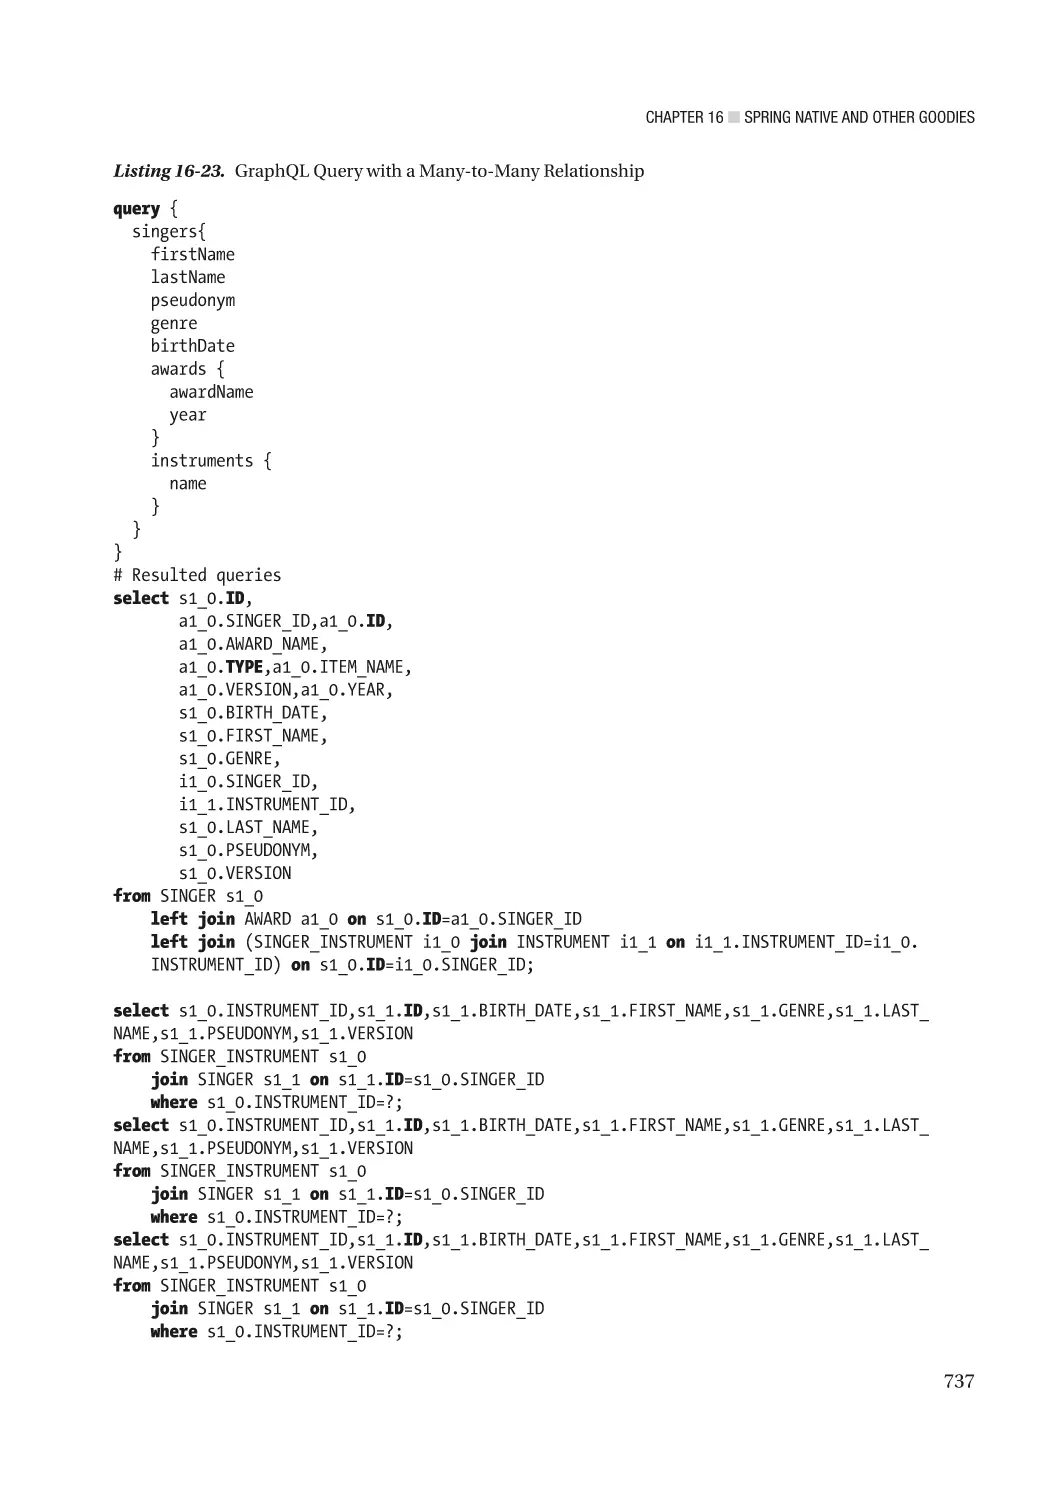
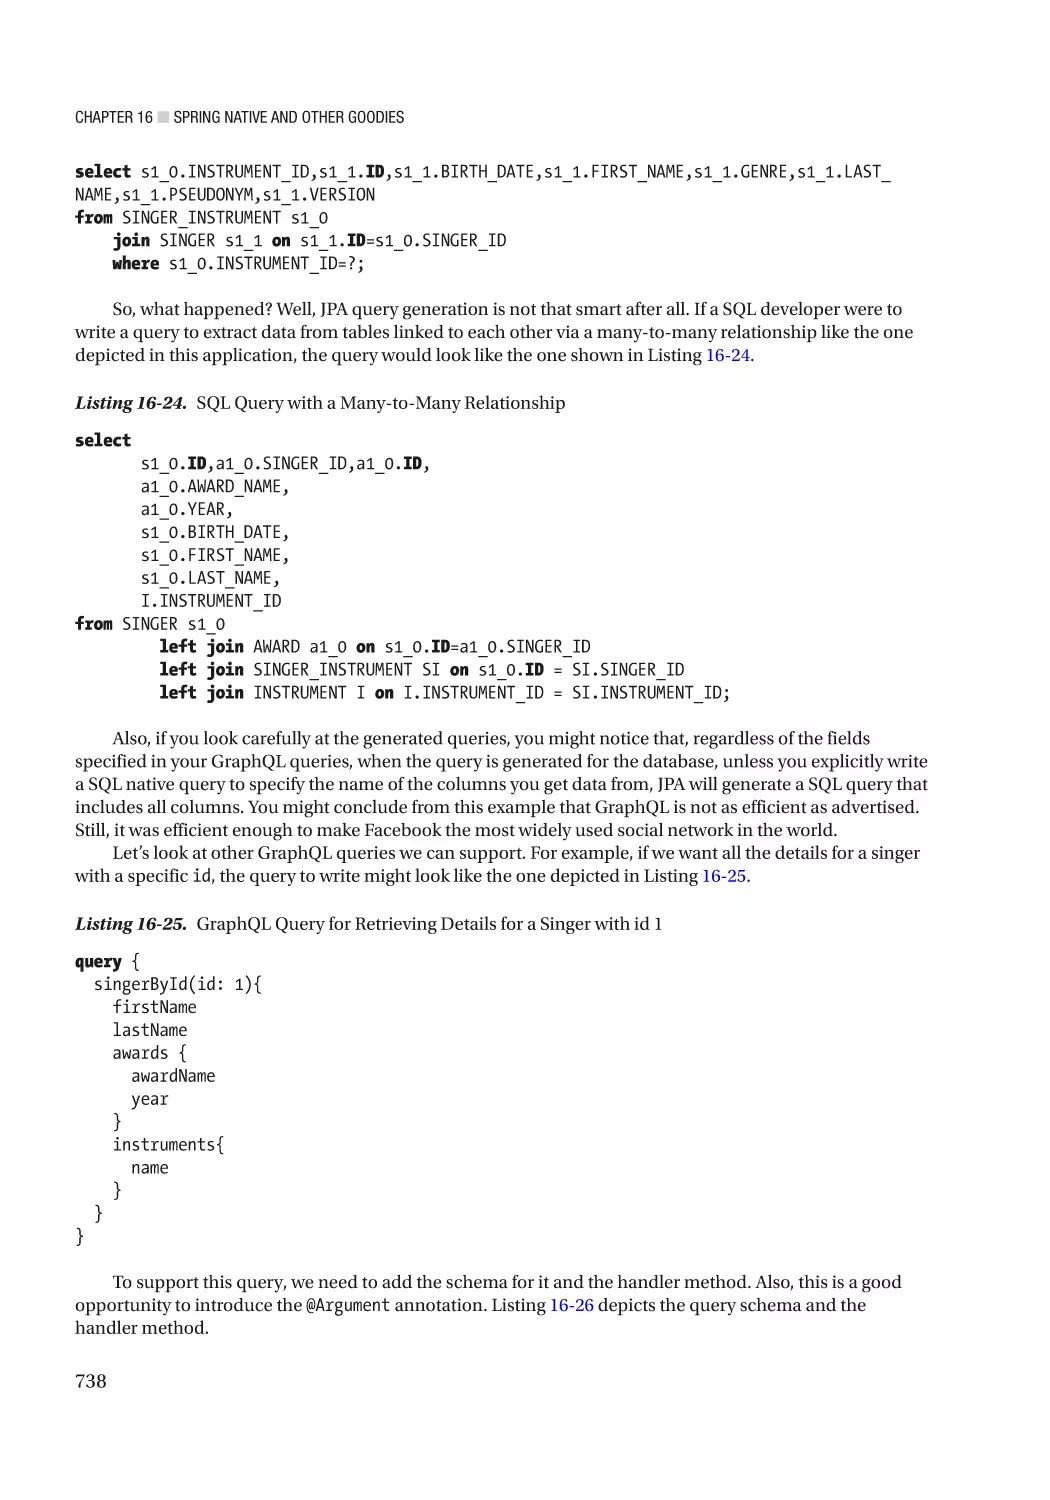
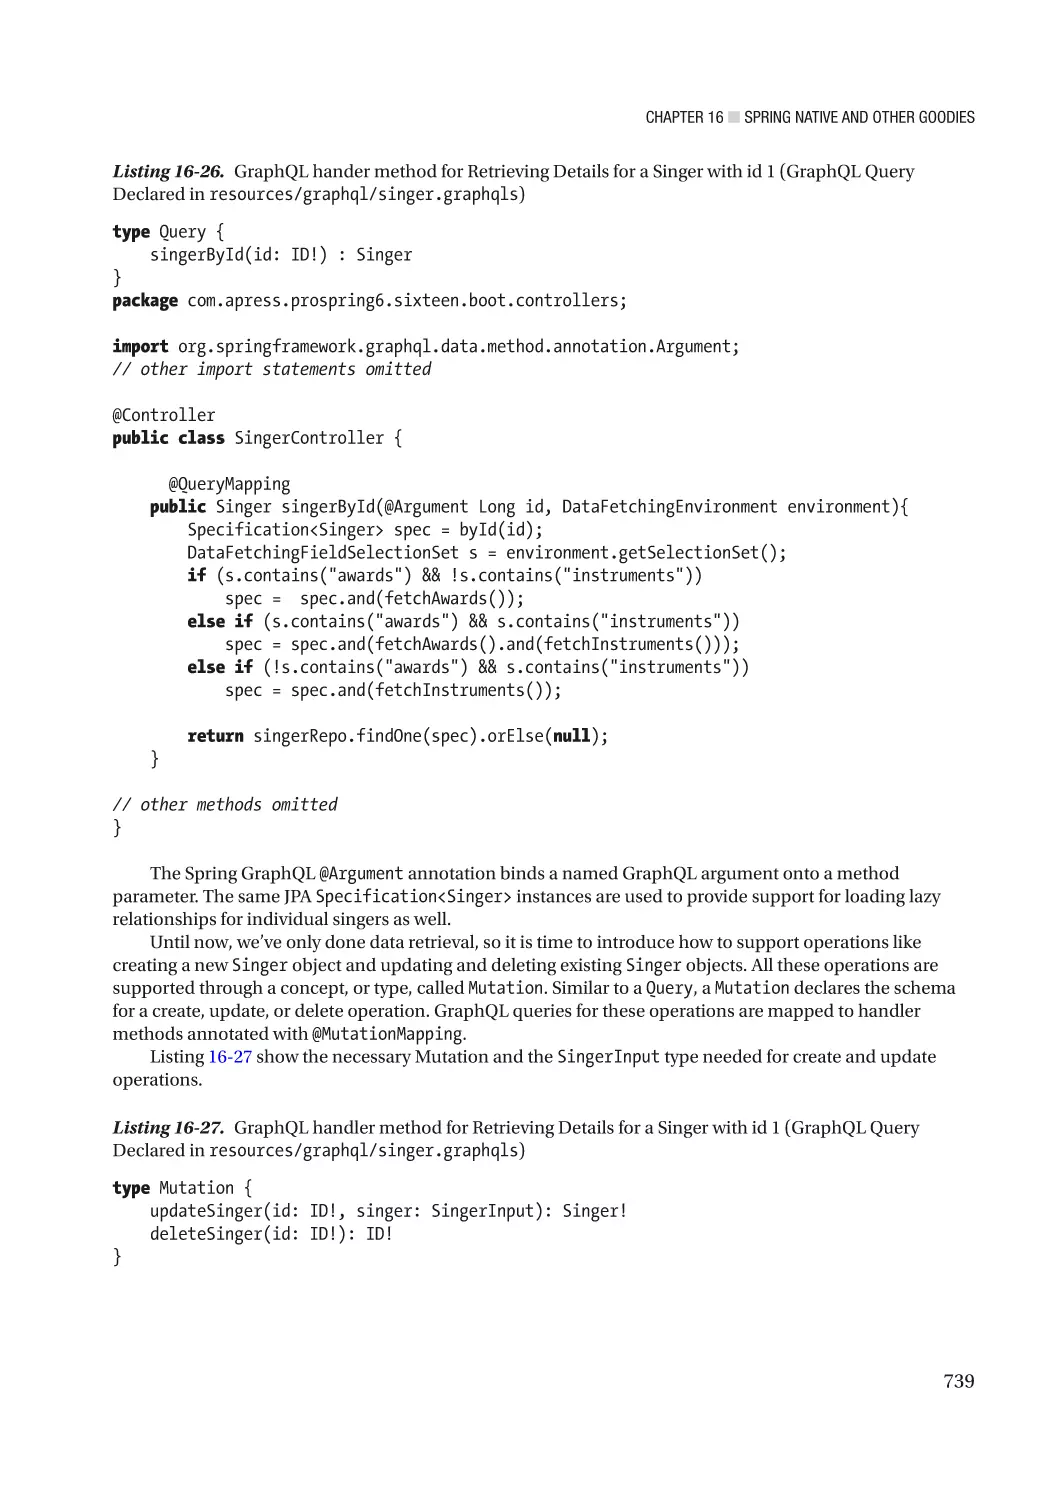
Spring for GraphQL������������������������������������������������������������������������������������������������������� 726
Spring Kotlin Applications�������������������������������������������������������������������������������������������� 744
xv
■ Table of Contents
The Configuration������������������������������������������������������������������������������������������������������������������������������� 746
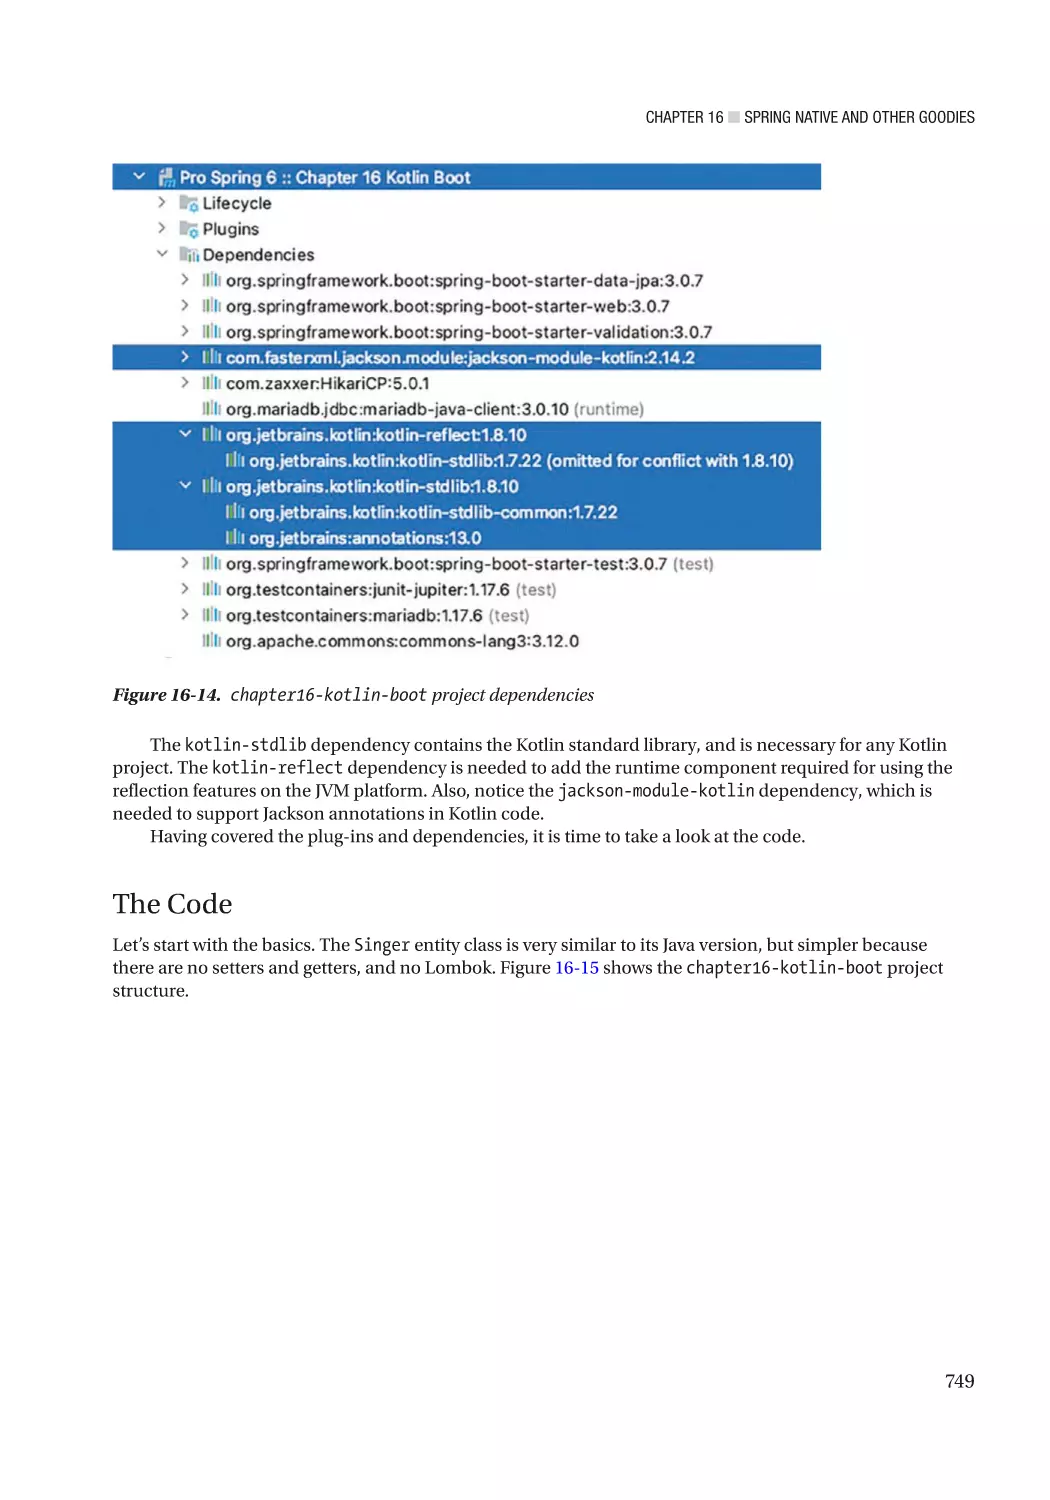
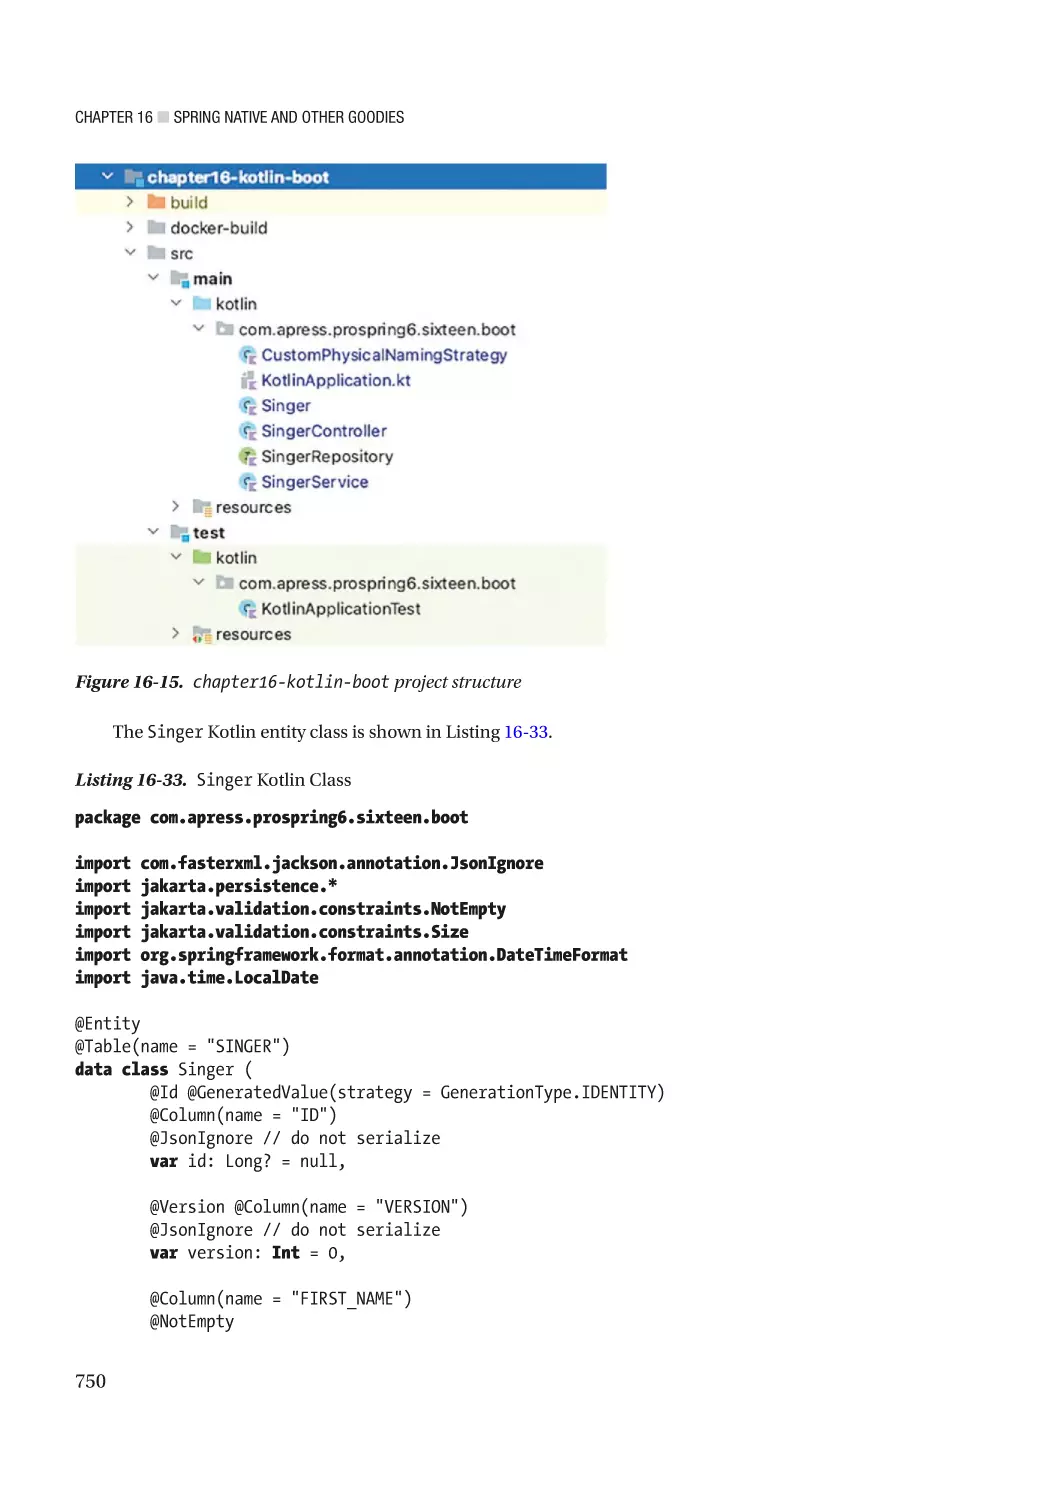
The Code��������������������������������������������������������������������������������������������������������������������������������������������� 749
Summary���������������������������������������������������������������������������������������������������������������������� 757
■Chapter
■
17: Securing Spring Web Applications������������������������������������������������� 759
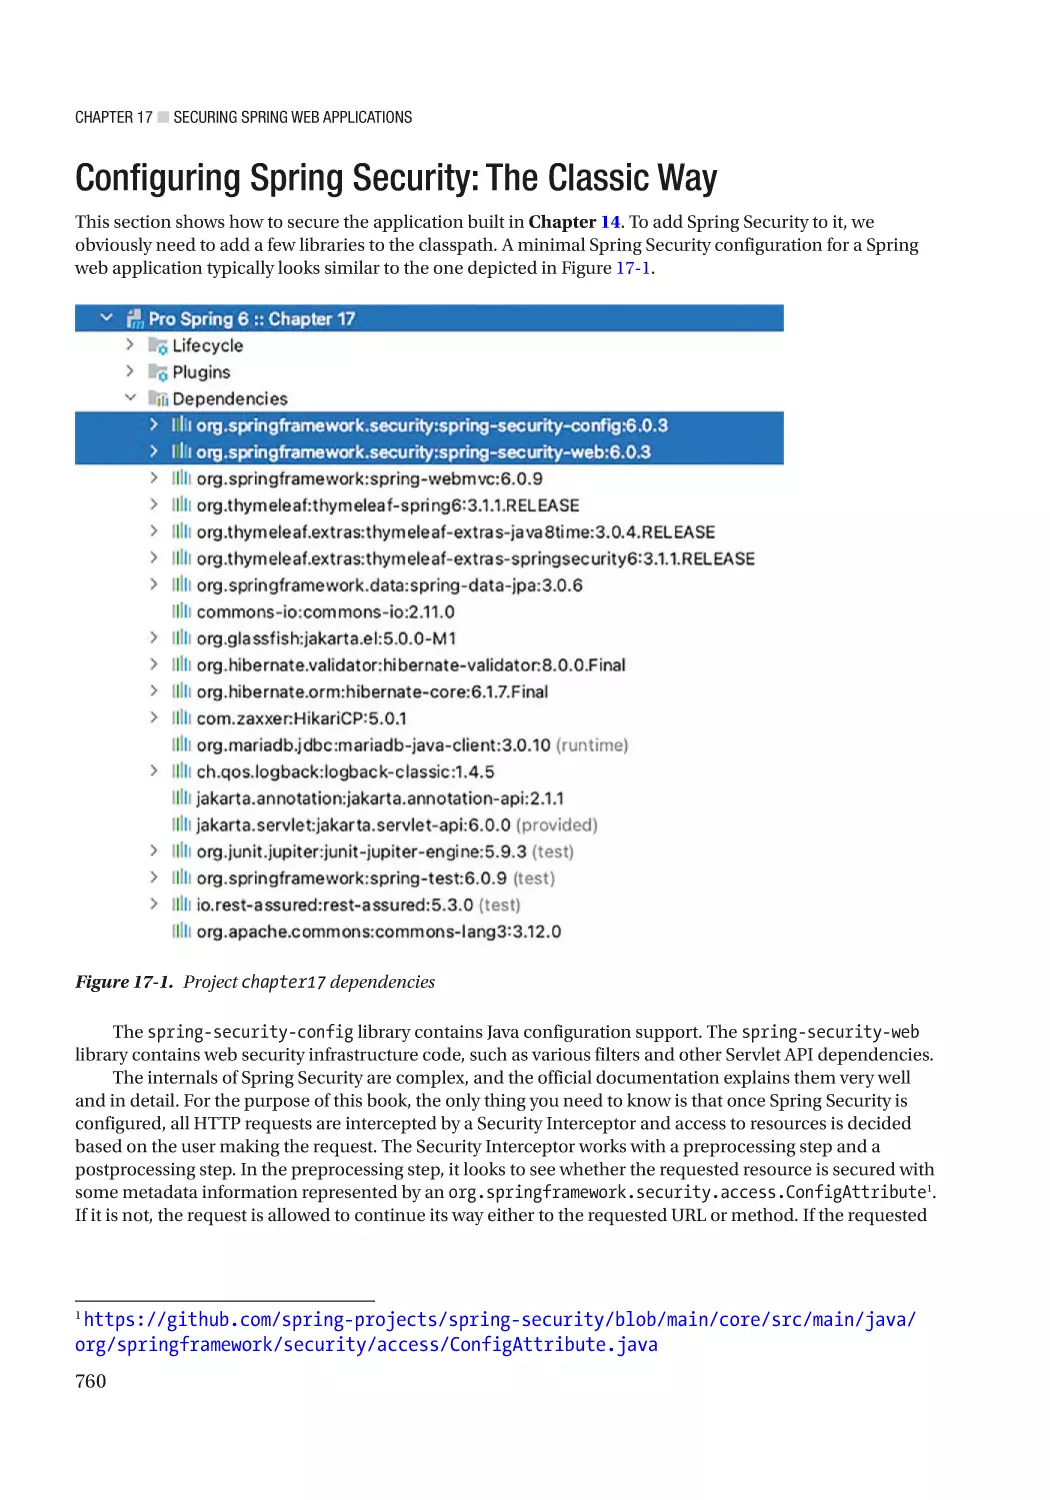
Configuring Spring Security: The Classic Way�������������������������������������������������������������� 760
JDBC Authentication��������������������������������������������������������������������������������������������������������������������������� 780
Testing Secured Web Applications������������������������������������������������������������������������������������������������������ 784
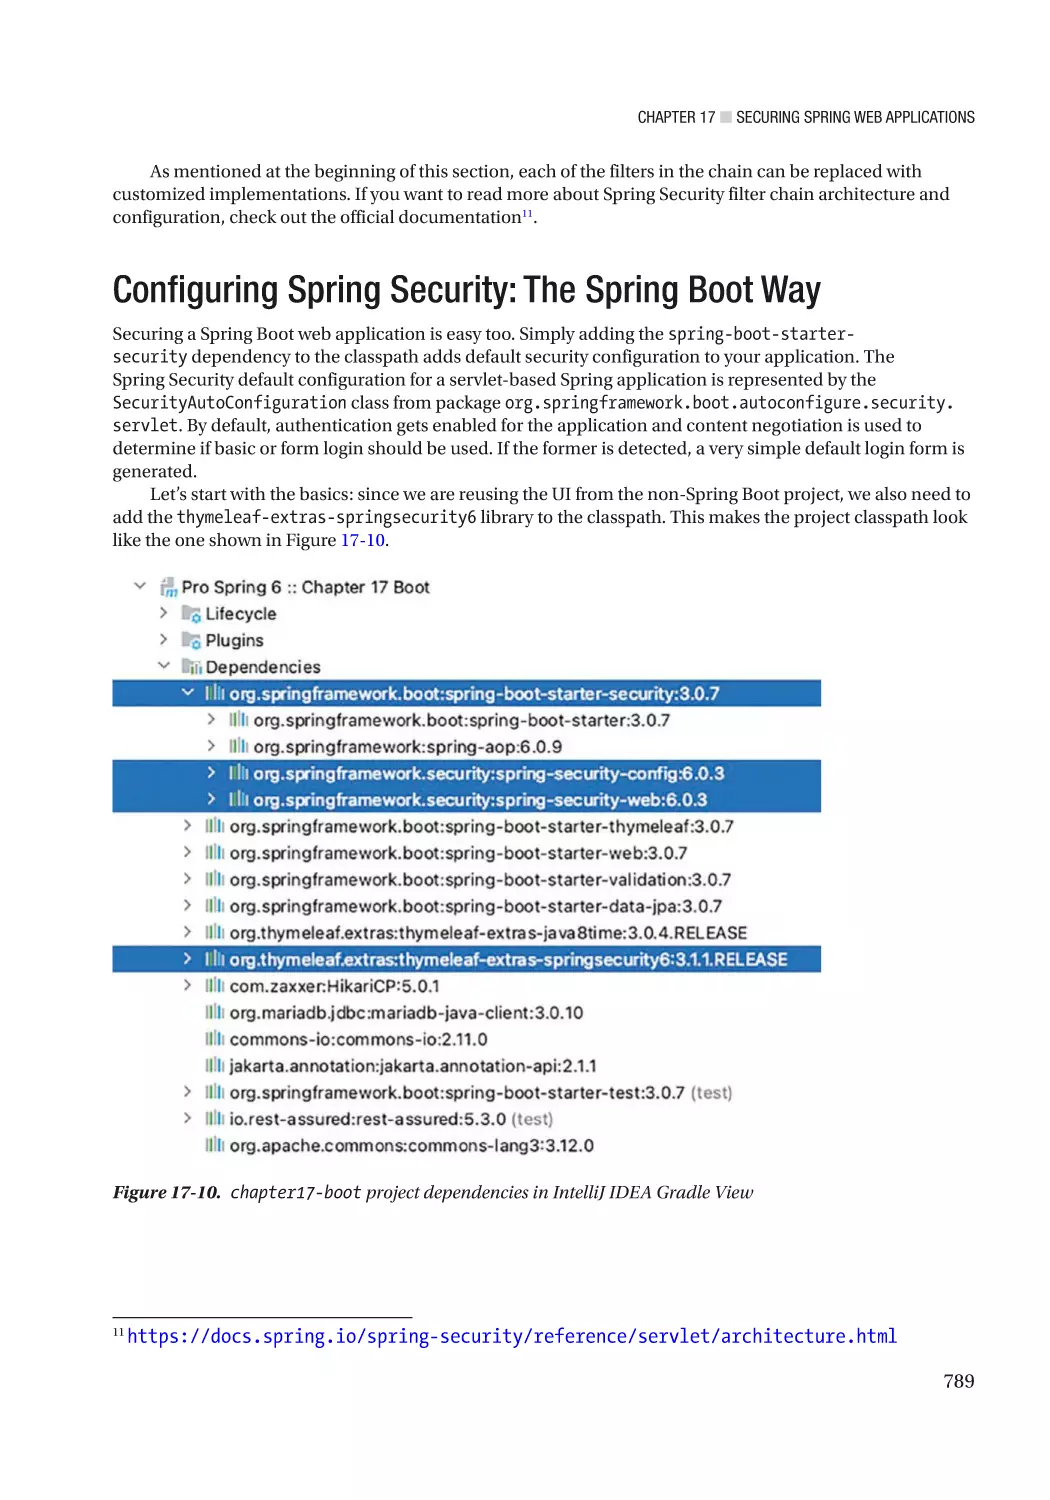
Configuring Spring Security: The Spring Boot Way������������������������������������������������������ 789
Summary���������������������������������������������������������������������������������������������������������������������� 791
■Chapter
■
18: Monitoring Spring Applications����������������������������������������������������� 793
JMX Support in Spring������������������������������������������������������������������������������������������������� 794
Exporting a Spring Bean to JMX��������������������������������������������������������������������������������������������������������� 794
Using VisualVM for JMX Monitoring���������������������������������������������������������������������������������������������������� 796
Monitoring Hibernate Statistics���������������������������������������������������������������������������������������������������������� 800
JMX with Spring Boot��������������������������������������������������������������������������������������������������� 803
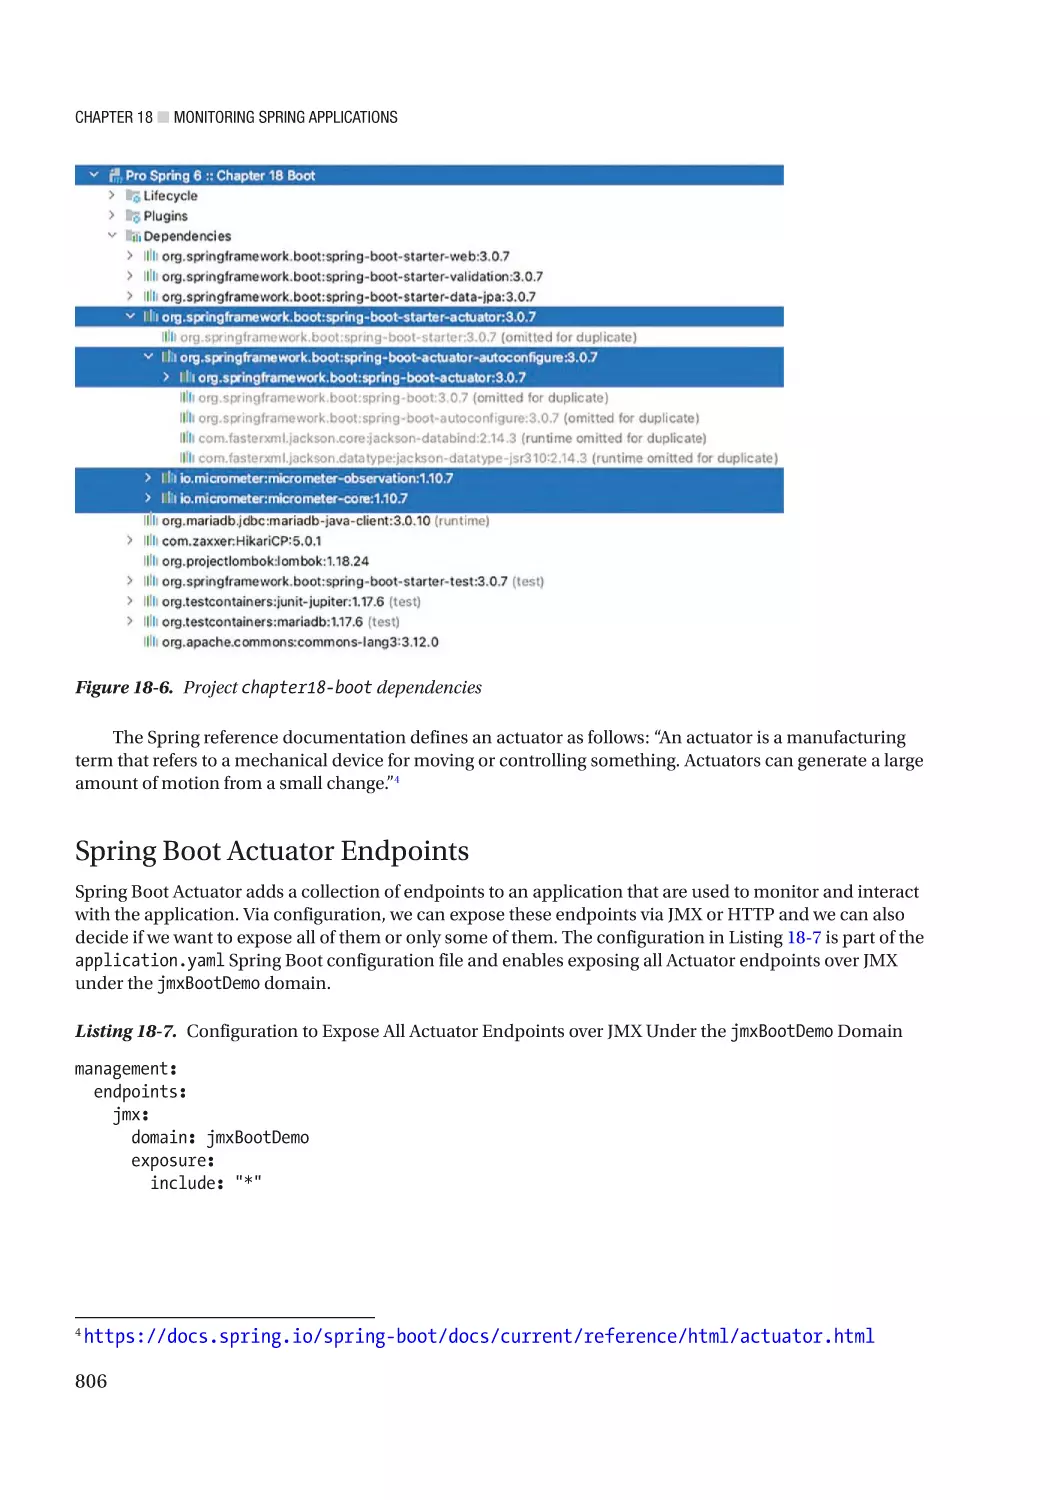
Monitoring Applications with Spring Boot Actuator������������������������������������������������������ 805
Spring Boot Actuator Endpoints���������������������������������������������������������������������������������������������������������� 806
Using Spring Boot Actuator with Micrometer������������������������������������������������������������������������������������� 812
Summary���������������������������������������������������������������������������������������������������������������������� 822
■Chapter
■
19: Spring WebSocket Support������������������������������������������������������������ 823
Introducing WebSocket������������������������������������������������������������������������������������������������ 823
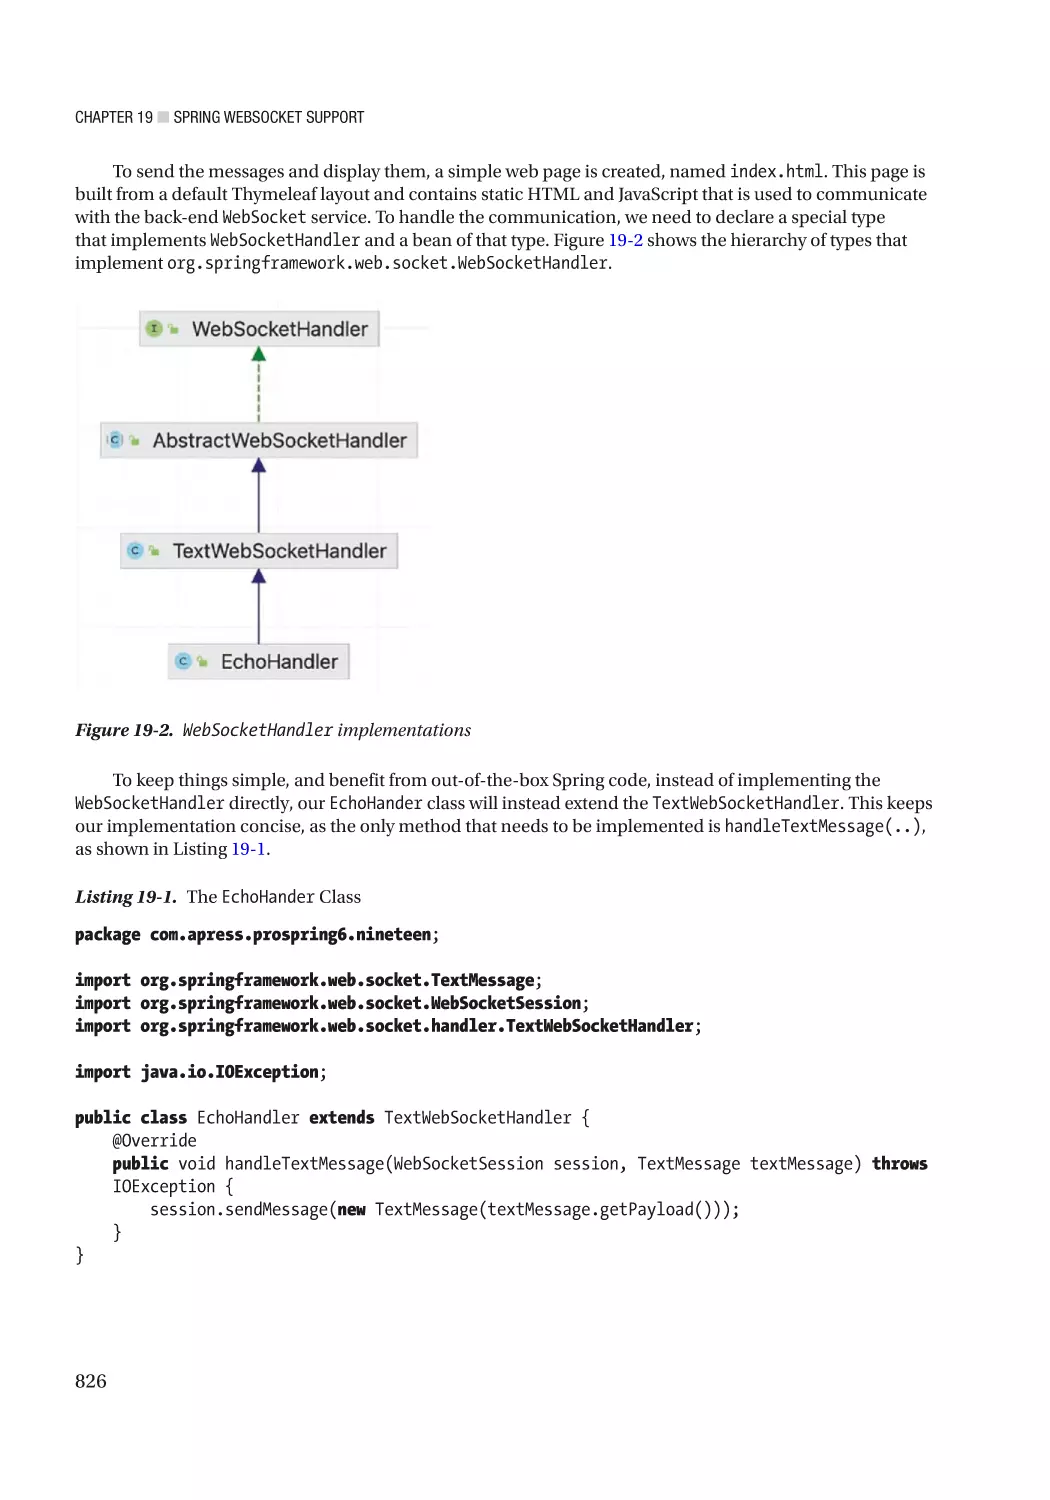
Using WebSocket with Spring�������������������������������������������������������������������������������������� 824
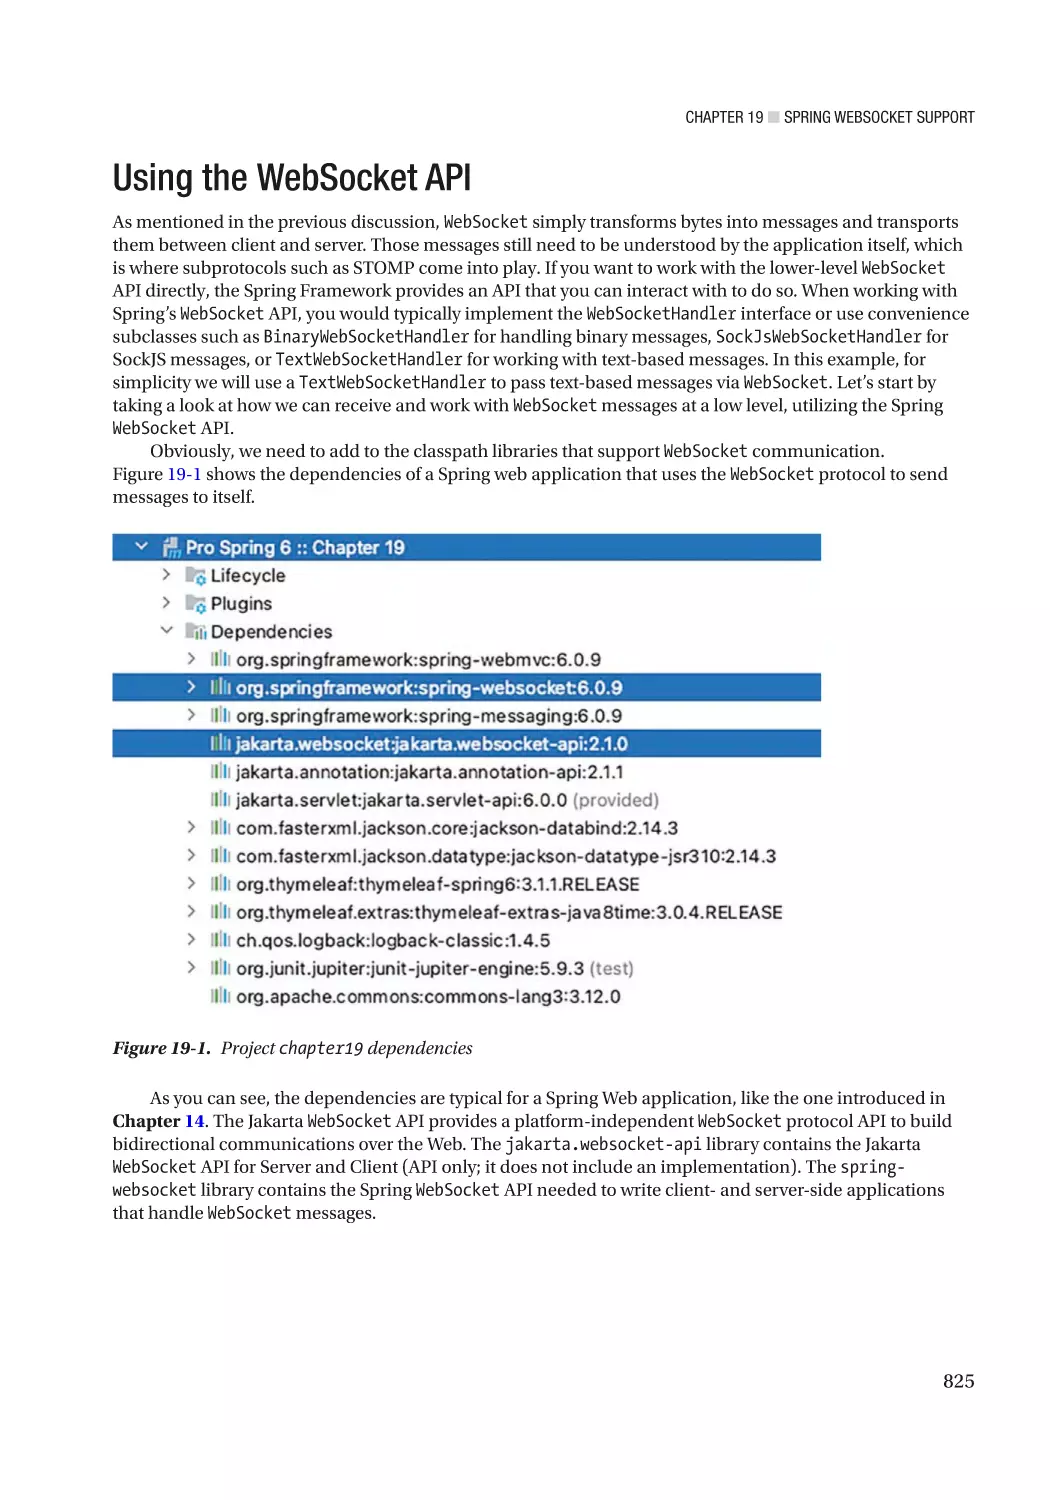
Using the WebSocket API��������������������������������������������������������������������������������������������� 825
Using SockJS��������������������������������������������������������������������������������������������������������������� 832
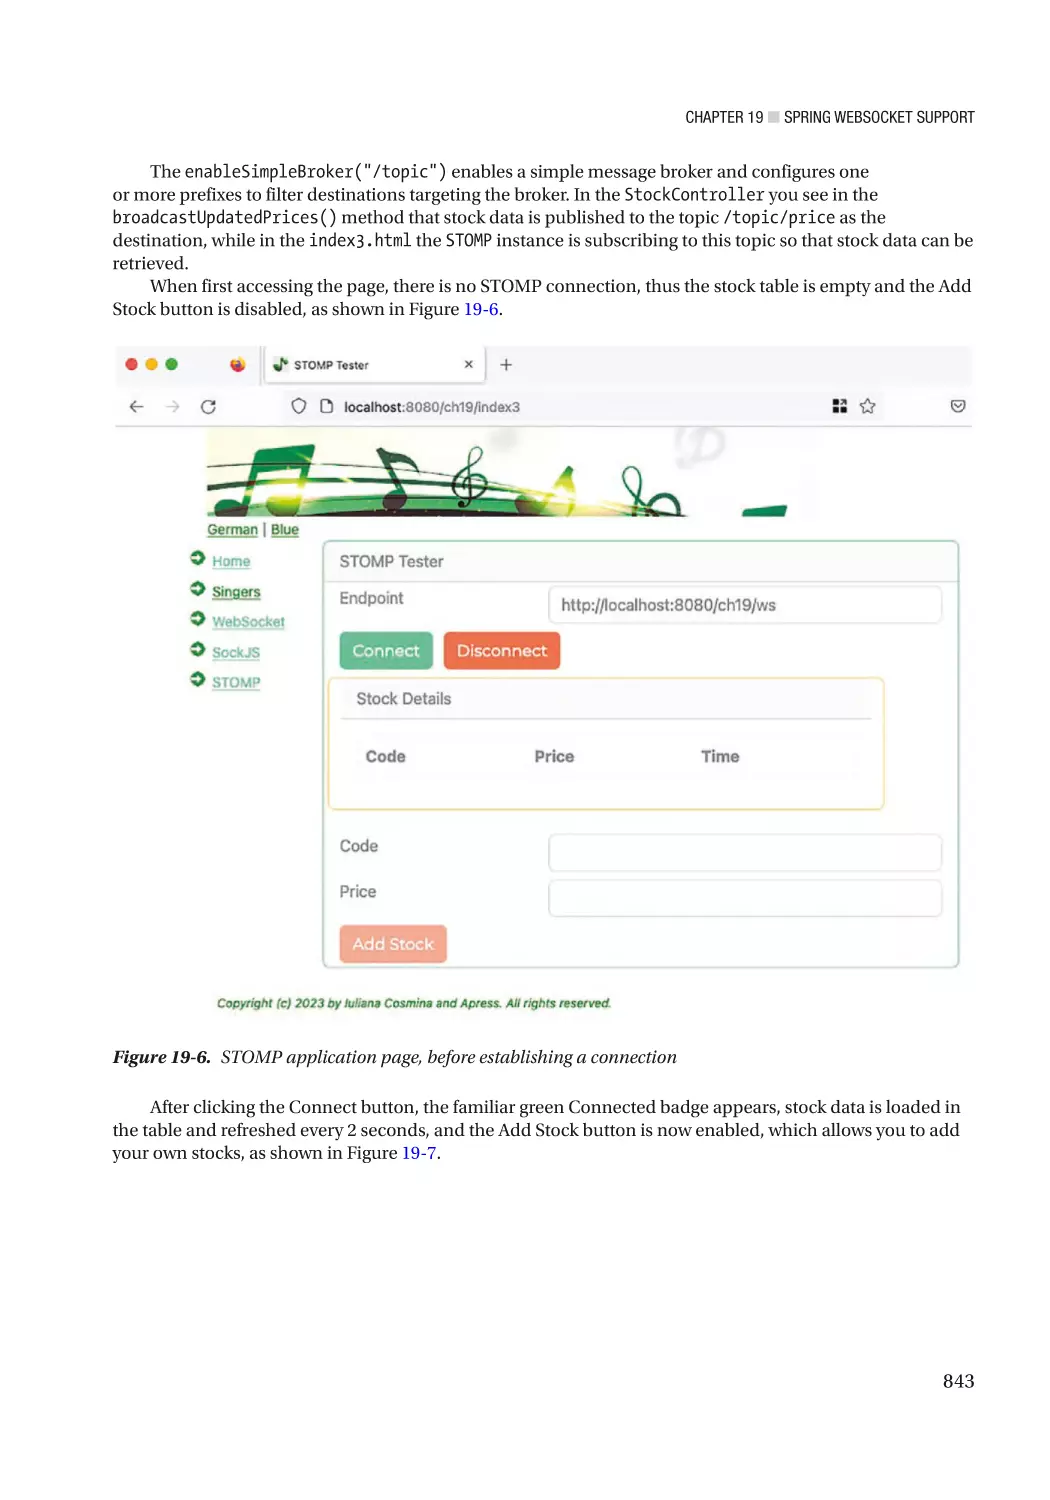
Sending Messages with STOMP����������������������������������������������������������������������������������� 836
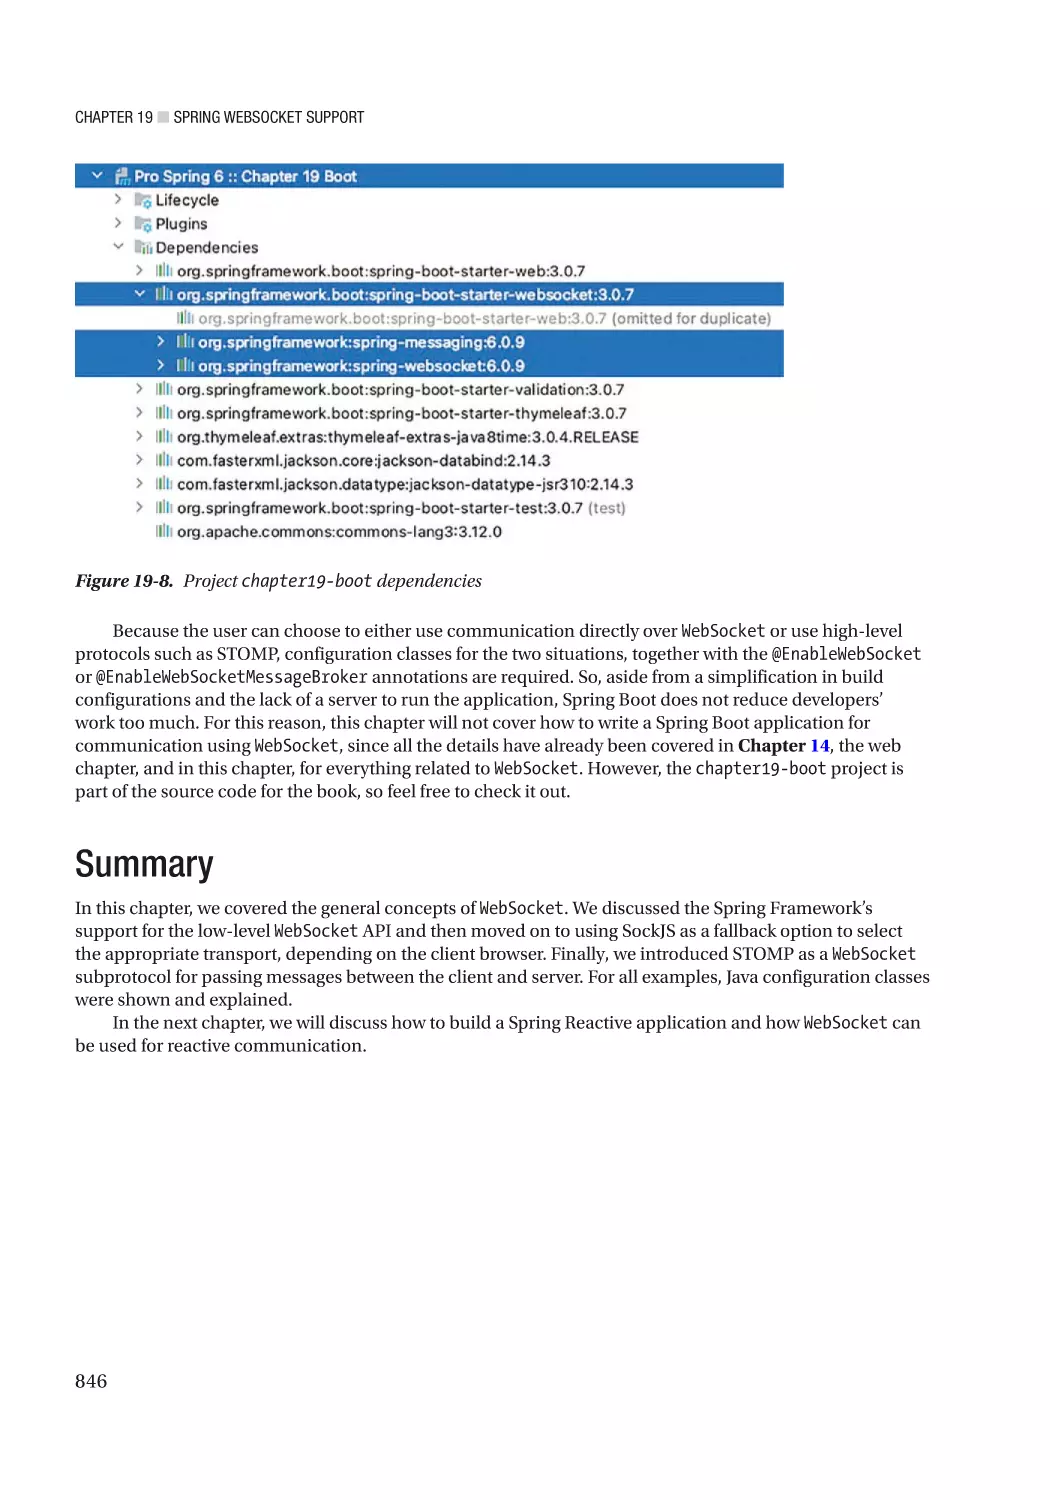
Spring Boot Equivalent Application����������������������������������������������������������������������������������������������������� 845
Summary���������������������������������������������������������������������������������������������������������������������� 846
xvi
■ Table of Contents
■Chapter
■
20: Reactive Spring������������������������������������������������������������������������������ 847
Introduction to Reactive Programming in Spring��������������������������������������������������������� 848
Introducing Spring WebFlux����������������������������������������������������������������������������������������� 853
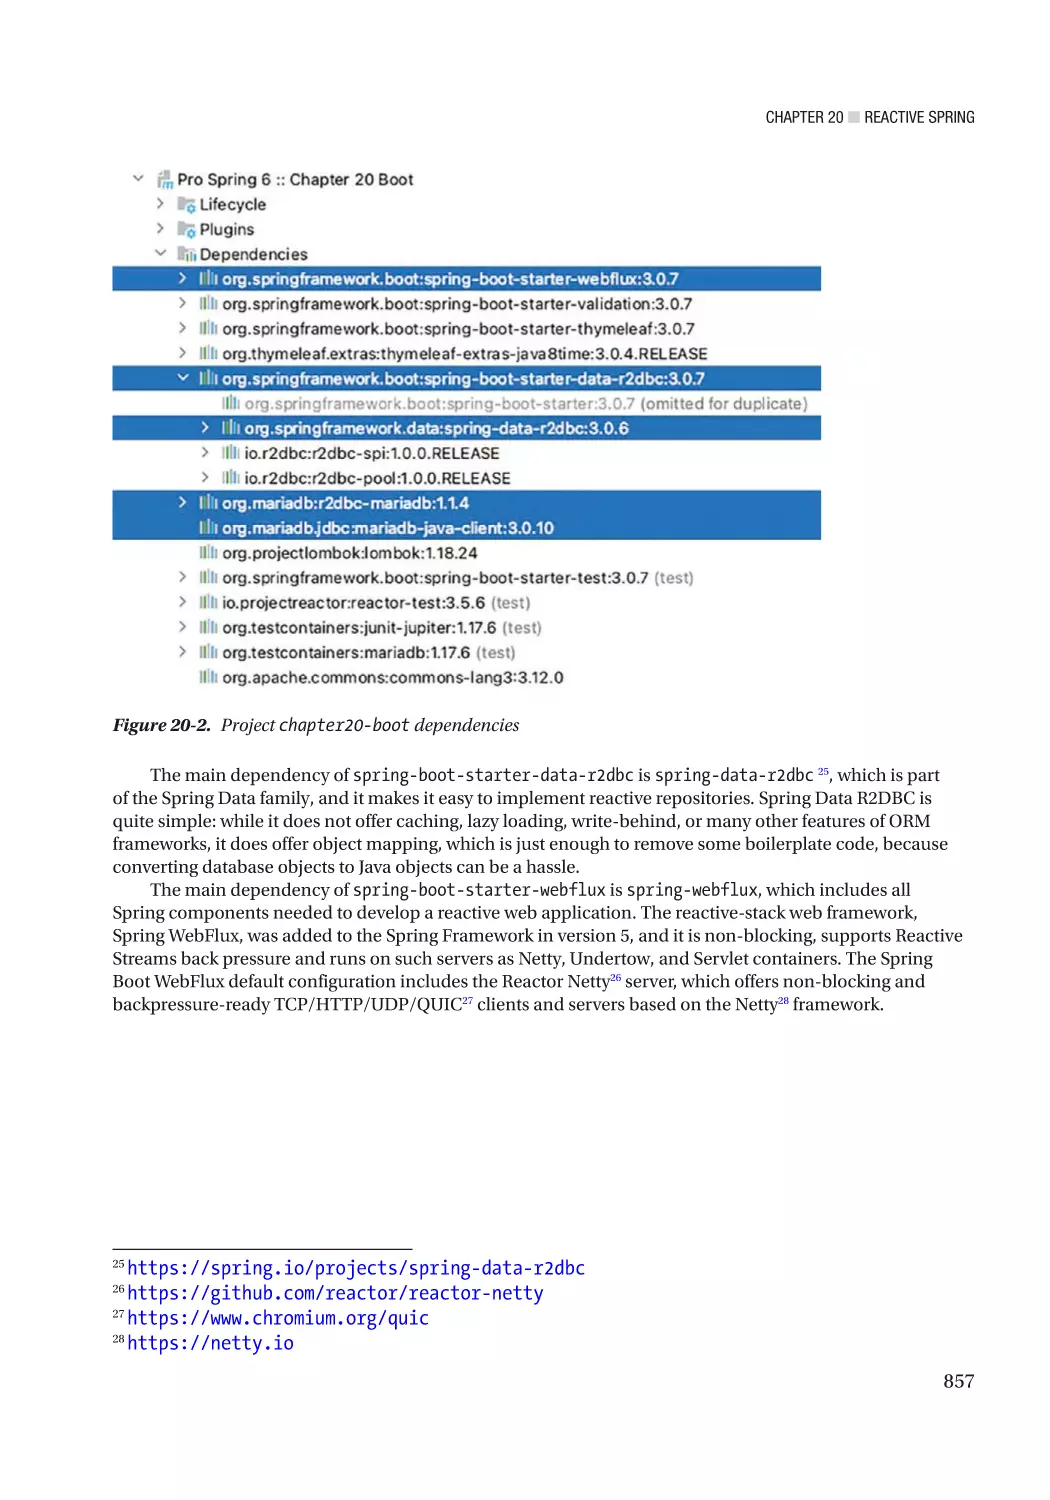
Spring Boot Configuration for a Reactive application������������������������������������������������������������������������� 856
Reactive Repository and Database����������������������������������������������������������������������������������������������������� 858
Reactive Services������������������������������������������������������������������������������������������������������������������������������� 864
Reactive Controllers��������������������������������������������������������������������������������������������������������������������������� 871
Handler Classes and Functional Endpoints���������������������������������������������������������������������������������������� 873
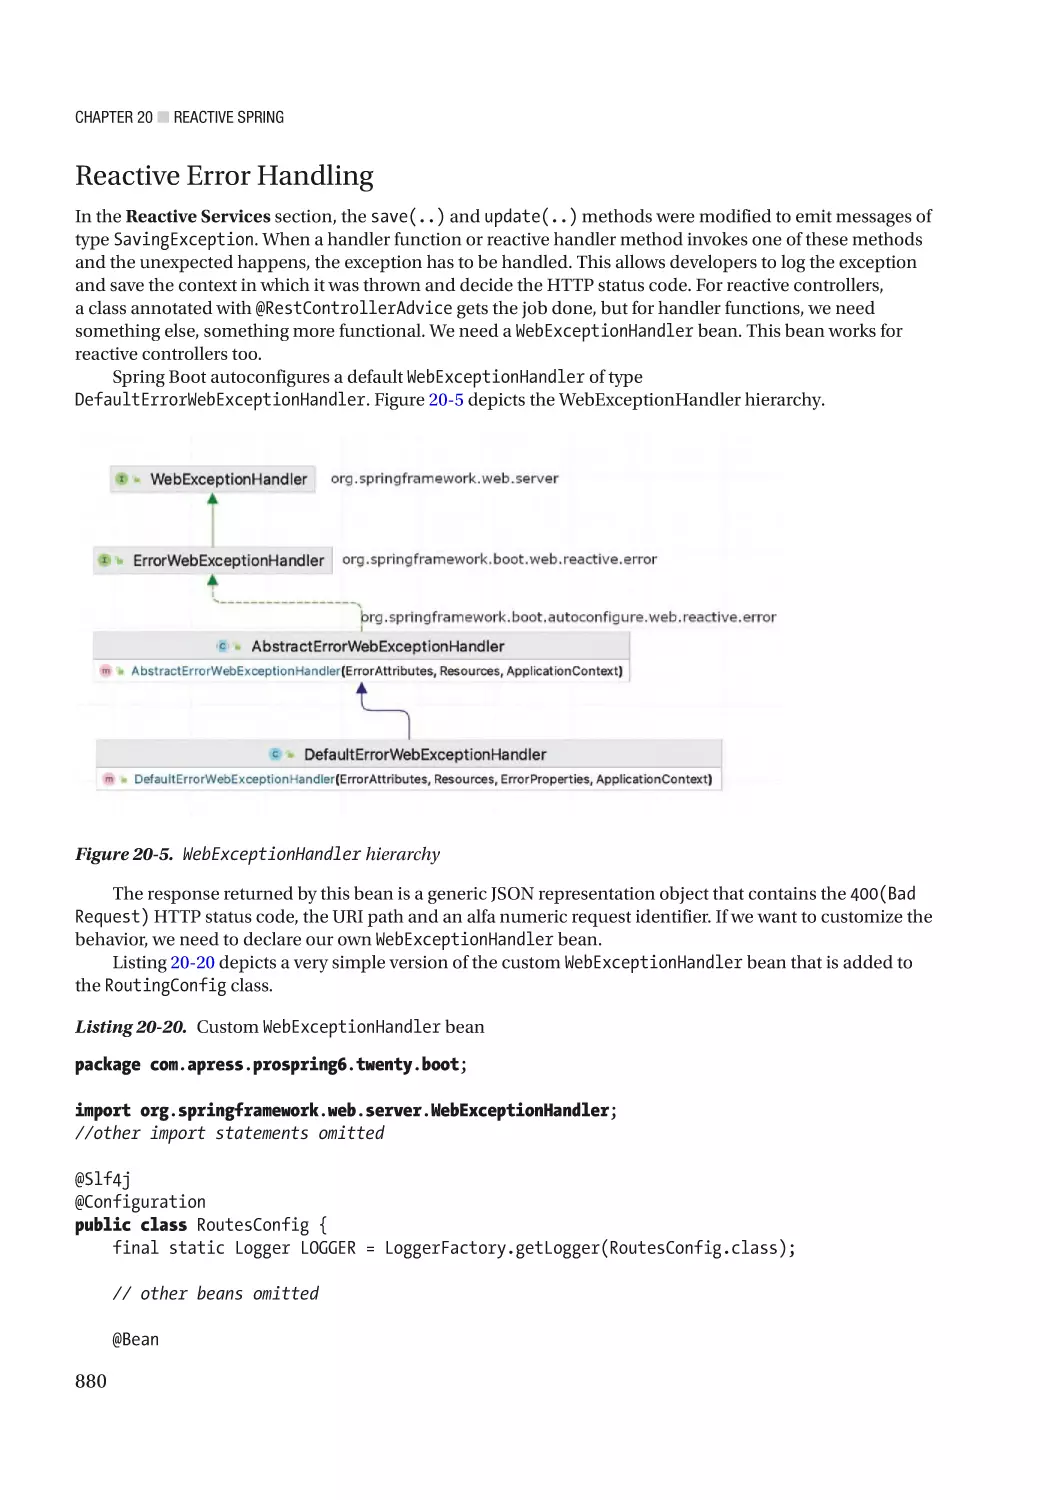
Reactive Error Handling���������������������������������������������������������������������������������������������������������������������� 880
Testing Reactive Endpoints with WebTestClient��������������������������������������������������������������������������������� 881
Reactive Web Layer���������������������������������������������������������������������������������������������������������������������������� 884
Handler Functions Validation�������������������������������������������������������������������������������������������������������������� 891
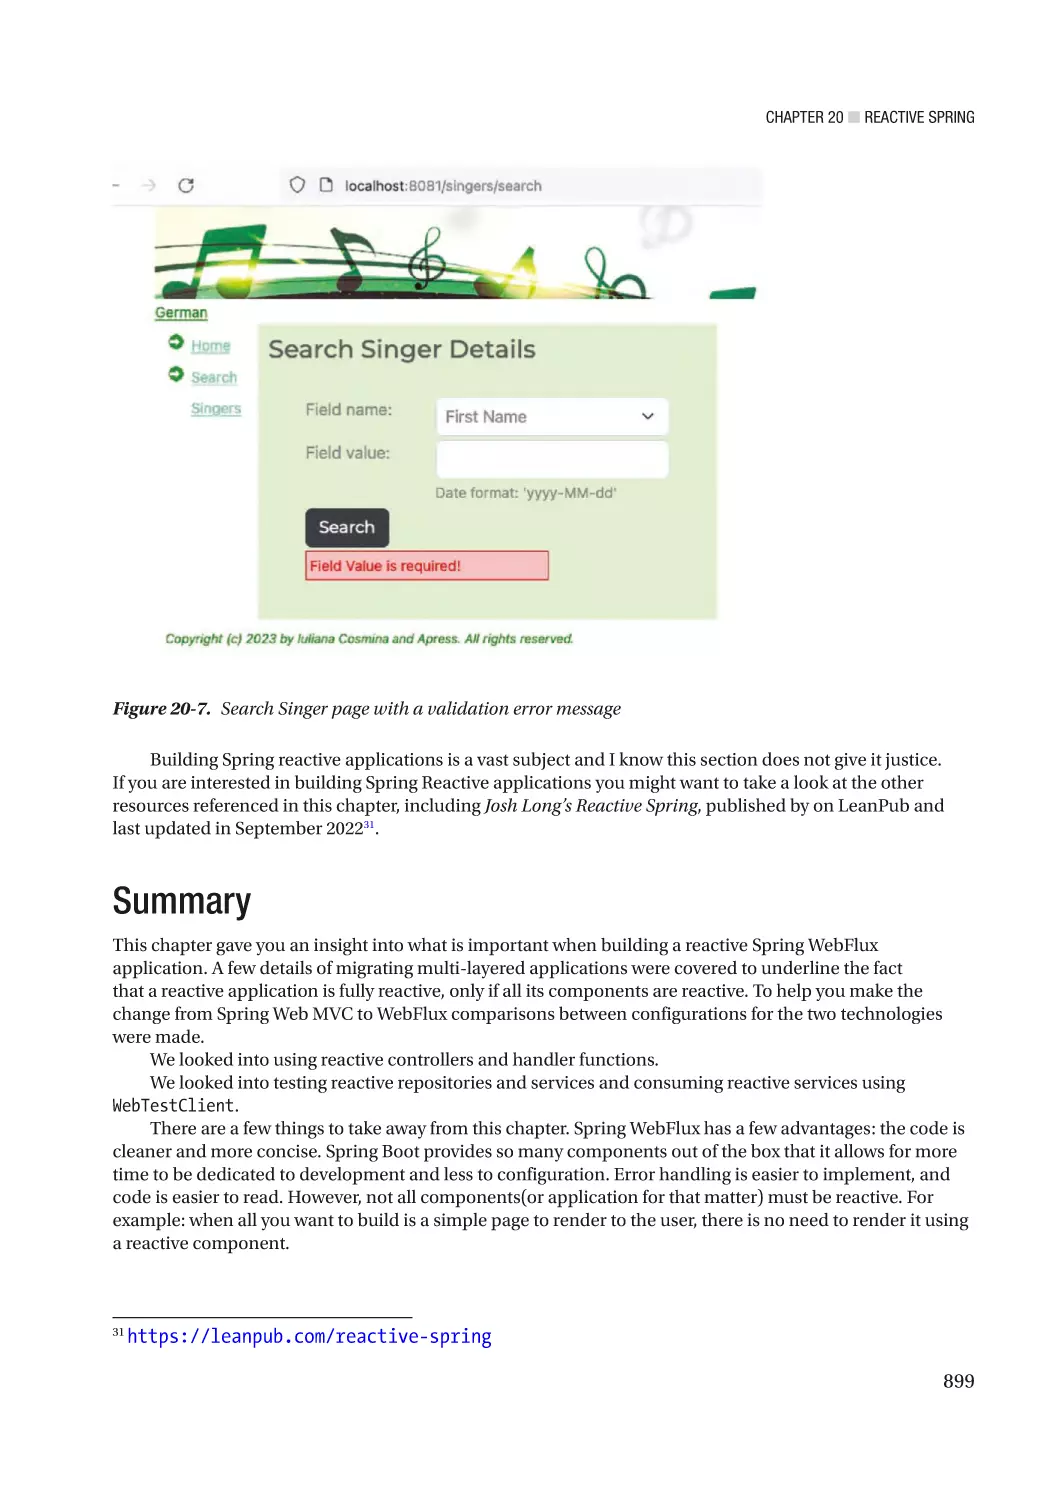
Summary���������������������������������������������������������������������������������������������������������������������� 899
■Appendix
■
A�������������������������������������������������������������������������������������������������������� 901
Index��������������������������������������������������������������������������������������������������������������������� 915
xvii
About the Authors
Iuliana Cosmina is a Spring Certified Web Developer and a Spring Certified Core Spring Professional.
She is a Spring certified expert, as defined by Pivotal, the makers of Spring Framework, Spring Boot, and
other tools. Iuliana has authored books with Apress on Core Spring certification and Spring Certified web
development. She is a Lead Engineer at Cloudsoft, located in Edinburgh, Scotland, and is an active coder
and software contributor on Apache Brooklyn, GitHub, StackOverflow, and more.
Rob Harrop is a software consultant specializing in delivering high-performance, highly scalable enterprise
applications. He is an experienced architect with a particular flair for understanding and solving complex
design issues. With a thorough knowledge of both Java and .NET, Rob has successfully deployed projects
across both platforms. He also has extensive experience across a variety of sectors, retail and government
in particular. Rob is the author of five books, including the book you are currently reading, now at its sixth
edition, a widely acclaimed, comprehensive resource on the Spring Framework.
Chris Schaefer is a principle software developer for Spring projects at Pivotal, the makers of Spring
Framework, Boot, and other Spring tools.
Clarence Ho is the senior Java architect of a Hong Kong–based software consultancy firm, SkywideSoft
Technology Limited. Having worked in the IT field for more than 20 years, Clarence has been the team
leader of many in-house application development projects, as well as providing consultancy services on
enterprise solutions to clients.
xix
About the Technical Reviewer
Manuel Jordan Elera is an autodidactic developer and researcher who
enjoys learning new technologies for his own experiments and creating
new integrations. Manuel won the Springy Award 2013 Community
Champion and Spring Champion. In his little free time, he reads the Bible
and composes music on his guitar. Manuel is known as dr_pompeii. He
has tech-reviewed numerous books, including Pro Spring MVC with
WebFlux (Apress, 2020), Pro Spring Boot 2 (Apress, 2019), Rapid Java
Persistence and Microservices (Apress, 2019), Java Language Features
(Apress, 2018), Spring Boot 2 Recipes (Apress, 2018), and Java APIs,
Extensions and Libraries (Apress, 2018). You can read his detailed
tutorials on Spring technologies and contact him through his blog at www.
manueljordanelera.blogspot.com. You can follow Manuel on his Twitter
account, @dr_pompeii.
xxi
Acknowledgments
Writing this book was difficult. Spring has grown exponentially since the first edition of this book was
written, and a small framework providing dependency injection for Java applications became a collection
of projects designed to be used to develop a myriad of modern applications, from websites to mobile
applications to mini applications run on Arduinos and microservices.
This book has a long history; this is the sixth edition, after all. Rob Harrop and Jan Machacheck wrote a
comprehensive Spring book named Pro Spring: From Professional to Expert, which was published in 2005;
that was the first edition. Spring has changed dramatically over the past 18 years, and the book has evolved
accordingly, so much so that there is little left of the original text. What you are reading right now is its sixth
edition. In previous editions, a rotating cast of authors have taken the mantle and responsibility of making
this book better and upgrading it to keep up with Spring Framework’s growth. I was brought on board for the
fifth edition, to upgrade the material from Spring 4 to Spring 5, making this the second time I am involved in
upgrading this book.
However, I did not produce the sixth edition alone, so in this section I want to thank all the people
involved: Steve Anglin for taking a gamble on me in 2014 and giving me a chance to become a technical
author; Mark Powers for guiding me through the process of producing a book that is worth publishing; to my
technical reviewer, Manual Jordan Elera, for making sure making sure the code in the book is good; all the
grammar reviewers for making sure the text in the book is readable, understandable, and meaningful.
A big thank you to the people who read the book, ran the code, and found errors and bugs that I and all
those previously mentioned people missed: Rafal Nowicki, Carlos Perez, Affid Fedorov, and all the GitHub
contributors.
And the biggest thank you to my mentor, Achim Wagner, to my dearly departed friend, Evelyn Walker,
and to my friends, Mihaela Filipiuc, Agustin Demouselle, and the Bogza-Vlad family, for always being there
for me when I needed you.
—Iuliana Cosmina
xxiii
Introduction
Covering version 6 of the Spring Framework, this book is the most comprehensive Spring reference and
practical guide available for harnessing the power of this leading enterprise Java application development
framework.
This edition covers core Spring and its integration with other leading Java technologies, such as
Hibernate, JPA 3, Thymeleaf, Kafka, GraphQL, and WebFlux. The focus of the book is on using Java
configuration classes, lambda expressions, Spring Boot, and reactive programming. We share our insights
and real-world experiences with enterprise application development, including remoting, transactions, web
and presentation tiers, and much more.
With Pro Spring 6, you’ll learn how to do the following:
•
Use inversion of control (IoC) and dependency injection (DI)
•
Discover what is new in Spring Framework 6
•
Build Spring-based web applications using Spring MVC
•
Build Spring web reactive applications with Spring WebFlux
•
Test Spring applications using Junit 5
•
Utilize the new Java 8+ lambda syntax
•
Use Spring Boot to an advanced level to get any kind of Spring application up and
running in no time
•
Package your Spring Native application into a Docker image with Cloud Native
Buildpacks
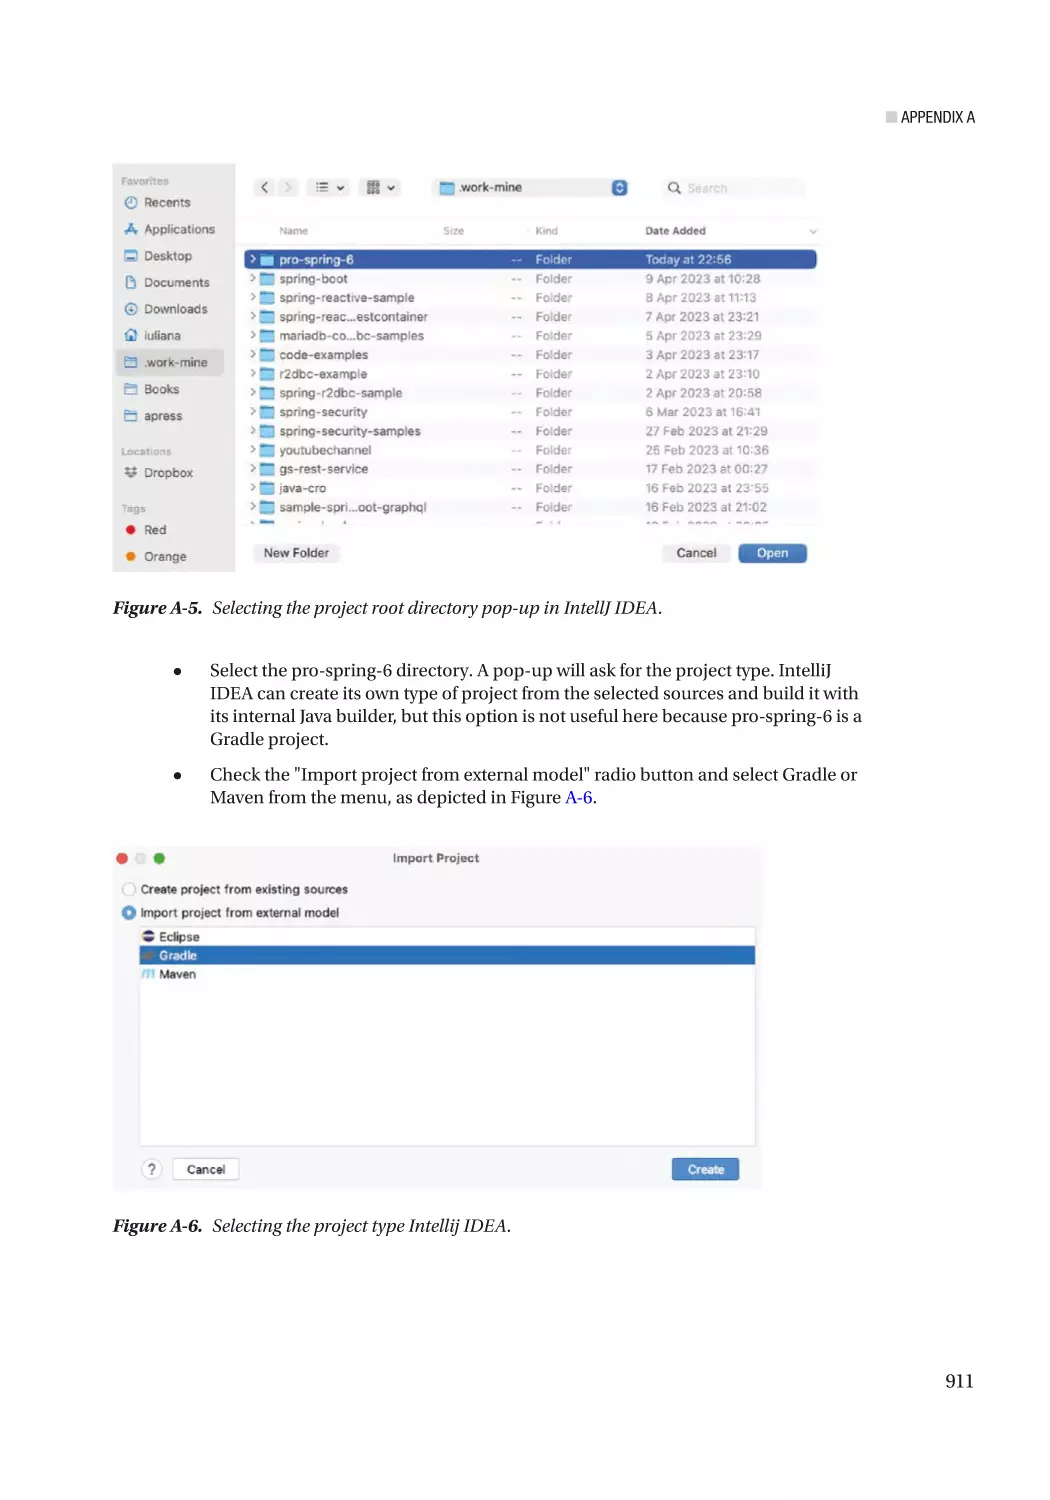
There is a multimodule project associated with this book, configured using Gradle 8/Maven 3.9.
The project is available on the Apress official repository: https://github.com/Apress/pro-spring-6.
The project can be built immediately after cloning according to the instructions in its README.adoc file. If
you do not have Gradle/Maven installed locally, you can rely on IntelliJ IDEA to download it and use it to
build your project by using the Gradle/Maven Wrapper (https://docs.gradle.org/current/userguide/
gradle_wrapper.html). There is a small appendix at the end of the book describing the project structure,
configuration, and additional details related to development tools that can be used to develop and run the
code samples of the book, which are available on GitHub.
As the book was being written, new versions of Spring 6 and Spring Boot 3 were released, a new version
of IntelliJ IDEA was released, and new versions of Gradle/Maven and other technologies used in the book
were updated. We upgraded to the new versions to provide the most recent information and keep this
book synchronized with the official documentation. Several reviewers have checked the book for technical
accuracy, but if you notice any inconsistencies, please send an email to editorial@apress.com and errata
will be created.
xxv
■ Introduction
You can access the example source code for this book at github.com/apress/pro-spring-6. It
will be maintained, synchronized with new versions of the technologies, and enriched based on the
recommendations of the developers using it to learn Spring.
We truly hope you will enjoy using this book to learn Spring as much as we enjoyed writing it.
xxvi
CHAPTER 1
Introducing Spring
Every year there are tweets and blog posts announcing that Java is no longer relevant and there is a shiny
new technology taking its place. And every year these turn out to be just industry rumors. Java is an everevolving technology that has been in the top 10 most used technologies by companies to build software
solutions since its initial release in 1995. A lot of libraries and frameworks have been built on Java, many of
them available to developers as open source projects, others safely locked away in a private cloud because of
the sensitive information they manage(e.g., banking applications).
One of the most popular frameworks written in Java is the Spring Framework. The first version of Spring
was released in October 2002 and consisted of a small core with an inversion of control container that was
easy to configure and use. Over the years the Spring Framework has become the main replacement of Java
Enterprise Edition (JEE) servers and has grown into a full-blown technology made up of many distinct projects,
each with its own purpose. Whether you want to build microservices applications, or classical ERPs (Enterprise
resource planning), or compile your app into a native image to run on GraalVM, Spring has a project for that.
Throughout this book, you will see many applications of different open source technologies, all of
which are unified under the Spring Framework. When working with Spring, an application developer can
use a large variety of open source tools, without needing to write reams of code and without coupling his
application too closely to any particular tool.
This is an introductory chapter that covers important details about this book, introduces you to the
Spring Framework, explains why understanding Spring in depth is so useful for developers, and describes
how powerful Spring can be when used correctly. If you are already familiar with Spring, you might want to
skip this chapter and proceed straight to Chapter 2.
About This Book
Covering version 6 of the Spring Framework, this book is the most comprehensive Spring reference and
practical guide available for harnessing the power of this leading enterprise Java application development
framework.
This edition covers core Spring and its integration with other leading Java technologies, such as
Hibernate, JPA 2, Thymeleaf, Apache Kafka, and others. The focus of the book is on using Java configuration
classes, lambda expressions, Spring Boot, and reactive programming. We share our insights and real-world
experiences with enterprise application development, including remoting, transactions, the web and
presentation tiers, and much more.
With Pro Spring 6, you’ll learn how to do the following:
•
Use and understand inversion of control (IoC) and dependency injection (DI)
•
Discover what’s new in Spring Framework 6
© Iuliana Cosmina, Rob Harrop, Chris Schaefer, and Clarence Ho 2023
I. Cosmina et al., Pro Spring 6, https://doi.org/10.1007/978-1-4842-8640-1_1
1
Chapter 1 ■ Introducing Spring
•
Build Spring-based web applications using Spring MVC
•
Test Spring applications using Junit 5 and other Java testing libraries
•
Utilize the new capabilities of Java 19
•
Use Spring Boot to an advanced level, but learn how to do without it as well
•
Secure Spring applications
•
Monitor Spring applications
•
Write reactive applications using Spring
•
Build your Spring application and run it on a compact native image with
Spring Native
To make sure the focus of the book is on Spring, instructions on how to install additional technologies
mentioned in the book are provided in documentation files for each project in the book repository. This, of
course, will be pointed out to you in the book when necessary.
What Is Spring?
Perhaps one the hardest parts of explaining Spring is classifying exactly what it is. Spring was described in
the beginning, shortly after being launched, as a lightweight framework for building Java applications, but
that statement brings up two interesting points:
•
You can use Spring to build any application in Java (for example, stand-alone, web,
mobile, or JEE applications), unlike many other frameworks (such as Apache Struts,
which is limited to web applications).
•
The lightweight part of the description is not related to the number of classes or the
size of the distribution but rather defines the principle of the Spring philosophy as a
whole—that is, minimal impact. Spring is lightweight in the sense that you have to
make few, if any, changes to your application code to gain the benefits of the Spring
Core, and should you choose to stop using Spring at any point, you will find that
doing so is quite simple.
Notice that we qualified that last statement to refer to the Spring Core only—many of the extra Spring
components, such as data access, require a much closer coupling to the Spring Framework. However, the
benefits of this coupling are quite clear, and throughout the book we present techniques for minimizing the
impact this has on your application. Also, if coupling your code to a framework brings with it development
speed and better dependency management, which reduces the number of build failures during upgrades,
isn’t the price worth it? Also, with Spring Native, Spring applications now can be run on native images (e.g.,
GraalVM) that provide various advantages, such as an instant startup and reduced memory consumption, so
gone are the days when JavaScript or .NET developers could diss on Spring by saying it is heavyweight.
Evolution of the Spring Framework
The Spring Framework originated from the book Expert One-on-One: J2EE Design and Development by
Rod Johnson (Wrox, 2002). In his book, Johnson presented his own framework, called the Interface 21
Framework, which he developed to use in his own applications. Released into the open source world, this
framework formed the foundation of the Spring Framework as we know it today. Over the last decade, the
2
Chapter 1 ■ Introducing Spring
Spring Framework has grown dramatically in core functionality, associated projects, and community support.
Spring 0.9 started as a community project made of a few core modules and without an official documentation.
VMware took it over and started its transition from XML to Java Config (using annotations) in version 2.5.
In 2012, Pivotal Software split from VMware and took over Spring and grew it from a framework to a
collection of projects. There were two major releases under Pivotal: 4.x, which was the first version to fully
support Java 8, and 5.x, which dropped support for XML configurations completely.
Together with Spring 4.x, Spring Boot was released and became one of the most used Spring projects.
Spring Boot takes an opinionated view of building Spring applications. Developers at Pivotal have identified
a few types of applications being built and have created templates for them using a set of default component
dependencies and automatic configuration of components. These application templates are modeled by
a set of Spring Boot starter projects. For example, if you would want to create a Spring web application,
just add the spring-boot-starter-web dependency to your project and you have a minimal, Spring web
application with default configurations. This is possible because Spring Boot has some cool features such
as embedded application server (Jetty/Tomcat), a command-line interface based on Groovy, and health/
metrics monitoring.
Spring Boot provides the ability to develop applications quickly, based on a stable, curated set
of dependencies with all the required Spring Framework components configured correctly. This is
good because it reduces the developer setup effort. However, this also reduces the need for a deeper
understanding of the Spring Framework, which might trick developers into a false sense of confidence in
their knowledge and understanding of the Spring Framework.
In the previous edition of this book, this chapter contained a long list of all the Spring versions ever
released and their most important features. Since that information is available publicly on the Internet, we
decided to skip that list both to reduce the size of the book and to dedicate that space to something more
interesting such as Project Reactor1 and Spring Native2.
At the end of 2019, VMware bought Pivotal Software and took over Spring again, so at the end of 2021,
Spring 6.x will be out, the first major Spring Release under VMware. At the time this chapter is being written,
the first milestone has already been released and the most important thing about it is that the codebase has
been upgraded to JDK 17. This version is considered the first JDK3 produced by Oracle that provides enough
performance and security improvements for a migration from JDK 1.8 to be worth it for companies that are
(still) reluctant to do so.
A lot of deprecated classes and packages that provided support for deprecated third-party technologies
have been removed and existing classes have been updated to work with newer versions of certain
technologies (for example, Tomcat 10, Jetty 11, or Undertow 2.2.14).
https://projectreactor.io
https://docs.spring.io/spring-native/docs/current/reference/htmlsingle
3
https://blogs.oracle.com/javamagazine/post/its-time-to-move-your-applications-tojava-17-heres-why-and-heres-how
1
2
3
Chapter 1 ■ Introducing Spring
Spring Projects
The current Spring Projects are listed on the official Spring site4, but for your convenience here is a list
of them with a short summary of each. The site might list a different set of projects because the Spring
ecosystem is quite dynamic.
•
Spring Boot consists of a set of libraries (called starters) that provide default
application templates that can be customized easily to quickly develop multiple
types of stand-alone, production-grade Spring-based applications.
•
Spring Framework consists of a set of libraries that provide support for dependency
injection, transaction management, data access, messaging, and other core
functionalities for any type of application. The Spring Framework now includes the
Spring WebFlux framework that represents the Spring reactive-stack designed to
build fully non-blocking, with back-pressure support reactive applications on servers
such as Netty, Undertow, and Servlet 3.1+ containers.
•
Spring Data consists of a set of libraries that provide a consistent programming
model for accessing various databases both relational (e.g., MySQL and Oracle) and
nonrelational (e.g., MongoDB and Couchbase). Support for in-memory databases
(e.g., H2 and MongoDB) is included, which is pretty useful for testing applications
without the drag of a concrete database. Also, Spring Data R2DBC makes it easy to
access reactive databases.
•
Spring Security provides the ability to secure applications easily, with a simple
model for authentication and authorization.
•
Spring Cloud provides a set of common tools for writing microservices applications
destined to run in distributed systems.
•
Spring Cloud Data Flow provides a set of common tools for streaming and
batch processing of data between microservices running in Cloud Foundry and
Kubernetes.
•
Spring Integration provides support for building Spring applications that make
use of lightweight messaging and integrate with external systems via declarative
adapters.
•
Spring Session provides an API and implementations for managing a user’s session
information.
•
Spring HATEOAS provides some APIs to ease creating REST representations that
follow the HATEOAS principle when working with Spring and especially Spring
MVC. Some developers/architects consider that the hypermedia5 pollutes the
REST data and a better solution is to use Swagger6 to expose (and document) an
application’s API or Spring REST Docs.
•
Spring for GraphQL provides the tools to build Spring applications on GraphQL
Java. GraphQL7 is a query language to retrieve data from a server.
https://spring.io/projects
https://en.wikipedia.org/wiki/HATEOAS
6
https://swagger.io
7
https://www.graphql-java.com
4
5
4
Chapter 1 ■ Introducing Spring
8
•
Spring REST Docs provides the tools to expose and document a Spring
application’s API.
•
Spring Batch is a framework that provides the tools to build lightweight and robust
Spring applications that handle immense volumes of data.
•
Spring AMQP provides the tools to build AMQP-based messaging solutions
using Spring.
•
Spring CredHub is part of the Spring Cloud project family and provides client-side
support for storing, retrieving, and deleting credentials from a CredHub server
running in a CloudFoundry platform.
•
Spring Flo is a JavaScript library that offers a basic embeddable HTML5 visual
builder for pipelines and simple graphs. Spring Cloud Data Flow is an extension of
this project.
•
Spring for Apache Kafka provides tools for building Kafka-based messaging
solutions using Spring.
•
Spring LDAP is a library to simplify LDAP programming in Java, built on the same
principles as Spring JDBC.
•
Spring Shell provides the tools to build a full-featured shell (aka command line)
application by depending on the Spring Shell jars and adding their own commands
(which come as methods on Spring beans).
•
Spring Statemachine is a framework for application developers to use state machine
concepts with Spring applications.
•
Spring Vault provides familiar Spring abstractions and client-side support
for accessing, storing, and revoking secrets. It offers both low-level and highlevel abstractions for interacting with HashiCorp’s Vault8, freeing the user from
infrastructural concerns.
•
Spring Web Flow extends Spring MVC to provide the tools for implementing the
“flows” of a web application. A flow encapsulates a sequence of steps that guide a
user through the execution of some business task. It spans multiple HTTP requests,
has state, deals with transactional data, is reusable, and may be dynamic and longrunning in nature.
•
Spring Web Services (Spring-WS) is a product of the Spring community focused
on creating document-driven web services. Spring Web Services aims to facilitate
contract-first SOAP service development, allowing for the creation of flexible web
services using one of the many ways to manipulate XML payloads.
•
Spring Native (currently still considered experimental, but quickly being adopted
in the industry) provides support for compiling Spring applications to native
executables using the GraalVM native-image compiler.
https://www.vaultproject.io
5
Chapter 1 ■ Introducing Spring
•
Spring Initializr (not actually a project, but good to know), available at https://
start.spring.io, provides a quick start for creating custom Spring Boot projects
completely configurable according to the developer’s necessities: programming
language, build tool, Spring Boot version, and project requirements (database
access, web access, event messaging, security, etc.).
There are a few projects that over the years have lost the developer community’s interest (e.g., Spring
Scala) and are now in a state called in the attic. If developers’ interest continues to drop, these projects
are archived and others will surely take their place. If you want to keep up to date with the Spring projects
ecosystem, check https://spring.io/projects from time to time.
That’s enough about Spring projects to pique your interest; let’s talk more in dept about Spring.
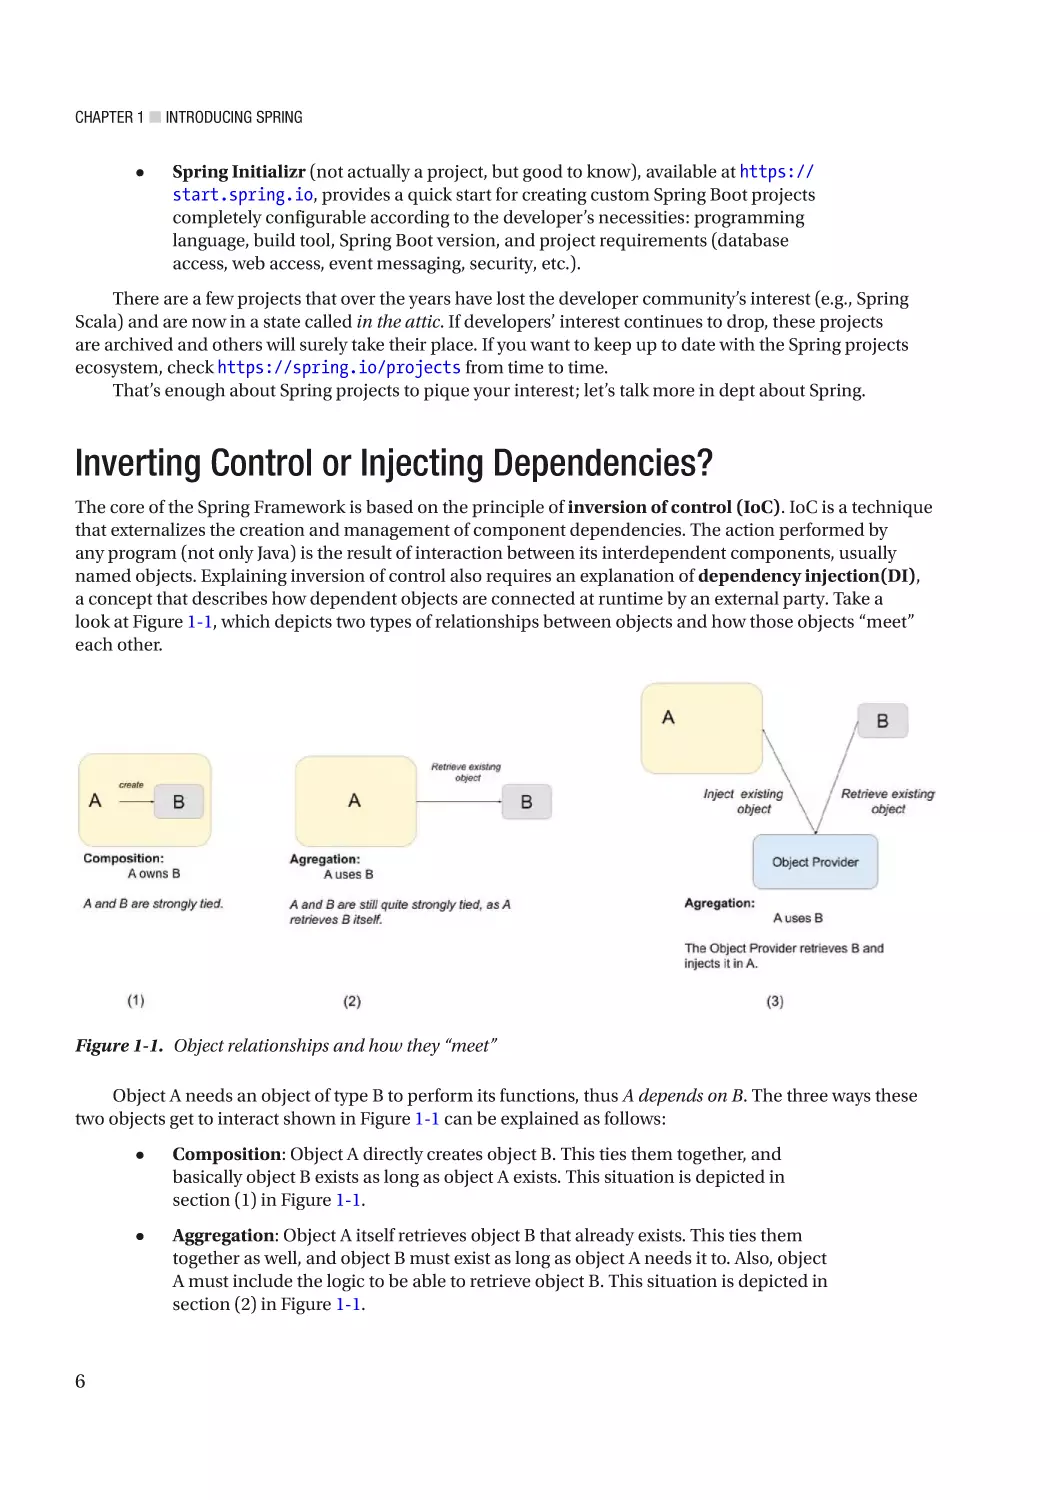
Inverting Control or Injecting Dependencies?
The core of the Spring Framework is based on the principle of inversion of control (IoC). IoC is a technique
that externalizes the creation and management of component dependencies. The action performed by
any program (not only Java) is the result of interaction between its interdependent components, usually
named objects. Explaining inversion of control also requires an explanation of dependency injection(DI),
a concept that describes how dependent objects are connected at runtime by an external party. Take a
look at Figure 1-1, which depicts two types of relationships between objects and how those objects “meet”
each other.
Figure 1-1. Object relationships and how they “meet”
Object A needs an object of type B to perform its functions, thus A depends on B. The three ways these
two objects get to interact shown in Figure 1-1 can be explained as follows:
6
•
Composition: Object A directly creates object B. This ties them together, and
basically object B exists as long as object A exists. This situation is depicted in
section (1) in Figure 1-1.
•
Aggregation: Object A itself retrieves object B that already exists. This ties them
together as well, and object B must exist as long as object A needs it to. Also, object
A must include the logic to be able to retrieve object B. This situation is depicted in
section (2) in Figure 1-1.
Chapter 1 ■ Introducing Spring
•
Dependency injection allows severing that tie, as depicted in section (3) in
Figure 1-1, by using an external party to provide object B to object A, which is still
aggregation, but with no direct ties and a twist.
Inversion of control is a design principle in which generic reusable components are used to control
the execution of problem-specific code, as in retrieving dependencies. Thus, you can say that Spring is
a dependency handler used to perform dependency injection, and it was designed following the IoC
principle, also known as the Hollywood Principle: Don’t call us, we’ll call you.
Spring’s DI implementation is based on two core Java concepts: JavaBeans (also known as POJOs, plain
old Java objects) and interfaces. When you use Spring as the DI provider, you gain the flexibility of defining
dependency configuration within your applications in different ways. Up to Spring 2.5, XML was the only
way to do it. Spring 2.5 introduced a few annotations to support configuration within the code. Spring 3
introduced Java configuration classes, which became the norm, although XML is still supported in case you
really need it. Starting with version 4, Spring provides support for Groovy-based configurations. This means
that Groovy classes can be legitimate Spring beans.
JavaBeans (POJOs) provide a standard mechanism for creating Java resources that are configurable in
a number of ways, such as constructors and setter methods. In Chapter 3, you will see how Spring uses the
JavaBean specification to form the core of its DI configuration model; in fact, any Spring-managed resource
is referred to as a bean. If you are unfamiliar with JavaBeans, we present a quick primer at the beginning of
Chapter 3.
Interfaces and DI are technologies that are mutually beneficial. Clearly designing and coding
an application to interfaces makes for a flexible application, but the complexity of wiring together an
application designed using interfaces is quite high and places an additional coding burden on developers.
By using DI, you reduce to almost zero the amount of code you need to use an interface-based design in your
application. Likewise, by using interfaces, you can get the most out of DI because your beans can utilize any
interface implementation to satisfy their dependency. The use of interfaces also allows Spring to utilize JDK
dynamic proxies (the Proxy pattern) to provide powerful concepts such as aspect-oriented programming
(AOP) for crosscutting concerns.
In the context of DI, Spring acts more like a container than a framework—providing instances of your
application classes with all the dependencies they need—but it does so in a much less intrusive way. Using
Spring for DI relies on nothing more than following the JavaBeans naming conventions within your classes—
there are no special classes from which to inherit or proprietary naming schemes to follow. If anything, the
only change you make in an application that uses DI is to expose more properties on your JavaBeans, thus
allowing more dependencies to be injected at runtime.
Evolution of Dependency Injection
In the past few years, thanks to the popularity gained by Spring and other DI frameworks, DI has gained wide
acceptance among Java developer communities. At the same time, developers were convinced that using
DI was a best practice in application development, and the benefits of using DI were also well understood.
The popularity of DI was acknowledged when the Java Community Process (JCP) adopted JSR-330
(“Dependency Injection for Java”) in 2009. JSR-330 had become a formal Java specification request, and as
you might expect, one of the specification leads was Rod Johnson—the founder of the Spring Framework.
In JEE 6, JSR-330 became one of the included specifications of the entire technology stack. In the
meantime, the EJB architecture (starting from version 3.0) was also revamped dramatically; it adopted the DI
model in order to ease the development of various Enterprise JavaBeans apps.
Although we leave the full discussion of DI until Chapter 3, it is worth taking a look at the benefits of
using DI rather than a more traditional approach.
•
Reduced glue code: DI dramatically reduces the amount of code you have to
write to glue the components of your application together. Code required to glue
components together is often trivial, but repetitive, and a lot of it can increase the
7
Chapter 1 ■ Introducing Spring
overall complexity of your solution. It gets even trickier when you need to look up
dependencies in a Java Naming and Directory Interface (JNDI) repository or when
the dependencies cannot be invoked directly, as is the case with remote resources. In
these cases, DI can really simplify the glue code by providing automatic JNDI lookup
and automatic proxying of remote resources.
•
Simplified application configuration: A variety of ways can be used to configure
classes that are injectable to other classes. You can use the same technique to
express the dependency requirements to the “injector” for injecting the appropriate
bean instance or property. In addition, DI makes it much simpler to swap one
implementation of a dependency for another. For example, using DI, a DAO
component that performs data operations against a PostgreSQL database can easily
be switched to perform the same operations on an Oracle database via configuration
(as you will see in Chapter 6).
•
Ability to manage common dependencies in a single repository: Using a traditional
approach to dependency management of common services—for example, data
source connection, transaction, and remote services—you create instances (or
lookup from some factory classes) of your dependencies where they are needed
(within the dependent class). This causes the dependencies to spread across the
classes in your application, and changing them can prove problematic. When you
use DI, all the information about those common dependencies is contained in a
single repository, making the management of dependencies much simpler and less
error-prone.
•
Improved testability: Classes designed for DI are easily testable because
dependencies can be replaced easily. For example, if you want to test a DAO
component, you can replace the concrete database with an in-memory database via
configuration. This has the benefit of your tests being executed faster but within an
appropriate context that mimics as much as possible a production environment. This
mechanism can be extended for testing any tier of your application and is especially
useful for testing web components where you can create mock implementations of
HttpServletRequest and HttpServletResponse.
•
Fostering of good application design: A typical injection-oriented application is
designed so that all major components are defined as interfaces, and then concrete
implementations of these interfaces are created and hooked together using the
DI container. This kind of design was possible in Java before the advent of DI and
DI-based containers such as Spring, but by using Spring, you get a whole host of DI
features for free, and you are able to concentrate on building your application logic,
not a framework to support it.
As you can see from this list, DI provides a lot of benefits for your application, but it is not without its
drawbacks. In particular, DI can make it difficult for someone not intimately familiar with the code to see
just what implementation of a particular dependency is being hooked into which objects. Typically, this is
a problem only when developers are inexperienced with DI. We’ve heard a lot of colleagues in this situation
mentioning that Spring auto-magically injects beans, or complaining that they don’t understand where a
bean is coming from, or, worst of all, asking “Why is Spring not finding my bean?” After becoming more
experienced and following good DI coding practice (for example, putting all injectable classes within each
application layer into the same package), developers will be able to discover the whole picture easily. For the
most part, the massive benefits of DI far outweigh this small drawback, but you should consider this when
planning your application.
8
Chapter 1 ■ Introducing Spring
Beyond Dependency Injection
Spring Core alone, with its advanced DI capabilities, is a worthy tool, but where Spring really excels is in its
myriad of additional features, all elegantly designed and built using the principles of DI. Spring provides
features for all layers of an application, from helper application programming interfaces (APIs) for data
access right through to advanced MVC (Model View Controller) capabilities. What is great about these
features in Spring is that, although Spring often provides its own approach, you can easily integrate them
with other tools in Spring, making these tools first-class members of the Spring family.
The following list describes the most important Spring features and indicates the chapters in which they
are covered in this book:
•
Aspect-oriented programming: AOP provides the ability to implement crosscutting
logic—that is, logic that applies to many parts of your application—in a single
place and to have that logic applied across your application automatically. Spring’s
approach to AOP, covered in Chapter 5, is to create dynamic proxies to the target
objects and weave the objects with the configured advice to execute the crosscutting
logic. By the nature of JDK dynamic proxies, target objects must implement an
interface declaring the method in which the AOP advice will be applied.
•
Spring Expression Language: Expression Language (EL) is a technology to allow an
application to manipulate Java objects at runtime. However, the problem with EL
is that different technologies provide their own EL implementations and syntax.
For example, Java Server Pages (JSP) and Java Server Faces (JSF) both have their
own EL, and their syntax are different. To solve the problem, the Unified Expression
Language was created. Spring Expression Language (SpEL) was introduced in Spring
3.0. Its syntax is similar to Unified EL and provides powerful features for evaluating
expressions and for accessing Java objects and Spring beans at runtime.
•
Validation: Data managed by an application must abide by specific validation rules.
The ideal scenario is that the validation rules of the attributes within JavaBeans
containing business data can be applied in a consistent way, regardless of whether
the data manipulation request is initiated from the front end, a batch job, or remotely
(for example, via web services, RESTful web services, or remote procedure calls
[RPCs]). To address these concerns, Spring provides a built-in validation API by way
of the Validator interface. This interface provides a simple yet concise mechanism
that allows you to encapsulate your validation logic into a class responsible for
validating the target object. In addition to the target object, the validate() method
takes an Errors object, which is used to collect any validation errors that may occur.
The topic of validation and all aspects of it are covered in detail in Chapter 11.
•
Accessing data: Data access and persistence seem to be the most discussed topics in
the Java world. Spring provides excellent integration with a choice selection of data
access tools. In addition, Spring makes plain-vanilla JDBC a viable option for many
projects, with its simplified wrapper APIs around the standard API. Spring’s data
access module provides out-of-the-box support for JDBC (Chapter 6), Hibernate
(Chapter 7), JDO the JPA (Chapter 8), and various NoSQL databases(Chapter 10).
When using the Spring APIs to access data via any tool, you are able to take
advantage of Spring’s excellent transaction support. You’ll find a full discussion of
this in Chapter 9.
•
Managing transactions: Spring provides an excellent abstraction layer for transaction
management, allowing for programmatic and declarative transaction control. By
using the Spring abstraction layer for transactions, you can make it simple to change
the underlying transaction protocol and resource managers. You can start with
9
Chapter 1 ■ Introducing Spring
simple, local, resource-specific transactions and move to global, multi-resource
transactions without having to change your code. Transactions are covered in full
detail in Chapter 9.
9
•
Object mapping: Most applications need to integrate or provide services to other
applications. One common requirement is to exchange data with other systems,
either on a regular basis or in real time. In terms of data format, XML used to
be the most commonly used, but nowadays JSON and YAML have taken over,
mostly because the excellent support provided by the Jackson Project9. Starting
with Chapter 13, in which we discuss remotely accessing a Spring application for
business data in various formats, you will see how to use Spring’s object mapping
support in your application.
•
Job scheduling support: Most nontrivial applications require some kind of scheduling
capability. Whether this is for sending updates to customers or performing
housekeeping tasks, the ability to schedule code to run at a predefined time is an
invaluable tool for developers. Spring provides scheduling support that can fulfill
most common scenarios. A task can be scheduled either for a fixed interval or by
using a Unix cron expression. On the other hand, for task execution and scheduling,
Spring integrates with other scheduling libraries as well. For example, in the
application server environment, Spring can delegate execution to the CommonJ
library that is used by many application servers. For job scheduling, Spring also
supports libraries including the JDK Timer API and Quartz, a commonly used open
source scheduling library. The scheduling support in Spring is covered in full in
Chapter 12.
•
MVC in the web tier: Although Spring can be used in almost any setting, from
the desktop to the Web, it provides a rich array of classes to support the creation
of web-based applications. Using Spring, you have maximum flexibility when
you are choosing how to implement your web front end. For developing web
applications, the MVC pattern is the most popular practice. In recent versions,
Spring has gradually evolved from a simple web framework into a full-blown MVC
implementation. First, view support in Spring MVC is extensive. In addition to
standard support for JSP and Java Standard Tag Library (JSTL), which is greatly
bolstered by the Spring tag libraries, you can take advantage of fully integrated
support for Apache Velocity, FreeMarker, Thymeleaf, XSLT, React, and Mustache
templates. In addition, you will find a set of base view classes that make it simple to
add Microsoft Excel, PDF, and JasperReports output to your applications. Starting
with Chapter 15, we discuss developing web applications by using Spring MVC.
•
Remoting support: Accessing or exposing remote components in Java has never been
the simplest of jobs. Using Spring, you can take advantage of extensive support for
a wide range of remoting techniques to quickly expose and access remote services:
JMS, Advanced Message Queuing Protocol (AMQP), and REST. Accessing remote
services nowadays more often than not involves real-time streaming data, and
applications must adapt to the data streams; this is where Apache Kafka comes in
handy. How Spring integrates with these technologies is covered in Chapter 13,
except REST, which is covered in Chapter 16.
https://github.com/FasterXML/jackson
10
Chapter 1 ■ Introducing Spring
10
•
Simplified exception handling: One area where Spring really helps reduce the amount
of repetitive, boilerplate code you need to write is in exception handling. The core of
the Spring philosophy in this respect is that checked exceptions are overused in Java
and that a framework should not force you to catch any exception from which you
are unlikely to be able to recover—a point of view that we agree with wholeheartedly.
In reality, many frameworks are designed to reduce the impact of having to write
code to handle checked exceptions. However, many of these frameworks take the
approach of sticking with checked exceptions but artificially reducing the granularity
of the exception class hierarchy. One thing you will notice with Spring is that because
of the convenience afforded to the developer from using unchecked exceptions,
the exception hierarchy is remarkably granular. Throughout the book, you will see
examples in which the Spring exception-handling mechanisms can reduce the
amount of code you have to write and, at the same time, improve your ability to
identify, classify, and diagnose errors within your application.
•
WebSocket support: Starting with Spring Framework 4.0, support for JSR-356 (“Java
API for WebSocket”) is available. WebSocket defines an API for creating a persistent
connection between a client and server, typically implemented in web browsers
and servers. WebSocket-style development opens the door for efficient, full-duplex
communication enabling real-time message exchanges for highly responsive
applications. Use of WebSocket support is detailed further in Chapter 19. The Spring
Framework provides a reactive WebSocket API that you can use to write client and
server-side applications that handle WebSocket messages, which is covered briefly in
Chapter 20.
•
Reactive programming: Reactive programming describes a design paradigm that
relies on asynchronous programming logic to handle real-time updates to otherwise
static content. It provides an efficient means—the use of automated data streams—
to handle data updates to content whenever a user makes an inquiry. The Spring
team created its own reactive streams implementation, Project Reactor, when the
JDK Reactive support was delayed, so Spring could have a jump-start into providing
support for building reactive applications with Spring. How to develop reactive
Spring applications is covered in Chapter 20.
•
Securing applications: In a world where almost any business transaction is done
over the Internet, securing data and ensuring access to it is no longer an option but
a requirement. The Spring Security project10, formerly known as the Acegi Security
System for Spring, is another important project within the Spring portfolio. Spring
Security provides comprehensive support for both web application and methodlevel security. It tightly integrates with the Spring Framework and other commonly
used authentication mechanisms, such as HTTP basic authentication, form-based
login, X.509 certificate, OAuth2 and single sign-on (SSO) products (for example, CA
SiteMinder). It provides role-based access control (RBAC) to application resources,
and in applications with more-complicated security requirements (for example,
data segregations), it supports use of an access control list (ACL). Spring Security is
mostly used in securing web applications, which is covered in Chapter 17. Reactive
security is briefly touched upon in Chapter 20.
https://projects.spring.io/spring-security
11
Chapter 1 ■ Introducing Spring
•
Monitoring applications: An application made of multiple components should
have a setup that, after being put into production, ensures the smooth functioning
of the many components that make up the application. You need to monitor
its performance—its resource usage, user traffic, request rates, response times,
bottlenecks, memory issues, and so forth—to be able to overcome these limitations
and ensure a good end-user experience. Spring Actuator is used to expose
operational information about the running application—health, metrics, info, dump,
env, and so on. It uses HTTP endpoints or JMX beans to enable you to interact with it.
Actuator uses Micrometer, a dimensional-first metrics collection facade whose aim is
to allow you to time, count, and gauge your code with a vendor-neutral API. Despite
its focus on dimensional metrics, Micrometer does map to hierarchical names to
continue to serve older monitoring solutions like Ganglia or narrower scoped tools
like JMX. The change to Micrometer arose out of a desire to better serve a wave of
dimensional monitoring systems (think Prometheus, Datadog, Wavefront, SignalFx,
Influx, etc.). This flexibility is an advantage of Spring being designed for DI, which
allows easily swapping monitoring systems as well. Working with Actuator is covered
in Chapter 18.
•
Run everywhere: For a long time the technical evolution allow us to go big, we’ve
found new ways of keeping CPUs cool while increasing their frequency, we’ve
managed to provide more memory with smaller chips, but recently a new trend
has arisen. Deploying applications on privately owned clouds has made people
worry about the cloud costs, so an emerging trend is to build compact applications
that require smaller CPUs and less memory to run. Better performance with less
resource consumption means less cloud costs, and this is why the age of compact
native images is coming. The experimental (for now) Spring Native project provides
support for compiling Spring applications to native executables using the GraalVM
native-image compiler. GraalVM is a high-performance runtime that provides
significant improvements in application performance and efficiency, which is ideal
for microservices. This means applications start faster and need less resources while
running. This makes them suitable to be deployed in a private cloud (Amazon,
GCP, Hetzner, etc.) with decent costs. How to build a Spring project to be runnable
using a GraalVM native image using Spring Native and other goodies is covered in
Chapter 14.
The Spring Community
The Spring community is one of the best in any open source project we have encountered. The mailing
lists and forums are always active, and progress on new features is usually rapid. The development team is
truly dedicated to making Spring the most successful of all the Java application frameworks, and this shows
in the quality of the code that is reproduced. As we mentioned already, Spring also benefits from excellent
relationships with other open source projects, a fact that is extremely beneficial when you consider the large
amount of dependency the full Spring distribution has. From a user’s perspective, perhaps one of the best
features of Spring is the excellent documentation and test suite that accompany the distribution.
Documentation is provided for almost all the features of Spring, making it easy for new users to pick up
the framework. The test suite Spring provides is impressively comprehensive—the development team writes
tests for everything. If they discover a bug, they fix that bug by first writing a test that highlights the bug and
then getting the test to pass. Fixing bugs and creating new features is not limited just to the development
12
Chapter 1 ■ Introducing Spring
team! You can contribute code through pull requests against any portfolio of Spring projects through the
official GitHub repositories11. Or you can help experimental projects grow their wings by contributing
though the official experimental GitHub repositories12.
What does all this mean to you? Well, put simply, it means you can be confident in the quality of the
Spring Framework and confident that, for the foreseeable future, the Spring development team will continue
to improve what is already an excellent framework.
Alternatives to Spring
Going back to our previous comments on the number of open source projects, you should not be surprised
to learn that Spring is not the only framework offering dependency injection features or full end-to-end
solutions for building applications.
A popular DI framework is Google Guice13. Led by the search engine giant Google, Guice is a
lightweight framework that focuses on providing DI for application configuration management. It was also
the reference implementation of JSR-330.
Vaadin14 is an open source web application development platform for Java. Vaadin includes a set of
web components, a Java web framework, and a set of tools that enable developers to implement modern
web graphical user interfaces using the Java programming language only, TypeScript only, or a combination
of both. It’s scope is limited to web applications, but for more complex applications it easily integrates with
Spring and can harness the power of the Spring IoC container.
The now defunct JBoss Seam Framework15 used to be a good alternative to Spring. When I (Iuliana)
took my first Spring training in 2012, I was pretty convinced the Spring annotation model for configuring its
beans was inspired from it.
The now defunct PicoContainer16 was an exceptionally small DI container that allowed you to use
DI for your application without introducing any dependencies other than PicoContainer. Being nothing
more than a DI container, writing a more complex application required adding of extra frameworks, such as
Spring, in which case you would have been better off using Spring from the start. However, if all you needed
was a tiny DI container, then PicoContainer was a good choice.
Summary
In this chapter, you were provided a 10,000-foot view of the Spring Framework and its evolution onto a
collection of projects that can be used to build any type of application you might need, complete with
discussions of all the important features. A guide to the relevant sections of the book where these features
are discussed in detail was provided, together with references to the additional technologies that will be
used throughout the book.
After reading this chapter, you should understand what Spring can do for you; all that remains is to see
how it can do it. In the next chapter, you will be provided all the information you need to know to prepare
your development environment to get up and running with a basic Spring application. Chapter 2 introduces
some basic Spring code and configuration, including a time-honored Hello World example in all its DIbased glory.
https://github.com/spring-projects
https://github.com/spring-projects-experimental
13
https://code.google.com/p/google-guice
14
https://vaadin.com
15
https://www.seamframework.org
16
http://picocontainer.com
11
12
13
CHAPTER 2
Getting Started
The most difficult part when starting a new project is setting up a development environment, a process that
involves selecting and optimizing the tooling so that then you can focus on writing the code. Fortunately,
this book intends to make that easier. The project for this book is a Java project that uses Spring components,
which means there are quite a few choices when it comes to editors, build tools, and even JDKs.
This chapter provides all the basic knowledge you need to get off to a flying start, but first let’s look at a
few conventions.
Conventions
This book uses several formatting conventions that should make it easier to read. To that end, the following
conventions are used within the book:
•
Code or concept names in paragraphs appear as follows: java.util.List
•
Code listings and configurations appear as follows:
public static void main(String... args) {
System.out.println("Hello World!");
}
•
Logs in console outputs appear as follows:
01:24:07.809 [main] INFO c.a.Application - Starting Application
01:24:07.814 [main] DEBUG c.a.p.c.Application - Running in debug mode
•
{xx} is a placeholder, where the xx value is a pseudo-value giving a hint about the
real value that should be used in the command or statement. For example, {name_
of_your_bean} means that in a concrete example, the whole construct should be
replaced by the name of your bean.
•
Italic font is used for humorous metaphors, expressions, and bits of text that need
some kind of separation from the text around them. For example, in Chapter 1 the
Hollywood Principle is introduced as Don’t call us, we’ll call you.
•
Bold font is used for chapter references and important terms.
© Iuliana Cosmina, Rob Harrop, Chris Schaefer, and Clarence Ho 2023
I. Cosmina et al., Pro Spring 6, https://doi.org/10.1007/978-1-4842-8640-1_2
15
Chapter 2 ■ Getting Started
•
(..) is used to replace sets of parameter declarations and arguments in methods
and constructors, to avoid distracting you from the actual code.
•
...is used to replace code, configuration, and logs not relevant to the context.
•
Packages import statements are kept to a minimum, and only the ones relevant to
the component being discussed are shown. This is to reduce the space taken up by
code in the book, which is better used for more in-depth explanations. You have the
full code in the repository anyway!
•
Each chapter has a few footnotes and links pointing you to documentation, tools,
and blog articles. The book is readable without consulting them, so feel free to ignore
them, but you might find them useful.
•
Some paragraphs are shown in a rectangle and labeled with one of the icons in
Table 2-1. The table also shows the meaning of each icon.
Table 2-1. Special Paragraphs Icons and Meanings
Icon
Meaning
You might find this useful.
You will definitely find this useful.
This is really useful.
Be careful when using this.
Whatever this is about, it is recommended not to do it.
Whatever this is about, just don’t do it.
As for my style of writing, I (Iuliana) like to write my books in the same way I have technical
conversations with colleagues and friends, sprinkling in jokes, giving production examples, and making
analogies to non-programming situations. Because programming is nothing but just another way to model
the real world.
Who This Book Is For
This book assumes you are somewhat familiar with Java and tools involved in the development of Java
applications. If you are not, that might not be too much of a problem, because the project is neatly set up
such that you could build it without having any knowledge about what Gradle and Maven do. Also, if you
stick to the recommended editor, which is IntelliJ IDEA, you should be able to just clone the repository, build
the project, and get right to business.
16
Chapter 2 ■ Getting Started
What You Need for This Book
You obviously need a computer, desktop or laptop, the choice of which doesn’t really matter as long as it is
up to date, running Windows, Linux, or macOS, and is connected to the Internet.
You need to have JDK 17 installed locally. Instructions on how to do so on any operating system are
available in the JDK Installation Guide, available on the Oracle official page1.
For any Unix-based system, SDKMAN!2 is very useful. SDKMAN! is a tool for managing parallel versions
of multiple software development kits on most Unix-based systems. It provides a convenient command-line
interface (CLI) and API for installing, switching, removing, and listing software candidates. It works for JDK,
Gradle, Maven, and many more.
As previously mentioned, the recommended editor is IntelliJ IDEA3; you can use the Enterprise version
for free for 30 days, or you can help test Early Access versions. IntelliJ IDEA is a great editor for Spring
applications because it comes with a great set of plug-ins that resolve beans by name in XML and Java
configuration classes, thus helping you be very aware if your beans are properly configured. If you are more
familiar with Eclipse IDE, you can try Spring Tools 44.
You need the sources where all the code samples referenced in the book come from. Depending on
how you are getting the project associated with this book, you might need Git5 installed. You can use Git
from the command line to clone the repository, or you can use the IDE, or you can download the sources as
a zip from the repository page.
This is the project repository page: https://github.com/Apress/pro-spring-6
Any project dependencies that are more complex than a Java library and need to run services that the
Spring applications interact with are provided via Docker containers; thus, you need to install Docker6 on
your computer. Instructions on how to download images and start them are provided in README.adoc files
for the respective chapters.
To summarize the requirements for you to become a Spring Pro: this book, a computer, Internet,
Java 17, Git, the sources, Docker, and a little bit of time and determination.
https://docs.oracle.com/en/java/javase/17/install/overview-jdk-installation.html
https://sdkman.io
3
https://www.jetbrains.com/idea
4
https://spring.io/tools
5
https://git-scm.com/
6
https://www.docker.com/
1
2
17
Chapter 2 ■ Getting Started
Prepare Your Development Environment
Here is the list of steps you have to go through to start running the code associated with the book:
•
Sit comfortably in front of your computer.
•
Install JDK 17.
If you have older versions installed, make sure it is the default one used on your system by opening a
terminal (Command Prompt or Power Shell on Windows systems) and running java -version. Expect the
output to mention Java version 17, as depicted in code Listing 2-1.
Listing 2-1. Output of Command java -version Showing JDK 17 Set As Default
> java -version
java version "17.0.1" 2021-10-19 LTS
Java(TM) SE Runtime Environment (build 17.0.1+12-LTS-39)
Java HotSpot(TM) 64-Bit Server VM (build 17.0.1+12-LTS-39, mixed mode, sharing)
•
18
Clone the project repository or download the sources from the Apress official
page and unzip them on your computer. You should have a directory named prospring-6 containing the modules as shown in Figure 2-1.
Chapter 2 ■ Getting Started
Figure 2-1. The pro-spring-6 project and its modules
•
Open the IntelliJ IDEA editor, choose File ➤ Openin the main menu, and in the file
selector window that opens, select the pro-spring-6 directory. After a short while,
on the left side (in a pane we’ll call the Project View in the book), you should see the
pro-spring-6 project and its modules listed. On the right side of the window, you
should see a section showing you the Gradle configuration (we’ll call this the Gradle
View in this book) and a section showing you the Maven configuration (we’ll call this
the Maven View). All three views are shown in Figure 2-2.
19
Chapter 2 ■ Getting Started
Figure 2-2. The pro-spring-6 project, Gradle and Maven Views
The project is made up of multiple modules, each representing a Java project. The name of each module
corresponds to the chapter where its contents are referenced. Each chapter has two or more modules
associated with it, depending on the context and topics covered. The ones with names that end in -boot
are Spring Boot projects. The ones with names that don’t end in -boot are just Java projects using Spring,
because, yes, you can use Spring without using Spring Boot. We call these classic Spring projects, because this
is how Spring applications were developed before Spring Boot was around. This project depends on a lot of
libraries that will be automatically downloaded when your project is opened in an editor for the first time.
The project has a Gradle configuration and a Maven configuration; use whichever you feel most
comfortable with. The project can be built right after cloning according to the instructions in its README.adoc
file. The project does not need Gradle or Maven installed locally, since both are configured to use wrappers.
The Gradle version used to build the project at the time this chapter is being written is 7.4. The version
likely will change by the time the book is released, but the version will be mentioned in the main README.
adoc file and in the Gradle wrapper configuration file: gradle/wrapper/gradle-wrapper.properties.
Similarly, the Maven version used to build the project at the time of writing is 3.8.4. The version likely
will change by the time the book is released, but the version will be mentioned in the main README.adoc file
and in the Maven wrapper configuration file: .mvn/wrapper/maven-wrapper.properties.
IntelliJ IDEA identifies the wrapper configurations and builds your project using any of them. If you
want to explicitly trigger any of the wrapper configurations from the interface, just click the
you see in the upper-left corner of Gradle View and Maven View.
20
symbol that
Chapter 2 ■ Getting Started
IntelliJ IDEA keeps the state of your project internally and sometimes gets…ahem…confused. If your
project shows class names in red and complains about missing dependencies, try building it from the command
line as explained in the README.adoc file. If that works, you might to one of these options under the File menu:
Invalidate Caches..., Reload All from Disk, Restart IDE, Repair IDE....
Now that you have the project loaded and building successfully on your computer, we’ll tell you more
about Spring internals before explaining the pro-spring-6 project Maven and Gradle configurations.
Understanding Spring Packaging
Spring packaging is modular; it allows you to pick and choose which components you want to use in your
application and to include only those components when you are distributing your application. Spring has
many modules, but you need only a subset of these modules depending on your application’s needs. Each
module has its compiled binary code in a JAR file along with corresponding Javadoc and source JARs. IntelliJ
IDEA scans the dependencies of your project and, on request, it can download the sources and Javadoc. This
means that you can see the code and read about Spring classes in your editor.
The Javadoc for a class is shown in a rectangle when hovering over its name, as depicted in Figure 2-3
for the @SpringBootApplication annotation.
Figure 2-3. IntelliJ IDEA displaying the Javadoc for the @SpringBootApplication annotation
You can also choose to press the Ctrl (Command for macOS) key and click a class name, and IntelliJ
IDEA will download the sources for it and open them in a new tab. In Figure 2-4 you can see on the right the
source for the @SpringBootApplication annotation.
21
Chapter 2 ■ Getting Started
Figure 2-4. IntelliJ IDEA displaying the source for the @SpringBootApplication annotation
Back to the Spring modules. Spring modules are simply JAR files that package the required code for that
module. The code base for the Spring Framework is publicly available on GitHub. If you are curious about
what the code of the Spring Framework looks like and want to be on the cutting edge of Spring development,
check out the latest version of the source code from Spring’s GitHub repository7.
After you understand the purpose of each module, you can select the modules required in your project
and include them in your code. As shown by the most recent tag on GitHub, it seems that Spring Framework
version 6.0 comes with 22 modules. Table 2-2 describes these JAR files and their corresponding modules.
The actual JAR file name is, for example, spring-aop-6.0.0.jar, though we have included only the specific
module portion for simplicity (as in aop, for example).
Table 2-2. Spring Modules
Module
Description
aop
This module contains all the classes you need to use Spring’s AOP features within your
application. You also need to include this JAR in your application if you plan to use other
features in Spring that use AOP, such as declarative transaction management. Moreover,
classes that support integration with AspectJ are packed in this module.
aspects
This module contains all the classes for advanced integration with the AspectJ AOP library.
For example, if you are using Java classes for your Spring configuration and need AspectJstyle annotation-driven transaction management, you need this module.
beans
This module contains all the classes for supporting Spring’s manipulation of Spring beans.
Most of the classes here support Spring’s bean factory implementation. For example, the
classes required for processing the Spring XML configuration file and Java annotations are
packed into this module.
(continued)
7
https://github.com/spring-projects/spring-framework
22
Chapter 2 ■ Getting Started
Table 2-2. (continued)
Module
Description
context
This module contains classes that provide many extensions to Spring Core. You will find that
all classes need to use Spring’s ApplicationContext feature (covered in Chapter 5), along
with classes for Enterprise JavaBeans (EJB), Java Naming and Directory Interface (JNDI), and
Java Management Extensions (JMX) integration. Also contained in this module are the Spring
remoting classes, classes for integration with dynamic scripting languages (for example,
JRuby, Groovy, and BeanShell), JSR-303 (“Bean Validation”), scheduling and task execution,
and so on.
contextindexer
This module contains an indexer implementation that provides access to the candidates that
are defined in META-INF/spring.components. The core class CandidateComponentsIndex is
not meant to be used externally.
contextsupport
This module contains further extensions to the spring-context module. On the userinterface side, there are classes for mail support and integration with templating engines
such as Velocity, FreeMarker, and JasperReports. Also, integration with various task execution
and scheduling libraries, including CommonJ and Quartz, are packaged here.
core
This is the main module that you will need for every Spring application. In this JAR file, you
will find all the classes that are shared among all other Spring modules (for example, classes
for accessing configuration files). Also, in this JAR you will find selections of extremely useful
utility classes that are used throughout the Spring codebase and that you can use in your own
application.
expression This module contains all support classes for Spring Expression Language (SpEL).
instrument This module includes Spring’s instrumentation agent for JVM bootstrapping. This JAR file is
required for using load-time weaving with AspectJ in a Spring application.
jcl
This module is only present for binary compatibility with existing Commons Logging usage,
such as in Apache Commons Configuration.
jdbc
This module includes all classes for JDBC support. You will need this module for all
applications that require database access. Classes for supporting data sources, JDBC data
types, JDBC templates, native JDBC connections, and so on, are packed in this module.
jms
This module includes all classes for Java Message Service (JMS) support.
messaging
This module contains key abstractions taken from the Spring Integration project to serve as
a foundation for message-based applications and adds support for Simple or Streaming Text
Orientated Messaging Protocol (STOMP) messages.
orm
This module extends Spring’s standard JDBC feature set with support for popular ORM
tools including Hibernate, JDO, and JPA. Many of the classes in this JAR depend on classes
contained in the spring-jdbc JAR file, so you definitely need to include that in your
application as well.
oxm
This module provides support for Object/XML Mapping (OXM). Classes for the abstraction
of XML marshalling and unmarshalling and support for popular tools such as Castor, JAXB,
XMLBeans, and XStream are packed into this module.
r2dbc
This module makes R2DBC easier to use and reduces the likelihood of common errors. It
provides simple error handling and a family of unchecked concise exceptions agnostic of the
underlying Reactive Database Manager (RDBM).
(continued)
23
Chapter 2 ■ Getting Started
Table 2-2. (continued)
Module
Description
test
Spring provides a set of mock classes to aid in testing your applications, and many of
these mock classes are used within the Spring test suite, so they are well tested and
make testing your applications much simpler. Certainly we have found great use for the
mock HttpServletRequest and HttpServletResponse classes in unit tests for our web
applications. On the other hand, Spring provides a tight integration with the JUnit unittesting framework, and many classes that support the development of JUnit test cases are
provided in this module; for example SpringExtension integrates the Spring TestContext
Framework into JUnit 5’s Jupiter programming model.
tx
This module provides all classes for supporting Spring’s transaction infrastructure. You will
find classes from the transaction abstraction layer to support the Java Transaction API (JTA)
and integration with application servers from major vendors.
web
This module contains the core classes for using Spring in your web applications, including
classes for loading an ApplicationContext feature automatically, file upload support classes,
and a bunch of useful classes for performing repetitive tasks such as parsing integer values
from the query string.
webflux
This module contains core interfaces and classes for the Spring Web Reactive model.
webmvc
This module contains all the classes for Spring’s own MVC framework. If you are using a
separate MVC framework for your application, you won’t need any of the classes from this
JAR file. Spring MVC is covered in more detail in Chapter 15.
websocket
This module provides support for JSR-356 (“Java API for WebSocket”).
If you use Spring Boot, you don’t have to select Spring modules to add as dependencies explicitly,
because the appropriate set of Spring dependencies are configured depending on the Spring Boot starter
dependencies used. The codebase for Spring Boot is also publicly available on GitHub. If you are curious
about how the Spring Boot code looks like and want to be on the cutting edge of Spring Boot development,
check out the latest version of the source code from Spring’s GitHub repository8. Under spring-bootproject/spring-boot-starters there is a list of Spring Boot starter modules that can be used as
dependencies for a Spring project to build a certain type of Spring application, with a default configuration
and curated set of dependencies. The modules are nothing but dependency descriptors that can be added
under the <dependencies> section in pom. xml. They can be used with Gradle projects too. There are
currently more than 30 of them, and Table 2-3 lists the ones most often used and the dependencies they
configure for your application.
8
https://github.com/spring-projects/spring-boot/
24
Chapter 2 ■ Getting Started
Table 2-3. Spring Boot Starter Modules
Module
Description
spring-boot-starter
This is the simplest Spring Boot starter that adds the spring-core
library as a dependency for your project. It can be used to create a very
simple Spring application. It is used mostly for learning purposes and
for creating base projects, and encapsulates common functionality
shared among other modules in a project.
spring-boot-starter-aop
Adds the spring-aop library as a dependency for your project.
spring-boot-starter-data-*
This type of starter adds various Spring dependencies for working with
data in your project. The * replaces the technology from which data is
coming. For example, spring-boot-starter-data-jdbc adds classes
for creating Spring Repository beans for handling data from databases
supporting a JDBC driver: MySQL, PostgreSQL, Oracle, etc.
spring-boot-starter-web
Configures minimal dependencies for creating a web application.
spring-boot-starter-security
Configures minimal dependencies for securing a Spring web
application.
spring-boot-starter-webflux
Configures minimal dependencies for creating a reactive web
application.
spring-boot-starter-actuator
Configures the Spring Boot Actuator, which enables a set of endpoints
for monitoring a Spring web application.
spring-boot-starter-test
Configures the following set of libraries: Spring Test, JUnit, Hamcrest,
and Mockito.
Choosing Modules for Your Application
Without a dependency management tool such as Maven or Gradle, choosing which modules to use in your
application may be a bit tricky. For example, if you require Spring’s bean factory and DI support only, you
still need several modules, including spring-core, spring-beans, spring-context, and spring-aop. If you
need Spring’s web application support, you then need to further add spring-web and so on. Thanks to build
tools features such as Maven’s transitive dependencies support, all required third-party libraries would be
included automatically.
Accessing Spring Modules on the Maven Repository
Founded by Apache Software Foundation, Maven9 has become one of the most popular tools in managing
the dependencies for Java applications, from open source to enterprise environments. Maven is a powerful
application building, packaging, and dependency management tool. It manages the entire build cycle
of an application, from resource processing and compiling to testing and packaging. There also exists a
large number of Maven plug-ins for various tasks, such as updating databases and deploying a packaged
application to a specific server (for example: Tomcat, WildFly, or WebLogic). As of this writing, the current
Maven version is 3.8.4.
9
https://maven.apache.org
25
Chapter 2 ■ Getting Started
Almost all open source projects support distribution of libraries via the Maven repository. The most
popular one is the Maven Central repository hosted on Apache, and you can access and search for the
existence and related information of an artifact on the Maven Central website10. If you download and install
Maven into your development machine, you automatically gain access to the Maven Central repository.
Some other open source communities (for example, JBoss and Spring) also provide their own Maven
repository for their users. However, to be able to access those repositories, you need to add the repository
into your Maven’s setting file or in your project’s POM file. (You can see an example of this in pro-spring-6/
pom.xml; just look for the <repositories> element.)
A detailed discussion of Maven is not in the scope of this book, and you can always refer to the online
documentation or books that give you a detailed reference to Maven. However, since Maven is widely
adopted, it’s worth mentioning the typical structure of the project packaging on the Maven repository.
A group ID, artifact ID, packaging type, and version identify each Maven artifact. For example, for
log4j-core, the group ID is org.apache.logging.log4j, the artifact ID is log4j-core, and the packaging
type is jar. Under that, different versions are defined. For example, for version 2.17.1, the artifact’s
file name becomes log4j-core-2.17.1.jar under the group ID, artifact ID, and version folder. Maven
configuration files are written in XML and must respect the Maven standard syntax defined by the https://
maven.apache.org/maven-v4_0_0.xsd schema. The default name of a Maven configuration file for a project
is pom.xml, and a sample file is shown in Listing 2-2.
Listing 2-2. pom.xml Snippet
<project xmlns="http://maven.apache.org/POM/4.0.0"
xmlns:xsi="http://www.w3.org/2001/XMLSchema-instance"
xsi:schemaLocation="http://maven.apache.org/POM/4.0.0
http://maven.apache.org/maven-v4_0_0.xsd">
<modelVersion>4.0.0</modelVersion>
<groupId>com.apress.prospring6.ch02</groupId>
<artifactId>hello-world</artifactId>
<packaging>jar</packaging>
<version>5.0-SNAPSHOT</version>
<name>hello-world</name>
<dependencies>
<dependency>
<groupId>org.apache.logging.log4j</groupId>
<artifactId>log4j-core</artifactId>
<version>2.17.1</version>
</dependency>
</dependencies>
<build>
<plugins>
<plugin>
...
10
https://mvnrepository.com/
26
Chapter 2 ■ Getting Started
</plugin>
</plugins>
</build>
</project>
Maven also defines a typical standard project structure, as depicted in Figure 2-5.
Figure 2-5. Maven typical project structure
The main directory contains the application codebase in the java directory and application
configuration files in the resources directory. The test directory contains the application test code in the
java directory and the application test configuration files in the resources directory.
Accessing Spring modules and adding them as dependencies to a project is pretty similar to what
was shown so far in this section, but Spring Boot’s dependency management can be used even for Spring
projects that don’t use Spring Boot, and this ensures that transitive dependencies added to your projects will
always be stable and compatible with each other. But first, let us introduce you to Gradle.
Accessing Spring Modules Using Gradle
The Maven project standard structure and artifact categorization and organization is important because
Gradle11 respects the same rules and even uses the Maven central repository to retrieve artifacts. Various
other repositories can be configured as well. Gradle is a powerful build tool that has given up the bloated
XML for configuration and switched to the simplicity and flexibility of Groovy. Which is very good and
provides a lot of flexibility, up until a developer gets too creative with their configuration, that is. At the time
of writing, the current version of Gradle is 7.3.3. Starting with version 4.x, the Spring team has switched to
using Gradle for the configuration of every Spring product. That is why the source code for this book can be
built and executed using Gradle too. The default name of a Gradle configuration file for a project is build.
gradle. The equivalent of the pom.xml file depicted earlier (well, one version of it) is shown in Listing 2-3.
11
https://gradle.org/
27
Chapter 2 ■ Getting Started
Listing 2-3. build.gradle Snippet
group 'com.apress.prospring6.ch02'
version '6.0-SNAPSHOT'
apply plugin: 'java'
repositories {
mavenCentral()
}
tasks.withType(JavaCompile) {
options.encoding = "UTF-8"
}
dependencies {
compile group: 'org.apache.logging.log4j', name: 'log4j-core', version: '2.17.1'
...
}
That’s way more readable, right? As you can observe, the artifacts are identified using the group, artifact,
and version as previously introduced with Maven, but the property names differ. Gradle is not in the scope of
this book either, but it will be mentioned here and there in the book.
Using Spring Boot Dependency Management
As previously mentioned, you can use a Spring Boot starter project as a parent project to provide your
project with a minimal set of dependencies and default configurations. By declaring spring-boot-starterparent as a parent project, Spring Boot dependency management is enabled, which means default
configurations for your application and a complete dependency tree are set up for the project. Listing 2-4
depicts a Maven configuration file using spring-boot-starter as a dependency. Since we are using a Spring
Boot SNAPSHOT version, the https://repo.spring.io/snapshot repository is configured as well (line
marked with 2).
Listing 2-4. pom.xml for a Project Using spring-boot-starter As a Parent
<project xmlns="http://maven.apache.org/POM/4.0.0"
xmlns:xsi="http://www.w3.org/2001/XMLSchema-instance"
xsi:schemaLocation="http://maven.apache.org/POM/4.0.0
http://maven.apache.org/maven-v4_0_0.xsd">
<modelVersion>4.0.0</modelVersion>
<parent>
<groupId>org.springframework.boot</groupId>
<artifactId>spring-boot-starter-parent</artifactId>
<version>3.0.0-SNAPSHOT</version> <!-- 1 -->
<relativePath/> <!-- lookup parent from repository -->
</parent>
<groupId>com.apress.prospring6.ch02</groupId>
<artifactId>hello-world</artifactId>
<version>6.0-SNAPSHOT</version>
28
Chapter 2 ■ Getting Started
<name>hello-world</name>
<properties>
<java.version>17</java.version>
</properties>
<dependencies>
<dependency>
<groupId>org.springframework.boot</groupId>
<artifactId>spring-boot-starter</artifactId>
</dependency>
<dependency>
<groupId>org.springframework.boot</groupId>
<artifactId>spring-boot-starter-test</artifactId>
<scope>test</scope>
</dependency>
</dependencies>
<build>
<plugins>
<plugin>
<groupId>org.springframework.boot</groupId>
<artifactId>spring-boot-maven-plugin</artifactId>
</plugin>
</plugins>
</build>
<repositories>
<repository>
<id>spring-milestones</id>
<url>https://repo.spring.io/milestone</url>
</repository>
<repository>
<id>spring-snapshot</id>
<url>https://repo.spring.io/snapshot</url> <!-- 2 -->
</repository>
</repositories>
</project>
Notice how the only version declared in the file, beside the project version, is the one for spring-bootstarter-parent. There is no need to specify any version for Spring boot, or Spring dependencies, because
they are already part of the configuration introduced by spring-boot-starter-parent. If you find it hard
to believe, just open the IntelliJ IDEA Maven View and expand the Dependencies node. You should see
the dependencies declared in the pom.xml file, and notice that they do have a version attached, even if you
did not specify one. Also, notice their dependencies—the transitive dependencies of your project—have
versions, and the best part is that you can declare any of these dependencies in your project and override the
version.
So, sure, Spring Boot imposes a lot of defaults, but it is also easily customizable, and this affirmation
is valid for dependencies and Java configurations as well. Figure 2-6 shows the Maven dependencies
configured by the configuration file in Listing 2-4; only the jakarta.annotation-api dependency version
has been overwritten with 2.1.0-B1.
29
Chapter 2 ■ Getting Started
Figure 2-6. Maven Spring Boot project with customized version for jakarta.annotation-api
Having spring-boot-starter-parent as a parent for a project is not always convenient. Real-life
projects have their own hierarchies and dependencies that are shared and not managed by Spring Boot.
What is convenient is having proper dependency management where possible, and this can be achieved
by removing the <parent> configuration and replacing it with the <dependencyManagement> configuration
shown in Listing 2-5.
Listing 2-5. Spring Boot Project Maven Configuration Without spring-boot-starter-parent
<dependencyManagement>
<dependencies>
<dependency>
<groupId>org.springframework.boot</groupId>
<artifactId>spring-boot-dependencies</artifactId>
<version>3.0.0-SNAPSHOT</version>
<type>pom</type>
<scope>import</scope>
</dependency>
</dependencies>
</dependencyManagement>
And the best part, Spring Boot dependency management can be used even in a Spring classic project—
that does not use any Spring Boot starter dependencies. Figure 2-7 depicts a very simple Spring Project
Maven configuration that only declares spring-context and junit-jupiter-engine as dependencies.
Notice how there are no versions specified for the two dependencies, but in the Maven View we can clearly
see the dependencies versions. This is done by importing the versions from the spring-boot-dependencies
pom artifact.
30
Chapter 2 ■ Getting Started
Figure 2-7. Maven Spring (classic) project with dependency management provided by Spring Boot
What is the equivalent of this in Gradle? Since Gradle does not have a parent concept similar to Maven,
dependency management is done using the io.spring.dependency-management plug-in. Listing 2-6 depicts
a Gradle configuration analogous to the Maven configuration shown in Listing 2-4.
Listing 2-6. Simple Spring Boot Project Gradle Configuration
plugins {
id 'org.springframework.boot' version '3.0.0-SNAPSHOT'
id 'io.spring.dependency-management' version '1.0.11.RELEASE'
id 'java'
}
group = 'com.apress.prospring6.ch02'
version = '6.0-SNAPSHOT'
sourceCompatibility = '17'
repositories {
mavenCentral()
maven { url 'https://repo.spring.io/milestone' }
maven { url 'https://repo.spring.io/snapshot' }
}
dependencies {
implementation 'org.springframework.boot:spring-boot-starter'
testImplementation 'org.springframework.boot:spring-boot-starter-test'
}
...
31
Chapter 2 ■ Getting Started
Overriding Spring Boot managed dependency versions is possible using Gradle as well. Figure 2-8
shows the IntelliJ IDEA’s Gradle View showing the dependencies introduced by Spring Boot dependency
management and the Gradle configuration syntax for overriding versions.
Figure 2-8. Gradle Spring Boot project with customized version for jakarta.annotation-api
Since Spring Boot dependency management in Gradle is made using a plug-in, configuring Spring
classic projects that make use of dependency management is possible without any additional change to
the configurations, except removing starter dependencies and replacing them with the desired Spring
dependencies.
In bigger projects, organized in multiple modules, configuration might get more complex, and
simplifying it implies creating configuration templates that can be reused in modules. The pro-spring-6
project is organized this way; the root build.gradle and pom.xml files contain configuration that is shared
between all modules. Where necessary the module configuration files are used to override dependency
versions and declare their own dependencies.
Gradle configuration is more readable and more concise, but in a big project, the lack of standards
might lead to convoluted tasks implementations, because the only limit to declaring tasks is the developers’
understanding of Groovy. Maven, however, with its XML standard schema that is the same for all
dependencies and plug-ins, is very consistent and easy to learn by beginners.
Using Spring Documentation
One of the aspects of Spring that makes it such a useful framework for developers who are building real
applications is its wealth of well-written, accurate documentation. In every release, the Spring Framework’s
documentation team works hard to ensure that all the documentation is finished and polished by the
development team. This means that every feature of Spring is not only fully documented in the Javadoc but
is also covered in the Spring reference manual included in every distribution. If you haven’t yet familiarized
yourself with the Spring Javadoc and the reference manual, do so now. This book is not a replacement for
either of these resources; rather, it is a complementary reference, demonstrating how to build a Springbased application from the ground up.
32
Chapter 2 ■ Getting Started
You can access the Spring Javadoc through the IntelliJ IDEA editor as mentioned previously, but if you
prefer doing so in the browser, you can bookmark this URL: https://docs.spring.io/spring-framework/
docs/current/javadoc-api.
For a more in-depth introduction to the Spring Framework, you can also bookmark the URL to
the official reference documentation: https://docs.spring.io/spring-framework/docs/current/
reference/html.
Putting a Spring into Hello World
At this point in the book, we are optimistic that you are convinced that Spring is a solid, well-supported
project that has all the makings of a great tool for application development and that understanding it in
depth will not only make you a better developer but also boost your career. However, one thing is missing—
we haven’t shown you any code yet. We are sure you are dying to see Spring in action, and because we
cannot go any longer without getting into the code, let’s do just that. Do not worry if you do not fully
understand all the code in this section; we go into much more detail on all the topics as we proceed through
the book.
Building the Sample Hello World Application
Now, we are sure you are familiar with the traditional Hello World example, but just in case you have been
living on the moon for the past 30 years, the code snippet in Listing 2-7 shows the Java version in all its glory.
Listing 2-7. Classic Hello World Java Project
package com.apress.prospring6.two;
public class HelloWorld {
public static void main(String... args) {
System.out.println("Hello World!");
}
}
As examples go, this one is pretty simple—it does the job, but it is not very extensible. What if we
want to change the message? What if we want to output the message differently, maybe to standard error
instead of standard output or enclosed in HTML tags rather than as plain text? We are going to redefine
the requirements for the sample application and say that it must support a simple, flexible mechanism
for changing the message, and it must be easy to change the rendering behavior. In the basic Hello World
example, you can make both of these changes quickly and easily by just changing the code as appropriate.
However, in a bigger application, recompiling takes time, and it requires the application to be fully tested
again. A better solution is to externalize the message content and read it in at runtime, perhaps from the
command-line arguments, as shown in Listing 2-8.
Listing 2-8. Classic Hello World Java Project with Arguments
package com.apress.prospring6.two;
public class HelloWorldWithCommandLine {
public static void main(String... args) {
33
Chapter 2 ■ Getting Started
if (args.length > 0) {
System.out.println(args[0]);
} else {
System.out.println("Hello World!");
}
}
}
This example accomplishes what we wanted—we can now change the message without changing
the code. However, there is still a problem with this application: the component responsible for rendering
the message is also responsible for obtaining the message. Changing how the message is obtained means
changing the code in the renderer. Add to this the fact that we still cannot change the renderer easily; doing
so means changing the class that launches the application.
If we take this application a step further (away from the basics of Hello World), a better solution is
to refactor the rendering and message retrieval logic into separate components. Plus, if we really want
to make our application flexible, we should have these components implement interfaces and define
the interdependencies between the components and the launcher using these interfaces. By refactoring
the message retrieval logic, we can define a simple MessageProvider interface with a single method,
getMessage(), as shown in Listing 2-9.
Listing 2-9. MessageProvider Interface
package com.apress.prospring6.two.decoupled;
public interface MessageProvider {
String getMessage();
}
The MessageRenderer interface is implemented by all components that can render messages, and such
a component is depicted in Listing 2-10.
Listing 2-10. MessageRenderer Interface
package com.apress.prospring6.two.decoupled;
public interface MessageRenderer {
void render();
void setMessageProvider(MessageProvider provider);
MessageProvider getMessageProvider();
}
As you can see, the MessageRenderer interface declares a method, render(), and also a JavaBean-style
method, setMessageProvider(). Any MessageRenderer implementations are decoupled from message
retrieval and delegate that responsibility to the MessageProvider instance with which they are supplied.
Here, MessageProvider is a dependency of MessageRenderer. Creating simple implementations of
these interfaces is easy, as shown in Listing 2-11.
34
Chapter 2 ■ Getting Started
Listing 2-11. MessageProvider Implementation
package com.apress.prospring6.two.decoupled;
public class HelloWorldMessageProvider implements MessageProvider {
@Override
public String getMessage() {
return "Hello World!";
}
}
You can see that we have created a simple MessageProvider that always returns “Hello World!” as the
message. The StandardOutMessageRenderer class shown in Listing 2-12 is just as simple.
Listing 2-12. MessageRenderer Implementation
package com.apress.prospring6.two.decoupled;
import static java.lang.System.*;
public class StandardOutMessageRenderer implements MessageRenderer {
private MessageProvider messageProvider;
public StandardOutMessageRenderer(){
out.println(" --> StandardOutMessageRenderer: constructor called");
}
@Override
public void render() {
if (messageProvider == null) {
throw new RuntimeException(
"You must set the property messageProvider of class:"
+ StandardOutMessageRenderer.class.getName());
}
out.println(messageProvider.getMessage());
}
@Override
public void setMessageProvider(MessageProvider provider) {
out.println(" --> StandardOutMessageRenderer: setting the provider");
this.messageProvider = provider;
}
@Override
public MessageProvider getMessageProvider() {
return this.messageProvider;
}
}
Now all that remains is to rewrite the main(..) method of the entry class, as depicted in Listing 2-13.
35
Chapter 2 ■ Getting Started
Listing 2-13. New main(..) Method
package com.apress.prospring6.two.decoupled;
public class HelloWorldDecoupled {
public static void main(String... args) {
MessageRenderer mr = new StandardOutMessageRenderer();
MessageProvider mp = new HelloWorldMessageProvider();
mr.setMessageProvider(mp);
mr.render();
}
}
Figure 2-9 depicts the abstract schema of the application built so far.
Figure 2-9. A little more decoupled Hello World application
The code here is fairly simple:
•
We instantiate instances of HelloWorldMessageProvider and
StandardOutMessageRenderer, although the declared types are MessageProvider
and MessageRenderer, respectively. This is because we need to interact only
with the methods provided by the interface in the programming logic, and
HelloWorldMessageProvider and StandardOutMessageRenderer already
implemented those interfaces, respectively.
•
Then, we pass MessageProvider to MessageRenderer and invoke
MessageRenderer#render().
If we compile and run this program, we get the expected “Hello World!” output. Now, this example is
more like what we are looking for, but there is one small problem. Changing the implementation of either the
MessageRenderer or MessageProvider interface means a change to the code.
To get around this we need to delegate the responsibility of retrieving the two implementation types
and instantiating them to somebody else. The most manual one is to create a simple factory class that reads
the implementation class names from a properties file and instantiates them on behalf of the application, as
shown Listing 2-14.
36
Chapter 2 ■ Getting Started
Listing 2-14. Instance Factory Class Tasked with Retrieving the Two Implementation Types and
Instantiating Them
package com.apress.prospring6.two.decoupled;
import java.util.Optional;
import java.util.Properties;
public class MessageSupportFactory {
private
private
private
private
static MessageSupportFactory instance;
Properties props;
MessageRenderer renderer;
MessageProvider provider;
private MessageSupportFactory() {
props = new Properties();
try {
props.load(this.getClass().getResourceAsStream("/msf.properties"));
String rendererClass = props.getProperty("renderer.class");
String providerClass = props.getProperty("provider.class");
renderer = (MessageRenderer) Class.forName(rendererClass).
getDeclaredConstructor().newInstance();
provider = (MessageProvider) Class.forName(providerClass).
getDeclaredConstructor().newInstance();
} catch (Exception ex) {
ex.printStackTrace();
}
}
static {
instance = new MessageSupportFactory();
}
public static MessageSupportFactory getInstance() {
return instance;
}
public Optional<MessageRenderer> getMessageRenderer() {
return renderer != null? Optional.of(renderer) : Optional.empty();
}
public Optional<MessageProvider> getMessageProvider() {
return provider!= null? Optional.of(provider) : Optional.empty();
}
}
The implementation here is trivial and naive, the error handling is simplistic, and the name of the
configuration file is hard-coded, but we already have a substantial amount of code. The configuration file for
this class is quite simple and is depicted in Listing 2-15.
37
Chapter 2 ■ Getting Started
Listing 2-15. Configuration File Contents for the MessageSupportFactory Class, Ergo the Contents of the
msf.properties File
renderer.class=com.apress.prospring6.ch2.decoupled.StandardOutMessageRenderer
provider.class=com.apress.prospring6.ch2.decoupled.HelloWorldMessageProvider
The configuration file must be on the project classpath. When running from IntelliJ IDEA, the file
is located in the chapter02/src/main/resources directory and is added to the classpath when running
the code.
To delegate the responsibilities of retrieving a MessageProvider and MessageRenderer instance to
MessageSupportFactory, the main(..) method must be changed as shown in Listing 2-16.
Listing 2-16. HelloWorld Version Using MessageSupportFactory
package com.apress.prospring6.two.decoupled;
public class HelloWorldDecoupledWithFactory {
public static void main(String... args) {
MessageRenderer mr = MessageSupportFactory.getInstance().getMessageRenderer()
.orElseThrow(() -> new IllegalArgumentException("Service of type
'MessageRenderer' was not found!"));
MessageProvider mp = MessageSupportFactory.getInstance().getMessageProvider()
.orElseThrow(() -> new IllegalArgumentException("Service of type
'MessageProvider' was not found!"));
mr.setMessageProvider(mp);
mr.render();
}
}
However, there is another way to do this with pure Java, without creating the MessageSupportFactory
class, because there is already a class named ServiceLoader in package java.util that does the exact
thing. This class was introduced in Java 6 to facilitate discovering and loading implementations matching
a given interface. The interfaces that this class retrieves implementations for are called Service Provider
Interface (SPI).
The approach is similar to the MessageSupportFactory, only the configuration file names have to
respect three rules:
•
Must be on the project classpath in a directory named META-INF/services.
•
The file name is the fully qualified name of the SPI.
•
Its content is the fully qualified name of the SPI implementation.
This means that in src/main/resources the directory and files structure shown in Listing 2-17 needs to
be created.
Listing 2-17. Configuration Files Location for ServiceLoader
└── resources
└── META-INF
└── services
├── com.apress.prospring6.two.decoupled.MessageProvider
└── com.apress.prospring6.two.decoupled.MessageRenderer
38
Chapter 2 ■ Getting Started
The com.apress.prospring6.two.decoupled.MessageProvider file contains the fully qualified
name of the SPI implementation, which in this case is com.apress.prospring6.two.decoupled.
HelloWorldMessageProvider.
The com.apress.prospring6.two.decoupled.MessageRenderer file contains the fully qualified
name of the SPI implementation, which in this case is com.apress.prospring6.two.decoupled.
StandardOutMessageRenderer.
Listing 2-18 depicts the main(..) method that uses ServiceLoader.
Listing 2-18. HelloWorld Version Using ServiceLoader
package com.apress.prospring6.two.decoupled;
import java.util.ServiceLoader;
public class HelloWorldWithServiceLoader {
public static void main(String... args) {
ServiceLoader<MessageRenderer> slr = ServiceLoader.
load(MessageRenderer.class);
ServiceLoader<MessageProvider> slp = ServiceLoader.load(MessageProvider.class);
MessageRenderer mr = slr.findFirst()
.orElseThrow(() -> new IllegalArgumentException("Service of type
'MessageRenderer' was not found!"));
MessageProvider mp = slp.findFirst()
.orElseThrow(() -> new IllegalArgumentException("Service of type
'MessageProvider' was not found!"));
mr.setMessageProvider(mp);
mr.render();
}
}
ServiceLoader is overkill for this example, and it shows its true power in multi-module projects,
where Java modules are configured. The module providing the implementation declares the following in its
module.java file: provides {SPI} with {SPI-Implementation}. The module using the service has no
idea where the implementation is coming from, or its fully qualified name; it just declares in its main.java file
uses {SPI} and the ServiceLoader picks whatever it finds on the classpath. You can find more details
about this in Java 17 for Absolute Beginners, published by Apress in 2022.
Before we move on to see how we can introduce Spring into this application, let’s quickly recap what we
have done:
•
We started with the simple Hello World application.
•
We defined two additional requirements that the application must fulfill:
–– Changing the message should be simple.
–– Changing the rendering mechanism should also be simple.
39
Chapter 2 ■ Getting Started
•
To meet these requirements, we used two interfaces: MessageProvider and
MessageRenderer.
•
The MessageRenderer interface depends on an implementation of the
MessageProvider interface to be able to retrieve a message to render.
•
Finally, we added a simple factory class to retrieve the names of the implementation
classes and instantiate them as applicable. And this was just showing off, since
ServiceLoader exists.
Refactoring with Spring
The MessageSupportFactory example shown earlier met the goals laid out for the sample application, but its
main problem is the quantity of glue code needed to piece the application together, while at the same time
keeping the components loosely coupled. Using SpringLoader is the Java way of using dependency injection
in your application and removes the necessity of writing all that glue code. However, one problem remains:
we still had to provide the implementation of MessageRenderer with an instance of MessageProvider
manually and explicitly in the code of the main(..) method. This last problem can be solved by Spring.
Using Spring XML Configuration
Since we are using Spring for the full solution, SpringLoader is no longer necessary and its place is taken
by a Spring interface named ApplicationContext. Don’t worry too much about this interface; for now,
it is enough to know that this interface is used by Spring for storing all the environmental information
with regard to an application being managed by Spring. This interface extends another interface,
ListableBeanFactory, which acts as the provider for any Spring-managed bean instance. Take a look at the
code snippet in Listing 2-19.
Listing 2-19. HelloWorld Version Using Spring
package com.apress.prospring6.two;
import com.apress.prospring6.two.decoupled.MessageRenderer;
import org.springframework.context.ApplicationContext;
import org.springframework.context.support.ClassPathXmlApplicationContext;
public class HelloWorldSpringDI {
public static void main(String... args) {
ApplicationContext ctx = new ClassPathXmlApplicationContext("spring/appcontext.xml");
MessageRenderer mr = ctx.getBean("renderer", MessageRenderer.class);
mr.render();
}
}
In the previous code snippet, you can see that the main(..) method obtains an instance of
ClassPathXmlApplicationContext (the application configuration information is loaded from the file
spring/app-context.xml in the project’s classpath), typed as ApplicationContext, and from this, it
obtains the MessageRenderer instances by using the ApplicationContext#getBean() method. Don’t
worry too much about the getBean() method for now; just know that this method reads the application
40
Chapter 2 ■ Getting Started
configuration (in this case, an XML file), initializes Spring’s ApplicationContext environment, and then
returns the configured bean instance. This app-context.xml XML file serves the same purpose as the one
used for MessageSupportFactory or the ones used for ServiceLoader. The contents of this file are shown in
Listing 2-20.
Listing 2-20. Spring XML Configuration File
<?xml version="1.0" encoding="UTF-8"?>
<beans xmlns="http://www.springframework.org/schema/beans"
xmlns:xsi="http://www.w3.org/2001/XMLSchema-instance"
xmlns:p="http://www.springframework.org/schema/p"
xsi:schemaLocation="http://www.springframework.org/schema/beans
http://www.springframework.org/schema/beans/spring-beans.xsd">
<bean id="provider"
class="com.apress.prospring6.two.decoupled.HelloWorldMessageProvider"/>
<bean id="renderer"
class="com.apress.prospring6.two.decoupled.StandardOutMessageRenderer"
p:messageProvider-ref="provider"/>
</beans>
Listing 2-20 shows a typical Spring ApplicationContext configuration. First, Spring’s namespaces are
declared, and the default namespace is beans. The beans namespace is used to declare the beans that need
to be managed by Spring and to declare their dependency requirements (for the preceding example, the
renderer bean’s messageProvider property is referencing the provider bean). Spring will resolve and inject
those dependencies.
Afterward, we declare the bean with the ID provider and the corresponding implementation class.
When Spring sees this bean definition during the ApplicationContext initialization, it will instantiate the
class and store it with the specified ID.
Then the renderer bean is declared, with the corresponding implementation class. Remember that
this bean depends on the MessageProvider interface for getting the message to render. To inform Spring
about the DI requirement, we use the p namespace attribute. The tag attribute p:messageProviderref="provider" tells Spring that the bean’s property, messageProvider, should be injected with another
bean. The bean to be injected into the property should reference a bean with the ID provider. When Spring
sees this definition, it will instantiate the class, look up the bean’s property named messageProvider, and
inject it with the bean instance with the ID provider.
As you can see, upon the initialization of Spring’s ApplicationContext, the main(..) method now
just obtains the MessageRenderer bean by using its type-safe getBean() method (passing in the ID and the
expected return type, which is the MessageRenderer interface) and calls render(). Spring has created the
MessageProvider instance and injected it into the MessageRenderer instance. Notice that we didn’t have
to make any changes to the classes that are being wired together using Spring. In fact, these classes have no
reference to Spring and are completely oblivious to its existence. However, this isn’t always the case. Your
classes can implement Spring-specified interfaces to interact in a variety of ways with the DI container.
With your new Spring configuration and modified main(..) method, let’s see it in action. Using Gradle
or Maven, build the full project by executing any of the commands in the pro-spring-6/README.adoc.
The only required Spring module to be declared in your configuration file is spring-context. Gradle/
Maven will automatically bring in any dependencies required for this module. In Figure 2-10 you can see the
transitive dependencies of spring-context.jar in Gradle View.
41
Chapter 2 ■ Getting Started
Figure 2-10. Gradle View showing spring-context and its dependencies
For module chapter02 the build will result in an executable JAR file.
Gradle stores artifacts produced by the build under {module_name}/build/libs. Maven stores
artifacts produced by the build under {module_name}/target.
You can run any of the executable jars (produced by Gradle or Maven—they are identical) using the
commands in Listing 2-21, in a terminal.
Listing 2-21. Commands to Run Executable Jars Produced by Gradle and Maven for Module chapter02
# Gradle
cd pro-spring-6/chapter02/build/libs
java -jar chapter02-6.0-SNAPSHOT.jar
# Maven
cd pro-spring-6/chapter02/target
java -jar chapter02-6.0-SNAPSHOT.jar
Running any of the jars yields the output in Listing 2-22.
Listing 2-22. Output Produced by Running the Executable jars Produced by Gradle and Maven for Module
chapter02
--> HelloWorldMessageProvider: constructor called
--> StandardOutMessageRenderer: constructor called
--> StandardOutMessageRenderer: setting the provider
Hello World!
42
Chapter 2 ■ Getting Started
This section was kept in the book to show you how Spring configuration has evolved. Spring 5 has
dropped support for XML configurations. This way of configuring Spring applications might still be used in
legacy projects, so if you end up working on one, feel free to look for previous editions of this book.
Spring Configuration Using Annotations
Starting with Spring 3.0, XML configuration files are no longer necessary when developing a Spring
application. They can be replaced with annotations and Java configuration classes. Configuration classes
are Java classes annotated with @Configuration that contain bean definitions (methods annotated with
@Bean) or are configured themselves to identify bean definitions in the application by annotating them with
@ComponentScanning. The equivalent of the app-context.xml file presented earlier is shown in Listing 2-23.
Listing 2-23. Spring Java Configuration Class
package com.apress.prospring6.two.annotated;
// some imports omitted
import org.springframework.context.annotation.Bean;
import org.springframework.context.annotation.Configuration;
@Configuration
public class HelloWorldConfiguration {
@Bean // // equivalent to <bean id="provider" class=".."/>
public MessageProvider provider() {
return new HelloWorldMessageProvider();
}
@Bean // // equivalent to <bean id="renderer" class=".."/>
public MessageRenderer renderer(){
MessageRenderer renderer = new StandardOutMessageRenderer();
renderer.setMessageProvider(provider());
return renderer;
}
}
The main(..) method has to be modified as follows: ClassPathXmlApplicationContext must be
replaced with another ApplicationContext implementation that knows how to read bean definitions from
configuration classes. This class is AnnotationConfigApplicationContext. This version of the method is
depicted in Listing 2-24.
Listing 2-24. main(..) Method to Start a Spring Application Configured Using Java Configuration
package com.apress.prospring6.two.annotated;
// some imports omitted
import org.springframework.context.ApplicationContext;
import org.springframework.context.annotation.AnnotationConfigApplicationContext;
43
Chapter 2 ■ Getting Started
public class HelloWorldSpringAnnotated {
public static void main(String... args) {
ApplicationContext ctx = new AnnotationConfigApplicationContext(HelloWorldConfigura
tion.class);
MessageRenderer mr = ctx.getBean("renderer", MessageRenderer.class);
mr.render();
}
}
This is just one version of configuration using annotations and configuration classes. Without XML,
things get pretty flexible when it comes to Spring configuration. You’ll learn more about that later in this
book, but the focus when it comes to configuration is on Java configuration and annotations.
Some interfaces and classes defined in the Hello World example may be used in later chapters.
Although we showed the full source code in this example, future chapters may show condensed versions of
code to avoid being verbose, especially in the case of incremental code modifications. The code has been
organized to allow code reusability between modules. All classes that can be used in Spring future examples
were placed under the com.apress.prospring6.two.decoupled and com.apress.prospring6.two.
annotated packages.
Summary
This chapter presented all the background information you need to get up and running with Spring. We
showed you how to get started with Spring through dependency management systems and the current
development version directly from GitHub. We described how Spring is packaged and the dependencies
you need for each of Spring’s features. Using this information, you can make informed decisions about
which of the Spring JAR files your application needs and which dependencies you need to distribute with
your application. Spring’s documentation, guides, and test suite provide Spring users with an ideal base
from which to start their Spring development, so we took some time to investigate what is made available
by Spring.
Finally, we presented an example of how, using Spring DI, it is possible to make the traditional Hello
World example a loosely coupled, extendable message-rendering application. The important thing to realize
is that we only scratched the surface of Spring DI in this chapter, and we barely made a dent in Spring as a
whole. In the next chapter, we take an in-depth look at IoC and DI in Spring.
44
CHAPTER 3
Introducing IoC and DI in Spring
Chapters 1 and 2 have introduced you to the Spring world, explaining why this framework is necessary and
why dependency injection is so cool and useful. In essence, Spring was built to make dependency injection
easy. This software design pattern implies that dependent components delegate the dependency resolution
to an external service that will take care of injecting the dependencies. The dependent component is not
allowed to call the injector service and has very little to say when it comes to the dependencies that will
be injected. This is why the behavior is also known as the “Don’t call us, we’ll call you!” principle, and it
is technically known as inversion of control (IoC). If you do a quick Google search, you will find a lot of
conflicting opinions about dependency injection and inversion of control. You will find programming
articles calling them programming techniques, programming principles, and design patterns. However, the
best explanation comes from an article by Martin Fowler1, which is recognized in the Java world as the
highest authority when it comes to design patterns. If you do not have the time to read it, here is a summary:
Inversion of control is a common characteristic of frameworks that facilitate injection of dependencies. And the
basic idea of the dependency injection pattern is to have a separate object that injects dependencies with the
required behavior, based on an interface contract.
In this chapter the following DI features are covered:
1
•
Inversion of control concepts: we discuss the various kinds of IoC, including
dependency injection and dependency lookup. This section presents the differences
between the various IoC approaches as well as the pros and cons of each.
•
Inversion of control in Spring: we look at IoC capabilities available in Spring and how
they are implemented. In particular, you’ll see the dependency injection services
that Spring offers, including setter, constructor, and method injection.
•
Dependency injection in Spring: we cover Spring’s implementation of the IoC
container. For bean definition and DI requirements, BeanFactory is the main
interface an application interacts with. However, other than the first few listings, the
remainder of the sample code provided in this chapter focuses on using Spring’s
ApplicationContext interface, which is an extension of BeanFactory and provides
much more powerful features. We cover the difference between BeanFactory and
ApplicationContext in later sections.
https://martinfowler.com/articles/injection.html#InversionOfControl
© Iuliana Cosmina, Rob Harrop, Chris Schaefer, and Clarence Ho 2023
I. Cosmina et al., Pro Spring 6, https://doi.org/10.1007/978-1-4842-8640-1_3
45
Chapter 3 ■ Introducing IoC and DI in Spring
•
Configuring the Spring application context: The final part of this chapter focuses
on the annotation approach for ApplicationContext configuration. Groovy and
Java configuration are further discussed in Chapter 4. This section starts with a
discussion of DI configuration and moves on to present additional services provided
by BeanFactory, such as bean inheritance, life-cycle management, and autowiring.
Inversion of Control and Dependency Injection
At its core, IoC aims to offer a simpler mechanism for provisioning component dependencies (often referred
to as an object’s collaborators) and managing these dependencies throughout their life cycles. A component
that requires certain dependencies is often referred to as the dependent object or, in the case of IoC, the
target. In general, IoC can be decomposed into two subtypes: dependency injection and dependency lookup.
These subtypes are further decomposed into concrete implementations of the IoC services. From this
definition, you can clearly see that when we are talking about DI, we are always talking about IoC, but when
we are talking about IoC, we are not always talking about DI (for example, dependency lookup is also a form
of IoC).
Types of Inversion of Control
You may be wondering why there are two types of IoC and why these types are split further into different
implementations. There seems to be no clear answer to this question; certainly, the different types provide a
level of flexibility, but to us, it seems that IoC is more of a mixture of old and new ideas. The two types of IoC
represent this. Dependency lookup is a much more traditional approach, and at first glance, it seems more
familiar to Java programmers. Dependency injection, although it appears counterintuitive at first, is actually
much more flexible and usable than dependency lookup. With dependency lookup–style IoC, a component
must acquire a reference to a dependency, whereas with dependency injection, the dependencies are
injected into the component by the IoC container. Dependency lookup comes in two types:
•
Dependency pull
•
Contextualized dependency lookup (CDL)
Dependency injection also has two common flavors:
•
Constructor dependency injection
•
Setter dependency injection
For the discussions in this section, we are not concerned with how the fictional IoC container comes to
know about all the different dependencies, just that at some point, it performs the actions described for each
mechanism.
Dependency Pull
To a Java developer, dependency pull is the most familiar type of IoC. In dependency pull, dependencies are
pulled from a registry as required. Anyone who has ever written code to access an EJB (2.1 or prior versions)
has used dependency pull (that is, via the JNDI API to look up an EJB component). Figure 3-1 shows the
scenario of dependency pull via the lookup mechanism.
46
Chapter 3 ■ Introducing IoC and DI in Spring
Figure 3-1. Dependency pull via JNDI lookup
Spring also offers dependency pull as a mechanism for retrieving the components that the framework
manages; you saw this in action in Chapter 2. Listing 3-1 shows an example of a typical dependency pull
lookup in a Spring-based application.
Listing 3-1. Spring Dependency Pull Example
package com.apress.prospring6.two.annotated;
// some imports omitted
import org.springframework.context.ApplicationContext;
import org.springframework.context.annotation.AnnotationConfigApplicationContext;
public class HelloWorldSpringAnnotated {
public static void main(String... args) {
ApplicationContext ctx = new AnnotationConfigApplicationContext(HelloWorldConfigura
tion.class);
MessageRenderer mr = ctx.getBean("renderer", MessageRenderer.class);
mr.render();
}
}
This code snippet, and all classes referenced in it, was introduced at the end of Chapter 2 to show you
how a Spring ApplicationContext is built. Notice that in the main(..) method the MessageRenderer bean
is retrieved from the ApplicationContext that functions as a register of all beans in the application; this
instance is therefore pulled, so its render() method can be invoked.
This kind of IoC is not only prevalent in JEE-based applications (using EJB 2.1 or prior versions), which
make extensive use of JNDI lookups to obtain dependencies from a registry, but also pivotal to working with
Spring in many environments.
Contextualized Dependency Lookup
Contextualized dependency lookup (CDL) is similar, in some respects, to dependency pull, but in CDL,
lookup is performed against the container that is managing the resource, not from some central registry, and
it is usually performed at some set point. Figure 3-2 shows the CDL mechanism.
47
Chapter 3 ■ Introducing IoC and DI in Spring
Figure 3-2. Contextualized dependency lookup
CDL works by having the component that requires a dependency implement an interface similar to the
one in Listing 3-2.
Listing 3-2. Contextualized Dependency Lookup Interface
package com.apress.prospring6.three;
// some imports omitted
public interface ManagedComponent {
void performLookup(Container container);
}
By implementing this interface, a component is signaling to the container that it wants to obtain a
dependency. The container is usually provided by the underlying application server or framework (for
example, Tomcat or JBoss) or framework (for example, Spring). The code in Listing 3-3 shows a simple
Container interface that provides a dependency lookup service.
Listing 3-3. Container Interface That Provides a Dependency Lookup Service
package com.apress.prospring6.three;
public interface Container {
Object getDependency(String key);
}
When the container is ready to pass dependencies to a component, it calls performLookup() on each
component in turn. The component can then look up its dependencies by using the Container interface.
To work with the already familiar example, the MessageRenderer interface is declared to extend the
ManagedComponent interface, so that the StandardOutMessageRenderer can look up its own dependency
using the provided Container implementation. The code for the MessageRenderer interface and
StandardOutMessageRenderer class is displayed in Listing 3-4.
48
Chapter 3 ■ Introducing IoC and DI in Spring
Listing 3-4. ManagedComponent Implementation Using the StandardOutMessageRenderer Class
package com.apress.prospring6.three;
interface MessageRenderer extends ManagedComponent {
void render();
}
class StandardOutMessageRenderer implements MessageRenderer {
private MessageProvider messageProvider;
@Override
public void performLookup(Container container) {
this.messageProvider = (MessageProvider) container.getDependency("provider");
}
// other code omitted, already listed in Chapter 2
}
You might notice that the interface and class in this example have np type accessor. They are not public
because they are not declared in separate file. Actually, all Java types related to the CDL example are part of the
CDLDemo.java file. We decided to put all types related to this example in the same file because it makes
navigating the project sources easier. Also, since all the types in the example are in the same file, there is no
doubt where the bean definitions are coming from. We kept this approach wherever necessary in the project for
this book.
Constructor Dependency Injection
In constructor dependency injection the IoC container injects a component’s dependencies via its constructor
(or constructors). The component declares a constructor or a set of constructors, taking as arguments its
dependencies, and the IoC container passes the dependencies to the component when instantiation occurs.
This means this version of the StandardOutMessageRenderer looks like the one depicted in Listing 3-5.
Listing 3-5. StandardOutMessageRenderer Modified for Constructor Injection
package com.apress.prospring6.three.ci;
class StandardOutMessageRenderer implements MessageRenderer {
private final MessageProvider messageProvider;
public StandardOutMessageRenderer(MessageProvider messageProvider) {
this.messageProvider = messageProvider;
}
// other code omitted, already listed in Chapter 2
}
49
Chapter 3 ■ Introducing IoC and DI in Spring
An obvious consequence of using constructor injection is that an object cannot be created without its
dependencies; thus, they are mandatory.
Setter Dependency Injection
In setter dependency injection, the IoC container injects a component’s dependencies via JavaBean-style
setter methods. A component’s setters expose the dependencies that the IoC container can manage.
Listing 3-6 shows a typical setter dependency injection–based version of the StandardOutMessageRenderer.
Listing 3-6. StandardOutMessageRenderer Modified for Setter Injection
package com.apress.prospring6.three.di;
class StandardOutMessageRenderer implements MessageRenderer {
private MessageProvider messageProvider;
public void setMessageProvider(MessageProvider messageProvider) {
this.messageProvider = messageProvider;
}
// other code omitted, already listed in Chapter 2
}
An obvious consequence of using setter injection is that an object can be created without its
dependencies, and they can be provided later by calling the setter.
Within the container, the dependency requirement exposed by the setMessageProvider() method is
referred to by the JavaBeans-style name, dependency. In practice, setter injection is the most widely used
injection mechanism, and it is one of the simplest IoC mechanisms to implement.
There is another type of injection supported in Spring called field injection, but this will be covered later
in the chapter, when you learn about autowiring using the @Autowire annotation.
Injection vs. Lookup
Choosing which style of IoC to use—injection or lookup—usually is not a difficult decision. In many cases,
the type of IoC you choose is mandated by the container you are using. For instance, if you are using EJB
2.1 or prior versions, you must use lookup-style IoC (via JNDI) to obtain an EJB from the JEE container. In
Spring, aside from initial bean lookups, your components and their dependencies are always wired together
using injection-style IoC.
When you are using Spring, you can access EJB resources without performing an explicit lookup.
Spring can act as an adapter between lookup- and injection-style IoC systems, thus allowing you to manage all
resources by using injection.
50
Chapter 3 ■ Introducing IoC and DI in Spring
After reading thus far, what do you think? Would you use dependency injection or dependency lookup?
Using injection, you are free to use your classes completely decoupled from the IoC container that
is supplying dependent objects with their collaborators manually, whereas with lookup your classes are
always dependent on the classes and interfaces defined by the container. Another drawback with lookup
is that testing your classes in isolation from the container becomes difficult. Using injection, testing your
components is trivial because you can simply provide the dependencies yourself by using the appropriate
constructor or setter, as you will see throughout this book.
The biggest reason to choose injection over lookup is that it makes your life easier. You write
substantially less code when you are using injection, and the code that you do write is simple and can, in
general, be automated by a good IDE. You will notice that all the code in the injection examples is passive,
in that it doesn’t actively try to accomplish a task. The most exciting thing you see in injection code is that
objects get stored in a field only; no other code is involved in pulling the dependency from any registry
or container. Therefore, the code is much simpler and less error prone. Passive code is much simpler to
maintain than active code because there is very little that can go wrong. There are a lot of things that could
go wrong with the StandardOutMessageRenderer from Listing 3-4: the dependency key could change,
the container instance could be null, or the returned dependency might be the incorrect type. Using
dependency lookup might decouple the components of your application, but it adds complexity in the
additional code required to couple these components back together in order to perform any useful tasks.
Setter Injection vs. Constructor Injection
At this point in the book, it is clear that dependency injection is the way to go. Constructor injection is useful
when dependency must be enforced, and the component requiring a dependency won’t work without it.
Many containers, Spring included, provide a mechanism for ensuring that all dependencies are defined
when you use setter injection, but by using constructor injection, you assert the requirement for the
dependency in a container-agnostic manner. Constructor injection also helps achieve the use of immutable
objects—this is why in Listing 3-5 the MessageProvider field is declared final.
Setter injection is useful in a variety of cases. If the component is exposing its dependencies to the
container but is happy to provide its own defaults, setter injection is usually the best way to accomplish this.
Another benefit of setter injection is that it allows dependencies to be declared on an interface, although this
is not as useful as you might first think. Think about it, an interface can be implemented by multiple classes,
that need to expose the same API, but need different dependencies. So, unless you are absolutely sure that
all implementations of a particular business interface require a particular dependency, you should let each
implementation class define its own dependencies and keep the business interface for business methods.
Listing 3-7 depicts an interface for a newsletter sender service and it looks like a contraction to what was
said so far.
Listing 3-7. NewsletterSender Interface
package com.apress.prospring6.three;
public interface NewsletterSender {
void setSmtpServer(String smtpServer);
String getSmtpServer();
void setFromAddress(String fromAddress);
String getFromAddress();
void send();
}
51
Chapter 3 ■ Introducing IoC and DI in Spring
But here’s the catch: the dependencies declared via this interface are configurations. Configuration
parameters are a special case for dependencies. Certainly, your components depend on the configuration
data, but configuration data is significantly different from the types of dependency you have seen so far.
Thus, placing setters and getters for configuration parameters in the business interface is a good idea and
makes setter injection a valuable tool.
Classes that send a set of newsletters via e-mail implement the NewsletterSender interface. The
send() method is the only business method, but notice that we have defined two JavaBean properties
on the interface. Why are we doing this when we just said that you shouldn’t define dependencies in the
business interface? The reason is that these values, the SMTP server address and the address the e-mails
are sent from, are not dependencies in the practical sense; rather, they are configuration details that affect
how all implementations of the NewsletterSender interface function. The question then is this: what is the
difference between a configuration parameter and any other kind of dependency? In most cases, you can
clearly see whether a dependency should be classified as a configuration parameter, but if you are not sure,
look for the following three characteristics that point to a configuration parameter:
•
Configuration parameters are passive: In the NewsletterSender example depicted
in Listing 3-7, the smtpServer parameter is an example of a passive dependency.
Passive dependencies are not used directly to perform an action; instead, they
are used internally or by another dependency to perform their actions. In the
MessageRenderer example from Chapter 2, the MessageProvider dependency was
not passive; it performed a function that was necessary for the MessageRenderer to
complete its task.
•
Configuration parameters are usually information, not other components: By this
we mean that a configuration parameter is usually some piece of information that
a component needs to complete its work. Clearly, the SMTP server is a piece of
information required by the NewsletterSender, but the MessageProvider is really
another component that the MessageRenderer needs to function correctly.
•
Configuration parameters are usually simple values or collections of simple
values: This is really a byproduct of the previous two points, but configuration
parameters are usually simple values. In Java this means they are a primitive (or
the corresponding wrapper class) or a String or collections of these values. Simple
values are generally passive. This means you can’t do much with a String other
than manipulate the data it represents; and you almost always use these values for
information purposes—for example, an int value that represents the port number
that a network socket should listen on or a String that represents the SMTP server
through which an e-mail program should send messages.
When considering whether to define configuration options in the business interface, also consider
whether the configuration parameter is applicable to all implementations of the business interface
or just one. For instance, in the case of implementations of NewsletterSender, it is obvious that all
implementations need to know which SMTP server to use when sending e-mails. However, we would
probably choose to leave the configuration option that flags whether to send secure e-mail off the
business interface because not all e-mail APIs are capable of this, and it is correct to assume that many
implementations will not take security into consideration at all.
Recall that in Chapter 2 we chose to define the dependencies in the business purposes. This was for
illustration purposes only and should not be treated in any way as a best practice.
52
Chapter 3 ■ Introducing IoC and DI in Spring
Setter injection also allows you to swap dependencies for a different implementation on-the-fly without
creating a new instance of the parent component. Spring’s JMX support makes this possible. Perhaps the
biggest benefit of setter injection is that it is the least intrusive of the injection mechanisms.
In general, you should choose an injection type based on your use case. Setter-based injection allows
dependencies to be swapped out without creating new objects and also lets your class choose appropriate
defaults without the need to explicitly inject an object. Constructor injection is a good choice when you
want to ensure that dependencies are being passed to a component and when designing for immutable
objects. Do keep in mind that while constructor injection ensures that all dependencies are provided to a
component, most containers provide a mechanism to ensure this as well but may incur a cost of coupling
your code to the framework.
Inversion of Control in Spring
As mentioned earlier, inversion of control is a big part of what Spring does. The core of Spring’s
implementation is based on dependency injection, although dependency lookup features are provided as
well. When Spring provides collaborators to a dependent object automatically, it does so using dependency
injection. In a Spring-based application, it is always preferable to use dependency injection to pass
collaborators to dependent objects rather than have the dependent objects obtain the collaborators via
lookup. Figure 3-3 shows Spring’s dependency injection mechanism.
Figure 3-3. Spring’s dependency injection mechanism
Although dependency injection is the preferred mechanism for wiring together collaborators and
dependent objects, you need dependency lookup to access the dependent objects. In many environments,
Spring cannot automatically wire up all of your application components by using dependency injection, and
you must use dependency lookup to access the initial set of components. For example, in stand-alone Java
applications, you need to bootstrap Spring’s container in the main(..) method and obtain the dependencies
(via the ApplicationContext interface) for processing programmatically. However, when you are building
web applications by using Spring’s MVC support, Spring can avoid this by gluing your entire application
together automatically. Wherever it is possible to use dependency injection with Spring, you should do so;
otherwise, you can fall back on the dependency lookup capabilities. You will see examples of both in action
during the course of this chapter, and we will point them out when they first arise.
An interesting feature of Spring’s IoC container is that it has the ability to act as an adapter between its
own dependency injection container and external dependency lookup containers. We discuss this feature
later in this chapter.
Spring supports both constructor and setter injection and bolsters the standard IoC feature set with a
whole host of useful additions to make your life easier.
The rest of this chapter introduces the basics of Spring’s DI container, complete with plenty of examples.
Dependency Injection in Spring
Spring’s support for dependency injection is comprehensive and, as you will see in Chapter 4, goes beyond
the standard IoC feature set we have discussed so far. The rest of this chapter addresses the basics of Spring’s
dependency injection container, looking at setter, constructor, and Method Injection, along with a detailed
look at how dependency injection is configured in Spring.
53
Chapter 3 ■ Introducing IoC and DI in Spring
Beans and BeanFactory
The org.springframework.beans and org.springframework.context packages are the basis for Spring
Framework’s IoC container. The central point of Spring’s IoC container is the org.springframework.beans.
factory.BeanFactory interface. Spring implementations of this interface are responsible for managing
components, including their dependencies as well as their life cycles. Figure 3-4 shows the most commonly
used BeanFactory implementations.
Figure 3-4. BeanFactory most common implementations
In Spring, the term bean is used to refer to any object managed by the Spring IoC container. The Spring
IoC container creates, configures (assembles), and manages beans throughout their life cycle. Typically,
your beans adhere, at some level, to the JavaBeans specification, but this is not required, especially if you
plan to use constructor injection to wire your beans together.
If your application needs only DI support, you can interact with the Spring DI container via the
BeanFactory interface. In this case, your application must create an instance of a class that implements
the BeanFactory interface and configures it with bean and dependency information. This interface is
implemented by objects that hold a number of bean definitions, each uniquely identified by a String name.
After an instance of this type is created, your application can access the beans via BeanFactory and get on
with its processing.
In some cases, all of this setup is handled automatically (for example, in a web application, Spring’s
ApplicationContext will be bootstrapped by the web container during application startup via a Springprovided ContextLoaderListener class declared in the web.xml descriptor file). But in many cases, you
need to code the setup yourself. Most examples in this chapter require manual setup of the BeanFactory
implementation.
54
Chapter 3 ■ Introducing IoC and DI in Spring
The ApplicationContext interface is an extension to BeanFactory. In addition to DI services,
ApplicationContext provides other services:
•
Integration with Spring’s AOP features
•
Message resource handling for internationalization (i18n)
•
Application event handling
•
Application layer–specific contexts (e.g., web, security, etc.)
In developing Spring-based applications, it’s recommended that you interact with Spring via
the ApplicationContext interface. Spring supports the bootstrapping of ApplicationContext by
manual coding (instantiate it manually and load the appropriate configuration) or in a web container
environment via ContextLoaderListener. From this point onward, all the sample code in this book uses
ApplicationContext and its implementations.
Configuring ApplicationContext
In the first example in Chapter 2, the org.springframework.context.ApplicationContext was configured
using an XML file. Although still possible, configuration using XML is limited to capabilities of Spring 4,
since no technical investment in this area has been done from that version onward. During Spring’s there’s
been a long discussion about which way of configuring an application is better, XML or annotations. It really
depends on developer preferences. Annotations are intertwined with the types of the configured beans and
they provide a lot of context, which makes configurations more concise. XML configures a Spring application
while being decoupled from the actual code(the Spring XML configuration files are resource files), although
this is valid for JavaConfig as well, which means the configuration can be externalized and modified without
recompiling the code. One of the best things about Spring is that you can mix configuration styles easily.
To keep things simple in this edition of the book, Spring applications are configured only through Java
annotations (JavaConfig) and Java code, that provide enough flexibility to describe any type of Spring application.
Basic Configuration Overview
To configure a stand-alone Spring application, all that is needed is a class annotated with @Configuration.
This annotation indicates that the class contains methods annotated with @Bean, which are bean
declarations. This approach works for any type of object, especially types provided by third-party libraries—
code that is not part of your project, and you cannot edit it to declare your beans. The same class can also
be configured to enable looking for existing bean declarations by annotating it with @ComponentScan. The
discoverable bean declarations are classes annotated with @Component and other stereotype annotations.
The Spring container processes these classes to generate bean definitions and service requests for those
beans at runtime. All these annotations are basically used to describe what objects should be created, the
order they should be created in, initialization operations, and even operations to be executed before being
discarded by the Garbage Collector, most simply referred to as configuration metadata.
This is the most compact way in which Spring applications can be configured. However, slowly
expanding the topic is more appropriate. Let’s start with a Spring configuration class, shown in Listing 3-8,
that declares two beans. You’ve already seen this class in Chapter 2, but now we are getting into details.
Listing 3-8. Simple Spring Configuration Class
package com.apress.prospring6.two.annotated;
// other imports omitted
import org.springframework.context.annotation.Bean;
import org.springframework.context.annotation.Configuration;
55
Chapter 3 ■ Introducing IoC and DI in Spring
@Configuration
public class HelloWorldConfiguration {
@Bean
public MessageProvider provider() {
return new HelloWorldMessageProvider();
}
@Bean
public MessageRenderer renderer(){
MessageRenderer renderer = new StandardOutMessageRenderer();
renderer.setMessageProvider(provider());
return renderer;
}
}
Listing 3-8 declares two beans, one named provider and one named renderer; yes, the beans have the
same name as the methods creating them. Naming beans is covered later in the chapter.
Spring configuration classes are typically bootstrapped using either
AnnotationConfigApplicationContext or its web-capable variant,
AnnotationConfigWebApplicationContext. Both classes implement ApplicationContext, and the code to
bootstrap the application configured in Listing 3-8 can be written as shown in Listing 3-9.
Listing 3-9. Bootstrapping a Spring Application
package com.apress.prospring6.two.annotated;
import org.springframework.context.ApplicationContext;
import org.springframework.context.annotation.AnnotationConfigApplicationContext;
public class HelloWorldSpringAnnotated {
public static void main(String... args) {
ApplicationContext ctx =
new AnnotationConfigApplicationContext(HelloWorldConfiguration.class);
MessageRenderer mr = ctx.getBean("renderer", MessageRenderer.class);
mr.render();
}
}
When running the HelloWorldSpringAnnotated class, a Spring application context is created that
contains the beans configured by the HelloWorldConfiguration class. A reference to the renderer bean
is obtained by calling the getBean("{name}", {type}.class) method and its render() method is called.
Since Spring injects the MessageProvider dependency according to the configuration, the “Hello World!”
message is printed in the console, as expected.
The bootstrapping process consists of instantiating the AnnotationConfigApplicationContext class
and providing the configuration simple class name as a parameter. By instantiating this class, we are creating
an instance of a Spring IoC container that will read the bean declarations, create the beans, add them to its
registry, and manage them. Using a reference to the container, beans can be retrieved and used, exactly as
shown in Listing 3-9.
56
Chapter 3 ■ Introducing IoC and DI in Spring
Declaring Spring Components
Another way to declare beans is to annotate the classes directly with stereotype annotations. These
annotations are called stereotype because they define the roles of types or methods in the overall
architecture. They are part of a package named org.springframework.stereotype. This package groups
together annotations used to define beans. These annotations are relevant to the role of a bean. For example,
@Service is used to define a service bean, which is a more complex functional bean that provides services
that other beans may require, and @Repository is used to define a bean that is used to retrieve/save data
from/to a database. And @Component is the annotation that marks a class as a bean declaration.
@Component is a meta-annotation, and annotations used to configure beans are annotated with it. This
makes them candidates for auto-detection when using annotation-based configuration and classpath
scanning.
To create bean definitions using annotations, the bean classes must be annotated with the appropriate
stereotype annotation, and the setters or constructors used to inject dependencies must be annotated with
@Autowired to tell the Spring IoC container to look for a bean of that type and use it as an argument when
calling that method.
In Listing 3-10, the annotations used to create the bean definition are highlighted. The stereotype
annotations can have as a parameter the name of the resulting bean.
Listing 3-10. Declaring Spring Beans Using @Component
// HelloWorldMessageProvider.java
package com.apress.prospring6.three.constructor;
import com.apress.prospring6.two.decoupled.MessageProvider;
import org.springframework.stereotype.Component;
// simple bean without dependencies
@Component("provider")
public class HelloWorldMessageProvider implements MessageProvider {
// some code omitted
}
// StandardOutMessageRenderer.java
package com.apress.prospring6.three.setter;
import com.apress.prospring6.two.decoupled.MessageRenderer;
import org.springframework.beans.factory.annotation.Autowired;
// simple bean requiring a dependency
@Component("renderer")
public class StandardOutMessageRenderer implements MessageRenderer {
private MessageProvider messageProvider;
@Autowired
public void setMessageProvider(MessageProvider provider) {
this.messageProvider = provider;
}
// some code omitted
}
57
Chapter 3 ■ Introducing IoC and DI in Spring
By annotating a configuration class with @ComponentScan, when bootstrapping the
ApplicationContext, Spring will seek out these classes, also called components, and instantiate the beans
with the specified names. In Listing 3-11 you can see the simple HelloWorldConfiguration configuration
class annotated with @ComponentScan.
Listing 3-11. Simple Spring Configuration Class with Component Scanning
package com.apress.prospring6.three.constructor;
import org.springframework.context.annotation.ComponentScan;
@Configuration
@ComponentScan
public class HelloWorldConfiguration {
}
The code to bootstrap a Spring environment using AnnotationConfigApplicationContext (see
Listing 3-9) works with this class, too, with no additional changes.
The @ComponentScan annotation declares the scanning directive and may configure specific packages
to scan. When no package is configured, scanning occurs from the package of the class that declares this
annotation, regardless of whether the class is public or package-private.
The class in Listing 3-11 tells Spring to look for bean definitions in package constructor and its
subpackages. If we want to widen or restrict the scanning context, we can do so by declaring the
@ComponentScan annotation with the basePackages attribute that allows the declaration of a package or a
collection of packages where Spring will look for components.
For example:
•
@ComponentScan(basePackages = "com.apress.prospring6") tells Spring to look
for component classes in package com.apress.prospring6 and all its subpackages.
•
@ComponentScan(basePackages = { "com.apress.prospring6.two", "com.
apress.prospring6.three" }) tells Spring to look for component classes in
package com.apress.prospring6.two and package com.apress.prospring6.three
and all their subpackages.
Bean definitions on package-private classes are picked up by the @ComponentScan configuration that
includes the package they are part of.
Component scanning is a time-consuming operation, and it is good programming practice to try to
limit the places where Spring will look for bean definitions in the codebase. The @ComponentScan annotation
provides other attributes beside basePackages to help build concise definitions of the scanning locations:
•
basePackageClasses: A class or more can be configured; the package of each class
specified will be scanned.
•
includeFilters: Specifies which types are eligible for component scanning.
•
excludeFilters: Specifies which types are not eligible for component scanning.
In real-life production applications, there might be legacy code, developed with older versions of
Spring, or requirements might be of such a nature that require XML and configuration classes. Fortunately,
XML and Java configuration can be mixed in more than one way. For example, a configuration class can
58
Chapter 3 ■ Introducing IoC and DI in Spring
import bean definitions from an XML file (or more) using @ImportResource, and the same bootstrapping
using AnnotationConfigApplicationContext will work in this case as well. Other bean definitions from Java
configuration classes can be imported using @Import.
So, Spring allows you to be really creative when defining your beans; you’ll learn more about this in
Chapter 4, which is focused solely on Spring application configuration.
Using Setter Injection
In the previous section, setter injection was used to configure the renderer bean, but since the focus was on
the Spring configuration classes, some extra details are needed.
To configure setter injection, the @Autowired annotation must be put on every setter that is called
by Spring to inject a dependency. Listing 3-12 shows the version of StandardOutMessageRenderer that is
designed to support setter injection.
Listing 3-12. Declaring StandardOutMessageRenderer Beans Using @Component and Setter Injection
package com.apress.prospring6.three.setter;
import org.springframework.beans.factory.annotation.Autowired;
// other import statements omitted
@Component("renderer")
public class StandardOutMessageRenderer implements MessageRenderer {
private MessageProvider messageProvider;
@Autowired
public void setMessageProvider(MessageProvider provider) {
out.println(" ~~ Injecting dependency using setter ~~");
this.messageProvider = provider;
}
// other code omitted
}
To make sure that when executing the code the dependency is injected using the setter method, we
added the out.println(" ~~ Injecting dependency using setter ~~") statement to the setter method.
The Java configuration class requires no changes; if @ComponentScan is configured correctly, the bean
definitions are discovered regardless of the injection style used.
Instead of @Autowired, you can use @Resource(name="provider") to achieve the same result.
@Resource is one of the annotations in the JSR-250 (“Common Annotations for the Java Platform”) standard
that defines a common set of Java annotations for use on both JSE and JEE platforms. This annotation is
currently part of the jakarta.annotation-api library. Different from @Autowired, the @Resource
annotation supports the name parameter for more fine-grained DI requirements. Additionally, Spring supports
use of the @Inject annotation introduced as part of JSR-299 (“Contexts and Dependency Injection for the Java
EE Platform”), later moved to JSR-330 (“Dependency Injection for Java”). @Inject is equivalent in behavior to
Spring’s @Autowired annotation and currently is part of the jakarta.inject-api library.
59
Chapter 3 ■ Introducing IoC and DI in Spring
The code to bootstrap a Spring application context to test that configuring a Spring bean using setter
injection works as intended is the same as the code for the HelloWorldSpringAnnotated class.
In the project attached to this book, most class names containing a main(..) method to bootstrap a
Spring application context are suffixed with Demo. The demo class for this section is named
SetterInjectionDemo and all bean definitions and configuration are part of the SetterInjectionDemo.
java file. This decision was made to keep all implementations in a single file to make it easy to find their
locations within the project.
Using Constructor Injection
In the previous section, we injected a provider instance into the renderer bean, via a setter method. This
works fine, because the @Autowired annotation by default enforces the injection of a dependency, and thus
the Spring application cannot be started if there is a missing dependency. As you will see later in the book,
there are cases when injecting a dependency via setter is not an option, because of the way Spring creates
the beans: it first instantiates the constructor, then it invokes the setters to inject dependencies. If you want
to make sure that a bean is not even created without its dependencies, you can do so by enforcing this
earlier in the life cycle, right at the instantiation step, by declaring your dependency as an argument for the
constructor, ergo designing your bean for constructor injection.
In our examples so far, creating a renderer if there is no provider makes no sense, so a better design for
our StandardOutMessageRenderer class should involve a constructor with a MessageProvider, as shown in
Listing 3-13.
Listing 3-13. StandardOutMessageRenderer Designed for Constructor Injection
package com.apress.prospring6.three.constructor;
// import statements omitted
@Component("renderer")
class StandardOutMessageRenderer implements MessageRenderer {
private MessageProvider messageProvider;
@Autowired
public StandardOutMessageRenderer(MessageProvider messageProvider) {
out.println(" ~~ Injecting dependency using constructor ~~");
this.messageProvider = messageProvider;
}
// other code omitted
}
By implementing MessageRenderer like this, we’ve made it impossible to create an instance of
StandardOutMessageRenderer without providing a value for the messageProvider. The @Autowired
annotation is not used to decorate the constructor, which tells Spring which constructor to use when
instantiating this bean, in case there is more than one.
60
Chapter 3 ■ Introducing IoC and DI in Spring
In Spring 4.x, it was decided that if a bean declares a single constructor that initializes all
dependencies, the @Autowired annotation was redundant, so in the spirit of convention over configuration,
the Spring IoC was modified to call the only constructor present to create the bean regardless of the presence/
absence of the annotation. So, the renderer bean declared in Listing 3-13 is valid even if the @Autowired
annotation is removed.
Since we mentioned that a class representing a bean definition can have more than one constructor, we
present to you the ConstructorConfusion class in Listing 3-14.
Listing 3-14. ConstructorConfusion Class with Multiple Constructors
package com.apress.prospring6.three.constructor;
// import statements omitted
@Component
public class ConstructorConfusion {
private String someValue;
public ConstructorConfusion(String someValue) {
System.out.println("ConstructorConfusion(String) called");
this.someValue = someValue;
}
@Autowired
public ConstructorConfusion(@Value("90") int someValue) {
System.out.println("ConstructorConfusion(int) called");
this.someValue = "Number: " + Integer.toString(someValue);
}
public String toString() {
return someValue;
}
public static void main(String... args) {
var ctx = new AnnotationConfigApplicationContext();
ctx.register(ConstructorConfusion.class);
ctx.refresh();
var cc = ctx.getBean(ConstructorConfusion.class);
out.println("Does this work? " + cc);
}
}
The ConstructorConfusion bean definition in Listing 3-14 is correct, because the second constructor
is annotated with @Autowired. This tells Spring to use this constructor to instantiate this bean. Without that
annotation, Spring cannot decide on its own which constructor to use, and running this class results in the
following exception being thrown.
61
Chapter 3 ■ Introducing IoC and DI in Spring
Caused by: org.springframework.beans.BeanInstantiationException:
Failed to instantiate [com.apress.prospring6.three.constructor.ConstructorConfusion]:
No default constructor found;
nested exception is java.lang.NoSuchMethodException: com.apress.prospring6.three.
constructor.ConstructorConfusion.<init>()
Notice the @Value annotation in the constructor annotated with @Autowired. This annotation is
explained later in this chapter, but for now, in this simple example, know that it is necessary to inject a value for
the constructor parameter, and that the constructor won’t work without it.
The ConstructorConfusion class declares a bean but also has its own main(..) method used to
do the following:
•
Instantiate a simple, empty Spring application context of type
AnnotationConfigApplicationContext
•
that is then populated with the bean definition represented
by the ConstructorConfusion class by calling ctx.
register(ConstructorConfusion.class)
•
and then the context is refreshed by calling refresh(), which re-creates all the beans
according to the registered bean definitions.
Or you have already read all this and find it incredibly interesting that you can register bean definitions
programmatically, without the need for a configuration class.
The example in Listing 3-14 also highlights that the @Autowired annotation can be applied to only
one of the constructors within a class. If we apply the annotation to more than one constructor method, Spring
will complain while bootstrapping ApplicationContext.
Another scenario that is interesting to introduce here is what happens if the dependency is not a bean.
What if it is a simple object, such as a String? Let’s tackle that by creating a configurable message provider. A
configurable MessageProvider implementation that allows the message to be defined externally is shown in
Listing 3-15.
Listing 3-15. Configurable MessageProvider Implementation
package com.apress.prospring6.three.configurable;
import org.springframework.beans.factory.annotation.Value;
// import statements omitted
62
Chapter 3 ■ Introducing IoC and DI in Spring
@Component("provider")
class ConfigurableMessageProvider implements MessageProvider {
private String message;
public ConfigurableMessageProvider(@Value("Configurable message"), String message) {
this.message = message;
}
@Override
public String getMessage() {
return message;
}
}
By implementing MessageProvider like this, we’ve made it impossible to create an instance of
ConfigurableMessageProvider without providing a value for the message. Notice the @Value annotation
used to define the value to be injected into the constructor. This is how we inject values that are not beans
into a Spring bean. Sadly, in this example the value is specified within the annotation declaration, so there
is a necessary hard-coding, but using SpEL dynamic value injection is possible from other sources such as
property files (more on this later in this chapter).
Using Field Injection
There is a third type of dependency injection supported in Spring called field injection. As the name
indicates, the dependency is injected directly into the field, with no constructor or setter needed. This is
done by annotating the class member with the @Autowired annotation. This might seem practical, because
when the dependency is not needed outside the object it is part of, it relieves the developer of writing some
code that is no longer used after the initial creation of the bean. In the code snippet in Listing 3-16, the bean
of type NonSingletonDemo has a field of type Inspiration.
Listing 3-16. NonSingletonDemo Class Used to Show Field Injection
package com.apress.prospring6.three.field;
import org.springframework.stereotype.Component;
// import statements omitted
@Component("singer")
class Singer {
@Autowired
private Inspiration inspirationBean;
public void sing() {
System.out.println("... " + inspirationBean.getLyric());
}
}
The field is private, but the Spring IoC container does not really care about that; it uses reflection to
populate the required dependency.
The Inspiration class code is shown in Listing 3-17 together with the class used to bootstrap a Spring
application context; it is a simple bean with a String field.
63
Chapter 3 ■ Introducing IoC and DI in Spring
Listing 3-17. Inspiration Class and Demo Class Used to Show How Field Injection Works
package com.apress.prospring6.three.field;
// import statements omitted
@Component
class Inspiration {
private String lyric = "I can keep the door cracked open, to let light through";
public Inspiration(@Value("For all my running, I can understand") String lyric) {
this.lyric = lyric;
}
public String getLyric() {
return lyric;
}
public void setLyric(String lyric) {
this.lyric = lyric;
}
}
// demo class
public class SingerFieldInjectionDemo {
public static void main(String... args) {
var ctx = new AnnotationConfigApplicationContext();
ctx.register(Singer.class, Inspiration.class);
ctx.refresh();
Singer singerBean = ctx.getBean(Singer.class);
singerBean.sing();
}
}
Finding one bean of type Inspiration, the Spring IoC container will inject that bean in the
inspirationBean field of the singer bean. That is why when running the code in Listing 3-17 the main class
prints in the console For all my running, I can understand.
However, there are a few drawbacks, and this is why using field injection is not recommended. Here is
the list of drawbacks:
64
•
A risk of violating the single responsibility principle: Having more dependencies
means more responsibilities for a class, which might lead to difficulty separating
concerns at refactoring time. The situation when a class becomes bloated is easier to
see when dependencies are set using constructors or setters but is quite well hidden
when using field injection.
•
Dependency hiding: The responsibility of injecting dependencies is passed to the
container in Spring, but the class should clearly communicate the type of dependencies
needed using a public interface, through methods or constructors. Using field injection,
it can become unclear what type of dependency is really needed and if the dependency
is mandatory or not. (It’s pretty similar to how some partners don’t communicate their
needs but expect you to magically read their minds and satisfy them.)
Chapter 3 ■ Introducing IoC and DI in Spring
•
Dependency on the Spring IoC: Field injection introduces a dependency of the Spring
container, as the @Autowired annotation is a Spring component; thus, the bean is no
longer a POJO and cannot be instantiated independently. (Unless you use @Resource
or @Inject and a different container, that is.)
•
Field injection cannot be used for final fields: This type of field can only be initialized
using constructor injection.
•
Difficulties writing tests: Field injection introduces difficulties when writing tests
because the dependencies must be injected manually.
However, it is practical to use @Autowired in instance variables only for @Configuration and @Test
classes—for the latter based with Integration Testing where a Spring context is necessary.
Using Injection Parameters
In previous examples, we briefly mentioned that other components and values can be injected into a bean
by using both setter injection and constructor injection. Spring supports a myriad of options for injection
parameters, allowing you to inject not only other components and simple values but also Java collections,
externally defined properties, and even beans in another factory. Let’s delve into this a little more.
Injecting Simple Values
Injecting simple values into your beans is easy. To do so, simply specify the value in the @Value annotation.
By default, not only can the @Value annotation read String values, but it can also convert these values to any
primitive or primitive wrapper class. The code snippet in Listing 3-18 shows a simple bean that has a variety
of properties exposed for injection.
Listing 3-18. InjectSimpleDemo Class Used to Show Injecting Value in Properties of Various Types
package com.apress.prospring6.three.valinject;
// import statements omitted
@Component("injectSimple")
public class InjectSimpleDemo {
@Value("John Mayer")
private String name;
@Value("40")
private int age;
@Value("1.92")
private float height;
@Value("false")
private boolean developer;
@Value("1241401112")
private Long ageInSeconds;
public static void main(String... args) {
var ctx = new AnnotationConfigApplicationContext();
ctx.register(InjectSimpleDemo.class);
ctx.refresh();
65
Chapter 3 ■ Introducing IoC and DI in Spring
InjectSimpleDemo simple = (InjectSimpleDemo) ctx.getBean("injectSimple");
out.println(simple);
}
public String toString() {
return "Name: " + name + "\n"
+ "Age: " + age + "\n"
+ "Age in Seconds: " + ageInSeconds + "\n"
+ "Height: " + height + "\n"
+ "Is Developer?: " + developer;
}
}
The @Value annotation can be used directly on fields as well, and is used like this in the
InjectSimpleDemo class to keep things simple and avoid the boilerplate of setters code. If you run this class,
the console output is as expected, shown in Listing 3-19.
Listing 3-19. Console Output Resulting from Running the Class in Listing 3-18
Name: John Mayer
Age: 39
Age in Seconds: 1241401112
Height: 1.92
Is Programmer?: false
Injecting Values Using SpEL
The example in Listing 3-18 shows the capabilities of automatic conversion that Spring has when injecting
property values. However, the example is still quite basic since the values are hard-coded in the @Value
annotation. This is where SpEL makes things interesting.
One powerful feature that was introduced in Spring 3 is the Spring Expression Language (SpEL). SpEL
enables you to evaluate an expression dynamically and then use it in Spring’s ApplicationContext. You can
use the result for injection into Spring beans. In this section, we look at how to use SpEL to inject properties
from other beans, by using the example in the preceding section.
Suppose now we want to externalize the values to be injected into a Spring bean in a configuration
class, as shown in the code Listing 3-20.
Listing 3-20. Spring Configuration Class Providing a Few Values As Fields
package com.apress.prospring6.three.valinject;
// import statements omitted
@Component("injectSimpleConfig")
class InjectSimpleConfig {
private
private
private
private
private
66
String name = "John Mayer";
int age = 40;
float height = 1.92f;
boolean developer = false;
Long ageInSeconds = 1_241_401_112L;
Chapter 3 ■ Introducing IoC and DI in Spring
public String getName() {
return name;
}
public int getAge() {
return age;
}
public float getHeight() {
return height;
}
public boolean isDeveloper() {
return developer;
}
public Long getAgeInSeconds() {
return ageInSeconds;
}
}
The first thing to do is to edit the @Value annotations and replace the hard-coded values with SpEL
expressions referencing properties of this bean. The second thing to do is to add a bean of this type to the
configuration. Both are shown in Listing 3-21.
Listing 3-21. @Value Annotations Customized to Use SpEL Expressions
package com.apress.prospring6.three.valinject;
// import statements omitted
@Component("injectSimpleSpEL")
public class InjectSimpleSpELDemo {
@Value("#{injectSimpleConfig.name.toUpperCase()}")
private String name;
@Value("#{injectSimpleConfig.age + 1}")
private int age;
@Value("#{injectSimpleConfig.height}")
private float height;
@Value("#{injectSimpleConfig.developer}")
private boolean developer;
@Value("#{injectSimpleConfig.ageInSeconds}")
private Long ageInSeconds;
public static void main(String... args) {
var ctx = new AnnotationConfigApplicationContext();
ctx.register(InjectSimpleConfig.class, InjectSimpleSpELDemo.class);
ctx.refresh();
67
Chapter 3 ■ Introducing IoC and DI in Spring
InjectSimpleSpELDemo simple = (InjectSimpleSpELDemo) ctx.getBean("injectSimpleSpEL");
out.println(simple);
}
// other code omitted
}
Notice that we use the SpEL #{injectSimpleConfig.name} in referencing the property of the other
bean. Notice also how there is no getter called, but the SpEL expression contains the bean and property
name concatenated by a “.”(dot) and Spring knows exactly what to do. SpEL supports String manipulation
and arithmetic operations as well, as shown by calling toUpperCase() on the name property before injection
and by adding 1 to the value of the bean property before injection. If you run the main(..) method of the
InjectSimpleSpELDemo class, the output depicted in Listing 3-22 should be printed in the console.
Listing 3-22. Console Output Resulting from Running the Class in Listing 3-21
Name: JOHN MAYER
Age: 41
Age in Seconds: 1241401112
Height: 1.92
Is Developer?: false
Since the toUpperCase() call was added to the name property, the output is almost identical to the
example where values were hard-coded. Using SpEL, you can access any Spring-managed beans and
properties and manipulate them for application use by Spring’s support of sophisticated language features
and syntax.
Injection and ApplicationContext Nesting
So far, the beans we have been injecting have been located in the same ApplicationContext (and hence the
same BeanFactory) as the beans they are injected into. However, Spring supports a hierarchical structure
for ApplicationContext so that one context (and hence the associating BeanFactory) is considered the
parent of another. By allowing ApplicationContext instances to be nested, Spring allows you to split your
configuration into different files, which is a godsend on larger projects with lots of beans.
When nesting ApplicationContext instances, Spring allows beans in what is considered the child
context to reference beans in the parent context. In XML this was easy to do, because of the <ref/> tag,
which could be configured to reference a bean in the parent context via its parent attribute. Using Java
configuration and annotation, the task is a little more tedious but still doable. Let us show you the magic.
ApplicationContext nesting using AnnotationConfigApplicationContext is simple to understand. To
nest one AnnotationConfigApplicationContext inside another, simply call the setParent() method in the
child ApplicationContext as shown in the code in Listing 3-23.
Listing 3-23. Nesting Application Contexts
package com.apress.prospring6.three.nesting;
// import statements omitted
public class ContextNestingDemo {
public static void main(String... args) {
var parentCtx = new AnnotationConfigApplicationContext();
68
Chapter 3 ■ Introducing IoC and DI in Spring
parentCtx.register(ParentConfig.class);
parentCtx.refresh();
var childCtx = new AnnotationConfigApplicationContext();
childCtx.register(ChildConfig.class);
childCtx.setParent(parentCtx);
childCtx.refresh();
Song song1 = (Song) childCtx.getBean("song1");
Song song2 = (Song) childCtx.getBean("song2");
Song song3 = (Song) childCtx.getBean("song3");
out.println("from parent ctx: " + song1.getTitle());
out.println("from child ctx: " + song2.getTitle());
out.println("from child ctx: " + song3.getTitle());
}
}
This method is inherited from the org.springframework.context.support.
GenericApplicationContext, that is a superclass of AnnotationConfigApplicationContext. The
method is, however, declared higher in the hierarchy, in the org.springframework.context.
ConfigurableApplicationContext interface that provides facilities to configure an application context in
addition to the application context client methods in the ApplicationContext interface. The full hierarchy
that AnnotationConfigApplicationContext is part of is depicted in Figure 3-5.
Figure 3-5. AnnotationConfigApplicationContext hierarchy
The context nesting is easy to set up, but accessing beans from the parent…not so much.
The Song class is very simple, just a very simple POJO with a field named title. To declare song title
depending on the context, a class named TitleProvider is used. This class can be instantiated with various
titles via a static builder method. This class is very simple as well. Both these classes are shown in Listing 3-24.
69
Chapter 3 ■ Introducing IoC and DI in Spring
Listing 3-24. Song and TitleProvider Classes
package com.apress.prospring6.three.nesting;
// Song.java
public class Song {
private String title;
public Song(String title) {
this.title = title;
}
public String getTitle() {
return title;
}
}
// TitleProvider.java
import org.apache.commons.lang3.StringUtils;
public class TitleProvider {
private String title = "Gravity";
public String getTitle() {
return title;
}
public void setTitle(String title) {
this.title = title;
}
// builder method
public static TitleProvider instance(final String title){
var childProvider = new TitleProvider();
if(StringUtils.isNotBlank(title)) {
childProvider.setTitle(title);
}
return childProvider;
}
}
The ParentConfig class is simple and declares two TitleProvider beans named parentProvider and
childProvider as shown in Listing 3-25.
Listing 3-25. ParentConfig Class Declaring Two TitleProvider Beans
package com.apress.prospring6.three.nesting;
// import statements omitted
@Configuration
public class ParentConfig {
70
Chapter 3 ■ Introducing IoC and DI in Spring
@Bean
public TitleProvider parentProvider(){
return TitleProvider.instance(null);
}
@Bean
public TitleProvider childProvider(){
return TitleProvider.instance("Daughters");
}
}
The ChildConfig class declares three Song beans, each of which has a title injected from a
TitleProvider bean:
•
song1 is injected with the title value provided by the bean named parentProvider;
since there is a single bean named parentProvider in the parent context, which the
child context inherits, the injected value is Gravity.
•
song2 is injected with the title value provided the bean named childProvider
declared in the parent context; since there is a bean named childProvider in
the child context as well, to access the one from the parent context, some coding
acrobatics are required (this is way easier using XML configuration):
–– To access the bean from the parent context, access to the current context is needed.
This is done by implementing the ApplicationContextAware interface and
declaring a property of type ApplicationContext that will be initialized by Spring
with a reference to the current application context by calling the
setApplicationContext(..) method.
–– Once we have a reference to the current context, we write a complicated SpEL
expression designed to get a reference to the parent context, access the
childProvider, and get the title value, which is expected to be Daughters.
•
song3 is injected with the title value provided the bean named childProvider; since
there is a bean named childProvider in the current context, the injected value is No
Such Thing.
The code is depicted in Listing 3-26.
Listing 3-26. Injecting Beans Properties from a Parent Context in Beans in a Child Context
package com.apress.prospring6.three.nesting;
import org.springframework.beans.BeansException;
import org.springframework.context.ApplicationContextAware;
// import statements omitted
@Configuration
public class ChildConfig implements ApplicationContextAware {
public ApplicationContext applicationContext;
@Bean // overrides {@code childProvider} bean from parent context
public TitleProvider childProvider(){
71
Chapter 3 ■ Introducing IoC and DI in Spring
return TitleProvider.instance("No Such Thing");
}
@Bean
public Song song1(@Value("#{parentProvider.title}") String title){
return new Song(title);
}
@Bean
public Song song2(@Value("#{childConfig.applicationContext.parent.
getBean(\"childProvider\").title}") String title){
return new Song(title);
}
@Bean
public Song song3(@Value("#{childProvider.title}") String title){
return new Song(title);
}
@Override
public void setApplicationContext(ApplicationContext applicationContext) throws
BeansException {
this.applicationContext = applicationContext;
}
}
The SpEL expression in the @Value annotation for bean song2 seems complicated, but it really isn’t.
Remember how we accessed beans in every demo class so far? This is exactly what this expression does, only
instead of accessing the bean from the current context, it does so from its parent. Let us explain:
•
The expression needs to start with childConfig because this is the name of the
configuration bean. It was mentioned before that SpEL can access bean properties.
The current application context is referenced by the applicationContext property
of the bean childConfig.
•
parent is a property of an ApplicationContext that references the parent context. If
there is no parent, it is null, but in this example, we know that we have one.
•
getBean("childProvider") is the typical method we’ve used before to obtain a
reference to a bean using its name. In Java code, a conversion to the appropriate type
was needed, whereas SpEL figures it out on its own.
Listing 3-27 is the output from running the ContextNestingDemo class.
Listing 3-27. Injecting Beans Properties from a Parent Context in Beans in a Child Context
from parent ctx: Gravity
from parent ctx: No Such Thing
from child ctx: Daughters
As expected, the song1 and song2 beans both get a title value from beans in the parent
ApplicationContext, whereas the song3 bean gets a title value from a bean in the child ApplicationContext.
72
Chapter 3 ■ Introducing IoC and DI in Spring
Injecting Collections
Often your beans need access to collections of objects rather than just individual beans or values.
Therefore, it should come as no surprise that Spring allows you to inject a collection of objects into one of
your beans. In the previous edition of this book, lists, sets, maps, and properties values were configured
using XML. Since this book is not focused on that, let’s see how we can declare collections using Java
configuration. It’s quite easy, really: just declare methods annotated with @Bean in a configuration class
that returns List<E>, Set<E>, Properties, or Map<K,V>. This section covers only the List<E> type, but the
sources for the book contain examples for all types.
For the next example, we’ll make use of the Song class used in the previous section. The type
CollectionConfig declares a List<Song> bean and is depicted in Listing 3-28.
Listing 3-28. Configuration Class Declaring a Bean of Type List<Song>
package com.apress.prospring6.three.collectioninject;
// import statements omitted
@Configuration
public class CollectionConfig {
@Bean
public List<Song> list(){
return List.of(
new Song("Not the end"),
new Song("Rise Up")
);
}
@Bean
public Song song1(){
return new Song("Here's to hoping");
}
@Bean
public Song song2(){
return new Song("Wishing the best for you");
}
}
The CollectionConfig class also declares two beans of type Song. The purpose of these beans will
become obvious a bit further in this section.
The CollectingBean is a type for the bean where the list bean is injected and the values are printed
by invoking the printCollections() method. The CollectionInjectionDemo class is where the
main(..) method is declared containing the code to create the application context, get a reference to a
CollectingBean bean, and invoke the printCollections() method on to check that the list value was
injected. The code in Listing 3-29 shows both classes.
73
Chapter 3 ■ Introducing IoC and DI in Spring
Listing 3-29. Demo Class for Testing Configuration Class Declaring a Bean of Type List<Song>
package com.apress.prospring6.three.collectioninject;
// import statements omitted
@Component
class CollectingBean {
@Autowired
List<Song> songList;
public void printCollections(){
songList.forEach(s -> out.println(s.getTitle()));
}
}
public class CollectionInjectionDemo {
public static void main(String... args) {
var ctx = new AnnotationConfigApplicationContext();
ctx.register(CollectionConfig.class, CollectingBean.class);
ctx.refresh();
var collectingBean = ctx.getBean(CollectingBean.class);
collectingBean.printCollections();
}
}
The code looks simple enough, but when we run it, here’s what is printed:
Here's to hoping
Wishing the best for you
Wait, what? Yup, the two extra Song beans have been added to a list and injected into the songList
property, instead of the list bean, as we expected. What happened here? The behavior you are seeing is
caused by the @Autowired annotation. The @Autowired annotation is semantically defined in a way that
it always treats arrays, collections, and maps as sets of corresponding beans, with the target bean type
derived from the declared collection value type. Our class has an attribute of type List<Song> and has
the @Autowired annotation on it, thus Spring will try to inject all beans of type Song within the current
ApplicationContext into this property, which will result in either the unexpected dependencies being
injected or Spring throwing an exception if no bean of type Song was defined.
So, for collection type injection, we have to explicitly instruct Spring to perform injection by specifying
the bean name, and this can be done by using the Spring @Qualifier annotation, the one in the org.
springframework.beans.factory.annotation. This statement is necessary because there is a @Qualifier
annotation in the Jakarta Inject library too, and it has a different purpose. This means annotating the
songList dependency with @Autowired @Qualifier("list") ensures the expected behavior. However,
there are three additional ways to do it:
•
74
@Inject @Named("list"): Both annotations can be found in the jakarta.inject
package. The @Inject annotation is the Jakarta equivalent of Spring’s @Autowired
and the @Named annotation is the equivalent of Spring’s @Qualifier.
Chapter 3 ■ Introducing IoC and DI in Spring
•
@Resource(name="list"): This annotation, mentioned previously, can be found in
the jakarta.annotation package and it is one of the preferred ways to do collection
injection because using one annotation is better than using two of them.
•
@Value("#{collectionConfig.list}"): Since it is preferable to keep it in the
Spring domain, and add as little dependencies to your application as possible, this is
actually the recommended way to inject collections, and there is no doubt what will
be injected.
The behavior described for injecting collections applies for Set and Map too, with the only difference
being that in a Map Spring will inject {beanName,bean} key-value pairs.
Using Method Injection
Beside constructor and setter injection, another less frequently used DI feature that Spring provides is
Method Injection. Spring’s Method Injection capabilities come in two loosely related forms, Lookup Method
Injection and Method Replacement. Lookup Method Injection provides another mechanism by which a
bean can obtain one of its dependencies. Method Replacement allows you to replace the implementation of
any method on a bean arbitrarily, without having to change the original source code. To provide these two
features, Spring uses the dynamic bytecode enhancement capabilities of CGLIB. CGLIB is a powerful, highperformance, and high-quality code generation library. It can extend Java classes and implement interfaces
at runtime. It is open source, and you can find the official repository at https://github.com/cglib/cglib.
Lookup Method Injection
Lookup Method Injection was added to Spring in version 1.1 to overcome the problems encountered when a
bean depends on another bean with a different life cycle, specifically, when a singleton depends on a nonsingleton. In this situation, both setter and constructor injection result in the singleton maintaining a single
instance of what should be a non-singleton bean. In some cases, you will want to have the singleton bean
obtain a new instance of the non-singleton every time it requires the bean in question.
Consider a scenario in which a LockOpener class provides the service of opening any locker. The
LockOpener class relies on a KeyHelper class for opening the locker, which was injected into LockOpener.
However, the design of the KeyHelper class involves some internal states that make it not suitable for reuse.
Every time the openLock() method is called, a new KeyHelper instance is required. In this case, LockOpener
will be a singleton. However, if we inject the KeyHelper class by using the normal mechanism, the same
instance of the KeyHelper class (which was instantiated when Spring performed the injection the first time)
will be reused. To make sure that a new instance of the KeyHelper instance is passed into the openLock()
method every time it is invoked, we need to use Lookup Method Injection.
Typically, you can achieve this by having the singleton bean implement the ApplicationContextAware
interface (we discuss this interface in Chapter 4). Then, using the ApplicationContext instance, the
singleton bean can look up a new instance of the non-singleton dependency every time it needs it. Lookup
Method Injection allows the singleton bean to declare that it requires a non-singleton dependency and
that it will receive a new instance of the non-singleton bean each time it needs to interact with it, without
needing to implement any Spring-specific interfaces.
Lookup Method Injection works by having your singleton declare a method, the lookup method,
which returns an instance of the non-singleton bean. When you obtain a reference to the singleton in
your application, you are actually receiving a reference to a dynamically created subclass on which Spring
75
Chapter 3 ■ Introducing IoC and DI in Spring
has implemented the lookup method. A typical implementation involves defining the lookup method,
and thus the bean class, as abstract. This prevents any strange errors from creeping in when you forget to
configure the Method Injection and you are working directly against the bean class with the empty method
implementation instead of the Spring-enhanced subclass. This topic is quite complex and is best shown by
example.
In this example, we create one non-singleton bean and two singleton beans that both implement the
same interface. One of the singletons obtains an instance of the non-singleton bean by using “traditional”
setter injection; the other uses Method Injection. The code sample in Listing 3-30 depicts the KeyHelper
class, which in this example is the type of the non-singleton bean, which means instances of this type are
created every time one is required to be injected as a dependency.
Listing 3-30. Non-Singleton Bean
package com.apress.prospring6.three.methodinject;
import org.springframework.context.annotation.Scope;
// import statements omitted
@Component("keyHelper")
@Scope("prototype")
class KeyHelper {
public void open(){
}
}
This class is decidedly unexciting, but it serves the purposes of this example perfectly. Next, in
Listing 3-31 you can see the LockOpener interface, which is implemented by both of the singleton bean
classes.
Listing 3-31. Singleton Bean Interface Type
package com.apress.prospring6.three.methodinject;
interface LockOpener {
KeyHelper getMyKeyOpener();
void openLock();
}
This bean has two methods: getMyKeyOpener() and openLock(). The sample application uses the
getMyKeyOpener() method to get a reference to a KeyHelper instance and, in the case of the method lookup
bean, to perform the actual method lookup. The openLock() method is a simple method that depends on
the KeyHelper instance to do its processing. The code in Listing 3-32 shows the StandardLockOpener class,
which uses setter injection to obtain an instance of the KeyHelper class.
Listing 3-32. StandardLockOpener Class Configured Using Autowiring to Obtain a Dependency of Type
KeyHolder
package com.apress.prospring6.three.methodinject;
// import statements omitted
@Component("standardLockOpener")
class StandardLockOpener implements LockOpener {
76
Chapter 3 ■ Introducing IoC and DI in Spring
private KeyHelper keyHelper;
@Autowired
@Qualifier("keyHelper")
public void setKeyHelper(KeyHelper keyHelper) {
this.keyHelper = keyHelper;
}
@Override
public KeyHelper getMyKeyOpener() {
return keyHelper;
}
@Override
public void openLock() {
keyHelper.open();
}
}
This code should all look familiar, but notice that the openLock() method uses the stored instance
of KeyHelper to complete its processing. In the code in Listing 3-33, you can see the AbstractLockOpener
class, which uses Method Injection to obtain an instance of the KeyHelper class, configured using the org.
springframework.beans.factory.annotation.Lookup annotation.
Listing 3-33. AbstractLockOpener Class Configured Using Method Injection to Obtain a Dependency of
Type KeyHolder
package com.apress.prospring6.three.methodinject;
import org.springframework.beans.factory.annotation.Lookup;
// import statements omitted
@Component("abstractLockOpener")
abstract class AbstractLockOpener implements LockOpener {
@Lookup("keyHelper")
@Override
public abstract KeyHelper getMyKeyOpener() ;
@Override
public void openLock() {
getMyKeyOpener().open();
}
}
Notice that the getMyKeyOpener() method is declared as abstract and that this method is called by
the openLock() method to obtain a KeyHelper instance. Populating an application context with the bean
definitions in this section might require writing more code than writing a simple configuration class, thus in
code Listing 3-34 the configuration class is depicted.
77
Chapter 3 ■ Introducing IoC and DI in Spring
Listing 3-34. The Java Configuration Class for This Section
package com.apress.prospring6.three.methodinject;
// import statements omitted
@Configuration
@ComponentScan
class LookupConfig {}
The configuration for the keyHelper and standardLockOpener beans should look familiar to you by
now. For abstractLockOpener, you need to configure the lookup method by using the @Lookup annotation.
This tells Spring which method on the bean it should override. This method must not accept any arguments,
and the return type should be that of the bean you want to return from the method. In this case, the method
should return a class of type KeyHelper, or its subclasses. The annotation attribute value tells Spring which
bean the lookup method should return. The code snippet in Listing 3-35 shows the final piece of code for
this example, which is the class containing the main() method used to run the example.
Listing 3-35. Main Class to Test Method Injection
package com.apress.prospring6.three.methodinject;
import org.springframework.util.StopWatch;
// import statements omitted
public class MethodInjectionDemo {
public static void main(String... args) {
var ctx = new AnnotationConfigApplicationContext(LookupConfig.class);
var abstractLockOpener = ctx.getBean("abstractLockOpener", LockOpener.class);
var standardLockOpener = ctx.getBean("standardLockOpener", LockOpener.class);
displayInfo("abstractLockOpener", abstractLockOpener);
displayInfo("standardLockOpener", standardLockOpener);
}
public static void displayInfo(String beanName, LockOpener lockOpener) {
KeyHelper keyHelperOne = lockOpener.getMyKeyOpener();
KeyHelper keyHelperTwo = lockOpener.getMyKeyOpener();
out.println("[" + beanName + "]: KeyHelper Instances the Same? " + (keyHelperOne ==
keyHelperTwo));
StopWatch stopWatch = new StopWatch();
stopWatch.start("lookupDemo");
for (int x = 0; x < 100_000; x++) {
KeyHelper keyHelper = lockOpener.getMyKeyOpener();
keyHelper.open();
}
stopWatch.stop();
out.println("100000 gets took " + stopWatch.getTotalTimeMillis() + " ms");
}
}
78
Chapter 3 ■ Introducing IoC and DI in Spring
In this code, you can see that the abstractLockOpener and the standardLockOpener from the
AnnotationConfigApplicationContext are retrieved and each reference is passed to the displayInfo()
method. The instantiation of the abstract class is supported only when using Lookup Method Injection,
in which Spring will use CGLIB to generate a subclass of the AbstractLockOpener class that overrides the
method dynamically. The first part of the displayInfo() method creates two local variables of KeyHelper
type and assigns them each a value by calling getMyKeyOpener() on the bean passed to it. Using these
two variables, it writes a message to the console indicating whether the two references point to the same
object. For the abstractLockOpener bean, a new instance of KeyHelper should be retrieved for each call to
getMyKeyOpener(), so the references should not be the same. For standardLockOpener, a single instance
of Singer is passed to the bean by setter injection, and this instance is stored and returned for every call to
getMyKeyOpener(), so the two references should be the same.
The StopWatch class used in the previous example is a utility class available with Spring. You’ll find
StopWatch very useful when you need to perform simple performance tests and when you are testing your
applications.
The final part of the displayInfo() method runs a simple performance test to see which bean is
faster. Clearly, standardLockOpener should be faster because it returns the same instance each time, but it
is interesting to see the difference. We can now run the MethodInjectionDemo class for testing. Here is the
output we received from this example:
[abstractLockOpener]: KeyHelper Instances the Same? false
100000 gets took 431 ms
[standardLockOpener]: KeyHelper Instances the Same? true
100000 gets took 1 ms
As you can see, the KeyHelper instances are, as expected, the same when we use standardLockOpener
and different when we use abstractLockOpener. There is a noticeable performance difference when you use
standardLockOpener, but that is to be expected.
Considerations for Lookup Method Injection
Lookup Method Injection is intended for use when you want to work with two beans of different life cycles.
Avoid the temptation to use Lookup Method Injection when the beans share the same life cycle, especially
if they are singletons. The output of running the previous example shows a noticeable difference in
performance between using Method Injection to obtain new instances of a dependency and using standard
DI to obtain a single instance of a dependency. Also, make sure you don’t use Lookup Method Injection
needlessly, even when you have beans of different life cycles.
Consider a situation in which you have three singletons that share a dependency in common. You want
each singleton to have its own instance of the dependency, so you create the dependency as a non-singleton,
but you are happy with each singleton using the same instance of the collaborator throughout its life. In this
case, setter injection is the ideal solution; Lookup Method Injection just adds unnecessary overhead.
When you are using Lookup Method Injection, there are a few design guidelines that you should keep
in mind when building your classes. In the earlier examples, we declared the lookup method in an interface.
The only reason we did this was that we did not have to duplicate the displayInfo() method twice for two
different bean types. As mentioned earlier, generally you do not need to pollute a business interface with
79
Chapter 3 ■ Introducing IoC and DI in Spring
unnecessary definitions that are used solely for IoC purposes. Another point is that although you don’t have
to make your lookup method abstract, doing so prevents you from forgetting to configure the lookup method
and then using a blank implementation by accident.
Understanding Bean Naming
Spring supports quite a complex bean-naming structure that allows you the flexibility to handle
many situations. Every bean must have at least one name that is unique within the containing
ApplicationContext. Spring follows a simple resolution process to determine what name is used for the
bean. When using XML configuration, if you give the <bean> tag an id attribute, the value of that attribute is
used as the unique name within the application context.
When using Java configuration, unless explicitly configured, Spring generates bean names using a few
strategies, which will be covered in this section. When retrieving beans from the application, bean names
or bean types can be used, or both can be used. If multiple beans of the same type without id or name are
declared, Spring will throw an org.springframework.beans.factory.NoSuchBeanDefinitionException
exception during ApplicationContext initialization. Using Java configuration, it is pretty difficult to cause
collisions, but it might happen, so it is better to know what to expect.
Default Bean Naming Style for Beans Declared with @Component
For the purpose of this section, the configuration class enables component scanning for the com.apress.
prospring6.three.naming package. We’ll start by declaring a very simple bean, as shown in Listing 3-36.
Listing 3-36. The Simplest Bean Type
@Component
class SimpleBean { }
To figure out how Spring names the beans by default, we create an ApplicationContext based on a
configuration that includes the SimpleBean class. This class is annotated with @Component and is discovered
via component scanning. The ApplicationContext provides methods to retrieve references to the beans,
but also to retrieve all the bean names in the context. In Listing 3-37, all the names of the beans in the
context are printed in the console using a Logback logger.
Listing 3-37. Printing All Bean Names
package com.apress.prospring6.three.naming;
import org.springframework.context.annotation.AnnotationConfigApplicationContext;
import org.slf4j.Logger;
import org.slf4j.LoggerFactory;
// other import statements omitted
import java.util.Arrays;
public class BeanNamingDemo {
private static Logger logger = LoggerFactory.getLogger(BeanNamingDemo.class);
public static void main(String... args) {
var ctx = new AnnotationConfigApplicationContext(BeanNamingCfg.class);
80
Chapter 3 ■ Introducing IoC and DI in Spring
Arrays.stream(ctx.getBeanDefinitionNames()).forEach(beanName -> logger.
debug(beanName));
}
}
The console output is depicted in Listing 3-38.
Listing 3-38. Console Log Showing All Bean Names in the Context
DEBUG: BeanNamingDemo - org.springframework.context.annotation.
internalConfigurationAnnotationProcessor
DEBUG: BeanNamingDemo - org.springframework.context.annotation.
internalAutowiredAnnotationProcessor
DEBUG: BeanNamingDemo - org.springframework.context.annotation.
internalCommonAnnotationProcessor
DEBUG: BeanNamingDemo - org.springframework.context.event.internalEventListenerProcessor
DEBUG: BeanNamingDemo - org.springframework.context.event.internalEventListenerFactory
DEBUG: BeanNamingDemo - beanNamingCfg
DEBUG: BeanNamingDemo - simpleBean
In the list you can see a few bean names that start with org.springframework. These are what we
call infrastructure beans and are internally used by Spring to process bean definitions and create beans.
The beans that are not obviously Spring infrastructure beans are beans declared within the application
configuration. In the output in Listing 3-37 there are two beans that should spark your interest:
•
beanNamingCfg: This bean name is the same as the simple name of the configuration
class BeanNamingCfg. The @Configuration annotation is annotated itself with
@Component, and this means any configuration class is in essence a bean definition.
•
simpleBean: This bean name is the same as the simple name of the bean class
SimpleBean.
As proven by the beanNamingCfg and simpleBean names, when bean names are not configured
explicitly, Spring takes the simple name of the type declaring the bean, changes the first letter to lowercase,
and uses the resulting value to name the bean.
Customizing Bean Naming Style
Before going further and explaining how beans declared with @Beans are named, we’ll show you a neat trick.
As in almost everything with Spring, if there is a default behavior, it can be customized. Thus, bean naming
can be customized. The @Configuration annotation has an attribute named nameGenerator. The attribute
value must be a class implementing org.springframework.beans.factory.support.BeanNameGenerator or
extending any of the implementations provided by Spring. Listing 3-39 shows the SimpleBeanNameGenerator
class and the BeanNamingCfg.
81
Chapter 3 ■ Introducing IoC and DI in Spring
Listing 3-39. Console Log Showing All Bean Names in the Context
package com.apress.prospring6.three.generator;
import org.springframework.beans.factory.config.BeanDefinition;
import org.springframework.beans.factory.support.BeanDefinitionRegistry;
import org.springframework.context.annotation.AnnotationBeanNameGenerator;
import java.util.UUID;
// other import statements omitted
@Configuration
@ComponentScan(nameGenerator = SimpleBeanNameGenerator.class)
class BeanNamingCfg {
}
class SimpleBeanNameGenerator extends AnnotationBeanNameGenerator {
@Override
protected String buildDefaultBeanName(BeanDefinition definition, BeanDefinitionRegistry
registry) {
var beanName = definition.getBeanClassName().substring(definition.
getBeanClassName().lastIndexOf(".") + 1).toLowerCase(Locale.ROOT);
var uid = UUID.randomUUID().toString().replace("-","").substring(0,8);
return beanName + "-" + uid;
}
}
The org.springframework.context.annotation.AnnotationBeanNameGenerator class is the
BeanNameGenerator implementation for bean classes annotated with the @Component annotation or with
another annotation that is itself annotated with @Component. The SimpleBeanNameGenerator extends this
class and overrides the buildDefaultBeanName(..) method to return a bean name composed from the
lowercase simple class name concatenated with a unique identifier. When creating an application context
and printing the bean names, the output looks pretty similar to that shown in Listing 3-40.
Listing 3-40. Console Log Showing All Bean Names in the Context
# infrastructure bean names omitted
DEBUG: BeanNameGerneratorDemo - beanNamingCfg
DEBUG: BeanNameGerneratorDemo - simplebean-07f01cdc
Notice that, even if the configuration class is annotated with @Configuration, which is annotated
itself with @Component, the resulting bean name is not generated by the SimpleBeanNameGenerator
bean. This is because this class is not discovered through component scanning, since this is the class that
enables component scanning with the custom bean generator being processed by Spring before the
SimpleBeanNameGenerator bean is enabled.
82
Chapter 3 ■ Introducing IoC and DI in Spring
Bean Naming Style for Beans Declared with @Bean
We mentioned previously that beans configured by methods annotated with @Bean are named as the
methods that configure them. The easiest way to show this is to modify one of our previous examples and
declare a SimpleBean in the BeanNamingCfg configuration class using the @Bean annotation. Listing 3-41
depicts the new configuration and the code to execute to list the bean names within the context.
Listing 3-41. Console Log Showing All Bean Names in the Context
package com.apress.prospring6.three.naming;
import org.springframework.context.annotation.Bean;
// other import statements omitted
public class BeanNamingDemo {
private static Logger logger = LoggerFactory.getLogger(BeanNamingDemo.class);
public static void main(String... args) {
var ctx = new AnnotationConfigApplicationContext(BeanNamingCfg.class);
Arrays.stream(ctx.getBeanDefinitionNames()).forEach(beanName -> logger.
debug(beanName));
}
}
@Configuration
@ComponentScan
class BeanNamingCfg {
@Bean
public SimpleBean anotherSimpleBean(){
return new SimpleBean();
}
}
@Component
class SimpleBean { }
Running the code in Listing 3-41 produces the output shown in Listing 3-42.
Listing 3-42. Console Log Showing All Bean Names in the Context
# infrastructure bean
DEBUG: BeanNamingDemo
DEBUG: BeanNamingDemo
DEBUG: BeanNamingDemo
names omitted
- beanNamingCfg
- simpleBean
- anotherSimpleBean
As you can see, an entry named anotherSimpleBean is listed, which means that a SimpleBean was
created and named as the method that created it.
Default naming of beans is practical only when one bean of a certain type is needed in the context of an
application, but when this is not the case, explicitly naming the beans is the only option.
83
Chapter 3 ■ Introducing IoC and DI in Spring
In the code in Listing 3-41, the two SimpleBean beans were configured through different methods,
and thus the names were generated using different approaches. This means that retrieving a bean of type
SimpleBean by calling ctx.getBean(SimpleBean.class) no longer works as intended, because that method
expects one bean of type SimpleBean to be found. Calling that method will result in the following exception
being thrown:
Exception in thread "main" org.springframework.beans.factory.
NoUniqueBeanDefinitionException:
No qualifying bean of type 'com.apress.prospring6.three.naming.SimpleBean' available:
expected single matching bean but found 2: simpleBean,anotherSimpleBean
The exception message is pretty clear about what the issue is though.
If you need all the beans of a certain type from the application, there is a method for that, shown in
Listing 3-43.
Listing 3-43. Code to List All SimpleBean Bean Names in the Context
var beans = ctx.getBeansOfType(SimpleBean.class);
beans.entrySet().forEach(b -> System.out.println(b.getKey()));
ctx.getBeansOfType(String.class) is used to obtain a map with all beans of type SimpleBean and
their IDs that exist within ApplicationContext. The keys of the map are the bean IDs that are printed
using the lambda expression in the previous code. With the configuration used so far in the section, this is
the output:
simpleBean
anotherSimpleBean
Explicit Bean Naming
Configuring a bean explicitly is very easy to do. When the bean is declared with @Component, or any other
stereotype annotation (@Service, @Repository, etc.), there is a default attribute named value that can
be initialized with a value to be used as a name for the bean. Listing 3-44 shows a SimpleBean bean being
configured with name simpleBeanOne.
Listing 3-44. Bean with Custom Name, Declared with @Component
@Component(value = "simpleBeanOne")
class SimpleBean { }
When an annotation attribute is declared to be default, this means when using the annotation, the
name of the attribute can be skipped, so @Component(value = "simpleBeanOne") is equivalent to
@Component("simpleBeanOne").
The @Bean annotation has a default attribute, named value as well, used for a similar purpose. It can be
initialized with a value to be used as a name for the bean, but when an array of values is used, the first one in
the array becomes the name and the rest become aliases. The code in Listing 3-45 shows how to configure
beans with aliases using @Bean, but also how to print the names and aliases for a bean.
84
Chapter 3 ■ Introducing IoC and DI in Spring
Listing 3-45. Bean with Custom Name, Declared with @Bean
package com.apress.prospring6.three.explicit;
// import statements omitted
public class ExplicitBeanNamingDemo {
private static Logger logger = LoggerFactory.getLogger(ExplicitBeanNamingDemo.class);
public static void main(String... args) {
var ctx = new AnnotationConfigApplicationContext(BeanNamingCfg.class);
var simpleBeans = ctx.getBeansOfType(SimpleBean.class);
simpleBeans.forEach((k,v) -> {
var aliases = ctx.getAliases(k);
if(aliases.length > 0) {
logger.debug("Aliases for {} ", k);
Arrays.stream(aliases).forEach(a -> logger.debug("\t {}", a));
}
});
}
}
@Configuration
@ComponentScan
class BeanNamingCfg {
//@Bean(name="simpleBeanTwo")
//@Bean(value= "simpleBeanTwo")
@Bean("simpleBeanTwo")
public SimpleBean simpleBean2(){
return new SimpleBean();
}
//@Bean(name= {"simpleBeanThree", "three", "numero_tres"})
//@Bean(value= {"simpleBeanThree", "three", "numero_tres"})
@Bean({"simpleBeanThree", "three", "numero_tres"})
public SimpleBean simpleBean3(){
return new SimpleBean();
}
}
In the code snippet in Listing 3-45, all the possibilities to name a bean and specify aliases are covered;
the annotations in the comments are equivalent to the annotation that is not commented. simpleBeanTwo
doesn’t have any aliases. simpleBeanThree has two of them. When the code snippet is run, the output in
Listing 3-46 is produced.
Listing 3-46. Output Showing Bean Aliases
DEBUG:
DEBUG:
DEBUG:
DEBUG:
DEBUG:
ExplicitBeanNamingDemo
ExplicitBeanNamingDemo
ExplicitBeanNamingDemo
ExplicitBeanNamingDemo
ExplicitBeanNamingDemo
- simpleBeanTwo
- simpleBeanThree
- Aliases for simpleBeanThree
- three
- numero_tres
85
Chapter 3 ■ Introducing IoC and DI in Spring
The @AliasFor Annotation
When it comes to aliases, in Spring 4.2 the @AliasFor annotation was introduced. This annotation is used to
declare aliases for annotation attributes, and most Spring annotations make use of it. For example, the
@Bean annotation has two attributes, name and value, which are declared as aliases for each other. The
code snippet in Listing 3-47 is a snapshot of the @Bean annotation code and is taken from the official Spring
GitHub repository. The code and documentation that are not relevant at the moment are omitted.
Listing 3-47. Code Snippet from the @Bean Annotation
package org.springframework.context.annotation;
import java.lang.annotation.Documented;
import java.lang.annotation.ElementType;
import java.lang.annotation.Retention;
import java.lang.annotation.RetentionPolicy;
import java.lang.annotation.Target;
import org.springframework.core.annotation.AliasFor;
// other import statements omitted
@Target({ElementType.METHOD, ElementType.ANNOTATION_TYPE})
@Retention(RetentionPolicy.RUNTIME)
@Documented
public @interface Bean {
@AliasFor("name")
String value() default {};
@AliasFor("value")
String name() default {};
// code omitted
}
This configuration using @AliasFor is what makes for @Bean(name= {"simpleBeanThree", "three",
"numero_tres"}) to be equivalent to @Bean(value= {"simpleBeanThree", "three", "numero_tres"}).
Something more interesting can be done with the @AliasFor annotation: aliases for meta-annotation
attributes can be declared. In Listing 3-48 you can see an annotation named @Award that declares an
attribute named prize and an annotation named @Trophy that is meta-annotated with @Award. This
annotation declares an attribute that is an alias for the prize attribute in the @Award interface.
Listing 3-48. Usage of @AliasFor
package com.apress.prospring6.three.alias;
// Award.java
import java.lang.annotation.*;
@Target({ElementType.TYPE})
@Retention(RetentionPolicy.RUNTIME)
@Documented
public @interface Award {
String[] prize() default {};
}
86
Chapter 3 ■ Introducing IoC and DI in Spring
// Trophy.java
import org.springframework.core.annotation.AliasFor;
@Award
public @interface Trophy {
@AliasFor(annotation = Award.class, attribute = "value")
String[] name() default {};
}
With these two annotations, a NonSingletonDemo class can be declared and annotated with @Award or
@Trophy, as shown in Listing 3-49.
Listing 3-49. NonSingletonDemo Class Annotated with Alias Annotations
package com.apress.prospring6.three.alias;
import org.springframework.stereotype.Component;
@Component("johnMayer")
//@Award(prize = {"grammy", "platinum disk"})
@Trophy(name={"grammy", "platinum disk"})
public class Singer {
private String lyric = "I used to crave the sight of you";
public void sing() {
System.out.println(lyric);
}
}
Creating aliases for attributes of annotations using yet another annotation @AliasFor does have
limitations. @AliasFor cannot be used on any stereotype annotations (@Component and its specializations).
The reason is that the special handling of these value attributes was in place years before @AliasFor was
invented. Consequently, because of backward-compatibility issues, it is simply not possible to use @AliasFor
with such value attributes. When writing code to do just so (aliasing value attributes in stereotype annotations),
no compile errors will be shown to you, and the code might even run, but any argument provided for the alias
will be ignored. The same goes for the @Qualifier annotation.
Understanding Bean Instantiation Mode
Earlier in this chapter the term singleton was used to describe beans that are created only once within the
context, and non-singleton was used to describe beans that are created every time they are requested from
the context. By default, all beans in Spring are singletons. This means Spring maintains a single instance of
the bean, all dependent objects use the same instance, and all calls to ApplicationContext.getBean(..)
return the same instance. We demonstrated this in the previous section, where we were able to use identity
comparison (==) rather than the equals() comparison to check whether the beans were the same.
87
Chapter 3 ■ Introducing IoC and DI in Spring
The term singleton is used interchangeably in Java to refer to two distinct concepts: an object that has
a single instance within the application, and the Singleton design pattern. We refer to the first concept as
a singleton and to the Singleton pattern as Singleton. The Singleton design pattern was popularized in the
seminal Design Patterns: Elements of Reusable Object-Oriented Software, by Erich Gamma et al. (AddisonWesley, 1994). The problem arises when people confuse the need for singleton instances with the need to
apply the Singleton pattern. The code in Listing 3-50 shows a typical implementation of the Singleton pattern
in Java.
Listing 3-50. Singleton Pattern in Java
package com.apress.prospring6.three;
public class Singleton {
private static final Singleton instance;
static {
instance = new Singleton();
}
public static Singleton getInstance() {
return instance;
}
}
This pattern achieves its goal of allowing you to maintain and access a single instance of a class
throughout your application, but it does so at the expense of increased coupling. Your application code must
always have explicit knowledge of the Singleton class in order to obtain the instance—completely removing
the ability to code to interfaces.
In reality, the Singleton pattern is actually two patterns in one. The first, and desired, pattern involves
maintenance of a single instance of an object. The second, and less desirable, is a pattern for object lookup
that completely removes the possibility of using interfaces. Using the Singleton pattern also makes it difficult
to swap out implementations arbitrarily because most objects that require the Singleton instance access
the Singleton object directly. This can cause all kinds of headaches when you are trying to unit test your
application, because you are unable to replace the Singleton with a mock for testing purposes.
Fortunately, with Spring you can take advantage of the singleton instantiation model without having to
work around the Singleton design pattern. All beans in Spring are, by default, created as singleton instances,
and Spring uses the same instances to fulfill all requests for that bean. Of course, Spring is not just limited
to the use of the Singleton instance; it can still create a new instance of the bean to satisfy every dependency
and every call to getBean(). It does all of this without any impact on your application code, and for this
reason, we like to refer to Spring as being instantiation mode agnostic. This is a powerful concept. If you
start off with an object that is a singleton but then discover it is not really suited to multithread access, you
can change it to a non-singleton (prototype) without affecting any of your application code.
Although changing the instantiation mode of your bean won’t affect your application code, it does
cause some problems if you rely on Spring’s life-cycle interfaces. We cover this in more detail in Chapter 4.
Changing the instantiation mode from singleton to non-singleton is simple. The configuration in
Listing 3-51 depicts using @Scope with the scopeName attribute set to configure a bean as non-singleton.
88
Chapter 3 ■ Introducing IoC and DI in Spring
Listing 3-51. Configure a Bean As Non-Singleton
package com.apress.prospring6.three.scope;
import org.springframework.context.annotation.Scope;
// other import statements omitted
@Component("nonSingleton")
@Scope(scopeName = "prototype")
public class Singer {
private String name = "unknown";
public Singer(@Value("John Mayer") String name) {
this.name = name;
}
}
As you can see, the only difference between this bean declaration and any of the declarations you have
seen so far is that we add the scope attribute and set the value to prototype. Spring defaults the scope to the
value singleton. The prototype scope instructs Spring to instantiate a new instance of the bean every time a
bean instance is requested by the application. The code snippet in Listing 3-52 shows the effect this setting
has on your application.
Listing 3-52. Accessing Non-Singleton Beans from the Context
package com.apress.prospring6.three.scope;
// other import statements omitted
public class NonSingletonDemo {
private static Logger logger = LoggerFactory.getLogger(BeanNameGerneratorDemo.class);
public static void main(String... args) {
var ctx = new AnnotationConfigApplicationContext();
ctx.register(Singer.class);
ctx.refresh();
var singer1 = ctx.getBean("nonSingleton", Singer.class);
var singer2 = ctx.getBean("nonSingleton", Singer.class);
logger.info("Identity Equal?: " + (singer1 == singer2));
logger.info("Value Equal:? " + singer1.equals(singer2));
logger.info(singer1.toString());
logger.info(singer2.toString());
}
}
Running this example gives you the output in Listing 3-53, which proves without a doubt that ctx.
getBean("nonSingleton", Singer.class) returns two different instances.
89
Chapter 3 ■ Introducing IoC and DI in Spring
Listing 3-53. Output of Code in Listing 3-52
INFO
INFO
INFO
INFO
:
:
:
:
NonSingletonDemo
NonSingletonDemo
NonSingletonDemo
NonSingletonDemo
-
Identity Equal?: false
Value Equal:? false
com.apress.prospring6.three.scope.Singer@6631f5ca[name=John Mayer]
com.apress.prospring6.three.scope.Singer@5ace1ed4[name=John Mayer]
You can see from this that although the values of the two String objects are clearly equal, the identities
are not, even though both instances were retrieved using the same bean name.
Choosing an Instantiation Mode
In most scenarios, it is quite easy to see which instantiation mode is suitable. Typically, you will find
that singleton is the default mode for your beans. In general, singletons should be used in the following
scenarios:
•
Shared object with no state: You have an object that maintains no state and has many
dependent objects. Because you do not need synchronization if there is no state, you
do not need to create a new instance of the bean each time a dependent object needs
to use it for some processing.
•
Shared object with read-only state: This is similar to the previous point, but you have
some read-only state. In this case, you still do not need synchronization, so creating
an instance to satisfy each request for the bean is just adding overhead.
•
Shared object with shared state: If you have a bean that has state that must be shared,
singleton is the ideal choice. In this case, ensure that your synchronization for state
writes is as granular as possible.
•
High-throughput objects with writable state: If you have a bean that is used a great
deal in your application, you may find that keeping a singleton and synchronizing
all write access to the bean state allows for better performance than constantly
creating hundreds of instances of the bean. When using this approach, try to keep
the synchronization as granular as possible without sacrificing consistency. You
will find that this approach is particularly useful when your application creates a
large number of instances over a long period of time, when your shared object has
only a small amount of writable state, or when the instantiation of a new instance is
expensive.
You should consider using non-singletons in the following scenarios:
•
Objects with writable state: If you have a bean that has a lot of writable state, you
may find that the cost of synchronization is greater than the cost of creating a new
instance to handle each request from a dependent object.
•
Objects with private state: Some dependent objects need a bean that has private state
so that they can conduct their processing separately from other objects that depend
on that bean. In this case, singleton is clearly not suitable, and you should use nonsingleton.
The main positive you gain from Spring’s instantiation management is that your applications can
immediately benefit from the lower memory usage associated with singletons, with very little effort on your
part. Then, if you find that singleton mode does not meet the needs of your application, it is a trivial task to
modify your configuration to use non-singleton mode.
90
Chapter 3 ■ Introducing IoC and DI in Spring
Additional Bean Scopes
In addition to the singleton and prototype scopes, other scopes exist when defining a Spring bean for
more specific purposes. You can also implement your own custom scope and register it in Spring’s
ApplicationContext. The following bean scopes are supported as of version 6:
•
singleton: The default singleton scope. Only one object will be created per Spring
IoC container.
•
prototype: A new instance will be created by Spring when requested by the
application.
•
request: For web application use. When using Spring MVC for web applications,
beans with request scope will be instantiated for every HTTP request and then
destroyed when the request is completed.
•
session: For web application use. When using Spring MVC for web applications,
beans with session scope will be instantiated for every HTTP session and then
destroyed when the session is over.
•
application: Scopes a single bean definition to the life cycle of a ServletContext.
The application scope is only valid in a Spring web application.
•
thread: A new bean instance will be created by Spring when requested by a new
thread, while for the same thread, the same bean instance will be returned. Note that
this scope is not registered by default.
•
custom: Custom bean scope that can be created by implementing the interface org.
springframework.beans.factory.config.Scope and registering the custom scope
in Spring’s configuration (for XML, use the class org.springframework.beans.
factory.config.CustomScopeConfigurer).
•
websocket: Scopes a single bean definition to the life cycle of a WebSocket. The
websocket scope is only valid in a Spring web application.
Resolving Dependencies
Spring is able to resolve dependencies by simply looking at your configuration files or annotations in your
classes. Unfortunately, Spring is not aware of any dependencies that exist between beans in your code that
are not specified in the configuration. For instance, take one bean, named johnMayer, of type Singer, which
obtains an instance of another bean, called gopher, of type Guitar using ctx.getBean() and uses it when
the johnMayer.sing() method is called. In this method, you get an instance of type Guitar by calling ctx.
getBean("gopher"), without asking Spring to inject the dependency for you. In this case, Spring is unaware
that johnMayer depends on gopher, and, as a result, it may instantiate the johnMayer bean before the
gopher bean.
You can provide Spring with additional information about your bean dependencies by using the
@DependsOn annotation. The configuration snippet in Listing 3-54 shows how the scenario for johnMayer and
gopher beans would be configured.
91
Chapter 3 ■ Introducing IoC and DI in Spring
Listing 3-54. Configuring Dependencies with @DependsOn
package com.apress.prospring6.three.dependson;
import
import
import
import
import
org.springframework.beans.BeansException;
org.springframework.context.ApplicationContext;
org.springframework.context.ApplicationContextAware;
org.springframework.context.annotation.AnnotationConfigApplicationContext;
org.springframework.context.annotation.DependsOn;
@Component("gopher")
class Guitar {
public void sing(){
System.out.println("Cm Eb Fm Ab Bb");
}
}
@DependsOn("gopher")
@Component("johnMayer")
class Singer implements ApplicationContextAware {
private ApplicationContext ctx;
@Override
public void setApplicationContext(ApplicationContext applicationContext) throws
BeansException {
this.ctx = applicationContext;
}
private Guitar guitar;
public Singer(){
}
public void sing() {
guitar = ctx.getBean("gopher", Guitar.class);
guitar.sing();
}
}
In this configuration, we are declaring that bean johnMayer depends on bean gopher. Spring
should take this into consideration when instantiating the beans and ensure that gopher is created
before johnMayer. For the johnMayer bean, to retrieve the dependency on its own, it needs to access
ApplicationContext. Thus, we also have to tell Spring to inject this reference, so when the johnMayer.
sing() method will be called, it can be used to procure the gopher bean. This is done by making the Singer
class implement the ApplicationContextAware interface. This is a Spring-specific interface that forces an
implementation of a setter for an ApplicationContext object. It is automatically detected by the Spring IoC
container, and the ApplicationContext that the bean is created in is injected into it. This is done after the
constructor of the bean is called, so obviously using ApplicationContext in the constructor will lead to a
NullPointerException.
92
Chapter 3 ■ Introducing IoC and DI in Spring
The class to test the configuration is simple, and involves just creating a context, retrieving the
johnMayer bean, and calling the sing() method on it. Since it introduces nothing that was not shown before
in the book, it won’t be listed again. The class is named DependsOnDemo and is part of the com.apress.
prospring6.three.dependson package. When run, the output will be “Cm Eb Fm Ab Bb.”
When developing your applications, avoid designing them to use this feature; instead, define your
dependencies by means of setter and constructor injection contracts. However, if you are integrating Spring
with legacy code, you may find that the dependencies defined in the code require you to provide extra
information to the Spring Framework.
Autowiring Your Bean
Autowiring is the process of implicitly injecting beans into beans depending on them. Spring supports five
modes for autowiring:
•
byName: When using byName autowiring, Spring attempts to wire each property to a
bean of the same name. So, if the target bean has a property named foo and a foo
bean is defined in ApplicationContext, the foo bean is assigned to the foo property
of the target.
•
byType: When using byType autowiring, Spring attempts to wire each of the
properties on the target bean by automatically using a bean of the same type in
ApplicationContext.
•
constructor: This functions just like byType wiring, except that it uses constructors
rather than setters to perform the injection. Spring attempts to match the
greatest numbers of arguments it can in the constructor. So, if your bean has two
constructors, one that accepts a String and one that accepts String and an Integer,
and you have both a String and an Integer bean in your ApplicationContext,
Spring uses the two-argument constructor.
•
default: Spring will choose between the constructor and byType modes
automatically. If your bean has a default (no-arguments) constructor, Spring uses
byType; otherwise, it uses constructor.
•
no: No autowiring; this is the default.
Autowiring mode can be configured explicitly through metadata when using XML configuration, by
specifying the value for the autowire attribute on the <bean/> element. Since this book does not cover XML,
let’s focus on annotation configuration.
Constructor Autowiring
When a dependency is provided using constructor injection, autowiring obviously is done through the
constructor. If the class has more than one constructor, the constructor to be used is chosen based on a few
conditions.
If none of the constructors is annotated with @Autowired, the most suitable will be used. If more
than one is suitable, Spring just uses the no-argument constructor if there is one. If there is none, a
BeanInstantiationException is thrown. Take a look at the sample in Listing 3-55.
93
Chapter 3 ■ Introducing IoC and DI in Spring
Listing 3-55. Example Showing Autowiring by Type
package com.apress.prospring6.three.autowiring;
import org.springframework.context.annotation.Lazy;
// other import statements omitted
public class AutowiringDemo {
private static Logger logger = LoggerFactory.getLogger(AutowiringDemo.class);
public static void main(String... args) {
var ctx = new AnnotationConfigApplicationContext(AutowiringCfg.class);
var target = ctx.getBean(Target.class);
logger.info("Created target? {}" , target != null);
logger.info("Injected bar? {}" , target.bar != null);
logger.info("Injected fooOne? {}" , target.fooOne != null ? target.fooOne.id: "");
logger.info("Injected fooTwo? {}" , target.fooTwo != null ? target.fooTwo.id : "");
}
}
@Configuration
@ComponentScan
class AutowiringCfg {}
@Component
@Lazy
class Target {
private static Logger logger = LoggerFactory.getLogger(Target.class);
Foo fooOne;
Foo fooTwo;
Bar bar;
public Target() {
logger.info(" --> Target() called");
}
public Target(Foo foo) {
this.fooOne = foo;
logger.info(" --> Target(Foo) called");
}
public Target(Foo foo, Bar bar) {
this.fooOne = foo;
this.bar = bar;
logger.info(" --> Target(Foo, Bar) called");
}
}
94
Chapter 3 ■ Introducing IoC and DI in Spring
@Component
class Foo {
String id = UUID.randomUUID().toString().replace("-","").substring(0,8);
}
@Component
class Bar {}
In this code, you can see that the Target class has three constructors:
•
A no-argument constructor
•
A constructor that accepts a Foo instance
•
A constructor that accepts a Foo instance and a Bar instance
Each of these constructors writes a message to console output when it is called. The main() method
simply retrieves the Target bean declared in ApplicationContext, triggering the autowiring process. A few
logging statements print details about the Target bean.
In addition to these constructors, the Target bean has three properties:
•
Two of type Foo
•
One of type Bar
Foo and Bar are simple classes. Every Foo object receives a unique identifier(id) when instantiated. The
@Lazy annotation is used to inform Spring to instantiate the bean only when it is first requested, rather than
at startup, so that we can output the result in the correct place in the testing program.
When running this code, the output in Listing 3-56 is printed, proving without a doubt that when
Spring is not told what to do, it just goes straight for the no-argument constructor, which means none of the
properties will be injected.
Listing 3-56. Example Showing Autowiring by Constructor when No Constructor Is Annotated with
@Autowired
INFO
INFO
INFO
INFO
INFO
:
:
:
:
:
Target - --> Target() called
AutowiringDemo - Created target? true
AutowiringDemo - Injected bar? false
AutowiringDemo - Injected fooOne?
AutowiringDemo - Injected fooTwo?
To change the behavior, just annotate any of the constructors with @Autowired. Since there are Foo and
Bar beans declared in the application, any of the other two constructors can be used to initialize Target.
If the no-argument constructor is deleted, the following exception is thrown.
Caused by: org.springframework.beans.BeanInstantiationException:
Failed to instantiate [com.apress.prospring6.three.autowiring.Target]:
No default constructor found;
nested exception is java.lang.NoSuchMethodException:
com.apress.prospring6.three.autowiring.Target.<init>()
95
Chapter 3 ■ Introducing IoC and DI in Spring
The compiler allows you to annotate both of the remaining constructors with @Autowired, because the
Java compiler does not really care about what Spring allows or not, but running the code will confuse it and
it won’t be able to create the Target bean. It will throw a BeanCreationException and the following snippet
shows the partial stacktrace, when the Target class has two annotated constructors:
Exception in thread "main" org.springframework.beans.factory.BeanCreationException: Error
creating bean with name 'target':
Invalid autowire-marked constructor: public com.apress.prospring6.three.autowiring.
Target(com.apress.prospring6.three.autowiring.
Foo,com.apress.prospring6.three.autowiring.Bar).
Found constructor with 'required' Autowired annotation already: public com.apress.
prospring6.three.autowiring.Target(com.apress.prospring6.three.autowiring.Foo)
...
at com.apress.prospring6.three.autowiring.AutowiringDemo.main(AutowiringDemo.java:51)
byType Autowiring
When there are no constructors declared, but there are setters annotated with @Autowired, Spring will
use them and will identify the beans to be injected based on their type. Listing 3-57 shows a class named
AnotherTarget that is pretty similar to the Target class, but the properties are injected using setters.
Listing 3-57. Example Showing Autowiring by Type Using Setters
package com.apress.prospring6.three.autowiring;
// import statements omitted
public class AutowiringDemo {
private static Logger logger = LoggerFactory.getLogger(AutowiringDemo.class);
public static void main(String... args) {
var ctx = new AnnotationConfigApplicationContext(AutowiringCfg.class);
var anotherTarget = ctx.getBean(AnotherTarget.class);
logger.info("anotherTarget: Created anotherTarget? {}" , anotherTarget != null);
logger.info("anotherTarget: Injected bar? {}" , anotherTarget.bar != null);
logger.info("anotherTarget: Injected fooOne? {}" , anotherTarget.fooOne != null ?
anotherTarget.fooOne.id: "");
logger.info("anotherTarget: Injected fooTwo? {}" , anotherTarget.fooTwo != null ?
anotherTarget.fooTwo.id : "");
}
}
@Component
@Lazy
class AnotherTarget {
private static Logger logger = LoggerFactory.getLogger(AnotherTarget.class);
Foo fooOne;
Foo fooTwo;
Bar bar;
96
Chapter 3 ■ Introducing IoC and DI in Spring
@Autowired
public void setFooOne(Foo fooOne) {
logger.info(" --> AnotherTarget#setFooOne(Foo) called");
this.fooOne = fooOne;
}
@Autowired
public void setFooTwo(Foo fooTwo) {
logger.info(" --> AnotherTarget#setFooTwo(Foo) called");
this.fooTwo = fooTwo;
}
@Autowired
public void setBar(Bar bar) {
logger.info(" --> AnotherTarget#setBar(Bar) called");
this.bar = bar;
}
}
When running this code, the output in Listing 3-58 is printed.
Listing 3-58. Console Log Example Showing Autowiring by Type when Setters Are Annotated with
@Autowired
INFO
INFO
INFO
INFO
INFO
INFO
INFO
:
:
:
:
:
:
:
AnotherTarget - --> AnotherTarget#setFooOne(Foo) called
AnotherTarget - --> AnotherTarget#setFooTwo(Foo) called
AnotherTarget - --> AnotherTarget#setBar(Bar) called
AutowiringDemo - anotherTarget: Created anotherTarget? true
AutowiringDemo - anotherTarget: Injected bar? true
AutowiringDemo - anotherTarget: Injected fooOne? a4eb2b71
AutowiringDemo - anotherTarget: Injected fooTwo? a4eb2b71
Spring injects dependencies by type when fields are directly annotated with @Autowired too, and
since field injection is discouraged, the code won’t be depicted in the book, but check out the com.apress.
prospring6.three.autowiring.FieldTarget class in the project.
As you’ve seen so far, there is a single Foo bean declared and that bean is injected in both fooOne and
fooTwo properties. If we declare another Foo bean, this will break the Target, the AnotherTarget and the
FieldTarget beans definitions and Spring won’t be able to create them anymore, since dependencies are
autowired by type and there are two dependencies of type Foo being required and Spring cannot figure out
which of the two Foo beans are required where. The code in Listing 3-59 shows the AutowiringCfg class
being updated to declare a bean of type Foo.
Listing 3-59. AutowiringCfg Class Declaring a Bean of Type Foo
@Configuration
@ComponentScan
class AutowiringCfg {
@Bean
Foo anotherFoo() {
return new Foo();
}
}
97
Chapter 3 ■ Introducing IoC and DI in Spring
If you run the AutowiringDemo class, the following org.springframework.beans.factory.
NoUniqueBeanDefinitionException exception will be thrown:
Caused by: org.springframework.beans.factory.NoUniqueBeanDefinitionException:
No qualifying bean of type 'com.apress.prospring6.three.autowiring.Foo'
available: expected single matching bean but found 2: foo,anotherFoo
To get Spring out of this pickle, the solution is to specify which bean we want injected where, which
means switching from autowiring by type to autowiring by name.
byName Autowiring
Listing 3-60 shows the Target class with the constructors modified to receive specific beans as arguments.
The @Qualifier annotation, previously used to inject collections, is what saves the day here as well.
Listing 3-60. Target Bean Class Configured Using Constructor Autowiring by Name
package com.apress.prospring6.three.autowiring;
import org.springframework.beans.factory.annotation.Qualifier;
// other import statements omitted
@Component
@Lazy
class Target {
private static Logger logger = LoggerFactory.getLogger(Target.class);
Foo fooOne;
Foo fooTwo;
Bar bar;
@Autowired
public Target(@Qualifier("foo") Foo foo) {
this.fooOne = foo;
logger.info(" --> Target(Foo) called");
}
public Target(@Qualifier("foo")Foo foo, Bar bar) {
this.fooOne = foo;
this.bar = bar;
logger.info(" --> Target(Foo, Bar) called");
}
}
Notice that the @Qualifier is placed on the argument, not on the constructor. If you use @Inject
instead of @Autowired to inject dependencies, use @Named instead of @Qualifier. To fix the AnotherTarget
class, the @Qualifier is placed on the setter arguments as shown in Listing 3-61.
98
Chapter 3 ■ Introducing IoC and DI in Spring
Listing 3-61. AnotherTarget Bean Class Configured Using Setter Autowiring by Name
package com.apress.prospring6.three.autowiring;
import org.springframework.beans.factory.annotation.Qualifier;
// other import statements omitted
@Component
@Lazy
class AnotherTarget {
private static Logger logger = LoggerFactory.getLogger(AnotherTarget.class);
Foo fooOne;
Foo fooTwo;
Bar bar;
@Autowired
public void setFooOne(@Qualifier("foo")Foo fooOne) {
logger.info(" --> AnotherTarget#setFooOne(Foo) called");
this.fooOne = fooOne;
}
@Autowired
public void setFooTwo(@Qualifier("anotherFoo")Foo fooTwo) {
logger.info(" --> AnotherTarget#setFooTwo(Foo) called");
this.fooTwo = fooTwo;
}
@Autowired
public void setBar(Bar bar) {
logger.info(" --> AnotherTarget#setBar(Bar) called");
this.bar = bar;
}
}
Running the AutowiringDemo, accessing the AnotherTarget, and inspecting its dependencies prints the
details in Listing 3-62, which makes it clear that there are two different Foo beans being injected.
Listing 3-62. Console Output Example Showing Autowiring by Name when Setters Are Annotated with
@Autowired
INFO
INFO
INFO
INFO
INFO
INFO
INFO
:
:
:
:
:
:
:
AnotherTarget - --> AnotherTarget#setFooOne(Foo) called
AnotherTarget - --> AnotherTarget#setFooTwo(Foo) called
AnotherTarget - --> AnotherTarget#setBar(Bar) called
AutowiringDemo - anotherTarget: Created anotherTarget? true
AutowiringDemo - anotherTarget: Injected bar? true
AutowiringDemo - anotherTarget: Injected fooOne? baa24632
AutowiringDemo - anotherTarget: Injected fooTwo? 0d74b352
As for the FieldTarget, things are even simpler; the @Qualifier annotation gets placed directly on the
field being autowired, as shown in Listing 3-63.
99
Chapter 3 ■ Introducing IoC and DI in Spring
Listing 3-63. FieldTarget Bean Class Configured Using Field Autowiring by Name
package com.apress.prospring6.three.autowiring;
import org.springframework.beans.factory.annotation.Qualifier;
// other import statements omitted
@Component
@Lazy
class FieldTarget {
private static Logger logger = LoggerFactory.getLogger(FieldTarget.class);
@Autowired @Qualifier("foo") Foo fooOne;
@Autowired @Qualifier("anotherFoo") Foo fooTwo;
@Autowired Bar bar;
}
Yet Another Pickle
When autowiring by type, things get complicated when bean types are related, and exceptions are thrown
when you have more classes that implement the same interface and the property requiring to be autowired
specifies the interface as the type, because Spring does not know which bean to inject. To create such a
scenario, we’ll transform Foo into an interface and declare two bean types implementing it, each with its
bean declaration. The configuration is the default one with bean names generated by Spring, as shown in
Listing 3-64.
Listing 3-64. Foo Implementation Classes and Configuration
package com.apress.prospring6.three.pickle;
// other import statements omitted
interface Foo {
// empty interface, used as a marker interface
}
class FooImplOne implements Foo {
String id = "one:" + UUID.randomUUID().toString().replace("-","").substring(0,8);
@Override
public String toString() {
return new ToStringBuilder(this).append("id", id).toString();
}
}
class FooImplTwo implements Foo {
String id = "two:" + UUID.randomUUID().toString().replace("-","").substring(0,8);
@Override
public String toString() {
100
Chapter 3 ■ Introducing IoC and DI in Spring
return new ToStringBuilder(this).append("id", id).toString();
}
}
class Bar { }
@Configuration
@ComponentScan
class AutowiringCfg {
@Bean
public Foo fooImplOne() { return new FooImplOne(); }
@Bean
public Foo fooImplTwo() { return new FooImplTwo(); }
@Bean
public Bar bar() { return new Bar(); }
@Bean
public TrickyTarget trickyTarget() { return new TrickyTarget(); }
}
class TrickyTarget {
Foo fooOne;
Foo fooTwo;
Bar bar;
// constructors and setters omitted
}
The TrickyTarget code is pretty similar to the Target class, and when dependencies are
injected by type, with the configuration in Listing 3-64, Spring is unable to create this bean and a
NoUniqueBeanDefinitionException is thrown:
Caused by: org.springframework.beans.factory.NoUniqueBeanDefinitionException:
No qualifying bean of type 'com.apress.prospring6.three.pickle.Foo'
available: expected single matching bean but found 2: fooImplOne,fooImplTwo
The console output is way longer, but the first lines in the previous output reveal the problem
in quite a readable manner. When Spring does not know what bean to autowire, it throws an
NoUniqueBeanDefinitionException with an explicit message. It tells you what beans were found but that it
cannot choose which to use where. There are two ways to fix this problem.
The first way is to use the @Primary annotation in the bean definition that you want Spring to consider
first for autowiring. This resolves the problem in a pretty weird way, because in both fooOne and fooTwo, the
bean annotated with @Primary is injected. The configuration and resulting output is shown in Listing 3-65.
101
Chapter 3 ■ Introducing IoC and DI in Spring
Listing 3-65. Configuration Using @Primary
package com.apress.prospring6.three.pickle;
// import statements omitted
import org.springframework.context.annotation.Primary;
@Configuration
@ComponentScan
class AutowiringCfg {
@Bean @Primary
public Foo fooImplOne() { return new FooImplOne(); }
@Bean
public Foo fooImplTwo() { return new FooImplTwo(); }
@Bean
public Bar bar() { return new Bar(); }
@Bean
public TrickyTarget trickyTarget() { return new TrickyTarget(); }
}
// Log for configuration using @Primary
INFO : TrickyTarget - --> Property fooOne set
INFO : TrickyTarget - --> Property fooTwo set
INFO : TrickyTarget - --> Property bar set
INFO : PickleAutowiringDemo - target: Created target? true
INFO : PickleAutowiringDemo - target: Injected bar? true
INFO : PickleAutowiringDemo - target: Injected fooOne? com.apress.prospring6.three.pickle.Fo
oImplOne@2eea88a1[id=one:7ab78d36]
INFO : PickleAutowiringDemo - target: Injected fooTwo? com.apress.prospring6.three.pickle.Fo
oImplOne@2eea88a1[id=one:7ab78d36]
So, it’s all back to normal, but still, using @Primary is a solution only when there are just two beanrelated types. If there are more, using it will not get rid of the NoUniqueBeanDefinitionException.
What will do the job is the second way, which will give you full control over which bean gets injected
where, and this is to name your beans and configure them where to be injected using @Qualifier as shown
in the previous section. Listing 3-66 shows the TrickyTarget class with setters configured with @Qualifier
and the resulting output when the class PickleAutowiringDemo is run.
Listing 3-66. Configuration Using @Qualifier and Resulting Output
package com.apress.prospring6.three.pickle;
// import statements omitted
import org.springframework.beans.factory.annotation.Qualifier;
class TrickyTarget {
private static Logger logger = LoggerFactory.getLogger(TrickyTarget.class);
Foo fooOne;
Foo fooTwo;
Bar bar;
102
Chapter 3 ■ Introducing IoC and DI in Spring
public TrickyTarget() {
logger.info(" --> TrickyTarget() called");
}
@Autowired
@Qualifier("fooImplOne")
public void setFooOne(Foo fooOne) {
this.fooOne = fooOne;
logger.info(" --> Property fooOne set");
}
@Autowired
@Qualifier("fooImplTwo")
public void setFooTwo(Foo foo) {
this.fooTwo = foo;
logger.info(" --> Property fooTwo set");
}
@Autowired
public void setBar(Bar bar) {
this.bar = bar;
logger.info(" --> Property bar set");
}
}
// Log for configuration using @Qualifier
INFO : TrickyTarget - --> TrickyTarget() called
INFO : TrickyTarget - --> Property fooOne set
INFO : TrickyTarget - --> Property fooTwo set
INFO : TrickyTarget - --> Property bar set
INFO : PickleAutowiringDemo - target: Created target? true
INFO : PickleAutowiringDemo - target: Injected bar? true
INFO : PickleAutowiringDemo - target: Injected fooOne? com.apress.prospring6.three.pickle.Fo
oImplOne@7fd7a283[id=one:8efc8d31]
INFO : PickleAutowiringDemo - target: Injected fooTwo? com.apress.prospring6.three.pickle.Fo
oImplTwo@22f59fa[id=two:a5d9ed75]
When to Use Autowiring
When writing Spring applications, autowiring cannot be avoided; the whole idea behind Spring is that
you can create your classes as you like and have Spring work for you. The question is not when you
should use autowiring, but which type of autowiring is suitable for certain parts of your application. You
may be tempted to use byType until you realize that you can have only one bean for each type in your
ApplicationContext—a restriction that is problematic when you need to maintain beans with different
configurations of the same type. The same argument applies to the use of constructor autowiring. In some
cases, autowiring can save you time, but it does not really take that much extra effort to define your wiring
explicitly, and you benefit from explicit semantics and full flexibility on property naming and on how many
instances of the same type you manage.
103
Chapter 3 ■ Introducing IoC and DI in Spring
Summary
In this chapter, we covered a lot of ground with both Spring Core and IoC in general. We showed you
examples of the types of IoC and presented the pros and cons of using each mechanism in your applications.
We looked at which IoC mechanisms Spring provides and when (and when not) to use each within your
applications. While exploring IoC, we introduced the Spring BeanFactory, which is the core component
for Spring’s IoC capabilities, and then ApplicationContext, which extends BeanFactory and provides
additional functionalities.
For ApplicationContext, we focused on AnnotationConfigApplicationContext, which allows
external configuration of Spring by using annotation. We also discussed another method to declare DI
requirements for ApplicationContext, by using Java annotations.
This chapter also introduced you to the basics of Spring’s IoC feature set including setter injection,
constructor injection, Method Injection, autowiring, and bean inheritance. In the discussion of
configuration, we demonstrated how you can configure your bean properties with a wide variety of values,
including other beans.
This chapter only scratched the surface of Spring and Spring’s IoC container. In the next chapter,
you’ll look at some IoC-related features specific to Spring, and you’ll take a more detailed look at other
functionality available in Spring Core.
104
CHAPTER 4
Advanced Spring Configuration
and Spring Boot
In the previous chapter, we presented a detailed look at the concept of inversion of control (IoC) and how it
fits into the Spring Framework. However, we have really only scratched the surface of what Spring Core can
do. Spring provides a wide array of services that supplement and extend its basic IoC capabilities. In this
chapter, you are going to explore these in detail. Specifically, you will be looking at the following:
1
•
Managing the bean life cycle: So far, all the beans you have seen have been fairly
simple and completely decoupled from the Spring container. In this chapter, we
present some strategies you can employ to enable your beans to receive notifications
from the Spring container at various points throughout their life cycles. You can
do this either by implementing specific interfaces laid out by Spring, by specifying
methods that Spring can call via reflection, or by using JavaBeans1 life-cycle
annotations.
•
Making your beans “Spring aware”: In some cases, you want a bean to be able to
interact with the ApplicationContext instance that configured it. For this reason,
Spring offers two interfaces, BeanNameAware and ApplicationContextAware
(introduced at the end of Chapter 3), that allow your bean to obtain its
assigned name and reference its ApplicationContext, respectively. The section
corresponding to this topic covers implementing these interfaces and gives some
practical considerations for using them in your application.
•
Using FactoryBeans: As its name implies, the FactoryBean interface is meant to be
implemented by any bean that acts as a factory for other beans. The FactoryBean
interface provides a mechanism by which you can easily integrate your own factories
with the Spring BeanFactory interface.
•
Working with JavaBeans PropertyEditor implementations: The PropertyEditor
interface is a standard interface provided in the java.beans package.
PropertyEditors are used to convert property values to and from String
representations. Spring uses PropertyEditors extensively, mainly to read values
specified in the BeanFactory configuration and convert them into the correct types.
https://jcp.org/en/jsr/detail?id=250
© Iuliana Cosmina, Rob Harrop, Chris Schaefer, and Clarence Ho 2023
I. Cosmina et al., Pro Spring 6, https://doi.org/10.1007/978-1-4842-8640-1_4
105
Chapter 4 ■ Advanced Spring Configuration and Spring Boot
In this chapter, we discuss the set of PropertyEditors supplied with Spring and
how you can use them within your application. We also take a look at implementing
custom PropertyEditors.
•
Learning more about the Spring aplication context: As you know,
ApplicationContext is an extension of BeanFactory intended for use in full
applications. The ApplicationContext interface provides a useful set of additional
functionalities, including internationalized message support, resource loading,
and event publishing. In this chapter, we present a detailed look at the features in
addition to IoC that ApplicationContext offers. We also jump ahead of ourselves a
little to show you how ApplicationContext simplifies the use of Spring when you are
building web applications.
•
Testing Spring applications: Chapter 3 explained how to build a Spring
ApplicationContext and demonstrated that it is well constructed—beans were
created as expected—by running a main(..) method. However, this is not the best
way, because classes containing these methods are only compiled, not run, during
the build, so any change in the bean declarations, or library upgrades that cause
issues, might not become obvious until later in development. So, in this chapter we
show how Spring test contexts can be created to test Spring applications.
•
Using Spring Boot: Spring application configuration is made even more practical
by using Spring Boot. This Spring project makes it easy to create stand-alone,
production-grade, Spring-based applications that you can “just run.”
•
Using configuration enhancements: We present features that make application
configuration easier, such as profile management, environment and property source
abstraction, and so on. The section presenting those features shows how to use them
to address specific configuration needs.
•
Using Groovy for configuration: Spring 4.0 introduced the ability to configure
bean definitions in the Groovy language, which, as you’ll see, can be used as an
alternative/supplement to the old XML and Java configuration styles.
Spring’s Impact on Application Portability
Most of the features discussed in this chapter are specific to Spring and, in many cases, are not available
in other IoC containers. Although many IoC containers offer life-cycle management functionality, they
probably do so through a different set of interfaces than Spring. If the portability of your application between
different IoC containers is truly important, you might want to avoid using some features that couple your
application to Spring.
Remember, however, that by setting a constraint—meaning that your application is portable between
IoC containers—you are losing out on the wealth of functionality Spring offers. Because you are likely to be
making a strategic choice to use Spring, it makes sense that you use it to the best of its ability.
Be careful not to create a requirement for portability out of thin air. In many cases, the end users of
your application do not care whether the application can run on three different IoC containers; they just
want it to run. In our experience, it is often a mistake to try to build an application on the lowest common
denominator of features available in your chosen technology. Doing so often sets your application at a
disadvantage right from the get-go. However, if your application requires IoC container portability, do not
see this as a drawback—it is a true requirement and, therefore, one your application should fulfill. In Expert
One-on-One: J2EE Development without EJB (Wrox, 2004), Rod Johnson and Jürgen Höller describe these
types of requirements as phantom requirements and provide a much more detailed discussion of them and
how they can affect your project.
106
Chapter 4 ■ Advanced Spring Configuration and Spring Boot
Although using these features may couple your application to the Spring Framework, in reality you
are increasing the portability of your application in the wider scope. Consider that you are using a freely
available, open source framework that has no particular vendor affiliation. An application built using
Spring’s IoC container runs anywhere Java runs. For Java enterprise applications, Spring opens up new
possibilities for portability. Spring provides many of the same capabilities as JEE and also provides classes to
abstract and simplify many other aspects of JEE. In many cases, it is possible to build a web application using
Spring that runs in a simple servlet container but with the same level of sophistication as an application
targeted at a full-blown JEE application server. By coupling to Spring, you can increase your application’s
portability by replacing many features that either are vendor-specific or rely on vendor-specific configuration
with equivalent features in Spring.
Bean Life-Cycle Management
An important part of any IoC container, Spring included, is that beans can be constructed in such a way that
they receive notifications at certain points in their life cycle. This enables your beans to perform relevant
processing at certain points throughout their life. In general, two life-cycle events are particularly relevant to
a bean: post-initialization and pre-destruction.
In the context of Spring, the post-initialization event is raised as soon as Spring finishes setting all the
property values on the bean and finishes any dependency checks that you configured it to perform.
The pre-destruction event is fired just before Spring destroys the bean instance.
However, for beans with prototype scope, the pre-destruction event will not be fired by Spring. The
design of Spring is that the initialization life-cycle callback methods will be called on objects regardless
of bean scope, while for beans with prototype scope, the destruction life-cycle callback methods will not
be called.
Spring provides three mechanisms a bean can use to hook into each of these events and perform some
additional processing:
•
Interface-based mechanism: Your bean implements an interface specific to the type
of notification it wants to receive, and Spring notifies the bean via a callback method
defined in the interface.
•
Method-based mechanism: Spring allows you to specify, in your ApplicationContext
configuration, the name of a method to call when the bean is initialized and the
name of a method to call when the bean is destroyed.
•
Annotation-based mechanism: You can use JSR-250 annotations to specify the
method that Spring should call after construction or before destruction.
In the case of both events, the mechanisms achieve exactly the same goal. The interface-based
mechanism is used extensively throughout Spring so that you don’t have to remember to specify the
initialization or destruction each time you use one of Spring’s components. However, in your own beans,
you may be better served using the method-based or annotation-based mechanism because your beans
do not need to implement any Spring-specific interfaces. Although we stated that portability often isn’t
as important a requirement as many books lead you to believe, this does not mean you should sacrifice
107
Chapter 4 ■ Advanced Spring Configuration and Spring Boot
portability when a perfectly good alternative exists. That said, if you are coupling your application to Spring
in other ways, using the interface method allows you to specify the callback once and then forget about it.
If you are defining a lot of beans of the same type that need to take advantage of the life-cycle notifications,
then using the interface-based mechanism can avoid the need for specifying the life-cycle callback methods
for every bean in the bean configuration. Using JSR-250 annotations is a standard defined by the JCP and you
are also not coupled to Spring’s specific annotations. Just make sure that the IoC container you are running
your application on supports the JSR-250 standard.
Overall, the choice of which mechanism you use for receiving life-cycle notifications depends on your
application requirements. When using annotation-type configuration, just make sure you are using an IoC
container that supports JSR-250. If you are not too concerned about portability or you are defining many
beans of the same type that need the life-cycle notifications, using the interface-based mechanism is the
best way to ensure that your beans always receive the notifications they are expecting. If you plan to use a
bean across different Spring projects, you almost certainly want the functionality of that bean to be as selfcontained as possible, so you should definitely use the interface-based mechanism.
Figure 4-1 shows a high-level overview of how Spring manages the life cycle of the beans within its
container.
Figure 4-1. Spring beans life cycle
Hooking into Bean Creation
By being aware of when it is initialized, a bean can check whether all its required dependencies are satisfied.
Although Spring can check dependencies for you, it is pretty much an all-or-nothing approach, and it
doesn’t offer any opportunities for applying additional logic to the dependency resolution procedure.
Consider a bean that has four dependencies declared as setters, two of which are required and one of which
has a suitable default in the event that no dependency is provided. Using an initialization callback, your
bean can check for the dependencies it requires, throwing an exception or providing a default as needed.
A bean cannot perform these checks in its constructor because, at this point, Spring has not had an
opportunity to provide values for the dependencies it can satisfy. The initialization callback in Spring is
called after Spring finishes providing the dependencies that it can and performs any dependency checks that
you ask of it.
You are not limited to using the initialization callback just to check dependencies; you can do
anything you want in the callback, but it is most useful for the purpose we have described. In many cases,
the initialization callback is also the place to trigger any actions that your bean must take automatically
in response to its configuration. For instance, if you build a bean to run scheduled tasks, the initialization
callback provides the ideal place to start the scheduler—after all, the configuration data is set on the bean.
108
Chapter 4 ■ Advanced Spring Configuration and Spring Boot
You will not have to write a bean to run scheduled tasks because this is something Spring can do
automatically through its built-in scheduling feature or via integration with the Quartz scheduler. We cover this
in more detail in Chapter 12.
Executing a Method When a Bean Is Created
As we mentioned previously, one way to receive the initialization callback is to designate a method on
your bean as an initialization method and tell Spring to use this method as an initialization method. As
discussed, this callback-based mechanism is useful when you have only a few beans of the same type or
when you want to keep your application decoupled from Spring. Another reason for using this mechanism
is to enable your Spring application to work with beans that were built previously or were provided by
third-party vendors. Specifying a callback method is simply a case of specifying the name of the method as a
value for the initMethod attribute in the @Bean annotation. This annotation is used to declare beans in Java
configuration classes. Although Java configuration is covered a bit later in this chapter, the bean initialization
part belongs here.
Listing 4-1 shows a basic bean with two dependencies.
Listing 4-1. Bean Type with Two Dependencies
package com.apress.prospring6.four.initmethod;
import org.apache.commons.lang3.builder.ToStringBuilder;
// import statements omitted
class Singer {
private static Logger logger = LoggerFactory.getLogger(Singer.class);
private static final String DEFAULT_NAME = "No Name";
private String name;
private int age;
public void setName(String name) {
logger.info("Calling setName for bean of type {}.", Singer.class);
this.name = name;
}
public void setAge(int age) {
logger.info("Calling setAge for bean of type {}.", Singer.class);
this.age = age;
}
public void init() {
logger.info("Initializing bean");
if (name == null) {
logger.info("Using default name");
name = DEFAULT_NAME;
}
109
Chapter 4 ■ Advanced Spring Configuration and Spring Boot
if (age == Integer.MIN_VALUE) {
throw new IllegalArgumentException(
"You must set the age property of any beans of type " + Singer.class);
}
}
@Override
public String toString() {
return new ToStringBuilder(this)
.append("name", name)
.append("age", age)
.toString();
}
}
public class InitMethodDemo {
private static Logger logger = LoggerFactory.getLogger(InitMethodDemo.class);
public static void main(String... args) {
var ctx = new AnnotationConfigApplicationContext(SingerConfiguration.class);
getBean("singerOne", ctx);
getBean("singerTwo", ctx);
getBean("singerThree", ctx);
}
public static Singer getBean(String beanName, ApplicationContext ctx) {
try {
Singer bean = (Singer) ctx.getBean(beanName);
logger.info("Found: {}", bean);
return bean;
} catch (BeanCreationException ex) {
logger.error("An error occurred in bean configuration: " + ex.getMessage());
return null;
}
}
}
Notice that we have defined a method, init(), to act as the initialization callback. The init()
method checks whether the name property has been set, and if it has not, it uses the default value stored
in the DEFAULT_NAME constant. The init() method also checks whether the age property is set and throws
IllegalArgumentException if it is not.
The main() method of the InitMethodDemo class attempts to obtain three beans from
AnnotationConfigApplicationContext, all of type Singer, using its own getBean() method. Notice that
in the getBean() method, if the bean is obtained successfully, its details are written to console output. If an
exception is thrown in the init() method, as will occur in this case if the age property is not set, then Spring
wraps that exception in BeanCreationException. The getBean() method catches these exceptions and
writes a message to the console output informing us of the error, as well as returns a null value.
Listing 4-2 shows an ApplicationContext configuration that defines the beans used in the previous
code snippet.
110
Chapter 4 ■ Advanced Spring Configuration and Spring Boot
Listing 4-2. SingerConfiguration Configuring a Spring ApplicationContext with Three Singer Beans
package com.apress.prospring6.four.initmethod;
import org.springframework.context.annotation.Bean;
import org.springframework.context.annotation.Configuration;
@Configuration
class SingerConfiguration {
@Bean(initMethod = "init")
Singer singerOne(){
Singer singer = new Singer();
singer.setName("John Mayer");
singer.setAge(43);
return singer;
}
@Bean(initMethod = "init")
Singer singerTwo(){
Singer singer = new Singer();
singer.setAge(42);
return singer;
}
@Bean(initMethod = "init")
Singer singerThree(){
Singer singer = new Singer();
singer.setName("John Butler");
return singer;
}
}
As you can see, the @Bean annotation for each of the three beans has an initMethod attribute that tells
Spring that it should invoke the init() method as soon as it finishes configuring the bean. The singerOne
bean has values for both the name and age properties, so it passes through the init() method with
absolutely no changes. The singerTwo bean has no value for the name property, meaning that in the init()
method, the name property is given the default value. Finally, the singerThree bean has no value for the
age property. The logic defined in the init() method treats this as an error, so IllegalArgumentException
is thrown.
Running the InitMethodDemo class yields the output in Listing 4-3.
Listing 4-3. Output Produced by Running InitMethodDemo
INFO : Singer - Calling setName for bean of type class com.apress.prospring6.four.
initmethod.Singer.
INFO : Singer - Calling setAge for bean of type class com.apress.prospring6.four.
initmethod.Singer.
INFO : Singer - Initializing bean
DEBUG: DefaultSingletonBeanRegistry - Creating shared instance of singleton bean 'singerTwo'
INFO : Singer - Calling setAge for bean of type class com.apress.prospring6.four.
initmethod.Singer.
111
Chapter 4 ■ Advanced Spring Configuration and Spring Boot
INFO : Singer - Initializing bean
INFO : Singer - Using default name
DEBUG: DefaultSingletonBeanRegistry - Creating shared instance of singleton bean
'singerThree'
INFO : Singer - Calling setName for bean of type class com.apress.prospring6.four.
initmethod.Singer.
INFO : Singer - Initializing bean
WARN : AbstractApplicationContext - Exception encountered during context initialization cancelling refresh attempt: org.springframework.beans.factory.BeanCreationException: Error
creating bean with name 'singerThree' defined in com.apress.prospring6.four.initmethod.
SingerConfiguration: Invocation of init method failed; nested exception is java.lang.
IllegalArgumentException: You must set the age property of any beans of type class com.
apress.prospring6.four.initmethod.Singer
Exception in thread "main" org.springframework.beans.factory.BeanCreationException: Error
creating bean with name 'singerThree' defined in com.apress.prospring6.four.initmethod.
SingerConfiguration: Invocation of init method failed; nested exception is java.lang.
IllegalArgumentException: You must set the age property of any beans of type class com.
apress.prospring6.four.initmethod.Singer
From this output, you can see that singerOne was configured correctly with the values that we specified
in the configuration file. For singerTwo, the default value for the name property was used because no value
was specified in the configuration. Finally, for singerThree, no bean instance was created since the init()
method raised an error because of the lack of a value for the age property.
As you can see, using the initialization method is an ideal way to ensure that your beans are configured
correctly. By using this mechanism, you can take full advantage of the benefits of IoC without losing any of
the control you get from manually defining dependencies.
The only constraint on your initialization method is that it cannot accept any arguments. You can define
any return type, although it is ignored by Spring, and you can even use a static method, but the method must
accept no arguments.
The benefits of this mechanism are negated when using a static initialization method, because you
cannot access any of the bean’s state to validate it. If your bean is using static state as a mechanism for saving
memory and you are using a static initialization method to validate this state, then you should consider
moving the static state to instance state and using a nonstatic initialization method. If you use Spring’s
singleton management capabilities, the end effect is the same, but you have a bean that is much simpler to
test, and you also have the increased effect of being able to create multiple instances of the bean with their
own state when necessary. Of course, in some instances, you need to use static state shared across multiple
instances of a bean, in which case you can always use a static initialization method.
Implementing the InitializingBean Interface
The InitializingBean interface defined in Spring allows you to define inside your bean code for
Spring to execute after it has finished configuring the bean. In the same way as when you are using an
initialization method, this gives you the opportunity to check the bean configuration to ensure that it is
valid, providing any default values along the way. The InitializingBean interface defines a single method,
112
Chapter 4 ■ Advanced Spring Configuration and Spring Boot
afterPropertiesSet(), that serves the same purpose as the init() method introduced in the previous
section. Listing 4-4 shows a reimplementation of the previous example using the InitializingBean
interface in place of the initialization method.
Listing 4-4. Singer Class Implementing InitializingBean
package com.apress.prospring6.four.intf;
import org.springframework.beans.factory.InitializingBean;
// other import statements omitted
class Singer implements InitializingBean {
private static Logger logger = LoggerFactory.getLogger(Singer.class);
private static final String DEFAULT_NAME = "No Name";
private String name;
private int age = Integer.MIN_VALUE;
public void setName(String name) {
logger.info("Calling setName for bean of type {}.", Singer.class);
this.name = name;
}
public void setAge(int age) {
logger.info("Calling setAge for bean of type {}.", Singer.class);
this.age = age;
}
@Override
public void afterPropertiesSet() throws Exception {
logger.info("Initializing bean using 'afterPropertiesSet()'");
if (name == null) {
logger.info("Using default name");
name = DEFAULT_NAME;
}
if (age == Integer.MIN_VALUE) {
throw new IllegalArgumentException(
"You must set the age property of any beans of type " + Singer.class);
}
}
@Override
public String toString() {
return new ToStringBuilder(this)
.append("name", name)
.append("age", age)
.toString();
}
}
@Configuration
class SingerConfiguration {
113
Chapter 4 ■ Advanced Spring Configuration and Spring Boot
@Bean
Singer singerOne(){
Singer singer = new Singer();
singer.setName("John Mayer");
singer.setAge(43);
return singer;
}
// other bean declarations omitted
}
public class InitializingBeanDemo {
private static Logger logger = LoggerFactory.getLogger(InitializingBeanDemo.class);
public static void main(String... args) {
var ctx = new AnnotationConfigApplicationContext(SingerConfiguration.class);
getBean("singerOne", ctx);
getBean("singerTwo", ctx);
getBean("singerThree", ctx);
}
// getBean(..) method omitted, identical to the one in Listing 4-1.
}
As you can see, not much in this example has changed. The only differences are that this class
implements InitializingBean and that the initialization logic has moved into the afterPropertiesSet()
method. The configuration no longer requires the initMethod attribute, and if you run the
InitializingBeanDemo you will see an identical output.
Using the JSR-250 @PostConstruct Annotation
JSR-250 annotations were described in Chapter 4 in connection to dependency autowiring using @Resource.
In this section you will be shown how to use the JSR-250 life-cycle annotation, @PostConstruct. Starting
from Spring 2.5, JSR-250 annotations are also supported to specify the method that Spring should call if the
corresponding annotation relating to the bean’s life cycle exists in the class. Listing 4-5 shows the previous
example written to make use of the @PostConstruct annotation.
Listing 4-5. Singer Class Implemented Using @PostConstruct
package com.apress.prospring6.four.jsr250;
import jakarta.annotation.PostConstruct;
class Singer {
private static Logger logger = LoggerFactory.getLogger(Singer.class);
private static final String DEFAULT_NAME = "No Name";
private String name;
private int age = Integer.MIN_VALUE;
public void setName(String name) {
logger.info("Calling setName for bean of type {}.", Singer.class);
this.name = name;
}
114
Chapter 4 ■ Advanced Spring Configuration and Spring Boot
public void setAge(int age) {
logger.info("Calling setAge for bean of type {}.", Singer.class);
this.age = age;
}
@PostConstruct
public void postConstruct() throws Exception {
logger.info("Initializing bean using 'postConstruct()'");
if (name == null) {
logger.info("Using default name");
name = DEFAULT_NAME;
}
if (age == Integer.MIN_VALUE) {
throw new IllegalArgumentException(
"You must set the age property of any beans of type " + Singer.class);
}
}
// toString() omitted
}
The program is the same as using the @Bean(initMethod=..) and InitializingBean approach; the
@PostConstruct annotation is applied to the initialization method instead. The method is renamed to
postConstruct in this scenario to make it even more obvious as to what the purpose of this method is. Note
that you can name the method any way you want to.
The configuration and the class used to test this new Singer bean type are identical to the one in the
InitializingBean example and so is the produced output, so it won’t be repeated here, but feel free to
execute the com.apress.prospring6.four.jsr250.PostConstructDemo class in the project for this
book yourself to test this affirmation.
All three approaches have their benefits and drawbacks:
•
Using an initialization method, you have the benefit of keeping your application
decoupled from Spring, but you must remember to configure the initialization
method for every bean that needs it.
•
Using the InitializingBean interface, you have the benefit of being able to specify
the initialization callback once for all instances of your bean class, but you have to
couple your application to Spring to do so.
•
Using annotations, you need to apply the annotation to the method and make sure
that the IoC container supports JSR-250.
In the end, you should let the requirements of your application drive the decision about which
approach to use. If portability is an issue, use the initialization or annotation method; otherwise, use the
InitializingBean interface to reduce the amount of configuration your application needs and the chance
of errors creeping into your application because of misconfiguration.
115
Chapter 4 ■ Advanced Spring Configuration and Spring Boot
When configuring initialization with @Bean(initMethod=..) or @PostConstruct, there is the
advantage of declaring the initialization method with a different access right. Initialization methods should be
called only once by the Spring IoC, at bean creation time. Subsequent calls will lead to unexpected results or
even failures. External additional calls can be prohibited by making the initialization method private. The
Spring IoC will be able to call it via reflection, but any additional calls in the code won’t be permitted.
Understanding Order of Resolution
All initialization mechanisms can be used on the same bean instance. In this case, Spring invokes the
method annotated with @PostConstruct first and then afterPropertiesSet(), followed by the initialization
method specified in the @Bean annotation. There is a technical reason for this order, and by following the
path in Figure 4-1, we can notice the following steps in the bean creation process:
1.
The constructor is called first to create the bean.
2.
The dependencies are injected (setters are called). If there are dependencies,
the BeanPostProcessor infrastructure bean is consulted to call the setters.
This is a Spring-specific infrastructure bean that performs bean modifications
after they are created. The @Autowired annotation is registered by the
AutowiredAnnotationBeanPostProcessor so this bean will call the setter
methods found annotated with @Autowired.
3.
Now that the beans exist and the dependencies were provided, the preinitialization BeanPostProcessor infrastructure beans are consulted to
see whether they want to call anything from this bean. These are Springspecific infrastructure beans that perform bean modifications after
they are created. The @PostConstruct annotation is registered by the
CommonAnnotationBeanPostProcessor bean, so this bean will call the method
found annotated with @PostConstruct. This method is executed right after the
bean has been constructed and before the class is put into service2, before the
actual initialization of the bean (before afterPropertiesSet and initMethod).
4.
The InitializingBean’s afterPropertiesSet is executed right after the
dependencies are injected. The afterPropertiesSet() method is invoked by
a BeanFactory after it has set all the bean properties supplied and has satisfied
BeanFactoryAware and ApplicationContextAware.
5.
The method specified by name in the initMethod attribute is executed last
because this is the actual initialization method of the bean.
The AllInitMethodsDemo set of classes shown in Listing 4-6 can be used to demonstrate all the previous
affirmations.
Check out this snippet from JEE official Javadoc: https://docs.oracle.com/javaee/7/api/
javax/annotation/PostConstruct.html
2
116
Chapter 4 ■ Advanced Spring Configuration and Spring Boot
Listing 4-6. AllInitMethodsDemo Example to Show Order of Initialization Methods
package com.apress.prospring6.four.all;
// import statement omitted
class Dependency { // very simple bean type
}
class MultiInit implements InitializingBean {
private static Logger logger = LoggerFactory.getLogger(MultiInit.class);
private Dependency dependency;
public MultiInit() {
logger.info("1. Calling constructor for bean of type {}.", MultiInit.class);
}
public Dependency getDependency() {
return dependency;
}
@Autowired
public void setDependency(Dependency dependency) {
logger.info("2. Calling setDependency for bean of type {}.", MultiInit.class);
this.dependency = dependency;
}
@PostConstruct
private void postConstruct() throws Exception {
logger.info("3. Calling postConstruct() for bean of type {}.", MultiInit.class);
}
@Override
public void afterPropertiesSet() throws Exception {
logger.info("4. Calling afterPropertiesSet() for bean of type {}.",
MultiInit.class);
}
private void initMe() throws Exception {
logger.info("5. Calling initMethod() for bean of type {}.", MultiInit.class);
}
}
@Configuration
class MultiInitConfiguration {
@Bean
Dependency dependency (){
return new Dependency();
}
@Bean(initMethod = "initMe")
MultiInit multiInitBean(){
117
Chapter 4 ■ Advanced Spring Configuration and Spring Boot
return new MultiInit();
}
}
public class AllInitMethodsDemo {
public static void main(String... args) {
new AnnotationConfigApplicationContext(MultiInitConfiguration.class);
}
}
When running the main(..) method in class AllInitMethodsDemo with DEBUG logs enabled for the org.
springframework package, the output in Listing 4-7 is produced.
Listing 4-7. AllInitMethodsDemo Console Output
...
DEBUG: DefaultSingletonBeanRegistry - Creating shared instance of singleton bean 'org.
springframework.context.annotation.internalConfigurationAnnotationProcessor'
DEBUG: DefaultSingletonBeanRegistry - Creating shared instance of singleton bean 'org.
springframework.context.event.internalEventListenerProcessor'
DEBUG: DefaultSingletonBeanRegistry - Creating shared instance of singleton bean 'org.
springframework.context.event.internalEventListenerFactory'
DEBUG: DefaultSingletonBeanRegistry - Creating shared instance of singleton bean 'org.
springframework.context.annotation.internalAutowiredAnnotationProcessor'
DEBUG: DefaultSingletonBeanRegistry - Creating shared instance of singleton bean 'org.
springframework.context.annotation.internalCommonAnnotationProcessor'
DEBUG: DefaultSingletonBeanRegistry - Creating shared instance of singleton bean
'multiInitConfiguration'
DEBUG: DefaultSingletonBeanRegistry - Creating shared instance of singleton bean
'dependency'
DEBUG: DefaultSingletonBeanRegistry - Creating shared instance of singleton bean
'multiInitBean'
INFO : MultiInit - 1. Calling constructor for bean of type class com.apress.prospring6.four.
all.MultiInit.
INFO : MultiInit - 2. Calling setDependency for bean of type class com.apress.prospring6.
four.all.MultiInit.
INFO : MultiInit - 3. Calling postConstruct() for bean of type class com.apress.prospring6.
four.all.MultiInit.
INFO : MultiInit - 4. Calling afterPropertiesSet() for bean of type class com.apress.
prospring6.four.all.MultiInit.
INFO : MultiInit - 5. Calling initMethod() for bean of type class com.apress.prospring6.
four.all.MultiInit.
If you look at the detailed log of the Spring application, you might notice a few Spring-specific
infrastructure beans. Their names hint to their type and responsibilities. For example, the org.
springframework.context.annotation.internalCommonAnnotationProcessor bean is the
CommonAnnotationBeanPostProcessor bean that provides support for the @PostConstruct annotation, and
the org.springframework.context.annotation.internalAutowiredAnnotationProcessor bean is the
118
Chapter 4 ■ Advanced Spring Configuration and Spring Boot
AutowiredAnnotationBeanPostProcessor bean that provides support for the @Autowired annotation. If
you want to identify other types of Spring-specific infrastructure beans using their names take a look at the
source code of the AnnotationConfigUtils 3.
Hooking into Bean Destruction
When using an ApplicationContext implementation that wraps the DefaultListableBeanFactory
interface (such as AnnotationConfigApplicationContext, via the getDefaultListableBeanFactory()
method), you can signal to BeanFactory that you want to destroy all singleton instances with a call to
ConfigurableBeanFactory.destroySingletons(). Typically, you do this when your application shuts
down, and it allows you to clean up any resources that your beans might be holding open, thus allowing your
application to shut down gracefully. This callback also provides the perfect place to flush any data you are
storing in memory to persistent storage and to allow your beans to end any long-running processes they may
have started.
To allow your beans to receive notification that destroySingletons() has been called, you have three
options, all similar to the mechanisms available for receiving an initialization callback. The destruction
callback is often used in conjunction with the initialization callback. In many cases, you create and configure
a resource in the initialization callback and then release the resource in the destruction callback.
The name of the method destroySingletons() gives a hint about an important detail. Spring only
performs bean destruction for singleton beans. Beans with other scopes than singleton do not have their life
cycle fully managed by Spring. For example, for prototype beans, the Spring container instantiates, configures,
and otherwise assembles a prototype object, and hands it to the client, with no further record of that prototype
instance
Executing a Method When a Bean Is Destroyed
To designate a method to be called when a bean is destroyed, you simply specify the name of the method in
the destroyMethod attribute of the bean’s definition @Bean annotation. Spring calls it just before it destroys
the singleton instance of the bean (Spring will not call this method for those beans with prototype scope).
The code snippet in Listing 4-8 provides an example of using a destroy-method callback.
Listing 4-8. Example Showing How to Configure a Destroy Method Using the @Bean Annotation
package com.apress.prospring6.four.destroymethod;
// import statements omitted
class FileManager {
private static Logger logger = LoggerFactory.getLogger(FileManager.class);
private Path file;
public FileManager() {
logger.info("Creating bean of type {}", FileManager.class);
https://github.com/spring-projects/spring-framework/blob/main/spring-context/src/
main/java/org/springframework/context/annotation/AnnotationConfigUtils.java
3
119
Chapter 4 ■ Advanced Spring Configuration and Spring Boot
try {
file = Files.createFile(Path.of("sample"));
} catch (IOException e) {
logger.error("Could not create file");
}
}
private void destroyMethod() throws IOException {
logger.info("Destroying bean of type {}", FileManager.class);
if (file != null) {
Files.deleteIfExists(file);
}
}
}
@Configuration
class DemoConfig {
@Bean(destroyMethod = "destroyMethod")
FileManager fileManager() {
return new FileManager();
}
}
public class DestroyMethodDemo {
public static void main(String... args) {
var ctx = new AnnotationConfigApplicationContext(DemoConfig.class);
ctx.close(); // needed to close the context
}
}
Class FileManager defines a destroyMethod() method, in which the file that is created by its
constructor gets deleted. The main() method retrieves a bean of type FileManager from the context and
then invokes its destroyMethod() method (which will, in turn, invoke the ConfigurableBeanFactory.
destroySingletons() method that was wrapped by the ApplicationContext), instructing Spring to destroy
all the singletons managed by it. Both the constructor and the destroy method write a message to console
output informing us that they have been called.
Implementing the DisposableBean Interface
As with initialization callbacks, Spring provides an interface, in this case DisposableBean, that can be
implemented by your beans as a mechanism for receiving destruction callbacks. The DisposableBean
interface defines a single method, destroy(), which is called just before the bean is destroyed. Using this
mechanism is orthogonal to using the InitializingBean interface to receive initialization callbacks. The
code snippet in Listing 4-9 shows a modified implementation of the FileManager class that implements the
DisposableBean interface.
120
Chapter 4 ■ Advanced Spring Configuration and Spring Boot
Listing 4-9. Example Showing How to Configure a Destroy Method Using the DisposableBean Interface
package com.apress.prospring6.four.intf;
import org.springframework.beans.factory.DisposableBean;
// other import statements omitted
class FileManager implements DisposableBean {
private static Logger logger = LoggerFactory.getLogger(FileManager.class);
private Path file;
public FileManager() {
logger.info("Creating bean of type {}", FileManager.class);
try {
file = Files.createFile(Path.of("sample"));
} catch (IOException e) {
logger.error("Could not create file");
}
}
@Override
public void destroy() throws Exception {
logger.info("Calling destroy() on bean of type {}", FileManager.class);
if (file != null) {
Files.deleteIfExists(file);
}
}
}
There is not much difference between the code that uses the callback method mechanism configured
with @Bean(destroyMethod="..") and the code that uses the callback interface mechanism. The
configuration is identical to that in the previous section, except for the missing (destroyMethod=".."),
which is no longer necessary. The code to run the example is the same as well. Thus, we can skip showing
these two implementations and jump to the next way of configuring a destroy method.
Using the JSR-250 @PreDestroy Annotation
The third way to define a method to be called before a bean is destroyed is to use the JSR-250 life-cycle
@PreDestroy annotation, which is the inverse of the @PostConstruct annotation. The code snippet in
Listing 4-10 is a version of FileManager that uses @PreDestroy to perform destroy actions.
Listing 4-10. Example Showing How to Configure a Destroy Method Using the @PreDestroy Annotation
package com.apress.prospring6.four.jsr250;
import jakarta.annotation.PreDestroy;
// import statements omitted
class FileManager {
private static Logger logger = LoggerFactory.getLogger(FileManager.class);
private Path file;
121
Chapter 4 ■ Advanced Spring Configuration and Spring Boot
public FileManager() {
logger.info("Creating bean of type {}", FileManager.class);
try {
file = Files.createFile(Path.of("sample"));
} catch (IOException e) {
logger.error("Could not create file");
}
}
@PreDestroy
private void preDestroy() throws IOException {
logger.info("Calling preDestroy() on bean of type {}",FileManager.class);
if (file != null) {
Files.deleteIfExists(file);
}
}
}
Running any of the examples declaring destroy callbacks results in a console log pretty similar to the
one shown in Listing 4-11.
Listing 4-11. Log Sample Showing Bean Destruction
...
INFO : FileManager - Creating bean of type class com.apress.prospring6.four.*.FileManager
DEBUG: AbstractApplicationContext - Closing org.springframework.context.annotation.Annotatio
nConfigApplicationContext@79be0360, started on Fri Mar 25 12:05:49 GMT 2022
INFO : FileManager - Calling destroy()/destroyMethod()/preDestroy() on bean of type class
com.apress.prospring6.four.*.FileManager
The destruction callback is an ideal mechanism for ensuring that your applications shut down
gracefully and do not leave resources open or in an inconsistent state. However, you still have to decide
how to use the destruction method callback: using the @Bean(destroyMethod=".."), the DisposableBean
interface, or the @PreDestroy annotation. Again, let the requirements of your application drive your decision
in this respect; use the method callback where portability is an issue, and use the DisposableBean interface
or a JSR-250 annotation to reduce the amount of configuration required.
Understanding Order of Resolution
As with the case of bean creation, you can use all mechanisms on the same bean instance for bean
destruction. In this case, Spring invokes the method annotated with @PreDestroy first and then
DisposableBean.destroy(), followed by your destroy method configured in your @Bean definition.
Using a Shutdown Hook
The only drawback of the destruction callbacks in Spring is that they are not fired automatically; you need
to remember to call ctx.close() before your application is closed. When your application runs as a servlet,
you can simply call destroy() in the servlet’s destroy() method.
122
Chapter 4 ■ Advanced Spring Configuration and Spring Boot
However, in a stand-alone application, things are not quite so simple, especially if you have
multiple exit points out of your application. Fortunately, there is a solution. Java allows you to create
a shutdown hook, which is a thread that is executed just before the application shuts down. This is the
perfect way to invoke the destroy() method of your context (which was being extended by all concrete
ApplicationContext implementations). The easiest way to take advantage of this mechanism is to
use AbstractApplicationContext’s registerShutdownHook() method. The method automatically
instructs Spring to register a shutdown hook of the underlying JVM runtime. The bean declaration and
configuration stay the same as before; the only thing that changes is the main method: the call of ctx.
registerShutdownHook is added, and calls to ctx.destroy() or close() will be removed.
Running the code in Listing 4-12 produces the same output as the output displayed in Listing 4-11.
Listing 4-12. Log Sample Showing Bean Destruction
package com.apress.prospring6.four.jsr250;
// import and some code omitted
public class PreDestroyDemo {
public static void main(String... args) {
var ctx = new AnnotationConfigApplicationContext(DemoConfig.class);
ctx.registerShutdownHook();
}
}
Making Your Beans “Spring Aware”
One of the biggest selling points of dependency injection over dependency lookup as a mechanism for
achieving inversion of control is that your beans do not need to be aware of the implementation of the
container that is managing them. To a bean that uses constructor or setter injection, the Spring container is
the same as the container provided by Google Guice or PicoContainer. However, in certain circumstances,
you may need a bean that is using dependency injection to obtain its dependencies so it can interact with
the container for some other reason. An example of this may be a bean that automatically configures a
shutdown hook for you, and thus it needs access to ApplicationContext. In other cases, a bean may want to
know what its name is (that is, the bean name that was assigned within the current ApplicationContext) so
it can perform some additional processing based on this name.
That said, this feature is really intended for internal Spring use. Giving the bean name some kind of
business meaning is generally a bad idea and can lead to configuration problems as bean names have to be
artificially manipulated to support their business meaning. However, we have found that being able to have a
bean find out its name at runtime is really useful for logging. Say you have many beans of the same type running
under different configurations. The bean name can be included in log messages to help you differentiate
between the one that is generating errors and the ones that are working fine when something goes wrong.
Using the BeanNameAware Interface
The BeanNameAware interface, which can be implemented by a bean that wants to obtain its own name,
has a single method: setBeanName(String). Spring calls the setBeanName() method after it has finished
configuring your bean but before any life-cycle callbacks (initialization or destroy) are called (refer to
Figure 4-1). In most cases, the implementation of the setBeanName() interface is just a single line that stores
the value passed in by the container in a field for use later. The code snippet in Listing 4-13 shows a simple
bean that obtains its name by using BeanNameAware and then later uses this bean name to print to the console.
123
Chapter 4 ■ Advanced Spring Configuration and Spring Boot
Listing 4-13. BeanNameAware Sample Implementation
package com.apress.prospring6.four.aware;
// other imports omitted
import org.springframework.beans.factory.BeanNameAware;
class NamedSinger implements BeanNameAware {
private static Logger logger = LoggerFactory.getLogger(NamedSinger.class);
private String name;
@Override /** @Implements {@link BeanNameAware#setBeanName(String)} */
public void setBeanName(String beanName) {
this.name = beanName;
}
public void sing() {
logger.info("Singer " + name + " - sing()");
}
}
This implementation is fairly trivial. Remember that BeanNameAware.setBeanName() is called before
the first instance of the bean is returned to your application via a call to ApplicationContext.getBean(),
so there is no need to check whether the bean name is available in the sing() method. As you can see, no
special configuration is required to take advantage of the BeanNameAware interface. In Listing 4-14, you
can see a simple example configuration and application that retrieves the NamedSinger instance from
ApplicationContext and then calls the sing() method.
Listing 4-14. BeanNameAware Example Usage
package com.apress.prospring6.four.aware;
// other import statements omitted
@ComponentScan
class AwareConfig {
@Bean
NamedSinger johnMayer(){
return new NamedSinger();
}
}
public class AwareDemo {
public static void main(String... args) {
var ctx = new AnnotationConfigApplicationContext(AwareConfig.class);
ctx.registerShutdownHook();
var singer = ctx.getBean(NamedSinger.class);
singer.sing();
}
}
124
Chapter 4 ■ Advanced Spring Configuration and Spring Boot
When run, this example generates a very simple output:
INFO : NamedSinger - Singer johnMayer - sing() ;
Notice the inclusion of the bean name in the log message for the call to the sing() method.
Using the BeanNameAware interface is really quite simple, and it is put to good use when you are
improving the quality of your log messages. Avoid being tempted to give your bean names business meaning
just because you can access them; by doing so, you are coupling your classes to Spring for a feature that
brings negligible benefit. If your beans need some kind of name internally, have them implement an
interface such as Nameable (which is specific to your application) with a method setName() and then
give each bean a name by using dependency injection. This way, you can keep the names you use for
configuration concise, and you won’t need to manipulate your configuration unnecessarily to give your
beans names with business meaning.
Using the ApplicationContextAware Interface
ApplicationContextAware was introduced at the end of Chapter 3 to show how Spring can be used to deal
with beans that require other beans to function that are not injected using constructors or setters in the
configuration (the @DependsOn example in Listing 3-54).
Using the ApplicationContextAware interface, it is possible for your beans to get a reference to the
ApplicationContext instance that configured them. The main reason this interface was created is to allow a
bean to access Spring’s ApplicationContext in your application, for example, to acquire other Spring beans
programmatically, using getBean(). You should, however, avoid this practice and use dependency injection
to provide your beans with their collaborators. If you use the lookup-based getBean() approach to obtain
dependencies when you can use dependency injection, you are adding unnecessary complexity to your
beans and coupling them to the Spring Framework without good reason.
Of course, ApplicationContext isn’t used just to look up beans; it performs a great many other
tasks. As you saw previously, one of these tasks is to destroy all singletons, notifying each of them in
turn before doing so. In the previous section, you saw how to create a shutdown hook to ensure that
ApplicationContext is instructed to destroy all singletons before the application shuts down. By using the
ApplicationContextAware interface, you can build a bean that can be configured in ApplicationContext to
create and configure a shutdown hook bean automatically. Listing 4-15 shows the code for this bean.
Listing 4-15. ApplicationContextAware Implementation Example
package com.apress.prospring6.four.aware;
import org.springframework.context.ApplicationContextAware;
// other import statements omitted
class ShutdownHookBean implements ApplicationContextAware {
private ApplicationContext ctx;
/** @Implements {@link ApplicationContextAware#setApplicationContext(Application
Context)} }*/
public void setApplicationContext(ApplicationContext ctx) throws BeansException {
if (ctx instanceof GenericApplicationContext) {
((GenericApplicationContext) ctx).registerShutdownHook();
}
}
}
125
Chapter 4 ■ Advanced Spring Configuration and Spring Boot
Most of this code should seem familiar to you by now. The ApplicationContextAware interface
defines a single method, setApplicationContext(ApplicationContext), that Spring calls to pass your
bean a reference to its ApplicationContext. In the previous code snippet, the ShutdownHookBean class
checks whether ApplicationContext is of type GenericApplicationContext, meaning it supports the
registerShutdownHook() method; if it does, it will register a shutdown hook to ApplicationContext.
Listing 4-16 shows how to configure this bean to work with the FileManager bean introduced in the previous
section.
Listing 4-16. ApplicationContextAware Bean Configuration and Code to Bootstrap the Spring Application
Based on This Configuration
package com.apress.prospring6.four.aware;
// other import statements omitted
@ComponentScan
class AwareConfig {
@Bean
FileManager fileManager() {
return new FileManager();
}
@Bean
ShutdownHookBean shutdownHookBean() {
return new ShutdownHookBean();
}
}
public class AwareDemo {
public static void main(String... args) {
new AnnotationConfigApplicationContext(AwareConfig.class);
}
}
Notice that no special configuration is required. The code to build a Spring application is simple too, as
depicted by the new AwareDemo class. Calling ctx.registerShutdownHook() is no longer needed because
this is done by the ShutdownHookBean. Running the previous example will generate a console output
ending in
INFO : FileManager - Calling preDestroy() on bean of type class com.apress.prospring6.four.
aware.FileManager
Even without a call to ctx.registerShutdownHook() or ctx.close() that closes the application context
removing the hooks, the preDestroy() method is called before the application shuts down, because the
ShutdownHookBean.setApplicationContext(ApplicationContext ctx) method does shutdown hook
registering.
126
Chapter 4 ■ Advanced Spring Configuration and Spring Boot
Use of FactoryBeans
One of the problems that you will face when using Spring is how to create and then inject dependencies
that cannot be created simply by using the new operator. To overcome this problem, Spring provides the
FactoryBean interface that acts as an adapter for objects that cannot be created and managed using the
standard Spring semantics. Typically, you use FactoryBean implementations to create beans that you cannot
create by using the new operator, such as those you access through static factory methods, although this is
not always the case. Simply put, a FactoryBean is a bean that acts as a factory for other beans. FactoryBeans
are configured within your ApplicationContext like any normal bean, but when Spring uses the
FactoryBean interface to satisfy a dependency or lookup request, it does not return FactoryBean; instead, it
invokes the FactoryBean.getObject() method and returns the result of that invocation.
Spring automatically calls the getObject() method; it is a bad practice call that method manually.
FactoryBeans are used to great effect in Spring; the most noticeable uses are the creation of
transactional proxies, which we cover in Chapter 9, and the automatic retrieval of resources from a JNDI
context. However, FactoryBeans are useful not just for building the internals of Spring; you’ll find them
really useful when you build your own applications because they allow you to manage many more resources
by using IoC than would otherwise be available.
FactoryBean Example: The MessageDigestFactoryBean
Often the projects that we work on require some kind of cryptographic processing; typically, this
involves generating a message digest or hash of a user’s password to be stored in a database. In Java, the
MessageDigest class provides functionality for creating a digest of any arbitrary data. MessageDigest itself is
abstract, and you obtain concrete implementations by calling MessageDigest.getInstance() and passing
in the name of the digest algorithm you want to use. For instance, if we want to use the MD5 algorithm to
create a digest, we use the following code to create the MessageDigest instance:
MessageDigest md5 = MessageDigest.getInstance("MD5");
If we want to use Spring to manage the creation of the MessageDigest object, the best we can do without
a FactoryBean is to have a property named algorithmName on our bean and then use an initialization
callback to call MessageDigest.getInstance(). Using a FactoryBean, we can encapsulate this logic inside a
bean. Then, any beans that require a MessageDigest instance can simply declare a property, messageDigest,
and use the FactoryBean to obtain the instance. Listing 4-17 shows an implementation of FactoryBean that
does this.
127
Chapter 4 ■ Advanced Spring Configuration and Spring Boot
Listing 4-17. MessageDigestFactoryBean Implementation
package com.apress.prospring6.four.factory;
import org.springframework.beans.factory.FactoryBean;
import java.security.MessageDigest;
// other import statements omitted
public class MessageDigestFactoryBean implements FactoryBean<MessageDigest>,
InitializingBean {
private String algorithmName = "MD5";
private MessageDigest messageDigest = null;
@Override /** @Implements {@link FactoryBean#getObject()} */
public MessageDigest getObject() throws Exception {
return messageDigest;
}
@Override /** @Implements {@link FactoryBean#getObjectType()} */
public Class<MessageDigest> getObjectType() {
return MessageDigest.class;
}
@Override /** @Implements {@link FactoryBean#isSingleton()} */
public boolean isSingleton() {
return true;
}
@Override /** @Implements {@link InitializingBean#afterPropertiesSet()} */
public void afterPropertiesSet() throws Exception {
messageDigest = MessageDigest.getInstance(algorithmName);
}
public void setAlgorithmName(String algorithmName) {
this.algorithmName = algorithmName;
}
}
Spring calls the getObject() method to retrieve the object created by the FactoryBean.
This is the actual object that is passed to other beans that use the FactoryBean as a collaborator.
MessageDigestFactoryBean passes a clone of the stored MessageDigest instance that is created in the
InitializingBean.afterPropertiesSet() callback.
The getObjectType() method allows you to tell Spring what type of object your FactoryBean will
return. This can be null if the return type is unknown in advance (for example, the FactoryBean creates
different types of objects depending on the configuration, which will be determined only after the
FactoryBean is initialized), but if you specify a type, Spring can use it for autowiring purposes. We return
MessageDigest as our type (in this case, a class, but try to return an interface type and have the FactoryBean
instantiate the concrete implementation class, unless necessary). The reason is that we do not know what
concrete type will be returned (not that it matters, because all beans will define their dependencies by using
MessageDigest anyway).
128
Chapter 4 ■ Advanced Spring Configuration and Spring Boot
The isSingleton() property allows you to inform Spring whether the FactoryBean is managing a
singleton instance. Remember that by annotating the FactoryBean’s definition with @Scope(scopeName
= "singleton"), you tell Spring about the singleton status of the FactoryBean itself, not the objects it is
returning. Now let’s see how the FactoryBean is employed in an application. In Listing 4-18, you can see a
simple bean that maintains two MessageDigest instances and then displays the digests of a message passed
to its digest() method.
Listing 4-18. Simple Bean Maintaining Two MessageDigest Instances
package com.apress.prospring6.four.factory;
import java.security.MessageDigest;
public class MessageDigester {
private static Logger logger = LoggerFactory.getLogger(MessageDigester.class);
private MessageDigest digest1;
private MessageDigest digest2;
public void setDigest1(MessageDigest digest1) {
this.digest1 = digest1;
}
public void setDigest2(MessageDigest digest2) {
this.digest2 = digest2;
}
public void digest(String msg) {
logger.info("Using digest1");
digest(msg, digest1);
logger.info("Using digest2");
digest(msg, digest2);
}
private void digest(String msg, MessageDigest digest) {
logger.info("Using algorithm: " + digest.getAlgorithm());
digest.reset();
byte[] bytes = msg.getBytes();
byte[] out = digest.digest(bytes);
// we are printing the actual byte values
logger.info("Original Message: {} ", bytes);
logger.info("Encrypted Message: {} ", out);
}
}
The snippet in Listing 4-19 shows an example configuration for two MessageDigestFactoryBean
classes, one for the SHA1 algorithm and the other using the default (MD5) algorithm. The same listing
also shows the FactoryBeanDemo class that retrieves the MessageDigester bean from the BeanFactory and
creates the digest of a simple message.
129
Chapter 4 ■ Advanced Spring Configuration and Spring Boot
Listing 4-19. Simple Configuration for MessageDigestFactoryBean and Code to Bootstrap a Spring
Application to Test It
package com.apress.prospring6.four.factory;
// import statements omitted
@Configuration
@ComponentScan
class MessageDigestConfig {
@Bean
public MessageDigestFactoryBean shaDigest(){
MessageDigestFactoryBean shaDigest = new MessageDigestFactoryBean();
shaDigest.setAlgorithmName("SHA1");
return shaDigest;
}
@Bean
public MessageDigestFactoryBean defaultDigest(){
return new MessageDigestFactoryBean();
}
@Bean
public MessageDigester digester() throws Exception {
MessageDigester messageDigester = new MessageDigester();
messageDigester.setDigest1(shaDigest().getObject());
messageDigester.setDigest2(defaultDigest().getObject());
return messageDigester;
}
}
public class FactoryBeanDemo {
public static void main(String... args) {
var ctx = new AnnotationConfigApplicationContext(MessageDigestConfig.class);
MessageDigester digester = ctx.getBean("digester", MessageDigester.class);
digester.digest("Hello World!");
ctx.close();
}
}
As you can see, we not only have configured the two MessageDigestFactoryBean classes, but also have
configured a MessageDigester, using the two MessageDigestFactoryBean classes, to provide values for the
digest1 and digest2 properties. For the defaultDigest bean, since the algorithmName property was not
specified, no injection will happen, and the default algorithm (MD5) that was coded in the class will be used.
In Listing 4-20, you can see the console log produced by running the code in Listing 4-19.
130
Chapter 4 ■ Advanced Spring Configuration and Spring Boot
Listing 4-20. Simple Message Digest Generated by the Application Configured by the
MessageDigestConfig Class
INFO : MessageDigester - Using digest1
INFO : MessageDigester - Using algorithm: SHA1
INFO : MessageDigester - Original Message: [72, 101,
100, 33]
INFO : MessageDigester - Encrypted Message: [46, -9,
4, 47, -107, -8, -97, 28, 35, 40, 113]
INFO : MessageDigester - Using digest2
INFO : MessageDigester - Using algorithm: MD5
INFO : MessageDigester - Original Message: [72, 101,
100, 33]
INFO : MessageDigester - Encrypted Message: [-19, 7,
30, -110, -65, -59, 13, -116]
108, 108, 111, 32, 87, 111, 114, 108,
-67, -26, 8, -50, 84, 4, -23, 125, 95,
108, 108, 111, 32, 87, 111, 114, 108,
98, -121, 83, 46, -122, 54, 94, -124,
We chose to print the numeric byte values instead of the messages as text to show the changes
that encryption makes at the byte level. As you can see, the MessageDigest bean is provided with two
MessageDigest implementations, SHA1 and MD5, even though no MessageDigest beans are configured in
the BeanFactory. This is the FactoryBean at work.
FactoryBeans are the perfect solution when you are working with classes that cannot be created by
using the new operator. If you work with objects that are created by using a factory method and you want to
use these classes in a Spring application, create a FactoryBean to act as an adapter, allowing your classes to
take full advantage of Spring’s IoC capabilities.
The power of using FactoryBeans becomes obvious when XML configuration is used, since Spring
automatically satisfies any references to a FactoryBean by the objects produced by that FactoryBean. This
allows for the MessageDigester bean to be configured like shown in the previous edition of this book:
<beans ...>
<bean id="shaDigest"
class="com.apress.prospring5.ch4.MessageDigestFactoryBean"
p:algorithmName="SHA1"/>
<bean id="defaultDigest"
class="com.apress.prospring5.ch4.MessageDigestFactoryBean"/>
<bean id="digester"
class="com.apress.prospring5.ch4.MessageDigester"
p:digest1-ref="shaDigest"
p:digest2-ref="defaultDigest"/>
</beans>
Accessing a FactoryBean Directly
Given that Spring automatically satisfies any references to a FactoryBean<T> by the objects produced by
that FactoryBean, you may be wondering whether you can actually access the FactoryBean directly. The
answer is yes. Accessing FactoryBean is simple: you prefix the bean name with an ampersand in the call to
getBean(), as shown in Listing 4-21.
131
Chapter 4 ■ Advanced Spring Configuration and Spring Boot
Listing 4-21. Accessing a FactoryBean Directly
package com.apress.prospring6.four.factory;
// import statements omitted
public class FactoryBeanDemo {
private static Logger logger = LoggerFactory.getLogger(FactoryBeanDemo.class);
public static void main(String... args) {
var ctx = new AnnotationConfigApplicationContext(MessageDigestConfig.class);
MessageDigestFactoryBean factoryBean = (MessageDigestFactoryBean) ctx.
getBean("&shaDigest");
try {
MessageDigest shaDigest = factoryBean.getObject();
logger.info("Explicit use digest bean: {}", shaDigest.digest("Hello world".
getBytes()));
} catch (Exception ex) {
logger.error("Could not find MessageDigestFactoryBean ", ex);
}
ctx.close();
}
}
This feature is used in a few places in the Spring code, but your application should really have no reason
to use it. The FactoryBean is intended to be used as a piece of supporting infrastructure to allow you to use
more of your application’s classes in an IoC setting. Avoid accessing FactoryBean directly and invoking its
getObject() manually, and let Spring do it for you; if you do this manually, you are making extra work for
yourself and are unnecessarily coupling your application to a specific implementation detail that could quite
easily change in the future.
J avaBeans PropertyEditors
If you are not entirely familiar with JavaBeans concepts, a PropertyEditor is an interface that converts a
property’s value to and from its native type representation into a String. Originally, this was conceived as a
way to allow property values to be entered, as String values, into an editor and have them transformed into
the correct type. However, because PropertyEditor implementations are inherently lightweight classes,
they have found uses in many settings, including Spring.
Since a good portion of property values in a Spring-based application start life in the BeanFactory
configuration file, they are essentially Strings. However, the property that these values are set on might not
be String-typed. So, to save you from having to create a load of String-typed properties artificially, Spring
allows you to define PropertyEditor beans to manage the conversion of String-based property values
into the correct types. Figure 4-2 shows the full list of PropertyEditor implementations that are part of the
Spring Framework, most of them being grouped in the spring-beans package; you can see this list with any
smart Java editor, but in IntelliJ you can see all the implementations of a specific interface by opening its
source code, selecting its name, and pressing Ctrl+H (macOS) or Ctrl+E (Windows).
132
Chapter 4 ■ Advanced Spring Configuration and Spring Boot
Figure 4-2. Spring PropertyEditor implementations
The list in Figure 4-2 shows that the root of the hierarchy is the java.beans.PropertyEditor interface.
All Spring implementations actually extend the java.beans.PropertyEditorSupport class that provides
support for building a custom property editor or to delegate to an existing one. For example, the java.
beans.StringEditor that handles implicit conversion of String literals into property values to be injected in
beans is pre-registered with BeanFactory and does not require additional configuration.
Using the Built-in PropertyEditors
Listing 4-22 shows a simple bean that declares 14 properties, one for each of the types supported by the
built-in PropertyEditor implementations.
Listing 4-22. Bean with Types of All Property Types Supported by Default in Spring Applications
package com.apress.prospring6.four;
import org.springframework.beans.PropertyEditorRegistrar;
import org.springframework.beans.PropertyEditorRegistry;
import org.springframework.beans.factory.annotation.Value;
import org.springframework.beans.propertyeditors.CustomDateEditor;
import org.springframework.beans.propertyeditors.StringTrimmerEditor;
// some import statements omitted
@Component("builtInSample")
public class DiverseValuesContainer {
private byte[] bytes; // ByteArrayPropertyEditor
private Character character; //CharacterEditor
private Class<?> cls; // ClassEditor
private Boolean trueOrFalse; // CustomBooleanEditor
private List<String> stringList; // CustomCollectionEditor
private Date date; // CustomDateEditor
private Float floatValue; // CustomNumberEditor
private File file; // FileEditor
private InputStream stream; // InputStreamEditor
private Locale locale; // LocaleEditor
133
Chapter 4 ■ Advanced Spring Configuration and Spring Boot
private
private
private
private
Pattern pattern; //
Properties properties; //
String trimString; //
URL url; //
PatternEditor
PropertiesEditor
StringTrimmerEditor
URLEditor
private static Logger logger = LoggerFactory.getLogger(DiverseValuesContainer.class);
@Value("A")
public void setCharacter(Character character) {
logger.info("Setting character: {}", character);
this.character = character;
}
@Value("java.lang.String")
public void setCls(Class<?> cls) {
logger.info("Setting class: {}" , cls.getName());
this.cls = cls;
}
@Value("#{systemProperties['java.io.tmpdir']}#{systemProperties['file.separator']}
test.txt")
public void setFile(File file) {
logger.info("Setting file: {}" , file.getAbsolutePath());
this.file = file;
}
@Value("en_US")
public void setLocale(Locale locale) {
logger.info("Setting locale: {}" , locale.getDisplayName());
this.locale = locale;
}
@Value("name=Ben age=41")
public void setProperties(Properties properties) {
logger.info("Loaded {}" , properties.size() + " properties");
this.properties = properties;
}
@Value("https://iuliana-cosmina.com")
public void setUrl(URL url) {
logger.info("Setting URL: {}" , url.toExternalForm());
this.url = url;
}
@Value("John Mayer")
public void setBytes(byte... bytes) {
logger.info("Setting bytes: {}" , Arrays.toString(bytes));
this.bytes = bytes;
}
@Value("true")
public void setTrueOrFalse(Boolean trueOrFalse) {
134
Chapter 4 ■ Advanced Spring Configuration and Spring Boot
logger.info("Setting Boolean: {}" , trueOrFalse);
this.trueOrFalse = trueOrFalse;
}
@Value("#{valuesHolder.stringList}")
public void setStringList(List<String> stringList) {
logger.info("Setting stringList with: {}" , stringList);
this.stringList = stringList;
}
@Value("20/08/1981")
public void setDate(Date date) {
logger.info("Setting date: {}" , date);
this.date = date;
}
@Value("123.45678")
public void setFloatValue(Float floatValue) {
logger.info("Setting float value: {}" , floatValue);
this.floatValue = floatValue;
}
@Value("#{valuesHolder.inputStream}")
public void setStream(InputStream stream) {
this.stream = stream;
logger.info("Setting stream & reading from it: {}" ,
new BufferedReader(new InputStreamReader(stream)).lines().parallel().
collect(Collectors.joining("\n")));
}
@Value("a*b")
public void setPattern(Pattern pattern) {
logger.info("Setting pattern: {}" , pattern);
this.pattern = pattern;
}
@Value(" String need trimming ")
public void setTrimString(String trimString) {
logger.info("Setting trim string: {}" , trimString);
this.trimString = trimString;
}
public static class CustomPropertyEditorRegistrar implements PropertyEditorRegistrar {
@Override
public void registerCustomEditors(PropertyEditorRegistry registry) {
SimpleDateFormat dateFormatter = new SimpleDateFormat("MM/dd/yyyy");
registry.registerCustomEditor(Date.class,
new CustomDateEditor(dateFormatter, true));
registry.registerCustomEditor(String.class, new StringTrimmerEditor(true));
}
}
135
Chapter 4 ■ Advanced Spring Configuration and Spring Boot
@Component
class ValuesHolder {
List<String> stringList;
InputStream inputStream;
public ValuesHolder(List<String> stringList) {
this.stringList = List.of("Mayer", "Psihoza", "Mazikeen");
try {
this.inputStream = new FileInputStream(
System.getProperty("java.io.tmpdir")
+ System.getProperty("file.separator")
+ "test.txt"
);
} catch (FileNotFoundException e) {
e.printStackTrace(); // we are not interested in this exception
}
}
// getters omitted
}
public static void main(String... args) throws Exception {
File baseDir = new File(System.getProperty("java.io.tmpdir"));
Path path = Files.createFile(Path.of(baseDir.getAbsolutePath(), "test.txt"));
Files.writeString(path, "Hello World!");
path.toFile().deleteOnExit();
var ctx = new AnnotationConfigApplicationContext();
ctx.register(ValuesHolder.class, DiverseValuesContainer.class);
ctx.refresh();
ctx.close();
}
}
As you can see, although all the properties in the DiverseValuesContainer are not Strings, the values
for the properties are specified as simple Strings. Also note that we registered the CustomDateEditor with
the desired formatter, and StringTrimmerEditor, since those two editors were not registered by default
in Spring by providing an implementation for org.springframework.beans.PropertyEditorRegistrar.
Running this example yields the output shown in Listing 4-23.
Listing 4-23. Output Showing the Properties Being Injected with the Converted Values
INFO
INFO
INFO
INFO
INFO
DiverseValuesContainer - Loaded 1 properties
DiverseValuesContainer - Setting locale: English (United States)
DiverseValuesContainer - Setting date: Sun Aug 08 00:00:00 BST 1982
DiverseValuesContainer - Setting class: java.lang.String
DiverseValuesContainer - Setting file: /var/folders/gg/nm_
cb2lx72q1lz7xwwdh7tnc0000gn/T/test.txt
INFO : DiverseValuesContainer - Setting URL: https://iuliana-cosmina.com
INFO : DiverseValuesContainer - Setting bytes: [74, 111, 104, 110, 32, 77, 97, 121,
101, 114]
136
:
:
:
:
:
Chapter 4 ■ Advanced Spring Configuration and Spring Boot
INFO
INFO
INFO
INFO
INFO
INFO
INFO
:
:
:
:
:
:
:
DiverseValuesContainer
DiverseValuesContainer
DiverseValuesContainer
DiverseValuesContainer
DiverseValuesContainer
DiverseValuesContainer
DiverseValuesContainer
-
Setting
Setting
Setting
Setting
Setting
Setting
Setting
stream & reading from it: Hello World!
pattern: a*b
character: A
Boolean: true
stringList with: [Mayer, Psihoza, Mazikeen]
float value: 123.45678
trim string: String need trimming
As you can see, Spring has, using the built-in PropertyEditors, converted the String representations
of the various properties to the correct types. Table 4-1 lists the most important built-in PropertyEditors
available in Spring.
Table 4-1. Spring PropertyEditors
PropertyEditor
Description
ByteArrayPropertyEditor Converts String values to their corresponding byte representations.
CharacterEditor
Populates a property of type Character or char from a String value.
ClassEditor
Converts from a fully qualified class name into a Class instance. When using
this PropertyEditor, be careful not to include any extraneous spaces on either
side of the class name when using GenericApplicationContext because this
results in a ClassNotFoundException.
CustomBooleanEditor
Converts a string into a Java Boolean type.
CustomCollectionEditor Converts a source collection (e.g., represented by the valueHolder.
stringList property SpEL expression) into the target Collection type.
CustomDateEditor
Converts a string representation of a date into a java.util.Date value.
You need to register the CustomDateEditor implementation in Spring’s
ApplicationContext with the desired date format.
FileEditor
Converts a String file path into a File instance. Spring does not check
whether the file exists.
InputStreamEditor
Converts a string representation of a resource (e.g., file resource using
file:///D:/temp/test.txt or classpath:test.txt) into an input stream
property.
LocaleEditor
Converts the String representation of a locale, such as en-GB, into a java.
util.Locale instance.
PatternEditor
Converts a String into the JDK Pattern object, or the other way around.
PropertiesEditor
Converts a String in the format key1=value1 key2=value2 keyn=valuen
into an instance of java.util.Properties with the corresponding properties
configured.
StringTrimmerEditor
Performs trimming on the String values before injection. You need to
explicitly register this editor.
URLEditor
Converts a String representation of a URL into an instance of java.net.URL.
137
Chapter 4 ■ Advanced Spring Configuration and Spring Boot
This set of PropertyEditors provides a good base for working with Spring and makes configuring your
application with common components such as files and URLs much simpler.
Creating a Custom PropertyEditor
Although the built-in PropertyEditor implementations cover most of the standard cases of property
type conversion, there may come a time when you need to create your own PropertyEditor to support
a class or a set of classes you are using in your application. Spring has full support for registering custom
PropertyEditor implementations; the only downside is that the java.beans.PropertyEditor interface
has a lot of methods, many of which are irrelevant to the task at hand, which is converting property types.
Thankfully, starting with JDK 5 or newer the PropertyEditorSupport class can be used, which your own
PropertyEditors can extend, leaving you to implement only a single method: setAsText().
Let’s consider a simple example to see the implementation of a custom property editor in action.
Suppose we have a FullName class with just two properties, firstName and lastName, defined as shown in
Listing 4-24.
Listing 4-24. NamePropertyEditor Class, a Custom PropertyEditor
package com.apress.prospring6.four.custom;
import org.apache.commons.lang3.builder.ToStringBuilder;
public class FullName {
private String firstName;
private String lastName;
public FullName(String firstName, String lastName) {
this.firstName = firstName;
this.lastName = lastName;
}
// getters and toString(..) omitted
}
To simplify the application configuration, let’s develop a custom editor that converts a String with a
space separator into the FullName class’s first name and last name, respectively. Listing 4-25 depicts the
custom property editor implementation.
Listing 4-25. FullName Class, to Be Used in Showing How to Build a Custom PropertyEditor
package com.apress.prospring6.four.custom;
import java.beans.PropertyEditorSupport;
public class NamePropertyEditor extends PropertyEditorSupport {
@Override
public void setAsText(String text) throws IllegalArgumentException {
String[] name = text.split("\\s");
setValue(new FullName(name[0], name[1]));
}
}
138
Chapter 4 ■ Advanced Spring Configuration and Spring Boot
The implementation is simple. It extends JDK’s PropertyEditorSupport class and implements the
setAsText() method. In the method, we simply split the String into a string array with a space as the
delimiter. Afterward, an instance of the FullName class is instantiated, passing in the String before the space
character as the first name and passing the String after the space character as the last name. Finally, the
converted value is returned by calling the setValue() method with the result. To use NamePropertyEditor
in your application, you need to register the editor in Spring’s ApplicationContext. Listing 4-26 shows an
ApplicationContext configuration of a CustomEditorConfigurer and the NamePropertyEditor and the
code to bootstrap a Spring application made of these beans.
Listing 4-26. Configuration and Bootstrap Code for a Spring Application Demonstrating a PropertyEditor
package com.apress.prospring6.four.custom;
import org.springframework.beans.factory.config.CustomEditorConfigurer;
// other import statements omitted
@Component
class Person {
private FullName name;
@Value("John Mayer")
public void setName(FullName name) {
this.name = name;
}
public FullName getName() {
return name;
}
}
@Configuration
@ComponentScan
class CustomPropertyEditorCfg {
@Bean
CustomEditorConfigurer customEditorConfigurer(){
var cust = new CustomEditorConfigurer();
cust.setCustomEditors(Map.of(FullName.class, NamePropertyEditor.class));
return cust;
}
}
public class CustomPropertyEditorDemo {
private static Logger logger = LoggerFactory.getLogger(CustomPropertyEditorDemo.class);
public static void main(String... args) {
var ctx = new AnnotationConfigApplicationContext(CustomPropertyEditorCfg.class);
var person = ctx.getBean(Person.class, "person");
logger.info("Person full name = {}" , person.getName());
139
Chapter 4 ■ Advanced Spring Configuration and Spring Boot
ctx.close();
}
}
You should notice two things in this configuration:
•
Custom PropertyEditors get injected into the CustomEditorConfigurer bean by
using the Map-typed customEditors property.
•
Each entry in the Map represents a single PropertyEditor, with the entry key
being the class for which the PropertyEditor is used. As you can see, the key for
NamePropertyEditor is com.apress.prospring6.four.custom.FullName, which
signifies that this is the class for which this implementation should be used.
Feel free to run the code in Listing 4-26 and the output should be a simple:
INFO : CustomPropertyEditorDemo - Person full name = com.apress.prospring6.four.custom.FullN
ame@5b38c1ec[firstName=John,lastName=Mayer]
This is the output from the toString() method implemented in the FullName class (that is not shown
because it is quite basic and not relevant to this section), and you can see that the first name and last name
of the FullName object were correctly populated by Spring by using the configured NamePropertyEditor.
Starting from version 3, Spring introduced the Type Conversion API and the Field Formatting Service
Provider Interface (SPI), which provide a simpler and well-structured API to perform type conversion and
field formatting. It’s especially useful for web application development. Both the Type Conversion API and
the Field Formatting SPI are discussed in detail in Chapter 11.
M
ore Spring ApplicationContext Configuration
So far, although we are discussing Spring’s ApplicationContext, most of the features that we have
covered mainly surround the BeanFactory interface wrapped by ApplicationContext. In Spring, various
implementations of the BeanFactory interface are responsible for bean instantiation, providing dependency
injection and life-cycle support for beans managed by Spring. However, as stated earlier, being an extension
of the BeanFactory interface, ApplicationContext provides other useful functionalities as well. The main
function of ApplicationContext is to provide a much richer framework on which to build your applications.
ApplicationContext is much more aware of the beans (compared to BeanFactory) that you
configure within it, and in the case of many of the Spring infrastructure classes and interfaces, such as
BeanFactoryPostProcessor, it interacts with them on your behalf, reducing the amount of code you need to
write in order to use Spring.
The biggest benefit of using ApplicationContext is that it allows you to configure and manage Spring
and Spring-managed resources in a completely declarative way. This means that wherever possible, Spring
provides support classes to load ApplicationContext into your application automatically, thus removing
the need for you to write any code to access ApplicationContext. In practice, this feature is currently
available only when you are building web applications with Spring, which allows you to initialize Spring’s
ApplicationContext in the web application deployment descriptor. When using a stand-alone application,
you can also initialize Spring’s ApplicationContext by simple coding, as you’ve been shown so far.
In addition to providing a model that is focused more on declarative configuration,
ApplicationContext supports the following features:
140
•
Internationalization
•
Event publication
Chapter 4 ■ Advanced Spring Configuration and Spring Boot
•
Resource management and access
•
Additional life-cycle interfaces
•
Improved automatic configuration of infrastructure components
In the following sections, we discuss some of the most important features in ApplicationContext
besides DI.
Internationalization
One area where Spring really excels is in support for internationalization (i18n). Using the MessageSource
interface, your application can access String resources, called messages, stored in a variety of languages.
For each language you want to support in your application, you maintain a list of messages that are keyed
to correspond to messages in other languages. For instance, if you wanted to display “The quick brown fox
jumped over the lazy dog” in English and in Ukrainian, you would create two messages, both keyed as msg;
the one for English would read “The quick brown fox jumped over the lazy dog” and the one for Ukrainian
would read “Те що Росія робить з Україною, є злочином.”
Although you don’t need to use ApplicationContext to use MessageSource, the ApplicationContext
interface extends MessageSource and provides special support for loading messages and for making them
available in your environment. The automatic loading of messages is available in any environment, but
automatic access is provided only in certain Spring-managed scenarios, such as when you are using Spring’s
MVC framework to build a web application. Although any class can implement ApplicationContextAware
and thus access the automatically loaded messages, we suggest a better solution later in this chapter, in the
section “Using MessageSource in Stand-Alone Applications.”
Internationalization with MessageSource
Aside from ApplicationContext, Spring provides three MessageSource implementations:
•
ResourceBundleMessageSource
•
ReloadableResourceBundleMessageSource
•
StaticMessageSource
The StaticMessageSource implementation should not be used in a production application because
you can’t configure it externally, and this is generally one of the main requirements when you are adding
i18n capabilities to your application. ResourceBundleMessageSource loads messages by using a Java
ResourceBundle. ReloadableResource BundleMessageSource is essentially the same, except it supports
scheduled reloading of the underlying source files. All three MessageSource implementations also
implement another interface called HierarchicalMessageSource, which allows for many MessageSource
instances to be nested. This is key to the way ApplicationContext works with MessageSource instances.
To take advantage of ApplicationContext’s support for MessageSource, you must define a bean in your
configuration of type MessageSource and with the name messageSource. ApplicationContext takes this
MessageSource and nests it within itself, allowing you to access the messages by using ApplicationContext.
This can be hard to visualize, so take a look at the example presented in Listing 4-27, which shows a simple
application that accesses a set of messages for both the English and Ukrainian locales.
141
Chapter 4 ■ Advanced Spring Configuration and Spring Boot
Listing 4-27. MessageSource Configuration Using Spring ApplicationContext
package com.apress.prospring6.four;
import org.springframework.context.MessageSource;
import org.springframework.context.support.ResourceBundleMessageSource;
// other import statements omitted
@Configuration
class MessageSourceConfig {
@Bean
public MessageSource messageSource(){
var messageSource = new ResourceBundleMessageSource();
messageSource.setBasenames("labels");
return messageSource;
}
}
public class MessageSourceDemo {
private static Logger logger = LoggerFactory.getLogger(MessageSourceDemo.class);
public static void main(String... args) {
var ctx = new AnnotationConfigApplicationContext(MessageSourceConfig.class);
Locale english = Locale.ENGLISH;
Locale ukrainian = new Locale("uk", "UA");
logger.info(ctx.getMessage("msg", null, english));
logger.info(ctx.getMessage("msg", null, ukrainian));
logger.info(ctx.getMessage("nameMsg", new Object[]{ "Iuliana", "Cosmina" },
english));
logger.info(ctx.getMessage("nameMsg", new Object[]{ "Iuliana", "Cosmina" },
ukrainian));
ctx.close();
}
}
Don’t worry about the calls to getMessage() just yet; we will return to those shortly. For now, just know
that they retrieve a keyed message for the specified locale.
In the MessageSourceConfig class we define a ResourceBundleMessageSource bean with the name
messageSource as required by Spring. We configure it with a set of names to form the base of its file set. A
Java ResourceBundle, which is used by ResourceBundleMessageSource, works on a set of properties files that
are identified by base names. When looking for a message for a particular Locale, the ResourceBundle looks
for a file that is named as a combination of the base name and the locale name. For instance, if the base
name is foo and we are looking for a message in the en-GB (British English) locale, ResourceBundle looks
for a file called foo_en_GB.properties.
For the previous example, the content of the properties files for English (labels_en.properties) and
Ukrainian (labels_uk_UA.properties) is shown in Listing 4-28.
142
Chapter 4 ■ Advanced Spring Configuration and Spring Boot
Listing 4-28. Content of MessageSource Resource Files
#labels_en.properties
msg=Witnessing and not stopping evil is condoning it
nameMsg=My name is {0} {1}
#labels_de_DE.properties
msg=Бути свідком зла і не зупиняти його – це брати участь у цьому
nameMsg=Мене звати {0} {1}
These files are located in the resources directory and are added to the application classpath.
Now, this example just raises even more questions. What do those calls to getMessage() mean? Why
did we use ApplicationContext.getMessage() rather than access the ResourceBundleMessageSource bean
directly? We’ll answer each of these questions in turn.
Using the getMessage() Method
The MessageSource interface defines three overloads for the getMessage() method. These are described in
Table 4-2.
Table 4-2. getMessage(..) method signatures
Method Signature
Description
getMessage(String,Object[], This is the standard getMessage() method. The String argument is the
Locale)
key of the message corresponding to the key in the properties file. In
the previous code sample, the first call to getMessage() used msg as the
key, and this corresponded to the following entry in the properties file
for the en locale: msg=The quick brown fox jumped over the lazy
dog. The Object[] array argument is used for replacements in the
message. In the third call to getMessage(), we passed in an array of two
Strings. The message keyed as nameMsg was My nameis {0} {1}. The
numbers in braces are placeholders, and each one is replaced with the
corresponding entry in the argument array. The final argument, Locale,
tells ResourceBundleMessageSource which properties file to look in. Even
though the first and second calls to getMessage() in the example used the
same key, they returned different messages that correspond to the Locale
setting that was passed in to getMessage().
getMessage(String,
Object[], String,Locale)
This overload works in the same way as getMessage(String,Object[],
Locale), other than the second String argument, which allows us to pass
in a default value in case a message for the supplied key is not available
for the supplied Locale.
getMessage(MessageSourceRe This overload is a special case. We discuss it in further detail in the
solvable,Locale)
upcoming section “The MessageSourceResolvable Interface.”
143
Chapter 4 ■ Advanced Spring Configuration and Spring Boot
Why Use ApplicationContext As a MessageSource?
To answer this question, we need to jump a little ahead of ourselves and look at the web application support
in Spring. The answer, in general, is that you shouldn’t use ApplicationContext as a MessageSource
because doing so couples your bean to ApplicationContext unnecessarily (this is discussed in more detail
in the next section). You should use ApplicationContext when you are building a web application by using
Spring’s MVC framework.
The core interface in Spring MVC is Controller. Unlike frameworks such as Struts that require you to
implement your controllers by inheriting from a concrete class, Spring simply requires that you implement
the Controller interface (or annotate your controller class with the @Controller annotation). Having said
that, Spring provides a collection of useful base classes that you will use to implement your own controllers.
Each of these base classes is a subclass (directly or indirectly) of the ApplicationObjectSupport class,
which is a convenient superclass for any application objects that want to be aware of ApplicationContext.
Remember that in a web application setting, ApplicationContext is loaded automatically.
ApplicationObjectSupport accesses this ApplicationContext, wraps it in a MessageSourceAccessor
object, and makes that available to your controller via the protected getMessageSourceAccessor() method.
MessageSourceAccessor provides a wide array of convenient methods for working with MessageSource
instances. This form of autoinjection is quite beneficial; it removes the need for all of your controllers to
expose a MessageSource property.
However, this is not the best reason for using ApplicationContext as a MessageSource in your web
application. The main reason to use ApplicationContext rather than a manually defined MessageSource
bean is that Spring does, where possible, expose ApplicationContext, as a MessageSource, to the view
tier. This means when you are using Spring’s JSP tag library, the <spring:message> tag automatically reads
messages from ApplicationContext, and when you are using JSTL, the <fmt:message> tag does the same.
All of these benefits mean that it is better to use the MessageSource support in ApplicationContext
when you are building a web application, rather than manage an instance of MessageSource separately. This
is especially true when you consider that all you need to do to take advantage of this feature is to configure a
MessageSource bean with the name messageSource.
Using MessageSource in Stand-Alone Applications
When you are using MessageSource in stand-alone applications, where Spring offers no additional
support other than to nest the MessageSource bean automatically in ApplicationContext, it is best
to make the MessageSource available by using dependency injection. You can opt to make your bean
ApplicationContextAware, but doing so precludes its use in a BeanFactory context. Add to this that you
complicate testing without any discernible benefit, and it is clear that you should stick to using dependency
injection to access MessageSource objects in a stand-alone setting.
The MessageSourceResolvable Interface
You can use an object that implements MessageSourceResolvable in place of a key and a set of arguments
when you are looking up a message from a MessageSource. This interface is most widely used in the Spring
validation libraries to link Error objects to their internationalized error messages.
Events Publication
Another feature of ApplicationContext not present in BeanFactory is the ability to publish and receive
events by using ApplicationContext as a broker. In this section, you will take a look at its usage.
144
Chapter 4 ■ Advanced Spring Configuration and Spring Boot
Using Application Events
An event is a class derived from ApplicationEvent, which itself derives from java.util.EventObject. Any
bean can listen for events by implementing the ApplicationListener<T> interface; ApplicationContext
automatically registers any bean that implements this interface as a listener when it is configured. Events are
published using the ApplicationEventPublisher.publishEvent() method, so the publishing class must
have knowledge of ApplicationContext (which extends the ApplicationEventPublisher interface). In a
web application, this is simple because many of your classes are derived from Spring Framework classes
that allow access to ApplicationContext through a protected method. In a stand-alone application, you can
have your publishing bean implement ApplicationContextAware to enable it to publish events. Listing 4-29
shows an example of a basic event class.
Listing 4-29. Basic Spring ApplicationEvent Class
package com.apress.prospring6.four.events;
import org.springframework.context.ApplicationEvent;
public class MessageEvent extends ApplicationEvent {
private String msg;
public MessageEvent(Object source, String msg) {
super(source);
this.msg = msg;
}
public String getMessage() {
return msg;
}
}
This code is quite basic; the only point of note is that ApplicationEvent has a single constructor that
accepts a reference to the source of the event. This is reflected in the constructor for MessageEvent. In
Listing 4-30, you can see the code for the listener.
Listing 4-30. Basic Spring ApplicationListener Class
package com.apress.prospring6.four.events;
import org.springframework.context.ApplicationListener;
// other import statements omitted
@Component
public class MessageEventListener implements ApplicationListener<MessageEvent> {
private static Logger logger = LoggerFactory.getLogger(MessageEventListener.class);
@Override
public void onApplicationEvent(MessageEvent event) {
MessageEvent msgEvt = event;
logger.info("Received: {}" , event.getMessage());
}
}
145
Chapter 4 ■ Advanced Spring Configuration and Spring Boot
The ApplicationListener interface defines a single method, onApplicationEvent(..), that is
called by Spring when an event is raised. MessageEventListener shows its interest only in events of type
MessageEvent (or its subclasses) by implementing the strongly typed ApplicationListener interface. If a
MessageEvent was received, it writes the message to stdout. Publishing events is simple; it is just a matter of
creating an instance of the event class and passing it to the ApplicationEventPublisher.publishEvent()
method, as shown in Listing 4-31.
Listing 4-31. Basic Spring ApplicationContextAware Class and Code to Test It
package com.apress.prospring6.four.events;
import org.springframework.context.ApplicationContextAware;
// other import statements omitted
@Configuration
@ComponentScan
class EventsConfig{ }
@Component
public class Publisher implements ApplicationContextAware {
private ApplicationContext ctx;
@Override /** @Implements {@link
ApplicationContextAware#setApplicationContext(ApplicationContext)} }*/
public void setApplicationContext(ApplicationContext applicationContext) throws
BeansException {
this.ctx = applicationContext;
}
public void publish(String message) {
ctx.publishEvent(new MessageEvent(this, message));
}
public static void main(String... args) {
var ctx = new AnnotationConfigApplicationContext(EventsConfig.class);
Publisher pub = (Publisher) ctx.getBean("publisher");
pub.publish("I send an SOS to the world... ");
pub.publish("... I hope that someone gets my...");
pub.publish("... Message in a bottle");
}
}
A code shortcut artifice was used here to keep things simple: the Publisher bean type contains the
main(..) methods as well, which retrieves an instance of itself from ApplicationContext and then, using
the publish() method, publishes two MessageEvent instances to ApplicationContext. The Publisher
bean instance accesses the ApplicationContext instance by implementing ApplicationContextAware. The
EventsConfig configuration class is empty and is just declared to enable component scanning within the
package, so the Publisher and the MessageEventListener bean definitions are picked up.
Running this example results in the output shown in Listing 4-32, proving that the
MessageEventListener reacts to the events published by the Publisher bean using the injected
ApplicationContext.
146
Chapter 4 ■ Advanced Spring Configuration and Spring Boot
Listing 4-32. Output Produced by Running the Code in Listing 4-31
INFO : MessageEventListener - Received: I send an SOS to the world...
INFO : MessageEventListener - Received: ... I hope that someone gets my...
INFO : MessageEventListener - Received: ... Message in a bottle
Considerations for Event Usage
In many cases in an application, certain components need to be notified of certain events. Often you do this
by writing code to notify each component explicitly or by using a messaging technology such as JMS. The
drawback of writing code to notify each component in turn is that you are coupling those components to the
publisher, in many cases unnecessarily.
Consider a situation whereby you cache product details in your application to avoid trips to the
database. Another component allows product details to be modified and persisted to the database. To avoid
making the cache invalid, the update component explicitly notifies the cache that the user details have
changed. In this example, the update component is coupled to a component that, really, has nothing to do
with its business responsibility. A better solution would be to have the update component publish an event
every time a product’s details are modified and then have interested components, such as the cache, listen
for that event. This has the benefit of keeping the components decoupled, which makes it simple to remove
the cache if needed or to add another listener that is interested in knowing when a product’s details change.
Using JMS in this case would be overkill because the process of invalidating the product’s entry in the
cache is quick and is not business critical. The use of the Spring event infrastructure adds very little overhead
to your application.
Typically, we use events for reactionary logic that executes quickly and is not part of the main
application logic. In the previous example, the invalidation of a product in cache happens in reaction to
the updating of product details, it executes quickly (or it should), and it is not part of the main function
of the application. For processes that are long-running and form part of the main business logic, it is
recommended to use JMS or similar messaging systems such as RabbitMQ. The main benefits of using JMS
are that it is more suited to long-running processes, and as the system grows, you can, if necessary, factor the
JMS-driven processing of messages containing business information onto a separate machine.
Accessing Resources
Often an application needs to access a variety of resources in different forms. You might need to access some
configuration data stored in a file in the file system, some image data stored in a JAR file on the classpath, or
maybe some data on a server elsewhere. Spring provides a unified mechanism for accessing resources in a
protocol-independent way. This means your application can access a file resource in the same way, whether
it is stored in the file system, in the classpath, or on a remote server.
At the core of Spring’s resource support is the org.springframework.core.io.Resource interface. The
Resource interface defines ten self-explanatory methods:
•
contentLength()
•
exists()
•
getDescription()
•
getFile()
•
getFileName()
147
Chapter 4 ■ Advanced Spring Configuration and Spring Boot
•
getURI()
•
getURL()
•
isOpen()
•
isReadable()
•
lastModified()
In addition to these ten methods, there is one that is not quite so self-explanatory: createRelative().
The createRelative() method creates a new Resource instance by using a path that is relative to the
instance on which it is invoked. You can provide your own Resource implementations, although that
is outside the scope of this chapter, but in most cases, you use one of the built-in implementations for
accessing a file (the FileSystemResource class), a classpath (the ClassPathResource class), or URL
resources (the UrlResource class). Internally, Spring uses another interface, ResourceLoader, and the
default implementation, DefaultResourceLoader, to locate and create Resource instances. However,
you generally won’t interact with DefaultResourceLoader, instead using another ResourceLoader
implementation, called ApplicationContext. Listing 4-33 depicts an application that accesses three
resources by using ApplicationContext.
Listing 4-33. Application Sample Accessing Various Spring Resources
package com.apress.prospring6.four;
import org.springframework.core.io.Resource;
// other import statements omitted
public class ResourceDemo {
private static Logger logger = LoggerFactory.getLogger(ResourceDemo.class);
public static void main(String... args) throws Exception{
var ctx = new AnnotationConfigApplicationContext();
File baseDir = new File(System.getProperty("java.io.tmpdir"));
Path filePath = Files.createFile(Path.of(baseDir.getAbsolutePath(), "test.txt"));
Files.writeString(filePath, "Hello World!");
filePath.toFile().deleteOnExit();
Resource res1 = ctx.getResource("file://" + filePath);
displayInfo(res1);
Resource res2 = ctx.getResource("classpath:test.txt");
displayInfo(res2);
Resource res3 = ctx.getResource("http://iuliana-cosmina.com");
displayInfo(res3);
}
private static void displayInfo(Resource res) throws Exception{
logger.info("Resource class: {}" , res.getClass());
logger.info("Resource URL content: {}" ,
new BufferedReader(new InputStreamReader((InputStream) res.getURL().
getContent())).lines().parallel().collect(Collectors.joining("\n")));
148
Chapter 4 ■ Advanced Spring Configuration and Spring Boot
logger.info(" -------------");
}
}
Notice that in each call to getResource(), we pass in a URI for each resource. You will recognize the
common file: and http: protocols that we pass in for res1 and res3. The classpath: protocol we use for
res2 is Spring-specific and indicates that ResourceLoader should look in the classpath for the resource.
Running this example results in the output depicted in Listing 4-34.
Listing 4-34. Output of Code in Listing 4-33
INFO : ResourceDemo - Resource class: class org.springframework.core.io.FileUrlResource
INFO : ResourceDemo - Resource URL content: Hello World!
INFO : ResourceDemo - ------------INFO : ResourceDemo - Resource class: class org.springframework.core.io.ClassPathResource
INFO : ResourceDemo - Resource URL content: Hello World from the classpath!
INFO : ResourceDemo - ------------INFO : ResourceDemo - Resource class: class org.springframework.core.io.UrlResource
INFO : ResourceDemo - Resource URL content: <html>
<center><h1>301 Moved Permanently</h1></center></body>
</html>
INFO : ResourceDemo - -------------
The reason you are getting the 301 Moved Permanently response when trying to access the
http://iuliana-cosmina.com site is because the site actually uses HTTPS. To extract the actual content of
the main page, use ctx.getResource("https://iuliana-cosmina.com").
Notice that for both the file: and http: protocols, Spring returns a UrlResource instance. Spring
does include a FileSystemResource class, thus the DefaultResourceLoader does not use this class at all.
It’s because Spring’s default resource-loading strategy treats the URL and file as the same type of resource
with difference protocols (file: and http:). If an instance of FileSystemResource is required, use
FileSystemResourceLoader. Once a Resource instance is obtained, you are free to access the contents as
you see fit, using getFile(), getInputStream(), or getURL(). In some cases, such as when you are using the
http: protocol, the call to getFile() results in a FileNotFoundException. For this reason, we recommend
that you use getInputStream() to access resource contents because it is likely to function for all possible
resource types.
Advanced Java Configuration Classes
So far in the book Java configuration classes have been pretty basic. Let’s proceed to more configuration
options. Considering the MessageRender and ConfigurableMessageProvider introduced in Chapter 3,
let’s say we want to externalize the message into a properties file named message.properties. The
ConfigurableMessageProvider.message property is to be injected with a value read from this file by using
constructor injection. The content of message.properties is as follows:
message=Only hope can keep me together
149
Chapter 4 ■ Advanced Spring Configuration and Spring Boot
Let’s see the revised testing program, which loads the properties files by using the @PropertySource
annotation and then injects them into the message provider implementation. Listing 4-35 shows the testing
program, the configuration class enriched with annotations on bean declarations, and the simplified bean types.
Listing 4-35. @PropertySource Usage Example
package com.apress.prospring6.four;
import com.apress.prospring6.two.decoupled.MessageProvider;
import com.apress.prospring6.two.decoupled.MessageRenderer;
import org.springframework.core.env.Environment;
// other import statements omitted
public class PropertySourcesDemo {
public static void main(String... args) {
ApplicationContext ctx =
new AnnotationConfigApplicationContext(PropertySourcesCfg.class);
MessageRenderer mr = ctx.getBean("messageRenderer", MessageRenderer.class);
mr.render();
}
}
@Configuration
@PropertySource(value = "classpath:message.properties")
class PropertySourcesCfg {
@Autowired
Environment env;
@Bean
@Lazy
public MessageProvider messageProvider() {
return new ConfigurableMessageProvider(env.getProperty("message"));
}
@Bean(name = "messageRenderer")
@Scope(value="prototype")
@DependsOn(value="messageProvider")
public MessageRenderer messageRenderer() {
MessageRenderer renderer = new StandardOutMessageRenderer();
renderer.setMessageProvider(messageProvider());
return renderer;
}
}
class ConfigurableMessageProvider implements MessageProvider {
private String message;
public ConfigurableMessageProvider(@Value("Configurable message") String message) {
this.message = message;
}
150
Chapter 4 ■ Advanced Spring Configuration and Spring Boot
@Override
public String getMessage() {
return message;
}
}
class StandardOutMessageRenderer implements MessageRenderer {
private static Logger logger = LoggerFactory.getLogger(StandardOutMessageRender
er.class);
private MessageProvider messageProvider;
@Override
public void setMessageProvider(MessageProvider provider) {
this.messageProvider = provider;
}
@Override
public MessageProvider getMessageProvider() {
return this.messageProvider;
}
@Override
public void render() {
logger.info(messageProvider.getMessage());
}
}
Listing 4-35 introduces a few annotations that are explained in Table 4-3. Some of them have been used
in Chapter 3 already, but they were not explained at the time. Beans that are defined using a stereotype
annotation like @Component, @Service, and others can be used in a Java configuration class, by enabling
component scanning and autowiring them where needed. In the example shown in Listing 4-36, we declare
ConfigurableMessageProvider as a service bean.
Table 4-3. Java Configuration Annotations Table
Annotation
Description
@PropertySource
This annotation is used to load properties files into Spring’s ApplicationContext,
which accepts the location as the argument (more than one location can be provided).
@Lazy
This annotation instructs Spring to instantiate the bean only when requested.
This annotation has a default value attribute that is true by default; thus, using
@Lazy(value=true) is equivalent to using @Lazy.
@Scope
This annotation is used to define the bean scope, when the desired scope is other
than singleton.
@DependsOn
This annotation tells Spring that a certain bean depends on some other beans, so
Spring will make sure that those beans are instantiated first.
@Autowired
This annotation is used here on the env variable, which is of Environment type. This
is the Environment abstraction feature that Spring provides. We discuss it later in this
chapter.
151
Chapter 4 ■ Advanced Spring Configuration and Spring Boot
An application can have multiple configuration classes, which can be used to decouple configuration
and organize beans by purpose (for example, one class can be dedicated to DAO beans declaration, one for
the service beans declaration, and so forth). To show this, we can modify the previous example and define
the ConfigurableMessageProvider as a service and declare a configuration class named ServiceConfig
declaring this bean type. The configuration class declaring the MessageRenderer bean will use @Import
annotation to access the MessageProvider bean declared by the ServiceConfig class. Listing 4-36 shows
these configuration classes.
Listing 4-36. @Import Usage Example
package com.apress.prospring6.four.multiple;
import org.springframework.context.annotation.Import;
import org.springframework.stereotype.Service;
// other import statements omitted
@Service("provider")
class ConfigurableMessageProvider implements MessageProvider {
// same code as in previous listings
}
class StandardOutMessageRenderer implements MessageRenderer {
// same code as in previous listings
}
@Configuration
@ComponentScan
class ServiceConfig {
}
@Configuration
@Import(ServiceConfig.class)
class TheOtherConfig {
@Autowired
MessageProvider provider;
@Bean(name = "messageRenderer")
public MessageRenderer messageRenderer() {
MessageRenderer renderer = new StandardOutMessageRenderer();
renderer.setMessageProvider(provider);
return renderer;
}
}
public class ImportDemo {
public static void main(String... args) {
ApplicationContext ctx = new AnnotationConfigApplicationContext(TheOther
Config.class);
MessageRenderer mr = ctx.getBean("messageRenderer", MessageRenderer.class);
mr.render();
}
}
152
Chapter 4 ■ Advanced Spring Configuration and Spring Boot
In the main method in class ImportDemo, only the TheOtherConfig class is required when the
application context is created, since this class imports all the bean definitions that are declared within or
discovered via scanning by the ServiceConfig imported class.
Profiles
Another interesting feature that Spring provides is the concept of configuration profiles. Basically, a profile
instructs Spring to configure only the ApplicationContext instance that was defined when the specified
profile was active. In this section, we demonstrate how to use profiles in a simple program.
An Example of Using the Spring Profiles Feature
Let’s say there is a service called FoodProviderService that is responsible for providing food to schools,
including kindergarten and high school. The FoodProviderService interface has only one method called
provideLunchSet(), which produces the lunch set to each student for the calling school. A lunch set is a list
of Food objects, which is a simple class that has only a name attribute. Listing 4-37 shows the Food class.
Listing 4-37. Food Bean Type
package com.apress.prospring6.four.profile;
public class Food {
private String name;
public Food() {
}
public Food(String name) {
this.name = name;
}
// getters and setters omitted
}
The FoodProviderService interface is depicted in Listing 4-38.
Listing 4-38. FoodProviderService Interface
package com.apress.prospring6.four.profile;
import java.util.List;
public interface FoodProviderService {
List<Food> provideLunchSet();
}
Now suppose that there are two providers for the lunch set, one for kindergarten and one for high
school. The lunch set produced by them is different, although the service they provide is the same, that is, to
provide lunch to pupils/students. So, now let’s create two implementations of FoodProviderService, using
the same name but putting them into different packages to identify their target school. The two classes are
shown in Listing 4-39.
153
Chapter 4 ■ Advanced Spring Configuration and Spring Boot
Listing 4-39. FoodProviderService Implementations
// chapter04/src/main/java/com/apress/prospring6/four/profile/
kindergarten/FoodProviderServiceImpl.java
package com.apress.prospring6.four.profile.kindergarten;
import com.apress.prospring6.four.profile.Food;
import com.apress.prospring6.four.profile.FoodProviderService;
import java.util.List;
public class FoodProviderServiceImpl implements FoodProviderService {
@Override
public List<Food> provideLunchSet() {
return List.of(new Food("Milk"), new Food("Biscuits"));
}
}
// chapter04/src/main/java/com/apress/prospring6/four/profile/
highschool/FoodProviderServiceImpl.java
package com.apress.prospring6.four.profile.highschool;
// same imports as above
public class FoodProviderServiceImpl implements FoodProviderService {
@Override
public List<Food> provideLunchSet() {
return List.of(new Food("Coke"), new Food("Hamburger"), new Food("Fries"));
}
}
From the previous listings, you can see that the two implementations provide the same
FoodProviderService interface but produce different combinations of food in the lunch set. So, now
suppose a kindergarten wants the provider to deliver the lunch set for their students; let’s see how we can
use Spring’s profile configuration to achieve this. We will run through the Java configuration first. We will
create two configuration classes, one for the kindergarten profile and the other for the high-school profile.
Listing 4-40 depicts the two profile configurations.
Listing 4-40. Profiles configuration
package com.apress.prospring6.four.profile.highschool;
import org.springframework.context.annotation.Profile;
// other import statements omitted
@Configuration
@Profile("highschool")
public class HighSchoolConfig {
@Bean
FoodProviderService foodProviderService(){
154
Chapter 4 ■ Advanced Spring Configuration and Spring Boot
return new FoodProviderServiceImpl();
}
}
package com.apress.prospring6.four.profile.kindergarten;
// other import statements omitted
@Configuration
@Profile("kindergarten")
public class KindergartenConfig {
@Bean
FoodProviderService foodProviderService(){
return new FoodProviderServiceImpl();
}
}
In the two configuration classes, notice the @Profile annotation declared with "highschool"
and "kindergarten" respectively. This annotation tells Spring that those beans in the file should be
instantiated only when the specified profile is active. To activate the correct profile when using Spring’s
ApplicationContext in a stand-alone application, we need to provide the profile as a value for the spring.
profiles.active JVM argument, set it on the created context, add the configuration classes, and then
refresh the context. This will ensure that only the beans matching the configured profile will be added to
the context. Listing 4-41 shows the code to do this and test the results by printing the items returned by the
FoodProviderService.provideLunchSet() call.
Listing 4-41. FoodProviderService Testing
package com.apress.prospring6.four.profile;
// import statements omitted
public class ProfileDemo {
private static Logger logger = LoggerFactory.getLogger(ProfileDemo.class);
public static void main(String... args) {
var profile= System.getProperty("spring.profiles.active");
var ctx = new AnnotationConfigApplicationContext();
ctx.getEnvironment().setActiveProfiles(profile);
ctx.register(HighSchoolConfig.class, KindergartenConfig.class);
ctx.refresh();
var foodProviderService = ctx.getBean("foodProviderService",
FoodProviderService.class);
var lunchSet = foodProviderService.provideLunchSet();
lunchSet.forEach(food -> logger.info("Food: {}", food.getName()));
ctx.close();
}
}
To provide the -Dspring.profiles.active="kindergarten" JVM argument when running the
ProfileDemo class in IntelliJ IDEA, you need to customize the launcher as shown in Figure 4-3.
155
Chapter 4 ■ Advanced Spring Configuration and Spring Boot
Figure 4-3. Spring Application Launcher with activated profile
You can provide the profile value in the same way when running a main class or executable jar in the
command line.
Running the ProfileDemo class with the JVM -Dspring.profiles.active="kindergarten" argument
produces the following output:
DEBUG:
INFO :
INFO :
INFO :
AbstractEnvironment
ProfileDemo - Food:
ProfileDemo - Food:
ProfileDemo - Food:
- Activating profiles [kindergarten]
Coke
Hamburger
Fries
This is exactly what the implementation of the kindergarten provider will produce for the lunch
set. Now change the profile argument from the previous listing to high school (-Dspring.profiles.
active="highschool"), and the output will change to the following:
DEBUG:
INFO :
INFO :
INFO :
156
AbstractEnvironment
ProfileDemo - Food:
ProfileDemo - Food:
ProfileDemo - Food:
- Activating profiles [highschool]
Coke
Hamburger
Fries
Chapter 4 ■ Advanced Spring Configuration and Spring Boot
The active profile was set programmatically in Listing 4-41, by calling ctx.getEnvironment().
setActiveProfiles(".."). The context is created empty and configuration is added after the profile is
set. But the context can be created directly from all the configuration classes, and the profile is activated
automatically, leading to only beans specific to it being added to the context. If no profile is specified, the
application can still be functional by calling and ctx.getEnvironment().setDefaultProfiles(".."), and
providing an argument consisting of a list of profile names activated by default.
Listing 4-42 shows the other way of configuring an application context using profiled configurations.
Listing 4-42. FoodProviderService Testing (Second Version)
package com.apress.prospring6.four.profile;
// other import statements omitted
public class AnotherProfileDemo {
private static Logger logger = LoggerFactory.getLogger(AnotherProfileDemo.class);
public static void main(String... args) {
var ctx = new AnnotationConfigApplicationContext(HighSchoolConfig.class,
KindergartenConfig.class);
var foodProviderService = ctx.getBean("foodProviderService",
FoodProviderService.class);
var lunchSet = foodProviderService.provideLunchSet();
lunchSet.forEach(food -> logger.info("Food: {}", food.getName()));
ctx.close();
}
}
Additionally, you can enable profiles by using the @ActiveProfiles annotation, but for this we have to
talk about testing first, because this annotation can only be used on testing classes.
Considerations for Using Profiles
The profiles feature in Spring creates another way for developers to manage the application’s running
configuration, which used to be done in build tools (for example, Maven’s profile support). Build tools
rely on the arguments passed into the tool to pack the correct configuration/property files into the Java
archive (JAR or WAR, depending on the application type) and then deploy to the target environment.
Spring’s profile feature lets you as an application developer define the profiles by yourself and activate
them either programmatically or by passing in the JVM argument. By using Spring’s profile support, you
can now use the same application archive and deploy to all environments by passing in the correct profiles
as an argument during JVM startup. For example, you can have applications with different profiles such as
(dev, hibernate), (prd, jdbc), and so on, with each combination representing the running environment
(development or production) and the data access library to use (Hibernate or JDBC). It brings application
profile management into the programming side.
But this approach also has its drawbacks. For example, some may argue that putting all the
configurations for different environments into application configuration files or Java classes and bundling
them together will be error-prone if not handled carefully (for example, the administrator may forget to set
the correct JVM argument in the application server environment). Packing files for all profiles together will
also make the package a bit larger than usual. Again, let the application and configuration requirements
drive you to select the approach that best fits your project.
157
Chapter 4 ■ Advanced Spring Configuration and Spring Boot
Environment and PropertySource Abstraction
To set the active profile, a call to ctx.getEnvironment() is necessary to provide access to Spring’s
Environment object. This is an abstraction layer that serves to encapsulate the environment of the running
Spring application.
Besides the profile, other key pieces of information encapsulated by the Environment object are
properties. Properties are used to store the application’s underlying environment configuration, such as the
location of the application folder, database connection information, and so on.
The Environment bean performs a search over a set of PropertySource objects to look for property
values. PropertySource abstraction features in Spring assist developers in accessing various configuration
information from the running platform. Under the abstraction, all system properties, environment
variables, and application properties are served by the Environment interface, which Spring populates when
bootstrapping ApplicationContext. Listing 4-43 shows a simple example.
Listing 4-43. Using the Environment Interface
package com.apress.prospring6.four;
import org.springframework.context.support.GenericApplicationContext;
import org.springframework.core.env.ConfigurableEnvironment;
import org.springframework.core.env.MapPropertySource;
import org.springframework.core.env.MutablePropertySources;
// other import statements omitted
public class EnvironmentTest {
private static Logger logger = LoggerFactory.getLogger(EnvironmentTest.class);
@Test
void testPropertySourceOne(){
var ctx = new GenericApplicationContext();
ConfigurableEnvironment env = ctx.getEnvironment();
MutablePropertySources propertySources = env.getPropertySources();
Map<String,Object> appMap = new HashMap<>();
appMap.put("user.home", "CUSTOM_USER_HOME");
propertySources.addLast(new MapPropertySource("prospring6_MAP", appMap));
logger.info("-- Env Variables from java.lang.System --");
logger.info("user.home: " + System.getProperty("user.home"));
logger.info("JAVA_HOME: " + System.getenv("JAVA_HOME"));
logger.info("-- Env Variables from ConfigurableEnvironment --");
logger.info("user.home: " + env.getProperty("user.home"));
logger.info("JAVA_HOME: " + env.getProperty("JAVA_HOME"));
ctx.close();
}
}
158
Chapter 4 ■ Advanced Spring Configuration and Spring Boot
In Listing 4-43, after the ApplicationContext initialization, we get a reference to the
ConfigurableEnvironment interface, which extends Environment. Via this instance, a handle to
MutablePropertySources (a default implementation of the PropertySources interface, which allows
manipulation of the contained property sources) is obtained. Afterward, we construct a map, put the
application properties into the map, and then construct a MapPropertySource class (a PropertySource
subclass that reads keys and values from a Map instance) with the map. Finally, the MapPropertySource class
is added to MutablePropertySources via the addLast() method. Running the program prints the output
shown in Listing 4-44 in the console.
Listing 4-44. Values Extracted Using the Environment Interface
INFO : EnvironmentDemo - -- Env Variables from java.lang.System -INFO : EnvironmentDemo - user.home: /Users/iulianacosmina
INFO : EnvironmentDemo - JAVA_HOME: /Users/iulianacosmina/.sdkman/candidates/java/current
INFO : EnvironmentDemo - -- Env Variables from ConfigurableEnvironment -INFO : EnvironmentDemo - user.home: /Users/iulianacosmina
INFO : EnvironmentDemo - JAVA_HOME: /Users/iulianacosmina/.sdkman/candidates/java/current
For the first two lines, the JVM system property user.home and the environment variable JAVA_HOME
are retrieved using the JVM’s System class. However, for the last two lines, you can see that all the system
properties, environment variables, and application properties can be accessed via the Environment
interface. You can see how the Environment abstraction can help us manage and access all the various
properties within the application’s running environment.
The Environment instance performs a search over a set of PropertySource objects. Spring accesses the
properties in the following default order:
•
System properties for the running JVM
•
Environment variables
•
Application-defined properties
The output shows that when defining the same application property named user.home, and adding it
to the Environment interface via the MutablePropertySources class, the user.home value is still retrieved
from the JVM properties, and the CUSTOM_USER_HOME is nowhere to be found. However, Spring allows you to
control the order in which Environment retrieves the properties. Listing 4-45 shows the revised version of the
code in Listing 4-43.
Listing 4-45. Using the Environment Interface (Part 2)
package com.apress.prospring6.four;
// import statements omitted
public class EnvironmentTest {
private static Logger logger = LoggerFactory.getLogger(EnvironmentTest.class);
@Test
void testPropertySourceTwo(){
var ctx = new GenericApplicationContext();
ConfigurableEnvironment env = ctx.getEnvironment();
MutablePropertySources propertySources = env.getPropertySources();
159
Chapter 4 ■ Advanced Spring Configuration and Spring Boot
Map<String,Object> appMap = new HashMap<>();
appMap.put("user.home", "CUSTOM_USER_HOME");
propertySources.addFirst(new MapPropertySource("prospring6_MAP", appMap));
logger.info("-- Env Variables from java.lang.System --");
logger.info("user.home: " + System.getProperty("user.home"));
logger.info("JAVA_HOME: " + System.getenv("JAVA_HOME"));
logger.info("-- Env Variables from ConfigurableEnvironment --");
logger.info("user.home: " + env.getProperty("user.home"));
logger.info("JAVA_HOME: " + env.getProperty("JAVA_HOME"));
ctx.close();
}
}
In the code sample in Listing 4-45, notice the line in bold. It declares an application property also
called user.home, but this time is added as the first one to search for via the addFirst() method of the
MutablePropertySources class. When you run the program, you will see the output shown in Listing 4-46.
Listing 4-46. Values Extracted Using the Environment Interface
INFO : EnvironmentTest - -- Env Variables from java.lang.System -INFO : EnvironmentTest - user.home: /Users/iulianacosmina
INFO : EnvironmentTest - JAVA_HOME: /Users/iulianacosmina/.sdkman/candidates/java/current
INFO : EnvironmentDemo - -- Env Variables from ConfigurableEnvironment -INFO : EnvironmentTest - user.home: CUSTOM_USER_HOME
INFO : EnvironmentTest - JAVA_HOME: /Users/iulianacosmina/.sdkman/candidates/java/current
The first two lines remain the same because we still use the getProperty() and getenv() methods
of the JVM System class to retrieve them. However, when using the Environment interface, you will see
that the user.home property we defined takes precedence since we defined it as the first one to search for
property values.
In real life, you seldom need to interact directly with the Environment interface, but instead will use a
property placeholder in the form of ${} (for example, ${application.home}) and inject the resolved value
into Spring beans. Let’s see this in action. Suppose we had a class to store all the application properties
loaded from a property file. Listing 4-47 shows the AppProperty class and the contents of the application.
properties file.
Listing 4-47. The AppProperty Bean Type
package com.apress.prospring6.four;
// import statements omitted
class AppProperty {
private String applicationHome;
private String userHome;
public String getApplicationHome() {
return applicationHome;
}
160
Chapter 4 ■ Advanced Spring Configuration and Spring Boot
@Autowired
public void setApplicationHome(@Value("${application.home}") String applicationHome) {
this.applicationHome = applicationHome;
}
public String getUserHome() {
return userHome;
}
@Autowired
public void setUserHome(@Value("${user.home}") String userHome) {
this.userHome = userHome;
}
@Override
public String toString() {
return new ToStringBuilder(this)
.append("applicationHome", applicationHome)
.append("userHome", userHome)
.toString();
}
}
// Contents of the application.properties file
application.home=application_home
user.home=/home/CUSTOM-USER-HOME
To add the contents of the application.properties file to Spring’s application context, the
@PropertySource annotation is required on the class annotated with @Configuration. This adds this file as a
property source to the list of locations Environment is looking for properties in.
Listing 4-48 shows the configuration class, the test class, and the produced output of running the
main(..) method.
Listing 4-48. Configuration Class for the AppProperty Bean, Test Class, and Console Output
package com.apress.prospring6.four;
import org.springframework.context.annotation.PropertySource;
// other import statements omitted
@Configuration
@PropertySource("classpath:application.properties")
class PropDemoConfig{
@Bean
AppProperty appProperty(){
return new AppProperty();
}
}
public class PropertySourceDemo {
private static Logger logger = LoggerFactory.getLogger(PropertySourceDemo.class);
161
Chapter 4 ■ Advanced Spring Configuration and Spring Boot
public static void main(String... args) {
var ctx = new AnnotationConfigApplicationContext(PropDemoConfig.class);
var appProperty = ctx.getBean("appProperty", AppProperty.class);
logger.info("Outcome: {}", appProperty);
}
}
// output
INFO : PropertySourceDemo - Outcome: com.apress.prospring6.four.AppProperty@624ea235[
applicationHome=application_home,
userHome=/Users/iulianacosmina
]
So, what is going on with that output? Well, the application.home placeholder is properly resolved,
while the user.home property is still retrieved from the JVM properties, as expected, because system
properties take precedence over custom property sources. So, how do we instruct Spring that we want to
consider our property source (application.properties) as the one with the highest priority? Unless you
use XML configuration (check out the previous edition of this book) or manual explicit configuration as
shown in Listing 4-45, you cannot, because the order is defined as previously stated: system properties,
environment properties, then application-defined properties. If you really want to use Java configuration for
your application and override the order of property sources, there is a way to do it—it is not clean, but it is
possible.
First thing, let’s start with the Environment hierarchy, displayed in Figure 4-4.
Figure 4-4. IntelliJ IDEA Environment hierarchy
Figure 4-4 depicts the family of Environment classes. In its center notice the StandardEnvironment
class that is the type of the object created within the Spring context. StandardEnvironment implements the
ConfigurableEnvironment interface and this means we can manipulate this object and modify the priority
of the locations where properties are read from.
Listing 4-49 shows the modified version of the PropDemoConfig class where the StandardEnvironment is
autowired and an initialization method is declared to modify the property resource priority.
162
Chapter 4 ■ Advanced Spring Configuration and Spring Boot
Listing 4-49. Configuration Class for the AppProperty Bean, with Customized Property Sources Locations
package com.apress.prospring6.four;
import org.springframework.context.annotation.PropertySource;
import org.springframework.core.env.StandardEnvironment;
import org.springframework.core.io.support.ResourcePropertySource;
// other import statements omitted
@Configuration
@PropertySource("classpath:application.properties")
class PropDemoConfig{
@Autowired
StandardEnvironment environment;
@PostConstruct
void configPriority() {
ResourcePropertySource rps = (ResourcePropertySource) environment.
getPropertySources()
.stream().filter(ps -> ps instanceof ResourcePropertySource)
.findAny().orElse(null);
environment.getPropertySources().addFirst(rps);
}
@Bean
AppProperty appProperty(){
return new AppProperty();
}
}
The ResourcePropertySource class loads a Properties object from a given Resource
or resource (such as the classpath:application.properties used in this example). Since
we know that a ConfigurableEnvironment interface exposes references to all its property
sources in a MutablePropertySources object, all we have to do is access this object, identify the
ResourcePropertySource, and add it back to the object by calling addFirst(..). It’s the same
thing we did in Listing 4-45, only instead of creating a new MapPropertySource we used the existing
ResourcePropertySource.
In practice, you might never need to do this, but in case you ever need to do some Spring code
acrobatics like this, now you have a working sample. And if you execute the PropertySourceDemo class
with this funky configuration, you will notice the output in Listing 4-50 confirms that the properties in the
application.properties file took precedence over anything else.
Listing 4-50. Output Produced by Running the PropertySourceDemo with a Reprioritized Property Sources
Location Configuration
INFO : PropertySourceDemo - Outcome: com.apress.prospring6.four.AppProperty@5340477f[
applicationHome=application_home,
userHome=/home/CUSTOM-USER-HOME
]
163
Chapter 4 ■ Advanced Spring Configuration and Spring Boot
T esting Spring Applications
When developing applications for enterprise use, testing is an important way to ensure that the completed
application performs as expected and fulfills all kinds of requirements (architectural, security, user
requirements, and so on). Every time a change is made, you should ensure that the change doesn’t impact
the existing logic. Maintaining an ongoing build and test environment is critical for ensuring high-quality
applications. Reproducible tests with high coverage for all your code allow you to deploy new applications,
and changes to applications, with a high level of confidence. In an enterprise development environment,
there are many kinds of testing that target each layer within an enterprise application, and each kind of
testing has its own characteristics and requirements. In this section, we discuss the basic concepts involved
in the testing of various application layers, especially in the testing of Spring-powered applications. We also
cover the ways in which Spring makes implementing the test cases of various layers easier for developers.
This section introduces various kinds of testing and their purposes. It covers basic approaches to testing
Spring applications, and in future chapters each code sample will be paired with a way to test it.
An enterprise testing framework refers to testing activities in the application’s entire life cycle. In various
phases, different testing activities are performed to verify that the functionalities of the application are
working as expected, according to the defined business and technical requirements.
In each phase, different test cases are executed. Some are automated, while others are performed
manually. In each case, the result is verified by the corresponding personnel (for example, business analysts,
application users, and so on). Table 4-4 describes the characteristics and objectives of each type of testing, as
well as common tools and libraries that are used for implementing the test cases.
Table 4-4. Different Testing Categories Used in Practice
Test Category Description
Common Tools
Logic unit test A logic unit test takes a single object and tests it by itself,
without worrying about the role it plays in the surrounding
system.
Unit test: JUnit, TestNG;
Mock objects: Mockito,
EasyMock
Integration
unit test
An integration unit test focuses on testing the interaction
between components in a “near real” environment. These
tests exercise the interactions with the container (embedded
database, web container, and so on).
Embedded database: H2;
Database testing: DbUnit;
In-memory web container:
Jetty
Front-end
unit test
A front-end unit test focuses on testing the user interface. The Selenium, Cypress
objective is to ensure that each user interface reacts to users’
actions and produces output to users as expected.
Continuous
build and
code quality
test
The application code base should be built on a regular basis
to ensure that the code quality complies with the standard
(for example, comments are all in place, no empty exception
catch block, and so on). Also, test coverage should be as high
as possible to ensure that all developed lines of codes are
tested.
Code quality: PMD, Checkstyle, FindBugs, Sonar;
Test coverage: Cobertura,
EclEmma; Build tool:
Gradle, Maven; Continuous
build: Hudson, Jenkins
System
integration
test
A system integration test verifies the accuracy of
communication among all programs in the new system
and between the new system and all external interfaces.
The integration test must also prove that the new system
performs according to the functional specifications and
functions effectively in the operating environment without
adversely affecting other systems.
IBM Rational Functional
Tester, HP Unified
Functional Testing
(continued)
164
Chapter 4 ■ Advanced Spring Configuration and Spring Boot
Table 4-4. (continued)
Test Category Description
Common Tools
System quality A system quality test ensures that the developed application
test
meets those nonfunctional requirements. Most of the time,
this tests the performance of the application to ensure that
the target requirements for concurrent users of the system
and workload are met. Other nonfunctional requirements
include security, high-availability features, and so on.
Apache JMeter, HP
LoadRunner, Locust, K6
User
acceptance
test
IBM Rational TestManager,
A user acceptance test simulates the actual working
HP Quality Center
conditions of the new system, including the user manuals
and procedures. Extensive user involvement in this stage
of testing provides the user with invaluable training in
operating the new system. It also benefits the programmer or
designer to see the user experience with the new programs.
This joint involvement encourages the user and operations
personnel to approve the system conversion.
Now that the general testing academic details have been presented, let’s get down to practice. Instead of
presenting the full details and list of classes that the Spring Framework provides in the testing area, we cover
the most commonly used patterns and the supporting interfaces and classes within the Spring TestContext
Framework as we show how to implement the sample test cases in this chapter.
Using Spring Test Annotations
Spring also provides testing-specific annotations in addition to the standard annotations (such as
@Autowired and @Resource). These annotations can be used in your unit tests, providing various
functionality such as simplified context file loading, profiles, test execution timing, and much more.
Table 4-5 outlines the annotations and their uses.
Table 4-5. Spring specialized test annotations
Annotation
Description
@BootstrapWith
Class-level annotation used to determine how to bootstrap the
Spring TestContext Framework.
@ContextConfiguration
Class-level annotation used to determine how to load and
configure an ApplicationContext for integration tests.
When using Junit 4, annotation test classes need to be
annotated with @RunWith(SpringRunner.class). When
using Junit Jupiter, test classes need to be annotated with
@ExtendWith(SpringExtension.class).
@WebAppConfiguration
Class-level annotation used to indicate the ApplicationContext
loaded should be a WebApplicationContext.
@ContextHierarchy
Class-level annotation used to define a hierarchy of
ApplicationContexts for integration tests.
(continued)
165
Chapter 4 ■ Advanced Spring Configuration and Spring Boot
Table 4-5. (continued)
Annotation
Description
@DirtiesContext
Class- and method-level annotation used to indicate that the
context has been modified or corrupted in some way during
the execution of the test and should be closed and rebuilt for
subsequent tests.
@ActiveProfiles
Class-level annotation indicating which bean profile should be
active.
@TestPropertySource
Class-level annotation used to configure locations of properties
files and inlined properties to be added to the Environment’s set of
PropertySources for an ApplicationContext for integration tests.
@DynamicPropertySource
Method-level annotation for integration tests that need to add
properties with dynamic values to the Environment’s set of
PropertySources.
@TestExecutionListeners
Class-level annotation for configuring TestExecutionListeners
that should be registered with the TestContextManager.
@RecordApplicationEvents
Class-level annotation used to record all application events
published in the ApplicationContext during the execution of a
single test.
@Commit
Class- and method-level annotation that is used to indicate that
a test-managed transaction should be committed after the test
method has completed.
@Rollback
Class- and method-level annotation that is used to indicate
whether a test-managed transaction should be rolled back after
the test method has completed. As expected, @Rollback(false) is
equivalent to @Commit.
@BeforeTransaction
Method-level annotation indicating that the annotated method
should be called before a transaction is started for test methods
marked with the @Transactional annotation.
@AfterTransaction
Method-level annotation indicating that the annotated method
should be called after a transaction has ended for test methods
marked with the @Transactional annotation.
@Sql
Class- and method-level annotation used to configure SQL scripts
and statements to be executed against a given database during
integration tests.
@SqlConfig
Class- and method-level annotation used to indicate how to parse
and execute SQL scripts configured via the @Sql annotation.
@SqlMergeMode
Class- and method-level annotation used to indicate whether
method-level @Sql declarations are merged with class-level @Sql
declarations.
@SqlGroup
Container-level annotation that aggregates several @Sql
annotations.
(continued)
166
Chapter 4 ■ Advanced Spring Configuration and Spring Boot
Table 4-5. (continued)
Annotation
Description
@IfProfileValue
Class- and method-level annotation used to indicate that the test
method should be enabled for a specific set of environmental
conditions.
@ProfileValueSourceConfiguration
Class-level annotation used to specify the ProfileValueSource
used by @IfProfileValue. If this annotation is not declared on the
test, SystemProfileValueSource is used as the default.
@Timed
Method-level annotation used to indicate that the test must finish
in the specified time period.
@Repeat
Method-level annotation used to indicate that the annotated test
method should be repeated the specified number of times.
Implementing Logic Unit Tests
As previously discussed, a logic unit test is the finest level of testing. The objective is to verify the behavior of
an individual class, with all the class’s dependencies being “mocked” with expected behavior. Considering
the MessageRender and MessageProvider beans, testing the MessageRender bean in isolation, by injecting it
with a mock MessageProvider bean, is a suitable example of unit testing. To help mock the behavior of the
MessageProvider bean, we will show how to use Mockito4, which is a popular mocking framework.
The Spring Framework provides first-class support for integration testing in the spring-test module.
To provide a test context for the integration tests that will be created for this section, you will use the springtest.jar library. This library contains valuable classes for integration testing with a Spring container.
For the tests in this section, the spring-test, mockito-all and junit-jupiter-engine are added to the
configuration of the project.
Let’s start small. Considering the MessageRender and MessageProvider beans, let’s declare a test class
that checks that the StandardOutMessageRenderer bean type works as intended, as in when render()
is called, this invokes messageProvider.getMessage(). To perform this test, we do not need a Spring
ApplicationContext nor a MessageProvider; we just need a mock, a simple replacement. Listing 4-51
depicts the test class and the test method that need to be run to execute the test.
Listing 4-51. Unit Test for StandardOutMessageRenderer Using Mockito
package com.apress.prospring6.four;
import
import
import
import
static
static
static
static
org.mockito.Mockito.mock;
org.mockito.Mockito.when;
org.mockito.Mockito.verify;
org.mockito.Mockito.times;
import org.junit.jupiter.api.Test;
// other import statements omitted
public class MessageRenderTest {
4
https://site.mockito.org/
167
Chapter 4 ■ Advanced Spring Configuration and Spring Boot
@Test
void testStandardOutMessageRenderer(){
MessageProvider mockProvider = mock(MessageProvider.class);
when(mockProvider.getMessage()).thenReturn("test message");
MessageRenderer messageRenderer = new StandardOutMessageRenderer();
messageRenderer.setMessageProvider(mockProvider);
messageRenderer.render();
verify(mockProvider, times(1)).getMessage();
}
}
The test method is annotated with the Junit Jupiter @Test annotation, which marks it as a test method.
The test method creates the context and checks the existence of the beans and the result of calling the
render() method. Tests can be run in debug mode as well, and breakpoints can be used to pause execution
to inspect objects for debugging purposes.
IntelliJ IDEA can run all the test methods within a test class, package, or module or a single method.
Just right-click the component and there should be a Run option in the menu that is displayed. When
you right-click the content of a test class, if you click outside any test method, the option will be to run all
methods; when you right-click a method name or inside the method body, the Run option from the menu is
specific to that method. Figure 4-5 shows the IntelliJ IDEA menu that appears when a test method name is
right-clicked.
Figure 4-5. IntelliJ IDEA options for running tests
168
Chapter 4 ■ Advanced Spring Configuration and Spring Boot
Figure 4-5 also shows two buttons to the left of the file. Clicking the button at the class level expands
into a menu grouping options for running the test class. Clicking the button at the method level expands
into a menu grouping options for running the test method. Feel free to experiment with those buttons and
options a little to get used to them, then get back to reading the book.
The testStandardOutMessageRenderer() method verifies the behavior of the
StandardOutMessageRenderer implementation in isolation. Its behavior cannot be influenced by
anything else in the application; even its dependency on the MessageProvider instance is replaced
with a mock implementation constructed by Mockito, with the perfect behavior configured by this line:
when(mockProvider.getMessage()).thenReturn("test message").
The Mockito utility methods are quite practical, because they also make the test code very readable.
The when(..) line configures the String value to be returned when the getMessage() method is called on
this mock. How does this work? Well, Mockito implements the MessageProvider interface to create a mock
object, and then creates a proxy to intercept calls to it. When we invoke the when(..) method, we are in
fact recalling the last registered method call from that context and thenReturn() saves the return value for
it. Anyway, Mockito is really useful for isolating components for unit testing, or for reducing the number of
levels in a integration test to focus only on the bits that present interest.
(Iuliana) In the company I’ve been working at for the last three years, we rarely write unit tests,
because integration tests cover the behavior the unit tests cover anyway. Lately, I’ve found myself agreeing to
this more and more, because setting up the test context requires effort, and using the same context for multiple
tests makes that effort worthwhile.
In this book, we will mostly use integration testing, but some unit tests will be covered here and there,
just enough to make you comfortable with them and recognize them in the future. There is more than one
option for mocking dependencies. JMock5 is an alternative library you can use. EasyMock6 is another, and for
writing assumption checks, take a look at Hamcrest7.
This being said, let’s switch gears to integration testing.
Implementing an Integration Test
In this section, we will implement the integration test for the previous example. A configuration creating
those beans and connecting them together is created, to prepare the test context. This configuration is used
to create a test application context, and the test will check that the two beans are created correctly. To show
how configurations can be aggregated for integration tests, the MessageProvider and the MessageRenderer
bean types have been declared in their own package with their own configuration class, as shown in
Figure 4-6.
http://jmock.org
https://easymock.org
7
https://hamcrest.org
5
6
169
Chapter 4 ■ Advanced Spring Configuration and Spring Boot
Figure 4-6. Organizing beans with their own configuration
Before introducing tests to create the ApplicationContext, we would have created a class with a
main(..) method, but now that we know how to write a test, let’s give it a try. Listing 4-52 shows a test
method that tests the proper creation of an ApplicationContext containing the two beans.
Listing 4-52. Integration Test for StandardOutMessageRenderer
package com.apress.prospring6.four;
import static org.junit.jupiter.api.Assertions.assertAll;
import static org.junit.jupiter.api.Assertions.assertEquals;
import static org.junit.jupiter.api.Assertions.assertNotNull;
// other import statements omitted
public class MessageRenderOneIT {
@Test
void testConfig(){
var ctx = new AnnotationConfigApplicationContext(RendererConfig.class,
ProviderConfig.class);
var messageProvider = ctx.getBean(MessageProvider.class);
var messageRenderer = ctx.getBean(MessageRenderer.class);
assertAll(
()
()
()
);
170
"messageTest" ,
-> assertNotNull(messageRenderer),
-> assertNotNull(messageProvider),
-> assertEquals(messageProvider, messageRenderer.getMessageProvider())
Chapter 4 ■ Advanced Spring Configuration and Spring Boot
messageRenderer.render();
}
}
Compared to the initial approach of creating the ApplicationContext in a main method, there are
three observations:
•
In a test method, test utility methods can be used. Method assertAll(..) and other
JUnit Jupiter utility methods are used to test our assumptions about the beans that
were created as part of the context.
•
The render() method cannot be tested since it returns void; we can only check
the console and look for the Text Sample text being printed, just as we did using a
main(..) method.
•
Tests are run when the project is built, which means configuration problems will be
identified quickly.
The previous test method is a very simple way to move the logic from the main module to the test
module. Also, this is not the efficient way to do it, because if we write more test methods in the same class,
the context must be built for each method. Reusing a test context is possible in more than one way.
Listing 4-53 shows the JUnit way.
Listing 4-53. Integration Test for StandardOutMessageRenderer with Shared Test Context (the JUnit Way)
package com.apress.prospring6.four;
import org.junit.jupiter.api.BeforeAll;
// other import statements omitted
public class MessageRenderTwoIT {
public static ApplicationContext ctx;
@BeforeAll
static void setUp() {
ctx = new AnnotationConfigApplicationContext(RendererConfig.class,
ProviderConfig.class);
}
@Test
void testProvider(){
var messageProvider = ctx.getBean(MessageProvider.class);
assertNotNull(messageProvider);
}
@Test
void testRenderer(){
var messageRenderer = ctx.getBean(MessageRenderer.class);
assertAll( "messageTest" ,
() -> assertNotNull(messageRenderer),
() -> assertNotNull(messageRenderer.getMessageProvider())
);
171
Chapter 4 ■ Advanced Spring Configuration and Spring Boot
messageRenderer.render();
}
}
Sharing the test context among test methods the JUnit way is by declaring an ApplicationContext static
reference and telling JUnit to call the setUp(..) method only once to initialize it by annotating it with
@BeforeAll. This works for any other component that needs to be shared between the test methods.
The example in Listing 4-53 shows the test class written using annotations from JUnit Jupiter, also
known as JUnit 5. An equivalent test can be written with JUnit 4. Check out the previous edition of this book if
you are interested in using JUnit 4.
However, the best way is the Spring way. The @ContextConfiguration annotation introduced in
Table 4-5 is used to configure the configuration classes used to build the ApplicationContext, but to
integrate the Spring test context with the Jupiter 5 programming model, the @ExtendWith annotation is
also required together with the SpringExtension.class argument, because this is how we configure the
extension for Spring. Listing 4-54 shows the code of this class.
Listing 4-54. Integration Test for StandardOutMessageRenderer with Shared Test Context (the Spring Way)
package com.apress.prospring6.four;
import org.junit.jupiter.api.extension.ExtendWith;
import org.springframework.test.context.ContextConfiguration;
import org.springframework.test.context.junit.jupiter.SpringExtension;
// other import statements omitted
@ExtendWith(SpringExtension.class)
@ContextConfiguration(classes = {RendererConfig.class, ProviderConfig.class})
public class MessageRenderThreeIT {
@Autowired
MessageRenderer messageRenderer;
@Autowired
MessageProvider messageProvider;
@Test
void testProvider(){
assertNotNull(messageProvider);
}
@Test
void testRenderer(){
assertAll( "messageTest" ,
() -> assertNotNull(messageRenderer),
() -> assertNotNull(messageRenderer.getMessageProvider())
);
172
Chapter 4 ■ Advanced Spring Configuration and Spring Boot
messageRenderer.render();
}
}
Since the Spring ApplicationContext is integrated with the Jupiter programming model, we do not
need to extract the beans from the context—we can just autowire them in the test class.
If you want to keep things simple, JUnit Jupiter also provides the @SpringJUnitConfig annotation in the
package org.springframework.test.context.junit.jupiter that replaces the @ExtendWith +
@ContextConfiguration combination. Thus,
@ExtendWith(SpringExtension.class)
@ContextConfiguration(classes = {RendererConfig.class, ProviderConfig.class})
can be replaced with
@SpringJUnitConfig(classes = {RendererConfig.class, ProviderConfig.class})
Configuring Profile for Integration Testing
The bean definition profiles feature introduced in Spring 3.1 is useful for implementing a test case with
the appropriate configuration of the testing components. Profiles are useful for other things as well. For
example, if you are working on an application that integrates with an Amazon DynamoDB instance, you
might not want to use that instance during development or during continuous integration builds, to avoid
costs. So, you could configure a development profile that includes a connection bean that connects to a local
DynamoDb container instead of the remote Amazon DynamoDB instance.
Are you still wondering why we need profiles when we could just isolate beans specific to a purpose in
their own configuration files and just import those? Profiles are useful when, for some reason, you cannot do
that, because you can annotate certain bean definitions with the @Profile(..) annotations and leave the
rest of the bean definitions untouched.
For example, take a look at the configuration class in Listing 4-55; it declares a MessageRenderer bean
that is not associated with a profile and a MessageProvider bean that is associated to a profile named dev.
Listing 4-55. Configuration Class with a Bean Associated to a Profile
package com.apress.prospring6.four.impl;
import org.springframework.context.annotation.Profile;
// other import statement omitted
@Configuration
public class AllConfig {
@Profile("dev")
@Bean
MessageProvider messageProvider(){
return new ConfigurableMessageProvider("Text Sample");
}
173
Chapter 4 ■ Advanced Spring Configuration and Spring Boot
@Bean
MessageRenderer messageRenderer(){
MessageRenderer messageRenderer = new StandardOutMessageRenderer();
messageRenderer.setMessageProvider(messageProvider());
return messageRenderer;
}
}
Not being associated to a profile, this means the MessageRenderer bean will be part of the context,
regardless of the activated profile, which is what we are interested in, because this is the bean we are
interested in testing.
To test this bean we need to provide a different MessageProvider dependency in the test context. We
do this by declaring a new bean type named TestMessageProvider that implements MessageProvider but
returns a different message. The implementation is basic, so it won’t be shown here. Listing 4-56 shows the
test configuration class declaring a bean definition associated to the test profile, the test class annotated
with @ActiveProfiles("test") annotation to activate the test profile, and the test method that checks that
the MessageRenderer was created as expected and the dependency injected is of type TestMessageProvider.
Listing 4-56. Test Configuration Class and Profiled Test Class
package com.apress.prospring6.four;
import org.springframework.context.annotation.Profile;
import org.springframework.test.context.ActiveProfiles;
import org.springframework.test.context.junit.jupiter.SpringJUnitConfig;
// other import statements omitted
@Configuration
class TestConfig {
@Profile("test")
@Bean
MessageProvider messageProvider(){
return new TestMessageProvider("Test Message");
}
}
@ActiveProfiles("test")
@SpringJUnitConfig(classes = {AllConfig.class, TestConfig.class})
public class MessageRenderFourIT {
@Autowired
MessageRenderer messageRenderer;
@Autowired
MessageProvider messageProvider;
@Test
void testConfig(){
assertAll( "messageTest" ,
() -> assertNotNull(messageRenderer),
174
Chapter 4 ■ Advanced Spring Configuration and Spring Boot
() -> assertNotNull(messageProvider),
() -> assertTrue(messageProvider instanceof TestMessageProvider),
() -> assertEquals(messageProvider, messageRenderer.getMessageProvider())
);
messageRenderer.render();
}
}
This is all that can be said at the moment about integration tests. As this book progresses and more
complex applications are built, the tests will increase in complexity, and thus almost all annotations in
Table 4-5 are going to be introduced and explained when needed.
Implementing a Front-End Unit Test
Another testing area of particular interest is testing the front-end behavior as a whole, upon the deployment
of the web application to a web container like Apache Tomcat. The main reason is that even though we test
every layer within the application, we still need to make sure that the views behave correctly with different
actions from users. Automating front-end testing is important in saving time for developers and users when
repeating the actions on the front end for a test case.
However, developing a test case for a front end is a challenging task, especially for those web
applications with a lot of interactive, rich, and Ajax-based components. This is were Selenium and other web
testing automation frameworks come to help.
Introducing Selenium
Selenium is a powerful and comprehensive tool and framework target for automating web-based front-end
testing. The main feature is that by using Selenium, we can “drive” the browsers, simulating user interactions
with the application, and perform verification of the view status.
Selenium supports common browsers including Firefox, IE, and Chrome. In terms of languages,
Selenium supports Java, C#, PHP, Perl, Ruby, and Python. Selenium is also designed with Ajax and rich
Internet applications (RIAs) in mind, making automated testing of modern web applications possible.
If your application has a lot of front-end user interfaces and needs to run a large number of front-end
tests, the selenium-server module provides built-in grid functionality that supports the execution of frontend tests among a group of computers.
The Selenium IDE is a Firefox plug-in that can help “record” user interactions with the web application.
It also supports replay and exports the scripts into various formats that can help simplify the development of
test cases.
Starting from version 2.0, Selenium integrates the WebDriver API, which addresses a number of
limitations and provides an alternative, and simpler, programming interface. The result is a comprehensive
object-oriented API that provides additional support for a larger number of browsers along with improved
support for modern advanced web application testing problems.
Front-end web testing is a complex subject and beyond the scope of this book. From this brief overview,
you can see how Selenium can help automate the user interaction with the web application front end with
cross-browser compatibility. For more details, please refer to Selenium’s online documentation8.
Now that you have a basic idea of how to test Spring applications, let’s switch gears to one of the most
loved and hated Spring projects: Groovy.
8
https://www.selenium.dev
175
Chapter 4 ■ Advanced Spring Configuration and Spring Boot
Configuration Using Groovy
Spring Framework 4.0 introduced the ability to configure bean definitions and ApplicationContext
by using the Groovy language. This provides developers with another choice in configuration
to either replace or supplement XML and/or annotation-based bean configuration. A Spring
ApplicationContext can be created directly in a Groovy script or loaded from Java, both by way of the
GenericGroovyApplicationContext class.
First let’s dive into the details by showing how to create bean definitions from an external Groovy script
and loading them from Java. In previous sections and chapters, we introduced various bean classes, and to
promote some code reusability, we will use in this example the Singer class shown in Listing 4-57.
Listing 4-57. Singer Class to Be Used in Groovy Examples
package com.apress.prospring6.four.groovy;
import org.apache.commons.lang3.builder.ToStringBuilder;
public class Singer {
private String name;
private int age;
@Override
public String toString() {
return new ToStringBuilder(this)
.append("name", name)
.append("age", age)
.toString();
}
// setters and getters omitted
}
As you can see, this is just a Java class with a couple of properties describing a singer. We use this simple
Java class here to show that just because you configure your beans in Groovy doesn’t mean your entire code
base needs to be rewritten in Groovy. Not only that, but Java classes can be imported from dependencies and
used within Groovy scripts. Now, let’s create the Groovy script (beans.groovy) that will be used to create the
bean definition, as shown in Listing 4-58.
Listing 4-58. Singer Bean Groovy Definition
import com.apress.prospring6.four.groovy.Singer
beans {
singer(Singer, name: 'John Mayer', age: 42)
}
This Groovy script starts with a top-level closure called beans, which provides bean definitions to
Spring. First, we specify the bean name (singer), and then as arguments we provide the class type (Singer)
followed by the property names and values that we would like to set. Next, let’s create a simple test driver in
Java, loading bean definitions from the Groovy script, as shown in Listing 4-59.
176
Chapter 4 ■ Advanced Spring Configuration and Spring Boot
Listing 4-59. Test Class to Test Groovy Beans
package com.apress.prospring6.four.groovy;
import
import
import
import
org.slf4j.Logger;
org.slf4j.LoggerFactory;
org.springframework.context.ApplicationContext;
org.springframework.context.support.GenericGroovyApplicationContext;
public class GroovyBeansFromJavaDemo {
private static Logger logger = LoggerFactory.getLogger(GroovyBeansFromJavaDemo.class);
public static void main(String... args) {
ApplicationContext context =
new GenericGroovyApplicationContext("classpath:spring/beans.groovy");
Singer singer = context.getBean("singer", Singer.class);
logger.info("Singer bean: {}", singer);
}
}
As you can see, the creation of ApplicationContext is carried out in typical fashion, but it’s done by
using the GenericGroovyApplicationContext class and providing your Groovy script that builds the bean
definitions. Running GroovyBeansFromJavaDemo should print:
INFO : GroovyBeansFromJavaDemo - Singer bean: com.apress.prospring6.four.groovy.
Singer@272a179c[name=John Mayer,age=42]
The only thing you must keep in mind when using Groovy bean definitions is that the groovy-all
library must be on the project classpath. So, whatever build tool you are using, whether Maven or Gradle, make
sure you mention it in your configuration file.
Now that you have seen how to load bean definitions from Java via an external Groovy script, how can
we go about creating the ApplicationContext and bean definitions from a Groovy script alone? There’s not
much to it, really, and the Groovy syntax is more simplistic than Java is, as shown in Listing 4-60.
Listing 4-60. Groovy Script to Declare Beans and Use Them
package com.apress.prospring6.four.groovy
import org.springframework.beans.factory.groovy.GroovyBeanDefinitionReader
import org.springframework.context.support.GenericApplicationContext
def ctx = new GenericApplicationContext()
def reader = new GroovyBeanDefinitionReader(ctx)
177
Chapter 4 ■ Advanced Spring Configuration and Spring Boot
reader.beans {
singer(Singer, name: 'John Mayer', age: 42)
}
ctx.refresh()
println ctx.getBean("singer")
When we run this sample, we get same output as before, only we don’t get a log statement, since a
logger is not used in this case, but a simple console output. This time we create an instance of a typical
GenericApplicationContext, but use GroovyBeanDefinitionReader, which will be used to pass
bean definitions to. Then, as in the previous example, we create a bean from our simple POJO, refresh
ApplicationContext, and print the string representation of the Singer bean. It doesn’t get any easier
than that!
As you probably can tell, we are only scratching the surface of what can be done with the Groovy
support in Spring. Since you have the full power of the Groovy language, you can do all sorts of interesting
things when creating bean definitions. As you have full access to ApplicationContext, not only can you
configure beans, but you can also work with profile support, property files, and so on. Just keep in mind, with
great power comes great responsibility.
Using Spring Boot
Following this book so far has taught you more than one way to declare beans that make up a Spring
application. But what if we tell you there is something even cooler than all that?
The Spring Boot project aims to simplify the getting-started experience of building an application by
using Spring. Spring Boot takes the guesswork out of manually gathering dependencies and provides some
of the most common features needed by most applications, such as metrics and health checks.
Spring Boot takes an “opinionated” approach to achieve the goal of developer simplification by way of
providing starter projects for various types of applications that already contain the proper dependencies and
versions, which means less time spent to get started. For those who may be looking to get away from XML
completely, Spring Boot does not require any configuration to be written in XML.
In this example, we will create the traditional Hello World web application with a twist. You may
be surprised to see the minimal amount of code required to do so as compared to your typical Java web
application setup. Typically, we have started off examples by defining the dependencies you need to add to
your project. Part of Spring Boot’s simplification model is to prepare all the dependencies for you, and when
using Maven, for example, you as the developer utilize a parent POM to obtain this functionality. When
using Gradle, things become even simpler. There is no parent needed, except a Gradle plug-in and a starter
dependency. If your project is simple enough, you can generate the full configuration using Spring Initializr,
accessible at https://start.spring.io; download the basic structure and configuration from there, and
start customizing it according to your needs. Chapter 2 mentioned how powerful Spring Boot is, and that
the Maven setup of the project for this book uses Spring Boot dependency management to keep dependency
versions compatible and the project stable. Spring Boot is powerful and practical, but it can become a toughto-manage beast without the proper understanding of Spring. Thankfully, you are reading this book, so
you’ll be fine.
Without further ado, let’s get down to using Spring Boot!
As of the time this chapter is being written, Spring Boot version 3.0.0 has not been released yet. This is
the reason why the project is currently configured to use version 3.0.0-M2. By the time this book is released,
the project will be updated with the official release version.
178
Chapter 4 ■ Advanced Spring Configuration and Spring Boot
Each release of Spring Boot provides a curated list of dependencies it supports. The versions of the
necessary libraries are selected so the API matches perfectly, and this is handled by Spring Boot. Therefore,
the manual configuration of dependencies versions is not necessary. Upgrading Spring Boot will ensure that
those dependencies are upgraded as well. With the previous configuration, a set of dependencies will be
added to the project, each with the proper versions so that their API will be compatible. In a smart editor like
IntelliJ IDEA, there is a Maven(or Gradle) Projects view, where you can expand each module and inspect the
available tasks and dependencies, as shown in Figure 4-7.
The Spring Boot version in Figure 4-7 might be different in the project attached to the book, by the time
the book is released. The reason behind this is that the code is written when Spring Boot 3 is still in
development. So is Spring 6. The intention is to edit this book and update the image with the official version
before publication, but in case we miss this image, just know that is all right as long as the code runs.
Figure 4-7. Spring Boot starter library and dependencies
The chapter04-boot project is very simple and declares a simple Spring boot starter dependency,
the spring-boot-starter library. This dependency brings with it a set of Spring dependencies and their
dependencies that make a strong foundation for building Spring application. The entry point of a Spring
Boot project is the application class, the one annotated with @SpringBootApplication, in our case the
Chapter4application class. When Spring Initializr is used to generate a Spring Boot project, this class is
generated with an empty body for the main(..) method, but what we like to do is complete that body with a
few lines of code that list all the beans in the application context, as shown in Listing 4-61.
179
Chapter 4 ■ Advanced Spring Configuration and Spring Boot
Listing 4-61. Spring Boot Application Class Modified to Show All Beans in the Application Context
package com.apress.prospring6.four;
import
import
import
import
org.slf4j.Logger;
org.slf4j.LoggerFactory;
org.springframework.boot.SpringApplication;
org.springframework.boot.autoconfigure.SpringBootApplication;
import java.util.Arrays;
@SpringBootApplication
public class Chapter4Application {
private static Logger logger = LoggerFactory.getLogger(Chapter4Application.class);
public static void main(String... args) {
var ctx = SpringApplication.run(Chapter4Application.class, args);
assert (ctx != null);
// listing all bean definition names
Arrays.stream(ctx.getBeanDefinitionNames()).forEach(logger::info);
}
}
That is all. Really. The extra lines to check that a context was created and to list all the bean names
in the context is the bit we added. The only necessary statement to bootstrap a Spring application is
SpringApplication.run(Chapter4Application.class, args).
The novelty here is the @SpringBootApplication annotation. This annotation is a top-level annotation
designed to be used only at the class level. It is a convenience annotation that is equivalent to declaring the
following three:
180
•
@SpringBootConfiguration: Indicates that this class provides configuration for a
Spring Boot application. It is meta-annotated with @Configuration, which means
this class can declare beans with @Bean.
•
@EnableAutoConfiguration: This is a specific Spring Boot annotation from the
package org.springframework.boot.autoconfigure that enables creating a
default Spring ApplicationContext with all the infrastructure beans needed
based on the project dependencies. @EnableAutoConfiguration works well
with Spring-provided starter dependencies, but it is not directly tied to them, so
other dependencies outside the starters can be used. For example, if there is a
specific embedded server on the classpath, it will be used, unless there is another
EmbeddedServletContainerFactory configuration in the project. This is a core
element of the practicality of Spring Boot; it configures stable default infrastructure
beans, but it is easy to customize as well.
•
@ComponentScan: This enables discovery of classes annotated with stereotype
annotations. The attribute used to list the packages to scan used with @
SpringBootApplication is basePackages. In version 1.3.0, another attribute was
added to this annotation: basePackageClasses. This attribute provides a typesafe alternative to basePackages for specifying the packages to scan for annotated
components. The package of each class specified will be scanned. By default
@SpringBootApplication enables scanning for the package where the application
class is declared and all packages under it.
Chapter 4 ■ Advanced Spring Configuration and Spring Boot
If you ran the Chapter4Application call, you might have noticed that the number of infrastructure
beans in the Spring Boot context is much higher than the number of beans in a simple Spring Classic
application context. Being able to just declare your beans and run a Spring application comes with a cost:
you avoid the work of setting up your context and allow Spring Boot to do it for you. The most basic Spring
Boot application context is designed based on decisions of experienced developers who, after working with
Spring for a long time, have identified the typical Spring components used in various Spring applications
and baked that into default setups packed into the Spring Boot starter dependencies. There are multiple
Spring Boot starter dependencies, and each of them is specific to the application being built: spring-bootstarter is used for the simplest Spring applications containing interoperating beans and writing logs;
spring-boot-starter-jpa is used for simple Spring applications that manage data stored in a database;
spring-boot-starter-web is used to create a basic Spring web application; and so on. All these starter
dependencies will be covered and explained in more detail in the suitable chapters in the book.
For now let’s modify this Spring Boot application to add the MessageProvider and MessageRenderer
beans that we’ve played with so far. The only things we have to do are as follows:
•
Modify the configuration files to add a Maven/Gradle dependency on the chapter02
project where those two interfaces are declared.
•
Copy the ConfigurableMessageProvider and StandardOutMessageRenderer classes
into the chapter04-boot project and make sure they are annotated with @Component
and @Autowired where necessary.
•
Modify the Chapter4Application class to access the MessageRenderer and call
render().
Listing 4-62 shows all these changes together, and the bean definitions have been added to the
WithBeansApplication file, to keep all things in the same context close to each other. (You will thank us
when navigating the project!)
Listing 4-62. Spring Boot Application Class with Developer Beans
package com.apress.prospring6.four.beans;
import com.apress.prospring6.two.decoupled.MessageProvider;
import com.apress.prospring6.two.decoupled.MessageRenderer;
import org.springframework.boot.SpringApplication;
import org.springframework.boot.autoconfigure.SpringBootApplication;
// other import statements omitted
@Component("messageRenderer")
class StandardOutMessageRenderer implements MessageRenderer {
private static Logger logger = LoggerFactory.getLogger(StandardOutMessageRender
er.class);
private MessageProvider messageProvider;
@Autowired
@Override
public void setMessageProvider(MessageProvider provider) {
this.messageProvider = provider;
}
181
Chapter 4 ■ Advanced Spring Configuration and Spring Boot
@Override
public MessageProvider getMessageProvider() {
return this.messageProvider;
}
@Override
public void render() {
logger.info(messageProvider.getMessage());
}
}
@Component
class ConfigurableMessageProvider implements MessageProvider {
private String message;
public ConfigurableMessageProvider(@Value("Configurable message") String message) {
this.message = message;
}
@Override
public String getMessage() {
return message;
}
}
@SpringBootApplication
public class WithBeansApplication {
private static Logger logger = LoggerFactory.getLogger(WithBeansApplication.class);
public static void main(String... args) {
var ctx = SpringApplication.run(WithBeansApplication.class, args);
MessageRenderer mr = ctx.getBean("messageRenderer", MessageRenderer.class);
mr.render();
}
}
If you run the WithBeansApplication class and look at the console, you will also notice the
Configurable message output being printed.
In this example we explicitly called the render() method on the MessageRenderer bean, but what if we
did not have to? Spring Boot is the gift that keeps on giving, as you will discover reading this book, but we
would like to introduce you right now to the org.springframework.boot.CommandLineRunner interface. This
functional interface declares a single method named run() and is used to indicate that a bean should run—
meaning the run() method is executed when it is contained within a Spring application. This means we can
modify the StandardOutMessageRenderer class and make the run() method call render.
We can go even one step further. Since multiple CommandLineRunner beans can be defined within the
same application context and can be ordered using the Ordered interface or @Order annotation, we can
modify the ConfigurableMessageProvider as well to make it a CommandLineRunner, but in its run() method
we make sure the message field is set with the command-line argument, thus making this implementation
truly configurable.
182
Chapter 4 ■ Advanced Spring Configuration and Spring Boot
Also, to make sure the two beans behave as expected, we use the @Order annotation on both, annotating
ConfigurableMessageProvider with @Order(1) and MessageRenderer with @Order(2), to make sure they
are initialized and run correctly. The new runner beans and configuration class are shown in Listing 4-63.
Listing 4-63. Spring Boot Application Class with Runner Beans
package com.apress.prospring6.four.runners;
import org.springframework.boot.CommandLineRunner;
import org.springframework.core.annotation.Order;
// other import statements omitted
@Order(2)
@Component("messageRenderer")
class StandardOutMessageRenderer implements MessageRenderer, CommandLineRunner {
// other methods omitted
@Override
public void run(String... args) throws Exception {
render();
}
}
@Order(1)
@Component
class ConfigurableMessageProvider implements MessageProvider, CommandLineRunner {
private String message;
public ConfigurableMessageProvider(@Value("Configurable message") String message) {
this.message = message;
}
// getter omitted
@Override
public void run(String... args) throws Exception {
if(args.length >=1) {
message = args[0];
}
}
}
@SpringBootApplication
public class WithRunnersApplication {
public static void main(String... args) {
SpringApplication.run(WithRunnersApplication.class, args);
}
}
183
Chapter 4 ■ Advanced Spring Configuration and Spring Boot
When running the WithRunnersApplication, you will also notice the Configurable message output
being printed. This happens because you probably ran it without providing any program arguments. To
do that, open the launch configuration IntelliJ IDEA has created for this class and modify the Build and
run section to include the Program arguments text box and introduce a value similar to the one shown in
Figure 4-8.
Figure 4-8. Spring Boot IntelliJ IDEA configuration window
If the Program arguments text box is not visible, add it from the Modify options menu (highlighted on
right in Figure 4-8).
If you run the code using the launcher, you will see the program argument you provided appearing in
the console log.
org.springframework.boot.ApplicationRunner provides similar functionality but exposes the
arguments as an instance of ApplicationArguments that provides additional arguments operations such
as: returning the raw, unprocessed arguments by invoking getSourceArgs(), or returning the names of
all arguments by invoking getOptionNames(), which is useful if you want to print some command-line
suggestions, and so forth.
The most useful Spring Boot starter library in our opinion is spring-boot-starter-test. When added
to a project, it not only provides a cool set of classes for testing Spring Boot applications, but also brings in a
rich set of testing libraries, so you don’t have to add JUnit, mock, and so on, manually to your configuration.
184
Chapter 4 ■ Advanced Spring Configuration and Spring Boot
Let’s start with the basics. If the entry point of a Spring Boot application is the class annotated with
@SpringBootApplication, the entry point of a Spring Boot test is the class annotated with @SpringBootTest.
This annotation does the following things:
•
Uses a default SpringBootContextLoader when no ContextLoader is defined, for
example, via @ContextConfiguration(loader=..)
•
Searches for a class annotated with @SpringBootConfiguration when nested
@Configuration is not used
•
Allows custom properties to be specified for a test context via its properties
attribute
•
Provides support for different webEnvironment modes, including the ability to start a
fully running web server listening on a random port
•
Registers a TestRestTemplate and/or WebTestClient for use in web tests that are
using a fully running web server
Some capabilities of @SpringBootTest won’t be obvious now, but they will be when you start writing
more complex tests.
Another thing you should know about @SpringBootTest is that it is annotated with
@ExtendWith(SpringExtension.class) and thus by default integrates the Spring TestContext Framework
into JUnit 5’s Jupiter programming model. This obviously means you won’t be able to write Junit 4 tests in a
class annotated with @SpringBootTest, because the Junit 4 annotations won’t be recognized.
Listing 4-64 shows a Spring Boot test class that runs its test in the context defined by the
WithBeansApplication Spring Boot class.
Listing 4-64. Spring Boot Test Class
package com.apress.prospring6.four.beans;
import org.springframework.boot.test.context.SpringBootTest;
// other import statements omitted
@SpringBootTest
public class BeansTest {
@Autowired
ApplicationContext context;
@Autowired
MessageRenderer messageRenderer;
@Autowired
MessageProvider messageProvider;
@Test
void contextLoaded(){
assertNotNull(context);
}
@Test
void rendererTest(){
185
Chapter 4 ■ Advanced Spring Configuration and Spring Boot
assertAll(
()
()
()
);
"messageTest" ,
-> assertNotNull(messageRenderer),
-> assertNotNull(messageProvider),
-> assertEquals(messageProvider, messageRenderer.getMessageProvider())
messageRenderer.render();
}
}
Looking at the code in Listing 4-64, you might notice that the WithBeansApplication class is not
mentioned anywhere, so you might be lifting an eyebrow sarcastically and asking, How does Spring Boot
know to use that class? Well, remember that @SpringBootTest searches for a class annotated with
@SpringBootConfiguration. The search starts in the package where the test class is defined. So if the test
class is defined in package com.apress.prospring6.four.beans, then Spring Boot looks for a configuration
class in this package and, if it is not found, continues searching in the packages within it.
However, if you want to make it really obvious which Spring Boot configuration class is being used, you
can use the classes attribute:
@SpringBootTest(classes = {WithBeansApplication.class})
This attribute can be used to add additional test configuration classes, to override beans with scoped
variants. Also, @ActiveProfiles is supported on @SpringBootTest annotated classes too, and it is
particularly useful when testing applications that involve database access, as we’ll see from Chapter 6
onward.
A Spring Boot test class is nothing but a test class, so running it does not require anything else than just
clicking right in your editor and selecting Run or Debug, depending on your overall intentions.
Since our technical reviewer insists, we will add this note: test classes and methods specifically can be
run from the command line, using Maven or Gradle commands. This however is not relevant for this book, since
the book is focused on the Spring Framework, so if you find yourself in need of doing that, the official
documentation for the two build tools used to organize this project should suffice.
Summary
In this chapter, you saw a wide range of Spring-specific features that complement the core IoC capabilities.
You saw how to hook into the life cycle of a bean and to make it aware of the Spring environment. We
introduced FactoryBeans as a solution for IoC, enabling a wider set of classes. We also showed how
you can use PropertyEditors to simplify application configuration and to remove the need for artificial
String-typed properties. We showed you more than one way to define beans using annotations, Java
configuration, and Groovy. Moreover, we finished with an in-depth look at some additional features offered
by ApplicationContext, including i18n, event publication, and resource access.
We also covered features such as profiles support, and the environment and property source abstraction
layer. Finally, we discussed various testing styles and testing Spring applications.
186
Chapter 4 ■ Advanced Spring Configuration and Spring Boot
The icing on the cake was how to use Spring Boot to configure beans and boot up your application as
soon as possible and with little effort.
So far, we have covered the main concepts of the Spring Framework and its features as a DI container, as
well as other services that the core Spring Framework provides. In the next chapter and onward, we discuss
using Spring in specific areas such as AOP, data access, transaction support, and web application support.
187
CHAPTER 5
Spring AOP
Besides dependency injection (DI), another core feature that the Spring Framework offers is support for
aspect-oriented programming (AOP). AOP is often referred to as a tool for implementing crosscutting
concerns. The term crosscutting concerns refers to logic in an application that cannot be decomposed
from the rest of the application and may result in code duplication and tight coupling. By using AOP
for modularizing individual pieces of logic, known as concerns, you can apply them to many parts of an
application without duplicating the code or creating hard dependencies. Logging and security are typical
examples of crosscutting concerns that are present in many applications. Consider an application that logs
the start and end of every method for debugging purposes. You will probably refactor the logging code into a
special class, but you still have to call methods on that class twice per method in your application in order to
perform the logging. Using AOP, you can simply specify that you want the methods on your logging class to
be invoked before and after each method call in your application.
It is important to understand that AOP complements object-oriented programming (OOP), rather
than competing with it. OOP is very good at solving a wide variety of problems that we, as programmers,
encounter. However, if you look at the logging example again, it is obvious to see where OOP is lacking
when it comes to implementing crosscutting logic on a large scale. Using AOP on its own to develop an
entire application is practically impossible, given that AOP functions on top of OOP. Likewise, although it is
certainly possible to develop entire applications by using OOP, you can work smarter by employing AOP to
solve certain problems that involve crosscutting logic.
The AOP framework is one of the core components of Spring, and important functionalities such as
transactional data management and security would not be possible without it.
This chapter covers the following topics:
1
•
AOP basics: Before discussing Spring’s AOP implementation, we cover the basics of
AOP as a technology. Most of the concepts covered in the “AOP Concepts” section
are not specific to Spring and can be found in any AOP implementation. If you
are already familiar with another AOP implementation, feel free to skip the “AOP
Concepts” section.
•
Types of AOP: There are two distinct types of AOP: static and dynamic. In static
AOP, like that provided by AspectJ’s1 compile-time weaving mechanisms, the
crosscutting logic is applied to your code at compile time, and you cannot change
it without modifying the code and recompiling. With dynamic AOP, such as Spring
AOP, crosscutting logic is applied dynamically at runtime. This allows you to make
https://www.eclipse.org/aspectj
© Iuliana Cosmina, Rob Harrop, Chris Schaefer, and Clarence Ho 2023
I. Cosmina et al., Pro Spring 6, https://doi.org/10.1007/978-1-4842-8640-1_5
189
Chapter 5 ■ Spring AOP
changes to the AOP configuration without having to recompile the application.
These types of AOP are complementary, and, when used together, they form a
powerful combination that you can use in your applications.
•
Spring AOP architecture: Spring AOP is only a subset of the full AOP feature set found
in other implementations such as AspectJ. In this chapter, we take a high-level look
at which features are present in Spring, how they are implemented, and why some
features are excluded from the Spring implementation.
•
Proxies in Spring AOP: Proxies are a huge part of how Spring AOP works, and you
must understand them to get the most out of Spring AOP. In this chapter, we look
at the two kinds of proxy: the JDK dynamic proxy and the CGLIB proxy. We look at
the different scenarios in which Spring uses each proxy, the performance of the two
proxy types, and some simple guidelines to follow in your application to get the most
from Spring AOP.
•
Using Spring AOP: In this chapter, we present some practical examples of AOP
usage. We start off with a simple example to ease you into Spring’s AOP code, and we
continue with a detailed description of the AOP features that are available in Spring,
complete with examples.
•
Advanced use of pointcuts: We explore the ComposablePointcut and
ControlFlowPointcut classes, introductions, and appropriate techniques you
should employ when using pointcuts in your application.
•
AOP framework services: The Spring Framework fully supports configuring AOP
transparently and declaratively. We look at two ways (the ProxyFactoryBean class,
and @AspectJ-style annotations) to inject declaratively defined AOP proxies into
your application objects as collaborators, thus making your application completely
unaware that it is working with advised objects.
•
Integrating AspectJ: AspectJ is a fully featured AOP implementation. The main
difference between AspectJ and Spring AOP is that AspectJ applies advice to target
objects via weaving (either compile-time or load-time weaving), while Spring AOP is
based on proxies. The feature set of AspectJ is much greater than that of Spring AOP,
but it is much more complicated to use than Spring. AspectJ is a good solution when
you find that Spring AOP lacks a feature you need.
AOP Concepts
As with most technologies, AOP comes with its own specific set of concepts and terms, and it’s important to
understand what they mean. The following are the core concepts of AOP:
190
•
Joinpoints: A joinpoint is a well-defined point during the execution of your
application. Typical examples of joinpoints include a call to a method, the method
invocation itself, class initialization, and object instantiation. Joinpoints define the
points in your application at which you can insert additional logic using AOP.
•
Advice: The code that is executed at a particular joinpoint is the advice, defined by a
method in your class. There are many types of advice, such as before, which executes
before the joinpoint, and after, which executes after it.
•
Pointcuts: A pointcut is a collection of joinpoints that you use to define when advice
should be executed. By creating pointcuts, you gain fine-grained control over how
Chapter 5 ■ Spring AOP
you apply advice to the components in your application. As mentioned previously, a
typical joinpoint is a method invocation, or the collection of all method invocations
in a particular class. Often you can compose pointcuts in complex relationships to
further constrain when advice is executed.
•
Aspects: An aspect is the combination of advice and pointcuts encapsulated in a
class. This combination results in a definition of the logic that should be included in
the application and where it should execute
•
Weaving: This is the process of inserting aspects into the application code at the
appropriate point. For compile-time AOP solutions, this weaving is generally done
at build time. Likewise, for runtime AOP solutions, the weaving process is executed
dynamically at runtime. AspectJ supports another weaving mechanism called
loadtime weaving (LTW), in which it intercepts the underlying JVM class loader and
provides weaving to the bytecode when it is being loaded by the class loader.
•
Target: An object whose execution flow is modified by an AOP process is referred to
as the target object. Often you see the target object referred to as the advised object.
•
Introduction: This is the process by which you can modify the structure of an object
by introducing additional methods or fields to it. You can use introduction AOP to
make any object implement a specific interface without needing the object’s class to
implement that interface explicitly.
Don’t worry if you find these concepts confusing; this will all become clear when you see some
examples. Also, be aware that you are shielded from many of these concepts in Spring AOP, and some are not
relevant because of Spring’s choice of implementation. We will discuss each of these features in the context
of Spring as we progress through the chapter.
Types of AOP
As we mentioned earlier, there are two distinct types of AOP: static and dynamic. The difference between
them is really the point at which the weaving process occurs and how this process is achieved.
Static AOP
In static AOP, the weaving process forms another step in the build process for an application. In Java terms,
you achieve the weaving process in a static AOP implementation by modifying the actual bytecode of your
application, changing and extending the application code as necessary. This is a well-performing way of
achieving the weaving process because the end result is just Java bytecode, and you do not perform any
special tricks at runtime to determine when advice should be executed. The drawback of this mechanism
is that any modifications you make to the aspects, even if you simply want to add another joinpoint, require
you to recompile the entire application. AspectJ’s compile-time weaving is an excellent example of a static
AOP implementation.
191
Chapter 5 ■ Spring AOP
Dynamic AOP
Dynamic AOP implementations, such as Spring AOP, differ from static AOP implementations in that the
weaving process is performed dynamically at runtime. How this is achieved is implementation-dependent,
but as you will see, Spring’s approach is to create proxies for all advised objects, allowing for advice to be
invoked as required. The drawback of dynamic AOP is that, typically, it does not perform as well as static
AOP, but the performance is steadily increasing. The major benefit of dynamic AOP implementations is the
ease with which you can modify the entire aspect set of an application without needing to recompile the
main application code.
Choosing an AOP Type
Choosing whether to use static or dynamic AOP is quite a hard decision. Both have their own benefits, and
you are not restricted to using only one type. In general, static AOP implementations have been around
longer and tend to have more feature-rich implementations, with a greater number of available joinpoints.
Typically, if performance is absolutely critical or you need an AOP feature that is not implemented
in Spring, you will want to use AspectJ. In most other cases, Spring AOP is ideal. Keep in mind that many
AOP-based solutions such as transaction management are already provided for you by Spring, so check the
framework capabilities before rolling your own! As always, let the requirements of your application drive
your choice of AOP implementation, and don’t restrict yourself to a single implementation if a combination
of technologies would better suit your application. In general, Spring AOP is less complex than AspectJ, so it
tends to be an ideal first choice.
AOP in Spring
Spring’s AOP implementation can be viewed as two logical parts. The first part is the AOP core, which
provides fully decoupled, purely programmatic AOP functionality (also known as the Spring AOP API). The
second part of the AOP implementation is the set of framework services that make AOP easier to use in your
applications. On top of this, other components of Spring, such as the transaction manager and EJB helper
classes, provide AOP-based services to simplify the development of your application.
The AOP Alliance
The AOP Alliance2 is a joint effort among representatives of many open source AOP projects to define a
standard set of interfaces for AOP implementations. Wherever applicable, Spring uses the AOP Alliance
interfaces rather than defining its own. This allows you to reuse certain advice across multiple AOP
implementations that support the AOP Alliance interfaces.
Spring AOP Architecture
Spring AOP is implemented in pure Java. There is no need for a special compilation process. The core
architecture of Spring AOP is based on proxies. An advised instance of a class is the result of a ProxyFactory
creating a proxy instance of that class with all the aspects woven into the proxy. ProxyFactory can be used
manually in a purely programmatic approach to creating AOP proxies. For the most part, you don’t need
to use this in your application; instead, you can rely on the declarative AOP configuration mechanisms
2
https://aopalliance.sourceforge.net
192
Chapter 5 ■ Spring AOP
provided by Spring (the ProxyFactoryBean class, the aop namespace [when using XML], and @AspectJ-style
annotations) to take advantage of declarative proxy creation. However, it is important to understand how
proxy creation works, so this chapter aims to provide a very solid knowledge base.
At runtime, Spring analyzes the crosscutting concerns defined for the beans in ApplicationContext
and generates proxy beans (which wrap the underlying target bean) dynamically. Instead of calling the
target bean directly, callers are injected with the proxied bean. The proxy bean then analyzes the running
condition (that is, joinpoint, pointcut, or advice) and weaves in the appropriate advice accordingly.
Figure 5-1 shows a high-level view of a Spring AOP proxy in action.
Figure 5-1. Spring AOP proxy in action
Internally, Spring has two proxy implementations:
•
JDK dynamic proxies
•
CGLIB proxies
By default, when the target object to be advised implements an interface, Spring will use a JDK dynamic
proxy to create proxy instances of the target. However, when the advised target object doesn’t implement
an interface (for example, it’s a concrete class), CGLIB will be used for proxy instance creation. One major
reason is that the JDK dynamic proxy supports only the proxying of interfaces. We discuss proxies in detail in
the section “Understanding Proxies.”
Joinpoints in Spring
One of the more noticeable simplifications in Spring AOP is that it supports only one joinpoint type: method
invocation. At first glance, this might seem like a severe limitation if you are familiar with other AOP
implementations such as AspectJ, which supports many more joinpoints, but in fact this makes Spring more
accessible.
The method invocation joinpoint is by far the most useful joinpoint available, and using it, you can achieve
many of the tasks that make AOP useful in day-to-day programming. Remember that if you need to advise some
code at a joinpoint other than a method invocation, you can always use Spring and AspectJ together.
Aspects in Spring
In Spring AOP, an aspect is represented by an instance of a class that implements the Advisor interface.
Spring provides convenience Advisor implementations that you can reuse in your applications, thus
removing the need for you to create custom Advisor implementations. There are two subinterfaces of org.
springframework.aop.Advisor:
•
org.springframework.aop.PointcutAdvisor
•
org.springframework.aop.IntroductionAdvisor
193
Chapter 5 ■ Spring AOP
The PointcutAdvisor interface is implemented by all Advisor implementations that use pointcuts to
control the advice applied to joinpoints. In Spring, introductions are treated as special kinds of advice, and
by using the IntroductionAdvisor interface, you can control those classes to which an introduction applies.
We discuss PointcutAdvisor implementations in detail in the upcoming section “Advisors and
Pointcuts in Spring.”
The ProxyFactory Class
The org.springframework.aop.framework.ProxyFactory class controls the weaving and proxy creation
process in Spring AOP. A proxy is created for an advised or target object, which can be set by calling the
setTarget(..) method. Internally, ProxyFactory delegates the proxy creation process to an instance
of org.springframework.aop.framework.DefaultAopProxyFactory, which in turn delegates to either
org.springframework.aop.framework.CglibAopProxy or org.springframework.aop.framework.
JdkDynamicAopProxy, depending on the settings of your application. We discuss proxy creation in more
detail later in this chapter.
Starting with Spring 4, another implementation was added, org.springframework.aop.
framework.ObjenesisCglibAopProxy, which extends CglibAopProxy to create proxy instances without
invoking the constructor of the class. This is useful when a class has a constructor with arguments, a
constructor with side effects, and constructors that throw exceptions.
The ProxyFactory class provides an implementation for the addAdvice(Advice) method (defined by
the org.springframework.aop.framework.Advised interface) for cases where you want advice to apply to
the invocation of all methods in a class, not just a selection. Internally, addAdvice(..) wraps the advice that
you pass to it in an instance of org.springframework.aop.support.DefaultPointcutAdvisor, which is the
standard implementation of PointcutAdvisor, and configures it with a pointcut that includes all methods
by default. When you want more control over the Advisor that is created or when you want to add an
introduction to the proxy, create the org.springframework.aop.Advisor yourself and use the addAdvisor()
method of the ProxyFactory.
You can use the same ProxyFactory instance to create many proxies, each with different aspects. To
help with this, ProxyFactory has removeAdvice() and removeAdvisor() methods, which allow you to
remove any advice or advisors from the ProxyFactory that you previously passed to it. To check whether a
ProxyFactory has particular advice attached to it, call adviceIncluded(), passing in the advice object for
which you want to check.
Creating Advice in Spring
Spring supports six flavors of advice, described in Table 5-1.
194
Chapter 5 ■ Spring AOP
Table 5-1. Spring Advice Types
Advice Name Interface
Description
Before
org.springframework.aop.
BeforeAdvice
Using before advice, you can perform custom processing
before a joinpoint executes. A joinpoint in Spring is
always a method invocation, which essentially allows you
to perform preprocessing before the method executes.
The before advice has full access to the target of the
method invocation as well as the arguments passed to the
method, but it has no control over the execution of the
method itself. If the before advice throws an exception,
further execution of the interceptor chain (as well as the
target method) will be aborted, and the exception will
propagate back up the interceptor chain.
Afterreturning
org.springframework.aop.
AfterReturningAdvice
After-returning advice is executed after the method
invocation at the joinpoint has finished executing
and has returned a value. The after-returning advice
has access to the target of the method invocation, the
arguments passed to the method, and the return value.
Because the method has already executed when the
after-returning advice is invoked, it has no control over
the method invocation at all. If the target method throws
an exception, the after-returning advice will not be run,
and the exception will be propagated up to the call stack
as usual.
After(finally) org.springframework.aop.
AfterAdvice
After(finally) advice is executed no matter the result of
the advised method. The advice is executed even when
the advised method fails and an exception is thrown.
Throws
org.springframework.aop.
ThrowsAdvice
Throws advice is executed after a method invocation
returns, but only if that invocation threw an exception.
It is possible for throws advice to catch only specific
exceptions, and if you choose to do so, you can access the
method that threw the exception, the arguments passed
into the invocation, and the target of the invocation.
Around
org.aopalliance.intercept.
MethodInterceptor
In Spring, around advice is modeled using the AOP
Alliance standard of a method interceptor. Your advice
is allowed to execute before and after the method
invocation, and you can control the point at which
the method invocation is allowed to proceed. You can
choose to bypass the method altogether if you want,
providing your own implementation of the logic.
Introduction org.springframework.aop.
IntroductionInterceptor
Spring models introductions as special types of
interceptors. Using an introduction interceptor, you can
specify the implementation for methods that are being
introduced by the advice.
195
Chapter 5 ■ Spring AOP
I nterfaces for Advice
With regard to the ProxyFactory class, recall that advice is added to a proxy either directly, by using the
addAdvice(..) method, or indirectly, by using an Advisor implementation with the addAdvisor(..)
method. The main difference between advice and an advisor is that an advisor carries advice with the
associated pointcut, which provides more fine-grained control on which joinpoints the advice will intercept.
With regard to advice, Spring has created a well-defined hierarchy for Advice interfaces. This hierarchy
is based on the AOP Alliance interfaces and is shown in detail in Figure 5-2.
Figure 5-2. Interfaces for Spring advice types as depicted in IntelliJ IDEA
This kind of hierarchy has the benefit of not only being sound OO design but also enabling you to deal
with advice types generically, such as by using a single addAdvice(..) method on the ProxyFactory, and
you can add new advice types easily without having to modify the ProxyFactory class.
C
reating Advice Programmatically
It was mentioned in an earlier section that ProxyFactory can be used manually in a purely programmatic
approach to creating AOP proxies. An example is in order before switching to the declarative Spring way of
doing it. All interfaces listed in Table 5-1 can be implemented to define advices for a desired target. Listing 5-1
shows three such implementations: a before advice, an after advice, and an around advice, each of them
implementing the appropriate interfaces.
Listing 5-1. Three Types of Custom Advice
package com.apress.prospring6.five.manual;
import org.aopalliance.intercept.MethodInterceptor;
import org.aopalliance.intercept.MethodInvocation;
import org.springframework.aop.AfterReturningAdvice;
196
Chapter 5 ■ Spring AOP
import org.springframework.aop.MethodBeforeAdvice;
import org.springframework.util.StopWatch;
import java.lang.reflect.Method;
// other import statement omitted
class SimpleBeforeAdvice implements MethodBeforeAdvice {
private static Logger logger = LoggerFactory.getLogger(SimpleBeforeAdvice.class);
@Override
public void before(Method method, Object[] args, Object target) throws Throwable {
logger.info("Before: set up concert hall.");
}
}
class SimpleAfterAdvice implements AfterReturningAdvice {
private static Logger logger = LoggerFactory.getLogger(SimpleAfterAdvice.class);
@Override
public void afterReturning(Object returnValue, Method method, Object[] args, Object
target) throws Throwable {
logger.info("After: offer standing ovation.");
}
}
class SimpleAroundAdvice implements MethodInterceptor {
private static Logger logger = LoggerFactory.getLogger(SimpleAroundAdvice.class);
@Override
public Object invoke(@Nonnull MethodInvocation invocation) throws Throwable {
logger.info("Around: starting timer");
StopWatch sw = new StopWatch();
sw.start(invocation.getMethod().getName());
Object returnValue = invocation.proceed();
sw.stop();
logger.info("Around: concert duration = {}", sw.getTotalTimeMillis());
return returnValue;
}
}
The SimpleBeforeAdvice, SimpleAfterAdvice, and SimpleAroundAdvice types are designed to be used
on instances of type Performance. SimpleBeforeAdvice and SimpleAfterAdvice just print log messages, to
confirm that the advice was applied. SimpleAroundAdvice is a little bit more complex and uses a StopWatch
instance to time the performance. The intercepted method is being called using Java Reflection.
Listing 5-2 depicts the Performance interface and the Concert implementation.
197
Chapter 5 ■ Spring AOP
Listing 5-2. Types of Objects to Apply Advice On
// Performance.java
package com.apress.prospring6.five.manual;
public interface Performance {
void execute();
}
// Concert.java
import org.slf4j.Logger;
import org.slf4j.LoggerFactory;
import static java.time.Duration.ofMillis;
public class Concert implements Performance{
private static Logger LOGGER = LoggerFactory.getLogger(Concert.class);
@Override
public void execute() {
LOGGER.info(" ... La la la la laaaa ...");
try {
Thread.sleep(ofMillis(2000).toMillis());
} catch (InterruptedException e) {}
}
}
Putting advice instances and the target together is easy; we just need to instantiate the ProxyFactory
class and set the target and the advice instances as depicted in Listing 5-3.
Listing 5-3. Example Showing Programmatically Creating and Applying Advice on a Target
package com.apress.prospring6.five.manual;
import org.springframework.aop.framework.ProxyFactory;
// other import statements omitted
public class ManualAdviceDemo {
public static void main(String... args) {
Concert concert = new Concert();
ProxyFactory pf = new ProxyFactory();
pf.addAdvice(new SimpleBeforeAdvice());
pf.addAdvice(new SimpleAroundAdvice());
pf.addAdvice(new SimpleAfterAdvice());
pf.setTarget(concert);
Performance proxy = (Performance) pf.getProxy();
proxy.execute();
}
}
198
Chapter 5 ■ Spring AOP
The order of execution of the advice is determined by the advice type, not the order in which they are
added to the ProxyFactory instance.
The SimpleBeforeAdvice prints a message, making sure the concert hall is set up before the concert.
The SimpleAroundAdvice intercepts the concert.execute() method to start the timer before the method
execution, to stop it and print the duration after the execution. The SimpleAfterAdvice prints a message,
making sure there is a standing ovation after the concert.
Running the class in Listing 5-3 prints the log shown in Listing 5-4.
Listing 5-4. Console Output Produced by Executing the ManualAdviceDemo Class
> Task
INFO :
INFO :
INFO :
INFO :
INFO :
:chapter05:ManualAdviceDemo.main()
SimpleBeforeAdvice - Before: set up concert hall.
SimpleAroundAdvice - Around: starting timer
Concert - ... La la la la laaaa ...
SimpleAroundAdvice - Around: concert duration = 2015
SimpleAfterAdvice - After: offer standing ovation.
The output from calling execute() on the proxy object is shown, and it includes the output of the before
advice, the first message of the around advice, the actual message printed by the target object—the Concert
object—the second message of the around advice, and the output of the after advice. The order of the
messages demonstrates that the advices were applied where expected.
You can play around and write your own code samples implementing org.springframework.aop.
AfterAdvice and org.springframework.aop.ThrowsAdvice or check out the examples in the project for this
book. Because there is a lot of code duplication, they won’t be covered here.
Applying advice this way is not really useful, the best way is to declare your bean, and your advice bean
and tell Spring to do it, but before getting there some detailed conclusions about advice use are in order.
A Few Conclusions
Before advice is one of the most useful advice types available in Spring. This advice can modify the
arguments passed to a method and can prevent the method from executing by raising an exception. This is
most useful for secure implementations, where a before advice checks user credentials before allowing the
method invocation to proceed.
After-returning advice is executed after the method invocation at the joinpoint returns. Given that the
method has already executed, you can’t change the arguments that are passed to it. Although you can read
these arguments, you can’t change the execution path, and you can’t prevent the method from executing.
These restrictions are expected; what might not be expected, however, is that you cannot modify the
return value in the after-returning advice. When using after-returning advice, you are limited to adding
processing. Although after-returning advice cannot modify the return value of a method invocation, it can
throw an exception that can be sent up the stack instead of the return value.
Throws advice is similar to after-returning advice in that it executes after the joinpoint, which is always
a method invocation, but throws advice executes only if the method throws an exception. Throws advice
is also similar to after-returning advice in that it has little control over program execution. If you are using
throws advice, you can’t choose to ignore the exception that was raised and return a value for the method
instead. The only modification you can make to the program flow is to change the type of exception
that is thrown. This is quite a powerful concept and can make application development much simpler.
Consider a situation where you have an API that throws an array of poorly defined exceptions. Using
199
Chapter 5 ■ Spring AOP
throws advice, you can advise all classes in that API and reclassify the exception hierarchy into something
more manageable and descriptive. Of course, you can also use throws advice to provide centralized error
logging across your application, thus reducing the amount of error-logging code that is spread across
your application. After-throwing advice is useful in a variety of situations; it allows you to reclassify entire
Exception hierarchies as well as build centralized exception logging for your application. We have found that
after-throwing advice is particularly useful when we are debugging a live application because it allows us to
add extra logging code without needing to modify the application’s code.
Around advice functions like a combination of before and after advice, with two differences:
•
You can modify the return value.
•
You can prevent the method from executing.
This means that by using around advice, you can essentially replace the entire implementation of a
method with new code. Around advice in Spring is modeled as an interceptor using the MethodInterceptor
interface as shown in the example in this section. There are many uses for around advice, and you will find
that many features of Spring are created by using method interceptors, such as the remote proxy support
and the transaction management features. Method interception is also a good mechanism for profiling the
execution of your application, and the example shown, by timing the execution of the target method, does
exactly that—records the duration this method takes to execute, enabling you to study the values to make a
decision if the method should be optimized or not.
Choosing an Advice Type
In general, choosing an advice type is driven by the requirements of your application, but you should choose
the most specific advice type for your need. That is to say, don’t use around advice when before advice will
do. In most cases, around advice can accomplish everything that the other three advice types can, but it
may be overkill for what you are trying to achieve. By using the most specific type of advice, you are making
the intention of your code clearer, and you are also reducing the possibility of errors. Consider advice that
counts method calls. When you are using before advice, all you need to code is the counter, but with around
advice, you need to remember to invoke the method and return the value to the caller. These small things
can allow spurious errors to creep into your application. By keeping the advice type as focused as possible,
you reduce the scope for errors.
Advisors and Pointcuts in Spring
Thus far, all the examples you have seen have used the ProxyFactory class. This class provides a simple way
of obtaining and configuring AOP proxy instances in custom user code. The ProxyFactory.addAdvice()
method is used to configure advice for a proxy. This method delegates to addAdvisor() behind the scenes,
creating an instance of org.springframework.aop.support.DefaultPointcutAdvisor and configuring it
with a pointcut that points to all methods. In this way, the advice is deemed to apply to all methods on the
target. In some cases, such as when you are using AOP for logging purposes, this may be desirable, but in
other cases you may want to limit the methods to which the advice applies.
Of course, you could simply perform the checking in the advice itself that the method being advised is
the correct one, but this approach has several drawbacks. First, hard-coding the list of acceptable methods
into the advice reduces the advice’s reusability. By using pointcuts, you can configure the methods to
which an advice applies, without needing to put this code inside the advice; this clearly increases the reuse
value of the advice. Other drawbacks with hard-coding the list of methods into the advice are performance
related. To inspect the method being advised in the advice, you need to perform the check each time any
method on the target is invoked. This clearly reduces the performance of your application. When you use
pointcuts, the check is performed once for each method, and the results are cached for later use. The other
200
Chapter 5 ■ Spring AOP
performance-related drawback of not using pointcuts to restrict the list-advised methods is that Spring can
make optimizations for unadvised methods when creating a proxy, which results in faster invocations on
unadvised methods. These optimizations are covered in greater detail when we discuss proxies later in the
chapter.
We strongly recommend that you avoid the temptation to hard-code method checks into your advice
and instead use pointcuts wherever possible to govern the applicability of advice to methods on the target.
That said, in some cases it is necessary to hard-code the checks into your advice. Consider the earlier
example of the after-returning advice designed to catch weak keys generated by the KeyGenerator class. This
kind of advice is closely coupled to the class it is advising, and it is wise to check inside the advice to ensure
that it is applied to the correct type. We refer to this coupling between advice and target as target affinity. In
general, you should use pointcuts when your advice has little or no target affinity. That is, it can apply to any
type or a wide range of types. When your advice has strong target affinity, try to check that the advice is being
used correctly in the advice itself; this helps reduce head-scratching errors when advice is misused. We
also recommend you avoid advising methods needlessly. As you will see, this results in a noticeable drop in
invocation speed that can have a large impact on the overall performance of your application.
The Pointcut Interface
Pointcuts in Spring are created by implementing the org.springframework.aop.Pointcut interface, which
is shown in Listing 5-5 (full code is available on the GitHub Spring Framework repository3).
Listing 5-5. Spring Pointcut Interface
package org.springframework.aop;
public interface Pointcut {
ClassFilter getClassFilter();
MethodMatcher getMethodMatcher();
// some non-relevant code missing
}
As you can see from this code, the Pointcut interface defines two methods, getClassFilter() and
getMethodMatcher(), which return instances of ClassFilter and MethodMatcher, respectively. Obviously, if
you choose to implement the Pointcut interface, you will need to implement these methods. Thankfully, as
you will see in the next section, this is usually unnecessary because Spring provides a selection of Pointcut
implementations that cover most, if not all, of your use cases.
When determining whether a pointcut applies to a particular method, Spring first checks to see
whether the Pointcut interface applies to the method’s class by using the ClassFilter instance returned
by Pointcut.getClassFilter().The ClassFilter functional interface is shown in Listing 5-6 (full code is
available on the GitHub Spring Framework repository4).
https://github.com/spring-projects/spring-framework/blob/main/spring-aop/src/
main/java/org/springframework/aop/Pointcut.java
4
https://github.com/spring-projects/spring-framework/blob/main/spring-aop/src/
main/java/org/springframework/aop/ClassFilter.java
3
201
Chapter 5 ■ Spring AOP
Listing 5-6. Spring ClassFilter Interface
org.springframework.aop;
@FunctionalInterface
public interface ClassFilter {
boolean matches(Class<?> clazz);
// some non-relevant code missing
}
As you can see, the ClassFilter functional interface defines a single abstract method, matches(), that
is passed an instance of Class that represents the class to be checked. As you have no doubt determined, the
matches() method returns true if the pointcut applies to the class and returns false otherwise.
The MethodMatcher interface is more complex than the ClassFilter interface, as shown Listing 5-7 (full
code is available on the GitHub Spring Framework repository5).
Listing 5-7. Spring MethodMatcher Interface
package org.springframework.aop;
import java.lang.reflect.Method
public interface MethodMatcher {
boolean
boolean
boolean
// some
}
matches(Method method, Class<?> targetClass);
isRuntime();
matches(Method method, Class<?> targetClass, Object... args);
non-relevant code missing
Spring supports two types of MethodMatcher, static and dynamic, which are determined by the return
value of isRuntime(). Before using MethodMatcher, Spring calls isRuntime() to determine whether
MethodMatcher is static, indicated by a return value of false, or dynamic, indicated by a return value of true.
For a static pointcut, Spring calls the matches(Method, Class<T>) method of the MethodMatcher once
for every method on the target, caching the return value for subsequent invocations of those methods.
In this way, the check for method applicability is performed only once for each method, and subsequent
invocations of a method do not result in an invocation of matches().
With dynamic pointcuts, Spring still performs a static check by using matches(Method, Class<T>) the
first time a method is invoked to determine the overall applicability of a method. However, in addition to
this and provided that the static check returned true, Spring performs a further check for each invocation
of a method by using the matches(Method, Class<T>, Object[]) method. In this way, a dynamic
MethodMatcher can determine whether a pointcut should apply based on a particular invocation of a
method, not just on the method itself. For example, a pointcut needs to be applied only when the argument
is an Integer with a value larger than 100. In this case, the matches(Method,Class<T>, Object[]) method
can be coded to perform further checking on the argument for each invocation.
Clearly, static pointcuts perform much better than dynamic pointcuts because they avoid the need
for an additional check per invocation. Dynamic pointcuts provide a greater level of flexibility for deciding
whether to apply advice. In general, we recommend you use static pointcuts wherever you can. However, in
https://github.com/spring-projects/spring-framework/blob/main/spring-aop/src/
main/java/org/springframework/aop/MethodMatcher.java
5
202
Chapter 5 ■ Spring AOP
cases where your advice adds substantial overhead, it may be wise to avoid any unnecessary invocations of
your advice by using a dynamic pointcut.
In general, you rarely create your own Pointcut implementations from scratch because Spring provides
abstract base classes for both static and dynamic pointcuts. We will look at these base classes, along with
other Pointcut implementations, over the next few sections.
Available Pointcut Implementations
As of version 4.0, Spring provides eight main implementations of the Pointcut interface: two abstract classes
intended as convenience classes for creating static and dynamic pointcuts, and six concrete classes, one for
each of the following:
•
Composing multiple pointcuts together
•
Handling control flow pointcuts
•
Performing simple name-based matching
•
Defining pointcuts using regular expressions
•
Defining pointcuts using AspectJ expressions
•
Defining pointcuts that look for specific annotations at the class or method level
Table 5-2 summarizes the main eight Pointcut interface implementations.
Table 5-2. Summary of Spring Pointcut Implementations
Implementation Class
Description
org.springframework.aop.support.
annotation.AnnotationMatchingPointcut
This implementation looks for a specific Java annotation on
a class or method. This class requires JDK 5 or higher.
org.springframework.aop.
aspectj.AspectJExpressionPointcut
This implementation uses an AspectJ weaver to evaluate a
pointcut expression in AspectJ syntax.
org.springframework.aop.support.
ComposablePointcut
The ComposablePointcut class is used to compose two or
more pointcuts together with operations such as union()
and intersection().
org.springframework.aop.support.
ControlFlowPointcut
ControlFlowPointcut is a special-case pointcut that
matches all methods within the control flow of another
method; that is, any method that is invoked either directly
or indirectly as the result of another method being invoked.
org.springframework.aop.support.
DynamicMethodMatcherPointcut
This implementation is intended as a base class for
building dynamic pointcuts.
org.springframework.aop.support.
JdkRegexpMethodPointcut
This implementation allows you to define pointcuts using
JDK 1.4 regular expression support. This class requires JDK
1.4 or newer.
org.springframework.aop.support.
NameMatchMethodPointcut
Using NameMatchMethodPointcut, you can create a
pointcut that performs simple matching against a list of
method names.
org.springframework.aop.support.
StaticMethodMatcherPointcut
The StaticMethodMatcherPointcut class is intended as a
base for building static pointcuts.
203
Chapter 5 ■ Spring AOP
Figure 5-3 shows the Pointcut Spring hierarchy.
Figure 5-3. Pointcut implementation classes represented as a UML diagram in IntelliJ IDEA
Using DefaultPointcutAdvisor
Before you can use any Pointcut implementation, you must first create an instance of the Advisor interface,
or more specifically a PointcutAdvisor interface. Remember from our earlier discussions that Advisor is
Spring’s representation of an aspect (see the previous section called “Aspects in Spring”), which is a coupling
of advice and pointcuts that governs which methods should be advised and how they should be advised.
Spring provides a number of implementations of PointcutAdvisor, but for now we will concern ourselves
with just one, DefaultPointcutAdvisor. This is a simple PointcutAdvisor for associating a single Pointcut
with a single Advice.
U
sing StaticMethodMatcherPointcut
In this section, we will create a simple static pointcut by extending the abstract
StaticMethodMatcherPointcut class. Since the StaticMethodMatcherPointcut class extends the
StaticMethodMatcher class (an abstract class too), which implements the MethodMatcher interface, you are
required to implement the method matches(Method, Class<?>). The rest of the Pointcut implementation
is handled automatically. Although this is the only method you are required to implement (when extending
the StaticMethodMatcherPointcut class), you may want to override the getClassFilter() method as
shown in Listing 5-8 to ensure that only methods of the correct type get advised.
204
Chapter 5 ■ Spring AOP
For this example, we have two classes, GoodGuitarist and GreatGuitarist, with identical methods
defined in both, which are implementations of the method in interface Singer. They are depicted together
with the SimpleAroundAdvice designed to wrap around instances of these types.
Listing 5-8. Classes GoodGuitarist and GreatGuitarist to Be Used for Showing
StaticMethodMatcherPointcut Usage
package com.apress.prospring6.two.common;
// import statements omitted
public interface Singer {
void sing();
}
public class GoodGuitarist implements Singer {
private static Logger LOGGER = LoggerFactory.getLogger(GoodGuitarist.class);
@Override public void sing() {
LOGGER.info("Head on your heart, arms around me");
}
}
public class GreatGuitarist implements Singer {
private static Logger LOGGER = LoggerFactory.getLogger(GreatGuitarist.class);
@Override public void sing() {
LOGGER.info("You've got my soul in your hand");
}
}
public class SimpleAroundAdvice implements MethodInterceptor {
private static Logger LOGGER = LoggerFactory.getLogger(GoodGuitarist.class);
@Override
public Object invoke(MethodInvocation invocation) throws Throwable {
LOGGER.debug(">> Invoking " + invocation.getMethod().getName());
Object retVal = invocation.proceed();
LOGGER.debug(">> Done");
return retVal;
}
}
With this example, we want to be able to create a proxy of both classes by using the same
DefaultPointcutAdvisor but have the advice apply only to the sing() method of the GoodGuitarist class.
To do this, we created the SimpleStaticPointcut class as shown in Listing 5-9, together with the class
used to test it.
205
Chapter 5 ■ Spring AOP
Listing 5-9. StaticMethodMatcherPointcut Implementation
package com.apress.prospring6.five.pointcut;
import org.aopalliance.aop.Advice;
import org.springframework.aop.Advisor;
import org.springframework.aop.ClassFilter;
import org.springframework.aop.Pointcut;
import org.springframework.aop.framework.ProxyFactory;
import org.springframework.aop.support.DefaultPointcutAdvisor;
import org.springframework.aop.support.StaticMethodMatcherPointcut;
import java.lang.reflect.Method;
// other static imports omitted
class SimpleStaticPointcut extends StaticMethodMatcherPointcut {
@Override
public boolean matches(Method method, Class<?> cls) {
return ("sing".equals(method.getName()));
}
@Override
public ClassFilter getClassFilter() {
return cls -> (cls == GoodGuitarist.class);
}
}
public class StaticPointcutDemo {
public static void main(String... args) {
// targets
GoodGuitarist johnMayer = new GoodGuitarist();
GreatGuitarist ericClapton = new GreatGuitarist();
Singer proxyOne;
Singer proxyTwo;
Pointcut pc = new SimpleStaticPointcut();
Advice advice = new SimpleAroundAdvice();
Advisor advisor = new DefaultPointcutAdvisor(pc, advice);
ProxyFactory pf = new ProxyFactory();
pf.addAdvisor(advisor);
pf.setTarget(johnMayer);
proxyOne = (Singer)pf.getProxy();
pf = new ProxyFactory();
pf.addAdvisor(advisor);
pf.setTarget(ericClapton);
proxyTwo = (Singer)pf.getProxy();
proxyOne.sing();
proxyTwo.sing();
}
}
206
Chapter 5 ■ Spring AOP
Notice that the getClassFilter() method was overridden to return a ClassFilter instance whose
matches() method returns true only for the GoodGuitarist class. With this static pointcut, we are saying
that only methods of the GoodGuitarist class will be matched, and furthermore, only the sing() method of
that class is to be matched.
The main(..) method creates an instance of DefaultPointcutAdvisor by using the
SimpleAroundAdvice and SimpleStaticPointcut classes. Also, because both classes (GoodGuitarist and
GreatGuitarist) implement the same interface, you can see that the proxies can be created based on the
interface, not on the concrete classes. Notice that the DefaultPointcutAdvisor instance is then used to
create two proxies: one for an instance of GoodGuitarist and one for an instance of EricClapton. Finally,
the sing() method is invoked on the two proxies. Running this example results in the output shown in
Listing 5-10.
Listing 5-10. StaticMethodMatcherPointcut Example Output
DEBUG: SimpleAroundAdvice - >> Invoking sing
INFO : GoodGuitarist - Head on your heart, arms around me
DEBUG: SimpleAroundAdvice - >> Done
INFO : GreatGuitarist - You've got my soul in your hand
As you can see, the only method for which SimpleAroundAdvice was actually invoked was the sing()
method for the GoodGuitarist class, exactly as expected. Restricting the methods to which advice applies is
quite simple and, as you will see when we discuss proxy options, is key to getting the best performance out of
your application.
Using DynamicMethodMatcherPointcut
Creating a dynamic pointcut is not much different from creating a static one, so for this example we
will create a dynamic pointcut for the same classes we did previously, but we also need a method with
arguments, to use this type of pointcut. The easiest way to do this is to enrich the Singer interface with a
default method, to not affect the other implementations. To match the context of this example, let’s add a
sing(String key) method that receives the value of the key for the singer to sing in. The implementation of
the Singer interface is shown in Listing 5-11.
Listing 5-11. Enriched Singer Interface
package com.apress.prospring6.five.common;
import org.slf4j.Logger;
import org.slf4j.LoggerFactory;
public interface Singer {
Logger logger = LoggerFactory.getLogger(Singer.class);
void sing();
default void sing(String key){
logger.info("Singing in the key of {}", key);
}
}
207
Chapter 5 ■ Spring AOP
Listing 5-12 shows the DynamicMethodMatcherPointcut implementation.
Listing 5-12. SimpleDynamicPointcut Implementation
package com.apress.prospring6.five.pointcut;
import com.apress.prospring6.five.common.GoodGuitarist;
import org.springframework.aop.ClassFilter;
import org.springframework.aop.support.DynamicMethodMatcherPointcut;
import java.lang.reflect.Method;
class SimpleDynamicPointcut extends DynamicMethodMatcherPointcut {
@Override
public ClassFilter getClassFilter() {
return cls -> (cls == GoodGuitarist.class);
}
@Override
public boolean matches(Method method, Class<?> targetClass) {
return ("sing".equals(method.getName()));
}
@Override
public boolean matches(Method method, Class<?> targetClass, Object... args) {
logger.debug("Dynamic check for " + method.getName());
if(args.length == 0) {
return false;
}
var key = (String) args[0];
return key.equalsIgnoreCase("C");
}
}
As you can see from Listing 5-12, we override the getClassFilter() method in a similar manner as in
the previous section. This removes the need to check the class in the method-matching methods, which is
something that is especially important for the dynamic check. Although only the dynamic check is required,
we implement the static check as well. The reason for this is that you know the sing() method (the one
without arguments) will not be advised. Indicating this by using the static check, Spring never has to perform
a dynamic check for this method. This is because when the static check method is implemented, Spring will
first check against it, and if the checking result is not a match, Spring will stop doing any further dynamic
checking. Moreover, the result of the static check will be cached for better performance. If the static check is
not implemented, Spring performs a dynamic check each time the sing({key}) method is invoked.
As a recommended practice, perform the class checking in the getClassFilter() method, the
method checking in the matches(Method, Class<?>) method, and the argument checking in the
matches(Method,Class<?>, Object[]) method. This will make your pointcut much easier to understand
and maintain, and performance will be better too.
208
Chapter 5 ■ Spring AOP
In the matches(Method, Class<?>, Object[]) method, you can see that we return false if the value
of the String argument passed to the sing({key}) method is not equal to “C”; otherwise, we return true.
Note that in the dynamic check, we know that we are dealing with a method named sing because no other
method makes it past the static check. In the code in Listing 5-13, you can see the test class used to test this
pointcut.
Listing 5-13. DynamicPointcutDemo Class to Test the Dynamic Pointcut
package com.apress.prospring6.five.pointcut;
import org.springframework.aop.Advisor;
import org.springframework.aop.framework.ProxyFactory;
import org.springframework.aop.support.DefaultPointcutAdvisor;
// other import statements omitted
public class DynamicPointcutDemo {
public static void main(String... args) {
GoodGuitarist target = new GoodGuitarist();
Advisor advisor = new DefaultPointcutAdvisor(new SimpleDynamicPointcut(), new
SimpleAroundAdvice());
ProxyFactory pf = new ProxyFactory();
pf.setTarget(target);
pf.addAdvisor(advisor);
Singer proxy = (Singer)pf.getProxy();
proxy.sing("C");
proxy.sing("c");
proxy.sing("E");
proxy.sing();
}
}
Notice that we have used the same advice class as in the static pointcut example. However, in this
example, only the first two calls to sing({key}) should be advised. The dynamic check prevents the third
call to sing("E") from being advised, and the static check prevents the sing() method from being advised.
Running this example yields the output in Listing 5-14.
Listing 5-14. DynamicPointcutDemo Output
DEBUG:
DEBUG:
DEBUG:
DEBUG:
DEBUG:
DEBUG:
DEBUG:
INFO :
DEBUG:
DEBUG:
INFO :
DEBUG:
SimpleDynamicPointcut SimpleDynamicPointcut SimpleDynamicPointcut SimpleDynamicPointcut SimpleDynamicPointcut SimpleDynamicPointcut SimpleAroundAdvice - >>
Singer - Singing in the
SimpleAroundAdvice - >>
SimpleDynamicPointcut Singer - Singing in the
SimpleDynamicPointcut -
Static check for sing
Static check for toString
Static check for clone
Static check for sing
Static check for sing
Dynamic check for sing
Invoking sing
key of C
Done
Dynamic check for sing
key of E
Static check for sing
209
Chapter 5 ■ Spring AOP
DEBUG: SimpleDynamicPointcut - Dynamic check for sing
INFO : GoodGuitarist - Head on your heart, arms around me
As we expected, only the first two invocations of the sing({key}) method were advised. Notice that the
sing() invocation is subject to a dynamic check, thanks to the static check that checks the method name. An
interesting point to note here is that the sing({key}) method is subject to two static checks: one during the
initial phase when all methods are checked, and another when it is first invoked. This is why the log contains
so many Static check for sing entries.
As you can see, dynamic pointcuts offer a greater degree of flexibility than static pointcuts, but
because of the additional runtime overhead they require, you should use a dynamic pointcut only when
absolutely necessary.
Using Simple Name Matching
Often when creating a pointcut, we want to match based on just the name of the method, ignoring
method signature and return type. In this case, you can avoid needing to create a subclass of
StaticMethodMatcherPointcut and use NameMatchMethodPointcut (which is a subclass of
StaticMethodMatcherPointcut) to match against a list of method names instead. When you are using
NameMatchMethodPointcut, no consideration is given to the signature of the method, so if you have methods
sing() and sing({key}), they are both matched for the name sing().
In the code snippet in Listing 5-15, you can see the GrammyGuitarist class, which is yet another
implementation of Singer, because this Grammy award singer sings using his voice, uses a guitar, and, being
human, occasionally talks and rests during a performance.
Listing 5-15. GrammyGuitarist Implementation
package com.apress.prospring6.five.common;
public class GrammyGuitarist implements Singer {
private static Logger LOGGER = LoggerFactory.getLogger(GrammyGuitarist.class);
@Override
public void sing() {
LOGGER.info("sing: Gravity is working against me\n" +
"And gravity wants to bring me down");
}
public void sing(Guitar guitar) {
LOGGER.info("play: " + guitar.play());
}
public void talk(){
LOGGER.info("talk");
}
210
Chapter 5 ■ Spring AOP
@Override
public void rest(){
LOGGER.info("zzz");
}
}
public class Guitar {
public String play(){
return "G C G C Am D7";
}
}
For this example, we want to match the sing(), sing(Guitar), and rest() methods by using
NameMatchMethodPointcut. This translates to matching the names sing and rest. This is shown in
Listing 5-16.
Listing 5-16. NamePointcutDemo Class, Used to Test NameMatchMethodPointcut
package com.apress.prospring6.five.pointcut;
import org.springframework.aop.support.NameMatchMethodPointcut;
// other import statements omitted
public class NamePointcutDemo {
public static void main(String... args) {
GrammyGuitarist johnMayer = new GrammyGuitarist();
NameMatchMethodPointcut pc = new NameMatchMethodPointcut();
pc.addMethodName("sing");
pc.addMethodName("rest");
Advisor advisor = new DefaultPointcutAdvisor(pc, new SimpleAroundAdvice());
ProxyFactory pf = new ProxyFactory();
pf.setTarget(johnMayer);
pf.addAdvisor(advisor);
GrammyGuitarist proxy = (GrammyGuitarist) pf.getProxy();
proxy.sing();
proxy.sing(new Guitar());
proxy.rest();
proxy.talk();
}
}
There is no need to extend NameMatchMethodPointcut; you can simply create an instance of
NameMatchMethodPointcut, and you are on your way. Notice that we have added two method names to the
pointcut, sing and rest, using the addMethodName(..) method. Running this example produces the output
in Listing 5-17.
211
Chapter 5 ■ Spring AOP
Listing 5-17. NamePointcutDemo Output
DEBUG: SimpleAroundAdvice - >> Invoking sing
INFO : GrammyGuitarist - sing: Gravity is working against me
And gravity wants to bring me down
DEBUG: SimpleAroundAdvice - >> Done
DEBUG: SimpleAroundAdvice - >> Invoking sing
INFO : GrammyGuitarist - play: G C G C Am D7
DEBUG: SimpleAroundAdvice - >> Done
DEBUG: SimpleAroundAdvice - >> Invoking rest
INFO : GrammyGuitarist - zzz
DEBUG: SimpleAroundAdvice - >> Done
INFO : GrammyGuitarist - talk
As expected, the sing(), sing(Guitar), and rest() methods are advised, thanks to the pointcut, but
the talk() method is left unadvised.
For many of the Pointcut implementations, Spring also provides a convenience Advisor
implementation that acts as the pointcut. For instance, instead of using NameMatchMethodPointcut
coupled with DefaultPointcutAdvisor in the previous example, we could simply have used
NameMatchMethodPointcutAdvisor, as shown in Listing 5-18.
Listing 5-18. NameMatchMethodPointcutAdvisor Usage Example
package com.apress.prospring6.five;
import org.springframework.aop.support.NameMatchMethodPointcutAdvisor;
// other import statements omitted
public class NameMatchMethodPointcutAdvisorDemo {
public static void main(String... args) {
GrammyGuitarist johnMayer = new GrammyGuitarist();
NameMatchMethodPointcutAdvisor advisor =
new NameMatchMethodPointcutAdvisor(new SimpleAroundAdvice());
advisor.setMappedNames("sing", "rest");
ProxyFactory pf = new ProxyFactory();
pf.setTarget(johnMayer);
pf.addAdvisor(advisor);
GrammyGuitarist proxy = (GrammyGuitarist) pf.getProxy();
proxy.sing();
proxy.sing(new Guitar());
proxy.rest();
proxy.talk();
}
}
212
Chapter 5 ■ Spring AOP
Notice that rather than creating an instance of NameMatchMethodPointcut, we configure the pointcut
details on the instance of NameMatchMethodPointcutAdvisor by calling the setMappedNames(..) method
and providing the method names as arguments. In this way, NameMatchMethodPointcutAdvisor is acting as
both the advisor and the pointcut.
You can find full details of the different Advisor implementations by exploring the Javadoc for the
org.springframework.aop.support package. There is no noticeable performance difference between the
two approaches, and aside from there being slightly less code in the second example, there is very little
difference in the actual coding approach. We prefer to stick with the first approach because we feel the intent
is slightly clearer in the code. At the end of the day, the style you choose comes down to personal preference.
Creating Pointcuts with Regular Expressions
In the previous section, we discussed how to perform simple matching against a predefined list of methods.
But what if you don’t know all the method names in advance, and instead you know the pattern that the
names follow? For instance, what if you want to match all methods whose names start with get? In this case,
you can use the regular expression pointcut JdkRegexpMethodPointcut to match a method name based on a
regular expression. Listing 5-19 depicts another Guitarist class, which contains three methods.
Listing 5-19. Guitarist Implementation
package com.apress.prospring6.five.common;
// other imports omitted
public class Guitarist implements Singer{
private static Logger LOGGER = LoggerFactory.getLogger(Guitarist.class);
@Override
public void sing() {
LOGGER.info("Just keep me where the light is");
}
public void sing2() {
LOGGER.info("And wrap me in your arms");
}
@Override
public void rest() {
LOGGER.info("zzz...");
}
}
Using a regular expression–based pointcut, we can match all methods in this class whose name starts
with sing. This is shown in Listing 5-20.
Listing 5-20. Regex Pointcut Test Class
package com.apress.prospring6.five.pointcut;
import org.springframework.aop.support.JdkRegexpMethodPointcut;
// other import statements omitted
213
Chapter 5 ■ Spring AOP
public class RegexpPointcutDemo {
public static void main(String... args) {
Guitarist johnMayer = new Guitarist();
var pc = new JdkRegexpMethodPointcut();
pc.setPattern(".*sing.*");
Advisor advisor = new DefaultPointcutAdvisor(pc, new SimpleAroundAdvice());
ProxyFactory pf = new ProxyFactory();
pf.setTarget(johnMayer);
pf.addAdvisor(advisor);
Guitarist proxy = (Guitarist) pf.getProxy();
proxy.sing();
proxy.sing2();
proxy.rest();
}
}
Notice we do not need to create a class for the pointcut; instead, we just create an instance of
JdkRegexpMethodPointcut and specify the pattern to match, and we are finished. The interesting thing to
note is the pattern. When matching method names, Spring matches the fully qualified name of the method,
so for sing1(), Spring is matching against com.apress.prospring6.five.common.Guitarist.sing1, which
is why there’s the leading .* in the pattern. This is a powerful concept because it allows you to match all
methods within a given package, without needing to know exactly which classes are in that package and
what the names of the methods are. Running this example yields the output shown in Listing 5-21.
Listing 5-21. Regex Pointcut Test Class Output
DEBUG:
INFO :
DEBUG:
DEBUG:
INFO :
DEBUG:
INFO :
SimpleAroundAdvice - >> Invoking sing
Guitarist - Just keep me where the light is
SimpleAroundAdvice - >> Done
SimpleAroundAdvice - >> Invoking sing2
Guitarist - And wrap me in your arms
SimpleAroundAdvice - >> Done
Guitarist - zzz...
As expected, only the sing() and sing2() methods have been advised because the rest() method
does not match the regular expression pattern configured for the pointcut instance.
Creating Pointcuts with AspectJ Pointcut Expression
Besides JDK regular expressions, you can use AspectJ’s pointcut expression language for pointcut
declaration. Later in this chapter, you will see that when we declare the pointcut in Java configuration,
Spring defaults to using AspectJ’s pointcut language. Moreover, when using Spring’s @AspectJ annotation–
style AOP support, you need to use AspectJ’s pointcut language. So when declaring pointcuts by using
expression language, using an AspectJ pointcut expression is the best way to go. Spring provides the class
AspectJExpressionPointcut for defining pointcuts via AspectJ’s expression language.
214
Chapter 5 ■ Spring AOP
To use AspectJ pointcut expressions with Spring, you need to include two AspectJ library files,
aspectjrt.jar and aspectjweaver.jar, in your project’s classpath. Check out the pom.xml and
chapter05.gradle files for the configuration for each build tool.
Considering the previous implementation of the Guitarist class, the same functionality implemented
with JDK regular expressions can be implemented using an AspectJ expression. The code for that is shown in
Listing 5-22.
Listing 5-22. AspectJ Regex Pointcut Test Class
package com.apress.prospring6.five.pointcut;
import org.springframework.aop.aspectj.AspectJExpressionPointcut;
// other import statements omitted
public class AspectjexpPointcutDemo {
public static void main(String... args) {
Guitarist johnMayer = new Guitarist();
var pc = new AspectJExpressionPointcut();
pc.setExpression("execution(* sing*(..))");
var advisor = new DefaultPointcutAdvisor(pc, new SimpleAroundAdvice());
ProxyFactory pf = new ProxyFactory();
pf.setTarget(johnMayer);
pf.addAdvisor(advisor);
Guitarist proxy = (Guitarist) pf.getProxy();
proxy.sing();
proxy.sing2();
proxy.rest();
}
}
Note that we use the AspectJExpressionPointcut class’ setExpression() method to set the matching
criteria. The expression execution(* sing*(..)) means that the advice should apply to the execution
of any methods that start with sing, have any arguments, and return any types (yes, AspectJ is a lot more
flexible and concise). Running the program will get the same result as the previous example using JDK
regular expressions.
Creating Annotation Matching Pointcuts
If your application is annotation-based, you may want to use your own specified annotations for defining
pointcuts—that is, apply the advice logic to all methods or types with specific annotations. Spring provides
the class AnnotationMatchingPointcut for defining pointcuts using annotations. Again, let’s reuse the
previous example and see how to do it when using an annotation as a pointcut.
215
Chapter 5 ■ Spring AOP
First we define an annotation called AdviceRequired, which is an annotation that we will use for
declaring a pointcut. Listing 5-23 shows the annotation class and the modified AnnotatedGuitarist class
that has the sing(Guitar) method annotated with it.
Listing 5-23. Custom Annotation to Be Used with an AnnotationMatchingPointcut and the Class Using It
package com.apress.prospring6.five.common;
import
import
import
import
java.lang.annotation.ElementType;
java.lang.annotation.Retention;
java.lang.annotation.RetentionPolicy;
java.lang.annotation.Target;
@Retention(RetentionPolicy.RUNTIME)
@Target({ElementType.TYPE, ElementType.METHOD})
public @interface AdviceRequired { }
// AnnotatedGuitarist class
class AnnotatedGuitarist implements Singer {
private static Logger LOGGER = LoggerFactory.getLogger(AnnotatedGuitarist.class);
@Override
public void sing() {}
@AdviceRequired
public void sing(Guitar guitar) {
LOGGER.info("play: " + guitar.play());
}
}
The interface AdviceRequired is declared as an annotation by using @interface as the type, and the
@Target annotation defines that the annotation can apply at either the type or method level. The class
AnnotatedGuitarist class implements the Singer interface and adds its own sing(..) method that takes a
Guitar argument and is annotated with @AdviceRequired.
The testing program is no different from what was presented before and is depicted in Listing 5-24
together with its output.
Listing 5-24. Testing Program for the AnnotationMatchingPointcut
package com.apress.prospring6.five;
import com.apress.prospring6.five.common.AdviceRequired;
import org.springframework.aop.support.annotation.AnnotationMatchingPointcut;
// other import statements omitted
public class AnnotationPointcutDemo {
public static void main(String... args) {
var johnMayer = new AnnotatedGuitarist();
var pc = AnnotationMatchingPointcut.forMethodAnnotation(AdviceRequired.class);
216
Chapter 5 ■ Spring AOP
var advisor = new DefaultPointcutAdvisor(pc, new SimpleAroundAdvice());
ProxyFactory pf = new ProxyFactory();
pf.setTarget(johnMayer);
pf.addAdvisor(advisor);
AnnotatedGuitarist proxy = (AnnotatedGuitarist) pf.getProxy();
proxy.sing(new Guitar());
proxy.rest();
}
}
// output
DEBUG: SimpleAroundAdvice - >> Invoking sing
INFO : AnnotatedGuitarist - play: G C G C Am D7
DEBUG: SimpleAroundAdvice - >> Done
An instance of AnnotationMatchingPointcut is acquired by calling its static method
forMethodAnnotation() and passing in the annotation type. This indicates that we want to apply the advice
to all the methods annotated with the given annotation. It’s also possible to specify annotations applied at
the type level by calling the forClassAnnotation() method.
As you can see, since we annotated the sing(Guitar) method, only that method was advised.
U
nderstanding Proxies
So far, we have taken only a cursory look at the proxies generated by ProxyFactory. We mentioned that two
types of proxy are available in Spring: JDK proxies created by using the JDK Proxy class and CGLIB-based
proxies created by using the CGLIB Enhancer class. You may be wondering exactly what the difference
between the two proxies is and why Spring needs two types of proxy. In this section, we take a detailed look
at the differences between the proxies.
The core goal of a proxy is to intercept method invocations and, where necessary, execute chains of advice
that apply to a particular method. The management and invocation of advice is largely proxy independent
and is managed by the Spring AOP framework. However, the proxy is responsible for intercepting calls to all
methods and passing them as necessary to the AOP framework for the advice to be applied.
In addition to this core functionality, the proxy must support a set of additional features. It is possible
to configure the proxy to expose itself via the AopContext class (which is an abstract class) so that you can
retrieve the proxy and invoke advised methods on the proxy from the target object. The proxy is responsible
for ensuring that when this option is enabled via ProxyFactory.setExposeProxy(), the proxy class is
appropriately exposed. In addition, all proxy classes implement the Advised interface by default, which
allows for, among other things, the advice chain to be changed after the proxy has been created. A proxy
must also ensure that any methods that return this (that is, return the proxied target) do return the proxy and
not the target.
As you can see, a typical proxy has quite a lot of work to perform, and all of this logic is implemented in
both the JDK and CGLIB proxies.
Using JDK Dynamic Proxies
JDK proxies are the most basic type of proxy available in Spring. Unlike the CGLIB proxy, the JDK proxy can
generate proxies only of interfaces, not classes. In this way, any object you want to proxy must implement at
least one interface, and the resulting proxy will be an object that implements that interface. Figure 5-4 shows
an abstract schema of such a proxy.
217
Chapter 5 ■ Spring AOP
Figure 5-4. JDK proxy abstract schema
In general, it is good design to use interfaces for your classes, but it is not always possible, especially
when you are working with third-party or legacy code. In this case, you must use the CGLIB proxy. When you
are using the JDK proxy, all method calls are intercepted by the JVM and routed to the invoke() method of
the proxy. This method then determines whether the method in question is advised (by the rules defined by
the pointcut), and if so, it invokes the advice chain and then the method itself by using reflection. In addition
to this, the invoke() method performs all the logic discussed in the previous section.
The JDK proxy makes no determination between methods that are advised and unadvised until it is
in the invoke() method. This means that for unadvised methods on the proxy, the invoke() method is
still called, all the checks are still performed, and the method is still invoked by using reflection. Obviously,
this incurs runtime overhead each time the method is invoked, even though the proxy often performs no
additional processing other than to invoke the unadvised method via reflection.
You can instruct ProxyFactory to use a JDK proxy by specifying the list of interfaces to proxy by using
setInterfaces() (in the AdvisedSupport class that the ProxyFactory class extends indirectly).
Using CGLIB Proxies
With the JDK proxy, all decisions about how to handle a particular method invocation are handled at
runtime each time the method is invoked. When you use CGLIB, CGLIB dynamically generates the bytecode
for a new class on-the-fly for each proxy, reusing already generated classes wherever possible. The resulting
proxy type in this case will be a subclass of the target object class. Figure 5-5 shows an abstract schema of
such a proxy.
218
Chapter 5 ■ Spring AOP
Figure 5-5. CGLIB proxy abstract schema
When a CGLIB proxy is first created, CGLIB asks Spring how it wants to handle each method. This
means that many of the decisions that are performed in each call to invoke() on the JDK proxy are
performed just once for the CGLIB proxy. Because CGLIB generates actual bytecode, there is also a lot more
flexibility in the way you can handle methods. For instance, the CGLIB proxy generates the appropriate
bytecode to invoke any unadvised methods directly, reducing the overhead introduced by the proxy. In
addition, the CGLIB proxy determines whether it is possible for a method to return this; if not, it allows the
method call to be invoked directly, again reducing the runtime overhead.
The CGLIB proxy also handles fixed-advice chains differently than the JDK proxy. A fixed-advice chain
is one that you guarantee will not change after the proxy has been generated. By default, you are able to
change the advisors and advice on a proxy even after it is created, although this is rarely a requirement. The
CGLIB proxy handles fixed-advice chains in a particular way, reducing the runtime overhead for executing
an advice chain.
There are some limitations when working with CGLIB proxies:
1.
For obvious reasons, GLIB proxies cannot be created for final classes (since they
cannot be subclassed).
2.
Since static members belong to a class, not to an instance, they cannot be proxied.
3.
Private methods cannot be proxied either, since a subclass cannot access them.
219
Chapter 5 ■ Spring AOP
Comparing Proxy Performance
So far, we’ve discussed only in loose terms the differences in implementation between the proxy types. In
this section, we are going to run a simple test to compare the performance of the CGLIB proxy with the
JDK proxy. For this purpose we need the simplest bean and its interface, with no-op methods and a no-op
before advice.
The bean is named DefaultSimpleBean and implements the SimpleBean interface. It implements
the two methods declared by the interface, aptly named advised and unadvised, which are shown in
Listing 5-25.
Listing 5-25. SimpleBean and Its Implementation
package com.apress.prospring6.five.performance;
public interface SimpleBean {
void advised();
void unadvised();
}
// DefaultSimpleBean.java in the same package
public class DefaultSimpleBean implements SimpleBean {
@Override
public void advised() {
System.currentTimeMillis();
}
@Override
public void unadvised() {
System.currentTimeMillis();
}
}
Listing 5-26 depicts the NoOpBeforeAdvice class, which is just simple before advice without any
operation; this is needed to avoid polluting the output.
Listing 5-26. NoOpBeforeAdvice Implementation
package com.apress.prospring6.five.performance;
// import statements omitted
class NoOpBeforeAdvice implements MethodBeforeAdvice {
@Override
public void before(Method method, Object[] args, Object target) throws Throwable {
// no-op
}
}
220
Chapter 5 ■ Spring AOP
Listing 5-27 shows the code used to test various types of proxies.
Listing 5-27. NoOpBeforeAdvice Implementation test class
package com.apress.prospring6.five.performance
public class ProxyPerfTestDemo {
private static Logger LOGGER = LoggerFactory.getLogger(ProxyPerfTestDemo.class);
public static void main(String... args) {
SimpleBean target = new DefaultSimpleBean();
NameMatchMethodPointcutAdvisor advisor = new NameMatchMethodPointcutAdvisor(new
NoOpBeforeAdvice());
advisor.setMappedName("advised");
LOGGER.info("Starting tests ...");
runCglibTests(advisor, target);
runCglibFrozenTests(advisor, target);
runJdkTests(advisor, target);
}
private static void runCglibTests(Advisor advisor, SimpleBean target) {
ProxyFactory pf = new ProxyFactory();
pf.setProxyTargetClass(true);
pf.setTarget(target);
pf.addAdvisor(advisor);
SimpleBean proxy = (SimpleBean)pf.getProxy();
var testResults = test(proxy);
LOGGER.info(" --- CGLIB (Standard) Test results ---\n {} ", testResults);
}
private static void runCglibFrozenTests(Advisor advisor, SimpleBean target) {
ProxyFactory pf = new ProxyFactory();
pf.setProxyTargetClass(true);
pf.setTarget(target);
pf.addAdvisor(advisor);
pf.setFrozen(true);
SimpleBean proxy = (SimpleBean) pf.getProxy();
var testResults = test(proxy);
LOGGER.info(" --- CGLIB (Frozen) Test results ---\n {} ", testResults);
}
private static void runJdkTests(Advisor advisor, SimpleBean target) {
ProxyFactory pf = new ProxyFactory();
pf.setTarget(target);
pf.addAdvisor(advisor);
pf.setInterfaces(SimpleBean.class);
SimpleBean proxy = (SimpleBean)pf.getProxy();
var testResults = test(proxy);
LOGGER.info(" --- JDK Test results ---\n {} ", testResults);
}
221
Chapter 5 ■ Spring AOP
private static TestResults test(SimpleBean bean) {
TestResults testResults = new TestResults();
long before = System.currentTimeMillis();
for(int x = 0; x < 500000; x++) {
bean.advised();
}
long after = System.currentTimeMillis();
testResults.advisedMethodTime = after - before;
//----before = System.currentTimeMillis();
for(int x = 0; x < 500000; x++) {
bean.unadvised();
}
after = System.currentTimeMillis();
testResults.unadvisedMethodTime = after - before;
//----before = System.currentTimeMillis();
for(int x = 0; x < 500000; x++) {
bean.equals(bean);
}
after = System.currentTimeMillis();
testResults.equalsTime = after - before;
// ---before = System.currentTimeMillis();
for(int x = 0; x < 500000; x++) {
bean.hashCode();
}
after = System.currentTimeMillis();
testResults.hashCodeTime = after - before;
// ----Advised advised = (Advised)bean;
before = System.currentTimeMillis();
for(int x = 0; x < 500000; x++) {
advised.getTargetClass();
}
after = System.currentTimeMillis();
testResults.proxyTargetTime = after - before;
return testResults;
}
}
In this code, you can see that you are testing three kinds of proxies:
222
•
A standard CGLIB proxy
•
A CGLIB proxy with a frozen advice chain (that is, when a proxy is frozen by calling
the setFrozen() method in the ProxyConfig class that ProxyFactory extends
indirectly, CGLIB will perform further optimization; however, further advice change
will not be allowed)
•
A JDK proxy
Chapter 5 ■ Spring AOP
For each proxy type, you run the following five test cases:
•
Advised method (test 1): This is a method that is advised. The advice type used in
the test is before advice that performs no processing, so it reduces the effects of the
advice on the performance tests.
•
Unadvised method (test 2): This is a method on the proxy that is unadvised. Often
your proxy has many methods that are not advised. This test looks at how well
unadvised methods perform for the different proxies.
•
The equals() method (test 3): This test looks at the overhead of invoking the
equals() method. This is especially important when you use proxies as keys in a
HashMap<K,V> or similar collection.
•
The hashCode() method (test 4): As with the equals() method, the hashCode()
method is important when you are using HashMaps or similar collections.
•
Executing methods on the Advised interface (test 5): As we mentioned earlier, a proxy
implements the Advised interface by default, allowing you to modify the proxy
after creation and to query information about the proxy. This test looks at how fast
methods on the Advised interface can be accessed using the different proxy types.
Table 5-3 shows the results of these tests.
Table 5-3. Proxy Performance Test Results (in Milliseconds)
Methods being tested
CGLIB (Standard)
CGLIB (Frozen)
JDK
advised()
126
73
159
unadvised()
127
28
96
equals()
20
16
122
hashCode()
28
20
33
Advised.getProxyTargetClass()
13
8
81
As you can see, the performance between standard CGLIB and JDK dynamic proxy for both advised()
and unadvised() methods doesn’t differ much. As always, these numbers will vary based on hardware and
the JDK being used.
However, there is a noticeable difference when you are using a CGLIB proxy with a frozen advice chain.
Similar figures apply to the equals() and hashCode() methods, which are noticeably faster when you are
using the CGLIB proxy. For methods on the Advised interface, you will notice that they are also faster on the
CGLIB frozen proxy. The reason for this is that Advised methods are handled early on in the intercept()
method, so they avoid much of the logic that is required for other methods.
The TestResults class is a simple utility class with four properties, named after the method being
tested. Saving the test results for each proxy type in an instance of this type is done for practical reasons, in
an attempt to keep the code concise and readable. You can see this class in Listing 5-28.
Listing 5-28. TestResults Implementation
package com.apress.prospring6.five.performance;
// import statements omitted
public class TestResults {
private static Logger LOGGER = LoggerFactory.getLogger(TestResults.class);
223
Chapter 5 ■ Spring AOP
long
long
long
long
long
advisedMethodTime;
unadvisedMethodTime;
equalsTime;
hashCodeTime;
proxyTargetTime;
@Override
public String toString() {
return new ToStringBuilder(this)
.append("advised", advisedMethodTime)
.append("unadvised", unadvisedMethodTime)
.append("equals ", equalsTime)
.append("hashCode", hashCodeTime)
.append("getProxyTargetClass ", proxyTargetTime)
.toString();
}
}
Choosing a Proxy to Use
Deciding which proxy to use is typically easy. The CGLIB proxy can proxy both classes and interfaces,
whereas JDK proxies can proxy only interfaces. In terms of performance, there is no significant difference
between JDK and CGLIB standard mode (at least in running both advised and unadvised methods), unless
you use CGLIB in frozen mode, in which case the advice chain can’t be changed and CGLIB performs further
optimization when in frozen mode. When proxying a class, the CGLIB proxy is the default choice because it
is the only proxy capable of generating a proxy of a class. To use the CGLIB proxy when proxying an interface,
you must set the value of the optimize flag in ProxyFactory to true by using the setOptimize() method.
Advanced Use of Pointcuts
Earlier in the chapter, we looked at the six basic Pointcut implementations Spring provides; for the most
part, we have found that these meet the needs of our applications. However, sometimes you might need
more flexibility when defining pointcuts. Spring provides two additional Pointcut implementations,
ComposablePointcut and ControlFlowPointcut, which provide exactly the flexibility you need.
Using Control Flow Pointcuts
Spring control flow pointcuts, implemented by the ControlFlowPointcut class, are similar to the cflow
construct available in many other AOP implementations, although they are not quite as powerful.
Essentially, a control flow pointcut in Spring applies to all method calls below a given method or below all
methods in a class. This is quite hard to visualize and is better explained using an example.
Listing 5-29 shows a SimpleBeforeAdvice class that writes out a message describing the method it is
advising.
224
Chapter 5 ■ Spring AOP
Listing 5-29. SimpleBeforeAdvice Implementation
package com.apress.prospring6.five.advanced;
import org.springframework.aop.MethodBeforeAdvice;
import java.lang.reflect.Method;
//other import statements omitted
public class SimpleBeforeAdvice implements MethodBeforeAdvice {
private static Logger LOGGER = LoggerFactory.getLogger(SimpleBeforeAdvice.class);
@Override
public void before(Method method, Object[] args, Object target) throws Throwable {
LOGGER.info("Before method: {}", method);
}
}
This advice class allows us to see which methods the ControlFlowPointcut applies to. The TestBean
class is shown in Listing 5-30.
Listing 5-30. TestBean Implementation
package com.apress.prospring6.five.advanced;
// import statements omitted
public class TestBean {
private static Logger LOGGER = LoggerFactory.getLogger(TestBean.class);
public void foo() {
LOGGER.info("foo()");
}
}
You can see the simple foo() method that we want to advise. We have, however, a special requirement:
we want to advise this method only when it is called from another, specific method. Listing 5-31 shows a
simple driver program for this example.
Listing 5-31. ControlFlowDemo Implementation
package com.apress.prospring6.five.advanced;
import org.springframework.aop.support.ControlFlowPointcut;
// other import statements omitted
public class ControlFlowDemo {
private static Logger LOGGER = LoggerFactory.getLogger(ControlFlowDemo.class);
public static void main(String... args) {
ControlFlowDemo ex = new ControlFlowDemo();
ex.run();
}
225
Chapter 5 ■ Spring AOP
public void run() {
TestBean target = new TestBean();
Pointcut pc = new ControlFlowPointcut(ControlFlowDemo.class, "test");
Advisor advisor = new DefaultPointcutAdvisor(pc, new SimpleBeforeAdvice());
ProxyFactory pf = new ProxyFactory();
pf.setTarget(target);
pf.addAdvisor(advisor);
TestBean proxy = (TestBean) pf.getProxy();
LOGGER.info("\tTrying normal invoke");
proxy.foo();
LOGGER.info("\tTrying under ControlFlowDemo.test()");
test(proxy);
}
private void test(TestBean bean) {
bean.foo();
}
}
Notice that the advised proxy is assembled with ControlFlowPointcut, and then the foo() method is
invoked twice, once directly from the run() method and once from the test() method.
Here is the line of particular interest:
Pointcut pc = new ControlFlowPointcut(ControlFlowDemo.class, "test");
In this line, we are creating a ControlFlowPointcut instance for the test() method of the
ControlFlowDemo class. Essentially, this says, “Pointcut all methods that are called from the
ControlFlowExample.test() method.” Note that “Pointcut all methods” in fact means “Pointcut
all methods on the proxy object that is advised using the Advisor corresponding to this instance of
ControlFlowPointcut.” Running the code yields in the console the output shown in Listing 5-32.
Listing 5-32. ControlFlowDemo Console Output
INFO
INFO
INFO
INFO
:
:
:
:
ControlFlowDemo - Trying normal invoke
TestBean - foo()
ControlFlowDemo - Trying under ControlFlowDemo.test()
SimpleBeforeAdvice - Before method: public void com.apress.prospring6.five.advanced.
TestBean.foo()
INFO : TestBean - foo()
As you can see, when the sing() method is first invoked outside of the control flow of the test()
method, it is unadvised. When it executes for a second time, this time inside the control flow of the test()
method, the ControlFlowPointcut indicates that its associated advice applies to the method, and thus the
method is advised. Note that if we had called another method from within the test() method, one that was
not on the advised proxy, it would not have been advised.
Control flow pointcuts can be extremely useful, allowing you to advise an object selectively only when
it is executed in the context of another. However, be aware that you take a substantial performance hit for
using control flow pointcuts over other pointcuts.
226
Chapter 5 ■ Spring AOP
Let’s consider an example. Suppose we have a transaction processing system, which contains a
TransactionService interface as well as an AccountService interface. We would like to apply after
advice so that when the AccountService.updateBalance() method is called by TransactionService.
reverseTransaction(), an e-mail notification is sent to the customer, after the account balance is updated.
However, an e-mail will not be sent under any other circumstances. In this case, the control flow pointcut
will be useful. Figure 5-6 shows the UML sequence diagram for this scenario.
Figure 5-6. UML sequence diagram for a control flow pointcut
Using a Composable Pointcut
In previous pointcut examples, we used just a single pointcut for each advisor. In most cases, this is usually
enough, but in some cases, you may need to compose two or more pointcuts together to achieve the desired
goal. Say you want to pointcut all getter and setter methods on a bean. You have a pointcut for getters and
a pointcut for setters, but you don’t have one for both. Of course, you could just create another pointcut
with the new logic, but a better approach is to combine the two pointcuts into a single pointcut by using
ComposablePointcut.
ComposablePointcut supports two methods: union() and intersection(). By default,
ComposablePointcut is created with a ClassFilter that matches all classes and a MethodMatcher that
matches all methods, although you can supply your own initial ClassFilter and MethodMatcher during
construction. The union() and intersection() methods are both overloaded to accept ClassFilter and
MethodMatcher arguments.
227
Chapter 5 ■ Spring AOP
The ComposablePointcut.union() method can be called by passing in an instance of either
the ClassFilter, MethodMatcher, or Pointcut interface. The result of a union operation is that
ComposablePointcut will add an “or” condition into its call chain for matching with the joinpoints. It’s
the same for the ComposablePointcut.intersection() method, but this time an “and” condition will
be added instead, which means that all ClassFilter, MethodMatcher, and Pointcut definitions within
ComposablePointcut should be matched for applying an advice. You can imagine it as the WHERE clause in a
SQL query, with the union() method like the “or” operator and the intersection() method like the “and”
operator.
As with control flow pointcuts, this is quite difficult to visualize, and it is much easier to understand with
an example. Listing 5-33 shows the GrammyGuitarist class used in a previous example with its four methods.
Listing 5-33. GrammyGuitarist Implementation
package com.apress.prospring6.five.common;
// other import statements omitted
public class GrammyGuitarist implements Singer {
private static Logger LOGGER = LoggerFactory.getLogger(GrammyGuitarist.class);
@Override
public void sing() {
LOGGER.info("sing: Gravity is working against me\n" +
"And gravity wants to bring me down");
}
public void sing(Guitar guitar) {
LOGGER.info("play: " + guitar.play());
}
public void talk(){
LOGGER.info("talk");
}
@Override
public void rest(){
LOGGER.info("zzz");
}
}
With this example, we are going to generate three proxies by using the same ComposablePointcut
instance, but each time, we are going to modify ComposablePointcut by using either the union() or
intersection() method. Following this, we will invoke all three methods on the target bean proxy and look
at which ones have been advised. Listing 5-34 depicts this.
Listing 5-34. Testing ComposablePointcut
package com.apress.prospring6.five;
import org.springframework.aop.support.ComposablePointcut;
import org.springframework.aop.support.StaticMethodMatcher;
// other import statement omitted
228
Chapter 5 ■ Spring AOP
public class ComposablePointcutDemo {
private static Logger LOGGER = LoggerFactory.getLogger(ComposablePointcutDemo.class);
public static void main(String... args) {
GrammyGuitarist johnMayer = new GrammyGuitarist();
ComposablePointcut pc = new ComposablePointcut(ClassFilter.TRUE, new
SingMethodMatcher());
LOGGER.info("Test 1 >> ");
GrammyGuitarist proxy = getProxy(pc, johnMayer);
testInvoke(proxy);
LOGGER.info("Test 2 >> ");
pc.union(new TalkMethodMatcher());
proxy = getProxy(pc, johnMayer);
testInvoke(proxy);
LOGGER.info("Test 3 >> ");
pc.intersection(new RestMethodMatcher());
proxy = getProxy(pc, johnMayer);
testInvoke(proxy);
}
private static GrammyGuitarist getProxy(ComposablePointcut pc, GrammyGuitarist target) {
Advisor advisor = new DefaultPointcutAdvisor(pc, new SimpleBeforeAdvice());
ProxyFactory pf = new ProxyFactory();
pf.setTarget(target);
pf.addAdvisor(advisor);
return (GrammyGuitarist) pf.getProxy();
}
private static void testInvoke(GrammyGuitarist proxy) {
proxy.sing();
proxy.sing(new Guitar());
proxy.talk();
proxy.rest();
}
}
class SingMethodMatcher extends StaticMethodMatcher {
@Override
public boolean matches(Method method, Class<?> cls) {
return (method.getName().startsWith("si"));
}
}
class TalkMethodMatcher extends StaticMethodMatcher {
@Override
public boolean matches(Method method, Class<?> cls) {
return "talk".equals(method.getName());
}
}
229
Chapter 5 ■ Spring AOP
class RestMethodMatcher extends StaticMethodMatcher {
@Override
public boolean matches(Method method, Class<?> cls) {
return (method.getName().endsWith("st"));
}
}
The first thing to notice in this example is the set of three private MethodMatcher implementations.
SingMethodMatcher matches all methods that start with ‘get’. This is the default MethodMatcher that we
use to assemble ComposablePointcut. Because of this, we expect that the first round of invocations on the
GrammyGuitarist methods will result in only the sing() methods being advised.
TalkMethodMatcher matches all methods named talk, and it is combined with ComposablePointcut by
using union() for the second round of invocations. At this point, we have a union of two MethodMatchers:
one that matches all methods starting with si and one that matches all methods named talk. We now expect
that all invocations during the second round will be advised. TalkMethodMatcher is very specific and
matches only the talk() method. This MethodMatcher is combined with ComposablePointcut by using
intersection() for the third round for invocations.
Because RestMethodMatcher is being composed by using intersection(), we expect none of the
methods to be advised in the third round because there is no method that matches all the composed
MethodMatchers.
Running the code in Listing 5-34 yields the console output shown in Listing 5-35.
Listing 5-35. ComposablePointcutDemo Output
INFO : ComposablePointcutDemo - Test 1 >>
INFO : SimpleBeforeAdvice - Before method: public void com.apress.prospring6.five.common.
GrammyGuitarist.sing()
INFO : GrammyGuitarist - sing: Gravity is working against me
And gravity wants to bring me down
INFO : SimpleBeforeAdvice - Before method: public void com.apress.prospring6.five.common.
GrammyGuitarist.sing(com.apress.prospring6.five.common.Guitar)
INFO : GrammyGuitarist - play: G C G C Am D7
INFO : GrammyGuitarist - talk
INFO : GrammyGuitarist - zzz
INFO : ComposablePointcutDemo - Test 2 >>
INFO : SimpleBeforeAdvice - Before method: public void com.apress.prospring6.five.common.
GrammyGuitarist.sing()
INFO : GrammyGuitarist - sing: Gravity is working against me
And gravity wants to bring me down
INFO : SimpleBeforeAdvice - Before method: public void com.apress.prospring6.five.common.
GrammyGuitarist.sing(com.apress.prospring6.five.common.Guitar)
INFO : GrammyGuitarist - play: G C G C Am D7
INFO : SimpleBeforeAdvice - Before method: public void com.apress.prospring6.five.common.
GrammyGuitarist.talk()
INFO : GrammyGuitarist - talk
INFO : GrammyGuitarist - zzz
INFO : ComposablePointcutDemo - Test 3 >>
INFO : GrammyGuitarist - sing: Gravity is working against me
And gravity wants to bring me down
INFO : GrammyGuitarist - play: G C G C Am D7
INFO : GrammyGuitarist - talk
INFO : GrammyGuitarist - zzz
230
Chapter 5 ■ Spring AOP
Although this example demonstrated the use of MethodMatchers only in the composition process, it is
just as simple to use ClassFilter when you are building the pointcut. Indeed, you can use a combination of
MethodMatchers and ClassFilters when building your composite pointcut.
Composition and the Pointcut Interface
In the previous section, you saw how to create a composite pointcut by using multiple MethodMatchers and
ClassFilters. You can also create composite pointcuts by using other objects that implement the Pointcut
interface.
Another way to construct a composite pointcut is to use the org.springframework.aop.support.
Pointcuts class. The class provides three static methods. The intersection() and union() methods
both take two pointcuts as arguments to construct a composite pointcut. On the other hand, a
matches(Pointcut, Method, Class, Object[]) method is provided for performing a quick check on
whether a pointcut matches with the provided method, class, and method arguments.
The Pointcuts class supports operations on only two pointcuts. So, if you need to combine
MethodMatcher and ClassFilter with Pointcut, you need to use the ComposablePointcut class. However,
when you need to combine just two pointcuts, the Pointcuts class will be more convenient.
Pointcut Summary
Spring offers a powerful set of Pointcut implementations that should meet most, if not all, of your
application’s requirements. Remember that if you can’t find a pointcut to suit your needs, you can create
your own implementation from scratch by implementing Pointcut, MethodMatcher, and ClassFilter.
You can use two patterns to combine pointcuts and advisors. The first pattern, the one we have
used so far, involves having the Pointcut implementation decoupled from the advisor. In the code
we have seen up to this point, we created instances of Pointcut implementations and then used the
DefaultPointcutAdvisor implementation to add advice along with the Pointcut to the proxy.
The second option, one that is adopted by many of the examples in the Spring documentation, is
to encapsulate the Pointcut inside your own Advisor implementation. This way, you have a class that
implements both Pointcut and PointcutAdvisor, with the PointcutAdvisor.getPointcut() method
simply returning this. This is an approach many classes, such as StaticMethodMatcherPointcutAdvisor,
use in Spring. We find that the first approach is the most flexible, allowing you to use different Pointcut
implementations with different Advisor implementations. However, the second approach is useful in
situations where you are going to be using the same combination of Pointcut and Advisor in different parts
of your application or, indeed, across many applications.
The second approach is useful when each Advisor bean must have a separate instance of a Pointcut;
by making the Advisor responsible for creating the Pointcut, you can ensure that this is the case. If you
recall the discussion on proxy performance from the previous section, you will remember that unadvised
methods perform much better than methods that are advised. For this reason, you should ensure that,
by using Pointcuts, you advise only the methods that are absolutely necessary. This way, you reduce the
amount of unnecessary overhead added to your application by using AOP.
Getting Started with Introductions
Introductions are an important part of the AOP feature set available in Spring. By using introductions,
you can introduce new functionality to an existing object dynamically. In Spring, you can introduce an
implementation of any interface to an existing object. You may well be wondering exactly why this is
useful. Why would you want to add functionality dynamically at runtime when you can simply add that
functionality at development time? The answer to this question is easy: you add functionality dynamically
when the functionality is crosscutting and is not easily implemented using traditional advice.
231
Chapter 5 ■ Spring AOP
Introduction Basics
Spring treats introductions as a special type of advice, more specifically, as a special type of
around advice. Because introductions apply solely at the class level, you cannot use pointcuts with
introductions; semantically, the two don’t match. An introduction adds new interface implementations
to a class, and a pointcut defines which methods the advice applies to. You create an introduction by
implementing the IntroductionInterceptor interface, which extends the MethodInterceptor and
DynamicIntroductionAdvice interfaces.
Figure 5-7 shows this structure along with the methods of both interfaces, as depicted by the IntelliJ
IDEA UML plug-in.
Figure 5-7. IntroductionInterceptor interface hierarchy
As you can see, the MethodInterceptor interface defines an invoke() method. Using this method,
you provide the implementation for the interfaces that you are introducing and perform interception
for any additional methods as required. Implementing all methods for an interface inside a single
method can prove troublesome, and it is likely to result in an awful lot of code that you will have to wade
through just to decide which method to invoke. Thankfully, Spring provides a default implementation
of IntroductionInterceptor, called DelegatingIntroductionInterceptor, which makes creating
introductions much simpler. To build an introduction by using DelegatingIntroductionInterceptor, you
create a class that both inherits from DelegatingIntroductionInterceptor and implements the interfaces
you want to introduce. The DelegatingIntroductionInterceptor implementation then simply delegates all
calls to introduced methods to the corresponding method on itself. Don’t worry if this seems a little unclear;
you will see an example of it in the next section.
Just as you need to use PointcutAdvisor when you are working with pointcut advice, you need to use
IntroductionAdvisor to add introductions to a proxy. The default implementation of IntroductionAdvisor
is DefaultIntroductionAdvisor, which should suffice for most, if not all, of your introduction needs. You
should be aware that adding an introduction by using ProxyFactory.addAdvice() is not permitted and
results in AopConfigException being thrown. Instead, you should use the addAdvisor() method and pass
an instance of the IntroductionAdvisor interface.
When using standard advice—that is, not introductions—it is possible for the same advice instance to
be used for many objects. The Spring documentation refers to this as the per-class life cycle, although you can
use a single advice instance for many classes. For introductions, the introduction advice forms part of the
232
Chapter 5 ■ Spring AOP
state of the advised object, and as a result, you must have a distinct advice instance for every advised object.
This is called the per-instance life cycle. Because you must ensure that each advised object has a distinct
instance of the introduction, it is often preferable to create a subclass of DefaultIntroductionAdvisor
that is responsible for creating the introduction advice. This way, you need to ensure only that a new
instance of your advisor class is created for each object because it will automatically create a new instance
of the introduction. For example, say you want to apply before advice to the setFirstName() method
on all instances of the Contact class. Figure 5-8 shows the same advice that applies to all objects of the
Contact type.
Figure 5-8. Per-class life cycle of advice
Now let’s say you want to mix an introduction into all instances of the Contact class, and the
introduction will carry information for each Contact instance (for example, an attribute isModified that
indicates whether the specific instance was modified). In this case, the introduction will be created for each
instance of Contact and tied to that specific instance, as shown in Figure 5-9.
That covers the basics of introduction creation. We will now discuss how you can use introductions to
solve the problem of object modification detection.
Figure 5-9. Per-instance introduction
233
Chapter 5 ■ Spring AOP
Object Modification Detection with Introductions
Object modification detection is a useful technique for many reasons. Typically, you apply modification
detection to prevent unnecessary database access when you are persisting object data. If an object is
passed to a method for modification but it comes back unmodified, there is little point in issuing an
update statement to the database. Using a modification check in this way can really increase application
throughput, especially when the database is already under a substantial load or is located on a remote
network, making communication an expensive operation.
Unfortunately, this kind of functionality is difficult to implement by hand because it requires you to add
to every method that can modify object state to check whether the object state is actually being modified.
When you consider all the null checks that have to be made and the checks to see whether the value is
actually changing, you are looking at around eight lines of code per method. You could refactor this into a
single method, but you still have to call this method every time you need to perform the check. Spread this
across a typical application with many classes that require modification checks, and you have a disaster
waiting to happen.
This is clearly a place where introductions will help. We don’t want to have each class that requires
modification checks inherit from some base implementation, losing its only chance for inheritance as a
result, nor do we really want to be adding checking code to each and every state-changing method. Using
introductions, we can provide a flexible solution to the modification detection problem without having to
write a bunch of repetitive, error-prone code.
In this example, we are going to build a full modification check framework using introduction. The
modification check logic is encapsulated by the IsModified interface, an implementation of which will
be introduced into the appropriate objects, along with interception logic to perform modification checks
automatically. For the purposes of this example, we use JavaBeans conventions, in that we consider a
modification to be any call to a setter method. Of course, we don’t just treat all calls to a setter method as a
modification; we check to see whether the value being passed to the setter is different from the one currently
stored in the object. The only flaw with this solution is that setting an object back to its original state will still
reflect a modification if any one of the values on the object has changed. For example, you have a Contact
object with the firstName attribute. Let’s say that during processing, the firstName attribute was changed
from Peter to John. As a result, the object was marked as modified. However, it will still be marked as
modified, even if the value is then changed back from John to its original value Peter in later processing.
One way to keep track of such changes is to store the full history of changes in the object’s entire life
cycle. However, the implementation here is trivial and suffices for most requirements. Implementing the
more complete solution would result in an overly complex example.
U
sing the IsModified Interface
Central to the modification check solution is the IsModified interface, which the fictional application
uses to make intelligent decisions about object persistence. We do not cover how the application would
use IsModified; instead, we will focus on the implementation of the introduction. Listing 5-36 shows the
IsModified interface.
Listing 5-36. The IsModified Interface
package com.apress.prospring6.five.introduction;
public interface IsModified {
boolean isModified();
}
There’s nothing special here—just a single method, isModified(), indicating whether an object has
been modified.
234
Chapter 5 ■ Spring AOP
C
reating a Mixin
The next step is to create the code that implements IsModified and that is introduced to the
objects; this is referred to as a mixin. As we mentioned earlier, it is much simpler to create mixins
by subclassing DelegatingIntroductionInterceptor than to create one by directly implementing
the IntroductionInterceptor interface. The mixin class, IsModifiedMixin, subclasses
DelegatingIntroductionInterceptor and also implements the IsModified interface. This implementation
is shown in Listing 5-37.
Listing 5-37. The IsModifiedMixin Class
package com.apress.prospring6.five.introduction;
import
import
import
import
import
import
java.lang.reflect.Method;
java.util.HashMap;
java.util.Map;
java.util.function.Predicate;
org.aopalliance.intercept.MethodInvocation;
org.springframework.aop.support.DelegatingIntroductionInterceptor;
public class IsModifiedMixin extends DelegatingIntroductionInterceptor implements
IsModified {
private boolean isModified = false;
private final Map<Method, Method> methodCache = new HashMap<>();
private final Predicate<MethodInvocation> isSetter = invocation ->
invocation.getMethod().getName().startsWith("set") && (invocation.
getArguments().length == 1);
@Override
public boolean isModified() {
return isModified;
}
@Override
public Object invoke(MethodInvocation invocation) throws Throwable {
if (!isModified) {
if (isSetter.test(invocation)) {
Method getter = getGetter(invocation.getMethod());
if (getter != null) {
Object newVal = invocation.getArguments()[0];
Object oldVal = getter.invoke(invocation.getThis(), null);
if (newVal == null && oldVal == null) {
isModified = false;
} else if ((newVal == null && oldVal != null) || (newVal != null &&
oldVal == null)) {
isModified = true;
} else {
isModified = !newVal.equals(oldVal);
}
}
}
}
235
Chapter 5 ■ Spring AOP
return super.invoke(invocation);
}
private Method getGetter(Method setter) {
Method getter = methodCache.get(setter);
if (getter != null) {
return getter;
}
String getterName = setter.getName().replaceFirst("set", "get");
try {
getter = setter.getDeclaringClass().getMethod(getterName, null);
synchronized (methodCache) {
methodCache.put(setter, getter);
}
return getter;
} catch (NoSuchMethodException ex) {
return null;
}
}
}
The first thing to notice here is the implementation of IsModified, which consists of the private
modified field and the isModified() method. This example highlights why you must have one mixin
instance per advised object—the mixin introduces not only methods to the object but also state. If you share
a single instance of this mixin across many objects, then you are also sharing the state, which means all
objects show as modified the first time a single object becomes modified.
You do not actually have to implement the invoke() method for a mixin, but in this case, doing so
allows us to detect automatically when a modification occurs. We start by performing the check only if the
object is still unmodified; we do not need to check for modifications once we know that the object has been
modified. Next, we check to see whether the method is a setter, and if it is, we retrieve the corresponding
getter method. Note that we cache the getter/setter pairs for quicker future retrieval. Finally, we compare the
value returned by the getter with that passed to the setter to determine whether a modification has occurred.
Notice that we check for the different possible combinations of null and set the modifications appropriately.
It is important to remember that when you are using DelegatingIntroductionInterceptor, you must
call super.invoke() when overriding invoke() because it is DelegatingIntroductionInterceptor that
dispatches the invocation to the correct location, either the advised object or the mixin itself.
You can implement as many interfaces as you like in your mixin, each of which is automatically
introduced into the advised object.
Creating an Advisor
The next step is to create an Advisor class to wrap the creation of the mixin class. This step is optional, but it
does help to ensure that a new instance of the mixin is being used for each advised object. Listing 5-38 shows
the IsModifiedAdvisor class.
236
Chapter 5 ■ Spring AOP
Listing 5-38. The IsModifiedAdvisor Class
package com.apress.prospring6.five.introduction;
import org.springframework.aop.support.DefaultIntroductionAdvisor;
public class IsModifiedAdvisor extends DefaultIntroductionAdvisor {
public IsModifiedAdvisor() {
super(new IsModifiedMixin());
}
}
Notice that we have extended DefaultIntroductionAdvisor to create our IsModifiedAdvisor. The
implementation of this advisor is trivial and self-explanatory.
Putting It All Together
Now that we have a mixin class and an Advisor class, we can test the modification check framework. The
class that we are going to use is the Contact class that was mentioned earlier, which is part of a common
package. This class is often used as a dependency for projects in this book for reasons of reusability. The
contents of this class are shown in Listing 5-39.
Listing 5-39. The Contact Class
package com.apress.prospring6.five.introduction;
public class Contact {
private String name;
private String phoneNumber;
private String email;
// getters, setters and toString omitted
}
This bean has a set of properties, but only the name property for testing the modification check mixin.
Listing 5-40 shows how to assemble the advised proxy and then tests the modification check code.
Listing 5-40. The IntroductionDemo Class
package com.apress.prospring6.five.introduction;
import
import
import
import
org.slf4j.Logger;
org.slf4j.LoggerFactory;
org.springframework.aop.IntroductionAdvisor;
org.springframework.aop.framework.ProxyFactory;
public class IntroductionDemo {
private static Logger LOGGER = LoggerFactory.getLogger(IntroductionDemo.class);
public static void main(String... args) {
Contact target = new Contact();
target.setName("John Mayer");
237
Chapter 5 ■ Spring AOP
IntroductionAdvisor advisor = new IsModifiedAdvisor();
ProxyFactory pf = new ProxyFactory();
pf.setTarget(target);
pf.addAdvisor(advisor);
pf.setOptimize(true);
Contact proxy = (Contact) pf.getProxy();
IsModified proxyInterface = (IsModified)proxy;
LOGGER.info("Is Contact? => {} " , (proxy instanceof Contact));
LOGGER.info("Is IsModified? => {} " , (proxy instanceof IsModified));
LOGGER.info("Has been modified? => {} " , proxyInterface.isModified());
proxy.setName("John Mayer");
LOGGER.info("Has been modified? => {} " , proxyInterface.isModified());
proxy.setName("Ben Barnes");
LOGGER.info("Has been modified? => {} " , proxyInterface.isModified());
}
}
Notice that when we are creating the proxy, we set the optimize flag to true to force the use of the
CGLIB proxy. The reason for this is that when you are using the JDK proxy to introduce a mixin, the resulting
proxy will not be an instance of the object class (in this case Contact); the proxy implements only the mixin
interfaces, it does not extend the original class. With the CGLIB proxy, the original class is extended by the
proxy along with the mixin interfaces.
Notice in Listing 5-40 that we test first to see whether the proxy is an instance of Contact and then to
see whether it is an instance of IsModified. Both tests return true when you are using the CGLIB proxy, but
only the IsModified test returns true for the JDK proxy. Finally, we test the modification check code by first
setting the name property to its current value and then to a new value, checking the value of the isModified
flag each time. Running the example results in the output shown in Listing 5-41.
Listing 5-41. The IntroductionDemo Execution Output
INFO
INFO
INFO
INFO
INFO
:
:
:
:
:
IntroductionDemo
IntroductionDemo
IntroductionDemo
IntroductionDemo
IntroductionDemo
-
Is Contact? => true
Is IsModified? => true
Has been modified? => false
Has been modified? => false
Has been modified? => true
As expected, both instanceof tests return true. Notice that the first call to isModified(), before any
modification occurred, returns false. The next call, after we set the value of name to the same value, also
returns false. For the final call, however, after we set the value of name to a new value, the isModified()
method returns true, indicating that the object has in fact been modified.
Introduction Summary
Introductions are one of the most powerful features of Spring AOP; they allow you not only to extend
the functionality of existing methods but to extend the set of interfaces and object implementations
dynamically. Using introductions is the perfect way to implement crosscutting logic that your application
interacts with through well-defined interfaces. In general, this is the kind of logic that you want to apply
238
Chapter 5 ■ Spring AOP
declaratively rather than programmatically. By using IsModifiedMixin defined in this example and the
framework services discussed in the next section, we can declaratively define which objects are capable of
modification checks, without needing to modify the implementations of those objects.
Obviously, because introductions work via proxies, they add a certain amount of overhead. All methods
on the proxy are considered advised since pointcuts cannot be used in conjunction with introductions.
However, in the case of many of the services that you can implement by using introductions, such as the
object modification check, this performance overhead is a small price to pay for the reduction in code
required to implement the service, as well as the increase in stability and maintainability that comes from
fully centralizing the service logic.
Framework Services for AOP
Up to now, we have had to write a lot of code to advise objects and generate the proxies for them. Although
this in itself is not a huge problem, it does mean that all advice configuration is hard-coded into your
application, removing some benefits of being able to advise a method implementation transparently.
Thankfully, Spring provides additional framework services that allow you to create an advised proxy in your
application configuration and then inject this proxy into a target bean just like any other dependencies.
Using the declarative approach to AOP configuration is preferable to the manual, programmatic
mechanism. When you use the declarative mechanism, not only do you externalize the configuration
of advice, but you also reduce the chance of coding errors. You can also take advantage of DI and AOP
combined to enable AOP so that it can be used in a completely transparent environment.
Configuring AOP Declaratively
When using declarative configuration of Spring AOP, three options exist.
•
Using ProxyFactoryBean: In Spring AOP, ProxyFactoryBean provides a declarative
way to configure Spring’s ApplicationContext (and hence the underlying
BeanFactory) when creating AOP proxies based on defined Spring beans.
•
Using the Spring aop namespace: Introduced in Spring 2.0, the aop namespace
provides a simplified way (when compared to ProxyFactoryBean) to define aspects
and their DI requirements in Spring applications. However, the aop namespace also
uses ProxyFactoryBean behind the scenes. We do not show this option in this book
since the focus is on using Java configuration.
•
Using @AspectJ-style annotations: The practical way for configuring Spring AOP is
to use @AspectJ-style annotations within your classes. Although the syntax it uses
is based on AspectJ and you need to include some AspectJ libraries when using this
option, Spring still uses the proxy mechanism (that is, creates proxied objects for the
targets) when bootstrapping ApplicationContext.
Using ProxyFactoryBean
The ProxyFactoryBean class is an implementation of FactoryBean that allows you to specify a bean to
target, and it provides a set of advice and advisors for that bean that are eventually merged into an AOP
proxy. ProxyFactoryBean is used to apply interceptor logic to an existing target bean in such a way that
when methods on that bean are invoked, the interceptors are executed before and after that method call.
Because you can use both advisor and advice with ProxyFactoryBean, you can configure not only the advice
declaratively but the pointcuts as well.
239
Chapter 5 ■ Spring AOP
ProxyFactoryBean shares a common interface (the org.springframework.aop.framework.
Advised interface) with ProxyFactory (both classes extend the org.springframework.aop.framework.
AdvisedSupport class indirectly, which implements the Advised interface), and as a result, it exposes many
of the same flags such as frozen, optimize, and exposeProxy. The values for these flags are passed directly
to the underlying ProxyFactory, which allows you to configure the factory declaratively as well.
Using ProxyFactoryBean is simple. You define a bean that will be the target bean, and then using
ProxyFactoryBean, you define the bean that your application will access, using the target bean as the proxy
target. Where possible, define the target bean as an anonymous bean inside the proxy bean declaration. This
prevents your application from accidentally accessing the unadvised bean. However, in some cases, such as
the sample we are about to show you, you may want to create more than one proxy for the same bean, so you
should use a normal top-level bean for this case.
For the following example, imagine this scenario: you have a singer working together with a
documentarist to produce a documentary of a tour. In this case, Documentarist has a dependency on the
Singer implementation. The Singer implementation that we will use here is the previously introduced
GrammyGuitarist that has been shown twice before in this chapter, the last time in Listing 5-33. The
Documentarist class that will basically tell the singer what to do while filming the documentary is shown in
Listing 5-42.
Listing 5-42. The Documentarist Class
package com.apress.prospring6.five.common;
public class Documentarist {
private GrammyGuitarist guitarist;
public void execute() {
guitarist.sing();
guitarist.talk();
}
public void setDep(GrammyGuitarist guitarist) {
this.guitarist = guitarist;
}
}
For this example, we are going to create two proxies for a single GrammySinger instance, both with the
same basic advice shown in Listing 5-43.
Listing 5-43. The AuditAdvice Class
package com.apress.prospring6.five.common;
import org.aspectj.lang.JoinPoint;
import org.slf4j.Logger;
import org.slf4j.LoggerFactory;
public class AuditAdvice implements MethodBeforeAdvice {
private static Logger LOGGER = LoggerFactory.getLogger(AuditAdvice.class);
240
Chapter 5 ■ Spring AOP
@Override
public void before(Method method, Object[] args, Object target) throws Throwable {
LOGGER.info("Executing {}" , method );
}
}
The first proxy will just advise the target by using the advice directly; thus, all methods will be advised.
For the second proxy, we will configure AspectJExpressionPointcut and DefaultPointcutAdvisor
so that only the sing() method of the GrammySinger class is advised. To test the advice, we will create two
bean definitions of type Documentarist, each of which will be injected with a different proxy. Then we will
invoke the execute() method on each of these beans and observe what happens when the advised methods
on the dependency are invoked. Figure 5-10 shows the configuration for this example represented by the
AopConfig class.
Figure 5-10. Declarative AOP configuration
Since the image might be unclear in print, Listing 5-44 shows the AopConfig class.
Listing 5-44. The AopConfig Configuration Class
package com.apress.prospring6.five;
// import statements omitted
@Configuration
class AopConfig implements BeanFactoryAware {
private BeanFactory beanFactory;
241
Chapter 5 ■ Spring AOP
@Override
public void setBeanFactory(BeanFactory beanFactory) throws BeansException {
this.beanFactory = beanFactory;
}
@Bean
public GrammyGuitarist johnMayer(){
return new GrammyGuitarist();
}
@Bean
public Advice advice(){
return new AuditAdvice();
}
@Bean
public GrammyGuitarist proxyOne(){
ProxyFactoryBean pfb = new ProxyFactoryBean();
pfb.setProxyTargetClass(true);
pfb.setTarget(johnMayer());
pfb.setInterceptorNames("advice");
pfb.setBeanFactory(beanFactory);
pfb.setFrozen(true);
return (GrammyGuitarist) pfb.getObject();
}
@Bean
public Documentarist documentaristOne() {
Documentarist documentarist = new Documentarist();
documentarist.setDep(proxyOne());
return documentarist;
}
@Bean
public GrammyGuitarist proxyTwo(){
ProxyFactoryBean pfb = new ProxyFactoryBean();
pfb.setProxyTargetClass(true);
pfb.setTarget(johnMayer());
pfb.setInterceptorNames("advisor");
pfb.setBeanFactory(beanFactory);
pfb.setFrozen(true);
return (GrammyGuitarist) pfb.getObject();
}
@Bean
public Documentarist documentaristTwo(){
Documentarist documentarist = new Documentarist();
documentarist.setDep(proxyTwo());
return documentarist;
}
242
Chapter 5 ■ Spring AOP
@Bean
public DefaultPointcutAdvisor advisor(){
DefaultPointcutAdvisor advisor = new DefaultPointcutAdvisor();
advisor.setAdvice(advice());
AspectJExpressionPointcut pc = new AspectJExpressionPointcut();
pc.setExpression("execution(* sing*(..))");
advisor.setPointcut(pc);
return advisor;
}
}
We used an image to depict this configuration because it might look a little confusing and we wanted to
make sure it is easy to see where each bean is injected. In the example, we are simply setting the properties
that we set in code using Spring’s DI capabilities. The only points of interest are that the pointcut is not
declared as a bean, but as a simple pojo set on the advisor bean, since this is not meant to be shared, and
we use the ProxyFactoryBean class to create proxies. The important point to realize when you are using
ProxyFactoryBean is that the ProxyFactoryBean declaration is the one to expose to your application and
the one to use when you are fulfilling dependencies. The underlying target bean declaration is not advised,
so you should use this bean only when you want to bypass the AOP framework, although in general, your
application should not be aware of the AOP framework and thus should not want to bypass it. For this
reason, you should use anonymous beans wherever possible to avoid accidental access from the application.
Listing 5-45 shows a simple class that obtains the two Documentarist instances from
ApplicationContext and then runs the execute() method for each one. In the same listing you can also see
its output.
Listing 5-45. The Class Testing the ProxyFactoryBean Configuration
package com.apress.prospring6.five;
// import statements omitted
public class ProxyFactoryBeanDemo {
public static void main(String... args) {
var ctx = new AnnotationConfigApplicationContext(AopConfig.class);
Documentarist documentaristOne = ctx.getBean("documentaristOne",
Documentarist.class);
Documentarist documentaristTwo = ctx.getBean("documentaristTwo",
Documentarist.class);
System.out.println("Documentarist One >>");
documentaristOne.execute();
System.out.println("\nDocumentarist Two >> ");
documentaristTwo.execute();
}
}
// output
Documentarist One >>
INFO : AuditAdvice - Executing public void com.apress.prospring6.five.common.
GrammyGuitarist.sing()
INFO : GrammyGuitarist - sing: Gravity is working against me
243
Chapter 5 ■ Spring AOP
And gravity wants to bring me down
INFO : AuditAdvice - Executing public void com.apress.prospring6.five.common.
GrammyGuitarist.talk()
INFO : GrammyGuitarist - talk
Documentarist Two >>
INFO : AuditAdvice - Executing public void com.apress.prospring6.five.common.
GrammyGuitarist.sing()
INFO : GrammyGuitarist - sing: Gravity is working against me
And gravity wants to bring me down
INFO : GrammyGuitarist - talk
As expected, both the sing() and talk() methods in the first proxy are advised because no pointcut
was used in its configuration. For the second proxy, however, only the sing() method was advised because
of the pointcut used in the configuration.
Using ProxyFactoryBean for Introductions
You are not limited in using the ProxyFactoryBean class for just advising an object but also for introducing
mixins to your objects. Remember from the earlier discussion on introductions that you must use an
IntroductionAdvisor to add an introduction; you cannot add an introduction directly. The same rule
applies when you are using ProxyFactoryBean with introductions. When you are using ProxyFactoryBean, it
becomes much easier to configure your proxies if you created a custom Advisor for your mixin. Listing 5-46
shows a configuration snippet for the IsModifiedMixin introduction from earlier in the chapter.
Listing 5-46. The Class Testing the ProxyFactoryBean Configuration
package com.apress.prospring6.five;
import org.springframework.aop.framework.ProxyFactoryBean;
// other import statements omitted
@Configuration
class IntroductionAopConfig {
@Bean
public Contact guitarist(){
var contact = new Contact();
contact.setName("John Mayer");
return contact;
}
@Bean
public IsModifiedAdvisor advisor() {
return new IsModifiedAdvisor();
}
@Bean
public Contact proxy(){
ProxyFactoryBean pfb = new ProxyFactoryBean();
pfb.setProxyTargetClass(true);
244
Chapter 5 ■ Spring AOP
pfb.setTarget(guitarist());
pfb.addAdvisor(advisor());
pfb.setFrozen(true);
return (Contact) pfb.getObject();
}
}
Running this example yields exactly the same output as the previous introduction example, covered at
the beginning of the “Getting Started with Introductions” section, but this time the proxy is obtained from
ApplicationContext and no configuration is present in the application code.
Notice that there is no need to refer to the advisor bean by name to provide it as an argument to
ProxyFactoryBean because addAdvisor(..) can be called directly and the advisor bean can be provided as
the argument. This obviously simplifies the configuration.
ProxyFactoryBean Summary
When you use ProxyFactoryBean, you can configure AOP proxies that provide all the flexibility of the
programmatic method without needing to couple your application to the AOP configuration. Unless
you need to perform decisions at runtime as to how your proxies should be created, it is best to use the
declarative method of proxy configuration over the programmatic method. Let’s move on, so you can see the
most practical way for using declarative Spring AOP.
U
sing @AspectJ-Style Annotations
When using Spring AOP with JDK 5 or newer, you can also use the @AspectJ-style annotations to declare
your advice. However, as stated before, Spring still uses its own proxying mechanism for advising the target
methods, not AspectJ’s weaving mechanism.
In this section, we will go through how to implement the same aspects as the ones introduced at the
beginning of the chapter by using @AspectJ-style annotations. AspectJ is a general-purpose aspect-oriented
extension to Java born out of need to solve issues or concerns that are not well captured by traditional
programming methodologies—in other words, crosscutting concerns. For the examples in this section, we
will use annotations for other Spring beans as well, and we will use Java configuration classes.
Listing 5-47 depicts the GrammyGuitarist class with the bean being declared using annotations.
Listing 5-47. GrammyGuitarist Bean Declared Using the @Component Annotation
package com.apress.prospring6.five.annotated;
import org.springframework.stereotype.Component;
// other import statements missing
@Component("johnMayer") //
public class GrammyGuitarist implements Singer {
private static Logger LOGGER = LoggerFactory.getLogger(GrammyGuitarist.class);
@Override
public void sing() {
LOGGER.info("sing: Gravity is working against me\n" +
"And gravity wants to bring me down");
}
245
Chapter 5 ■ Spring AOP
public void sing(Guitar guitar) {
LOGGER.info("play: " + guitar.play());
}
public void talk(){
LOGGER.info("talk");
}
@Override
public void rest(){
LOGGER.info("zzz");
}
}
To make things more interesting, a NewDocumentarist class is introduced that calls sing(Guitar) as
well. This class is shown in Listing 5-48.
Listing 5-48. NewDocumentarist Bean Declared Using the @Component Annotation
package com.apress.prospring6.five.annotated;
import org.springframework.beans.factory.annotation.Autowired;
import org.springframework.beans.factory.annotation.Qualifier;
// other import statements omitted
@Component("documentarist")
public class NewDocumentarist {
protected GrammyGuitarist guitarist;
public void execute() {
guitarist.sing();
Guitar guitar = new Guitar();
guitar.setBrand("Gibson");
guitarist.sing(guitar);
guitarist.talk();
}
@Autowired
@Qualifier("johnMayer")
public void setGuitarist(GrammyGuitarist guitarist) {
this.guitarist = guitarist;
}
}
Both classes are annotated with @Component to declare beans of these types. The annotation is also
used to name the beans. In the NewDocumentarist class, the setter method of the property guitarist was
annotated with @Autowired for automatic injection by Spring and with @Qualifier to configure the name of
the bean that Spring should inject.
Now that we have the beans, let’s start with a very simple before advice.
246
Chapter 5 ■ Spring AOP
Declarative Before Advice with AspectJ Annotations
Using annotations, we don’t always need to explicitly declare a Pointcut, since the AspectJ @Before
annotation’s default attribute can be configured with a pointcut expression representing where to bind the
advice. Listing 5-49 shows the BeforeAdviceV1 class that declares the annotated advice.
Listing 5-49. BeforeAdviceV1 Class, Declaring an Aspect Bean with a Single Before Advice
package com.apress.prospring6.five.advice;
import org.aspectj.lang.JoinPoint;
import org.aspectj.lang.annotation.Aspect;
import org.aspectj.lang.annotation.Before;
// other import annotations omitted
@Component
@Aspect
public class BeforeAdviceV1 {
private static Logger LOGGER = LoggerFactory.getLogger(BeforeAdviceV1.class);
@Before("execution(* com.apress.prospring6.five..sing*(com.apress.prospring6.five.
common.Guitar))")
public void simpleBeforeAdvice(JoinPoint joinPoint) {
var signature = (MethodSignature) joinPoint.getSignature();
LOGGER.info(" > Executing: {} from {}", signature.getName(), signature.
getDeclaringTypeName() );
}
}
Why the V1 suffix? Because there is more than one way to declare this advice and pointcut. In this
section all classes declaring the same before advice in different ways are suffixed with a number that is also
used as a suffix for the method testing the advice.
Notice how the advice class does not need to implement the MethodBeforeAdvice. Another thing to
notice is the @Aspect annotation is used to declare that it’s an aspect class. An aspect class groups together
advice declarations, pointcuts, and other utility methods for declaring these.
The @Before annotation marks the simpleBeforeAdvice(..) method as a before advice and the
expression provided as the value for its default attribute is a pointcut expression that means we want to
advise all methods with the name starting with sing, and the classes are defined under the package
com.apress.prospring6.five (including all the subpackages, which is what the .. means). Also, the sing*
method should receive one argument with the com.apress.prospring6.five.common.Guitar type.
The before advice method accepts the joinpoint as an argument but not the method, object, and
arguments. Actually, for the advice class, this argument is optional, so you can leave the method with no
argument. However, if in the advice you need to access the information of the joinpoint being advised (in
this case, we want to dump the information of the calling type and method name), then you need to define
the acceptance of the argument. When the argument is defined for the method, Spring will automatically
pass the joinpoint into the method for your processing. In this example, we use the JoinPoint to print the
joinpoint details.
247
Chapter 5 ■ Spring AOP
To test this advice we must design a Spring configuration class that discovers the GrammyGuitarist
and NewDocumentarist beans and enables support for handling components marked with AspectJ’s
@Aspect annotation and others. To keep the code simple and the advices isolated for each scenario in
this section, the aspect bean will be registered together with the configuration class in Listing 5-50 in an
empty ApplicationContext. This allows us to reuse this configuration class, and keeps the testing snippets
identical, the only difference being the aspect class added to the context.
The configuration class is shown in Listing 5-50.
Listing 5-50. AspectJ Spring Configuration Class
package com.apress.prospring6.five.annotated;
import org.springframework.context.annotation.ComponentScan;
import org.springframework.context.annotation.Configuration;
import org.springframework.context.annotation.EnableAspectJAutoProxy;
@ComponentScan
@Configuration
@EnableAspectJAutoProxy(proxyTargetClass = true)
public class AspectJAopConfig {
}
Notice the @EnableAspectJAutoProxy annotation. This annotation enables support for handling
components marked with AspectJ’s @Aspect annotation and is designed to be used on classes annotated
with @Configuration. It also has an attribute called proxyTargetClass. When set to true it indicates that
subclass-based (CGLIB) proxies are to be created as opposed to standard Java interface-based proxies. In
this example, CGLIB proxies are needed because even if GrammyGuitarist implements the Singer interface,
and by default interface-based JDK dynamic proxies should be suitable, NewDocumentarist strictly requires
the dependency to be of type GrammyGuitarist or an extension of it. So we need a proxy that extends
GrammyGuitarist. Without the proxyTargetClass = true attribute when attempting to start a Spring
application with this configuration the following exception will be thrown:
Error creating bean with name 'documentarist': Unsatisfied dependency expressed through
method 'setGuitarist' parameter 0; nested exception is org.springframework.beans.
factory.BeanNotOfRequiredTypeException: Bean named 'johnMayer' is expected to be of type
'com.apress.prospring6.five.annotated.GrammyGuitarist' but was actually of type 'jdk.
proxy3.$Proxy26'
A rule of thumb if at least one class in the configuration needs to be proxied through subclassing the
proxyTargetClass=true is mandatory, otherwise the application context won’t be created correctly.
The class is also annotated with @ComponentScan that enables discovery of beans in the class where this
class is (com.apress.prospring6.five.annotated) and its subpackages.
To test each type of advice introduced in this section, test methods are used and grouped in the
AnnotatedAdviceTest class shown in Listing 5-51.
248
Chapter 5 ■ Spring AOP
Listing 5-51. AnnotatedAdviceTest Class, Grouping All Annotated Aspect Tests and a Test Method Verifying
the Before Advice Declared in Class BeforeAdviceV1
package com.apress.prospring6.five.annotated;
import org.junit.jupiter.api.Test;
import com.apress.prospring6.five.advice.BeforeAdviceV1;
import org.springframework.context.annotation.AnnotationConfigApplicationContext;
public class AnnotatedAdviceTest {
@Test
void testBeforeAdviceV1(){
var ctx = new AnnotationConfigApplicationContext();
ctx.register(AspectJAopConfig.class, BeforeAdviceV1.class);
ctx.refresh();
assertTrue(Arrays.asList(ctx.getBeanDefinitionNames()).contains("beforeAdviceV1"));
NewDocumentarist
documentarist = ctx.getBean("documentarist",
NewDocumentarist.class);
documentarist.execute();
ctx.close();
}
}
The testBeforeAdviceV1() method creates an ApplicationContext based on the AspectJAopConfig
configuration class and adds the aspect bean declared by the BeforeAdviceV1 class to it. If the context
can be created and the bean is found to be present, then the documentarist bean is retrieved and its
execute() method is invoked. This will cause the proxy.sing() method to be called that includes the
simpleBeforeAdvice. When all goes well, the test should pass and the produced console output should be
as shown in Listing 5-52.
Listing 5-52. Console Output Produced by Running the testBeforeAdviceV1() Method
DEBUG: AbstractApplicationContext - Refreshing org.springframework.context.annotation
.AnnotationConfigApplicationContext@1046d517
...
DEBUG: ReflectiveAspectJAdvisorFactory - Found AspectJ method: public void com.apress.
prospring6.five.advice.BeforeAdviceV1.simpleBeforeAdvice(org.aspectj.lang.JoinPoint)
...
INFO : GrammyGuitarist - sing: Wild blue, deeper than I ever knew
INFO : BeforeAdviceV1 - > Executing: sing from com.apress.prospring6.five.annotated.
GrammyGuitarist
INFO : GrammyGuitarist - play: G C G C Am D7
INFO : GrammyGuitarist - talk
DEBUG: AbstractApplicationContext - Closing org.springframework.context.annotation
.AnnotationConfigApplicationContext@1046d517, started on ...
249
Chapter 5 ■ Spring AOP
A few things were mentioned so far:
•
In our example, we have a pointcut expression, but a pointcut can be declared
separately from the advice, which is quite cool, since this means it can be reused.
•
The before advice method accepts the joinpoint as an argument, but not the method,
object, and arguments. However, the signature of this method is flexible, so we can
add the argument value.
Listing 5-53 shows BeforeAdviceV2, an equivalent advice to BeforeAdviceV1, but the pointcut is
separated from the advice declaration.
Listing 5-53. BeforeAdviceV2 Class, Declaring an Aspect Bean with a Single Before Advice and a Pointcut
package com.apress.prospring6.five.advice;
import org.aspectj.lang.annotation.Pointcut;
// other import statements omitted
@Component
@Aspect
public class BeforeAdviceV2 {
private static Logger LOGGER = LoggerFactory.getLogger(BeforeAdviceV2.class);
@Pointcut("execution(* com.apress.prospring6.five..sing*(com.apress.prospring6.five.
common.Guitar))")
public void singExecution() {
}
@Before("singExecution()")
public void simpleBeforeAdvice(JoinPoint joinPoint) {
var signature = (MethodSignature) joinPoint.getSignature();
LOGGER.info(" > Executing: {} from {}", signature.getName(), signature.
getDeclaringTypeName() );
}
}
Notice how the expression is provided as a value for the @Pointcut default attribute and this annotation
is used to decorate a different method than the advice. A call to this method is then used as an expression
for the @Before annotation. The method annotated with @Pointcut must return void and can also have
arguments, as shown a little bit later in this section.
The test method is 99% identical to the one shown in Listing 5-50, with the exception that the
BeforeAdviceV1 gets replaced with the BeforeAdviceV2 type. The output is identical to that of the execution
of testBeforeAdviceV1().
As previously mentioned, now that we have a pointcut, we can add another pointcut and compose
them. The AspectJ pointcut expressions semantics are quite rich, and if you are interested you can check
out the official documentation6. The second pointcut introduced in class BeforeAdviceV3 is used to declare
that the bean used as a target should have a name that starts with john. This pointcut is composed with
the singExecution() pointcut using an AND (&&) operation. This obviously ensures that all methods with
6
https://www.eclipse.org/aspectj/doc/released/progguide/semantics-pointcuts.html
250
Chapter 5 ■ Spring AOP
the name starting with sing and the classes are defined under the package com.apress.prospring6.five
(including all the subpackages, indicated by ..). Also, the sing* method should receive one argument with
the com.apress.prospring6.five.common.Guitar type AND only the beans with names starting with john
should be advised.
Listing 5-54 shows BeforeAdviceV3, a before advice declaration that applies to a composed pointcut.
Listing 5-54. BeforeAdviceV3 Class, Declaring an Aspect Bean with a Single Before Advice and Two
Pointcuts That Are Composed
package com.apress.prospring6.five.advice;
// import statements omitted
@Component
@Aspect
public class BeforeAdviceV3{
private static Logger LOGGER = LoggerFactory.getLogger(BeforeAdviceV3.class);
@Pointcut("execution(* com.apress.prospring6.five..sing*(com.apress.prospring6.five.
common.Guitar))")
public void singExecution() {
}
@Pointcut("bean(john*)")
public void isJohn() {
}
@Before("singExecution() && isJohn()")
public void simpleBeforeAdvice(JoinPoint joinPoint) {
var signature = (MethodSignature) joinPoint.getSignature();
LOGGER.info(" > Executing: {} from {}", signature.getName(), signature.
getDeclaringTypeName() );
}
}
The test method is 99% identical to the one shown in Listing 5-50, with the exception that the
BeforeAdviceV1 gets replaced with the BeforeAdviceV3 type. The output is identical to that of the execution
of testBeforeAdviceV1(), since we only have one bean named johnMayer in the configuration.
As for the arguments, we can modify the advice to do some checks on the arguments of the method
being advised, but this will require the modification of the pointcut identifying the method and the method
it decorates, and also the signature of the advice. This version of this advice is depicted in Listing 5-55.
Listing 5-55. BeforeAdviceV4 Class, Declaring an Aspect Bean with a Single Before Advice That Checks the
Argument Value
package com.apress.prospring6.five.advice;
// import statements omitted
@Component
@Aspect
public class BeforeAdviceV4 {
private static Logger LOGGER = LoggerFactory.getLogger(BeforeAdviceV4.class);
251
Chapter 5 ■ Spring AOP
@Pointcut("execution(* com.apress.prospring6.five..sing*(com.apress.prospring6.five.
common.Guitar)) && args(value)")
public void singExecution(Guitar value) {
}
@Pointcut("bean(john*)")
public void isJohn() {
}
@Before(value = "singExecution(guitar) && isJohn()", argNames = "joinPoint,guitar")
public void simpleBeforeAdvice(JoinPoint joinPoint, Guitar guitar) {
if(guitar.getBrand().equals("Gibson")) {
var signature = (MethodSignature) joinPoint.getSignature();
LOGGER.info(" > Executing: {} from {}", signature.getName(), signature.
getDeclaringTypeName());
}
}
}
Notice that the pointcut expression includes the argument names: joinPoint and guitar. The
advice method must have arguments with the names as the expression and the must appear in the same order.
The test method is 99% identical to the one shown in Listing 5-50, with the exception that the
BeforeAdviceV1 gets replaced with the BeforeAdviceV4 type. The output is identical to that of the execution
of testBeforeAdviceV1(), since we only have one bean named johnMayer in the configuration and this
bean had a Guitar property with the brand set to Gibson. Feel free to modify the advice code and replace
the guitar brand name and check how the advice output is no longer shown in the console when you run
the test.
Declarative Around Advice with AspectJ Annotations
Declaring an around advice is pretty similar, but there are a few differences. As expected, the annotation to
declare the advice is @Around and the method signature includes a ProceedingJoinPoint since this type of
advice has to have the possibility to call the target method.
Listing 5-56 depicts the class AroundAdviceV1 that declares a pointcut and an around advice. This
version does not take parameters into account.
Listing 5-56. AroundAdviceV1 Class, Declaring an Aspect Bean with a Single Around Advice That Wraps
Around the Target Method
package com.apress.prospring6.five.advice;
import org.aspectj.lang.ProceedingJoinPoint;
import org.aspectj.lang.annotation.Around;
// other import statements omitted
252
Chapter 5 ■ Spring AOP
@Component
@Aspect
public class AroundAdviceV1 {
private static Logger LOGGER = LoggerFactory.getLogger(AroundAdviceV1.class);
@Pointcut("execution(* com.apress.prospring6.five..sing*(com.apress.prospring6.five.
common.Guitar))")
public void singExecution() {
}
@Around("singExecution()")
public Object simpleAroundAdvice(ProceedingJoinPoint pjp) throws Throwable {
var signature = (MethodSignature) pjp.getSignature();
LOGGER.info(" > Before Executing: {} from {}", signature.getName(), signature.
getDeclaringTypeName() );
Object retVal = pjp.proceed();
LOGGER.info(" > After Executing: {} from {}", signature.getName(), signature.
getDeclaringTypeName() );
return retVal;
}
}
This advice does nothing else than print a message before and after invoking the target method. If a
configuration is created from the AspectJAopConfig class and the AroundAdviceV1 and tested as shown
previously in the section (Listing 5-51), the resulted output proves without a doubt that the advice method
has executed as expected, since the message printed by the target method sing(Guitar) is wrapped
between the messages printed by the simpleAfterAdvice as shown in Listing 5-57.
Listing 5-57. Console Output Produced by Testing the AroundAdviceV1 Aspect Class
INFO : GrammyGuitarist - sing: Wild blue, deeper than I ever knew
INFO : AroundAdviceV1 - > Before Executing: sing from com.apress.prospring6.five.annotated.
GrammyGuitarist
INFO : GrammyGuitarist - play: G C G C Am D7
INFO : AroundAdviceV1 - > After Executing: sing from com.apress.prospring6.five.annotated.
GrammyGuitarist
INFO : GrammyGuitarist - talk
Let’s make things more interesting and introduce AroundAdviceV2, which also uses the argument of the
target method; in this case, the Guitar.brand property value is added to the advice messages, as shown in
Listing 5-58.
Listing 5-58. AroundAdviceV2 Class, Declaring an Aspect Bean with a Single Around Advice That Wraps
Around the Target Method
package com.apress.prospring6.five.advice;
// other import statements omitted
@Component
@Aspect
253
Chapter 5 ■ Spring AOP
public class AroundAdviceV2 {
private static Logger LOGGER = LoggerFactory.getLogger(AroundAdviceV2.class);
@Pointcut("execution(* com.apress.prospring6.five..sing*(com.apress.prospring6.five.
common.Guitar)) && args(value)")
public void singExecution(Guitar value) {
}
@Around(value = "singExecution(guitar)", argNames = "pjp,guitar")
public Object simpleAroundAdvice(ProceedingJoinPoint pjp, Guitar guitar) throws
Throwable {
var signature = (MethodSignature) pjp.getSignature();
LOGGER.info(" > Before Executing: {} from {} with argument {}", signature.getName(),
signature.getDeclaringTypeName(), guitar.getBrand());
Object retVal = pjp.proceed();
LOGGER.info(" > After Executing: {} from {} with argument {}", signature.getName(),
signature.getDeclaringTypeName(), guitar.getBrand());
return retVal;
}
}
To underline how advice is being applied to all invocation, let’s also extend the NewDocumentarist and
change the brand of guitar our singer is playing. The new implementation is depicted in Listing 5-59.
Listing 5-59. CommandingDocumentarist Class
package com.apress.prospring6.five.annotated;
// import statements omitted
@Component("commandingDocumentarist")
public class CommandingDocumentarist extends NewDocumentarist {
@Override
public void execute() {
guitarist.sing();
Guitar guitar = new Guitar();
guitar.setBrand("Gibson");
guitarist.sing(guitar);
guitarist.sing(new Guitar());
guitarist.talk();
}
}
When testing the new CommandingDocumentarist bean from a context created using the
AspectJAopConfig, CommandingDocumentarist, and AroundAdviceV2 classes using a test method similar to
what was shown so far, the output is as shown in Listing 5-60.
254
Chapter 5 ■ Spring AOP
Listing 5-60. Output for Testing an AroundAdviceV2
INFO : GrammyGuitarist - sing: Wild blue, deeper than I ever knew
INFO : AroundAdviceV2 - > Before Executing: sing from com.apress.prospring6.five.annotated.
GrammyGuitarist with argument Gibson
INFO : GrammyGuitarist - play: G C G C Am D7
INFO : AroundAdviceV2 - > After Executing: sing from com.apress.prospring6.five.annotated.
GrammyGuitarist with argument Gibson
INFO : AroundAdviceV2 - > Before Executing: sing from com.apress.prospring6.five.annotated.
GrammyGuitarist with argument Martin
INFO : GrammyGuitarist - play: G C G C Am D7
INFO : AroundAdviceV2 - > After Executing: sing from com.apress.prospring6.five.annotated.
GrammyGuitarist with argument Martin
INFO : GrammyGuitarist - talk
You see that the around advice was applied to both invocations of the sing(Guitar) method, since
applying the advice does not depend on the argument value.
Declarative After Advice with AspectJ Annotations
There are three AspectJ annotations for declaring after advice:
•
@After (finally) declares advice that gets executed after the target method, regardless
if it returned normally or by an exception being thrown. This type of advice is typically
used for releasing resources or sending notifications. Since the advice gets executed
regardless of mode of return, its behavior is similar to a try-finally statement.
•
@AfterReturning declares advice that gets executed after the target method only if it
returned normally.
•
@AfterThrowing declares advice that gets executed after the target method, only if
the method returned by an exception being thrown.
To demonstrate how to configure each type of after advice, a new Singer implementation is needed.
This implementation is named PretentiosGuitarist and it implements the sing(Guitar) method to throw
an exception when the brand of the Guitar instance is ‘Musicman’. This class and the bean declaration is
shown in Listing 5-61.
Listing 5-61. PretentiosGuitarist Class
package com.apress.prospring6.five.annotated;
// import statements omitted
@Component("agustin")
public class PretentiosGuitarist implements Singer {
private static Logger LOGGER = LoggerFactory.getLogger(PretentiosGuitarist.class);
255
Chapter 5 ■ Spring AOP
public void sing(Guitar guitar) {
if (guitar.getBrand().equalsIgnoreCase("Musicman")) {
throw new IllegalArgumentException("Unacceptable guitar!");
}
LOGGER.info("play: " + guitar.play());
}
@Override
public void sing() {
LOGGER.info("sing: solo tu puedes calmar el hambre de ti");
}
}
Let’s start with the @After advice. The AfterAdviceV1 class, the class that declares the @After advice
that intercepts the sing(Guitar) method, is shown in Listing 5-62.
Listing 5-62. AfterAdviceV1 Class Declaring an Aspect Bean with a Single After(finally) Advice That Is
Called After the Target Method
package com.apress.prospring6.five.advice;
import org.aspectj.lang.annotation.After;
// other import statements omitted
@Component
@Aspect
public class AfterAdviceV1 {
private static Logger LOGGER = LoggerFactory.getLogger(AfterAdviceV1.class);
@Pointcut("execution(* com.apress.prospring6.five..PretentiosGuitarist.sing*(com.apress.
prospring6.five.common.Guitar)) && args(value)")
public void singExecution(Guitar value) {
}
@After(value = "singExecution(guitar) ", argNames = "joinPoint,guitar")
public void simpleAfterAdvice(JoinPoint joinPoint, Guitar guitar) {
var signature = (MethodSignature) joinPoint.getSignature();
LOGGER.info(" > Executed: {} from {} with guitar {} ", signature.getName(),
signature.getDeclaringTypeName(), guitar.getBrand() );
}
}
Notice that the @After advice has access to the argument of the target method and can make use of it,
but it does not have access to the exception being thrown. Testing this advice requires a different approach;
in the test method, the proxy bean is accessed directly and the sing(..) method is invoked twice, once with
a default Guitar instance and once with the same instance after the brand property was set to the name that
causes the IllegalArgumentException to be thrown. The test method is shown in Listing 5-63.
256
Chapter 5 ■ Spring AOP
Listing 5-63. Test Method for the AfterAdviceV1 Aspect
package com.apress.prospring6.five.annotated;
import com.apress.prospring6.five.advice.AfterAdviceV1;
import static org.junit.jupiter.api.Assertions.assertThrows;
//other import statements omitted
public class AnnotatedAdviceTest {
private static Logger LOGGER = LoggerFactory.getLogger(AnnotatedAdviceTest.class);
@Test
void testAfterAdviceV1(){
var ctx = new AnnotationConfigApplicationContext();
ctx.register(AspectJAopConfig.class, AfterAdviceV1.class);
ctx.refresh();
assertTrue(Arrays.asList(ctx.getBeanDefinitionNames()).contains("afterAdviceV1"));
var guitar = new Guitar();
var guitarist = ctx.getBean("agustin", PretentiosGuitarist.class);
guitarist.sing(guitar);
LOGGER.info("-------------------");
guitar.setBrand("Musicman");
assertThrows(IllegalArgumentException.class,
() -> guitarist.sing(guitar),
"Unacceptable guitar!");
ctx.close();
}
}
JUnit Jupiter provides a method named assertThrows(..) to test the assumption that the exception is
thrown when calling sing(Guitar) the second time. Running the code generates in the console the output
shown in Listing 5-64.
Listing 5-64. Output When Testing AfterAdviceV1
INFO : PretentiosGuitarist - play: G C G C Am D7
INFO : AfterAdviceV1 - > Executed: sing from com.apress.prospring6.five.annotated.
PretentiosGuitarist with guitar Martin
INFO : AnnotatedAdviceTest - ------------------INFO : AfterAdviceV1 - > Executed: sing from com.apress.prospring6.five.annotated.
PretentiosGuitarist with guitar Musicman
Notice that the advice is executed twice, but the stacktrace is nowhere to be seen. The reason for this is
the assertThrows(..) method, but since the test passed we are sure the exception was thrown. If you have
doubts, just comment the assertThrows(..) line, replace it with a call to sing(guitar), and rerun the test.
For the @AfterReturning advice, the code stays mostly the same, with the exception that the advice is
annotated with @AfterReturning instead of @After and testing it will only cause > Executed: sing from
com.apress.prospring6.five.annotated.PretentiosGuitarist with guitar Martin to be printed.
For the @AfterThrowing advice the code stays mostly the same, with the exception that the advice is
annotated with @AfterThrowing instead of @After and testing it will only cause > Executed: sing from
com.apress.prospring6.five.annotated.PretentiosGuitarist with guitar Musicman to be printed.
257
Chapter 5 ■ Spring AOP
One extra thing an @AfterThrowing advice can do what the other two types of advice can’t: intercept the
exception thrown by the target method and replace it with a different exception type.
The AfterThrowingAdviceV2 aspect replaces the IllegalArgumentException thrown by the target
method with an instance of RejectedInstrumentException, a very simple custom RuntimeException
implementation. An @AfterThrowing advice cannot prevent an exception being thrown by the target method,
but it can replace the exception thrown by it. The AfterThrowingAdviceV2 code is shown in Listing 5-65.
Listing 5-65. AfterThrowingAdviceV2 Class Declaring an Aspect Bean with a Single After-Throwing Advice
That Replaces the Target Method Exception
package com.apress.prospring6.five.advice;
import com.apress.prospring6.five.common.RejectedInstrumentException;
import org.aspectj.lang.annotation.AfterThrowing;
// other import statements omitted
@Component
@Aspect
public class AfterThrowingAdviceV2 {
private static Logger LOGGER = LoggerFactory.getLogger(AfterThrowingAdviceV2.class);
@Pointcut("execution(* com.apress.prospring6.five..PretentiosGuitarist.sing*(com.apress.
prospring6.five.common.Guitar)) && args(value)")
public void singExecution(Guitar value) {
}
@AfterThrowing(value = "singExecution(guitar) ", argNames = "joinPoint,guitar, ex",
throwing = "ex")
public void simpleAfterAdvice(JoinPoint joinPoint, Guitar guitar,
IllegalArgumentException ex) {
var signature = (MethodSignature) joinPoint.getSignature();
LOGGER.info(" > Executed: {} from {} with guitar {} ", signature.getName(),
signature.getDeclaringTypeName(), guitar.getBrand());
if(ex.getMessage().contains("Unacceptable guitar!")) {
throw new RejectedInstrumentException(ex.getMessage(), ex);
}
}
}
The introduction of the new exception type requires an updated test method that tests the assumption
that the RejectedInstrumentException is thrown when invoking the sing(Guitar) method on the agustin
bean. This test method is depicted in Listing 5-66.
Listing 5-66. Test Method for the AfterThrowingAdviceV2 Aspect
package com.apress.prospring6.five.annotated;
import com.apress.prospring6.five.advice.AfterThrowingAdviceV2;
// other import statements omitted
public class AnnotatedAdviceTest {
private static Logger LOGGER = LoggerFactory.getLogger(AnnotatedAdviceTest.class);
258
Chapter 5 ■ Spring AOP
@Test
void testAfterThrowingAdviceV2(){
var ctx = new AnnotationConfigApplicationContext();
ctx.register(AspectJAopConfig.class, AfterThrowingAdviceV2.class);
ctx.refresh();
assertTrue(Arrays.asList(ctx.getBeanDefinitionNames()).contains("afterThrowing
AdviceV2"));
var guitar = new Guitar();
var guitarist = ctx.getBean("agustin", PretentiosGuitarist.class);
guitarist.sing(guitar);
LOGGER.info("-------------------");
guitar.setBrand("Musicman");
assertThrows(RejectedInstrumentException.class,
() -> guitarist.sing(guitar),
"Unacceptable guitar!");
ctx.close();
}
}
The testAfterThrowingAdviceV2() test should pass and produce the output shown in Listing 5-67 in
the console.
Listing 5-67. Output When Testing AfterThrowingAdviceV2
INFO : PretentiosGuitarist - play: G C G C Am D7
INFO : AfterAdviceV1 - > Executed: sing from com.apress.prospring6.five.annotated.
PretentiosGuitarist with guitar Martin
INFO : AnnotatedAdviceTest - ------------------INFO : AfterAdviceV1 - > Executed: sing from com.apress.prospring6.five.annotated.
PretentiosGuitarist with guitar Musicman
Declarative Introductions with AspectJ Annotations
Introductions were mentioned briefly when discussing proxies. The earlier “Getting Started with
Introductions” section showed how to write an aspect that decorates a target object with an interface, and
provided an implementation for that interface. Putting all of this together in an application was done using a
ProxyFactory instance and ProxyFactoryBean. All was done programmatically at the time, but a declarative
configuration is possible as well by using the AspectJ @DeclareParents annotation.
To demonstrate this, Listing 5-68 introduces a new interface named Performer and its implementation
named Dancer.
Listing 5-68. Performer and Dancer Implementations
package com.apress.prospring6.five.common;
public interface Performer {
void perform();
}
259
Chapter 5 ■ Spring AOP
// import statements omitted
public class Dancer implements Performer {
private static Logger LOGGER = LoggerFactory.getLogger(Dancer.class);
@Override
public void perform() {
LOGGER.info(" Shake it to the left, shake it to the right!");
}
}
The @DeclareParents annotation is used to introduce the Performer interface for any bean of a type
that implements Singer. Listing 5-69 shows the configuration of the AnnotatedIntroduction aspect.
Listing 5-69. AnnotatedIntroduction Class and Aspect Definition for Introduction
package com.apress.prospring6.five.annotated;
import com.apress.prospring6.five.common.Dancer;
import com.apress.prospring6.five.common.Performer;
import org.aspectj.lang.annotation.DeclareParents;
// other import statements omitted
@Component
@Aspect
public class AnnotatedIntroduction {
@DeclareParents(value="com.apress.prospring6.five.common.Singer+",
defaultImpl=Dancer.class)
public static Performer performer;
}
The interface to be implemented is determined by the type of the annotated field, in this case
Performer. The value attribute of @DeclareParents is used to tell Spring for what types the introduction
must happen. Any bean of a matching type is wrapped in a proxy that implements the Performer interface
and introduces the behavior described by the Dancer class.
Testing the introduction is easy; we just get the bean from the context and check its type via instanceof,
we convert it to Perfomer and call perform(). The testing method is depicted in Listing 5-70.
Listing 5-70. AnnotatedIntroduction Test Method
package com.apress.prospring6.five.annotated;
import com.apress.prospring6.five.common.Performer;
// other import statements omitted
public class AnnotatedIntroductionTest {
private static Logger LOGGER = LoggerFactory.getLogger(AnnotatedIntroductionTest.class);
@Test
void testAnnotatedIntroduction() {
var ctx = new AnnotationConfigApplicationContext();
260
Chapter 5 ■ Spring AOP
ctx.register(AspectJAopConfig.class, AnnotatedIntroduction.class);
ctx.refresh();
assertTrue(Arrays.asList(ctx.getBeanDefinitionNames()).contains("annotated
Introduction"));
var guitar = new Guitar();
var guitarist = ctx.getBean("agustin", PretentiosGuitarist.class);
assertTrue(guitarist instanceof Singer);
guitarist.sing(guitar);
LOGGER.info("Proxy type: {} ", guitar.getClass().getName());
assertTrue(guitarist instanceof Performer);
Performer performer = (Performer)guitarist;
performer.perform();
ctx.close();
}
}
Running the test should pass and output from the target bean and the Dancer type should be present in
the console log, as shown in Listing 5-71.
Listing 5-71. AnnotatedIntroduction Test Output
INFO : PretentiosGuitarist - play: G C G C Am D7
INFO : AnnotatedIntroductionTest - Proxy type: com.apress.prospring6.five.common.Guitar
INFO : Dancer - Shake it to the left, shake it to the right!
Aspect Instantiation Models
In Spring AOP, aspect classes cannot be the targets of advice from other aspects. The @Aspect
annotation is also a marker interface, excluding the resulting beans from auto-proxying.
Since the @Aspect annotation is not sufficient for auto-detection in the classpath, aspect classes were
registered as beans using @Component in the examples shown so far. They can be registered using @Bean as
well. This means that each aspect class becomes a singleton bean in the Spring ApplicationContext.
To test this, we declare a BeforeAdviceV5 class that declares a single simple before advice, but we
declare the default constructor to print the instantiation time of the object. The code of this aspect is almost
identical to that of BeforeAdviceV2, the only extra thing being the constructor with the logging statement, so
we won’t list it here again. Listing 5-72 shows the method testing that the constructor of this aspect is called
only once. The configuration declares two Singer beans: johnMayer and agustin.
261
Chapter 5 ■ Spring AOP
Listing 5-72. BeforeAdviceV5 Test Method
package com.apress.prospring6.five.annotated;
import com.apress.prospring6.five.advice.BeforeAdviceV5;
// other import statements omitted
public class AnnotatedAdviceTest {
private static Logger LOGGER = LoggerFactory.getLogger(AnnotatedAdviceTest.class);
@Test
void testAfterThrowingAdviceV5(){
var ctx = new AnnotationConfigApplicationContext();
ctx.register(AspectJAopConfig.class, BeforeAdviceV5.class);
ctx.refresh();
assertTrue(Arrays.asList(ctx.getBeanDefinitionNames()).contains("beforeAdviceV5"));
var johnMayer = ctx.getBean("johnMayer", GrammyGuitarist.class);
johnMayer.sing(new Guitar());
var pretentiousGuitarist = ctx.getBean("agustin", PretentiosGuitarist.class);
pretentiousGuitarist.sing(new Guitar());
ctx.close();
}
}
The test method retrieves these beans and calls sing(Guitar) on them. When looking in the console,
we should see the BeforeAdviceV5 constructor message printed only once. Listing 5-73 shows the output of
executing the test method in Listing 5-72.
Listing 5-73. BeforeAdviceV5 Test Method Output
INFO : BeforeAdviceV5 - BeforeAdviceV5 creation time: 2022-04-24T18:08:05.971660Z
...
INFO : BeforeAdviceV5 - > Executing: sing from com.apress.prospring6.five.annotated.
GrammyGuitarist
INFO : GrammyGuitarist - play: G C G C Am D7
INFO : BeforeAdviceV5 - > Executing: sing from com.apress.prospring6.five.annotated.
PretentiosGuitarist
INFO : PretentiosGuitarist - play: G C G C Am D7
The message is printed only once since the aspect class is annotated with @Component and the scope is
not explicitly configured, so the resulting aspect is a singleton bean.
This leads to the conclusion that there is a way to do things differently. Consider a scenario where you
need more than one aspect bean to be created, such as one per target. This is possible via configuration. The
@Aspect annotation declares a single attribute that can be initialized with an AspectJ expression configuring
how many aspect beans should be created and when.
262
Chapter 5 ■ Spring AOP
Of course, the Spring configuration must be modified to match, which means the aspect bean scope
cannot be singleton anymore.
To create an aspect bean for each target bean, the @Aspect annotation should receive as a parameter
a pertarget expression pointing at the type of the intended target beans, in this case Singer. The
BeforeAdviceV6 is depicted in Listing 5-74.
Listing 5-74. BeforeAdviceV6 Aspect Class Declaring an Aspect for Each Singer Bean
package com.apress.prospring6.five.advice;
import java.time.Instant;
// other import statements omitted
@Component
@Scope("prototype")
@Aspect("pertarget(targetIdentifier())")
public class BeforeAdviceV6 {
private static Logger LOGGER = LoggerFactory.getLogger(BeforeAdviceV6.class);
public BeforeAdviceV6() {
LOGGER.info("BeforeAdviceV6 creation time: {}" , Instant.now());
}
@Pointcut("target(com.apress.prospring6.five.common.Singer+))")
public void targetIdentifier() {
}
// pointcut and advice for the 'sing' method omitted.
}
The method used for testing BeforeAdviceV6 is almost identical to the one for BeforeAdviceV5, the
only difference being the number in the names, so the method won’t be shown here. However, the output
produced by it is interesting. The new aspect configuration causes an aspect to be created for each of the
Singer beans in the configuration, and this is shown by the BeforeAdviceV6 constructor message being
printed twice, with different date and time, as shown in Listing 5-75.
Listing 5-75. BeforeAdviceV6 Test Method Output
INFO : BeforeAdviceV6 - BeforeAdviceV5 creation time: 2022-04-24T18:34:23.037830Z
INFO : BeforeAdviceV6 - > Executing: sing from com.apress.prospring6.five.annotated.
GrammyGuitarist
INFO : GrammyGuitarist - play: G C G C Am D7
INFO : BeforeAdviceV6 - BeforeAdviceV5 creation time: 2022-04-24T18:34:23.053335Z
INFO : BeforeAdviceV6 - > Executing: sing from com.apress.prospring6.five.annotated.
PretentiosGuitarist
INFO : PretentiosGuitarist - play: G C G C Am D7
263
Chapter 5 ■ Spring AOP
An alternative configuration involves the @Aspect annotation receiving as a parameter a perthis
expression, pointing at the target method, in this case the sing(Guitar) method. The BeforeAdviceV7
aspect configuration is shown in Listing 5-76.
Listing 5-76. BeforeAdviceV7 Aspect Class Declaring an Aspect for Each Singer Bean
package com.apress.prospring6.five.advice;
// import statement omitted
@Component
@Scope("prototype")
@Aspect("perthis(singExecution())")
public class BeforeAdviceV7 {
private static Logger LOGGER = LoggerFactory.getLogger(BeforeAdviceV7.class);
public BeforeAdviceV7() {
LOGGER.info("BeforeAdviceV7 creation time: {}" , Instant.now());
}
@Pointcut("execution(* com.apress.prospring6.five..sing*(com.apress.prospring6.five.
common.Guitar))")
public void singExecution() {
}
@Before("singExecution()")
public void simpleBeforeAdvice(JoinPoint joinPoint) {
var signature = (MethodSignature) joinPoint.getSignature();
LOGGER.info(" > Executing: {} from {}", signature.getName(), signature.
getDeclaringTypeName() );
}
}
The test method is almost identical, and the test output shows two aspect beans being created.
So what is the difference between perthis(Pointcut) and pertarget(Pointcut)? The
difference is represented by the object being examined when an advised joinpoint is reached. Pertarget
specifies a type expression, which means a new aspect is to be instantiated for every new object that is the
target of an advice-triggering joinpoint. perthis specifies a method expression and, thus, a new aspect is to
be instantiated for every new object referenced by this at the advice-triggering joinpoint.
You would rarely need to write your own aspects, since almost anything you might need when building
a Spring application is already provided by Spring, but it is good to understand what happens under the
hood and how Spring does its magic. And this is all that can be said about aspects with Spring, so let’s turn to
how you can work with aspects in a Spring Boot application.
264
Chapter 5 ■ Spring AOP
S
pring Boot AOP
Spring Boot provides a special AOP starter library, spring-boot-starter-aop, that removes the hassle of
configuration, even if there is not much of it anyway. To use the library in a Spring Boot project, just create a
Spring Boot project and add it as a dependency.
In Figure 5-11 you can see the set of libraries added as dependencies to the Spring Boot project (the
screenshot is from the Maven View; the Gradle View is almost identical).
Figure 5-11. Spring Boot AOP starter transitive dependencies as depicted in IntelliJ IDEA
By adding this library to your project as a dependency, the @EnableAspectJAutoProxy(proxyTargetCl
ass = true) annotation is no longer needed because the AOP Spring support is already enabled by default.
The proxyTargetClass attribute does not have to be set anywhere either, because Spring Boot automatically
detects what type of proxies you need.
Any of the aspects introduced in previous sections can be added to the Spring Boot project, and
when proxies are used, you can watch the advice work as expected. But let’s keep things simple. A
GrammyGuitarist type is declared and its implementation is identical that used in the rest of the chapter,
except that for the Spring Boot project, GrammyGuitarist does not implement the Singer interface. With
these beans in the project, the Spring application can be configured using the class shown in Listing 5-77.
Listing 5-77. Spring Boot Chapter5Application Main Class
package com.apress.prospring6.five;
import org.springframework.boot.SpringApplication;
import org.springframework.boot.autoconfigure.SpringBootApplication;
@SpringBootApplication
public class Chapter5Application {
265
Chapter 5 ■ Spring AOP
public static void main(String... args) throws Exception{
var ctx = SpringApplication.run(Chapter5Application.class, args);
assert (ctx != null);
If you want to run this class to test the advice remove comment from the
//
next 2 lines
/* var documentarist = ctx.getBean("documentarist", NewDocumentarist.class);
documentarist.execute();*/
System.in.read();
ctx.close();
}
}
Simple, right? Also, the reason those two lines are commented is because the Chapter5Application
class is used to only configure the Spring application. Since testing was mentioned in previous chapters, it
only makes sense to test our application using a Spring Boot test class. Take a look at Listing 5-78.
Listing 5-78. Spring Boot Chapter5ApplicationTest Main Class
package com.apress.prospring6.five;
import org.springframework.boot.test.context.SpringBootTest;
import static org.junit.jupiter.api.Assertions.*;
// other imports omitted
@SpringBootTest
public class Chapter5ApplicationTest {
@Autowired
NewDocumentarist documentarist;
@Autowired
GrammyGuitarist guitarist;
@Test
void testDocumentarist(){
assertAll(
() -> assertNotNull(documentarist.getGuitarist()),
() -> assertNotNull(guitarist),
() -> assertTrue(guitarist.getClass().getName().contains("SpringCGLIB"))
);
documentarist.execute();
}
}
The @SpringBootTest annotation ensures that the test context is populated with the beans declared
in the Spring Boot configuration class, which means we can use @Autowired to access the beans in the test
context.
266
Chapter 5 ■ Spring AOP
When this test passes, this means the application context was created correctly, the two beans of type
GrammyGuitarist and NewDocumentarist were created, and the GrammyGuitarist bean, is a GCLIB proxy,
since a JDK proxy is not suitable for it as its type does not implement an interface.
This is all that can be said about AOP with Spring Boot; Spring Boot provides no fancy, specialized
components to simplify AOP with Spring because there is almost nothing to simplify.
Considerations for Declarative Spring AOP Configuration
This book has shown two ways to write your code using Spring AOP: using ProxyFactoryBean and using the
@AspectJ-style annotations. XML AOP configuration is not the focus of this book, but its main advantage
is that it makes easy to separate the configuration from your code. On the other hand, if your application is
mainly annotation based, use the @AspectJ annotation. Again, let the requirements of your application drive
the configuration approach, and make your best effort to be consistent.
Moreover, there are some other differences between the aop namespace and @AspectJ annotation
approaches:
•
The pointcut expression syntax has some minor differences (for example, in XML
configuration, when using the aop namespace, we need to use and to aggregate
conditions, but && in @AspectJ annotation).
•
In XML configuration, the aop namespace approach supports only the singleton
aspect instantiation model.
•
In XML configuration, using the aop namespace, you can’t “combine” multiple
pointcut expressions. In the example using @AspectJ, we can combine the two
pointcut definitions (that is, singExecution(value) && isJohn()) in the before
and around advice. When using the aop namespace and needing to create a new
pointcut expression that combines the matching conditions, you need to use the
ComposablePointcut class.
S
ummary
In this chapter, we covered a large number of AOP core concepts and looked at how these concepts translate
into the Spring AOP implementation. We discussed the features that are (and are not) implemented
in Spring AOP, and we pointed to AspectJ as an AOP solution for those features that Spring does not
implement. We spent some time explaining the details of the advice types available in Spring, and you saw
examples of the four types in action. We also looked at how you limit the methods to which advice applies by
using pointcuts. In particular, we looked at the six basic pointcut implementations available with Spring. We
also covered the details of how the AOP proxies are constructed, the different options, and what makes them
different. We compared performance among three proxy types and highlighted some major differences and
restrictions for choosing between a JDK vs. CGLIB proxy. We covered the advanced options for pointcutting,
as well as how to extend the set of interfaces implemented by an object using introductions.
We also covered Spring Framework services to configure AOP declaratively, thus avoiding the need
to hard-code AOP proxy construction logic into your code. We spent some time looking at how Spring and
AspectJ are integrated to allow you to use the added power of AspectJ without losing any of the flexibility of
Spring. That’s certainly a lot of AOP!
In the next chapter, we move on to a completely different topic—how we can use Spring’s JDBC support
to radically simplify the creation of JDBC-based data access code.
267
CHAPTER 6
Spring Data Access with JDBC
By now you have seen how easy it is to build a fully Spring-managed application. You have a solid
understanding of bean configuration and aspect-oriented programming (AOP). However, one part of the
puzzle is missing: how do you get the data that drives the application?
Besides simple throwaway command-line utilities, almost every application needs to persist data to
some sort of data store. The most usual and convenient data store is a database.
These are the top seven enterprise databases for 2023:
•
MariaDB: One of the most popular databases for web applications (all WordPress
blogs store their data in a MariaDB database).
•
Oracle Database: The most widely used commercial relational database
management system (especially in financial applications).
•
PostgreSQL: A database management system written in C and used by businesses
that deal with huge amounts of data.
•
Microsoft SQL Server: Yet another favorite of financial companies, both on-premises
and in the cloud.
•
MongoDB: Most popular NoSQL database, a document-oriented database, available
in the cloud as a service via self-healing clusters, known as MongoDB Atlas.
•
Redis: A distributed in-memory key-value store, with great scalability.
•
Elasticsearch: A full-text search engine based on Lucene.
Also, Oracle pushes seriously for the replacement of MariaDB with MySQL. If you are not working for
a big company that can afford licenses for enterprise database or database cloud instances such as GCP
Managed SQL instance or Amazon RDS or Aurora, you probably are using MariaDB, PostgreSQL, or other
free database not listed here. MariaDB is generally more widely used for web application development,
especially on the Linux platform; on the other side, PostgreSQL is friendlier to Oracle developers because its
procedural language, PL/pgSQL, is very close to Oracle’s PL/SQL language.
Even if you choose the fastest and most reliable database, you cannot afford to lose its speed and
flexibility by using a poorly designed and implemented data access layer. Applications tend to use the data
access layer very frequently; thus, any unnecessary bottlenecks in the data access code impact the entire
application, no matter how well designed it is. This chapter is the first in a series of five that will show you
how to work with SQL and NoSQL databases, how to manage transactions, and how to use a persistence tool
such as Hibernate. Specifically, we’ll discuss the following:
© Iuliana Cosmina, Rob Harrop, Chris Schaefer, and Clarence Ho 2023
I. Cosmina et al., Pro Spring 6, https://doi.org/10.1007/978-1-4842-8640-1_6
269
Chapter 6 ■ Spring Data Access with JDBC
•
Comparing traditional JDBC code and Spring JDBC support: We explore how Spring
simplifies the old-style JDBC code while keeping the same functionality. You will
also see how Spring accesses the low-level JDBC API and how this low-level API is
mapped into convenient classes such as JdbcTemplate.
•
Connecting to the database: Even though we do not go into every little detail of
database connection management, we do show you the fundamental differences
between a simple Connection and a DataSource. Naturally, we discuss how Spring
manages the data sources and which data sources you can use in your applications.
Various libraries for connection pooling—the process through which connections
are reused, rather than created every time a connection is requested—are also
introduced.
•
Retrieving and mapping the data to Java objects: We show you how to retrieve data
and then how to effectively map the selected data to Java objects. You also learn that
Spring JDBC is a viable alternative to object-relational mapping (ORM) tools (which
will be introduced in Chapter 7).
•
Inserting, updating, and deleting data: We discuss how you can implement the insert,
update, and delete operations by using Spring to execute these types of queries.
•
Testing JDBC code using an in-memory database: We discuss approaches to testing
JDBC code, explain why in-memory databases are suitable for testing, and introduce
the @Sql* annotations family that provides support to write concise tests for your
JDBC code. We also introduce you to a very practical library called Testcontainers
that allows starting up and tearing down a Docker container within the life cycle of a
test or test class.
•
Using Spring Boot JDBC: We show how easy it is to configure distinct databases for
production and test environments using the Spring Boot JDBC starter library.
Let’s start with the simplest scenario involving databases: writing code to work with SQL databases
and JDBC.
Sample Data Model for Example Code
Before proceeding with the discussion, we introduce a simple data model that is used for the examples
throughout this chapter, as well as the next few chapters when discussing other data access techniques (we
will expand the model accordingly to fulfill the needs of each topic as we go).
The model is a simple music database with two tables. The first one is the SINGER table, which stores
a singer’s information, and the other table is ALBUM, which stores details about the albums released by that
singer. Each singer can have zero or more albums; in other words, it’s a one-to-many relationship between
SINGER and ALBUM. A singer’s information includes their first and last names and date of birth. Figure 6-1
shows the entity-relationship (ER) diagram of the database.
270
Chapter 6 ■ Spring Data Access with JDBC
Figure 6-1. Simple data model for the example code
As you can see, both tables have an ID column that will be automatically assigned by the database
during insertion. For the ALBUM table, there is a foreign-key relation to the SINGER table, which is linked by
the column SINGER_ID with the primary key of the SINGER table (that is, the ID column).
In this chapter, we use the open source database MariaDB1 to show interactions with a real database in
some examples. MariaDB is a truly open source distribution of MySQL2, released as a response to Oracle buying
MySQL. The interesting thing you should be aware of is that MariaDB shows improved speed when compared to
MySQL. In particular, MariaDB offers better performance when it comes to views and handling flash storage
through its RocksDB3 engine.
This chapter, and probably the next ones in the data access series, requires you to have an instance of
MariaDB available to use. We do not cover how to install MariaDB, but the chapter06 module has a
CHAPTER06.adoc file instructing you how to start MariaDB in a Docker container. You can use another
database of your choice, but you may need to modify the schema and function definitions. We also cover
embedded database usage, which does not require a MariaDB database.
In case you want to install MariaDB locally, on the official site you can find very good tutorials on
installing and configuring MariaDB. After you have downloaded MariaDB4 and installed it, you can access it
using the root account. Usually, when you develop an application, you need a new schema and user. For the
code samples in this chapter, the schema is named musicdb, and the user to access it is named prospring6.
The SQL code to execute to create them is located in docker-build/scripts/CreateTable.sql in the
directory of the chapter06 project. The SQL code to execute to populate the tables is located in dockerbuild/scripts/InsertData.sql in the directory of the chapter06 project.
https://mariadb.com
https://www.mysql.com
3
https://rocksdb.org
4
https://mariadb.com/kb/en/binary-packages
1
2
271
Chapter 6 ■ Spring Data Access with JDBC
Using the Docker MariaDB container, you don’t need to execute the scripts manually because they are
automatically executed when the container is started. Follow the instructions in CHAPTER06.adoc if you are
interested in this approach (and you should be, because containers are everywhere nowadays).
Following the instructions in the CHAPTER06.adoc should produce a MariaDB container named
local-mariadb. If you use a smart editor (like IntelliJ IDEA, the editor recommended in this book), you
can use the Database view to inspect your schema and tables. In Figure 6-2 you can see the contents of the
musicdb schema as depicted in IntelliJ IDEA.
Figure 6-2. Contents of the musicdb schema
As you can see, we have a one-to-many relationship between the SINGER and ALBUM tables and both
have a primary key named ID. The foreign key linking records in ALBUM to parent records in SINGER is named
SINGER_ID.
In later sections of this chapter, you will see examples of retrieving the data via JDBC from the database
and directly mapping the result set into Java objects (that is, POJOs). These classes that map to the records in
tables are also called pojos. For the SINGER table, a Singer class is and instances of this class map to rows in
the SINGER table.
272
Chapter 6 ■ Spring Data Access with JDBC
In the I Love Lucy episode “Paris at Last,” Lucy is rescued from arrest by an elaborate translation effort
by Ricky, a Paris policemen, and a third man who helps5. The episode basically shows Lucy getting in trouble
and getting arrested by the French police. The two police officers cannot speak English, but one speaks both
French and German; Ricky and Lucy cannot speak French, but Ricky speaks Spanish; and the third man
speaks only German and Spanish. This leads to a chain of three translators between Lucy, who speaks only
English, and the police chief, who speaks only French.
In a similar way, a Java application and a database cannot communicate directly, so they need a
translator, which in software is called a driver. In the I Love Lucy episode, they need three translators to get
the job done. When it comes to Java and most databases, we have the following options:
•
We usually need one translator, the driver.
•
We might use two, if we want to introduce a persistence layer such as Hibernate.
•
We might use three, if we add Spring Data to easily map records to POJOs and handle
transactions easily.
In this book, we show you how to do all three. Let’s start with the basic one and define our POJOs.
Listing 6-1 shows the Singer and Album classes that map to records in the SINGER and ALBUM tables,
respectively.
Listing 6-1. POJOs for Working with the JDBC Driver
package com.apress.prospring6.six.plain.pojos;
import
import
import
import
java.io.Serializable;
java.time.LocalDate;
java.util.HashSet;
java.util.Set;
// maps to table SINGER
public class Singer implements Serializable {
private Long id;
private String firstName;
private String lastName;
private LocalDate birthDate;
private Set<Album> albums;
// getters and setters omitted
}
// maps to table ALBUM
public class Album implements Serializable {
private Long id;
private Long singerId;
private String title;
private LocalDate releaseDate;
// getters and setters omitted
}
5
https://youtu.be/Xle3I-5nfpI
273
Chapter 6 ■ Spring Data Access with JDBC
Let’s start with a simple interface for SingerDao that encapsulates all the data access methods for
Singer information. DAO is an acronym for data access object, and in the Spring world the term repository
is used instead. The code is as shown in Listing 6-2.
Listing 6-2. SingerDao Interface
package com.apress.prospring6.six.plain.dao.pojos;
import com.apress.prospring6.six.entities.Singer;
import java.util.Set;
import java.util.Optional;
public interface SingerDao extends CoreDao {
Set<Singer> findAll();
Set<Singer> findByFirstName(String firstName);
Optional<String> findNameById(Long id);
Optional<String> findLastNameById(Long id);
Optional<String> findFirstNameById(Long id);
void insert(Singer singer);
void update(Singer singer);
void delete(Long singerId);
Set<Singer> findAllWithAlbums();
void insertWithAlbum(Singer singer);
}
In the SingerDao interface, we define two find(..) methods and the insert(..), update(..), and delete(..)
methods, respectively. They correspond to the CRUD terms (create, read, update, delete).
A Java application needs a connection instance to communicate with the database, and retrieve or
send data. The CoreDao interface extended by SingerDao is a simple interface that groups methods related
to connection management: getting a connection and closing a connection. This interface and the JDBC
infrastructure are discussed in the next section (and shown in Listing 6-4).
Finally, to facilitate testing, let’s modify the logback.xml configuration file to turn the log level to DEBUG
for all classes. At the DEBUG level, the application will output all the underlying SQL statements being fired
to the database, so you know what exactly is going on; this is especially useful for troubleshooting SQL
statement syntax errors. Listing 6-3 depicts the contents of the logback.xml file for the project containing
the sources for Chapter 6 project (chapter06).
Listing 6-3. logback.xml Contents
<?xml version="1.0" encoding="UTF-8"?>
<configuration>
<contextListener class="ch.qos.logback.classic.jul.LevelChangePropagator">
<resetJUL>true</resetJUL>
</contextListener>
<appender name="console" class="ch.qos.logback.core.ConsoleAppender">
<encoder>
<pattern> %-5level: %class{0} - %msg%n</pattern>
</encoder>
</appender>
274
Chapter 6 ■ Spring Data Access with JDBC
<logger name="com.apress.prospring6.six" level="debug"/>
<logger name="org.springframework" level="debug"/>
<root level="info">
<appender-ref ref="console" />
</root>
</configuration>
Exploring the JDBC Infrastructure
JDBC provides a standard way for Java applications to access data stored in a database. The core of the JDBC
infrastructure is a driver that is specific to each database; it is this driver that allows Java code to access the
database.
Once a driver is loaded, it registers itself with a java.sql.DriverManager class. This class manages a list
of drivers and provides static methods for establishing connections to the database. The DriverManager’s
getConnection() method returns a driver-implemented java.sql.Connection interface. This interface
allows you to run SQL statements against the database.
The JDBC framework is quite complex and well tested; however, with this complexity comes difficulty
in development. The first level of complexity lies in making sure your code manages the connections to
the database. A connection is a scarce resource and is very expensive to establish. Generally, the database
creates a thread or spawns a child process for each connection. Also, the number of concurrent connections
is usually limited, and an excessive number of open connections will slow down the database.
We will show you how Spring helps manage this complexity, but before we can proceed any further, we
need to show you how to select, delete, and update data in pure JDBC.
A Java application needs a connection instance to communicate with the database and retrieve or send
data. The type for this instance is provided by the driver present on the project classpath. In our case the
MariaDB driver was added to the classpath by declaring the mariadb-java-client.jar file as a dependency
in the Maven/Gradle configuration. Listing 6-4 shows the CoreDao code that contains two default methods,
one for retrieving a connection and one for closing it, that are inherited by any type implementing this
interface, directly or indirectly.
Listing 6-4. CoreDao Interface
package com.apress.prospring6.six.dao;
import java.sql.Connection;
import java.sql.DriverManager;
import java.sql.SQLException;
public interface CoreDao {
default Connection getConnection() throws SQLException {
return DriverManager.getConnection(
"jdbc:mariadb://localhost:3306/musicdb?useSSL=false",
"prospring6", "prospring6");
}
275
Chapter 6 ■ Spring Data Access with JDBC
default void closeConnection(Connection connection) throws SQLException {
if (connection == null) {
return;
}
connection.close();
}
}
Keeping in mind what we already know about database connections, we will take the cautious and
expensive (in terms of performance) approach of creating a connection for each statement. This greatly
degrades the performance of Java and adds extra stress to the database because a connection must be
established for each query. However, if we kept a connection open, we could bring the database server
to a halt.
As you can see, the reference type for the connection is the java.sql.Connection interface that is part
of the JDK. Any JDBC driver that plays the role of a translator between a Java application and a SQL database
must have a class that implements this interface. The MariaDB implementation is the org.mariadb.jdbc.
Connection interface. To check that a driver is present on the classpath, most applications declare a static
block that uses reflection to find the core driver class of that driver, an implementation of java.sql.Driver.
Listing 6-5 shows the static block that does this for the MariaDB driver.
Listing 6-5. Static Block Used to Check the Presence of a JDBC Driver on the Classpath
package com.apress.prospring6.six.plain;
import org.slf4j.Logger;
import org.slf4j.LoggerFactory;
// other import statements omitted
public class PlainJdbcDemo {
private static Logger LOGGER = LoggerFactory.getLogger(PlainJdbcDemo.class);
static {
try {
Class.forName("org.mariadb.jdbc.Driver");
} catch (ClassNotFoundException ex) {
LOGGER.error("Problem loading DB Driver!", ex);
}
}
// other code omitted
}
This code is far from complete, but it gives you an idea of the steps you need in order to manage a
JDBC connection. This code does not even deal with connection pooling, which is a common technique
for managing connections to the database more effectively. We do not discuss connection pooling at this
point (connection pooling is discussed in the “Database Connections and DataSources” section later in this
chapter); instead, the code snippet in Listing 6-6 shows an implementation of the findAll(), insert(..),
and delete() methods of the SingerDao interface using plain JDBC.
276
Chapter 6 ■ Spring Data Access with JDBC
Listing 6-6. PlainSingerDao Implementation
package com.apress.prospring6.six.plain.dao.pojos;
import java.sql.Connection;
import java.sql.PreparedStatement;
import java.sql.ResultSet;
import java.sql.SQLException;
import java.sql.Statement;
// other import statements omitted
public class PlainSingerDao implements SingerDao {
private static Logger LOGGER = LoggerFactory.getLogger(PlainSingerDao.class);
@Override
public Set<Singer> findAll() {
Set<Singer> result = new HashSet<>();
try (var connection = getConnection();
var statement = connection.prepareStatement("select * from SINGER");
var resultSet = statement.executeQuery()) {
while (resultSet.next()) {
var singer = new Singer();
singer.setId(resultSet.getLong("id"));
singer.setFirstName(resultSet.getString("first_name"));
singer.setLastName(resultSet.getString("last_name"));
singer.setBirthDate(resultSet.getDate("birth_date")
.toLocalDate());
result.add(singer);
}
} catch (SQLException ex) {
LOGGER.error("Problem when executing SELECT!",ex);
}
return result;
}
@Override
public Singer insert(Singer singer) {
try ( var connection = getConnection()){
var statement = connection.prepareStatement(
"insert into SINGER (first_name, last_name, birth_date) values
(?, ?, ?)"
, Statement.RETURN_GENERATED_KEYS);
statement.setString(1, singer.getFirstName());
statement.setString(2, singer.getLastName());
statement.setDate(3, java.sql.Date.valueOf(singer.getBirthDate()));
statement.execute();
var generatedKeys = statement.getGeneratedKeys();
if (generatedKeys.next()) {
singer.setId(generatedKeys.getLong(1));
}
return singer;
} catch (SQLException ex) {
277
Chapter 6 ■ Spring Data Access with JDBC
LOGGER.error("Problem executing INSERT", ex);
}
return null;
}
@Override
public void delete(Long singerId) {
try (var connection = getConnection();
var statement = connection.prepareStatement("delete from SINGER where id=?")) {
statement.setLong(1, singerId);
statement.execute();
} catch (SQLException ex) {
LOGGER.error("Problem executing DELETE", ex);
}
}
// other methods omitted
}
Notice the amount of code needed for each method. We always have to make sure the connection to the
database can be used, and using it requires us to treat the checked SQLException that might be thrown. In
earlier versions of Java, when java.sql.Connection and other types needed to handle communication with
the database, did not implement java.lang.AutoCloseable, and there was no try-with-resources statement,
that code looked even uglier.
The class to test the methods in PlainSingerDao is shown in Listing 6-7.
Listing 6-7. PlainJdbcDemo Class That Tests Methods in PlainSingerDao
package com.apress.prospring6.six.plain;
// import statements omitted
public class PlainJdbcDemo {
private static Logger LOGGER = LoggerFactory.getLogger(PlainJdbcDemo.class);
public static void main(String... args) {
LOGGER.info("Listing initial singer data:");
listAllSingers();
LOGGER.info("-------------");
LOGGER.info("Insert a new singer");
Singer singer = new Singer();
singer.setFirstName("Ed");
singer.setLastName("Sheeran");
singer.setBirthDate(new Date((new GregorianCalendar(1991, 2, 1991)).getTime().
getTime()));
singerDao.insert(singer);
LOGGER.info("The singer has ID now: {}", singer.getId());
LOGGER.info("-------------");
LOGGER.info("Listing singer data after new singer created:");
listAllSingers();
278
Chapter 6 ■ Spring Data Access with JDBC
LOGGER.info("-------------");
LOGGER.info("Deleting the previous created singer");
singerDao.delete(singer.getId());
LOGGER.info("Listing singer data after new singer deleted:");
listAllSingers();
}
private static void listAllSingers() {
var singers = singerDao.findAll();
for (Singer singer: singers) {
LOGGER.info(singer.toString());
}
}
}
The logger is used a lot in the example to print the contents of the database after each method is called.
Running this program yields the result shown in Listing 6-8 (assuming you have a locally installed MariaDB
database called musicdb that has a username and password set to prospring6 and the sample data was
loaded).
Listing 6-8. PlainJdbcDemo Output
INFO
INFO
INFO
INFO
INFO
INFO
INFO
INFO
INFO
INFO
INFO
INFO
INFO
INFO
INFO
INFO
INFO
INFO
INFO
:
:
:
:
:
:
:
:
:
:
:
:
:
:
:
:
:
:
:
PlainJdbcDemo
PlainJdbcDemo
PlainJdbcDemo
PlainJdbcDemo
PlainJdbcDemo
PlainJdbcDemo
PlainJdbcDemo
PlainJdbcDemo
PlainJdbcDemo
PlainJdbcDemo
PlainJdbcDemo
PlainJdbcDemo
PlainJdbcDemo
PlainJdbcDemo
PlainJdbcDemo
PlainJdbcDemo
PlainJdbcDemo
PlainJdbcDemo
PlainJdbcDemo
-
Listing initial singer data:
Singer[id=1,firstName=John,lastName=Mayer,birthDate=1977-10-16]
Singer[id=2,firstName=Ben,lastName=Barnes,birthDate=1981-08-20]
Singer[id=3,firstName=John,lastName=Butler,birthDate=1975-04-01]
------------Insert a new singer
The singer has ID now: 19
------------Listing singer data after new singer created:
Singer[id=1,firstName=John,lastName=Mayer,birthDate=1977-10-16]
Singer[id=2,firstName=Ben,lastName=Barnes,birthDate=1981-08-20]
Singer[id=3,firstName=John,lastName=Butler,birthDate=1975-04-01]
Singer[id=19,firstName=Ed,lastName=Sheeran,birthDate=1996-08-11]
------------Deleting the previous created singer
Listing singer data after new singer deleted:
Singer[id=1,firstName=John,lastName=Mayer,birthDate=1977-10-16]
Singer[id=2,firstName=Ben,lastName=Barnes,birthDate=1981-08-20]
Singer[id=3,firstName=John,lastName=Butler,birthDate=1975-04-01]
As shown in the output, the first block of lines shows the initial data. The second block of lines shows
that the new record was added. The final block of lines shows that the newly created singer Ed Sheeran was
deleted.
As you can see in the previous code samples, a lot of code needs to be moved to a helper class or,
even worse, duplicated in each DAO class. This is the main disadvantage of JDBC from the application
programmer’s point of view; you just do not have time to write repetitive code in every DAO class. Instead,
you want to concentrate on writing code that actually does what you need the DAO class to do: select,
update, and delete the data. The more helper code you need to write, the more checked exceptions you need
279
Chapter 6 ■ Spring Data Access with JDBC
to handle, and the more bugs you may introduce in your code. This is where a DAO framework and Spring
come in. A framework eliminates the code that does not actually perform any custom logic and allows you to
forget about all the housekeeping that needs to be performed. In addition, Spring’s extensive JDBC support
makes your life a lot easier.
The plain JDBC code shown in this section can also be written using Java records instead of POJOs.
The project for this book contains code for this, but it won’t be discussed in detail in the book since the focus of
this book is Spring.
Spring JDBC Infrastructure
The code we discussed in the first part of the chapter is not very complex, but it is tedious, and because there
is so much of it to write, the likelihood of coding errors is quite high. It is time to take a look at how Spring
makes things easier and more elegant.
Overview and Used Packages
JDBC support in Spring is divided into the five packages detailed in Table 6-1; each handles different aspects
of JDBC access.
Table 6-1. Spring JDBC Packages
Package
Description
org.
springframework.
jdbc.core
This package contains the foundations of JDBC classes in Spring. It includes the core
JDBC class, JdbcTemplate, which simplifies programming database operations with
JDBC. Several subpackages provide support of JDBC data access with more specific
purposes (e.g., a JdbcTemplate class that supports named parameters) and related
support classes as well.
org.
springframework.
jdbc.datasource
This package contains helper classes and DataSource implementations that you
can use to run JDBC code outside a JEE container. Several subpackages provide
support for embedded databases, database initialization, and various data source
lookup mechanisms.
org.
springframework.
jdbc.object
This package contains classes that help convert the data returned from the database
into objects or lists of objects. These objects and lists are plain Java objects and
therefore are disconnected from the database.
org.
springframework.
jdbc.support
The most important class in this package is SQLException translation support.
This allows Spring to recognize error codes used by the database and map them to
higher-level exceptions.
org.
springframework.
jdbc.config
This package contains classes that support JDBC configuration within Spring’s
ApplicationContext. For example, it contains classes used to work with embedded
databases.
280
Chapter 6 ■ Spring Data Access with JDBC
Let’s start the discussion of Spring JDBC support by looking at the lowest-level functionality. The first
thing that you need to do before running SQL queries is to establish a connection to the database.
Database Connections and DataSources
You can use Spring to manage the database connection for you by providing a bean that implements javax.
sql.DataSource. The difference between a DataSource and a Connection is that a DataSource provides and
manages connections.
DriverManagerDataSource, in package org.springframework.jdbc.datasource, is the simplest
implementation of a DataSource. By looking at the class name, you can guess that it simply calls
DriverManager to obtain a connection. The fact that DriverManagerDataSource doesn’t support database
connection pooling makes this class unsuitable for anything other than testing. The configuration of
DriverManagerDataSource is quite simple, as you can see in Listing 6-9; you just need to supply the driver
class name, a connection URL, a username, and a password.
Listing 6-9. Contents of jdbc.properties
driverClassName=org.mariadb.jdbc.Driver
url=jdbc:mariadb://localhost:3306/musicdb?useSSL=false
username=prospring6
password=prospring6
You most likely recognize the properties in the listing. They represent the values you normally pass
to JDBC to obtain a Connection interface. The database connection information typically is stored in a
properties file for easy maintenance and substitution in different deployment environments. The properties
in jdbc.properties are injected by Spring into the properties in a Java configuration class. Such a
configuration class would look pretty much like the one shown in Listing 6-10.
Listing 6-10. Database Configuration Class
package com.apress.prospring6.six.config;
import
import
import
import
import
import
import
org.slf4j.Logger;
org.slf4j.LoggerFactory;
org.springframework.beans.factory.annotation.Value;
org.springframework.context.annotation.Bean;
org.springframework.context.annotation.Configuration;
org.springframework.context.annotation.PropertySource;
org.springframework.jdbc.datasource.SimpleDriverDataSource;
import javax.sql.DataSource;
import java.sql.Driver;
@Configuration
@PropertySource("classpath:db/jdbc.properties")
public class SimpleDataSourceCfg {
private static Logger LOGGER = LoggerFactory.getLogger(SimpleDataSourceCfg.class);
@Value("${jdbc.driverClassName}")
private String driverClassName;
@Value("${jdbc.url}")
281
Chapter 6 ■ Spring Data Access with JDBC
private String url;
@Value("${jdbc.username}")
private String username;
@Value("${jdbc.password}")
private String password;
public DataSource dataSource() {
try {
var dataSource = new SimpleDriverDataSource();
Class<? extends Driver> driver = (Class<? extends Driver>) Class.
forName(driverClassName);
dataSource.setDriverClass(driver);
dataSource.setUrl(url);
dataSource.setUsername(username);
dataSource.setPassword(password);
return dataSource;
} catch (Exception e) {
LOGGER.error("DBCP DataSource bean cannot be created!", e);
return null;
}
}
}
Testing a configuration class like this is easy; just create an application context based on it and
inspect the beans in it. Listing 6-11 shows a test class containing a method that checks the existence of the
DataSource bean and uses it to execute a simple SQL check statement.
Listing 6-11. Test Class Checking the Validity of the SimpleDataSourceCfg Class
package com.apress.prospring6.six.plain;
// import statements omitted
public class DataSourceConfigTest {
private static Logger LOGGER = LoggerFactory.getLogger(DataSourceConfigTest.class);
@Test
public void testSimpleDataSource() throws SQLException {
var ctx = new AnnotationConfigApplicationContext(SimpleDataSourceCfg.class);
var dataSource = ctx.getBean("dataSource", DataSource.class);
assertNotNull(dataSource);
testDataSource(dataSource);
ctx.close();
}
private void testDataSource(DataSource dataSource) throws SQLException{
try (var connection = dataSource.getConnection();
var statement = connection.prepareStatement("SELECT 1");
var resultSet = statement.executeQuery()){
while (resultSet.next()) {
int mockVal = resultSet.getInt("1");
282
Chapter 6 ■ Spring Data Access with JDBC
assertEquals(1, mockVal);
}
} catch (Exception e) {
LOGGER.debug("Something unexpected happened.", e);
}
}
}
A test class was used because it is more practical to reuse some of the code and also teach you to work
with JUnit to quickly write tests for any piece of code you write. The testOne() method is used to test the
SimpleDataSourceCfg configuration class. After obtaining the dataSource bean from any configuration, the
mock query SELECT 1 is used to test the connection to the MariaDB database.
In real-world applications, you can use the Apache Commons BasicDataSource6 class or a DataSource
implemented by a JEE application server (for example, JBoss, WildFly, WebSphere, WebLogic, or GlassFish),
which may further increase the performance of the application. You could use a DataSource in the plain
JDBC code and get the same pooling benefits; however, in most cases, you would still need a central place
to configure the DataSource. Spring, on the other hand, allows you to declare a dataSource bean and set the
connection properties in the ApplicationContext definition files. See the configuration sample in Listing 6-12,
which instead of SimpleDriverDataSource uses an org.apache.commons.dbcp2.BasicDataSource
implementation.
Listing 6-12. BasicDataSourceCfg Class
package com.apress.prospring6.six.config;
import org.apache.commons.dbcp2.BasicDataSource;
// other import statements omitted
@Configuration
@PropertySource("classpath:db/jdbc.properties")
public class BasicDataSourceCfg {
private static Logger LOGGER = LoggerFactory.getLogger(BasicDataSourceCfg.class);
// code omitted for duplication, same as in 6-10
@Bean(destroyMethod = "close")
public DataSource dataSource() {
try {
var dataSource = new BasicDataSource();
dataSource.setDriverClassName(driverClassName);
dataSource.setUrl(url);
dataSource.setUsername(username);
dataSource.setPassword(password);
return dataSource;
} catch (Exception e) {
LOGGER.error("DBCP DataSource bean cannot be created!", e);
return null;
}
}
}
6
https://commons.apache.org/proper/commons-dbcp
283
Chapter 6 ■ Spring Data Access with JDBC
This particular Spring-managed DataSource is implemented in org.apache.commons.dbcp2.
BasicDataSource. The most important bit is that the bean type implements javax.sql.DataSource, and you
can immediately start using it in your data access classes.
Another way to configure a dataSource bean is to use JNDI. If the application you are developing is
going to run in a JEE container, you can take advantage of the container-managed connection pooling.
To use a JNDI-based data source, you need to change the dataSource bean declaration, as shown in
Listing 6-13.
Listing 6-13. JndiDataSourceCfg Class
package com.apress.prospring6.six.config;
import org.springframework.jndi.JndiTemplate;
// other import statements omitted
@Configuration
public class JndiDataSourceCfg {
private static Logger LOGGER = LoggerFactory.getLogger(JndiDataSourceCfg.class);
@Bean
public DataSource dataSource() {
try {
return (DataSource) new JndiTemplate().lookup("java:comp/env/jdbc/musicdb");
} catch (Exception e) {
LOGGER.error("JNDI DataSource bean cannot be created!", e);
return null;
}
}
}
In this example the JndiTemplate class is used to obtain the data source by JNDI lookup. This is a
very useful helper class that simplifies JNDI operations. It provides methods to look up and bind objects
and allows implementations of the JndiCallback interface to perform any operation they like with a JNDI
naming context provided.
As you can see, Spring allows you to configure the DataSource in almost any way you like, and it hides
the actual implementation or location of the data source from the rest of the application’s code. In other
words, your DAO classes do not know and do not need to know where the DataSource points.
The connection management is also delegated to the dataSource bean, which in turn performs the
management itself or uses the JEE container to do all the work.
Embedded Database Support
Starting from version 3.0, Spring also offers embedded database support, which automatically starts an
embedded database and exposes it as a DataSource for the application. The embedded database support
is extremely useful for local development or unit testing. Throughout the rest of the chapters covering data
access, we use the embedded database to run the sample code, so your machine doesn’t require a database
to be installed in order to run the samples, but if you want a true developer experience, consider setting up a
Docker container.
The configuration class in Listing 6-14 shows the minimal configuration required to set up an
embedded H2 database in a Spring application context.
284
Chapter 6 ■ Spring Data Access with JDBC
Listing 6-14. EmbeddedJdbcConfig Class
package com.apress.prospring6.six.config;
import org.springframework.jdbc.datasource.embedded.EmbeddedDatabaseBuilder;
import org.springframework.jdbc.datasource.embedded.EmbeddedDatabaseType;
// other import statements omitted
@Configuration
public class EmbeddedJdbcConfig {
private static Logger LOGGER = LoggerFactory.getLogger(EmbeddedJdbcConfig.class);
@Bean
public DataSource dataSource() {
try {
var dbBuilder = new EmbeddedDatabaseBuilder();
return dbBuilder.setType(EmbeddedDatabaseType.H2)
.addScripts("classpath:h2/schema.sql",
"classpath:h2/test-data.sql").build();
} catch (Exception e) {
LOGGER.error("Embedded DataSource bean cannot be created!", e);
return null;
}
}
}
The EmbeddedDatabaseBuilder class uses the database creation and loading data scripts as arguments
to create an instance of EmbeddedDatabase that implements DataSource.
Note that the order of the scripts is important, and the file that contains Data Definition Language (DDL)
should always appear first, followed by the file with Data Manipulation Language (DML). For the type attribute,
we specify the type of embedded database to use. As of version 4.0, Spring supports HSQL (the default), H2,
and DERBY.
Using DataSources in DAO Classes
The Data Access Object (DAO) pattern is used to separate low-level data accessing APIs or operations from
high-level business services. The Data Access Object pattern requires the following components:
•
DAO interface: This defines the standard operations to be performed on a model
object (or objects).
•
DAO implementation: This class provides a concrete implementation for the DAO
interface. Typically, this uses a JDBC connection or data source to handle model
object (or objects).
•
Model objects (also called data objects or entities): This is a simple POJO mapping to
a table record.
285
Chapter 6 ■ Spring Data Access with JDBC
Let’s create a SingerDao interface to implement for the sample, as shown in Listing 6-15.
Listing 6-15. SingerDao Interface
public interface SingerDao {
String findNameById(Long id);
}
For the simple implementing class named JdbcSingerDao, first we will add a dataSource property.
The reason we want to add the dataSource property to the implementation class rather than the interface
should be quite obvious: the interface does not need to know how the data is going to be retrieved and
updated. By adding DataSource mutator methods to the interface, in the best-case scenario this forces the
implementations to declare the getter and setter stubs. Clearly, this is not a very good design practice. Take a
look at the simple JdbcSingerDao class shown in Listing 6-16.
Listing 6-16. JdbcSingerDao Class
package com.apress.prospring6.six.plain;
class JdbcSingerDao implements SingerDao, InitializingBean {
private static Logger LOGGER = LoggerFactory.getLogger(JdbcSingerDao.class);
private DataSource dataSource;
public void setDataSource(DataSource dataSource) {
this.dataSource = dataSource;
}
@Override
public void afterPropertiesSet() throws Exception {
if (dataSource == null) {
throw new BeanCreationException("Must set dataSource on SingerDao");
}
}
@Override
public String findNameById(Long id) {
var result = "";
try (var connection = dataSource.getConnection();
var statement = connection.prepareStatement("select first_name, last_name from
SINGER where id=" + id);
var resultSet = statement.executeQuery()) {
while (resultSet.next()) {
return resultSet.getString("first_name") + " " + resultSet.
getString("last_name");
}
} catch (SQLException ex) {
LOGGER.error("Problem when executing SELECT!",ex);
}
return result;
}
}
286
Chapter 6 ■ Spring Data Access with JDBC
We can now instruct Spring to configure our singerDao bean by using the JdbcSingerDao
implementation and set the dataSource property as shown in the SpringDatasourceCfg configuration class,
shown in Listing 6-17. (Notice that we import the BasicDataSourceCfg class introduced in the previous
section, to avoid duplicating code.)
Listing 6-17. SpringDatasourceCfg Configuration Class
package com.apress.prospring6.six.plain;
import org.springframework.context.annotation.Configuration;
import org.springframework.context.annotation.Import;
import org.springframework.beans.factory.annotation.Autowired;
import org.springframework.context.annotation.Bean;
// other import statements omitted
import java.sql.SQLException;
@Import(BasicDataSourceCfg.class)
@Configuration
public class SpringDatasourceCfg {
private static Logger LOGGER = LoggerFactory.getLogger(SpringDatasourceCfg.class);
@Autowired
DataSource dataSource;
@Bean
public SingerDao singerDao(){
JdbcSingerDao dao = new JdbcSingerDao();
dao.setDataSource(dataSource);
return dao;
}
}
Spring now creates the singerDao bean by instantiating the JdbcSingerDao class with the dataSource
property set to the dataSource bean. It is good practice to make sure that all required properties on a bean
have been set. The easiest way to do this is to implement the InitializingBean interface and provide an
implementation for the afterPropertiesSet() method. This way, we make sure that all required properties
have been set on our JdbcSingerDao. For further discussion of bean initialization, refer to Chapter 4.
The code we have looked at so far uses Spring to manage the data source and introduces the SingerDao
interface and its JDBC implementation. We also set the dataSource property on the JdbcSingerDao class in
the Spring ApplicationContext file.
The SpringDatasourceCfg can be tested in the same way as BasicDataSourceCfg, but the test can also
check the behavior of the findNameById(..) method. The test method is shown in Listing 6-18.
Listing 6-18. Testing the SpringDatasourceCfg Configuration Class
package com.apress.prospring6.six;
import static org.junit.jupiter.api.Assertions.assertEquals;
import static org.junit.jupiter.api.Assertions.assertNotNull;
// other import statements omitted
287
Chapter 6 ■ Spring Data Access with JDBC
public class DataSourceConfigTest {
private static Logger LOGGER = LoggerFactory.getLogger(DataSourceConfigTest.class);
@Test
public void testSpringJdbc() throws SQLException {
var ctx = new AnnotationConfigApplicationContext(SpringDatasourceCfg.class);
var dataSource = ctx.getBean("dataSource", DataSource.class);
assertNotNull(dataSource);
testDataSource(dataSource);
var singerDao = ctx.getBean("singerDao", SingerDao.class);
assertEquals("John Mayer", singerDao.findNameById(1L));
ctx.close();
}
// other code omitted for duplication
}
Exception Handling
Spring advocates using runtime exceptions rather than checked exceptions, so we need a mechanism to translate
the checked SQLException into a runtime Spring JDBC exception. Because Spring’s SQL exceptions are runtime
exceptions, they can be much more granular than checked exceptions. By definition, this is not a feature of
runtime exceptions, but it is inconvenient to have to declare a long list of checked exceptions in the throws
clause; hence, checked exceptions tend to be much more coarse-grained than their runtime equivalents.
Spring provides a default implementation of the SQLExceptionTranslator interface, which takes care
of translating the generic SQL error codes into Spring JDBC exceptions. In most cases, this implementation
is sufficient, but you can extend Spring’s default implementation and set your new SQLExceptionTranslator
implementation to be used in JdbcTemplate, as shown in Listing 6-19.
Listing 6-19. SQLExceptionTranslator Custom Implementation
package com.apress.prospring6.six;
import org.springframework.dao.DataAccessException;
import org.springframework.dao.DeadlockLoserDataAccessException;
import org.springframework.jdbc.support.SQLErrorCodeSQLExceptionTranslator;
import java.sql.SQLException;
public class MariaDBErrorCodesTranslator extends SQLErrorCodeSQLExceptionTranslator {
@Override
protected DataAccessException customTranslate(String task, String sql, SQLException
sqlex) {
if (sqlex.getErrorCode() == -12345) {
return new DeadlockLoserDataAccessException(task, sqlex);
}
return null;
}
}
288
Chapter 6 ■ Spring Data Access with JDBC
At this point, it becomes clear that SQLErrorCodeSQLExceptionTranslator, a practical Springprovided implementation of SQLExceptionTranslator, is part of the spring-jdbc.jar library, so this
library needs to be added to the classpath. Yes, this is the section where we leave behind plain JDBC and add
Spring into the mix to make our development experience less of a headache when communicating with a
database.
The org.springframework.dao.DataAccessException represents the Spring root of the hierarchy of
runtime data access exceptions. Extensions of this class match specific data access exceptions and provide
more information about the real cause of an exception when accessing a database. The full hierarchy is
discussed later in the book.
To use the MariaDBErrorCodesTranslator we have to give up using the connection to communicate
with the database directly and instead wrap the DataSource in Spring’s JdbcTemplate as shown in
Listing 6-20.
Listing 6-20. Introducing Spring’s JdbcTemplate
package com.apress.prospring6.six.hybrid;
import org.springframework.jdbc.core.JdbcTemplate;
// other import statements omitted
class JdbcSingerDao implements SingerDao, InitializingBean {
private static Logger LOGGER = LoggerFactory.getLogger(JdbcSingerDao.class);
private DataSource dataSource;
private JdbcTemplate jdbcTemplate;
public void setDataSource(DataSource dataSource) {
this.dataSource = dataSource;
var jdbcTemplate = new JdbcTemplate();
jdbcTemplate.setDataSource(dataSource);
var errorTranslator = new MariaDBErrorCodesTranslator();
errorTranslator.setDataSource(dataSource);
jdbcTemplate.setExceptionTranslator(errorTranslator);
this.jdbcTemplate = jdbcTemplate;
}
// other code omitted
}
Having the custom SQL exception translator in place, Spring will invoke it upon SQL exceptions detected
when executing SQL statements against the database, and custom exception translation will happen when the
error code is -12345. For other errors, Spring will fall back to its default mechanism for exception translation.
Obviously, nothing can stop you from creating SQLExceptionTranslator as a Spring-managed bean and
using the JdbcTemplate bean in your DAO classes. Don’t worry if you don’t remember reading about the
JdbcTemplate class; we are going to discuss it in more detail right now.
289
Chapter 6 ■ Spring Data Access with JDBC
The JdbcTemplate Class
This class represents the core of Spring’s JDBC support. It can execute all types of SQL statements. In the
most simplistic view, you can classify the data definition and data manipulation statements. Data definition
statements cover creating various database objects (tables, views, stored procedures, and so on). Data
manipulation statements manipulate the data and can be classified as select and update statements.
A select statement generally returns a set of rows; each row has the same set of columns. An update
statement modifies the data in the database but does not return any results.
The JdbcTemplate class allows you to issue any type of SQL statement to the database and return any
type of result. In this section, we will go through several common use cases for JDBC programming in Spring
with the JdbcTemplate class.
I nitializing JdbcTemplate in a DAO Class
Before discussing how to use JdbcTemplate, let’s take a look at how to prepare JdbcTemplate for use in the
DAO class. It’s straightforward; most of the time you just need to construct the class by passing in the data
source object (which should be injected by Spring into the DAO class). The last code snippet in the previous
section in Listing 6-20 shows how to initialize the JdbcTemplate object. The general practice is to initialize
JdbcTemplate within the same method/constructor where the data source object is injected by Spring. This
ensures that JdbcTemplate will also be initialized and ready for use.
Once configured, JdbcTemplate is thread-safe. That means you can also choose to initialize a single
instance of JdbcTemplate in Spring’s configuration and have it injected into all DAO beans. A configuration
like this is depicted in Listing 6-21.
Listing 6-21. JdbcTemplate Configured As a Bean
package com.apress.prospring6.six.template;
import org.springframework.jdbc.core.JdbcTemplate;
// other import statements omitted
@Import(BasicDataSourceCfg.class)
@Configuration
class SpringJdbcTemplateCfg {
private static Logger LOGGER = LoggerFactory.getLogger(SpringJdbcTemplateCfg.class);
@Autowired
DataSource dataSource;
@Bean
public SingerDao singerDao(){
JdbcSingerDao dao = new JdbcSingerDao();
dao.setDataSource(dataSource);
return dao;
}
@Bean public JdbcTemplate jdbcTemplate(){
JdbcTemplate jdbcTemplate = new JdbcTemplate();
jdbcTemplate.setDataSource(dataSource);
290
Chapter 6 ■ Spring Data Access with JDBC
return jdbcTemplate;
}
}
Now that we have a JdbcTemplate bean, let’s rewrite JdbcSingerDao to make use of it. Listing 6-22
makes it quite obvious that it is way easier to use the JdbcTemplate bean to communicate with the database,
especially for retrieving a single value.
Listing 6-22. Using the JdbcTemplate Bean
package com.apress.prospring6.six.template;
class JdbcSingerDao implements SingerDao {
private JdbcTemplate jdbcTemplate;
public void setJdbcTemplate(JdbcTemplate jdbcTemplate) {
this.jdbcTemplate = jdbcTemplate;
}
@Override
public String findNameById(Long id) {
return jdbcTemplate
.queryForObject("select CONCAT(first_name , ' ' , last_name) from SINGER
where id = ?", String.class, id);
}
}
In Listing 6-22, we use the queryForObject(..) method of JdbcTemplate to retrieve the value of the
first name in a record identified by its id. The first argument is the SQL string, and the last consists of the
parameters to be passed to the SQL for parameter binding in varargs format. The second argument is the
type to be returned, which is String in this case. Besides String, you can also query for other types such as
Long and Integer. Let’s take a look at the outcome. Listing 6-23 shows the testing program. A JUnit test class
is used because this allows us to run test methods separately.
Listing 6-23. Testing JdbcSingerDao That Uses the JdbcTemplate Bean
package com.apress.prospring6.six.template;
import com.apress.prospring6.six.config.EmbeddedJdbcConfig;
// other import statements omitted
public class JdbcTemplateConfigTest {
@Test
public void testSpringJdbcWithH2Db() {
var ctx = new AnnotationConfigApplicationContext(TestDbCfg.class);
var jdbcTemplate = ctx.getBean("jdbcTemplate", JdbcTemplate.class);
assertNotNull(jdbcTemplate);
var singerDao = ctx.getBean("singerDao", SingerDao.class);
291
Chapter 6 ■ Spring Data Access with JDBC
assertEquals("John Mayer", singerDao.findNameById(1L));
ctx.close();
}
@Import(EmbeddedJdbcConfig.class)
@Configuration
public static class TestDbCfg {
@Autowired
DataSource dataSource;
@Bean
public JdbcTemplate jdbcTemplate(){
JdbcTemplate jdbcTemplate = new JdbcTemplate();
jdbcTemplate.setDataSource(dataSource);
return jdbcTemplate;
}
@Bean
public SingerDao singerDao(){
var dao = new JdbcSingerDao();
dao.setJdbcTemplate(jdbcTemplate());
return dao;
}
}
}
When executing the test method testSpringJdbcWithH2Db(), we expect the John Mayer string to be
returned by the singerDao.findNameById(1L) call, and we test this assumption using the assertTrue
method. The test can be run with the original configuration class, the SpringJdbcTemplateCfg class, but
this means the data source for this is MariaDB, and the test won’t pass unless there is a MariaDB database
installed and configured properly on the machine where the test is run. For this reason, the static class
TestDbCfg was declared within the body of the test class, to inject an embedded database, instead of a
real one. This test class is identical to the SpringJdbcTemplateCfg class, but instead of importing the
BasicDataSourceCfg class, which configures an actual database, it imports the EmbeddedJdbcConfig class
that configures an in-memory H2 database, which is more suitable for a test environment.
Of course, profiles could have been used for this example, but in this chapter, it was hinted at the
possibility to declare a static configuration class to be used in a test context, and we wanted to cover this
scenario as well.
Using Named Parameters with NamedParameterJdbcTemplate
In previous examples, the SQL query used as an argument for the jdbcTemplate.queryForObject(..)
method is declared using the normal placeholder (the ? character) as a query parameter, and the parameter
values are passed using varargs:
select CONCAT(first_name , ' ' , last_name) from SINGER where id = ?
When using a normal placeholder, the order is important, and the order in which you put the
parameters into the varargs should be the same as the order of the parameters in the query.
292
Chapter 6 ■ Spring Data Access with JDBC
Some developers prefer to use named parameters to ensure that each parameter is being bound exactly
as intended. In Spring, an extension of the JdbcTemplate class, called NamedParameterJdbcTemplate (under
the package org.springframework.jdbc.core.namedparam), provides support for this.
The initialization of the NamedParameterJdbcTemplate bean is the same as for the JdbcTemplate
bean. This means we just need to declare a bean of type NamedParameterJdbcTemplate and inject it in the
DAO class. In Listing 6-24, you can see the NamedTemplateDao equivalent of JdbcSingerDao that uses a
NamedParameterJdbcTemplate.
Listing 6-24. NamedTemplateDao That Uses the NamedParameterJdbcTemplate Bean
package com.apress.prospring6.six.named;
import org.springframework.jdbc.core.namedparam.NamedParameterJdbcTemplate;
// other import statements omitted
class NamedTemplateDao implements SingerDao {
private NamedParameterJdbcTemplate namedTemplate;
public void setNamedTemplate(NamedParameterJdbcTemplate namedTemplate) {
this.namedTemplate = namedTemplate;
}
@Override
public String findNameById(Long id) {
return namedTemplate.queryForObject( "select CONCAT(first_name , ' ' , last_name)
from SINGER where id = :singerId"
, Map.of("singerId", id), String.class);
}
}
Instead of the ? placeholder, the named parameter (prefixed by a semicolon) is used: :singerId.
Testing NamedTemplateDao is identical to testing JdbcSingerDao, so the code for this is omitted from the
book, but it is part of the project.
Retrieving Domain Objects with RowMapper<T>
Examples using JdbcTemplate and related classes presented so far have been quite simple: a single value
was returned by the query of a simple type, such as String. When the query returns multiple rows that
need to be converted in POJOs (like we did in the plain JDBC section), things get a little more complicated.
However, Spring is here to help with its RowMapper<T> interface. As its name indicates, an instance of a
type implementing RowMapper<T> is suitable only for row mapping to a single domain object. Spring’s
RowMapper<T> interface (in package org.springframework.jdbc.core) provides a simple way for you to
perform mapping from a JDBC result set to POJOs or records. Let’s see it in action by implementing the
findAll() method of the SingerDao using the RowMapper<T> interface. In Listing 6-25, you can see the
implementation of the findAll() method that returns a list of Singer records.
Listing 6-25. findAll() Using RowMapper<Singer>
package com.apress.prospring6.six.plain.records;
import java.time.LocalDate;
293
Chapter 6 ■ Spring Data Access with JDBC
import java.util.Set;
// in file Singer.java
public record Singer(Long id,
String firstName,
String lastName,
LocalDate birthDate,
Set<Album> albums) {}
// in file RowMapperCfg.java
package com.apress.prospring6.six.rowmapper;
import org.springframework.jdbc.core.RowMapper;
// other imports statements omitted
interface SingerDao {
Set<Singer> findAll();
}
class RowMapperDao implements SingerDao {
private NamedParameterJdbcTemplate namedTemplate;
public void setNamedTemplate(NamedParameterJdbcTemplate namedTemplate) {
this.namedTemplate = namedTemplate;
}
@Override
public Set<Singer> findAll() {
return new HashSet<>(namedTemplate.query("select * from SINGER", new
SingerMapper()));
}
static class SingerMapper implements RowMapper<Singer> {
@Override
public Singer mapRow(ResultSet rs, int rowNum)
throws SQLException {
return new Singer(rs.getLong("id"),
rs.getString("first_name"),
rs.getString("last_name"),
rs.getDate("birth_date").toLocalDate(),
Set.of());
}
}
}
In Listing 6-25 we define a static inner class named SingerMapper that implements the
RowMapper<Singer> interface. The class needs to provide the mapRow() implementation, which transforms
the values in a specific record of the ResultSet into the domain object you want. In this case records were
used, because they exist, and they are suitable for this example. Making it a static inner class allows you to
294
Chapter 6 ■ Spring Data Access with JDBC
share the RowMapper<Singer> among multiple finder methods in the same DAO class. If sharing the class
is not necessary, SingerMapper explicit implementation can be skipped altogether using Java 8 lambda
expressions; thus, the findAll() method can be refactored as shown in Listing 6-26.
Listing 6-26. Using Lambdas to Avoid an Explicit Implementation of RowMapper<Singer>
package com.apress.prospring6.six.rowmapper;
// other import statements omitted
class RowMapperDao implements SingerDao {
@Override
public Set<Singer> findAll() {
return new HashSet<>(namedTemplate.query("select * from SINGER", (rs, rowNum) -> {
return new Singer(rs.getLong("id"),
rs.getString("first_name"),
rs.getString("last_name"),
rs.getDate("birth_date").toLocalDate(),
Set.of());
}));
}
// other code omitted
}
Testing the findAll() method is done in the same way everything has been tested so far. The
configuration class that configures a MariaDB data source is named RowMapperCfg and is almost identical to
previous classes using JdbcTemplate (or related implementations), so it won’t be depicted here, but testing
is always useful, so Listing 6-27 shows the test method and static test class for testing the findAll() method
using an in-memory H2 database.
Listing 6-27. Method Testing findAll() and Output
package com.apress.prospring6.six.rowmapper;
import org.junit.jupiter.api.Test;
import static org.junit.jupiter.api.Assertions.assertEquals;
// other import statements omitted
public class JdbcNamedTemplateConfigTest {
private static Logger LOGGER = LoggerFactory.getLogger(JdbcNamedTemplateConfigTe
st.class);
@Test
public void testSpringJdbc() {
var ctx = new AnnotationConfigApplicationContext(TestDbCfg.class);
var singerDao = ctx.getBean("singerDao", SingerDao.class);
var singers = singerDao.findAll();
assertEquals(3, singers.size());
singers.forEach(singer -> LOGGER.info(singer.toString()));
295
Chapter 6 ■ Spring Data Access with JDBC
ctx.close();
}
@Import(EmbeddedJdbcConfig.class)
@Configuration
public static class TestDbCfg {
// other config omitted
@Bean
public SingerDao singerDao(){
var dao = new RowMapperDao();
dao.setNamedTemplate(namedTemplate());
return dao;
}
}
}
# test method result
INFO : JdbcNamedTemplateConfigTest - Singer[id=1, firstName=John, lastName=Mayer,
birthDate=1977-10-16, albums=[]]
INFO : JdbcNamedTemplateConfigTest - Singer[id=2, firstName=Ben, lastName=Barnes,
birthDate=1981-08-20, albums=[]]
INFO : JdbcNamedTemplateConfigTest - Singer[id=3, firstName=John, lastName=Butler,
birthDate=1975-04-01, albums=[]]
The albums are not printed because the RowMapper<Singer> implementation does not actually set them
on the returned Singer records. This is because they are not actually loaded from the database; for this we
need a more complex query and something more powerful than RowMapper<Singer>.
Retrieving Nested Domain Objects with ResultSetExtractor
Let’s proceed to a somewhat more complicated example, in which we need to retrieve the data from the
parent (SINGER) and child (ALBUM) tables with a join and then transform the data back into the nested object
(Set<Album> within Singer) accordingly.
For a more complicated scenario, we need to use the ResultSetExtractor<T> interface. To
demonstrate its use, let’s implement findAllWithAlbums() into the SingerDao interface. The method should
populate the list of singers with their albums. Listing 6-28 shows the addition of the findAllWithAlbums()
method to the interface and the implementation of the method using ResultSetExtractor<T>.
Listing 6-28. findAllWithAlbums() Using ResultSetExtractor<List<Singer>>
package com.apress.prospring6.six.rowmapper;
import org.springframework.jdbc.core.ResultSetExtractor;
// other import statements omitted
interface SingerDao {
Set<Singer> findAllWithAlbums();
}
class RowMapperDao implements SingerDao {
296
Chapter 6 ■ Spring Data Access with JDBC
private NamedParameterJdbcTemplate namedTemplate;
public void setNamedTemplate(NamedParameterJdbcTemplate namedTemplate) {
this.namedTemplate = namedTemplate;
}
@Override
public Set<Singer> findAllWithAlbums() {
var sqlQuery = "select s.id, s.first_name, s.last_name, s.birth_date, "+
"a.id AS album_id, a.title, a.release_date " +
"from SINGER s " +
"left join ALBUM a on s.id = a.singer_id";
return new HashSet<>(namedTemplate.query(sqlQuery, new
SingerWithAlbumsExtractor()));
}
static class SingerWithAlbumsExtractor implements ResultSetExtractor<Set<Singer>> {
@Override
public Set<Singer> extractData(ResultSet rs) throws SQLException,
DataAccessException {
Map<Long, Singer> map = new HashMap<>();
Singer singer;
while (rs.next()) {
Long id = rs.getLong("id");
singer = map.get(id);
if (singer == null) {
singer = new Singer(id,rs.getString("first_name"),rs.getString("last_
name"),rs.getDate("birth_date"),new HashSet<>());
map.put(id, singer);
}
var albumId = rs.getLong("album_id");
if (albumId > 0) {
Album album = new Album(albumId,id,rs.getString("title"),rs.
getDate("release_date"));
singer.albums().add(album);
}
}
return new HashSet<>(map.values());
}
}
}
The code looks quite like the RowMapper<T> sample, but this time we declare an inner class that
implements ResultSetExtractor<T>. Then we implement the extractData(..) method to transform the
result set into a list of Singer records accordingly. For the findAllWithDetail() method, the query uses a
left join to join the two tables so that singers with no albums will also be retrieved. The result is a cartesian
product of the two tables. Finally, we use the namedTemplate.query() method, passing in the query string
and the result set extractor.
Of course, the SingerWithDetailExtractor inner class is not actually necessary because lambda
expressions are an option. In Listing 6-29 you can see the findAllWithAlbums() version that makes use of
Java 8 lambda expressions.
297
Chapter 6 ■ Spring Data Access with JDBC
Listing 6-29. findAllWithAlbums() Using Lambda Expressions
package com.apress.prospring6.six.rowmapper;
// other import statements omitted
class RowMapperDao implements SingerDao {
public static final String ALL_JOIN_SELECT = "select s.id, s.first_name, s.last_name,
s.birth_date, "+
"a.id AS album_id, a.title, a.release_date " +
"from SINGER s " +
"left join ALBUM a on s.id = a.singer_id";
public List<Singer> findAllWithAlbums() {
return namedTemplate.query(ALL_JOIN_SELECT, rs -> {
Map<Long, Singer> map = new HashMap<>();
Singer singer;
while (rs.next()) {
Long id = rs.getLong("id");
singer = map.get(id);
if (singer == null) {
singer = new Singer(id,rs.getString("first_name"),rs.getString
("last_name"),rs.getDate("birth_date"),new ArrayList<>());
map.put(id, singer);
}
var albumId = rs.getLong("album_id");
if (albumId > 0) {
Album album = new Album(albumId,id,rs.getString("title"),rs.
getDate("release_date"));
singer.albums().add(album);
}
}
return new ArrayList<>(map.values());
});
}
// other code omitted
}
Testing the findAllWithAlbums() method requires writing a method like the one depicted in Listing 6-27,
the only thing being different this time is that the albums are part of the output, as shown in Listing 6-30.
Listing 6-30. Method Testing findAllWithAlbums() Output
INFO : JdbcNamedTemplateConfigTest - Singer[id=1, firstName=John, lastName=Mayer,
birthDate=1977-10-16,
albums=[Album[id=1, singerId=1, title=The Search For Everything, date=2017-01-20],
Album[id=2, singerId=1, title=Battle Studies, date=2009-11-17]]]
INFO : JdbcNamedTemplateConfigTest - Singer[id=2, firstName=Ben, lastName=Barnes,
birthDate=1981-08-20,
albums=[Album[id=3, singerId=2, title= 11:11 , date=2021-09-18]]]
INFO : JdbcNamedTemplateConfigTest - Singer[id=3, firstName=John, lastName=Butler,
birthDate=1975-04-01, albums=[]]
298
Chapter 6 ■ Spring Data Access with JDBC
You can see the singers and their album details are listed accordingly. The data is based on the data
population script that you can find in resources/h2/test-data.sql for each of the JDBC sample projects.
So far, you have seen how to use JdbcTemplate to perform some common query operations. JdbcTemplate
(and the NamedParameterJdbcTemplate class too) provides a number of overloading update() methods that
support data update operations, including insert, update, delete, and so on. However, the update() method
is quite self-explanatory, so we leave it as an exercise for you to explore. On the other side, as you will see in
later sections, we will use the Spring-provided SqlUpdate class to perform data update operations.
Spring Classes That Model JDBC Operations
In the preceding section, you saw how JdbcTemplate and the related data mapper utility classes greatly
simplify the programming model in developing data access logic with JDBC. Built on top of JdbcTemplate,
Spring also provides a number of useful classes that model JDBC data operations and let developers
maintain the query and transformation logic from ResultSet to domain objects in a more object-oriented
fashion. Specifically, this section presents the following:
•
MappingSqlQuery<T>: The MappingSqlQuery<T> abstract class allows you to wrap the
query String together with the mapRow() method into a single class.
•
SqlUpdate: The SqlUpdate class allows you to wrap any SQL update statement into
it. It also provides a lot of useful functions for you to bind SQL parameters, retrieve
the RDBMS-generated key after a new record is inserted, and so on.
•
BatchSqlUpdate: As its name indicates, this class allows you to perform batch update
operations. For example, you can loop through a Java List object and have the
BatchSqlUpdate queue up the records and submit the update statements for you in a
batch. You can set the batch size and flush the operation at any time.
•
SqlFunction<T>: The SqlFunction<T> class allows you to call stored functions in
the database with argument and return types. Another class, StoredProcedure, also
helps you to invoke stored procedures.
•
Setting up JDBC DAO by using annotations
First let’s take a look at how to set up the DAO implementation class by using annotations. Listing 6-31
shows the SingerRepo interface class with a complete listing of the data access services it provides.
Listing 6-31. SingerRepo Complete DAO Interface
package com.apress.prospring6.six.repo;
import com.apress.prospring6.six.plain.records.Singer;
import java.util.List;
public interface SingerRepo {
Set<Singer> findAll();
List<Singer> findByFirstName(String firstName);
String findNameById(Long id);
String findLastNameById(Long id);
String findFirstNameById(Long id);
List<Singer> findAllWithAlbums();
void insert(Singer singer);
299
Chapter 6 ■ Spring Data Access with JDBC
void update(Singer singer);
void delete(Long singerId);
void insertWithAlbum(Singer singer);
}
Chapter 3 introduced stereotype annotations, including @Repository, a specialization of the
@Component annotation, that is designed to be used for beans handling database operations7. Listing 6-32
shows the initial declaration and injection of the data source property into a @Repository annotated DAO
class using the JSR-250 annotation.
Listing 6-32. SingerJdbcRepo Class Implementing SingerRepo
package com.apress.prospring6.six.repo;
import jakarta.annotation.Resource;
import org.springframework.stereotype.Repository;
// other import statements omitted
@Repository("singerRepo")
public class SingerJdbcRepo implements SingerRepo {
private static Logger LOGGER = LoggerFactory.getLogger(SingerJdbcRepo.class);
private DataSource dataSource;
@Autowired
public void setDataSource(DataSource dataSource) {
this.dataSource = dataSource;
}
public DataSource getDataSource() {
return dataSource;
}
...
}
In Listing 6-32, we use @Repository to declare the Spring bean with a name of singerRepo, and since
the class contains data access code, @Repository also instructs Spring to perform database-specific SQL
exceptions to the more application-friendly DataAccessException hierarchy in Spring.
The BasicDataSourceCfg configuration class, introduced earlier in the chapter, declaring a MariaDB
poolable BasicDataSource bean, works with this type of bean as well. You were instructed at the beginning
of the chapter how to install and set up a MariaDB database and create the musicdb schema. Having the
infrastructure in place, we can now proceed to writing the implementation of JDBC operations.
This indicates that the annotated class is a repository, originally defined by Eric Evans in
Domain-Driven Design (Addison-Wesley Professional, 2003) as “a mechanism for encapsulating
storage, retrieval, and search behavior which emulates a collection of objects.”
7
300
Chapter 6 ■ Spring Data Access with JDBC
Querying Data by Using MappingSqlQuery<T>
Spring provides the MappingSqlQuery<T> abstract class for modeling query operations. Basically, we
construct a MappingSqlQuery<T> class by using the data source and the query string. We then implement
the mapRow() method to map each ResultSet record into the corresponding domain object. Let’s begin by
creating the SelectAllSingers class (which represents the query operation for selecting all singers) that
extends the MappingSqlQuery<T> abstract class. The SelectAllSingers class is shown in Listing 6-33.
Listing 6-33. SelectAllSingers Implementation
package com.apress.prospring6.six.repo;
import com.apress.prospring6.six.plain.records.Singer;
import org.springframework.jdbc.object.MappingSqlQuery;
//other import statements omitted
public class SelectAllSingers extends MappingSqlQuery<Singer> {
public SelectAllSingers(DataSource dataSource) {
super(dataSource, "select * from SINGER");
}
@Override
protected Singer mapRow(ResultSet rs, int rowNum)
throws SQLException {
return new Singer(rs.getLong("id"),
rs.getString("first_name"),
rs.getString("last_name"),
rs.getDate("birth_date"),
List.of());
}
}
Within the SelectAllSingers class, the SQL for selecting all singers is declared. In the class constructor,
the super(..) method is called to construct the class, using the DataSource as well as the SQL statement.
Moreover, the MappingSqlQuery<T>.mapRow() method is implemented to provide the mapping of the result
set to the Singer record.
Having the SelectAllSingers class in place, we can implement the findAll() method in the
SingerJdbcRepo class. The code snippet in Listing 6-34 depicts a section of the SingerJdbcRepo class.
Listing 6-34. SingerJdbcRepo.findAll() Implementation
package com.apress.prospring6.six.repo;
// import statements omitted
@Repository("singerRepo")
public class SingerJdbcRepo implements SingerDao {
private static Logger LOGGER = LoggerFactory.getLogger(SingerJdbcRepo.class);
private DataSource dataSource;
private SelectAllSingers selectAllSingers;
301
Chapter 6 ■ Spring Data Access with JDBC
@Autowired
public void setDataSource(DataSource dataSource) {
this.dataSource = dataSource;
this.selectAllSingers = new SelectAllSingers(dataSource);
}
@Override
public List<Singer> findAll() {
return selectAllSingers.execute();
}
// other code omitted
}
In the setDataSource() method, upon the injection of the DataSource, an instance of the
SelectAllSingers class is constructed. In the findAll() method, we simply invoke the execute() method,
which is inherited from the SqlQuery<T> abstract class indirectly. That’s all we need to do.
Figure 6-3 shows the full SelectAllSingers class hierarchy, with the SqlQuery<T> class shown in a red
dotted rectangle to make its place in the hierarchy obvious.
Figure 6-3. SelectAllSingers class hierarchy
The findAll() method implemented this way can be run on the MariaDB database by creating an
executable class that creates a Spring application context using the BasicDataSourceCfg class or can be
tested against an embedded database in a test context.
Listing 6-35 depicts the RepoDemo class and its output.
Listing 6-35. RepoDemo Class and Its Output
package com.apress.prospring6.six.repo;
import com.apress.prospring6.six.config.BasicDataSourceCfg;
// other import statements omitted
302
Chapter 6 ■ Spring Data Access with JDBC
public class RepoDemo {
private static Logger LOGGER = LoggerFactory.getLogger(RepoDemo.class);
public static void main(String... args) {
var ctx = new AnnotationConfigApplicationContext(BasicDataSourceCfg.class,
SingerJdbcRepo.class);
var singerRepo = ctx.getBean("singerRepo", SingerDao.class);
List<Singer> singers = singerRepo.findAll();
singers.forEach(singer -> LOGGER.info(singer.toString()));
ctx.close();
}
}
# output
INFO : RepoDemo - Singer[id=1, firstName=John, lastName=Mayer, birthDate=1977-10-16,
albums=[]]
INFO : RepoDemo - Singer[id=2, firstName=Ben, lastName=Barnes, birthDate=1981-08-20,
albums=[]]
INFO : RepoDemo - Singer[id=3, firstName=John, lastName=Butler, birthDate=1975-04-01,
albums=[]]
Testing the method requires creating a test context based on the EmbeddedJdbcConfig class that we
used earlier to declare an embedded in-memory H2 database (see Listing 6-14). The code from the main(..)
method is almost identical to the code in the test method, but it is depicted in Listing 6-36 to make obvious
how easy it is to test Spring JDBC methods.
Listing 6-36. SingerJdbcRepo Test Method and Output
package com.apress.prospring6.six.repo;
import com.apress.prospring6.six.config.EmbeddedJdbcConfig;
// other import statements omitted
public class RepoBeanTest {
private static Logger LOGGER = LoggerFactory.getLogger(RepoBeanTest.class);
@Test
public void testFindAllWithMappingSqlQuery() {
var ctx = new AnnotationConfigApplicationContext(EmbeddedJdbcConfig.class,
SingerJdbcRepo.class);
var singerRepo = ctx.getBean("singerRepo", SingerDao.class);
assertNotNull(singerRepo);
List<Singer> singers = singerRepo.findAll();
assertEquals(3, singers.size());
singers.forEach(singer -> LOGGER.info(singer.toString()));
ctx.close();
}
}
303
Chapter 6 ■ Spring Data Access with JDBC
# output
DEBUG: RdbmsOperation
DEBUG: RdbmsOperation
INFO : RepoBeanTest albums=[]]
INFO : RepoBeanTest albums=[]]
INFO : RepoBeanTest albums=[]]
- SQL operation not compiled before execution - invoking compile
- RdbmsOperation with SQL [select * from SINGER] compiled
Singer[id=1, firstName=John, lastName=Mayer, birthDate=1977-10-16,
Singer[id=2, firstName=Ben, lastName=Barnes, birthDate=1981-08-20,
Singer[id=3, firstName=John, lastName=Butler, birthDate=1975-04-01,
If DEBUG logging is enabled for the org.springframework.jdbc package, you can also see the query
that was submitted by Spring.
The implementation for the findByFirstName(..) method is pretty similar to the implementation for
findAll(), but it also involves a parameter. To keep things consistent, the SelectSingerByFirstName class is
created for this operation and the code is depicted in Listing 6-37.
Listing 6-37. SelectSingerByFirstName Implementation
package com.apress.prospring6.six.repo;
import com.apress.prospring6.six.plain.records.Singer;
import org.springframework.jdbc.core.SqlParameter;
import org.springframework.jdbc.object.MappingSqlQuery;
// other import statements omitted
public class SelectSingerByFirstName extends MappingSqlQuery<Singer> {
public SelectSingerByFirstName(DataSource dataSource) {
var sqlQuery = "select id, first_name, last_name, birth_date from singer where
first_name = :first_name";
super(dataSource, sqlQuery);
super.declareParameter(new SqlParameter("first_name", Types.VARCHAR));
}
protected Singer mapRow(ResultSet rs, int rowNum) throws SQLException {
return new Singer(rs.getLong("id"),rs.getString("first_name"),rs.getString("last_
name"),rs.getDate("birth_date"), List.of());
}
}
The SelectSingerByFirstName class is similar to the SelectAllSingers class. One difference
is that the SQL statement is different and carries a named parameter called first_name. Also, in the
constructor method, the declareParameter() method is called (which is inherited from the org.
springframework.jdbc.object.RdbmsOperation abstract class indirectly). Let’s proceed to implement the
findByFirstName(..) method in the SingerJdbcRepo class. Listing 6-38 shows the updated code.
Listing 6-38. SingerJdbcRepo.findByFirstName(..) Implementation
package com.apress.prospring6.six.repo;
// import statements omitted
@Repository("singerRepo")
304
Chapter 6 ■ Spring Data Access with JDBC
public class SingerJdbcRepo implements SingerDao {
private static Logger LOGGER = LoggerFactory.getLogger(SingerJdbcRepo.class);
private DataSource dataSource;
private SelectSingerByFirstName selectSingerByFirstName;
@Autowired
public void setDataSource(DataSource dataSource) {
this.dataSource = dataSource;
this.selectSingerByFirstName = new SelectSingerByFirstName(dataSource);
}
public DataSource getDataSource() {
return dataSource;
}
@Override
public List<Singer> findByFirstName(String firstName) {
return selectSingerByFirstName.executeByNamedParam(Map.of("first_name", firstName));
}
// other code omitted
}
Upon data source injection, an instance of SelectSingerByFirstName is constructed. Afterward,
in the findByFirstName(..) method, a HashMap<K,V> is constructed with the named parameters and
values. Finally, the executeByNamedParam(..) method (inherited from the SqlQuery<T> abstract class
indirectly) is called. Testing this method requires a configuration class providing the database, and the
EmbeddedJdbcConfig suits this purpose well. Listing 6-39 shows the test method and the output.
Listing 6-39. SingerJdbcRepo.findByFirstName(..) Test Method
package com.apress.prospring6.six.repo;
// import statements omitted
public class RepoBeanTest {
private static Logger LOGGER = LoggerFactory.getLogger(RepoBeanTest.class);
@Test
public void testFindByNameWithMappingSqlQuery() {
var ctx = new AnnotationConfigApplicationContext(EmbeddedJdbcConfig.class,
SingerJdbcRepo.class);
var singerRepo = ctx.getBean("singerRepo", SingerDao.class);
assertNotNull(singerRepo);
var singers = singerRepo.findByFirstName("Ben");
assertEquals(1, singers.size());
LOGGER.info("Result: {}", singers.get(0));
ctx.close();
}
305
Chapter 6 ■ Spring Data Access with JDBC
}
# output
DEBUG: RdbmsOperation - SQL operation not compiled before execution - invoking compile
DEBUG: RdbmsOperation - RdbmsOperation with SQL [select id, first_name, last_name, birth_
date from singer where first_name = :first_name] compiled
INFO : RepoBeanTest - Result: Singer[id=2, firstName=Ben, lastName=Barnes,
birthDate=1981-08-20, albums=[]]
Updating Data by Using SqlUpdate
For updating data, Spring provides the SqlUpdate class. Listing 6-40 shows the UpdateSinger class that
extends the SqlUpdate class for update operations using Singer records.
Listing 6-40. SqlUpdate Extension to Update Singer Database Entries
package com.apress.prospring6.six.repo;
import org.springframework.jdbc.core.SqlParameter;
import org.springframework.jdbc.object.SqlUpdate;
import java.sql.Types;
// other import statements omitted
public class UpdateSinger extends SqlUpdate {
public static final String UPDATE_SINGER = "update SINGER set first_name=:first_name," +
" last_name=:last_name, birth_date=:birth_date where id=:id";
public UpdateSinger(DataSource dataSource) {
super(dataSource, UPDATE_SINGER);
super.declareParameter(new SqlParameter("first_name", Types.VARCHAR));
super.declareParameter(new SqlParameter("last_name", Types.VARCHAR));
super.declareParameter(new SqlParameter("birth_date", Types.DATE));
super.declareParameter(new SqlParameter("id", Types.INTEGER));
}
}
UpdateSinger is a customization of the SqlUpdate class with a custom query and custom-named
parameters. Listing 6-41 shows the implementation of the update() method in the SingerJdbcRepo class.
Listing 6-41. Using SqlUpdate in a Repo Class
package com.apress.prospring6.six.repo;
// import statements omitted
@Repository("singerRepo")
public class SingerJdbcRepo implements SingerDao {
private static Logger LOGGER = LoggerFactory.getLogger(SingerJdbcRepo.class);
private DataSource dataSource;
private UpdateSinger updateSinger;
306
Chapter 6 ■ Spring Data Access with JDBC
@Autowired
public void setDataSource(DataSource dataSource) {
this.dataSource = dataSource;
this.updateSinger = new UpdateSinger(dataSource);
}
@Override
public void update(Singer singer) {
updateSinger.updateByNamedParam(
Map.of("first_name", singer.firstName(),
"last_name", singer.lastName(),
"birth_date", singer.birthDate(),
"id", singer.id())
);
LOGGER.info("Existing singer updated with id: " + singer.id());
}
// other code omitted
}
Upon data source injection, an instance of UpdateSinger is constructed. In the update() method, a
Map<K,V> instance containing parameter names and their values is constructed from the passed-in Singer
record, and then updateByNamedParam() is called to update the Singer database entry. Testing the operation
is just as simple as the previous operations, and the test method (and output) is shown in Listing 6-42.
Listing 6-42. Method Used to Test the UpdateSinger Implementation and Its Output
@Test
public void testUpdateWithSqlUpdate() {
var ctx = new AnnotationConfigApplicationContext(EmbeddedJdbcConfig.class,
SingerJdbcRepo.class);
var singerRepo = ctx.getBean("singerRepo", SingerDao.class);
assertNotNull(singerRepo);
Singer singer = new Singer(1L, "John Clayton", "Mayer",
new Date((new GregorianCalendar(1977, 9, 16)).getTime().getTime()),
List.of());
singerRepo.update(singer);
var singers = singerRepo.findByFirstName("John Clayton");
assertEquals(1, singers.size());
LOGGER.info("Result: {}", singers.get(0));
ctx.close();
}
# output
DEBUG: RdbmsOperation - RdbmsOperation with SQL [update SINGER set first_name=:first_name,
last_name=:last_name, birth_date=:birth_date where id=:id] compiled
INFO : SingerJdbcRepo - Existing singer updated with id: 1
307
Chapter 6 ■ Spring Data Access with JDBC
DEBUG: RdbmsOperation - RdbmsOperation with SQL [select id, first_name, last_name,
birth_date from SINGER where first_name = :first_name] compiled
INFO : RepoBeanTest - Result: Singer[id=1, firstName=John Clayton, lastName=Mayer,
birthDate=1977-10-16, albums=[]]
As you can see, we construct a Singer record with an existing ID and a new firstName and pass it to the
update(..) method. The id field is used to identify the database records, and all other fields are used as new
values for the matching columns.
Inserting Data and Retrieving the Generated Key
Inserting data is implemented by extending SqlUpdate as well.
One interesting point is how the primary key is generated (which is typically the ID column). This
value is available only after the insert statement has completed; that’s because the RDBMS generates the
identity value for the record on insert. The column ID is declared with the attribute AUTO_INCREMENT and is
the primary key, and this value will be assigned by the RDBMS during the insert operation. If you are using
Oracle, you will probably get a unique ID first from an Oracle sequence and then execute an insert statement
with the query result.
In old versions of JDBC, the method is a bit tricky. For example, if we are using MariaDB, we need
to execute the SQL select last_insert_id() function. For Microsoft SQL Server, we execute select @@
IDENTITY statements. Fortunately, starting from JDBC version 3.0, a new feature was added that allows the
retrieval of an RDBMS-generated key in a unified fashion. Listing 6-43 shows the implementation of the
insert() method, which also retrieves the generated key for the inserted contact record. It will work in most
databases (if not all); just make sure you are using a JDBC driver that is compatible with JDBC 3.0 or newer.
We start by creating the InsertSinger class for the insert operation, which extends the SqlUpdate class.
The code is shown in Listing 6-43.
Listing 6-43. SqlUpdate Extension to Insert a Singer Database Entry
package com.apress.prospring6.six.repo;
import org.springframework.jdbc.object.SqlUpdate;
import java.sql.Types;
// import statements omitted
public class InsertSinger extends SqlUpdate {
public static final String INSERT_SINGER = "insert into singer (first_name, last_name,
birth_date) " +
" values (:first_name, :last_name, :birth_date)";
public InsertSinger(DataSource dataSource) {
super(dataSource, INSERT_SINGER);
super.declareParameter(new SqlParameter("first_name", Types.VARCHAR));
super.declareParameter(new SqlParameter("last_name", Types.VARCHAR));
super.declareParameter(new SqlParameter("birth_date", Types.DATE));
super.setGeneratedKeysColumnNames("id");
super.setReturnGeneratedKeys(true);
}
}
308
Chapter 6 ■ Spring Data Access with JDBC
The InsertSinger class is almost the same as the UpdateSinger class; we need to do just two more
things. When constructing the InsertSinger class, we call the method setGeneratedKeysColumnNames() to
declare the name of the ID column. The method setReturnGeneratedKeys() then instructs the underlying
JDBC driver to retrieve the generated key. In Listing 6-44 you can see the implementation of the insert()
method in the SingerJdbcRepo class.
Listing 6-44. Using SqlUpdate in a Repo Class to Insert a Singer Entry
package com.apress.prospring6.six.repo;
import org.springframework.jdbc.support.GeneratedKeyHolder;
import org.springframework.jdbc.support.KeyHolder;
// other import statements missing
@Repository("singerRepo")
public class SingerJdbcRepo implements SingerDao {
private static Logger LOGGER = LoggerFactory.getLogger(SingerJdbcRepo.class);
private InsertSinger insertSinger;
@Autowired
public void setDataSource(DataSource dataSource) {
this.dataSource = dataSource;
this.insertSinger = new InsertSinger(dataSource);
}
@Override
public void insert(Singer singer) {
KeyHolder keyHolder = new GeneratedKeyHolder();
insertSinger.updateByNamedParam(Map.of("first_name", singer.firstName(),
"last_name", singer.lastName(),
"birth_date", singer.birthDate()), keyHolder);
var generatedId = keyHolder.getKey().longValue();
LOGGER.info("New singer {} {} inserted with id {} ", singer.firstName(), singer.
lastName(), generatedId);
}
// other code omitted
}
Upon data source injection, an instance of InsertSinger is constructed. In the insert(..) method, we
also use the SqlUpdate.updateByNamedParam() method. Additionally, we pass in an instance of KeyHolder
to the method, which will have the generated ID stored in it. After the data is inserted, we can then retrieve
the generated key from the KeyHolder. Testing the insert(..) method does not introduce anything new at
this point, but just in case, the test method is depicted in Listing 6-45.
Listing 6-45. Method Used to Test the InsertSinger Implementation and Its Output
@Test
public void testInsertWithSqlUpdate() {
var ctx = new AnnotationConfigApplicationContext(EmbeddedJdbcConfig.class,
SingerJdbcRepo.class);
var singerRepo = ctx.getBean("singerRepo", SingerDao.class);
assertNotNull(singerRepo);
309
Chapter 6 ■ Spring Data Access with JDBC
Singer singer = new Singer(null,"Ed","Sheeran", new Date((new
GregorianCalendar(1991, 1, 17)).getTime().getTime()), List.of());
singerRepo.insert(singer);
var singers = singerRepo.findByFirstName("Ed");
assertEquals(1, singers.size());
LOGGER.info("Result: {}", singers.get(0));
ctx.close();
}
# output
DEBUG: RdbmsOperation - RdbmsOperation with SQL [insert into singer (first_name, last_name,
birth_date) values (:first_name, :last_name, :birth_date)] compiled
INFO : SingerJdbcRepo - New singer Ed Sheeran inserted with id 4
DEBUG: RdbmsOperation - RdbmsOperation with SQL [select id, first_name, last_name, birth_
date from SINGER where first_name = :first_name] compiled
INFO : RepoBeanTest - Result: Singer[id=4, firstName=Ed, lastName=Sheeran,
birthDate=1991-02-17, albums=[]]
Batching Operations with BatchSqlUpdate
For batch operations, we use the BatchSqlUpdate class. The new insertWithAlbum() method will insert
both the singer and its released album into the database. To be able to insert the album record, we need to
create the InsertSingerAlbum class, which is shown in Listing 6-46.
Listing 6-46. BatchSqlUpdate Extension to Insert a Singer with an Album Collection in the Database
package com.apress.prospring6.six.repo;
import org.springframework.jdbc.core.SqlParameter;
import org.springframework.jdbc.object.BatchSqlUpdate;
import java.sql.Types;
// other import statements omitted
public class InsertSingerAlbum extends BatchSqlUpdate {
public static final int BATCH_SIZE = 10;
public static final String INSERT_SINGER_ALBUM = "insert into album (singer_id, title,
release_date) " +
"values (:singer_id, :title, :release_date)";
public InsertSingerAlbum(DataSource dataSource) {
super(dataSource, INSERT_SINGER_ALBUM);
declareParameter(new SqlParameter("singer_id", Types.INTEGER));
declareParameter(new SqlParameter("title", Types.VARCHAR));
declareParameter(new SqlParameter("release_date", Types.DATE));
setBatchSize(BATCH_SIZE);
}
}
310
Chapter 6 ■ Spring Data Access with JDBC
Note that in the constructor, we call the BatchSqlUpdate.setBatchSize() method to set the batch size
for the JDBC insert operation. Listing 6-47 shows the implementation of the insertWithAlbum() method in
the SingerJdbcRepo class.
Listing 6-47. insertWithAlbum() Implementation Using the InsertSingerAlbum Class
package com.apress.prospring6.six.repo;
import com.apress.prospring6.six.plain.records.Album;
import com.apress.prospring6.six.plain.records.Singer;
// other import statements omitted
@Repository("singerRepo")
public class SingerJdbcRepo implements SingerDao {
private static Logger LOGGER = LoggerFactory.getLogger(SingerJdbcRepo.class);
private InsertSinger insertSinger;
private InsertSingerAlbum insertSingerAlbum;
@Resource(name = "dataSource")
public void setDataSource(DataSource dataSource) {
this.dataSource = dataSource;
this.insertSinger = new InsertSinger(dataSource);
this.insertSingerAlbum = new InsertSingerAlbum(dataSource);
}
@Override
public void insertWithAlbum(Singer singer) {
var keyHolder = new GeneratedKeyHolder();
insertSinger.updateByNamedParam(Map.of("first_name", singer.firstName(),
"last_name", singer.lastName(),
"birth_date", singer.birthDate()), keyHolder);
var newSingerId = Objects.requireNonNull(keyHolder.getKey()).longValue();
LOGGER.info("New singer {} {} inserted with id {} ", singer.firstName(), singer.
lastName(), newSingerId);
var albums = singer.albums();
if (albums != null) {
for (Album album : albums) {
insertSingerAlbum.updateByNamedParam(Map.of("singer_id", newSingerId,
"title", album.title(),
"release_date", album.releaseDate()));
}
}
insertSingerAlbum.flush();
}
}
Each time the insertWithAlbum() method is called, a new instance of InsertSingerAlbum is
constructed because the BatchSqlUpdate class is not thread safe. Then we use it just like SqlUpdate. The
main difference is that the BatchSqlUpdate class will queue up the insert operations and submit them to
the database in batch. Every time the number of records equals the batch size, Spring will execute a bulk
311
Chapter 6 ■ Spring Data Access with JDBC
insert operation to the database for the pending records. On the other hand, upon completion, we call
the BatchSqlUpdate.flush() method to instruct Spring to flush all pending operations (that is, the insert
operations being queued that still haven’t reached the batch size yet). Finally, we loop through the list of
Album objects in the Singer object and invoke the BatchSqlUpdate.updateByNamedParam() method. To
facilitate testing, the insertWithAlbum() method is also implemented. As this implementation is pretty big,
it can be reduced by making use of Java 8 lambda expressions and records, as shown in Listing 6-48.
Listing 6-48. findAllWithAlbum() Implementation Using a JdbcTemplate Instance
@Override
public List<Singer> findAllWithAlbums() {
var jdbcTemplate = new JdbcTemplate(getDataSource());
return jdbcTemplate.query(FIND_SINGER_ALBUM, rs -> {
Map<Long, Singer> map = new HashMap<>();
Singer singer;
while (rs.next()) {
var singerID = rs.getLong("id");
singer = map.computeIfAbsent(singerID,
s-> {
try {
return new Singer(singerID, rs.getString("first_name"),
rs.getString("last_name"),
rs.getDate("birth_date"), new ArrayList<>());
} catch (SQLException sex) {
LOGGER.error("Malformed data!", sex);
}
return null;
});
var albumID = rs.getLong("album_id");
if (albumID > 0) {
Objects.requireNonNull(singer).albums().add(
new Album(albumID,singerID,rs.getString("title"),rs.getDate
("release_date")));
}
}
return new ArrayList<>(map.values());
});
}
Testing this method does not present any special challenge. The test method and the output are shown
in Listing 6-49.
Listing 6-49. Test Method insertAllWithAlbum() and findAllWithAlbum() and the Output
@Test
public void testInsertAlbumsWithBatchSqlUpdate() {
var ctx = new AnnotationConfigApplicationContext(EmbeddedJdbcConfig.class,
SingerJdbcRepo.class);
var singerRepo = ctx.getBean("singerRepo", SingerDao.class);
assertNotNull(singerRepo);
312
Chapter 6 ■ Spring Data Access with JDBC
var singer = new Singer(null,"BB","King", new Date((new GregorianCalendar(1940,
8, 16)).getTime().getTime()), new ArrayList<>());
var album = new Album(null, null,"My Kind of Blues", new Date(
(new GregorianCalendar(1961, 7, 18)).getTime().getTime()));
singer.albums().add(album);
album = new Album(null, null, "A Heart Full of Blues", new Date(
(new GregorianCalendar(1962, 3, 20)).getTime().getTime()));
singer.albums().add(album);
singerRepo.insertWithAlbum(singer);
var singers = singerRepo.findAllWithAlbums();
assertEquals(4, singers.size());
singers.forEach(s -> LOGGER.info(s.toString()));
ctx.close();
}
# output
DEBUG: RdbmsOperation - RdbmsOperation with SQL [insert into SINGER (first_name, last_name,
birth_date) values (:first_name, :last_name, :birth_date)] compiled
INFO : SingerJdbcRepo - New singer BB King inserted with id 4
DEBUG: RdbmsOperation - RdbmsOperation with SQL [insert into ALBUM (singer_id, title,
release_date) values (:singer_id, :title, :release_date)] compiled
INFO : RepoBeanTest - Singer[id=1, firstName=John, lastName=Mayer, birthDate=1977-10-16,
albums=[Album[id=1, singerId=1, title=The Search For Everything, releaseDate=2017-01-20],
Album[id=2, singerId=1, title=Battle Studies, releaseDate=2009-11-17]]]
INFO : RepoBeanTest - Singer[id=2, firstName=Ben, lastName=Barnes, birthDate=1981-08-20,
albums=[Album[id=3, singerId=2, title= 11:11 , releaseDate=2021-09-18]]]
INFO : RepoBeanTest - Singer[id=3, firstName=John, lastName=Butler, birthDate=1975-04-01,
albums=[]]
INFO : RepoBeanTest - Singer[id=4, firstName=BB, lastName=King, birthDate=1940-09-16,
albums=[Album[id=4, singerId=4, title=My Kind of Blues, releaseDate=1961-08-18], Album[id=5,
singerId=4, title=A Heart Full of Blues, releaseDate=1962-04-20]]]
Calling Stored Functions by Using SqlFunction
Spring also provides classes to simplify the execution of stored procedures/functions using JDBC. In this
section, we show you how to execute a simple function by using the SqlFunction<T> class. We show how to
use MariaDB for the database, create a stored function, and call it by using the SqlFunction<T> class. We’re
assuming you have a MariaDB database with a schema called musicdb, with a username and password
both equaling prospring6 (the same as in the example in the section “Exploring the JDBC Infrastructure”).
Let’s create a stored function called getFirstNameById(..), which accepts the singer’s ID and returns the
first name of the singer. Listing 6-50 shows the script to create the stored function in MariaDB (resources/
stored-function.sql). Run the script against the MariaDB database.
313
Chapter 6 ■ Spring Data Access with JDBC
Listing 6-50. MariaDB Stored Function
CREATE FUNCTION IF NOT EXISTS getFirstNameById(in_id INT) RETURNS VARCHAR(60)
LANGUAGE SQL
BEGIN
RETURN (SELECT first_name FROM SINGER WHERE id = in_id);
END;
The stored function simply accepts the ID and returns the first name of the singer record with the
ID. Next we create a StoredFunctionFirstNameById class to represent the stored function operation, which
extends the SqlFunction<String> class. The generic type is the type of the result returned by the stored
function. You can see the content of the class in Listing 6-51.
Listing 6-51. StoredFunctionFirstNameById, Which Extends the SqlFunction<T> Class
package com.apress.prospring6.six.repo;
import org.springframework.jdbc.object.SqlFunction;
// other import statements omitted
public class StoredFunctionFirstNameById extends SqlFunction<String> {
private static final String SQL_CALL = "select getfirstnamebyid(?)";
public StoredFunctionFirstNameById (DataSource dataSource) {
super(dataSource, SQL_CALL);
declareParameter(new SqlParameter(Types.INTEGER));
compile();
}
}
The SQL to call the stored function in MariaDB is very simple: select getfirstnamebyid(?). Notice
that it requires a parameter. Afterward, in the constructor, the parameter is declared, and we compile the
operation. The class is now ready for use in the implementation class. Listing 6-52 shows the updated
SingerJdbcRepo class to use the stored function.
Listing 6-52. SingerJdbcRepo Modified to Call a Stored Function
package com.apress.prospring6.six.repo;
// import statements omitted
@Repository("singerRepo")
public class SingerJdbcRepo implements SingerDao {
private StoredFunctionFirstNameById storedFunctionFirstNameById;
@Resource(name = "dataSource")
public void setDataSource(DataSource dataSource) {
this.dataSource = dataSource;
this.storedFunctionFirstNameById = new StoredFunctionFirstNameById(dataSource);
}
@Override
public Optional<String> findFirstNameById(Long id) {
var result = storedFunctionFirstNameById.execute(id).get(0);
314
Chapter 6 ■ Spring Data Access with JDBC
return result != null ? Optional.of(storedFunctionFirstNameById.execute(id).get(0)):
Optional.empty();
}
// other code omitted
}
Upon data source injection, an instance of StoredFunctionFirstNameById is constructed. Then in the
findFirstNameById() method, its execute() method is called, passing in the contact ID. The method will
return a list of Strings, and we need only the first one, because there should be only one record returned in
the result set. Testing this functionality is not possible with H2, since the lightweight in-memory database
does not have the concept of stored functions or procedures, so we’ll test the method by invoking it in the
RepoDemo.main(..) method. Listing 6-53 depicts the RepoDemo class.
Listing 6-53. RepoDemo Class and Its Output
package com.apress.prospring6.six.repo;
// import statements omitted
public class RepoDemo {
private static final Logger LOGGER = LoggerFactory.getLogger(RepoDemo.class);
public static void main(String... args) {
var ctx = new AnnotationConfigApplicationContext(BasicDataSourceCfg.class,
SingerJdbcRepo.class);
var singerRepo = ctx.getBean("singerRepo", SingerDao.class);
LOGGER.info("--------------------------");
List<Singer> singers = singerRepo.findAll();
singers.forEach(singer -> LOGGER.info(singer.toString()));
LOGGER.info("--------------------------");
String firstName = singerRepo.findFirstNameById(2L).orElse(null);
LOGGER.info("Retrieved {} ", firstName); // expect 'Ben'
ctx.close();
}
}
# output
INFO : RepoDemo - -------------------------DEBUG: RdbmsOperation - RdbmsOperation with SQL [select * from SINGER] compiled
INFO : RepoDemo - Singer[id=1, firstName=John, lastName=Mayer, birthDate=1977-10-16,
albums=[]]
INFO : RepoDemo - Singer[id=2, firstName=Ben, lastName=Barnes, birthDate=1981-08-20,
albums=[]]
INFO : RepoDemo - Singer[id=3, firstName=John, lastName=Butler, birthDate=1975-04-01,
albums=[]]
INFO : RepoDemo - -------------------------DEBUG: RdbmsOperation - RdbmsOperation with SQL [select getfirstnamebyid(?)] compiled
INFO : RepoDemo - Retrieved Ben
315
Chapter 6 ■ Spring Data Access with JDBC
You can see that the first name is retrieved correctly. What is presented here is just a simple sample
to demonstrate the Spring JDBC module’s function capabilities. Spring also provides other classes (for
example, StoredProcedure) for you to invoke complex stored procedures that return complex data types.
We recommend you refer to Spring’s reference manual in case you need to access stored procedures
using JDBC.
Spring Data Project: JDBC Extensions
In recent years, database technology has evolved so quickly with the rise of so many purpose-specific
databases that, nowadays, an RDBMS is not the only choice for an application’s back-end database. In
response to this database technology evolution and the developer community’s needs, Spring created the
Spring Data project8. The major objective of the project is to provide useful extensions on top of Spring’s core
data access functionality to interact with databases other than traditional RDBMSs.
The Spring Data project comes with various extensions. One that we would like to introduce here is
JDBC Extensions9. As its name implies, the extension provides some advanced features to facilitate the
development of JDBC applications using Spring. The main features that JDBC Extensions provides are
listed here:
•
QueryDSL support: QueryDSL10 is a domain-specific language that provides a
framework for developing type-safe queries. Spring Data’s JDBC Extensions provides
QueryDslJdbcTemplate to facilitate the development of JDBC applications using
QueryDSL instead of SQL statements.
•
Advanced support for Oracle Database: The extension provides advanced features for
Oracle Database users. On the database connection side, it supports Oracle-specific
session settings, as well as Fast Connection Failover technology when working with
Oracle RAC. It also provides classes that integrate with Oracle Advanced Queueing.
On the data type side, it provides native support for Oracle’s XML types, STRUCT and
ARRAY, and so on.
If you are developing JDBC applications using Spring with Oracle Database, JDBC Extensions is really
worth a look.
Spring JDBC Testing Annotations
In Chapter 4, you were introduced to a few testing annotations. Some of them were very obviously
related to the data access context. @Sql, @SqlConfig, @SqlGroup, and @SqlMergeMode are part of the
org.springframework.test.context.jdbc package and are suitable for testing pure Spring JDBC
implementations. In this chapter all test methods were designed to build their own application context to
keep the configuration obvious. All test methods that are using an in-memory database can be written to
share the same test context and use these specialized annotations to customize it for each test method.
https://spring.io/projects/spring-data
https://spring.io/projects/spring-data-jdbc-ext
10
http://querydsl.com
8
9
316
Chapter 6 ■ Spring Data Access with JDBC
Let’s start with @Sql. This annotation is used to annotate a test class or test method to configure SQL
scripts and statements to be executed against a given database during integration tests. This annotation can
be used with plain JDBC or with more complex applications that make use of persistence or transactions.
@Sql can be used on a test class, and this means the statements or scripts configured with it will be
applied to each test method in the class. Listing 6-54 shows a test class with a single test method for the
findAll() method.
Listing 6-54. JdbcRepoTest Class Using @Sql* Annotations
package com.apress.prospring6.six.repo;
import org.junit.jupiter.api.DisplayName;
import org.junit.jupiter.api.Test;
import org.springframework.jdbc.datasource.embedded.EmbeddedDatabaseBuilder;
import org.springframework.jdbc.datasource.embedded.EmbeddedDatabaseType;
import org.springframework.test.context.jdbc.Sql;
import org.springframework.test.context.jdbc.SqlMergeMode;
import org.springframework.test.context.junit.jupiter.SpringJUnitConfig;
// other imports omitted
@SqlMergeMode(SqlMergeMode.MergeMode.MERGE)
@Sql({ "classpath:h2/drop-schema.sql", "classpath:h2/create-schema.sql" })
@SpringJUnitConfig(classes = {JdbcRepoTest.EmptyEmbeddedJdbcConfig.class,
SingerJdbcRepo.class})
public class JdbcRepoTest {
private static final Logger LOGGER = LoggerFactory.getLogger(RepoBeanTest.class);
@Autowired
SingerDao singerRepo;
@Test
@DisplayName("should return all singers")
@Sql(value = "classpath:h2/test-data.sql")
void testFindAllWithMappingSqlQuery(){
var singers = singerRepo.findAll();
assertEquals(3, singers.size());
singers.forEach(singer -> LOGGER.info(singer.toString()));
}
@Configuration
public static class EmptyEmbeddedJdbcConfig {
private static final Logger LOGGER = LoggerFactory.getLogger(EmptyEmbeddedJdbc
Config.class);
@Bean
public DataSource dataSource() {
try {
var dbBuilder = new EmbeddedDatabaseBuilder();
return dbBuilder.setType(EmbeddedDatabaseType.H2).setName("musicdb").
build();
} catch (Exception e) {
LOGGER.error("Embedded DataSource bean cannot be created!", e);
317
Chapter 6 ■ Spring Data Access with JDBC
return null;
}
}
}
}
The test ApplicationContext is created using the @SpringJUnitJupiterConfig annotation. This is a
composed annotation that combines @ExtendWith(SpringExtension.class) from JUnit Jupiter with
@ContextConfiguration from the Spring TestContext Framework. The EmptyEmbeddedJdbcConfig config
class is declared static in the test class body for practical reasons: it is small and is relevant only to this test
class. The resulting test ApplicationContext contains beans that define a data source pointing to an empty
in-memory H2 database named musicdb. Since the test class is targeting methods of the SingerJdbcRepo
bean, this class is also added to the context.
The database schema with the SINGER and ALBUM is initialized by annotating the test class with this
annotation: @Sql({ "classpath:h2/drop-schema.sql", "classpath:h2/create-schema.sql" }). These
two scripts contain the SQL code to do exactly what their names suggest—destroy and create the tables in
the database schema.
Annotation @Sql(value = "classpath:h2/test-data.sql") is used to annotate the test method and is
executed by default before the test method to prepare the database contents for the test. There would be no
point in executing findAll() if there were no singers to be found, right?
This annotation is quite versatile and can be configured using @SqlConfigure to provide more details
about the script being executed, such as encoding, the character used as a statement separator and the
character used to prefix comments and many more. @Sql also provides and executionPhase attribute used
to specify if the script or statements should be executed before or after the test method, which is useful for
cleanup to avoid dirtying the context and preventing other tests from failing.
This means the annotation on the testFindAllWithMappingSqlQuery() test method can also be written
as follows:
@Sql(value = "classpath:h2/test-data.sql",
config = @SqlConfig(encoding = "utf-8", separator = ";", commentPrefix = "--"),
executionPhase = Sql.ExecutionPhase.BEFORE_TEST_METHOD)
The @SqlMergeMode(SqlMergeMode.MergeMode.MERGE) annotation indicates that method-level @Sql
declarations should be merged with @Sql declarations, with class-level SQL scripts and statements executed
before method-level scripts and statements. The other option is to use @SqlMergeMode(SqlMergeMode.
MergeMode.OVERRIDE), which allows @Sql declaration annotations on methods to override the annotations
at class level.
When @Sql annotations are used at class level, and @SqlMergeMode is not specified, the declarations
configured by them are ignored, and this will almost definitely cause test failures.
As previously mentioned, @Sql can also specify statements, not only scripts. Listing 6-55 shows the
testFindByNameWithMappingSqlQuery() method, used to check that the findByFirstName(..) method
works as expected.
Listing 6-55. JdbcRepoTest.testFindByNameWithMappingSqlQuery() Test Method
package com.apress.prospring6.six.repo;
import org.springframework.test.context.jdbc.SqlGroup;
// other import statements omitted
@SqlMergeMode(SqlMergeMode.MergeMode.MERGE)
@Sql({ "classpath:h2/drop-schema.sql", "classpath:h2/create-schema.sql" })
318
Chapter 6 ■ Spring Data Access with JDBC
@SpringJUnitConfig(classes = {JdbcRepoTest.EmptyEmbeddedJdbcConfig.class,
SingerJdbcRepo.class})
public class JdbcRepoTest {
@Test
@DisplayName("should return Chuck Berry")
@SqlGroup({
@Sql(statements = "insert into SINGER (first_name, last_name, birth_date) values
('Chuck', 'Berry', '1926-09-18')",
executionPhase = Sql.ExecutionPhase.BEFORE_TEST_METHOD),
@Sql(statements = "delete from SINGER where first_name = 'Chuck'",
executionPhase = Sql.ExecutionPhase.AFTER_TEST_METHOD)
})
public void testFindByNameWithMappingSqlQuery() {
var singers = singerRepo.findByFirstName("Chuck");
assertEquals(1, singers.size());
LOGGER.info("Result: {}", singers.get(0));
}
// other code omitted
}
Listing 6-55 shows how @Sql annotations can be grouped using the @SqlGroup annotation. Having
multiple @Sql annotations on the same test method (or class) is allowed, but @SqlGroup is just a nicer
way to group them to make it obvious that they are all relevant to the item they are set on. For the same
method, notice how the executionPhase attribute is used to insert the item targeted by the test method, by
setting it to Sql.ExecutionPhase.BEFORE_TEST_METHOD for one of the @Sql annotations. For the other one,
executionPhase is set to Sql.ExecutionPhase.AFTER_TEST_METHOD to delete the item from the database.
This ensures that the test context is kept clean, and that the methods in the test class can be run in any order,
and will still pass.
The @DisplayName annotation is a typical JUnit Jupiter annotation used to declare a custom display
value for the annotated test class or test method. In an editor that supports JUnit 5, this can look very pretty,
as shown in Figure 6-4.
Figure 6-4. Tests with pretty name
319
Chapter 6 ■ Spring Data Access with JDBC
In Figure 6-4, IntelliJ IDEA uses Gradle to run the tests, and by clicking the icon marked with a box and
asterisk, a tab is opened in your browser showing the test results in HTML format. Notice that the display
name is kept, which gives a lot of context for the assumptions checked by the test methods. The HTML
format for the test results is shown in Figure 6-5.
Figure 6-5. HTML test results generated by Gradle
The log level for the test can be configured to show more details. We recommend using <logger
name="com.apress.prospring6.six" level="debug"/>. This way, queries, parameters, and results become
visible. Also, you might see this exception being reported:
DEBUG: TestContextTransactionUtils - Caught exception while retrieving
PlatformTransactionManager for test context
[
DefaultTestContext@2320fa6f testClass = JdbcRepoTest, testInstance = com.apress.
prospring6.six.repo.JdbcRepoTest@7c1e2a2d,
testMethod = testFindByNameWithMappingSqlQuery@JdbcRepoTest,
testException = [null],
mergedContextConfiguration = [MergedContextConfiguration@7a560583 testClass
= JdbcRepoTest, locations = '{}',
classes = {
'class com.apress.prospring6.six.repo.JdbcRepoTest$EmptyEmbeddedJdbcConfig, '
'class com.apress.prospring6.six.repo.SingerJdbcRepo',
},
contextInitializerClasses = '[]',
activeProfiles = '{}',
propertySourceLocations = '{}',
propertySourceProperties = '{}',
contextCustomizers = set[[empty]],
contextLoader = 'org.springframework.test.context.support.DelegatingSmart
ContextLoader',
parent = [null]],
320
Chapter 6 ■ Spring Data Access with JDBC
attributes = map['org.springframework.test.context.event.
ApplicationEventsTestExecutionListener.recordApplicationEvents' -> false]
]
org.springframework.beans.factory.NoSuchBeanDefinitionException: No bean named
'transactionManager' available
...
This exception shows that the @Sql* annotations family is suitable for applications using transactions as
well (which will be covered in Chapter 7).
Introducing Testcontainers
As previously mentioned, testing stored functions and procedures is not possible with H2, since the
lightweight in-memory database does not have these concepts. However, not testing the code written is not
something that we want to encourage you to do. When in production, the code runs on an actual database.
During daily development builds, the tests run a test database, or a database in a container. Since preparing
a test database might still be a costly operation, the most suitable alternative is to run the tests in a database
in a container. To make this easy, the Testcontainers11 library was invented.
Testcontainers is a Java library that supports JUnit tests, providing lightweight, throwaway instances
of common databases, Selenium web browsers, or anything else that can run in a Docker container. Using
this library, we can start a container using a lightweight MariaDB image and write a test for our stored
function. This obviously requires Docker being installed on your computer. The good news is that you don’t
have to create the container manually, or run Docker commands, because Testcontainers provides all the
components to do so from the code. These components integrate nicely with the JUnit Jupiter and Spring
JDBC testing annotations introduced thus far.
The approach is similar to testing when using an embedded database, but instead of creating
a DataSource bean using EmbeddedDatabaseBuilder, an org.testcontainers.containers.
MariaDBContainer instance is used. The test configuration class is shown in Listing 6-56.
Listing 6-56. TestContainersConfig Using a MariaDBContainer Instance
package com.apress.prospring6.six.repo;
import org.testcontainers.containers.MariaDBContainer;
// other import statements omitted
// annotations omitted
public class StoredFunctionV1Test {
// test methods omitted for relevance
@Configuration
public static class TestContainersConfig {
private static final Logger LOGGER = LoggerFactory.getLogger
(TestContainersConfig.class);
MariaDBContainer<?> mariaDB = new MariaDBContainer<>("mariadb:10.7.4-focal");
11
https://www.testcontainers.org/
321
Chapter 6 ■ Spring Data Access with JDBC
@PostConstruct
void initialize() {
mariaDB.start();
}
@PreDestroy
void tearDown(){
mariaDB.stop();
}
@Bean
DataSource dataSource() {
try {
var dataSource = new BasicDataSource();
dataSource.setDriverClassName(mariaDB.getDriverClassName());
dataSource.setUrl(mariaDB.getJdbcUrl());
dataSource.setUsername(mariaDB.getUsername());
dataSource.setPassword(mariaDB.getPassword());
return dataSource;
} catch (Exception e) {
LOGGER.error("MariaDB TestContainers DataSource bean cannot be
created!", e);
return null;
}
}
}
}
Any code that might distract you from the TestContainers central configuration was stripped away from
the StoredFunctionV1TestTest class, the class where TestContainersConfig is declared. It was declared
inside the test class because this is the only place where it is used.
As you can see, the MariaDBContainer class provides all the properties necessary to create a
DataSource bean. When instantiated, the MariaDBContainer constructor requires a single String argument
representing the Docker container image and a tag representing the MariaDB version. To make sure the
container is started gracefully, an initialize() method was added to the configuration annotated with
@PostConstruct that calls mariaDB.start() to start the container. To make sure the container is stopped
gracefully, a tearDown() method annotated with @PreDestroy that calls mariaDB.stop() was added to stop
the container. These two methods are needed because the container is treated like a bean, and thus we must
make sure that when the context is destroyed, the container is shut down gracefully and terminated as well.
Although this approach gets the job done, the recommended way is to rely on JUnit Jupiter life-cycle
management to start and stop the container. This allows us to reuse the BasicDataSourceCfg configuration
class. The practical part here is that the same DataSource bean declared in BasicDataSourceCfg can be
used; since only the database location changes, the database is the same as the one declared for production,
MariaDB. To make this work, we need to do the following three things:
322
•
Declare our MariaDBContainer as a static field in our test class and add the
@Testcontainers annotation that is a JUnit Jupiter extension to activate automatic
startup and stop of containers used in a test case.
•
Annotate the container static field with @Container to let JUnit Jupiter know that
this is the container instance we want managed. (Both @Testcontainers and this
annotation are part of the junit-jupiter.jar Testcontainers library that is added to
the classpath of the project.)
Chapter 6 ■ Spring Data Access with JDBC
•
Use @DynamicPropertySource on a method to register the container properties as
configuration properties for the dataSource bean. This annotation was mentioned in
Chapter 4 and this test case is the first suitable place to use it in this book. It is used
here to dynamically add properties to the Environment’s set of PropertySources.
With this configuration the container is created and MariaDB is installed and started, but the schema,
the data, and the stored function required for the tests are not there yet. The SQL scripts to do that still
have to be configured using various @Sql* annotations. Listing 6-57 shows the full implementation of the
StoredFunctionV2Test with the two methods: one testing the singerRepo.findAll() query and one testing
the singerRepo.findFirstNameById(..) stored function.
Listing 6-57. StoredFunctionV2Test Using a MariaDBContainer to Test JDBC Methods On
package com.apress.prospring6.six.repo;
import org.testcontainers.containers.MariaDBContainer;
import org.testcontainers.junit.jupiter.Container;
import org.testcontainers.junit.jupiter.Testcontainers;
// import statements omitted
@Testcontainers
@SqlMergeMode(SqlMergeMode.MergeMode.MERGE)
@Sql({ "classpath:testcontainers/drop-schema.sql", "classpath:testcontainers/create-schema.
sql" }) // This works
@SpringJUnitConfig(classes = { BasicDataSourceCfg.class, SingerJdbcRepo.class})
public class StoredFunctionV2Test {
@Container
static MariaDBContainer<?> mariaDB = new MariaDBContainer<>("mariadb:10.7.4-focal");
@DynamicPropertySource // this does the magic
static void setUp(DynamicPropertyRegistry registry) {
registry.add("jdbc.driverClassName", mariaDB::getDriverClassName);
registry.add("jdbc.url", mariaDB::getJdbcUrl);
registry.add("jdbc.username", mariaDB::getUsername);
registry.add("jdbc.password", mariaDB::getPassword);
}
@Autowired
SingerRepo singerRepo;
@Test
void testFindAllQuery(){
var singers = singerRepo.findAll();
assertEquals(3, singers.size());
}
@Test
@Sql({ "classpath:testcontainers/original-stored-function.sql" }) // this does not!
Testcontainers simply can't support all SQL dialects to 100%.
void testStoredFunction(){
323
Chapter 6 ■ Spring Data Access with JDBC
var firstName = singerRepo.findFirstNameById(2L).orElse(null);
assertEquals("Ben", firstName);
}
}
Using Testcontainers simplifies testing, but Testcontainers is not perfect, and simply can’t support all
SQL dialects to 100%. Sometimes perfectly valid SQL syntax is not recognized and some adjustments have
to be made or files have to be copied onto the container and executed there. For example, the initial version
of the getFirstNameById(..) stored function shown in Listing 6-50 caused the testStoredFunction() test
method to fail, as shown in Figure 6-6.
Figure 6-6. Failing test using MariaDB test container
To make StoredFunctionV1Test and StoredFunctionV2Test pass completely, the
getFirstNameById(..) stored function declaration needs to be changed to the one in testcontainers/
stored-function.sql that is depicted here:
CREATE FUNCTION getFirstNameById (in_id INT) RETURNS VARCHAR(60)
RETURN (SELECT first_name FROM SINGER WHERE id = in_id);
However, when the right SQL changes can’t be figured out, issues like these can be overcome by copying
the SQL scripts onto the container and letting them be executed by Docker when creating the container.
Of course, this means we no longer need the @Sql* annotations and the initialization() method is
needed to copy the scripts onto the container and execute them. Listing 6-58 shows the full implementation
of StoredFunctionV3Test that actually works with the original SQL syntax of the stored function. A
TestContainersConfig class is needed to declare the initialization() method.
324
Chapter 6 ■ Spring Data Access with JDBC
Listing 6-58. GoodStoredFunctionTest Using a MariaDBContainer to Test JDBC Methods On
package com.apress.prospring6.six.repo;
import org.testcontainers.ext.ScriptUtils;
import org.testcontainers.jdbc.JdbcDatabaseDelegate;
import org.testcontainers.shaded.com.google.common.io.Resources;
import java.nio.charset.StandardCharsets;
import javax.script.ScriptException;
import java.io.IOException;
// other import statements omitted
@Testcontainers
@SpringJUnitConfig(classes = {StoredFunctionV3Test.TestContainersConfig.class,
SingerJdbcRepo.class})
public class StoredFunctionV3Test {
@Container
static MariaDBContainer<?> mariaDB = new MariaDBContainer<>("mariadb:10.7.4-focal");
@DynamicPropertySource // this does the magic
static void setUp(DynamicPropertyRegistry registry) {
registry.add("jdbc.driverClassName", mariaDB::getDriverClassName);
registry.add("jdbc.url", mariaDB::getJdbcUrl);
registry.add("jdbc.username", mariaDB::getUsername);
registry.add("jdbc.password", mariaDB::getPassword);
}
@Autowired
SingerRepo singerRepo;
@Test
void testFindAllQuery(){
var singers = singerRepo.findAll();
assertEquals(3, singers.size());
}
@Test
void testStoredFunction(){
var firstName = singerRepo.findFirstNameById(2L).orElse(null);
assertEquals("Ben", firstName);
}
@Configuration
@Import(BasicDataSourceCfg.class)
public static class TestContainersConfig {
@PostConstruct
public void initialize() throws ScriptException, IOException {
final String script1 = Resources.toString(Resources.getResource("testcontainers/
create-schema.sql"), StandardCharsets.UTF_8);
325
Chapter 6 ■ Spring Data Access with JDBC
final String script2 = Resources.toString(Resources.getResource("testcontainers/
original-stored-function.sql"), StandardCharsets.UTF_8);
mariaDB.start();
ScriptUtils.executeDatabaseScript(new JdbcDatabaseDelegate(mariaDB,""), "schema.
sql", script1, false, false, ScriptUtils.DEFAULT_COMMENT_PREFIX,
ScriptUtils.DEFAULT_STATEMENT_SEPARATOR, "$$", "$$$");
ScriptUtils.executeDatabaseScript(new JdbcDatabaseDelegate(mariaDB,""), "schema.
sql", script2, false, false, ScriptUtils.DEFAULT_COMMENT_PREFIX,
ScriptUtils.DEFAULT_STATEMENT_SEPARATOR, "$$", "$$$");
}
}
}
Copying the files onto the container can be done in more than one way, but the only way we’ve found
that works with the MariaDB image used for this example is the one depicted in Listing 6-58. The code is not
the prettiest, but it gets the job done.
To add Testcontainers support to your project, you need to add the library specific to the type of
container image you need. For this book, the org.testcontainers:mariadb:1.17.2 library was added to
the Maven/Gradle configuration.
To benefit of JUnit Jupiter flawless integration provided by the @Testcontainers and the @Container
annotations, the org.testcontainers:junit-jupiter:1.17.2 library was added to the Maven/Gradle
configuration.
There are other Testcontainers libraries available, and you can find them at the Maven Repository12.
Considerations for Using JDBC
With this rich feature set, you can see how Spring can make your life much easier when using JDBC
to interact with the underlying RDBMS. However, there is still quite a lot of code you need to develop,
especially when transforming the result set into the corresponding domain objects.
On top of JDBC, a lot of open source libraries have been developed to help close the gap between the
relational data structure and Java’s OO model. For example, iBATIS is a popular DataMapper framework that
is also based on SQL mapping. iBATIS lets you map objects with stored procedures or queries to an XML
descriptor file. Like Spring, iBATIS provides a declarative way to query object mapping, greatly saving you
the time it takes to maintain SQL queries that may be scattered around various DAO classes. There are also
many other ORM frameworks that focus on the object model, rather than the query. Popular ones include
Hibernate, EclipseLink (also known as TopLink), and OpenJPA. All of them comply with the JCP’s JPA
specification.
In recent years, these ORM tools and mapping frameworks have become much more mature so that
most developers will settle on one of them, instead of using JDBC directly. However, in cases where you need
to have absolute control over the query that will be submitted to the database for performance purposes (for
example, using a hierarchical query in Oracle), Spring JDBC is really a viable option. And when using Spring,
one great advantage is that you can mix and match different data access technologies. For example, you can
use Hibernate as the main ORM and then JDBC as a supplement for some of the complex query logic or
batch operations; you can mix and match them in a single business operation and then wrap them under the
same database transaction. Spring will help you handle those situations easily.
12
https://mvnrepository.com/artifact/org.testcontainers
326
Chapter 6 ■ Spring Data Access with JDBC
Spring Boot JDBC
As we’ve already introduced Spring Boot for simple console applications, it is only logical to cover a Spring
Boot starter library for JDBC in this book. It helps you remove boilerplate configurations and jump directly
into implementation.
When spring-boot-starter-jdbc is added as a dependency to a project, a group of libraries is added
to the classpath of the project. What is not added is a database driver. That decision must be taken by the
developer. In this case, the mysql-java-client is added as a dependency just as for the non–Spring Boot
project. In the same way, for running tests, the h2 library must be explicitly configured. The project that will
be covered in this section is chapter06-boot. The autoconfigured libraries are depicted in Figure 6-7 in the
IntelliJ IDEA Gradle Projects view.
Figure 6-7. Spring Boot JDBC starter dependencies
The spring-boot-starter-jdbc library uses HikariCP13 to configure the DataSource bean, which
is a fast, reliable, and simple production-ready connection pool library. Thus, if there is no DataSource
bean explicitly configured and there is an embedded database driver in the classpath, Spring Boot will
automatically register the DataSource bean using in-memory database settings. Spring Boot also registers
the following beans automatically:
•
A JdbcTemplate bean
•
A NamedParameterJdbcTemplate bean
•
A PlatformTransactionManager (DataSourceTransactionManager) bean
The PlatformTransactionManager bean is not of interest at this time, since it is covered in Chapter 7.
The first two are, since in this chapter we configured them manually, when Spring Boot was not used. Using
Spring Boot that is no longer needed.
13
https://github.com/brettwooldridge/HikariCP
327
Chapter 6 ■ Spring Data Access with JDBC
Another interesting thing to note is that, to make sure the MariaDB datasource is used when running
the application, and the H2 datasource is used for tests, two application profiles are used: "dev" and "test".
Here are other things that might be interesting that reduce the amount of environment setup work:
•
Spring Boot database connection details are configured in the application{profileName}.properties/application-{profileName}.yaml file, which is
located under src/main/resources. Listing 6-59 shows the configuration for the
local containerized MariaDB database recommended in this chapter and the inmemory H2 configuration, used for tests.
Listing 6-59. MariaDB and H2 Database Connection Details for a Spring Boot Application
# application-dev.yaml
spring:
datasource:
driverClassName: org.mariadb.jdbc.Driver
url: jdbc:mariadb://localhost:3306/musicdb?useSSL=false
username: prospring6
password: prospring6
# application-test.yaml
spring:
datasource:
url: "jdbc:h2:mem:mydb"
username: "sa"
•
Spring Boot looks for embedded database initialization files under src/main/
resources. It expects to find a file named schema.sql that contains SQL DDL
statements (for example, CREATE TABLE statements) and a file named data.sql
that contains DML statements (for example, INSERT statements). It uses this file to
initialize a database at boot time.
•
The location and names for these files can be configured in the application.
properties/application.yaml file, which is located under src/main/resources as
well. A sample configuration file that would allow the Spring Boot application to use
SQL files is shown in Listing 6-60.
Listing 6-60. Database Initialization Spring Boot Configurations
# application-{profileName}.properties
spring.datasource.schema=db/schema.sql
spring.datasource.data=db/test-data.sql
# application-{profileName}.yml
spring:
datasource:
schema: db/schema.sql
data: db/test-data.sql
328
Chapter 6 ■ Spring Data Access with JDBC
•
By default, Spring Boot initializes the database at boot time (unless already there),
but this can be changed as well by adding the property spring.datasource.
initialize=false to the application-{profileName}.properties/application{profileName}.yaml file.
Aside from all that was mentioned, what is left to do with Spring Boot is to provide some domain classes
and a DAO bean. As previously mentioned, Spring Boot automatically configures a JdbcTemplate bean
automatically, so what we need to do is to create a simple SingerJdbcRepo this bean gets injected into and
use it to manage data. As for domain classes, the Signer and Album records introduced previously in the
chapter suffice. Listing 6-61 shows a simple SingerRepo interface and SingerJdbcRepo implementing it.
Listing 6-61. SingerJdbcRepo repository class and bean definition
// SingerDao.java
package com.apress.prospring6.six.repo;
import com.apress.prospring6.six.records.Singer;
import java.util.stream.Stream;
public interface SingerRepo {
Stream<Singer> findAll();
}
// SingerJdbcRepo.java
package com.apress.prospring6.six.repo;
import com.apress.prospring6.six.records.Singer;
import org.springframework.jdbc.core.JdbcTemplate;
import java.util.List;
import java.util.stream.Stream;
// other import statements omitted
@Repository("singerRepo")
public class SingerJdbcRepo implements SingerRepo {
private static final Logger LOGGER = LoggerFactory.getLogger(SingerJdbcRepo.class);
public static final String ALL_SELECT = "select * from SINGER";
private JdbcTemplate jdbcTemplate;
@Autowired
public void setJdbcTemplate(JdbcTemplate jdbcTemplate) {
this.jdbcTemplate = jdbcTemplate;
}
@Override
public Stream<Singer> findAll() {
return jdbcTemplate.queryForStream(ALL_SELECT, (rs, rowNum) ->
new Singer(rs.getLong("id"),
rs.getString("first_name"),
rs.getString("last_name"),
rs.getDate("birth_date"),
List.of()));
}
}
329
Chapter 6 ■ Spring Data Access with JDBC
As you (maybe) remember, the Spring Boot entry class is an executable class. The ApplicationContext
created when running its main class can be used to retrieve the singerRepo bean and call the findAll()
method. With the configurations in Listing 6-59, file application-dev.yaml, the findAll() method will
be executed on the MariaDB musicdb database SINGER table. The code for this class and its output when
executed are shown in Listing 6-62.
Listing 6-62. Chapter6Application Spring Boot Main Class and Output Sample of Its Execution
package com.apress.prospring6.six;
import org.springframework.boot.SpringApplication;
import org.springframework.boot.autoconfigure.SpringBootApplication;
// other import statements omitted
@SpringBootApplication
public class Chapter6Application {
private static final Logger LOGGER = LoggerFactory.getLogger(Chapter6Application.class);
public static void main(String... args) {
System.setProperty(AbstractEnvironment.ACTIVE_PROFILES_PROPERTY_NAME,
"dev"); // (1)
var ctx = SpringApplication.run(Chapter6Application.class, args);
var repo = ctx.getBean(SingerRepo.class);
repo.findAll().forEach(singer -> LOGGER.info(singer.toString()));
}
}
# output
INFO : StartupInfoLogger - Starting Chapter6Application using Java 17 on IulianasPrimary
with PID 95259 ...
INFO : SpringApplication - The following 1 profile is active: "dev"
INFO : StartupInfoLogger - Started Chapter6Application in 2.027 seconds (JVM running
for 3.023)
INFO : HikariDataSource - HikariPool-1 - Starting...
INFO : HikariPool - HikariPool-1 - Added connection org.mariadb.jdbc.
Connection@2301b75 # (2)
INFO : HikariDataSource - HikariPool-1 - Start completed.
INFO : Chapter6Application - Singer[id=1, firstName=John, lastName=Mayer,
birthDate=1977-10-16, albums=[]]
INFO : Chapter6Application - Singer[id=2, firstName=Ben, lastName=Barnes,
birthDate=1981-08-20, albums=[]]
INFO : Chapter6Application - Singer[id=3, firstName=John, lastName=Butler,
birthDate=1975-04-01, albums=[]]
INFO : HikariDataSource - HikariPool-1 - Shutdown initiated...
INFO : HikariDataSource - HikariPool-1 - Shutdown completed.
The line marked with (1) at the end sets the profile to be dev, which allows us to just run the class and
get the expected behavior, instead of supplying the profile as a program argument. The line marked with (2)
shows the connection type printed in the log. This makes it clear where the records are coming from.
330
Chapter 6 ■ Spring Data Access with JDBC
A Spring Boot test class can be easily written, and the embedded database is automatically created
based on the configurations in Listing 6-59 (application-test.yaml), so all we are left to do is decorate the
class and the test method with the @Sql* annotations introduced earlier in the chapter to make sure test data
is available. Listing 6-63 shows this test class and the result of executing it.
Listing 6-63. Chapter6ApplicationTest Spring Boot Test Class and Output Sample of Its Execution
package com.apress.prospring6.six;
import com.apress.prospring6.six.repo.SingerRepo;
import org.springframework.boot.test.context.SpringBootTest;
import org.springframework.test.context.jdbc.Sql;
import org.springframework.test.context.jdbc.SqlConfig;
import org.springframework.test.context.jdbc.SqlMergeMode;
import org.springframework.test.context.ActiveProfiles;
// other import statements omitted
@ActiveProfiles("test") // (1)
@SqlMergeMode(SqlMergeMode.MergeMode.MERGE)
@Sql({ "classpath:h2/drop-schema.sql", "classpath:h2/create-schema.sql" })
@SpringBootTest
public class Chapter6ApplicationTest {
private static final Logger LOGGER = LoggerFactory.getLogger(Chapter6ApplicationTe
st.class);
@Autowired
SingerRepo singerRepo;
@Test
@DisplayName("should return all singers")
@Sql(value = "classpath:h2/test-data.sql",
config = @SqlConfig(encoding = "utf-8", separator = ";", commentPrefix = "--"),
executionPhase = Sql.ExecutionPhase.BEFORE_TEST_METHOD)
void testFindAllWithJdbcTemplate(){
var singers = singerRepo.findAll().toList();
assertEquals(3, singers.size());
singers.forEach(singer -> LOGGER.info(singer.toString()));
}
}
# output
INFO : StartupInfoLogger - Starting Chapter6ApplicationTest using Java 17 on
IulianasPrimary with PID 95805 ...
INFO : SpringApplication - The following 1 profile is active: "test"
INFO : HikariDataSource - HikariPool-1 - Starting...
INFO : HikariPool - HikariPool-1 - Added connection conn0: url=jdbc:h2:mem:mydb
user=SA // (2)
INFO : HikariDataSource - HikariPool-1 - Start completed.
INFO : Chapter6ApplicationTest - Singer[id=1, firstName=John, lastName=Mayer,
birthDate=1977-10-16, albums=[]]
INFO : Chapter6ApplicationTest - Singer[id=2, firstName=Ben, lastName=Barnes,
birthDate=1981-08-20, albums=[]]
331
Chapter 6 ■ Spring Data Access with JDBC
INFO : Chapter6ApplicationTest - Singer[id=3, firstName=John, lastName=Butler,
birthDate=1975-04-01, albums=[]]
INFO : HikariDataSource - HikariPool-1 - Shutdown initiated...
INFO : HikariDataSource - HikariPool-1 - Shutdown completed.
The line marked with (1) sets the profile to be test, which allows us to just run the test class using the
test profile, meaning the datasource configured in the application-test.yaml is used. The line marked
with (2) shows the connection type printed in the log. This makes it clear where the records are coming from.
What about Testcontainers? Does it work with Spring Boot? The answer is yes, and the setup is even
easier because it benefits a lot from the Spring Boot autoconfiguration. The approach to using Testcontainers
in Spring Boot tests can be similar to what we did for Spring classic applications, but there is another way
that will result in a database instance per test class being created. After adding the Testcontainers libraries
mentioned previously in the chapter to the Spring Boot application classpath, the spring.datasource.
url property can be set in the configuration file to jdbc:tc:mariadb:10.7.4-focal:///testdb. The tc:
after the jdbc: prefix will make Testcontainers instantiate database instances without any code change.
Hostname, port, and database name are ignored; you can set them to custom values or leave them as they
are. The /// are used to emphasize the unimportance of the host:port pair.
To keep test contexts separated in the project, we introduced the testcontainers profile with its
corresponding application-testcontainers.yaml configuration file, depicted in Listing 6-64.
Listing 6-64. The Contents of the application-testcontainers.yaml Configuration File
spring:
datasource:
url: "jdbc:tc:mariadb:10.7.4-focal:///musicdb"
# Logging config
logging:
pattern:
console: " %-5level: %class{0} - %msg%n"
level:
root: INFO
org.springframework.boot: DEBUG
com.apress.prospring6.six: DEBUG
org.testcontainers: DEBUG
Using this profile and configuration file, a Spring Boot test class is written that is almost identical to the
one in Listing 6-63. The only difference are that the testcontainers profile is used and the scripts preparing
the database for tests are MariaDB scripts. The test class is shown in Listing 6-65.
Listing 6-65. The Contents of the Chapter6ApplicationV2Test Configuration File
package com.apress.prospring6.six;
import org.springframework.boot.test.context.SpringBootTest;
import org.springframework.test.context.ActiveProfiles;
import org.springframework.test.context.jdbc.Sql;
import org.springframework.test.context.jdbc.SqlConfig;
import org.testcontainers.junit.jupiter.Testcontainers;
// other imports omitted
@ActiveProfiles("testcontainers")
332
Chapter 6 ■ Spring Data Access with JDBC
@Testcontainers
@Sql(value = "classpath:testcontainers/create-schema.sql",
config = @SqlConfig(encoding = "utf-8", separator = ";", commentPrefix = "--"),
executionPhase = Sql.ExecutionPhase.BEFORE_TEST_METHOD)
@SpringBootTest(classes = Chapter6Application.class)
public class Chapter6ApplicationV2Test {
private static final Logger LOGGER = LoggerFactory.getLogger(Chapter6ApplicationV2Te
st.class);
@Autowired
SingerRepo singerRepo;
@Test
@DisplayName("should return all singers")
void testFindAllWithJdbcTemplate(){
var singers = singerRepo.findAll().toList();
assertEquals(3, singers.size());
singers.forEach(singer -> LOGGER.info(singer.toString()));
}
@Test
@DisplayName("find singer by name")
@Sql({ "classpath:testcontainers/stored-function.sql" })
void testStoredFunction(){
var firstName = singerRepo.findFirstNameById(2L).orElse(null);
assertEquals("Ben", firstName);
}
}
Notice that there’s no need to use @DynamicPropertySource to register dynamic properties for the
spring.datasource.* property group. In the Chapter6ApplicationV2Test, the script to initialize the
database was configured on the test class using a @Sql annotation, but the test script can be configured
using the TC_INITSCRIPT variable inside the spring.datasource.url value. So, in the applicationtestcontainers.yaml configuration file, the spring.datasource.url property can be set to the following:
jdbc:tc:mariadb:10.7.4-focal:///testdb?TC_INITSCRIPT=testcontainers/create-schema.sql
Also, the @Sql annotation can be removed from the Chapter6ApplicationV2Test class and the tests will
still pass, because Testcontainers is looking for that initialization script on the classpath. You can also point
to a location relative to the working directory, which will usually be the project root, using file:.
We encourage you to read more about Testcontainers; it provides a very practical way to write
integration tests that run on a setup very similar to production and prove that the code being written will
have the expected results in a production environment as well. In this book, whenever a database is needed
for running tests, Testcontainers is recommended.
333
Chapter 6 ■ Spring Data Access with JDBC
Summary
This chapter showed you how to use Spring to simplify JDBC programming. You learned how to connect
to a database and perform selects, updates, deletes, and inserts, as well as call database stored functions.
In production, using the DataSource bean or JdbcTemplate is rarely needed. This might be needed only
if you have a very complex query, or a stored procedure or function to execute. Regardless, we covered
JdbcTemplate and other Spring classes that are built on top of JdbcTemplate and that help you model
various JDBC operations. We also showed how to use the new lambda expressions from Java 8 where
appropriate. And because code is written by humans, and humans are not infallible, you were shown how to
test your JDBC code in Spring Classic and Spring Boot applications.
In addition, Spring Boot JDBC was covered, because whatever helps you focus more on the
implementation of the business logic of an application and less on the configurations is a great tool to
know. In the next couple of chapters, we discuss how to use Spring with popular ORM technologies when
developing data access logic and how to interact with NoSQL databases.
334
CHAPTER 7
Spring with Hibernate
Chapter 6 introduced you to how to use JDBC drivers to communicate to SQL databases. However, even
though Spring goes a long way toward simplifying JDBC development, you still have a lot of code to write.
To avoid this and provide support for easier querying, persistence frameworks were invented, such as
MyBatis1 and Hibernate2. jOOQ3, one of the most recent libraries to emerge, is a database-mapping software
library that generates Java code from your database and lets you build type-safe SQL queries through
its fluent API. Some users have reported positive experiences when combining jOOQ with Hibernate,
letting Hibernate do the tedious CRUD work, and jOOQ the complex querying and reporting through its
sophisticated, yet intuitive query DSL. This chapter focuses mostly on Hibernate, one of the most commonly
used object-relational mapping (ORM) libraries, but given its potential, jOOQ is going to be introduced
as well. In Chapter 6, working with Java and databases was compared to the I Love Lucy episode “Paris at
Last,” where three translators were needed to resolve a misunderstanding. If JDBC was the first translator,
Hibernate is the second.
If you have experience developing data access applications using EJB entity beans (prior to EJB 3.0), you
may remember the painful process. Tedious configuration of mappings, transaction demarcation, and much
boilerplate code in each bean to manage its life cycle greatly reduced productivity when developing enterprise
Java applications. Just like Spring was developed to embrace POJO-based development and declarative
configuration management rather than EJB’s heavy and clumsy setup, the developer community realized that a
simpler, lightweight, and POJO-based framework could ease the development of data access logic. Since then,
many libraries have appeared; they are generally referred to as ORM libraries. The main objectives of an ORM
library are to close the gap between the relational data structure in the relational database management system
(RDBMS) and the object-oriented (OO) model in Java so that developers can focus on programming with the
object model and at the same time easily perform actions related to persistence.
Among the many ORM libraries available in the open source community, Hibernate is one of the most
successful. Its features, such as a POJO-based approach, ease of development, and support of sophisticated
relationship definitions, have won the heart of the mainstream Java developer community. Hibernate’s
popularity has also influenced the Java Community Process (JCP), which developed the Java Data Objects
(JDO) specification as one of the standard ORM technologies in Java EE. Starting from EJB 3.0, the EJB entity
bean was even replaced with the Java Persistence API (JPA). JPA has a lot of concepts that were influenced
by popular ORM libraries such as Hibernate, TopLink, and JDO. The relationship between Hibernate and
https://mybatis.org/mybatis-3
https://hibernate.org
3
https://www.jooq.org
1
2
© Iuliana Cosmina, Rob Harrop, Chris Schaefer, and Clarence Ho 2023
I. Cosmina et al., Pro Spring 6, https://doi.org/10.1007/978-1-4842-8640-1_7
335
Chapter 7 ■ Spring with Hibernate
JPA is also very close. Gavin King, the founder of Hibernate, represented JBoss as one of the JCP expert group
members in defining the JPA specification. Starting from version 3.2, Hibernate provides an implementation
of JPA. That means when you develop applications with Hibernate, you can choose to use either Hibernate’s
own API or the JPA API with Hibernate as the persistence service provider.
Having offered a brief history of Hibernate, this chapter will cover how to use Spring with Hibernate
when developing data access logic. Hibernate is such an extensive ORM library that covering every aspect in
just one chapter is simply not possible, and numerous books are dedicated to discussing Hibernate.
This chapter covers the basic ideas and main use cases of Hibernate in Spring. In particular, we discuss
the following topics:
•
Configuring Hibernate SessionFactory: The core concept of Hibernate revolves
around the Session interface, which is managed by SessionFactory. We show you
how to configure Hibernate’s session factory to work in a Spring application.
•
Major concepts of ORMs using Hibernate: We go through the major concepts of how
to use Hibernate to map a POJO to the underlying relational database structure.
We also discuss some commonly used relationships, including one-to-many and
many-to-many.
•
Data operations: We present examples of how to perform data operations (query,
insert, update, delete) by using Hibernate in the Spring environment. When working
with Hibernate, its Session interface is the main interface that you will interact with.
When defining object-to-relational mappings, Hibernate supports two configuration styles. One is to
configure the mapping information in XML files, and the other is to use Java annotations within the entity
classes (in the ORM or JPA world, a Java class that is mapped to the underlying relational database structure is
called an entity class). This chapter focuses on using the annotation approach for object-relational mapping. For
the mapping annotation, we use the JPA standards (for example, under the jakarta.persistence package)
because they are interchangeable with Hibernate’s own annotations and will help you with future migrations to
a JPA environment.
Sample Data Model for Example Code
Figure 7-1 shows the data model used in this chapter.
336
Chapter 7 ■ Spring with Hibernate
Figure 7-1. Sample data model
As shown in this data model, two new tables were added, namely, INSTRUMENT and SINGER_INSTRUMENT
(the join table). SINGER_INSTRUMENT models the many-to-many relationships between the SINGER and
INSTRUMENT tables. A VERSION column was added to the SINGER and ALBUM tables for optimistic locking,
which will be discussed in detail later.
In the examples in this chapter, we will use MariaDB in a Docker container manually built to simulate a
local instance available on port 3306 for production-like code. The instructions for building the image and
starting the container are provided in the project repository through the chapter07/CHAPTER07.adoc file. A
Testcontainers MariaDB instance container is used for testing.
Configuring Hibernate’s SessionFactory
As mentioned earlier in this chapter, the core concept of Hibernate is based on the org.hibernate.Session
interface, which is obtained from org.hibernate.SessionFactory. Spring provides classes to support the
configuration of Hibernate’s session factory as a Spring bean with the desired properties. To use Hibernate,
you must add the hibernate-core-jakarta library as a dependency to the project. To integrate it with
Spring, spring-orm must be added as a dependency as well.
As this chapter is being written, the most recent Hibernate version compatible with Spring ORM is
5.6.9.Final. Hibernate 6.1.0.Final has already been released, but Spring ORM does not currently
support it.
337
Chapter 7 ■ Spring with Hibernate
The reason why hibernate-core-jakarta is used as a dependency instead of hibernate-core
is because of its dependency of Java Persistence API, which is part of Java EE. Oracle made Java EE open
source and gave the rights over it to the Eclipse Foundation, which was legally required to change the package
name from java, as Oracle legally owns the Java brand now. So newer versions of Hibernate use package
name jakarta.* instead of javax.*.
The Spring Hibernate configuration is built on top of a DataSource configuration. The DataSource
configuration was already introduced in Chapter 6. Apache DBCP2 was used to set up connection pooling,
but in this chapter, to keep things interesting, we replaced this library with hikariCP.jar. The HikariCP4
GitHub main page shows various benchmark results proving this library to be the most efficient connection
pooling library there is. With the purpose of improving performance and enriching the collection tools, we
decided to add this dependency for the project in this chapter. From a configuration point of view, not much
changes: the class that needs to be configured is named HikariDataSource instead of BasicDataSource, and
it comes from the com.zaxxer.hikari package.
Listing 7-1 shows the new and improved BasicDataSourceCfg configuration class.
Listing 7-1. MariaDB DataSource Configuration Class
package com.apress.prospring6.seven.base.config;
import
import
import
import
import
import
import
import
import
com.zaxxer.hikari.HikariConfig;
com.zaxxer.hikari.HikariDataSource;
org.slf4j.Logger;
org.slf4j.LoggerFactory;
org.springframework.beans.factory.annotation.Value;
org.springframework.context.annotation.Bean;
org.springframework.context.annotation.Configuration;
org.springframework.context.annotation.Profile;
org.springframework.context.annotation.PropertySource;
import javax.sql.DataSource;
@Configuration
@PropertySource("classpath:db/jdbc.properties") // file already introduced in Chapter 6
public class BasicDataSourceCfg {
private static Logger LOGGER = LoggerFactory.getLogger(BasicDataSourceCfg.class);
@Value("${jdbc.driverClassName}")
private String driverClassName;
@Value("${jdbc.url}")
private String url;
@Value("${jdbc.username}")
private String username;
4
https://github.com/brettwooldridge/HikariCP
338
Chapter 7 ■ Spring with Hibernate
@Value("${jdbc.password}")
private String password;
@Bean(destroyMethod = "close")
public DataSource dataSource() {
try {
var hc = new HikariConfig();
hc.setJdbcUrl(url);
hc.setDriverClassName(driverClassName);
hc.setUsername(username);
hc.setPassword(password);
var dataSource= new HikariDataSource(hc);
dataSource.setMaximumPoolSize(25); // 25 is a good enough data pool size, it is
a database in a container after all
return dataSource;
} catch (Exception e) {
LOGGER.error("DBCP DataSource bean cannot be created!", e);
return null;
}
}
}
Since we are using Testcontainers, replacement of the production-like DataSource bean with a MariaDB
test container can easily be done as it was shown in Chapter 6.
Listing 7-2 shows the HibernateConfig class that groups Hibernate-specific configurations.
Listing 7-2. HibernateConfig Configuration Class
package com.apress.prospring6.seven.base.config;
import org.hibernate.cfg.Environment;
import
import
import
import
import
import
import
import
import
import
import
org.slf4j.Logger;
org.slf4j.LoggerFactory;
org.springframework.beans.factory.annotation.Autowired;
org.springframework.context.annotation.Bean;
org.springframework.context.annotation.ComponentScan;
org.springframework.context.annotation.Configuration;
org.springframework.context.annotation.Import;
org.springframework.orm.hibernate5.HibernateTransactionManager;
org.springframework.orm.hibernate5.LocalSessionFactoryBean;
org.springframework.transaction.PlatformTransactionManager;
org.springframework.transaction.annotation.EnableTransactionManagement;
import javax.sql.DataSource;
import java.util.Properties;
@Import(BasicDataSourceCfg.class)
@Configuration
@ComponentScan(basePackages = {"com.apress.prospring6.seven.base"})
@EnableTransactionManagement
public class HibernateConfig {
private static Logger LOGGER = LoggerFactory.getLogger(HibernateConfig.class);
339
Chapter 7 ■ Spring with Hibernate
@Autowired
DataSource dataSource;
@Bean
public Properties hibernateProperties() {
Properties hibernateProp = new Properties();
// hibernateProp.put(Environment.DIALECT, "org.hibernate.dialect.
MariaDB106Dialect ");
hibernateProp.put(Environment.HBM2DDL_AUTO, "none");
hibernateProp.put(Environment.FORMAT_SQL, false);
hibernateProp.put(Environment.USE_SQL_COMMENTS, false);
hibernateProp.put(Environment.SHOW_SQL, false);
hibernateProp.put(Environment.MAX_FETCH_DEPTH, 3);
hibernateProp.put(Environment.STATEMENT_BATCH_SIZE, 10);
hibernateProp.put(Environment.STATEMENT_FETCH_SIZE, 50);
// hibernateProp.put(Environment.JTA_PLATFORM, "org.springframework.orm.hibernate5.
ConfigurableJtaPlatform");
return hibernateProp;
}
@Bean
public LocalSessionFactoryBean sessionFactory() {
LocalSessionFactoryBean sessionFactory = new LocalSessionFactoryBean();
sessionFactory.setDataSource(dataSource);
sessionFactory
.setPackagesToScan("com.apress.prospring6.seven.base.entities");
sessionFactory.setHibernateProperties(hibernateProperties());
return sessionFactory;
}
@Bean public PlatformTransactionManager transactionManager() {
var transactionManager = new HibernateTransactionManager();
transactionManager.setSessionFactory(sessionFactory().getObject());
return transactionManager;
}
}
The Spring Hibernate configuration declares the following beans to support Hibernate’s session factory:
340
•
dataSource: This bean is imported from the BasicDataSourceCfg configuration
class using the @Import annotation and injected into the HibernateConfig class
using autowiring.
•
transactionManager: The Hibernate session factory requires a transaction
manager for transactional data access. Spring provides a transaction manager
specifically for Hibernate 5 declared in package org.springframework.orm.
hibernate5.HibernateTransactionManager. The bean was declared with the
transactionManager name. By default, when using XML configuration, Spring will
look up the bean with the name transactionManager within its ApplicationContext
whenever transaction management is required. Java configuration is a little more
flexible because the bean is being searched by its type, not by its name. We discuss
transactions in detail in Chapter 9. In addition, the configuration class is annotated
with @EnableTransactionManagement to support the declaration of transaction
demarcation requirements using annotations (enables support for Spring’s
@Transactional).
Chapter 7 ■ Spring with Hibernate
•
Component scan: The @ComponentScan annotation should be familiar to you from
the previous chapters. We use it to instruct Spring to scan the components under the
package com.apress.prospring6.seven (not configured explicitly since this is the
package the configuration class is declared in) to detect the beans annotated with
@Repository, which contain methods for accessing data.
•
SessionFactory: The Hibernate sessionFactory bean is the most important part of
this configuration. Within the bean, several properties are configured:
––
First, we need to inject the dataSource bean into the sessionFactory bean.
––
Second, we instruct Hibernate to scan for the domain objects under the package
com.apress.prospring6.seven.entities.
––
Finally, the hibernateProperties bean provides configuration details for Hibernate.
There are many configuration parameters, and we define only a few important properties that should be provided for every application. Table 7-1 lists the configuration
properties for the Hibernate session factory in our example, the constant names and
their String values; you can find the other properties in interface org.hibernate.cfg.
AvailableSettings, which is implemented by org.hibernate.cfg.Environment.
Table 7-1. Hibernate Properties
Property (Constant/Value)
Description
Environment.FORMAT_SQL/hibernate.format_sql Indicates whether SQL output in the log or console
should be formatted. Default value is false.
Environment.USE_SQL_COMMENTS/hibernate.
use_sql_comments
If set to true, Hibernate generates comments inside
the SQL for easier debugging. Default value is false.
Environment.SHOW_SQL/hibernate.show_sql
Indicates whether Hibernate should output the SQL
queries to the logfile or console. You should turn this
on in a development environment, which can greatly
help in the testing and troubleshooting process.
Default value is false.
Environment.MAX_FETCH_DEPTH/hibernate.
max_fetch_depth
Declares the “depth” for outer joins when the mapping
objects have associations with other mapped objects.
This setting prevents Hibernate from fetching too
much data with a lot of nested associations. A
commonly used value is 3. A value of 0 disables default
outer join fetching.
Environment.STATEMENT_BATCH_SIZE/
hibernate.jdbc.batch_size
Instructs Hibernate on the number of update
operations that should be grouped together into
a batch. This is useful for performing batch job
operations in Hibernate. Obviously, when we are
doing a batch job updating hundreds of thousands of
records, we would like Hibernate to group the queries in
batches, rather than submit the updates one by one. The
recommended value is between 5 and 30.
(continued)
341
Chapter 7 ■ Spring with Hibernate
Table 7-1. (continued)
Property (Constant/Value)
Description
Environment.STATEMENT_FETCH_SIZE/
hibernate.jdbc.fetch_size
Specifies the number of records from the underlying
JDBC ResultSet that Hibernate should use to retrieve the
records from the database for each fetch. For example,
a query was submitted to the database, and ResultSet
contains 500 records. If the fetch size is set to 50,
Hibernate will need to fetch ten times to get all the data.
Environment.JTA_PLATFORM/hibernate.
transaction.jta.platform
This property, when present, should be set to a
qualified class name representing an implementation
of org.hibernate.engine.transaction.jta.
platform.spi.JtaPlatform that defines how
Hibernate interacts with JTA on a certain platform. If
not present, Hibernate uses default org.hibernate.
engine.transaction.jta.platform.internal.
NoJtaPlatform, which means no transactions
are used. In our configuration, it is set to Spring’s
ConfigurableJtaPlatform implementation. Since this
chapter does not focus on transactions, this property
can be safely removed from the configuration.
Environment.HBM2DDL_AUTO/hibernate.
hbm2ddl.auto
Traditionally, the process of generating schema from
entity mapping has been called HBM2DDL. This
property can have any of the following values:
•
•
•
•
•
* none tells Hibernate to do nothing with the
existing schema.
* create tells Hibernate to generate the schema
matching the managed entity classes.
* validate tells Hibernate to validate the schema;
it makes no changes to the database.
* update tells Hibernate to update the schema,
according to the changes made to the entity
classes.
* create-drop tells Hibernate to create the schema
matching the managed entity classes and drop
the schema when the SessionFactory is closed
explicitly, typically when the application is stopped.
For the full list of properties that Hibernate supports, please refer to Hibernate’s ORM user guide5,
specifically, Section 24.2.
ORM Mapping Using Hibernate Annotations
Having the configuration in place, the next step is to model the Java POJO entity classes and their mapping to
the underlying relational data structure.
https://docs.jboss.org/hibernate/orm/5.6/userguide/html_single/Hibernate_User_
Guide.html#configurations-general
5
342
Chapter 7 ■ Spring with Hibernate
There are two approaches to the mapping. The first one is to design the object model and then
generate the database scripts based on the object model. Configuring the Hibernate property hibernate.
hbm2ddl.auto to create or create-drop takes care of this approach. However, this approach is not suitable
for production environments, but rather for test environments that use in-memory databases, for which
generating the tables based on Java POJOs is not a costly operation.
The second approach is to start with the data model (the tables) and then model the POJOs with the
desired mappings. The latter approach is recommended for development and production environments,
because it provides more control over the data model, which is useful in optimizing the performance of data
access. Based on the data model, Figure 7-2 shows the corresponding Java object model class diagram.
Figure 7-2. Class diagram for the sample data model
You can see there is a one-to-many relationship between Singer and Album, and there’s a many-tomany relationship between the Singer and Instrument objects. The table that models the many-to-many
relationship, the SINGER_INSTRUMENT, is not mapped to a Java class.
Notice that also Singer and Album have the id and version fields in common, and they are grouped
into an abstract class named AbstractEntity to simplify the other entity classes. In production applications
where auditing is usually set up, other fields that are part of this abstract class could be any of the following:
createdAt, updatedAt, createdBy, updatedBy, and so on. The AbstractEntity class is annotated with the
@MappedSuperclass annotation that designates a class whose mapping information is applied to the entities
that inherit from it.
343
Chapter 7 ■ Spring with Hibernate
S
imple Mappings
First let’s start by mapping the simple attributes of the class. Listing 7-3 shows the AbstractEntity class with
the mapping information inherited by Singer and Album.
Listing 7-3. AbstractEntity Base Entity Class
package com.apress.prospring6.seven.base.entities;
import jakarta.persistence.Column;
import jakarta.persistence.GeneratedValue;
import jakarta.persistence.Id;
import jakarta.persistence.MappedSuperclass;
import jakarta.persistence.Version;
// other import statements omitted
import static jakarta.persistence.GenerationType.IDENTITY;
@MappedSuperclass
public abstract class AbstractEntity implements Serializable {
@Serial
private static final long serialVersionUID = 1L;
protected Long id;
protected int version;
@Id
@GeneratedValue(strategy = IDENTITY)
@Column(name = "ID")
public Long getId() {
return this.id;
}
public void setId(Long id) {
this.id = id;
}
@Version
@Column(name = "VERSION")
public int getVersion() {
return version;
}
public void setVersion(int version) {
this.version = version;
}
// other methods omitted
}
The AbstractEntity class does not map to any table, but annotations used in its configuration might be
used in classes mapped to tables as well.
344
Chapter 7 ■ Spring with Hibernate
Listing 7-4 shows the Singer class with its mapping annotations.
Listing 7-4. Singer Entity Class
package com.apress.prospring6.seven.base.entities;
import jakarta.persistence.Column;
import jakarta.persistence.Entity;
import jakarta.persistence.Table;
// other import statements omitted
@Entity
@Table(name = "SINGER")
public class Singer extends AbstractEntity {
@Serial
private static final long serialVersionUID = 2L;
private String firstName;
private String lastName;
private LocalDate birthDate;
@Column(name = "FIRST_NAME")
public String getFirstName() {
return this.firstName;
}
@Column(name = "LAST_NAME")
public String getLastName() {
return this.lastName;
}
@Column(name = "BIRTH_DATE")
public LocalDate getBirthDate() {
return birthDate;
}
public void setFirstName(String firstName) {
this.firstName = firstName;
}
public void setLastName(String lastName) {
this.lastName = lastName;
}
public void setBirthDate(LocalDate birthDate) {
this.birthDate = birthDate;
}
// other methods omitted
}
345
Chapter 7 ■ Spring with Hibernate
First, we annotate the type with @Entity, which means that this is a mapped entity class. Also, a class
annotated with @Entity must have a column annotated with @Id, this column representing the primary
key of that table. The @Table annotation defines the table name in the database that this entity is being
mapped to. For each mapped attribute, you annotate it with the @Column annotation, with the column names
provided.
Table and column names can be skipped if the type and attribute names are the same as the table and
column names.
Here are a few highlights of this configuration:
•
For the id attribute, we annotate it with @Id. This means it is mapped to the primary
key of the record. Hibernate will use it as the unique identifier when managing
the contact entity instances within its session. Additionally, the @GeneratedValue
annotation tells Hibernate how the id value was generated. The IDENTITY strategy
means that the id value was generated by the back end during insert.
•
For the version attribute, we annotate it with @Version. This instructs Hibernate
that we would like to use an optimistic locking mechanism, using the version
attribute as a control. Every time Hibernate updates a record, it compares the
version of the entity instance to that of the record in the database. If both versions
are the same, it means that no one updated the data before, thus Hibernate will
update the data and increment the version column. However, if the version is not
the same, it means that someone has updated the record before, and Hibernate
will throw a StaleObjectStateException exception, which Spring will translate
to HibernateOptimisticLockingFailureException. In this example we used an
Integer for version control. In addition to an integer, Hibernate supports using
a timestamp. However, using an integer for version control is recommended since
Hibernate will always increment the version number by 1 after each update. When
using a timestamp, Hibernate will update the latest timestamp after each update. A
timestamp is slightly less safe because two concurrent transactions may both load
and update the same item in the same millisecond.
Another mapped object is Album, as shown in Listing 7-5.
Listing 7-5. Album Entity Class
package com.apress.prospring6.seven.base.entities;
// other import statements omitted
@Entity
@Table(name = "ALBUM")
public class Album extends AbstractEntity {
@Serial
private static final long serialVersionUID = 3L;
private String title;
private LocalDate releaseDate;
346
Chapter 7 ■ Spring with Hibernate
@Column
public String getTitle() {
return this.title;
}
@Column(name = "RELEASE_DATE")
public LocalDate getReleaseDate() {
return this.releaseDate;
}
public void setTitle(String title) {
this.title = title;
}
public void setReleaseDate(LocalDate releaseDate) {
this.releaseDate = releaseDate;
}
// other methods omitted
}
The third entity class is named Instrument and maps to the INSTRUMENT table, a very simple table with
a single column. This table was introduced just so that a many-to-many relationship is part of the code
samples. This class is shown in Listing 7-6.
Listing 7-6. Instrument Entity Class
package com.apress.prospring6.seven.base.entities;
// import statements omitted
@Entity
@Table(name = "INSTRUMENT")
public class Instrument implements Serializable {
@Serial
private static final long serialVersionUID = 4L;
private String instrumentId;
@Id
@Column(name = "INSTRUMENT_ID")
public String getInstrumentId() {
return this.instrumentId;
}
public void setInstrumentId(String instrumentId) {
this.instrumentId = instrumentId;
}
// other methods omitted
}
347
Chapter 7 ■ Spring with Hibernate
One-to-Many Mappings
Hibernate has the capability to model many kinds of associations. The most common associations are oneto-many and many-to-many. In this chapter’s source examples, each Singer has zero or more albums, so
it’s a one-to-many association (in ORM terms, the one-to-many association is used to model both zero-tomany and one-to-many relationships within the data structure). Listing 7-7 depicts the properties and the
methods necessary to define the one-to-many relationship between the Singer and Album entities.
Listing 7-7. Singer and Album Code Snippets Used to Model One-to-Many and Many-to-One Relationships
package com.apress.prospring6.seven.base.entities;
import jakarta.persistence.OneToMany;
import jakarta.persistence.CascadeType;
// other import statements omitted
// Singer.java
@Entity
@Table(name = "SINGER")
public class Singer extends AbstractEntity {
private Set<Album> albums = new HashSet<>();
@OneToMany(mappedBy = "singer", cascade=CascadeType.ALL, orphanRemoval=true)
public Set<Album> getAlbums() {
return albums;
}
public boolean addAlbum(Album album) {
album.setSinger(this);
return getAlbums().add(album);
}
public void removeAlbum(Album album) {
getAlbums().remove(album);
}
public void setAlbums(Set<Album> albums) {
this.albums = albums;
}
// other methods and properties omitted
}
// Album.java
import jakarta.persistence.ManyToOne;
import jakarta.persistence.JoinColumn;
// other import statements omitted
@Entity
@Table(name = "ALBUM")
public class Album extends AbstractEntity {
private Singer singer;
348
Chapter 7 ■ Spring with Hibernate
@ManyToOne
@JoinColumn(name = "SINGER_ID")
public Singer getSinger() {
return this.singer;
}
public void setSinger(Singer singer) {
this.singer = singer;
}
// other methods and properties omitted
}
The getter method of the attribute getAlbums is annotated with @OneToMany, which indicates the oneto-many relationship with the Album class. Several attributes are passed to the annotation. The mappedBy
attribute indicates the property in the Album class that provides the association (that is, linked up by the
foreign-key definition in the FK_ALBUM_SINGER table).
The cascade attribute set to CascadeType.ALL means that any operation done on the Singer record are
propagated to albums linked to it. The orphanRemoval attribute means that after the albums set has been
updated, the Album entries that no longer exist in the set should be deleted from the database.
The Singer class declares the one-to-many part of the relationship with Album. This means the Album
entity must declare the many-to-one part of the relationship with Singer, and this is done using the
@ManyToOne annotation. The @JoinColumn annotation associated with it is necessary to specify the
underlying foreign-key column name.
Many-to-Many Mappings
Every singer can play zero or more instruments, and each instrument is also associated with zero or more
singers, which means it’s a many-to-many mapping. A many-to-many mapping requires a join table, which
is SINGER_INSTRUMENT in this case. Listing 7-8 shows the code that needs to be added to the Singer class to
implement this relationship.
Listing 7-8. Singer and Instrument Code Snippets Used to Model Many-to-Many Relationships
package com.apress.prospring6.seven.base.entities;
import jakarta.persistence.ManyToMany;
import jakarta.persistence.JoinTable;
import jakarta.persistence.JoinColumn;
// other import statements omitted
// Singer.java
@Entity
@Table(name = "SINGER")
public class Singer extends AbstractEntity {
private Set<Instrument> instruments = new HashSet<>();
@ManyToMany
@JoinTable(name = "SINGER_INSTRUMENT",
joinColumns = @JoinColumn(name = "SINGER_ID"),
inverseJoinColumns = @JoinColumn(name = "INSTRUMENT_ID"))
349
Chapter 7 ■ Spring with Hibernate
public Set<Instrument> getInstruments() {
return instruments;
}
public void setInstruments(Set<Instrument> instruments) {
this.instruments = instruments;
}
public boolean addInstrument(Instrument instrument) {
return getInstruments().add(instrument);
}
// other methods omitted
}
// Instrument.java
@Entity
@Table(name = "INSTRUMENT")
public class Instrument implements Serializable {
private Set<Singer> singers = new HashSet<>();
@ManyToMany
@JoinTable(name = "SINGER_INSTRUMENT",
joinColumns = @JoinColumn(name = "INSTRUMENT_ID"),
inverseJoinColumns = @JoinColumn(name = "SINGER_ID"))
public Set<Singer> getSingers() {
return this.singers;
}
public void setSingers(Set<Singer> singers) {
this.singers = singers;
}
// other methods omitted
}
The getter method of the attribute instruments in the Singer class is annotated with @ManyToMany.
The @JoinTable annotation is used to indicate the underlying join table that Hibernate should look for. The
name is the join table’s name, joinColumns defines the column that is the foreign key to the SINGER table, and
inverseJoinColumns defines the column that is the foreign key to the other side of the association (that is,
the INSTRUMENT table). The code in the Instrument class is more or less the same as the one for Singer, but
the joinColumns and inverseJoinColumns attributes are reversed to reflect the association.
The Hibernate Session Interface
In Hibernate, when interacting with the database, the main interface you need to deal with is the Session
interface, which is obtained from an instance of SessionFactory. A SessionFactory instance is created and
added to the application context and this is caused by configuring a LocalSessionFactoryBean as shown
in the HibernateConfig class introduced earlier in the chapter (see Listing 7-2). This instance can then
be autowired in repository classes and used to create a Hibernate Session used to communicate with the
database. Listing 7-9 shows the SingerDaoImpl class that is used in the samples in this chapter and has the
configured Hibernate SessionFactory injected into the class.
350
Chapter 7 ■ Spring with Hibernate
Listing 7-9. SingerDaoImpl Repository Class That Uses Hibernate’s SessionFactory
package com.apress.prospring6.seven.base.dao;
import
import
import
import
import
import
import
com.apress.prospring6.seven.base.entities.Singer;
jakarta.annotation.Resource;
org.hibernate.SessionFactory;
org.slf4j.Logger;
org.slf4j.LoggerFactory;
org.springframework.stereotype.Repository;
org.springframework.transaction.annotation.Transactional;
import java.util.List;
@Transactional(readOnly = true)
@Repository("singerDao")
public class SingerDaoImpl implements SingerDao {
private static final Logger LOGGER = LoggerFactory.getLogger(SingerDaoImpl.class);
private SessionFactory sessionFactory;
public SingerDaoImpl(SessionFactory sessionFactory) {
this.sessionFactory = sessionFactory;
}
// other methods omitted
}
We declare the DAO class as a Spring bean by using the @Repository annotation. This integrates it into
the Spring Context and exception translation to Spring’s runtime and the DataAccessException family use
is enabled. The @Transactional annotation defines the transaction requirements that we discuss further
in Chapter 9. The sessionFactory property is autowired by Spring using the constructor. The SingerDao
interface is quite simple, and it has just three finder methods, one save method, and one delete method. The
save(..) method performs both the insert and update operations. This interface is shown in Listing 7-10.
Listing 7-10. SingerDao Interface
package com.apress.prospring6.seven.base.dao;
import com.apress.prospring6.seven.base.entities.Singer;
import java.util.Set;
public interface SingerDao {
List<Singer> findAll();
List<Singer> findAllWithAlbum();
Singer findById(Long id);
Singer save(Singer singer);
void delete(Singer singer);
}
351
Chapter 7 ■ Spring with Hibernate
Querying Data by Using the Hibernate Query Language
Hibernate, together with other ORM tools such as JDO and JPA, is engineered around the object model. So,
after the mappings are defined, we don’t need to construct SQL to interact with the database. Instead, for
Hibernate, we use the Hibernate Query Language (HQL) to define our queries. When interacting with the
database, Hibernate will translate the queries into SQL statements on our behalf. When coding HQL queries,
the syntax is quite like SQL. However, you need to think on the object side rather than database side. We will
take you through several examples in the following sections.
Simple Querying with Lazy Fetching
Let’s begin by implementing the findAll() method, which simply retrieves all the singers from the
database. Listing 7-11 shows the updated code for this functionality.
Listing 7-11. SingerDaoImpl#findAll() Method
package com.apress.prospring6.seven.base.dao;
// import statements omitted
@Transactional
@Repository("singerDao")
public class SingerDaoImpl implements SingerDao{
private SessionFactory sessionFactory;
@Transactional(readOnly = true)
@Override
public List<Singer> findAll() {
return sessionFactory.getCurrentSession().createQuery("from Singer s")
.list();
}
// other methods omitted
}
The method SessionFactory.getCurrentSession() gets hold of Hibernate’s Session interface. Then,
the Session.createQuery() method is called, passing in the HQL statement. The statement from Singer
simply retrieves all singers from the database. An alternative syntax for the statement is select s from
Singer s. The @Transactional(readOnly=true) annotation means we want the transaction to be set as
read-only. Setting that attribute for read-only methods will result in better performance in some cases.
There are two ways to test the findAll() method. You can run the HibernateDemoV1 class that will
invoke this method on the MariaDB database available locally or in a container. Or, a test method can be
written and executed in a Spring test context using a Testcontainers MariaDB datasource. Listing 7-12 shows
the contents of the HibernateDemoV1 class and the results of running the class.
Listing 7-12. HibernateDemoV1 Runnable Class
package com.apress.prospring6.seven.base;
import com.apress.prospring6.seven.base.config.HibernateConfig;
import com.apress.prospring6.seven.base.dao.SingerDao;
import org.slf4j.Logger;
352
Chapter 7 ■ Spring with Hibernate
import org.slf4j.LoggerFactory;
import org.springframework.context.annotation.AnnotationConfigApplicationContext;
public class HibernateDemoV1 {
private static final Logger LOGGER = LoggerFactory.getLogger(HibernateDemoV1.class);
public static void main(String... args) {
var ctx = new AnnotationConfigApplicationContext(HibernateConfig.class);
var singerDao = ctx.getBean(SingerDao.class);
LOGGER.info(" ---- Listing singers:");
singerDao.findAll().forEach(s -> LOGGER.info(s.toString()));
ctx.close();
}
}
# output
---- Listing
Singer - Id:
Singer - Id:
Singer - Id:
singers:
1, First name: John, Last name: Mayer, Birthday: 1977-10-16
3, First name: John, Last name: Butler, Birthday: 1975-04-01
2, First name: Eric, Last name: Clapton, Birthday: 1945-03-30
Although the singer records were retrieved, what about the albums and instruments? Let’s modify the
testing class to print the detailed information. In Listing 7-13, you can see the method singerDao.findAll()
being replaced with singerDao.findAllWithAlbums() in the runnable HibernateDemoV2 class. The
listing also shows the output printed when this class is executed.
Listing 7-13. HibernateDemoV2 Runnable Class
package com.apress.prospring6.seven.base;
// import statements omitted
public class HibernateDemoV2 {
private static final Logger LOGGER = LoggerFactory.getLogger(HibernateDemoV2.class);
public static void main(String... args) {
var ctx = new AnnotationConfigApplicationContext(HibernateConfig.class);
var singerDao = ctx.getBean(SingerDao.class);
var singer = singerDao.findById(2L);
listSingersWithAlbum(singerDao.findAllWithAlbum());
ctx.close();
}
private static void listSingersWithAlbum(List<Singer> singers) {
LOGGER.info(" ---- Listing singers with instruments:");
singers.forEach(s -> {
LOGGER.info(s.toString());
if (s.getAlbums() != null) {
s.getAlbums().forEach(a -> LOGGER.info("\t" + a.toString()));
}
353
Chapter 7 ■ Spring with Hibernate
if (s.getInstruments() != null) {
s.getInstruments().forEach(i -> LOGGER.info("\tInstrument: " +
i.getInstrumentId()));
}
});
}
}
# output
INFO : HibernateDemoV2 - ---- Listing singers with instruments:
INFO : HibernateDemoV2 - Singer - Id: 1, First name: John, Last name: Mayer, Birthday:
1977-10-16
Exception in thread "main" org.hibernate.LazyInitializationException: failed to lazily
initialize a collection of role: com.apress.prospring6.seven.base.entities.Singer.albums,
could not initialize proxy - no Session
at org.hibernate.collection.internal.AbstractPersistentCollection.throwLazyInitializatio
nException(AbstractPersistentCollection.java:614)
at org.hibernate.collection.internal.AbstractPersistentCollection.withTemporarySessionIf
Needed(AbstractPersistentCollection.java:218)
at org.hibernate.collection.internal.AbstractPersistentCollection.initialize(AbstractPer
sistentCollection.java:591)
at org.hibernate.collection.internal.AbstractPersistentCollection.read(AbstractPersisten
tCollection.java:149)
at org.hibernate.collection.internal.PersistentSet.iterator(PersistentSet.java:188)
at java.base/java.lang.Iterable.forEach(Iterable.java:74)
at com.apress.prospring6.seven.base.HibernateDemoV2.lambda$listSingersWithAlbum$2(Hiber
nateDemoV2.java:62)
You will see Hibernate throw the LazyInitializationException when you try to access the
associations because, by default, Hibernate will fetch the associations lazily. This means that Hibernate will
not join the association tables (that is, ALBUM or INSTRUMENT) for records. The rationale behind this is for
performance; as you can imagine, if a query is retrieving thousands of records and all the associations are
retrieved, the massive amount of data transfer will degrade performance.
Querying with Associations Fetching
To have Hibernate fetch the data from associations, there are two options. The first one is by declaring
the Java association with fetch mode EAGER: @ManyToMany(fetch=FetchType.EAGER). This tells Hibernate
to fetch the associated records in every query. However, as discussed, this will impact data retrieval
performance. The second option is to instruct Hibernate to fetch the associated records in the query when
required. If you use the Criteria query, you can call the function Criteria.setFetchMode() to instruct
Hibernate to eagerly fetch the association. When using NamedQuery, you can use the fetch operator to
instruct Hibernate to fetch the association eagerly.
Let’s take a look at the implementation of the findAllWithAlbum() method, which will retrieve
all singer information together with their albums and instruments. This example will use the jakarta.
persistence.NamedQuery approach. NamedQuery can be externalized into an XML file or declared using an
annotation on the entity class. In Listing 7-14 you can see the revised Singer entity class with the named
query defined using annotations.
354
Chapter 7 ■ Spring with Hibernate
Listing 7-14. Singer Entity Class with NamedQuery Declaration Used in Method SingerDaoImpl.
findAllWithAlbum()
package com.apress.prospring6.seven.base.entities;
import jakarta.persistence.NamedQueries;
import jakarta.persistence.NamedQuery;
// other import statements omitted
@Entity
@Table(name = "SINGER")
@NamedQueries({
@NamedQuery(name="Singer.findAllWithAlbum",
query="select distinct s from Singer s " +
"left join fetch s.albums a " +
"left join fetch s.instruments i")
})
public class Singer extends AbstractEntity {
// content omitted
}
In Listing 7-14 we define a NamedQuery instance called Singer.findAllWithAlbum. Then we define
the query in HQL. Pay attention to the left join fetch clause, which instructs Hibernate to fetch the
association eagerly. We also need to use select distinct; otherwise, Hibernate will return duplicate
objects (two Singer objects will be returned if a single Singer has two Albums associated with him).
The implementation of the SingerDaoImpl.findAllWithAlbum() method is shown in Listing 7-15.
Listing 7-15. SingerDaoImpl.findAllWithAlbum() Using the NamedQuery Instance Called Singer.
findAllWithAlbum, Declared in Listing 7-14
package com.apress.prospring6.seven.base.dao;
// import statements omitted
@Transactional
@Repository("singerDao")
public class SingerDaoImpl implements SingerDao {
@Transactional(readOnly = true)
@Override
public List<Singer> findAllWithAlbum() {
return sessionFactory.getCurrentSession().getNamedQuery("Singer.
findAllWithAlbum").list();
}
// other code omitted
}
This time, when running HibernateDemoV2, the Session.getNamedQuery() method is called, passing
in the name of the NamedQuery instance, which now produces the expected output instead of throwing the
LazyInitializationException. This output is shown in Listing 7-16.
355
Chapter 7 ■ Spring with Hibernate
Listing 7-16. Output of HibernateDemoV2 When SingerDaoImpl.findAllWithAlbum() Is Implemented
Correctly
INFO : HibernateDemoV2 - ---- Listing singers with instruments:
INFO : HibernateDemoV2 - Singer - Id: 1, First name: John, Last name: Mayer, Birthday:
1977-10-16
INFO : HibernateDemoV2 - Album - Id: 1, Singer id: 1, Title: The Search For Everything,
Release Date: 2017-01-20
INFO : HibernateDemoV2 - Album - Id: 2, Singer id: 1, Title: Battle Studies, Release
Date: 2009-11-17
INFO : HibernateDemoV2 - Instrument: Piano
INFO : HibernateDemoV2 - Instrument: Guitar
INFO : HibernateDemoV2 - Singer - Id: 2, First name: Ben, Last name: Barnes, Birthday:
1981-08-20
INFO : HibernateDemoV2 - Album - Id: 3, Singer id: 2, Title: 11:11 , Release Date:
2021-09-18
INFO : HibernateDemoV2 - Instrument: Drums
INFO : HibernateDemoV2 - Instrument: Piano
INFO : HibernateDemoV2 - Instrument: Guitar
INFO : HibernateDemoV2 - Singer - Id: 3, First name: John, Last name: Butler, Birthday:
1975-04-01
Now all the singers with details were retrieved correctly. Let’s see another example with NamedQuery
with parameters. This time, we will implement the findById() method that should fetch the associations as
well. Listing 7-17 shows the Singer class with the new NamedQuery instance added.
Listing 7-17. Singer Entity Class with Two NamedQuery Instances
package com.apress.prospring6.seven.base.entities;
import jakarta.persistence.NamedQueries;
import jakarta.persistence.NamedQuery;
// other import statements omitted
@Entity
@Table(name = "SINGER")
@NamedQueries({
@NamedQuery(name="Singer.findById",
query="select distinct s from Singer s " +
"left join fetch s.albums a " +
"left join fetch s.instruments i " +
"where s.id = :id"),
@NamedQuery(name="Singer.findAllWithAlbum",
query="select distinct s from Singer s " +
"left join fetch s.albums a " +
"left join fetch s.instruments i")
})
public class Singer extends AbstractEntity {
// content omitted
}
356
Chapter 7 ■ Spring with Hibernate
For the Singer.findById named query, we declare a named parameter: id. When this query is
used, the parameter needs to be replaced with a concrete value. You can see the implementation of the
SingerDaoImpl.findById() method in Listing 7-18.
Listing 7-18. SingerDaoImpl.findById() Method That Makes Use of the Singer.findById NamedQuery
Instance
package com.apress.prospring6.seven.base.dao;
// import statements omitted
@Transactional
@Repository("singerDao")
public class SingerDaoImpl implements SingerDao {
@Transactional(readOnly = true)
@Override
public Singer findById(Long id) {
return (Singer) sessionFactory.getCurrentSession()
.getNamedQuery("Singer.findById")
.setParameter("id", id)
.uniqueResult();
}
// other code omitted
}
The getNamedQuery(..) method returns an instance of a type that implements the org.hibernate.
query.Query interface. For a Hibernate named query, the concrete type of the instance returned by this
method is org.hibernate.query.internal.QueryImpl. This is a Hibernate internal type, as its package
name makes really obvious. In the same package there are also types specific to native and criteria queries,
which are introduced a bit further in the chapter.
Providing the value for the id parameter is done by calling the setParameter(..) method on this
instance. When the named query requires more than one parameter, their values can be provided by calling
method setParameterList() or setParameters(), which are part of the Query interface declaration.
Up to this point in the chapter, you have only seen how to test the repository class SingerDaoImpl
methods by running an executable class. As previously mentioned, a Testcontainers MariaDB instance is
used for testing in this chapter, so Listing 7-19 introduces the HibernateTest class that tests the two named
queries introduced in the chapter, on a limited data set that is part of the testcontainers/create-schema.
sql script for this chapter.
Listing 7-19. HibernateTest Test Class Using a Testcontainers MariaDB Instance
package com.apress.prospring6.seven;
import com.apress.prospring6.seven.base.config.HibernateConfig;
import org.testcontainers.containers.MariaDBContainer;
import org.testcontainers.junit.jupiter.Container;
import org.testcontainers.junit.jupiter.Testcontainers;
// other import statements omitted
import static org.junit.jupiter.api.Assertions.assertEquals;
357
Chapter 7 ■ Spring with Hibernate
@Testcontainers
@Sql({ "classpath:testcontainers/drop-schema.sql", "classpath:testcontainers/createschema.sql" })
@SpringJUnitConfig(classes = {HibernateConfig.class})
public class HibernateTest {
private static final Logger LOGGER = LoggerFactory.getLogger(HibernateTest.class);
@Container
static MariaDBContainer<?> mariaDB = new MariaDBContainer<>("mariadb:10.7.4-focal");
@Autowired
SingerDao singerDao;
@Test
@DisplayName("should return all singers")
void testFindAll(){
var singers = singerDao.findAll();
assertEquals(3, singers.size());
singers.forEach(singer -> LOGGER.info(singer.toString()));
}
@Test
@DisplayName("should return singer by id")
void testFindById(){
var singer = singerDao.findById(2L);
assertEquals("Ben", singer.getFirstName());
LOGGER.info(singer.toString());
}
}
One thing you might have noticed since Testcontainers was introduced in Chapter 6, is how practical it
is to write tests using this library. For most cases, especially for small-scale, demonstrative applications like
those in this book, the production-like Spring configuration can be reused without the need to introduce a
different profile and extra configurations for testing contexts.
I nserting Data
Inserting data with Hibernate is simple as well. When using pure JDBC in Chapter 6, we needed to explicitly
declare that we wanted to retrieve the database-generated primary key, pass in the KeyHolder instance,
and get the key back from it after executing the insert statement. With Hibernate, none of those actions are
required. Hibernate retrieves the generated key and populates the domain object after the insert operation.
Listing 7-20 shows the implementation of the save(..) method using Hibernate’s SessionFactory.
Listing 7-20. SingerDaoImpl.save(..) Method
package com.apress.prospring6.seven.base.dao;
// import statements omitted
import java.util.List;
358
Chapter 7 ■ Spring with Hibernate
@Transactional
@Repository("singerDao")
public class SingerDaoImpl implements SingerDao {
// other code omitted
@Override
public Singer save(Singer singer) {
sessionFactory.getCurrentSession().saveOrUpdate(singer);
LOGGER.debug("Singer saved with id: " + singer.getId());
return singer;
}
}
The saveOrUpdate({daoObject}) method can be used for both insert and update operations. A logging
statement was added to the implementation to print the singer.id field that is populated by Hibernate
after the object is persisted. Also note that when we declared our Singer entity class, we declared it with
a @OneToMany association to the Album class and a @ManyToMany association to the Instrument class. What
do you think, will a Singer instance with the albums and instruments fields populated be saved together
with those associations? Let’s test this assumption by creating a new method in the HibernateTest class, as
shown in Listing 7-21.
Listing 7-21. HibernateTest.testInsert() Method
package com.apress.prospring6.seven;
// import statements omitted
@Testcontainers
@SqlMergeMode(SqlMergeMode.MergeMode.MERGE)
@Sql({ "classpath:testcontainers/drop-schema.sql", "classpath:testcontainers/createschema.sql" })
@SpringJUnitConfig(classes = {HibernateTest.TestContainersConfig.class})
public class HibernateTest {
private static final Logger LOGGER = LoggerFactory.getLogger(HibernateTest.class);
@Container
static MariaDBContainer<?> mariaDB = new MariaDBContainer<>("mariadb:10.7.4-focal");
@Autowired
SingerDao singerDao;
// other test methods omitted
@Test
@DisplayName("should
@Sql(statements = {
"delete from
= 'BB')",
"delete from
FIRST_NAME =
"delete from
},
insert a singer with associations")
ALBUM where SINGER_ID = (select ID from SINGER where FIRST_NAME
SINGER_INSTRUMENT where SINGER_ID = (select ID from SINGER where
'BB')",
SINGER where FIRST_NAME = 'BB'"
359
Chapter 7 ■ Spring with Hibernate
executionPhase = Sql.ExecutionPhase.AFTER_TEST_METHOD)
void testInsertSinger(){
var singer = new Singer();
singer.setFirstName("BB");
singer.setLastName("King");
singer.setBirthDate(LocalDate.of(1940, 8, 16));
var album = new Album();
album.setTitle("My Kind of Blues");
album.setReleaseDate(LocalDate.of(1961, 7, 18));
singer.addAlbum(album);
album = new Album();
album.setTitle("A Heart Full of Blues");
album.setReleaseDate(LocalDate.of(1962, 3, 20));
singer.addAlbum(album);
singerDao.save(singer);
assertNotNull(singer.getId());
var singers = singerDao.findAllWithAlbum();
assertEquals(4, singers.size());
listSingersWithAssociations(singers);
}
@Configuration
@Import(HibernateConfig.class)
public static class TestContainersConfig {
@Autowired
Properties hibernateProperties;
@PostConstruct
public void initialize() {
hibernateProperties.put(Environment.FORMAT_SQL, true);
hibernateProperties.put(Environment.USE_SQL_COMMENTS, true);
hibernateProperties.put(Environment.SHOW_SQL, true);
}
}
private static void listSingersWithAssociations(List<Singer> singers) {
LOGGER.info(" ---- Listing singers with instruments:");
// code omitted for duplication
}
In the testInsertSinger() method, a new singer record is inserted in the SINGER table, with two
child records in the ALBUM table, and then the assumption that the insertion succeeded is tested. All singer
instances and their associations are logged in the console too, to make it really obvious that the insertion
succeeded. To test the insert method in isolation, without dirtying the test context, a few SQL statements
to do the cleanup after the test method is executed are configured using the @Sql annotation. Another
thing done for this test context is to override the format_sql, use_sql_comments and show_sql hibernate
properties in a test configuration class and set them to true. This will cause all SQL queries generated by
360
Chapter 7 ■ Spring with Hibernate
Hibernate to be printed in the log. This means that, when executing the testInsertSinger() method, the
test is expected to pass, and all the data in the SINGER, ALBUM and INSTRUMENTS tables is printed, together
with the SQL queries used to select the data as shown in Listing 7-22.
Listing 7-22. HibernateTest.testInsert() Method Logs
...
INFO : Dialect - HHH000400: Using dialect: org.hibernate.dialect.MariaDB106Dialect
Hibernate:
/* insert com.apress.prospring6.seven.base.entities.Singer
*/ insert
into
SINGER
(VERSION, BIRTH_DATE, FIRST_NAME, LAST_NAME)
values
(?, ?, ?, ?)
Hibernate:
/* insert com.apress.prospring6.seven.base.entities.Album
*/ insert
into
ALBUM
(VERSION, RELEASE_DATE, SINGER_ID, title)
values
(?, ?, ?, ?)
Hibernate:
/* insert com.apress.prospring6.seven.base.entities.Album
*/ insert
into
ALBUM
(VERSION, RELEASE_DATE, SINGER_ID, title)
values
(?, ?, ?, ?)
INFO : SingerDaoImpl - Singer saved with id: 4
...
INFO : HibernateTest - ---- Listing singers with instruments:
INFO : HibernateTest - Singer - Id: 1, First name: John, Last name: Mayer, Birthday:
1977-10-16
INFO : HibernateTest - Album - Id: 2, Singer id: 1, Title: Battle Studies, Release Date:
2009-11-17
INFO : HibernateTest - Album - Id: 1, Singer id: 1, Title: The Search For Everything,
Release Date: 2017-01-20
INFO : HibernateTest - Instrument: Guitar
INFO : HibernateTest - Instrument: Piano
INFO : HibernateTest - Singer - Id: 2, First name: Ben, Last name: Barnes, Birthday:
1981-08-20
INFO : HibernateTest - Album - Id: 3, Singer id: 2, Title: 11:11 , Release Date:
2021-09-18
INFO : HibernateTest - Instrument: Guitar
INFO : HibernateTest - Instrument: Drums
INFO : HibernateTest - Instrument: Piano
INFO : HibernateTest - Singer - Id: 4, First name: BB, Last name: King, Birthday: 1940-08-16
361
Chapter 7 ■ Spring with Hibernate
INFO : HibernateTest - Album - Id: 4, Singer id: 4, Title: A Heart Full of Blues, Release
Date: 1962-03-20
INFO : HibernateTest - Album - Id: 5, Singer id: 4, Title: My Kind of Blues, Release Date:
1961-07-18
INFO : HibernateTest - Singer - Id: 3, First name: John, Last name: Butler, Birthday:
1975-04-01
The logging configuration has been modified so that more detailed Hibernate information is printed.
From the INFO log record, we can see that the ID of the newly saved contact was populated correctly.
Hibernate will also show all the SQL statements being executed against the database, so you know what is
happening behind the scenes.
U
pdating Data
Updating a record is as easy as inserting data. Suppose for the singer with an ID of 5 we want to update
the first name and last name and remove one album. The testUpdate() method used to test the update
operation is shown Listing 7-23.
Listing 7-23. HibernateTest.testUpdate() Method
package com.apress.prospring6.seven;
// import statements omitted
@Testcontainers
@SqlMergeMode(SqlMergeMode.MergeMode.MERGE)
@Sql({ "classpath:testcontainers/drop-schema.sql", "classpath:testcontainers/createschema.sql" })
@SpringJUnitConfig(classes = {HibernateTest.TestContainersConfig.class})
public class HibernateTest {
private static final Logger LOGGER = LoggerFactory.getLogger(HibernateTest.class);
@Container
static MariaDBContainer<?> mariaDB = new MariaDBContainer<>("mariadb:10.7.4-focal");
@Autowired
SingerDao singerDao;
// other test methods omitted
@Test
@SqlGroup({
@Sql(scripts = {"classpath:testcontainers/add-nina.sql"},
executionPhase = Sql.ExecutionPhase.BEFORE_TEST_METHOD),
@Sql(scripts = {"classpath:testcontainers/remove-nina.sql"},
executionPhase = Sql.ExecutionPhase.AFTER_TEST_METHOD)
})
void testUpdate() {
void testUpdate() {
Singer singer = singerDao.findById(5L);
// making sure such singer exists
362
Chapter 7 ■ Spring with Hibernate
assertNotNull(singer);
// making sure we got expected singer
assertEquals("Simone", singer.getLastName());
// retrieve the album
Album album = singer.getAlbums().stream().filter(
a -> a.getTitle().equals("I Put a Spell on You")).findFirst().orElse(null);
assertNotNull(album);
singer.setFirstName("Eunice Kathleen");
singer.setLastName("Waymon");
singer.removeAlbum(album);
int version = singer.getVersion();
var nina = singerDao.save(singer);
assertEquals(version +1, nina.getVersion());
// test the update
listSingersWithAssociations(singerDao.findAllWithAlbum());
}
private static void listSingersWithAssociations(List<Singer> singers) {
LOGGER.info(" ---- Listing singers with instruments:");
// code omitted for duplication
}
}
As shown in this test method, we first retrieve the record with an ID of 5. Next, we change the first name
and last name. We then loop through the album objects, retrieve the one with the title I Put a Spell on You,
and remove it from the singer’s albums property. Finally, we call the singerDao.save() method and check
that the value of the version field of the saved record is incremented. When executed, this test method is
expected to pass and print the output shown in Listing 7-24.
Listing 7-24. HibernateTest.testUpdate() Method Logs
Hibernate:
/* update
com.apress.prospring6.seven.base.entities.Singer */ update
SINGER
set
VERSION=?,
BIRTH_DATE=?,
FIRST_NAME=?,
LAST_NAME=?
where
ID=?
and VERSION=?
Hibernate:
/* delete com.apress.prospring6.seven.base.entities.Album */ delete
from
ALBUM
363
Chapter 7 ■ Spring with Hibernate
where
ID=?
and VERSION=?
INFO : SingerDaoImpl - Singer saved with id: 5
INFO : HibernateTest - ---- Listing singers with instruments:
...
INFO : HibernateTest - Singer - Id: 5, First name: Eunice Kathleen, Last name: Waymon,
Birthday: 1933-02-21
INFO : HibernateTest - Album - Id: 4, Singer id: 5, Title: Little Girl Blue, Release Date:
1959-02-20
INFO : HibernateTest - Album - Id: 5, Singer id: 5, Title: Forbidden Fruit, Release Date:
1961-08-18
INFO : HibernateTest - Instrument: Voice
INFO : HibernateTest - Instrument: Piano
You will see that the first name and last name are updated, and the I Put a Spell on You album is
removed. The album can be removed because of the orphanRemoval=true attribute we pass into the one-tomany association, which instructs Hibernate to remove all orphan records that exist in the database but are
no longer found in the object when persisted.
D
eleting Data
Deleting data is simple as well. Just call the session.delete() method and pass in the Singer object.
Listing 7-25 shows the code for deletion.
Listing 7-25. SingerDaoImpl.delete() Method
package com.apress.prospring6.seven.base.dao;
// import statements omitted
@Transactional
@Repository("singerDao")
public class SingerDaoImpl implements SingerDao {
private static final Logger LOGGER = LoggerFactory.getLogger(SingerDaoImpl.class);
private SessionFactory sessionFactory;
public SingerDaoImpl(SessionFactory sessionFactory) {
this.sessionFactory = sessionFactory;
}
// other methods omitted
@Override
public void delete(Singer singer) {
sessionFactory.getCurrentSession().delete(singer);
LOGGER.info("Singer deleted with id: " + singer.getId());
}
}
364
Chapter 7 ■ Spring with Hibernate
The delete operation will delete the singer record, together with all its associated information, including
albums and instruments, as we defined cascade=CascadeType.ALL in the mapping. Listing 7-26 shows the
code for testing the delete method, testDelete().
Listing 7-26. HibernateTest.testDelete() Method
package com.apress.prospring6.seven;
// import statements omitted
@Testcontainers
@SqlMergeMode(SqlMergeMode.MergeMode.MERGE)
@Sql({ "classpath:testcontainers/drop-schema.sql", "classpath:testcontainers/createschema.sql" })
@SpringJUnitConfig(classes = {HibernateTest.TestContainersConfig.class})
public class HibernateTest {
private static final Logger LOGGER = LoggerFactory.getLogger(HibernateTest.class);
@Container
static MariaDBContainer<?> mariaDB = new MariaDBContainer<>("mariadb:10.7.4-focal");
@Autowired
SingerDao singerDao;
@Test
@Sql(scripts = {"classpath:testcontainers/add-chuck.sql"},
executionPhase = Sql.ExecutionPhase.BEFORE_TEST_METHOD)
void testDelete() {
Singer singer = singerDao.findById(6L);
// making sure such singer exists
assertNotNull(singer);
singerDao.delete(singer);
listSingersWithAssociations(singerDao.findAllWithAlbum());
}
private static void listSingersWithAssociations(List<Singer> singers) {
LOGGER.info(" ---- Listing singers with instruments:");
// code omitted for duplication
}
}
The testDelete() method retrieves the singer with an ID of 6 and then calls the singerDao.delete(..)
method to delete the singer record from the database. Running the program will produce the output shown
in Listing 7-27.
Listing 7-27. HibernateTest.testDelete() Method Output
Hibernate:
/* delete com.apress.prospring6.seven.base.entities.Album */ delete
from
ALBUM
365
Chapter 7 ■ Spring with Hibernate
where
ID=?
and VERSION=?
Hibernate:
/* delete com.apress.prospring6.seven.base.entities.Singer */ delete
from
SINGER
where
ID=?
and VERSION=?
INFO : SingerDaoImpl - Singer deleted with id: 6
INFO : HibernateTest - ---- Listing singers with instruments:
INFO : HibernateTest - Singer - Id: 1, First name: John, Last name: Mayer, Birthday:
1977-10-16
INFO : HibernateTest - Album - Id: 2, Singer id: 1, Title: Battle Studies, Release Date:
2009-11-17
INFO : HibernateTest - Album - Id: 1, Singer id: 1, Title: The Search For Everything,
Release Date: 2017-01-20
INFO : HibernateTest - Instrument: Piano
INFO : HibernateTest - Instrument: Guitar
INFO : HibernateTest - Singer - Id: 2, First name: Ben, Last name: Barnes, Birthday:
1981-08-20
INFO : HibernateTest - Album - Id: 3, Singer id: 2, Title: 11:11, Release Date: 2021-09-18
INFO : HibernateTest - Instrument: Piano
INFO : HibernateTest - Instrument: Guitar
INFO : HibernateTest - Instrument: Drums
INFO : HibernateTest - Singer - Id: 3, First name: John, Last name: Butler, Birthday:
1975-04-01
You can see that the singer with an ID of 6 was deleted together with its child record in the ALBUM table.
Executing SQL Native Queries
HQL queries are easy to write, but writing complex queries that span across multiple tables and doing
complex calculations (like are often needed in financial domains) is difficult, if not impossible. More often
than not, the generated SQL query would not be as efficient as a native query written by a SQL expert. For
the examples in the project associated with this book, it is just as easy to write HQL queries as it is to write
SQL native queries, but assuming you would need to execute a SQL native query, the Hibernate session
allows native SQL query execution as well using the createNativeQuery(..) method. An example of using
this method with a relatively complex query is shown in Listing 7-28.
Listing 7-28. SingerDaoImpl.findAllDetails() Method That Executed a Native SQL Query
package com.apress.prospring6.seven.base.dao;
// import statements omitted
@Transactional(readOnly = true)
@Repository("singerDao")
public class SingerDaoImpl implements SingerDao {
private SessionFactory sessionFactory;
366
Chapter 7 ■ Spring with Hibernate
// other code omitted for duplication
private static final String ALL_SELECT = """
SELECT DISTINCT s.first_name, s.last_name, a.title, a.RELEASE_DATE,
i.INSTRUMENT_ID
from SINGER s
inner join ALBUM a on s.id = a.singer_id
inner join SINGER_INSTRUMENT si on s.ID = si.SINGER_ID
inner join INSTRUMENT i on si.INSTRUMENT_ID = i.INSTRUMENT_ID
where s.FIRST_NAME = :firstName and s.LAST_NAME= :lastName
""";
@Override
public Singer findAllDetails(String firstName, String lastName) {
List<Object[]> results = sessionFactory.getCurrentSession()
.createNativeQuery(ALL_SELECT)
.setParameter("firstName", firstName)
.setParameter("lastName", lastName)
.list();
var singer = new Singer();
for (Object[] item : results) {
if (singer.getFirstName() == null && singer.getLastName() == null) {
singer.setFirstName((String) item[0]);
singer.setLastName((String) item[1]);
}
var album = new Album();
album.setTitle((String)item[2]);
album.setReleaseDate(((Date) item[3]).toLocalDate());
singer.addAlbum(album);
var instrument = new Instrument();
instrument.setInstrumentId((String) item[4]);
singer.getInstruments().add(instrument);
}
return singer;
}
}
The ALL_SELECT SQL query uses named parameters. Values for these parameters are provided by calling
the setParameter(..) method that is called on the org.hibernate.query.NativeQuery instance returned
by the createNativeQuery(..) call. For a Hibernate-native SQL query, the concrete type of the instance
returned by this method is org.hibernate.query.internal.NativeQueryImpl. Since we are executing a
native query, we lose the benefit of automatic mapping of the database records to Java entities, but it is worth
it for the benefit of performance.
The returned type of calling this method could be explained as follows. Each Object[] in the list
contains the values of the columns specified in the query. A List<E> is needed in case multiple rows are
returned, thus List<Object[]> is the suitable returned type.
This is where jOOQ provides better support, but this will be shown later in the chapter, after exploring
the other interesting things that Hibernate can be used for.
367
Chapter 7 ■ Spring with Hibernate
Executing Projections with Hibernate
So far in this chapter, all Hibernate operations returned full records, unless the query asked for a specific
column value. When querying tables, the return of the full record is not always necessary. The operation of
querying only a subset of columns is called a projection. Hibernate support projection queries through its
org.hibernate.criterion.Projection interface and org.hibernate.Criteria class.
An example of using Hibernate to create a projection query to extract firstName and lastName from
table SINGER is shown in Listing 7-29.
Listing 7-29. SingerDaoImpl.findAllNamesByProjection() Method Using Hibernate Projections
package com.apress.prospring6.seven.base.dao;
import org.hibernate.Criteria;
import org.hibernate.criterion.Projection;
import org.hibernate.criterion.ProjectionList;
import org.hibernate.criterion.Projections;
// import statements omitted
@Repository("singerDao")
public class SingerDaoImpl implements SingerDao {
@Transactional(readOnly = true)
@Override
public Set<String> findAllNamesByProjection() {
@SuppressWarnings({"deprecation"})
Criteria criteria = sessionFactory.getCurrentSession().createCriteria(Singer.class);
Projection fnProjection = Projections.property("firstName");
Projection lnProjection = Projections.property("lastName");
ProjectionList pList = Projections.projectionList();
pList.add(fnProjection);
pList.add(lnProjection);
criteria.setProjection(pList);
List<Object[]> projResult = criteria.list();
return projResult.stream().map(o -> o[0] + " " + o[1]).collect(Collectors.toSet());
}
// other methods omitted
}
Notice that a Projection instance is needed for each property being queried.
Calling Stored Functions with Hibernate
Hibernate provides support for calling stored procedures and functions. This section demonstrates
how to use Hibernate to call a simple stored function in a MariaDB database using Hibernate Session’s
createSQLQuery(..) method.
The function being called is the same introduced in Chapter 6. The SQL code that creates the function
is depicted in a comment on the SingerDaoImpl.findFirstNameById(..) method in Listing 7-30.
368
Chapter 7 ■ Spring with Hibernate
Listing 7-30. SingerDaoImpl.findFirstNameById() Method Using Hibernate Session to Call a Stored
Function
package com.apress.prospring6.seven.base.dao;
// import statements omitted
@Repository("singerDao")
public class SingerDaoImpl implements SingerDao {
/*
CREATE FUNCTION IF NOT EXISTS
getFirstNameById (in_id INT) RETURNS VARCHAR(60)
RETURN (SELECT first_name FROM SINGER WHERE id = in_id);
*/
@Transactional(readOnly = true)
@Override
public String findFirstNameById(Long id) {
return sessionFactory.getCurrentSession().createSQLQuery("select
getfirstnamebyid(?) ")
.setParameter(1, id).getSingleResult().toString();
}
// other methods omitted
}
The stored function simply accepts the ID and returns the first name of the singer record with the ID.
The createSQLQuery(..) method takes a native SQL function call statement as an argument and returns
an instance of org.hibernate.query.NativeQueryImpl. The function call requires an argument that is
provided by calling the setParameter(..) method. There is a version of this method that sets parameters
using their index and one that does the same using their name. This function is a simple one, thus the
Hibernate code to call it is simple as well. Since it returns a single String result, retrieving that result is easily
done by calling getSingleResult().
Configuring Hibernate to Generate Tables from Entities
In startup applications using Hibernate, it is common behavior to first write the entity classes and then
generate the database tables based on their contents. Usually, a framework like Flyway6 is added in the
mix to manage different versions of the application’s database schema reliably and easily, but that topic is
beyond the scope of this book.
Generating the database schema from entity classes is done by using the Environment.HBM2DDL_AUTO/
hibernate.hbm2ddl.auto Hibernate property. When the application is started the first time, this property
value is set to create; this will make Hibernate scan the entities and generate tables and keys (primary,
foreign, unique) according to the relationships defined using JPA and Hibernate annotations.
If the entities are configured correctly and the resulting database objects are exactly as expected, the
value of the property should be changed to update. This will tell Hibernate to update the existing database
with any changes performed later on entities and keep the original database and any data that has been
inserted into it.
6
https://flywaydb.org
369
Chapter 7 ■ Spring with Hibernate
In production applications, it is practical to write integration tests that run on a pseudo-database
that is discarded after all test cases are executed. Usually, the test database is an in-memory database
and Hibernate is told to create the database and discard it after the execution of the tests by setting
the Environment.HBM2DDL_AUTO value to create-drop. With the introduction of Testcontainers, this
functionality is not necessary, but if, for some reason, you are prohibited from installing Docker on the
machine where your tests are running, or the application is so small that Testcontainers is overkill, Hibernate
and an embedded in-memory database can come to the rescue. You can find the full list of values for the
hibernate.hbm2ddl.auto property in the Hibernate official documentation7.
Listing 7-31 shows the Java configuration class named HibernateTestConfig. As you can see,
Environment.HBM2DDL_AUTO/hibernate.hbm2ddl.auto is set to create-drop and H2 embedded datasource
was set up.
Listing 7-31. HibernateTestConfig Configuration Class
package com.apress.prospring6.seven.config;
import org.hibernate.SessionFactory;
import org.hibernate.cfg.Environment;
import org.springframework.jdbc.datasource.embedded.EmbeddedDatabaseBuilder;
import org.springframework.jdbc.datasource.embedded.EmbeddedDatabaseType;
import org.springframework.orm.hibernate5.HibernateTransactionManager;
import org.springframework.orm.hibernate5.LocalSessionFactoryBuilder;
import org.springframework.transaction.PlatformTransactionManager;
// other import statements omitted
@Configuration
@ComponentScan(basePackages = {"com.apress.prospring6.seven.base"})
@EnableTransactionManagement
public class HibernateTestConfig {
private static final Logger LOGGER = LoggerFactory.getLogger(HibernateTestConfig.class);
@Bean
public DataSource dataSource() {
try {
var dbBuilder = new EmbeddedDatabaseBuilder();
return dbBuilder.setType(EmbeddedDatabaseType.H2).setName("testdb").build();
} catch (Exception e) {
LOGGER.error("Embedded DataSource bean cannot be created!", e);
return null;
}
}
@Bean
public Properties hibernateProperties() {
Properties hibernateProp = new Properties();
hibernateProp.put(Environment.DIALECT, "org.hibernate.dialect.H2Dialect");
7
See Table 3.7 at https://docs.jboss.org/hibernate/orm/5.0/manual/en-US/html/ch03.html
370
Chapter 7 ■ Spring with Hibernate
hibernateProp.put(Environment.HBM2DDL_AUTO, "create-drop");
hibernateProp.put(Environment.FORMAT_SQL, true);
hibernateProp.put(Environment.USE_SQL_COMMENTS, true);
hibernateProp.put(Environment.SHOW_SQL, true);
hibernateProp.put(Environment.MAX_FETCH_DEPTH, 3);
hibernateProp.put(Environment.STATEMENT_BATCH_SIZE, 10);
hibernateProp.put(Environment.STATEMENT_FETCH_SIZE, 50);
return hibernateProp;
}
@Bean
public SessionFactory sessionFactory() {
return new LocalSessionFactoryBuilder(dataSource())
.scanPackages("com.apress.prospring6.seven.base.entities")
.addProperties(hibernateProperties())
.buildSessionFactory();
}
@Bean public PlatformTransactionManager transactionManager() {
return new HibernateTransactionManager(sessionFactory());
}
}
Of course, even if the database schema is created, there is no data, so we cannot run any tests. One
solution is to use the @Sql* annotation family to set it all up, as done in Chapter 6. Another solution is to
write ordered tests, where the first one inserts the data, the second queries it, the third updates it, and the
last deletes it. Doing it this way, we validate all CRUD operations in SingerDaoImpl. The H2HibernateTest
class that uses HibernateTestConfig to configure its test context is shown in Listing 7-32.
Listing 7-32. H2HibernateTest Test Class
package com.apress.prospring6.seven;
import com.apress.prospring6.seven.config.HibernateTestConfig;
import org.junit.jupiter.api.MethodOrderer;
import org.junit.jupiter.api.Order;
import org.junit.jupiter.api.TestMethodOrder;
// other import statements omitted
@SpringJUnitConfig(classes = {HibernateTestConfig.class})
@TestMethodOrder(MethodOrderer.OrderAnnotation.class)
public class H2HibernateTest {
private static final Logger LOGGER = LoggerFactory.getLogger(HibernateTest.class);
@Autowired
SingerDao singerDao;
@Test
@Order(1)
@DisplayName("should insert a singer with albums")
public void testInsert() {
371
Chapter 7 ■ Spring with Hibernate
var singer = new Singer();
singer.setFirstName("BB");
singer.setLastName("King");
singer.setBirthDate(LocalDate.of(1940, 8, 16));
var album = new Album();
album.setTitle("My Kind of Blues");
album.setReleaseDate(LocalDate.of(1961, 7, 18));
singer.addAlbum(album);
album = new Album();
album.setTitle("A Heart Full of Blues");
album.setReleaseDate(LocalDate.of(1962, 3, 20));
singer.addAlbum(album);
var created = singerDao.save(singer);
assertNotNull(created.getId());
}
@Test
@Order(2)
@DisplayName("should return all singers")
public void testFindAll() {
var singers = singerDao.findAll();
assertEquals(1, singers.size());
singers.forEach(singer -> LOGGER.info(singer.toString()));
}
@Test
@Order(3)
@DisplayName("should update a singer")
public void testUpdate() {
var singer = singerDao.findAll().get(0);
// making sure such singer exists
assertNotNull(singer);
singer.setFirstName("Riley B. ");
int version = singer.getVersion();
var bb = singerDao.save(singer);
assertEquals(version + 1, bb.getVersion());
}
372
Chapter 7 ■ Spring with Hibernate
@Test
@Order(4)
@DisplayName("should delete a singer")
void testDelete() {
Singer singer = singerDao.findAll().get(0);
// making sure such singer exists
assertNotNull(singer);
singerDao.delete(singer);
assertEquals(0, singerDao.findAll().size());
}
}
Notice that the class is annotated with @TestMethodOrder(MethodOrderer.OrderAnnotation.class)
and each test method is annotated with @Order({x}), where x represents the numeric order of the test
method. The test methods are executed in ascending order, and if all goes well, they should all pass. This
obviously introduces a certain dependency between the test methods, and if one fails, all the others that
follow might fail too.
Using Hibernate Tools8, it is possible to also generate entity classes from an existing schema, but the
resulting code is not always the best and might need adjustments.
Annotating Methods or Fields?
In the previous example, the entities had JPA annotations on their getters. But JPA annotations can be used
directly on the fields, which has a few advantages:
•
Entity configuration is clearer and located in the fields section, instead of being
scattered in the whole class content. This is obviously true only if the code was
written following clean code recommendations to keep all field declarations in a
class in the same continuous section.
•
Annotating entity fields does not enforce providing setter/getters. This is useful for
the @Version annotated field and other audit scope fields, which should never be
modified manually; only Hibernate should have access to them.
•
Annotating fields allows to do extra processing in setters (for example, encrypting/
calculating the value after loading it from the database). The problem with the
property access is that the setters are also called when the object is loaded.
There are a lot of discussions on the Internet over which one is better. From a performance point of
view, there isn’t any difference. The decision is eventually up to the developer because there might be some
valid cases when annotating accessors (getters) makes more sense. But keep in mind that in the database,
8
https://github.com/hibernate/hibernate-tools
373
Chapter 7 ■ Spring with Hibernate
the state of the objects is actually saved, and the state of the object is defined by the values of its fields, not
the values returned by accessors. This also means that an object can be accurately re-created from the
database exactly the way it was persisted. So, in a way, setting the annotations on the getters can be seen as
breaking encapsulation.
Listing 7-33 shows the AbstractEntity mapped class that was rewritten to annotate the fields common
to all Hibernate entity classes in an application.
Listing 7-33. AbstractEntity Mapped Class with JPA Annotated Fields
package com.apress.prospring6.seven.crud.entities;
import jakarta.persistence.*;
import java.io.Serial;
import java.io.Serializable;
@MappedSuperclass
public abstract class AbstractEntity implements Serializable {
@Serial
private static final long serialVersionUID = 1L;
@Id
@GeneratedValue(strategy = GenerationType.IDENTITY)
@Column(updatable = false)
protected Long id;
@Version
@Column(name = "VERSION")
private int version;
// getters and setters omitted
}
Listing 7-34 shows the Singer entity class that was rewritten to have annotated fields.
Listing 7-34. Singer Entity Class with JPA Annotated Fields
package com.apress.prospring6.seven.crud.entities;
import jakarta.persistence.*;
// other import statements omitted
@Entity
@Table(name = "singer")
@NamedQueries({
@NamedQuery(name=Singer.FIND_SINGER_BY_ID,
query="select distinct s from Singer s " +
"left join fetch s.albums a " +
"left join fetch s.instruments i " +
"where s.id = :id"),
374
Chapter 7 ■ Spring with Hibernate
@NamedQuery(name=Singer.FIND_ALL_WITH_ALBUM,
query="select distinct s from Singer s " +
"left join fetch s.albums a " +
"left join fetch s.instruments i")
})
public class Singer extends AbstractEntity {
public static final String FIND_SINGER_BY_ID = "Singer.findById";
public static final String FIND_ALL_WITH_ALBUM = "Singer.findAllWithAlbum";
@Column(name = "FIRST_NAME")
private String firstName;
@Column(name = "LAST_NAME")
private String lastName;
@Column(name = "BIRTH_DATE")
private LocalDate birthDate;
@OneToMany(mappedBy = "singer", cascade=CascadeType.ALL,
orphanRemoval=true)
private Set<Album> albums = new HashSet<>();
@ManyToMany
@JoinTable(name = "singer_instrument",
joinColumns = @JoinColumn(name = "SINGER_ID"),
inverseJoinColumns = @JoinColumn(name = "INSTRUMENT_ID"))
private Set<Instrument> instruments = new HashSet<>();
// getters and setter omitted
}
Considerations When Using Hibernate
As shown in the examples of this chapter, once all the object-to-relational mapping, associations, and
queries are properly defined, Hibernate can provide an environment for you to focus on programming
with the object model, rather than composing SQL statements for each operation. In the past few years,
Hibernate has been evolving quickly and has been widely adopted by Java developers as the data access
layer library, both in the open source community and in enterprises. However, there are some points you
need to bear in mind:
•
Since you don’t have control over the generated SQL, you should be careful when
defining the mappings, especially the associations and their fetching strategy.
•
You should observe the SQL statements generated by Hibernate to verify that all
perform as you expect.
•
SQL is a highly expressive and type-safe language with a rich syntax, so writing SQL
queries is not easy and syntax errors are a common occurrence.
375
Chapter 7 ■ Spring with Hibernate
•
Understanding the internal mechanism of how Hibernate manages its session is
important, especially in batch job operations. Hibernate will keep the managed
objects in session and will flush and clear them regularly. Poorly designed data
access logic may cause Hibernate to flush the session too frequently and greatly
impact the performance (in our examples, we flushed it explicitly in the save(..)
and delete() methods).
•
If you want absolute control over the query, you can use a native query, as already
shown in this chapter. More examples will be shown in the next chapter as well.
•
The settings (batch size, fetch size, and so forth) play a significant role in tuning
Hibernate’s performance. You should define them in your session factory and adjust
them while load testing your application to identify the optimal value.
After all, Hibernate, and its excellent JPA support that we discuss in the next chapter, is a natural
decision for Java developers looking for an OO way to implement data access logic.
If you are interested in harnessing the full power of Hibernate in a project, you should read Vlad
Mihalcea’s High-Performance Java Persistence9.
Introducing jOOQ
jOOQ stands for Java Object Oriented Querying and it is a database-mapping software library written in Java
that implements the active record pattern10. It is both relational and object-oriented and provides a domainspecific language to construct queries from classes generated from a database schema. jOOQ is SQLcentric and focused on the database. Its capabilities are powerful: it can generate POJO classes that map
to database records and DAO classes too, and it supports an extensive number of databases11. Also, jOOQ
can be integrated with Hibernate: JPA can be kept for modifications, and jOOQ can be used for generating
expensive SQL native queries that can be executed with JPA native-queries.
This section will show you how to use jOOQ to generate POJOs and DAOs and how to configure jOOQ
in a Spring application to make use of them.
As of jOOQ 3.15, the commercial edition is not published to Maven Central, but available only from the
jOOQ website12. The distribution can be downloaded as a ZIP file, which contains scripts to publish the artifacts
in a local repository (via mvn install or mvn deploy). Our recommendation is to run the maven-install
script specific to your operating system. At the moment this chapter is being written, version 3.16.7 is the
most recent.
https://vladmihalcea.com/books/high-performance-java-persistence
https://en.wikipedia.org/wiki/Active_record_pattern
11
https://www.jooq.org/doc/latest/manual/reference/supported-rdbms
12
https://www.jooq.org/download/versions
9
10
376
Chapter 7 ■ Spring with Hibernate
Since using jOOQ requires you to manually install it first on your computer, we created the project
chapter07-jooq, which is not part of the full build for the book. To add it to the full build, remove the
commented configuration snippet from the main pom.xml or settings.gradle, depending on the build tool
you chose to use.
Assuming you managed to install the jOOQ libraries in your local Maven repository, the next step is to
add the necessary libraries to your Maven/Gradle configuration. Luckily for us, the jooq-codegen.jar file
that needs to be used for code generation depends on the main jooq.jar and jooq-meta.jar files that will
be added to the project as its transitive dependencies.
After this, we need to generate the jOOQ classes. There is more than one way to do it:
•
Programmatic way using the org.jooq.codegen.GenerationTool and XML
configuration
•
Programmatic way using the org.jooq.codegen.GenerationTool and explicit
configuration in the Java code
•
The jooq-codegen-maven plug-in
•
The nu.studer.jooq plug-in
In chapter07-jooq, both of the plug-ins are configured, which you can take a look at after cloning the
repository. In Listing 7-35, however, the GenerateJOOQSources class is depicted, an executable class that
contains the two programmatic code-generation versions.
Listing 7-35. Programmatic jOOQ Code-Generation Class
package com.apress.prospring6.seven.util;
import org.jooq.codegen.GenerationTool;
import org.jooq.meta.jaxb.Configuration;
import org.jooq.meta.jaxb.Database;
import org.jooq.meta.jaxb.Generate;
import org.jooq.meta.jaxb.Generator;
import org.jooq.meta.jaxb.Jdbc;
import org.jooq.meta.jaxb.Target;
// other import statements omitted
public class GenerateJOOQSources {
private static final Logger LOGGER = LoggerFactory.getLogger(GenerateJOOQSources.class);
public static void main(String... args) throws Exception {
if (args.length > 0) { // run with any argument to run this one
// programmatic version 1
LOGGER.info("... Generating jOOQ using programmatic version 1 with XML
configuration ...");
URL resource = GenerateJOOQSources.class.getResource("/jooq-config.xml");
assert resource != null;
final File jooqCfg = Paths.get(resource.toURI()).toFile();
377
Chapter 7 ■ Spring with Hibernate
GenerationTool.generate(
Files.readString(jooqCfg.toPath())
);
} else {
// programmatic version 2
LOGGER.info("... Generating jOOQ using programmatic version 2 with programmatic
configuration ...");
GenerationTool.generate(new Configuration()
.withJdbc(new Jdbc()
.withDriver("org.mariadb.jdbc.Driver")
.withUrl("jdbc:mariadb://localhost:3306/musicdb")
.withUser("prospring6")
.withPassword("prospring6"))
.withGenerator(new Generator()
.withDatabase(new Database()
.withName("org.jooq.meta.mariadb.MariaDBDatabase")
.withInputSchema("musicdb")
.withIncludes(".*"))
.withGenerate(
new Generate()
.withPojos(true)
.withPojosToString(true)
.withDaos(true))
.withTarget(new Target()
.withPackageName("com.apress.prospring6.seven.jooq.
generated")
.withDirectory("./chapter07-jooq/src/main/generated"))));
}
}
}
To run the second version, just execute the class with an argument (any argument). The jooq-config.
xml file is located in the resources directory, and it contains the same information shown in the full
programmatic version in version2, but in XML format.
Notice that the generated sources are saved in a directory named generated, saved at the same level
with the java directory, the one that Maven and Gradle know contains the project sources. A small
configuration is necessary for Maven and Gradle to tell them that the generated directory also contains
sources for the project.
Separating the generated sources from the concrete project sources is a good practice for clarity reasons and
avoiding the risk of overriding concrete classes with generated ones in case of misconfiguration.
If the withDirectory property is not set, the generated sources are put into the target/generatedsources directory. For easy access and visibility, we decided to put them in a more obvious location.
Once the GenerateJOOQSources is executed, the generated directory should be populated with a lot of
classes, as shown in Figure 7-3.
378
Chapter 7 ■ Spring with Hibernate
Figure 7-3. Classes generated by jOOQ
The reason there are so many classes in the generated directory is that the configuration shown
in Listing 7-35 requested them through this snippet: withPojos(true).withPojosToString(true).
withDaos(true). There are a lot more possible options, and you can find them all in the official
documentation. For the example in this book, we just configured for POJO classes to be generated for the
tables in the MariaDB schema, toString() methods for them, for logging purposes, and DAO classes to
manage data. The generated POJO classes look like the Hibernate entity classes but without the annotations.
The classes under package daos look very similar to the DAO classes we’ve been writing so far, only the
instances returned are of the types declared in the pojos package.
379
Chapter 7 ■ Spring with Hibernate
Now that we have the classes, let’s use them. The first step is to configure jOOQ support in the Spring
application, which is quite easy. At the core of jOOQ is a class named org.jooq.DSLContext. An instance of this
class is the main entry point for client code to access jOOQ classes and functionality that are related to org.jooq.
Query execution. To configure a org.jooq.DSLContext bean a connection to the database, a few details regarding
the syntax being used when generating queries, and other such little things are needed. The most important
piece is the database connection. Earlier this chapter presented the BasicDataSourceCfg configuration class that
configured a MariaDB DataSource; this class can be reused, because the database connection can be retrieved
from it. Listing 7-36 shows the JOOQConfig class that contains a single DSLContext declaration.
Listing 7-36. Spring Configuration Class to Enable Support for jOOQ
package com.apress.prospring6.seven.jooq.config;
import org.jooq.DSLContext;
import org.jooq.conf.RenderNameCase;
import org.jooq.conf.RenderQuotedNames;
import org.jooq.conf.Settings;
import org.jooq.impl.DSL;
import javax.sql.DataSource;
import java.sql.SQLException;
// other import statements omitted
@Configuration
public class JOOQConfig {
private static Logger LOGGER = LoggerFactory.getLogger(JOOQConfig.class);
@Autowired
DataSource dataSource;
@Bean
DSLContext dslContext() {
try {
return DSL.using(dataSource.getConnection(),
new Settings()
.withRenderNameCase(RenderNameCase.UPPER)
.withRenderQuotedNames(RenderQuotedNames.NEVER)
.withRenderSchema(false)
.withRenderGroupConcatMaxLenSessionVariable(false));
} catch (SQLException ex) {
LOGGER.error("Problem initializing jOOQ.DSLContext!",ex);
}
return null;
}
}
Notice how the BasicDataSourceCfg configuration class is not imported using @Import. This is because
we want to keep the jOOQ configuration detached and only introduce it to the configuration when a context
is created.
Now we’ll use our new configuration class. The easiest way to keep the project compiling even when the
generated classes are not there is to write tests. Another great thing about jOOQ is that it integrates nicely
with Spring Test components and Testcontainers, which makes writing tests easier too. We just had to copy
380
Chapter 7 ■ Spring with Hibernate
the HibernateTest class and replace the test context annotation configuration and the body of each method
and, voilà, we had a class testing SQL native queries generated by jOOQ’s DSLContext. Listing 7-37 shows
a few test methods from the JOOQDslTest, because you don’t have to use the jOOQ-generated DAOs if you
don’t want to.
Listing 7-37. Testing jOOQ’s DSLContext
package com.apress.prospring6.seven;
import com.apress.prospring6.seven.base.config.BasicDataSourceCfg;
import com.apress.prospring6.seven.jooq.config.JOOQConfig;
import com.apress.prospring6.seven.jooq.generated.tables.records.SingerRecord;
import org.jooq.DSLContext;
import static com.apress.prospring6.seven.jooq.generated.tables.Singer.SINGER;
// other import statements omitted
@Testcontainers
@SqlMergeMode(SqlMergeMode.MergeMode.MERGE)
@Sql({ "classpath:testcontainers/drop-schema.sql", "classpath:testcontainers/createschema.sql" })
@SpringJUnitConfig(classes = {BasicDataSourceCfg.class, JOOQConfig.class})
public class JOOQDslTest {
private static final Logger LOGGER = LoggerFactory.getLogger(JOOQDslTest.class);
@Container
static MariaDBContainer<?> mariaDB = new MariaDBContainer<>("mariadb:10.7.4-focal");
@Autowired
DSLContext dslContext;
@Test
@DisplayName("should return all singers")
void findAll(){
Result<SingerRecord> singers = dslContext.selectFrom(SINGER).fetch();
assertEquals(3, singers.size());
}
@Test
@DisplayName("should return singer by id")
void testFindById(){
SingerRecord singerRecord = dslContext.selectFrom(SINGER).where(SINGER.ID.eq(2)).
fetchOne();
assertNotNull(singerRecord);
assertEquals("Ben", singerRecord.getFirstName());
}
// other code omitted
}
381
Chapter 7 ■ Spring with Hibernate
Notice that the jOOQ syntax looks a lot like SQL. Also, if logging for org.jooq is configured to DEBUG,
when the JOOQDslTest class is run, the generated SQL queries are dumped in the console, but also the
results. A log sample is shown in Listing 7-38.
Listing 7-38. Log Snippets for the Execution of the JOOQDslTest Class
DEBUG: JooqLogger - Executing query : select SINGER.ID, SINGER.VERSION, SINGER.
FIRST_NAME, SINGER.LAST_NAME, SINGER.BIRTH_DATE
from SINGER
DEBUG: JooqLogger - Fetched result : +----+-------+----------+---------+----------+
DEBUG: JooqLogger - : | ID|VERSION|FIRST_NAME|LAST_NAME|BIRTH_DATE|
DEBUG: JooqLogger - : +----+-------+----------+---------+----------+
DEBUG: JooqLogger - : | 1| 0|John |Mayer |1977-10-16|
DEBUG: JooqLogger - : | 2| 0|Ben |Barnes |1981-08-20|
DEBUG: JooqLogger - : | 3| 0|John |Butler |1975-04-01|
DEBUG: JooqLogger - : +----+-------+----------+---------+----------+
DEBUG: JooqLogger - Fetched row(s) : 3
...
DEBUG: JooqLogger - Executing query : select SINGER.ID, SINGER.VERSION, SINGER.FIRST_
NAME, SINGER.LAST_NAME, SINGER.BIRTH_DATE from
SINGER where SINGER.ID = ?
DEBUG: JooqLogger --> with bind values : select SINGER.ID, SINGER.VERSION, SINGER.FIRST_
NAME, SINGER.LAST_NAME, SINGER.BIRTH_DATE from
SINGER where SINGER.ID = 2
DEBUG: JooqLogger - Fetched result : +----+-------+----------+---------+----------+
DEBUG: JooqLogger - : | ID|VERSION|FIRST_NAME|LAST_NAME|BIRTH_DATE|
DEBUG: JooqLogger - : +----+-------+----------+---------+----------+
DEBUG: JooqLogger - : | 2| 0|Ben |Barnes |1981-08-20|
DEBUG: JooqLogger - : +----+-------+----------+---------+----------+
DEBUG: JooqLogger - Fetched row(s) : 1
Neat, right? What about retrieving singers with albums? This obviously requires a join. This can be
done as well, but a little manual work is required. The advantage is that we can design the classes to store
the data and simplify them to hold only the necessary data. For example, we created a record named
SingerWithAlbums that only contains the firstName, lastName, and List<AlbumRecord>. As the name
indicates, AlbumRecord is also a record and only declares two fields, title and releaseDate. Listing 7-39
shows these two records and the test method loading the information using DSLContext.
Listing 7-39. jOOQ Way to Execute a Join Query
// --------// SingerWithAlbums.java
public record SingerWithAlbums(String firstName,
String lastName,
LocalDate birthDate,
List<AlbumRecord> albums) {
}
// --------// AlbumRecord.java
public record AlbumRecord( String title, LocalDate releaseDate) {}
382
Chapter 7 ■ Spring with Hibernate
// --------// JOOQDslTest.java
import com.apress.prospring6.seven.jooq.records.SingerWithAlbums;
import com.apress.prospring6.seven.jooq.records.AlbumRecord;
import static com.apress.prospring6.seven.jooq.generated.tables.Singer.SINGER;
import static com.apress.prospring6.seven.jooq.generated.tables.Album.ALBUM;
import static org.jooq.Records.mapping;
import static org.jooq.impl.DSL.multisetAgg;
@Test
@DisplayName("should return all singers with albums as records")
void findAllWithAlbumsAsRecords(){
List<SingerWithAlbums> singerWithAlbums =
dslContext.select(SINGER.FIRST_NAME, SINGER.LAST_NAME, SINGER.BIRTH_DATE,
multisetAgg(ALBUM.TITLE, ALBUM.RELEASE_DATE).convertFrom
(r -> r.map(mapping(AlbumRecord::new))))
.from(SINGER)
.innerJoin(ALBUM).on(ALBUM.SINGER_ID.eq(SINGER.ID))
.groupBy(SINGER.FIRST_NAME, SINGER.LAST_NAME,SINGER.BIRTH_DATE)
.fetch(mapping(SingerWithAlbums::new));
assertEquals(2, singerWithAlbums.size());
}
To make sure we only get the singers that have albums in the databases, we use the innerJoin(..)
method. The multisetAgg(..) method is used to aggregate the column of an album into an AlbumRecord.
Since we do not want duplicate entries, a groupBy(..) call is also necessary. As you might have noticed, the
Java code here looks a lot like its SQL equivalent as well, which makes it very easy to write and enables you
to ensure that only the data you are interested in is extracted. The SINGER instance is of type com.apress.
prospring6.seven.jooq.generated.tables.Singer that encapsulates all the metadata supporting writing
jOOQ queries involving the SINGER table. The same goes for ALBUM and INSTRUMENT, which are not used in
this example.
A version of the generated classes is part of the repository, in case you are not interested in generating
them yourself.
Listing 7-40 shows a snippet of the findAllWithAlbumsAsRecords() log, showing the generated query
and the retrieved data.
Listing 7-40. findAllWithAlbumsAsRecords() Log Snippet Showing the jOOQ-Generated Query
DEBUG: JooqLogger - Executing query : select SINGER.FIRST_NAME, SINGER.LAST_NAME,
SINGER.BIRTH_DATE,
JSON_MERGE_PRESERVE('[]', CONCAT('[', GROUP_CONCAT(JSON_ARRAY(ALBUM.TITLE, ALBUM.RELEASE_
DATE) separator ','), ']'))
from SINGER
join ALBUM on ALBUM.SINGER_ID = SINGER.ID
383
Chapter 7 ■ Spring with Hibernate
group by SINGER.FIRST_NAME, SINGER.LAST_NAME, SINGER.BIRTH_DATE
DEBUG: JooqLogger - Fetched result:
+----------+---------+----------+------------------------------------------+
DEBUG: JooqLogger - :
|FIRST_NAME|LAST_NAME|BIRTH_DATE|multiset_agg
|
DEBUG: JooqLogger - :
+----------+---------+----------+------------------------------------------+
DEBUG: JooqLogger - : |Ben |Barnes |1981-08-20|[AlbumRecord[title=11:11, releaseDate=..]]|
DEBUG: JooqLogger - : |John |Mayer |1977-10-16|[AlbumRecord[title=The Search For .., r...|
DEBUG: JooqLogger - : +----------+---------+----------+------------------------------------------+
DEBUG: JooqLogger - Fetched row(s) : 2
In this example, because we wanted to keep our objects compact, we used some simplified records
to represent singer and albums. Here is where Hibernate might meet jOOQ. Instead of mapping the jOOQ
retrieved data to records, we could have mapped it to JPA entities.
Writing insert, update, and delete statements is just as easy; feel free to look at the examples provided
with the book on your own, because now it’s time to cover jOOQ DAO classes. The DAO classes generated
by jOOQ are grouped under the daos package, and all of them extend org.jooq.impl.DAOImpl<R extends
UpdatableRecord<R>, P, T>. This means that for the SINGER table, a class named SingerDao was created
that extends DAOImpl<SingerRecord, com.apress.prospring6.seven.jooq.generated.tables.pojos.
Singer, Integer>. This type of class is very similar in concept to the repository implementations generated
by Spring Data, which will be introduced later in the book. The SingerRecord is generated by jOOQ, and its
purpose is to represent a Singer instance holding a primary key that maps to a database record. This type
of class is designed to be used internally by jOOQ, so you should never need to use them directly. The com.
apress.prospring6.seven.jooq.generated.tables.pojos.Singer is a view on top of it that you can use in
your code to interact with jOOQ DAO classes.
With the previous rather abstract way of looking at things in mind, let’s see how we can test jOOQ DAO
classes. Listing 7-41 shows two very simple test methods testing the SingerDao class.
Listing 7-41. JOOQDaoTest Class
package com.apress.prospring6.seven;
import com.apress.prospring6.seven.base.config.BasicDataSourceCfg;
import com.apress.prospring6.seven.jooq.config.JOOQConfig;
import com.apress.prospring6.seven.jooq.generated.tables.daos.SingerDao;
import org.jooq.DSLContext;
// other import statements omitted
@Testcontainers
@SqlMergeMode(SqlMergeMode.MergeMode.MERGE)
@Sql({ "classpath:testcontainers/drop-schema.sql", "classpath:testcontainers/createschema.sql" })
@SpringJUnitConfig(classes = {BasicDataSourceCfg.class, JOOQConfig.class})
public class JOOQDaoTest {
@Container
static MariaDBContainer<?> mariaDB = new MariaDBContainer<>("mariadb:10.7.4-focal");
384
Chapter 7 ■ Spring with Hibernate
@Autowired
DSLContext dslContext;
@Test
@DisplayName("should return all singers")
void findAll(){
var dao = new SingerDao(dslContext.configuration());
var singers = dao.findAll();
assertEquals(3, singers.size());
}
@Test
@DisplayName("should return singer by id")
void testFindById(){
var dao = new SingerDao(dslContext.configuration());
var singer = dao.findById(2);
assertNotNull(singer);
assertEquals("Ben", singer.getFirstName());
}
@Test
@SqlGroup({
@Sql(scripts = {"classpath:testcontainers/add-nina.sql"},
executionPhase = Sql.ExecutionPhase.BEFORE_TEST_METHOD),
@Sql(scripts = {"classpath:testcontainers/remove-nina.sql"},
executionPhase = Sql.ExecutionPhase.AFTER_TEST_METHOD)
})
@DisplayName("should update a singer")
void testUpdate() {
var dao = new SingerDao(dslContext.configuration());
var nina = dao.findById(5);
assertNotNull(nina);
nina.setFirstName("Eunice Kathleen");
nina.setLastName("Waymon");
dao.update(nina);
var updatedNina = dao.findById(5);
assertNotNull(updatedNina);
assertEquals("Eunice Kathleen", updatedNina.getFirstName());
assertEquals("Waymon", updatedNina.getLastName());
}
}
Listing 7-42 depicts some snippets of the JOOQDaoTest execution log, showing the generated SQL
queries and the data.
385
Chapter 7 ■ Spring with Hibernate
Listing 7-42. JOOQDaoTest Class Log Snippets
DEBUG: JooqLogger - Executing query : select SINGER.ID, SINGER.VERSION, SINGER.
FIRST_NAME, SINGER.LAST_NAME, SINGER.BIRTH_DATE
from SINGER
DEBUG: JooqLogger - Fetched result : +----+-------+----------+---------+----------+
DEBUG: JooqLogger - : | ID|VERSION|FIRST_NAME|LAST_NAME|BIRTH_DATE|
DEBUG: JooqLogger - : +----+-------+----------+---------+----------+
DEBUG: JooqLogger - : | 1| 0|John |Mayer |1977-10-16|
DEBUG: JooqLogger - : | 2| 0|Ben |Barnes |1981-08-20|
DEBUG: JooqLogger - : | 3| 0|John |Butler |1975-04-01|
DEBUG: JooqLogger - : +----+-------+----------+---------+----------+
DEBUG: JooqLogger - Fetched row(s) : 3
...
DEBUG: JooqLogger - Executing query : select SINGER.ID, SINGER.VERSION, SINGER.FIRST_
NAME, SINGER.LAST_NAME, SINGER.BIRTH_DATE from
SINGER where SINGER.ID = ?
DEBUG: JooqLogger --> with bind values : select SINGER.ID, SINGER.VERSION, SINGER.FIRST_NAME,
SINGER.LAST_NAME, SINGER.BIRTH_DATE from SINGER
where SINGER.ID = 2
DEBUG: JooqLogger - Fetched result : +----+-------+----------+---------+----------+
DEBUG: JooqLogger - : | ID|VERSION|FIRST_NAME|LAST_NAME|BIRTH_DATE|
DEBUG: JooqLogger - : +----+-------+----------+---------+----------+
DEBUG: JooqLogger - : | 2| 0|Ben |Barnes |1981-08-20|
DEBUG: JooqLogger - : +----+-------+----------+---------+----------+
DEBUG: JooqLogger - Fetched row(s) : 1
...
DEBUG: JooqLogger - Executing query : select SINGER.ID, SINGER.VERSION, SINGER.FIRST_
NAME, SINGER.LAST_NAME, SINGER.BIRTH_DATE from
SINGER where SINGER.ID = ?
DEBUG: JooqLogger --> with bind values : select SINGER.ID, SINGER.VERSION, SINGER.FIRST_
NAME, SINGER.LAST_NAME, SINGER.BIRTH_DATE from
SINGER where SINGER.ID = 5
DEBUG: JooqLogger - Fetched result : +----+-------+----------+---------+----------+
DEBUG: JooqLogger - : | ID|VERSION|FIRST_NAME|LAST_NAME|BIRTH_DATE|
DEBUG: JooqLogger - : +----+-------+----------+---------+----------+
DEBUG: JooqLogger - : | 5| 0|Nina |Simone |1933-02-21|
DEBUG: JooqLogger - : +----+-------+----------+---------+----------+
DEBUG: JooqLogger - Fetched row(s) : 1
DEBUG: JooqLogger - Executing query : update SINGER set SINGER.VERSION = ?,
SINGER.FIRST_NAME = ?, SINGER.LAST_NAME = ?,
SINGER.BIRTH_DATE = ? where SINGER.ID = ?
DEBUG: JooqLogger --> with bind values : update SINGER set SINGER.VERSION = 0, SINGER.FIRST_
NAME = 'Eunice Kathleen', SINGER.LAST_NAME = 'Waymon', SINGER.BIRTH_DATE = date '1933-02-21' where
SINGER.ID = 5
DEBUG: JooqLogger - Affected row(s) : 1
DEBUG: JooqLogger - Executing query : select SINGER.ID, SINGER.VERSION, SINGER.FIRST_
NAME, SINGER.LAST_NAME, SINGER.BIRTH_DATE from
SINGER where SINGER.ID = ?
386
Chapter 7 ■ Spring with Hibernate
DEBUG: JooqLogger --> with bind values : select SINGER.ID, SINGER.VERSION, SINGER.FIRST_
NAME, SINGER.LAST_NAME, SINGER.BIRTH_DATE
from SINGER where SINGER.ID = 5
DEBUG: JooqLogger - Fetched result : +----+-------+---------------+---------+----------+
DEBUG: JooqLogger - : | ID|VERSION|FIRST_NAME |LAST_NAME|BIRTH_DATE|
DEBUG: JooqLogger - : +----+-------+---------------+---------+----------+
DEBUG: JooqLogger - : | 5| 0|Eunice Kathleen|Waymon |1933-02-21|
DEBUG: JooqLogger - : +----+-------+---------------+---------+----------+
DEBUG: JooqLogger - Fetched row(s) : 1
The jOOQ-generated POJO classes map completely to the tables they model, which means that when
using the DAO classes, we always work with a fully populated object. So if performance is an issue and you
need only a small set of columns, using the DSLContext is the better approach.
This section showed you how to configure jOOQ in a Spring application and gave a few usage example
to try to underline a few of the following benefits of using this framework:
•
It allows the developer to think in terms of objects, rather than sets of objects.
•
It saves you from writing SQL queries but allows you to write clear and concise Java
code representing the query logic.
•
It generates very good, working SQL code and the Java code provides type safety—
there is no way to have a typo in your SQL query if you don’t write the SQL query.
•
It supports a ridiculous number of databases, so if you want to use a relational
database in a project, there’s a 99% chance you can use jOOQ too.
•
It is a very good integration with Spring.
Using the jOOQ framework also has disadvantages, of course, and this list is just a sampling of what was
noticed while writing this section:
•
You have to install jOOQ manually on your Maven repo, because it was pulled from
Maven Central, starting with version3.16.6.
•
Even if you don’t have to write SQL queries, the Java syntax for interacting with a
database is a language itself. Luckily the compiler helps here, so usually compiling
Java code results in a valid SQL script.
•
Currently there is some confusion regarding which version works with which
JDK. For example, the community trial version was supposed to work with JDK 17+,
but it didn’t at the time of writing.
•
Complex SQL queries will be represented by complex Java queries, and traversing
large object graphs can become very inefficient, so in the end it is the developer’s
responsibility to design the database schema properly.
This section was just meant to introduce you to jOOQ as a possible alternative for Hibernate. Its
capabilities are very vast and covering them would require an entire book. If jOOQ looks interesting to you,
you can advance your knowledge by reading more about it on its official page.
Spring Boot makes things even easier with jOOQ and Hibernate. Since the same library spring-bootstarter-data-jpa is used in Chapter 8 and the code is pretty much the same as the code for classic non–
Boot Spring application, we’ll end this chapter here.
387
Chapter 7 ■ Spring with Hibernate
Summary
In this chapter, we first discussed the basic concepts of Hibernate and how to configure it within a Spring
application. Then we covered common techniques for defining ORM mappings; associations; and how to
use the HibernateTemplate class to perform various database operations. With regard to Hibernate, we
covered only a small piece of its functionality and features. If you are interested in using Hibernate with
Spring, we highly recommend you study Hibernate’s standard documentation.
Also, numerous books discuss Hibernate in detail. We recommend Beginning Hibernate 6 by Joseph
Ottinger, Jeff Linwood, and Dave Minter (Apress, 2022)13, as well as Pro JPA 2 by Mike Keith and Merrick
Schincariol (Apress, 2013)14.
We also introduced you to jOOQ, a cool framework for generating SQL queries using Java code; jOOQ
can be used together with Hibernate, or could replace it altogether, it all depends on your development needs.
Chapter 8 will introduce you to JPA and how to use it when using Spring. Hibernate provides excellent
support for JPA, and we will continue to use Hibernate as the persistence provider for the examples in
Chapter 8. For query and update operations, JPA act likes Hibernate. We’ll also discuss advanced topics
including native and criteria query and how we can use Hibernate as well as its JPA support.
13
14
https://link.springer.com/book/10.1007/978-1-4842-7337-1
https://link.springer.com/book/10.1007/978-1-4302-4927-6
388
CHAPTER 8
Spring with JPA
In Chapter 7, we discussed how to use Hibernate with Spring when implementing data access logic with the
ORM approach. We demonstrated how to configure Hibernate’s SessionFactory in Spring’s configuration
and how to use the Session interface for various data access operations. However, that is just one way
Hibernate can be used. Another way of adopting Hibernate in a Spring application is to use Hibernate as a
persistence provider of the standard Java Persistence API (JPA), now renamed to Jakarta Persistence API.
Hibernate’s POJO mapping and its powerful query language (HQL) have gained great success and also
influenced the development of data access technology standards in the Java world. After Hibernate, the Java
Community Process members developed the Java Data Objects (JDO) standard and then JPA.
At the time of this writing JPA has reached version 3.1 and provides concepts that were standardized
such as PersistenceContext, EntityManager, and the Java Persistence Query Language (JPQL). These
standardizations provide a way for developers to switch between JPA persistence providers such as
Hibernate, EclipseLink, Oracle TopLink, and Apache OpenJPA. As a result, most new JEE applications are
adopting JPA as the data access layer.
Spring also provides excellent support for JPA. For example, the Spring container creates and
manages an EntityManager instance, injecting it in the respective JPA components, based on a
EntityManagerFactoryBean bean.
The Spring Data project also provides a subproject called Spring Data JPA, which provides advanced
support for using JPA in Spring applications. The main features of the Spring Data JPA project include
concepts of a repository and specification and support for the Query Domain-Specific Language (Querydsl).
This chapter covers how to use JPA 3.1, recently outsourced by Oracle and thus renamed to Jakarta
Persistence API1, with Spring, using Hibernate as the underlying persistence provider. You will learn how to
implement various database operations by using JPA’s EntityManager interface and JPQL. Then you will see
how Spring Data JPA can further help simplify JPA development. Finally, we present advanced topics related
to ORM, including native queries and criteria queries.
Specifically, we discuss the following topics:
1
•
Core concepts of Jakarta Persistence API (JPA): We cover major concepts of JPA.
•
Configuring the JPA entity manager: We discuss the types of EntityManagerFactory
that Spring supports and how to configure the most commonly used one,
LocalContainerEntityManagerFactoryBean.
•
Data operations: We show how to implement basic database operations in JPA,
which is much like the concept when using Hibernate on its own.
https://github.com/eclipse-ee4j/jpa-api
© Iuliana Cosmina, Rob Harrop, Chris Schaefer, and Clarence Ho 2023
I. Cosmina et al., Pro Spring 6, https://doi.org/10.1007/978-1-4842-8640-1_8
389
Chapter 8 ■ Spring with JPA
•
Advanced query operations: We discuss how to use native queries in JPA and the
strongly typed Criteria API in JPA for more flexible query operations.
Like Hibernate, JPA supports the definition of mappings either in XML or in Java annotations. This
chapter focuses on the annotation type of mapping because its usage tends to be much more popular than
the XML style.
Introducing JPA 3.1
Like other Java Specification Requests (JSRs), the objective of the JPA 2.1 specification as defined by
JSR-3382 is to standardize the ORM programming model in both the JSE and JEE environments. It defines a
common set of concepts, annotations, interfaces, and other services that a JPA persistence provider should
implement. When programming to the JPA standard, developers have the option of switching the underlying
provider at will, just like switching to another JEE-compliant application server for applications developed
on the JEE standards. Since Oracle is no longer in charge of JPA development, there will be no other JSRs for
it in the future, but you can read about the latest releases on its Jakarta EE official site. The version used in
this project is JPA version 3.1.3
The core concept of JPA is the EntityManager interface, which comes from factories of the type
EntityManagerFactory. The main job of EntityManager is to maintain a persistence context, in which all the
entity instances managed by it will be stored. The configuration of EntityManager is defined as a persistence
unit, and there can be more than one persistence unit in an application. If you are using Hibernate, you can
think of the persistence context in the same way as the Session interface, while EntityManagerFactory
is the same as SessionFactory. In Hibernate, the managed entities are stored in the session, which you
can directly interact with via Hibernate’s SessionFactory or Session interface. In JPA, however, you can’t
interact with the persistence context directly. Instead, you need to rely on EntityManager to do the work
for you.
JPQL is similar to HQL, so if you have used HQL before, JPQL should be easy to pick up. However, in JPA
2, a strongly typed Criteria API was introduced, which relies on the mapped entities’ metadata to construct
the query. Given this, any errors will be discovered at compile time rather than runtime.
For a detailed discussion of JPA 2, since JPA 3 is identical except the package name (jakarta), we
recommend the book Pro JPA 24 by Mike Keith and Merrick Schincariol (Apress, 2013). In this section,
we discuss the basic concepts of JPA, the sample data model that will be used in this chapter, and how to
configure Spring’s ApplicationContext to support JPA.
https://jcp.org/aboutJava/communityprocess/final/jsr338/index.html
https://jakarta.ee/specifications/persistence/3.1
4
https://link.springer.com/book/10.1007/978-1-4302-1957-6
2
3
390
Chapter 8 ■ Spring with JPA
Sample Data Model for Example Code
In this chapter, we use the same data model as used in Chapter 7. To get started, we will begin with the
same database creation scripts used in the previous chapter. If you skipped Chapter 7, take a look at the
data model presented in that chapter’s “Sample Data Model for Example Code” section, which can help you
understand the sample code in this chapter.
Configuring JPA’s EntityManagerFactory
As mentioned earlier in this chapter, to use JPA in Spring, we need to configure EntityManagerFactory,
just like SessionFactory used in Hibernate. Spring supports three types of EntityManagerFactory
configurations.
The first option uses the LocalEntityManagerFactoryBean class. It’s the simplest one, which requires
only the persistence unit name. However, since it doesn’t support the injection of DataSource and hence
isn’t able to participate in global transactions, it’s suitable only for simple development purposes.
The second option is to use a JEE-compliant container, in which the application server bootstraps the
JPA persistence unit based on the information in the deployment descriptors. This allows Spring to look up
the entity manager via the JNDI JEE namespace. This obviously means that XML configuration is needed for
this. Listing 8-1 depicts the element needed to look up an entity manager via JNDI.
Listing 8-1. Spring XML Configuration Snippet Using JNDI JEE Namespace for Lookup
<beans ...>
<jee:jndi-lookup id="prospring6Emf"
jndi-name="persistence/prospring6PersistenceUnit"/>
</beans>
In the JPA specification, a persistence unit should be defined in the configuration file META-INF/
persistence.xml. However, as of Spring 3.1, a new feature has been added that eliminates this need; we
show you how to use it later in this chapter.
Luckily, there are various Java configuration alternatives that can be used in a Spring @Configuration
class. The configuration depicted in Listing 8-2 is the most compact of them.
Listing 8-2. Spring Annotated Configuration Snippet Using JNDI JEE Namespace for Lookup
package com.apress.prospring6.eight.config;
import
import
import
import
org.springframework.context.annotation.Bean;
org.springframework.context.annotation.Configuration;
org.springframework.jdbc.datasource.lookup.JndiDataSourceLookup;
javax.sql.DataSource;
@Configuration
public class JndiDataSourceCfg {
@Bean
public DataSource dataSource() {
final JndiDataSourceLookup dsLookup = new JndiDataSourceLookup();
dsLookup.setResourceRef(true);
return dsLookup.getDataSource("persistence/prospring6PersistenceUnit");
}
}
391
Chapter 8 ■ Spring with JPA
The third option, which is the most common and is used in this chapter, is the
LocalContainerEntityManagerFactoryBean class that supports the injection of DataSource and can
participate in both local and global transactions. Listing 8-3 depicts the configuration snippet.
Listing 8-3. Spring Annotated Configuration Using LocalContainerEntityManagerFactoryBean
package com.apress.prospring6.eight.config;
import org.hibernate.cfg.Environment;
import org.hibernate.jpa.HibernatePersistenceProvider;
import org.springframework.beans.factory.annotation.Autowired;
import org.springframework.orm.jpa.JpaTransactionManager;
import org.springframework.orm.jpa.JpaVendorAdapter;
import org.springframework.orm.jpa.LocalContainerEntityManagerFactoryBean;
import org.springframework.orm.jpa.vendor.HibernateJpaVendorAdapter;
import org.springframework.transaction.PlatformTransactionManager;
import org.springframework.transaction.annotation.EnableTransactionManagement;
// other import statements omitted
@Import(BasicDataSourceCfg.class)
@Configuration
@EnableTransactionManagement
@ComponentScan(basePackages = {"com.apress.prospring6.eight.service"})
public class JpaConfig {
private static Logger LOGGER = LoggerFactory.getLogger(JpaConfig.class);
@Autowired
DataSource dataSource;
@Bean
public PlatformTransactionManager transactionManager() {
JpaTransactionManager transactionManager=new JpaTransactionManager();
transactionManager.setEntityManagerFactory(entityManagerFactory().getObject());
return transactionManager;
}
@Bean
public JpaVendorAdapter jpaVendorAdapter() {
return new HibernateJpaVendorAdapter();
}
@Bean
public Properties jpaProperties() {
Properties jpaProps = new Properties();
jpaProps.put(Environment.HBM2DDL_AUTO, "none");
jpaProps.put(Environment.FORMAT_SQL, false);
jpaProps.put(Environment.USE_SQL_COMMENTS, false);
jpaProps.put(Environment.SHOW_SQL, false);
return jpaProps;
}
392
Chapter 8 ■ Spring with JPA
@Bean
public LocalContainerEntityManagerFactoryBean entityManagerFactory() {
var factory = new LocalContainerEntityManagerFactoryBean();
factory.setDataSource(dataSource);
factory.setJpaVendorAdapter(jpaVendorAdapter());
//factory.setPersistenceProviderClass(HibernatePersistenceProvider.class);
factory.setPackagesToScan("com.apress.prospring6.eight.entities");
factory.setJpaProperties(jpaProperties());
return factory;
}
}
In this configuration, several beans are declared in order to be able to support the configuration of
LocalContainerEntityManagerFactoryBean with Hibernate as the persistence provider. The purpose for
each bean and other configuration details are described next:
•
Component scan: The tag should be familiar to you. We instruct Spring to scan the
components under the package com.apress.prospring6.eight.service.
•
dataSource: This bean is injected and it is declared in a separate configuration class
that contains only database-specific beans and properties (e.g., BasicDataSourceCfg
introduced in Chapter 7).
•
transactionManager: EntityManagerFactory requires a transaction manager for
transactional data access. Spring provides a transaction manager specifically for JPA
(org.springframework.orm.jpa.JpaTransactionManager). The bean is declared
with an ID of transactionManager assigned. We discuss transactions in detail in
Chapter 9. The @EnableTransactionManagement annotation is needed to support a
declaration of the transaction demarcation requirements using annotations, but for
now notice that this bean needs an EntityManagerFactory instance to be created
that is provided by the EntityManagerFactoryBean, by calling getObject();.
•
JpaVendorAdapter: This bean allows us to plug in vendor-specific behavior into
Spring’s EntityManagerFactory creators. In this case we are using Hibernate, and
thus the type of the bean is HibernateJpaVendorAdapter.
•
EntityManagerFactoryBean: The JPA EntityManagerFactory bean is the most
important part of this configuration. However, it is not part of it directly, but instead
a LocalContainerEntityManagerFactoryBean bean is declared, which will configure
and create it. To configure the LocalContainerEntityManagerFactoryBean bean the
following are needed:
––
a DataSource bean.
––
a HibernateJpaVendorAdapter bean.
––
hird, although commented, it deserves a mention. Calling the setPersistenT
ceProviderClass(..) method sets the PersistenceProvider implementation
class to use for creating the EntityManagerFactory. If not specified, the persistence provider will be taken from the JpaVendorAdapter (if any) or retrieved
through scanning (as far as possible). This also means, when specified, the
JpaVendorAdapter bean is no longer necessary.
393
Chapter 8 ■ Spring with JPA
––
orth, we instruct the LocalContainerEntityManagerFactoryBean bean to
F
scan for the domain objects with ORM annotations under the package com.
apress.prospring6.eight.entities by setting the packagesToScan property
to this value.
Note that this feature has been available only since Spring 3.1. In the same version support for
domain class scanning was added, that allows ditching the definition of the persistence unit from the
META-INF/persistence.xml file.
––
Finally, the jpaProperties property provides configuration details for the
Hibernate persistence provider. The configuration options are the same as
those introduced in Chapter 7.
Using JPA Annotations for ORM Mapping
If you read Chapter 7 you might have noticed that the annotations used to configure entity classes were
JPA annotations. Hibernate used to have a set of its own, but when JPA was developed the team behind it
decided to keep things simple and adopt the new specification. This is the reason why, if you take a look at
the domain classes’ source code in Chapter 7, you will see that same mapping annotations are used.
Once EntityManagerFactory has been properly configured, injecting it into your classes is simple. Let’s
start with a simple service class.
In a multilayered application, service classes depend on repository classes and service beans are the
ones that are usually annotated with @Transactional, so that related repository calls can be grouped in the
same transaction. Since the service classes in this project do nothing but call repository classes, we decided
to combine the two, and thus a service class is annotated with @Repository and @Transactional.
The purpose of doing this is for simplicity, and except for academic purposes, you might never need to write
code like this.
The @Transactional annotations are shown in the code of this chapter, because executing
database operations outside of a transaction is not something you might ever want to do, unless you are using
a database as a service (e.g., DynamoDB). Transactions are discussed in detail in Chapter 9.
The SingerService interface depicted in Listing 8-4 declares the methods expected for the bean type to
implement.
394
Chapter 8 ■ Spring with JPA
Listing 8-4. SingerService Interface
package com.apress.prospring6.eight.service;
import com.apress.prospring6.eight.entities.Singer;
import java.util.Optional;
import java.util.stream.Stream;
public interface SingerService {
String ALL_SINGER_NATIVE_QUERY =
"select ID, FIRST_NAME, LAST_NAME, BIRTH_DATE, VERSION from
SINGER";
Stream<Singer> findAll();
Stream<Singer> findAllWithAlbum();
Optional<Singer> findById(Long id);
Optional<Singer> save(Singer singer);
void delete(Singer singer);
Stream<Singer> findAllByNativeQuery();
}
The interface is very simple; it has just three finder methods, one save method, and one delete method.
The save method will serve both the insert and update operations. To keep things interesting and a little
different, we’ve also changed the type returned by the methods from Set<T> to Stream<T>.
Listing 8-5 shows the code for the SingerServiceImpl class that implements the SingerService
interface, which we will use as the sample for performing database operations using JPA.
Listing 8-5. SingerServiceImpl Bean Type
package com.apress.prospring6.eight.service;
import jakarta.persistence.EntityManager;
import jakarta.persistence.TypedQuery;
import jakarta.persistence.PersistenceContext;
// other import statements omitted
@Service("jpaSingerService")
@Repository
@Transactional
public class SingerServiceImpl implements SingerService {
private static final Logger LOGGER = LoggerFactory.getLogger(SingerServiceImpl.class);
@PersistenceContext
private EntityManager em;
@Transactional(readOnly=true)
@Override
public Stream<Singer> findAllWithAlbum() {
throw new NotImplementedException("findAllWithAlbum");
}
395
Chapter 8 ■ Spring with JPA
@Transactional(readOnly=true)
@Override
public Stream<Singer> findAll() {
throw new NotImplementedException("findAll");
}
@Transactional(readOnly=true)
@Override
public Optional<Singer> findById(Long id) {
throw new NotImplementedException("findById");
}
@Override
public Optional<Singer> save(Singer singer) {
throw new NotImplementedException("save");
}
@Override
public void delete(Singer singer) {
throw new NotImplementedException("delete");
}
@Override
public Stream<Singer> findAllByNativeQuery() {
throw new NotImplementedException("findAllByNativeQuery");
}
}
Several annotations are applied to the class:
•
The @Service annotation is used to identify the class as being a Spring component
that provides business services to another layer and assigns the Spring bean the
name jpaSingerService.
•
The @Repository annotation indicates that the class contains data access logic
and instructs Spring to translate the vendor-specific exceptions to Spring’s
DataAccessException hierarchy.
•
The @Transactional annotation is used for defining transaction requirements.
To inject EntityManager, we use the @PersistenceContext annotation, which is the standard
JPA annotation for entity manager injection. It may be questionable as to why we’re using the name
@PersistenceContext to inject an entity manager, but if you consider that the persistence context itself is
managed by EntityManager, the annotation naming makes perfect sense. If you have multiple persistence
units in your application, you can also add the unitName attribute to the annotation to specify which
persistence unit you want to be injected. Typically, a persistence unit represents an individual back-end
DataSource.
Performing Database Operations with JPA
Executing queries and managing data with EntityManager is similar to using Hibernate’s SessionFactory,
the only difference being that there is no session involved.
396
Chapter 8 ■ Spring with JPA
The syntax for JPQL and HQL is so similar that all the HQL queries that we used in Chapter 7 are
reusable to implement the finder methods within the SingerService interface. To use JPA and Hibernate,
the exact set of dependencies from Chapter 7 are required; the most important are spring-orm and
hibernate-core-jakarta. The latter is the one that depends on Jakarta’s persistence-api.jar and adds it
to the classpath as a transitive dependency. The dependencies of this project as shown in the Gradle View of
IntelliJ IDEA in Figure 8-1.
Figure 8-1. Spring with Hibernate JPA project dependencies
Using the Java Persistence Query Language to Query Data
Listing 8-6 recaps the important bits of code for the Singer domain object model class introduced
Chapter 7. (The other classes won’t be depicted.)
Listing 8-6. Singer Domain Object
package com.apress.prospring6.eight.entities;
import jakarta.persistence.*;
import java.io.Serial;
// other import statements omitted
397
Chapter 8 ■ Spring with JPA
@Entity
@Table(name = "SINGER")
@NamedQueries({
@NamedQuery(name=Singer.FIND_ALL, query="select s from Singer s"),
@NamedQuery(name=Singer.FIND_SINGER_BY_ID,
query="""
select distinct s from Singer s
left join fetch s.albums a
left join fetch s.instruments i
where s.id = :id
"""),
@NamedQuery(name=Singer.FIND_ALL_WITH_ALBUM,
query="""
select distinct s from Singer s
left join fetch s.albums a
left join fetch s.instruments i
""")
})
public class Singer extends AbstractEntity {
@Serial
private static final long serialVersionUID = 2L;
public static final String FIND_ALL = "Singer.findAll";
public static final String FIND_SINGER_BY_ID = "Singer.findById";
public static final String FIND_ALL_WITH_ALBUM = "Singer.findAllWithAlbum";
private
private
private
private
private
String firstName;
String lastName;
LocalDate birthDate;
Set<Album> albums = new HashSet<>();
Set<Instrument> instruments = new HashSet<>();
@Column(name = "FIRST_NAME")
public String getFirstName() {
return this.firstName;
}
@Column(name = "LAST_NAME")
public String getLastName() {
return this.lastName;
}
@Column(name = "BIRTH_DATE")
public LocalDate getBirthDate() {
return birthDate;
}
@OneToMany(mappedBy = "singer", cascade=CascadeType.ALL, orphanRemoval=true)
public Set<Album> getAlbums() {
return albums;
}
398
Chapter 8 ■ Spring with JPA
@ManyToMany
@JoinTable(name = "SINGER_INSTRUMENT",
joinColumns = @JoinColumn(name = "SINGER_ID"),
inverseJoinColumns = @JoinColumn(name = "INSTRUMENT_ID"))
public Set<Instrument> getInstruments() {
return instruments;
}
// other methods omitted
}
If you analyze the queries defined using @NamedQuery, you will see that there seems to be no difference
between HQL and JPQL, at least not for the simple queries anyway. Now that we have entity classes
and configuration, we can start implementing the methods to interact with the database. Let’s begin by
writing the findAll() method, which simply retrieves all the singers from the database. The method
implementation is depicted in Listing 8-7.
Listing 8-7. findAll() Method Implemented Using EntityManager
package com.apress.prospring6.eight.service;
// import statements omitted
@Service("jpaSingerService")
@Repository
@Transactional
public class SingerServiceImpl implements SingerService {
private static final Logger LOGGER = LoggerFactory.getLogger(SingerServiceImpl.class);
@PersistenceContext
private EntityManager em;
@Transactional(readOnly=true)
@Override
public Stream<Singer> findAll() {
return em.createNamedQuery(Singer.FIND_ALL, Singer.class)
.getResultList()
.stream();
}
// other methods omitted
}
As shown in Listing 8-7, we use the EntityManager.createNamedQuery() method, passing in the
name of the query and the expected return type. The method returns an instance of TypedQuery<X>. The
method getResultList() is then called to retrieve the singers, which are then returned as a stream. To
test the implementation of the method, a test class is built that uses Testcontainers to spin up a MariaDB
test container to run the queries on. The test method used to test SingerServiceImpl.findAll() and the
Testcontainers setup are shown in Listing 8-8 (the latter will be omitted from future test examples).
399
Chapter 8 ■ Spring with JPA
Listing 8-8. Testing the findAll() Method
package com.apress.prospring6.eight;
import org.testcontainers.containers.MariaDBContainer;
import org.testcontainers.junit.jupiter.Container;
import org.testcontainers.junit.jupiter.Testcontainers;
import static org.junit.jupiter.api.Assertions.assertEquals;
// other import statements omitted
@Testcontainers
@SqlMergeMode(SqlMergeMode.MergeMode.MERGE)
@Sql({ "classpath:testcontainers/drop-schema.sql", "classpath:testcontainers/createschema.sql" })
@SpringJUnitConfig(classes = {SingerServiceTest.TestContainersConfig.class})
public class SingerServiceTest {
private static final Logger LOGGER = LoggerFactory.getLogger(SingerServiceTest.class);
@Container
static MariaDBContainer<?> mariaDB = new MariaDBContainer<>("mariadb:10.7.4-focal");
@Autowired
SingerService singerService;
@Test
@DisplayName("should return all singers")
void testFindAll(){
var singers = singerService.findAll().toList();
assertEquals(3, singers.size());
singers.forEach(singer -> LOGGER.info(singer.toString()));
}
@Configuration
@Import(JpaConfig.class)
public static class TestContainersConfig {
@Autowired
Properties jpaProperties;
@PostConstruct
public void initialize() {
jpaProperties.put(Environment.FORMAT_SQL, true);
jpaProperties.put(Environment.USE_SQL_COMMENTS, true);
jpaProperties.put(Environment.SHOW_SQL, true);
}
}
}
The TestContainersConfig class is introduced to override the Hibernate variables that control showing
the generated SQL queries. If assertEquals() does not throw an exception (the test fails), running the
testFindAll() test method produces the output shown in Listing 8-9.
400
Chapter 8 ■ Spring with JPA
Listing 8-9. Snippets of the Console Output When Running the testFindAll() Test Method
/* 1 */ DEBUG: LocalContainerEntityManagerFactoryBean - Building JPA container
EntityManagerFactory for persistence unit 'default'
DEBUG: LogHelper - PersistenceUnitInfo [
name: default
persistence provider classname: null
classloader: jdk.internal.loader.ClassLoaders$AppClassLoader@5ffd2b27
excludeUnlistedClasses: true
JTA datasource: null
Non JTA datasource: org.apache.tomcat.dbcp.dbcp2.BasicDataSource@40247d48
Transaction type: RESOURCE_LOCAL
PU root URL: file:/Users/iulianacosmina/apress/workspace/pro-spring-6/chapter08/build/
classes/java/test/
Shared Cache Mode: UNSPECIFIED
Validation Mode: AUTO
Jar files URLs []
Managed classes names [
com.apress.prospring6.eight.entities.AbstractEntity
com.apress.prospring6.eight.entities.Album
com.apress.prospring6.eight.entities.Instrument
com.apress.prospring6.eight.entities.Singer]
Mapping files names []
Properties []
...
/* 2 */ DEBUG: JdbcEnvironmentInitiator - Database ->
name : MariaDB
version : 10.7.4-MariaDB-1:10.7.4+maria~focal
major : 10
minor : 7
...
/* 3 */ DEBUG: SqlStatementLogger - select singer0_.ID as id1_2_,
singer0_.VERSION as version2_2_,
singer0_.BIRTH_DATE as birth_da3_2_,
singer0_.FIRST_NAME as first_na4_2_,
singer0_.LAST_NAME as last_nam5_2_
from SINGER singer0_
...
/* 4 */ INFO : SingerServiceTest - Singer - Id: 1, First name: John, Last name: Mayer,
Birthday: 1977-10-16
INFO : SingerServiceTest - Singer - Id: 2, First name: Ben, Last name: Barnes, Birthday:
1981-08-20
INFO : SingerServiceTest - Singer - Id: 3, First name: John, Last name: Butler, Birthday:
1975-04-01
The output sample is made of four different snippets:
•
/* 1 */ is the EntityManager configuration used in this test context.
•
/* 2 */ includes the properties of the container used to run the tests.
•
/* 3 */ is the SQL native query generated for the Singer.findAll query.
•
/* 4 */ includes the results returned by the execution of the Singer.findAll query.
401
Chapter 8 ■ Spring with JPA
For associations, the JPA specification states that, by default, the persistence providers must fetch
the association eagerly. However, for Hibernate’s JPA implementation, the default fetching strategy is still lazy.
So, when using Hibernate’s JPA implementation, you don’t need to explicitly define an association as lazy
fetching. The default fetching strategy of Hibernate is different from the JPA specification.
Now let’s implement the findAllWithAlbum() method, which will fetch the associated albums and
instruments. The implementation is shown in Listing 8-10.
Listing 8-10. The findAllWithAlbum() Method
package com.apress.prospring6.eight.service;
// all import statements omitted
/*
Annotation from Singer.java, to show the JQL query
@NamedQuery(name=Singer.FIND_ALL_WITH_ALBUM,
query="select distinct s from Singer s " +
"left join fetch s.albums a " +
"left join fetch s.instruments i")
*/
@Service("jpaSingerService")
@Repository
@Transactional
public class SingerServiceImpl implements SingerService {
@Transactional(readOnly=true)
@Override
public Stream<Singer> findAllWithAlbum() {
return em.createNamedQuery(Singer.FIND_ALL_WITH_ALBUM, Singer.class).
getResultList().stream();
}
// other methods and set up omitted
}
The findAllWithAlbum() method is the same as the findAll() method, but it uses a different named
query with inner join fetch statements that are used to link records from different tables. The method
used to test it and print the entries is shown in Listing 8-11.
Listing 8-11. Testing the findAllWithAlbum() Method
package com.apress.prospring6.eight;
// all import statements omitted
//annotation omitted
public class SingerServiceTest {
@Test
402
Chapter 8 ■ Spring with JPA
@DisplayName("should return all singers")
void testFindAllWithAlbum(){
var singers = singerService.findAllWithAlbum().toList();
assertEquals(3, singers.size());
singers.forEach(s -> {
LOGGER.info(s.toString());
if (s.getAlbums() != null) {
s.getAlbums().forEach(a -> LOGGER.info("\tAlbum:" + a.toString()));
}
if (s.getInstruments() != null) {
s.getInstruments().forEach(i -> LOGGER.info("\tInstrument: " +
i.getInstrumentId()));
}
});
}
// other methods and setup omitted
}
The JQL query is simple, but the generated SQL query is not so simple, as shown by the output of this
method execution depicted in Listing 8-12.
Listing 8-12. Snippets of the Console Output When Running the testFindAllWithAlbum() Test Method
DEBUG: SqlStatementLogger - select distinct singer0_.ID as id1_2_0_,
albums1_.ID as id1_0_1_,
instrument3_.INSTRUMENT_ID as instrume1_1_2_,
singer0_.VERSION as version2_2_0_,
singer0_.BIRTH_DATE as birth_da3_2_0_,
singer0_.FIRST_NAME as first_na4_2_0_,
singer0_.LAST_NAME as last_nam5_2_0_,
albums1_.VERSION as version2_0_1_,
albums1_.RELEASE_DATE as release_3_0_1_,
albums1_.SINGER_ID as singer_i5_0_1_,
albums1_.title as title4_0_1_,
albums1_.SINGER_ID as singer_i5_0_0__,
albums1_.ID as id1_0_0__,
instrument2_.SINGER_ID as singer_i1_3_1__,
instrument2_.INSTRUMENT_ID as instrume2_3_1__
from SINGER singer0_
left outer join ALBUM albums1_ on singer0_.ID=albums1_.SINGER_ID
left outer join SINGER_INSTRUMENT instrument2_ on singer0_.ID=instrument2_.SINGER_ID
left outer join INSTRUMENT instrument3_ on instrument2_.INSTRUMENT_ID=instrument3_.
INSTRUMENT_ID
...
INFO : SingerServiceTest - Singer - Id: 1, First name: John, Last name: Mayer, Birthday:
1977-10-16
INFO : SingerServiceTest - Album:Album - Id: 1, Singer id: 1, Title: The Search For
Everything, Release Date: 2017-01-20
INFO : SingerServiceTest - Album:Album - Id: 2, Singer id: 1, Title: Battle Studies,
Release Date: 2009-11-17
INFO : SingerServiceTest - Instrument: Piano
INFO : SingerServiceTest - Instrument: Guitar
403
Chapter 8 ■ Spring with JPA
INFO : SingerServiceTest
1981-08-20
INFO : SingerServiceTest
2021-09-18
INFO : SingerServiceTest
INFO : SingerServiceTest
INFO : SingerServiceTest
INFO : SingerServiceTest
1975-04-01
- Singer - Id: 2, First name: Ben, Last name: Barnes, Birthday:
- Album:Album - Id: 3, Singer id: 2, Title: 11:11, Release Date:
- Instrument:
- Instrument:
- Instrument:
- Singer - Id:
Piano
Drums
Guitar
3, First name: John, Last name: Butler, Birthday:
Now let’s see the findById() method, which demonstrates how to use a named query with named
parameters in JPA. The associations will be fetched as well. Listing 8-13 shows the implementation.
Listing 8-13. The findById() Method
package com.apress.prospring6.eight.service;
import jakarta.persistence.NoResultException;
// all import statements omitted
/*
Annotation from Singer.java, to show the JQL query
@NamedQuery(name=Singer.FIND_SINGER_BY_ID,
query="""
select distinct s from Singer s
left join fetch s.albums a
left join fetch s.instruments i
where s.id = :id
""")
*/
@Service("jpaSingerService")
@Repository
@Transactional
public class SingerServiceImpl implements SingerService {
@Transactional(readOnly=true)
@Override
public Optional<Singer> findById(Long id) {
TypedQuery<Singer> query = em.createNamedQuery(Singer.FIND_SINGER_BY_ID,
Singer.class);
query.setParameter("id", id);
try {
return Optional.of(query.getSingleResult());
} catch (NoResultException nre) {
return Optional.empty();
}
}
// other methods and set up omitted
}
404
Chapter 8 ■ Spring with JPA
EntityManager.createNamedQuery(java.lang.String name, java.lang.Class<T> resultClass)
was called to get an instance of the TypedQuery<T> interface, which ensures that the result of the query
must be of type Singer. Then the TypedQuery<T>.setParameter() method was used to set the values of the
named parameters within the query and to invoke the getSingleResult() method, since the result should
contain only a single Singer object with the specified ID. Testing it is very easy, and similar to what was done
in Chapter 7 for similar methods, so it won’t be repeated here.
Querying with Untyped Results
In many cases, you want to submit a query to the database and manipulate the results at will, instead of
storing them in a mapped entity class. After all, why use entity classes when you could use records, right?
Also, records can be designed to store only a subset of columns, and thus this results in behavior identical to
a projection query.
One typical example is a web-based report that lists only a certain number of columns across multiple
tables. For example, say you have a web page that shows the singer information and their most recently
released album title. The summary information contains the complete name of the singer and their most
recently released album title. Singers without albums will not be listed. In this case, we can implement this
use case with a query and then manually manipulate the ResultSet object.
Let’s create a new class called SingerSummaryServiceImpl and name the method findAllAsRecord().
Listing 8-14 shows a typical implementation of the method and the SingerSummaryRecord record class.
Listing 8-14. The SingerSummaryServiceImpl.findAllAsRecord() Method
package com.apress.prospring6.eight.view;
public record SingerSummaryRecord(String firstName,
String lastName,
String latestAlbum) {
}
// -----------------------------package com.apress.prospring6.eight.service;
import com.apress.prospring6.eight.view.SingerSummary;
import com.apress.prospring6.eight.view.SingerSummaryRecord;
// other import statements
@Service("singerSummaryService")
@Repository
@Transactional(readOnly = true)
public class SingerSummaryServiceImpl implements SingerSummaryService {
@PersistenceContext
private EntityManager em;
public static final String ALL_SINGER_SUMMARY_RECORD_JPQL_QUERY ="""
select s.firstName, s.lastName, a.title from Singer s
left join s.albums a
where a.releaseDate=(select max(a2.releaseDate) from Album a2 where a2.singer.
id = s.id)
""";
405
Chapter 8 ■ Spring with JPA
@SuppressWarnings({"unchecked"})
@Override
public Stream<SingerSummaryRecord> findAllAsRecord() {
return em.createQuery(ALL_SINGER_SUMMARY_RECORD_JPQL_QUERY).getResultList().
stream().
map(obj -> {
Object[] values = (Object[]) obj;
return new SingerSummaryRecord((String) values[0],(String) values[1],
(String) values[2]);
});
}
}
SingerSummaryService is just the interface declaring the method to be implemented by
SingerSummaryServiceImpl.
As shown in Listing 8-14, we use the EntityManager.createQuery() method to create Query, passing in
the JPQL statement, and then get the result list. When we explicitly specify the columns to be selected within
JPQL, JPA will return an iterator, and each item within the iterator is an array of objects. We loop through the
iterator, and for each array object a SingerSummaryRecord instance is created. Each object array corresponds
to a record within the ResultSet object.
Listing 8-15 shows the test method.
Listing 8-15. Testing the SingerSummaryServiceImpl.findAllAsRecord() Method
package com.apress.prospring6.eight;
// import statements omitted
// annotations omitted
public class SingerServiceTest {
@Autowired
SingerSummaryService singerSummaryService;
@Test
@DisplayName("should return all singers and their most recent album as records")
void testFindAllWithAlbumAsRecords(){
var singers =
singerSummaryService.findAllAsRecord()
.peek(s -> LOGGER.info(s.toString()))
.toList();
assertEquals(2, singers.size());
}
// other methods and setup omitted
}
Executing this test method produces similar output to that of other methods in this chapter, but the
results are converted to String using the record toString() generated method, as shown in Listing 8-16.
406
Chapter 8 ■ Spring with JPA
Listing 8-16. Output Snippets Printed During Testing of the SingerSummaryServiceImpl.
findAllAsRecord() Method
DEBUG: SqlStatementLogger - select singer0_.FIRST_NAME as col_0_0_,
singer0_.LAST_NAME as col_1_0_,
albums1_.title as col_2_0_ from SINGER singer0_
left outer join ALBUM albums1_ on singer0_.ID=albums1_.SINGER_ID
where
albums1_.RELEASE_DATE=(select max(album2_.RELEASE_DATE) from ALBUM album2_
where album2_.SINGER_ID=singer0_.ID)
...
INFO : SingerServiceTest - SingerSummaryRecord[firstName=John, lastName=Mayer,
latestAlbum=The Search For Everything]
INFO : SingerServiceTest - SingerSummaryRecord[firstName=Ben, lastName=Barnes,
latestAlbum=11:11]
In JPA, there is a more elegant solution than playing around with the ResultSet object array returned
from the query, as discussed in the next section.
Querying for a Custom Result Type with a Constructor Expression
In JPA, when querying for a custom result like the one in the previous section, you can instruct JPA to
directly construct a POJO from each record for you. This POJO is also called a view because it contains data
from multiple tables. For the example in the previous section, a record called SingerSummaryRecord was
created. For this example, a POJO called SingerSummary is used, which is equivalent to the record class. The
SingerSummary class has the properties for each singer summary, with a constructor method that accepts all
the properties. Using this class we can write a findAll() method and use a constructor expression within
the query to instruct the JPA provider to map the ResultSet to the SingerSummary class. In Listing 8-17 you
can see this method and the query it executes.
Listing 8-17. The SingerSummaryServiceImpl.findAll() Method
package com.apress.prospring6.eight.service;
// all import statements omitted
@Service("singerSummaryService")
@Repository
@Transactional(readOnly = true)
public class SingerSummaryServiceImpl implements SingerSummaryService {
@PersistenceContext
private EntityManager em;
public static final String ALL_SINGER_SUMMARY_JPQL_QUERY ="""
select new com.apress.prospring6.eight.view.SingerSummary(
s.firstName, s.lastName, a.title) from Singer s
left join s.albums a
where a.releaseDate=(select max(a2.releaseDate) from Album a2 where a2.singer.
id = s.id)
""";
407
Chapter 8 ■ Spring with JPA
@Override
public Stream<SingerSummary> findAll() {
return em.createQuery(ALL_SINGER_SUMMARY_JPQL_QUERY, SingerSummary.class).
getResultList().stream();
}
// other method omitted
}
In the JPQL query, the new keyword is specified, together with the fully qualified name of the POJO
class that will store the results and pass in the selected attributes as the constructor argument of each
SingerSummary class. Finally, the SingerSummary class is passed into the createQuery() method to indicate
the result type. Testing this method is no different than what we did for the findAllAsRecord(), but the
returned results are of type SingerSummary instead of SingerSummaryRecord, as you can see in Listing 8-18.
Listing 8-18. Testing the SingerSummaryServiceImpl.findAll() Method
package com.apress.prospring6.eight;
// import statements omitted
// annotations omitted
public class SingerServiceTest {
@Autowired
SingerSummaryService singerSummaryService;
@Test
@DisplayName("should return all singers and their most recent album as POJOs")
void testFindAllAsPojos(){
var singers =
singerSummaryService.findAll()
.peek(s -> LOGGER.info(s.toString())).toList();
assertEquals(2, singers.size());
}
// other methods and setup omitted
}
Executing this method produces the result in Listing 8-19.
Listing 8-19. Output Snippets Printed During Testing of the SingerSummaryServiceImpl.
testFindAllAsPojos() Method
DEBUG: QueryTranslatorImpl - HQL: select new com.apress.prospring6.eight.view.
SingerSummary(s.firstName, s.lastName, a.title)
from com.apress.prospring6.eight.entities.Singer s
left join s.albums a where a.releaseDate=
(select max(a2.releaseDate)
from com.apress.prospring6.eight.entities.Album a2
where a2.singer.id = s.id)
DEBUG: QueryTranslatorImpl - SQL: select singer0_.FIRST_NAME as col_0_0_,
singer0_.LAST_NAME as col_1_0_,
albums1_.title as col_2_0_ from SINGER singer0_
left outer join ALBUM albums1_ on singer0_.ID=albums1_.SINGER_ID
408
Chapter 8 ■ Spring with JPA
where albums1_.RELEASE_DATE=
(select max(album2_.RELEASE_DATE)
from ALBUM album2_
where album2_.SINGER_ID=singer0_.ID)
...
INFO : SingerServiceTest - First name: John, Last Name: Mayer, Most Recent Album: The Search
For Everything
INFO : SingerServiceTest - First name: Ben, Last Name: Barnes, Most Recent Album: 11:11
Notice that the JPQL query is represented in Java by an org.hibernate.query.internal.QueryImpl
instance; this is because Hibernate is the JPA provider for this application. Also notice in the native SQL
generated query that there is no trace of the SingerSummary constructor.
Inserting Data
Inserting data by using JPA is simple. Like Hibernate, JPA also supports retrieving a database-generated
primary key. Listing 8-20 shows the save(..) method.
Listing 8-20. The SingerServiceImpl.save(..) Method
package com.apress.prospring6.eight.service;
// import statements omitted
@Service("jpaSingerService")
@Repository
@Transactional
public class SingerServiceImpl implements SingerService {
private static final Logger LOGGER = LoggerFactory.getLogger(SingerServiceImpl.class);
@PersistenceContext
private EntityManager em;
@Override
public void save(Singer singer) {
if (singer.getId() == null) {
LOGGER.info("Inserting new singer");
em.persist(singer);
} else {
em.merge(singer);
LOGGER.info("Updating existing singer");
}
LOGGER.info("Singer saved with id: " + singer.getId());
}
// other methods omitted
}
409
Chapter 8 ■ Spring with JPA
As shown here, the save(..) method first checks whether the object is a new entity instance, by
checking the id value. If id is null (that is, not yet assigned), the object is a new entity instance, and
the EntityManager.persist(..) method will be invoked. When calling the persist(..) method,
EntityManager persists the entity and makes it a managed instance within the current persistence context.
If the id value exists, then we’re carrying out an update, and the EntityManager.merge(..) method will be
called instead. When the merge(..) method is called, the EntityManager merges the state of the entity into
the current persistence context.
Listing 8-21 shows the code to insert a new Singer record. It’s all done in a test method because we
want to test that the insert succeeds.
Listing 8-21. Testing the SingerServiceImpl.save(..) Method
package com.apress.prospring6.eight;
// import statements omitted
// annotations omitted
public class SingerServiceTest {
@Test
@DisplayName("should insert a singer with associations")
@Sql(statements = { // avoid dirtying up the test context
"delete from ALBUM where SINGER_ID = (select ID from SINGER where
FIRST_NAME = 'BB')",
"delete from SINGER_INSTRUMENT where SINGER_ID = (select ID from SINGER where
FIRST_NAME = 'BB')",
"delete from SINGER where FIRST_NAME = 'BB'"
},
executionPhase = Sql.ExecutionPhase.AFTER_TEST_METHOD)
public void testInsert(){
var singer = new Singer();
singer.setFirstName("BB");
singer.setLastName("King");
singer.setBirthDate(LocalDate.of(1940, 8, 16));
var album = new Album();
album.setTitle("My Kind of Blues");
album.setReleaseDate(LocalDate.of(1961, 7, 18));
singer.addAlbum(album);
album = new Album();
album.setTitle("A Heart Full of Blues");
album.setReleaseDate(LocalDate.of(1962, 3, 20));
singer.addAlbum(album);
singerService.save(singer);
Assertions.assertNotNull(singer.getId());
var singers = singerService.findAllWithAlbum().peek(
s -> {
LOGGER.info(s.toString());
if (s.getAlbums() != null) {
s.getAlbums().forEach(a -> LOGGER.info("\tAlbum:" + a.toString()));
410
Chapter 8 ■ Spring with JPA
}
if (s.getInstruments() != null) {
s.getInstruments().forEach(i -> LOGGER.info("\tInstrument: " +
i.getInstrumentId()));
}
}).toList();
assertEquals(4, singers.size());
}
// other methods and setup omitted
}
As shown here, we create a new singer, add two albums, and save the object. The success of this
operation is tested by verifying the size of the result set returned by the findAllWithAlbum() method.
The @Sql annotation is used to clean up the database to avoid accidentally failing other tests run on the
initial test data set.
Updating Data
Updating data is as easy as inserting data, and as you’ve seen, s single method was created for the insert
and update operation. There are two ways we can test an update operation: by updating the name or other
properties of a singer record, or by removing related associations, such as an album. Listing 8-22 shows two
ways to test the SingerServiceImpl.save(..) method for performing updates.
Listing 8-22. Testing the SingerServiceImpl.save(..) Method for Two Forms of the Update Operation
package com.apress.prospring6.eight;
// import statements omitted
// annotations omitted
public class SingerServiceTest {
@Test
@SqlGroup({
@Sql(scripts = {"classpath:testcontainers/add-nina.sql"},
executionPhase = Sql.ExecutionPhase.BEFORE_TEST_METHOD),
@Sql(scripts = {"classpath:testcontainers/remove-nina.sql"},
executionPhase = Sql.ExecutionPhase.AFTER_TEST_METHOD)
})
@DisplayName("should update a singer")
void testUpdate() {
var singer = singerService.findById(5L).orElse(null);
// making sure such singer exists
assertNotNull(singer);
// making sure we got expected singer
assertEquals("Simone", singer.getLastName());
// retrieve the album
var album = singer.getAlbums().stream().filter(
a -> a.getTitle().equals("I Put a Spell on You")).findFirst().orElse(null);
Assertions.assertNotNull(album);
411
Chapter 8 ■ Spring with JPA
singer.setFirstName("Eunice Kathleen");
singer.setLastName("Waymon");
singer.removeAlbum(album);
int version = singer.getVersion();
singerService.save(singer);
var nina = singerService.findById(5L).orElse(null);
assertAll( "nina was updated" ,
() -> Assertions.assertNotNull(nina),
() -> Assertions.assertEquals(version +1, nina.getVersion())
);
}
@Test
@DisplayName("should update album set")
public void testUpdateAlbumSet() {
var singer = singerService.findById(1L).orElse(null);
// making sure such singer exists
assertNotNull(singer);
// making sure we got expected record
assertEquals("Mayer", singer.getLastName());
// retrieve the album
var album = singer.getAlbums().stream().filter(a -> a.getTitle().equals("Battle
Studies")).findAny().orElse(null);
singer.setFirstName("John Clayton");
singer.removeAlbum(album);
singerService.save(singer);
var singers = singerService.findAllWithAlbum().peek(
s -> {
LOGGER.info(s.toString());
if (s.getAlbums() != null) {
s.getAlbums().forEach(a -> LOGGER.info("\tAlbum:" + a.toString()));
}
if (s.getInstruments() != null) {
s.getInstruments().forEach(i -> LOGGER.info("\tInstrument: " +
i.getInstrumentId()));
}
}).toList();
assertEquals(3, singers.size());
}
// other methods and setup omitted
}
In the testUpdate() method, we first retrieve the record with an ID of 5, and we change the first and
last name. We call the SingerService.save(..) method and then retrieve the saved item from the database.
The success of the update operation is confirmed by the incrementing of its version field.
412
Chapter 8 ■ Spring with JPA
In the testUpdateAlbumSet() method, we first retrieve the record with an ID of 1 and we change the
first name. Then we loop through its Album associations and retrieve the one with title Battle Studies and
remove it from the singer’s albums property. Finally, we call the SingerService.save(..) method again.
When you execute this method, you can check that the update operation succeeded by looking in the
console log and checking that the Battle Studies album is not displayed.
The album can be removed because of the orphanRemoval=true attribute that was defined in the
one-to-many association, which instructs the JPA provider (Hibernate) to remove all orphan records that exist
in the database but are no longer found in the object when persisted: @OneToMany(mappedBy =
"singer", cascade=CascadeType.ALL, orphanRemoval=true).
Deleting Data
Deleting data is just as simple. Simply call the EntityManager.remove() method and pass in the Singer
object. Listing 8-23 shows the updated code to delete a singer.
Listing 8-23. The SingerServiceImpl.delete(..) Method
package com.apress.prospring6.eight.service;
// import statements omitted
@Service("jpaSingerService")
@Repository
@Transactional
public class SingerServiceImpl implements SingerService {
@Override
public void delete(Singer singer) {
var mergedContact = em.merge(singer);
em.remove(mergedContact);
LOGGER.info("Singer with id: " + singer.getId() + " deleted successfully");
}
// other methods and setup omitted
}
First the EntityManager.merge(..) method is invoked to merge the state of the entity into the current
persistence context. The merge(..) method returns the managed entity instance. Then EntityManager.
remove() method is called, passing in the managed singer entity instance. The remove operation deletes the
singer record, together with all its associated information, including albums and instruments, as we defined
the cascade=CascadeType.ALL in the mapping. To test the delete operation, the testDelete() method can
be used, which is depicted in Listing 8-24.
413
Chapter 8 ■ Spring with JPA
Listing 8-24. Testing the SingerServiceImpl.delete(..) Method
package com.apress.prospring6.eight;
// import statements omitted
// annotations omitted
public class SingerServiceTest {
@Test
@Sql(scripts = {"classpath:testcontainers/add-chuck.sql"},
executionPhase = Sql.ExecutionPhase.BEFORE_TEST_METHOD)
@DisplayName("should delete a singer")
public void testDelete() {
var singer = singerService.findById(6L).orElse(null);
//making sure such singer exists
assertNotNull(singer);
singerService.delete(singer);
var deleted = singerService.findById(6L);
assertTrue(deleted.isEmpty());
}
// other methods and setup omitted
}
Listing 8-24 retrieves the singer with an ID of 6 and then calls the delete(..) method to delete the
singer information.
Using a Native Query
Having discussed performing trivial database operations by using JPA, now let’s move on to some more
advanced topics. Sometimes you may want to have absolute control over the query that will be submitted
to the database. One example is using a hierarchical query in an Oracle database. This kind of query is
database-specific and referred to as a native query.
JPA supports the execution of native queries; EntityManager will submit the query to the database as
is, without any mapping or transformation performed. One main benefit of using JPA native queries is the
mapping of ResultSet back to the ORM-mapped entity classes. The following two sections discuss how to
use a native query to retrieve all singers and directly map ResultSet back to the Singer objects.
Using a Simple Native Query
To demonstrate how to use a native query, let’s implement a new method to retrieve all the singers from the
database. This method is shown in Listing 8-25.
Listing 8-25. The SingerServiceImpl.findAllByNativeQuery(..) Method
package com.apress.prospring6.eight.service;
// import statements omitted
@Service("jpaSingerService")
@Repository
414
Chapter 8 ■ Spring with JPA
@Transactional
public class SingerServiceImpl implements SingerService {
public static final String ALL_SINGER_NATIVE_QUERY =
"select ID, FIRST_NAME, LAST_NAME, BIRTH_DATE, VERSION from SINGER";
@Override
public Stream<Singer> findAllByNativeQuery() {
return em.createNativeQuery(ALL_SINGER_NATIVE_QUERY)
.getResultList().stream();
}
// other methods and setup omitted
}
You can see that the native query is just a simple SQL statement to retrieve all the columns from the
SINGER table. To create and execute the query, EntityManager.createNativeQuery(..) was first called,
passing in the query string as well as the result type. The result type should be a mapped entity class (in this
case the Singer class). The createNativeQuery(..) method returns a Query instance, which provides the
getResultList() operation to get the result list. The JPA provider will execute the query and transform the
ResultSet object into the entity instances, based on the JPA mappings defined in the entity class. Executing
the previous method produces the same result as the findAll() method.
Native Querying with SQL ResultSet Mapping
Aside from the mapped domain object, you can pass in a string representing the name of a SQL ResultSet
mapping. A SQL ResultSet mapping is defined at the entity class level by using the @SqlResultSetMapping
annotation. A SQL ResultSet mapping can have one or more entity and column mappings. A SQL
ResultSet mapping called singerResult is defined for the entity class, with the entityClass attribute in the
Singer class itself. JPA supports more complex mapping for multiple entities and supports mapping down to
column-level mapping.
After the SQL ResultSet mapping is defined, the findAllByNativeQuery() method can be invoked
using the ResultSet mapping’s name. Listing 8-26 shows the updated findAllByNativeQuery() method.
Listing 8-26. The @SqlResultSetMapping Mapping Results of the ALL_SINGER_NATIVE_QUERY Native Query
package com.apress.prospring6.eight.entities;
import jakarta.persistence.EntityResult;
import jakarta.persistence.SqlResultSetMapping;
// other import statements omitted
@Entity
@Table(name = "SINGER")
@SqlResultSetMapping(
name="singerResult",
entities=@EntityResult(entityClass=Singer.class)
)
public class Singer extends AbstractEntity {
// code omitted
}
415
Chapter 8 ■ Spring with JPA
// ---------------------// other details omitted
public class SingerServiceImpl implements SingerService {
@Override
public Stream<Singer> findAllByNativeQuery() {
return em.createNativeQuery(ALL_SINGER_NATIVE_QUERY, "singerResult").
getResultList().stream();
}
// other methods omitted
}
As you can see, JPA also provides strong support for executing native queries, with a flexible SQL
ResultSet mapping facility provided.
Executing Stored Functions and Procedures
There is more than one way to configure support for SQL functions and procedures execution, but the
easiest is to use native queries. To do so, write the SQL to declare your stored SQL function or procedure, use
@NamedNativeQuery from the jakarta.persistence package to map its SQL invocation to a query name,
and then use EntityManager.createNamedQuery(..) to create a native query and retrieve the result using
getSingleResult() or .getResultList() or any other method available.
Listing 8-27 shows a very simple SQL stored function that returns the first name for a singer with a
given id.
Listing 8-27. The getFirstNameById SQL Stored Function
CREATE FUNCTION IF NOT EXISTS getFirstNameById (in_id INT) RETURNS VARCHAR(60)
RETURN (SELECT first_name FROM SINGER WHERE id = in_id);
The getFirstNameById(..) stored function invocation can be mapped to a name using @
NamedNativeQuery. This annotation can be included in @NamedNativeQueries when there is more than one
native query declared for an entity type. These annotations are declared on the entity class, in this case the
Singer class, as shown in Listing 8-28.
Listing 8-28. The getFirstNameById SQL Stored Function Invocation Being Mapped to Named Query
Singer.getFirstNameById(?)
package com.apress.prospring6.eight.entities;
// other class details omitted
import jakarta.persistence.NamedNativeQueries;
import jakarta.persistence.NamedNativeQuery;
@NamedNativeQueries({
@NamedNativeQuery(
name = "Singer.getFirstNameById(?)",
query = "select getfirstnamebyid(?)")
})
public class Singer extends AbstractEntity {
// body omitted
}
416
Chapter 8 ■ Spring with JPA
The SQL stored function or procedure is nothing else than a native query, and thus it is allowed to map
it to a named native query. The name is quite flexible, and in this scenario the chosen name is Singer.
getFirstNameById(?) because it makes it quite obvious that the query is specific to Singer instances and
that it requires a parameter.
Since the query is named, the EntityManager.createNamedQuery(..) is used to create the query and
retrieve the result, as shown in Listing 8-29.
Listing 8-29. Invoking a SQL Stored Function Using EntityManager
package com.apress.prospring6.eight.service;
// other class details omitted
public class SingerServiceImpl implements SingerService {
@Override
public String findFirstNameById(Long id) {
return em.createNamedQuery("Singer.getFirstNameById(?)")
.setParameter(1, id).getSingleResult().toString();
}
}
Testing this method is done by a method identical to the one introduced for testing SQL functions and
procedures in Chapter 7.
You should know that in the jakarta.persistence package there is an annotation named
@NamedStoredProcedureQueries used to declare an array of SQL stored procedures, each of them
configured using @NamedStoredProcedureQuery. When declared using these annotations, a stored function
or procedure can be invoked from an EntityManager using the createNamedStoredProcedureQuery(..)
method. Since these annotations are a bit misleading (their names imply that only SQL stored procedures
are supported), we prefer to use named native queries instead.
Using the JPA Criteria API for a Criteria Query
Most applications provide a front end for users to search for information. Typically, many searchable fields
are displayed, and the users enter information in only some of them and do the search. It’s difficult to
prepare many queries, with each possible combination of parameters that users may choose to enter. In this
situation, the Criteria API query feature comes to the rescue.
In JPA 2, one major new feature introduced was a strongly typed Criteria API query. In this new Criteria
API, the criteria being passed into the query is based on the mapped entity classes’ metamodel. As a result,
each criteria specified is strongly typed, and errors will be discovered at compile time, rather than runtime.
In the JPA Criteria API, an entity class metamodel is represented by the entity class name with a suffix
of an underscore (_). For example, the metamodel class for the Singer entity class is Singer_. Listing 8-30
shows the Singer_ class.
Listing 8-30. The Metamodel for the Singer Entity
package com.apress.prospring6.eight.entities;
import jakarta.persistence.metamodel.SetAttribute;
import jakarta.persistence.metamodel.SingularAttribute;
import jakarta.persistence.metamodel.StaticMetamodel;
417
Chapter 8 ■ Spring with JPA
import java.time.LocalDate;
import javax.annotation.processing.Generated;
@Generated(value = "org.hibernate.jpamodelgen.JPAMetaModelEntityProcessor")
@StaticMetamodel(Singer.class)
public abstract class Singer_ extends com.apress.prospring6.eight.entities.AbstractEntity_ {
public
public
public
public
public
static
static
static
static
static
volatile
volatile
volatile
volatile
volatile
public
public
public
public
public
}
static
static
static
static
static
final
final
final
final
final
SingularAttribute<Singer, String> firstName;
SingularAttribute<Singer, String> lastName;
SetAttribute<Singer, Album> albums;
SetAttribute<Singer, Instrument> instruments;
SingularAttribute<Singer, LocalDate> birthDate;
String
String
String
String
String
FIRST_NAME = "firstName";
LAST_NAME = "lastName";
ALBUMS = "albums";
INSTRUMENTS = "instruments";
BIRTH_DATE = "birthDate";
The metamodel class is annotated with @StaticMetamodel, and the attribute is the mapped entity class.
Within the class are the declaration of each attribute and its related types. It would be tedious to code and
maintain those metamodel classes. However, tools can help generate those metamodel classes automatically
based on the JPA mappings within the entity classes. The one provided by Hibernate is called Hibernate
Metamodel Generator5.
The way you go about generating your metamodel classes depends on what tools you are using to
develop and build your project. We recommend reading the “Usage” section of the documentation6 for
specific details.
The required dependency for metamodel class generation is the hibernate-jpamodelgen library.
Configuration for Maven and Gradle is included in the project for this chapter, and metamodel classes are
generated during the default build.
With the class generation strategy set up, let’s define a query that accepts both the first name and last
name for searching singers. For this we will add a method findByCriteriaQuery() in the SingerService
interface and its implementation in SingerServiceImpl, as shown in Listing 8-31.
Listing 8-31. SingerServiceImpl.findByCriteriaQuery() Using JPA Criteria API
package com.apress.prospring6.eight.service;
import com.apress.prospring6.eight.entities.Singer_;
import org.apache.commons.lang3.StringUtils;
import jakarta.persistence.criteria.CriteriaBuilder;
import jakarta.persistence.criteria.CriteriaQuery;
import jakarta.persistence.criteria.JoinType;
import jakarta.persistence.criteria.Predicate;
import jakarta.persistence.criteria.Root;
//other import statements omitted
5
6
https://hibernate.org/orm/tooling
https://docs.jboss.org/hibernate/stable/jpamodelgen/reference/en-US/html_single
418
Chapter 8 ■ Spring with JPA
@Service("jpaSingerService")
@Repository
@Transactional
public class SingerServiceImpl implements SingerService {
private static final Logger LOGGER = LoggerFactory.getLogger(SingerServiceImpl.class);
@PersistenceContext
private EntityManager em;
@Override
public Stream<Singer> findByCriteriaQuery(String firstName, String lastName) {
LOGGER.info("Finding singer for firstName: " + firstName + " and lastName: " +
lastName);
CriteriaBuilder cb = em.getCriteriaBuilder();
CriteriaQuery<Singer> criteriaQuery = cb.createQuery(Singer.class);
Root<Singer> singerRoot = criteriaQuery.from(Singer.class);
singerRoot.fetch(Singer_.albums, JoinType.LEFT);
singerRoot.fetch(Singer_.instruments, JoinType.LEFT);
criteriaQuery.select(singerRoot).distinct(true);
Predicate criteria = cb.conjunction();
if (StringUtils.isNotBlank(firstName)) {
Predicate firstNamePredicate = cb.equal(singerRoot.get(Singer_.firstName),
firstName);
criteria = cb.and(criteria, firstNamePredicate);
}
if (StringUtils.isNotBlank(lastName)) {
Predicate lastNamePredicate = cb.equal(singerRoot.get(Singer_.lastName),
lastName);
criteria = cb.and(criteria, lastNamePredicate);
}
criteriaQuery.where(criteria);
return em.createQuery(criteriaQuery).getResultList().stream();
}
// other methods and setup omitted
}
Let’s break down the Criteria API usage:
•
EntityManager.getCriteriaBuilder() is called to retrieve an instance of jakarta.
persistence.criteria.CriteriaBuilder.
•
A typed query is created by calling CriteriaBuilder.createQuery() and passing
in Singer as the result type. The resulting instance is of type jakarta.persistence.
criteria.CriteriaQueryImpl<Singer> that implements jakarta.persistence.
criteria.CriteriaQuery<Singer>.
419
Chapter 8 ■ Spring with JPA
•
The two Root<..>.fetch(..) method calls enforce the eager fetching of the
associations relating to albums and instruments. The JoinType.LEFT argument
specifies an outer join. Calling the Root<..>.fetch(..) method with JoinType.LEFT
as the second argument is equivalent to specifying the left join fetch join operation
in JPQL.
•
The CriteriaQuery.select(..) method is invoked and with the root query object.
The distinct(..) method called with argument true means that duplicate records
should be eliminated.
•
A jakarta.persistence.criteria.Predicate instance is obtained by calling the
CriteriaBuilder.conjunction() method, which means that a conjunction of one
or more restrictions is made. A Predicate can be a simple or compound predicate,
and a predicate is a restriction that indicates the selection criteria defined by an
expression.
•
The firstName and lastName arguments are checked. For each not null argument,
a new Predicate is constructed using the CriteriaBuilder instance (that is, the
CriteriaBuilder.and(..) method). The method equal() is to specify an equal
restriction, within which Root<..>.get() is called, passing in the corresponding
attribute of the entity class metamodel to which the restriction applies. The
constructed predicate is then “conjunct” with the existing predicate (stored by the
variable criteria) by calling the CriteriaBuilder.and() method.
•
The Predicate is constructed with all the criteria and restrictions and passed as the
where clause to the query by calling the CriteriaQuery.where(..) method.
•
Finally, CriteriaQuery is passed to EntityManager. EntityManager then constructs
the query based on the CriteriaQuery value passed in, executes the query, and
returns the result.
To test the criteria query operation, a new test method is added to the SingerServiceTest test class and
is depicted in Listing 8-32.
Listing 8-32. Testing the SingerServiceImpl.findByCriteriaQuery() Method
package com.apress.prospring6.eight;
// import statements omitted
// annotations omitted
public class SingerServiceTest {
@Test
public void testFindByCriteriaQuery(){
var singers = singerService.findByCriteriaQuery("John", "Mayer").peek(
s -> {
LOGGER.info(s.toString());
if (s.getAlbums() != null) {
s.getAlbums().forEach(a -> LOGGER.info("\tAlbum:" + a.toString()));
}
if (s.getInstruments() != null) {
s.getInstruments().forEach(i -> LOGGER.info("\tInstrument: " +
i.getInstrumentId()));
}
420
Chapter 8 ■ Spring with JPA
}).toList();
assertEquals(1, singers.size());
}
// other methods and setup omitted
}
The test is not that different from the previous tests written in this chapter, and neither is the output, as
depicted in Listing 8-33.
Listing 8-33. Console Output Snippets for the Execution of the testFindByCriteriaQuery() Test Method.
INFO : SingerServiceImpl - Finding singer for firstName: John and lastName: Mayer
DEBUG: CriteriaQueryImpl - Rendered criteria query ->
select distinct generatedAlias0 from Singer as generatedAlias0
left join fetch generatedAlias0.albums as generatedAlias1
left join fetch generatedAlias0.instruments as generatedAlias2
where ( ( 1=1 )
and ( generatedAlias0.firstName=:param0 ) )
and ( generatedAlias0.lastName=:param1 )
...
DEBUG: QueryTranslatorImpl - parse() - HQL:
select distinct generatedAlias0
from com.apress.prospring6.eight.entities.Singer as generatedAlias0
left join fetch generatedAlias0.albums as generatedAlias1
left join fetch generatedAlias0.instruments as generatedAlias2
where ( ( 1=1 )
and ( generatedAlias0.firstName=:param0 ) )
and ( generatedAlias0.lastName=:param1 )
...
DEBUG: QueryTranslatorImpl - SQL:
select
distinct singer0_.ID as id1_2_0_,
albums1_.ID as id1_0_1_,
instrument3_.INSTRUMENT_ID as instrume1_1_2_,
singer0_.VERSION as version2_2_0_,
singer0_.BIRTH_DATE as birth_da3_2_0_,
singer0_.FIRST_NAME as first_na4_2_0_,
singer0_.LAST_NAME as last_nam5_2_0_,
albums1_.VERSION as version2_0_1_,
albums1_.RELEASE_DATE as release_3_0_1_,
albums1_.SINGER_ID as singer_i5_0_1_,
albums1_.title as title4_0_1_,
albums1_.SINGER_ID as singer_i5_0_0__,
albums1_.ID as id1_0_0__,
instrument2_.SINGER_ID as singer_i1_3_1__,
instrument2_.INSTRUMENT_ID as instrume2_3_1__
from SINGER singer0_
left outer join ALBUM albums1_ on singer0_.ID=albums1_.SINGER_ID
left outer join SINGER_INSTRUMENT instrument2_ on singer0_.ID=instrument2_.SINGER_ID
left outer join INSTRUMENT instrument3_ on instrument2_.INSTRUMENT_ID=instrument3_.
INSTRUMENT_ID
421
Chapter 8 ■ Spring with JPA
where 1=1
and singer0_.FIRST_NAME=?
and singer0_.LAST_NAME=?
...
INFO : SingerServiceTest - Singer - Id:
1977-10-16
INFO : SingerServiceTest - Album:Album
Everything, Release Date: 2017-01-20
INFO : SingerServiceTest - Album:Album
Release Date: 2009-11-17
INFO : SingerServiceTest - Instrument:
INFO : SingerServiceTest - Instrument:
1, First name: John, Last name: Mayer, Birthday:
- Id: 1, Singer id: 1, Title: The Search For
- Id: 2, Singer id: 1, Title: Battle Studies,
Guitar
Piano
This output is consistent, but it will show you exactly what is happening under the hood. It starts with
a criteria query that gets transformed in HQL, which is then transformed in SQL and finally executed on the
database. This seems a little too much, right? Is the performance cost worth having strongly typed queries
and having errors discovered at compile time rather than at runtime? It depends on the application profile
and the query complexity. We already mentioned jOOQ in Chapter 7, which provides roughly the same
benefits but without two levels of conversion and with a friendlier syntax.
S
ummary
In this chapter, we covered the basic concepts of JPA and how to configure JPA’s EntityManagerFactory in
Spring by using Hibernate as the persistence service provider. Then we discussed using JPA to perform basic
database operations. Advanced topics included native queries and the strongly typed JPA Criteria API.
The purpose of this chapter was to introduce you to JPA’s EntityManagerFactory, because from an
architectural point of view, Hibernate’s SessionFactory is an extension of it. Thus, the SessionFactory is
also a JPA EntityManagerFactory, which means both contain the entity mapping metadata and allow you to
create a Hibernate Session or a EntityManager.
However, the EntityManagerFactory is the standard implementation, and it is the same across all the
implementations. This means that, although not very likely, if you would like to change your JPA provider,
in this case Hibernate, to some other persistence implementation (let’s say Oracle TopLink), doing so is way
easier when your code is not tied to your provider.
This being said, in Chapter 9 we’ll complete the whole picture of working with SQL databases in Spring
by exploring transactions.
422
CHAPTER 9
Spring Transaction Management
Managing transactions is one of the most critical parts of building a reliable enterprise application. The most
common type of transaction is a database operation. In a typical database update operation, a database
transaction begins, data is updated, and then the transaction is committed or rolled back, depending on the
result of the database operation. However, in many cases, depending on the application requirements and
the back-end resources that the application needs to interact with (such as an RDBMS, message-oriented
middleware, an ERP system, and so on), transaction management can be much more complicated.
In the early days of Java application development (after JDBC was created but before the JEE standard
or an application framework like Spring was available), developers programmatically controlled and
managed transactions within application code. When JEE and, more specifically, the EJB standard became
available, developers were able to use container-managed transactions (CMTs) to manage transactions
in a declarative way. But the complicated transaction declaration in the EJB deployment descriptor was
difficult to maintain and introduced unnecessary complexity for transaction processing. Some developers
favored having more control over the transaction and chose bean-managed transactions (BMTs) to manage
transactions in a programmatic way. However, the complexity of programming with the Java Transaction API
(JTA) also hindered developers’ productivity.
As discussed in Chapter 5, transaction management is a crosscutting concern and should not be coded
within the business logic. The most appropriate way to implement transaction management is to allow
developers to define transaction requirements in a declarative way and have frameworks such as Spring, JEE,
or AOP weave in the transaction processing logic on our behalf. In this chapter, we discuss how Spring helps
simplify the implementation of transaction-processing logic. Spring provides support for both declarative
and programmatic transaction management.
Spring offers excellent support for declarative transactions, which means you do not need to clutter
your business logic with transaction management code. All you have to do is declare those methods
(within classes or layers) that must participate in a transaction, together with the details of the transaction
configuration, and Spring will take care of handling the transaction management. To be more specific, this
chapter covers the following:
•
Spring transaction abstraction layer: We discuss the base components of Spring
transaction abstraction classes and explain how to use these classes to control the
properties of the transactions.
•
Declarative transaction management: We show you how to use Spring and just plain
Java objects to implement declarative transactional management. We offer examples
for declarative transaction management using the XML configuration files as well as
Java annotations.
© Iuliana Cosmina, Rob Harrop, Chris Schaefer, and Clarence Ho 2023
I. Cosmina et al., Pro Spring 6, https://doi.org/10.1007/978-1-4842-8640-1_9
423
Chapter 9 ■ Spring Transaction Management
•
Programmatic transaction management: Even though programmatic transaction
management is not used very often, we explain how to use the Spring-provided
TransactionTemplate class, which gives you full control over the transaction
management code.
Exploring the Spring Transaction Abstraction Layer
When developing your applications, no matter whether you choose to use Spring or not, you have to make a
fundamental choice when using transactions about whether to use global transactions or local transactions.
Local transactions are specific to a single transactional resource (a JDBC connection, for example), whereas
global transactions are managed by the container and can span multiple transactional resources.
Transaction Types
Local transactions are easy to manage, and if all operations in your application need to interact with just one
transactional resource (such as a JDBC transaction), using local transactions will be sufficient. However, if
you are not using an application framework such as Spring, you have a lot of transaction management code
to write, and if in the future the scope of the transaction needs to be extended across multiple transactional
resources, you have to drop the local transaction management code and rewrite it to use global transactions.
In the Java world, global transactions are implemented with the JTA (Java/Jakarta Transaction API).
In this scenario, a JTA-compatible transaction manager connects to multiple transactional resources via
respective resource managers, which are capable of communicating with the transaction manager over the
XA (Exchange Access) protocol (an open standard defining distributed transactions). The 2-Phase Commit
(2PC) mechanism is used to ensure that all back-end data sources were updated or rolled back altogether.
If either of the back-end resources fails, the entire transaction is rolled back, and hence the updates to
all resources are rolled back too. The global transaction is an implementation of UserTransaction and
normally needs to be sourced from JNDI. Since JNDI is specific to a server environment, this limits the
potential reuse of application code. In the past there were some libraries that did not require a server, such
as Atomikos1, which was used in the previous edition of this book, but is not used this edition because the
current version has not been adapted to Jakarta Transaction API and thus is unusable with the most recent
Spring version.
Figure 9-1 shows a high-level view of global transactions with JTA. As you can see, four main parties
participate in a global transaction (also generally referred to as a distributed transaction). The first party is
the back-end resource, such as an RDBMS, messaging middleware, an enterprise resource planning (ERP)
system, and so on.
1
https://www.atomikos.com
424
Chapter 9 ■ Spring Transaction Management
Figure 9-1. Overview of global transactions with JTA
The second party is the resource manager, which is generally provided by the back-end resource vendor
and is responsible for interacting with the back-end resource. For example, when connecting to a MySQL
database, we need to interact with the MysqlXADataSource class provided by MySQL’s Java connector.
Equivalent implementations exist for MariaDB as well. Other back-end resources (for example, MQ, ERP,
and so on) provide their resource managers too.
The third party is the JTA transaction manager, which is responsible for managing, coordinating, and
synchronizing the transaction status with all resource managers that are participating in the transaction. The
previously mentioned XA protocol is used, which is an open standard widely used for distributed transaction
processing. The JTA transaction manager also supports 2PC so that all changes will be committed together,
and if any resource update fails, the entire transaction will be rolled back, resulting in none of the resources
being updated. The entire mechanism was specified by the Java Transaction Service (JTS) specification.
The final component is the application. Either the application itself or the underlying container
or Spring Framework that the application runs on manages the transaction (begin, commit, roll back a
transaction, and so on). At the same time, the application interacts with the underlying back-end resources
via various standards defined by JEE. As shown in Figure 9-1, the application connects to the RDBMS via
JDBC, MQ via JMS, and an ERP system via Java EE Connector Architecture (JCA). JTA is supported by all
full-blown JEE-compliant application servers (for example, JBoss, WebSphere, WebLogic, and GlassFish),
within which the transaction is available via JNDI lookup. As for stand-alone applications or web containers
(for example, Tomcat and Jetty), open source and commercial solutions exist that provide support for JTA/
XA in those environments. The one favored by the Spring community used to be Atomikos, for which there
was even a Spring Boot starter library. Unfortunately, the latest version of Atomikos as this chapter is being
written (5.0.9) is not based on Jakarta JTA, which means building a Spring JTA application with the latest
Spring version is not possible. The other alternative, Bitronix2, is already archived on GitHub and no update
has been done in the last 6 years. The last update on Java Open Transaction Manager (JOTM)3 was done
in 2009.
2
3
https://github.com/bitronix/btm
https://jotm.ow2.org
425
Chapter 9 ■ Spring Transaction Management
It looks like JTA is slowly becoming obsolete with the increasing interest in microservices, event-driven
systems built using Apache Kafka, RabbitMQ, and Azure Event Hub (and more), and the rise of DBaaS
(database as a service) like Amazon’s DynamoDB and MariaDB SkySQL, all of which make transactions not
particularly necessary. Of course, if you need to use global transactions, there is always the option to use an
application EE server.
At the time of writing, Spring 6 JTA support with stand-alone implementations is unclear. Spring’s
components are based on Jakarta API, which means the stand-alone implementation must be based
on it too. For example, a stand-alone implementation must provide an implementation for jakarta.
transaction.UserTransaction to be compatible with Spring 6 JTA, and none of them do yet. Using a Jakarta
10–compatible server is not an option either. Jakarta EE 104 is the first major release of Jakarta EE since the
“jakarta” namespace update, and a lot of application servers are not compatible with it.
By the end of the year there might be compatible stand-alone implementations available, or Jakarta
10–compatible servers like Apache TomEE, Open Liberty, Eclipse Glassfish, and others5. If you are interested
in global transactions with Spring 5 and Atomikos, feel free to check out the previous edition of this book and
the sample project in its associated repo6.
Implementations of the PlatformTransactionManager
In Spring, the PlatformTransactionManager interface uses the TransactionDefinition and
TransactionStatus interfaces to create and manage transactions. The concrete implementations of these
interfaces must have detailed knowledge of the transaction manager.
Spring provides a rich set of implementations for the PlatformTransactionManager interface.
Figure 9-2 shows a few of them.
Figure 9-2. PlatformTransactionManager implementations
4
5
6
https://eclipse-ee4j.github.io/jakartaee-platform/jakartaee10/JakartaEE10ReleasePlan
https://jakarta.ee/compatibility
https://github.com/Apress/pro-spring-5/tree/master/chapter09
426
Chapter 9 ■ Spring Transaction Management
The DataSourceTransactionManager class, from package org.springframework.jdbc.datasource,
is for generic JDBC connections. For the ORM side, there are a few implementations, including JPA - the
JpaTransactionManager class, and Hibernate 5 HibernateTransactionManager class. There will probably
be a new version for Hibernate 6 in the future. Currently the only HibernateTransactionManager class
available is the one from package org.springframework.orm.hibernate5. Since support for Hibernate 5
will probably not be dropped, expect a package named org.springframework.orm.hibernate6 to appear
in Spring ORM 6. For JMS, the implementations support JMS 2.0 through the JmsTransactionManager
class. For JTA, the generic implementation class is JtaTransactionManager. For reactive servers, Spring
provides AbstractReactiveTransactionManager, an abstract base class that implements Spring’s standard
reactive transaction workflow, serving as a basis for concrete platform transaction managers (like the
R2dbcTransactionManager implementation for a single R2DBC ConnectionFactory).
Spring also provides several JTA transaction manager classes (not depicted here in Figure 9-2) that
are specific to particular application servers. Those classes provide native support for WebSphere
(the WebSphereUowTransactionManager class) and BEA WebLogic 9.0 and higher (the
WebLogicJtaTransactionManager class).
JDO support was dropped in Spring 5, thus JdoTransactionManager is missing from the class
diagram in Figure 9-2. Starting with Spring 5, only Hibernate 5 is supported; implementations for Hibernate 3
and Hibernate 4 have been dropped. Support for JMS 1.1 was dropped in Spring 5. The
CciLocalTransactionManager class that supports JEE, JCA, and the Common Client Interface (CCI) is
currently deprecated.
Analyzing Transaction Properties
In this section, we discuss the transaction properties that Spring supports, focusing on interacting with
RDBMS as the back-end resource.
Transactions have the four well-known ACID properties (atomicity, consistency, isolation, and
durability), and it is up to the transactional resources to maintain these aspects of a transaction. You cannot
control the atomicity, consistency, and durability of a transaction. However, you can control the transaction
propagation and timeout, as well as configure whether the transaction should be read-only and specify the
isolation level.
Spring encapsulates all these settings in a TransactionDefinition interface. This interface is used in
the core interface of the transaction support in Spring, which is the PlatformTransactionManager interface,
whose implementations perform transaction management on a specific platform, such as JDBC or JTA. The
core method, PlatformTransactionManager.getTransaction(), takes a TransactionDefinition interface
as an argument and returns a TransactionStatus interface. The TransactionStatus interface is used to
control the transaction execution, more specifically to set the transaction result and to check whether the
transaction is completed or whether it is a new transaction.
427
Chapter 9 ■ Spring Transaction Management
The TransactionDefinition Interface
As we mentioned earlier, the TransactionDefinition interface controls the properties of a transaction. Let’s
take a more detailed look at the TransactionDefinition interface7, shown in Listing 9-1, and describe its
methods.
Listing 9-1. Essential TransactionDefinition Source Code
package org.springframework.transaction;
import org.springframework.lang.Nullable;
public interface TransactionDefinition {
// Variable declarations and comments omitted
default int getPropagationBehavior() {
return PROPAGATION_REQUIRED; // 0
}
default int getIsolationLevel() {
return ISOLATION_DEFAULT; // -1
}
default int getTimeout() {
return TIMEOUT_DEFAULT; // -1
}
default boolean isReadOnly() {
return false;
}
@Nullable
default String getName() {
return null;
}
// Return an unmodifiable {@code TransactionDefinition} with defaults.
static TransactionDefinition withDefaults() {
return StaticTransactionDefinition.INSTANCE;
}
}
The simple and obvious methods of this interface are getTimeout(), which returns the time (in
seconds) in which the transaction must complete, and isReadOnly(), which indicates whether the
transaction is read-only. The transaction manager implementation can use this value to optimize the
execution and check to make sure that the transaction is performing only read operations. The getName()
method returns the name of the transaction.
https://github.com/spring-projects/spring-framework/blob/main/spring-tx/src/main/
java/org/springframework/transaction/TransactionDefinition.java
7
428
Chapter 9 ■ Spring Transaction Management
The other two methods, getPropagationBehavior() and getIsolationLevel(), need to be discussed
in more detail. We begin with getIsolationLevel(), which controls what changes to the data other
transactions see. Table 9-1 lists the transaction isolation levels you can use and explains which changes
made in the current transaction other transactions can access. The isolation levels are represented as static
values defined in the TransactionDefinition interface.
Table 9-1. Transaction Isolation Levels
Isolation Level
Description
ISOLATION_DEFAULT
Default isolation level of the underlying data store.
ISOLATION_READ_
UNCOMMITTED
Lowest level of isolation; it is barely a transaction at all because it allows this
transaction to see data modified by other uncommitted transactions.
ISOLATION_READ_
COMMITTED
Default level in most databases; it ensures that other transactions are not able to
read data that has not been committed by other transactions. However, the data
that was read by one transaction can be updated by other transactions.
ISOLATION_
REPEATABLE_READ
Stricter than ISOLATION_READ_COMMITTED; it ensures that once you select data,
you can select at least the same set again. However, if other transactions insert
new data, you can still select the newly inserted data.
ISOLATION_
SERIALIZABLE
The most expensive and reliable isolation level; all transactions are treated as if
they were executed one after another.
Choosing the appropriate isolation level is important for the consistency of the data, but making these
choices can have a great impact on performance. The highest isolation level, ISOLATION_SERIALIZABLE, is
particularly expensive to maintain.
The getPropagationBehavior() method specifies what happens to a transactional call, depending on
whether there is an active transaction. Table 9-2 describes the values for this method. The propagation types
are represented as static values defined in the TransactionDefinition interface.
Table 9-2. Transaction Propagation Modes
Propagation Mode
Value Description
PROPAGATION_REQUIRED
0
Supports a transaction if one already exists. If there is no transaction,
starts one. Default propagation mode in Spring.
PROPAGATION_SUPPORTS
1
Supports a current transaction; executes non-transactionally if no
current transaction exists.
PROPAGATION_MANDATORY
2
Supports a current transaction; throws an exception if no current
transaction exists.
PROPAGATION_REQUIRES_
NEW
3
Creates a new transaction, suspending the current transaction if one
exists.
PROPAGATION_NOT_
SUPPORTED
4
Does not support execution with an active transaction. Always executes
non-transactionally and suspends any existing transaction.
PROPAGATION_NEVER
5
Always executes non-transactionally even if an active transaction exists.
Throws an exception if an active transaction exists.
PROPAGATION_NESTED
6
Runs in a nested transaction if an active transaction exists. If there is no
active transaction, behaves as if PROPAGATION_REQUIRED is set.
429
Chapter 9 ■ Spring Transaction Management
The TransactionStatus Interface
The TransactionStatus interface8 allows a transaction manager to control the transaction execution.
The code can check whether the transaction is a new one or whether it is a read-only transaction, and it
can initiate a rollback. The behavior described by the TransactionStatus interface is split between two
interfaces: TransactionExecution, which declares basic transaction operations, and SavepointManager,
which declares methods related to savepoints. All are shown in Listing 9-2.
Listing 9-2. Essential TransactionStatus Source Code
// TransactionStatus.java
package org.springframework.transaction;
import java.io.Flushable;
public interface TransactionStatus extends TransactionExecution, SavepointManager,
Flushable {
boolean hasSavepoint();
@Override
void flush();
}
// TransactionExecution.java
package org.springframework.transaction;
public interface TransactionExecution {
boolean isNewTransaction();
void setRollbackOnly();
boolean isRollbackOnly();
boolean isCompleted();
}
// SavepointManager.java
package org.springframework.transaction;
public interface SavepointManager {
Object createSavepoint() throws TransactionException;
void rollbackToSavepoint(Object savepoint) throws TransactionException;
void releaseSavepoint(Object savepoint) throws TransactionException;
}
The methods in the TransactionExecution interface are fairly self-explanatory; the most notable
one is setRollbackOnly(), which causes a rollback and ends the active transaction. The hasSavePoint()
method from TransactionStatus returns whether the transaction internally carries a savepoint (that is,
the transaction was created as a nested transaction based on a savepoint). The flush() method, also from
https://github.com/spring-projects/spring-framework/blob/main/spring-tx/src/main/
java/org/springframework/transaction/TransactionStatus.java
8
430
Chapter 9 ■ Spring Transaction Management
TransactionStatus, flushes the underlying session to a data store if applicable (for example, when using
with Hibernate). The isCompleted() method from the TransactionExecution interface method returns
whether the transaction has ended (that is, committed or rolled back).
Sample Data Model and Infrastructure for Example Code
This section uses the same data model introduced in Chapter 7. There are two main tables, namely SINGER
and ALBUM, that we have used throughout the chapters about data access. Feel free to set up the container
as instructed in chapter09/README.adoc or ignore that altogether and just run the tests that are set up to
use a MariaDB container set up by Testcontainers. JPA with Hibernate is used as the persistence layer for
implementing data access logic.
The main project dependencies are Spring ORM and Hibernate. The Spring ORM library introduces the
spring-tx transitive dependency that contains all the Spring components that provide transaction support.
Figure 9-3 shows the list of dependencies for the chapter09 project.
Figure 9-3. Project chapter09 dependencies as shown in the Gradle View
There are two main JPA entity classes, Singer and Album, that map to those tables that will be used in
most examples in this chapter. These two classes should be familiar to you if you’ve read the previous data
access chapters, but to keep things simple, their core parts are shown in Listing 9-3.
431
Chapter 9 ■ Spring Transaction Management
Listing 9-3. Singer and Album JPA Entity Classes
// Singer.java
package com.apress.prospring6.nine.entities;
import jakarta.persistence.*;
// other import statements omitted
@Entity
@Table(name = "SINGER")
@NamedQueries({
@NamedQuery(name=Singer.FIND_ALL, query="select s from Singer s"),
@NamedQuery(name=Singer.COUNT_ALL, query="select count(s) from Singer s")
})
public class Singer extends AbstractEntity {
@Serial
private static final long serialVersionUID = 2L;
public static final String FIND_ALL = "Singer.findAll";
public static final String COUNT_ALL = "Singer.countAll";
@Column(name = "FIRST_NAME")
private String firstName;
@Column(name = "LAST_NAME")
private String lastName;
@Column(name = "BIRTH_DATE")
private LocalDate birthDate;
@OneToMany(mappedBy = "singer)
private Set<Album> albums = new HashSet<>();
@ManyToMany
@JoinTable(name = "SINGER_INSTRUMENT",
joinColumns = @JoinColumn(name = "SINGER_ID"),
inverseJoinColumns = @JoinColumn(name = "INSTRUMENT_ID"))
private Set<Instrument> instruments = new HashSet<>();
// setters, getter, etc. omitted
}
// -----------------------------------------------------// Album.java
package com.apress.prospring6.nine.entities;
import jakarta.persistence.*;
// other import statements omitted
@Entity
@Table(name = "ALBUM")
@NamedQueries({
@NamedQuery(name=Album.FIND_ALL, query="select a from Album a where a.singer=
:singer")
})
432
Chapter 9 ■ Spring Transaction Management
public class Album extends AbstractEntity {
@Serial
private static final long serialVersionUID = 3L;
public static final String FIND_ALL = "Album.findAll";
@Column
private String title;
@Column(name = "RELEASE_DATE")
private LocalDate releaseDate;
@ManyToOne
@JoinColumn(name = "SINGER_ID")
private Singer singer;
// setters, getter, etc. omitted
}
We use JPA with Hibernate as the persistence layer for implementing data access logic, which means the
configuration will too be identical to the one in Chapter 7. Listing 9-4 shows only the piece of configuration
that is relevant to transaction management.
Listing 9-4. Transaction Management Configuration Class
package com.apress.prospring6.nine.config;
import org.springframework.orm.jpa.JpaTransactionManager;
import org.springframework.orm.jpa.JpaVendorAdapter;
import org.springframework.orm.jpa.LocalContainerEntityManagerFactoryBean;
import org.springframework.orm.jpa.vendor.HibernateJpaVendorAdapter;
import org.springframework.transaction.PlatformTransactionManager;
import org.springframework.transaction.annotation.EnableTransactionManagement;
// other import statements omitted
@Import(BasicDataSourceCfg.class)
@Configuration
@EnableTransactionManagement
@ComponentScan(basePackages = {"com.apress.prospring6.nine.services"})
public class TransactionCfg {
private static Logger LOGGER = LoggerFactory.getLogger(TransactionCfg.class);
@Autowired
DataSource dataSource;
@Bean
public PlatformTransactionManager transactionManager() {
JpaTransactionManager transactionManager=new JpaTransactionManager();
transactionManager.setEntityManagerFactory(entityManagerFactory().getObject());
return transactionManager;
}
433
Chapter 9 ■ Spring Transaction Management
@Bean
public JpaVendorAdapter jpaVendorAdapter() {
return new HibernateJpaVendorAdapter();
}
@Bean
public LocalContainerEntityManagerFactoryBean entityManagerFactory() {
var factory = new LocalContainerEntityManagerFactoryBean();
factory.setPersistenceProviderClass(HibernatePersistenceProvider.class);
factory.setPackagesToScan("com.apress.prospring6.nine.entities");
factory.setDataSource(dataSource);
factory.setJpaProperties(jpaProperties());
factory.setJpaVendorAdapter(jpaVendorAdapter());
return factory;
}
@Bean
public Properties jpaProperties() {
Properties jpaProps = new Properties();
jpaProps.put(Environment.HBM2DDL_AUTO, "none");
jpaProps.put(Environment.FORMAT_SQL, false);
jpaProps.put(Environment.USE_SQL_COMMENTS, false);
jpaProps.put(Environment.SHOW_SQL, false);
return jpaProps;
}
}
Currently, using annotations is the most common way to define transaction requirements in Spring.
The main benefit is that the transaction requirement together with the detail transaction properties
(timeout, isolation level, propagation behavior, and so on) are defined within the code itself, which makes
the application easier to trace and maintain. The configuration for the transactionManager bean, the core
component ensuring those requirements are met, is done using Java configuration. Because we are using JPA,
our transactionManager is a JpaTransactionManager instance that implements Spring’s standard transaction
workflow in applications that use a single JPA EntityManagerFactory for transactional data access.
The @EnableTransactionManagement annotation is the one that completes this configuration, because
it is responsible for enabling annotation-driven transaction capability. This annotation is used on Spring
configuration classes to configure traditional, imperative transaction management or reactive transaction
management. @EnableTransactionManagement is responsible for registering all infrastructure Spring beans
that support transaction management, such as TransactionInterceptor and the proxy- or AspectJ-based
advice that weaves the interceptor into the call stack when methods annotated with @Transactional
are called.
There is no change in how the EntityManagerFactory bean is then configured.
With this configuration in place, any method interacting with the data layer can be annotated with @
Transactional and the Spring IoC container will open a transaction before the method execution and close
it right after.
Using Declarative Transactions
Configuring transactional behavior using annotations is referred to as declarative because the desired
behavior is declared using annotations on the targeted methods. There is no code to be written to create,
start, and end a transaction. The Spring transactionManager bean picks up the @Transactional annotations
434
Chapter 9 ■ Spring Transaction Management
and wraps the method within the desired transactional behavior. This is done using something introduced
in Chapter 5: proxying. The bean declaration annotated with @Transactional, or that contains methods
annotated with @Transactional, is transformed at runtime into a bean that is wrapped into a proxy that
injects transactional behavior for every targeted method.
Figure 9-4 shows what happens under the hood every time a method of a transactional bean is invoked.
Figure 9-4. Diagram showing how transactional behavior is injected in Spring
In multilayered implementations, where service classes are calling repository classes to exchange data
with the database, service methods are configured to be executed in transactions, providing the opportunity
to provide atomic behavior for methods that involve multiple database operations. For this reason, in
the examples in this section, the albums are not eagerly loaded for a singer, nor are they loaded through
a named query, since they will be loaded through a repo method in the same method where singers are
extracted as well, as shown in the AllServiceImpl class shown in Listing 9-5.
Listing 9-5. AllServiceImpl Method Showing Loading of Singers and Albums Through Repository
Methods Executed in the Same Transaction
package com.apress.prospring6.nine.services;
import org.springframework.stereotype.Service;
import org.springframework.transaction.annotation.Transactional;
// other import statements omitted
@Service
@Transactional
public class AllServiceImpl implements AllService{
435
Chapter 9 ■ Spring Transaction Management
private final SingerRepo singerRepo;
private final AlbumRepo albumRepo;
public AllServiceImpl(SingerRepo singerRepo, AlbumRepo albumRepo) {
this.singerRepo = singerRepo;
this.albumRepo = albumRepo;
}
@Transactional(readOnly = true)
@Override
public Stream<Singer> findAllWithAlbums() {
var singers = singerRepo.findAll();
return singers.peek(s -> s.setAlbums(albumRepo.findBySinger(s).collect(Collectors.
toSet())));
}
}
When using annotation-based transaction management, the only annotation that we need to deal
with is Spring’s @Transactional. The @Transactional annotation can be applied at the class level, which
means that, by default, Spring will ensure that a transaction is present before the execution of each method
within the class. Starting with Spring 5, @Transactional is supported on interfaces and default methods in
interfaces as well.
It is recommended to use Spring’s @Transactional annotation only on non-private methods, since
the transactional behavior is injected using AOP proxying.
The implementation for the SingerRepo and AlbumRepo is not important for this chapter, but if you
are curious, feel free to check the repository sources. Their methods are implemented using EntityManager,
as shown in Chapter 8.
The @Transactional annotation supports a number of attributes that you can provide to override
the default behavior. Table 9-3 shows the available attributes, together with the default values and
possible values.
436
Chapter 9 ■ Spring Transaction Management
Table 9-3. @Transactional annotation attributes
Attribute Name
Default Value
Possible Values
propagation
Propagation.REQUIRED
Propagation.REQUIRED Propagation.
SUPPORTS Propagation.MANDATORY
Propagation.REQUIRES_NEW
Propagation.NOT_SUPPORTED
Propagation.NEVER Propagation.NESTED
isolation
Isolation.DEFAULT (default
isolation level of the underlying
resource)
Isolation.DEFAULT Isolation.
READ_UNCOMMITTED Isolation.READ_
COMMITTED Isolation.REPEATABLE_READ
Isolation.SERIALIZABLE
timeout
TransactionDefinition.
TIMEOUT_DEFAULT (default
transaction timeout in seconds of
the underlying resource)
An integer value larger than zero;
indicates the number in seconds for
timeout
readOnly
false
{true, false}
rollbackFor
Exception classes for which the
transaction will be rolled back
N/A
rollbackForClassName
Exception class names for which
the transaction will be rolled back
N/A
noRollbackFor
Exception classes for which the
transaction will not be rolled back
N/A
noRollbackForClassName Exception class names for which
the transaction will not be rolled
back
N/A
value
A qualifier value for the specified
transaction; may be used to determine
the target transaction manager, matching
the qualifier value (or the bean name) of a
specific transactionManager bean
""
As a result, based on Table 9-3, the @Transactional annotation without any attribute means that
the transaction propagation mode is required, the isolation is the default isolation level of the underlying
datastore, the timeout is the default timeout of the underlying transaction system, and the mode is read-write.
The @Transactional annotation can be applied at the method level as well, and this allows overriding
of the transactional configuration at the class level. For example, use @Transactional(readOnly = true)
when transaction is effectively read-only, which allows for corresponding optimizations at runtime. All
attributes remain unchanged.
The readOnly flag configuration is just a hint for the underlying persistence system, and Hibernate is
very good at taking hints, so don’t use readOnly = true on a method designed to update an existing entry,
for example, or you’ll have to flush the changes explicitly.
437
Chapter 9 ■ Spring Transaction Management
Now that we have a service method, it is time to test it. Listing 9-6 shows the AllServiceTest class,
which uses a MariaDB container managed by Testcontainers for database operations.
Listing 9-6. AllServiceTest Test Class
package com.apress.prospring6.nine;
// import statements omitted
@Testcontainers
@SqlMergeMode(SqlMergeMode.MergeMode.MERGE)
@Sql({ "classpath:testcontainers/drop-schema.sql", "classpath:testcontainers/createschema.sql" })
@SpringJUnitConfig(classes = {AllServiceTest.TestContainersConfig.class})
public class AllServiceTest {
private static final Logger LOGGER = LoggerFactory.getLogger(AllServiceTest.class);
@Container
static MariaDBContainer<?> mariaDB = new MariaDBContainer<>("mariadb:10.7.4-focal");
@DynamicPropertySource
static void setUp(DynamicPropertyRegistry registry) {
registry.add("jdbc.driverClassName", mariaDB::getDriverClassName);
registry.add("jdbc.url", mariaDB::getJdbcUrl);
registry.add("jdbc.username", mariaDB::getUsername);
registry.add("jdbc.password", mariaDB::getPassword);
}
@Autowired
AllService service;
@Test
@DisplayName("should return all singers and albums")
void testFindAll(){
var singers = service.findAllWithAlbums().peek(s -> {
LOGGER.info(s.toString());
if (s.getAlbums() != null) {
s.getAlbums().forEach(a -> LOGGER.info("\tAlbum:" + a.toString()));
}
}).toList();
assertEquals(3, singers.size());
}
@Configuration
@Import(TransactionCfg.class)
public static class TestContainersConfig {
@Autowired
Properties jpaProperties;
@PostConstruct
public void initialize() {
jpaProperties.put(Environment.FORMAT_SQL, true);
438
Chapter 9 ■ Spring Transaction Management
jpaProperties.put(Environment.USE_SQL_COMMENTS, true);
jpaProperties.put(Environment.SHOW_SQL, true);
}
}
}
Testing methods designed to run in a transaction is no different from what was done in the previous
chapters. The focus in this chapter won’t be on the SQL queries being generated, but on the transactions
being used to execute those queries in. Take a look at the logging statements in Listing 9-7.
Listing 9-7. AllServiceTest.testFindAll() Execution Log Snippet Showing Transaction Management
DEBUG: AbstractPlatformTransactionManager - Creating new transaction with name
[com.apress.prospring6.nine.services.AllServiceImpl.findAllWithAlbums]:
PROPAGATION_REQUIRED,ISOLATION_DEFAULT,readOnly
DEBUG: JpaTransactionManager - Opened new EntityManager [SessionImpl(1958757239<open>)] for
JPA transaction
DEBUG: DataSourceUtils - Setting JDBC Connection [HikariProxyConnection@282368256 wrapping
org.mariadb.jdbc.Connection@7327a447] read-only
DEBUG: TransactionImpl - On TransactionImpl creation, JpaCompliance#isJpaTransactionComplia
nceEnabled == false
DEBUG: TransactionImpl - begin
DEBUG: JpaTransactionManager - Exposing JPA transaction as JDBC [org.springframework.orm.
jpa.vendor.HibernateJpaDialect$HibernateConnectionHandle@e645600]
TRACE: TransactionAspectSupport - Getting transaction for
[com.apress.prospring6.nine.services.AllServiceImpl.findAllWithAlbums]
DEBUG: SqlStatementLogger - select singer0_.... from SINGER singer0_
...
DEBUG: TwoPhaseLoad - Done materializing entity [com.apress.prospring6.nine.entities.
Singer#3]
TRACE: TransactionAspectSupport - Completing transaction for
[com.apress.prospring6.nine.services.AllServiceImpl.findAllWithAlbums]
DEBUG: AbstractPlatformTransactionManager - Initiating transaction commit
DEBUG: JpaTransactionManager - Committing JPA transaction on EntityManager [SessionImpl
(1958757239<open>)]
DEBUG: TransactionImpl - committing
DEBUG: DataSourceUtils - Resetting read-only flag of JDBC Connection
[HikariProxyConnection@282368256 wrapping org.mariadb.jdbc.Connection@7327a447]
DEBUG: JpaTransactionManager - Closing JPA EntityManager [SessionImpl(1958757239<open>)]
after transaction
DEBUG: SharedEntityManagerCreator$SharedEntityManagerInvocationHandler - Creating new
EntityManager for shared EntityManager invocation
DEBUG: SqlStatementLogger - select album0_... from ALBUM album0_ where album0_.SINGER_ID=?
...
INFO : AbstractEntityManagerFactoryBean - Closing JPA EntityManagerFactory for persistence
unit 'default'
...
INFO : AllServiceTest - Singer - Id: 1, First name: John, Last name: Mayer, Birthday:
1977-10-16
INFO : AllServiceTest - Album:Album - Id: 1, Singer id: 1, Title: The Search For
Everything, Release Date: 2017-01-20
439
Chapter 9 ■ Spring Transaction Management
INFO : AllServiceTest - Album:Album
Release Date: 2009-11-17
INFO : AllServiceTest - Singer - Id: 2,
1981-08-20
INFO : AllServiceTest - Album:Album
2021-09-1
INFO : AllServiceTest - Singer - Id: 3,
1975-04-01
- Id: 2, Singer id: 1, Title: Battle Studies,
First name: Ben, Last name: Barnes, Birthday:
- Id: 3, Singer id: 2, Title: 11:11, Release Date:
First name: John, Last name: Butler, Birthday:
This log snippet contains relevant logging statements for classes in packages org.springframework.
orm.jpa and org.springframework.transaction. The JpaTransactionManager handles the creation
and commit operations of the transaction. Notice how before the execution of the findAllWithAlbums()
method, Spring’s AbstractPlatformTransactionManager (JpaTransactionManager’s superclass) creates
a new transaction. Its name is equal to the fully qualified class name concatenated with the method
name. Next to the transaction name are the transaction attributes: PROPAGATION_REQUIRED,ISOLATION_
DEFAULT,readOnly. The transaction is represented by an instance of Hibernate’s TransactionImpl from its
internal package org.hibernate.engine.transaction.internal. This class implements (indirectly) the
jakarta.persistence.EntityTransaction interface, which is used to control transactions on resourcelocal entity managers. The transaction is thus being obtained by the EntityManager, then the query is
submitted, and upon completion and without any errors, the transaction is committed.
From the log you might think that the transaction is committed before the albums are retrieved from the
database, but it is only logging timing. In fact, all queries are executed within the same transaction.
The next method we want to look at is the update operation. To check the result of an update operation,
the findById() method is useful too. Listing 9-8 shows the implementation of the two methods.
Listing 9-8. AllServiceImpl in the Same Transaction
package com.apress.prospring6.nine.services;
// import statements omitted
@Service
@Transactional
public class AllServiceImpl implements AllService{
// constructor and fields omitted
@Transactional(readOnly = true)
@Override
public Optional<Singer> findByIdWithAlbums(Long id) {
var singerOpt = singerRepo.findById(id);
singerOpt.ifPresent(s -> s.setAlbums(albumRepo.findBySinger(s).collect(Collectors.
toSet())));
return singerOpt;
}
@Transactional(propagation = Propagation.REQUIRES_NEW)
@Override
public void update(Singer singer) {
singerRepo.save(singer);
}
}
440
Chapter 9 ■ Spring Transaction Management
The findByIdWithAlbums(..) method is also annotated with @Transactional(readOnly=true).
Generally, the readOnly=true attribute should be applied to all finder methods. The main reason is that
most persistence providers will perform a certain level of optimization on read-only transactions. For
example, Hibernate will not maintain the snapshots of the managed instances retrieved from the database
with read-only turned on.
In the AllServiceImpl.update(..) method, we simply invoke the SingerRepoIml.save(..)
method and annotate the method with @Transactional(propagation = Propagation.REQUIRES_NEW).
This means the class-level annotation is overridden and a new transaction is to be created and used to
perform the update operation. The method to test the AllServiceImpl.update(..) operation first calls the
findByIdWithAlbums(..) method to retrieve the record to be updated, as shown in Listing 9-9.
Listing 9-9. AllServiceTest Method Testing the AllServiceImpl.update(..) Method
package com.apress.prospring6.nine;
// import statements omitted
@Testcontainers
@SqlMergeMode(SqlMergeMode.MergeMode.MERGE)
@Sql({ "classpath:testcontainers/drop-schema.sql", "classpath:testcontainers/createschema.sql" })
@SpringJUnitConfig(classes = {AllServiceTest.TestContainersConfig.class})
public class AllServiceTest {
@Test
@SqlGroup({
@Sql(scripts = {"classpath:testcontainers/add-nina.sql"},
executionPhase = Sql.ExecutionPhase.BEFORE_TEST_METHOD)
})
@DisplayName("should update a singer")
void testUpdate() {
var singer = service.findByIdWithAlbums(5L).orElse(null);
// making sure such singer exists
assertNotNull(singer);
// retrieve the album
var album = singer.getAlbums().stream().filter(
a -> a.getTitle().equals("I Put a Spell on You")).findFirst().orElse(null);
assertNotNull(album);
singer.setFirstName("Eunice Kathleen");
singer.setLastName("Waymon");
singer.removeAlbum(album);
int version = singer.getVersion();
service.update(singer);
var nina = service.findByIdWithAlbums(5L).orElse(null);
assertAll( "nina was updated" ,
() -> assertNotNull(nina),
441
Chapter 9 ■ Spring Transaction Management
() -> assertEquals(version +1, nina.getVersion()),
() -> assertEquals(2, nina.getAlbums().size())
);
}
// test setup and other test methods omitted
}
There are three things being updated for the Singer instance: its firstName, lastName, and
album collection. This method is executed in its own transaction, separate from AllServiceImpl.
findByIdWithAlbums(..), as it is revealed by the test execution log. The log in Listing 9-10 shows only the
statements creating transactions relevant for the test method; the actual execution log is quite verbose and
includes the transactions necessary to populate the database with the entries necessary for the test methods
to be run.
Listing 9-10. AllServiceTest Method Testing the AllServiceImpl.update(..) Method Execution
Log Snippet
DEBUG: AbstractPlatformTransactionManager - Creating new transaction with name
[com.apress.prospring6.nine.services.AllServiceImpl.findByIdWithAlbums]:
PROPAGATION_REQUIRED,ISOLATION_DEFAULT,readOnly
TRACE: TransactionAspectSupport - Getting transaction for
[com.apress.prospring6.nine.services.AllServiceImpl.findByIdWithAlbums]
DEBUG: TransactionImpl - begin
...
TRACE: TransactionAspectSupport - Completing transaction for
[com.apress.prospring6.nine.services.AllServiceImpl.findByIdWithAlbums]
....
DEBUG: AbstractPlatformTransactionManager - Creating new transaction with name
[com.apress.prospring6.nine.services.AllServiceImpl.update]:
PROPAGATION_REQUIRES_NEW,ISOLATION_DEFAULT
TRACE: TransactionAspectSupport - Getting transaction for
[com.apress.prospring6.nine.services.AllServiceImpl.update]
DEBUG: TransactionImpl - begin
...
TRACE: TransactionAspectSupport - Completing transaction for
[com.apress.prospring6.nine.services.AllServiceImpl.update]
...
DEBUG: AbstractPlatformTransactionManager - Creating new transaction with name
[com.apress.prospring6.nine.services.AllServiceImpl.findByIdWithAlbums]:
PROPAGATION_REQUIRED,ISOLATION_DEFAULT,readOnly
TRACE: TransactionAspectSupport - Getting transaction for
[com.apress.prospring6.nine.services.AllServiceImpl.findByIdWithAlbums]
DEBUG: TransactionImpl - begin
...
TRACE: TransactionAspectSupport - Completing transaction for
[com.apress.prospring6.nine.services.AllServiceImpl.findByIdWithAlbums]
....
Here’s the fun part: because the update operation requires a non-read-only transaction, even
without the @Transactional(propagation = Propagation.REQUIRES_NEW) configuration, the update
operation would have been executed in its own newly created transaction anyway. The only thing
442
Chapter 9 ■ Spring Transaction Management
important here is that creating this new transaction suspends the existing one, and thus the next time
findByIdWithAlbums(..) is executed to retrieve the updated item from the database, it requires creating a
new transaction, as shown by the last section of the log.
Let’s design an example that shows an existing transaction being reused. Although pretty basic, a
method returning the total number of singers in the database can be configured to run in an existing
read-only transaction, since it does not modify the database. To make it execute in an existing transaction,
the method is annotated with @Transactional(propagation = Propagation.SUPPORTS), as shown in
Listing 9-11.
Listing 9-11. AllServiceImpl.countSingers(..) Method
package com.apress.prospring6.nine.services;
// import statements omitted
@Service
@Transactional
public class AllServiceImpl implements AllService {
// constructor and fields omitted
@Transactional(readOnly = true, propagation = Propagation.SUPPORTS)
@Override
public Long countSingers() {
return singerRepo.countAllSingers();
}
}
To make sure that this method is executed in an existing transaction, a test method can be written to
compare the result of the AllServiceImpl.countSingers() method with the size of the collection returned
by AllServiceImpl.findAllWithAlbums(), as shown in Listing 9-12.
Listing 9-12. AllServiceImplTest.testCount(..) Method
package com.apress.prospring6.nine;
// import statements omitted
@Testcontainers
@SqlMergeMode(SqlMergeMode.MergeMode.MERGE)
@Sql({ "classpath:testcontainers/drop-schema.sql", "classpath:testcontainers/createschema.sql" })
@SpringJUnitConfig(classes = {AllServiceTest.TestContainersConfig.class})
public class AllServiceTest {
@Test
void testCount() {
var singers = service.findAllWithAlbums().collect(Collectors.toSet());
var count = service.countSingers();
assertEquals(count, singers.size() );
}
// test setup and other test methods omitted
}
443
Chapter 9 ■ Spring Transaction Management
The expectation is that a transaction is created to execute service.findAllWithAlbums() and this
transaction is reused to execute service.countSingers(). The test execution log makes it pretty clear that a
new transaction is not created for service.countSingers(), as shown in the log snippet in Listing 9-13.
Listing 9-13. AllServiceTest Method Testing the AllServiceImpl.countSingers(..) Method Execution
Log Snippet
DEBUG: AbstractPlatformTransactionManager - Creating new transaction with name
[com.apress.prospring6.nine.services.AllServiceImpl.findAllWithAlbums]:
PROPAGATION_REQUIRED,ISOLATION_DEFAULT,readOnly
DEBUG: JpaTransactionManager - Opened new EntityManager [SessionImpl(1674995553<open>)] for
JPA transaction
DEBUG: TransactionImpl - begin
TRACE: TransactionAspectSupport - Getting transaction for [com.apress.prospring6.nine.
services.AllServiceImpl.findAllWithAlbums]
DEBUG: SqlStatementLogger - select singer0_.... from SINGER singer0_
...
TRACE: TransactionAspectSupport - Getting transaction for [com.apress.prospring6.nine.
services.AllServiceImpl.countSingers]
DEBUG: EntityManagerFactoryUtils - Opening JPA EntityManager
DEBUG: SqlStatementLogger - select count(singer0_.ID) as col_0_0_ from SINGER singer0_
Notice that there is no log message saying Creating new transaction with name[com.apress.
prospring6.nine.services.AllServiceImpl.countSingers], and the reason is that no transaction is
created to execute this method. Because of the transaction propagation mode being set to PROPAGATION_
SUPPORTS, the method is executed within an existing transaction, or non-transactionally if none exists.
This section covered a few transaction configurations that you might find useful when writing
transactional applications. For special cases, you may need to configure the timeout, isolation level, rollback
(or not) for specific exceptions, and so on.
Configuring transactional behavior using annotations is practical since transactional behavior can be
customized up to the method level. Just make sure to not mix up Spring’s @Transactional with Jakarta’s @
Transactional, since Jakarta’s version does not support as many options as Spring’s version does.
Rolling Back Transactions
In database technologies, a rollback is an operation that returns the database to some previous state.
Rollbacks are important for database integrity, because they restore a clean copy of the database even after
erroneous operations are performed.
At the beginning of this section, when listing the @Transactional attributes, there were four
of them related to rollback behavior: rollbackFor, rollbackForClassName, noRollbackFor, and
noRollbackForClassName. Their names are quite relevant to the behavior they configure. Rollback is
important for methods that perform more than one database operation within the same transaction. For
example, let’s assume we have a save(..) method that inserts a singer to the database, then retrieves the
saved record to link it to a set of albums being saved to the database. Although not realistic, let’s assume one
of the albums cannot be saved, and we want to undo the entire process, an all-or-nothing approach.
By default, a transaction will be rolled back on RuntimeException and Error but not on
checked exceptions (business exceptions). This means that if we try to insert an album twice, the
transaction is automatically rolled back, since the exception thrown is of type jakarta.persistence.
PersistenceException that is a subclass of RuntimeException.
However, if we introduce a limitation of 50 characters for the title length, when we try to save a record
with a title length bigger than 50, a checked exception is thrown, but the transaction is not automatically
rolled back. The rollback has to be explicitly configured using the rollbackFor attribute.
444
Chapter 9 ■ Spring Transaction Management
To test this, let’s introduce the checked exception class shown in Listing 9-14.
Listing 9-14. TitleTooLongException Checked Exception Class
package com.apress.prospring6.nine.ex;
public class TitleTooLongException extends Exception {
public TitleTooLongException(String message) {
super(message);
}
public TitleTooLongException(String message, Throwable cause) {
super(message, cause);
}
}
This exception is thrown by the save(..) method in the AlbumRepoImpl. Since we know we want to save
a set of albums, we can also add a version of save(..) that takes a Set<Album> argument. This method can
also be used to implement something that wasn’t covered until this chapter: batch writing, the grouping of
multiple save requests into one method call. The two methods are shown in Listing 9-15.
Listing 9-15. The Two Versions of the save(..) Method That Throw TitleTooLongException Checked
Exceptions
package com.apress.prospring6.nine.repos;
import com.apress.prospring6.nine.ex.TitleTooLongException;
// other import statements omitted
@Repository
public class AlbumRepoImpl implements AlbumRepo{
@PersistenceContext
private EntityManager em;
// Declared in TransactionCfg.java, 'jpaProperties' bean:
// 'jpaProps.put(Environment.STATEMENT_BATCH_SIZE, 30);'
@Value("#{jpaProperties.get('hibernate.jdbc.batch_size')}")
private int batchSize;
@Override
public Set<Album> save(Set<Album> albums) throws TitleTooLongException {
final Set<Album> savedAlbums = new HashSet<>();
int i = 0;
for (Album a : albums) {
savedAlbums.add(save(a));
i++;
if (i % batchSize == 0) {
// Flush a batch of inserts and release memory.
em.flush();
em.clear();
}
445
Chapter 9 ■ Spring Transaction Management
}
return savedAlbums;
}
@Override
public Album save(Album album) throws TitleTooLongException {
if (50 < album.getTitle().length()) {
throw new TitleTooLongException("Title "+ album.getTitle() + "too long!");
}
if (album.getId() == null) {
em.persist(album);
return album;
} else {
return em.merge(album);
}
}
// other methods omitted
}
The save(Set<Album>) method is wrapped in a transaction together with the save(Singer) method in
the AllServiceImpl class, in the saveSingerWithAlbums(..) method, as shown in Listing 9-16.
Listing 9-16. AllServiceImpl.saveSingerWithAlbums(..) Transactional Method
package com.apress.prospring6.nine.services;
import com.apress.prospring6.nine.ex.TitleTooLongException;
import org.springframework.transaction.annotation.Transactional;
// other import statements omitted
@Service
@Transactional
public class AllServiceImpl implements AllService {
// other methods and fields omitted
@Transactional(rollbackFor = TitleTooLongException.class)
@Override
public void saveSingerWithAlbums(Singer s, Set<Album> albums) throws
TitleTooLongException {
var singer = singerRepo.save(s);
if (singer != null) {
albums.forEach(a -> a.setSinger(singer));
albumRepo.save(albums);
}
}
}
Since this is the method grouping multiple database operations together, its corresponding
transaction is rolled back, and any partial operation is reverted by default if a RuntimeException
or a TitleTooLongException is thrown as configured by @Transactional(rollbackFor =
TitleTooLongException.class).
446
Chapter 9 ■ Spring Transaction Management
To test this behavior we need two test methods. The test method in Listing 9-17 verifies the default
rollback for any RuntimeException method. In this particular scenario, we are trying to insert the Little Girl
Blue album, which already exists in the database, being inserted via the add-nina.sql test setup script.
Listing 9-17. Method Testing Transaction Rollback Caused by a RuntimeException Being Thrown
package com.apress.prospring6.nine;
import jakarta.persistence.PersistenceException;
// other import statements omitted
@Testcontainers
@SqlMergeMode(SqlMergeMode.MergeMode.MERGE)
@Sql({ "classpath:testcontainers/drop-schema.sql", "classpath:testcontainers/createschema.sql" })
@SpringJUnitConfig(classes = {AllServiceTest.TestContainersConfig.class})
public class AllServiceTest extends TestContainersBase {
@Test
@SqlGroup({
@Sql(scripts = {"classpath:testcontainers/add-nina.sql"},
executionPhase = Sql.ExecutionPhase.BEFORE_TEST_METHOD)
})
@DisplayName("should perform a rollback because PersistenceException")
void testRollbackRuntimeUpdate() {
// (1)
var singer = service.findByIdWithAlbums(5L).orElse(null);
assertNotNull(singer);
// (2)
singer.setFirstName("Eunice Kathleen");
singer.setLastName("Waymon");
var album = new Album();
album.setTitle("Little Girl Blue");
album.setReleaseDate(LocalDate.of(1959,2, 20));
album.setSinger(singer);
// (3)
var albums = Set.of(album);
// (4)
assertThrows(PersistenceException.class ,
() -> service.saveSingerWithAlbums(singer, albums),
"PersistenceException not thrown!");
// (5)
var nina = service.findByIdWithAlbums(5L).orElse(null);
assertAll( "nina was not updated" ,
() -> assertNotNull(nina),
447
Chapter 9 ■ Spring Transaction Management
() -> assertNotEquals("Eunice Kathleen", nina.getFirstName()),
() -> assertNotEquals("Waymon", nina.getLastName())
);
}
// other methods and fields omitted
}
The test method is made of five parts (as indicated by the comments):
1.
The singer is retrieved from the database by calling service.
findByIdWithAlbums(5L).
2.
The singer’s firstName and lastName are updated.
3.
A set containing the Little Girl Blue album is created.
4.
service.saveSingerWithAlbums(singer, albums) is invoked and the
assumption that a PersistenceException is thrown is tested. Calling this
method triggers the rollback of the transaction in which this method is executed,
thus the changed Singer instance is reverted to its original state.
5.
The singer is retrieved from the database by calling service.
findByIdWithAlbums(5L) and the assumption about its first name and last name
being unchanged is tested.
This test should pass because PersistenceException is a RuntimeException and, as mentioned
previously, a transaction is by default rolled back for any RuntimeException. If you really want to be sure that
the rollback happened, you can always check the log of the test method execution and look for messages
mentioning the transaction rollback. Listing 9-18 shows log snippets printed in the console when the
testRollbackRuntimeUpdate() method is executed mentioning the transaction being rolled back.
Listing 9-18. Console Log Method Testing Transaction Rollback Caused by a RuntimeException
Being Thrown
DEBUG: AbstractPlatformTransactionManager - Creating new transaction with name
[com.apress.prospring6.nine.services.AllServiceImpl.saveSingerWithAlbums]:
PROPAGATION_REQUIRED,ISOLATION_DEFAULT,
-com.apress.prospring6.nine.ex.TitleTooLongException
DEBUG: TransactionImpl - begin
...
DEBUG: SqlStatementLogger - insert into ALBUM (VERSION, RELEASE_DATE, SINGER_ID, title)
values (?, ?, ?, ?)
WARN : Slf4JLogger - Error: 1062-23000: Duplicate entry '5-Little Girl Blue' for key
'SINGER_ID'
DEBUG: SqlExceptionHelper - could not execute statement [n/a]
java.sql.SQLIntegrityConstraintViolationException:
(conn=4) Duplicate entry '5-Little Girl Blue' for key 'SINGER_ID'
DEBUG: JdbcResourceLocalTransactionCoordinatorImpl$TransactionDriverControlImpl - JDBC
transaction marked for rollback-only (exception provided for stack trace)
TRACE: TransactionAspectSupport - Completing transaction for
[com.apress.prospring6.nine.services.AllServiceImpl.saveSingerWithAlbums]
after exception:
jakarta.persistence.PersistenceException:
org.hibernate.exception.ConstraintViolationException: could not execute statement
448
Chapter 9 ■ Spring Transaction Management
DEBUG: AbstractPlatformTransactionManager - Initiating transaction rollback
DEBUG: JpaTransactionManager - Rolling back JPA transaction on EntityManager [SessionImpl
(1299829127<open>)]
DEBUG: TransactionImpl - rolling back
Notice that the transaction is being rolled back and the cause is the PersistenceException, but also
that the TitleTooLongException is mentioned in the description of the transaction being created to execute
this method. This, of course, is the checked exception that we introduced and configured rollback for. To
test that a rollback of the transaction is done, a different test must be written that causes this exception
to be thrown. The test in Listing 9-19 sets a title for the album being inserted that is too long, causing the
TitleTooLongException to be thrown.
Listing 9-19. Method Testing Transaction Rollback Caused by a TitleTooLongException (Checked)
Being Thrown
package com.apress.prospring6.nine;
import jakarta.persistence.PersistenceException;
// other import statements omitted
@Testcontainers
@SqlMergeMode(SqlMergeMode.MergeMode.MERGE)
@Sql({ "classpath:testcontainers/drop-schema.sql", "classpath:testcontainers/createschema.sql" })
@SpringJUnitConfig(classes = {AllServiceTest.TestContainersConfig.class})
public class AllServiceTest extends TestContainersBase {
@Test
@SqlGroup({
@Sql(scripts = {"classpath:testcontainers/add-nina.sql"},
executionPhase = Sql.ExecutionPhase.BEFORE_TEST_METHOD)
})
@DisplayName("should perform a rollback because TitleTooLongException")
void testRollbackCheckedUpdate() {
var singer = service.findByIdWithAlbums(5L).orElse(null);
assertNotNull(singer);
singer.setFirstName("Eunice Kathleen");
singer.setLastName("Waymon");
var album = new Album();
album.setTitle("""
Sit there and count your fingers
What can you do?
Old girl you're through
Sit there, count your little fingers
Unhappy little girl blue
""");
album.setReleaseDate(LocalDate.of(1959,2, 20));
album.setSinger(singer);
var albums = Set.of(album);
449
Chapter 9 ■ Spring Transaction Management
assertThrows(TitleTooLongException.class ,
() -> service.saveSingerWithAlbums(singer, albums),
"TitleTooLongException not thrown!");
var nina =
assertAll(
()
()
()
);
}
service.findByIdWithAlbums(5L).orElse(null);
"nina was not updated" ,
-> assertNotNull(nina),
-> assertNotEquals("Eunice Kathleen", nina.getFirstName()),
-> assertNotEquals("Waymon", nina.getLastName())
// other methods and fields omitted
}
When this test method is executed, the console log displays similar messages to the ones shown in
Listing 9-18 mentioning the rollback.
The rollbackFor attribute can be configured with multiple values, and the exceptions that trigger a
rollback must be of the configured type or their subclasses. If there is a need to restrict the rollback for an
exact exception type, the rollbackForClassName attribute can be configured with an array of full checked
exception class names.
The noRollbackFor attribute has a similar role to rollbackFor, but instead of configuring exception
types for which rollback is triggered, it is used to configure checked exception types for which a rollback
should not be triggered. The noRollbackForClassName attribute can be configured with an array of checked
exception full class names for which rollback is not to be triggered.
It is recommended to use rollbackFor and noRollbackFor in your configuration, instead of
rollbackForClassName and noRollbackForClassName. Doing so keeps the configuration more concise
and the context more relaxed, as they provide matching the exception type and its subclasses in a typesafe manner.
Using Programmatic Transactions
The second option is to control the transaction behavior programmatically. In this case, we have two
options. The first one is to inject an instance of PlatformTransactionManager into the bean and interact
with the transaction manager directly. Another option is to use the Spring-provided TransactionTemplate
class, which simplifies your work a lot. In this section, we demonstrate using the TransactionTemplate
class. To make it simple, in this section a new version of the countSingers() method is implemented for
which the transactional behavior is provided using the TransactionTemplate bean. Listing 9-20 depicts the
ProgrammaticTransactionCfg class, a configuration class introduced especially for demonstrating the use of
programmatic transactions.
450
Chapter 9 ■ Spring Transaction Management
Listing 9-20. ProgrammaticTransactionCfg Configuration Class
package com.apress.prospring6.nine.config;
import org.springframework.beans.factory.annotation.Autowired;
import org.springframework.transaction.TransactionDefinition;
import org.springframework.transaction.support.TransactionTemplate;
@Import(BasicDataSourceCfg.class)
@Configuration
@ComponentScan(basePackages = {"com.apress.prospring6.nine.repos", "com.apress.prospring6.
nine.programmatic"})
public class ProgrammaticTransactionCfg {
@Bean
public TransactionTemplate transactionTemplate() {
TransactionTemplate tt = new TransactionTemplate();
tt.setPropagationBehavior(TransactionDefinition.PROPAGATION_REQUIRES_NEW);
tt.setTimeout(30);
tt.setTransactionManager(transactionManager());
return tt;
}
@Bean
public PlatformTransactionManager transactionManager() {
JpaTransactionManager transactionManager = new JpaTransactionManager();
transactionManager.setEntityManagerFactory(entityManagerFactory().getObject());
return transactionManager;
}
// the rest of this class is identical to TransactionCfg.java
}
A TransactionTemplate bean is defined, using the org.springframework.transaction.support.
TransactionTemplate class, with a few transaction attributes. The propagation mode is configured to
PROPAGATION_REQUIRES_NEW so that log messages about the transaction are easy to spot.
The TransactionTemplate template adopts the same approach as other Spring templates, such as the
JdbcTemplate introduced in Chapter 6. Also, the @EnableTransactionManagement annotation is not needed
since transaction management is now done explicitly. With this configuration, the implementation of the
countSingers() method changes to the one shown in Listing 9-21.
Listing 9-21. ProgramaticServiceImpl Class Containing countSingers() Method with Explicit Transaction
Management
package com.apress.prospring6.nine.programmatic;
import com.apress.prospring6.nine.repos.SingerRepo;
import org.springframework.stereotype.Service;
import org.springframework.transaction.support.TransactionTemplate;
@Service
public class ProgramaticServiceImpl implements ProgramaticService {
451
Chapter 9 ■ Spring Transaction Management
private final SingerRepo singerRepo;
private final TransactionTemplate transactionTemplate;
public ProgramaticServiceImpl(SingerRepo singerRepo, TransactionTemplate
transactionTemplate) {
this.singerRepo = singerRepo;
this.transactionTemplate = transactionTemplate;
}
@Override
public Long countSingers() {
return transactionTemplate.execute(transactionStatus -> singerRepo.
countAllSingers());
}
}
A new class named ProgramaticServiceImpl is introduced to separate this transactional service from
the ones configured with declarative transactions. The bean declared by this class requires a SpringRepo and
a TransactionTemplate bean to be injected by Spring.
The singerRepo.countAllSingers() method is passed as an argument to the TransactionTemplate.
execute(..) method and is wrapped in a declaration of an inner class that implements the
TransactionCallback<T> interface. Then doInTransaction() is the method invoking the actual
singerRepo.countAllSingers(). The logic runs within a transaction with the attributes as defined by the
transactionTemplate bean. The reason you are not clearly seeing all of that in Listing 9-21 is because Java 8
lambda expression are used. The code in Listing 9-22 is the expanded version (because it was written before
lambda expressions were introduced) of the method shown in Listing 9-21.
Listing 9-22. Expanded Version of the countSingers() Method
package org.springframework.transaction.support.TransactionCallback;
@Override
public Long countSingers() {
return transactionTemplate.execute(new TransactionCallback<Long>() {
@Override
public Long doInTransaction(TransactionStatus status) {
return singerRepo.countAllSingers();
}
});
}
Testing this method is not different than what we’ve shown so far, but what needs to be pointed out is
what to look for in the execution log. Listing 9-23 shows the testing method, without all the setup needed for
it and the most interesting lines in the execution log.
Listing 9-23. countSingers() Test Method and Execution Log Snippet
@Test
@DisplayName("should count singers")
void testCount() {
var count = service.countSingers();
452
Chapter 9 ■ Spring Transaction Management
assertEquals(3, count );
}
//------ execution log ---DEBUG: AbstractPlatformTransactionManager - Creating new transaction with name [null]:
PROPAGATION_REQUIRES_NEW,ISOLATION_DEFAULT,timeout_30
DEBUG: TransactionImpl - begin
DEBUG: SqlStatementLogger - select count(singer0_.ID) as col_0_0_ from SINGER singer0_
...
DEBUG: AbstractPlatformTransactionManager - Initiating transaction commit
DEBUG: JpaTransactionManager - Committing JPA transaction on EntityManager
[SessionImpl(981307724<open>)]
DEBUG: TransactionImpl - committing
DEBUG: JpaTransactionManager - Closing JPA EntityManager [SessionImpl(981307724<open>)]
after transaction
The only thing to observe here is that since the transactionTemplate bean does not know any details
about the method being executed in a transaction, it cannot name the transaction, so the transaction
name is set to null, but the transaction attributes shown in the log are the ones configured for the
transactionTemplate in the ProgrammaticTransactionCfg.
During your development career, you might never get to write code using TransactionTemplate (or
its reactive counterpart, TransactionalOperator), simply because declarative transaction is much more
practical, but in the improbable case you’d ever need it, now you know it exists and how to use it.
Considerations on Transaction Management
So, having discussed two ways for implementing transaction management, which one should you use?
The declarative approach is recommended in all cases, and you should avoid implementing transaction
management explicitly within your code as much as possible. Most of the time, when you find it necessary
to code transaction control logic in the application, it is because of bad design, and in this case, you should
consider refactoring your logic into manageable pieces and have the transaction requirements defined on
those pieces declaratively.
There is another declarative way to configure transactional behavior in Spring, and that is by using AOP
XML–style configuration. Since XML is not a focus of this book, you can check out the previous edition of
this book if you are interested in this topic. For the declarative approach, using XML and using annotations
both have their own pros and cons. Some developers prefer not to declare transaction requirements in
code, while others prefer using annotations for easy maintenance, because you can see all the transaction
requirement declarations within the code. Again, let the application requirements drive your decision, and
once your team or company has standardized on the approach, stay consistent with the configuration style.
There is also a @Transactional annotation in the jakarta.transaction package. Spring
supports this annotation as well, but it offers less configuration options than Spring’s @Transactional does.
So, when writing Spring applications, make sure you check the package the annotation is coming from.
453
Chapter 9 ■ Spring Transaction Management
Transactional Configuration with Spring Boot
Without adding Spring Data in the mix, a Spring Boot transactional application is pretty easy to configure,
since the main dependency is spring-boot-starter-jdbc and to add transactional-specific components
requires only adding spring-orm and hibernate-core into the mix. The configuration for a Spring Boot
transactional project that does not use Spring Data is shown in Figure 9-5.
Figure 9-5. Gradle View showing dependencies for the Spring Boot project
Using Spring Boot allows a somewhat simplified configuration, since the application.properties/
application.yaml files can be used to provide configuration using various Spring properties, instead of
declaring Java beans. As an example, take a look at the application-dev.yaml file contents in Listing 9-24.
Listing 9-24. application-dev.yaml Contents for the chapter09-boot Project
# datasource config
spring:
datasource:
driverClassName: org.mariadb.jdbc.Driver
url: jdbc:mariadb://localhost:3306/musicdb?useSSL=false
username: prospring6
password: prospring6
hikari:
454
Chapter 9 ■ Spring Transaction Management
maximum-pool-size: 25
# JPA config
jpa:
generate-ddl: false
properties:
hibernate:
jdbc:
batch_size: 10
fetch_size: 30
max_fetch_depth: 3
show-sql: true
format-sql: false
use_sql_comments: false
hbm2ddl:
auto: none
# Logging config
logging:
pattern:
console: "%-5level: %class{0} - %msg%n"
level:
root: INFO
org.springframework.boot: INFO
com.apress.prospring6.nine: INFO
The configuration is split into three sections: data source, JPA, and logging. Properties with names
starting with spring.datasource are set with values necessary for configuring a data source: connection
URL, credentials, and connection pooling values. Properties with names starting with spring.jpa are set
with values describing a persistence unit. You can easily recognize the Hibernate properties covered in
Chapter 7 and 8. Properties starting with logging are set with the typical value for logging configuration that
in classic applications could be found in logback.xml files.
All this means that in a Spring Boot application there is no need for a configuration class to declare
a DataSource bean, Spring will autoconfigure it based on the properties in the configuration file. The
spring.jpa properties are used by Spring Boot to autoconfigure the persistence layer—it configures a
bean named jpaVendorAdapter of type HibernateJpaVendorAdapter, a transactionManager bean of
type JpaTransactionManager, and many more beans, including Properties beans for Hibernate and
JPA. The only thing Spring Boot does not configure is a LocalSessionFactoryBean bean, so that needs to be
configured explicitly. Listing 9-25 shows the TransactionalConfig configuration that contains a single bean
declaration of type LocalSessionFactoryBean.
Listing 9-25. TransactionalConfig Declaring a Bean of Type LocalSessionFactoryBean Using Beans
Autoconfigured by Spring Boot
package com.apress.prospring6.nine.boot;
import org.springframework.boot.context.properties.ConfigurationProperties;
// other import statements omitted
@Configuration
@ComponentScan(basePackages = {
"com.apress.prospring6.nine.boot.repos",
"com.apress.prospring6.nine.boot.services"})
455
Chapter 9 ■ Spring Transaction Management
@EnableTransactionManagement
public class TransactionalConfig {
@Autowired
DataSource dataSource;
@Bean
@ConfigurationProperties("spring.jpa.properties")
public Properties jpaProperties() {
return new Properties();
}
@Bean
public LocalSessionFactoryBean sessionFactory() {
LocalSessionFactoryBean sessionFactory = new LocalSessionFactoryBean();
sessionFactory.setDataSource(dataSource);
sessionFactory.setPackagesToScan("com.apress.prospring6.nine.boot.entities");
sessionFactory.setHibernateProperties(jpaProperties());
return sessionFactory;
}
}
Since the LocalSessionFactoryBean bean needs a data source, and needs the JPA properties to be
configured, we need to access the JPA property values in the Spring Boot configuration file. This is done by
configuring a bean of type java.util.Properties and annotating it with
@ConfigurationProperties("spring.jpa.properties") to bind the properties declared in the Spring Boot
configuration file to the Properties bean created by the method annotated with it.
And this is all that is needed to configure a Spring Boot transactional application. A Spring Boot test
class can be created and the rollback tests can be added to it. When the test class is run, something peculiar
happens, though—the test method in Listing 9-17, the one testing the rollback when a RuntimeException is
thrown, fails. In the Gradle test page shown in Figure 9-6, it is quite obvious which test failed.
Figure 9-6. Gradle test page showing a test failure
456
Chapter 9 ■ Spring Transaction Management
If you look in the console log or click the test name, you will see this message:
org.opentest4j.AssertionFailedError:
PersistenceException not thrown!
==> Unexpected exception type thrown
==> expected: <jakarta.persistence.PersistenceException>
but was: <org.springframework.dao.DataIntegrityViolationException>
So what is going on here? Why is there a different type of exception being thrown?
In Chapter 6 you were introduced to the Spring hierarchy of runtime data access exceptions. Extensions
of this org.springframework.dao.DataAccessException class (DataIntegrityViolationException
is one of these extensions) match specific data access exceptions and provide more information
about the real cause of an exception when accessing a database. They wrap around the exceptions
thrown by all layers below Spring, and thus this is how the SQL checked exception java.sql.
SQLIntegrityConstraintViolationException gets wrapped in a DataIntegrityViolationException
instead of a PersistenceException. This happens in a Spring Boot application because Spring Boot
autoconfigures a lot more beans than a developer might think to do; in this case Spring Boot autoconfigures
an exception translator for the persistence layer, via its org.springframework.boot.autoconfigure.dao.
PersistenceExceptionTranslationAutoConfiguration configuration class.
This means the test needs to be updated for the Spring Boot application to take this into account. The
new test is shown in Listing 9-26.
Listing 9-26. The Spring Boot Version of the testRollbackRuntimeUpdate() Test Method
package com.apress.prospring6.nine;
import org.springframework.dao.DataIntegrityViolationException;
// other import statements omitted
@ActiveProfiles("test")
@Testcontainers
@SqlMergeMode(SqlMergeMode.MergeMode.MERGE)
@Sql({ "classpath:testcontainers/drop-schema.sql", "classpath:testcontainers/createschema.sql" })
@SpringBootTest(classes = Chapter9Application.class)
public class Chapter9ApplicationTest {
private static final Logger LOGGER = LoggerFactory.getLogger(Chapter9Application
Test.class);
@Autowired
AllService service;
@Test
@SqlGroup({
@Sql(scripts = {"classpath:testcontainers/add-nina.sql"},
executionPhase = Sql.ExecutionPhase.BEFORE_TEST_METHOD)
})
@DisplayName("should perform a rollback because DataIntegrityViolationException")
void testRollbackRuntimeUpdate() {
var singer = service.findByIdWithAlbums(5L).orElse(null);
assertNotNull(singer);
457
Chapter 9 ■ Spring Transaction Management
singer.setFirstName("Eunice Kathleen");
singer.setLastName("Waymon");
var album = new Album();
album.setTitle("Little Girl Blue");
album.setReleaseDate(LocalDate.of(1959,2, 20));
album.setSinger(singer);
var albums = Set.of(album);
assertThrows(DataIntegrityViolationException.class ,
() -> service.saveSingerWithAlbums(singer, albums),
"PersistenceException not thrown!");
var nina =
assertAll(
()
()
()
);
}
service.findByIdWithAlbums(5L).orElse(null);
"nina was not updated" ,
-> assertNotNull(nina),
-> assertNotEquals("Eunice Kathleen", nina.getFirstName()),
-> assertNotEquals("Waymon", nina.getLastName())
}
This test method checks for the DataIntegrityViolationException being thrown when the bad
update is being executed and thus this test passes. If you look in the execution log in the console, you will
notice the same messages mentioning the transaction rollback that were printed for the test checking for the
PersistenceException earlier in the chapter.
Transactional Tests
In Chapter 4, Table 4-5 listed and described the following test annotation that are relevant for transactional
contexts:
•
@Rollback
•
@Commit
•
@BeforeTransaction
•
@AfterTransaction
The names of all four of them make pretty obvious their purposes. They are useful when writing
transactional tests. Obviously, there is no need to annotate test methods with @Transactional when testing
transactional services. You might want to do this to test your repositories in isolation. Although, with the
introduction of Spring Data, testing repositories is not really necessary, as you will see in Chapter 10.
Test-managed transactions are not the same as Spring-managed transactions, the ones managed by
Spring in the application context (created to run methods annotated with @Transactional), or the same as
application-managed transactions, those managed programmatically within the application.
The text context is based on the application context and thus Spring-managed and applicationmanaged transactions will typically participate in test-managed transactions. This can be easily seen when
running the test classes AllServiceTest and ProgramaticServiceTest introduced in previous sections. If
you look in the execution log for the text Creating new transaction, you will notice that transactions are
458
Chapter 9 ■ Spring Transaction Management
created for every test method. These transactions are the test-context transactions and are created by default
in a test context for the test methods. This might cause issues if some Spring-managed transactions are
declared with a propagation mode other than REQUIRED or SUPPORTS.
Annotating a test method with @Transactional causes the test to be run within a transaction that
will, by default, be automatically rolled back after completion of the test. Annotating a test class with @
Transactional causes each test method within that class hierarchy to be run within a transaction.
Propagation mode, rollback reasons, isolation, and so forth can be configured for test methods as well, when
annotated with @Transactional.
The @Commit annotation is an alias for @Rollback(false); they can both be used at the class level and
method level. When used at the class level, the behavior applies to all test methods in the class. You can
override the behavior at the class level, but try not to mix them, because the behavior of your tests might
become unpredictable.
The @BeforeTransaction and @AfterTransaction annotations are the equivalents of @BeforeEach and
@AfterEach for transactional methods. @BeforeTransaction indicates that the annotated method should be
executed before a transaction is started for a test method configured to run within a transaction via Spring’s
@Transactional annotation. @AfterTransaction annotates a method that is executed after a transaction is
ended for a test method annotated with Spring’s @Transactional annotation. Starting with Spring 4.3, these
two annotations can be used on Java 8 interface default messages as well.
This is all that we can say about Spring transactional applications at the moment. The information
provided in this chapter should be enough to help you configure and work confidently with transactions in
Spring applications.
Considerations on Transaction Management
So, having discussed the various ways for implementing transaction management, which one should you
use? The declarative approach is recommended in all cases, and you should avoid implementing transaction
management within your code as much as possible. Most of the time, when you find it necessary to code
transaction control logic in the application, it is because of bad design, and in this case, you should consider
refactoring your logic into manageable pieces and have the transaction requirements defined on those
pieces declaratively.
For the declarative approach, using XML and using annotations both have their own pros and
cons. Some developers prefer not to declare transaction requirements in code, while others prefer using
annotations for easy maintenance, because you can see all the transaction requirement declarations within
the code. Again, let the application requirements drive your decision, and once your team or company has
standardized on the approach, stay consistent with the configuration style.
Summary
Transaction management is a key part of ensuring data integrity in almost any type of application. In this
chapter, we discussed how to use Spring to manage transactions with almost no impact on your source code.
You were introduced to using annotations to configure declarative transactional behavior. You were also
shown how to implement programmatic transactional behavior and how to test transactional services.
Local transactions are supported inside/outside a JEE application server, and only simple configuration
is required to enable local transaction support in Spring. However, setting up a global transaction
environment involves more work and greatly depends on which JTA provider and corresponding back-end
resources your application needs to interact with. Also, the future seems to be all microservices running on
serverless environments, where global transactions no longer really have a purpose.
Chapter 6 through 9 have focuses on working with SQL databases which are good for structured data. If
the data you plan on working with is a little more chaotic, you might be interested in reading Chapter 10 that
aims to give you an overview of Spring support for NoSQL databases.
459
CHAPTER 10
Spring Data with SQL and
NoSQL Databases
Now that you’ve been introduced to multiple aspects of data access, such as connecting to the database,
executing native queries with JDBC, mapping tables to entity classes to allow database records to be treated
as objects in the Java code, creating repository classes for data management using Hibernate sessions and
EntityManagerFactory, and then executing multiple database operations in the same Spring-managed
transaction, it is time to show you how to avoid writing all this code and let Spring do the job for you using
the Spring Data.
The Spring Data project is a subproject under the Spring Data umbrella project1. The main objective
of the Spring Data project is to provide additional features for simplifying application development with
various data sources. The Spring Data project contains multiple subprojects for interacting with SQL and
NoSQL databases, both classic and reactive ones. It provides powerful repository and custom objectmapping abstractions, generation of repository queries based on configuration, support for transparent
auditing, the possibility to extend repository code, and easy integration with Spring MVC controllers.
Spring Data provides a plethora of features designed to make data access easy, and this chapter focuses on
a few aspects without going too much into detail, because that would require doubling the size of this book.
In this chapter we discuss the following:
1
•
Introducing Spring Data Java Persistence API (JPA): We discuss the Spring Data JPA
project and demonstrate how it can help simplify the development of data access
logic. Since JPA applies to SQL databases, MariaDB is used in the code samples.
•
Tracking entity changes and auditing: In database update operations, it’s a common
requirement to keep track of the date an entity was created or last updated and who
made the change. Also, for critical information such as a customer, a history table
that stores each version of the entity is usually required. We discuss how Spring Data
JPA and Hibernate Envers (Hibernate Entity Versioning System) can help ease the
development of such logic.
•
Spring Data for NoSQL databases: We discuss what NoSQL databases are, why they
are so interesting, what they are good for, and how accessing their data from a Spring
application becomes easier with Spring Data. For the code samples, we have chosen
MongoDB.
https://spring.io/projects/spring-data
© Iuliana Cosmina, Rob Harrop, Chris Schaefer, and Clarence Ho 2023
I. Cosmina et al., Pro Spring 6, https://doi.org/10.1007/978-1-4842-8640-1_10
461
Chapter 10 ■ Spring Data with SQL and NoSQL Databases
•
Spring Data configuration with Spring Boot: Spring Data makes things easier in Spring
classic applications, but configuration becomes even easier in Spring Boot applications,
since there is a special starter library with a lot of auto-configuration options.
In addition to being introduced to all these cool technologies, you will also be shown how to test your
repositories and services, using Testcontainers as a database access provider.
Introducing Spring Data JPA
Spring Data JPA eases development of applications that need to access JPA data sources; This obviously
means applications that use Hibernate and Jakarta Persistence API components for data manipulation. The
starting point in using Spring Data JPA is to add spring-data-jpa as a dependency to the project. Whether
Maven or Gradle, adding this dependency to your project results in all required Spring dependencies being
added to the application classpath. The only thing left is to add Hibernate Core Jakarta to the configuration
and override the jakarta.annotation-api when a different (more recent version) is desired. In Figure 10-1
you can see the list of dependencies for the chapter10 project, a Spring classic project using Spring Data JPA,
as shown by the Gradle view in IntelliJ IDEA.
Figure 10-1. Gradle View showing dependencies for the chapter10 project
462
Chapter 10 ■ Spring Data with SQL and NoSQL Databases
sing Spring Data JPA Repository Abstraction
U
for Database Operations
In previous data access chapter, repository classes (classes used to interact with the database) were created
explicitly by the developer, and build around Hibernate components (Session, EntityManager) or Spring
(JdbcTemplate). They had to be explicitly configured as beans and injected wherever necessary. The same
applies for adding transactional behavior; if a repository needed to be transactional, the developer had to
explicitly add the @Transactional annotation on the methods communicating with the database.
One of the main concepts of Spring Data and all its subprojects is the Repository abstraction, which
belongs to the Spring Data Commons2 project, one of the dependencies. In Spring Data JPA, the repository
abstraction wraps the underlying JPA EntityManager and provides a simpler interface for JPA-based
data access. What this means is that you do not have to write code using the EntityManager to access the
data, unless you really have some custom query that Spring Data cannot generate for you based on your
configurations.
The central interface within Spring Data is the org.springframework.data.repository.
Repository<T,ID> interface, which is a marker interface (be sure not to mix it up with the @Repository
stereotype annotation). Spring Data provides various extensions of the Repository<T, ID> interface;
one of them is the org.springframework.data.repository.CrudRepository<T, ID> interface (which
also belongs to the Spring Data Commons project), which we discuss in this section. Interfaces extending
Repository<T, ID>, directly or by extending one of its subinterfaces, are called domain repositories because
they replace the generic T with a concrete domain object type. These interfaces expose CRUD methods for
managing domain objects.
Before explaining the CrudRepository<T, ID> interface and why it is important, take a look at
Figure 10-2 that shows the Spring Repository<T, ID> interfaces hierarchy.
2
https://github.com/spring-projects/spring-data-commons
463
Chapter 10 ■ Spring Data with SQL and NoSQL Databases
Figure 10-2. Spring Data Repository interfaces hierarchy
At this point you might be scratching your head and asking: Hey, those are mostly interfaces, how are
they supposed to do everything you mentioned previously? Well, we are using Java 17 on this project, so
technically, default methods might be an answer, but no. We are working with Spring, so the simplest answer
is proxying. It will all become clear when you get to write some of your own repositories, but until then, let’s
go back to the CrudRepository<T, ID> interface.
The CrudRepository<T, ID> interface3 provides a number of commonly used methods when handling
data. Listing 10-1 shows a code snippet representing the interface declaration, which is extracted from
Spring Data Commons project source code.
Listing 10-1. The CrudRepository<T, ID> Source Code
package org.springframework.data.repository;
import java.util.Optional;
@NoRepositoryBean
public interface CrudRepository<T, ID> extends Repository<T, ID> {
https://github.com/spring-projects/spring-data-commons/blob/main/src/main/java/
org/springframework/data/repository/CrudRepository.java
3
464
Chapter 10 ■ Spring Data with SQL and NoSQL Databases
<S extends T> S save(S entity);
<S extends T> Iterable<S> saveAll(Iterable<S> entities);
Optional<T> findById(ID id);
boolean existsById(ID id);
Iterable<T> findAll();
Iterable<T> findAllById(Iterable<ID> ids);
long count();
void
void
void
void
void
}
deleteById(ID id);
delete(T entity);
deleteAllById(Iterable<? extends ID> ids);
deleteAll(Iterable<? extends T> entities);
deleteAll();
Looking at this interface, you might recognize method signatures that we’ve previously added to our
repository interfaces and then implemented in the repository classes. The CrudRepository<T, ID> interface
declares a complete set of methods you might expect a repository class to offer for data access. The names
are self-explanatory and—don’t panic—you do not have to provide the implementation for them! To put
your mind at ease, let’s take a look at an example.
The entity classes used in this chapter are the same as those that have been used in Chapters 6–9.
Please review any of the previous chapters or take a peek at the code for the previous chapters if you need a
reminder. If you’ve read the other chapters, entity classes like Singer and Album should be familiar to
you by now.
Listing 10-2 depicts a classic repository interface named SingerRepository that declares just a few
finder methods.
Listing 10-2. Classic SingerRepository Interface
package com.apress.prospring6.ten;
import com.apress.prospring6.ten.entities.Singer;
import java.util.List;
public interface
List<Singer>
List<Singer>
List<Singer>
}
SingerRepository {
findAll();
findByFirstName(String firstName);
findByFirstNameAndLastName(String firstName, String lastName);
This interface can now be revised to transform it into a Spring Data Domain Repository interface by
modifying it to extend CrudRepository<T, ID> as shown in Listing 10-3.
465
Chapter 10 ■ Spring Data with SQL and NoSQL Databases
Listing 10-3. Spring Data Domain Repository SingerRepository Interface
package com.apress.prospring5.ten;
// other import statements omitted
import org.springframework.data.repository.CrudRepository;
public interface SingerRepository extends CrudRepository<Singer, Long> {
Iterable<Singer> findByFirstName(String firstName);
Iterable<Singer> findByFirstNameAndLastName(String firstName, String lastName);
}
Notice that we just need to declare two methods in this interface, as the findAll() method is
already provided by the CrudRepository<T, ID> interface. The SingerRepository interface extends the
CrudRepository<T, ID> interface, passing in the entity class (Singer) and the ID type (Long). One fancy
aspect of Spring Data’s Repository abstraction is that when you use the common naming convention of
findBy{fieldName}, such as findByFirstName and findByFirstNameAndLastName do, you don’t need to
provide Spring Data JPA with the named query. Instead, at runtime, Spring Data JPA will “infer” and construct
the query for you based on the method name and entity class replacing the generic type. For example, for the
findByFirstName() method, Spring Data JPA will automatically prepare the query select s from Singer s
where s.firstName = :firstName for you and set the named parameter firstName from the argument.
Now that we have declared our interface, we must create the configuration that will tell
Spring Data where to find this interface. This is done by annotating the configuration class with @
EnableJpaRepositories, as shown in Listing 10-4.
Listing 10-4. Spring Data JPA Configuration
package com.apress.prospring6.ten.config;
// other import statements omitted
import org.springframework.transaction.annotation.EnableTransactionManagement;
import org.springframework.data.jpa.repository.config.EnableJpaRepositories;
@Import(BasicDataSourceCfg.class)
@Configuration
@EnableTransactionManagement
@ComponentScan(basePackages = {"com.apress.prospring6.ten"})
@EnableJpaRepositories("com.apress.prospring6.ten.repos")
public class DataJpaCfg {
@Bean
public PlatformTransactionManager transactionManager() {
// code omitted
return transactionManager;
}
@Bean
public LocalContainerEntityManagerFactoryBean entityManagerFactory() {
// code omitted
factory.setPackagesToScan("com.apress.prospring6.ten.entities");
return factory;
}
// rest of configuration omitted
}
466
Chapter 10 ■ Spring Data with SQL and NoSQL Databases
The full configuration of this class and the BasicDataSourceCfg class have been covered repeatedly over
the previous data access chapters (from Chapter 6 until now), and really, the only requirement to tell Spring
where the repository interfaces are is @EnableJpaRepositories("com.apress.prospring6.ten.repos").
The @EnableJpaRepositories annotation is quite powerful, allowing you to specify multiple locations, in
various ways, by declaring configuration attributes pretty similar to those provided by @ComponentScan. The
default attribute is basePackages, by the way. Aside from that, the namedQueriesLocation attribute is used to
specify the location of a properties file containing named queries, the entityManagerFactoryRef attribute is
used to specify the name of the EntityManager bean to use for creating queries, the transactionManagerRef
attribute is used to specify the name of the TransactionManager bean to create the repository instances, and
many other useful attributes (feel free to check the official documentation for).
So, how does this work? Recall from Chapter 5 that there are two types of proxies: JDK proxies, which
implement the same interface as the target object, and class-based proxies, which extend the target object
class. Spring Data JPA requires the repositories to be declared as interfaces extending Repository<T, ID> or
one of its subinterfaces. By adding the @EnableJpaRepositories("com.apress.prospring6.ten.repos")
configuration, we tell Spring to look in this package for these type of interfaces. For each of them, the Spring
Data infrastructure components register the persistence technology-specific FactoryBean to create the
appropriate proxies that handle invocations of the query methods.
So now that we have a Spring Data domain repository interface and a configuration telling Spring where
it is, the next step is to create a transactional service to use our repository. The SingerServiceImpl class
shown in Listing 10-5 just calls the SingerRepository instance methods.
Listing 10-5. SingerServiceImpl Class That Uses a Spring Data Repository Instance
package com.apress.prospring6.ten.service;
import java.util.stream.Stream;
import java.util.stream.StreamSupport;
// other import statements omitted
@Service
@Transactional
public class SingerServiceImpl implements SingerService {
private final SingerRepository singerRepository;
public SingerServiceImpl(SingerRepository singerRepository) {
this.singerRepository = singerRepository;
}
@Override
@Transactional(readOnly=true)
public Stream<Singer> findAll() {
return StreamSupport.stream(singerRepository.findAll().spliterator(), false);
}
@Override
@Transactional(readOnly=true)
public Stream<Singer> findByFirstName(String firstName) {
return StreamSupport.stream(singerRepository.findByFirstName(firstName).
spliterator(), false);
}
467
Chapter 10 ■ Spring Data with SQL and NoSQL Databases
@Override
@Transactional(readOnly=true)
public Stream<Singer> findByFirstNameAndLastName(String firstName, String lastName) {
return StreamSupport.stream(singerRepository.findByFirstNameAndLastName(firstName,
lastName).spliterator(), false);
}
}
You can see that instead of EntityManager, we need to inject the singerRepository instance into the
service bean. This is generated by Spring based on the SingerRepository interface. All the low-level work
is done for us because of Spring Data JPA. In Listing 10-6, you can see a testing class, and by now you should
already be familiar with its content.
Listing 10-6. SingerServiceTest Test Class
package com.apress.prospring6.ten;
// import statements omitted
@Testcontainers
@SqlMergeMode(SqlMergeMode.MergeMode.MERGE)
@Sql({ "classpath:testcontainers/drop-schema.sql", "classpath:testcontainers/createschema.sql" })
@SpringJUnitConfig(classes = {SingerServiceTest.TestContainersConfig.class})
public class SingerServiceTest extends TestContainersBase {
private static final Logger LOGGER = LoggerFactory.getLogger(SingerServiceTest.class);
@Autowired
SingerService singerService;
@Autowired
ApplicationContext ctx;
@Test
public void testFindAll(){
var singers = singerService.findAll().peek(s -> LOGGER.info(s.toString())).toList();
assertEquals(3, singers.size());
}
@Test
public void testFindByFirstName(){
var singers = singerService.findByFirstName("John").peek(s -> LOGGER.info(s.
toString())).toList();
assertEquals(2, singers.size());
}
@Test
public void testFindByFirstNameAndLastName(){
var singers = singerService.findByFirstNameAndLastName("John", "Mayer").peek(s ->
LOGGER.info(s.toString())).toList();
assertEquals(1, singers.size());
}
468
Chapter 10 ■ Spring Data with SQL and NoSQL Databases
@Configuration
@Import(DataJpaCfg.class)
public static class TestContainersConfig {
@Autowired
Properties jpaProperties;
@PostConstruct
public void initialize() {
jpaProperties.put(Environment.FORMAT_SQL, true);
jpaProperties.put(Environment.USE_SQL_COMMENTS, true);
jpaProperties.put(Environment.SHOW_SQL, true);
jpaProperties.put(Environment.STATEMENT_BATCH_SIZE, 30);
}
}
}
The test class is nothing special, and the Testcontainers MariaDB container configuration was isolated
to the TestContainersBase class, to avoid repeating it here. When running this test class, all methods should
pass, but as usual, let’s crank up the log levels to TRACE for all Spring libraries and check out the execution log,
which gives us a lot of information about what Spring is doing. Take a look at the log snippets in Listing 10-7.
Listing 10-7. SingerServiceTest Execution Log Snippets
DEBUG: RepositoryConfigurationDelegate - Scanning for JPA repositories in packages com.
apress.prospring6.ten.repos. <1>
TRACE: ClassPathScanningCandidateComponentProvider - Scanning file [/../com/apress/
prospring6/ten/repos/SingerRepository.class]
DEBUG: ClassPathScanningCandidateComponentProvider - Identified candidate component class:
file [/../com/apress/prospring6/ten/repos/SingerRepository.class]
TRACE: RepositoryConfigurationDelegate - Spring Data JPA - Registering repository:
singerRepository <1>
- Interface: com.apress.prospring6.ten.repos.SingerRepository <1>
- Factory: org.springframework.data.jpa.repository.support.JpaRepositoryFactoryBean <1>
INFO : RepositoryConfigurationDelegate - Finished Spring Data repository scanning in 37 ms.
Found 1 JPA repository interfaces.
...
DEBUG: RepositoryFactorySupport - Initializing repository instance for com.apress.
prospring6.ten.repos.SingerRepository...
...
DEBUG: RepositoryFactorySupport - Finished creation of repository instance for com.apress.
prospring6.ten.repos.SingerRepository.
...
TRACE: TransactionAspectSupport - Getting transaction for
[com.apress.prospring6.ten.service.SingerServiceImpl.findAll] <2>
TRACE: AbstractFallbackTransactionAttributeSource - Adding transactional method
'org.springframework.data.jpa.repository.support.SimpleJpaRepository.findAll'
with attribute: PROPAGATION_REQUIRED,ISOLATION_DEFAULT,readOnly <3>
TRACE: TransactionAspectSupport - Getting transaction for
[org.springframework.data.jpa.repository.support.SimpleJpaRepository.findAll]
The configured package com.apress.prospring6.ten.repos and its subpackages are scanned, and
the SingerRepository interface is identified as a candidate for creating a repository instance (lines marked
with <1>).
469
Chapter 10 ■ Spring Data with SQL and NoSQL Databases
The peculiar thing about this log is that it seems as if a transaction is created for the repository instance
method being called (line marked with <2>). So, what is happening there? Well, the class backing up the proxy
is org.springframework.data.jpa.repository.support.SimpleJpaRepository<T, ID> and if you check out
the Spring code4, you will notice that this class is annotated with @Transactional(readOnly = true). This is
where your transactions for the repository methods come from. They are needed because any JPA operation
should be done in a transactional context; that way, in case of errors, a rollback will ensure the database is
left in a good state. This obviously means that for service methods that just call a single repository method,
an extra transaction is not needed. Even if configured, since the default propagation mode is PROPAGATION_
REQUIRED, (line marked with <3>) the service method will be executed within the same transaction as the
repository method.
Before talking about more complex queries and how calling them is supported, let’s talk about the
JpaRepository<T, ID> interface.
Using JpaRepository
The JpaRepository<T, ID> interface is an even more advanced Spring interface than CrudRepository<T,
ID> that can make creating custom repositories easier. The JpaRepository<T, ID> interface provides batch,
paging, and sorting operations. Figure 10-3 shows the relationship between JpaRepository<T, ID> and the
CrudRepository<T, ID> interface.
Figure 10-3. Spring Data JpaRepository<T, ID> hierarchy
https://github.com/spring-projects/spring-data-jpa/blob/main/spring-data-jpa/src/
main/java/org/springframework/data/jpa/repository/support/SimpleJpaRepository.java
4
470
Chapter 10 ■ Spring Data with SQL and NoSQL Databases
Depending on the complexity of the application, you can choose to use CrudRepository<T,
ID> or JpaRepository<T, ID>. As you can see from Figure 10-3, JpaRepository<T, ID> extends
CrudRepository<T, ID> and thus provides all the same functionalities.
Spring Data JPA with Custom Queries
In complex applications, you might need custom queries that cannot be “inferred” by Spring.
In previous chapters, using named queries declared using the @NamedQuery annotation, we showed a
way to provide support for query execution, whether with a Hibernate Session or EntityManager. Named
queries are supported with Spring Data repositories, too. Spring Data tries to resolve a call to a method
declared by the developer to a named query starting with the simple name of the configured domain class,
followed by the method name separated by a dot. This way of naming queries was used when working with
a Hibernate Session or EntityManager too, just to make the transition practical. Named queries with Spring
Data do have some limitations, however; for example, named parameters are not supported. To show an
example, consider a named query to select albums with a release date greater than 2010-01-01. Listing 10-8
presents the important code bits showing the named query.
Listing 10-8. Album Entity with a Named Query
package com.apress.prospring6.ten.entities;
import jakarta.persistence.NamedQuery;
// other import statements omitted
@Entity
@Table(name = "ALBUM")
@NamedQuery(name=Album.FIND_WITH_RELEASE_DATE_GREATER_THAN, query="select a from Album a
where a.releaseDate > ?1")
public class Album extends AbstractEntity {
@Serial
private static final long serialVersionUID = 3L;
public static final String FIND_WITH_RELEASE_DATE_GREATER_THAN = "Album.
findWithReleaseDateGreaterThan";
@Column
private String title;
@Column(name = "RELEASE_DATE")
private LocalDate releaseDate;
@ManyToOne
@JoinColumn(name = "SINGER_ID")
private Singer singer;
// rest of the code omitted
}
For cases requiring named parameters, the query must be defined explicitly using the @Query
annotation. We’ll use this annotation to search for all music albums containing The in their title. Listing 10-9
depicts the AlbumRepository interface.
471
Chapter 10 ■ Spring Data with SQL and NoSQL Databases
Listing 10-9. AlbumRepository with Named Queries and @Query Methods
package com.apress.prospring6.ten.repos;
import org.springframework.data.jpa.repository.Query;
import org.springframework.data.repository.query.Param;
// other import statements omitted
public interface AlbumRepository extends JpaRepository<Album, Long> {
Iterable<Album> findBySinger(Singer singer);
Iterable<Album> findWithReleaseDateGreaterThan(LocalDate rd);
@Query("select a from Album a where a.title like %:title%")
Iterable<Album> findByTitle(@Param("title") String t);
}
Spring Data matches the findWithReleaseDateGreaterThan(..) method to the query named Album.
findWithReleaseDateGreaterThan. The query for the findByTitle(..) method has a named parameter
called title. When the name of the named parameter is the same as the name of the argument in the
method annotated with @Query, the @Param annotation is not needed. If the method argument has a different
name, the @Param annotation is needed to tell Spring that the value of this argument is to be injected in the
named parameter in the query.
The AlbumServiceImpl service class is quite simple and only uses the albumRepository bean to call its
methods. It is depicted in Listing 10-10.
Listing 10-10. AlbumServiceImpl Service Calling AlbumRepository Methods
package com.apress.prospring6.ten.service;
// other import statements omitted
import java.util.stream.Stream;
import java.util.stream.StreamSupport;
@Service
@Transactional(readOnly = true)
public class AlbumServiceImpl implements AlbumService {
private final AlbumRepository albumRepository;
public AlbumServiceImpl(AlbumRepository albumRepository) {
this.albumRepository = albumRepository;
}
@Override
public Stream<Album> findBySinger(Singer singer) {
return StreamSupport.stream(albumRepository.findBySinger(singer).
spliterator(), false);
}
@Override
public Stream<Album> findWithReleaseDateGreaterThan(LocalDate rd) {
472
Chapter 10 ■ Spring Data with SQL and NoSQL Databases
return StreamSupport.stream(albumRepository.findWithReleaseDateGreaterThan(rd).
spliterator(), false);
}
@Override
public Stream<Album> findByTitle(String title) {
return StreamSupport.stream(albumRepository.findByTitle(title).
spliterator(), false);
}
}
The findBySinger(..) query is an easy one, and Spring Data is able to resolve this one on its own. For
this reason, the test class won’t cover this one. Feel free to write the test for this one yourself. Listing 10-11
shows the test class for the two slightly complex queries.
Listing 10-11. AlbumServiceTest Class
package com.apress.prospring6.ten;
// import statements omitted
@Testcontainers
@Sql({ "classpath:testcontainers/drop-schema.sql", "classpath:testcontainers/createschema.sql" })
@SpringJUnitConfig(classes = {AlbumServiceTest.TestContainersConfig.class})
public class AlbumServiceTest extends TestContainersBase {
private static final Logger LOGGER = LoggerFactory.getLogger(AlbumServiceTest.class);
@Autowired
AlbumService albumService;
@Test
public void testFindWithReleaseDateGreaterThan(){
var albums = albumService
.findWithReleaseDateGreaterThan(LocalDate.of(2010, 1, 1))
.peek(s -> LOGGER.info(s.toString())).toList();
assertEquals(2, albums.size());
}
@Test
public void testFindByTitle(){
var albums = albumService
.findByTitle("The")
.peek(s -> LOGGER.info(s.toString())).toList();
assertEquals(1, albums.size());
}
// test config class omitted
}
Spring Data repositories are quite powerful and versatile. Methods annotated with @Query also support
sorting, by adding an org.springframework.data.domain.Sort parameter. Queries declared with the
@Query annotations even support SpEL expressions.
473
Chapter 10 ■ Spring Data with SQL and NoSQL Databases
The examples in this section only show queries that read data. Queries that modify data also need to be
annotated with @Modified. Just as an example, the SingerRepository is modified to add a query that changes
the first name of a singer record based on its id. The method declaration is depicted in Listing 10-12.
Listing 10-12. @Modifying Annotated Spring Data Query Method
Package com.apress.prospring6.ten.repos;
// other import statements omitted
import org.springframework.data.jpa.repository.Modifying;
public interface SingerRepository extends CrudRepository<Singer, Long> {
// other method declarations omitted
@Modifying(clearAutomatically = true)
@Query("update Singer s set s.firstName = ?1 where s.id = ?2")
int setFirstNameFor(String firstName, Long id);
}
The @Modifying annotation is designed to be used only together with the @Query annotation, and it
makes no sense without it. If used on its own, it is just ignored by Spring Data.
The @Modifying annotation supports two attributes:
•
flushAutomatically: When set to true (the default is false), it causes the
underlying persistence context to be flushed before executing the modifying query.
•
clearAutomatically: When set to true (the default is false), it causes the
underlying persistence context to be flushed after executing the modifying query.
This means the changed entities are persisted to the database, immediately after the
execution of this method.
The reason why the setFirstNameFor(..) method was annotated with @
Modifying(clearAutomatically = true) is that in the service method, this method is invoked to perform
an update, then the entity to be returned is retrieved from the database using the findById(id) repository
method. Since changes get flushed at the end of a transaction, and we have no control over when that might
be, the returned entity might not be the updated one.
To make things interesting, the service method calling setFirstNameFor(..) returns the updated
instance, which we can test. The service method is shown in Listing 10-13.
Listing 10-13. Service Method Calling @Modified Annotated Spring Data Query Method
package com.apress.prospring6.ten.service;
// import statements omitted
@Service
@Transactional
public class SingerServiceImpl implements SingerService {
private final SingerRepository singerRepository;
public SingerServiceImpl(SingerRepository singerRepository) {
this.singerRepository = singerRepository;
}
474
Chapter 10 ■ Spring Data with SQL and NoSQL Databases
// other methods omitted
@Transactional(propagation = Propagation.REQUIRES_NEW, label = "modifying")
@Override
public Singer updateFirstName(String firstName, Long id) {
singerRepository.findById(id).ifPresent(s ->
singerRepository.setFirstNameFor(firstName, id));
return singerRepository.findById(id).orElse(null);
}
}
The test method is depicted in Listing 10-14.
Listing 10-14. Test Method for the Service Method Calling @Modified Annotated Spring Data Query Method
package com.apress.prospring6.ten;
// other import statements omitted
import org.springframework.test.annotation.Rollback;
@Testcontainers
@SqlMergeMode(SqlMergeMode.MergeMode.MERGE)
@Sql({ "classpath:testcontainers/drop-schema.sql", "classpath:testcontainers/createschema.sql" })
@SpringJUnitConfig(classes = {SingerServiceTest.TestContainersConfig.class})
public class SingerServiceTest extends TestContainersBase {
@Rollback
@Test
@SqlGroup({
@Sql(scripts = {"classpath:testcontainers/add-nina.sql"},
executionPhase = Sql.ExecutionPhase.BEFORE_TEST_METHOD),
})
@DisplayName("should update a singer's name")
public void testUpdateFirstNameByQuery(){
var nina = singerService.updateFirstName("Eunice Kathleen", 5L);
assertAll( "nina was not updated" ,
() -> assertNotNull(nina),
() -> assertEquals("Eunice Kathleen", nina.getFirstName())
);
}
}
Notice that instead of cleaning up the context by using a @Sql annotation and a delete script, the
@Rollback annotation introduced in Chapter 9 is used.
475
Chapter 10 ■ Spring Data with SQL and NoSQL Databases
The @Modifying annotation works in the same way for conditional delete queries as well. There are
more database operations that can be made simple with Spring Data JPA repositories. However, covering all
of them is beyond the scope of this book. Feel free to research on your own in the official documentation5.
Projection Queries
Chapters 7 and 8 already introduced the topic of projection queries, so this section shows only how to
configure a projection query using Spring Data JPA.
To limit the result of a query to only a few fields, an interface is needed that exposes accessor methods
for the properties to be read. Spring supports quite a few interesting ways to declare projection interfaces,
but for simplicity, in this example we’ll just show an interface that exposes the first name and last name
of a singer. Since interfaces support default methods starting with Java 8, we’ll add a default method to
concatenate the first and last names and expose them as the full name. The repository method and the
interface are both shown in Listing 10-15.
Listing 10-15. Projection Interface and Repository Method
package com.apress.prospring6.ten.service;
// import statements omitted
public interface SingerService {
// other methods omitted
Stream<FullName> findByLastName(String lastName);
interface FullName {
String getFirstName();
String getLastName();
default String getFullName() {
return getFirstName().concat(" ").concat(getLastName());
}
}
}
The service method does nothing other than call the findByLastName(..) method, and the test method
just prints the results and tests the assumption that a single result is returned. Both are provided in the book
repository, but they won’t be listed here.
The only thing interesting to see is the actual type of the objects being returned by the repository
method. Since the database results are modeled using the FullName interface, there must be an
implementation generated by Spring, right? Well, not in the actual sense. A proxy is created, yet again,
and that proxy implements the FullName interface, so the method class are forwarded to the Spring Data
infrastructure components responsible for storing and returning the actual values. This can be easily seen by
setting a breakpoint in the test method and inspecting the contents of the returned collection using IntelliJ
IDEA’s evaluate expression at runtime feature. Just right-click the source code while the execution is paused,
5
https://docs.spring.io/spring-data/data-jpa/docs/current/reference/html
476
Chapter 10 ■ Spring Data with SQL and NoSQL Databases
choose Evaluate Expression in the context menu, and insert singers.get(0). Notice the type of the object
and, if you expand it, you will see the target objects and the interfaces implemented. It should look pretty
similar to what is shown in Figure 10-4 (but note there’s a small chance that some types might be renamed,
moved, etc., by the time of the final Spring Data JPA).
Figure 10-4. Inspecting Spring Data instances
Keeping Track of Changes on the Entity Class
In most applications, we need to keep track of basic audit activities for the business data being maintained
by users. The audit information typically includes the user who created the data, the date it was created, the
date it was last modified, and the user who last modified it.
The Spring Data JPA project provides this function in the form of a JPA entity listener, which helps you to
keep track of the audit information automatically. To use the feature, until Spring 4, the entity class needed
to implement the Auditable<U, ID, T extends TemporalAccessor> extends Persistable<ID> interface
477
Chapter 10 ■ Spring Data with SQL and NoSQL Databases
(belonging to Spring Data Commons)6 or extend any class that implements this interface. Listing 10-16
shows the Auditable interface that was extracted from Spring Data’s reference documentation.
Listing 10-16. The Auditable<U, ID extends Serializable, T extends TemporalAccessor> Interface
package org.springframework.data.domain;
import java.time.temporal.TemporalAccessor;
import java.util.Optional;
public interface Auditable<U, ID, T extends TemporalAccessor>
extends Persistable<ID> {
Optional<U> getCreatedBy();
void setCreatedBy(U createdBy);
Optional<T> getCreatedDate();
void setCreatedDate(T creationDate);
Optional<U> getLastModifiedBy();
void setLastModifiedBy(U lastModifiedBy);
Optional<T> getLastModifiedDate();
void setLastModifiedDate(T lastModifiedDate);
}
As you can see from the definition of the Auditable<U, ID, T extends TemporalAccessor> interface,
the date types columns are restricted to types extending java.time.temporal.TemporalAccessor. Starting
with Spring 5, implementing Auditable<U, ID, T extends TemporalAccessor> is no longer necessary
because everything can be replaced by annotations.
To show how auditing works, let’s create a new table called SINGER_AUDIT in the database schema,
which is based on the SINGER table, with four audit-related columns added. The columns record when the
entity was created and by who and the last user that edited the entity and when. Listing 10-17 shows the
table creation script (AuditSchema.sql).
Listing 10-17. The SINGER_AUDIT Table DDL
CREATE TABLE SINGER_AUDIT (
ID INT NOT NULL AUTO_INCREMENT
, FIRST_NAME VARCHAR(60) NOT NULL
, LAST_NAME VARCHAR(40) NOT NULL
, BIRTH_DATE DATE
, VERSION INT NOT NULL DEFAULT 0
, CREATED_BY VARCHAR(20) -- *
, CREATED_DATE TIMESTAMP -- *
, LAST_MODIFIED_BY VARCHAR(20) -- *
, LAST_MODIFIED_DATE TIMESTAMP -- *
, UNIQUE UQ_SINGER_AUDIT_1 (FIRST_NAME, LAST_NAME)
, PRIMARY KEY (ID)
);
https://github.com/spring-projects/spring-data-commons/blob/main/src/main/java/
org/springframework/data/domain/Auditable.java
6
478
Chapter 10 ■ Spring Data with SQL and NoSQL Databases
The four marked columns indicate the audit-related columns. The @CreatedBy, @CreatedDate,
@LastModifiedBy, and @LastModifiedDate annotations are part of the org.springframework.data.
annotation package. Using these annotations, the type restriction for the date columns no longer applies. To
keep things neatly organized, an @MappedSuperclass named AuditableEntity<U> is added to the project to
group the audit fields together. This class is shown in Listing 10-18.
Listing 10-18. The AuditableEntity Abstract Class
package com.apress.prospring6.ten.entities;
// other import statements omitted
import org.springframework.data.jpa.domain.support.AuditingEntityListener;
import jakarta.persistence.EntityListeners;
import org.springframework.data.annotation;
@MappedSuperclass
@EntityListeners(AuditingEntityListener.class)
public abstract class AuditableEntity<U> implements Serializable {
@CreatedDate
@Column(name = "CREATED_DATE")
protected LocalDateTime createdDate;
@CreatedBy
@Column(name = "CREATED_BY")
protected String createdBy;
@LastModifiedBy
@Column(name = "LAST_MODIFIED_BY")
protected String lastModifiedBy;
@LastModifiedDate
@Column(name = "LAST_MODIFIED_DATE")
protected LocalDateTime lastModifiedDate;
// getters and setters omitted
}
The @Column annotations are applied on the auditing fields to map to the actual column in the table.
The @EntityListeners(AuditingEntityListener.class) annotation registers AuditingEntityListener to
be used for all entities extending this class in the persistent context.
The @EntityListeners(AuditingEntityListener.class) annotation replaces the need to
declare an orm.xml configuration file, as indicated in the JPA specification:
<?xml version="1.0" encoding="UTF-8" ?>
<entity-mappings xmlns="http://java.sun.com/xml/ns/persistence/orm"
xmlns:xsi="http://www.w3.org/2001/XMLSchema-instance"
xsi:schemaLocation="http://java.sun.com/xml/ns/persistence/orm
http://java.sun.com/xml/ns/persistence/orm_2_0.xsd"
479
Chapter 10 ■ Spring Data with SQL and NoSQL Databases
version="2.0">
<description>JPA</description>
<persistence-unit-metadata>
<persistence-unit-defaults>
<entity-listeners>
<entity-listener class="org.springframework.data.jpa.domain.support.Auditin
gEntityListener" />
</entity-listeners>
</persistence-unit-defaults>
</persistence-unit-metadata>
</entity-mappings>
Any class that needs auditing in our application should be declared to extend the AuditableEntity<U>
class. So to map the SINGER_AUDIT table, the SingerAudit class depicted in Listing 10-19 needs to be written.
Listing 10-19. The SingerAudit Entity Class
package com.apress.prospring6.ten.entities;
// import statements omitted
@Entity
@Table(name = "SINGER_AUDIT")
public class SingerAudit extends AuditableEntity<SingerAudit> {
@Serial
private static final long serialVersionUID = 5L;
@Id
@GeneratedValue(strategy = IDENTITY)
@Column(name = "ID")
private Long id;
@Version
@Column(name = "VERSION")
private int version;
@Column(name = "FIRST_NAME")
private String firstName;
@Column(name = "LAST_NAME")
private String lastName;
@Column(name = "BIRTH_DATE")
private LocalDate birthDate;
// getters and setters omitted
}
To manage audited entities of type SingerAudit, a repository interface and a service class should be
used. The SingerAuditRepository interface just extends CrudRepository<SingerAudit, Long>, which
already declares all the methods that we are going to use for SingerAuditService. The SingerAuditService
interface is shown in Listing 10-20.
480
Chapter 10 ■ Spring Data with SQL and NoSQL Databases
Listing 10-20. The SingerAuditService Interface
package com.apress.prospring6.ten.service;
// import statements omitted
public interface SingerAuditService {
Stream<SingerAudit> findAll();
SingerAudit findById(Long id);
SingerAudit save(SingerAudit singer);
}
The SingerAuditServiceImpl class that implements SingerAuditService does nothing more than
call the SingerAuditRepository methods in a transactional context. Both are so simple they require no
attention at this point. However, to tell Spring to take care of the automatic update of the audit fields, a little
more configuration is needed: a configuration class must be annotated with EnableJpaAuditing and a bean
that implements AuditorAware<T> must be configured, as shown in Listing 10-21.
Listing 10-21. The Spring Configuration Class for Enabling Automatic Auditing Support
package com.apress.prospring6.ten.config;
import org.apache.commons.lang3.RandomStringUtils;
import org.springframework.data.domain.AuditorAware;
import org.springframework.data.jpa.repository.config.EnableJpaAuditing;
// some import statements omitted
@EnableJpaAuditing
@Configuration
public class AuditCfg {
@Bean
public AuditorAware<String> auditorProvider() {
return () -> Optional.of("prospring6-"
+ RandomStringUtils.random(6, true, true));
}
}
This is a very simple configuration. Here’s the thing: in production-level applications, to populate
the @CreatedBy and @LastModifiedBy annotated fields, the value is provided by a bean that interacts
with Spring Security. In real situations, this should be an instance containing user information, such as a
User class that represents the logged-in user who is performing the data update action retrieved from the
SecurityContextHolder. However, since that topic is quite advanced and is covered toward the end of the
book (Chapter 17), a bean of type implementing AuditorAware<String> interface using a simplified lambda
statement. The lambda statement in Listing 10-21 can be expanded to the following:
new AuditorAware<String>() {
@Override
public Optional<String> getCurrentAuditor() {
{
return Optional.of("prospring6");
}
}
};
481
Chapter 10 ■ Spring Data with SQL and NoSQL Databases
In this anonymous implementation of AuditorAware<String>, the method getCurrentAuditor()
is implemented. The value returned is prospring6 concatenated with a randomly generated six-character
text. This will help generate different user values, so we can test that the @CreatedBy and @LastModifiedBy
annotated fields values were set.
Now that the configuration and the implementation is in place, the next step is to test our auditing
support. Just to keep things limited to their own context, we added the AuditServiceTest class, which
executes the three service methods in the SingerAuditServiceImpl class and checks the assumptions made
about their effects. The test class and methods are shown in Listing 10-22.
Listing 10-22. The Class Used to Test the SingerAuditServiceImpl Class
package com.apress.prospring6.ten;
// import statements omitted
@Testcontainers
@Sql({ "classpath:testcontainers/audit/drop-schema.sql", "classpath:testcontainers/audit/
create-schema.sql" })
@SpringJUnitConfig(classes = {AuditServiceTest.TestContainersConfig.class})
public class AuditServiceTest extends TestContainersBase {
private static final Logger LOGGER = LoggerFactory.getLogger(AuditServiceTest.class);
@Autowired
SingerAuditService auditService;
@BeforeEach
void setUp(){
var singer = new SingerAudit();
singer.setFirstName("BB");
singer.setLastName("King");
singer.setBirthDate(LocalDate.of(1940, 8, 16));
auditService.save(singer);
}
@Test
void testFindById() {
var singer = auditService.findAll().findFirst().orElse(null);
assertAll( "auditFindByIdTest" ,
() -> assertNotNull(singer),
() -> assertTrue(singer.getCreatedBy().isPresent()),
() -> assertTrue(singer.getLastModifiedBy().isPresent()),
() -> assertNotNull(singer.getCreatedDate()),
() -> assertNotNull(singer.getLastModifiedDate())
);
LOGGER.info(">> created record: {} ", singer);
}
@Test
void testUpdate() {
var singer = auditService.findAll().findFirst().orElse(null);
assertNotNull(singer);
482
Chapter 10 ■ Spring Data with SQL and NoSQL Databases
singer.setFirstName("Riley B.");
var updated = auditService.save(singer);
assertAll(
()
()
()
"auditUpdateTest" ,
-> assertEquals("Riley B.", updated.getFirstName()),
-> assertTrue(updated.getLastModifiedBy().isPresent()),
-> assertNotEquals(updated.getCreatedBy().orElse(null), updated.
getLastModifiedBy().orElse(null))
);
LOGGER.info(">> updated record: {} ", updated);
}
@Configuration
@Import({DataJpaCfg.class, AuditCfg.class})
public static class TestContainersConfig {
@Autowired
Properties jpaProperties;
@PostConstruct
public void initialize() {
jpaProperties.put(Environment.FORMAT_SQL, true);
jpaProperties.put(Environment.USE_SQL_COMMENTS, true);
jpaProperties.put(Environment.SHOW_SQL, true);
jpaProperties.put(Environment.STATEMENT_BATCH_SIZE, 30);
}
}
}
The test methods should pass, and check that the values for the audit fields are populated.
These test methods reveal something important: java.time.LocalDate is not a good type for the
fields annotated with @CreatedDate and @LastModifiedDate for records designed to be edited more than
once a day. For our examples, we used java.time.LocalDateTime to make it really obvious the records
were changed.
JPA auditing support requires an additional library to be added to the classpath. Spring Data needs
spring-aspects to create special proxies that intercept entity updates and add their own changes before the
entities get persisted.
Keeping Entity Versions by Using Hibernate Envers
In an enterprise application, for business-critical data, it is always a requirement to keep a few versions of
each entity. For example, in a customer relationship management (CRM) system, each time a customer
record is inserted, updated, or deleted, the previous version should be kept in a history or auditing table to
fulfill the firm’s auditing or other compliance requirements.
483
Chapter 10 ■ Spring Data with SQL and NoSQL Databases
To accomplish this, there are two common options. The first one is to create database triggers that will
clone the pre-update record into the history table before any update operations. The second is to develop
the logic in the data access layer (for example, by using AOP). Both options have their drawbacks, however.
The trigger approach is tied to the database platform, while implementing the logic manually is quite
clumsy, might affect performance, and is very error-prone.
Hibernate Envers7 (short for entity versioning system) is a Hibernate module specifically designed
to automate the versioning of entities. In this section, we discuss how to use Envers to implement the
versioning of the SingerAudit entity introduced in the previous section.
Hibernate Envers is not a feature of JPA. We mention it here because we believe it’s more appropriate to cover
this after we have discussed some basic auditing features that you can use with Spring Data JPA.
Spring Data provides a module for Hibernate Envers named spring-data-envers. spring-data-jpa is
a transitive dependency of the Spring Data Envers library. Figure 10-5 shows the dependencies of a Spring
Data project using Hibernate Envers for versioning entities.
Figure 10-5. Gradle View showing dependencies for the chapter10 Envers project
Envers supports two auditing strategies, which are shown in Table 10-1.
7
https://hibernate.org/orm/envers/
484
Chapter 10 ■ Spring Data with SQL and NoSQL Databases
Table 10-1. Envers Auditing Strategies
Auditing
Strategy
Description
Default
Envers maintains a column for the revision of the record. Every time a record is inserted or
updated, a new record will be inserted into the history table with the revision number retrieved
from a database sequence or table.
Validity
audit
This strategy stores both the start and end revisions of each history record. Every time a
record is inserted or updated, a new record will be inserted into the history table with the start
revision number. At the same time, the previous record will be updated with the end revision
number. It’s also possible to configure Envers to record the timestamp at which the end
revision was updated into the previous history record.
In this section, we demonstrate the validity audit strategy. Although it will trigger more database
updates, retrieving the history records becomes much faster. Because the end revision timestamp is also
written to the history records, it will be easier to identify the snapshot of a record at a specific point in time
when querying the data.
Adding Tables for Entity Versioning
To support entity versioning, we need to add a few tables. First, for each table that the entity (in this case,
the SingerAudit entity class) will be versioning, we need to create the corresponding history table. For the
versioning of records in the SINGER_AUDIT table, let’s create a history table called SINGER_AUDIT_H. The code
in Listing 10-23 shows the table creation script.
Listing 10-23. SQL Code Describing the Hibernate Audit Table for the SingerAudit Entity
(AuditSchema.sql)
CREATE TABLE SINGER_AUDIT_H (
ID INT NOT NULL AUTO_INCREMENT
, FIRST_NAME VARCHAR(60) NOT NULL
, LAST_NAME VARCHAR(40) NOT NULL
, BIRTH_DATE DATE
, VERSION INT NOT NULL DEFAULT 0
, CREATED_BY VARCHAR(20)
, CREATED_DATE TIMESTAMP
, LAST_MODIFIED_BY VARCHAR(20)
, LAST_MODIFIED_DATE TIMESTAMP
, AUDIT_REVISION INT NOT NULL // *
, ACTION_TYPE INT // *
, AUDIT_REVISION_END INT // *
, AUDIT_REVISION_END_TS TIMESTAMP // *
, UNIQUE UQ_SINGER_AUDIT_H_1 (FIRST_NAME, LAST_NAME)
, PRIMARY KEY (ID, AUDIT_REVISION)
);
To support the validity audit strategy, we need to add four columns for each history table, shown
marked with //* in Listing 10-23 in the previous script snippet. Table 10-2 shows the columns and their
purposes.
485
Chapter 10 ■ Spring Data with SQL and NoSQL Databases
Table 10-2. Envers Audit Columns Details
Column
Data Type
Description
AUDIT_REVISION
INT
The start revision of the history record.
ACTION_TYPE
INT
The action type, with these possible values: 0 for add, 1 for modify,
and 2 for delete.
AUDIT_REVISION_END
INT
The end revision of the history record.
AUDIT_REVISION_END_TS
TIMESTAMP
The timestamp at which the end revision was updated.
Hibernate Envers requires another table for keeping track of the revision number and the timestamp
at which each revision was created for insert, add, update, or delete operations. The table should be named
REVINFO and a foreign key should be added to the SINGER_AUDIT_H table to link each audited record to its
versions. Its schema is very simple and is shown in Listing 10-24.
Listing 10-24. SQL Code Describing the Hibernate Audit REVINFO Table (AuditSchema.sql)
CREATE TABLE REVINFO (
REVTSTMP BIGINT NOT NULL
, REV INT NOT NULL AUTO_INCREMENT
, PRIMARY KEY (REVTSTMP, REV)
);
ALTER TABLE SINGER_AUDIT_H
ADD CONSTRAINT SINGER_AUDIT_H_TO_REVISION
FOREIGN KEY ( AUDIT_REVISION ) REFERENCES REVINFO( REV);
The REV column is for storing each revision number, which will be auto-incremented when a new
history record is created. The REVTSTMP column stores the timestamp (in a number format) when the
revision was created.
Configuring EntityManagerFactory for Entity Versioning
Hibernate Envers is implemented in the form of EJB listeners. We can configure those listeners in the
LocalContainerEntityManagerFactory bean by setting a set of specific Envers properties. The Java
configuration class is mostly identical to the one used so far for a transactional Spring application,
the only difference being that the Envers properties are added to the Properties object set on the
LocalContainerEntityManagerFactoryBean object by calling setJpaProperties(..). In Listing 10-25 you
can see these properties.
Listing 10-25. Envers Properties to Be Set on the LocalContainerEntityManagerFactoryBean
package com.apress.prospring6.ten.config;
// other import statements omitted
import org.hibernate.envers.configuration.EnversSettings;
import org.hibernate.cfg.Environment;
@Import(BasicDataSourceCfg.class)
@Configuration
@EnableTransactionManagement
486
Chapter 10 ■ Spring Data with SQL and NoSQL Databases
@ComponentScan(basePackages = {"com.apress.prospring6.ten"})
@EnableJpaRepositories("com.apress.prospring6.ten.repos")
public class EnversConfig {
// other bean declarations omitted
@Bean
public Properties jpaProperties() {
Properties jpaProps = new Properties();
jpaProps.put(Environment.HBM2DDL_AUTO, "none");
jpaProps.put(Environment.FORMAT_SQL, false);
jpaProps.put(Environment.STATEMENT_BATCH_SIZE, 30);
jpaProps.put(Environment.USE_SQL_COMMENTS, false);
jpaProps.put(Environment.SHOW_SQL, false);
// Properties for Hibernate Envers
jpaProps.put(EnversSettings.AUDIT_TABLE_SUFFIX, "_H");
jpaProps.put(EnversSettings.REVISION_FIELD_NAME, "AUDIT_REVISION");
jpaProps.put(EnversSettings.REVISION_TYPE_FIELD_NAME, "ACTION_TYPE");
jpaProps.put(EnversSettings.AUDIT_STRATEGY, "org.hibernate.envers.strategy.
ValidityAuditStrategy");
jpaProps.put(EnversSettings.AUDIT_STRATEGY_VALIDITY_END_REV_FIELD_NAME, "AUDIT_
REVISION_END");
jpaProps.put(EnversSettings.AUDIT_STRATEGY_VALIDITY_STORE_REVEND_TIMESTAMP, "true");
jpaProps.put(EnversSettings.AUDIT_STRATEGY_VALIDITY_REVEND_TIMESTAMP_FIELD_NAME,
"AUDIT_REVISION_END_TS");
return jpaProps;
}
@Bean
public LocalContainerEntityManagerFactoryBean entityManagerFactory() {
var factory = new LocalContainerEntityManagerFactoryBean();
factory.setPersistenceProviderClass(HibernatePersistenceProvider.class);
factory.setPackagesToScan("com.apress.prospring6.ten.entities");
factory.setDataSource(dataSource);
factory.setJpaProperties(jpaProperties());
factory.setJpaVendorAdapter(jpaVendorAdapter());
return factory;
}
}
With this configuration, what happens under the hood is that audit event listeners (instances of types
implementing org.hibernate.envers.event.spi.EnversListener) are attached to persistence events:
add, insert, update, and delete. These listeners intercept the events post-insert, post-update, or post-delete
and clone the pre-update snapshot of the entity class into the history table. The listeners are also attached to
those association update events (pre-collection-update, pre-collection-remove, and pre-collection-recreate)
for handling the update operations of the entity class’s associations. Envers is capable of keeping the history
of the entities within an association (for example, one-to-many or many-to-many).
The properties are set in the configuration in Listing 10-25 and explained briefly in Table 10-3.
487
Chapter 10 ■ Spring Data with SQL and NoSQL Databases
All constants are declared in the org.hibernate.envers.configuration.EnversSettings
interface. The interface name is not shown in Table 10-3 because that would make it very difficult to fit the
table in the page8.
All property names in the second column start with org.hibernate.envers. This prefix is not
shown in the table because that would make it very difficult to fit it in the page.
Table 10-3. Envers configurations
Constant
Property Name
Default Value
Description
AUDIT_TABLE_SUFFIX audit_table_
prefix
_AUD
The table name suffix for the versioned
entity. For example, for the entity class
SingerAudit, which is mapped to the
SINGER_AUDIT table, Envers will keep the
history in the table SINGER_AUDIT_H, since
we defined the value _H for the property.
REVISION_FIELD_
NAME
revision_
field_name
REV
The history table’s column for storing the
revision number for each history record.
REVISION_TYPE_
FIELD_NAME
revision_type_ REVTYPE
field_name
The history table’s column for storing
the update action type.
AUDIT_STRATEGY
audit_strategy org.hibernate.
envers.strategy.
DefaultAuditStrategy
The audit strategy to use for entity
versioning.
AUDIT_STRATEGY_
VALIDITY_ END_
REV_FIELD_NAME
audit_
REVEND
strategy_
validity_ end_
rev_field_name
The history table’s column for storing
the end revision number foreach
history record. Required only when
using the validity audit strategy.
AUDIT_STRATEGY_
VALIDITY_ STORE_
REVEND_TIMESTAMP
audit_
strategy_
validity_
store_revend_
timestamp
false
Specifies whether to store the
timestamp when the end revision
number for each history record is
updated. Required only when using the
validity audit strategy.
AUDIT_STRATEGY_
VALIDITY_ REVEND_
TIMESTAMP_FIELD_
NAME
audit_
strategy_
validity_
revend_
timestamp_
field_name
REVEND_TSTMP
The history table’s column for storing
the timestamp when the end revision
number for each history record is
updated. Required only when using the
validity audit strategy and the previous
property is set to true.
https://docs.jboss.org/hibernate/orm/current/javadocs/org/hibernate/envers/
configuration/EnversSettings.html
8
488
Chapter 10 ■ Spring Data with SQL and NoSQL Databases
The default values in Table 10-3 are the one used by Hibernate when configured to generate the
database schema, and no values are explicitly configured for these properties.
You can find the full list of Hibernate properties in the Hibernate official documentation9.
Enabling Entity Versioning and History Retrieval
To enable versioning of an entity, just annotate the entity class with the @Audited annotation provided
by Hibernate. This annotation can be used at the class level and then the changes on all entity fields are
audited. If you want to escape certain fields from auditing, you can use Hibernate’s @NotAudited annotation
on those fields. Listing 10-26 shows the SingerAudit class annotated with @Audited and the other Jakartaspecific annotations.
Listing 10-26. Entity Class Annotated with Hibernates Envers @Audited
package com.apress.prospring6.ten.entities;
// other import statements omitted
import org.hibernate.envers.Audited;
@Entity
@Audited
@Table(name = "SINGER_AUDIT")
public class SingerAudit extends AuditableEntity<SingerAudit> {
// body omitted
}
The entity class is annotated with @Audited, which Envers listeners will check for and perform
versioning of the updated entities. By default, Envers will also try to keep a history of the associations; if you
want to avoid this, you should use the @NotAudited annotation.
To retrieve the history records, Envers provides the org.hibernate.envers.AuditReader interface, which
can be obtained from the AuditReaderFactory class. To do this, a new method called findAuditByRevision()
is added to the SingerAuditService interface for retrieving the SingerAudit history records by audited record
id and revision number. Listing 10-27 shows the SingerAuditServiceImpl implementation.
Listing 10-27. Service Method for Retrieving History Records by Revision
package com.apress.prospring6.ten.service;
import jakarta.persistence.PersistenceContext;
import org.hibernate.envers.AuditReaderFactory;
https://docs.jboss.org/hibernate/orm/current/userguide/html_single/Hibernate_User_
Guide.html#envers-configuration
9
489
Chapter 10 ■ Spring Data with SQL and NoSQL Databases
@Service("singerAuditService")
@Transactional
public class SingerAuditServiceImpl implements SingerAuditService {
private final SingerAuditRepository singerAuditRepository;
@PersistenceContext
private EntityManager entityManager;
// other methods and fields omitted
@Override
public SingerAudit findAuditByRevision(Long id, int revision) {
var auditReader = AuditReaderFactory.get(entityManager);
return auditReader.find(SingerAudit.class, id, revision);
}
}
The SingerAuditServiceImpl class must be modified, obviously, and the EntityManager must be
injected into it so that the AuditReaderFactory can use it to create an org.hibernate.envers.AuditReader
instance to read the audit records.
This can easily be avoided by using custom implementations for Spring Data custom repositories, and
since the focus of this Spring, let’s do that.
Custom Implementations for Spring Data Repositories
Spring Data provides default options for handling database records and creating query methods with little
coding. However, there are cases when that is not enough, and the Envers example introduced here is a good
example.
To add a custom method to the default functionality of a Spring Data Repository, we need to define
a fragment interface declaring the behavior we want to add. In our case, as depicted in Listing 10-28, the
interface is named CustomSingerAuditRepository and declares a single method with the sole purpose of
retrieving older versions of SingerAudit records using their id and revision number.
Listing 10-28. Fragment Interface Declaring a Method for Retrieving Versions of SingerAudit Records
package com.apress.prospring6.ten.repos.envers;
import com.apress.prospring6.ten.entities.SingerAudit;
import java.util.Optional;
public interface CustomSingerAuditRepository {
Optional<SingerAudit> findAuditByIdAndRevision(Long id, int revision);
}
Now that we have an interface, we need to provide an implementation. This is where the class
CustomSingerAuditRepositoryImpl depicted in Listing 10-29 comes in.
490
Chapter 10 ■ Spring Data with SQL and NoSQL Databases
Listing 10-29. Implementation of the CustomSingerAuditRepository Interface
package com.apress.prospring6.ten.repos.envers;
import
import
import
import
com.apress.prospring6.ten.entities.SingerAudit;
jakarta.persistence.EntityManager;
jakarta.persistence.PersistenceContext;
org.hibernate.envers.AuditReaderFactory;
import java.util.Optional;
public class CustomSingerAuditRepositoryImpl implements CustomSingerAuditRepository {
@PersistenceContext
private EntityManager entityManager;
@Override
public Optional<SingerAudit> findAuditByIdAndRevision(Long id, int revision) {
var auditReader = AuditReaderFactory.get(entityManager);
var result = auditReader.find(SingerAudit.class, id, revision);
if(result != null)
return Optional.of(result);
return Optional.empty();
}
}
Notice that we just moved the Envers-specific code from SingerAuditServiceImpl to this class.
To tell Spring Data that we want this method to be added to its default set of functionalities, we need to
make the Spring Data repository for the SingerAudit entity extend the CustomSingerAuditRepository too,
like depicted in Listing 10-30.
Listing 10-30. Implementation of the CustomSingerAuditRepository Interface
package com.apress.prospring6.ten.repos;
import com.apress.prospring6.ten.entities.SingerAudit;
import com.apress.prospring6.ten.repos.envers.CustomSingerAuditRepository;
import org.springframework.data.jpa.repository.JpaRepository;
public interface SingerAuditRepository extends
JpaRepository<SingerAudit, Long> ,
CustomSingerAuditRepository { }
491
Chapter 10 ■ Spring Data with SQL and NoSQL Databases
The most important part of the class name that corresponds to the fragment interface is the Impl
postfix. This is what allows Spring Data to identify where the implementation for that method is coming from
and add it to its JPA repository proxies. After all, convention over configuration is one of the core values of the
Spring Framework.
However, being easy to customize is also a Spring value, and thus if you want to name your custom
repository implementation differently, you have to tell Spring about it. The customization is somewhat limited;
you can only specify a different postfix to replace the default Impl, using @EnableJpaRepositories(
repositoryImplementationPostfix = "${custom-prefix}), but it is better than nothing.
This means that now the SingerAuditServiceImpl class can be cleaned up of the Envers-specific
code and the findAuditByRevision(..) method just invokes the findAuditByIdAndRevision(..) method
provided by the Spring JPA SingerAuditRepository, as shown in Listing 10-31.
Listing 10-31. Implementation of the SingerAuditServiceImpl Interface
package com.apress.prospring6.ten.service;
@Service("singerAuditService")
@Transactional
public class SingerAuditServiceImpl implements SingerAuditService {
private final SingerAuditRepository singerAuditRepository;
// other methods omitted
@Transactional(readOnly=true)
@Override
public SingerAudit findAuditByRevision(Long id, int revision) {
return singerAuditRepository.findAuditByIdAndRevision(id, revision).orElse(null);
}
}
What is left is to test that this works. Writing a test method is not that difficult, but to make sure that
our revisioning works, an update and a delete operation should be checked. The test class is shown in
Listing 10-32.
Listing 10-32. Testing the Envers Auditing in a Spring Application
package com.apress.prospring6.ten;
// import statements omitted
@Testcontainers
@Sql({ "classpath:testcontainers/audit/drop-schema.sql", "classpath:testcontainers/audit/
create-schema.sql" })
@SpringJUnitConfig(classes = {EnversConfig.class, AuditCfg.class})
492
Chapter 10 ■ Spring Data with SQL and NoSQL Databases
public class EnversServiceTest extends TestContainersBase {
private static final Logger LOGGER = LoggerFactory.getLogger(EnversServiceTest.class);
@Autowired
SingerAuditService auditService;
@BeforeEach
void setUp(){
var singer = new SingerAudit();
singer.setFirstName("BB");
singer.setLastName("King");
singer.setBirthDate(LocalDate.of(1940, 8, 16));
auditService.save(singer);
}
@Test
void testFindAuditByRevision() {
// update to create new version
var singer = auditService.findAll().findFirst().orElse(null);
assertNotNull(singer);
singer.setFirstName("Riley B.");
auditService.save(singer);
var oldSinger = auditService.findAuditByRevision(singer.getId(), 1);
assertEquals("BB", oldSinger.getFirstName());
LOGGER.info(">> old singer: {} ", oldSinger);
var newSinger = auditService.findAuditByRevision(singer.getId(), 2);
assertEquals("Riley B.", newSinger.getFirstName());
LOGGER.info(">> updated singer: {} ", newSinger);
}
@Test
void testFindAuditAfterDeletion() {
// delete record
var singer = auditService.findAll().findFirst().orElse(null);
auditService.delete(singer.getId());
// extract from audit
var deletedSinger = auditService.findAuditByRevision(singer.getId(), 1);
assertEquals("BB", deletedSinger.getFirstName());
LOGGER.info(">> deleted singer: {} ", deletedSinger);
}
}
To get a glimpse of what is happening, you can try taking a look in the console log messages printed
when the test methods are executed. Unfortunately, at this point in the book, if we enable the TRACE log for
org.hibernate, the log becomes unreadable, but Listing 10-33 shows the most important bits.
493
Chapter 10 ■ Spring Data with SQL and NoSQL Databases
Listing 10-33. Envers Auditing Test Execution Log
TRACE: TransactionAspectSupport - Getting transaction for
[com.apress.prospring6.ten.service.SingerAuditServiceImpl.save]
TRACE: AbstractEntityPersister - Updating entity:
[com.apress.prospring6.ten.entities.SingerAudit#1]
...
DEBUG: SqlStatementLogger - insert into REVINFO (REVTSTMP) values (?)
TRACE: AbstractEntityPersister - Inserting entity:
[com.apress.prospring6.ten.entities.SingerAudit_H#component[
id,AUDIT_REVISION]{id=1, AUDIT_REVISION=org.hibernate.envers.
DefaultRevisionEntity#1}]
DEBUG: SqlStatementLogger - insert into REVINFO (REVTSTMP) values (?)
TRACE: AbstractEntityPersister - Inserting entity:
[com.apress.prospring6.ten.entities.SingerAudit_H#component[
id,AUDIT_REVISION]{id=1, AUDIT_REVISION=org.hibernate.envers.
DefaultRevisionEntity#2}]
...
TRACE: TransactionAspectSupport - Getting transaction for
[com.apress.prospring6.ten.service.SingerAuditServiceImpl.findAuditByRevision]
DEBUG: QueryTranslatorImpl - parse() - HQL:
select e__ from com.apress.prospring6.ten.entities.SingerAudit_H e__
where e__.originalId.AUDIT_REVISION.id <= :revision
and e__.ACTION_TYPE <> :_p0
and e__.originalId.id = :_p1
and (e__.AUDIT_REVISION_END.id > :revision or e__.AUDIT_REVISION_END is null)
TRACE: QueryParameters - Named parameters: {_p1=1, _p0=DEL, revision=1}
DEBUG: Loader - Result row: EntityKey[com.apress.prospring6.ten.entities.SingerAudit_H#compo
nent[id,AUDIT_REVISION]{id=1, AUDIT_REVISION=org.hibernate.envers.DefaultRevisionEntity#1}]
INFO : EnversServiceTest - >> old singer: com.apress.prospring6.ten.entities.
SingerAudit@20524816[
id=1,version=0,firstName=BB,lastName=King,birthDate=1940-08-16,
createdBy=prospring6-0e94fe,
createdDate=2022-08-07T13:40:31,
lastModifiedBy=prospring6-0e94fe,
lastModifiedDate=2022-08-07T14:40:30
]
...
TRACE: QueryParameters - Named parameters: {_p1=1, _p0=DEL, revision=2}
DEBUG: Loader - Result row: EntityKey[com.apress.prospring6.ten.entities.SingerAudit_H#compo
nent[id,AUDIT_REVISION]{id=1, AUDIT_REVISION=org.hibernate.envers.DefaultRevisionEntity#2}]
INFO : EnversServiceTest - >> updated singer: com.apress.prospring6.ten.entities.
SingerAudit@6347f9cc[
id=1,version=0,firstName=Riley B.,lastName=King,birthDate=1940-08-16,
createdBy=prospring6-0e94fe,
createdDate=2022-08-07T14:40:30,
lastModifiedBy=prospring6-TJFUWY,
lastModifiedDate=2022-08-07T14:40:31
]
...
494
Chapter 10 ■ Spring Data with SQL and NoSQL Databases
Notice how every action on the SINGER_AUDIT table causes an entry to be created in REVINFO and
SINGER_AUDIT_H. Then, when SingerAudit entries are extracted with a certain revision, they are extracted
from the SINGER_AUDIT_H table. After the update operation, the SingerAudit’s first name is changed to Riley
B. As expected, when looking at the history, at revision 1, the first name is BB. At revision 2, the first name
becomes Riley B. Also notice that the lastModifiedDate date and lastModifiedBy of revision 2 reflect the
updated date and time and a different username, generated by the AuditAware<String> bean.
Spring Boot Data JPA
Up to this point, we have configured everything explicitly, including entities, databases, repositories, and
services. As you probably expect by now, there should be a Spring Boot starter artifact to make things easier.
Spring Boot JDBC was introduced in Chapter 9, but its capabilities truly shine in combination with Spring Data,
and there is a starter library for that called spring-boot-starter-data-jpa. Adding this library to a project
classpath adds transitively all the dependencies necessary to a Spring transactional application: hibernatecore for persistence, HikariCP for connection pooling, spring-data-jpa for data access using data repository
interfaces, and spring-tx for transaction management. The project dependencies are shown in Figure 10-6.
Figure 10-6. Gradle View showing dependencies for the chapter10-boot project
495
Chapter 10 ■ Spring Data with SQL and NoSQL Databases
The Spring Boot Data JPA configuration has two parts: the main class annotated with
@SpringBootApplication and the application-dev.yaml (or application-dev.properties) file. Of course,
the -dev suffix is added because we are using an application profile named dev. This is a practical way to
isolate bean declarations based on context.
For this project the application-dev.yaml file has the contents shown in Listing 10-34.
Listing 10-34. Spring Boot Data JPA Configuration yaml Configuration
# datasource config
spring:
datasource:
driverClassName: org.mariadb.jdbc.Driver
url: jdbc:mariadb://localhost:3306/musicdb?useSSL=false
username: prospring6
password: prospring6
# HikariCP
hikari:
maximum-pool-size: 25
# JPA config
jpa:
generate-ddl: false
properties:
hibernate:
naming:
physical-strategy:
jdbc:
batch_size: 10
fetch_size: 30
max_fetch_depth: 3
show-sql: true
format-sql: false
use_sql_comments: false
hbm2ddl:
auto: none
# Logging config
logging:
pattern:
console: "%-5level: %class{0} - %msg%n"
level:
root: INFO
org.springframework.boot: DEBUG
com.apress.prospring6.ten.boot: INFO
org.springframework.orm.jpa: TRACE
The configuration is split in three sections: datasource, jpa, and logging. Properties with names
starting with spring.datasource are set with values necessary for configuring a data source: connection
URL, credentials, and connection pooling values. Properties with names starting with spring.jpa are set
with values describing a persistence unit. You can easily recognize the Hibernate properties covered in
Chapters 7 and 8. Properties starting with logging are set with the typical value for logging configuration
that in classic applications could be found in logback.xml files.
496
Chapter 10 ■ Spring Data with SQL and NoSQL Databases
In a Spring Boot Data JPA application, the autoconfiguration mechanism takes care of declaring the
necessary beans like DataSource, EntityManager, LocalSessionFactoryBean, TransactionManager, and so
on, based on the properties in the configuration file, but we still have to configure a few things:
•
Location of the entity classes: Since the LocalSessionFactoryBean is autoconfigured
for us, the way to specify the packages where the entity classes are is to use the
@EntityScan annotation from the org.springframework.boot.autoconfigure.
domain package.
•
Location of the Data repository interfaces: This is easily done by adding the
@EnableJpaRepositories annotation to a class annotated with @Configuration, if
there is one, or the @SpringBootApplication annotated class if there is not.
•
Transactional behavior: This is easily done by adding the
@EnableTransactionManagement annotation to a class annotated with
@Configuration, if there is one, or the @SpringBootApplication annotated class if
there is not.
For the project analyzed in this section, the configuration is depicted in Listing 10-35.
Listing 10-35. Spring Boot Data JPA Annotation Configuration
package com.apress.prospring6.ten.boot;
import
import
import
import
import
import
import
import
import
com.apress.prospring6.ten.boot.service.SingerService;
org.slf4j.Logger;
org.slf4j.LoggerFactory;
org.springframework.boot.SpringApplication;
org.springframework.boot.autoconfigure.SpringBootApplication;
org.springframework.boot.autoconfigure.domain.EntityScan;
org.springframework.core.env.AbstractEnvironment;
org.springframework.data.jpa.repository.config.EnableJpaRepositories;
org.springframework.transaction.annotation.EnableTransactionManagement;
@EntityScan(basePackages = {"com.apress.prospring6.ten.boot.entities"})
@EnableTransactionManagement
@EnableJpaRepositories("com.apress.prospring6.ten.boot.repos")
@SpringBootApplication
public class Chapter10Application {
private static final Logger LOGGER = LoggerFactory.getLogger(Chapter10Application.class);
public static void main(String... args) {
System.setProperty(AbstractEnvironment.ACTIVE_PROFILES_PROPERTY_NAME, "dev");
var ctx = SpringApplication.run(Chapter10Application.class, args);
var service = ctx.getBean(SingerService.class);
LOGGER.info(" ---- Listing singers:");
service.findAll().forEach(s -> LOGGER.info(s.toString()));
}
}
497
Chapter 10 ■ Spring Data with SQL and NoSQL Databases
As you can see, the Spring Boot main configuration class has a main(..) method. This makes this class
executable, and running the code in this class’s main(..) method ensures that the configuration is correct.
However, running the class with the configuration shown so far ends with the following error:
Exception in thread "main" org.springframework.dao.InvalidDataAccessResourceUsageException:
JDBC exception executing SQL
[select s1_0.id,
s1_0.birth_date,
s1_0.first_name,
s1_0.last_name,
s1_0.version
from singer s1_0
]; SQL [n/a]
...
Caused by: java.sql.SQLSyntaxErrorException: (conn=308) Table 'musicdb.singer' doesn't exist
at org.mariadb.jdbc.export.ExceptionFactory.createException(ExceptionFactory.java:280)
at org.mariadb.jdbc.export.ExceptionFactory.create(ExceptionFactory.java:368)
So, what is going on here? If the data source was configured correctly, why is the singer table not found?
If you think the reason is that the table names are case-sensitive, you are somewhat right. Before explaining
what is going on in this Spring Boot Data JPA application, let’s talk about Hibernate naming strategies.
Hibernate uses two different naming strategies10 to map names from the object model to the
corresponding database names:
•
ImplicitNamingStrategy: The proper logical name is determined from the domain
model mapping, either from configuration annotations like @Column and @Table
(as you’ve seen in previous chapters) or by Hibernate using an implementation
of org.hibernate.boot.model.naming.ImplicitNamingStrategy configured via
the Environment.IMPLICIT_NAMING_STRATEGY / hibernate.implicit_naming_
strategy property.
•
PhysicalNamingStrategy: The proper logical name is determined by
Hibernate using an implementation of org.hibernate.boot.model.naming.
PhysicalNamingStrategy configured via the Environment.PHYSICAL_NAMING_
STRATEGY / hibernate.physical_naming_strategy property.
The purpose of these two strategies is to reduce the explicit configuration a developer must provide.
Many organizations define rules around the naming of database objects (tables, columns, foreign keys,
etc.). The idea of a PhysicalNamingStrategy is to help implement such naming rules without having to
hard-code them into the mapping via explicit names.
A few companies I (Iuliana) have worked for preferred to name database object in uppercase letters,
because in the code, it was easier to discern between HQL and SQL native queries. This is the approach I
kept for this book as well.
In a Spring Boot Data JPA application, the default strategy of determining database object names
is an implementation of PhysicalNamingStrategy named org.hibernate.boot.model.naming.
CamelCaseToUnderscoresNamingStrategy that is provided by Hibernate. As its name indicates, the logical
names are assumed to be in camel case and separated by underscores. This is the reason why the Singer
entity class gets mapped to the singer table, and since MariaDB is installed on a Linux container, database
object names are case-sensitive, so SINGER is clearly not equal to singer.
https://docs.jboss.org/hibernate/orm/current/userguide/html_single/Hibernate_
User_Guide.html#naming
10
498
Chapter 10 ■ Spring Data with SQL and NoSQL Databases
The solution here is to provide our own PhysicalNamingStrategy bean, instructing Spring Boot how
to determine the database object names. The PhysicalNamingStrategy interface declares five methods for
each named database object11. The body of this interface is declared in Listing 10-36.
Listing 10-36. Hibernate’s PhysicalNamingStrategy Interface
package org.hibernate.boot.model.naming;
import org.hibernate.Incubating;
import org.hibernate.engine.jdbc.env.spi.JdbcEnvironment;
@Incubating
public interface PhysicalNamingStrategy {
Identifier toPhysicalCatalogName(Identifier logicalName, JdbcEnvironment jdbcEnvironment);
Identifier toPhysicalSchemaName(Identifier logicalName, JdbcEnvironment jdbcEnvironment);
Identifier toPhysicalTableName(Identifier logicalName, JdbcEnvironment jdbcEnvironment);
Identifier toPhysicalSequenceName(Identifier logicalName, JdbcEnvironment jdbcEnvironment);
Identifier toPhysicalColumnName(Identifier logicalName, JdbcEnvironment jdbcEnvironment);
}
The @Incubating annotation indicates something that is still being actively developed and therefore
may change at a later time.
To make things simpler. we can extend the PhysicalNamingStrategyImpl class, provided by Hibernate,
and override only the methods we are interested in. The HibernateCfg configuration class shown in
Listing 10-37 declares a bean of an anonymous type extending PhysicalNamingStrategyImpl.
Listing 10-37. Custom PhysicalNamingStrategy Implementation
package com.apress.prospring6.ten.boot;
import
import
import
import
import
org.hibernate.boot.model.naming.Identifier;
org.hibernate.boot.model.naming.PhysicalNamingStrategyStandardImpl;
org.hibernate.engine.jdbc.env.spi.JdbcEnvironment;
org.springframework.context.annotation.Bean;
org.springframework.context.annotation.Configuration;
@Configuration(proxyBeanMethods = false)
public class HibernateCfg {
https://github.com/hibernate/hibernate-orm/blob/main/hibernate-core/src/main/
java/org/hibernate/boot/model/naming/PhysicalNamingStrategy.java
11
499
Chapter 10 ■ Spring Data with SQL and NoSQL Databases
@Bean
PhysicalNamingStrategyStandardImpl caseSensitivePhysicalNamingStrategy() {
return new PhysicalNamingStrategyStandardImpl() {
@Override
public Identifier toPhysicalTableName(Identifier logicalName, JdbcEnvironment
context) {
return apply(logicalName, context);
}
@Override
public Identifier toPhysicalColumnName(Identifier logicalName, JdbcEnvironment
context) {
return apply(logicalName, context);
}
private Identifier apply(final Identifier name, final JdbcEnvironment context) {
if ( name == null ) {
return null;
}
StringBuilder builder = new StringBuilder( name.getText().replace( '.',
'_' ) );
for ( int i = 1; i < builder.length() - 1; i++ ) {
if ( isUnderscoreRequired( builder.charAt( i - 1 ), builder.charAt( i ),
builder.charAt( i + 1 ) ) ) {
builder.insert( i++, '_' );
}
}
return Identifier.toIdentifier(builder.toString().toUpperCase());
}
private boolean isUnderscoreRequired(final char before, final char current,
final char after) {
return Character.isLowerCase( before ) && Character.isUpperCase( current )
&& Character.isLowerCase( after );
}
};
}
}
The proxyBeanMethods attribute is set to false because methods annotated with @Bean in this class
should not get proxied in order to enforce bean life-cycle behavior. The code used to determine the logical
names for tables and columns is declared in the apply() method.
Executing the Chapter10Application class with this new configuration class we can see that the
expected output, the singer instances as string, is printed in the console log.
The repository data classes and service classes are the same as shown in this chapter, in the classic
Spring application. The test methods are the same as well, the only difference being in the configuration of
the test context. An application-test.yaml or application-test.propeties file is recommended, since
the data source has to be replaced with a Testcontainers datasource. The configuration file used in this
section’s example is shown in Listing 10-38.
500
Chapter 10 ■ Spring Data with SQL and NoSQL Databases
Listing 10-38. Spring Boot Data JPA Test Configuration yaml Configuration
spring:
datasource:
url: "jdbc:tc:mariadb:10.9-rc:///testdb?TC_INITSCRIPT=testcontainers/create-schema.sql"
jpa:
properties:
hibernate:
jdbc:
batch_size: 10
fetch_size: 30
max_fetch_depth: 3
show-sql: true
format-sql: true
use_sql_comments: true
hbm2ddl:
auto: none
# Logging config
logging:
pattern:
console: " %-5level: %class{0} - %msg%n"
level:
root: INFO
org.springframework.boot: DEBUG
com.apress.prospring6.ten.boot: DEBUG
org.springframework.orm.jpa: TRACE
Notice that Hibernate-specific properties useful for debugging are set to true and the logging
configuration is more detailed.
The Spring Boot test configuration class is annotated with @SpringBootTest and additional annotations
required to set up a test context, as shown in Listing 10-39.
Listing 10-39. Spring Boot Data Test Class
package com.apress.prospring6.ten.boot;
import org.springframework.boot.test.context.SpringBootTest;
import org.springframework.test.context.ActiveProfiles;
import org.springframework.test.context.jdbc.Sql;
import org.springframework.test.context.jdbc.SqlMergeMode;
import org.testcontainers.junit.jupiter.Testcontainers;
// other import statements omitted
@ActiveProfiles("test")
@Testcontainers
@SqlMergeMode(SqlMergeMode.MergeMode.MERGE)
@Sql({ "classpath:testcontainers/drop-schema.sql", "classpath:testcontainers/createschema.sql" })
@SpringBootTest(classes = {Chapter10Application.class})
public class Chapter10ApplicationTest {
private static final Logger LOGGER = LoggerFactory.getLogger(Chapter10Application.class);
501
Chapter 10 ■ Spring Data with SQL and NoSQL Databases
@Autowired
SingerService singerService;
@Test
public void testFindAll(){
var singers = singerService.findAll().peek(s -> LOGGER.info(s.toString())).toList();
assertEquals(3, singers.size());
}
// other test methods omitted
}
What tells Spring Boot to initialize the test context based on the configuration in application-test.
yaml is the @ActiveProfiles("test") annotation enabling the test context. The @SpringBootTest(classes
= {Chapter10Application.class}) annotation is explicitly configured to use the Chapter10Application
configuration. This is not necessary when there is a single Spring Boot test class named exactly as the Spring
Boot configuration class suffixed with Test, but throughout the book’s examples, this form is used for a bit of
extra clarity, to make it obvious where the configuration for the beans tested is coming from.
Considerations Using Spring Data JPA
Using Spring Data JPA’s Repository abstraction can help simplify JPA application development. Spring
Boot can simplify development even more, but customizing configurations might require a bit of learning.
Referring again to the I Love Lucy episode “Paris at Last” introduced in Chapter 6, Spring Data JPA is
the last translator in the chain. Its job is based on the ones before it, the JDBC driver, JPA, and Hibernate
(and similar, like Oracle TopLink), and it is what makes writing Java code to access data easiest, because it
focuses on the business logic and hides the technical complexity and boilerplate code. All these technical
layers together make it pretty easy and fast to implement the persistence layer. Spring Data JPA also makes
customizing transactional behavior easy. Spring Data (and the frameworks it relies on) is very popular, for
big enterprise projects; for smaller projects, might be overkill. Plus, the more technologies you add in your
project, the steeper the learning curve is for developers and the more failure points you add at the points
where those are glued together.
Thus far this chapter has introduced the core concepts and interfaces of Spring Data JPA repositories.
JPA is suitable when working with normalized SQL databases. How about when working with nonstructured,
non-strongly relational data that is not a good fit for a SQL database? Does Spring Data offer something for
that? Of course! You can learn about that in the next section.
Spring Data with MongoDB12
Almost all data is relational in some way, and for years SQL databases that represented those relationship
through concrete objects, like foreign keys, dominated the industry. Organizing data to reduce duplication
and storage costs, however, introduced delays when handling that data since relationships had to be taken
into account. As the quantity of data grows, the quantity of metadata describing relationships grows too,
and operations become slower. Relational databases are well suited to accomplish tasks that involve a lot
of tables, that involve complex and huge queries, and in which transactional operations are crucial (ACID)
and speed is not always a requirement. Performing big cascade deletes while keeping relationships and data
integrity are other good use cases for relational databases.
12
https://spring.io/projects/spring-data-mongodb
502
Chapter 10 ■ Spring Data with SQL and NoSQL Databases
In this new age of the Internet, speed is the most common requirement. SQL databases, although
efficient in storing data and very precise and consistent in providing it when requested, are not suitable for
Internet services, where speed is more important than data integrity. NoSQL databases are useful when your
data isn’t strongly structured, when their relationships aren’t deep, when you need to save data for a small
amount of time (caching), or your queries aren’t too complex. For example, eBay is using a NoSQL database
called MongoDB, and Amazon is using DynamoDB, a proprietary NoSQL database created to satisfy its own
commercial needs. DynamoDB is known to be the most suitable NoSQL database for shopping sites, as it is
highly customizable, fast, and infinitely scalable in the Amazon cloud.
Thus, NoSQL databases appeare to satisfy this need for getting things quickly, even if not always
consistent. For example, when you access the Amazon shopping site, you don’t expect to get the most recent
products immediately, buy you will eventually get them. Also, being nonrelational, NoSQL databases have
some data duplication, thus data integrity comes second to speed of retrieval.
Another thing you need to keep in mind is that relational databases are not a very good model of real
systems. They force you to declare your full data structure before you even start writing the code to interact
with them, and making changes later is tricky, which is a problem because in real life changes happen
constantly. The main advantage of NoSQL is that, aside from a main identifier for every record, everything is
easily modifiable later. Amazon’s DynamoDB is a step even further in that direction because, aside from the
primary key, all columns—named attributes—in a record can be different from record to record. This level
of flexibility, unfortunately, means that writing a Spring Data library for working with DynamoDB is almost
impossible.
Since NoSQL databases have become widely used, it is only suitable to add a section about how Spring
can help interact with them. Spring provides quite a few data libraries for working with NoSQL databases,
but the Spring team’s favorite is MongoDB13, for which classic and reactive API is provided. Aside from that,
there is support for Apache Cassandra14 (an open source NoSQL Database Manage able to handle massive
amounts of data, and is fast too), Couchbase15(a modern cloud database that offers the robust capabilities
required for business-critical applications on a highly scalable and available platform), and Redis16 (an open
source, BSD licensed, in-memory data structure store, used as a database, cache, and message broker).
Recently, since it has become clear that fully nonrelational data does not exist, the NoSQL term is slowly
changing meaning from “non-SQL” to “not only SQL.” So, feel free to explore the NoSQL data realm, because
you’ll likely end up working with one of these databases.
MongoDB Concepts
For this section, you can install MongoDB on your computer, but the recommended way is to use Docker
and set up the container as recommended in the CHAPTER10-MONGO.adoc file present in the chapter10mongo project. Of course, you can skip this step altogether and just run the tests that use a Testcontainers
MongoDB container.
MongoDB is a document-oriented NoSQL database used for high-volume data storage. Instead of
using tables and rows as in the traditional relational databases, MongoDB makes use of collections and
documents. Documents in a collection do not have a fixed structure, like all rows in a table do.
Although we already mentioned what NoSQL databases are good for, to keep things consistent, the
Singer class is mapped to a MongoDB collection named singers. This is done in Spring by annotating
the Singer class with @Document, from the package org.springframework.data.mongodb.core.mapping.
This annotation is useful to configure the collection name to be different from the class name, since the
MongoDB standard is to name collections with the plural of the type of documents in it.
https://www.mongodb.com
https://cassandra.apache.org
15
https://www.couchbase.com
16
https://redis.io/
13
14
503
Chapter 10 ■ Spring Data with SQL and NoSQL Databases
The Singer class is shown in Listing 10-40.
Listing 10-40. Singer Class Configured As a MongoDB Document
package com.apress.prospring6.ten.document;
import org.springframework.data.mongodb.core.index.Indexed;
import org.springframework.data.mongodb.core.mapping.Document;
import org.springframework.data.mongodb.core.mapping.MongoId;
import java.time.LocalDate;
@Document(collection = "singers")
public class Singer {
@MongoId
public String id;
@Indexed
public String firstName;
@Indexed
public String lastName;
private LocalDate birthDate;
public Singer() {
}
public Singer(String firstName, String lastName, LocalDate birthDate) {
this.firstName = firstName;
this.lastName = lastName;
this.birthDate = birthDate;
}
// getters & setters omitted
}
MongoDB requires that all documents have an _id field. Using Spring Data, the field mapped to it is
annotated with @Id or @MongoId from the org.springframework.data.mongodb.core.mapping. The
@MongoId annotation is meta-annotated with @Id and, although used here to make it obvious that this
class maps to a MongoDB document, it provides the possibility to configure the field type using
@MongoId(FieldType.*). When annotated like this, Spring Data will attempt to convert the value to the
declared type.
The @Indexed annotation tells the mapping framework to call createIndex(..) on that property of your
document, making searches faster.
If the name of the field is required to be different in the document than the in the Java class, you can
annotate it with the @Field annotation to configure the desired value.
In Spring, types are mapped to and from a MongoDB representation using a set of built-in converters.
This is the reason why we can declare the LocalDate birthDate field without any conversion annotation.
504
Chapter 10 ■ Spring Data with SQL and NoSQL Databases
Now that we have a document, the next step is to create a repository for handling Singer instances.
The approach is similar to the one shown for Spring Data JPA. In Spring Data MongoDB, there is a
MongoRepository<T, ID> interface that is an extension of CrudRepository<T, ID> from the org.
springframework.data.repository package (there is also a reactive version, but more about that in
Chapter 20), and that is the interface our SingerRepository interface must extend. The SingerRepository
interface is shown in Listing 10-41.
Listing 10-41. SingerRepository MongoDB Data Repository Interface
package com.apress.prospring6.ten.repos;
import
import
import
import
com.apress.prospring6.ten.document.Singer;
org.springframework.data.mongodb.repository.MongoRepository;
org.springframework.data.mongodb.repository.Query;
org.springframework.data.repository.query.Param;
import java.time.LocalDate;
public interface SingerRepository extends MongoRepository<Singer, String> {
Iterable<Singer> findByFirstName(String firstName);
@Query("{'firstName' : ?0, 'lastName' : ?1}")
Iterable<Singer> findByPositionedParams(String fn, String ln);
@Query("{'firstName' : :#{#fn}, 'lastName' : :#{#ln}}")
Iterable<Singer> findByNamedParams(@Param("fn") String fn, @Param("ln") String ln);
}
The SingerRepository interface introduced here contains two MongoDB custom queries. When
writing MongoDB query expressions, parameters can be specified by position or they can be named, just
like for SQL queries. The only thing that is different is the query expression syntax; MongoDB queries are
essentially JSON objects. The findByPositionedParams(..) method uses indexes that match the order
of the parameters, the ?0 corresponds to the first argument in the method, and the value of the argument
will be used instead of ?0. This means that developers must keep track of positions and not mix them up,
because, although MongoDB won’t fail, it won’t return the expected result. However, query expressions are
pretty simple, and thus this is the recommended approach.
It is possible to use named parameters as well, which are referenced via their names mixed with the
@Param annotation and SpEL expressions. The expressions are more complex and verbose, but this approach
is more flexible and there is no risk of mistakenly positioning the arguments. Use whichever option you are
more comfortable with.
As we are already accustomed to, a SingerService bean is used to invoke repository methods, and its
implementation, being basic, is not worth repeating here. What is important is the Spring configuration for
connecting to a MongoDB instance and enabling Spring Data MongoDB repository support.
To connect to a MongoDB instance, a bean of type com.mongodb.client.MongoClient is needed. This
bean can be declared by the developer directly in a @Configuration class as shown in Listing 10-42.
505
Chapter 10 ■ Spring Data with SQL and NoSQL Databases
Listing 10-42. MongoClient Bean Declaration
package com.apress.prospring6.ten.config;
import com.mongodb.client.MongoClients;
import com.mongodb.client.MongoClient;
@Configuration
public class MongoCfg {
@Bean
public MongoClient mongoClient() {
return MongoClients.create("mongodb://prospring6:prospring6@localhost:27017/
musicdb?authSource=admin");
}
}
The MongoClients.create(..) static method is used to create a MongoClient instance based on the
connection string provided as an argument. The connection string in the listing is built upon this template:
mongodb://[username:password@]host1[:port1][,...hostN[:portN]][/[defaultauthdb][?options]]
The concrete connection string used in this section has the following components:
•
It starts with mongodb://, which represents the type of driver we are using (in the
same way MySQL connection strings start with jdbc:).
•
prospring6:prospring6 represents user:password used to connect to the
MongoDB database.
•
localhost represents the location where the database is installed, in this case on the
same machine where the code is executed (or in a container managed by the local
Docker runtime).
•
27017 represents the connection port.
•
musicdb is the name of the database, and the prospring6 user must have the
dbOwner role on it.
•
authSource=admin is a parameter pointing to the collection where the user data is
located, so the provided username and password can be checked against it.
This way of creating a MongoClient is the most direct one. When using Spring Data MongoDB, the
recommended approach is to declare a Spring MongoClientFactoryBean as shown in Listing 10-43.
Listing 10-43. MongoClientFactoryBean Bean Declaration
package com.apress.prospring6.ten.config;
import org.springframework.data.mongodb.core.MongoClientFactoryBean;
@Configuration
public class MongoCfg {
506
Chapter 10 ■ Spring Data with SQL and NoSQL Databases
@Bean
public MongoClientFactoryBean mongoClientFactory() {
MongoClientFactoryBean mongo = new MongoClientFactoryBean();
mongo.setConnectionString("mongodb://prospring6:prospring6@localhost:27017/
musicdb?authSource=admin");
return mongo;
}
}
Enabling support for MongoDB Data repositories is done by annotating the configuration class with
@EnableMongoRepositories. If no base package is configured, the infrastructure scans the package of the
annotated configuration class.
Spring MongoDB Data repositories use a bean of org.springframework.data.mongodb.core.
MongoTemplate to exchange data with the MongoDB instance, and thus this bean must be created too.
Listing 10-44 shows the full configuration class, with the connection string being read from a mongo.
properties file.
Listing 10-44. Spring Data MongoDB Application Full Configuration
/** === Contents of 'mongo.properties' file ===
mongo.url=mongodb://prospring6:prospring6@localhost:27017/musicdb?authSource=admin
mongo.db=musicdb
*/
package com.apress.prospring6.ten.config;
import org.springframework.data.mongodb.core.MongoTemplate;
import org.springframework.data.mongodb.core.MongoClientFactoryBean;
@ComponentScan(basePackages = {"com.apress.prospring6.ten.service"})
@EnableMongoRepositories(basePackageClasses = SingerRepository.class)
@Configuration
@PropertySource("classpath:mongo.properties")
public class MongoCfg {
@Value("${mongo.url}")
private String url;
@Bean
public MongoClientFactoryBean mongoClientFactory() {
MongoClientFactoryBean mongo = new MongoClientFactoryBean();
mongo.setConnectionString(url);
return mongo;
}
@Bean
public MongoTemplate mongoTemplate() {
return new MongoTemplate(mongoClientFactory());
}
}
507
Chapter 10 ■ Spring Data with SQL and NoSQL Databases
So far, so good, but Spring can do a lot more with MongoDB, and thus it provides the
AbstractMongoClientConfiguration class that declares a lot of MongoDB-specific infrastructure beans.
It is recommended to configure your MongoDB application by extending this class and overriding its
mongoClientSettings() method to provide the connection string. Based on this instance, Spring Data
configures the MongoClientFactoryBean, the MongoTemplate, and all the other infrastructure beans. And if
customization is needed, a lot of its methods can be overridden. Listing 10-45 shows the version of MongoCfg
that extends class AbstractMongoClientConfiguration and overrides a few of its methods, especially
autoIndexCreation() to turn on automatic index creation, since we have fields annotated with @Indexed in
our configuration.
Listing 10-45. MongoCfg Class That Extends Class AbstractMongoClientConfiguration
package com.apress.prospring6.ten.config;
import com.mongodb.ConnectionString;
import com.mongodb.MongoClientSettings;
import org.springframework.data.mongodb.config.AbstractMongoClientConfiguration;
import org.springframework.data.mongodb.repository.config.EnableMongoRepositories;
// other import statements omitted
@ComponentScan(basePackages = {"com.apress.prospring6.ten.service"})
@EnableMongoRepositories
@Configuration
@PropertySource("classpath:mongo.properties")
public class MongoCfg extends AbstractMongoClientConfiguration {
@Value("${mongo.url}")
private String url;
@Value("${mongo.db}")
private String database;
@Override
protected String getDatabaseName() {
return database;
}
@Override
protected Collection<String> getMappingBasePackages() {
return Collections.singleton("com.apress.prospring6.ten.repos");
}
@Override
public boolean autoIndexCreation() {
return true;
}
@Override
protected MongoClientSettings mongoClientSettings() {
MongoClientSettings.Builder builder = MongoClientSettings.builder();
builder.applyConnectionString(new ConnectionString(url));
508
Chapter 10 ■ Spring Data with SQL and NoSQL Databases
this.configureClientSettings(builder);
return builder.build();
}
}
The getMappingBasePackages() method is used to configure where the classes annotated with
@Document are; if the method is not overridden, the infrastructure scans the package of the annotated
configuration class and its sub-packages.
As for the project dependencies, because all these classes have to come from somewhere, the main
dependencies of the project are the spring-data-mongodb and mongodb-driver-sync libraries. The
mongodb-driver-sync library is a wrapper around mongodb-driver-core to provide classic behavior when
interacting with a MongoDB instance. There is also a wrapper providing reactive behavior in the mongodbdriver-reactivestreams library. Figure 10-7 shows the dependencies for the chapter10-mongo project.
Figure 10-7. Gradle View showing dependencies for the chapter10-mongo project
One thing that needs to be mentioned here is that starting with MongoDB 4.0, transactions are
supported as well. Transactions are built on top of Sessions and, consequently, require an active
com.mongodb.session.ClientSession. If a TransactionManager bean is not configured, transactions are
disabled.
509
Chapter 10 ■ Spring Data with SQL and NoSQL Databases
Spring provides the MongoTransactionManager class for MongoDB transaction management. The
MongoTransactionManager class binds a ClientSession session to the thread. MongoTemplate detects
the session and operates on these resources, which are associated with the transaction accordingly. Since
Spring Data MongoDB repositories are backed up by a MongoTemplate bean, their methods are executed in a
transactional context.
Listing 10-46 shows the MongoCfg class modified for a transactional behavior.
Listing 10-46. MongoCfg Class with Transaction Management Configured
package com.apress.prospring6.ten.config;
// other import statements omitted
import org.springframework.data.mongodb.MongoDatabaseFactory;
import org.springframework.data.mongodb.MongoTransactionManager;
import org.springframework.transaction.annotation.EnableTransactionManagement;
@ComponentScan(basePackages = {"com.apress.prospring6.ten.service"})
@EnableMongoRepositories(basePackages = {"com.apress.prospring6.ten.repos"})
@Configuration
@PropertySource("classpath:mongo.properties")
@EnableTransactionManagement
public class MongoCfg extends AbstractMongoClientConfiguration {
@Bean
MongoTransactionManager transactionManager(MongoDatabaseFactory dbFactory) {
return new MongoTransactionManager(dbFactory);
}
// other methods omitted
}
With this configuration, @Transactional can be used for configuring SingerServiceImpl as a
transactional service. Programmatic transactions are supported as well, and the syntax is identical to the
syntax already shown in Chapter 9.
Because of Spring Data consistency in its APIs, writing tests for a Spring Data Mongo application is no
different from writing tests for a Spring Data JPA application.
If you are interested in working with Spring and MongoDB, the official documentation from Spring17
and MongoDB18 are rich and easy to follow. Also, feel free to give the Spring Boot MongoDB starter a try. A
simple project is provided in the book repository.
Considerations Using Spring Data
Whether you are using Spring Data JPA or MongoDB or any other module for a specific database, Spring
Data reduces the work you have to do by a lot. Add in Spring Boot, and even configuration work is reduced
considerably. However, to manage data efficiently, you must understand all the building blocks of the data
managing infrastructure. This is what this book is good for, because it slowly builds all the layers, showing
you the effort that you will be spared by using all that Spring has to offer correctly.
https://docs.spring.io/spring-data/data-mongo/docs/current/reference/
html/#reference
18
https://www.mongodb.com/docs/manual/reference/
17
510
Chapter 10 ■ Spring Data with SQL and NoSQL Databases
Still, depending on the size and scope of the project, using Spring Data might be overkill, so take that
into consideration before starting to write your application.
It’s like choosing a smartphone for your 83-year-old grandma who only needs to make and receive
phone calls, and because she has arthritis, she might drop it a lot. So, it makes no sense to buy her an
expensive, complex, fragile phone that provides a lot of functionalities that she will never use, when all her
needs can be satisfied by a flip phone. So, consider the needs your project is trying to satisfy and choose the
tools based on that.
Summary
Since this is the last chapter in the series of chapters covering data access, an overall summary is in order:
•
JPA is a specification that defines an API for object-relational mappings and for
managing persistent objects. It existed as part of JEE until Oracle decided to make it
open source and donate it to Jakarta. This triggered a package rename from javax
to jakarta, and you might see the JPA acronym expanded to Jakarta Persistence API
also, instead of the classic Java Persistence API. Both of them mean the same thing:
the set of Java components used to map database objects and actions to Java objects
and actions.
•
All JPA implementations, such as Hibernate and EclipseLink latest’s version, have
aligned to the new specification.
•
Spring Data JPA adds a layer on top of JPA and uses all its features, like entity and,
association mapping, entity life-cycle management, and adds its own features, like
the Spring Data no-code repositories.
•
There are multiple Spring Data libraries, each designed to reduce boilerplate code
when working with a particular database. Spring Data JPA is suitable for working
with any relational database. For NoSQL databases, there are several libraries for
MongoDB, CouchBase, Redis, etc.
•
Transactional behavior is easy to configure by declaring a TransactionManager
bean and annotating service classes and methods with Spring’s @Transactional
annotation. It is configured in the same way for relational databases and
nonrelational databases, with only the type of the TransactionManager being
different.
•
Spring Data Boot starter libraries reduce the effort a developer must make to interact
with a database by reducing the code necessary to be written to configure the
application.
•
Testcontainers is an amazing tool for testing Spring applications that require a
database because it is easy to set up, allowing you to reuse most of the productionscoped configuration. This enables you to run integration tests in a test context
as close to the production context as possible. Of course, it requires you to have
Docker installed and access to the Internet so that container images can be pulled
when needed.
This concludes the data access chapter series. The data access topic is touched again, but just a little bit,
in Chapter 20, in the “Reactive Data Access” section.
511
CHAPTER 11
Validation, Formatting, and
Type Conversion
In an enterprise application, data validation is critical. The purpose of data validation is to verify that the
data being processed fulfills all predefined business requirements as well as ensures the data integrity and
usefulness in all layers of the application.
In application development, data validation is always mentioned alongside conversion and formatting.
The reason is that the format of the source of data most likely is different from the format being used in the
application. For example, in a web application, a user enters information in the web browser front end.
When the user saves that data, it is sent to the server (after the local validation has completed). On the server
side, a data-binding process is performed, in which the data from the HTTP request is extracted, converted,
and bound to corresponding domain objects (for example, a user enters singer information in an HTML
form that is then bound to a Singer object in the server), based on the formatting rules defined for each
attribute (for example, the date format pattern is yyyy-MM-dd). When the data binding is complete, validation
rules are applied to the domain object to check for any constraint violation. If everything runs fine, the
data is persisted, and a success message is displayed to the user. Otherwise, validation error messages are
populated and displayed to the user.
In this chapter, you will learn how Spring provides sophisticated support for type conversion, field
formatting, and validation. Specifically, this chapter covers the following topics:
•
The Spring type conversion system and the Formatter service provider interface (SPI):
We present the generic type conversion system and Formatter<T> SPI. We cover how
the new services can be used to replace the previous PropertyEditor support and
how they convert between any Java types.
•
Validation in Spring: We discuss how Spring supports domain object validation.
First, we provide a short introduction to Spring’s own Validator interface. Then, we
focus on the JSR-349 (Bean Validation) support.
© Iuliana Cosmina, Rob Harrop, Chris Schaefer, and Clarence Ho 2023
I. Cosmina et al., Pro Spring 6, https://doi.org/10.1007/978-1-4842-8640-1_11
513
Chapter 11 ■ Validation, Formatting, and Type Conversion
Converting String Values Using PropertyEditors
In Spring 3, a new type conversion system was introduced, providing a powerful way to convert between any
Java types within Spring-powered applications. All classes are in the org.springframework.core.convert
package. This section shows how this new service can perform the same functionality provided by the
previous PropertyEditor support, as well as how it supports the conversion between any Java types. We also
demonstrate how to implement a custom type converter by using the Converter SPI.
Chapter 4 covered how Spring handles the conversion from a String in the properties files into the
properties of POJOs by supporting PropertyEditors. Let’s do a quick review here and then cover how
Spring’s Converter SPI (available since 3.0) provides a more powerful alternative.
Listing 11-1 shows a record named Blogger. We are using records because we know we do not intend to
modify these beans in any way, nor do we need to proxy them (it also reduces the code we need to write).
Listing 11-1. The Blogger Record with Various Field Types
package com.apress.prospring6.eleven.domain;
import java.net.URL;
import java.time.LocalDate;
public record Blogger (String firstName,
String lastName,
LocalDate birthDate,
URL personalSite) {}
For the birthDate attribute, the java.time.LocalDate type is used. In addition, there is a URL type field
that indicates the blogger’s personal web site, if applicable. Suppose we want to construct Blogger instances
in Spring’s ApplicationContext, with values stored either in Spring’s configuration or in a properties file.
To make things practical, the AppConfig class declares two Blogger beans: awsBlogger, which is created
with property values injected using @Value annotations with hard-coded values, and springBlogger, which
is created with property values injected using @Value annotations with values read from the blogger.
properties configuration file. The properties file is configured using the @PropertySource annotation
introduced in Chapter 4. The AppConfig class is shown in Listing 11-2 and in the comment on top of it you
can see the contents of the blogger.properties file.
Listing 11-2. A Spring Configuration Class Declaring Two Blogger Beans
package com.apress.prospring6.eleven;
import
import
import
import
org.springframework.beans.factory.annotation.Value;
org.springframework.context.annotation.Bean;
org.springframework.context.annotation.Configuration;
org.springframework.context.annotation.PropertySource;
import java.net.URL;
import java.time.LocalDate;
514
Chapter 11 ■ Validation, Formatting, and Type Conversion
/*
springBlogger.firstName=Iuliana
springBlogger.lastName=Cosmina
springBlogger.birthDate=1983-08-16
springBlogger.personalSite=https://iuliana-cosmina.com
*/
@PropertySource("classpath:blogger.properties")
@Configuration
public class AppConfig {
@Bean
public Blogger awsBlogger(@Value("Alex") String firstName,
@Value("DeBrie") String lastName,
@Value("https://www.alexdebrie.com") URL personalSite,
@Value("1980-01-02") LocalDate birthDate) throws Exception {
return new Blogger(firstName, lastName, birthDate, personalSite);
}
@Bean
public Blogger springBlogger(@Value("${springBlogger.firstName}") String firstName,
@Value("${springBlogger.lastName}") String lastName,
@Value("${springBlogger.personalSite}") URL personalSite,
@Value("${springBlogger.birthDate}") LocalDate birthDate)
throws Exception {
return new Blogger(firstName, lastName, birthDate, personalSite);
}
}
An attempt to create an application context based on the AppConfig class would fail with a stacktrace
making it quite obvious that Spring cannot convert the text representations of calendar dates to java.time.
LocalDate:
org.springframework.beans.factory.UnsatisfiedDependencyException:
Error creating bean with name 'awsBlogger' defined in com.apress.prospring6.eleven.
AppConfig:
Unsatisfied dependency expressed through method 'awsBlogger' parameter 3:
Failed to convert value of type 'java.lang.String' to required type 'java.time.
LocalDate';
Cannot convert value of type 'java.lang.String' to required type 'java.time.
LocalDate':
no matching editors or conversion strategy found
at app//org.springframework.beans.factory.support.ConstructorResolver.createArgument
Array(ConstructorResolver.java:774)
Caused by: java.lang.IllegalStateException:
Cannot convert value of type 'java.lang.String' to required type 'java.time.LocalDate':
no matching editors or conversion strategy found at
org.springframework.beans.TypeConverterDelegate.convertIfNecessary(TypeConverter
Delegate.java:262)
515
Chapter 11 ■ Validation, Formatting, and Type Conversion
To fix this, we need to tell Spring how to do the conversion of text representations of calendar
dates to java.time.LocalDate. We can do so by using an extension of PropertyEditorSupport like the
LocalDatePropertyEditor shown in Listing 11-3.
Listing 11-3. LocalDatePropertyEditor Class
package com.apress.prospring6.eleven.property.editor;
import java.beans.PropertyEditorSupport;
import java.time.LocalDate;
import java.time.format.DateTimeFormatter;
public class LocalDatePropertyEditor extends PropertyEditorSupport {
private DateTimeFormatter dateFormat = DateTimeFormatter.ofPattern("yyyy-MM-dd");
@Override
public void setAsText(String text) throws IllegalArgumentException {
setValue(LocalDate.parse(text, dateFormat));
}
}
A CustomEditorConfigurer bean needs to be part of the configuration to register our custom property
editor: the LocalDatePropertyEditor. The old-style approach, introduced in Spring 2, is to declare a
PropertyEditorRegistrar bean that maps the LocalDatePropertyEditor instance to the type the text
representation is converted to, in this case LocalDate. By the magic of lambda expressions, a bean of a
custom type implementing PropertyEditorRegistrar can be created in a single line. Listing 11-4 shows the
configuration class declaring all the necessary beans to enable the proper conversion of text representations
to LocalDate.
This bean can be created on the spot using lambda expressions like the one in Listing 11-4.
Listing 11-4. PropertyEditorRegistrar Class
package com.apress.prospring6.eleven.property.editor;
import org.springframework.beans.PropertyEditorRegistrar;
import org.springframework.beans.factory.config.CustomEditorConfigurer;
// other import statements omitted
import java.time.LocalDate;
@Configuration
public class CustomRegistrarCfg {
@Bean
public PropertyEditorRegistrar registrar(){
return registry ->
registry.registerCustomEditor(LocalDate.class, new LocalDatePropertyEditor());
}
516
Chapter 11 ■ Validation, Formatting, and Type Conversion
@Bean
public CustomEditorConfigurer customEditorConfigurer() {
var cus = new CustomEditorConfigurer();
var registrars = new PropertyEditorRegistrar[1];
registrars[0] = registrar();
cus.setPropertyEditorRegistrars(registrars);
return cus;
}
}
To test this class, we need to build an application context based on the AppConfig bean classes and the
CustomRegistrarCfg and retrieve the two blogger beans and print their properties to the console. This can
be done using a test method, as shown in Listing 11-5.
Listing 11-5. ConvertersTest Class and Method Used to Test the LocalDatePropertyEditor
package com.apress.prospring6.eleven;
public class ConvertersTest {
private static final Logger LOGGER = LoggerFactory.getLogger(ConvertersTest.class);
@Test
public void testCustomPropertyEditorRegistrar() {
try (var ctx = new AnnotationConfigApplicationContext(AppConfig.class,
CustomRegistrarCfg.class)) {
var springBlogger = ctx.getBean("springBlogger", Blogger.class);
LOGGER.info("SpringBlogger info: {}" , springBlogger);
var awsBlogger = ctx.getBean("awsBlogger", Blogger.class);
LOGGER.info("AwsBlogger info: {}" , awsBlogger);
}
}
// expected output
INFO ConvertersTest SpringBlogger info: Blogger{ firstName='Iuliana',
lastName='Cosmina',
birthDate=1983-08-16,
personalSite=https://iuliana-cosmina.com}
INFO ConvertersTest AwsBlogger info: Blogger{firstName='Alex',
lastName='DeBrie',
birthDate=1980-01-02,
personalSite=https://www.alexdebrie.com/}
When running this method, the context should be successfully created and the two beans retrieved
from it and printed.
There is another version of this configuration, that requires a single bean of type
CustomEditorConfigurer that registers the custom property editor by mapping it to a certain type, and a
custom PropertyEditorRegistrar is not necessary, as shown in the configuration class in Listing 11-6.
517
Chapter 11 ■ Validation, Formatting, and Type Conversion
Listing 11-6. CustomEditorCfg Class
package com.apress.prospring6.eleven.property.editor;
import org.springframework.beans.factory.config.CustomEditorConfigurer;
// other imports statement omitted
@Configuration
public class CustomEditorCfg {
@Bean
public CustomEditorConfigurer customEditorConfigurer() {
var cus = new CustomEditorConfigurer();
cus.setCustomEditors(Map.of(LocalDate.class, LocalDatePropertyEditor.class));
return cus;
}
}
This is the old way of doing it. The new way involves classes from the org.springframework.core.
convert package and is discussed in the next section.
Introducing Spring Type Conversion
Spring 3.0 introduced a general type conversion system that resides under the package org.
springframework.core.convert. In addition to providing an alternative to PropertyEditor support,
the type conversion system can be configured to convert between any Java types and POJOs (while
PropertyEditor is focused on converting String representations in the properties file into Java types).
Implementing a Custom Converter
To see the type conversion system in action, let’s revisit the previous example and use the same Blogger
class. Suppose this time we want to use the type conversion system to convert the date in String format into
the blogger’s birthDate property, which is of LocalDate type. To support the conversion, instead of creating
a custom PropertyEditor, we create a custom converter by implementing the org.springframework.core.
convert.converter.Converter<S,T> interface. Listing 11-7 shows the custom converter.
Listing 11-7. LocalDateConverter Implementation
package com.apress.prospring6.eleven.converter.bean;
import org.springframework.core.convert.converter.Converter;
import java.time.LocalDate;
import java.time.format.DateTimeFormatter;
public class LocalDateConverter implements Converter<String, LocalDate> {
private DateTimeFormatter dateFormat = DateTimeFormatter.ofPattern("yyyy-MM-dd");
518
Chapter 11 ■ Validation, Formatting, and Type Conversion
@Override
public LocalDate convert(String source) {
return LocalDate.parse(source, dateFormat);
}
}
We implement the interface Converter<String, DateTime>, which means the converter is responsible
for converting a String (the source type S) to a LocalDate type (the target type T).
To use this converter instead of the PropertyEditor, we need to configure an instance of the org.
springframework.core.convert.ConversionService interface in Spring’s ApplicationContext.
Listing 11-8 shows the Java configuration class.
Listing 11-8. Java Configuration Class for Using a Converter Implementation
package com.apress.prospring6.eleven.converter.bean;
import org.springframework.context.support.ConversionServiceFactoryBean;
// other import statements omitted
@Configuration
@ComponentScan
public class ConverterCfg {
@Bean
public ConversionServiceFactoryBean conversionService() {
var conversionServiceFactoryBean = new ConversionServiceFactoryBean();
var convs = new HashSet<>();
convs.add(new LocalDateConverter());
conversionServiceFactoryBean.setConverters(convs);
conversionServiceFactoryBean.afterPropertiesSet();
return conversionServiceFactoryBean;
}
}
Here we instruct Spring to use the type conversion system by declaring a conversionService bean
with the class ConversionServiceFactoryBean. This type of bean groups multiple conversion services. If no
conversion service bean is defined, Spring will use the PropertyEditor-based system.
By default, the type conversion service supports conversion between common types including strings,
numbers, enums, collections, maps, and so on. In addition, the conversion from String instances to Java
types within the PropertyEditor-based system is supported.
The testing method is almost identical to the one shown in Listing 11-5, the only difference being that
the CustomRegistrarCfg class is replaced with ConverterCfg.
Converting Between Arbitrary Types
The real strength of the type conversion system is the ability to convert between arbitrary types.
Listing 11-9 introduces the record SimpleBlogger that only has two fields and the converter implementation
that converts a Blogger instance to a SimpleBlogger instance.
519
Chapter 11 ■ Validation, Formatting, and Type Conversion
Listing 11-9. SimpleBlogger Record and Converter
package com.apress.prospring6.eleven.domain;
import com.apress.prospring6.eleven.Blogger;
import org.springframework.core.convert.converter.Converter;
import java.net.URL;
public record SimpleBlogger (String fullName, URL personalSite) {
public static class BloggerToSimpleBloggerConverter implements Converter<Blogger,
SimpleBlogger> {
@Override
public SimpleBlogger convert(Blogger source) {
return new SimpleBlogger(source.firstName() + " " + source.lastName(), source.
personalSite());
}
}
}
To add this converter to the application context configuration, an instance of
BloggerToSimpleBloggerConverter needs to be added to the converters set of the
ConversionServiceFactoryBean as shown in Listing 11-10.
Listing 11-10. SimpleBlogger Class and Converter
package com.apress.prospring6.eleven.converter.bean;
// import statements omitted
@Configuration
@ComponentScan
public class ConverterCfg {
@Bean
public ConversionServiceFactoryBean conversionService() {
var conversionServiceFactoryBean = new ConversionServiceFactoryBean();
var convs = new HashSet<>();
convs.add(new LocalDateConverter());
convs.add(new SimpleBlogger.BloggerToSimpleBloggerConverter());
conversionServiceFactoryBean.setConverters(convs);
conversionServiceFactoryBean.afterPropertiesSet();
return conversionServiceFactoryBean;
}
}
To test this converter, we need to retrieve the converter bean from the context and convert one of our
Blogger instances to a SimpleBlogger instance, as shown in Listing 11-11.
520
Chapter 11 ■ Validation, Formatting, and Type Conversion
Listing 11-11. Conversion to SimpleBlogger
package com.apress.prospring6.eleven;
import org.springframework.core.convert.ConversionService;
public class ConvertersTest {
@Test
public void testConvertingToSimpleBlogger() {
try (var ctx = new AnnotationConfigApplicationContext(AppConfig.class, ConverterCfg.
class)) {
var springBlogger = ctx.getBean("springBlogger", Blogger.class);
LOGGER.info("SpringBlogger info: {}" , springBlogger);
var conversionService = ctx.getBean(ConversionService.class);
var simpleBlogger = conversionService.convert(springBlogger,
SimpleBlogger.class);
LOGGER.info("simpleBlogger info: {}" , simpleBlogger);
}
}
}
// expected output
INFO ConvertersTest - SpringBlogger info:
Blogger[firstName=Iuliana,
lastName=Cosmina,
birthDate=1983-08-16,
personalSite=https://iuliana-cosmina.com]
INFO ConvertersTest - simpleBlogger info: SimpleBlogger[fullName=Iuliana Cosmina,
personalSite=https://iuliana-cosmina.com]
As you have probably noticed, the conversion from string to java.net.URL was done automatically for
the personalSite field. This is because Spring registers out of the box a set of converters that handle the
most common development use cases (e.g., from a string representing a list of items separated by commas to
an Array, from a List to a Set, etc.).
With Spring’s type conversion service, you can create custom converters easily and perform conversion
at any layer within your application. One possible use case is that you have two systems with the same
blogger information that you need to update. However, the database structure is different (for example,
system A has two field names, but system B has a single field, and so on). You can use the type conversion
system to convert the objects before persisting to each individual system.
Starting with Spring 3.0, Spring MVC makes heavy use of the conversion service (as well as the
Formatter SPI discussed in the next section). In the web application context configuration, the Java
configuration class annotated with @EnableWebMvc introduced in Spring 3.1 will automatically register
all default converters (for example, StringToArrayConverter, StringToBooleanConverter, and
StringToLocaleConverter, all residing under the org.springframework.core.convert.support package)
and formatters (for example, CurrencyStyleFormatter, DateFormatter, and AbstractNumberFormatter,
all residing under various subpackages within the org.springframework.format package). More details are
covered in Chapter 14, when we discuss web application development in Spring.
521
Chapter 11 ■ Validation, Formatting, and Type Conversion
Field Formatting in Spring
Besides the type conversion system, another great feature that Spring brings to developers is the Formatter
SPI. As you might expect, this SPI can help configure the field-formatting aspects. In the Formatter SPI, the
main interface for implementing a formatter is the org.springframework.format.Formatter<T> interface.
Spring provides a few implementations of commonly used types, including CurrencyStyleFormatter,
DateFormatter, AbstractNumberFormatter, and PercentStyleFormatter.
Implementing a custom formatter is as easy as implementing a customer converter. We will use the
same Blogger record, but instead of using a converter, we’ll implement a custom formatter for converting
the LocalDate type of the birthDate attribute to and from a String. This involves extending Spring’s org.
springframework.format.support.FormattingConversionServiceFactoryBean class and providing our
custom formatter. The FormattingConversionServiceFactoryBean class is a factory class that provides
convenient access to the underlying FormattingConversionService class, which supports the type
conversion system, as well as field formatting according to the formatting rules defined for each field type.
In Listing 11-12 you can see a custom class that extends the
FormattingConversionServiceFactoryBean class, with a custom formatter defined for formatting Java’s
LocalDate type. Notice that the formatter is configurable with a date pattern.
Listing 11-12. ApplicationConversionServiceFactoryBean Implementation
package com.apress.prospring6.eleven.formatter.factory;
import org.springframework.format.Formatter;
import org.springframework.format.support.FormattingConversionServiceFactoryBean;
// other import statements omitted
@Service("conversionService")
public class ApplicationConversionServiceFactoryBean extends
FormattingConversionServiceFactoryBean {
private static final Logger LOGGER = LoggerFactory.getLogger(ApplicationConversion
ServiceFactoryBean.class);
private
private
private
private
static final String DEFAULT_DATE_PATTERN = "yyyy-MM-dd";
DateTimeFormatter dateTimeFormatter;
String datePattern = DEFAULT_DATE_PATTERN;
final Set<Formatter<?>> formatters = new HashSet<>();
public String getDatePattern() {
return datePattern;
}
@Autowired(required = false)
public void setDatePattern(String datePattern) {
this.datePattern = datePattern;
}
522
Chapter 11 ■ Validation, Formatting, and Type Conversion
@PostConstruct
public void init() {
dateTimeFormatter = DateTimeFormatter.ofPattern(datePattern);
formatters.add(getDateTimeFormatter());
setFormatters(formatters);
}
public Formatter<LocalDate> getDateTimeFormatter() {
return new Formatter<>() {
@Override
public LocalDate parse(String source, Locale locale)
throws ParseException {
LOGGER.info("Parsing date string: " + source);
return LocalDate.parse(source, dateTimeFormatter);
}
@Override
public String print(LocalDate source, Locale locale) {
LOGGER.info("Formatting datetime: " + source);
return source.format(dateTimeFormatter);
}
};
}
}
In Listing 11-12, the custom formatter implementation is shown in bold font. It implements the
Formatter<LocalDate> interface and implements the two methods defined by the interface. The parse(..)
method parses the String format into the LocalDate type (the locale was also passed for localization
support), while the LOGGER.info(..) method is to format a LocalDate instance into a String. The date
pattern can be injected into the bean (or the default will be yyyy-MM-dd). Also, in the init() method, the
custom formatter is registered by calling the setFormatters() method. You can add as many formatters as
required.
Since ApplicationConversionServiceFactoryBean is configured as a bean, the simplest way to use
it is just to create an annotation context using the AppConfig class and this bean. Listing 11-13 shows a test
method creating this context and printing the two Blogger beans.
Listing 11-13. ApplicationConversionServiceFactoryBean Implementation test
package com.apress.prospring6.eleven;
// import statements omitted
public class FormattersTest {
private static final Logger LOGGER = LoggerFactory.getLogger(FormattersTest.class);
@Test
public void testFormattingFactoryService() {
try (var ctx = new AnnotationConfigApplicationContext(AppConfig.class,
ApplicationConversionServiceFactoryBean.class)) {
var springBlogger = ctx.getBean("springBlogger", Blogger.class);
LOGGER.info("SpringBlogger info: {}" , springBlogger);
523
Chapter 11 ■ Validation, Formatting, and Type Conversion
var awsBlogger = ctx.getBean("awsBlogger", Blogger.class);
LOGGER.info("AwsBlogger info: {}" , awsBlogger);
}
}
}
The purpose of this test is to show that the application context is created correctly, and the two Blogger
beans are too.
This method might not look like a test because there are no assertion statements, but this method
essentially tests the assumption that all beans in the configuration are configured correctly. If you run the
Gradle build, a very nice web page with test results is generated for you. Figure 11-1 shows this page and
the console execution log showing these tests passing.
Figure 11-1. Gradle test result page and log showing the test methods under FormattersTest passing
The output of executing the testFormattingFactoryService() test method is similar to the output
shown in the conversion section (Listing 11-11), proving that the responsibility of converting a text
representation to a LocalDate was taken over by the Formatter<LocalDate> instance.
The Formatter<T> SPI is a composed interface, extending interfaces Printer<T> and Parser<T>. All
three interfaces are part of the org.springframework.format package. Each of the methods implemented
in the Formatter<LocalDate> shown in Listing 11-12 is provided by one of these interfaces. The three
interfaces are shown in Listing 11-14. 1
https://github.com/spring-projects/spring-framework/tree/main/spring-context/src/
main/java/org/springframework/format
1
524
Chapter 11 ■ Validation, Formatting, and Type Conversion
Listing 11-14. Spring Formatting SPI Interfaces
// ---- Formatter.java ---package org.springframework.format;
public interface Formatter<T> extends Printer<T>, Parser<T> {
}
// ---- Printer.java ---@FunctionalInterface
public interface Printer<T> {
String print(T fieldValue, Locale locale);
}
// ---- Parser.java ---import java.text.ParseException;
import java.util.Locale;
@FunctionalInterface
public interface Parser<T> {
T parse(String clientValue, Locale locale) throws ParseException;
}
Every time you need a formatter, all you have to do is implement the Formatter<T> interface and
parametrize it with the desired type and then add it to the Spring configuration using either custom
FormattingConversionServiceFactoryBean or by declaring a bean of type FormattingConversionService
and adding the formatter instance to it. The easiest is to use the DefaultFormattingConversionService, an
out-of-the-box specialization of FormattingConversionService configured by default with converters and
formatters appropriate for most applications.
Listing 11-15 shows the FormattingServiceCfg class that declares a bean named conversionService
that is a DefaultFormattingConversionService to which the Formatter<LocalDate> implementation
is added.
Listing 11-15. Configuration Class Using DefaultFormattingConversionService to Register a Custom
Formatter
package com.apress.prospring6.eleven.formatter;
import org.springframework.format.Formatter;
import org.springframework.format.support.DefaultFormattingConversionService;
import org.springframework.format.support.FormattingConversionService;
// other import statements omitted
@Configuration
public class FormattingServiceCfg {
@Bean
public FormattingConversionService conversionService() {
var formattingConversionServiceBean = new DefaultFormattingConversionService(true);
formattingConversionServiceBean.addFormatter(localDateFormatter());
return formattingConversionServiceBean;
}
525
Chapter 11 ■ Validation, Formatting, and Type Conversion
protected Formatter<LocalDate> localDateFormatter() {
return new Formatter<LocalDate>() {
@Override
public LocalDate parse(String source, Locale locale) throws ParseException {
return LocalDate.parse(source, getDateTimeFormatter());
}
@Override
public String print(LocalDate source, Locale locale) {
return source.format(getDateTimeFormatter());
}
protected DateTimeFormatter getDateTimeFormatter(){
return DateTimeFormatter.ofPattern("yyyy-MM-dd");
}
};
}
}
When declaring a bean of type FormattingConversionService to customize the list of
converters and formatters in your Spring application, make sure this bean is named conversionService,
because Spring does not like it any other way. The same applies for a bean of type
ConversionServiceFactoryBean, the convenient implementation to configure access to a
ConversionService configured with converters appropriate for most environments.
Notice that the DefaultFormattingConversionService constructor with a value of true.
This value is assigned to the registerDefaultFormatters field and is necessary to enable the set of
default formatters in the context. If set to false this bean will just enable the default set of converters.
Validation in Spring
Validation is a critical part of any application. Validation rules applied on domain objects ensure that all
business data is well structured and fulfills all the business definitions. The ideal case is that all validation
rules are maintained in a centralized location, and the same set of rules are applied to the same type of data,
no matter which source the data comes from (for example, from user input via a web application, from a
remote application via web services, from a JMS message, or from a file).
When talking about validation, conversion and formatting are important too, because before a piece of
data can be validated, it should be converted to the desired POJO according to the formatting rules defined
for each type. For example, a user enters some blogger information via a web application within a browser
and then submits that data to a server. On the server side, if the web application was developed in Spring
MVC, Spring will extract the data from the HTTP request and perform the conversion from a String to the
desired type based on the formatting rule (for example, a String representing a date will be converted into
a LocalDate field, with the formatting rule yyyy-MM-dd). The process is called data binding. When the data
526
Chapter 11 ■ Validation, Formatting, and Type Conversion
binding is complete and the domain object constructed, validation will then be applied to the object, and
any errors will be returned and displayed to the user. If validation succeeds, the object will be persisted to
the database.
Spring supports two main types of validation. The first one is provided by Spring. Validators are created
by implementing the org.springframework.validation.Validator interface, depicted in Listing 11-16. 2
Listing 11-16. Spring’s Validator Interface
package org.springframework.validation;
public interface Validator {
boolean supports(Class<?> clazz);
void validate(Object target, Errors errors);
}
The other type of validation is via Spring’s support of JSR-349 (Bean Validation)3, now renamed Jakarta
Bean Validation We present both type of validation in the coming sections.
Using the Spring Validator Interface
Using Spring’s Validator interface, we can develop some validation logic by creating a class to implement
the interface. Let’s see how it works. For the Blogger class that we’ve worked with so far, suppose the first
name cannot be empty. To validate Blogger objects against this rule, a custom validator is needed. The code
snippet in Listing 11-17 shows the BloggerValidator validator class.
Listing 11-17. Custom Validator for Blogger Class
package com.apress.prospring6.eleven.validator;
import org.springframework.validation.Errors;
import org.springframework.validation.ValidationUtils;
import org.springframework.validation.Validator;
// other import statements omitted
@Component("simpleBloggerValidator")
public class SimpleBloggerValidator implements Validator {
@Override
public boolean supports(Class<?> clazz) {
return Blogger.class.equals(clazz);
}
https://github.com/spring-projects/spring-framework/blob/main/spring-context/src/
main/java/org/springframework/validation/Validator.java
3
https://jcp.org/en/jsr/detail?id=349
2
527
Chapter 11 ■ Validation, Formatting, and Type Conversion
@Override
public void validate(Object target, Errors errors) {
ValidationUtils.rejectIfEmpty(errors, "firstName", "field.required");
}
}
The validator class implements the Validator interface and implements two methods. The
supports(..) method indicates whether validation of the passed-in class type is supported by the
validator. The validate(..) method performs validation on the passed-in object. The result will be
stored in an instance of the org.springframework.validation.Errors interface. In the validate(..)
method, we perform a check only on the firstName attribute and use the convenient ValidationUtils.
rejectIfEmpty(..) method to ensure that the first name of the blogger is not empty. The last argument
is the error code, which can be used for looking up validation messages from resource bundles to display
localized error messages.
To add this bean to a Spring application context, a @ComponentScan(basePackages = {"com.
apress.prospring6.eleven.validator"}) is required on an existing configuration class, and when
the application starts it will be automatically picked up. However, in our test methods, we avoid that
annotation to avoid test context pollution, and instead we build it explicitly from the application configuration
class AppConfig and any other validator bean class targeted by the test.
Any external data entering a system needs to be validated, converted, and formatted to types that
are known. Converters, formatters, and validators are necessary components for applications that handle
user-provided data, like web applications with forms, or applications that import data from any thirdparty source.
Using Spring MVC for writing Spring applications is covered in Chapter 14. In this type of applications
is where the power of converters, formatters, and validators truly shines. Since we are not there yet,
application contexts in this chapter are created by direct instantiation, and the validator is invoked explicitly.
The SimpleBloggerValidator is tested in Listing 11-18.
Listing 11-18. Testing the Custom Validator for the Blogger Class
package com.apress.prospring6.eleven;
import com.apress.prospring6.eleven.formatter.FormattingServiceCfg;
import com.apress.prospring6.eleven.validator.BloggerValidator;
import org.springframework.validation.BeanPropertyBindingResult;
import org.springframework.validation.ValidationUtils;
// other import statements omitted
public class SpringValidatorTest {
528
Chapter 11 ■ Validation, Formatting, and Type Conversion
private static final Logger LOGGER = LoggerFactory.getLogger(SpringValidatorTest.class);
@Test
void testSimpleBloggerValidator() throws MalformedURLException {
try (var ctx = new AnnotationConfigApplicationContext(AppConfig.
class, FormattingServiceCfg.class, SimpleBloggerValidator.class)) {
var blogger = new Blogger("", "Pedala", LocalDate.of(2000, 1, 1), new
URL("https://none.co.uk"));
var bloggerValidator = ctx.getBean(SimpleBloggerValidator.class);
var result = new BeanPropertyBindingResult(blogger, "blogger");
ValidationUtils.invokeValidator(bloggerValidator, blogger, result);
var errors = result.getAllErrors();
assertEquals(1, errors.size());
errors.forEach(e -> LOGGER.info("Object '{}' failed validation. Error code: {}",
e.getObjectName(), e.getCode()));
}
}
}
In the test method in Listing 11-18, a Blogger object is constructed with the first name set to an
empty String value. Then, the validator bean is retrieved from ApplicationContext. To store the
validation result, an instance of the BeanPropertyBindingResult class is constructed using the object to
be validated and a name for it, which is what the second argument is for. This might be useful for reporting
the error to the next service in the chain, or for logging. To perform the validation, the ValidationUtils.
invokeValidator() method is called, and then a normal assertion statement checks the number of error
objects returned. Since the Blogger instance is created with no firstName, the validation fails and an error
object with the field.required error code is created.
This example shows a very simple validation, just checking that a property of the object is empty,
but the validate(..) method can be even more complex, testing more of the object properties against
different rules.
A null value is not the same as an empty String value, so a Blogger object with a null first
name will not fail the validation rule described by the SimpleBloggerValidator class.
For example, the version of BloggerValidator in Listing 11-19 checks if at least one of firstName or
lastName is present and not null (the StringUtils.isEmpty(..) method makes sure of that), and the
birthDate is bigger than the 1st of January 1983.
Listing 11-19. Complex Validator Implementation for Blogger
package com.apress.prospring6.eleven.validator;
import org.apache.commons.lang3.StringUtils;
// import statements omitted
@Component("complexBloggerValidator")
529
Chapter 11 ■ Validation, Formatting, and Type Conversion
public class ComplexBloggerValidator implements Validator {
@Override
public boolean supports(Class<?> clazz) {
return Blogger.class.equals(clazz);
}
@Override
public void validate(Object target, Errors errors) {
var b = (Blogger) target;
if(StringUtils.isEmpty(b.firstName()) && StringUtils.isEmpty(b.lastName())) {
errors.rejectValue("firstName", "firstNameOrLastName.required");
errors.rejectValue("lastName", "firstNameOrLastName.required");
}
if(b.birthDate().isBefore(LocalDate.of(1983,1,1))) {
errors.rejectValue("birthDate", "birthDate.greaterThan1983");
}
}
}
Aside from this, the Validator interface can be implemented to validate complex objects by reusing
validation logic for nested objects. To show this, a new class is needed named BloggerWithAddress that
models exactly what its name says: a blogger with an address. The address is modeled using a record, the
blogger with a class because this allows for a validation to be applicable to all the classes extending it.
Listing 11-20 shows the Address record and the BloggerWithAddress class.
Listing 11-20. Complex BloggerWithAddress with a Nested Field of Type Address
// ---- Address.java ---package com.apress.prospring6.eleven.domain;
public record Address(String city, String country) {
}
// ---- BloggerWithAddress.java ---package com.apress.prospring6.eleven.domain;
public class BloggerWithAddress {
private String firstName;
private String lastName;
private LocalDate birthDate;
private URL personalSite;
private Address address;
// getters and setters omitted
}
Listing 11-21 shows the AddressValidator that verifies that both city and country fields are populated
and that they contain only letters.
530
Chapter 11 ■ Validation, Formatting, and Type Conversion
Listing 11-21. AddressValidator Class
package com.apress.prospring6.eleven.validator;
import org.apache.commons.lang3.StringUtils;
// other import statements omitted
@Component("addressValidator")
public class AddressValidator implements Validator {
@Override
public boolean supports(Class<?> clazz) {
return Address.class.equals(clazz);
}
@Override
public void validate(Object target, Errors errors) {
ValidationUtils.rejectIfEmpty(errors, "city", "city.empty");
ValidationUtils.rejectIfEmpty(errors, "country", "country.empty");
var address = (Address)target;
if(!StringUtils.isAlpha(address.city())) {
errors.rejectValue("city", "city.onlyLettersAllowed");
}
if(!StringUtils.isAlpha(address.country())) {
ValidationUtils.rejectIfEmpty(errors, "country", "country.onlyLettersAllowed");
}
}
}
Listing 11-22 shows the BloggerWithAddressValidator validator that checks that fields address and
personalSite are populated, that at least one of firstName and lastName is populated, and that the address
is valid by using the AddressValidator.
Listing 11-22. BloggerWithAddressValidator Class
package com.apress.prospring6.eleven.validator;
// import statements omitted
@Component("bloggerWithAddressValidator")
public class BloggerWithAddressValidator implements Validator {
private final Validator addressValidator;
public BloggerWithAddressValidator(Validator addressValidator) {
if (!addressValidator.supports(Address.class)) {
throw new IllegalArgumentException("The supplied [Validator] must " +
"support the validation of [Address] instances.");
}
this.addressValidator = addressValidator;
}
531
Chapter 11 ■ Validation, Formatting, and Type Conversion
@Override
public boolean supports(Class<?> clazz) {
return BloggerWithAddress.class.isAssignableFrom(clazz);
}
@Override
public void validate(Object target, Errors errors) {
ValidationUtils.rejectIfEmptyOrWhitespace(errors, "address", "address.required");
ValidationUtils.rejectIfEmptyOrWhitespace(errors, "personalSite", "personalSite.
required");
var b = (BloggerWithAddress) target;
if(StringUtils.isEmpty(b.getFirstName()) && StringUtils.isEmpty(b.getLastName())) {
errors.rejectValue("firstName", "firstNameOrLastName.required");
errors.rejectValue("lastName", "firstNameOrLastName.required");
}
try {
errors.pushNestedPath("address");
ValidationUtils.invokeValidator(this.addressValidator, b.getAddress(), errors);
} finally {
errors.popNestedPath();
}
}
}
Notice that the BloggerWithAddressValidator is a composed object that has a nested
AddressValidator field. This field is used to validate the nested address field in a BloggerWithAddress
instance. Notice the body of the supports(..) method. The BloggerWithAddress.class.
isAssignableFrom(clazz) statement validates that the target object is either an instance of
BloggerWithAddress, either an instance of its superclass.
The two methods pushNestedPath(..) and popNestedPath(..) are used to generate nested
error properties for the error messages. For example, when the current path is blogger., a call to
pushNestedPath("address") results in the path being changed to blogger.address., which means the
error properties are relative to this path. Then, a call to popNestedPath() results in the path reverting to
blogger. again.
To test this implementation, we’ll do the same as before: construct a Spring configuration using the
AddressValidator, BloggerWithAddressValidator, and the existing AppConfig class. Then we’ll create a
BloggerWithAddress instance that fails the validation and check that our validator reports the existing error.
The code is shown in Listing 11-23.
Listing 11-23. Testing the BloggerWithAddressValidator Class
package com.apress.prospring6.eleven;
// import statements omitted
public class SpringValidatorTest {
private static final Logger LOGGER = LoggerFactory.getLogger(SpringValidatorTest.class);
@Test
void testBloggerWithAddressValidator() throws MalformedURLException {
532
Chapter 11 ■ Validation, Formatting, and Type Conversion
try (var ctx = new AnnotationConfigApplicationContext(AppConf
ig.class, FormattingServiceCfg.class, AddressValidator.class,
BloggerWithAddressValidator.class)) {
var address = new Address("221B", "UK");
var blogger = new BloggerWithAddress( null, "Mazzie", LocalDate.of(1973, 1, 1),
null, address);
var bloggerValidator = ctx.getBean(BloggerWithAddressValidator.class);
var result = new BeanPropertyBindingResult(blogger, "blogger");
ValidationUtils.invokeValidator(bloggerValidator, blogger, result);
var errors = result.getAllErrors();
assertEquals(2, errors.size());
errors.forEach(e -> LOGGER.info("Error Code: {}", e.getCode()));
}
}
}
\\ expected output
DEBUG ValidationUtils - Validator found 2 errors
INFO SpringValidatorTest - Error Code: personalSite.required
INFO SpringValidatorTest - Error Code: city.onlyLettersAllowed
The objects in bold font both fail the validation: the address has a city named 221B and the blogger has
a null personalSite.
The examples in this section all print the error codes. Outputting messages that correspond to
validation errors is a topic for Chapter 14. That’s pretty much it for Spring validation. The next sections cover
Spring integration with Jakarta’s Bean Validation API and Hibernate Validator.
Using JSR-349/Jakarta Bean Validation
As of Spring 4, full support for JSR-349 (Bean Validation 3.0)4 has been implemented. The Bean Validation
API defines a set of constraints in the form of Java annotations (for example, @NotNull) under the package
jakarta.validation.constraints that can be applied to the domain objects. In addition, custom validators
(for example, class-level validators) can be developed and applied by using annotation.
Using the Bean Validation API frees you from coupling to a specific validation service provider. By using
the Bean Validation API, you can use standard annotations and the API for implementing validation logic to
your domain objects, without knowing the underlying validation service provider. For example, Hibernate
Validator5 is a JSR-349 reference implementation.
Spring provides seamless support for the Bean Validation API. The main features include support for
JSR-349 standard annotations for defining validation constraints, custom validators, and configuration of
JSR-349 validation within Spring’s ApplicationContext. We’ll go through these features one by one in the
following sections.
4
5
https://beanvalidation.org/3.0
https://hibernate.org/validator
533
Chapter 11 ■ Validation, Formatting, and Type Conversion
Dependencies
For the next sections we need to add the hibernate-validator library to the chapter11 project’s classpath.
The current version specific to Jakarta 10 is 8.0.0.Final. Its transitive dependency is jakarta.validationapi version 3.0.2. Also, an implementation of jakarta.el.ExpressionFactory is needed, because it
provides an implementation for creating and evaluating Jakarta Expression Language expressions, thus the
Glassfish jakarta.el version 5.0.0-M1 library is added too. They are configured using Maven/Gradle and
are shown in the IntelliJ IDEA Gradle View in Figure 11-2.
Figure 11-2. Gradle View showing dependencies for the chapter11 project
Defining Validation Constraints on Domain Object Properties
For the next sections, the type targeted by validation is a more interesting variation of Singer, that has two
enum type fields used to set its genre and gender. The Singer class is shown in Listing 11-24 together with
the two enum declarations.
Listing 11-24. The Enriched Singer Class
package com.apress.prospring6.eleven.domain;
import jakarta.validation.constraints.NotNull;
import jakarta.validation.constraints.Size;
534
Chapter 11 ■ Validation, Formatting, and Type Conversion
public class Singer {
@NotNull
@Size(min=2, max=60)
private String firstName;
private String lastName;
@NotNull
private Genre genre;
private Gender gender;
// setters and getters omitted
public enum Genre {
POP("P"), JAZZ("J"), BLUES("B"), COUNTRY("C");
private String code;
private Genre(String code) {
this.code = code;
}
public String toString() {
return this.code;
}
}
public enum Gender {
MALE("M"), FEMALE("F"), UNSPECIFIED("U");
private String code;
Gender(String code) {
this.code = code;
}
@Override
public String toString() {
return this.code;
}
}
}
In this domain object the validation annotations are shown in bold font. Two constraints are applied to
the firstName property: the @NotNull annotation, which indicates that the value should not be null, and the
@Size annotation, which governs the length of the firstName property. The @NotNull constraint is applied to
the genre property too. The genre property indicates the music genre a singer belongs to, while the gender
property is not relevant for a musical career (or for any career), so it could be null.
Configuring Bean Validation Support in Spring
To configure support of the Bean Validation API in Spring’s ApplicationContext, we define a bean of
type org.springframework.validation.beanvalidation.LocalValidatorFactoryBean in Spring’s
configuration. Listing 11-25 depicts the configuration class.
535
Chapter 11 ■ Validation, Formatting, and Type Conversion
Listing 11-25. Configuring Support for Jakarta Validation in a Spring Application
package com.apress.prospring6.eleven.validator;
import org.springframework.validation.beanvalidation.LocalValidatorFactoryBean;
// other import statements omitted
@Configuration
@ComponentScan
public class JakartaValidationCfg {
@Bean
LocalValidatorFactoryBean validator() {
return new LocalValidatorFactoryBean();
}
}
The declaration of a LocalValidatorFactoryBean bean and enabling component scanning in the
current package so the SingerValidationService bean is registered are all that is needed. Listing 11-26
shows SingerValidationService, a service class that provides a validation service for the Singer class.
Listing 11-26. SingerValidationService, a Validation Service for the Singer Class
package com.apress.prospring6.eleven.validator;
// other import statements omitted
import jakarta.validation.ConstraintViolation;
import jakarta.validation.Validator;
import org.springframework.stereotype.Service;
@Service("singerValidationService")
public class SingerValidationService {
private final Validator validator;
public SingerValidationService(Validator validator) {
this.validator = validator;
}
public Set<ConstraintViolation<Singer>> validateSinger(Singer singer) {
return validator.validate(singer);
}
}
An instance of the jakarta.validation.Validator was injected.
Note the difference from the Spring-provided Validator interface, which is org.
springframework.validation.Validator. Using Jakarta Validator allows you to decouple the
business logic from Spring if necessary.
536
Chapter 11 ■ Validation, Formatting, and Type Conversion
Once the LocalValidatorFactoryBean is defined, you can inject any Validator bean anywhere in your
application and use it. To perform validation on a POJO, the Validator.validate(..) method is called. The
validation results will be returned as a Set of the ConstraintViolation<T> interface.
To test this configuration, we’ll use the same approach as before, as shown in Listing 11-27.
Listing 11-27. Testing SingerValidationService
package com.apress.prospring6.eleven;
import com.apress.prospring6.eleven.validator.JakartaValidationCfg;
import com.apress.prospring6.eleven.validator.SingerValidationService;
import akarta.validation.ConstraintViolation;
// other import statements omitted
public class JakartaValidationTest {
private static final Logger LOGGER = LoggerFactory.
getLogger(JakartaValidationTest.class);
@Test
void testSingerValidation() {
try (var ctx = new AnnotationConfigApplicationContext(JakartaValidationCfg.class)) {
var singerBeanValidationService = ctx.getBean(SingerValidationService.class);
Singer singer = new Singer();
singer.setFirstName("J");
singer.setLastName("Mayer");
singer.setGenre(null);
singer.setGender(null);
var violations = singerBeanValidationService.validateSinger(singer);
assertEquals(2, violations.size());
listViolations(violations);
}
}
private static void listViolations(Set<ConstraintViolation<Singer>> violations) {
violations.forEach(violation ->
LOGGER.info("Validation error for property: {} with value: {} with error
message: {}" ,
violation.getPropertyPath(), violation.getInvalidValue(), violation.
getMessage()));
}
}
// expected output
INFO : Version – HV000001: Hibernate Validator 8.0.0.Alpha1
...
INFO JakartaValidationTest Validation error for property: genre
with value: null
with error message: must not be null
INFO JakartaValidationTest Validation error for property: firstName
with value: J
with error message: size must be between 2 and 60
537
Chapter 11 ■ Validation, Formatting, and Type Conversion
As shown in this listing, a Singer object is constructed with firstName and genre violating the
constraints declared using annotations. The SingerValidationService.validateSinger(..) method is
called, which in turn will invoke JSR-349 (Jakarta Bean Validation 3.0). Running the program also prints
in the console the rules that were violated and the values that were rejected. As you can see, there are two
violations, and the messages are shown. In the output, you can see that Hibernate Validator had already
constructed default validation error messages based on the annotation. You can also provide your own
validation error message, which we demonstrate in the next section.
Creating a Custom Validator
Besides property-level validation, we can apply class-level validation. This applies when in the same class
a field value depends on the value of another field; for example, age and dateOfBirth are related to each
other, and an object is not valid if age is 15 and dateOfBirth is 1980-01-01. For the Singer class, for country
singers, we want to make sure that the lastName and gender properties are not null (again, not that the
gender really matters, but just for educational purposes). In this case, we can develop a custom validator to
perform the check. In the Bean Validation API, developing a custom validator is a two-step process. First,
create an Annotation type for the validator, as shown in Listing 11-28. The second step is to develop the class
that implements the validation logic.
Listing 11-28. Annotation for Custom Validator for Singer Instances
package com.apress.prospring6.eleven.validator;
import jakarta.validation.Constraint;
import jakarta.validation.Payload;
import java.lang.annotation.*;
@Retention(RetentionPolicy.RUNTIME)
@Target(ElementType.TYPE)
@Constraint(validatedBy=CountrySingerValidator.class)
@Documented
public @interface CheckCountrySinger {
String message() default "Country Singer should have gender and last name defined";
Class<?>[] groups() default {};
Class<? extends Payload>[] payload() default {};
}
The @Target(ElementType.TYPE) annotation means that the annotation should be applied only at
the class level. The @Constraint annotation indicates that it’s a validator, and the validatedBy attribute
specifies the class providing the validation logic. Within the body, three attributes are defined (in the form of
a method), as follows:
538
•
The message attribute defines the message (or error code) to return when the
constraint is violated. A default message can also be provided in the annotation.
•
The groups attribute specifies the validation group, if applicable. It’s possible to
assign validators to different groups and perform validation on a specific group.
•
The payload attribute specifies additional payload objects (of the class
implementing the jakarta.validation.Payload interface). It allows you to attach
additional information to the constraint (for example, a payload object can indicate
the severity of a constraint violation).
Chapter 11 ■ Validation, Formatting, and Type Conversion
The code in Listing 11-29 shows the CountrySingerValidator class that provides the validation logic.
Listing 11-29. CountrySingerValidator Class
package com.apress.prospring6.eleven.validator;
import com.apress.prospring6.eleven.domain.Singer;
import jakarta.validation.ConstraintValidator;
import jakarta.validation.ConstraintValidatorContext;
public class CountrySingerValidator implements ConstraintValidator<CheckCountrySinger,
Singer> {
@Override
public void initialize(CheckCountrySinger constraintAnnotation) {}
@Override
public boolean isValid(Singer singer, ConstraintValidatorContext context) {
return singer.getGenre() == null || (!singer.isCountrySinger() ||
(singer.getLastName() != null && singer.getGender() != null));
}
}
CountrySingerValidator implements the ConstraintValidator<CheckCountrySinger, Singer>
interface, which means that the validator checks the @CheckCountrySinger annotation on the Singer
classes. The isValid() method is implemented, and the underlying validation service provider (for
example, Hibernate Validator) will pass the instance under validation to the method. In the method, we
verify that if the singer is a country music singer, the lastName and gender properties should not be null.
The result is a Boolean value that indicates the validation result.
To enable the validation, apply the @CheckCountrySinger annotation to the Singer class, as shown in
Listing 11-30.
Listing 11-30. Annotated Singer Class
package com.apress.prospring6.eleven.domain;
import com.apress.prospring6.eleven.validator.CheckCountrySinger;
// other import statements omitted
@CheckCountrySinger
public class Singer {
@NotNull
@Size(min=2, max=60)
private String firstName;
private String lastName;
@NotNull
private Genre genre;
539
Chapter 11 ■ Validation, Formatting, and Type Conversion
private Gender gender;
public boolean isCountrySinger() {
return genre == Genre.COUNTRY;
}
// getters and setter omitted
Notice that the class in Listing 11-29, CountrySingerValidator, is not declared as a bean. It is an
implementation of jakarta.validation.ConstraintValidator and therefore is automatically detected by
the SingerValidationService bean. To test the custom validation, another test method is needed, shown in
Listing 11-31.
Listing 11-31. Testing Custom Validation
Package com.apress.prospring6.eleven;
//import statements omitted
public class JakartaValidationTest {
private static final Logger LOGGER = LoggerFactory.
getLogger(JakartaValidationTest.class);
@Test
void testCountrySingerValidation() {
try (var ctx = new AnnotationConfigApplicationContext(JakartaValidationCfg.class)) {
var singerBeanValidationService = ctx.getBean(SingerValidationService.class);
Singer singer = new Singer();
singer.setFirstName("John");
singer.setLastName("Mayer");
singer.setGenre(Singer.Genre.COUNTRY);
singer.setGender(null);
var violations = singerBeanValidationService.validateSinger(singer);
assertEquals(1, violations.size());
listViolations(violations);
}
}
private static void listViolations(Set<ConstraintViolation<Singer>> violations) {
violations.forEach(violation ->
LOGGER.info("Validation error for property: {} with value: {} with error
message: {}" ,
violation.getPropertyPath(), violation.getInvalidValue(), violation.
getMessage()));
}
}
// expected output
INFO : JakartaValidationTest – Validation error for property:
with value: Singer{firstName='John', lastName='Mayer', genre=C, gender=null}
with error message: Country Singer should have gender and last name defined
540
Chapter 11 ■ Validation, Formatting, and Type Conversion
In the output, you can see that the value being checked (which is the Singer instance) violates the
validation rule for country singers, because the gender property is null. Note also that in the output, the
property path is empty because this is a class-level validation error.
Using AssertTrue for Custom Validation
Besides implementing a custom validator, another way to apply custom validation using the Bean
Validation API is to use the @AssertTrue annotation. To use this annotation for the Singer class, the
@CheckCountrySinger annotation should be removed, and the isCountrySinger() method should be
annotated with @AssertTrue. Additionally, the validation logic from the CountrySingerValidator.
isValid(..) method should be moved in the body of the isCountrySinger() method as well. We want
to keep the Singer class as it is, to avoid undesired interactions between validations beans. So a duplicate
class named SingerTwo is created with these changes and a validator for these types of instances named
SingerTwoValidationService is added to the configuration.
In Listing 11-32 you can see the SingerTwo class containing the isCountrySinger() method. The
SingerTwoValidationService is almost identical to SingerValidationService, the only difference being
the domain object type it works on.
Listing 11-32. Using the @AssertTrue Annotation
package com.apress.prospring6.eleven.domain;
import jakarta.validation.constraints.AssertTrue;
// other import statements omitted
public class SingerTwo {
@NotNull
@Size(min=2, max=60)
private String firstName;
private String lastName;
@NotNull
private Singer.Genre genre;
private Singer.Gender gender;
@AssertTrue(message="ERROR! Individual singer should have gender and last name defined")
public boolean isCountrySinger() {
return genre == null || (!genre.equals(Singer.Genre.COUNTRY) ||
(gender != null && lastName != null));
}
// setters and getters omitted
}
When invoking validation, the provider invokes the checking and makes sure that the result is true.
JSR-349/Jakarta Bean Validation also provides the @AssertFalse annotation to check for some condition
that should be false. The test method in Listing 11-33 tests whether the validation rule introduced by the
@AssertTrue annotation is violated.
541
Chapter 11 ■ Validation, Formatting, and Type Conversion
Listing 11-33. Testing the @AssertTrue Annotation
package com.apress.prospring6.eleven;
// import statements omitted
public class JakartaValidationTest {
private static final Logger LOGGER = LoggerFactory.getLogger
(JakartaValidationTest.class);
@Test
void testCountrySingerTwoValidation() {
try (var ctx = new AnnotationConfigApplicationContext(JakartaValidationCfg.class)) {
var singerBeanValidationService = ctx.getBean(SingerTwoValidationService.class);
var singer = new SingerTwo();
singer.setFirstName("John");
singer.setLastName("Mayer");
singer.setGenre(Singer.Genre.COUNTRY);
singer.setGender(null);
var violations = singerBeanValidationService.validateSinger(singer);
assertEquals(1, violations.size());
violations.forEach(violation ->
LOGGER.info("Validation error for property: {} with value: {} with error
message: {}" ,
violation.getPropertyPath(), violation.getInvalidValue(),
violation.getMessage()));
}
}
}
// expected output
INFO : JakartaValidationTest - Validation error for property: countrySinger
with value: false
with error message: ERROR! Individual singer should have gender and last name defined
Implementing validation this way makes it clear which rule was violated and allows a custom message
to be configured. It also provides the advantage of keeping the code in the same scope. Some developers
might say that the domain object is polluted with validation logic and recommend against this approach,
but we like this approach for simple validation rules. When the code required to validate the domain objects
becomes bigger than the domain object, that is when a separate validator class is needed.
Deciding Which Validation API to Use
Having discussed Spring’s own Validator interface and the Bean Validation API, which one should you use
in your application? JSR-349/Jakarta Bean Validation is definitely the way to go. The following are the major
reasons:
542
•
JSR-349/Jakarta Bean Validation is a JEE standard and is broadly supported by many
front-end/back-end frameworks (for example, Spring, JPA 3, Spring MVC, etc.).
•
JSR-349/Jakarta Bean Validation provides a standard validation API that hides the
underlying provider, so you are not tied to a specific provider.
Chapter 11 ■ Validation, Formatting, and Type Conversion
•
Spring tightly integrates with JSR-349 starting with version 4. For example, in the
Spring MVC web controller, you can annotate the argument in a method with the
@Valid annotation (under the package jakarta.validation), and Spring will
invoke JSR-349 validation automatically during the data-binding process. Moreover,
in a Spring MVC web application context configuration, a simple annotation
(@EnableWebMvc) configures Spring to automatically enable the Spring type
conversion system and field formatting, as well as support of JSR-349
(Bean Validation).
•
If you are using JPA 3, the provider will automatically perform JSR-349/Jakarta Bean
Validation validation to the entity before persisting, providing another layer of
protection.
For detailed information about using Jakarta Bean Validation with Hibernate Validator as the
implementation provider, please refer to Hibernate Validator’s documentation page.
Configuring Validation in a Spring Boot Application
As you can probably imagine by now, there is a Spring Boot starter library that adds all the necessary
libraries to the project classpath, so you can start writing your validators right away. The library is named
spring-boot-starter-validation and having it in the classpath also removes the necessity of explicitly
declaring a LocalValidatorFactoryBean.
Figure 11-3 shows the collection of libraries added to the project classpath by Spring Boot.
Figure 11-3. Gradle View showing dependencies for the chapter11-boot project
To test that the validation works, without any other explicit configuration, we copied the Singer object
and the SingerValidationService into this project, next to the main class, the one annotated with
@SpringBootApplication, and modified the main method to create a Singer instance and validate it using
the SingerValidationService bean as we’ve done so far in the chapter.
543
Chapter 11 ■ Validation, Formatting, and Type Conversion
Figure 11-4 shows the project content.
Figure 11-4. Project view showing the contents of the chapter11-boot project
The code to test our validation is in the body of the @SpringBootApplication class for simplicity
reasons. What would be the point to have an empty main method anyway? You can see the code validating
the Singer object in Listing 11-34.
Listing 11-34. Spring Boot main Method Validating a Singer Instance
package com.apress.prospring6.eleven.boot;
import
import
import
import
import
org.slf4j.Logger;
org.slf4j.LoggerFactory;
org.springframework.boot.SpringApplication;
org.springframework.boot.autoconfigure.SpringBootApplication;
org.springframework.core.env.AbstractEnvironment;
@SpringBootApplication
public class Chapter11Application {
private static final Logger LOGGER = LoggerFactory.getLogger
(Chapter11Application.class);
public static void main(String... args) {
System.setProperty(AbstractEnvironment.ACTIVE_PROFILES_PROPERTY_NAME, "dev");
var ctx = SpringApplication.run(Chapter11Application.class, args);
var singerBeanValidationService = ctx.getBean(SingerValidationService.class);
var singer = new Singer();
singer.setFirstName("J");
singer.setLastName("Mayer");
singer.setGenre(null);
singer.setGender(null);
var violations = singerBeanValidationService.validateSinger(singer);
if(violations.size() != 2) {
LOGGER.error("Unexpected number of violations: {}", violations.size());
}
544
Chapter 11 ■ Validation, Formatting, and Type Conversion
violations.forEach(violation ->
LOGGER.info("Validation error for property: {} with value: {} with error
message: {}" ,
violation.getPropertyPath(), violation.getInvalidValue(), violation.
getMessage()));
}
}
S
ummary
In this chapter, we covered the Spring type conversion system as well as the field Formatter SPI. You
saw how the new type conversion system can be used for arbitrary type conversion, in addition to the
PropertyEditors support.
We also covered validation support in Spring, Spring’s Validator interface, and the recommended
JSR-349/Jakarta Bean Validation support in Spring. Since the Spring Boot Validation starter library exists, it
was mentioned in the Spring Boot section.
The gist of this chapter is simple: you can implement and configure conversion, formatting, and
validation in multiple ways in a Spring application.
545
CHAPTER 12
Task Execution and Scheduling
Task scheduling is a common feature in enterprise applications. Task scheduling is composed mainly of
three parts:
•
The task: The piece of business logic needed to run at a specific time or on a
regular basis
•
The trigger: Specifies the condition under which the task should be executed
•
The scheduler: Executes the task based on the information from the trigger
Specifically, this chapter covers the following topics:
•
Task execution in Java: We briefly discuss Spring’s TaskExecutor interface and how
tasks are executed.
•
Task scheduling in Spring: We discuss how Spring supports task scheduling, focusing
on the TaskScheduler abstraction introduced in Spring 3. We also cover scheduling
scenarios such as fixed-interval scheduling and cron expressions.
•
Asynchronous task execution: We show how to use the @Async annotation in Spring to
execute tasks asynchronously.
If you are a somewhat experienced developer, you are probably aware of the concept of execution
threads. A Java application is described by code that the JVM can run on one or multiple threads, and one
of the threads is the non-daemon thread that calls the main(..) method of a main class. In Java, the class to
model an execution thread is java.lang.Thread. An execution thread can be created by extending this class
and overriding its run() method. The resulting instance models an execution thread that must be started
explicitly by invoking its start() method.
There’s another way to create threads, however, and this is by creating a class implementing java.lang.
Runnable. This interface provides a common protocol for objects that wish to execute code, including the
Thread class. This means that Runnable instances can be created and passed to some components, called
executors, that execute the code in the way they were configured: sequentially, in parallel, using threads
provided by a thread pool. In case it’s not obvious what a task is, in a Java application a task is any instance of
type Runnable.
© Iuliana Cosmina, Rob Harrop, Chris Schaefer, and Clarence Ho 2023
I. Cosmina et al., Pro Spring 6, https://doi.org/10.1007/978-1-4842-8640-1_12
547
Chapter 12 ■ Task Execution and Scheduling
In Java, the java.util.concurrent.Executor interface represents the abstraction for asynchronous
task execution. In Spring, there is an interface that extents this one and is basically identical, with the
exception that it is annotated with @FunctionalInterface to mark it as a functional interface: org.
springframework.core.task.TaskExecutor.
This interface is necessary for backward compatibility with JDK 1.4 in Spring 2.x.
Spring’s TaskExecutor interface is depicted in Listing 12-1.
Listing 12-1. Spring’s org.springframework.core.task.TaskExecutor Interface
package org.springframework.core.task;
import java.util.concurrent.Executor;
@FunctionalInterface
public interface TaskExecutor extends Executor {
@Override
void execute(Runnable task);
}
The interface has a single method, execute(Runnable task), that accepts a task for execution
based on the semantics and configuration of the thread pool. Spring provides a few useful TaskExecutor
implementations.
Task Executing in Java
In Java there are quite a few java.util.concurrent.Executor implementations. Thread pools provide the
advantage of improved performance when executing a large number of asynchronous tasks, because they
provide a way of bounding and managing the resources, including threads when executing a collection of
tasks. ThreadPoolExecutor maintains basic statistics as the number of active and completed tasks and one
of my (Iuliana’s) favorite implementations is to write a ThreadPoolMonitor class that implements java.
lang.Runnable that prints those statistics.
This section introduces a hierarchy of classes that model various sorting algorithms, shown in
Figure 12-1. These classes are suitable for creating sorting tasks that can be executed asynchronously by an
executor.
548
Chapter 12 ■ Task Execution and Scheduling
Figure 12-1. Hierarchy of classes modeling various sorting algorithms
The implementation of these sorting algorithms is not important for this chapter, but running them in
parallel managed by a ThreadPoolExecutor instance is.
All Java components specific to task executions can be found under the java.util.concurrent
package. The ThreadPoolExecutor class is an implementation of ExecutorService that executes each
submitted task using one of possibly several pooled threads, configured using Executors factory methods.
The size of the thread pool and its maximum capacity are provided as arguments to its constructor. The
tasks are provided as an argument of a type that implements the BlockingQueue<Runnable> interface, which
avoids the same task being submitted more than once for execution, by being thread-safe. It also supports
operations that wait for the queue to become non-empty before retrieving an element, which allows for tasks
to be added to this list after the execution of its contents began.
The ThreadPoolMonitor class is a custom extension of Thread written specifically for this section to
print statistics for a running ThreadPoolExecutor, and its code is shown in Listing 12-2.
549
Chapter 12 ■ Task Execution and Scheduling
Listing 12-2. The ThreadPoolMonitor Monitor Class
package com.apress.prospring6.twelve.classic;
import org.slf4j.Logger;
import org.slf4j.LoggerFactory;
import java.util.concurrent.ThreadPoolExecutor;
public class ThreadPoolMonitor implements Runnable {
private static final Logger LOGGER = LoggerFactory.getLogger(ThreadPoolMonitor.class);
protected ThreadPoolExecutor executor;
protected int printInterval = 200;
@Override
public void run() {
try {
while (executor.getActiveCount() > 0) {
monitorThreadPool();
Thread.sleep(printInterval);
}
} catch (Exception e) {
LOGGER.error(e.getMessage());
}
}
private void monitorThreadPool() {
String strBuff = "CurrentPoolSize : " + executor.getPoolSize() +
" - CorePoolSize : " + executor.getCorePoolSize() +
" - MaximumPoolSize : " + executor.getMaximumPoolSize() +
" - ActiveTaskCount : " + executor.getActiveCount() +
" - CompletedTaskCount : " + executor.getCompletedTaskCount() +
" - TotalTaskCount : " + executor.getTaskCount() +
" - isTerminated : " + executor.isTerminated();
LOGGER.debug(strBuff);
}
public void setExecutor(ThreadPoolExecutor executor) {
this.executor = executor;
}
}
Notice that ThreadPoolMonitor class implements Runnable, which makes it a task too. A
ThreadPoolMonitor instance can be started as a thread executing independently from the sorting tasks
managed by the ThreadPoolExecutor.
Listing 12-3 shows the ClassicDemo class, which generates an array containing 100,000 elements with
values between 0 and 500_000 that is handed over to be sorted in parallel by the tasks in Figure 12-1. These
tasks are managed and executed by an instance of ThreadPoolExecutor, which is monitored by an instance
of ThreadPoolMonitor.
550
Chapter 12 ■ Task Execution and Scheduling
Listing 12-3. The ClassicDemo Monitor Class
package com.apress.prospring6.twelve.classic;
import
import
import
import
import
java.util.List;
java.util.Random;
java.util.concurrent.LinkedBlockingQueue;
java.util.concurrent.ThreadPoolExecutor;
java.util.concurrent.TimeUnit;
public class ClassicDemo {
public static void main(String... args) {
int[] arr = new Random().ints(100_000, 0, 500_000).toArray(); // (1)
// LOGGER.info("Starting Array: {} " , Arrays.toString(arr));
var algsMonitor = new ThreadPoolMonitor(); // (2)
var monitor = new Thread(algsMonitor);
var executor = new ThreadPoolExecutor(2, 4, 0L, TimeUnit.MILLISECONDS,
new LinkedBlockingQueue<>()); // (3)
algsMonitor.setExecutor(executor);
List.of(new BubbleSort(arr), // (4)
new InsertionSort(arr),
new HeapSort(arr),
new MergeSort(arr),
new QuickSort(arr),
new ShellSort(arr))
.forEach(executor::execute);
monitor.start(); // (5)
executor.shutdown();
try {
executor.awaitTermination(30, TimeUnit.MINUTES);
} catch (InterruptedException e) {
throw new RuntimeException(e);
}
}
}
The code has been split into sections by using empty lines. The sections are marked with numbers.
Each section is responsible for the following:
•
1. The first section of the code creates the array. If you want to print it to check its
values, feel free to un-comment the logging line.
•
2. The second section creates the ThreadPoolMonitor instance (algsMonitor) and
the Thread that will execute it (monitor).
•
3. The third section creates the ThreadPoolExecutor (executor). Notice that while
initializing the ThreadPoolExecutor, we are keeping initial pool size as 2 and
maximum pool size to 4. The algsMonitor is configured to monitor the executor.
551
Chapter 12 ■ Task Execution and Scheduling
•
4. The fourth section creates the tasks and submits them for execution.
•
5. The fifth section starts the monitor thread. Then the executor is shut down,
causing the finish execution of all the submitted tasks and termination of the
thread pool.
When the ClassicDemo class is executed, the logs will make it obvious that tasks are being executed in
parallel and that some complete faster than other…BubbleSort never had a chance in this competition, right?
A log snippet is shown in Listing 12-4.
Listing 12-4. The ClassicDemo Console Log
DEBUG: ThreadPoolMonitor - CurrentPoolSize : 2 - CorePoolSize : 2 - MaximumPoolSize : 4 ActiveTaskCount : 2 - CompletedTaskCount : 0 - TotalTaskCount : 6 - isTerminated : false
INFO : AbstractSort - InsertionSort Sort Time: 0.8 seconds
DEBUG: ThreadPoolMonitor - MONITOR: [Sorting Algs Monitor] CurrentPoolSize : 2 CorePoolSize : 2 - MaximumPoolSize : 4 - ActiveTaskCount : 2 - CompletedTaskCount : 1 TotalTaskCount : 6 - isTerminated : false
INFO : AbstractSort - InsertionSort Sort Time: 0.847 seconds
INFO : AbstractSort - HeapSort Sort Time: 0.014 seconds
DEBUG: ThreadPoolMonitor - CurrentPoolSize : 2 - CorePoolSize : 2 - MaximumPoolSize : 4 ActiveTaskCount : 2 - CompletedTaskCount : 2 - TotalTaskCount : 6 - isTerminated : false
INFO : AbstractSort - MergeSort Sort Time: 0.226 seconds
INFO : AbstractSort - QuickSort Sort Time: 0.011 seconds
INFO : AbstractSort - ShellSort Sort Time: 0.017 seconds
DEBUG: ThreadPoolMonitor - CurrentPoolSize : 1 - CorePoolSize : 2 - MaximumPoolSize : 4 ActiveTaskCount : 1 - CompletedTaskCount : 5 - TotalTaskCount : 6 - isTerminated : false
...
DEBUG: ThreadPoolMonitor - CurrentPoolSize : 1 - CorePoolSize : 2 - MaximumPoolSize : 4 ActiveTaskCount : 1 - CompletedTaskCount : 5 - TotalTaskCount : 6 - isTerminated : false
INFO : AbstractSort - BubbleSort Sort Time: 19.991 seconds
The log clearly shows the change in active, completed, and total completed tasks counts of the executor.
For this example, the ThreadPoolExecutor was created by explicitly invoking the constructor, but a similar
result could be obtained by calling the factory method Executors.newFixedThreadPool(6). There are
other Java extensions of the ExecutorService that allow more granular control over task execution, such as
the ScheduledExecutorService, so feel free to take a deeper look. Next we’ll turn to how Spring does task
execution.
Task Executing in Spring
Spring’s TaskExecutor interface was added in version 2.0. Similar to the JDK, out of the box, Spring provides
a number of TaskExecutor implementations suited for different needs1. The most interesting are listed next:
•
org.springframework.core.task.SyncTaskExecutor: Does not execute tasks
asynchronously; invocation occurs in the calling thread.
•
org.springframework.core.task.SimpleAsyncTaskExecutor: Creates new threads
on each invocation; does not reuse existing threads.
https://docs.spring.io/spring-framework/docs/current/javadoc-api/org/
springframework/core/task/TaskExecutor.html
1
552
Chapter 12 ■ Task Execution and Scheduling
•
org.springframework.scheduling.concurrent.ConcurrentTaskExecutor:
An adapter for a java.util.concurrent.Executor instance. Not usually used
since there is a ThreadPoolTaskExecutor class, but it is useful if this one is not
flexible enough.
•
org.springframework.scheduling.concurrent.ThreadPoolTaskExecutor:
TaskExecutor implementation providing the ability to configure
ThreadPoolExecutor via bean properties and expose it as a Spring TaskExecutor.
•
org.springframework.scheduling.quartz.SimpleThreadPoolTaskExecutor:
Subclass of Quartz’s SimpleThreadPool; used when you need to share a thread pool
by both Quartz and non-Quartz components.
Each TaskExecutor implementation serves its own purpose, and all of them obviously have the same
API. The only variation is in the configuration, when defining which TaskExecutor implementation you
want to use and its properties, if any. Let’s take a look at a simple example that prints out a number of
random texts. The TaskExecutor implementation used is SimpleAsyncTaskExecutor. First let’s create a bean
class that holds the task execution logic, as shown in Listing 12-5.
Listing 12-5. The RandomStringPrinter Class
package com.apress.prospring6.twelve;
// some import statements omitted
import org.springframework.core.task.TaskExecutor;
import java.util.UUID;
@Component
public class RandomStringPrinter {
private final Logger logger = LoggerFactory.getLogger(RandomStringPrinter.class);
private final TaskExecutor taskExecutor;
public RandomStringPrinter(TaskExecutor taskExecutor) {
this.taskExecutor = taskExecutor;
}
public void executeTask() {
for(int i=0; i < 10; ++ i) {
final int index = i;
taskExecutor.execute(() -> LOGGER.info("{}: {}", index , UUID.randomUUID().
toString().substring(0, 8)));
}
}
}
This class is just a regular bean that needs TaskExecutor to be injected as a dependency and defines a
method executeTask(). The executeTask() method calls the execute method of the provided TaskExecutor
by creating a new Runnable instance containing the logic we want to execute for this task. This might not
be obvious here, as a lambda expression is used to create the Runnable instance. The configuration is quite
simple; it is similar to the configuration depicted in the previous section. The only thing we have to take into
account here is that we need to provide a declaration for a TaskExecutor bean, which needs to be injected in
the RandomStringPrinter bean.
553
Chapter 12 ■ Task Execution and Scheduling
Listing 12-6 shows the configuration class and the demo class named SimpleAsyncTaskExecutorDemon.
Listing 12-6. The SimpleAsyncTaskExecutorDemo and AppConfig Monitor Classes
package com.apress.prospring6.twelve;
// some import statements omitted
import org.springframework.scheduling.annotation.EnableAsync;
@Configuration
@EnableAsync
class AppConfig {
@Bean
TaskExecutor taskExecutor() {
return new SimpleAsyncTaskExecutor();
}
}
public class SimpleAsyncTaskExecutorDemo {
public static void main(String... args) throws IOException {
try (var ctx = new AnnotationConfigApplicationContext(AppConfig.class,
RandomStringPrinter.class)) {
var printer = ctx.getBean(RandomStringPrinter.class);
printer.executeTask();
System.in.read();
}
}
}
The most important bit in the class is the @EnableAsync annotation that enables Spring’s asynchronous
method execution capability, which means Spring will be searching for an associated thread pool definition,
either a unique org.springframework.core.task.TaskExecutor bean in the context or an java.util.
concurrent.Executor bean named taskExecutor otherwise. If none is found, a org.springframework.
core.task.SimpleAsyncTaskExecutor will be used to process async method invocations.
When the SimpleAsyncTaskExecutorDemo class is run, the random strings are printed by each task
in random order, since the tasks are executed asynchronously. This is obvious because each task has an
associated number. Listing 12-7 shows sample output.
Listing 12-7. Log Sample Printed by the SimpleAsyncTaskExecutorDemo Class Execution
INFO
INFO
INFO
INFO
INFO
INFO
INFO
INFO
INFO
INFO
554
:
:
:
:
:
:
:
:
:
:
RandomStringPrinter
RandomStringPrinter
RandomStringPrinter
RandomStringPrinter
RandomStringPrinter
RandomStringPrinter
RandomStringPrinter
RandomStringPrinter
RandomStringPrinter
RandomStringPrinter
-
6:
4:
3:
1:
5:
8:
2:
7:
0:
9:
87548a56
019c9571
a5cc57ef
8a6dc271
52fd6224
11810531
820b17a4
9e56cf1b
eab9362a
d24c2076
Chapter 12 ■ Task Execution and Scheduling
Task Scheduling in Spring
Executing tasks is clearly easy, but enterprise applications often need to do so in a more controlled manner,
which means tasks must be scheduled. In many applications, various tasks (such as sending e-mail
notifications to customers, running day-end jobs, doing data housekeeping, and updating data in batches)
need to be scheduled to run on a regular basis, either in a fixed interval (for example, every hour) or at a
specific schedule (for example, at 8 p.m. every night, from Monday to Friday).
There are many ways to trigger the execution of a task in a Spring application. One way is to trigger a
job externally from a scheduling system that already exists in the application deployment environment. For
example, many enterprises use commercial systems, such as Control-M or CA AutoSys, for scheduling tasks.
If the application is running on a Linux/Unix platform, the crontab scheduler can be used. The job triggering
can be done by sending a RESTful-WS request to the Spring application and having Spring’s MVC controller
trigger the task.
Another way is to use the task scheduling support in Spring. Spring provides three options in terms of
task scheduling:
•
Support of JDK Timer: Spring supports JDK’s Timer object for task scheduling.
•
Integration with Quartz: Quartz Job Scheduler2 is a popular open source scheduling
library.
•
Spring’s own Spring TaskScheduler abstraction: Spring 3 introduced the
TaskScheduler abstraction, which provides a simple way to schedule tasks and
supports most typical requirements.
This section focuses on using Spring’s TaskScheduler abstraction for task scheduling, the consequence
of which is that the project is quite simple and the only Spring dependency necessary is the springcontext.jar library.
Introducing the Spring TaskScheduler Abstraction
Spring’s TaskScheduler abstraction provides a variety of methods for scheduling tasks to run at some point
in the future and has mainly three participants:
2
•
The Trigger interface: The org.springframework.scheduling.Trigger interface
provides support for defining the triggering mechanism. Spring provides two
Trigger implementations. The CronTrigger class supports triggering based on a
cron expression, while the PeriodicTrigger class supports triggering based on an
initial delay and then a fixed interval.
•
The task: The task is the piece of business logic that needs to be scheduled. In Spring,
a task can be specified as a method within any Spring bean.
•
The TaskScheduler interface: The org.springframework.scheduling.
TaskScheduler interface provides support for task scheduling. Spring
provides three implementation classes of the TaskScheduler interface. The
ConcurrentTaskScheduler and ThreadPoolTaskScheduler classes (both under
the package org.springframework.scheduling.concurrent) wrap the java.
util.concurrent.ScheduledThreadPoolExecutor class. Both classes support task
execution from a shared thread pool. The DefaultManagedTaskScheduler class, also
in package org.springframework.scheduling.concurrent, is commonly used in a
Jakarta EE environment.
https://www.quartz-scheduler.org/
555
Chapter 12 ■ Task Execution and Scheduling
Figure 12-2 shows the relationships between the Trigger interface, the TaskScheduler interface, and
the task that implements the java.lang.Runnable interface.
Figure 12-2. Relationship between trigger, task, and scheduler
Basically, task schedulers execute tasks based on a date, time, once, or repeatedly. Task executions are
triggered by Trigger implementations, which provide granular control over the time tasks are executed,
especially in relation to other task executions.
To schedule tasks by using Spring’s TaskScheduler abstraction, a few annotations are necessary, which
are demonstrated and described in the following section.
Exploring a Sample Task
To demonstrate task scheduling in Spring, let’s implement a simple job first, namely, an application
maintaining a database of car information. Listing 12-8 shows the Car class, which is implemented as a JPA
entity class.
Listing 12-8. Car Entity class
package com.apress.prospring6.twelve.entities;
import static jakarta.persistence.GenerationType.IDENTITY;
import jakarta.persistence.*;
import java.time.LocalDate;
@Entity
@Table(name="CAR")
public class Car {
@Id
@GeneratedValue(strategy = IDENTITY)
@Column(name = "ID")
private Long id;
556
Chapter 12 ■ Task Execution and Scheduling
@Column(name="LICENSE_PLATE")
private String licensePlate;
@Column(name="MANUFACTURER")
private String manufacturer;
@Column(name="MANUFACTURE_DATE")
private LocalDate manufactureDate;
@Column(name="AGE")
private int age;
@Version
private int version;
// getters and setters
}
This entity class is used as a model for the CAR table generated by Hibernate. The configuration for the
data access and services layers is provided by the BasicDataSourceCfg and the JpaConfig classes, just like
shown in the data access chapters. To tell Hibernate to create the table, the Environment.HBM2DDL_AUTO
property is set to create-drop. To make sure there is some data to work with, a class named DBInitializer
is introduced. Creating a bean of this type adds three Car records to the table. The DBInitializer class is
shown in Listing 12-9.
Listing 12-9. DBInitializer Class That Populates the CAR Table
package com.apress.prospring6.twelve.config;
// import statements omitted
@Service
public class DBInitializer {
private static Logger LOGGER = LoggerFactory.getLogger(DBInitializer.class);
private final CarRepository carRepository;
public DBInitializer(CarRepository carRepository) {
this.carRepository = carRepository;
}
@PostConstruct
public void initDB() {
LOGGER.info("Starting database initialization...");
var car = new Car();
car.setLicensePlate("GRAVITY-0405");
car.setManufacturer("Ford");
car.setManufactureDate(LocalDate.of(2006, 9, 12));
carRepository.save(car);
car = new Car();
car.setLicensePlate("CLARITY-0432");
car.setManufacturer("Toyota");
557
Chapter 12 ■ Task Execution and Scheduling
car.setManufactureDate(LocalDate.of(2003, 9, 9));
carRepository.save(car);
car = new Car();
car.setLicensePlate("ROSIE-0402");
car.setManufacturer("Toyota");
car.setManufactureDate(LocalDate.of(2017, 4, 16));
carRepository.save(car);
// ...
LOGGER.info("Database initialization finished.");
}
}
The CarRepository bean injected in DBInitializer is a Spring Data typical repo, an interface
extending CrudRepository<Car, Long>. The same bean is injected into the CarServiceImpl class depicted
in Listing 12-10.
Listing 12-10. CarServiceImpl Class
package com.apress.prospring6.twelve.service;
// import statements omitted
import org.springframework.scheduling.annotation.Scheduled;
@Service("carService")
@Repository
@Transactional
public class CarServiceImpl implements CarService {
public boolean done;
final Logger LOGGER = LoggerFactory.getLogger(CarServiceImpl.class);
private final CarRepository carRepository;
public CarServiceImpl(CarRepository carRepository) {
this.carRepository = carRepository;
}
@Override
@Transactional(readOnly=true)
public Stream<Car> findAll() {
return StreamSupport.stream(carRepository.findAll().spliterator(), false);
}
@Override
public Car save(Car car) {
return carRepository.save(car);
}
@Override
@Scheduled(fixedDelay=10000)
558
Chapter 12 ■ Task Execution and Scheduling
public void updateCarAgeJob() {
var cars = findAll();
var currentDate = LocalDate.now();
LOGGER.info("Car age update job started");
cars.forEach(car -> {
var p = Period.between(car.getManufactureDate(), currentDate);
int age = p.getYears();
car.setAge(age);
save(car);
LOGGER.info("Car age update --> {}" , car);
});
LOGGER.info("Car age update job completed successfully");
done = true;
}
@Override
public boolean isDone() {
return done;
}
}
The CarServiceImpl class contains four methods:
•
Stream<Car> findAll(): Retrieves the information about all cars.
•
Car save(Car car): Persists an updated Car object.
•
void updateCarAgeJob(): The job that needs to be run regularly to update the age of
the car based on the manufacture date of the car and the current date. Notice the
@Scheduled annotation on it. It configures this method to be executed approximately
every 10 seconds.
•
boolean isDone(): A utility method designed to be used to know when the job
ended, so that the application can be shut down gracefully.
The only thing missing is the Spring application configuration that enables task scheduling. The
TaskSchedulingConfig class is shown in Listing 12-11.
Listing 12-11. TaskSchedulingConfig Class
package com.apress.prospring6.twelve.config;
import org.springframework.context.annotation.ComponentScan;
import org.springframework.context.annotation.Configuration;
import org.springframework.scheduling.annotation.EnableScheduling;
@Configuration
@ComponentScan(basePackages = {"com.apress.prospring6.twelve"} )
@EnableScheduling
public class TaskSchedulingConfig {
}
559
Chapter 12 ■ Task Execution and Scheduling
The @EnableScheduling annotation used on a @Configuration class enables detection of @Scheduled
annotations on any Spring-managed bean in the container or their methods. Methods annotated with
@Scheduled may even be declared directly within @Configuration classes, since configuration classes
are beans themselves. Since Spring 4.2, @Scheduled methods are supported on beans of any scope. This
annotation tells Spring to look for an associated scheduler definition: either a unique TaskScheduler bean
in the context or a TaskScheduler bean named taskScheduler or a ScheduledExecutorService bean. If
none is found, a local single-threaded default scheduler will be created and used to execute scheduled tasks.
To schedule a specific method in a Spring bean, the method must be annotated with @Scheduled and pass in
the scheduling requirements.
The testing program is shown in Listing 12-12.
Listing 12-12. CarTaskSchedulerDemo Class
package com.apress.prospring6.twelve;
// import statements omitted
public class CarTaskSchedulerDemo {
private static final Logger LOGGER = LoggerFactory.
getLogger(CarTaskSchedulerDemo.class);
public static void main(String[] args) throws IOException {
try (var ctx = new AnnotationConfigApplicationContext(TaskSchedulingConfig.class)) {
try {
var taskScheduler = ctx.getBean(ScheduledAnnotationBeanPostProcessor.
DEFAULT_TASK_SCHEDULER_BEAN_NAME);
LOGGER.info(" >>>> Task 'taskScheduler' found: {}", taskScheduler.
getClass());
} catch (NoSuchBeanDefinitionException nbd) {
LOGGER.debug("No 'taskScheduler' configured!");
}
System.in.read();
}
}
}
Since we want to check if we have a scheduler, we search for a scheduler bean named taskScheduler
(this is the value of the DEFAULT_TASK_SCHEDULER_BEAN_NAME constant) in the demo code and print its class.
Scheduling tasks in Spring is implemented the same way as almost everything else is implemented,
by proxying. The @EnableScheduling annotation adds a org.springframework.scheduling.annotation.
ScheduledAnnotationBeanPostProcessor bean to the context that picks up methods annotated with
@Scheduled. These methods are invoked by a TaskScheduler according to the fixedRate, fixedDelay, or
cron expression configured via the @Scheduled annotation.
Since we need the main thread to continue its execution, so that we can see the updateCarAgeJob()
method being executed repeatedly, the System.in.read() statement is used to wait for the developer
to press any key before exiting. The log printed in the console might look a lot like the one shown in
Listing 12-13.
Listing 12-13. CarTaskSchedulerDemo Log for execution with configuration in TaskSchedulingConfig
00:14:21.818 [main] INFO : ScheduledAnnotationBeanPostProcessor - No TaskScheduler/
ScheduledExecutorService bean found for scheduled processing
00:14:21.822 [main] DEBUG: CarTaskSchedulerDemo - No 'taskScheduler' configured!
560
Chapter 12 ■ Task Execution and Scheduling
00:14:21.900 [pool-1-thread-1] INFO : CarServiceImpl - Car age update job started
00:14:21.903 [pool-1-thread-1] INFO : CarServiceImpl - Car age update --> Car{id=1,
licensePlate='GRAVITY-0405', manufacturer='Ford', manufactureDate=2006-09-12, age=16,
version=0}
00:14:21.908 [pool-1-thread-1] INFO : CarServiceImpl - Car age update --> Car{id=2,
licensePlate='CLARITY-0432', manufacturer='Toyota', manufactureDate=2003-09-09, age=19,
version=0}
00:14:21.908 [pool-1-thread-1] INFO : CarServiceImpl - Car age update --> Car{id=3,
licensePlate='ROSIE-0402', manufacturer='Toyota', manufactureDate=2017-04-16, age=5,
version=0}
...
00:14:21.909 [pool-1-thread-1] INFO : CarServiceImpl - Car age update job completed
successfully
00:14:31.936 [pool-1-thread-1] INFO : CarServiceImpl - Car age update job started
00:14:31.936 [pool-1-thread-1] INFO : CarServiceImpl - Car age update --> Car{id=1,
licensePlate='GRAVITY-0405', manufacturer='Ford', manufactureDate=2006-09-12, age=16,
version=1}
00:14:31.937 [pool-1-thread-1] INFO : CarServiceImpl - Car age update --> Car{id=2,
licensePlate='CLARITY-0432', manufacturer='Toyota', manufactureDate=2003-09-09, age=19,
version=1}
00:14:31.937 [pool-1-thread-1] INFO : CarServiceImpl - Car age update --> Car{id=3,
licensePlate='ROSIE-0402', manufacturer='Toyota', manufactureDate=2017-04-16, age=5,
version=1}
00:14:31.938 [pool-1-thread-1] INFO : CarServiceImpl - Car age update job completed
successfully
...
The thread name is added to the log to make it obvious that the updateCarAgeJob() methods are
executed in a thread pool, even if the default executor uses a single thread.
There are two ways to configure a task scheduler to be used: make the TaskSchedulingConfig class
implement org.springframework.scheduling.annotation.SchedulingConfigurer and override the
configureTasks(..) to set up a custom task scheduler, or declare a task scheduler custom bean.
Listing 12-14 shows the TaskSchedulingConfig2 class that implements SchedulingConfigurer.
Listing 12-14. TaskSchedulingConfig2 Configuration Class
package com.apress.prospring6.twelve.spring.config;
import
import
import
import
import
org.springframework.context.annotation.FilterType;
org.springframework.scheduling.annotation.EnableScheduling;
org.springframework.scheduling.annotation.SchedulingConfigurer;
org.springframework.scheduling.concurrent.ThreadPoolTaskScheduler;
org.springframework.scheduling.config.ScheduledTaskRegistrar;
import java.util.concurrent.Executor;
import java.util.concurrent.ScheduledThreadPoolExecutor;
// import statements omitted
@Configuration
@ComponentScan(basePackages = {"com.apress.prospring6.twelve.spring"})
@EnableScheduling
public class TaskSchedulingConfig2 implements SchedulingConfigurer {
561
Chapter 12 ■ Task Execution and Scheduling
private static final Logger LOGGER = LoggerFactory.
getLogger(TaskSchedulingConfig2.class);
@Override
public void configureTasks(ScheduledTaskRegistrar taskRegistrar) {
taskRegistrar.setScheduler(taskExecutor());
}
@Bean(destroyMethod = "shutdown")
public Executor taskExecutor() {
var tpts = new ThreadPoolTaskScheduler();
tpts.setPoolSize(3);
tpts.setThreadNamePrefix("tsc2-");
return tpts;
}
}
The task scheduler is configured to name managed threads with the tsc2- to make it obvious that the
tasks invoking updateCarAgeJob() are executed by it.
Listing 12-15 shows the demo program that checks the existence of a taskExecutor bean.
Listing 12-15. CarTaskSchedulerDemo Version Using TaskSchedulingConfig2 Configuration Class
package com.apress.prospring6.twelve;
// import statements omitted
public class CarTaskSchedulerDemo {
private static final Logger LOGGER = LoggerFactory.
getLogger(CarTaskSchedulerDemo.class);
public static void main(String[] args) throws IOException {
try (var ctx = new AnnotationConfigApplicationContext(TaskSchedulingConfig2.
class)) {
try {
var taskExecutor = ctx.getBean("taskExecutor");
LOGGER.info(" >>>> 'taskExecutor' found: {}", taskExecutor.getClass());
} catch (NoSuchBeanDefinitionException nbd) {
LOGGER.debug("No 'taskExecutor' configured!");
}
System.in.read();
}
}
}
When run, this version of the CarTaskSchedulerDemo produces the output shown in Listing 12-16.
Listing 12-16. CarTaskSchedulerDemo Log for execution with configuration in TaskSchedulingConfig2
00:15:47.299 [main] DEBUG: CarTaskSchedulerDemo - No 'taskScheduler' configured!
00:15:47.299 [main] INFO : CarTaskSchedulerDemo - >>>> 'taskExecutor' found: class org.
springframework.scheduling.concurrent.ThreadPoolTaskScheduler
00:15:47.375 [tsc2-1] INFO : CarServiceImpl - Car age update job started
562
Chapter 12 ■ Task Execution and Scheduling
00:15:47.378 [tsc2-1] INFO : CarServiceImpl - Car age update --> Car{id=1,
licensePlate='GRAVITY-0405', manufacturer='Ford', manufactureDate=2006-09-12, age=16,
version=0}
00:15:47.383 [tsc2-1] INFO : CarServiceImpl - Car age update --> Car{id=2,
licensePlate='CLARITY-0432', manufacturer='Toyota', manufactureDate=2003-09-09, age=19,
version=0}
00:15:47.383 [tsc2-1] INFO : CarServiceImpl - Car age update --> Car{id=3,
licensePlate='ROSIE-0402', manufacturer='Toyota', manufactureDate=2017-04-16, age=5,
version=0}
00:15:47.384 [tsc2-1] INFO : CarServiceImpl - Car age update job completed successfully
...
The reason you do not see more than one thread is that the tasks take so little time to execute there is no
need to use another thread from the pool.
The other way to do the same thing is by declaring the TaskScheduler bean directly as shown in
Listing 12-17.
Listing 12-17. TaskSchedulingConfig3 Configuration Class.
package com.apress.prospring6.twelve.spring.config;
@Configuration
@ComponentScan(basePackages = {"com.apress.prospring6.twelve.spring"})
@EnableScheduling
public class TaskSchedulingConfig3 {
@Bean
TaskScheduler taskScheduler() {
var tpts = new ThreadPoolTaskScheduler();
tpts.setPoolSize(3);
tpts.setThreadNamePrefix("tsc3-");
return tpts;
}
}
The test program for the TaskSchedulingConfig3 class is identical to the class shown in Listing 12-12,
but the log shows the that the new task scheduler bean is used, as you can see in Listing 12-18.
Listing 12-18. CarTaskSchedulerDemo Log for execution with configuration in TaskSchedulingConfig3
00:16:32.485 [main] INFO : CarTaskSchedulerDemo - >>>> 'taskScheduler' found: class org.
springframework.scheduling.concurrent.ThreadPoolTaskScheduler
00:16:32.558 [tsc3-1] INFO : CarServiceImpl - Car age update job started
00:16:32.560 [tsc3-1] INFO : CarServiceImpl - Car age update --> Car{id=1,
licensePlate='GRAVITY-0405', manufacturer='Ford', manufactureDate=2006-09-12, age=16,
version=0}
00:16:32.565 [tsc3-1] INFO : CarServiceImpl - Car age update --> Car{id=2,
licensePlate='CLARITY-0432', manufacturer='Toyota', manufactureDate=2003-09-09, age=19,
version=0}
563
Chapter 12 ■ Task Execution and Scheduling
00:16:32.565 [tsc3-1] INFO : CarServiceImpl - Car age update --> Car{id=3,
licensePlate='ROSIE-0402', manufacturer='Toyota', manufactureDate=2017-04-16, age=5,
version=0}
00:16:32.566 [tsc3-1] INFO : CarServiceImpl - Car age update job completed successfully
...
Asynchronous Task Execution in Spring
Since version 3.0, Spring also supports using annotations to execute a task asynchronously. To do this, you
just need to annotate the method with @Async. This means the caller returns immediately while the actual
execution happens in a task submitted to Spring TaskExecutor.
This being said, Listing 12-19 shows the AsyncServiceImpl class that defines two simple methods that
are invoked by asynchronous tasks.
Listing 12-19. AsyncServiceImpl Bean Class
package com.apress.prospring6.twelve.spring.async;
import java.util.concurrent.CompletableFuture;
import java.util.concurrent.Future;
import org.slf4j.Logger;
import org.slf4j.LoggerFactory;
import org.springframework.scheduling.annotation.Async;
public class AsyncServiceImpl implements AsyncService {
private static final Logger LOGGER = LoggerFactory.getLogger(AsyncServiceImpl.class);
@Async
@Override
public void asyncTask() {
LOGGER.info("Start execution of async. task");
try {
Thread.sleep(10000);
} catch (Exception ex) {
LOGGER.error("Task Interruption", ex);
}
LOGGER.info("Complete execution of async. task");
}
@Async
@Override
public Future<String> asyncWithReturn(String name) {
LOGGER.info("Start execution of async. task with return for {}",name);
try {
Thread.sleep(5000);
} catch (Exception ex) {
LOGGER.error("Task Interruption", ex);
}
564
Chapter 12 ■ Task Execution and Scheduling
LOGGER.info("Complete execution of async. task with return for {}", name);
return CompletableFuture.completedFuture("Hello: " + name);
}
}
The AsyncService interface defines two methods that AsyncServiceImpl provides implementations
for. The asyncTask() method is a simple task that logs information to the logger. The method
asyncWithReturn() accepts a String argument and returns an instance of the java.util.concurrent.
CompletableFuture<T> that can be used by the caller to retrieve the result of the execution later.
The @Async annotation is picked up by enabling Spring’s asynchronous method execution capability,
and that is done by annotating a Java configuration class with @EnableAsync. Refining the configuration can
be done by declaring the configuration class to implement org.springframework.scheduling.annotation.
AsyncConfigurer.
Listing 12-20 shows the empty configuration class that enables asynchronous task execution.
Listing 12-20. AsyncConfig Bean Class
package com.apress.prospring6.twelve.spring.async;
// other import statements omitted
import org.springframework.scheduling.annotation.EnableAsync;
@Configuration
@EnableAsync
@ComponentScan
public class AsyncConfig {
@Bean
public AsyncService asyncService() {
return new AsyncServiceImpl();
}
}
The AsyncService bean was declared using @Bean, to avoid being picked up by the task scheduling
configuration classes introduced previously and added into a context where it does not belong. This is a
technical decision to avoid collision and log pollution, basically keeping the example scopes separate.
Testing this configuration requires explicit submission of tasks, especially since we need the results of
the asyncWithReturn() invocation. The testing program is shown in Listing 12-21.
Listing 12-21. AsyncDemo Testing Class
package com.apress.prospring6.twelve.spring.async;
// other import statements omitted
import org.springframework.scheduling.annotation.EnableAsync;
import java.util.concurrent.ExecutionException;
public class AsyncDemo {
private static final Logger LOGGER = LoggerFactory.getLogger(AsyncDemo.class);
565
Chapter 12 ■ Task Execution and Scheduling
public static void main(String... args) throws IOException, ExecutionException,
InterruptedException {
try (var ctx = new AnnotationConfigApplicationContext(AsyncConfig.class)) {
var asyncService = ctx.getBean("asyncService", AsyncService.class);
for (int i = 0; i < 5; i++) {
asyncService.asyncTask();
}
var result1 = asyncService.asyncWithReturn("John Mayer");
var result2 = asyncService.asyncWithReturn("Eric Clapton");
var result3 = asyncService.asyncWithReturn("BB King");
Thread.sleep(6000);
LOGGER.info(" >> Result1: " + result1.get());
LOGGER.info(" >> Result2: " + result2.get());
LOGGER.info(" >> Result3: " + result3.get());
System.in.read();
}
}
}
The asyncTask() method is invoked five times, then asyncWithReturn() method is invoked three
times with different arguments, and then we retrieve the results after the main thread sleeps for six seconds.
Running the program produces the output shown in Listing 12-22.
Listing 12-22. AsyncDemo Log Sample
00:11:28.937 [main] INFO : AsyncExecutionAspectSupport - No task
async processing: no bean of type TaskExecutor and no bean named
00:11:28.944 [SimpleAsyncTaskExecutor-1] INFO : AsyncServiceImpl
async. task
00:11:28.944 [SimpleAsyncTaskExecutor-3] INFO : AsyncServiceImpl
async. task
00:11:28.944 [SimpleAsyncTaskExecutor-4] INFO : AsyncServiceImpl
async. task
00:11:28.944 [SimpleAsyncTaskExecutor-5] INFO : AsyncServiceImpl
async. task
00:11:28.944 [SimpleAsyncTaskExecutor-2] INFO : AsyncServiceImpl
async. task
00:11:28.945 [SimpleAsyncTaskExecutor-8] INFO : AsyncServiceImpl
task with return for BB King
00:11:28.945 [SimpleAsyncTaskExecutor-7] INFO : AsyncServiceImpl
task with return for Eric Clapton
00:11:28.945 [SimpleAsyncTaskExecutor-6] INFO : AsyncServiceImpl
task with return for John Mayer
00:11:33.951 [SimpleAsyncTaskExecutor-7] INFO : AsyncServiceImpl
async. task with return for Eric Clapton
00:11:33.951 [SimpleAsyncTaskExecutor-6] INFO : AsyncServiceImpl
async. task with return for John Mayer
566
executor bean found for
'taskExecutor' either
- Start execution of
- Start execution of
- Start execution of
- Start execution of
- Start execution of
- Start execution of async.
- Start execution of async.
- Start execution of async.
- Complete execution of
- Complete execution of
Chapter 12 ■ Task Execution and Scheduling
00:11:33.951 [SimpleAsyncTaskExecutor-8] INFO : AsyncServiceImpl - Complete
async. task with return for BB King
00:11:34.949 [main] INFO : AsyncDemo - >> Result1: Hello: John Mayer
00:11:34.949 [main] INFO : AsyncDemo - >> Result2: Hello: Eric Clapton
00:11:34.949 [main] INFO : AsyncDemo - >> Result3: Hello: BB King
00:11:38.949 [SimpleAsyncTaskExecutor-5] INFO : AsyncServiceImpl - Complete
async. task
00:11:38.949 [SimpleAsyncTaskExecutor-2] INFO : AsyncServiceImpl - Complete
async. task
00:11:38.949 [SimpleAsyncTaskExecutor-3] INFO : AsyncServiceImpl - Complete
async. task
00:11:38.949 [SimpleAsyncTaskExecutor-4] INFO : AsyncServiceImpl - Complete
async. task
00:11:38.949 [SimpleAsyncTaskExecutor-1] INFO : AsyncServiceImpl - Complete
async. task
execution of
execution of
execution of
execution of
execution of
execution of
From the output, you can see that all the calls were started at the same time. The three invocations with
return values complete first, and are displayed on the console output. Finally, the five asyncTask() methods
called are completed too.
Customizing this configuration is as simple as customizing the scheduled configuration—just make the
configuration class implement AsyncConfigurer and override the getAsyncExecutor() method, as shown
in Listing 12-23.
Listing 12-23. AsyncDemo with Custom Async Executor
package com.apress.prospring6.twelve.spring.async;
// other import statements omitted
import org.springframework.scheduling.annotation.AsyncConfigurer;
import org.springframework.scheduling.concurrent.ThreadPoolTaskExecutor;
@Configuration
@EnableAsync
@ComponentScan
public class AsyncConfig implements AsyncConfigurer {
@Override
public Executor getAsyncExecutor() {
var tpts = new ThreadPoolTaskExecutor();
tpts.setCorePoolSize(2);
tpts.setMaxPoolSize(10);
tpts.setThreadNamePrefix("tpte2-");
tpts.setQueueCapacity(5);
tpts.initialize();
return tpts;
}
@Bean
public AsyncService asyncService() {
return new AsyncServiceImpl();
}
}
567
Chapter 12 ■ Task Execution and Scheduling
If more than one task executor is configured in the same application context, tasks can be assigned
to a specific executor by using its name as a parameter for the @Async annotation, such as
@Async("otherExecutor").
Both task executions and schedulers can be configured to handle situations in which tasks
end with an exception being thrown using special exception handlers. As shown in Listing 12-24,
the ThreadPoolTaskScheduler can be configured with an instance of org.springframework.util.
ErrorHandler to handle errors that occur during asynchronous execution of tasks, and a task executor
can be configured with an instance of type java.util.concurrent.RejectedExecutionHandler to handle
rejected tasks.
Listing 12-24. TaskSchedulingConfig4 Example with an ErrorHandler and a RejectedExecutionHandler
package com.apress.prospring6.twelve.spring.config;
import org.springframework.scheduling.annotation.EnableScheduling;
import org.springframework.scheduling.concurrent.ThreadPoolTaskScheduler;
import org.springframework.util.ErrorHandler;
import java.util.concurrent.ConcurrentHashMap;
import java.util.concurrent.RejectedExecutionHandler;
import java.util.concurrent.ThreadPoolExecutor;
@Configuration
@ComponentScan(basePackages = {"com.apress.prospring6.twelve.spring"})
@EnableScheduling
public class TaskSchedulingConfig4 {
@Bean
TaskScheduler taskScheduler() {
var tpts = new ThreadPoolTaskScheduler();
tpts.setPoolSize(3);
tpts.setThreadNamePrefix("tsc4-");
tpts.setErrorHandler(new LoggingErrorHandler("tsc4"));
tpts.setRejectedExecutionHandler(new RejectedTaskHandler());
return tpts;
}
}
class LoggingErrorHandler implements ErrorHandler {
private static final Logger LOGGER = LoggerFactory.getLogger(LoggingErrorHandler.class);
private final String name;
public LoggingErrorHandler(String name) {
this.name = name;
}
@Override
public void handleError(Throwable t) {
LOGGER.error("[{}]: task failed because {}",name , t.getCause(), t);
}
}
568
Chapter 12 ■ Task Execution and Scheduling
class RejectedTaskHandler implements RejectedExecutionHandler {
private static final Logger LOGGER = LoggerFactory.getLogger(RejectedTaskHandler.class);
private Map<Runnable, Integer> rejectedTasks = new ConcurrentHashMap<>();
@Override
public void rejectedExecution(Runnable r, ThreadPoolExecutor executor) {
LOGGER.info(" >> check for resubmission.");
boolean submit = true;
if (rejectedTasks.containsKey(r)) {
int submittedCnt = rejectedTasks.get(r);
if (submittedCnt > 5) {
submit = false;
} else {
rejectedTasks.put(r, rejectedTasks.get(r) + 1);
}
} else {
rejectedTasks.put(r, 1);
}
if(submit) {
executor.execute(r);
} else {
LOGGER.error(">> Task {} cannot be re-submitted.", r.toString());
}
}
}
The LoggingErrorHandler simply logs with the ERROR level the exception thrown by a task being
processed. The RejectedTaskHandler resubmits a rejected task and keeps count of the number of
resubmissions. If a task has been resubmitted more than five times, an exception is thrown and the task is
not submitted anymore.
Listing 12-10 earlier in the chapter shows the CarServiceImpl throwing an IllegalStateException
every time the internal time divides perfectly by 5. The stacktrace of this exception is shown in the console
and the LoggingErrorHandler intercepts it and prints the task name, so we know which task failed.
There are two situations in which a task is rejected: when the task is submitted after shutdown()
is invoked, and when the thread pool doesn’t have any available threads for the task to execute in. For
the first scenario, an implementation of RejectedExecutionHandler can only submit a notification or
write a log with the details of the failed task. For the second scenario, an implementation like the one in
RejectedTaskHandler tries to resubmit the task a few times back to the executor until a final rejection, if the
task was still not executed. Unfortunately, this situation is difficult to reproduce with tasks that barely do
anything, like the one in CarServiceImpl.
Feel free to run the examples in the chapter12 project and notice the exception handling specific to the
TaskSchedulingConfig4 configuration.
Listing 12-19 shows the AsyncServiceImpl throwing an IllegalStateException every time
the internal time divides perfectly by 5. For a Spring asynchronous task executor, a bean of type org.
springframework.aop.interceptor.SimpleAsyncUncaughtExceptionHandler (that implements org.
springframework.aop.interceptor.AsyncUncaughtExceptionHandler) simply logs the exception. To
override this behavior, we have to implement this interface and override the default one by implementing
the getAsyncUncaughtExceptionHandler() method from the AsyncConfigurer interface.
569
Chapter 12 ■ Task Execution and Scheduling
Listing 12-25 shows the custom AsyncExceptionHandler class and the new asynchronous executor
configuration.
Listing 12-25. TaskSchedulingConfig4 Example with an ErrorHandler and a RejectedExecutionHandler
package com.apress.prospring6.twelve.spring.async;
import org.springframework.aop.interceptor.AsyncUncaughtExceptionHandler;
// other import statements omitted
class AsyncExceptionHandler implements AsyncUncaughtExceptionHandler {
private static final Logger LOGGER = LoggerFactory.
getLogger(AsyncExceptionHandler.class);
@Override
public void handleUncaughtException(Throwable t, Method method, Object... obj) {
LOGGER.error("[{}]: task method '{}' failed because {}" , Thread.currentThread(),
method.getName() , t.getMessage(), t);
}
}
@Configuration
@EnableAsync
@ComponentScan
class Async2Config implements AsyncConfigurer {
@Override
public Executor getAsyncExecutor() {
var tpts = new ThreadPoolTaskExecutor();
tpts.setCorePoolSize(2);
tpts.setMaxPoolSize(10);
tpts.setThreadNamePrefix("tpte2-");
tpts.setQueueCapacity(5);
tpts.initialize();
return tpts;
}
@Bean
public AsyncService asyncService() {
return new AsyncServiceImpl();
}
@Override
public AsyncUncaughtExceptionHandler getAsyncUncaughtExceptionHandler() {
return new AsyncExceptionHandler();
}
}
570
Chapter 12 ■ Task Execution and Scheduling
public class Async2Demo {
private static final Logger LOGGER = LoggerFactory.getLogger(AsyncDemo.class);
public static void main(String... args) throws IOException, ExecutionException,
InterruptedException {
try (var ctx = new AnnotationConfigApplicationContext(Async2Config.class)) {
var asyncService = ctx.getBean("asyncService", AsyncService.class);
// code to invoke tasks is omitted for duplicate
}
}
}
Again, feel free to run the examples in the chapter12 project and notice the exception handling specific
to the Async2Config configuration.
S
ummary
In this chapter, we briefly covered Spring’s TaskExecutor and common implementations. We also covered
Spring’s support for task scheduling. We focused on Spring’s built-in TaskScheduler abstraction and
demonstrated how to use it to fulfill task scheduling needs with a sample batch data update job. We also
covered how Spring supports annotation for executing tasks asynchronously.
A Spring Boot section is not needed in this chapter because the annotations used for marking tasks for
scheduling and asynchronous execution are part of the spring-context library and available with a basic
Spring Boot configuration. Plus, configuring scheduled and asynchronous tasks is already as easy as it can
be with Spring; there is not much Spring Boot could do to improve on this topic. If you are curious and want
to convert the provided project to Spring Boot, you can find inspiration in previous chapters or in this brief
tutorial: https://spring.io/guides/gs/scheduling-tasks.
Since the future seems to be serverless, there will be no servers to be up to run tasks at scheduled
intervals. The current approach on cloud applications is to design microservices that run within containers
that are scheduled for deployment (or to use scheduled lambdas in AWS, for example). Task execution
and scheduling is not a complex subject, so it is time to move on to something more interesting, Spring
Remoting.
571
CHAPTER 13
Spring Remoting
In the previous chapters of this book, the projects have been relatively simple, insofar as they can be run on
a single VM and the only component they exchange data with is a database, which can be local or remote.
These types of applications are called monolithic applications and this type of communication is also
referred to as inter-process communication.
Most enterprise applications, however, are complex, are composed of multiple parts, and communicate
with other applications. Take, for example, a company selling products; when a customer places an order,
an order-processing system processes that order and generates a transaction. During order processing, an
inquiry is made to the inventory system to check whether the product is in stock. Upon order confirmation, a
notification is sent to the fulfillment system to deliver the product to the customer. Finally, the information is
sent to the accounting system, an invoice is generated, and the payment is processed.
This business process is not fulfilled by a single application, but by several applications working
together. Some applications may be developed in-house, and others may be purchased from external
vendors. Moreover, the applications may be running on different machines in different locations and
implemented with different technologies and programming languages (for example, Java, .NET, or C++).
Performing the handshaking between applications in order to build an efficient business process is always
a critical task when architecting and implementing an application. As a result, remoting support via various
protocols and technologies is needed for an application to participate well in an enterprise environment.
In earlier times, communication between applications was achieved via remoting and web services. In
remoting, the applications involved in the communication process may be located on the same computer or
on different computers (either in the same network or a different network). In remoting, both applications
know about each other. A proxy of an application object is created in the other application, and this allows to
make the execution of a foreign (remote) method to look like the invocation of a local method.
In the Java world, remoting support has existed since Java was first created. In the early days (Java 1.x),
most remoting requirements were implemented by using traditional TCP sockets or Java Remote Method
Invocation (RMI). After J2EE came on the scene, EJB (Enterprise Java Beans) and JMS (Java Messaging
System) became common choices for inter-application server communications.
The rapid evolution of XML and the Internet gave rise to remote support using XML over HTTP, also
known as web services. This is a term that includes any kind of remoting technology that sits on HTTP,
including the Java API for XML-based RPC (JAX-RPC), the Java API for XML Web Services (JAXWS), and
HTTP-based technologies (for example, Hessian1 and Burlap2). Spring used to have its own HTTP-based
remoting support, called the Spring HTTP Invoker. In the following years, to cope with the explosive growth
of the Internet and more responsive web application requirements (for example, via Ajax), more lightweight
1
2
http://hessian.caucho.com/doc/hessian-overview.xtp
http://hessian.caucho.com/doc/burlap.xtp
© Iuliana Cosmina, Rob Harrop, Chris Schaefer, and Clarence Ho 2023
I. Cosmina et al., Pro Spring 6, https://doi.org/10.1007/978-1-4842-8640-1_13
573
Chapter 13 ■ Spring Remoting
and efficient remoting support of applications has become critical for the success of an enterprise.
Consequently, the Java API for RESTful Web Services (JAX-RS) was created and quickly gained popularity.
Other protocols, such as Comet and HTML5 WebSocket, also attracted a lot of developers. Needless to say,
remoting technologies keep evolving at a rapid pace.
Nowadays, the most popular application architecture style is microservices, small modules/elements
that are independent of each other. At times, microservices are interdependent on other microservices or
even a database. Breaking down applications into smaller elements brings scalability and efficiency to the
structure. It also requires efficient communication between the services, which if not considered ahead
of time can wreak havoc. Communication between the components of a microservices application is also
referred to as inter-service communication.
The outright leader when choosing how services will communicate with each other tends to be
HTTP. Communication via HTTP can be synchronous, which is when a service has to wait for another
service to complete before it returns; this introduces a strong coupling of the two services. Communication
via HTTP can also be asynchronous, which is when the service takes the request from the first service and
immediately returns a URL. An alternative to HTTP is gRPC3 a modern open source high-performance
Remote Procedure Call (RPC) framework that can run in any environment. Unfortunately, there is no Spring
module for working with gRPC.
The second communication pattern leveraged in microservices applications is message-based
communication. The most popular protocol for this is Advanced Message Queuing Protocol (AMQP). Unlike
HTTP, the services involved do not directly communicate with each other, but interact via a message broker
(Kafka, RabbitMQ, ActiveMQ, SNS, etc.).
Thus, the title of this chapter is somewhat misleading. Its content will cover a few ways to communicate
between Spring applications remotely, but Spring Remoting is a term that is somewhat deprecated.
Communication via HTTP Using Spring REST
Using HTTP for communication obviously implies that the applications have to be web applications or
expose some REST API to support those calls. To show how two Spring applications can communicate with
each other via HTTP, a single application is used that models a person sending and receiving letters, as
depicted in Figure 13-1. The application is started twice with different properties to model Evelyn and Tom,
two pen pals sending letters to each other using POST requests and saving them into their own respective H2
database. The application representing Evelyn is started on port 8080, and the application representing Tom
is started on port 8090.
Figure 13-1. Abstract representation of the two pen pals applications
3
https://grpc.io
574
Chapter 13 ■ Spring Remoting
To make Evelyn send a letter to Tom, a POST event is sent to http://localhost:8080/send with a body
representing a letter. Internally, the LetterSender bean will make a POST call to Tom’s exposed REST API at
http://localhost:8090/letters using an instance of webClient.
To keep the discussion and examples simple in this chapter, maintaining secure communications
between applications won’t be a focus.
To make Tom send a letter to Evelyn, the same thing will be done, as already shown in Figure 13-1.
The webClient mentioned is an instance of Spring’s org.springframework.web.client.RestTemplate,
the web client class used to make REST calls in non-reactive applications. There is also an implementation
for reactive applications, which is introduced in Chapter 20.
To keep things easy, only Spring Boot applications are used in this chapter. To keep things even simpler
for the letter correspondence application over HTTP, Spring Data REST repositories are used. Spring Data
REST takes the features of Spring HATEOAS (Hypermedia as the Engine of Application Stat) and Spring Data
JPA and automatically combines them together, allowing us to expose REST APIs to manage entities without
declaring a controller to interact with the Spring Repository.
Figure 13-2 shows the dependencies needed for project chapter13-sender-boot to model the behavior
we are interested in.
Figure 13-2. Project chapter13-sender-boot dependencies
Let’s build the project step by step, starting with the entity class. The class that models a letter is shown
in Listing 13-1.
575
Chapter 13 ■ Spring Remoting
Listing 13-1. The Letter Class
package com.apress.prospring6.thirteen;
import jakarta.persistence.*;
import lombok.*;
import
import
import
import
java.io.Serial;
java.io.Serializable;
java.time.LocalDate;
jakarta.validation.constraints.NotEmpty;
@Data
@Entity
public class Letter implements Serializable {
@Serial
private static final long serialVersionUID = 1L;
@Id
@GeneratedValue(strategy = GenerationType.AUTO)
private Long id;
@NotEmpty
private String title;
private String sender;
private LocalDate sentOn;
@Enumerated(EnumType.STRING)
private Category category = Category.MISC;
@NotEmpty
private String content;
}
Notice that the Lombok @Data annotation used on the Letter entity class is a shortcut annotation
that bundles the features of Lombok’s @ToString, @EqualsAndHashCode, @Getter, @Setter, and
@RequiredArgsConstructor together, thus generating all the boilerplate that is associated with simple
entity classes (POJOs).
Using Lombok4 was avoided in this book until this chapter, because it was important to show the data
classes as Hibernate needs them to be modeled, with default constructors and setter and getters for all
properties. Project Lombok is a Java library that automatically plugs into your editor and build tools, spicing up
your Java. It generates a lot of code for you: constructors, getters, setters, hashcode, equals, and configures
loggers, reducing the boilerplate code and allowing you to focus on pure functionality.
4
https://projectlombok.org
576
Chapter 13 ■ Spring Remoting
Lombok is closely tied to the Java compiler. Since the annotation processor API only allows creation of
new files during the compilation (and not the modification of existing files), Lombok uses that API as an entry
point to modify the Java compiler. Unfortunately, these modifications of the compiler make heavy usage of
non-public APIs. Using Lombok may be a good idea, but you must be aware that upgrading your compiler may
break your code.
The Category enum is used to categorize letters based on tier scope. This enum has various values,
and to ensure correct serialization and deserialization when letters are sent, CategorySerializer and
CategoryDeserializer classes are declared as shown in Listing 13-2.
Listing 13-2. The Category Enum and Its CategorySerializer and CategoryDeserializer Classes
package com.apress.prospring6.thirteen;
import com.fasterxml.jackson.core.JsonGenerator;
import com.fasterxml.jackson.core.JsonParser;
import com.fasterxml.jackson.databind.JsonDeserializer;
import com.fasterxml.jackson.databind.JsonSerializer;
import lombok.Getter;
import lombok.RequiredArgsConstructor;
// other import statements omitted
@JsonSerialize(using = Category.CategorySerializer.class)
@JsonDeserialize(using = Category.CategoryDeserializer.class)
@Getter
@RequiredArgsConstructor
public enum Category {
PERSONAL("Personal"),
FORMAL("Formal"),
MISC("Miscellaneous")
;
private final String name;
public static Category eventOf(final String value) {
var result = Arrays.stream(Category.values()).filter(m -> m.getName().
equalsIgnoreCase(value)).findAny();
return result.orElse(null);
}
public static final class CategorySerializer extends JsonSerializer<Category> {
@Override
public void serialize(final Category enumValue, final JsonGenerator gen, final
SerializerProvider serializer) throws IOException {
gen.writeString(enumValue.getName());
}
}
577
Chapter 13 ■ Spring Remoting
public final static class CategoryDeserializer extends JsonDeserializer<Category> {
@Override
public Category deserialize(final JsonParser parser, final DeserializationContext
context) throws IOException, JsonProcessingException
{
final String jsonValue = parser.getText();
return Category.eventOf(jsonValue);
}
}
}
Now that we have the entity class in place, we can write the Spring Data REST repository. This
repository is just like a Spring Data Repository, either JpaRepository<T, ID>, CrudRepository<T, ID>, or
PagingAndSortingRepository<T, ID>, but the class and its methods are decorated with special Spring Data
REST annotations that tell Spring MVC (the topic of Chapter 14) to create RESTful endpoints for managing
entities. The LetterRepository interface is shown in Listing 13-3.
Listing 13-3. The LetterRepository Spring Data REST Repository
package com.apress.prospring6.thirteen;
import
import
import
import
org.springframework.data.jpa.repository.JpaRepository;
org.springframework.data.repository.query.Param;
org.springframework.data.rest.core.annotation.RepositoryRestResource;
org.springframework.data.rest.core.annotation.RestResource;
import java.time.LocalDate;
import java.util.List;
@RepositoryRestResource(collectionResourceRel = "mailbox", path = "letters")
public interface LetterRepository extends JpaRepository<Letter, Long> {
@RestResource(path = "byCategory", rel = "customFindMethod")
List<Letter> findByCategory(@Param("category") Category category);
List<Letter> findBySentOn(@Param("date") LocalDate sentOn);
@Override
@RestResource(exported = false)
void deleteById(Long id);
}
The @RepositoryRestResource annotation tells Spring MVC to create RESTful endpoints at /
letters. This annotation is not necessary when the spring-boot-starter-data-rest is on the project
classpath, but it is useful to customize the path all the management endpoints are relative to. The default
root path for managing Letter instances is letters, the same one used in the example. When the http://
localhost:8090/letters is accessed, a JSON construct similar to the one depicted in Listing 13-4 is shown.
578
Chapter 13 ■ Spring Remoting
Listing 13-4. The JSON Representation Returned When Accessing the http://localhost:8090/letters
Endpoint
{
"_embedded" : {
"mailbox" : [ {
"title" : "Salutations from England",
"sender" : "Evelyn",
"sentOn" : "2022-12-05",
"category" : "Personal",
"content" : "I would love to visit. Let's discuss dates.",
"_links" : {
"self" : {
"href" : "http://localhost:8090/letters/1"
},
"letter" : {
"href" : "http://localhost:8090/letters/1"
}
}
} ]
},
"_links" : {
"self" : {
"href" : "http://localhost:8090/letters"
},
"profile" : {
"href" : "http://localhost:8090/profile/letters"
},
"search" : {
"href" : "http://localhost:8090/letters/search"
}
},
"page" : {
"size" : 20,
"totalElements" : 2,
"totalPages" : 1,
"number" : 0
}
}
The collectionResourceRel attribute declares the relative value to use when generating links to
the collection resource. This means all Letter instances will be returned as part of the collection named
mailbox that is a member of the JSON representation accessible at the http://localhost:8090/letters
endpoint. (Look at the highlighted text in Listing 13-4, that is the mentioned collection, that is empty when
the application starts.)
The @RestResource annotation tells Spring MVC what the value of the path of a resource is, and the
value of the rel attribute will be in links. By executing a curl to http://localhost:8090/letters/search
(or opening the URL in the browser), we can see our new methods listed with other resources, parameters
names included as shown in Listing 13-5.
579
Chapter 13 ■ Spring Remoting
Listing 13-5. The JSON Representation Returned When Accessing the http://localhost:8090/letters/
search Endpoint
## curl http://localhost:8090/letters/search
{
"_links" : {
"findBySentOn" : {
"href" : "http://localhost:8090/letters/search/findBySentOn{?date}",
"templated" : true
},
"customFindMethod" : {
"href" : "http://localhost:8090/letters/search/byCategory{?category}",
"templated" : true
},
"self" : {
"href" : "http://localhost:8090/letters/search"
}
}
}
In Listing 13-3 the deleteById(..) method is annotated with @RestResource(exported = false).
The exported attribute value decides if the resource is exported or not. In this example, the effect of this
configuration is that there will be no REST endpoint created for the deleteById(..) method. However, there
are two links matching the two custom search methods declared in LetterRepository shown in Listing 13-3.
The {?category} construct represents the request parameter name, thus the search by category actual URL is
something like:
GET http://localhost:8090/letters/search/byCategory?category=PERSONAL
The purpose of the LetterRepository interface is to expose REST API endpoints to be invoked by a
RestTemplate instance.
The next class to be analyzed is LetterSenderController. This class is a REST controller exposing a
single POST handler used to trigger the sending letter operation on the current application. The handler
method uses the RestTemplate bean to send a POST request to the other instance of the application
representing letter destination. The LetterSenderController class is depicted in Listing 13-6.
Listing 13-6. The LetterSenderController Class
package com.apress.prospring6.thirteen;
import
import
import
import
import
import
import
import
import
580
org.springframework.beans.factory.annotation.Value;
org.springframework.http.HttpEntity;
org.springframework.http.HttpMethod;
org.springframework.http.MediaType;
org.springframework.web.bind.annotation.PostMapping;
org.springframework.web.bind.annotation.RequestBody;
org.springframework.web.bind.annotation.RestController;
org.springframework.web.client.RestTemplate;
java.time.LocalDate;
Chapter 13 ■ Spring Remoting
@RestController
public class LetterSenderController {
private final RestTemplate webClient;
private final String correspondentAddress;
private final String sender;
public LetterSenderController(RestTemplate webClient,
@Value("#{senderApplication.correspondentAddress}") String
correspondentAddress,
@Value("#{senderApplication.sender}") String sender) {
this.webClient = webClient;
this.correspondentAddress = correspondentAddress;
this.sender = sender;
}
@PostMapping(path = "send", consumes = MediaType.APPLICATION_JSON_VALUE)
public void sendLetter(@RequestBody Letter letter){
letter.setSender(sender);
letter.setSentOn(LocalDate.now());
var request = new HttpEntity<>(letter);
webClient.exchange(correspondentAddress +"/letters", HttpMethod.POST, request,
Letter.class);
}
}
Chapter 3 introduced stereotype annotations. The @RestController annotation is a convenience
annotation that is itself annotated with @Controller and @ResponseBody. If @Controller is used to mark
beans destined for web use, containing methods mapped to URLs, @RestController is used to mark beans
destined for REST use, containing methods mapped to REST endpoints. Since neither Spring MVC support
(Chapter 14) nor Spring REST support (Chapter 15) were introduced so far in the book, this explanation
should suffice for now.
The RestTemplate class is a Spring class used to create synchronous clients to perform HTTP requests.
It exposes a very simple set of methods used to set request content and headers and also exposes a simple,
template method API over underlying HTTP client libraries such as the JDK HttpURLConnection, Apache
HttpComponents, and others. RestTemplate is typically used as a shared component; a single bean is
declared in the application and injected wherever necessary. Starting with Spring version 5.0, this class is
in maintenance mode, with only minor requests for changes and bugs to be accepted going forward. The
recommendation is to use org.springframework.web.reactive.client.WebClient, which has a more
modern API and supports sync, async, and streaming scenarios, but for non-reactive applications, the
reactive WebClient is not suitable.
The LetterSenderController class is configured with a sender property which is set to the name of
the person sending the letter. The sender value is injected from the main Spring Boot application class,
referenced here using a SpEL expression: #{senderApplication.sender}. The same is valid for the person
the letters are sent to, represented here by the correspondentAddress property that is populated from a
Spring Boot property as well. The values for these properties are read from the Spring Boot configuration file,
the application.yaml file in this example. Its contents are shown in Listing 13-7.
581
Chapter 13 ■ Spring Remoting
Listing 13-7. The application.yaml File for the chapter13-sender-boot Project
# Spring Boot application name
spring:
application:
name: chapter13-sender-app
# datasource config
datasource:
url: "jdbc:h2:mem:testdb"
driverClassName: "org.h2.Driver"
username: sa
password: password
# jpa config
jpa:
database-platform: "org.hibernate.dialect.H2Dialect"
hibernate:
ddl-auto: create-drop
# Uppercase Table Names
naming:
physical-strategy: org.hibernate.boot.model.naming.
PhysicalNamingStrategyStandardImpl
# enabling the H2 web console
h2:
console:
enabled: true
# application config
app:
sender:
name: "default"
correspondent:
address: "http://localhost:8090"
# server config
server:
port: 8090
compression:
enabled: true
address: 0.0.0.0
582
Chapter 13 ■ Spring Remoting
# Logging config
logging:
pattern:
console: "%-5level: %class{0} - %msg%n"
level:
root: INFO
org.springframework: DEBUG
com.apress.prospring6.thirteen: INFO
This configuration is split into seven sections, some of which are already familiar to you if you’ve read
the previous chapter. Each section is described in the following list:
5
•
# Spring Boot application name: This section configures a value for the Spring
ApplicationContext ID.
•
# datasource config: This section configures the data source connection details; in
this case the underlying database is an in-memory H2 database.
•
# jpa config: This section configures the JPA details, such as the dialect used to
communicate with the database, whether the database should be created, and
how the tables should be named; in this case, all table names are generated using
uppercase letters.
•
# enabling the H2 web console: As the section name indicates, sometimes to
check if the application is doing the right thing, we might want to check the database
and generated table. This property enables exposing the /h2-console endpoint that
points to a web console for managing the H2 database (similar to phpMyAdmin5,
but way simpler). The login window and the console dashboard are shown in
Figure 13-3.
https://www.phpmyadmin.net
583
Chapter 13 ■ Spring Remoting
Figure 13-3. H2 Console login and dashboard
•
584
# application config: This section configures the user sending the letters and the
address which the letters are being sent. The default configuration is to configure an
application where the letter sender and the correspondence address represent the
same application.
Chapter 13 ■ Spring Remoting
•
# server config: This section configures the URL where the application is available.
Setting the address to 0.0.0.0 allows the application to be accessible on all network
addresses associated with the computer the application runs in (e.g., http://
localhost:8090/letters, http://127.0.0.1:8090/letters, etc.).
•
# Logging config: This section configures the logging levels for packages and
classes in the application.
Based on this configuration and a Spring Boot main class, an application that can communicate via
HTTP with another one can be started. The Spring Boot main class is shown in Listing 13-8.
Listing 13-8. The Spring Boot Main Class for the chapter13-sender-boot Project
package com.apress.prospring6.thirteen;
import lombok.extern.slf4j.Slf4j;
import org.springframework.boot.CommandLineRunner;
// other import statements omitted
@SpringBootApplication
@Slf4j
public class SenderApplication {
public static void main(String... args) {
ConfigurableApplicationContext ctx = SpringApplication.run(SenderApplication.
class, args);
}
@Value("${app.sender.name}")
public String sender;
@Value("${app.correspondent.address}")
public String correspondentAddress;
@Bean
RestTemplate restTemplate(){
return new RestTemplate();
}
@Bean
public CommandLineRunner initCmd(){
return (args) -> log.info(" >>> Sender {} ready to send letters to {} ", sender,
correspondentAddress);
}
}
As you can see from this example, Lombok can also help declare the logger for classes, by using the @
Slf4j annotation.
The app.sender.name is read from the application.yaml file and injected into the sender
property. The app.correspondent.address is read from the application.yaml file and injected into
the correspondentAddress property. The SenderApplication configuration declares a bean named
senderApplication, and the properties of this bean are injected in the LetterSenderController class using
SpEL expressions as shown previously in Listing 13-6.
585
Chapter 13 ■ Spring Remoting
Now that all beans and configurations have been explained, let’s start the two applications, named Tom
and Evelyn, and start sending letters. To start two instances of the application, you can use IntelliJ IDEA
launchers, but the easiest way is to build the application and start it twice, with different configurations for
Tom and Evelyn using the generated JAR.
To build the project, go to the pro-spring-6/chapter13-sender-boot and run gradle clean build.
The project is built and the executable is generated at chapter13-sender-boot/build/libs/chapter13sender-boot-6.0-SNAPSHOT.jar.
To start the Tom application, open a terminal and run the command shown in Listing 13-9.
Listing 13-9. Starting the Tom Application
java -jar \
build/libs/chapter13-sender-boot-6.0-SNAPSHOT.jar \
--server.port=8090 \
--app.sender.name=Tom \
--app.correspondent.address=http://localhost:8080 # Evelyn's address
The application starts and the last two log entries printed should be as follows:
INFO: SenderApplication - >>> Sender Tom ready to send letters to http://localhost:8080
DEBUG: ApplicationAvailabilityBean - Application availability state ReadinessState changed
to ACCEPTING_TRAFFIC
The INFO log is printed by the CommandLineRunner bean.
To start the Evelyn application, open a terminal and run the command shown in Listing 13-10.
Listing 13-10. Starting the Evelyn Application
java -jar \
build/libs/chapter13-sender-boot-6.0-SNAPSHOT.jar \
--server.port=8080 \
--app.sender.name=Evelyn \
--app.correspondent.address=http://localhost:8090 # Tom's address
The application starts and the last two log entries printed should be as follows:
INFO : SenderApplication - >>> Sender Evelyn ready to send letters to http://
localhost:8090
DEBUG: ApplicationAvailabilityBean - Application availability state ReadinessState changed
to ACCEPTING_TRAFFIC
To make Tom send a letter to Evelyn, a POST request must be made to http://localhost:8090/send.
The easiest way to do so is by executing the requests in the chapter13-sender-boot/src/test/resources/
Sender.http file, using the HTTPie6 client embedded in IntelliJ IDEA. For example, the request to send a
letter from Tom to Evelyn (one of the requests in the Sender.http file) is shown in Listing 13-11.
Listing 13-11. HTTPie POST Request to Make Tom Send a Letter to Evelyn
### Tom sending letter to Evelyn
POST http://localhost:8090/send
Content-Type: application/json
6
https://httpie.io
586
Chapter 13 ■ Spring Remoting
{
"title": "Salutations from Scotland",
"category": "Personal",
"content" : "Scotland is rather lovely this time of year. Would you like to visit?"
}
How do we know this worked? We look in Tom’s log and look for the log entries that report that the
restTemplate bean has performed the request. The log entries should look very similar to the ones shown in
Listing 13-12.
Listing 13-12. Application Log Entries for Sending Requests Using a restTemplate Bean
DEBUG: LogFormatUtils - POST "/send", parameters={}
DEBUG: AbstractHandlerMapping - Mapped to com.apress.prospring6.thirteen.LetterSender
Controller#sendLetter(Letter)
DEBUG: CompositeLog - HTTP POST http://localhost:8080/letters
DEBUG: CompositeLog - Accept=[application/json, application/*+json]
DEBUG: CompositeLog - Writing [Letter(id=null, title=Salutations from Scotland,
sender=Tom, sentOn=2022-12-06, category=PERSONAL, content=Scotland is rather lovely this
time of year. Would you like to visit?)] with org.springframework.http.converter.json.
MappingJackson2HttpMessageConverter
DEBUG: CompositeLog - Response 201 CREATED
DEBUG: CompositeLog - Reading to [com.apress.prospring6.thirteen.Letter]
On the Evelyn application, you can see a matching log, depicted in Listing 13-13.
Listing 13-13. Application Log Entries for Receiving a POST Request
DEBUG: LogFormatUtils - POST "/letters", parameters={}
DEBUG: AbstractMessageConverterMethodProcessor - Using 'application/json', given
[application/json, application/*+json] and supported [application/hal+json, application/
json, application/prs.hal-forms+json]
DEBUG: LogFormatUtils - Writing [EntityModel { content: Letter(id=1, title=Salutations from
Scotland, sender=Tom, sentOn=2022-12-06, (truncated)...]
DEBUG: FrameworkServlet - Completed 201 CREATED
And to be really convinced, you can open http://localhost:8080/letters in a browser (or use the GET
request in the Sender.http file). The returned JSON representation for Evelyn should now have the mailbox
populated with the letter sent by Tom. The JSON representation is shown in Listing 13-14.
Listing 13-14. JSON Representation of Letter Resources for the Evelyn Application
### Root JSON representation of Evelyn's letters
GET http://localhost:8080/letters
Accept: application/json
###
{
"_embedded" : {
"mailbox" : [ {
"title" : "Salutations from Scotland",
"sender" : "Tom",
"sentOn" : "2022-12-06",
587
Chapter 13 ■ Spring Remoting
"category" : "Personal",
"content" : "Scotland is rather lovely this time of year. Would you like to visit?",
"_links" : {
"self" : {
"href" : "http://localhost:8080/letters/1"
},
"letter" : {
"href" : "http://localhost:8080/letters/1"
}
}
} ]
},
"_links" : {
"self" : {
"href" : "http://localhost:8080/letters"
},
"profile" : {
"href" : "http://localhost:8080/profile/letters"
},
"search" : {
"href" : "http://localhost:8080/letters/search"
}
},
"page" : {
"size" : 20,
"totalElements" : 1,
"totalPages" : 1,
"number" : 0
}
}
By default, RestTemplate registers all built-in message converters, depending on classpath checks that
help to determine what optional conversion libraries are present. Since we have two copies of the same
application communicating, they can both covert between Letter and its JSON representation and vice
versa with no problem. You can also set the message converters to use explicitly if you need too.
However, RestTemplate can be used to communicate with any other application, written in any
language, as long as the right converters are registered. For example, in Listing 13-15 a method is added
to LetterSenderController to perform a request to https://jsonplaceholder.typicode.com/users, an
endpoint provided by a free fake API for testing and prototyping.
Listing 13-15. RestTemplate Being Used to Perform a GET to https://jsonplaceholder.typicode.com/
users
package com.apress.prospring6.thirteen;
// other imports omitted
@RestController
@Slf4j
public class LetterSenderController {
@GetMapping(path = "misc", produces = MediaType.APPLICATION_JSON_VALUE)
public String getMiscData(){
588
Chapter 13 ■ Spring Remoting
var response = webClient.getForObject("https://jsonplaceholder.typicode.com/users",
String.class);
log.info("Random info from non-java application: {} ", response);
return response;
}
}
The returned result is an array of user objects in JSON representation. If the application had a User
POJO definition matching the JSON representation, a converter would ensure a correct conversion.
The RestTemplate class used to submit the requests is quite versatile, but as previously mentioned, it is
set to be deprecated. The future seems to be reactive, and WebClient and the new declarative HTTP interface
are the replacements.
Starting with Spring 6 and Spring Boot 3, the Spring Framework supports proxying a remote HTTP
service as a Java interface with annotated methods for HTTP exchanges, also called a declarative HTTP
interface7. A declarative HTTP interface is a Java interface that helps reduce the boilerplate code, generates a
proxy implementing this interface, and performs the exchanges at the framework level.
Using JMS in Spring
Using message-oriented middleware, generally referred to as a message queue (MQ) server, is another
popular way to support communication between applications. The main benefits of an MQ server are that it
provides an asynchronous and loosely coupled way for application integration. In the Java world, JMS is the
standard for connecting to an MQ server for sending or receiving messages. An MQ server maintains a list of
queues and topics for applications to connect to for sending and receiving messages. The following is a brief
description of the difference between a queue and a topic:
•
Queue: A queue is used to support a point-to-point message exchange model. When
a producer sends a message to a queue, the MQ server keeps the message within the
queue and delivers it to one, and only one, consumer the next time the consumer
connects.
•
Topic: A topic is used to support the publish-subscribe model. Any number of
clients can subscribe to the message within a topic. When a message arrives for that
topic, the MQ server delivers it to all clients that have subscribed to the message.
This model is particularly useful when you have multiple applications that will be
interested in the same piece of information (for example, a news feed).
In JMS, a producer connects to an MQ server and sends a message to a queue or topic. A consumer also
connects to the MQ server and listens to a queue or topics for messages of interest. In JMS 1.1, the API was
unified, so the producer and consumer didn’t need to deal with different APIs for interacting with queues
and topics. As of Spring Framework 5, Spring’s JMS package fully supports JMS 2.0 and requires the JMS 2.0
API to be present at runtime. Thus, a JMS 2.0–compatible provider is required. Starting with Spring 6, the
JMS API specification used is the Jakarta Messaging API version 3.x, because the JMS API is one of the Java
EE products that Oracle outsourced.
https://docs.spring.io/spring-framework/docs/current/reference/html/integration.
html#rest-http-interface
7
589
Chapter 13 ■ Spring Remoting
This chapter demonstrates how to use Apache ActiveMQ Artemis8, which has a Jakarta JMS–compatible
version, and there is a Spring Boot starter for it, which will make things a lot easier.
The core of JMS communication in Spring is the JmsTemplate, which simplifies creation and release of
resources when sending and receiving synchronous messages. For convenience, JmsTemplate also exposes
a basic request-reply operation that allows for sending a message and waiting for a response. JmsTemplate is
similar to RestTemplate; they are both used in remote communication between applications, and they both
expose practical APIs for developers to use. Instances of both types are thread-safe once configured, and
thus a single JmsTemplate bean is necessary in an application, and it can be injected wherever necessary.
Working with Apache ActiveMQ Artemis
Using Spring Boot makes development of JMS applications more practical since it autoconfigures a jakarta.
jms.ConnectionFactory bean when it detects ActiveMQ Artemis is available on the classpath.
Listing 13-16 shows an example of the application.yaml configuration file for native use(local or remote,
referenced by IP) of the ActiveMQ Artemis server.
Listing 13-16. application.yaml Configuration for native use of the ActiveMQ Artemis Server
spring:
artemis:
mode: native
host: IP_ADDRESS
port: 61617
user: prospring6
password:prospring6
# or
spring:
artemis:
mode: native
broker-url: tcp://${IP_ADDRESS}:61617
user: prospring6
password:prospring6
Starting with Spring Boot 3.x, properties spring.artemis.host and spring.artemis.port are marked
as deprecated and the recommendation is to use spring.artemis.broker-url.
Installing ActiveMQ Artemis is not the focus of this book, so for the code samples, the embedded
version is used. To use ActiveMQ Artemis embedded in a Spring Boot application, three things are
necessary: spring-boot-starter-artemis on the classpath, artemis-jakarta-server on the classpath, and
the Spring Boot embedded configuration. Figure 13-4 shows all the dependencies of the project specific to
this section, chapter13-artemis-boot.
8
https://activemq.apache.org/components/artemis
590
Chapter 13 ■ Spring Remoting
Figure 13-4. Spring Boot Artemis JMS project dependencies
The Spring Boot application configuration that uses an embedded ActiveMQ Artemis server is shown in
Listing 13-17.
Listing 13-17. application.yaml Configuration for an Embedded ActiveMQ Artemis Server
spring:
artemis:
mode: embedded
embedded:
queues: prospring6
enabled: true
Using Spring Boot is very practical, because there is no need to declare a jakarta.jms.
ConnectionFactory bean; it is automatically set up. The spring.artemis.embedded.queues property
configures a comma-separated list of queues to create on startup. By default, Spring Boot configures a bean
of type org.springframework.jms.connection.CachingConnectionFactory. This type is an extension of
org.springframework.jms.connection.SingleConnectionFactory. This is a special class that ensures
591
Chapter 13 ■ Spring Remoting
a single JMS connection is opened and shared between all objects needing to communicate with the JMS
server. The CachingConnectionFactory adds caching behavior for message producers and consumers.
Figure 13-5 shows the most common implementations of the jakarta.jms.ConnectionFactory.
Figure 13-5. jakarta.jms.ConnectionFactory hierarchy
In the previous section we sent Letter instances between two applications, so in this section the
same object will be sent to a JMQ queue by a Sender and read by a Receiver. Since Spring Boot is using an
embedded Apache MQ Artemis server, we cannot start two applications and exchange messages between
them. So, the functionality is simple and matches the schema shown in Figure 13-6.
Figure 13-6. Spring Boot JMS application abstract schema
The Sender bean uses a JmsTemplate bean to send a Letter instance. The JmsTemplate bean is
autoconfigured by Spring Boot too, so all we must do is inject it in the Sender bean declaration and use it.
The Sender class and bean declaration is shown in Listing 13-18.
Listing 13-18. The JMS Producer, the Sender Class
package com.apress.prospring6.thirteen;
import org.springframework.jms.core.JmsTemplate;
// other import statements omitted
@Component
@Slf4j
592
Chapter 13 ■ Spring Remoting
@RequiredArgsConstructor
public class Sender {
private final JmsTemplate jmsTemplate;
@PostConstruct
public void init(){
jmsTemplate.setDeliveryDelay(2000L);
}
@Value("${spring.artemis.embedded.queues}")
private String queueName;
public void send(Letter letter) {
log.info(" >> sending letter='{}'", letter);
jmsTemplate.convertAndSend(queueName, letter);
}
}
Notice that the queue name is extracted from the Spring Boot configuration file using
@Value("${spring.artemis.embedded.queues}").
The Receiver is even simpler, as shown in Listing 13-19.
Listing 13-19. The JMS Consumer, the Receiver Class
package com.apress.prospring6.thirteen;
import org.springframework.jms.annotation.JmsListener;
// other import statements omitted
@Component
@Slf4j
public class Receiver {
@JmsListener(destination = "${spring.artemis.embedded.queues}")
public void receive(Letter letter) {
log.info(" >> received letter='{}'", letter);
}
}
The most important thing in this bean declaration is the method annotated with @JmsListener. This
annotation marks a method to be the target of a JMS message listener on the specified destination. This
annotation can also specify a custom JMS ConnectionFactory using the connectionFactory attribute.
Without it, it uses the default ConnectionFactory configured by Spring Boot.
Processing @JmsListener is the responsibility of a org.springframework.jms.annotation.
JmsListenerAnnotationBeanPostProcessor bean that Spring Boot automatically configures. Without
Spring Boot to configure this bean, the @EnableJms annotation (from package org.springframework.jms.
annotation) needs to be placed on a configuration class.
To test that letters sent by the Sender bean are received by the Receiver bean through the prospring6
queue, managed by the embedded Artemis server, we can write the program shown in Listing 13-20.
593
Chapter 13 ■ Spring Remoting
Listing 13-20. Program to Test JMS Message Handling
package com.apress.prospring6.thirteen;
import java.util.UUID;
// other impost statements omitted
@SpringBootApplication
@Slf4j
public class ArtemisApplication {
public static void main(String... args) {
try (var ctx = SpringApplication.run(ArtemisApplication.class, args)){
var sender = ctx.getBean(Sender.class);
for (int i = 0; i < 10; ++i) {
var letter = new Letter("Letter no. " + i, "Test", LocalDate.now(), UUID.
randomUUID().toString());
sender.send(letter);
}
System.in.read();
} catch (IOException e) {
log.error("Problem reading keystrokes.");
}
}
}
In Listing 13-20, the application context is created, and then the Sender bean is retrieved from the
context and used to send ten Letter instances. The Receiver bean automatically reacts to Letter instances
found in the queue, and “consumes” them, which in this case means they are just logged. When running
this program, you might notice that it does not work as expected and the following message is printed in the
console:
Exception in thread "main"
org.springframework.jms.support.converter.MessageConversionException:
Cannot convert object of type [com.apress.prospring6.thirteen.Letter] to JMS message.
Supported message payloads are: String, byte array, Map<String,?>, Serializable object.
at org.springframework.jms.support.converter.SimpleMessageConverter.toMessage(SimpleMess
ageConverter.java:79)
at org.springframework.jms.core.JmsTemplate.lambda$convertAndSend$5(JmsTemplate.
java:661)
...
at com.apress.prospring6.thirteen.Sender.send(Sender.java:56)
at com.apress.prospring6.thirteen.ArtemisApplication.main(ArtemisApplication.java:70)
So, what is the problem here? By default, as the message states, only a few types of messages can be
written to the queue, and all of them are represented by types implementing jakarta.jms.Message, as
shown in Figure 13-7.
594
Chapter 13 ■ Spring Remoting
Figure 13-7. Hierarchy of available implementations for the jakarta.jms.Message interface
The ActiveMQMessage class is the message implementation that is part of the active-server.
jar library, but it is not really necessary in a Spring application.
So, how do we add support for a different type? There is a hint in the error message: since there is no
message convertor, we need a message convertor. The easiest way is to provide a converter that transforms
a Letter to JSON text representation, so the Sender writes a jakarta.jms.TextMessage to the queue,
and transforms a JSON representation to a Letter so the Receiver can read it. And since we are working
in a Spring context, the most suitable way is to declare a bean doing that, and because this is a Spring
Boot application, the bean will be automatically used where needed. The JMS converter bean is shown in
Listing 13-21, and it is configured using the Jackson library.
Listing 13-21. JMS Converter Bean
package com.apress.prospring6.thirteen;
import com.fasterxml.jackson.databind.json.JsonMapper;
import com.fasterxml.jackson.datatype.jsr310.JavaTimeModule;
import org.springframework.jms.support.converter.MappingJackson2MessageConverter;
import org.springframework.jms.support.converter.MessageConverter;
import org.springframework.jms.support.converter.MessageType;
//other import statements omitted
@SpringBootApplication
@Slf4j
public class ArtemisApplication {
@Bean
public MessageConverter messageConverter() {
var converter = new MappingJackson2MessageConverter();
converter.setTargetType(MessageType.TEXT); // (1)
converter.setTypeIdPropertyName("_type"); // (2)
var mapper = new JsonMapper();
mapper.registerModule(new JavaTimeModule()); // (3)
595
Chapter 13 ■ Spring Remoting
converter.setObjectMapper(mapper);
return converter;
}
// main method omitted
}
There are three lines marked in Listing 13-21, which are needed to configure the following:
•
1. converter.setTargetType(MessageType.TEXT): Specifies that the object should
be marshalled to a TextMessage by being invoked with the MessageType.TEXT enum
value. Other possible values are BYTES, MAP, or OBJECT.
•
2. converter.setTypeIdPropertyName("_type"): Specifies the name of the JMS
message property that carries the type ID for the contained object. This property
needs to be set in order to allow the conversion from an incoming message to a
Java object.
•
3. mapper.registerModule(new JavaTimeModule()): This is needed because the
Letter record contains a field named sentOn of type java.time.LocalDate.
With this bean in the configuration, now the application behaves as it should. If we run the main(..)
method and analyze the console, the log messages printed by the Sender before sending a Letter instance
and the log messages printed by the Receiver after receiving a Letter instance are printed in the console. A
sample log snippet is shown in Listing 13-22.
Listing 13-22. Spring Boot Console Log Snippet Showing JMS Messages Being Processed
INFO : ActiveMQServerLogger_impl - AMQ221007: Server is now live
INFO : ActiveMQServerLogger_impl - AMQ221001: Apache ActiveMQ Artemis Message Broker version
2.27.1 [localhost, nodeID=62e0a32a-7a73-11ed-b408-3e5b0a7a3878]
...
INFO : Sender - >> sending letter='Letter[title=Letter no. 0, sender=Test,
sentOn=2022-12-12, content=95e3c388-37b5-499d-a720-c6b77b8cb99c]'
INFO : AuditLogger_impl - AMQ601267: User anonymous@invm:0 is creating a core session
on target resource ActiveMQServerImpl::name=localhost with parameters: [63310d25-7a7311ed-b408-3e5b0a7a3878, null, ****, 102400, RemotingConnectionImpl [ID=631dfa50-7a7311ed-b408-3e5b0a7a3878, clientID=null, nodeID=62e0a32a-7a73-11ed-b408-3e5b0a7a3878, tra
nsportConnection=InVMConnection [serverID=0, id=631dfa50-7a73-11ed-b408-3e5b0a7a3878]],
true, true, false, false, null, org.apache.activemq.artemis.core.protocol.core.impl.
CoreSessionCallback@4a09407d, true, {}]
...
INFO : Sender - >> sending letter='Letter[title=Letter no. 1, sender=Test,
sentOn=2022-12-12, content=c9490fb3-49d3-4678-af76-a3c2fff3de21]'
...
INFO : Receiver - >> received letter='Letter[title=Letter no. 0, sender=Test,
sentOn=2022-12-12, content=95e3c388-37b5-499d-a720-c6b77b8cb99c]'
INFO : AuditLogger_impl - AMQ601759: User anonymous@invm:0 added acknowledgement of a
message from prospring6: CoreMessage[messageID=17,durable=true,userID=6337eaf6-7a7311ed-b408-3e5b0a7a3878,priority=4, timestamp=Mon Dec 12 23:19:12 GMT 2022,expiration=0,
durable=true, address=prospring6,size=588,properties=TypedProperties[__AMQ_
CID=63296c02-7a73-11ed-b408-3e5b0a7a3878,_type=com.apress.prospring6.thirteen.Letter,_AMQ_
SCHED_DELIVERY=1670887154279,_AMQ_ROUTING_TYPE=1]]@489572349 to transaction: TransactionImpl
596
Chapter 13 ■ Spring Remoting
[xid=null, txID=30, xid=null, state=ACTIVE, createTime=1670887154268(Mon Dec 12 23:19:14 GMT
2022), timeoutSeconds=300, nr operations = 1]@16eb0e22
INFO : Receiver - >> received letter='Letter[title=Letter no. 1, sender=Test,
sentOn=2022-12-12, content=c9490fb3-49d3-4678-af76-a3c2fff3de21]'
...
Among the custom log messages confirming sending (producing) and receiving (consuming) of
messages, there are Artemis-specific logs. Since the server is an embedded one, each message is sent using
an anonymous user, which is confirmed by the logs. As you can see from the logs, sending and receiving JMS
messages is done in a JMS transaction, which Spring Boot manages by default.
More advanced behavior, like message consumption prioritization and handling errors, can be easily
configured by customizing the Spring Boot configuration. Feel free to enrich your knowledge of Spring Boot
JMS support by reading the official documentation9.
Using Spring for Apache Kafka
In this section, we focus on the point-to-point style for using queues, which is a more commonly used
pattern within an enterprise, and not on any queueing technology. We are going to show you how to write
Spring Boot applications using Apache Kafka10.
In a world where the quantity of data to manage increases exponentially from year to year, and where
making data accessible with lightning speed is essential for productivity, classical queuing technologies have
difficulties adapting. Enter open source Apache Kafka, a distributed event streaming platform renowned for
being used to build high-performance data pipelines, streaming analytics, data integration, and missioncritical applications by thousands of companies. Apache Kafka is known for its excellent performance, low
latency, fault tolerance, and high throughput. It’s capable of handling thousands of messages per second. So,
of course, integrating with it was a priority for the Spring Team. The Spring for Apache Kafka (spring-kafka)
project applies core Spring concepts to the development of Kafka-based messaging solutions.
Notice that the project is named Spring for Apache Kafka, not Spring Kafka, the reason being that the
Apache Foundation wanted to avoid confusion in regard to Kafka ownership. All open source Apache projects
have their name prefixed with “Apache,” and any project donated to the Apache Foundation gets renamed as
such. For example, the Brooklyn orchestration server became Apache Brooklyn when it was donated to the
Apache Foundation.
As stated in the official documentation: “Apache Kafka is a distributed system consisting of servers and
clients that communicate via a high-performance TCP network protocol. It can be deployed on bare-metal
hardware, virtual machines, and containers in on-premises as well as cloud environments.” For the example
in this book, Apache Kafka is deployed on-premises in a Docker runtime.
9
https://docs.spring.io/spring-boot/docs/3.0.0/reference/htmlsingle/#messaging
https://kafka.apache.org
10
597
Chapter 13 ■ Spring Remoting
The containers needed to run Apache Kafka locally are configured via a docker-compose.yaml file,
and Docker Compose11 is used to start up and shut down the containers. This configuration is provided by
Bitnami12, a library of installers or software packages for web applications and software stacks as well as
virtual appliances. The full library is shared via GitHub and all container configurations are available here:
https://github.com/bitnami/containers. The configuration necessary for the example in this book was
downloaded from this repository13. The instructions to start the containers can be found in the chapter13kafka-boot/CHAPTER13-KAFKA-BOOT.adoc document.
In production environments, Apache Kafka is run as a cluster, and somebody must manage the
instances. This is where Zookeeper comes in. Zookeeper is software developed by Apache that acts as a
centralized service and is used to maintain naming and configuration data and to provide flexible and robust
synchronization within distributed systems. This means in a production environment you might see a setup
like the one shown in Figure 13-8, where instances of Zookeeper coordinate with each other and each one of
them is responsible for its own Apache Kafka server.
Figure 13-8. Apache Kafka production setup
In a production system, multiple instances of Zookeeper work together to manage Kafka data that
is divided across multiple collections of nodes, and this is how Kafka achieves its high availability and
consistency. In Figure 13-8 each gray rectangle is a node, the bubbles labeled with Z represent Zookeeper
instances, and the black “grape” logos represent Apache Kafka instances. (For a development Docker setup
though, one Zookeeper instance and one Apache Kafka instance is sufficient.)
Since we are using an Apache Kafka instance that is external to our application, we can write another
application that can be started twice and simulate a communication between instances. As we did in the
beginning of this chapter, an application will be started for Tom to send letter messages to Evelyn, and one
for Evelyn to send letters to Tom. Tom and Evelyn have their own queues they receive messages on. Each
application is a web application that will expose a single /kafka/send endpoint, and a POST method is used
to trigger a message to be sent to the queue of the other person, as described in Figure 13-9.
https://github.com/docker/compose
https://bitnami.com
13
https://github.com/bitnami/containers/blob/main/bitnami/kafka/docker-compose.yml
11
12
598
Chapter 13 ■ Spring Remoting
Figure 13-9. Abstract representation of the two pen pals applications using Apache Kafka
There is no Spring Boot starter for Apache Kafka, since you cannot start Kafka in embedded mode, but
it is quite easy to create a Spring Boot web application, add spring-kafka as a dependency, and configure it
using Spring properties. Figure 13-10 shows the dependencies of the chapter13-kafka-boot project.
Figure 13-10. Gradle configuration for a Spring Boot application using Apache Kafka
599
Chapter 13 ■ Spring Remoting
Not that we have the desired behavior and the dependencies, let’s build this application. First we need
to tell Spring Boot where Apache Kafka is running, so that its API can be called so that queues are created,
and messages can be sent and received. Listing 13-23 shows the Spring Boot application configuration (the
contents of the application.yaml file).
Listing 13-23. Spring Boot with Apache Kafka Application Configuration
# web config
server:
port: 8090
compression:
enabled: true
address: 0.0.0.0
# kafka config
spring:
kafka:
bootstrap-servers: localhost:9092
consumer:
group-id: letters-group-id
# custom config
app:
sending:
topic:
name: default # topic where letters are sent
receiving:
topic:
name: self # topic where letters are received
# logging config
logging:
pattern:
console: "%-5level: %class{0} - %msg%n"
level:
root: INFO
org.springframework: DEBUG
com.apress.prospring6.thirteen: INFO
The YAML configuration has been split in sections per scope, and the sections are explained in the
following list:
600
•
# web config: This section configures web application details, like the port, and if
the application is exposed on all network IPs (0.0.0.0 means the application will be
accessible at http://localhost:8090, http://127.0.0.1:8090, etc.).
•
# kafka config: This section configures the location and port where the Apache
Kafka cluster is available. The consumer.group-id is a Kafka abstraction that enables
supporting both point-to-point and publish-subscribe messaging. This property can
be used to group multiple consumers and customize the behavior per-group, such as
priority when consuming messages, parallelism, and so on.
Chapter 13 ■ Spring Remoting
•
# custom config: This section configures the topic where messages are sent
(app.topic.sending.name) and the topic where messages are received (app.topic.
receiving.name). The app.topic.receiving.name property also identifies the
application: Tom or Evelyn.
•
# logging config: This section configures log levels.
Second, we need a Java type to model the information sent to the topics. On the two topics, Letter
instances will be written. The record declaration is shown in Listing 13-24.
Listing 13-24. Letter Record Declaration
package com.apress.prospring6.thirteen;
import com.fasterxml.jackson.annotation.JsonFormat;
import com.fasterxml.jackson.annotation.JsonProperty;
import java.time.LocalDate;
public record Letter (@JsonProperty("title") String title,
@JsonProperty("sender") String sender,
@JsonFormat(shape = JsonFormat.Shape.STRING, pattern = "yyyy-MM-dd")
@JsonProperty("sentOn") LocalDate sentOn,
@JsonProperty("content") String content ) {}
Since we do not plan to edit the received Letter instances, a Java record is suitable for this application.
The Apache Kafka cluster doesn’t know what topics we need, so we have to configure them. This is the
third thing we need: a configuration class for Kafka. It doesn’t know what kind of object we plan to produce
and consume from the topics, so we have to configure that as well. To keep it simple, we’ll group all these
configurations in a class named KafkaConfig that is shown in Listing 13-25.
Listing 13-25. KafkaConfig Configuration Class
package com.apress.prospring6.thirteen;
import org.apache.kafka.clients.admin.NewTopic;
import org.apache.kafka.clients.consumer.ConsumerConfig;
import org.apache.kafka.clients.producer.ProducerConfig;
import org.apache.kafka.common.serialization.StringDeserializer;
import org.apache.kafka.common.serialization.StringSerializer;
import org.springframework.boot.autoconfigure.kafka.KafkaProperties;
// some import statements omitted
@SuppressWarnings({"unchecked", "rawtypes"})
@Configuration
@RequiredArgsConstructor
public class KafkaConfig {
private final KafkaProperties kafkaProperties;
@Value(value = "${spring.kafka.bootstrap-servers}")
private String bootstrapAddress;
601
Chapter 13 ■ Spring Remoting
@Value(value = "${spring.kafka.consumer.group-id}")
private String groupId;
@Value("#{kafkaApplication.sendingTopic}")
private String sendingTopicName;
@Value("#{kafkaApplication.receivingTopic}")
private String receivingTopicName;
@Bean // configs for the LetterSender
public Map<String, Object> producerConfigs() {
Map<String, Object> props = new HashMap<>(kafkaProperties.
buildProducerProperties());
props.put(ProducerConfig.KEY_SERIALIZER_CLASS_CONFIG, StringSerializer.class);
props.put(ProducerConfig.VALUE_SERIALIZER_CLASS_CONFIG, JsonSerializer.class);
return props;
}
@Bean
public ProducerFactory<String, Object> producerFactory() {
return new DefaultKafkaProducerFactory<>(producerConfigs());
}
@Bean
public KafkaTemplate<String, Object> kafkaTemplate() {
return new KafkaTemplate<>(producerFactory());
}
@Bean // topic where Letters are sent
public NewTopic sendingTopic() {
return new NewTopic(sendingTopicName, 1, (short) 1);
}
@Bean // topic where to read letters from
public NewTopic receivingTopic() {
return new NewTopic(receivingTopicName, 1, (short) 1);
}
@Bean // configs for the LetterReader
public ConsumerFactory<String, Object> consumerFactory() {
final org.springframework.kafka.support.serializer.JsonDeserializer<Object>
jsonDeserializer = new JsonDeserializer<>();
jsonDeserializer.addTrustedPackages("*");
return new DefaultKafkaConsumerFactory<>(kafkaProperties.buildConsumerProperties(),
new StringDeserializer(), jsonDeserializer);
}
@Bean
public ConcurrentKafkaListenerContainerFactory<String, Object>
kafkaListenerContainerFactory() {
602
Chapter 13 ■ Spring Remoting
ConcurrentKafkaListenerContainerFactory<String, Object> factory = new
ConcurrentKafkaListenerContainerFactory<>();
factory.setConsumerFactory(consumerFactory());
return factory;
}
}
In a Spring Boot application, all the Kafka-specific properties from the configuration are loaded into a
KafkaProperties configuration bean. This bean is injected into the KafkaConfig class, so it can be extended
with properties specific for a ProducerFactory<String,Object> or a ConsumerFactory<String, Object>—
in this example, serializers and deserializers, which are used to convert a Letter instance to a JSON
representation before writing it to the topic, and vice versa when the message is consumed. Notice that the
Letter type is not mentioned anywhere. The ProducerFactory only needs to know what to use to convert
the message key and the message, because every message has to be identified uniquely by a unique key.
Before the application is started, the Apache Kafka cluster does not have any topics defined. A NewTopic
bean is declared for each topic we need, which ensures a topic with the configured name is created if it
doesn’t already exist. A topic can be configured to be divided into multiple partitions and replicated across
brokers. In our very simple example, both the number of partitions and the replication factor are set to 1.
The KafkaTemplate class is similar to JmsTemplate (and RestTemplate too), and a bean of this type
is needed to execute high-level operations with Apache Kafka. The bean is thread-safe, and to produce
messages, the configured ProducerFactory<K, V> bean is used.
The ConsumerFactory<K, V> is needed to consume messages from a topic. For this simple scenario, we
use Spring’s DefaultKafkaConsumerFactory<K,V> implementation with a minimal configuration.
For messages to be consumed, they need to be picked up by a listener. To create one of those, beside the
@KafkaListener annotation attached to a consuming method, a ConcurrentKafkaListenerContainerFactory
<K,V> is needed.
The reason why none of the beans for producing and consuming messages are restricted to a certain
type of message is that multiple types of messages can be written on the same queue, and read by different
listeners, created by different ConcurrentKafkaListenerContainerFactory<K,V>.
Notice that Kafka properties are extracted from the Spring Boot configuration files and injected using
@Value(value = "${spring.kafka.*}"), but custom properties like app.topic.sending.name need to
first be declared as properties of the Spring Boot main configuration class and injected using SpEL.
The beans in this configuration must be injected in the beans used to produce and consume Letter
instances. The class used to model a message producer is named LetterSender, because its responsibility is
to send letters. The class is shown in Listing 13-26.
Listing 13-26. LetterSender Class and Bean Configuration
package com.apress.prospring6.thirteen;
import
import
import
import
import
lombok.RequiredArgsConstructor;
lombok.extern.slf4j.Slf4j;
org.springframework.beans.factory.annotation.Value;
org.springframework.kafka.core.KafkaTemplate;
org.springframework.stereotype.Service;
603
Chapter 13 ■ Spring Remoting
@RequiredArgsConstructor
@Service
@Slf4j
public class LetterSender {
@Value("#{kafkaApplication.sendingTopic}")
public String sendingToTopicName;
@Value("#{kafkaApplication.receivingTopic}")
private String sender; // who is sending the letter
private final KafkaTemplate<String,Object> kafkaTemplate;
// make application configurable
public void send(Letter letter) {
log.info(">>>> -> [{}] Sending letter -> {}", sender, letter);
kafkaTemplate.send(sendingToTopicName, letter);
}
}
The LetterSender bean needs the KafkaTemplate bean to send messages and the name of the topic
the messages are sent to. There are multiple versions of the send(..) message that include parameters for
choosing a partition and the time when the message was produced. There is also a version that returns a Compl
etableFuture<SendResult<K, V>>, which allows declaring a callback to be executed after the message is sent
successfully.
kafkaApplication.receivingTopic is also the name of the application sending the messages and is
injected in this bean for logging purposes.
The LetterSender bean is injected into the KafkaController, so sending a letter can be triggered via a
POST request. The KafkaController class and bean configuration are shown in Listing 13-27.
Listing 13-27. KafkaController Class and Bean Configuration
package com.apress.prospring6.thirteen;
import lombok.RequiredArgsConstructor;
import org.springframework.web.bind.annotation.*;
@RequiredArgsConstructor
@RestController
@RequestMapping(path = "/kafka")
public class KafkaController {
private final LetterSender sender;
@PostMapping(value = "/send")
public void sendMessageToKafkaTopic(@RequestBody Letter letter) {
this.sender.send(letter);
}
}
Now that we know how to send Letter instances to a topic, let’s see how we can consume them. We
already mentioned the @KafkaListener, but where do we put it? The answer is on a method in a class called
LetterReader, which is shown in Listing 13-28.
604
Chapter 13 ■ Spring Remoting
Listing 13-28. LetterReader Class and Bean Configuration
package com.apress.prospring6.thirteen;
import lombok.extern.slf4j.Slf4j;
import
import
import
import
org.springframework.beans.factory.annotation.Value;
org.springframework.kafka.annotation.KafkaListener;
org.springframework.messaging.handler.annotation.Payload;
org.springframework.stereotype.Service;
@Service
@Slf4j
public class LetterReader {
@Value("#{kafkaApplication.receivingTopic}")
private String receivingTopicName;
@KafkaListener(topics = "#{kafkaApplication.receivingTopic}",
groupId = "${spring.kafka.consumer.group-id}",
containerFactory = "kafkaListenerContainerFactory")
public void consume(@Payload Letter letter) {
log.info("<<<< [{}] Reading letter -> {}", receivingTopicName, letter);
}
}
The @KafkaListener annotation marks a method to be the target of a Kafka message listener. A listener
needs to know the topics (yes, it can read messages from multiple topics) to read messages from, and this is
configured using the topics attribute. If multiple groups are used, and we want a listener to read messages
only from a single group of topics, the groupId attribute is useful for that.
And, since we want to make sure the message is converted correctly, we need to make sure the suitable
listener is created, and this means specifying the suitable ConcurrentKafkaListenerContainerFactory<K,V>
to use via the containerFactory method.
The consume(..) method can have various signatures, as long as Spring knows what to do with the message
once consumed from the topic. The @Payload annotation from the org.springframework.messaging.handler.
annotation package binds the body of a Kafka message to this method parameter and converts it to the
appropriate type, in this case Letter.
The last class to be shown is the KafkaApplication class, the main Spring Boot configuration class and
runner, shown in Listing 13-29.
Listing 13-29. KafkaApplication Spring Boot Class
package com.apress.prospring6.thirteen;
@SpringBootApplication
@Slf4j
public class KafkaApplication {
public static void main(String... args) {
SpringApplication.run(KafkaApplication.class, args);
}
605
Chapter 13 ■ Spring Remoting
@Value("${app.sending.topic.name}")
public String sendingTopic;
@Value("${app.receiving.topic.name}")
public String receivingTopic;
@Bean
public CommandLineRunner initCmd(){
return (args) -> log.info(" >>> Sender {} ready to send letters to {} ",
receivingTopic, sendingTopic);
}
}
Since this application is going to be started twice, once for Evelyn and once for Tom, a
CommandLineRunner bean is created to show which application is running. The name of the topic where
Letters are received is also the name of the application. As shown earlier in Figure 13-9, the application for
Evelyn is started on port 8080, and the Tom application is started on 8090.
To start the two application instances, the way to go is either to configure different IntelliJ IDEA
launchers, or to build the application and start two instances using the JAR in different terminal windows,
using the commands shown in Listing 13-30.
Listing 13-30. Bash Commands to Start Two Instances of the Application
# starting Evelyn
java -jar build/libs/chapter13-kafka-boot-6.0-SNAPSHOT.jar --app.sending.topic.name=
Tom --app.receiving.topic.name=Evelyn --server.port=8080
# starting Tom
java -jar build/libs/chapter13-kafka-boot-6.0-SNAPSHOT.jar --app.sending.topic.name=
Evelyn --app.receiving.topic.name=Tom --server.port=8090
A practical approach when using IntelliJ IDEA to develop applications with multiple pieces is to have it
all in separate IntelliJ terminals. In Figure 13-11, there is a terminal where we run Docker Compose to start
the Apache Kafka server, and another terminal with two windows where the Evelyn and Tom applications
can be seen running at the same time.
Figure 13-11. IntelliJ IDEA terminals with Apache Kafka and two Spring Boot applications running
606
Chapter 13 ■ Spring Remoting
Requests can be made using curl14 or Postman15, or if you are using IntelliJ IDEA, you can use
the HTTPie client. The request body to send a Letter from Evelyn to Tom, and vice versa, is shown in
Listing 13-31.
Listing 13-31. POST Requests in HTTPie to Send Letter Instances Between the Two Applications to
Each Other
### Evelyn sending letter message to Tom
POST http://localhost:8080/kafka/send
Content-Type: application/json
{
"title": "To my Dear Friend",
"sender": "HTTPIE",
"sentOn" : "2022-12-04",
"content" : "Haven't read anything written by you in a while. Miss you!"
}
### Tom sending letter message to Evelyn
POST http://localhost:8090/kafka/send
Content-Type: application/json
{
"title": "Miss you too",
"sender": "HTTPIE",
"sentOn" : "2022-12-05",
"content" : "Scotland is rather lovely this time of year. Would you like to visit?"
}
If you run the two requests, you will see both applications printing logs confirming the sending of a
Letter and receiving one, as shown in Listing 13-32.
Listing 13-32. Evelyn Logs Confirming a Letter Is Sent and One Is Received
INFO : LetterSender - >>>> [Evelyn] Sending letter -> Letter[title=To my Dear Friend,
sender=HTTPIE, sentOn=2022-12-04, content=Haven't read anything written by you in a while.
Miss you!]
DEBUG: FrameworkServlet - Completed 200 OK
...
DEBUG: LogAccessor - Received: 1 records
INFO : LetterReader - <<<< [Evelyn] Reading letter ->
Letter[
title=Miss you too,
sender=HTTPIE,
sentOn=2022-12-05,
content=Scotland is rather lovely this time of year. Would you like to visit?
]
14
15
https://curl.se
https://www.postman.com
607
Chapter 13 ■ Spring Remoting
The Tom application prints something similar.
It was mentioned previously that the method annotated with @KafkaListener can have a different
signature, and all details of a message can be inspected, not only the body (payload). To achieve this, the
method can be written as shown in Listing 13-33.
Listing 13-33. Method annotated with @KafkaListener that inspects the contents of a ConsumerRecord
package com.apress.prospring6.thirteen;
import org.apache.kafka.clients.consumer.ConsumerRecord;
// other import statements omitted
@Service
@Slf4j
public class LetterReader {
@KafkaListener(topics = "#{kafkaApplication.receivingTopic}",
groupId = "${spring.kafka.consumer.group-id}",
clientIdPrefix = "json",
containerFactory = "kafkaListenerContainerFactory")
public void consume(ConsumerRecord<String, String> cr) {
log.info("<<<< Receiving message at -> {}", cr.timestamp());
log.info("<<<< Receiving message on topic -> {}", cr.topic());
log.info("<<<< Receiving message on partition -> {}", cr.partition());
log.info("<<<< Receiving message with headers -> {}", cr.headers());
log.info("<<<< Receiving message with key -> {}", cr.key());
log.info("<<<< Receiving message with value -> {}", cr.value());
}
}
The ConsumerRecord<K, V> is part of the kafka-clients.jar library and, as you can see, it is a key/pair
value mapping to the message identifier and payload, but also includes other useful information such as the
topic name and partition number for where the message is received.
Listing 13-34 shows the output of this method when letters are being sent after this change.
Listing 13-34. Evelyn Logs Confirming a Letter Is Received As a ConsumerRecord<String, Letter>
INFO : LetterReader - <<<< Receiving message at -> 1671403710391
INFO : LetterReader - <<<< Receiving message on topic -> Evelyn
INFO : LetterReader - <<<< Receiving message on partition -> 0
INFO : LetterReader - <<<< Receiving message with headers -> RecordHeaders(headers = [],
isReadOnly = false)
INFO : LetterReader - <<<< Receiving message with key -> dcccbbe7-3b5f-4447-9c15-0272f45591a9
INFO : LetterReader - <<<< Receiving message with value ->
Letter[
title=Miss you too,
sender=HTTPIE,
sentOn=2022-12-05,
content=Scotland is rather lovely this time of year. Would you like to visit?
]
608
Chapter 13 ■ Spring Remoting
Summary
In this chapter, we covered the most commonly used remoting techniques in Spring-based applications.
For each scenario in this chapter, you’ve been shown how to send and receive messages. Communication
between remote applications is a vast subject, and there are multiple technologies that can be used for this
purpose. This chapter’s purpose was to introduce you to the most common of them and give you an overall
idea of how Spring applications can be designed to communicate with other applications, written with
Spring or not.
Spring Boot was exclusively used for this chapter, as the focus was on the integration of Spring with each
of the technologies, REST, JMS, and Apache Kafka.
In the next chapter, we discuss using Spring for writing web applications.
609
CHAPTER 14
Spring MVC
In an enterprise application, the presentation layer critically affects users’ level of acceptance of the
application. The presentation layer is the front door into your application. It lets users perform business
functions provided by the application, as well as presents a view of the information that is being maintained
by the application. How the user interface performs greatly contributes to the success of the application.
Because of the explosive growth of the Internet (especially these days), as well as the rise of different kinds of
devices that people are using, developing an application’s presentation layer is a challenging task.
The following are some major considerations when developing web applications:
•
Performance: Performance is always the top requirement of a web application. If
users choose a function or click a link, and it takes a long time to execute (in the
world of the Internet, three seconds is like a century!), users will definitely not be
happy with the application.
•
User-friendliness: The application should be easy to use and easy to navigate, with
clear instructions that don’t confuse the user.
•
Interactivity and richness: The user interface should be highly interactive and
responsive. In addition, the presentation should be rich in terms of visual
presentation, such as charting, a dashboard type of interface, and so on.
•
Accessibility: Nowadays, users require that the application is accessible from
anywhere via any device. In the office, they will use their desktop to access the
application. On the road, users will use various mobile devices (including laptops,
tablets, and smartphones) to access the application.
Developing a web application to fulfill the previous requirements is not easy, but they are considered
mandatory for business users. Fortunately, many new technologies and frameworks have been developed
to address those needs. Many web application frameworks and libraries—such as Spring MVC (Spring
Web Flow), Apache Struts, Tapestry, Java/Jakarta Server Faces (JSF), Google Web Toolkit (GWT), jQuery,
React, and Dojo, to name a few—provide tools and rich component libraries that can help you develop
highly interactive web front ends. Spring Web Flow1 provides a JSF integration that lets you use the JSF
UI Component Model with Spring Web Flow controllers. In addition, many frameworks provide tools
1
https://spring.io/projects/spring-webflow
© Iuliana Cosmina, Rob Harrop, Chris Schaefer, and Clarence Ho 2023
I. Cosmina et al., Pro Spring 6, https://doi.org/10.1007/978-1-4842-8640-1_14
611
Chapter 14 ■ Spring MVC
or corresponding widget libraries targeting mobile devices such as smartphones and tablets. The rise of
the HTML52 and CSS33 standards and the support of these latest standards by most web browsers and
mobile device manufacturers also help ease the development of web applications that need to be available
anywhere, from any device.
In parallel with Spring MVC, starting with version 5.0 Spring Framework introduced a reactive-stack
web framework whose name named Spring WebFlux4. This stack will be covered succinctly in Chapter 20.
In terms of web application development, Spring provides comprehensive and intensive support. The
Spring MVC module provides a solid infrastructure and Model View Controller (MVC) framework for web
application development. When using Spring MVC, you can use various view technologies (for example,
JSP or Velocity). In addition, Spring MVC integrates with many common web frameworks and toolkits (for
example, Struts and GWT). Other Spring projects help address specific needs for web applications. For
example, Spring MVC, when combined with the Spring Web Flow project and its Spring Faces module,
provides comprehensive support for developing web applications with complex flows and for using JSF
as the view technology. Simply speaking, there are many choices out there in terms of presentation layer
development. This chapter focuses on Spring MVC and discusses how we can use the powerful features
provided by Spring MVC to develop highly performing web applications.
Specifically, this chapter covers the following topics:
•
Spring MVC: We discuss the main concepts of the MVC pattern and introduce Spring
MVC. We present Spring MVC’s core concepts, including its WebApplicationContext
hierarchy and the request-handling life cycle.
•
i18n, locale, and theming: Spring MVC provides comprehensive support for common
web application requirements, including i18n (internationalization), locale, and
theming. We discuss how to use Spring MVC to develop web applications that
support those requirements.
•
View support: The use of view technologies in Spring MVC is pluggable. In this
chapter, we focus on using Thymeleaf as the view part of the web application,
because it allows development of simple web pages without explicit use of JavaScript
and other dynamic technologies. Anything else that you might want to use that
is supported by Spring, such as Groovy markup templates and JSPs, can be easily
plugged in just with simple configuration changes.
•
File upload support: Instead of integration with Apache Commons FileUpload,
we discuss how to use Spring MVC with the Jakarta Servlet 5.0 container’s built-in
multipart support for file upload.
Setting Up the Data and Lower-Level Layers
A web application must provide access to manipulate data that is stored in a remote location, on a certain
type of storage, usually a database. Up to this chapter, you were introduced to how to configure a Spring
application to manage data using Spring Data repositories and declare transactional beans to manage data
within a transaction. These are the two data layers of an application; in this chapter, you will be introduced
to configuring the last layer of an application: the presentation layer, which is the web application or the
web console the end user works with, unaware of which kind of application is doing the heavy lifting in the
backend.
https://html.spec.whatwg.org/multipage
https://developer.mozilla.org/en-US/docs/Web/CSS
4
https://docs.spring.io/spring-framework/docs/current/reference/html/webreactive.html
2
3
612
Chapter 14 ■ Spring MVC
This chapter uses the same database structure used in previous chapters, but a new column, PHOTO, is
added to the SINGER table. The new SINGER table creation script is shown in Listing 14-1.
Listing 14-1. The Updated SINGER Table
CREATE TABLE SINGER (
ID INT NOT NULL AUTO_INCREMENT
, VERSION INT NOT NULL DEFAULT 0
, FIRST_NAME VARCHAR(60) NOT NULL
, LAST_NAME VARCHAR(40) NOT NULL
, BIRTH_DATE DATE
, PHOTO LONGBLOB NULL
, UNIQUE (FIRST_NAME, LAST_NAME)
, PRIMARY KEY (ID)
);
The PHOTO column, of the binary large object (LONGBLOB) data type, will be used to store the photo of a
singer using file upload. To create the database and the tables in it, a Docker container is needed. Creating
the image for it and running it is described in the chapter14/CHAPTER14.adoc file that is part of the project
for this chapter.
To manage SINGER records as Java objects, we use Singer instances. This class is configured as a Jakarta
Persistence entity, shown in Listing 14-2.
Listing 14-2. The Updated Singer Entity
package com.apress.prospring6.fourteen.entities;
import jakarta.persistence.*;
import jakarta.validation.*;
import org.springframework.format.annotation.DateTimeFormat;
@Entity
@Table(name = "SINGER")
public class Singer extends AbstractEntity {
@Serial
private static final long serialVersionUID = 2L;
@NotNull
@Size(min = 2, max = 30)
@Column(name = "FIRST_NAME")
private String firstName;
@NotNull
@Size(min = 2, max = 30)
@Column(name = "LAST_NAME")
private String lastName;
@DateTimeFormat(pattern = "yyyy-MM-dd")
@Column(name = "BIRTH_DATE")
private LocalDate birthDate;
@OneToMany(mappedBy = "singer")
private Set<Album> albums = new HashSet<>();
613
Chapter 14 ■ Spring MVC
@Basic(fetch= FetchType.LAZY)
@Lob
@Column(name = "PHOTO")
private byte[] photo;
// other code omitted
}
AbstractEntity is an abstract class containing fields common to all entity classes used in the
application (id and version). Notice that most fields have validation annotations on them, which are useful
to validate user-provided data. The @DateTimeFormat annotation is a Spring annotation that configures a
field or method parameter to be formatted as a date or time according to the format provided as an attribute.
The ALBUM and INSTRUMENT tables and the entities for them are part of the project, but there is
enough ground to cover on Spring MVC by only working with Singer instances, so they won’t be mentioned in
this chapter.
For managing Singer instances, a simple Spring Data Repository interface is necessary, as shown in
Listing 14-3.
Listing 14-3. The SingerRepo Interface
package com.apress.prospring6.fourteen.repos;
import
import
import
import
import
com.apress.prospring6.fourteen.entities.Singer;
org.springframework.data.jpa.repository.JpaRepository;
org.springframework.data.jpa.repository.Query;
org.springframework.data.repository.query.Param;
org.springframework.stereotype.Repository;
import java.time.LocalDate;
public interface SingerRepo extends JpaRepository<Singer, Long> {
@Query("select s from Singer s where s.firstName=:fn")
Iterable<Singer> findByFirstName(@Param("fn") String firstName);
@Query("select s from Singer s where s.firstName like %?1%")
Iterable<Singer> findByFirstNameLike(String firstName);
@Query("select s from Singer s where s.lastName=:ln")
Iterable<Singer> findByLastName(@Param("ln") String lastName);
@Query("select s from Singer s where s.lastName like %?1%")
Iterable<Singer> findByLastNameLike(String lastName);
614
Chapter 14 ■ Spring MVC
@Query("select s from Singer s where s.birthDate=:date")
Iterable<Singer> findByBirthDate(@Param("date") LocalDate date);
}
All the extra methods are invoked by the SingerService bean, to preform various operations with
Singer instances. The SingerService interface declaring all the methods available in the implementation is
shown in Listing 14-4.
Listing 14-4. The SingerService Interface
package com.apress.prospring6.fourteen.services;
import
import
import
import
import
com.apress.prospring6.fourteen.entities.Singer;
com.apress.prospring6.fourteen.problem.InvalidCriteriaException;
com.apress.prospring6.fourteen.util.CriteriaDto;
org.springframework.data.domain.Page;
org.springframework.data.domain.Pageable;
import java.util.List;
public interface SingerService {
List<Singer> findAll();
Singer findById(Long id);
Singer save(Singer singer);
void delete(Long id);
Page<Singer> findAllByPage(Pageable pageable);
List<Singer> getByCriteriaDto(CriteriaDto criteria)
throws InvalidCriteriaException;
}
The SingerServiceImpl class that implements SingerService is transactional and mostly wraps
around SingerRepo methods, except for the getByCriteriaDto(..) method. This method is used to
delegate to one of the customized find* methods in SingerRepo based on the CriteriaDto instance passed
as an argument; its code will be shown later in the chapter when the context is more relevant.
The configuration for the first two layers is provided by two classes. The BasicDataSourceCfg class,
introduced in Chapter 8, provides a way to interact with the MariaDB database. The TransactionCfg
class, introduced in Chapter 9, provides the details for database operations to happen in a transactional
environment. Feel free to review those two chapters if these two configuration classes that are part of the
chapter-14 project look foreign.
Now that the two lower layers are set up, we are ready to start covering Spring MVC.
615
Chapter 14 ■ Spring MVC
Before moving on to implement the presentation layer, let’s go through some major concepts of MVC as
a pattern in web applications and how Spring MVC provides comprehensive support in this area.
In the following sections, we present these high-level concepts one by one. First, we give a brief
introduction to MVC. Second, we present a high-level view of Spring MVC and its WebApplicationContext
hierarchy. Finally, we discuss the request life cycle within Spring MVC.
Introducing MVC
MVC is a commonly used pattern in implementing the presentation layer of an application. The main
principle of the MVC pattern is to define an architecture with clear responsibilities for different components.
As its name implies, there are three participants within the MVC pattern.
•
Model: A model represents the business data as well as the “state” of the application
within the context of the user. For example, in an e-commerce website, the model
usually includes the user profile information, shopping cart data, and order data if
users purchase goods on the site.
•
View: This presents the data to the user in the desired format, supports interaction
with users, and supports client-side validation, i18n, styles, and so on.
•
Controller: The controller handles requests for actions performed by users in the
front end, interacting with the service layer, updating the model, and directing users
to the appropriate view based on the result of execution.
Figure 14-1 illustrates a commonly used web application pattern, which can be treated as an
enhancement to the traditional MVC pattern because of the introduction of Spring as a main component.
Figure 14-1. The MVC pattern in a typical web application
616
Chapter 14 ■ Spring MVC
A normal view request is handled as follows:
1.
Request: A request is submitted to the server. On the server side, most
frameworks (for example, Spring MVC or Struts) have a dispatcher (in the form of
a servlet) to handle the request.
2.
Invokes: The dispatcher dispatches the request to the appropriate controller
based on the HTTP request information and the web application configuration.
3.
Service call: The controller interacts with the service layer.
4.
Model is populated: The information obtained from the service layer is used by
the controller to populate a model.
5.
View is created: Based on the model, a view is created.
6.
Response: The controller returns the corresponding view to the user.
Introducing Spring MVC
In the Spring Framework, the Spring MVC module provides comprehensive support for the MVC pattern,
with support for other features (for example, theming, i18n, validation, and type conversion and formatting)
that ease the implementation of the presentation layer.
In the following sections, we discuss the main concepts of Spring MVC. Topics include Spring MVC’s
WebApplicationContext hierarchy, a typical request-handling life cycle, and configuration.
Spring MVC WebApplicationContext Hierarchy
In Spring MVC, DispatcherServlet is the central servlet that receives requests and dispatches them to
the appropriate controllers. In a Spring MVC application, there can be any number of DispatcherServlet
instances for various purposes (for example, handling user interface requests and RESTful-WS requests),
and each DispatcherServlet instance has its own WebApplicationContext configuration, which defines
the servlet-level characteristics, such as controllers supporting the servlet, handler mapping, view resolving,
i18n, theming, validation, and type conversion and formatting.
Underneath the servlet-level WebApplicationContext configurations, Spring MVC maintains a root
WebApplicationContext, which includes the application-level configurations such as the back-end data
source, security, and service and persistence layer configuration. The root WebApplicationContext will be
available to all servlet-level WebApplicationContexts.
Let’s consider an example. Say we have two DispatcherServlet instances in an application. One
servlet supports the user interface (called the application servlet), and the other provides services in the
form of RESTful-WS to other applications (called the RESTful servlet). In Spring MVC, we will define the
configurations for both the root WebApplicationContext instance and the WebApplicationContext instance
for the two DispatcherServlet instances. Figure 14-2 shows the WebApplicationContext hierarchy that will
be maintained by Spring MVC for this scenario.
617
Chapter 14 ■ Spring MVC
Figure 14-2. Spring MVC WebApplicationContext hierarchy
Spring MVC Request Life Cycle
Let’s see how Spring MVC handles a request. Figure 14-3 shows the main components involved in handling
a request in Spring MVC.
618
Chapter 14 ■ Spring MVC
Figure 14-3. Spring MVC Request Handling Components
The main components and their purposes are as follows:
•
Filter: The filter applies to every request. Several commonly used filters and their
purposes are described in the next section.
•
DispatcherServlet: The servlet analyzes the requests and dispatches them to the
appropriate controller for processing.
•
Common services: The common services will apply to every request to provide
support including i18n, theme, and file upload. Their configuration is defined in the
DispatcherServlet’s WebApplicationContext.
•
Handler Mapping: This maps incoming requests to handlers (a method within a
Spring MVC controller class). Since Spring 2.5, in most situations the configuration
is not required because Spring MVC will automatically register a HandlerMapping
implementation out of the box that maps handlers based on HTTP paths expressed
through the @RequestMapping annotation (and its extensions) at the type or method
level within controller classes.
619
Chapter 14 ■ Spring MVC
In Spring 2.5, DefaultAnnotationHandlerMapping was the default implementation. Starting with
Spring 3.1, RequestMappingHandlerMapping has become the default implementation, which supports
request mapping to handlers defined without annotations also, as long as the Spring conventions of naming
controllers and methods are respected.
•
Handler Interceptor: In Spring MVC, you can register interceptors for the handlers
for implementing common checking or logic. For example, a handler interceptor can
check to ensure that the handlers can only be invoked during office hours.
•
HandlerExceptionResolver: In Spring MVC, the HandlerExceptionResolver interface
(defined in package org.springframework.web.servlet) is designed to deal with
unexpected exceptions thrown during request processing by handlers. By default,
DispatcherServlet registers the DefaultHandlerExceptionResolver class (from
package org.springframework.web.servlet.mvc.support). This resolver handles
certain standard Spring MVC exceptions by setting a specific response status code.
You can also implement your own exception handler by annotating a controller
method with the @ExceptionHandler annotation and passing in the exception type
as the attribute.
•
ViewResolver: Spring MVC’s ViewResolver interface (from package org.
springframework.web.servlet) supports view resolution based on a
logical name returned by the controller. There are many implementation
classes to support various view-resolving mechanisms. For example, the
UrlBasedViewResolver class supports direct resolution of logical names to URLs.
The ContentNegotiatingViewResolver class supports dynamic resolving of views
depending on the media type supported by the client (such as XML, PDF, and
JSON). There also exists a number of implementations to integrate with different
view technologies, such as Thymeleaf5 (ThymeleafViewResolver), FreeMarker6
(FreeMarkerViewResolver), Velocity7 (VelocityViewResolver), and JasperReports8
(JasperReportsViewResolver).
These descriptions cover only a few commonly used handlers and resolvers. For a full description,
please refer to the Spring Framework reference documentation and its Javadoc.
Spring MVC Configuration
To enable Spring MVC within a web application, some initial configuration is required, especially for the web
deployment descriptor web.xml. Since Spring 3.1, support has been available for code-based configuration
within a Servlet 3.0 web container. This provides an alternative to the XML configuration required in the web
deployment descriptor file (web.xml).
https://www.thymeleaf.org
https://freemarker.apache.org
7
https://velocity.apache.org
8
https://community.jaspersoft.com
5
6
620
Chapter 14 ■ Spring MVC
If you are interested in using XML configuration, check out Pro Spring 4, the fourth edition of this book.
To configure Spring MVC support for web applications, we need to perform the following configurations
for the web deployment descriptor:
•
Configure the root WebApplicationContext
•
Configure the servlet filters required by Spring MVC
•
Configure the dispatcher servlets within the application
There are many ways to do this in Spring, but the easiest way is to extend
AbstractAnnotationConfigDispatcherServletInitializer, a Spring utility class from the org.
springframework.web.servlet.support, as shown in Listing 14-5.
Listing 14-5. Configuration Class for a Spring Web Application Context
package com.apress.prospring6.fourteen;
import org.springframework.web.filter.CharacterEncodingFilter;
import org.springframework.web.filter.HiddenHttpMethodFilter;
import org.springframework.web.servlet.support.
AbstractAnnotationConfigDispatcherServletInitializer;
import jakarta.servlet.Filter;
import java.nio.charset.StandardCharsets;
public class WebInitializer
extends AbstractAnnotationConfigDispatcherServletInitializer {
@Override
protected Class<?>[] getRootConfigClasses() {
return new Class[]{BasicDataSourceCfg.class, TransactionCfg.class};
}
@Override
protected Class<?>[] getServletConfigClasses() {
return new Class[]{WebConfig.class};
}
@Override
protected String[] getServletMappings() {
return new String[]{"/"};
}
@Override
protected Filter[] getServletFilters() {
final CharacterEncodingFilter cef = new CharacterEncodingFilter();
cef.setEncoding(StandardCharsets.UTF_8.name());
621
Chapter 14 ■ Spring MVC
cef.setForceEncoding(true);
return new Filter[]{new HiddenHttpMethodFilter(), cef};
}
}
The AbstractAnnotationConfigDispatcherServletInitializer class implements the org.
springframework.web.WebApplicationInitializer class. This interface needs to be implemented in
servlet environments in order to configure the ServletContext programmatically. Spring provides more
than one implementation, as shown in Figure 14-4, depending on how complex the user customization
needs to be.
Figure 14-4. Spring WebApplicationInitializer implementations
In the previous example, the Spring class AbstractAnnotationConfigDispatcherServletInitializer
is used because it contains concrete implementations of methods needed for the configuration of Spring
web applications that use Java-based Spring configuration.
All classes implementing the WebApplicationInitializer interface are automatically detected by the
org.springframework.web.SpringServletContainerInitializer class. Starting with Spring 6, this class
implements Servlet 3.0’s jakarta.servlet.ServletContainerInitializer interface, which bootstraps
automatically in any Servlet 3.0 containers. As shown in Listing 14-5, the following methods were overridden
to plug in customized configurations:
622
•
getRootConfigClasses(): A root application context of type
AnnotationConfigWebApplicationContext will be created using the configuration
classes returned by this method.
•
getServletConfigClasses(): A web application context of type
AnnotationConfigWebApplicationContext will be created using the configuration
classes returned by this method.
Chapter 14 ■ Spring MVC
•
getServletMappings(): The DispatcherServlet’s mappings (context) are specified
by the array of strings returned by this method.
•
getServletFilters(): This method returns an array of implementations of
jakarta.servlet.Filter that will be applied to every request.
Returning to the filters, Table 14-1 describes each of the filters in the array returned by
getServletFilters().
Table 14-1. Commonly Used Spring MVC Servlet Filters
Filter Class Full Name
Description
org.springframework.web.filter.
CharacterEncodingFilter
This filter is used to specify the character encoding for the
request.
org.springframework.web.filter.
HiddenHttpMethodFilter
This filter provides support for HTTP methods other than GET
and POST (for example, PUT).
Although not needed here (and thus not used in the configuration), there is a filter implementation that
should be mentioned: org.springframework.orm.jpa.support.OpenEntityManagerInViewFilter.
This implementation binds a JPA EntityManager to the thread for the entire processing of the request. It is
intended for the Open EntityManager in View pattern, allowing for lazy loading in web views despite the
original transactions already being completed. Although practical, it is quite dangerous, as multiple requests
might end up consuming all database-allowed open connections. Also, if the data set to load is big, the
application might freeze. That is why developers prefer not to use it, instead having specific handlers called via
Ajax requests to load the data in web-specific view objects (instead of entities).
Creating the First View in Spring MVC
Having the service layer and Spring MVC configuration in place, we can start to implement our first view. In
this section, we will implement a simple view to display all singers that are saved in the SINGER table.
As mentioned at the beginning of chapter, Thymeleaf is used to design HTML pages. Thymeleaf is a
modern server-side Java template engine for both web and stand-alone environments, and it integrates
smoothly with Spring applications since it was created specifically for them. To integrate Thymeleaf with a
Spring Web application, the Thymeleaf library needs to be on the classpath. And it is about time to list the
dependencies of the chapter-14 project, which represents a Spring MVC application that is packed as a war
and deployed on an Apache Tomcat 109 server.
Figure 14-5 shows the dependencies of the chapter-14 project in the Gradle View.
9
https://tomcat.apache.org/download-10.cgi
623
Chapter 14 ■ Spring MVC
Figure 14-5. Gradle View showing dependencies of the chapter-14 project
The library marked with (1), jakarta.servlet-api10, is part of the Jakarta project and contains all the
required interfaces, classes, and methods to develop a web application. To develop a Spring web application,
we need to build on top of it. Version 6.0.0 of this library is suitable for a web application compatible with
Apache Tomcat 10.
The library marked with (2), spring-webmvc, contains all the interfaces and classes used to develop a
Spring Web application. Spring Web MVC is built on top of Servlet API and is part of the Spring Framework.
Version 6.x is compatible with Jakarta EE 9.
The library marked with (3), thymeleaf-spring6, provides all interfaces and classes to integrate
Thymeleaf with Spring.
Configuring DispatcherServlet
The next step is to configure DispatcherServlet. This is done by creating a configuration class that defines all
infrastructure beans needed for a Spring web application. The Java Config–based class for the chapter-14
project is depicted in Listing 14-6.
10
https://projects.eclipse.org/projects/ee4j.servlet
624
Chapter 14 ■ Spring MVC
Listing 14-6. Configuration Class for Spring’s DispatcherServlet
package com.apress.prospring6.fourteen;
import
import
import
import
import
import
import
import
import
org.springframework.context.annotation.Description;
org.springframework.web.servlet.DispatcherServlet;
org.springframework.web.servlet.ViewResolver;
org.springframework.web.servlet.config.annotation.*;
org.thymeleaf.extras.java8time.dialect.Java8TimeDialect;
org.thymeleaf.spring6.SpringTemplateEngine;
org.thymeleaf.spring6.templateresolver.SpringResourceTemplateResolver;
org.thymeleaf.spring6.view.ThymeleafViewResolver;
org.thymeleaf.templatemode.TemplateMode;
@Configuration
@EnableWebMvc
@ComponentScan(basePackages = {"com.apress.prospring6.fourteen"})
public class WebConfig implements WebMvcConfigurer {
@Bean
@Description("Thymeleaf Template Resolver")
public SpringResourceTemplateResolver templateResolver(){
var resolver = new SpringResourceTemplateResolver();
resolver.setApplicationContext(this.applicationContext);
resolver.setPrefix("/WEB-INF/views/");
resolver.setSuffix(".html");
resolver.setTemplateMode(TemplateMode.HTML);
resolver.setCacheable(false);
return resolver;
}
@Bean
@Description("Thymeleaf Template Engine")
public SpringTemplateEngine templateEngine() {
var engine = new SpringTemplateEngine();
engine.addDialect(new Java8TimeDialect());
engine.setTemplateResolver(templateResolver());
engine.setEnableSpringELCompiler(true);
return engine;
}
@Bean
@Description("Thymeleaf View Resolver")
public ViewResolver viewResolver() {
var viewResolver = new ThymeleafViewResolver();
viewResolver.setTemplateEngine(templateEngine());
viewResolver.setOrder(1);
return viewResolver;
}
625
Chapter 14 ■ Spring MVC
@Override
public void addResourceHandlers(final ResourceHandlerRegistry registry) {
WebMvcConfigurer.super.addResourceHandlers(registry);
registry.addResourceHandler("/images/**", "/styles/**")
.addResourceLocations("/images/", "/styles/");
}
@Override
public void configureDefaultServletHandling(final DefaultServletHandlerConfigurer
configurer) {
configurer.enable();
}
@Override
public void addViewControllers(ViewControllerRegistry registry) {
registry.addRedirectViewController("/", "/home");
}
}
The interface WebMvcConfigurer defines callback methods to customize the Java-based configuration
for Spring MVC enabled by using @EnableWebMvc. Although there can be more than one Java-based
configuration class in a Spring application, only one is allowed to be annotated with @EnableWebMvc. In
Listing 14-6, you can observe that several methods are overridden to customize the configuration:
626
•
addResourceHandlers(..): Adds handlers that are used to serve static resources
such as images, JavaScript, and CSS files from specific locations under the web
application root, the classpath, and others. In this customized implementation,
any request with the URL containing resources will be treated by a special handler
that bypasses all filters. The method defines the locations of the static resource
files, which enables Spring MVC to handle the files within those folders efficiently.
Within the tag, the location attribute defines the folders for the static resources. The
WebMvcConfigurer.super.addResourceHandlers(registry) invocation indicates
the root folder for the web application, which is by default /src/main/webapp. The
resource handler path, /styles/**, defines the URL for mapping to CSS resources;
as an example, for the URL http://localhost:8080/ch14/styles/standard.
css, Spring MVC will retrieve the file standard.css from the folder /src/main/
webapp/styles.
•
configureDefaultServletHandling(..): Enables the mapping of
DispatcherServlet to the web application’s root context URL, while still allowing
static resource requests to be handled by the container’s default servlet.
•
addViewControllers(..): Defines simple automated controllers preconfigured with
the response status code and/or a view to render the response body. These views
have no controller logic and are used to render a welcome page, perform simple
site URL redirects, return a 404 status, and more. In Listing 14-6, we are using this
method to perform a redirection to the home view, when the root (/) of the site is
accessed, which basically turns the home page into a front page.
•
viewResolver(..): Declares a view resolver of type ThymeleafViewResolver
that matches symbolic view names to *.html templates under /WEBINF/views. Thymeleaf is a templating tool, generating views per logical
Chapter 14 ■ Spring MVC
names by combining more fragments; this job is being performed by the
SpringResourceTemplateResolver bean declared in this configuration. The final
view is a HTML page built by replacing Thymeleaf special constructs with HTML
elements compiled together with Spring view data, and this is being taken care of by
the SpringTemplateEngine.
Implementing Spring Controllers
The home view is simple and is the best example to introduce Spring controllers. Spring controllers are
special beans annotated with the special stereotype annotation @Controller and its extensions like
@RestController, covered in Chapter 15.
The HomeController class is depicted in Listing 14-7.
Listing 14-7. HomeController Class and Bean Declaration
package com.apress.prospring6.fourteen.controllers;
import
import
import
import
org.springframework.stereotype.Controller;
org.springframework.ui.Model;
org.springframework.web.bind.annotation.RequestMapping;
org.springframework.web.bind.annotation.RequestMethod;
@Controller
public class HomeController {
@RequestMapping(path = "home", method = RequestMethod.GET)
public String home(Model model) {
model.addAttribute("message", "Spring MVC ThymeleafExample!!");
return "home";
}
}
The annotation @Controller is applied to the class, indicating that it’s a Spring MVC controller.
The @RequestMapping annotation indicates the URL that will be handled by the method the annotation
is placed on. The controller class is sometimes called a handler, because it handles requests, and the
methods are called handler methods, because they handle requests too. Usually the handler methods
handle requests that have a common root path declared using a @RequestMapping annotation at the class
level; the controller class is just a way of grouping them together.
The @RequestMapping annotation placed on the home(..) method is mapped to the HTTP GET
method via the method attribute. This means that any GET request to the URL /home will be handled by
this method. Within the body of this method, "Spring MVC ThymeleafExample!!" is set as a value for the
message property on the Model object. In the DispatcherServlet configuration, ThymeleafViewResolver is
configured as the view resolver, with the file prefix /WEB-INF/views/ and the suffix .html. As a result, Spring
MVC will pick up the file /WEB-INF/views/singers/home.html as the view and render it using the data in the
Model object.
627
Chapter 14 ■ Spring MVC
I mplementing the View
The home.html Thymeleaf template is quite simple, as you can see in Listing 14-8.
Listing 14-8. The Contents of the /WEB-INF/views/singers/home.html Thymeleaf View File
<!DOCTYPE HTML>
<html xmlns:th="http://www.thymeleaf.org">
<head th:replace="~{templates/layout :: pageTitle('Singers Home Page')}"></head>
<body>
<div class="container">
<header th:replace="~{templates/layout :: pageHeader}" ></header>
<header th:replace="~{templates/layout :: pageMenu}" ></header>
<section th:fragment="~{templates/layout :: pageContent}">
<p th:text="Home Page" ></p>
<p th:text="${message}" ></p>
</section>
<footer th:replace="~{templates/layout :: pageFooter}" ></footer>
</div>
</body>
</html>
This template should look pretty familiar to anyone who has seen HTML code. The only extra parts
are all the elements prefixed with th:. The reason this template looks so simple is that the biggest parts are
in a different template called a layout. This template contains the general layout of the site, and for each
view, Thymeleaf replaces pieces of it with scoped ones. The general template of the site is located under
chapter14/src/main/webapp/WEB-INF/views/templates/ and is named layout.html. Since the focus of
this book is Spring, not Thymeleaf, and layout.html is quite big, it won’t be shown here (feel free to check
it out yourself in the book’s project repo); only small Thymeleaf constructs are explained. The Thymeleaf
constructs in Listing 14-8 are explained here:
•
th:replace: Substitutes the <head> tag in the home.html template with the fragment
from templates/layout.html, but substitutes the title with the one provided as a
parameter for the custom function pageTitle(..).
•
th:fragment: Substitutes the fragment from templates/layout.html with the
fragment declared in home.html. In this example the pageContent section declared
in templates/layout.html is a very simple generic one, so in each inheriting view it
needs to be replaced with an appropriate one.
Testing the Home View
The view files are located under the WEB-INF directory located under the webapp directory that groups all the
web resources. The internal structure of the project is the typical Maven one for a web project, and various
plug-ins are configured for Maven and Gradle to build the project into a Web Archive (WAR) that can be
deployed on an Apache Tomcat server. The structure of the project is displayed in Figure 14-6.
628
Chapter 14 ■ Spring MVC
Figure 14-6. The internal structure of chapter-14 project
Testing the home.html view can be done in two ways:
•
Write a Spring MVC test to test the mapping of the view and the population of
the model.
•
Build the project, deploy the resulting war to a local Apache Tomcat, and check the
home page.
Writing a test for a very simple view and controller is pretty simple. When the application context
becomes more complex and more dependencies must be wired, it might be more complicated but not
impossible. Listing 14-9 shows the test class and method that check the proper mapping of the /home path to
the HomeController#home(..) method and the population of the model for the home.html view.
629
Chapter 14 ■ Spring MVC
Listing 14-9. Testing the HomeController and the home.html View
package com.apress.prospring6.fourteen.controllers;
import
import
import
import
import
import
import
com.apress.prospring6.fourteen.WebConfig;
org.junit.jupiter.api.Test;
org.springframework.test.context.junit.jupiter.web.SpringJUnitWebConfig;
org.springframework.test.web.servlet.MockMvc;
org.springframework.test.web.servlet.request.MockMvcRequestBuilders;
org.springframework.test.web.servlet.setup.MockMvcBuilders;
org.springframework.web.context.WebApplicationContext;
import static org.hamcrest.Matchers.containsString;
import static org.springframework.test.web.servlet.result.MockMvcResultHandlers.print;
import static org.springframework.test.web.servlet.result.MockMvcResultMatchers.*;
@SpringJUnitWebConfig(classes = WebConfig.class)
public class HomeControllerTest {
MockMvc mockMvc;
public HomeControllerTest(WebApplicationContext wac) {
this.mockMvc = MockMvcBuilders.webAppContextSetup(wac).build();
}
@Test
void testHome() throws Exception {
mockMvc.perform(MockMvcRequestBuilders.get("/home"))
.andDo(print())
.andExpect(status().isOk())
.andExpect(view().name("home"))
.andExpect(content().string(containsString("Spring MVC
ThymeleafExample!!")));
}
}
MockMvc is built on Servlet API mock implementations from the spring-test module and does not rely
on a running container, but it still needs the servlet-api dependency. This is not an end-to-end test, and it
works because the HomeController does not invoke a service and/or a repository.
The MockMvcRequestBuilders.get(..) method creates a MockHttpServletRequest instance
that is configured with the parameters set for it to create a valid request. MockMvc performs the request
on the context configured via the @SpringJUnitWebConfig annotation. This annotation is a special
Spring Test annotation used to configure test context for Spring web applications. It is meta-annotated
with @ExtendWith(SpringExtension.class) used to register the SpringExtension that integrates
the Spring TestContext Framework into JUnit 5’s Jupiter programming model. It is meta-annotated
with @ContextConfiguration used to determine how to load and configure an ApplicationContext
for integration tests. And it is meta-annotated with @WebAppConfiguration used to configure that a
WebApplicationContext should be loaded for the test using a default for the path to the root of the web
application.
630
Chapter 14 ■ Spring MVC
The test checks all the important parts of a response:
•
That the HTTP response code is the expected one through the
.andExpect(status().isOk()) matcher
•
That the logical view name is the expected one through the .andExpect(view().
name("home")) matcher
•
That the attribute set on the Spring Model instance was added to the rendered
view through the .andExpect(content().string(containsString("Spring MVC
ThymeleafExample!!"))) matcher
The other method of checking that the home page is rendered correctly is by actually deploying the
application. For this you have to do the following:
•
Build the project, which generates the build/libs/chapter14-6.0-SNAPSHOT.war.
•
Download and install Apache Tomcat 10.
On Unix-based systems you might need to make all scripts under $TOMCAT_HOME/bin executable.
•
Deploy the chapter14-6.0-SNAPSHOT.war, by using an IntelliJ IDEA Tomcat
launcher.
To create an Apache Tomcat launcher, follow the instructions on the IntelliJ official page11. In
Figure 14-7 you can see that the Deployment tab is used to add the web artifact to the launcher. When added
in exploded form, the launcher can be started in Debug mode and breakpoints from the code will pause the
application to allow runtime debugging.
https://www.jetbrains.com/help/idea/configuring-and-managing-application-serverintegration.html
11
631
Chapter 14 ■ Spring MVC
Figure 14-7. IntelliJ IDEA launcher for the chapter-14 project
Once a launcher is in place, you can start the application, and when the application is fully deployed,
IntelliJ tries to open a web page with the http://localhost:8080/ch14/home location. If the page is loaded
correctly, you should see a page that look like the one shown in Figure 14-8.
Figure 14-8. chapter-14 project main web page
632
Chapter 14 ■ Spring MVC
Now we have our first view working. In the upcoming sections, we will enrich the application with more
views and enable support of i18n, themes, error handling, and so on.
Understanding the Spring MVC Project Structure
Before diving into the implementation of the various aspects of a web application, let’s take a look at what
the project structure in the sample web application developed in this chapter looks like.
Typically, in a web application, a lot of files are required to support various features. For example, there
are a lot of static resource files, such as style sheets, JavaScript files, images, and component libraries. Then
there are files that support presenting the interface in various languages. And of course, there are the view
pages that will be parsed and rendered by the web container, as well as the layout and definition files that
will be used by the templating framework (for example, Thymeleaf ) to provide a consistent look and feel of
the application.
It’s always good practice to store files that serve different purposes in a well-structured folder hierarchy
to give you a clear picture of the various resources being used by the application and ease ongoing
maintenance work.
The project structure was already introduced via Figure 14-6. Now Table 14-2 describes the folder
structure of the web application that is developed in this chapter. Note that the structure presented here is
not mandatory but is commonly used in the developer community for web application development.
Table 14-2. Sample Web Project Folder Structure Description
Folder Name
Purpose
images
Stores images used to style the site: logos, bullets, etc.
styles
Stores the style sheet files in supporting the CSS styles, look and feel for the site.
WEB-INF/classes
Stores property files for theme cookies configuration.
WEB-INF/views
Stores template files for creating views, in this case Thymeleaf templates.
resources/i18n
Stores files for supporting i18n. The file application*.properties stores the layoutrelated text (for example, page titles, field labels, and menu titles). The message*.
properties file stores various messages (for example, success and error messages and
validation messages). The sample will support both English (US) and German(DE).
The i18n directory contains internationalization resources files. The files could have
been placed under WEB-INF/i18n, but for easier migration to Spring Boot at the end of
the chapter, it was placed under resources.
Sometimes there might also be a webapp/scripts directory containing generic JavaScript files
necessary to make the pages dynamic. There might also be other directories specific to JavaScript frameworks
used, like jQuery12 or jqgrid13. For the simple example in this chapter no such files are needed.
12
13
https://jquery.com
http://www.trirand.com/blog
633
Chapter 14 ■ Spring MVC
Most web files mentioned in Table 14-2 will not be shown here. Given that, we recommend you
download a copy of the source code for this chapter and extract it to a temporary folder so that you can copy
the files required into the project directly.
Enabling Internationalization (i18n)
When developing web applications, it’s always good practice to enable i18n in the early stages. The main
work is to externalize the user interface text and messages into properties files.
Even though you may not have i18n requirements on day one, it’s good to externalize the languagerelated settings so that it will be easier later when you need to support more languages.
With Spring MVC, enabling i18n is simple. First, externalize the language-related user interface settings
into various properties files within the /resources/i18n folder, as described in Table 14-2. Because we will
support both English (US) and German (DE), you will need two files. The global.properties file stores the
settings for the default locale, which in this case is English (US). The global_de.properties file stores the
settings in the German (DE) language.
C
onfiguring i18n in the DispatcherServlet Configuration
Having the language files in place, the next step is to configure the DispatcherServlet instance’s
WebApplicationContext for i18n support. For this we need to declare a MessageSource bean in the
WebConfig class introduced in Listing 14-6, inject it in the template resolver, and add request interceptors
to replace all message codes in view templates with test representations in the configured language. The
configuration modifications to support internationalization are depicted in Listing 14-10.
Listing 14-10. Adding Internationalization Configuration Class for Spring’s DispatcherServlet
package com.apress.prospring6.fourteen;
import org.springframework.context.MessageSource;
import org.springframework.context.support.ReloadableResourceBundleMessageSource;
import org.springframework.web.servlet.i18n.LocaleChangeInterceptor;
import org.springframework.web.servlet.mvc.WebContentInterceptor;
import org.springframework.web.servlet.config.annotation.InterceptorRegistry;
import org.springframework.web.servlet.i18n.CookieLocaleResolver;
// other import statements omitted
@Configuration
@EnableWebMvc
@ComponentScan(basePackages = {"com.apress.prospring6.fourteen"})
public class WebConfig implements WebMvcConfigurer {
@Bean
@Description("Thymeleaf Template Engine")
public SpringTemplateEngine templateEngine() {
var engine = new SpringTemplateEngine();
engine.addDialect(new Java8TimeDialect());
engine.setTemplateResolver(templateResolver());
engine.setTemplateEngineMessageSource(messageSource());
engine.setEnableSpringELCompiler(true);
return engine;
}
634
Chapter 14 ■ Spring MVC
@Override
public void addInterceptors(InterceptorRegistry registry) {
registry.addInterceptor(localeChangeInterceptor()).addPathPatterns("/*");
}
@Bean
MessageSource messageSource() {
var messageResource = new ReloadableResourceBundleMessageSource();
messageResource.setBasename("classpath:i18n/global");
messageResource.setDefaultEncoding(StandardCharsets.UTF_8.name());
messageResource.setUseCodeAsDefaultMessage(true);
messageResource.setFallbackToSystemLocale(true);
return messageResource;
}
@Bean
LocaleChangeInterceptor localeChangeInterceptor() {
var localeChangeInterceptor = new LocaleChangeInterceptor();
localeChangeInterceptor.setParamName("lang");
return localeChangeInterceptor;
}
@Bean
CookieLocaleResolver localeResolver() {
var cookieLocaleResolver = new CookieLocaleResolver();
cookieLocaleResolver.setDefaultLocale(Locale.ENGLISH);
cookieLocaleResolver.setCookieMaxAge(3600);
cookieLocaleResolver.setCookieName("locale");
return cookieLocaleResolver;
}
// other configurations omitted
}
In this version of the configuration, the MessageSource bean is declared as a
ReloadableResourceBundleMessageSource instance. The ReloadableResourceBundleMessageSource
class implements the MessageSource interface, which loads the messages from the defined files (in this
case, it’s the global*.properties in the /resources/i18n folder), to support i18n. Note the property
fallbackToSystemLocale. This property instructs Spring MVC whether to fall back to the locale of the
system that the application is running on when a special resource bundle for the client locale isn’t found.
The instance is configured using the location of the property files, classpath:i18n/global, which
means they are expected to be on the application classpath, and thus under the resources directory at
development time. The encoding is also configured, and in case a message code is used in the view files
without a value configured for it in the resource files, the code is used as a value. A Spring MVC interceptor
with class LocaleChangeInterceptor is defined, which intercepts all the requests to DispatcherServlet.
The interceptor supports locale switching with a configurable request parameter. From the interceptor
configuration, the URL parameter with the name lang is defined for changing the locale for the application
and is customizable, so you can use a different one if you want.
Finally, a bean with the CookieLocaleResolver class is defined. This class supports the storage and
retrieval of locale settings from the user browser’s cookie.
635
Chapter 14 ■ Spring MVC
Modifying Views for i18n Support
Now that internationalization support is configured, the view template files must be modified to support
internationalization. The home.html view introduced previously does not have any elements needing
internationalization, so to show how internationalization is supported in Thymeleaf templates, a snippet
from the views/templates/layout.html file is shown in Listing 14-11.
Listing 14-11. views/templates/layout.html Snippet
<!DOCTYPE HTML>
<html xmlns:th="http://www.thymeleaf.org"
th:with="lang=${#locale.language}"
th:lang="${lang}">
<head th:fragment="pageTitle(title)">
<link rel="icon" type="image/png" th:href="@{/images/favicon.ico}">
<link rel="stylesheet" type="text/css" th:href="@{/styles/bootstrap.min.css}">
<meta http-equiv="Content-Type" content="text/html; charset=UTF-8" />
<title th:text="${title}"> Layout Page </title>
<link type="text/css" rel="stylesheet" th:href="@{/styles/general.css}" >
</head>
<body>
<header th:fragment="pageHeader" class="page-header">
<div class="row">
<div class="col-lg-8 col-md-7 col-sm-6">
<div class="banner"></div>
<div class="themeLocal">
<span th:if="${#locale.language eq 'en'}">
<a th:href="@{/?lang=de}" th:text="#{locale.de}">DE</a>
</span>
<span th:unless="${#locale.language eq 'en'}">
<a th:href="@{/?lang=en}" th:text="#{locale.en}">EN</a>
</span>
</div>
</div>
</div>
</header>
<section th:fragment="pageMenu">
<!-- code omitted-->
</section>
<section th:fragment="pageContent">
<div class="content">
<p>Page Content</p>
</div>
</section>
636
Chapter 14 ■ Spring MVC
<footer th:fragment="pageFooter">
<div class="footer">
<p th:text="#{footer.text}"></p>
</div>
</footer>
</html>
The HTML lang attribute is used to identify the language of text content on the Web. The th:lang
construct populates this attribute with the value of the lang parameter set by the LocaleChangeInterceptor
on each request. Because we defined LocaleChangeInterceptor in DispatcherServlet’s
WebApplicationContext, Spring MVC stores the locale setting in your browser’s cookie (with the name
locale), and by default, the cookie is kept for the user session. If you want to persist the cookie for a
longer time, in the CookieLocaleResolver bean definition you can override the property cookieMaxAge,
which is inherited from the class org.springframework.web.util.CookieGenerator, by calling
setCookieMaxAge(...).
To switch to English (US), you can change the URL in your browser to reflect ?lang=en, and the page
will switch back to English. Since the properties file named global_en.properties is not provided, Spring
MVC falls back to use the default file global.properties, which stores the properties in the default language
of the site, of English.
Locale-specific values will be accessed using the keys with the syntax #{key}, where key is the message
key in the internationalization properties files.
Using Theming and Templating
Besides i18n, a web application requires an appropriate look and feel (for example, a business website needs
a professional look and feel, while a social website needs a more vivid style), as well as a consistent layout so
that users will not get confused while using the web application.
Currently, the approach is to keep the website separate from the back end and create the website
using evolved JavaScript frameworks like React14 and TypeScript15 that interact with a Spring REST Web
application for data management and other high-level operations. This means that the user interface will be
mostly static. This is why the ThemeChangeInterceptor, ResourceBundleThemeSource, and
CookieThemeResolver types that will be covered in this section are marked as deprecated in Spring 6.x, but
no replacement is recommended.
Theming Support
Spring MVC provides comprehensive support for theming, and enabling it in web applications is easy. For
this reason, we’ll start with the Spring theming configurations that need to be added to the WebConfig class,
as shown in Listing 14-12.
14
15
https://reactjs.org
https://www.typescriptlang.org
637
Chapter 14 ■ Spring MVC
Listing 14-12. WebConfig Theming Configuration
package com.apress.prospring6.fourteen;
import org.springframework.ui.context.support.ResourceBundleThemeSource;
import org.springframework.web.servlet.theme.CookieThemeResolver;
import org.springframework.web.servlet.theme.ThemeChangeInterceptor;
// other import statements omitted
@Configuration
@EnableWebMvc
@ComponentScan(basePackages = {"com.apress.prospring6.fourteen"})
public class WebConfig implements WebMvcConfigurer {
@Bean
ResourceBundleThemeSource themeSource() {
return new ResourceBundleThemeSource();
}
@Bean
ThemeChangeInterceptor themeChangeInterceptor() {
var themeChangeInterceptor = new ThemeChangeInterceptor();
themeChangeInterceptor.setParamName("theme");
return themeChangeInterceptor;
}
@Bean
CookieThemeResolver themeResolver() {
var cookieThemeResolver = new CookieThemeResolver();
cookieThemeResolver.setDefaultThemeName("green");
cookieThemeResolver.setCookieMaxAge(3600);
cookieThemeResolver.setCookieName("theme");
return cookieThemeResolver;
}
@Override
public void addInterceptors(InterceptorRegistry registry) {
registry.addInterceptor(localeChangeInterceptor()).addPathPatterns("/*");
registry.addInterceptor(themeChangeInterceptor());
}
// other configurations omitted
}
The first bean, of type ResourceBundleThemeSource, is responsible for loading the ResourceBundle
bean of the active theme. For example, if the active theme is called blue, the bean will look for the file blue.
properties as the ResourceBundle bean of the theme. The property files for the two themes are located
under WEB-INF/classes. The files are named blue.properties and green.properties and they match the
blue and green theme. The content of the files is represented by the theme name as a property and other
properties pointing to images and paths to CSS files specific to the team. For example, the content of the
green.properties file is shown in Listing 14-13.
638
Chapter 14 ■ Spring MVC
Listing 14-13. green.properties File Contents
css.style=/styles/decorator-green.css
banner.image=/images/banner-green.png
name=green
The new interceptor bean of type ThemeChangeInterceptor intercepts every request to add the theme
parameter.
The bean of type CookieThemeResolver is used to resolve the active theme for users. The property
defaultThemeName defines the default theme to use, which is the green theme. Note that as its name implies,
the CookieThemeResolver class uses cookies to store the theme for the user. There is also a type called
SessionThemeResolver. Beans of this type store the theme attribute in a user’s session, but in order to use it
we would have to add security to our app, and we do not want to do that right now.
Now that theming is configured, there is not much change to be done. In the views/templates/layout.
html file, we only need to add support for the theme parameter and add a menu option to change the theme,
in the same way it was added for locale, as shown in Listing 14-14.
Listing 14-14. views/templates/layout.html Snippet
<!DOCTYPE HTML>
<html xmlns:th="http://www.thymeleaf.org"
th:with="lang=${#locale.language}, theme=${#themes.code('name')}"
th:lang="${lang}"
th:theme="${theme}">
<head th:fragment="pageTitle(title)">
<link rel="icon" type="image/png" th:href="@{/images/favicon.ico}">
<link rel="stylesheet" type="text/css" th:href="@{/styles/bootstrap.min.css}">
<meta http-equiv="Content-Type" content="text/html; charset=UTF-8" />
<title th:text="${title}"> Layout Page </title>
<link type="text/css" rel="stylesheet" th:with="cssStyle=${#themes.code('css.style')}"
th:href="@{(${cssStyle})}" >
<link type="text/css" rel="stylesheet" th:href="@{/styles/general.css}" >
</head>
<body>
<header th:fragment="pageHeader" class="page-header">
<div class="row">
<div class="col-lg-8 col-md-7 col-sm-6">
<div class="banner"></div>
<div class="themeLocal">
<span th:if="${#locale.language eq 'en'}">
<a th:href="@{/?lang=de}" th:text="#{locale.de}">DE</a>
</span>
<span th:unless="${#locale.language eq 'en'}">
<a th:href="@{/?lang=en}" th:text="#{locale.en}">EN</a>
</span> |
<span th:if="${#themes.code('name') eq 'green'}">
<a th:href="@{/?theme=blue}" th:text="#{theme.Blue}">BLUE</a>
</span>
<span th:unless="${#themes.code('name') eq 'green'}">
<a th:href="@{/?theme=green}" th:text="#{theme.Green}">GREEN</a>
639
Chapter 14 ■ Spring MVC
</span>
</div>
</div>
</div>
</header>
<section th:fragment="pageMenu">
<!-- code omitted-->
</section>
<section th:fragment="pageContent">
<div class="content">
<p>Page Content</p>
</div>
</section>
<footer th:fragment="pageFooter">
<div class="footer">
<p th:text="#{footer.text}"></p>
</div>
</footer>
</html>
Notice that in the <head> section the th:theme is added as an attribute. The value of this attribute is set
by the ThemeChangeInterceptor bean. The #themes.code('css.style') construct is a context object used
to retrieve the css.style property from the theme’s ResourceBundle, which is the path to the style sheet file
decorator-*.css. Its value is stored in the cssStyle variable using the th:with construct and then set as a
value for the href attribute using th:href="@{(${cssStyle})}".
After rebuilding and redeploying the application to the server, open the browser and open http://
localhost:8080/ch14 again, and you will see that the style defined in the green.css file was applied, since
this is the theme configured to be the default in the ThemeChangeInterceptor bean declaration.
If you want, you can right-click on the web page and analyze the HTML code that Thymeleaf produced
for the home.html template.
Designing the Template Layout
The consistent structure of the site is already ensured by using the views/templates/layout.html file as
a template, on which every view is based. To keep colors and element styling consistent and matching, a
theme requires a combination of web design and Spring MVC configuration.
The common structure for all web pages has been presented as HTML already in Listing 14-11, but
Figure 14-9 provides a more useful visual representation.
640
Chapter 14 ■ Spring MVC
Figure 14-9. Thymeleaf template with fragments
The banner image and font color are part of the site theme, and thus when switching between blue
and green theme, the banner and font color change too. For each view designed based on the layout.
html the developer can choose to replace some of its sections with fragments from layout.html using
the th:replace, or they can declare its own fragments using th:fragment. Obviously, in most views the
only things that are customized are the pageContent fragment and the page title that is part of the <head>
element.
Implementing More Complex Views
Now we can proceed to implement the views that allow users to view the complete list of singers, view the
details of a singer, edit existing singers, create new singers, or even delete them.
In the following sections, we discuss the mapping of URLs to the various views, as well as how the views
are implemented. We also discuss how to enable JSR-349/Jakarta Bean Validation16 validation support in
Spring MVC for the edit view.
First, we need to design how the various URLs are to be mapped to the corresponding views. In Spring
MVC, one of the best practices is to follow the RESTful-style URL for mapping views (wherever possible).
Table 14-3 shows the URLs-to-views mapping, as well as the controller method name that will handle
the action.
16
https://beanvalidation.org/3.0
641
Chapter 14 ■ Spring MVC
Table 14-3. Spring Controllers APIs for managing Singer instances
URL
HTTP
Method
Controller
Method Description
/singers
GET
SingersController
Lists all singers.
/singers
POST
SingersController
Creates new singer.
/singers/
create
GET
SingersController
Displays the form to create a singer.
/singers/
search
GET
SingersController
Displays the form to search for a singer.
/singers/go
GET
SingersController
Lists singers by criteria provided as request
parameters: fieldName, fieldValue, and exactMatch.
/singer/id
GET
OneSingerController
Shows information of singer with the provided id.
/singer/id
PUT
OneSingerController
Updates singer with provided id.
/singer/id
DELETE
OneSingerController
Deletes singer with provided id.
/singer/id/
edit
GET
OneSingerController
Displays the form to edit the singer with the provided
id.
/singer/id/
upload
GET
OneSingerController
Displays the form to upload a photo for the singer with
the provided id.
/singer/id/
photo
GET
OneSingerController
Retrieves the photo as a byte array for the singer with
the provided id.
/singer/id/
photo
POST
OneSingerController
Submits user-provided image for singer with provided
id.
Implementing the List Singers View
To implement a view showing a set of data, we need three things:
•
A mapping between the URL and the handler method
•
A handler method to populate the model
•
The view template, which we’ll call list.html
As mentioned in Table 14-3, the request URL for showing a list of singers is /singers and the controller
where the handler method is declared is the SingersController. There are two controllers in the project.
The SingersController groups handler methods that do not affect a specific Singer instance identified
by id. All handled requests are grouped under the /singers path. The handler methods affecting a single
Singer instance identified by id are grouped under OneSingerController. All handled requests are grouped
under /singer/{id}.
Listing 14-15 shows the SingersController class and controller configuration and the handler method
populating the model for the view showing the singers.
642
Chapter 14 ■ Spring MVC
Listing 14-15. SingersController Controller and list(..) Method
package com.apress.prospring6.fourteen.controllers;
import com.apress.prospring6.fourteen.services.SingerService;
import org.springframework.context.MessageSource;
import org.springframework.stereotype.Controller;
import org.springframework.ui.Model;
import org.springframework.web.bind.annotation.RequestMapping;
// other import statements omitted
@Controller
@RequestMapping("/singers")
public class SingersController {
private static Comparator<AbstractEntity> COMPARATOR_BY_ID = Comparator.comparing(Abstract
Entity::getId);
private final SingerService singerService;
private final MessageSource messageSource;
public SingersController(SingerService singerService, MessageSource messageSource) {
this.singerService = singerService;
this.messageSource = messageSource;
}
@RequestMapping(method = RequestMethod.GET)
public String list(Model uiModel) {
List<Singer> singers = singerService.findAll();
singers.sort(COMPARATOR_BY_ID);
uiModel.addAttribute("singers", singers);
return "singers/list";
}
// other handler methods omitted
}
The @RequestMapping annotation placed on the class indicates that all handler methods in this class
either apply to the path provided as the argument or to paths relative to that.
On the list(..) method, the @RequestMapping(method = RequestMethod.GET) applied to it indicates
that the method is used to handle a GET request to the URL /singers. The Model object is populated with
an attribute named singers and populated with the collection of singers returned by the singerService.
findAll() invocation.
It was probably mentioned before in this book, but the findAll() method should never be used in
production environments unless the size of the returned collection is manageable; otherwise, it might lead to
serious performance problems.
643
Chapter 14 ■ Spring MVC
The @GetMapping annotation is meta-annotated with @RequestMapping(method = RequestMethod.
GET) can replace it on handler methods to keep the code more readable.
The value returned by this method is "singers/list", which is the logical name of the view used to
render the data in the model. This logical name is used by the ThymeleafViewResolver bean to identify the
view template to use the HTML page that is returned as a response to the user request.
The views/singers/list.html template is shown in Listing 14-16.
Listing 14-16. views/singers/list.html Template Contents
<!DOCTYPE HTML>
<html xmlns:th="http://www.thymeleaf.org">
<head th:replace="~{templates/layout :: pageTitle('List Singers Page')}"></head>
<body>
<div class="container">
<header th:replace="~{templates/layout :: pageHeader}" ></header>
<header th:replace="~{templates/layout :: pageMenu}" ></header>
<section th:fragment="~{templates/layout :: pageContent}">
<div class="card border-success mb-3" style="max-width: 40rem;">
<div class="card-header" th:text="#{singers.list.title}"/>
<div class="card-body">
<table th:if="${not #lists.isEmpty(singers)}" class="table table-hover">
<thead>
<tr>
<th th:text="#{label.Singer.count}" class="table-success">COUNT</th>
<th th:text="#{label.Singer.firstname}" class="tablesuccess">FIRSTNAME</th>
<th th:text="#{label.Singer.lastname}" class="table-success">LASTNAME</th>
</tr>
</thead>
<tbody>
<tr th:each="singer : ${singers}" >
<td><a th:href="@{/singer/} + ${singer.id}" th:text="${singer.
id}">ID</a></td>
<td th:text="${singer.firstName}">...</td>
<td th:text="${singer.lastName}">...</td>
</tr>
</tbody>
</table>
</div>
</div>
</section>
<footer th:replace="~{templates/layout :: pageFooter}" ></footer>
</div>
</body>
</html>
644
Chapter 14 ■ Spring MVC
Thymeleaf is pretty powerful and, in addition to its previously described capabilities, it supports
arithmetic operations, comparators, and conditional expressions. For example, the th:if="${not #lists.
isEmpty(singers)}" construct added as an attribute to the <table> element conditions the creation of the
table based on the singer attribute value being a non-empty list. The th:each="singer : ${singers}"
construct is used to iterate the values of the singers list. When set as an attribute for an HTML element,
it will create a copy for each entry in the list. In this template for each value in the singers list, a row in
the table is created. Using the ${..} syntax, a cell is created in the table for each property of the objects in
the list.
When opening http://localhost:8080/ch14/singers in the browser, an HTML table containing
singers should be displayed in the page, and if you inspect the page source, you can see the HTML code
generated by Thymeleaf. It should look like the code in Listing 14-17.
Listing 14-17. HTML Code Generated by Thymeleaf for the singers/list View
<table class="table table-hover">
<thead>
<tr>
<th class="table-success">Cnt.</th>
<th class="table-success">First Name</th>
<th class="table-success">Last Name</th>
</tr>
</thead>
<tbody>
<tr >
<td><a href="/ch14/singer/1">1</a></td>
<td>John</td>
<td>Mayer</td>
</tr>
<tr >
<td><a href="/ch14/singer/2">2</a></td>
<td>Ben</td>
<td>Barnes</td>
</tr>
<!-- some rows omitted -->
</tbody>
</table>
Implementing the Show Singer View
Implementing the show.html view to display the information for a singer is quite similar to implementing
the list.html view. Showing the information requires a GET request for all text information and another
GET information to retrieve the photo as an array of bytes. The code for the two handling methods is shown
in Listing 14-18.
Listing 14-18. OneSingerController Controller and show(..) and downloadPhoto(..) Methods
package com.apress.prospring6.fourteen.controllers;
import org.springframework.http.MediaType;
import org.springframework.web.bind.annotation.*;
//other import statements omitted
645
Chapter 14 ■ Spring MVC
@Controller
@RequestMapping("/singer/{id}")
public class OneSingerController {
private final Logger LOGGER = LoggerFactory.getLogger(OneSingerController.class);
private final SingerService singerService;
private final MessageSource messageSource;
public OneSingerController(SingerService singerService, MessageSource messageSource) {
this.singerService = singerService;
this.messageSource = messageSource;
}
@GetMapping
public String showSingerData(@PathVariable("id") Long id, Model uiModel) {
Singer singer = singerService.findById(id);
uiModel.addAttribute("singer", singer);
return "singers/show";
}
@GetMapping(value = "/photo")
@ResponseBody
public byte[] downloadPhoto(@PathVariable("id") Long id) {
Singer singer = singerService.findById(id);
if (singer.getPhoto() != null) {
LOGGER.info("Downloading photo for id: {} with size: {}", singer.getId(),
singer.getPhoto().length);
return singer.getPhoto();
}
return null;
}
// other handler methods omitted
}
The two methods are part of the OneSingerController because both operations apply on a single
Singer instance. All operations that apply to a Singer instance that exists in our system and thus has
an id are grouped in this controller, and all operations are mapped to requests to URLs starting with /
singer/{id}.
The code is easily readable, but some extra clarifications are needed regarding the annotations:
646
•
The @RequestMapping("/singer/{id}") annotation declares the common URL path
for all request URLs handled by methods in this controller. Since it is used at the type
level, all method-level mappings inherit it, and additional method-level annotation
URL paths are appended to it.
•
The @PathVariable("id") annotation allows Spring to take the parameter from the
URL path and inject it as a value to the id parameter that the showSingerData(..)
method is invoked with. This annotation is itself configured with the name of the
URL path variable for demonstration purposes, but when the URL path variable
name is the same as the method parameter, this is not necessary. So in this scenario,
@PathVariable("id") Long id is equivalent to @PathVariable Long id
Chapter 14 ■ Spring MVC
•
The @GetMapping(value = "/photo") annotation is equivalent to
@RequestMapping(value = “/photo”, method = RequestMethod.GET). The value
attribute in @GetMapping is an alias for the same attribute from @RequestMapping. In
@RequestMapping, the value and path attributes are aliases for each other, and both
are default attributes, which means all the following annotations are equivalent:
–– @GetMapping(value = "/photo")
–– @GetMapping(path = "/photo")
–– @GetMapping("/photo")
–– @RequestMapping(value = "/photo", method = RequestMethod.GET)
–– @RequestMapping(path = "/photo", method = RequestMethod.GET)
•
The @ResponseBody annotation indicates that the returned value should be bound
to the response body. This means that Spring is not looking for a view based on the
returned value, but returns the value as it is.
The downloadPhoto(..) handler method is necessary because photos are saved in the database as an
array of bytes, and to render them in HTML, we need to provide this entire array of bytes as a source for an
<img> element.
The fragment pageContent from the show.html view template is shown in Listing 14-19. (The rest of the
template is inherited unchanged from layout.html and is omitted here to save book space.)
Listing 14-19. views/singers/show.html Template pageContent Fragment
<section th:fragment="~{templates/layout :: pageContent}">
<div class="card border-info mb-3" style="max-width: 20rem;">
<div class="card-header" th:text="#{singer.title}"/>
<div class="card-body">
<table>
<tr>
<th th:text="#{label.Singer.firstname}" >FN</th>
<td th:text="${singer.firstName}" >FN</td>
</tr>
<tr>
<th th:text="#{label.Singer.lastname}" >LN</th>
<td th:text="${singer.lastName}" >LN</td>
</tr>
<tr>
<th th:text="#{label.Singer.birthDate}" >BD</th>
<td th:text="${singer.birthDate}" >BD</td>
</tr>
<tr th:if="${singer.photo != null}">
<td colspan="2">
<img class="card-img-top" th:src="@{/singer/} + ${singer.id} + '/photo'">
</td>
</tr>
647
Chapter 14 ■ Spring MVC
<tr>
<td colspan="2">
<a th:href="@{/singer/} + ${singer.id} + '/edit'"
th:text="#{command.edit}"
class="btn-success">EDIT</a>
</td>
<td >
<a th:href="@{/singer/} + ${singer.id} + '/upload'"
th:text="#{command.update.photo}"
class="btn-success">UPLOAD_PHOTO</a>
</td>
</tr>
</table>
<div class="container col-lg-12">
<form th:object="${singer}" th:action="@{/singer/} + ${singer.id}"
th:method="delete" class="col p-3">
<input type="submit" th:value="#{command.delete}" id="deleteButton" class="btn
btn-danger"/>
</form>
</div>
</div>
</div>
</section>
To see the details of any singer, you can just click the link on the number in column Cnt. for that singer.
Figure 14-10 shows the list of singers, pinpointing the links that cause the show view to be displayed.
Figure 14-10. List and show views
648
Chapter 14 ■ Spring MVC
The highlights of the show.html view template are as follows:
•
The th:src="@{/singer/} + ${singer.id} + '/photo'" : the @{...} Thymeleaf
construct is used to build links relative to the current page context. This means the
value of the src attribute in the generated HTML becomes /ch14/singer/3/photo
and the full source URL becomes http://localhost:8080/ch14/singer/3/photo
that is mapped to the downloadPhoto(..) handler method.
•
The same construct is used to generate the Edit Info and Update Photo links.
The Edit Info link opens a new page where the user can edit the singer’s info. The
Update Photo link opens a new page where the user can upload a new photo.
Handling a Delete Request
There is a form in the show.html template that is used to trigger a DELETE request for the singer being
shown. The generated HTML is shown in Listing 14-20.
Listing 14-20. The Singer Delete Form
<form action="/ch14/singer/3" method="post" class="col p-3">
<input type="hidden" name="_method" value="delete"/>
<input type="submit" value="Delete" id="deleteButton" class="btn btn-danger"/>
</form>
Notice that in fact the form method is POST, but a hidden input was added to the form by Thymeleaf
with the name of _method and the value of delete. If it looks like this form input indicates the actual desired
request method, it’s because that is exactly what it is used for.
The explanation is simply that when it comes to the HTTP protocol, there are two main things people
use it for: to retrieve data (GET) or to send data (POST). This means that methods like PUT and DELETE
essentially do the same as POST—they are essentially subcategories of POST—and therefore no need exists to
directly support more methods in HTML.
However, for practical reasons and readability, Thymeleaf allows declaration of forms with
th:method="delete" or th:method="put" and does the heavy lifting of converting them to POST methods
when the responses are generated. How does Spring deal with these requests, though? Or better stated, how
should handling methods be mapped to these types of requests?
The answer is: in the same way as GET requests, after all the @RequestMapping annotation can
be configured for a specific HTTP method, and there are also the meta-annotations: @DeleteRequest
and @PutRequest, equivalent to @RequestMapping (method = RequestMethod.DELETE) and
@RequestMapping(method = RequestMethod.PUT).
Listing 14-21 shows the handler method for the request to delete a singer.
Listing 14-21. The Singer Delete Handler Method
package com.apress.prospring6.fourteen.controllers;
import org.springframework.web.bind.annotation.DeleteMapping;
// other import statements omitted
@Controller
@RequestMapping("/singer/{id}")
public class OneSingerController {
649
Chapter 14 ■ Spring MVC
@DeleteMapping
public String deleteSinger(@PathVariable("id") Long id) {
singerService.findById(id);
singerService.delete(id);
return "redirect:/singers/list";
}
// other handler methods omitted
}
One other thing is necessary, though: we need to tell Spring that we will have PUT and DELETE
requests for the application, so that it knows to convert POST requests with _method hidden inputs to
appropriate HTTP requests, so that they can be mapped to the suitable type of handlers. This is done by
adding an instance of org.springframework.web.filter.HiddenHttpMethodFilter to the list of filters
that modify requests before they are passed over to DispatcherServlet. The modification is made in the
WebInitializer class introduced in Listing 14-5. Recall that when this configuration was introduced, the
getServletFilters() was described as returning an array of implementations of jakarta.servlet.Filter
that will be applied to every request. The method is shown again in Listing 14-22.
Listing 14-22. The Configuration to Support PUT and DELETE Methods in a Spring Application
package com.apress.prospring6.fourteen;
public class WebInitializer extends AbstractAnnotationConfigDispatcherServletInitializer {
@Override
protected Filter[] getServletFilters() {
final CharacterEncodingFilter cef = new CharacterEncodingFilter();
cef.setEncoding(StandardCharsets.UTF_8.name());
cef.setForceEncoding(true);
return new Filter[]{new HiddenHttpMethodFilter(), cef};
}
// other methods omitted
}
This piece of configuration is something that most developers forget when writing Spring web
applications, especially if this is not something that they do often. Who writes Spring web applications from
scratch often enough for these configurations to become routine, anyway?
Implementing the Edit Singer View
To edit a singer, we need a different type of view that not only shows data, but does so in components that
are editable, and we also need a form to submit the edited data. For requests that submit data used to edit
existing records on the server, the REST convention is to use a PUT to differentiate it from a normal POST
request, for which the submitted data is used to create a new record.
650
Chapter 14 ■ Spring MVC
The Edit Info link, introduced in the section about showing singer data, points to a page showing
the singer details in editable fields. A GET request is submitted to the /singer/{id}/edit URL. Spring
populates a model with the details of the Singer instance with the provided id and returns the singers/
edit view logical name. The page contains a form that submits the edited data using a HTTP POST request to
/singer/{id}.
The Thymeleaf fragment with the form design is shown in Listing 14-23.
Listing 14-23. The singers/edit.html Fragment Containing the Edit Singer Form
<section th:fragment="~{templates/layout :: pageContent}">
<div class="content"> <!-- content -->
<h4 th:text="#{command.edit} + ' ' + #{singer.title}">EDIT</h4>
<div class="container col-lg-12">
<form name="update_info" th:action="@{/singer/} + ${singer.id}" th:object="${singer}"
th:method="put" class="col p-3">
<input type="hidden" th:field="*{id}" />
<div class="row mb-1">
<label for="firstName" th:text="#{label.Singer.firstname} + ':'" class="col-sm-4
form-label">FN:</label>
<div class="col-sm-8">
<input type="text" th:field="*{firstName}" class="form-control"/>
<span th:if="${#fields.hasErrors('firstName')}" class="error" th:errors="*{firstNa
me}">MISSING FN</span>
</div>
</div>
<div class="row mb-1">
<label for="lastName" th:text="#{label.Singer.lastname} + ':'" class=
"col-sm-4 form-label">LN:</label>
<div class="col-sm-8">
<input type="text" th:field="*{lastName}" class="form-control"/>
<span th:if="${#fields.hasErrors('lastName')}" class="error"
th:errors="*{lastName}">MISSING LN</span>
</div>
</div>
<div class="row mb-1">
<label for="birthDate" th:text="#{label.Singer.birthDate} + ':'" class=
"col-sm-4 form-label">BD:</label>
<div class="col-sm-8">
<input type="date" th:field="*{birthDate}" class="form-control datetimepickerinput" data-target="#datetimepicker1"/>
<span th:if="${#fields.hasErrors('birthDate')}" class="error" th:errors="*{birth
Date}">MISSING BD</span>
</div>
</div>
<div class="form-group mb-1 align-items-end">
<input type="submit" th:value="#{command.save}" id="saveButton" class="btn btnprimary"/>
651
Chapter 14 ■ Spring MVC
</div>
</form>
<p th:if="${message ne null}" th:text="${message}" class="error"></p>
<div class="form-group mb-1 align-items-end">
<a href="#" th:href="@{/singer/} + ${singer.id}" th:text="#{command.cancel}">
CANCEL</a>
</div>
</div>
</div> <!-- content -->
</section>
The highlights in the edit.html template are as follows:
•
th:object="${singer}": This construct is the model object; its properties are used
to populate the fields.
•
th:field="*{propName}": This construct is used to mark a form field for user input,
but also to populate it with properties of the singer object.
•
th:if="${#fields.hasErrors('labelName')}": This construct is used to check
if the data has any error, if yes the element containing this construct as attribute is
displayed. The element is populated with an error message. The error message is
displayed after the form was submitted, Spring performed the validation, the errors
were added to the model, and the response sent back to the edit view with data
and errors.
•
th:if="${message ne null}": This construct tests if the message object is not null
and displays the element containing it as an attribute. It is used in this case to add an
additional message telling the user why the singer was not saved.
As mentioned in the previous section, DELETE and PUT methods are supported by Thymeleaf and
Spring. Notice that the edit form has the attribute th:method="put", but if you look in the generated HTML,
the form method is POST, but a hidden input was added to the form by Thymeleaf with the name of _method
and the value of put. This input configures the actual desired request method and Spring treats these POST
requests as PUT requests thanks to the HiddenHttpMethodFilter filter already mentioned in the “Handling a
Delete Request” section.
Now that we have the view, let’s see what the Spring code to display it and process the submitted data
looks like. The code for the two handler methods is shown in Listing 14-24.
Listing 14-24. The Handler Methods for Showing the Edit View and Processing a PUT Request
package com.apress.prospring6.fourteen.controllers;
import org.springframework.web.bind.annotation.PutMapping;
// other import statements omitted
@Controller
@RequestMapping("/singer/{id}")
public class OneSingerController {
//@RequestMapping(path = "/edit", method = RequestMethod.GET)
@GetMapping(path = "/edit")
public String showEditForm(@PathVariable("id") Long id, Model uiModel) {
Singer singer = singerService.findById(id);
652
Chapter 14 ■ Spring MVC
uiModel.addAttribute("singer", singer);
return "singers/edit";
}
@PutMapping
public String updateSingerInfo(@Valid Singer singer, BindingResult bindingResult,
Model uiModel, Locale locale) {
if (bindingResult.hasErrors()) {
uiModel.addAttribute("message", messageSource.getMessage("singer.save.fail",
new Object[]{}, locale));
uiModel.addAttribute("singer", singer);
return "singers/edit";
} else {
uiModel.asMap().clear();
var fromDb = singerService.findById(singer.getId());
fromDb.setFirstName(singer.getFirstName());
fromDb.setLastName(singer.getLastName());
fromDb.setBirthDate(singer.getBirthDate());
singerService.save(fromDb);
return "redirect:/singer/" + singer.getId();
}
}
// other handler methods omitted
}
Ignore the @Valid annotation and all the code related to error handling—that has its own section
later in this chapter. One thing to notice in this code section is the introduction of the redirect: keyword.
Prefixing a logical view name with “redirect:” tells Spring to use the logical view name as a redirect URL. In
case of a successful edit operation, the redirection is to the page showing the singer details; in case of
validation errors, the user is returned to the edit page and the errors are shown.
The edit form should look like the one depicted in Figure 14-11; otherwise something went wrong when
deploying the project.
653
Chapter 14 ■ Spring MVC
Figure 14-11. The edit view
Implementing the Create Singer View
Implementing the create singer view is much like implementing the edit view. To make things interesting,
the create.html file contains a form that also includes a file chooser to upload a photo of the singer. Aside
from that, the form is pretty much identical to the one in edit.html. The pageContent fragment containing
the form for creating a singer is shown in Listing 14-25.
Listing 14-25. The singers/create.html Form
<section th:fragment="~{templates/layout :: pageContent}">
<div class="content"> <!-- content -->
<h4 th:text="#{command.create} + ' ' + #{singer.new}">CREATE</h4>
<div class="container col-lg-12">
<form name="create_singer" th:action="@{/singers}" th:object="${singerForm}"
th:method="post" class="col p-3" enctype="multipart/form-data">
<div class="row mb-1">
<label for="firstName" th:text="#{label.Singer.firstname} + ':'" class="col-sm-4
form-label">FN:</label>
<div class="col-sm-8">
<input type="text" th:field="*{firstName}" class="form-control"/>
<span th:if="${#fields.hasErrors('firstName')}" class="error" th:errors="*{first
Name}">MISSING FN</span>
</div>
</div>
654
Chapter 14 ■ Spring MVC
<div class="row mb-1">
<label for="lastName" th:text="#{label.Singer.lastname} + ':'" class=
"col-sm-4 form-label">LN:</label>
<div class="col-sm-8">
<input type="text" th:field="*{lastName}" class="form-control"/>
<span th:if="${#fields.hasErrors('lastName')}" class="error"
th:errors="*{lastName}">MISSING LN</span>
</div>
</div>
<div class="row mb-1">
<label for="birthDate" th:text="#{label.Singer.birthDate} + ':'" class=
"col-sm-4 form-label">BD:</label>
<div class="col-sm-8">
<input type="date" th:field="*{birthDate}" class="form-control datetimepickerinput" data-target="#datetimepicker1"/>
<span th:if="${#fields.hasErrors('birthDate')}" class="error" th:errors="*{birth
Date}">MISSING BD</span>
</div>
</div>
<div class="row mb-1">
<label for="file" th:text="#{label.Singer.photo} + ':'" class="col-sm-4 formlabel">PH</label>
<div class="col-sm-8">
<input type="file" th:field="*{file}" name="file" id="file" class="form-control"/>
</div>
</div>
<div class="form-group mb-1 align-items-end">
<input type="submit" th:value="#{command.save}" id="saveButton" class="btn btnprimary"/>
</div>
</form>
<p th:if="${message ne null}" th:text="${message}" class="error"></p>
<div class="form-group mb-1 align-items-end">
<a href="#" th:href="@{/singers}" th:text="#{command.cancel}"> CANCEL</a>
</div>
</div>
</div> <!-- content -->
</section>
Having a file chooser in the form means that an input field of type file is part of the form, which in turn
means that the type of the form must be declared to be enctype="multipart/form-data". This is a special
type used for forms that allows inclusion of entire files in the submitted data. The singer information has a
field of LONGBLOB type to store a photo, which can be uploaded from the client. This where the data from the
creation form should end up. But, user data that includes files needs special handling on the server side.
655
Chapter 14 ■ Spring MVC
For a long time, the standard servlet specification didn’t support file upload. As a result, Spring MVC
worked with other libraries (the most common one being the Apache Commons FileUpload library17)
to serve this purpose. Spring MVC has built-in support for Commons FileUpload. However, starting
from Servlet 3.0, file upload has become a built-in feature of the web container. Apache Tomcat 7 supports
Servlet 3.0, and Spring has also supported Servlet 3.0 file upload since version 3.1.
Supporting file upload is thus an easy feat to do in Spring web applications, especially when deploying
applications to Apache Tomcat 10.
Let’s start with the code for processing the submission data. Since creating a new singer is not an
operation on an existing singer, the handler method is in SingersController. The code is shown in
Listing 14-26.
Listing 14-26. The Handler Method for Processing Data Submitted by a Form for Creating a Singer Instance
package com.apress.prospring6.fourteen.controllers;
import org.springframework.web.bind.annotation.PostMapping;
import org.springframework.http.MediaType;
import com.apress.prospring6.fourteen.util.SingerForm;
// other import statements omitted
@Controller
@RequestMapping("/singers")
public class SingersController {
@GetMapping(value = "/create")
public String showCreateForm( Model uiModel) {
uiModel.addAttribute("singerForm", new SingerForm());
return "singers/create";
}
@PostMapping(consumes = MediaType.MULTIPART_FORM_DATA_VALUE)
public String create(@Valid SingerForm singerForm, BindingResult bindingResult,
Model uiModel,
HttpServletRequest httpServletRequest,
Locale locale) throws IOException {
if (bindingResult.hasErrors()) {
uiModel.addAttribute("message", messageSource.getMessage("singer.save.fail", new
Object[]{}, locale));
uiModel.addAttribute("singerForm", singerForm);
return "singers/create";
}
uiModel.asMap().clear();
var singer = new Singer();
singer.setFirstName(singerForm.getFirstName());
singer.setLastName(singerForm.getLastName());
singer.setBirthDate(singerForm.getBirthDate());
17
https://commons.apache.org/proper/commons-fileupload/
656
Chapter 14 ■ Spring MVC
// Process file upload
if (!singerForm.getFile().isEmpty()) {
setPhoto(singer, singerForm.getFile());
}
var created = singerService.save(singer);
return "redirect:/singer/" + UrlUtil.encodeUrlPathSegment(created.getId().
toString(),
httpServletRequest);
}
static void setPhoto(Singer singer, MultipartFile file) throws IOException {
InputStream inputStream = file.getInputStream();
var fileContent = IOUtils.toByteArray(inputStream);
singer.setPhoto(fileContent);
}
// other handler methods omitted
}
The contents on the form do not map appropriately to a Singer instance, because the photo field value
is not mapped in the handler method to an org.springframework.web.multipart.MultipartFile, and
thus the SingerForm type is needed.
In complex applications, the entity types declared in the DAO layer are never used in controllers, in the
web layer. Usually view types are introduced that wrap around one or more entity types and expose only useful
fields, hiding some details such as sensitive data like identifiers and passwords, and fields that are not relevant
to the web context, such as the version field.
SingerForm is a view type that declares only the fields necessary for creating a Singer instance for the
web level. The fields of this type are also decorated with validation annotations that match the ones declared
on the Singer class for the corresponding fields.
The SingerForm is shown in Listing 14-27.
Listing 14-27. The SingerForm View Type
package com.apress.prospring6.fourteen.util;
import
import
import
import
jakarta.validation.constraints.NotNull;
jakarta.validation.constraints.Size;
org.springframework.format.annotation.DateTimeFormat;
org.springframework.web.multipart.MultipartFile;
import java.time.LocalDate;
public class SingerForm {
657
Chapter 14 ■ Spring MVC
@NotNull
@Size(min = 2, max = 30)
private String firstName;
@NotNull
@Size(min = 2, max = 30)
private String lastName;
@DateTimeFormat(pattern = "yyyy-MM-dd")
private LocalDate birthDate;
MultipartFile file;
// getters and setters omitted
}
Spring MVC is smart enough to take the uploaded content, convert it to a MultipartFile, and use it as
a value for the file field in SingerForm. From the SingerForm populated by Spring MVC, a Singer instance
is created. The setPhoto(..) method is used to read the uploaded content as a byte array that then can be
saved into the LONGBLOG photo column in the SINGER table.
But is this enough? Turns out that this is not enough, because the Spring DispatcherServlet needs
to be configured to support file uploads. In a Servlet 3.0+–compatible web container with Spring MVC,
configuring file upload support is a two-step process.
First, in the Java-based configuration class that defines everything needed to create the
DispatcherServlet definition, we need to add a bean of type StandardServletMultipartResolver. This
is a standard implementation of the MultipartResolver interface, based on the Servlet 3.0 jakarta.
servlet.http.Part API. Listing 14-28 depicts the declaration of this bean that needs to be added to the
WebConfig class.
Listing 14-28. The Spring Bean Necessary to Support File Uploading
package com.apress.prospring6.fourteen;
import org.springframework.web.multipart.support.StandardServletMultipartResolver;
// other import statements omitted
@Configuration
@EnableWebMvc
@ComponentScan(basePackages = {"com.apress.prospring6.fourteen"})
public class WebConfig implements WebMvcConfigurer, ApplicationContextAware {
@Bean(name = DispatcherServlet.MULTIPART_RESOLVER_BEAN_NAME) // "multipartResolver"
StandardServletMultipartResolver multipartResolver() {
StandardServletMultipartResolver multipartResolver = new
StandardServletMultipartResolver();
return multipartResolver;
}
// other configuration code omitted
}
658
Chapter 14 ■ Spring MVC
The second step is to enable MultiParsing in Servlet 3.0+ environments; this means
that the WebInitializer implementation needs some changes. There is a method called
customizeRegistration(..) that is defined in the AbstractDispatcherServletInitializer abstract
class, which is the class extended by AbstractAnnotationConfigDispatcherServletInitializer. This
method must be implemented to register an instance of jakarta.servlet.MultipartConfigElement. The
configuration snippet that needs to be added in the WebInitializer class is shown in Listing 14-29.
Listing 14-29. The Spring Configuration Necessary to Support File Uploading
package com.apress.prospring6.fourteen;
import jakarta.servlet.MultipartConfigElement;
import jakarta.servlet.ServletRegistration;
//other import statements omitted
public class WebInitializer extends AbstractAnnotationConfigDispatcherServletInitializer {
// other configuration code omitted
@Override
protected Filter[] getServletFilters() {
final CharacterEncodingFilter cef = new CharacterEncodingFilter();
cef.setEncoding(StandardCharsets.UTF_8.name());
cef.setForceEncoding(true);
return new Filter[]{new HiddenHttpMethodFilter(), cef};
}
@Override
public void customizeRegistration(ServletRegistration.Dynamic registration) {
registration.setInitParameter("throwExceptionIfNoHandlerFound", "true");
registration.setMultipartConfig(getMultipartConfigElement());
super.customizeRegistration(registration);
}
private MultipartConfigElement getMultipartConfigElement() {
return new MultipartConfigElement(null, MAX_FILE_SIZE, MAX_REQUEST_SIZE, FILE_SIZE_
THRESHOLD);
}
private static final long MAX_FILE_SIZE = 5000000;
// Beyond that size spring will throw exception.
private static final long MAX_REQUEST_SIZE = 5000000;
// Size threshold after which files will be written to disk
private static final int FILE_SIZE_THRESHOLD = 0;
}
The first parameter of MultipartConfigElement is a temporary location where files should be stored.
The second parameter is the maximum file size allowed for upload, which is 5MB in this case. The third
parameter represents the size of the request, which is also 5MB here. The last parameter represents the
threshold after which files will be written to disk.
659
Chapter 14 ■ Spring MVC
To test the file upload function, redeploy the application and add a new singer with a photo. Upon
completion, you will be able to see the photo in the show view.
Enabling JSR-349 (Bean Validation)
This topic was reserved until now so that the focus could be on building the web pages and linking
functionality to various buttons and links. Just as important as making sure user requests are processed
correctly is making sure the data submitted by the user is correct. This is especially important for data being
saved into the database, because invalid data can yield invalid results or, in some cases, even allow a hacker
to break into your system(e.g., via SQL injection18).
Chapter 11 introduced you to validation, formatting, and type conversion, and mentioned that the true
power of Spring beans declared for these purposes is most obvious in web applications when handling userprovided data. Chapter 11 introduced you to Spring’s support of JSR-349 (Bean Validation)19 (now part of
Jakarta libraries). Listing 14-27 introduced class SingerForm that declares a few fields that are initialized with
user-provided date. The same validations annotations are present in the Singer class, which is used to create
Singer domain objects.
Listing 14-30 shows the SingerForm version with validations annotation with customized error
message codes.
Listing 14-30. The SingerForm Type Necessary to Support File Uploading
package com.apress.prospring6.fourteen.util;
import jakarta.validation.constraints.*;
import org.springframework.web.multipart.MultipartFile;
// other import statements omitted
public class SingerForm {
@NotEmpty
@Size(min = 2, max = 30)
private String firstName;
@NotEmpty
@Size(min = 2, max = 30)
private String lastName;
@DateTimeFormat(pattern = "yyyy-MM-dd")
private LocalDate birthDate;
private Multipart file;
// getters and setters omitted
}
18
19
https://www.w3schools.com/sql/sql_injection.asp
https://beanvalidation.org/3.0
660
Chapter 14 ■ Spring MVC
The constraints are applied to their respective fields. Note that for the validation message, you specify
a message key by using the curly braces. This will cause the validation messages to be retrieved from
ResourceBundle and hence support i18n. The @Size annotation is special because it is declared with a
minimum value and maximum value; these values are injected from the code into the internationalization
messages using the {*} syntax.
The error message codes are resolved by an org.springframework.validation.
MessageCodesResolver bean registered automatically by Spring when validation is configured. The default
implementation used by Spring is org.springframework.validation.DefaultMessageCodesResolver.
This type of bean creates two message codes based on the annotations used on fields to enforce constraints,
based on the name of the type where used and based on field names. For example, for the firstName field in
class SingerForm, annotated with @Size validation, this bean will create a group of message codes that are
resolved in the following order:
•
Validation name + object name + field name ⇒ Size.singerForm.firstName
•
Validation name + field name ⇒ Size.firstName
•
Validation name + field type ⇒ Size.java.lang.String
•
Validation name ⇒ Size
However, if neither of these message properties is declared, the default message is set to annotation full
name + “message” ⇒ jakarta.validation.constraints.Size.message. For the singerForm object, these
messages are not declared in our initial internationalization files, but the ones for the singer object are.
They are shown in Listing 14-31.
Listing 14-31. Message Codes for Validation Errors for Object singer, Field firstName
NotEmpty.singer.firstName=Please insert First Name Value
Size.singer.firstName=Length must be between {2} and {1}
NotEmpty.singer.lastName=Please insert Last Name Value
Size.singer.lastName=Length must be between {2} and {1}
typeMismatch.birthDate=Invalid format, should be \'yyyy-mm-dd\'
There are two solutions here: add a copy of messages in Listing 14-28 and replace singer with
singerForm or configure the annotation validations to use the existing set of messages, using the messages
attribute. The SingerForm version with customized error messages is depicted in Listing 14-32.
Listing 14-32. SingerForm Version with Customized Error Messages
package com.apress.prospring6.fourteen.util;
import jakarta.validation.constraints.*;
// other import statements omitted
public class SingerForm {
@NotEmpty(message="{NotEmpty.singer.firstName}")
@Size(min=2, max=30, message="{Size.singer.firstName}")
private String firstName;
@NotEmpty(message="{NotEmpty.singer.lastName}")
@Size(min=2, max=30, message="{Size.singer.lastName}")
private String lastName;
661
Chapter 14 ■ Spring MVC
@DateTimeFormat(pattern = "yyyy-MM-dd")
private LocalDate birthDate;
private Multipart file;
// getters and setters omitted
}
To enable JSR-349/Jakarta Bean Validation during the web data binding process, we just need to apply
the @Valid annotation to the SingerForm argument of the SingersController.create(..) method and to
the Singer argument of the OneSingerController.updateSingerInfo(..) method. Listing 14-33 shows the
signatures for both methods.
Listing 14-33. OneSingerController handler methods with validated parameters
package com.apress.prospring6.fourteen.controllers;
import jakarta.validation.Valid;
// other import statements omitted
@Controller
@RequestMapping("/singer/{id}")
public class OneSingerController {
@PutMapping
public String updateSingerInfo(@Valid Singer singer,
BindingResult bindingResult,
Model uiModel, Locale locale) {
// method body omitted
}
// other methods omitted
}
@Controller
@RequestMapping("/singers")
public class SingersController {
@PostMapping(consumes = MediaType.MULTIPART_FORM_DATA_VALUE)
public String create(@Valid SingerForm singerForm,
BindingResult bindingResult, Model uiModel,
HttpServletRequest httpServletRequest,
Locale locale) throws IOException {
// method body omitted
}
// other methods omitted
}
We also want the JSR-349 validation message to use the same ResourceBundle instance as for the views.
To do this, we need to configure the validator in the DispatcherServlet configuration, in the WebConfig
class, as shown in Listing 14-34.
662
Chapter 14 ■ Spring MVC
Listing 14-34. Spring Validation Configuration
package com.apress.prospring6.fourteen;
import org.springframework.validation.Validator;
import org.springframework.validation.beanvalidation.LocalValidatorFactoryBean;
// other import statements omitted
@Configuration
@EnableWebMvc
@ComponentScan(basePackages = {"com.apress.prospring6.fourteen"})
public class WebConfig implements WebMvcConfigurer, ApplicationContextAware {
@Bean
public Validator validator() {
final var validator = new LocalValidatorFactoryBean();
validator.setValidationMessageSource(messageSource());
return validator;
}
@Bean
MessageSource messageSource() {
var messageResource = new ReloadableResourceBundleMessageSource();
messageResource.setBasename("classpath:i18n/global");
messageResource.setDefaultEncoding(StandardCharsets.UTF_8.name());
messageResource.setUseCodeAsDefaultMessage(true);
messageResource.setFallbackToSystemLocale(true);
//messageResource.setCacheSeconds(0);
return messageResource;
}
@Override
public Validator getValidator() {
return validator();
}
// other configuration code omitted
}
First, a validator bean is defined, with the class LocalValidatorFactoryBean, for JSR-349 support. Note
that we set the validationMessageSource property to reference the MessageSource bean defined, which
instructs the JSR-349 validator to look up the messages by the code from the MessageSource bean. Then the
getValidator() method is implemented to return the validator bean we defined. That’s all; we can test the
validation now. Bring up the create singer view and click the Save button without inserting any data. The
returned page will now show multiple validation errors, as shown in Figure 14-12.
663
Chapter 14 ■ Spring MVC
Figure 14-12. View page with validation errors
Switch to the German (DE) language and do the same thing. This time, the messages will be displayed
in German. The views are basically complete; all we need now is to handle potential errors.
Exception Handling
When handler methods are executed, things can go wrong. Some situations, like trying to access a URL that
does not exist, might be expected, but others might not. In both scenarios, the activity has to be recorded
and the end user has to be notified. Spring MVC catches and handles the exceptions using implementations
of HandlerExceptionResolver. The typical way to treat an MVC exception is to prepare a model and select
an error view. Multiple exception resolvers can be used and ordered in a chain to treat different type of
exceptions in different ways. Spring MVC supports the default resolvers shown in Listing 14-35 (resolvers
of these types are created automatically for you in a Spring web application), and they are declared in the
DispatcherServlet.properties file that is packaged in the spring-webmvc.jar.
Listing 14-35. DispatcherServlet.properties Default Exception Resolvers
org.springframework.web.servlet.HandlerExceptionResolver=
o.s.web.servlet.mvc.method.annotation.ExceptionHandlerExceptionResolver,\
o.s.web.servlet.mvc.annotation.ResponseStatusExceptionResolver,\
o.s.web.servlet.mvc.support.DefaultHandlerExceptionResolver
664
Chapter 14 ■ Spring MVC
The default exception resolvers perform the following functions:
•
ExceptionHandlerExceptionResolver: Resolves exceptions by invoking methods
annotated with @ExceptionHandler found within a controller or a class annotated
with @ControllerAdvice.
•
ResponseStatusExceptionResolver: Resolves methods annotated with
@ResponseStatus and maps them to the status code configured using this annotation.
•
DefaultHandlerExceptionResolver: Resolves exceptions raised by Spring MVC and
maps them to HTTP status codes. The equivalent of this class when REST requests
are processed is class ResponseEntityExceptionHandler.
The SimpleMappingExceptionResolver class is not in the previous list, but beans of this type can be
declared and configured to map exception classes to view names, and it is helpful to render error pages
in a browser application. An exception resolver provides information related to the context in which
the exception was thrown; that is, the handler method that was executing and the arguments that it was
called with.
Let’s start with the simplest example: people make mistakes when writing URLs all the time. Let’s
try to access the following URL: http://localhost:8080/ch14/missing. Since no exception handling is
configured, Spring will try to find a view using the InternalResourceViewResolver bean (or whatever other
view resolver is found). Since it cannot find one, it assumes it must be a static page and tries to render that.
But it fails to provide a proper page, and Apache Tomcat comes to the rescue. It displays its default error
page, letting the user know what happened, as shown in Figure 14-13.
Figure 14-13. Apache Tomcat default error page for missing view
The default error message does a good job describing the problem, and it returns the proper HTTP
status code for missing resources: 404. But still, it’s not okay, because this looks like a technical exception
or a development problem, and the recommended practice is to not let the end user know that. Also, there
is no need to give so many details to the end user, because they should not be bothered with the internal
problems an application has. So, what can be done? One rule of developing web applications is to keep the
look and feel consistent, so instead of the Apache Tomcat page, we could display a customized error view.
Out of the box, Spring MVC offers no default (fallback) error page when a view or a handler method is not
found. It doesn’t throw an exception either; it just forwards the responsibility of showing the appropriate
message to the server. To override this behavior, we need to make the following changes to a Spring web
application configuration.
665
Chapter 14 ■ Spring MVC
First, customize DispatcherServlet to throw org.springframework.web.servlet.
NoHandlerFoundException when a handler method cannot be found. This is done by overriding the
customizeRegistration(..) method from the AbstractDispatcherServletInitializer class in the
WebInitializer class, as shown in Listing 14-36.
Listing 14-36. Customizing DispatcherServlet to Throw NoHandlerFoundException When Handlers Are
Not Found
package com.apress.prospring6.fourteen;
import jakarta.servlet.ServletRegistration;
// other import methods omitted
public class WebInitializer
extends AbstractAnnotationConfigDispatcherServletInitializer {
@Override
public void customizeRegistration(ServletRegistration.Dynamic registration) {
registration.setInitParameter("throwExceptionIfNoHandlerFound", "true");
super.customizeRegistration(registration);
}
// other config methods omitted
}
This configuration declares an initialization parameter named throwExceptionIfNoHandlerFound
and sets it to “true”, which causes DispatcherServlet to throw an org.springframework.web.servlet.
NoHandlerFoundException when a handler method cannot be found.
Note that adding this configuration does nothing if DefaultServletHttpRequestHandler is used,
because requests will always be forwarded to it and a NoHandlerFoundException will never be thrown in
that case. You can verify this by looking into the logs. If you see something similar to the next output snippet,
you still have more steps to go.
DEBUG o.s.w.s.DispatcherServlet - GET "/ch14/missing", parameters={}
DEBUG o.s.w.s.h.SimpleUrlHandlerMapping - Mapped to org.springframework.web.
servlet.resource.DefaultServletHttpRequestHandler@763956dc
DEBUG o.s.w.s.DispatcherServlet - Completed 404 NOT_FOUND
So, if in your configuration you have the following:
@Override
public void configureDefaultServletHandling(final DefaultServletHandlerConfigurer
configurer) {
configurer.enable();
}
666
Chapter 14 ■ Spring MVC
Just remove this method and make do without DefaultServletHttpRequestHandler if you want
NoHandlerFoundExceptions to be thrown.
But this does nothing without a bean of type HandlerExceptionResolver customized to do something
else than simply tell the application server what to do. And this brings us to the next change. Next, an option
is to implement the HandlerExceptionResolver interface or extend any of the classes that implement it and
provide the desired implementation for the doResolveException(...) method that will return the desired
view, as shown in Listing 14-37.
Listing 14-37. HandlerExceptionResolver Implementation
package com.apress.cems.web.problem;
import org.springframework.http.HttpStatus;
import org.springframework.web.servlet.ModelAndView;
import org.springframework.web.servlet.NoHandlerFoundException;
import org.springframework.web.servlet.handler.SimpleMappingExceptionResolver;
import javax.servlet.http.HttpServletRequest;
import javax.servlet.http.HttpServletResponse;
public class MissingExceptionResolver extends SimpleMappingExceptionResolver {
@Override
protected ModelAndView doResolveException(HttpServletRequest request,
HttpServletResponse response, Object handler, Exception ex) {
if (ex instanceof NoHandlerFoundException) {
ModelAndView model = new ModelAndView("error");
model.addObject("problem","URL not supported : "
+ request.getRequestURI());
response.setStatus(HttpStatus.NOT_FOUND.value());
return model;
}
return null;
}
}
Notice that for error handling the type ModelAndView is used. Since the exception handling method is
not a normal handler method declared in a controller class, mapping its result to a view template is not possible.
An object of this type is a holder for both Model and View objects in the web MVC framework, needed to return
both a model and a view in a single object. This allows Spring MVC to customize the error view before being
sent to the user with different error messages based on the exception thrown when a request is handled.
Here are a few details about a HandlerExceptionResolver implementation:
•
It can return a ModelAndView that points to an error view, usually the same one for a
related class of problems, or for the entire application.
•
It can return an empty ModelAndView if the exception is handled within the resolver.
•
It can return null if the exception remains unresolved, thus allowing other exception
resolvers to try to handle it. If none of the exception resolvers can handle the
exception, it is bubbled up to the Servlet container.
667
Chapter 14 ■ Spring MVC
In Listing 14-37, note that the method returns an actual ModelAndView instance.
HandlerExceptionResolve implementations are designed to make sure an exception is resolved to a view
or allowed to bubble up to the Servlet container.
The next step is to declare a bean of this type with the lowest priority (highest precedence), so that every
time something goes wrong within the application, this exception resolver will be used first.
The alternative to having multiple SimpleMappingExceptionResolver mapped to various types of
exceptions is to declare different error handler methods and group all of them in a class annotated with
@ControllerAdvice. This annotation is meta-annotated with @Component and this means a bean of this
type will be created. This bean intercepts any exceptions thrown by handler methods and maps them to
methods annotated with @ExceptionHandler that have some logic to process these exceptions and render
the corresponding error views. Listing 14-38 shows a class annotated with @ControllerAdvice.
Listing 14-38. Class containing multiple exception handler methods
package com.apress.prospring6.fourteen.problem;
import
import
import
import
import
import
import
jakarta.servlet.http.HttpServletRequest;
org.springframework.http.HttpStatus;
org.springframework.web.bind.annotation.ControllerAdvice;
org.springframework.web.bind.annotation.ExceptionHandler;
org.springframework.web.bind.annotation.ResponseStatus;
org.springframework.web.servlet.ModelAndView;
org.springframework.web.servlet.NoHandlerFoundException;
@ControllerAdvice
public class GlobalExceptionHandler {
@ExceptionHandler(NotFoundException.class)
@ResponseStatus(HttpStatus.NOT_FOUND)
public ModelAndView handle(NotFoundException ex) {
ModelAndView mav = new ModelAndView();
mav.addObject("problem", ex.getMessage());
mav.setViewName("error");
return mav;
}
@ExceptionHandler(NoHandlerFoundException.class)
@ResponseStatus(HttpStatus.NOT_FOUND)
public ModelAndView notFound(HttpServletRequest req) {
ModelAndView mav = new ModelAndView();
mav.addObject("problem", "Not Supported " + req.getRequestURI());
mav.setViewName("error");
return mav;
}
}
668
Chapter 14 ■ Spring MVC
To test that this exception handler works as expected, you could try accessing http://localhost:8080/
ch14/singer/99 and http://localhost:8080/ch14/missing. Notice that there are different types of
exceptions being thrown, which causes different error messages to be added to the error view model, as
shown in Figure 14-14.
Figure 14-14. Different error pages being shown for different errors
You should view the error page with the proper exception message. Inspect the response contents and
you will notice that although an error page is displayed, the HTTP status code is still 200. Since the user is
trying to access a resource that does not exist, the HTTP status code should be 404. This can be done easily
by annotating the exception handler method with @ResponseStatus(HttpStatus.NOT_FOUND), which was
done in Listing 14-38.
And that’s pretty much it when it comes to handling exceptions thrown by the handler methods.
Switching to Spring Boot
Switching to Spring Boot makes things simpler, because a Spring Boot application does not need an Apache
Tomcat server. Also, the structure of the project is simpler and there is no need for special plug-ins to pack
the application.
To create a full-blown Spring web application means that, besides the web layer and the view
templating layer, you need a DAO layer and a service layer in place. This means you need the specific Boot
starter library for persistence and transactions. If you’ve read this chapter up to now, you know that you also
need validation. The complete list of dependencies is shown in Figure 14-15.
669
Chapter 14 ■ Spring MVC
Figure 14-15. Spring Boot web application dependencies
The structure of the project must change as well, since all interface-related files and resource files
can be placed under the resources directory. The internal structure of the project changes as shown in
Figure 14-16.
670
Chapter 14 ■ Spring MVC
Figure 14-16. Spring classic and Spring Boot web application structures comparison
The orange arrows show the files that changed not only name but location as well. For example, the data
source configuration files are no longer necessary, since their content is configured by using Spring Boot
configuration properties. The logback.xml file is also no longer needed, because Logback configuration
is done by using Spring Boot properties. And the views directory, containing the Thymeleaf templates, is
renamed to templates, so instead of configuring Thymeleaf support using explicit bean configuration,
Spring Boot out-of-the-box configurations can be used.
The blue.properties and green.properties files for theming configuration were moved from the
classes directory to the root of the static directory to benefit of the default Spring Boot theming beans
configuration, because customizing them is a pain.
The next thing to analyze is the Spring Boot application-dev.yaml contents, shown in Listing 14-39.
Listing 14-39. Spring Boot Web Application Configuration
# web server configuration
server:
port: 8081
servlet:
context-path: /
compression:
enabled: true
address: 0.0.0.0
671
Chapter 14 ■ Spring MVC
# application configuration
spring:
mvc:
hiddenmethod:
filter: # HTTP Method filter
enabled: true
# internationalization configuration
messages:
basename: i18n/global
encoding: UTF-8
always-use-message-format: true
# file upload configuration
servlet:
multipart:
enabled: true
max-file-size: 10MB
max-request-size: 12MB
# view resolver configuration
thymeleaf:
prefix: classpath:templates/
suffix: .html
mode: HTML
cache: false
check-template: false
reactive:
max-chunk-size: 8192
# data source configuration
datasource:
driverClassName: org.mariadb.jdbc.Driver
url: jdbc:mariadb://localhost:3306/musicdb?useSSL=false
username: prospring6
password: prospring6
hikari:
maximum-pool-size: 25
jpa:
generate-ddl: false
properties:
hibernate:
jdbc:
batch_size: 10
fetch_size: 30
max_fetch_depth: 3
show-sql: true
format-sql: false
use_sql_comments: false
hbm2ddl:
auto: none
# Logging config
logging:
pattern:
672
Chapter 14 ■ Spring MVC
console: "%-5level: %class{0} - %msg%n"
level:
root: INFO
org.springframework.boot: DEBUG
com.apress.prospring6.fourteen: INFO
Each section of the configuration is prefixed by a comment revealing its scope. The following list further
explains properties used in each section:
•
# web server configuration: This section configures the URL where the
application is available. Setting the address to 0.0.0.0 allows the application to be
accessible on all network addresses associated with the computer the application
runs in; for example, http://localhost:8081/, http://127.0.0.1:8081/, etc.
•
# HTTP Method filter : The spring.mvc.hiddenmethod.filter.enabled set to
true is the Spring Boot equivalent of configuring the filter for supporting PUT and
DELETE HTTP methods.
•
# internationalization configuration: This section configures the location,
name, encoding, and so forth of the internationalization files.
•
# file upload configuration: This section configures all components necessary
to support file upload.
•
# view resolver configuration: This section configures location, encoding,
max size, and so forth for the Thymeleaf view templates. Spring Boot uses this
configuration to configure a Thymeleaf Engine and Thymeleaf resolver bean.
•
# data source configuration: This section groups all data source configurations,
including persistence.
•
# Logging config: This section configures logging.
The parts of the configuration that cannot be put in application-dev.yaml are placed into typical
configuration classes, annotated with @Configuration.
The HibernateCfg class is a workaround for a bug Spring Data JPA with MariaDB related to
database objects naming. Without this class the repositories cannot be mapped to tables because Spring Boot
looks for a table named musicdb.singer but doesn’t find it, since the MariaDB Docker container was
configured by declaring objects using uppercase letters (e.g.: MUSICDB.SINGER). Since lowercasing the Docker
SQL queries was a bit too much work, there was an opportunity to introduce an advanced configuration
example. The HibernateCfg class is shown in Listing 14-40.
Listing 14-40. HibernateCfg Class
package com.apress.prospring6.fourteen.boot;
import org.hibernate.boot.model.naming.Identifier;
import org.hibernate.boot.model.naming.PhysicalNamingStrategyStandardImpl;
import org.hibernate.engine.jdbc.env.spi.JdbcEnvironment;
673
Chapter 14 ■ Spring MVC
import org.springframework.context.annotation.Bean;
import org.springframework.context.annotation.Configuration;
@Configuration(proxyBeanMethods = false)
public class HibernateCfg {
@Bean
PhysicalNamingStrategyStandardImpl caseSensitivePhysicalNamingStrategy() {
return new PhysicalNamingStrategyStandardImpl() {
@Override
public Identifier toPhysicalTableName(Identifier logicalName, JdbcEnvironment
context) {
return apply(logicalName, context);
}
@Override
public Identifier toPhysicalColumnName(Identifier logicalName, JdbcEnvironment
context) {
return apply(logicalName, context);
}
private Identifier apply(final Identifier name, final JdbcEnvironment context) {
if ( name == null ) {
return null;
}
StringBuilder builder = new StringBuilder( name.getText().replace( '.',
'_' ) );
for ( int i = 1; i < builder.length() - 1; i++ ) {
if ( isUnderscoreRequired( builder.charAt( i - 1 ), builder.charAt( i ),
builder.charAt( i + 1 ) ) ) {
builder.insert( i++, '_' );
}
}
return Identifier.toIdentifier(builder.toString().toUpperCase());
}
private boolean isUnderscoreRequired(final char before, final char current,
final char after) {
return Character.isLowerCase( before ) && Character.isUpperCase( current )
&& Character.isLowerCase( after );
}
};
}
}
The PhysicalNamingStrategyStandardImpl class, extended here by an anonymous class, is itself
implementing PhysicalNamingStrategy, which is a pluggable strategy contract for applying physical
naming rules for database object names. The @Configuration(proxyBeanMethods = false) configuration
is used to exclude beans declared in this class from getting proxied to enforce bean life-cycle behavior. This
means that any bean that is created by calling the caseSensitivePhysicalNamingStrategy() method will
get a new copy of the PhysicalNamingStrategyStandardImpl bean.
674
Chapter 14 ■ Spring MVC
The WebConfig class is a Spring web configuration class extending WebMvcConfigurer and is necessary
to configure the locale and theme interceptors and resolvers. They are not automatically configured by
Spring Boot, so this job is left to the developer. The WebConfig class is shown in Listing 14-41.
Listing 14-41. WebConfig Class
package com.apress.prospring6.fourteen.boot;
// import statements omitted
import java.util.Locale;
@Configuration
@ComponentScan(basePackages = {"com.apress.prospring6.fourteen.boot"})
public class WebConfig implements WebMvcConfigurer {
@Bean
LocaleChangeInterceptor localeChangeInterceptor() {
var localeChangeInterceptor = new LocaleChangeInterceptor();
localeChangeInterceptor.setParamName("lang");
return localeChangeInterceptor;
}
@Bean
ThemeChangeInterceptor themeChangeInterceptor() {
var themeChangeInterceptor = new ThemeChangeInterceptor();
themeChangeInterceptor.setParamName("theme");
return themeChangeInterceptor;
}
@Bean
CookieLocaleResolver localeResolver() {
var cookieLocaleResolver = new CookieLocaleResolver();
cookieLocaleResolver.setDefaultLocale(Locale.ENGLISH);
cookieLocaleResolver.setCookieMaxAge(3600);
cookieLocaleResolver.setCookieName("locale");
return cookieLocaleResolver;
}
@Bean
CookieThemeResolver themeResolver() {
var cookieThemeResolver = new CookieThemeResolver();
cookieThemeResolver.setDefaultThemeName("green");
cookieThemeResolver.setCookieMaxAge(3600);
cookieThemeResolver.setCookieName("theme");
return cookieThemeResolver;
}
@Bean
WebContentInterceptor webChangeInterceptor() {
var webContentInterceptor = new WebContentInterceptor();
webContentInterceptor.setCacheSeconds(0);
675
Chapter 14 ■ Spring MVC
webContentInterceptor.setSupportedMethods("GET", "POST", "PUT", "DELETE");
return webContentInterceptor;
}
@Override
public void addInterceptors(InterceptorRegistry registry) {
registry.addInterceptor(localeChangeInterceptor()).addPathPatterns("/*");
registry.addInterceptor(themeChangeInterceptor());
registry.addInterceptor(webChangeInterceptor());
}
}
Notice that this class is not annotated with @EnableWebMvc. It is not needed because Spring Boot
configures the web application context. Using this annotation in a Spring Boot application will cause
unpredictable behavior, if the application starts at all.
What is left is to tell Spring Boot where our entities and repository interfaces are, and enable
transactional support. These configurations are easily done via annotations placed on the Spring Boot main
class, depicted in Listing 14-42.
Listing 14-42. Chapter14Application Class
package com.apress.prospring6.fourteen.boot;
import
import
import
import
import
import
org.springframework.boot.SpringApplication;
org.springframework.boot.autoconfigure.SpringBootApplication;
org.springframework.boot.autoconfigure.domain.EntityScan;
org.springframework.core.env.AbstractEnvironment;
org.springframework.data.jpa.repository.config.EnableJpaRepositories;
org.springframework.transaction.annotation.EnableTransactionManagement;
import java.util.Arrays;
import java.util.stream.Collectors;
@EntityScan(basePackages = {"com.apress.prospring6.fourteen.boot.entities"})
@EnableJpaRepositories("com.apress.prospring6.fourteen.boot.repos")
@EnableTransactionManagement
@SpringBootApplication
public class Chapter14Application {
public static void main(String... args) {
System.setProperty(AbstractEnvironment.ACTIVE_PROFILES_PROPERTY_NAME, "dev");
SpringApplication.run(Chapter14Application.class, args);
}
}
The reason for declaring a profile named dev for running the application is so that the context can be
slightly modified for running tests.
676
Chapter 14 ■ Spring MVC
With the configuration described so far, running the Chapter14Application will start the same
applications deployed on an Apache Tomcat server in previous sections.
Testing a Spring Boot Web Application
As expected, testing with Spring Boot is easier too. As an example, we’ll add two very simple tests for the
HomeController with Spring Boot. Spring Boot tests are annotated with @SpringBootTest, which can
be used to start a web application on a random port that can be then accessed to send requests using an
instance of TestRestTemplate. The test class is shown in Listing 14-43.
Listing 14-43. HomeController1Test Class Using TestRestTemplate
package com.apress.prospring6.fourteen.boot;
import org.springframework.boot.test.context.SpringBootTest;
import org.springframework.boot.test.web.client.TestRestTemplate;
import static org.assertj.core.api.Assertions.assertThat;
// other import statements
@ActiveProfiles("test")
@SpringBootTest(webEnvironment = SpringBootTest.WebEnvironment.RANDOM_PORT)
public class HomeController1Test {
@Value(value="${local.server.port}")
private int port;
@Autowired
private TestRestTemplate restTemplate;
@Test
public void testHomeController(){
assertThat(this.restTemplate.getForObject("http://localhost:" + port + "/",
String.class))
.contains("Spring Boot Thymeleaf Example");
}
}
TestRestTemplate is the non-reactive equivalent of the WebTestClient that is covered in Chapter 20,
and it is convenient alternative of RestTemplate that is suitable for integration tests. It is designed
specifically for testing, because failed requests with 4xx and 5xx do not throw an exception, this being very
useful for writing negative test cases. Testing using TestRestTemplate consists of checking assumptions
about the response returned by the application so the testing is data-oriented, since correct mapping of
requests to handlers is not checked.
Another alternative to TestRestTemplate is Rest Assured20.
The same test can be written by using MockMvc, introduced earlier in this chapter, but previously the
test was configured using @SpringJUnitWebConfig. When Spring Boot is in the mix, a different annotation is
used: @AutoConfigureMockMvc. The test is shown in Listing 14-44.
20
https://rest-assured.io
677
Chapter 14 ■ Spring MVC
Listing 14-44. HomeController2Test Class Using MockMvc
package com.apress.prospring6.fourteen.boot;
import org.springframework.boot.test.autoconfigure.web.servlet.AutoConfigureMockMvc;
// other import statements
@ActiveProfiles("test")
@AutoConfigureMockMvc
@SpringBootTest
public class HomeController2Test {
@Autowired
MockMvc mockMvc;
@Test
void testHome() throws Exception {
mockMvc.perform(MockMvcRequestBuilders.get("/home"))
.andDo(print())
.andExpect(status().isOk())
.andExpect(view().name("home"))
.andExpect(content().string(containsString("Spring Boot Thymeleaf
Example!!")));
}
}
Testing using MockMvc is a little more powerful because it allows checking of assumptions on the actual
controller handler method configuration. In Listing 14-44, you can see that an assumption over the view
name is tested too, which makes this approach more config-oriented.
S
ummary
In this chapter, we covered many topics related to web development using Spring MVC. First, we discussed
the high-level concepts of the MVC pattern. Then we covered Spring MVC’s architecture, including its
WebApplicationContext hierarchy, request-handling life cycle, and configuration.
Next you learned how to develop a sample singer management application using Spring MVC, with
Thymeleaf as the view technology. During the course of developing the samples, we elaborated on different
areas. Main topics included i18n, theming, and template support with Thymeleaf.
To integrate a Spring web application with a view technology, there needs to be at least a custom
bean that implements Spring’s org.springframework.web.servlet.ViewResolver. Thymeleaf is also a
templating view technology, and thus its ViewResolver implementation relies on a SpringTemplateEngine
and SpringResourceTemplateResolver.
And because Spring Boot is the prodigy feature of the Spring team, how to build a full-blown web
application using it had to be covered. In the next chapter, we cover more features that Spring brings in
terms of web application development by covering REST requests.
678
CHAPTER 15
Spring REST Support
Chapter 13 introduced communication over the HTTP protocol between two Spring web applications
that exposed REST API. This chapter expands the subject by introducing you to RESTful web services, also
referred to as RESTful-WS.
Nowadays, RESTful-WS is perhaps the most widely used technology for remote access. From remote
service invocation via HTTP to supporting an Ajax-style interactive web front end, RESTful-WS is being
adopted intensively, especially because of the rise of microservices. RESTful web services are popular for
several reasons:
•
Easy to understand: RESTful web services are designed around HTTP. The URL,
together with the HTTP method, specifies the intention of the request. For example,
the URL http://somedomain.com/restful/customer/1 with an HTTP method of
GET means that the client wants to retrieve the customer information, where the
customer ID equals 1.
•
Lightweight: RESTful is much more lightweight when compared to SOAP-based
web services, which include a large amount of metadata to describe which service
the client wants to invoke. For a RESTful request and response, it’s simply an HTTP
request and response, as with any other web application.
•
Firewall friendly: Because RESTful web services are designed to be accessible via
HTTP (or HTTPS), the application becomes much more firewall friendly and easily
accessed by remote clients.
In this chapter, we present the basic concepts of RESTful-WS and Spring’s support of RESTful-WS
through its Spring MVC module.
Introducing RESTful Web Services
The REST in RESTful-WS is short for REpresentational State Transfer, which is an architectural style. REST
defines a set of architectural constraints that together describe a uniform interface for accessing resources.
The main concepts of this uniform interface include the identification of resources and the manipulation
of resources through representations. For the identification of resources, a piece of information should be
accessible via a uniform resource identifier (URI). For example, the URL http://somedomain.com/api/
singer/1 is a URI that represents a resource, which is a piece of singer information with an identifier of 1. If
the singer with an identifier of 1 does not exist, the client will get a 404 HTTP status code, just like a “page not
© Iuliana Cosmina, Rob Harrop, Chris Schaefer, and Clarence Ho 2023
I. Cosmina et al., Pro Spring 6, https://doi.org/10.1007/978-1-4842-8640-1_15
679
Chapter 15 ■ Spring REST Support
found” error on a web site. Another example, http://somedomain.com/api/singers, is a URI that represents
a resource that is a list of singer information. Those identifiable resources can be managed through various
representations, as shown in Table 15-1.
Table 15-1. Representations for Manipulating Resources
HTTP Method
Description
GET
GET retrieves a representation of a resource.
HEAD
Identical to GET, without the response body. Typically used for getting a header.
POST
POST creates a new resource.
PUT
PUT updates a resource.
DELETE
DELETE deletes a resource.
OPTIONS
OPTIONS retrieves allowed HTTP methods.
For a detailed description of RESTful web services, we recommend Ajax and REST Recipes: A ProblemSolution Approach by Christian Gross (Apress, 2006).
Using Spring MVC to Expose RESTful Web Services
In this section, we show you how to use Spring MVC to expose the singer services as RESTful web services,
as designed in the previous section. This sample builds upon the already introduced Singer class and the
SingerRepo repository interface.
In the previous edition of the book, Castor1 XML was used for serialization. The Castor library hasn’t
been maintained for a while, so in this edition it was dropped in favor of Jackson2.
The Jackson library is very capable and provides components for serializing objects to JSON and
XML. Mapping Java properties to XML elements or JSON properties is easily done via annotations. Although
Jackson annotations are named @Json*, they work as configurations for XML serialization too. Listing 15-1
shows the Singer class decorated with Jackson annotations.
Listing 15-1. The Updated Singer Class Decorated with Jackson Annotations
package com.apress.prospring6.fifteen.entities;
import com.fasterxml.jackson.annotation.JsonFormat;
import com.fasterxml.jackson.annotation.JsonIgnore;
// other import statements omitted
@Data
@Entity
1
2
https://castor.exolab.org/xml-framework.html
https://github.com/FasterXML/jackson
680
Chapter 15 ■ Spring REST Support
@Table(name = "SINGER")
public class Singer {
@Serial
private static final long serialVersionUID = 2L;
@Id
@GeneratedValue(strategy = IDENTITY)
@Column(name = "ID")
protected Long id;
@JsonIgnore
@Version
@Column(name = "VERSION")
protected int version;
@NotEmpty
@Size(min = 2, max = 30)
@Column(name = "FIRST_NAME")
private String firstName;
@NotEmpty
@Size(min = 2, max = 30)
@Column(name = "LAST_NAME")
private String lastName;
@JsonFormat(pattern = "yyyy-MM-dd")
@DateTimeFormat(pattern = "yyyy-MM-dd")
@Column(name = "BIRTH_DATE")
private LocalDate birthDate;
}
By default, all Singer fields that Jackson knows how to serialize to text values are serialized. All fields
that should not be serialized, such as the version field, must be annotated with the @JsonIgnore annotation.
For complex types such as calendar dates, there are two options: use the @JsonFormat annotation
configured with the pattern we want our date value converted to or extend com.fasterxml.jackson.
databind.ser.std.StdSerializer.
Implementing SingerController
To keep things simple, we’ll skip declaring a SingerService and write a SingerController that uses
SingerRepo. The SingerController is displayed in Listing 15-2.
Listing 15-2. The SingerController Implementation
package com.apress.prospring6.fifteen.controllers;
import org.springframework.stereotype.Controller;
import org.springframework.web.bind.annotation.*;
// other import statements omitted
681
Chapter 15 ■ Spring REST Support
@Controller
@RequestMapping(path = "singer")
public class SingerController {
final Logger logger = LoggerFactory.getLogger(SingerController.class);
private final SingerRepo singerRepo;
public SingerController(SingerRepo singerRepo) {
this.singerRepo = singerRepo;
}
@ResponseStatus(HttpStatus.OK)
@ResponseBody
@RequestMapping(path={"/", ""}, method = RequestMethod.GET)
public List<Singer> all() {
return singerRepo.findAll();
}
@ResponseStatus(HttpStatus.OK)
@ResponseBody
@RequestMapping(path = "/{id}", method = RequestMethod.GET)
public Singer findSingerById(@PathVariable Long id) {
return singerRepo.findById(id).orElse(null);
}
@ResponseStatus(HttpStatus.CREATED)
@ResponseBody
@RequestMapping(path = "/", method = RequestMethod.POST)
public Singer create(@RequestBody Singer singer) {
logger.info("Creating singer: " + singer);
var saved = singerRepo.save(singer);
logger.info("Singer created successfully with info: " + saved);
return singer;
}
@ResponseStatus(HttpStatus.OK)
@ResponseBody
@RequestMapping(path = "/{id}", method = RequestMethod.PUT)
public void update(@RequestBody Singer singer, @PathVariable Long id) {
LOGGER.info("Updating singer: {}", singer);
var fromDb = singerRepo.findById(id).orElseThrow(() -> new IllegalArgumentException(
"Singer does not exist!") );
fromDb.setFirstName(singer.getFirstName());
fromDb.setLastName(singer.getLastName());
fromDb.setBirthDate(singer.getBirthDate());
singerRepo.save(fromDb);
LOGGER.info("Singer updated successfully with info: " + fromDb);
}
@ResponseStatus(HttpStatus.NO_CONTENT)
@ResponseBody
682
Chapter 15 ■ Spring REST Support
@RequestMapping(path = "/{id}", method = RequestMethod.DELETE)
public void delete(@PathVariable Long id) {
logger.info("Deleting singer with id: " + id);
singerRepo.deleteById(id);
logger.info("Singer deleted successfully");
}
}
The main points about the previous class are as follows:
•
The class is annotated with @Controller, indicating that it’s a Spring MVC controller.
•
The class-level annotation @RequestMapping(value="/singer") indicates that this
controller will be mapped to all URLs under the main web context. In this sample, all
URLs under http://localhost:8080/singer will be handled by this controller.
•
The SingerRepo is required for this controller to work.
•
The @RequestMapping annotation for each method indicates the URL pattern and
the corresponding HTTP method that it will be mapped to. For example, the all()
method will be mapped to the http://localhost:8080/singer URL, with an HTTP
GET method. For the update(..) method, it will be mapped to the URL http://
localhost:8080/singer/1 with an HTTP PUT method.
•
What is the difference between this controller and the ones introduced in Chapter 14?
What makes a controller suitable for REST requests? Two things: the @ResponseBody
annotation being placed on each handler method and the fact that the handler
methods to not return a logical view name, because there is no view, the methods
return the actual data. The @ResponseBody annotation indicates a method return
value should be bound to the web response body, which is the fancy technical way to
say that the value returned by the method is the actual web response. If annotating
each method with @ResponseBody seems verbose, you can easily skip that by just
using the annotation once the class level, but this means no method in the controller
is expected to return a view or a view name.
•
For methods that accept path variables (for example, the findSingerById(..)
method), the path variable is annotated with @PathVariable. This instructs
Spring MVC to bind the path variable within the URL (for example, http://
localhost:8080/singer/1) into the id argument of the findSingerById(..)
method. Note that for the id argument, the type is Long, and Spring’s type conversion
system will automatically handle the conversion from String to Long for us.
•
For the create(..) and update(..) methods, the Singer argument is annotated
with @RequestBody. This instructs Spring to automatically bind the content within
the HTTP request body into the Singer domain object. The conversion will be done
by the declared instances of the HttpMessageConverter<Object> interface (under
the package org.springframework.http.converter) for supporting formats, which
will be discussed later in this chapter.
Spring version 4.3 introduced some customization of the @RequestMapping annotations that match
basic HTTP methods. Table 15-2 lists the equivalence between the new annotations and old-style
@RequestMapping.
683
Chapter 15 ■ Spring REST Support
Table 15-2. Annotations for Mapping HTTP Method Requests onto Specific
Handler Methods Introduced in Spring 4.3
Annotation
Old-Style Equivalent
@GetMapping
@RequestMapping(method = RequestMethod.GET)
@PostMapping
@RequestMapping(method = RequestMethod.POST)
@PutMapping
@RequestMapping(method = RequestMethod.PUT)
@DeleteMapping
@RequestMapping(method = RequestMethod.DELETE)
There is also another stereotype annotation that was introduced in Spring 4.0 for REST controller
classes, called @RestController. This annotation is declared in the org.springframework.web.bind.
annotation as well and is meta-annotated with @Controller and @ResponseBody, which basically give it the
power of both. Using this annotation, and the ones in Table 15-2, the SingerController class becomes less
verbose, as shown in Listing 15-3.
Listing 15-3. The SingerController Implementation Using @RestController
package com.apress.prospring6.fifteen.controllers;
import org.springframework.web.bind.annotation.RestController;
// other import statements omitted
@RestController
@RequestMapping(path = "singer")
public class SingerController {
final Logger logger = LoggerFactory.getLogger(SingerController.class);
private final SingerRepo singerRepo;
public SingerController(SingerRepo singerRepo) {
this.singerRepo = singerRepo;
}
@ResponseStatus(HttpStatus.OK)
@GetMapping(path="/")
public List<Singer> all() {
return singerRepo.findAll();
}
@ResponseStatus(HttpStatus.OK)
@GetMapping(path = "/{id}")
public Singer findSingerById(@PathVariable Long id) {
return singerRepo.findById(id).orElse(null);
}
@ResponseStatus(HttpStatus.CREATED)
@PostMapping(path="/")
public Singer create(@RequestBody Singer singer) {
LOGGER.info("Creating singer: {}" , singer);
684
Chapter 15 ■ Spring REST Support
var saved = singerRepo.save(singer);
LOGGER.info("Singer created successfully with info: " + saved);
return singer;
}
// other methods omitted
}
For a Spring Web REST application, one that doesn’t require specialized web views, there is no ned for
specialized view resolver beans. So, the configuration is a little simpler. The WebInitializer class, the one
configuring the DispatcherServlet is pretty standard for Spring web applications and when no specialized
views are used, the HiddenHttpMethodFilter is not needed. This class is depicted in Listing 15-4.
Listing 15-4. The WebInitializer Class
package com.apress.prospring6.fifteen;
import jakarta.servlet.Filter;
import org.springframework.web.filter.CharacterEncodingFilter;
import org.springframework.web.filter.HiddenHttpMethodFilter;
import org.springframework.web.servlet.support.
AbstractAnnotationConfigDispatcherServletInitializer;
import java.nio.charset.StandardCharsets;
import java.nio.charset.StandardCharsets;
public class WebInitializer
extends AbstractAnnotationConfigDispatcherServletInitializer {
@Override
protected Class<?>[] getRootConfigClasses() {
return new Class[]{BasicDataSourceCfg.class, TransactionCfg.class};
}
@Override
protected Class<?>[] getServletConfigClasses() {
return new Class[]{WebConfig.class};
}
@Override
protected String[] getServletMappings() {
return new String[]{"/"};
}
@Override
protected Filter[] getServletFilters() {
final CharacterEncodingFilter cef = new CharacterEncodingFilter();
cef.setEncoding(StandardCharsets.UTF_8.name());
cef.setForceEncoding(true);
return new Filter[]{new HiddenHttpMethodFilter(), cef};
}
}
685
Chapter 15 ■ Spring REST Support
The Spring MVC configuration class (WebConfig, shown in Listing 15-5) is simple as well, since usually a
REST application does not require theming or internationalization.
Listing 15-5. The WebConfig Class
package com.apress.prospring6.fifteen;
import org.springframework.web.servlet.config.annotation.EnableWebMvc;
import org.springframework.web.servlet.config.annotation.WebMvcConfigurer;
// other import statements omitted
@Configuration
@EnableWebMvc
@ComponentScan(basePackages = {"com.apress.prospring6.fifteen"})
public class WebConfig implements WebMvcConfigurer {
@Override
public void addViewControllers(ViewControllerRegistry registry) {
registry.addRedirectViewController("/", "/home");
}
@Bean
public Validator validator() {
final var validator = new LocalValidatorFactoryBean();
return validator;
}
@Override
public Validator getValidator() {
return validator();
}
}
This configuration is minimal, and even in classic configuration, Spring MVC determines the requested
media types from the request based on the Accept header.
You can configure the requested media type based on path extension, query parameters, or other
methods by overriding the configureContentNegotiation(..) method in your WebConfig class3, or by
declaring different handler methods and using the produces attribute.
The other way to configure the requested media type is to override the default message converters
created by Spring MVC by overriding the configureMessageConverters() method, or adding custom
message converters to the set of default ones by overriding method extendMessageConverters().4
For this chapter, we don’t need to do any of that, because the default message converters configured by
Spring MVC are all that we need.
https://docs.spring.io/spring-framework/docs/current/reference/html/web.
html#mvc-config-content-negotiation
4
https://docs.spring.io/spring-framework/docs/current/reference/html/web.
html#mvc-config-message-converters
3
686
Chapter 15 ■ Spring REST Support
So, now that we’ve decided the Accept header is the one that a client must provide in the request to
specify the format they want for the data, do we need to configure anything else to make this work? The
answer is no, no other Spring configuration is needed. We do, however, need to add the suitable Jackson
libraries to the classpath, so Spring MVC can use them.
The dependencies for the chapter15 project are shown in Figure 15-1.
Figure 15-1. Project chapter15 dependencies
687
Chapter 15 ■ Spring REST Support
In Figure 15-1 you can see the following three Jackson libraries highlighted:
•
jackson-dataformat-xml is needed for serialization to XML.
•
jackson-core is the core Jackson library used for serialization to JSON; it contains all
the @Json* annotations.
•
jackson-datatype-jsr310 is needed for serialization and formatting of Java 8 Date
and Time types.
Now, the server-side service is complete. At this point, can build the WAR file containing the web
application and deploy it to an Apache Tomcat 10 instance or, if you are using IntelliJ IDEA, create an
Apache Tomcat Launcher as shown in Chapter 14.
Testing the RESTful-WS Application
There are many ways to test a REST application. We can build a Java client, we can use HTTPie requests, or
we can use curl5, Postman6, or any other application or CLI for making HTTP requests. Let’s start with the
simplest HTTPie, the IntelliJ IDEA HTTP client. The request to retrieve all singers as XML and a snippet of
the returned response is shown in Listing 15-6
Listing 15-6. HTTPie Request to Get All Singers As XML and Response
### Request
GET http://localhost:8080/ch15/singer/
Accept: application/xml
### Response
HTTP/1.1 200
Content-Type: application/xml;charset=UTF-8
Transfer-Encoding: chunked
Date: Tue, 17 Jan 2023 22:13:57 GMT
Keep-Alive: timeout=20
Connection: keep-alive
<List>
<item>
<firstName>John</firstName>
<lastName>Mayer</lastName>
<birthDate>1977-10-16</birthDate>
</item>
<item>
<firstName>Ben</firstName>
<lastName>Barnes</lastName>
<birthDate>1981-08-20</birthDate>
</item>
<!-- other elements omitted -->
</list>
5
6
https://curl.se
https://www.postman.com
688
Chapter 15 ■ Spring REST Support
This command sends an HTTP request to the server’s RESTful web service; in this case, it invokes the
all() method in SingerController to retrieve and return all singer information. Also, the Accept HTTP
header value is set to application/xml, meaning that the client wants to receive data in XML format.
To get the data in JSON format, all we have to do is replace the Accept header value with application/
json. And because curl was mentioned, Listing 15-7 shows the verbose (-v option) curl request for
retrieving the data as JSON and a snippet of the response.
Listing 15-7. curl Request to Get All Singers As JSON and Response
### Request
curl -v -H "Accept: application/json" http://localhost:8080/ch15/singer/
### Response
* Trying 127.0.0.1:8080...
* Connected to localhost (127.0.0.1) port 8080 (#0)
> GET /ch15/singer/ HTTP/1.1
> Host: localhost:8080
> User-Agent: curl/7.84.0
> Accept: application/json
>
* Mark bundle as not supporting multiuse
< HTTP/1.1 200
< Content-Type: application/json;charset=UTF-8
< Transfer-Encoding: chunked
< Date: Tue, 17 Jan 2023 22:22:54 GMT
<
* Connection #0 to host localhost left intact
[
{
"firstName":"John",
"lastName":"Mayer",
"birthDate":"1977-10-16"
},
{
"firstName":"Ben",
"lastName":"Barnes",
"birthDate":"1981-08-20"
}
# other JSON elements omitted
]
This command sends an HTTP request to the server’s RESTful web service, and the same all() method
in SingerController to retrieve and return all singer information. In this case, the -H option declares an
HTTP header attribute, meaning that the client wants to receive data in JSON format.
Both HTTPie and curl make the same request; the only thing different is the value of the Accept header.
Changing the data format works because Spring MVC registers org.springframework.http.converter.
HttpMessageConverter<T> implementations found on the classpath and uses them for content type
resolution.
For modelling communication between non-reactive Spring REST applications a RestTemplate
instance is used. Chapter 13 introduced RestTemplate to test a Spring Boot application, and the tests were
designed to run in a Spring Boot test context. For this section, the application is configured in a classic
way, without Spring Boot and packed as a *.war that is deployed on an Apache Tomcat server. This means
689
Chapter 15 ■ Spring REST Support
that the tests written for this application are separate from the application context. The application runs
in Tomcat, and the test class shares only the classpath with the application, not the context, thus the test is
equivalent to a client for the application.
Listing 15-8 shows the RestClientTest class that uses a RestTemplate instance to submit all type of
HTTP requests to the application deployed on Tomcat.
Listing 15-8. RestClientTest Class Making Requests to ch15 Web Application Using RestTemplate
package com.apress.prospring6.fifteen;
import org.springframework.web.client.RestTemplate;
// other import statements omitted
public class RestClientTest {
final Logger LOGGER = LoggerFactory.getLogger(RestClientTest.class);
private static final String URI_SINGER_ROOT = "http://localhost:8080/ch15/singer/";
private static final String URI_SINGER_WITH_ID = "http://localhost:8080/ch15/
singer/{id}";
RestTemplate restTemplate = new RestTemplate();
@Test
public void testFindAll() {
LOGGER.info("--> Testing retrieve all singers");
var singers = restTemplate.getForObject(URI_SINGER_ROOT, Singer[].class);
assertEquals(15, singers.length);
Arrays.stream(singers).forEach(s -> LOGGER.info(s.toString()));
}
@Test
public void testFindById() {
LOGGER.info("--> Testing retrieve a singer by id : 1");
var singer = restTemplate.getForObject(URI_SINGER_WITH_ID, Singer.class, 1);
assertNotNull(singer);
LOGGER.info(singer.toString());
}
@Test
public void testCreate() {
LOGGER.info("--> Testing create singer");
Singer singerNew = new Singer();
singerNew.setFirstName("TEST");
singerNew.setLastName("Singer");
singerNew.setBirthDate(LocalDate.now());
singerNew = restTemplate.postForObject(URI_SINGER_ROOT, singerNew, Singer.class);
LOGGER.info("Singer created successfully: " + singerNew);
}
690
Chapter 15 ■ Spring REST Support
@Test
public void testDelete() {
LOGGER.info("--> Testing delete singer by id : 33");
var initialCount = restTemplate.getForObject(URI_SINGER_ROOT, Singer[].
class).length;
restTemplate.delete(URI_SINGER_WITH_ID, 33);
var afterDeleteCount = restTemplate.getForObject(URI_SINGER_ROOT, Singer[].
class).length;
assertEquals((initialCount - afterDeleteCount), 1);
}
@Test
public void testUpdate() {
LOGGER.info("--> Testing update singer by id : 1");
var singer = restTemplate.getForObject(URI_SINGER_ROOT, Singer.class, 1);
singer.setFirstName("John Marvelous");
restTemplate.put(URI_SINGER_ROOT, singer, 1);
LOGGER.info("Singer update successfully: " + singer);
}
}
The RestClientTest class contains methods for testing all the URLs supported by the web application.
Each method can be run individually in a smart editor such as IntelliJ IDEA. The URLs for accessing various
operations are declared, which will be used in later samples. The RestTemplate instance is created and used
in all test methods.
In the testFindAll() method, the RestTemplate#getForObject(..) method is called (which
corresponds to the HTTP GET method), passing in the URL and the expected return type, which is the
Singers[] class that contains the full list of singers.
Make sure the application server is running and the web application is exposed under context ch15.
Running the testFindAll() test method, the test should pass and produce the output shown in Listing 15-9.
Listing 15-9. Console Log for Execution of RestClientTest#testFindAll()
11:33:06.970 [Test worker] INFO c.a.p.f.RestClientTest - --> Testing retrieve all singers
11:33:07.002 [Test worker] DEBUG o.s.w.c.RestTemplate - HTTP GET http://localhost:8080/
ch15/singer/
11:33:07.018 [Test worker] DEBUG o.s.w.c.RestTemplate - Accept=[application/xml, text/xml,
application/json, application/*+xml, application/*+json]
11:33:07.090 [Test worker] DEBUG o.s.w.c.RestTemplate - Response 200 OK
11:33:07.096 [Test worker] DEBUG o.s.w.c.RestTemplate - Reading to [com.apress.prospring6.
fifteen.entities.Singer[]]
11:33:07.179 [Test worker] INFO c.a.p.f.RestClientTest - Singer(id=null, version=0,
firstName=John, lastName=Mayer, birthDate=1977-10-16)
11:33:07.179 [Test worker] INFO c.a.p.f.RestClientTest - Singer(id=null, version=0,
firstName=Ben, lastName=Barnes, birthDate=1981-08-20)
...
# the rest of the singers omitted
As you can see, the RestTemplate instance submits the request with Accept header values matching
all converters found on the classpath, in this case application/xml, text/xml, application/json,
application/xml, application/json, which guarantees a correct interpretation of the response and a
691
Chapter 15 ■ Spring REST Support
successful conversion to the Java type provided as an argument, in this case an array of Singer. We cannot
use List<Singer> as a type for the response to be converted to, because this type is generic and cannot be
used as an argument.
The method getForObject(..), as its name makes obvious, is useful for submitting GET requests. If you
analyze the rest of the test methods, you can see that there are matching methods in RestTemplate for the
rest of the HTTP methods: postForObject(..) for POST, put(..) for PUT, and delete(..) for DELETE. Aside
from these, there are also the specialized execute(..) and exchange() sets of methods. The execute(..)
method is suitable when a callback method (provided as an implementation for RequestCallback) must be
executed right after the request is submitted, and since the type to convert the response body is not provided
as an argument, a ResponseExtractor<T> can be provided to explicitly convert the body into the required
type. There is more than one version of this method, including additional request parameters. Listing 15-10
shows how a test method equivalent to testFindAll(..) can be written using the execute(..) method.
Listing 15-10. The method testing testFindAll(..) using restTemplate.execute(..)
package com.apress.prospring6.fifteen;
import org.springframework.web.client.RequestCallback;
import org.springframework.web.client.ResponseExtractor;
// other import statements omitted
public class RestClientTest {
@Test
public void testFindAllWithExecute() {
LOGGER.info("--> Testing retrieve all singers");
var singers = restTemplate.execute(URI_SINGER_ROOT, HttpMethod.GET,
request -> LOGGER.debug("Request submitted ..."),
response -> {
assertEquals(HttpStatus.OK, response.getStatusCode());
return new String(response.getBody().readAllBytes());
}
);
LOGGER.info("Response: {}" , singers);
}
// other test methods omitted
}
Both RequestCallback7 and ResponseExtractor<T>8 are functional interfaces, which allows for their
implementations to be declared inline using lambda expressions. The two functional interfaces are shown in
Listing 15-11.
https://github.com/spring-projects/spring-framework/blob/main/spring-web/src/main/
java/org/springframework/web/client/RequestCallback.java
8
https://github.com/spring-projects/spring-framework/blob/main/spring-web/src/main/
java/org/springframework/web/client/ResponseExtractor.java
7
692
Chapter 15 ■ Spring REST Support
Listing 15-11. The RequestCallback and ResponseExtractor<T> Functional Interfaces
// comments omitted
package org.springframework.web.client;
import java.io.IOException;
import java.lang.reflect.Type;
import org.springframework.http.client.ClientHttpRequest;
@FunctionalInterface
public interface RequestCallback {
void doWithRequest(ClientHttpRequest request) throws IOException;
}
//------------------------------package org.springframework.web.client;
import java.io.IOException;
import java.lang.reflect.Type;
import org.springframework.http.client.ClientHttpResponse;
import org.springframework.lang.Nullable;
@FunctionalInterface
public interface ResponseExtractor<T> {
@Nullable
T extractData(ClientHttpResponse response) throws IOException;
}
The set of exchange(..) methods are the most general/capable methods provided by RestTemplate
suitable when none of the other methods provides a complete enough parameter set to meet your needs.
As its name reveals, the exchange(..) method is designed to do an exchange of information between the
client and the application running on a server, and thus is most suitable for complex POST and PUT requests.
Listing 15-12 shows the testCreate(..) version using exchange(..).
Listing 15-12. Testing the RequestCallback Interfaces
package com.apress.prospring6.fifteen;
import org.springframework.http.HttpEntity;
import org.springframework.http.HttpMethod;
// other import statements omitted
public class RestClientTest {
@Test
public void testCreateWithExchange() {
693
Chapter 15 ■ Spring REST Support
LOGGER.info("--> Testing create singer");
Singer singerNew = new Singer();
singerNew.setFirstName("TEST");
singerNew.setLastName("Singer");
singerNew.setBirthDate(LocalDate.now());
HttpEntity<Singer> request = new HttpEntity<>(singerNew);
ResponseEntity<Singer> created =
restTemplate.exchange(URI_SINGER_ROOT, HttpMethod.POST,request, Singer.class);
assertEquals(HttpStatus.CREATED, created.getStatusCode());
var singerCreated = created.getBody();
assertNotNull(singerCreated);
LOGGER.info("Singer created successfully: " + singerCreated);
}
// other test methods omitted
}
The HttpEntity<T> is powerful, as it can wrap together body and headers, making it possible for
RestTemplate#exchange(..) to submit secured rest requests.
Testing with RestTemplate is simple, but the controller might need some work to make it more capable
REST wise. What happens if the Singer instance we are trying to edit does not exist? What happens if we
try to create a Singer instance with some name? What would the response be? No way to know, because
all the handler methods are annotated with @ResponseStatus to configure the response status code to
return when all goes well, but no error status code was configured anywhere. For example, running the
testCreateWithExchange(..) method now returns 500(INTERNAL_SERVER_ERROR) because the repository
throws a org.springframework.dao.DataIntegrityViolationException that is not handled anywhere.
And so, handling exceptions is necessary.
REST Exception Handling Using ResponseEntity<t>
The first thing we could do is treat an exception where it happens, and return the desired HttpStatus
value explicitly via the ResponseEntity<T> type. This type is an extension of org.springframework.
http.HttpEntity<T> that includes a HttpStatusCode status code. It can be used to wrap the result of a
RestTemplate method invocation, but it can also be used as a return type in REST handler methods.
This being said, let’s modify the findSingerById(..) handler method to return a
ResponseEntity<Singer> that includes the HttpStatus.OK code when a singer with the provided id exists
and return a ResponseEntity<HttpStatus> that includes the HttpStatus.NOT_FOUND code when a singer
with the provided id cannot be found. Listing 15-13 shows this version of the method, which is part of a new
REST controller class named Singer2Controller.
Listing 15-13. The Singer2Controller#findSingerById(..) Method That Returns a ResponseEntity<T>
package com.apress.prospring6.fifteen.controllers;
import org.springframework.http.HttpStatus;
import org.springframework.http.ResponseEntity;
//other import statements omitted
@RestController
694
Chapter 15 ■ Spring REST Support
@RequestMapping(path = "singer2")
public class Singer2Controller {
final Logger LOGGER = LoggerFactory.getLogger(Singer2Controller.class);
private final SingerRepo singerRepo;
public Singer2Controller(SingerRepo singerRepo) {
this.singerRepo = singerRepo;
}
@GetMapping(path = "/{id}")
public ResponseEntity<Singer> findSingerById(@PathVariable Long id) {
Optional<Singer> fromDb = singerRepo.findById(id);
return fromDb
.map(s -> new ResponseEntity<>(s, HttpStatus.OK))
.orElseGet(() -> new ResponseEntity<>(HttpStatus.NOT_FOUND));
}
// other methods omitted
}
Notice that now the @ResponseStatus(HttpStatus.OK) is no longer necessary, but also in case the id
does not match an existing singer, an empty response is sent together in the HttpStatus.NOT_FOUND. The
response is represented as a ResponseEntity<T> that contains a body and a successful 200(Ok) HTTP status
code for a successful request, and only a 404(Not Found) HTTP status code for a failed request. The objects
are created explicitly by invoking constructors, but ResponseEntity<T> provides builders for constructing
requests specific to the most common HTTP status codes. Listing 15-14 shows the findSingerById(..)
handler method written using ResponseEntity<T> builders.
Listing 15-14. The Singer2Controller#findSingerById(..) Method That Returns a ResponseEntity<T>
Created Using Builders
package com.apress.prospring6.fifteen.controllers;
import org.springframework.http.HttpStatus;
import org.springframework.http.ResponseEntity;
//other import statements omitted
@RestController
@RequestMapping(path = "singer2")
public class Singer2Controller {
final Logger LOGGER = LoggerFactory.getLogger(Singer2Controller.class);
private final SingerRepo singerRepo;
public Singer2Controller(SingerRepo singerRepo) {
this.singerRepo = singerRepo;
}
@GetMapping(path = "/{id}")
public ResponseEntity<Singer> findSingerById(@PathVariable Long id) {
Optional<Singer> fromDb = singerRepo.findById(id);
return fromDb
695
Chapter 15 ■ Spring REST Support
.map(s -> ResponseEntity.ok().body(s))
.orElseGet(() -> ResponseEntity.notFound().build());
}
// other methods omitted
}
Since the response now is a ResponseEntity<Singer>, to test this method two tests can be written
using the RestTemplate#exchange(..) method, one positive, one negative. Listing 15-15 shows the two test
methods.
Listing 15-15. Testing the Singer2Controller#findSingerById(..) Methods
package com.apress.prospring6.fifteen;
import org.springframework.web.client.HttpClientErrorException;
import org.springframework.web.client.RestTemplate;
import org.springframework.http.RequestEntity;
// other import statements omitted
public class RestClient2Test {
final Logger LOGGER = LoggerFactory.getLogger(RestClientTest.class);
private static final String URI_SINGER2_ROOT = "http://localhost:8080/ch15/singer2/";
RestTemplate restTemplate = new RestTemplate();
@Test
public void testPositiveFindById() throws URISyntaxException {
HttpHeaders headers = new HttpHeaders();
headers.setAccept(List.of(MediaType.APPLICATION_JSON));
RequestEntity<HttpHeaders> req = new RequestEntity<>(headers, HttpMethod.GET, new
URI(URI_SINGER2_ROOT + 1));
LOGGER.info("--> Testing retrieve a singer by id : 1");
ResponseEntity<Singer> response = restTemplate.exchange(req, Singer.class);
assertEquals(HttpStatus.OK, response.getStatusCode());
assertTrue(Objects.requireNonNull(response.getHeaders().get(HttpHeaders.CONTENT_
TYPE)).contains(MediaType.APPLICATION_JSON_UTF8_VALUE));
assertNotNull(response.getBody());
}
@Test
public void testNegativeFindById() throws URISyntaxException {
LOGGER.info("--> Testing retrieve a singer by id : 99");
RequestEntity<HttpHeaders> req = new RequestEntity<>(HttpMethod.GET, new
URI(URI_SINGER2_ROOT + 99));
assertThrowsExactly(HttpClientErrorException.NotFound.class, () -> restTemplate.
exchange(req, HttpStatus.class));
}
}
696
Chapter 15 ■ Spring REST Support
As mentioned previously, the RestTemplate#exchange(..) exchange methods are very powerful. In the
testPositiveFindById() test method, the version of the method that requires a RequestEntity<T> and the
returned object type as arguments is invoked. The RequestEntity<T> type is an extension of HttpEntity<T>
that exposes the HTTP method and the target URL. Just for fun, the requested resource representation
is JSON, but RestTemplate is smart enough to convert it back to Singer so assertions can be run on the
returned object.
In the testNegativeFindById() test method, notice that instead of inspecting a RequestEntity<T>, an
assumption that an org.springframework.web.client.HttpClientErrorException.NotFound exception
is thrown is checked. This is because the under the hood an error handler handles the response with the
404(Not Found) by throwing this type of exception. This kind of handling happens for other HTTP status
codes corresponding to responses other than the successful one, and the exception types all extend
org.springframework.web.client.HttpClientErrorException.
The rest of the methods in Singer2Controller are shown in Listing 15-16.
Listing 15-16. The Complete Singer2Controller
package com.apress.prospring6.fifteen.controllers;
// other import statements are omitted
@RestController
@RequestMapping(path = "singer2")
public class Singer2Controller {
final Logger LOGGER = LoggerFactory.getLogger(Singer2Controller.class);
private final SingerRepo singerRepo;
public Singer2Controller(SingerRepo singerRepo) {
this.singerRepo = singerRepo;
}
@GetMapping(path={"/", ""})
public ResponseEntity<List<Singer>> all() {
var singers = singerRepo.findAll();
if(singers.isEmpty()) {
return ResponseEntity.notFound().build();
}
return ResponseEntity.ok().body(singerRepo.findAll());
}
@GetMapping(path = "/{id}")
public ResponseEntity<Singer> findSingerById(@PathVariable Long id) {
Optional<Singer> fromDb = singerRepo.findById(id);
return fromDb
.map(s -> ResponseEntity.ok().body(s))
.orElseGet(() -> ResponseEntity.notFound().build());
}
@PostMapping(path="/")
public ResponseEntity<Singer> create(@RequestBody @Valid Singer singer) {
LOGGER.info("Creating singer: {}" , singer);
697
Chapter 15 ■ Spring REST Support
try {
var saved = singerRepo.save(singer);
LOGGER.info("Singer created successfully with info: {}" , saved);
return new ResponseEntity<>(saved, HttpStatus.CREATED);
} catch (DataIntegrityViolationException dive) {
LOGGER.debug("Could not create singer." , dive);
return ResponseEntity.badRequest().build();
}
}
@PutMapping(value="/{id}")
public ResponseEntity<Object> update(@RequestBody Singer singer, @PathVariable
Long id) {
LOGGER.info("Updating singer: " + singer);
Optional<Singer> fromDb = singerRepo.findById(id);
return fromDb
.map(s -> {
s.setFirstName(singer.getFirstName());
s.setLastName(singer.getLastName());
s.setBirthDate(singer.getBirthDate());
try {
singerRepo.save(s);
return ResponseEntity.ok().build();
} catch (DataIntegrityViolationException dive) {
LOGGER.debug("Could not update singer." , dive);
return ResponseEntity.badRequest().build();
}
})
.orElseGet(() -> ResponseEntity.notFound().build());
}
@DeleteMapping(value="/{id}")
public ResponseEntity<Object> delete(@PathVariable Long id) {
LOGGER.info("Deleting singer with id: " + id);
Optional<Singer> fromDb = singerRepo.findById(id);
return fromDb
.map(s -> {
singerRepo.deleteById(id);
return ResponseEntity.noContent().build();
})
.orElseGet(() -> ResponseEntity.notFound().build());
}
}
Looking at the full Singer2Controller, you might notice that there is a repetitive situation when a
singer is not found in the database: a ResponseEntity.notFound().build() is built and returned. This leads
to the same code being written quite a few times. Just to make the situation more dire, we’ve also returned
this type of response when no singer is found in the database. So, can all this repetitive code be avoided? Of
course, and you will learn how by reading the following section.
698
Chapter 15 ■ Spring REST Support
REST Exception Handling Using @RestControllerAdvice
To reduce the code that needs to be written, we can write a SingerService that wraps around the
SingerRepo and throws an exception named NotFoundException, declared to extend RuntimeException
because checked exceptions are annoying. We inject a bean of this type in the controller and
annotate this class with @ResponseStatus(value= HttpStatus.NOT_FOUND), and voila, automatic
mapping of this exception to the response status that is returned to the client. Listing 15-17 shows the
NotFoundException class.
Listing 15-17. The NotFoundException REST-Specific Exception Class
package com.apress.prospring6.fifteen.problem;
import org.springframework.http.HttpStatus;
import org.springframework.web.bind.annotation.ResponseStatus;
import java.io.Serial;
@ResponseStatus(value= HttpStatus.NOT_FOUND, reason="Requested item(s) not found")
public class NotFoundException extends RuntimeException {
@Serial
private static final long serialVersionUID = 2L;
private Long objIdentifier;
public <T> NotFoundException(Class<T> cls) {
super("table for " + cls.getSimpleName() + " is empty");
}
public <T> NotFoundException(Class<T> cls, Long id) {
super(cls.getSimpleName() + " with id: " + id + " does not exist!");
}
public Long getObjIdentifier() {
return objIdentifier;
}
}
Notice that an error message can be attached via the reason attribute, and it will be part of the response.
Listing 15-18 shows the SingerService implementation that throws this type of exception whenever
some data cannot be found.
Listing 15-18. The SingerService Class
package com.apress.prospring6.fifteen.services;
import com.apress.prospring6.fifteen.problem.NotFoundException;
// other import statements omitted
@Transactional
@Service("singerService")
699
Chapter 15 ■ Spring REST Support
public class SingerServiceImpl implements SingerService {
private final SingerRepo singerRepo;
public SingerServiceImpl(SingerRepo singerRepo) {
this.singerRepo = singerRepo;
}
@Override
public List<Singer> findAll() {
var singers = singerRepo.findAll();
if(singers.isEmpty()) {
throw new NotFoundException(Singer.class);
}
return singerRepo.findAll();
}
@Override
public Singer findById(Long id) {
return singerRepo.findById(id).orElseThrow(() -> new NotFoundException
(Singer.class, id));
}
@Override
public Singer save(Singer singer) {
return singerRepo.save(singer);
}
@Override
public Singer update(Long id, Singer singer) {
return singerRepo.findById(id)
.map(s -> {
s.setFirstName(singer.getFirstName());
s.setLastName(singer.getLastName());
s.setBirthDate(singer.getBirthDate());
return singerRepo.save(s);
})
.orElseThrow(() -> new NotFoundException(Singer.class, id));
}
@Override
public void delete(Long id) {
Optional<Singer> fromDb = singerRepo.findById(id);
if (fromDb.isEmpty()) {
throw new NotFoundException(Singer.class, id);
}
singerRepo.deleteById(id);
}
}
700
Chapter 15 ■ Spring REST Support
Notice that most of the logic we previously had in the controller handler methods now has moved to
this class. This means that we can write a new controller named Singer3Controller to use a bean of this
type, and this controller is way more elegant and compact, as shown in Listing 15-19.
Listing 15-19. The Singer3Controller Class
package com.apress.prospring6.fifteen.controllers;
import com.apress.prospring6.fifteen.services.SingerService;
// other import statements omitted
@RestController
@RequestMapping(path = "singer3")
public class Singer3Controller {
final Logger LOGGER = LoggerFactory.getLogger(Singer3Controller.class);
private final SingerService singerService;
public Singer3Controller(SingerService singerService) {
this.singerService = singerService;
}
@GetMapping(path={"/", ""})
public List<Singer> all() {
return singerService.findAll();
}
@GetMapping(path = "/{id}")
public Singer findSingerById(@PathVariable Long id) {
return singerService.findById(id);
}
@PostMapping(path="/")
@ResponseStatus(HttpStatus.CREATED)
public Singer create(@RequestBody @Valid Singer singer) {
LOGGER.info("Creating singer: " + singer);
return singerService.save(singer);
}
@PutMapping(value="/{id}")
public void update(@RequestBody @Valid Singer singer, @PathVariable Long id) {
LOGGER.info("Updating singer: " + singer);
singerService.update(id, singer);
}
@ResponseStatus(HttpStatus.NO_CONTENT)
@DeleteMapping(value="/{id}")
public void delete(@PathVariable Long id) {
701
Chapter 15 ■ Spring REST Support
LOGGER.info("Deleting singer with id: {}" , id);
singerService.delete(id);
}
}
To test that this exception causes a response with the 404(Not Found) HTTP status code, the job
is done by the testNegativeFindById(..) introduced in Listing 15-15, but by sending the request
"http://localhost:8080/ch15/singer3/99".
Having an exception annotated like this gets the job done, but our controller also throws a
DataIntegrityViolationException that is not mapped to any HTTP status code. This type of exception is
not part of our application, and thus cannot be annotated with @ResponseStatus.
For this type of exception, the solution is to write an exception handler class, annotate it with
@RestControllerAdvice (the REST equivalent of @ControllerAdvice), and declare a method handler for the
DataIntegrityViolationException, similar to what was done in Chapter 14 for Spring web applications.
The RestErrorHandler class that is a global exception handler for REST requests is shown in
Listing 15-20.
Listing 15-20. The RestErrorHandler Class
package com.apress.prospring6.fifteen.controllers;
import
import
import
import
import
org.springframework.dao.DataIntegrityViolationException;
org.springframework.http.HttpStatus;
org.springframework.http.ResponseEntity;
org.springframework.web.bind.annotation.ControllerAdvice;
org.springframework.web.bind.annotation.ExceptionHandler;
@RestControllerAdvice
public class RestErrorHandler {
@ExceptionHandler(DataIntegrityViolationException.class)
public ResponseEntity<HttpStatus> handleBadRequest(DataIntegrityViolationException ex) {
return ResponseEntity.badRequest().build();
}
}
How do we test that when a DataIntegrityViolationException happens we no longer have a
500(Internal Server Error)? Simple: we try to create a new Singer instance with an existing firstName
and lastName, and since a combination of these two is declared to be the SINGER table unique key, the
exception is thrown. The test is depicted in Listing 15-21.
Listing 15-21. The RestClient3Test#testNegativeCreate() Test Method
package com.apress.prospring6.fifteen;
import org.springframework.web.client.HttpClientErrorException;
import org.springframework.web.client.RestTemplate;
// other import statements omitted
702
Chapter 15 ■ Spring REST Support
public class RestClient3Test {
final Logger LOGGER = LoggerFactory.getLogger(RestClientTest.class);
private static final String URL_GET_ALL_SINGERS = "http://localhost:8080/ch15/singer3/";
private static final String URL_CREATE_SINGER = "http://localhost:8080/ch15/singer3/";
RestTemplate restTemplate = new RestTemplate();
@Test
public void testNegativeCreate() throws URISyntaxException {
LOGGER.info("--> Testing create singer");
Singer singerNew = new Singer();
singerNew.setFirstName("Ben");
singerNew.setLastName("Barnes");
singerNew.setBirthDate(LocalDate.now());
RequestEntity<Singer> req = new RequestEntity<>(singerNew, HttpMethod.POST, new
URI(URL_CREATE_SINGER));
assertThrowsExactly(HttpClientErrorException.BadRequest.class, () -> restTemplate.
exchange(req, HttpStatus.class));
}
// other test methods omitted
}
Notice that the type of exception being thrown by RestTemplate is HttpClientErrorException.
BadRequest, which is the type of exception matching the 400(Bad Request) HTTP status code.
This is where this section about writing a Spring REST Web application must end, because when it
comes to REST APIs with Spring, the subject is quite vast. Check out the next section to see how easy it is to
build Spring REST Web application using Spring Boot.
RESTful-WS with Spring Boot
This section is included because Spring Boot makes everything easier to develop. The Singer entity,
repository, service, exception, and exception handler classes are the same as before; there’s no need to
change anything. The same rule as for a classic Spring REST application applies: if we want XML and
JSON serialization, we need to add the required Jackson libraries to the classpath. Figure 15-2 shows the
chapter15-boot project dependencies.
703
Chapter 15 ■ Spring REST Support
Figure 15-2. Project chapter15-boot dependencies
Being a web application, the Spring Boot configuration is almost identical to the one introduced in
Chapter 14, except the Thymeleaf section. Listing 15-22 shows the Spring Boot configuration contained by
the application-dev.yaml.
Listing 15-22. The Spring Boot Configuration for the chapter15-boot Project
# web server config
server:
port: 8081
servlet:
context-path: /
compression:
enabled: true # improves website performance by compressing response body
address: 0.0.0.0
704
Chapter 15 ■ Spring REST Support
# datasource config
spring:
datasource:
driverClassName: org.mariadb.jdbc.Driver
url: jdbc:mariadb://localhost:3306/musicdb?useSSL=false
username: prospring6
password: prospring6
hikari:
maximum-pool-size: 25
jpa:
generate-ddl: false
properties:
hibernate:
jdbc:
batch_size: 10
show-sql: true
format-sql: false
use_sql_comments: false
hbm2ddl:
auto: none
# Logging config
logging:
pattern:
console: "%-5level: %class{0} - %msg%n"
level:
root: INFO
org.springframework.boot: DEBUG
com.apress.prospring6.fifteen: INFO
As usual, the dev profile is used to connect the application to an existing container. This allows for a test
profile to spin up a container using Testcontainers. Testing this application is way easier because Spring Boot
makes it so. The application-test.yaml file is simple because the data source configuration is the only one
being customized. Listing 15-23 shows the data source configuration for the Spring Boot test context.
Listing 15-23. The Spring Boot Test Configuration for the chapter15-boot Project
spring:
datasource:
url: "jdbc:tc:mariadb:latest:///testdb?TC_INITSCRIPT=testcontainers/create-schema.sql"
jpa:
properties:
hibernate:
jdbc:
batch_size: 10
fetch_size: 30
max_fetch_depth: 3
show-sql: true
format-sql: true
use_sql_comments: true
hbm2ddl:
auto: none
705
Chapter 15 ■ Spring REST Support
The Chapter15ApplicationTest class is shown in Listing 15-24.
Listing 15-24. The Spring Boot Chapter15ApplicationTest Class
package com.apress.prospring6.fifteen.boot;
import org.springframework.boot.test.context.SpringBootTest;
import org.springframework.boot.test.web.client.TestRestTemplate;
import org.springframework.test.context.ActiveProfiles;
import static org.junit.jupiter.api.Assertions.*;
// other import statements omitted
@ActiveProfiles("test")
@SpringBootTest(webEnvironment = SpringBootTest.WebEnvironment.RANDOM_PORT)
public class Chapter15ApplicationTest {
final Logger LOGGER = LoggerFactory.getLogger(Chapter15ApplicationTest.class);
@Value(value="${local.server.port}")
private int port;
@Autowired
private TestRestTemplate restTemplate;
@Test
public void testFindAll() {
LOGGER.info("--> Testing retrieve all singers");
var singers = restTemplate.getForObject("http://localhost:"+port+"/singer/",
Singer[].class);
assertTrue( singers.length >= 15);
Arrays.stream(singers).forEach(s -> LOGGER.info(s.toString()));
}
@Test
public void testPositiveFindById() throws URISyntaxException {
HttpHeaders headers = new HttpHeaders();
headers.setAccept(List.of(MediaType.APPLICATION_JSON));
RequestEntity<HttpHeaders> req = new RequestEntity<>(headers, HttpMethod.GET, new
URI("http://localhost:"+port+"/singer/1"));
LOGGER.info("--> Testing retrieve a singer by id : 1");
ResponseEntity<Singer> response = restTemplate.exchange(req, Singer.class);
assertAll("testPositiveFindById",
() -> assertEquals(HttpStatus.OK, response.getStatusCode()),
() -> assertTrue(Objects.requireNonNull(response.getHeaders().
get(HttpHeaders.CONTENT_TYPE)).contains(MediaType.APPLICATION_JSON_
VALUE)),
() -> assertNotNull(response.getBody()),
() -> assertEquals(Singer.class, response.getBody().getClass())
);
}
@Test
public void testNegativeFindById() throws URISyntaxException {
706
Chapter 15 ■ Spring REST Support
LOGGER.info("--> Testing retrieve a singer by id : 99");
RequestEntity<Singer> req = new RequestEntity<>(HttpMethod.GET, new URI("http://
localhost:"+port+"/singer/99"));
ResponseEntity<Singer> response = restTemplate.exchange(req, Singer.class);
assertAll("testNegativeFindById",
() -> assertEquals(HttpStatus.NOT_FOUND, response.getStatusCode()),
() -> assertNull(response.getBody().getFirstName()),
() -> assertNull(response.getBody().getLastName())
);
}
@Test
public void testNegativeCreate() throws URISyntaxException {
LOGGER.info("--> Testing create singer");
Singer singerNew = new Singer();
singerNew.setFirstName("Ben");
singerNew.setLastName("Barnes");
singerNew.setBirthDate(LocalDate.now());
RequestEntity<Singer> req = new RequestEntity<>(singerNew, HttpMethod.POST, new
URI("http://localhost:"+port+"/singer/"));
ResponseEntity<String> response = restTemplate.exchange(req, String.class);
assertAll("testNegativeCreate",
() -> assertEquals(HttpStatus.BAD_REQUEST, response.getStatusCode()),
()-> assertTrue(response.getBody().contains("could not execute statement;
SQL [n/a]; constraint [FIRST_NAME]")));
}
}
This test class uses a TestRestTemplate instance to submit requests. TestRestTemplate is the nonreactive equivalent of the WebClient that is covered in Chapter 20, and it is a convenient alternative to
RestTemplate that is suitable for integration tests. It is designed specifically for testing because failed
requests with 4xx and 5xx do not throw an exception (like you’ve noticed in the tests for the classic
application), this being very useful for writing negative test cases.
Notice the testNegativeFindById() method. Normally a HttpClientErrorException.BadRequest
would be thrown, but when using TestRestTemplate, an actual ResponseEntity<Singer> is returned, with
an actual body, that is a Singer instance with all fields set to null.
This raises the following question: is it possible to handle handler method exceptions better and return
a body with proper details? Of course it is. The exception-handling methods in the RestErrorHandler class,
annotated with @RestControllerAdvice, return a ResponseEntity<T>. A custom type could be declared to
contain exception details that are clearer and more relevant, like in the example provided here: https://
www.toptal.com/java/spring-boot-rest-api-error-handling.
707
Chapter 15 ■ Spring REST Support
Summary
In this chapter, we covered a few topics about creating Spring Restful web services and exposing them
via Spring configuration. The types of configurations covered were the classic configuration, where the
application is packed as a *.war and deployed to an Apache Tomcat 10 server, and configuration using
Spring Boot. The REST APIs were consumed using RestTemplate and TestRestTemplate.
This chapter also covered various ways of writing handler methods for REST requests and exception
handling. The next chapter is not related to Spring REST in any way, but does cover some newer Spring
features, so if you are not sleepy yet, you can start that one.
708
CHAPTER 16
Spring Native and Other Goodies
In previous chapters, you saw how the Spring Framework can help Java developers create JEE applications.
By using the Spring Framework’s dependency injection (DI) mechanism and its integration with each layer
(via libraries within the Spring Framework’s own modules or via integration with third-party libraries), you
can simplify implementing and maintaining business logic.
The Spring Framework has evolved a lot over the years, splitting into separate projects integrating with
the latest technologies. Version 6 is truly rich in features and new projects. This chapter introduces you to
three important new developments:
•
1
2
Spring Native Images: Spring Boot 2.3.0 introduced the ability to package your app
into a Docker image with Cloud Native Buildpacks (CNB). At the same time, Oracle
was working on GraalVM,1 a high-performance JDK distribution written for Java
and other JVM languages that promised incredible performance optimizations for
individual languages and interoperability for polyglot applications. The goal was
eventually to have compact, fast-starting applications that can be run, for example,
in an AWS Lambda function. AWS Lambda functions are applications that are
triggered on request, without the need for a server running all time. A Spring Boot
application running on an AWS EC2 is an infrastructure as a service (laaS), whereas
a Spring Boot application running in a AWS Lambda is a platform as a service (PaaS)
that helps you to run and execute your back-end code, only when needed. The
Spring Native project provided support for compiling Spring applications to native
executables using the GraalVM native-image compiler. This project is now retired,
since it was experimental, and its result is the Spring Boot 3 official native support.2
https://www.graalvm.org
https://docs.spring.io/spring-boot/docs/current/reference/html/native-image.html
© Iuliana Cosmina, Rob Harrop, Chris Schaefer, and Clarence Ho 2023
I. Cosmina et al., Pro Spring 6, https://doi.org/10.1007/978-1-4842-8640-1_16
709
Chapter 16 ■ Spring Native and Other Goodies
•
Spring for GraphQL: GraphQL3 is a query language for APIs and a runtime for
fulfilling those queries with your existing data. For a long time, components in the
service layer(services) have been communicating over HTTP using REST requests,
handling information in various formats such a JSON, XML, and others. What
GraphQL adds in is the possibility to easily declare which data you want retrieved
and nothing more without writing complicated code to provide it. Spring for
GraphQL4 provides support for Spring applications built on GraphQL Java. It is a
joint collaboration between the GraphQL Java team and Spring engineering. In this
chapter you will learn how to build a Spring Boot application capable of retrieving
data efficiently in response to GraphQL queries.
•
Spring Kotlin applications: Kotlin5 is a cross-platform, statically typed, generalpurpose, high-level programming language with type inference. Kotlin is designed to
interoperate fully with Java, and the JVM version of Kotlin’s standard library provides
a more concise syntax, various types, and programming constructs. Some developers
have described it as a cross between Scala and Java. The language has a great
community supporting it, and is developed by the team that produced the best Java
editor, so it is no surprise its adoption was quick; its hype is well deserved. In this
chapter you will learn how to use Kotlin to build a small Spring Boot web application.
Spring Native Images
A Spring Native image is a stand-alone executable that is created by processing a compiled Spring
application ahead of time using the GraalVM native-image compiler. Native images are usually a smaller
memory footprint and start faster than their JVM counterparts. Also, you don’t need a JVM to run them. In
previous chapters, the result of building a Spring project was an executable JAR containing all bytecode, a
result of compiling all the Java and Spring Code making up that project. To execute the JAR you need a JVM,
provided by a JDK (or JRE, in the distant past before Java 9). Spring Native will produce an executable for the
targeted system. A native executable is made of the following:
•
Substrate VM: A virtual machine compiled and configured for the code that needs
to be run on it. It is a replacement for a JVM. The process to create it is very similar
to how jlink6 is used to strip away from the JDK all modules that are not necessary
for running an application, to assemble and optimize a set of modules and their
dependencies into a custom runtime image.
•
DWARF info: Information useful during the debugging processes. DWARF is a
debugging information file format used by many compilers. You can read more
about it here: https://dwarfstd.org.
•
Initial heap: Memory for the application to run.
•
Native machine code: Low level code designed to run on a particular
operating system.
•
Application compiled to native code: In this case, a Spring Boot application and all its
dependencies.
https://graphql.org
https://docs.spring.io/spring-graphql/docs/current/reference/html
5
https://kotlinlang.org
6
https://docs.oracle.com/javase/9/tools/jlink.htm
3
4
710
Chapter 16 ■ Spring Native and Other Goodies
To keep things simple, the Spring Boot ability to create Docker images is leveraged in this section to
create a Docker image that contains the Spring native executable and run the application by starting up a
container. This is easier since it doesn’t require you to install GraalVM on your machine. Also, you obviously
need Docker locally, because the Docker image that you will create needs to be added to an image catalog
and then needs a runtime to run a container based on it.
So, what is ahead-of-time (AOT) compilation and how is it different from normal Java compilation?
There are a few things that are worth mentioning:
•
AOT compilation is a process that involves statically analyzing your application code
from its main entry point.
•
Code that cannot be reached when the native image is created is excluded from
the executable. This obviously means that using Spring dynamic elements is out
the window, along with the “automagic” that naive developers are so enthralled
by. GraalVM must be told about reflection, resources, serialization, and dynamic
proxies.
•
The application classpath is known at build time and does not change at runtime.
This means there is no lazy class loading, and all the classes in the executables are
loaded in memory on startup.
•
There might be other limitations for Java applications and the platform that can only
be discovered after more companies start using GraalVM. (For example, I(Iuliana)
have had some problems when building native images for macOS running Apple M1
architecture.)
So, the flexibility and dynamism of Spring Boot applications must be given up in exchange for a small
memory footprint and a faster startup. This means profiles are not supported, and beans cannot be modified
once created. Is this worth it? Time will tell.
When a Spring application is processed ahead of time, the following must happen for it to be
transformed into a native executable:
•
Java code is generated
•
Bytecode is generated for dynamic proxies
•
The following GraalVM JSON hint files are generated that describe how GraalVM
should deal with things that it can’t understand by directly inspecting the code:
–– Resource hints (resource-config.json)
–– Reflection hints (reflect-config.json)
–– Serialization hints (serialization-config.json)
–– Java proxy hints (proxy-config.json)
–– JNI hints (jni-config.json)
In a typical Spring application, a lot of reflection is required to inject beans into other beans. The Spring
IoC container identifies @Configuration classes and bean definitions and creates a dependency tree to
decide the order in which the beans are created, so that they can be injected. All this work is done when the
application starts, at runtime. This obviously takes some time, as you’ve probably noticed if you’ve read the
previous chapters and ran the code yourself.
In a Spring Native executable, Spring behaves differently. Configuration classes are no longer identified
and parsed and bean definitions are not created at runtime; all this work is done at build time. The bean
definitions are processed and converted into source code that is analyzed by the GraalVM compiler, so that
711
Chapter 16 ■ Spring Native and Other Goodies
the ones that are not reached (used) can be dropped. The generated code is seriously verbose, because
without the power of Spring IoC, all that is left is very explicit code, injecting the right beans in the right
places through classic Java code—direct assignment and explicit instantiation of the bean type. This
obviously increases the build time, but that is not really a problem.
Development can be done on a normal JVM for the developer’s comfort and speed, and the production
build can be isolated on a pipeline and run only when a release is necessary.
There are two main ways to build a Spring Boot native image application:
•
Using Spring Boot support for Cloud Native Buildpacks (CNB)7 to generate a
lightweight container containing a native executable
•
Using GraalVM Native Build Tools to generate a native executable
Spring Boot native support is a breeze, especially if you happen to use Gradle, which makes the
configuration very concise because of the Gradle Native Build Tools plug-in. For Maven, things are simple
too if you declare spring-boot-starter-parent as the parent of your project. This is because your project
inherits the native profile that is configured with all the components necessary to build a Spring Native
executable. If having spring-boot-starter-parent as a parent is not an option (some companies prefer
to have their own custom parent), the configuration is a bit more complicated. The focus of this section is
not the code and techniques for writing a Spring application, but the configurations necessary to compile a
Spring application into a native executable and run it using a Docker runtime.
The Application
The Spring application that is compiled into a native executable in this section is a simple Spring Boot REST
web application. It uses Spring Data JPA to retrieve data from a database running in a container on your local
Docker (could be also remote somewhere if you have the resources). Figure 16-1 shows the structure of the
simple project used in this section.
7
https://buildpacks.io
712
Chapter 16 ■ Spring Native and Other Goodies
Figure 16-1. Project chapter16-native-boot structure
All the classes should be familiar to you from previous chapters. The Singer class is a very simple entity
class, declared using Lombok to keep it simple and write it fast, and is shown in Listing 16-1.
Listing 16-1. The Singer Entity Class
package com.apress.prospring6.sixteen.boot.entities;
import
import
import
import
jakarta.persistence.*;
lombok.*;
org.springframework.format.annotation.DateTimeFormat;
static jakarta.persistence.GenerationType.IDENTITY;
@Entity // JPA
@Data // Lombok
@AllArgsConstructor // Lombok
@NoArgsConstructor // Lombok
@EqualsAndHashCode(onlyExplicitlyIncluded = true) // Lombok
@Table(name = "SINGER") // JPA
public class Singer {
@Serial
private static final long serialVersionUID = 1L;
713
Chapter 16 ■ Spring Native and Other Goodies
@Id // JPA
@GeneratedValue(strategy = IDENTITY) // JPA
@EqualsAndHashCode.Include // Lombok
@Column(name = "ID") // JPA
protected Long id;
@Version
@Column(name = "VERSION")
protected int version;
@Column(name = "FIRST_NAME")
private String firstName;
@Column(name = "LAST_NAME")
private String lastName;
@DateTimeFormat(pattern = "yyyy-MM-dd")
@Column(name = "BIRTH_DATE")
private LocalDate birthDate;
}
To handle Singer instances, the SingerRepo interface is declared as extending JpaRepository<Singer,
Long> as shown in Listing 16-2.
Listing 16-2. The SingerRepo Spring Data Interface Class
package com.apress.prospring6.sixteen.boot.repos;
import com.apress.prospring6.sixteen.boot.entities.Singer;
import org.springframework.data.jpa.repository.JpaRepository;
public interface SingerRepo extends JpaRepository<Singer, Long> {
}
To keep things simple, the SingerController class requires an instance of SingerRepo to pass data
back and forth via its handler methods (for simplicity, we are skipping the service layer). This class and bean
declaration are shown in Listing 16-3.
Listing 16-3. The SingerController Class
package com.apress.prospring6.sixteen.boot.controllers;
// other import statements omitted
import org.springframework.web.bind.annotation.*;
@RestController
@RequestMapping(value="/singer")
public class SingerController {
final Logger LOGGER = LoggerFactory.getLogger(SingerController.class);
private final SingerRepo singerRepo;
714
Chapter 16 ■ Spring Native and Other Goodies
public SingerController(SingerRepo singerRepo) {
this.singerRepo = singerRepo;
}
@GetMapping(path={"/", ""})
public List<Singer> all() {
return singerRepo.findAll();
}
@GetMapping(path = "/{id}")
public Singer findSingerById(@PathVariable Long id) {
return singerRepo.findById(id).orElse(null);
}
// other methods omitted
}
The CustomPhysicalNamingStrategy bean is used to configure Spring Data to recognize database
objects with names consisting of only uppercase letters, and is out of scope for this section. The
Chapter16NativeApplication class shown in Listing 16-4 is a basic Spring Boot configuration and main
class, the entry point of this application.
Listing 16-4. The Chapter16NativeApplication Class
package com.apress.prospring6.sixteen.boot;
import
import
import
import
import
org.springframework.boot.SpringApplication;
org.springframework.boot.autoconfigure.SpringBootApplication;
org.springframework.boot.autoconfigure.domain.EntityScan;
org.springframework.data.jpa.repository.config.EnableJpaRepositories;
org.springframework.transaction.annotation.EnableTransactionManagement;
@EntityScan(basePackages = {"com.apress.prospring6.sixteen.boot.entities"})
@EnableJpaRepositories("com.apress.prospring6.sixteen.boot.repos")
@EnableTransactionManagement
@SpringBootApplication
public class Chapter16NativeApplication {
public static void main(String... args) {
SpringApplication.run(Chapter16NativeApplication.class, args);
}
}
As you can see, there is nothing in the code that needs to be modified for this application to be eligible
to be compiled as a Spring Native executable.
The Configuration
It is all in the configuration. So, let’s look at the Gradle configuration first, because this is the smaller one.
Listing 16-5 shows the Gradle configuration for the chapter16-native-boot project.
715
Chapter 16 ■ Spring Native and Other Goodies
Listing 16-5. The Contents of the chapter16-native-boot.gradle File
apply plugin: 'java'
apply plugin: 'org.graalvm.buildtools.native'
dependencies {
implementation 'org.springframework.boot:spring-boot-starter-web'
implementation 'org.springframework.boot:spring-boot-starter-data-jpa'
implementation "commons-io:commons-io:2.11.0"
compileOnly "org.projectlombok:lombok:$lombokVersion"
annotationProcessor "org.projectlombok:lombok:$lombokVersion"
implementation "com.zaxxer:HikariCP:$hikariVersion"
implementation "org.mariadb.jdbc:mariadb-java-client:$mariadbClientVersion"
}
tasks.named("bootBuildImage") {
docker {
buildpacks = [
"gcr.io/paketo-buildpacks/graalvm",
"gcr.io/paketo-buildpacks/java-native-image",
]
}
imageName = "prospring6-gradle-native:1.0"
}
bootJar {
manifest {
attributes 'Start-Class': 'com.apress.prospring6.sixteen.boot.
Chapter16NativeApplication'
}
}
The most important part of this configuration is the GraalVM Native Image plug-in: org.graalvm.
buildtools.native. The current version of this project is 0.9.22 and it is added to the classpath of the parent
project pro-spring-6. The parent project also configures the Spring Boot project for all subprojects with
names ending in boot. The configuration snippets are shown in Listing 16-6.
Listing 16-6. pro-spring-6 Project Configuration Snippets
buildscript {
repositories {
mavenLocal()
mavenCentral()
}
dependencies {
classpath 'io.spring.gradle:dependency-management-plugin:1.1.0'
classpath 'org.springframework.boot:spring-boot-gradle-plugin:3.0.7'
716
Chapter 16 ■ Spring Native and Other Goodies
classpath 'org.graalvm.buildtools.native:org.graalvm.buildtools.native.gradle.
plugin:0.9.22'
}
}
ext {
bootProjects = subprojects.findAll { ( it.name.endsWith('-boot')) }
// various version variables omitted
}
// other configuration somitted
configure(bootProjects) { project ->
apply plugin: 'org.springframework.boot'
}
Notice the buildscript.dependencies declaring plug-ins to be added to the project classpath. The
plug-in declarations follow the template of groupId:artifactId:version. This is the equivalent of a
<pluginManagement><plugins> declaration in Maven.
The bootProjects variable is an array containing all the Spring Boot subprojects (or modules) of the
pro-spring-6 parent. The configure(bootProjects) statement configures the Spring Boot plug-in for all
Spring Boot subprojects. Independently, each subproject Gradle configuration contains additional plug-in
configurations for the plug-ins in the classpath.
This configuration approach is specific to the pro-spring-6 project. This is a multi-modular project
containing Spring Boot and Spring classic projects, all making use of the awesome Spring Dependency
management, and reusing a lot of configurations. When using Spring Initializr to create a Spring Boot project,
whether using Maven or Gradle, all that configuration is already declared in the Spring Boot project you are
inheriting it from.
The chapter16-native-boot.gradle file contains the org.graalvm.buildtools.native plug-in
declaration. Because of its presence in the configuration, the Spring Boot Gradle plug-in adds AOT tasks to
the project. Since IntelliJ IDEA is smart, it shows in the Gradle View all the tasks under their scope and the
dependencies for AOT purposes. Figure 16-2 depicts the Gradle View, showing the AOT and Native tasks and
dependency groups.
717
Chapter 16 ■ Spring Native and Other Goodies
Figure 16-2. AOT and Native task and dependency groups for project chapter16-native-boot
Notice that in aotCompileClasspath there is an item named aotClasses, which represents the static
code generated for Spring configuration classes and bean definitions. The main probably represents the
main entry point of the application, which is the main(..) method in the Chapter16NativeApplication class.
Since Java 19 is configured for this project, we need to customize the Cloud Native Buildpacks used to
create the executable. We do so by specifying an array with the two values shown in the configuration for
the buildpacks property: gcr.io/paketo-buildpacks/graalvm and gcr.io/paketo-buildpacks/javanative-image.
To easily recognize the resulting native image in the Docker dashboard, the imageName property is set to
prospring6-gradle-native:1.0.
With this configuration, all that remains to do is to create the image by running gradle bootBuildImage
in the terminal, in the chapter16-native-boot directory. The execution will take a long time, at least the
first time. For this small project it took about 5 minutes, but this is because the Docker images the executable
is based on need to be downloaded too. Listing 16-7 shows some snippets of this execution.
Listing 16-7. gradle bootBuildImage Execution Log Snippets
> Task :chapter16-native-boot:compileJava
...
> Task :chapter16-native-boot:processAot
...
>Task :chapter16-native-boot:compileAotJava
...
> Task :chapter16-native-boot:bootBuildImage
718
Chapter 16 ■ Spring Native and Other Goodies
Building image 'docker.io/library/prospring6-gradle-native:1.0'
>
>
>
>
>
Pulling builder image 'docker.io/paketobuildpacks/builder:tiny' ...
Pulling run image 'docker.io/paketobuildpacks/run:tiny-cnb' ...
Pulling buildpack image 'gcr.io/paketo-buildpacks/graalvm:latest' ...
Pulling buildpack image 'gcr.io/paketo-buildpacks/java-native-image:latest' ...
Executing lifecycle version v0.16.0
> Running creator
[creator] ===> ANALYZING
[creator] Previous image with name "docker.io/library/prospring6-gradle-native:1.0"
not found
[creator] ===> DETECTING
[creator] 7 of 15 buildpacks participating
[creator] paketo-buildpacks/graalvm 7.10.0
...
[creator] ===> BUILDING
[creator] Paketo Buildpack for GraalVM 7.10.0
...
[creator] Build Configuration:
[creator] $BP_NATIVE_IMAGE true enable native image build
# other build specific variables
[creator] Native Image: Contributing to layer
[creator] Executing native-image ... # classpath omitted
[creator] =========================================================================
[creator] GraalVM Native Image: Generating '/layers/paketo-buildpacks_native-image/
native-image/com.apress.prospring6.sixteen.boot.Chapter16NativeApplication' (static
executable)...
[creator] =========================================================================
[creator] [1/7] Initializing...
[creator] [2/7] Performing analysis... [***********] (138.0s @ 3.28GB)
[creator] [3/7] Building universe... (16.0s @ 3.34GB)
[creator] [4/7] Parsing methods... [***] (10.8s @ 3.47GB)
[creator] [6/7] Compiling methods... [********] (75.3s @ 3.19GB)
[creator] [7/7] Creating image... (13.0s @ 2.88GB)
# listing packages, object types and sizes omitted
...
[creator] 20.4s (6.9% of total time) in 129 GCs | Peak RSS: 5.36GB | CPU
load: 5.51
[creator] ------------------------------------------------------------------------ [creator] Produced artifacts:
[creator] /layers/paketo-buildpacks_native-image/native-image/com.apress.
prospring6.sixteen.boot.Chapter16NativeApplication (executable)
[creator]
/layers/paketo-buildpacks_native-image/native-image/com.apress.prospring6.
sixteen.boot.Chapter16NativeApplication.build_artifacts.txt (txt)
[creator] =========================================================================
[creator] Finished generating '/layers/paketo-buildpacks_native-image/native-image/
com.apress.prospring6.sixteen.boot.Chapter16NativeApplication' in 4m 53s.
[creator] ===> EXPORTING
[creator] Adding layer 'paketo-buildpacks/ca-certificates:helper'
[creator] Adding layer 'buildpacksio/lifecycle:launch.sbom'
719
Chapter 16 ■ Spring Native and Other Goodies
# layers to build the image
Successfully built image 'docker.io/library/prospring6-gradle-native:1.0'
BUILD SUCCESSFUL in 5m 36s
9 actionable tasks: 8 executed, 1 up-to-date
First, the compileJava task compiles the project, making sure all dependencies are provided and the
project is functional. Then the processAot task generates the AOT Java code. Then the processAot starts the
application to check that it still works. Then the compileAotJava produces the native bytecode.
The results of all these tasks can be seen in the build/generated directory. This is where the AOTgenerated Java code and the GraalVM JSON hint files are saved. The bytecode and native code are stored
under build/classes/java/ directories grouped by their scope. Figure 16-3 shows these new directories
and some contents.
Figure 16-3. Intermediary files created by the build process that produces a native image
720
Chapter 16 ■ Spring Native and Other Goodies
Finally, the bootBuildImage starts building the image for the native executable. First it downloads the
base CND images, and then it builds the executable based on the GraalVM JDK 19.0.2, adding only bits and
pieces necessary for the executable to run. In the end a static executable is produced, and then processed to
compute the memory footprint and its storage requirements, which will determine these parameters for the
Docker image.
If all these steps are successful, the Images tab of the Docker dashboard should list the recently
produced prospring6-gradle-native:1.0 image, as shown in Figure 16-4.
Figure 16-4. Docker dashboard showing the prospring6-gradle-native:1.0 image
Notice the size of the image. Clicking its name reveals details of the image, as shown in Figure 16-5, such
as the layers, its contents, and its vulnerabilities (nothing to worry about necessarily, because any software
has vulnerabilities; it only depends on how critical they are).
721
Chapter 16 ■ Spring Native and Other Goodies
Figure 16-5. Docker dashboard showing the details of the prospring6-gradle-native:1.0 image
To check if this image works, we should start a container based on it, but since we know our application
needs a database, we need a way to tell it where to find it and how to connect to it. All these details are
provided via program arguments that become environment variables for the container. Spring Boot
applications can reference these variables in the configuration files. The application.yaml file data source
configuration needs to be modified to pick up the values necessary for connecting to the database from
environment variables. The configuration sample is depicted in Listing 16-8.
Listing 16-8. Spring Boot Configuration File That References Environment Variables
spring:
datasource:
driverClassName: org.mariadb.jdbc.Driver
url: jdbc:mariadb://${DB_HOST:localhost}:${DB_PORT:3306}/${DB_
SCHEMA:musicdb}?useSSL=false
username: ${DB_USER:prospring6}
password: ${DB_PASS:prospring6}
The ${VAR_NAME:default_value} construct are used to provide a default value for a variable in the
case when starting the application, the environment variable is neither set nor provided via the command
line. All the variables in the configuration have default values. When running an application within a
container that needs to connect to a database running in another container, the only one variable we need
a value for is DB_HOST, because in a container localhost points to itself. To obtain the IP address of the
container where the database is accessible, assuming the container is named local-mariadb, the command
in Listing 16-9 gets the job done.
722
Chapter 16 ■ Spring Native and Other Goodies
Listing 16-9. Command to Retrieve a Running Docker Container’s IP Address
docker inspect local-mariadb | grep IPAddress # assuming 172.17.0.2
Now that we have the database IP address, we can start our native container using the command in
Listing 16-10.
Listing 16-10. Command to Start the Container Using the Native Image we’ve built with Gradle
docker run --name prospring6-native -e DB_HOST=172.17.0.2 -d -p 8081:8081 prospring6-gradlenative:1.0
To make sure the application started correctly, you can try accessing http://localhost:8081/
singers, and all Singer instances’ JSON representations should be returned. The other way to ensure
the application started correctly is to inspect the container log in the Docker dashboard, which shows
not only the Spring Boot application startup log, but also the time it took the application to start, which
is where one of the superpowers of native images shines. Figure 16-6 shows a comparison between the
Chapter16NativeApplication being started on a local system on JVM and the same application starting
from a native executable within a container.
Figure 16-6. Startup times for a container based on the prospring6-gradle-native:1.0 image
The time dropped from 3 seconds to 0.147 second when the application was built into a native
executable, so the startup time diminished by half, and this is just for a small, very simple application. For
applications doing more complex operations, the improvement might be even better.
Declaring spring-boot-starter-parent ensures that the project inherits default configurations for
the Spring Boot and GraalVM Maven plug-ins grouped under the native profile. When using springboot-starter-parent as a parent, the only explicit configuration needed is for Spring Boot, as shown in
Listing 16-11.
Listing 16-11. Native Configuration for a Spring Boot Project That Declares spring-boot-starter-parent
As a Parent
<!-- other configurations omitted -->
<build>
<plugins>
<plugin>
723
Chapter 16 ■ Spring Native and Other Goodies
<groupId>org.graalvm.buildtools</groupId>
<artifactId>native-maven-plugin</artifactId>
<version>0.9.22</version>
</plugin>
<plugin>
<groupId>org.springframework.boot</groupId>
<artifactId>spring-boot-maven-plugin</artifactId>
<configuration>
<mainClass>com.example.demo.DemoApplication</mainClass>
<image>
<buildpacks>
<buildpack>gcr.io/paketo-buildpacks/graalvm</buildpack>
<buildpack>gcr.io/paketo-buildpacks/java-native-image</buildpack>
</buildpacks>
</image>
<imageName>demo-native-mvn:${project.version}</imageName>
</configuration>
</plugin>
</plugins>
</build>
The configuration is pretty similar to what was done in Gradle. Custom buildpacks are declared to
support Java 19 and a custom image name is added to the configuration so that the result of the build is easy
to spot in the Docker image collection.
When spring-boot-starter-parent is not used as a parent, the Maven configuration must include
more-verbose configurations for the native-maven-plugin and spring-boot-maven-plugin. It’s pretty easy
to do since they can be copied from the spring-boot-starter-parent pom file. The configuration is shown
in Listing 16-12.
Listing 16-12. Native Configuration for a Spring Boot Project That Does Not Declare spring-boot-starterparent As a Parent
<!-- other configurations omitted -->
<build>
<plugins>
<plugin>
<groupId>org.graalvm.buildtools</groupId>
<artifactId>native-maven-plugin</artifactId>
<version>${spring-native.version}</version>
<configuration>
<classesDirectory>${project.build.outputDirectory}</classesDirectory>
<metadataRepository>
<enabled>true</enabled>
</metadataRepository>
<requiredVersion>22.3</requiredVersion>
</configuration>
<executions>
<execution>
<id>add-reachability-metadata</id>
<goals>
<goal>add-reachability-metadata</goal>
</goals>
724
Chapter 16 ■ Spring Native and Other Goodies
</execution>
</executions>
</plugin>
<plugin>
<groupId>org.springframework.boot</groupId>
<artifactId>spring-boot-maven-plugin</artifactId>
<version>${spring-boot.version}</version>
<configuration>
<mainClass>com.apress.prospring6.sixteen.boot.Chapter16NativeApplication</
mainClass>
<image>
<builder>paketobuildpacks/builder:tiny</builder>
<env>
<BP_NATIVE_IMAGE>true</BP_NATIVE_IMAGE>
</env>
<buildpacks>
<buildpack>gcr.io/paketo-buildpacks/graalvm</buildpack>
<buildpack>gcr.io/paketo-buildpacks/java-native-image</buildpack>
</buildpacks>
</image>
<imageName>prospring6-mvn-native:1.0</imageName>
<excludes>
<exclude>
<groupId>org.projectlombok</groupId>
<artifactId>lombok</artifactId>
</exclude>
</excludes>
</configuration>
<executions>
<execution>
<id>process-aot</id>
<goals>
<goal>process-aot</goal>
</goals>
</execution>
</executions>
</plugin>
</plugins>
</build>
With this configuration, you can generate the native image by executing mvn spring-boot:buildimage. Notice that the image name was set to prospring6-mvn-native:1.0 to differentiate it easily from the
one generated with Gradle.
All the intermediary generated sources, bytecode, and native code are located under the target
directory, but compared to Gradle, they are just scattered everywhere under target/classes, because
Maven does not create separate directories for different goals.
The Maven build execution for generating a native image for the Chapter16NativeApplication takes
about 5 minutes as well, and at the end the image is listed in the Docker dashboard, as shown in Figure 16-7.
725
Chapter 16 ■ Spring Native and Other Goodies
Figure 16-7. Docker dashboard showing the prospring6-mvn-native:1.0 image
Starting a container based on this image is done with the same command as the one shown in
Listing 16-10; just make sure to name the container differently.
To read more about native images and recommendations on how to better develop Spring applications
such that they are easily built into native executables, read the official documentation, and keep an eye out
for any talks on this subject at conferences. The technology, although out of the experimental phase, is still
in an early phase and has a long way to go to become the industry default for Java applications, if that even
happens at all.
Spring for GraphQL
GraphQL is a query language for APIs and a runtime for providing data according to those queries. GraphQL
provides a complete and understandable description of the data in your API and allows the client to ask for
some data and receive only what they asked for without writing complicated code to do so.
Consider the REST APIs that were built so far in this book. REST requests are mapped to URL paths such
as http://localhost:8081/singer/1. A client sends an HTTP GET request and receives all the information
about a singer that is retrieved from a database table named SINGER for the record identified with a primary
key equal to 1. If the client needs information about this singer that is held in other tables, different queries
must be written, and they will be mapped to different URL paths. So, the client must do multiple requests.
With GraphQL, the client doesn’t have to change the URL for the request, just the schema used to specify
the required data. In the end, GraphQL is just another alternative to established remote communications
between applications such as REST, SOAP, or gRPC.
726
Chapter 16 ■ Spring Native and Other Goodies
Facebook invented GraphQL because REST was not a solution to retrieve a graph of related information
for a single request. Using REST, multiple back and forth communication would make the page load slowly
and generate unacceptable flicker. We could describe GraphQL in a lot more depth, but for purposes of this
discussion, we’ll simply list its most important characteristics:
•
GraphQL is schema based.
•
GraphQL queries look a lot like JSON, but they are not JSON.
•
GraphQL is heavily typed. The GraphQL schema language supports the scalar types
of String, Int, Float, Boolean, and ID, so you can use these directly in the schema
you pass to buildSchema.
•
GraphQL is designed for developers.
•
GraphQL is transport agnostic; it is mostly used over HTTP, but is not limited to it.
For example, you can use it over TCP and over WebSockets.
•
GraphQL queries are sent over using POST requests, so they can be as big and
as complex as necessary to specify data to be retrieved from different levels in a
database by nesting the desired properties.
REST APIs are a collection of endpoints, whereas GraphQL APIs are focused on the data. This section
is focused on writing a Spring Boot application with support for GraphQL. Core concepts of GraphQL are
explained gradually as the need arises.
For this section we’ll use a modified version of the database used so far in the book. The data managed
by this application is stored in three tables, SINGER, AWARD, and INSTRUMENT, that are related as shown in
Figure 16-8.
Figure 16-8. Table relationships for project chapter16-graphql-boot
For the code samples in this chapter, the tables are part of a schema that is named MUSICDB, and the
user to access it is named prospring6. The SQL code to create the schema can be found in the chapter16graphql-boot/docker-build/scripts/CreateTable.sql file in the directory of the chapter16-graphqlboot project. The SQL code to execute to populate the tables can be found in the chapter16-graphql-boot/
docker-build/scripts/InsertData.sql file in the directory of the chapter16-graphql-boot project. These
scripts are part of a Docker configuration used to build an image with the database needed for the examples.
Except the spring-boot-starter-graphql dependency, all the dependencies are the same as for a
Spring Boot web application backed up by a MariaDB database accessed through Spring Data repositories.
Figure 16-9 shows the dependencies of the chapter16-graphql-boot project.
727
Chapter 16 ■ Spring Native and Other Goodies
Figure 16-9. Dependencies for project chapter16-graphql-boot
The Singer entity class is shown in Listing 16-13 and is no different than the entity classes introduced in
the data access chapters.
Listing 16-13. The Singer Entity Class
package com.apress.prospring6.sixteen.boot.entities;
import jakarta.persistence.*;
import lombok.*;
// other import statements omitted
@Entity
@Data
@AllArgsConstructor
@NoArgsConstructor
@EqualsAndHashCode(onlyExplicitlyIncluded = true)
@Table(name = "SINGER")
public class Singer implements Serializable {
@Serial
private static final long serialVersionUID = 1L;
@Id
@GeneratedValue(strategy = IDENTITY)
@EqualsAndHashCode.Include
@Column(name = "ID")
protected Long id;
728
Chapter 16 ■ Spring Native and Other Goodies
@Version
@Column(name = "VERSION")
protected int version;
@Column(name = "FIRST_NAME")
private String firstName;
@Column(name = "LAST_NAME")
private String lastName;
@Column(name = "PSEUDONYM")
private String pseudonym;
@Column(name = "GENRE")
private String genre;
@DateTimeFormat(pattern = "yyyy-MM-dd")
@Column(name = "BIRTH_DATE")
private LocalDate birthDate;
@OneToMany(mappedBy = "singer")
private Set<Award> awards;
@ManyToMany
@JoinTable(name = "SINGER_INSTRUMENT",
joinColumns = @JoinColumn(name = "SINGER_ID"),
inverseJoinColumns = @JoinColumn(name = "INSTRUMENT_ID"))
private Set<Instrument> instruments;
}
To keep things simple and avoid the need for a lot of boilerplate code, Lombok is used to annotate
this class and its fields, so that the proper setters, getters, constructors, and so on are generated. Notice the
@OneToMany relationship between the Singer and Award classes and the @ManytoMany relationship between
Singer and Instrument. Both relationships are by default lazily initialized by the persistence provider
runtime when first accessed. This is an important detail, as you will see later.
The Award entity class is shown in Listing 16-14.
Listing 16-14. The Award Entity Class
package com.apress.prospring6.sixteen.boot.entities;
import jakarta.persistence.*;
import lombok.*;
// other import statements omitted
@Entity
@Data
@NoArgsConstructor
@AllArgsConstructor
@EqualsAndHashCode(onlyExplicitlyIncluded = true)
@Table(name = "AWARD")
729
Chapter 16 ■ Spring Native and Other Goodies
public class Award implements Serializable {
@Serial
private static final long serialVersionUID = 3L;
@Id
@EqualsAndHashCode.Include
@GeneratedValue(strategy = IDENTITY)
@Column(name = "ID")
protected Long id;
@Version
@Column(name = "VERSION")
protected int version;
@ManyToOne
@JoinColumn(name = "SINGER_ID")
private Singer singer;
@Column(name = "YEAR")
private Integer year;
@Column(name = "TYPE")
private String category;
@Column(name = "ITEM_NAME")
private String itemName;
@Column(name = "AWARD_NAME")
private String awardName;
}
Notice the @ManyToOne relationship between Award and Singer. By default, the singer field is eagerly
initialized by the persistence provider runtime when first accessed. The SINGER_ID column is actually a
foreign key, making the singer record a parent of this award, so it makes sense that when an award record is
accessed, its parent should be accessible too.
The Instrument entity class is a very simple one, mapping to a table with a single column that is its
primary key as well. It was introduced more as a plot device (sic!) to show a @ManyToMany relationship.
The Spring Data repository interfaces are those used in the data access chapters—simple extensions of
JpaRepository. The repository interfaces are shown in Listing 16-15.
Listing 16-15. The Repository Interfaces
package com.apress.prospring6.sixteen.boot.entities;
// import statements omitted
public interface SingerRepo extends JpaRepository<Singer, Long> { }
public interface AwardRepo extends JpaRepository<Award, Long>{ }
public interface InstrumentRepo extends JpaRepository<Instrument, String> {
}
730
Chapter 16 ■ Spring Native and Other Goodies
For simplicity, we will not be using service beans, and we’ll jump directly to implementing GraphQL
controllers. Spring for GraphQL provides an annotation-based programming model where @Controller
components use specific GraphQL annotations to decorate handler methods with flexible signatures, to
fetch data for specific GraphQL fields. Let’s consider the simplest example, querying for all the singers.
Listing 16-16 shows a controller with a handler method for responding to a GraphQL query for retrieving all
singers.
Listing 16-16. GraphQL Handler Method for Returning All Singers in the Singer Table
package com.apress.prospring6.sixteen.boot.controllers;
import org.springframework.graphql.data.method.annotation.QueryMapping;
import org.springframework.stereotype.Controller;
// other import statements omitted
@Controller
public class SingerController {
private final SingerRepo singerRepo;
public SingerController(SingerRepo singerRepo) {
this.singerRepo = singerRepo;
}
@QueryMapping
public Iterable<Singer> singers(){
return singerRepo.findAll();
}
// other handler methods omitted
}
The @Controller annotation is the same stereotype annotation introduced earlier in this book. It
is automatically picked up by Spring Boot, which adds all org.springframework.graphql.execution.
RuntimeWiringConfigurer beans to org.springframework.graphql.execution.GraphQlSource.Builder
and enables support for annotated graphql.schema.DataFetcher instances.
The @QueryMapping annotation binds the method to a query, a GraphQL field under a Query type.
@QueryMapping is a composed annotation that acts as a shortcut for @SchemaMapping with
typeName="Query". It is a practical way to map controller methods to GraphQL queries. You can think of the
@SchemaMapping as the @RequestMapping for GraphQL.
Now that we have a handler method, we need to configure the GraphQL schemas with objects, queries,
and mutations definitions. These three terms are the core terms of GraphQL. As previously mentioned,
GraphQL is statically typed, which means the server knows exactly the shape of every object you can query
and any client can actually “introspect” the server and ask for the “schema.” These types are declared in
schema files located under resources/graphql and they map to all objects involved in GraphQL actions of
any kind.
Listing 16-17 shows the schema for the Singer object and the singers query definition that are
declared in resources/graphql/singer.graphqls.
731
Chapter 16 ■ Spring Native and Other Goodies
Listing 16-17. GraphQL Schema for the Singer Type and singers Query
type Singer {
id: ID!
firstName: String!
lastName: String!
pseudonym: String
genre: String
birthDate: String
awards: [Award]
instruments: [Instrument]
}
type Query {
singers: [Singer]
}
The schema describes what queries are possible and what fields you can get back for a certain type. If
fields are supposed to be not null, in the declaration the type must be suffixed with ! (exclamation mark).
So, now that we have a schema, are we ready to submit GraphQL requests? Not yet, because we still
need to configure the Spring Boot application to support GraphQL, as shown in Listing 16-18.
Listing 16-18. Spring Boot Application Configuration for GraphQL
server:
port: 8081
servlet:
context-path: /
compression:
enabled: true
address: 0.0.0.0
spring:
graphql:
graphiql:
enabled: true
path: graphiql
datasource:
driverClassName: org.mariadb.jdbc.Driver
url: jdbc:mariadb://localhost:3307/musicdb?useSSL=false
username: prospring6
password: prospring6
hikari:
maximum-pool-size: 25
jpa:
generate-ddl: false
properties:
hibernate:
naming:
physical-strategy: com.apress.prospring6.sixteen.boot.CustomPhysicalNamingStrategy
jdbc:
732
Chapter 16 ■ Spring Native and Other Goodies
batch_size: 10
fetch_size: 30
max_fetch_depth: 3
hbm2ddl:
auto: none
# logging configuration omitted
GraphQL queries can be sent to an application using a web interface named GraphiQL. This is a
web console that can communicate with any GraphQL server and helps to consume and develop against a
GraphQL API. It is included in the Spring Boot starter for GraphQL and is exposed by default at the
/graphiql endpoint. In the configuration sample in Listing 16-8 the same value is configured just to show
that the property spring.graphql.graphiql.path can be used to customize the URL path where the web
console is accessible. The endpoint is disabled by default, but it can be turned on by setting the spring.
graphql.graphiql.enabled property to true. GraphiQL is a very practical tool to write and test queries,
particularly during development and testing.
Now we are ready to start the application and write some queries. To access GraphiQL, open the
http://localhost:8081/graphiql URL in the browser. This opens a page with a nice editor that on the left
has an entry text area where the queries can be written and, on the right, the retrieved data is shown.
Figure 16-10 shows the GraphiQL web console.
Figure 16-10. GraphiQL web console with a simple query
The query in this image is simple; we can add more fields and even relationships. Figure 16-11 shows a
GraphQL query that retrieves all the details for all the singers (not something you would ever need to do, but
just know it is possible).
733
Chapter 16 ■ Spring Native and Other Goodies
Figure 16-11. GraphiQL web console with a nested query
So this works, even though, as previously mentioned, the awards collection is lazily initialized. So, how
is GraphQL doing it? It would be interesting to see how many queries are executed on the table for retrieving
that data—in short, how efficient it really is. To figure this out, let’s enable SQL logging in the Spring Boot
configuration by adding the property logging.level.sql=debug to the configuration.
If we send the same query and look in the console log, we can see the log in Listing 16-19.
Listing 16-19. Database Queries logged in the console for a lazily initialized collection
DEBUG: SqlStatementLogger - select s1_0.ID,s1_0.BIRTH_DATE,s1_0.FIRST_NAME,s1_0.GENRE,s1_0.
LAST_NAME,s1_0.PSEUDONYM,s1_0.VERSION from SINGER s1_0
DEBUG: SqlStatementLogger - select a1_0.SINGER_ID,a1_0.ID,a1_0.AWARD_NAME,a1_0.TYPE,a1_0.
ITEM_NAME,a1_0.VERSION,a1_0.YEAR from AWARD a1_0 where a1_0.SINGER_ID=?
DEBUG: SqlStatementLogger - select a1_0.SINGER_ID,a1_0.ID,a1_0.AWARD_NAME,a1_0.TYPE,a1_0.
ITEM_NAME,a1_0.VERSION,a1_0.YEAR from AWARD a1_0 where a1_0.SINGER_ID=?
DEBUG: SqlStatementLogger - select a1_0.SINGER_ID,a1_0.ID,a1_0.AWARD_NAME,a1_0.TYPE,a1_0.
ITEM_NAME,a1_0.VERSION,a1_0.YEAR from AWARD a1_0 where a1_0.SINGER_ID=?
DEBUG: SqlStatementLogger - select a1_0.SINGER_ID,a1_0.ID,a1_0.AWARD_NAME,a1_0.TYPE,a1_0.
ITEM_NAME,a1_0.VERSION,a1_0.YEAR from AWARD a1_0 where a1_0.SINGER_ID=?
...
Two things are going on here:
•
For every singer, an extra query is executed to extract the awards (N+1 complexity
problem).
•
This is possible because, by default, Spring Boot configures a Hibernate session
to be open when a request for data is coming. This allows for lazy associations to
be loaded, which improves developer productivity because it keeps things simple.
There is no need for special queries with join statements. The bean providing this
behavior is the OpenSessionInViewInterceptor.8
https://docs.spring.io/spring-framework/docs/current/javadoc-api/org/
springframework/orm/hibernate5/support/OpenSessionInViewInterceptor.html
8
734
Chapter 16 ■ Spring Native and Other Goodies
The problem with the session per request transactional pattern is that it can become inefficient in
production environments. This behavior can be disabled by adding the following property to the Spring
Boot configuration: spring.jpa.open-in-view=false. This, however, does not go well with GraphQL nested
queries when it tries to fetch lazy relationships.
What is the fix for this? We need to modify the GraphQL handler method and use Spring JPA
Specification API methods to extract relationship data only when required. This obviously means we need
to analyze the query sent by the client. There is more than one way to do this, but the easiest is to use the
graphql.schema.DataFetchingEnvironment parameter inside the QueryResolver implementation. In
methods annotated with @QueryMapping, Spring Boot automatically injects the value for this parameter and
depending on the requested relations we build different queries. If you remember, we did have two relations,
“awards” and “instruments”. Listing 16-20 shows the improved singers(..) handler method.
Listing 16-20. GraphQL handler methods for nested queries
package com.apress.prospring6.sixteen.boot.controllers;
import org.springframework.graphql.data.method.annotation.QueryMapping;
import org.springframework.stereotype.Controller;
import graphql.schema.DataFetchingEnvironment;
import graphql.schema.DataFetchingFieldSelectionSet;
import jakarta.persistence.criteria.Fetch;
import jakarta.persistence.criteria.Join;
import jakarta.persistence.criteria.JoinType;
import org.springframework.data.jpa.domain.Specification;
// other import statements omitted
@Controller
public class SingerController {
@QueryMapping
public Iterable<Singer> singers(DataFetchingEnvironment environment) {
DataFetchingFieldSelectionSet s = environment.getSelectionSet();
if (s.contains("awards") && !s.contains("instruments"))
return singerRepo.findAll(fetchAwards());
else if (s.contains("awards") && s.contains("instruments"))
return singerRepo.findAll(fetchAwards().and(fetchInstruments()));
else if (!s.contains("awards") && s.contains("instruments"))
return singerRepo.findAll(fetchInstruments());
else
return singerRepo.findAll();
}
private Specification<Singer> fetchAwards() {
return (root, query, builder) -> {
Fetch<Singer, Award> f = root.fetch("awards", JoinType.LEFT);
Join<Singer, Award> join = (Join<Singer, Award>) f;
return join.getOn();
};
}
private Specification<Singer> fetchInstruments() {
return (root, query, builder) -> {
735
Chapter 16 ■ Spring Native and Other Goodies
Fetch<Singer, Instrument> f = root.fetch("instruments", JoinType.LEFT);
Join<Singer, Instrument> join = (Join<Singer, Instrument>) f;
return join.getOn();
};
}
// other methods omitted
}
The findAll(Specification<T> spec) method used to retrieve a list of Singer instances
with some relationships loaded is provided by org.springframework.data.jpa.repository.
JpaSpecificationExecutor<T>, so the SingerRepo must be modified to extend this interface too.
If we restart the application and send the query in Listing 16-21, we get the expected reply, and if we
look in the console, we notice that a single query is executed.
Listing 16-21. GraphQL Query Requesting a One-to-Many Relationship
query {
singers{
firstName
lastName
pseudonym
genre
birthDate
awards {
awardName
year
}
}
}
The query in the console log is shown in Listing 16-22.
Listing 16-22. SQL Query Generated for a Nested GraphQL Query
select s1_0.ID,
a1_0.SINGER_ID,
a1_0.ID,a1_0.AWARD_NAME,
a1_0.TYPE,
a1_0.ITEM_NAME,
a1_0.VERSION,a1_0.YEAR,
s1_0.BIRTH_DATE,
s1_0.FIRST_NAME,
s1_0.GENRE,
s1_0.LAST_NAME,
s1_0.PSEUDONYM,
s1_0.VERSION
from SINGER s1_0
left join AWARD a1_0 on s1_0.ID=a1_0.SINGER_ID
What happens if we add the instruments relationship to the query as well? This is a many-to-many
relationship that is modelled under the hood using two one-to-many relationships: one between SINGER
and SINGER_INSTRUMENT and one between INSTRUMENT and SINGER_INSTRUMENT. Listing 16-23 shows the
GraphQL query and the queries generated to extract the requested data.
736
Chapter 16 ■ Spring Native and Other Goodies
Listing 16-23. GraphQL Query with a Many-to-Many Relationship
query {
singers{
firstName
lastName
pseudonym
genre
birthDate
awards {
awardName
year
}
instruments {
name
}
}
}
# Resulted queries
select s1_0.ID,
a1_0.SINGER_ID,a1_0.ID,
a1_0.AWARD_NAME,
a1_0.TYPE,a1_0.ITEM_NAME,
a1_0.VERSION,a1_0.YEAR,
s1_0.BIRTH_DATE,
s1_0.FIRST_NAME,
s1_0.GENRE,
i1_0.SINGER_ID,
i1_1.INSTRUMENT_ID,
s1_0.LAST_NAME,
s1_0.PSEUDONYM,
s1_0.VERSION
from SINGER s1_0
left join AWARD a1_0 on s1_0.ID=a1_0.SINGER_ID
left join (SINGER_INSTRUMENT i1_0 join INSTRUMENT i1_1 on i1_1.INSTRUMENT_ID=i1_0.
INSTRUMENT_ID) on s1_0.ID=i1_0.SINGER_ID;
select s1_0.INSTRUMENT_ID,s1_1.ID,s1_1.BIRTH_DATE,s1_1.FIRST_NAME,s1_1.GENRE,s1_1.LAST_
NAME,s1_1.PSEUDONYM,s1_1.VERSION
from SINGER_INSTRUMENT s1_0
join SINGER s1_1 on s1_1.ID=s1_0.SINGER_ID
where s1_0.INSTRUMENT_ID=?;
select s1_0.INSTRUMENT_ID,s1_1.ID,s1_1.BIRTH_DATE,s1_1.FIRST_NAME,s1_1.GENRE,s1_1.LAST_
NAME,s1_1.PSEUDONYM,s1_1.VERSION
from SINGER_INSTRUMENT s1_0
join SINGER s1_1 on s1_1.ID=s1_0.SINGER_ID
where s1_0.INSTRUMENT_ID=?;
select s1_0.INSTRUMENT_ID,s1_1.ID,s1_1.BIRTH_DATE,s1_1.FIRST_NAME,s1_1.GENRE,s1_1.LAST_
NAME,s1_1.PSEUDONYM,s1_1.VERSION
from SINGER_INSTRUMENT s1_0
join SINGER s1_1 on s1_1.ID=s1_0.SINGER_ID
where s1_0.INSTRUMENT_ID=?;
737
Chapter 16 ■ Spring Native and Other Goodies
select s1_0.INSTRUMENT_ID,s1_1.ID,s1_1.BIRTH_DATE,s1_1.FIRST_NAME,s1_1.GENRE,s1_1.LAST_
NAME,s1_1.PSEUDONYM,s1_1.VERSION
from SINGER_INSTRUMENT s1_0
join SINGER s1_1 on s1_1.ID=s1_0.SINGER_ID
where s1_0.INSTRUMENT_ID=?;
So, what happened? Well,JPA query generation is not that smart after all. If a SQL developer were to
write a query to extract data from tables linked to each other via a many-to-many relationship like the one
depicted in this application, the query would look like the one shown in Listing 16-24.
Listing 16-24. SQL Query with a Many-to-Many Relationship
select
s1_0.ID,a1_0.SINGER_ID,a1_0.ID,
a1_0.AWARD_NAME,
a1_0.YEAR,
s1_0.BIRTH_DATE,
s1_0.FIRST_NAME,
s1_0.LAST_NAME,
I.INSTRUMENT_ID
from SINGER s1_0
left join AWARD a1_0 on s1_0.ID=a1_0.SINGER_ID
left join SINGER_INSTRUMENT SI on s1_0.ID = SI.SINGER_ID
left join INSTRUMENT I on I.INSTRUMENT_ID = SI.INSTRUMENT_ID;
Also, if you look carefully at the generated queries, you might notice that, regardless of the fields
specified in your GraphQL queries, when the query is generated for the database, unless you explicitly write
a SQL native query to specify the name of the columns you get data from, JPA will generate a SQL query that
includes all columns. You might conclude from this example that GraphQL is not as efficient as advertised.
Still, it was efficient enough to make Facebook the most widely used social network in the world.
Let’s look at other GraphQL queries we can support. For example, if we want all the details for a singer
with a specific id, the query to write might look like the one depicted in Listing 16-25.
Listing 16-25. GraphQL Query for Retrieving Details for a Singer with id 1
query {
singerById(id: 1){
firstName
lastName
awards {
awardName
year
}
instruments{
name
}
}
}
To support this query, we need to add the schema for it and the handler method. Also, this is a good
opportunity to introduce the @Argument annotation. Listing 16-26 depicts the query schema and the
handler method.
738
Chapter 16 ■ Spring Native and Other Goodies
Listing 16-26. GraphQL hander method for Retrieving Details for a Singer with id 1 (GraphQL Query
Declared in resources/graphql/singer.graphqls)
type Query {
singerById(id: ID!) : Singer
}
package com.apress.prospring6.sixteen.boot.controllers;
import org.springframework.graphql.data.method.annotation.Argument;
// other import statements omitted
@Controller
public class SingerController {
@QueryMapping
public Singer singerById(@Argument Long id, DataFetchingEnvironment environment){
Specification<Singer> spec = byId(id);
DataFetchingFieldSelectionSet s = environment.getSelectionSet();
if (s.contains("awards") && !s.contains("instruments"))
spec = spec.and(fetchAwards());
else if (s.contains("awards") && s.contains("instruments"))
spec = spec.and(fetchAwards().and(fetchInstruments()));
else if (!s.contains("awards") && s.contains("instruments"))
spec = spec.and(fetchInstruments());
return singerRepo.findOne(spec).orElse(null);
}
// other methods omitted
}
The Spring GraphQL @Argument annotation binds a named GraphQL argument onto a method
parameter. The same JPA Specification<Singer> instances are used to provide support for loading lazy
relationships for individual singers as well.
Until now, we’ve only done data retrieval, so it is time to introduce how to support operations like
creating a new Singer object and updating and deleting existing Singer objects. All these operations are
supported through a concept, or type, called Mutation. Similar to a Query, a Mutation declares the schema
for a create, update, or delete operation. GraphQL queries for these operations are mapped to handler
methods annotated with @MutationMapping.
Listing 16-27 show the necessary Mutation and the SingerInput type needed for create and update
operations.
Listing 16-27. GraphQL handler method for Retrieving Details for a Singer with id 1 (GraphQL Query
Declared in resources/graphql/singer.graphqls)
type Mutation {
updateSinger(id: ID!, singer: SingerInput): Singer!
deleteSinger(id: ID!): ID!
}
739
Chapter 16 ■ Spring Native and Other Goodies
input SingerInput {
firstName: String!
lastName: String!
pseudonym: String
genre: String
birthDate: String
}
package com.apress.prospring6.sixteen.boot.controllers;
import org.springframework.graphql.data.method.annotation.MutationMapping;
// other import statements omitted
@Controller
public class SingerController {
// other methods omitted
@MutationMapping
public Singer newSinger(@Argument SingerInput singer){
LocalDate date;
try {
date = LocalDate.parse(singer.birthDate(), DateTimeFormatter.ofPattern
("yyyy-MM-dd"));
} catch (DateTimeParseException e) {
throw new IllegalArgumentException("Bade date format");
}
var newSinger = new Singer(null, 0, singer.firstName,singer.lastName,
singer.pseudonym, singer.genre, date, null, null);
return singerRepo.save(newSinger);
}
@MutationMapping
public Singer updateSinger(@Argument Long id, @Argument SingerInput singer) {
var fromDb = singerRepo.findById(id).orElseThrow(() -> new NotFoundException
(Singer.class, id ));
fromDb.setFirstName(singer.firstName);
fromDb.setLastName(singer.lastName);
fromDb.setPseudonym(singer.pseudonym);
fromDb.setGenre(singer.genre);
LocalDate date;
try {
date = LocalDate.parse(singer.birthDate(), DateTimeFormatter.ofPattern
("yyyy-MM-dd"));
fromDb.setBirthDate(date);
} catch (DateTimeParseException e) {
throw new IllegalArgumentException("Bade date format");
}
return singerRepo.save(fromDb);
}
@MutationMapping
public Long deleteSinger(@Argument Long id) {
singerRepo.findById(id).orElseThrow(() -> new NotFoundException(Singer.class, id ));
740
Chapter 16 ■ Spring Native and Other Goodies
singerRepo.deleteById(id);
return id;
}
record SingerInput(String firstName, String lastName, String pseudonym, String genre,
String birthDate){}
}
In the current version of GraphQL, you cannot declare a query or mutation without a return type. A
workaround is to return a typical value that represents a successful operation, such a 0 (zero) or OK in the
handler method, or just return null, and declare a nullable type in the schema.
The GraphQL queries for creating, updating, and deleting a singer are shown in Listing 16-28.
Listing 16-28. GraphQL Query for Creating, Updating, and Deleting a Singer
# create singer
mutation {
newSinger(singer: {
firstName: "Lindsey"
lastName: "Buckingham"
pseudonym: "The Greatest"
genre: "rock"
birthDate: "1949-10-03"
}) {
id
firstName
lastName
}
}
# update singer
mutation {
updateSinger(id: 16, singer: {
firstName: "Lindsey"
lastName: "Buckingham"
genre: "rock"
birthDate: "1949-10-03"
}) {
id
firstName
lastName
}
}
#delete singer
mutation {
deleteSinger(id: 16)
}
741
Chapter 16 ■ Spring Native and Other Goodies
Now that we’ve explored how to create Singer instances via GraphQL queries, what happens if we
try to execute the query to create a singer twice? That is clearly not allowed, because singers are supposed
to be unique in our database. Trying to create a singer with the same firstName and lastName causes a
DataIntegrityViolationException to be thrown, which we can see in the console log, but in GraphQL, the
web console does not give a lot of details, as shown in Figure 16-12.
Figure 16-12. GraphiQL web console showing an error when trying to execute the same mutation twice
We know the server has a problem executing what we asked it to, but we do not know why. Obviously,
proper exception handling is needed. When working with GraphQL, we handle errors by extending the
org.springframework.graphql.execution.DataFetcherExceptionResolverAdapter class and overriding
the resolveToSingleError(..) or the resolveToMultipleErrors(..) method. Adding a bean of this
type to the configuration provides a more concise way to represent data layer errors in the GraphQL
response that is shown in the GraphiQL web console. Listing 16-29 shows a custom implementation of
DataFetcherExceptionResolverAdapter.
Listing 16-29. Custom Implementation for DataFetcherExceptionResolverAdapter
package com.apress.prospring6.sixteen.boot.problem;
import
import
import
import
import
import
import
742
graphql.GraphQLError;
graphql.GraphqlErrorBuilder;
graphql.schema.DataFetchingEnvironment;
org.springframework.dao.DataIntegrityViolationException;
org.springframework.graphql.execution.DataFetcherExceptionResolverAdapter;
org.springframework.graphql.execution.ErrorType;
org.springframework.stereotype.Component;
Chapter 16 ■ Spring Native and Other Goodies
@Component
public class CustomExceptionResolver extends DataFetcherExceptionResolverAdapter {
@Override
protected GraphQLError resolveToSingleError(Throwable ex, DataFetchingEnvironment env) {
if (ex instanceof DataIntegrityViolationException) {
return GraphqlErrorBuilder.newError()
.errorType(ErrorType.BAD_REQUEST)
.message("Cannot create duplicate entry:" + ex.getCause().getCause().
getMessage())
.path(env.getExecutionStepInfo().getPath())
.location(env.getField().getSourceLocation())
.build();
}
return super.resolveToSingleError(ex, env);
}
@Override
protected List<GraphQLError> resolveToMultipleErrors(Throwable ex,
DataFetchingEnvironment env) {
return super.resolveToMultipleErrors(ex, env);
}
}
Both resolveToSingleError(..) and resolveToMultipleErrors(..) have the same signature,
and the only difference between them is that resolveToSingleError(..) resolves a thrown exception to
a single GraphQL error, while resolveToMultipleErrors(..) does so to multiple GraphQL errors. The
DataFetchingEnvironment argument provides details about the execution context in which the error
happened. GraphqlErrorBuilder is a useful class used to build a GraphQL error. The ErrorType represents
the error category and the values in this enum match the most common HTTP statuses: BAD_REQUEST,
UNAUTHORIZED, FORBIDDEN, NOT_FOUND, and INTERNAL_ERROR. A customized message can be set to add
details about the failure. The path is the name of the query or mutation that caused the issue. The location
represents the GraphQL query lines that caused the error.
With this bean added to the configuration, the error becomes more readable, as shown in Figure 16-13,
providing someone who sends a bad query with the information needed to correct it.
743
Chapter 16 ■ Spring Native and Other Goodies
Figure 16-13. GraphiQL web console showing a customized error when trying to execute the same
mutation twice
Testing GraphQL controllers can be done as shown in previous chapters for web applications, using
TestRestTemplate or MockMvc, or WebClient for a Spring Boot Reactive GraphQL application, by sending
POST requests containing GraphQL queries in the body.
This section just touched on the basics on how to get started with building GraphQL APIs in Spring.
If you would like to learn more about Spring support for GraphQL, feel free to check out the Spring for
GraphQL official project page.9
Spring Kotlin Applications
Kotlin10 is a JVM programming language developed by JetBrains11, the company that also produces the best
Java editor, IntelliJ IDEA12 (recommended to you repeatedly throughout this book). As mentioned at the
beginning of this chapter, syntactically Kotlin is pretty much a cross between Java and Scala, combining
the best of both worlds: the readability of Java, the elegance of Scala, and the ability to run it on a JVM, so it
interoperates with Java too. Projects can be written to have both Java and Kotlin sources, and smart editors
like Maven and Gradle know how to compile them and build them into bytecode that can run on any
JVM. Kotlin is a cross-platform, statically typed, general-purpose, high-level programming language with
type inference, allowing its syntax to be more concise.
The following are the main strong points of Kotlin that might convince a Java developer to give
Kotlin a try:
•
Kotlin has concise syntax, requiring less code to be written, thus avoiding
boilerplate code. The Kotlin official page indicates approximately a 40% reduction
in the number of lines of code compared to Java. Also, it supports string template
expressions.
https://spring.io/projects/spring-graphql
https://kotlinlang.org
11
https://www.jetbrains.com
12
https://www.jetbrains.com/idea
9
10
744
Chapter 16 ■ Spring Native and Other Goodies
13
•
Kotlin has both object-oriented and functional constructs, which means you can
write object-oriented and functional code using its higher-order functions, function
types, and lambdas.
•
Kotlin supports non-nullable types, which helps avoid NullPointerExceptions.
•
Kotlin has classes and their members are final by default.
•
Kotlin uses smart casts, which means the is operator checks the type of an object
and the Kotlin compiler explicitly casts for immutable values and inserts (safe) casts
automatically when necessary.
•
Kotlin provides better control flow via the when expression and numeric ranges.
•
The common superclass in Kotlin is named Any.
•
By default, methods and properties are final, and the override keyword is needed
to make them overridable, which makes inheritance code easier to read.
•
Properties can be declared read-only using the val keyword, and declared mutable
using the var keyword.
•
Kotlin is adept of the less is more principle: getters, setters, and property types are
optional.
•
Interfaces can have properties and functions.
•
Classes and interfaces can be enriched with new functionality without inheritance,
through extension functions. To declare an extension function, prefix its name with a
receiver type, which refers to the type being extended. Extensions can be called on an
object variable even if its value is null, which means toString() can be invoked on
objects without checking for nullability.
•
Kotlin provides a solution for the diamond problem.13
•
Accessors or visibility modifiers are similar to Java. There are four visibility modifiers
in Kotlin: private, protected, internal, and public. The default visibility is public.
•
If a top-level class, function, or interface is private, it will only be visible inside the
file that contains the declaration.
•
If a top-level class, function, or interface is internal, it will be visible everywhere in
the same module.
•
The protected modifier is not available for top-level declarations.
•
Constructors are declared with the constructor keyword, and by default are public.
•
Kotlin supports modules: a module is a set of Kotlin files compiled together.
•
Kotlin supports companion objects; a companion object is similar to a static instance
that allows calling methods without instantiating the type.
•
Kotlin supports data classes: classes with standard functionality such as equals(),
hashCode(), toString(), and so on.
•
Kotlin supports sealed classes (and did so before Java did).
https://kotlinlang.org/docs/interfaces.html#resolving-overriding-conflicts
745
Chapter 16 ■ Spring Native and Other Goodies
•
Kotlin supports inline classes.
•
Kotlin provides support for asynchronous or non-blocking programming, via corutines.
•
Kotlin supports destructuring objects.
The application build for this section does not make use of all the features mentioned, but they are
listed here to spark your interest. For further information on all the features, the official documentation and
tutorials are very good,14 as is the book Learn to Program with Kotlin15 by Jim Lavers (Apress, 2021).
With the preceding introduction to Kotlin in mind, let’s build a Spring Boot web application
using Kotlin.
The Configuration
A Kotlin application can be built with Gradle and Maven. The structure of the project is the typical Maven
structure introduced to you at the beginning of this book, only Kotlin sources are located under a kotlin
directory. Also, a few Kotlin plug-ins are necessary, depending on the type of the application built, to make
sure the Kotlin sources are compiled into bytecode that the JVM can execute. The plug-ins needed for the
Spring Boot application built in this section are listed and explained next.
First is the Kotlin Gradle plug-in (kotlin-gradle-plugin), which selects the appropriate JVM standard
library depending on the compilerOptions.jvmTarget compiler option of your build script. For a multimodule Gradle project, the plug-in needs to be added as a classpath dependency in the parent project and
used in the subproject chapter16-kotlin-boot. Listing 16-30 shows these two bits of Gradle configuration.
Listing 16-30. Gradle Configuration of the kotlin-gradle-plugin Plug-in
// pro-spring-6/build.gradle
buildscript {
repositories {
mavenLocal()
mavenCentral()
}
dependencies {
classpath 'io.spring.gradle:dependency-management-plugin:1.1.0'
classpath 'org.jetbrains.kotlin:kotlin-gradle-plugin:1.8.10'
}
}
// pro-spring-6/chapter16-kotlin-boot/chapter16-kotlin-boot.gradle
apply plugin: 'org.jetbrains.kotlin.jvm'
tasks.withType(KotlinCompile).configureEach {
compileKotlin.compilerOptions.freeCompilerArgs.add('-Xjsr305=strict')
compileKotlin.compilerOptions.jvmTarget.set(JvmTarget.JVM_19)
}
14
15
https://kotlinlang.org/docs/getting-started.html
https://link.springer.com/book/10.1007/978-1-4842-6815-5
746
Chapter 16 ■ Spring Native and Other Goodies
tasks.withType(Test).configureEach {
useJUnitPlatform()
compileTestKotlin.compilerOptions.jvmTarget.set(JvmTarget.JVM_19)
}
The version of kotlin-gradle-plugin matches the supported Kotlin version, and the current Kotlin
version at the time of writing is 1.8.10. Notice that the KotlinCompile task was configured with the version
of the JVM that will run the application. This is necessary for the Test task as well if the tests are written in
Kotlin. The -Xjsr305 compile flag, when set to strict, is required to have null-safety taken into account in
Kotlin types inferred from Spring API.
As previously mentioned, Kotlin has classes and their members final by default. This might be
inconvenient for frameworks like Spring that need to proxy beans, and so they require classes to be open.
This means for interoperability, another plug-in is required. The kotlin-allopen compile plug-in adapts
Kotlin to the requirement of these frameworks. The configuration necessary for this plug-in is shown
in 16-31.
Listing 16-31. Gradle Configuration of the kotlin-allopen Plug-in
// pro-spring-6/build.gradle
buildscript {
repositories {
mavenLocal()
mavenCentral()
}
dependencies {
classpath 'io.spring.gradle:dependency-management-plugin:1.1.0'
classpath 'org.jetbrains.kotlin:kotlin-allopen:1.8.10'
}
}
// pro-spring-6/chapter16-kotlin-boot/chapter16-kotlin-boot.gradle
apply plugin: 'org.jetbrains.kotlin.plugin.spring'
Two other frameworks that are likely to cause issues are JPA and Hibernate. These frameworks require
entity classes to have a default, no-arguments constructor, because they create objects using it and then set
the properties. Kotlin does not generate such a constructor by default, so the kotlin-noarg plug-in must be
added to the configuration. The no-arg compiler plug-in generates an additional zero-argument constructor
for classes with a specific annotation.
The generated constructor is synthetic, so it can’t be directly called from Java or Kotlin, but it can be
called using reflection. Listing 16-32 shows the configuration for this plug-in.
Listing 16-32. Gradle Configuration of the kotlin-noarg Plug-in
// pro-spring-6/build.gradle
buildscript {
repositories {
mavenLocal()
mavenCentral()
}
747
Chapter 16 ■ Spring Native and Other Goodies
dependencies {
classpath 'io.spring.gradle:dependency-management-plugin:1.1.0'
classpath 'org.jetbrains.kotlin:kotlin-noarg:1.8.10'
}
}
// pro-spring-6/chapter16-kotlin-boot/chapter16-kotlin-boot.gradle
apply plugin: 'org.jetbrains.kotlin.plugin.jpa'
The Gradle configuration is written in Groovy, but Gradle supports writing configuration files in Kotlin
as well.
There is an equivalent configuration for Maven in chapter16-kotlin-boot project. Feel free to look
if you are interested in building Kotlin applications with Maven.
For Spring Boot applications written with Kotlin, take advantage of https://start.spring.io
to generate your project structure and configuration.
With all these plug-ins added to the configuration, we can now direct our attention to adding
the required dependencies to the configuration, so we can build a Spring Boot web application with
JPA. Figure 16-14 shows the dependencies of the project chapter16-kotlin-boot.
748
Chapter 16 ■ Spring Native and Other Goodies
Figure 16-14. chapter16-kotlin-boot project dependencies
The kotlin-stdlib dependency contains the Kotlin standard library, and is necessary for any Kotlin
project. The kotlin-reflect dependency is needed to add the runtime component required for using the
reflection features on the JVM platform. Also, notice the jackson-module-kotlin dependency, which is
needed to support Jackson annotations in Kotlin code.
Having covered the plug-ins and dependencies, it is time to take a look at the code.
The Code
Let’s start with the basics. The Singer entity class is very similar to its Java version, but simpler because
there are no setters and getters, and no Lombok. Figure 16-15 shows the chapter16-kotlin-boot project
structure.
749
Chapter 16 ■ Spring Native and Other Goodies
Figure 16-15. chapter16-kotlin-boot project structure
The Singer Kotlin entity class is shown in Listing 16-33.
Listing 16-33. Singer Kotlin Class
package com.apress.prospring6.sixteen.boot
import
import
import
import
import
import
com.fasterxml.jackson.annotation.JsonIgnore
jakarta.persistence.*
jakarta.validation.constraints.NotEmpty
jakarta.validation.constraints.Size
org.springframework.format.annotation.DateTimeFormat
java.time.LocalDate
@Entity
@Table(name = "SINGER")
data class Singer (
@Id @GeneratedValue(strategy = GenerationType.IDENTITY)
@Column(name = "ID")
@JsonIgnore // do not serialize
var id: Long? = null,
@Version @Column(name = "VERSION")
@JsonIgnore // do not serialize
var version: Int = 0,
@Column(name = "FIRST_NAME")
@NotEmpty
750
Chapter 16 ■ Spring Native and Other Goodies
@Size(min = 2, max = 30)
var firstName: String?,
@Column(name = "LAST_NAME")
var lastName: @NotEmpty @Size(min = 2, max = 30) String? = null,
@DateTimeFormat(pattern = "yyyy-MM-dd")
@Column(name = "BIRTH_DATE")
var birthDate: LocalDate? = null
)
The class is declared using the data class keywords. This tells the Kotlin compiler to generate
equals(), hashCode(), toString(), destructuring, and copy() functions.
The ? that appears after some types marks these properties as nullable; this is emphasized by initializing
them with null.
Notice that the class has no actual body; everything is done between the (). This declaration also works
as a constructor and is known as the primary constructor. Also notice that the variable type is declared after
the variable name and is prefixed by :, and if initialized with a value, the assignment statement comes after
the type declaration.
The SingerRepository interface is shown in Listing 16-34.
Listing 16-34. SingerRepository Kotlin Data Repository Interface
package com.apress.prospring6.sixteen.boot
import org.springframework.data.jpa.repository.Query
import org.springframework.data.repository.CrudRepository
import org.springframework.data.repository.query.Param
interface SingerRepository : CrudRepository<Singer, Long> {
@Query("select s from Singer s where s.firstName=:fn")
fun findByFirstName(@Param("fn") firstName: String?): Iterable<Singer?>?
@Query("select s from Singer s where s.firstName like %?1%")
fun findByFirstNameLike(firstName: String?): Iterable<Singer?>?
}
The service looks a lot different from its Java version and is shown in Listing 16-35.
Listing 16-35. SingerService Kotlin Class
package com.apress.prospring6.sixteen.boot
import
import
import
import
import
org.springframework.dao.DataIntegrityViolationException
org.springframework.stereotype.Service
org.springframework.transaction.annotation.Transactional
java.util.*
kotlin.jvm.Throws
@Transactional
@Service
class SingerService (private val repository: SingerRepository){
751
Chapter 16 ■ Spring Native and Other Goodies
@Throws(NotFoundException::class)
fun findAll(): List<Singer> {
val singers: List<Singer> = repository.findAll() as List<Singer>
if (singers.isEmpty()) {
throw NotFoundException(Singer::javaClass.name)
}
return singers
}
@Throws(NotFoundException::class)
fun findById(id: Long?): Singer? {
return id?.let { repository.findById(id).orElseThrow { NotFoundException(Singer::
javaClass.name, id) }}
}
@Throws(DataIntegrityViolationException::class)
fun save(singer: Singer?): Singer? {
return singer?.let { repository.save(it) }
}
@Throws(NotFoundException::class, DataIntegrityViolationException::class)
fun update(id: Long?, singer: Singer): Singer? {
return id?.let { repository.findById(id).map { update(it, singer, repository)
}.orElseThrow { NotFoundException(Singer::javaClass.name, id) }}
}
@Throws(NotFoundException::class)
fun delete(id: Long?) {
id?.let { repository.findById(id).orElseThrow { NotFoundException(Singer::javaClass.
name, id) } }
id?.let { repository.deleteById(id) }
}
fun update(it: Singer, singer: Singer, repository: SingerRepository): Singer {
it.firstName = singer.firstName
it.lastName = singer.lastName
it.birthDate = singer.birthDate
return repository.save(it)
}
}
The following list explains the most important constructs in the SingerService class. Notice that the
java.util.List<String> is used in Kotlin code.
752
•
The methods are declared with fun and the return type is declared at the end of the
signature right before the body block. Hereafter in this section, methods are called
functions, to switch to the Kotlin style.
•
The NotFoundException is a custom exception thrown whenever a service function
is invoked with an id that does not match a Singer instance. Kotlin does not
require checked exceptions to be declared with a throws statement, but since
Kotlin code is compiled to bytecode that needs to run on a JVM, it needs to be valid.
The @Throws annotation indicates what exceptions should be declared by a function
when compiled to a JVM method.
Chapter 16 ■ Spring Native and Other Goodies
•
The Singer::javaClass.name construct references the Java class object, so its name
can be accessed and used as a parameter to create a NotFoundException.
•
id?.let { .. } is made of two parts: ?. is named the safe call operator, which
allows repository.findById(id) to be invoked only when the id is not null; and
let calls the specified function block with this value as its argument and returns
its result.
Listing 16-36 shows the SingerController class.
Listing 16-36. SingerController Kotlin Class
package com.apress.prospring6.sixteen.boot
import jakarta.validation.Valid
import org.springframework.dao.DataIntegrityViolationException
import org.springframework.web.bind.annotation.*
@RestController
@RequestMapping("/singer")
class SingerController (private val service: SingerService) {
@GetMapping
fun all(): List<Singer> {
return service.findAll()
}
@GetMapping( "/{id}")
fun findSingerById(@PathVariable id: Long) : Singer? {
return service.findById(id)
}
@PostMapping
fun create(@RequestBody @Valid singer:Singer) : Singer? {
return service.save(singer)
}
@PutMapping("/{id}")
fun update(@RequestBody @Valid singer: Singer, @PathVariable id: Long) : Singer? {
return service.update(id, singer)
}
@DeleteMapping("/{id}")
fun delete(@PathVariable id: Long) {
service.delete(id)
}
}
The SingerController class seems simpler in Kotlin too, but it’s pretty similar to the one in Java, and it
introduces nothing new.
753
Chapter 16 ■ Spring Native and Other Goodies
But let’s look at the configuration. In previous chapters, a bean of a type extending
PhysicalNamingStrategyStandardImpl was necessary to convince Spring Data to recognize tables
and columns with names in all caps. Converting the CustomPhysicalNamingStrategy to Kotlin
provides the opportunity to use the private accessor and the override keyword. The Kotlin version of
CustomPhysicalNamingStrategy is shown in Listing 16-37.
Listing 16-37. CustomPhysicalNamingStrategy Kotlin Class
package com.apress.prospring6.sixteen.boot
import
import
import
import
import
import
org.hibernate.boot.model.naming.Identifier
org.hibernate.boot.model.naming.PhysicalNamingStrategyStandardImpl
org.hibernate.engine.jdbc.env.spi.JdbcEnvironment
org.springframework.stereotype.Component
java.io.Serializable
java.util.*
@Component
class CustomPhysicalNamingStrategy : PhysicalNamingStrategyStandardImpl(), Serializable {
override fun toPhysicalTableName(logicalName: Identifier?, context: JdbcEnvironment):
Identifier? {
return apply(logicalName)
}
override fun toPhysicalColumnName(logicalName: Identifier?, context: JdbcEnvironment):
Identifier? {
return apply(logicalName)
}
private fun apply(name: Identifier?): Identifier? {
if (name == null) {
return null
}
val builder = StringBuilder(name.text.replace('.', '_'))
var i = 1
while (i < builder.length - 1) {
if (isUnderscoreRequired(builder[i - 1], builder[i], builder[i + 1])) {
builder.insert(i++, '_')
}
i++
}
return Identifier.toIdentifier(builder.toString().uppercase(Locale.getDefault()))
}
private fun isUnderscoreRequired(before: Char, current: Char, after: Char): Boolean {
return Character.isLowerCase(before) && Character.isUpperCase(current) && Character.
isLowerCase(after)
}
}
754
Chapter 16 ■ Spring Native and Other Goodies
It doesn’t simplify the Java code by much, but that might just be attributed to a lack of Kotlin expertise.
Notice that in order to override a function, the declaration must be declared with the override keyword in
front of fun. The private accessor, when used on a function, has the same effect as in Java, keeping it local to
the class enclosing it.
The Spring Boot main class is shown in Listing 16-38.
Listing 16-38. Chapter16Application Kotlin Main Class
package com.apress.prospring6.sixteen.boot;
import org.springframework.boot.autoconfigure.SpringBootApplication
import org.springframework.boot.runApplication
import org.springframework.core.env.AbstractEnvironment
// some import statements omitted
@SpringBootApplication
class Chapter16Application
fun main(args: Array<String>) {
System.setProperty(AbstractEnvironment.ACTIVE_PROFILES_PROPERTY_NAME, "dev")
runApplication<Chapter16Application>(*args)
}
@ControllerAdvice
@ResponseBody
class RestErrorHandler {
@ExceptionHandler(DataIntegrityViolationException::class)
fun handleBadRequest(ex: DataIntegrityViolationException): ResponseEntity<Any?>? {
return ResponseEntity.badRequest().body(ex.message)
}
}
@ResponseStatus(value = HttpStatus.NOT_FOUND, reason = "Requested item(s) not found")
class NotFoundException : Exception {
constructor(clsName: String) : super("table for $clsName is empty!")
constructor(clsName: String, id: Long) : super("$clsName with id: $id does not exist!")
}
Kotlin does not enforce the name of the file to be the same as the top-level class declared within it, and
this allows developers to put various classes of smaller sizes in the same file. For example, the classes in
Listing 16-38 are declared in a file named KotlinApplication.kt (the Kotlin file extension is kt).
Now that you’ve been introduced to a not-so-simple Spring Boot web application with a REST controller
and JPA, all that is left is to test it. Writing a Spring Boot test in Kotlin is not that different from writing one
in Java, but it does provide the opportunity to introduce the compagnion object. Listing 16-39 shows a Kotlin
Spring Boot test class.
755
Chapter 16 ■ Spring Native and Other Goodies
Listing 16-39. KotlinApplicationTest Kotlin Spring Boot Test Class
package com.apress.prospring6.sixteen.boot
// import statements omitted
@ActiveProfiles("test")
@SpringBootTest(webEnvironment = SpringBootTest.WebEnvironment.RANDOM_PORT)
class KotlinApplicationTest(@Autowired val restTemplate: TestRestTemplate, @Value(value =
"\${local.server.port}") val port: Int) {
val logger: Logger = LoggerFactory.getLogger(KotlinApplicationTest::class.java)
companion object {
@JvmStatic
@BeforeAll
fun setup() {
println(">> Setup")
}
@JvmStatic
@AfterAll
fun teardown() {
println(">> Tear down")
}
}
@Test
fun `find all singers`() {
val singers: Array<Singer> = restTemplate.getForObject("/singer",
Array<Singer>::class.java)
Assertions.assertTrue(singers.size >= 15)
for(it in singers) logger.info(it.toString())
}
@Test
@Throws(URISyntaxException::class)
fun `can't find Singer by id`() {
logger.info("--> Testing retrieve a singer by id : 99")
val req: RequestEntity<Singer> = RequestEntity<Singer>(HttpMethod.GET, URI("http://
localhost:$port/singer/99"))
val response: ResponseEntity<Singer> = restTemplate.exchange(req,
Singer::class.java)
Assertions.assertAll("testNegativeFindById",
Executable { Assertions.assertEquals(HttpStatus.NOT_FOUND, response.
statusCode) },
Executable { Assertions.assertNull(response.body?.firstName) },
Executable { Assertions.assertNull(response.body?.lastName) }
)
}
}
756
Chapter 16 ■ Spring Native and Other Goodies
Here are the main observations about this class:
•
Note the syntax \$ in @Value(value = "\${local.server.port}") val port:
Int) toward the beginning of Listing 16-39. As mentioned at the beginning of this
section, Kotlin supports string template expressions. Template expressions start with
$ (dollar sign), but so do references to Spring environment variables, so in Kotlin,
when environment variables are referenced for injection in @Value annotations, for
example, the dollar sign needs to be escaped by prefixing it with \ (backslash).
•
There is no static in Kotlin. Java-style statics are not supported, to encourage
better coding practices. Since the @BeforeAll and @AfterAll annotations need to
be placed on static methods, the solution for this is to declare a companion object for
the KotlinApplicationTest, place the functions there, and annotate them with
@JvmStatic. This annotation specifies that an additional static method needs to be
generated from this element if it’s a function.
•
Since there is no static in Kotlin, there are no static imports, so assertions need to
be invoked like this: Assertions.assert*(..).
Also in Kotlin, class, function, and variable names can contain spaces if declared between backticks, ``.
It can be useful sometimes, but don’t abuse it, because it might make the code less readable.
Summary
GraalVM Native Images are an evolving technology, and not all libraries provide support. Spring Native
support was experimental until Spring Boot 3. The Maven Daemon (mvnd)16 is a good example of how
quick native executables are compared to applications running on the JVM. It is also a good example of
the limitations and restrictions involved, since Maven projects designed to be built with mvnd have to be
configured carefully so that modules can be built in parallel. For small projects with a few modules, mvnd
can provide a speedup of 7 to 10 times or more compared to stock Maven. For larger projects with many
modules, mvnd can provide a speedup of 3 to 5 times or more, due to its ability to build modules in parallel
and the optimization provided by the JIT compiler.
GraphQL’s adoption by Spring is a clear sign that GraphQL is here to stay. There is one operation
in GraphQL that was not covered in this chapter: subscription. Sometimes clients might want to receive
updates from the server when data they care about changes. Subscription is the operation that provides
this functionality. Another topic that was not touched upon is GraphQL on a reactive server like Netty. In
a Spring Boot reactive application with GraphQL, testing is possible with org.springframework.graphql.
test.tester.GraphQlTester.17
Kotlin has been developed by taking into account other things missing or implemented badly in other
languages. Seasoned developers might recognize in its syntax inspiration from Closure or Python, but
mostly Scala and Java. It is a modern and approachable language, with a great development team and a great
community around it. There are security and performance concerns about the black magic Kotlin does to
convert the code to bytecode runnable on JVM, and there is also the cost of the extra configuration required
to interact with Java frameworks already established in the industry. Is Kotlin the future? Yet again, the fact
that Spring has adopted it might be a sign that this is what developers want.
https://github.com/apache/maven-mvnd
https://docs.spring.io/spring-graphql/docs/current/api/org/springframework/
graphql/test/tester/GraphQlTester.html
16
17
757
CHAPTER 17
Securing Spring Web Applications
Chapter 14 explained how to build a Spring web application using classic, “manual”-style configuration
and using Spring Boot with Thymeleaf. This chapter will take the application built in Chapter 14 and add
a security layer that will declare which users are allowed to access various parts of the application. For
example, only those users who logged into the application with a valid user ID can add a new singer or
update existing singers. Other users, known as anonymous users, can only view singer information.
Spring Security is the best choice for securing Spring-based applications. Spring Security provides
authentication, authorization, and other security features for enterprise applications. Although mostly
used in the presentation layer, Spring Security can help secure all layers within the application, including
the service layer. In the following sections, we demonstrate how to use Spring Security to secure the singers
application. For web applications, depending on the view technology used, there are tags that can be part of
the view template to hide or show parts of the view based on the user rights.
Spring Security is a relatively complex framework that aims to make it easy for the developer to
implement security in an application. Before being part of Spring, the project, started in late 2003, was
named Acegi Security. The first Spring Security release was version 2.0.0 in April 2008.
When it comes to security in applications, there are two processes that are most important, and Spring
Security can be used to configure both:
•
Authentication: The process of proving that you are who you say you are. This means
you submit your credentials to the application, and they are tested against a set of
existing users, and if a match is found, you are given access to the application.
•
Authorization: The process of granting an authenticated party permission to do
something. Spring Security is essentially a framework composed of intercepting rules
for granting, or not granting, access to resources.
These two processes revolve around a principal which signifies a user, device, or system that could
perform an action within the application and, credentials which are identification keys that a principal
uses to confirm its identity (e.g., a username and password).
This chapter shows how to configure authorization and authentication with Spring Security version 6.x.
You can find Spring Security’s source code on GitHub at https://github.com/springprojects/spring-security/.
© Iuliana Cosmina, Rob Harrop, Chris Schaefer, and Clarence Ho 2023
I. Cosmina et al., Pro Spring 6, https://doi.org/10.1007/978-1-4842-8640-1_17
759
Chapter 17 ■ Securing Spring Web Applications
Configuring Spring Security: The Classic Way
This section shows how to secure the application built in Chapter 14. To add Spring Security to it, we
obviously need to add a few libraries to the classpath. A minimal Spring Security configuration for a Spring
web application typically looks similar to the one depicted in Figure 17-1.
Figure 17-1. Project chapter17 dependencies
The spring-security-config library contains Java configuration support. The spring-security-web
library contains web security infrastructure code, such as various filters and other Servlet API dependencies.
The internals of Spring Security are complex, and the official documentation explains them very well
and in detail. For the purpose of this book, the only thing you need to know is that once Spring Security is
configured, all HTTP requests are intercepted by a Security Interceptor and access to resources is decided
based on the user making the request. The Security Interceptor works with a preprocessing step and a
postprocessing step. In the preprocessing step, it looks to see whether the requested resource is secured with
some metadata information represented by an org.springframework.security.access.ConfigAttribute1.
If it is not, the request is allowed to continue its way either to the requested URL or method. If the requested
https://github.com/spring-projects/spring-security/blob/main/core/src/main/java/
org/springframework/security/access/ConfigAttribute.java
1
760
Chapter 17 ■ Securing Spring Web Applications
resource is secured, the Security Interceptor retrieves the Authentication object from the current
SecurityContext. If necessary, the Authentication object will be authenticated against the configured
AuthenticationManager.
Intercepting all requests to a web application requires a special servlet filter. The Spring Security filter
that needs to be configured is named springSecurityFilterChain and, as its name makes obvious, it is not
a single filter but a collection of filters that are chained together to protect the application URLs, validate
submitted usernames and passwords, redirect to the login form, and so on. Spring Security provides ways to
configure this filter and customize its various functions, as in depth as necessary.
This being said, let’s see how we can configure security support in a Spring web application with classic
configuration.
If you need to, please review Chapter 14 at this point to re-familiarize yourself with the components of
a Spring web application with classic configuration and how to pack up an application as a WAR file and deploy
it to Apache Tomcat 10.
Figure 17-2 shows the configuration classes for a secured Spring web application with classic
configuration.
Figure 17-2. Project chapter17 configuration classes
761
Chapter 17 ■ Securing Spring Web Applications
One of the first things that we need to do is to make sure springSecurityFilterChain is the entry
point to the application, registered with the highest precedence, to be the first filter in the chain, before
any other registered jakarta.servlet.Filter. This is done by adding a class that implements org.
springframework.web.WebApplicationInitializer to the application. In Figure 17-2 the class is named
SecurityInitializer. Its implementation is shown in Listing 17-1.
Listing 17-1. The SecurityInitializer Class
package com.apress.prospring6.seventeen;
import org.springframework.security.web.context.AbstractSecurityWebApplicationInitializer;
class SecurityInitializer extends AbstractSecurityWebApplicationInitializer {
@Override
protected boolean enableHttpSessionEventPublisher() {
return true;
}
}
Notice that the SecurityInitializer class does not implement WebApplicationInitializer directly,
but by extending AbstractSecurityWebApplicationInitializer to benefit from the default Spring
implementation and reduce the work a developer must do.
The enableHttpSessionEventPublisher() method is overridden to return true; by default it
returns false, and we could have left it like that since this configuration is not really important for the rest of the
chapter. This method should return true if session management has specified a maximum number of sessions,
because in this case a org.springframework.security.web.session.HttpSessionEventPublisher
is added to the configuration to notify the session registry when users logs out.
Now the security filter is in place, let’s give it the required components to do its job.
Notice that we haven’t added any view template for the login page—with Spring Security, we don’t
have to. With a default configuration, a default very simple login page is included, and any request requiring
authentication is redirected to it. So, we can jump directly to the Spring Security configuration. Listing 17-2
shows the SecurityCfg class, explanation of which follows the listing.
Listing 17-2. Basic Version of the SecurityCfg Class
package com.apress.prospring6.seventeen;
import org.springframework.context.annotation.Configuration;
import org.springframework.security.config.annotation.web.configuration.EnableWebSecurity;
@Configuration
@EnableWebSecurity
public class SecurityCfg {
}
762
Chapter 17 ■ Securing Spring Web Applications
This is the simplest Spring Security configuration example possible. It sets up the securityFilterChain
with a default configuration, so all requests are now blocked. If you deploy the project and try to access it at
http://localhost:8080/ch17, you are redirected to the login screen shown in Figure 17-3.
Figure 17-3. Default login screen
This is a very simple login page written in HTML with Bootstrap2 with a form for submitting a username
and password. You can inspect the source in your browser if you want to. If you try to introduce a username and
password, you will be redirected to the same page, but with an error message added, as shown in Figure 17-4.
Figure 17-4. Login screen with error message
2
https://getbootstrap.com/
763
Chapter 17 ■ Securing Spring Web Applications
What Spring is complaining about is that there is no AuthenticationProvider bean configured, and
thus Spring does not know where to look for a username and a password to match the ones submitted so
that your identity can be validated. To keep things as simple as possible as well, we’ll configure a bean of
type UserDetailsService to use in-memory authentication for teaching purposes. It declares a single user
named "john" with password "doe" and role "USER". The bean is shown in Listing 17-3.
Listing 17-3. The UserDetailsService bean
package com.apress.prospring6.seventeen;
import org.springframework.security.core.userdetails.User;
import org.springframework.security.core.userdetails.UserDetails;
import org.springframework.security.core.userdetails.UserDetailsService;
import org.springframework.security.provisioning.InMemoryUserDetailsManager;
// some import statements omitted
@Configuration
@EnableWebSecurity
public class SecurityCfg {
@Bean
public UserDetailsService userDetailsService() {
UserDetails user = User.withDefaultPasswordEncoder()
.username("john")
.password("doe")
.roles("USER")
.build();
return new InMemoryUserDetailsManager(user);
}
}
This configuration is compact, but it does a lot, a partial list of which follows:
•
Blocks access to all application URLs
•
Generates a login form
•
Allows form-based authentication for a user named john with password password
•
Allows for a user to log out as well
•
Prevents CSRF3 attack
•
Provides Session Fixation4 protection
The UserDetailsService bean is a very simple one as well, and the User object is built with
withDefaultPasswordEncoder(), which delegates to BCryptPasswordEncoder. If you want to build a demo
application, and you need multiple users and roles, you can explicitly declare a BCryptPasswordEncoder
bean and use it. Listing 17-4 shows you how.
3
4
https://portswigger.net/web-security/csrf
https://owasp.org/www-community/attacks/Session_fixation
764
Chapter 17 ■ Securing Spring Web Applications
Listing 17-4. The SecurityCfg Class with a BCryptPasswordEncoder Bean
package com.apress.prospring6.seventeen;
import org.springframework.security.crypto.bcrypt.BCryptPasswordEncoder;
// some import statements omitted
@Configuration
@EnableWebSecurity
public class SecurityCfg {
@Bean
public PasswordEncoder encoder() {
return new BCryptPasswordEncoder();
}
@Bean
public UserDetailsService userDetailsService(PasswordEncoder encoder) {
User.UserBuilder users = User.builder().passwordEncoder(encoder::encode);
var joe = users
.username("john")
.password("doe")
.roles("USER")
.build();
var jane = users
.username("jane")
.password("doe")
.roles("USER")
.build();
var admin = users
.username("admin")
.password("admin")
.roles("ADMIN")
.build();
return new InMemoryUserDetailsManager(jane, joe, admin);
}
}
The class is annotated with the @EnableWebSecurity annotation to enable secured behavior in a Spring
web application. This annotation exposes the SecurityFilterChain bean, so it can be customized. The
configuration introduced so far does not show any of that. Every aspect of the SecurityFilterChain bean
can be customized. Let’s start small and add an explicit configuration for it that actually uses the defaults,
just to have an idea of how it is done. Listing 17-5 introduces you to a custom SecurityFilterChain bean.
Listing 17-5. The SecurityCfg Class with a Simple SecurityFilterChain bean
package com.apress.prospring6.seventeen;
import org.springframework.security.config.Customizer;
import org.springframework.security.config.annotation.web.builders.HttpSecurity;
import org.springframework.security.web.SecurityFilterChain;
// some import statements omitted
765
Chapter 17 ■ Securing Spring Web Applications
@Configuration
@EnableWebSecurity
public class SecurityCfg {
@Bean
public SecurityFilterChain securityFilterChain(HttpSecurity http) throws Exception {
http
.authorizeHttpRequests((authorize) -> authorize
.anyRequest().authenticated()
)
//.httpBasic(Customizer.withDefaults())
.formLogin(Customizer.withDefaults())
.logout(Customizer.withDefaults());
return http.build();
}
@Bean
public PasswordEncoder encoder() {
return new BCryptPasswordEncoder();
}
// userDetailsService omitted
}
One by one, here is an explanation of all the important bits of this configuration:
766
•
HttpSecurity: This object allows configuration of web-based security for specific
HTTP requests. Spring injects an instance of this object, which can be further
configured.
•
authorizeHttpRequests(...): This method provides support for customizing
access to various resources to authenticated users. The syntax is builder specific and
multiple rules can be connected to each other through .and() methods.
•
httpBasic(Customizer.withDefaults()): This is used to configure HTTP basic
authentication for the application. The withDefaults() method returns an empty
implementation of the Customizer<T> functional interface. This does not generate
a login form, and authentication is enforced by the browser, by blocking access to
the application via a dialog box that allows you to submit a username and password.
Since it does not require a form, basic authentication is more suitable for REST
requests. This method invocation is equivalent to httpBasic().
•
formLogin(Customizer.withDefaults()): This is used to configure a login form.
With an empty Customizer<T>, it obviously defaults to the generic out-of-the-box
form, but a Customizer<FormLoginConfigurer<?>> can configure the path of the
login page, the names of the username and password form parameters. This method
invocation is equivalent to formLogin().
•
logout(Customizer.withDefaults()): This is used to configure logout support.
This functionality is automatically enabled when configuring security using @
EnableWebSecurity. This invocation, equivalent to logout(), is added to this
configuration for teaching purposes.
Chapter 17 ■ Securing Spring Web Applications
Now that we have some defaults, let’s customize some of them. Let’s start with the hardest: let’s
add a custom default form. For this we need to create a Thymeleaf view template containing a simple
authentication form. The base of this is the views/templates/layout.html template that declares sections
for the header, menu, and footer, thus the authentication form will represent only the central part of the
page, the pageContent section. The form is shown in Listing 17-6.
Listing 17-6. A Thymeleaf Authentication Form (views/auth.html)
<!DOCTYPE HTML>
<html xmlns:th="http://www.thymeleaf.org">
<head th:replace="~{templates/layout :: pageTitle('Login Page')}"></head>
<body>
<div class="container">
<header th:replace="~{templates/layout :: pageHeader}" ></header>
<header th:replace="~{templates/layout :: pageMenu}" ></header>
<section th:fragment="~{templates/layout :: pageContent}">
<div class="content"> <!-- content -->
<h5 th:text="#{command.login}">Log in</h5>
<div class="container col-lg-12">
<form th:action="@{/auth}" method="post">
<div class="row mb-1">
<input type="text" id="user" name="user"
autofocus="autofocus" class="form-control"
th:placeholder="#{label.username}" />
</div>
<div class="row mb-1">
<input type="password" id="pass" name="pass"
class="form-control" th:placeholder="#{label.
password}" />
</div>
<div class="form-group mb-1 align-items-end">
<input type="submit" th:value="#{command.signin}"
id="loginButton" class="btn btn-dark"/>
</div>
</form>
</div>
</div>
</section>
<footer th:replace="~{templates/layout :: pageFooter}" ></footer>
</div>
</body>
</html>
Intentionally, the URL for submitting the form is changed to /auth, the username and password
fields are renamed to user and pass, and the file is named auth.html to provide as much configuration as
possible.
To configure Spring Security to use this form as a login form, the .formLogin() invocation must be
replaced with the configuration in Listing 17-7.
767
Chapter 17 ■ Securing Spring Web Applications
Listing 17-7. Spring Security Configuration with a Custom Form
.formLogin(loginConfigurer -> loginConfigurer
.loginPage("/auth")
.loginProcessingUrl("/auth")
.usernameParameter("user")
.passwordParameter("pass")
.defaultSuccessUrl("/home")
.permitAll())
.csrf().disable();
The name of each of these methods makes it very obvious as to which part of the configuration it covers:
•
loginPage("/auth") configures the login form to be a view named auth. We can
map this view name to the views/auth.html template, either via a @GetMapping
handler method or by adding the mapping to the ViewControllerRegistry in the
web configuration, like shown in Listing 17-8.
Listing 17-8. Mapping the /auth Path to the views/auth.html View File
package com.apress.prospring6.seventeen;
import org.springframework.web.servlet.config.annotation.ViewControllerRegistry;
//other import statements omitted
@Configuration
@EnableWebMvc
public class WebConfig implements WebMvcConfigurer, ApplicationContextAware {
@Override
public void addViewControllers(ViewControllerRegistry registry) {
registry.addRedirectViewController("/", "/home");
registry.addViewController("/auth").setViewName("auth");
}
// other bits of configuration omitted
}
768
•
loginProcessingUrl("/auth") is needed to declare the /auth as the URL where the
credentials are submitted, and is the one in th:action="@{/auth}" Thymeleaf form
declaration.
•
defaultSuccessUrl("/home") is needed to redirect the user to the main page
when the authentication succeeds. By default, the user is redirected to the root of
the application, /, and in this example it is the same page we configured by this
method too.
•
csrf().disable() is needed to disable the generation of a CSRF token. As
mentioned at the beginning of this section, by default CSRF protection is enabled,
and to keep our form simple, and the configuration too, we decided to disable it.
Chapter 17 ■ Securing Spring Web Applications
Spring Security 4 introduced the possibility of using CSRF tokens in Spring forms to prevent cross-site
request forgery. In this example, because we wanted to keep things simple, the usage of CSRF tokens was
disabled by calling csrf().disable(). By default, a configuration without a CSRF element configuration is
invalid, and any login request will direct you to a 403 error page stating the following:
Invalid CSRF Token 'null' was found on the request parameter'_csrf' or header
'X-CSRF-TOKEN'.
•
permitAll() is needed to make sure unauthenticated users have access to the
authentication form.
Now that we have a custom form, when we try to access the application at http://localhost:8080/
ch17 instead of the Spring Security default form, the custom form is the one we get redirected to, shown in
Figure 17-5.
Figure 17-5. Custom login form configured with Spring Security
Each of the default configurations shown until now in this section will probably require small changes
and adjustments in real applications. For example, the authorizeHttpRequests(..) method is used to set
up authorization for specific URL paths, exclude some of them from this process like CSS and images. The
URL path for logging out of the application can be changed to something else and some extra cleanup steps
can be added, such as deleting authentication details from the browser cache or deleting some cookies.
Listing 17-9 shows the customized spring security configuration.
769
Chapter 17 ■ Securing Spring Web Applications
Listing 17-9. Customized Version of the SecurityFilterChain
package com.apress.prospring6.seventeen;
import
import
import
import
import
import
import
import
import
import
org.springframework.context.annotation.Bean;
org.springframework.context.annotation.Configuration;
org.springframework.security.config.annotation.web.builders.HttpSecurity;
org.springframework.security.config.annotation.web.configuration.EnableWebSecurity;
org.springframework.security.core.userdetails.User;
org.springframework.security.core.userdetails.UserDetailsService;
org.springframework.security.crypto.bcrypt.BCryptPasswordEncoder;
org.springframework.security.crypto.password.PasswordEncoder;
org.springframework.security.provisioning.InMemoryUserDetailsManager;
org.springframework.security.web.SecurityFilterChain;
@Configuration
@EnableWebSecurity
public class SecurityCfg {
@Bean
public SecurityFilterChain securityFilterChain(HttpSecurity http) throws Exception {
http
// authorization
.authorizeHttpRequests((authorize) -> authorize
.requestMatchers( "/styles/**", "/images/**").permitAll()
.anyRequest().authenticated())
// logout
.logout(httpSecurityLogoutConfigurer -> httpSecurityLogoutConfigurer
.logoutUrl("/exit")
.permitAll()
.clearAuthentication(true))
// login form
.formLogin(loginConfigurer -> loginConfigurer
.loginPage("/auth")
.loginProcessingUrl("/auth")
.usernameParameter("user")
.passwordParameter("pass")
.defaultSuccessUrl("/home")
.permitAll())
// CSRF protection disabled
.csrf().disable();
return http.build();
}
// other configuration elements omitted
}
Notice that the logout behavior has been configured as well, by providing a customizer as an argument
for the logout(..) method; besides changing the logout URL from /logout to /exit, it also adds the
clearAuthentication(true) call that tells Spring to clear the Authentication (default) when a user
logs out.
770
Chapter 17 ■ Securing Spring Web Applications
Now that we have the full configuration, how do we tell Spring about it? To make sure it is used
correctly, we need to add the SecurityCfg class to the collection of configuration classes that define our
application context. In Chapter 14 the WebInitializer class was used to register a DispatcherServlet.
Java-based Spring configuration was used for declaring the root application as being configured via the
BasicDataSourceCfg and TransactionCfg classes. The web application context was configured by the
WebConfig class. This configuration is shown in Listing 17-10.
Listing 17-10. Chapter 14 Web Application Configuration
package com.apress.prospring6.fifteen;
import jakarta.servlet.Filter;
import org.springframework.web.filter.CharacterEncodingFilter;
import org.springframework.web.filter.HiddenHttpMethodFilter;
import org.springframework.web.servlet.support.
AbstractAnnotationConfigDispatcherServletInitializer;
import java.nio.charset.StandardCharsets;
public class WebInitializer extends AbstractAnnotationConfigDispatcherServletInitializer {
@Override
protected Class<?>[] getRootConfigClasses() {
return new Class[]{BasicDataSourceCfg.class, TransactionCfg.class};
}
@Override
protected Class<?>[] getServletConfigClasses() {
return new Class[]{WebConfig.class};
}
@Override
protected String[] getServletMappings() {
return new String[]{"/"};
}
@Override
protected Filter[] getServletFilters() {
final CharacterEncodingFilter cef = new CharacterEncodingFilter();
cef.setEncoding(StandardCharsets.UTF_8.name());
cef.setForceEncoding(true);
return new Filter[]{new HiddenHttpMethodFilter(), cef};
}
}
When we know that security is implemented only for the web layer the SecurityCfg class must be
added to the web context. But there are situations when the security context spans through multiple layers,
the most obvious examples being when the users accessing the application have their credentials stored
in the database and when the service layer supports remote calls. In situations like these, a configuration
class picking up all configuration is introduced and used to declare a single huge and all-powerful web
application context. Listing 17-11 shows the ApplicationConfiguration class.
771
Chapter 17 ■ Securing Spring Web Applications
Listing 17-11. The ApplicationConfiguration Class
package com.apress.prospring6.seventeen;
import org.springframework.context.annotation.ComponentScan;
import org.springframework.context.annotation.Configuration;
@Configuration
@ComponentScan
public class ApplicationConfiguration {
}
The ApplicationConfiguration class is used as a single configuration entry point in the
WebInitializer for the chapter17 project, shown in Listing 17-12.
Listing 17-12. Chapter 17 Web Application Configuration
package com.apress.prospring6.seventeen;
// import statements omitted
public class WebInitializer extends AbstractAnnotationConfigDispatcherServletInitializer {
@Override
protected Class<?>[] getRootConfigClasses() {
return new Class[]{};
}
@Override
protected Class<?>[] getServletConfigClasses() {
return new Class[]{ApplicationConfiguration.class};
}
@Override
protected String[] getServletMappings() {
return new String[]{"/"};
}
// some configuration omitted
}
With the configuration in place, what is left to do is tweak bits of the UI to provide some logout option
displaying the logged-in user and so on. Since we are using Thymeleaf, this is quite easy to do, but it requires
the thymeleaf-extras-springsecurity6 library to be added to the classpath. This library adds the Spring
Security integration module to the application, which allows using the Spring Security dialect constructs
in the Thymeleaf templates. This means beside the attributes prefixed with th:, we can now use properties
prefixed with sec: to access the security context and make decisions about how the view appear to users
with different roles.
Since we now have authenticated users, we can add two things to our layout template (views/
templates/layout.html):
772
•
A logout menu item
•
A section where the name of the authenticated user is shown
Chapter 17 ■ Securing Spring Web Applications
These two modifications are shown in Listing 17-13.
Listing 17-13. Thymeleaf Security Constructs in views/templates/layout.html
<!DOCTYPE HTML>
<html xmlns:th="http://www.thymeleaf.org" th:with="lang=${#locale.language},
theme=${#themes.code('name')}" th:lang="${lang}" th:theme="${theme}">
<head th:fragment="pageTitle(title)">
<!-- head contents omitted -->
</head>
<body>
<header th:fragment="pageHeader" class="page-header">
<div class="row">
<div class="col-lg-8 col-md-7 col-sm-6">
<div class="banner"></div>
<div class="themeLocal">
<!-- theming links omitted -->
<span sec:authorize="isAuthenticated()">
Authenticated: <em sec:authentication="name"></em>
</span>
</div>
</div>
</div>
</header>
<section th:fragment="pageMenu">
<div class="menu">
<ul>
<!-- other elements configuration omitted -->
<li sec:authorize="isAuthenticated()">
<a th:href="@{/exit}" th:text="#{command.logout}">Sign Out</a>
</li>
</ul>
</div>
</section>
<section th:fragment="pageContent">
<div class="content">
<p>Page Content</p>
</div>
</section>
<footer th:fragment="pageFooter">
<div class="footer">
<p th:text="#{footer.text}"></p>
</div>
</footer>
</body>
</html>
773
Chapter 17 ■ Securing Spring Web Applications
Listing 17-14. Configuration Snippet to Register the SpringSecurityDialect with the
SpringTemplateEngine
package com.apress.prospring6.seventeen;
import org.thymeleaf.extras.java8time.dialect.Java8TimeDialect;
import org.thymeleaf.extras.springsecurity6.dialect.SpringSecurityDialect;
import org.thymeleaf.spring6.SpringTemplateEngine;
// other import statements omitted
@Configuration
@EnableWebMvc
public class WebConfig implements WebMvcConfigurer, ApplicationContextAware {
@Bean
@Description("Thymeleaf Template Engine")
public SpringTemplateEngine templateEngine() {
var engine = new SpringTemplateEngine();
engine.addDialect(new Java8TimeDialect());
engine.setTemplateResolver(templateResolver());
engine.setTemplateEngineMessageSource(messageSource());
engine.addDialect(new SpringSecurityDialect());
engine.setEnableSpringELCompiler(true);
return engine;
}
// other configurations omitted
}
With this configuration in place, when a user has successfully logged into the application, the home
page will show the user’s name and the logout option, as shown in Figure 17-6.
Figure 17-6. Home page shown to an authenticated user
774
Chapter 17 ■ Securing Spring Web Applications
In our configuration we have defined two roles, USER and ADMIN, but we are not using them for anything,
because currently there is no configuration that is specific only to a certain role. Just to show how this can be
done, let’s allow only users with the ADMIN right to delete singers. This means we must do two things:
•
Make sure the Delete button is not rendered for users that are not ADMIN
•
Reject delete requests for users that are not ADMIN, by securing the controller method
Preventing the rendering of the Delete button is easily done by using a combination of Thymeleaf
security constructs and SpEL expressions, as shown in Listing 17-15.
Listing 17-15. views/show.html Hiding the Delete Button for Non-ADMIN Users
<!DOCTYPE HTML>
<html xmlns:th="http://www.thymeleaf.org">
<head th:replace="~{templates/layout :: pageTitle('Singer Page')}"></head>
<body>
<div class="container">
<header th:replace="~{templates/layout :: pageHeader}" ></header>
<header th:replace="~{templates/layout :: pageMenu}" ></header>
<section th:fragment="~{templates/layout :: pageContent}">
<!-- some elements omitted -->
<div class="container col-lg-12">
<form th:object="${singer}" th:action="@{/singer/} + ${singer.id}"
th:method="delete" class="col p-3">
<input sec:authorize="hasRole('admin')"
type="submit" th:value="#{command.delete}"
id="deleteButton"
class="btn btn-danger"/>
</form>
</div>
</div>net
</div>
</section>
<footer th:replace="~{templates/layout :: pageFooter}" ></footer>
</div>
</body>
</html>
With this configuration, user john no longer can see the Delete button, while the admin user still can see
it, as verified by Figure 17-7.
775
Chapter 17 ■ Securing Spring Web Applications
Figure 17-7. Comparison of page display for user with role USER (left) and user with role ADMIN
The Spring Security SpEL expression is quite versatile. The role name is not case sensitive, so
hasRole('admin') is treated the same way as hasRole('ADMIN'). Also, if the role name does not have
a ROLE_ prefix, it is added by default, such as hasRole('ROLE_ADMIN'). This makes it quite practical to
configure authorization using SpEL expressions.
In Spring Security there are two ways to describe what a user can and cannot do. For each
application user, authorities and roles are configured. Both roles and authorities are represented by a
List<GrantedAuthority>, where the org.springframework.security.core.GrantedAuthority
interface represents an authority granted to an Authentication object, thus a permission. A role is nothing
else than a GrantedAuthority with name prefixed with ROLE_. Why are there two ways? Because under the
hood, Spring security might be configured to treat roles differently than authorities. Authorities are fine-grained
permissions targeting a specific action coupled sometimes with a specific data scope or context. For instance,
Read, Write, and Manage can represent various levels of permissions to a given scope of information. On the
other hand, roles are coarse-grained representations of a set of permissions. A ROLE_USER would only have
Read or View authority, while a ROLE_ADMIN would have Read, Write, and Delete.
776
Chapter 17 ■ Securing Spring Web Applications
There is quite a long list of Spring Security SpEL expressions for configuring authorization, and their
syntax and purpose are shown and described in Table 17-1.
Table 17-1. Spring Security SpEL Expressions
Expression
Description
hasRole(String role)
Returns true if the current principal has the specified role;
e.g., hasRole('admin'). The role is not case sensitive, and
if ROLE_ is not present, it is added by default. This behavior
is customizable by modifying the defaultRolePrefix on
DefaultWebSecurityExpressionHandler5.
hasAnyRole(String... roles)
Returns true if the current principal has any of the specified roles; e.g.,
hasAnyRole('admin', 'manager').
hasAuthority(String
authority)
Returns true if the current principal has the specified authority; e.g.,
hasAuthority('read').
hasAnyAuthority(String...
authorities)
Returns true if the current principal has any of the specified
authorities; e.g., hasAnyAuthority('read', 'write').
principal
Allows direct access to the principal object that represents the current user.
authentication
Allows direct access to the current Authentication object obtained
from the SecurityContext.
isAnonymous()
Returns true if the current principal is an anonymous user.
isRememberMe()
Returns true if the current principal is a remember-me user.
isAuthenticated()
Returns true if the user is not anonymous.
isFullyAuthenticated()
Returns true if the user is not anonymous and is not a remember-me user.
hasPermission(Object target,
Object permission)
Returns true if the user has access to the provided target for the given
permission; e.g., hasPermission(domainObject, 'read').
hasPermission(Object
targetId, String targetType,
Object permission)
Returns true if the user has access to the provided target, identified by
its id and type, for the given permission; e.g., hasPermission(1, 'com.
apress.Singer', 'read').
The hasRole('admin') Spring Security SpEL expression can be used to secure the delete handler
method when provided as an attribute value to the @PreAuthorize annotation. This annotation and a few
other annotations discussed later are part of the org.springframework.security.access.prepost package,
which allows you to define security-specific actions before and after the execution of the annotated method.
The @PreAuthorize annotation is configured with a method access-control expression that will be evaluated
to decide whether a method invocation is allowed or not. Listing 17-16 shows the controller method
annotated with @PreAuthorize.
https://github.com/spring-projects/spring-security/blob/main/web/src/main/
java/org/springframework/security/web/access/expression/DefaultWebSecurity
ExpressionHandler.java
5
777
Chapter 17 ■ Securing Spring Web Applications
Listing 17-16. Secured Controller Method
package com.apress.prospring6.seventeen.controllers;
import org.springframework.security.access.prepost.PreAuthorize;
import org.springframework.stereotype.Controller;
// other import statements omitted
@Controller
@RequestMapping("/singer/{id}")
public class OneSingerController {
private final Logger LOGGER = LoggerFactory.getLogger(OneSingerController.class);
private final SingerService singerService;
@PreAuthorize("hasRole('admin')")
@DeleteMapping
public String deleteSinger(@PathVariable("id") Long id) {
singerService.findById(id);
singerService.delete(id);
return "redirect:/singers/list";
}
// other methods omitted
}
In order to see this method not being executed for a user with a role different than admin, we have to
temporarily remove sec:authorize="hasRole('ADMIN')" from the Delete button in views/singers/show.
html. Since non-admin users are prohibited from executing this method, when clicking the Delete button,
we are redirected to an Apache Tomcat default page for the 403(Forbidden) error. Since we want to redirect
the user to the views/error.html, we need to add a method in the class annotated with @ControllerAdvice
as shown in Listing 17-17.
Listing 17-17. Handler for an org.springframework.security.access.AccessDeniedException in a
Spring Web Application
package com.apress.prospring6.seventeen.problem;
import org.springframework.http.HttpStatus;
import org.springframework.security.access.AccessDeniedException;
// other import statements omitted
@ControllerAdvice
public class GlobalExceptionHandler {
@ExceptionHandler(AccessDeniedException.class)
@ResponseStatus(HttpStatus.FORBIDDEN)
public ModelAndView forbidden(HttpServletRequest req) {
ModelAndView mav = new ModelAndView();
mav.addObject("problem", "Method not allowed " + req.getRequestURI());
mav.setViewName("error");
return mav;
}
}
778
Chapter 17 ■ Securing Spring Web Applications
But wait! We also need to configure support for these types of annotations. The @EnableWebSecurity
annotation only configures support for secured web requests, so to secure method invocations, we need to
add the @EnableMethodSecurity annotation on the SecurityCfg class. The new configuration is shown in
Listing 17-18.
Listing 17-18. SecurityCfg Configured to Support Secure Methods
package com.apress.prospring6.seventeen;
import org.springframework.security.config.annotation.method.configuration.
EnableMethodSecurity;
// other import statements omitted
@Configuration
@EnableWebSecurity
@EnableMethodSecurity
public class SecurityCfg {
// configuration beans omitted
}
With this configuration, when a non-admin user clicks the Delete button, the user is redirected to the
page shown in Figure 17-8.
Figure 17-8. Error page that a non-admin user is redirected to after attempting to delete a singer record
Securing methods is done via proxying. Security annotations are picked up and a proxy is created
around the bean containing the annotated methods, to inject security checks where necessary.
As mentioned, the org.springframework.security.access.prepost package contains four
annotations that support expression attributes to allow pre- and post-invocation authorization checks and
also to support filtering of submitted collection arguments or return values: @PreAuthorize,
@PreFilter, @PostAuthorize, and @PostFilter. By default, the support for these methods is enabled by the
@EnableMethodSecurity annotation. But they can be disabled by configuring it like this: @EnableMethod
Security(prePostEnabled= false).
779
Chapter 17 ■ Securing Spring Web Applications
To enable support for the @Secured annotation from package org.springframework.security.access.
annotation, we configure @EnableMethodSecurity(secured = true). By default, the secured attribute is
set to false.
Spring also provides support for Jakarta Annotations6 (previously known as JSR-250 annotations). This
library contains security annotations in the jakarta.annotation.security package that provide somewhat
similar functionalities to the Spring Security annotations. However, they are standards-based annotations
and allow simple role-based constraints to be applied, but do not have the power of Spring Security’s native
annotations. The Jakarta Security annotations are @RolesAllowed, @DenyAll, @PermitAll, @RunAs, and
@DeclareRoles. Support for these methods is enabled by this configuration: @EnableMethodSecurity(jsr25
0Enabled=true); by default, jsr250Enabled is false.
Both approaches will lead to Spring Security wrapping the service class in a secure proxy. Figure 17-9
depicts the abstract schema of how a secured method executes and the components involved.
Figure 17-9. Abstract schema of a secured method execution
Feel free to read more about method security in the official documentation7, since the subject is wider
than the scope of this book.
JDBC Authentication
Thus far, you have been introduced to the quickest and easiest authentication mode, where the user
credentials are stored in memory. For production applications, credentials are stored in relational databases,
custom data stores, or LDAP. Since the application already stores the rest of the data in a database, it is very
practical to add the necessary tables for storing credentials and groups. The focus of this section is JDBC
authentication and storing authentication data in a MariaDB database.
Spring Security provides default queries for JDBC-based authentication, but for them to work, the tables
must be created according to the schema provided by Spring Security. The schema is actually packed in the
spring-security-core.jar that is the core Spring Security library and a dependency of spring-securityconfig.jar. The schema files are exposed as a classpath resource named org/springframework/security/
core/userdetails/jdbc/users.ddl. The contents of this file are shown in Listing 17-19.
https://jakarta.ee/specifications/annotations/2.1
https://docs.spring.io/spring-security/reference/servlet/authorization/methodsecurity.html
6
7
780
Chapter 17 ■ Securing Spring Web Applications
Listing 17-19. The Spring Security JDBC Schema8
create table users(
username varchar(50) not null primary key,
password varchar(500) not null,
enabled boolean not null
);
create table authorities (
username varchar(50) not null,
authority varchar(50) not null,
constraint fk_authorities_users foreign key(username) references users(username)
);
create unique index ix_auth_username on authorities (username,authority);
To create these tables, the contents of this file were added to the configuration for the chapter17
project. There is more than one way to populate these tables, but Spring makes this easy as well, by providing
a class named UserDetailsManager that extends UserDetailsService introduced in the previous section.
A bean of this type, configured with a data source containing the Spring Security users and authorities
tables as declared in Listing 17-19, is able to load credentials to facilitate the authentication process. The
same class can also be used to initialize the tables. When starting a Spring Web–secured application for the
first time, to easily populate the security tables, the UserDetailsManager bean can be configured as shown
in Listing 17-20.
Listing 17-20. The Spring Security UserDetailsManager Configuration for Initializing Security Tables
package com.apress.prospring6.seventeen;
import org.springframework.security.provisioning.JdbcUserDetailsManager;
import org.springframework.security.provisioning.UserDetailsManager;
// other import statements omitted
@Configuration
@EnableWebSecurity
@EnableMethodSecurity
public class SecurityCfg2 {
// other configuration beans omitted
@Bean
UserDetailsManager users(DataSource dataSource) {
User.UserBuilder users = User.builder().passwordEncoder(encoder()::encode);
var joe = users
.username("john")
.password("doe")
.roles("USER")
.build();
https://github.com/spring-projects/spring-security/blob/main/core/src/main/
resources/org/springframework/security/core/userdetails/jdbc/users.ddl
8
781
Chapter 17 ■ Securing Spring Web Applications
var jane = users
.username("jane")
.password("doe")
.roles("USER", "ADMIN")
.build();
var admin = users
.username("admin")
.password("admin")
.roles("ADMIN")
.build();
var manager = new JdbcUserDetailsManager(dataSource);
manager.createUser(joe);
manager.createUser(jane);
manager.createUser(admin);
return manager;
}
}
The next time the application is started with the same data source, the user creation should be removed,
and the users created during the previous run will still be in our database and thus will work as expected.
This reduces the Spring configuration to the one shown in Listing 17-21.
Listing 17-21. The Spring Security UserDetailsManager Configuration Without Initialization
package com.apress.prospring6.seventeen;
// import statements omitted
@Configuration
@EnableWebSecurity
@EnableMethodSecurity
public class SecurityCfg2 {
@Bean
public SecurityFilterChain securityFilterChain(HttpSecurity http) throws Exception {
// request configuration omitted
return http.build();
}
@Bean
public PasswordEncoder encoder() {
return new BCryptPasswordEncoder();
}
@Bean
UserDetailsManager users(DataSource dataSource) {
return new JdbcUserDetailsManager(dataSource);
}
}
782
Chapter 17 ■ Securing Spring Web Applications
So far, you’ve been introduced to the Spring Security in-memory and JDBC implementations of
UserDetailsService. If for some reason you cannot use the Spring Security default schema, yo must provide
a custom implementation of UserDetailsService that is responsible for retrieving users and authorities
based on user-provided data. An alternative to this is to configure an AuthenticationManagerBuilder bean,
like shown in Listing 17-22.
Listing 17-22. The Spring Security AuthenticationManagerBuilder Configuration
package com.apress.prospring6.seventeen;
import org.springframework.security.config.annotation.ObjectPostProcessor;
import org.springframework.security.config.annotation.authentication.builders.
AuthenticationManagerBuilder;
// import statements omitted
@Configuration
@EnableWebSecurity
@EnableMethodSecurity
public class SecurityCfg3 {
@Bean
public SecurityFilterChain securityFilterChain(HttpSecurity http) throws Exception {
// request configuration omitted
return http.build();
}
@Bean
public PasswordEncoder encoder() {
return new BCryptPasswordEncoder();
}
@Bean
AuthenticationManagerBuilder authenticationManagerBuilder(ObjectPostProcessor<Object>
objectPostProcessor, DataSource dataSource) {
var authenticationManagerBuilder = new AuthenticationManagerBuilder(objectPost
Processor);
final String findUserQuery =
"""
select username, password, enabled
from users where username = ?
""";
final String findRoles =
"""
select username,authority from authorities
where username = ?
""";
try {
authenticationManagerBuilder.jdbcAuthentication().dataSource(dataSource)
.passwordEncoder(encoder())
.usersByUsernameQuery(findUserQuery)
783
Chapter 17 ■ Securing Spring Web Applications
.authoritiesByUsernameQuery(findRoles);
return authenticationManagerBuilder;
} catch (Exception e) {
throw new RuntimeException("Could not initialize
'AuthenticationManagerBuilder'");
}
}
}
Another shortcut was taken in Listing 17-22: findUserQuery and findRoles are queries written for the
Spring Security tables created previously, but this bean allows for users and authorities to be saved in tables
with different names and different structures—as long as username, password, enabled, and authority
columns exist, or the queries return them, the authentication process works as normal. For example, take
a look at the alternative findUserQuery and findRoles queries in Listing 17-23, which are run on tables
named staff and roles but rename the column to the one expected by the Spring Security authentication
manager bean.
Listing 17-23. Alternative Queries for Retrieving Credentials
-- findUserQuery
select staff_id as username,
staff_credentials as password,
active as enabled
from staff where staff_id = ?
-- findRoles
select staff_id as username,
role as authority
from roles where staff_id = ?
Spring Security configuration is flexible, varied, and powerful, and you can even implement
UserDetailsService to use Spring DATA repositories for managing security data, or even use a NoSQL
database as storage. It’s really up to your development needs and your imaginations; they are all just
configurable beans after all.
Testing Secured Web Applications
Testing a secured Spring web application can be done in multiple ways as well. Integration tests for an
application that gets deployed to Apache Tomcat require a lot of setup, so the easiest way is to use a web
client that supports form authentication and use it to submit requests and test your assumptions. For this
purpose, this chapter present REST Assured9.
REST Assured provides a very simple API for validating REST services in Java. In Listing 17-24 you can
see that three tests were written to cover the secured elements introduced in this section.
9
https://rest-assured.io
784
Chapter 17 ■ Securing Spring Web Applications
Listing 17-24. Testing secured components using REST Assured
package com.apress.prospring6.seventeen.controllers;
import
import
import
import
import
import
io.restassured.RestAssured;
io.restassured.authentication.FormAuthConfig;
io.restassured.http.ContentType;
org.junit.jupiter.api.BeforeEach;
org.junit.jupiter.api.Test;
org.springframework.http.HttpStatus;
import static io.restassured.RestAssured.given;
import static org.junit.jupiter.api.Assertions.*;
public class SingerControllerTest {
@BeforeEach
void setUp() {
RestAssured.port = 8080;
RestAssured.baseURI = "http://localhost";
}
@Test
void johnShouldNotSeeTheDeleteButton() {
var cfg = new FormAuthConfig("/ch17/auth", "user", "pass")
.withLoggingEnabled();
String responseStr = given()
.contentType(ContentType.URLENC)
.auth().form("john","doe", cfg)
.when().get("/ch17/singer/1")
.then()
.assertThat().statusCode(HttpStatus.OK.value())
.extract().body().asString();
assertAll(
() -> assertTrue(responseStr.contains("<div class=\"card-header\">Singer
Details</div>")),
() -> assertTrue(responseStr.contains("<td>Mayer</td>")),
() -> assertFalse(responseStr.contains("Delete"))
);
}
@Test
void johnShouldNotBeAllowedToDeleteSinger() {
var cfg = new FormAuthConfig("/ch17/auth", "user", "pass")
.withLoggingEnabled();
String responseStr = given()
.contentType(ContentType.URLENC)
.auth().form("john","doe", cfg)
.when().delete("/ch17/singer/1")
785
Chapter 17 ■ Securing Spring Web Applications
.then()
.assertThat().statusCode(HttpStatus.FORBIDDEN.value())
.extract().body().asString();
}
@Test
void adminShouldSeeTheDeleteButton() {
var cfg = new FormAuthConfig("/ch17/auth", "user", "pass")
.withLoggingEnabled();
String responseStr = given()
.contentType(ContentType.URLENC)
.auth().form("admin","admin", cfg)
.when().get("/ch17/singer/1")
.then()
.assertThat().statusCode(HttpStatus.OK.value())
.extract().body().asString();
assertAll(
() -> assertTrue(responseStr.contains("<div class=\"card-header\">Singer
Details</div>")),
() -> assertTrue(responseStr.contains("<td>Mayer</td>")),
() -> assertTrue(responseStr.contains("Delete"))
);
}
}
The FormAuthConfig object is configured to create a form authorization configuration with a predefined
form action, username input tag, and password input tag. This object maps to the form in the /views/
auth.html view template. The johnShouldNotSeeTheDeleteButton test checks that user john, a nonadministrator, is not able to see the Delete button, which proves that the Thymeleaf security element is
behaving as desired. The johnShouldNotBeAllowedToDeleteSinger test checks that user john cannot
submit a delete request. This proves that the @PreAuthorize annotation is configured correctly as well. The
adminShouldSeeTheDeleteButton test checks that user admin (an administrator) can see the Delete button.
To wrap up this section, let’s look at the security filters. As mentioned at the beginning of this section,
the securityFilterChain bean is an entry point for a collection of security filters. If you want to make
Spring show you the order of these filters being applied to your requests, simply configure TRACE logging
for org.springframework in your resources/logback.xml file. This will print a lot of logging messages, but
among them you should see a succession of logs similar to the ones in Listing 17-25.
Listing 17-25. Spring Security Filters Being Applied to the GET /singers Request
22:22:50.635 [http-nio-8080-exec-8] TRACE o.s.s.w.FilterChainProxy - Trying to match request
against DefaultSecurityFilterChain
[
RequestMatcher=any request,
Filters= [
org.springframework.security.web.session.DisableEncodeUrlFilter@125ebc0d,
org.springframework.security.web.context.request.async.WebAsyncManagerIntegrationFi
lter@6525ad0,
786
Chapter 17 ■ Securing Spring Web Applications
org.springframework.security.web.context.SecurityContextHolderFilter@3a7c81e1,
org.springframework.security.web.header.HeaderWriterFilter@309cde68,
org.springframework.security.web.authentication.logout.LogoutFilter@7111e25c,
org.springframework.security.web.authentication.UsernamePasswordAuthenticationFilte
r@5d008ea9,
org.springframework.security.web.savedrequest.RequestCacheAwareFilter@202ba409,
org.springframework.security.web.servletapi.SecurityContextHolderAwareRequestFilte
r@2d073dc4,
org.springframework.security.web.authentication.AnonymousAuthenticationFilte
r@77286aac,
org.springframework.security.web.access.ExceptionTranslationFilter@2f8c1059,
org.springframework.security.web.access.intercept.AuthorizationFilter@7fafe94a
]
] (1/1)
22:22:50.636 DEBUG o.s.s.w.FilterChainProxy - Securing GET /singers
22:22:50.636 TRACE o.s.s.w.FilterChainProxy - Invoking DisableEncodeUrlFilter (1/11)
22:22:50.636 TRACE o.s.s.w.FilterChainProxy - Invoking
WebAsyncManagerIntegrationFilter (2/11)
22:22:50.636 TRACE o.s.s.w.FilterChainProxy - Invoking SecurityContextHolderFilter (3/11)
22:22:50.636 TRACE o.s.s.w.FilterChainProxy - Invoking HeaderWriterFilter (4/11)
22:22:50.636 TRACE o.s.s.w.FilterChainProxy - Invoking LogoutFilter (5/11)
22:22:50.636 TRACE o.s.s.w.a.l.LogoutFilter - Did not match request to Or [Ant [pattern='/
exit', GET], Ant [pattern='/exit', POST], Ant [pattern='/exit', PUT], Ant [pattern='/exit',
DELETE]]
22:22:50.636 TRACE o.s.s.w.FilterChainProxy - Invoking
UsernamePasswordAuthenticationFilter (6/11)
22:22:50.636 TRACE o.s.s.w.a.UsernamePasswordAuthenticationFilter - Did not match request
to Ant [pattern='/auth', POST]
22:22:50.636 TRACE o.s.s.w.FilterChainProxy - Invoking RequestCacheAwareFilter (7/11)
22:22:50.636 TRACE o.s.s.w.s.HttpSessionRequestCache - matchingRequestParameterName is
required for getMatchingRequest to lookup a value, but not provided
22:22:50.636 TRACE o.s.s.w.FilterChainProxy - Invoking
SecurityContextHolderAwareRequestFilter (8/11)
22:22:50.636 TRACE o.s.s.w.FilterChainProxy - Invoking AnonymousAuthenticationFilter (9/11)
22:22:50.636 TRACE o.s.s.w.FilterChainProxy - Invoking ExceptionTranslationFilter (10/11)
22:22:50.636 TRACE o.s.s.w.FilterChainProxy - Invoking AuthorizationFilter (11/11)
...
The log snippet in Listing 17-25 shows a successful authenticated request of a user accessing something
that user is authorized to access, which is why you can see all the filters being invoked to process the request.
The first snippet of the log in Listing 17-25 shows all the types of the filters in the security chain. Feel
free to inspect the code for each of them on GitHub10.
https://github.com/spring-projects/spring-security/tree/main/web/src/main/java/
org/springframework/security/web
10
787
Chapter 17 ■ Securing Spring Web Applications
As the name of the bean indicates, the filters are chained, and they are executed in a fixed order. The
request object is passed from one filter to the next through the chain, just like an item on a conveyor belt
in a factory goes through various machines. Some filters are critical, and if they find something wrong with
the request, they throw an exception and the whole process stops; the rest of the filters are not applied to
the request. Some of filters are not critical, but they make changes to the request before sending it down
the chain.
The list of filters varies depending on what is configured in the application. For example, because
we’ve disabled CSRF support, the CsrfFilter filter does not appear in the list in Listing 17-25.
For example, introducing a wrong username/password combination causes the
UsernamePasswordAuthenticationFilter filter to throw a BadCredentialsException. This is the sixth filter
in the chain, and is where the process stops, so the five filters after it are not applied to the request because,
as this filter makes clear, the request does not contain credentials recognized by the application, as shown in
Listing 17-26.
Listing 17-26. Spring Security Filters Being Applied to the POST /auth Request with Wrong User and
Password
22:34:23.027 DEBUG o.s.s.w.FilterChainProxy - Securing POST /auth
22:34:23.027 TRACE o.s.s.w.FilterChainProxy - Invoking DisableEncodeUrlFilter (1/11)
22:34:23.027 TRACE o.s.s.w.FilterChainProxy - Invoking
WebAsyncManagerIntegrationFilter (2/11)
22:34:23.027 TRACE o.s.s.w.FilterChainProxy - Invoking SecurityContextHolderFilter (3/11)
22:34:23.027 TRACE o.s.s.w.FilterChainProxy - Invoking HeaderWriterFilter (4/11)
22:34:23.027 TRACE o.s.s.w.FilterChainProxy - Invoking LogoutFilter (5/11)
22:34:23.027 TRACE o.s.s.w.a.l.LogoutFilter - Did not match request to Or [Ant [pattern='/
exit', GET], Ant [pattern='/exit', POST], Ant [pattern='/exit', PUT], Ant [pattern='/exit',
DELETE]]
22:34:23.027 TRACE o.s.s.w.FilterChainProxy - Invoking
UsernamePasswordAuthenticationFilter (6/11)
22:34:23.027 TRACE o.s.s.a.ProviderManager - Authenticating request with
DaoAuthenticationProvider (1/1)
22:34:23.096 DEBUG o.s.s.a.d.DaoAuthenticationProvider - Failed to find user 'sfsfsf'
22:34:23.108 TRACE o.s.b.f.s.DefaultListableBeanFactory - Returning cached instance of
singleton bean 'delegatingApplicationListener'
22:34:23.108 TRACE o.s.s.w.a.UsernamePasswordAuthenticationFilter - Failed to process
authentication request
org.springframework.security.authentication.BadCredentialsException: Bad credentials
.. // exception stacktrace omitted
22:34:23.108 TRACE o.s.s.w.a.UsernamePasswordAuthenticationFilter - Cleared
SecurityContextHolder
22:34:23.108 TRACE o.s.s.w.a.UsernamePasswordAuthenticationFilter - Handling
authentication failure
22:34:23.108 DEBUG o.s.s.w.s.HttpSessionEventPublisher - Publishing event: org.
springframework.security.web.session.HttpSessionCreatedEvent[source=org.apache.catalina.
session.StandardSessionFacade@587e2789]
22:34:23.108 DEBUG o.s.s.w.DefaultRedirectStrategy - Redirecting to /ch17/auth?error
788
Chapter 17 ■ Securing Spring Web Applications
As mentioned at the beginning of this section, each of the filters in the chain can be replaced with
customized implementations. If you want to read more about Spring Security filter chain architecture and
configuration, check out the official documentation11.
Configuring Spring Security: The Spring Boot Way
Securing a Spring Boot web application is easy too. Simply adding the spring-boot-startersecurity dependency to the classpath adds default security configuration to your application. The
Spring Security default configuration for a servlet-based Spring application is represented by the
SecurityAutoConfiguration class from package org.springframework.boot.autoconfigure.security.
servlet. By default, authentication gets enabled for the application and content negotiation is used to
determine if basic or form login should be used. If the former is detected, a very simple default login form is
generated.
Let’s start with the basics: since we are reusing the UI from the non-Spring Boot project, we also need to
add the thymeleaf-extras-springsecurity6 library to the classpath. This makes the project classpath look
like the one shown in Figure 17-10.
Figure 17-10. chapter17-boot project dependencies in IntelliJ IDEA Gradle View
11
https://docs.spring.io/spring-security/reference/servlet/architecture.html
789
Chapter 17 ■ Securing Spring Web Applications
The Spring Boot configuration file (chapter17-boot/src/main/resources/application-dev.yaml) is
identical to the one covered in Chapter 15, but because the classpath contains the spring-boot-startersecurity dependency, when starting the application and accessing it at http://localhost:8081, the
default login form is shown. Without any specific security configuration, Spring Boot sets up in-memory
authentication and generates a password for you that can be used with a user named user. The password is
shown in the console log, as shown in Listing 17-27.
Listing 17-27. Spring Boot Default-Generated Password for Spring Security Authentication
WARN : UserDetailsServiceAutoConfiguration Using generated security password: 82155279-ce4c-4670-9d86-4990370ea728
This generated password is for development use only. Your security configuration must be
updated before running your application in production.
As you can see, you are also warned that before production you must configure security properly. If you
want to customize the default user and password, this is possible via the spring.security.user.username
and spring.security.user.password properties. Listing 17-28 shows the YAML configuration to declare a
user named john and password named doe. (Roles can also be configured.)
Listing 17-28. Spring Boot Default User Configuration for Spring Security Authentication (applicationdev.yaml)
spring:
security:
user:
name: john
roles: user,admin
The limitation of this configuration is, of course, that you can only have one user, so the configuration
with three users introduced in the previous section is not possible only with Spring Boot properties. When it
comes to configuring security, Spring Boot properties cannot help that much. So, unfortunately, the easiest
way to customize security configuration in a Spring Boot application is to disable security autoconfiguration
all together and build our classes from scratch. To disable Spring Boot security autoconfiguration, we need
to exclude the SecurityAutoConfiguration class from the application configuration. This can be done by
customizing the @SpringBootApplication, as shown in Listing 17-29.
Listing 17-29. Excluding Spring Boot Default Security Configuration Class
package com.apress.prospring6.seventeen.boot;
import
import
import
import
org.springframework.boot.SpringApplication;
org.springframework.boot.autoconfigure.SpringBootApplication;
org.springframework.boot.autoconfigure.security.servlet.SecurityAutoConfiguration;
org.springframework.core.env.AbstractEnvironment;
@SpringBootApplication(exclude = { SecurityAutoConfiguration.class })
public class Chapter17Application {
790
Chapter 17 ■ Securing Spring Web Applications
public static void main(String... args) {
System.setProperty(AbstractEnvironment.ACTIVE_PROFILES_PROPERTY_NAME, "dev");
SpringApplication.run(Chapter17Application.class, args);
}
}
The exclusion also can be done via configuration of Spring Boot properties, as shown in Listing 17-30.
Listing 17-30. Disabling Spring Security Default Configuration in a Spring Boot Application (applicationdev.yaml)
spring:
autoconfigure:
exclude: org.springframework.boot.autoconfigure.security.servlet.
SecurityAutoConfiguration
With the default configuration removed, any of the security configuration classes introduced in the
previous section can be added to the application, and they get the job done just fine. As for testing, the REST
Assured test class from the previous section works for the Spring Boot application too.
Of course, there are multiple ways to test secured applications, but the crux of the matter with web
applications is the type of authentication used. Form-based authentication is tricky to mock, so you are
better off just starting your application normally and then submitting some authenticated REST Assured
requests and checking the assumption.
S
ummary
Application security is one of the most important aspects that needs to be incorporated when building
an application designed to be used by the public over the Internet. Access to users’ personal info must be
restricted to validated parties; otherwise, there is a risk of identity theft that could destroy somebody’s life
and a company’s reputation. Leaked financial information could tear down global economies. Making it
practical for developers to set up and maintain secure applications is something Spring Security shines at.
This chapter has barely scratched the surface. If you want to read about Spring Security in depth and learn
how to configure Spring Security with OAuth or JWT tokens, Apress should publish Pro Spring Security for
Spring 6 and Spring Boot 3 soon12.
If you are interested in seeing more ways of configuring and testing Spring Security in classic and Spring
Boot web applications, take a look at this repository: https://github.com/spring-projects/springsecurity-samples.
12
https://link.springer.com/book/10.1007/978-1-4842-5052-5
791
CHAPTER 18
Monitoring Spring Applications
A typical JEE application contains a number of layers and components, such as the presentation layer,
service layer, persistence layer, and back-end data source. During the development stage, or after the
application has been deployed to the quality assurance (QA) or production environment, we want to ensure
that the application is in a healthy state without any potential problems or bottlenecks.
In a Java application, various areas may cause performance problems or overload server resources
(such as CPU, memory, or I/O). Examples include inefficient Java code, memory leaks (for example, Java
code that keeps allocating new objects without releasing the reference and prevents the underlying JVM
from freeing up the memory during the garbage collection process), miscalculated JVM parameters,
miscalculated thread pool parameters, too generous data source configurations (for example, too many
concurrent database connections allowed), improper database setup, and long-running SQL queries.
Consequently, we need to understand an application’s runtime behavior and identify whether any potential
bottlenecks or problems exist. In the Java world, a lot of tools can help monitor the detailed runtime behavior of
JEE applications. Most of them are built on top of the Java Management Extensions (JMX) technology.
In this chapter, we present common techniques for monitoring Spring-based JEE applications.
Specifically, this chapter covers the following topics:
•
Spring support of JMX: We discuss Spring’s comprehensive support of JMX and
demonstrate how to expose Spring beans for monitoring with JMX tools. In this
chapter, we show how to use the VisualVM1 as the application-monitoring tool.
•
Monitoring Hibernate statistics: Hibernate and many other packages provide support
classes and infrastructure for exposing the operational status and performance
metrics using JMX. We show how to enable the JMX monitoring of those commonly
used components in Spring-powered JEE applications.
•
Spring Boot JMX support: Spring Boot provides a starter library for JMX support that
comes with full default configuration out of the box. This library is called Actuator and
is mainly used to expose operational information about the running application—
health, metrics, info, dump, env, and so on. It uses HTTP endpoints or JMX beans to
enable us to interact with it. Spring Boot Actuator is the focus of this chapter.
Remember that this chapter is not intended to be an introduction to JMX, and a basic understanding of
JMX is assumed. For detailed information, please refer to Oracle’s online resources2.
1
2
https://visualvm.github.io
https://www.oracle.com/technical-resources/articles/javase/jmx.html
© Iuliana Cosmina, Rob Harrop, Chris Schaefer, and Clarence Ho 2023
I. Cosmina et al., Pro Spring 6, https://doi.org/10.1007/978-1-4842-8640-1_18
793
Chapter 18 ■ Monitoring Spring Applications
JMX Support in Spring
In JMX, the classes that are exposed for JMX monitoring and management are called managed beans
(generally referred to as MBeans). The Spring Framework supports several mechanisms for exposing
MBeans. This chapter focuses on exposing Spring beans (which were developed as simple POJOs) as
MBeans for JMX monitoring.
In the following sections, we discuss the procedure for exposing a bean containing application-related
statistics as an MBean for JMX monitoring. Topics include implementing the Spring bean, exposing the
Spring bean as an MBean in Spring ApplicationContext, and using VisualVM to monitor the MBean.
Exporting a Spring Bean to JMX
As an example, we will use the REST sample from Chapter 15. Review that chapter for the sample
application code or jump directly to the book’s source companion, which provides the source code we will
use to build upon.
Just for fun, let’s expose some property values and some methods via JMX and declare them via an
interface named AppStatistics as shown in Listing 18-1.
Listing 18-1. The AppStatistics Interface
package com.apress.prospring6.eighteen.audit;
public interface AppStatistics {
int getTotalSingerCount();
String findJohn();
String findSinger(String firstName, String lastName);
}
The implementation of the AppStatistics interface is a class named AppStatisticsImpl, and since
this class is the one exposing attributes and operations via JMX, we need to add the proper annotations. The
AppStatisticsImpl class is shown in Listing 18-2.
Listing 18-2. The AppStatisticsImpl Class
package com.apress.prospring6.eighteen.audit;
import org.springframework.jmx.export.annotation.*;
// other import statements omitted
@Component
@ManagedResource(description = "JMX managed resource",
objectName = "jmxDemo:name=ProSpring6SingerApp")
public class AppStatisticsImpl implements AppStatistics{
private final SingerService singerService;
public AppStatisticsImpl(SingerService singerService) {
this.singerService = singerService;
}
794
Chapter 18 ■ Monitoring Spring Applications
@ManagedAttribute(description = "Number of singers in the application")
@Override
public int getTotalSingerCount() {
return singerService.findAll().size();
}
@ManagedOperation
public String findJohn() {
List<Singer> singers = singerService.findByFirstNameAndLastName("John", "Mayer");
if (!singers.isEmpty()) {
return singers.get(0).getFirstName() + " " + singers.get(0).getLastName() + " "
+ singers.get(0).getBirthDate();
}
return "not found";
}
@ManagedOperation(description="Find Singer by first name and last name")
@ManagedOperationParameters({
@ManagedOperationParameter(name = "firstName", description = "Singer's
first name"),
@ManagedOperationParameter(name = "lastName", description = "Singer's last
name")})
public String findSinger(String firstName, String lastName) {
List<Singer> singers = singerService.findByFirstNameAndLastName(firstName,
lastName);
if (!singers.isEmpty()) {
return singers.get(0).getFirstName() + " " + singers.get(0).getLastName() + " "
+ singers.get(0).getBirthDate();
}
return "not found";
}
}
In this example, the @ManagedResource annotation has an attribute called objectName, and its value
represents the domain and name of the MBean. The @ManagedAttribute annotation is used to expose the
given bean property as a JMX attribute. @ManagedOperation is used to expose a given method as a JMX
operation. In this example, a few methods are defined to access database data and properties, such as the
number of records in the SINGER table.
To expose the Spring bean as JMX, we need to add configuration in Spring’s ApplicationContext.
This is done by annotating a configuration class with @EnableMBeanExport. This annotation enables the
default exporting of all standard MBeans from the Spring context, as well as all @ManagedResource annotated
beans. Basically, this annotation is what tells Spring to create an MBeanExporter bean with the name of
mbeanExporter. To keep things neatly scoped, we add a new class named MonitoringCfg on which we add
the @EnableMBeanExport annotation. This class is shown in Listing 18-3.
Listing 18-3. The MonitoringCfg Configuration Class
package com.apress.prospring6.eighteen;
import org.springframework.context.annotation.Configuration;
import org.springframework.context.annotation.EnableMBeanExport;
import org.springframework.jmx.support.RegistrationPolicy;
795
Chapter 18 ■ Monitoring Spring Applications
@EnableMBeanExport(registration = RegistrationPolicy.REPLACE_EXISTING)
@Configuration
public class MonitoringCfg {
}
The @EnableMBeanExport annotation is responsible for registering Spring beans with a JMX MBean
server (a server that implements JDK’s javax.management.MbeanServer interface, which exists in most
commonly used web and JEE containers, such as Apache Tomcat and WebSphere). When exposing a Spring
bean as an MBean, Spring will attempt to locate a running MbeanServer instance within the server and
register the Mbean with it. We can control what happens when an MBean is registered with an MbeanServer
instance. Spring’s JMX support allows for three different registration behaviors when the registration process
finds that an MBean has already been registered under the same ObjectName:
•
FAIL_ON_EXISTING: The MBean is not registered and an
InstanceAlreadyExistsException exception is thrown.
•
IGNORE_EXISTING: The MBean is not registered. The existing MBean is unaffected,
and no exception is thrown.
•
REPLACE_EXISTING: The MBean is registered, overwriting the already
registered MBean.
If not configured explicitly, the registration policy defaults to FAIL_ON_EXISTING.
With Apache Tomcat, an MBeanServer instance will be created automatically, so no additional
configuration is required. By default, all public properties of the bean are exposed as attributes, and all
public methods are exposed as operations.
Now the MBean is available for monitoring via JMX. Let’s proceed to set up VisualVM and use its JMX
client for monitoring purposes.
Using VisualVM for JMX Monitoring
VisualVM is a useful (free) tool that can help in monitoring Java applications in various aspects. It used to
reside under the bin folder in the JDK installation folder, but since it was removed from more recent versions
of the JDK, you can download a stand-alone version from the project website3.
VisualVM uses a plug-in system to support various monitoring functions. To support monitoring
MBeans of Java applications, we need to install the MBeans plug-in. To install the plug-in, follow these steps:
3
1.
From VisualVM’s menu, choose Tools ➤ Plugins to open the Plugins dialog
shown in Figure 18-1.
2.
Click the Available Plugins tab.
3.
Click the Check for Newest button.
4.
Select the plug-in VisualVM-MBeans and then click the Install button.
https://visualvm.github.io
796
Chapter 18 ■ Monitoring Spring Applications
Figure 18-1. VisualVM-MBeans plug-in selected for installation
After completing the installation of the VisualVM-MBeans plug-in, verify that Apache Tomcat is up and
that the sample application is running.
By default, VisualVM scans for the Java applications that are running on the JDK platform. Doubleclicking the desired node brings up the monitoring screen. Double-click the Tomcat node in the
Applications pane. After the installation of the VisualVM-MBeans plug-in, the MBeans tab is available.
Clicking this tab shows the available MBeans. You should see the node called jmxDemo. When you expand it,
it will show the Prospring6SingerApp MBean that was exposed through the configuration in Listing 18-1.
On the Attributes tab on the right side, you will see that for the method that we implemented in the bean, an
attribute named TotalSingerCount was automatically derived from the getTotalSingerCount() method.
The value should be the same as the number of singers in the SINGER table, as shown in Figure 18-2.
797
Chapter 18 ■ Monitoring Spring Applications
Figure 18-2. The Prospring6SingerApp MBean exposed in VisualVM
In a regular application, this number would change based on the number of singers added during the
application runtime. To test how the MBean reflects the changes in the table, we can use a repeated test
method to create a number of singers. Listing 18-4 shows the RestClientTest class containing a test method
to create ten singers and a method to delete them.
Listing 18-4. The RestClientTest Class
package com.apress.prospring6.eighteen;
import org.junit.jupiter.api.RepeatedTest;
// other import statements omitted
public class RestClientTest {
final Logger LOGGER = LoggerFactory.getLogger(RestClientTest.class);
private static final String URI_SINGER_ROOT = "http://localhost:8080/ch18/singer/";
private static final String URI_SINGER_WITH_ID = "http://localhost:8080/ch18/
singer/{id}";
798
Chapter 18 ■ Monitoring Spring Applications
RestTemplate restTemplate = new RestTemplate();
@RepeatedTest(10)
@Test
public void testCreate() {
LOGGER.info("--> Testing create singer");
Singer singerNew = new Singer();
singerNew.setFirstName("TEST" + System.currentTimeMillis());
singerNew.setLastName("Singer" + System.currentTimeMillis());
singerNew.setBirthDate(LocalDate.now());
singerNew = restTemplate.postForObject(URI_SINGER_ROOT, singerNew, Singer.class);
LOGGER.info("Singer created successfully: " + singerNew);
}
@Test
public void testDelete() {
LOGGER.info("--> Deleting singers with id > 15");
for (int i = 16; i < 70; i++) {
try {
restTemplate.delete(URI_SINGER_WITH_ID, i);
} catch (Exception e) {
// no need to treat
}
}
}
}
To see the MBean value change, run the testCreate() method and then click the Refresh button.
You can also retrieve the current number of singers by going to the Operations tab and clicking the button
labeled with the method name: getTotalSingerCount(). A pop-up with the operation return value is
displayed, as shown in Figure 18-3.
799
Chapter 18 ■ Monitoring Spring Applications
Figure 18-3. Result of the MBean getTotalSingerCount() operation
Feel free to try the other exposed operations: findJohn() and findSinger({"John", "Mayer").
Monitoring Hibernate Statistics
Hibernate also supports the maintenance and exposure of persistence-related metrics to JMX. To enable
this, we need to set a few Hibernate properties in the JPA configuration, as shown in Listing 18-5.
Listing 18-5. Hibernate Configuration with Statistics-Enabled Class
package com.apress.prospring6.eighteen;
import org.hibernate.cfg.Environment;
// other import statements omitted
@Import(BasicDataSourceCfg.class)
@Configuration
@EnableJpaRepositories(basePackages = {"com.apress.prospring6.eighteen.repos"})
@EnableTransactionManagement
@ComponentScan(basePackages = {"com.apress.prospring6.eighteen.repos"})
public class TransactionCfg {
// other configurations omitted
@Bean
public LocalContainerEntityManagerFactoryBean entityManagerFactory() {
var factory = new LocalContainerEntityManagerFactoryBean();
800
Chapter 18 ■ Monitoring Spring Applications
factory.setPersistenceProviderClass(HibernatePersistenceProvider.class);
factory.setPackagesToScan("com.apress.prospring6.eighteen.entities");
factory.setDataSource(dataSource);
factory.setJpaProperties(jpaProperties());
factory.setJpaVendorAdapter(jpaVendorAdapter());
return factory;
}
@Bean
public Properties jpaProperties() {
Properties jpaProps = new Properties();
jpaProps.put(Environment.HBM2DDL_AUTO, "none");
jpaProps.put(Environment.FORMAT_SQL, false);
jpaProps.put(Environment.STATEMENT_BATCH_SIZE, 30);
jpaProps.put(Environment.USE_SQL_COMMENTS, false);
jpaProps.put(Environment.GENERATE_STATISTICS, true);
jpaProps.put("hibernate.jmx.enabled", true);
jpaProps.put("hibernate.jmx.usePlatformServer", true);
jpaProps.put(Environment.SESSION_FACTORY_NAME, "sessionFactory");
return jpaProps;
}
}
The properties hibernate.jmx.enabled and hibernate.jmx.usePlatformServer are used to expose
the Hibernate metrics via JMX. The property hibernate.generate_statistics instructs Hibernate to
generate statistics for its JPA persistence provider, while the property hibernate.session_factory_name
(Environment.SESSION_FACTORY_NAME) defines the name of the session factory required by the Hibernate
statistics MBean.
Finally, we need to declare a Spring bean and configure it as an MBean to expose all the Hibernate
statistics and metrics. Listing 18-6 shows a snippet of a class named CustomHibernateStatistics that
exposes Hibernate statistics and metrics.
Listing 18-6. MonitoringCfg Declaring an MBean to Expose Hibernate Statistics
package com.apress.prospring6.eighteen.audit;
import org.hibernate.SessionFactory;
import org.hibernate.stat.*;
import org.springframework.jmx.export.annotation.*;
// other import statements omitted
@Component
@ManagedResource(description = "JMX managed resource",
objectName = "jmxDemo:name=ProSpring6SingerApp-hibernate")
public class CustomHibernateStatistics {
private final SessionFactory sessionFactory;
public CustomHibernateStatistics(SessionFactory sessionFactory) {
this.sessionFactory = sessionFactory;
}
801
Chapter 18 ■ Monitoring Spring Applications
private Statistics stats;
@PostConstruct
private void init() {
stats = sessionFactory.getStatistics();
}
@ManagedOperation(description="Get statistics for entity name")
@ManagedOperationParameter(name = "entityName", description = "Full class name for the
entity")
public EntityStatistics getEntityStatistics(String entityName) {
return stats.getEntityStatistics(entityName);
}
@ManagedAttribute
public long getEntityDeleteCount() {
return stats.getEntityDeleteCount();
}
@ManagedAttribute
public long getEntityInsertCount() {
return stats.getEntityInsertCount();
}
@ManagedAttribute
public String[] getEntityNames() {
return stats.getEntityNames();
}
@ManagedAttribute
public String[] getQueries() {
return stats.getQueries();
}
@ManagedAttribute
public long getTransactionCount() {
return stats.getTransactionCount();
}
@ManagedAttribute
public long getPrepareStatementCount(){
return stats.getPrepareStatementCount();
}
// other methods omitted
}
802
Chapter 18 ■ Monitoring Spring Applications
Now that the Hibernate statistics are enabled and available via JMX, reload the application and refresh
VisualVM; you will be able to see the Hibernate statistics MBean. Clicking the node displays the detail
statistics on the right side. Note that for the information that is not of a Java primitive type (for example, a
List), you can click in the field to expand it and show the content.
In VisualVM, you can see many other metrics, such as EntityNames, EntityInsertCount, Queries,
PrepareStatementCount, and TransactionCount. Those metrics are useful for understanding the
persistence behavior within your application and can assist you in troubleshooting and performance-tuning
exercises.
If you run the testCreate() method again, you’ll notice that the values change. Creating singers
requires Hibernate to persist the instances, thus you will see increases in the values of TransactionCount,
PrepareStatementCount, EntityInsertCount, and a few others too.
JMX with Spring Boot
Migrating the previous application to Spring Boot is easy, and the dependencies are provided and
automatically configured. For JMX, no starter dependency is needed, but to enable JMX to expose MBeans,
we need to add the spring.jmx.enable=true property to the configuration. To keep this application aligned
to the previous section, we also add spring.jmx.default-domain=jmxBootDemo to change the domain name
from bean to jmxBootDemo to identify easily the place where our MBeans are.
The application for this section is the same as the Spring Boot Web REST application from Chapter 15.
With the spring.jmx.enable=true property added to the configuration, the org.springframework.
boot.autoconfigure.jmx.JmxAutoConfiguration class is added to the application that declares an
MBeanServer with a bean ID of mbeanServer and exposes any of the beans that are annotated with Spring
JMX annotations.
By default, Spring Boot will expose management endpoints as JMX MBeans under the org.
springframework.boot domain. The AppStatisticsImpl class is identical to the one introduced in the
previous section. And since Spring Boot exposes all JMX MBeans, if any of the libraries in the classpath
contain them, they will be available under the jmxDemo domain. Now, if you open VisualVM and access the
Chapter18Application node, you should see in the MBeans tab that the jmxBootDemo domain includes the
HikariDataSource MBeans, as shown in Figure 18-4.
803
Chapter 18 ■ Monitoring Spring Applications
Figure 18-4. Operations for the ProSpring6SingerApp MBean declared in the chapter18-boot project
Notice that there is also an org.springframework.boot domain in the MBeans tab. There is not much
under this domain, except management endpoints exposed as JMX Beans. In a simple application such as
this, there are not many attributes and operations available. You can inspect the values of the Spring Boot
properties if you want by invoking the getProperty(..) operation with the name of a property, such as
spring.jmx.enabled as shown in Figure 18-5.
804
Chapter 18 ■ Monitoring Spring Applications
Figure 18-5. Using getProperty(..) operation to inspect the value of the spring.jmx.enabled property
It doesn’t look like Spring Boot brings much extra to the table, but that changes when Spring Boot
Actuator is added to the application.
Monitoring Applications with Spring Boot Actuator
Spring Boot provides additional features for monitoring an application via JMX. Auditing, health, and
metrics gathering are automatically applied to an application once spring-boot-actuator.jar is on
the classpath. The spring-boot-actuator module provides a list of production-ready features. The
recommended way to enable them is by adding the spring-boot-starter-actuator to the classpath.
Figure 18-6 shows the dependencies of the chapter18-boot project, with the spring-boot-starteractuator expanded to see all the transitive dependencies.
805
Chapter 18 ■ Monitoring Spring Applications
Figure 18-6. Project chapter18-boot dependencies
The Spring reference documentation defines an actuator as follows: “An actuator is a manufacturing
term that refers to a mechanical device for moving or controlling something. Actuators can generate a large
amount of motion from a small change.”4
Spring Boot Actuator Endpoints
Spring Boot Actuator adds a collection of endpoints to an application that are used to monitor and interact
with the application. Via configuration, we can expose these endpoints via JMX or HTTP and we can also
decide if we want to expose all of them or only some of them. The configuration in Listing 18-7 is part of the
application.yaml Spring Boot configuration file and enables exposing all Actuator endpoints over JMX
under the jmxBootDemo domain.
Listing 18-7. Configuration to Expose All Actuator Endpoints over JMX Under the jmxBootDemo Domain
management:
endpoints:
jmx:
domain: jmxBootDemo
exposure:
include: "*"
4
https://docs.spring.io/spring-boot/docs/current/reference/html/actuator.html
806
Chapter 18 ■ Monitoring Spring Applications
With this configuration in place, when restarting the application and connecting VisualVM to it, a
list of MBeans is added under the jmxBootDemo domain, grouped under the Endpoint node, as shown in
Figure 18-7.
Figure 18-7. Spring Boot Actuator JMX endpoints shown in VisualVM
Table 18-1 lists the Spring Boot Actuator JMX endpoints and provides a short explanation of operations
they expose.
807
Chapter 18 ■ Monitoring Spring Applications
Table 18-1. Spring Boot Actuator JMX Endpoints
Endpoint
Description
Beans
Operation beans() lists a complete list of all the Spring beans in your application.
Caches
Exposes operations to list and clear existing caches.
Conditions
Operation conditions() lists the conditions evaluated for the configuration of the
Spring Boot application.
Configprops
Exposes operations to retrieve a collated list of configuration properties.
Env
Exposes operations to list properties from Spring’s ConfigurableEnvironment.
Health
Operation health() lists application health information.
Info
Operation info() lists arbitrary application information.
Loggers
Exposes operations to show and modify the configuration of loggers in the application.
Mappings
Operation mappings() lists all @RequestMapping paths. Funny enough, this list includes
the Actuator HTTP endpoints.
Metrics
Operation listNames() lists all metrics configured for the application.
Scheduledtasks
Operation scheduledTasks() lists all the scheduled tasks in the application.
Threaddump
Exposes operations to perform a thread dump.
If you’ve clicked and tried to invoke operations in the VisualVM UI you’ve probably realized the JMX
endpoints are tedious to work with. The good news is that Spring Boot Actuator exposes these endpoints,
and a few more, over HTTP as well, all grouped under the /actuator path by default. The path under which
the endpoints are grouped and the port can be customized via configuration.
Listing 18-8 shows the configuration for exposing all Actuator endpoints over HTTP under path
/monitoring and on port 9091.
Listing 18-8. Configuration to Expose All Actuator Endpoints over HTTP
management:
endpoints:
web:
exposure:
include: "*"
base-path: /monitoring
server:
port: 9091
To check the result of this configuration, simply open http://localhost:9091/monitoring in a
browser. The response format is JSON, and it contains a list of endpoints. Some of them match the JMX
endpoints introduced previously, while others are endpoints specific to the Web. In a browser that displays
JSON nicely, like Firefox, this page looks like the one depicted in Figure 18-8.
808
Chapter 18 ■ Monitoring Spring Applications
Figure 18-8. Spring Boot Actuator HTTP endpoints
For example, the /health endpoint exposes basic information about the application’s health. By
default, it just returns {"status":"UP"}—yes, really basic. To view more details, the property management.
endpoint.health.show-details must be set to always in the Spring Boot configuration file application.
yml or in the applications.properties file. With this setting in place, details about the database used and
its status are provided, along with details about the disk space. (Iuliana) Listing 18-9 shows what I see on the
/health page when I run the application locally.
Listing 18-9. /health Page Contents Sample
{
"status":"UP",
"components":{
"db":{
"status":"UP",
809
Chapter 18 ■ Monitoring Spring Applications
"details":{
"database":"MariaDB",
"validationQuery":"isValid()"
}
},
"diskSpace":{
"status":"UP",
"details":{
"total":499963174912,
"free":320641298432,
"threshold":10485760,
"path":"/workspace/pro-spring-6/.",
"exists":true
}
},
"ping":{
"status":"UP"
}
}
}
Most endpoints are sensitive, they are not public by default, so if the application is secured, most
information exposed by them will be omitted. The grouping of all endpoints under /actuator was
introduced in Spring Boot 2.x. In the previous version, each available endpoint was exposed directly under
the application context, so the /health endpoint was exposed under http://localhost:8081/health.
In this configuration the /actuator path was renamed to /monitoring via Spring Boot configuration.
The same can be done for any of the endpoints; for example, via configuration we can rename the /health
endpoint to /salud by setting the management.endpoints.web.path-mapping.health to this value.
If for security reasons we want these endpoints to be accessible only internally, we can configure the IP
address by setting the management.server.address property to 127.0.0.1.
Another simple endpoint is the /info endpoint. This endpoint displays general information about the
project that is being read from META-INF/build-info.properties (generated at build time) or Git files like git.
properties (generated if there is a plug-in configured for this), or through any environment property under
the info key. The information exposed by this endpoint can be configured using the Spring Boot configuration
file. By default, as expected, accessing this endpoint displays the JSON equivalent of nothing, {}. Adding the
properties shown in Listing 18-10 to the configuration file makes this endpoint a little more useful.
Listing 18-10. Spring Boot Configuration for the /info Endpoint
management:
info:
java:
enabled: true # enable Java info
env:
enabled: true # enable environment info - from 'application.yml' file
info:
app:
name: chapter18-boot
description: "Pro Spring 6 - Chapter 18 :: Spring Actuator Application"
version: 6.0-SNAPSHOT
author: "Iuliana Cosmina"
810
Chapter 18 ■ Monitoring Spring Applications
When accessing the /info endpoint, the text in Listing 18-11 is returned.
Listing 18-11. Information exposed by the /info Endpoint
{
"app":{
"name":"chapter18-boot",
"description":"Pro Spring 6 - Chapter 18 :: Spring Actuator Application",
"version":"6.0-SNAPSHOT"
},
"author":"Iuliana Cosmina",
"build":{
"artifact":"chapter18-boot",
"name":"chapter18-boot",
"time":"2023-03-25T00:32:55.002Z",
"version":"6.0-SNAPSHOT",
"group":"pro-spring-6"
},
"java":{
"version":"19.0.1",
"vendor":{
"name":"Amazon.com Inc.",
"version":"Corretto-19.0.1.10.1"
},
"runtime":{
"name":"OpenJDK Runtime Environment",
"version":"19.0.1+10-FR"
},
"jvm":{
"name":"OpenJDK 64-Bit Server VM",
"vendor":"Amazon.com Inc.",
"version":"19.0.1+10-FR"
}
}
}
Other endpoints’ contents can be customized as well, and not only through Spring Boot
configuration properties, but also by implementing interfaces or extending specific classes from
the org.springframework.boot.actuate package. For example, a custom implementation of org.
springframework.boot.actuate.health.HealthIndicator can add additional information to the /health
endpoint.
As expected, Spring Boot Actuator provides the option to create your own endpoints. This is done by
annotating a bean with @Endpoint from the org.springframework.boot.actuate.endpoint.annotation
package. Annotating its methods with @ReadOperation (handling GET requests), @WriteOperation
(handling POST requests), and @DeleteOperation (handling DELETE requests) exposes them over JMX and
HTTP both.
811
Chapter 18 ■ Monitoring Spring Applications
In this book, some endpoints were mentioned to support filtering, because the data they display can be
reduced by adding component names as suffixes to their URIs. Depending on the endpoint in question, those
values can be bean names, fully qualified class names, property names, and so on. You might think of them as
path variables, or filters, but the Spring team prefers to call them tags.
Spring Boot Actuator is really powerful and very customizable. To read more about it, check out the
official documentation5.
Using Spring Boot Actuator with Micrometer
In Figure 18-6 (earlier in the chapter), the spring-boot-starter-actuator library is shown with two
transitive dependencies: micrometer-core and micrometer-observation. Micrometer6 is an open source
metrics facade that provides a vendor-neutral metrics collection API (the parent abstract implementations
is io.micrometer.core.instrument.MeterRegistry7) and implementations for a variety of monitoring
systems that were mentioned at the beginning of this chapter. It can be used with Spring Boot Actuator, but it
is an independent platform that can be used by itself.
If it’s hard to wrap your head around Micrometer, think of SLF4J, a facade or abstraction for various
logging frameworks. This means the developer can use SLF4J to write log messages that will be gathered
and written to the desired support by the framework configured by the application. In this book SLF4J
is used together with Logback Classic, but we could easily swap Logback Classic with Log4j2, without
any need of changes in the code. You could have the same for metrics starting with Spring Boot Actuator
2.x—Micrometer can be used to gather metrics and expose them in a format that any (almost) advanced
monitoring system can interpret. Spring Boot 3 autoconfigures quite a long list of metrics out of the box. This
list is returned by a GET request to the http://0.0.0.0:9091/monitoring/metrics endpoint(as configured
in the previous section). Listing 18-12 lists the names of these metrics.
Listing 18-12. Spring Boot Metrics Listed by the /metrics Endpoint
{
"names":[
"application.ready.time",
"application.started.time",
"disk.free",
"disk.total",
"executor.active",
"executor.completed",
"executor.pool.core",
"executor.pool.max",
"executor.pool.size",
"executor.queue.remaining",
"executor.queued",
https://docs.spring.io/spring-boot/docs/current/reference/html/actuator.html
https://micrometer.io
7
https://github.com/micrometer-metrics/micrometer/blob/main/micrometer-core/src/
main/java/io/micrometer/core/instrument/MeterRegistry.java
5
6
812
Chapter 18 ■ Monitoring Spring Applications
"hikaricp.connections",
"hikaricp.connections.acquire",
"hikaricp.connections.active",
"hikaricp.connections.creation",
"hikaricp.connections.idle",
"hikaricp.connections.max",
"hikaricp.connections.min",
"hikaricp.connections.pending",
"hikaricp.connections.timeout",
"hikaricp.connections.usage",
"jdbc.connections.active",
"jdbc.connections.idle",
"jdbc.connections.max",
"jdbc.connections.min",
"jvm.buffer.count",
"jvm.buffer.memory.used",
"jvm.buffer.total.capacity",
"jvm.classes.loaded",
"jvm.classes.unloaded",
"jvm.compilation.time",
"jvm.gc.live.data.size",
"jvm.gc.max.data.size",
"jvm.gc.memory.allocated",
"jvm.gc.memory.promoted",
"jvm.gc.overhead",
"jvm.info",
"jvm.memory.committed",
"jvm.memory.max",
"jvm.memory.usage.after.gc",
"jvm.memory.used",
"jvm.threads.daemon",
"jvm.threads.live",
"jvm.threads.peak",
"jvm.threads.states",
"logback.events",
"process.cpu.usage",
"process.files.max",
"process.files.open",
"process.start.time",
"process.uptime",
"system.cpu.count",
"system.cpu.usage",
"system.load.average.1m",
"tomcat.sessions.active.current",
"tomcat.sessions.active.max",
"tomcat.sessions.alive.max",
"tomcat.sessions.created",
"tomcat.sessions.expired",
"tomcat.sessions.rejected"
]
}
813
Chapter 18 ■ Monitoring Spring Applications
The metrics can be grouped in a few categories:
•
Application times
•
Uptime
•
JVM—garbage collector activity, memory consumption, thread utilization, number
of classes, etc.
•
CPU usage
•
Spring-specific components activity
•
Cache activity
•
Data source and HikariCP activity
•
Tomcat usage
•
Spring MVC and WebFlux request latencies (available only for Spring Boot MVC and
WebFlux applications)
•
Other custom components activity: RestTemplate latencies, file descriptor usage,
event logging, RabbitMQ or ApacheMQ (if used) connection factories, etc.
So, when running the application generates a lot of data, what can we do with it? Well, we process
it into reports and graphs that can be viewed with the naked eye, and that in turn can be used to predict
future behavior. Micrometer cannot help with this, but there’s a very easy-to-use tool that does the trick and
integrates perfectly with Spring Boot Actuator and Micrometer: Prometheus8. Prometheus is an open source
system-monitoring and alerting toolkit build at SoundCloud. It was released in 2012 and since then it has
become a stand-alone open source project with a big and active developer and user community.
To integrate our Spring Boot application with Prometheus, we need to add the micrometer-registryprometheus dependency. After adding this dependency, it should appear in the IntelliJ IDEA Gradle View,
together with its transitive dependencies, as depicted in Figure 18-9.
8
https://prometheus.io
814
Chapter 18 ■ Monitoring Spring Applications
Figure 18-9. Spring Boot Actuator and Prometheus application dependencies
After adding the dependency and rebuilding the application, start the Spring Boot application by
running the Chapter18Application main class. When opening the http://localhost:9091/monitoring
URL, notice the prometheus endpoint with URL http://localhost:9091/monitoring/prometheus. This
endpoint is provided by the PrometheusScrapeEndpoint class, from package org.springframework.boot.
actuate.metrics.export.prometheus that is part of the Spring Boot Actuator project. This endpoint
translates the metrics provided by Micrometer into a format that can be scraped by the Prometheus server.
You can see a summary of the exposed metrics by accessing the Prometheus endpoint in Listing 18-13.
Listing 18-13. Snippet of Spring Boot Metrics Listed on the /prometheus Endpoint
# HELP hikaricp_connections_max Max connections
# TYPE hikaricp_connections_max gauge
hikaricp_connections_max{pool="HikariPool-1",} 25.0
# HELP jvm_threads_live_threads The current number of live threads including both daemon and
non-daemon threads
# TYPE jvm_threads_live_threads gauge
jvm_threads_live_threads 39.0
# HELP http_server_requests_seconds
# TYPE http_server_requests_seconds summary
http_server_requests_seconds_count{error="none",exception="none",method="GET",outcome="SUCCE
SS",status="200",uri="/singer/{id}",} 100.0
815
Chapter 18 ■ Monitoring Spring Applications
http_server_requests_seconds_sum{error="none",exception="none",method="GET",outcome="SUCCESS
",status="200",uri="/singer/{id}",} 1.069158702
http_server_requests_seconds_count{error="none",exception="none",method="POST",outcome="SUCC
ESS",status="201",uri="/singer/",} 1000.0
http_server_requests_seconds_sum{error="none",exception="none",method="POST",outcome="SUCCES
S",status="201",uri="/singer/",} 6.119599968
http_server_requests_seconds_count{error="none",exception="none",method="GET",outcome="SUCCE
SS",status="200",uri="/singer/",} 100.0
http_server_requests_seconds_sum{error="none",exception="none",method="GET",outcome="SUCCESS
",status="200",uri="/singer/",} 1.052652658
...
The next step is to run Prometheus to plot the data. For this you need to install Prometheus as explained
on the official page9. To keep things practical, we recommend to go the Docker route and run it in a
container. In the chapter18-boot folder you will find a file named CHAPTER18-BOOT.adoc explaining how to
set up Prometheus in a Docker container; these steps will be skipped here to avoid derailing the focus of the
chapter.
Before starting the container, continue reading this section, because you need to tell Prometheus
where the metrics are coming from via a configuration file.
The Prometheus configuration file is named prometheus.yaml. The name is not mandatory, but it
does make its purpose obvious. According to the official documentation, we have to define a job that tells
Prometheus how often to query the metrics and from where. The syntax is YAML and the most important
properties are listed in Listing 18-14.
Listing 18-14. Contents of the prometheus.yaml file
global:
scrape_interval: 15s # By default, scrape targets every 15 seconds.
# Prometheus itself self-monitoring configuration
scrape_configs:
- job_name: 'prometheus'
# Override the global default and scrape targets from this job every 5 seconds.
scrape_interval: 5s
static_configs:
- targets: ['0.0.0.0:9090']
- job_name: 'chapter18-boot'
metrics_path: '/monitoring/prometheus'
# Override the global default and scrape targets from this job every 5 seconds.
scrape_interval: 5s
static_configs:
9
https://prometheus.io/docs/prometheus/latest/installation
816
Chapter 18 ■ Monitoring Spring Applications
# When Prometheus is run in a Docker container the real IP within the network
must be used
- targets: ['192.168.0.6:9091']
Notice that for the chapter18-boot job, the metrics_path property is set to the Prometheus Actuator
endpoint and targets is set to the IP and port where the chapter18-boot application is running.
Before starting the Prometheus container, start the chapter18-boot application. By default, the
Prometheus web console is available at http://localhost:9090. In the prometheus.yml file, the job named
prometheus represents the configuration of the Prometheus application itself, and the configurations of this
job can be customized to start Prometheus on a different IP and port.
The Prometheus web UI is pretty simplistic. The option of most interest for this discussion is Status ➤
Targets, highlighted in Figure 18-10.
Figure 18-10. Prometheus web UI
Choosing the Targets menu item directs you to the page shown in Figure 18-11 confirming that
chapter18-boot is UP, and listing the job configurations and the most recent time the metrics were
refreshed. If the text is DOWN and highlighted in red, either the application is not started or static_configs.
targets was not set properly for the chapter18-boot job.
817
Chapter 18 ■ Monitoring Spring Applications
Figure 18-11. Prometheus web UI showing chapter18-boot and Prometheus apps running
If everything is okay, you can go back to the main page and select a metric. One of the most visible
metrics is system_cpu_usage, so select that from the list of metrics and click the Execute button. The
information is not really visible in the Graph tab until we reduce the interval for the metrics analysis by
setting a sensible value, such as 15 or 30 minutes, in the first text field. The graph should be quite interesting,
similar to what is depicted in Figure 18-12.
818
Chapter 18 ■ Monitoring Spring Applications
Figure 18-12. Prometheus web UI showing graph for the system_cpu_usage metric
As previously shown in Listing 18-13, several metrics related to the number of requests are available. To
simulate a situation in which the server takes variable times to resolve requests, so that we can see the graph
for the http_server_requests_seconds_count, we can modify the SingerController to introduce a different
delay for each of the Singer instances returned when a GET request with the http://localhost:9091/singer/
{id} URL is received. This is done by adding a Thread.sleep() in the handler method for this URI, that pauses
the execution for a random time based on the record id. The handler method is shown in Listing 18-15.
Listing 18-15. Custom Handler Method for Request Path /singer{id} with Various Delays
package com.apress.prospring6.eighteen.boot.controllers;
// import statements omitted
@RestController
@RequestMapping(value="/singer")
public class SingerController {
@GetMapping(path = "/{id}")
public Singer findSingerById(@PathVariable Long id) {
var singer = singerService.findById(id);
819
Chapter 18 ■ Monitoring Spring Applications
if (singer != null) {
int msec = 10;
try {
Thread.sleep(Duration.ofMillis(msec * id));
} catch (InterruptedException e) {
e.printStackTrace();
}
}
return singer;
}
// other methods and fields omitted
}
Now, in order to submit a lot of requests and produce a lot of data so that Prometheus has something to
plot on the graph, the test class in Listing 18-16 has two very useful methods.
Listing 18-16. Test Methods to Generate Metric Data
package com.apress.prospring6.eighteen.boot;
// import statements omitted
public class SingerControllerTest {
private static String BASE_URL = "http://localhost:8081/singer/";
private RestTemplate restTemplate = new RestTemplate();
@RepeatedTest(500)
public void testCreate() throws URISyntaxException {
Singer singerNew = new Singer();
singerNew.setFirstName(UUID.randomUUID().toString().substring(0,8));
singerNew.setLastName(UUID.randomUUID().toString().substring(0,8));
singerNew.setBirthDate(LocalDate.now());
RequestEntity<Singer> req = new RequestEntity<>(singerNew, HttpMethod.POST, new
URI(BASE_URL));
ResponseEntity<String> response = restTemplate.exchange(req, String.class);
assertEquals(HttpStatus.CREATED, response.getStatusCode());
}
@RepeatedTest(10)
public void testPositiveFindById() throws URISyntaxException {
HttpHeaders headers = new HttpHeaders();
headers.setAccept(List.of(MediaType.APPLICATION_JSON));
for (int i = 1; i < 250; i++) {
RequestEntity<HttpHeaders> req = new RequestEntity<>(headers, HttpMethod.GET,
new URI(BASE_URL + i));
ResponseEntity<Singer> response = restTemplate.exchange(req, Singer.class);
assertAll("testPositiveFindById",
() -> assertEquals(HttpStatus.OK, response.getStatusCode()),
820
Chapter 18 ■ Monitoring Spring Applications
() -> assertTrue(Objects.requireNonNull(response.getHeaders().
get(HttpHeaders.CONTENT_TYPE)).contains(MediaType.APPLICATION_
JSON_VALUE)),
() -> assertNotNull(response.getBody()),
() -> assertEquals(Singer.class, response.getBody().getClass())
);
}
}
}
To get the expected result, run testCreate() first, and then run testPositiveFindById(). The
second test will take a while to execute, but you can go to the Prometheus web UI and plot the graph for the
http_server_requests_seconds_count metric and refresh the page from time to time to see the number of
request being handled growing over time.
Figure 18-13 shows the graph generated for this project. Notice how multiple request paths are
grouped by color. Prometheus has two types of graphs, stacked and unstacked; the one in this image is the
stacked type.
Figure 18-13. Prometheus web UI showing graph for the http_server_requests_seconds_count metric
821
Chapter 18 ■ Monitoring Spring Applications
Notice that the duration of a GET request to /singer/ (shown in green at the bottom) never increases.
Notice that the duration of the POST request to /singer/ (shown in red) increases as the table gets bigger.
The duration of the GET request to /singer/{id} (shown in blue) is the one that shows the most increase,
considering that is where the Thread.sleep(..) is.
The Prometheus graphs are quite simple, and the default Micrometer metrics are basic too. In a
production application, teams can define their own metrics depending on the services the application
provides. For example, for a banking application, login failures coupled with certain originating IPs might
reveal some type of hacking attempt, so a must-have metric is one that groups together failed logins and a
class of IPs where requests are generated from.
The leading solution in visualizing metrics at the moment seems to be Grafana10, and the good news is
that it knows how to interpret Prometheus metrics. So, the Prometheus metrics can be forwarded to Grafana
to plot some higher-definition graphs.
Summary
In this chapter, we covered the high-level topics of monitoring a Spring-powered JEE application. First,
we discussed Spring’s support of JMX, the standard in monitoring Java applications. We discussed
implementing custom MBeans for exposing application-related information, as well as exposing statistics of
common components such as Hibernate; and we showed how JMX can be used in a Spring Boot application.
Next, we showed the full power of Spring Boot Actuator in generating application metrics and how to
plot those metrics using Prometheus. This is all the space we have in this book for application monitoring.
The next chapter introduces you to WebSocket, s protocol that allows bi-directional communication
between a web client and a web server.
10
https://grafana.com
822
CHAPTER 19
Spring WebSocket Support
Traditionally, web applications have utilized the standard request/response HTTP functionality to provide
communication between the client and server. As the Web has evolved, more interactive abilities have
been required, some of which demand push/pull or real-time updates from the server. Over time, various
methods have been implemented, such as continuous polling, long polling, and Comet. Each has its pros
and cons, and the WebSocket Protocol1 is an attempt to learn from those needs and deficiencies, creating
a simpler and more robust way to build interactive applications. The HTML5 WebSocket specification
defines an API that enables web pages to use the WebSocket protocol for two-way communication with a
remote host.
This chapter presents a high-level overview of the WebSocket protocol, and the main functionality
provided by the Spring Framework. Specifically, this chapter covers the following topics:
•
Introduction to WebSocket: We provide a general introduction of the WebSocket
protocol. This chapter is not intended to serve as a detailed reference of the
WebSocket protocol but rather as a high-level overview.
•
Using WebSocket with Spring: We dive into some details of using WebSocket with the
Spring Framework; specifically, we cover using Spring’s WebSocket API, utilizing
SockJS as a fallback option for non-WebSocket-enabled browsers, and sending
messages using Simple (or Streaming) Text-Oriented Message Protocol (STOMP)
over SockJS/WebSocket.
Introducing WebSocket
WebSocket is a specification developed as part of the HTML5 initiative, allowing for a full-duplex singlesocket connection in which messages can be sent between a client and a server. In the past, web applications
requiring the functionality of real-time updates would poll a server-side component periodically to obtain
this data, opening multiple connections or using long polling.
Using WebSocket for bidirectional communication avoids the need to perform HTTP polling for twoway communications between a client (for example, a web browser) and an HTTP server. The WebSocket
protocol is meant to supersede all existing bidirectional communication methods utilizing HTTP for
1
https://www.rfc-editor.org/rfc/rfc6455
© Iuliana Cosmina, Rob Harrop, Chris Schaefer, and Clarence Ho 2023
I. Cosmina et al., Pro Spring 6, https://doi.org/10.1007/978-1-4842-8640-1_19
823
Chapter 19 ■ Spring WebSocket Support
transport. The single-socket model of WebSocket results in a simpler solution, avoiding the need for multiple
connections for each client and the corresponding overhead—for example, not needing to send an HTTP
header with each message.
WebSocket utilizes HTTP during its initial handshake, which in turn allows it to be used over standard
HTTP (80) and HTTPS (443) ports. The WebSocket specification defines a ws:// and a wss:// scheme to
indicate non-secure and secure connections. The WebSocket protocol has two parts: a handshake between
the client and server and then data transfer. A WebSocket connection is established by making an upgrade
request from HTTP to the WebSocket protocol during the initial handshake between the client and the server,
over the same underlying TCP/IP connection. During the data transfer portion of the communication, both
the client and server can send messages to each other simultaneously, opening the door to add more-robust
real-time communication functionality to your applications.
Using WebSocket with Spring
As of version 4.1, the Spring Framework supports WebSocket-style messaging as well as STOMP as an
application-level subprotocol. Within the framework, you can find support for WebSocket in the springwebsocket module, which is compatible with JSR-356 (“Java WebSocket” recently renamed to “Jakarta
WebSocket API”)2.
Application developers must also recognize that although WebSocket brings new and exciting
opportunities, not all web browsers support the protocol. Given this, the application must continue to work
for the user and utilize some sort of fallback technology to simulate the intended functionality as best as
possible. To handle this case, the Spring Framework provides transparent fallback options via the SockJS
protocol, which will we go into later in this chapter.
Unlike REST-based applications, where services are represented by different URLs, WebSocket uses a
single URL to establish the initial handshake, and data flows over that same connection. This type of messagepassing functionality is more along the lines of traditional messaging systems. As of Spring Framework 4, core
message-based interfaces such as Message have been migrated from the Spring Integration project into a new
module called spring-messaging to support WebSocket-style messaging applications.
When we refer to using STOMP as an application-level subprotocol, we are talking about the protocol
that is transported via WebSocket. WebSocket itself is a low-level protocol that simply transforms bytes
into messages. The application needs to understand what is being sent across the wire, which is where a
subprotocol such as STOMP comes into play. During the initial handshake, the client and server can use the
Sec-WebSocket-Protocol header to define what subprotocol to use. While the Spring Framework provides
support for STOMP, WebSocket does not mandate anything specific.
Now that you have an understanding of what WebSocket is and the support Spring provides, you’re
likely wondering where you might use this technology. Given the single-socket nature of WebSocket and its
ability to provide a continuous bidirectional data flow, WebSocket lends itself well to applications that have a
high frequency of message passing and require low-latency communications. Applications that may be good
candidates for WebSocket could include gaming, real-time group collaboration tools, messaging systems,
time-sensitive pricing information such as financial updates, and so on. When designing your application
with the consideration of using WebSocket, you must take into account both the frequency of messages
and latency requirements. This will help determine whether to use WebSocket or, for example, HTTP long
polling.
2
https://www.oracle.com/technical-resources/articles/java/jsr356.html
824
Chapter 19 ■ Spring WebSocket Support
Using the WebSocket API
As mentioned in the previous discussion, WebSocket simply transforms bytes into messages and transports
them between client and server. Those messages still need to be understood by the application itself, which
is where subprotocols such as STOMP come into play. If you want to work with the lower-level WebSocket
API directly, the Spring Framework provides an API that you can interact with to do so. When working with
Spring’s WebSocket API, you would typically implement the WebSocketHandler interface or use convenience
subclasses such as BinaryWebSocketHandler for handling binary messages, SockJsWebSocketHandler for
SockJS messages, or TextWebSocketHandler for working with text-based messages. In this example, for
simplicity we will use a TextWebSocketHandler to pass text-based messages via WebSocket. Let’s start by
taking a look at how we can receive and work with WebSocket messages at a low level, utilizing the Spring
WebSocket API.
Obviously, we need to add to the classpath libraries that support WebSocket communication.
Figure 19-1 shows the dependencies of a Spring web application that uses the WebSocket protocol to send
messages to itself.
Figure 19-1. Project chapter19 dependencies
As you can see, the dependencies are typical for a Spring Web application, like the one introduced in
Chapter 14. The Jakarta WebSocket API provides a platform-independent WebSocket protocol API to build
bidirectional communications over the Web. The jakarta.websocket-api library contains the Jakarta
WebSocket API for Server and Client (API only; it does not include an implementation). The springwebsocket library contains the Spring WebSocket API needed to write client- and server-side applications
that handle WebSocket messages.
825
Chapter 19 ■ Spring WebSocket Support
To send the messages and display them, a simple web page is created, named index.html. This page is
built from a default Thymeleaf layout and contains static HTML and JavaScript that is used to communicate
with the back-end WebSocket service. To handle the communication, we need to declare a special type
that implements WebSocketHandler and a bean of that type. Figure 19-2 shows the hierarchy of types that
implement org.springframework.web.socket.WebSocketHandler.
Figure 19-2. WebSocketHandler implementations
To keep things simple, and benefit from out-of-the-box Spring code, instead of implementing the
WebSocketHandler directly, our EchoHander class will instead extend the TextWebSocketHandler. This keeps
our implementation concise, as the only method that needs to be implemented is handleTextMessage(..),
as shown in Listing 19-1.
Listing 19-1. The EchoHander Class
package com.apress.prospring6.nineteen;
import org.springframework.web.socket.TextMessage;
import org.springframework.web.socket.WebSocketSession;
import org.springframework.web.socket.handler.TextWebSocketHandler;
import java.io.IOException;
public class EchoHandler extends TextWebSocketHandler {
@Override
public void handleTextMessage(WebSocketSession session, TextMessage textMessage) throws
IOException {
session.sendMessage(new TextMessage(textMessage.getPayload()));
}
}
826
Chapter 19 ■ Spring WebSocket Support
As you can see, this is a basic handler that takes the provided message and simply echoes it back to the
client. The content of the received WebSocket message is contained in the getPayload() method.
Now that we have the type, we need to define a single handler mapping in this example, which receives
requests at /echoHandler and uses the bean with the ID of echoHandler to receive a message and respond
by echoing the provided message back to the client. To keep the WebSocket configuration separate from the
MVC configuration, we introduce a class named WebSocketConfig that declares the mapping, the bean, and
also enables support for communication using WebSocket, as shown in Listing 19-2.
Listing 19-2. The WebSocketConfig Configuration Class
package com.apress.prospring6.nineteen;
import org.springframework.web.socket.config.annotation.EnableWebSocket;
import org.springframework.web.socket.config.annotation.WebSocketConfigurer;
import org.springframework.web.socket.config.annotation.WebSocketHandlerRegistry;
// other import statements omitted
@Configuration
@EnableWebSocket
public class WebSocketConfig implements WebSocketConfigurer {
@Override
public void registerWebSocketHandlers(WebSocketHandlerRegistry registry) {
registry.addHandler(echoHandler(), "/echoHandler");
}
@Bean
public EchoHandler echoHandler() {
return new EchoHandler();
}
}
The @EnableWebSocket annotation enables support for processing WebSocket requests, while the
WebSocketConfig configuration class implements Spring’s WebSocketConfigurer interface that defines
callback methods to configure the WebSocket request handling.
The Spring MVC configuration is nothing special (refer to Chapter 14 if you need to jog your memory),
but we do need to map the index.html page to the /index path. The controller is shown in Listing 19-3.
Listing 19-3. The IndexController Configuration Class
package com.apress.prospring6.nineteen;
import
import
import
import
jakarta.servlet.http.HttpServletRequest;
org.springframework.stereotype.Controller;
org.springframework.ui.Model;
org.springframework.web.bind.annotation.GetMapping;
@Controller
public class IndexController {
@GetMapping(path = "index")
public String auth(Model model, HttpServletRequest request) {
var requestUrl= request.getRequestURL().toString();
827
Chapter 19 ■ Spring WebSocket Support
var webSocketAddress = requestUrl.replace("http", "ws").replace("index",
"echoHandler");
model.addAttribute("webSocket", webSocketAddress);
return "index";
}
}
The implementation is quite simple, but to keep the WebSocket handler URL dynamic and relative to
the context path of the application, a little artifice is implemented that takes the URL of the initial request,
which is http://localhost:8080/ch19/index, and uses it to produce the ws://localhost:8080/ch19/
echoHandler value, which is added as the webSocket attribute to the index model.
That’s pretty much all that is needed on the back end. Given that EchoHandler is a typical Spring bean,
you can do anything you would in a normal Spring application, such as inject services, to carry out any
functions this handler may need to do.
The index.html page is a very simple Thymeleaf view representing a simple front-end client where
we can interact with the back-end WebSocket service. The front end is a simple HTML page with a bit of
JavaScript that uses the browser’s API to make the WebSocket connection; it also contains some jQuery3
to handle button-click events and data display. jQuery is quite simple, but introducing a more complex
JavaScript framework would be overkill for purposes of this chapter. The front-end application will have the
ability to connect, disconnect, send a message, and display status updates to the screen. Listing 19-4 shows
the code for the front-end client page (views/index.html).
Listing 19-4. The views/index.html View
<html>
<head th:fragment="~{templates/layout :: pageTitle}">
<title> WebSocket Tester </title>
<script type="text/javascript" th:src="@{/js/jquery-3.6.4.min.js}"></script>
<script type="text/javascript">
let ping;
let websocket;
let supportsWebSockets = 'WebSocket' in window || 'MozWebSocket' in window;
jQuery(function ($) {
$("#connect").attr("disabled", true);
if (supportsWebSockets) {
console.log(">> webSocket protocol supported.")
$("#connect").attr("disabled", false);
}
function writePing(message) {
$('#pingOutput').append(message + '\n');
}
function writeMessage(message) {
$('#messageOutput').append(message + '\n')
}
3
https://jquery.com
828
Chapter 19 ■ Spring WebSocket Support
$('#connect')
.click(function doConnect() {
websocket = new WebSocket($("#target").val());
websocket.onopen = function (evt) {
let badge= $("#badgeStatus");
badge.text("Connected");
badge.attr('class','badge bg-success');
setInterval(function () {
if (websocket !== "undefined") {
websocket.send("ping");
}
}, 3000);
};
websocket.onclose = function (evt) {
let badge= $("#badgeStatus");
badge.text("Disconnected");
badge.attr('class','badge bg-light');
};
websocket.onmessage = function (evt) {
if (evt.data === "ping") {
writePing(evt.data);
} else {
writeMessage('ECHO: ' + evt.data);
}
};
websocket.onerror = function (evt) {
onError(writeStatus('ERROR:' + evt.data))
};
});
$('#disconnect')
.click(function () {
if (typeof websocket != 'undefined') {
websocket.close();
websocket = undefined;
} else {
alert("Not connected.");
}
});
$('#send')
.click(function () {
if (typeof websocket != 'undefined') {
websocket.send($('#message').val());
} else {
alert("Not connected.");
}
829
Chapter 19 ■ Spring WebSocket Support
});
});
</script>
</head>
<body>
<div class="container">
<header th:replace="~{templates/layout :: pageHeader}" ></header>
<header th:replace="~{templates/layout :: pageMenu}" ></header>
<section th:fragment="~{templates/layout :: pageContent}">
<div class="card border-success mb-3" style="max-width: 40rem;">
<div class="card-header">WebSocket Tester</div>
<div class="row mb-1 m-sm-1">
<label for="target" th:text="Target" class="col-sm-4 form-label">FN:</label>
<div class="col-sm-8">
<input type="text" id="target" size="40" th:value="${webSocket}"
class="form-control"/>
</div>
</div>
<div class="row mb-1 m-sm-1">
<div class="col-sm-2"> <input type="submit" id="connect" class="btn btnsuccess" value="Connect"/></div>
<div class="col-sm-2"><input type="submit" id="disconnect" class="btn btndanger" value="Disconnect"/></div>
<div class="col-sm-2"><span id="badgeStatus"></span></div>
</div>
<div class="row mb-1 m-sm-1">
<label for="message" th:text="Message" class="col-sm-4 formlabel">FN:</label>
<div class="col-sm-8">
<input type="text" id="message" value="" class="form-control"/>
</div>
</div>
<div class="row mb-1 m-sm-1">
<div class="col-sm-2"> <input type="submit" id="send" value="Send"
class="btn btn-dark"/></div>
</div>
<div class="row mb-1 m-sm-1">
<label for="messageOutput" th:text="Echo" class="col-sm-4 formlabel">FN:</label>
<div class="col-sm-7">
<pre><textarea id="messageOutput" rows="5" cols="25" class="formcontrol"></textarea></pre>
</div>
</div>
<div class="row mb-1 m-sm-1">
<label for="pingOutput" th:text="Ping" class="col-sm-4 formlabel">FN:</label>
<div class="col-sm-7">
<pre><textarea id="pingOutput" rows="5" cols="25" class="formcontrol"></textarea></pre>
830
Chapter 19 ■ Spring WebSocket Support
</div>
</div>
</div>
</section>
<footer th:replace="~{templates/layout :: pageFooter}" ></footer>
</div>
</body>
</html>
The code snippet in Listing 19-4 models a UI that allows us to call back into the WebSocket API and
watch real-time results appear on the screen.
Build the project and deploy it into your web container using an IntelliJ IDEA launcher as instructed in
Chapter 14. Then navigate to http://localhost:8080/ch19/index to bring up the UI. Click the Connect
button, and you will notice a Connected green badge next to the Connect and Disconnect buttons, as
shown in Figure 19-3, and every three seconds a ping message will display in the Ping text area. Go ahead
and type a message in the Message text box and then click the Send button. This message will be sent to
the back-end WebSocket service and displayed in the Echo box. When you have finished sending messages,
click the Disconnect button, and you will notice that the green badge is replaced by a gray badge labeled
Disconnected. You will not be able to send any further messages or disconnect again until you reconnect to
the WebSocket service.
Figure 19-3. WebSocket client page
831
Chapter 19 ■ Spring WebSocket Support
While this example utilizes the Spring abstraction on top of the low-level WebSocket API, you can clearly
see the exciting possibilities this technology can bring to your applications. Now let’s take a look at how to
handle this functionality when the browser does not support WebSocket and a fallback option is required.
The code in Listing 19-4 tests if WebSocket is not supported in the browser using the supportsWebSockets
variable and disables the Connect button if it is not.
U
sing SockJS
Because not all browsers support WebSocket (e.g., this might be the case for browsers on mobile devices)
and applications still need to function correctly for end users, the Spring Framework provides a fallback
option utilizing SockJS4. Using SockJS provides WebSocket-like behavior as close as possible during runtime
without the need for changes to application-side code. The SockJS protocol is used on the client side via
JavaScript libraries. The Spring Framework’s spring-websocket library contains the relevant SockJS serverside components. When using SockJS to provide a seamless fallback option, the client will first send a GET
request to the server by using a path of /info to obtain transport information from the server. SockJS will
first try to use WebSocket, then HTTP streaming, and finally HTTP long polling as a last resort.
There is a simple modification to be made to support WebSocket communication using SockJS. First, we
need to support asynchronous messaging, which is enabled in the configuration in Listing 19-5 using the
@EnableAsync annotation.
Listing 19-5. Spring MVC Configuration for SockJS Asynchronous Configuration
package com.apress.prospring6.nineteen;
import org.springframework.scheduling.annotation.EnableAsync;
// other import statements omitted
@EnableAsync
@Configuration
@EnableWebMvc
@ComponentScan
public class WebConfig implements WebMvcConfigurer, ApplicationContextAware {
// other configuration omitted
}
The official Spring Javadoc states that the @EnableAsync annotation enables Spring’s asynchronous
method execution capability, thus enabling annotation-driven async processing for an entire Spring
application context5.
The second change must be done in WebSocketConfig to enable SockJS support for our handler, as
shown in Listing 19-6.
https://github.com/sockjs
https://docs.spring.io/spring-framework/docs/current/javadoc-api/org/
springframework/scheduling/annotation/EnableAsync.html
4
5
832
Chapter 19 ■ Spring WebSocket Support
Listing 19-6. Spring WebSocket for SockJS Configuration
package com.apress.prospring6.nineteen;
import
import
import
import
import
org.springframework.context.annotation.Bean;
org.springframework.context.annotation.Configuration;
org.springframework.web.socket.config.annotation.EnableWebSocket;
org.springframework.web.socket.config.annotation.WebSocketConfigurer;
org.springframework.web.socket.config.annotation.WebSocketHandlerRegistry;
@Configuration
@EnableWebSocket
public class WebSocketConfig implements WebSocketConfigurer {
@Override
public void registerWebSocketHandlers(WebSocketHandlerRegistry registry) {
registry.addHandler(echoHandler(), "/echoHandler");
registry.addHandler(echoHandler2(), "/sockjs/echoHandler").withSockJS();
}
@Bean
public EchoHandler echoHandler() {
return new EchoHandler();
}
@Bean
public EchoHandler echoHandler2() {
return new EchoHandler();
}
}
Notice that another EchoHandler bean is declared and mapped to "/sockjs/echoHandler".
Next we will need to create an HTML page as we did in the WebSocket API sample, but this time utilizing
SockJS to take care of the transport negotiation. The most notable differences are that we use the SockJS
library rather than WebSocket directly and utilize a typical http:// scheme rather than ws:// to connect to
the endpoint. To use SockJS, we need to add the corresponding JavaScript library to the HTML page, and
instead of using a WebSocket for communication, we use a SockJS object. The HTML code is almost identical
to the code in views/index2.html, the only difference being the JavaScript code to handle the SockJS
communication, and is shown in Listing 19-7.
Listing 19-7. The JavaScript Code in views/index2.html View
// <script type="text/javascript" th:src="@{/js/sockjs-1.6.1.min.js}"></script>
// <script type="text/javascript" th:src="@{/js/jquery-3.6.4.min.js}"></script>
let ping;
let websocket;
jQuery(function ($) {
function writePing(message) {
$('#pingOutput').append(message + '\n');
}
833
Chapter 19 ■ Spring WebSocket Support
function writeMessage(message) {
$('#messageOutput').append(message + '\n')
}
$('#connect')
.click(function doConnect() {
sockjs = new SockJS($("#target").val());
sockjs.onopen = function (evt) {
let badge= $("#badgeStatus");
badge.text("Connected");
badge.attr('class','badge bg-success');
setInterval(function () {
if (sockjs !== "undefined") {
sockjs.send("ping");
}
}, 3000);
};
sockjs.onclose = function (evt) {
let badge= $("#badgeStatus");
badge.text("Disconnected");
badge.attr('class','badge bg-light');
};
sockjs.onmessage = function (evt) {
if (evt.data === "ping") {
writePing(evt.data);
} else {
writeMessage('ECHO: ' + evt.data);
}
};
});
$('#disconnect')
.click(function () {
if (typeof sockjs != 'undefined') {
sockjs.close();
sockjs = undefined;
} else {
alert("Not connected.");
}
});
$('#send')
.click(function () {
if (typeof sockjs != 'undefined') {
sockjs.send($('#message').val());
} else {
alert("Not connected.");
834
Chapter 19 ■ Spring WebSocket Support
}
});
});
With the new SockJS code implemented, build and deploy the project to the container and navigate to
the UI located at http://localhost:8080/ch19/index2, which has all the same features and functionality of
the WebSocket example, as shown in Figure 19-4.
Figure 19-4. SocketJS application page, after establishing a connection
To test the SockJS fallback functionality, try disabling WebSocket support in your browser. In Firefox, for
example, navigate to the about:config page and then search for network.websocket.enabled. Toggle this
setting to false, as shown in Figure 19-5, reload the sample UI, and reconnect.
835
Chapter 19 ■ Spring WebSocket Support
Figure 19-5. Firefox about:config page
Utilizing a tool such as Live HTTP Headers will allow you to inspect the traffic going from browser to
server for verification purposes. After verifying the behavior, toggle the Firefox setting network.websocket.
enabled back to true, reload the page, and reconnect. Watching the traffic via Live HTTP Headers will
now show you the WebSocket handshake. In the simple example, everything should work just as with the
WebSocket API.
Sending Messages with STOMP
When working with WebSocket, typically a subprotocol such as STOMP will be used as a common format
between the client and server so that both ends know what to expect and are able to react accordingly.
STOMP is supported out of the box by the Spring Framework, and we will use this protocol in the sample.
STOMP, a simple, frame-based messaging protocol modeled on HTTP, can be used over any reliable
bidirectional streaming network protocol such as WebSocket. STOMP has a standard protocol format;
JavaScript client-side support exists for sending and receiving messages in a browser and, optionally, for
plugging into traditional message brokers that support STOMP, such as RabbitMQ and ActiveMQ. Out of
the box, the Spring Framework supports a simple broker that handles subscription requests and message
broadcasting to connected clients in memory. In the STOMP example presented in this section, we will
utilize the simple broker and leave the full-featured broker setup as an exercise for you6.
For a full description of the STOMP protocol, see official the website7.
We will create a simple stock-ticker application that displays a few predefined stock symbols, their
current price, and the timestamp upon price change. New stock symbols and starting prices can also be
added through the UI. Any connecting clients (that is, other browsers in tabs or totally new clients on other
networks) will see the same data as they are subscribed to the message broadcasts. Every second, each stock
price will be updated to a new random amount and the timestamp will be updated.
To ensure that clients will be able to use the stock-ticker application even if their browser does not
support WebSocket, we will utilize SockJS again to transparently handle any transport switching. Before
diving into the code, it is worth noticing that STOMP messages support is provided by the spring-messaging
library.
https://docs.spring.io/spring-framework/docs/current/reference/html/web.
html#websocket-stomp
7
https://stomp.github.io/stomp-specification-1.2.html
6
836
Chapter 19 ■ Spring WebSocket Support
Let’s first create the Stock domain object, which holds information about the stock such as its code and
price, as shown in Listing 19-8.
Listing 19-8. The Stock Domain Object
package com.apress.prospring6.nineteen.stomp;
import java.io.Serializable;
import java.time.LocalDateTime;
import java.time.format.DateTimeFormatter;
public class Stock implements Serializable {
private static final long serialVersionUID = 1L;
private static final String DATE_FORMAT = "MMM dd yyyy HH:mm:ss";
private String code;
private double price;
private LocalDateTime date;
public Stock() { }
public Stock(String code, double price) {
this.code = code;
this.price = price;
}
// getters and setters omitted
public String getDateFormatted() {
var formatter = DateTimeFormatter.ofPattern(DATE_FORMAT);
return formatter.format(date);
}
}
To handle requests for stock updates, a controller is needed. Listing 19-9 shows the
StockController class.
Listing 19-9. The StockController Class
package com.apress.prospring6.nineteen.stomp;
import org.springframework.messaging.handler.annotation.MessageMapping;
import org.springframework.messaging.simp.SimpMessagingTemplate;
import org.springframework.scheduling.TaskScheduler;
// other import statements omitted
@Controller
public class StockController {
private final TaskScheduler taskScheduler;
private final SimpMessagingTemplate simpMessagingTemplate;
837
Chapter 19 ■ Spring WebSocket Support
private List<Stock> stocks = new ArrayList<>();
private Random random = new Random(System.currentTimeMillis());
public StockController(TaskScheduler taskScheduler, SimpMessagingTemplate
simpMessagingTemplate) {
this.taskScheduler = taskScheduler;
this.simpMessagingTemplate = simpMessagingTemplate;
}
@MessageMapping("/addStock")
public void addStock(Stock stock) throws Exception {
stocks.add(stock);
broadcastUpdatedPrices();
}
private void broadcastUpdatedPrices() {
for(Stock stock : stocks) {
stock.setPrice(stock.getPrice() + (getUpdatedStockPrice() * stock.getPrice()));
stock.setDate(LocalDateTime.now());
}
simpMessagingTemplate.convertAndSend("/topic/price", stocks);
}
private double getUpdatedStockPrice() {
double priceChange = random.nextDouble() * 5.0;
if (random.nextInt(2) == 1) {
priceChange = -priceChange;
}
return priceChange / 100.0;
}
@PostConstruct
private void broadcastTimePeriodically() {
stocks.add(new Stock("VMW", 1.00d));
stocks.add(new Stock("EMC", 1.00d));
stocks.add(new Stock("GOOG", 1.00d));
stocks.add(new Stock("IBM", 1.00d));
taskScheduler.scheduleAtFixedRate(this::broadcastUpdatedPrices, Duration.
ofSeconds(2));
}
}
The code in Listing 19-9 can be explained as follows:
838
•
The controller needs a task scheduler (Chapter 12) and a SimpMessagingTemplate
instance to send Stock prices updates every 2 seconds. SimpMessagingeTemplate
is an implementation of org.springframework.messaging.core.
MessageSendingOperations<D> that provides support for Simple Messaging
Protocols like STOMP.
•
The controller is initialized with a few predefined stock entries and their starting
prices for demonstration purposes.
Chapter 19 ■ Spring WebSocket Support
•
The /addStock handler method allows the user to submit a Stock instance, which is
added to the list of stocks, and then broadcasts the stocks to all subscribers.
•
When broadcasting the stock information, the list of Stock instances is traversed,
the price for each is updated, and then the information is sent to all subscribers
of /topic/price by using the wired SimpMessagingTemplate instance. The
TaskExecutor instance broadcasts the updated list of stock prices to all subscribed
clients by invoking the broadcastUpdatedPrices (..) method every 2 seconds.
With the controller in place, we now need an HTML UI to display stock information to clients. To make
things easier, the views/index3.html view is written in Thymeleaf and inherits theme elements from the
views/templates/layout.html template used in Chapters 14 and 17.
The HTML JavaScript code in the views/index3.html view are shown in Listing 19-10.
Listing 19-10. The index3.html view template
<html>
<head th:fragment="~{templates/layout :: pageTitle}">
<!-- some head elements missing -->
<script type="text/javascript" th:src="@{/js/sockjs-1.6.1.min.js}"></script>
<script type="text/javascript" th:src="@{/js/stomp-1.7.1.min.js}"></script>
<script type="text/javascript" th:src="@{/js/jquery-3.6.4.min.js}"></script>
<script type="text/javascript">
let stomp;
function displayStockPrice(frame) {
let stocks = JSON.parse(frame.body);
$('#stock').empty();
for (let i in stocks) {
let stock = stocks[i];
$('#stock').append(
$('<tr>').append(
$('<td>').html(stock.code),
$('<td>').html(stock.price.toFixed(2)),
$('<td>').html(stock.dateFormatted)
)
);
}
}
let connectCallback = function () {
stomp.subscribe('/topic/price', displayStockPrice);
};
let errorCallback = function (error) {
alert(error);
};
jQuery(function ($) {
$("#addStockButton").attr("disabled", true);
839
Chapter 19 ■ Spring WebSocket Support
$('#connect')
.click(function doConnect() {
stomp = Stomp.over(new SockJS($("#target").val()));
stomp.connect("guest", "guest", connectCallback, errorCallback);
let badge= $("#badgeStatus");
badge.text("Connected");
badge.attr('class','badge bg-success');
$("#addStockButton").attr('disabled', false);
});
$('#disconnect')
.click(function () {
if (typeof stomp != 'undefined') {
stomp.disconnect();
stomp = undefined;
let badge= $("#badgeStatus");
badge.text("Disconnected");
badge.attr('class','badge bg-light');
$("#addStockButton").attr('disabled', true);
} else {
alert("Not connected.");
}
});
$('.addStockButton').click(function (e) {
e.preventDefault();
const stockStr = JSON.stringify({
'code': $('.addStock .code').val(),
'price': Number($('.addStock .price').val())
});
stomp.send('/app/addStock', {}, stockStr);
return false;
});
});
</script>
</head>
<section th:fragment="~{templates/layout :: pageContent}">
<div class="card border-success mb-3" style="max-width: 40rem; left:30px;">
<div class="card-header">STOMP Tester</div>
<div class="row mb-1 m-sm-1">
<label for="target" th:text="Endpoint" class="col-sm-4 form-label">FN:</label>
<div class="col-sm-8">
<input type="text" id="target" size="40" th:value="${endpoint}" class="formcontrol"/>
</div>
</div>
<div class="row mb-1 m-sm-1">
<div class="col-sm-2"> <input type="submit" id="connect" class="btn btnsuccess" value="Connect"/></div>
<div class="col-sm-3"><input type="submit" id="disconnect" class="btn btndanger" value="Disconnect"/></div>
840
Chapter 19 ■ Spring WebSocket Support
<div class="col-sm-2"><span id="badgeStatus"></span></div>
</div>
<div class="row mb-1 m-sm-1">
<div class="card border-warning mb-3" style="max-width: 35rem;">
<div class="card-header">Stock Details</div>
<div class="card-body">
<table class="table table-hover table-bordered">
<thead>
<tr>
<th scope="col">Code</th>
<th scope="col">Price</th>
<th scope="col">Time</th>
</tr>
</thead>
<tbody id="stock"></tbody>
</table>
</div>
</div>
</div>
<div class="row mb-1 m-sm-1 addStock">
<label for="code" th:text="Code" class="col-sm-4 form-label">FN:</label>
<div class="col-sm-8">
<input type="text" id="code" value="" class="form-control code"/>
</div>
</div>
<div class="row mb-1 m-sm-1 addStock">
<label for="price2" th:text="Price" class="col-sm-4 form-label">FN:</label>
<div class="col-sm-8">
<input type="text" id="price2" value="" class="form-control price"/>
</div>
</div>
<div class="row mb-1 m-sm-1 addStock">
<div class="col-sm-2"><input type="submit" id="addStockButton" class="btn btndanger addStockButton" value="Add Stock"/></div>
</div>
</div>
</section>
Similar to previous examples in this chapter, we have some HTML mixed in with JavaScript to update
the display. The reason we combine HTML with JavaScript, although it is not respecting commonsense
programming rules, is to keep the Spring MVC configuration as simple as possible; it also helps to make
the page and the functions of its components easy to understand. We utilize jQuery to update HTML data,
SockJS to provide transport selection, and the STOMP JavaScript library stomp.min.js for communication
with the server. Data sent via STOMP messages is encoded in JSON format, which we extract on events.
Upon a STOMP connection, we subscribe to /topic/price to receive stock-price updates.
The Java configuration for STOMP communication is represented by the StompConfig class shown in
Listing 19-11.
841
Chapter 19 ■ Spring WebSocket Support
Listing 19-11. The StompConfig Configuration Class
package com.apress.prospring6.nineteen;
import
import
import
import
import
import
org.springframework.context.annotation.Configuration;
org.springframework.scheduling.annotation.EnableAsync;
org.springframework.messaging.simp.config.MessageBrokerRegistry;
org.springframework.web.socket.config.annotation.EnableWebSocketMessageBroker;
org.springframework.web.socket.config.annotation.StompEndpointRegistry;
org.springframework.web.socket.config.annotation.WebSocketMessageBrokerConfigurer;
@Configuration
@EnableAsync
@EnableWebSocketMessageBroker
public class StompConfig implements WebSocketMessageBrokerConfigurer {
@Override
public void registerStompEndpoints(StompEndpointRegistry registry) {
registry.addEndpoint("/ws").withSockJS();
}
@Override
public void configureMessageBroker(MessageBrokerRegistry config) {
config.setApplicationDestinationPrefixes("/app");
config.enableSimpleBroker("/topic");
}
@Bean
TaskExecutor taskExecutor() {
return new SimpleAsyncTaskExecutor();
}
}
To enable Spring asynchronous calls and task execution, the configuration class must be annotated with
@EnableAsync, and a bean of type org.springframework.core.task.TaskExecutor is needed to repeatedly
broadcast stock information.
The @EnableWebSocketMessageBroker annotation enables broker-backed messaging
over WebSocket using a higher-level messaging subprotocol. Notice the class implements the
WebSocketMessageBrokerConfigurer interface which defines methods for configuring message handling
with simple messaging protocols (e.g., STOMP) for WebSocket clients. The registerStompEndpoints(..)
method is implemented to register the /ws STOMP endpoints mapping. The http://localhost:8080/ch19/ws
is used to initialize a SocketJS instance that provides the support for STOMP communication.
The configureMessageBroker is implemented to configure message broker options. The
applicationDestinationPrefixes property helps filter destinations targeting application annotated
methods; this configuration sets the /app filter. This filter needs to prefix the URL path of the stock handler
method, which is why in Listing 19-10 you see the following:
stomp.send('/app/addStock', {}, stockStr)
842
Chapter 19 ■ Spring WebSocket Support
The enableSimpleBroker("/topic") enables a simple message broker and configures one
or more prefixes to filter destinations targeting the broker. In the StockController you see in the
broadcastUpdatedPrices() method that stock data is published to the topic /topic/price as the
destination, while in the index3.html the STOMP instance is subscribing to this topic so that stock data can be
retrieved.
When first accessing the page, there is no STOMP connection, thus the stock table is empty and the Add
Stock button is disabled, as shown in Figure 19-6.
Figure 19-6. STOMP application page, before establishing a connection
After clicking the Connect button, the familiar green Connected badge appears, stock data is loaded in
the table and refreshed every 2 seconds, and the Add Stock button is now enabled, which allows you to add
your own stocks, as shown in Figure 19-7.
843
Chapter 19 ■ Spring WebSocket Support
Figure 19-7. STOMP application page, after establishing a connection
Under the covers, a connection is established, and in the browser console we can see the browser
subscribing to the topic/price queue and then information being received every 2 seconds. A snippet of the
browser console log is shown in Listing 19-12.
Listing 19-12. Browser Console Log Snippet for STOMP Communication
Opening Web Socket... stomp-1.7.1.min.js:8:1895
Web Socket Opened... stomp-1.7.1.min.js:8:1895
>>> CONNECT
login:guest
passcode:guest
844
Chapter 19 ■ Spring WebSocket Support
accept-version:1.1,1.0
heart-beat:10000,10000
<<< CONNECTED stomp-1.7.1.min.js:8:1895
version:1.1
heart-beat:0,0
connected to server undefined stomp-1.7.1.min.js:8:1895
>>> SUBSCRIBE stomp-1.7.1.min.js:8:1895
id:sub-0
destination:/topic/price
# this bit repeats every 2 seconds
<<< MESSAGE stomp-1.7.1.min.js:8:1895
destination:/topic/price
content-type:application/json
subscription:sub-0
message-id:v41nbtcg-1338
content-length:593
[{"code":"VMW","price":0.8412643922671524,"date":[2023,4,1,22,34,0,818886000],"dateFormatted
":"Apr 01 2023 22:34:00"},{"code":"EMC","price":0.3389473652730331,"date":[2023,4,1,22,34,0
,818888000],"dateFormatted":"Apr 01 2023 22:34:00"},{"code":"GOOG","price":0.86116531147
55639,"date":[2023,4,1,22,34,0,818889000],"dateFormatted":"Apr 01 2023 22:34:00"},{"code":"
IBM","price":0.6431663274824831,"date":[2023,4,1,22,34,0,818889000],"dateFormatted":"Apr 01
2023 22:34:00"},{"code":"TSL001","price":1.1764953118520888E-4,"date":[2023,4,1,22,34,0,8188
90000],"dateFormatted":"Apr 01 2023 22:34:00"}]
...
>>> DISCONNECT stomp-1.7.1.min.js:8:1895
Spring Boot Equivalent Application
Converting the preceding application to a Spring Boot application is fairly easy because there is a springboot-starter-websocket library. The dependencies for the chapter19-boot project are shown in
Figure 19-8.
845
Chapter 19 ■ Spring WebSocket Support
Figure 19-8. Project chapter19-boot dependencies
Because the user can choose to either use communication directly over WebSocket or use high-level
protocols such as STOMP, configuration classes for the two situations, together with the @EnableWebSocket
or @EnableWebSocketMessageBroker annotations are required. So, aside from a simplification in build
configurations and the lack of a server to run the application, Spring Boot does not reduce developers’
work too much. For this reason, this chapter will not cover how to write a Spring Boot application for
communication using WebSocket, since all the details have already been covered in Chapter 14, the web
chapter, and in this chapter, for everything related to WebSocket. However, the chapter19-boot project is
part of the source code for the book, so feel free to check it out.
Summary
In this chapter, we covered the general concepts of WebSocket. We discussed the Spring Framework’s
support for the low-level WebSocket API and then moved on to using SockJS as a fallback option to select
the appropriate transport, depending on the client browser. Finally, we introduced STOMP as a WebSocket
subprotocol for passing messages between the client and server. For all examples, Java configuration classes
were shown and explained.
In the next chapter, we will discuss how to build a Spring Reactive application and how WebSocket can
be used for reactive communication.
846
CHAPTER 20
Reactive Spring
In previous chapters, typical Java web applications were built and run on an instance of Apache Tomcat
server that was external for Spring classic configuration, or embedded in the application for Spring Boot
Web applications. Whatever the case, the Spring DispatcherServlet was responsible for directing incoming
HTTP requests to all the handlers declared in the application. However, there are a few things to consider.
Can an application like the ones we developed thus far be used in a real production environment? How
many HTTP requests can DispatcherServlet handle at the same time? Can that number be increased?
DispatcherServlet does not truly have a say in the number of requests it can handle. The servlet container
defines that, in our case, the Apache Tomcat server.
Apache Tomcat is a popular choice for building and maintaining dynamic websites and applications
based on the Java software platform. The Java Servlet API enables a web server to handle dynamic Javabased web content using the HTTP protocol. This is known as the request-response model: the client
makes a request; the server prepares a response and sends it back to the client. It is unidirectional and
controlled by the client, and the server does not care if the client can handle the response. For example,
when you enter a Facebook chat window in your browser, if the server would send all conversations you’ve
had with that friend, the page would not only take a long time to load, but it might crash the browser.
Over the years, there were many improvements made to the software and application development
style, that allowed a more efficient client-server interaction, but the one that is the focus of this chapter is
reactive communication.
If you want a more detailed explanation on how client-server communication evolved from the initial
request-response to the reactive model, check out the Pro Spring MVC with WebFlux book1, published by Apress
in 2021; start with chapter 9.
Efficient reactive communication can only occur between a reactive client and a reactive server, ergo
between reactive applications. Compared to a classic request-response style, where the client and server
exchange data in disconnected blobs of information, reactive communication implies continuous data flow
between client and server.
1
https://link.springer.com/book/10.1007/978-1-4842-5666-4
© Iuliana Cosmina, Rob Harrop, Chris Schaefer, and Clarence Ho 2023
I. Cosmina et al., Pro Spring 6, https://doi.org/10.1007/978-1-4842-8640-1_20
847
Chapter 20 ■ Reactive Spring
Reactive applications are the solution when it comes to handling large amounts of data. Reactive
applications are applications designed with resilience, responsiveness, and scalability as a priority. The
Reactive Manifesto2 describes the characteristics of reactive applications. The Reactive Streams API
specification3 provides a minimum set of interfaces that application components should implement so that
applications can be considered reactive. Thus, the Reactive Streams API is an interoperability specification
that ensures that reactive components integrate flawlessly and keep the operations non-blocking and
asynchronous.
There are four key terms that describe reactive applications.
•
Responsive: fast and consistent response times are expected.
•
Resilient: failures are expected, and applications are designed to handle them and
self-heal.
•
Elastic: the application should be able to deal with high loads by scaling up its
capabilities automatically and scaling down when no longer needed.
•
Message-driven: reactive communication should be asynchronous, and it is
implied that components are loosely coupled and communicate using messages.
Additionally, backpressure is applied to prevent producers of messages from
overwhelming consumers.
Reactive applications are supposed to be more flexible, loosely coupled, non-blocking, and scalable, but
at the same time easier to develop, more malleable to change and more tolerant of failure. Building reactive
applications requires following the principles of the reactive programming paradigm.
After reading thus far, you might think that reactive applications are pinnacle of software design
evolution, and that every application in the world should be redesigned to be a reactive one. That is not
always true, reactive applications don’t always run faster than classic ones, and they come with their own
sets of problems. As you will see in this chapter, reactive programming is quite different from imperative
programming and requires a little bit of a mind shift. The main benefits of reactive applications are that they
are non-blocking, and they are able to scale an application with a small, fixed number of threads and lesser
memory requirements while at the same time making the best use of the available processing power.
In this chapter, you will learn about reactive programming and how you can build fully reactive
applications using Spring WebFlux.
Introduction to Reactive Programming in Spring
Reactive programming is a declarative programming paradigm that is based on the idea of asynchronous
event processing and data streams. Reactive Streams is an initiative to provide a standard for asynchronous
stream processing with non-blocking back pressure. They are extremely useful for solving problems that
require complex coordination across thread boundaries.
2
3
https://www.reactivemanifesto.org/
https://www.reactive-streams.org/
848
Chapter 20 ■ Reactive Spring
Java introduced the Streams API in version 8 and Lambda expressions, which was the first step toward
reactive programming because reactive programming can also be defined as functional programming with
reactive streams. Reactive streams were not available in the JDK until version 9. Unable to wait for JDK 9,
which was released with a six-month delay, the Pivotal4 open source team, the same one that created Spring,
built the Spring WebFlux5 using Project Reactor6, its own reactive library.
Reactive Streams provide a common API for reactive programming in Java. It is composed of four
simple interfaces that provide a standard for asynchronous stream processing with non-blocking back
pressure. If you want to write a component that can integrate with other reactive components, you need
to implement one of these. On an abstract level, the components and the relationships between them, as
described in the Reactive Streams specification, looks like what is shown in Figure 20-1.
Figure 20-1. Reactive Streams specification abstract representation
If you think it looks a lot like the publisher/subscriber model with the bonus of back-pressure, you are
not wrong, that’s pretty much what it is. Data flows between components, each component processes it and
passes it forward, and each component regulates the speed via back pressure. The most appropriate model
in the real world is a factory conveyor belt. Let’s go through the components in Figure 20-1.
•
A publisher is a potentially infinite producer of data. In Java, a producer of data
must implement org.reactivestreams.Publisher<T>. A publisher prepares and
transfers the data to subscribers as individual messages. The publisher emits values
on demand from the subscriber.
•
A subscriber registers with the publisher to consume data. In Java, a data consumer
must implement org.reactivestreams.Subscriber<T>. A subscriber receives
messages from the publisher and processes them. It is a terminal operation in the
Streams API.
•
Upon subscribing, a subscription object is created to represent the one-to-one
relationship between the publisher and the subscriber. This object requests data
from the publisher and cancels the demand for data. In Java, a subscription class
must implement org.reactivestreams.Subscription and an object of this type can
only be used once by a subscriber.
https://tanzu.vmware.com/open-source
https://docs.spring.io/spring-framework/docs/current/reference/html/webreactive.html
6
https://projectreactor.io
4
5
849
Chapter 20 ■ Reactive Spring
•
A processor is a special component that has the same properties as a publisher
and subscriber. In Java, a processor type must implement org.reactivestreams.
Processor<T,R>. Processors can be chained to form a stream processing pipeline.
A processor consumes data from the publisher/processor in front of it in the chain
and emits data for the processor/subscriber after it in the chain to consume. The
subscriber/processor applies back pressure to slow down the producer/processor
when emitting data if it cannot consume it fast enough.
You can check out the code for these interfaces in your IDE or on GitHub7.
Most reactive implementations for the JVM were developed in parallel, and so today we have: RxJava8,
Akka Streams9, Ratpack10, Vert.x11 and Project Reactor.
Code written with Reactive Streams looks similar to code written with non-Reactive Streams, but what
happens under the hood is different. Reactive streams are asynchronous, but you do not have to write the
logic for dealing with that. You only need to declare what must happen when some value is emitted on a
stream. The code you are writing is invoked when the stream emits an item asynchronously, independent
of the main program flow. If there is more than one processor involved, each is executed on its own
thread. Since your code runs asynchronously, you must be careful with the functions you are providing as
arguments to your processor(also reffered to as transformer) methods. You must make sure they are pure
functions. Pure functions should only interact with the program through their arguments and return values,
they return the same result for the same argument values, and they should never modify an object that
requires synchronization, as this will probably cause unpredictable delay of the entire flow.
Project Reactor implements the Reactive Streams API providing a non-blocking stable foundation with
efficient demand management for reactive applications. It declares two main publisher implementations:
•
reactor.core.publisher.Mono<T> is a reactive stream publisher representing zero
or one element.
•
reactor.core.publisher.Flux<T> is a reactive stream publisher representing an
asynchronous sequence of zero to infinity elements.
Mono<T> and Flux<T> are similar to java.util.concurrent.Future<V>. They represent the result of
an asynchronous computation. The difference between them is that Future<V>, blocks the current thread
until the computation completes when you try to get the result by invoking the get() method. Mono<T>
and Flux<T> both provide a family of block*() methods used to retrieve the value of an asynchronous
computation that does not block the current thread.
To make it obvious how reactive programming looks different syntactically from imperative
programming, let’s consider the following scenario: given a list of singers, we want to find all with an age
greater than 50, and we want to sum their ages. If the code is written in imperative style, it might look like the
snippet in Listing 20-1.
https://github.com/reactive-streams/reactive-streams-jvm/tree/master/api/src/main/
java/org/reactivestreams
8
https://github.com/ReactiveX/RxJava
9
https://doc.akka.io/docs/akka/current/stream/index.html
10
https://ratpack.io
11
https://vertx.io
7
850
Chapter 20 ■ Reactive Spring
Listing 20-1. Imperative style code to process a list of singers
package com.apress.prospring6.twenty.boot;
//import statements omitted
public class SimpleProgrammingTest {
List<Singer> singers = List.of(
Singer.builder().firstName("John").lastName("Mayer").birthDate(LocalDate.
of(1977, 10, 16)).build(),
Singer.builder().firstName("B.B.").lastName("King").birthDate(LocalDate.of(1929,
9, 16)).build(),
Singer.builder().firstName("Peggy").lastName("Lee").birthDate(LocalDate.of(1920,
5, 26)).build(),
Singer.builder().firstName("Ella").lastName("Fitzgerald").birthDate(LocalDate.
of(1917, 4, 25)).build()
);
Function<Singer, Pair<Singer, Integer>> computeAge = singer -> Pair.of(singer,Period.
between(singer.getBirthDate(), LocalDate.now()).getYears());
Predicate<Pair<Singer, Integer>> checkAge = pair -> pair.getRight() > 50;
@Test
void imperativePlay(){
int agesum = 0;
for (var s : singers) {
var p = computeAge.apply(s);
if (checkAge.test(p)) {
agesum += p.getRight();
}
}
assertEquals(300, agesum);
}
}
Not pretty, right? Well, this is the type of code all Java developers used to write in Java before the Stream
API was introduced in Java 8. A set of instructions were listed one after the other for the JVM to execute.
Additionally, using a Function<T,R> and a Predicate<T> is a little bit of a cheat, considering those types did
not exist before Java 8 either. The decision to use them was made for simplicity and reusability reasons.
Using the Stream API, in combination with Function<T,R> and a Predicate<T> instances, the same
code can be written more declarative and more functional, as shown in Listing 20-2.
Listing 20-2. Declarative(functional) style code using Java 8 Stream API to process a list of singers
package com.apress.prospring6.twenty.boot;
//import statements omitted
import static org.junit.jupiter.api.Assertions.assertEquals;
public class SimpleProgrammingTest {
// list, function and predicate same as Listing 20-1
@Test
void streamsPlay() {
851
Chapter 20 ■ Reactive Spring
var agesum = singers.stream() // Stream<Singer>
.map(computeAge) // Stream<Pair<Singer, Integer>>
.filter(checkAge)// Stream<Pair<Singer, Integer>>
.map(Pair::getRight) // Stream<Integer>
.reduce(Integer:: sum) // Optional<Integer>
.orElseThrow(() -> new RuntimeException("Something went terribly wrong!"));
assertEquals(300, agesum);
}
}
Declarative programming is more of a process of constantly defining what things are, as pointed
out by the comments in Listing 20-2 showing the types of objects the resulting stream emits. Declarative
programming focuses on what the program should achieve, while imperative programming focuses on how
the program should achieve the result.
Transforming the code in Listing 20-2 into reactive code does not require much effort: we just replace
Stream<T> with Flux<T>, and we make sure to declare a subscriber that does something with the result of
the last processor in the chain: the reduce(..) function. The code is depicted in Listing 20-3.
Listing 20-3. Functional style code using Reactive Streams to process a list of singers
package com.apress.prospring6.twenty.boot;
import reactor.core.publisher.BaseSubscriber;
import reactor.core.publisher.Flux;
//other import statements omitted
public class SimpleProgrammingTest {
// list, function and predicate same as Listing 20-1
@Test
void reactivePlay() {
Flux.fromIterable(singers) // Flux<Singer>
.map(computeAge) // Flux <Pair<Singer, Integer>>
.filter(checkAge) // Flux <Pair<Singer, Integer>>
.map(Pair::getRight) // Flux <Integer>
.reduce(0, Integer::sum) // Mono<Integer>
.subscribe(new BaseSubscriber<>() {
@Override
protected void hookOnNext(Integer agesum) {
assertEquals(300, agesum); // depending when you are running this
test it might fail, now in April 2023 it passes ;)
}
});
}
}
The BaseSubscriber<T> abstract class is a simple base class for a Subscriber<T> implementation that
lets the user perform a request(long) and cancel() on it directly. The hookOnNext(..) method is useful to
attach behavior to the emitted value; in our case, this is the perfect place to check our assumption.
Now that you’ve been introduced to reactive programming with Project Reactor, let’s switch gears and
see how we can write reactive applications using Spring WebFlux.
852
Chapter 20 ■ Reactive Spring
Introducing Spring WebFlux
Spring Web MVC is designed around the DispatcherServlet, which is the gateway that maps HTTP
requests to handlers and is set up with theme configurations, internationalization, file upload and view
resolution. Spring MVC was built for the Servlet API and Servlet containers. This means that it mostly uses
blocking I/O and one thread per HTTP request. Supporting asynchronous processing of requests is possible
but requires a larger thread pool, which in turn requires more resources and is difficult to scale.
Spring WebFlux is a reactive stack web framework that was added in Spring 5, and it is Spring’s response
to the rising issue of blocking I/O architecture. It can run on Servlet 3.1+ containers, but it can adapt to
other native server APIs. The Spring team’s preferred server of choice is Netty12, which is well established in
the async, non-blocking space. Spring WebFlux is built with functional reactive programming in mind and
allows for code to be written in declarative style. Spring MVC and WebFlux have a few elements in common
and can even be used together. There is no reason for a handler method to not be able to return Flux<T> or
Mono<T>, as it will be shown soon in this chapter.
One thing to keep in mind: when writing a reactive application, every component of the application
must be reactive, otherwise the application will not truly be reactive. The non-reactive component might
become a bottleneck and break down the entire flow. For example, a three-tier application with the typical tiers:
presentation, service, database will only be reactive if all three are reactive. Therefore, a reactive Spring
WebFlux application must have reactive views, reactive controllers, reactive services, reactive repositories and a
reactive database(any SQL database that comes with a reactive driver, or a reactive NoSQL database like
MongoDB, RethingDB etc). In addition, the client making calls to the application must be reactive too.
Before converting the singers application to a reactive one, let’s review how Spring WebFlux works
under the bonnet.
Reactive applications can be deployed on Servlet 3.1+ containers, such as Tomcat, Jetty or Undertow.
The trick here is to not use the DispatcherServlet bean. The DispatcherServlet bean is the central
dispatcher for HTTP request handlers/controllers, and no matter how powerful it is, it is still a blocking
component. This is where the new and improved Spring web components come to the rescue by introducing
the org.springframework.http.server.reactive.HttpHandler13. This interface represents the lowest
level contract for reactive HTTP request handling, and Spring provides server adapters based on it for each
supported server. Its code is shown in Listing 20-4.
https://netty.io
https://github.com/spring-projects/spring-framework/blob/main/spring-web/src/
main/java/org/springframework/http/server/reactive/HttpHandler.java
12
13
853
Chapter 20 ■ Reactive Spring
Listing 20-4. Spring’s HttpHandler interface
package org.springframework.http.server.reactive;
import reactor.core.publisher.Mono;
// other comments omitted
public interface HttpHandler {
/**
* Handle the given request and write to the response.
* @param request current request
* @param response current response
* @return indicates completion of request handling
*/
Mono<Void> handle(ServerHttpRequest request, ServerHttpResponse response);
}
Table 20-1 lists the servers supported by Spring WebFlux and the name of the adapter classes that
represent the core of the non-blocking I/O to Reactive Streams bridge for each server.
Table 20-1. HTTP servers supported by Spring WebFlux
Server
Name
Netty14
Spring Adapter
Servlet API used
ReactorHttpHandlerAdapter
Netty API using the Reactor Netty library
Undertow
UndertowHttpHandlerAdapter spring-web Undertow to Reactive Streams bridge
Tomcat16
TomcatHttpHandlerAdapter
spring-web: Servlet 3.1 non-blocking I/O to Reactive
Streams bridge
Jetty17
JettyHttpHandlerAdapter
spring-web: Servlet 3.1 non-blocking I/O to Reactive
Streams bridge
15
On top of HttpHandler, Spring provides the org.springframework.web.server.WebHandler 18
interface, which is a slightly higher level contract describing all general purpose server APIs with filter chain
style processing and exception handling. This interface is shown in Listing 20-5, and it is pretty similar to
HttpHandler.
Listing 20-5. WebHandler interface
package org.springframework.web.server;
import reactor.core.publisher.Mono;
import org.springframework.web.server.adapter.HttpWebHandlerAdapter;
https://netty.io
https://undertow.io
16
https://tomcat.apache.org
17
https://www.eclipse.org/jetty
14
15
854
Chapter 20 ■ Reactive Spring
import org.springframework.web.server.adapter.WebHttpHandlerBuilder;
public interface WebHandler {
/**
* Handle the web server exchange.
* @param exchange the current server exchange
* @return {@code Mono<Void>} to indicate when request handling is complete
*/
Mono<Void> handle(ServerWebExchange exchange);
}
Instead of using ServerRequest and ServerResponse objects in its handle(..) method, WebHandler
uses an object of type ServerWebExchange, a specialized interface representing a contract for an HTTP
request-response interaction that also exposes additional server-side processing-related properties and
features such as request attributes. Therefore, what does this mean for a Spring WebFlux configuration
compared to a Spring Web MVC application?
A Spring Web MVC application has an org.springframework.web.servlet.DispatcherServlet bean
as the front controller intercepting all requests and matching them to handler methods. A Spring WebFlux
application has an org.springframework.web.reactive. DispatcherHandler bean as a dispatcher
for HTTP request handlers/controllers. DispatcherHandler is an implementation of WebHandler and
ApplicationContextAware interfaces that gives it access to all the beans in the application configuration. It
is the central WebHandler implementation and provides an algorithm for request processing performed by
configurable components. It delegates to special beans for processing requests and rendering appropriate
responses, and their implementations are, as expected, non-blocking. Similar to the Spring MVC ecosystem,
there is a HandlerMapping bean to map a request to a handler, a HandlerAdapter bean to invoke a handler,
and an org.springframework.web.server.WebExceptionHandler bean to handle exceptions, and a
HandlerResultHandler bean to get the result from the handler and finalize the response all declared into the
org.springframework.web.reactive package.
In the Spring typical way, for most cases, the configuration of the DispatcherHandler does not require
code that describes it directly. To configure a Spring WebFlux application that will be run in a Servlet 3.1+
container, you need to do the following:
•
declare a Spring WebFlux configuration class and annotate it with @Configuration
and @EnableWebFlux. The @EnableWebFlux annotation is part of the org.
springframework.web.reactive.config package, and it enables the use of
annotated controllers and functional endpoints
•
extend the org.springframework.web.server.adapter.
AbstractReactiveWebInitializer class and implement the getConfigClasses()
method and inject your Spring WebFlux configuration class in it.
In a Spring Boot application, you do not need to do any of this. Just declare your controllers, your
handler classes and functional endpoints and that is it. Because in this chapter the end game is to build a
fully reactive application, from the database to the presentation layer, the classic Spring configuration for a
reactive application will not be shown. (Especially since there is a book that covers that in more detail, that is
still quite relevant: Pro Spring MVC with WebFlux book, published by Apress in 2021)
https://github.com/spring-projects/spring-framework/blob/main/spring-web/src/
main/java/org/springframework/web/server/WebHandler.java
18
855
Chapter 20 ■ Reactive Spring
Spring Boot Configuration for a Reactive application
Let’s start with the configuration. To build a reactive three-tier application, we need all layers to be built with
reactive components. This means the following:
•
The data access layer must be reactive: this means that the database driver must
be reactive and the persistence layer, if used, needs to be reactive too. The classic
database JDBC drivers are not reactive, so in a reactive application, they represent
a blocking I/O component that affects the behavior of the whole application.
Therefore, an SQL reactive driver was needed, so R2DBC19 was developed. The
Reactive Relational Database Connectivity (R2DBC) project brings reactive
programming APIs to relational databases, and a driver for MariaDB is available. For
persistence, there is a Hibernate Reactive library20, but currently its capabilities are
limited, so we will not use it in this chapter.
•
The service later must be reactive: this is not that complicated; we just need to make
sure the service classes only return Flux<T> and Mono<T> instances.
•
The web layer must be reactive: this means controllers and handlers are reactive too,
and thus only return Flux<T> and Mono<T> instances.
•
The presentation layer must be reactive: this means that the view templates must
be dynamic, so they can render the data as it arrives from the server. A combination
of Thymeleaf21 and jQuery22 can handle reactive communication with a server well
enough, but if you need a more advanced UI, React23 and Angular24 are a more
appropriate choice.
Figure 20-2 shows the project dependencies.
https://r2dbc.io
https://hibernate.org/reactive
21
https://www.thymeleaf.org
22
https://jquery.com
23
https://react.dev
24
https://angular.io
19
20
856
Chapter 20 ■ Reactive Spring
Figure 20-2. Project chapter20-boot dependencies
The main dependency of spring-boot-starter-data-r2dbc is spring-data-r2dbc 25, which is part
of the Spring Data family, and it makes it easy to implement reactive repositories. Spring Data R2DBC is
quite simple: while it does not offer caching, lazy loading, write-behind, or many other features of ORM
frameworks, it does offer object mapping, which is just enough to remove some boilerplate code, because
converting database objects to Java objects can be a hassle.
The main dependency of spring-boot-starter-webflux is spring-webflux, which includes all
Spring components needed to develop a reactive web application. The reactive-stack web framework,
Spring WebFlux, was added to the Spring Framework in version 5, and it is non-blocking, supports Reactive
Streams back pressure and runs on such servers as Netty, Undertow, and Servlet containers. The Spring
Boot WebFlux default configuration includes the Reactor Netty26 server, which offers non-blocking and
backpressure-ready TCP/HTTP/UDP/QUIC27 clients and servers based on the Netty28 framework.
https://spring.io/projects/spring-data-r2dbc
https://github.com/reactor/reactor-netty
27
https://www.chromium.org/quic
28
https://netty.io
25
26
857
Chapter 20 ■ Reactive Spring
Reactive Repository and Database
The database of choice for the project linked to this chapter is MariaDB. There is a stable R2DBC driver
for MariaDB, so this replaces the blocking JDBC driver. The reactive driver provides non-blocking
communication with the database, as expected, and authentication too. Since using the driver is done under
the bonnet by Spring Data, the only thing that lets a developer looking at the code know that a reactive
driver is used is the configuration. The database connection URL no longer uses the jdbc: prefix but the
r2dbc: prefix.
Listing 20-6 shows the Spring Boot datasource configuration properties in the application.yaml
configuration file when a reactive driver is used.
Listing 20-6. Spring Boot Data Source Configuration with a Reactive Driver
spring:
url: r2dbc:mariadb://localhost:3306/musicdb
username: prospring6
password: prospring6
Spring Data R2DBC provides a few useful classes, such as R2dbcEntityTemplate in the org.
springframework.data.r2dbc.core package, which is the equivalent of JdbcTemplate for a reactive
environment. It simplifies the use of Reactive R2DBC by using reactive entity classes to model data and
avoiding common errors. To perform database operations, it delegates to a DatabaseClient (same package)
bean, which can also be used to run statements for mapped entities using the Criteria API. In this project,
Spring Data reactive repositories are used, thus none of these are referenced directly. Just know that they
exist, and they can be used if needed.
Spring Data reactive repositories are not that different from non-reactive repositories. They are
just interfaces that provide a contract for the basic queries for an entity type: create, read, update, and
delete. They can be expanded by adding (reactive version) @Query annotated methods and custom
implementations if needed, as shown in Chapter 10.
Listing 20-7 shows the SingerRepo interface that extends the ReactiveCrudRepository<T,ID> Spring
Data repository interface and adds its own reactive methods.
Listing 20-7. SingerRepo reactive repository interface
package com.apress.prospring6.twenty.boot.repo;
import
import
import
import
import
import
com.apress.prospring6.twenty.boot.model. Singer;
org.springframework.data.r2dbc.repository. Query;
org.springframework.data.repository.query. Param;
org.springframework.data.repository.reactive. ReactiveCrudRepository;
reactor.core.publisher. Flux;
reactor.core.publisher. Mono;
import java.time. LocalDate;
public interface SingerRepo extends ReactiveCrudRepository<Singer,Long>{
@Query("select * from singer where first_name=:fn and last_name=:ln")
Mono<Singer> findByFirstNameAndLastName(@Param("fn") String firstName, @Param("ln")
String lastName);
858
Chapter 20 ■ Reactive Spring
@Query("select * from singer where first_name=:fn")
Flux<Singer> findByFirstName(@Param("fn") String firstName);
@Query("select * from singer where last_name=:ln")
Flux<Singer> findByLastName(@Param("ln") String lastName);
@Query("select * from singer where birth_date=:ln")
Flux<Singer> findByBirthDate(@Param("bd") LocalDate birthDate);
}
Note that some Spring Data components, such as the @Param annotation, can be used in a reactive
context, and only those interacting directly with the data flow need to be reactive. For example, Spring has
two @Query annotations: a reactive one in the org.springframework.data.r2dbc.repository package and
a non-reactive one in the org.springframework.data.jpa.repository package.
The ReactiveCrudRepository<T, ID> interface used in this example is the reactive equivalent of
CrudRepository<T,ID> introduced in Chapter 10, and its main characteristic is that it returns reactive types,
so instead of data, we obtain a data reactive stream as a result that will emit the data when requested by a
subscriber.
Notice that to keep our repository fully reactive, all additional methods must return Flux<T> or
Mono<T>.
When Spring Data reactive repositories are enriched with additional methods, via configuration as
shown in Listing 20-7, or by composing custom implementations via custom interfaces as shown in
Chapter 10 you might want to test your repository. This can be easily done by using a combination of
TestContainers, Junit 5, Spring Boot and Project Reactor test libraries. (Yeah, I know, it does not seem so easy
when you need 4 libraries to get it done, but it is true!)
Figure 20-3 shows the test dependencies of the chapter20-boot project.
859
Chapter 20 ■ Reactive Spring
Figure 20-3. Project chapter20-boot test dependencies
To write the test, you need to do the following:
•
You need to set up a MariaDB container and extract its properties and convert the
connection URL to a reactive connection URL and inject it into the Spring Boot Test
context. This step is necessary so that Spring Boot can configure the R2DBC driver.
•
Annotate the test class with @DataR2dbcTest to let Spring Boot know that the test
context needed is one specific for a Reactive context, and we are only interested in
Spring Data components.
•
To check assertions on the data being manipulated reactively, we need to use Project
Reactor’s StepVerifier, which provides a declarative way of creating a verifiable
script for an async Publisher sequence by expressing expectations about the events
that will happen upon subscription.
•
To control the order of the test methods being executed (we are keeping the test
really simple here), mark methods with their execution step number and check
assumptions. We use JUnit 5 annotations and static methods that at this point in the
book you should be familiar with.
Listing 20-8 shows the test class that checks the most important methods of the SingerRepo interface
and uses all the libraries and components mentioned.
860
Chapter 20 ■ Reactive Spring
Listing 20-8. Reactive RepositoryTest test class
package com.apress.prospring6.twenty.boot;
// Spring Boot imports
import org.springframework.boot.test.autoconfigure.data.r2dbc.DataR2dbcTest;
import org.springframework.data.r2dbc.core.R2dbcEntityTemplate;
// TestContainers imports
import org.testcontainers.containers.MariaDBContainer;
import org.testcontainers.junit.jupiter.Container;
import org.testcontainers.junit.jupiter.Testcontainers;
import org.testcontainers.utility.MountableFile;
// Project Reactor Test imports
import reactor.test.StepVerifier;
// JUnit 5 import
import static org.junit.jupiter.api.Assertions.assertNotNull;
// other import statements omitted
@Testcontainers
@DataR2dbcTest
@TestMethodOrder(MethodOrderer.OrderAnnotation.class)
public class RepositoryTest {
@Container
static MariaDBContainer<?> mariaDB = new MariaDBContainer<>("mariadb:latest")
.withCopyFileToContainer(MountableFile
.forClasspathResource("testcontainers/create-schema.sql"), "/dockerentrypoint-initdb.d/init.sql");
@Autowired
SingerRepo singerRepo;
@Autowired
R2dbcEntityTemplate template;
@Order(1)
@BeforeEach
public void testRepoExists() {
assertNotNull(singerRepo);
}
@Order(2)
@Test
public void testCount() {
singerRepo.count()
.log()
.as(StepVerifier:: create)
.expectNextMatches(p -> p == 4)
861
Chapter 20 ■ Reactive Spring
.verifyComplete();
}
@Order(3)
@Test
public void testFindByFistName() {
singerRepo.findByFirstName("John")
.log()
.as(StepVerifier:: create)
.expectNextCount(2)
.verifyComplete();
}
@Order(4)
@Test
public void testFindByFistNameAndLastName() {
singerRepo.findByFirstNameAndLastName("John", "Mayer")
.log()
.as(StepVerifier:: create)
.expectNext(Singer.builder()
.id(1L)
.firstName("John")
.lastName("Mayer")
.birthDate(LocalDate.of(1977, 10, 16))
.build())
.verifyComplete();
}
@Order(5)
@Test
public void testCreateSinger() {
singerRepo.save(Singer.builder()
.firstName("Test")
.lastName("Test")
.birthDate(LocalDate.now())
.build())
.log()
.as(StepVerifier:: create)
.assertNext(s -> assertNotNull(s.getId()))
.verifyComplete();
}
@Order(6)
@Test
public void testDeleteSinger() {
singerRepo.deleteById(4L)
.log()
.as(StepVerifier:: create)
.expectNextCount(0)
.verifyComplete();
}
862
Chapter 20 ■ Reactive Spring
@DynamicPropertySource
static void registerDynamicProperties(DynamicPropertyRegistry registry) {
registry.add("spring.r2dbc.url", () -> "r2dbc:mariadb://"
+ mariaDB.getHost() + ":" + mariaDB.getFirstMappedPort()
+ "/" + mariaDB.getDatabaseName());
registry.add("spring.r2dbc.username", () -> mariaDB.getUsername());
registry.add("spring.r2dbc.password", () -> mariaDB.getPassword());
}
}
Note that the test methods are written following the functional programming paradigm as well. Each
statement declares the operation to be performed on the data when it is emitted. The most important
method here is the verifyComplete() method that triggers the verification, expecting a completion signal as
a terminal event.
The log() method was added to observe all reactive streams signals and trace them using a configured
logging library, in this case, Logback. When this test class is run, the tests should pass, and the console log
might look verbose, but it makes it quite obvious that the SingerRepo and the R2DBC driver are indeed
working together and communicating reactively.
Listing 20-9. Reactive repository test class console log
INFO 14470 --- [ Test worker] c.a.p.twenty.boot.RepositoryTest :
RepositoryTest using Java 19.0.2 with PID 14470
INFO 14470 --- [ Test worker] .s.d.r.c.RepositoryConfigurationDelegate :
Spring Data R2DBC repositories in DEFAULT mode.
INFO 14470 --- [ Test worker] .s.d.r.c.RepositoryConfigurationDelegate :
Data repository scanning in 130 ms. Found 1 R2DBC repository interfaces.
INFO 14470 --- [ Test worker] c.a.p.twenty.boot.RepositoryTest :
RepositoryTest in 1.385 seconds (process running for 10.938)
INFO 14470 --- [ Test worker] reactor.Mono.UsingWhen.1 :
onSubscribe(MonoUsingWhen.MonoUsingWhenSubscriber)
INFO 14470 --- [ Test worker] reactor.Mono.UsingWhen.1 :
request(unbounded)
INFO 14470 --- [actor-tcp-nio-2] reactor.Mono.UsingWhen.1 :
INFO 14470 --- [actor-tcp-nio-2] reactor.Mono.UsingWhen.1 :
Starting
Bootstrapping
Finished Spring
Started
onNext(4)
onComplete()
INFO 14470 --- [ Test worker] reactor.Flux.UsingWhen.2 :
onSubscribe(FluxUsingWhen.UsingWhenSubscriber)
INFO 14470 --- [ Test worker] reactor.Flux.UsingWhen.2 :
request(unbounded)
INFO 14470 --- [actor-tcp-nio-2] reactor.Flux.UsingWhen.2 :
onNext(Singer(id=3, firstName=John, lastName=Butler, birthDate=1975-04-01))
INFO 14470 --- [actor-tcp-nio-2] reactor.Flux.UsingWhen.2 :
onNext(Singer(id=1, firstName=John, lastName=Mayer, birthDate=1977-10-16))
INFO 14470 --- [actor-tcp-nio-2] reactor.Flux.UsingWhen.2 : onComplete()
INFO 14470 --- [ Test worker] reactor.Mono.Next.3 :
onSubscribe(MonoNext.NextSubscriber)
INFO 14470 --- [ Test worker] reactor.Mono.Next.3 :
request(unbounded)
INFO 14470 --- [actor-tcp-nio-2] reactor.Mono.Next.3 :
onNext(Singer(id=1, firstName=John, lastName=Mayer, birthDate=1977-10-16))
863
Chapter 20 ■ Reactive Spring
INFO 14470 --- [actor-tcp-nio-2] reactor.Mono.Next.3 : onComplete()
INFO 14470 --- [ Test worker] reactor.Mono.UsingWhen.4 :
onSubscribe(MonoUsingWhen.MonoUsingWhenSubscriber)
INFO 14470 --- [ Test worker] reactor.Mono.UsingWhen.4 :
request(unbounded)
INFO 14470 --- [actor-tcp-nio-2] reactor.Mono.UsingWhen.4 :
onNext(Singer(id=5, firstName=Test, lastName=Test, birthDate=2023-04-15))
INFO 14470 --- [actor-tcp-nio-2] reactor.Mono.UsingWhen.4 : onComplete()
INFO 14470 --- [ Test worker] reactor.Mono.UsingWhen.5 :
onSubscribe(MonoUsingWhen.MonoUsingWhenSubscriber)
INFO 14470 --- [ Test worker] reactor.Mono.UsingWhen.5 :
request(unbounded)
INFO 14470 --- [actor-tcp-nio-2] reactor.Mono.UsingWhen.5 : onComplete()
This console log shows the thread identifiers and makes it quite obvious that repository operations are
executed on a different thread, as expected for a reactive component.
All that is well and good, but can we check erroneous behavior? How can we check that a Singer
without a lastName cannot be saved in the table. Technically, this should never happen because we expect
Spring validation to prevent such an object from being passed as an argument to the repository bean, but
just as an example, let’s do it! StepVerifier provides a few methods for that: the verifyError*() method
family allows a developer to check if an operation completed with an error and what the characteristics of
that error are. For example, in Listing 20-10, we check that trying to save a Singer object without a lastName
fails and a TransientDataAccessResourceException is thrown.
Listing 20-10. Reactive repository test method modeling a negative test scenario
import org.springframework.dao.TransientDataAccessResourceException;
...
@Test // negative test, lastName is null which is not allowed
public void testFailedCreateSinger() {
singerRepo.save(Singer.builder()
.firstName("Prince")
.birthDate(LocalDate.now())
.build())
.log()
.as(StepVerifier:: create)
.verifyError(TransientDataAccessResourceException.class);
}
Now that we have a reactive data repository, we can use it to build a reactive service.
Reactive Services
A reactive service class is nothing special in this scenario; it just forwards returned objects from a reactive
repository and replaces lower-level data processing exceptions with service-level scoped exceptions. In
a real implementation, a service method might apply more transformations to the data returned by the
repository methods by adding its own processor functions, as shown in the beginning of this chapter.
864
Chapter 20 ■ Reactive Spring
Listing 20-11 shows the SingerService interface, the template for our reactive service.
Listing 20-11. SingerService interface describing the template for a reactive service class
package com.apress.prospring6.twenty.boot.service;
// import statements omitted
public interface SingerService {
Flux<Singer> findAll();
Mono<Singer> findById(Long id);
Mono<Singer> findByFirstNameAndLastName(String firstName, String lastName);
Flux<Singer> findByFirstName(String firstName);
Mono<Singer> save(Singer singer);
Mono<Singer> update(Long id, Singer actorMono);
Mono<Void> delete(Long id);
}
Note that all the methods return reactive types, which is what makes it truly a reactive service capable of
interacting with a reactive repository and a reactive controller without hindering the data flow.
The SingerServiceImpl class, implementing this interface, is shown in Listing 20-12.
Listing 20-12. SingerServiceImpl reactive service class and bean definition
package com.apress.prospring6.twenty.boot.service;
// import statements omitted
import java.time.LocalDate;
import java.time.format.DateTimeFormatter;
@RequiredArgsConstructor
@Transactional
@Service
public class SingerServiceImpl implements SingerService {
private final SingerRepo singerRepo;
@Override
public Flux<Singer> findAll() {
return singerRepo.findAll();
}
@Override
public Mono<Singer> findByFirstNameAndLastName(String firstName, String lastName) {
return singerRepo.findByFirstNameAndLastName(firstName, lastName);
}
865
Chapter 20 ■ Reactive Spring
@Override
public Mono<Singer> findById(Long id) {
return singerRepo.findById(id);
}
@Override
public Flux<Singer> findByFirstName(String firstName) {
return singerRepo.findByFirstName(firstName);
}
@Override
public Mono<Singer> save(Singer singer) {
return singerRepo.save(singer)
.onErrorMap(error -> new SaveException("Could Not Save Singer " + singer,
error));
}
@Override
public Mono<Singer> update(Long id, Singer updateData) {
return singerRepo.findById(id)
.flatMap( original -> {
original.setFirstName(updateData.getFirstName());
original.setLastName(updateData.getLastName());
original.setBirthDate(updateData.getBirthDate());
return singerRepo.save(original)
.onErrorMap(error -> new SaveException("Could Not Update Singer " +
updateData, error));
});
}
@Override
public Mono<Void> delete(Long id) {
return singerRepo.deleteById(id);
}
}
The class is pretty simple, has little logic of its own, mostly surrounding the search function and the
Singer object update.
The SaveException is just a simple class extending RuntimeException that wraps around the Spring
Data exceptions to provide more information about the context in which the exception was produced.
The other thing to note here is that this service is transactional. Therefore, how do transactions
work in a reactive application? They work pretty much the same as in a non-reactive application, but the
functionality is based on different components.
Transactions in a reactive application have the same purpose as in an non-reactive application: to
group multiple database operations in a single multistep operation that succeeds only if all the steps do;
otherwise, any successful steps prior to the failed step get rolled back. In Spring applications, imperative
and reactive transaction management is enabled by a PlatformTransactionManager bean that manages
transactions for transactional resources, and resources are marked as transactional by annotating them with
Spring’s @Transactional annotation from package org.springframework.transaction.annotation. At a
lower level although, things are a little bit different.
Transaction management needs to associate its transactional state with an execution. In imperative
programming, this is typically a java.lang.ThreadLocal storage object, so the transactional state is bound
866
Chapter 20 ■ Reactive Spring
to a Thread object, in which the Spring container started to execute the code. In a reactive application,
this does not apply, because reactive execution requires multiple threads. The solution was to introduce a
reactive alternative to the ThreadLocal storage class and this is Reactor’s reactor.util.context.Context
interface. Contexts allow binding contextual data to a particular execution, and for reactive programming,
this is a Subscription object. The Reactor’s Context object lets Spring bind the transaction state, along with
all resources and synchronizations, to a particular Subscription object. All reactive code that uses Project
Reactor can now participate in reactive transactions.
Starting with Spring Framework 5.2 M2, Spring supports reactive transaction management
through the ReactiveTransactionManager SPI. The org.springframework.transaction.
ReactiveTransactionManager interface is a transaction management abstraction for reactive and nonblocking integrations that uses transactional resources. It is a foundation for reactive transactional
methods that return Publisher<T> types and for programmatic transaction management that uses
TransactionalOperator. Spring Data R2DBC provides the R2dbcTransactionManager class in the org.
springframework.r2dbc.connection package that implements ReactiveTransactionManager.
In Figure 20-4 shows the imperative and reactive hierarchies of interfaces and classes of org.
springframework.transaction.TransactionManager.
In Figure 20-4, ReactiveMongoTransactionManager is included as well because the
pro-spring-6 project has spring-data-mongodb in the classpath. This class is the reactive transaction
manager for MongoDB and manages transactions so that code executed within a managed transaction
participates in multi-document transactions.
Figure 20-4. TransactionManger imperative and reactive hierarchy, side by side
The R2dbcTransactionManager wraps around a reactive connection to the database to perform its job,
and this connection is provided by the R2DBC driver. In a Spring Boot application, the configuration is fairly
simple, as shown in Listing 20-13.
Listing 20-13. Configuring an R2dbcTransactionManager
package com.apress.prospring6.twenty.boot;
import io.r2dbc.spi.ConnectionFactory;
import org.springframework.r2dbc.connection.R2dbcTransactionManager;
import org.springframework.transaction.ReactiveTransactionManager;
import org.springframework.transaction.annotation.EnableTransactionManagement;
// other import statements omitted
867
Chapter 20 ■ Reactive Spring
@EnableTransactionManagement
@SpringBootApplication
public class Chapter20Application {
final static Logger LOGGER = LoggerFactory.getLogger(Chapter20Application.class);
public static void main(String... args) {
System.setProperty(AbstractEnvironment.ACTIVE_PROFILES_PROPERTY_NAME, "dev");
SpringApplication.run(Chapter20Application.class, args);
}
@Bean
ReactiveTransactionManager transactionManager(ConnectionFactory connectionFactory) {
return new R2dbcTransactionManager(connectionFactory);
}
}
Two things need to be clarified about the sample in Listing 2-13:
•
The @EnableTransactionManagement annotation is needed to enable Spring’s
annotation-driven transaction management capability, meaning support for
@Transactional annotations.
•
The ConnectionFactory bean is not declared explicitly. Spring Boot creates this bean
from the configuration in the application.yaml (or the equivalent application.
properties) and injects it wherever needed, in this case in our reactive transaction
management bean. (The Spring Boot configuration file was already depicted in
Listing 20-6.)
Although slightly repetitive, we can also write some tests for SingerServiceImpl. All we have to do is to
add this bean to the test context. Listing 20-14 shows a few test methods for SingerServiceImpl.
Listing 20-14. Testing the SingerServiceImpl reactive service class
package com.apress.prospring6.twenty.boot.service;
// import statements omitted
@DataR2dbcTest
@TestMethodOrder(MethodOrderer.OrderAnnotation.class)
@Import(SingerServiceImpl.class)
public class SingerServiceTest {
@Autowired
SingerService singerService;
// some test methods and container setup omitted
@Order(2)
@Test
void testFindAll() {
singerService.findAll()
.log()
.as(StepVerifier:: create)
868
Chapter 20 ■ Reactive Spring
.expectNextCount(4)
.verifyComplete();
}
@Order(3)
@Test
void testFindById() {
singerService.findById(1L)
.log()
.as(StepVerifier:: create)
.expectNextMatches(s -> "John".equals(s.getFirstName()) && "Mayer".equals(s.
getLastName()))
.verifyComplete();
}
// some test methods omitted
@Order(8)
@Test // duplicate firstName and lastName
public void testNoCreateSinger() {
singerService.save(Singer.builder()
.firstName("John")
.lastName("Mayer")
.birthDate(LocalDate.now())
.build())
.log()
.as(StepVerifier:: create)
.verifyError(SaveException.class); // repo throws org.springframework.dao.
DuplicateKeyException
}
@Order(9)
@Test
public void testUpdateSinger() {
singerService.update(4L, Singer.builder()
.firstName("Erik Patrick")
.lastName("Clapton")
.birthDate(LocalDate.now())
.build())
.log()
.as(StepVerifier:: create)
.expectNext(Singer.builder()
.id(4L)
.firstName("Erik Patrick")
.lastName("Clapton")
.birthDate(LocalDate.now())
.build())
.verifyComplete();
}
@Order(10)
@Test
public void testUpdateSingerWithDuplicateData() {
869
Chapter 20 ■ Reactive Spring
singerService.update(4L, Singer.builder()
.firstName("John")
.lastName("Mayer")
.birthDate(LocalDate.now())
.build())
.log()
.as(StepVerifier:: create)
.verifyError(SaveException.class); // repo throws org.springframework.dao.
DuplicateKeyException
}
@Order(11)
@Test // negative test, lastName is null which is not allowed
public void testFailedCreateSinger() {
singerService.update(4L, Singer.builder()
.firstName("Test")
.birthDate(LocalDate.now())
.build())
.log()
.as(StepVerifier:: create)
.verifyError(SaveException.class); // repo throws org.springframework.dao.
DataIntegrityViolationException
}
@Order(12)
@Test
public void testDeleteSinger() {
singerService.delete(4L)
.log()
.as(StepVerifier:: create)
.expectNextCount(0)
.verifyComplete();
}
}
The lines in bold show the tests that check service level exceptions being thrown instead of the Spring
Data exceptions. The type of underlying exception is shown in the comments.
For all these situations, the choice was made to use onErrorMap(..) to transform the exception into
something more useful. However, the Project reactor provides six methods to handle errors on its reactive
types (Mono<T>, Flux<T>), which are listed and explained below:
•
onErrorReturn(..): declares a default value to be emitted in case an exception
is thrown in the processor. This method does not hinder the data flow in any way;
when processing a troublesome element, the default value is emitted, and the rest
of the elements in the flow will be processed normally. There are three versions of
this method:
–– one that takes as a parameter the value to be returned.
–– one that takes as parameters the value to be returned and the type of exception
for which the default value should be returned.
–– one that takes as parameters the value to be returned and a predicate for the
exception to match for the default value to be returned.
870
Chapter 20 ■ Reactive Spring
•
onErrorResume(): declares a default function to use to choose a fallback
Publisher<T> in case an exception is thrown in the processor. It also comes with the
same three flavors. For troublesome elements, the chosen Publisher<T> is used to
emit a value, and the rest of the elements in the flow will be processed normally.
•
onErrorContinue(..): declares a consumer to be used in case an exception is
thrown in the processor. This method also comes in three flavors, the same as
described for onErrorReturn(..), but instead of returning a value the consumer is
executed. It processes the troublesome elements using the declared consumer and
leaves the downstream chain as it is for good elements.
•
doOnError(..): consumes error and stops execution for further elements in the
stream. It also comes in the same three flavors, but after the consumer is executed,
the error is propagated downstream.
•
onErrorMap(..): cast one error into another and stop execution for further elements
in the stream.
Since the test context does not have a transaction manager, tests are not transactional. Having a few
service tests passing is proof that the reactive service layer works as well, so we can now continue the
implementation by adding reactive controllers.
Reactive Controllers
It was mentioned previously that a reactive controller is nothing other than a controller that contains
handler methods that return Flux<T> and Mono<T>. This makes sense for REST controllers because for a
controller handler method returning a logical view name, reactivity makes no sense, since it does not add
any benefits. This being said, take a look at Listing 20-15, which shows a REST controller for managing
Singer instances.
Listing 20-15. The ReactiveSingerController class
package com.apress.prospring6.twenty.boot.controller;
import org.springframework.http.HttpStatus;
import org.springframework.http.ResponseEntity;
import reactor.core.publisher.Flux;
import reactor.core.publisher.Mono;
// other import statemetns omitted
@Slf4j
@RequiredArgsConstructor
@RestController
@RequestMapping(path = "/reactive/singer")
public class ReactiveSingerController {
private final SingerService singerService;
/* 1 */
@GetMapping(path = {"", "/"})
public Flux<Singer> list() {
return singerService.findAll();
}
/* 3 */
871
Chapter 20 ■ Reactive Spring
@GetMapping(path = "/{id}")
public Mono<ResponseEntity<Singer>> findById(@PathVariable Long id) {
return singerService.findById(id)
.map(s -> ResponseEntity.ok().body(s))
.defaultIfEmpty(ResponseEntity.notFound().build());
}
/* 4 */
@PostMapping
@ResponseStatus(HttpStatus.CREATED)
public Mono<Singer> create (@RequestBody Singer singer) {
return singerService.save(singer);
}
/* 5 */
@PutMapping("/{id}")
public Mono<ResponseEntity<Singer>> updateById(@PathVariable Long id, @RequestBody
Singer singer){
return singerService.update(id,singer)
.map(s -> ResponseEntity.ok().body(s))
.defaultIfEmpty(ResponseEntity.badRequest().build());
}
/* 2 */
@DeleteMapping("/{id}")
public Mono<ResponseEntity<Void>> deleteById(@PathVariable Long id){
return singerService.delete(id)
.then(Mono.fromCallable(() -> ResponseEntity.noContent().<Void>build()))
.defaultIfEmpty(ResponseEntity.notFound().build());
}
/* 6 */
@GetMapping(params = {"name"})
public Flux<Singer> searchSingers(@RequestParam("name") String name) {
if (StringUtils.isBlank(name)) {
throw new IllegalArgumentException("Missing request parameter 'name'");
}
return singerService.findByFirstName(name);
}
/* 7 */
@GetMapping(params = {"fn", "ln"})
public Mono<Singer> searchSinger(@RequestParam("fn") String fn, @RequestParam("ln")
String ln) {
if ((StringUtils.isBlank(fn) || StringUtils.isBlank(ln))) {
throw new IllegalArgumentException("Missing request parameter, one of {'fn',
'ln'}");
}
return singerService.findByFirstNameAndLastName(fn, ln);
}
}
872
Chapter 20 ■ Reactive Spring
Except for the returned types, which are necessary because the reactive SingerService is used, there
is nothing special about this controller. When you start the application and test the reactive/singer
endpoints using a client such as curl, Postman or HTTPie or a browser(for the GET endpoints), you will
notice that this controller does not behave in any way different from a non-reactive controller. This is
because neither of these is a reactive client, but this academic example is too small and simple to actually
notice anything.
You can try to generate random data (a lot of it) to fill the singer table and then try to access
the /reactive/singer endpoint to notice the data flow.
Therefore, there is not much that we can use this controller for right now. The reason this controller
was introduced first is because the intention is to rewrite it using handler functions, one of the fancy things
introduced by Spring WebFlow. You probably noticed the comment with a number attached to each
method. Those are there to make it easy to look up the equivalent handler function.
Handler Classes and Functional Endpoints
A handler class is just a logical way of grouping handler functions. A handler function must implement the
HandlerFunction 29 functional interface and provide an implementation for its handle(..) method that
takes an org.springframework.web.reactive.function.server.ServerRequest object as argument and
returns a Mono<org.springframework.web.reactive.function.server.ServerResponse> object.
Listing 20-16 shows its code.
Listing 20-16. Spring’s reactive HandlerFunction functional interface
package org.springframework.web.reactive.function.server;
import reactor.core.publisher.Mono;
@FunctionalInterface
public interface HandlerFunction<T extends ServerResponse> {
Mono<T> handle(ServerRequest request);
}
An implementation of HandlerFunction<T> represents a function that handles a request, and it can be
mapped to the request path via a RouterFunction.
https://github.com/spring-projects/spring-framework/blob/main/spring-webflux/src/
main/java/org/springframework/web/reactive/function/server/HandlerFunction.java
29
873
Chapter 20 ■ Reactive Spring
The version shown in Listing 20-16 is the reactive version, introduced as part of Spring WebFlux in
version 5.0. The same goes for RouterFunction. In Spring MVC version 5.2 non-reactive versions were added
in package org.springframework.web.servlet.function as a functional alternative to classic
controllers. The syntax is more declarative, and the request mapping centralized in a single bean making the
configuration easier to read.
Let’s make use of this new declarative syntax and write some code that declares handler functions
instead of handler methods for requests. Listing 20-17 shows the SingerHandler class that groups all the
handler functions analogous to the ones in the ReactiveSingerController introduced in the previous
section.
Listing 20-17. The SingerHandler class
package com.apress.prospring6.twenty.boot.handler;
import org.springframework.http.MediaType;
import org.springframework.web.reactive.function.server.HandlerFunction;
import org.springframework.web.reactive.function.server.ServerRequest;
import org.springframework.web.reactive.function.server.ServerResponse;
import java.net.URI;
import static org.springframework.web.reactive.function.server.ServerResponse.*;
// other import statements omitted
@Component
public class SingerHandler {
private final SingerService singerService;
public HandlerFunction<ServerResponse> list;
public HandlerFunction<ServerResponse> deleteById;
public SingerHandler(SingerService singerService) {
this.singerService = singerService;
/* 1 */
list = serverRequest ->ok()
.contentType(MediaType.APPLICATION_JSON).body(singerService.findAll(),
Singer.class);
/* 2 */
deleteById = serverRequest -> noContent()
.build(singerService.delete(Long.parseLong(serverRequest.
pathVariable("id"))));
}
/* 3 */
public Mono<ServerResponse> findById(ServerRequest serverRequest) {
var id = Long.parseLong(serverRequest.pathVariable("id"));
return singerService.findById(id)
874
Chapter 20 ■ Reactive Spring
.flatMap(singer -> ok().contentType(MediaType.APPLICATION_JSON).
bodyValue(singer))
.switchIfEmpty(notFound().build());
}
/* 4 */
public Mono<ServerResponse> create(ServerRequest serverRequest) {
Mono<Singer> singerMono = serverRequest.bodyToMono(Singer.class);
return singerMono
.flatMap(singerService::save)
.log()
.flatMap(s -> created(URI.create("/singer/" + s.getId()))
.contentType(MediaType.APPLICATION_JSON).bodyValue(s));
}
/* 5 */
public Mono<ServerResponse> updateById(ServerRequest serverRequest) {
var id = Long.parseLong(serverRequest.pathVariable("id"));
return singerService.findById(id)
.flatMap(fromDb -> serverRequest.bodyToMono(Singer.class)
.flatMap(s -> ok()
.contentType(MediaType.APPLICATION_JSON)
.body(singerService.update(id, s), Singer.class)
)
).switchIfEmpty(badRequest().bodyValue("Failure to update user!"));
}
/* 6 */
public Mono<ServerResponse> searchSingers(ServerRequest serverRequest) {
var name = serverRequest.queryParam("name").orElse(null);
if (StringUtils.isBlank(name) ) {
return badRequest().bodyValue("Missing request parameter 'name'");
}
return ok()
.contentType(MediaType.APPLICATION_JSON).body(singerService.
findByFirstName(name), Singer.class);
}
/* 7 */
public Mono<ServerResponse> searchSinger(ServerRequest serverRequest) {
var fn = serverRequest.queryParam("fn").orElse(null);
var ln = serverRequest.queryParam("ln").orElse(null);
if ((StringUtils.isBlank(fn) || StringUtils.isBlank(ln))) {
return badRequest().bodyValue("Missing request parameter, one of {fn, ln}");
}
return singerService.findByFirstNameAndLastName(fn, ln)
.flatMap(singer -> ok().contentType(MediaType.APPLICATION_JSON).bodyValue(singer));
}
}
875
Chapter 20 ■ Reactive Spring
A SingerHandler bean is declared and is part of the Spring WebFlux application configuration, and its
methods are used as handler functions for requests managing Singer instances.
The numbers that mark the functions make it easy to identify the equivalent handler method in the
ReactiveSingerController class, but also make it easy to use them as pointers when trying to explain the
particularities of each function.
876
1.
list is a simple handler function that returns all the Singers instances retrieved
by invoking singerService.findAll(). It is declared as a field of type Handler
Function<ServerResponse> and it is a member of the SingerHandler class. It
cannot be declared and initialized in the same line because of its dependency
on singerService. To initialize this field, the singerService field must be
initialized first. Since it is initialized in the constructor, the initialization of
the list field is also part of the constructor. The initial ServerResponse.ok()
sets the HTTP response status to 200 (OK), and it returns a reference to the
internal BodyBuilder that allows for other methods to be chained to describe the
request. The chain must end with one of the body*(..) methods that returns a
Mono<ServerResponse>.
2.
deleteById is a simple handler function that deletes a Singer instance with
the ID matching the path variable. The path variable is extracted by calling
serverRequest.pathVariable("id"). The ID argument represents the name of
the path variable. The singerService.delete() method returns Mono<Void>, so
Mono<ServerResponse> actually emits a response with an empty body and 204
(no content) status code set by ServerResponse.noContent().
3.
findById is a handler function that returns a single Singer instance identified
by the id path variable. The instance is retrieved by calling singerService.
findById(..) that returns a Mono<Singer>. If this stream emits a value, this
means a singer was found matching the path variable, and a response is created
with the 200 (OK) status code and a body represented by the Singer instance
as JSON. To access the Singer instance, emitted by the stream without blocking,
the flatMap(..) function is used. If the stream does not emit a value, this means
a singer with the expected ID was not found, so an empty response is created
with the status 404 (Not Found) by calling switchIfEmpty(ServerResponse.
notFound().build()).
4.
create is a handler function for creating a new Singer instance. The Singer
instance is extracted from the request body. The request body is read as a
Mono<Singer> by calling serverRequest.bodyToMono(String.class). The
flatMap(singerService::save) stream emits a value when a successful save
is executed, and the response is populated with a location header pointing to
the URL where the created resource can be accessed and the 201 (Created)
response status. If the stream does not emit a value, this means the save
operation failed, and there is an option to configure the desired response
status by adding a switchIfEmpty(status(HttpStatus.INTERNAL_SERVER_
ERROR).build()) function to this processing chain. However, we declared our
SingerService to throw a SavingException when saving a Singer instance
fails, and thus, this does not apply anymore because the error handler will take
care of it.
Chapter 20 ■ Reactive Spring
5.
updateById is a handler function for updating a Singer instance. It is mentioned
here just to point out that the switchIfEmpty(..) function can build a response
with a custom body as well, not just a response status and this method shows an
example where the response body is set to the "Failure to update singer!"
text. The body can be any type of object, including the exception object being
emitted by the singerService.update(..) method.
6.
searchSingers is a handler function that handles a request with a
parameter named name. Its value is extracted by calling serverRequest.
queryParam("name").
Now that we have our handler functions, the next step is to map them to requests. This is done via a
RouterFunction bean. This bean can be declared in any configuration class. org.springframework.web.
reactive.function.server.RouterFunction<T> 30 is a simple functional interface describing a function
that routes incoming requests to HandlerFunction<T> instances. Its code is shown in Listing 20-18.
Listing 20-18. Spring's reactive RouterFunction functional interface
package org.springframework.web.reactive.function.server;
// import statements omitted
@FunctionalInterface
public interface RouterFunction<T extends ServerResponse> {
Mono<HandlerFunction<T>> route(ServerRequest request);
// default methods omitted
}
The route(..) method returns the handler function matching the request provided as an argument.
If a handler function is not found, it returns an empty Mono<Void>. The RouterFunction<T> has a similar
purpose as the @RequestMapping annotation(and its specialized versions) in controller classes.
Composing a RouterFunction<T> for a Spring application is made easy by using the builder
methods in the org.springframework.web.reactive.function.server.RouterFunctions class. This
class provides static methods for building simple and nested routing functions and can even transform
a RouterFunction<T> into a HttpHandler instance, which makes the application run in a Servlet 3.1+
container. Before discussing routing functions any further, let’s first see the router function for handler
functions declared in SingerHandler. The router function is shown in Listing 20-19.
Listing 20-19. The RoutesConfig class declaring the routing configuration bean for the handler functions in
SingerHandler
package com.apress.prospring6.twenty.boot;
import org.springframework.web.reactive.function.server.RequestPredicates;
import org.springframework.web.reactive.function.server.RouterFunction;
import org.springframework.web.reactive.function.server.ServerResponse;
https://github.com/spring-projects/spring-framework/blob/main/spring-webflux/src/
main/java/org/springframework/web/reactive/function/server/RouterFunction.java
30
877
Chapter 20 ■ Reactive Spring
import static org.springframework.web.reactive.function.server.RequestPredicates.queryParam;
import static org.springframework.web.reactive.function.server.RouterFunctions.route;
@Slf4j
@Configuration
public class RoutesConfig {
final static Logger LOGGER = LoggerFactory.getLogger(RoutesConfig.class);
@Bean
public RouterFunction<ServerResponse> singerRoutes(SingerHandler singerHandler) {
return route()
.GET("/handler/singer", queryParam("name", t -> true),
singerHandler::searchSingers) /* 6 */
.GET("/handler/singer", RequestPredicates.all()
.and(queryParam("fn", t -> true))
.and(queryParam("ln", t -> true)),
singerHandler::searchSinger) /* 7 */
// requests with parameters always come first
.GET("/handler/singer", singerHandler.list) /* 1 */
.POST("/handler/singer", singerHandler::create) /* 4 */
.GET("/handler/singer/{id}", singerHandler::findById) /* 3 */
.PUT("/handler/singer/{id}", singerHandler::updateById) /* 5 */
.DELETE("/handler/singer/{id}", singerHandler.deleteById) /* 2 */
.filter((request, next) -> {
LOGGER.info("Before handler invocation: {}" , request.path());
return next.handle(request);
})
.build();
}
}
The singerRoutes bean is a router function used to route incoming requests to the handler functions
declared in the SingerHandler bean introduced previously.
In Listing 20-19, each handler function is marked with a number that matches the handler function in
SingerHandler. The route() method returns a RouterFunctionBuilder instance that is further used to add
router mappings via methods specific to HTTP methods, paths and request parameters.
The following list discusses the content of each line, and the bullet number matches the
function number.
878
1.
GET("/handler/singer", singerHandler.list) - GET(..) is a static method
from the abstract utility class org.springframework.web.reactive.function.
server.RequestPredicates used here to create a route that maps GET requests to
the /handler/singer URL with the singerHandler.list function.
2.
DELETE("/handler/singer/{id}", singerHandler.deleteById) - DELETE(..)
is a static method from the utility class RequestPredicates that creates a route
that maps DELETE requests to the /handler/singer/{id} URL, where id is the
name of the path variable to the singerHandler.deleteById function.
3.
GET("/handler/singer/{id}", singerHandler::findById) - maps GET
requests to /handler/singer/{id} to singerHandler.findById
Chapter 20 ■ Reactive Spring
4.
POST("/handler/singer", singerHandler::create) - POST(..) is a static
method from the utility class RequestPredicates that creates a route that maps
POST requests to the /handler/singer URL to the singerHandler.create
function.
5.
PUT("/handler/singer/{id}", singerHandler::updateById) - PUT(..) is a
static method from the utility class RequestPredicates that creates a route that
maps PUT requests to the /handler/singer/{id} URL to the singerHandler.
updateById function.
6.
GET("/handler/singer", queryParam("name", t → true),
singerHandler::searchSingers) - maps GET methods to the /handler/
singer?name=${val} URL to the singerHandler.searchSingers function. The
parameters are declared via the RequestPredicates.queryParam(..) utility
method, which basically returns a RequestPredicate that returns true if the
parameter is part of the URL
7.
This statement does the same thing as the method at point 6, but uses the
RequestPredicates.all() builder method to check for the presence of two
parameters.
The filter(..) statement declares a function that filters all requests. The statement in this example
just prints a simple log, but it can be used to inspect any kind of cross-cutting concerns, such as logging,
security, etc.
The build() method is called to construct the RouterFunction<ServerResponse> bean.
With this configuration in place, now we have a singer API available under /handler/singer
URL. When you start the application and test the /handler/singer endpoints using a client like curl,
Postman, or a browser (for the GET endpoints) you’ll notice that all works well and the behavior is the same
as the one implemented by the ReactiveSingerController.
Routes for requests that have parameters need to be specified first in the builder, or at least before the
routes based on the same path, but with no parameters. The request is checked against the existing routes of
the router function in the order they were declared. Thus, a request to URL "/handler/
singers?name=John" matches the first mapping to the "/handler/singers" found in the list. This is
because, the existence of the parameters is checked only after a route is found, since request parameters are
optional and not part of the route. Therefore, a GET request to "/handler/singers" will first be matched
against the first GET "/handler/singers" route, then the existence of the name parameter is checked and
if not found the conclusion is that this is not a match, and so, the next GET "/handler/singers" in the list
is found to be a match, but neither fn and ln parameters are found, thus this is not a match either, and so the
next one in the list is identified, and this route has no parameters, so the singerHandler.list gets finally
invoked.
879
Chapter 20 ■ Reactive Spring
Reactive Error Handling
In the Reactive Services section, the save(..) and update(..) methods were modified to emit messages of
type SavingException. When a handler function or reactive handler method invokes one of these methods
and the unexpected happens, the exception has to be handled. This allows developers to log the exception
and save the context in which it was thrown and decide the HTTP status code. For reactive controllers,
a class annotated with @RestControllerAdvice gets the job done, but for handler functions, we need
something else, something more functional. We need a WebExceptionHandler bean. This bean works for
reactive controllers too.
Spring Boot autoconfigures a default WebExceptionHandler of type
DefaultErrorWebExceptionHandler. Figure 20-5 depicts the WebExceptionHandler hierarchy.
Figure 20-5. WebExceptionHandler hierarchy
The response returned by this bean is a generic JSON representation object that contains the 400(Bad
Request) HTTP status code, the URI path and an alfa numeric request identifier. If we want to customize the
behavior, we need to declare our own WebExceptionHandler bean.
Listing 20-20 depicts a very simple version of the custom WebExceptionHandler bean that is added to
the RoutingConfig class.
Listing 20-20. Custom WebExceptionHandler bean
package com.apress.prospring6.twenty.boot;
import org.springframework.web.server.WebExceptionHandler;
//other import statements omitted
@Slf4j
@Configuration
public class RoutesConfig {
final static Logger LOGGER = LoggerFactory.getLogger(RoutesConfig.class);
// other beans omitted
@Bean
880
Chapter 20 ■ Reactive Spring
@Order(-2)
public WebExceptionHandler exceptionHandler() {
return (ServerWebExchange exchange, Throwable ex) -> {
if (ex instanceof SaveException se) {
log.debug("RouterConfig:: handling exception :: " , se);
exchange.getResponse().setStatusCode(HttpStatus.BAD_REQUEST);
return exchange.getResponse().setComplete();
} else if (ex instanceof IllegalArgumentException iae) {
log.debug("RouterConfig:: handling exception :: " , iae);
exchange.getResponse().setStatusCode(HttpStatus.BAD_REQUEST);
return exchange.getResponse().setComplete();
}
return Mono.error(ex);
};
}
}
Note that to ensure that our exception handler is used, we need to give it the highest priority by
annotating it with @Order(-2); otherwise, Spring Boot will still use the default handler.
Testing Reactive Endpoints with WebTestClient
To test a reactive endpoint using an actual reactive client, we can use an instance of WebTestClient.
The WebClient API was introduced in Spring 5 to replace the existing RestTemplate class. In Spring
6, you can still use both to submit requests to a Spring application, with the WebClient being preferred for
reactive applications since it is part of the spring-webflux package. WebClient can be used for synchronous
or asynchronous HTTP requests with a functional fluent API that can integrate directly into your existing
Spring configuration and the WebFlux reactive framework.
WebClient can only be used on top of an existing asynchronous HTTP client library. In the chapter20boot project this is Reactor Netty, but Jetty Reactive or Apache Reactive HTTP clients are just as good.
WebClient can be used to make requests to other reactive services written in any language.
For testing reactive web applications, WebTestClient was introduced as well, as a counterpart for the
WebClient used in production. WebTestClient uses WebClient internally to perform requests while also
providing a fluent API to verify responses.
In this section we’ll use a WebTestClient to submit some requests to the APIs built in the previous
sections.
Let’s start by testing the endpoints backed up by the ReactiveSingerController. Listing 20-21 shows
the creation of a WebTestClient pointing at the root URL http://localhost:8081/reactive/singer and a
test that checks that the expected number of records are returned.
Listing 20-21. Test class using WebTestClient
package com.apress.prospring6.twenty.boot.webclient;
import org.springframework.test.web.reactive.server.WebTestClient;
// other import statements omitted
public class ReactiveSingerControllerTest {
private static final Logger LOGGER = LoggerFactory.getLogger(SingerHandlerTest.class);
881
Chapter 20 ■ Reactive Spring
private final WebTestClient controllerClient = WebTestClient
.bindToServer()
.baseUrl("http://localhost:8081/reactive/singer")
.build();
@Test
void shouldReturnAFew(){
controllerClient.get()
.uri(uriBuilder -> uriBuilder.queryParam("name", "John").build())
.accept(MediaType.APPLICATION_JSON)
.exchange()
.expectStatus().isOk()
.expectHeader().contentType(MediaType.APPLICATION_JSON)
.expectBody()
.jsonPath("$.length()").isEqualTo(2);
}
}
There are a few things happening here:
•
We create a WebTestClient instance by using the builder returned by
WebTestClient.bindToServer(), and we set the base URL for this client to http://
localhost:8081/reactive/singer. Obviously, this means that the application must be
running for this test to work as intended.
•
a GET request is sent to the configured base URL with the name parameter set
to “John”
•
to send the request we use the exchange() function
•
To check the result, we use the assertion methods available: expect*(..) to check
statuses and headers and jsonPath(..).* to check assumptions on the request
body, assuming the body is represented as JSON.
However, what is interesting to test, is a negative scenario For example, the test method in Listing 20-22
checks the application behaviour when we try to create another ‘John Mayer’.
Listing 20-22. Test method for a negative scenario using WebTestClient
package com.apress.prospring6.twenty.boot.webclient;
import org.springframework.test.web.reactive.server.WebTestClient;
// other import statements omitted
public class ReactiveSingerControllerTest {
private static final Logger LOGGER = LoggerFactory.getLogger(SingerHandlerTest.class);
private final WebTestClient controllerClient = WebTestClient
.bindToServer()
.baseUrl("http://localhost:8081/reactive/singer")
.build();
882
Chapter 20 ■ Reactive Spring
@Test
void shouldFailToCreateJohnMayer(){
controllerClient.post()
.accept(MediaType.APPLICATION_JSON)
.bodyValue(Singer.builder()
.firstName("John")
.lastName("Mayer")
.birthDate(LocalDate.of(1977, 10, 16))
.build())
.exchange()
.expectStatus().is4xxClientError()
.expectBody()
.consumeWith(body -> LOGGER.debug("body: {}", body));
}
}
The shouldFailToCreateJohnMayer() test method will pass, and no Singer instance will be created
since there is already a singer with those names. The response HTTP code is 400, as proven by the response
details printed in the console, which you can see in Listing 20-23. The response details include the
submitted data.
Listing 20-23. Console log for the shouldFailToCreateJohnMayer() test execution
DEBUG c.a.p.t.b.w.SingerHandlerTest -- body:
> POST http://localhost:8081/reactive/singer
> accept-encoding: [gzip]
> user-agent: [ReactorNetty/1.1.5]
> host: [localhost:8081]
> WebTestClient-Request-Id: [1]
> Accept: [application/json]
> Content-Type: [application/json]
> Content-Length: [74]
{
"id":null,
"firstName":"John",
"lastName":"Mayer",
"birthDate":"1977-10-16"
}
< 400 BAD_REQUEST Bad Request
< content-length: [0]
The WebTestClient does not care what type of backend component generates the response to the
request it is sending, which means the tests written in this section pass if the base URL is replaced with
http://localhost:8081/handler/singer, and the requests are handled by functions in the SingerHandler class.
The tests pass also when the URL points to an application written in a language other than Java, as long as
the application is reactive and the response has the expected format.
883
Chapter 20 ■ Reactive Spring
Reactive Web Layer
Migrating the web layer requires quite a few changes because rendering a view is quite difficult when you
do not know how much data is sent to be rendered. In the past, Asynchronous JavaScript and XML (also
known as AJAX) was used to resolve this problem, but AJAX enables us to update pages only in response
to user action on the page. It does not solve the problem of updates coming from the server. Since reactive
communication involves data flowing in both directions, new web libraries were needed. There is more than
one way to do so, but in this section, we cover the most common way to do so: by using server-sent events.
Let’s create a page in the singer application to display the list of beans in the application context. In
previous chapters, HomeController contained a single handler method that returned a simple String
We will modify this method to return all the names of the beans in the application context as a
Flux<String>.
Thymeleaf supports reactive views, and there is more than one way to populate the model with reactive
data. To keep things quick and simple, we use a JavaScript piece of code to slowly populate the view with data
coming as a flow. However, before that, we have to configure Thymeleaf for reactive support. Listing 20-24
shows this configuration class. Most properties are set with the default values set by Spring Boot, but the class is
written like this to make it obvious what is customizable from a development point of view.
Listing 20-24. The reactive Thymeleaf configuration class
package com.apress.prospring6.twenty.boot;
import org.springframework.boot.autoconfigure.thymeleaf.ThymeleafProperties;
import org.springframework.boot.context.properties.EnableConfigurationProperties;
import org.springframework.web.reactive.config.ViewResolverRegistry;
import org.springframework.web.reactive.config.WebFluxConfigurer;
import org.thymeleaf.spring6.ISpringWebFluxTemplateEngine;
import org.thymeleaf.spring6.view.reactive.ThymeleafReactiveViewResolver;
// other import statements omitted
@Configuration
@EnableConfigurationProperties(ThymeleafProperties.class)
public class ReactiveThymeleafWebConfig implements WebFluxConfigurer {
private final ISpringWebFluxTemplateEngine thymeleafTemplateEngine;
public ReactiveThymeleafWebConfig(ISpringWebFluxTemplateEngine templateEngine) {
this.thymeleafTemplateEngine = templateEngine;
}
/*
@Bean
public ITemplateResolver thymeleafTemplateResolver() {
var resolver = new SpringResourceTemplateResolver();
resolver.setApplicationContext(this.context);
resolver.setPrefix("classpath:templates/");
resolver.setSuffix(".html");
resolver.setTemplateMode(TemplateMode.HTML);
resolver.setCacheable(false);
resolver.setCheckExistence(false);
884
Chapter 20 ■ Reactive Spring
return resolver;
} */
@Bean
public ThymeleafReactiveViewResolver thymeleafReactiveViewResolver() {
var viewResolver = new ThymeleafReactiveViewResolver();
viewResolver.setTemplateEngine(thymeleafTemplateEngine);
viewResolver.setOrder(1);
return viewResolver;
}
@Override
public void configureViewResolvers(ViewResolverRegistry registry) {
registry.viewResolver(thymeleafReactiveViewResolver());
}
}
The template resolver bean that is responsible for resolving templates does not need to be reactive. Since
the template resolver bean contains data from the application configuration, when using Spring Boot, it can be
dropped all together and replaced by annotating the configuration class with @EnableConfigurationProperti
es(ThymeleafProperties.class). This is the reason why in Listing 20-24, the bean declaration is commented.
The template engine that uses the template resolver is reactive and is an implementation of the
ISpringWebFluxTemplateEngine interface. Therefore, the SpringTemplateEngine class designed
for integration with the Spring MVC type, must be replaced with SpringWebFluxTemplateEngine, an
implementation of the ISpringWebFluxTemplateEngine interface, designed for integration with Spring
WebFlux and execution of templates in a reactive-friendly way. Since the template engine requires a template
resolver and nothing else, this bean declaration is skipped, Spring Boot is allowed to configure it, and we just
inject it in our configuration using the configuration class constructor constructor.
The @EnableConfigurationProperties(ThymeleafProperties.class) annotation enables
support for Thymeleaf configuration properties. The ThymeleafProperties class is annotated with
@ConfigurationProperties (prefix = "spring.thymeleaf"), which makes it a configuration bean for
Thymeleaf properties. This means you can use a application.yaml or application.properties file to
configure Thymeleaf. The properties are prefixed with spring.thymeleaf and allow you to configure the
template resolver bean without writing additional code. The Spring Boot Thymeleaf configuration properties
are depicted in Listing 20-25.
Listing 20-25. Spring Boot Thymeleaf configuration
spring:
thymeleaf:
prefix: classpath:templates/
suffix: .html
mode: HTML
cache: false
check-template: false
reactive:
max-chunk-size: 8192
The ThymeleafReactiveViewResolver is an implementation of the org.springframework.web.
reactive.result.view.ViewResolver interface, the Spring WebFlux view resolver interface. The
responseMaxChunkSizeBytes is the one you should be interested in, because it defines the maximum size for
the output org.springframework.core.io.buffer.DataBuffer instances produced by the Thymeleaf engine
885
Chapter 20 ■ Reactive Spring
and passed to the server as output. This is important because if you have a lot of data being sent through a
Flux<T>, you might want to render the view in chunks, bit by bit, instead of keeping a web page in a loading
state, until the response is complete. Especially since this one of the main ideas of reactive communication.
Now, let’s talk about our controller. Since HomeController needs to be annotated with @
RestController, because its handler method returns a reactive stream of data, we need another way to
return the logical view name. We can use a handler function and a router function for this, but first, let’s look
at HomeController, depicted in Listing 20-26.
Listing 20-26. The reactive HomeController class
package com.apress.prospring6.twenty.boot.controller;
// import statements omitted
@RestController
public class HomeController implements ApplicationContextAware {
private ApplicationContext ctx;
@Override
public void setApplicationContext(ApplicationContext applicationContext) throws
BeansException {
ctx = applicationContext;
}
// The response payload for this request will be rendered in JSON
@RequestMapping(value = "/beans", produces = MediaType.TEXT_EVENT_STREAM_VALUE)
public Flux<String> getBeanNames() {
List<String> beans = Arrays.stream(ctx.getBeanDefinitionNames()).sorted().
collect(Collectors.toList());
return Flux.fromIterable(beans).delayElements(Duration.ofMillis(200));
}
}
Notice the MediaType.TEXT_EVENT_STREAM_VALUE, which is a constant with the text/event-stream
value. This is the MIME type specific to a simple stream of text data that the server sends to the client when a
GET request is sent to this URL: http://localhost:8081/beans
Messages in the event stream are separated by a pair of newline characters. A colon as the first character
of a line is a comment and is ignored.
When the application is started, you can test whether the method returns a flux of bean names by running
a simple curl command. The command and a few events from on the stream are shown in Listing 20-27.
Listing 20-27. Data stream returned by GET request to http://localhost:8081/beans
> curl -H "Accept:text/event-stream" http://localhost:8081/beans
data:applicationAvailability
data:applicationTaskExecutor
data:chapter20Application
data:clientConnectorCustomizer
data:connectionFactory
886
Chapter 20 ■ Reactive Spring
data:data-r2dbc.repository-aot-processor#0
// the rest of the stream events omitted
Thymeleaf generates three types of SSEs:
•
Header - the data is prefixed by head: or {prefix_}head. Used for a single event
during the communication containing all the markup previous to the iterated data
(if any). Example: When you are reading a Facebook thread, the moment you open the
page, all the comments that exist in the database, previous to the timestamp when you
opened that page, should already be rendered in the page. There is no point to render
them one by one. Thymeleaf supports this type of initializing event.
•
Data Message - the data is prefixed by message: or {prefix_}message. Used for a
series of events, one for each value produced by the data driver. Example: When you
are reading a Facebook thread, comments from other users that are being posted while
you are viewing the page just appear in the comment section, one by one. Data from
the comment would be sent to the client through an SSE of type message.
•
Tail - the data is prefixed by tail: or {prefix_}tail. Used for a single event during
the communication containing all the markup following the iterated data (if any).
Example: Assuming Facebook had an option though which the user could choose to
stop seeing new comments, an event of this type could be used to send all the comments
exiting in the database with a timestamp value between the last displayed comment
and the timestamp when the user chose to stop seeing new comments.
The prefix value can be set via the org.thymeleaf.spring6.context.webflux.
ReactiveDataDriverContextVariable constructor when a reactive stream is wrapped in it, and the
variable is added as an attribute to a Thymeleaf reactive view. The prefix is really useful when more than one
SSE source is used on the same Web page, because it helps separate the server events in categories, so the
data can be displayed in different parts of the page. This however, is a complex scenario that we won’t cover in
this chapter.
The /beans URL is used as a source for a stream of SSEs. An EventSource instance is created using the
URL, and it opens a persistent connection through which the server sends events in text/event-stream
format. The connection remains open until closed by calling EventSource.close(). The events are marked
as message events by Spring WebFlux, and an EventListener instance is set on the EventSource instance to
intercept those events, extract the data and add it to the HTML page.
The bean names stream was intentionally slowed down by calling the delayElements(Duration.
ofMillis(200)) on the resulting Flux<String> to show the continuous communication. If you use Chrome
or Firefox, when loading the page, you can see the events being sent by the server in the developer console.
Just remove the comment from the console.log(event) statement from the body of the EventListener
instance shown in the home.html template snippet (HTML and JavaScript) depicted in Listing 20-28.
Listing 20-28. Thymeleaf template snippet used to display the bean names received as server-sent events
(snippet from the home.html file)
<section th:fragment="~{templates/layout :: pageContent}">
<script type="text/javascript" th:inline="javascript">
/*<![CDATA[*/
887
Chapter 20 ■ Reactive Spring
$(window).on( "load", function() {
renderBeans.start();
});
$(window).on( "onbeforeunload", function() {
renderBeans.stop();
});
let renderBeans = {
source: new EventSource(/*[[@{|/beans|}]]*/) ,
start: function () {
this.source.addEventListener("message", function (event) {
//console.log(event);
$("#beans").append('<li>'+ event.data +'</li>')
});
this.source.onerror = function () {
this.source.close();
};
},
stop: function() {
this.source.close();
}
};
/*]]>*/
</script>
<div class="card border-success mb-3" style="max-width: 40rem; left:30px;">
<div class="card-header"> Reactive Application Beans: </div>
<div class="row mb-1 m-sm-1">
<div class="scrollable">
<ul id="beans">
</ul>
</div>
</div>
</div>
</section>
The /*[[@{|/beans|}]]*/ is a Thymeleaf link expression used to generate a URL relative to the
application context. Looks weird, I know, but all those symbols make sure is not interpreted like something
else, and it results in a valid piece of JavaScript code.
In Listing 20-28, the jQuery library was used to write the JavaScript code required to handle server-sent
vents. The server-sent events (SSEs) are a server push technology enabling a client to receive automatic
updates from a server via an HTTP connection. This means that the page is rendered, but the connection
is kept open, so the server can send more data to the client. The server-sent events EventSource API is
standardized as part of HTML5, and except Internet Explorer, all other browsers support it.
In Figure 20-6, the main page of the Singers application is opened in Firefox, and you can see the stream
of data being sent from the server in the developer console.
888
Chapter 20 ■ Reactive Spring
Figure 20-6. Server-sent events displayed in Firefox’s developer console
There is one piece left that is missing: the mapping between the /home URL path and the home.html
view. It was mentioned at the beginning of this section that this can be done by using a handler function and
a routing function.
Listing 20-29 shows the handler function for rendering the view template with the 'home' name.
Listing 20-29. Handler function for mapping requests to a view, returning a logical view name
package com.apress.prospring6.twenty.boot.handler;
import
import
import
import
import
org.springframework.http.MediaType;
org.springframework.stereotype.Component;
org.springframework.web.reactive.function.server.ServerRequest;
org.springframework.web.reactive.function.server.ServerResponse;
reactor.core.publisher.Mono;
@Component
public class HomeHandler {
public Mono<ServerResponse> view(ServerRequest request) {
return ServerResponse
.ok()
.contentType(MediaType.TEXT_HTML)
.render("home");
}
}
The render(..) method has two versions, the one used in Listing 20-29 that just takes the
logical view name as an argument, is declared with var-args for the model attributes, in case there
are any: render(String name, Object... modelAttributes) . There is another version, where
the second argument is a Map<String, ?> representing the model used to render the template
that can be used for rendering an error page
To add this handler function to the application routing configuration, we just need to inject the
HomeHandler in the routing function bean configured in this chapter and add a GET(..) routing function, as
shown in Listing 20-30.
889
Chapter 20 ■ Reactive Spring
Listing 20-30. Router function including the HomeHandler::view handler function
package com.apress.prospring6.twenty.boot;
// import statements omitted
@Slf4j
@Configuration
public class RoutesConfig {
final static Logger LOGGER = LoggerFactory.getLogger(RoutesConfig.class);
@Bean
public RouterFunction<ServerResponse> singerRoutes(HomeHandler homeHandler,
SingerHandler singerHandler) {
return route()
.GET("/", homeHandler::view)
.GET("/home", homeHandler::view)
// singer routes omitted
.filter((request, next) -> {
LOGGER.info("Before handler invocation: {}" , request.path());
return next.handle(request);
})
.build();
}
}
Another thing that might be interesting to know, when writing Spring reactive web applications, you
might want to isolate the routing configuration for the static resources in a different routing function created
with the RouterFunctions.resources(..) method. This method routes requests that match the given
pattern to resources relative to the given root location, which is useful to skip the static resources from
additional filtering that applies only to dynamic resources.
An example of RouterFunction<ServerResponse> bean for static resources is shown in Listing 20-31.
Listing 20-31. RouterFunction<ServerResponse> for static resources
package com.apress.prospring6.twenty.boot;
import org.springframework.web.reactive.function.server.RouterFunction;
import static org.springframework.web.reactive.function.server.RouterFunctions.resources;
// other import statements omitted
@Slf4j
@Configuration
public class RoutesConfig {
public RouterFunction<ServerResponse> staticRouter() {
return resources("/images/**", new ClassPathResource("static/images/"))
.and(resources("/styles/**", new ClassPathResource("static/styles/")))
.and(resources("/js/**", new ClassPathResource("static/js/")));
}
// other configurations omitted
}
890
Chapter 20 ■ Reactive Spring
Note that RouterFunction<ServerResponse> can be composed using the and(..) method. The
resulting router function is a composed routing function that first invokes the first function and then invokes
the other function if this route has no result, and so on.
Handler Functions Validation
A functional endpoint can use Spring’s validation components to apply validation to the request body.
To explain how validation works, we’ll add a criteria object that allows the user to specify the filter for a
database query. This criteria object is used in the service to decide which query repo to execute.
The CriteriaDto class is added to the SingerService interface because it is only used in the context
of this service and thus is very strongly related to it. Since we are working with data provided by the user, a
validator class is needed as well. These two classes and the method skeleton for the service method using
the CriteriaDto as an argument are shown in Listing 20-32.
Listing 20-32. CriteriaDto object and CriteriaValidator classes
package com.apress.prospring6.twenty.boot.service;
import org.springframework.validation.Errors;
import org.springframework.validation.ValidationUtils;
import org.springframework.validation.Validator;
// other import statements omitted
public interface SingerService {
// other service methods omitted
Flux<Singer> findByCriteriaDto(CriteriaDto criteria);
@Getter
@Setter
@NoArgsConstructor
class CriteriaDto {
private String fieldName;
private String fieldValue;
}
class CriteriaValidator implements Validator {
@Override
public boolean supports(Class<?> clazz) {
return (CriteriaDto.class).isAssignableFrom(clazz);
}
@Override
public void validate(Object target, Errors errors) {
ValidationUtils.rejectIfEmpty(errors, "fieldName", "required", new Object[] {
"fieldName" }, "Field Name is required!");
ValidationUtils.rejectIfEmpty(errors, "fieldValue", "required", new Object[] {
"fieldValue" }, "Field Value is required!");
}
}
891
Chapter 20 ■ Reactive Spring
enum FieldGroup {
FIRSTNAME,
LASTNAME,
BIRTHDATE;
public static FieldGroup getField(String field){
return FieldGroup.valueOf(field.toUpperCase());
}
}
}
CriteriaDto instances are used to hold search criteria for a form object. For these instances to be valid,
both fields must be present.
The FieldGroup enum is added to easily select the column based on which the filtering is done.
Listing 20-33 shows the implementation of the findByCriteriaDto(..) method.
Listing 20-33. SingerServiceImpl#findByCriteriaDto(..) implementation
package com.apress.prospring6.twenty.boot.service;
// import statements omitted
@RequiredArgsConstructor
@Transactional
@Service
public class SingerServiceImpl implements SingerService {
@Override
public Flux<Singer> findByCriteriaDto(CriteriaDto criteria) {
var fieldName = FieldGroup.getField(criteria.getFieldName().toUpperCase());
if ("*".equals(criteria.getFieldValue())) {
return singerRepo.findAll();
}
return switch (fieldName) {
case FIRSTNAME -> "*".equals(criteria.getFieldValue())
? singerRepo.findAll()
: singerRepo.findByFirstName(criteria.getFieldValue());
case LASTNAME -> "*".equals(criteria.getFieldValue())
? singerRepo.findAll()
: singerRepo.findByLastName(criteria.getFieldValue());
case BIRTHDATE -> "*".equals(criteria.getFieldValue())
? singerRepo.findAll()
: singerRepo.findByBirthDate(LocalDate.parse(criteria.getFieldValue(),
DateTimeFormatter.ofPattern("yyyy-MM-dd")));
};
}
}
Just for fun, the possibility to select all the entries when a field value is equal to * was coded in.
This method is invoked by a handler function in class SingerHandler, which is shown in Listing 20-34.
892
Chapter 20 ■ Reactive Spring
Listing 20-34. Handler function that invokes the findByCriteriaDto(..) service method
package com.apress.prospring6.twenty.boot.handler;
import org.springframework.validation.BeanPropertyBindingResult;
// import statements omitted
@Component
public class SingerHandler {
// other handler functions omitted
public Mono<ServerResponse> search(ServerRequest serverRequest) {
var criteriaMono = serverRequest.bodyToMono(SingerService.CriteriaDto.class);
return criteriaMono.log()
.flatMap(this::validate)
.flatMap(criteria -> ok().contentType(MediaType.APPLICATION_JSON)
.body(singerService.findByCriteriaDto(criteria), Singer.class));
}
private Mono<SingerService.CriteriaDto> validate(SingerService.CriteriaDto criteria) {
var validator = new SingerService.CriteriaValidator();
var errors = new BeanPropertyBindingResult(criteria, "criteria");
validator.validate(criteria, errors);
if (errors.hasErrors()) {
// throw new ServerWebInputException(errors.toString());
throw MissingValueException.of(errors.getAllErrors());
}
return Mono.just(criteria);
}
}
Notice the validate(..) method. This method is used as a processor in a reactive chain. For this
simple example, the CriteriaValidator is instantiated in this method. In bigger applications where a
validator is used in multiple handler functions, you might want to declare it as a bean. If the validator.
validate(criteria, errors) populates the errors object, a MissingValueException is created with
the name of the fields that are missing and the error messages. The MissingValueException is a custom
exception type, with a simple builder that allows converting the validation errors in representations that can
be shown in the interface.
Listing 20-35 shows this custom exception type.
Listing 20-35. The MissingValueException custom exception type
package com.apress.prospring6.twenty.boot.problem;
import org.springframework.validation.FieldError;
import org.springframework.validation.ObjectError;
// some import statements omitted
@SuppressWarnings("serial")
public class MissingValueException extends RuntimeException {
private Map<String,String> fieldNames;
893
Chapter 20 ■ Reactive Spring
public MissingValueException(String message, Map<String,String> fieldNames) {
super(message);
this.fieldNames = fieldNames;
}
public MissingValueException(String message, Throwable cause, Map<String,String>
fieldNames) {
super(message, cause);
this.fieldNames = fieldNames;
}
public Map<String,String> getFieldNames() {
return fieldNames;
}
public static MissingValueException of(List<ObjectError> errors) {
final List<String> fields = new ArrayList<>();
var fieldNames = new HashMap<String,String>();
errors.forEach(err -> fieldNames.put( ((FieldError)err).getField() , err.
getDefaultMessage()));
return new MissingValueException("Some values are missing!", fieldNames);
}
}
The next step is to also add a method in SingerHandler to render the search view. The method is shown
in Listing 20-36.
Listing 20-36. The SingerHandler.searchView() handler function to render the Thymeleaf search view
package com.apress.prospring6.twenty.boot.handler;
// import statements omitted
@Component
public class SingerHandler {
// other handler function omitted
public Mono<ServerResponse> searchView(ServerRequest request) {
return ServerResponse
.ok()
.contentType(MediaType.TEXT_HTML)
.render("singers/search", new SingerService.CriteriaDto());
}
}
Now that we have all these, before designing the view template, we need to add the routing for the two
new handler functions to the singerRoutes routing function introduced in Listing 20-19.
We also need to add a new section in the WebExceptionHandler to handle the MissingValueException.
894
Chapter 20 ■ Reactive Spring
Listing 20-37 shows the minimal configuration of the singerRoutes routing function showing
the two mappings and the new WebExceptionHandler bean that includes a block for handling the
MissingValueException.
Listing 20-37. The updated routing function and exception handler that includes code for handling
MissingValueException instances
package com.apress.prospring6.twenty.boot;
// import statements omitted
@Slf4j
@Configuration
public class RoutesConfig {
final static Logger LOGGER = LoggerFactory.getLogger(RoutesConfig.class);
@Bean
public RouterFunction<ServerResponse> singerRoutes(HomeHandler homeHandler,
SingerHandler singerHandler) {
return route()
// returns home view template
.GET("/", homeHandler::view)
.GET("/home", homeHandler::view)
.GET("/singers/search", singerHandler::searchView)
.POST("/singers/go", singerHandler::search)
// other mapping omitted
.filter((request, next) -> {
LOGGER.info("Before handler invocation: {}" , request.path());
return next.handle(request);
})
.build();
}
@Bean
@Order(-2)
public WebExceptionHandler exceptionHandler() {
return (ServerWebExchange exchange, Throwable ex) -> {
if (ex instanceof SaveException se) {
log.debug("RouterConfig:: handling exception :: " , se);
exchange.getResponse().setStatusCode(HttpStatus.BAD_REQUEST);
// marks the response as complete and forbids writing to it
return exchange.getResponse().setComplete();
} else if (ex instanceof IllegalArgumentException iae) {
log.debug("RouterConfig:: handling exception :: " , iae);
exchange.getResponse().setStatusCode(HttpStatus.BAD_REQUEST);
// marks the response as complete and forbids writing to it
return exchange.getResponse().setComplete();
} else if (ex instanceof MissingValueException mve) {
exchange.getResponse().setStatusCode(HttpStatus.BAD_REQUEST);
exchange.getResponse().getHeaders().add("Content-Type", "application/json");
895
Chapter 20 ■ Reactive Spring
final String message;
try {
message = new JsonMapper().writeValueAsString(mve.getFieldNames());
var buffer = exchange.getResponse().bufferFactory().wrap(message.
getBytes());
return exchange.getResponse().writeWith(Flux.just(buffer));
} catch (JsonProcessingException e) {
}
}
return Mono.error(ex);
};
}
}
Now we have everything we need but the view. The singers/search.html view needs to have a
dynamic section where a table is built with the results of the search, a dynamic section that is displayed only
when there are errors and the JavaScript code that populates these elements.
The main section of the search.html view template is shown in Listing 20-38.
Listing 20-38. The main section of the singers/search.html view
<section th:fragment="~{templates/layout :: pageContent}">
<div class="content"> <!-- content -->
<h4 th:text="#{command.search} + ' ' + #{singer.title}">SEARCH</h4>
<div class="container col-lg-12">
<form action="#" th:action="@{/singers/go}" name="search"
th:object="${criteriaDto}" method="post" class="col p-4" id="singerSearchForm">
<div class="row mb-1">
<label for="fieldName" th:text="#{label.Criteria.fieldname} + ':'"
class="col-sm-4 form-label">FN:</label>
<div class="col-sm-8">
<select th:field="*{fieldName}" class="form-select">
<option th:value="firstName" th:text="#{label.Singer.
firstname}">FN</option>
<option th:value="lastName" th:text="#{label.Singer.
lastname}">LN</option>
<option th:value="birthDate" th:text="#{label.Singer.
birthDate}">BD</option>
</select>
</div>
</div>
<div class="row mb-1">
<label for="fieldValue" th:text="#{label.Criteria.fieldvalue} + ':'"
class="col-sm-4 form-label"></label>
<div class="col-sm-8">
<div>
<input type="text" th:field="*{fieldValue}" class="form-control"/>
<small th:text="#{label.dateFormat.accepted}" class="textmutes">ACC</small></div>
896
Chapter 20 ■ Reactive Spring
</div>
</div>
<div class="bs-component mb-1">
<input type="submit" th:value="#{command.search}" id="searchButton"
class="btn btn-dark"/>
<div class="col-sm-8">
<small id="errMessage"></small>
</div>
</div>
</form>
<script th:inline="javascript">
/*<![CDATA[*/
$( window ).on( "load", function() {
$('#errMessage').hide();
$('#singerSearchResults').hide();
});
function renderSearchResults(singers) {
$('#errMessage').empty()
$('#errMessage').hide();
let content = '';
let baseDetailUrl = /*[[@{/singers/}]]*/ '/singers';
for (let i = 0; i < singers.length; i++) {
content += '<tr>';
content += '<td><a href="'+ baseDetailUrl + singers[i].id+'">'
+singers[i].id+'</a></td>';
content += '<td>'+singers[i].firstName+'</td>';
content += '<td>'+singers[i].lastName+'</td>';
}
$('#singerSearchResults tbody').html(content);
if(content !== '') {
$('#singerSearchResults').show();
} else {
$('#singerSearchResults').hide();
}
}
$('#singerSearchForm').submit(function(evt){
evt.preventDefault();
let fieldName = $('#fieldName').val();
let fieldValue = $('#fieldValue').val();
let json = { "fieldName" : fieldName, "fieldValue" : fieldValue};
$.ajax({
url: $('#singerSearchForm')[0].action,
type: 'POST',
dataType: 'json',
contentType: 'application/json',
897
Chapter 20 ■ Reactive Spring
data: JSON.stringify(json),
success: function(responseData) { renderSearchResults(responseData);},
error: function(e) {
let jsonData = e.responseJSON;
for(let i in jsonData) {
let key = i;
let val = jsonData[i];
$('#errMessage').append("<p class=\"error\">"+ val +"</p>");
}
$('#errMessage').show();
}
});
})
/*]]>*/
</script>
<table id="singerSearchResults" class="table table-hover">
<thead>
<tr>
<th th:text="#{label.Singer.count}" class="table-success">COUNT</th>
<th th:text="#{label.Singer.firstname}" class="tablesuccess">FIRSTNAME</th>
<th th:text="#{label.Singer.lastname}" class="tablesuccess">LASTNAME</th>
</tr>
</thead>
<tbody>
<th:block th:each="singer : ${singers}">
<td><a th:href="@{/singer/} + ${singer.id}" th:text="${singer.
id}">ID</a></td>
<td th:text="${singer.firstName}">...</td>
<td th:text="${singer.lastName}">...</td>
</th:block>
</tbody>
</table>
</div>
</div> <!-- content -->
</section>
The JavaScript code looks a lot like the one written to display the bean names, with the exception that
this time column rows are being written and there is also an error section for the $.ajax(..) invocation
that is responsible for showing the validations error messages received from the server.
Figure 20-7 shows the Search Singer page with a validation error message being displayed after a
request was sent without providing a value for the search.
898
Chapter 20 ■ Reactive Spring
Figure 20-7. Search Singer page with a validation error message
Building Spring reactive applications is a vast subject and I know this section does not give it justice.
If you are interested in building Spring Reactive applications you might want to take a look at the other
resources referenced in this chapter, including Josh Long’s Reactive Spring, published by on LeanPub and
last updated in September 202231.
Summary
This chapter gave you an insight into what is important when building a reactive Spring WebFlux
application. A few details of migrating multi-layered applications were covered to underline the fact
that a reactive application is fully reactive, only if all its components are reactive. To help you make the
change from Spring Web MVC to WebFlux comparisons between configurations for the two technologies
were made.
We looked into using reactive controllers and handler functions.
We looked into testing reactive repositories and services and consuming reactive services using
WebTestClient.
There are a few things to take away from this chapter. Spring WebFlux has a few advantages: the code is
cleaner and more concise. Spring Boot provides so many components out of the box that it allows for more
time to be dedicated to development and less to configuration. Error handling is easier to implement, and
code is easier to read. However, not all components(or application for that matter) must be reactive. For
example: when all you want to build is a simple page to render to the user, there is no need to render it using
a reactive component.
31
https://leanpub.com/reactive-spring
899
A
ppendix A
Setting Up Your Development
This appendix helps you set up the development environment that you will use to write, compile, and
execute the Spring applications discussed in this book.
Introducing project pro-spring-6
Project pro-spring-6 is a two-level Gradle/Maven project. pro-spring-6 is the root project and is the
parent of the projects named chapter02 through chapter20. Each module is named as the chapter where its
contents are referenced. Each chapter has two or more modules associated with it, depending on the context
and topics covered. The ones with names that end in -boot are Spring Boot projects. The ones that don’t are
just Java projects using Spring, because yes, you can use Spring without using Spring Boot. I call these classic
Spring projects because this is how Spring applications were developed before Spring Boot was around. This
project depends on many libraries that will be automatically downloaded when your project is opened in an
editor for the first time.
This project is configured with both Gradle and Maven and you can build it and import it in IntelliJ
IDEA using whichever you prefer.
Understanding the Gradle Configuration
The pro-spring-6 project defines a set of libraries available for the child modules to use, and it has the
Gradle configuration in a file typically named build.gradle. All the modules on the second level (in other
words, the chapter** projects) have a Gradle configuration file named [module_name].gradle (for example,
chapter02.gradle). This was a development choice; the configuration file of a chapter module is more
visible in an editor this way. Plus, if you want to modify the configuration file for a chapter module, you can
easily find the file in IntelliJ IDEA using a unique name.
Additionally, there is a closure element in pro-spring-6/settings.gradle that verifies at build time
that all chapter modules have their configuration file present.
// pro-spring-6/settings.gradle
rootProject.name = 'pro-spring-6'
include 'chapter02'
include 'chapter02-boot'
include 'chapter03'
// other module names omitted
© Iuliana Cosmina, Rob Harrop, Chris Schaefer, and Clarence Ho 2023
I. Cosmina et al., Pro Spring 6, https://doi.org/10.1007/978-1-4842-8640-1
901
■ Appendix A
rootProject.children.each { project ->
project.buildFileName = "${project.name}.gradle"
assert project.projectDir.isDirectory()
assert project.buildFile.exists()
assert project.buildFile.isFile()
}
This file also contains the names of all modules; if some module gives you trouble, you can comment on
it here, and the project will build without it.
For example, the chapter07-jooq and chapter07-jooq-boot modules are commented, because
these projects require a started MariaDB Docker container to generate the JOOQ sources. When studying
Chapter 7, build the image and start the Docker container as instructed, and then you can remove the
comments, so you can build these modules as part of the project.
If a Gradle build file is not named the same as the module, then when executing any Gradle task, an
error is thrown. The error is similar to the one depicted in the following configuration snippet, where the
chapter02.gradle file was renamed to chapter02_2.gradle:
$ gradle
FAILURE: Build failed with an exception.
* Where:
Settings file '/workspace/pro-spring-6/settings.gradle' line: 67
* What went wrong:
A problem occurred evaluating settings 'pro-spring-6'.
> assert project.buildFile.exists()
| | |
| | false
| /workspace/pro-spring-6/chapter02/chapter02.gradle
:chapter02
*
>
>
>
Try:
Run with --stacktrace option to get the stack trace.
Run with --info or --debug option to get more log output.
Run with --scan to get full insights.
* Get more help at https://help.gradle.org
BUILD FAILED in 669ms
Another approach for a multimodular project would have been to have in the main build.gradle
file specific closures to customize the configuration for each module. However, in the spirit of good
development practices, I decided to keep the configurations for the modules as decoupled as possible and in
the same location as the module contents.
902
■ Appendix A
The pro-spring-6/build.gradle configuration file contains a variable for each software version being
used. The pro-spring-6 was configured to use Spring Boot dependency management even for classic
projects, but there are some dependencies that the Spring Boot dependency management plugin does not
manage, so we have to put their versions in a common place to ensure that different modules that do not
end up using different versions and causing dependency conflicts. It also makes it really practical to upgrade
them. The versions are declared as global variables and grouped under the ext closure.
ext {
lombokVersion = "1.18.24"
lang3Version = "3.12.0"
mockitoVersion = "2.0.2-beta"
testcontainersVersion = "1.17.6"
jakartaAnnotationVersion = "2.1.1"
jakartaInjectApiVersion = "2.0.1"
jacksonVersion = "2.14.1"
dbcp2Version = "2.9.0"
// other version omitted
}
Additionally, here, the bootProjects variable is declared and initialized with the Spring Boot module
names. This variable is used to configure the Spring Boot plugin only for these modules.
ext {
bootProjects = subprojects.findAll { ( it.name.endsWith('-boot')) }
}
configure(bootProjects) { project ->
apply plugin: 'org.springframework.boot'
}
There are other configurations that are required for all modules that are declared in this file, most of
them related to plugins being applied, common dependencies, compiling options, java version used, etc.
This file also contains the declarations for all plugins used in the project. Since they are referenced in
the modules only by their ID, having them here declared together with their versions also makes the plugins
easier to upgrade.
In the projects on the second level of the hierarchy (in other words, the chapterXX projects), you’ll find
the chapterXX.gradle configuration files. Dependencies are referred to by their group, artifact name and
version when Spring Boot dependency management plugin is used for managing them. Here you can see the
chapter09.gradle file:
import org.springframework.boot.gradle.plugin.SpringBootPlugin
description 'Chapter 09: Spring Transaction Management!'
// we are using Spring Boot dependency management, but we configure Spring MVC in the
classic manner - explicitly, with no Spring Boot "magic". This is to avoid confusing
IntelliJ IDEA by accidentally ending up with different versions of Spring and its
dependencies in the project classpath.
dependencyManagement {
imports {
mavenBom SpringBootPlugin.BOM_COORDINATES
}
}
903
■ Appendix A
dependencies {
implementation 'org.springframework:spring-orm' // managed by Spring Boot Dependency
Management
implementation 'org.springframework:spring-context'
implementation "ch.qos.logback:logback-classic:$logbackVersion" // not managed by
Spring Boot Dependency
Management
implementation "jakarta.annotation:jakarta.annotation-api:$jakartaAnnotationVersion"
implementation "com.zaxxer:HikariCP:$hikariVersion"
runtimeOnly "org.mariadb.jdbc:mariadb-java-client"
implementation "org.hibernate.orm:hibernate-core:$hibernateVersion"
testImplementation
testImplementation
testImplementation
testImplementation
}
'org.springframework:spring-test'
'org.junit.jupiter:junit-jupiter-engine'
"org.testcontainers:mariadb:$testcontainersVersion"
"org.testcontainers:junit-jupiter:$testcontainersVersion"
task jar(type: Jar, overwrite: true) {
duplicatesStrategy = DuplicatesStrategy.INCLUDE
/* Gradle Fat jars with multiple dependencies are affected by the same bug: https://issues.
apache.org/jira/browse/MASSEMBLY-360 this statement fixes it */
manifest {
attributes(
"Created-By": "Iuliana Cosmina",
"Specification-Title": "Pro Spring 6 - Chapter 09",
"Main-Class": "com.apress.prospring6.nine.Chapter9Demo",
"Class-Path": configurations.runtimeClasspath.collect { it.getName()
}.join(' ')
)
}
from {
configurations.runtimeClasspath.collect { it.isDirectory() ? it : zipTree(it) }
}
}
Notice how the SpringBootPlugin class is imported just to access the static variable
BOM_COORDINATES that will point to the Spring Boot Dependencies BOM file, so the Spring Boot dependency
plugin will extract the version for the managed dependencies from there.
For projects where there is a main class, we are building an executable jar with a custom manifest file.
Just to show you how it is done, but also because I like having my name everywhere. ;)
For chapter09-boot.gradle, the configuration is simpler, dependency management is configured by
default, and creating an executable jar is also easy because of the Spring Boot Plugin. Additionally, some
dependencies don’t have to be specified at all since they are transitive dependencies for Spring Boot Starters
dependencies. For a quick comparison, please see the chapter09-boot.gradle file:
904
■ Appendix A
apply plugin: 'java'
dependencies {
implementation 'org.springframework.boot:spring-boot-starter-jdbc'
implementation 'org.springframework:spring-orm'
implementation "jakarta.annotation:jakarta.annotation-api:$jakartaAnnotationVersion"
implementation "com.zaxxer:HikariCP:$hikariVersion"
runtimeOnly "org.mariadb.jdbc:mariadb-java-client"
implementation "org.hibernate.orm:hibernate-core:$hibernateVersion"
testImplementation 'org.springframework.boot:spring-boot-starter-test'
testImplementation "org.testcontainers:mariadb:$testcontainersVersion"
testImplementation "org.testcontainers:junit-jupiter:$testcontainersVersion"
}
bootJar {
manifest {
attributes 'Start-Class': 'com.apress.prospring6.nine.boot.Chapter9Application'
}
}
This project is configured with Gradle Wrapper, so if you do not want to install Gradle locally, when
building it, just use the gradlew or gradlew.bat executables.
The default tasks for this project are declared to be clean and build, so you can build it by just running
the previously mentioned executables.
What I like about Gradle is that the configuration is readable and more compact, even for applications
that need to be packaged as a war. Of course, how readable and compact a Gradle configuration is depends
greatly on the developer’s skills.
Understanding the Maven Configuration
In this edition of the book, the pro-spring-6 project comes with a Maven configuration too, mostly because
after 8 years I got tired of people asking for one and I gave in.
The approach I took is similar to the Gradle configuration: all that was common to all modules is part of
the pro-spring-6/pom.xml. Under the <properties> element, all the project common properties, e.g., java
version, dependency versions, plugin versions, encoding, etc., are declared.
<properties>
<spring-boot.version>3.0.5</spring-boot.version>
<!-- Java version for non-Boot projects -->
<maven.compiler.source>19</maven.compiler.source>
<maven.compiler.target>19</maven.compiler.target>
<!-- Java version for Boot projects-->
<java.version>19</java.version>
<versions-maven-plugin.version>2.12.0</versions-maven-plugin.version>
<maven-compiler-plugin.version>3.10.1</maven-compiler-plugin.version>
<jackson.version>2.14.2</jackson.version>
<lombok.version>1.18.24</lombok.version>
905
■ Appendix A
<commons-lang3.version>3.12.0</commons-lang3.version>
<project.build.sourceEncoding>UTF-8</project.build.sourceEncoding>
<!-- other properties omitted-->
</properties>
Under the <modules> element, all the module names are listed.
For example, the chapter07-jooq and chapter07-jooq-boot modules are commented, because
these projects require a started MariaDB Docker container to generate the JOOQ sources. When studying
Chapter 7, build the image and start the Docker container as instructed, and then you can remove the
comments, so you can build these modules as part of the project.
Dependencies common to all modules are declared under the <dependencies> element.
All dependencies used by most modules are declared under the <dependencyManagement> element with
their version pointing to their respective properties. This allows for simplified usage when declaring them as
dependencies for modules because the version is no longer necessary. (Sample A-1)
Figure A-1. logback-classic dependency in parent pom.xml and in chapter04/pom.xml .
Under <dependencyManagement> the spring-boot-dependencies is added as well with the
<scope>import</scope>, this is what configured dependency management for all modules.
<dependencyManagement>
<dependencies>
<!-- other dependencies omitted -->
<dependency>
<groupId>org.springframework.boot</groupId>
<artifactId>spring-boot-dependencies</artifactId>
<version>${spring-boot.version}</version>
<type>pom</type>
<scope>import</scope>
</dependency>
</dependencies>
</dependencyManagement>
906
■ Appendix A
A similar approach has been taken for the plugins as well, and a <pluginManagement> element is
present under <build> to declare common plugins and configurations for all modules. The next snippet
shows the maven-compiler-plugin being configured here so that this configuration is inherited by all
modules, which means that all modules are compiled with ${maven.compiler.source}, which is set to 19,
as shown previously.
The default goals for this project are declared to be clean and install, so you can build it by just
running the previously mentioned executables.
The pom.xml files do not differ that much between a classic project and a Boot project. The only
difference is that the Spring Boot project has the spring-boot-maven-plugin configured, while the classic
project has the maven-compiler-plugin.
As an example, let’s look at chapter09/pom.xml.
<?xml version="1.0" encoding="UTF-8"?>
<project> <!-- Xsd schema references omitted-->
<modelVersion>4.0.0</modelVersion>
<parent>
<groupId>com.apress.prospring6</groupId>
<artifactId>pro-spring-6</artifactId>
<version>6.0-SNAPSHOT</version>
</parent>
<artifactId>chapter09</artifactId>
<name>Pro Spring 6 :: Chapter 09</name>
<description>This is a Java project is a collection of simple code samples using
Spring.</description>
<dependencies>
<dependency>
<groupId>org.springframework</groupId>
<artifactId>spring-orm</artifactId> <!-- managed by Spring Boot Dependency
Management -->
</dependency>
<!-- logging lib -->
<dependency>
<groupId>ch.qos.logback</groupId>
<artifactId>logback-classic</artifactId> <!-- not managed by Spring Boot
Dependency Management-->
</dependency>
<!-- not used in that many projects, thus not part of root pom.xml
<dependencyManagement> -->
<dependency>
<groupId>com.zaxxer</groupId>
<artifactId>HikariCP</artifactId>
<version>${hikari.version}</version>
</dependency>
<!-- other dependencies omitted -->
</dependencies>
907
■ Appendix A
<build>
<plugins>
<plugin>
<!-- no version, configured with <pluginManagement> -->
<groupId>org.apache.maven.plugins</groupId>
<artifactId>maven-compiler-plugin</artifactId>
</plugin>
</plugins>
</build>
</project>
Compare this with chapter09-boot/pom.xml.
<?xml version="1.0" encoding="UTF-8"?>
<project> <!-- Xsd schema references omitted-->
<modelVersion>4.0.0</modelVersion>
<parent>
<groupId>com.apress.prospring6</groupId>
<artifactId>pro-spring-6</artifactId>
<version>6.0-SNAPSHOT</version>
</parent>
<artifactId>chapter09-boot</artifactId>
<name>Pro Spring 6 :: Chapter 09 Boot (Transactions) </name>
<description>This is a very simple Spring Boot project.</description>
<dependencies>
<!-- almost the same dependencies-->
</dependencies>
<build>
<plugins>
<plugin>
<groupId>org.springframework.boot</groupId>
<artifactId>spring-boot-maven-plugin</artifactId>
<!-- version needed, cannot be configured with <pluginManagement> -->
<version>${spring-boot.version}</version>
<configuration>
<mainClass>com.apress.prospring6.nine.boot.Chapter9Application</
mainClass>
</configuration>
</plugin>
</plugins>
</build>
</project>
The Maven configuration becomes slightly complicated for projects that need to be packaged as war
since the maven-assembly plugin is necessary to assemble the war properly.
This project is configured with Maven Wrapper, so if you do not want to install Maven locally, when
building it, just use the mvnw or mvnw.bat executables.
908
■ Appendix A
Using Docker
Starting with Chapter 6, most projects require a database, for running and testing. For running the
application, you need to set up the container as instructed in the chapterXX.adoc readme file. The Docker
Image files are located under chapterXX/docker-build directory.
Just remember to stop the container when switching to another project, because containers map
■■
the MariaDB port 3306, to the 3306 port of your computer to allow your Spring applications to work with the
database as if it were installed on your computer. Obviously, you can’t have more than one container mapped to
the same port.
Your Docker Dashboard should look like mine, shown in Figure A-2.
Figure A-2. Docker dashboard showing containers for project chapter06 and chapter07.
For testing, we are using TestContainers1, a very practical library that downloads a Docker image and
starts the container automatically. All you need, of course, is to have Docker running locally.
Once your container is deployed and started, you can use the Database View in IntelliJ IDEA to check
that the database is there and populated as expected.
1
https://www.testcontainers.org
909
■ Appendix A
Figure A-3. Using IntelliJ IDEA Database view to check that a MariaDB container is usable.
For Chapter 13, two containers are needed, and they are created and configured using Docker
Compose2. This is because these containers work together to provide a Kafka service, and the Kafka
container needs to be configured with some details of the Zookeeper container that Docker compose injects.
Building and Troubleshooting
After you clone the source code (or download it), you need to import the project in the IntelliJ IDEA editor.
To do this, follow these steps:
•
Select from the IntelliJ IDEA menu File ➤ New ➤ Project from Existing Sources (as
shown in Figure A-4).
Figure A-4. Project import menu options in IntelliJ IDEA.
After selecting the proper option, a pop-up window will appear requesting the
location of the project (as shown in Figure A-5).
2
https://docs.docker.com/compose/compose-file
910
■ Appendix A
Figure A-5. Selecting the project root directory pop-up in IntellJ IDEA.
•
Select the pro-spring-6 directory. A pop-up will ask for the project type. IntelliJ
IDEA can create its own type of project from the selected sources and build it with
its internal Java builder, but this option is not useful here because pro-spring-6 is a
Gradle project.
•
Check the "Import project from external model" radio button and select Gradle or
Maven from the menu, as depicted in Figure A-6.
Figure A-6. Selecting the project type Intellij IDEA.
911
■ Appendix A
Before getting to work, you should build the project. This can be done from Intellij IDEA by clicking
the Refresh button, as shown by (1) in Figure A-7. Clicking this button will cause IntelliJ IDEA to scan the
configuration of the project and resolve dependencies. This includes downloading missing libraries and
doing an internal light build of the project (just enough to remove compile-time errors caused by missing
dependencies).
Figure A-7. Intellij IDEA Gradle and Maven View for building the project.
The Gradle clean and build tasks, marked with (2) in Figure A-7, execute a full build of the project. You
can also do the same from the command line by executing the Gradle build command, as depicted below:
./gradlew #because of the default configured tasks
# or
./gradlew clean build
This will execute the following set of tasks on every module(here shown only for chapter02):
00:11:02: Executing 'build clean'...
Starting Gradle Daemon...
>
>
>
>
>
>
>
>
>
>
Task
Task
Task
Task
Task
Task
Task
Task
Task
Task
912
:compileJava NO-SOURCE
:processResources NO-SOURCE
:classes UP-TO-DATE
:jar
:assemble
:compileTestJava NO-SOURCE
:processTestResources NO-SOURCE
:testClasses UP-TO-DATE
:test NO-SOURCE
:check UP-TO-DATE
■ Appendix A
> Task
> Task
> Task
> Task
> Task
> Task
> Task
> Task
> Task
> Task
> Task
> Task
...
:build
:chapter02:compileJava
:chapter02:processResources
:chapter02:classes
:chapter02:jar
:chapter02:assemble
:chapter02:compileTestJava
:chapter02:processTestResources NO-SOURCE
:chapter02:testClasses
:chapter02:test
:chapter02:check
:chapter02:build
The Maven clean and install goals marked with (3) in Figure A-7 execute a full build of the
project. You can also do the same from the command line by executing the Gradle build command, as
depicted below:
./mvnw #because of the default configured goals
# or
./mvnw clean install
If you have multiple JDKs installed, IntelliJ IDEA might not select the expected one to build your
project with Gradle/Maven. In this case, click on the button marked with (4) in Figure A-7 and select Gradle
Settings/Maven Settings and set JDK 19 in the pop-up that appears.
The pop-up box for configuring the JDK Gradle uses is depicted in Figure A-8.
Figure A-8. IntelliJ IDEA JDK configuration pop-up for Gradle.
913
■ Appendix A
The pop-up box for configuring the JDK Maven uses is depicted in Figure A-9.
Figure A-9. Intellij IDEA JDK configuration pop-up for Maven.
You need to expand the Maven node and select Importing to see the JDK for importer selector.
914
Index
A
AbstractApplicationContext’s
registerShutdownHook() method, 123
AbstractEntity, 343, 344
AbstractLockOpener class, 77
AbstractMongoClientConfiguration class, 508
Access control list (ACL), 11
Accessing resources, 147–149
Acegi Security, 759
ActiveMQMessage class, 595
@ActiveProfiles annotation, 157, 166, 174, 186, 502
addAdvice(..) method, 196
addAdvisor(..) method, 196
addResourceHandlers(..) method, 626
AddressValidator class, 531
addViewControllers(..) method, 626
Advanced Message Queuing Protocol
(AMQP), 10, 574
afterPropertiesSet() method, 113, 287
Ajax-based components, 175
Ajax-style interactive web front end, 679
AlbumRepository interface, 471
AlbumServiceImpl service class, 472
AlbumServiceTest class, 473
AllInitMethodsDemo, 116–118
Amazon DynamoDB instance, 173
Annotation-based mechanism, 107
AnnotationConfigApplicationContext, 69, 104, 110
AnnotationConfigUtils, 119
Annotations, 43, 57
Anonymous users, 759
anotherSimpleBean, 83
AnotherTarget Bean Class, 99
Apache ActiveMQ Artemis, 590
classpath, 590
JSON representation, 595
Letter instance, 596
logs, 597
messages exchange, 592
project dependencies, 591
Receiver bean, 593
Sender bean, 594
Spring Boot application configuration, 590,
591, 593
Apache DBCP2, 338
Apache Kafka
availability and consistency, 598
CommandLineRunner bean, 606
definition, 597
distributed event streaming platform, 597
features, 597
IntelliJ IDEA terminals, 606
Kafka-based messaging solutions, 597
LetterSender bean, 604
local configuration, 598
NewTopic bean, 603
@Payload annotation, 605
POST method, 598
production setup, 598
record declaration, 601
Spring Boot application configuration, 600
Spring Boot configuration files, 603
Spring Boot web application, 599
topics, 601
vs. Zookeeper, 598
Apache Tomcat, 847
Apache Tomcat launcher, 631
Apache Tomcat server, 689
app.correspondent.address, 585
ApplicationArguments, 184
ApplicationContext, 41, 45, 58, 72, 80, 92, 95,
103, 104
BeanFactory, 106
configuration, 41, 110, 140, 141
definition files, 283
implementation, 119
static reference, 172
ApplicationContextAware interface, 75, 125, 126,
141, 145
ApplicationContext.getBean(), 87, 124
ApplicationConversionServiceFactoryBean
class, 523
© Iuliana Cosmina, Rob Harrop, Chris Schaefer, and Clarence Ho 2023
I. Cosmina et al., Pro Spring 6, https://doi.org/10.1007/978-1-4842-8640-1
915
■ INDEX
application-dev.yaml file, 496
ApplicationEvent
considerations, 147
constructor, 145
java.util.EventObject, 145
ApplicationEventPublisher.publishEvent() method,
145, 146
ApplicationListener class, 145, 146
ApplicationObjectSupport class, 144
Application programming interfaces (APIs), 9
Application’s presentation layer, 611
application-testcontainers.yaml configuration file,
332, 333
application-test.propeties file, 500
application-test.yaml file, 500
application.yaml file, 581, 582, 585
@Argument annotation, 739
Artemis-specific logs, 597
Aspect instantiation models
@Aspect annotation, 261, 262
aspect bean, 263
BeforeAdviceV5 class, 261, 262
BeforeAdviceV6 class, 263
BeforeAdviceV7 class, 264
message, 262
@AspectJ-style annotations, 245
after advice
AfterAdviceV1 class, 256
@AfterReturning, 257
@AfterThrowing, 257
AfterThrowingAdviceV2 class, 258, 259
annotations, 255
assertThrows(..) method, 257
output, 257, 259
PretentiosGuitarist class, 255, 256
test method, 256, 257
around advice
AroundAdviceV1 class, 252, 253
AroundAdviceV2 class, 253, 254
AspectJAopConfig class, 253
CommandingDocumentarist Class, 254
simpleAfterAdvice, 253
Before Advice
AnnotatedAdviceTest class, 248, 249
@Aspect annotation, 247
BeforeAdviceV1 class, 247
BeforeAdviceV2 class, 250
BeforeAdviceV3 class, 251
BeforeAdviceV4 class, 251, 252
@Before annotation, 247
configuration class, 248
EnableAspectJAutoProxy annotation, 248
joinpoint, 247
pointcuts, 250
proxies, 248
916
rule of thumb, 248
testBeforeAdviceV1() method, 249
testing, 248
test method, 250–252
GrammyGuitarist class, 245, 246
introductions, 259–261
NewDocumentarist class, 246
Aspect-oriented programming (AOP), 7, 9, 189, 269
concepts, 190, 191, 267
framework services, 239
functionalities, 189
introductions (see Introductions, AOP)
Spring Boot (see Spring Boot)
types, 191, 192
@AssertTrue annotation, 541, 542
Asynchronous HTTP, 574
Atomicity, consistency, isolation and durability
(ACID), 427
Atomikos, 424–426
AuditableEntity abstract class, 479
AuditAware<<String> bean, 495
AuditorAware<T> interface, 481
AuditServiceTest class, 482
Authenticated user, 774
Authentication, 11, 759
Authorization, 759
authorizeHttpRequests(..) method, 766, 769
Autoconfigured libraries, 327
AUTO_INCREMENT, 308
autoIndexCreation(), 508
@Autowired, 74, 95, 96
Autowiring
byName, 93, 98, 99
byType, 93, 96–98, 103
constructor, 93, 95, 96
default, 93
Foo, 100
NoUniqueBeanDefinitionException, 101
modes, 93
PickleAutowiringDemo, 102
@Primary, 101, 102
@Qualifier, 102
Spring applications, 103
TrickyTarget code, 101
AutowiringCfg class, 97
AutowiringDemo class, 98
AWS Lambda functions, 709
B
basePackageClasses, 180
BasicDataSource, 283
BasicDataSourceCfg configuration class, 292, 300,
302, 322, 338
BatchSqlUpdate class, 299
■ INDEX
InsertSingerAlbum, 311
insertWithAlbum() method, 310
JDBC insert operation, 311
testing, 312
BatchSqlUpdate.setBatchSize() method, 311
BatchSqlUpdate.updateByNamedParam()
method, 312
BCryptPasswordEncoder, 764, 765
Bean, 7, 84
annotations, 57
configuration, 269
constructor, 58
inspirationBean field, 64
scopes, 91
@Bean annotation, 81, 83, 84, 109, 111, 116, 119
Bean creation
dependency resolution procedure, 108
initialization callback, 108, 109
InitializingBean interface, 112, 114
JSR-250 annotations, 114, 115
method execution, 109–112
order of resolution, 116–118
BeanCreationException, 96
Bean destruction
destruction callback, 119
DisposableBean, 120, 121
JSR-250 annotation, 121, 122
method execution, 119, 120
order of resolution, 122
shutdown hook, 123
BeanFactory, 45, 54, 55, 104, 132
BeanFactoryPostProcessor, 140
BeanInstantiationException, 93
Bean instantiation mode, 87–89
Bean life-cycle management, 105, 107, 108
Bean-managed transactions (BMTs), 423
BeanNameAware interface, 123–125
BeanNameAware.setBeanName() method, 124
BeanNameGenerator, 82
Bean naming
@AliasFor annotation, 86, 87
ApplicationContext, 80
@Bean, 83, 84
bean instantiation mode, 87–89
@Component, 80, 81
customize bean naming style, 81, 82
explicit, 84, 85
Java configuration, 80
BeanNamingCfg configuration class, 81, 83
BeanPropertyBindingResult class, 529
Beans handling database operations, 300
Bean Validation API, 533, 538
Bitronix, 425
blogger.properties file, 514
BloggerToSimpleBloggerConverter class, 520
BloggerWithAddress class, 530, 532
BloggerWithAddress.class.isAssignableFrom(clazz)
statement, 532
BloggerWithAddressValidator class, 531, 532
buildDefaultBeanName(..) method, 82
build() method, 879
Business process, 573
byName Autowiring, 93, 98, 99
byType Autowiring, 93, 96–98
C
CategoryDeserializer, 577
CategorySerializer, 577
chapter04-boot project, 179
Chapter6ApplicationV2Test, 333
Chapter15-boot project dependencies, 703, 704
@CheckCountrySinger annotation, 539
ChildConfig class, 71
Cloud Native Buildpacks (CNB), 709
CollectingBean, 73
CollectionConfig class, 73
CollectionInjectionDemo class, 73
collectionResourceRel, 579
@Column annotations, 479
CommandLineRunner bean, 182, 586
Common Client Interface (CCI), 427
CommonJ library, 10
Communication process, 573
@ComponentScan, 58, 180
Component scanning, 58, 80, 151
ConfigurableBeanFactory.destroySingletons(),
119, 120
ConfigurableEnvironment interface, 159, 162, 163
ConfigurableMessageProvider, 149, 151, 152,
181, 183
@Configuration, 55, 81
Configuration metadata, 55
Configuration parameter, 52
configureContentNegotiation(..) method, 686
configureDefaultServletHandling(..) method, 626
configureMessageConverters() method, 686
connectionFactory attribute, 593
ConstraintViolation<T> interface, 537
Constructor autowiring, 93, 95, 96
Constructor dependency injection, 49, 50
Constructor injection, 51, 60, 61, 63, 93
ConstructorConfusion Class, 61, 62
MessageProvider Implementation, 62, 63
MessageRenderer, 60
renderer, 60
consume(…) method, 605
ConsumerRecord<K, V>, 608
containerFactory method, 605
Container-managed transactions (CMTs), 423
917
■ INDEX
@ContextConfiguration annotation, 172
ContextNestingDemo class, 72
Contextualized dependency lookup (CDL), 47–49
@Controller annotation, 683, 684, 731
ConversionServiceFactoryBean class, 519
Converter<String, DateTime> interface, 519
converter.setTargetType(MessageType.TEXT), 596
converter.setTypeIdPropertyName(“_type”), 596
ConvertersTest Class, 517
CoreDao interface, 274, 275
correspondentAddress property, 581
Couchbase, 503
CountrySingerValidator class, 539, 540
CountrySingerValidator.isValid(..) method, 541
createNativeQuery(..) method, 366
createRelative() method, 148
createSQLQuery(..) method, 368, 369
CriteriaDto class, 891
Criteria.setFetchMode(), 354
CriteriaValidator classes, 891
CRUD methods, 463
CrudRepository<T, ID> interface, 464, 465, 505
CSRF tokens, 769
ctx.getBeansOfType(String.class), 84
ctx.getEnvironment() method, 158
ctx.registerShutdownHook, 123
CustomEditorCfg class, 518
CustomEditorConfigurer class, 516, 517
Customer relationship management (CRM), 483
CustomPhysicalNamingStrategy class, 715
CustomRegistrarCfg class, 519
CustomSingerAuditRepository interface, 490–492
D
DAO interface, 285
DataAccessException hierarchy, 300
Data access object (DAO), 8, 152, 274, 279, 285–288,
299, 351, 376, 379, 384, 387
Data and lower-level layers
AbstractEntity, 614
@DateTimeFormat annotation, 614
Jakarta Persistence Entity, 613, 614
PHOTO column, 613
SINGER table, 613
SingerRepo Interface, 614
SingerServiceImpl class, 615
SingerService Interface, 615
SINGER table, 613
tables, 614
Database as a service (DBaaS), 394, 426
Database operations, 423
data
deletion, 413, 414
insertion, 409–411
918
updation, 411, 412
dependencies, 397
querying
custom result, constructor
expression, 407–409
untyped results, 405, 406
Database technology, 316
Data definition, 290
Data Definition Language (DDL), 285
Data manipulation, 290
Data Manipulation Language (DML), 285
Data model and infrastructure
annotations, 434
JPA entity classes, 431–433
project dependencies, 431
tables, 431
@DataR2dbcTest, 860
Data repository interfaces, 497
DataSource
BasicDataSourceCfg Class, 283
configuration class, 281, 282
DAO classes, 285–287
DriverManagerDataSource, 281
jdbc.properties, 281
JndiDataSourceCfg Class, 284
test class, 282, 283
DataSource bean, 283, 284, 287, 327, 339
Declarative HTTP interface, 589
Declarative programming, 852
Declarative transactions
AllServiceImpl class, 435, 436
AllServiceImpl.countSingers(..) method,
443, 444
AllServiceImplTest.testCount(..) method, 443
AllServiceImpl.update(..) method, 441, 442
AllServiceTest class, 438, 439
attributes, 436, 437
findById() method, 440
findByIdWithAlbums(..) method, 441, 443
logging statements, 439, 440
multilayered implementations, 435
readOnly flag, 437
testing methods, 439
@Transactional annotation, 434, 436, 437
transactional behavior, 434, 435, 444
DefaultFormattingConversionService class,
525, 526
DefaultListableBeanFactory interface, 119
DefaultResourceLoader, 148, 149
deleteById(..) method, 580
Dependency injection (DI), 1, 46, 51, 189
advantages, 7, 8
configuration model, 7
constructor, 49, 50
description, 6
■ INDEX
disadvantages, 8
interface-based design, 7
JavaBeans, 7
Java concepts, 7
object relationships, 6
Spring
ApplicationContext interface, 55
Autowired annotation, 59
BeanFactory interface, 54
configuration overview, 55, 56
configure ApplicationContext, 55
constructor injection, 60, 61, 63
declare spring components, 57, 58
field injection, 63–65
StandardOutMessageRenderer, 59
Dependency lookup, 46
CDL, 47–49
dependency pull, 46, 47
types, 46
Dependency management, 8
Dependent component, 45
Dependent object, 46
@DependsOn annotation, 91
DependsOnDemo, 93
destroy() method, 123
destroyMethod() method, 120
destroySingletons() method, 119, 120, 122
Destruction callback, 122
DispatcherHandler, 855
DispatcherServlet, 685, 853
displayInfo() method, 79
@DisplayName annotation, 319
DisposableBean.destroy() method, 122
DisposableBean interface, 120, 121
Docker
dashboard, 909
image files, 909
IntelliJ IDEA database view, 909, 910
TestContainers, 909
docker-build/scripts/CreateTable.sql, 271
Docker Compose, 598, 606, 910
docker-compose.yaml file, 598
Docker MariaDB container, 272
Documentation, 12
DriverManager, 281
DriverManager’s getConnection() method, 275
DriverManagerDataSource, 281
@DynamicPropertySource, 323, 333
E
EclipseLink, 326
EJB architecture, 7
Elasticsearch, 269
EmbeddedDatabaseBuilder, 321
Embedded database support, 284
Embedded H2 database, 284
EmbeddedJdbcConfig class, 285, 292, 303
EmbeddedServletContainerFactory
configuration, 180
EmptyEmbeddedJdbcConfig config class, 318
@EnableAutoConfiguration, 180
enableHttpSessionEventPublisher() method, 762
@EnableJms bean, 593
@EnableJpaRepositories annotation, 466, 467, 497
@EnableMongoRepositories, 507
@EnableTransactionManagement annotation, 497
@EnableWebMvc, 521
@EnableWebSecurity, 765, 779
Enterprise applications, 573, 611
Enterprise JavaBeans (EJB), 7, 23, 46, 50, 192, 335,
423, 486, 573
Enterprise resource planning (ERP), 1, 424, 425
Enterprise testing framework, 164
@EntityListeners(AuditingEntityListener.class)
annotation, 479
EntityManager, 463, 468, 471, 490, 497
EntityManagerFactory, 461
entityManagerFactoryRef attribute, 467
Entity-relationship (ER), 270
Entity versioning, 485, 486, 489
Envers auditing strategies, 484, 485
Environment hierarchy, 162
Environment interface, 158–160
Environment object, 158
Evelyn application, 586
EventsConfig configuration class, 146
EventSource, 887
Exception handling
Apache Tomcat error page, 665, 669
bean declaration, 668
configuration, 666
@ControllerAdvice, 668
DefaultServletHttpRequestHandler, 666
DispatcherServlet.properties file, 664
error message, 665
functions, 665
HandlerExceptionResolver, 667, 668
HTTP status code, 669
ModelAndView, 667
SimpleMappingExceptionResolver class,
665, 668
testing, 669
URLs, 665
Exchange Access (XA), 424
executeByNamedParam(..) method, 305
Expert One-on-One: J2EE Design and Development
(book), 2
Expression Language (EL), 9
extractData(..) method, 297
919
■ INDEX
F
FactoryBean.getObject() method, 127
FactoryBean interface, 105
accessing, 131, 132
definition, 127
MessageDigestFactoryBean, 127–131
object adapter, 127
transactional proxies, 127
Field formatting
AppConfig class, 523
custom formatter implementation, 522
Formatter SPI, 522, 524, 525
Formatter<LocalDate> interface, 523
FormattingServiceCfg class, 525
init() method, 523
test method, 524
type conversion system, 522
Field Formatting SPI, 140
Field injection, 50, 63–65
FieldTarget Bean Class, 100
FileNotFoundException, 149
FileSystemResource class, 149
findAll() method, 295, 302, 330, 352
findAllWithAlbum() method, 312, 354
findAllWithAlbumsAsRecords() log, 383
findAllWithDetail() method, 297
findAuditByRevision() method, 489, 492
findByFirstName(..) method, 304, 305, 318
findById() method, 356
findById(id) repository method, 474
findByLastName(..) method, 476
findByPositionedParams(..) method, 505
findBySinger(..) query, 473
findNameById(..) method, 287
findWithReleaseDateGreaterThan(..) method, 472
FoodProviderService interface, 153, 154
Formatter SPI, 522, 524, 525
Formatter<LocalDate> instance, 524
FormattingConversionService class, 522, 525, 526
FormattingConversionServiceFactoryBean class,
522, 525
Formatting rules, 513
FormattingServiceCfg class, 525
Front-end unit test, 175
Front-end web testing, 175
FullName interface, 476
Functional endpoints, 873–879
G
@GeneratedValue, 346
GenericApplicationContext, 126, 178
GenericGroovyApplicationContext class, 176, 177
getAlbums, 349
920
getBean() method, 40, 41, 110
getBean(“childProvider”), 72
getClassFilter() method, 207
getCurrentAuditor() method, 482
getFirstNameById(..), 313, 324
getForObject(..), 692
getMappingBasePackages() method, 509
getMessage() method, 143, 169
getMessageSourceAccessor() method, 144
getMyKeyOpener() method, 76, 77
getNamedQuery(..) method, 357
getObject() method, 127, 128
getObjectType() method, 128
getOptionNames() method, 184
getPropagationBehavior() method, 429
getResource() method, 149
getRootConfigClasses() method, 622
getServletConfigClasses() method, 622
getServletFilters() method, 623
getServletMappings() method, 623
getSourceArgs() method, 184
GitHub repositories, 13
Google Guice, 13, 123
Google Web Toolkit (GWT), 611
GraphQL, 710
annotation-based programming model, 731
APIs, 726
@Argument annotation, 739
Award entity class, 729
characteristics, 727
@Controller annotation, 731
creating/updating/deleting a singer, 741
database queries, 734
DataFetcherExceptionResolverAdapter, 742
dependencies, 728
Facebook, 727
GraphiQL web console, 734, 742, 744
Instrument entity class, 730
JPA Specification API methods, 735
many-to-many Relationship, 737
one-to-many Relationship, 736
QueryMapping annotation, 731
repository interfaces, 730
REST, 726, 727
schema, singer type and singers query, 732
singer entity class, 728
Spring Boot Application Configuration, 732
SQL Query, many-to-many relationship, 738
tables, 727
GraphQL Java, 4
GroovyBeanDefinitionReader, 178
GroovyBeansFromJavaDemo class, 177
Groovy language, 106, 176, 178
Groovy scripts, 176, 177
gRPC, 574
■ INDEX
H
H2 datasource, 284, 292, 328
H2HibernateTest Test Class, 371
H2 web console, 583, 584
handle(..) method, 855
Handler class, 873–879
Handler function, 873, 889
create, 876
deleteById, 876
findById, 876
searchSingers, 877
updateById, 877
Handler functions validation
CriteriaDto class, 891
FieldGroup enum, 892
findByCriteriaDto(..) implementation, 892
MissingValueException, 893
Search Singer page, 898
SingerHandler, 893
SingerHandler.searchView(), 894, 895
singers/search.html view, 896
validate(..) method, 893
HandlerMapping, 855
HashiCorp’s Vault, 5
Hello World, Spring
Arguments, 33
configuration file, 38
decoupled Hello World application, 36
HelloWorldMessageProvider, 36
Instance Factory Class, 37
Java version, 33
main(..) method, 35, 36
MessageProvider, 34–36, 40
MessageRenderer, 34–36, 40
MessageSupportFactory, 38
ServiceLoader, 39
Spring configuration, Annotations, 43, 44
spring-context, Gradle view, 42
Spring XML configuration, 40–42
StandardOutMessageRenderer, 36
HelloWorldSpringAnnotated class, 56
Hibernate, 9, 269, 326, 498
AbstractEntity, 374
@ComponentScan, 341
configuration, 800, 801
CustomHibernateStatistics class, 801, 802
data model, 337
dataSource, 340
deleting data, 364–366
generate tables, entities, 369–373
inserting data, 358–362
JBoss, 336
JPA annotations, 373
mapping, 343
ORM library, 336
properties, 341, 801
querying data, HQL
associations fetching, 354–358
lazy fetching, 352–354
sample data model, 336, 337
SessionFactory, 337–342
settings, 376
simple mappings
AbstractEntity, 344
Album, 346
@Entity, 346
id attribute, 346
INSTRUMENT table, 347
many-to-many mappings, 349, 350
one-to-many mappings, 348, 349
session interface, 350–355
version attribute, 346
SQL native queries, 366, 367
statistics, 803
stored functions, 368, 369
testCreate() method, 803
transactionManager, 340
updating data, 362–364
VisualVM, 803
HibernateCfg configuration class, 499
HibernateConfig class, 339
hibernate-core-jakarta, 338
Hibernate Core Jakarta, 462
HibernateDemoV1 Runnable Class, 352
HibernateDemoV2 Runnable Class, 353
Hibernate Envers, 461, 484, 486
Hibernate Query Language (HQL), 352
Hibernate sessions, 461
Hibernate-specific properties, 501
HibernateTest class, 357
HibernateTestConfig Configuration Class, 370
HibernateTest.testDelete() method, 365
HibernateTest.testInsert() method, 359, 361
HibernateTest.testUpdate() method, 362, 363
Hibernate Validator, 533
HierarchicalMessageSource, 141
HikariCP, 495
HomeController, 627, 884, 886
hookOnNext(..) method, 852
HTML format, 320
HTTP-based technologies, 573
httpBasic(Customizer.withDefaults()), 766
HTTP client libraries, 581
HTTP GET method, 691
HttpHandler, 854
HTTPie client, 586, 607
HttpSecurity, 766
HttpServletRequest, 8
HttpServletResponse, 8
921
■ INDEX
I
iBATIS, 326
ImplicitNamingStrategy, 498
Impl postfix, 492
@Indexed annotation, 504
initialization() method, 324
initializationBean Destruction callback, 119
initialize() method, 322
InitializingBean interface, 112–114, 287
init() method, 111
InitMethodDemo class, 110, 111
Injection-oriented application, 8
Injection parameters
ApplicationContext nesting, 68–72
injecting collection, 73–75
injecting simple values, 65, 66
injecting values, SpEL, 66–68
injection, 68–72
Injection-style IoC, 50
InjectSimpleDemo Class, 65
InjectSimpleSpELDemo class, 68
insert(..) method, 309
Inserting data, 308
Inserting, updating and deleting data, 270
InsertSinger class, 309
InsertSingerAlbum class, 310
insertWithAlbum() method, 311, 312
Inspiration class, 63, 64
Instantiation mode, 88, 90
Integration test, 169–173
Integration testing, profile configuration, 173–175
IntelliJ IDEA, 17, 21, 168, 586, 606, 607, 688, 691
IntelliJ IDEA Gradle Projects, 327
IntelliJ IDEA Gradle View, 534, 789
Interface-based mechanism, 107
Internationalization (i18n), 634
DispatcherServlet, 634, 635
files, 634
language-related settings, 634
Spring MVC, 634
view, internationalization support, 636, 637
Internet, 17, 503
Inter-service communication, 574
Introductions, AOP, 191
advisor, 236
around advice, 232
Contact class, 233, 237
crosscutting logic, 238
DelegatingIntroductionInterceptor, 232
functionality, 231
IntroductionDemo Class, 237, 238
IntroductionInterceptor interface, 232
invoke() method, 232
IsModifiedMixin, 239
922
object modification detection (see Object
modification detection)
per-class life cycle, 232, 233
per-instance life cycle, 233
PointcutAdvisor, 232
proxies, 238, 239
ProxyFactoryBean class, 244, 245
standard advice, 232
Inversion of control (IoC), 1, 6, 7, 45, 105
dependency injection (see Dependency
injection (DI))
dependency lookup (see Dependency lookup)
dependent object, 46
setter injection vs. constructor injection, 51–53
in Spring, 53
isCountrySinger() method, 541
isSingleton() property, 129
isValid() method, 539
J
Jackson annotations, 680
Jackson library, 680
Jackson Project, 10
Jakarta 10–compatible servers, 426
Jakarta Annotations, 780
jakarta.el.ExpressionFactory, 534
Jakarta Expression Language expressions, 534
jakarta.jms.ConnectionFactory bean, 590
jakarta.jms.ConnectionFactory hierarchy, 592
jakarta.jms.Message, 594
jakarta.jms.TextMessage, 595
jakarta.persistence.NamedQuery approach, 354
jakarta.validation-api version 3.0.2, 534
jakarta.validation.constraints package, 533
jakarta.validation.Validator, 536
JasperReports, 10
Java 8 Stream API, 851
Java API for RESTful Web Services (JAX-RS), 574
Java API for XML-based RPC (JAX-RPC), 573
Java API for XML Web Services (JAXWS), 573
Java application, 423, 793
JavaBeans, 7
java.beans.PropertyEditor interface, 133
java.beans.PropertyEditorSupport class, 133
Java Community Process (JCP), 7, 335
Java Configuration Annotations Table, 151
Java configuration classes, 43, 149–153, 486
Java Data Objects (JDO), 335, 389
Java EE Connector Architecture (JCA), 425
Java Enterprise Edition (JEE), 1
java.lang.AutoCloseable, 278
Java Management Extensions (JMX), 793
Hibernate (see Hibernate)
managed beans (MBeans), 794, 803
■ INDEX
spring beans
ApplicationContext, 795
AppStatisticsImpl class, 794, 795
AppStatistics interface, 794
@EnableMBeanExport annotation, 796
@ManagedAttribute annotation, 795
@ManagedResource annotation, 795
MbeanServer instance, 796
MonitoringCfg class, 795, 796
registration process, 796
Spring Boot (see Spring Boot)
VisualVM (see VisualVM)
Java Naming and Directory Interface (JNDI), 8
Java Object Oriented Querying (jOOQ), 335
BasicDataSourceCfg configuration class, 380
benefits, 387
disadvantages, 387
DSLContext, 381
GenerateJOOQSources class, 377–379
innerJoin(..) method., 383
jooq-codegen-maven plug-in, 377
jooq-config.xml file, 378
multisetAgg(..) method, 383
nu.studer.jooq plug-in, 377
org.jooq.codegen.GenerationTool, 377
SingerWithAlbums, 382
Spring Configuration Class, 380
SQL native queries, 376
Testcontainers, 380
toString() methods, 379
Java objects retrieving and mapping, 270
Java Open Transaction Manager (JOTM), 425
Java Persistence API (JPA), 335, 461
annotations, ORM mapping
finder methods, 395
Hibernate, 394
multilayered application, 394
@PersistenceContext, 396
@Repository, 396
@Service, 396
SingerServiceImpl class, 395, 396
SingerService interface, 394, 395
@Transactional, 394, 396
concept, 389, 390
database operations (see Database operations)
data model, 391
EntityManager, 390
EntityManagerFactory, 422
beans, 393
Java configuration, 391
JEE-compliant container, 391
LocalContainerEntityManagerFactoryBean
class, 392, 393
LocalEntityManagerFactoryBean class, 391
XML configuration, 391
JPA 2.1, 390
JPA 3.1, 390
persistence providers, 389
persistence unit, 390
specification, 391
Java Persistence Query Language (JPQL), 389, 390
associations, 402
EntityManager.createNamedQuery()
method, 399
findAll() method, 399, 400
findAllWithAlbum() method, 402, 403
findById() method, 404
getSingleResult() method, 405
@NamedQuery, 399
Singer domain object model class, 397
TestContainersConfig class, 400
testFindAll() test method, 400, 401
testFindAllWithAlbum() test method, 403
TypedQuery<T>.setParameter() method, 405
Java Remote Method Invocation (RMI), 573
JavaScript frameworks, 633, 637
JavaScript or .NET developers, 2
Java Server Faces (JSF), 9, 611
Java Server Pages (JSP), 9
Java Servlet API, 847
Java’s OO model, 326
Java Specification Requests (JSRs), 390
java.sql.Connection interface, 275, 276, 278
java.sql.Driver implementation, 276
java.sql.DriverManager class, 275
Java Standard Tag Library (JSTL), 10
java.time.LocalDate, 515, 516
Java Transaction API (JTA), 423
Java Transaction Service (JTS), 425
javax.sql.DataSource, 284
JBoss Seam Framework, 13
JDBC authentication, 780–784
JDBC infrastructure
complexity, 275
DAO class, 279
database connections and datasources,
276, 281–284
driver, 275
embedded database support, 284, 285
exception handling, 288–289
packages, 280, 281
project classpath, 275
JDBC packages, 280
JDBC programming, 290, 334
JdbcSingerDao class, 286, 287
JdbcTemplate bean, 290, 291
JdbcTemplate class, 288, 291
initializing, DAO class, 290–292
JDBC programming, 290
named parameters, 292, 293
923
■ INDEX
JdbcTemplate class (cont.)
ResultSetExtractor<T>, 296–299
RowMapper<T>, 293–296
SQL statement, 290
jdbcTemplate.queryForObject(..) method, 292
JDBC testing annotations
database schema, 318
@DisplayName, 319
HTML format, 320
@SpringJUnitJupiterConfig, 318
@SqlConfigure, 318
@SqlGroup, 319
@SqlMergeMode, 318
JDK proxies, 467
JEE application, 793
JMS 2.0 API, 589
JMS communication, 590
JMS-driven processing, 147
JmsTemplate bean, 590, 592
JndiCallback interface, 284
JndiTemplate, 284
Job scheduling, 10
johnMayer.sing() method, 91, 92
Joinpoint, 190
jOOQ 3.15, 376
JOOQDaoTest, 384–386
JPA annotations, 373
JPA auditing, 483
JPA criteria API, criteria query
metamodel class, 417, 418
SingerServiceImpl.findByCriteriaQuery(),
418, 419
SingerServiceTest test class, 420, 421
@StaticMetamodel, 418
testFindByCriteriaQuery() test method, 421
uses, 419, 420
JPA entity listener, 477
JPA implementations, 511
JpaRepository<T, ID> interface, 470, 471
JSON format, 689
JSON properties, 680
JSON representation, 580, 587, 589
JSR-250 annotations, 780
JSR-250 @PostConstruct Annotation, 114, 115
JSR-349 (bean validation)
API selection, 542–544
configuration class, 535–538
constraints, domain object properties, 534, 535
creating custom validator, 538–541
dependencies, 534
DispatcherServlet configuration, 662, 663
error message codes, 661
getValidator() method, 663
singer object, 661
SingerForm class, 660
924
customized error messages, 661, 662
file uploading, 660
methods, 662
@Size annotation, 661
solutions, 661
Spring’s ApplicationContext, 533
validation message, 661
validator bean, 663
view page, validation errors, 663, 664
JTA transaction manager classes, 427
junit-jupiter.jar Testcontainers library, 322
JUnit Jupiter life-cycle management, 322
JVM system property, 159
K
Kafka abstraction, 600
KafkaApplication class, 605
kafkaApplication.receivingTopic, 604
kafka-clients.jar library, 608
KafkaConfig configuration class, 601
KafkaController class, 604
@KafkaListener annotation, 605, 608
Kafka-specific properties, 603
KafkaTemplate class, 603
KeyHelper class, 75
Kotlin
BeforeAll and @AfterAll annotations, 757
CustomPhysicalNamingStrategy Kotlin
Class, 754
gradle configuration
in Groovy, 748
kotlin-allopen plug-in, 747
kotlin-noarg plug-in, 747
Gradle plug-in (kotlin-gradle-plugin), 746, 747
Java developer, points, 744, 746
JVM programming language, 744
KotlinApplicationTest Kotlin Spring Boot Test
Class, 755, 756
kotlin-stdlib dependency, 749
SingerController class, 753
Singer Kotlin Class, 750
SingerRepository Spring Data repository
interface, 751
SingerService class, 752
SingerService Kotlin Class, 751
Spring Boot applications, 748
Spring Boot main class, 755
KotlinApplicationTest, 757
L
@LastModifiedBy annotated fields, 482
@Lazy annotation, 95
LazyInitializationException, 354, 355
■ INDEX
LetterReader class, 604, 605
LetterRepository interface, 578, 580
LetterRepository Spring Data REST Repository, 578
LetterSender class, 603
LetterSenderController class, 580, 581, 585, 588
Life-cycle notifications, 108
ListableBeanFactory, 40
Loadtime weaving (LTW), 191
LocalContainerEntityManagerFactoryBean
object, 486
LocalDate type, 518, 523
LocalDate birthDate field, 504
LocalDatePropertyEditor class, 516
LocalSessionFactoryBean, 497
LocalValidatorFactoryBean class, 536, 537, 543
LockOpener class, 75
log() method, 863
logback.xml configuration file, 274
logback.xml files, 274, 496
Logic unit test, 167–169
Lookup method injection, 75
AbstractLockOpener class, 77, 79
ApplicationContextAware interface, 75
displayInfo() method, 79
getMyKeyOpener() method, 76, 77
life cycles, 79
KeyHelper, 75, 78, 79
LockOpener class, 75, 76
main() method, 78
non-singleton bean, 75, 76
openLock() method, 76, 77
singleton bean interface type, 76
Spring, version 1.1, 75
StandardLockOpener class, 76
Lookup-style IoC, 50
M
main(..) method, 40, 41, 43, 53
Many-to-many mappings, 349, 350
@MappedSuperclass, 479
mapper.registerModule(new
JavaTimeModule()), 596
MappingSqlQuery<T> class, 299
declareParameter() method, 304
findAll() method, 301, 302
modeling query operations, 301
SelectAllSingers class, 301
setDataSource() method, 302
super(..) method, 301
mapRow() method, 299
MariaDB container, 322, 860
MariaDB database, 269, 271, 368
MariaDBErrorCodesTranslator, 289
MariaDB implementation, 276
mariadb-java-client.jar file, 275
MariaDB scripts, 332
mariaDB.start(), 322
MariaDB test container, 339
Maven, 25–27
Maven/Gradle configuration, 275
Message-based communication, 574
MessageDigestFactoryBean, 127–131
MessageEvent, 146
MessageEventListener, 146
MessageProvider, 34, 40, 41, 52
MessageProvider and MessageRenderer beans, 181
MessageProvider dependency, 174
MessageProvider Interface, 34
Message queue (MQ), 589
MessageRender, 149
MessageRender and MessageProvider
beans, 167–169
MessageRenderer, 40, 41, 52
MessageRenderer bean, 182
MessageRenderer interface, 34, 48
MessageSource interface
ApplicationContext, 141, 144
application events, 144–147
getMessage() method, 143
internationalization, 141–143
stand-alone applications, 144
String resources, 141
MessageSourceAccessor object, 144
MessageSourceResolvable interface, 144
MessageSupportFactory, 38
Method-based mechanism, 107
Method injection
lookup method injection, 75–79
Micrometer
data, 814
Logback Classic, 812
metrics, 822
categories, 814
names, 812, 813
SLF4J, 812
Microservices, 574
Microsoft SQL Server, 269
MissingValueException, 893
Mobile devices, 611, 612
Mockito utility methods, 169
MockMvcRequestBuilders.get(..) method, 630
Model objects, 285
Model View Controller (MVC), 612, 616
@Modifying annotations, 474, 476
MongoCfg class, 510
MongoClient Bean Declaration, 506
MongoClientFactoryBean, 506, 508
Spring MongoClientFactoryBean, 506
MongoClients.create(..) static method, 506
925
■ INDEX
mongoClientSettings() method, 508
MongoDB, 269
AbstractMongoClientConfiguration class, 508
connection string, 506
Data repositories, 507
Docker, 503
@Field annotation, 504
_id field, 504
instance, 505, 506
MongoClient, 506
MongoRepository<T, ID> interface, 505
NoSQL database, 503
@Param annotation, 505
project dependencies, 509
Singer class, 503, 504
SingerRepository interface, 505
SingerService bean, 505
Spring Data, 510
mongodb-driver-reactivestreams library, 509
mongodb-driver-sync libraries, 509
MongoDB-specific infrastructure, 508
@MongoId, 504
mongo.properties file, 507
MongoRepository<T, ID> interface, 505
MongoTemplate bean, 510
MongoTransactionManager class, 510
Monolithic applications, 573
MQ server, 589
musicdb schema, 272, 300
MariaDB musicdb database, 330
MutablePropertySources class, 159, 160
MyBatis, 335
mysql-java-client, 327
N
NamedParameterJdbcTemplate class, 293, 299
namedQueriesLocation attribute, 467
NamedQuery, 354–356
@NamedQuery annotation, 471
NamedTemplateDao, 293
namedTemplate.query() method, 297
NamePropertyEditor, 139
Native query, 414
creation/execution, 415
EntityManager, 414
functions and procedures execution, 416, 417
SingerServiceImpl.findAllByNativeQuery(..)
method, 414
SQL ResultSet mapping, 415
NewsletterSender interface, 52
Non-singleton beans, 76, 89
NonSingletonDemo class, 63, 87
Non-singletons, 90
NoSQL databases, 461, 503, 511
926
@NotAudited annotation, 489
NotFoundException REST-Specific Exception
Class, 699
@NotNull annotation, 535
@NotNull constraint, 535
NullPointerException, 92
O
Object modification detection, 234
Contact class, 237
IsModified interface, 234
JavaBeans conventions, 234
mixin class, 235, 236
object state, 234
uses, 234
Object-oriented (OO) model, 335
Object-oriented programming (OOP), 189
Object-relational mapping (ORM), 270, 335
frameworks, 326
library, 335
tools, 326
Object-to-relational mappings, 336
Old-style approach, 516
One-to-many mappings, 348, 349
One-to-many relationship, 272
OpenJPA, 326
openLock() method, 75, 76
Open source projects, 13
Optimistic locking mechanism, 346
Oracle Advanced Queueing, 316
Oracle Database, 8, 269, 316
@Order annotation, 182, 183
org.apache.commons.dbcp2.BasicDataSource, 284
org.hibernate.envers.AuditReader interface, 489
org.mariadb.jdbc.Connection interface, 276
org.springframework.beans.
PropertyEditorRegistrar, 136
org.springframework.boot.ApplicationRunner
class, 184
org.springframework.boot.autoconfigure, 180
org.springframework.boot.CommandLineRunner
interface, 182
org.springframework.context.annotation.
AnnotationBeanNameGenerator class, 82
org.springframework.core.convert package,
514, 518
org.springframework.core.convert.
ConversionService interface, 519
org.springframework.core.convert.converter.
Converter<S,T> interface, 518
org.springframework.core.convert.support
package, 521
org.springframework.core.io.Resource
interface, 147
■ INDEX
org.springframework.dao.
DataAccessException, 289
org.springframework.data.annotation package, 479
org.springframework.data.repository.
Repository<T,ID> interface, 463
org.springframework.format package, 524
org.springframework.jdbc package, 304
org.springframework.jdbc.datasource, 281
org.springframework.validation.Errors
interface, 528
org.springframework.validation.Validator interface,
527, 536
org.springframework.web.client.RestTemplate
class, 575
P
@Param annotation, 472, 859
ParentConfig class, 70
parse(..) method, 523
performLookup(), 48
Persistable<ID> interface, 477
Persistence events, 487
personalSite field, 521, 533
2-Phase Commit (2PC) mechanism, 424
PhysicalNamingStrategyImpl class, 499
PhysicalNamingStrategy interface, 498, 499
PicoContainer, 13, 123
Pivotal Software, 3
PlainJdbcDemo class, 278
Plain old Java objects (POJOs), 7
PlainSingerDao implementation, 277
PlatformTransactionManager, 327, 426, 427, 866
Pointcuts, 190
advice, 200, 201
annotations, 215–217
AspectJ pointcut expression, 214, 215
ComposablePointcut, 228
console output, 230
GrammyGuitarist class, 228
intersection() method, 227, 228
RestMethodMatcher, 230
SingMethodMatcher, 230
TalkMethodMatcher, 230
testing, 228–230
union() method, 227, 228
composition, 231
control flow pointcuts
ControlFlowDemo, 225, 226
ControlFlowPointcut class, 224
foo() method, 225, 226
output, 226
SimpleBeforeAdvice class, 224, 225
sing() method, 226
test() method, 226
TestBean class, 225
transaction processing system, 227
UML sequence diagram, 227
uses, 226
DefaultPointcutAdvisor, 204
DynamicMethodMatcherPointcut
DynamicPointcutDemo Class, 209
getClassFilter() method, 208
implementation, 208
output, 209
Singer interface, 207
sing() method, 208
sing({key}) method, 210
getter and setter methods, 227
hard-code method, 201
implementations, 203, 224, 231
KeyGenerator class, 201
MethodMatcher interface, 202
dynamic pointcut, 202
static pointcut, 202
NameMatchMethodPointcut
addMethodName(..) method, 211
Advisor implementations, 213
GrammyGuitarist class, 210, 211
NameMatchMethodPointcutAdvisor, 212
NamePointcutDemo Class, 211
output, 211, 212
setMappedNames(..) method, 213
perthis(Pointcut) vs.
pertarget(Pointcut), 264
Pointcut interface, 201, 230
methods, 201
Pointcut.getClassFilter(), 201, 202
regular expressions, 213, 214
sing() method, 207
Spring documentation, 231
StaticMethodMatcherPointcut, 204
classes, 205
getClassFilter() method, 207
implementation, 205, 206
main(..) method, 207
output, 207
StaticMethodMatcherPointcut
Advisor, 231
target affinity, 201
POJOs, 272, 273, 335
popNestedPath(..) method, 532
@PostConstruct, 322
PostgreSQL, 8, 269
Post-initialization, 107
POST Request, 587
preDestroy() method, 126
@Primary, 101, 102
printCollections() method, 73
ProducerFactory bean, 603
927
■ INDEX
@Profile(..) annotations, 173
Profiles
ApplicationContext instance, 153
application developer, 157
configuration files/Java classes, 157
features, 153–157
Programmatic transactions, 510
countSingers() method, 451, 452
options, 450
ProgramaticServiceImpl class, 452
ProgrammaticTransactionCfg
class, 450, 451
singerRepo.countAllSingers() method, 452
testing method, 452
TransactionTemplate, 451, 453
Project Reactor, 849, 850
Prometheus, 814
Docker container, 816
GET/POST requests, 822
Grafana, 822
graphs, 821, 822
handler method, 819, 820
http_server_requests_seconds_count, 821
/prometheus endpoint, 815, 816
PrometheusScrapeEndpoint class, 815
prometheus.yaml file, 816
SingerController, 819
system_cpu_usage, 818, 819
targets menu item, 817, 818
test methods, 820, 821
web console, 817
PropDemoConfig class, 162
PropertyEditor, 105, 519
built-in, 133, 136–138
custom, 138–140
lightweight classes, 132
spring-beans package, 132
string-typed properties, 132
String values, 132
PropertyEditorRegistrar class, 516, 517
PropertyEditorSupport class, 139
PropertySource abstraction, 158–160
@PropertySource annotation, 150, 161, 514
PropertySourceDemo class, 163
pro-spring-6 project, 901
building/troubleshooting
Gradle build command, 912, 913
Gradle view, 912
import menu, 910
JDK Gradle uses, 913
JDK Maven uses, 914
Maven view, 912
project type, 911
root directory, 910, 911
tasks, 912
928
Gradle configuration
bootProjects variable, 903
build.gradle file, 902
chapter02_2.gradle, 902
chapter09-boot.gradle, 904, 905
chapter09.gradle file, 903, 904
configuration file, 901–903
declarations, 903
global variables, 903
modules, 901, 902
Spring Boot, 903
Gradle Wrapper, 905
Maven configuration
dependency management, 906
modules, 905, 906
<modules> element, 906
<pluginManagement>
element, 907
pom.xml files, 907, 908
versions, 905
Maven Wrapper, 908
modules, 19
tasks, 905
provideLunchSet() method, 153
Proxies
advised interface, 217
CGLIB proxies, 217–219, 223
choosing to use, 224
functionality, 217
goal, 217
JDK proxies, 217
NoOpBeforeAdvice class, 220
performance, 220, 223
SimpleBean interface, 220
test cases, 223
testing, 221, 222
test results, 223
TestResults class, 223, 224
types, 222
proxyBeanMethods attribute, 500
ProxyFactory.addAdvice() method, 200
ProxyFactoryBean class, 239
AopConfig class, 241–243
AOP proxies, 245
AuditAdvice class, 240, 241
configuration, 243, 244
declaration, 243
Documentarist class, 240
flags, 240
GrammySinger class, 241
image, 243
interface, 240
methods, 243, 244
scenario, 240
target bean, 240
■ INDEX
Publish-subscribe model, 589
pushNestedPath(..) method, 532
Q
@Qualifier, 74, 98, 99
Quality assurance (QA), 793
@Query annotations, 471, 473
Query Domain-Specific Language (QueryDSL)., 389
QueryDSL, 316
queryForObject(..) method, 291
@QueryMapping annotation, 731
R
R2dbcTransactionManager, 867
Reactive applications, 853
elastic, 848
message-driven, 848
reactive manifesto, 848
resilient, 848
responsive, 848
software design evolution, 848
Spring Boot Configuration, 856–857
Reactive communication, 847, 884
Reactive controllers, 871–873
Reactive Error Handling, 880, 881
Reactive Manifesto, 848
ReactiveMongoTransactionManager, 867
Reactive programming, Spring, 11
asynchronous event processing, 848
BaseSubscriber<T> abstract class, 852
data streams, 848
declarative programming, 852
definition, 849
hookOnNext(..) method, 852
imperative style code, 851
Reactive Streams, 849
Reactive Relational Database Connectivity
(R2DBC), 856, 858
Reactive service
ConnectionFactory bean, 868
doOnError(..), 871
@EnableTransactionManagement
annotation, 868
onErrorContinue(..), 871
onErrorMap(..), 871
onErrorResume(), 871
onErrorReturn(..), 870
R2dbcTransactionManager, 867
ReactiveMongoTransactionManager, 867
ReactiveTransactionManager, 867
SaveException, 866
SingerService interface, 865
SingerServiceImpl class, 865, 868
transaction management, 866
transactions, 866
ReactiveSingerController, 871, 876, 881
Reactive Streams, 848, 849
asynchronous, 850
functional style code, 852
processor, 850
Project Reactor, 850
publisher, 849
pure functions, 850
subscriber, 849
subscription, 849
ReactiveTransactionManager, 867
Reactive web layer
@EnableConfigurationProperties
annotation, 885
HomeController class, 886
reactive Thymeleaf configuration class, 884
responseMaxChunkSizeBytes, 885
server-sent events, 884
SpringTemplateEngine, 885
Thymeleaf, 884, 887
ThymeleafReactiveViewResolver, 885
Reactor Netty, 857
Reactor’s Context, 867
registerShutdownHook() method, 126
Relational database management system
(RDBMS), 335
Relational databases, 502
Remote procedure calls (RPCs), 9, 574
Remote services, 10
Remoting support, 10
render() method, 182, 889
RepoDemo class, 302, 315
RepoDemo.main(..) method, 315
@Repository, 300
Repository abstraction
BasicDataSourceCfg class, 467
configuration class, 466
CrudRepository<T, ID> interface, 463–465
JPA EntityManager, 463
findAll() method, 466
findByFirstName() method, 466
JPA operation, 470
marker interface, 463
proxies, 467
singerRepository instance, 468
Testcontainers MariaDB, 469
Repository instance method, 470
Reactive RepositoryTest test class, 861
Reproducible tests, 164
@RequestBody, 683
@RequestMapping, 683
ResourceBundleMessageSource, 141, 142
ResourceLoader implementation, 148
929
■ INDEX
ResourcePropertySource class, 163
@ResponseBody, 683, 684
responseMaxChunkSizeBytes, 885
REST APIs, 726, 727
RestClient3Test#testNegativeCreate() Test
Method, 702
RestClientTest#testFindAll(), 691
@RestController, 684
@RestControllerAdvice, 699–703
RestErrorHandler class, 702
REST Exception Handling
ResponseEntity<T>, 694–698
@RestControllerAdvice, 699–703
RESTful web services (RESTful-WS), 9, 679
Ajax-style interactive web front end, 679
description, 680
Exception Handling, 664–679
representations for manipulating resources,
679, 680
SingerController, 681–688
Spring Boot, 703–707
Spring MVC, 680–681
testing, 688–694
RestTemplate class, 581, 588, 589, 689–691
RestTemplate#exchange(..) method, 696, 697
REVTSTMP column, 486
Rich Internet applications (RIAs), 175
Role-based access control (RBAC), 11
Rolling back transactions
checked exception class, 445
noRollbackFor attribute, 450
rollback behavior, 444
rollbackFor attribute, 450
RuntimeException method, 444, 447, 448
save(..) method, 444–446
save(Set<Album>) method, 446
saveSingerWithAlbums(..) method, 446
test methods, 447, 448
testRollbackRuntimeUpdate() method, 448
TitleTooLongException method, 449, 450
route(..) method, 877
RouterFunction, 874, 877, 890
RouterFunctionBuilder, 878
RoutesConfig class, 877
RowMapperCfg, 295
RowMapper<T> interface
findAll() method, 293, 295
implementation, 296
mapRow() implementation, 294
single domain object mapping, 293
S
save(..) method, 351, 358
SaveException, 866
930
saveOrUpdate({daoObject}) method, 359
scopeName attribute, 88
Securing applications, 11
SecurityCfg class, 762, 764, 765
SecurityContextHolder, 481
SecurityFilterChain Class, 765
SecurityInitializer, 762
Security Interceptor, 760, 761
SelectAllSingers class, 301
SelectAllSingers class hierarchy, 302
SQL select last_insert_id() function, 308
SelectSingerByFirstName class, 304, 305
Selenium, 175
Selenium IDE, 175
selenium-server module, 175
send() method, 52
SenderApplication configuration, 585
ServerRequest object, 855
ServerResponse object, 855
Server-sent events (SSEs), 884, 888
data message, 887
Firefox’s developer console, 889
Header, 887
tail, 887
@Service, 57
ServiceConfig class, 152
ServiceLoader, 39, 41
Service provider interface (SPI), 38, 140, 513
Servlet API dependencies, 760
session.delete() method, 364
SessionFactory, 341, 350, 351, 358
SessionFactory.getCurrentSession(), 352
Session.getNamedQuery() method, 355
setAsText() method, 138, 139
setBeanName() method, 123
setFirstNameFor(..) method, 474
setFormatters() method, 523
setMessageProvider() method, 50
setParameter(..) method, 357, 367, 369
setReturnGeneratedKeys() method, 309
Setter-based injection, 53
Setter dependency injection
injection vs. lookup, 50, 51
IoC container, 50
setMessageProvider() method, 50
tandardOutMessageRenderer, 50
shouldFailToCreateJohnMayer() test, 883
ShutdownHookBean.setApplicationContext(Applic
ationContext ctx) method, 126
SimpleBeanNameGenerator class, 81
SimpleBlogger class, 520
SimpleBlogger instance, 519, 520
Simple data model, 270, 271
SimpleDataSourceCfg configuration class, 283
SimpleDriverDataSource, 283
■ INDEX
Simple/Streaming Text-Oriented Message Protocol
(STOMP), 836
application page, 843, 844
browser console log, 844, 845
configureMessageBroker, 842
@EnableAsync annotation, 842
enableSimpleBroker(“/topic”), 843
@EnableWebSocketMessageBroker
annotation, 842
HTML/JavaScript, 841
HTML UI, 839
registerStompEndpoins, 842
SockJS, 836
Stock domain object, 837
StockController class, 837–839
stock-ticker application, 836
StompConfig class, 841, 842
stomp.min.js, 841
views/index3.html view, 839–841
Simplified exception handling, 11
sing() method, 93
Singer class, 345, 349
Singer entity class, 728
SINGER and ALBUM relationship, 270
Singer2Controller class, 697, 698, 701
Singer2Controller#findSingerById(..) Method,
695, 696
SingerAudit entity class, 480
SingerAudit history, 489
SINGER_AUDIT table, 495
SingerAuditRepository methods, 480, 481
Spring JPA SingerAuditRepository, 492
SingerAuditService interface, 480, 481
SingerAuditServiceImpl class, 481, 482, 492
SingerController
annotations for mapping HTTP Method
Requests, 684
class, 683
configureMessageConverters() method, 686
dependencies, 687
implementation, 681, 683
Jackson libraries, 688
@RestController, 684
and SingerService, 681
WebConfig Class, 686
WebInitializer class, 685
SingerDao interface, 274, 276, 286, 287, 351
singerDao.delete(..) method, 365
singerDao.findAll(), 353
SingerDaoImpl methods, 357
SingerDaoImpl.delete() method, 364
SingerDaoImpl#findAll() Method, 352
SingerDaoImpl.findAllDetails() method, 366
SingerDaoImpl.findAllNamesByProjection()
Method, 368
SingerDaoImpl.findAllWithAlbum() method, 355
SingerDaoImpl.findById() method, 357
SingerDaoImpl.findFirstNameById() Method,
368, 369
SingerDaoImpl.save(..) Method, 358
singerDao.save() method, 363
Singer.findById, 357
SingerHandler, 876, 877, 892
SingerHandler.searchView() handler function, 894
SingerJdbcRepo class, 301, 304, 311, 314
SingerJdbcRepo.findAll() Implementation, 301
SingerRepo, 683
SingerRepo interface, 299, 329, 714, 858, 860
SingerRepo reactive repository interface, 858
singerRepo.findFirstNameById(..) stored
function, 323
SingerRepository interface, 465, 466, 468, 469, 505
singerRoutes bean, 878
SingerService Class, 681, 699, 873
singerService.findAll(), 876
SingerService interface, 865
SingerServiceImpl class, 467, 615, 865
SingerServiceTest execution log, 469
SingerServiceTest test class, 468
SingerTwoValidationService class, 541
SingerValidationService bean, 536, 540, 543
SingerValidationService.validateSinger(..)
method, 538
SingerWithDetailExtractor inner class, 297
Single sign-on (SSO), 11
Singleton, 88
Singleton pattern, Java, 88
SockJS
application page, 835
asynchronous configuration, 832
@EnableAsync annotation, 832
fallback functionality, 835
HTML page, 833
Live HTTP Headers, 836
uses, 832
views/index2.html, 834, 835
vs. WebSocket, 833
WebSocketConfig class, 832, 833
SpEL expressions, 505, 776, 777
Spring, 2, 91
advisors (see Pointcuts)
AOP
advice instances, 198
advices, 194–197, 200
after-returning advice, 199
alliance, 192
architecture, 192
around advice, 200
aspects, 193
Before advice, 199
931
■ INDEX
Spring (cont.)
Concert object, 199
configuration, 267
Custom Advice, 196, 197
declarative configuration, 239
implementation, 192, 267
interfaces, 196
joinpoints, 193
ManualAdviceDemo Class, 199
Performance interface/Concert
implementation, 197, 198
proxy, 193
ProxyFactory class, 192, 194
runtime, 193
SimpleAfterAdvice, 197, 199
SimpleAroundAdvice, 197, 199
SimpleBeforeAdvice, 197, 199
target object, 193
Throws advice, 199, 200
container, 389
Data project, 389
framework services, 267
Hibernate, 389
pointcuts (see Pointcuts)
TaskScheduler abstraction, 555, 556, 571
Spring 0.9, 3
Spring 3.0, 521
Spring 4.x, 3
Spring Actuator, 12
Spring AMQP, 5
Spring applications, 2, 106
Spring aware, 105
Spring-based applications, 2, 609
Spring Boot, 3, 4, 24, 462, 609, 703–707
aim, 178
annotations, 265, 266
Application Class, 181, 183
Application context, 181
application-dev.yaml contents, 671–673
AppStatisticsImpl class, 803
blue.properties/green.properties files, 671
bootstrap, 180
Chapter5Application Main Class, 265, 266
dependencies, 179, 265, 669, 670
dependency management, 178
getProperty(..) operation, 804, 805
HibernateCfg class, 673, 674
IntelliJ IDEA configuration, 184
Java web application setup, 178
logback.xml file, 671
main class, 676
management endpoints, 803
monitoring, 805
opinionated approach, 178
org.springframework.boot domain, 804
932
PhysicalNamingStrategyStandardImpl
class, 674
project internal structure, 670, 671
Prospring6SingerApp MBean, 803, 804
proxies, 265
sections, 673
simplification model, 178
spring-boot-starter-aop, 265
Spring Security, 789–791
starter library, 184, 669
test class, 186, 266
testing, 677, 678
top-level annotation, 180
version 3.0.0, 178
views directory, 671
WebConfig class, 675, 676
Web REST application, 803
Spring Boot Actuator
/actuator path, 810
application.yaml file, 806
annotating, bean, 811
chapter18-boot project dependencies, 805, 806
configuration, HTTP, 808
definition, 806
endpoints, 806–808, 810, 812
/health page, 809, 810
HTTP endpoints, 808, 809
/info endpoint, 810
IP address, 810
management.endpoint.health.show, 809
micrometer (see Micrometer)
org.springframework.boot.actuate package, 811
Prometheus, 814, 815
VisualVM, 807, 808
Spring Boot application, 709, 855
@SpringBootApplication, 180, 185, 496, 497,
543, 544
@SpringBootConfiguration, 180, 186
Spring Boot Configuration, 502, 856–858
Spring Boot Data JPA, 495–502
Spring Boot Dependency Management
Gradle configuration, 31, 32
jakarta.annotation-api, 30
Maven Spring (classic) project, 31
Maven configuration file, spring-boot-starter, 28
spring-boot-starter-parent, 29, 30
Spring classic project, 30
Spring Boot embedded configuration, 590
Spring Boot JDBC, 270, 327
application classpath, 332
autoconfiguration, 332
business logic implementation, 334
database connection, 328
embedded database initialization files, 328
entry class, 330
■ INDEX
JdbcTemplate bean, 329
test class, 331, 332
Spring Boot JMS application, 592
Spring Boot main class, 585
Spring Boot MongoDB, 510
Spring Boot native image application, 712
SpringBootPlugin class, 904
spring-boot-starter, 181
spring-boot-starter-jdbc library, 327
spring-boot-starter-jpa, 181
spring-boot-starter-parent, 29
spring-boot-starter-test, 184
spring-boot-starter-web dependency, 3
@SpringBootTest, 185, 186
Spring Boot test configuration class, 501
Spring Boot Thymeleaf configuration, 885
Spring Classic application context, 181
Spring Cloud Data Flow, 4, 5
Spring community, 12
Spring configuration class, 481
spring-context library, 571
Spring controllers, 627
Spring Core, 2, 9
Spring CredHub, 5
Spring Data, 4
consideration, 511
data access, 461
repository interfaces hierarchy, 464
MongoDB (see MongoDB)
project, 461
SQL and NoSQL databases, 461
Spring Data Commons project, 463, 464
Spring Data components, 859
Spring Data Domain repository interface, 465, 467
Spring Data JPA
configuration, 466
custom queries, 471–474, 476
entity class changes tracking, 477–483
Hibernate and Jakarta Persistence API, 462
IntelliJ IDEA, 462
JpaRepository<T, ID> interface, 470, 471
projection queries, 476
repositories, 502
repository abstraction, 463–470
Spring Data libraries, 511
Spring Data Mongo application, 510
spring-data-mongodb, 509
Spring Data MongoDB repository, 505
Spring Data project, 316
Spring Data R2DBC, 857, 858, 867
Spring Data reactive repositories, 858, 859
Spring Data Repository, 490, 491
Spring Data REST
configuration, 583
entity class, 575, 576
enum, 577
HATEOAS, 575
JSON representation, 579
repository, 578
@RepositoryRestResource annotation, 578
@RestController annotation, 581
@RestResource, 579, 580
RestTemplate class, 581
SpringDatasourceCfg Configuration Class, 287
Spring Data’s Repository abstraction, 466
Spring Documentation, 32
Spring Expression Language (SpEL), 9, 66–68
Spring Flo, 5
Spring for Apache Kafka, 5
Spring Framework, 4
alternatives, 13
evolution, 2, 3
IoC, 6
Java, 1
Projects, 4–6
reference and practical guide, 1
Spring HATEOAS, 4
Spring HTTP Invoker, 573
Spring Initializer, 6, 178, 179
Spring Integration, 4
Spring Java Configuration Class, 43
Spring Javadoc, 33
Spring JDBC methods, 303
Spring JDBC module’s function capabilities, 316
SpringJdbcTemplateCfg class, 292
@SpringJUnitConfig annotation, 173
@SpringJUnitJupiterConfig annotation, 318
Spring LDAP, 5
SpringLoader, 40
Spring-managed transaction, 461
Spring modules, 22, 24
Gradle, 27, 28
Maven repository, 25–27
Spring Boot Dependency
Management, 28–32
Spring MVC, 680–681
configuration
AbstractAnnotationConfigDispatcher
ServletInitializer class, 621, 622
filter implementation, 623
methods, 622
WebApplicationInitializer, 622
web deployment descriptor, 621
XML, 620
DispatcherServlet, 617
configuration class, 624–626
methods, 626
WebMvcConfigurer, 626
project structure, 633, 634
request life cycle, 618, 619
933
■ INDEX
Spring MVC (cont.)
components, 619, 620
description, 620
servlet filters, 623
template layout, 640, 641
theming
CookieThemeResolver, 639
green.properties file, 638, 639
ResourceBundleThemeSource, 638
ThemeChangeInterceptor, 639, 640
Thymeleaf, 640
views/templates/layout.html file, 639, 640
WebConfig class, 637, 638
views (see Views)
WebApplicationContext, 617, 618
Spring Native, 2, 5, 12
Spring Native image
ahead-of-time (AOT) compilation, 711
AOT/Native task/dependency groups, 718
aotCompileClasspath, 718
AWS Lambda functions, 709
bootProjects variable, 717
CustomPhysicalNamingStrategy, 715
Docker Container’s IP Address, 723
GraalVM, 710
gradle bootBuildImage, 718
Gradle configuration, 715
intermediary files creation, 720
Java applications, 711
Maven configuration, 724
Native Configuration, Spring Boot Project, 724
native executable, 710
pro-spring-6 Project Configuration
Snippets, 716
prospring6-gradle-native, 721, 722
prospring6-mvn-native, 726
Singer Entity Class, 713
SingerRepo interface, 714
Spring application, 711, 712
Spring Boot Configuration File, 722
Spring Boot native support, 712
spring-boot-starter-parent, 723
Spring Native executable, 711
Spring packaging
IntelliJ IDEA, 21
Javadoc, 21
Spring Boot, 24
SpringBootApplication annotation, 22
Spring modules, 22
spring.profiles.active JVM argument, 155
Spring Remoting, 574
Spring REST Docs, 5
Spring Scala, 6
Spring’s Converter SPI, 514
Spring’s dependency injection mechanism, 53
934
Spring’s DI implementation, 7
Spring Security, 4
abstract schema, 780
Acegi Security, 759
annotations, 779
application testing, 784–789
ApplicationConfiguration class, 771, 772
authenticated user, 774
authentication, 759, 790
authorization, 759
authorizeHttpRequests(..) method, 766, 769
BCryptPasswordEncoder, 764, 765
config library, 760
configuration, 760–762, 767, 768, 771
configured, 760
Configured to Support Secure Methods, 779
@ControllerAdvice, 778
controller method, 777, 778
CSRF tokens, 769
csrf().disable(), 768
custom login, 769
customized version of SecurityFilterChain,
769, 770
defaultSuccessUrl(“/home”), 768
dependencies, 760
formLogin(Customizer.withDefaults()), 766
httpBasic(Customizer.withDefaults()), 766
HttpSecurity, 766
Jakarta Annotations, 780
JDBC authentication, 780–784
login screen, 763
loginProcessingUrl(“/auth”), 768
logout(Customizer.withDefaults()), 766
non-admin user, 779
non-ADMIN users, 775
SecurityCfg class, 762
SecurityInitializer, 762
Security Interceptor, 760, 761
Servlet API dependencies, 760
SpEL expression, 776, 777
Spring Boot, 789–791
SpringSecurityDialect with the
SpringTemplateEngine, 774
Thymeleaf Authentication Form, 767
Thymeleaf Security Constructs, 772, 773
UserDetailsService bean, 764
ViewControllerRegistry in web
configuration, 768
SpringSecurityDialect with the
SpringTemplateEngine, 774
Spring Session, 4
Spring Shell, 5
Spring’s JDBC support, 290
Spring’s JSP tag library, 144
Spring-specific infrastructure beans, 119
■ INDEX
Spring Statemachine, 5
Spring’s Validator interface
AddressValidator, 530, 531
AppConfig class, 532
Blogger class, 527
Blogger objects, 527, 529
BloggerValidator, 529
BloggerWithAddress, 530
methods, 528, 532
SimpleBloggerValidator, 528
validation logic, 527
Spring tag libraries, 10
Spring test annotations, 165
Spring TestContext Framework, 165, 185, 318
Spring transaction abstraction layer, 423
global transactions, 424, 425
local transactions, 424
microservices, 426
stand-alone implementations, 426
Spring transactional application, 495
Spring type conversion system
AppConfig class, 515
arbitrary types, 519–521
classes, 514
custom converter, 518, 519
field formatting, 522–525
Formatter SPI, 545
PropertyEditors, 514, 516–518
validation, 526–533
Spring value, 5, 492
Spring web applications, 3
Spring Web Flow, 5, 611, 612
Spring WebFlux, 849, 873–879
advantages, 899
DispatcherHandler, 855
handler class, 873–879
handler functions validation (see Handler
functions validation)
reactive controllers, 871–873
Reactive Error Handling, 880, 881
Reactive repository and database, 858–868
reactive service (see Reactive service)
reactive web layer (see Reactive web layer)
Spring Boot Configuration, Reactive
application, 856–857
test reactive endpoint, WebTestClient, 881–883
Spring Web MVC
DispatcherServlet, 853
HttpHandler interface, 854
HTTP servers, 854
Netty, 853
reactive stack web framework, 853
Servlet API, 853
Servlet containers, 853
WebHandler interface, 854
Spring Web Services (Spring-WS), 5
@Sql* annotations, 317, 321, 323, 324, 331, 333
SQL databases, 503
SQL DDL statements, 328
SQLErrorCodeSQLExceptionTranslator, 289
SQLException, 278
SQLExceptionTranslator, 288, 289
Sql.ExecutionPhase.AFTER_TEST_METHOD, 319
Sql.ExecutionPhase.BEFORE_TEST_METHOD, 319
SqlFunction<T> class
findFirstNameById() method, 315
MariaDB, 313
stored function operation, 314
storing functions, 299
@SqlGroup annotation, 319
@SqlMergeMode(SqlMergeMode.MergeMode.
MERGE) annotation, 318
SQL native queries, 366, 367
SqlUpdate class
operations, 306
setReturnGeneratedKeys(), 309
update() method, 307, 308
UpdateSinger, 306
SqlUpdate.updateByNamedParam() method, 309
StandardEnvironment class, 162
StandardOutMessageRenderer class, 48–51, 181, 182
StaticMessageSource implementation, 141
StepVerifier, 860, 864
Stereotype, 57
Stereotype annotations, 300
StopWatch class, 79
StoredFunctionFirstNameById class, 314, 315
StoredFunctionV1Test, 322, 324
StoredFunctionV2Test, 323, 324
StringUtils.isEmpty(..) method, 529
supports(..) method, 528, 532
Synchronous HTTP, 574
System properties, 162
T
Target bean, 95
@Target(ElementType.TYPE) annotation, 538
Task execution
AsyncDemo
Custom Async Executor, 567
output, 566
testing class, 565, 566
asynchronous
@Async annotation, 565, 568
AsyncConfig class, 565
AsyncService bean, 565
AsyncService interface, 565
AsyncServiceImpl class, 564, 565
asyncTask() method, 566, 567
935
■ INDEX
Task execution (cont.)
@EnableAsync annotation, 554
executeTask() method, 553
Java
ClassicDemo class, 550, 551
ClassicDemo console log, 552
hierarchy of classes, 548, 549
java.util.concurrent package, 549
ScheduledExecutorService, 552
sections, 551, 552
sorting algorithms, 548, 549
ThreadPoolExecutor class, 548, 549, 552
ThreadPoolMonitor class, 548–550
java.util.concurrent.Executor interface, 548
RandomStringPrinter class, 553
SimpleAsyncTaskExecutorDemon class, 554
TaskExecutor implementations, 552, 553
TaskExecutor interface, 548
threads, 547
Task scheduling
asynchronous
AsyncExceptionHandler class, 570, 571
AsyncServiceImpl class, 569
CarServiceImpl class, 569
getAsyncUncaughtExceptionHandler()
method, 569
LoggingErrorHandler, 569
RejectedTaskHandler, 569
task executions/schedulers, 568
task rejection, 569
TaskSchedulingConfig4 class, 568, 569
Car class, 556, 557
CarServiceImpl class, 558, 559
CarTaskSchedulerDemo, 560–564
DBInitializer class, 557, 558
@EnableScheduling annotation, 560
entity class, 557
implementation, 560
methods, 559
options, 555
parts, 547
taskExecutor bean, 562
task scheduler, 560–562
taskScheduler bean, 560
TaskScheduler abstraction, 555, 556
TaskSchedulingConfig2 class, 561, 562
TaskSchedulingConfig3 class, 563
testing program, 560
triggering, 555
updateCarAgeJob() method, 560, 561
tearDown() method, 322
Testcontainers, 270, 358, 370, 462, 511, 705
annotations, 326
central configuration, 322
components, 321
936
definition, 321
disadvantages, 324
libraries, 326
MariaDB, 322
MariaDBContainer class, 322
MariaDB image, 326
SQL scripts, 324
TestContainersConfig class, 322, 324
Testcontainers datasource, 500
Testcontainers MariaDB container
configuration, 469
testcontainers/stored-function.sql, 324
testCreateWithExchange(..) method, 694
TestDbCfg static class, 292
testDelete() method, 365
testFindAllWithMappingSqlQuery() test
method, 318
testFindByNameWithMappingSqlQuery()
method, 318
testFormattingFactoryService() test method, 524
Testing annotations, 316
Testing JDBC code, 270
Testing, RESTful-WS application
execute(..) method, 692
getForObject(..), 692
IntelliJ IDEA HTTP client, 688
Java client, 688
JSON format, 689
RestClientTest, 690, 691
RestClientTest#testFindAll(), 691
RestTemplate, 689–691, 694
RestTemplate#exchange(..), 694
testFindAll(..), 692
Testing Spring applications, 106
annotations, 165
characteristics and objectives, 164
development environment, 164
enterprise testing framework, 164
integration test, 169–173
logic unit test, 167–169
testInsertSinger() method, 360, 361
TestMessageProvider, 174
testNegativeFindById() test method, 697, 707
testOne() method, 283
TestRestTemplate, 707
testSpringJdbcWithH2Db() method, 292
testStandardOutMessageRenderer() method, 169
testStoredFunction() test method, 324
testUpdate() method, 362
TheOtherConfig class, 153
ThreadLocal storage, 867
Thymeleaf, 623, 633, 645, 649, 651, 652, 678, 772
Thymeleaf Authentication Form, 767
ThymeleafProperties class, 885
ThymeleafReactiveViewResolver, 885
■ INDEX
TitleProvider class, 69, 70
toString() method, 140
TRACE log, 493
Traditional JDBC code vs. Spring JDBC support, 270
@Transactional annotation, 463, 511
Transactional behavior, 497, 511
Transactional configuration, Spring Boot
application-dev.yaml file, 454, 455
application.properties/application.yaml
files, 454
data access exceptions, 457
DataIntegrityViolationException, 458
Gradle test page, 456
Gradle View, 454
LocalSessionFactoryBean bean, 456
message, 457
sections, 455
spring.jpa properties, 455
test class, 456
testRollbackRuntimeUpdate() Test Method,
457, 458
TransactionalConfig configuration, 455, 456
transactional tests, 458, 459
transaction management, 459
Transaction management, 423, 459, 866
annotation-based, 436
configuration class, 433, 434
considerations, 453, 459
data model and infrastructure (see Data model
and infrastructure)
declarative, 423
programmatic, 424
TransactionManager, 340, 497
TransactionManger, 867
Transactions, 423, 866
declarative (see Declarative transactions)
global, 424, 425, 459
isolation levels, 429
local, 424, 459
programmatic (see Programmatic
transactions)
propagation types, 429
properties, 427
TransactionDefinition interface, 428
TransactionStatus interface, 430
Rolling back (see Rolling back transactions)
TrickyTarget code, 101
Trigger approach, 484
U
Uniform resource identifier (URI), 679
Unix cron expression, 10
updateByNamedParam() method, 307
UserDetailsService bean, 764
V
Vaadin, 13
validate(..) method, 528, 529, 893
Validation, 9
data binding, 526
domain objects, 526
formatting rule, 526
interface, 527
JSR-349, 527
POJO, 526
Spring Validator (see Spring’s Validator
interface)
types, 527
Validation error messages, 513
ValidationUtils.invokeValidator() method, 529
ValidationUtils.rejectIfEmpty(..) method, 528
Validator.validate(..) method, 537
@Value annotations, 72, 514
Vendor-neutral API, 12
verifyComplete(), 863
viewResolver(..) method, 626
Views
chapter-14 project
IntelliJ IDEA launcher, 632
internal structure, 628, 629
create singer view
complex applications, 657
file chooser, 655
file uploading, 656, 660
form contents, 657
libraries, 656
multiParsing, 659
pageContent fragment, 654, 655
parameters, 659
setPhoto(..) method, 658
SingerForm, 657, 658
SingersController, 656, 657
StandardServletMultipartResolver, 658
WebConfig class, 658
WebInitializer class, 659
creation, 623, 624
DELETE request, 649, 650
Edit Singer View
DELETE/PUT methods, 652
Edit Info link, 651
edit view, 653, 654
GET request, 651
handler methods, 652, 653
highlights, 652
Thymeleaf, form design, 651, 652
@Valid annotation, 653
home view
annotations, 630
Apache Tomcat launcher, 631
937
■ INDEX
Views (cont.)
HomeController#home(..) method, 629, 630
MockMvc, 630
MockMvcRequestBuilders.get(..)
method, 630
testing, 629–631
Unix-based systems, 631
WEB-INF directory, 628
i18n, 636, 637
implementation, 628
List Singers View
controllers, 642
@GetMapping annotation, 644
HTML code, 645
list(..) method, 642, 643
logical name, 644
@RequestMapping annotation, 643
requirements, 642
SingersController class, 642, 643
Thymeleaf, 645
views/singers/list.html template, 644
Show Singers View
annotations, 646, 647
handler methods, 647
handling methods, 645, 646
highlights, 649
information, 645
list/show views, 648
OneSingerController, 646
pageContent fragment, 647, 648
URLs-to-views mapping, 641, 642
View technologies, 612, 620
VisualVM
Apache Tomcat, 797
getTotalSingerCount() method, 797, 799, 800
Hibernate, 803
Java applications, 797
MBeans plug-in, 796, 797
MBeans tab, 797
Prospring6SingerApp MBean, 797, 798
RestClientTest class, 798, 799
Spring Boot Actuator, 807
testCreate() method, 799
uses, 796
W, X
Web applications, 823
access, 612
considerations, 611
development, 612
files, 633
folder structure, 633
frameworks/libraries, 611
full-blown, 669
938
i18n, 634, 637
MVC, 621
pattern, 616
requirements, 612
rule, 665
WebClient, 881
WebConfig Class, 686
WebExceptionHandler, 880, 894
Web frameworks and toolkits, 612
WebHandler interface, 854
WebInitializer class, 685, 771
Web services, 573
WebSocket, 823
API
buttons, 831
client page, 831
dependencies, 825
EchoHander class, 826
@EnableWebSocket annotation, 827
getPayload() method, 827
IndexController Configuration Class,
827, 828
index.html, 826, 828–831
Jakarta, 825
jQuery, 828
subclasses, 825
TextWebSocketHandler, 825
URL, 828
WebSocketConfig class, 827
WebSocketHandler, 825, 826
application developers, 824
applications, 824
bidirectional communication, 823
bidirectional data flow, 824
chapter19-boot project dependencies, 845, 846
data transfer, 824
HTTP, 824
message-passing functionality, 824
parts, 824
REST-based applications, 824
Spring Boot, 846
STOMP, 824, 846
WebSocket support, 11
WebTestClient, 881, 882
WithBeansApplication class, 182, 186
WithBeansApplication Spring Boot class, 185
WithRunnersApplication, 184
Y
YAML configuration, 600
Z
Zookeeper, 598