/


Author: Dame M.
Tags: programming languages programming computer science microprocessors packt publisher reverse engineering frameworks
ISBN: 978-1-80323-285-0
Year: 2022
Similar


Text
The Kubernetes
Operator
Framework Book
Overcome complex Kubernetes cluster management
challenges with automation toolkits
Michael Dame
BIRMINGHAM—MUMBAI
The Kubernetes Operator Framework Book
Copyright © 2022 Packt Publishing
All rights reserved. No part of this book may be reproduced, stored in a retrieval system, or
transmitted in any form or by any means, without the prior written permission of the publisher,
except in the case of brief quotations embedded in critical articles or reviews.
Every effort has been made in the preparation of this book to ensure the accuracy of the
information presented. However, the information contained in this book is sold without
warranty, either express or implied. Neither the author(s), nor Packt Publishing or its dealers and
distributors, will be held liable for any damages caused or alleged to have been caused directly or
indirectly by this book.
Packt Publishing has endeavored to provide trademark information about all of the companies
and products mentioned in this book by the appropriate use of capitals. However, Packt Publishing
cannot guarantee the accuracy of this information.
Group Product Manager: Rahul Nair
Publishing Product Manager: Surbhi Suman
Senior Editor: Sapuni Rishana Athiko
Content Development Editor: Yasir Ali Khan
Technical Editor: Shruthi Shetty
Copy Editor: Safis Editing
Project Coordinator: Shagun Saini
Proofreader: Safis Editing
Indexer: Rekha Nair
Production Designer: Prashant Ghare
Marketing Coordinator: Nimisha Dua
Senior Marketing Coordinator: Sanjana Gupta
First published: June 2022
Production reference: 1070622
Published by Packt Publishing Ltd.
Livery Place
35 Livery Street
Birmingham
B3 2PB, UK.
ISBN 978-1-80323-285-0
www.packt.com
To my wife, Meaghan, my parents and sister, the boys of Gold Team and
Gamma Tetarton, and all of the amazing mentors and colleagues who have
guided me along in my career, helping me to grow into a better engineer.
– Mike Dame
Contributors
About the author
Michael Dame is a software engineer who has several years of experience in working
with Kubernetes and Operators. He is an active contributor to the Kubernetes project,
focusing his work on the Scheduler and Descheduler sub-projects, for which he received
a 2021 Kubernetes Contributor Award. Michael has a degree in computer science from
Rensselaer Polytechnic Institute and has worked on the Kubernetes control plane and
OpenShift Operators as a senior engineer at Red Hat. He currently works at Google as
a software engineer for Google Cloud Platform.
I want to thank Meaghan, for supporting and encouraging me throughout
the writing process, and the many brilliant colleagues who took the time
and had the patience to teach me everything I know about Kubernetes.
About the reviewers
Mustafa Musaji is an experienced architect and engineer in the enterprise IT space. He
develops and designs open source software solutions for large organizations looking to
adopt transformational changes within their IT estate. Mustafa currently works at Red Hat
as an associate principal solutions architect, where he supports customers in the journey
to cloud-native applications. That involves not only discussing using container-based
deployments but also the underlying orchestration and dependent services.
Drew Hodun is the co-author of O'Reilly's Google Cloud Cookbook. He has had a number
of roles at Google, both customer-facing and in product engineering. His focus has been
on machine learning applications running on the Google cloud and Kubernetes for
various clients, including in the autonomous vehicle, financial services, and media and
entertainment industries. Currently, Drew works as a machine learning tech lead working
on AI-powered EdTech products. He has spoken at a variety of conferences, including
Predictive Analytics World, Google Cloud Next, and O'Reilly's AI Conference.
(Twitter: @DrewHodun)
Thomas Lloyd III is an information technology professional who specializes in systems
and network administration. He currently works in the non-profit sector, lending his
skills and experience to St. Catherine's Center for Children located in Albany, NY. Prior
to this. he worked for a variety of private sector companies, where he honed his skill set.
He has an A.A.S. in systems and network administration and is currently in the process of
earning his B.S. in technology from SUNY Empire.
I'd like to thank the countless individuals who have helped me throughout
my education and career. I wouldn't be where I am today without the
endless support of my family, friends, professors, and many colleagues who
gave me guidance and the opportunity to succeed.
Table of Contents
Preface
Part 1: Essentials of Operators and the
Operator Framework
1
Introducing the Operator Framework
Technical requirements
4
Managing clusters without
Operators4
Demonstrating on a sample application
Reacting to changing cluster states
4
5
Introducing the Operator
Framework6
Exploring Kubernetes controllers
Knowing key terms for Operators
Putting it all together
6
7
8
Developing with the
Operator SDK
9
Managing Operators with OLM 11
Distributing Operators on
OperatorHub.io12
Defining Operator functions
with the Capability Model
14
Using Operators to manage
applications19
Summarizing the Operator Framework 19
Applying Operator capabilities
20
Summary22
viii Table of Contents
2
Understanding How Operators Interact with Kubernetes
Interacting with Kubernetes
cluster resources
26
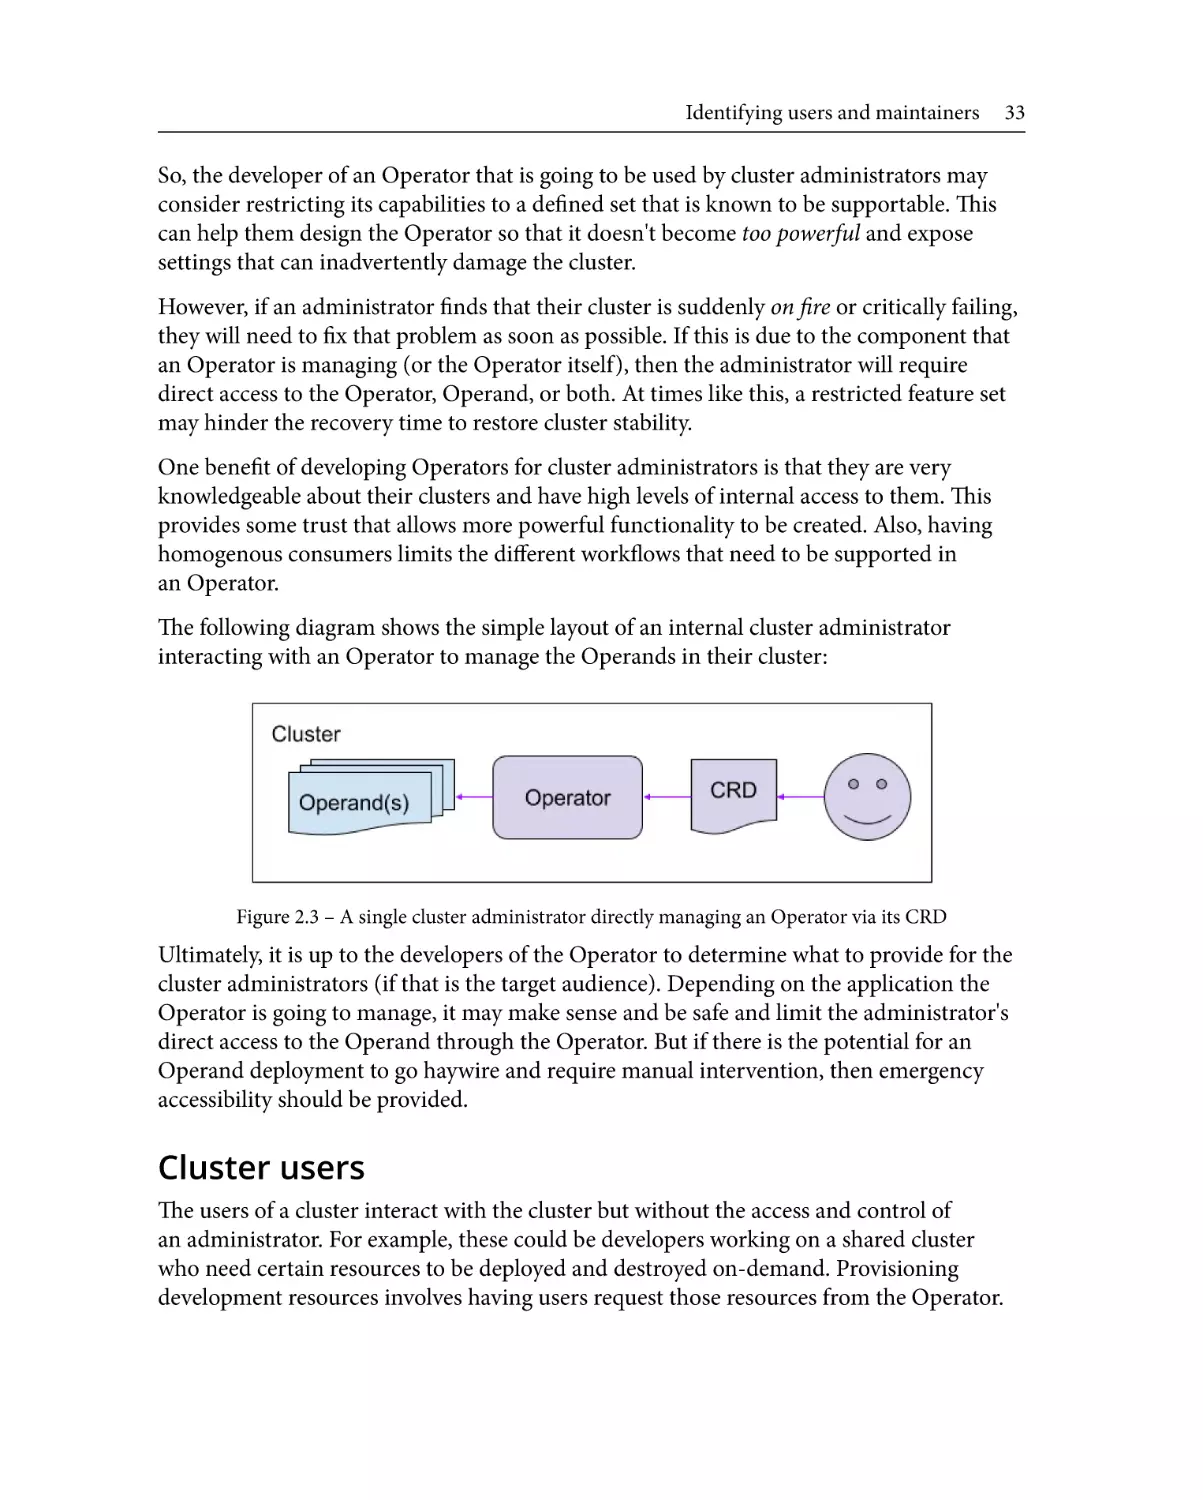
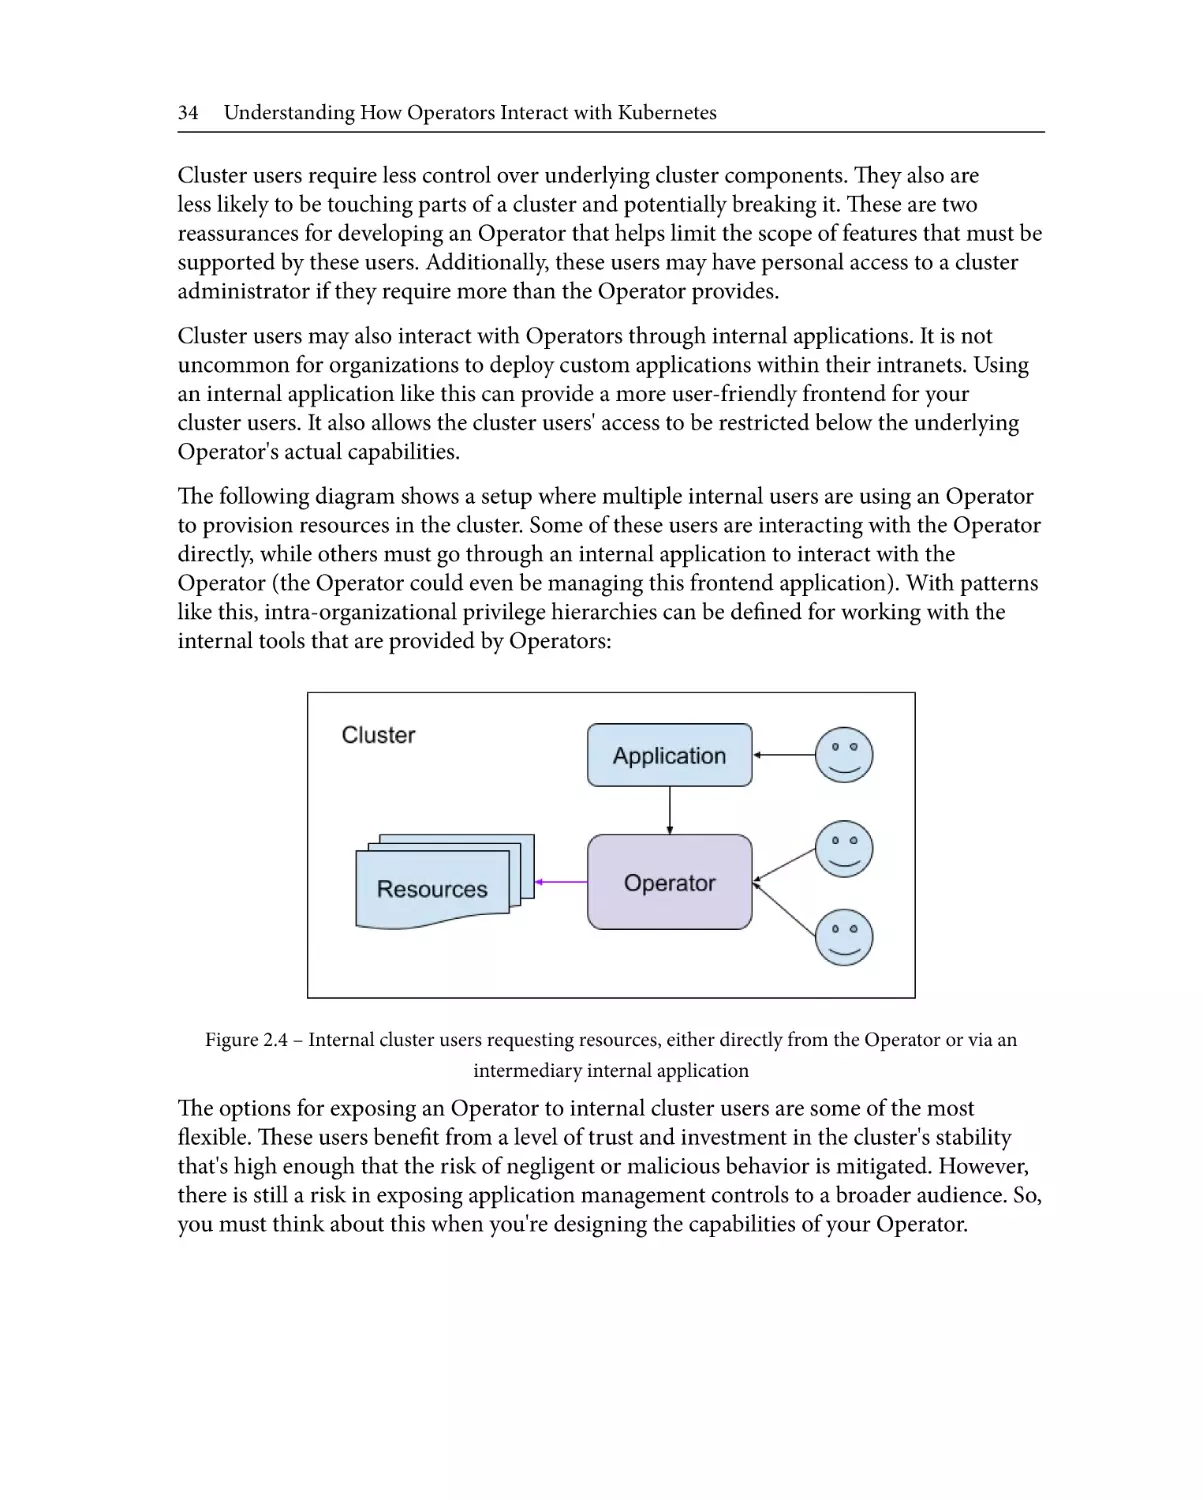
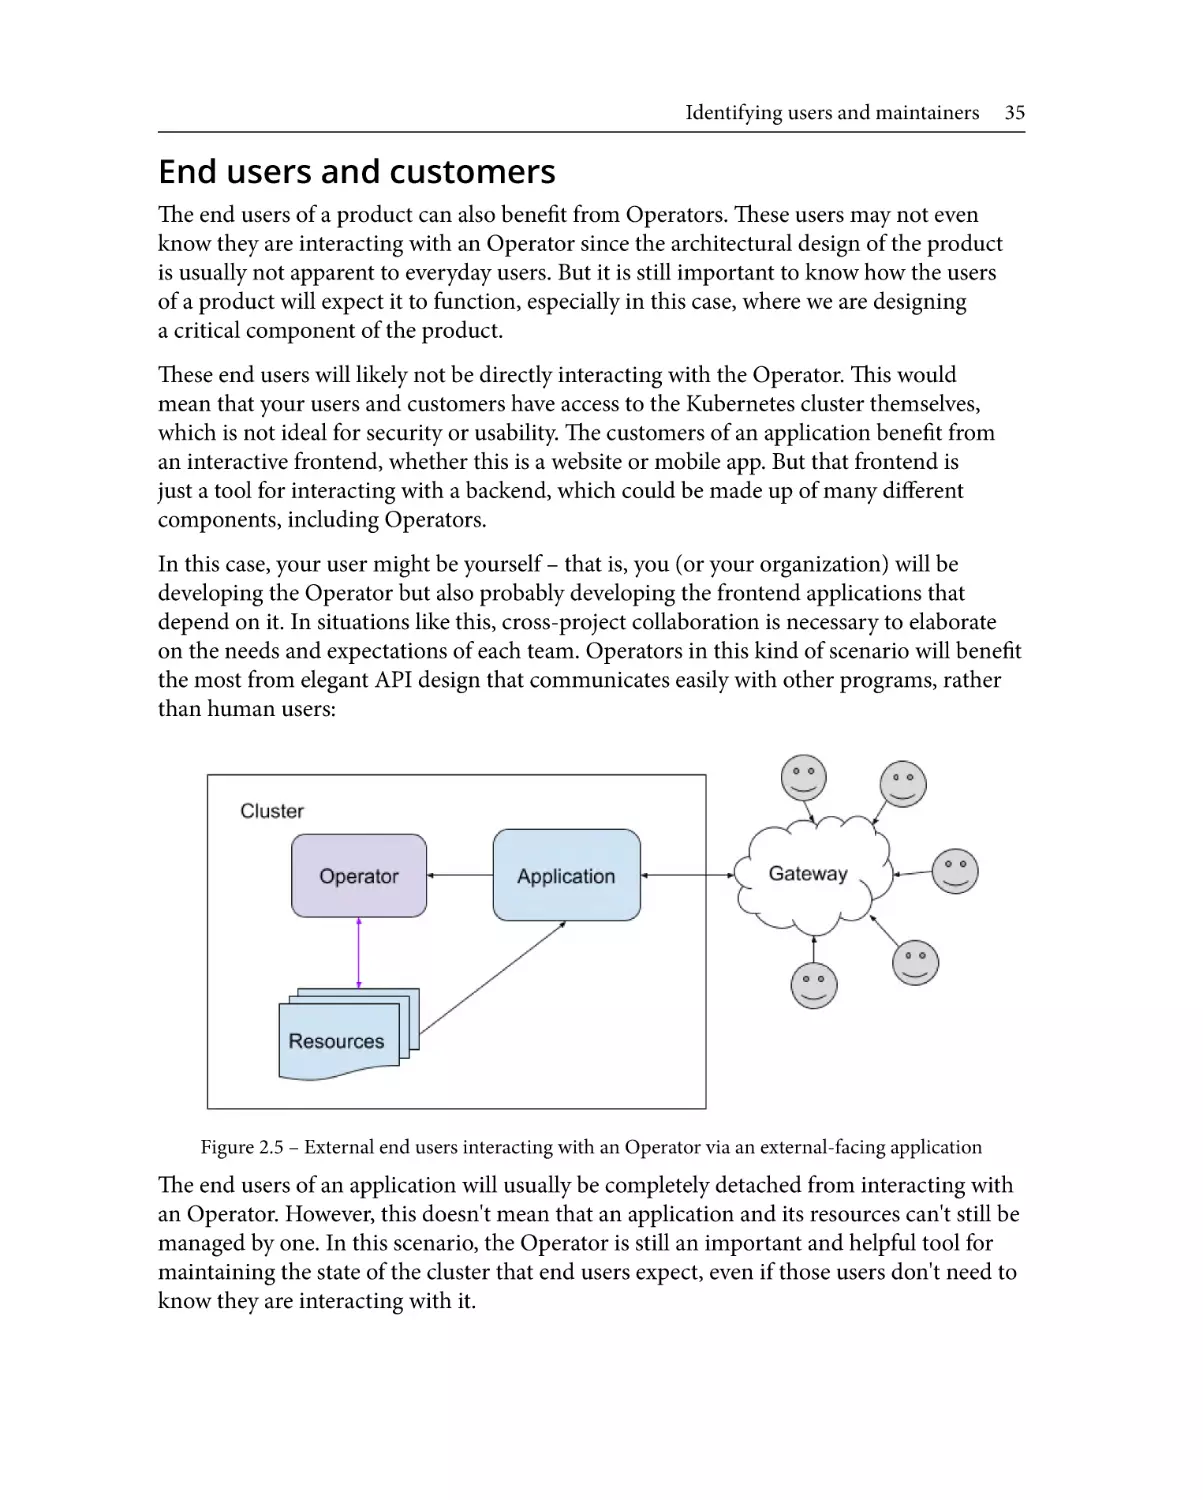
End users and customers
35
Maintainers36
Pods, ReplicaSets, and Deployments
27
Custom resource definitions
28
ServiceAccounts, roles, and
RoleBindings (RBAC)
29
Namespaces31
Designing beneficial features
for your operator
36
Planning for changes in your
Operator38
Identifying users and
maintainers32
Starting small
Iterating effectively
Deprecating gracefully
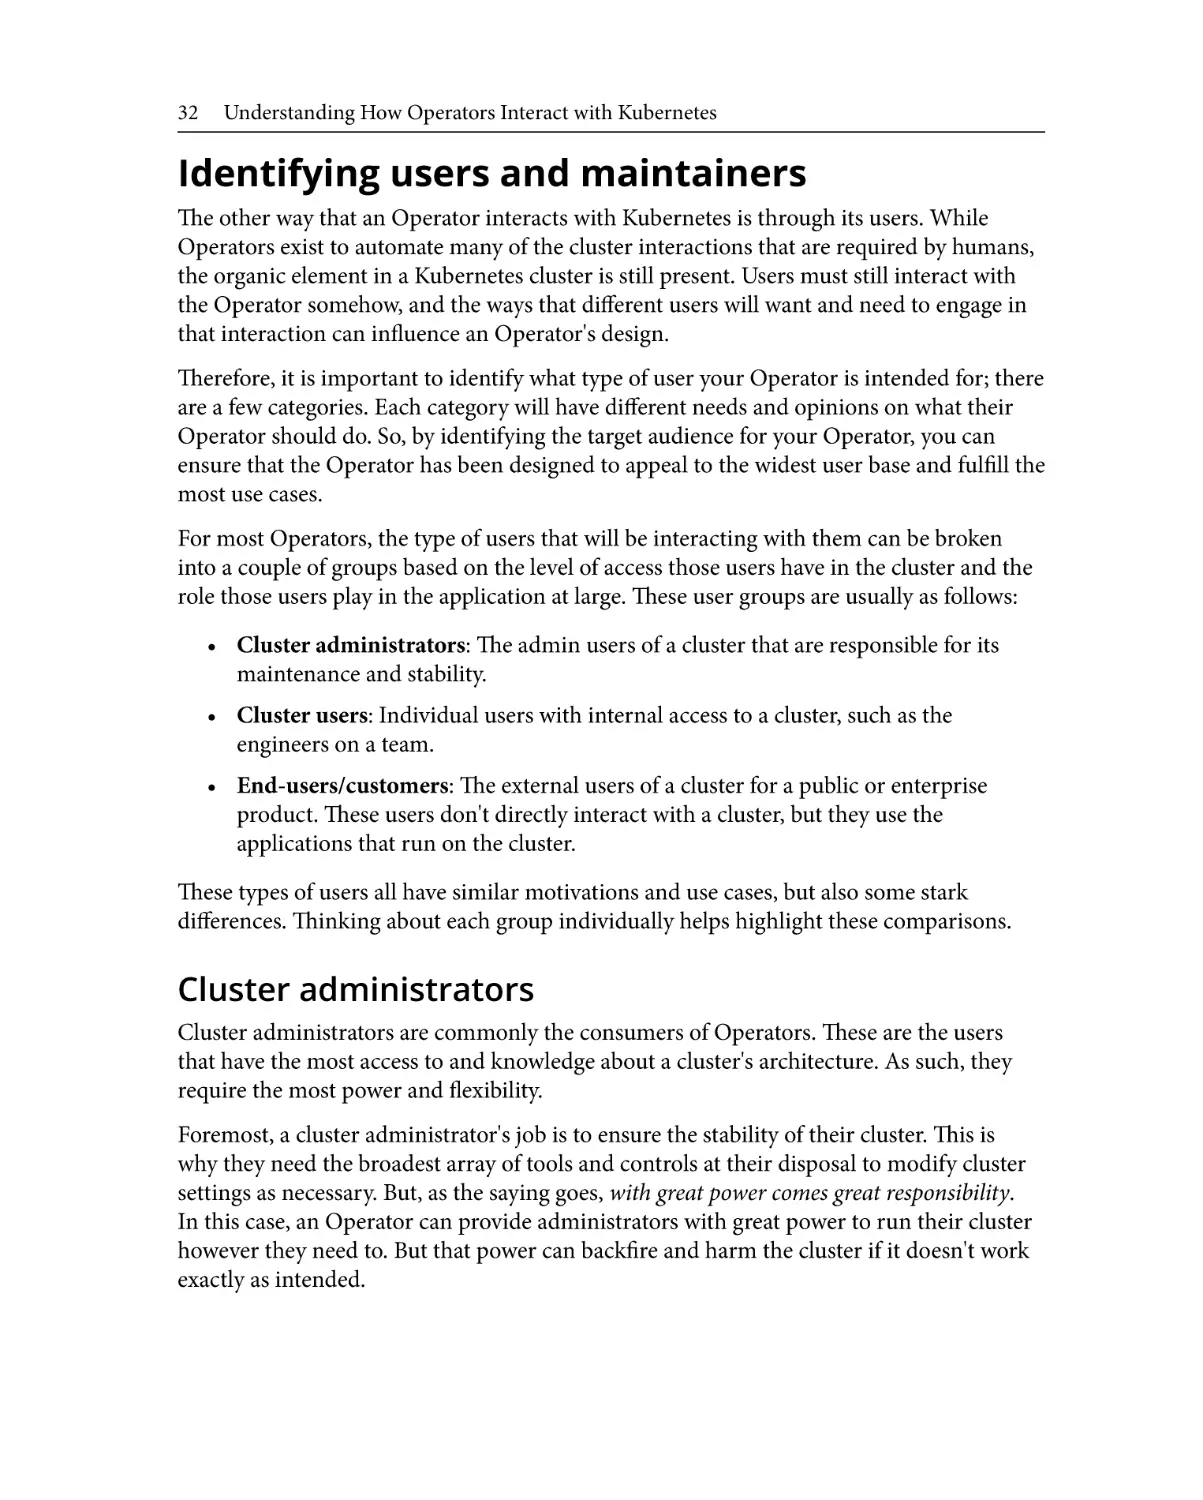
Cluster administrators
Cluster users
Summary40
32
33
38
39
40
Part 2: Designing and Developing an
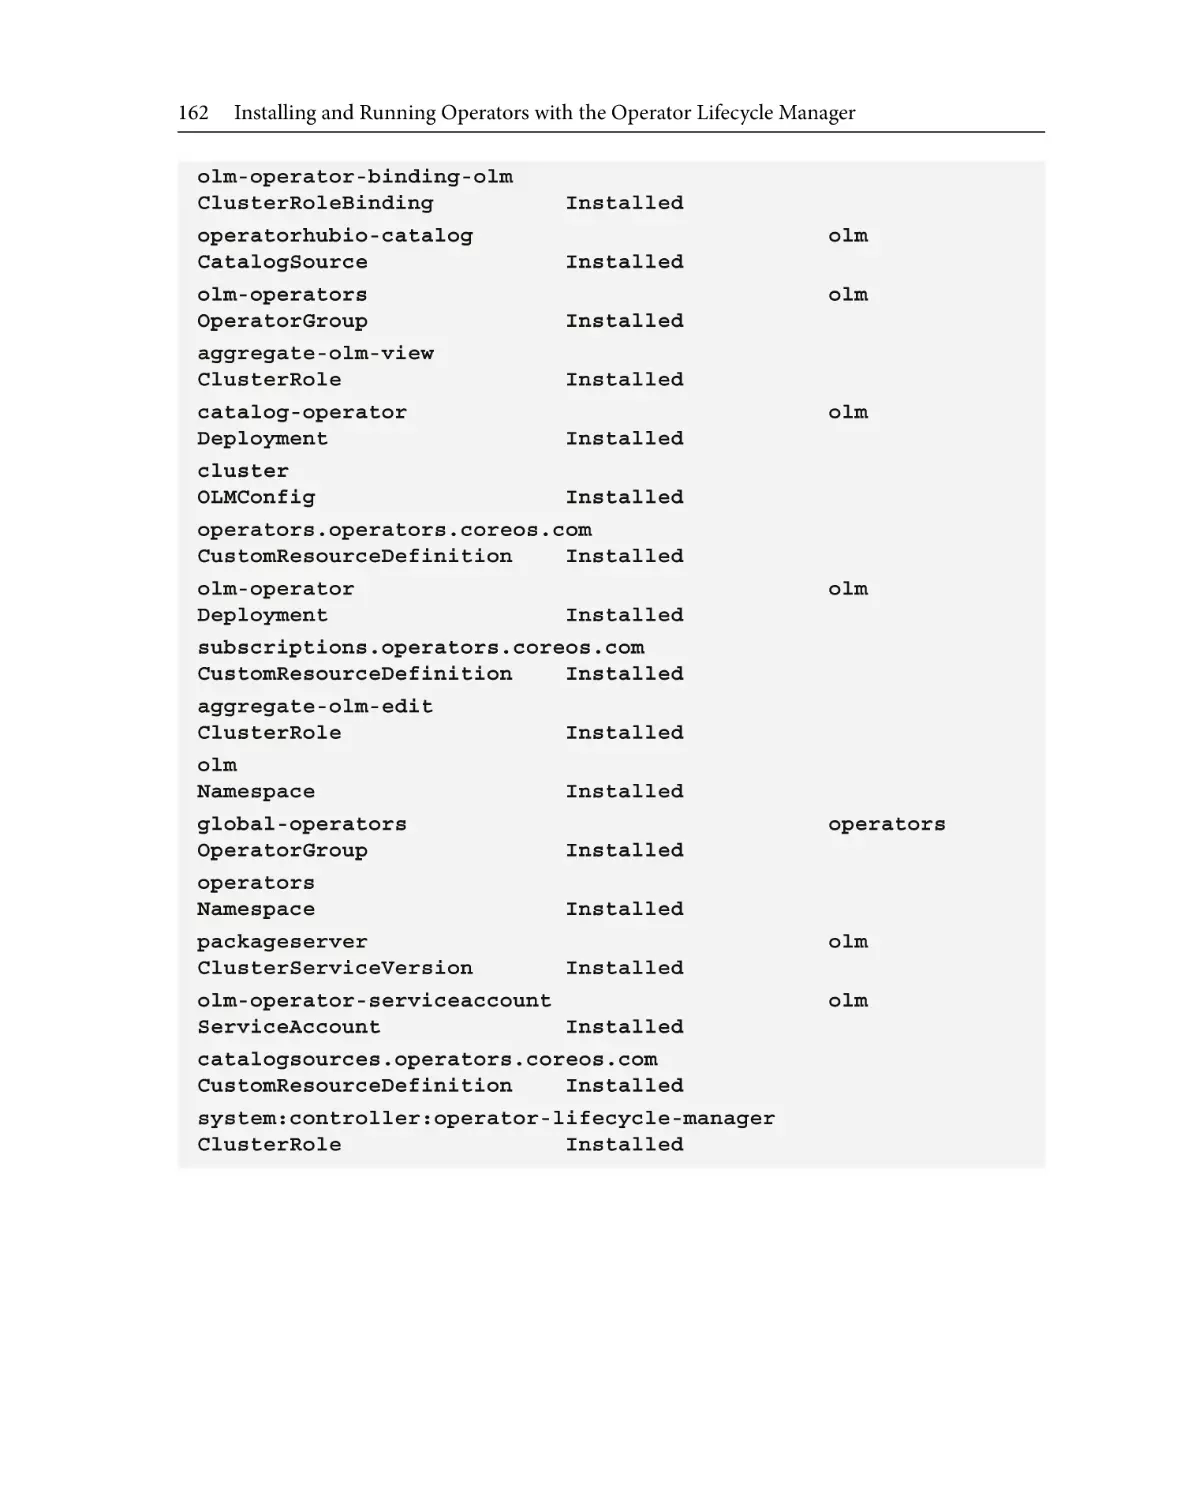
Operator
3
Designing an Operator – CRD, API, and Target Reconciliation
Describing the problem
Designing an API and a CRD
46
48
Following the Kubernetes API design
conventions49
Understanding a CRD schema
51
Example Operator CRD
53
Working with other required
resources55
Designing a target
reconciliation loop
57
Level- versus edge-based event
triggering58
Designing reconcile logic
58
Handling upgrades and
downgrades60
Using failure reporting
62
Reporting errors with logging
Reporting errors with status updates
Reporting errors with events
62
63
64
Summary66
Table of Contents ix
4
Developing an Operator with the Operator SDK
Technical requirements
Setting up your project
Defining an API
Adding resource manifests
70
71
72
76
Troubleshooting97
Additional manifests and BinData
81
Summary100
Writing a control loop
89
General Kubernetes resources
Operator SDK resources
Kubebuilder resources
97
99
99
5
Developing an Operator – Advanced Functionality
Technical requirements
Understanding the need for
advanced functionality
Reporting status conditions
102
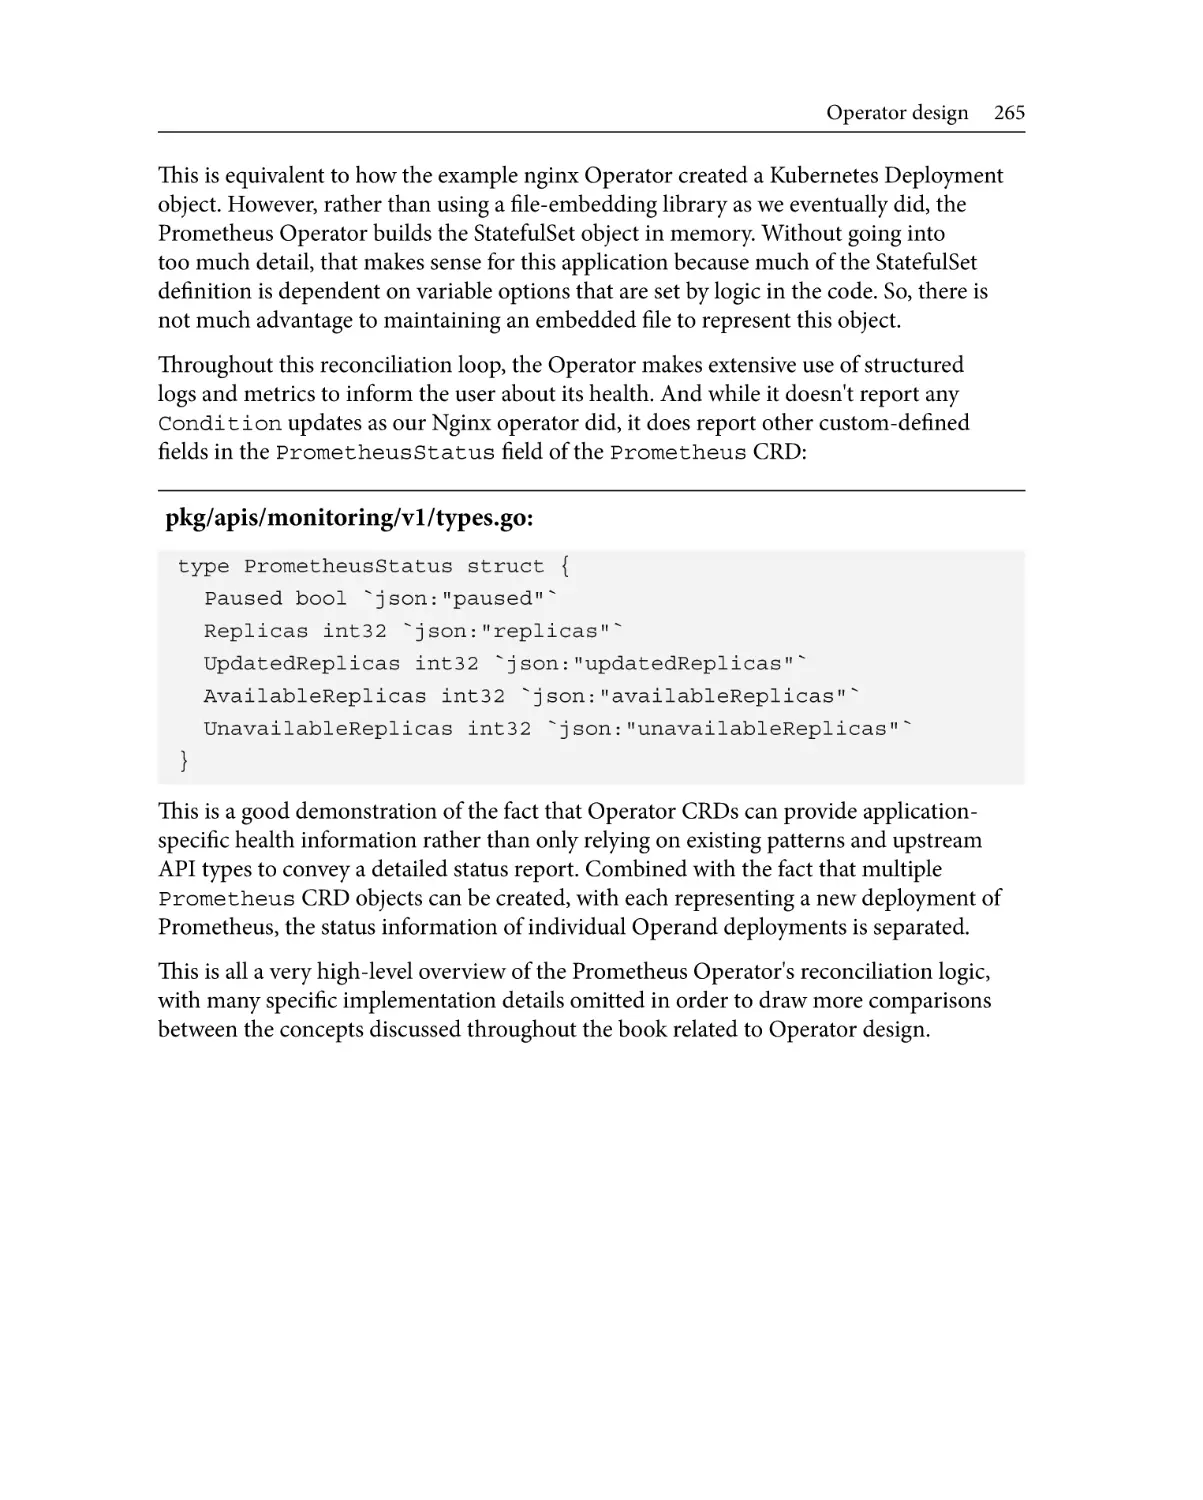
Implementing metrics
reporting114
102
103
Adding a custom service metric
RED metrics
Operator CRD conditions
Using the OLM OperatorCondition
104
111
115
116
Implementing leader election 121
Adding health checks
125
Summary127
6
Building and Deploying Your Operator
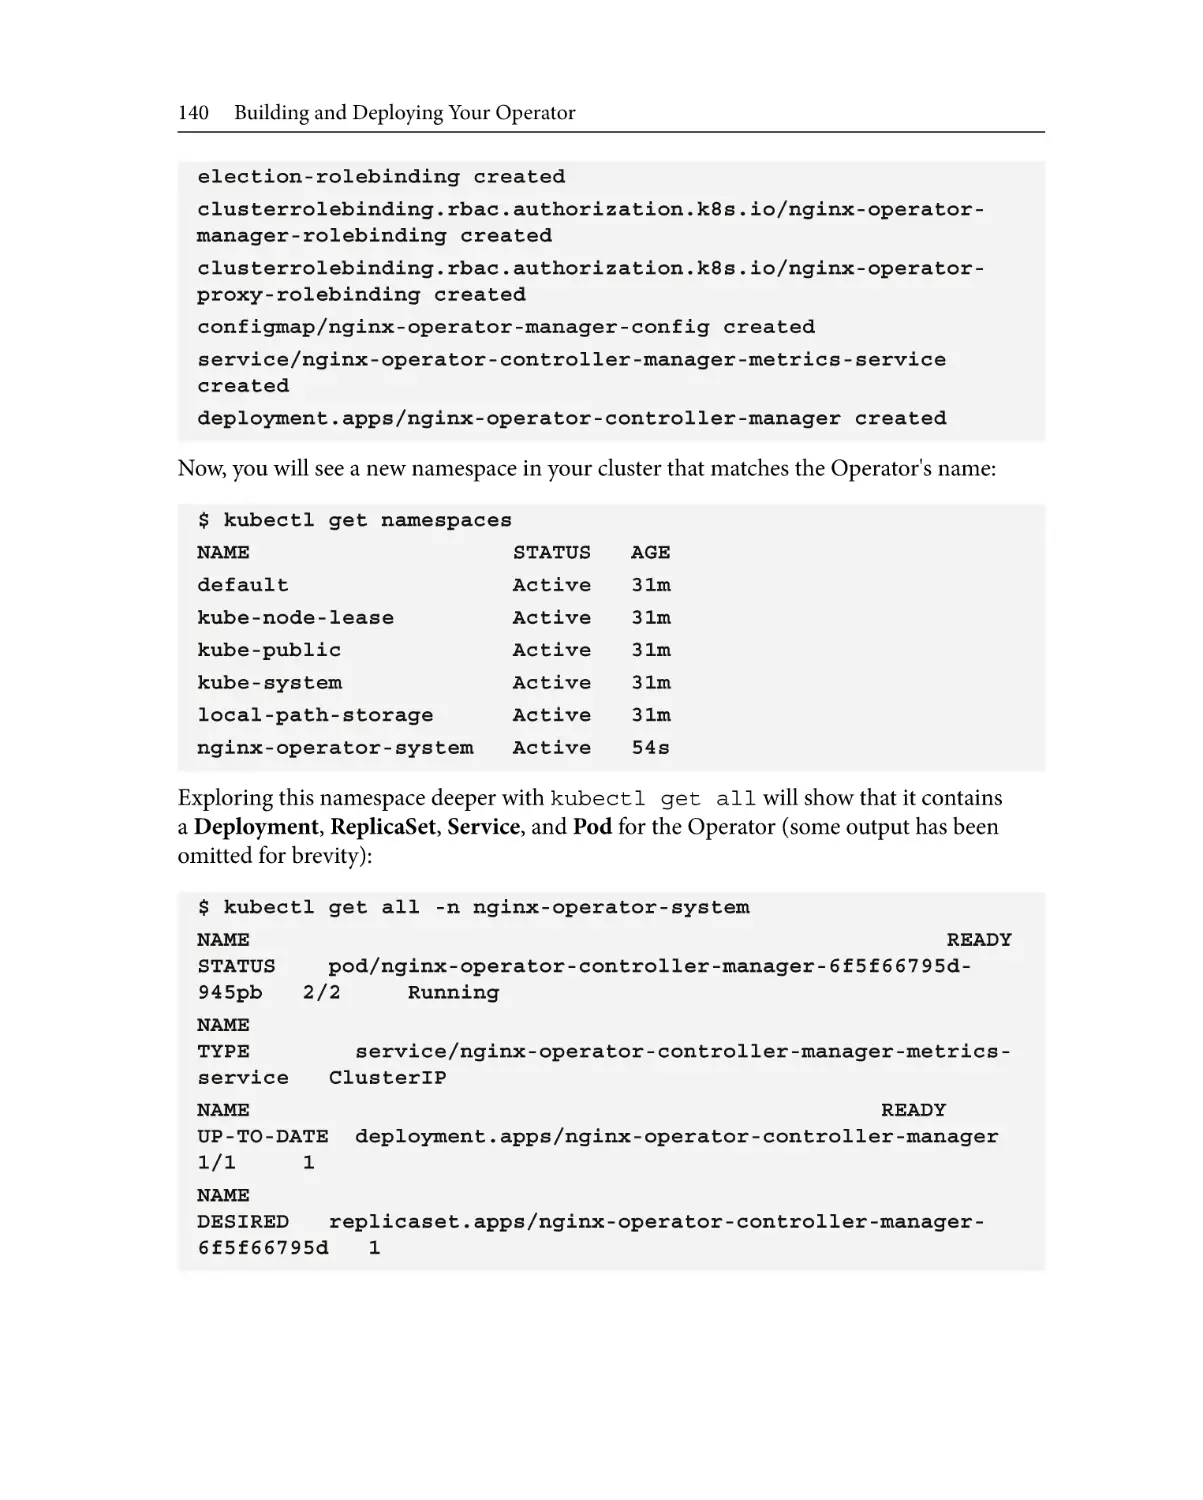
Technical requirements
Building a container image
130
131
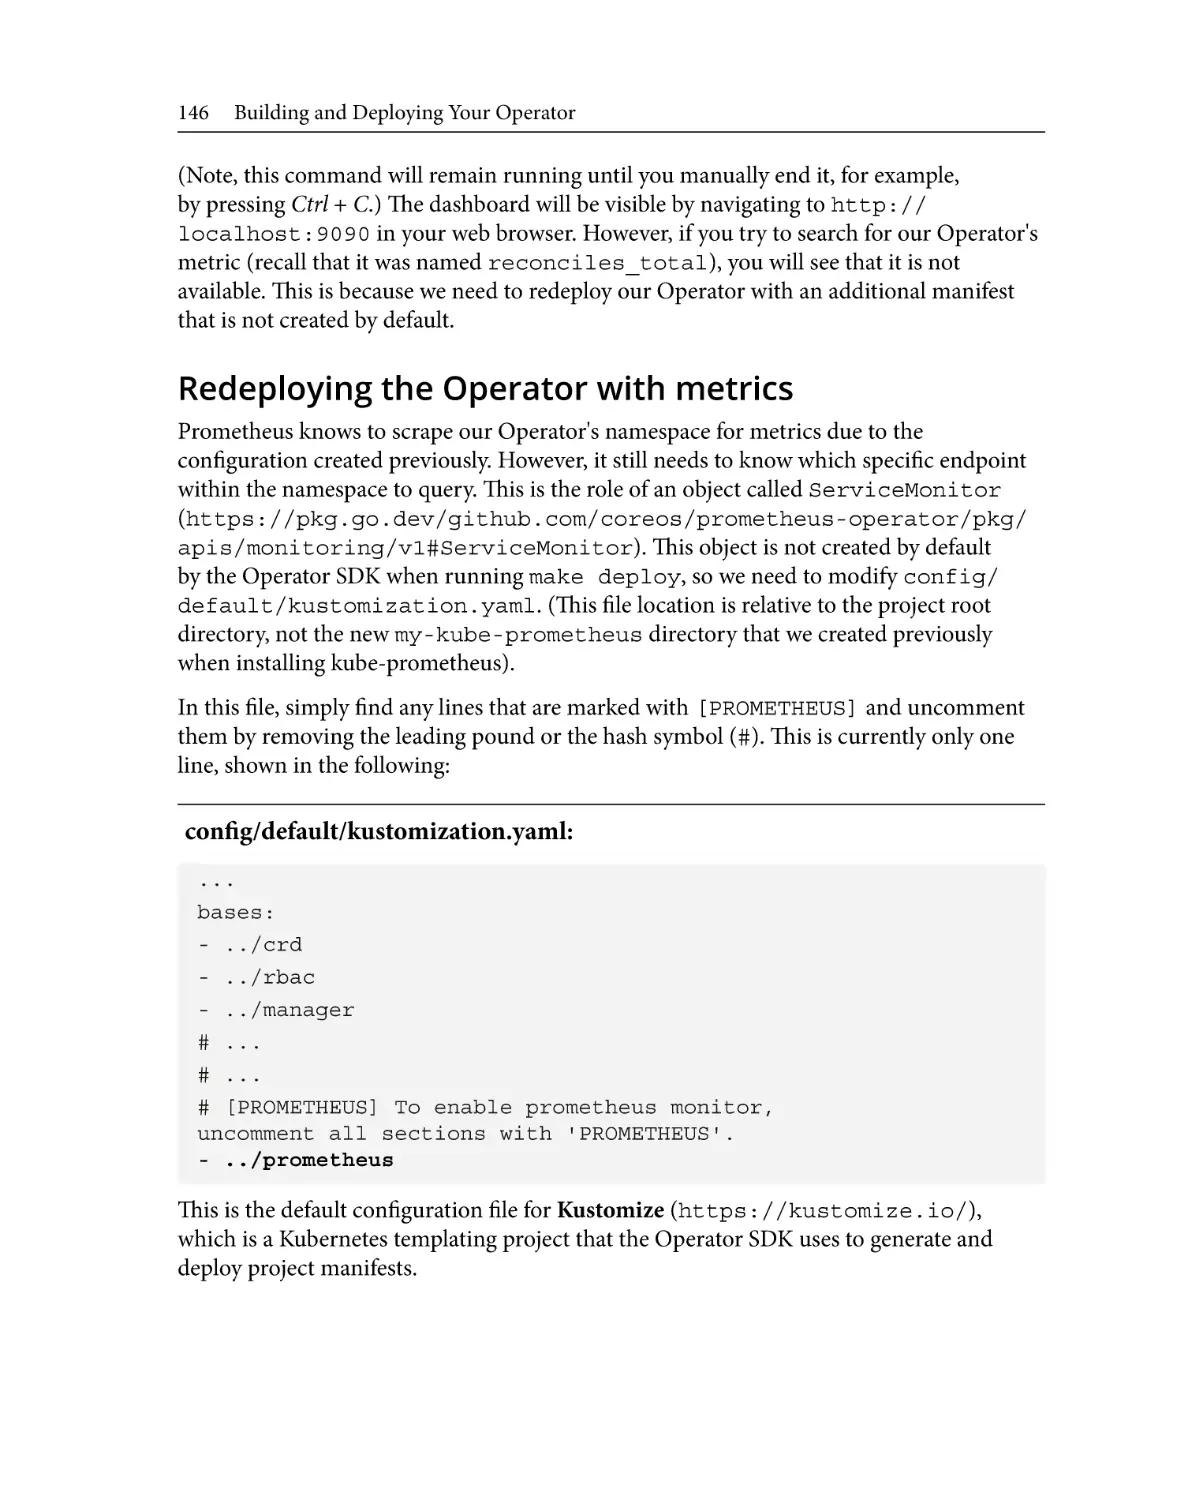
Redeploying the Operator with metrics 146
Key takeaways
147
Building the Operator locally
133
Building the Operator image with
Docker133
Troubleshooting148
Deploying in a test cluster
Pushing and testing changes
137
143
Installing and configuring kubeprometheus144
Makefile issues
148
kind148
Docker149
Metrics151
Additional errors
153
Summary153
x Table of Contents
Part 3: Deploying and Distributing
Operators for Public Use
7
Installing and Running Operators with the Operator Lifecycle
Manager
Technical requirements
Understanding the OLM
158
159
Installing the OLM in a Kubernetes
cluster159
Interacting with the OLM
161
Running your Operator
Generating an Operator's bundle
Exploring the bundle files
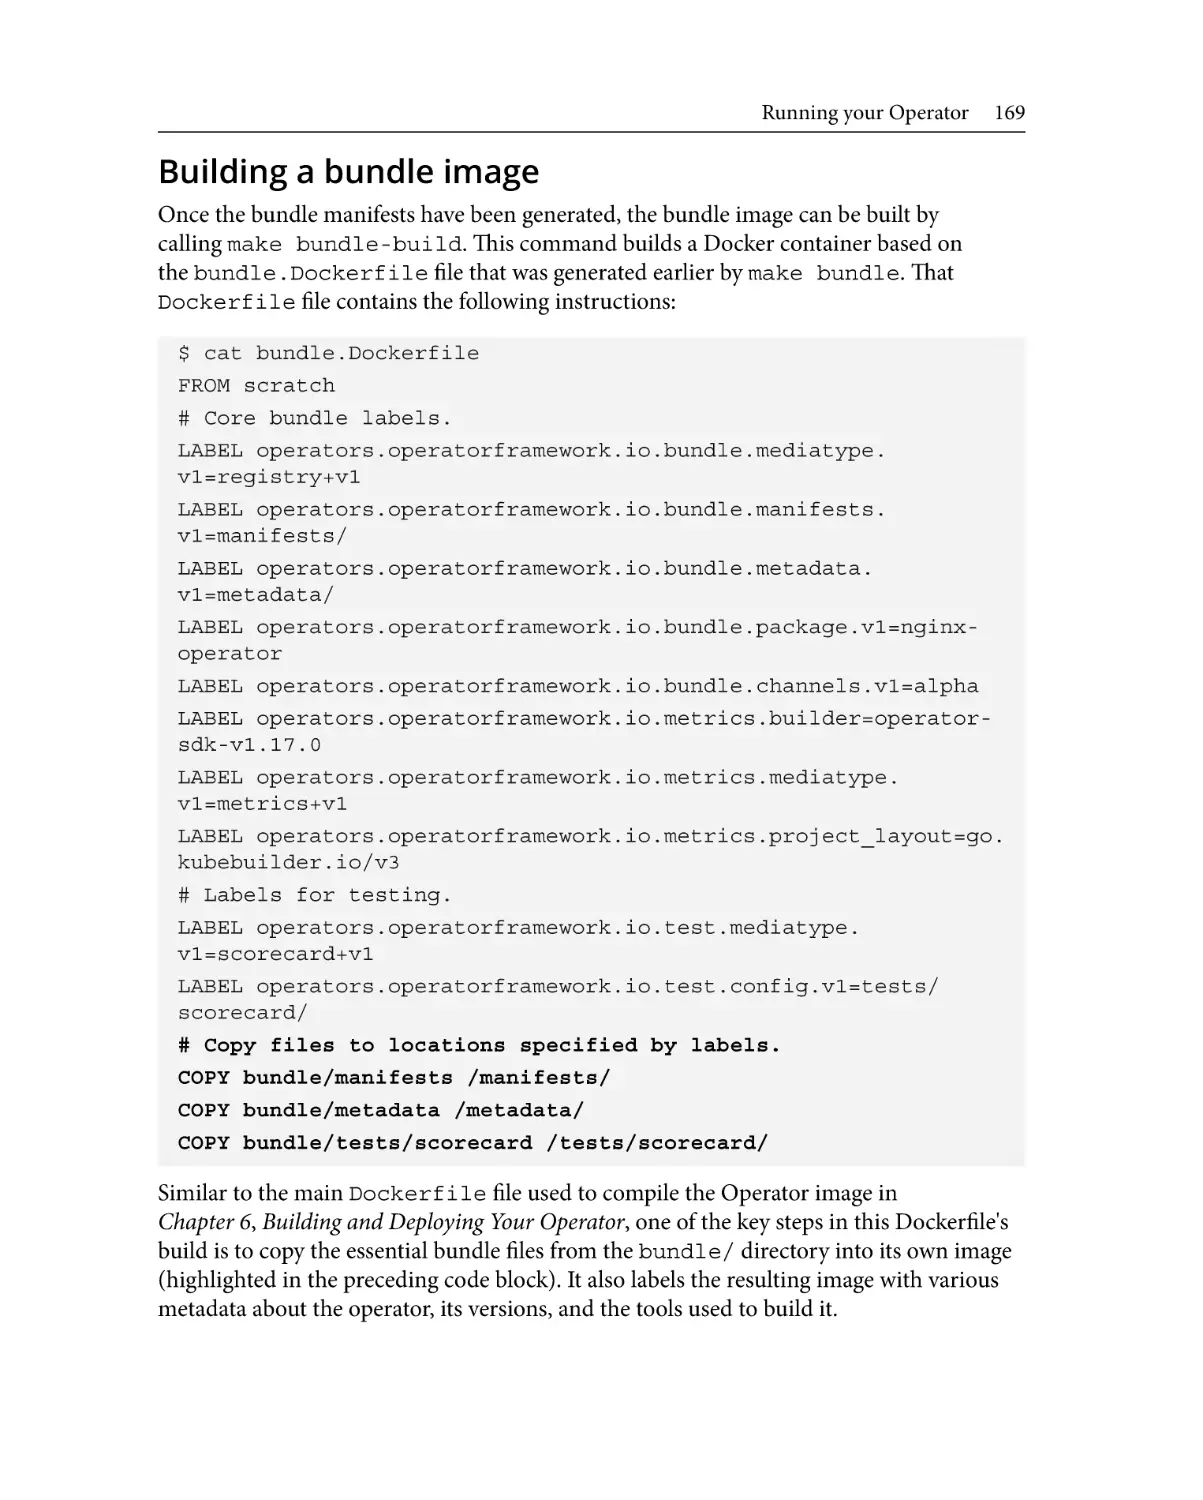
Building a bundle image
Pushing a bundle image
163
163
166
169
171
Deploying an Operator bundle with
the OLM
Working with OperatorHub
172
173
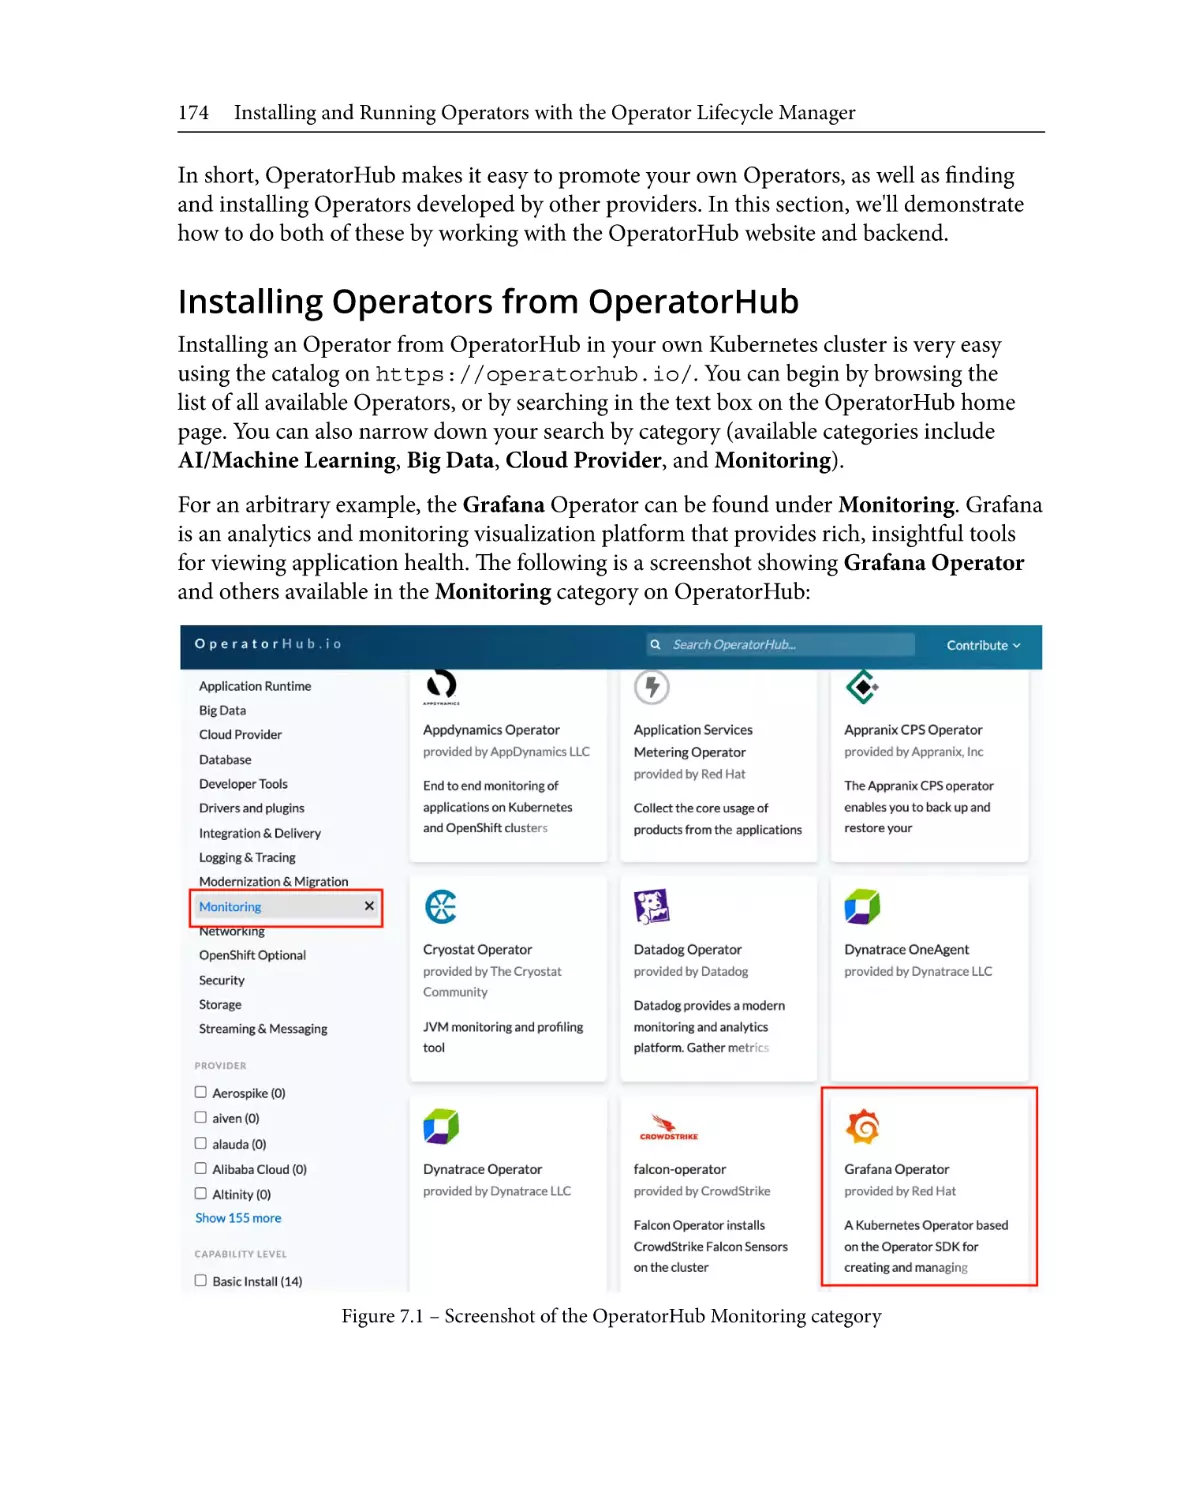
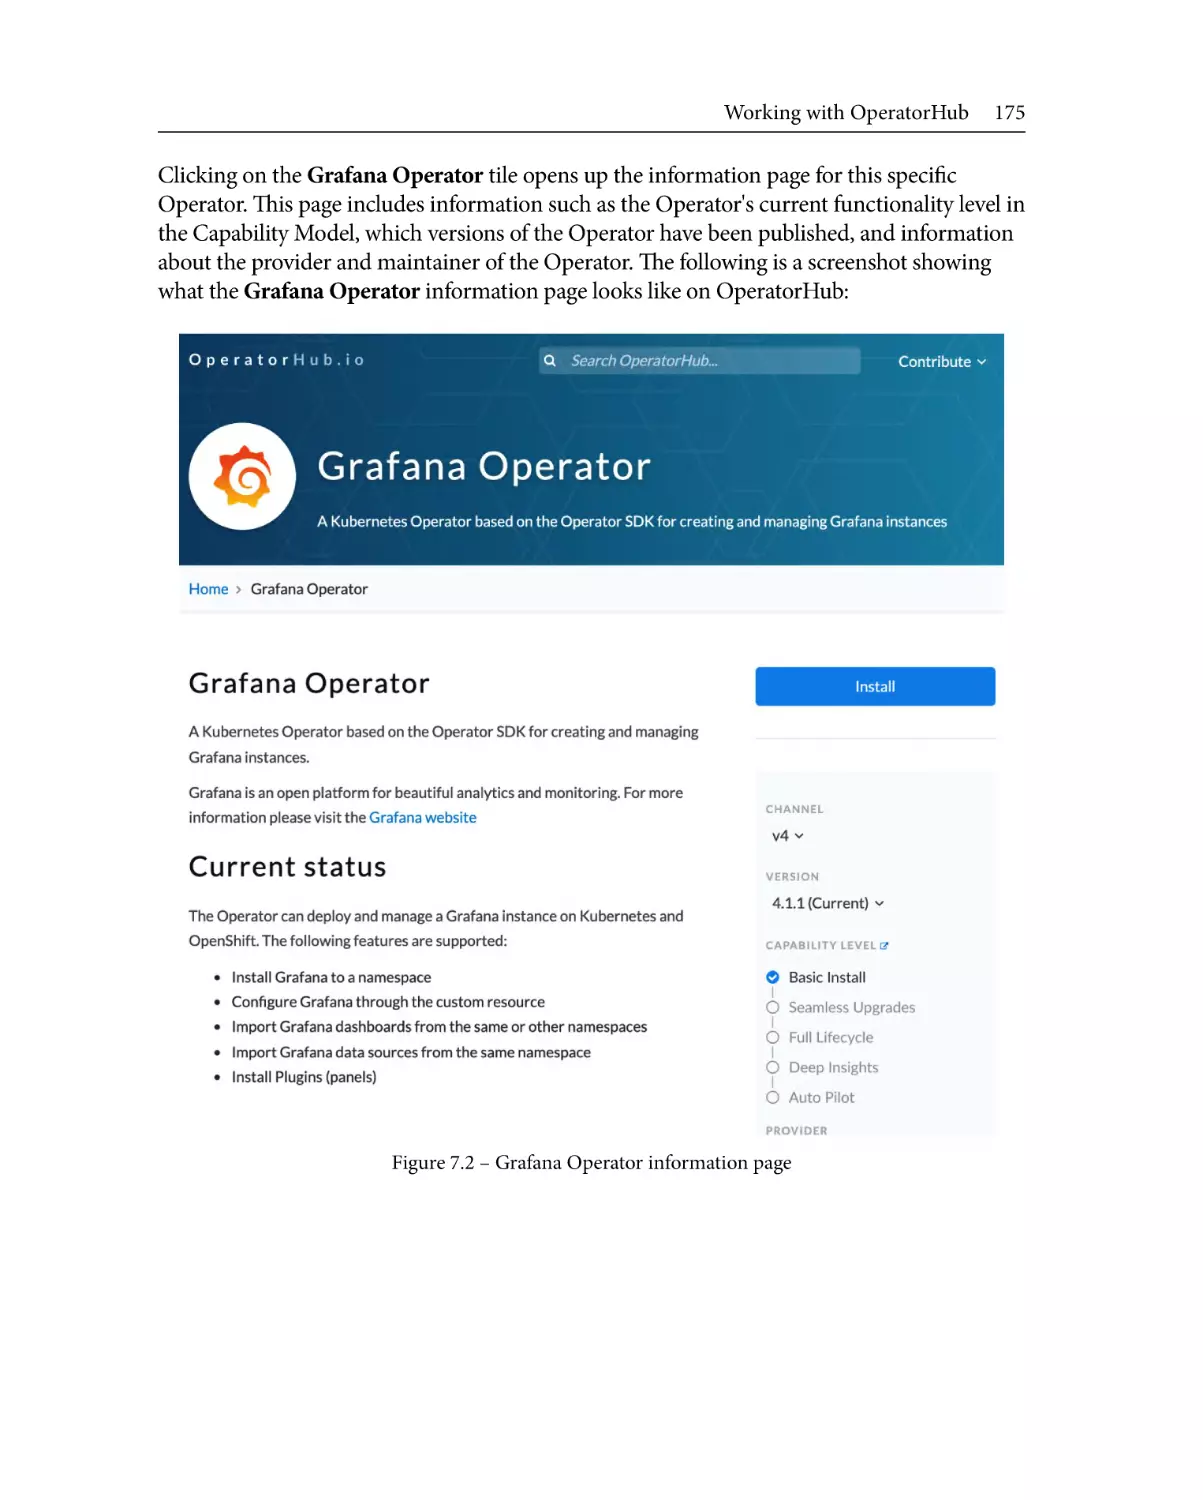
Installing Operators from OperatorHub 174
Submitting your own Operator to
OperatorHub178
Troubleshooting181
OLM support
OperatorHub support
181
181
Summary183
8
Preparing for Ongoing Maintenance of Your Operator
Technical requirements
186
Releasing new versions of your
Operator187
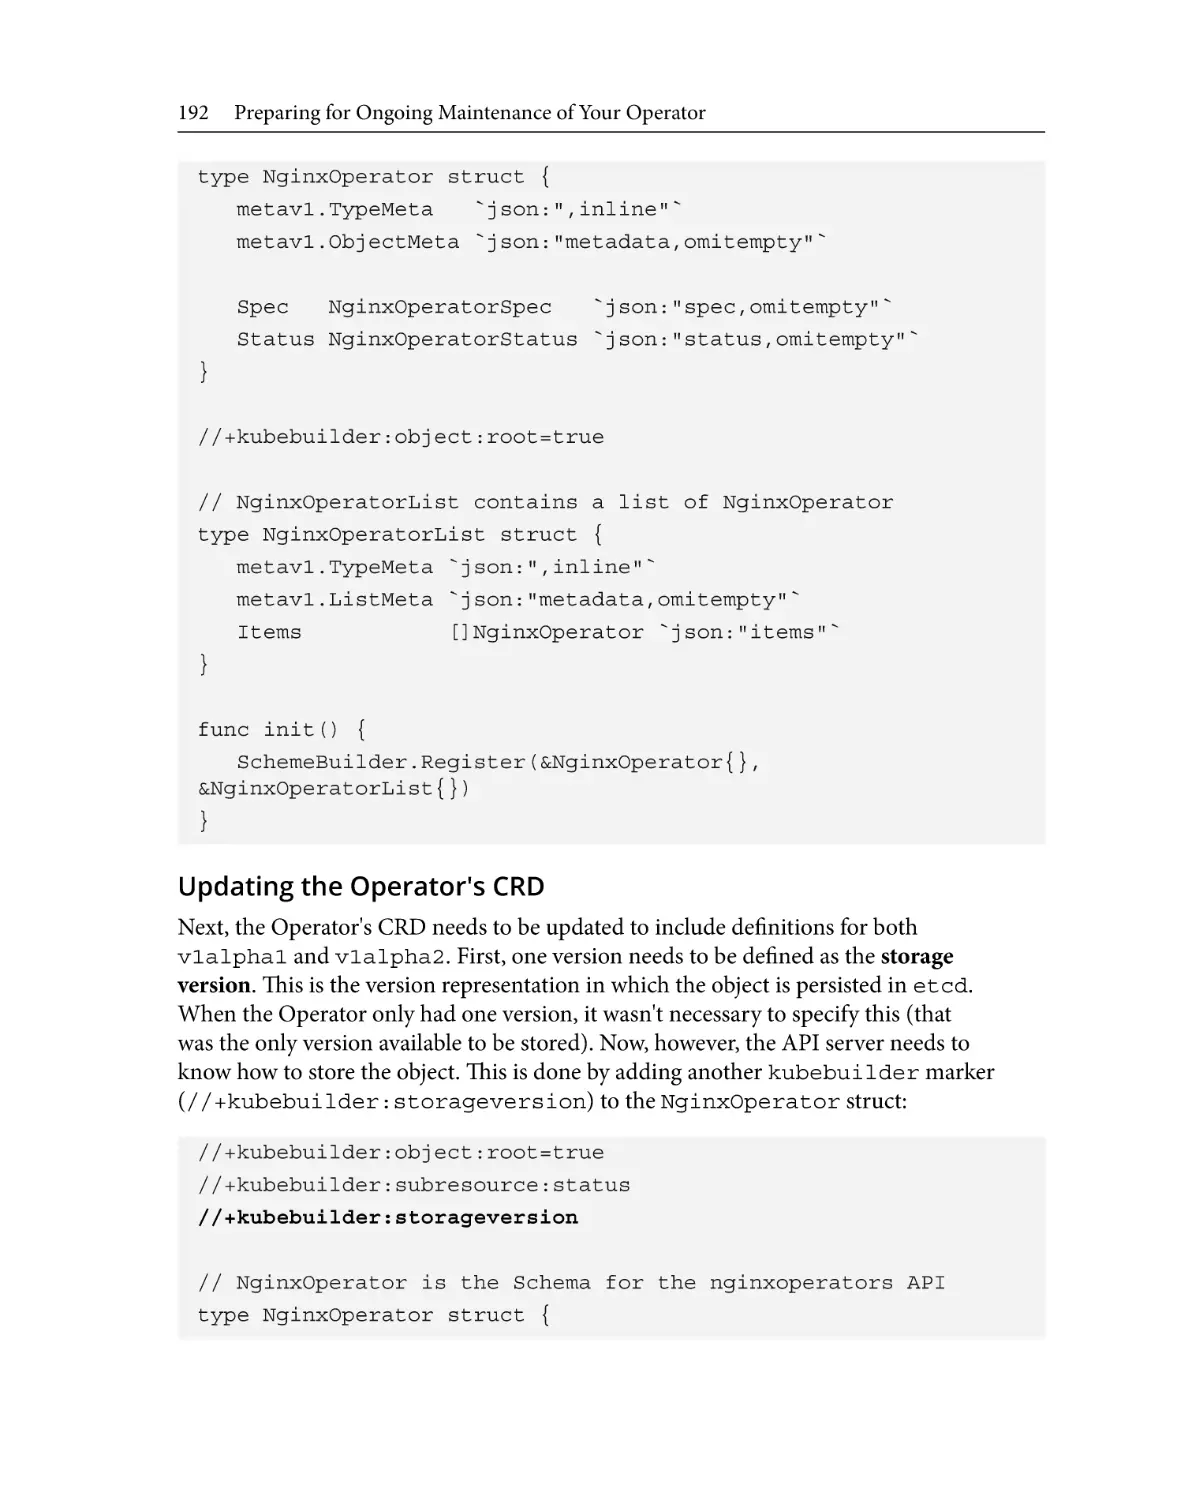
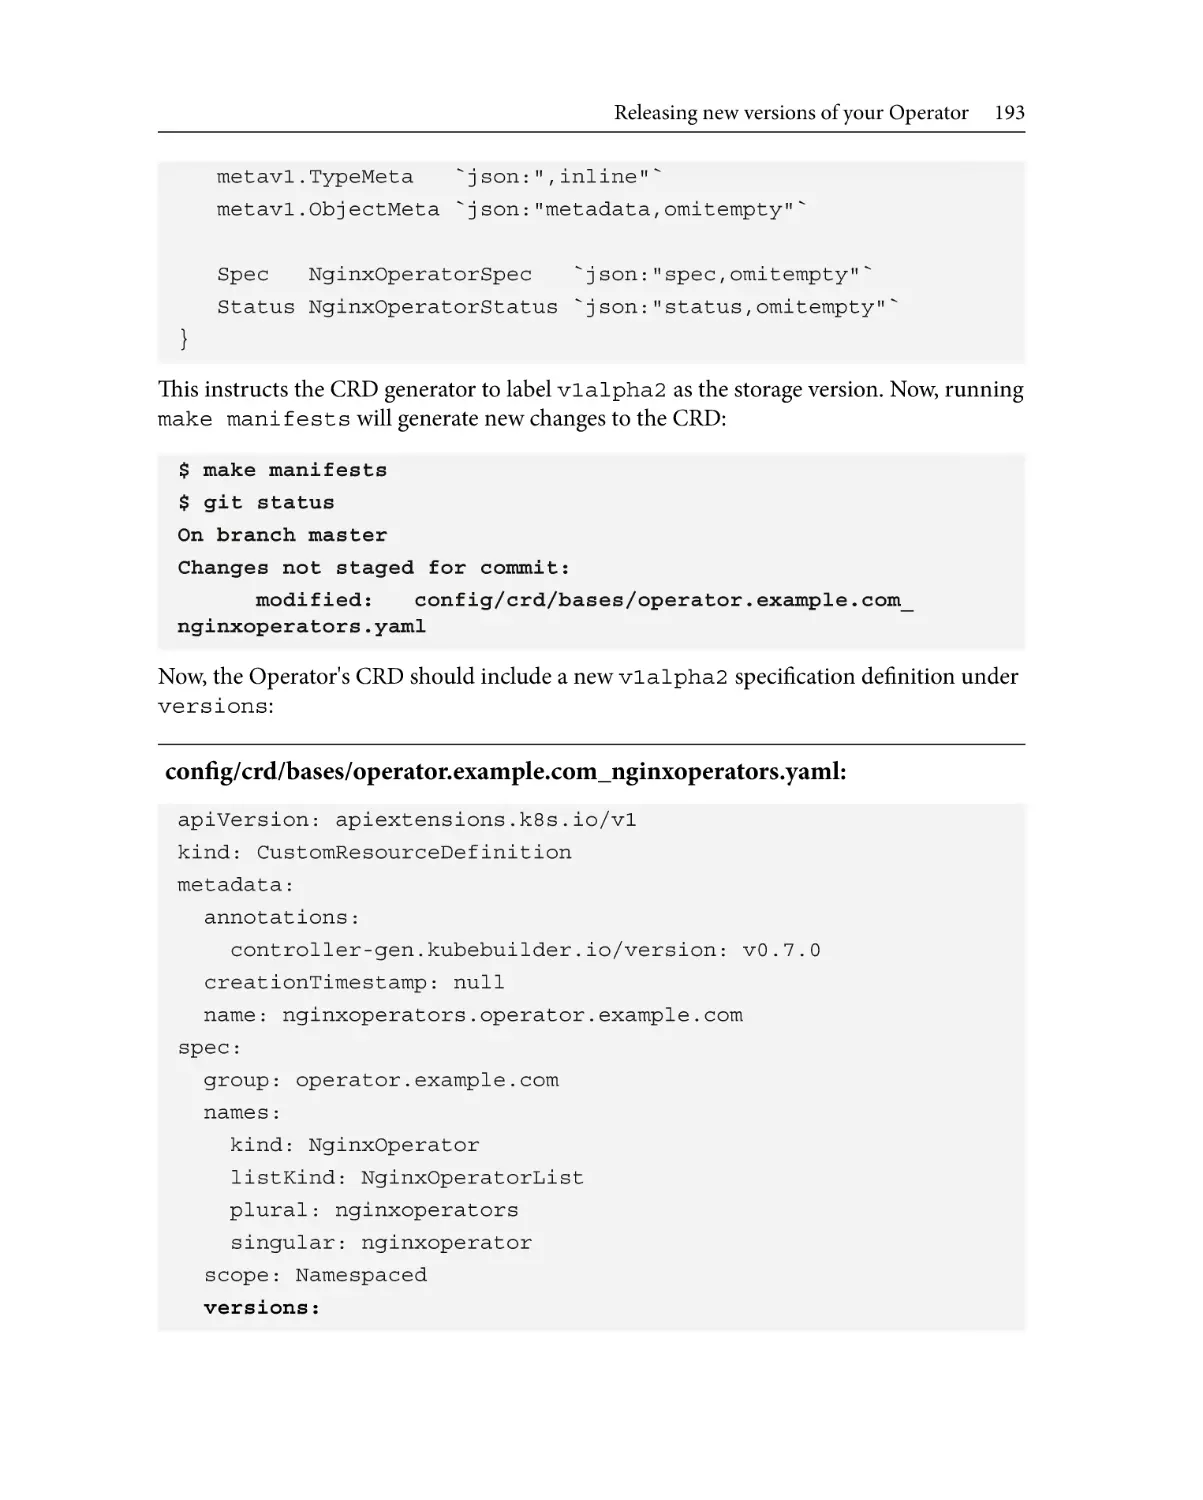
Adding an API version to your Operator 187
Updating the Operator CSV version
206
Releasing a new version on
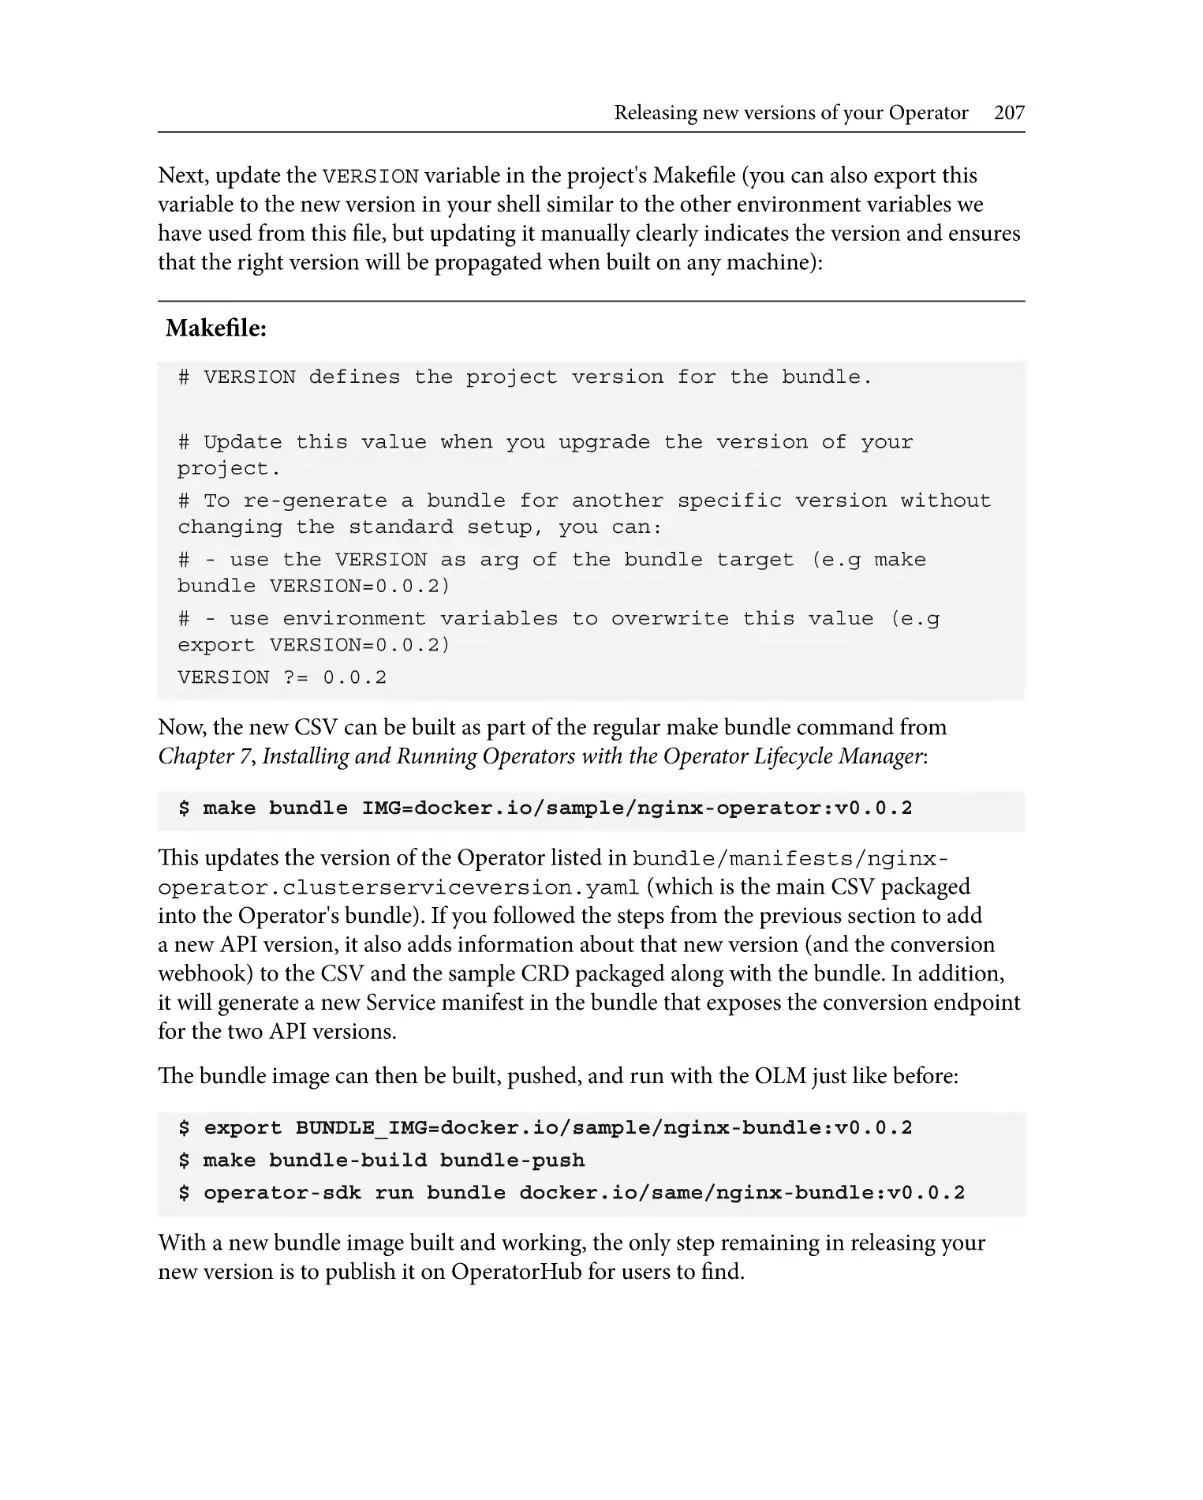
OperatorHub208
Planning for deprecation and
backward compatibility
Revisiting Operator design
Starting small
Iterating effectively
Deprecating gracefully
209
209
210
210
211
Complying with Kubernetes
standards for changes
Removing APIs
API conversion
API lifetime
211
212
213
213
Aligning with the Kubernetes
release timeline
214
Overview of a Kubernetes release
Start of release
Enhancements Freeze
Call for Exceptions
Code Freeze
Test Freeze
214
216
216
217
218
218
Table of Contents xi
GA release/Code Thaw
219
Retrospective220
Working with the Kubernetes
community220
Summary221
9
Diving into FAQs and Future Trends
FAQs about the Operator
Framework224
What is an Operator?
224
What benefit do Operators provide to
a Kubernetes cluster?
224
How are Operators different from
other Kubernetes controllers?
224
What is the Operator Framework?
225
What is an Operand?
225
What are the main components of the
Operator Framework?
225
What programming languages can
Operators be written in?
226
What is the Operator Capability Model? 226
FAQs about Operator design,
CRDs, and APIs
227
How does an Operator interact with
Kubernetes?227
What cluster resources does an
Operator act on?
227
What is a CRD?
227
How is a CRD different from a CR
object?227
What Kubernetes namespaces do
Operators run within?
228
How do users interact with an
Operator?228
How can you plan for changes early in
an Operator's lifecycle?
228
How does an Operator's API relate to
its CRD?
228
What are the conventions for an
Operator API?
229
What is a structural CRD schema?
229
What is OpenAPI v3 validation?
229
What is Kubebuilder?
229
What is a reconciliation loop?
229
What is the main function of an
Operator's reconciliation loop?
230
What are the two kinds of event
triggering?230
What is a ClusterServiceVersion (CSV)? 230
How can Operators handle upgrades
and downgrades?
230
How can Operators report failures?
231
What are status conditions?
231
What are Kubernetes events?
231
FAQs about the Operator SDK
and coding controller logic
231
What is the Operator SDK?
231
How can operator-sdk scaffold a
boilerplate Operator project?
231
What does a boilerplate Operator
project contain?
232
How can you create an API with
operator-sdk?232
What does a basic Operator API
created with operator-sdk look like?
232
What other code is generated by
operator-sdk?232
What do Kubebuilder markers do?
232
How does the Operator SDK generate
Operator resource manifests?
233
xii Table of Contents
How else can you customize generated
Operator manifests?
233
What are go-bindata and go:embed?
233
What is the basic structure of a
control/reconciliation loop?
233
How does a control loop function
access Operator config settings?
234
What information does a status
condition report?
234
What are the two basic kinds of
metrics?234
How can metrics be collected?
234
What are RED metrics?
234
What is leader election?
235
What are the two main strategies for
leader election?
235
What are health and ready checks?
235
FAQs about OperatorHub and
the OLM
235
What are the different ways to
compile an Operator?
235
How does a basic Operator SDK
project build a container image?
235
How can an Operator be deployed
in a Kubernetes cluster?
236
What is the OLM?
236
What benefit does running an
Operator with the OLM provide?
236
How do you install the OLM
in a cluster?
236
What does the operator-sdk olm
status command show?
236
What is an Operator bundle?
236
How do you generate a bundle?
237
What is a bundle image?
237
How do you build a bundle image?
237
How do you deploy a bundle with the
OLM?237
What is OperatorHub?
237
How do you install an Operator from
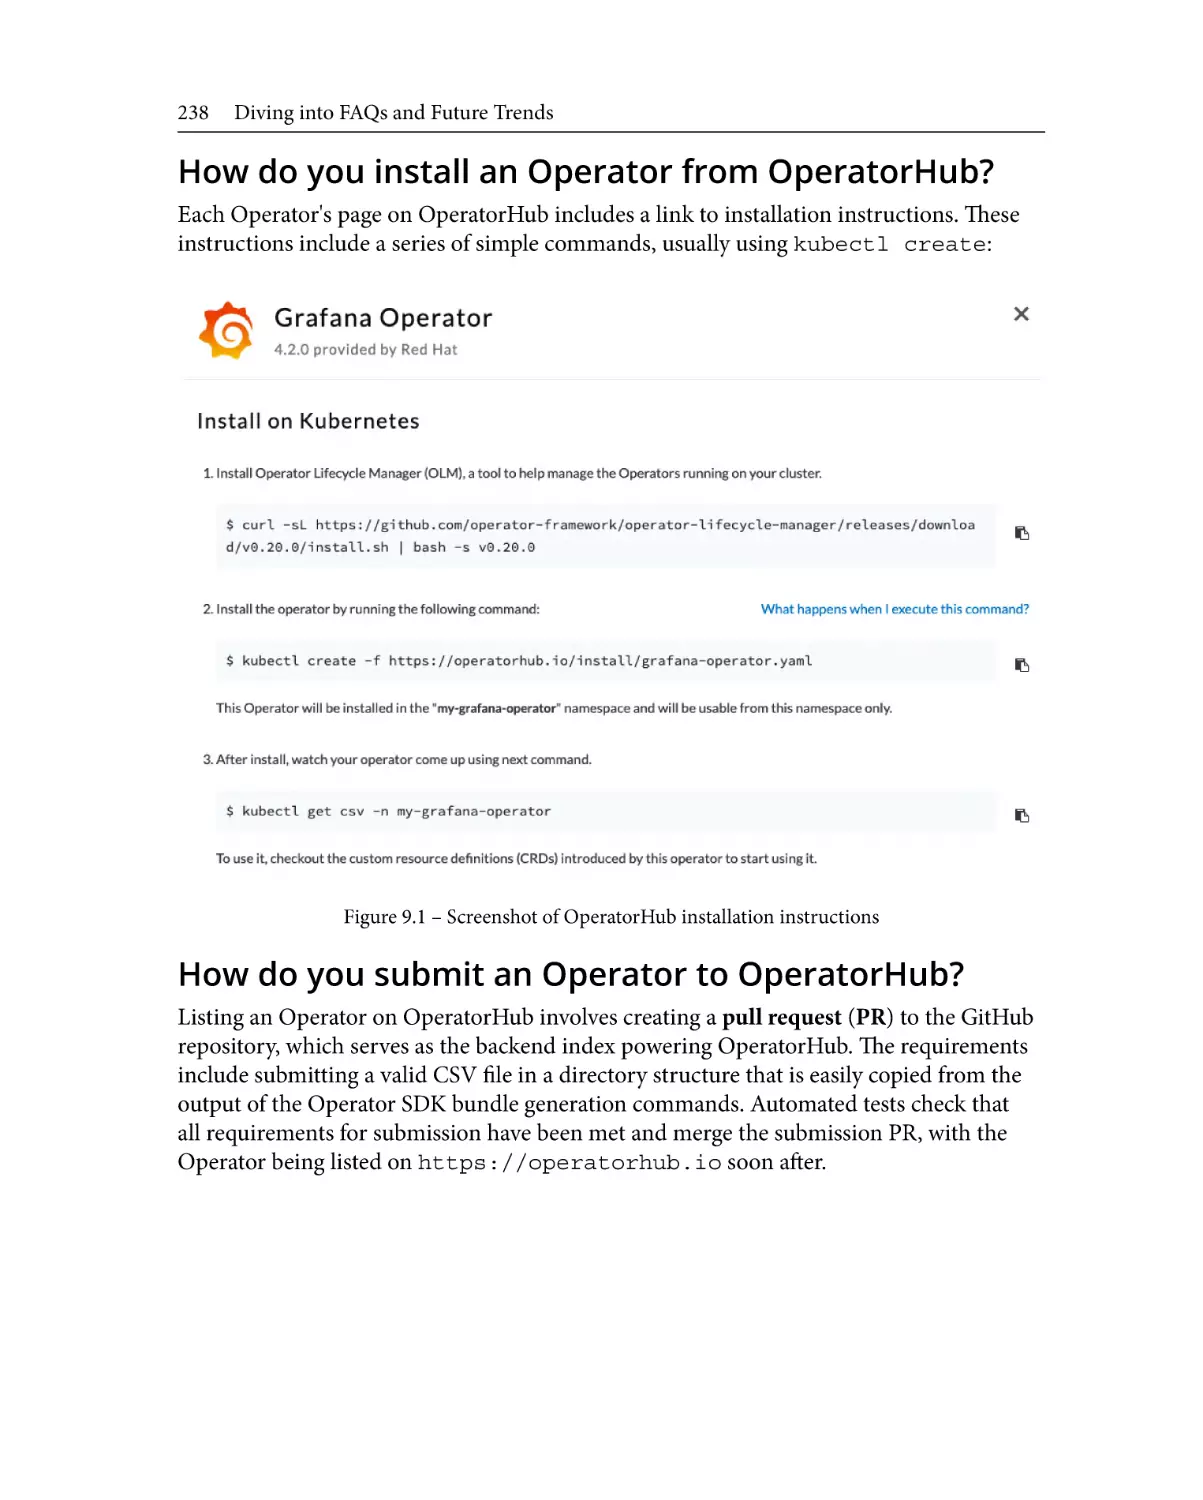
OperatorHub?238
How do you submit an Operator to
OperatorHub?238
Future trends in the Operator
Framework239
How do you release a new version of
an Operator?
239
When is it appropriate to add a new
API version?
239
How do you add a new API version?
239
What is an API conversion?
239
How do you convert between two
versions of an API?
240
What is a conversion webhook?
240
How do you add a conversion
webhook to an Operator?
240
What is kube-storage-version-migrator?240
How do you update an Operator's CSV? 240
What are upgrade channels?
241
How do you publish a new version on
OperatorHub?241
What is the Kubernetes deprecation
policy?241
How can API elements be removed in
the Kubernetes deprecation policy?
241
How long are API versions generally
supported?241
How long is the Kubernetes release
cycle?242
What is Enhancements Freeze?
242
What is Code Freeze?
242
What is Retrospective?
242
How do Kubernetes community
standards apply to Operator
development?242
Summary243
Table of Contents xiii
10
Case Study for Optional Operators – the Prometheus
Operator
A real-world use case
Prometheus overview
Installing and running Prometheus
Configuring Prometheus
Summarizing the problems with
manual Prometheus
Operator design
246
247
247
249
252
254
CRDs and APIs
Reconciliation logic
254
261
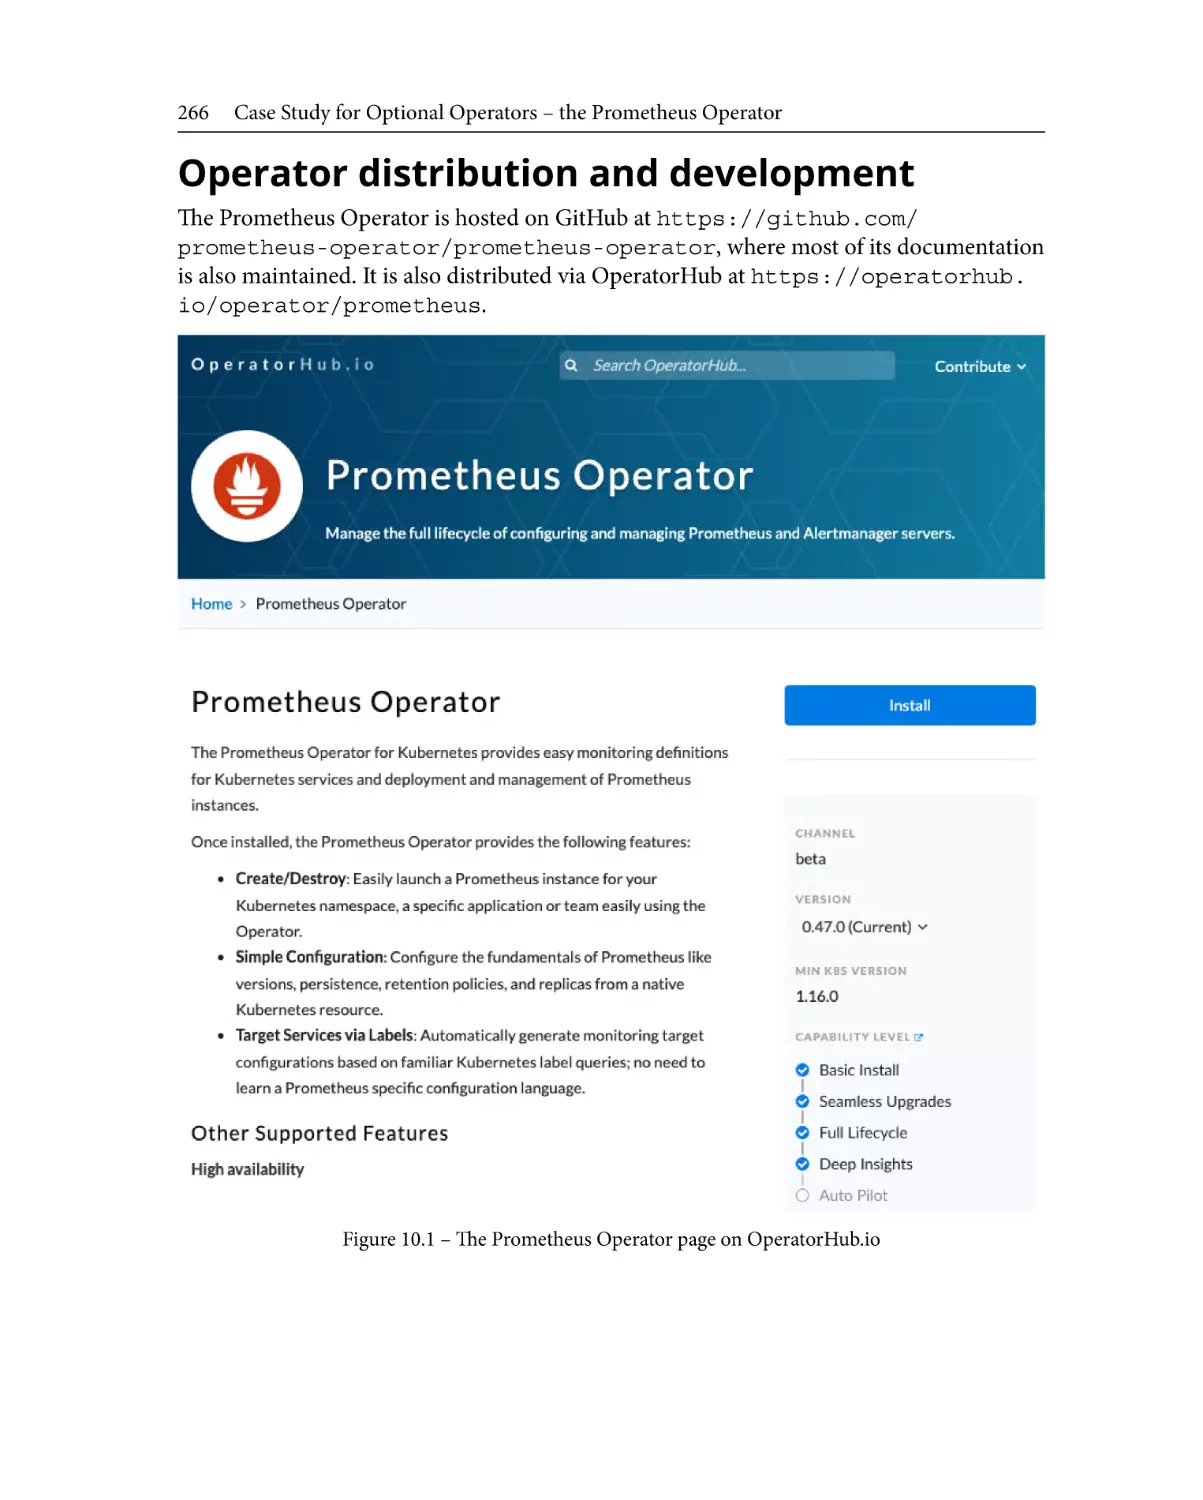
Operator distribution and
development266
Updates and maintenance
271
Summary273
11
Case Study for Core Operator – Etcd Operator
Core Operators – extending the
Kubernetes platform
276
Reconciliation logic
Failure recovery
RBAC Manager
The Kube Scheduler Operator
The etcd Operator
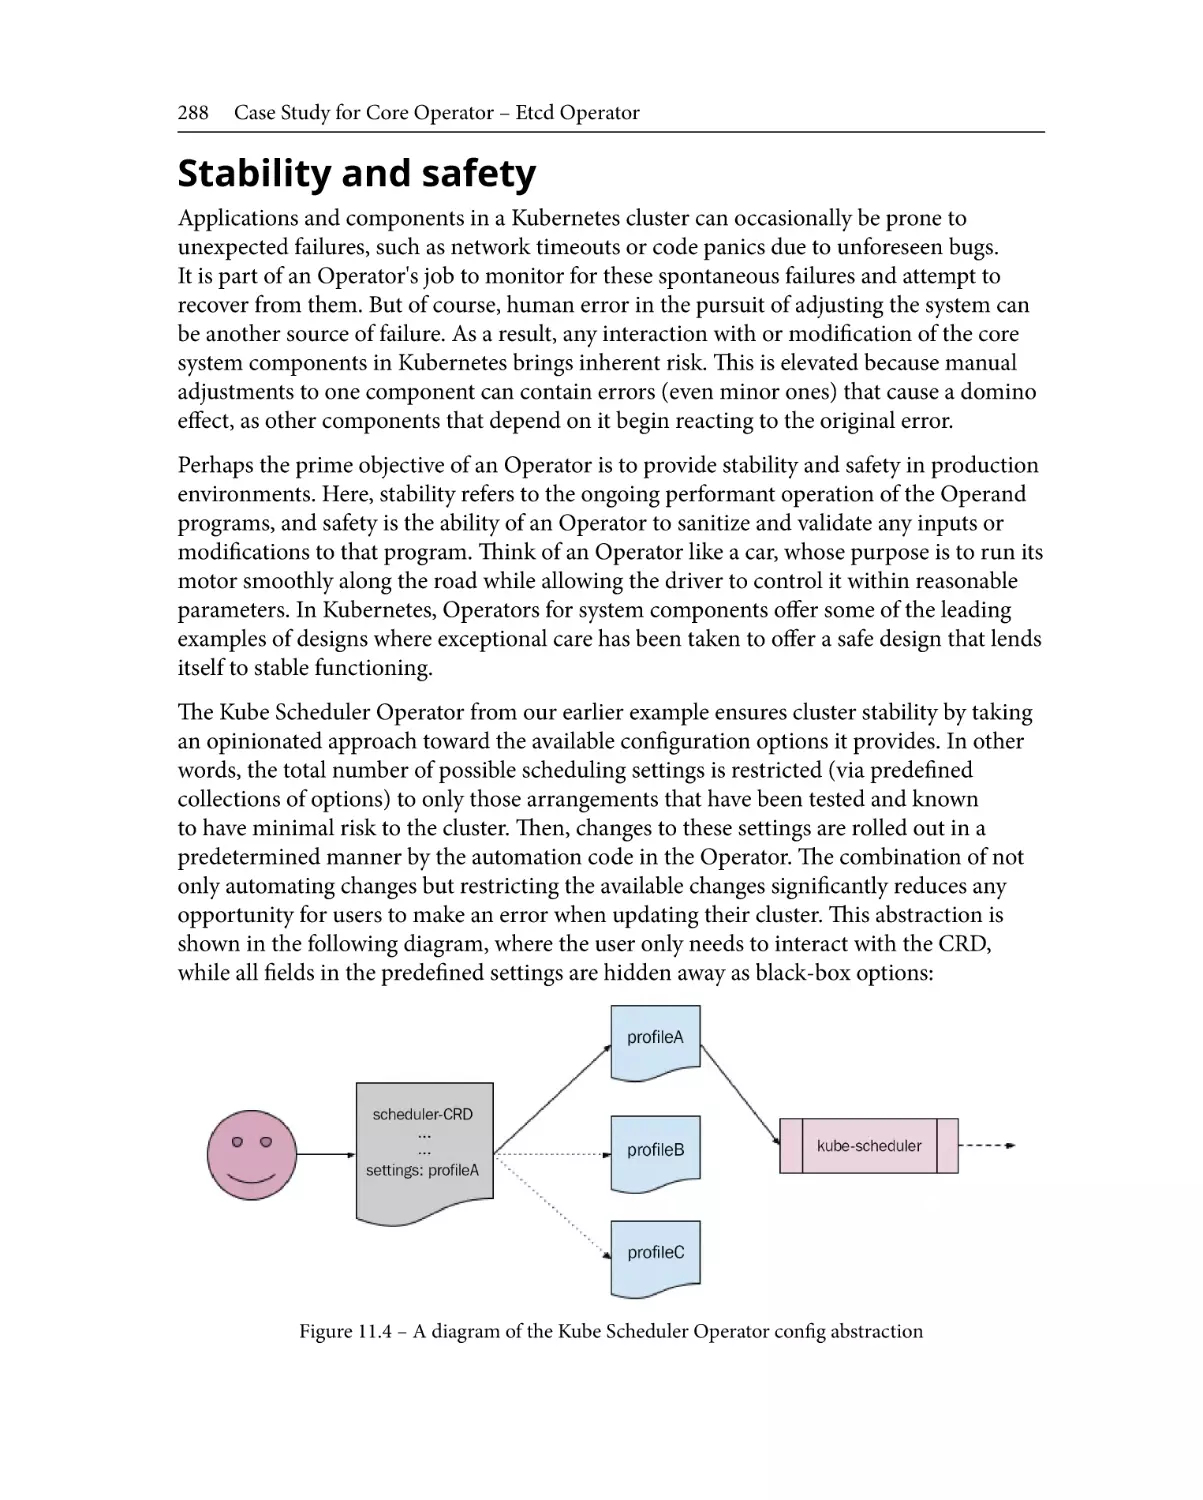
Stability and safety
288
Upgrading Kubernetes
290
Summary292
etcd Operator design
277
281
282
283
CRDs283
Index
Other Books You May Enjoy
285
287
Preface
The emergence of Kubernetes as a standard platform for distributed computing has
revolutionized the landscape of enterprise application development. Organizations and
developers can now easily write and deploy applications with a cloud-native approach,
scaling those deployments to meet the needs of them and their users. However, with that
scale comes increasing complexity and a maintenance burden. In addition, the nature of
distributed workloads exposes applications to increased potential points of failure, which
can be costly and time-consuming to repair. While Kubernetes is a powerful platform on
its own, it is not without its own challenges.
The Operator Framework has been developed specifically to address these pain points
by defining a standard process for automating operational tasks in Kubernetes clusters.
Kubernetes administrators and developers now have a set of APIs, libraries, management
applications, and command-line tools to rapidly create controllers that automatically
create and manage their applications (and even core cluster components). These
controllers, called Operators, react to the naturally fluctuating state of a Kubernetes cluster
to reconcile any deviation from the desired administrative stasis.
This book is an introduction to the Operator Framework for anyone who is interested in,
but unfamiliar with, Operators and how they benefit Kubernetes users, with the goal of
providing a practical lesson in designing, building, and using Operators. To that end, it is
more than just a technical tutorial for writing Operator code (though it does walk through
writing a sample Operator in Go). It is also a guide on intangible design considerations
and maintenance workflows, offering a holistic approach to Operator use cases and
development to guide you toward building and maintaining your own Operators.
Who this book is for
The target audience for this book is anyone who is considering using the Operator
Framework for their own development, including engineers, project managers, architects,
and hobbyist developers. The content in this book assumes some prior knowledge of basic
Kubernetes concepts (such as Pods, ReplicaSets, and Deployments). However, there is no
requirement for any prior experience with Operators or the Operator Framework.
xvi
Preface
What this book covers
Chapter 1, Introducing the Operator Framework, provides a brief introduction to the
fundamental concepts and terminology that describe the Operator Framework.
Chapter 2, Understanding How Operators Interact with Kubernetes, provides sample
descriptions of the ways that Operators function in a Kubernetes cluster, including not
only the technical interactions but also descriptions of different user interactions.
Chapter 3, Designing an Operator – CRD, API, and Target Reconciliation, discusses highlevel considerations to take into account when designing a new Operator.
Chapter 4, Developing an Operator with the Operator SDK, provides a technical walk through of creating a sample Operator project in Go with the Operator SDK toolkit.
Chapter 5, Developing an Operator – Advanced Functionality, builds on the sample
Operator project from the previous chapter to add more complex functionality.
Chapter 6, Building and Deploying Your Operator, demonstrates the processes for
compiling and installing an Operator in a Kubernetes cluster by hand.
Chapter 7, Installing and Running Operators with the Operator Lifecycle Manager,
provides an introduction to the Operator Lifecycle Manager, which helps to automate the
deployment of Operators in a cluster.
Chapter 8, Preparing for Ongoing Maintenance of Your Operator, provides considerations
for promoting the active maintenance of Operator projects, including how to release new
versions and alignment with upstream Kubernetes release standards.
Chapter 9, Diving into FAQs and Future Trends, provides a distilled summary of the
content from previous chapters, broken down into small FAQ-style sections.
Chapter 10, Case Study for Optional Operators – the Prometheus Operator, provides
a demonstration of the Operator Framework concepts in a real-world example of an
Operator used to manage applications.
Chapter 11, Case Study for Core Operator – Etcd Operator, provides an additional example
of Operator Framework concepts applied to the management of core cluster components.
Preface
xvii
To get the most out of this book
It is assumed that you have at least a foundational understanding of basic Kubernetes
concepts and terms due to the fact that the Operator Framework builds heavily on these
concepts to serve its purpose. These include topics such as basic application deployment
and a familiarity with command-line tools such as kubectl for interacting with
Kubernetes clusters. While direct hands-on experience with these topics is not necessary,
it will be helpful.
In addition, administrator access to a Kubernetes cluster is needed in order to complete all
of the sample tasks in the book (for example, deploying an Operator in Chapter 6, Building
and Deploying Your Operator). The chapters that require a Kubernetes cluster offer some
options for creating disposable clusters and basic setup steps for doing so, but in order
to focus on the main content, these sections intentionally do not go into thorough detail
regarding cluster setup. It is strongly recommended to use a disposable cluster for all
examples in order to avoid accidental damage to sensitive workloads.
If you are using the digital version of this book, we advise you to type the code yourself
or access the code from the book's GitHub repository (a link is available in the next
section). Doing so will help you avoid any potential errors related to the copying and
pasting of code.
Download the example code files
You can download the example code files for this book from GitHub at https://
github.com/PacktPublishing/The-Kubernetes-Operator-FrameworkBook. If there's an update to the code, it will be updated in the GitHub repository.
We also have other code bundles from our rich catalog of books and videos available at
https://github.com/PacktPublishing/. Check them out!
Code in Action
The Code in Action videos for this book can be viewed at https://bit.ly/3m5dlYa.
xviii
Preface
Download the color images
We also provide a PDF file that has color images of the screenshots and diagrams used
in this book. You can download it here: https://static.packt-cdn.com/
downloads/9781803232850_ColorImages.pdf.
Conventions used
There are a number of text conventions used throughout this book.
Code in text: Indicates code words in text, database table names, folder names,
filenames, file extensions, pathnames, dummy URLs, user input, and Twitter handles.
Here is an example: "This requires additional resources, such as ClusterRoles and
RoleBindings, to ensure the Prometheus Pod has permission to scrape metrics from
the cluster and its applications."
A block of code is set as follows:
apiVersion: monitoring.coreos.com/v1
kind: Prometheus
metadata:
name: sample
spec:
replicas: 2
When we wish to draw your attention to a particular part of a code block, the relevant
lines or items are set in bold:
apiVersion: monitoring.coreos.com/v1
kind: ServiceMonitor
metadata:
name: web-service-monitor
labels:
app: web
spec:
selector:
matchLabels:
serviceLabel: webapp
Preface
xix
Any command-line input or output is written as follows:
$ export BUNDLE_IMG=docker.io/sample/nginx-bundle:v0.0.2
$ make bundle-build bundle-push
$ operator-sdk run bundle docker.io/same/nginx-bundle:v0.0.2
Bold: Indicates a new term, an important word, or words that you see on screen. For
instance, words in menus or dialog boxes appear in bold. Here is an example: "Clicking on
the Grafana Operator tile opens up the information page for this specific Operator."
Tips or Important Notes
Appear like this.
Get in touch
Feedback from our readers is always welcome.
General feedback: If you have questions about any aspect of this book, email us at
customercare@packtpub.com and mention the book title in the subject of your
message.
Errata: Although we have taken every care to ensure the accuracy of our content, mistakes
do happen. If you have found a mistake in this book, we would be grateful if you would
report this to us. Please visit www.packtpub.com/support/errata and fill in
the form.
Piracy: If you come across any illegal copies of our works in any form on the internet,
we would be grateful if you would provide us with the location address or website name.
Please contact us at copyright@packt.com with a link to the material.
If you are interested in becoming an author: If there is a topic that you have expertise in
and you are interested in either writing or contributing to a book, please visit authors.
packtpub.com.
xx
Preface
Share Your Thoughts
Once you've read The Kubernetes Operator Framework Book, we'd love to hear your
thoughts! Please click here to go straight to the Amazon review page for this book and
share your feedback.
Your review is important to us and the tech community and will help us make sure we're
delivering excellent quality content.
Part 1:
Essentials of
Operators and the
Operator Framework
In this section, you will achieve a basic understanding of the history and purpose of
Kubernetes Operators. The fundamental concepts of the Operator Framework will be
introduced and you will learn how Operators function in a Kubernetes cluster. This will
set the groundwork for more complex concepts, which will be introduced later.
This section comprises the following chapters:
• Chapter 1, Introducing the Operator Framework
• Chapter 2, Understanding How Operators Interact with Kubernetes
1
Introducing
the Operator
Framework
Managing a Kubernetes cluster is hard. This is partly due to the fact that any microservice
architecture is going to be inherently based on the interactions of many small
components, each introducing its own potential point of failure. There are, of course,
many benefits to this type of system design, such as graceful error handling thanks to the
separation of responsibilities. However, diagnosing and reconciling such errors requires
significant engineering resources and a keen familiarity with an application's design. This
is a major pain point for project teams who migrate to the Kubernetes platform.
The Operator Framework was introduced to the Kubernetes ecosystem to address these
problems. This chapter will go over a few general topics to give a broad overview of
the Operator Framework. The intent is to provide a brief introduction to the Operator
Framework, the problems it solves, how it solves them, and the tools and patterns it
provides to users. This will highlight key takeaways for the goals and benefits of using
Operators to help administrate a Kubernetes cluster. These topics include the following:
• Managing clusters without Operators
• Introducing the Operator Framework
4
Introducing the Operator Framework
• Developing with the Operator software development kit (SDK)
• Managing Operators with the Operator Lifecycle Manager (OLM)
• Distributing Operators on OperatorHub.io
• Defining Operator functions with the Capability Model
• Using Operators to manage applications
Technical requirements
This chapter does not have any technical requirements because we will only be covering
general topics. In later chapters, we will discuss these various topics in depth and include
technical prerequisites for following along with them.
The Code in Action video for this chapter can be viewed at: https://bit.ly/3GKJfmE
Managing clusters without Operators
Kubernetes is a powerful microservice container orchestration platform. It provides many
different controllers, resources, and design patterns to cover almost any use case, and it is
constantly growing. Because of this, applications designed to be deployed on Kubernetes
can be very complex.
When designing an application to use microservices, there are a number of concepts to
be familiar with. In Kubernetes, these are mainly the native application programming
interface (API) resource objects included in the core platform. Throughout this book, we
will assume a foundational familiarity with the common Kubernetes resources and their
functions.
These objects include Pods, Replicas, Deployments, Services, Volumes, and more. The
orchestration of any microservice-based cloud application on Kubernetes relies on
integrating these different concepts to weave a coherent whole. This orchestration is what
creates a complexity that many application developers struggle to manage.
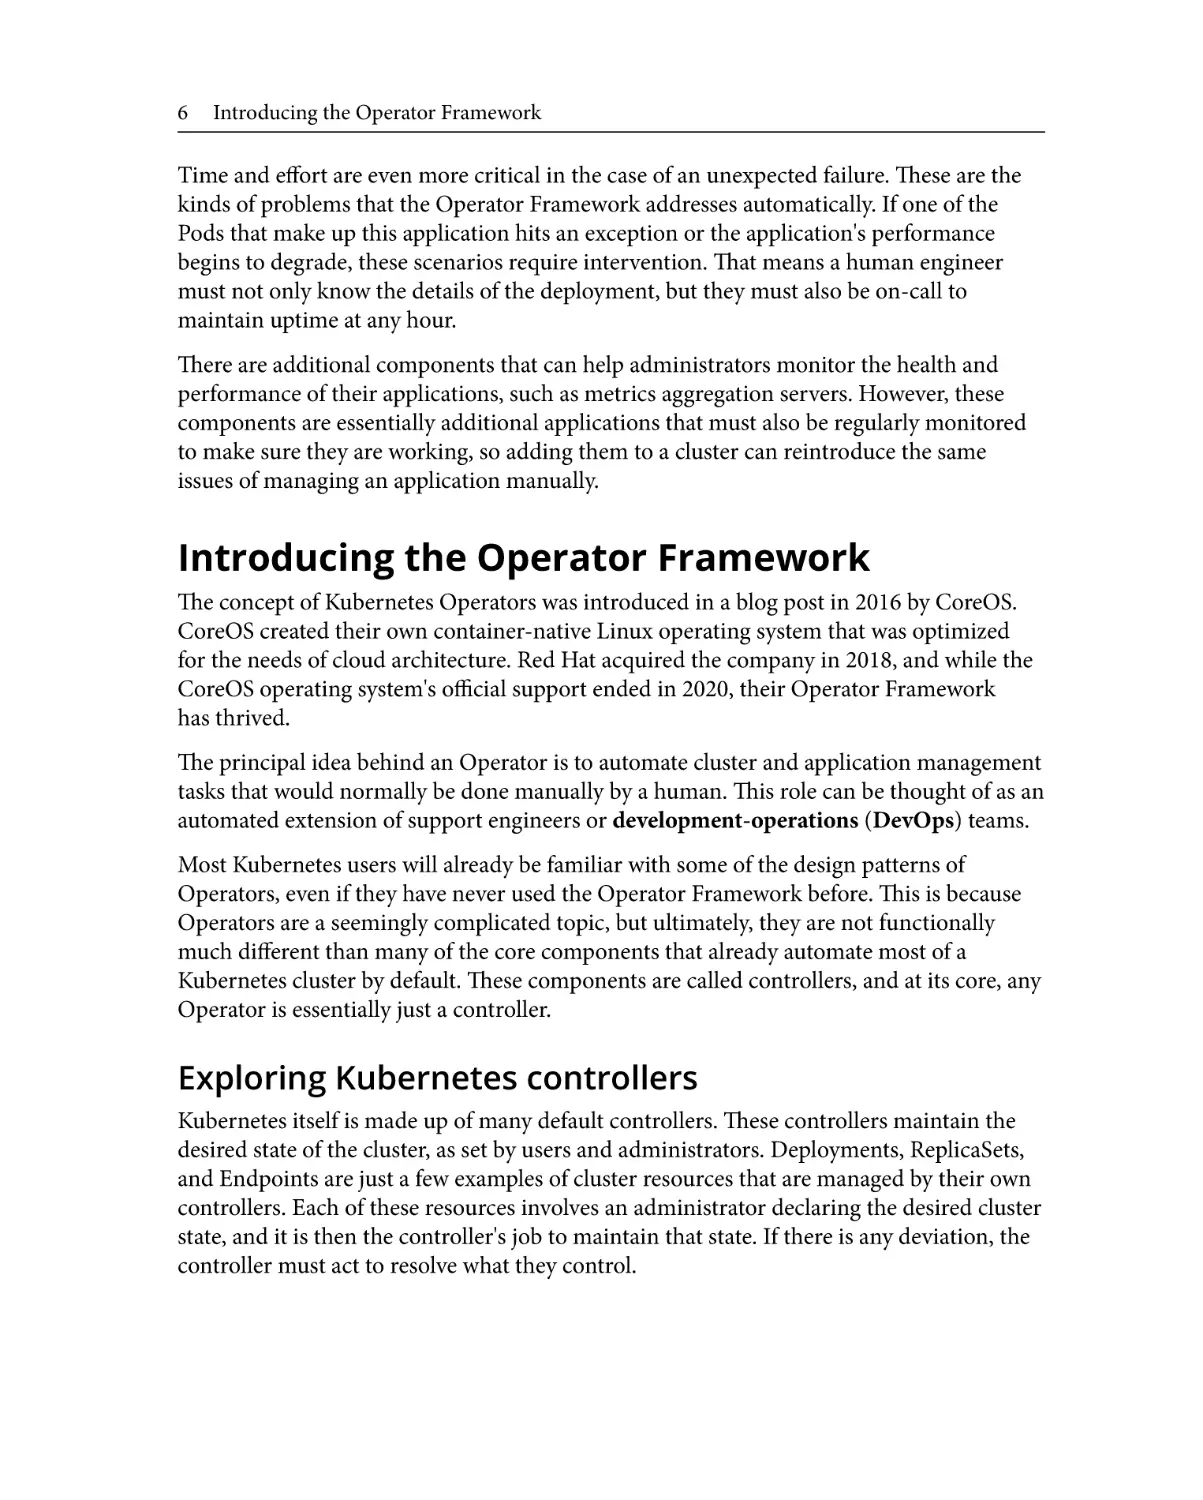
Demonstrating on a sample application
Take, for example, a simple web application that accepts, processes, and stores user input
(such as a message board or chat server). A good, containerized design for an application
such as this would be to have one Pod presenting the frontend to the user and a second
backend Pod that accepts the user's input and sends it to a database for storage.
Managing clusters without Operators
5
Of course, you will then need a Pod running the database software and a Persistent
Volume to be mounted by the database Pod. These three Pods will benefit from Services
to communicate with each other, and they will also need to share some common
environment variables (such as access credentials for the database and environment
variables to tweak different application settings).
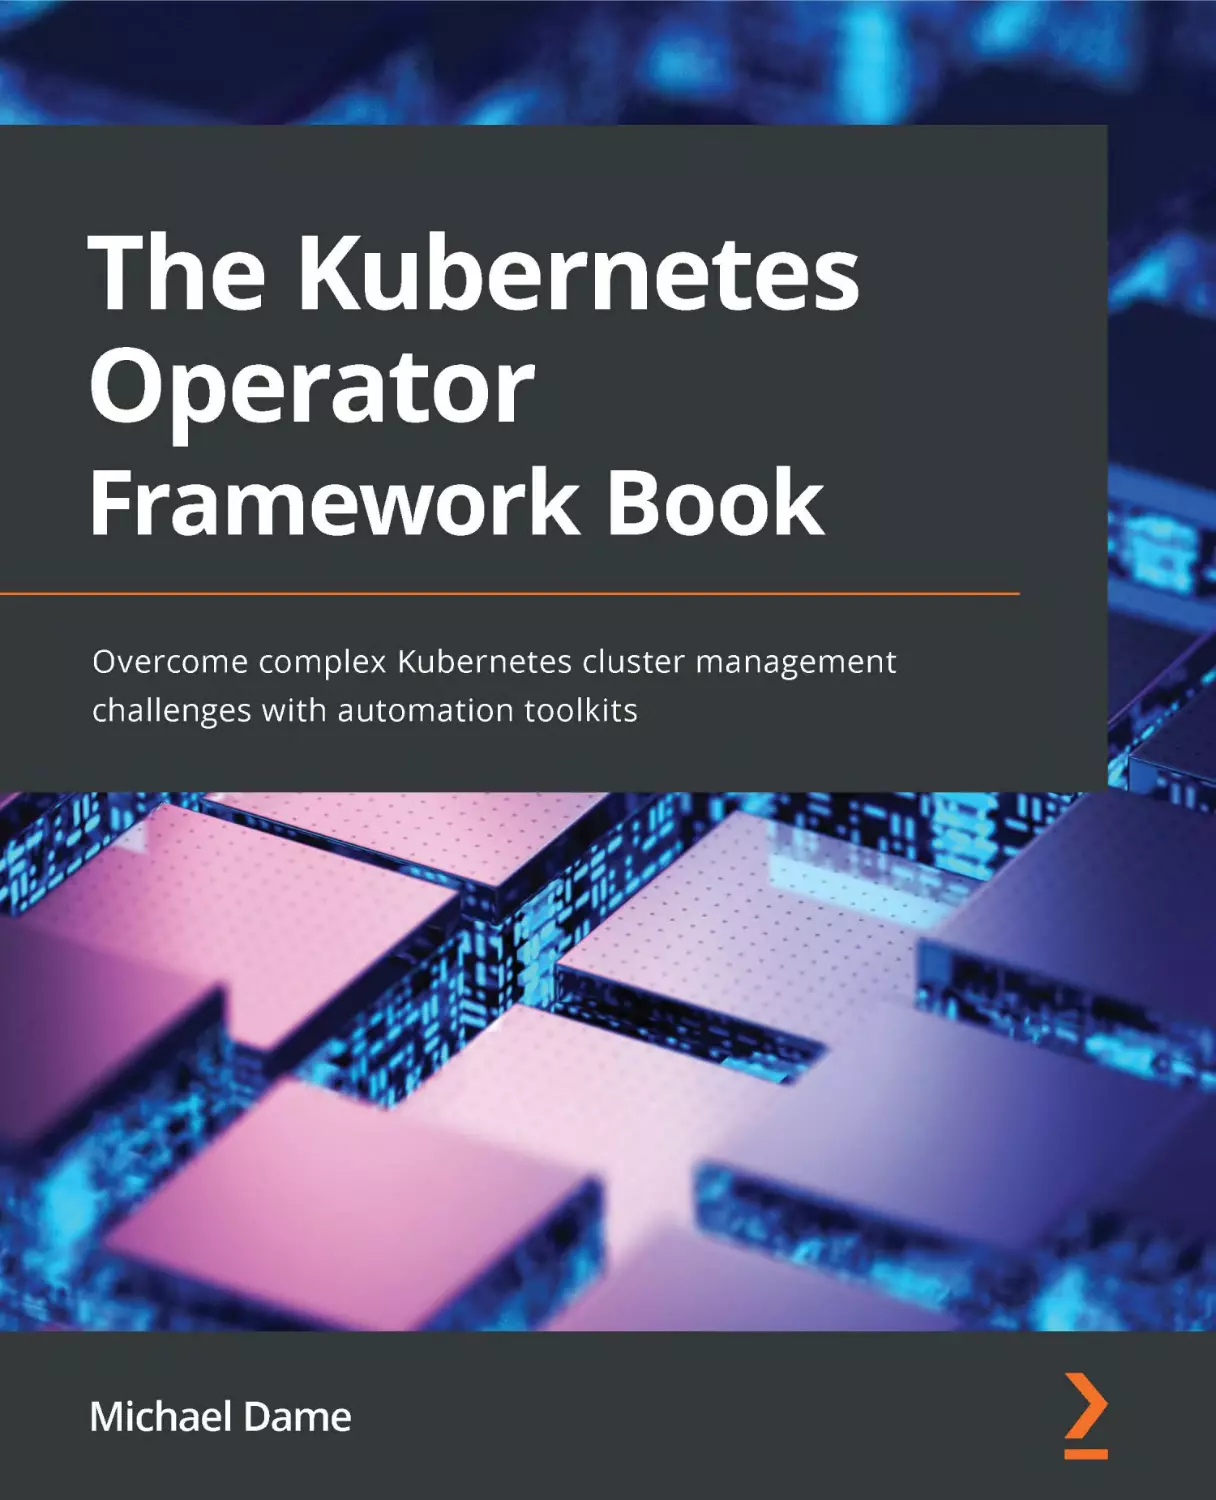
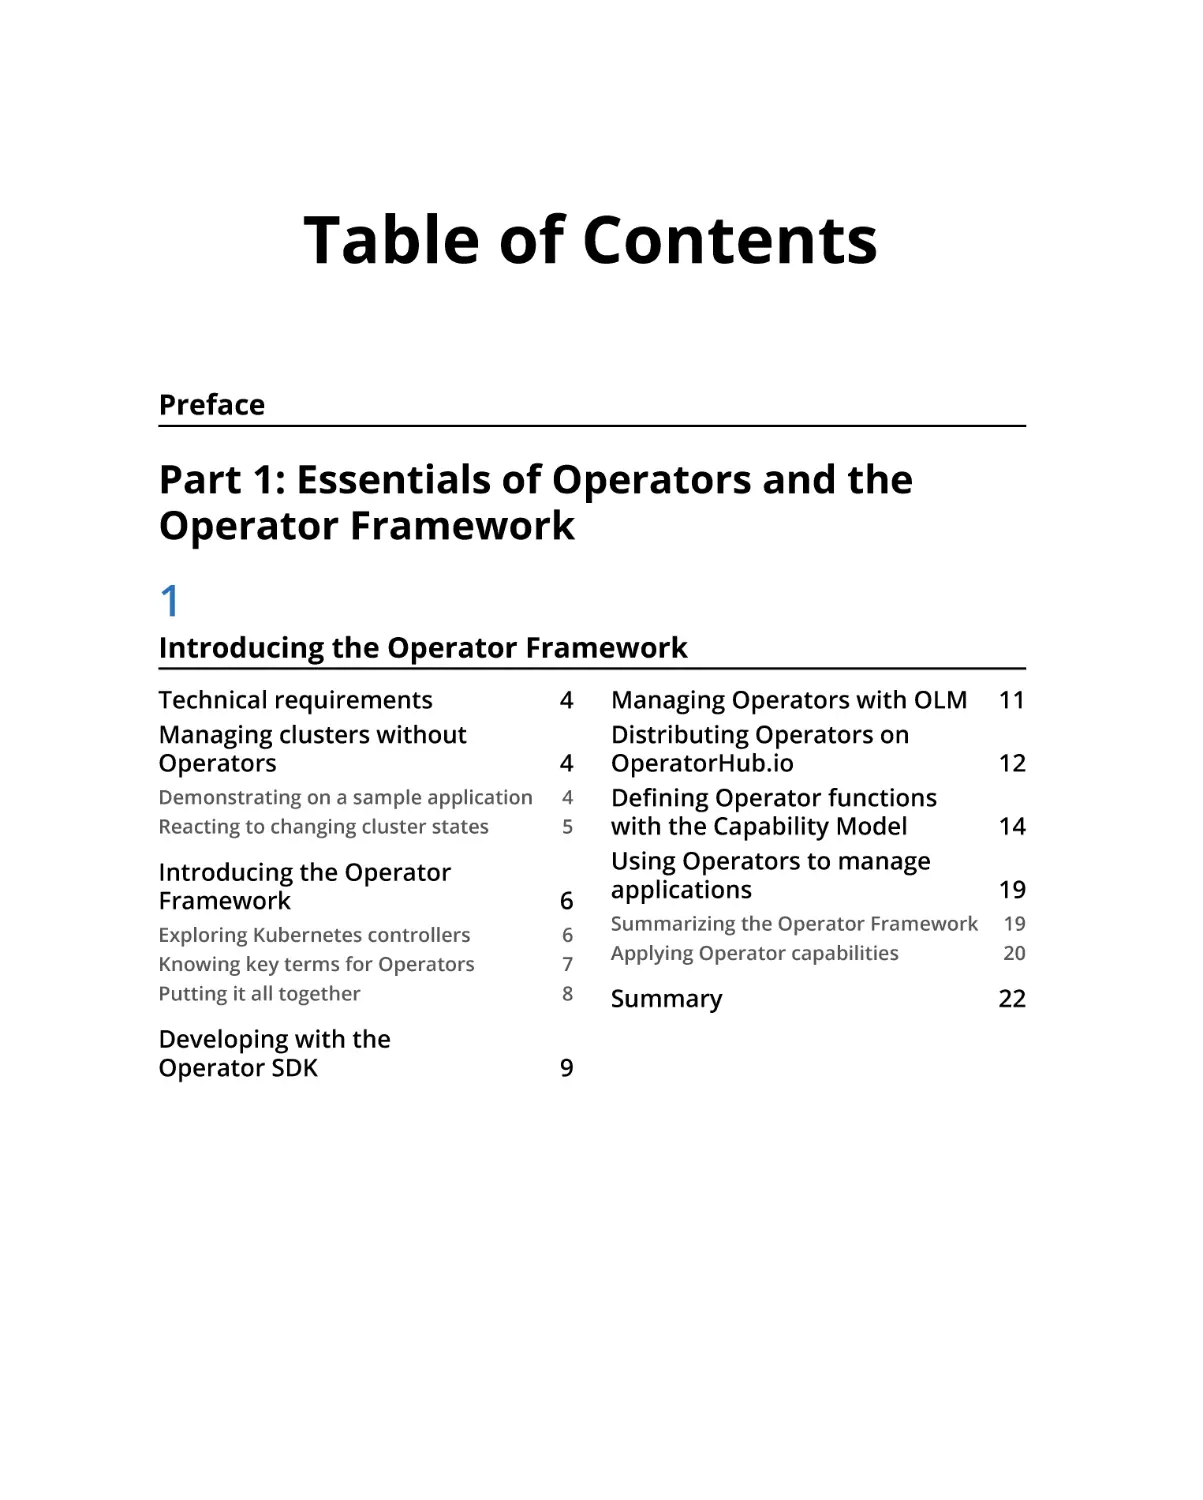
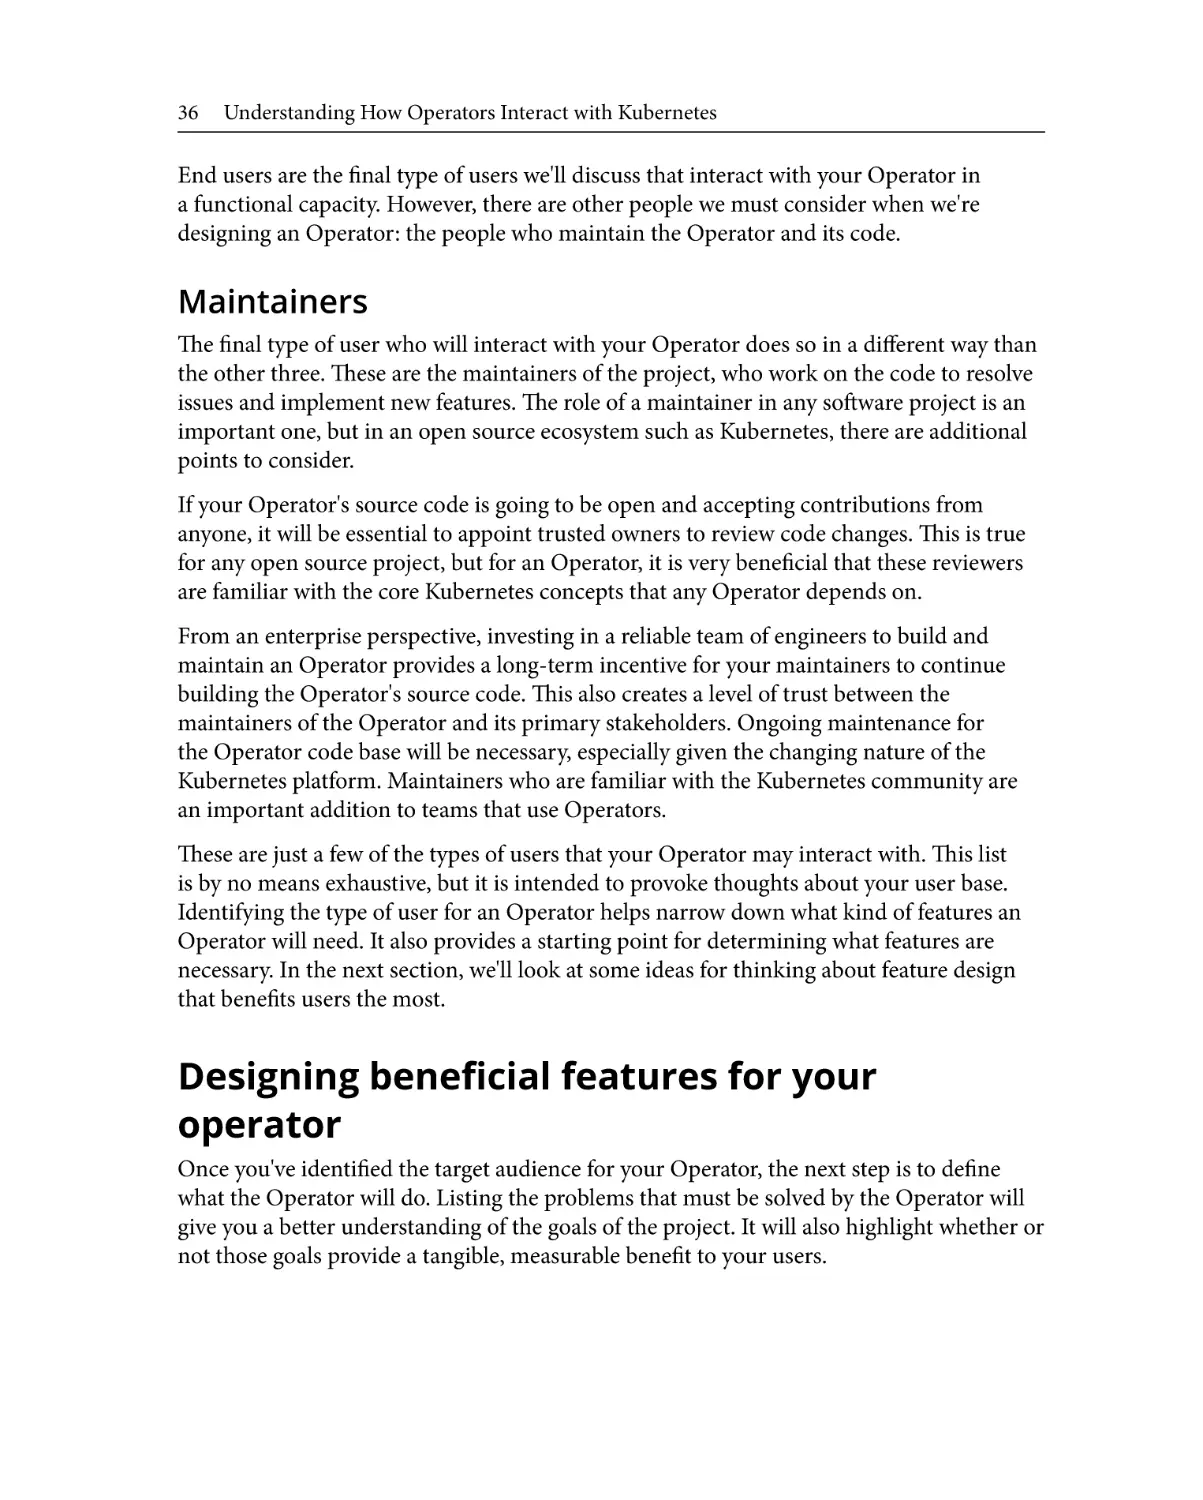
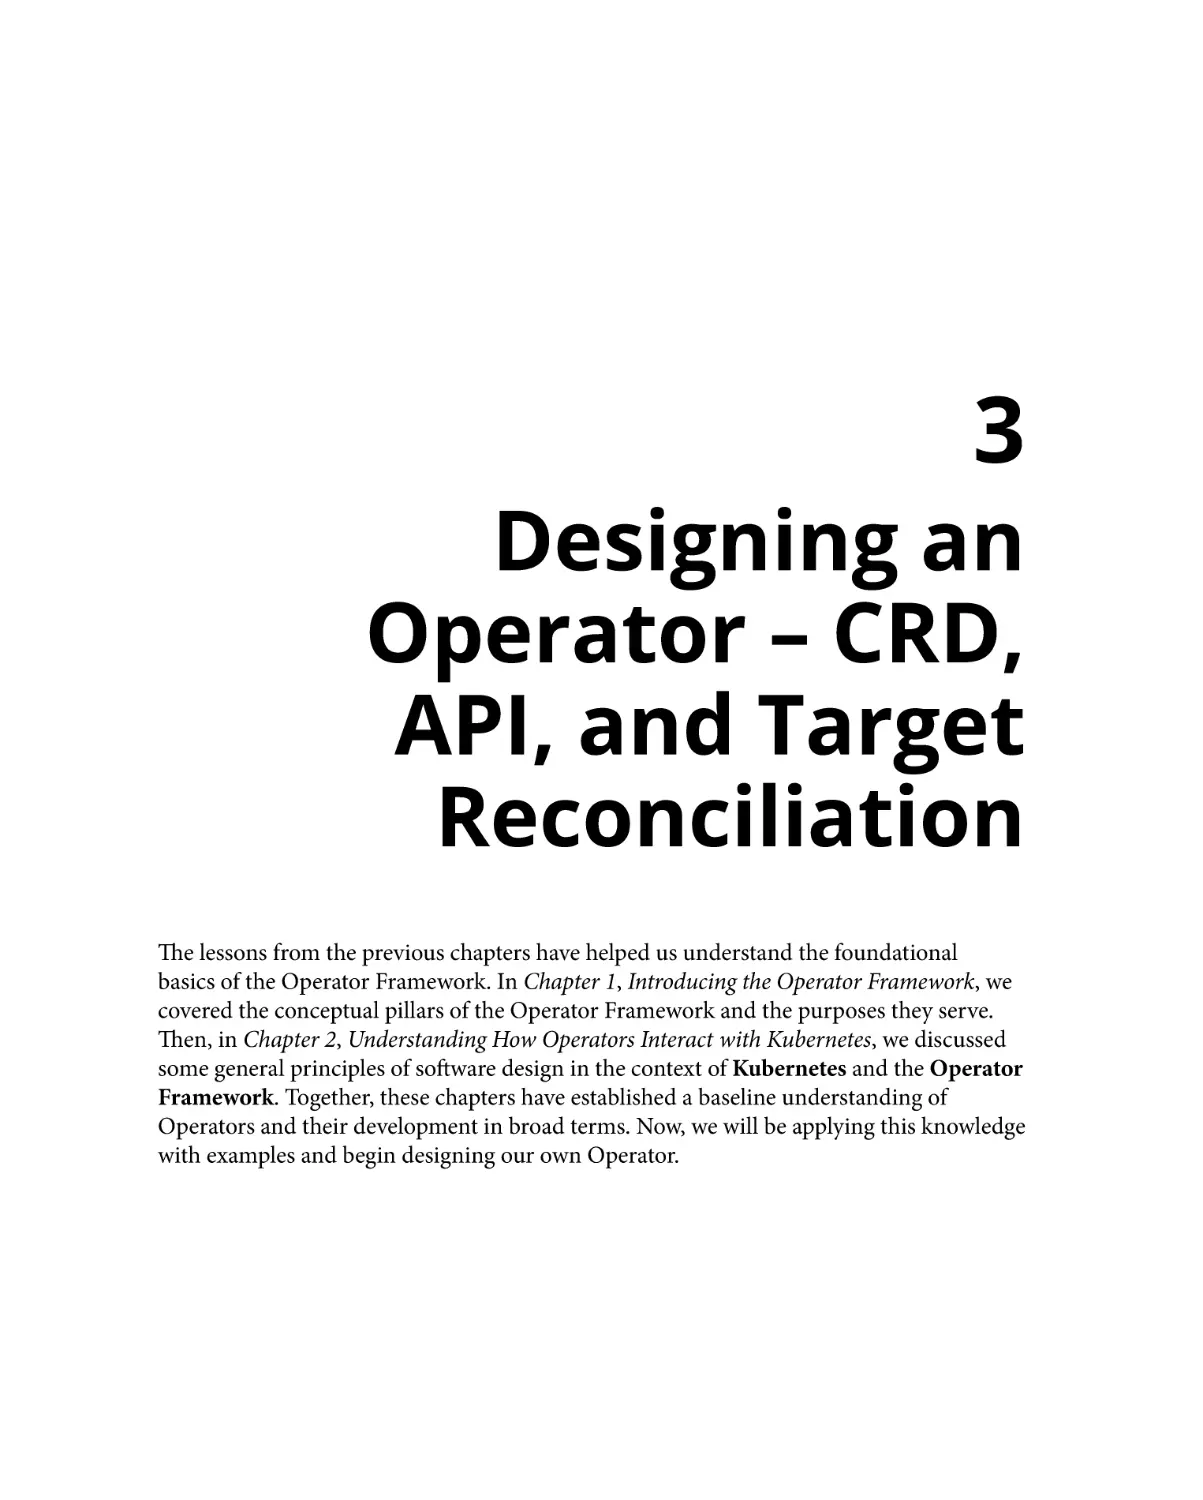
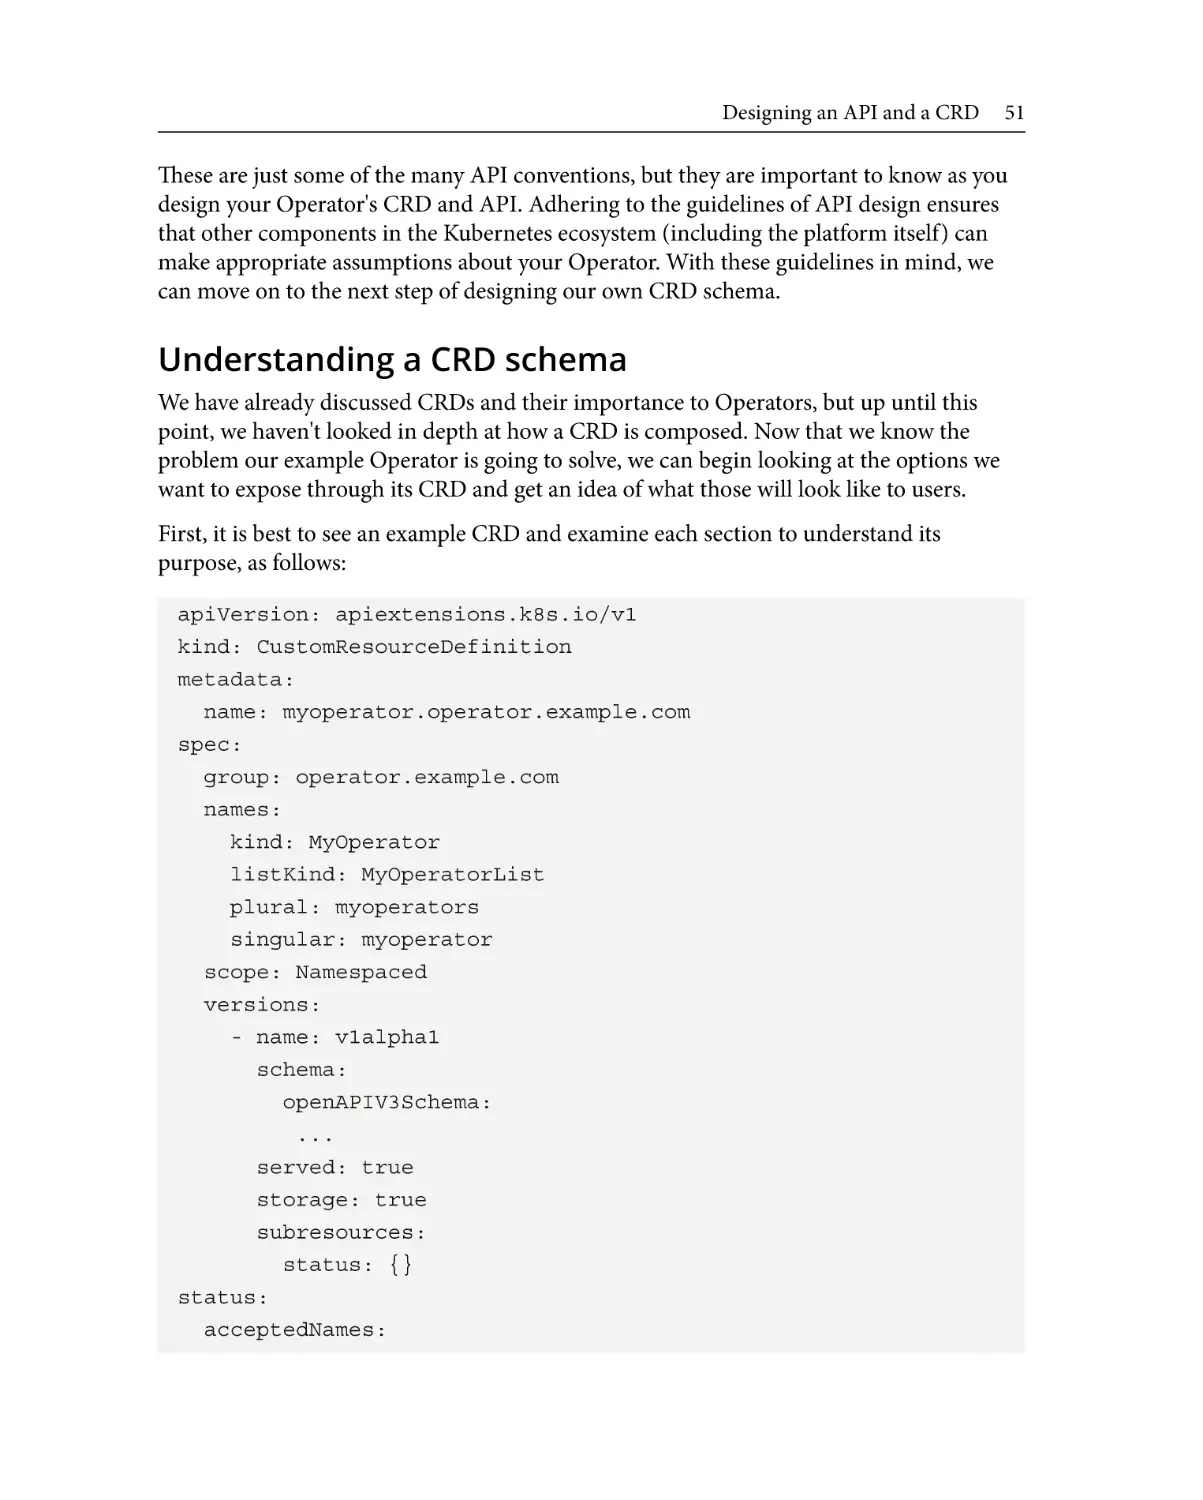
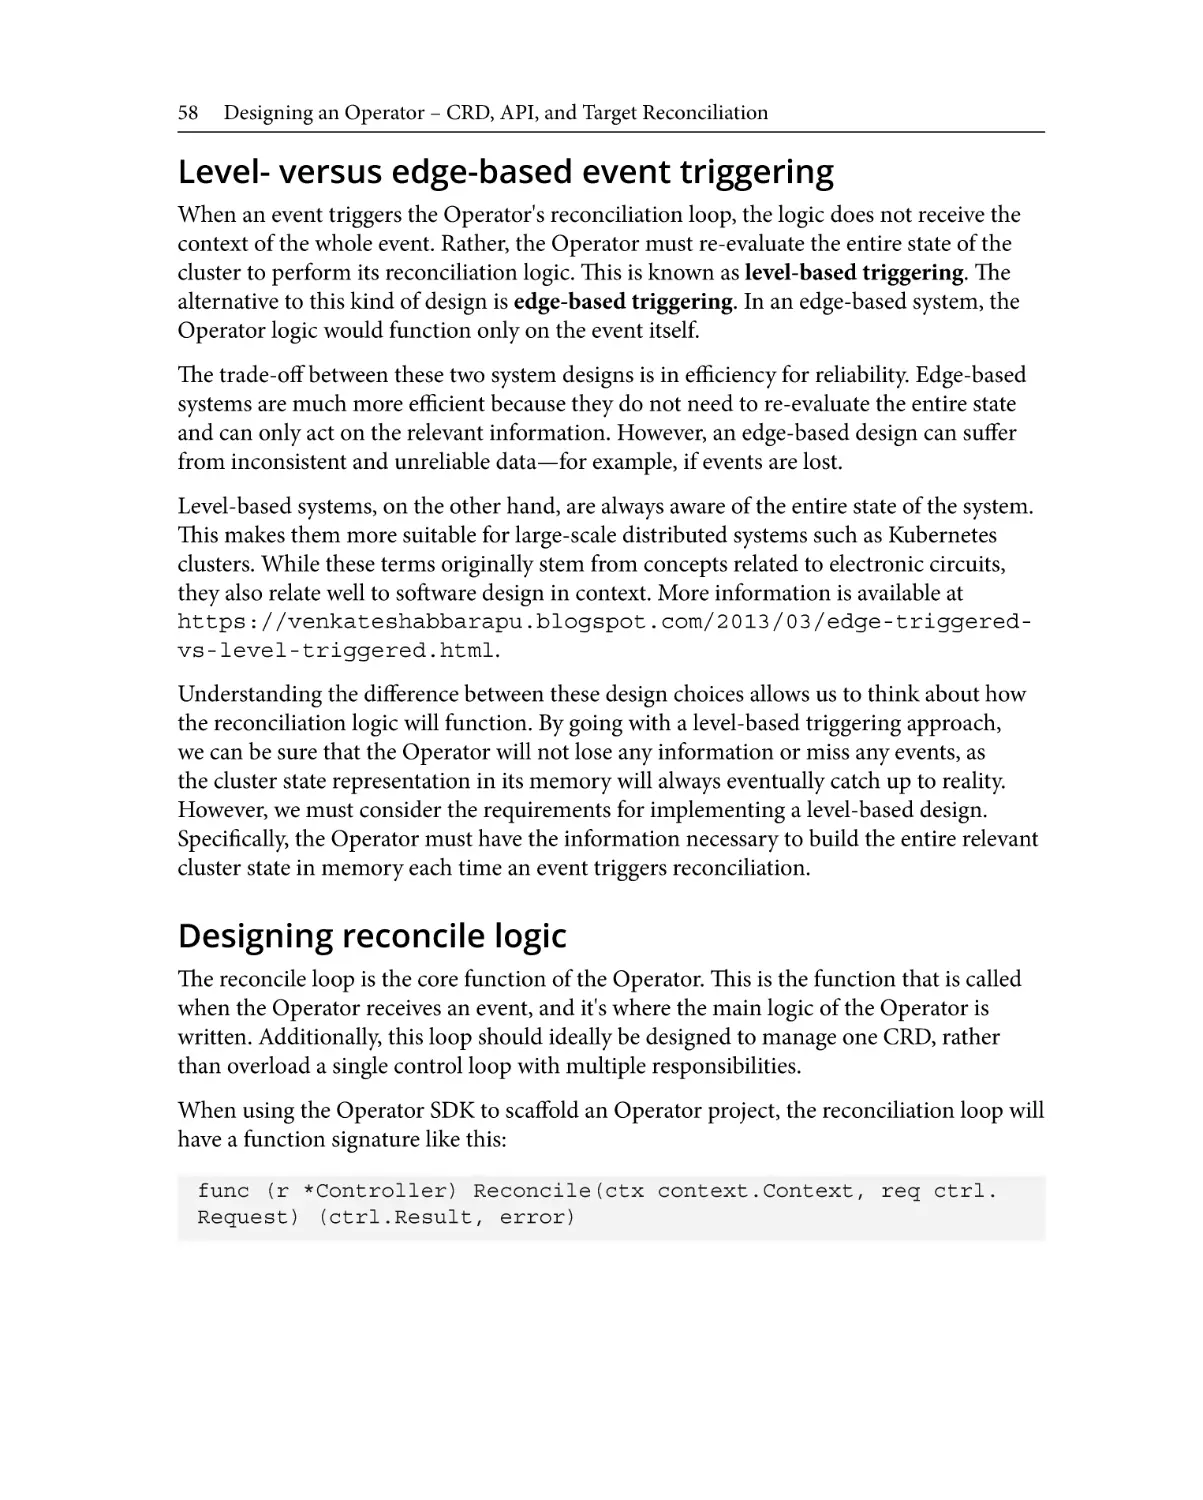
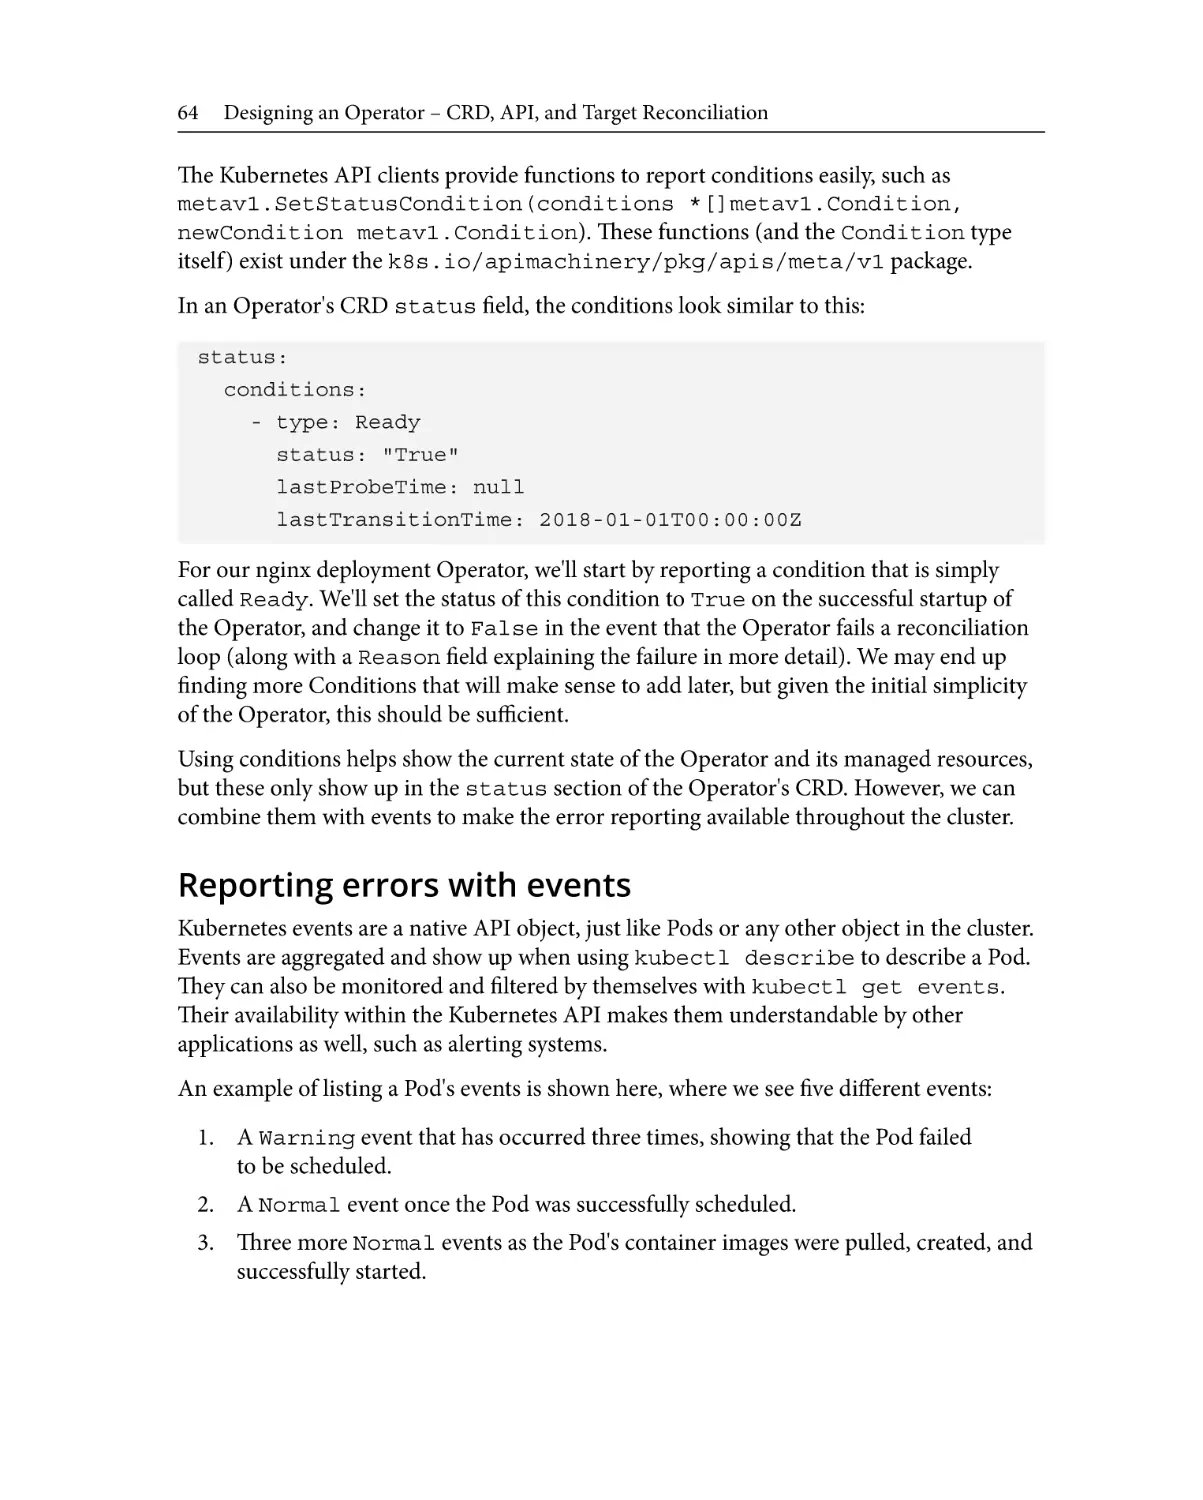
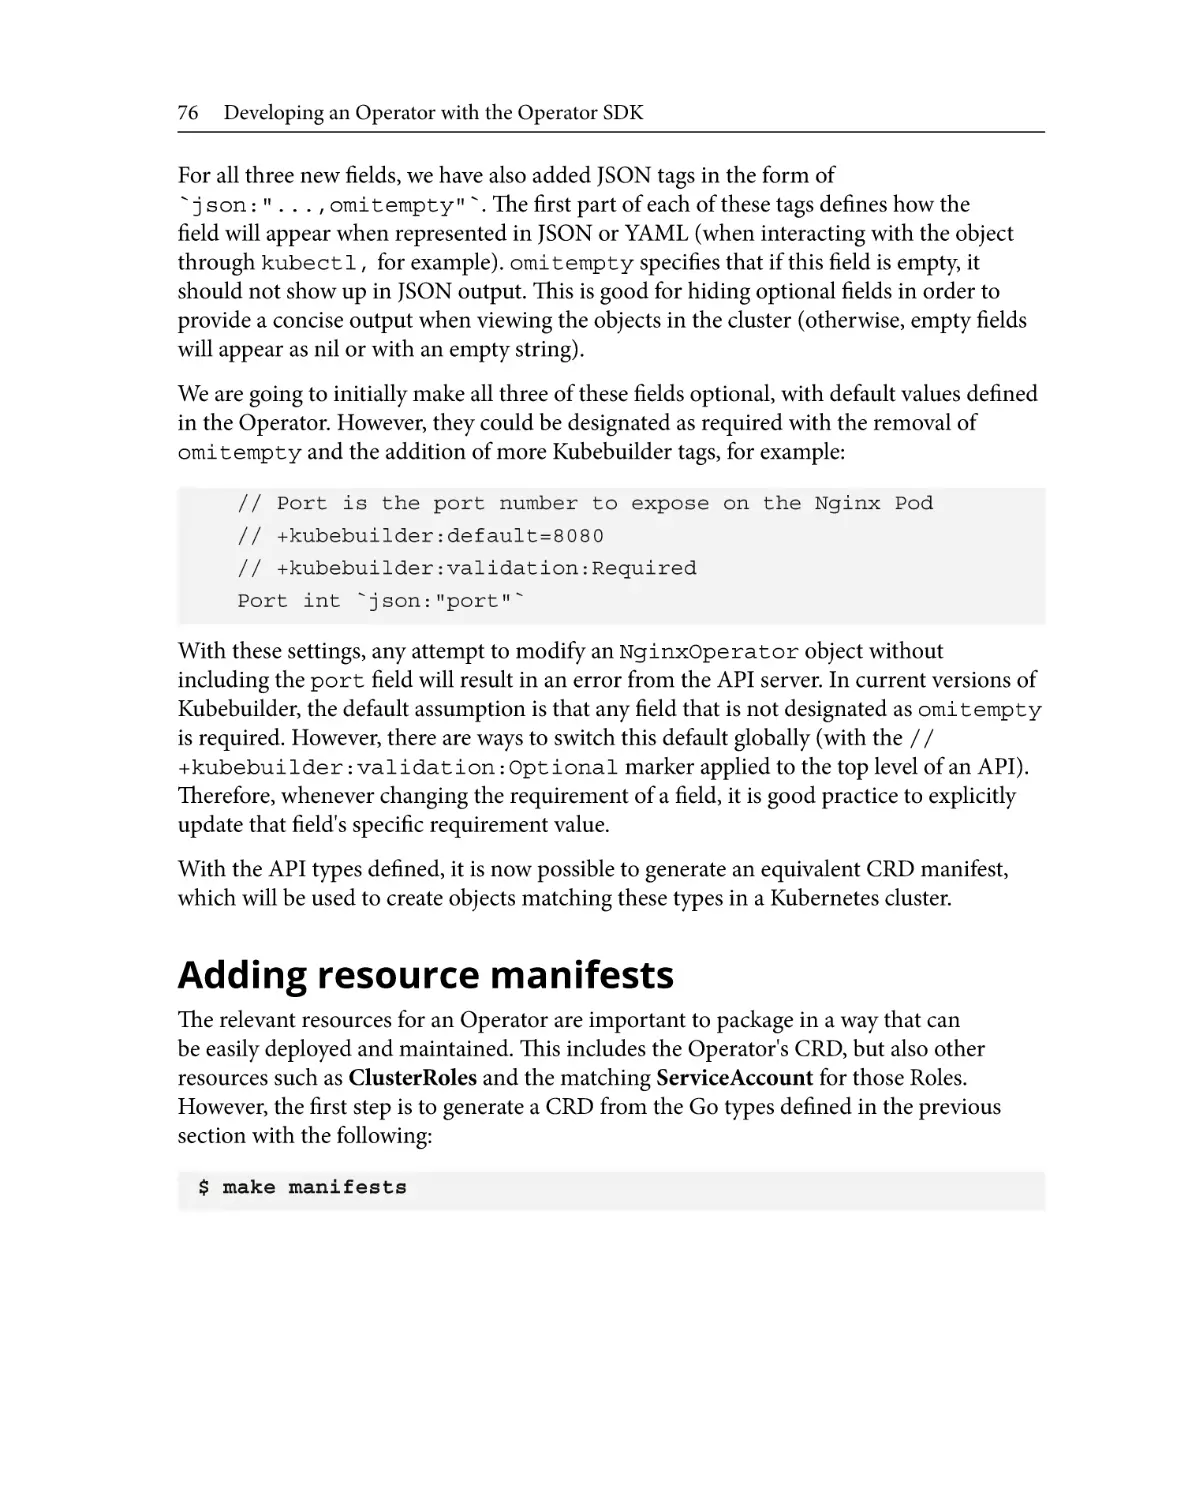
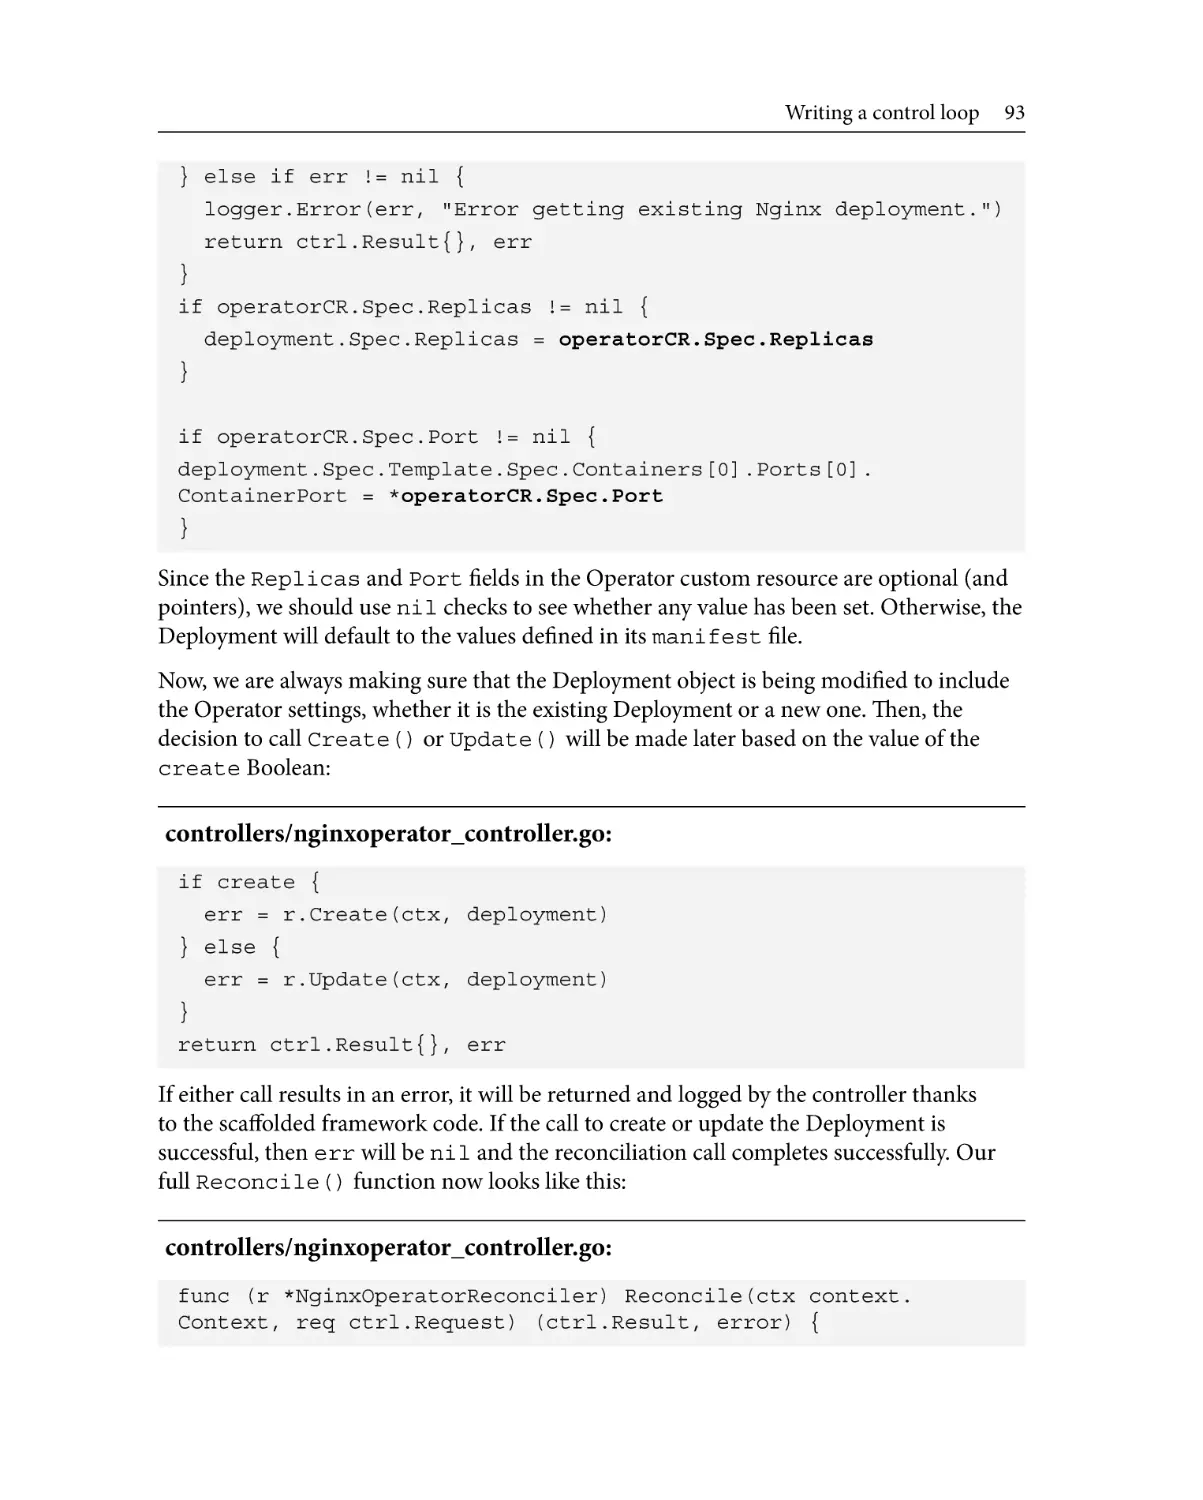
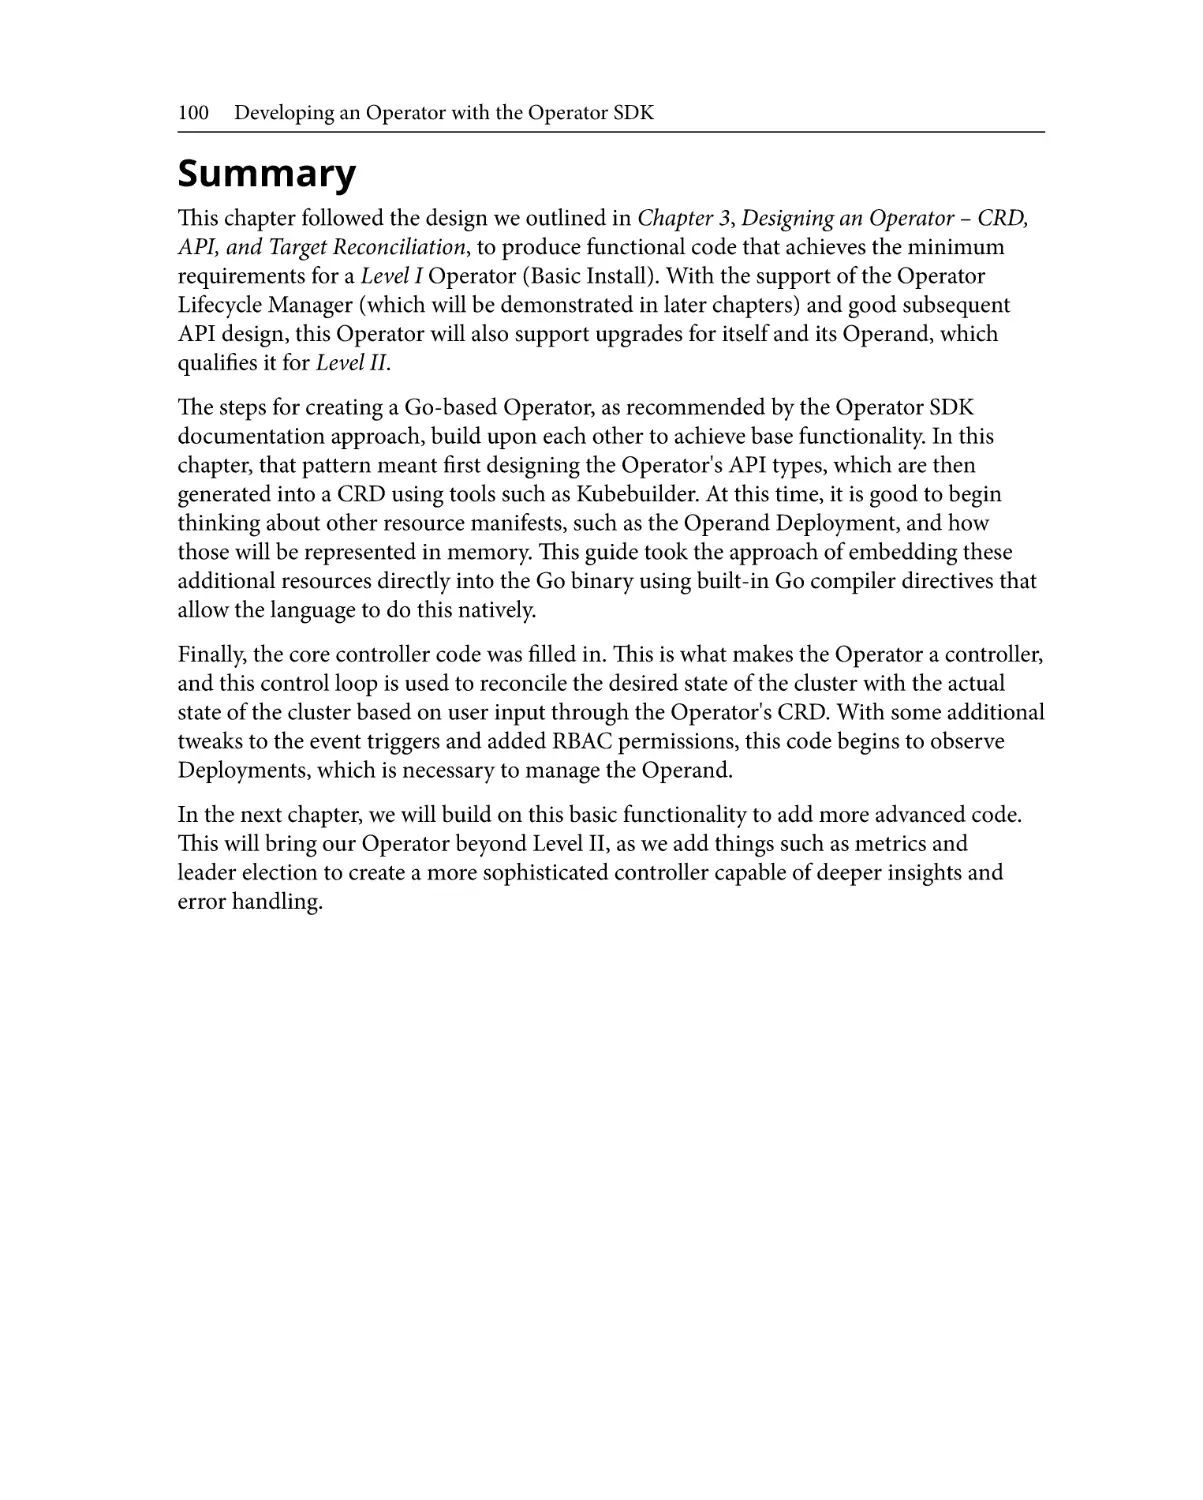
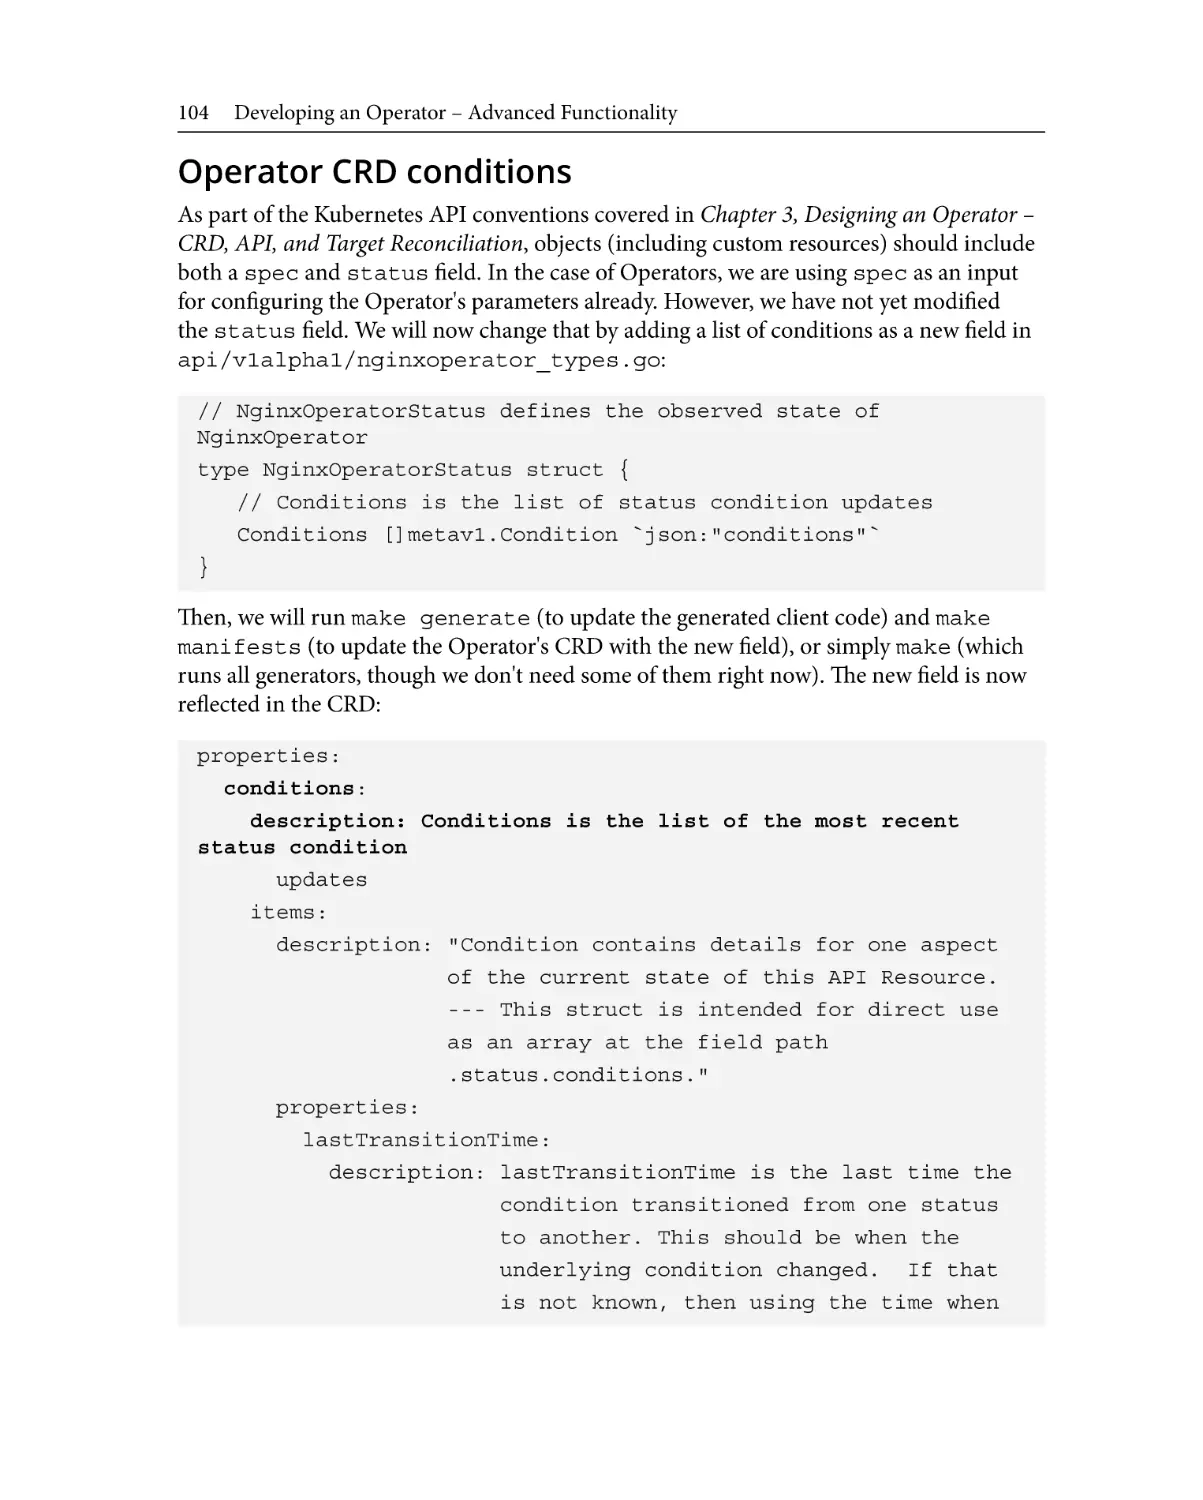
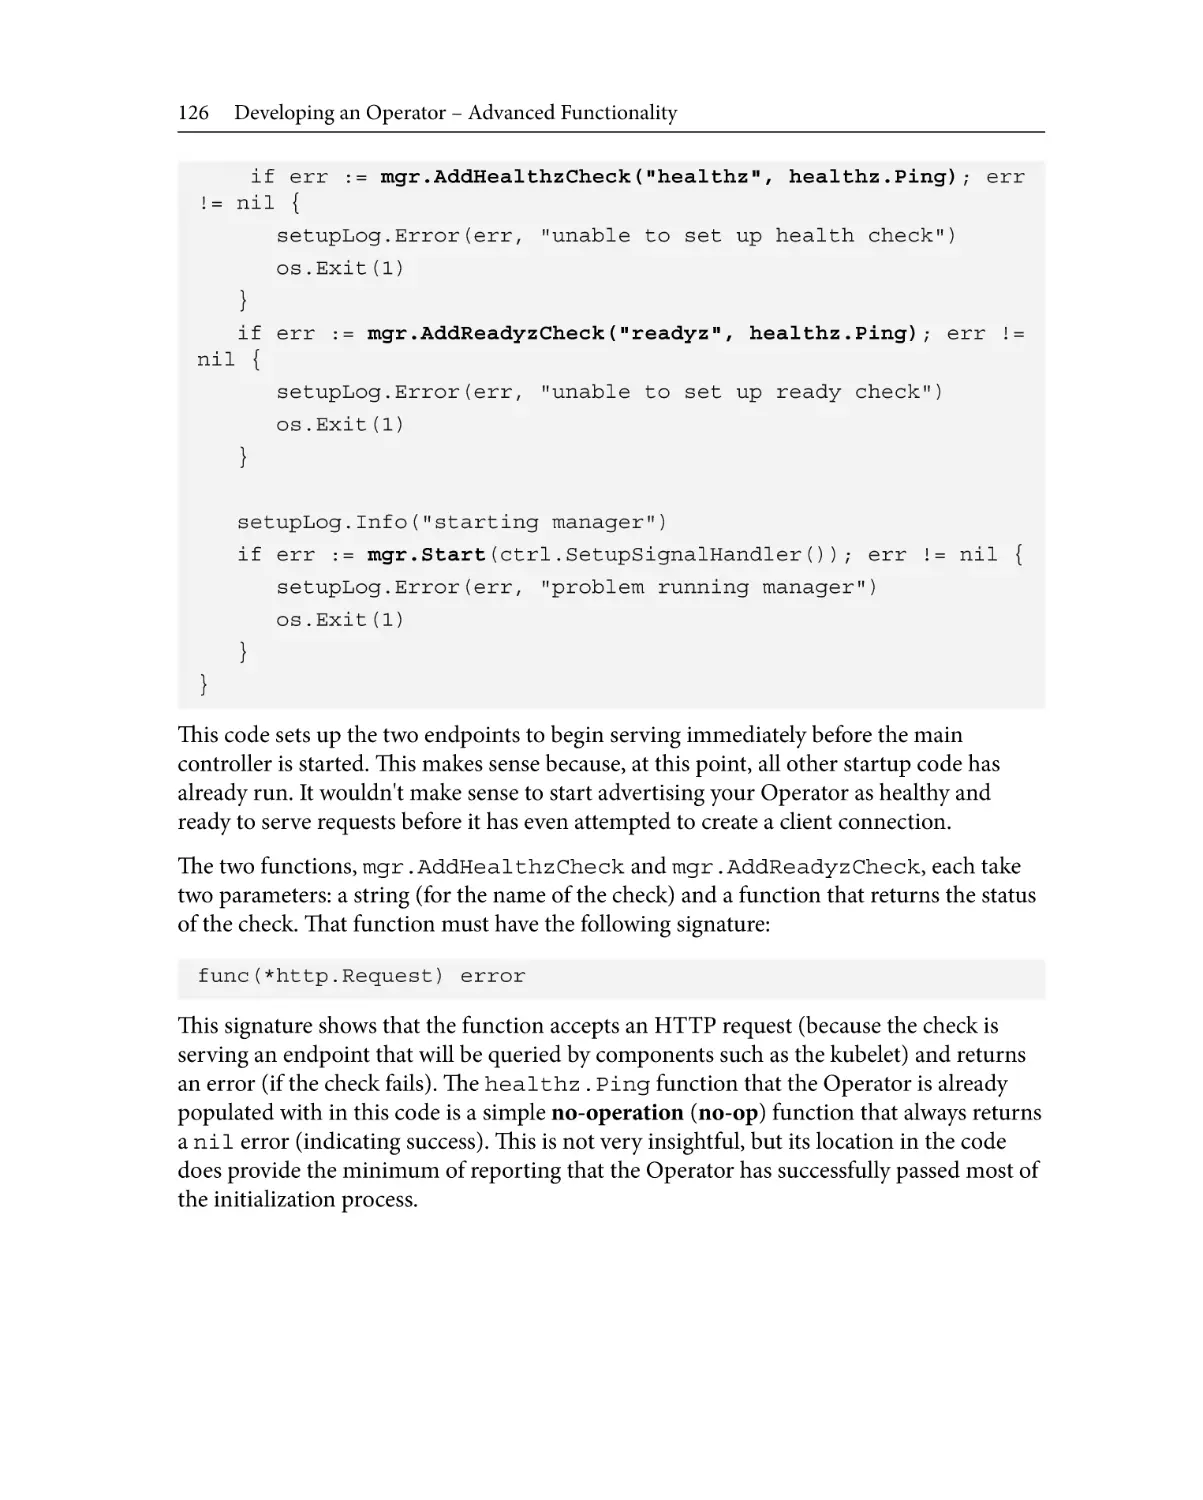
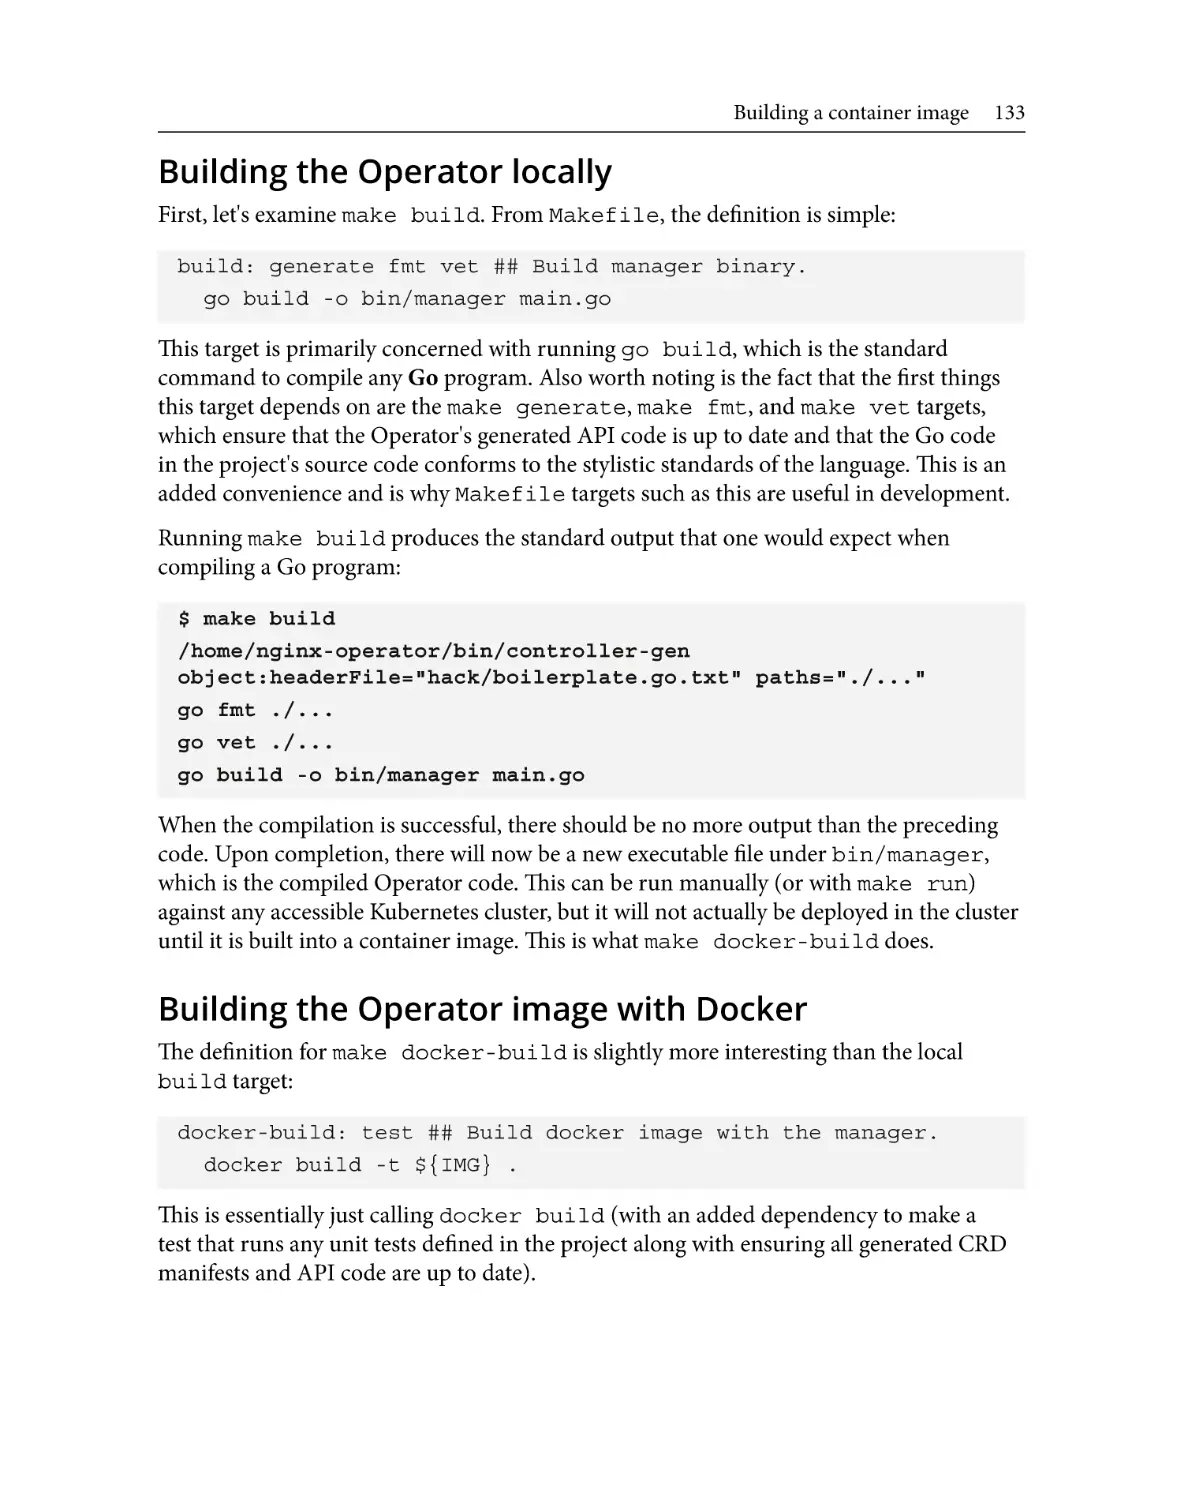
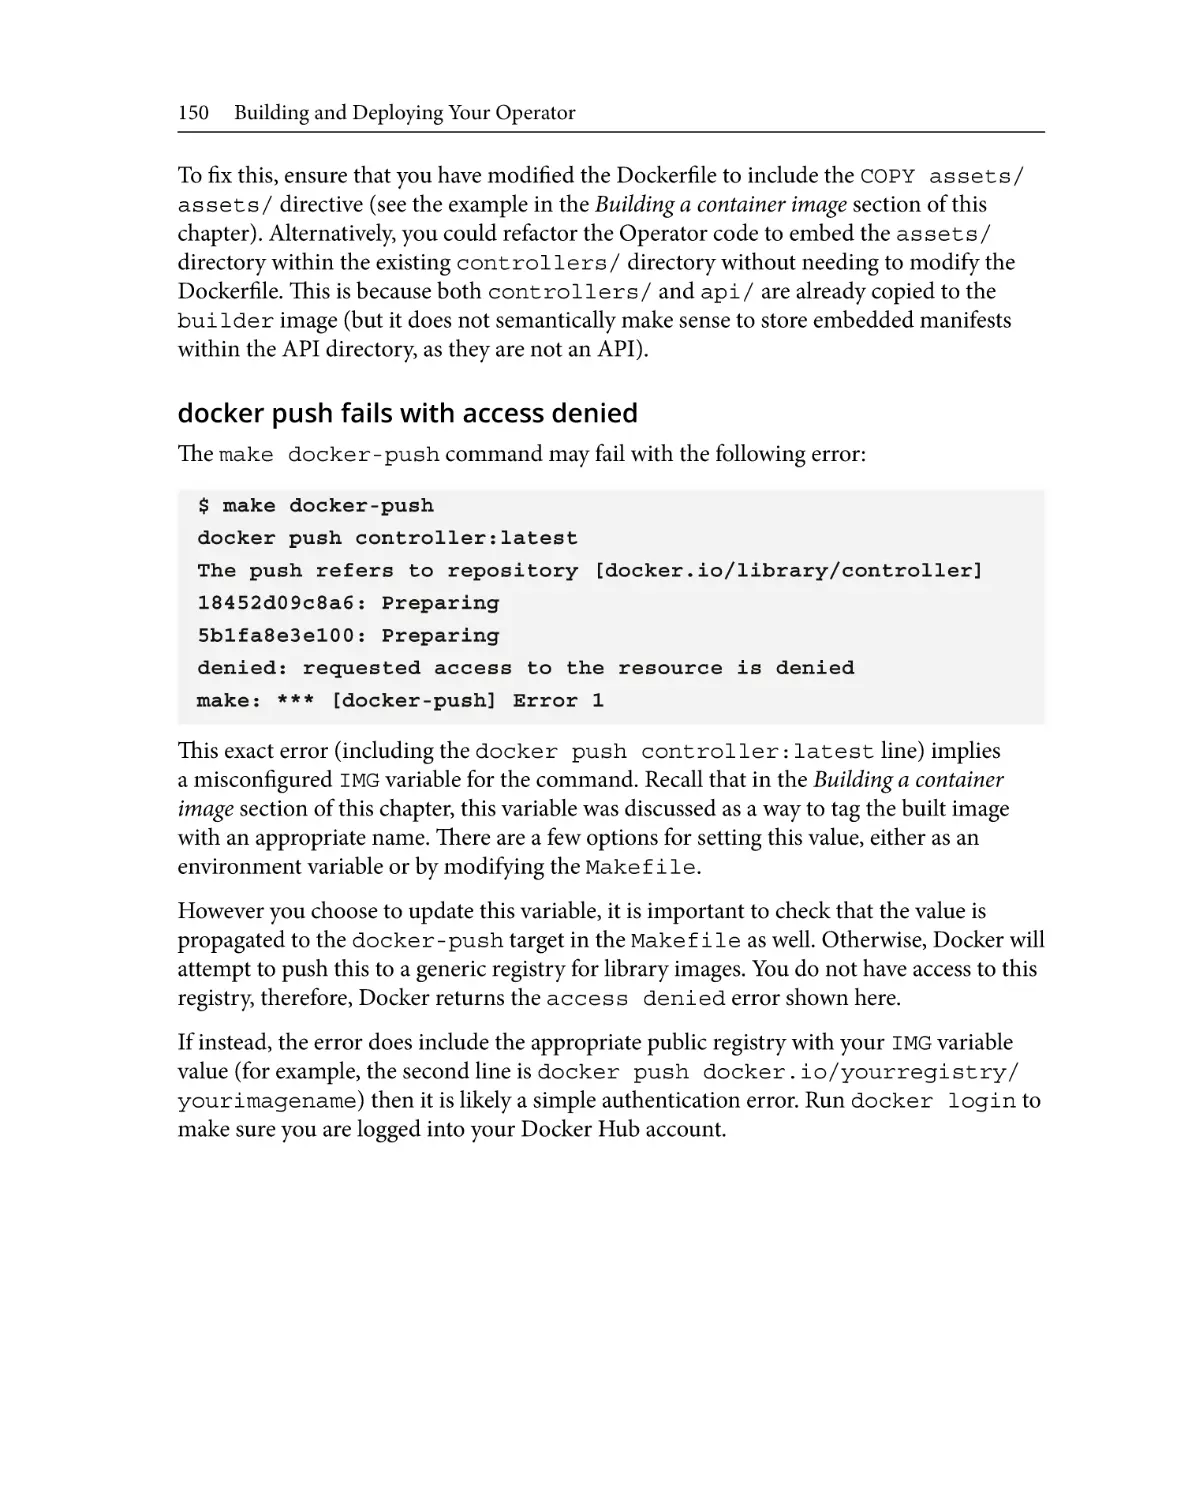
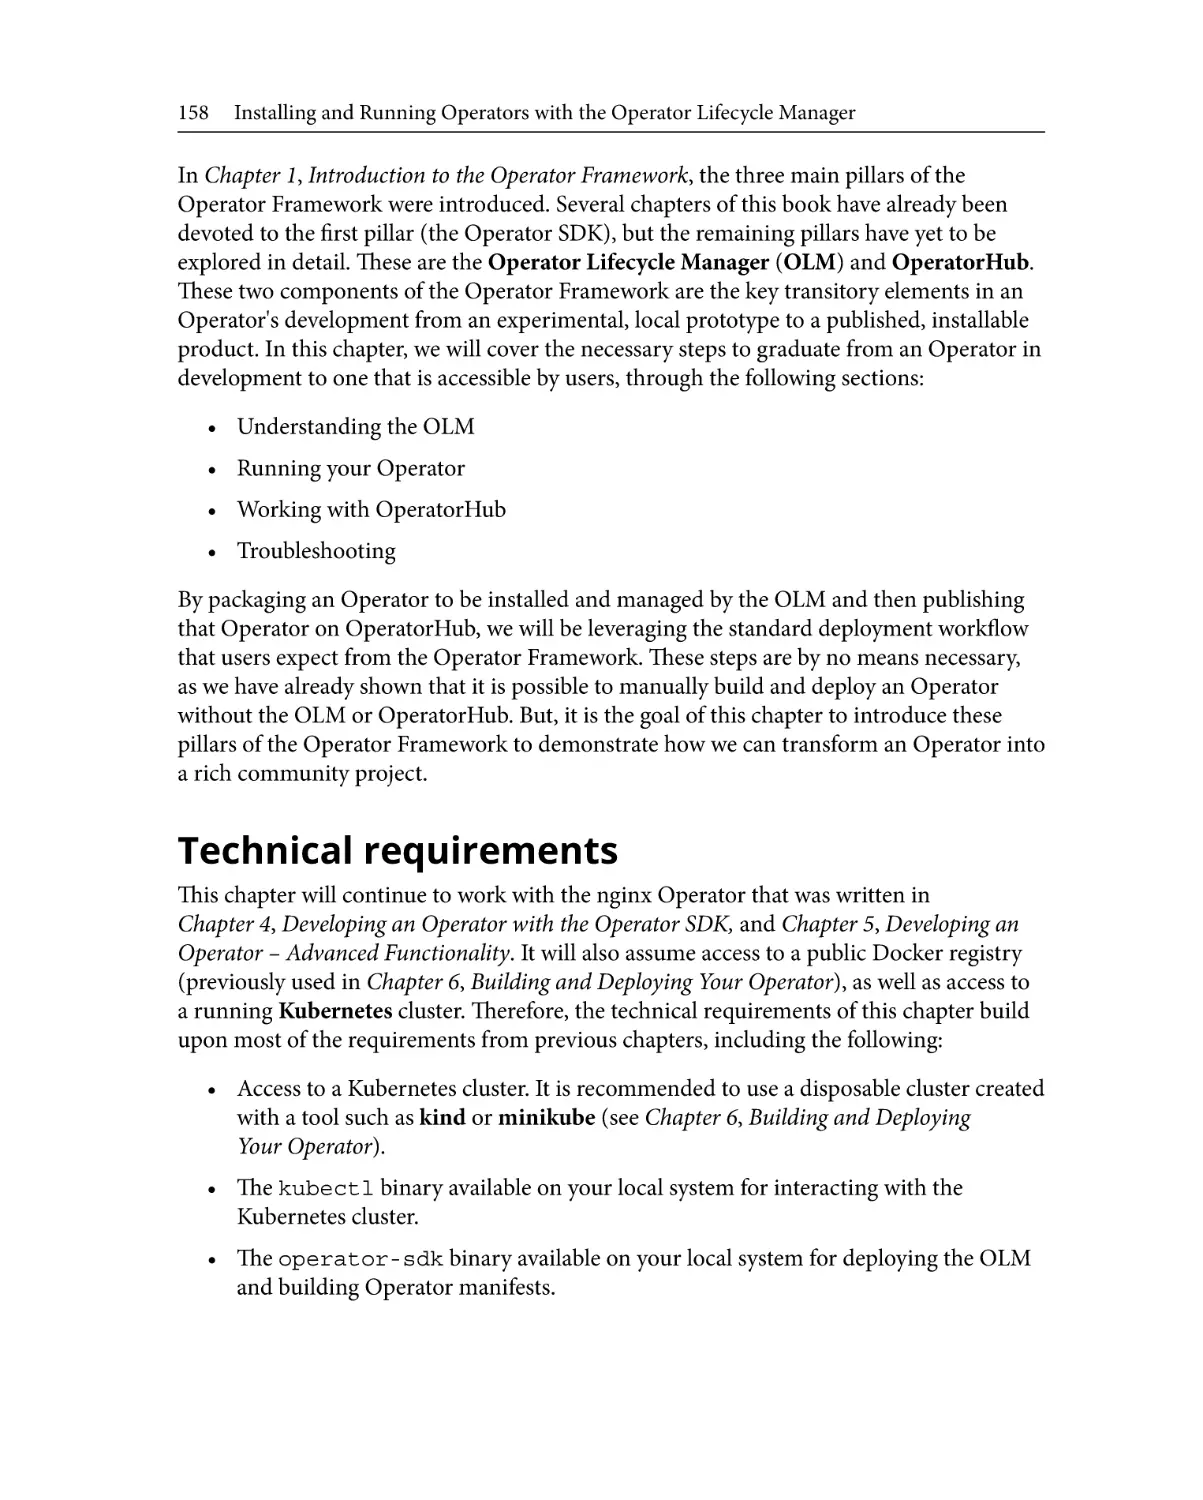
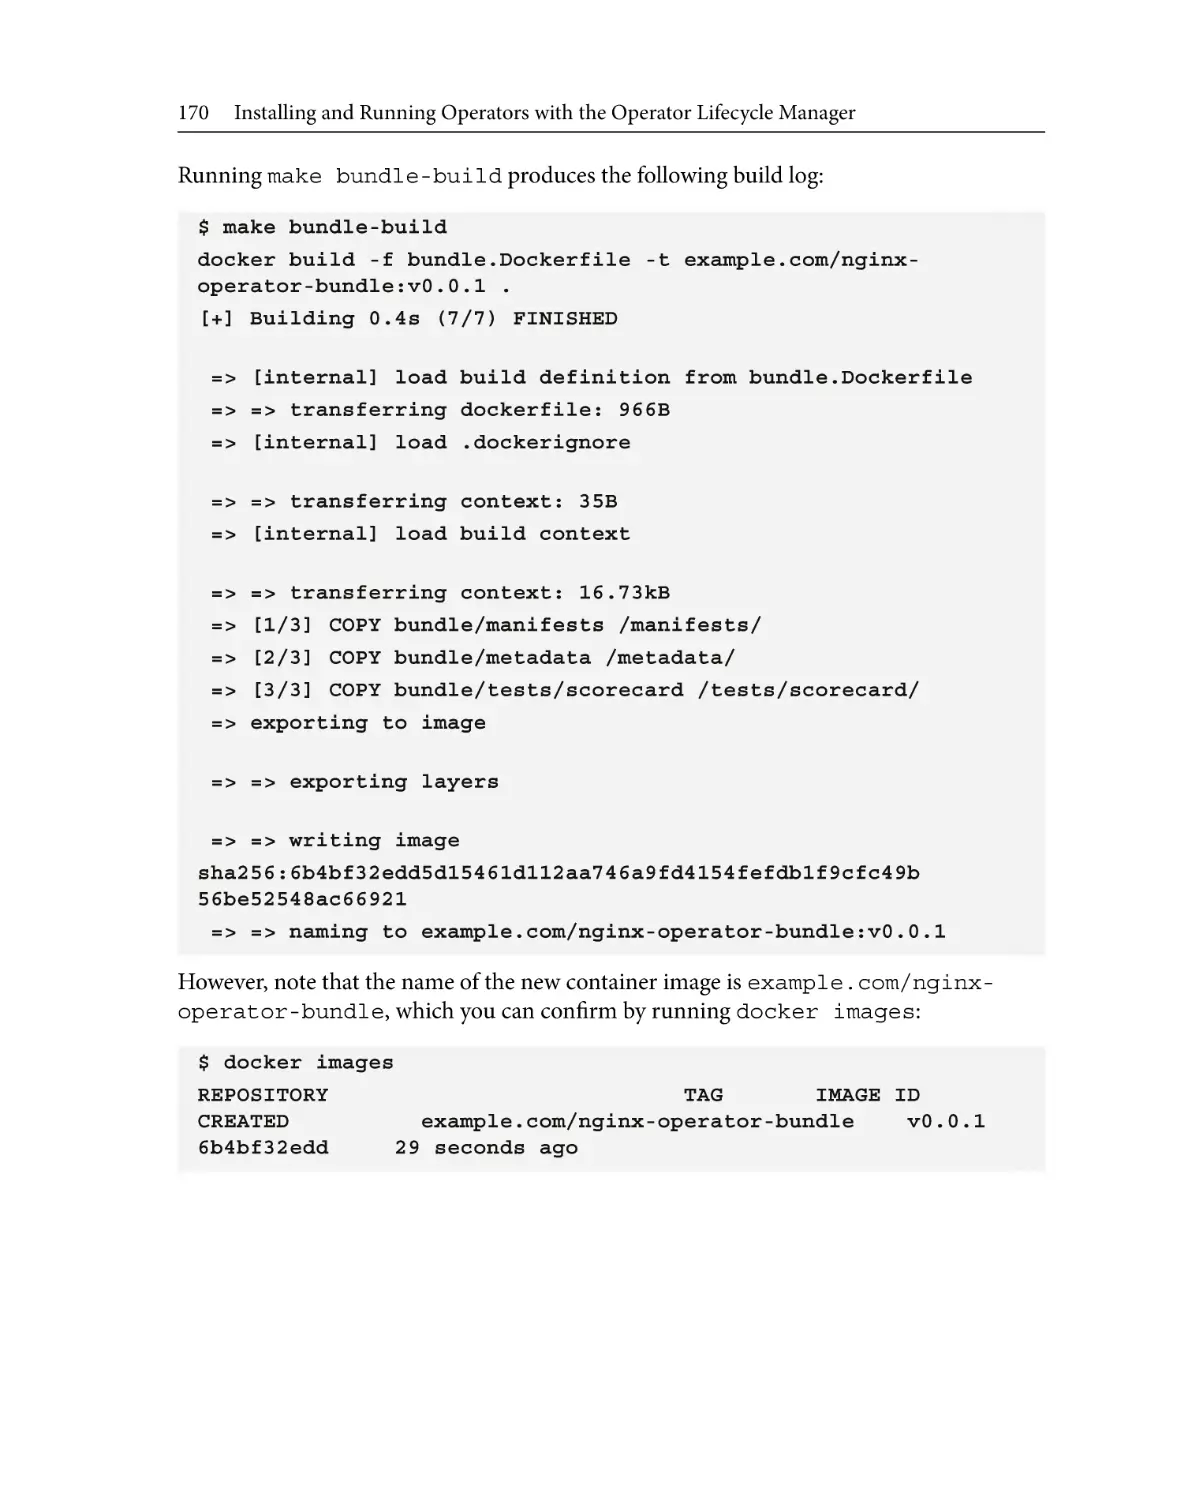
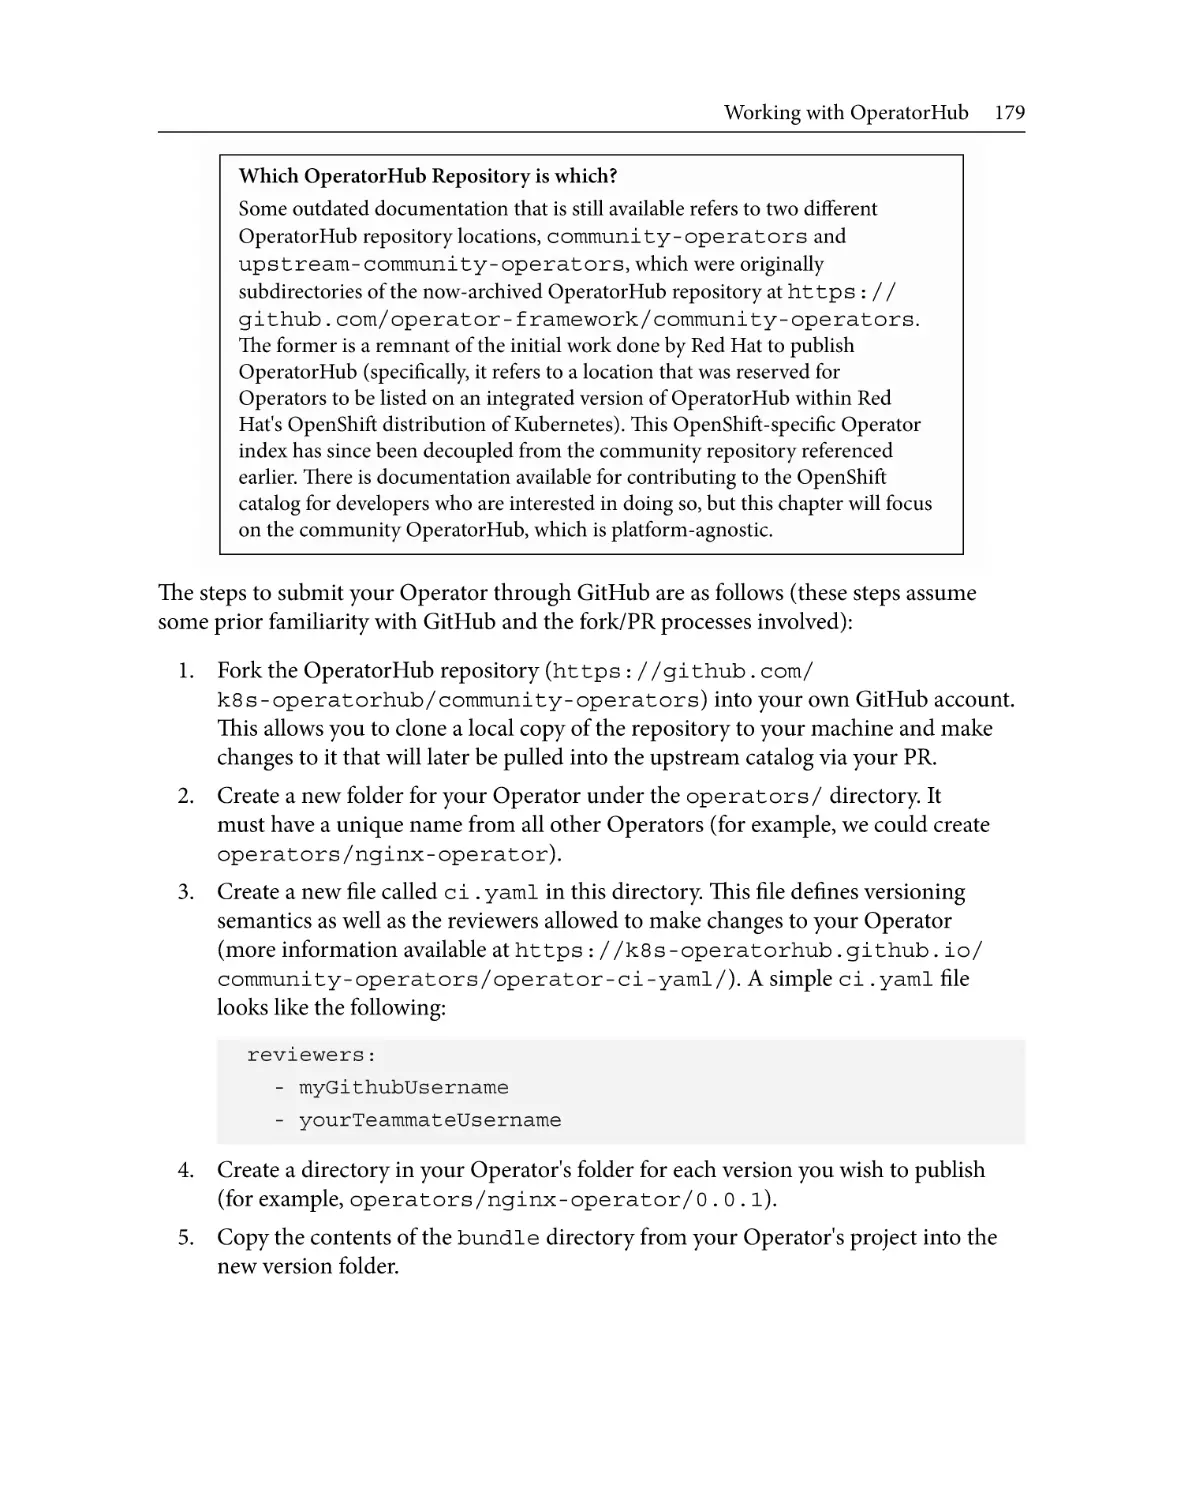
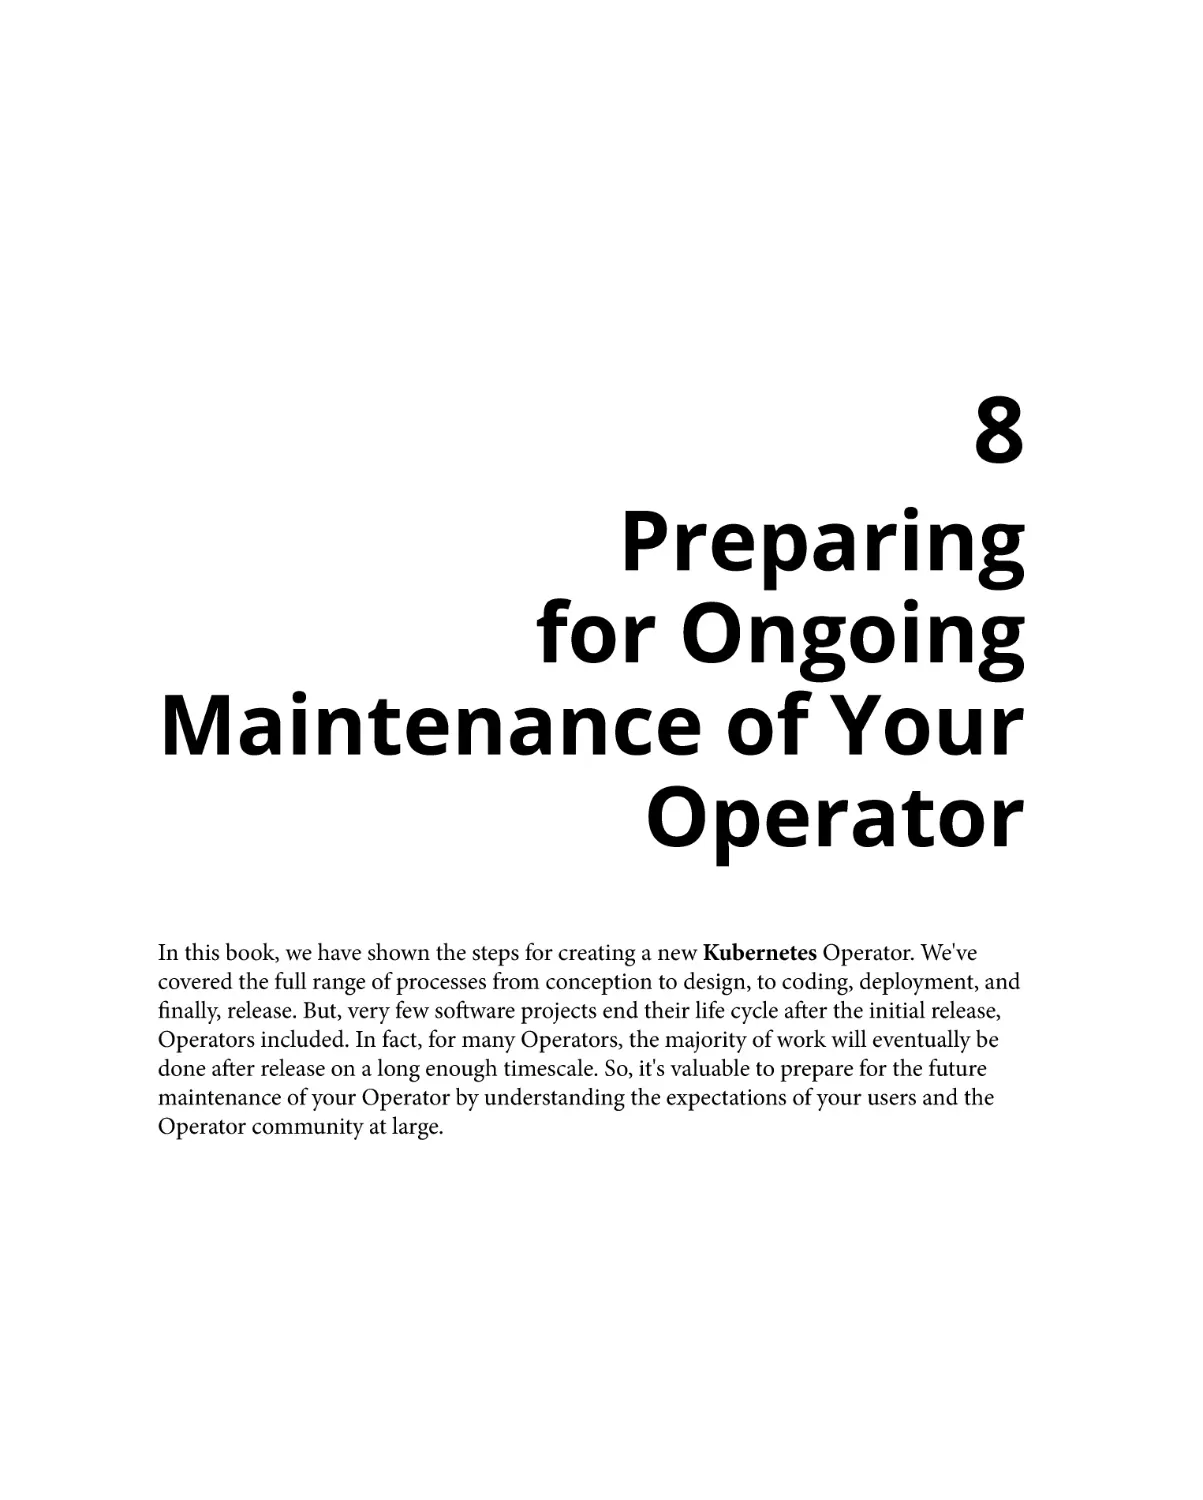
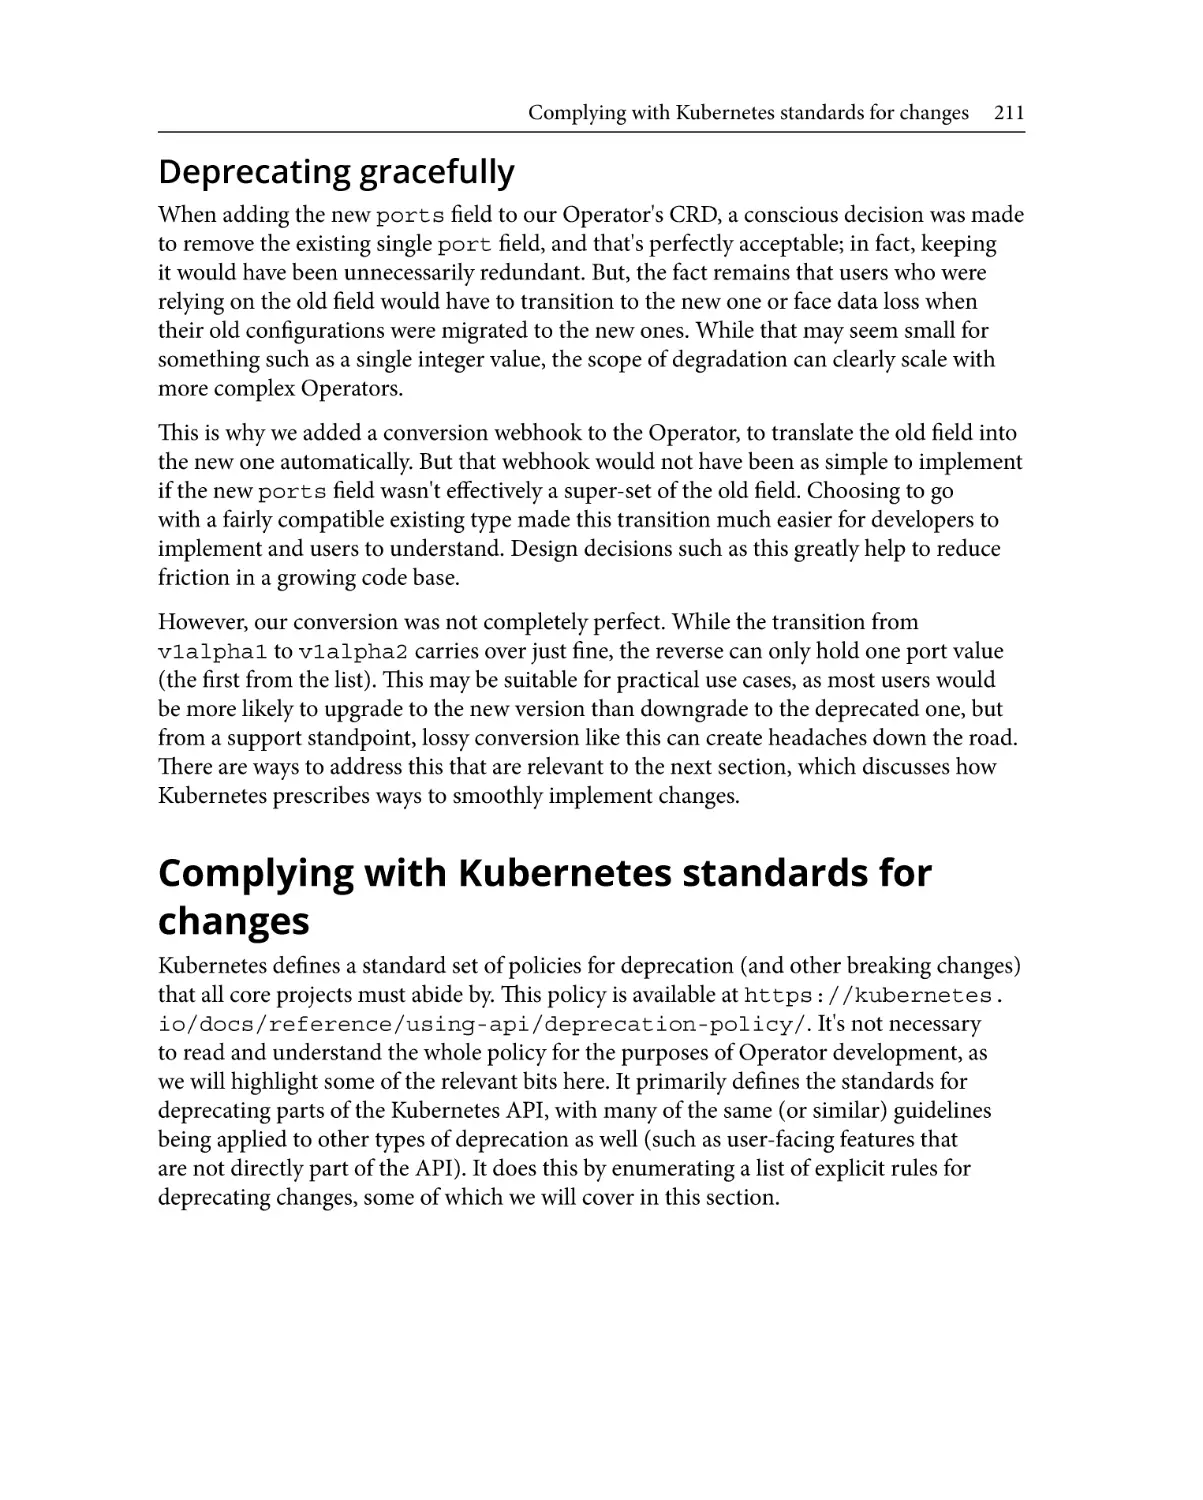
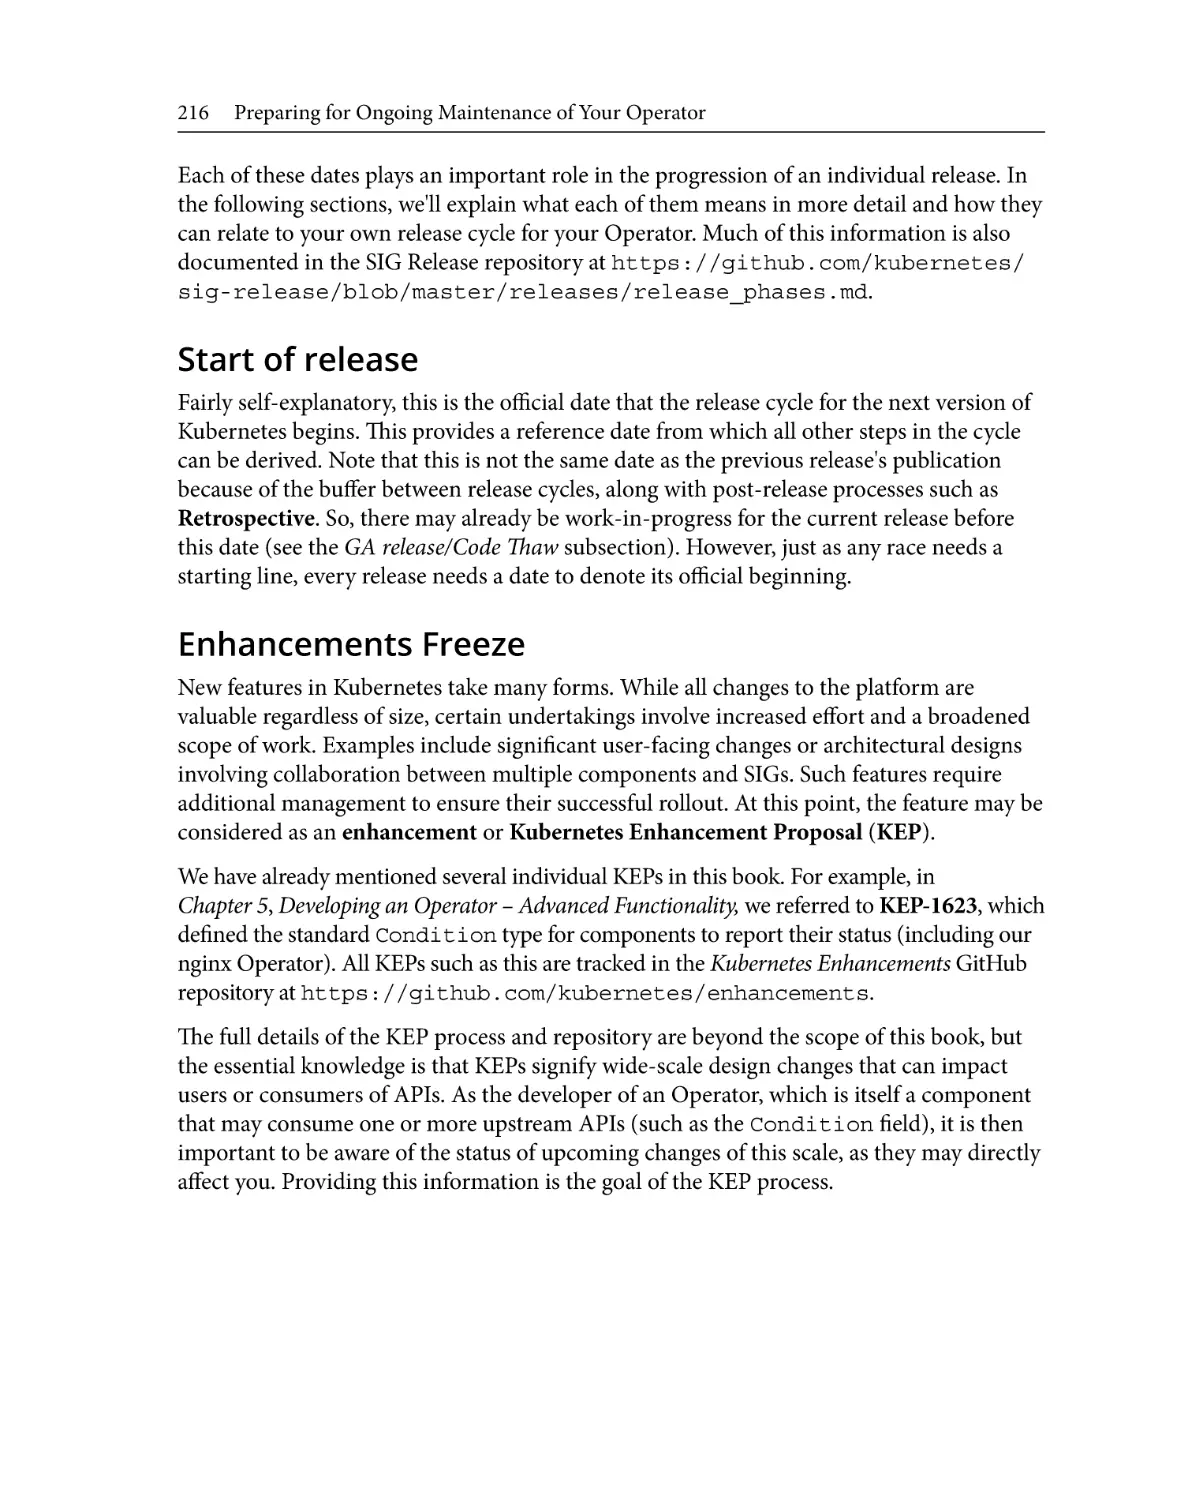
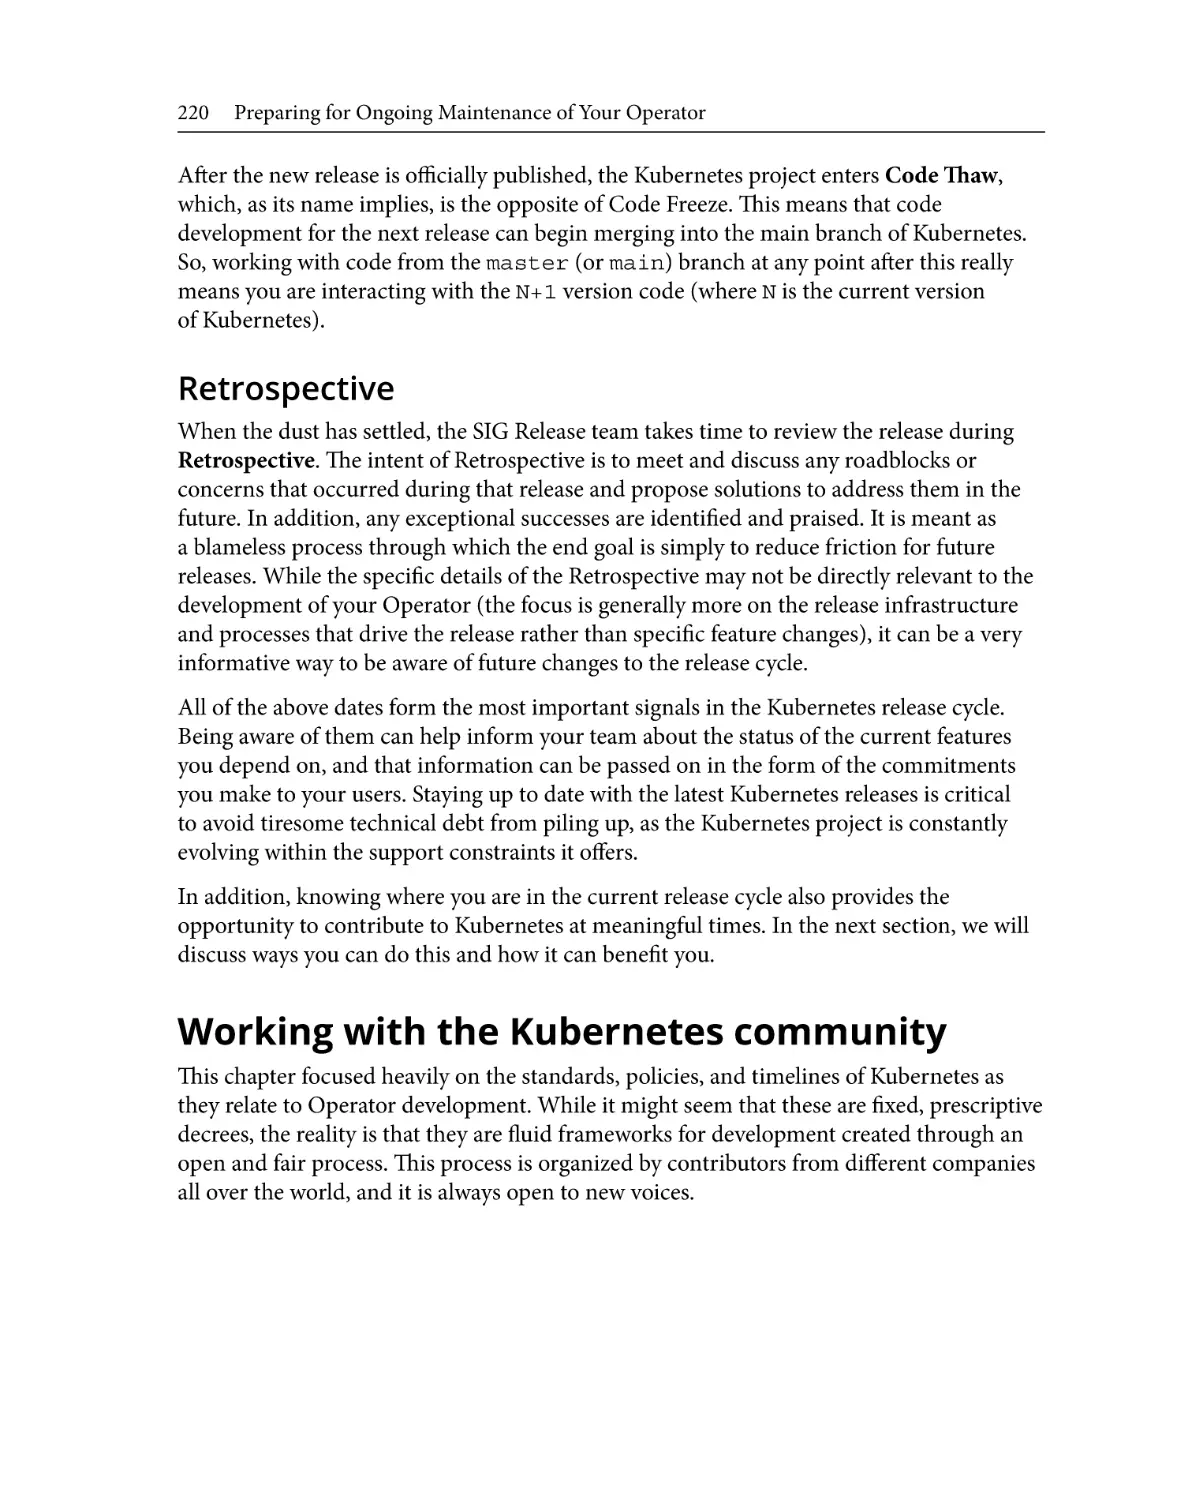
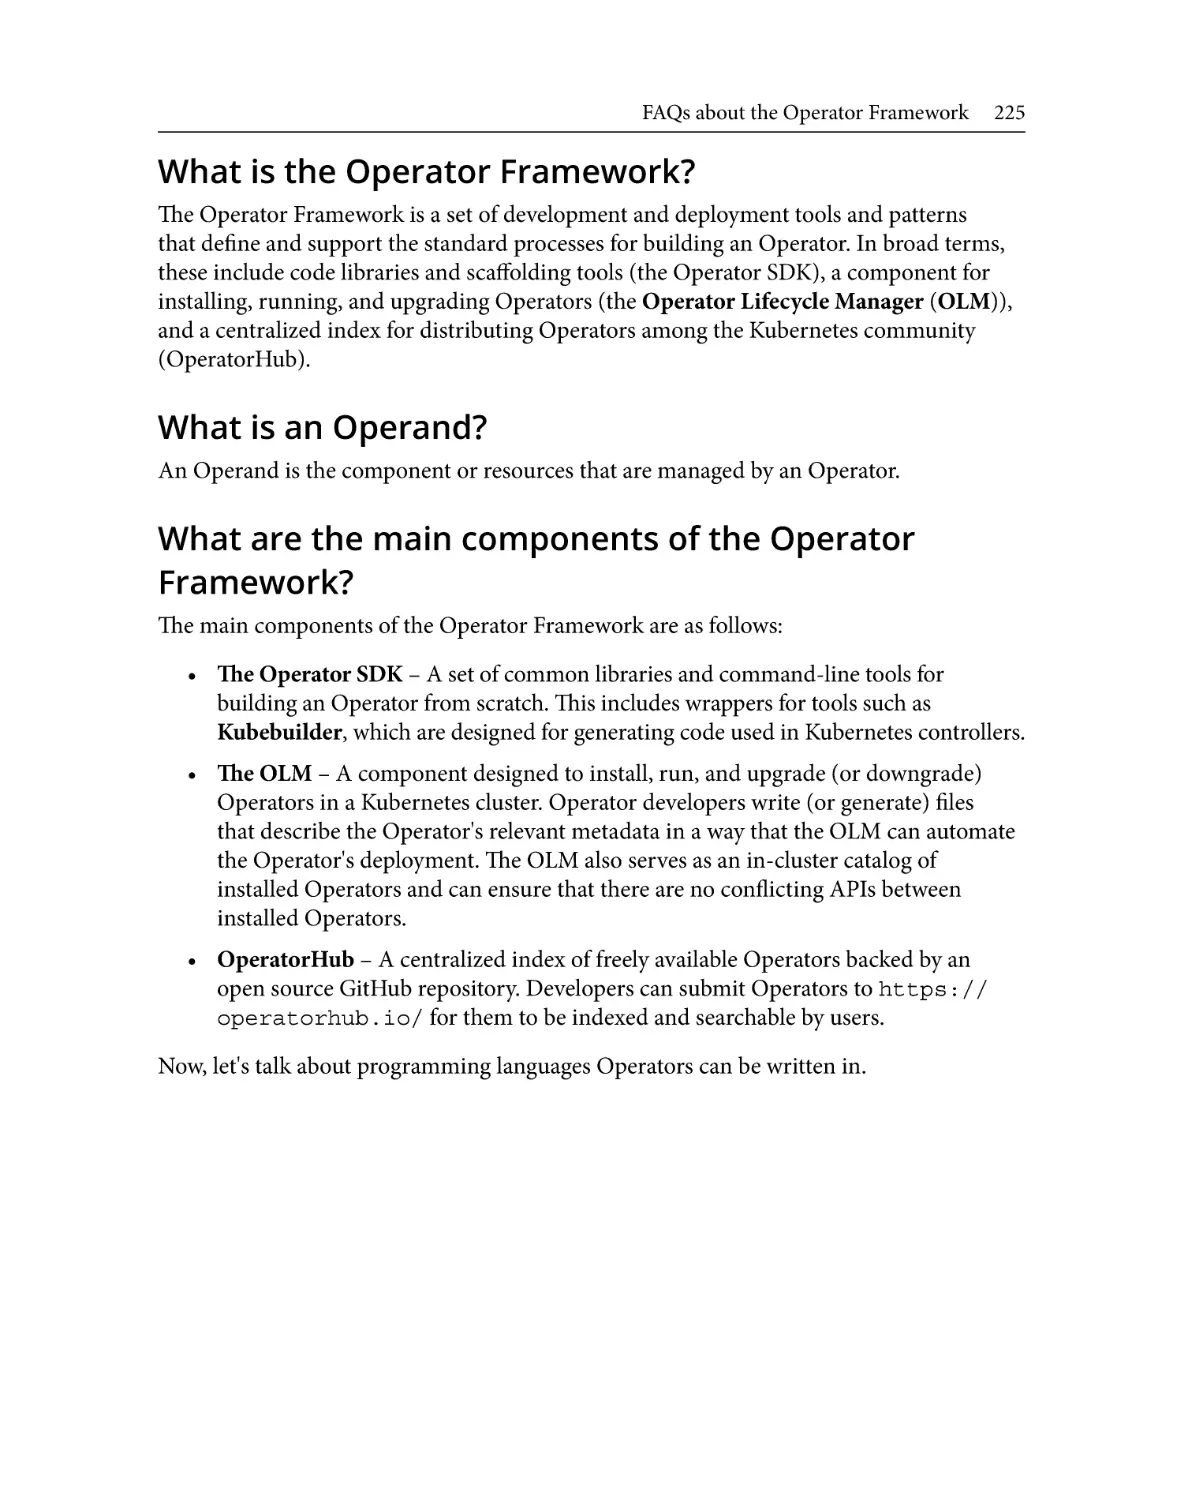
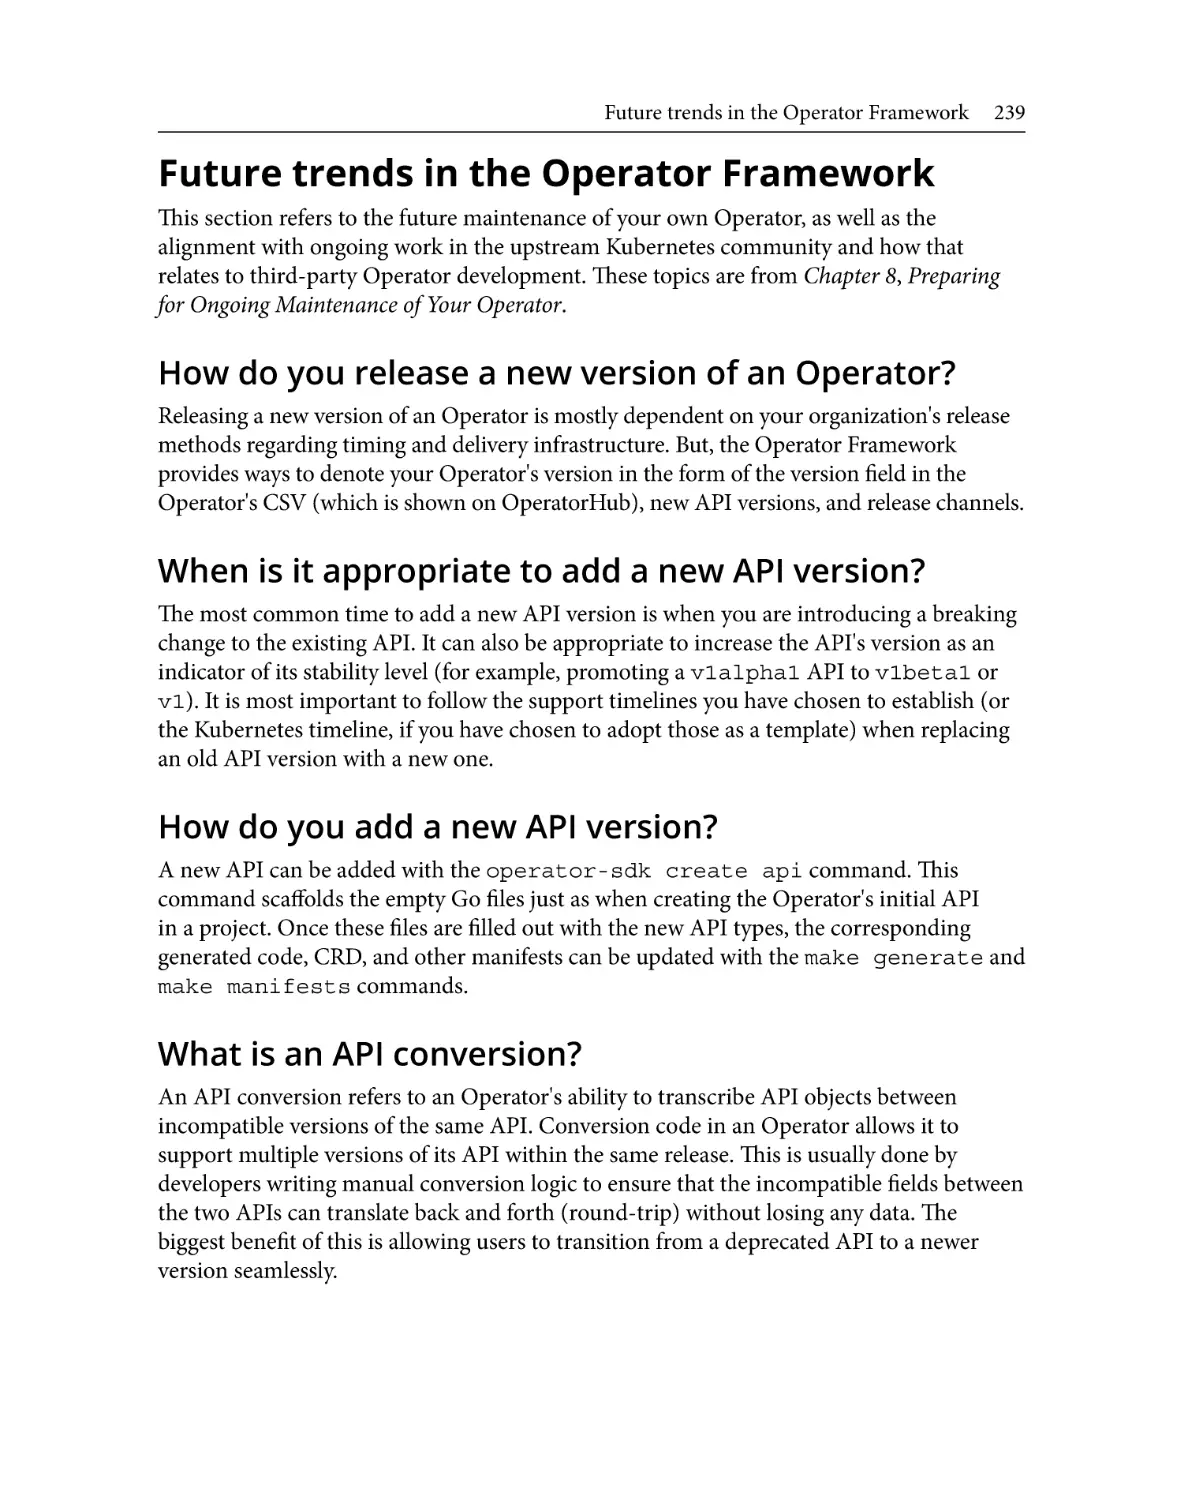
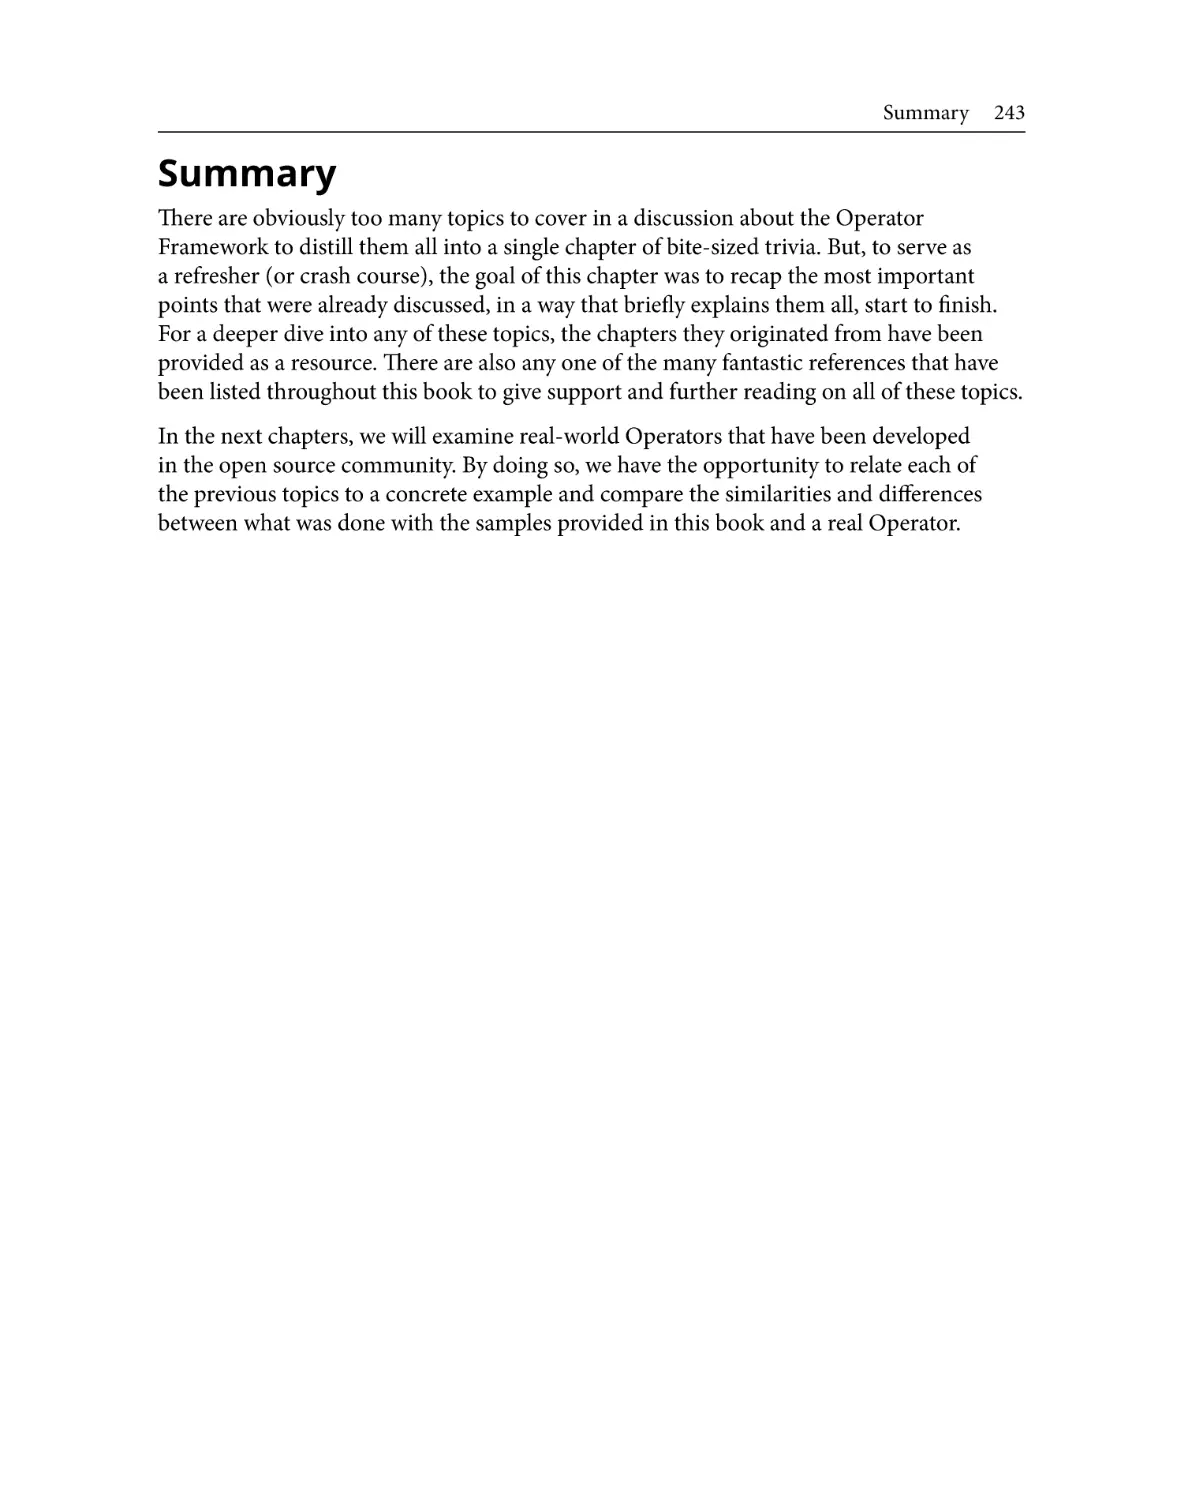
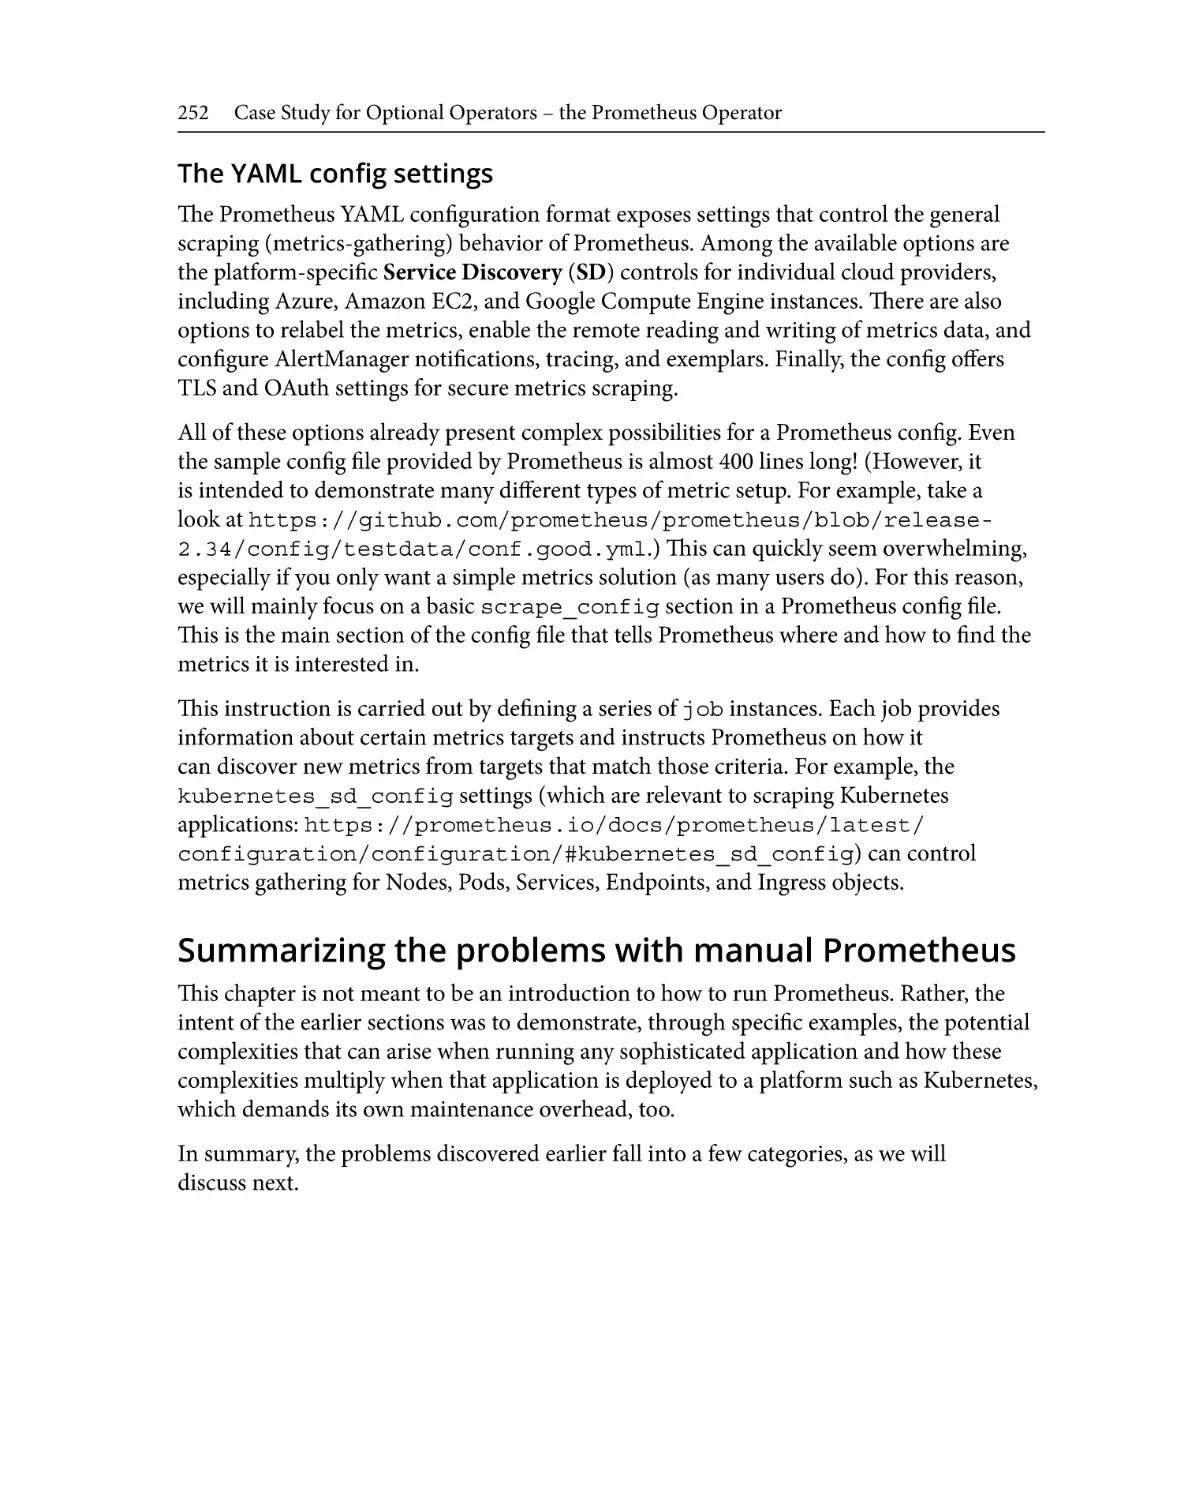
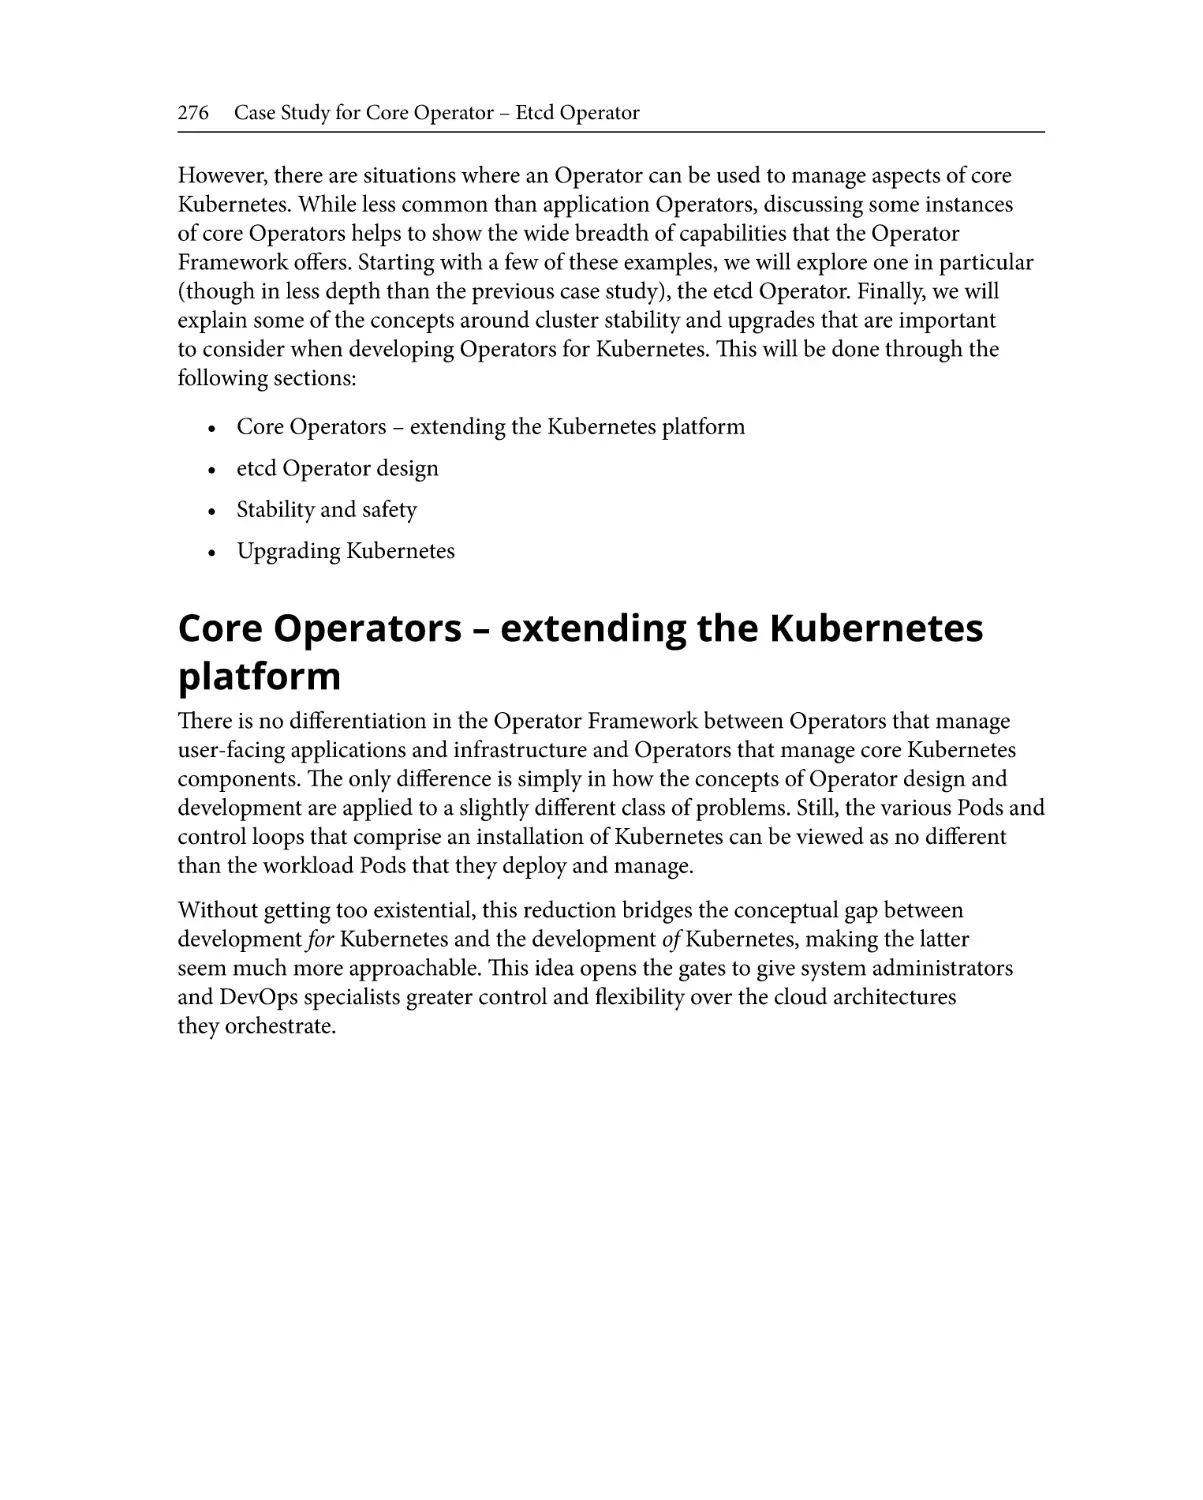
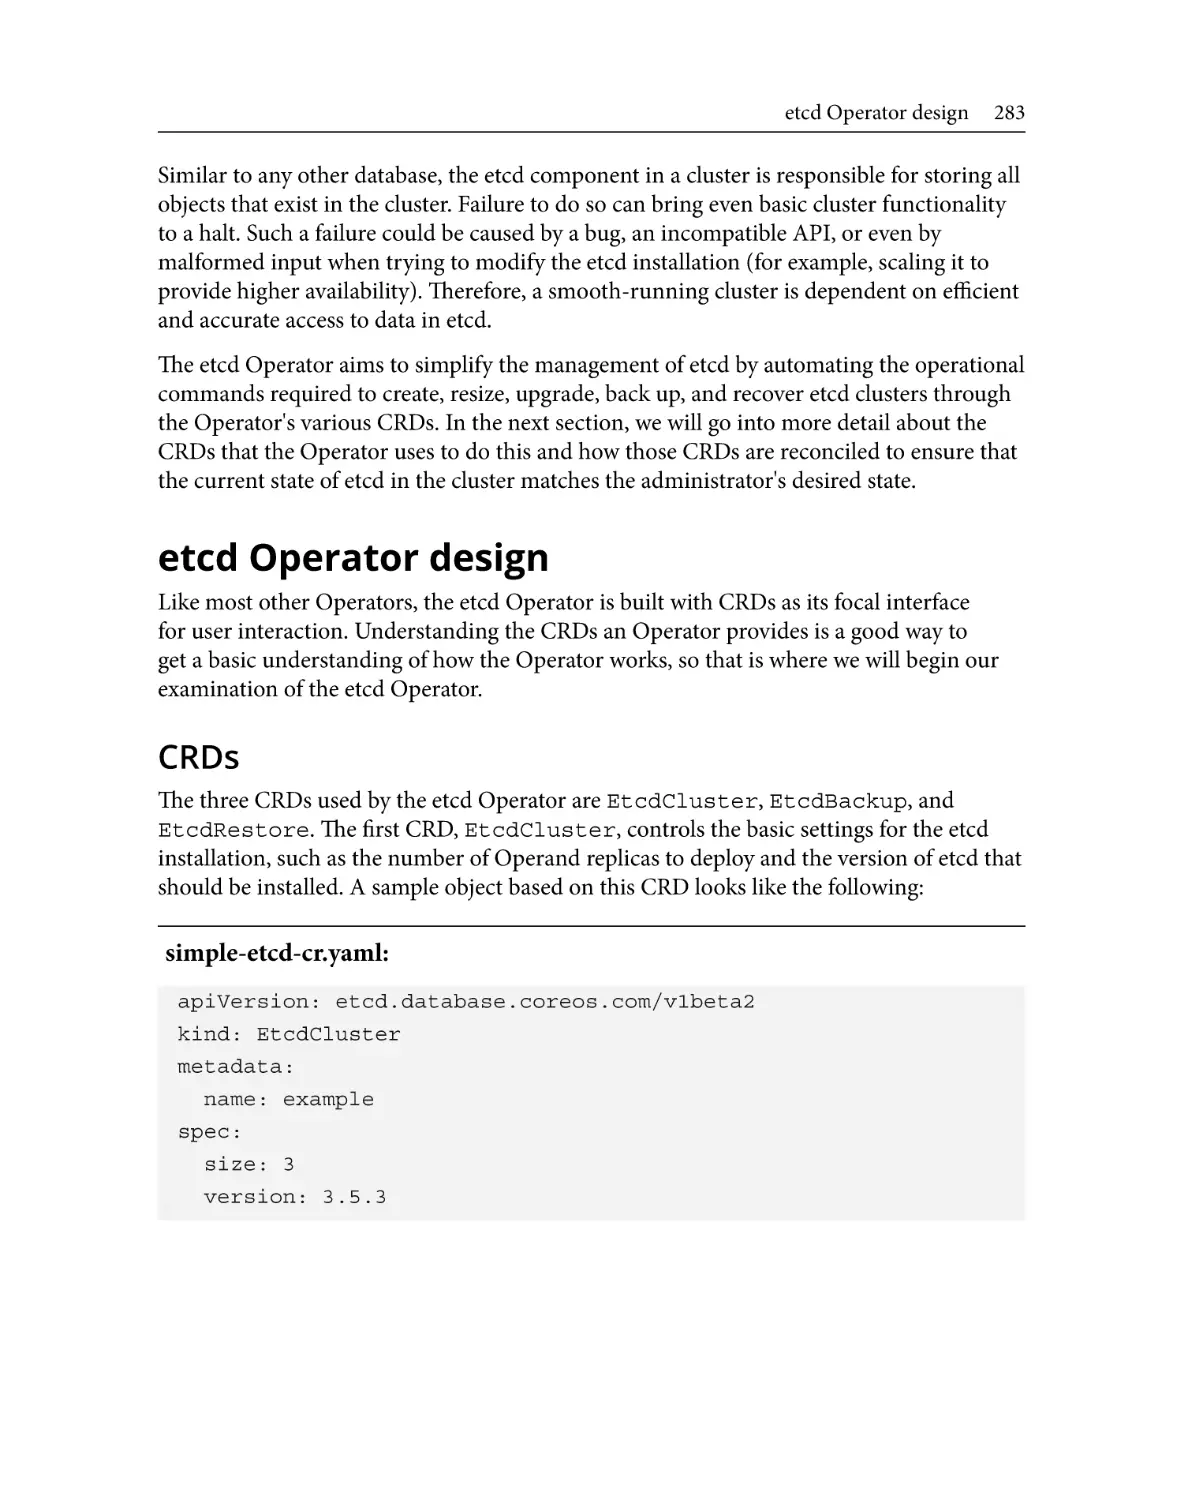
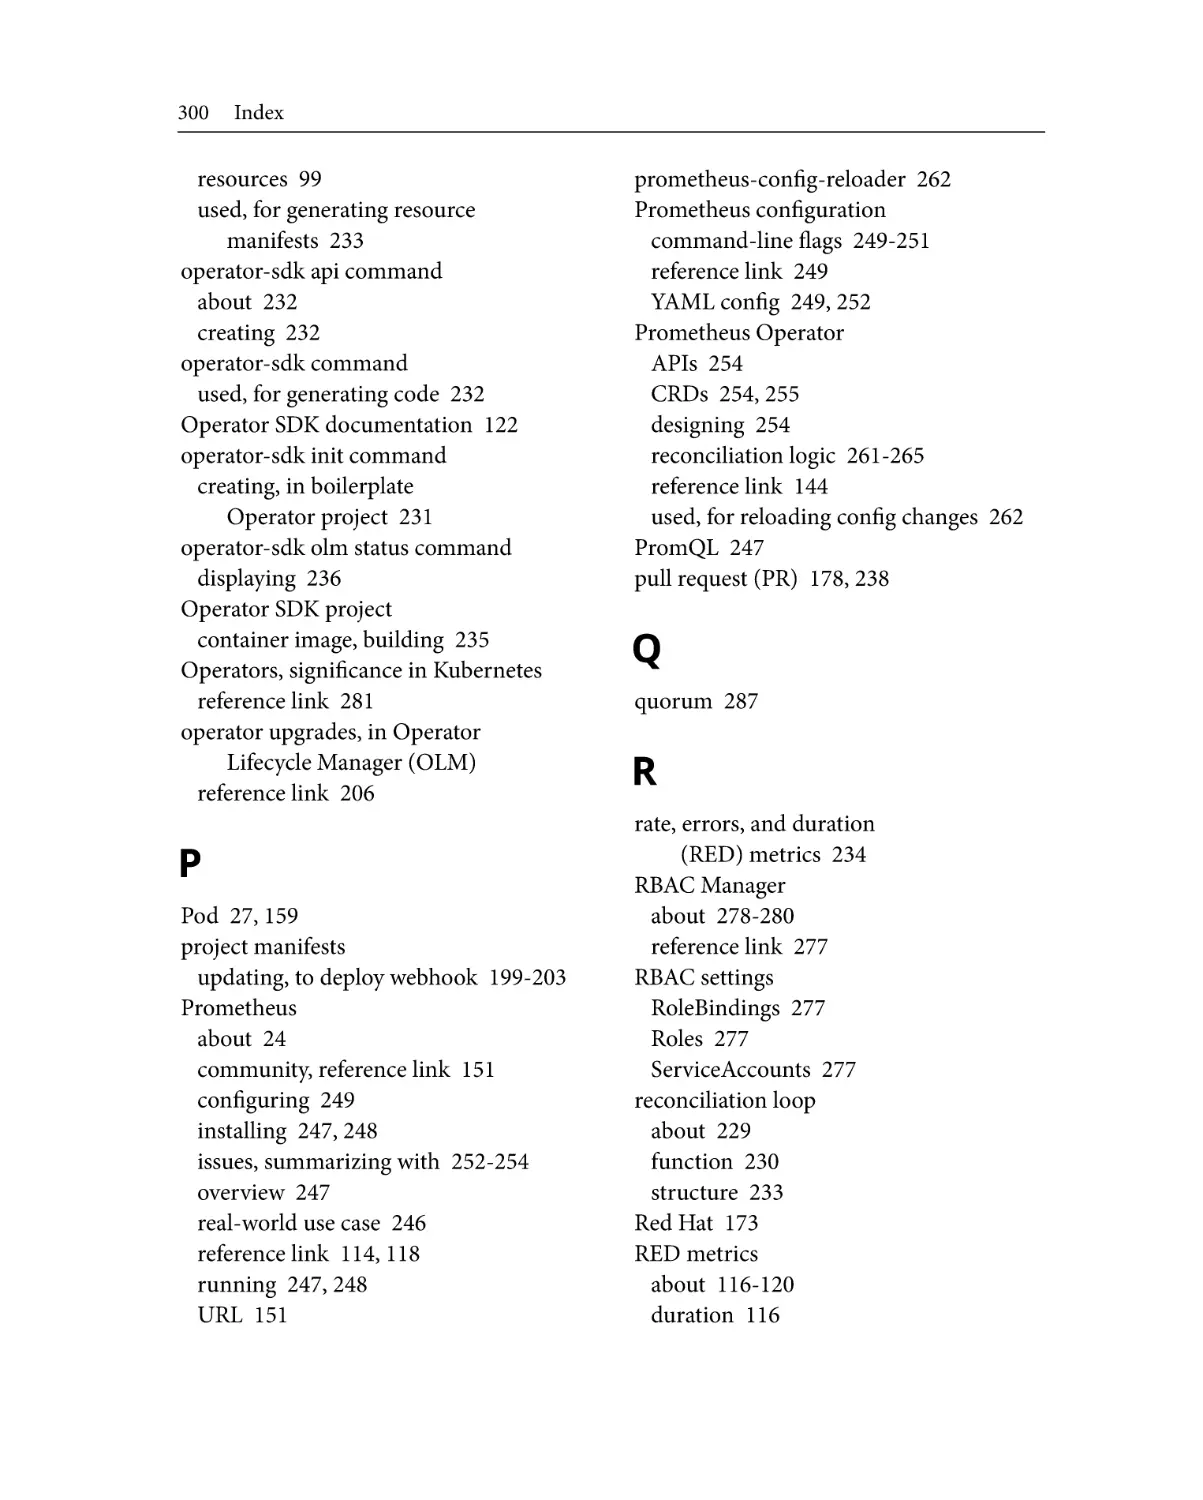
Here is a diagram of what a sample application of this sort could look like. There are three
Pods (frontend, backend, and database), as well as a Persistent Volume:
Figure 1.1 – Simple application diagram with three Pods and a Persistent Volume
This is just a small example, but it's already evident how even a simple application can
quickly involve tedious coordination between several moving parts. In theory, these
discrete components will all continue to function cohesively as long as each individual
component does not fail. But what about when a failure does occur somewhere in the
application's distributed design? It is never wise to assume that an application's valid state
will consistently remain that way.
Reacting to changing cluster states
There are a number of reasons a cluster state can change. Some may not even technically
be considered a failure, but they are still changes of which the running application must
be aware. For example, if your database access credentials change, then that update
needs to be propagated to all the Pods that interact with it. Or, a new feature is available
in your application that requires tactful rollout and updated settings for the running
workloads. This requires manual effort (and, more importantly, time), along with a keen
understanding of the application architecture.
6
Introducing the Operator Framework
Time and effort are even more critical in the case of an unexpected failure. These are the
kinds of problems that the Operator Framework addresses automatically. If one of the
Pods that make up this application hits an exception or the application's performance
begins to degrade, these scenarios require intervention. That means a human engineer
must not only know the details of the deployment, but they must also be on-call to
maintain uptime at any hour.
There are additional components that can help administrators monitor the health and
performance of their applications, such as metrics aggregation servers. However, these
components are essentially additional applications that must also be regularly monitored
to make sure they are working, so adding them to a cluster can reintroduce the same
issues of managing an application manually.
Introducing the Operator Framework
The concept of Kubernetes Operators was introduced in a blog post in 2016 by CoreOS.
CoreOS created their own container-native Linux operating system that was optimized
for the needs of cloud architecture. Red Hat acquired the company in 2018, and while the
CoreOS operating system's official support ended in 2020, their Operator Framework
has thrived.
The principal idea behind an Operator is to automate cluster and application management
tasks that would normally be done manually by a human. This role can be thought of as an
automated extension of support engineers or development-operations (DevOps) teams.
Most Kubernetes users will already be familiar with some of the design patterns of
Operators, even if they have never used the Operator Framework before. This is because
Operators are a seemingly complicated topic, but ultimately, they are not functionally
much different than many of the core components that already automate most of a
Kubernetes cluster by default. These components are called controllers, and at its core, any
Operator is essentially just a controller.
Exploring Kubernetes controllers
Kubernetes itself is made up of many default controllers. These controllers maintain the
desired state of the cluster, as set by users and administrators. Deployments, ReplicaSets,
and Endpoints are just a few examples of cluster resources that are managed by their own
controllers. Each of these resources involves an administrator declaring the desired cluster
state, and it is then the controller's job to maintain that state. If there is any deviation, the
controller must act to resolve what they control.
Introducing the Operator Framework
7
These controllers work by monitoring the current state of the cluster and comparing it to
the desired state. One example is a ReplicaSet with a specification to maintain three replicas
of a Pod. Should one of the replicas fail, the ReplicaSet quickly identifies that there are now
only two running replicas. It then creates a new Pod to bring stasis back to the cluster.
In addition, these core controllers are collectively managed by the Kube Controller
Manager, which is another type of controller. It monitors the state of controllers and
attempts to recover from errors if one fails or reports the error for human intervention
if it cannot automatically recover. So, it is even possible to have controllers that manage
other controllers.
In the same way, Kubernetes Operators put the development of operational controllers in
the hands of users. This provides administrators with the flexibility to write a controller
that can manage any aspect of a Kubernetes cluster or custom application. With the ability
to define more specific logic, developers can extend the main benefits of Kubernetes to the
unique needs of their own applications.
The Operators that are written following the guidelines of the Operator Framework are
designed to function very similarly to native controllers. They do this by also monitoring
the current state of the cluster and acting to reconcile it with the desired state. Specifically,
an Operator is tailored to a unique workload or component. The Operator then knows
how to interact with that component in various ways.
Knowing key terms for Operators
The component that is managed by an Operator is its Operand. An Operand is any kind
of application or workload whose state is reconciled by an Operator. Operators can have
many Operands, though most Operators manage—at most—just a few (usually just one).
The key distinction is that Operators exist to manage Operands, where the Operator is
a meta-application in the architectural design of the system.
Operands can be almost any type of workload. While some Operators manage application
deployments, many others deploy additional, optional cluster components offering metafunctionality such as database backup and restoration. Some Operators even make core
native Kubernetes components their Operands, such as etcd. So, an Operator doesn't
even need to be managing your own workloads; they can help with any part of a cluster.
No matter what the Operator is managing, it must provide a way for cluster administrators
to interact with it and configure settings for their application. An Operator exposes its
configuration options through a Custom Resource.
8
Introducing the Operator Framework
Custom Resources are created as API objects following the constraints of a matching
CustomResourceDefinition (CRD). CRDs are themselves a type of native Kubernetes
object that allows users and administrators to extend the Kubernetes platform with their
own resource objects beyond what is defined in the core API. In other words, while a Pod
is a built-in native API object in Kubernetes, CRDs allow cluster administrators to define
MyOperator as another API object and interact with it the same way as native objects.
Putting it all together
The Operator Framework strives to define an entire ecosystem for Operator development
and distribution. This ecosystem comprises three pillars that cover the coding,
deployment, and publishing of Operators. They are the Operator SDK, OLM, and
OperatorHub.
These three pillars are what have made the Operator Framework so successful. They
transform the framework from just development patterns to an encompassing, iterative
process that spans the entire lifecycle of an Operator. This helps support the contract
between Operator developers and users to provide consistent industry standards for
their software.
The lifecycle of an Operator begins with development. To help with this, the Operator
SDK exists to guide developers in the first steps of creating an Operator. Technically,
an Operator does not have to be written with the Operator SDK, but the Operator SDK
provides development patterns to significantly reduce the effort needed to bootstrap and
maintain an Operator's source code.
While coding and development are certainly important parts of creating an Operator,
any project's timeline does not end once the code is compiled. The Operator Framework
community recognized that a coherent ecosystem of projects must offer guidance beyond
just the initial development stage. Projects need consistent methods for installation, and
as software evolves, there is a need to publish and distribute new versions. OLM and
OperatorHub help users to install and manage Operators in their cluster, as well as share
their Operators in the community.
Finally, the Operator Framework provides a scale of Operator functionality called the
Capability Model. The Capability Model provides developers with a way to classify the
functional abilities of their Operator by answering quantifiable questions. An Operator's
classification, along with the Capability Model, gives users information about what they
can expect from the Operator.
Developing with the Operator SDK
9
Together, these three pillars establish the basis of the Operator Framework and form the
design patterns and community standards that distinguish Operators as a concept. Along
with the Capability Model, this standardized framework has led to an explosion in the
adoption of Operators in Kubernetes.
At this point, we have discussed a brief introduction to the core concepts of the Operator
Framework. In contrast with a Kubernetes application managed without an Operator, the
pillars of the Operator Framework address problems met by application developers. This
understanding of the core pillars of the Operator Framework will set us up for exploring
each of them in more depth.
Developing with the Operator SDK
The first pillar of the Operator Framework is the Operator SDK. As with any other software
development toolkit, the Operator SDK provides packaged functionality and design
patterns as code. These include predefined APIs, abstracted common functions, code
generators, and project scaffolding tools to easily start an Operator project from scratch.
The Operator SDK is primarily written in Go, but its tooling allows Operators to be
written using Go code, Ansible, or Helm. This gives developers the ability to write their
Operators from the ground up by coding the CRDs and reconciliation logic themselves,
or by taking advantage of automated deployment tools provided by Ansible and Helm to
generate their APIs and reconciliation logic depending on their needs.
Developers interact with the Operator SDK through its operator-sdk command-line
binary. The binary is available on Homebrew for Mac and is also available directly from
the Operator Framework GitHub repository (https://github.com/operatorframework/operator-sdk) as a release, where it can also be compiled from source.
Whether you are planning to develop an Operator with Go, Ansible, or Helm, the
Operator SDK binary provides commands to initialize the boilerplate project source
tree. These commands include operator-sdk init and operator-sdk create
api. The first command initializes a project's source directory with boilerplate Go code,
dependencies, hack scripts, and even a Dockerfile and Makefile for compiling
the project.
10
Introducing the Operator Framework
Creating an API for your Operator is necessary to define the CRD required to interact
with the Operator once it is deployed in a Kubernetes cluster. This is because CRDs are
backed by API type definitions written in Go code. The CRD is generated from these
code definitions, and the Operator has logic built in to translate between CRD and Go
representations of the object. Essentially, CRDs are how users interact with Operators, and
Go code is how the Operator understands the settings. CRDs also add benefits such as
structural validation schemas to automatically validate inputs.
The Operator SDK binary has flags to specify the name and version of the API. It then
generates the API types as Go code and corresponding YAML Ain't Markup Language
(YAML) files based on best-practice standard definitions. However, you are free to modify
the definitions of your API in whichever way you choose.
If we were to initialize a basic Operator for an application such as the one first
demonstrated at the start of this chapter, the steps would be relatively simple. They would
look like this:
$ mkdir sample-app
$ cd sample-app/
$ operator-sdk init --domain mysite.com
sample/simple-app
$ operator-sdk create api --group myapp
--kind WebApp --resource –controller
$ ls
total 112K
drwxr-xr-x
15 mdame staff 480 Nov 15
drwxr-xr-x+ 270 mdame staff 8.5K Nov 15
drwx-----3 mdame staff
96 Nov 15
drwxr-xr-x
3 mdame staff
96 Nov 15
drwx-----10 mdame staff 320 Nov 15
drwx-----4 mdame staff 128 Nov 15
drwx-----3 mdame staff
96 Nov 15
-rw------1 mdame staff 129 Nov 15
-rw------1 mdame staff 367 Nov 15
-rw------1 mdame staff 776 Nov 15
-rw------1 mdame staff 8.7K Nov 15
-rw------1 mdame staff 422 Nov 15
-rw------1 mdame staff 218 Nov 15
-rw-r--r-1 mdame staff 76K Nov 15
-rw------1 mdame staff 3.1K Nov 15
--repo github.com/
--version v1alpha1
17:00
16:48
17:00
17:00
17:00
17:00
16:50
16:50
16:50
16:50
16:51
17:00
17:00
16:51
17:00
.
..
api
bin
config
controllers
hack
.dockerignore
.gitignore
Dockerfile
Makefile
PROJECT
go.mod
go.sum
main.go
Managing Operators with OLM
11
After this, you would go on to develop the logic of the Operator based on the method you
choose. If that's to write Go code directly, it would start by modifying the *.go files in the
project tree. For Ansible and Helm deployments, you would begin working on the Ansible
roles or Helm chart for your project.
Finally, the Operator SDK binary provides a set of commands to interact with OLM. These
include the ability to install OLM in a running cluster, but also install and manage specific
Operators within OLM.
Managing Operators with OLM
OLM is the second pillar of the Operator Framework. Its purpose is to facilitate the
deployment and management of Operators in a Kubernetes cluster. It is a component
that runs within a Kubernetes cluster and provides several commands and features for
interacting with Operators.
OLM is primarily used for the installation and upgrade of Operators—this includes
fetching and installing any dependencies for those Operators. Users interact with OLM
via commands provided by the Operator SDK binary, the Kubernetes command-line tool
(kubectl), and declarative YAML.
To get started, OLM can be initialized in a cluster with the following command:
$ operator-sdk olm install
Besides installing Operators, OLM can also make Operators that are currently installed
discoverable to users on the cluster. This provides a catalog of already installed Operators
available to cluster users. Also, by managing all the known Operators in the cluster, OLM
can watch for conflicting Operator APIs and settings that would destabilize the cluster.
Once an Operator's Go code is compiled into an image, it is ready to be installed into
a cluster with OLM running. Technically, OLM is not required to run an Operator in
any cluster. For example, it is completely possible to deploy an Operator manually in the
cluster, just as with any other container-based application. However, due to the advantages
and security measures described previously (including its ability to install Operators
and its awareness of other installed Operators), it is highly recommended to use OLM to
manage cluster Operators.
12
Introducing the Operator Framework
When developing an Operator, the image is compiled into a bundle, and that bundle is
installed via OLM. The bundle consists of several YAML files that describe the Operator,
its CRD, and its dependencies. OLM knows how to process this bundle in its standardized
format to properly manage the Operator in a cluster.
Compiling an Operator's code and deploying it can be done with commands such as
the ones shown next. The first command shown in the following code snippet builds the
bundle of YAML manifests that describe the Operator. Then, it passes that information to
OLM to run the Operator in your cluster:
$ make bundle ...
$ operator-sdk run bundle ...
Later chapters will demonstrate exactly how to use these commands and what they do,
but the general idea is that these commands first compile the Operator's Go code into an
image and a deployable format that's understandable by OLM. But OLM isn't the only
part of the Operator Framework that consumes an Operator's bundle—much of the same
information is used by OperatorHub to provide information on an Operator.
Once an Operator has been compiled into its image, OperatorHub exists as a platform to
share and distribute those images to other users.
Distributing Operators on OperatorHub.io
The final core component of the Operator Framework is OperatorHub.io. As a major
open source project, the Operator Framework ecosystem is built on the open sharing and
distribution of projects. Therefore, OperatorHub powers the growth of Operators as a
Kubernetes concept.
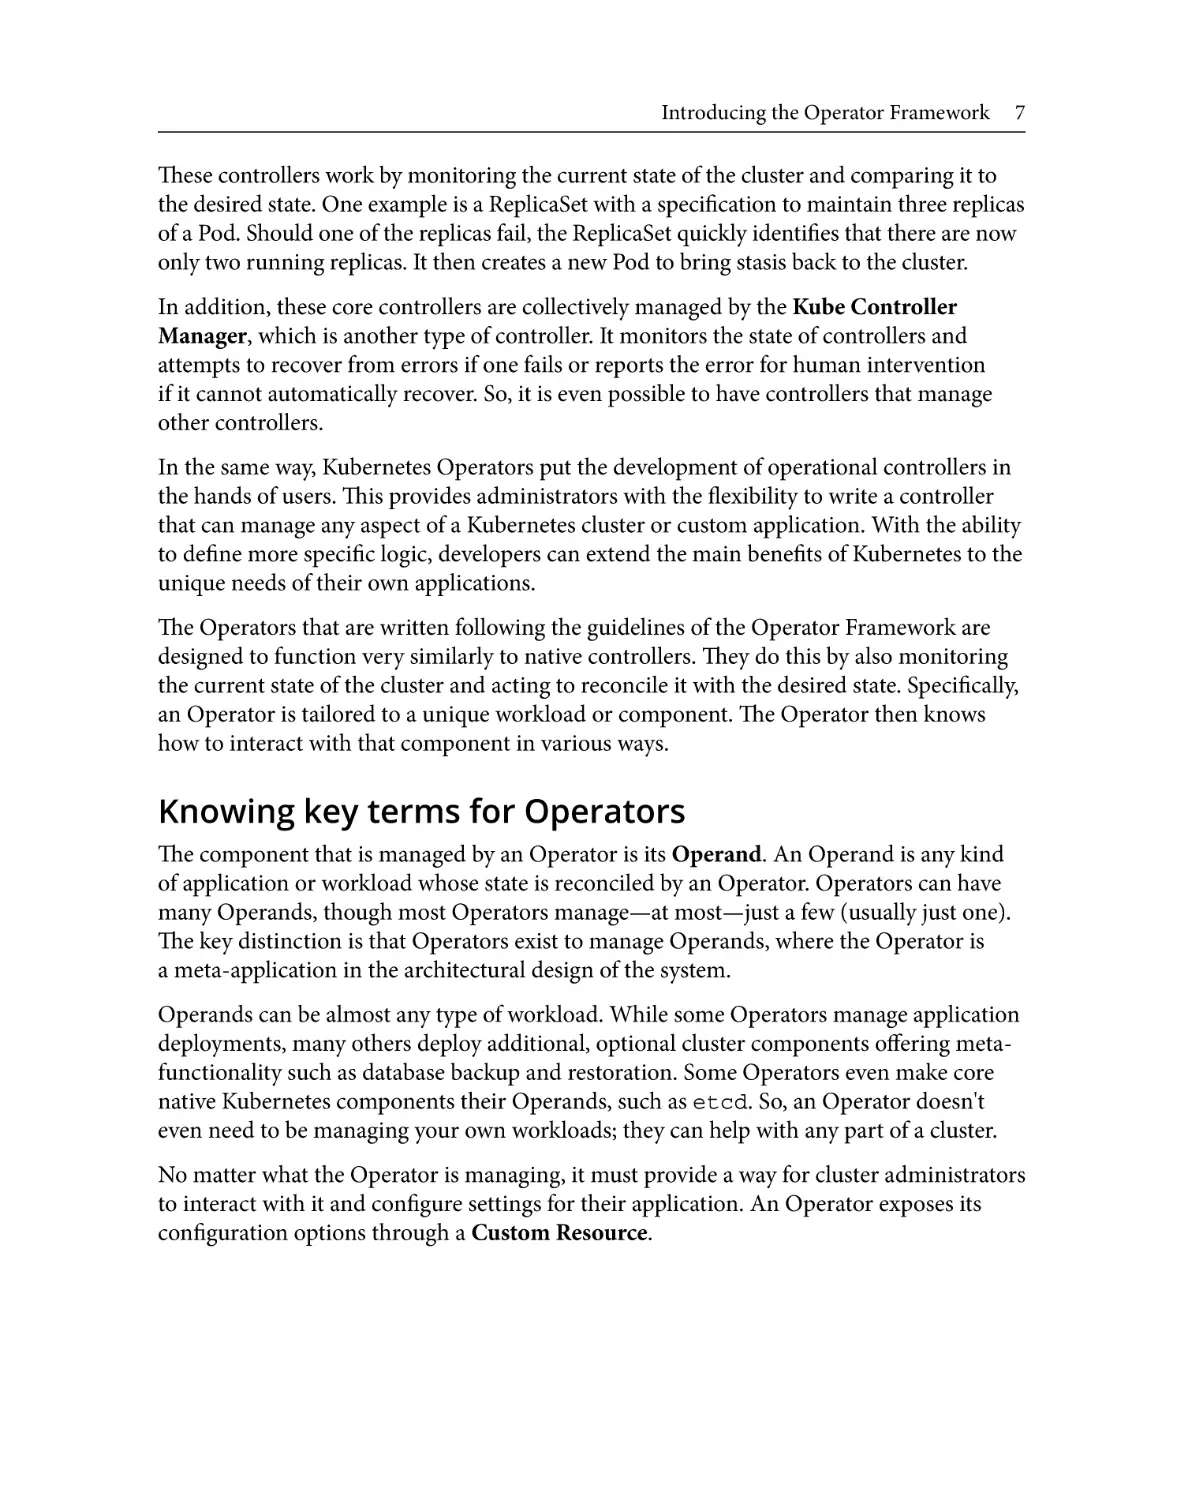
OperatorHub is an open catalog of Operators published and managed by the Kubernetes
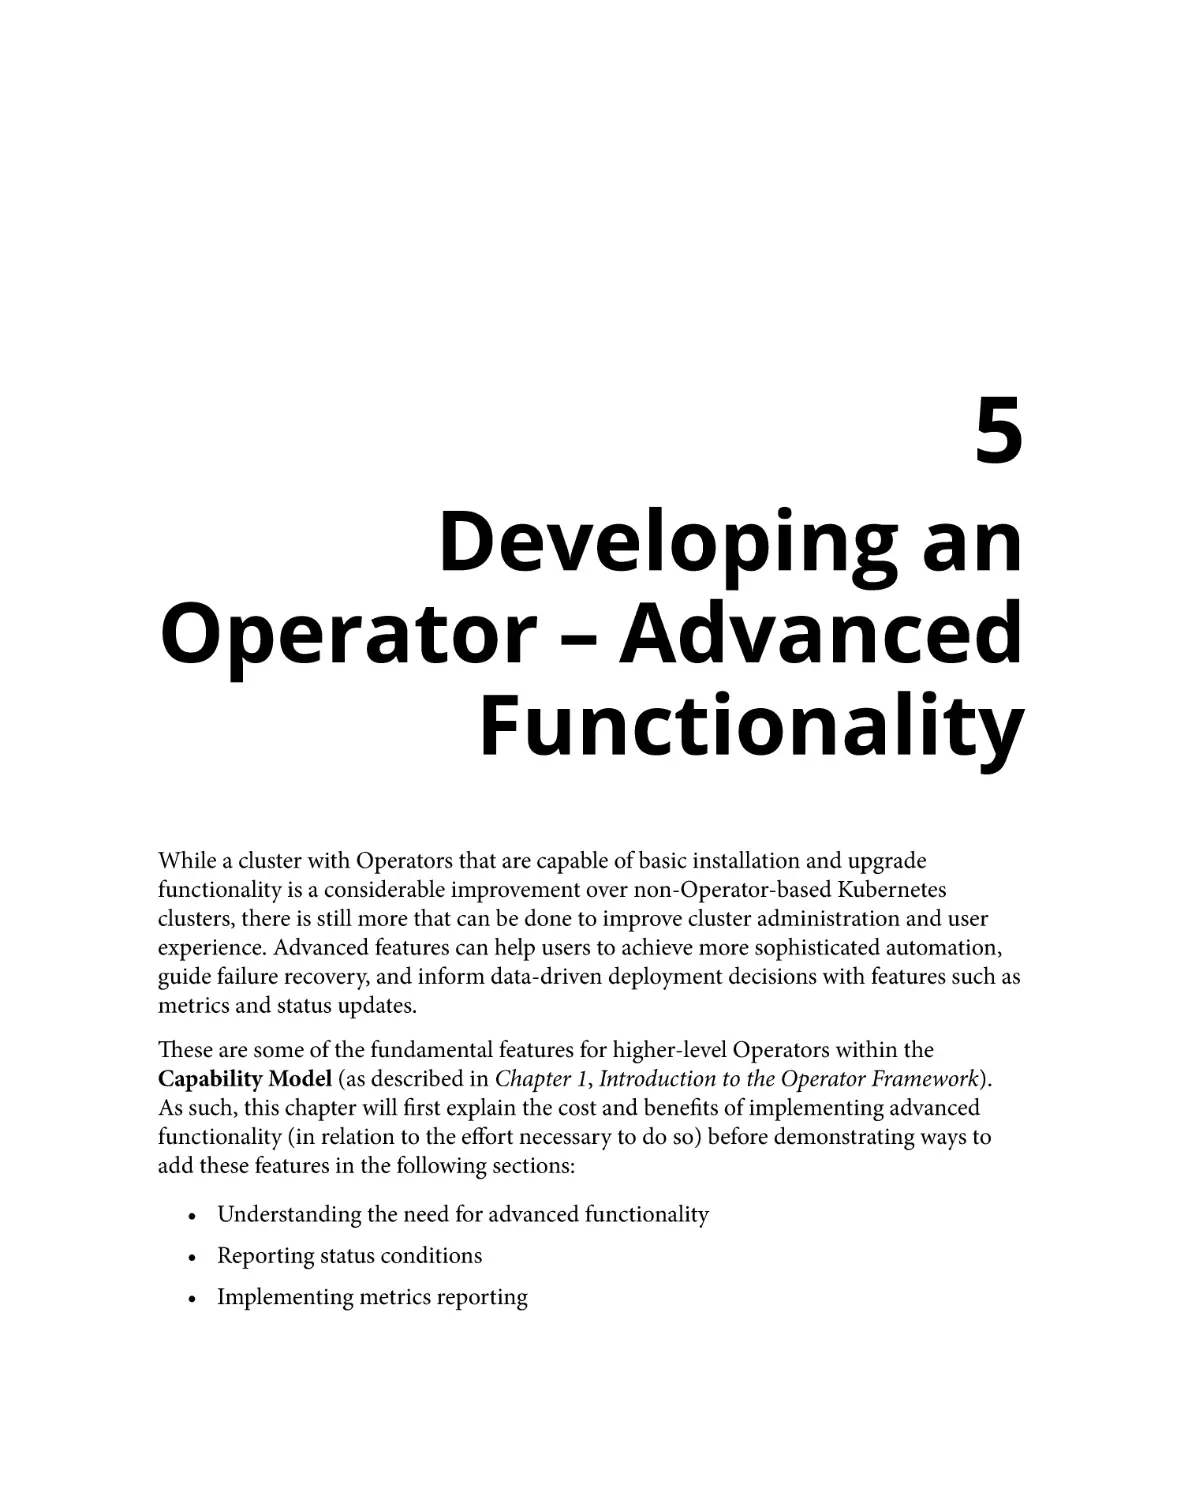
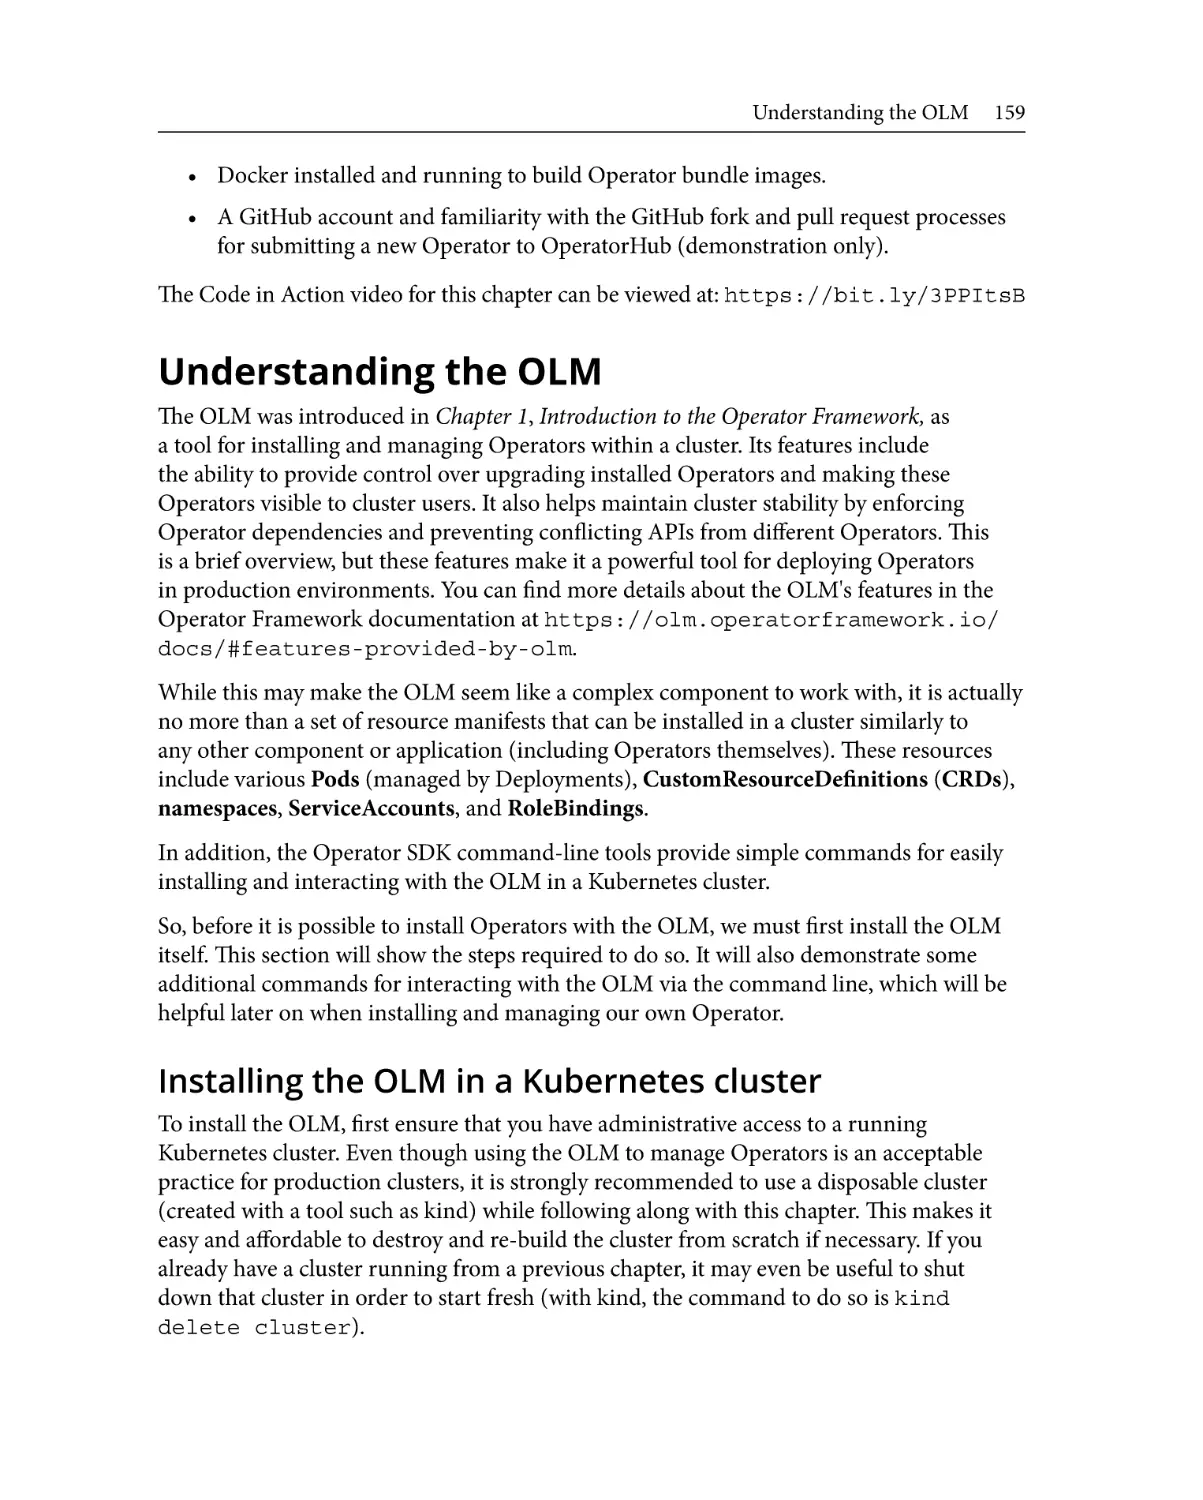
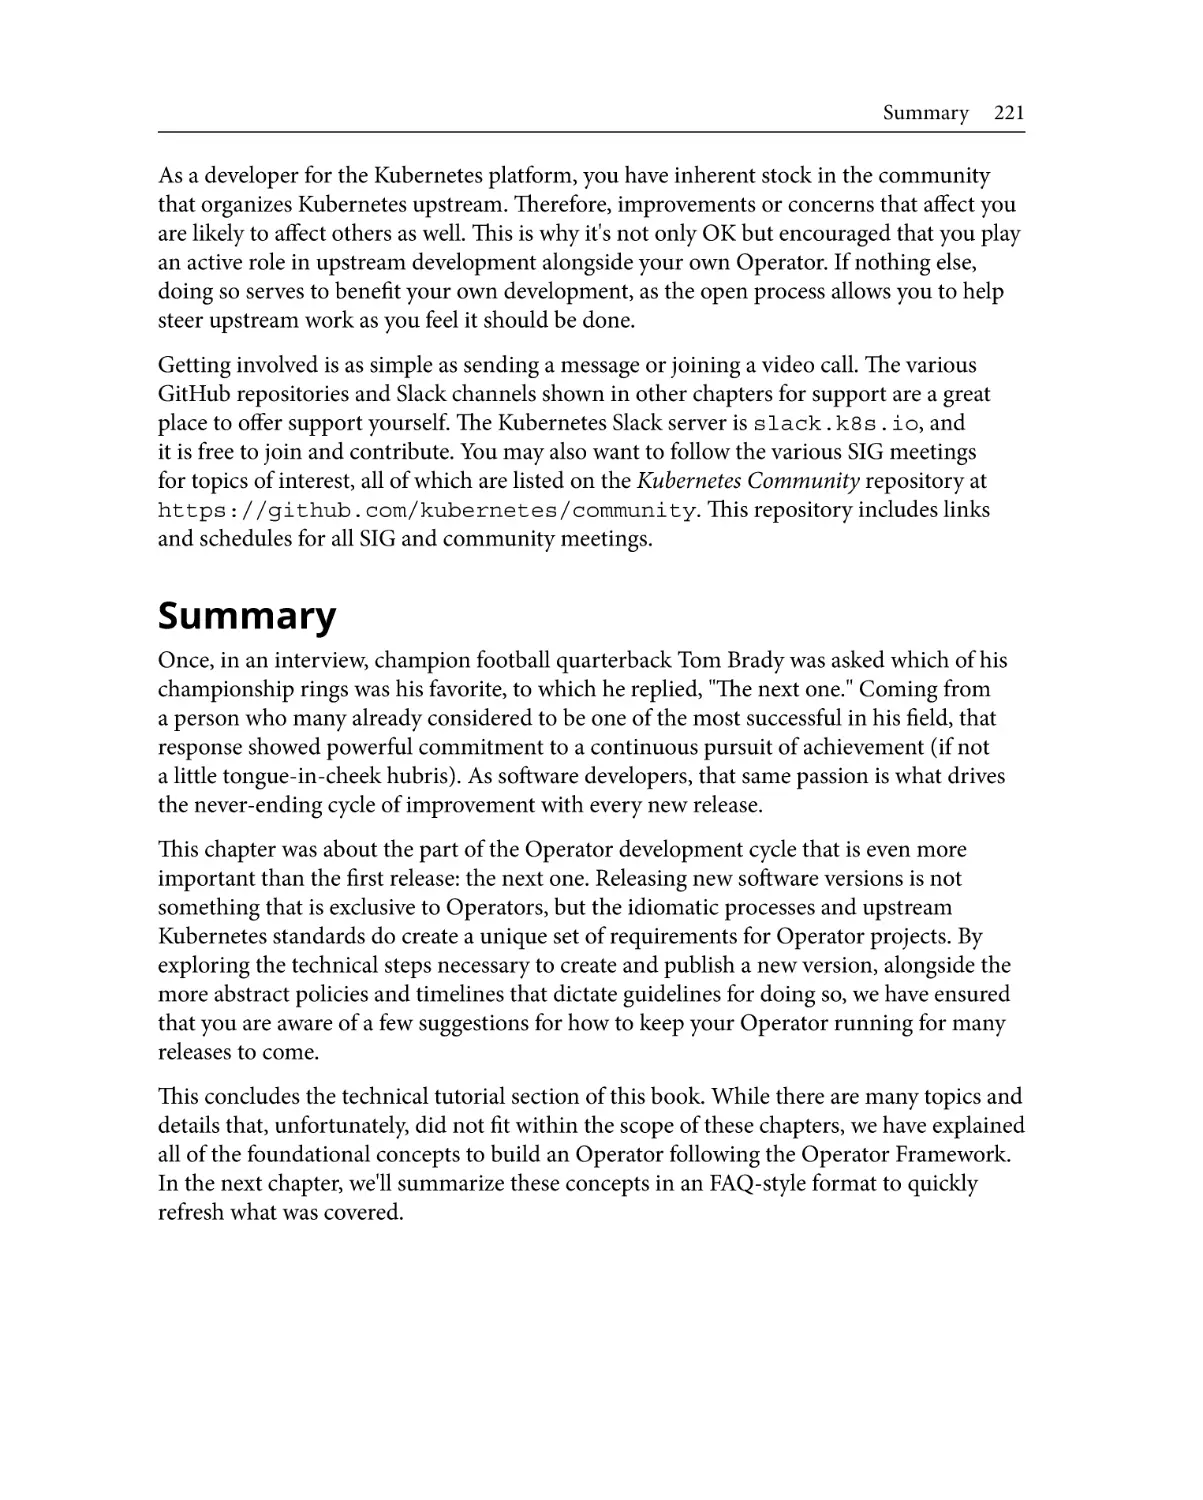
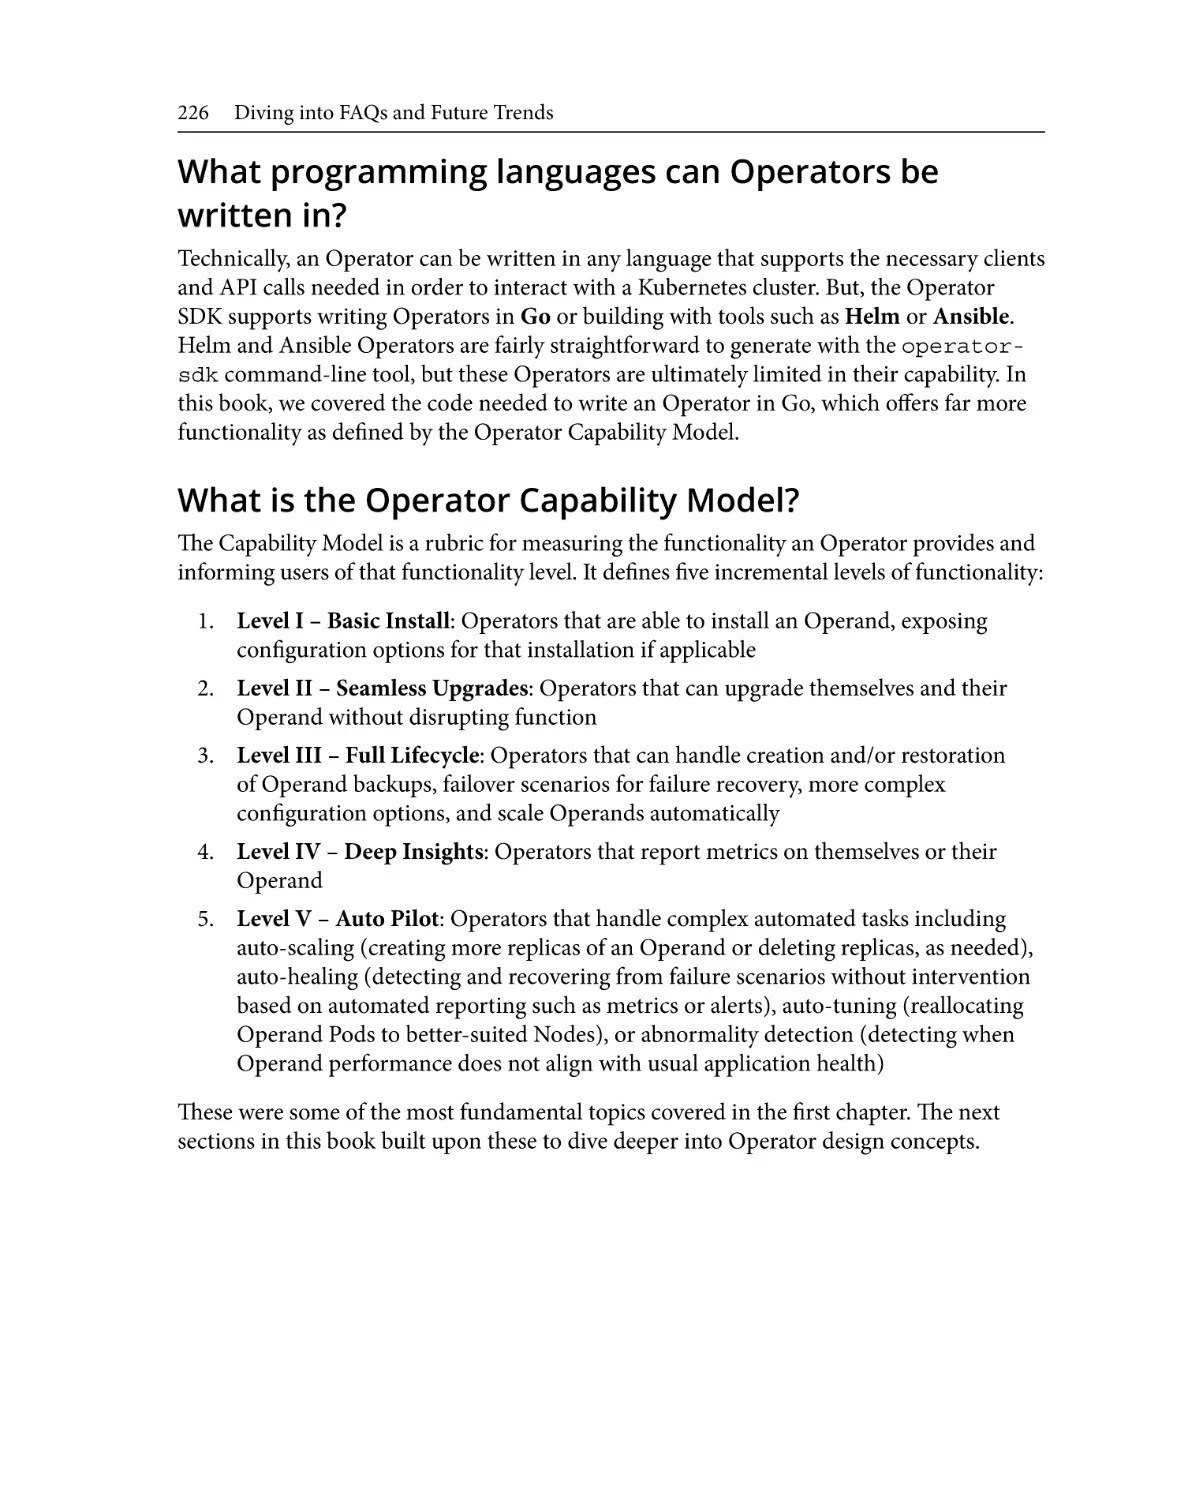
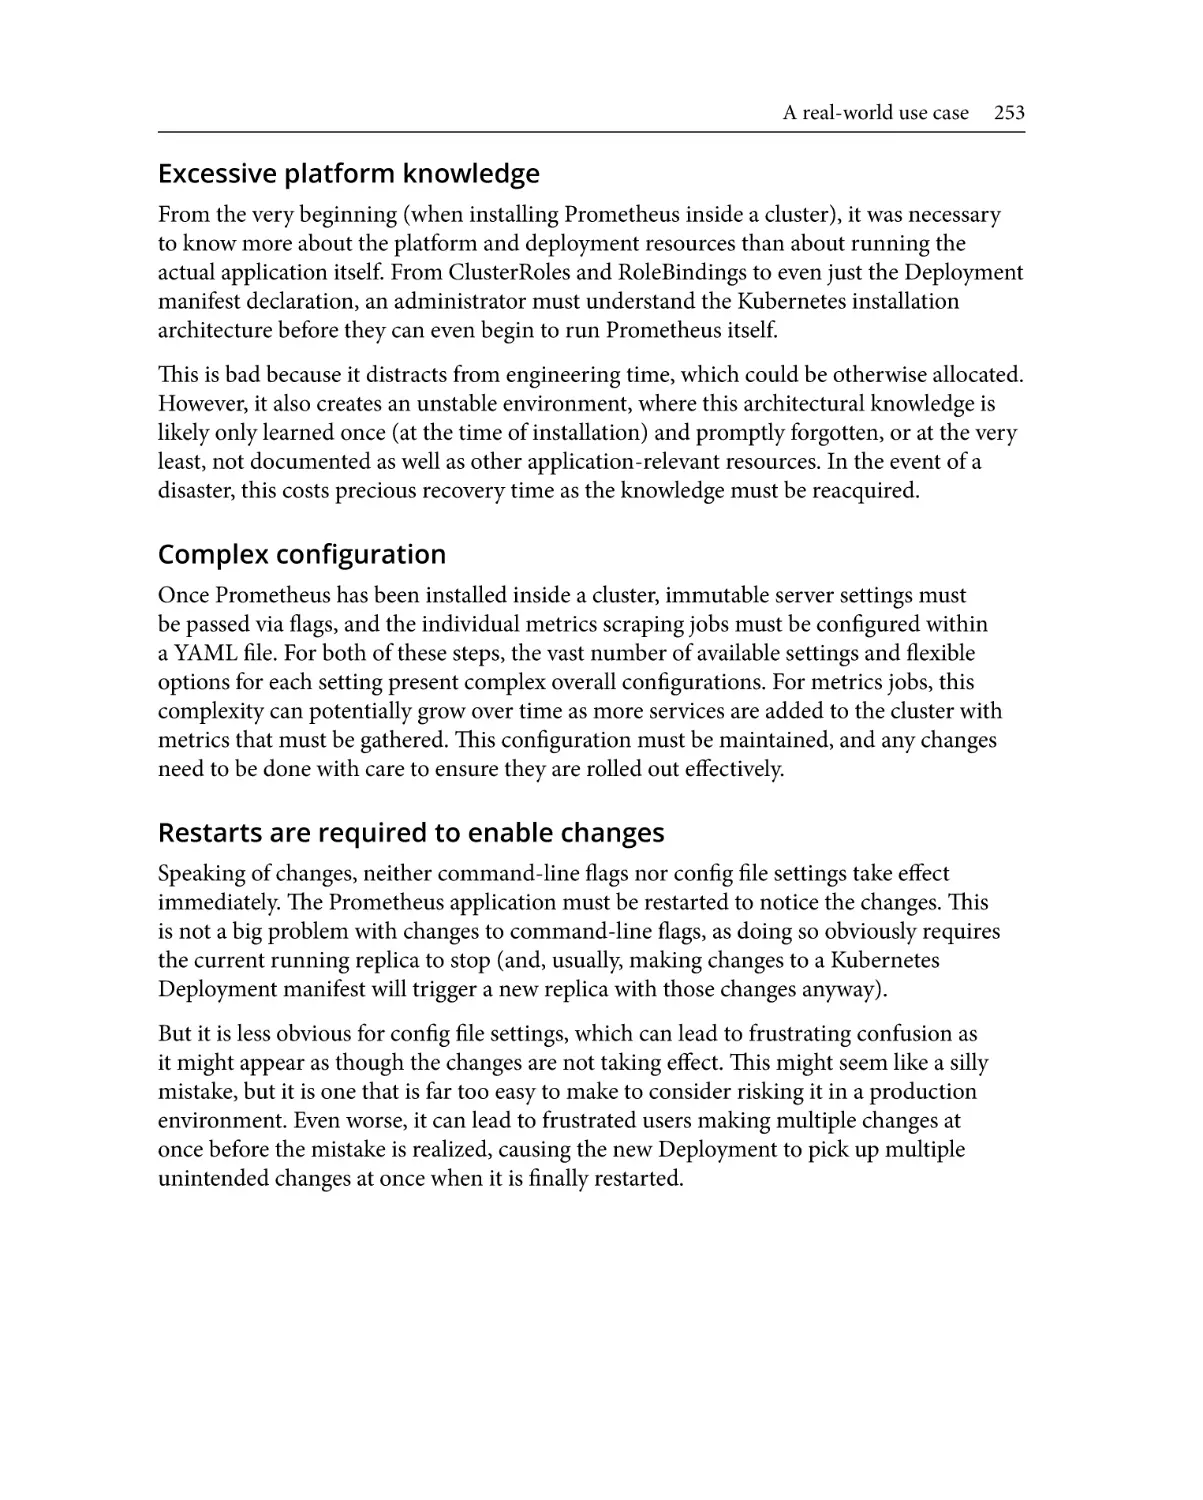
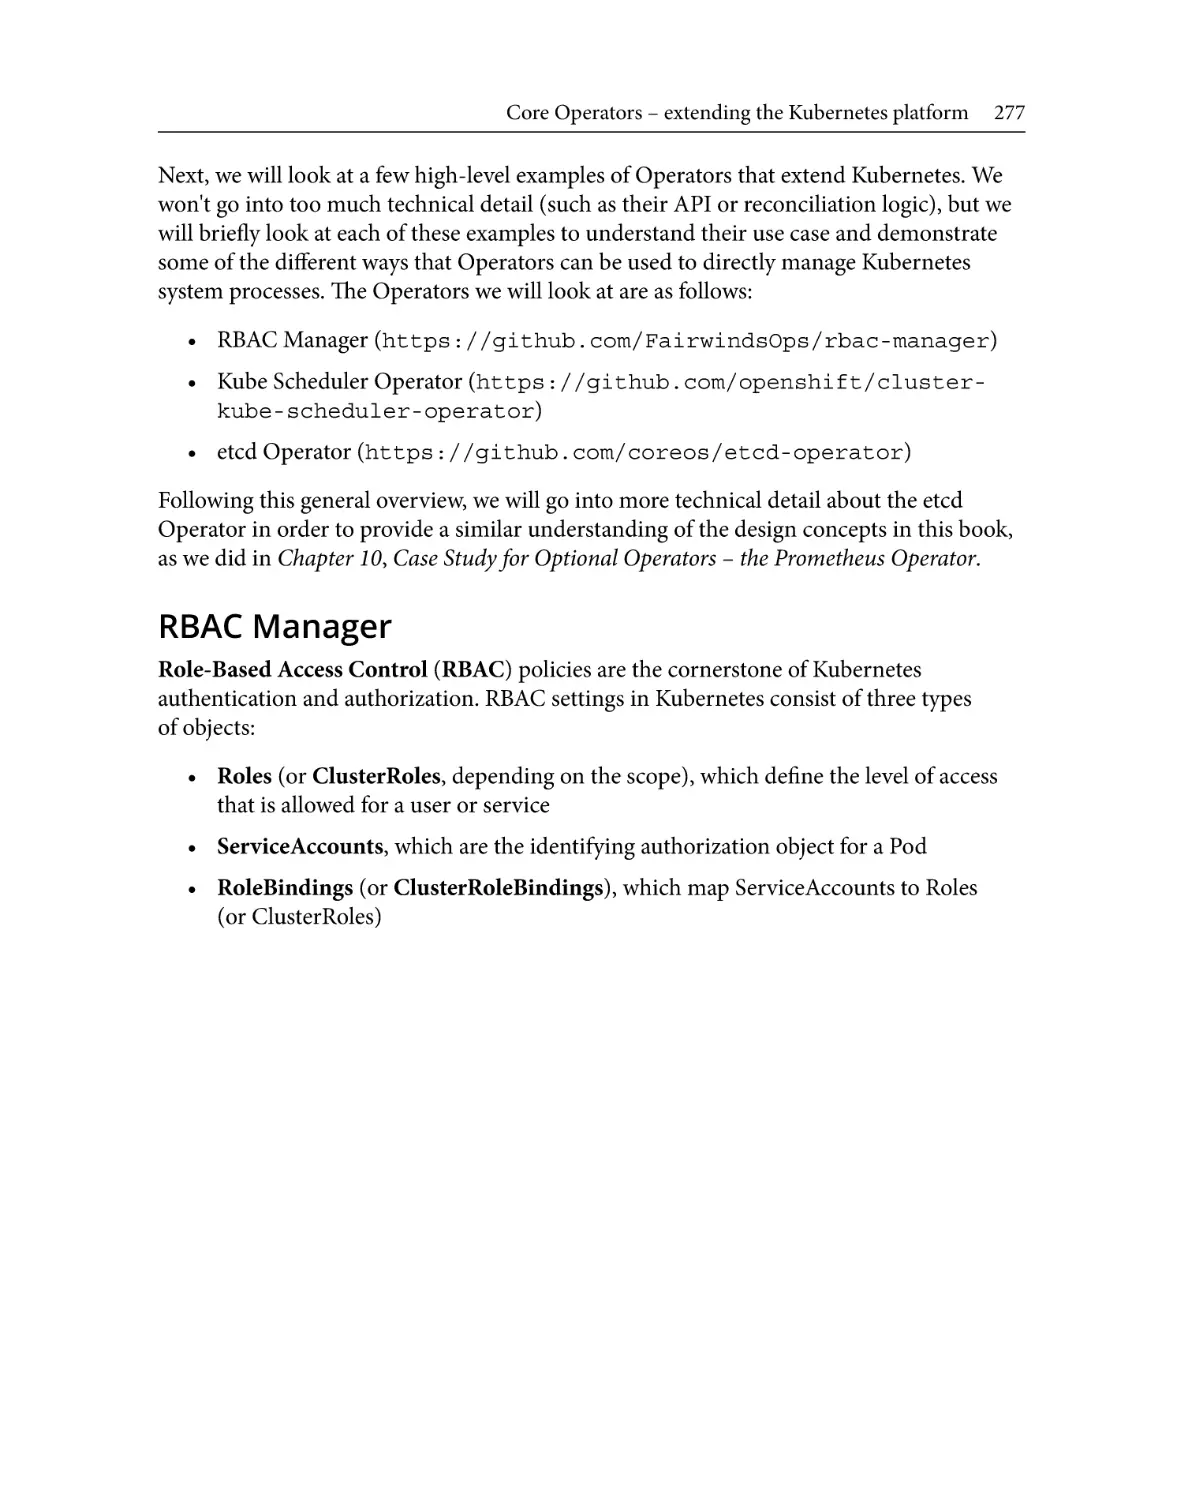
community. It serves as a central index of freely available Operators, each contributed by
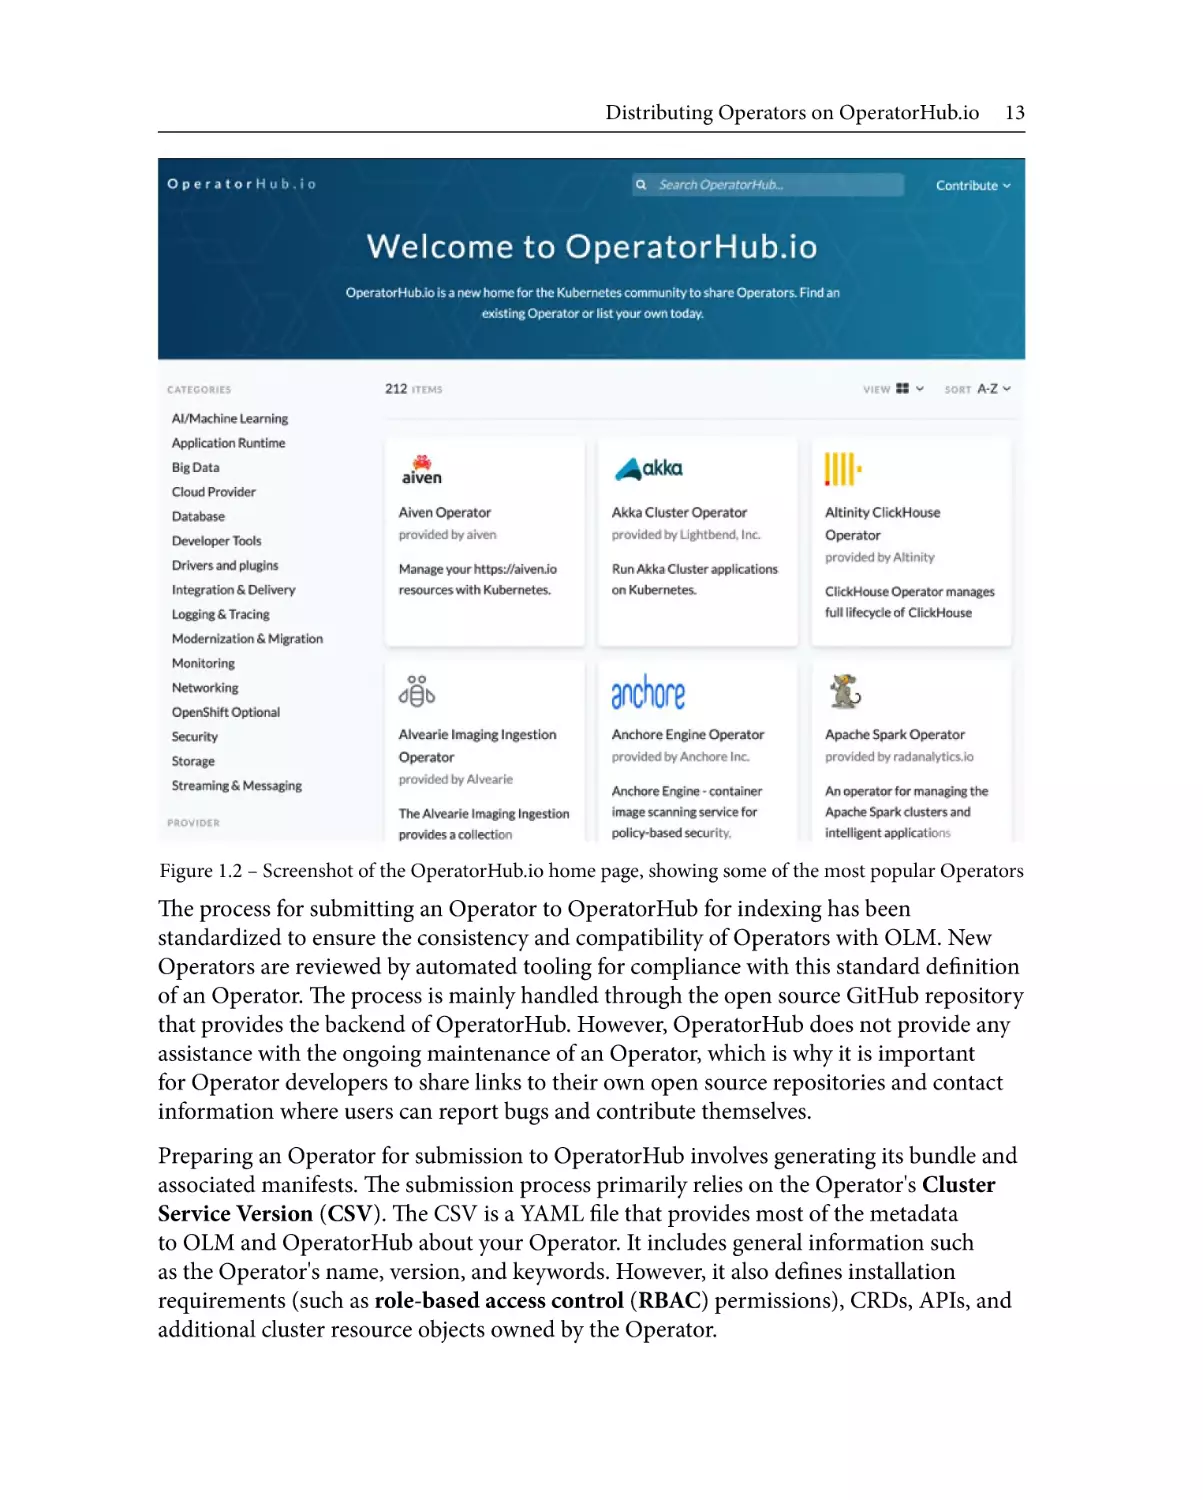
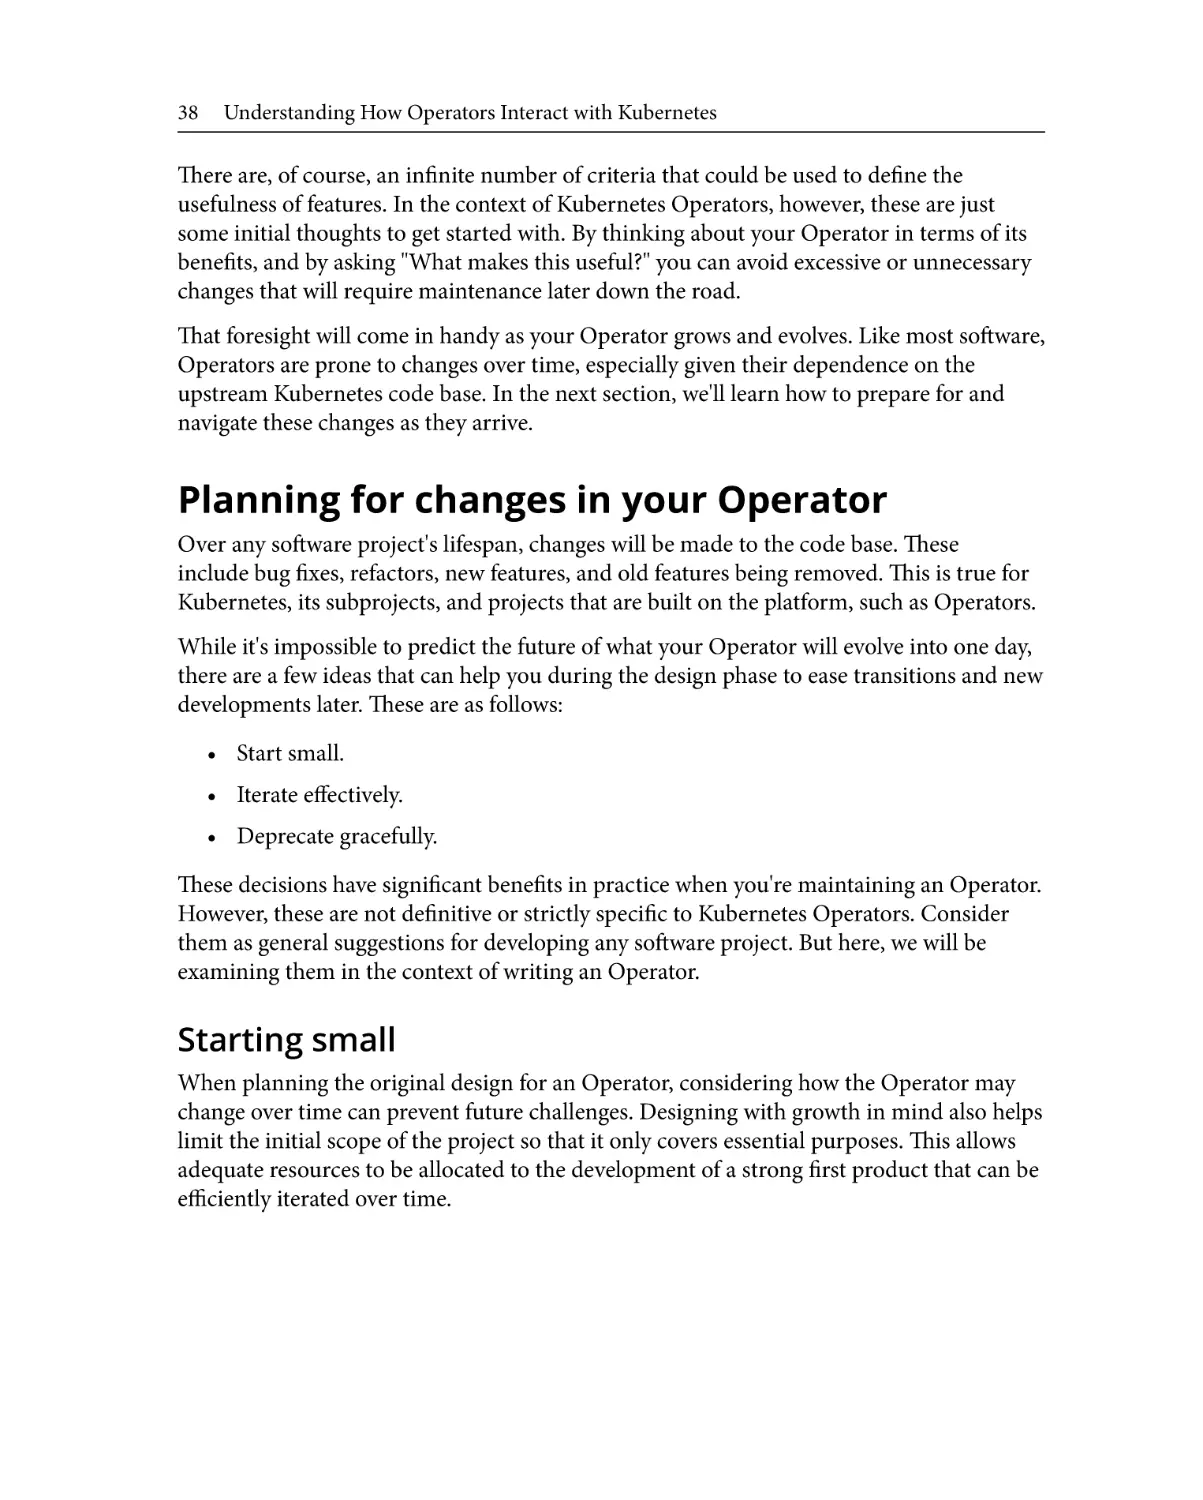
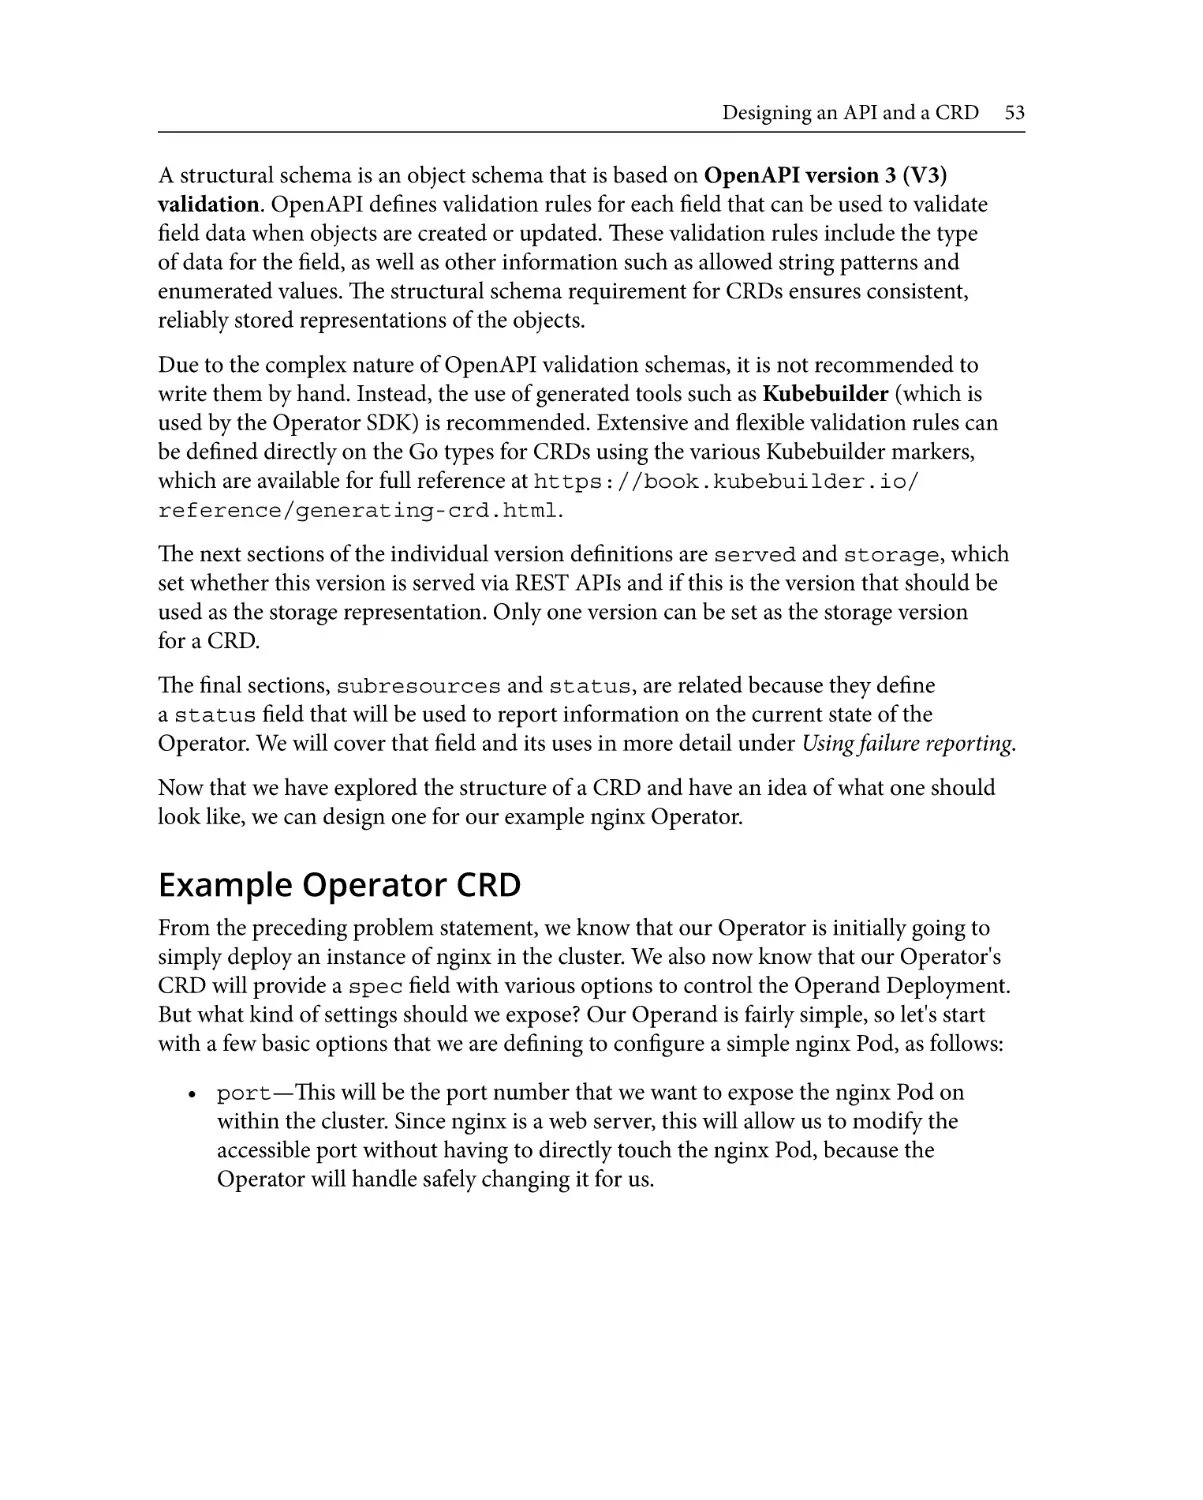
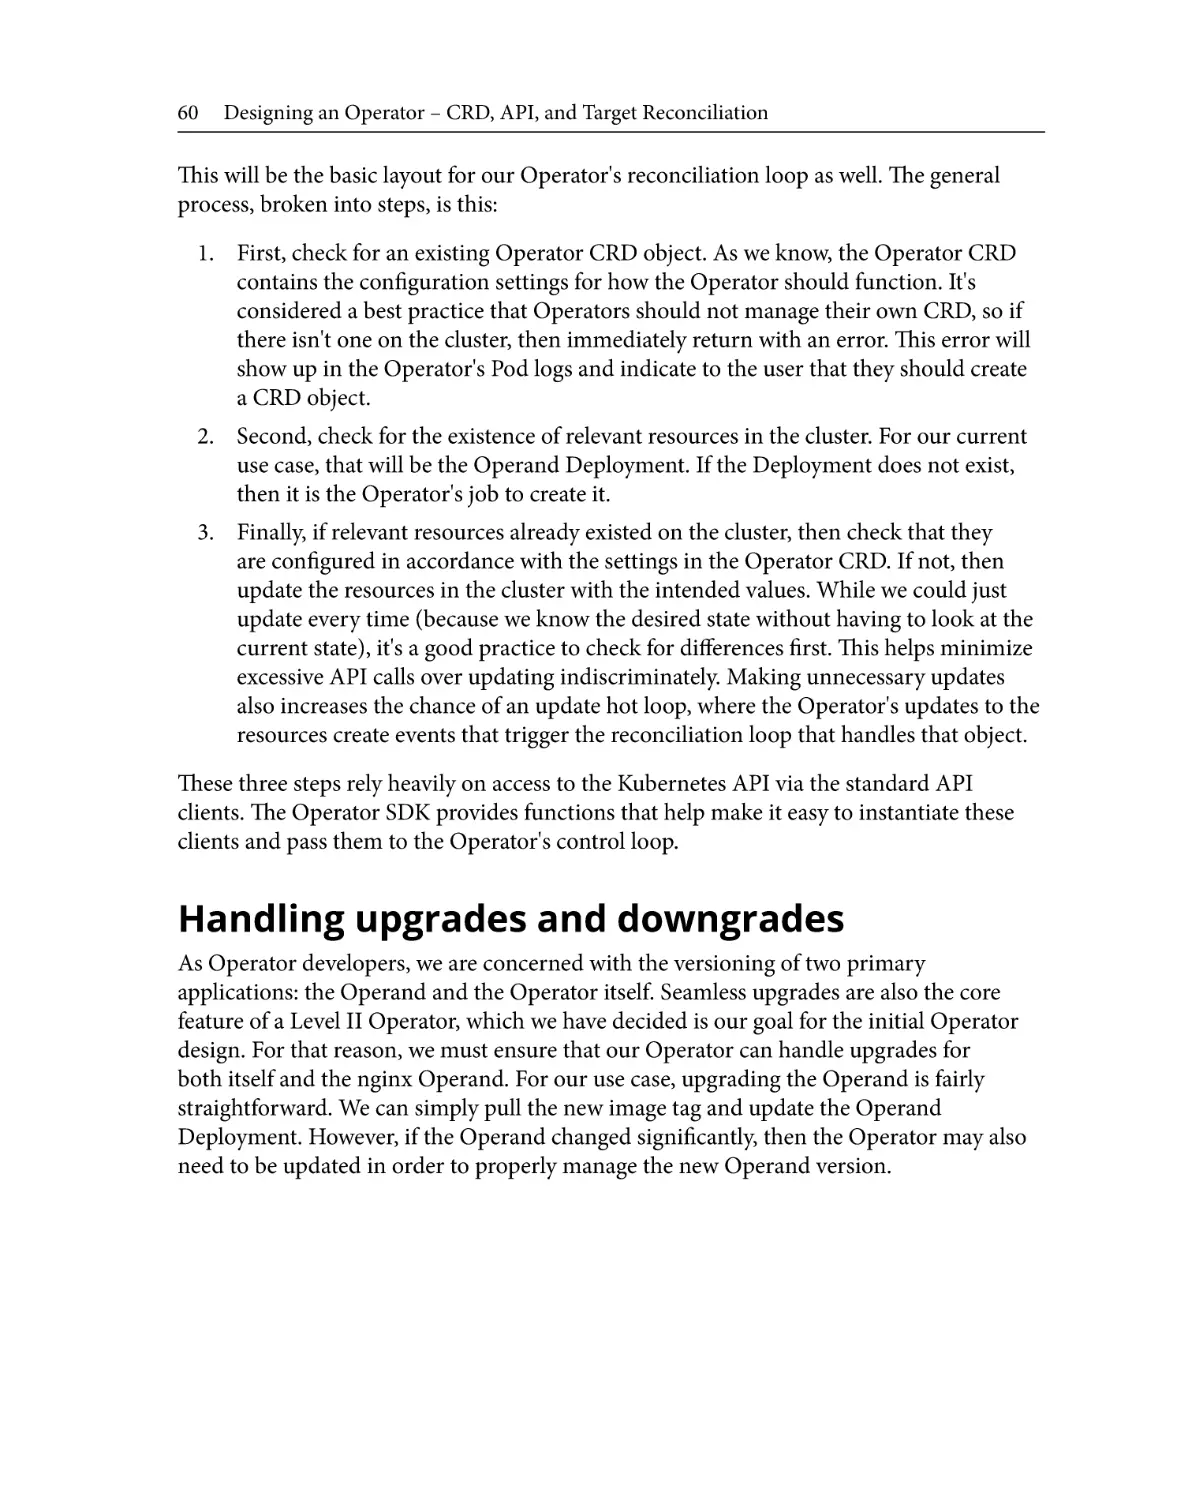
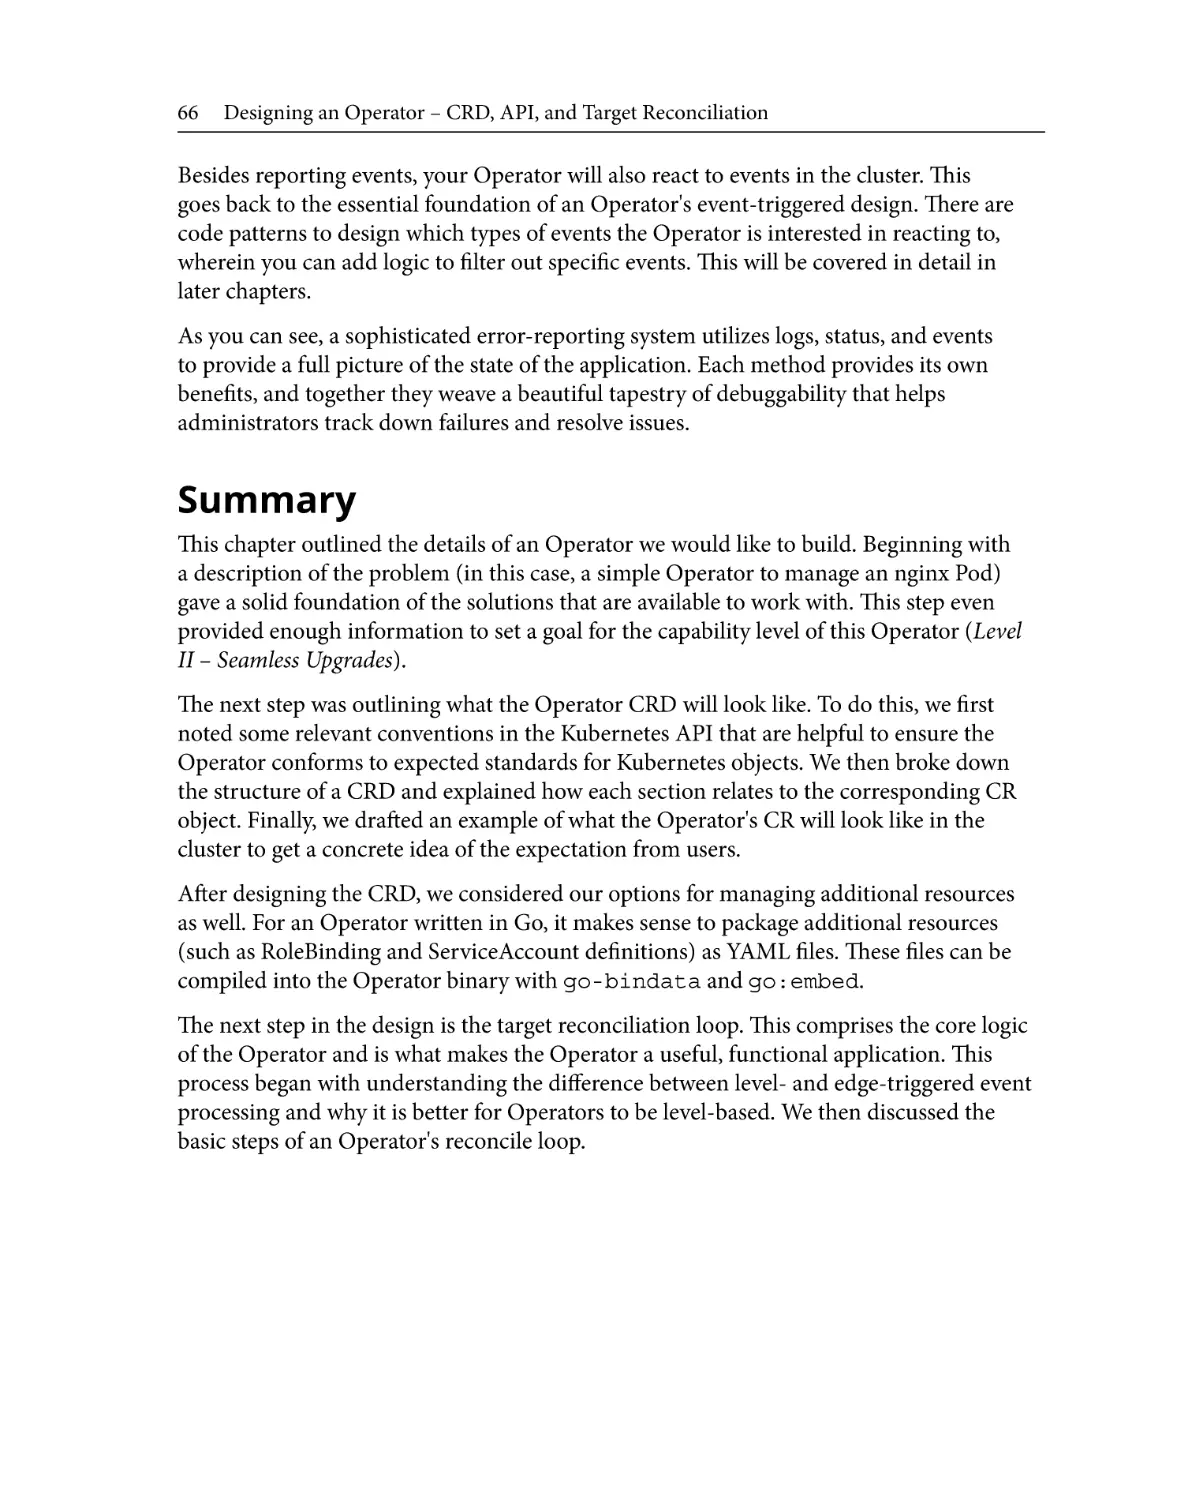
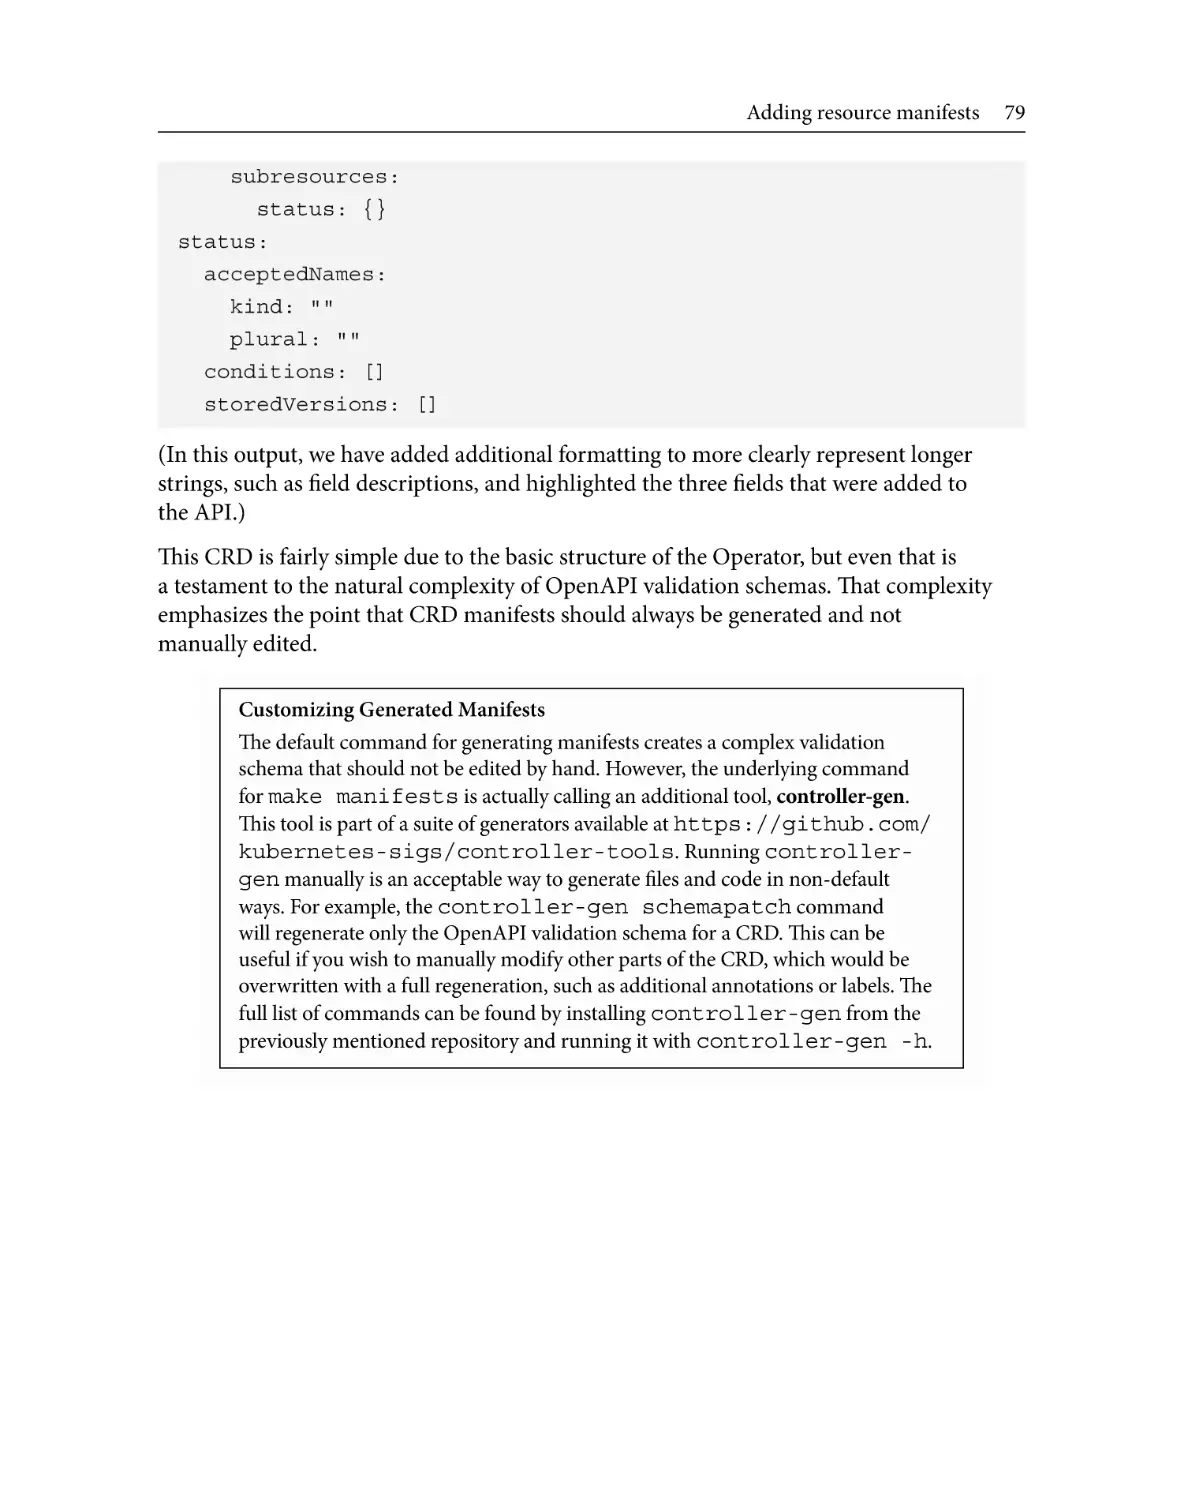
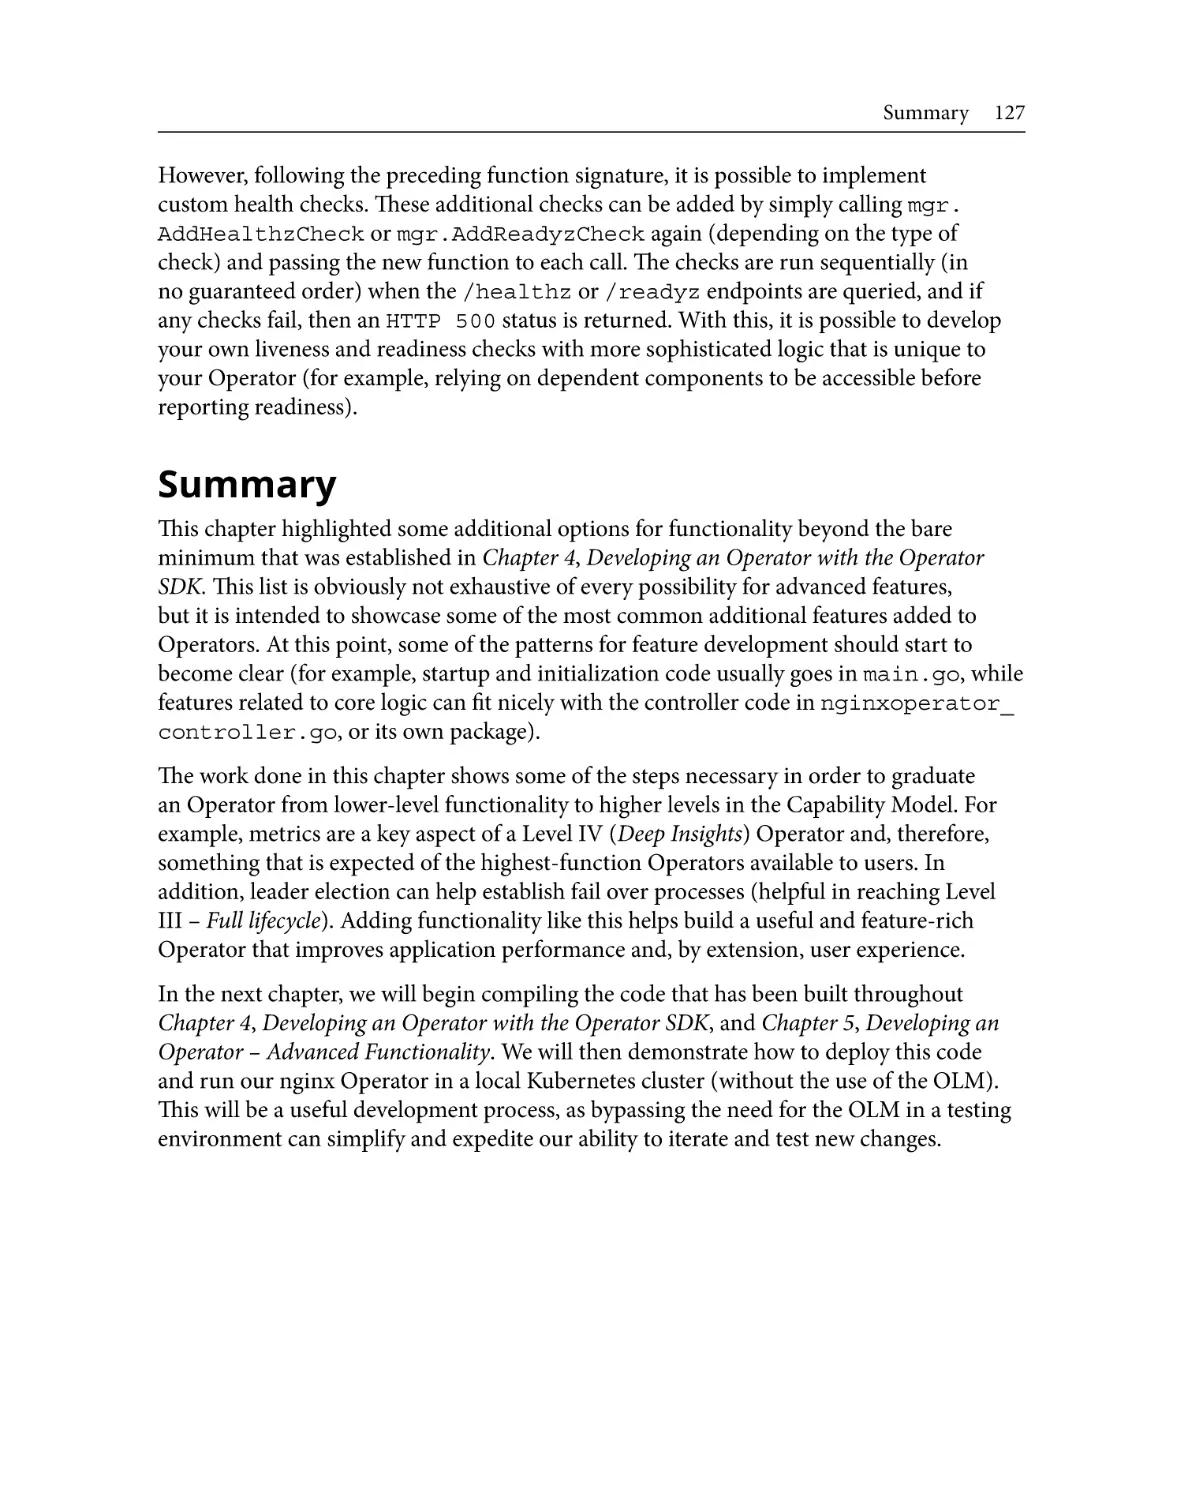
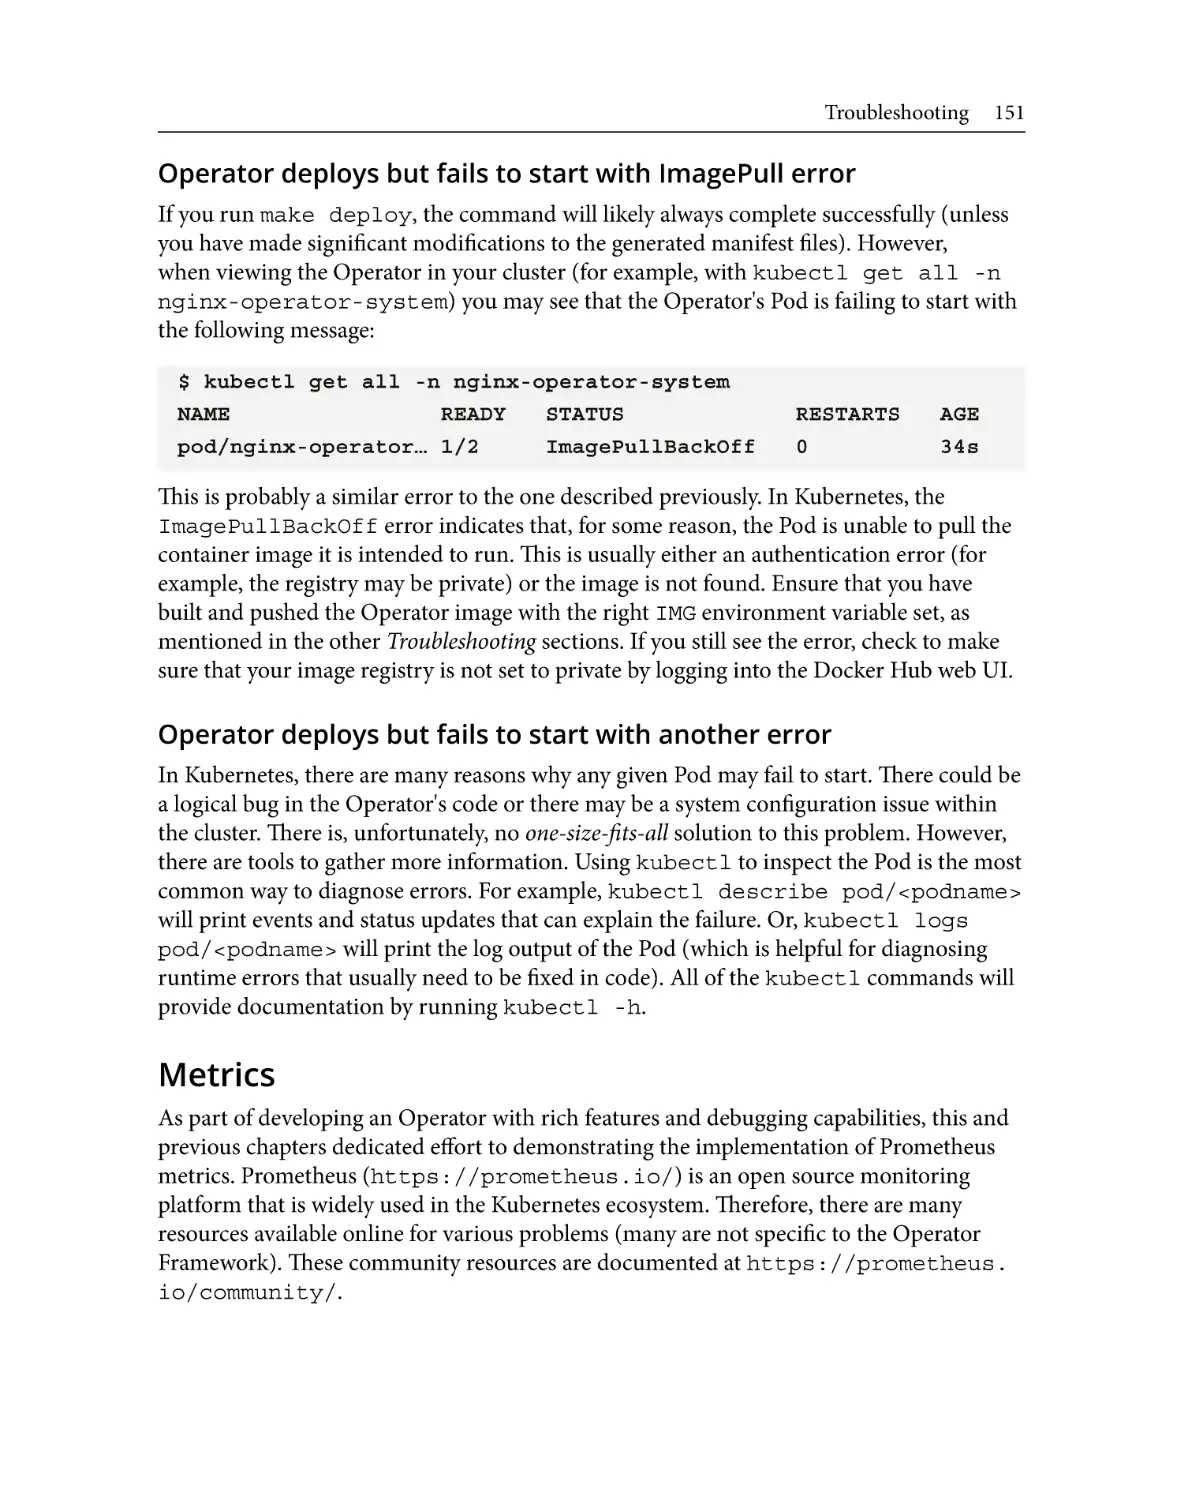
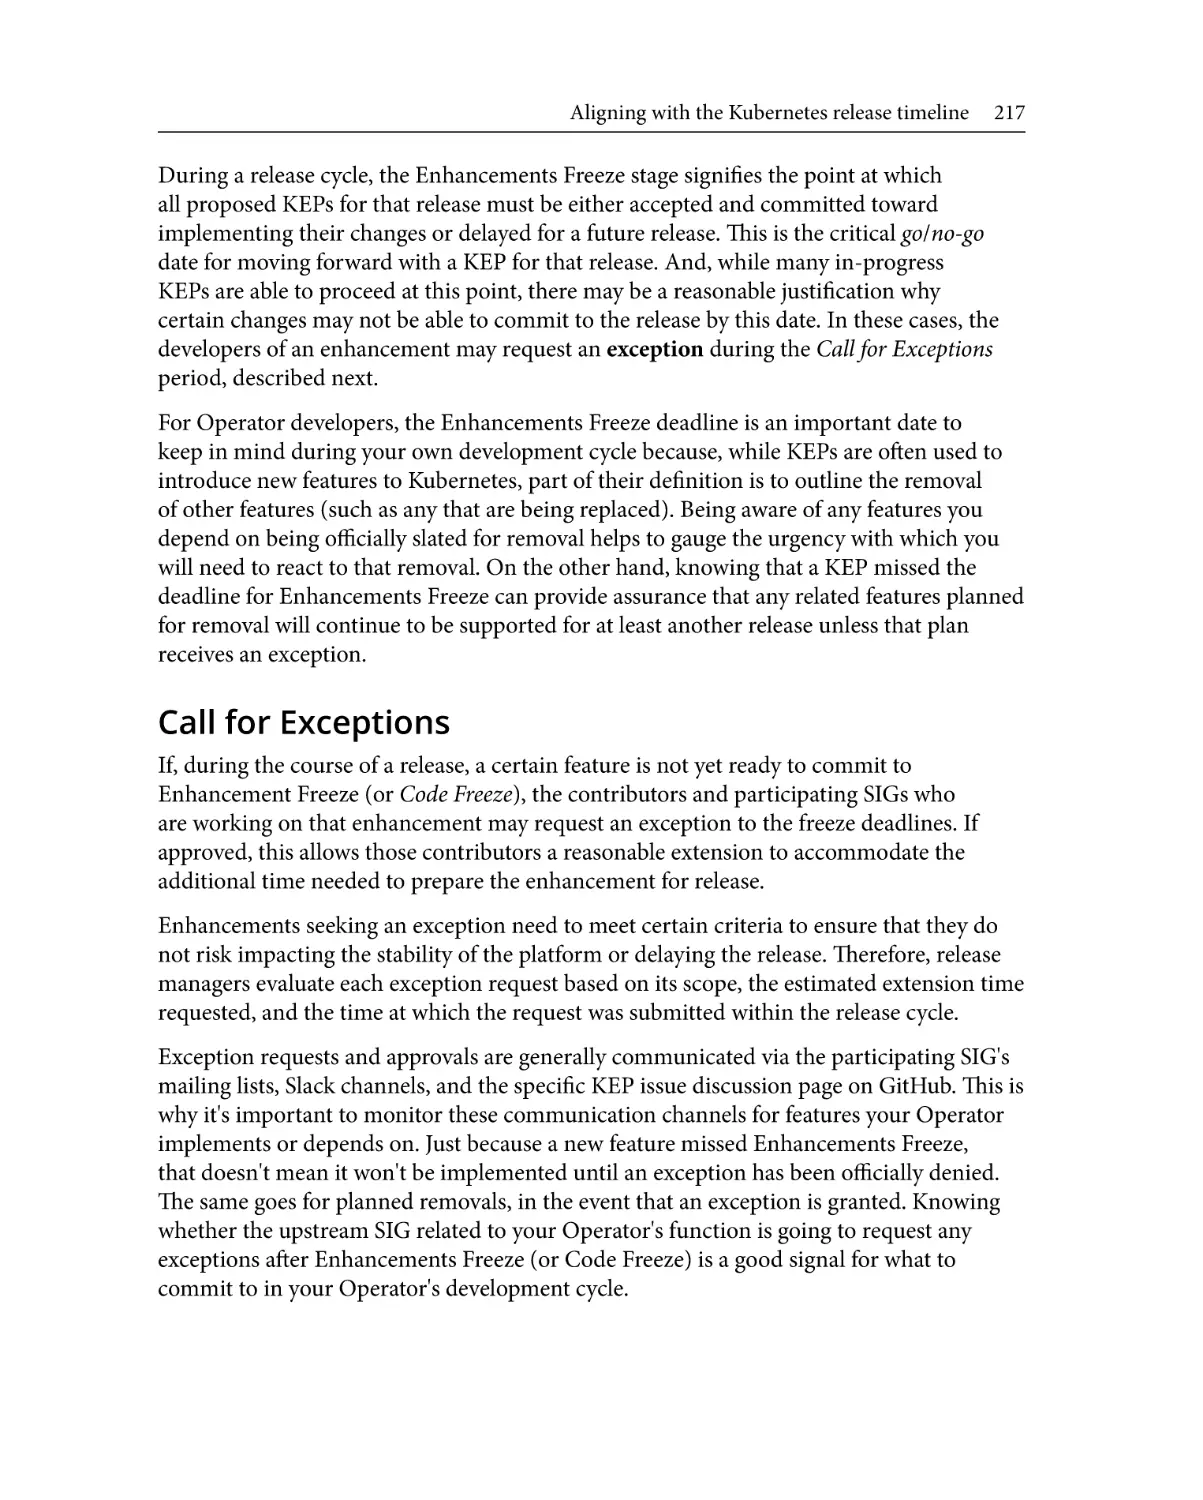
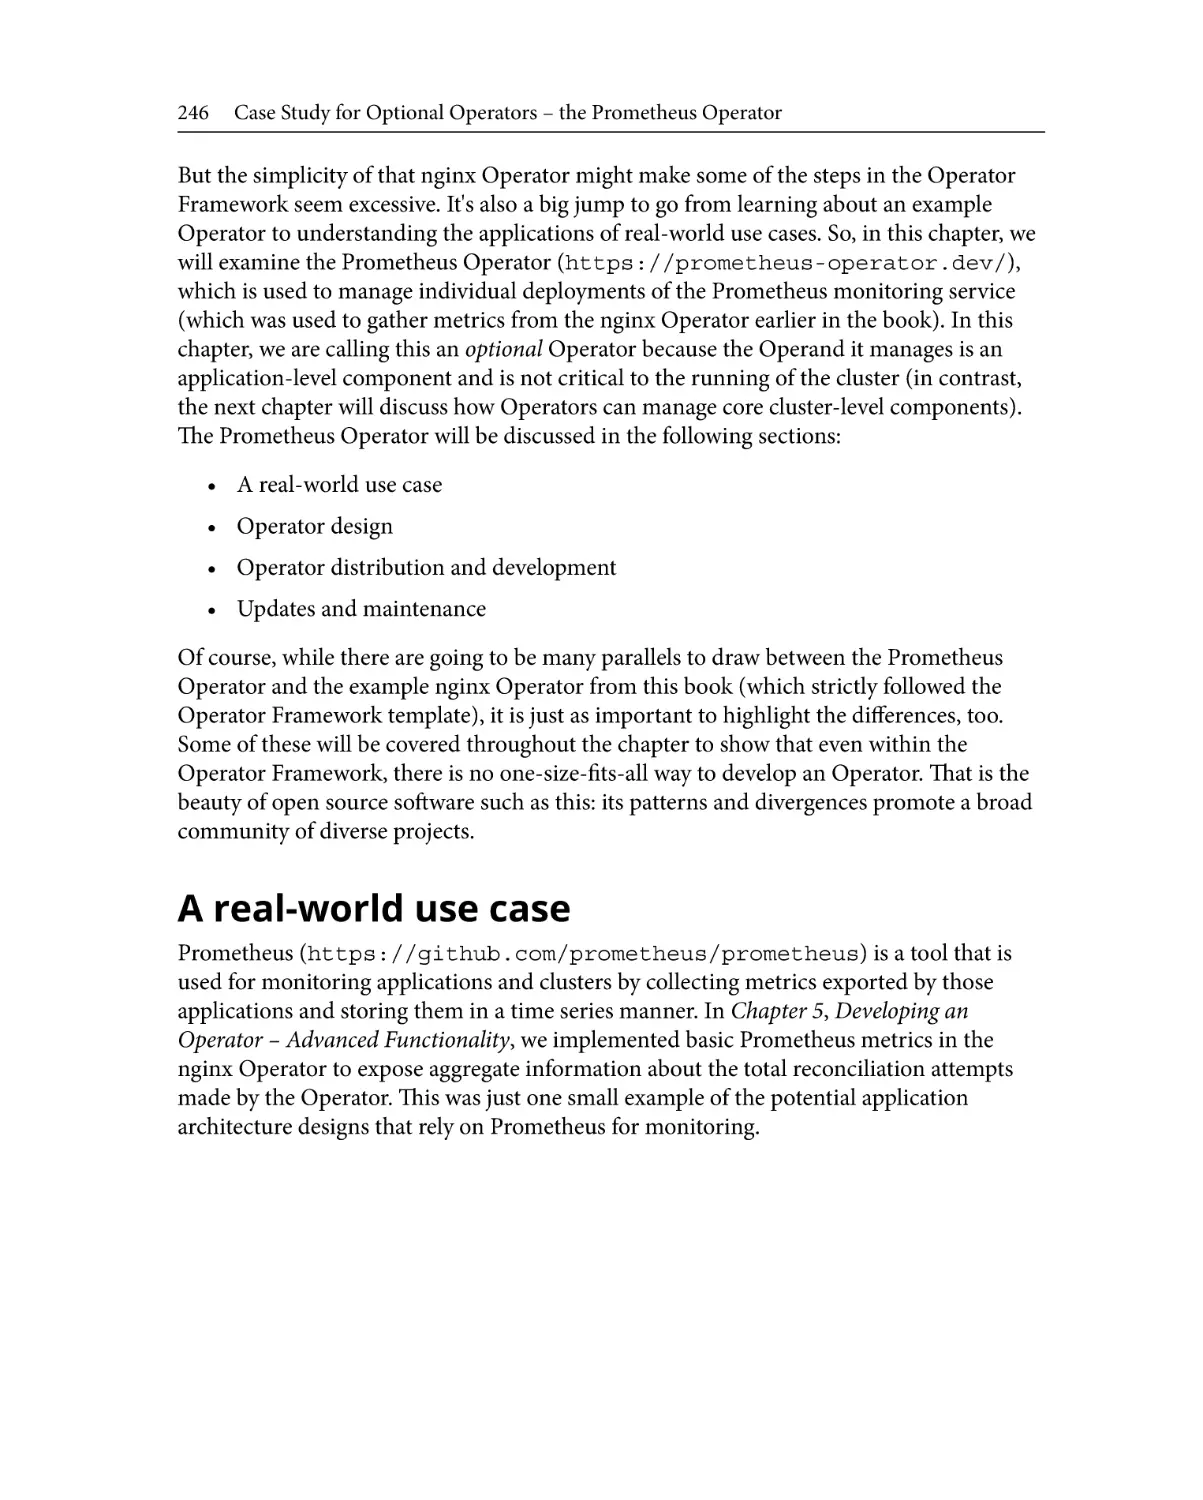
developers and organizations. You can see an overview of the OperatorHub.io home
page in the following screenshot:
Distributing Operators on OperatorHub.io
13
Figure 1.2 – Screenshot of the OperatorHub.io home page, showing some of the most popular Operators
The process for submitting an Operator to OperatorHub for indexing has been
standardized to ensure the consistency and compatibility of Operators with OLM. New
Operators are reviewed by automated tooling for compliance with this standard definition
of an Operator. The process is mainly handled through the open source GitHub repository
that provides the backend of OperatorHub. However, OperatorHub does not provide any
assistance with the ongoing maintenance of an Operator, which is why it is important
for Operator developers to share links to their own open source repositories and contact
information where users can report bugs and contribute themselves.
Preparing an Operator for submission to OperatorHub involves generating its bundle and
associated manifests. The submission process primarily relies on the Operator's Cluster
Service Version (CSV). The CSV is a YAML file that provides most of the metadata
to OLM and OperatorHub about your Operator. It includes general information such
as the Operator's name, version, and keywords. However, it also defines installation
requirements (such as role-based access control (RBAC) permissions), CRDs, APIs, and
additional cluster resource objects owned by the Operator.
14
Introducing the Operator Framework
The specific sections of an Operator's CSV include the following:
• The Operator's name and version number, as well as a description of the Operator
and its display icon in Base64-encoded image format
• Annotations for the Operator
• Contact information for the maintainers of the Operator and the open source
repository where its code is located
• How the Operator should be installed in the cluster
• Example configurations for the Operator's CRD
• Required CRDs and other resources and dependencies that the Operator needs
to run
Because of all the information that it covers, the Operator CSV is usually very long and
takes time to prepare properly. However, a well-defined CSV helps an Operator reach a
much wider audience. Details of Operator CSVs will be covered in a later chapter.
Defining Operator functions with the
Capability Model
The Operator Framework defines a Capability Model (https://
operatorframework.io/operator-capabilities/) that categorizes Operators
based on their functionality and design. This model helps to break down Operators based
on their maturity, and also describes the extent of an Operator's interoperability with
OLM and the capabilities users can expect when using the Operator.
The Capability Model is divided into five hierarchical levels. Operators can be published
at any one of these levels and, as they grow, may evolve and graduate from one level to the
next as features and functionality are added. In addition, the levels are cumulative, with
each level generally encompassing all features of the levels below it.
The current level of an Operator is part of the CSV, and this level is displayed on its
OperatorHub listing. The level is based on somewhat subjective yet guided criteria and is
purely an informational metric.
Defining Operator functions with the Capability Model
15
Each level has specific functionalities that define it. These functionalities are broken down
into Basic Install, Seamless Upgrades, Full Lifecycle, Deep Insights, and Auto Pilot. The
specific levels of the Capability Model are outlined here:
1. Level I—Basic Install: This level represents the most basic of Operator capabilities.
At Level I, an Operator is only capable of installing its Operand in the cluster and
conveying the status of the workload to cluster administrators. This means that it
can set up the basic resources required for an application and report when those
resources are ready to be used by the cluster.
At Level I, an Operator also allows for simple configuration of the Operand. This
configuration is specified through the Operator's Custom Resource. The Operator
is responsible for reconciling the configuration specifications with the running
Operand workload. However, it may not be able to react if the Operand reaches a
failed state, whether due to malformed configuration or outside influence.
Going back to our example web application from the start of the chapter, a Level
I Operator for this application would handle the basic setup of the workloads and
nothing else. This is good for a simple application that needs to be quickly set up on
many different clusters, or one that should be easily shared with users for them to
install themselves.
2. Level II—Seamless Upgrades: Operators at Level II offer the features of basic
installation, with added functionality around upgrades. This includes upgrades for
the Operand but also upgrades for the Operator itself.
Upgrades are a critical part of any application. As bug fixes are implemented and
more features are added, being able to smoothly transition between versions helps
ensure application uptime. An Operator that handles its own upgrades can either
upgrade its Operand when it upgrades itself or manually upgrade its Operand by
modifying the Operator's Custom Resource.
For seamless upgrades, an Operator must also be able to upgrade older versions
of its Operand (which may exist because they were managed by an older version
of the Operator). This kind of backward compatibility is essential for both
upgrading to newer versions and handling rollbacks (for example, if a new version
introduces a high-visibility bug that can't wait for an eventual fix to be published in
a patch version).
16
Introducing the Operator Framework
Our example web application Operator could offer the same set of features. This
means that if a new version of the application were released, the Operator could
handle upgrading the deployed instances of the application to the newer version.
Or, if changes were made to the Operator itself, then it could manage its own
upgrades (and later upgrade the application, regardless of version skew between
Operator and Operand).
3. Level III—Full Lifecycle: Level III Operators offer at least one out of a list of
Operand lifecycle management features. Being able to offer management during the
Operand's lifecycle implies that the Operator is more than just passively operating
on a workload in a set and forget fashion. At Level III, Operators are actively
contributing to the ongoing function of the Operand.
The features relevant to the lifecycle management of an Operand include the
following:
The ability to create and/or restore backups of the Operand.
Support for more complex configuration options and multistep workflows.
Failover and failback mechanisms for disaster recovery (DR). When the Operator
encounters an error (either in itself or the Operand), it needs to be able to either
re-route to a backup process (fail over) or roll the system back to its last known
functioning state (fail back).
The ability to manage clustered Operands, and—specifically—support for adding
and removing members to and from Operands. The Operator should be capable of
considering quorum for Operands that run multiple replicas.
Similarly, support for scaling an Operand with worker instances that operate with
read-only functionality.
Any Operator that implements one or more of these features can be considered to
be at least a Level III Operator. The simple web application Operator could take
advantage of a few of these, such as DR and scaling. As the user base grows and
resources demands increase, an administrator could instruct the Operator to scale
the application with additional replica Pods to handle the increased load.
Defining Operator functions with the Capability Model
17
Should any of the Pods fail during this process, the Operator would be smart
enough to know to fail over to a different Pod or cluster zone entirely. Alternatively,
if a new version of the web app was released that introduced an unexpected bug,
the Operator could be aware of the previous successful version and provide ways to
downgrade its Operand workloads if an administrator noticed the error.
4. Level IV—Deep Insights: While the previous levels focus primarily on Operator
features as they relate to functional interaction with the application workload,
Level IV emphasizes monitoring and metrics. This means an Operator is capable of
providing measurable insights to the status of both itself and its Operand.
Insights may be seen as less important from a development perspective relative
to features and bug fixes, but they are just as critical to an application's success.
Quantifiable reports about an application's performance can drive ongoing
development and highlight areas that need improvement. Having a measurable
system to push these efforts allows a way to scientifically prove or disprove which
changes have an effect.
Operators most commonly provide their insights in the form of metrics.
These metrics are usually compatible with metrics aggregation servers such as
Prometheus. (Interestingly enough, Red Hat publishes an Operator for Prometheus
that is a Level IV Operator. That Operator is available on OperatorHub at
https://operatorhub.io/operator/prometheus.)
However, Operators can provide insights through other means as well. These
include alerts and Kubernetes Events. Events are built-in cluster resource objects
that are used by core Kubernetes objects and controllers.
Another key insight that Level IV Operators report is the performance of the
Operator and Operand. Together, these insights help inform administrators about
the health of their clusters.
Our simple web application Operator could provide insights about the performance
of the Operand. Requests to the app would provide information about the current
and historic load on the cluster. Additionally, since the Operator can identify failed
states at this point, it could trigger an alert when the application is unhealthy.
Many alerts would indicate a reliability issue that would gain the attention of an
administrator.
18
Introducing the Operator Framework
5. Level V—Auto Pilot: Level V is the most sophisticated level for Operators. It
includes Operators that offer the highest capabilities, in addition to the features
in all four previous levels. This level is called Auto Pilot because the features that
define it focus on being able to run almost entirely autonomously. These capabilities
include Auto Scaling, Auto-Healing, Auto-Tuning, and Abnormality Detection.
Auto Scaling is the ability for an Operator to detect the need to scale an application
up or down based on demand. By measuring the current load and performance, an
Operator can determine whether more or fewer resources are necessary to satisfy
the current usage. Advanced Operators can even try to predict the need to scale
based on current and past data.
Auto-Healing Operators can react to applications that are reporting unhealthy
conditions and work to correct them (or, at least, prevent them from getting any
worse). When an Operand is reporting an error, the Operator should take reactive
steps to rectify the failure. In addition, Operators can use current metrics to
proactively prevent an Operand from transitioning to a failure state.
Auto-Tuning means that an Operator can dynamically modify an Operand for peak
performance. This involves tuning the settings of an Operand automatically. It can
even include complex operations such as shifting workloads to entirely different
nodes that are better suited than their current nodes.
Finally, Abnormality Detection is the capability of an Operator to identify
suboptimal or off-pattern behavior in an Operand. By measuring performance,
an Operator has a picture of the application's current and historical levels
of functioning. That data can be compared to a manually defined minimum
expectation or used to dynamically inform the Operator of that expectation.
All of these features are heavily dependent upon the use of metrics to automatically
inform the Operator of the need to act upon itself or its Operand. Therefore, a Level
V Operator is an inherent progression from Level IV, which is the level at which an
Operator exposes advanced metrics.
At Level V, the simple web application Operator would manage most of the aspects
of the application for us. It has insights into the current number of requests, so it
can scale up copies of the app on demand. If this scaling starts to cause errors (for
example, too many concurrent database calls), it can identify the number of failing
Pods and prevent further scaling. It would also attempt to modify parameters of
the web app (such as request timeouts) to help rectify the situation and allow the
auto-scaling to proceed. When the load peak subsided, the Operator would then
automatically scale down the application to its baseline service levels.
Using Operators to manage applications
19
Levels I and II (Basic Install and Seamless Upgrades) can be used with the three facets of
the Operator SDK: Helm, Ansible, and Go. However, Level III and above (Full Lifecycle,
Deep Insights, and Auto Pilot) are only possible with Ansible and Go. This is because the
functionality at these higher levels requires more intricate logic than what is available
through Helm charts alone.
We have now explained the three main pillars of the Operator Framework: Operator SDK,
OLM, and OperatorHub. We learned how each contributes different helpful features to the
development and usage of Operators. We also learned about the Capability Model, which
serves as a reference for the different levels of functionality that Operators can have. In the
next section, we'll apply this knowledge to a sample application.
Using Operators to manage applications
Clearly, working with Operators involves more than simply reconciling a cluster state. The
Operator Framework is an encompassing platform for Kubernetes developers and users to
solve unique problems, which makes Kubernetes so flexible.
Cluster administrators' first step in the Operator Framework is usually either with the
Operator SDK, to develop their own Operator if there are no existing Operators that
address their needs, or OperatorHub if there are.
Summarizing the Operator Framework
When developing an Operator from scratch, there are three choices for development
methods: Go, Ansible, or Helm. However, using Ansible or Helm alone will ultimately
limit the Operator's capabilities to the most basic levels of functionality.
If the developer wishes to share their Operator, they will need to package it into the
standard manifest bundle for OperatorHub. Following a review, their Operator will be
available publicly for other users to download and install in their own clusters.
20
Introducing the Operator Framework
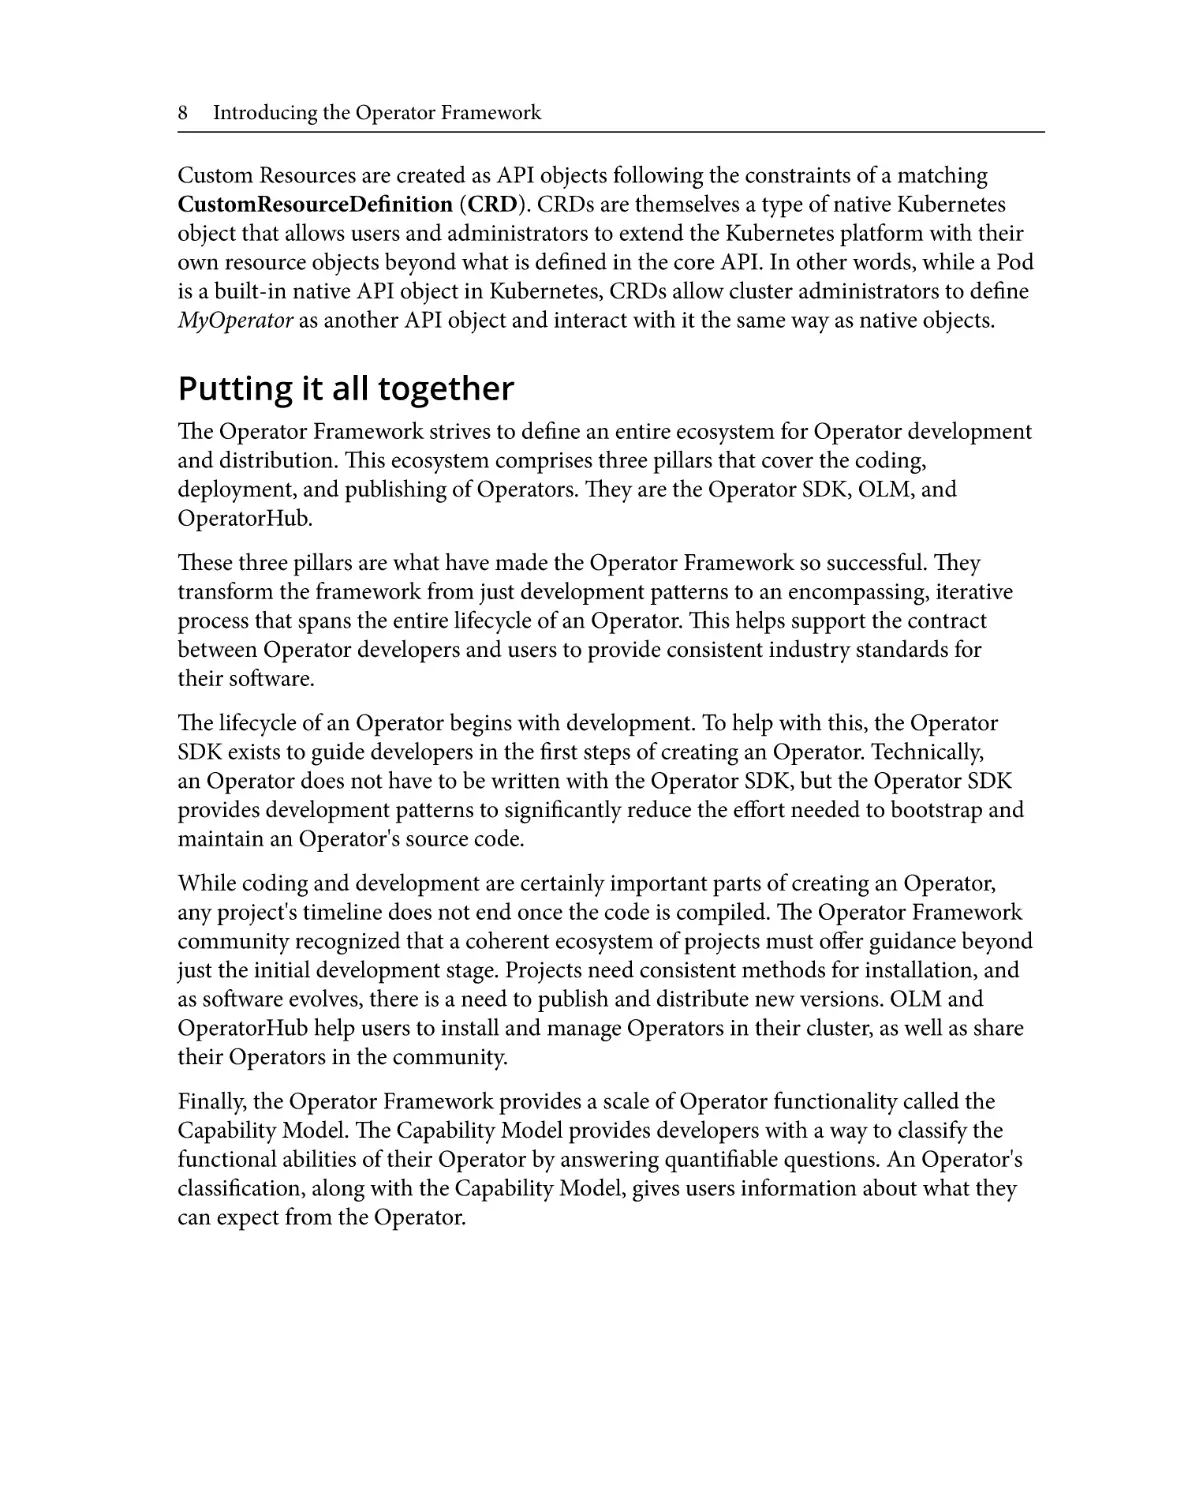
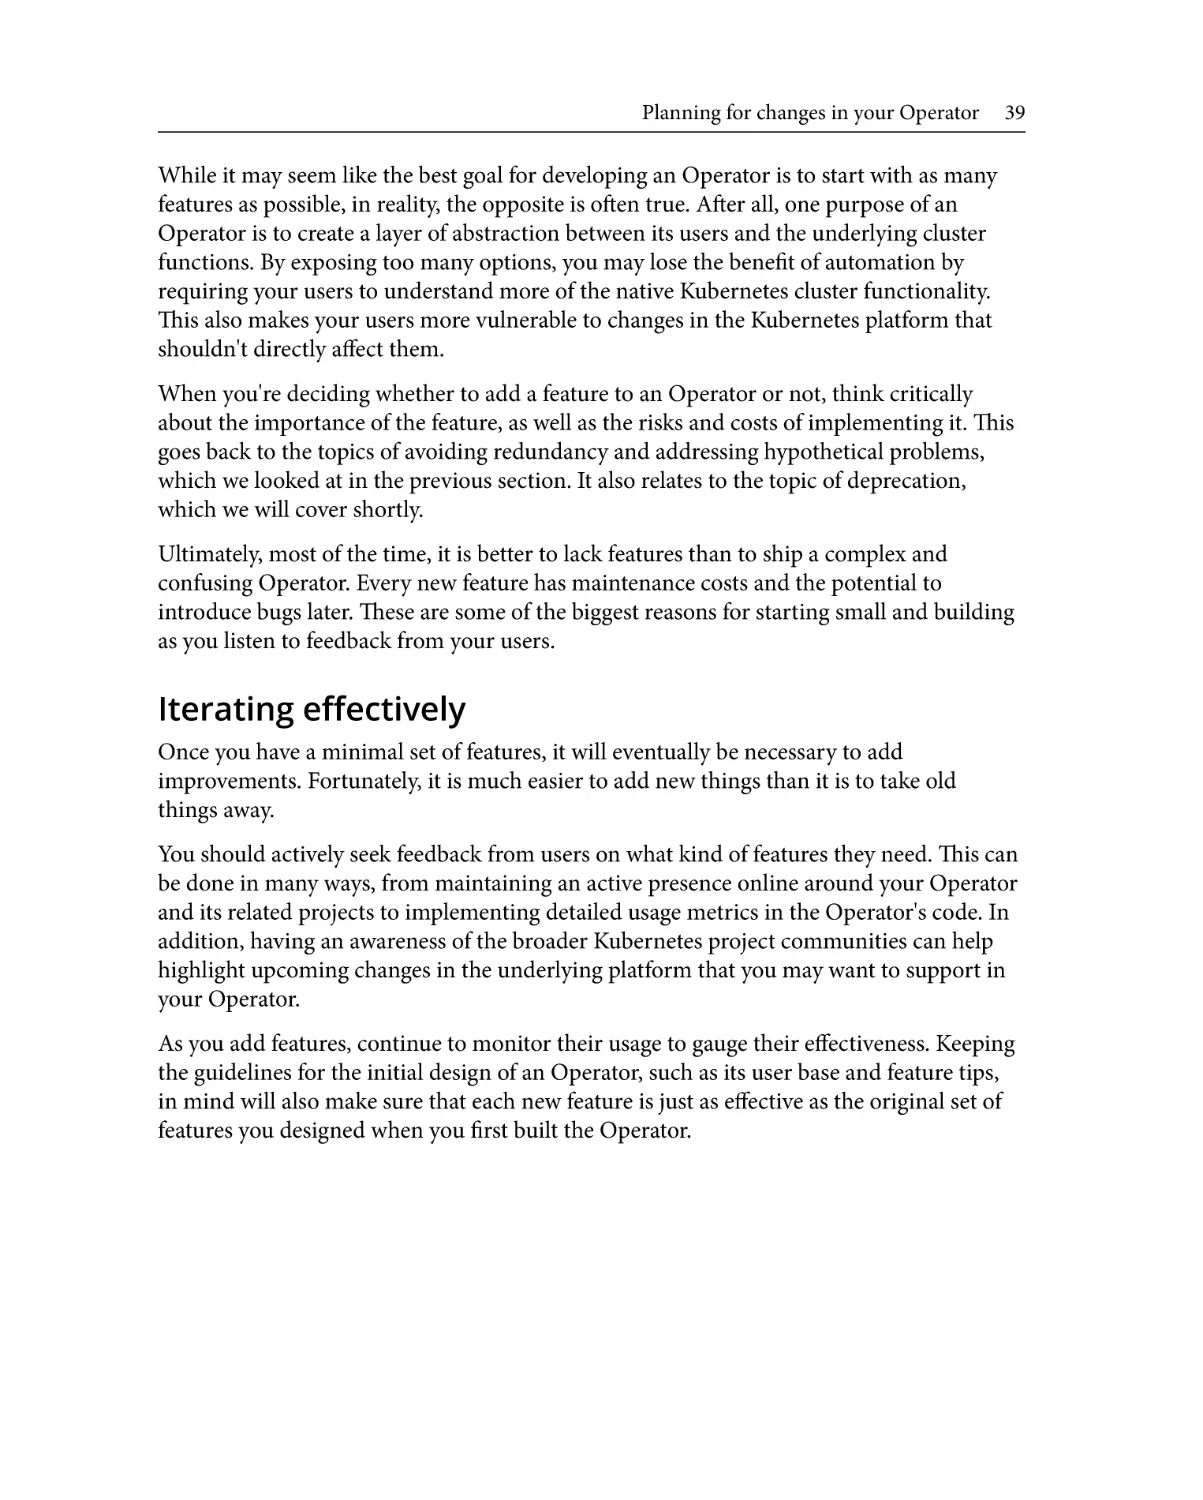
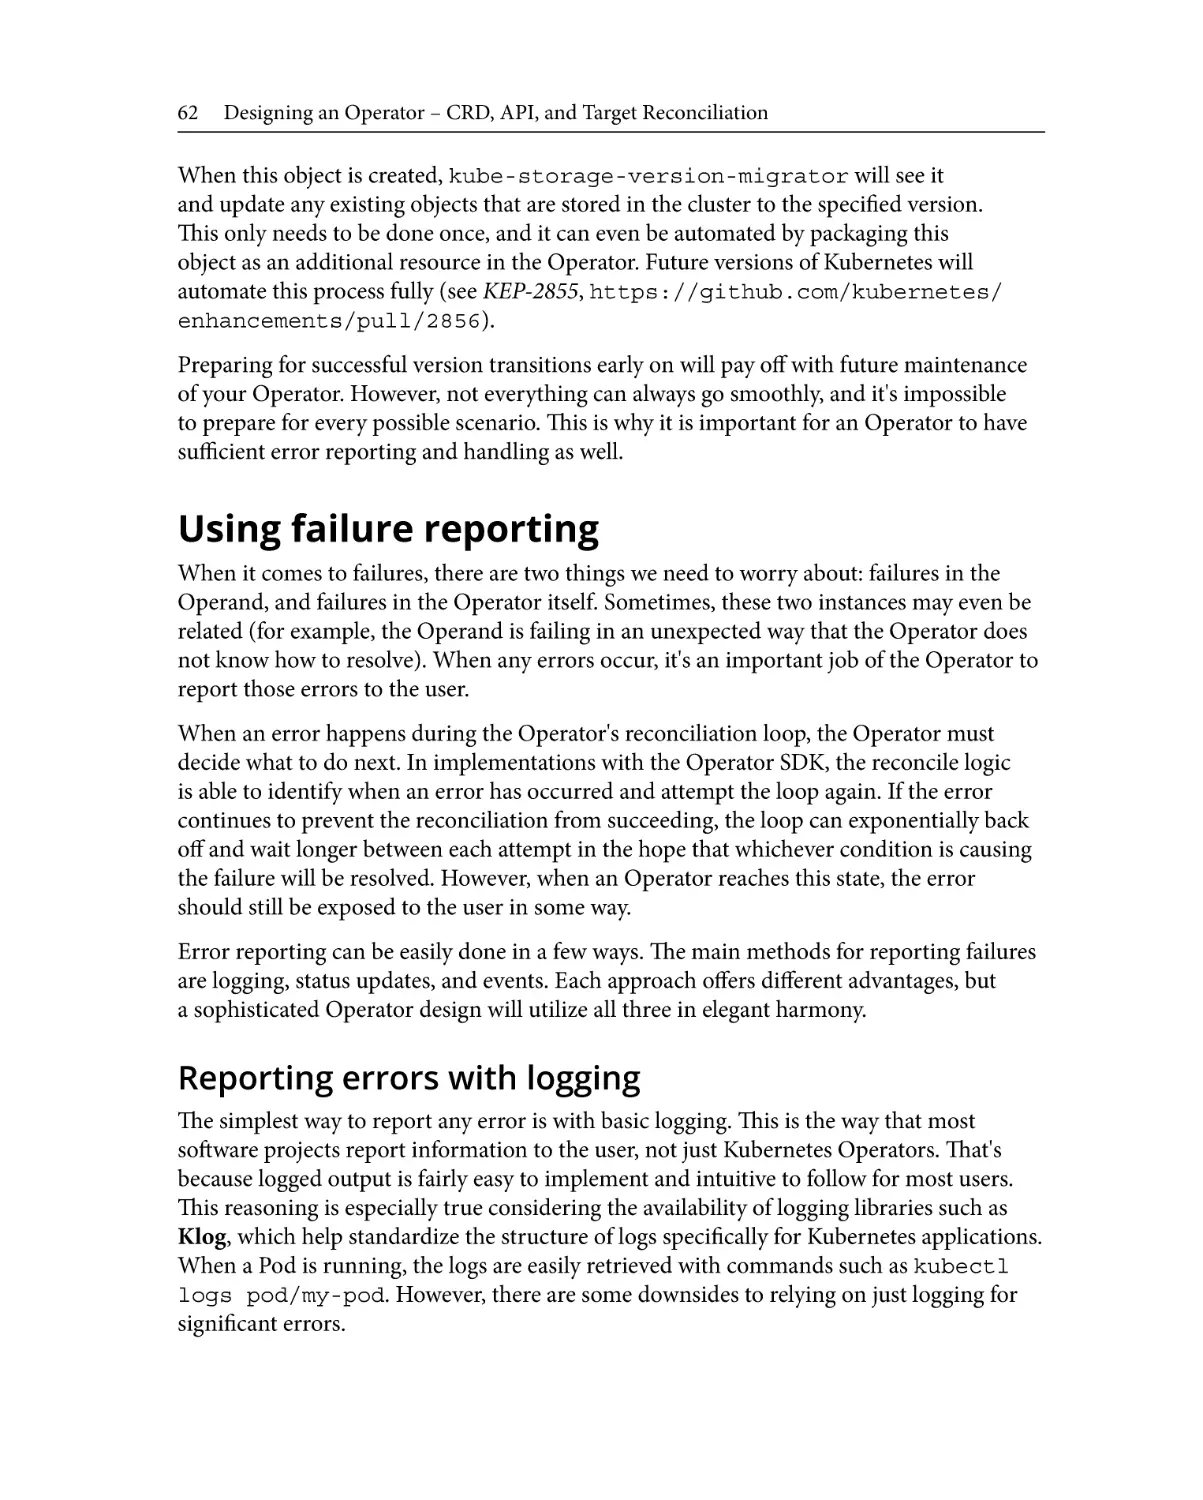
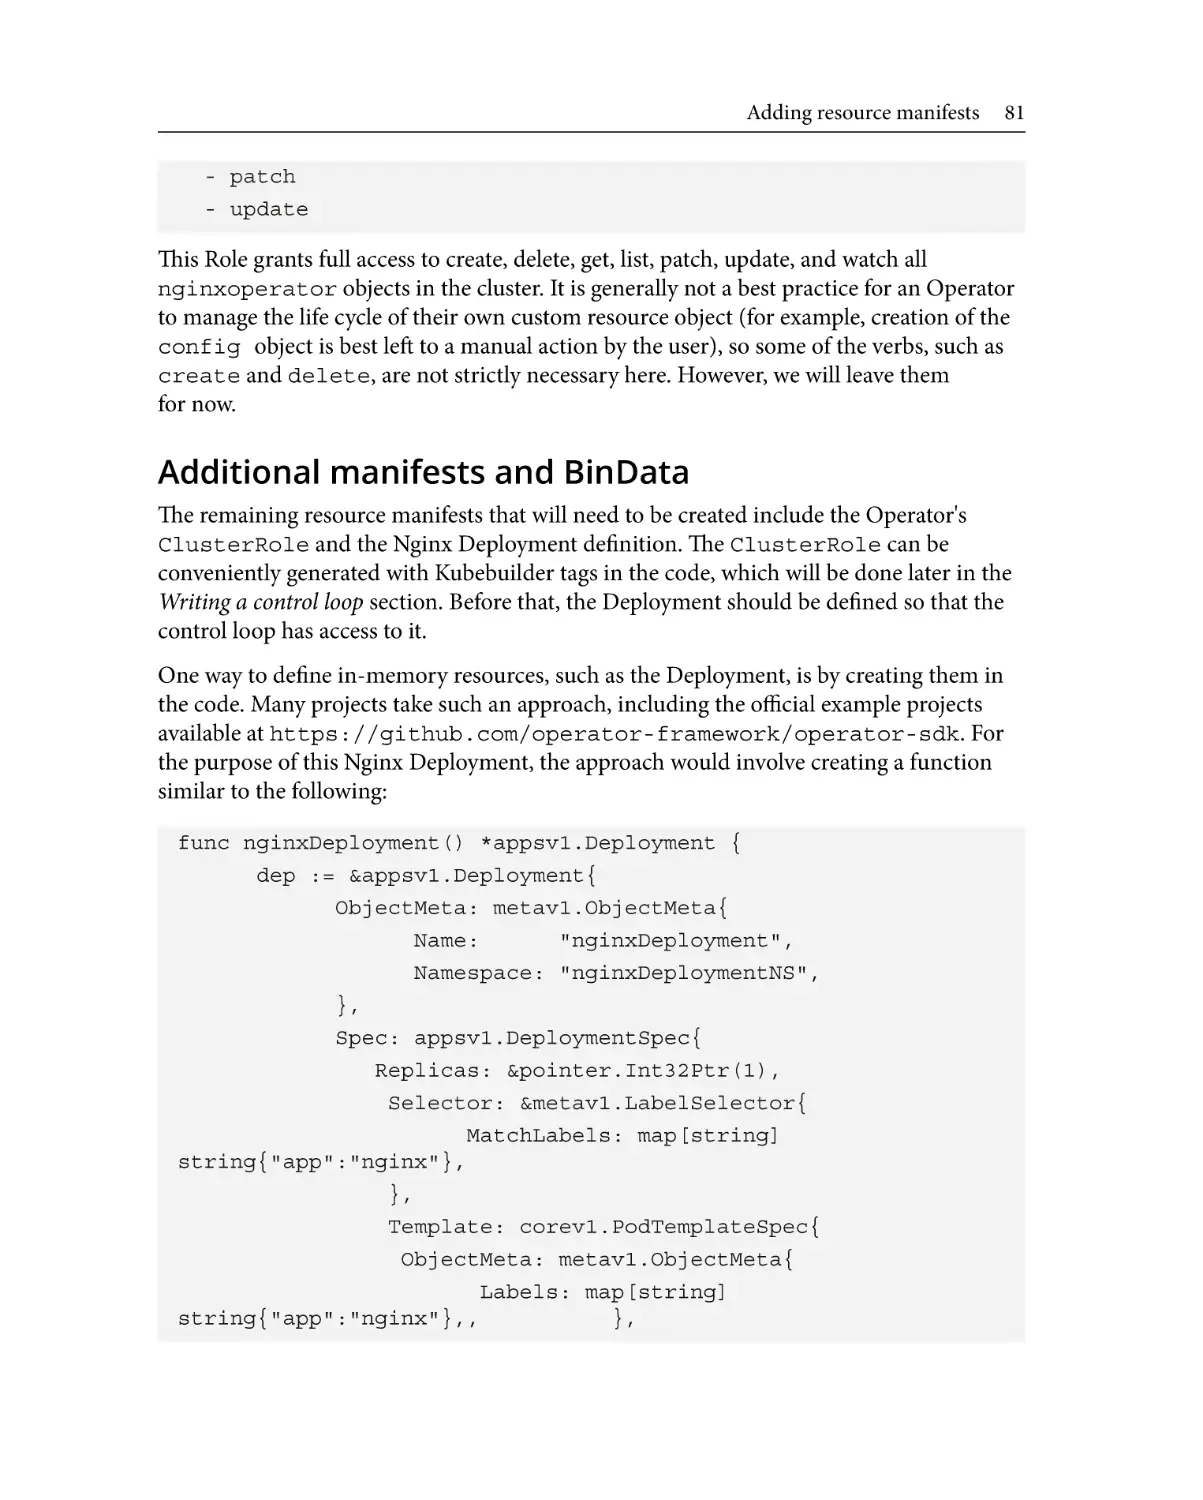
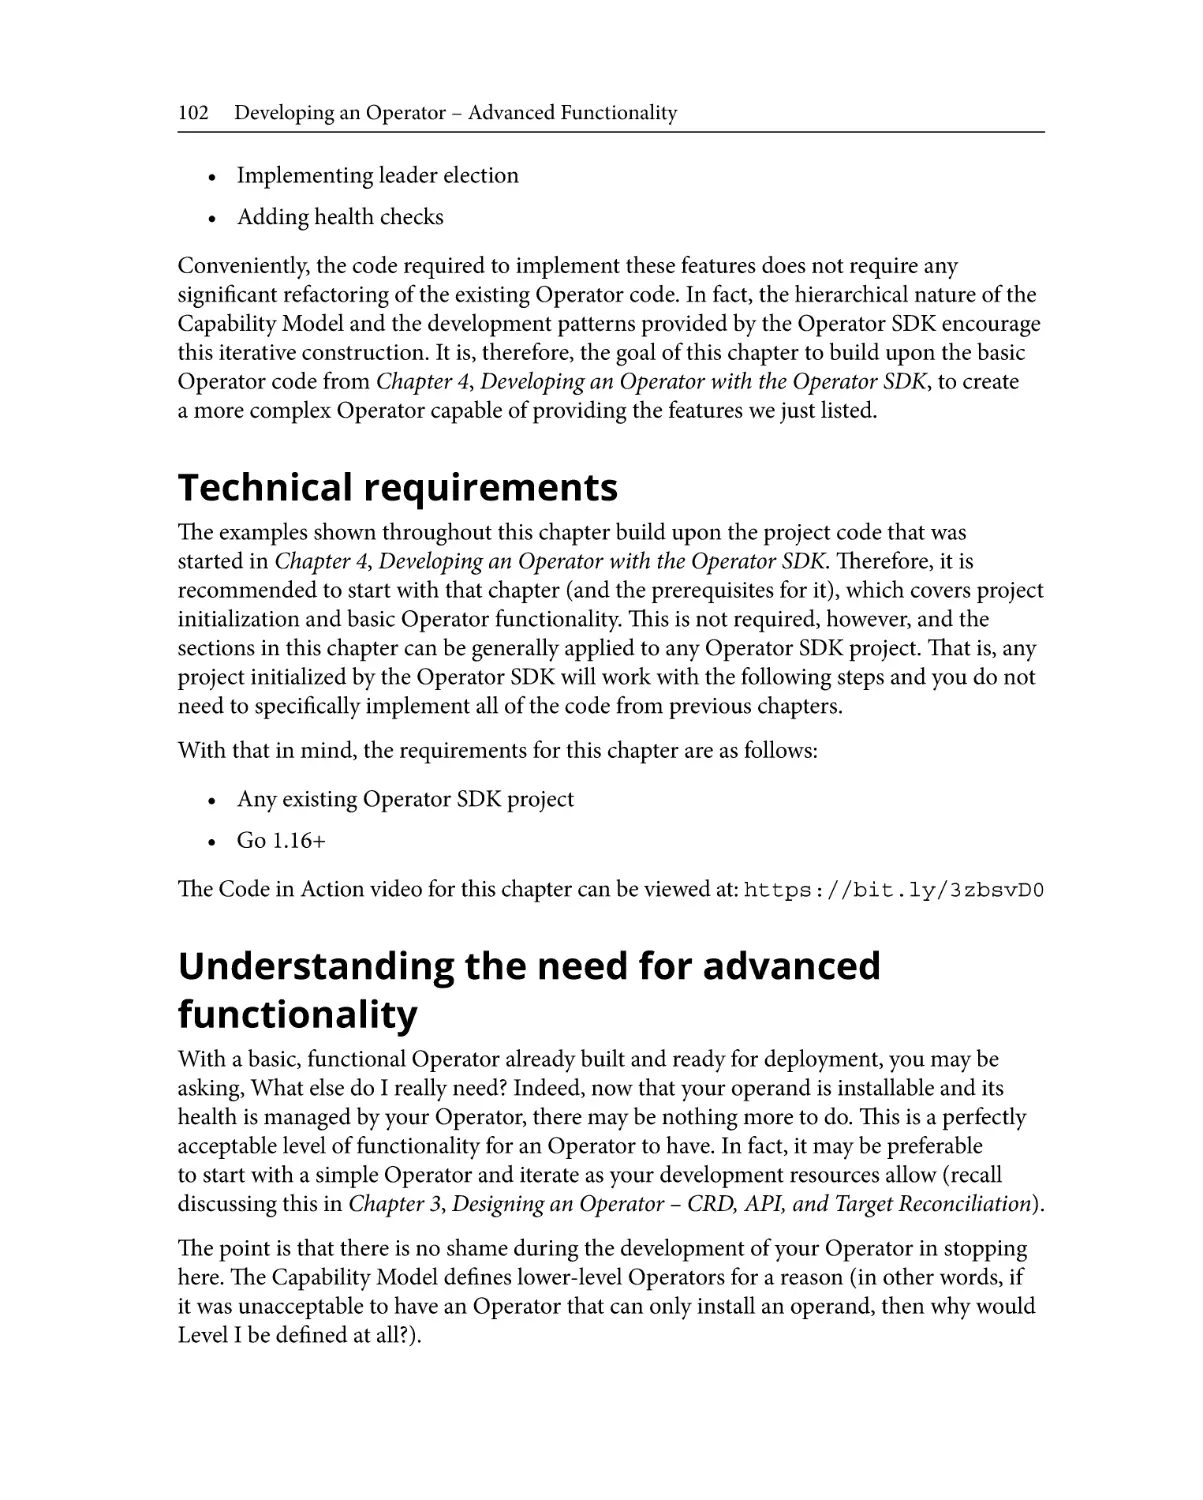
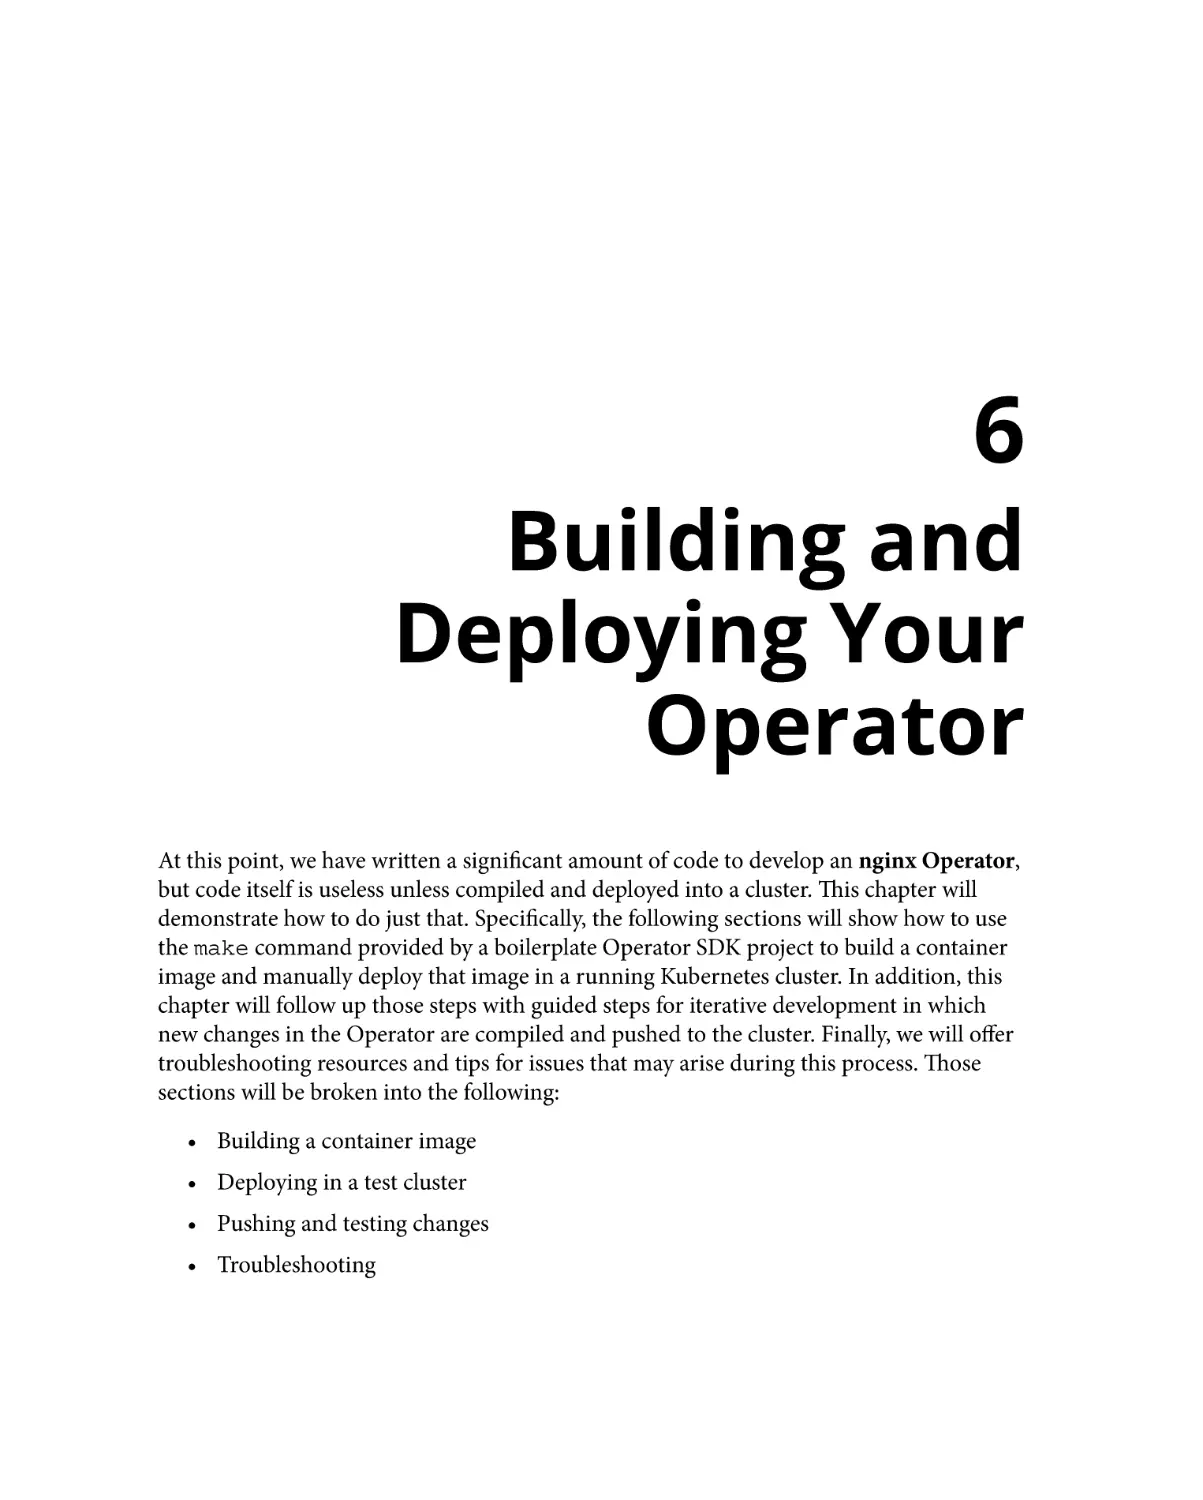
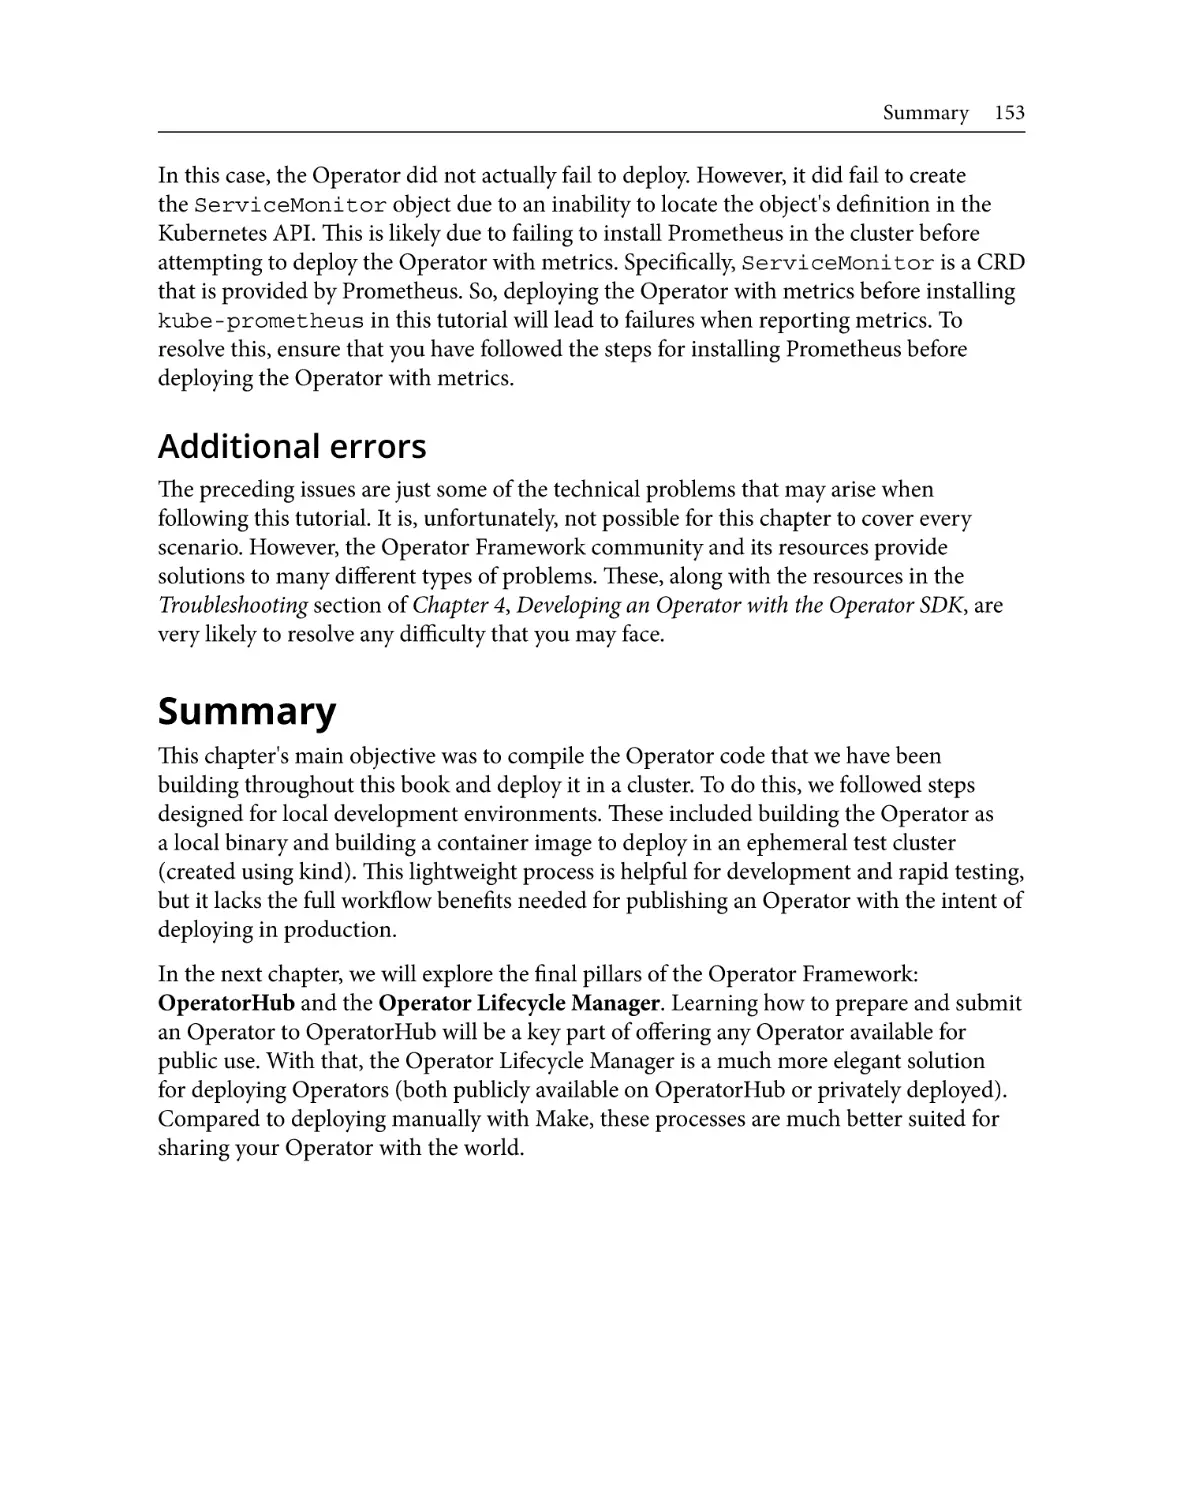
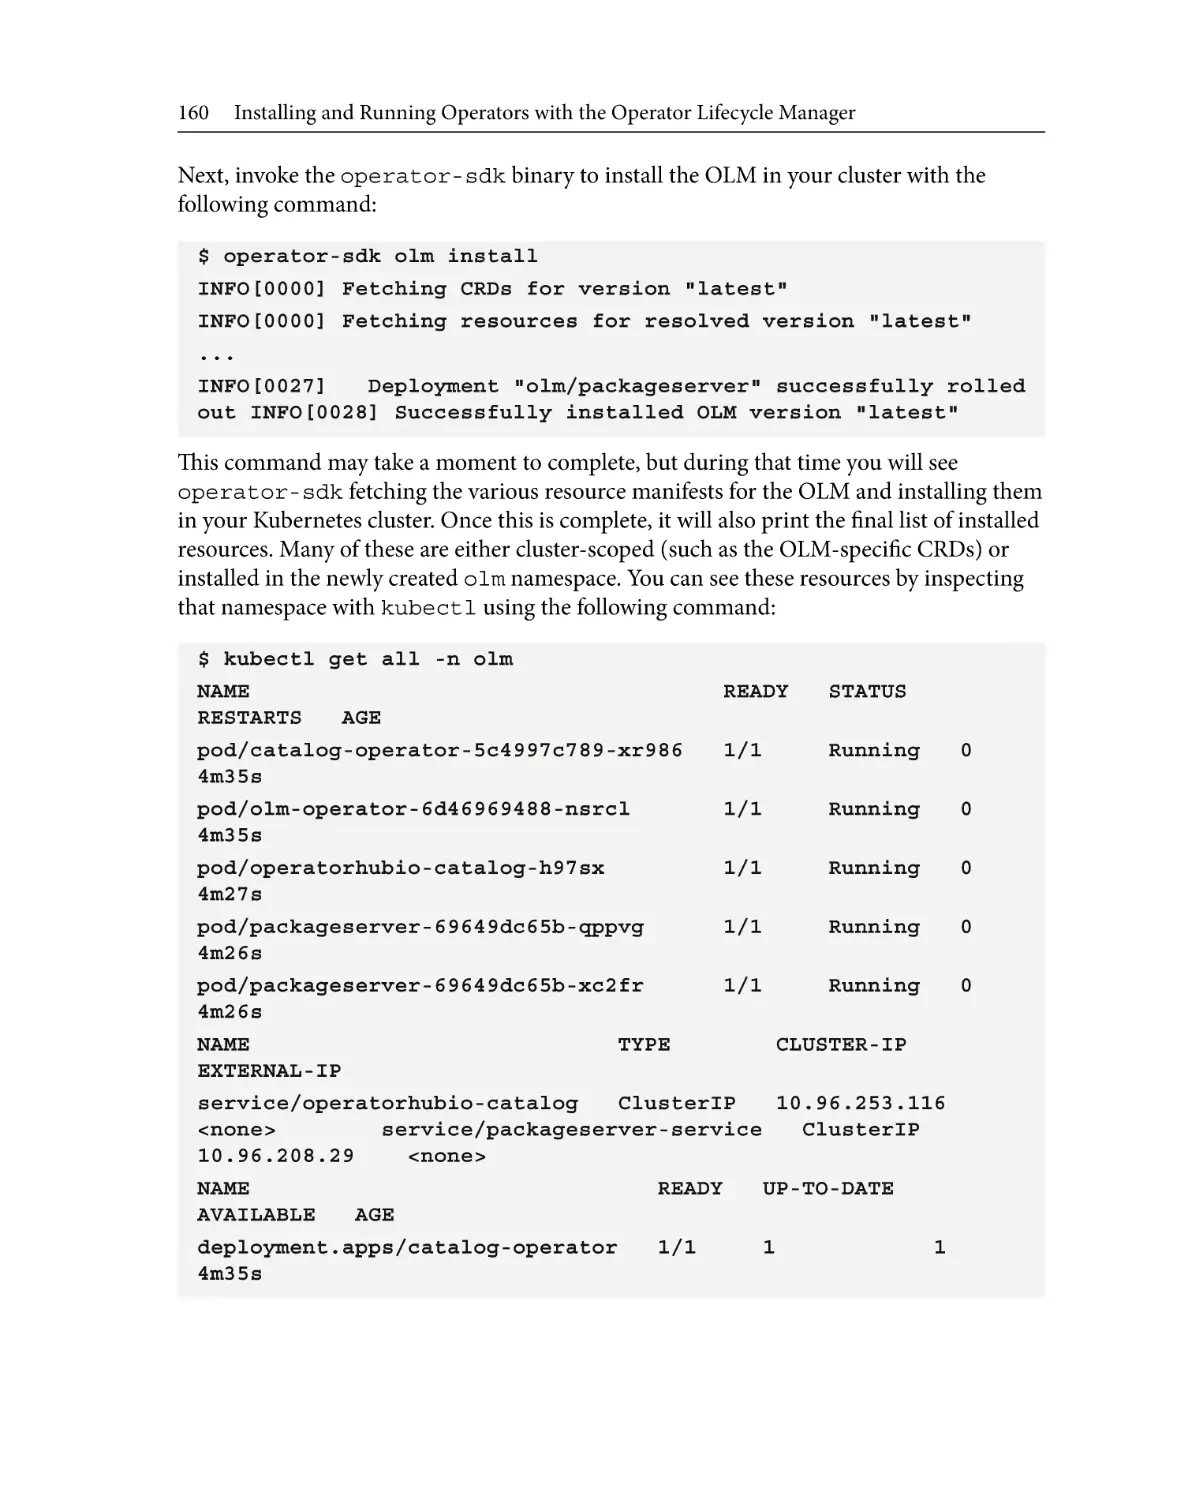
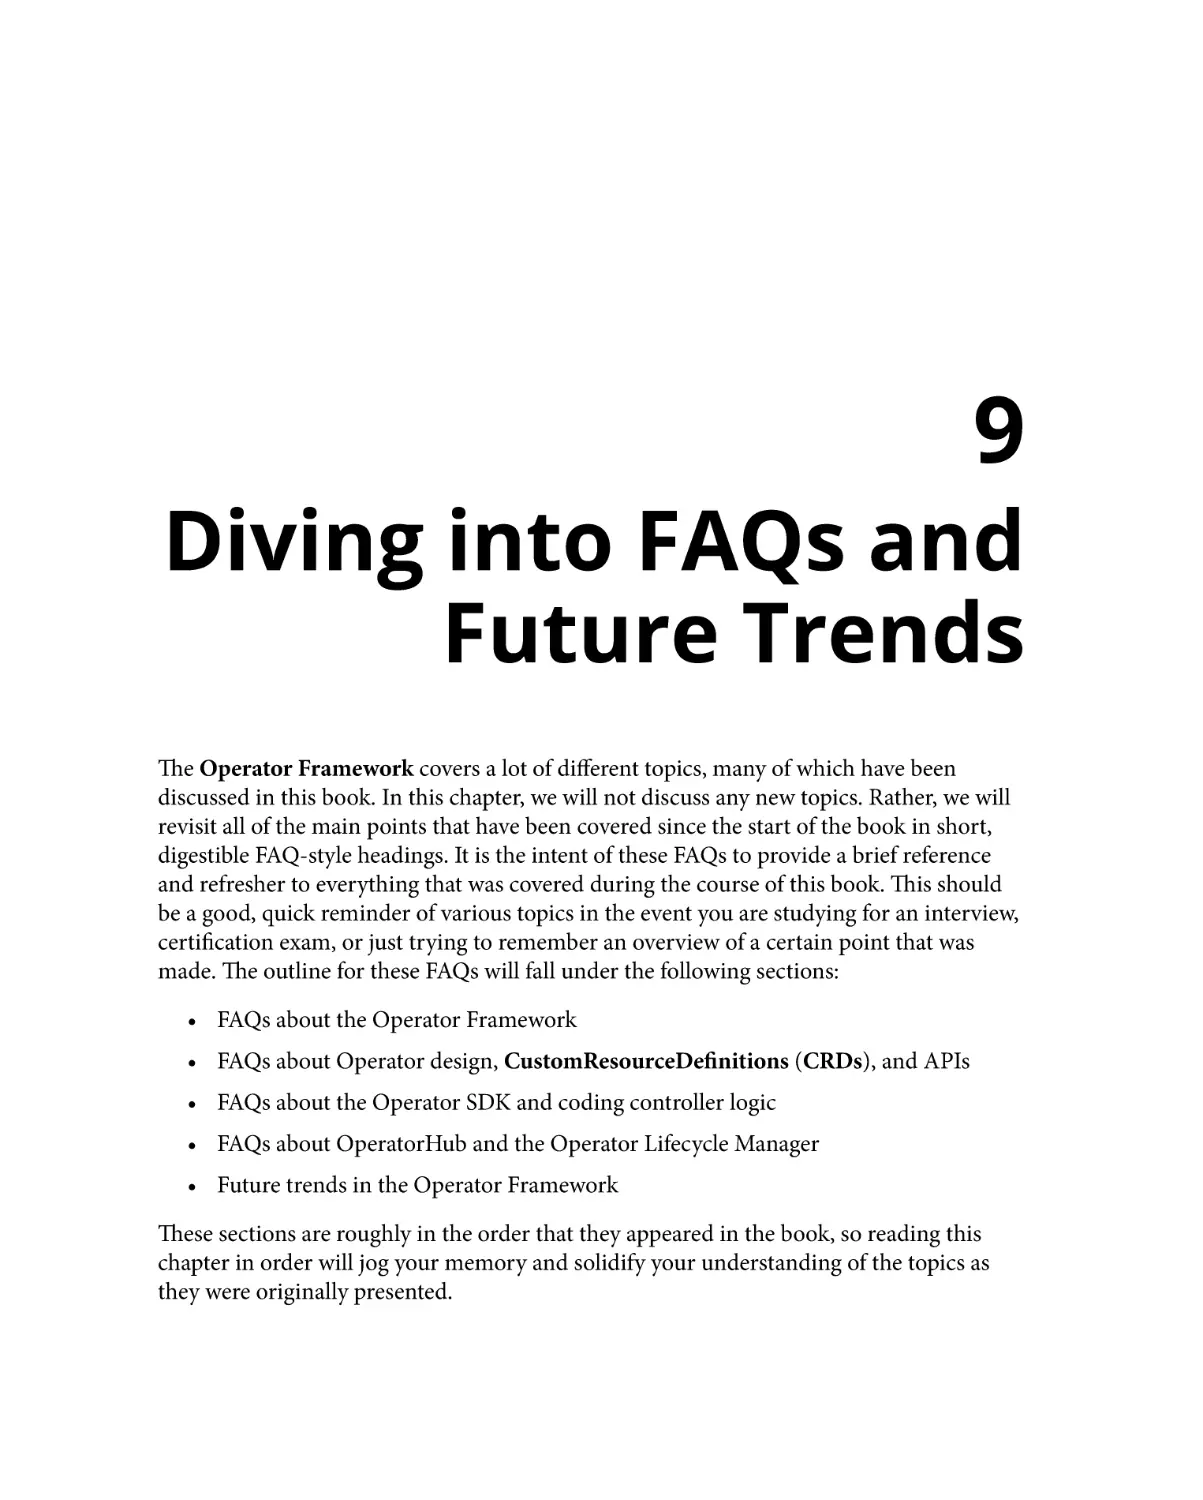
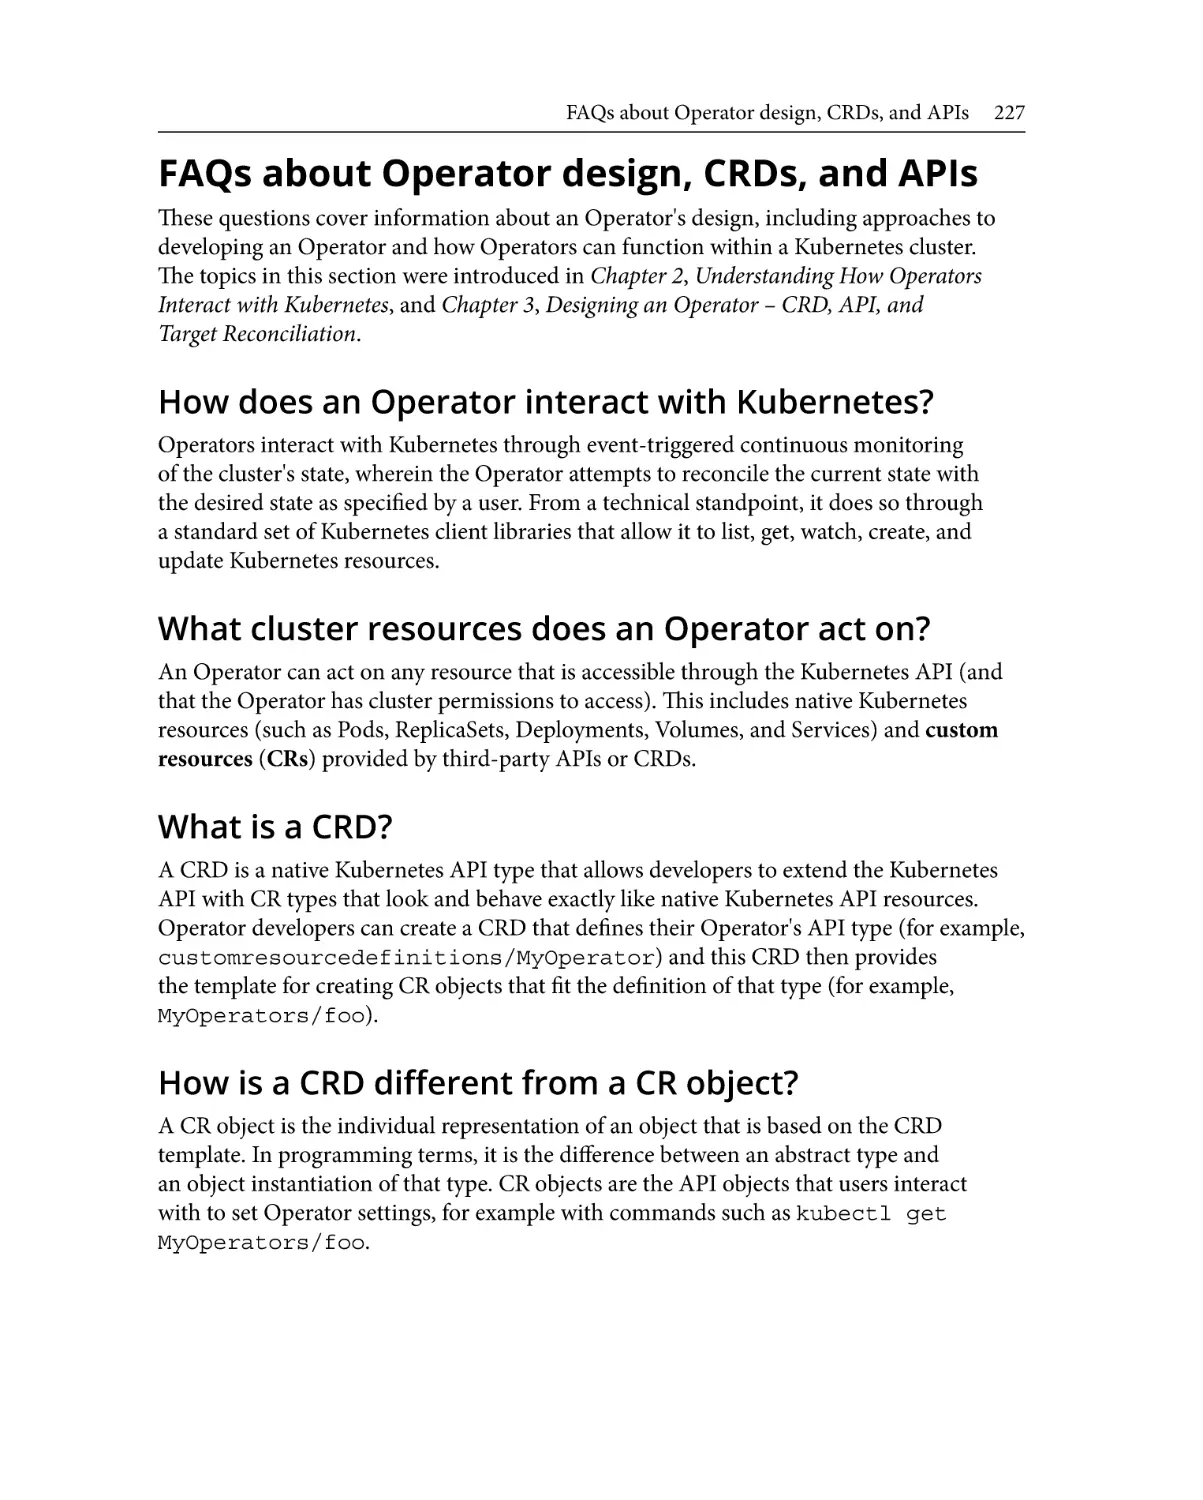
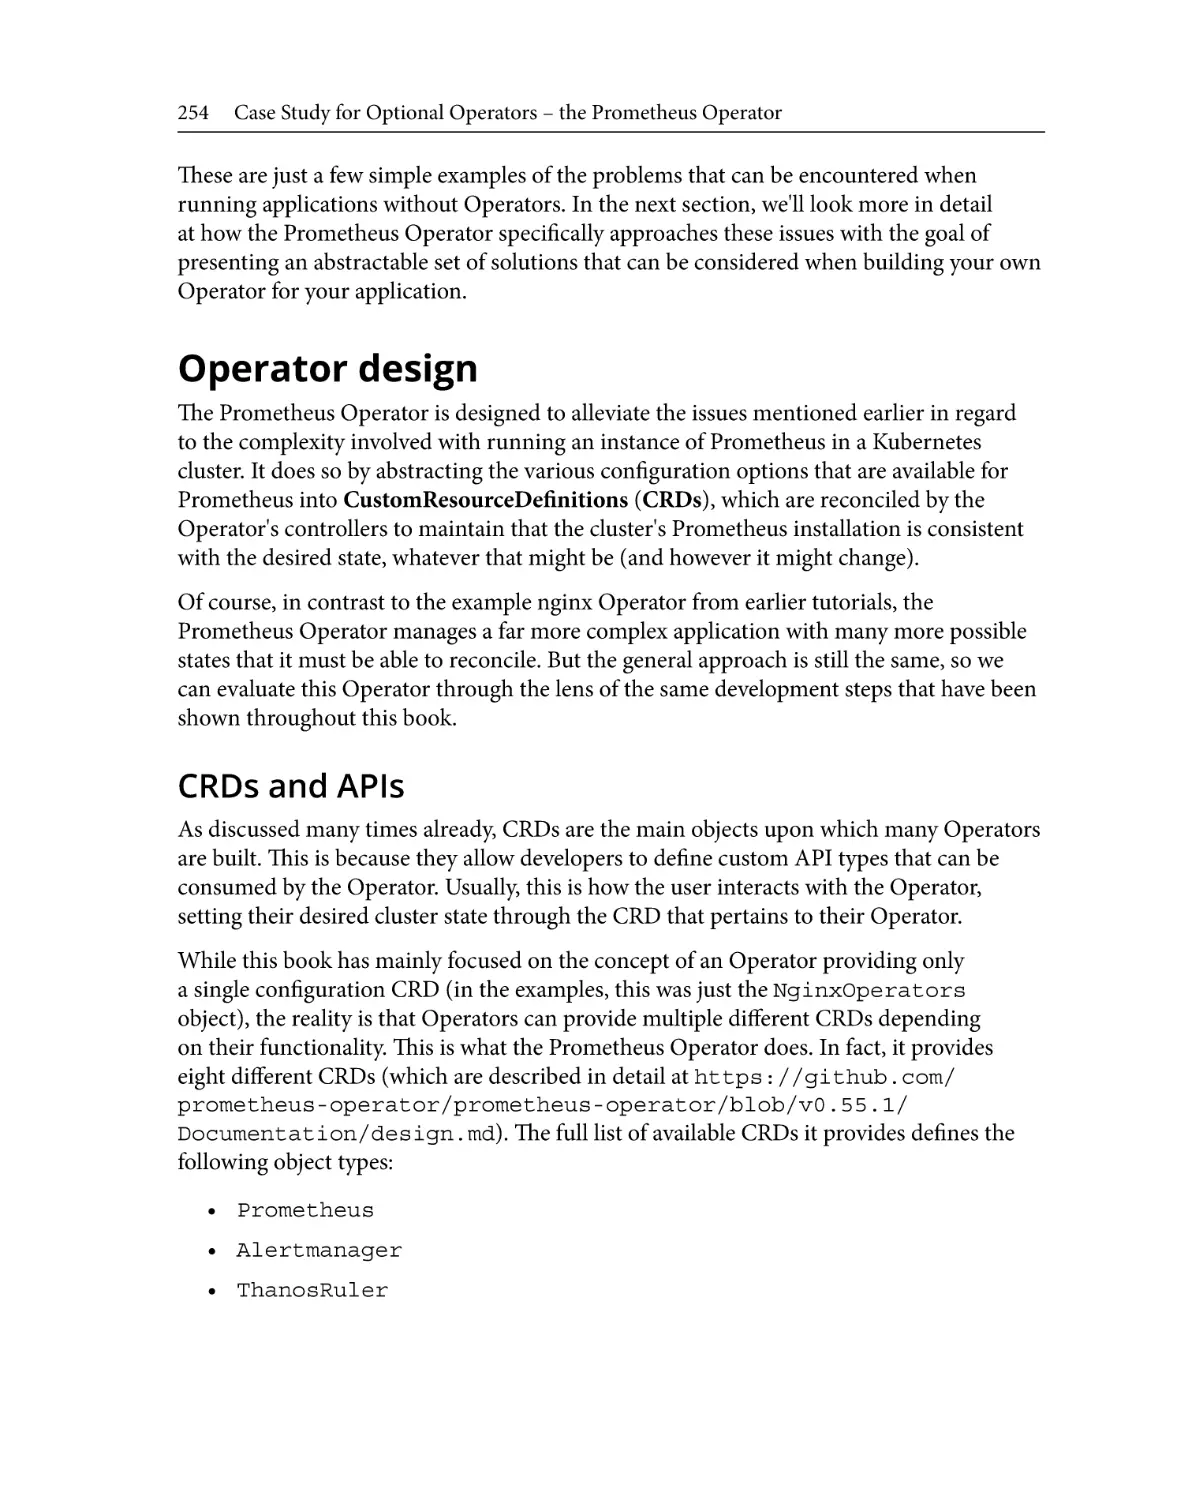
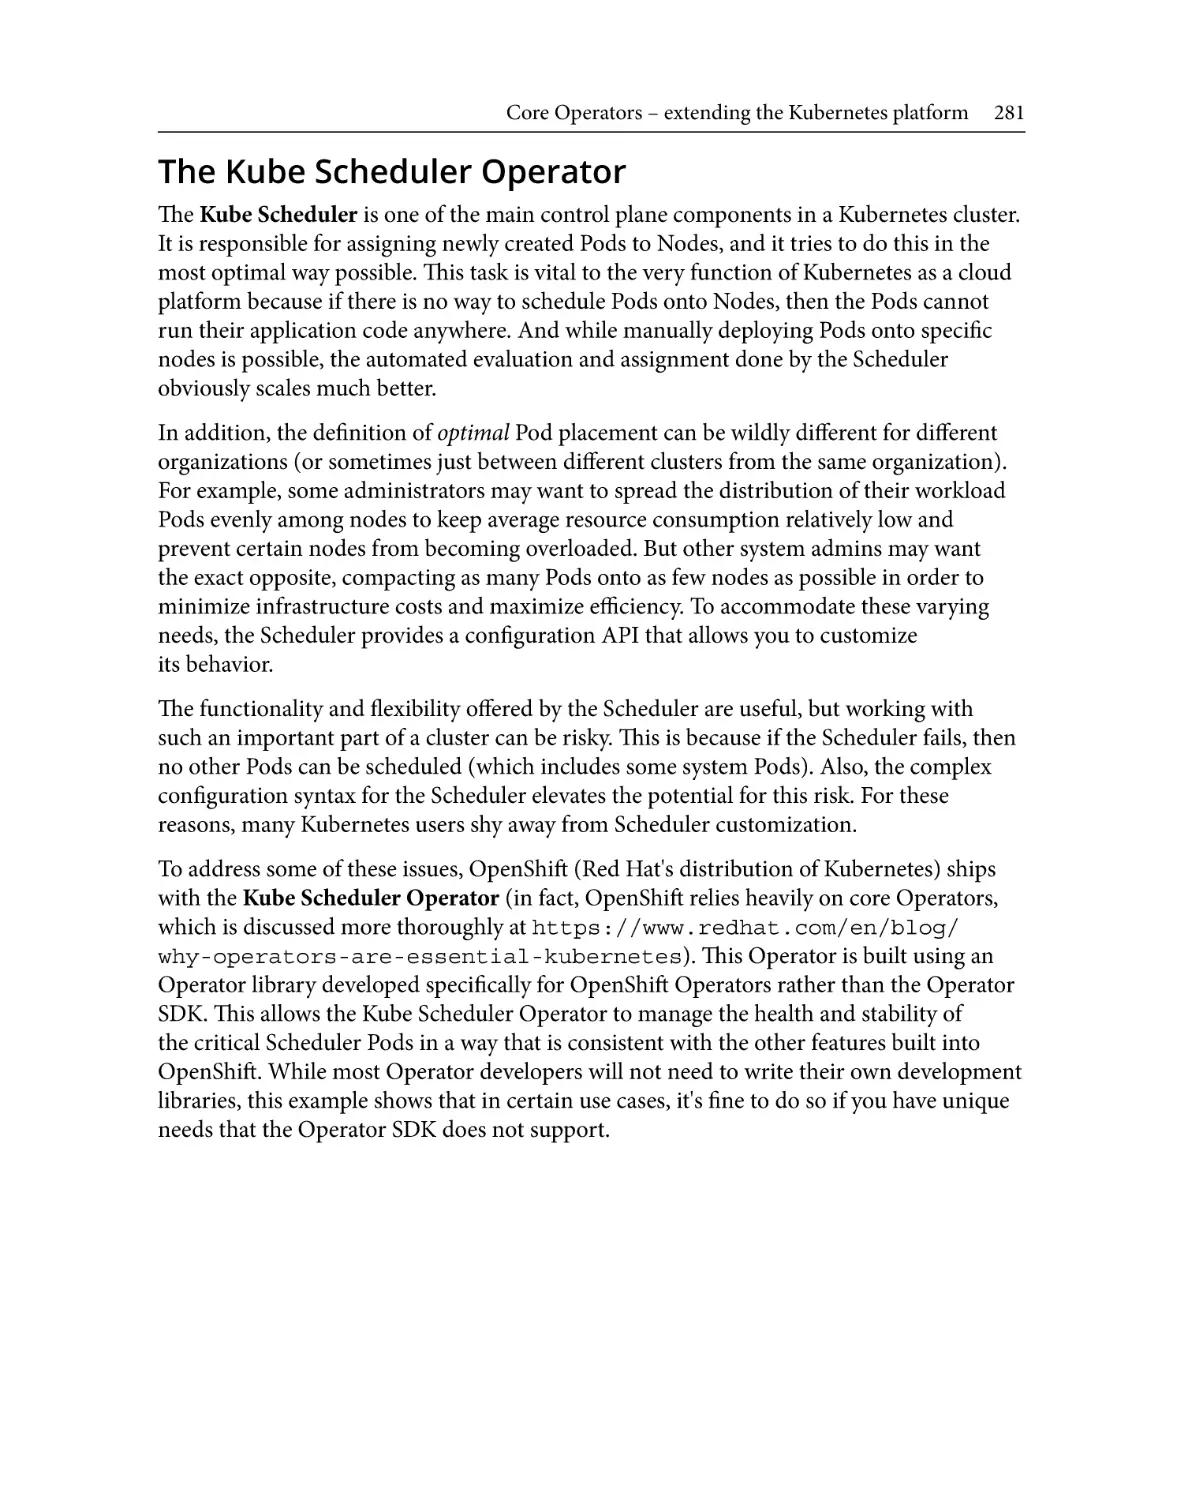
OLM then makes it easy for users to launch Operators in a cluster. These Operators can
be sourced from OperatorHub or written from scratch. Either way, OLM makes Operator
installation, upgrades, and management much easier. It also provides several stability
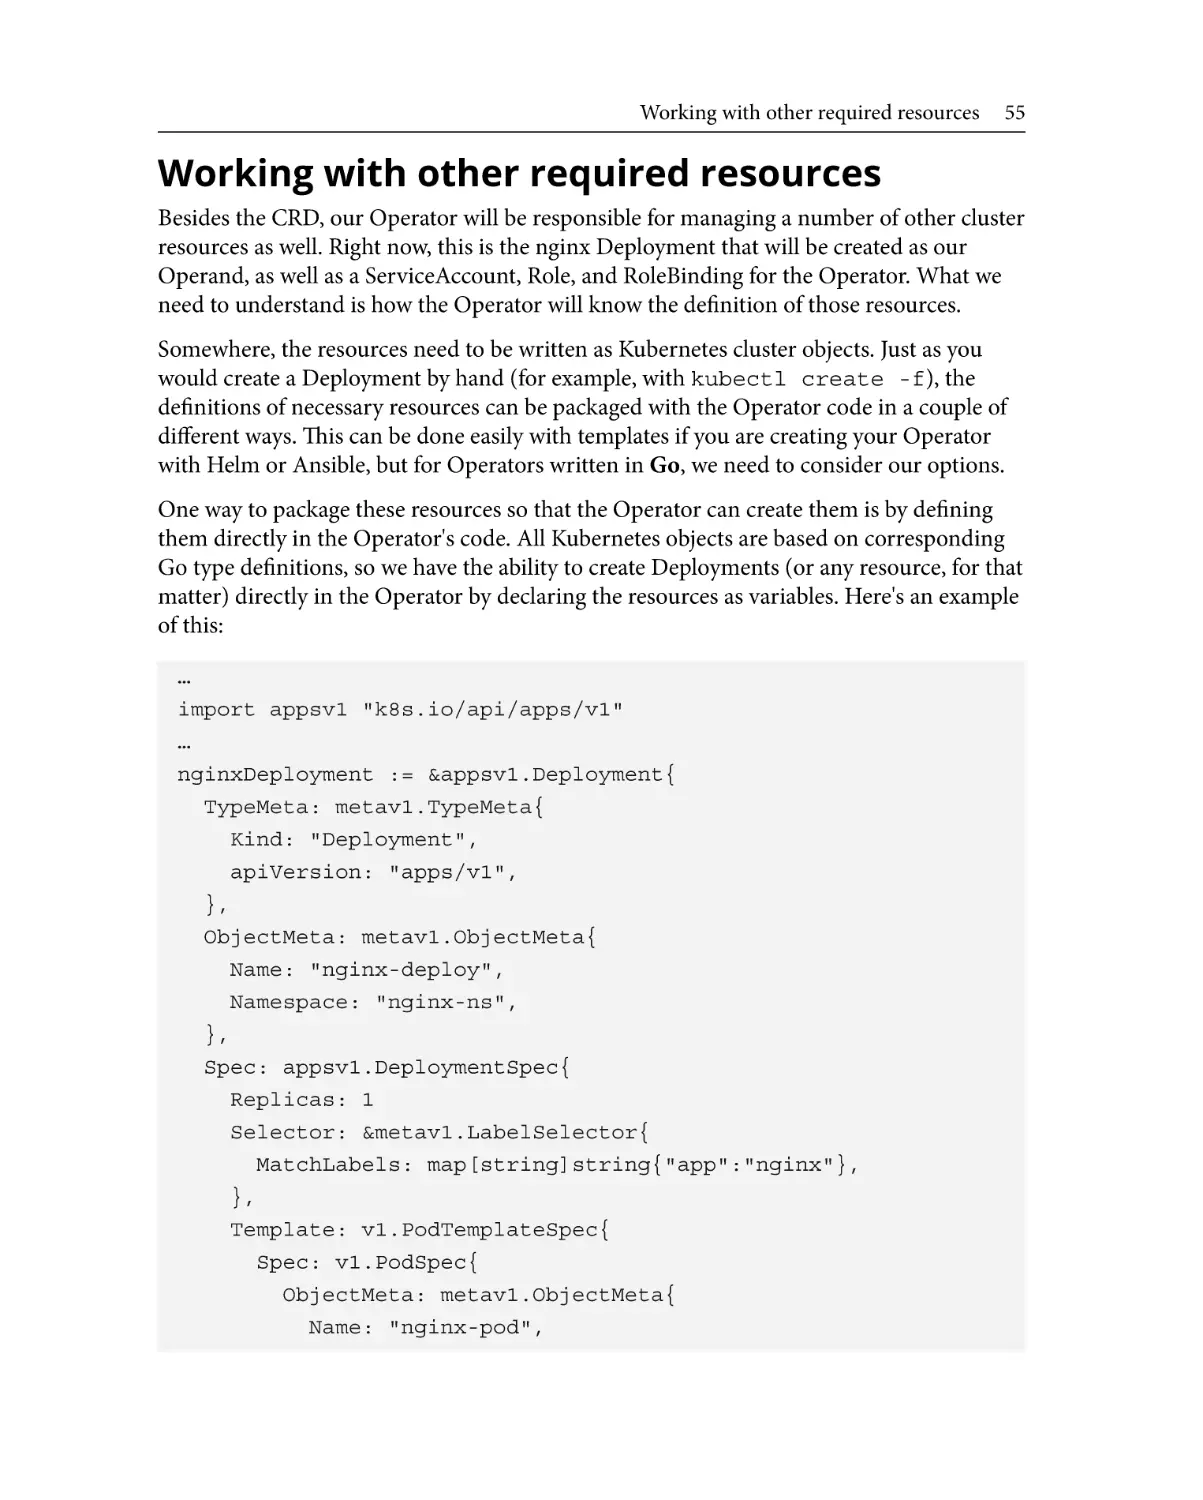
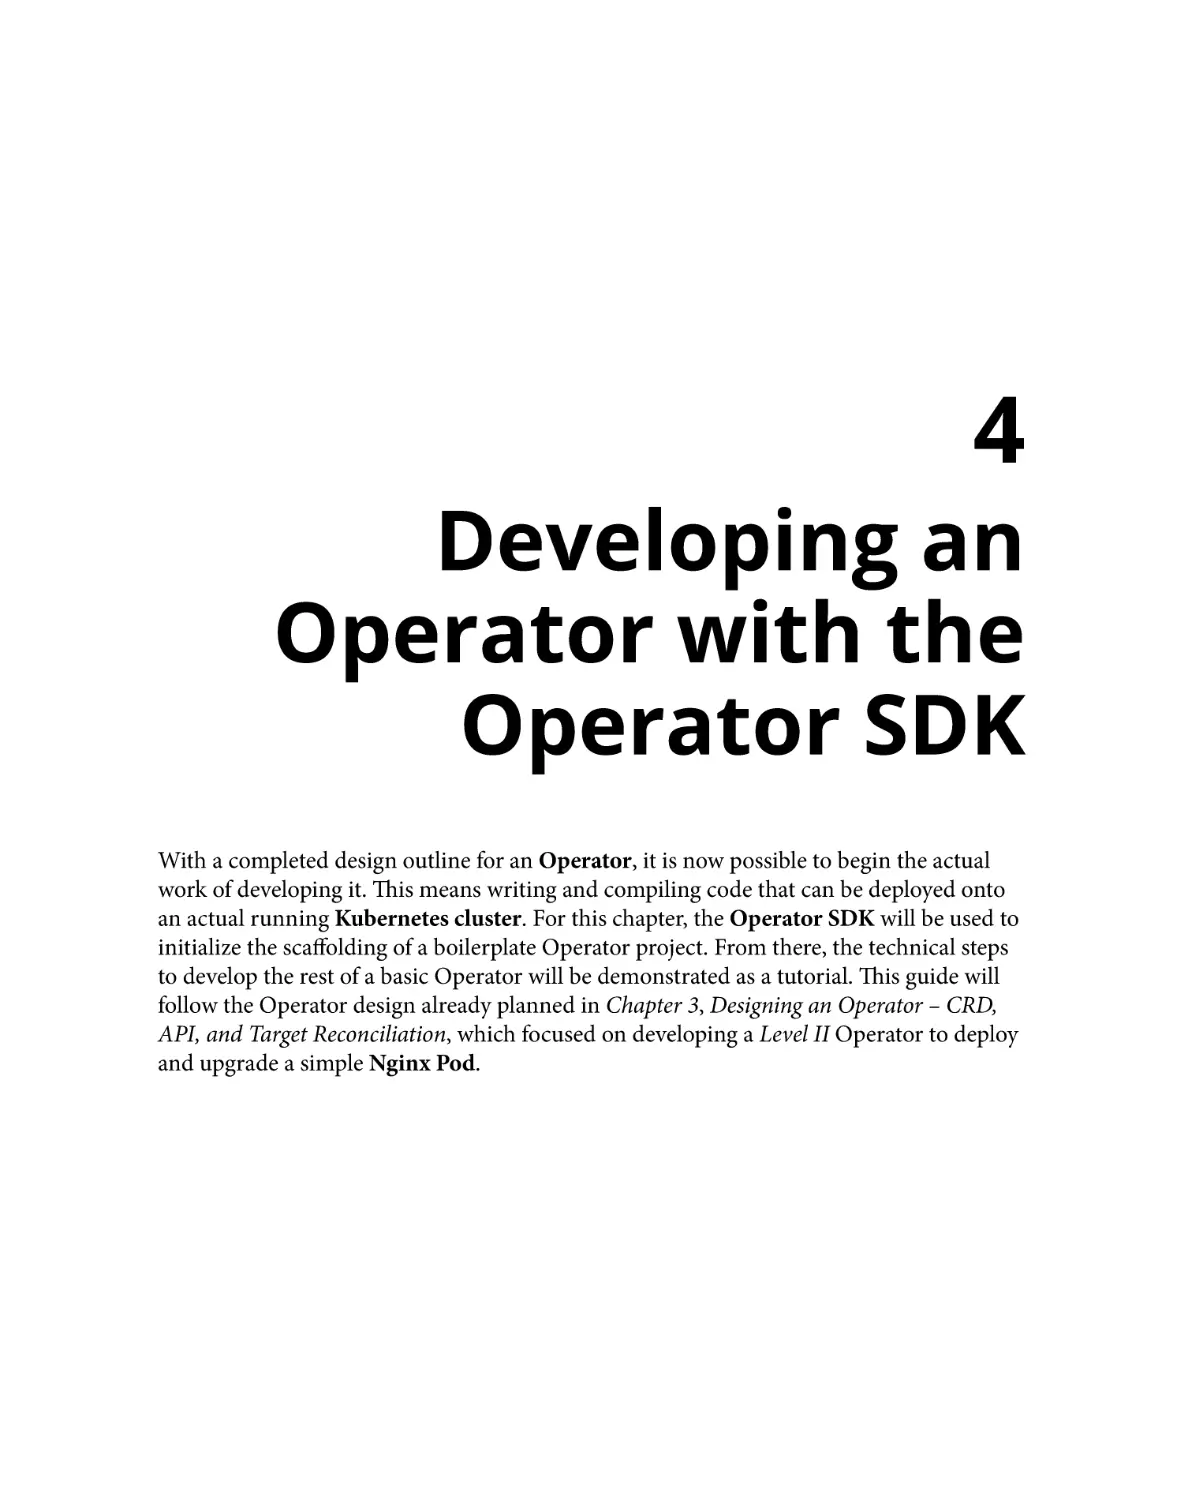
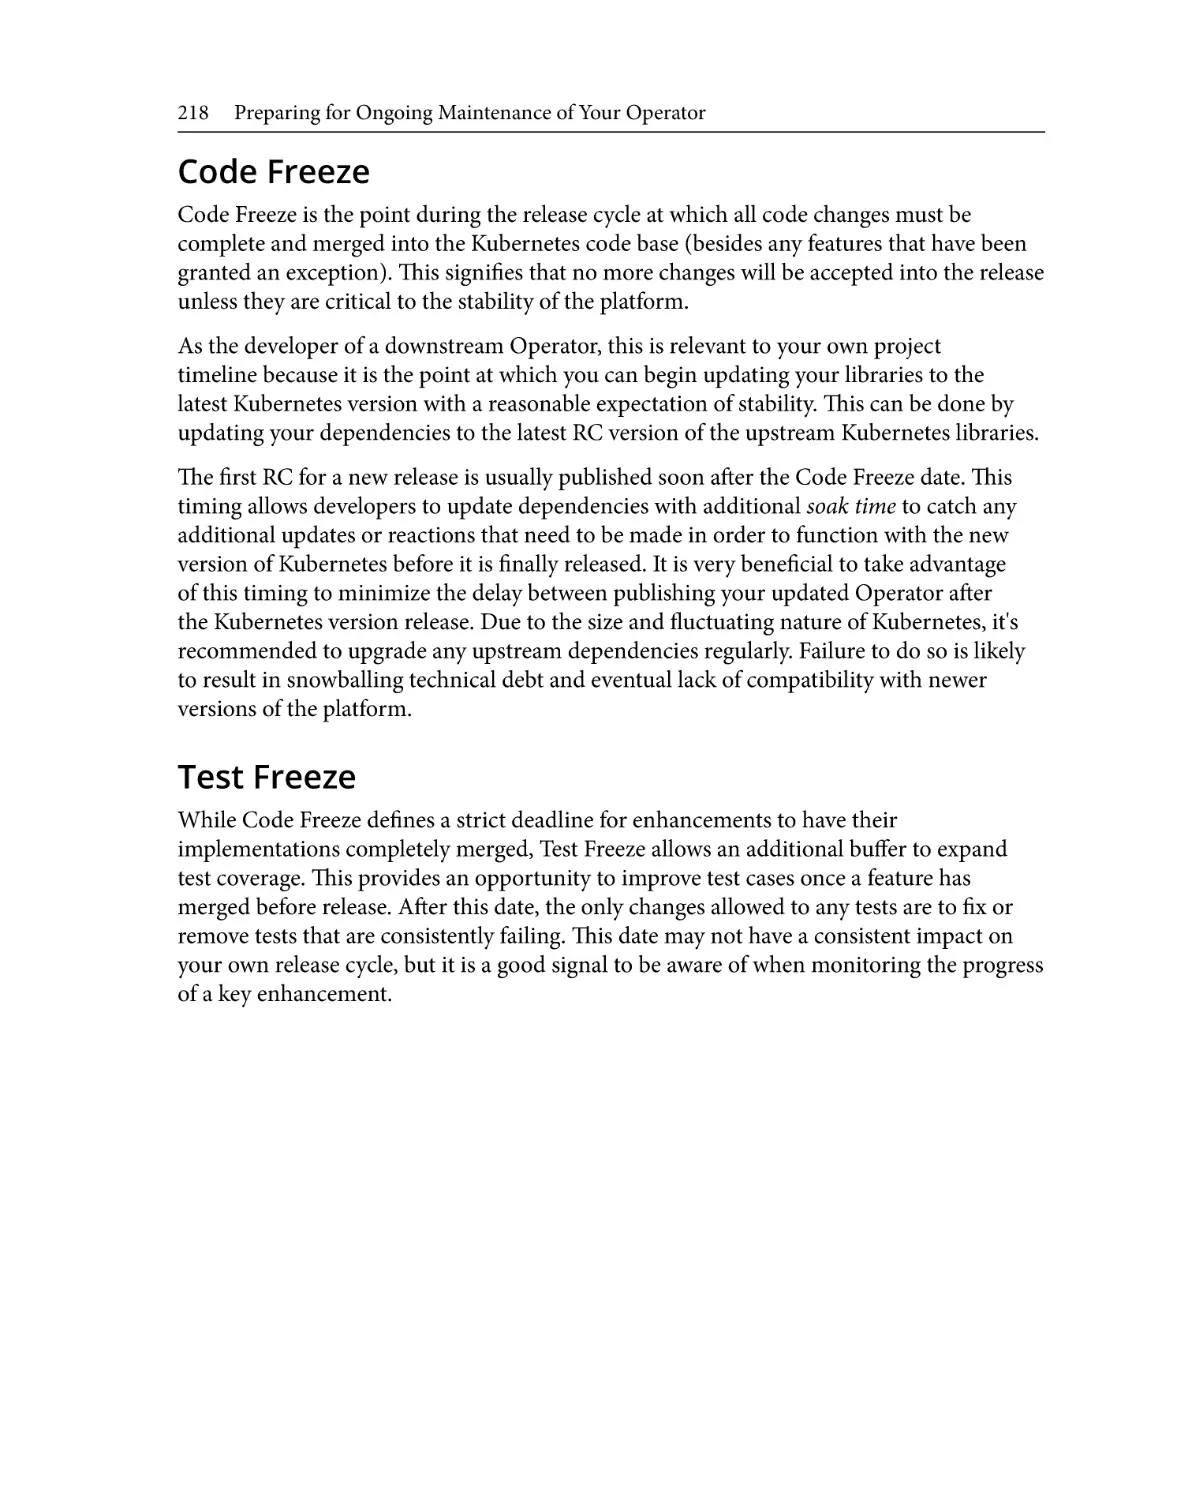
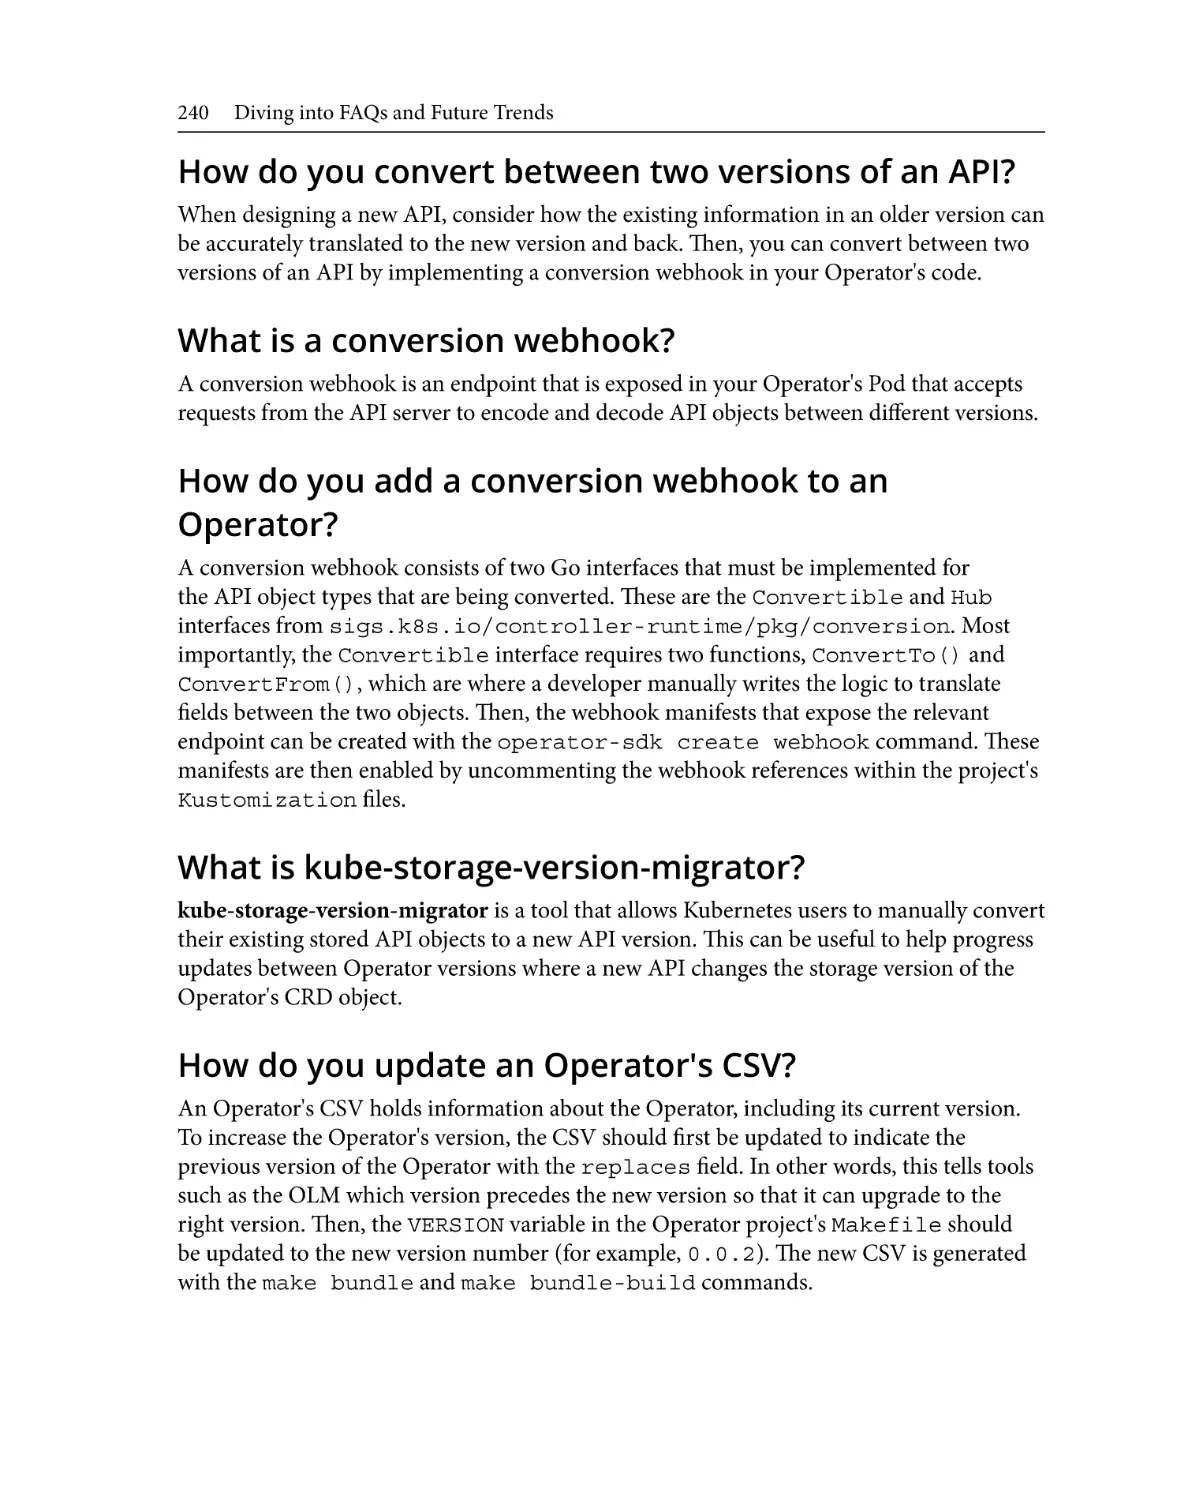
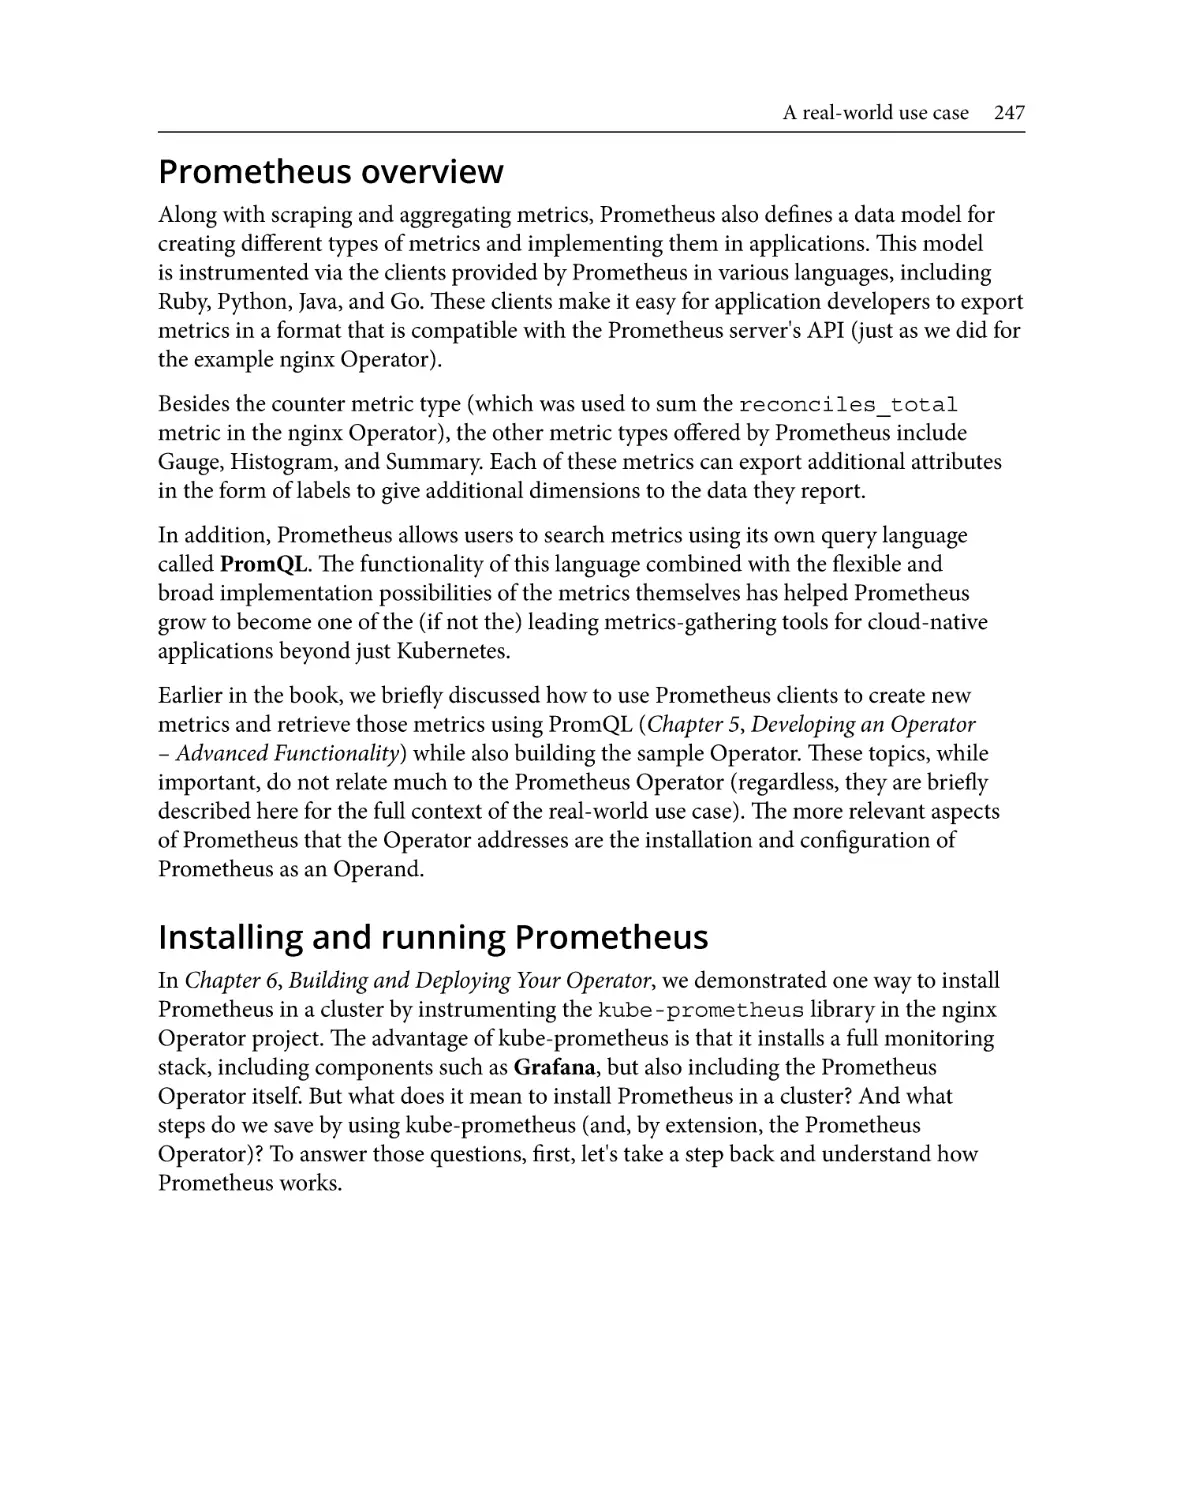
benefits when working with many Operators. You can see the relationship between the
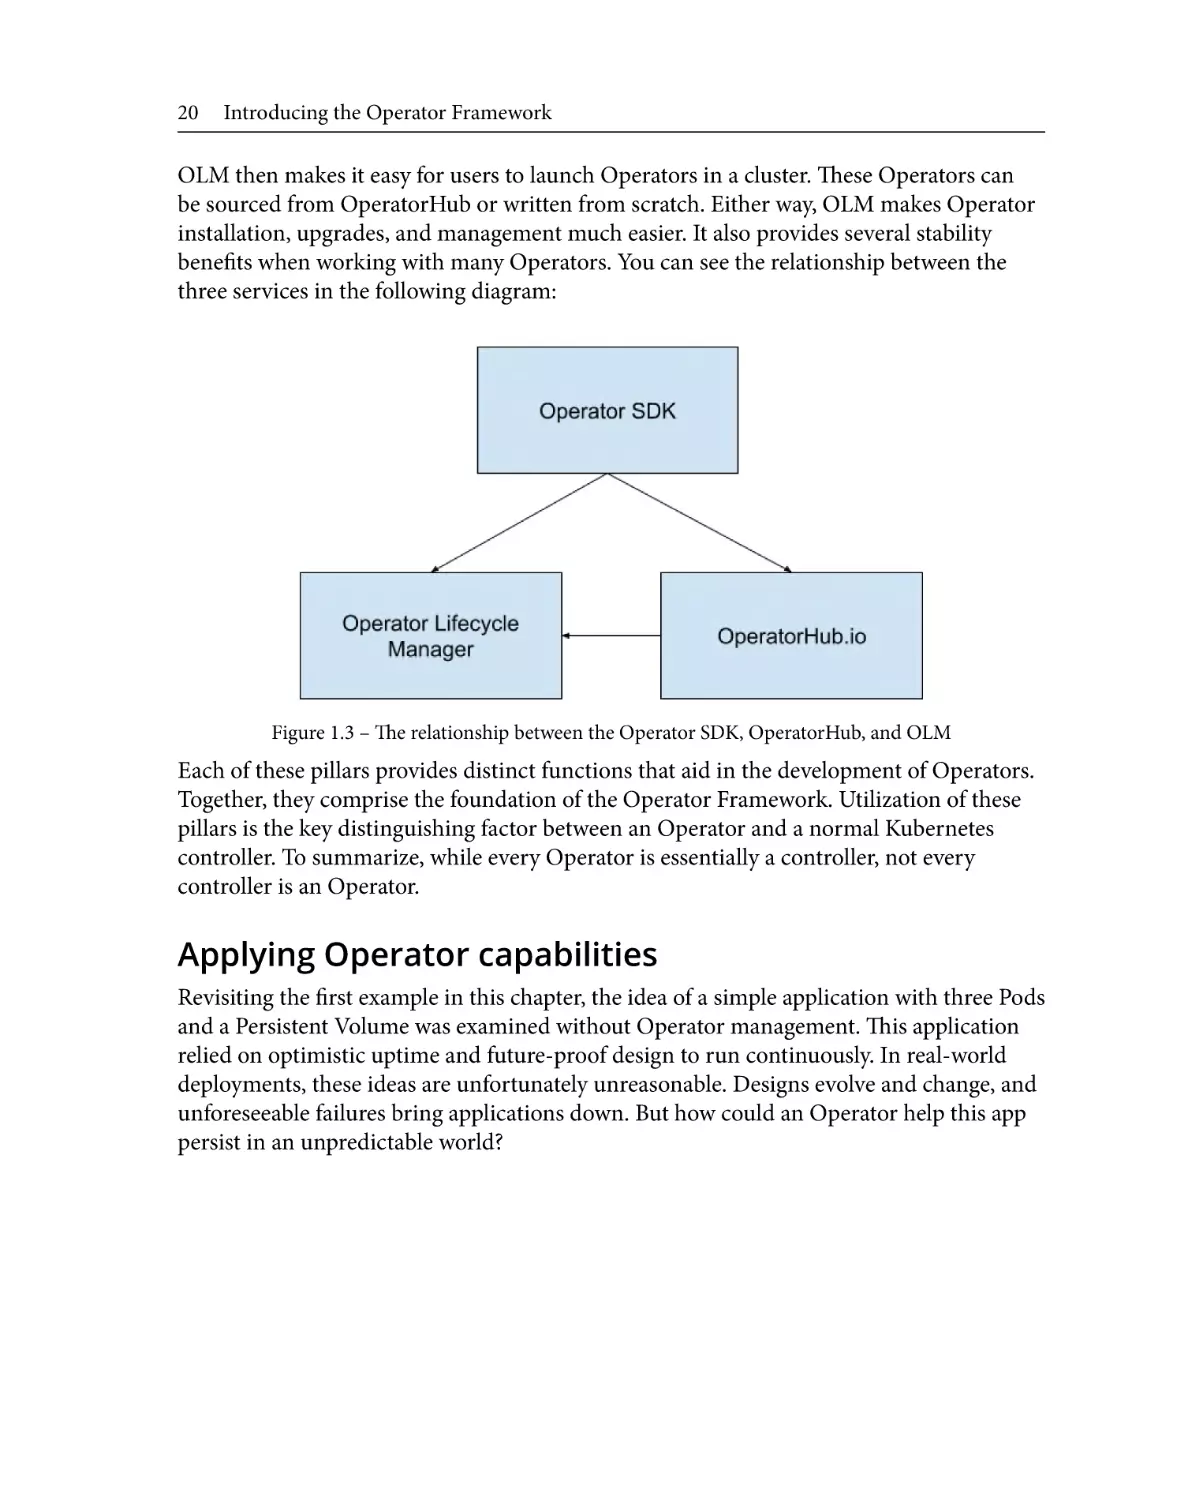
three services in the following diagram:
Figure 1.3 – The relationship between the Operator SDK, OperatorHub, and OLM
Each of these pillars provides distinct functions that aid in the development of Operators.
Together, they comprise the foundation of the Operator Framework. Utilization of these
pillars is the key distinguishing factor between an Operator and a normal Kubernetes
controller. To summarize, while every Operator is essentially a controller, not every
controller is an Operator.
Applying Operator capabilities
Revisiting the first example in this chapter, the idea of a simple application with three Pods
and a Persistent Volume was examined without Operator management. This application
relied on optimistic uptime and future-proof design to run continuously. In real-world
deployments, these ideas are unfortunately unreasonable. Designs evolve and change, and
unforeseeable failures bring applications down. But how could an Operator help this app
persist in an unpredictable world?
Using Operators to manage applications
21
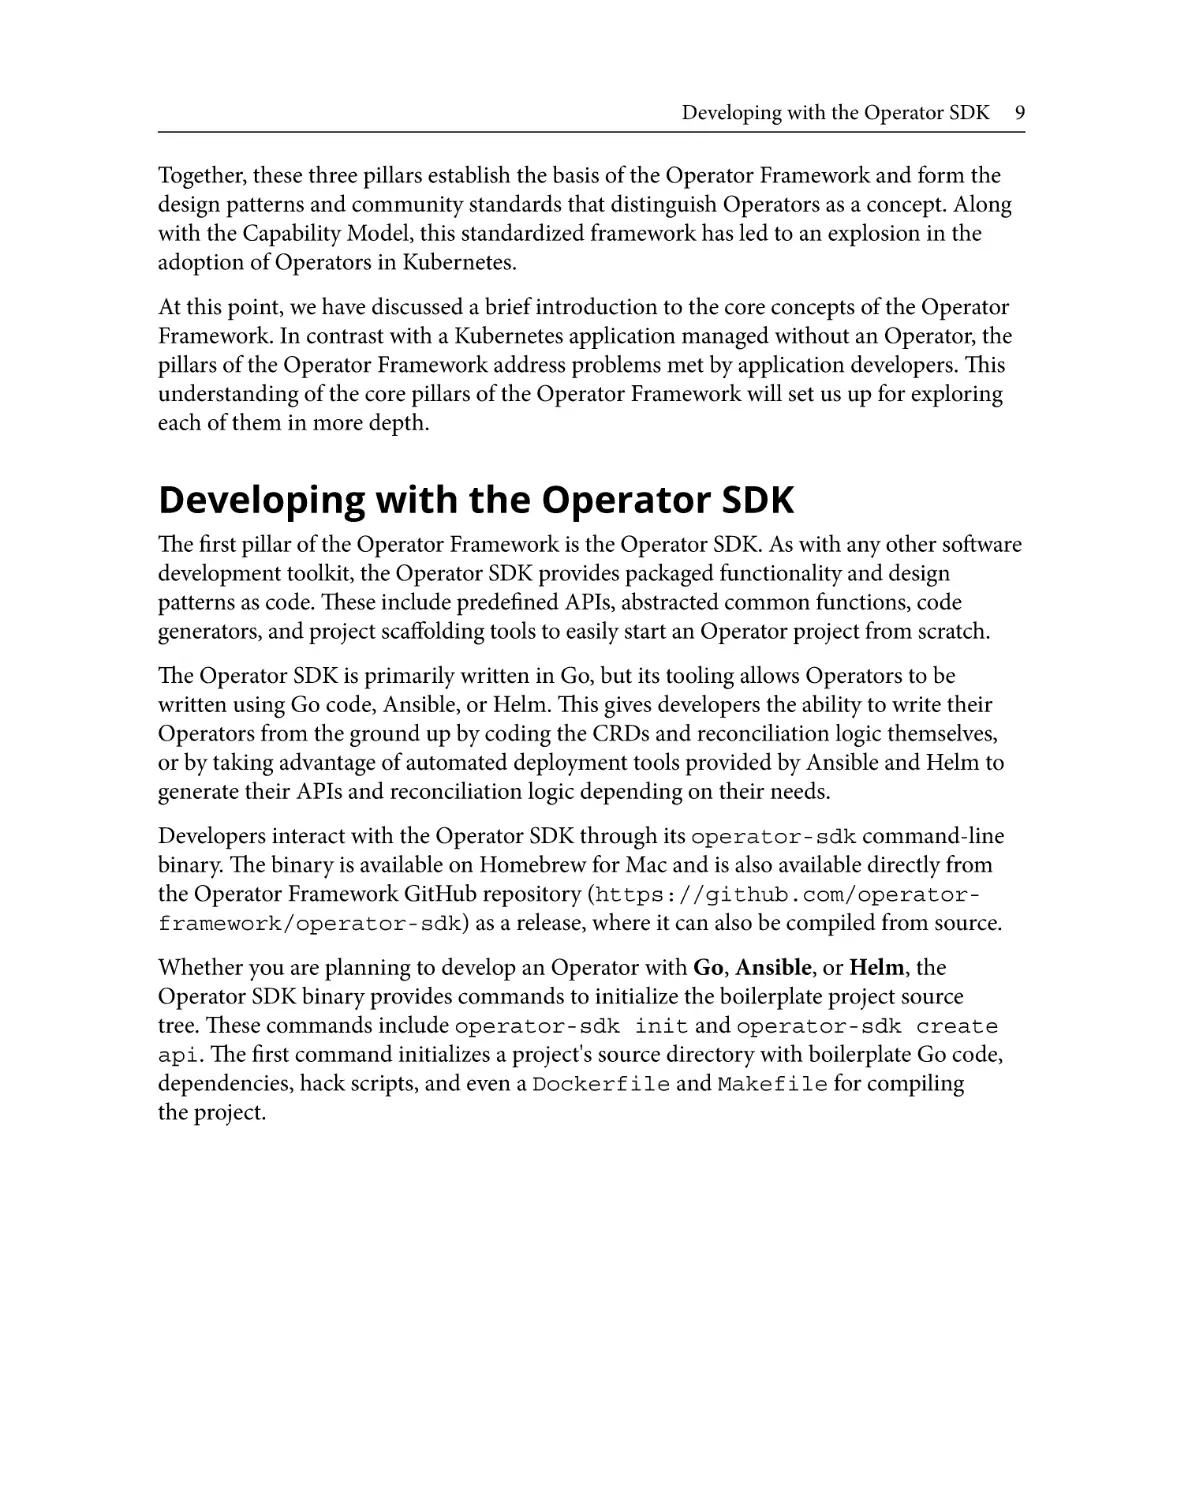
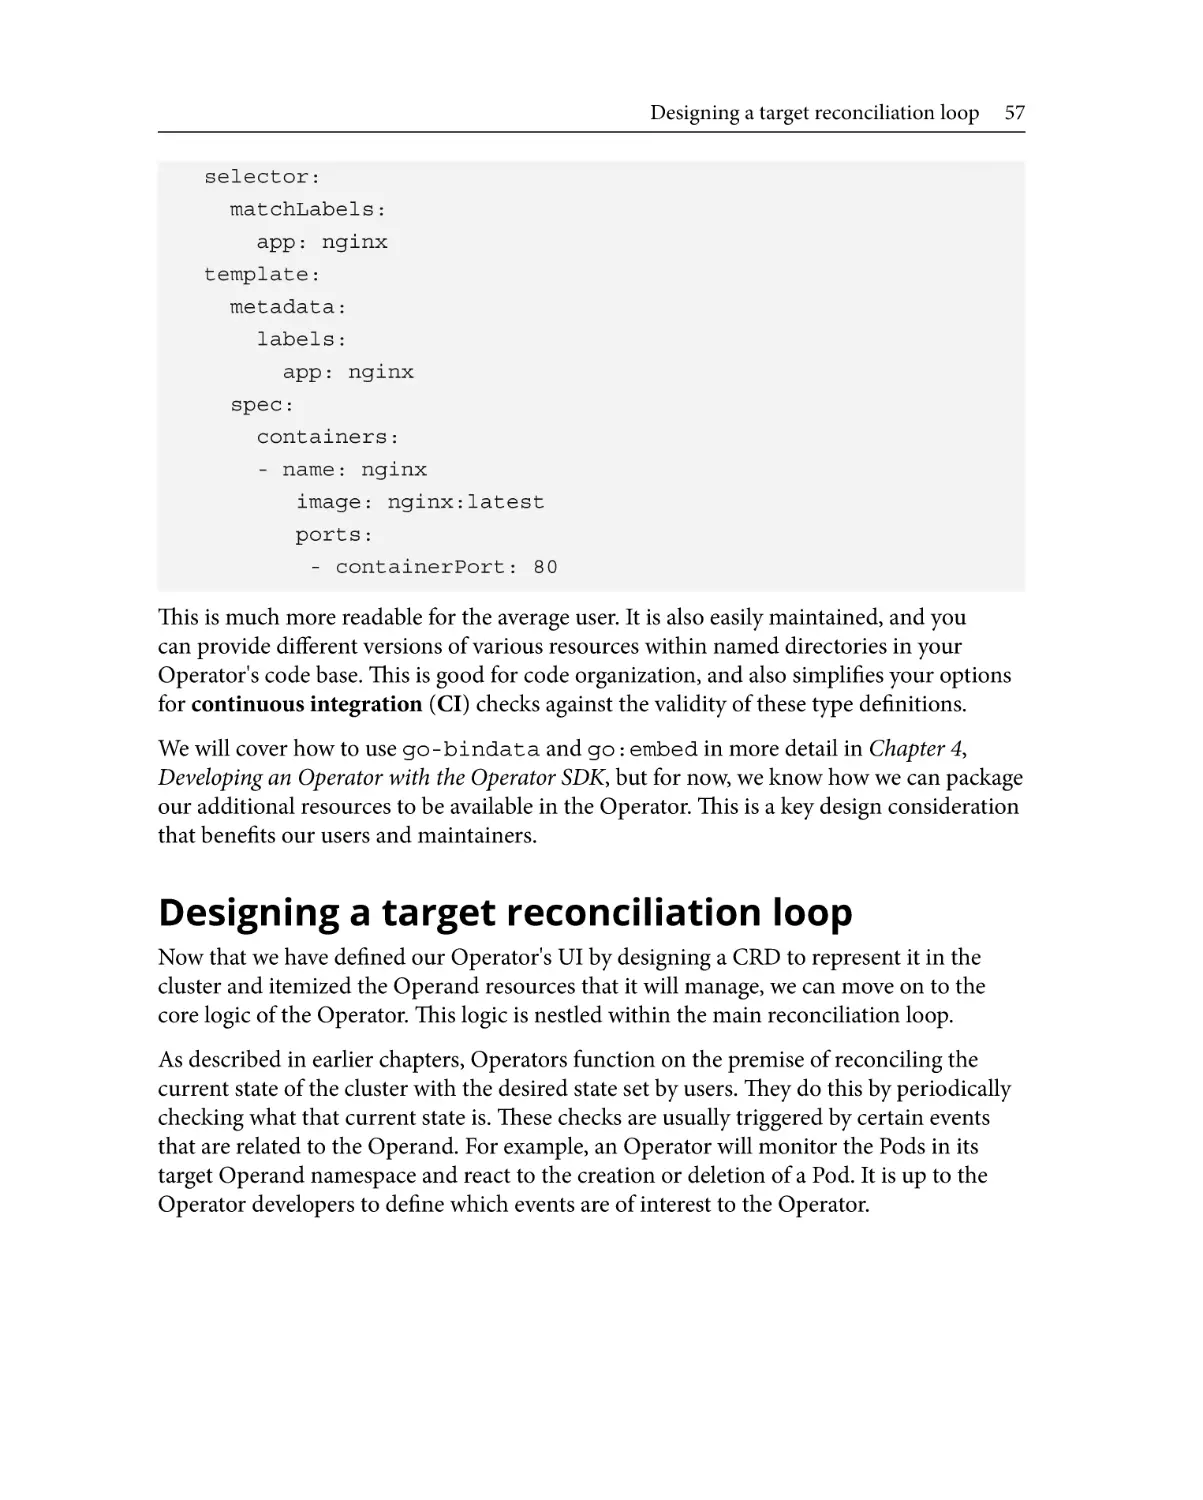
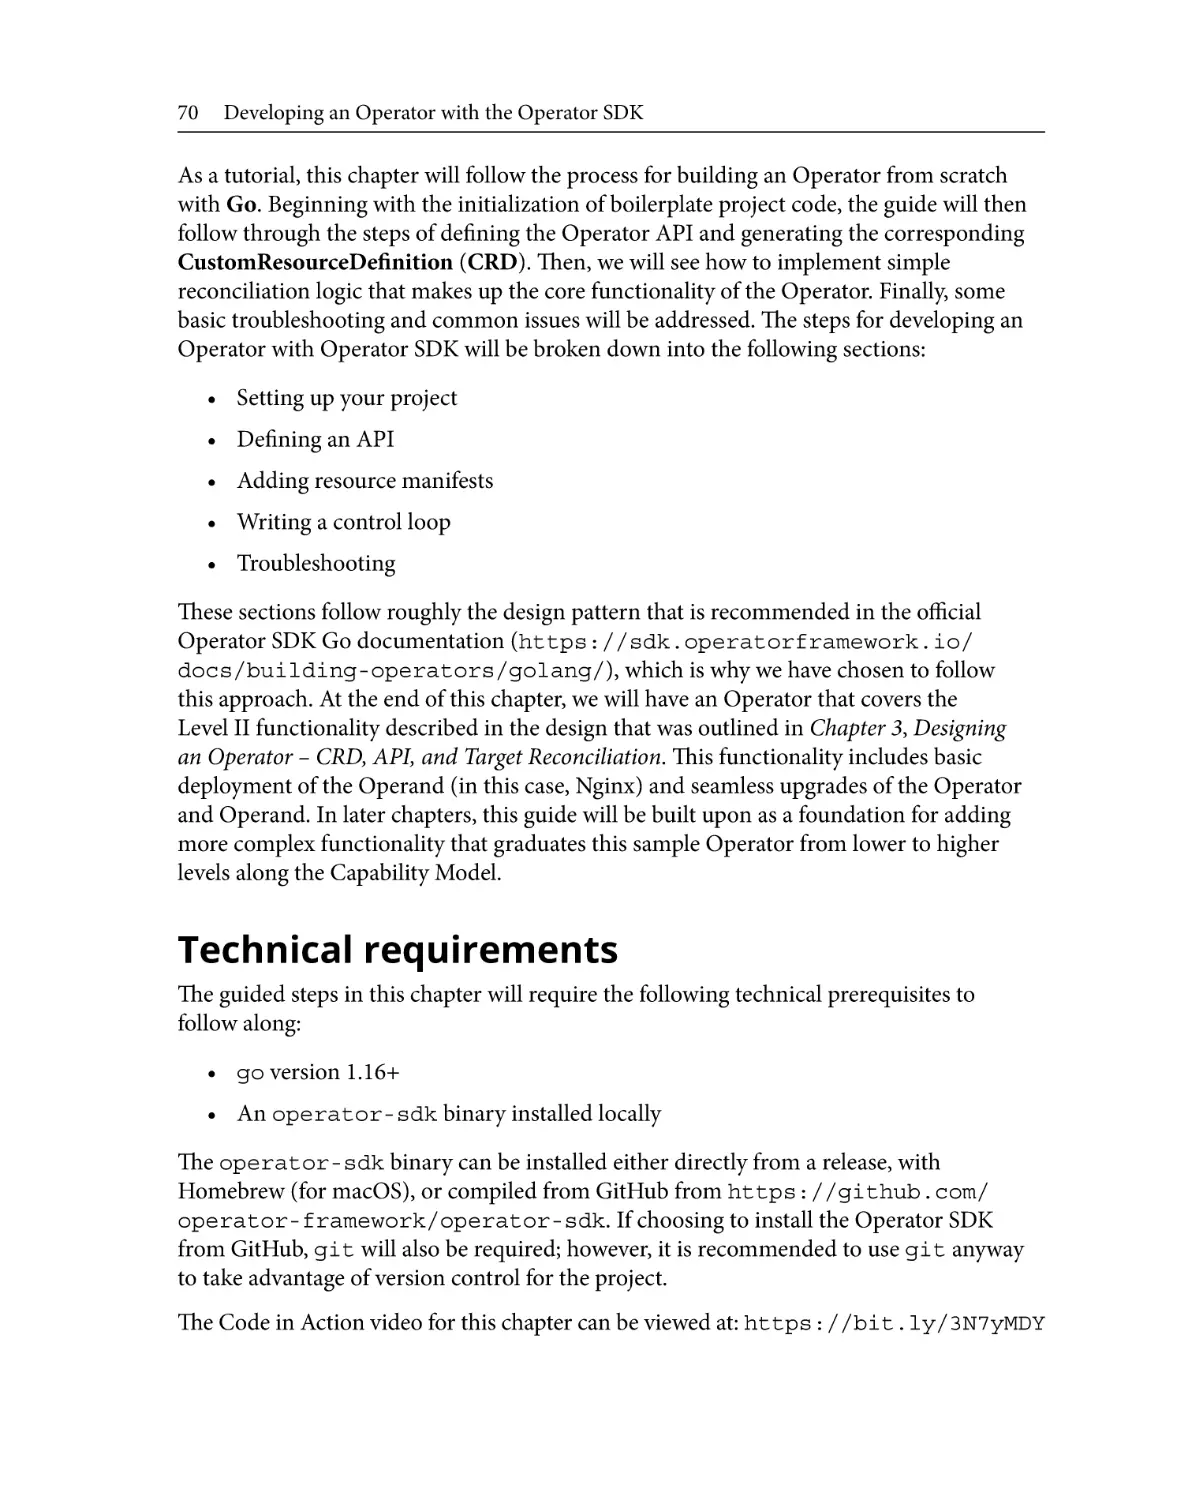
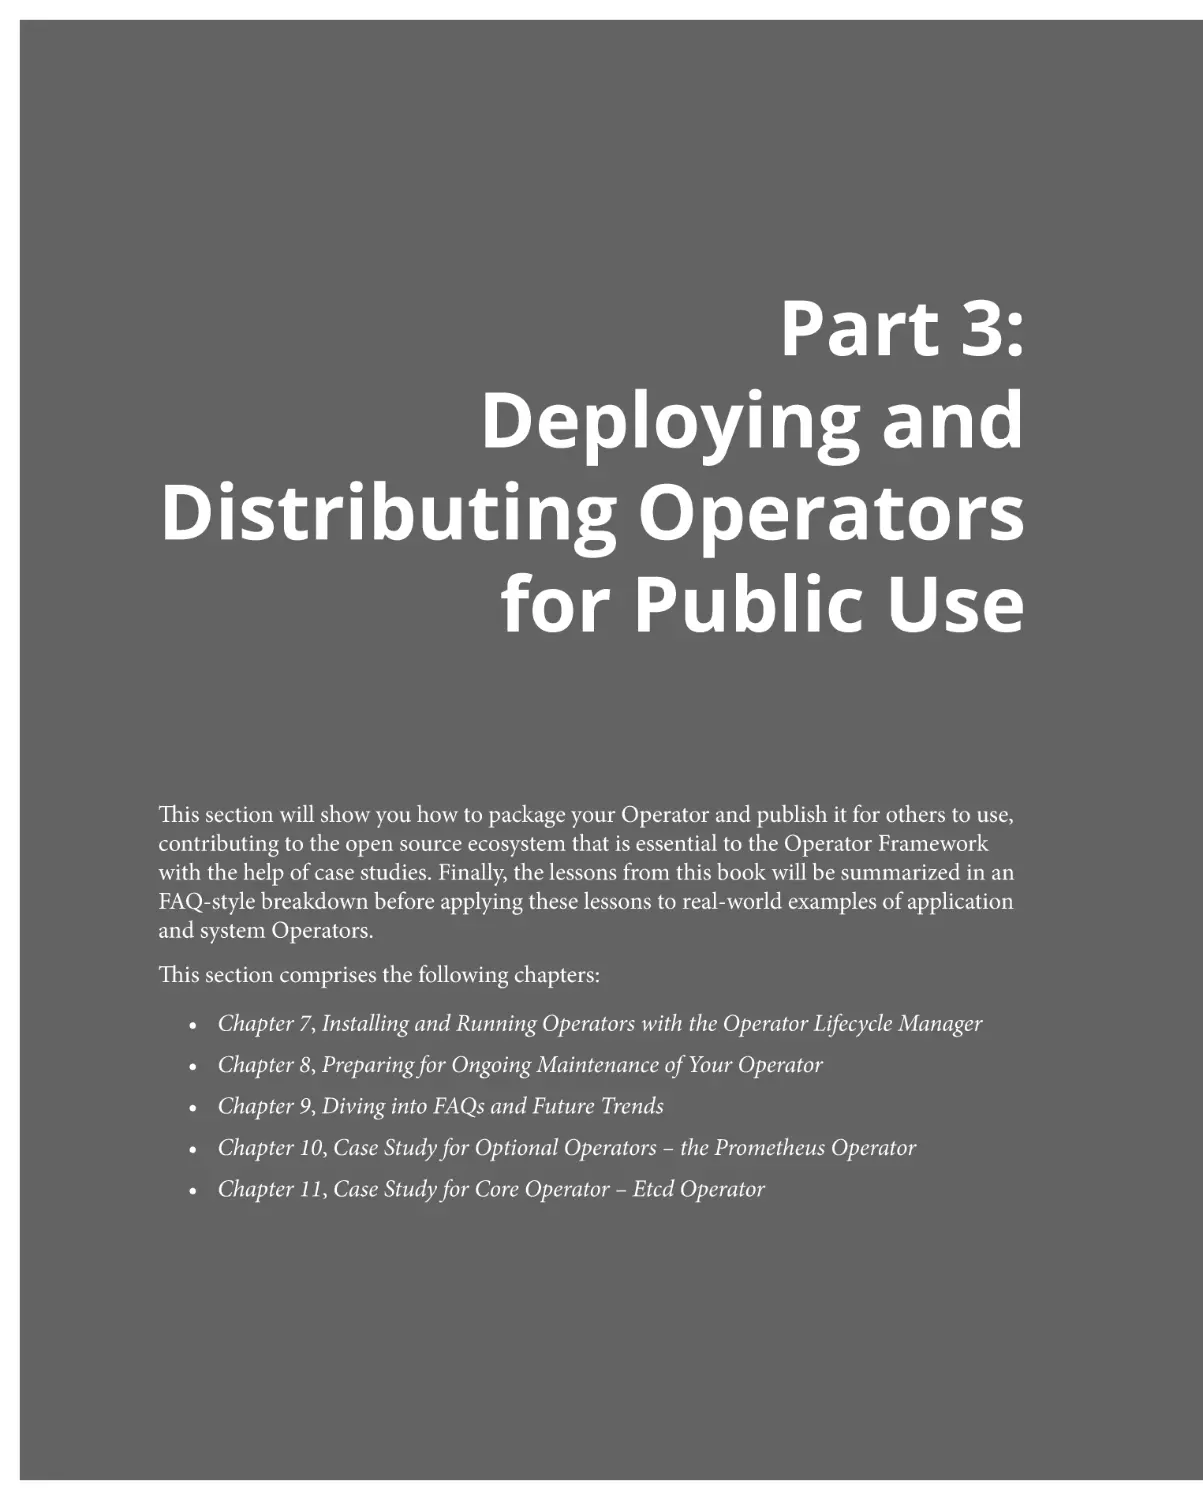
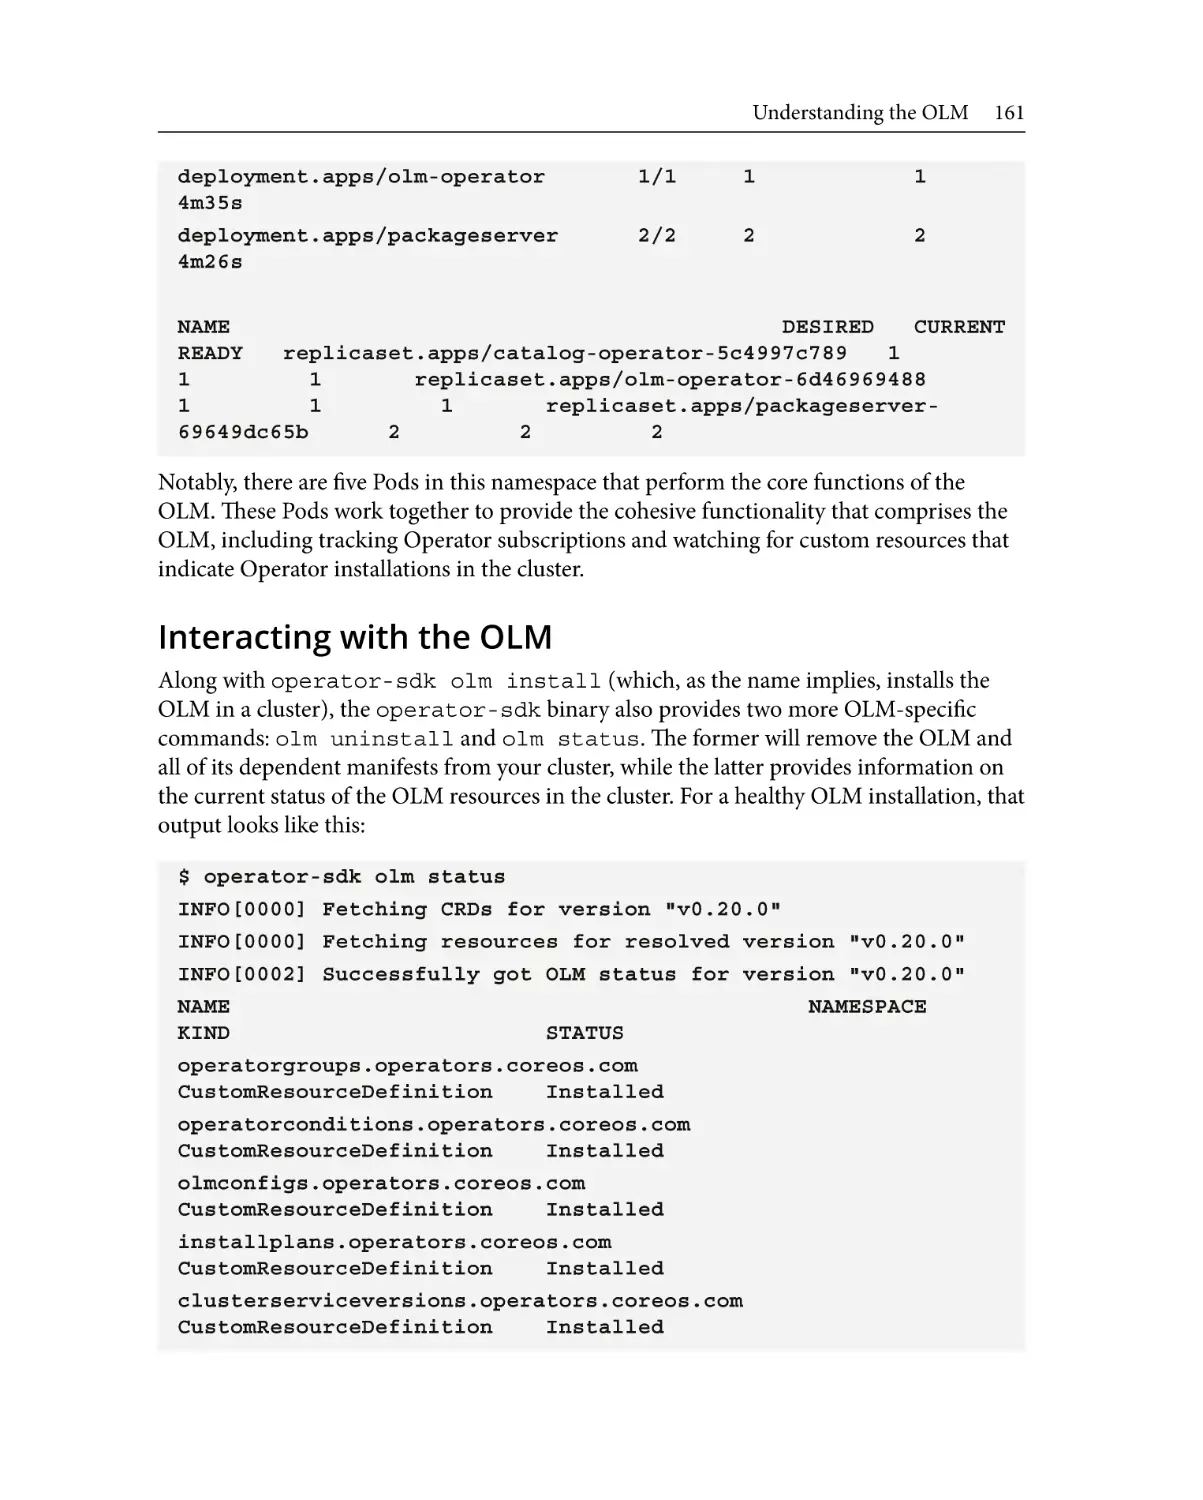
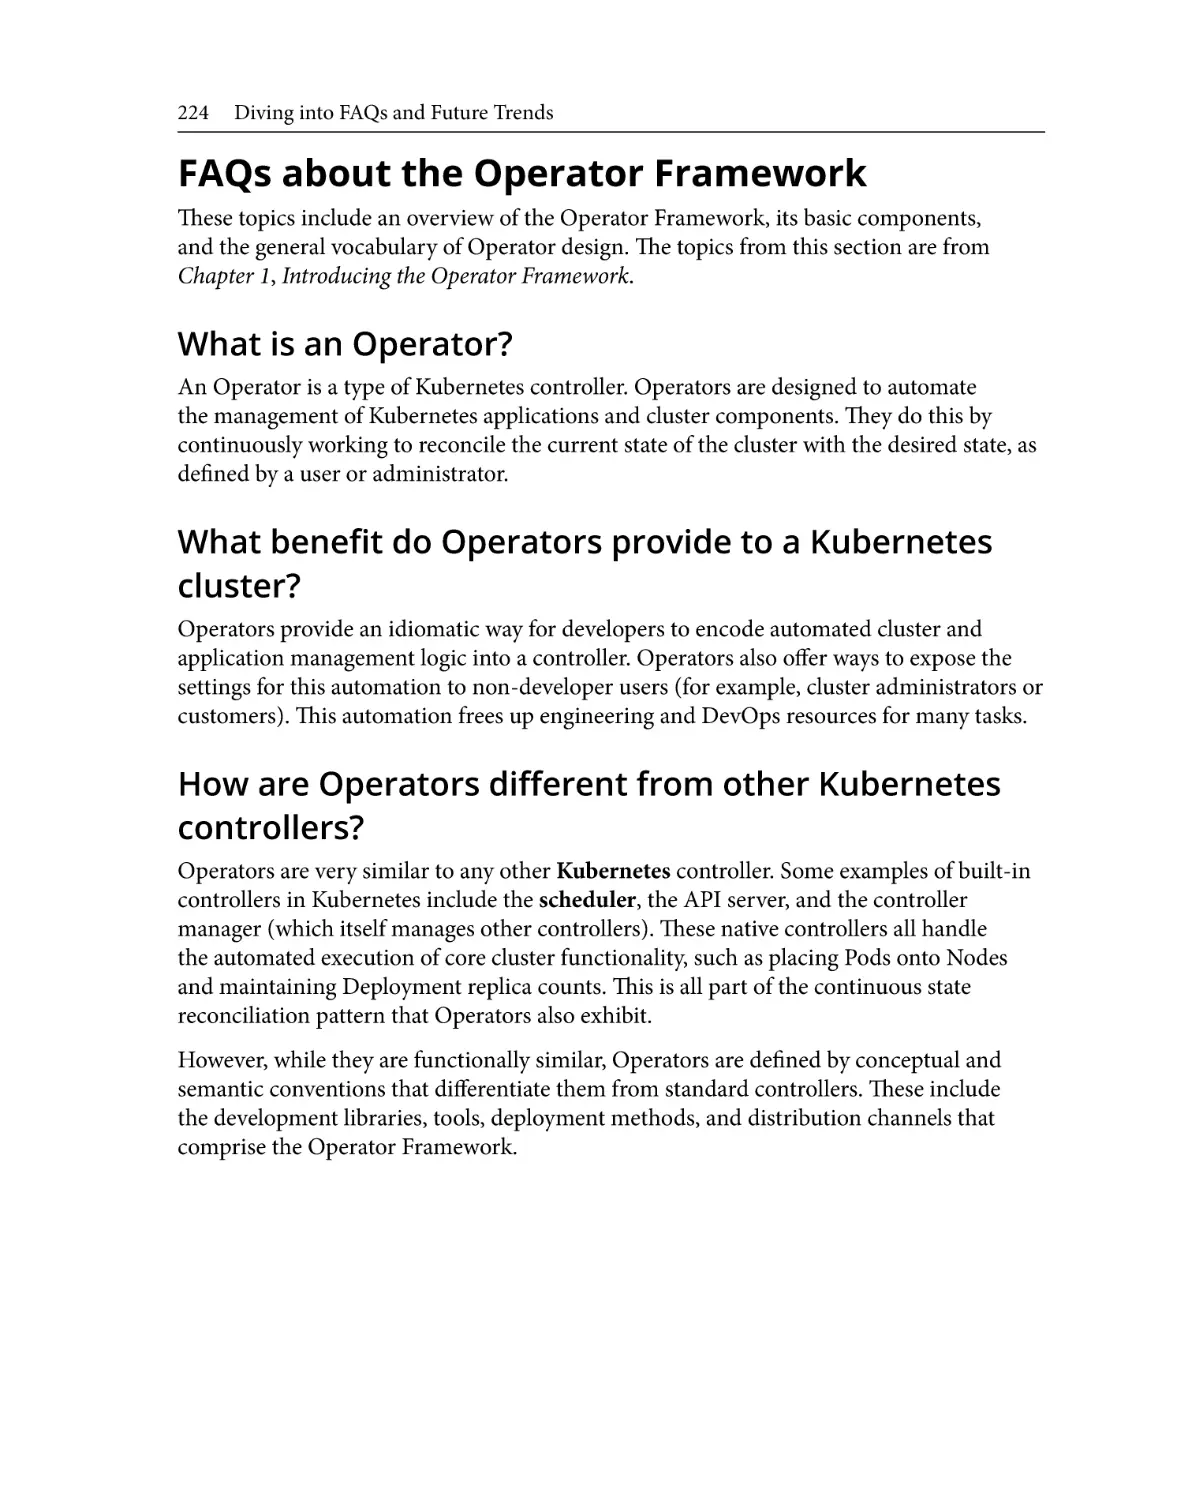
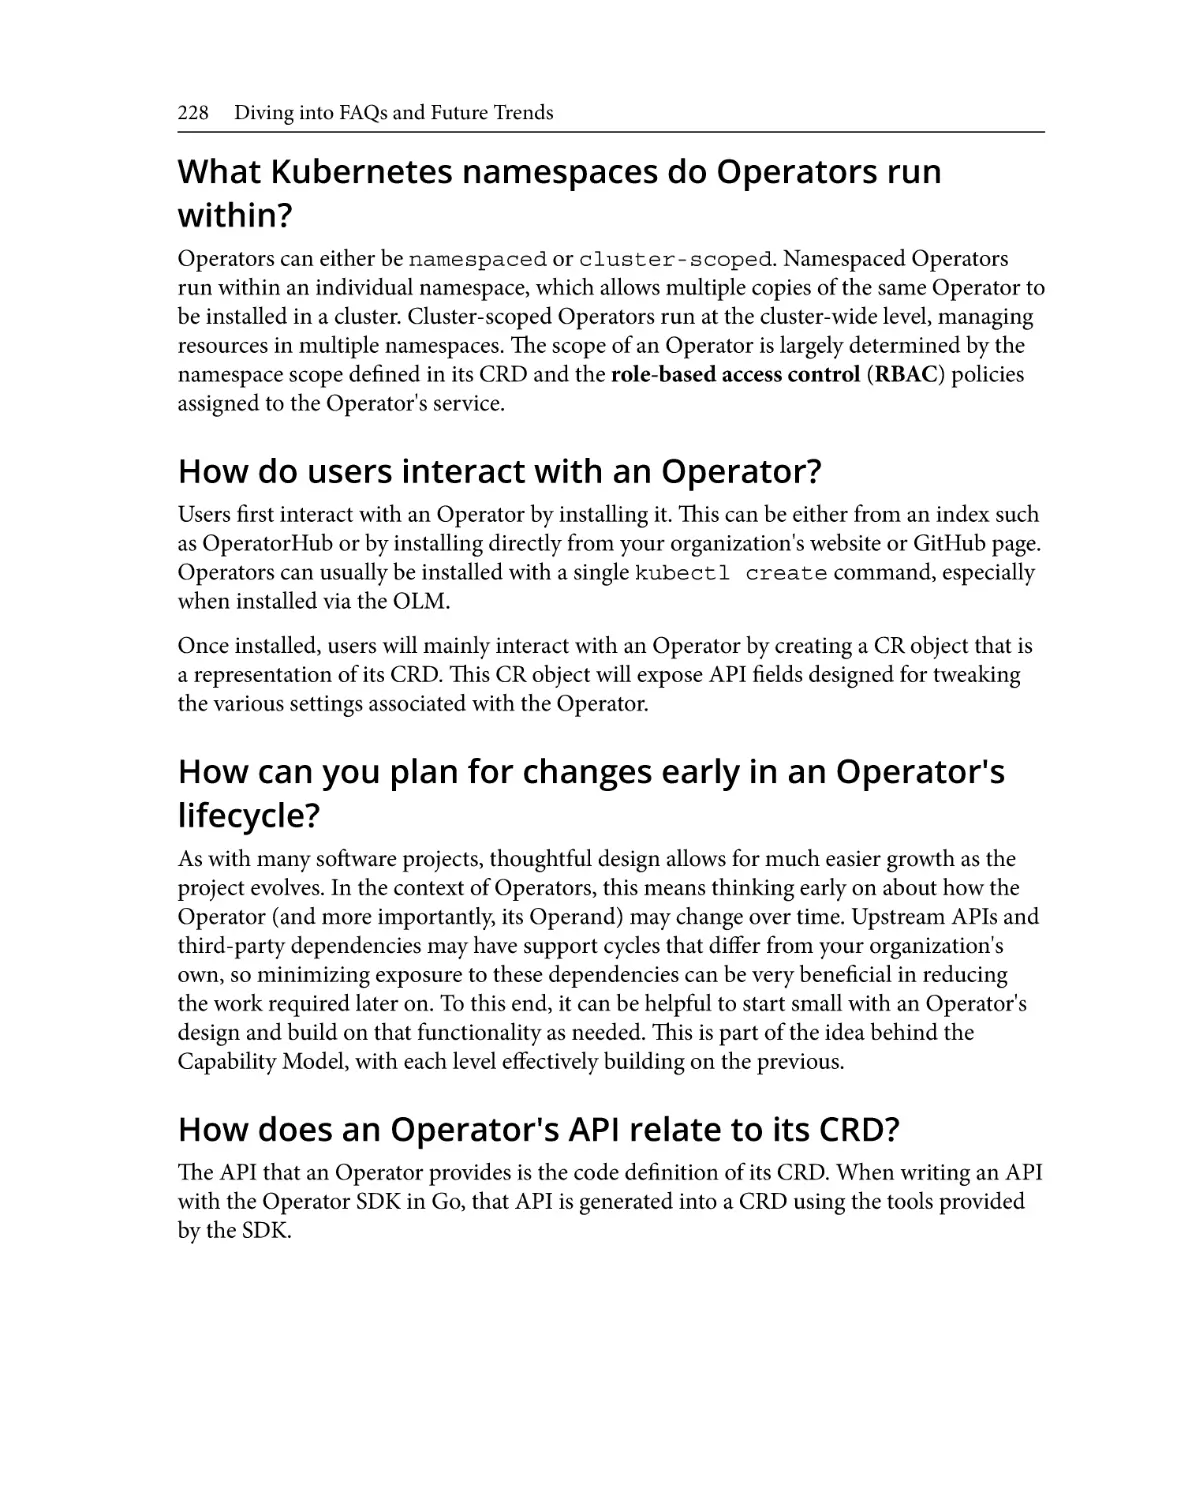
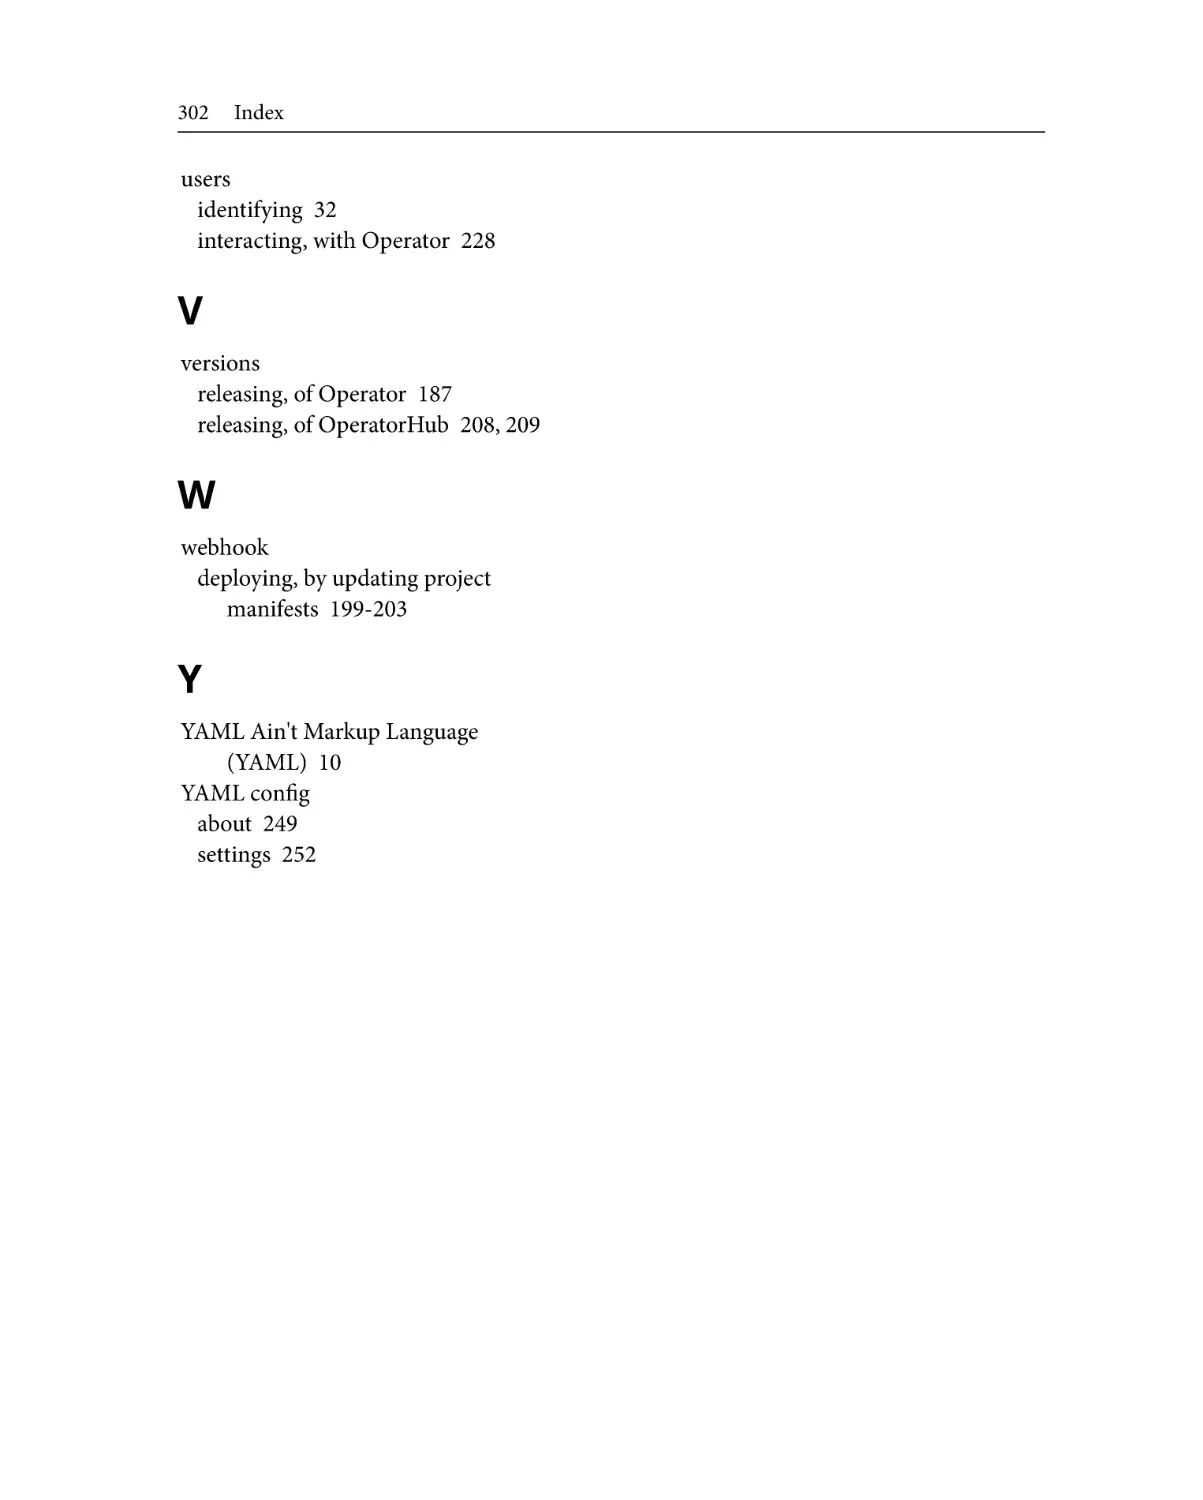
By defining a single declarative configuration, this Operator could control various settings
of the application deployment in one spot. This is the reason Operators are built on CRDs.
These custom objects allow developers and users to easily interact with their Operators
just as if they were native Kubernetes objects. So, the first step in writing an Operator to
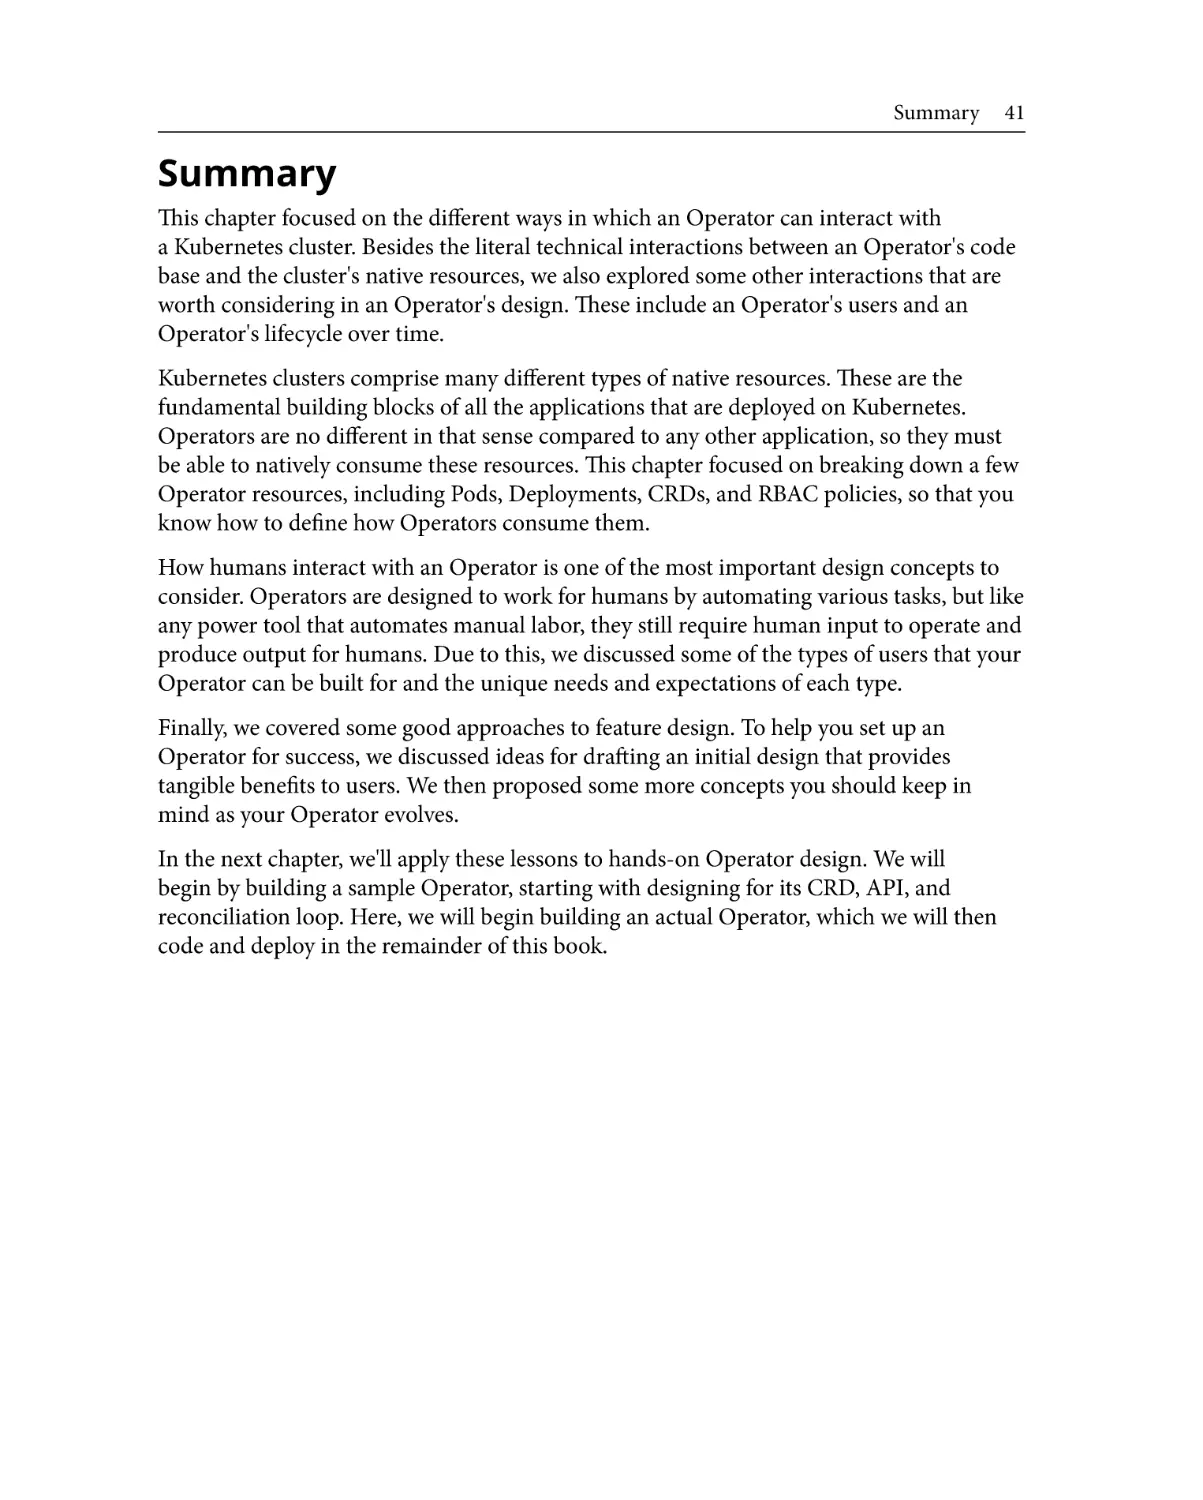
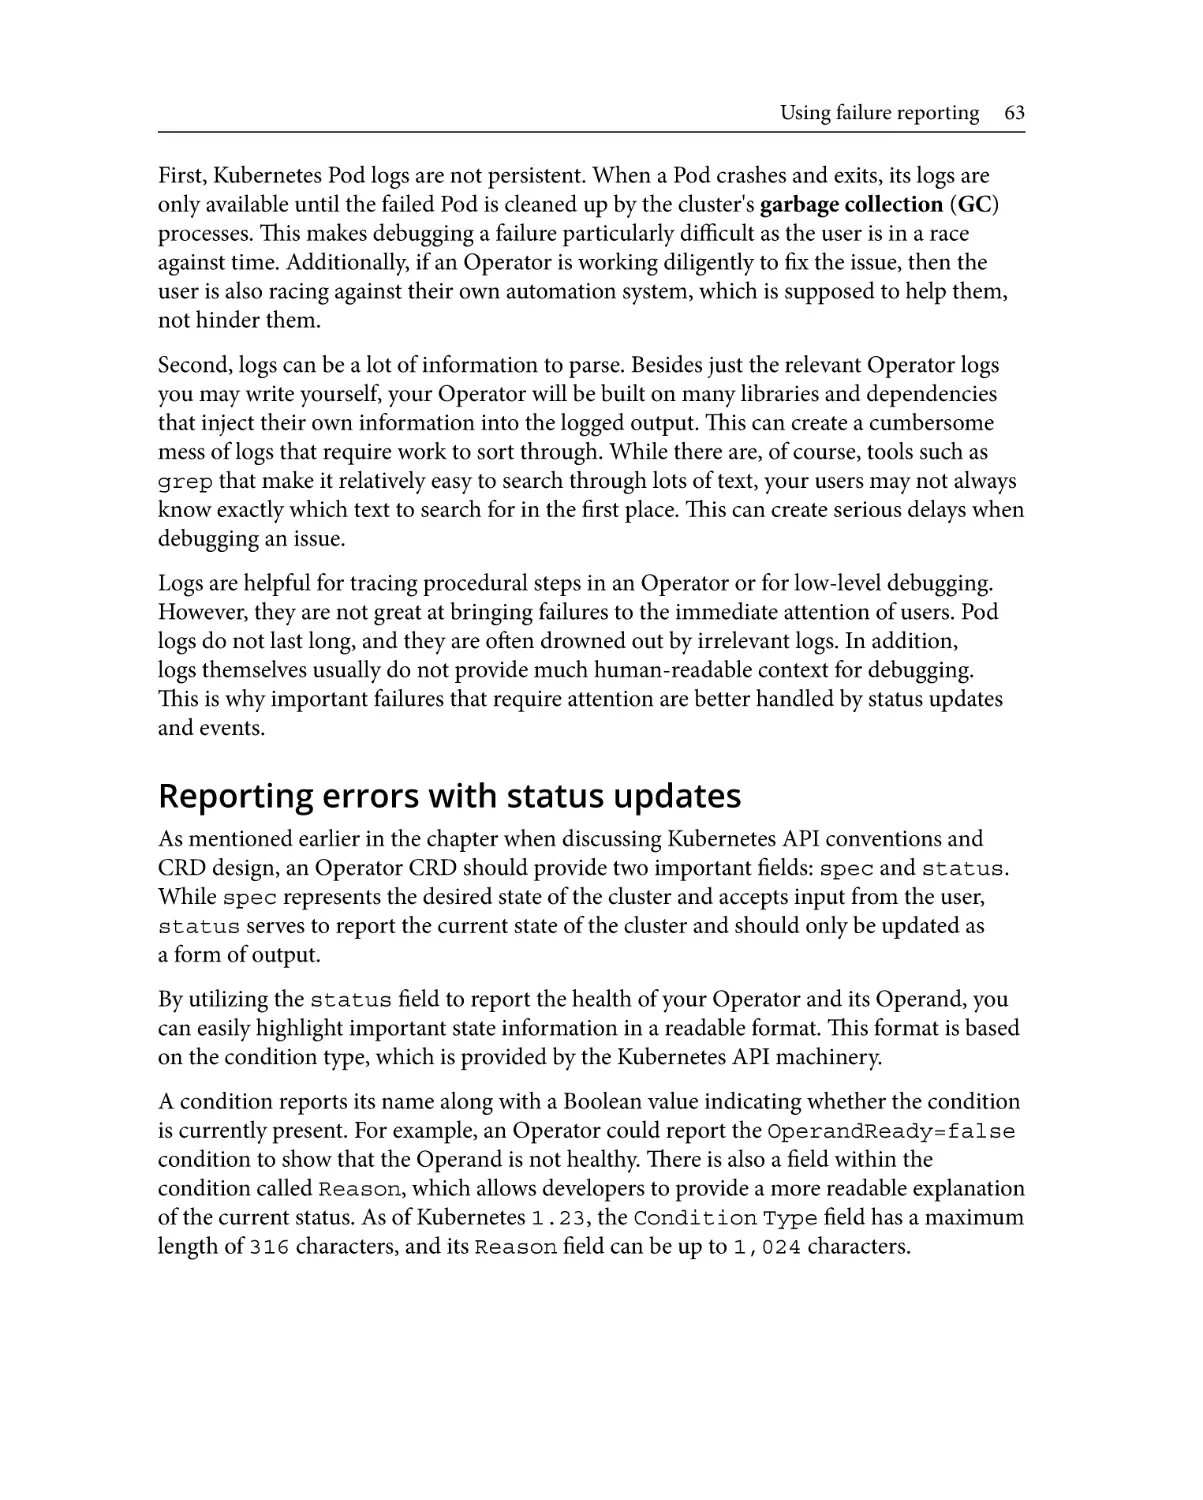
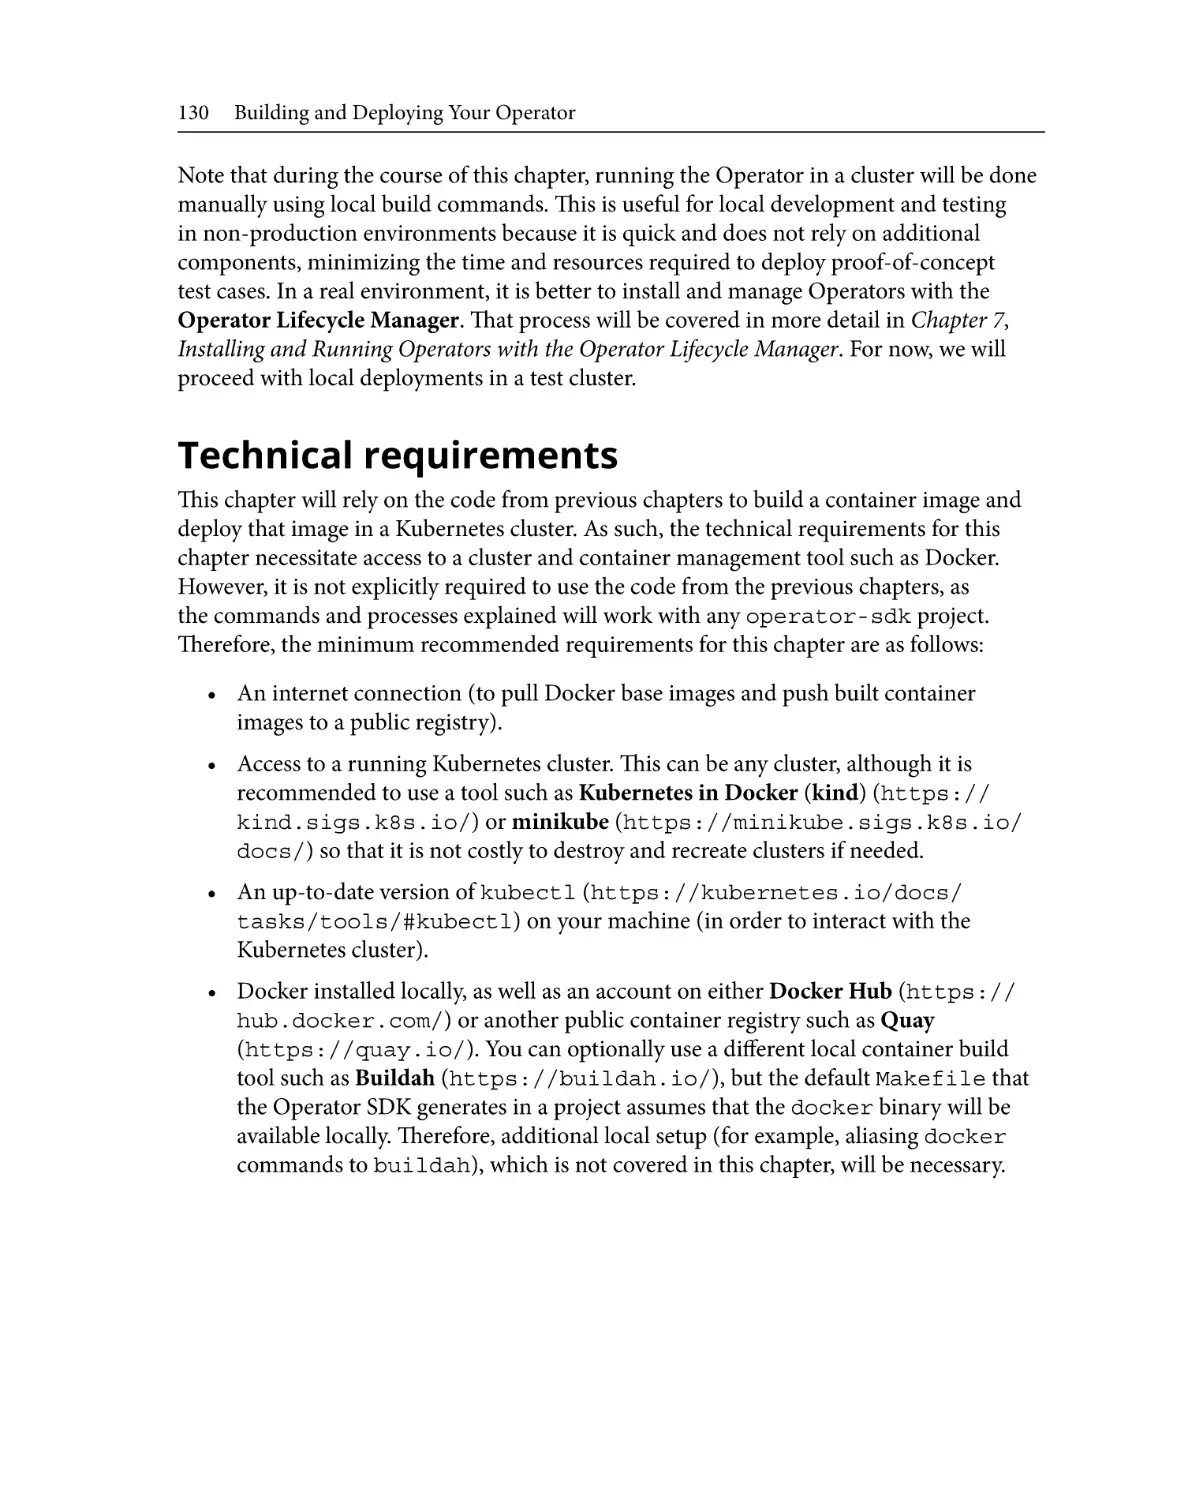
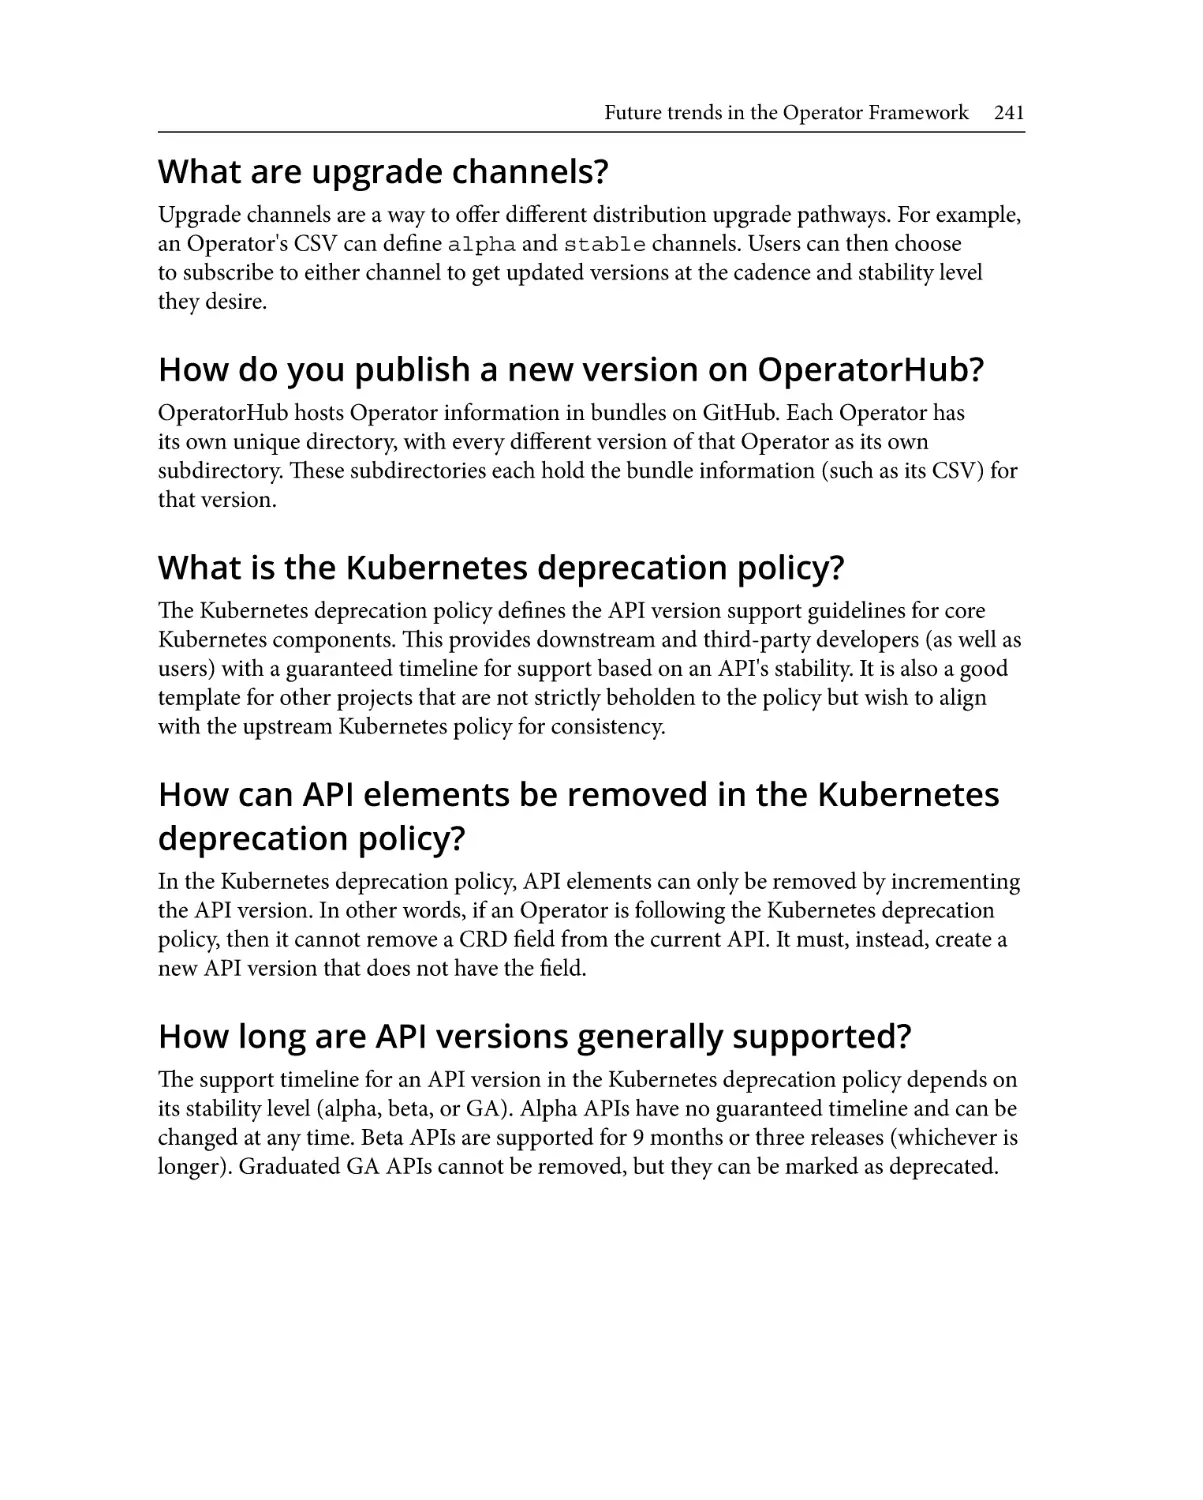
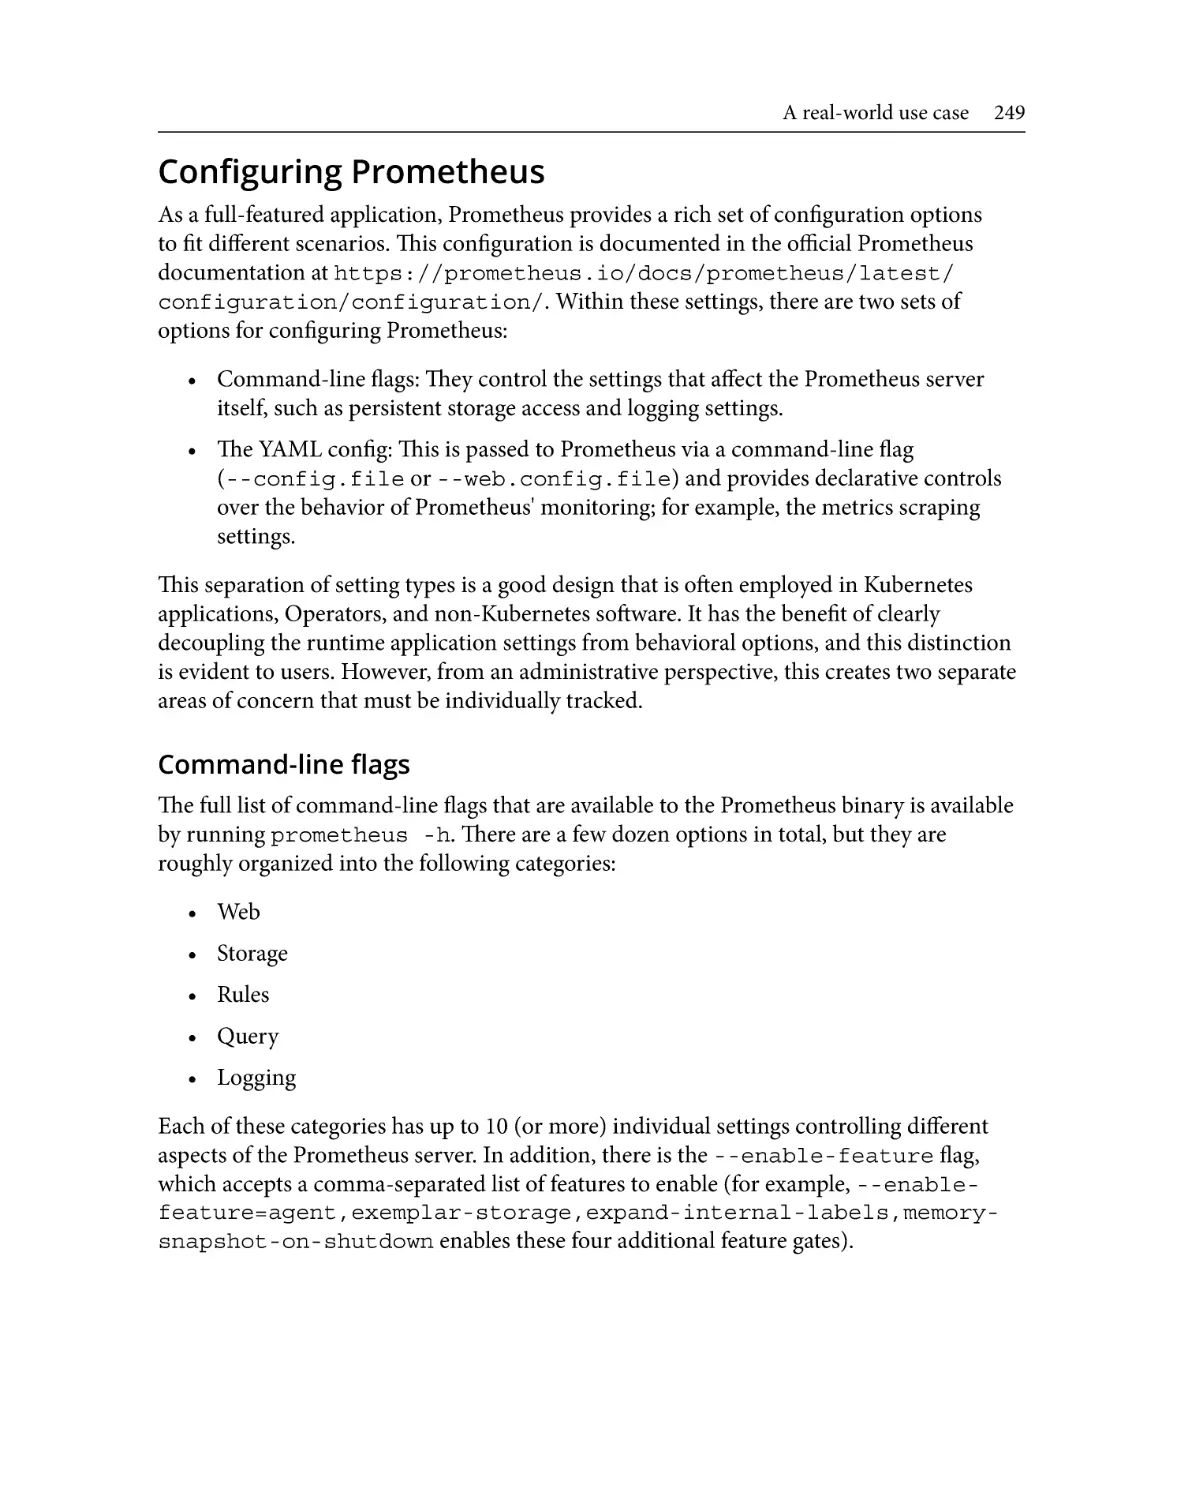
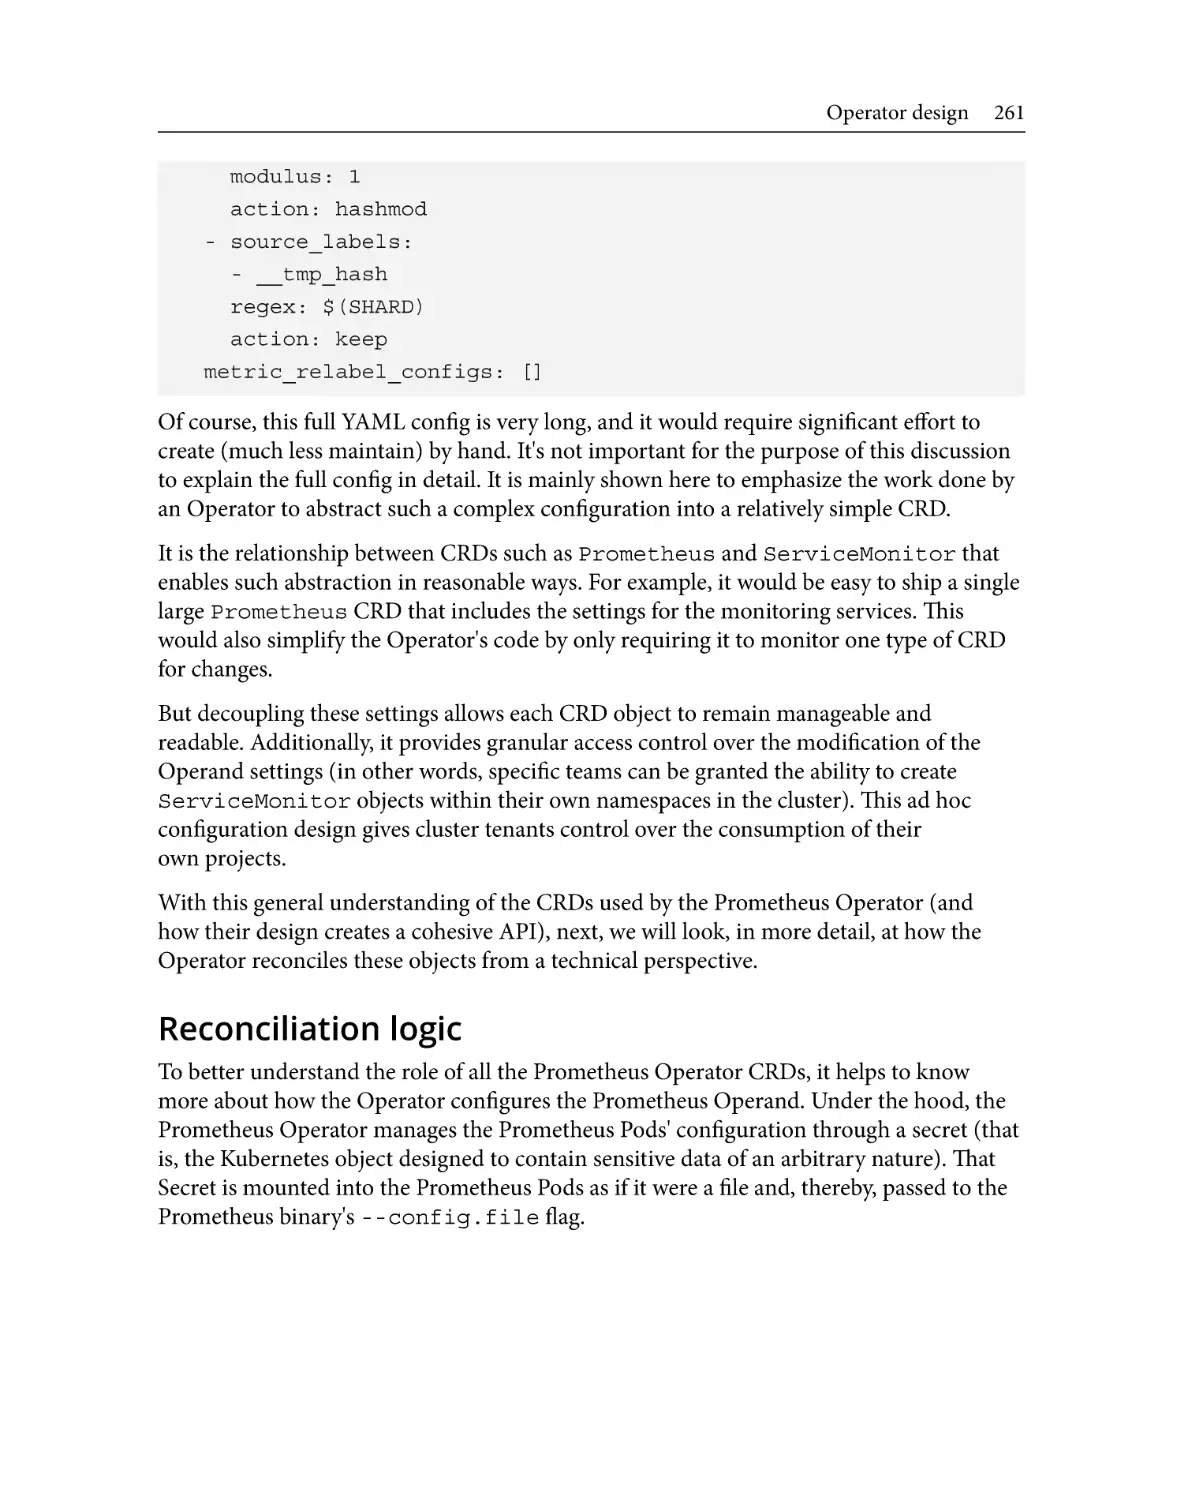
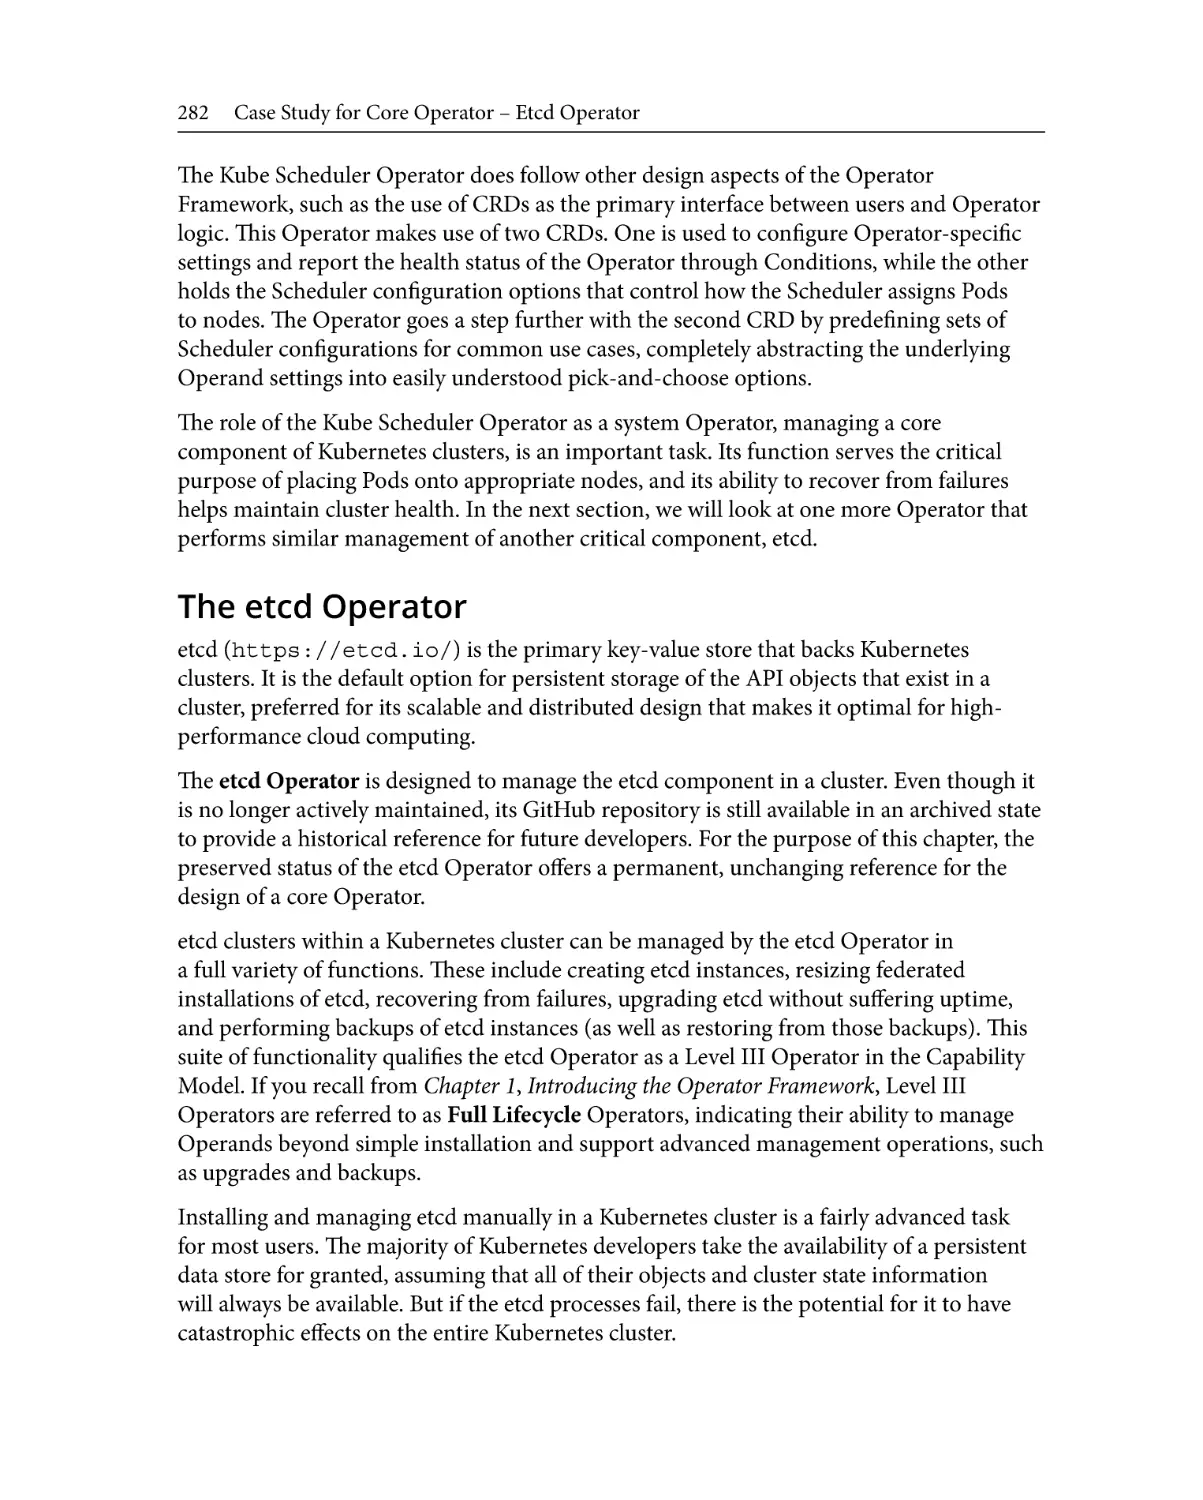
manage our simple web application would be to define a basic code structure with a CRD
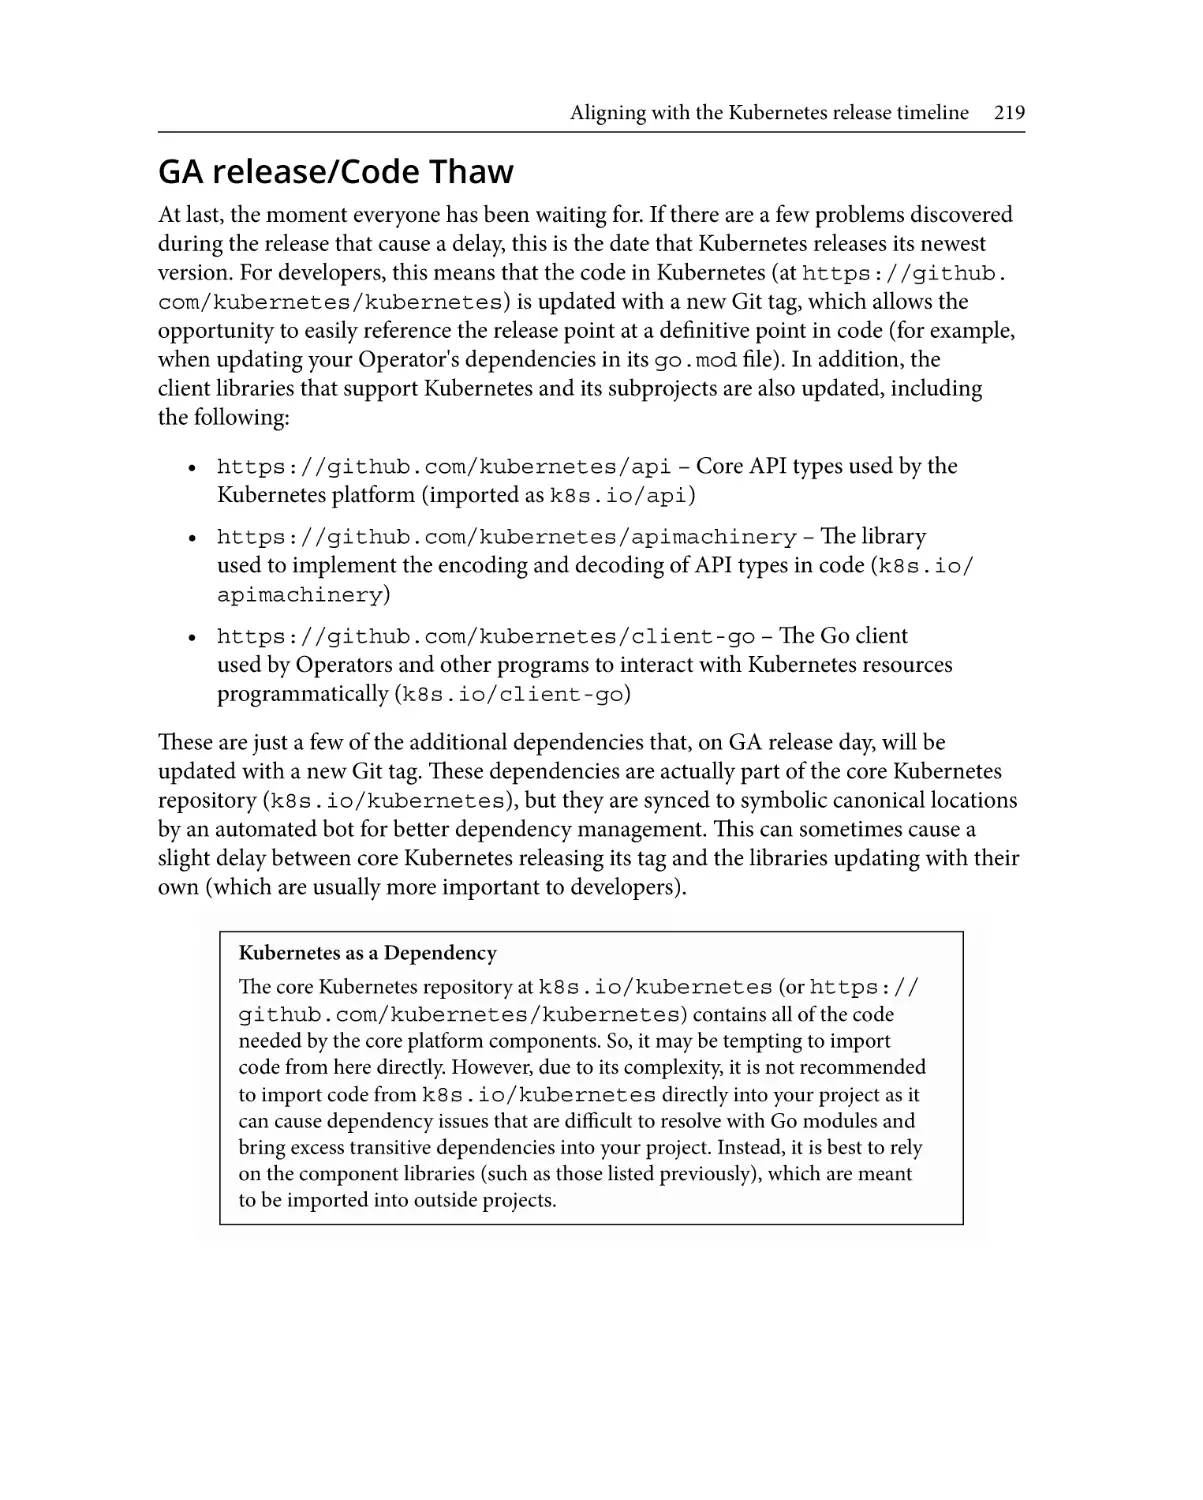
that has all the settings we think we'll need. Once we have done this, the new diagram of
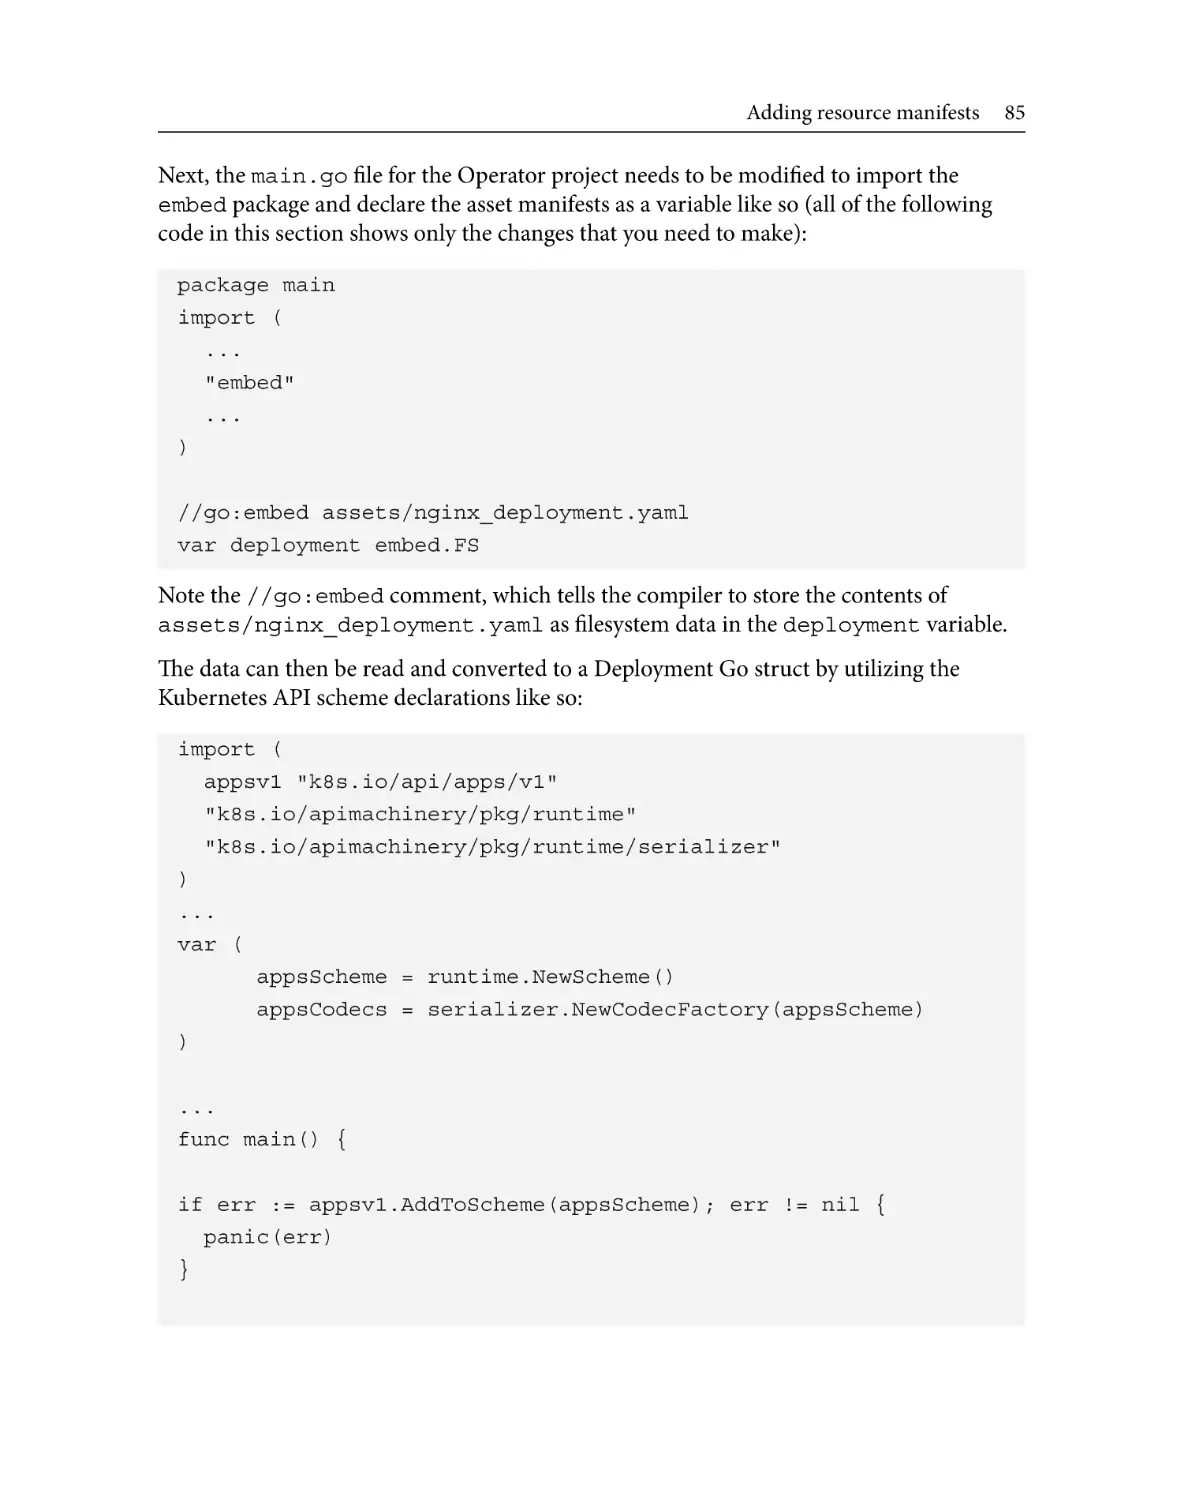
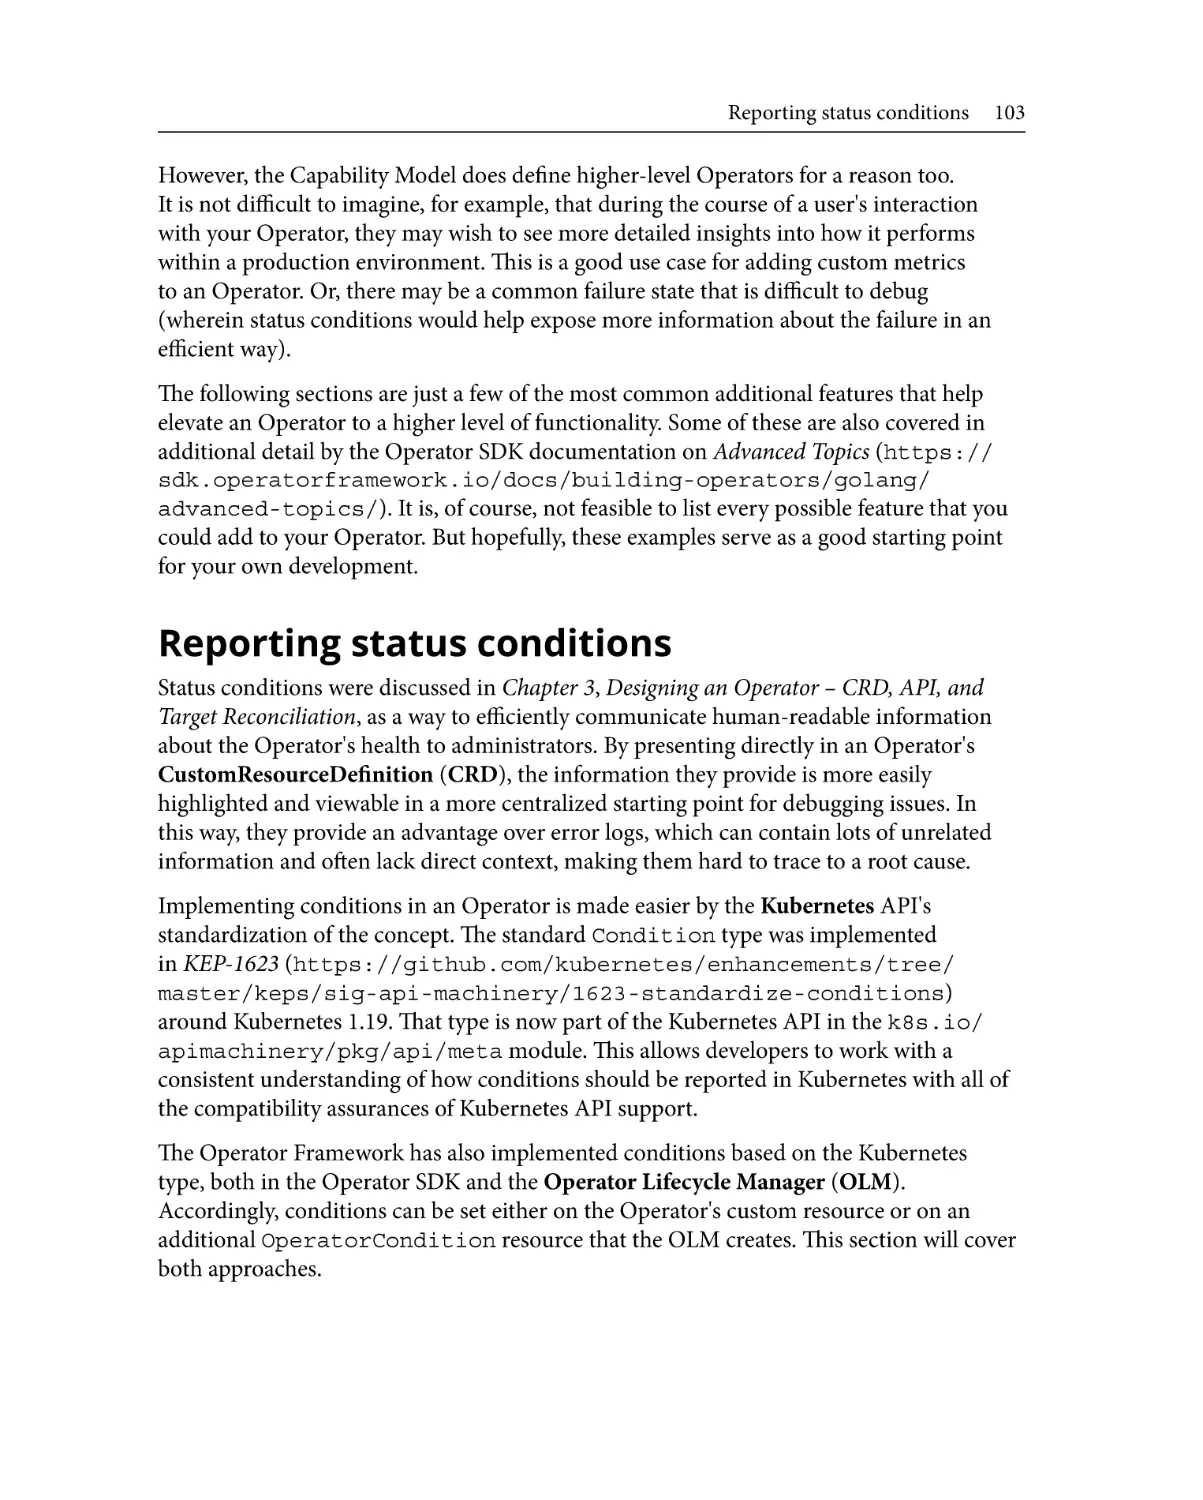
our application will look like this:
Figure 1.4 – In the new app layout, the cluster administrator only interacts with the Operator; the
Operator then manages the workload
This shows how the details of the Operand deployment have been abstracted away from
requiring manual administrator control, and the great part about CRDs is that more
settings can be added in later versions of the Operator as our app grows. A few examples
of settings to start with could be these:
• Database access information
• Application behavior settings
• Log level
22
Introducing the Operator Framework
While writing our Operator code, we'll also want to write logic for things such as metrics,
error handling, and reporting. The Operator can also start to bidirectionally communicate
with the Operand. This means that not only can it install and update the Operand,
but it can receive communication back from the Operand about its status and report that
as well.
Summary
In this chapter, we introduced the fundamental concepts of the Operator Framework.
These include the Operator SDK, OLM, and OperatorHub. In addition to the development
and distribution pillars of the Operator Framework, the Capability Model provides an
additional tool for measuring the functionality of an Operator. Throughout this book, we
will be exploring these components in deeper detail to get a hands-on understanding of
how they actually work.
We began this chapter by examining some of the problems that arise when manually
managing applications and clusters without Operators. This was done through the lens
of a simple generic web application based on a couple of Pods and a Persistent Volume.
The main difficulties in managing something such as this include the time and resources
required to debug applications. This is especially important in cloud applications, where
high availability (HA) and consistent uptime are top priorities.
We then looked at how each pillar of the Operator Framework addresses the biggest
difficulties of application management. These pillars begin with the Operator SDK,
which streamlines Operator development. This allows developers to begin iterating on
automated reconciliation logic to get their Operators written quickly. It also provides
commands to interact with OLM, which is the next pillar of the framework.
OLM exists to help administrators install and curate Operators within a cluster. It provides
dependency management and notifies administrators of conflicting APIs to promote
cluster stability. It also serves as a local catalog of installed Operators, which is useful for
users on the cluster.
Next, we examined OperatorHub and its role in the broader open source Kubernetes
community. As an open index of freely available Operators, OperatorHub serves to
promote the adoption and maintenance of Operators. It consumes the same manifests as
OLM to provide a standardized set of metadata about each Operator to users.
Finally, the Capability Model summarizes the maturity of an Operator based on the
functionality it provides. This is helpful to users, but it also serves as a convenient
roadmap for developers to plan features for their Operators.
Summary
23
To summarize each of these components, we revisited the original application example
presented in the first section. We showed that, with an Operator in place to manage the
application, cluster administrators do not need to be keenly aware of the architectural
details of the app to keep it running. Instead, this information and controls are abstracted
away behind the Operator's interface.
With all of this in mind, we move on to the next chapters to explore each of these topics in
depth. We will also be following detailed examples to build our own sample Operator. In
the next chapter, we'll begin looking at the important concepts of designing an Operator
based on its interactions with a Kubernetes cluster.
2
Understanding How
Operators Interact
with Kubernetes
Now that we understand what kinds of things an Operator does (and why it does them),
we can begin to explore how it performs these tasks. After identifying a use case for an
Operator, taking the steps to lay out its technical design is the next step of the process.
Though this is the period before any actual coding begins, it is still an essential part of
development. This is the standard approach for almost any software project, and in this
chapter, we will frame it in the context of Kubernetes.
During this planning phase, there are several factors to consider and questions to answer
that will help guide the Operator's design. These factors are both technical and organic
since your Operator needs to interact with not only the Kubernetes resources in your
cluster but also the human resources of your engineers and administrators.
26
Understanding How Operators Interact with Kubernetes
This chapter will explain some of the key considerations that should factor into your
Operator's design. First, we will provide an introduction to some of the native Kubernetes
components and resources that many Operators interact with. By looking at the ways that
Operators consume these resources and the use cases for doing so, we can start looking
at some of the patterns for functional Operator design. Next, we'll look at designing
an Operator while keeping its unique user base in mind and the ways that the design
can benefit users. Finally, we'll discuss some of the best practices for futureproofing an
Operator for ongoing developments.
In this chapter, we will cover the following topics:
• Interacting with Kubernetes cluster resources
• Identifying your users and maintainers
• Designing beneficial features for your Operator
• Planning for evolving changes in your Operator
The goal of this chapter is to help guide you through the early design process of an
Operator. Poorly planning an Operator's design can lead to many changes and updates
being needed during the Operator's life cycle. This puts stress on engineering resources,
but it can also confuse and frustrate users. That is why most of this chapter will focus
on non-technical specifics. However, we do need to know some baseline technical
interactions to shape these for our users. By the end of this chapter, you may find that you
are not currently able to address all of the pre-design concerns that are described here.
This is fine – the important part is to understand certain concepts that you must be aware
of as you head into development.
Interacting with Kubernetes cluster resources
Before you decide on how to design an Operator with users' experiences in mind, it is
important to understand what an Operator is capable of from a technical standpoint.
Having a mindset for the specific capabilities of the Operator's code base will help guide
the rest of the design process around what is truly possible. Otherwise, trying to define the
scope of an Operator based solely on user requests without considering feasibility could
lead to over-promising and under-delivering on functionality and usability.
The possibilities of any Operator are inherently limited by the underlying features of the
Kubernetes platform. This platform is composed of different native cluster resources, some
of which you may already be familiar with. This section will examine the most common
resources that Operators work with and explain how they can and should use them.
When you're developing an Operator, these resources will usually be consumed via the
Kubernetes client libraries, which allow any application to interact with cluster resources.
Interacting with Kubernetes cluster resources
27
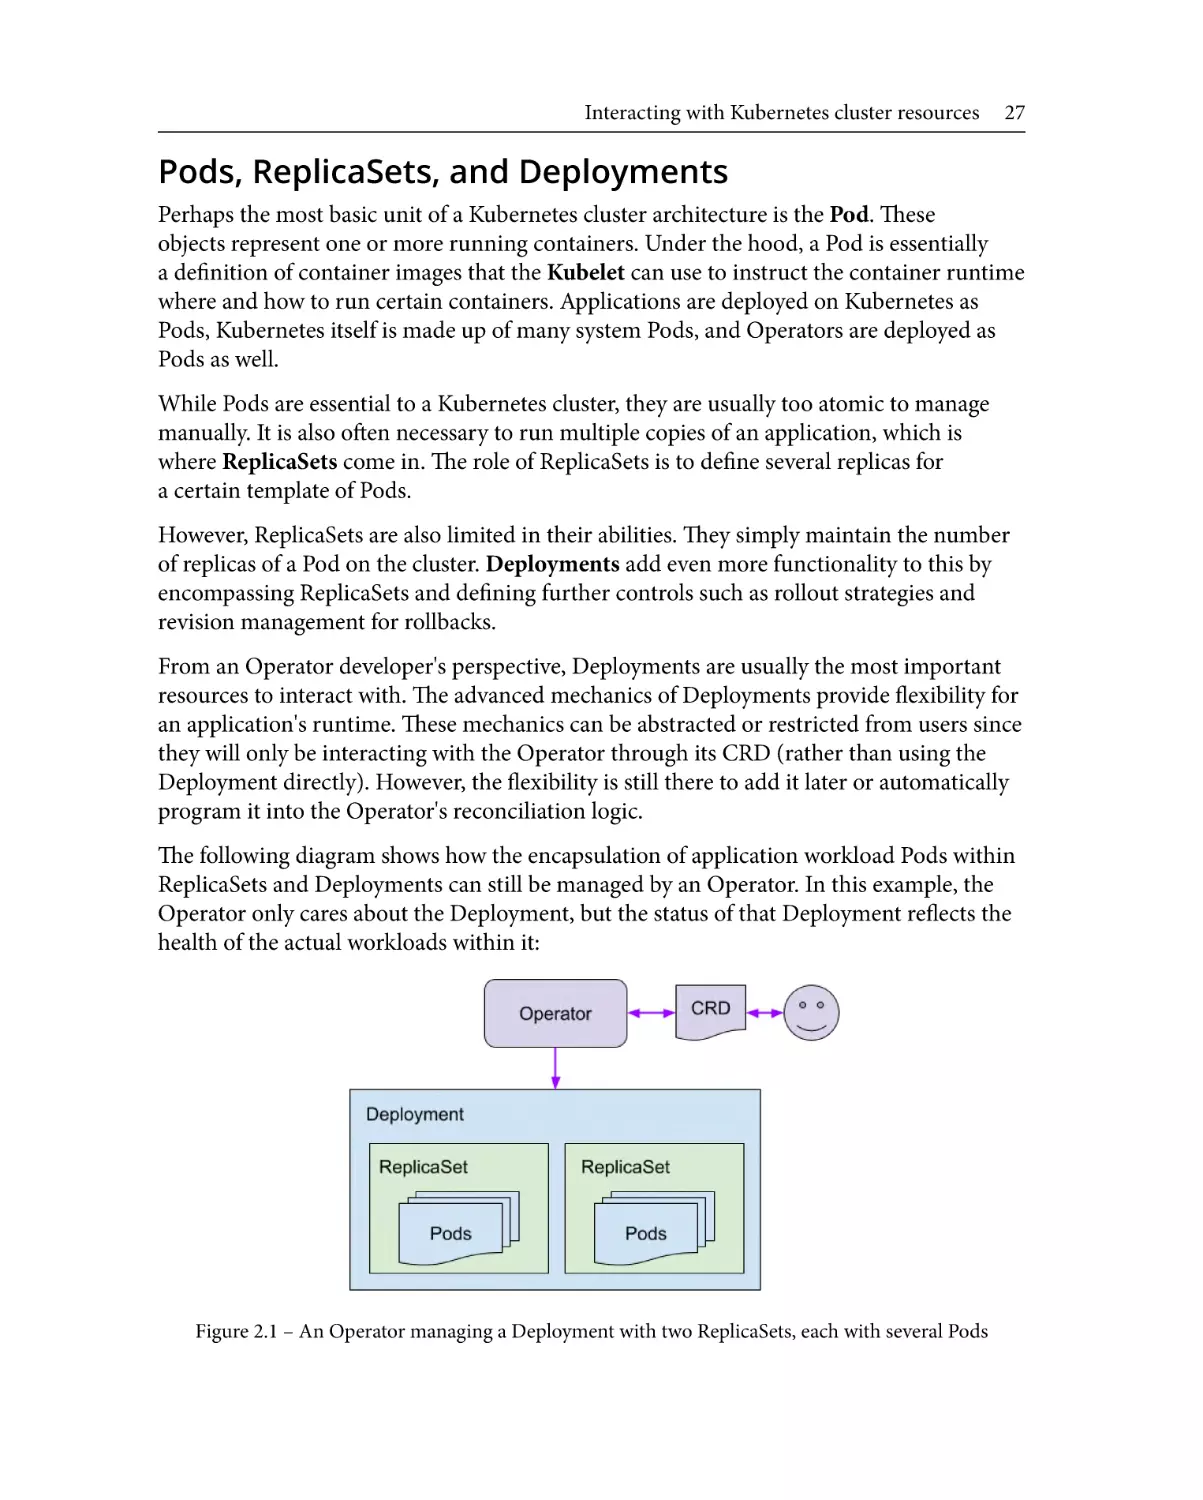
Pods, ReplicaSets, and Deployments
Perhaps the most basic unit of a Kubernetes cluster architecture is the Pod. These
objects represent one or more running containers. Under the hood, a Pod is essentially
a definition of container images that the Kubelet can use to instruct the container runtime
where and how to run certain containers. Applications are deployed on Kubernetes as
Pods, Kubernetes itself is made up of many system Pods, and Operators are deployed as
Pods as well.
While Pods are essential to a Kubernetes cluster, they are usually too atomic to manage
manually. It is also often necessary to run multiple copies of an application, which is
where ReplicaSets come in. The role of ReplicaSets is to define several replicas for
a certain template of Pods.
However, ReplicaSets are also limited in their abilities. They simply maintain the number
of replicas of a Pod on the cluster. Deployments add even more functionality to this by
encompassing ReplicaSets and defining further controls such as rollout strategies and
revision management for rollbacks.
From an Operator developer's perspective, Deployments are usually the most important
resources to interact with. The advanced mechanics of Deployments provide flexibility for
an application's runtime. These mechanics can be abstracted or restricted from users since
they will only be interacting with the Operator through its CRD (rather than using the
Deployment directly). However, the flexibility is still there to add it later or automatically
program it into the Operator's reconciliation logic.
The following diagram shows how the encapsulation of application workload Pods within
ReplicaSets and Deployments can still be managed by an Operator. In this example, the
Operator only cares about the Deployment, but the status of that Deployment reflects the
health of the actual workloads within it:
Figure 2.1 – An Operator managing a Deployment with two ReplicaSets, each with several Pods
28
Understanding How Operators Interact with Kubernetes
An Operator will usually be installed and managed by a Deployment. The Deployment
then provides a good owner reference of all the resource components that comprise
the Operator for garbage collection. This is useful for upgrading and uninstalling
the Operator.
Although it is not uncommon for an Operator to directly manage some Pods or
ReplicaSets, there are certainly tradeoffs. For one, such an Operator's design would lead
to a simpler application architecture at the expense of the capabilities and conveniences of
using Deployments. So, when you're deciding if your Operator will directly manage Pods
or a Deployment, it is important to consider the intent of the application itself and the
needs of the design.
Custom resource definitions
As we mentioned in Chapter 1, Introducing the Operator Framework, most Operators
are dependent on CustomResourceDefinitions (CRDs). CRDs are native Kubernetes
resources that allow users to extend the Kubernetes platform with their resource
definitions at runtime. They are like plugins to the Kubernetes API. Upon installing
a CRD in the cluster, it provides the API server with information on how to handle and
validate objects of that custom type.
The most common use case for an Operator to consume CRDs is to provide its
configuration object as one. Once the Kubernetes API knows how to handle this CRD, the
Operator or user will then create the Operator object from YAML (just like when creating
a Pod or Deployment).
Users can then interact solely with the Operator resource, rather than having to manually
tweak the Operator's Deployment to adjust its settings. This allows developers to present
a curated frontend user experience and abstract away the Kubernetes internals of the
application, all in an interface that feels just like any other native Kubernetes resource object.
But Operators can package more than just their configuration in a CRD. Depending on
the application that's being managed, an Operator can also install and monitor custom
resources that are needed by the application. Because of the many use cases for CRDs, it's
not unusual for an application to provide and depend on its custom resource objects.
An application Operator should know these resources and be able to install and manage
them too.
Interacting with Kubernetes cluster resources
29
CRDs are a core aspect of Operator development because, without them, all that is left are
the core Kubernetes resources (such as Pods, ReplicaSets, and Deployments) to achieve
our goals. While these resources can accomplish many things, they do not have the
inherent flexibility to be customized to any specific need. An Operator's custom resource
object provides a user interface that seamlessly fits into a cluster with other Kubernetes
objects. In addition, the Kubernetes API clients and Operator SDK provide code tools
so that you can easily interact with these custom resources, just like they were any other
cluster resource.
ServiceAccounts, roles, and RoleBindings (RBAC)
Access policies are often overlooked but can be critical to ensuring the stability and
security of your and your users' clusters. Just like an application manages other cluster
components, an Operator is going to require certain RBAC policies to complete its job
within the necessary access.
Operators require RBAC policies to manage their Operands. Defining an RBAC policy for
any application in Kubernetes starts with a role. Roles define the types of API objects that
an application or user has access to, as well as the verbs that are allowed to be used with
those objects. The following is an example of a role:
apiVersion: rbac.authorization.k8s.io/v1
kind: Role
metadata:
namespace: my-operators-namespace
name: my-operator-role
rules:
- apiGroups:
- operator.sample.com
resources:
- "*"
verbs:
- "*"
- apiGroups:
- ""
resources:
- pods
verbs:
- get
30
Understanding How Operators Interact with Kubernetes
- watch
- list
This sample creates a role that allows an Operator to get, watch, and list the Pods in the
specified namespace. It also allows the Operator to access all the resources under the
operator.sample.com API group. This is included to indicate how an Operator gains
access to its CRD. Since there is nothing inherently tying the Operator to the CRD, it still
needs RBAC access to that object, just like it would with any other API object. In this case,
the CRD would be created under that API group.
Roles can be scoped to a single namespace, or they can be cluster-scoped with
ClusterRoles. Either way, the role is bound to a ServiceAccount with a RoleBinding (or
ClusterRoleBinding). ServiceAccounts are specified on Pods to complete the chain of
identifying what RBAC-based access a Pod has within the cluster:
Figure 2.2 – Diagram of cluster versus namespace-scoped roles
The difference between roles and ClusterRoles depends on the breadth of access an
Operator will need within a cluster. Specifically, this is mostly based on the namespaces
that an Operator, its Operand, and their dependencies are installed in.
Interacting with Kubernetes cluster resources
31
Namespaces
All Kubernetes applications run within namespaces. A namespace is a logical partition for
application resources to reside in that separates components and allows certain degrees
of access control. Operators are also deployed within namespaces, but they sometimes
require access to other namespaces as well.
The breadth of an Operator's namespace coverage is called its scope. Operators can either
be scoped to a single namespace (namespace-scoped), or they can be cluster-scoped.
When an Operator is cluster-scoped, it can observe and interact with resources in multiple
namespaces. In contrast, a namespace-scoped operator is installed on a single namespace
and manages the resources within that namespace. Which scope a developer chooses for
their Operator depends on the resources the Operator will manage.
If the Operator must be able to manage resources that are created in any namespace,
then it should be cluster-scoped. This could be an Operator that manages an Operand in
a specific separate namespace from the Operator itself. Or, it could simply need to manage
Operands that exist in many namespaces (such as a resource provisioner where users
request development environments to be deployed).
On the other hand, namespace-scoped Operators have some benefits. Specifically,
restricting an Operator to a single namespace allows for easier debugging and failure
isolation. It also allows for flexible installation (including installing multiples of the same
Operator across multiple namespaces).
The Operator's scope is ultimately defined by its CRD and access roles. Cluster-scoped
custom resources are created outside of any specific namespace. This can be good for
Operators that will only have one instance in a cluster (for example, Operators that
manage core Kubernetes components, such as the API server). The access roles an
Operator needs will usually follow the scope of the Operator's CRD.
In summary, the resources we have covered here (Pods, ReplicaSets, Deployments, CRDs,
RBAC, and namespaces) are only a few of the possible resources an Operator will depend
on. However, they are the most common and likely the first ones you should consider
when you're designing your Operator's cluster interactions. In the next section, we'll look
at the other side of an Operator's interactions: how it interacts with humans.
32
Understanding How Operators Interact with Kubernetes
Identifying users and maintainers
The other way that an Operator interacts with Kubernetes is through its users. While
Operators exist to automate many of the cluster interactions that are required by humans,
the organic element in a Kubernetes cluster is still present. Users must still interact with
the Operator somehow, and the ways that different users will want and need to engage in
that interaction can influence an Operator's design.
Therefore, it is important to identify what type of user your Operator is intended for; there
are a few categories. Each category will have different needs and opinions on what their
Operator should do. So, by identifying the target audience for your Operator, you can
ensure that the Operator has been designed to appeal to the widest user base and fulfill the
most use cases.
For most Operators, the type of users that will be interacting with them can be broken
into a couple of groups based on the level of access those users have in the cluster and the
role those users play in the application at large. These user groups are usually as follows:
• Cluster administrators: The admin users of a cluster that are responsible for its
maintenance and stability.
• Cluster users: Individual users with internal access to a cluster, such as the
engineers on a team.
• End-users/customers: The external users of a cluster for a public or enterprise
product. These users don't directly interact with a cluster, but they use the
applications that run on the cluster.
These types of users all have similar motivations and use cases, but also some stark
differences. Thinking about each group individually helps highlight these comparisons.
Cluster administrators
Cluster administrators are commonly the consumers of Operators. These are the users
that have the most access to and knowledge about a cluster's architecture. As such, they
require the most power and flexibility.
Foremost, a cluster administrator's job is to ensure the stability of their cluster. This is
why they need the broadest array of tools and controls at their disposal to modify cluster
settings as necessary. But, as the saying goes, with great power comes great responsibility.
In this case, an Operator can provide administrators with great power to run their cluster
however they need to. But that power can backfire and harm the cluster if it doesn't work
exactly as intended.
Identifying users and maintainers
33
So, the developer of an Operator that is going to be used by cluster administrators may
consider restricting its capabilities to a defined set that is known to be supportable. This
can help them design the Operator so that it doesn't become too powerful and expose
settings that can inadvertently damage the cluster.
However, if an administrator finds that their cluster is suddenly on fire or critically failing,
they will need to fix that problem as soon as possible. If this is due to the component that
an Operator is managing (or the Operator itself), then the administrator will require
direct access to the Operator, Operand, or both. At times like this, a restricted feature set
may hinder the recovery time to restore cluster stability.
One benefit of developing Operators for cluster administrators is that they are very
knowledgeable about their clusters and have high levels of internal access to them. This
provides some trust that allows more powerful functionality to be created. Also, having
homogenous consumers limits the different workflows that need to be supported in
an Operator.
The following diagram shows the simple layout of an internal cluster administrator
interacting with an Operator to manage the Operands in their cluster:
Figure 2.3 – A single cluster administrator directly managing an Operator via its CRD
Ultimately, it is up to the developers of the Operator to determine what to provide for the
cluster administrators (if that is the target audience). Depending on the application the
Operator is going to manage, it may make sense and be safe and limit the administrator's
direct access to the Operand through the Operator. But if there is the potential for an
Operand deployment to go haywire and require manual intervention, then emergency
accessibility should be provided.
Cluster users
The users of a cluster interact with the cluster but without the access and control of
an administrator. For example, these could be developers working on a shared cluster
who need certain resources to be deployed and destroyed on-demand. Provisioning
development resources involves having users request those resources from the Operator.
34
Understanding How Operators Interact with Kubernetes
Cluster users require less control over underlying cluster components. They also are
less likely to be touching parts of a cluster and potentially breaking it. These are two
reassurances for developing an Operator that helps limit the scope of features that must be
supported by these users. Additionally, these users may have personal access to a cluster
administrator if they require more than the Operator provides.
Cluster users may also interact with Operators through internal applications. It is not
uncommon for organizations to deploy custom applications within their intranets. Using
an internal application like this can provide a more user-friendly frontend for your
cluster users. It also allows the cluster users' access to be restricted below the underlying
Operator's actual capabilities.
The following diagram shows a setup where multiple internal users are using an Operator
to provision resources in the cluster. Some of these users are interacting with the Operator
directly, while others must go through an internal application to interact with the
Operator (the Operator could even be managing this frontend application). With patterns
like this, intra-organizational privilege hierarchies can be defined for working with the
internal tools that are provided by Operators:
Figure 2.4 – Internal cluster users requesting resources, either directly from the Operator or via an
intermediary internal application
The options for exposing an Operator to internal cluster users are some of the most
flexible. These users benefit from a level of trust and investment in the cluster's stability
that's high enough that the risk of negligent or malicious behavior is mitigated. However,
there is still a risk in exposing application management controls to a broader audience. So,
you must think about this when you're designing the capabilities of your Operator.
Identifying users and maintainers
35
End users and customers
The end users of a product can also benefit from Operators. These users may not even
know they are interacting with an Operator since the architectural design of the product
is usually not apparent to everyday users. But it is still important to know how the users
of a product will expect it to function, especially in this case, where we are designing
a critical component of the product.
These end users will likely not be directly interacting with the Operator. This would
mean that your users and customers have access to the Kubernetes cluster themselves,
which is not ideal for security or usability. The customers of an application benefit from
an interactive frontend, whether this is a website or mobile app. But that frontend is
just a tool for interacting with a backend, which could be made up of many different
components, including Operators.
In this case, your user might be yourself – that is, you (or your organization) will be
developing the Operator but also probably developing the frontend applications that
depend on it. In situations like this, cross-project collaboration is necessary to elaborate
on the needs and expectations of each team. Operators in this kind of scenario will benefit
the most from elegant API design that communicates easily with other programs, rather
than human users:
Figure 2.5 – External end users interacting with an Operator via an external-facing application
The end users of an application will usually be completely detached from interacting with
an Operator. However, this doesn't mean that an application and its resources can't still be
managed by one. In this scenario, the Operator is still an important and helpful tool for
maintaining the state of the cluster that end users expect, even if those users don't need to
know they are interacting with it.
36
Understanding How Operators Interact with Kubernetes
End users are the final type of users we'll discuss that interact with your Operator in
a functional capacity. However, there are other people we must consider when we're
designing an Operator: the people who maintain the Operator and its code.
Maintainers
The final type of user who will interact with your Operator does so in a different way than
the other three. These are the maintainers of the project, who work on the code to resolve
issues and implement new features. The role of a maintainer in any software project is an
important one, but in an open source ecosystem such as Kubernetes, there are additional
points to consider.
If your Operator's source code is going to be open and accepting contributions from
anyone, it will be essential to appoint trusted owners to review code changes. This is true
for any open source project, but for an Operator, it is very beneficial that these reviewers
are familiar with the core Kubernetes concepts that any Operator depends on.
From an enterprise perspective, investing in a reliable team of engineers to build and
maintain an Operator provides a long-term incentive for your maintainers to continue
building the Operator's source code. This also creates a level of trust between the
maintainers of the Operator and its primary stakeholders. Ongoing maintenance for
the Operator code base will be necessary, especially given the changing nature of the
Kubernetes platform. Maintainers who are familiar with the Kubernetes community are
an important addition to teams that use Operators.
These are just a few of the types of users that your Operator may interact with. This list
is by no means exhaustive, but it is intended to provoke thoughts about your user base.
Identifying the type of user for an Operator helps narrow down what kind of features an
Operator will need. It also provides a starting point for determining what features are
necessary. In the next section, we'll look at some ideas for thinking about feature design
that benefits users the most.
Designing beneficial features for your
operator
Once you've identified the target audience for your Operator, the next step is to define
what the Operator will do. Listing the problems that must be solved by the Operator will
give you a better understanding of the goals of the project. It will also highlight whether or
not those goals provide a tangible, measurable benefit to your users.
Designing beneficial features for your operator
37
Figuring out what kind of functions are truly beneficial is hard to define. The exact
definition of "helpful" is different on a case-by-case basis. Some beneficial Operators solve
widespread headaches in a novel and intuitive way. Others address more niche problems
that may only affect small communities of users, but the impact of eliminating those
problems is significant. However, it is a bit easier to describe beneficial functions in terms
of what is not useful.
Foremost, useful Operators are not redundant. In specific examples, redundancy can
mean a lot of different things. But it is fundamentally the essence of nonduplication that
Operator designers should strive for. The most basic example of this is not rewriting
an Operator that already exists elsewhere without having a sufficient reason to do so.
Researching the proposed area of your Operator can prevent this. Researching the
approaches that others have undertaken will also reveal potential pitfalls to avoid in
the process.
Operators can also be redundant in terms of Kubernetes concepts. Since an Operator is
essentially interacting with the cluster and exposing some of that interaction to users, the
Operator is an extension of Kubernetes. Because of this, it can be inadvertently tempting
to "reinvent the wheel" when it comes to brainstorming functions for the Operator. This
kind of functional redundancy can be related to the next issue we'll discuss, wherein
developers try to address nonexistent problems.
The next issue concerns beneficial tasks, which are not hypothetical. The world of software
development benefits from many passionate engineers who are eager to fix the problems
they run into. This zeal for contribution can extend to fixing potential issues, even if they
have not been witnessed in practice. This is certainly a good mentality to have, and in no
way should this kind of passion be stifled. There are, of course, many types of issues and
bugs that can be identified and should be patched – hopefully before anyone runs into them
in production. But occasionally, real solutions are proposed for purely theoretical problems.
These hypothetical use cases may be proposed without any actual evidence that users are
seeking such a solution. This can be tricky because sometimes, the use case seems obvious
enough that it almost shouldn't necessitate any explicit demand. But when each new
feature costs resources to implement and binds the maintainers to support it, paying close
attention to silence can reveal unnecessary work.
While there could be many breakthrough ideas for features, it is important to try to
validate a feature's proposal with real demand. This type of research can also uncover
redundancy in the idea and lead to more effective alternative solutions that already exist.
38
Understanding How Operators Interact with Kubernetes
There are, of course, an infinite number of criteria that could be used to define the
usefulness of features. In the context of Kubernetes Operators, however, these are just
some initial thoughts to get started with. By thinking about your Operator in terms of its
benefits, and by asking "What makes this useful?" you can avoid excessive or unnecessary
changes that will require maintenance later down the road.
That foresight will come in handy as your Operator grows and evolves. Like most software,
Operators are prone to changes over time, especially given their dependence on the
upstream Kubernetes code base. In the next section, we'll learn how to prepare for and
navigate these changes as they arrive.
Planning for changes in your Operator
Over any software project's lifespan, changes will be made to the code base. These
include bug fixes, refactors, new features, and old features being removed. This is true for
Kubernetes, its subprojects, and projects that are built on the platform, such as Operators.
While it's impossible to predict the future of what your Operator will evolve into one day,
there are a few ideas that can help you during the design phase to ease transitions and new
developments later. These are as follows:
• Start small.
• Iterate effectively.
• Deprecate gracefully.
These decisions have significant benefits in practice when you're maintaining an Operator.
However, these are not definitive or strictly specific to Kubernetes Operators. Consider
them as general suggestions for developing any software project. But here, we will be
examining them in the context of writing an Operator.
Starting small
When planning the original design for an Operator, considering how the Operator may
change over time can prevent future challenges. Designing with growth in mind also helps
limit the initial scope of the project so that it only covers essential purposes. This allows
adequate resources to be allocated to the development of a strong first product that can be
efficiently iterated over time.
Planning for changes in your Operator
39
While it may seem like the best goal for developing an Operator is to start with as many
features as possible, in reality, the opposite is often true. After all, one purpose of an
Operator is to create a layer of abstraction between its users and the underlying cluster
functions. By exposing too many options, you may lose the benefit of automation by
requiring your users to understand more of the native Kubernetes cluster functionality.
This also makes your users more vulnerable to changes in the Kubernetes platform that
shouldn't directly affect them.
When you're deciding whether to add a feature to an Operator or not, think critically
about the importance of the feature, as well as the risks and costs of implementing it. This
goes back to the topics of avoiding redundancy and addressing hypothetical problems,
which we looked at in the previous section. It also relates to the topic of deprecation,
which we will cover shortly.
Ultimately, most of the time, it is better to lack features than to ship a complex and
confusing Operator. Every new feature has maintenance costs and the potential to
introduce bugs later. These are some of the biggest reasons for starting small and building
as you listen to feedback from your users.
Iterating effectively
Once you have a minimal set of features, it will eventually be necessary to add
improvements. Fortunately, it is much easier to add new things than it is to take old
things away.
You should actively seek feedback from users on what kind of features they need. This can
be done in many ways, from maintaining an active presence online around your Operator
and its related projects to implementing detailed usage metrics in the Operator's code. In
addition, having an awareness of the broader Kubernetes project communities can help
highlight upcoming changes in the underlying platform that you may want to support in
your Operator.
As you add features, continue to monitor their usage to gauge their effectiveness. Keeping
the guidelines for the initial design of an Operator, such as its user base and feature tips,
in mind will also make sure that each new feature is just as effective as the original set of
features you designed when you first built the Operator.
40
Understanding How Operators Interact with Kubernetes
Deprecating gracefully
One type of change that can be incredibly inconvenient for users is deprecation. Many
aspects of large software projects inevitably have to be replaced or have their support
dropped by official maintainers. With a minimal Operator design, the possibility of your
users' experience having to be changed is also minimized.
Starting with a small design and thoughtful, effective iterations after that will help reduce
the need to remove features. Unfortunately, it may be inevitable at some point. In this case,
it is important to give users plenty of notice so that they have sufficient time to transition
to an alternative, if applicable.
The Kubernetes community has defined policies for deprecation, which will be covered in
detail Chapter 8, Preparing for Ongoing Maintenance of Your Operator. But these guidelines
serve as a good template for your deprecation. Kubernetes users will be familiar with the
timelines and processes for deprecation, so by remaining consistent with those processes,
your users will benefit from a familiarity they already have.
Just as all good things must come to an end, so too must some good features be eventually
retired. Fortunately, this is not a foreign concept to the Kubernetes community, which
offers a well-established template for deprecation. As a responsible citizen of the open
source community, you and your users will benefit from a respectful, considerate
approach to removing and changing aspects of your project.
Keeping all these practices in mind during the design stage of an Operator will pay off by
limiting the scope of the project. This allows resources to focus on building a stable tool
that does not radically change over time. Users and maintainers will both benefit from
this stability, as users can seamlessly work with different versions of the Operator without
changing their workflows, and maintainers can invest long-term effort into growing the
project and passing knowledge about it to others.
Summary
41
Summary
This chapter focused on the different ways in which an Operator can interact with
a Kubernetes cluster. Besides the literal technical interactions between an Operator's code
base and the cluster's native resources, we also explored some other interactions that are
worth considering in an Operator's design. These include an Operator's users and an
Operator's lifecycle over time.
Kubernetes clusters comprise many different types of native resources. These are the
fundamental building blocks of all the applications that are deployed on Kubernetes.
Operators are no different in that sense compared to any other application, so they must
be able to natively consume these resources. This chapter focused on breaking down a few
Operator resources, including Pods, Deployments, CRDs, and RBAC policies, so that you
know how to define how Operators consume them.
How humans interact with an Operator is one of the most important design concepts to
consider. Operators are designed to work for humans by automating various tasks, but like
any power tool that automates manual labor, they still require human input to operate and
produce output for humans. Due to this, we discussed some of the types of users that your
Operator can be built for and the unique needs and expectations of each type.
Finally, we covered some good approaches to feature design. To help you set up an
Operator for success, we discussed ideas for drafting an initial design that provides
tangible benefits to users. We then proposed some more concepts you should keep in
mind as your Operator evolves.
In the next chapter, we'll apply these lessons to hands-on Operator design. We will
begin by building a sample Operator, starting with designing for its CRD, API, and
reconciliation loop. Here, we will begin building an actual Operator, which we will then
code and deploy in the remainder of this book.
Part 2:
Designing and
Developing an
Operator
In this section, you will learn how to create your own Operator, from general architectural
best practices to specific technical code examples.
This section comprises the following chapters:
• Chapter 3, Designing an Operator – CRD, API, and Target Reconciliation
• Chapter 4, Developing an Operator with the Operator SDK
• Chapter 5, Developing an Operator – Advanced Functionality
• Chapter 6, Building and Deploying Your Operator
3
Designing an
Operator – CRD,
API, and Target
Reconciliation
The lessons from the previous chapters have helped us understand the foundational
basics of the Operator Framework. In Chapter 1, Introducing the Operator Framework, we
covered the conceptual pillars of the Operator Framework and the purposes they serve.
Then, in Chapter 2, Understanding How Operators Interact with Kubernetes, we discussed
some general principles of software design in the context of Kubernetes and the Operator
Framework. Together, these chapters have established a baseline understanding of
Operators and their development in broad terms. Now, we will be applying this knowledge
with examples and begin designing our own Operator.
46
Designing an Operator – CRD, API, and Target Reconciliation
We'll start by defining a simple problem that our Operator is going to solve. In this case,
that will be managing a basic deployment of an application with a single Pod. Over the
next few chapters, we will add functionality to this Operator with specific code examples,
but before we can start coding our sample Operator, we must first walk through the
design process. Building on the generic definitions and steps we've already discussed
with a concrete example will provide a context with which to frame the earlier lessons in
practical terms.
This process will cover a few different steps in order to lay out the core aspects of our
Operator. These will include drawing out the application programming interfaces
(APIs), CustomResourceDefinitions (CRDs), and reconciliation logic that will make our
Operator work. Along the way, these steps will be related back to the lessons discussed
earlier and industry-standard best practices for Operators. We'll break this process into
the following steps:
• Describing the problem
• Designing an API and a CRD
• Working with other required resources
• Designing a target reconciliation loop
• Handling upgrades and downgrades
• Using failure reporting
We won't start writing any actual code yet besides some YAML Ain't Markup Language
(YAML) snippets where applicable. However, we will use some pseudocode to better
visualize how our actual code will work once we initialize the project with the Operator
software development kit (SDK) in Chapter 4, Developing an Operator with the
Operator SDK.
Describing the problem
Many software projects can be defined with a user story in the following format:
As a [user] I want to [action], so that [reason]. We'll also do that here, as follows:
As a cluster administrator, I want to use an Operator to manage my nginx
application so that its health and monitoring are automatically managed
for me.
Describing the problem
47
For our use case (designing an Operator), we don't care about the specific application
right now. For that reason, our application is just going to be a basic nginx sample Pod.
We will assume that this represents any single-Pod application with basic input/output
(I/O) needs. While this may seem too abstract, the focus will be on building an Operator
around the application.
The first thing we have identified from this user story is that we will be building the
Operator for cluster administrators. From the previous chapter, we know this means that
the Operator's users will have a better understanding of the cluster architecture than most
end users and that they will need higher levels of direct control over the Operand. We can
also assume that most cluster administrators will be comfortable interacting directly with
the Operator rather than through an intermediary frontend application.
The second part of this user story identifies the functional objective of the Operator.
Specifically, this Operator is going to manage the Deployment of a single-Pod application.
In this case, manage is a vague term that we will assume to mean create and maintain
the required Kubernetes resources to run the application. These resources will be, at
minimum, a Deployment. We will need to expose some of the options of this Deployment
through the Operator, such as the container port for nginx.
Finally, the user story provides our motivation for running the Operator. The cluster
administrators want to have the application's health and monitoring managed by the
Operator. Application health can mean a lot of different things, but generally, this comes
down to maintaining high uptime for the application and recovering from any crashes, if
possible. Monitoring the application can also be done in a number of ways, usually in the
form of metrics.
So, from all of the preceding information, we have identified that we want a very basic
Operator that can do the following:
• Deploy an application
• Keep the application running if it fails
• Report on the health status of the application
48
Designing an Operator – CRD, API, and Target Reconciliation
These are some of the simplest functions that an Operator can serve. In later chapters,
we'll build on these requests a bit more. But in the interest of starting with a solid
foundation upon which to iterate later, this will be our minimum viable product (MVP).
Henceforward, therefore, this is the basic Operator design we will be referencing when
referring to our examples.
Based on these criteria, we can try to define our Operator in terms of the Capability
Model covered in Chapter 1, Introducing the Operator Framework (recall that the
Capability Model defines five levels of Operator functionality, from Basic Install to Auto
Pilot). We know that the Operator will be able to install the Operand, as well as manage
any additional required resources. We would like it to be able to report on the status of the
Operand as well and provide configuration through its CRD. These are all the criteria for
a Level I Operator. In addition, it would be great if our Operator could handle upgrades to
qualify it as a Level II Operator.
This is a good start for the initial Operator design. With a full picture of the problem we
are trying to solve, we can now begin to brainstorm how we will solve it. To do that, we
can start by designing how our Operator will be represented in the cluster API.
Designing an API and a CRD
As we covered in Chapter 1, Introducing the Operator Framework, and Chapter 2,
Understanding How Operators Interact with Kubernetes, the use of a CRD is a defining
characteristic of Operators to create an object for users to interact with. This object creates
an interface for controlling the Operator. In this way, the Custom Resource (CR) object is
a window into the Operator's main functions.
As with any good window, the Operator's CRD must be built well. It must be clear enough
to expose the details of the Operator while being secure enough to keep out harsh weather
and burglars, and as with a window, the CRD's design should follow local building codes
to ensure that it is built up to the expected standards of the environment. In our case,
those building codes are the Kubernetes API conventions.
Designing an API and a CRD
49
Following the Kubernetes API design conventions
Even though a CRD is a custom object that can be created by anyone, there are still best
practices to keep in mind. This is because the CRD exists within the Kubernetes API,
which defines its conventions so that there are certain expectations when interacting with
the API. These conventions are documented in the Kubernetes community at https://
github.com/kubernetes/community/blob/master/contributors/
devel/sig-architecture/api-conventions.md. However, this documentation
is extensive and covers the requirements for all kinds of API objects, not just Operator
CRDs. There are, however, a few key elements that are relevant to our purpose, as outlined
here (Note: some of these fields will be discussed in more detail later in the chapter):
• All API objects must have two fields: kind and apiVersion. These fields make
it possible for Kubernetes API clients to decode the object. Kind represents the
name of the object type—for example, MyOperator—and apiVersion is, aptly,
the version of the API for that object. For example, your Operator may ship API
versions v1alpha1, v1beta1, and v1.
• API objects should also have the following fields (though they are not required):
resourceVersion and generation, both of which help to track
changes to an object. However, these fields serve different purposes. The
resourceVersion field is an internal reference that is incremented every
time an object is modified, which serves to help with concurrency control. For
example, when trying to update an Operand Deployment, you will make two
client calls: Get() and Update(). When calling Update(), the API can detect
if the object's resourceVersion field has changed on the server (which would
indicate that another controller has modified the object before we updated it) and
reject the update. In contrast, generation serves to keep track of the relevant
updates to an object. For example, a Deployment that has recently rolled out a new
version would have its generation field updated. These values can be used to
reference older generations or ensure that new ones are of the expected generation
number (that is, current+1).
creationTimestamp and deletionTimestamp, which serve as helpful
reference points for the age of an object. With creationTimestamp, for
example, you can easily reference the age of an Operator's Deployment based on
when its CRD was created. Similarly, deletionTimestamp serves to indicate
that a deletion request has been sent to the API server for that object.
50
Designing an Operator – CRD, API, and Target Reconciliation
labels and annotations, which serve similar purposes but are semantically
different. Applying labels to an object serves to organize objects by criteria that
are easily filtered through the API. On the other hand, annotations exposes
metadata about the object.
• API objects should have spec and status fields. We will cover status in more
detail later in the chapter (under Using failure reporting), but for now, there are some
conventions around it to keep in mind, as outlined here:
Conditions reported in an object's status field should be clearly self-explanatory
without the need for additional context to understand them.
Conditions should respect the same API compatibility rules as any other field.
In order to maintain backward compatibility, condition definitions should not
change once defined.
Conditions can report either True or False as their normal operating state.
There is no set guideline for which one should be the standard mode; it is up
to the developer to consider readability in the definition of the condition. For
example, a Ready=true condition can have the same meaning as one called
NotReady=false, but the former is much easier to understand.
Conditions should represent the current known state of the cluster, rather than
reporting transitions between states. As we will cover in the Designing a target
reconciliation loop section, many Kubernetes controllers are written with a leveltriggered design (meaning they operate based on the current state of the cluster
rather than incoming events alone). So, an Operator reporting conditions based
on its current state helps to maintain this mutual design assumption of being able
to build the current state of the cluster in memory at any time. However, for long
transitionary phases, the Unknown condition can be used if necessary.
• Sub-objects within an API object should be represented as lists, rather than maps;
for example, our nginx deployment may need several different named ports to be
specified through the Operator CRD. This means that they should be represented
as a list, with each item in the list having fields for name and port, as opposed to a
map where the key for each entry is the name of the port.
• Optional fields should be implemented as pointer values in order to easily
distinguish between zero and unset values.
• The convention for fields with units is to include the units in the field name—for
example, restartTimeoutSeconds.
Designing an API and a CRD
51
These are just some of the many API conventions, but they are important to know as you
design your Operator's CRD and API. Adhering to the guidelines of API design ensures
that other components in the Kubernetes ecosystem (including the platform itself) can
make appropriate assumptions about your Operator. With these guidelines in mind, we
can move on to the next step of designing our own CRD schema.
Understanding a CRD schema
We have already discussed CRDs and their importance to Operators, but up until this
point, we haven't looked in depth at how a CRD is composed. Now that we know the
problem our example Operator is going to solve, we can begin looking at the options we
want to expose through its CRD and get an idea of what those will look like to users.
First, it is best to see an example CRD and examine each section to understand its
purpose, as follows:
apiVersion: apiextensions.k8s.io/v1
kind: CustomResourceDefinition
metadata:
name: myoperator.operator.example.com
spec:
group: operator.example.com
names:
kind: MyOperator
listKind: MyOperatorList
plural: myoperators
singular: myoperator
scope: Namespaced
versions:
- name: v1alpha1
schema:
openAPIV3Schema:
...
served: true
storage: true
subresources:
status: {}
status:
acceptedNames:
52
Designing an Operator – CRD, API, and Target Reconciliation
kind: ""
plural: ""
conditions: []
storedVersions: []
The first two fields, apiVersion and kind, define that this is a CRD. Even though we
are trying to define a blueprint of our own custom objects, that blueprint must exist within
a CustomResourceDefinition object first. From this, the API server will know how
to parse the CRD data to create instances of our CR.
Next, the metadata.Name field defines the name of our CRD (not the custom object
created from the CRD). To be more specific, this is the name of the blueprint, not the
objects created from the blueprint. For example, we could retrieve this CRD design using
kubectl get crd/myoperator.operator.example.com.
Within spec is where the CRD begins to actually define the CR objects we want to create.
The group defines a custom API group to which new objects will belong. Using a unique
name here helps to prevent collisions with other objects and APIs in the cluster.
The names section defines different ways in which our objects can be referenced. Here,
only kind and plural are required (as the others can be inferred from these two).
Just as any other type of object in the cluster is accessible via its kind or plural form
(for example, kubectl get pods), our CRs will be accessible the same way with
commands such as kubectl edit myoperator/foo. Even though most Operators
will (and should) only have one CR object in the cluster, these fields are still required.
Next, scope defines custom objects as namespace- or cluster-scoped. The differences
between these two were covered in detail in Chapter 1, Introducing the Operator
Framework. The available options for this field are Cluster and Namespaced.
Versions provides a list of the different API versions that will be available for our CR.
As your Operator evolves over time and new features are added or removed, you will need
to introduce new versions of the Operator's CR. For backward compatibility and support,
you should continue to ship older versions of the resource to provide users a transitory
period after which the version can be safely deprecated. This is why this field provides a
list of versions. The API server is aware of each version and can operate effectively on an
object that is created and used in any available version in this list.
Each version in the list contains schematic information about the object itself that
uniquely identifies the structure of that version in openAPIV3Schema. In this example,
the openAPIV3Schema section has been intentionally omitted. We have done that
because this section is usually very long and complex. However, in recent versions of
Kubernetes, this section is required in order to provide a structural schema for the CRD.
Designing an API and a CRD
53
A structural schema is an object schema that is based on OpenAPI version 3 (V3)
validation. OpenAPI defines validation rules for each field that can be used to validate
field data when objects are created or updated. These validation rules include the type
of data for the field, as well as other information such as allowed string patterns and
enumerated values. The structural schema requirement for CRDs ensures consistent,
reliably stored representations of the objects.
Due to the complex nature of OpenAPI validation schemas, it is not recommended to
write them by hand. Instead, the use of generated tools such as Kubebuilder (which is
used by the Operator SDK) is recommended. Extensive and flexible validation rules can
be defined directly on the Go types for CRDs using the various Kubebuilder markers,
which are available for full reference at https://book.kubebuilder.io/
reference/generating-crd.html.
The next sections of the individual version definitions are served and storage, which
set whether this version is served via REST APIs and if this is the version that should be
used as the storage representation. Only one version can be set as the storage version
for a CRD.
The final sections, subresources and status, are related because they define
a status field that will be used to report information on the current state of the
Operator. We will cover that field and its uses in more detail under Using failure reporting.
Now that we have explored the structure of a CRD and have an idea of what one should
look like, we can design one for our example nginx Operator.
Example Operator CRD
From the preceding problem statement, we know that our Operator is initially going to
simply deploy an instance of nginx in the cluster. We also now know that our Operator's
CRD will provide a spec field with various options to control the Operand Deployment.
But what kind of settings should we expose? Our Operand is fairly simple, so let's start
with a few basic options that we are defining to configure a simple nginx Pod, as follows:
• port—This will be the port number that we want to expose the nginx Pod on
within the cluster. Since nginx is a web server, this will allow us to modify the
accessible port without having to directly touch the nginx Pod, because the
Operator will handle safely changing it for us.
54
Designing an Operator – CRD, API, and Target Reconciliation
• replicas—This is a bit redundant because the number of replicas for any
Kubernetes Deployment can be adjusted through the Deployment itself. But in
the interest of abstracting control of the Operand away into a user interface (UI)
behind the management of an Operator, we will provide this option. This way, an
administrator (or other application) can scale the Operand with the added handling
and reporting of our Operator.
• forceRedeploy—This field is interesting because it will effectively be a
no-operation (no-op) against the Operand in terms of how it functions. However,
including a field in the Operator CRD that can be set to any arbitrary value allows
us a way to instruct the Operator to trigger a new rollout of the Operand without
having to modify any actual settings. Having that functionality is useful for stuck
Deployments where manual intervention can resolve the issue.
This works because the Operator watches for changes to relevant resources in the cluster,
one of which being its own CRD (more on this in the Designing a target reconciliation loop
section). This watch is necessary so that the Operator knows when to update an Operand.
So, including a no-op field can be enough for the Operator to know to redeploy the
Operand without needing to make any actual changes.
These three settings together will make the basis of our Operator's CRD spec. With this,
we know that as an object in the cluster the CR object will look something like this:
apiVersion: v1alpha1
kind: NginxOperator
metadata:
name: instance
spec:
port: 80
replicas: 1
status:
...
Note that this is the CR itself, not the CRD, as shown in an example earlier. We are
using a generic name: instance value here because we will probably only have one
instance of the Operator running in a namespace at a time. We also haven't included the
forceRedeploy field here because that will be optional.
This object could be retrieved with the kubectl get -o yaml nginxoperator/
instance command if we define our CRD right. Thankfully, the Operator SDK and
Kubebuilder will help us generate that.
Working with other required resources
55
Working with other required resources
Besides the CRD, our Operator will be responsible for managing a number of other cluster
resources as well. Right now, this is the nginx Deployment that will be created as our
Operand, as well as a ServiceAccount, Role, and RoleBinding for the Operator. What we
need to understand is how the Operator will know the definition of those resources.
Somewhere, the resources need to be written as Kubernetes cluster objects. Just as you
would create a Deployment by hand (for example, with kubectl create -f), the
definitions of necessary resources can be packaged with the Operator code in a couple of
different ways. This can be done easily with templates if you are creating your Operator
with Helm or Ansible, but for Operators written in Go, we need to consider our options.
One way to package these resources so that the Operator can create them is by defining
them directly in the Operator's code. All Kubernetes objects are based on corresponding
Go type definitions, so we have the ability to create Deployments (or any resource, for that
matter) directly in the Operator by declaring the resources as variables. Here's an example
of this:
…
import appsv1 "k8s.io/api/apps/v1"
…
nginxDeployment := &appsv1.Deployment{
TypeMeta: metav1.TypeMeta{
Kind: "Deployment",
apiVersion: "apps/v1",
},
ObjectMeta: metav1.ObjectMeta{
Name: "nginx-deploy",
Namespace: "nginx-ns",
},
Spec: appsv1.DeploymentSpec{
Replicas: 1
Selector: &metav1.LabelSelector{
MatchLabels: map[string]string{"app":"nginx"},
},
Template: v1.PodTemplateSpec{
Spec: v1.PodSpec{
ObjectMeta: metav1.ObjectMeta{
Name: "nginx-pod",
56
Designing an Operator – CRD, API, and Target Reconciliation
Namespace: "nginx-ns",
Labels: map[string]string{"app":"nginx"},
},
Containers: []v1.Container{
{
Name: "nginx",
Image: "nginx:latest",
Ports: []v1.ContainerPort{{ContainerPort:
int32(80)}},
},
},
},
},
},
}
The convenience of defining objects in code in this way is helpful for development. This
approach provides a transparent definition that is clearly available and immediately
usable by the Kubernetes API clients. However, there are some drawbacks to this. First,
it is not very human-readable. Users will be familiar with interacting with Kubernetes
objects represented as YAML or JavaScript Object Notation (JSON), wherein the type
definitions for each field are not present. This information is unnecessary and superfluous
for most users. So, any users who are interested in seeing the resource definitions clearly
or modifying them may find themselves lost deep in the Operator's code.
Fortunately, there is an alternative to defining resources as Go types directly. There is
a helpful package called go-bindata (available at github.com/go-bindata/
go-bindata) that compiles declarative YAML files into your Go binary so that they
can be accessible by code. Newer versions of Go (1.16+) also now include the go:embed
compiler directive to do this without an external tool such as go-bindata. So, we can
simplify the preceding Deployment definition like so:
kind: Deployment
apiVersion: apps/v1
metadata:
name: nginx-deploy
namespace: nginx-ns
spec:
replicas: 1
Designing a target reconciliation loop
57
selector:
matchLabels:
app: nginx
template:
metadata:
labels:
app: nginx
spec:
containers:
- name: nginx
image: nginx:latest
ports:
- containerPort: 80
This is much more readable for the average user. It is also easily maintained, and you
can provide different versions of various resources within named directories in your
Operator's code base. This is good for code organization, and also simplifies your options
for continuous integration (CI) checks against the validity of these type definitions.
We will cover how to use go-bindata and go:embed in more detail in Chapter 4,
Developing an Operator with the Operator SDK, but for now, we know how we can package
our additional resources to be available in the Operator. This is a key design consideration
that benefits our users and maintainers.
Designing a target reconciliation loop
Now that we have defined our Operator's UI by designing a CRD to represent it in the
cluster and itemized the Operand resources that it will manage, we can move on to the
core logic of the Operator. This logic is nestled within the main reconciliation loop.
As described in earlier chapters, Operators function on the premise of reconciling the
current state of the cluster with the desired state set by users. They do this by periodically
checking what that current state is. These checks are usually triggered by certain events
that are related to the Operand. For example, an Operator will monitor the Pods in its
target Operand namespace and react to the creation or deletion of a Pod. It is up to the
Operator developers to define which events are of interest to the Operator.
58
Designing an Operator – CRD, API, and Target Reconciliation
Level- versus edge-based event triggering
When an event triggers the Operator's reconciliation loop, the logic does not receive the
context of the whole event. Rather, the Operator must re-evaluate the entire state of the
cluster to perform its reconciliation logic. This is known as level-based triggering. The
alternative to this kind of design is edge-based triggering. In an edge-based system, the
Operator logic would function only on the event itself.
The trade-off between these two system designs is in efficiency for reliability. Edge-based
systems are much more efficient because they do not need to re-evaluate the entire state
and can only act on the relevant information. However, an edge-based design can suffer
from inconsistent and unreliable data—for example, if events are lost.
Level-based systems, on the other hand, are always aware of the entire state of the system.
This makes them more suitable for large-scale distributed systems such as Kubernetes
clusters. While these terms originally stem from concepts related to electronic circuits,
they also relate well to software design in context. More information is available at
https://venkateshabbarapu.blogspot.com/2013/03/edge-triggeredvs-level-triggered.html.
Understanding the difference between these design choices allows us to think about how
the reconciliation logic will function. By going with a level-based triggering approach,
we can be sure that the Operator will not lose any information or miss any events, as
the cluster state representation in its memory will always eventually catch up to reality.
However, we must consider the requirements for implementing a level-based design.
Specifically, the Operator must have the information necessary to build the entire relevant
cluster state in memory each time an event triggers reconciliation.
Designing reconcile logic
The reconcile loop is the core function of the Operator. This is the function that is called
when the Operator receives an event, and it's where the main logic of the Operator is
written. Additionally, this loop should ideally be designed to manage one CRD, rather
than overload a single control loop with multiple responsibilities.
When using the Operator SDK to scaffold an Operator project, the reconciliation loop will
have a function signature like this:
func (r *Controller) Reconcile(ctx context.Context, req ctrl.
Request) (ctrl.Result, error)
Designing a target reconciliation loop
59
This function is a method of a Controller object (which can be any name; we use
Controller in this example, but it could just as easily be FooOperator). This object
will be instantiated during the startup of the Operator. It then takes two parameters:
context.Context and ctrl.Request. Finally, it returns a ctrl.Result
parameter and, if applicable, an error parameter, We will go into more detail about
these types and their specific roles in Chapter 4, Developing an Operator with the Operator
SDK, but for now, understand that the core reconciliation loop of an Operator is built
upon very little information about the event that triggered reconciliation. Note that the
Operator's CRD and information about the cluster state are not passed to this loop; nor is
anything else.
Because the Operator is level-driven, the Reconcile function should instead build the
status of the cluster itself. In pseudocode, this often looks something like this:
func Reconcile:
// Get the Operator's CRD, if it doesn't exist then return
// an error so the user knows to create it
operatorCrd, error = getMyCRD()
if error != nil {
return error
}
// Get the related resources for the Operator (ie, the
// Operand's Deployment). If they don't exist, create them
resources, error = getRelatedResources()
if error == ResourcesNotFound {
createRelatedResources()
}
// Check that the related resources relevant values match
// what is set in the Operator's CRD. If they don't match,
// update the resource with the specified values.
if resources.Spec != operatorCrd.Spec {
updateRelatedResources(operatorCrd.Spec)
}
60
Designing an Operator – CRD, API, and Target Reconciliation
This will be the basic layout for our Operator's reconciliation loop as well. The general
process, broken into steps, is this:
1. First, check for an existing Operator CRD object. As we know, the Operator CRD
contains the configuration settings for how the Operator should function. It's
considered a best practice that Operators should not manage their own CRD, so if
there isn't one on the cluster, then immediately return with an error. This error will
show up in the Operator's Pod logs and indicate to the user that they should create
a CRD object.
2. Second, check for the existence of relevant resources in the cluster. For our current
use case, that will be the Operand Deployment. If the Deployment does not exist,
then it is the Operator's job to create it.
3. Finally, if relevant resources already existed on the cluster, then check that they
are configured in accordance with the settings in the Operator CRD. If not, then
update the resources in the cluster with the intended values. While we could just
update every time (because we know the desired state without having to look at the
current state), it's a good practice to check for differences first. This helps minimize
excessive API calls over updating indiscriminately. Making unnecessary updates
also increases the chance of an update hot loop, where the Operator's updates to the
resources create events that trigger the reconciliation loop that handles that object.
These three steps rely heavily on access to the Kubernetes API via the standard API
clients. The Operator SDK provides functions that help make it easy to instantiate these
clients and pass them to the Operator's control loop.
Handling upgrades and downgrades
As Operator developers, we are concerned with the versioning of two primary
applications: the Operand and the Operator itself. Seamless upgrades are also the core
feature of a Level II Operator, which we have decided is our goal for the initial Operator
design. For that reason, we must ensure that our Operator can handle upgrades for
both itself and the nginx Operand. For our use case, upgrading the Operand is fairly
straightforward. We can simply pull the new image tag and update the Operand
Deployment. However, if the Operand changed significantly, then the Operator may also
need to be updated in order to properly manage the new Operand version.
Handling upgrades and downgrades
61
Operator upgrades arise when changes to the Operator code, API, or both need
to be shipped to users. Operator Lifecycle Manager (OLM) makes upgrading
Operators with newer released versions easy from a user standpoint. The Operator's
ClusterServiceVersion (CSV) allows developers to define specific upgrade paths for
maintainers to provide specific information about new versions that replace older
versions. This will be covered in more detail in Chapter 7, Installing and Running
Operators with the Operator Lifecycle Manager, when we actually write a CSV for
our Operator.
There may also be a scenario where the Operator's CRD changes in incompatible ways
(for example, deprecation of an old field). In this scenario, your Operator's API version
should be increased (for example, from v1alpha1 to v1alpha2 or v1beta1). The new
version should also be shipped with the existing version's CRD. This is the reason why
the CRD's versions field is a list of version definitions, and it allows users the ability to
transition from one version to the next thanks to simultaneous support of both.
Recall, however, that out of this list of versions there may only be one that is the
designated storage version. It is also excessive to ship every previous API version forever
(eventually, older versions will need to be completely removed after an appropriate
deprecation timeline has passed). When it is time to permanently remove support for
deprecated API versions, the storage version may also need to be updated as well. This
can cause issues for users who still have the old version of the Operator CRD installed
as the storage version in their cluster. The kube-storage-version-migrator
tool (https://github.com/kubernetes-sigs/kube-storage-versionmigrator) helps with this by providing a migration process for existing objects in the
cluster. The storage version can be migrated with a Migration object, such as this:
apiVersion: migration.k8s.io/v1alpha1
kind: StorageVersionMigration
metadata:
name: nginx-operator-storage-version-migration
spec:
resource:
group: operator.example.com
resource: nginxoperators
version: v1alpha2
62
Designing an Operator – CRD, API, and Target Reconciliation
When this object is created, kube-storage-version-migrator will see it
and update any existing objects that are stored in the cluster to the specified version.
This only needs to be done once, and it can even be automated by packaging this
object as an additional resource in the Operator. Future versions of Kubernetes will
automate this process fully (see KEP-2855, https://github.com/kubernetes/
enhancements/pull/2856).
Preparing for successful version transitions early on will pay off with future maintenance
of your Operator. However, not everything can always go smoothly, and it's impossible
to prepare for every possible scenario. This is why it is important for an Operator to have
sufficient error reporting and handling as well.
Using failure reporting
When it comes to failures, there are two things we need to worry about: failures in the
Operand, and failures in the Operator itself. Sometimes, these two instances may even be
related (for example, the Operand is failing in an unexpected way that the Operator does
not know how to resolve). When any errors occur, it's an important job of the Operator to
report those errors to the user.
When an error happens during the Operator's reconciliation loop, the Operator must
decide what to do next. In implementations with the Operator SDK, the reconcile logic
is able to identify when an error has occurred and attempt the loop again. If the error
continues to prevent the reconciliation from succeeding, the loop can exponentially back
off and wait longer between each attempt in the hope that whichever condition is causing
the failure will be resolved. However, when an Operator reaches this state, the error
should still be exposed to the user in some way.
Error reporting can be easily done in a few ways. The main methods for reporting failures
are logging, status updates, and events. Each approach offers different advantages, but
a sophisticated Operator design will utilize all three in elegant harmony.
Reporting errors with logging
The simplest way to report any error is with basic logging. This is the way that most
software projects report information to the user, not just Kubernetes Operators. That's
because logged output is fairly easy to implement and intuitive to follow for most users.
This reasoning is especially true considering the availability of logging libraries such as
Klog, which help standardize the structure of logs specifically for Kubernetes applications.
When a Pod is running, the logs are easily retrieved with commands such as kubectl
logs pod/my-pod. However, there are some downsides to relying on just logging for
significant errors.
Using failure reporting
63
First, Kubernetes Pod logs are not persistent. When a Pod crashes and exits, its logs are
only available until the failed Pod is cleaned up by the cluster's garbage collection (GC)
processes. This makes debugging a failure particularly difficult as the user is in a race
against time. Additionally, if an Operator is working diligently to fix the issue, then the
user is also racing against their own automation system, which is supposed to help them,
not hinder them.
Second, logs can be a lot of information to parse. Besides just the relevant Operator logs
you may write yourself, your Operator will be built on many libraries and dependencies
that inject their own information into the logged output. This can create a cumbersome
mess of logs that require work to sort through. While there are, of course, tools such as
grep that make it relatively easy to search through lots of text, your users may not always
know exactly which text to search for in the first place. This can create serious delays when
debugging an issue.
Logs are helpful for tracing procedural steps in an Operator or for low-level debugging.
However, they are not great at bringing failures to the immediate attention of users. Pod
logs do not last long, and they are often drowned out by irrelevant logs. In addition,
logs themselves usually do not provide much human-readable context for debugging.
This is why important failures that require attention are better handled by status updates
and events.
Reporting errors with status updates
As mentioned earlier in the chapter when discussing Kubernetes API conventions and
CRD design, an Operator CRD should provide two important fields: spec and status.
While spec represents the desired state of the cluster and accepts input from the user,
status serves to report the current state of the cluster and should only be updated as
a form of output.
By utilizing the status field to report the health of your Operator and its Operand, you
can easily highlight important state information in a readable format. This format is based
on the condition type, which is provided by the Kubernetes API machinery.
A condition reports its name along with a Boolean value indicating whether the condition
is currently present. For example, an Operator could report the OperandReady=false
condition to show that the Operand is not healthy. There is also a field within the
condition called Reason, which allows developers to provide a more readable explanation
of the current status. As of Kubernetes 1.23, the Condition Type field has a maximum
length of 316 characters, and its Reason field can be up to 1,024 characters.
64
Designing an Operator – CRD, API, and Target Reconciliation
The Kubernetes API clients provide functions to report conditions easily, such as
metav1.SetStatusCondition(conditions *[]metav1.Condition,
newCondition metav1.Condition). These functions (and the Condition type
itself) exist under the k8s.io/apimachinery/pkg/apis/meta/v1 package.
In an Operator's CRD status field, the conditions look similar to this:
status:
conditions:
- type: Ready
status: "True"
lastProbeTime: null
lastTransitionTime: 2018-01-01T00:00:00Z
For our nginx deployment Operator, we'll start by reporting a condition that is simply
called Ready. We'll set the status of this condition to True on the successful startup of
the Operator, and change it to False in the event that the Operator fails a reconciliation
loop (along with a Reason field explaining the failure in more detail). We may end up
finding more Conditions that will make sense to add later, but given the initial simplicity
of the Operator, this should be sufficient.
Using conditions helps show the current state of the Operator and its managed resources,
but these only show up in the status section of the Operator's CRD. However, we can
combine them with events to make the error reporting available throughout the cluster.
Reporting errors with events
Kubernetes events are a native API object, just like Pods or any other object in the cluster.
Events are aggregated and show up when using kubectl describe to describe a Pod.
They can also be monitored and filtered by themselves with kubectl get events.
Their availability within the Kubernetes API makes them understandable by other
applications as well, such as alerting systems.
An example of listing a Pod's events is shown here, where we see five different events:
1. A Warning event that has occurred three times, showing that the Pod failed
to be scheduled.
2. A Normal event once the Pod was successfully scheduled.
3. Three more Normal events as the Pod's container images were pulled, created, and
successfully started.
Using failure reporting
65
You can see these events in the following code snippet:
$ kubectl describe pod/coredns-558bd4d5db-6mqc2 -n kube-system
…
Events:
Type
Reason
Age
From
Message
--------------------Warning FailedScheduling 6m36s (x3 over 6m52s) defaultscheduler
0/1 nodes are available: 1 node(s) had
taint {node.kubernetes.io/not-ready: }, that the pod didn't
tolerate.
Normal
Scheduled
6m31s
defaultscheduler
Successfully assigned kube-system/coredns558bd4d5db-6mqc2 to kind-control-plane
Normal
Pulled
6m30s
kubelet,
kind-control-plane Container image "k8s.gcr.io/coredns/
coredns:v1.8.0" already present on machine
Normal
Created
6m29s
kubelet,
kind-control-plane Created container coredns
Normal
Started
6m29s
kubelet,
kind-control-plane Started container coredns
Events can relay more information than conditions thanks to a much more complex object
design. While events include a Reason and a Message field (analogous to conditions'
Type and Reason fields, respectively), they also include information such as Count
(which shows the number of times this event has occurred), ReportingController
(which shows the originating controller of the event), and Type (which can be used to
filter events of different severity levels).
The Type field can currently be used to categorize cluster events as Normal or Warning.
This means that, similar to how a condition can report a successful state, events can also be
used to show that certain functions completed successfully (such as startup or upgrades).
For a Pod to report events to the cluster, the code needs to implement an
EventRecorder object. This object should be passed throughout the controller and
broadcasts events to the cluster. The Operator SDK and Kubernetes clients provide
boilerplate code to set this up properly.
66
Designing an Operator – CRD, API, and Target Reconciliation
Besides reporting events, your Operator will also react to events in the cluster. This
goes back to the essential foundation of an Operator's event-triggered design. There are
code patterns to design which types of events the Operator is interested in reacting to,
wherein you can add logic to filter out specific events. This will be covered in detail in
later chapters.
As you can see, a sophisticated error-reporting system utilizes logs, status, and events
to provide a full picture of the state of the application. Each method provides its own
benefits, and together they weave a beautiful tapestry of debuggability that helps
administrators track down failures and resolve issues.
Summary
This chapter outlined the details of an Operator we would like to build. Beginning with
a description of the problem (in this case, a simple Operator to manage an nginx Pod)
gave a solid foundation of the solutions that are available to work with. This step even
provided enough information to set a goal for the capability level of this Operator (Level
II – Seamless Upgrades).
The next step was outlining what the Operator CRD will look like. To do this, we first
noted some relevant conventions in the Kubernetes API that are helpful to ensure the
Operator conforms to expected standards for Kubernetes objects. We then broke down
the structure of a CRD and explained how each section relates to the corresponding CR
object. Finally, we drafted an example of what the Operator's CR will look like in the
cluster to get a concrete idea of the expectation from users.
After designing the CRD, we considered our options for managing additional resources
as well. For an Operator written in Go, it makes sense to package additional resources
(such as RoleBinding and ServiceAccount definitions) as YAML files. These files can be
compiled into the Operator binary with go-bindata and go:embed.
The next step in the design is the target reconciliation loop. This comprises the core logic
of the Operator and is what makes the Operator a useful, functional application. This
process began with understanding the difference between level- and edge-triggered event
processing and why it is better for Operators to be level-based. We then discussed the
basic steps of an Operator's reconcile loop.
Summary
67
The last two sections discussed the topics of upgrades, downgrades, and error reporting.
With upgrades and downgrades, we covered the use cases for shipping and supporting
multiple API versions simultaneously, as well as the need to occasionally migrate storage
versions in existing installations. The section about error reporting focused on the three
main ways that applications can expose health information to users: logging, status
conditions, and events.
In the next chapter, we will take everything we have decided on as our initial design and
compose it into actual code. This will involve initializing a project with the Operator SDK,
generating an API that will become the Operator's CRD, and coding target reconciliation
logic. Essentially, we will apply the knowledge from this chapter to a hands-on exercise in
Operator development.
4
Developing an
Operator with the
Operator SDK
With a completed design outline for an Operator, it is now possible to begin the actual
work of developing it. This means writing and compiling code that can be deployed onto
an actual running Kubernetes cluster. For this chapter, the Operator SDK will be used to
initialize the scaffolding of a boilerplate Operator project. From there, the technical steps
to develop the rest of a basic Operator will be demonstrated as a tutorial. This guide will
follow the Operator design already planned in Chapter 3, Designing an Operator – CRD,
API, and Target Reconciliation, which focused on developing a Level II Operator to deploy
and upgrade a simple Nginx Pod.
70
Developing an Operator with the Operator SDK
As a tutorial, this chapter will follow the process for building an Operator from scratch
with Go. Beginning with the initialization of boilerplate project code, the guide will then
follow through the steps of defining the Operator API and generating the corresponding
CustomResourceDefinition (CRD). Then, we will see how to implement simple
reconciliation logic that makes up the core functionality of the Operator. Finally, some
basic troubleshooting and common issues will be addressed. The steps for developing an
Operator with Operator SDK will be broken down into the following sections:
• Setting up your project
• Defining an API
• Adding resource manifests
• Writing a control loop
• Troubleshooting
These sections follow roughly the design pattern that is recommended in the official
Operator SDK Go documentation (https://sdk.operatorframework.io/
docs/building-operators/golang/), which is why we have chosen to follow
this approach. At the end of this chapter, we will have an Operator that covers the
Level II functionality described in the design that was outlined in Chapter 3, Designing
an Operator – CRD, API, and Target Reconciliation. This functionality includes basic
deployment of the Operand (in this case, Nginx) and seamless upgrades of the Operator
and Operand. In later chapters, this guide will be built upon as a foundation for adding
more complex functionality that graduates this sample Operator from lower to higher
levels along the Capability Model.
Technical requirements
The guided steps in this chapter will require the following technical prerequisites to
follow along:
• go version 1.16+
• An operator-sdk binary installed locally
The operator-sdk binary can be installed either directly from a release, with
Homebrew (for macOS), or compiled from GitHub from https://github.com/
operator-framework/operator-sdk. If choosing to install the Operator SDK
from GitHub, git will also be required; however, it is recommended to use git anyway
to take advantage of version control for the project.
The Code in Action video for this chapter can be viewed at: https://bit.ly/3N7yMDY
Setting up your project
71
Setting up your project
The first step in starting a fresh Operator project is to initialize an empty project structure.
First, create an empty project directory with mkdir nginx-operator and cd into it.
Now, initialize a boilerplate project structure with the following:
operator-sdk init --domain example.com --repo github.com/
example/nginx-operator
Note
This command may take a few moments to complete the first time it is run.
This command sets up a lot of different files and folders that will be filled in with the
custom APIs and logic for the Operator we are building. The once-empty project directory
should now contain the following files:
~/nginx-operator$ ls
total 112K
drwxr-xr-x
12 mdame
drwxr-xr-x+ 282 mdame
drwx-----8 mdame
drwx-----3 mdame
-rw------1 mdame
-rw------1 mdame
-rw------1 mdame
-rw------1 mdame
-rw------1 mdame
-rw------1 mdame
-rw-r--r-1 mdame
-rw------1 mdame
staff 384 Dec 22 21:07 .
staff 8.9K Dec 22 21:06 ..
staff 256 Dec 22 21:07 config
staff
96 Dec 22 21:06 hack
staff 129 Dec 22 21:06 .dockerignore
staff 367 Dec 22 21:06 .gitignore
staff 776 Dec 22 21:06 Dockerfile
staff 8.7K Dec 22 21:07 Makefile
staff 228 Dec 22 21:07 PROJECT
staff 157 Dec 22 21:07 go.mod
staff 76K Dec 22 21:07 go.sum
staff 2.8K Dec 22 21:06 main.go
The purposes of these files are as follows:
• config – A directory that holds YAML definitions of Operator resources.
• hack – A directory that is used by many projects to hold various hack scripts.
These are scripts that can serve a variety of purposes but are often used to generate
or verify changes (often employed as part of a continuous integration process to
ensure code is properly generated before merging).
72
Developing an Operator with the Operator SDK
• .dockerignore / .gitignore – Declarative lists of files to be ignored by
Docker builds and Git, respectively.
• Dockerfile – Container image build definitions.
• Makefile – Operator build definitions.
• PROJECT – File used by Kubebuilder to hold project config information
(https://book.kubebuilder.io/reference/project-config.html).
• go.mod / go.sum – Dependency management lists for go mod (already
populated with various Kubernetes dependencies).
• main.go – The entry point file for the Operator's main functional code.
With this boilerplate project structure initialized, it is possible to start building Operator
logic on top. While this bare project will compile, it doesn't do much besides start an
empty controller with Readyz and Healthz endpoints. To get it to do a little more, first,
the Operator must have a defined API.
Defining an API
The Operator's API will be the definition of how it is represented within a Kubernetes
cluster. The API is directly translated to a generated CRD, which describes the blueprint
for the custom resource object that users will consume to interact with the Operator.
Therefore, creating this API is a necessary first step before writing other logic for the
Operator. Without this, there will be no way for the Operator's logic code to read values
from the custom resource.
Building an Operator API is done by writing a Go struct to represent the object. The basic
outline of this struct can be scaffolded by the Operator SDK with the following command:
operator-sdk create api --group operator --version v1alpha1
--kind NginxOperator --resource --controller
This command does the following:
1. Creates the API types in a new directory called api/
2. Defines these types as belonging to the API group operator.example.com
(since we initialized the project under the domain example.com)
3. Creates the initial version of the API named v1alpha1
4. Names these types after our Operator, NginxOperator
Defining an API
73
5. Instantiates boilerplate controller code under a new directory called
controllers/ (which we will work with more under Writing a control loop)
6. Updates main.go to add boilerplate code for starting the new controller
For now, we are only concerned with the API types under api/v1alpha1/
nginxoperator_types.go. There are two other files in this directory
(groupversion_info.go and zz_generated.deepcopy.go) that do not usually
need to be modified. In fact, the zz_generated. prefix is used as a standard to denote
generated files that should never be manually modified. The groupversion_info.
go file is used to define package variables for this API that instruct clients how to handle
objects from it.
Looking at nginxoperator_types.go, there are already some empty structs with
instructions to fill in additional fields. The three most important types in this file are
NginxOperator, NginxOperatorSpec, and NginxOperatorStatus:
// NginxOperatorSpec defines the desired state of NginxOperator
type NginxOperatorSpec struct {
// INSERT ADDITIONAL SPEC FIELDS - desired state of cluster
// Important: Run "make" to regenerate code after modifying
this file
// Foo is an example field of NginxOperator. Edit
nginxoperator_types.go to remove/update
Foo string `json:"foo,omitempty"`
}
// NginxOperatorStatus defines the observed state of
NginxOperator
type NginxOperatorStatus struct {
// INSERT ADDITIONAL STATUS FIELD - define observed state of
cluster
// Important: Run "make" to regenerate code after modifying
this file
}
//+kubebuilder:object:root=true
//+kubebuilder:subresource:status
// NginxOperator is the Schema for the nginxoperators API
type NginxOperator struct {
metav1.TypeMeta
`json:",inline"`
metav1.ObjectMeta `json:"metadata,omitempty"`
74
Developing an Operator with the Operator SDK
Spec
NginxOperatorSpec
`json:"spec,omitempty"`
Status NginxOperatorStatus `json:"status,omitempty"`
}
As discussed in Chapter 3, Designing an Operator – CRD, API, and Target Reconciliation,
all Kubernetes API objects should have Spec and Status fields, and Operators are
no different. Therefore, NginxOperatorSpec and NginxOperatorStatus are
those fields, which will be used to accept user input and report on the current state of
the Operator, respectively. With NginxOperator representing the main object, the
relationship between the three is hierarchical.
Figure 4.1 – The relationship between NginxOperator fields and logic
Recalling the problem definition from Chapter 3, Designing an Operator – CRD, API, and
Target Reconciliation, this Operator needs to accept the following inputs:
1. port, which will define the port number to expose on the Nginx Pod
2. replicas, which defines the number of Pod replicas in order to allow scaling of
this deployment through the Operator
3. forceRedploy, which is a no-operation (no-op) field that simply instructs the
Operator to redeploy the Nginx Operand
Defining an API
75
To implement these fields, we need to update the preceding code to modify
NginxOperatorSpec with these new fields, as in the following. We are using pointers
for the integer fields so that our Operator will be able to distinguish between a zero-value
and an unset value, which should fall back to using a defined default:
// NginxOperatorSpec defines the desired state of NginxOperator
type NginxOperatorSpec struct {
// Port is the port number to expose on the Nginx Pod
Port *int32 `json:"port,omitempty"`
// Replicas is the number of deployment replicas to scale
Replicas *int32 `json:"replicas,omitempty"`
// ForceRedploy is any string, modifying this field
// instructs the Operator to redeploy the Operand
ForceRedploy string `json:"forceRedploy,omitempty"`
}
(Note, we also removed the sample Foo field that was generated by the Operator SDK as
an example.)
Regenerating Code
Once the Operator types have been modified, it is sometimes necessary to run
make generate from the project root. This updates generated files, such
as the previously mentioned zz_generated.deepcopy.go. It is good
practice to develop the habit of regularly running this command whenever
making changes to the API, even if it does not always produce any changes.
It is even better practice to add pre-submit continuous integration checks to
the Operator's repository to ensure that any incoming code includes these
generated changes. Such an automated check can be implemented by running
make generate followed by a simple git diff command to assess
whether any changes have appeared. If so, the check should fail and instruct the
developer to regenerate their code.
76
Developing an Operator with the Operator SDK
For all three new fields, we have also added JSON tags in the form of
`json:"...,omitempty"`. The first part of each of these tags defines how the
field will appear when represented in JSON or YAML (when interacting with the object
through kubectl, for example). omitempty specifies that if this field is empty, it
should not show up in JSON output. This is good for hiding optional fields in order to
provide a concise output when viewing the objects in the cluster (otherwise, empty fields
will appear as nil or with an empty string).
We are going to initially make all three of these fields optional, with default values defined
in the Operator. However, they could be designated as required with the removal of
omitempty and the addition of more Kubebuilder tags, for example:
// Port is the port number to expose on the Nginx Pod
// +kubebuilder:default=8080
// +kubebuilder:validation:Required
Port int `json:"port"`
With these settings, any attempt to modify an NginxOperator object without
including the port field will result in an error from the API server. In current versions of
Kubebuilder, the default assumption is that any field that is not designated as omitempty
is required. However, there are ways to switch this default globally (with the //
+kubebuilder:validation:Optional marker applied to the top level of an API).
Therefore, whenever changing the requirement of a field, it is good practice to explicitly
update that field's specific requirement value.
With the API types defined, it is now possible to generate an equivalent CRD manifest,
which will be used to create objects matching these types in a Kubernetes cluster.
Adding resource manifests
The relevant resources for an Operator are important to package in a way that can
be easily deployed and maintained. This includes the Operator's CRD, but also other
resources such as ClusterRoles and the matching ServiceAccount for those Roles.
However, the first step is to generate a CRD from the Go types defined in the previous
section with the following:
$ make manifests
Adding resource manifests
77
This command generates a CRD that is based on the API we just defined. That CRD is
placed under config/crd/bases/operator.example.com_nginxoperators.
yaml. That CRD looks as follows:
apiVersion: apiextensions.k8s.io/v1
kind: CustomResourceDefinition
metadata:
annotations:
controller-gen.kubebuilder.io/version: v0.7.0
creationTimestamp: null
name: nginxoperators.operator.example.comspec:
group: operator.example.com
names:
kind: NginxOperator
listKind: NginxOperatorList
plural: nginxoperators
singular: nginxoperator
scope: Namespaced
versions:
- name: v1alpha1
schema:
openAPIV3Schema:
description: NginxOperator is the Schema for the
nginxoperators API
properties:
apiVersion:
description: 'APIVersion defines the versioned
schema of this representation
of an object. Servers should convert
recognized schemas to the latest
internal value, and may reject
unrecognized values. More info:
https://git.k8s.io/community/contributors/devel/sigarchitecture/api-conventions.md#resources'
type: string
kind:
description: 'Kind is a string value representing
78
Developing an Operator with the Operator SDK
the REST resource this
object represents. Servers may infer
this from the endpoint the client
submits requests to. Cannot be
updated. In CamelCase. More
info: https://git.k8s.io/community/contributors/devel/sigarchitecture/api-conventions.md#types-kinds'
type: string
metadata:
type: object
spec:
description: NginxOperatorSpec defines the desired
state of NginxOperator
properties:
forceRedploy:
description: ForceRedploy is any string,
modifying this field instructs
the Operator to redeploy the
Operand
type: string
port:
description: Port is the port number to expose
on the Nginx Pod
type: integer
replicas:
description: Replicas is the number of
deployment replicas to scale
type: integer
type: object
status:
description: NginxOperatorStatus defines the
observed state of NginxOperator
type: object
type: object
served: true
storage: true
Adding resource manifests
subresources:
status: {}
status:
acceptedNames:
kind: ""
plural: ""
conditions: []
storedVersions: []
(In this output, we have added additional formatting to more clearly represent longer
strings, such as field descriptions, and highlighted the three fields that were added to
the API.)
This CRD is fairly simple due to the basic structure of the Operator, but even that is
a testament to the natural complexity of OpenAPI validation schemas. That complexity
emphasizes the point that CRD manifests should always be generated and not
manually edited.
Customizing Generated Manifests
The default command for generating manifests creates a complex validation
schema that should not be edited by hand. However, the underlying command
for make manifests is actually calling an additional tool, controller-gen.
This tool is part of a suite of generators available at https://github.com/
kubernetes-sigs/controller-tools. Running controllergen manually is an acceptable way to generate files and code in non-default
ways. For example, the controller-gen schemapatch command
will regenerate only the OpenAPI validation schema for a CRD. This can be
useful if you wish to manually modify other parts of the CRD, which would be
overwritten with a full regeneration, such as additional annotations or labels. The
full list of commands can be found by installing controller-gen from the
previously mentioned repository and running it with controller-gen -h.
79
80
Developing an Operator with the Operator SDK
The make manifests command also creates a corresponding Role-Based Access
Control (RBAC) role with can be bound to the Operator's ServiceAccount to give the
Operator access to their own custom object:
config/rbac/role.yaml:
apiVersion: rbac.authorization.k8s.io/v1
kind: ClusterRole
metadata:
creationTimestamp: null
name: manager-role
rules:
- apiGroups:
- operator.example.com
resources:
- nginxoperators
verbs:
- create
- delete
- get
- list
- patch
- update
- watch
- apiGroups:
- operator.example.com
resources:
- nginxoperators/finalizers
verbs:
- update
- apiGroups:
- operator.example.com
resources:
- nginxoperators/status
verbs:
- get
Adding resource manifests
81
- patch
- update
This Role grants full access to create, delete, get, list, patch, update, and watch all
nginxoperator objects in the cluster. It is generally not a best practice for an Operator
to manage the life cycle of their own custom resource object (for example, creation of the
config object is best left to a manual action by the user), so some of the verbs, such as
create and delete, are not strictly necessary here. However, we will leave them
for now.
Additional manifests and BinData
The remaining resource manifests that will need to be created include the Operator's
ClusterRole and the Nginx Deployment definition. The ClusterRole can be
conveniently generated with Kubebuilder tags in the code, which will be done later in the
Writing a control loop section. Before that, the Deployment should be defined so that the
control loop has access to it.
One way to define in-memory resources, such as the Deployment, is by creating them in
the code. Many projects take such an approach, including the official example projects
available at https://github.com/operator-framework/operator-sdk. For
the purpose of this Nginx Deployment, the approach would involve creating a function
similar to the following:
func nginxDeployment() *appsv1.Deployment {
dep := &appsv1.Deployment{
ObjectMeta: metav1.ObjectMeta{
Name:
"nginxDeployment",
Namespace: "nginxDeploymentNS",
},
Spec: appsv1.DeploymentSpec{
Replicas: &pointer.Int32Ptr(1),
Selector: &metav1.LabelSelector{
MatchLabels: map[string]
string{"app":"nginx"},
},
Template: corev1.PodTemplateSpec{
ObjectMeta: metav1.ObjectMeta{
Labels: map[string]
string{"app":"nginx"},,
},
82
Developing an Operator with the Operator SDK
Spec: corev1.PodSpec{
Containers: []corev1.Container{{
Image:
"nginx:latest",
Name:
"nginx",
Command: []string{"nginx"
Ports: []corev1.ContainerPort{{
ContainerPort: 8080,
Name:
"nginx",
}},
}},
},
},
},
}
return dep
}
The preceding function returns a static Deployment Go struct, with default values
prepopulated, such as the Deployment name and exposed port. This object could then be
modified based on the specifications set in the Operator CRD before using a Kubernetes
API client to update the Deployment in the cluster (for example, to update the number
of replicas).
As discussed in Chapter 3, Designing an Operator – CRD, API, and Target Reconciliation,
this approach is easy to code because the resource struct is immediately available as a Go
type. However, in terms of maintainability and usability, there are better options. This is
where tools such as go-bindata and go:embed are helpful.
Using go-bindata and go:embed to access resources
The go-bindata project is available on GitHub at https://github.com/
go-bindata/go-bindata. It works by converting arbitrary files into Go code, which
is then compiled into the main program and available in memory. The benefit of using
go-bindata is that project resources can be more concisely managed and maintained in
a more readable format such as YAML, which provides familiarity with native Kubernetes
resource creation. Since Go 1.16, the language has included its own compiler directive,
go:embed, to essentially perform the same function; however, we will provide an
example of both approaches for the benefit of users who have not yet updated to Go 1.16
or who wish to avoid reliance on compiler-specific directives in their development and
production environments.
Adding resource manifests
83
The first step for either approach is to create the resource manifests in a directory, such as
assets/nginx_deployment.yaml:
apiVersion: apps/v1
kind: Deployment
metadata:
name: "nginx-deployment"
namespace: "nginx-operator-ns"
labels:
app: "nginx"
spec:
replicas: 1
selector:
matchLabels:
app: "nginx"
template:
metadata:
labels:
app: "nginx"
spec:
containers:
- name: "nginx"
image: "nginx:latest"
command: ["nginx"]
This structure is already much easier to work with than the native Go types by saving
us from having to define each embedded type (such as map[string]string for the
labels and Pod command). It can also be easily parsed by continuous integration checks to
ensure it maintains a valid structure.
The next two subsections will demonstrate the basic concepts of implementing either
go-bindata or go:embed. These examples will do so by showing how you could add
the foundational concepts for each approach. However, we will ultimately refactor most of
the code in the section titled Simplifying resource embedding; therefore, you may choose
not to write any of this code yourself until reaching the refactoring subsection.
84
Developing an Operator with the Operator SDK
Go 1.15 and older – go-bindata
For older versions of Go, you must install the go-bindata package from GitHub to
generate your files:
$ go get -u github.com/go-bindata/go-bindata/...
The generated code that contains the manifests can then be created with the
following command:
$ go-bindata -o assets/assets.go assets/...
This command will create an assets.go file under the assets/ directory that contains
generated functions and in-memory representations of the files in the assets/ directory.
Note that it can be easier to keep the assets themselves in a different directory than
the generated code, as re-running the go-bindata command will now include
a representation of the assets.go file itself unless it is excluded, like so:
$ go-bindata -o assets/assets.go -ignore=\assets\/assets\.go
assets/…
This file will need to be re-generated whenever modifications are made to the underlying
assets. Doing so will ensure the changes are made available in the compiled assets package
that includes the accessibility functions for the files.
Once the assets have been generated, they can be accessed in code by importing the new
assets package and using the Asset() function like so:
import "github.com/sample/nginx-operator/assets"
...
asset, err := assets.Asset("nginx_deployment.yaml")
if err != nil {
// process object not found error
}
For newer versions of Go (1.16 and above), it is even simpler to compile resource
manifests into assets.
Go 1.16 and newer – go:embed
The go:embed marker was included as a compiler directive in Go 1.16 to provide native
resource embedding without the need for external tools such as go-bindata. To start with
this approach, create the resource manifest files similarly to the go-bindata setup under
a new directory called assets/.
Adding resource manifests
85
Next, the main.go file for the Operator project needs to be modified to import the
embed package and declare the asset manifests as a variable like so (all of the following
code in this section shows only the changes that you need to make):
package main
import (
...
"embed"
...
)
//go:embed assets/nginx_deployment.yaml
var deployment embed.FS
Note the //go:embed comment, which tells the compiler to store the contents of
assets/nginx_deployment.yaml as filesystem data in the deployment variable.
The data can then be read and converted to a Deployment Go struct by utilizing the
Kubernetes API scheme declarations like so:
import (
appsv1 "k8s.io/api/apps/v1"
"k8s.io/apimachinery/pkg/runtime"
"k8s.io/apimachinery/pkg/runtime/serializer"
)
...
var (
appsScheme = runtime.NewScheme()
appsCodecs = serializer.NewCodecFactory(appsScheme)
)
...
func main() {
if err := appsv1.AddToScheme(appsScheme); err != nil {
panic(err)
}
86
Developing an Operator with the Operator SDK
deploymentBytes, err := deployment.ReadFile("assets/nginx_
deployment.yaml")
if err != nil {
panic(err)
}
deploymentObject, err := runtime.Decode(appsCodecs.
UniversalDecoder(appsv1.SchemeGroupVersion), deploymentBytes)
if err != nil {
panic(err)
}
dep := deploymentObject.(*appsv1.Deployment)
...
}
This code does a few things:
1. It imports the relevant Kubernetes API packages that define the schema for
Deployment API objects:
import (
appsv1 "k8s.io/api/apps/v1"
"k8s.io/apimachinery/pkg/runtime"
"k8s.io/apimachinery/pkg/runtime/serializer"
)
2. It initializes a Scheme and a set of codecs that can be used by the API's
UniversalDecoder in order to know how to convert the []byte data representation
of the file to a Go struct:
var (
appsScheme = runtime.NewScheme()
appsCodecs = serializer.NewCodecFactory(appsScheme)
)
3. It uses the deployment variable we declared earlier (as part of setting up
the embed directive) to read the Deployment file under assets/nginx_
deployment.yaml (highlighted):
deploymentBytes, err := deployment.ReadFile("assets/
nginx_deployment.yaml")
Adding resource manifests
87
if err != nil {
panic(err)
}
4. It decodes the []byte data returned from deployment.ReadFile() into an
object that can be cast to the Go type for Deployments:
deploymentObject, err := runtime.Decode(appsCodecs.
UniversalDecoder(appsv1.SchemeGroupVersion),
deploymentBytes)
if err != nil {
panic(err)
}
5. It casts the object data to an in-memory representation of *appsv1.
Deployment:
dep := deploymentObject.(*appsv1.Deployment)
From this point, it will be necessary to find a way to pass the Deployment
object to our Nginx Operator Controller. This can be done by modifying the
NginxOperatorReconciler type to have a field that holds a type of *appsv1.
Deployment. However, this is not convenient for all of the different types of resources
the Operator will be managing. To simplify this and better organize the project's structure,
we can move the resource embedding code to its own package.
Simplifying resource embedding
The preceding examples showed the essential steps of embedding a YAML file into Go
code. However, for our sample Nginx Operator, this can be better organized into its own
package. To do this, we will keep the existing assets/ directory (to use as an importable
Go module path that holds helper functions for loading and processing the files) and place
a new manifests/ directory underneath it (which will hold the actual manifest files).
This new file structure will look as follows:
./nginx-operator/
| - assets/
| - - assets.go
| - - manifests/
| - - - nginx_deployment.yaml
88
Developing an Operator with the Operator SDK
The assets.go file will include the API schema initialization and wrapped object
casting functionality from the preceding examples, like this:
package assets
import (
"embed"
appsv1 "k8s.io/api/apps/v1"
"k8s.io/apimachinery/pkg/runtime"
"k8s.io/apimachinery/pkg/runtime/serializer"
)
var (
//go:embed manifests/*
manifests embed.FS
appsScheme = runtime.NewScheme()
appsCodecs = serializer.NewCodecFactory(appsScheme)
)
func init() {
if err := appsv1.AddToScheme(appsScheme); err != nil {
panic(err)
}
}
func GetDeploymentFromFile(name string) *appsv1.Deployment {
deploymentBytes, err := manifests.ReadFile(name)
if err != nil {
panic(err)
}
deploymentObject, err := runtime.Decode(
appsCodecs.UniversalDecoder(appsv1.SchemeGroupVersion),
deploymentBytes,
)
if err != nil {
panic(err)
}
return deploymentObject.(*appsv1.Deployment)
}
Writing a control loop
89
This new file makes a couple of changes from the implementation shared before:
1. Now, the entire manifests/ directory is embedded as a filesystem variable. This
will make it easier to add functions to read other resources within the directory
without having to declare new variables in this package for each one.
2. The main logic has been wrapped in a new function,
GetDeploymentFromFile(). This function can be called and used by our
control loop like this:
import "github.com/sample/nginx-operator/assets"
...
nginxDeployment := assets.
GetDeploymentFromFile("manifests/nginx_deployment.yaml")
We can add other manifests to this directory so that the Operator can manage them
(for example, additional Operand dependencies). But for now, we have enough to begin
working on a control loop.
Writing a control loop
With a strategy for the in-memory representation of resource manifests in place, it is
now much easier to begin writing the Operator's control loop. As described in previous
chapters, this control loop comprises a core state reconciliation function call that is
triggered by certain relevant cluster events. This function does not run continuously on
a loop, but rather the main thread of the Operator will be continuously observing the
cluster for those events to kick off a call to the state reconciliation function.
The empty Reconcile() function has been scaffolded already by the Operator SDK in
controllers/nginxoperator_controller.go:
func (r *NginxOperatorReconciler) Reconcile(ctx context.
Context, req ctrl.Request) (ctrl.Result, error) {
_ = log.FromContext(ctx)
// your logic here
return ctrl.Result{}, nil
}
90
Developing an Operator with the Operator SDK
Right now, this function does nothing but return an empty ctrl.Result and an empty
error, which evaluates to a successful run and instructs the rest of the framework that
there is no need to re-try this reconciliation run. If this function returns either a non-nil
error or non-empty ctrl.Result struct, then the controller will instead re-queue
this reconciliation attempt to be tried again. These cases will come up as we populate the
controller's logic as indicated by the comment.
Because the Operator SDK instantiates this controller with a Kubernetes client already
accessible, we can use functions such as Get() to retrieve cluster resources. The first
thing to do is to attempt to access the existing Nginx Operator resource object. If one
is not found, we should log a message indicating so and terminate the reconciliation
attempt. If there are any other errors retrieving the object, we will instead return an
error, so this attempt gets re-queued and tried again. This approach can account for other
failures, such as network issues or temporarily dropped connections to the API server.
With these changes, the new Reconcile() function looks like the following:
controllers/nginxoperator_controller.go:
func (r *NginxOperatorReconciler) Reconcile(ctx context.
Context, req ctrl.Request) (ctrl.Result, error) {
logger := log.FromContext(ctx)
operatorCR := &operatorv1alpha1.NginxOperator{}
err := r.Get(ctx, req.NamespacedName, operatorCR)
if err != nil && errors.IsNotFound(err) {
logger.Info("Operator resource object not found.")
return ctrl.Result{}, nil
} else if err != nil {
logger.Error(err, "Error getting operator resource object")
return ctrl.Result{}, err
}
return ctrl.Result{}, nil
}
Writing a control loop
91
This error-handling pattern is common among Kubernetes projects, including examples
from the official Operator SDK documentation. Rather than immediately returning the
error, this code essentially ignores the case where the Operator object is simply not found.
The errors.IsNotFound() check comes from the k8s.io/apimachinery/pkg/
api/errors package, which provides several helper functions for a standard approach
to handling specific Kubernetes errors. Using this pattern helps to minimize logging
noise for the user and to ignore events where the Operator resource was deleted (which
will still trigger a reconciliation attempt). In the event that the Operator object is not
found, developers can go a step further and use that as a signal to take other steps (such as
deleting other resources that depend on the Operator deployment).
Also, note that this code is using req.NamespacedName to get the Name and
Namespace of the Operator config object. This follows one of the best practices laid out
in the Operator Framework documentation (https://sdk.operatorframework.
io/docs/best-practices/best-practices/):
Operators shouldn't make any assumptions about the namespace they are deployed in, and
they should not use hardcoded names of resources that they expect to already exist.
In this case, the req parameter includes the name of the object event that triggered the
reconciliation attempt. Using a consistent name across resources allows us to re-use the
req.NamespacedName field in every call to Reconcile(), regardless of the object
that triggered the reconciliation. In other words, if the Deployment has the same Name
and Namespace as the Operator custom resource object, we can consistently eliminate the
use of hardcoded assumptions for resource names.
With an Operator resource object successfully found, the controller can retrieve the values
for each setting in the Operator's spec in order to update them, if necessary. Similar
to what we just did for the Operator resource, however, we must first check whether
the Deployment exists. For this, we will follow a similar pattern utilizing errors.
IsNotFound() to check for the non-existence of an Nginx Deployment. However, in
this case, the function will not simply return if no Deployment is found, but instead the
controller will create one from the embedded Deployment YAML file:
controllers/nginxoperator_controller.go:
deployment := &appsv1.Deployment{}
err = r.Get(ctx, req.NamespacedName, deployment)
if err != nil && errors.IsNotFound(err) {
deployment.Namespace = req.Namespace
deployment.Name = req.Name
92
Developing an Operator with the Operator SDK
deploymentManifest := assets.
GetDeploymentFromFile("manifests/nginx_deployment.yaml")
deploymentManifest.Spec.Replicas = operatorCR.Spec.Replicas
deploymentManifest.Spec.Template.Spec.Containers[0].Ports[0].
ContainerPort = *operatorCR.Spec.Port
err = r.Create(ctx, deploymentManifest)
if err != nil {
logger.Error(err, "Error creating Nginx deployment.")
return ctrl.Result{}, err
}
return ctrl.Result{}, nil
} else if err != nil {
logger.Error(err, "Error getting existing Nginx deployment.")
return ctrl.Result{}, err
}
In this code, we are loading the embedded default manifest using the assets.
GetDeploymentFromFile() function created earlier. We are also modifying that
manifest declaration to include the values from the current Operator resource object.
An alternative to this approach would be to create the Deployment with the default
values, and then have the function immediately return with ctrl.Result{Requeue:
true}. This would trigger another reconciliation attempt, where the Deployment should
be found and then updated with the Operator resource settings. The trade - off here is the
immediate creation of a new object without the need for another reconciliation cycle, in
exchange for less atomic operation and some code duplication (because we will still need
the following code to apply the Operator resource settings in the case where an existing
Deployment was found). To eliminate that duplicate code, we can modify the preceding
section like this:
controllers/nginxoperator_controller.go:
deployment := &appsv1.Deployment{}
create := false
err = r.Get(ctx, req.NamespacedName, deployment)
if err != nil && errors.IsNotFound(err) {
create = true
deployment = assets.GetDeploymentFromFile("manifests/nginx_
deployment.yaml")
Writing a control loop
93
} else if err != nil {
logger.Error(err, "Error getting existing Nginx deployment.")
return ctrl.Result{}, err
}
if operatorCR.Spec.Replicas != nil {
deployment.Spec.Replicas = operatorCR.Spec.Replicas
}
if operatorCR.Spec.Port != nil {
deployment.Spec.Template.Spec.Containers[0].Ports[0].
ContainerPort = *operatorCR.Spec.Port
}
Since the Replicas and Port fields in the Operator custom resource are optional (and
pointers), we should use nil checks to see whether any value has been set. Otherwise, the
Deployment will default to the values defined in its manifest file.
Now, we are always making sure that the Deployment object is being modified to include
the Operator settings, whether it is the existing Deployment or a new one. Then, the
decision to call Create() or Update() will be made later based on the value of the
create Boolean:
controllers/nginxoperator_controller.go:
if create {
err = r.Create(ctx, deployment)
} else {
err = r.Update(ctx, deployment)
}
return ctrl.Result{}, err
If either call results in an error, it will be returned and logged by the controller thanks
to the scaffolded framework code. If the call to create or update the Deployment is
successful, then err will be nil and the reconciliation call completes successfully. Our
full Reconcile() function now looks like this:
controllers/nginxoperator_controller.go:
func (r *NginxOperatorReconciler) Reconcile(ctx context.
Context, req ctrl.Request) (ctrl.Result, error) {
94
Developing an Operator with the Operator SDK
logger := log.FromContext(ctx)
operatorCR := &operatorv1alpha1.NginxOperator{}
err := r.Get(ctx, req.NamespacedName, operatorCR)
if err != nil && errors.IsNotFound(err) {
logger.Info("Operator resource object not found.")
return ctrl.Result{}, nil
} else if err != nil {
logger.Error(err, "Error getting operator resource
object")
return ctrl.Result{}, err
}
deployment := &appsv1.Deployment{}
create := false
err = r.Get(ctx, req.NamespacedName, deployment)
if err != nil && errors.IsNotFound(err) {
create = true
deployment = assets.GetDeploymentFromFile("assets/nginx_
deployment.yaml")
} else if err != nil {
logger.Error(err, "Error getting existing Nginx
deployment.")
return ctrl.Result{}, err
}
deployment.Namespace = req.Namespace
deployment.Name = req.Name
if operatorCR.Spec.Replicas != nil {
deployment.Spec.Replicas = operatorCR.Spec.Replicas
}
if operatorCR.Spec.Port != nil { deployment.Spec.Template.
Spec.Containers[0].Ports[0].ContainerPort = *operatorCR.Spec.
Port
}
Writing a control loop
95
ctrl.SetControllerReference(operatorCR, deployment, r.Scheme)
if create {
err = r.Create(ctx, deployment)
} else {
err = r.Update(ctx, deployment)
}
return ctrl.Result{}, err
}
In addition, we added a call to ctrl.SetControllerReference() to indicate that
the Nginx Operator resource object should be listed as the OwnerReference (an API
field denoting which object "owns" the specified object) of the Nginx Deployment, which
helps with garbage collection.
Finally, we need to ensure that the Operator actually has the cluster permissions necessary
to get, create, and update Deployments. To do that, we need to update the RBAC role
for the Operator. This can be done automatically using Kubebuilder markers on the
Reconcile() function, which helps keep permissions organized and their necessary
usage clearly identified. There are already Kubebuilder markers that were generated
for accessing the Operator custom resource, but now we can add additional ones for
Deployments:
controllers/nginxoperator_controller.go:
//+kubebuilder:rbac:groups=operator.example.com,
resources=nginxoperators,verbs=get;list;watch;create;
update;patch;delete
//+kubebuilder:rbac:groups=operator.example.com,
resources=nginxoperators/status,verbs=get;update;patch
//+kubebuilder:rbac:groups=operator.example.com,
resources=nginxoperators/finalizers,verbs=update
//+kubebuilder:rbac:groups=apps,resources=deployments,
verbs=get;list;watch;create;update;patch;delete
Now, running make manifests should produce this new section in the Operator's
ClusterRole (config/rbac/role.yaml):
rules:
- apiGroups:
- apps
96
Developing an Operator with the Operator SDK
resources:
- deployments
verbs:
- create
- delete
- get
- list
- patch
- update
- watch
At this point, we now have a basic control loop reconciling the specified Operator settings
with the current state of the cluster. But what events will trigger this loop to run? This is
set up in SetupWithManager():
controllers/nginxoperator_controller.go:
// SetupWithManager sets up the controller with the Manager.
func (r *NginxOperatorReconciler) SetupWithManager(mgr ctrl.
Manager) error {
return ctrl.NewControllerManagedBy(mgr).
For(&operatorv1alpha1.NginxOperator{}).
Complete(r)
}
This code was generated to observe the cluster for changes to the NginxOperator
objects, but we need it to also observe changes to Deployment objects (since the Operator
is managing a Deployment). This can be done by modifying the function like this:
// SetupWithManager sets up the controller with the Manager.
func (r *NginxOperatorReconciler) SetupWithManager(mgr ctrl.
Manager) error {
return ctrl.NewControllerManagedBy(mgr).
For(&operatorv1alpha1.NginxOperator{}).
Owns(&appsv1.Deployment{}).
Complete(r)
}
Troubleshooting
97
With the added call to Owns(&appsv1.Deployment{}), the controller manager
now knows to also trigger calls to Reconcile() for changes to Deployment objects
in the cluster. The controller will now evaluate any changes to a Deployment object as a
relevant event for the NginxOperator object since we have listed it as the owner of the
Deployment. Multiple types of objects can be chained into this watch list with subsequent
calls to Owns().
We now have an Operator that does something. When built and deployed, this controller
will watch for changes to any NginxOperator custom resource in the cluster and react
to them. This means that the first time a user creates the Operator custom resource object,
the Operator will see that a configuration object now exists, and create a Deployment
based on the values present. It will also observe for changes to Deployments. For example,
if the Nginx Deployment is accidentally deleted, the Operator will respond by creating a
new one with the existing settings from its custom resource.
Troubleshooting
The steps outlined in this chapter involve using several different tools and libraries with
varying dependency requirements. Understandably, this can lead to errors, especially in
different development environments. While the authors of the software involved have
taken steps to produce informative and helpful error messages when necessary, it is
not always possible to provide a clear resolution with automated responses. Such is the
unfortunate nature of rapidly evolving software development.
Fortunately, however, the benefits of open source software provide many resources
and volunteers to help support and debug issues, should they arise. This section will
highlight those resources as a guide for resolving technical issues. All of these tools offer
documentation and how-to guides, but many of them also have community resources
where users can ask for clarification and assistance from maintainers and other users.
General Kubernetes resources
The Operator SDK is foundationally built upon several Kubernetes libraries; therefore,
it is very helpful to understand some of the Kubernetes packages that are used to build
Operators with the framework. By doing so, it can sometimes be easier to find the root
cause of an issue.
The Kubernetes reference documents are located at https://kubernetes.io/docs/
home/. However, this home section is mostly oriented toward usage documentation.
For support regarding the Kubernetes API (including API clients, standards, and object
references), the API reference section is much more relevant to the topics covered in this
chapter. That is located at https://kubernetes.io/docs/reference/.
98
Developing an Operator with the Operator SDK
The entire Kubernetes source code is available on GitHub under various organizations,
such as https://github.com/kubernetes (most of the project code) and
https://github.com/kubernetes-sigs (subprojects, such as Kubebuilder). For
example, the Go client library, which is used by the Operator SDK framework under the
hood to provide resource functions such as r.Get(), is hosted at https://github.
com/kubernetes/client-go/.
Familiarity with the GitHub repositories that host the different code dependencies that
the Operator Framework is built on provides an excellent resource for communication
with the maintainers of these projects. Searching the Issues on GitHub can very often
provide immediate relief to an issue (or at least provide insight into the current status of
ongoing problems).
For faster responses and a wider audience, the Kubernetes community is very active on
the Slack messaging platform. The official Kubernetes Slack server is open to anyone, at
slack.k8s.io. Helpful channels for developers working with general Kubernetes issues
include the following:
• #kubernetes-novice – This channel is for new Kubernetes users and developers.
• #kubernetes-contributors – This channel is more dedicated to the development
of Kubernetes itself, but there are still useful topics covered around relevant topics,
such as API clients.
• #kubernetes-users – Similar to #kubernetes-novice with a focus on usage
rather than development, but for more specific questions.
• #sig-api-machinery – The different areas and subprojects of Kubernetes are
owned by their respective Special Interest Groups (SIGs). SIG-APIMachinery
is responsible for the ownership of the Kubernetes Go client, which we used by
extension in this chapter. Here you will find the most knowledgeable contributors in
regard to API topics.
For the topics in this chapter, these resources are relevant for issues related to the
Kubernetes API, including the generated client tools created with commands such as
make generate.
Troubleshooting
99
Operator SDK resources
The Operator SDK also provides a wealth of documentation, including example Operator
development tutorials. In this chapter, developing an Operator in Go meant following similar
steps to those outlined in the Operator SDK Go documentation, located at https://sdk.
operatorframework.io/docs/building-operators/golang/.
Similar to other Kubernetes projects, Operator SDK is also available on GitHub at
https://github.com/operator-framework/operator-sdk/. This is a great
resource for examples, issue tracking, and staying notified of updates and ongoing work
with the project.
There are several Operator-specific channels on slack.k8s.io, including #operatorsdk-dev (which is meant for discussion related to the Operator SDK) and #kubernetesoperators, which is for general discussion purposes regarding Operators.
These resources are all helpful for problems related to the operator-sdk binary, or the
patterns provided by the SDK's code libraries and patterns.
Kubebuilder resources
Kubebuilder is the tool that is used by Operator SDK to generate manifests and some
controller code. This includes commands that were run in this chapter, such as make
manifests, so for most issues related to CRDs or generating them from code markers
(for example, //+kubebuilder…), this is a good starting point for assistance.
An excellent reference for Kubebuilder is the Kubebuilder Book, available at
https://book.kubebuilder.io/. This is the essential documentation reference
for Kubebuilder and includes details on all of the available comment markers for
generating code. Its code base is also available on GitHub at https://github.com/
kubernetes-sigs/kubebuilder, and some of its sub-tools (such as controller-gen)
are available at https://github.com/kubernetes-sigs/controller-tools.
Finally, there is the #kubebuilder channel on the Kubernetes Slack server for interactive
discussion and help with this tool.
100
Developing an Operator with the Operator SDK
Summary
This chapter followed the design we outlined in Chapter 3, Designing an Operator – CRD,
API, and Target Reconciliation, to produce functional code that achieves the minimum
requirements for a Level I Operator (Basic Install). With the support of the Operator
Lifecycle Manager (which will be demonstrated in later chapters) and good subsequent
API design, this Operator will also support upgrades for itself and its Operand, which
qualifies it for Level II.
The steps for creating a Go-based Operator, as recommended by the Operator SDK
documentation approach, build upon each other to achieve base functionality. In this
chapter, that pattern meant first designing the Operator's API types, which are then
generated into a CRD using tools such as Kubebuilder. At this time, it is good to begin
thinking about other resource manifests, such as the Operand Deployment, and how
those will be represented in memory. This guide took the approach of embedding these
additional resources directly into the Go binary using built-in Go compiler directives that
allow the language to do this natively.
Finally, the core controller code was filled in. This is what makes the Operator a controller,
and this control loop is used to reconcile the desired state of the cluster with the actual
state of the cluster based on user input through the Operator's CRD. With some additional
tweaks to the event triggers and added RBAC permissions, this code begins to observe
Deployments, which is necessary to manage the Operand.
In the next chapter, we will build on this basic functionality to add more advanced code.
This will bring our Operator beyond Level II, as we add things such as metrics and
leader election to create a more sophisticated controller capable of deeper insights and
error handling.
5
Developing an
Operator – Advanced
Functionality
While a cluster with Operators that are capable of basic installation and upgrade
functionality is a considerable improvement over non-Operator-based Kubernetes
clusters, there is still more that can be done to improve cluster administration and user
experience. Advanced features can help users to achieve more sophisticated automation,
guide failure recovery, and inform data-driven deployment decisions with features such as
metrics and status updates.
These are some of the fundamental features for higher-level Operators within the
Capability Model (as described in Chapter 1, Introduction to the Operator Framework).
As such, this chapter will first explain the cost and benefits of implementing advanced
functionality (in relation to the effort necessary to do so) before demonstrating ways to
add these features in the following sections:
• Understanding the need for advanced functionality
• Reporting status conditions
• Implementing metrics reporting
102
Developing an Operator – Advanced Functionality
• Implementing leader election
• Adding health checks
Conveniently, the code required to implement these features does not require any
significant refactoring of the existing Operator code. In fact, the hierarchical nature of the
Capability Model and the development patterns provided by the Operator SDK encourage
this iterative construction. It is, therefore, the goal of this chapter to build upon the basic
Operator code from Chapter 4, Developing an Operator with the Operator SDK, to create
a more complex Operator capable of providing the features we just listed.
Technical requirements
The examples shown throughout this chapter build upon the project code that was
started in Chapter 4, Developing an Operator with the Operator SDK. Therefore, it is
recommended to start with that chapter (and the prerequisites for it), which covers project
initialization and basic Operator functionality. This is not required, however, and the
sections in this chapter can be generally applied to any Operator SDK project. That is, any
project initialized by the Operator SDK will work with the following steps and you do not
need to specifically implement all of the code from previous chapters.
With that in mind, the requirements for this chapter are as follows:
• Any existing Operator SDK project
• Go 1.16+
The Code in Action video for this chapter can be viewed at: https://bit.ly/3zbsvD0
Understanding the need for advanced
functionality
With a basic, functional Operator already built and ready for deployment, you may be
asking, What else do I really need? Indeed, now that your operand is installable and its
health is managed by your Operator, there may be nothing more to do. This is a perfectly
acceptable level of functionality for an Operator to have. In fact, it may be preferable
to start with a simple Operator and iterate as your development resources allow (recall
discussing this in Chapter 3, Designing an Operator – CRD, API, and Target Reconciliation).
The point is that there is no shame during the development of your Operator in stopping
here. The Capability Model defines lower-level Operators for a reason (in other words, if
it was unacceptable to have an Operator that can only install an operand, then why would
Level I be defined at all?).
Reporting status conditions
103
However, the Capability Model does define higher-level Operators for a reason too.
It is not difficult to imagine, for example, that during the course of a user's interaction
with your Operator, they may wish to see more detailed insights into how it performs
within a production environment. This is a good use case for adding custom metrics
to an Operator. Or, there may be a common failure state that is difficult to debug
(wherein status conditions would help expose more information about the failure in an
efficient way).
The following sections are just a few of the most common additional features that help
elevate an Operator to a higher level of functionality. Some of these are also covered in
additional detail by the Operator SDK documentation on Advanced Topics (https://
sdk.operatorframework.io/docs/building-operators/golang/
advanced-topics/). It is, of course, not feasible to list every possible feature that you
could add to your Operator. But hopefully, these examples serve as a good starting point
for your own development.
Reporting status conditions
Status conditions were discussed in Chapter 3, Designing an Operator – CRD, API, and
Target Reconciliation, as a way to efficiently communicate human-readable information
about the Operator's health to administrators. By presenting directly in an Operator's
CustomResourceDefinition (CRD), the information they provide is more easily
highlighted and viewable in a more centralized starting point for debugging issues. In
this way, they provide an advantage over error logs, which can contain lots of unrelated
information and often lack direct context, making them hard to trace to a root cause.
Implementing conditions in an Operator is made easier by the Kubernetes API's
standardization of the concept. The standard Condition type was implemented
in KEP-1623 (https://github.com/kubernetes/enhancements/tree/
master/keps/sig-api-machinery/1623-standardize-conditions)
around Kubernetes 1.19. That type is now part of the Kubernetes API in the k8s.io/
apimachinery/pkg/api/meta module. This allows developers to work with a
consistent understanding of how conditions should be reported in Kubernetes with all of
the compatibility assurances of Kubernetes API support.
The Operator Framework has also implemented conditions based on the Kubernetes
type, both in the Operator SDK and the Operator Lifecycle Manager (OLM).
Accordingly, conditions can be set either on the Operator's custom resource or on an
additional OperatorCondition resource that the OLM creates. This section will cover
both approaches.
104
Developing an Operator – Advanced Functionality
Operator CRD conditions
As part of the Kubernetes API conventions covered in Chapter 3, Designing an Operator –
CRD, API, and Target Reconciliation, objects (including custom resources) should include
both a spec and status field. In the case of Operators, we are using spec as an input
for configuring the Operator's parameters already. However, we have not yet modified
the status field. We will now change that by adding a list of conditions as a new field in
api/v1alpha1/nginxoperator_types.go:
// NginxOperatorStatus defines the observed state of
NginxOperator
type NginxOperatorStatus struct {
// Conditions is the list of status condition updates
Conditions []metav1.Condition `json:"conditions"`
}
Then, we will run make generate (to update the generated client code) and make
manifests (to update the Operator's CRD with the new field), or simply make (which
runs all generators, though we don't need some of them right now). The new field is now
reflected in the CRD:
properties:
conditions:
description: Conditions is the list of the most recent
status condition
updates
items:
description: "Condition contains details for one aspect
of the current state of this API Resource.
--- This struct is intended for direct use
as an array at the field path
.status.conditions."
properties:
lastTransitionTime:
description: lastTransitionTime is the last time the
condition transitioned from one status
to another. This should be when the
underlying condition changed. If that
is not known, then using the time when
Reporting status conditions
the API field changed is acceptable.
format: date-time
type: string
message:
description: message is a human readable message
indicating details about the
transition. This may be an empty
string.
maxLength: 32768
type: string
...
status:
description: status of the condition, one of True,
False, Unknown.
enum:
- "True"
- "False"
- Unknown
type: string
type:
description: type of condition in CamelCase or in
foo.example.com/CamelCase. --- Many
.condition.type values are consistent
across resources like Available, but
because arbitrary conditions can be
useful (see .node.status.conditions),
the ability to deconflict is important.
The regex it matches is
(dns1123SubdomainFmt/)?(qualifiedNameFmt)
maxLength: 316
pattern: ^([a-z0-9]([-a-z0-9]*[a-z0-9])?(\.[a-z0-9]
([-a-z0-9]*[a-z0-9])?)*/)?(([A-Za-z0-9][-A-Za-z0-9_.]*)?[AZa-z0-9])$
type: string
required:
- lastTransitionTime
105
106
Developing an Operator – Advanced Functionality
- message
- reason
- status
- type
type: object
type: array
required:
- conditions
type: object
Note that this also imports all of the embedded validation requirements for the
Condition type from the Kubernetes API.
Now that the Operator's CRD has a field to report the latest status conditions, the code
can be updated to implement them. For this, we can use the SetStatusCondition()
helper function, which is available in the k8s.io/apimachinery/pkg/
api/meta module. For this example, we will start with a single condition called
OperatorDegraded, which will default to False to indicate that the Operator is
successfully reconciling changes in the cluster. If the Operator does encounter an error,
however, we will update this condition to True with a message indicating the error.
This will involve some refactoring of the Reconcile() function in controllers/
nginxoperator_controller.go to match the following:
func (r *NginxOperatorReconciler) Reconcile(ctx context.
Context, req ctrl.Request) (ctrl.Result, error) {
logger := log.FromContext(ctx)
operatorCR := &operatorv1alpha1.NginxOperator{}
err := r.Get(ctx, req.NamespacedName, operatorCR)
if err != nil && errors.IsNotFound(err) {
logger.Info("Operator resource object not found.")
return ctrl.Result{}, nil
} else if err != nil {
logger.Error(err, "Error getting operator resource
object")
meta.SetStatusCondition(&operatorCR.Status.Conditions,
metav1.Condition{
Type:
"OperatorDegraded",
Status:
metav1.ConditionTrue,
Reporting status conditions
107
Reason:
"OperatorResourceNotAvailable",
LastTransitionTime: metav1.NewTime(time.Now()),
Message:
fmt.Sprintf("unable to get
operator custom resource: %s", err.Error()),
})
return ctrl.Result{}, utilerrors.NewAggregate([]
error{err, r.Status().Update(ctx, operatorCR)})
}
The preceding code will now attempt to report a degraded status condition if the
controller is initially unable to access the Operator's CRD. The code continues as follows:
deployment := &appsv1.Deployment{}
create := false
err = r.Get(ctx, req.NamespacedName, deployment)
if err != nil && errors.IsNotFound(err) {
create = true
deployment = assets.GetDeploymentFromFile("assets/nginx_
deployment.yaml")
} else if err != nil {
logger.Error(err, "Error getting existing Nginx
deployment.")
meta.SetStatusCondition(&operatorCR.Status.Conditions,
metav1.Condition{
Type:
"OperatorDegraded",
Status:
metav1.ConditionTrue,
Reason:
"OperandDeploymentNotAvailable",
LastTransitionTime: metav1.NewTime(time.Now()),
Message:
fmt.Sprintf("unable to get operand
deployment: %s", err.Error()),
})
return ctrl.Result{}, utilerrors.NewAggregate([]
error{err, r.Status().Update(ctx, operatorCR)})
}
108
Developing an Operator – Advanced Functionality
This section of code works similarly to the previous, but now reporting a degraded
condition if the Deployment manifest for the nginx operand is unavailable:
deployment.Namespace = req.Namespace
deployment.Name = req.Name
if operatorCR.Spec.Replicas != nil {
deployment.Spec.Replicas = operatorCR.Spec.Replicas
}
if operatorCR.Spec.Port != nil {
deployment.Spec.Template.Spec.Containers[0].Ports[0].
ContainerPort = *operatorCR.Spec.Port
}
ctrl.SetControllerReference(operatorCR, deployment,
r.Scheme)
if create {
err = r.Create(ctx, deployment)
} else {
err = r.Update(ctx, deployment)
}
if err != nil {
meta.SetStatusCondition(&operatorCR.Status.Conditions,
metav1.Condition{
Type:
"OperatorDegraded",
Status:
metav1.ConditionTrue,
Reason:
"OperandDeploymentFailed",
LastTransitionTime: metav1.NewTime(time.Now()),
Message:
fmt.Sprintf("unable to update operand
deployment: %s", err.Error()),
})
return ctrl.Result{}, utilerrors.NewAggregate([]error{err,
r.Status().Update(ctx, operatorCR)})
}
Reporting status conditions
109
If the attempt to update the operand Deployment fails, this block will report that the
Operator is degraded as well. If the controller is able to succeed past this point, then there
is no degradation to report. For this reason, the next block of code will finish the function
by updating the Operator's CRD to show that there is no degraded condition:
meta.SetStatusCondition(&operatorCR.Status.Conditions,
metav1.Condition{
Type:
"OperatorDegraded",
Status:
metav1.ConditionFalse,
Reason:
"OperatorSucceeded",
LastTransitionTime: metav1.NewTime(time.Now()),
Message:
"operator successfully reconciling",
})
return ctrl.Result{}, utilerrors.NewAggregate([]error{err,
r.Status().Update(ctx, operatorCR)})
}
In this code, we have added four calls to SetStatusCondition(), in which the
condition with the type of "OperatorDegraded" is updated with the current time and
a brief reason:
1. If the Operator is unable to access its custom resource (for any reason besides
a simple IsNotFound error), set the condition to True with the reason,
OperatorResourceNotAvailable.
2. If we are unable to get the nginx Deployment manifest from the
embedded YAML file, update the condition to True with the reason,
OperandDeploymentNotAvailable.
3. If the Deployment manifest is successfully found but a call to create or update it
fails, set the condition to True with the reason, OperandDeploymentFailed.
4. Finally, if the Reconcile() function has completed with no critical errors, set the
OperatorDegraded condition to False.
110
Developing an Operator – Advanced Functionality
True or False as a Success Indicator
Note that, as discussed in the status conventions in Chapter 3, Designing
an Operator – CRD, API, and Target Reconciliation, the False condition
indicates a successful run. We could just as easily have inverted this logic,
naming the condition something like OperatorSucceeded, where the
default case is True and any failures change the condition to False. Doing
so would still be consistent with Kubernetes conventions, so the decision is
ultimately up to the developer based on the intent they wish to convey.
In this example, we have used string literals for each Reason update. In a practical
application, it is common to define various Reason constants in the Operator's API,
which allows for consistent reusability. For example, we could define the following
in api/v1alpha1/nginxoperator_types.go and use them through their
constant names:
const (
ReasonCRNotAvailable = "OperatorResourceNotAvailable"
ReasonDeploymentNotAvailable = "OperandDeploymentNotAvailable"
ReasonOperandDeploymentFailed = "OperandDeploymentFailed"
ReasonSucceeded
= "OperatorSucceeded"
)
The exact naming scheme for a condition reason is up to the preference of the developer,
with the only Kubernetes condition being that it must be CamelCase. For that reason,
different condition types and reasons can be named whatever is relevant and preferred
for that specific Operator. The only standard condition name that currently exists is
Upgradeable, which is consumed by the OLM. We will show how to use that condition
in the next section.
With these conditions implemented, we will be able to see the following output when
interacting with a custom resource for our Operator:
$ kubectl describe nginxoperators/cluster
Name:
cluster
Namespace:
nginx-operator-system
API Version: operator.example.com/v1alpha1
Kind:
NginxOperator
Metadata:
Creation Timestamp: 2022-01-20T21:47:32Z
Generation:
1
Reporting status conditions
...
Spec:
Replicas: 1
Status:
Conditions:
Last Transition Time:
Message:
Reason:
Status:
Type:
111
2022-01-20T21:47:32Z
operator successfully reconciling
OperatorSucceeded
False
OperatorDegraded
In the next section, we will show how to report Operator conditions directly to the OLM.
Using the OLM OperatorCondition
We have already discussed how the OLM is capable of managing the currently installed
list of Operators, including upgrading and downgrading. In Chapter 7, Installing and
Running Operators with the Operator Lifecycle Manager, we will show the OLM in action
for some of these features. But, for the moment, we can implement condition reporting in
our Operator so that the OLM is aware of certain states that could prevent the Operator
from upgrading. Combined with status conditions that are unique to the Operator (as
reported in its CRD), this can help inform the OLM of critical information regarding the
Operator's current state.
To read Operator conditions, the OLM creates a custom resource called
OperatorCondition. The OLM will automatically create an instance of this object for
every Operator that it manages from a CRD. A sample OperatorCondition object
looks like the following:
apiVersion: operators.coreos.com/v1
kind: OperatorCondition
metadata:
name: sample-operator
namespace: operator-ns
status:
conditions:
- type: Upgradeable
status: False
reason: "OperatorBusy"
112
Developing an Operator – Advanced Functionality
message: "Operator is currently busy with a critical task"
lastTransitionTime: "2022-01-19T12:00:00Z"
This object uses the same Condition type from the Kubernetes API as shown earlier
(when implementing status conditions in the Operator CRD). This means it also
includes all of the same fields, such as type, status, reason, and message, which
can be updated the same way we did before. The difference is that now, setting type to
Upgradeable will instruct the OLM to block any attempts to upgrade the Operator.
The other difference is that the Operator needs to report this status change to a different
CRD (rather than its own). To do that, there is a library available at https://github.
com/operator-framework/operator-lib, which includes helper functions to
update the OperatorCondition CRD. Details on using this library are available in the
Operator Framework enhancements repository at https://github.com/operatorframework/enhancements/blob/master/enhancements/operatorconditions-lib.md. One way this can be done is in our nginx Operator by modifying
the Reconcile() function in controllers/nginxoperator_controller.go
like so:
import (
...
apiv2 "github.com/operator-framework/api/pkg/operators/v2"
"github.com/operator-framework/operator-lib/conditions"
)
func (r *NginxOperatorReconciler) Reconcile(ctx context.
Context, req ctrl.Request) (ctrl.Result, error) {
...
condition, err := conditions.InClusterFactory{r.Client}.
NewCondition(apiv2.ConditionType(apiv2.Upgradeable))
if err != nil {
return ctrl.Result{}, err
}
err = condition.Set(ctx, metav1.ConditionTrue,
conditions.WithReason("OperatorUpgradeable"),
conditions.WithMessage("The operator is upgradeable"))
if err != nil {
Reporting status conditions
113
return ctrl.Result{}, err
}
...
}
This code imports two new modules: the Operator Framework V2 API and the
operator-lib/conditions library. It then instantiates a new Factory object,
which uses the same Kubernetes client that is already available to the Operator. That
factory can then create new Condition objects with NewCondition(), which accepts
ConditionType (which is really just a string) and creates a condition with that type.
In this example, Condition is created with the apiv2.Upgradeable type, which is
a constant defined by the Operator Framework for the Upgradeable condition that is
understood by the OLM.
Next, the condition.Set() function updates the OperatorCondition CRD
object that the OLM created for our Operator. Specifically, this adds (or updates) the list
of conditions with the new condition we just created and the status that is passed to it (in
this case, True). There are also two functions available that can be optionally passed to
Set() (WithReason() and WithMessage()), which set the reason and message for
the condition.
Using these helpers greatly simplifies the work necessary to retrieve and update the
OperatorCondition CRD object created for our Operator by the OLM. In addition,
the OLM takes steps to make sure that Operators cannot delete the CRD or modify
anything outside of the object's status. However, there are some other fields in the
OperatorCondition CRD spec that can be modified by administrators. Specifically,
the overrides field allows users to manually bypass automatically reported condition
updates that would otherwise block upgrading. A sample usage of this field looks
as follows:
apiVersion: operators.coreos.com/v1
kind: OperatorCondition
metadata:
name: sample-operator
namespace: operator-ns
spec:
overrides:
- type: Upgradeable
status: True
reason: "OperatorIsStable"
114
Developing an Operator – Advanced Functionality
message: "Forcing an upgrade to bypass bug state"
status:
conditions:
- type: Upgradeable
status: False
reason: "OperatorBusy"
message: "Operator is currently busy with a critical task"
lastTransitionTime: "2022-01-19T12:00:00Z"
Using overrides like this can be useful in the case of known issues or bugs that should
not prevent the Operator from upgrading.
Implementing metrics reporting
Metrics are a crucial aspect of any Kubernetes cluster. Metrics tools can provide detailed
insights into almost any measurable data in the cluster. This is why metrics are a key
part of graduating an Operator to Level IV in the Capability Model. In fact, most native
Kubernetes controllers already report metrics about themselves, for example, kubescheduler and kube-controller-manager. These components export data in metrics such
as schedule_attempts_total, which reports the number of attempts the scheduler
has made to schedule Pods onto Nodes.
The original design for the Kubernetes monitoring architecture (https://
github.com/kubernetes/design-proposals-archive/blob/main/
instrumentation/monitoring_architecture.md) defines metrics such as
schedule_attempts_total as service metrics. The alternative to service metrics is
core metrics, which are metrics that are generally available from all components. Core
metrics currently include information about CPU and memory usage and are scraped by
the Kubernetes metrics-server application (https://github.com/kubernetessigs/metrics-server).
On the other hand, service metrics expose application-specific data that is defined in the
code of individual components. All of this data can be scraped and aggregated by tools
such as Prometheus (https://prometheus.io) or OpenTelemetry (https://
opentelemetry.io), and presented with frontend visualization applications such as
Grafana (https://grafana.com).
Implementing metrics reporting
115
The entire concept of metrics in Kubernetes extends far beyond just implementation with
regard to Operators. While that, unfortunately, means there is a lot of information that is
outside the scope of this chapter, there is a great deal of community and documentation
resources available that cover the fundamentals of this topic. Instead, this section will
focus on the relevant Operator implementation steps for a new service metric with an
assumed prior understanding of the basics related to metrics in general.
Adding a custom service metric
The boilerplate code that is scaffolded by operator-sdk when the project is initialized
already includes the code and dependencies necessary to expose a metrics endpoint in
the Operator Pod. By default, this is the /metrics path on port 8080. This eliminates
the need for meticulous HTTP handler code and allows us to focus instead on simply
implementing the metrics themselves, as described in the Prometheus documentation
(https://prometheus.io/docs/guides/go-application/#adding-yourown-metrics).
Kubebuilder Metrics
The built-in metrics handler code is another aspect of the Operator SDK that is
actually provided by Kubebuilder under the hood. This implementation relies
on the metrics library imported from sigs.k8s.io/controllerruntime. That library includes features such as a global registry of metrics
that is already available to the core Operator code. This library is easy to hook
into in order to register new metrics and update them from anywhere in the
Operator's code base. More information on metrics and their use is available
in the kubebuilder book at https://book.kubebuilder.io/
reference/metrics.html.
The controller-runtime library that this functionality is built with includes
several metrics about the Operator's controller code already, each indicated by the prefix
controller_runtime_. These include the following:
• controller_runtime_reconcile_errors_total – A counter metric that
shows the cumulative number of times the Reconcile() function returned
a non-nil error
• controller_runtime_reconcile_time_seconds_bucket – A histogram
showing the latency for individual reconciliation attempts
• controller_runtime_reconcile_total – A counter that increases with
every attempt to call Reconcile()
116
Developing an Operator – Advanced Functionality
For this example, we will be recreating the last metric, controller_runtime_
reconcile_total, as a way to report the number of attempts our Operator has made
to reconcile its state in the cluster.
RED metrics
When it comes to what type of metrics to define in any application, the possibilities are
practically infinite. This can cause overwhelming decision fatigue for developers, as it
may seem there is no good place to start. So, what are the most important metrics for an
Operator to expose? The Operator SDK documentation recommends following the RED
method, which outlines three key types of metrics that every service should expose in
a Kubernetes cluster:
• Rate – A metric showing the number of requests or attempts per second. This can
provide insight into how much work an Operator is doing, highlighting frequent
re-queues, which could indicate hotloop conditions or suboptimal request
pipelines.
• Errors – Metrics showing the number of failed attempts by a service (for example,
controller_runtime_reconcile_errors_total). When correlated
with the Rate metric, this can help debug common failures that are degrading an
Operator's performance.
• Duration – Duration (or latency) metrics show the length of time it takes for an
Operator to complete its work (controller_runtime_reconcile_time_
seconds). This information can indicate poor performance or other conditions
that degrade the cluster's health.
These basic metrics can provide the foundation for defining service-level objectives (SLOs)
to ensure your Operator functions within the expected standards of your application.
Implementing metrics reporting
117
To begin adding a custom metric to our Operator, it is a good practice to organize
metrics definitions into their own package by creating a new file under controllers/
metrics/metrics.go. This new module will hold the declaration of our new metric
and automatically register it with the global registry available from sigs.k8s.io/
controller-runtime/pkg/metrics. In the following code, we define this file and
instantiate a new custom metric:
controllers/metrics/metrics.go:
package metrics
import (
"github.com/prometheus/client_golang/prometheus"
"sigs.k8s.io/controller-runtime/pkg/metrics"
)
var (
ReconcilesTotal = prometheus.NewCounter(
prometheus.CounterOpts{
Name: "reconciles_total",
Help: "Number of total reconciliation attempts",
},
)
)
func init() {
metrics.Registry.MustRegister(ReconcilesTotal)
}
This file depends on the Prometheus client library to define a new counter (a simple,
increasing metric) that we store in the ReconcilesTotal public variable. The actual
name of the metric is reconciles_total, which is the name that will be exposed
to Prometheus.
118
Developing an Operator – Advanced Functionality
Metrics Naming Best Practices
In a real environment, it is best to include a prefix to a metric's name that
is specific to the application exporting that metric. This is one of the best
practices recommended by Prometheus (https://prometheus.io/
docs/practices/naming/). Although we haven't done that here (for
simplicity), we have followed another best practice of appending _total
to this cumulative metric. It is helpful to be familiar with these practices, not
just for developing your own metrics, but also to know what to expect when
interacting with other metrics.
With this file's init() function automatically registering the new metric with the
global registry, we can now update this metric from anywhere in the Operator's code.
Since this is a measure of the total number of reconciliation attempts by the controller,
it makes sense to update it at the start of the Reconcile() function declaration in
controllers/nginxoperator_controller.go. This can be done with two new
lines of code, shown in the following code:
controllers/nginxoperator_controller.go:
import (
...
"github.com/sample/nginx-operator/controllers/metrics"
...
)
func (r *NginxOperatorReconciler) Reconcile(...) (...) {
metrics.ReconcilesTotal.Inc()
...
}
All that is necessary is to import the new metrics package just created and call
metrics.ReconcilesTotal.Inc(). This function doesn't return anything, so there
is no need to add any error handling or status updates. We also want to make this the
first line of the function since the goal is to increment for every call to Reconcile()
(regardless of whether the call succeeds or not).
Implementing metrics reporting
119
The updated metric value is automatically reported by the metrics endpoint initialized by
kubebuilder, so it is available to view through a properly configured Prometheus instance,
as shown here:
Figure 5.1 – Screenshot of reconciles_total metric graph in the Prometheus UI
120
Developing an Operator – Advanced Functionality
When compared to the built-in controller_runtime_reconcile_total metric,
we see that the values are the same:
Figure 5.2 – Screenshot comparing custom reconciles_total metric to built-in controller_runtime_
reconcile_total
We will cover more about how to install and configure Prometheus to capture this custom
metric in Chapter 6, Building and Deploying Your Operator.
Implementing leader election
121
Implementing leader election
Leader election is an important concept in any distributed computing system, not just
Kubernetes (and not just for Operators, either). High-availability applications will often
deploy multiple replicas of their workload Pods to support the uptime guarantees their
users expect. In situations where only one workload Pod can do work in a cluster at
a time, that replica is known as the leader. The remaining replicas will wait, running but
not doing anything significant, until the current leader becomes unavailable or gives up its
status as the leader. Those Pods will then determine among themselves who should be the
new leader.
Enabling proper leader election can greatly benefit the application's uptime. This can
include graceful failover handling if one replica fails, or help to maintain application
accessibility during rolling upgrades.
The Operator SDK makes leader election for Operators simple to implement. The
boilerplate code scaffolded by operator-sdk creates a flag in our Operator,
--leader-elect, which defaults to false and disables leader election. That flag is
passed to the LeaderElection option value in the controller initialization function
ctrl.NewManager():
main.go:
func main() {
...
var enableLeaderElection bool
flag.BoolVar(&enableLeaderElection, "leader-elect", false,
"Enable leader election for controller manager. "+
"Enabling this will ensure there is only one active
controller manager.")
...
mgr, err := ctrl.NewManager(ctrl.GetConfigOrDie(), ctrl.
Options{
...
HealthProbeBindAddress: probeAddr,
LeaderElection:
enableLeaderElection,
LeaderElectionID:
"df4c7b26.example.com",
})
122
Developing an Operator – Advanced Functionality
if err != nil {
setupLog.Error(err, "unable to start manager")
os.Exit(1)
}
The LeaderElectionID field represents the name of the resource that the Operator
will use in order to hold the leader lock.
This setup (using the LeaderElection option in ctrl.NewManager()) sets up the
Operator to use the first of two possible leader election strategies, known as leader-withlease. The other possible strategy for leader election is leader-for-life. There are some
benefits and trade-offs to each strategy, as described in the Operator SDK documentation
(https://sdk.operatorframework.io/docs/building-operators/
golang/advanced-topics/#leader-election):
• Leader-with-lease – The default leader election strategy wherein the current leader
periodically attempts to renew its status as the leader (known as its lease). If it is
unable to do so, the leader relinquishes its position to a new leader. This strategy
improves availability by enabling fast transitions between leaders when necessary.
However, this strategy makes it possible to end up with a so-called split-brain
scenario, in which multiple replicas believe they are the leader.
• Leader-for-life – The leader only gives up its position when it is deleted (and
by extension, its lease lock resource is deleted via garbage collection). Doing so
eliminates the possibility of multiple replicas competing for leader status, but it
means that recovery from failure scenarios may be bound by the kube controller
manager's Pod eviction timeout (which defaults to 5 minutes).
Implementing leader election
Solving Split-Brain in Leader-with-Lease
Leader-with-lease is vulnerable to split-brain situations where two or more
replicas determine inconsistent results for the current leader state. This
is because the Kubernetes client that handles leader election determines
the current state of the system's leader election by observing timestamps.
Internally, the client looks at the elapsed time to decide whether it is time to
renew the leader lease. Therefore, the clock skew rate can become an issue in
some clusters.
The client library recommends a method for clock synchronization within
your cluster to address this. You can also modify the RenewDeadline
and LeaseDuration fields when calling ctrl.NewManager() to
add approximate toleration for the ratio of clock skew rate between the fastest
and slowest nodes. This is because LeaseDuration is the amount of time
that current non-leaders will wait before attempting to acquire leadership,
and RenewDeadline is the time that the control plane will wait to
attempt refreshing the current leadership. Therefore, as an example, setting
LeaseDuration to some multiple of RenewDeadline will add a
tolerance for that same ratio of clock skew rate within the cluster.
For example, assume the current leader runs on Node A, which keeps time
accurately. If the fail over backup replica is waiting on Node B, which is slow
and keeps time at half the speed of Node A, then there is a clock skew rate
between Nodes A and B with a ratio of 2:1.
In this scenario, if the leader has LeaseDuration of 1 hour and fails for
some reason, then it may take 2 hours for Node B to notice that the lease has
expired and attempt to acquire a new lease.
However, with RenewDeadline of 30 minutes, the original leader will
fail to renew its lease within that time frame. This allows the replica on the
slower node to act at what it believes is only 30 minutes, but the actual time
has surpassed LeaseDuration of 1 hour. This is an obscure detail in
the leader election library, but one worth noting for Operators in clusters
that may be affected by this skew. There is more discussion on this topic in
the original GitHub pull request to add leader election to the Kubernetes
clients at https://github.com/kubernetes/kubernetes/
pull/16830.
123
124
Developing an Operator – Advanced Functionality
To make our Operator configurable so that users can decide between leader-with-lease
and leader-for-life election strategies, we can leverage the existing --leader-elect flag
to enable or disable a call to the leader.Become() function:
import (
"github.com/operator-framework/operator-lib/leader"
...
)
var (
...
setupLog = ctrl.Log.WithName("setup")
)
func main() {
...
var enableLeaderElection bool
flag.BoolVar(&enableLeaderElection, "leader-elect", false,
"Enable leader election for controller manager. "+
"Enabling this will ensure there is only one active
controller manager.")
...
if !enableLeaderElection {
err := leader.Become(context.TODO(), "nginx-lock")
if err != nil {
setupLog.Error(err, "unable to acquire leader lock")
os.Exit(1)
}
}
mgr, err := ctrl.NewManager(ctrl.GetConfigOrDie(), ctrl.
Options{
...
LeaderElection:
enableLeaderElection,
LeaderElectionID:
"df4c7b26.example.com",
})
Adding health checks
125
Now, our Operator will always use some method of leader election. The leader.
Become() function is a blocking call that will prevent the Operator from running if it
cannot acquire the leader lock. It will attempt to do so every second. If it succeeds, it will
create the lock as a ConfigMap (in our case, that ConfigMap will be named nginx-lock).
Adding health checks
Health checks (also known as liveness and readiness probes) are a way for any Pod to
make its current functional state discoverable by other components in the cluster.
This is usually done by way of exposing an endpoint in the container (traditionally
/healthz for liveness checks and /readyz for readiness). That endpoint can be
reached by other components (such as the kubelet) to determine whether the Pod is
healthy and ready to serve requests. The topic is covered in detail in the Kubernetes
documentation at https://kubernetes.io/docs/tasks/configure-podcontainer/configure-liveness-readiness-startup-probes/.
The code initialized by the Operator SDK in main.go contains the healthz and
readyz check setup by default:
main.go
import (
...
"sigs.k8s.io/controller-runtime/pkg/healthz"
)
func main() {
...
mgr, err := ctrl.NewManager(ctrl.GetConfigOrDie(),
Options{
Scheme:
scheme,
MetricsBindAddress:
metricsAddr,
Port:
9443,
HealthProbeBindAddress: probeAddr,
LeaderElection:
enableLeaderElection,
LeaderElectionID:
"df4c7b26.example.com",
})
...
ctrl.
126
Developing an Operator – Advanced Functionality
if err := mgr.AddHealthzCheck("healthz", healthz.Ping); err
!= nil {
setupLog.Error(err, "unable to set up health check")
os.Exit(1)
}
if err := mgr.AddReadyzCheck("readyz", healthz.Ping); err !=
nil {
setupLog.Error(err, "unable to set up ready check")
os.Exit(1)
}
setupLog.Info("starting manager")
if err := mgr.Start(ctrl.SetupSignalHandler()); err != nil {
setupLog.Error(err, "problem running manager")
os.Exit(1)
}
}
This code sets up the two endpoints to begin serving immediately before the main
controller is started. This makes sense because, at this point, all other startup code has
already run. It wouldn't make sense to start advertising your Operator as healthy and
ready to serve requests before it has even attempted to create a client connection.
The two functions, mgr.AddHealthzCheck and mgr.AddReadyzCheck, each take
two parameters: a string (for the name of the check) and a function that returns the status
of the check. That function must have the following signature:
func(*http.Request) error
This signature shows that the function accepts an HTTP request (because the check is
serving an endpoint that will be queried by components such as the kubelet) and returns
an error (if the check fails). The healthz.Ping function that the Operator is already
populated with in this code is a simple no-operation (no-op) function that always returns
a nil error (indicating success). This is not very insightful, but its location in the code
does provide the minimum of reporting that the Operator has successfully passed most of
the initialization process.
Summary
127
However, following the preceding function signature, it is possible to implement
custom health checks. These additional checks can be added by simply calling mgr.
AddHealthzCheck or mgr.AddReadyzCheck again (depending on the type of
check) and passing the new function to each call. The checks are run sequentially (in
no guaranteed order) when the /healthz or /readyz endpoints are queried, and if
any checks fail, then an HTTP 500 status is returned. With this, it is possible to develop
your own liveness and readiness checks with more sophisticated logic that is unique to
your Operator (for example, relying on dependent components to be accessible before
reporting readiness).
Summary
This chapter highlighted some additional options for functionality beyond the bare
minimum that was established in Chapter 4, Developing an Operator with the Operator
SDK. This list is obviously not exhaustive of every possibility for advanced features,
but it is intended to showcase some of the most common additional features added to
Operators. At this point, some of the patterns for feature development should start to
become clear (for example, startup and initialization code usually goes in main.go, while
features related to core logic can fit nicely with the controller code in nginxoperator_
controller.go, or its own package).
The work done in this chapter shows some of the steps necessary in order to graduate
an Operator from lower-level functionality to higher levels in the Capability Model. For
example, metrics are a key aspect of a Level IV (Deep Insights) Operator and, therefore,
something that is expected of the highest-function Operators available to users. In
addition, leader election can help establish fail over processes (helpful in reaching Level
III – Full lifecycle). Adding functionality like this helps build a useful and feature-rich
Operator that improves application performance and, by extension, user experience.
In the next chapter, we will begin compiling the code that has been built throughout
Chapter 4, Developing an Operator with the Operator SDK, and Chapter 5, Developing an
Operator – Advanced Functionality. We will then demonstrate how to deploy this code
and run our nginx Operator in a local Kubernetes cluster (without the use of the OLM).
This will be a useful development process, as bypassing the need for the OLM in a testing
environment can simplify and expedite our ability to iterate and test new changes.
6
Building and
Deploying Your
Operator
At this point, we have written a significant amount of code to develop an nginx Operator,
but code itself is useless unless compiled and deployed into a cluster. This chapter will
demonstrate how to do just that. Specifically, the following sections will show how to use
the make command provided by a boilerplate Operator SDK project to build a container
image and manually deploy that image in a running Kubernetes cluster. In addition, this
chapter will follow up those steps with guided steps for iterative development in which
new changes in the Operator are compiled and pushed to the cluster. Finally, we will offer
troubleshooting resources and tips for issues that may arise during this process. Those
sections will be broken into the following:
• Building a container image
• Deploying in a test cluster
• Pushing and testing changes
• Troubleshooting
130
Building and Deploying Your Operator
Note that during the course of this chapter, running the Operator in a cluster will be done
manually using local build commands. This is useful for local development and testing
in non-production environments because it is quick and does not rely on additional
components, minimizing the time and resources required to deploy proof-of-concept
test cases. In a real environment, it is better to install and manage Operators with the
Operator Lifecycle Manager. That process will be covered in more detail in Chapter 7,
Installing and Running Operators with the Operator Lifecycle Manager. For now, we will
proceed with local deployments in a test cluster.
Technical requirements
This chapter will rely on the code from previous chapters to build a container image and
deploy that image in a Kubernetes cluster. As such, the technical requirements for this
chapter necessitate access to a cluster and container management tool such as Docker.
However, it is not explicitly required to use the code from the previous chapters, as
the commands and processes explained will work with any operator-sdk project.
Therefore, the minimum recommended requirements for this chapter are as follows:
• An internet connection (to pull Docker base images and push built container
images to a public registry).
• Access to a running Kubernetes cluster. This can be any cluster, although it is
recommended to use a tool such as Kubernetes in Docker (kind) (https://
kind.sigs.k8s.io/) or minikube (https://minikube.sigs.k8s.io/
docs/) so that it is not costly to destroy and recreate clusters if needed.
• An up-to-date version of kubectl (https://kubernetes.io/docs/
tasks/tools/#kubectl) on your machine (in order to interact with the
Kubernetes cluster).
• Docker installed locally, as well as an account on either Docker Hub (https://
hub.docker.com/) or another public container registry such as Quay
(https://quay.io/). You can optionally use a different local container build
tool such as Buildah (https://buildah.io/), but the default Makefile that
the Operator SDK generates in a project assumes that the docker binary will be
available locally. Therefore, additional local setup (for example, aliasing docker
commands to buildah), which is not covered in this chapter, will be necessary.
Building a container image
131
This chapter introduces several of the preceding projects, some of which involve
additional setup. In addition, a few of them (such as kind) are described in this tutorial
only for the purposes of creating a stock test environment to follow along with. In
these cases, alternative tools can be used as noted if you are more comfortable with
them. For each of the technologies introduced in this chapter, resources are provided
in the Troubleshooting section at the end of this chapter for further assistance if needed.
However, the use cases with a specific technology in this chapter have been chosen to be
fairly basic to guide toward the minimal risk of technical problems.
Note
Using a public registry without any access credentials will make your Operator
image accessible to anyone on the internet. This may be fine for following
a tutorial such as this, but for production images, you may wish to look more
into securing your image registry (which is out of the scope of this book).
The Code in Action video for this chapter can be viewed at: https://bit.ly/3NdVZ7s
Building a container image
Kubernetes is a container orchestration platform, meaning that it is designed to run
applications that have been built into containers. Even the core system components for
Kubernetes, such as the API server and scheduler, run as containers. So, it should come as
no surprise that the Operators developed for Kubernetes must also be built and deployed
as containers.
For this process, a basic understanding of the fundamentals of working with containers is
helpful. Fortunately, however, the Operator SDK abstracts away much of the configuration
and command-line incantations to simple Makefile targets. These are build macros
that help to automate the process of compiling binaries and container images (as well as
pushing those images to a registry and deploying them in a cluster).
To see the full list of available targets provided by the Operator SDK, run the make help
command within the project:
$ make help
Usage:
make <target>
General
help
Development
Display this help.
132
Building and Deploying Your Operator
manifests
Generate WebhookConfiguration, ClusterRole
and CustomResourceDefinition objects.
generate
Generate code containing DeepCopy,
DeepCopyInto, and DeepCopyObject method implementations.
fmt
Run go fmt against code.
vet
Run go vet against code.
test
Run tests.
Build
build
Build manager binary.
run
Run a controller from your host.
docker-build
Build docker image with the manager.
docker-push
Push docker image with the manager.
Deployment
install
Install CRDs into the K8s cluster specified
in ~/.kube/config.
uninstall
Uninstall CRDs from the K8s cluster
specified in ~/.kube/config.
deploy
Deploy controller to the K8s cluster
specified in ~/.kube/config.
undeploy
Undeploy controller from the K8s cluster
specified in ~/.kube/config.
controller-gen
Download controller-gen locally if
necessary.
kustomize
Download kustomize locally if necessary.
envtest
Download envtest-setup locally if necessary.
bundle
Generate bundle manifests and metadata, then
validate generated files.
bundle-build
Build the bundle image.
bundle-push
Push the bundle image.
opm
Download opm locally if necessary.
catalog-build
Build a catalog image.
catalog-push
Push a catalog image.
Some of these commands, such as make manifests and make generate, were
used in earlier chapters to initialize the project and generate the Operator's API and
CustomResourceDefinition (CRD). Now, we are more concerned with the commands
under the Build heading. Specifically, make build and make docker-build, with
the former responsible for compiling a local binary of the Operator and the latter building
a container image.
Building a container image
133
Building the Operator locally
First, let's examine make build. From Makefile, the definition is simple:
build: generate fmt vet ## Build manager binary.
go build -o bin/manager main.go
This target is primarily concerned with running go build, which is the standard
command to compile any Go program. Also worth noting is the fact that the first things
this target depends on are the make generate, make fmt, and make vet targets,
which ensure that the Operator's generated API code is up to date and that the Go code
in the project's source code conforms to the stylistic standards of the language. This is an
added convenience and is why Makefile targets such as this are useful in development.
Running make build produces the standard output that one would expect when
compiling a Go program:
$ make build
/home/nginx-operator/bin/controller-gen
object:headerFile="hack/boilerplate.go.txt" paths="./..."
go fmt ./...
go vet ./...
go build -o bin/manager main.go
When the compilation is successful, there should be no more output than the preceding
code. Upon completion, there will now be a new executable file under bin/manager,
which is the compiled Operator code. This can be run manually (or with make run)
against any accessible Kubernetes cluster, but it will not actually be deployed in the cluster
until it is built into a container image. This is what make docker-build does.
Building the Operator image with Docker
The definition for make docker-build is slightly more interesting than the local
build target:
docker-build: test ## Build docker image with the manager.
docker build -t ${IMG} .
This is essentially just calling docker build (with an added dependency to make a
test that runs any unit tests defined in the project along with ensuring all generated CRD
manifests and API code are up to date).
134
Building and Deploying Your Operator
The docker build command will instruct the local Docker daemon to construct a
container image from the Dockerfile in the root of the Operator's project directory. This
file was originally generated by the initial operator-sdk init command from when
the project was first created. We have made a very slight modification (which will be
explained here), so the file now looks like the following:
Dockerfile:
# Build the manager binary
FROM golang:1.17 as builder
WORKDIR /workspace
# Copy the Go Modules manifests
COPY go.mod go.mod
COPY go.sum go.sum
# cache deps before building and copying source so that we
don't need to re-download as much
# and so that source changes don't invalidate our downloaded
layer
RUN go mod download
# Copy the go source
COPY main.go main.go
COPY api/ api/
COPY controllers/ controllers/
COPY assets/ assets
# Build
RUN CGO_ENABLED=0 GOOS=linux GOARCH=amd64 go build -a -o
manager main.go
# Use distroless as minimal base image to package the manager
binary
# Refer to https://github.com/GoogleContainerTools/distroless
for more details
FROM gcr.io/distroless/static:nonroot
WORKDIR /
COPY --from=builder /workspace/manager .
USER 65532:65532
ENTRYPOINT ["/manager"]
Building a container image
135
Note that the exact details about how this Dockerfile works are a more advanced topic in
regard to container builds. It's not critical to understand each of these in depth (just one
benefit of using the Operator SDK to generate the file!), but we will summarize them here.
These steps roughly break down into the following:
1. Set the base image for the Operator to build with Go 1.17.
2. Copy the Go module dependency files to the new image.
3. Download the module dependencies.
4. Copy the main Operator code, including main.go, api/, controllers/, and
assets/ to the new image.
Note
In this project, we have modified the default Dockerfile to copy the assets/
directory. When it is generated by operator-sdk, this Dockerfile only
copies main.go and the api/ and controllers/ directories by
default. Since the tutorial for our nginx Operator included adding a new toplevel package under assets/, we need to ensure that this directory is also
included in the Operator image. This serves as an example to demonstrate that
it is okay to modify the project's default Dockerfile (however, using version
control or otherwise making backups is recommended).
Alternatively, the assets package could have been created under the
controllers/ folder, which would not have required any updates to the
Dockerfile (because it would have been included under the existing COPY
controllers/ controllers/ line). See the Troubleshooting section of
this chapter for more information.
5. Compile the Operator binary within the image. This is the same as building
the Operator locally (as shown previously), except it will be packaged within a
container.
6. Define the Operator's binary as the main command for the built container.
With the preceding Dockerfile (including the change to include COPY assets/
assets/), running make docker-build will successfully complete. But, before we
do that, first note that this command includes a variable that we have not yet discussed:
${IMG}.
136
Building and Deploying Your Operator
The Makefile command uses this IMG variable to define the tag for the compiled
image. That variable is defined earlier in Makefile with a default value of
controller:latest:
# Image URL to use all building/pushing image targets
IMG ?= controller:latest
This is helpful to know because, without updating this variable, the built image for our
Operator will simply have the name controller. In order to build an image with a tag
that references our actual container registry (for example, docker.io/myregistry)
the build command can be invoked like so:
$ IMG=docker.io/sample/nginx-operator:v0.1 make docker-build
...
docker build -t docker.io/sample/nginx-operator:v0.1 .
[+] Building 99.1s (18/18) FINISHED
=> [internal] load build definition from Dockerfile 0.0s
=> [builder 1/10] FROM docker.io/library/golang:1.17 21.0s
=> [builder 2/10] WORKDIR /workspace
2.3s
=> [builder 3/10] COPY go.mod go.mod
0.0s
=> [builder 4/10] COPY go.sum go.sum
0.0s
=> [builder 5/10] RUN go mod download
31.3s
=> [builder 6/10] COPY main.go main.go
0.0s
=> [builder 7/10] COPY api/ api/
0.0s
=> [builder 8/10] COPY controllers/ controllers/ 0.0s
=> [builder 9/10] COPY assets/ assets
0.0s
=> [builder 10/10] RUN CGO_ENABLED=0 GOOS=linux GOARCH=amd64
go build -a -o manager main.go
42.5s
=> [stage-1 2/3] COPY --from=builder /workspace/manager .
=> exporting to image
0.2s
=> => exporting layers
0.2s
=> => writing image sha256:dd6546d...b5ba118bdba4 0.0s
=> => naming to docker.io/sample/nginx-operator:v0.1
Some output has been omitted, but the important parts to note are the builder steps,
which have been included. These follow the steps as defined in the project's Dockerfile.
Deploying in a test cluster
137
With a container image successfully built, the new image should now be present on your
local machine. You can confirm this by running docker images:
$ docker images
REPOSITORY
SIZE
sample/nginx-operator
48.9MB
TAG
IMAGE ID
CREATED
v0.1
dd6546d2afb0
45 hours ago
In the next section, we will push this image to a public registry and deploy the Operator in
a running Kubernetes cluster.
Deploying in a test cluster
Now that the Operator has been built into a container image, it can be deployed in
a cluster as a container. To do this, you will first need to ensure that you have access to
a running cluster as well as a public image registry. To host your image in a registry, you
can obtain a free personal account on Docker Hub (https://hub.docker.com).
For this tutorial, we will be using a local Kubernetes cluster created with kind, which
deploys a running Kubernetes cluster within Docker containers rather than directly on the
local machine, and is available at https://kind.sigs.k8s.io/. However, the steps
described here will be agnostic to any Kubernetes cluster running the latest version of the
platform. For example, if you are more comfortable using development environments such
as minikube (or have another cluster already available), then you can skip the kind setup
shown in this section. The rest of the steps in this section will apply to any Kubernetes
cluster.
To start a local cluster with kind, ensure that you have Docker and kind installed on your
machine and run kind create cluster:
$ kind create cluster
Creating cluster "kind" ...
Ensuring node image (kindest/node:v1.21.1)
Preparing nodes
Writing configuration
Starting control-plane
Installing CNI
Installing StorageClass
Set kubectl context to "kind-kind"
You can now use your cluster with
138
Building and Deploying Your Operator
kubectl cluster-info --context kind-kind
Have a nice day!
Note that kind create cluster may take a moment to complete. This bootstraps a
functional Kubernetes cluster running within Docker. You can confirm that your cluster is
accessible by running any kubectl command, for example, kubectl cluster-info:
$ kubectl cluster-info
Kubernetes master is running at https://127.0.0.1:56384
CoreDNS is running at https://127.0.0.1:56384/api/v1/
namespaces/kube-system/services/kube-dns:dns/proxy
With a cluster running, it's time to make the Operator's image accessible by pushing it to
a public registry. First, ensure that you have access to your registry. For Docker Hub, this
means running docker login and entering your username and password.
Once logged in, you can push the image using the provided Makefile make dockerpush target (which is simply the equivalent of manually running docker push):
$ IMG=docker.io/sample/nginx-operator:v0.1 make docker-push
docker push docker.io/sample/nginx-operator:v0.1
The push refers to repository [docker.io/sample/nginx-operator]
18452d09c8a6: Pushed 5b1fa8e3e100: Layer already exists
v0.1: digest: sha256:5315a7092bd7d5af1dbb454c05c15c54131
bd3ab78809ad1f3816f05dd467930 size: 739
(This command may take a moment to run, and your exact output may differ.)
Note that we have still passed the IMG variable to this command. To eliminate the need to
do this, you can either modify Makefile to change the default definition of the variable
(this definition was shown in the Building a container image section earlier) or export your
image name as an environment variable, like so:
$ export IMG=docker.io/sample/nginx-operator:v0.1
$ make docker-push
docker push docker.io/sample/nginx-operator:v0.1
The push refers to repository [docker.io/sample/nginx-operator]
18452d09c8a6: Pushed 5b1fa8e3e100: Layer already exists
v0.1: digest: sha256:5315a7092bd7d5af1dbb454c05c15c54131bd
3ab78809ad1f3816f05dd467930 size: 739
Deploying in a test cluster
139
Now, the image is available publicly on the internet. You may wish to manually confirm that
your image is accessible by running docker pull <image>, but this is not required.
Avoiding Docker Hub
You technically do not have to use a public registry such as Docker Hub
to make your image accessible to the cluster. There are alternative ways of
importing your image into the cluster, for example, kind provides the kind
load docker-image command, which manually loads the image into
your cluster's internal registry (see https://kind.sigs.k8s.io/
docs/user/quick-start/#loading-an-image-into-yourcluster for more information). However, in this tutorial, we have chosen
the public registry route as it is a common approach (especially for open source
Operators that are published for others to use) and remains agnostic to the
specific cluster you may be running.
With the Operator image accessible (and the public image name defined in an
environment variable or modified in Makefile, as shown earlier), all that is required to
run the Operator in a cluster now is the make deploy command:
$ make deploy
/Users/sample/nginx-operator/bin/controller-gen
rbac:roleName=manager-role crd webhook paths="./..."
output:crd:artifacts:config=config/crd/bases
cd config/manager && /Users/sample/nginx-operator/bin/kustomize
edit set image controller=docker.io/sample/nginx-operator:v0.1
/Users/sample/nginx-operator/bin/kustomize build config/default
| kubectl apply -f namespace/nginx-operator-system created
customresourcedefinition.apiextensions.k8s.io/nginxoperators.
operator.example.com created
serviceaccount/nginx-operator-controller-manager created
role.rbac.authorization.k8s.io/nginx-operator-leader-electionrole created
clusterrole.rbac.authorization.k8s.io/nginx-operator-managerrole created
clusterrole.rbac.authorization.k8s.io/nginx-operator-metricsreader created
clusterrole.rbac.authorization.k8s.io/nginx-operator-proxy-role
created
rolebinding.rbac.authorization.k8s.io/nginx-operator-leader-
140
Building and Deploying Your Operator
election-rolebinding created
clusterrolebinding.rbac.authorization.k8s.io/nginx-operatormanager-rolebinding created
clusterrolebinding.rbac.authorization.k8s.io/nginx-operatorproxy-rolebinding created
configmap/nginx-operator-manager-config created
service/nginx-operator-controller-manager-metrics-service
created
deployment.apps/nginx-operator-controller-manager created
Now, you will see a new namespace in your cluster that matches the Operator's name:
$ kubectl get namespaces
NAME
STATUS
default
Active
kube-node-lease
Active
kube-public
Active
kube-system
Active
local-path-storage
Active
nginx-operator-system
Active
AGE
31m
31m
31m
31m
31m
54s
Exploring this namespace deeper with kubectl get all will show that it contains
a Deployment, ReplicaSet, Service, and Pod for the Operator (some output has been
omitted for brevity):
$ kubectl get all -n nginx-operator-system
NAME
READY
STATUS
pod/nginx-operator-controller-manager-6f5f66795d945pb
2/2
Running
NAME
TYPE
service/nginx-operator-controller-manager-metricsservice
ClusterIP
NAME
READY
UP-TO-DATE deployment.apps/nginx-operator-controller-manager
1/1
1
NAME
DESIRED
replicaset.apps/nginx-operator-controller-manager6f5f66795d
1
Deploying in a test cluster
141
But where is the operand nginx Pod? Recall that we designed the Operator to do nothing
if it cannot locate an instance of its CRD. To remedy this, you can create your first CRD
object (matching the API defined in Chapter 4, Developing an Operator with the Operator
SDK) like the following:
sample-cr.yaml:
apiVersion: operator.example.com/v1alpha1
kind: NginxOperator
metadata:
name: cluster
namespace: nginx-operator-system
spec:
replicas: 1
Create this file and save it anywhere on your machine as any name (in this case,
sample-cr.yaml is fine). Then, run kubectl create -f sample-cr.yaml
to create the custom resource object in the nginx Operator's namespace. Now, running
kubectl get pods will show that the new nginx Pod (named cluster-xxx) has
been created:
$ kubectl get pods -n nginx-operator-system
NAME
STATUS
cluster-7855777498-rcwdj
1/1
Running
nginx-operator-controller-manager-6f5f66795d-hzb8n
Running
READY
2/2
You can modify the custom resource object you just created with kubectl edit
nginxoperators/cluster -n nginx-operator-system. This command
(kubectl edit) will open your local text editor where you can make changes directly
to the object's spec fields. For example, to change the number of operand replicas, we can
run the preceding command and set spec.replicas: 2, like so:
$ kubectl edit nginxoperators/cluster -n nginx-operator-system
apiVersion: operator.example.com/v1alpha1
kind: NginxOperator
metadata:
creationTimestamp: "2022-02-05T18:28:47Z"
142
Building and Deploying Your Operator
generation: 1
name: cluster
namespace: nginx-operator-system
resourceVersion: "7116"
uid: 66994aa7-e81b-4b18-8404-2976be3db1a7
spec:
replicas: 2
status:
conditions:
- lastTransitionTime: "2022-02-05T18:28:47Z"
message: operator successfully reconciling
reason: OperatorSucceeded
status: "False"
type: OperatorDegraded
Notice that when using kubectl edit, other fields in the Operator (such as status)
are also visible. While you cannot directly modify these fields, this is a good spot to point
out that our Operator conditions are successfully reporting in the CRD's status section.
This is indicated by the OperatorDegraded: False condition type and status.
However, take note that this condition may initially be confusing to users because it
appears to be indicating that OperatorSucceeded is False at first glance. But, upon
further inspection, it is indicated that OperatorSucceeded is actually the reason
for OperatorDegraded to be False. In other words, the Operator is not degraded
because the Operator succeeded. This example has intentionally been chosen to highlight
the care that must be taken to implement informative and clearly understandable status
conditions.
Saving the changes to the CRD object and running kubectl get pods again now shows
a new nginx Pod:
$ kubectl get pods -n nginx-operator-system
NAME
STATUS
cluster-7855777498-rcwdj
1/1
Running
cluster-7855777498-kzs25
Running
nginx-operator-controller-manager-6f5f66795d-hzb8n
Running
READY
1/1
2/2
Pushing and testing changes
143
Similarly, changing the spec.replicas field to 0 will delete all of the nginx Pods:
$ kubectl get pods -n nginx-operator-system
NAME
STATUS
cluster-7855777498-rcwdj
1/1
Terminating
cluster-7855777498-kzs25
Terminating
nginx-operator-controller-manager-6f5f66795d-hzb8n
Running
READY
1/1
2/2
This concludes the basic deployment steps for an Operator. The following steps summarize
what we have done so far:
1. Built a container image for the Operator
2. Pushed the image to a public registry
3. Used make deploy to launch the Operator in a local cluster (in the process,
pulling the image from the public registry into the cluster)
4. Manually created an instance of the Operator's CRD object
5. Modified the CRD object within the cluster using kubectl edit
However, there is still some work to be done in order to enable metrics (which was a big
part of the work done in Chapter 5, Developing an Operator – Advanced Functionality,
and key to achieving higher-level functionality within the capability model). In the next
section, we will demonstrate how to make changes to our Operator's deployment and
redeploy it in the cluster.
Pushing and testing changes
During the course of development (for any project, not just Kubernetes Operators) it
will likely become necessary to make changes to the code or other project files (such
as resource manifests) and test those changes. In the case of this example, we will not
be changing any code. Instead, we will redeploy the Operator with the proper metrics
resources created to make the metrics visible, which we implemented in Chapter 5,
Developing an Operator – Advanced Functionality.
144
Building and Deploying Your Operator
Installing and configuring kube-prometheus
Metrics are not very useful without a tool to scrape and present them. This is what
Prometheus is for, and it understands the metrics language in which we have implemented
our own metrics. There are a number of other tools that can parse Prometheus metrics. In
this tutorial, we will use kube-prometheus (https://github.com/prometheusoperator/kube-prometheus) to install a full end-to-end monitoring stack in our
cluster. kube-prometheus provides a number of additional features that we won't explicitly
explore in this book, but it is a very convenient and powerful library for installing
monitoring in a cluster. In your own environment, you may choose another option, such
as installing Prometheus directly or using the Prometheus Operator from https://
github.com/prometheus-operator/prometheus-operator (which is
provided by kube-prometheus).
To get started, follow the steps at https://github.com/prometheus-operator/
kube-prometheus installing to install kube-prometheus in our Operator project. Take
note of the prerequisites for the Installing and Compiling sections in that link. Specifically,
the following tools are required:
• jb
• gojsontoyaml
• jsonnet
When kube-prometheus has been successfully installed in the project, we will have
a new subdirectory (my-kube-prometheus, as described in the kube-prometheus
documentation), which contains the following files:
$ ls
total 20K
drwxr-xr-x 8 ... .
drwxr-xr-x 21 ... ..
drwxr-xr-x 74 ... manifests
drwxr-xr-x 19 ... vendor
-rwxr-xr-x 1 ... build.sh
-rw-r--r-- 1 ... 05 example.jsonnet
-rw-r--r-- 1 ... jsonnetfile.json
-rw-r--r-- 1 ... 04 jsonnetfile.lock.json
Pushing and testing changes
145
Now, we will modify example.jsonnet to include our Operator's namespace.
This means modifying the values+:: block within the file to add a prometheus+
object that includes a list of namespaces (in our case, only the nginx-operatorsystem namespace):
my-kube-prometheus/example.jsonnet:
local kp =
(import 'kube-prometheus/main.libsonnet') +
...
{
values+:: {
common+: {
namespace: 'monitoring',
},
prometheus+: {
namespaces+: ['nginx-operator-system'],
},
},
};
...
Next, use build.sh to compile the new manifests by running the following command:
$ ./build.sh example.jsonnet
Now, we can create the kube-prometheus manifests in our cluster by applying them
with the following commands (from within the my-kube-prometheus directory):
$ kubectl apply --server-side -f manifests/setup
$ kubectl apply -f manifests/
When finished, the Prometheus dashboard should be accessible by running the following
commands to open a local proxy to your cluster and the Prometheus service:
$ kubectl --namespace monitoring port-forward svc/prometheusk8s 9090
Forwarding from 127.0.0.1:9090 -> 9090
Forwarding from [::1]:9090 -> 9090
146
Building and Deploying Your Operator
(Note, this command will remain running until you manually end it, for example,
by pressing Ctrl + C.) The dashboard will be visible by navigating to http://
localhost:9090 in your web browser. However, if you try to search for our Operator's
metric (recall that it was named reconciles_total), you will see that it is not
available. This is because we need to redeploy our Operator with an additional manifest
that is not created by default.
Redeploying the Operator with metrics
Prometheus knows to scrape our Operator's namespace for metrics due to the
configuration created previously. However, it still needs to know which specific endpoint
within the namespace to query. This is the role of an object called ServiceMonitor
(https://pkg.go.dev/github.com/coreos/prometheus-operator/pkg/
apis/monitoring/v1#ServiceMonitor). This object is not created by default
by the Operator SDK when running make deploy, so we need to modify config/
default/kustomization.yaml. (This file location is relative to the project root
directory, not the new my-kube-prometheus directory that we created previously
when installing kube-prometheus).
In this file, simply find any lines that are marked with [PROMETHEUS] and uncomment
them by removing the leading pound or the hash symbol (#). This is currently only one
line, shown in the following:
config/default/kustomization.yaml:
...
bases:
- ../crd
- ../rbac
- ../manager
# ...
# ...
# [PROMETHEUS] To enable prometheus monitor,
uncomment all sections with 'PROMETHEUS'.
- ../prometheus
This is the default configuration file for Kustomize (https://kustomize.io/),
which is a Kubernetes templating project that the Operator SDK uses to generate and
deploy project manifests.
Pushing and testing changes
147
At this point, you can run make undeploy to remove the current Operator installation,
followed by running make deploy once again to recreate it. After a few moments,
the reconciles_total metric should be visible in the Prometheus dashboard. The
following screenshot shows this metric in the Prometheus dashboard search bar:
Figure 6.1 – Screenshot of the Prometheus dashboard
Key takeaways
While this section may seem focused on just setting up metrics, it actually covers some
important steps related to the development-driven redeployment of an Operator project.
Specifically, we covered the following:
• Installing kube-prometheus as a library in our project and configuring it to
scrape our Operator's namespace
• Modifying Kustomize configuration files to include new dependencies in our
Operator deployment
• Using make undeploy to remove the existing Operator deployment
Technically, we could have simply run make deploy without first undeploying the
project. The idempotent nature of Kubernetes resource manifests means that only the
new resources would have been created. However, awareness of make undeploy is very
useful in cases where the existing project may need to be completely removed.
148
Building and Deploying Your Operator
Troubleshooting
This chapter introduced several new tools and concepts not yet covered by earlier
chapters. These include Docker, kind, kubectl, Make, and kube-prometheus. It is possible
that you may have run into some issues while working with these tools, so this section
is intended to offer links to references that can help resolve common issues. Many of the
underlying tools used in this chapter are not exclusive to the Operator Framework, which
thankfully means that there is a wealth of resources available to address problems you
may encounter.
Makefile issues
Make (https://www.gnu.org/software/make/) is a very popular tool for
automating the generation and compilation of countless software projects. It was
already used in Chapter 4, Developing an Operator with the Operator SDK, and Chapter
5, Developing an Operator – Advanced Functionality, in order to generate the APIs and
manifests used by our project. In this chapter, it was leveraged even more to automate
many of the commands for building and deploying.
However, the make ... commands used throughout this book are shorthand for
running underlying tools. Therefore, when encountering an error with any make
commands, the first debugging step is to examine the Makefile to find what that
command is actually running. If this happens, you will likely find that you are rather
encountering an issue with Docker, Go, or Kubernetes.
These commands have been preemptively provided when operator-sdk initialized
the project, but you are free to modify the provided Makefile as you wish to customize
your project.
kind
In this chapter, we used kind to deploy a test Kubernetes cluster. Using kind offers a very
quick way to create (and destroy) local Kubernetes clusters. It also provides a configurable
setup that allows for relatively easy changes to the default cluster (for example, starting
a cluster with additional nodes).
The official website for kind is https://kind.sigs.k8s.io/. The website provides
extensive documentation and sample configurations for different cluster setups. In
addition, the kind code base is available on GitHub at https://github.com/
kubernetes-sigs/kind. The kind maintainers and users are also active on the official
Kubernetes Slack server (slack.k8s.io) in the #kind channel. Both of these links are
excellent resources for asking questions or searching for answers.
Troubleshooting
149
Docker
If you are working with Kubernetes, you are likely already familiar with Docker
(https://www.docker.com/). It is just one of several options for building and
managing container images, which are essential for deploying applications on Kubernetes.
The key step for transitioning Operator code to a deployable image is the docker build
command (which is called when running make docker-build). This command
follows the build steps defined in the Dockerfile. More information on Dockerfile syntax
is available in the Docker documentation at https://docs.docker.com/engine/
reference/builder/.
When building a container image following the steps in this chapter, there are some
unique issues specific to this tutorial that you may encounter, which are explained next.
docker build fails with no required module error for assets package
When running make docker-build, you may find that your build fails with the
following error (or something similar):
$ make docker-build
...
=> ERROR [builder 9/9] RUN CGO_ENABLED=0 GOOS=linux
GOARCH=amd64 go build -a -o manager main.go
2.1s
-----> [builder 9/9] RUN CGO_ENABLED=0 GOOS=linux GOARCH=amd64 go
build -a -o manager main.go:
#15 2.081 controllers/nginxoperator_controller.go:37:2: no
required module provides package github.com/sample/nginxoperator/assets; to add it:
#15 2.081 go get github.com/sample/nginx-operator/assets
-----executor failed running [/bin/sh -c CGO_ENABLED=0 GOOS=linux
GOARCH=amd64 go build -a -o manager main.go]: exit code: 1
make: *** [docker-build] Error 1
This error is actually arising from the go build command in the final step of the
Dockerfile. In the context of this specific tutorial, Go is failing to build because it cannot
locate the assets package (created in Chapter 4, Developing an Operator with the
Operator SDK, to organize and access the operand Deployment manifest).
150
Building and Deploying Your Operator
To fix this, ensure that you have modified the Dockerfile to include the COPY assets/
assets/ directive (see the example in the Building a container image section of this
chapter). Alternatively, you could refactor the Operator code to embed the assets/
directory within the existing controllers/ directory without needing to modify the
Dockerfile. This is because both controllers/ and api/ are already copied to the
builder image (but it does not semantically make sense to store embedded manifests
within the API directory, as they are not an API).
docker push fails with access denied
The make docker-push command may fail with the following error:
$ make docker-push
docker push controller:latest
The push refers to repository [docker.io/library/controller]
18452d09c8a6: Preparing
5b1fa8e3e100: Preparing
denied: requested access to the resource is denied
make: *** [docker-push] Error 1
This exact error (including the docker push controller:latest line) implies
a misconfigured IMG variable for the command. Recall that in the Building a container
image section of this chapter, this variable was discussed as a way to tag the built image
with an appropriate name. There are a few options for setting this value, either as an
environment variable or by modifying the Makefile.
However you choose to update this variable, it is important to check that the value is
propagated to the docker-push target in the Makefile as well. Otherwise, Docker will
attempt to push this to a generic registry for library images. You do not have access to this
registry, therefore, Docker returns the access denied error shown here.
If instead, the error does include the appropriate public registry with your IMG variable
value (for example, the second line is docker push docker.io/yourregistry/
yourimagename) then it is likely a simple authentication error. Run docker login to
make sure you are logged into your Docker Hub account.
Troubleshooting
151
Operator deploys but fails to start with ImagePull error
If you run make deploy, the command will likely always complete successfully (unless
you have made significant modifications to the generated manifest files). However,
when viewing the Operator in your cluster (for example, with kubectl get all -n
nginx-operator-system) you may see that the Operator's Pod is failing to start with
the following message:
$ kubectl get all -n nginx-operator-system
NAME
READY
STATUS
pod/nginx-operator… 1/2
ImagePullBackOff
RESTARTS
0
AGE
34s
This is probably a similar error to the one described previously. In Kubernetes, the
ImagePullBackOff error indicates that, for some reason, the Pod is unable to pull the
container image it is intended to run. This is usually either an authentication error (for
example, the registry may be private) or the image is not found. Ensure that you have
built and pushed the Operator image with the right IMG environment variable set, as
mentioned in the other Troubleshooting sections. If you still see the error, check to make
sure that your image registry is not set to private by logging into the Docker Hub web UI.
Operator deploys but fails to start with another error
In Kubernetes, there are many reasons why any given Pod may fail to start. There could be
a logical bug in the Operator's code or there may be a system configuration issue within
the cluster. There is, unfortunately, no one-size-fits-all solution to this problem. However,
there are tools to gather more information. Using kubectl to inspect the Pod is the most
common way to diagnose errors. For example, kubectl describe pod/<podname>
will print events and status updates that can explain the failure. Or, kubectl logs
pod/<podname> will print the log output of the Pod (which is helpful for diagnosing
runtime errors that usually need to be fixed in code). All of the kubectl commands will
provide documentation by running kubectl -h.
Metrics
As part of developing an Operator with rich features and debugging capabilities, this and
previous chapters dedicated effort to demonstrating the implementation of Prometheus
metrics. Prometheus (https://prometheus.io/) is an open source monitoring
platform that is widely used in the Kubernetes ecosystem. Therefore, there are many
resources available online for various problems (many are not specific to the Operator
Framework). These community resources are documented at https://prometheus.
io/community/.
152
Building and Deploying Your Operator
Operator metrics do not show up in Prometheus
With Prometheus deployed in a cluster following the kube-prometheus steps in
this tutorial, the custom metrics defined in our Operator code should show up in the
Prometheus dashboard after a few moments. If, after some time, the custom metrics are
still not visible, ensure that you have made the correct changes described in the Installing
and configuring kube-prometheus section to instruct Prometheus to scrape the Operator's
namespace for new metrics.
Additionally, make sure that you have uncommented the - ../prometheus line
in config/default/kustomization.yaml before deploying the Operator as
described in the Redeploying the Operator with metrics section. This step ensures that the
ServiceMonitor object (which informs Prometheus which endpoint to scrape for
metrics) is created in the namespace.
Operator deployment fails with no matches for kind
'ServiceMonitor'
When running make deploy, the following error may appear among several other lines
showing which resources were created:
$ make deploy
...
serviceaccount/nginx-operator-controller-manager created
role.rbac.authorization.k8s.io/nginx-operator-leader-electionrole created
clusterrole.rbac.authorization.k8s.io/nginx-operator-managerrole created
clusterrole.rbac.authorization.k8s.io/nginx-operator-metricsreader created
clusterrole.rbac.authorization.k8s.io/nginx-operator-proxy-role
created
...
error: unable to recognize "STDIN": no matches for kind
"ServiceMonitor" in version "monitoring.coreos.com/v1"
make: *** [deploy] Error 1
Summary
153
In this case, the Operator did not actually fail to deploy. However, it did fail to create
the ServiceMonitor object due to an inability to locate the object's definition in the
Kubernetes API. This is likely due to failing to install Prometheus in the cluster before
attempting to deploy the Operator with metrics. Specifically, ServiceMonitor is a CRD
that is provided by Prometheus. So, deploying the Operator with metrics before installing
kube-prometheus in this tutorial will lead to failures when reporting metrics. To
resolve this, ensure that you have followed the steps for installing Prometheus before
deploying the Operator with metrics.
Additional errors
The preceding issues are just some of the technical problems that may arise when
following this tutorial. It is, unfortunately, not possible for this chapter to cover every
scenario. However, the Operator Framework community and its resources provide
solutions to many different types of problems. These, along with the resources in the
Troubleshooting section of Chapter 4, Developing an Operator with the Operator SDK, are
very likely to resolve any difficulty that you may face.
Summary
This chapter's main objective was to compile the Operator code that we have been
building throughout this book and deploy it in a cluster. To do this, we followed steps
designed for local development environments. These included building the Operator as
a local binary and building a container image to deploy in an ephemeral test cluster
(created using kind). This lightweight process is helpful for development and rapid testing,
but it lacks the full workflow benefits needed for publishing an Operator with the intent of
deploying in production.
In the next chapter, we will explore the final pillars of the Operator Framework:
OperatorHub and the Operator Lifecycle Manager. Learning how to prepare and submit
an Operator to OperatorHub will be a key part of offering any Operator available for
public use. With that, the Operator Lifecycle Manager is a much more elegant solution
for deploying Operators (both publicly available on OperatorHub or privately deployed).
Compared to deploying manually with Make, these processes are much better suited for
sharing your Operator with the world.
Part 3:
Deploying and
Distributing Operators
for Public Use
This section will show you how to package your Operator and publish it for others to use,
contributing to the open source ecosystem that is essential to the Operator Framework
with the help of case studies. Finally, the lessons from this book will be summarized in an
FAQ-style breakdown before applying these lessons to real-world examples of application
and system Operators.
This section comprises the following chapters:
• Chapter 7, Installing and Running Operators with the Operator Lifecycle Manager
• Chapter 8, Preparing for Ongoing Maintenance of Your Operator
• Chapter 9, Diving into FAQs and Future Trends
• Chapter 10, Case Study for Optional Operators – the Prometheus Operator
• Chapter 11, Case Study for Core Operator – Etcd Operator
7
Installing and
Running Operators
with the Operator
Lifecycle Manager
Up until now, the Operator development work covered in previous chapters has been
mostly self-contained. That is, the development and deployment processes covered so far
have been primarily focused on local environments with relatively few external services
expected to interact with the Operator we have been writing. While these processes
are useful (and in some ways essential) to the early design of an Operator, there is an
expectation for most Operators (and indeed, most software projects in general) that they
will eventually be exposed to the outside world. This chapter will focus on this phase of an
Operator's lifespan, wherein the Operator is presented and consumed by external users.
158
Installing and Running Operators with the Operator Lifecycle Manager
In Chapter 1, Introduction to the Operator Framework, the three main pillars of the
Operator Framework were introduced. Several chapters of this book have already been
devoted to the first pillar (the Operator SDK), but the remaining pillars have yet to be
explored in detail. These are the Operator Lifecycle Manager (OLM) and OperatorHub.
These two components of the Operator Framework are the key transitory elements in an
Operator's development from an experimental, local prototype to a published, installable
product. In this chapter, we will cover the necessary steps to graduate from an Operator in
development to one that is accessible by users, through the following sections:
• Understanding the OLM
• Running your Operator
• Working with OperatorHub
• Troubleshooting
By packaging an Operator to be installed and managed by the OLM and then publishing
that Operator on OperatorHub, we will be leveraging the standard deployment workflow
that users expect from the Operator Framework. These steps are by no means necessary,
as we have already shown that it is possible to manually build and deploy an Operator
without the OLM or OperatorHub. But, it is the goal of this chapter to introduce these
pillars of the Operator Framework to demonstrate how we can transform an Operator into
a rich community project.
Technical requirements
This chapter will continue to work with the nginx Operator that was written in
Chapter 4, Developing an Operator with the Operator SDK, and Chapter 5, Developing an
Operator – Advanced Functionality. It will also assume access to a public Docker registry
(previously used in Chapter 6, Building and Deploying Your Operator), as well as access to
a running Kubernetes cluster. Therefore, the technical requirements of this chapter build
upon most of the requirements from previous chapters, including the following:
• Access to a Kubernetes cluster. It is recommended to use a disposable cluster created
with a tool such as kind or minikube (see Chapter 6, Building and Deploying
Your Operator).
• The kubectl binary available on your local system for interacting with the
Kubernetes cluster.
• The operator-sdk binary available on your local system for deploying the OLM
and building Operator manifests.
Understanding the OLM
159
• Docker installed and running to build Operator bundle images.
• A GitHub account and familiarity with the GitHub fork and pull request processes
for submitting a new Operator to OperatorHub (demonstration only).
The Code in Action video for this chapter can be viewed at: https://bit.ly/3PPItsB
Understanding the OLM
The OLM was introduced in Chapter 1, Introduction to the Operator Framework, as
a tool for installing and managing Operators within a cluster. Its features include
the ability to provide control over upgrading installed Operators and making these
Operators visible to cluster users. It also helps maintain cluster stability by enforcing
Operator dependencies and preventing conflicting APIs from different Operators. This
is a brief overview, but these features make it a powerful tool for deploying Operators
in production environments. You can find more details about the OLM's features in the
Operator Framework documentation at https://olm.operatorframework.io/
docs/#features-provided-by-olm.
While this may make the OLM seem like a complex component to work with, it is actually
no more than a set of resource manifests that can be installed in a cluster similarly to
any other component or application (including Operators themselves). These resources
include various Pods (managed by Deployments), CustomResourceDefinitions (CRDs),
namespaces, ServiceAccounts, and RoleBindings.
In addition, the Operator SDK command-line tools provide simple commands for easily
installing and interacting with the OLM in a Kubernetes cluster.
So, before it is possible to install Operators with the OLM, we must first install the OLM
itself. This section will show the steps required to do so. It will also demonstrate some
additional commands for interacting with the OLM via the command line, which will be
helpful later on when installing and managing our own Operator.
Installing the OLM in a Kubernetes cluster
To install the OLM, first ensure that you have administrative access to a running
Kubernetes cluster. Even though using the OLM to manage Operators is an acceptable
practice for production clusters, it is strongly recommended to use a disposable cluster
(created with a tool such as kind) while following along with this chapter. This makes it
easy and affordable to destroy and re-build the cluster from scratch if necessary. If you
already have a cluster running from a previous chapter, it may even be useful to shut
down that cluster in order to start fresh (with kind, the command to do so is kind
delete cluster).
160
Installing and Running Operators with the Operator Lifecycle Manager
Next, invoke the operator-sdk binary to install the OLM in your cluster with the
following command:
$ operator-sdk olm install
INFO[0000] Fetching CRDs for version "latest"
INFO[0000] Fetching resources for resolved version "latest"
...
INFO[0027]
Deployment "olm/packageserver" successfully rolled
out INFO[0028] Successfully installed OLM version "latest"
This command may take a moment to complete, but during that time you will see
operator-sdk fetching the various resource manifests for the OLM and installing them
in your Kubernetes cluster. Once this is complete, it will also print the final list of installed
resources. Many of these are either cluster-scoped (such as the OLM-specific CRDs) or
installed in the newly created olm namespace. You can see these resources by inspecting
that namespace with kubectl using the following command:
$ kubectl get all -n olm
NAME
READY
STATUS
RESTARTS
AGE
pod/catalog-operator-5c4997c789-xr986
1/1
Running
4m35s
pod/olm-operator-6d46969488-nsrcl
1/1
Running
4m35s
pod/operatorhubio-catalog-h97sx
1/1
Running
4m27s
pod/packageserver-69649dc65b-qppvg
1/1
Running
4m26s
pod/packageserver-69649dc65b-xc2fr
1/1
Running
4m26s
NAME
TYPE
CLUSTER-IP
EXTERNAL-IP
service/operatorhubio-catalog
ClusterIP
10.96.253.116
<none>
service/packageserver-service
ClusterIP
10.96.208.29
<none>
NAME
READY
UP-TO-DATE
AVAILABLE
AGE
deployment.apps/catalog-operator
1/1
1
1
4m35s
0
0
0
0
0
Understanding the OLM
deployment.apps/olm-operator
4m35s
deployment.apps/packageserver
4m26s
1/1
1
1
2/2
2
2
161
NAME
DESIRED
CURRENT
READY
replicaset.apps/catalog-operator-5c4997c789
1
1
1
replicaset.apps/olm-operator-6d46969488
1
1
1
replicaset.apps/packageserver69649dc65b
2
2
2
Notably, there are five Pods in this namespace that perform the core functions of the
OLM. These Pods work together to provide the cohesive functionality that comprises the
OLM, including tracking Operator subscriptions and watching for custom resources that
indicate Operator installations in the cluster.
Interacting with the OLM
Along with operator-sdk olm install (which, as the name implies, installs the
OLM in a cluster), the operator-sdk binary also provides two more OLM-specific
commands: olm uninstall and olm status. The former will remove the OLM and
all of its dependent manifests from your cluster, while the latter provides information on
the current status of the OLM resources in the cluster. For a healthy OLM installation, that
output looks like this:
$ operator-sdk olm status
INFO[0000] Fetching CRDs for version "v0.20.0"
INFO[0000] Fetching resources for resolved version "v0.20.0"
INFO[0002] Successfully got OLM status for version "v0.20.0"
NAME
NAMESPACE
KIND
STATUS
operatorgroups.operators.coreos.com
CustomResourceDefinition
Installed
operatorconditions.operators.coreos.com
CustomResourceDefinition
Installed
olmconfigs.operators.coreos.com
CustomResourceDefinition
Installed
installplans.operators.coreos.com
CustomResourceDefinition
Installed
clusterserviceversions.operators.coreos.com
CustomResourceDefinition
Installed
162
Installing and Running Operators with the Operator Lifecycle Manager
olm-operator-binding-olm
ClusterRoleBinding
Installed
operatorhubio-catalog
CatalogSource
Installed
olm-operators
OperatorGroup
Installed
aggregate-olm-view
ClusterRole
Installed
catalog-operator
Deployment
Installed
cluster
OLMConfig
Installed
operators.operators.coreos.com
CustomResourceDefinition
Installed
olm-operator
Deployment
Installed
subscriptions.operators.coreos.com
CustomResourceDefinition
Installed
aggregate-olm-edit
ClusterRole
Installed
olm
Namespace
Installed
global-operators
OperatorGroup
Installed
operators
Namespace
Installed
packageserver
ClusterServiceVersion
Installed
olm-operator-serviceaccount
ServiceAccount
Installed
catalogsources.operators.coreos.com
CustomResourceDefinition
Installed
system:controller:operator-lifecycle-manager
ClusterRole
Installed
olm
olm
olm
olm
operators
olm
olm
Running your Operator
163
However, if the OLM was not behaving properly or there were issues with Operators in
your cluster, this command could be used to debug the cause. For example, you can run
kubectl delete crd/operatorgroups.operators.coreos.com (which
deletes the OperatorGroups CRD installed by the OLM). Following this, running
operator-sdk olm status will show the error no matches for kind
"OperatorGroup" in version "operators.coreos.com/v1 next to the
global-operators and olm-operators entries, indicating that the CRD is missing
in the cluster.
This error can be repaired by uninstalling the OLM with operator-sdk olm
uninstall and reinstalling it. Note that uninstalling the OLM does not uninstall any of
the Operators it manages in the cluster. This is intentional to prevent data loss, but it also
means that any desire to remove Operators from the cluster cannot be done by simply
uninstalling the OLM.
Besides installing and checking on the health of the OLM itself, the other way to interact
with it is by installing and managing Operators. But first, the Operator must be prepared
in a way that the OLM will understand. This is called the Operator's bundle, and we will
show how to generate it in the next section.
Running your Operator
In Chapter 6, Building and Deploying Your Operator, we demonstrated ways to build and
run an Operator manually by either compiling locally or building a Docker image to run
in a Kubernetes cluster. But, neither of these methods is directly compatible with the
OLM, so in order to provide an Operator that can be installed by the OLM, the Operator
must be prepared with a bundle that contains metadata about the Operator in a format
that the OLM understands. Then, this bundle can be passed to the OLM, which will
handle the rest of the installation and life cycle management of the Operator.
Generating an Operator's bundle
An Operator's bundle consists of various manifests that describe the Operator and provide
additional metadata, such as its dependencies and APIs. Once created, these manifests can
be compiled into a bundle image, which is a deployable container image that is used by
the OLM to install the Operator in a cluster.
The simplest way to generate the bundle manifests is by running make bundle. This
command will ask you to provide some metadata about the Operator and compile that
input into the output resource manifests.
164
Installing and Running Operators with the Operator Lifecycle Manager
Note
make bundle generates a container image name in some fields based
on the same IMG environment variable used in Chapter 6, Building and
Deploying Your Operator. Ensure that this environment variable is still set
when generating the bundle, or that it is otherwise being passed to the make
bundle command when it is invoked.
The following block shows the output of make bundle. In this case, we will fill out the
prompts for our nginx Operator with the company name, MyCompany, as well as some
additional keywords and contact information for the maintainers of the Operator:
$ make bundle
/Users/mdame/nginx-operator/bin/controller-gen
rbac:roleName=manager-role crd webhook paths="./..."
output:crd:artifacts:config=config/crd/bases
operator-sdk generate kustomize manifests -q
Display name for the operator (required):
> Nginx Operator
Description for the operator (required):
> Operator for managing a basic Nginx deployment
Provider's name for the operator (required):
> MyCompany
Any relevant URL for the provider name (optional):
> http://mycompany.example
Comma-separated list of keywords for your operator (required):
> nginx,tutorial
Comma-separated list of maintainers and their emails (e.g.
'name1:email1, name2:email2') (required):
> Mike Dame:mike@mycompany.example
cd config/manager && /Users/mdame/nginx-operator/bin/kustomize
edit set image controller=controller:latest
/Users/mdame/nginx-operator/bin/kustomize build config/
manifests | operator-sdk generate bundle -q --overwrite
--version 0.0.1
INFO[0000] Creating bundle.Dockerfile
INFO[0000] Creating bundle/metadata/annotations.yaml
INFO[0000] Bundle metadata generated suceessfully
operator-sdk bundle validate ./bundle
INFO[0000] All validation tests have completed successfully
Running your Operator
165
During this step, the generator will request the following inputs one by one:
• Display name for the operator: This is the name that will be used
for displaying the Operator on resources such as OperatorHub. So, it should be
readable and clear with proper capitalization. For example, we have chosen Nginx
Operator.
• Description for the operator: This field provides a description of the
Operator and its functionality. Similar to the display name, this is intended for users
to see. Therefore, it should also be clear and thorough to describe the Operator's
functionality in detail.
• Provider's name for the operator: This is the name of the provider, or
developer, of the Operator. For a single developer, it can simply be your name. Or,
for larger organizations, it could be a company or department name.
• Any relevant URL for the provider name: This is the opportunity
for developers to provide an external URL to find more information about the
developer. This could be a personal blog, GitHub account, or corporate website.
• Comma-separated list of keywords for your operator: This is
a list of keywords that can help users categorize and find your Operator. For this
example, we have chosen nginx,tutorial, but you could just as easily provide a
different list, such as deployment,nginx,high availability,metrics.
This gives more insight into the key functionality we have developed for this
Operator. Note also that the list is comma-separated, so high availability is
one keyword.
• Comma-separated list of maintainers and their emails: Finally,
this section is a chance to provide the contact information for the maintainers
of the Operator. This gives users information on who to contact for support or
bug reporting. However, it can be useful for the developer's privacy to provide a
corporate address rather than personal contact information.
These fields correspond to matching fields in the Operator's cluster service version
(CSV) file (the CSV was briefly described in Chapter 1, Introduction to the Operator
Framework, and will be explained in more detail later in this chapter under Working with
OperatorHub). You can find more information about how each of these fields is used in
the Operator Framework documentation at https://sdk.operatorframework.
io/docs/olm-integration/generation/#csv-fields.
166
Installing and Running Operators with the Operator Lifecycle Manager
The CSV is one of several new files created in the project after running make bundle.
The majority of these new files are created under a new directory called bundle/. There
is also a new file at the root of the project called bundle.Dockerfile, which is used to
compile the manifests into the bundle image.
Exploring the bundle files
The files generated by make bundle contain metadata about the Operator that can be
used by the OLM to install and manage the Operator, as well as OperatorHub, to provide
information to users about the Operator and its dependencies and capabilities. Within the
bundle/ directory are three subdirectories that contain the following files:
• tests/: These are configuration files for running scorecard tests, which are a
series of tests designed to validate the Operator's bundle (see https://sdk.
operatorframework.io/docs/testing-operators/scorecard).
• metadata/: This contains an annotations.yaml file, which provides the OLM
with information about an Operator's version and dependencies. The annotations in
this file must be the same as the labels specified in bundle.Dockerfile (more
on that file shortly), and should usually not be modified.
• manifests/: This directory contains various manifests required by your operator,
including the Operator's CRD and metrics-related resources (if applicable). Most
notably, however, is the CSV, which contains the bulk of the Operator's metadata.
The Operator's CSV is the most interesting of these files, as it contains much
of the information used by the OLM to process the creation of the Operator,
as well as OperatorHub, to display important information to users about the
Operator. The one created for our nginx Operator is named nginx-operator.
clusterserviceversion.yaml, and contains the following sections:
1. Metadata, including a sample custom resource object (to be created by the user for
configuring the Operator) and its capability level:
apiVersion: operators.coreos.com/v1alpha1
kind: ClusterServiceVersion
metadata:
annotations:
alm-examples: |[
{
Running your Operator
167
"apiVersion": "operator.example.com/v1alpha1",
"kind": "NginxOperator",
"metadata": {
"name": "nginxoperator-sample"
},
"spec": null
}
]
capabilities: Basic Install
operators.operatorframework.io/builder: operatorsdk-v1.17.0
operators.operatorframework.io/project_layout:
go.kubebuilder.io/v3
name: nginx-operator.v0.0.1
namespace: placeholder
2. A specification field with the Operator's description, display name, display icon (if
provided), and related CRDs:
spec:
apiservicedefinitions: {}
customresourcedefinitions:
owned:
- description: NginxOperator is the Schema for the
nginxoperators API
displayName: Nginx Operator
kind: NginxOperator
name: nginxoperators.operator.example.com
version: v1alpha1
description: Operator for managing a basic Nginx
deployment
displayName: Nginx Operator
icon:
- base64data: ""
mediatype: ""
168
Installing and Running Operators with the Operator Lifecycle Manager
3. Installation instructions, including the cluster permissions and Deployment
specification for the Operator Pod (omitted here for brevity).
4. The install modes for the Operator, showing which namespace installation strategies
it supports:
installModes:
- supported: false
type: OwnNamespace
- supported: false
type: SingleNamespace
- supported: false
type: MultiNamespace
- supported: true
type: AllNamespaces
5. Keywords, maintainer information, provider URL, and version (as provided when
running make bundle):
keywords:
- nginx
- tutorial
links:
- name: Nginx Operator
url: https://nginx-operator.domain
maintainers:
- email: mike@mycompany.example
name: Mike Dame
maturity: alpha
provider:
name: MyCompany
url: http://mycompany.example
version: 0.0.1
Together, this information can be packaged together to provide enough data for the
OLM to deploy and manage the Operator in a cluster. That package is known as the
bundle image.
Running your Operator
169
Building a bundle image
Once the bundle manifests have been generated, the bundle image can be built by
calling make bundle-build. This command builds a Docker container based on
the bundle.Dockerfile file that was generated earlier by make bundle. That
Dockerfile file contains the following instructions:
$ cat bundle.Dockerfile
FROM scratch
# Core bundle labels.
LABEL operators.operatorframework.io.bundle.mediatype.
v1=registry+v1
LABEL operators.operatorframework.io.bundle.manifests.
v1=manifests/
LABEL operators.operatorframework.io.bundle.metadata.
v1=metadata/
LABEL operators.operatorframework.io.bundle.package.v1=nginxoperator
LABEL operators.operatorframework.io.bundle.channels.v1=alpha
LABEL operators.operatorframework.io.metrics.builder=operatorsdk-v1.17.0
LABEL operators.operatorframework.io.metrics.mediatype.
v1=metrics+v1
LABEL operators.operatorframework.io.metrics.project_layout=go.
kubebuilder.io/v3
# Labels for testing.
LABEL operators.operatorframework.io.test.mediatype.
v1=scorecard+v1
LABEL operators.operatorframework.io.test.config.v1=tests/
scorecard/
# Copy files to locations specified by labels.
COPY bundle/manifests /manifests/
COPY bundle/metadata /metadata/
COPY bundle/tests/scorecard /tests/scorecard/
Similar to the main Dockerfile file used to compile the Operator image in
Chapter 6, Building and Deploying Your Operator, one of the key steps in this Dockerfile's
build is to copy the essential bundle files from the bundle/ directory into its own image
(highlighted in the preceding code block). It also labels the resulting image with various
metadata about the operator, its versions, and the tools used to build it.
170
Installing and Running Operators with the Operator Lifecycle Manager
Running make bundle-build produces the following build log:
$ make bundle-build
docker build -f bundle.Dockerfile -t example.com/nginxoperator-bundle:v0.0.1 .
[+] Building 0.4s (7/7) FINISHED
=> [internal] load build definition from bundle.Dockerfile
=> => transferring dockerfile: 966B
=> [internal] load .dockerignore
=> => transferring context: 35B
=> [internal] load build context
=>
=>
=>
=>
=>
=> transferring context: 16.73kB
[1/3] COPY bundle/manifests /manifests/
[2/3] COPY bundle/metadata /metadata/
[3/3] COPY bundle/tests/scorecard /tests/scorecard/
exporting to image
=> => exporting layers
=> => writing image
sha256:6b4bf32edd5d15461d112aa746a9fd4154fefdb1f9cfc49b
56be52548ac66921
=> => naming to example.com/nginx-operator-bundle:v0.0.1
However, note that the name of the new container image is example.com/nginxoperator-bundle, which you can confirm by running docker images:
$ docker images
REPOSITORY
TAG
IMAGE ID
CREATED
example.com/nginx-operator-bundle
v0.0.1
6b4bf32edd
29 seconds ago
Running your Operator
171
This generic name is used because make bundle-build depends on a different
environment variable than the IMG variable that was used earlier to build the Operator
image manually (and generate the bundle manifests). To set a custom bundle image name,
either tag the generated image or re-run make bundle-build with the BUNDLE_IMG
variable set. An example is shown here:
$ BUNDLE_IMG=docker.io/myregistry/nginx-bundle:v0.0.1 make
bundle-build
This will generate the bundle image with the name docker.io/myregistry/nginxbundle:v0.0.1.
Pushing a bundle image
Recall that in Chapter 6, Building and Deploying Your Operator, it was necessary to not
only build the container image for the Operator but also push it to a publicly accessible
registry. This made the image available to our Kubernetes cluster. Similarly, the bundle
image must also be accessible by the cluster (and the OLM). For this reason, we must also
push the bundle image to a registry so that the OLM can pull it into the cluster.
The Operator SDK makes this step easy with the make bundle-push command:
$ make bundle-push
/Library/Developer/CommandLineTools/usr/bin/make docker-push
IMG=docker.io/mdame/nginx-bundle:v0.0.1
docker push docker.io/mdame/nginx-bundle:v0.0.1
The push refers to repository [docker.io/mdame/nginx-bundle]
79c3f933fff3: Pushed
93e60c892495: Pushed
dd3276fbf1b2: Pushed
v0.0.1: digest: sha256:f6938300b1b8b5a2ce127273e2e48443
ad3ef2e558cbcf260d9b03dd00d2f230 size: 939
This command simply calls docker push, but it inherits the environment variables
that have been set and used in previous commands (for example, BUNDLE_IMG). This
convenience helps reduce the chance of making a mistake and pushing the wrong image
name to the wrong registry.
172
Installing and Running Operators with the Operator Lifecycle Manager
Deploying an Operator bundle with the OLM
With a bundle image built and pushed to an accessible registry, it is simple to deploy
the Operator from its bundle with the operator-sdk run bundle command. For
example, we can now deploy the nginx Operator bundle from the previous section by
running the following:
$ operator-sdk run bundle docker.io/mdame/nginx-bundle:v0.0.1
INFO[0013] Successfully created registry pod: docker-io-mdamenginx-bundle-v0-0-1
INFO[0013] Created CatalogSource: nginx-operator-catalog
INFO[0013] OperatorGroup "operator-sdk-og" created
INFO[0013] Created Subscription: nginx-operator-v0-0-1-sub
INFO[0016] Approved InstallPlan install-44bh9 for the
Subscription: nginx-operator-v0-0-1-sub
INFO[0016] Waiting for ClusterServiceVersion "default/nginxoperator.v0.0.1" to reach 'Succeeded' phase
INFO[0016]
Waiting for ClusterServiceVersion "default/nginxoperator.v0.0.1" to appear
INFO[0023]
Found ClusterServiceVersion "default/nginxoperator.v0.0.1" phase: Pending
INFO[0026]
Found ClusterServiceVersion "default/nginxoperator.v0.0.1" phase: Installing
INFO[0046]
Found ClusterServiceVersion "default/nginxoperator.v0.0.1" phase: Succeeded
INFO[0046] OLM has successfully installed "nginx-operator.
v0.0.1"
Note
This command may take a few minutes to succeed. However, if the Operator's
ClusterServiceVersion object fails to install, double-check that you
have followed the steps to install kube-prometheus in the cluster, as detailed
in Chapter 6, Building and Deploying Your Operator. If the Operator bundle has
been built to include references to Prometheus resources, and these resources
are not present in the cluster, this can cause the Operator's installation to fail.
This command creates the resources necessary for the OLM to install the nginx Operator
using only the information in the Operator's bundle, including CatalogSource,
OperatorGroup, Subscription, and InstallPlan.
Working with OperatorHub
173
The Operator can then be uninstalled using the operator-sdk cleanup
<packageName> command, where <packageName> is defined in the Operator's
PROJECT file as projectName:
$ operator-sdk cleanup nginx-operator
INFO[0000] subscription "nginx-operator-v0-0-1-sub" deleted
INFO[0000] customresourcedefinition "nginxoperators.operator.
example.com" deleted
INFO[0000] clusterserviceversion "nginx-operator.v0.0.1"
deleted
INFO[0000] catalogsource "nginx-operator-catalog" deleted
INFO[0000] operatorgroup "operator-sdk-og" deleted
INFO[0000] Operator "nginx-operator" uninstalled
This concludes the normal development workflow for building and deploying Operators
with the OLM manually. However, there is another source for Operators to install in a
cluster. This is OperatorHub, and it is the focus of the next section.
Working with OperatorHub
Any successful open source project requires a dedicated community of users and
developers to help the project's ecosystem thrive. The Operator Framework is no
different, and at the center of this community is the Operator catalog of https://
operatorhub.io/. In fact, this centralization is the exact goal of OperatorHub, as
stated on https://operatorhub.io/about:
While there are several approaches to implement Operators yielding the
same level of integration with Kubernetes, what has been missing is a
central location to find the wide array of great Operators that have been
built by the community. OperatorHub.io aims to be that central location.
Launched in 2019 by a collaborative effort between Red Hat, AWS, Google Cloud,
and Microsoft, OperatorHub has been a driving force in the growth and adoption of
Kubernetes Operators. As of the time of writing, the OperatorHub index contains over
200 Operators (and this number continues to grow). Backed by only a public GitHub
repository and many volunteer maintainers, the open concept of catalog moderation
and acceptance of OperatorHub supports the very ideals of Kubernetes, by allowing
anyone from any organization to contribute their Operator to the catalog and make it
accessible to all.
174
Installing and Running Operators with the Operator Lifecycle Manager
In short, OperatorHub makes it easy to promote your own Operators, as well as finding
and installing Operators developed by other providers. In this section, we'll demonstrate
how to do both of these by working with the OperatorHub website and backend.
Installing Operators from OperatorHub
Installing an Operator from OperatorHub in your own Kubernetes cluster is very easy
using the catalog on https://operatorhub.io/. You can begin by browsing the
list of all available Operators, or by searching in the text box on the OperatorHub home
page. You can also narrow down your search by category (available categories include
AI/Machine Learning, Big Data, Cloud Provider, and Monitoring).
For an arbitrary example, the Grafana Operator can be found under Monitoring. Grafana
is an analytics and monitoring visualization platform that provides rich, insightful tools
for viewing application health. The following is a screenshot showing Grafana Operator
and others available in the Monitoring category on OperatorHub:
Figure 7.1 – Screenshot of the OperatorHub Monitoring category
Working with OperatorHub
175
Clicking on the Grafana Operator tile opens up the information page for this specific
Operator. This page includes information such as the Operator's current functionality level in
the Capability Model, which versions of the Operator have been published, and information
about the provider and maintainer of the Operator. The following is a screenshot showing
what the Grafana Operator information page looks like on OperatorHub:
Figure 7.2 – Grafana Operator information page
176
Installing and Running Operators with the Operator Lifecycle Manager
Also available on this page are installation instructions for this Operator, found by
clicking the Install button on the top right of the Operator's description. This opens a new
window with commands that can be copied and pasted to install the OLM, the Operator
itself, and how to watch the Operator startup. Since we already have the OLM installed in
a cluster, we can skip to Step 2 and copy the install command for this Operator. This is
shown in the following screenshot of the Grafana Operator installation instructions:
Figure 7.3 – Grafana Operator installation instructions
Running this command in a terminal produces the following output:
$ kubectl create -f https://operatorhub.io/install/grafanaoperator.yaml
namespace/my-grafana-operator created
operatorgroup.operators.coreos.com/operatorgroup created
subscription.operators.coreos.com/my-grafana-operator created
Working with OperatorHub
177
Following this, the new namespace, my-grafana-operator, has been created with the
resources necessary for this Operator:
$ kubectl get all -n my-grafana-operator
NAME
READY
STATUS
pod/grafana-operator-controller-manager-b95954bddsqwzr
2/2
Running
NAME
TYPE
service/grafana-operator-controller-managermetrics-service
ClusterIP
NAME
READY
UP-TO-DATE
deployment.apps/grafana-operator-controllermanager
1/1
1
1
NAME
DESIRED
replicaset.apps/grafana-operator-controller-managerb95954bdd
1
1
In addition, this command also created an OperatorGroup object and Subscription
object for this Operator. These resource types are CRDs that were installed in the cluster
by the OLM and implemented by individual Operators to represent their installation.
The details about what each of these objects does are available in the OperatorHub
documentation at https://operatorhub.io/how-to-install-an-operator,
but in summary, they define the user's (your) intent to install the Operator and inform
the OLM about the location of the Operator's metadata on OperatorHub. The OLM uses
this information to create the Deployment, Service, and other resources needed for the
new Operator.
Once an Operator has been installed, it is usually up to the user to create the configuration
CRD object for that Operator. With so many different CRDs floating around, this can get
confusing to keep track of. However, many of these CRDs (such as OperatorGroup and
Subscription) are installed and managed automatically by tools such as the OLM, and
they do not require manual interaction. Generally, the user is only concerned with the
CRD object for a specific Operator's configuration (such as the one that we created for our
nginx Operator). Most Operator README files and OperatorHub descriptions will contain
example CRDs and steps to get started with each Operator (and it is a good practice to do
so with your own Operator as well).
Speaking of your own Operator, contributing to the OperatorHub catalog is almost as
easy as installing Operators from it. In the next section, we'll look at how each of these
Operators made their way onto OperatorHub and how yours can, too.
178
Installing and Running Operators with the Operator Lifecycle Manager
Submitting your own Operator to OperatorHub
While it is not required to publish any Operator publicly, many providers choose to do
so, both for the benefit of the community and their own users. If the Operator you have
developed is used to manage an application you offer to your users, public availability of
the Operator can increase awareness of the application and bolster your organization's
reputation among the open source community. Offering a free Operator shows your
users that you are invested in providing a stable product with minimal engineering hours
required on their part.
What Is Required from Operator SDK Projects?
The Operator SDK, like many Kubernetes projects, is released under the
Apache 2.0 License. This gives permissive usability of the project for
commercial use, distribution, and private use (among other use cases). More
information on the Operator SDK license is available at https://github.
com/operator-framework/operator-sdk/blob/master/
LICENSE.
Because the nginx Operator that we have been developing throughout this book is
only intended as a tutorial (and not meant for public use), we cannot demonstrate the
process for submitting it to OperatorHub. However, the general process for submitting an
Operator to OperatorHub is outlined at https://operatorhub.io/contribute.
In broad terms, this involves the following steps:
1. Develop an Operator that is ready for publishing.
2. Generate the Operator's bundle, including its CSV and related CRDs.
3. Create a pull request (PR) against the OperatorHub repository on GitHub
(https://github.com/k8s-operatorhub/community-operators)
with your Operator's metadata.
If you have been following the steps in this book up until this point, then you are already
familiar with the first two steps. However, the third step is the most important part of
submitting to OperatorHub, because the GitHub repository represents the entire catalog
of Operators listed on OperatorHub. So, without the proper PR changes necessary
to merge your Operator's information into this repository, it will not show up on
OperatorHub.
Working with OperatorHub
179
Which OperatorHub Repository is which?
Some outdated documentation that is still available refers to two different
OperatorHub repository locations, community-operators and
upstream-community-operators, which were originally
subdirectories of the now-archived OperatorHub repository at https://
github.com/operator-framework/community-operators.
The former is a remnant of the initial work done by Red Hat to publish
OperatorHub (specifically, it refers to a location that was reserved for
Operators to be listed on an integrated version of OperatorHub within Red
Hat's OpenShift distribution of Kubernetes). This OpenShift-specific Operator
index has since been decoupled from the community repository referenced
earlier. There is documentation available for contributing to the OpenShift
catalog for developers who are interested in doing so, but this chapter will focus
on the community OperatorHub, which is platform-agnostic.
The steps to submit your Operator through GitHub are as follows (these steps assume
some prior familiarity with GitHub and the fork/PR processes involved):
1. Fork the OperatorHub repository (https://github.com/
k8s-operatorhub/community-operators) into your own GitHub account.
This allows you to clone a local copy of the repository to your machine and make
changes to it that will later be pulled into the upstream catalog via your PR.
2. Create a new folder for your Operator under the operators/ directory. It
must have a unique name from all other Operators (for example, we could create
operators/nginx-operator).
3. Create a new file called ci.yaml in this directory. This file defines versioning
semantics as well as the reviewers allowed to make changes to your Operator
(more information available at https://k8s-operatorhub.github.io/
community-operators/operator-ci-yaml/). A simple ci.yaml file
looks like the following:
reviewers:
- myGithubUsername
- yourTeammateUsername
4. Create a directory in your Operator's folder for each version you wish to publish
(for example, operators/nginx-operator/0.0.1).
5. Copy the contents of the bundle directory from your Operator's project into the
new version folder.
180
Installing and Running Operators with the Operator Lifecycle Manager
Also, copy the bundle.Dockerfile that was generated at your Operator's
project root into the version folder.
6. Commit and push the changes to a new branch of your forked OperatorHub
repository on GitHub.
7. Navigate back to the upstream OperatorHub repository's PR page (https://
github.com/k8s-operatorhub/community-operators/pulls)
and click New pull request. Choose your fork and branch to merge into the
upstream repository.
8. Read the PR template description and ensure that you have followed all of the steps
outlined. These prerequisite steps help expedite the review and approval process of
your Operator's PR and include the following:
I.
Reviewing the community contribution guidelines
II. Testing your Operator in a local cluster
III. Verifying your Operator's metadata aligns with the standards of OperatorHub
IV. Ensuring your Operator's description and versioning schema are sufficient for
your users
Once you have reviewed the pre-submission checks in the PR template, submit your
request. At this point, automated checks will validate your Operator's metadata to ensure
it passes the quality thresholds for submission (and report any problems in a GitHub
comment). If you need to make any changes to your submission in order for it to
pass these checks, you can simply push the changes to your forked branch of the
OperatorHub repository.
Once your PR passes the pre-submission checks, it should automatically merge your
changes into the upstream repository. Soon thereafter, your Operator will be visible on
https://operatorhub.io/ for the world to install!
Troubleshooting
181
Troubleshooting
While this chapter introduced some new concepts, including the OLM and OperatorHub,
many of the resources already listed in earlier Troubleshooting sections throughout this
book still apply.
OLM support
The OLM and its related resources are related in general to Operator SDK development.
So, there is reasonable help for this topic available in the #operator-sdk-dev Slack
channel on slack.k8s.io. The OLM is also available on GitHub for reporting issues
at https://github.com/operator-framework/operator-lifecyclemanager. The documentation for integrating an Operator with the OLM is available
as a primary resource at https://sdk.operatorframework.io/docs/
olm-integration/.
OperatorHub support
OperatorHub is also available on GitHub at the catalog repository shown in this chapter
(https://github.com/k8s-operatorhub/community-operators). For
issues with the frontend https://operatorhub.io/ website specifically, that code
is located at https://github.com/k8s-operatorhub/operatorhub.io. This
repository provides detailed documentation on all of the necessary metadata and bundle
files for OperatorHub submission (as well as the submission process itself) at https://
k8s-operatorhub.github.io/community-operators/.
182
Installing and Running Operators with the Operator Lifecycle Manager
OperatorHub also provides validators and tools for previewing your Operator's
submission prior to creating a PR against the repository. The preview tool is available at
https://operatorhub.io/preview. Submitting the generated CSV in this tool will
show a preview of how your Operator will look once it is submitted to OperatorHub:
Figure 7.4 – Screenshot of the Nginx Operator preview on OperatorHub
Summary
183
Previewing an Operator's presentation can be a very helpful manual step in testing that
all of the metadata prepared for that Operator is going to present to new users in the way
that you want. It can be easy to lose track of the confusing CRD and CSV definitions, so
previewing it gives early visual confirmation that everything is set up correctly. It also
verifies that the metadata is syntactically valid.
Summary
This chapter concluded the primary development and publication of an Operator. If you
have been following along up until this point while developing your own Operator, then
congratulations! Your Operator is now published and accessible to new users thanks to the
reach of OperatorHub. Starting from the early chapters of this book, we have shown the
steps to design an Operator, develop its basic and advanced functionality with Go, build
and deploy it for local testing, and finally, package and publish it for public distribution.
However, very few Operator project life cycles will end at this point.
It is likely that most Operators will eventually need to evolve, change their provided
features, and release new versions. Doing so in a consistent and predictable way benefits
both your users and your maintainers by establishing expected release standards. These
standards include policies for deprecation and timelines for new releases. In the next
chapter, we will explain some of the existing best practices used among Kubernetes
projects and provoke forward-looking thoughts about how to prepare for the ongoing
maintenance and development of your new Operator.
8
Preparing
for Ongoing
Maintenance of Your
Operator
In this book, we have shown the steps for creating a new Kubernetes Operator. We've
covered the full range of processes from conception to design, to coding, deployment, and
finally, release. But, very few software projects end their life cycle after the initial release,
Operators included. In fact, for many Operators, the majority of work will eventually be
done after release on a long enough timescale. So, it's valuable to prepare for the future
maintenance of your Operator by understanding the expectations of your users and the
Operator community at large.
186
Preparing for Ongoing Maintenance of Your Operator
As a Kubernetes-based project, it can be very helpful to rely on the established
conventions from Kubernetes and its subprojects for your own ongoing development.
While you are free to form your own guidelines for future releases, it is likely that your
Operator will depend on at least some library or aspect of the core Kubernetes platform
simply by virtue of being built for Kubernetes. For that reason, knowing the policies in
place for Kubernetes can help align your own development practices in preparation for
changes in the upstream platform, which you will almost certainly inherit and be forced
to react to. That's why this chapter will focus on those conventions throughout the
following sections:
• Releasing new versions of your Operator
• Planning for deprecation and backward compatibility
• Complying with Kubernetes standards for changes
• Aligning with the Kubernetes release timeline
• Working with the Kubernetes community
The procedures established by the Kubernetes community provide an excellent template
for your own development practices and a familiar set of policies for your users. There is,
of course, no requirement for any Operator to strictly follow these guidelines, but it is
the goal of this chapter to explain them in a way that provides the relevant precedent for
your project.
Technical requirements
For this chapter, the only technical work will be done in the Releasing new versions of
your Operator section, in which we will build on the existing nginx Operator code from
earlier chapters to add new code and run that code in a Kubernetes cluster. As such, the
requirements for this chapter include the following:
• The operator-sdk binary
• Go 1.16+
• Docker
• Access to a running Kubernetes cluster
The Code in Action video for this chapter can be viewed at: https://bit.ly/3aiaokl
Releasing new versions of your Operator
187
Releasing new versions of your Operator
Now that your Operator is published, the fun has just begun. It's now time to start
thinking about your next release! As with any software project, your Operator will evolve
over time by introducing new features and adapting to changes in upstream Kubernetes.
There are tomes of literature written on releasing software with recommendations on
when and how to publish updates to a software product. Much of that information is out
of the scope of this book. Instead, we will explain the technical steps required to create
and publish a new version of your Operator with the Operator SDK, Operator Lifecycle
Manager (OLM), and OperatorHub in mind. From there, methods and timing for your
release are entirely up to your organization (though you may want to learn more about
how other Kubernetes projects are released later in this chapter in the Aligning with the
Kubernetes release timeline section).
Adding an API version to your Operator
While there are many factors that may influence your decision to release a new version of
your Operator (such as bug fixes or simply following a regular release schedule), one type
of change that is common among Operators is updating the Operator's config API. Recall
that this is the API translated into the Operator's CustomResourceDefinition (CRD).
So, in some cases, it may be necessary to update the API that is shipped with your
Operator to indicate changes to users (see the Complying with Kubernetes standards for
changes section).
To do this, we need to create a new API version and include that version in the Operator's
CRD (for a more in-depth look at what this means from a technical standpoint, see the
Kubernetes documentation on CRD versioning for information on the details of how
this works: https://kubernetes.io/docs/tasks/extend-kubernetes/
custom-resources/custom-resource-definition-versioning/).
In Chapter 4, Developing an Operator with the Operator SDK, we initialized the first
version of our Operator's API with the following command:
operator-sdk create api --group operator --version v1alpha1
--kind NginxOperator --resource --controller
This created the NginxOperator API type as the v1alpha1 version. We then filled
out the API in api/v1alpha1/nginxoperator_types.go and generated the
corresponding CRD, which provides the interface for using the Operator once it was
deployed in a cluster.
188
Preparing for Ongoing Maintenance of Your Operator
If some incompatible changes needed to be made to this API that required a new
version, that version could be generated similarly. Say, for example, that we wanted to
allow the nginx Deployment managed by our Operator to expose multiple ports, such
as one for HTTP and another for HTTPS requests. We could do this by changing the
port field in the existing nginx Operator's CRD to a ports field that defines a list of
v1.ContainerPorts (this is a native Kubernetes API type that allows for naming
multiple ports for a container). This new type exposes additional information, such as
Name and HostPort, but it also includes the same int32 value for defining a singular
ContainerPort that the original port field used. Let's take the following line from
controllers/nginxoperator_controller.go as an example:
func (r *NginxOperatorReconciler) Reconcile(ctx context.
Context, req ctrl.Request) (ctrl.Result, error) {
if operatorCR.Spec.Port != nil {
deployment.Spec.Template.Spec.Containers[0].Ports[0].
ContainerPort = *operatorCR.Spec.Port
}
This could be simplified to just the following:
func (r *NginxOperatorReconciler) Reconcile(ctx context.
Context, req ctrl.Request) (ctrl.Result, error) {
if len(operatorCR.Spec.Ports) > 0 {
deployment.Spec.Template.Spec.Containers[0].Ports =
operatorCR.Spec.Ports
}
To show what this means for the Operator types, we will take the existing
NginxOperatorSpec type in v1alpha1:
// NginxOperatorSpec defines the desired state of NginxOperator
type NginxOperatorSpec struct {
// Port is the port number to expose on the Nginx Pod
Port *int32 `json:"port,omitempty"`
// Replicas is the number of deployment replicas to scale
Replicas *int32 `json:"replicas,omitempty"`
Releasing new versions of your Operator
189
// ForceRedploy is any string, modifying this field
instructs
// the Operator to redeploy the Operand
ForceRedploy string `json:"forceRedploy,omitempty"`
}
And now, we will change it to a new NginxOperatorSpec type in v1alpha2 that
looks like the following:
// NginxOperatorSpec defines the desired state of NginxOperator
type NginxOperatorSpec struct {
// Ports defines the ContainerPorts exposed on the Nginx Pod
Ports []v1.ContainerPort `json:"ports,omitempty""`
// Replicas is the number of deployment replicas to scale
Replicas *int32 `json:"replicas,omitempty"`
// ForceRedploy is any string, modifying this field
instructs
// the Operator to redeploy the Operand
ForceRedploy string `json:"forceRedploy,omitempty"`
}
In order to preserve functionality for our users, it's important to introduce the new
version in a way that ensures the Operator supports both versions for as long as required
by the deprecation policy.
Generating the new API directory
The first step is to generate the new API files. The new API version is generated as a
scaffold with the operator-sdk command, just like when we generated v1alpha1:
$ operator-sdk create api --group operator --version v1alpha2
--kind NginxOperator --resource
Create Controller [y/n]
n
Writing kustomize manifests for you to edit...
Writing scaffold for you to edit...
190
Preparing for Ongoing Maintenance of Your Operator
api/v1alpha2/nginxoperator_types.go
Update dependencies:
$ go mod tidy
Running make:
$ make generate
/Users/mdame/nginx-operator/bin/controllergenobject:headerFile="hack/boilerplate.go.txt" paths="./..."
Next: implement your new API and generate the manifests (e.g.
CRDs,CRs) with:
$ make manifests
Note that this time, the --controller flag was omitted (and we chose n for
Create Controller [y/n]) because the controller for this Operator already exists
(controllers/nginxoperator_controller.go), so we don't need to generate
another one.
Instead, the existing controller will need to be manually updated to remove references
to v1alpha1 and replace them with v1alpha2. This step can also be automated with
tools such as sed, but be sure to carefully review any changes whenever automating code
updates like this.
When the version is generated, it will create a new api/v1alpha2 folder, which also
contains an nginxoperator_types.go file. Copy the existing type definitions from
api/v1alpha1/nginxoperator_types.go into this file and change the port field
into ports, as shown in the preceding code. The new file should look as follows (note the
highlighted change to Ports):
api/v1alpha2/nginxoperator_types.go:
package v1alpha2
import (
v1 "k8s.io/api/core/v1"
metav1 "k8s.io/apimachinery/pkg/apis/meta/v1"
)
const (
ReasonCRNotAvailable
"OperatorResourceNotAvailable"
=
Releasing new versions of your Operator
191
ReasonDeploymentNotAvailable =
"OperandDeploymentNotAvailable"
ReasonOperandDeploymentFailed = "OperandDeploymentFailed"
ReasonSucceeded
= "OperatorSucceeded"
)
// NginxOperatorSpec defines the desired state of NginxOperator
type NginxOperatorSpec struct {
// INSERT ADDITIONAL SPEC FIELDS - desired state of cluster
// Important: Run "make" to regenerate code after modifying
this file
// Ports defines the ContainerPorts exposed on the Nginx Pod
Ports []v1.ContainerPort `json:"ports,omitempty""`
// Replicas is the number of deployment replicas to scale
Replicas *int32 `json:"replicas,omitempty"`
// ForceRedploy is any string, modifying this field
instructs
// the Operator to redeploy the Operand
ForceRedploy string `json:"forceRedploy,omitempty"`
}
// NginxOperatorStatus defines the observed state of
NginxOperator
type NginxOperatorStatus struct {
// Conditions is the list of the most recent status
condition updates
Conditions []metav1.Condition `json:"conditions"`
}
//+kubebuilder:object:root=true
//+kubebuilder:subresource:status
//+kubebuilder:storageversion
// NginxOperator is the Schema for the nginxoperators API
192
Preparing for Ongoing Maintenance of Your Operator
type NginxOperator struct {
metav1.TypeMeta
`json:",inline"`
metav1.ObjectMeta `json:"metadata,omitempty"`
Spec
NginxOperatorSpec
`json:"spec,omitempty"`
Status NginxOperatorStatus `json:"status,omitempty"`
}
//+kubebuilder:object:root=true
// NginxOperatorList contains a list of NginxOperator
type NginxOperatorList struct {
metav1.TypeMeta `json:",inline"`
metav1.ListMeta `json:"metadata,omitempty"`
Items
[]NginxOperator `json:"items"`
}
func init() {
SchemeBuilder.Register(&NginxOperator{},
&NginxOperatorList{})
}
Updating the Operator's CRD
Next, the Operator's CRD needs to be updated to include definitions for both
v1alpha1 and v1alpha2. First, one version needs to be defined as the storage
version. This is the version representation in which the object is persisted in etcd.
When the Operator only had one version, it wasn't necessary to specify this (that
was the only version available to be stored). Now, however, the API server needs to
know how to store the object. This is done by adding another kubebuilder marker
(//+kubebuilder:storageversion) to the NginxOperator struct:
//+kubebuilder:object:root=true
//+kubebuilder:subresource:status
//+kubebuilder:storageversion
// NginxOperator is the Schema for the nginxoperators API
type NginxOperator struct {
Releasing new versions of your Operator
193
metav1.TypeMeta
`json:",inline"`
metav1.ObjectMeta `json:"metadata,omitempty"`
Spec
NginxOperatorSpec
`json:"spec,omitempty"`
Status NginxOperatorStatus `json:"status,omitempty"`
}
This instructs the CRD generator to label v1alpha2 as the storage version. Now, running
make manifests will generate new changes to the CRD:
$ make manifests
$ git status
On branch master
Changes not staged for commit:
modified:
config/crd/bases/operator.example.com_
nginxoperators.yaml
Now, the Operator's CRD should include a new v1alpha2 specification definition under
versions:
config/crd/bases/operator.example.com_nginxoperators.yaml:
apiVersion: apiextensions.k8s.io/v1
kind: CustomResourceDefinition
metadata:
annotations:
controller-gen.kubebuilder.io/version: v0.7.0
creationTimestamp: null
name: nginxoperators.operator.example.com
spec:
group: operator.example.com
names:
kind: NginxOperator
listKind: NginxOperatorList
plural: nginxoperators
singular: nginxoperator
scope: Namespaced
versions:
194
Preparing for Ongoing Maintenance of Your Operator
- name: v1alpha1
schema:
openAPIV3Schema:
...
served: true
storage: false
subresources:
status: {}
- name: v1alpha2
schema:
openAPIV3Schema:
...
served: true
storage: true
subresources:
status: {}
Implementing API conversions
Finally, the API server needs to know how to convert between these two incompatible
versions. Specifically, the int32 value for the v1alpha1 port needs to be converted into
a ContainerPort value in a list of ports for v1alpha2. For the sake of this example,
we will define the behavior as the following:
• v1alpha1 to v1alpha2: int32(port) becomes ports[0].
ContainerPort.
• v1alpha2 to v1alpha1: ports[0].ContainerPort becomes
int32(port).
In other words, if we are handed a list of ports and need to convert to a single port
(v1alpha2 to v1alpha1), we will take the first value in the list and use that. In reverse
(v1alpha1 to v1alpha2), we will take the single port value and make it the first (and
only) value in a new list of ports.
Releasing new versions of your Operator
195
To define these conversion rules, we will implement the Convertible and Hub
interfaces from sigs.k8s.io/controller-runtime/pkg/conversion:
sigs.k8s.io/controller-runtime/pkg/conversion/conversion.go:
package conversion
import "k8s.io/apimachinery/pkg/runtime"
// Convertible defines capability of a type to convertible i.e.
it can be converted to/from a hub type.
type Convertible interface {
runtime.Object
ConvertTo(dst Hub) error
ConvertFrom(src Hub) error
}
// Hub marks that a given type is the hub type for conversion.
This means that
// all conversions will first convert to the hub type, then
convert from the hub
// type to the destination type. All types besides the hub type
should implement
// Convertible.
type Hub interface {
runtime.Object
Hub()
}
These will then be exposed to the API server via a webhook that creates an endpoint that
can be queried by the API server to instruct it on how to perform conversions between
different API versions of an object. The steps for creating a webhook with operatorsdk are wrappers for kubebuilder commands, so the steps for implementing the
conversion webhook in an Operator are the same as for any other controller, as shown
in the kubebuilder documentation). This process defines one version as the Hub type
through which the Convertible spoke types are converted.
196
Preparing for Ongoing Maintenance of Your Operator
To get started, first create a new file, api/v1alpha2/nginxoperator_
conversion.go, to define v1alpha2 as the Hub version:
api/v1alpha2/nginxoperator_conversion.go:
package v1alpha2
// Hub defines v1alpha2 as the hub version
func (*NginxOperator) Hub() {}
Next, create another file, api/v1alpha1/nginxoperator_conversion.go (note
this is in the v1alpha1 directory). This file will implement the ConvertTo() and
ConvertFrom() functions to translate v1alpha1 to and from v1alpha2:
api/v1alpha1/nginxoperator_conversion.go:
package v1alpha1
import (
"github.com/sample/nginx-operator/api/v1alpha2"
v1 "k8s.io/api/core/v1"
"k8s.io/utils/pointer"
"sigs.k8s.io/controller-runtime/pkg/conversion"
)
// ConvertTo converts v1alpha1 to v1alpha2
func (src *NginxOperator) ConvertTo(dst conversion.Hub) error {
return nil
}
// ConvertFrom converts v1alpha2 to v1alpha1
func (dst *NginxOperator) ConvertFrom(src conversion.Hub) error
{
return nil
}
Releasing new versions of your Operator
197
Then, fill in these functions to do the actual conversions. For the fields such as Replicas
and ForceRedeploy, the conversion is 1:1 (it's also important to copy the Metadata
and Status.Conditions too). But, for Port/Ports, we need to add the logic defined
previously. That makes ConvertTo() look like the following:
// ConvertTo converts v1alpha1 to v1alpha2
func (src *NginxOperator) ConvertTo(dst conversion.Hub) error {
objV1alpha2 := dst.(*v1alpha2.NginxOperator)
objV1alpha2.ObjectMeta = src.ObjectMeta
objV1alpha2.Status.Conditions = src.Status.Conditions
if src.Spec.Replicas != nil {
objV1alpha2.Spec.Replicas = src.Spec.Replicas
}
if len(src.Spec.ForceRedploy) > 0 {
objV1alpha2.Spec.ForceRedploy = src.Spec.ForceRedploy
}
if src.Spec.Port != nil {
objV1alpha2.Spec.Ports = make([]v1.ContainerPort, 0, 1)
objV1alpha2.Spec.Ports = append(objV1alpha2.Spec.Ports,
v1.ContainerPort{ContainerPort: *src.Spec.Port})
}
return nil
}
And ConvertFrom() is similar, but in reverse:
// ConvertFrom converts v1alpha2 to v1alpha1
func (dst *NginxOperator) ConvertFrom(src conversion.Hub) error
{
objV1alpha2 := src.(*v1alpha2.NginxOperator)
dst.ObjectMeta = objV1alpha2.ObjectMeta
dst.Status.Conditions = objV1alpha2.Status.Conditions
if objV1alpha2.Spec.Replicas != nil {
dst.Spec.Replicas = objV1alpha2.Spec.Replicas
}
198
Preparing for Ongoing Maintenance of Your Operator
if len(objV1alpha2.Spec.ForceRedploy) > 0 {
dst.Spec.ForceRedploy = objV1alpha2.Spec.ForceRedploy
}
if len(objV1alpha2.Spec.Ports) > 0 {
dst.Spec.Port = pointer.Int32(objV1alpha2.Spec.Ports[0].
ContainerPort)
}
return nil
}
Now, we can generate the webhook logic and endpoints by using operator-sdk
create webhook, with the following command:
$ operator-sdk create webhook --conversion --version v1alpha2
--kind NginxOperator --group operator --force
Writing kustomize manifests for you to edit...
Writing scaffold for you to edit...
api/v1alpha2/nginxoperator_webhook.go
Webhook server has been set up for you.
You need to implement the conversion.Hub and conversion.
Convertible interfaces for your CRD types.
Update dependencies:
$ go mod tidy
Running make:
$ make generate
/Users/mdame/nginx-operator/bin/controller-gen
object:headerFile="hack/boilerplate.go.txt" paths="./..."
Next: implement your new Webhook and generate the manifests
with:
$ make manifests
You can ignore the message saying You need to implement the conversion.
Hub and conversion.Convertible interfaces for your CRD types
because we already did that (the generator simply assumes that it will be run before these
are implemented). At this point, everything has been implemented, and the only next step
is to ensure that the webhook is properly deployed with the Operator when it is installed
in a cluster.
Releasing new versions of your Operator
199
Updating project manifests to deploy the webhook
Just like how the manifests to enable metrics resources needed to be uncommented in
order to be deployed with the Operator (Chapter 5, Developing an Operator – Advanced
Functionality), so too do resources related to the webhook.
To do this, first, modify config/crd/kustomization.yaml to uncomment the
patches/webhook_in_nginxoperators.yaml and patches/cainject_in_
nginxoperators.yaml lines to include these two patch files in the deployment:
config/crd/kustomization.yaml:
resources:
- bases/operator.example.com_nginxoperators.yaml
#+kubebuilder:scaffold:crdkustomizeresource
patchesStrategicMerge:
# [WEBHOOK] To enable webhook, uncomment all the sections with
[WEBHOOK] prefix.
# patches here are for enabling the conversion webhook for each
CRD
- patches/webhook_in_nginxoperators.yaml
#+kubebuilder:scaffold:crdkustomizewebhookpatch
# [CERTMANAGER] To enable cert-manager, uncomment
all the sections with [CERTMANAGER] prefix.
# patches here are for enabling the CA injection for each CRD
- patches/cainjection_in_nginxoperators.yaml
#+kubebuilder:scaffold:crdkustomizecainjectionpatch
# the following config is for teaching kustomize how to do
kustomization for CRDs.
configurations:
- kustomizeconfig.yaml
200
Preparing for Ongoing Maintenance of Your Operator
Now, modify one of those files, patches/webhook_in_nginxoperators.yaml, to
add the two CRD versions as conversionReviewVersions in the Operator's CRD:
config/crd/patches/webhook_in_nginxoperators.yaml:
# The following patch enables a conversion webhook for the CRD
apiVersion: apiextensions.k8s.io/v1
kind: CustomResourceDefinition
metadata:
name: nginxoperators.operator.example.com
spec:
conversion:
strategy: Webhook
webhook:
clientConfig:
service:
namespace: system
name: webhook-service
path: /convert
conversionReviewVersions:
- v1
- v1alpha1
- v1alpha2
Next, make the following changes to config/default/kustomization.yaml to
uncomment the following lines:
• - ../webhook
• - ../certmanager
• - manager_webhook_patch.yaml
• All of the variables in the vars section with the [CERTMANAGER] label.
Releasing new versions of your Operator
201
The final file will look as follows (uncommented lines highlighted and some sections
omitted for brevity):
config/default/kustomization.yaml:
...
bases:
- ../crd
- ../rbac
- ../manager
# [WEBHOOK] To enable webhook, uncomment all the sections with
[WEBHOOK] prefix including the one in
# crd/kustomization.yaml
- ../webhook
# [CERTMANAGER] To enable cert-manager, uncomment all sections
with 'CERTMANAGER'. 'WEBHOOK' components are required.
- ../certmanager
# [PROMETHEUS] To enable prometheus monitor, uncomment all
sections with 'PROMETHEUS'.
- ../prometheus
...
# [WEBHOOK] To enable webhook, uncomment all the sections with
[WEBHOOK] prefix including the one in
# crd/kustomization.yaml
- manager_webhook_patch.yaml
# [CERTMANAGER] To enable cert-manager, uncomment all sections
with 'CERTMANAGER'.
# Uncomment 'CERTMANAGER' sections in crd/kustomization.yaml to
enable the CA injection in the admission webhooks.
# 'CERTMANAGER' needs to be enabled to use ca injection
#- webhookcainjection_patch.yaml
# the following config is for teaching kustomize how to do var
substitution
vars:
# [CERTMANAGER] To enable cert-manager, uncomment all sections
with 'CERTMANAGER' prefix.
- name: CERTIFICATE_NAMESPACE # namespace of the certificate CR
objref:
202
Preparing for Ongoing Maintenance of Your Operator
kind: Certificate
group: cert-manager.io
version: v1
name: serving-cert # this name should match the one in
certificate.yaml
fieldref:
fieldpath: metadata.namespace
- name: CERTIFICATE_NAME
objref:
kind: Certificate
group: cert-manager.io
version: v1
name: serving-cert # this name should match the one in
certificate.yaml
- name: SERVICE_NAMESPACE # namespace of the service
objref:
kind: Service
version: v1
name: webhook-service
fieldref:
fieldpath: metadata.namespace
- name: SERVICE_NAME
objref:
kind: Service
version: v1
name: webhook-service
And finally, comment out the manifests.yaml line in config/webhook/
kustomization.yaml (this file does not exist for our use case, and trying to deploy
without uncommenting this line will result in an error). The following snippet shows
which line should be commented out with #:
config/webhook/kustomization.yaml:
resources:
#- manifests.yaml
- service.yaml
Releasing new versions of your Operator
203
With these changes, the Operator can be re-built and deployed using the operator-sdk
and make commands from earlier chapters.
Deploying and testing the new API version
To confirm that the API server now understands and can convert between versions of
the Operator CRD, install it in a cluster. Note that now your Operator will depend on
cert-manager being present in the cluster, so be sure to install that first (instructions are
available at https://cert-manager.io/docs/installation/).
Remember, you need to update controllers/nginxoperator_controller.go
to replace v1alpha1 references with v1alpha2 and change the Ports check
(in Reconcile()) to match the following:
controllers/nginxoperator_controller.go:
func (*NginxOperatorReconciler) Reconcile(…) {
if len(operatorCR.Spec.Ports) > 0 {
deployment.Spec.Template.Spec.Containers[0].Ports =
operatorCR.Spec.Ports
}
}
Forgetting to do this will cause an error when creating or retrieving the Operator CRD
(which won't show up at compile time). This is because the v1alpha1 API types are
still defined and valid (so the Operator code compiles correctly), but the new client and
reconciliation code will expect the object to be retrieved in the v1alpha2 format.
To deploy the nginx Operator, build and push the new container image before running
make deploy:
$ export IMG=docker.io/mdame/nginx-operator:v0.0.2
$ make docker-build docker-push
$ make deploy
204
Preparing for Ongoing Maintenance of Your Operator
Next, create a simple NginxOperator object. To demonstrate the API conversion, create
it as the v1alpha1 version and use the old port field:
sample-cr.yaml:
apiVersion: operator.example.com/v1alpha1
kind: NginxOperator
metadata:
name: cluster
namespace: nginx-operator-system
spec:
replicas: 1
port: 8080
Next, create the custom resource object with kubectl:
$ kubectl apply -f sample-cr.yaml
Now, using kubectl get to view the object will show it as v1alpha2 because it was
automatically converted and stored as this version:
$ kubectl get -o yaml nginxoperators/cluster -n nginx-operatorsystem
apiVersion: operator.example.com/v1alpha2
kind: NginxOperator
metadata:
...
name: cluster
namespace: nginx-operator-system
resourceVersion: "9032"
uid: c22f6e2f-58a5-4b27-be6e-90fd231833e2
spec:
ports:
- containerPort: 8080
protocol: TCP
replicas: 1
...
Releasing new versions of your Operator
205
You can choose to specifically view the object as v1alpha1 with the following command,
which will instruct the API server to call the Operator's webhook and convert it back
using the functions we wrote:
$ kubectl get -o yaml nginxoperators.v1alpha1.operator.example.
com/cluster -n nginx-operator-system
apiVersion: operator.example.com/v1alpha1
kind: NginxOperator
metadata:
name: cluster
namespace: nginx-operator-system
resourceVersion: "9032"
uid: c22f6e2f-58a5-4b27-be6e-90fd231833e2
spec:
port: 8080
replicas: 1
What this means for your users is that they can continue using the existing API, which
allows valuable transition time while you introduce a new version. Note that if they are
already using the Operator, and you introduce a new storage version, they may need to
use kube-storage-version-migrator (https://github.com/kubernetes-sigs/
kube-storage-version-migrator) to migrate the existing storage version to the
new one. You can provide migration files for them (or even automate it into the Operator,
as migrations are simply Kubernetes resources) to make this easier.
With a new API version introduced and conversion handled, your Operator is now ready
to be packaged into a new bundle so that deployment can be managed by the OLM. This
means updating your Operator's CSV to a new version.
206
Preparing for Ongoing Maintenance of Your Operator
Updating the Operator CSV version
Updating the version of the Operator in its CSV provides information to the OLM,
OperatorHub, and users about which version of the Operator they are running. It also
instructs the OLM on which versions replace other versions for in-cluster upgrades.
This allows developers to define specific upgrade channels (such as alpha and beta),
which are similar to the versioning channels in other software projects that allow users
to subscribe to a different release cadence. The Operator SDK documentation goes into
technical detail about this process on GitHub, but it is not necessary to understand these
details for completing this section (https://github.com/operator-framework/
operator-lifecycle-manager/blob/b43ecc4/doc/design/how-toupdate-operators.md). In this section, however, we will cover the simple task of
updating the CSV version in a single channel.
The first step toward bumping the Operator's CSV version is updating the version that will
be replaced with the current version. In other words, v0.0.2 will replace v0.0.1, so the
v0.0.2 CSV must indicate that it is replacing v0.0.1.
This is done by modifying the base CSV in config/manifests/bases to add a
replaces field under its spec, as shown in the following example:
config/manifests/bases/nginx-operator.clusterserviceversion.yaml:
apiVersion: operators.coreos.com/v1alpha1
kind: ClusterServiceVersion
metadata:
annotations:
alm-examples: '[]'
capabilities: Basic Install
name: nginx-operator.v0.0.0
namespace: placeholder
spec:
...
replaces: nginx-operator.v0.0.1
Releasing new versions of your Operator
207
Next, update the VERSION variable in the project's Makefile (you can also export this
variable to the new version in your shell similar to the other environment variables we
have used from this file, but updating it manually clearly indicates the version and ensures
that the right version will be propagated when built on any machine):
Makefile:
# VERSION defines the project version for the bundle.
# Update this value when you upgrade the version of your
project.
# To re-generate a bundle for another specific version without
changing the standard setup, you can:
# - use the VERSION as arg of the bundle target (e.g make
bundle VERSION=0.0.2)
# - use environment variables to overwrite this value (e.g
export VERSION=0.0.2)
VERSION ?= 0.0.2
Now, the new CSV can be built as part of the regular make bundle command from
Chapter 7, Installing and Running Operators with the Operator Lifecycle Manager:
$ make bundle IMG=docker.io/sample/nginx-operator:v0.0.2
This updates the version of the Operator listed in bundle/manifests/nginxoperator.clusterserviceversion.yaml (which is the main CSV packaged
into the Operator's bundle). If you followed the steps from the previous section to add
a new API version, it also adds information about that new version (and the conversion
webhook) to the CSV and the sample CRD packaged along with the bundle. In addition,
it will generate a new Service manifest in the bundle that exposes the conversion endpoint
for the two API versions.
The bundle image can then be built, pushed, and run with the OLM just like before:
$ export BUNDLE_IMG=docker.io/sample/nginx-bundle:v0.0.2
$ make bundle-build bundle-push
$ operator-sdk run bundle docker.io/same/nginx-bundle:v0.0.2
With a new bundle image built and working, the only step remaining in releasing your
new version is to publish it on OperatorHub for users to find.
208
Preparing for Ongoing Maintenance of Your Operator
Releasing a new version on OperatorHub
With a new version of your Operator, the bundle that is published to OperatorHub also
needs to be updated (if you have chosen to release your Operator on OperatorHub).
Thankfully, this process is not too complex. In fact, it is essentially the same as releasing
your initial version (as in Chapter 7, Installing and Running Operators with the Operator
Lifecycle Manager), wherein you created a folder with your Operator's bundle and
submitted that folder as a pull request to the community Operators repository on GitHub
(https://github.com/k8s-operatorhub/community-operators).
To release a new version of your Operator, simply create a new folder under your
Operator's directory in the community Operators project named after the version number.
For example, if the first version was nginx-operator/0.0.1, this version would be
nginx-operator/0.0.2.
Then, just like with your first version, simply copy the contents of your Operator's
bundle directory (after generating the new bundle version) into the new version folder.
Commit and push the changes to your fork of the GitHub repository and open a new pull
request against the main repository with the changes.
When your pull request passes the automated checks, it should merge, and the new
version of your Operator should be visible on OperatorHub soon after.
Figure 8.1 – Screenshot of version and channel listing on OperatorHub for the Grafana Operator
Planning for deprecation and backward compatibility
209
Now, you have finished releasing a new version of your Operator. By introducing a new
API, ensuring that the new API is convertible between existing versions, updating your
Operator's bundle, and publishing that updated bundle on OperatorHub, you should
now announce to your users that the new version of your Operator is available. In the
next sections, we'll discuss ways to ensure that future releases continue to go smoothly
by planning ahead to minimize breaking API changes that require new versions and
following the Kubernetes standards for making new changes.
Planning for deprecation and backward
compatibility
In the previous section, we discussed the work needed to release a new version of an
Operator. While the processes for bundling and publishing a new version are relatively
simple in terms of the effort required, implementing a new API version is not an
insignificant task. As such, doing so should be done only as necessary in order to
minimize the use of engineering resources and disruption to users.
Of course, it will occasionally be unavoidable that incompatible changes must be
introduced, for example, in the case of deprecation. Some of this deprecation might even
come from upstream, where it is beyond your direct control (see the Complying with
Kubernetes standards for changes section). However, the frequency of such changes can
often be controlled through careful planning. In this section, we'll discuss some ways to
plan for deprecation and support backward compatibility without causing undue strain on
your engineers or users.
Revisiting Operator design
In Chapter 2, Understanding How Operators Interact with Kubernetes, the Planning for
changes in your Operator section discussed, in general terms, various design approaches
that establish good practices for outlining an Operator's design for future evolution. These
suggested guidelines (which could, in reality, be applied to many software projects) were
to start small, iterate effectively, and deprecate gracefully.
Now, having gone through the steps of building an Operator from scratch in the form of
our nginx Operator, it will be helpful to revisit these guidelines and examine how they
were specifically applied to our own design.
210
Preparing for Ongoing Maintenance of Your Operator
Starting small
The nginx Operator design started out very simple. The Operator was intended to serve a
very basic function: manage the deployment of an nginx Pod. For configuration options,
it exposed three fields to control the container port on the Pod, the number of replicas
to deploy, and an extra field to trigger a forced redeployment. As a minimum viable
product (MVP), this served well to get our Operator off the ground. While this design
was intentionally kept minimal for the purpose of a reasonably sized demonstration, it
still shows the mindset that keeps Operator CRDs from starting out with too many knobs
exposed. Shipping excessive configuration options can be confusing to users, which then
poses potential risks to the stability of your product if users cannot fully understand what
every option does. This also adds a support burden on your own teams.
Remember that the first release of an Operator will actually likely make up a minority
of its life cycle. There will be plenty of time to add more features in future releases, but
this becomes difficult as the CRD grows in its API definition and new features dilute the
viability of existing ones. Of course, that's not to say you should never add new features
to your Operator or its CRD. But, when that time comes, it's important to do so carefully,
which is the focus of iterating effectively.
Iterating effectively
In this chapter, we introduced an API change to the Operator wherein the type of one field
was converted to an entirely different nested struct. This effectively removed the old field,
which would be a breaking change for any user who was already relying on that field (in
fact, we did technically remove the old field, but more on that in a minute). The benefit of
changes such as this needs to be weighed against the negatives, which include disruption
for your users (if applicable) and ongoing support for your own team.
In our case, we chose to move from a single int32 field (named port) to a list of
v1.ContainerPort objects (named ports). This added some complexity to the CRD
(because v1.ContainerPort contains other nested fields). However, it also shifted
our CRD to rely on a native, stable API type from upstream Kubernetes. This, along with
the added functionality of being able to configure multiple ports and added fields, offers
usability and stability benefits for users and developers of the Operator (not that int32 is
likely to be unstable, but the general idea remains).
Still, this change required the removal of the existing port field. This is what users must
ultimately react to, but that transition can be made smoother through graceful deprecation.
Complying with Kubernetes standards for changes
211
Deprecating gracefully
When adding the new ports field to our Operator's CRD, a conscious decision was made
to remove the existing single port field, and that's perfectly acceptable; in fact, keeping
it would have been unnecessarily redundant. But, the fact remains that users who were
relying on the old field would have to transition to the new one or face data loss when
their old configurations were migrated to the new ones. While that may seem small for
something such as a single integer value, the scope of degradation can clearly scale with
more complex Operators.
This is why we added a conversion webhook to the Operator, to translate the old field into
the new one automatically. But that webhook would not have been as simple to implement
if the new ports field wasn't effectively a super-set of the old field. Choosing to go
with a fairly compatible existing type made this transition much easier for developers to
implement and users to understand. Design decisions such as this greatly help to reduce
friction in a growing code base.
However, our conversion was not completely perfect. While the transition from
v1alpha1 to v1alpha2 carries over just fine, the reverse can only hold one port value
(the first from the list). This may be suitable for practical use cases, as most users would
be more likely to upgrade to the new version than downgrade to the deprecated one, but
from a support standpoint, lossy conversion like this can create headaches down the road.
There are ways to address this that are relevant to the next section, which discusses how
Kubernetes prescribes ways to smoothly implement changes.
Complying with Kubernetes standards for
changes
Kubernetes defines a standard set of policies for deprecation (and other breaking changes)
that all core projects must abide by. This policy is available at https://kubernetes.
io/docs/reference/using-api/deprecation-policy/. It's not necessary
to read and understand the whole policy for the purposes of Operator development, as
we will highlight some of the relevant bits here. It primarily defines the standards for
deprecating parts of the Kubernetes API, with many of the same (or similar) guidelines
being applied to other types of deprecation as well (such as user-facing features that
are not directly part of the API). It does this by enumerating a list of explicit rules for
deprecating changes, some of which we will cover in this section.
212
Preparing for Ongoing Maintenance of Your Operator
As a third-party component, your Operator is under no obligation to follow the
Kubernetes deprecation policy. But, in a practical sense, there are benefits to working
within the constraints of the ecosystem your Operator is built to be a part of. These
include a template provided to set expectations for your users and a set of guidelines for
planning your own ongoing development. And, even if you choose not to follow these
policies for your own Operator, it is still crucial to understand how they are enforced
upstream to be prepared for deprecations and changes beyond your control that you will
eventually inherit.
The full deprecation policy linked at the start of this section goes into specific detail for
standards that govern every applicable Kubernetes component. So, some details of the
deprecation are not directly relevant to Operator development. However, certain elements,
such as those pertaining to the support and removal of API fields, do apply to Operators
(should you choose to follow them).
Removing APIs
The Kubernetes deprecation policy is very clear on forbidding the removal of API
elements from the current API version. In fact, this is the first rule in the entire policy.
Rule #1
API elements may only be removed by incrementing the version of the API
group.
This means that it is forbidden to remove any field or object from an existing API. The
removal can only be done by introducing a new API version with that element removed.
This is relevant to our nginx Operator, where we removed the port field that was present
in v1alpha1 as we incremented the API version to v1alpha2. Following this rule
ensures that current users of an API version will not have their workflows suddenly
broken by updating to a new release. The distinction between API versions makes a clear
indication of some level of incompatibility.
Inversely, this rule allows for the addition of API elements without incrementing the
version of the existing API. This is because a new element in the current API version
will not break any existing use cases because it is as if consumers of the object are simply
leaving this field blank (as opposed to the removal of an existing field, which could result
in data loss as non-blank entries are dropped). This is directly relevant to our use case
because it provides an ability for seamless conversion.
Complying with Kubernetes standards for changes
213
API conversion
The second rule of the Kubernetes deprecation policy is as follows.
Rule #2
API objects must be able to round-trip between API versions in a given release
without information loss, with the exception of whole REST resources that do
not exist in some versions.
This means that when any two API versions exist within the same release of Kubernetes
(or, in this case, your Operator), objects of either API version must be able to convert
between the two versions while preserving all data fields.
In our nginx Operator, we did not follow this rule (because a v1alpha2 CRD object
with multiple ports defined cannot translate them all to a single port value). This is OK
because, as a third-party project, we are not beholden to the upstream Kubernetes policies.
But, from a practical standpoint, it would be useful for us and our users to support such
lossless conversions. This could be done by adding the ports field to both v1alpha2
and v1alpha1. Then, our conversion could have stored the additional ports in the new
field when converting to v1alpha1. Existing code that only knows about the v1alpha1
single port field may not be able to use these additional ports, but the important part is
that the data is preserved during conversion. Alternatively, we could have simply stored
the additional ports values as an annotation in the CRD object's metadata and read from
this during conversion.
API lifetime
How long you choose to support an API version is entirely up to your organization's
agreement with your users. The Kubernetes standards for support timelines vary based
on the stability level of that API. The three levels of stability are alpha, beta, and general
availability (GA).
In our nginx Operator, the API is currently in alpha. Technically, this means that there
is no support guarantee for any duration. However, when working toward graduating an
API to a more stable level, it is good practice to operate as if that API is already at the next
level of stability. For beta APIs, this timeline is the longer of 9 months or three releases
(see the Aligning with the Kubernetes release timeline section). APIs that are graduated to
GA cannot be removed, but they can be marked as deprecated. The intent is that an API
that is GA can be assumed stable for the lifetime of that major version of Kubernetes.
214
Preparing for Ongoing Maintenance of Your Operator
Removal, conversion, and lifetime are the three main points of the Kubernetes deprecation
policy relevant to our Operator development. There are more details in the link provided
at the top of this section. You can also follow the planned timeline for upcoming
upstream API deprecation, which is published at https://kubernetes.io/docs/
reference/using-api/deprecation-guide/, for each release.
While this section mentioned the Kubernetes release as a unit of time, we did not define
exactly how much time that is. In the next section, we will explain exactly how the
Kubernetes release breaks down and how it relates to your Operator development.
Aligning with the Kubernetes release timeline
Each new release of Kubernetes is driven by the hard work and dedication of many people
from different companies and time zones. This process for publishing a new version
of Kubernetes is, therefore, the product of an orchestration effort among component
areas and special interest groups (SIGs) to ensure timely, stable releases. While there
are occasional roadblocks and delays, the release timeline is, for the most part, a welldefined collaborative effort that strives to provide predictable updates that the Kubernetes
ecosystem of users and downstream products can depend on.
When developing an Operator, you or your organization will likely have similar organized
release efforts. You also want to provide a dependable and timely schedule for shipping
updates to your users. And, while your own release schedule may differ from the
Kubernetes timeline, there are still benefits to a keen understanding of how the upstream
release works. For example, it offers you the ability to plan around specific dates at which
a beta API will be promoted to GA, or an entirely new feature will become available that
you can leverage in your own product to pass on to your users. On the other hand, it also
outlines the remaining time that deprecated APIs have before they are removed entirely.
As a product vendor, you can rely on this timeline to guide your release planning.
For these reasons, aligning your Operator's release timeline for updates with that of
Kubernetes is a valuable effort and it's why we will explain that timeline more in this section.
Overview of a Kubernetes release
The Kubernetes release cycle is approximately 15 weeks long. As of Kubernetes 1.22, this has
defined a goal of three releases per calendar year. Of course, three 15-week releases do not
account for an entire 52-week-long year. This is because the release cycle allows for several
breaks in work, including holidays, end-of-year travel, and events or conferences such
as KubeCon. This timeline was decided on by the SIG Release team with input from the
community, and you can read more details about the decision in a blog post at https://
kubernetes.io/blog/2021/07/20/new-kubernetes-release-cadence/.
Aligning with the Kubernetes release timeline
215
During the course of a single release, there are several key dates that signal important
progress updates in that release. These include an Enhancements Freeze, Code Freeze,
deadlines for documentation updates and blog posts, and release candidate (RC)
version releases. The exact timeline for each release is posted in the SIG Release GitHub
repository at https://github.com/kubernetes/sig-release. As an example,
the Kubernetes 1.24 release cycle looked like the following, with some of these key
dates highlighted:
Figure 8.2 – Kubernetes 1.24 release cycle calendar
216
Preparing for Ongoing Maintenance of Your Operator
Each of these dates plays an important role in the progression of an individual release. In
the following sections, we'll explain what each of them means in more detail and how they
can relate to your own release cycle for your Operator. Much of this information is also
documented in the SIG Release repository at https://github.com/kubernetes/
sig-release/blob/master/releases/release_phases.md.
Start of release
Fairly self-explanatory, this is the official date that the release cycle for the next version of
Kubernetes begins. This provides a reference date from which all other steps in the cycle
can be derived. Note that this is not the same date as the previous release's publication
because of the buffer between release cycles, along with post-release processes such as
Retrospective. So, there may already be work-in-progress for the current release before
this date (see the GA release/Code Thaw subsection). However, just as any race needs a
starting line, every release needs a date to denote its official beginning.
Enhancements Freeze
New features in Kubernetes take many forms. While all changes to the platform are
valuable regardless of size, certain undertakings involve increased effort and a broadened
scope of work. Examples include significant user-facing changes or architectural designs
involving collaboration between multiple components and SIGs. Such features require
additional management to ensure their successful rollout. At this point, the feature may be
considered as an enhancement or Kubernetes Enhancement Proposal (KEP).
We have already mentioned several individual KEPs in this book. For example, in
Chapter 5, Developing an Operator – Advanced Functionality, we referred to KEP-1623, which
defined the standard Condition type for components to report their status (including our
nginx Operator). All KEPs such as this are tracked in the Kubernetes Enhancements GitHub
repository at https://github.com/kubernetes/enhancements.
The full details of the KEP process and repository are beyond the scope of this book, but
the essential knowledge is that KEPs signify wide-scale design changes that can impact
users or consumers of APIs. As the developer of an Operator, which is itself a component
that may consume one or more upstream APIs (such as the Condition field), it is then
important to be aware of the status of upcoming changes of this scale, as they may directly
affect you. Providing this information is the goal of the KEP process.
Aligning with the Kubernetes release timeline
217
During a release cycle, the Enhancements Freeze stage signifies the point at which
all proposed KEPs for that release must be either accepted and committed toward
implementing their changes or delayed for a future release. This is the critical go/no-go
date for moving forward with a KEP for that release. And, while many in-progress
KEPs are able to proceed at this point, there may be a reasonable justification why
certain changes may not be able to commit to the release by this date. In these cases, the
developers of an enhancement may request an exception during the Call for Exceptions
period, described next.
For Operator developers, the Enhancements Freeze deadline is an important date to
keep in mind during your own development cycle because, while KEPs are often used to
introduce new features to Kubernetes, part of their definition is to outline the removal
of other features (such as any that are being replaced). Being aware of any features you
depend on being officially slated for removal helps to gauge the urgency with which you
will need to react to that removal. On the other hand, knowing that a KEP missed the
deadline for Enhancements Freeze can provide assurance that any related features planned
for removal will continue to be supported for at least another release unless that plan
receives an exception.
Call for Exceptions
If, during the course of a release, a certain feature is not yet ready to commit to
Enhancement Freeze (or Code Freeze), the contributors and participating SIGs who
are working on that enhancement may request an exception to the freeze deadlines. If
approved, this allows those contributors a reasonable extension to accommodate the
additional time needed to prepare the enhancement for release.
Enhancements seeking an exception need to meet certain criteria to ensure that they do
not risk impacting the stability of the platform or delaying the release. Therefore, release
managers evaluate each exception request based on its scope, the estimated extension time
requested, and the time at which the request was submitted within the release cycle.
Exception requests and approvals are generally communicated via the participating SIG's
mailing lists, Slack channels, and the specific KEP issue discussion page on GitHub. This is
why it's important to monitor these communication channels for features your Operator
implements or depends on. Just because a new feature missed Enhancements Freeze,
that doesn't mean it won't be implemented until an exception has been officially denied.
The same goes for planned removals, in the event that an exception is granted. Knowing
whether the upstream SIG related to your Operator's function is going to request any
exceptions after Enhancements Freeze (or Code Freeze) is a good signal for what to
commit to in your Operator's development cycle.
218
Preparing for Ongoing Maintenance of Your Operator
Code Freeze
Code Freeze is the point during the release cycle at which all code changes must be
complete and merged into the Kubernetes code base (besides any features that have been
granted an exception). This signifies that no more changes will be accepted into the release
unless they are critical to the stability of the platform.
As the developer of a downstream Operator, this is relevant to your own project
timeline because it is the point at which you can begin updating your libraries to the
latest Kubernetes version with a reasonable expectation of stability. This can be done by
updating your dependencies to the latest RC version of the upstream Kubernetes libraries.
The first RC for a new release is usually published soon after the Code Freeze date. This
timing allows developers to update dependencies with additional soak time to catch any
additional updates or reactions that need to be made in order to function with the new
version of Kubernetes before it is finally released. It is very beneficial to take advantage
of this timing to minimize the delay between publishing your updated Operator after
the Kubernetes version release. Due to the size and fluctuating nature of Kubernetes, it's
recommended to upgrade any upstream dependencies regularly. Failure to do so is likely
to result in snowballing technical debt and eventual lack of compatibility with newer
versions of the platform.
Test Freeze
While Code Freeze defines a strict deadline for enhancements to have their
implementations completely merged, Test Freeze allows an additional buffer to expand
test coverage. This provides an opportunity to improve test cases once a feature has
merged before release. After this date, the only changes allowed to any tests are to fix or
remove tests that are consistently failing. This date may not have a consistent impact on
your own release cycle, but it is a good signal to be aware of when monitoring the progress
of a key enhancement.
Aligning with the Kubernetes release timeline
219
GA release/Code Thaw
At last, the moment everyone has been waiting for. If there are a few problems discovered
during the release that cause a delay, this is the date that Kubernetes releases its newest
version. For developers, this means that the code in Kubernetes (at https://github.
com/kubernetes/kubernetes) is updated with a new Git tag, which allows the
opportunity to easily reference the release point at a definitive point in code (for example,
when updating your Operator's dependencies in its go.mod file). In addition, the
client libraries that support Kubernetes and its subprojects are also updated, including
the following:
• https://github.com/kubernetes/api – Core API types used by the
Kubernetes platform (imported as k8s.io/api)
• https://github.com/kubernetes/apimachinery – The library
used to implement the encoding and decoding of API types in code (k8s.io/
apimachinery)
• https://github.com/kubernetes/client-go – The Go client
used by Operators and other programs to interact with Kubernetes resources
programmatically (k8s.io/client-go)
These are just a few of the additional dependencies that, on GA release day, will be
updated with a new Git tag. These dependencies are actually part of the core Kubernetes
repository (k8s.io/kubernetes), but they are synced to symbolic canonical locations
by an automated bot for better dependency management. This can sometimes cause a
slight delay between core Kubernetes releasing its tag and the libraries updating with their
own (which are usually more important to developers).
Kubernetes as a Dependency
The core Kubernetes repository at k8s.io/kubernetes (or https://
github.com/kubernetes/kubernetes) contains all of the code
needed by the core platform components. So, it may be tempting to import
code from here directly. However, due to its complexity, it is not recommended
to import code from k8s.io/kubernetes directly into your project as it
can cause dependency issues that are difficult to resolve with Go modules and
bring excess transitive dependencies into your project. Instead, it is best to rely
on the component libraries (such as those listed previously), which are meant
to be imported into outside projects.
220
Preparing for Ongoing Maintenance of Your Operator
After the new release is officially published, the Kubernetes project enters Code Thaw,
which, as its name implies, is the opposite of Code Freeze. This means that code
development for the next release can begin merging into the main branch of Kubernetes.
So, working with code from the master (or main) branch at any point after this really
means you are interacting with the N+1 version code (where N is the current version
of Kubernetes).
Retrospective
When the dust has settled, the SIG Release team takes time to review the release during
Retrospective. The intent of Retrospective is to meet and discuss any roadblocks or
concerns that occurred during that release and propose solutions to address them in the
future. In addition, any exceptional successes are identified and praised. It is meant as
a blameless process through which the end goal is simply to reduce friction for future
releases. While the specific details of the Retrospective may not be directly relevant to the
development of your Operator (the focus is generally more on the release infrastructure
and processes that drive the release rather than specific feature changes), it can be a very
informative way to be aware of future changes to the release cycle.
All of the above dates form the most important signals in the Kubernetes release cycle.
Being aware of them can help inform your team about the status of the current features
you depend on, and that information can be passed on in the form of the commitments
you make to your users. Staying up to date with the latest Kubernetes releases is critical
to avoid tiresome technical debt from piling up, as the Kubernetes project is constantly
evolving within the support constraints it offers.
In addition, knowing where you are in the current release cycle also provides the
opportunity to contribute to Kubernetes at meaningful times. In the next section, we will
discuss ways you can do this and how it can benefit you.
Working with the Kubernetes community
This chapter focused heavily on the standards, policies, and timelines of Kubernetes as
they relate to Operator development. While it might seem that these are fixed, prescriptive
decrees, the reality is that they are fluid frameworks for development created through an
open and fair process. This process is organized by contributors from different companies
all over the world, and it is always open to new voices.
Summary
221
As a developer for the Kubernetes platform, you have inherent stock in the community
that organizes Kubernetes upstream. Therefore, improvements or concerns that affect you
are likely to affect others as well. This is why it's not only OK but encouraged that you play
an active role in upstream development alongside your own Operator. If nothing else,
doing so serves to benefit your own development, as the open process allows you to help
steer upstream work as you feel it should be done.
Getting involved is as simple as sending a message or joining a video call. The various
GitHub repositories and Slack channels shown in other chapters for support are a great
place to offer support yourself. The Kubernetes Slack server is slack.k8s.io, and
it is free to join and contribute. You may also want to follow the various SIG meetings
for topics of interest, all of which are listed on the Kubernetes Community repository at
https://github.com/kubernetes/community. This repository includes links
and schedules for all SIG and community meetings.
Summary
Once, in an interview, champion football quarterback Tom Brady was asked which of his
championship rings was his favorite, to which he replied, "The next one." Coming from
a person who many already considered to be one of the most successful in his field, that
response showed powerful commitment to a continuous pursuit of achievement (if not
a little tongue-in-cheek hubris). As software developers, that same passion is what drives
the never-ending cycle of improvement with every new release.
This chapter was about the part of the Operator development cycle that is even more
important than the first release: the next one. Releasing new software versions is not
something that is exclusive to Operators, but the idiomatic processes and upstream
Kubernetes standards do create a unique set of requirements for Operator projects. By
exploring the technical steps necessary to create and publish a new version, alongside the
more abstract policies and timelines that dictate guidelines for doing so, we have ensured
that you are aware of a few suggestions for how to keep your Operator running for many
releases to come.
This concludes the technical tutorial section of this book. While there are many topics and
details that, unfortunately, did not fit within the scope of these chapters, we have explained
all of the foundational concepts to build an Operator following the Operator Framework.
In the next chapter, we'll summarize these concepts in an FAQ-style format to quickly
refresh what was covered.
9
Diving into FAQs and
Future Trends
The Operator Framework covers a lot of different topics, many of which have been
discussed in this book. In this chapter, we will not discuss any new topics. Rather, we will
revisit all of the main points that have been covered since the start of the book in short,
digestible FAQ-style headings. It is the intent of these FAQs to provide a brief reference
and refresher to everything that was covered during the course of this book. This should
be a good, quick reminder of various topics in the event you are studying for an interview,
certification exam, or just trying to remember an overview of a certain point that was
made. The outline for these FAQs will fall under the following sections:
• FAQs about the Operator Framework
• FAQs about Operator design, CustomResourceDefinitions (CRDs), and APIs
• FAQs about the Operator SDK and coding controller logic
• FAQs about OperatorHub and the Operator Lifecycle Manager
• Future trends in the Operator Framework
These sections are roughly in the order that they appeared in the book, so reading this
chapter in order will jog your memory and solidify your understanding of the topics as
they were originally presented.
224
Diving into FAQs and Future Trends
FAQs about the Operator Framework
These topics include an overview of the Operator Framework, its basic components,
and the general vocabulary of Operator design. The topics from this section are from
Chapter 1, Introducing the Operator Framework.
What is an Operator?
An Operator is a type of Kubernetes controller. Operators are designed to automate
the management of Kubernetes applications and cluster components. They do this by
continuously working to reconcile the current state of the cluster with the desired state, as
defined by a user or administrator.
What benefit do Operators provide to a Kubernetes
cluster?
Operators provide an idiomatic way for developers to encode automated cluster and
application management logic into a controller. Operators also offer ways to expose the
settings for this automation to non-developer users (for example, cluster administrators or
customers). This automation frees up engineering and DevOps resources for many tasks.
How are Operators different from other Kubernetes
controllers?
Operators are very similar to any other Kubernetes controller. Some examples of built-in
controllers in Kubernetes include the scheduler, the API server, and the controller
manager (which itself manages other controllers). These native controllers all handle
the automated execution of core cluster functionality, such as placing Pods onto Nodes
and maintaining Deployment replica counts. This is all part of the continuous state
reconciliation pattern that Operators also exhibit.
However, while they are functionally similar, Operators are defined by conceptual and
semantic conventions that differentiate them from standard controllers. These include
the development libraries, tools, deployment methods, and distribution channels that
comprise the Operator Framework.
FAQs about the Operator Framework
225
What is the Operator Framework?
The Operator Framework is a set of development and deployment tools and patterns
that define and support the standard processes for building an Operator. In broad terms,
these include code libraries and scaffolding tools (the Operator SDK), a component for
installing, running, and upgrading Operators (the Operator Lifecycle Manager (OLM)),
and a centralized index for distributing Operators among the Kubernetes community
(OperatorHub).
What is an Operand?
An Operand is the component or resources that are managed by an Operator.
What are the main components of the Operator
Framework?
The main components of the Operator Framework are as follows:
• The Operator SDK – A set of common libraries and command-line tools for
building an Operator from scratch. This includes wrappers for tools such as
Kubebuilder, which are designed for generating code used in Kubernetes controllers.
• The OLM – A component designed to install, run, and upgrade (or downgrade)
Operators in a Kubernetes cluster. Operator developers write (or generate) files
that describe the Operator's relevant metadata in a way that the OLM can automate
the Operator's deployment. The OLM also serves as an in-cluster catalog of
installed Operators and can ensure that there are no conflicting APIs between
installed Operators.
• OperatorHub – A centralized index of freely available Operators backed by an
open source GitHub repository. Developers can submit Operators to https://
operatorhub.io/ for them to be indexed and searchable by users.
Now, let's talk about programming languages Operators can be written in.
226
Diving into FAQs and Future Trends
What programming languages can Operators be
written in?
Technically, an Operator can be written in any language that supports the necessary clients
and API calls needed in order to interact with a Kubernetes cluster. But, the Operator
SDK supports writing Operators in Go or building with tools such as Helm or Ansible.
Helm and Ansible Operators are fairly straightforward to generate with the operatorsdk command-line tool, but these Operators are ultimately limited in their capability. In
this book, we covered the code needed to write an Operator in Go, which offers far more
functionality as defined by the Operator Capability Model.
What is the Operator Capability Model?
The Capability Model is a rubric for measuring the functionality an Operator provides and
informing users of that functionality level. It defines five incremental levels of functionality:
1. Level I – Basic Install: Operators that are able to install an Operand, exposing
configuration options for that installation if applicable
2. Level II – Seamless Upgrades: Operators that can upgrade themselves and their
Operand without disrupting function
3. Level III – Full Lifecycle: Operators that can handle creation and/or restoration
of Operand backups, failover scenarios for failure recovery, more complex
configuration options, and scale Operands automatically
4. Level IV – Deep Insights: Operators that report metrics on themselves or their
Operand
5. Level V – Auto Pilot: Operators that handle complex automated tasks including
auto-scaling (creating more replicas of an Operand or deleting replicas, as needed),
auto-healing (detecting and recovering from failure scenarios without intervention
based on automated reporting such as metrics or alerts), auto-tuning (reallocating
Operand Pods to better-suited Nodes), or abnormality detection (detecting when
Operand performance does not align with usual application health)
These were some of the most fundamental topics covered in the first chapter. The next
sections in this book built upon these to dive deeper into Operator design concepts.
FAQs about Operator design, CRDs, and APIs
227
FAQs about Operator design, CRDs, and APIs
These questions cover information about an Operator's design, including approaches to
developing an Operator and how Operators can function within a Kubernetes cluster.
The topics in this section were introduced in Chapter 2, Understanding How Operators
Interact with Kubernetes, and Chapter 3, Designing an Operator – CRD, API, and
Target Reconciliation.
How does an Operator interact with Kubernetes?
Operators interact with Kubernetes through event-triggered continuous monitoring
of the cluster's state, wherein the Operator attempts to reconcile the current state with
the desired state as specified by a user. From a technical standpoint, it does so through
a standard set of Kubernetes client libraries that allow it to list, get, watch, create, and
update Kubernetes resources.
What cluster resources does an Operator act on?
An Operator can act on any resource that is accessible through the Kubernetes API (and
that the Operator has cluster permissions to access). This includes native Kubernetes
resources (such as Pods, ReplicaSets, Deployments, Volumes, and Services) and custom
resources (CRs) provided by third-party APIs or CRDs.
What is a CRD?
A CRD is a native Kubernetes API type that allows developers to extend the Kubernetes
API with CR types that look and behave exactly like native Kubernetes API resources.
Operator developers can create a CRD that defines their Operator's API type (for example,
customresourcedefinitions/MyOperator) and this CRD then provides
the template for creating CR objects that fit the definition of that type (for example,
MyOperators/foo).
How is a CRD different from a CR object?
A CR object is the individual representation of an object that is based on the CRD
template. In programming terms, it is the difference between an abstract type and
an object instantiation of that type. CR objects are the API objects that users interact
with to set Operator settings, for example with commands such as kubectl get
MyOperators/foo.
228
Diving into FAQs and Future Trends
What Kubernetes namespaces do Operators run
within?
Operators can either be namespaced or cluster-scoped. Namespaced Operators
run within an individual namespace, which allows multiple copies of the same Operator to
be installed in a cluster. Cluster-scoped Operators run at the cluster-wide level, managing
resources in multiple namespaces. The scope of an Operator is largely determined by the
namespace scope defined in its CRD and the role-based access control (RBAC) policies
assigned to the Operator's service.
How do users interact with an Operator?
Users first interact with an Operator by installing it. This can be either from an index such
as OperatorHub or by installing directly from your organization's website or GitHub page.
Operators can usually be installed with a single kubectl create command, especially
when installed via the OLM.
Once installed, users will mainly interact with an Operator by creating a CR object that is
a representation of its CRD. This CR object will expose API fields designed for tweaking
the various settings associated with the Operator.
How can you plan for changes early in an Operator's
lifecycle?
As with many software projects, thoughtful design allows for much easier growth as the
project evolves. In the context of Operators, this means thinking early on about how the
Operator (and more importantly, its Operand) may change over time. Upstream APIs and
third-party dependencies may have support cycles that differ from your organization's
own, so minimizing exposure to these dependencies can be very beneficial in reducing
the work required later on. To this end, it can be helpful to start small with an Operator's
design and build on that functionality as needed. This is part of the idea behind the
Capability Model, with each level effectively building on the previous.
How does an Operator's API relate to its CRD?
The API that an Operator provides is the code definition of its CRD. When writing an API
with the Operator SDK in Go, that API is generated into a CRD using the tools provided
by the SDK.
FAQs about Operator design, CRDs, and APIs
229
What are the conventions for an Operator API?
Operator API conventions generally follow the same upstream Kubernetes conventions as
for native API objects. The most important of these is that the Operator object contains two
fields, spec and status, which provide the backbone for the cluster-state-reconciliation
loop that Operators run on. spec is the user input section of the Operator object, while
status reports the current functioning conditions of the Operator.
What is a structural CRD schema?
A structural CRD schema is an object definition that enforces known fields in cluster
memory. Kubernetes requires CRDs to define a structural schema, which can be generated
with tools provided by the Operator SDK. They provide security advantages and are often
complex, owing to the recommendation that they are generated rather than hand-written.
What is OpenAPI v3 validation?
OpenAPI v3 validation is a format for providing field type and format validation upon
the creation or modification of an object. Field validation is defined in the Go code
for the CRD's API types. This validation is in the form of comments (for example,
//+kubebuilder:validation…). These comments are generated into a validation
schema when the Operator CRD is generated.
What is Kubebuilder?
Kubebuilder is an open source project that provides a tool for generating Kubernetes
APIs and controllers. Many of the commands in the Operator SDK are wrappers for
underlying Kubebuilder commands. This is good to know for debugging and support
when troubleshooting Operator SDK issues.
What is a reconciliation loop?
The reconciliation loop, or control loop, is the main logic function of an Operator.
It is conceptually the continuous cycle of checks an Operator performs to ensure that
the actual cluster state matches the desired state. In reality, this is usually not done as
a continuous loop but rather as an event-triggered function call.
230
Diving into FAQs and Future Trends
What is the main function of an Operator's
reconciliation loop?
The Operator's reconciliation loop is its core logic, during which the Operator evaluates
the current state of the cluster, compares that to the desired state, and, if necessary,
performs the required actions to reconcile the state of the cluster to match the desired
state. This could mean updating a Deployment or tuning workload constraints to react to
changing states.
What are the two kinds of event triggering?
Event triggering generally falls into two categories: level-triggered and edge-triggered.
Operators are designed following the level-based triggering approach, in which a
triggering event does not contain all of the context of the cluster state. Rather, the
Operator must receive only enough information from the event to understand the relevant
cluster state itself. By rebuilding this information each time, the Operator ensures that
no state information is lost due to delays or dropped events. This is in contrast to edgetriggered events (reconciliation activated only by the incoming action of an event), which
can result in information loss and are not suitable for large distributed systems such as
Kubernetes. These terms stem from electronic circuit design.
What is a ClusterServiceVersion (CSV)?
A ClusterServiceVersion is a CRD provided by the Operator Framework
that contains metadata describing a single version of an Operator. The
ClusterServiceVersion CRD is provided by the OLM, which is the primary
consumer of Operator CSVs. OperatorHub also uses the Operator CSV to present
information to users about an Operator.
How can Operators handle upgrades and downgrades?
Operator versions are defined by their release version, image tag, and CSV metadata. The
CSV in particular provides the concept of upgrade channels, which allow a developer
to define subscription pathways for upgrade and downgrade versions. The OLM then
knows how to transition installed Operators between versions thanks to this metadata.
Operator API versions are defined in the Operator's CRD, which can contain information
about multiple versions. This allows developers to ship an Operator release that supports
multiple API versions simultaneously, enabling users to transition between versions
within a single release.
FAQs about the Operator SDK and coding controller logic
231
How can Operators report failures?
Operators have several ways to report issues. These include standard runtime logs, metrics
and telemetry, status conditions, and Kubernetes events.
What are status conditions?
Status conditions are an Operator's ability to use an upstream Kubernetes API type (v1.
Condition) that quickly informs a user about various failure (or success) states via an
Operator's status field in its CRD.
What are Kubernetes events?
Events are Kubernetes API objects that can be aggregated, monitored, and filtered by
native Kubernetes tools such as kubectl. Their definition is richer than that of status
conditions, allowing for more advanced information reporting to users.
FAQs about the Operator SDK and coding
controller logic
The topics in this section focus on the technical development of an Operator with the
Operator SDK. This includes generating an Operator project's initial boilerplate code,
filling out the code with custom reconciliation logic, and expanding that code with more
advanced features. These topics were introduced in Chapter 4, Developing an Operator
with the Operator SDK, and Chapter 5, Developing an Operator – Advanced Functionality.
What is the Operator SDK?
The Operator SDK is a software development kit that provides code libraries and tools to
quickly scaffold and build an Operator. It is mainly used through the operator-sdk
binary, which provides commands to initialize projects, create boilerplate APIs and
controllers, generate code, and build and deploy Operators in a cluster.
How can operator-sdk scaffold a boilerplate Operator
project?
The first command to create an Operator SDK project is operator-sdk init. This
command accepts additional flags to provide some project information (such as the code
repository location of the project) that will later populate variables used when creating
other aspects of the Operator (such as the API and controllers).
232
Diving into FAQs and Future Trends
What does a boilerplate Operator project contain?
A boilerplate Operator project (that is, one that has just been created with operatorsdk init and no other changes) contains only a main.go file with some basic
standard code, a Dockerfile file for building a container image, a Makefile file,
which provides more commands to build and deploy an Operator, and some additional
directories of config files and dependencies.
How can you create an API with operator-sdk?
The operator-sdk create api command initializes a template API file structure to
be filled in by the developer. It accepts additional flags to define the API version and the
Operator's resource name, and can even create the boilerplate controller for the Operator
to handle the API object.
What does a basic Operator API created with operatorsdk look like?
The empty template API created by operator-sdk create api contains a basic
definition for the Operator's config object. This object comprises upstream metadata
types (containing fields such as namespace and name) as well as two sub-objects,
representing the spec and status fields of the Operator's CRD.
What other code is generated by operator-sdk?
Along with the boilerplate template code, which is meant to be modified by the developer,
the operator-sdk command also generates deepcopy and other code that is used
by Kubernetes clients but should not be modified. Therefore, it's important to regularly
re-run the code generators provided by operator-sdk to ensure this auto-generated
code stays up to date.
What do Kubebuilder markers do?
Kubebuilder markers are specially formatted code comments placed on API object
fields, types, and packages. They define field validation settings (such as type, length,
and pattern) and other options that control the Operator's CRD generation. They allow
such options to be configured in a location that makes them very clear, right next to the
relevant code.
FAQs about the Operator SDK and coding controller logic
233
How does the Operator SDK generate Operator
resource manifests?
The Operator SDK generates the relevant resource manifests (including the Operator's
CRD, as well as other required resources such as RoleBindings) with the make
manifests command. This command is defined in the standard Makefile file in
a basic Operator project, and it invokes the controller-gen binary (part of the
Kubebuilder toolset) to do the generation.
How else can you customize generated Operator
manifests?
Generated Operator manifests can be customized beyond what is done by default with
the controller-gen tool. This program is the underlying component responsible for
much of the generated resource files, and running it manually offers access to additional
commands and flags.
What are go-bindata and go:embed?
go-bindata and go:embed are two ways to compile raw files into Go code. The former
is a package that can be imported into projects as a library, while the latter is a native Go
compiler directive. Both are useful options for making Operator-related resources (such as
an Operand Deployment YAML file) accessible in the code and readable for other users.
What is the basic structure of a control/reconciliation
loop?
For most Operators, the basic structure of a control loop follows these steps:
1. Retrieve the desired configuration of the Operator/cluster.
2. Assess the current state of the cluster, with the information available to the
Operator, and compare this to the desired configuration.
3. If needed, take action to transition the current cluster state toward the desired state.
At each of these steps, Operators should also implement error checking and status
reporting branches to report any failures to the user (for example, if the Operator is
unable to find its own configuration, it should obviously not proceed).
234
Diving into FAQs and Future Trends
How does a control loop function access Operator
config settings?
The main control loop function (Reconcile() in Operator SDK projects) accesses the
Operator's config settings through its CR object. This requires that the user has created
an instance of the CR object in the cluster (as defined by the CRD). Since CR objects are
accessible through the Kubernetes API, the Operator is able to use Kubernetes clients
and functions such as Get() to retrieve its config. In the Operator SDK, these clients are
automatically populated and passed to the Reconcile() function, ready to use.
What information does a status condition report?
A v1.Condition object contains fields describing the status: type (a short name
for the status), status (a Boolean value indicating the status), and reason (a longer
description providing more information to the user). It also contains timestamp
information regarding the last transition timestamp of the status.
What are the two basic kinds of metrics?
Metrics fall into roughly two categories: service metrics and core metrics. Service metrics
are metrics that have been defined as custom for a specific component (or service),
while core metrics are common metrics published by all services (such as CPU and
memory usage).
How can metrics be collected?
Core metrics can be collected using the metrics-server component (https://
github.com/kubernetes-sigs/metrics-server). Service metrics can be
collected by any metrics aggregation tool, such as Prometheus.
What are RED metrics?
Rate, errors, and duration (RED) is an acronym describing the best practices for defining
new metrics. It is recommended that the three key kinds of metrics for a service should
include rate, errors, and duration. This means reporting the number of requests per
period, the number of failed attempts, and the latency for a request, respectively.
FAQs about OperatorHub and the OLM
235
What is leader election?
Leader election is the concept of running multiple copies of an application, with one copy
(the leader) working at a time. This provides high availability for the application because if
one replica fails, there are others ready to take its place. This concept applies to Operators,
because it may be necessary to ensure Operator uptime in a distributed system.
What are the two main strategies for leader election?
Leader election can be implemented as either leader-with-lease or leader-for-life. The
leader-with-lease approach is the default strategy for Operator SDK projects, and in it, the
current leader makes periodic attempts to renew its status. This allows leader transitions
to happen quickly, should they need to occur. In leader-for-life approaches, the leader only
relinquishes its status when it is deleted. This makes recovery slower, but more definitive.
What are health and ready checks?
Health and ready checks are watchdog endpoints that allow an application to indicate
when it is healthy (that is, running smoothly) and ready (that is, actively prepared to serve
requests). The Operator SDK provides basic health and ready checks with a boilerplate
project, but these can easily be extended to accommodate custom logic.
FAQs about OperatorHub and the OLM
These questions relate to the building, shipping, and deployment of Operators. Topics
covered include installing Operators with the OLM and submitting Operators to
OperatorHub. These topics come from Chapter 6, Building and Deploying Your Operator,
and Chapter 7, Installing and Running Operators with the Operator Lifecycle Manager.
What are the different ways to compile an Operator?
Like many cloud-native applications, an Operator can be compiled either as a local binary
or built into a container image suitable for deploying directly onto a Kubernetes cluster.
The Operator SDK provides commands to do both.
How does a basic Operator SDK project build
a container image?
The Operator SDK provides Makefile targets to build a Docker image with make
docker-build. By default, this copies the main Operator source code (specifically, the
main controller and API) along with its assets directory to the Docker image.
236
Diving into FAQs and Future Trends
How can an Operator be deployed in a Kubernetes
cluster?
Operators can be deployed manually once the Docker image has been built, similar
to how any other application is deployed in a Kubernetes cluster. The Operator SDK
simplifies this with the make deploy command. Operators can also be installed with
the OLM.
What is the OLM?
The OLM is a component provided by the Operator Framework to manage the
installation, running, and upgrade/downgrade of Operators in a cluster.
What benefit does running an Operator with the OLM
provide?
The OLM provides a convenient tool to install Operators (as opposed to methods such
as manually deploying the Operator image), as well as monitor the Operator status in a
cluster. It can ensure that an Operator does not create any conflicts with other Operators.
It can also handle upgrades and downgrades of Operators in the cluster. Finally, it makes
the list of installed Operators in the cluster available to users.
How do you install the OLM in a cluster?
The OLM can be installed with the operator-sdk binary by running operator-sdk
olm install.
What does the operator-sdk olm status command
show?
Running operator-sdk olm status (after installing OLM in the cluster) shows
the OLM's health by listing its required resources (including the CRDs it installs, its
RoleBindings, Deployment, and namespaces).
What is an Operator bundle?
A bundle is a format for packaging an Operator's manifests and ClusterServiceVersion
(CSV).
FAQs about OperatorHub and the OLM
237
How do you generate a bundle?
With the Operator SDK, a bundle can be generated by running make bundle. This
command is interactive and will ask for information about the Operator and your
organization, which will then be compiled into the Operator's metadata in the bundle.
What is a bundle image?
A bundle image is a container image that holds the information from the Operator's bundle.
The image is used to deploy an Operator in a cluster, based on the underlying metadata.
How do you build a bundle image?
A bundle image can be built with the Operator SDK by running make bundle-build.
This builds the basic Docker image that holds the bundle information.
How do you deploy a bundle with the OLM?
The operator-sdk run bundle command deploys a bundle image into a cluster
with the OLM. This command takes an additional argument, which is the location of
the bundle image in a container registry, for example, operator-sdk run bundle
docker.io/myreg/myoperator-bundle:v0.0.1.
What is OperatorHub?
OperatorHub is a centralized index of published Operators from various developers
and organizations. Its website is https://operatorhub.io. For each Operator, it
provides information about the Operator and developer as well as installation guides and
links to support resources and source code. It does this by parsing information from the
Operator's bundle (mainly from the Operator CSV).
238
Diving into FAQs and Future Trends
How do you install an Operator from OperatorHub?
Each Operator's page on OperatorHub includes a link to installation instructions. These
instructions include a series of simple commands, usually using kubectl create:
Figure 9.1 – Screenshot of OperatorHub installation instructions
How do you submit an Operator to OperatorHub?
Listing an Operator on OperatorHub involves creating a pull request (PR) to the GitHub
repository, which serves as the backend index powering OperatorHub. The requirements
include submitting a valid CSV file in a directory structure that is easily copied from the
output of the Operator SDK bundle generation commands. Automated tests check that
all requirements for submission have been met and merge the submission PR, with the
Operator being listed on https://operatorhub.io soon after.
Future trends in the Operator Framework
239
Future trends in the Operator Framework
This section refers to the future maintenance of your own Operator, as well as the
alignment with ongoing work in the upstream Kubernetes community and how that
relates to third-party Operator development. These topics are from Chapter 8, Preparing
for Ongoing Maintenance of Your Operator.
How do you release a new version of an Operator?
Releasing a new version of an Operator is mostly dependent on your organization's release
methods regarding timing and delivery infrastructure. But, the Operator Framework
provides ways to denote your Operator's version in the form of the version field in the
Operator's CSV (which is shown on OperatorHub), new API versions, and release channels.
When is it appropriate to add a new API version?
The most common time to add a new API version is when you are introducing a breaking
change to the existing API. It can also be appropriate to increase the API's version as an
indicator of its stability level (for example, promoting a v1alpha1 API to v1beta1 or
v1). It is most important to follow the support timelines you have chosen to establish (or
the Kubernetes timeline, if you have chosen to adopt those as a template) when replacing
an old API version with a new one.
How do you add a new API version?
A new API can be added with the operator-sdk create api command. This
command scaffolds the empty Go files just as when creating the Operator's initial API
in a project. Once these files are filled out with the new API types, the corresponding
generated code, CRD, and other manifests can be updated with the make generate and
make manifests commands.
What is an API conversion?
An API conversion refers to an Operator's ability to transcribe API objects between
incompatible versions of the same API. Conversion code in an Operator allows it to
support multiple versions of its API within the same release. This is usually done by
developers writing manual conversion logic to ensure that the incompatible fields between
the two APIs can translate back and forth (round-trip) without losing any data. The
biggest benefit of this is allowing users to transition from a deprecated API to a newer
version seamlessly.
240
Diving into FAQs and Future Trends
How do you convert between two versions of an API?
When designing a new API, consider how the existing information in an older version can
be accurately translated to the new version and back. Then, you can convert between two
versions of an API by implementing a conversion webhook in your Operator's code.
What is a conversion webhook?
A conversion webhook is an endpoint that is exposed in your Operator's Pod that accepts
requests from the API server to encode and decode API objects between different versions.
How do you add a conversion webhook to an
Operator?
A conversion webhook consists of two Go interfaces that must be implemented for
the API object types that are being converted. These are the Convertible and Hub
interfaces from sigs.k8s.io/controller-runtime/pkg/conversion. Most
importantly, the Convertible interface requires two functions, ConvertTo() and
ConvertFrom(), which are where a developer manually writes the logic to translate
fields between the two objects. Then, the webhook manifests that expose the relevant
endpoint can be created with the operator-sdk create webhook command. These
manifests are then enabled by uncommenting the webhook references within the project's
Kustomization files.
What is kube-storage-version-migrator?
kube-storage-version-migrator is a tool that allows Kubernetes users to manually convert
their existing stored API objects to a new API version. This can be useful to help progress
updates between Operator versions where a new API changes the storage version of the
Operator's CRD object.
How do you update an Operator's CSV?
An Operator's CSV holds information about the Operator, including its current version.
To increase the Operator's version, the CSV should first be updated to indicate the
previous version of the Operator with the replaces field. In other words, this tells tools
such as the OLM which version precedes the new version so that it can upgrade to the
right version. Then, the VERSION variable in the Operator project's Makefile should
be updated to the new version number (for example, 0.0.2). The new CSV is generated
with the make bundle and make bundle-build commands.
Future trends in the Operator Framework
241
What are upgrade channels?
Upgrade channels are a way to offer different distribution upgrade pathways. For example,
an Operator's CSV can define alpha and stable channels. Users can then choose
to subscribe to either channel to get updated versions at the cadence and stability level
they desire.
How do you publish a new version on OperatorHub?
OperatorHub hosts Operator information in bundles on GitHub. Each Operator has
its own unique directory, with every different version of that Operator as its own
subdirectory. These subdirectories each hold the bundle information (such as its CSV) for
that version.
What is the Kubernetes deprecation policy?
The Kubernetes deprecation policy defines the API version support guidelines for core
Kubernetes components. This provides downstream and third-party developers (as well as
users) with a guaranteed timeline for support based on an API's stability. It is also a good
template for other projects that are not strictly beholden to the policy but wish to align
with the upstream Kubernetes policy for consistency.
How can API elements be removed in the Kubernetes
deprecation policy?
In the Kubernetes deprecation policy, API elements can only be removed by incrementing
the API version. In other words, if an Operator is following the Kubernetes deprecation
policy, then it cannot remove a CRD field from the current API. It must, instead, create a
new API version that does not have the field.
How long are API versions generally supported?
The support timeline for an API version in the Kubernetes deprecation policy depends on
its stability level (alpha, beta, or GA). Alpha APIs have no guaranteed timeline and can be
changed at any time. Beta APIs are supported for 9 months or three releases (whichever is
longer). Graduated GA APIs cannot be removed, but they can be marked as deprecated.
242
Diving into FAQs and Future Trends
How long is the Kubernetes release cycle?
The Kubernetes release cycle for a minor version is about 15 weeks long and contains
several milestone dates, including Enhancements Freeze, Code Freeze, and Retrospective.
What is Enhancements Freeze?
Enhancements Freeze is the point during the release cycle at which Kubernetes
Enhancements (KEPs) must be implementable and committed to the release or officially
delayed to at least the next release.
What is Code Freeze?
At Code Freeze, all significant code changes must be merged into the current release or
otherwise obtain an exception for a reasonable extension.
What is Retrospective?
Retrospective is a series of meetings leading up to and following the Kubernetes release
in which community members reflect on the successful areas of the release and pinpoint
processes that can use improvement.
How do Kubernetes community standards apply to
Operator development?
Operator developers have no requirement to adhere to the Kubernetes community
standards or participate in upstream development. However, an awareness of how the
Kubernetes project functions is helpful to Operator developers because it offers guidelines
for feature support, and Operators are very often dependent on certain Kubernetes
features. These standards also provide a template for an Operator's own development
processes that can be presented to the Operator's users.
Summary
243
Summary
There are obviously too many topics to cover in a discussion about the Operator
Framework to distill them all into a single chapter of bite-sized trivia. But, to serve as
a refresher (or crash course), the goal of this chapter was to recap the most important
points that were already discussed, in a way that briefly explains them all, start to finish.
For a deeper dive into any of these topics, the chapters they originated from have been
provided as a resource. There are also any one of the many fantastic references that have
been listed throughout this book to give support and further reading on all of these topics.
In the next chapters, we will examine real-world Operators that have been developed
in the open source community. By doing so, we have the opportunity to relate each of
the previous topics to a concrete example and compare the similarities and differences
between what was done with the samples provided in this book and a real Operator.
10
Case Study for
Optional Operators
– the Prometheus
Operator
The point of this book is to introduce, discuss, and demonstrate the main processes for
developing an Operator for Kubernetes using the Operator Framework. To do this,
a sample Operator with the basic functionality of managing an nginx deployment was
built. This example was intended to serve as a tutorial on Operator development without
overwhelming the reader with excessive features or the requirement of significant
background knowledge to understand the use case. Hopefully, it has served that
purpose well.
246
Case Study for Optional Operators – the Prometheus Operator
But the simplicity of that nginx Operator might make some of the steps in the Operator
Framework seem excessive. It's also a big jump to go from learning about an example
Operator to understanding the applications of real-world use cases. So, in this chapter, we
will examine the Prometheus Operator (https://prometheus-operator.dev/),
which is used to manage individual deployments of the Prometheus monitoring service
(which was used to gather metrics from the nginx Operator earlier in the book). In this
chapter, we are calling this an optional Operator because the Operand it manages is an
application-level component and is not critical to the running of the cluster (in contrast,
the next chapter will discuss how Operators can manage core cluster-level components).
The Prometheus Operator will be discussed in the following sections:
• A real-world use case
• Operator design
• Operator distribution and development
• Updates and maintenance
Of course, while there are going to be many parallels to draw between the Prometheus
Operator and the example nginx Operator from this book (which strictly followed the
Operator Framework template), it is just as important to highlight the differences, too.
Some of these will be covered throughout the chapter to show that even within the
Operator Framework, there is no one-size-fits-all way to develop an Operator. That is the
beauty of open source software such as this: its patterns and divergences promote a broad
community of diverse projects.
A real-world use case
Prometheus (https://github.com/prometheus/prometheus) is a tool that is
used for monitoring applications and clusters by collecting metrics exported by those
applications and storing them in a time series manner. In Chapter 5, Developing an
Operator – Advanced Functionality, we implemented basic Prometheus metrics in the
nginx Operator to expose aggregate information about the total reconciliation attempts
made by the Operator. This was just one small example of the potential application
architecture designs that rely on Prometheus for monitoring.
A real-world use case
247
Prometheus overview
Along with scraping and aggregating metrics, Prometheus also defines a data model for
creating different types of metrics and implementing them in applications. This model
is instrumented via the clients provided by Prometheus in various languages, including
Ruby, Python, Java, and Go. These clients make it easy for application developers to export
metrics in a format that is compatible with the Prometheus server's API (just as we did for
the example nginx Operator).
Besides the counter metric type (which was used to sum the reconciles_total
metric in the nginx Operator), the other metric types offered by Prometheus include
Gauge, Histogram, and Summary. Each of these metrics can export additional attributes
in the form of labels to give additional dimensions to the data they report.
In addition, Prometheus allows users to search metrics using its own query language
called PromQL. The functionality of this language combined with the flexible and
broad implementation possibilities of the metrics themselves has helped Prometheus
grow to become one of the (if not the) leading metrics-gathering tools for cloud-native
applications beyond just Kubernetes.
Earlier in the book, we briefly discussed how to use Prometheus clients to create new
metrics and retrieve those metrics using PromQL (Chapter 5, Developing an Operator
– Advanced Functionality) while also building the sample Operator. These topics, while
important, do not relate much to the Prometheus Operator (regardless, they are briefly
described here for the full context of the real-world use case). The more relevant aspects
of Prometheus that the Operator addresses are the installation and configuration of
Prometheus as an Operand.
Installing and running Prometheus
In Chapter 6, Building and Deploying Your Operator, we demonstrated one way to install
Prometheus in a cluster by instrumenting the kube-prometheus library in the nginx
Operator project. The advantage of kube-prometheus is that it installs a full monitoring
stack, including components such as Grafana, but also including the Prometheus
Operator itself. But what does it mean to install Prometheus in a cluster? And what
steps do we save by using kube-prometheus (and, by extension, the Prometheus
Operator)? To answer those questions, first, let's take a step back and understand how
Prometheus works.
248
Case Study for Optional Operators – the Prometheus Operator
Central to an instance of Prometheus is the Prometheus server, which runs as a single
binary that retrieves metrics and serves them to the web UI, notification services, or
long-term storage. Similar to an Operator (or any application intended to be deployed
to Kubernetes), this binary must be compiled and packaged into a container image. As
described in the Prometheus documentation, the precompiled binary is available to
download directly (as an executable or a container image), or it can be built from source
(https://github.com/prometheus/prometheus#install). This is accessible
enough for running locally, but for deployment to a Kubernetes cluster (especially a
production one), further setup is required.
First, it is rarely acceptable to deploy a container directly into a cluster without some
form of configuration. Kubernetes objects such as Deployments wrap the container in
a managed and configurable representation that exposes options such as replica count
and rollout strategies. So, installing Prometheus in a Kubernetes cluster manually would
require defining the Kubernetes Deployment yourself.
Once it's running in a cluster, Prometheus then needs access to the applications that
are exposing metrics. This requires additional resources such as ClusterRoles and
RoleBindings to ensure the Prometheus Pod has permission to scrape metrics
from the cluster and its applications. Those RBAC permissions must be bound to the
Prometheus Pod via a ServiceAccount instance. Then, user access to the web UI
requires a Service to make that frontend reachable in a web browser. That Service can only
be exposed outside the cluster with an Ingress object.
These are already a lot of steps for an initial installation. However, managing that
installation by hand also requires constant vigilance and a schematic understanding of
each resource and its role. While certainly possible, having an Operator to handle these
resources frees up engineering time and enables better scaling by abstracting complex
manifest declarations.
However, as discussed throughout this book, many (if not most) Operators do more
than simply install their Operand. Usually, they continue to manage the life cycle of the
installed application, including allowing you to make changes to the running Operand's
configuration. The Prometheus Operator does this for Prometheus, too.
A real-world use case
249
Configuring Prometheus
As a full-featured application, Prometheus provides a rich set of configuration options
to fit different scenarios. This configuration is documented in the official Prometheus
documentation at https://prometheus.io/docs/prometheus/latest/
configuration/configuration/. Within these settings, there are two sets of
options for configuring Prometheus:
• Command-line flags: They control the settings that affect the Prometheus server
itself, such as persistent storage access and logging settings.
• The YAML config: This is passed to Prometheus via a command-line flag
(--config.file or --web.config.file) and provides declarative controls
over the behavior of Prometheus' monitoring; for example, the metrics scraping
settings.
This separation of setting types is a good design that is often employed in Kubernetes
applications, Operators, and non-Kubernetes software. It has the benefit of clearly
decoupling the runtime application settings from behavioral options, and this distinction
is evident to users. However, from an administrative perspective, this creates two separate
areas of concern that must be individually tracked.
Command-line flags
The full list of command-line flags that are available to the Prometheus binary is available
by running prometheus -h. There are a few dozen options in total, but they are
roughly organized into the following categories:
• Web
• Storage
• Rules
• Query
• Logging
Each of these categories has up to 10 (or more) individual settings controlling different
aspects of the Prometheus server. In addition, there is the --enable-feature flag,
which accepts a comma-separated list of features to enable (for example, --enablefeature=agent,exemplar-storage,expand-internal-labels,memorysnapshot-on-shutdown enables these four additional feature gates).
250
Case Study for Optional Operators – the Prometheus Operator
In a Kubernetes Deployment manifest, these flags would be controlled in the spec.
template.spec.containers.command (or .args) field. For example, a simple
Prometheus Deployment YAML with a config file passed to it and the preceding features
enabled would look similar to the following:
apiVersion: apps/v1
kind: Deployment
metadata:
name: prometheus
labels:
app: prometheus
spec:
replicas: 1
selector:
matchLabels:
app: prometheus
template:
metadata:
labels:
app: prometheus
spec:
containers:
- name: prometheus
image: docker.io/prom/prometheus:latest
command: ["prometheus"]
args:
- --config=/etc/prom/config-file.yaml
- --enable-feature=agent,exemplar-storage,expandinternal-labels,memory-snapshot-on-shutdown
Of course, the config file also needs to be mounted into the Prometheus Pod so that it can
be accessed, as shown in the following code. This shows the preceding Deployment YAML
modified to add a VolumeMount instance, which makes the config file accessible to the
Prometheus Pod as if it were a local file (the new code has been highlighted):
apiVersion: apps/v1
kind: Deployment
metadata:
A real-world use case
251
name: prometheus
labels:
app: prometheus
spec:
replicas: 1
selector:
matchLabels:
app: prometheus
template:
metadata:
labels:
app: prometheus
spec:
containers:
- name: prometheus
image: docker.io/prom/prometheus:latest
command: ["prometheus"]
args:
- --config=/etc/prom/config-file.yaml
- --enable-feature=agent,exemplar-storage,expandinternal-labels,memory-snapshot-on-shutdown
volumeMounts:
- name: prom-config
mountPath: /etc/prom
volumes:
- name: prom-config
configMap:
name: prometheus-cfg
That config file (mounted as /etc/prom/config-file.yaml) will then need to be
created as its own ConfigMap. This brings us to the second set of Prometheus options that
the config file controls.
252
Case Study for Optional Operators – the Prometheus Operator
The YAML config settings
The Prometheus YAML configuration format exposes settings that control the general
scraping (metrics-gathering) behavior of Prometheus. Among the available options are
the platform-specific Service Discovery (SD) controls for individual cloud providers,
including Azure, Amazon EC2, and Google Compute Engine instances. There are also
options to relabel the metrics, enable the remote reading and writing of metrics data, and
configure AlertManager notifications, tracing, and exemplars. Finally, the config offers
TLS and OAuth settings for secure metrics scraping.
All of these options already present complex possibilities for a Prometheus config. Even
the sample config file provided by Prometheus is almost 400 lines long! (However, it
is intended to demonstrate many different types of metric setup. For example, take a
look at https://github.com/prometheus/prometheus/blob/release2.34/config/testdata/conf.good.yml.) This can quickly seem overwhelming,
especially if you only want a simple metrics solution (as many users do). For this reason,
we will mainly focus on a basic scrape_config section in a Prometheus config file.
This is the main section of the config file that tells Prometheus where and how to find the
metrics it is interested in.
This instruction is carried out by defining a series of job instances. Each job provides
information about certain metrics targets and instructs Prometheus on how it
can discover new metrics from targets that match those criteria. For example, the
kubernetes_sd_config settings (which are relevant to scraping Kubernetes
applications: https://prometheus.io/docs/prometheus/latest/
configuration/configuration/#kubernetes_sd_config) can control
metrics gathering for Nodes, Pods, Services, Endpoints, and Ingress objects.
Summarizing the problems with manual Prometheus
This chapter is not meant to be an introduction to how to run Prometheus. Rather, the
intent of the earlier sections was to demonstrate, through specific examples, the potential
complexities that can arise when running any sophisticated application and how these
complexities multiply when that application is deployed to a platform such as Kubernetes,
which demands its own maintenance overhead, too.
In summary, the problems discovered earlier fall into a few categories, as we will
discuss next.
A real-world use case
253
Excessive platform knowledge
From the very beginning (when installing Prometheus inside a cluster), it was necessary
to know more about the platform and deployment resources than about running the
actual application itself. From ClusterRoles and RoleBindings to even just the Deployment
manifest declaration, an administrator must understand the Kubernetes installation
architecture before they can even begin to run Prometheus itself.
This is bad because it distracts from engineering time, which could be otherwise allocated.
However, it also creates an unstable environment, where this architectural knowledge is
likely only learned once (at the time of installation) and promptly forgotten, or at the very
least, not documented as well as other application-relevant resources. In the event of a
disaster, this costs precious recovery time as the knowledge must be reacquired.
Complex configuration
Once Prometheus has been installed inside a cluster, immutable server settings must
be passed via flags, and the individual metrics scraping jobs must be configured within
a YAML file. For both of these steps, the vast number of available settings and flexible
options for each setting present complex overall configurations. For metrics jobs, this
complexity can potentially grow over time as more services are added to the cluster with
metrics that must be gathered. This configuration must be maintained, and any changes
need to be done with care to ensure they are rolled out effectively.
Restarts are required to enable changes
Speaking of changes, neither command-line flags nor config file settings take effect
immediately. The Prometheus application must be restarted to notice the changes. This
is not a big problem with changes to command-line flags, as doing so obviously requires
the current running replica to stop (and, usually, making changes to a Kubernetes
Deployment manifest will trigger a new replica with those changes anyway).
But it is less obvious for config file settings, which can lead to frustrating confusion as
it might appear as though the changes are not taking effect. This might seem like a silly
mistake, but it is one that is far too easy to make to consider risking it in a production
environment. Even worse, it can lead to frustrated users making multiple changes at
once before the mistake is realized, causing the new Deployment to pick up multiple
unintended changes at once when it is finally restarted.
254
Case Study for Optional Operators – the Prometheus Operator
These are just a few simple examples of the problems that can be encountered when
running applications without Operators. In the next section, we'll look more in detail
at how the Prometheus Operator specifically approaches these issues with the goal of
presenting an abstractable set of solutions that can be considered when building your own
Operator for your application.
Operator design
The Prometheus Operator is designed to alleviate the issues mentioned earlier in regard
to the complexity involved with running an instance of Prometheus in a Kubernetes
cluster. It does so by abstracting the various configuration options that are available for
Prometheus into CustomResourceDefinitions (CRDs), which are reconciled by the
Operator's controllers to maintain that the cluster's Prometheus installation is consistent
with the desired state, whatever that might be (and however it might change).
Of course, in contrast to the example nginx Operator from earlier tutorials, the
Prometheus Operator manages a far more complex application with many more possible
states that it must be able to reconcile. But the general approach is still the same, so we
can evaluate this Operator through the lens of the same development steps that have been
shown throughout this book.
CRDs and APIs
As discussed many times already, CRDs are the main objects upon which many Operators
are built. This is because they allow developers to define custom API types that can be
consumed by the Operator. Usually, this is how the user interacts with the Operator,
setting their desired cluster state through the CRD that pertains to their Operator.
While this book has mainly focused on the concept of an Operator providing only
a single configuration CRD (in the examples, this was just the NginxOperators
object), the reality is that Operators can provide multiple different CRDs depending
on their functionality. This is what the Prometheus Operator does. In fact, it provides
eight different CRDs (which are described in detail at https://github.com/
prometheus-operator/prometheus-operator/blob/v0.55.1/
Documentation/design.md). The full list of available CRDs it provides defines the
following object types:
• Prometheus
• Alertmanager
• ThanosRuler
Operator design
255
• ServiceMonitor
• PodMonitor
• Probe
• PrometheusRule
• AlertmanagerConfig
We will discuss some of these object types in more detail next. In general, the purposes of
these CRDs can be roughly broken down into a few categories:
• Operand deployment management
• Monitoring configuration settings
• Additional config objects
In order to keep the context of this chapter focused, we will only dive deeper into the first
two groups of CRDs, as listed earlier. (The third, which is, here, referred to as additional
config objects, includes the Probe, PrometheusRule, and AlertmanagerConfig
types, which go into advanced monitoring settings that are beyond the scope of
understanding Operator use cases.)
Operand deployment management
The first three CRDs, Prometheus, Alertmanager, and ThanosRuler, allow
users to control the settings for Operand deployments. For comparison, our example
NginxOperator CRD controlled the Kubernetes Deployment for an instance of
nginx, exposing options such as port and replicas, which directly affected how that
Deployment was configured. These Prometheus Operator CRDs serve the same purpose,
just for three different types of Operand deployments. (Technically, the Prometheus
Operator runs these Operands as StatefulSets, which is another type of Kubernetes object,
not Deployments, but the same principles apply.)
256
Case Study for Optional Operators – the Prometheus Operator
These Operand-related CRDs are defined in the Operator's code at pkg/apis/
monitoring/v1/types.go (note that the pkg/api/<version> pattern is similar to
the one used in our Operator SDK code path). Talking specifically about the Prometheus
object's top-level definition, it is exactly the same as our NginxOperator CRD:
prometheus-operator/pkg/apis/monitoring/v1/types.go:
type Prometheus struct {
metav1.TypeMeta
`json:",inline"`
metav1.ObjectMeta `json:"metadata,omitempty"`
Spec PrometheusSpec `json:"spec"`
Status *PrometheusStatus `json:"status,omitempty"`
}
With just the TypeMeta, ObjectMeta, Spec, and Status fields, this definition seems
very straightforward. However, looking more closely at the PrometheusSpec object, the
number of configuration options available becomes more evident:
prometheus-operator/pkg/apis/monitoring/v1/types.go:
type PrometheusSpec struct {
CommonPrometheusFields `json:",inline"`
Retention string `json:"retention,omitempty"`
DisableCompaction bool
WALCompression *bool
Rules Rules
PrometheusRulesExcludedFromEnforce []
PrometheusRuleExcludeConfig
Query *QuerySpec
RuleSelector *metav1.LabelSelector
RuleNamespaceSelector *metav1.LabelSelector
Alerting *AlertingSpec
RemoteRead []RemoteReadSpec
AdditionalAlertRelabelConfigs *v1.SecretKeySelector
AdditionalAlertManagerConfigs *v1.SecretKeySelector
Thanos *ThanosSpec
QueryLogFile string
Operator design
257
AllowOverlappingBlocks bool
}
For the purposes of this chapter, it's not necessary to know what each option does. But the
myriad of fields demonstrates how much an Operator's CRD can grow, emphasizing the
need for careful management of an Operator's API. The list of available options goes even
deeper with the embedded CommonPrometheusFields type, which offers controls
over the number of replicas of Prometheus to run, the ServiceAccount settings for the
Operand Pods, and a number of other settings related to the Prometheus deployment.
However, from a user's perspective, the Prometheus custom resource object they create
in the cluster could look much simpler. This is because all of the fields in its type definition
are marked with the omitempty JSON tag (for clarity, they were removed from all of
the fields in the preceding code block except one). This denotes the fields as optional in
the Kubebuilder CRD generator and does not print them if they are not set. Therefore, an
example Prometheus object could be as simple as the following one:
apiVersion: monitoring.coreos.com/v1
kind: Prometheus
metadata:
name: sample
spec:
replicas: 2
Altogether, the Prometheus CRD offers a single spot for controlling some of the settings
from either category, as discussed in the Configuring Prometheus section. That is, it
exposes both command-line flag options and config file options in a single spot (along
with Kubernetes-specific Deployment settings such as the replica count). It takes another
step to disentangle some of these settings with the CRDs that control the monitoring
options, which we will discuss next.
Monitoring configuration settings
While the Prometheus CRD allows users to configure the settings of the Prometheus
metrics service itself, the ServiceMonitor and PodMonitor CRDs effectively
translate to the Prometheus job config YAML settings, as described in the Configuring
Prometheus section. In this section, we'll discuss how ServiceMonitor works to
configure Prometheus to scrape metrics from specific Services (the same basic ideas apply
to PodMonitor, which scrapes metrics from Pods directly).
258
Case Study for Optional Operators – the Prometheus Operator
To demonstrate this translation, the following ServiceMonitor object will be used
to make the Prometheus Operator configure Prometheus so that it scrapes metrics from
Service endpoints that are labeled with the serviceLabel: webapp labels:
apiVersion: monitoring.coreos.com/v1
kind: ServiceMonitor
metadata:
name: web-service-monitor
labels:
app: web
spec:
selector:
matchLabels:
serviceLabel: webapp
endpoints:
- port: http
More specifically, this object is broken down into two sections that are common to most
Kubernetes objects: metadata and spec. Each serves an important role:
• The metadata field defines the labels that describe this ServiceMonitor object.
These labels must be passed to the Prometheus Operator (in a Prometheus object,
as described in the Operand deployment management section) to inform it about
which ServiceMonitor objects the Operator should watch.
• The spec field defines a selector field, which specifies which application
Services to scrape for metrics based on the labels on those Services. Here,
Prometheus will ultimately know to scrape application metrics from Services
labeled with serviceLabel: webapp. It will collect those metrics by querying
the named http port on the Endpoints of each Service.
To gather this service discovery information (and, eventually, process it inside a
Prometheus YAML configuration), the Prometheus Operator must be set up to watch
ServiceMonitors with the app: web label. To do this, a Prometheus CRD object
can be created similar to the following:
apiVersion: monitoring.coreos.com/v1
kind: Prometheus
metadata:
name: prometheus
spec:
Operator design
259
serviceAccountName: prometheus
serviceMonitorSelector:
matchLabels:
app: web
With this Prometheus object, the Prometheus Operator watches for instances of these
ServiceMonitor objects and automatically generates the equivalent Prometheus
YAML config. For the earlier ServiceMonitor object, that Prometheus configuration
file looks similar to the following (note that this code is only shown here as an example to
emphasize the complexity of a Prometheus config, and it is not necessary to understand it
in depth):
global:
evaluation_interval: 30s
scrape_interval: 30s
external_labels:
prometheus: default/prometheus
prometheus_replica: $(POD_NAME)
scrape_configs:
- job_name: serviceMonitor/default/web-service-monitor/0
honor_labels: false
kubernetes_sd_configs:
- role: endpoints
namespaces:
names:
- default
relabel_configs:
- source_labels:
- job
target_label: __tmp_prometheus_job_name
- action: keep
source_labels:
- __meta_kubernetes_service_label_serviceLabel
- __meta_kubernetes_service_labelpresent_serviceLabel
regex: (webapp);true
- action: keep
source_labels:
- __meta_kubernetes_endpoint_port_name
260
Case Study for Optional Operators – the Prometheus Operator
-
-
-
-
-
-
-
-
regex: http
source_labels:
- __meta_kubernetes_endpoint_address_target_kind
- __meta_kubernetes_endpoint_address_target_name
separator: ;
regex: Node;(.*)
replacement: ${1}
target_label: node
source_labels:
- __meta_kubernetes_endpoint_address_target_kind
- __meta_kubernetes_endpoint_address_target_name
separator: ;
regex: Pod;(.*)
replacement: ${1}
target_label: pod
source_labels:
- __meta_kubernetes_namespace
target_label: namespace
source_labels:
- __meta_kubernetes_service_name
target_label: service
source_labels:
- __meta_kubernetes_pod_name
target_label: pod
source_labels:
- __meta_kubernetes_pod_container_name
target_label: container
source_labels:
- __meta_kubernetes_service_name
target_label: job
replacement: ${1}
target_label: endpoint
replacement: http
source_labels:
- __address__
target_label: __tmp_hash
Operator design
261
modulus: 1
action: hashmod
- source_labels:
- __tmp_hash
regex: $(SHARD)
action: keep
metric_relabel_configs: []
Of course, this full YAML config is very long, and it would require significant effort to
create (much less maintain) by hand. It's not important for the purpose of this discussion
to explain the full config in detail. It is mainly shown here to emphasize the work done by
an Operator to abstract such a complex configuration into a relatively simple CRD.
It is the relationship between CRDs such as Prometheus and ServiceMonitor that
enables such abstraction in reasonable ways. For example, it would be easy to ship a single
large Prometheus CRD that includes the settings for the monitoring services. This
would also simplify the Operator's code by only requiring it to monitor one type of CRD
for changes.
But decoupling these settings allows each CRD object to remain manageable and
readable. Additionally, it provides granular access control over the modification of the
Operand settings (in other words, specific teams can be granted the ability to create
ServiceMonitor objects within their own namespaces in the cluster). This ad hoc
configuration design gives cluster tenants control over the consumption of their
own projects.
With this general understanding of the CRDs used by the Prometheus Operator (and
how their design creates a cohesive API), next, we will look, in more detail, at how the
Operator reconciles these objects from a technical perspective.
Reconciliation logic
To better understand the role of all the Prometheus Operator CRDs, it helps to know
more about how the Operator configures the Prometheus Operand. Under the hood, the
Prometheus Operator manages the Prometheus Pods' configuration through a secret (that
is, the Kubernetes object designed to contain sensitive data of an arbitrary nature). That
Secret is mounted into the Prometheus Pods as if it were a file and, thereby, passed to the
Prometheus binary's --config.file flag.
262
Case Study for Optional Operators – the Prometheus Operator
The Operator knows to update this secret (and redeploy the Prometheus Operand,
reloading the config file in the process) because it watches its Prometheus CRD
(along with other CRDs such as ServiceMonitor and PodMonitor) in the cluster
for changes.
Reloading Config Changes with Prometheus
Technically, the Prometheus Operator reloads the Prometheus config when
it is changed without needing to redeploy the entire Operand. It does this
with a sidecar container, running prometheus-config-reloader (https://
github.com/prometheus-operator/prometheusoperator/tree/main/cmd/prometheus-config-reloader),
which triggers a runtime reload by querying the /-/reload endpoint on the
Prometheus server. While Prometheus supports runtime config reloading this
way, many applications do not. So, for demonstration purposes, this chapter
glosses over this technical detail to focus on the capabilities of the Operator
and the more common use cases.
The Operator is able to monitor these CRD objects once it has been granted appropriate
RBAC permissions to do so. This is because even though it defines those objects in its
own project, the Kubernetes authentication services don't know that. To the cluster, the
Operator is simply another Pod running an arbitrary application, so it needs permission
to list, watch, get, or perform any other action on any type of API object.
In the nginx Operator example, the RBAC rules for accessing our Operator's CRD objects
were automatically generated using Kubebuilder markers. Instead, the Prometheus Operator
provides sample YAML files for its users with the appropriate permissions defined.
The Prometheus Operator creates three separate controllers for the three different
Operands it supports (that is, Prometheus, Alertmanager, and Thanos). With the Operator
SDK, the same design could be achieved by running operator-sdk create api
--controller for each CRD that requires its own reconciliation logic.
Each controller watches for adds, updates, and deletes for the relevant objects that
inform its reconciliation. For the Prometheus controller, these include the Prometheus,
ServiceMonitor, and PodMonitor CRDs. But it also watches for changes to things
such as Secrets and StatefulSets because, as mentioned earlier, these are the objects that
are used to deploy the Prometheus Operand. So, by watching for these too, it can ensure
that the Operand objects themselves are maintained at the appropriate settings and can
recover from any deviations (for example, accidental manual changes to the Secret that
holds the current Prometheus config YAML).
Operator design
263
The main controller logic is implemented in a function called sync(), which is the
equivalent to the Operator SDK's automatically created Reconcile() function. The
sync() function follows the same general outline, as described for our sample nginx
Operator, too. Some of the relevant code snippets from the Prometheus sync() function
are detailed next.
First, the function gets the Prometheus CRD object that is necessary for the Prometheus
Operand deployment to exist. If the object cannot be found, the controller returns an
error. If it is found, then it creates a copy to work with:
func (c *Operator) sync(ctx context.Context, key string) error
{
pobj, err := c.promInfs.Get(key)
if apierrors.IsNotFound(err) {
c.metrics.ForgetObject(key)
return nil
}
if err != nil {
return err
}
p := pobj.(*monitoringv1.Prometheus)
p = p.DeepCopy()
Next, it parses the Prometheus object (and gathers any relevant ServiceMonitor
objects or PodMonitor objects to parse too) in order to generate the YAML
configuration Secret. This is done in a helper function that also checks for an existing
Secret and creates one if none exist:
if err := c.createOrUpdateConfigurationSecret(…); err !=
nil {
return errors.Wrap(err, "creating config failed")
}
264
Case Study for Optional Operators – the Prometheus Operator
Finally, it creates the Prometheus StatefulSet, which runs the Operand deployment.
Similar to generating the config Secret, this part also uses helper functions to check for
the presence of an existing StatefulSet and then decides whether to update it or create
a new StatefulSet:
ssetClient := c.kclient.AppsV1().StatefulSets(p.Namespace)
…
obj, err := c.ssetInfs.Get(…)
exists := !apierrors.IsNotFound(err)
if err != nil && !apierrors.IsNotFound(err) {
return errors.Wrap(err, "retrieving statefulset failed")
}
…
sset, err := makeStatefulSet(ssetName)
if err != nil {
return errors.Wrap(err, "making statefulset failed")
}
…
if !exists {
level.Debug(logger).Log("msg", "no current statefulset
found")
level.Debug(logger).Log("msg", "creating statefulset")
if _, err := ssetClient.Create(ctx, sset, metav1.
CreateOptions{}); err != nil {
return errors.Wrap(err, "creating statefulset failed")
}
return nil
}
…
level.Debug(logger).Log("msg", "updating current statefulset")
err = k8sutil.UpdateStatefulSet(ctx, ssetClient, sset)
Operator design
265
This is equivalent to how the example nginx Operator created a Kubernetes Deployment
object. However, rather than using a file-embedding library as we eventually did, the
Prometheus Operator builds the StatefulSet object in memory. Without going into
too much detail, that makes sense for this application because much of the StatefulSet
definition is dependent on variable options that are set by logic in the code. So, there is
not much advantage to maintaining an embedded file to represent this object.
Throughout this reconciliation loop, the Operator makes extensive use of structured
logs and metrics to inform the user about its health. And while it doesn't report any
Condition updates as our Nginx operator did, it does report other custom-defined
fields in the PrometheusStatus field of the Prometheus CRD:
pkg/apis/monitoring/v1/types.go:
type PrometheusStatus struct {
Paused bool `json:"paused"`
Replicas int32 `json:"replicas"`
UpdatedReplicas int32 `json:"updatedReplicas"`
AvailableReplicas int32 `json:"availableReplicas"`
UnavailableReplicas int32 `json:"unavailableReplicas"`
}
This is a good demonstration of the fact that Operator CRDs can provide applicationspecific health information rather than only relying on existing patterns and upstream
API types to convey a detailed status report. Combined with the fact that multiple
Prometheus CRD objects can be created, with each representing a new deployment of
Prometheus, the status information of individual Operand deployments is separated.
This is all a very high-level overview of the Prometheus Operator's reconciliation logic,
with many specific implementation details omitted in order to draw more comparisons
between the concepts discussed throughout the book related to Operator design.
266
Case Study for Optional Operators – the Prometheus Operator
Operator distribution and development
The Prometheus Operator is hosted on GitHub at https://github.com/
prometheus-operator/prometheus-operator, where most of its documentation
is also maintained. It is also distributed via OperatorHub at https://operatorhub.
io/operator/prometheus.
Figure 10.1 – The Prometheus Operator page on OperatorHub.io
Operator distribution and development
267
As discussed in Chapter 6, Building and Deploying Your Operator, there are many
different ways to run an Operator. From local builds to container deployments, each
offers advantages for different development use cases. Then, in Chapter 7, Installing and
Running Operators with the Operator Lifecycle Manager, the function of OperatorHub was
explained as both a distribution index and an installation method when combined with
the Operator Lifecycle Manager (OLM).
In practice, this spectrum of distribution and installation options is illustrated by
the Prometheus Operator. Inside its GitHub repository, the Prometheus Operator
maintainers provide a single bundle.yaml file that allows curious users to quickly
install all of the resources that are necessary to run the Operator with a simple kubectl
create command.
Note that while this is similar in function to the bundle that's created to package an
Operator for OperatorHub and OLM, technically, it is not the same. That's because it
doesn't contain a ClusterServiceVersion (CSV) or other metadata that could be used by
the OLM to manage an installation of the Prometheus Operator.
However, the Prometheus Operator does provide this information on OperatorHub. The
backing CSV, along with the Operator's CRD files, are hosted for OperatorHub in its
GitHub repository at https://github.com/k8s-operatorhub/communityoperators/tree/main/operators/prometheus. This directory follows the
same structure that was described in Chapter 7, Installing and Running Operators with the
Operator Lifecycle Manager. Each new version of the Prometheus Operator's bundle is
kept in its own numbered directory.
Figure 10.2 – The Prometheus Operator version directories on OperatorHub
268
Case Study for Optional Operators – the Prometheus Operator
The individual versions contain the YAML definitions for each CRD used by the Operator
alongside a CSV that provides the metadata about the Operator and its resources.
To demonstrate the use case of this CSV, we can briefly look at some of the relevant
sections, as shown in the following code. First, it describes the Operator's descriptive
information, including its capability level (in this case, the Prometheus Operator is a Level
IV Operator providing Deep Insights such as metrics about itself and its Operand):
prometheusoperator.0.47.0.clusterserviceversion.yaml:
apiVersion: operators.coreos.com/v1alpha1
kind: ClusterServiceVersion
metadata:
annotations:
capabilities: Deep Insights
categories: Monitoring
certified: "false"
containerImage: quay.io/prometheus -operator/prometheus
-operator:v0.47.0
createdAt: "2021-04-15T23:43:00Z"
description: Manage the full lifecycle of configuring and
managing Prometheus and Alertmanager servers.
Repository: https://github.com/prometheus -operator/
prometheus -operator
support: Red Hat, Inc.
name: prometheusoperator.0.47.0
namespace: placeholder
Next, it embeds the various CRDs and a description of their fields. The following is an
excerpt from the Prometheus CRD description:
spec:
customresourcedefinitions:
owned:
- description: A running Prometheus instance
displayName: Prometheus
kind: Prometheus
name: prometheuses.monitoring.coreos.com
resources:
Operator distribution and development
- kind: StatefulSet
version: v1beta2
- kind: Pod
version: v1
- kind: ConfigMap
version: v1
- kind: Service
version: v1
specDescriptors:
- description: Desired number of Pods for the cluster
displayName: Size
path: replicas
x-descriptors:
- urn:alm:descriptor:com.tectonic.ui:podCount
The CSV goes on to define the deployment of the Operator. This maps directly to the
Kubernetes Deployment object, which will run the Operator Pods:
install:
spec:
deployments:
- name: prometheus -operator
spec:
replicas: 1
selector:
matchLabels:
k8s-app: prometheus -operator
template:
metadata:
labels:
k8s-app: prometheus -operator
spec:
containers:
- args:
- --prometheus-instancenamespaces=$(NAMESPACES)
- --prometheus-config-reloader=quay.io/
prometheus -operator/prometheus -config-reloader:v0.47.0
269
270
Case Study for Optional Operators – the Prometheus Operator
Finally, the CSV provides the RBAC permissions needed by the Operator to monitor
its relevant resources in the cluster. Additionally, it also creates the RBAC permissions
needed by the actual Prometheus Pods, which are separate from what the Operator needs.
This is because the Operator and its Operand are separate entities in the cluster, and the
Prometheus Server itself needs access to different resources to gather metrics (this is in
contrast to the Prometheus Operator, which needs to access its CRDs).
Here are the RBAC permissions used to access its own CRDs, with wildcard (*) access
under verbs indicating that the Operator can perform any API action against these
objects (such as get, create, delete, and more):
permissions:
- rules:
- apiGroups:
- monitoring.coreos.com
resources:
- alertmanagers
- alertmanagers/finalizers
- alertmanagerconfigs
- prometheuses
- prometheuses/finalizers
- thanosrulers
- thanosrulers/finalizers
- servicemonitors
- podmonitors
- probes
- prometheusrules
verbs:
- '*'
serviceAccountName: prometheus -operator
The CSV concludes with contact information for the maintainers, along with links to the
documentation and the version number of this release.
Updates and maintenance
271
Offering a variety of distribution channels, in this case, GitHub and OperatorHub, has
the obvious benefit of enabling an Operator to reach a broader audience of users. But
this range of users can often be defined less by where the Operator is distributed and
more by how the Operator is intended to be used. In other words, a user installing from
OperatorHub is more likely to be evaluating (or actively running) the Operator in a
production environment (with the full OLM stack) than a user installing the Operator
from GitHub. In the latter case, such installations are probably more experimental,
possibly from users seeking to contribute to the project themselves.
Accommodating the different use cases of an Operator in your distribution choices
helps not only with the growth of a project but also its health. Recall that in Chapter 2,
Understanding How Operators Interact with Kubernetes, we identified several types of
potential users such as cluster users and administrators. While, in theory, an Operator's
function might only apply to one type of user, the way that Operator is installed and
run could vary for different kinds of users, including developers. Understanding these
users and providing usage pathways for them increases the coverage of an Operator's
functionality, improving the odds that bugs and potential features are identified.
As with many other topics in this book, these concepts are not specific to Operator design.
But they are worth noting in the context of an Operator discussion to reiterate the ways in
which they apply here. Similarly, while the topics of maintaining software and providing
updates are not strictly specific to Operators, in the next section, we will still examine
them through the lens of this Operator.
Updates and maintenance
The Prometheus Operator's community of maintainers is very active. With over
400 contributors to date (https://github.com/prometheus-operator/
prometheus-operator/graphs/contributors), its code base remains fresh
through ongoing maintenance. This allows the Prometheus Operator to publish regular
releases on its GitHub Releases page (https://github.com/prometheusoperator/prometheus-operator/releases). As with any application,
releasing regular updates promotes confidence in potential users by demonstrating an
active investment in the project's support by its owners. In Kubernetes projects, such as
Operators, this is even more important due to the relatively fast-paced and highly fluctuant
developments in the underlying Kubernetes platform. Otherwise, with the current
Kubernetes deprecation policy, an Operator might become unusable in new clusters in as
little as a year (see Chapter 8, Preparing for Ongoing Maintenance of Your Operator).
272
Case Study for Optional Operators – the Prometheus Operator
In reality, in most cases, the main dependencies used by an Operator project will not
frequently introduce breaking changes that require manual updates to remain compatible
with existing users. Instead, most updates will simply be version bumps that bring in
security, performance, and edge-case optimization improvements. To automate this
process, the Prometheus Operator uses GitHub's Dependabot, which automatically creates
pull requests to update any dependencies with new releases (https://docs.github.
com/en/code-security/dependabot).
Automated dependency management tools such as Dependabot are a great way to ensure
your Operator remains up to date with its dependencies, and thereby compatible with
the most recent environment updates made by users. However, depending on your own
scenario, you might still choose to manually update your Operator (for example, if you are
aligning with a different release cadence where upstream patch releases might not be of
significance to your own release).
Besides dependency updates, most Operators will also ship their own updates; for
example, shipping a new API version (as covered in the Releasing new versions of
your operator section of Chapter 8, Preparing for Ongoing Maintenance). In the case
of the Prometheus Operator, the transition from API version v1alpha1 to v1 also
involved a migration from Kubernetes ThirdPartyResources (a now-deprecated early
implementation of extensible Kubernetes objects) to the at-the-time newly available CRDs
(https://github.com/prometheus-operator/prometheus-operator/
pull/555). So, examples of the Prometheus Operator shipping multiple API versions
in a CRD are not currently available. However, as part of the project's roadmap, the
intent is to update the AlertManager CRD from v1alpha1 to v1beta1, leveraging
conversion webhooks to translate between the two (this proposal is tracked and
documented at https://github.com/prometheus-operator/prometheusoperator/issues/4677).
Finally, the Prometheus Operator maintains its own Slack channel for community support
and discussion. Because the Operator is a third-party open source effort not directly
affiliated with Prometheus itself, openly advertising the proper channels for support not
only helps users find the right contacts but also respects the Prometheus maintainers'
scope of responsibility. In this way, it is perfectly acceptable to publish an Operator that
manages an Operand that you do not own. However, if this is not made clear, it can be
very disruptive to your users and the owners of that Operand if the distinction between
Operator and Operand is blurred.
Summary
273
Summary
In this chapter, we used the Prometheus Operator as an example to apply many of the
concepts covered throughout the book. This Operator makes a good example because,
aside from serving a common need by managing a popular application, it is actually one
of the earliest Operators (having published its first release, v0.1.1, in December 2016). This
predates the formalized Operator Framework, which developers can benefit from today,
explaining idiosyncrasies such as its lack of Operator SDK libraries, but demonstrating the
influence of early development decisions in the design of the Operator Framework.
At the beginning of this chapter, we gave a brief overview of Prometheus itself. This gave
us a foundational understanding of the use case for a Prometheus Operator, particularly
regarding the installation and configuration of Prometheus. This laid the groundwork
to understand what the Prometheus Operator does to alleviate these pain points. By
examining the CRDs it uses and how they are reconciled, we demonstrated how the
Prometheus Operator abstracts that underlying functionality from the user, drawing
parallels with the earlier chapters in the book (and the much simpler Nginx operator used
to build the examples in those chapters). Finally, we looked at the more intangible aspects
of the Prometheus Operator, such as its distribution and maintenance, to show how
popular Operators apply these concepts from the Operator Framework.
In the next chapter, we will follow a similar case study but for a different Operator, that is,
the etcd Operator.
11
Case Study for Core
Operator – Etcd
Operator
In the previous chapter (as for most of this book), we discussed Operators as a tool
for managing applications that are deployed on Kubernetes. For most use cases, this is
the main purpose of an Operator. In other words, the Operator serves to automate the
applications that are developed by an organization. These applications are the products
offered to users, and automating them helps to ship them without any issues and keep
users happy. Beyond that, Kubernetes itself is simply the underlying architecture.
As a part of this, it's usually assumed that Kubernetes doesn't need any additional
automation as would be provided by Operators. After all, it was a key point of the early
chapters in this book that Operators are not functionally much different than the native
suite of controllers that make up the Kubernetes control plane in the first place.
276
Case Study for Core Operator – Etcd Operator
However, there are situations where an Operator can be used to manage aspects of core
Kubernetes. While less common than application Operators, discussing some instances
of core Operators helps to show the wide breadth of capabilities that the Operator
Framework offers. Starting with a few of these examples, we will explore one in particular
(though in less depth than the previous case study), the etcd Operator. Finally, we will
explain some of the concepts around cluster stability and upgrades that are important
to consider when developing Operators for Kubernetes. This will be done through the
following sections:
• Core Operators – extending the Kubernetes platform
• etcd Operator design
• Stability and safety
• Upgrading Kubernetes
Core Operators – extending the Kubernetes
platform
There is no differentiation in the Operator Framework between Operators that manage
user-facing applications and infrastructure and Operators that manage core Kubernetes
components. The only difference is simply in how the concepts of Operator design and
development are applied to a slightly different class of problems. Still, the various Pods and
control loops that comprise an installation of Kubernetes can be viewed as no different
than the workload Pods that they deploy and manage.
Without getting too existential, this reduction bridges the conceptual gap between
development for Kubernetes and the development of Kubernetes, making the latter
seem much more approachable. This idea opens the gates to give system administrators
and DevOps specialists greater control and flexibility over the cloud architectures
they orchestrate.
Core Operators – extending the Kubernetes platform
277
Next, we will look at a few high-level examples of Operators that extend Kubernetes. We
won't go into too much technical detail (such as their API or reconciliation logic), but we
will briefly look at each of these examples to understand their use case and demonstrate
some of the different ways that Operators can be used to directly manage Kubernetes
system processes. The Operators we will look at are as follows:
• RBAC Manager (https://github.com/FairwindsOps/rbac-manager)
• Kube Scheduler Operator (https://github.com/openshift/clusterkube-scheduler-operator)
• etcd Operator (https://github.com/coreos/etcd-operator)
Following this general overview, we will go into more technical detail about the etcd
Operator in order to provide a similar understanding of the design concepts in this book,
as we did in Chapter 10, Case Study for Optional Operators – the Prometheus Operator.
RBAC Manager
Role-Based Access Control (RBAC) policies are the cornerstone of Kubernetes
authentication and authorization. RBAC settings in Kubernetes consist of three types
of objects:
• Roles (or ClusterRoles, depending on the scope), which define the level of access
that is allowed for a user or service
• ServiceAccounts, which are the identifying authorization object for a Pod
• RoleBindings (or ClusterRoleBindings), which map ServiceAccounts to Roles
(or ClusterRoles)
278
Case Study for Core Operator – Etcd Operator
These three types of Kubernetes API objects were explained in Chapter 2, Understanding
How Operators Interact with Kubernetes. The relationship between them can be generally
summarized by the following diagram (which was also used in that chapter):
Figure 11.1 – A diagram of the RBAC object relationships
These objects allow for flexibility and control over the design of RBAC policies in a cluster.
However, they can become confusing and cumbersome to manage, especially in large
clusters with many different levels of access to different services. For example, if a user
requires different authorization permissions for different namespaces, an administrator
will need to create separate RoleBindings for each namespace with the appropriate grants.
Then, if that user leaves the company or changes positions, the administrator will need
to track each of those RoleBindings to ensure they can be appropriately updated. This
approach is flexible, but it does not scale well for large organizations.
The RBAC Manager addresses these problems by providing a layer of abstraction on top
of the native Kubernetes RBAC policy objects. This abstraction is represented by a single
CustomResourceDefinition (CRD) that allows an administrator to effectively create and
manage multiple RoleBindings for a user in one spot (with a slightly simplified syntax).
Core Operators – extending the Kubernetes platform
279
The effect of the RBAC Manager's simplified approach to authorization is that the
management of RoleBindings is removed from a cluster administrator's manual
responsibilities. This may be just one object in the chain of relational RBAC objects
described previously, but it is the most repetitive and meticulous to track in large clusters.
This is because the other objects, Roles/ClusterRoles and ServiceAccounts, will essentially
map one-to-one against users, services, and access levels. But the intersection of users and
access levels means that there is potentially a many-to-many relationship, held in place by
RoleBindings.
The potential complexity of even a simple setup is shown by the following diagram, with
four users each having varying levels of access (among hypothetical read, write, view,
and edit roles). In this diagram, each arrow represents a RoleBinding that must be
manually maintained:
Figure 11.2 – A basic RoleBinding mapping of different users and RBAC levels
280
Case Study for Core Operator – Etcd Operator
The RBAC Manager would simplify that same setup by inserting its CRD between the
user and role definitions, creating a single access point to manage any user's permissions.
Additionally, UserB and UserC can share an RBAC Manager CRD since they have the
same role. This is shown in the following diagram:
Figure 11.3 – A diagram of the RBAC Manager CRDs managing RoleBindings
In this setup, the individual arrows between CRDs and Roles (each still representing
a single RoleBinding) are managed by the RBAC Manager Operator. This has the
advantage of reducing the number of individual object relationships that administrators
need to orchestrate. It also provides the state-reconciliation benefits of an Operator,
wherein any updates or removals of the underlying roles are reconciled by the Operator
to match the desired state of the cluster, as declared in the Operator's CRD objects. That
behavior is a good example of where an Operator not only helps with the creation and
management of complex systems but also ensures their ongoing stability.
The RBAC Manager is an Operator whose sole function is to manage native Kubernetes
objects in the cluster. Next, we will discuss the Kube Scheduler Operator, which goes
a step further to directly manage a critical component in the cluster, the Scheduler.
Core Operators – extending the Kubernetes platform
281
The Kube Scheduler Operator
The Kube Scheduler is one of the main control plane components in a Kubernetes cluster.
It is responsible for assigning newly created Pods to Nodes, and it tries to do this in the
most optimal way possible. This task is vital to the very function of Kubernetes as a cloud
platform because if there is no way to schedule Pods onto Nodes, then the Pods cannot
run their application code anywhere. And while manually deploying Pods onto specific
nodes is possible, the automated evaluation and assignment done by the Scheduler
obviously scales much better.
In addition, the definition of optimal Pod placement can be wildly different for different
organizations (or sometimes just between different clusters from the same organization).
For example, some administrators may want to spread the distribution of their workload
Pods evenly among nodes to keep average resource consumption relatively low and
prevent certain nodes from becoming overloaded. But other system admins may want
the exact opposite, compacting as many Pods onto as few nodes as possible in order to
minimize infrastructure costs and maximize efficiency. To accommodate these varying
needs, the Scheduler provides a configuration API that allows you to customize
its behavior.
The functionality and flexibility offered by the Scheduler are useful, but working with
such an important part of a cluster can be risky. This is because if the Scheduler fails, then
no other Pods can be scheduled (which includes some system Pods). Also, the complex
configuration syntax for the Scheduler elevates the potential for this risk. For these
reasons, many Kubernetes users shy away from Scheduler customization.
To address some of these issues, OpenShift (Red Hat's distribution of Kubernetes) ships
with the Kube Scheduler Operator (in fact, OpenShift relies heavily on core Operators,
which is discussed more thoroughly at https://www.redhat.com/en/blog/
why-operators-are-essential-kubernetes). This Operator is built using an
Operator library developed specifically for OpenShift Operators rather than the Operator
SDK. This allows the Kube Scheduler Operator to manage the health and stability of
the critical Scheduler Pods in a way that is consistent with the other features built into
OpenShift. While most Operator developers will not need to write their own development
libraries, this example shows that in certain use cases, it's fine to do so if you have unique
needs that the Operator SDK does not support.
282
Case Study for Core Operator – Etcd Operator
The Kube Scheduler Operator does follow other design aspects of the Operator
Framework, such as the use of CRDs as the primary interface between users and Operator
logic. This Operator makes use of two CRDs. One is used to configure Operator-specific
settings and report the health status of the Operator through Conditions, while the other
holds the Scheduler configuration options that control how the Scheduler assigns Pods
to nodes. The Operator goes a step further with the second CRD by predefining sets of
Scheduler configurations for common use cases, completely abstracting the underlying
Operand settings into easily understood pick-and-choose options.
The role of the Kube Scheduler Operator as a system Operator, managing a core
component of Kubernetes clusters, is an important task. Its function serves the critical
purpose of placing Pods onto appropriate nodes, and its ability to recover from failures
helps maintain cluster health. In the next section, we will look at one more Operator that
performs similar management of another critical component, etcd.
The etcd Operator
etcd (https://etcd.io/) is the primary key-value store that backs Kubernetes
clusters. It is the default option for persistent storage of the API objects that exist in a
cluster, preferred for its scalable and distributed design that makes it optimal for highperformance cloud computing.
The etcd Operator is designed to manage the etcd component in a cluster. Even though it
is no longer actively maintained, its GitHub repository is still available in an archived state
to provide a historical reference for future developers. For the purpose of this chapter, the
preserved status of the etcd Operator offers a permanent, unchanging reference for the
design of a core Operator.
etcd clusters within a Kubernetes cluster can be managed by the etcd Operator in
a full variety of functions. These include creating etcd instances, resizing federated
installations of etcd, recovering from failures, upgrading etcd without suffering uptime,
and performing backups of etcd instances (as well as restoring from those backups). This
suite of functionality qualifies the etcd Operator as a Level III Operator in the Capability
Model. If you recall from Chapter 1, Introducing the Operator Framework, Level III
Operators are referred to as Full Lifecycle Operators, indicating their ability to manage
Operands beyond simple installation and support advanced management operations, such
as upgrades and backups.
Installing and managing etcd manually in a Kubernetes cluster is a fairly advanced task
for most users. The majority of Kubernetes developers take the availability of a persistent
data store for granted, assuming that all of their objects and cluster state information
will always be available. But if the etcd processes fail, there is the potential for it to have
catastrophic effects on the entire Kubernetes cluster.
etcd Operator design
283
Similar to any other database, the etcd component in a cluster is responsible for storing all
objects that exist in the cluster. Failure to do so can bring even basic cluster functionality
to a halt. Such a failure could be caused by a bug, an incompatible API, or even by
malformed input when trying to modify the etcd installation (for example, scaling it to
provide higher availability). Therefore, a smooth-running cluster is dependent on efficient
and accurate access to data in etcd.
The etcd Operator aims to simplify the management of etcd by automating the operational
commands required to create, resize, upgrade, back up, and recover etcd clusters through
the Operator's various CRDs. In the next section, we will go into more detail about the
CRDs that the Operator uses to do this and how those CRDs are reconciled to ensure that
the current state of etcd in the cluster matches the administrator's desired state.
etcd Operator design
Like most other Operators, the etcd Operator is built with CRDs as its focal interface
for user interaction. Understanding the CRDs an Operator provides is a good way to
get a basic understanding of how the Operator works, so that is where we will begin our
examination of the etcd Operator.
CRDs
The three CRDs used by the etcd Operator are EtcdCluster, EtcdBackup, and
EtcdRestore. The first CRD, EtcdCluster, controls the basic settings for the etcd
installation, such as the number of Operand replicas to deploy and the version of etcd that
should be installed. A sample object based on this CRD looks like the following:
simple-etcd-cr.yaml:
apiVersion: etcd.database.coreos.com/v1beta2
kind: EtcdCluster
metadata:
name: example
spec:
size: 3
version: 3.5.3
284
Case Study for Core Operator – Etcd Operator
In this example, were this object to be created in a cluster (kubectl create -f
simple-etcd-cr.yaml), it would instruct the etcd Operator to create three replicas
of etcd version 3.5.3. Besides these options, the EtcdCluster CRD also provides
configuration settings for specifying a specific repository to pull the etcd container image
from, Operand Pod settings (such as affinity and nodeSelector settings), and
TLS config.
The other two aforementioned CRDs, EtcdBackup and EtcdRestore, work in tandem
to allow users to declaratively trigger the backup and subsequent restoration of etcd data
in a cluster. For example, etcd can be backed up to a Google Cloud Storage (GCS) bucket
by creating the following custom resource object:
etcd-gcs-backup.yaml:
apiVersion: etcd.database.coreos.com/v1beta2
kind: EtcdBackup
metadata:
name: backup-etcd-to-gcs
spec:
etcdEndpoints:
- https://etcd-cluster-client:2379
storageType: GCS
gcs:
path: gcsbucket/etcd
gcpSecret: <gcp-secret>
This instructs the Operator to back up the etcd data available at the cluster endpoint
https://etcd-cluster-client:2379 and send it to the GCS bucket called
gcsbucket/etcd, authenticated by the Google Cloud Platform (GCP) account secret
pasted in <gcp-secret>. That data can be restored by later creating the following
EtcdRestore object:
etcd-gcs-restore.yaml:
apiVersion: etcd.database.coreos.com/v1beta2
kind: EtcdRestore
metadata:
name: restore-etcd-from-gcs
spec:
etcdCluster:
etcd Operator design
285
name: sample-etcd-cluster
backupStorageType: GCS
gcs:
path: gcsbucket/etcd
gcpSecret: <gcp-secret>
These CRDs make it much easier to perform backups of etcd data and restore those
backups by abstracting and automating the heavy lifting into Operator controller logic,
but they also ensure that these operations are performed successfully. By eliminating the
need for human interaction for the bulk of the backup, they also eliminate the possibility
of human error in collecting and transferring the etcd data to a backup location. If the
Operator does encounter an error when performing the backup, this information is
reported through the Status section of the custom resource object for that backup.
Reconciliation logic
In the etcd Operator's design, each CRD type has its own reconciliation controller.
This is good Operator design, as recommended by the best practices in the Operator
Framework's documentation. Similar to the Prometheus Operator from Chapter 10, Case
Study for Optional Operators – the Prometheus Operator, each controller monitors for
cluster events, involving the CRD it reconciles. These events then trigger a level-based
reconciliation loop that either creates (or modifies) an etcd cluster, performs a backup of
a running etcd cluster, or restores the already backed-up data from an earlier etcd cluster.
Part of this reconciliation logic involves reporting the status of the Operand etcd Pods.
After receiving an event and during the ensuing reconciliation cycle, if the Operator
detects a change in the etcd cluster's status, it reports on this through the matching custom
resource object's Status field. This type has the following sub-fields:
type ClusterStatus struct {
// Phase is the cluster running phase
Phase ClusterPhase `json:"phase"`
Reason string
`json:"reason,omitempty"`
// ControlPaused indicates the operator pauses the control
of the cluster.
ControlPaused bool `json:"controlPaused,omitempty"`
// Condition keeps track of all cluster conditions, if
they exist.
286
Case Study for Core Operator – Etcd Operator
Conditions []ClusterCondition
`json:"conditions,omitempty"`
// Size is the current size of the cluster
Size int `json:"size"`
// ServiceName is the LB service for accessing etcd nodes.
ServiceName string `json:"serviceName,omitempty"`
// ClientPort is the port for etcd client to access.
// It's the same on client LB service and etcd nodes.
ClientPort int `json:"clientPort,omitempty"`
// Members are the etcd members in the cluster
Members MembersStatus `json:"members"`
// CurrentVersion is the current cluster version
CurrentVersion string `json:"currentVersion"`
// TargetVersion is the version the cluster upgrading to.
// If the cluster is not upgrading, TargetVersion is
empty.
TargetVersion string `json:"targetVersion"`
}
Note that the etcd Operator implements its own ClusterCondition type (rather
than the Condition type used in Chapter 5, Developing an Operator – Advanced
Functionality). This is because active maintenance of the etcd Operator was archived
shortly before the native Condition type was merged into upstream Kubernetes.
However, we mention this here as another tangible example where awareness of upstream
Kubernetes Enhancement Proposals (KEPs) and their status throughout the timeline of
a release cycle can have an impact on third-party Operator development (see Chapter 8,
Preparing for Ongoing Maintenance of Your Operator).
Beyond just reconciling the desired state of the etcd Operands and reporting their status,
the etcd Operator also has reconciliation logic to recover from failure states.
etcd Operator design
287
Failure recovery
The etcd Operator collects status information on the etcd Operands and, based on the
availability of a majority of the Operand Pods (known as a quorum), attempts to recover
the etcd cluster if necessary. In the edge case where an etcd cluster has no running
Operand Pods, the Operator must make an opinionated decision whether to interpret this
as an etcd cluster that has completely failed or simply one that has yet to be initialized.
In this case, the Operator always chooses to interpret it as a failed cluster and attempts to
restore the cluster from a backup, if one is available. This is not only the simplest option
for the Operator but also the safest (see the following Stability and safety section), as the
alternative (assuming no availability is simply uninitialized) could result in ignored failure
states that would otherwise be recovered from.
Besides recovering from failures in its Operands, the etcd Operator also has reconciliation
logic to recover from failures in itself. Part of this recovery path hinges on the etcd
Operator registering its own CRD in the cluster. This is interesting because it contradicts
the best practices recommended by the Operator SDK documentation. But by coupling
the creation of the CRD with the Operator (rather than having an administrator create
it – for example, with kubectl create -f), the Operator can use the presence of that
CRD to determine whether it exists as a new installation or has previously been running
in a cluster.
This is applicable because when any Pod restarts, including Operator Pods, they will not
have any inherent knowledge about their predecessors. From that Pod's perspective, it
has begun life with a fresh start. So, if the etcd Operator starts and finds its CRD already
registered in a Kubernetes cluster, that CRD serves as a sort of canary indicator to inform
the Operator that it should begin reconstructing the state of any existing Operand Pods.
Failure recovery is one of the most helpful benefits that Operators provide because the
automated error handling allows small hiccups in the day-to-day operation of a cluster to
be quickly and gracefully absorbed. In the case of the etcd Operator, it makes opinionated
decisions in handling failures and managing its own CRD to create a support contract that
clearly defines its recovery procedures. Doing so contributes greatly to the cluster's overall
stability, which is the focus of the next section.
288
Case Study for Core Operator – Etcd Operator
Stability and safety
Applications and components in a Kubernetes cluster can occasionally be prone to
unexpected failures, such as network timeouts or code panics due to unforeseen bugs.
It is part of an Operator's job to monitor for these spontaneous failures and attempt to
recover from them. But of course, human error in the pursuit of adjusting the system can
be another source of failure. As a result, any interaction with or modification of the core
system components in Kubernetes brings inherent risk. This is elevated because manual
adjustments to one component can contain errors (even minor ones) that cause a domino
effect, as other components that depend on it begin reacting to the original error.
Perhaps the prime objective of an Operator is to provide stability and safety in production
environments. Here, stability refers to the ongoing performant operation of the Operand
programs, and safety is the ability of an Operator to sanitize and validate any inputs or
modifications to that program. Think of an Operator like a car, whose purpose is to run its
motor smoothly along the road while allowing the driver to control it within reasonable
parameters. In Kubernetes, Operators for system components offer some of the leading
examples of designs where exceptional care has been taken to offer a safe design that lends
itself to stable functioning.
The Kube Scheduler Operator from our earlier example ensures cluster stability by taking
an opinionated approach toward the available configuration options it provides. In other
words, the total number of possible scheduling settings is restricted (via predefined
collections of options) to only those arrangements that have been tested and known
to have minimal risk to the cluster. Then, changes to these settings are rolled out in a
predetermined manner by the automation code in the Operator. The combination of not
only automating changes but restricting the available changes significantly reduces any
opportunity for users to make an error when updating their cluster. This abstraction is
shown in the following diagram, where the user only needs to interact with the CRD,
while all fields in the predefined settings are hidden away as black-box options:
Figure 11.4 – A diagram of the Kube Scheduler Operator config abstraction
Stability and safety
289
The etcd Operator has similar safeguards in place. For example, uninstalling the Operator
does not automatically remove the custom resource objects associated with it. While
some Operators may implement this sort of garbage collection as a feature to make
uninstallation easier, the developers of the etcd Operator intentionally chose not to do so
in order to prevent accidental deletion of running etcd clusters.
Another approach the etcd Operator takes toward achieving operational stability is in
the spreading of its Operand Pods. As mentioned earlier, the etcd Operator allows users
to configure individual Pod settings for the etcd Operand instances it deploys, such as
nodeSelectors. One interesting field to note, however, is that it provides a simple
Boolean option called antiAffinity. This value can be set within the EtcdCluster
CRD, as follows:
spec:
size: 3
pod:
antiAffinity: true
Enabling this value serves as shorthand to label the Operand etcd Pods with an
antiAffinity field to themselves. The effect of this is that the individual Pods will
not be scheduled onto the same nodes. This has the benefit of ensuring that the Pods are
distributed in a highly available fashion so that if one node goes down, it does not risk
bringing down a significant number of the etcd Pods.
The effective change of this one line on the Operand Pods looks something like
the following:
apiVersion: v1
kind: Pod
metadata:
name: etcd-cluster-pod
spec:
affinity:
podAntiAffinity:
requiredDuringSchedulingIgnoredDuringExecution:
- labelSelector:
matchLabels:
etcd_cluster: <etcd-resource-name>
topologyKey: kubernetes.io/hostname
290
Case Study for Core Operator – Etcd Operator
Packaging this into a single line not only saves time but also saves users from potential
mistakes. For example, the following snippet looks very similar to the preceding one.
However, it has the exact opposite effect, requiring that all similar etcd Pods are scheduled
onto the same node:
apiVersion: v1
kind: Pod
metadata:
name: etcd-cluster-pod
spec:
affinity:
podAffinity:
requiredDuringSchedulingIgnoredDuringExecution:
- labelSelector:
matchLabels:
etcd_cluster: <etcd-resource-name>
topologyKey: kubernetes.io/hostname
If this mistake went unnoticed and the node that hosted all of the etcd Pods went down, it
would result in potentially the entire cluster being unable to function.
While the antiAffinity setting was eventually deprecated in favor of allowing users
to provide full Pod Affinity blocks (as shown previously), its presence offers an example
of the safe configuration that Operators can provide. Swapping that with the option of
full Affinity blocks has the trade-off of safety for flexibility, which is a delicate scale that
Operator developers must balance in their own implementations.
These are just a few examples of the ways in which Operators can package complex
operations into abstracted user-facing settings to provide a safe interface and stable cluster
management. Next, we'll look at how Operators can maintain that stability during a
potentially tumultuous period of upgrades.
Upgrading Kubernetes
In software, upgrades are usually a fact of life. Very rarely is a single piece of software
that lives for more than a brief time able to run continuously without upgrading its code
to a new version. In Chapter 8, Preparing for Ongoing Maintenance of Your Operator,
we discussed ways to prepare and publish new version releases of an Operator. In that
chapter, we also explained the different phases of the Kubernetes release cycle and how
they impact Operator development. This is especially true for Operators that are deeply
entrenched in the Kubernetes platform components.
Upgrading Kubernetes
291
For system Operators, fluctuating changes in the upstream Kubernetes code base are
often more than just simple features. For example, when kube-scheduler was
refactored to accept an entirely different format of configuration (referred to as the
Scheduler Framework, which is no relation to the Operator Framework – see https://
kubernetes.io/docs/concepts/scheduling-eviction/schedulingframework/ for more details – though they are not technically relevant here), the
predefined settings profiles handled by the Kube Scheduler Operator's CRD needed to be
completely rewritten to accommodate that change. System Operators absolutely must be
aware of changes such as this between Kubernetes versions because in many cases, they
themselves are performing the upgrade to a new version.
The etcd Operator has logic to handle upgrades of its Operand, etcd. This adds a point of
complexity, as etcd is technically not part of the Kubernetes payload that runs a cluster.
So, while the upstream Kubernetes developers must coordinate their releases to support
certain versions of etcd (as etcd developers work on their own releases), the etcd Operator
developers need to react to changes in both dependencies.
In this way, the Operand is also a dependency for an Operator, which comes with its own
constraints that must be respected. For example, when performing an upgrade, the etcd
Operator first verifies that the desired new version is allowed by the upgrade strategies
supported by etcd. This specifies that etcd can only be upgraded by at most one minor
version at a time (for example, from 3.4 to 3.5). If more than this is specified, the etcd
Operator can determine that the upgrade should not proceed and aborts the process.
If an upgrade is allowed to proceed, the etcd Operator updates each of its Operand
Pods with a rolling upgrade strategy. This is a common way to upgrade versions
of applications, and even Kubernetes itself, where one Pod (or Node, in the case of
Kubernetes) in the available set is upgraded at a time. This allows for minimal downtime,
but it also allows for the ability to roll back (revert to the previous working version) if an
error is encountered when upgrading any single instance. This is a critical stability benefit
for any Operator to support as it provides the opportunity to diagnose the error in a stable
environment. The etcd Operator uses its own backup and restoration workflows to handle
these kinds of rollbacks during an upgrade.
Upgrading Kubernetes (as with upgrading any software) can be a tedious process, which
is why it's not uncommon for cluster administrators to delay upgrading until the last
possible minute. Unfortunately, this only exacerbates the problem, as more incompatible
changes are introduced with each skipped version. But introducing Operators to help with
handling these changes can make upgrades much smoother or, at the very least, assist with
collecting information to diagnose failed upgrades. While most Operator developers will
not be writing Operators for system-level Kubernetes components, the lessons from those
who have will serve as examples of how to handle upgrades in even the most missioncritical scenarios.
292
Case Study for Core Operator – Etcd Operator
Summary
In this chapter, we took one final look at some examples of Operators responsible for
some of the most critical tasks in a Kubernetes cluster. These core, or system, Operators
automatically manage the most complex and delicate workflows for Kubernetes
administrators while balancing functionality and care for the importance of their
Operands. From these types of Operators, we can draw lessons about the fullest spectrum
of capabilities in the Operator Framework.
The intent of this chapter wasn't to offer these examples as tutorials or imply that many
developers will write their own Operators to manage core Kubernetes components.
Rather, they serve as extreme cases where concepts from the Operator Framework were
applied to outlier problem sets. But understanding the edge cases in any problem is the
best way to form a strong understanding of the entire problem.
We did this by beginning the chapter with a brief overview of three different system
Operators. Then, we took a deeper dive into the technical details behind the etcd
Operator, understanding how it uses CRDs and reconciliation logic to manage the data
backup storage for Kubernetes. Finally, we concluded by exploring how Operators such as
the etcd Operator provide a stable and safe interface for their tasks, even when upgrading
versions of Kubernetes.
With that, we end this introduction to the Operator Framework. The topic of Kubernetes
Operators is a broad one, with many potential technical details to explore and volumes
of excellent literature already written by well-qualified authors. It would be difficult to
succinctly compile all of the available information on Operators from every available
resource, so in this book, we simply tried to cover the most important topics in novel and
interesting ways. Hopefully, you found this book insightful and helpful in building your
own understanding of the Operator Framework and will find ways to apply these lessons
when building your own Operators. Happy hacking!
Index
A
Abnormality Detection 18
advanced functionality
need for 102, 103
Ansible 9, 226
Apache 2.0 License 178
API conversions
implementing 194-198
API directory
generating 189, 190
API elements
removing, in Kubernetes
deprecation policy 241
API version
adding 239
adding, need for 239
adding, to Operator 187-189
converting 240
deploying 203-205
support timeline 241
testing 203-205
application programming interface (API)
about 4, 72-76, 254, 255
designing 48
overview 227
applications
managing with, Operators 19
Auto-Healing Operators 18
Auto Scaling Operators 18
Auto-Tuning Operators 18
AWS 173
B
BinData 81, 82
boilerplate Operator project
config files and dependencies,
containing 232
operator-sdk init command,
creating 231
bundle
about 12, 236
generating 237
bundle/ directory
manifests/ 166
metadata/ 166
tests/ 166
bundle image
about 163, 237
building 237
deploying, with OLM 237
294
Index
C
Call for Exceptions 217
Capability Model
about 8, 14, 226
Level I-basic install 15
Level II-seamless upgrades 15
Level III-full lifecycle 16
Level IV-deep insights 17
Level V-auto pilot 18
Operator functions, defining with 14-18
reference link 14
cert-manager
reference link 203
ci.yaml
reference link 179
cluster administrators 32, 33
ClusterRoleBindings 277
ClusterRoles 76, 277
cluster-scoped 31
ClusterServiceVersion (CSV) 61, 230, 236
clusters, without Operators
cluster states change, reacting to 5, 6
managing 4
sample application 4, 5
cluster users 33, 34
code
generating, by
operator-sdk command 232
Code Freeze 215, 218, 242
Code Thaw 220
coding controller logic
overview 231
command-line flags 249-251
community Operators repository
reference link 208
container image
building 131, 132
Operator, building locally 133
Operator image, building with
Docker 133, 135, 136
continuous integration (CI) 57
controller-gen 79
control loop function
about 229
Operator config settings, accessing 234
structure 233
conversion webhook
about 240
adding, to Operator 240
core metrics
about 114, 234
collecting, with
metrics-server component 234
core Operators
about 276
etcd Operator 282, 283
Kube Scheduler Operator 281, 282
RBAC Manager 278-280
CRD schema 51, 52
CRD versioning
reference link 187
CR object
about 227
versus CustomResourceDefinition
(CRD) 227
Custom Resource (CR) 7, 48
CustomResourceDefinition (CRD)
about 103, 27, 254, 278
configuration settings,
monitoring 257-261
designing 48
Index 295
Operator API, relating to 228
overview 227
object types 254
operand deployment
management 255, 257
updating 192, 193
overview 227
versus CR object 227
custom service metric
adding 115
D
deployments 27
Deprecated API Migration Guide
reference link 214
deprecation and backward compatibility
planning 209-211
development-operations (DevOps) 6
disaster recovery (DR) 16
Docker
Operator image, building with 134-136
troubleshooting 149-151
URL 149
Dockerfile syntax
reference link 149
DockerHub
URL 137
downgrades
handling 60-62
E
edge-based triggering 58
edge-triggered 230
end users and customers 35
Enhancements Freeze 215-217, 242
errors
reporting, with events 64, 65
reporting, with logging 62, 63
reporting, with status updates 63, 64
etcd Operator
about 282, 283
reference link 277, 282
etcd Operator, design
about 283
CRDs 283, 284
failure recovery 287
reconciliation logic 285, 286
event triggering
about 230
edge-triggered 230
level-triggered 230
F
failure reporting
using 62
Full Lifecycle Operators 282
G
go:embed marker
about 233
using, to access resources 82, 83
garbage collection (GC) 63
GA release 219
generated Operator manifests
customizing 233
Go 9, 70
go-bindata access resources
old version 84
using 82, 83
Google Cloud 173
296
Index
Google Cloud Platform
(GCP) account 284
Google Cloud Storage (GCS) bucket 284
Grafana
about 247
reference link 114
Grafana Operator 174
H
health and ready checks 235
health checks
adding 125, 126
Helm 9, 226
J
JavaScript Object Notation (JSON) 56
K
kind
reference link 148
troubleshooting 148
URL 137
kind codebase
reference link 148
Kubebuilder 53, 76, 225, 229
Kubebuilder markers 232
Kubebuilder Metrics
reference link 115
Kubebuilder resources 99
KubeCon 214
Kube Controller Manager 7
Kubelet 27
kube-prometheus
about 247
configuring 144, 145
installing 144
reference link 144
Kubernetes
about 4, 103
issues 98
Operator, interacting with 227
upgrading 290, 291
Kubernetes API design conventions
following 49, 50
Kubernetes cluster
benefits, to Operators 224
Operator, deploying 236
Kubernetes cluster resources
CustomResourceDefinition
(CRDs) 28, 29
deployments 27
interacting with 26
namespace 31
Pods 27, 28
ReplicaSets 27, 28
RoleBindings 29, 30
roles 29, 30
ServiceAccounts 29, 30
Kubernetes community
repository, reference link 221
working with 220, 221
Kubernetes community standards
applying, to Operator development 242
Kubernetes controller
versus Operator 224
Kubernetes deprecation policy
API elements, removing 241
reference link 211
Kubernetes Enhancement
Proposal (KEP) 216
Kubernetes events 231
Index 297
Kubernetes objects
metadata field 258
spec field 258
Kubernetes platform
extending 276
release, overview 214-216
Kubernetes Release Cadence Change
reference link 214
Kubernetes release cycle
about 242
Call for Exceptions 217
Code Freeze 218
Enhancements Freeze 216, 217
GA release/Code Thaw 219, 220
Retrospective 220
start 216
Test Freeze 218
Kubernetes release timeline
aligning with 214
Kubernetes resources 97, 98
Kubernetes SD configurations
reference link 252
Kubernetes Slack server
URL 148
kube-scheduler 114
Kube Scheduler Operator
about 281, 282
reference link 277
Kubernetes standards, complying
with for changes
about 211, 212
API conversion 213
API lifetime 213
APIs, removing 212
kube-storage-version-migrator
about 240
reference link 205
Kustomize
URL 146
L
leader 121
leader election
about 235
implementing 121-125
strategies 235
leader-for-life 122
leader-with-lease 122
level-based event triggering
versus edge-based event triggering 58
level-triggered 230
M
maintainers
identifying 32, 36
Make
reference link 148
Makefile issues
troubleshooting 148
metrics
about 234
core metrics 234
service metrics 234
troubleshooting 152, 153
metrics reporting
custom service metric, adding 115
implementing 114, 115
RED metrics 116-118, 120
metrics-server application 114
metrics-server component
about 234
used, for collecting core metrics 234
298
Index
Microsoft 173
minimum viable product (MVP) 48, 210
N
namespace 31 159
namespace-scoped 31
nginx Pod
managing, with simple Opertaor 48-66
no-operation (no-op) function 54, 74, 126
O
OLM Operator condition
using 111-114
OLM support
troubleshooting 181
OpenAPI version 3 (V3)
validation 53, 229
OpenTelemetry
reference link 114
Operand 7, 225
Operator
about 69, 224
applications, managing with 19
API 72-76
API version, adding to 187-189
beneficial features, designing 36, 37
benefit, providing to
Kubernetes cluster 224
building locally 133
bundle files, exploring 166-168
bundle image, building 169-171
bundle image, pushing 171
changes, pushing 143
changes, testing 143
cluster service version (CSV) file 165
compiling 235
control loop, writing 89-97
conversion webhook, adding to 240
CRD conditions 104-110
CustomResourceDefinition
(CRD), updating 192, 193
deploying, in Kubernetes cluster 236
deploying, in test cluster 137-143
downgrades, handling 230
errors, troubleshooting 97
failures, reporting 231
implementing, on cluster resources 227
installing, from OperatorHub 238
interacting, with Kubernetes 227
Kubernetes namespaces,
running within 228
new versions, releasing of 187
Operator bundle, deploying
with OLM 172
Operator bundle, generating 163-165
programming languages, writing 226
project, setting up 71, 72
redeploying, with metrics 146
resource manifests, adding 76-81
running 163
safety 288-290
stability 288-290
submitting, to OperatorHub 238
troubleshooting 148
upgrades, handling 230
users, interacting with 228
version, releasing 239
versus Kubernetes controller 224
Operator API
conventions 229
relating, to CRDs 228
Operator bundle 163, 236
Operator capabilities
applying 20-22
Index 299
Operator Capability Model
about 226
functionality level 226
Operator changes
deprecating 40
designing 38
iterating 39
planning 38
Operator config settings
accessing, with control
loop function 234
Operator CRD
example 53, 54
Operator CSV version
updating 206, 207
Operator design
overview 227
Operator development
Kubernetes community standards,
applying to 242
Operator, errors troubleshooting
Kubebuilder resources 99
Kubernetes resources 97, 98
SDK resources 99
Operator for Prometheus
reference link 17
Operator Framework
about 3, 6, 225
components 225
Custom Resource 7
future maintenance 239
Kubernetes controllers 6, 7
Operand 7
overview 8, 9, 224
summarizing 19, 20
Operator functions
defining, with Capability Model 14-18
OperatorHub
about 187, 237, 225
documentation, reference link 177
new version, releasing on 208, 209
Operators, installing from 174-177, 238
Operator, submitting 178-80
overview 235
URL 173, 225
version, publishing 241
working with 173
OperatorHub.io
about 12
Operators, distributing 12, 13
overview 12
OperatorHub repository 179
OperatorHub support
troubleshooting 181-183
Operator image
building, with Docker 133-136
Operator lifecycle
changes, planning 228
Operator Lifecycle Manager (OLM)
about 61, 103, 159, 225, 236
benefit 236
installing, in cluster 236
installing, in Kubernetes cluster 159-161
Operators, managing with 11
overview 235
used, for deploying bundle image 237
working with 161-163
Operator's Cluster Service Version (CSV)
about 13
updating 240
Operator SDK
about 69, 187, 225, 231
developing 9-11
overview 231
300
Index
resources 99
used, for generating resource
manifests 233
operator-sdk api command
about 232
creating 232
operator-sdk command
used, for generating code 232
Operator SDK documentation 122
operator-sdk init command
creating, in boilerplate
Operator project 231
operator-sdk olm status command
displaying 236
Operator SDK project
container image, building 235
Operators, significance in Kubernetes
reference link 281
operator upgrades, in Operator
Lifecycle Manager (OLM)
reference link 206
P
Pod 27, 159
project manifests
updating, to deploy webhook 199-203
Prometheus
about 24
community, reference link 151
configuring 249
installing 247, 248
issues, summarizing with 252-254
overview 247
real-world use case 246
reference link 114, 118
running 247, 248
URL 151
prometheus-config-reloader 262
Prometheus configuration
command-line flags 249-251
reference link 249
YAML config 249, 252
Prometheus Operator
APIs 254
CRDs 254, 255
designing 254
reconciliation logic 261-265
reference link 144
used, for reloading config changes 262
PromQL 247
pull request (PR) 178, 238
Q
quorum 287
R
rate, errors, and duration
(RED) metrics 234
RBAC Manager
about 278-280
reference link 277
RBAC settings
RoleBindings 277
Roles 277
ServiceAccounts 277
reconciliation loop
about 229
function 230
structure 233
Red Hat 173
RED metrics
about 116-120
duration 116
Index 301
Errors 116
Rate 116
release candidate (RC) 215
release phases, Kubernetes
reference link 216
ReplicaSets 27
required resources
working with 55-57
resource embedding
simplifying 87-89
resource manifests
about 81, 82
adding 76-81
generating, with Operator SDK 233
Retrospective 216, 220, 242
Role-Based Access Control (RBAC)
about 80
policies 277
RoleBindings 159, 233, 277
Roles 277
rolling upgrade strategy 291
S
scheduler 224
Scheduling Framework
reference link 291
ServiceAccounts 159, 277
Service Discovery (SD) controls 252
service metrics 114, 234
ServiceMonitor
reference link 146
split-brain scenario
about 122
solving, in leader-with-lease 123
status condition report
information 234
status conditions
about 231
reporting 103
storage version 192
structural CRD
schema 229
structural schema 52
T
target reconciliation loop
designing 57-60
edge-based, versus
level-event triggering 58
test cluster
Operator, deploying in 137-143
Test Freeze 218
troubleshooting
additional errors 153
Docker 149-151
kind 148
Makefile issues 148
metrics 151, 152
OLM support 181
OperatorHub support 181-183
U
upgrade channels 241
upgrades
handling 60-62
user groups
cluster administrators 32
cluster users 32
end-users/customers 32
user interface (UI) 54
302
Index
users
identifying 32
interacting, with Operator 228
V
versions
releasing, of Operator 187
releasing, of OperatorHub 208, 209
W
webhook
deploying, by updating project
manifests 199-203
Y
YAML Ain't Markup Language
(YAML) 10
YAML config
about 249
settings 252
Packt.com
Subscribe to our online digital library for full access to over 7,000 books and videos, as
well as industry leading tools to help you plan your personal development and advance
your career. For more information, please visit our website.
Why subscribe?
• Spend less time learning and more time coding with practical eBooks and Videos
from over 4,000 industry professionals
• Improve your learning with Skill Plans built especially for you
• Get a free eBook or video every month
• Fully searchable for easy access to vital information
• Copy and paste, print, and bookmark content
Did you know that Packt offers eBook versions of every book published, with PDF and
ePub files available? You can upgrade to the eBook version at packt.com and as a print
book customer, you are entitled to a discount on the eBook copy. Get in touch with us at
customercare@packtpub.com for more details.
At www.packt.com, you can also read a collection of free technical articles, sign up
for a range of free newsletters, and receive exclusive discounts and offers on Packt books
and eBooks.
304
Other Books You May Enjoy
Other Books You
May Enjoy
If you enjoyed this book, you may be interested in these other books by Packt:
The Kubernetes Bible
Nassim Kebbani, Piotr Tylenda, Russ McKendrick
ISBN: 9781838827694
• Manage containerized applications with Kubernetes
• Understand Kubernetes architecture and the responsibilities of each component
• Set up Kubernetes on Amazon Elastic Kubernetes Service, Google Kubernetes
Engine, and Microsoft Azure Kubernetes Service
• Deploy cloud applications such as Prometheus and Elasticsearch using Helm charts
• Discover advanced techniques for Pod scheduling and auto-scaling the cluster
• Understand possible approaches to traffic routing in Kubernetes
Other Books You May Enjoy
Learning DevOps - Second Edition
Mikael Krief
ISBN: 9781801818964
• Understand the basics of infrastructure as code patterns and practices
• Get an overview of Git command and Git flow
• Install and write Packer, Terraform, and Ansible code for provisioning and
configuring cloud infrastructure based on Azure examples
• Use Vagrant to create a local development environment
• Containerize applications with Docker and Kubernetes
• Apply DevSecOps for testing compliance and securing DevOps infrastructure
• Build DevOps CI/CD pipelines with Jenkins, Azure Pipelines, and GitLab CI
• Explore blue-green deployment and DevOps practices for open sources projects
305
306
Packt is searching for authors like you
If you're interested in becoming an author for Packt, please visit authors.
packtpub.com and apply today. We have worked with thousands of developers and
tech professionals, just like you, to help them share their insight with the global tech
community. You can make a general application, apply for a specific hot topic that we are
recruiting an author for, or submit your own idea.
Share Your Thoughts
Now you've finished The Kubernetes Operator Framework Book, we'd love to hear your
thoughts! If you purchased the book from Amazon, please click here to go straight to the
Amazon review page for this book and share your feedback or leave a review on the site
that you purchased it from.
Your review is important to us and the tech community and will help us make sure we're
delivering excellent quality content.