/


Text
Ж
DECORATIVE
PAINTING #9526
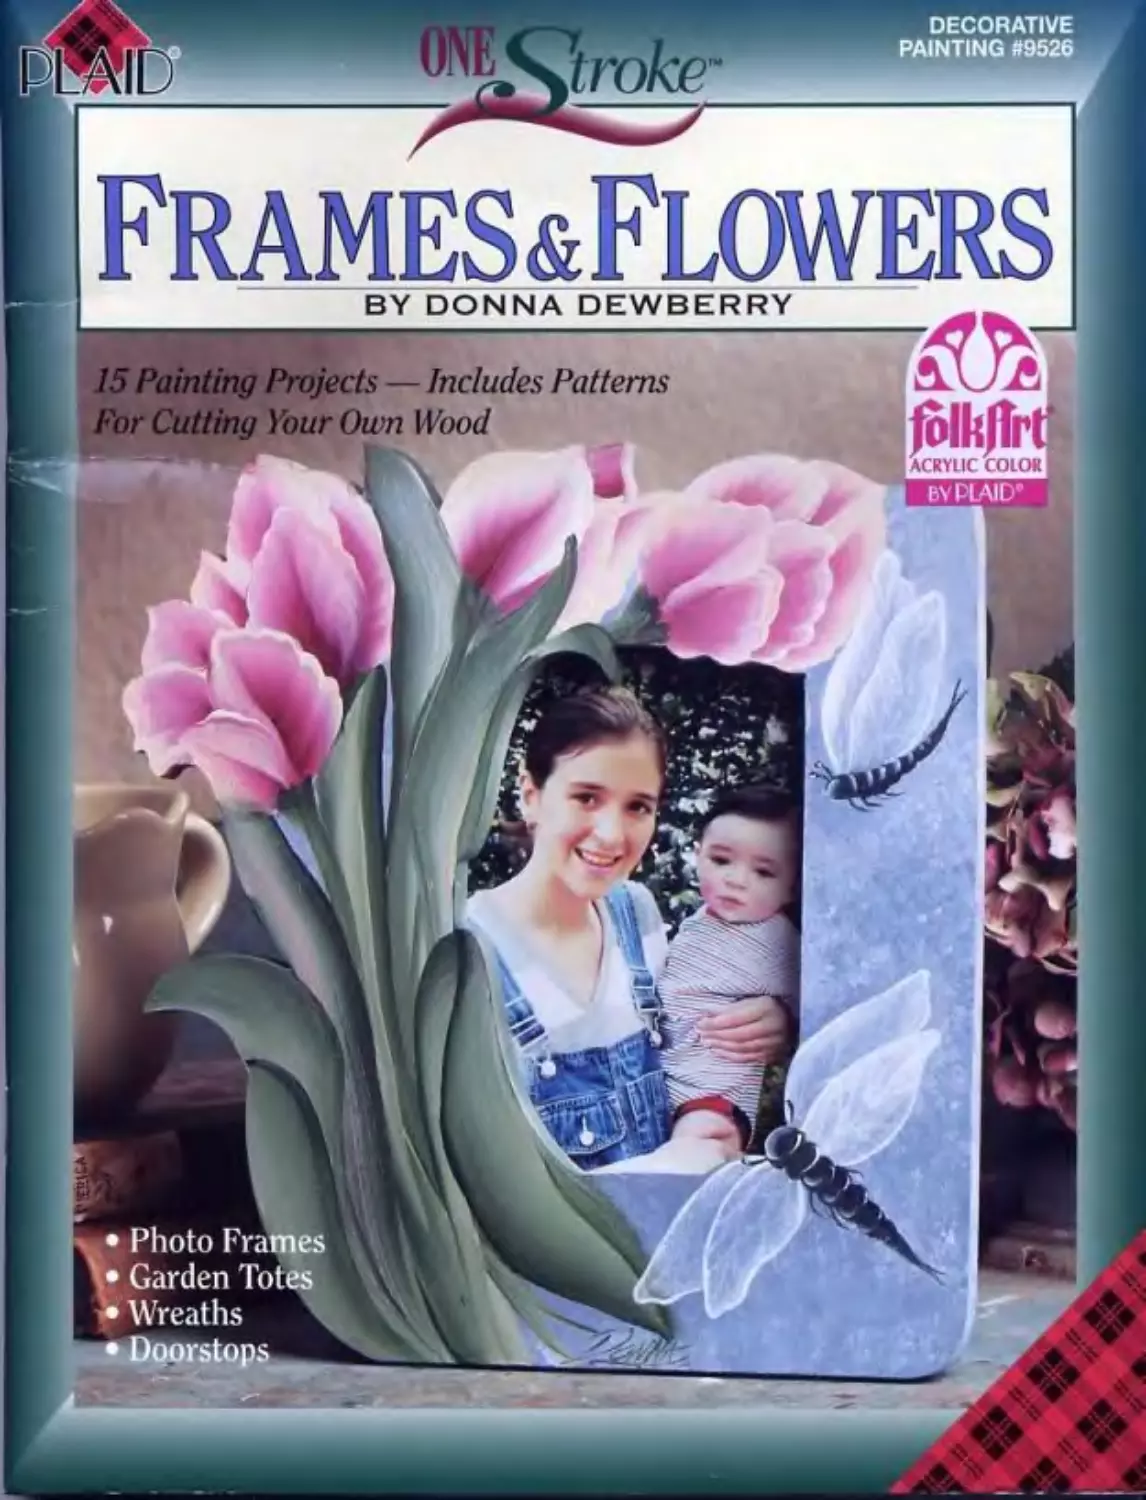
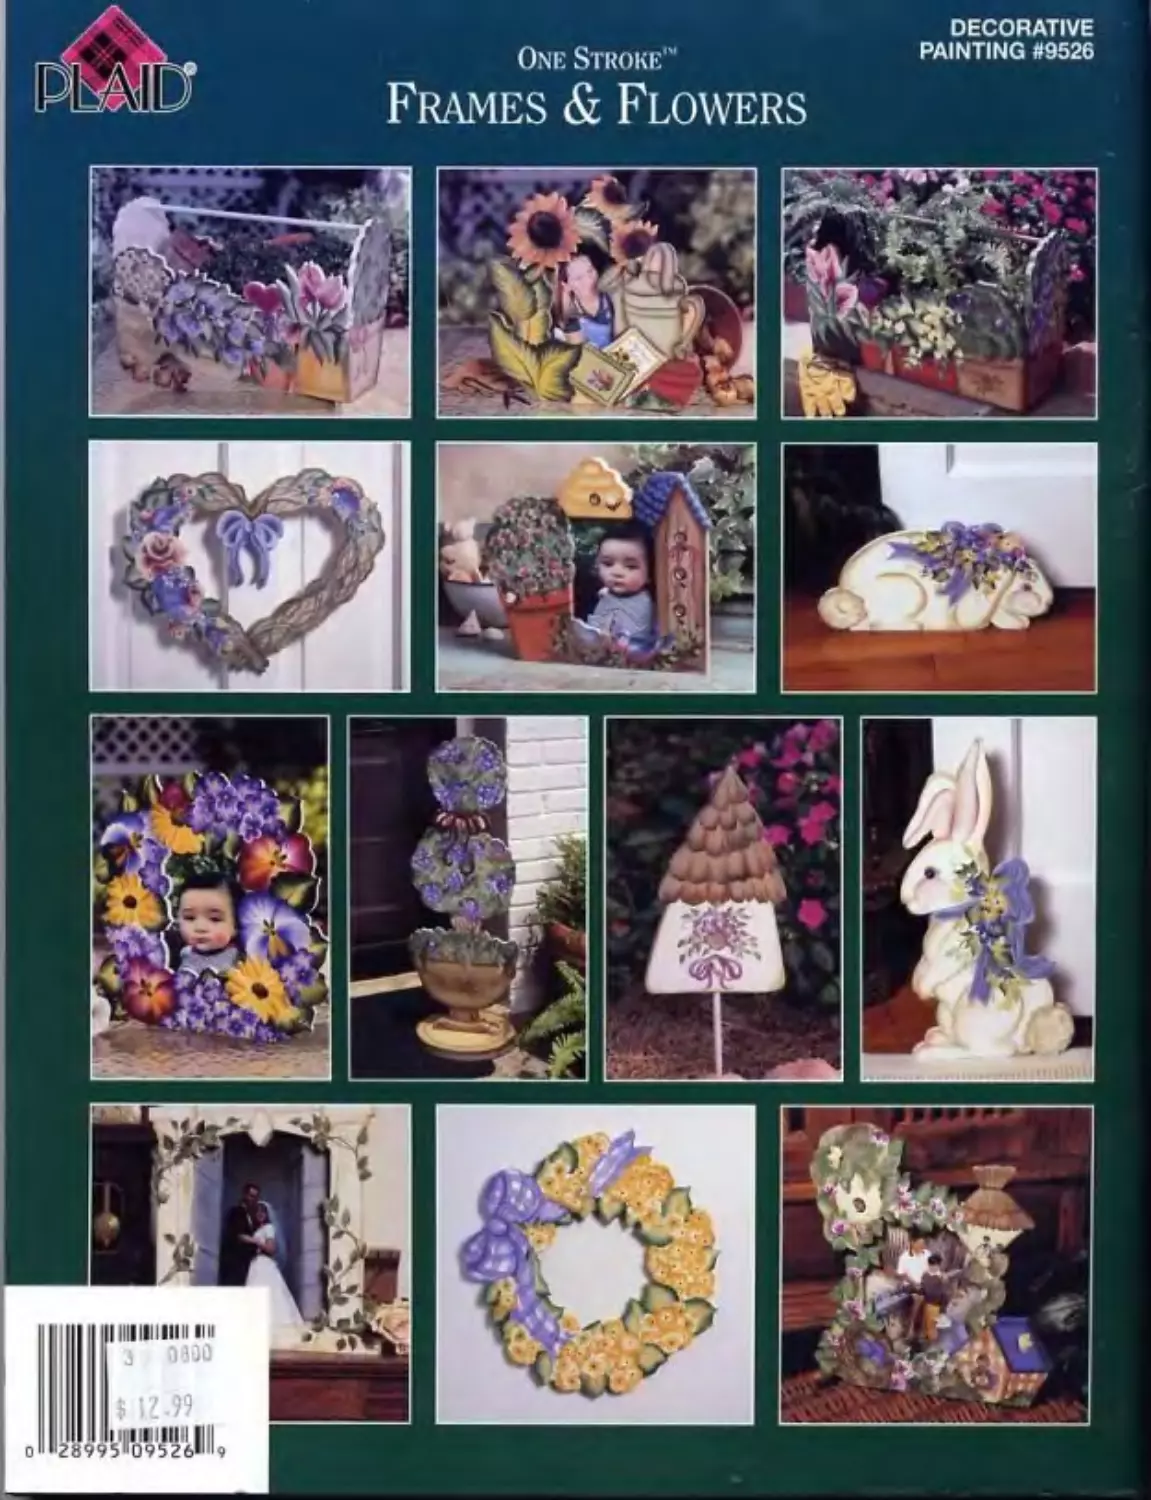
FRAMESsFUMERS
BY DONNA DEWBERRY
fbikllrf
ACRYLIC COLOR •
BV PLAID’
• Photo Frames
• Garden Totes
• Wreaths
• Doorstops
A Word From Donna Dewberry—
Paint Unique Frames For Your Grandchildren’s Photos!
There is nothing like a treasured grandchild to make you want to take
lots of photographs. And then you want to frame them. My grandson. Christian,
was the inspiration for designing this photo frame grouping. / think his little
face looks so precious wreathed in a garland of flowers or peeking out from
behind a birdhouse. These frames are easy to cut from pine and fun to paint.
My grandson. Christian, was bom on my birthday. It is so exciting to
be a grandmother, even more fun than / could ever haw imagined. My husband
says if / pull out those baby pictures just one more time, he's going to take
them away. / never fully understood the excitement about grandchildren until /
had one of my own. He just seems to light up the room when he comes in. His
little smile, his giggle just makes me stop whatever I'm doing and sit with him.
if only for a few minutes. / guess this is one of those hidden blessings ire enjoy
from haring our own children. I love and enjoy all of my children, but a grand-
child seems to have a special place in my heart. / am the mother of seven, so
that means that the possibilities of more grandchildren are great. I will have even more pictures Io show and frame.
/ am a native Floridian and still reside in Florida which means that all my grandchildren will want lo come to
Grandma's house because I live close to Disney World. I think this plan is working out pretty well so far. don't your I
can teach them all to paint unlike my children who don 't seem to have as much patience with me as my grandson
does. My husband says he's going to leach them how to basecoat and seal my projects. He has also informed me that I
am spoiling my grandson (like he's not?) and that my daughter may have to put her foot down if I'm not careful. You
see. no mailer how I try. I just always gel back to talking about grandchildren. 1 hope you can understand and be
patient with me as i go through this period.
About the Artist
Donna Dewberry
Talented artist, Donna Dewberry,
created the One Stroke™ painting tech-
nique featured in a number of books she
has authored. Donna has been involved
with arts and crafts all her married life, over
25 years. After many evenings at her dining
room table enjoying the pleasures of deco
rative painting, she developed a technique
for stress free painting that is the basts for
her One Stroke’M scries of painting books.
For any Information on her three and
one half day seminar in which you will
learn the technique from Donna while she
also teaches you how to start a business In
decorative painting (a dream come true for
many), hints on how to be a good teacher,
how to demo In stores, and even how to
get your painting published, contact Donna
through one of the following means:
Donna Dewberry
811 E. Highland Dr.
Altamonte Springs. FL 32701
Phone: 407-8306786
Fax:407-831-0658
Web site: www.onestroke.com
E-mail: dewberryt" magxnet.net
Disclaimer The information in this instruction book is presented in good faith, bul
no warranty is given, nor results guaranteed, nor is freedom from any patent to be
inferred. Since we have no control over physical conditions surrounding the appli-
cation of information heroin contained, Plaid Enterprises. Inc. disclaims any liabtti-
ly for untoward results.
IMPORTANT: Please be sure to thoroughly read the instructions for all products
used to complete projects in this book, paying particular attention to all cautions and
warnings shown for that product to ensure their proper and safe use.
Copyright: All Rights Reserved. No part of tins book may be reproduced in any
form without permission in writing, except by reviewer, who may in reviewing this
publication, quote brief passages in a magazine or newspaper.
I I All ПИ I I I ISI S.IX .
NORCROSS, GA 30091-7600
7709238200
web site: www.plaidonline.com
©1999, Plaid Enterprises, Inc. Printed in U.S.A
2
Dedication
This book is dedicated to all of you
who cut out your own wood pieces. I
admire you and your talent, but most of
all. the hard work it takes to cur nut the
pieces. I enjoy being аЫе to cut out my
own pieces, but many times I am unable
to for one reason or another. It seems to
be much more enjoyable to do decora-
tive painting on the pieces I cut out
myself. There is something to be said for
not only embellishing a piece but also
being able to create that piece, and the
satisfaction that comes from doing so. I
hope the designs in (his book will bring
you some pleasure and that, as you cut
these out, you will think about me. I
would really like to be there with you at
the saw.
Thank You
I would like to thank Jeff and
Sherry Foster and their staff at Cabin
Crafters for all their hard work. It took a
lot of time and effort to get all these
pieces cut and delivered for this book.
They did a great job (as usual), and the
pieces turned out really well, despite my
messy drawings. Sometimes I forget the
behind-the-scenes people but, believe
me, these books would not be possible
without their involvement. Thank you!
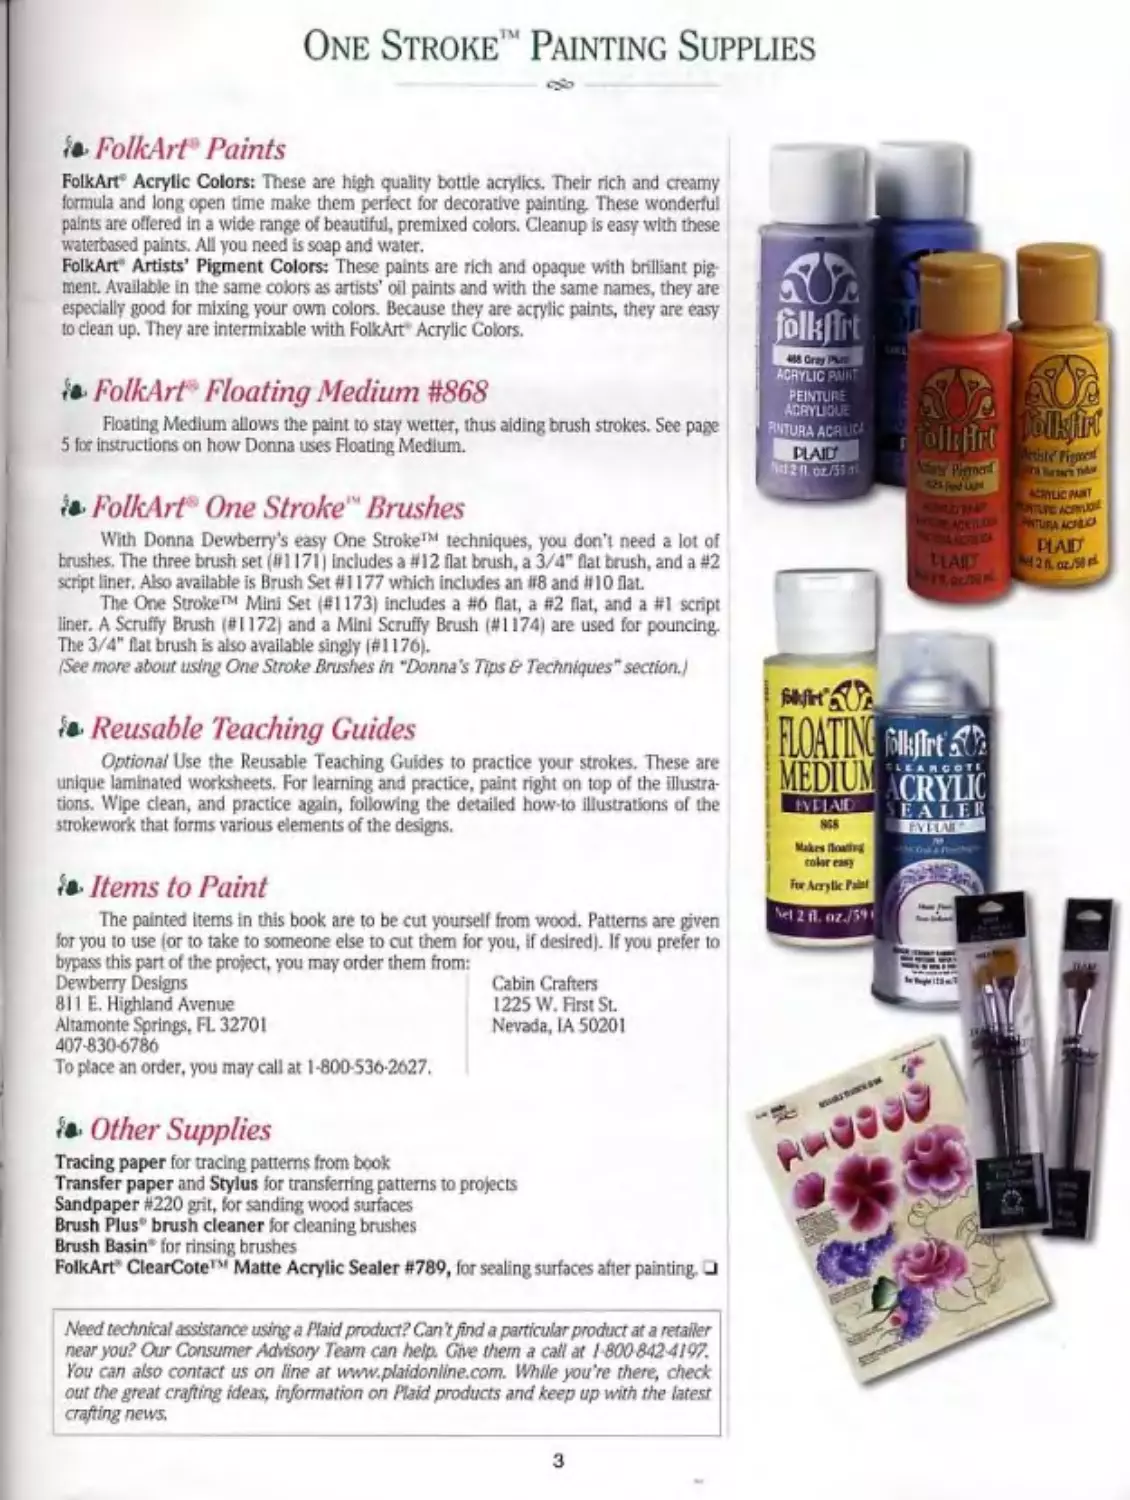
One Stroke'" Painting Supplies
FolkArt Paints
FolkArt Acrylic Colors: These are high quality bottle acrylics. Their rich and creamy
formula and long open time make them perfect for decorative painting. These wonderful
paints are offered In a wide range of beautiful, premixed colors. Cleanup Is easy with these
waterbased paints. All you need is soap and water.
FolkArt Artists’ Pigment Colors: These paints are rich and opaque with brilliant pig
menu Available in the same colors as artists' oil paints and with the same names, they are
especially good for mixing your own colors. Because they are acrylic paints, they are easy
to clean up. They arc intermixable with FolkArt Acrylic Colors.
FolkArt Floating Medium #868
Floating Medium allows the paint to stay wetter, thus aiding brush strokes. See page
5 for instructions on how Donna uses Floating Medium.
i* FolkA rt One Stroke'" Brushes
With Donna Dewberry's easy One Stroke1*' techniques, you don't need a lot of
brushes. The three brush set (ft 11711 Includes a «12 flat brush, a 3/4" flat brush, and a #2
script liner. Ako available is Brush Set«1177 which includes an «8 and И10 flat
The One Stroke™ Mini Set («1173| includes a «6 flat, a #2 fiat, and a «1 script
liner. A Scruffy Brush («11721 and a Mini Scruffy Brush I# I174) are used for pouncing.
The 3/4’ Hat brush is also available singly |#1176).
fSee more about using One Stroke Brushes in ‘Donna's Tips & Techniques’ section.)
Reusable Teaching Guides
Optional Use the Reusable Teaching Guides to practice your strokes. These are
unique laminated worksheets. For learning and practice, paint right on top of the illustra-
tions. Wipe clean, and practice again, following the detailed how-to illustrations of the
strokework that forms various elements of the designs.
Items to Paint
The painted items in this book are to be cut yourself from wood. Patterns are given
for you to use lor to take to someone else to cut them for you. if desired). If you prefer to
bypass this pan of the project, you may order them from:
Dewberry Designs Cabin Craftent
811 E. Highland Avenue 1225 W. First St.
Altamonte Springs, FL 32701 Nevada, IA 50201
407-8306786
To place an order, you may call at I -800-536-2627.
Other Supplies
Tracing paper for tracing patterns from book
Transfer paper and Stylus for transferring patterns to projects
Sandpaper #220 grit, for sanding wood surfaces
Brush Plus' brush cleaner for cleaning brushes
Brush Basin '1 for rinsing brushes
FolkArt' ClcarCoie™ Matte Acrylic Sealer #789, for scaling surfaces after painting. J
Need technical assistance using a Plaid product? Can't find a particular product at a retailer
near you? Our Consumer Advisory Team can help Give them a call at 18008424197.
You can also contact us on line at www.plaidonline.com. While you're there, check
our rhe great crafting ideas, information on Plaid products and keep up with the latest
crafting news.
3
The One Stroke Technique
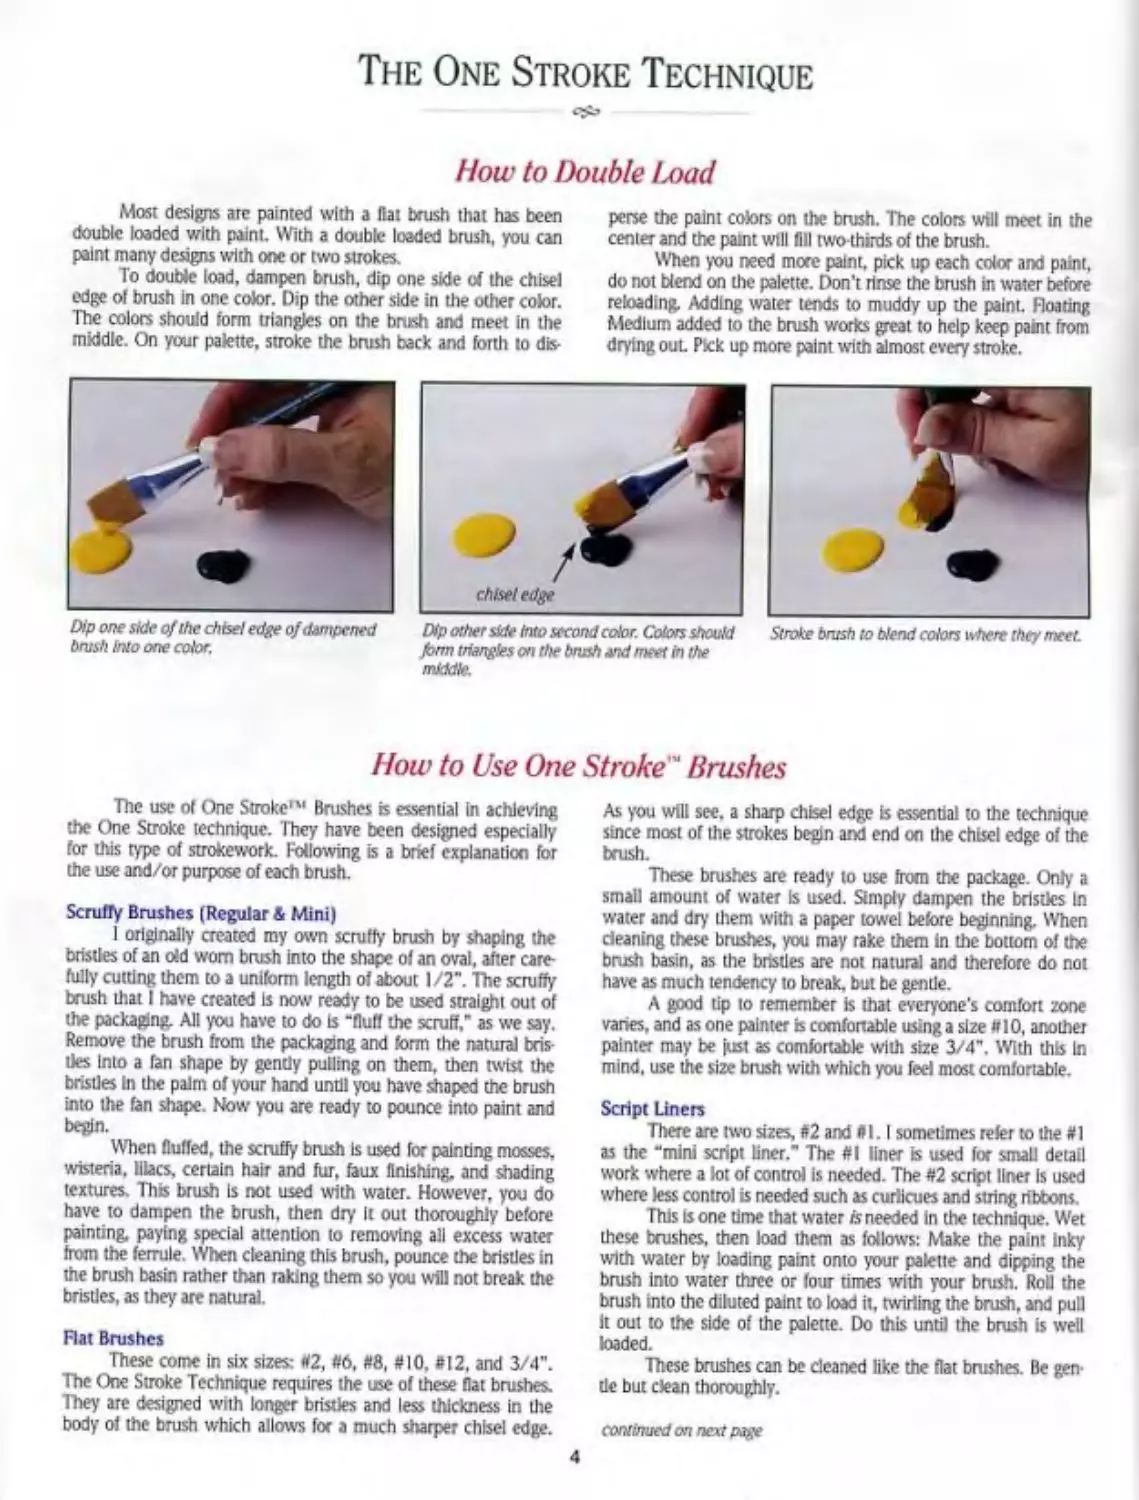
How to Double Load
Most designs are painted with a fiat brush that has been
double loaded with paint. With a double loaded brush, you can
paint many designs with one or two strokes.
To double load, dampen brush, dip one side of the chisel
edge of brush in one color. Dip the other side in the other color.
The colors should form triangles on the brush and meet in the
middle. On your palette, stroke the bnish back and forth to dis-
perse the paint colors on the bnish. The colors will meet in the
center and the paint will fill two thirds of the brush.
When you need mac paint, pick up each color and paint,
do not blend on tire palette. Don’t rinse the brush in water before
reloading. Adding water tends to muddy up the paint. Roaring
Medium added to the brush works great to help keep paint from
drying out Pick up more paint with almost every stroke.
Dip one side of the chisel edge of dampened
brush into one color.
Dip other side into second color. Colors should
fonn triangles on the brush and meet in the
middle.
Stroke brush to blend colors where they meet.
How to Use One Stroke" Brushes
The use of One Stroke"’ Brushes is essential in achieving
the One Stroke technique. They have been designed especially
for this type of strokework. Following is a brief explanation for
the use and/or purpose of each brush.
Scruffy Brushes (Regular & Mini)
I originally created my own scruffy brush by shaping the
bristles of an old worn brush into the shape of an oval, after care-
fully cutting them to a uniform length of about 1/2". The scruffy
brush that I have created is now ready to be used straight out of
the packaging. All you have to do Is "fluff the scruff," as we say.
Remove the brush from the packaging and form the natural bris-
tles Into a fan shape by gently pulling on them, then twist the
bristles in the palm of your hand until you have shaped the brush
into the fan shape. Now you are ready to pounce into paint and
begin.
When fluffed, the scruffy brush is used for painting mosses,
wisteria, lilacs, certain hair and fur, faux finishing, and shading
textures. This brush Is not used with water. However, you do
have to dampen the brush, then dry It out thoroughly before
painting, paying special attention to removing all excess water
from the ferrule. When cleaning this brush, pounce the bristles in
the brush basin rather than raking them so you will not break the
bristles, as they are natural.
Flat Brushes
These come in six sizes: #2, #6. #8, #10. #12. and 3/4".
The One Stroke Technique requires the use of these flat brushes.
They are designed with longer bristles and less thickness in the
body of the brush which allows foe a much sharper chisel edge.
As you will see. a sharp chisel edge is essential to the technique
since most of the strokes begin and end on the chisel edge of the
brush.
These brushes are ready to use from the package. Only a
small amount of water Is used. Simply dampen the bristles In
water and dry them with a paper towel before beginning. When
cleaning these brushes, you may rake them in the bottom of the
brush basin, as the bristles are not natural and therefore do not
have as much tendency to break, but be gentle.
A good tip to remember is that everyone’s comfort zone
varies, and as one painter is comfortable using a size #10, another
painter may be just as comfortable with size 3/4". With this In
mind, use the size brush with which you feel most comfortable.
Script Liners
There are two sizes, #2 and rtl. I sometimes refer to the # 1
as the “mini script liner." The #1 liner is used for small detail
work where a lot of control is needed. The #2 script liner Is used
where less control is needed such as curlicues and string ribtons.
This is one time that water is needed In the technique. Wet
these brushes, then load them as follows: Make the paint inky
with water by loading paint onto your palette and dipping the
brush into water three or four times with your brush. Roll the
brush into the diluted paint to load it, twirling the brush, and pull
it out to the side of the palette. Do this until the brush is well
loaded.
These brushes can be cleaned like the flat brushes. Be gen-
tle but clean thoroughly.
continued on next page
4
The One Sitoke™ Technique
Cleaning and Care Of finishes:
Proper cleaning and care makes brushes Iasi'longer and
perform better.
I. Thoroughly rinse the brush with water, using the grid at the
bottom of the Brush Basin*.
2. Squeeze finish Plus brush cleaner into the bristles and work
it In with your fingers all the way to the ferrule. Rinse with
water. Repeat, if needed.
3. Dry the bristles on a clean cloth rag or paper towels, shaping
the bristles as you dry them. It will not harm the bristles to
leave a small amount of moisture in the them.
4. Optional: I like to brush the bristles on a non perfumed, non-
deodorant bar of soap to help them keep their shape. Rinse
before painting again.
finish Care Tips
• Don't allow paint to dry In your brush.
• As you paint, occasionally rinse the bristles with water.
• Store brushes in the Brush Basin or in a container that allows
brashes to retain their form and be separated from each other.
Using Floating Medium
Using Floating Medium on your brush will allow the paint
to stay wet longer so that strokes glide more easily on the surface,
first, load the brush—either single load, double load, or multi-
load. Dip the chisel edge of the fully loaded brush into the
Floating Medium puddle. Stroke back and forth on the palette,
then paint. Repeat every two or three strokes. |lf you do this
more often you will lose your shading.)
Transferring Patterns
1. Trace pattern onto tracing paper with a pencil or pen.
2. Lay traced pattern in position on project. Slip transfer paper
between pattern and painting surface. Trace pattern with a
stylus to transfer it. Do not press too hard on wood surfaces or
you may leave an Impnnt.
Tips
• You may shrink or enlarge the patterns as necessary to accom-
modate the size of your project.
• Use dark transfer paper for light surfaces and white for darker
surfaces.
• Lightly tape the pattern to the surface to keep it from sliding.
• It is not necessary to trace every fine detail. Transfer the main
outlines of the pattern. Tracing every detail will take away
from the natural look you are trying to attain.
Cutting Your Own Wood
The outer edge of the design patterns can be used as a pat-
tern for cutting your wood. Use the thickness of wood given in
project instructions. The width of the wood you use can be 1/2",
5/8* or 3/4". The slight difference in these sizes will not alter
the look of your projects. Transfer the outline of the design to the
wood surface in the same manner given for transferring the
design. Cut out with a jigsaw or scroll saw.
Preparing the Surface
I. Sand wood, sanding in the direction of the grain. Wipe surface
clean of dust with a tack cloth.
2. Basecoat surface. Two coats will provide a good surface to
paint on. Allow sufficient drying time between coats. You may
need to lightly sand the surface after each coat to smooth
down the grain of the wood raised by the paint.
Painting Tips
• I usually paint the larger flowers or buds first, then fill in with
the leaves.
• Paint your florals and leaves by building one stroke at a time.
• On wildflowers or vines, paint the greenery first, then come
back and paint flowers, stems, and vines.
• Apply finishing touches by painting curlicues and your signature J
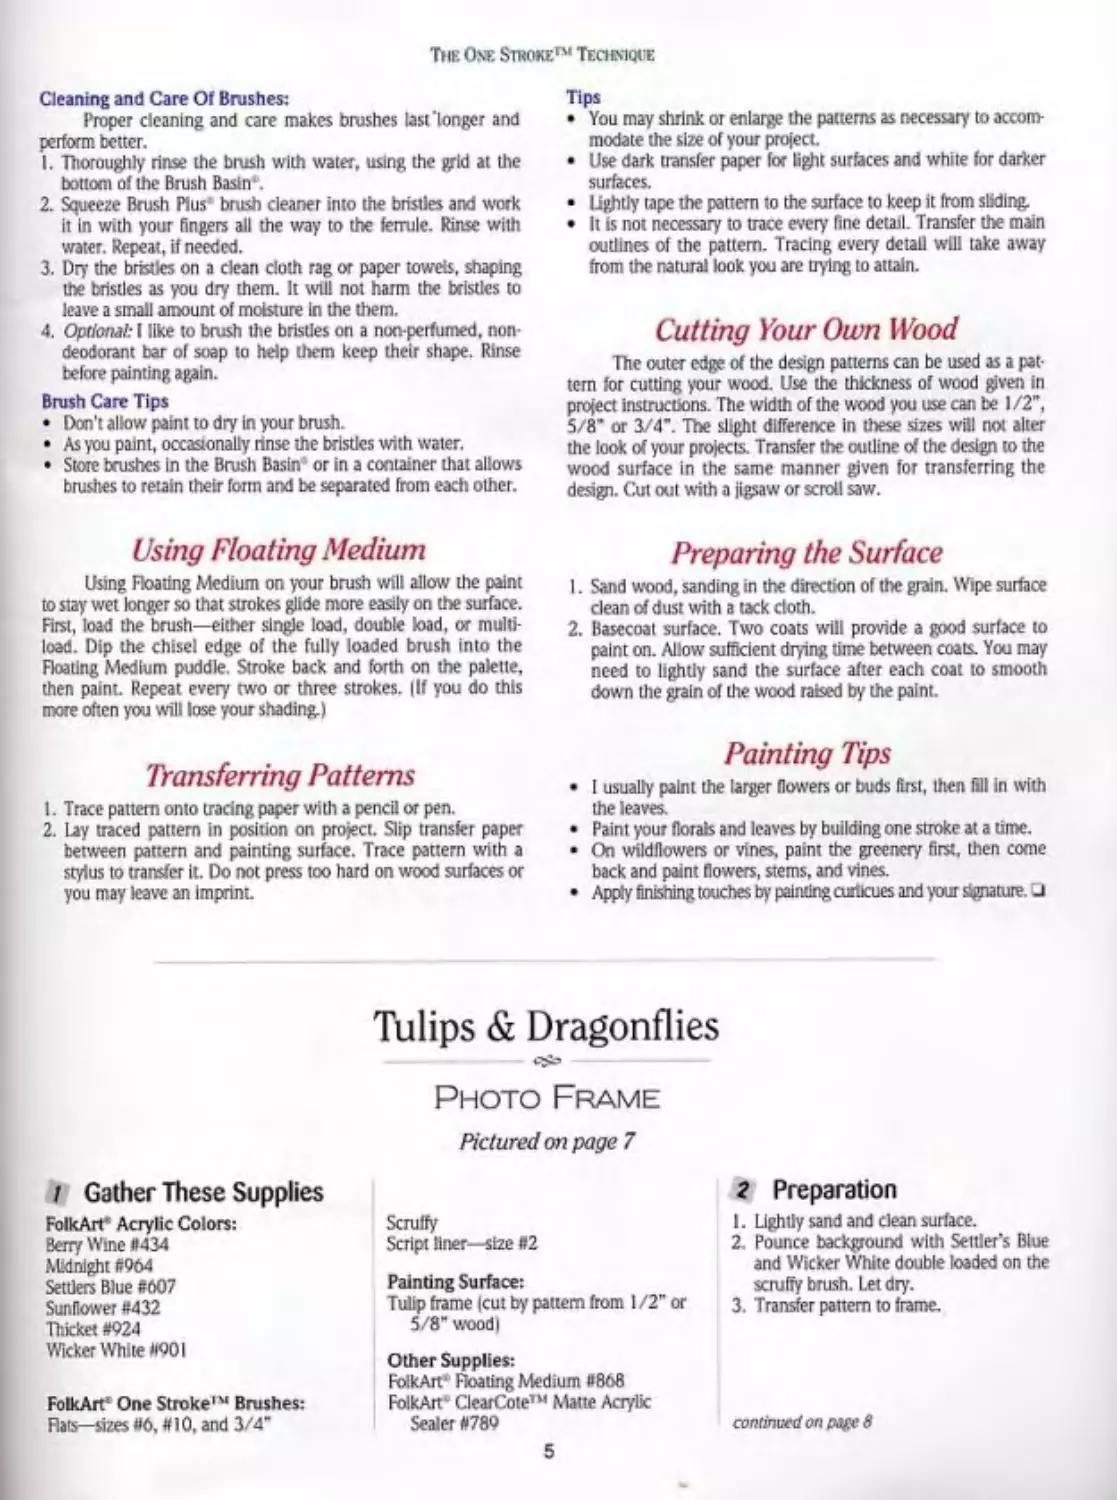
Tulips & Dragonflies
Photo Frame
Pictured on page 7
I Gather These Supplies
FolkArt' Acrylic Colors:
Berry Wine «434
Midnight «964
Settlers Blue #607
Sunflower #432
Thicket #924
Wicker White «901
FolkArt' One Stroke1 M Brushes:
Flats—sizes #6, #10, and 3/4*
Scruffy
Script liner—size #2
Painting Surface:
Tulip frame (cut by pattern from 1/2" or
5/8" wood |
Other Supplies:
FolkArt' Floating Medium #868
FolkArt1 ClearCote™ Matte Acrylic
Sealer #789
2 Preparation
I. Lightly sand and clean surface.
2. Pounce background with Settler’s Blue
and Wicker White double loaded on the
scruffy brush. Let dry.
3. Transfer pattern to frame.
continued on page 8
5
Chiwlt-dgr
Floated Dlox.
Purple witti
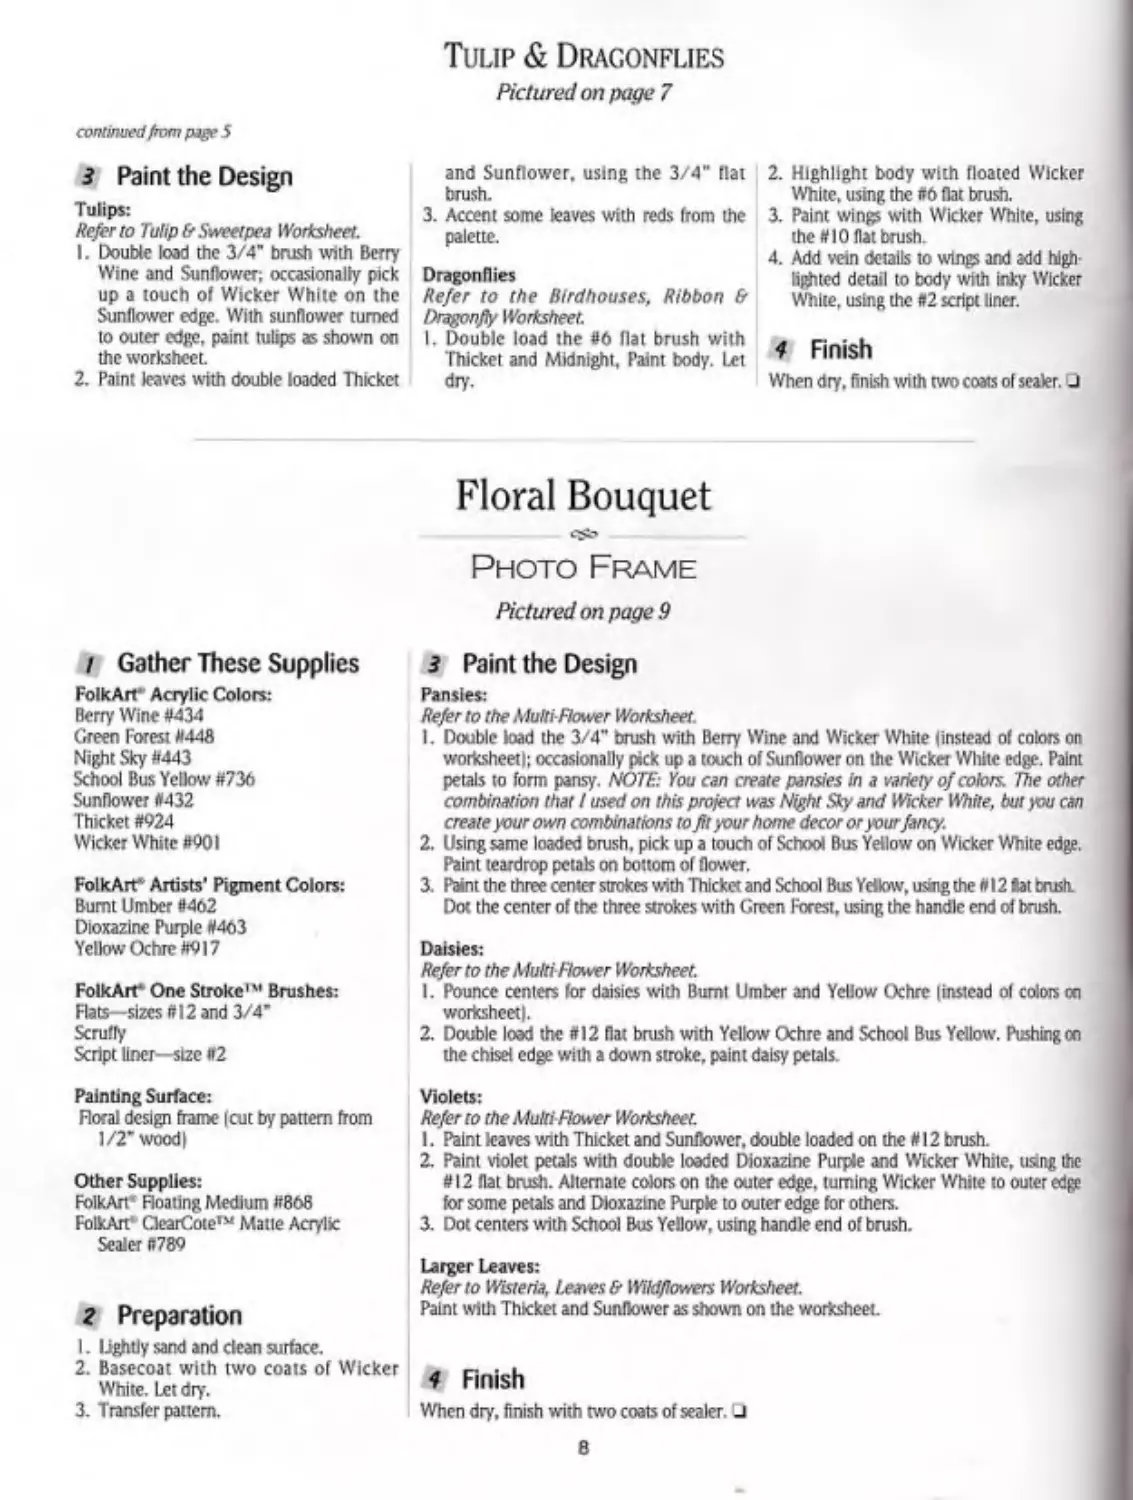
amtmiied frvm page 5
3 Paint the Design
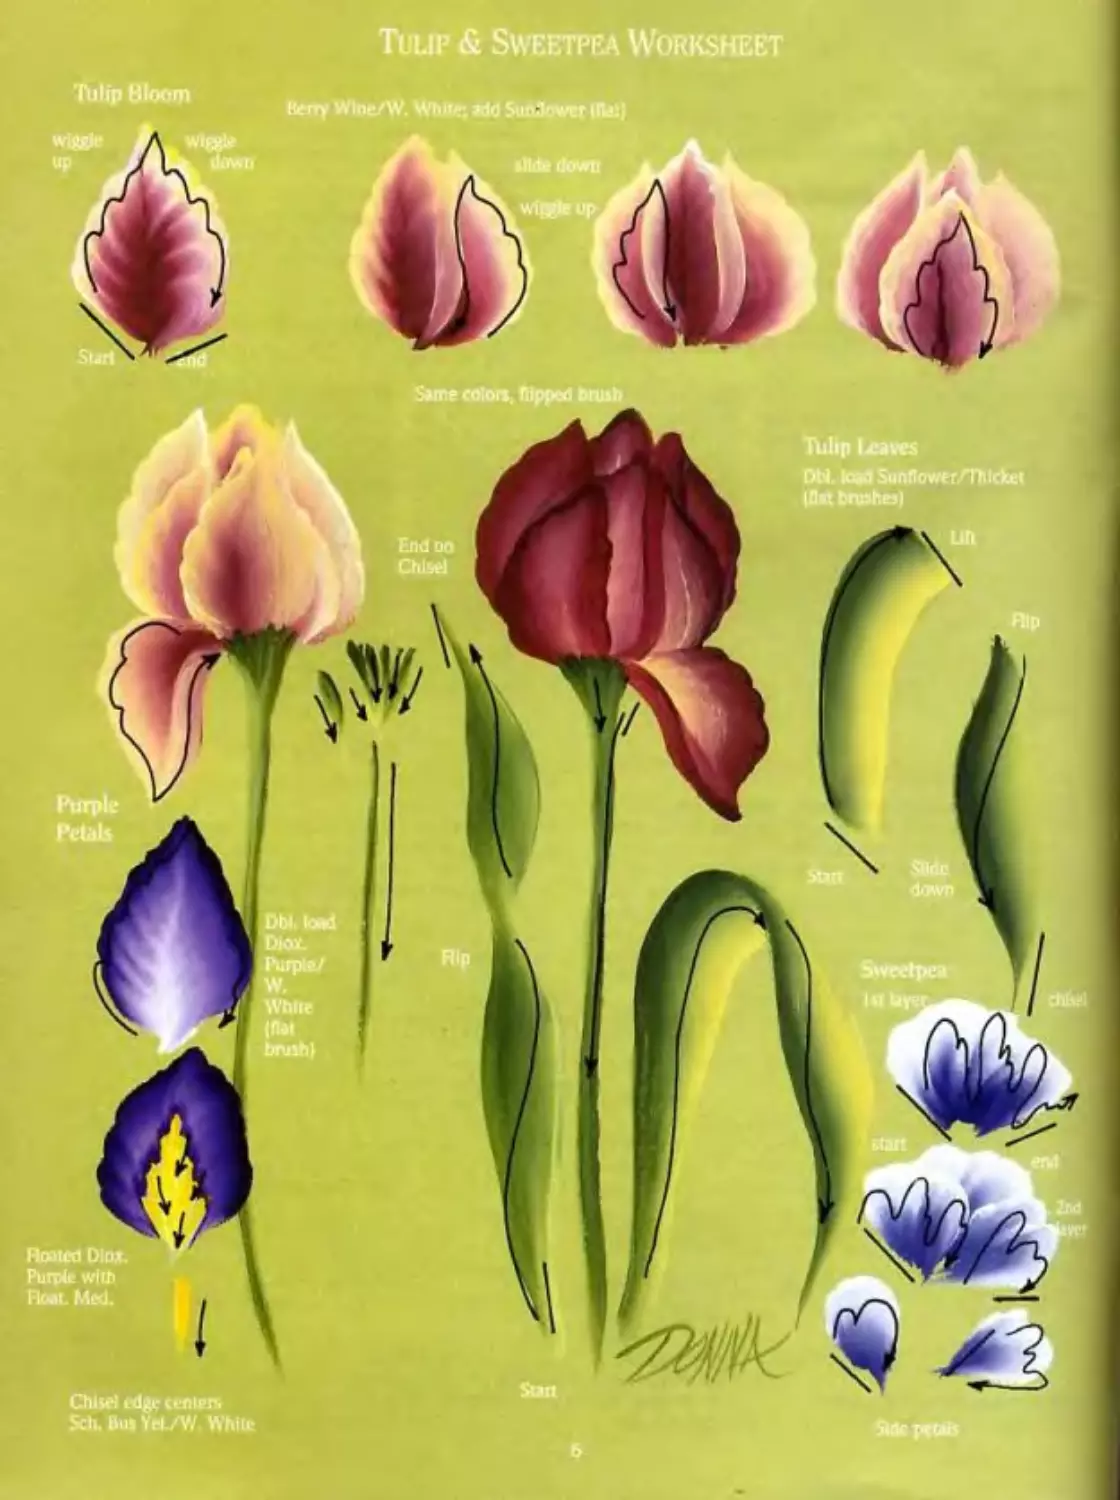
Tulips:
Refer io Tulip & Sweet pea Worksheet.
I. Double load the 3/4” brush with Berry
Wine and Sunflower; occasionally pick
up a touch of Wicker White on (he
Sunflower edge. With sunflower turned
to outer edge, paint tulips as shown on
the worksheet.
2. Paint leaves with double loaded Thicket
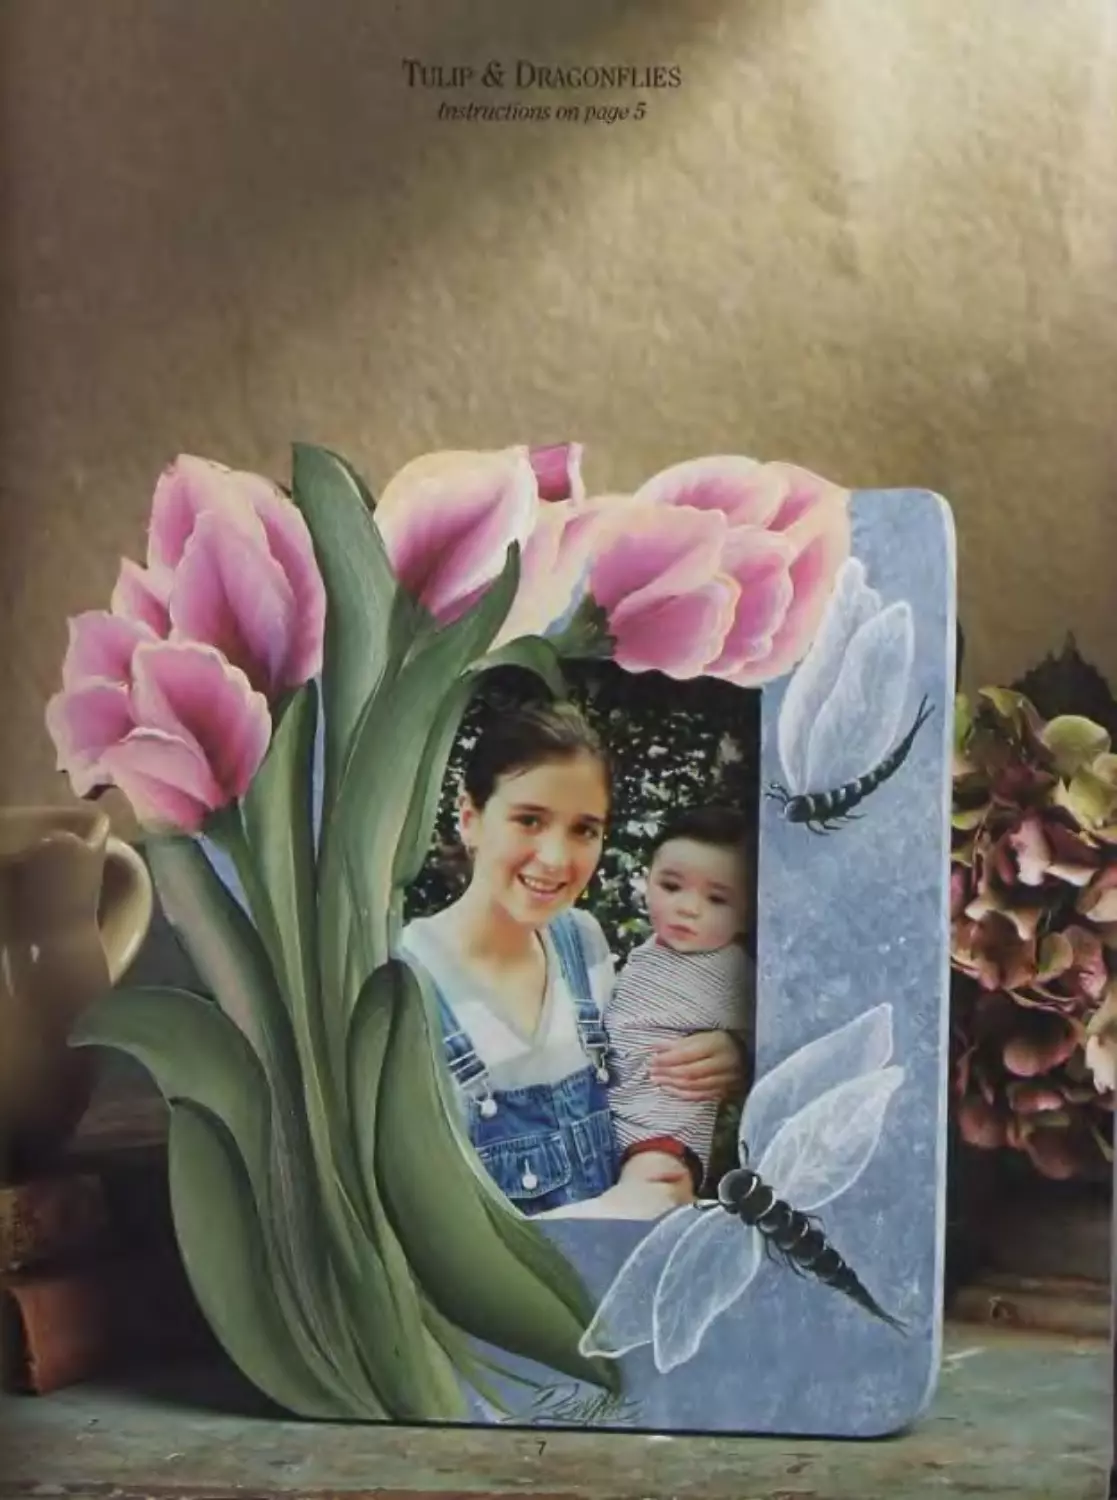
Tulip & Dragonflies
Pictured on раде 7
and Sunflower, using the 3/4" flat
brush.
3. Accent some leaves with reds from the
palette.
Dragonflies
Refer to the Bird houses, Ribbon &
Dragonfly Worksheet.
I. Double load the #6 flat brush with
Thicket and Midnight. Paint body. Let
dry.
2. Highlight body with floated Wicker
White, using the fib flat brush.
3. Paint wings with Wicker White, using
the tt 10 flat brush.
4. Add vein details to wings and add high
lighted detail to body with inky Wicker
White, using the #2 script liner.
4 Finish
When dry. finish with two coats of sealer. □
/ Gather These Supplies
FolkArt' Acrylic Colors:
Berry Wine #434
Green Forest #448
Night Sky #443
School Bus Yellow #736
Sunflower #432
Thicket #924
Wicker White #901
FolkArt* Artists’ Pigment Colors:
Burnt Umber #462
Dioxazine Purple #463
Yellow Ochre #917
FolkArt* One Stroke1'' Brushes:
Flats—sizes #12 and 3/4’
Scruffy
Script liner—size #2
Painting Surface:
Floral design frame (cut by pattern from
1/2’wood)
Other Supplies:
FolkArt Floating Medium #868
FolkArt' OearCote™ Mane Acrylic
Sealer #789
2 Preparation
I. Ijghtly sand and clean surface.
2. Basecoat with two coats of Wicker
White. Let dry.
3. Transfer pattern.
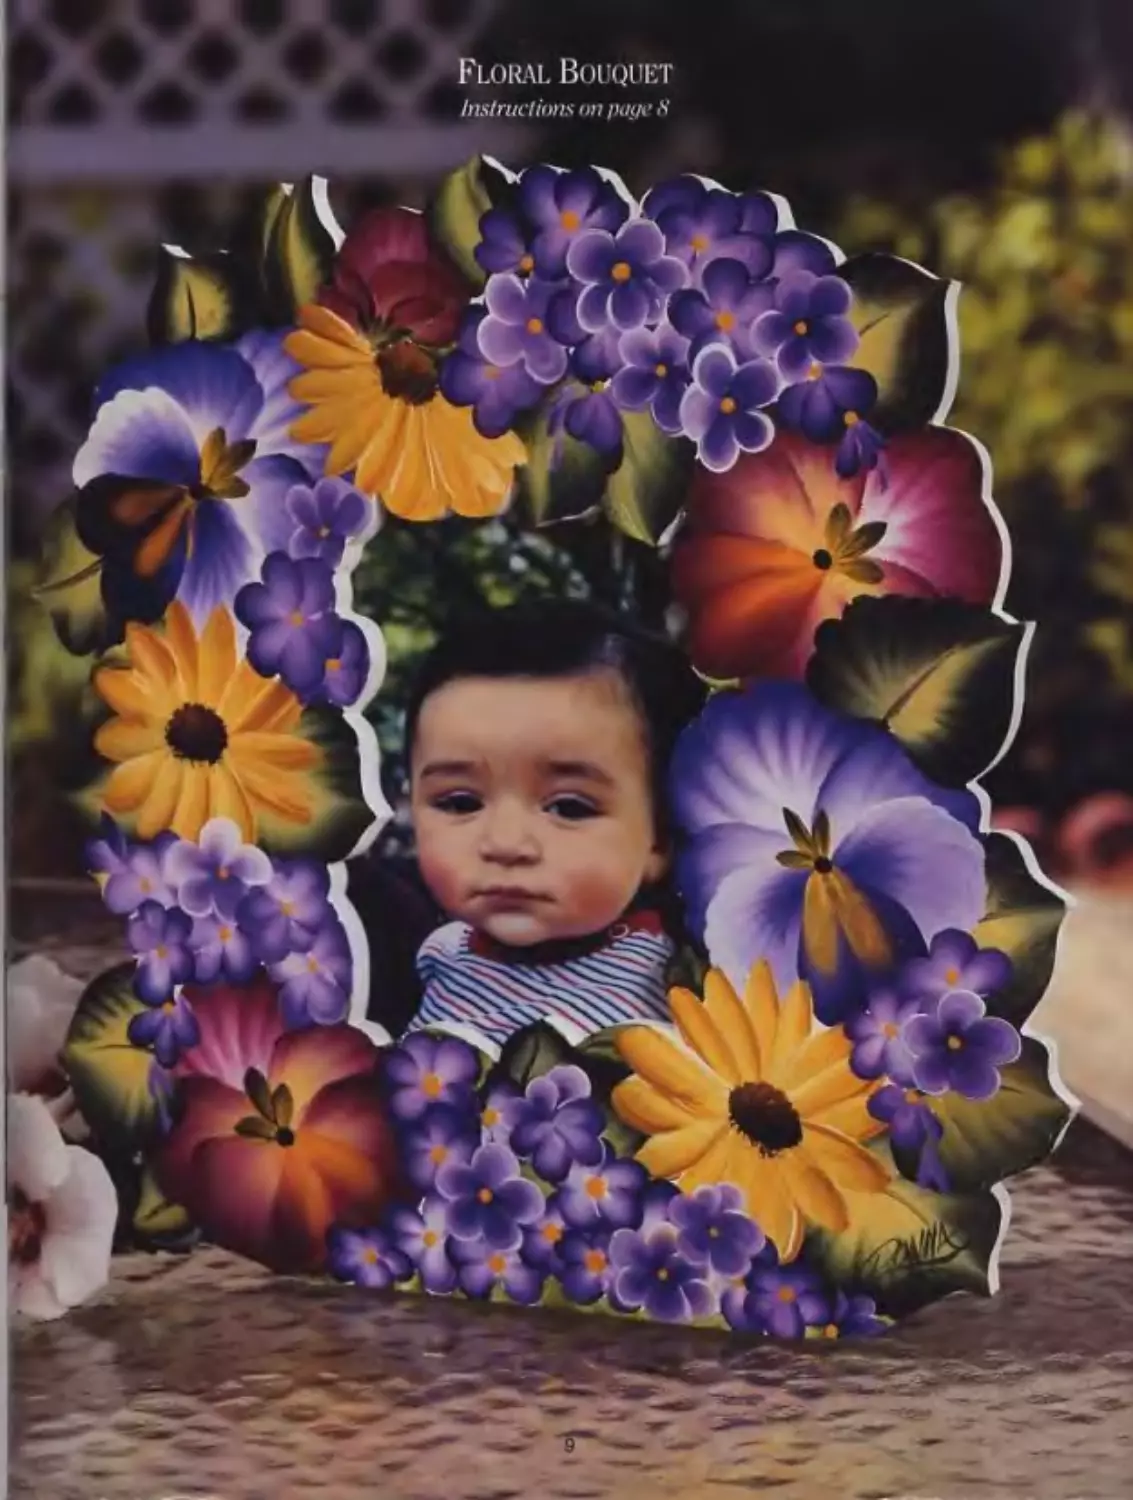
Floral Bouquet
Photo Frame
Pictured on раде 9
3 Paint the Design
Pansies:
Refer to the Multi Flower Worksheet.
I. Double load the 3/4“ brush with Berry Wine and Wicker White (instead of colors on
worksheet); occasionally pick up a touch of Sunflower on the Wicker White edge. Palm
petals to form pansy. NOTE: You can create pansies in a variety of colors. The other
combination that / used on this project was Night Sky and Wicker White, but you can
create your own combinations to fit your home decor or yourfancy.
2. Using same loaded brush, pick up a touch of School Bus Yellow on Wicker White edge.
Paint teardrop petals on bottom of flower.
3. Paint the three center strokes with Thicke: and School Bus Yellow, using the # 12 flat crush.
Dot the center of the three strokes with Green Iforest, using the handle end of brush.
Daisies:
Refer to the Multi Flower Worksheet.
I. Pounce centers for daisies with Burnt Umber and Yellow Ochre (instead of colors at
worksheet).
2. Double load the #12 flat brush with Yellow Ochre and School Bus Yellow. Pushing on
the chisel edge with a down stroke, paint daisy petals.
Violets:
Refer to the Multi Flower Worksheet.
1. Paint leaves with Thicket and Sunflower, double loaded on the # 12 brush.
2. Paint violet petals with double loaded Dioxazine Purple and Wicker White, using the
# 12 flat brush. Alternate colors on the outer edge, turning Wicker White to outer edge
for some petals and Dioxazine Purple to outer edge for others.
3. Dot centers with School Bus Yellow, using handle end of brush.
Larger Leaves:
Refer to Wisteria, Leaves & Wildflowers Worksheet.
Paint with Thicket and Sunflower as shown on the worksheet
4 Finish
When dry', finish with two coats of sealer. J
8
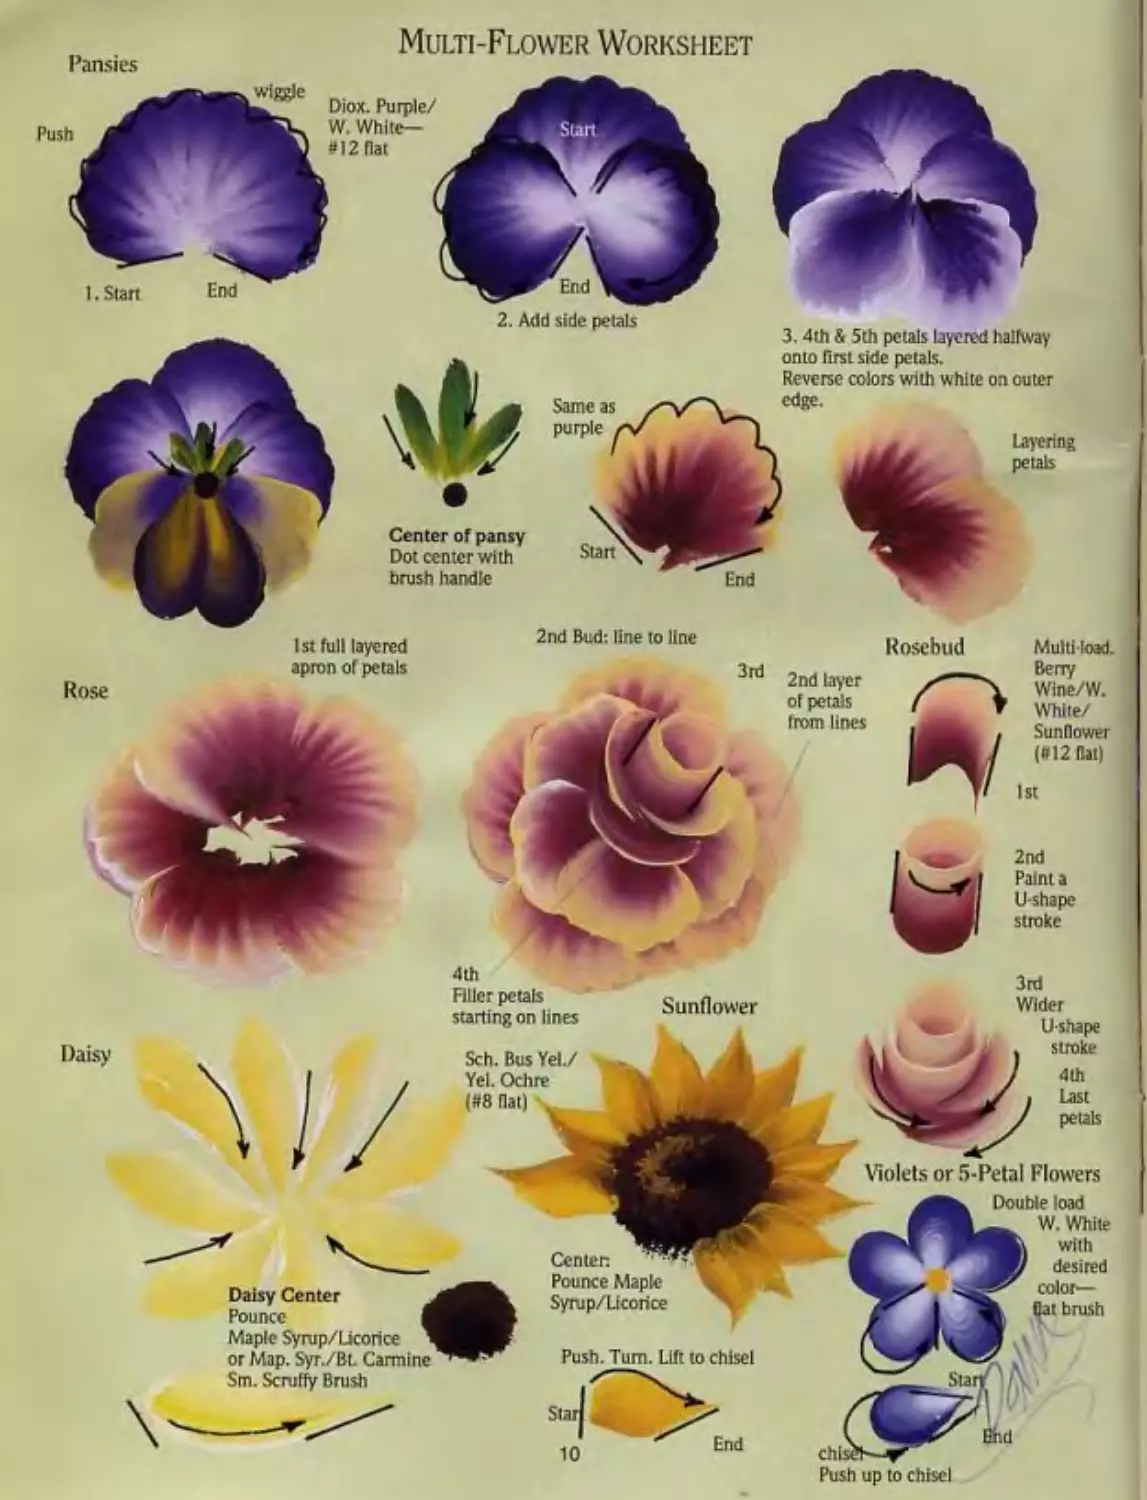
Multi-Flower Worksheet
Pansies
wiggle
Diox. Purple/
Push
»12 Hat
I. Start
2nd Bud: line to line
Rosebud
1st
Sunflower
Daisy
Sta
Bhd
Start
Sch. Bus Ye!./
Yel. Ochre
(#8 flat) .
4 th
Filler petals
starting on lines
3.4th & 5th petals layered halfway
onto first side petals.
Reverse colors with white on outer
edge.
chisel—
Push up to chisel
2. Add side petals
Center of pansy
Dot center with
brush handle
Rose
1st full layered
apron of petals
Daisy Center
Pounce fl
Maple Syrup/Licorice 1
or Map. Syr./Bt Carmine
Stn. Scruffy Brush
Same as
purple
Center.
Pounce Maple
Syrup/Licorice
End
3rd
2nd layer
of petals
Irom lines
Push. Turn. Lift to chisel
Layering
petals
Multi load.
Berry
Wine/W.
White/
Sunflower
(P12 flat)
2nd
Paint a
U-shape
stroke
3rd
Wider
U-shape
stroke
4th
Last
petals
Violets or 5-Petal Flowers
Double load
W. White
with
desired
color—
Oat brush
10
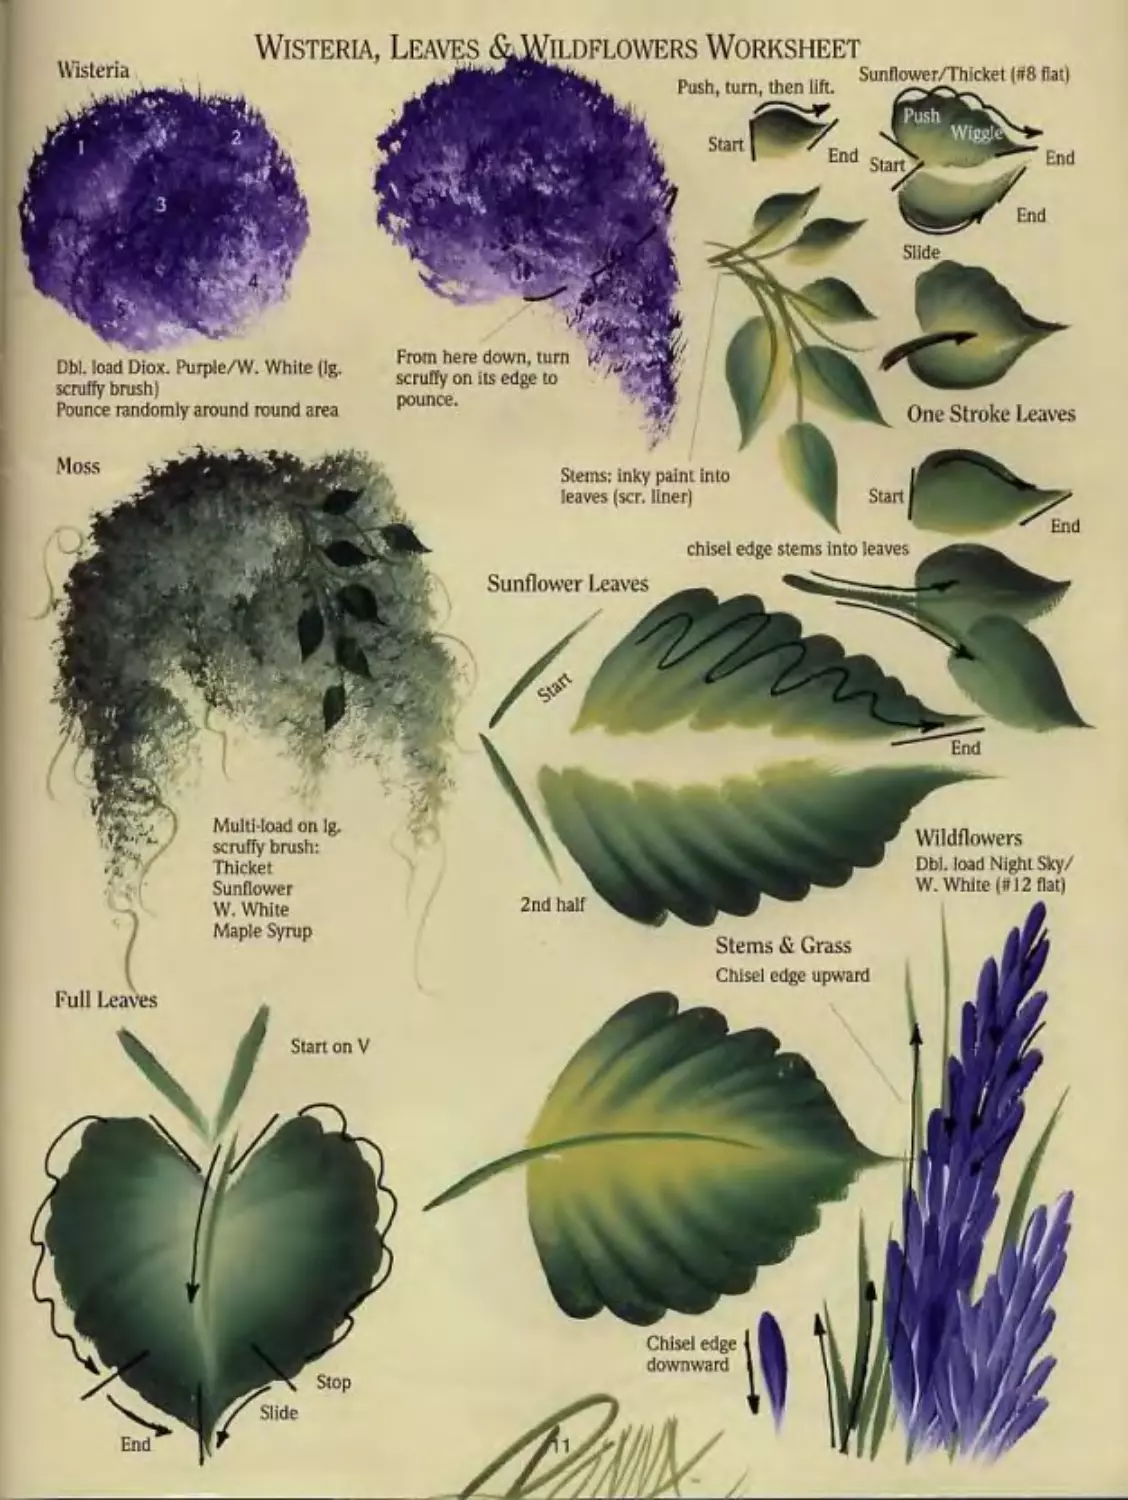
Wisteria, Leaves
Wisteria
Start
Start
Slide
One Stroke Leaves
Moss
Start
End
2nd half
Full Leaves
Start on V
Slide
Stems & Grass
Chisel edge upward
Stems: inky paint into
leaves (scr. liner)
Chisel edge
downward
Dbl. load Diox. Purple/W. White (Ig.
scruffy brush)
Pounce randomly around round area
Wildflowers
Dbl. load Night Sky/
W. White (it 12 flat)
Multi-load on lg.
scruffy brush:
Thicket
Sunflower
W. White
Maple Syrup
From here down, turn
scruffy on its edge to
pounce.
chisel edge stems Into leaves
Sunflower Leaves________
ILDFLOWERS WORKSHEET
fry n u u ... Sunflower/Thicket (#8 flat)
Push, turn, then lift.
WiggkJ
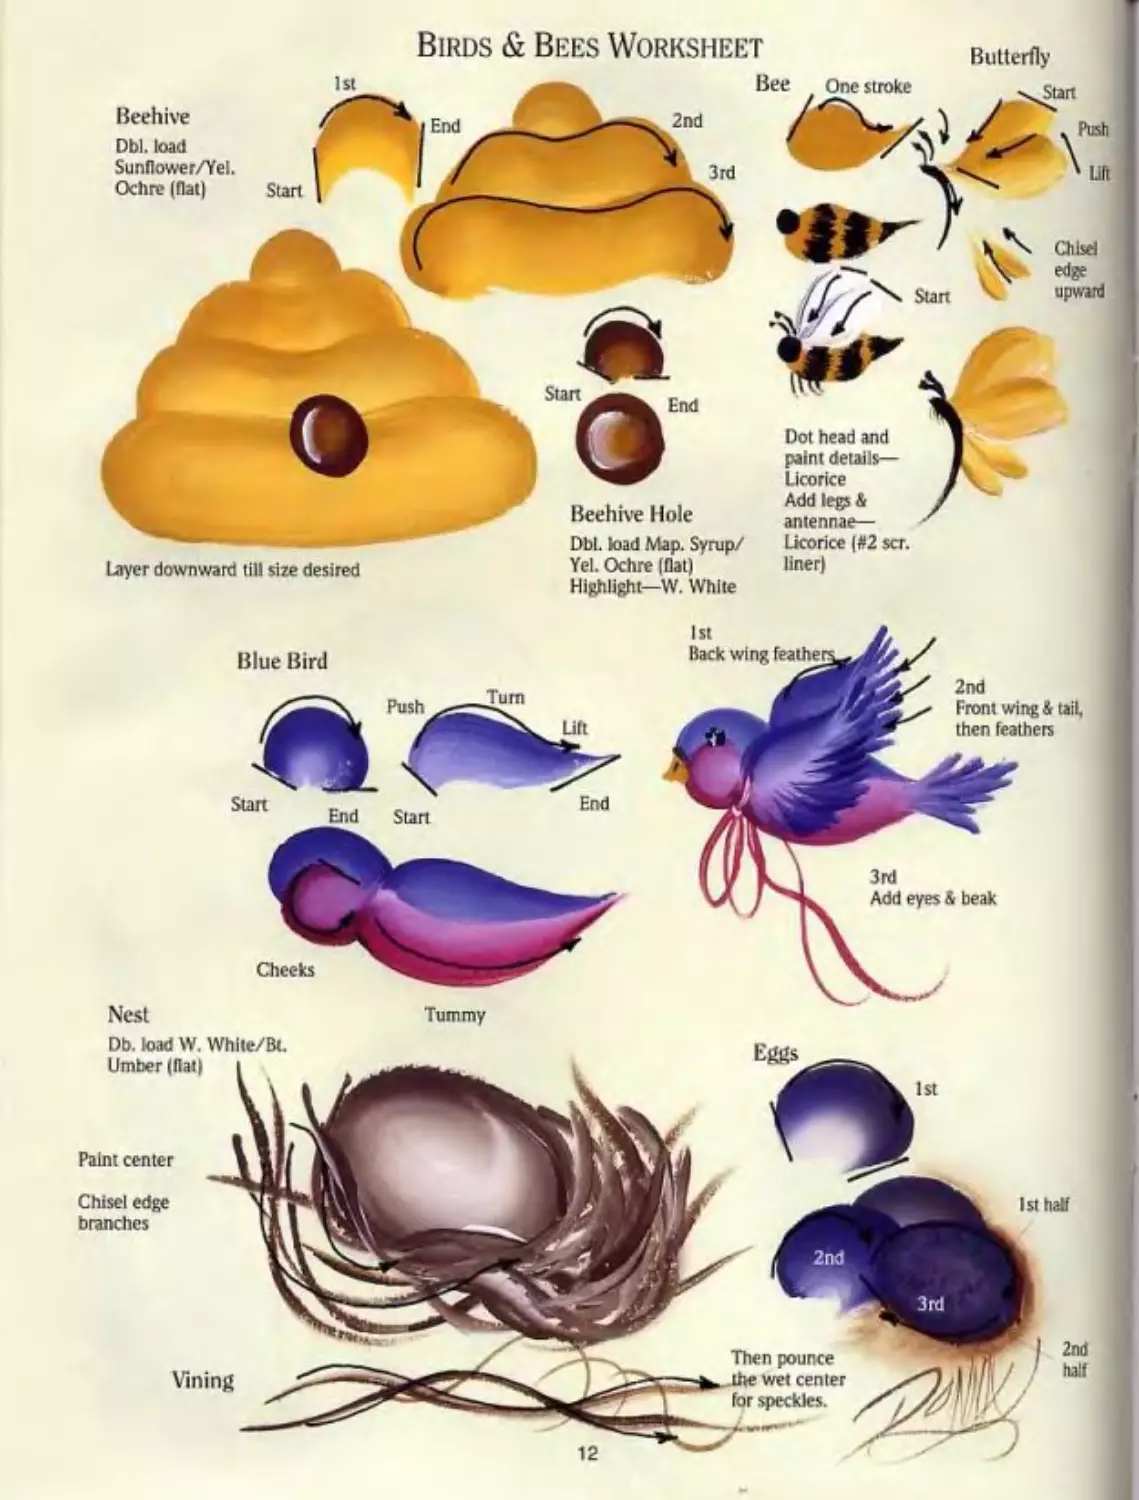
Birds & Bees Worksheet
Butterfly
Beehive Hole
Dbl. load Map. Syrup/
Yel. Ochre (flat)
Highlight—W. White
Licorice (#2 scr.
liner)
Layer downward till size desired
Blue Bird
Nest
Tummy
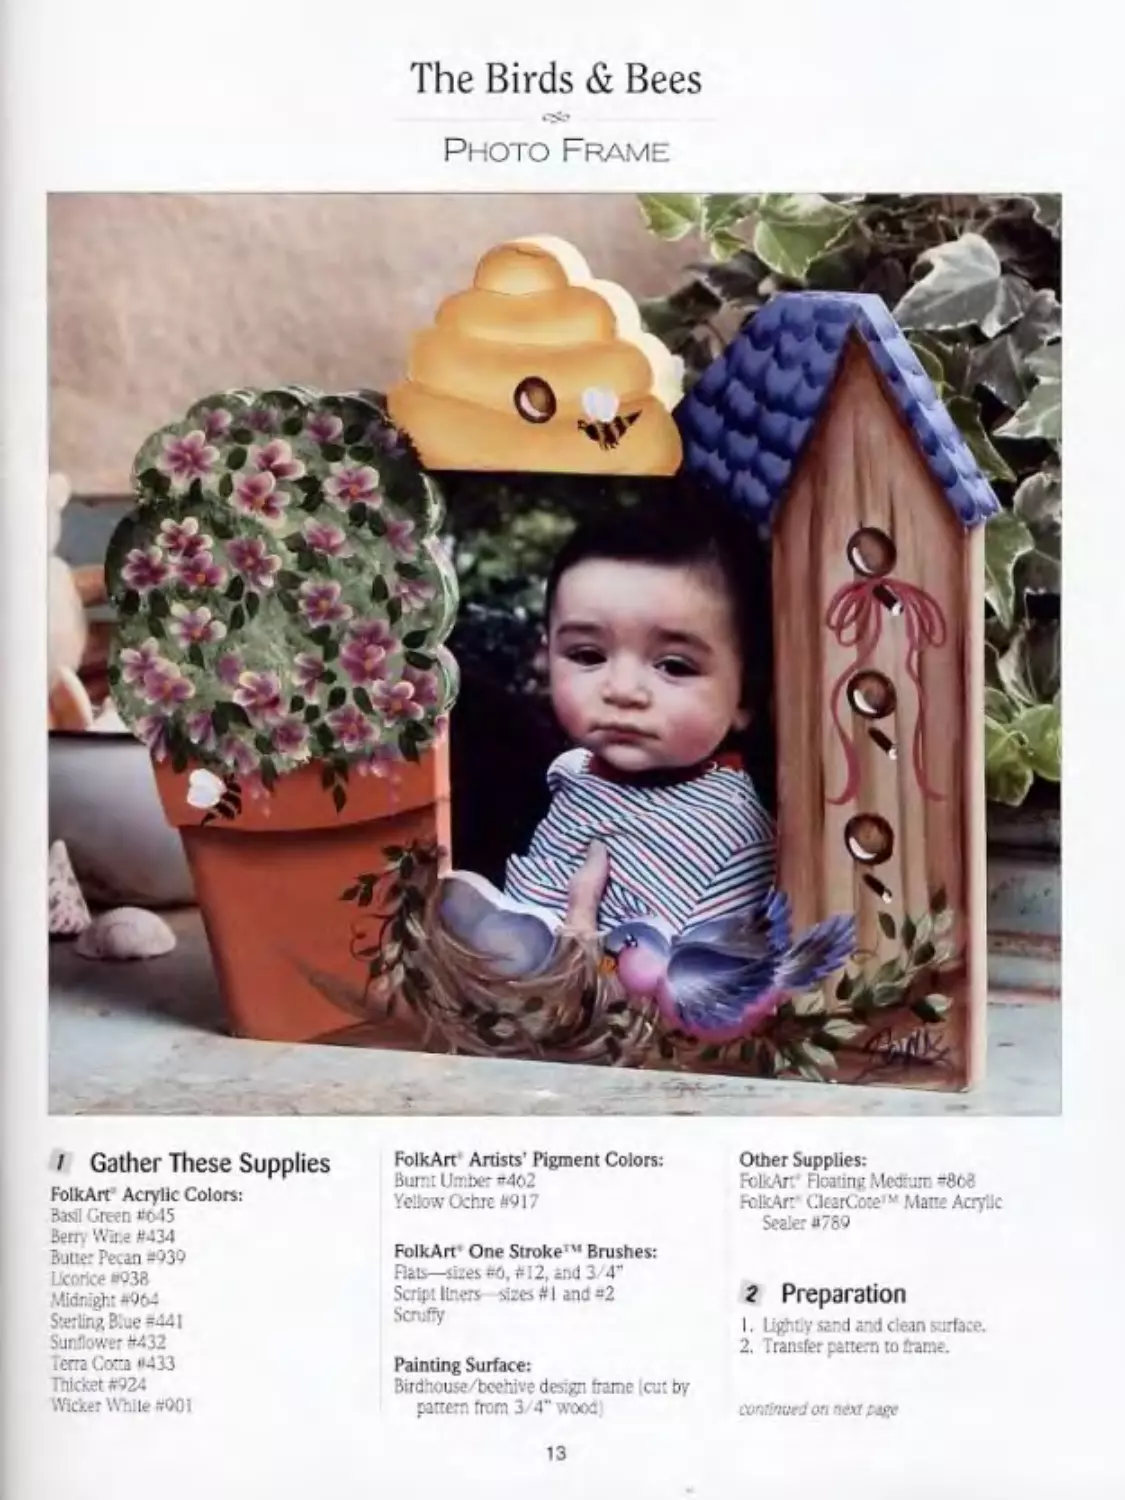
The Birds & Bees
Photo Frame
/ Gather These Supplies
FolkArt Acrylic Colors:
Basil Green *045
Bern Wire £434
Butte: Pecan #939
Licorice "038
Midnight «964
Sterling Blue =44|
Sunflower #432
Fem Cora «433
Thicket #924
Wicker White “001
FolkArr Anises' Pigment Colors:
Burr.: Umber *462
Yellow Ochre £917
FolkArr One Stroke”' Brushes:
Flab—sizes =6, #12, and 3 4“
Script liters sizes # I and =2
Scruffy
Painting Surface:
Birdhouse/beehive design tame (cut by
pattern from 3 4" wooc
Other Supplies:
FolkAr. Floa’ing Medium. =8c<?
FoBcArr* ClcarCote v Mane Acrylic
Sealer «789
2 Preparation
i i
2. Transfer partem to frame.
amtiwtd on •><?« гдес
13
The Birds & Bees
Pictured on page 13
co'itinvetffirm page 13
3 Paint the Design
Topiary:
1. Basecoat flower pot with Terra Cotta,
using the 3/4’ brush.
2. Sideload same brush Into Burnt Umber
and Roatlng Medium. Stroke details, fol-
lowing photo of project.
3. Paint moss with Thicket, Wicker White,
and Sunflower, multi-loaded on the
scruffy brush. Let dry.
4. Refer to Mute-Flower Worksheet for five-
petal flowers. Paint petals with Berry-
Wine and Sunflower, double loaded on
the #6 flat brush. Dot centers with
Yellow Ochre, using handle end of brush.
5. Paint leaves with Thicket, tising the «0
flat brush.
Beehive:
Refer to Birds & Bees Worksheet.
1. Load Che »12 flat brush with Sunflower,
then sideload into Yellow Ochre.
Starting with the top row, paint beenive-,
turn Yellow Ochre to the cuter edge.
2. Paint hive entrance with Burnt Umber
and Floating Medium (instead of colors
on worksheet), using the «0 flat brush.
3. Highlight beehive entrance with inky
Wicker White, using the #2 script liner.
Bees:
Refer to Birds & Bees Worksheet.
I. Paint body with Yellow Ochre, using the
#o flat brush. Let dry.
2. Paint stripes with Licorice. using the #2
script liner.
3. Load the "0 flat brush with Wicker
White and a touch of Licorice. Paint
wings.
Birdhouse:
1. Basecoat birdhouse with Butter Pecan,
using the 3/4“ flat brush.
2. Sideload same brush into Burnt Umber
and Floating Medium. With Burnt
Umber to outer edge, add board lines.
3. Paint holes and perches with Burnt
Umber and Roatlng Medium, using the
#6 brush. Add highlights to these with
inky Wicker White, using the «2 script
liner.
4. Basecoat roof with Sterling Blue, using
the «12 brush. Sideload same brush Into
Midnight. With Midnight turned to
outer edge, paint roof shingles. Refer to
the Birdhouses. Ribbon & Dragonfly-
Worksheet for this.
5. Paint the ribbon with inky Berry Wine,
using the #2 script liner. Refer to the
Birdhouses. Ribbon & Dragonfly
Worksheet.
Nest & Eggs:
Refer to Birds & Bees Worksheet.
1. Load the a 12 flat brush with Burnt
Umber and Wicker White. Use the chis-
el edge of brush and lead with Wicker
White и paint strokes of nest
2. Pamt eggs with Midnight and a touch of
Roatlng Medium, using the й 12 brush.
Bird:
Refer to Birds fr Bees Worksheet.
1. Load the «12 brush with Midnight,
Wicker White, and a touch of Roatlng
Medium. Paint read, body, and upper
wing.
2. Pamt cheek and chest with double
loaded Berry Wine and Wicker White,
using the #12 brush.
3. Load the #12 brush with Midnight and
Wicker White. Using the chisel edge of
brush, leading with Wicker White, paint
front wring and tall feathers.
Occasionally pick up a touch of Licorice
to add depth.
Leaves & Curlicues:
1. Paint leaves with Thicket, using the «6
flat brush. Occasionally pick up a touch
of Basil Green.
2. Paint curlicues with inky Thicket, using
the tip of the #2 script liner.
* Finish
When dry, finish with two or three coats of
sealer. -I
I Gather These Supplies
FolkArt Acrylic Colors:
Berry Wine #434
Buttercup «90S
Midnight «964
Rose Garden #7S4
Sterling Blue «441
Sunflower «432
Tapioca #903
Thicket «02-1
Wicker White #001
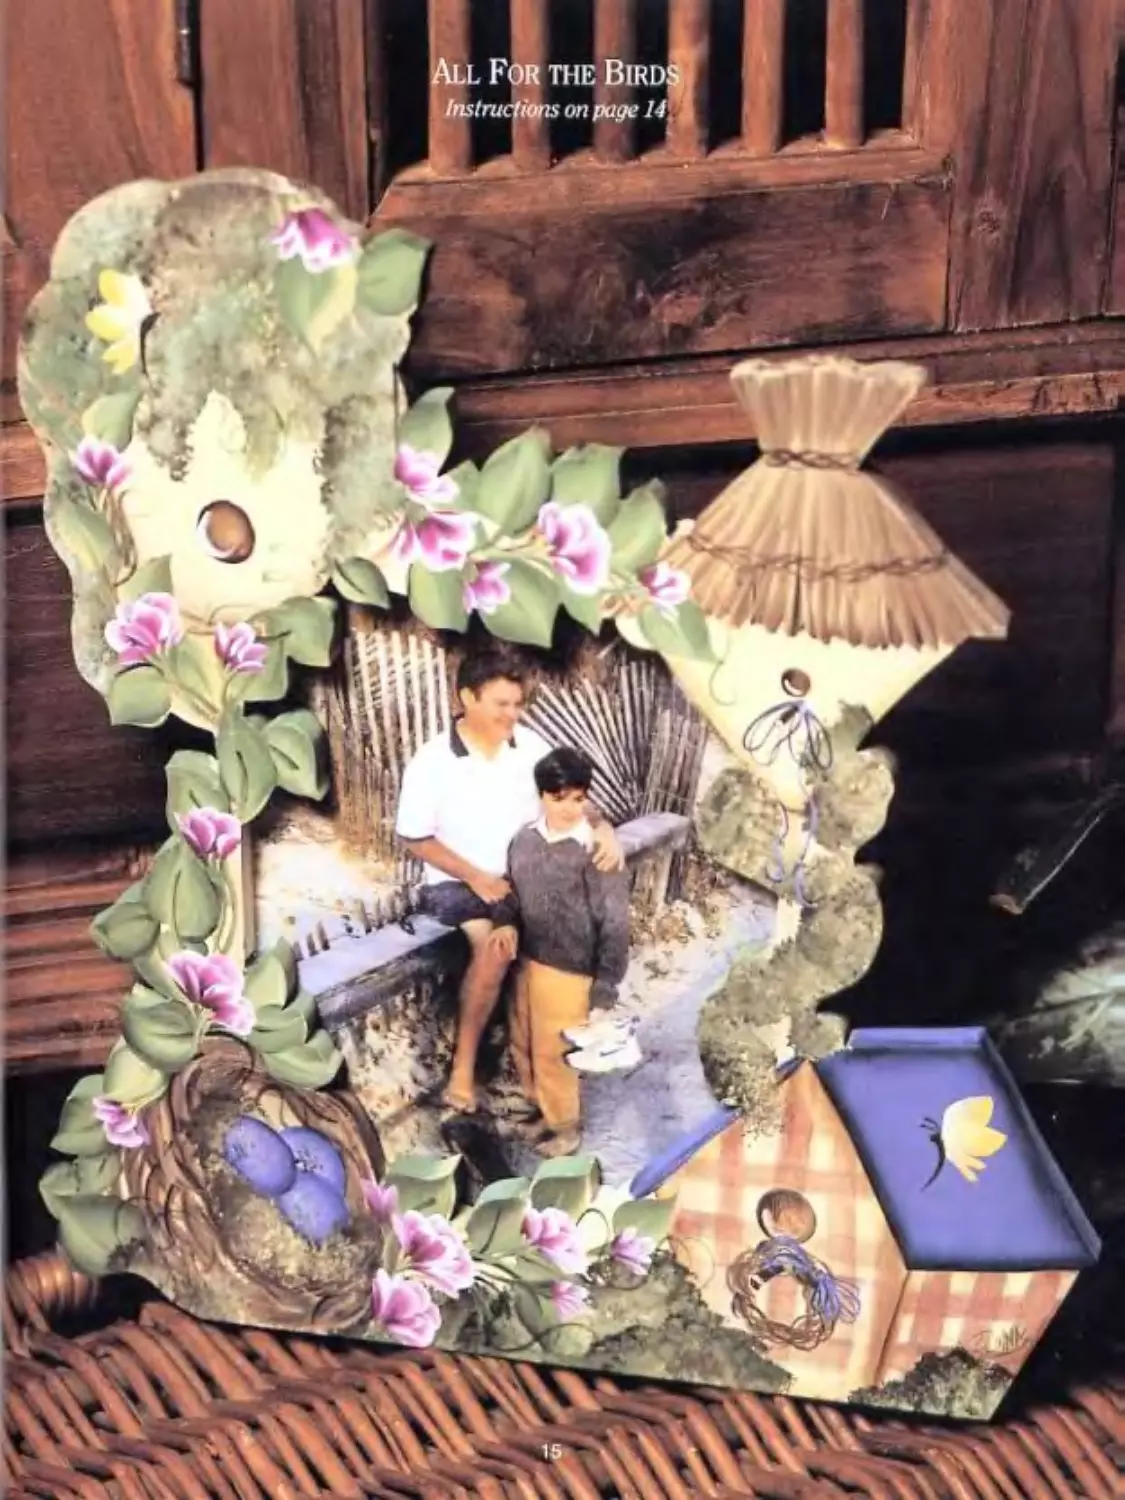
All For the Birds
Photo Frame
Pictured on page 15
FolkArf Artists' Pigment Colors:
Burnt Umber #402
FolkArT One Stroke’" Brushes:
Rats—sizes #6,410. я 12,3/4"
Script liner—size #2
Painting Surface:
Birdhouse/nest design frame tcut by pat-
tern from 1/2’ wood |
Other Supplies:
FclkArt ‘ Boating Medium #868
FolkAr.* ClearCote141 Matte Acrylic
Sealer «789
г Preparation
1. Lightly sand and clean surface.
2. Basecoat with two coats of Tapioca. Let
dry.
3. Transfer design pattern to ffame.
continued on page 16
14
li. For the Bird]
Instructions on page 14\
All For the Birds
Pictured on page 15
continued from page IJ
3 Paint the Design
Mossy Birdhouse:
I. Load the 3/4’ brush with Halting Medium
and sldelood with Burn: Umber. Turning
Burnt Umber to outer ed^r, add shading to
birdhouse.
2 Paint bl-dhoure hole with Boating Medium
and Burnt Umber, using me *0 brush. hflc up
a tixxh <x Wicker Whale and add hishtght
3. Pounce moss on roof with double loaded
Th>ck« and Wicker Whne, using the scruffy
brush. Occasionally pick up a touch 0!
Sunflower, alternating this with Burnt
Umber.
Thatched Roof Birdhouse:
Refer to Birdhouses. Ribbon & Dragonfly
Wortsteel.
I. Double load the t»!2 flat brash with Butte:
Pecan and Burnt Umber. Using the chisel
edge of brush, and leading with Batter
Pecan, make downstrokes from top of roof
and upstrokes from the bonom to create the
thatched look.
2. Pain1 wire wvh inky Bunt I fmber, using the
ir2 scrip: dner.
3. Pin: hole and perch. with double haded Bum:
Umber and Butte? Ресаг, using th? =o fat.
4. Pair.: string bow with inky Midmght instead
of color on worksheet!, using the »2 script
Ir er. Pc* up a touch r.f Wicker White and
add highlights.
5. Pounce moss around birdhouse pole wltr
Thicket and Wicker White double loaded on
the scruffy brush. Occasionally pick up a
touch of Sunflower, ar.d aittmatr thus color
with Burnt Umber.
Blue Roof Birdhouse:
Refer to Birdhouses, Ribbon (r Dragonfly
Wortsheet.
1. Paint roof with Sterling Blue, using the 3/4"
flat brush. Siceload same brush with
Midnight and add shading
2 Paint p-’aid criss crossed stripes on house
with Rose Garden and Floating Medium,
using the at> flat brush. Refer to work-
sheet.
3. Paint hole, perch, and кгарс.шс wreath w,ih
double loaded Butter Pecan and Burnt
Umber, using the «6 fa: brush.
4. Add hipughts to hole and perch with inky
Wicker White, using the =2 scrip: liner.
5. Paint string bow on wreath with inky
Midnight and Wicker White instead or cob-
on worksheet , double loaded on the =2
script liner.
Nest
Refer to Birds & Ben Worksheet.
I. Double had the 3/4" Sat brush with Bum:
Umber and Butter Pecan. Using the chisel
edge of brush, and leading with Butter
Pecan, paint nest
2. Load the я 12 flat with Midnight and a touch
o< Wicker While. Paint egg..
3. Pounce mo» around eggs ard near plaid bin:
house with Thicket and Sunflower double
leaded on the scruffy brush. ОесллпаПу pick
up a touch of Butter Pecan, and alternate this
colar with Burnt Umber. Fefer to Wister*
Leaves i Wildflowers Worksheet for moss.
Leaves & Sweetpeas:
I. Paint leaves 'with double loaded Thicke: an:
Sunflower, using the #12 flit brush. Refer to
Wisteria. Leaves & Wildflowers Worksheet.
2. Refer to Tulip & Sweetpea Wodcsbeet. Paint
sweetpeas with coub’.e kiadcd Berry' Wine
and Wicker White (instead of colors or.
worksheet), using the =10 Eat brush. Turn
Wicker White to cuter edge.
1 Paint flower stems and curitcues with Ink.
ТЫскИ. using the «2 script liner.
Butterfly:
Refer to Birds tr Bees Worksheet.
I. Paint wings and feet with Wicker White and
Buttercup double loaded on the #6 flat brush.
2. Paint body and antennae with тку Bum:
Umber, using the =2 script liner.
4 Finish
When dry. Crush with wo coats of sealer. □
I Gather These Supplies
FolkArt Acrylic Colors:
Basil Green "045
Вету wine »434
Green Forest
Licorice »938
Maple Syrup #945
Night»/=443
Schoo Bus Yellow "736
Sunflower =432
Terra Cotta 6*133
Wicker White WOI
FolkArt Artists’ Pigment Colors:
Yellow Ochre #917
FolkArt' One Stroke'4 Brushes:
Has—sizes »2, «12,3'4'
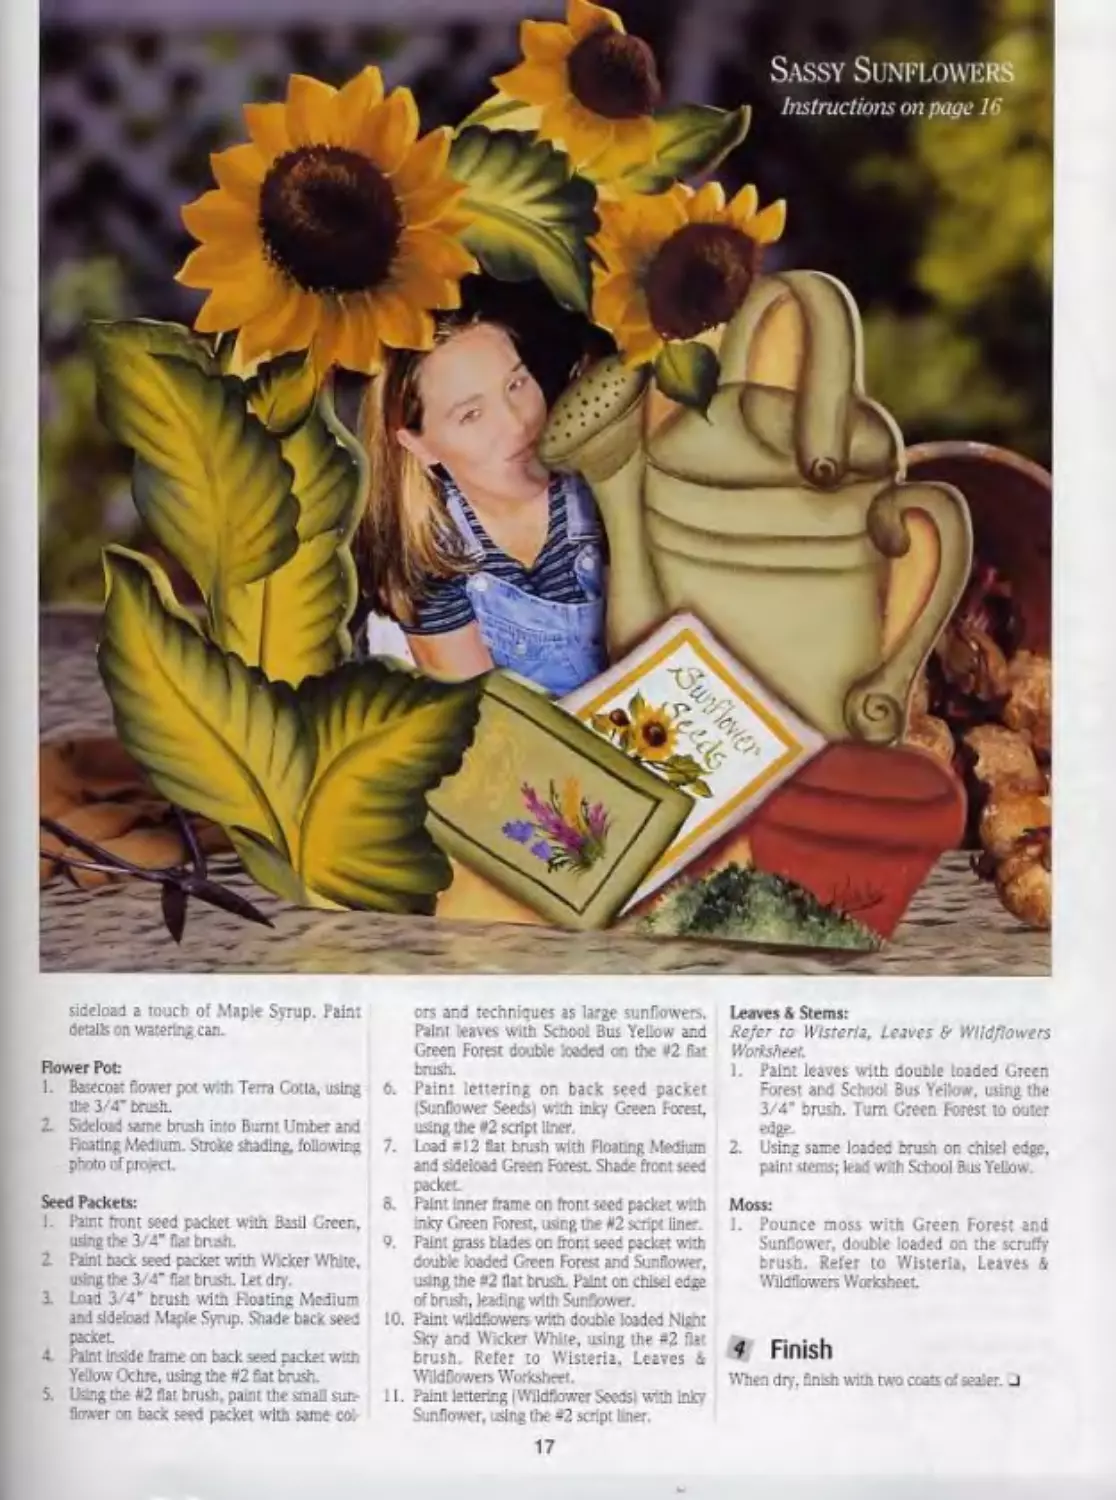
Sassy Sunflowers
Photo Frame
Pictured on раде 17
Scrip: liner—size "2
Scruffy
Painting Surface:
Sunflower drsign frame (cut by pattern from
I/2’ woodi
Other Supplies:
FolkArt* Boating Medium «868
Г-иЧКАг." ClearCoteTW Marte Acrylic
Seder ₽789
2 Preparation
1. Lightly sand and clean surface.
2. Basecoat with two coats of Sunflower Let
dry alter each coat. Lghtty sand after sec
end coat is cccncxtel) dry.
3. Transfer devgn patterr to frame.
16
3 Paint the Design
Sunflowers:
Refer to Multi now.’ Worksheet
i. Pounce center with Maple Syrup and
Licorice double loaded on the scruffy crush.
Turn Maple Syrup side to aaer edge.
2. Doubfe load the =12 flat brush with School
Bus YeDow and Yellow Ochre. Use the One
Stroke lea: stroke to create sunflower petals,
pulling from cd» of pounced center.
Watering Can:
1. Paint with Basil Green, using the 3/4’
brash.
2. Sideload a touch of Green Fores: on same
brush and add shading to watering car.
Occasionally pick up a touch of Maple
Syrup tor shadowing.
3. Lead ±e 3 4* brash, with Tern Cctta and
sideload a touch of Maple Syrup. Pain:
detail; on watering can.
Rower Pot:
1. Basecott flower ptx w.th Terra Cotte, using
to? 3/4’ brush.
2. Sideload same brush into Burnt Umber and
Boating Medium. Stroke shading, following
photo of project.
Seed Packets:
I. Pamt front seed packet with Basil Green,
using the 3/4’ flatbr.-h.
2 Paint asci seed packet with Wicker White,
using the 3/4" fiat brush. Let dry.
3. Lead 3/4* brush with Eoating Medium
and sideload Ma;>> Syrup. Shade back seed
packet.
4 Paint Inside frame on back seed packet with
Yellow Ochre, using the #2 Sat brush.
5. Using toe *2 Sat brush, paint the small sun-
flower on back seed packet with same col
ers and techniques as large sunflowers.
Paint leaves with Schoo! Bus Yellow and
Green Forest double loaded on the «2 fiat
brush.
0. Pain: lettering or. back seed packet
'.Sunflower Seeds। with inky Green Forest,
using toe *2 script liner.
7. lead *12 fiat brush with Floanng Medium
and sideload Green Forest. Shace front seed
packet
8. Paint tone? frame on front wed packet with
inky (keen Forest. using the *2 script liner
9. Paint grass blades on front seed packet with
double loaded Green Force arid Sunflower,
using toe «2 fiat brush. Paint on chisel edge
of brush, leading with Sunflower.
10. Paint wildflowers with double leaded Night
Sky and Wicker White, using the »2 r>.
brush. Refer to Wisteria. Leaves л
Wildflowm Worksheet.
11. Paint lettering (Wildflower Seedsi with Inkv
Sunflower, using the =2 script finer
17
Leaves & Stems:
Refer tc Wisteria, leaves & Wildflowers
Worishetf.
I. Paint leaves with double loaded Green
forest and School Bus Yellow. using the
3/Д’ о rush. Turn Greta Forest to outer
edge
2. Using same loaded orusn or. chisel edge,
paint «eras; k-ad with School Bus Yellow
Moss:
1. Pounce moss with Green Forest and
Sunflower, double loaded on the scruffy
brush. Refer to Wisteria, Leaves &
Wildflowers Worksheet.
4 Finish
When dry. finish wtto two coats of sealer. J
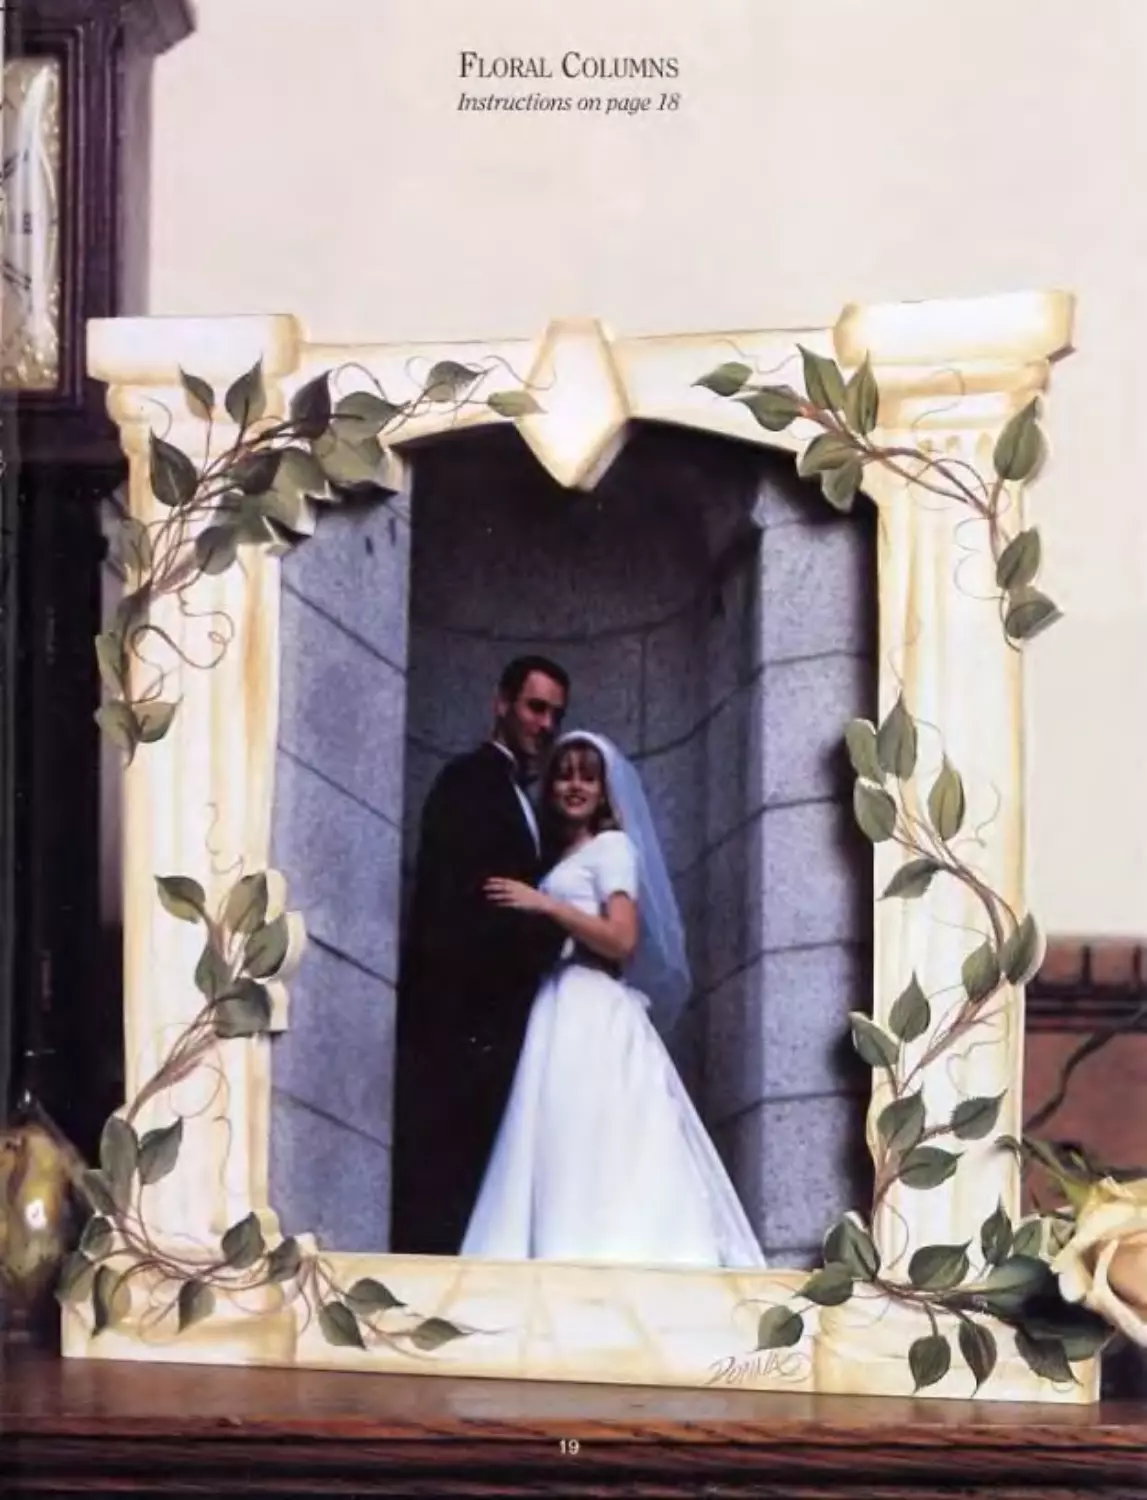
Formal Columns
Photo Frame
Pictured on page 19
I Gather These Supplies
FolkArt’-1 Acrylic Colors:
Butter Pecan #939
Thicke: #924
Wicker White #901
FolkArt Artists' Pigment Colors:
Burnt Umber #402
FolkArt' One Stroke'41 Brushes:
Eats—sizes #6 arid 3 4"
Script liner—size #2
Painting Surface:
Columns/leaves design frame (cut by pat
tern from 1/2" wood I
Other Supplies:
FolkArt Floating Medium #8o8
FofcAr? QearCote™ Matte АсгЛс Sealer *789
2 Preparation
1. Lightly sand and clean surface.
2. Basecoat with two coats of Wicker White. Let dry.
3. Transfer design pattern to frame.
3 Paint the Design
Columns:
Load the 3/4" brush with Floating Medium and sideload into Butter Pecan. Paint shad.ng
and fluting o! columns.
Vines:
Double load the #12 flat brush with Burnt Umber and Buner Pecan. Paint vines on chisel
edge, leading with Butter Pecan.
Leaves, Stems & Tendrils:
Re fer to Wisteria. Leaves & Wildflowers Worksheet.
1. Paint leaves with double loaded Butter Pecan and Thicket .nstead of colon; or. work-
sheet!, using the to flat brush.
2. Paint stems to leaves and curlicues (tendrils with inky Burnt Umber, using the =2
script liner.
4 Finish
When dry. finish ‘with two coats of sealer. J
I Gather These Supplies
FolkArt7 Acrylic Colors:
Berry Wine *434
Butter Pecan #939
Maple Syrup #945
Midnight #964
Rose Garden =754
School Bus Yellow’ *736
Settlers Blue =607
Sunflower #432
Thicket =924
Wicker White *901
FolkArt' One Stroke™ Brushes:
Rats—sizes #6, #12.3/4"
Script liner—size #2
Painting Surface:
Standing bunny wood cutout (cut by pat-
tern from 1/2" wood)
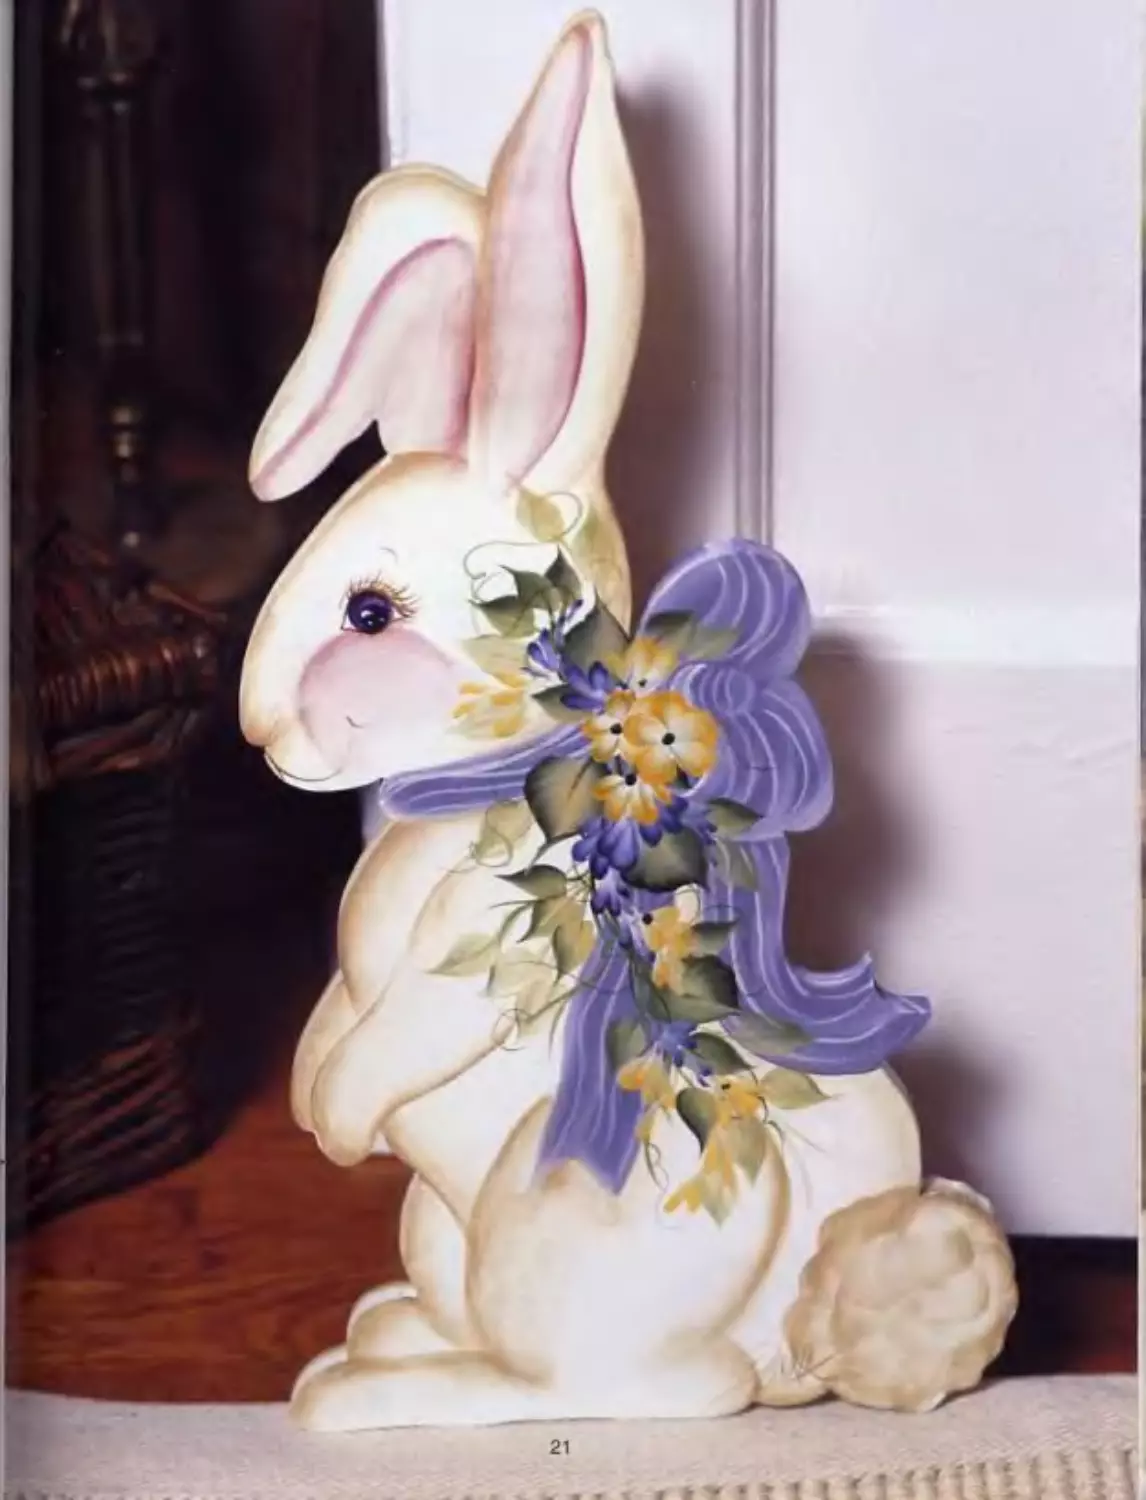
Floral Bunnies
Doorstops
Pictured on pages 20 & 21
Sitting bunny wood cutout (cut by pattern
from 1/2" wood)
To make a doorstop, glue a wedge
shaped ptece of wood onto rhe back
Ропот of the bunny shape to slide
under the door.
Other Supplies:
FolkArt’ Roatlng Medium “868
FolkArt’ ClearCote™ 'Лапе Acrylic
Sealer #789
2 Preparation
1. Lightly sand and clean surfbee.
2. Basecoat with one or two coats of
Wicker White. Let dry.
3. Transfer design pattern to frame.
3 Paint the Design
Bunny Bodies:
Refer to Bunny Worksheet.
1. Load the 3/4" brush with Floating
Medium and sideload into Butler Poca.
Add shading and details to body.
2. Load the 3/4" brush with Floating
Medium and Rose Garden. Pair.’, cheek
and nose of each bunny and 1ns: it
standing bunny’s cars.
Ribbons:
Refer to Birdhouses. Ribbon fr Dragon^
Worksheet, using colors given below.
1. Load the 3/4’ brush with Settler’s Blue
and pick up a touch of Wicker White.
Paint rhe tow ribbons.
2. Paint stripes on bows with inky Wkta
White, using the #2 script liner.
ccn.inuedon page 20
18
Floral Columns
Instructions on page 18
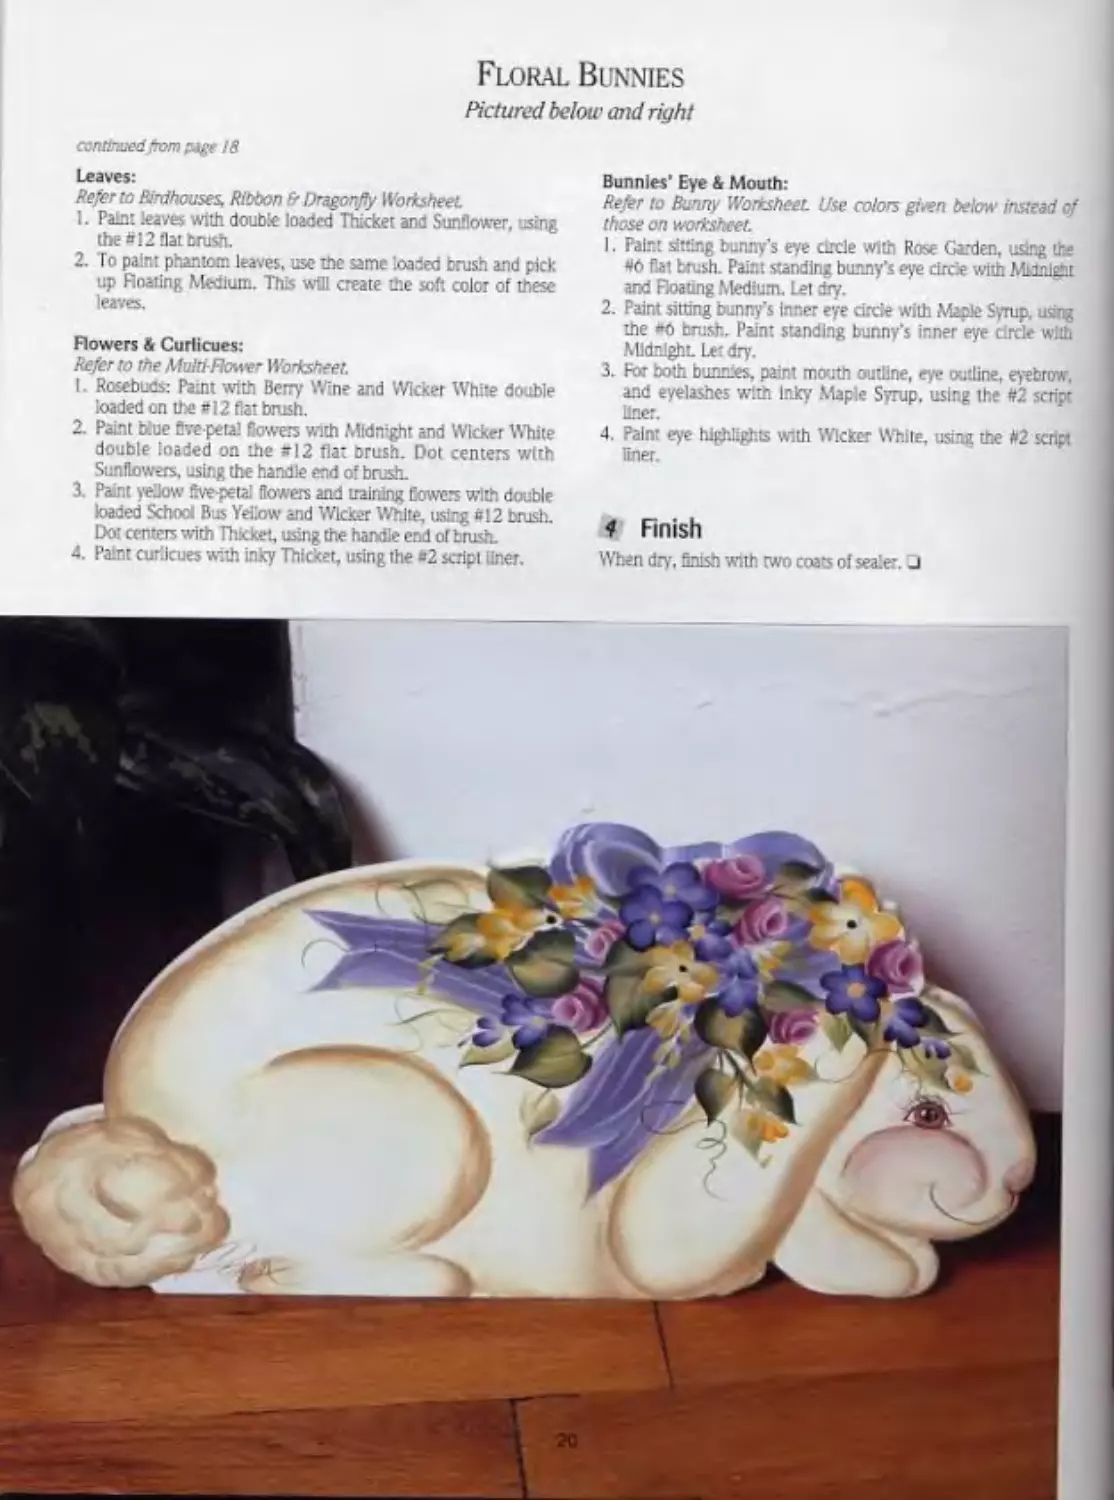
Floral Bunnies
Pictured below and right
continued from page 18
Leaves:
Refer to Birdhouses, Ribbon & Dragonfly Worksheet.
1. Paint leaves with double loaded Thicket and Sunflower, sing
the a 12 flat brush.
2. To paint phantom leaves, use the same loaded brush and pick
up Boating Medium. This will create the soft color of these
leaves.
Flowers & Curlicues:
Refer to the Multi-Rower Worksheet.
I. Rosebucs: Paint with Berry Wine and Wicker White double
loaded on the *12 fiat brush.
2. Paint blue five-petal Bowers with Midnight and Wicker White
double loaded on lie -12 flat brush. Dot centers with
Sunflowers, using the handle end of brush.
3. Paint yellow five-petal Bowers and training Gowers with double
baded School Bus Yellow and Wicker White, using *12 brush.
Dor centers with Thicket, using the handle end of brush.
4. Paint curlicues with inky Thicket, using the =2 script liner.
Bunnies' Eye & Mouth:
Refer to Banny Worksheet. Use colors gfaen below instead of
those on worksheet.
I. Paint sitting bunny’s eye circle with Rose Garden, using the
46 fiat brush. Paint standing bunny’s eye circle with .МШ1Й1
and Roaung Medium. Let dry.
2. Paint sitting bunny's Inner eye circle with Maple Syrup, using
the »o brush. Paint standing bunny’s inner eye circle with
Midnight. Let dry.
3. For both bunnies, paint mouth outline, eye outline, eyebrow,
and eyelashes with Inky Maple Syrup, using the #2 scrip-
liner.
4. Paint eye highlights with Wicker While, using the #2
liner.
4 Finish
When dry, finish with two coats of sealer. J
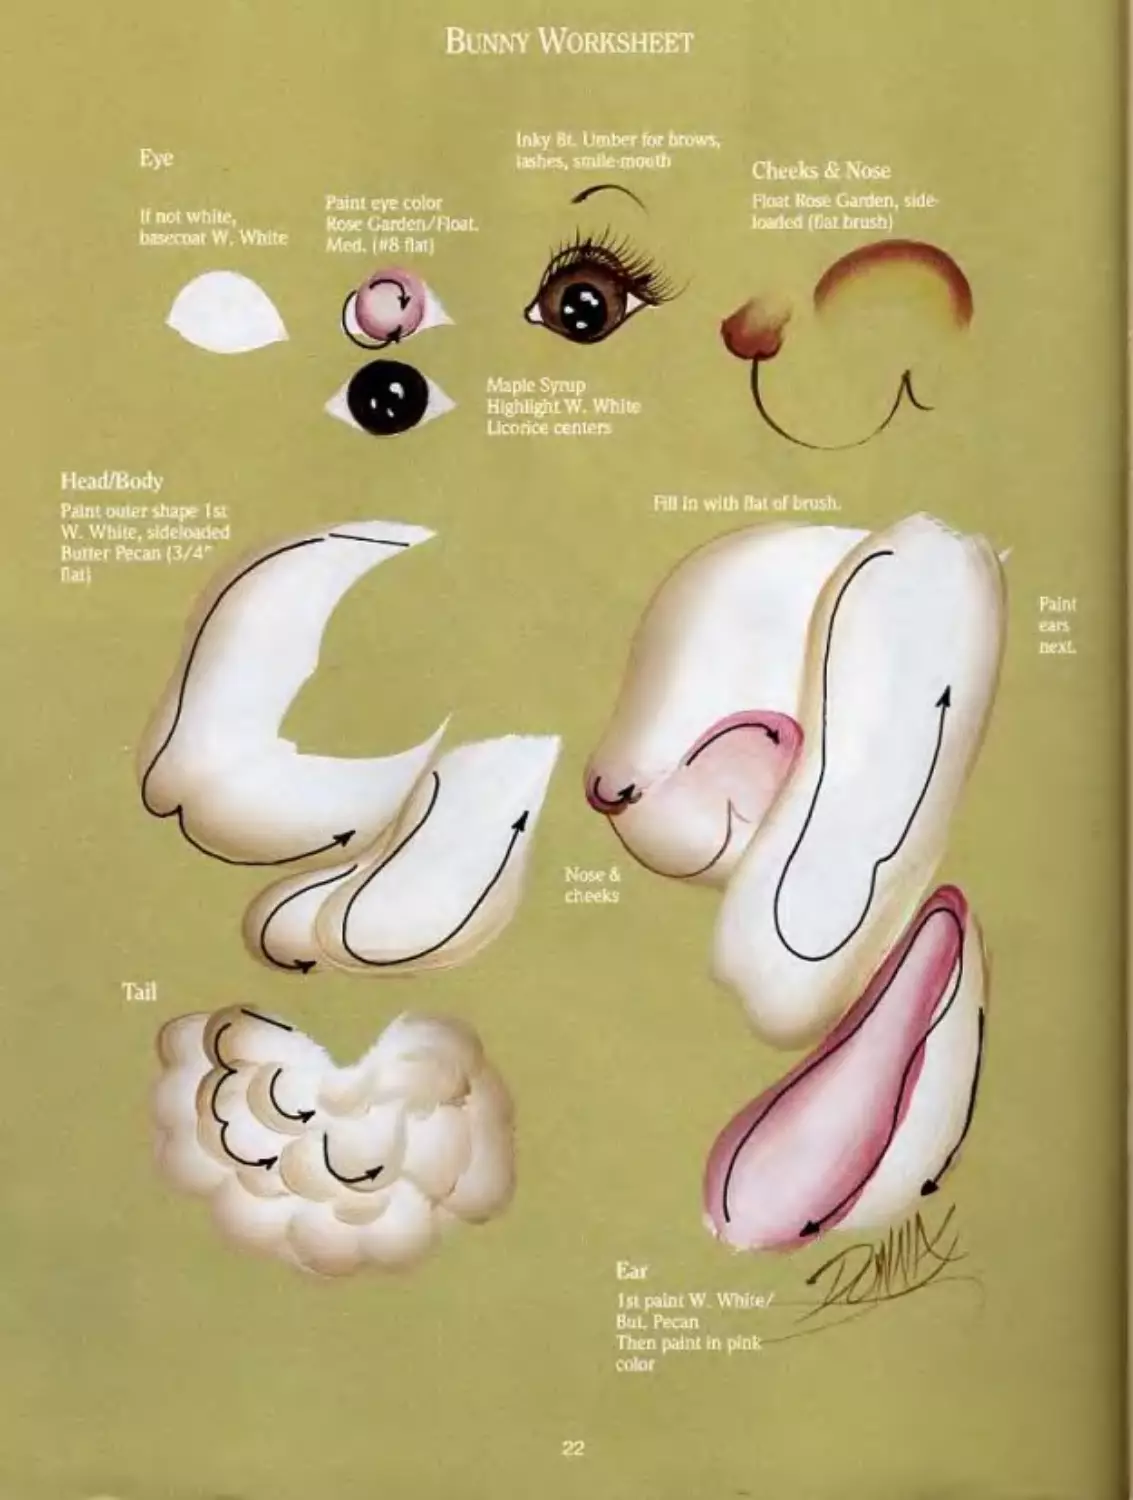
Eye
Bunny Worksheet
Inky 8r. Umber for brows,
lashes, smile-mouth
Cheeks & Nose
Float Rost Garden, side-
loaded (flat brush)
Tail
if not white,
basecoar W. White
Paint eye color
Rose Gardcn/Hoat.
Med. I «8 flail
Head/Body
Paint outer shape 1st
W. White, sideloaded
Butler Pecan (3/4*
flail
Maple Syrup
Highlight W. White
Licorice centers
Fill In with Bai of brush.
Nose b
cheeks
Ear
1st paint W White/
BuL Pecan
Then paint In pink
color
22
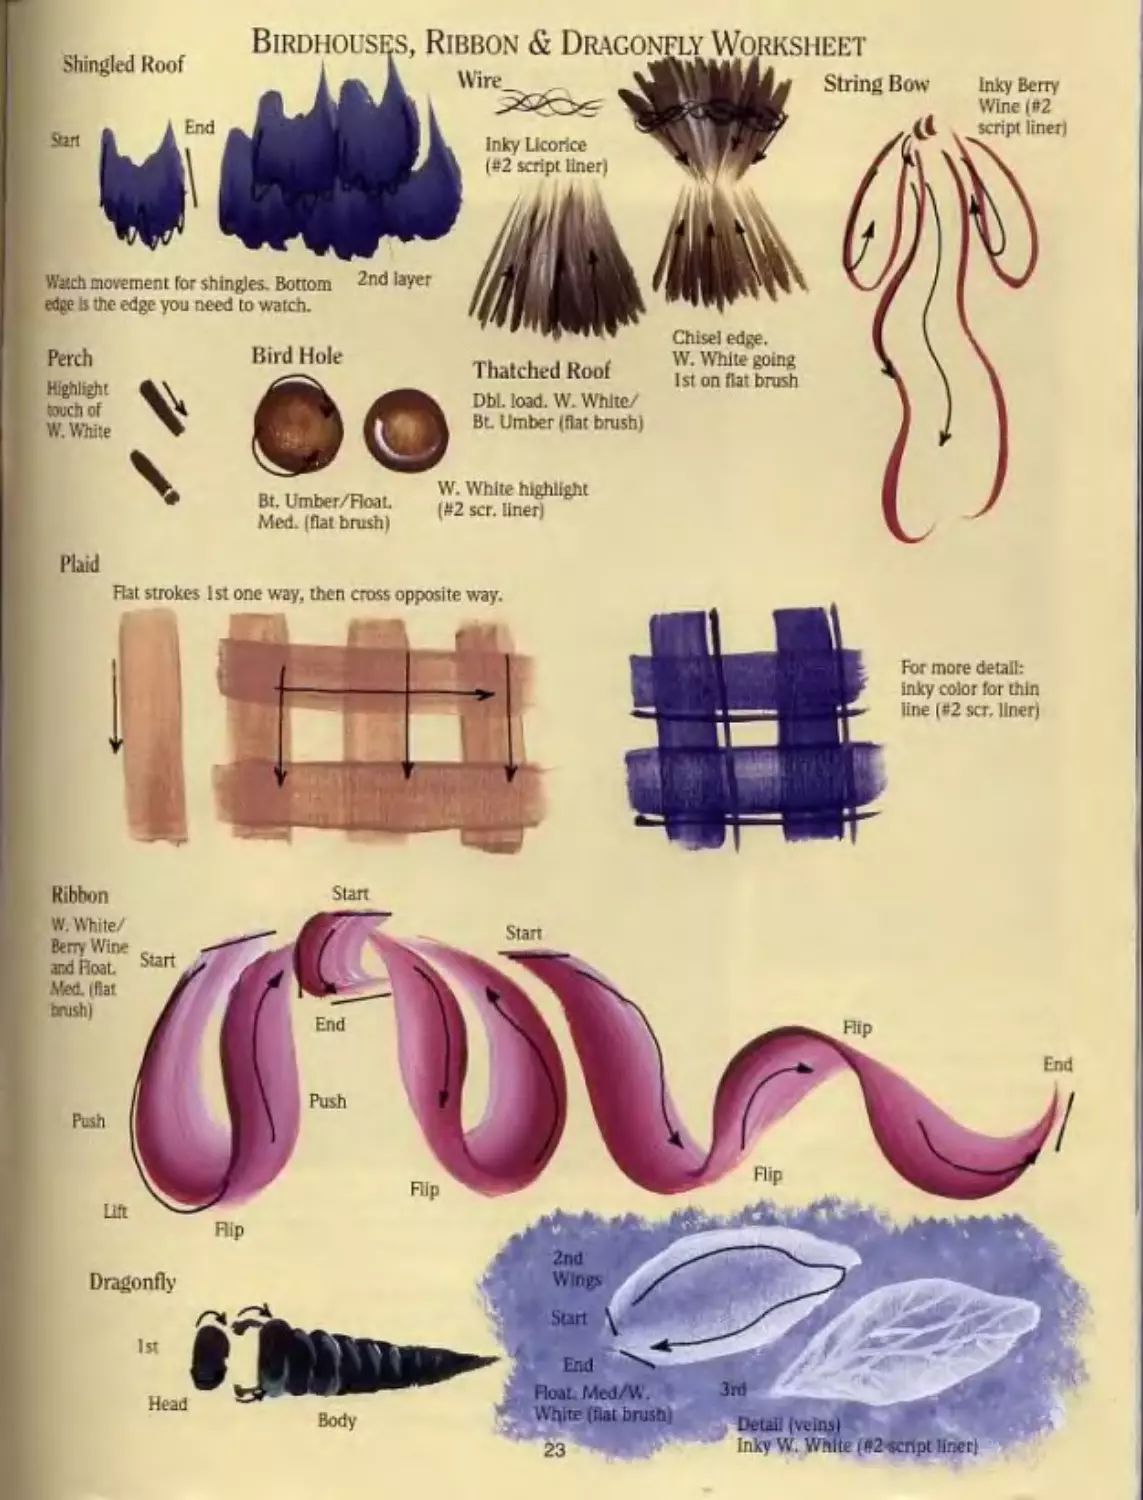
Shingled
Birdhouses, Ribbon & Dragonfly Worksheet
String Bow
Sun
inky Berry
Wine (#2
script liner)
Watch movement for shingles. Bottom 2nd layer
edge is the edge you need to watch.
Perch
Highlight
touch of
W. White
Bird Hole
Chisel edce.
Plaid
•o
Thatched Roof
Dbl. load. W. White/
Bl Umber (flat brush)
Chisel edge.
W. White going
1st on flat brush
Bt. Umber/Roat.
Med. (flat brush)
W. White highlight
(Д2 scr. liner)
Rat strokes 1st one way, then cross opposite way.
For more detail:
inky color for thin
line (#2 scr. liner)
Ribbon Stan
Flower Cluster Birdhouse
Garden Poke
/ Gather These Supplies
FolkArr Acrylic Colors:
Berry Wine i»434
Butter Pecan #939
Purple Passion #038
Sunflower #432
Thicket «*02-1
Wicker White #901
FolkAn Artists' Pigment Colors:
Burnt Umber #462
FolkArr One Stroke1'1 Brushes:
Rats—sizes #6, -12. 3/4*
Script Liner—size #2
Painting Surface:
Birdhouse design garden poke (cut by pat
tern from 5/8" wood
Post- wood dowel. 3/8’diam.
Other Supplies:
Rj&Art CtearCo*™ .’.Latte Acr,ir Sealer *789
2 Preparation
1. Ughfly sand and clear, surface.
2. Basecoat with one or two coaT« of
Wicker White. Let dry.
3. Transfer design pattern to frame.
3 Paint the Design
Roof:
Ле/ег to Birdhouses. Ribbon & Dragonfly
Worksheet.
Double load the 3/4" brush with Butter
Pecan and sideload It Into Burnt Umber.
With Burnt Umber to the outer edge of
shingle, paint roof shingles. Start with
lower layers and decrease size of shingles as
layers get smaller Refer to photo o! project
Hole & Perch:
Refer to Birdhouses, Ribbon & Dragonfly
Worksheet.
1. Paint with double loaded Burnt Umber
and Wicker White, using the #12 flat
brush. Turn the Burnt Umber side of
brush to outer edge.
2. Highlight hole and perch with inky
Wicker White, using the #2 script liner.
Flowers & Leaves:
Refer to Muiti-Hower Worksheet for Rve
Petal Howers.
1. Double load the #6 fiat brush with
2. Dot centers with Sunflower, using the handle end ol brash.
3. Paint leaves with Thicket and Sunflower double loaded on the *6 flat brush.
4. Paint curlicues with inky Thicket, using the *2 script liner.
Bow:
Refer to Birdhouses, Ribbon & Dragonfly iraristeet
Pain: with Purple Passion. Wicker White, and a touch of Berry wine Jistead of cokes on
worksheet. usmg the #6 flat brush.
Wicker White and Purple Passion and
paint the five-petal flowers. Occasionally
pick up a touch of Berry Wine.
f Finish
When dry. finish with two coats of scaler. J
24
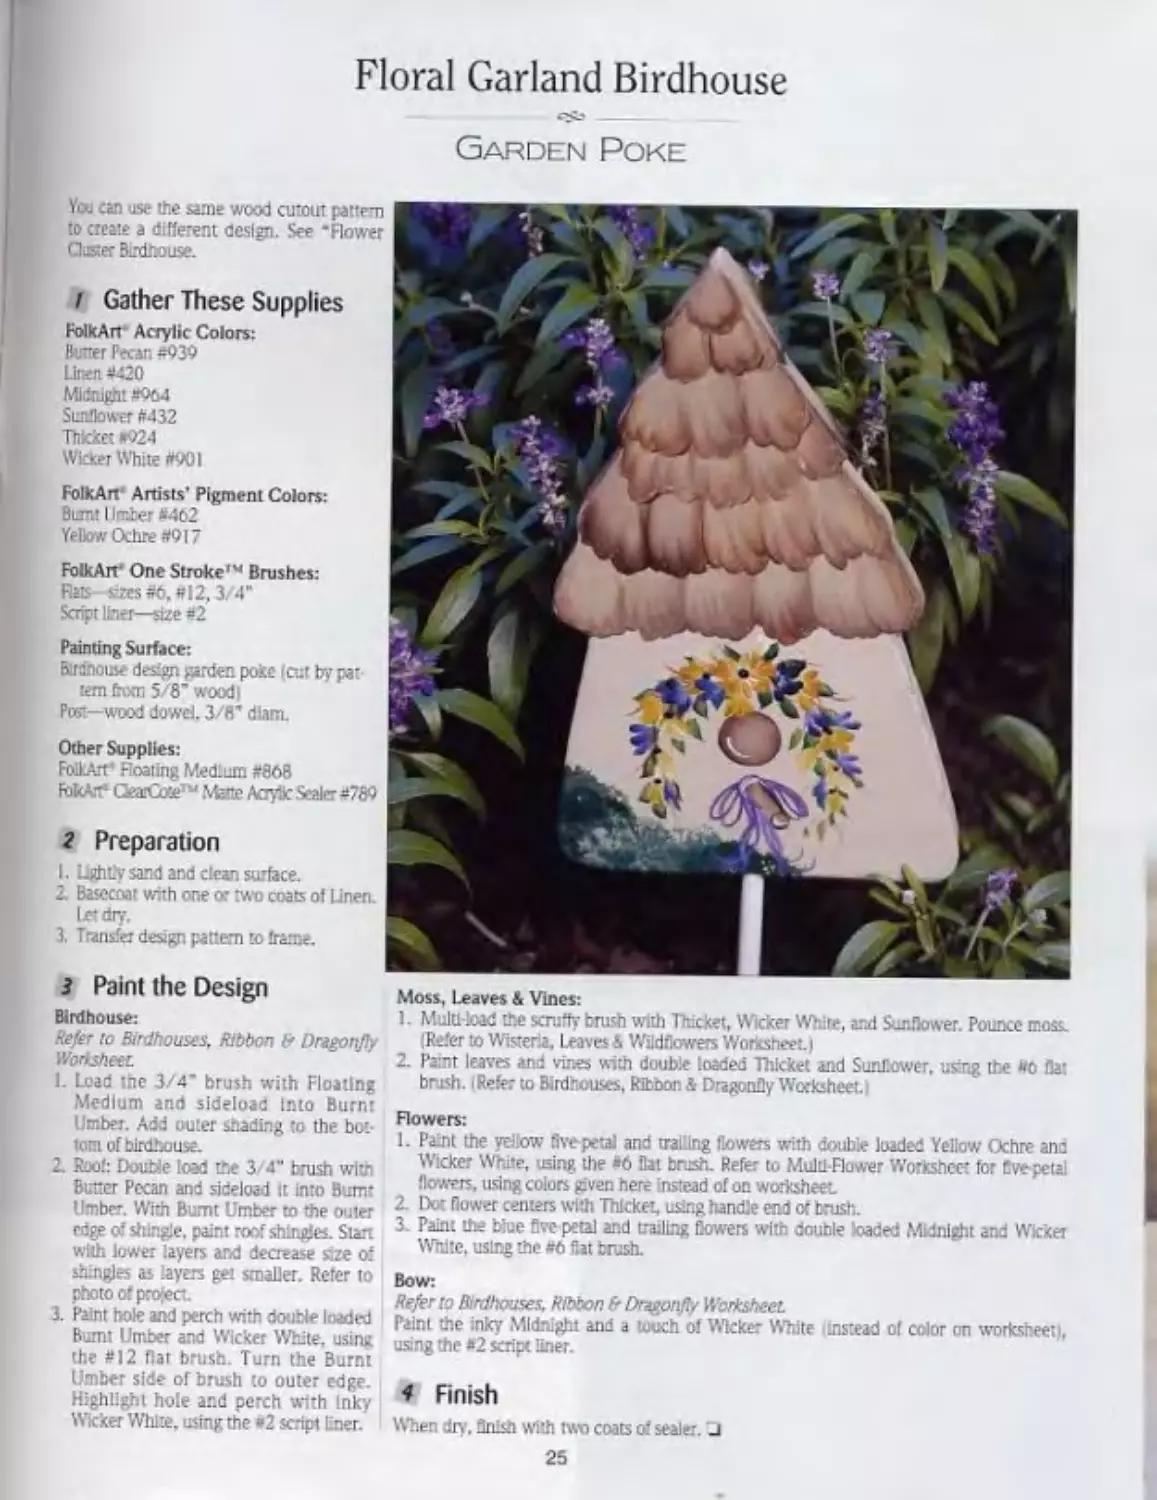
Floral Garland Birdhouse
--
Garden Poke
You can use the same wood cutcut pattern
to create a different design. See "Flower
Closer Birdhouse.
/ Gather These Supplies
FolkArt Acrylic Colors:
Ihraer Pecan =030
Linen «20
Midnight «964
Sunflower #432
Thicket «924
Wicker White #901
FolkArt- Artists’ Pigment Colors:
Burnt Umber -4o2
Yellow Ochre #917
FolkArt' One Stroke'M Brushes:
Rais sizes #6, #12.3/4"
Script liner—size =2
Painting Surface:
Birdnouse design garden pose (cut by pat-
tern 6otn 5/8'wood |
Post—wood dowel. 3/B' diam.
Other Supplies:
FolkArt' Floating Medium #868
folAf- QearCoteu Майе Acybc Sealer #759
2 Preparation
I. Lightly sand and clean surface.
2. Basecoat with one or two coats ol l-inen.
Let dry.
3, Transfer design pattern to frame.
3 Paint the Design
Birdhouse:
.-.’e/er to Birdhouses, Ribbon & Dragonfly
Wotisheet
1. Lead the 3/4' brush with Floating
Medium and sideload into Burnt
Umber. Add outer shading to the bot-
tom of birdhouse.
2. Roof: Double load the 3 4" brush wIl-
Butter Pecan and sideload it into Burnt
Umber. With Burnt Umber co the outer
rege of shingle. paint roof shingles. Start
with lower layers and decrease size of
shingles as layers get smaller. Refer to
photo of project.
3. Paint hole and perch with double loaded
Burnt Umber and Wicker White, using
the #12 fiat brush. Turn the Burnt
Umber side of brush to outer edge.
Highlight hole and perch with inky
Wicker White, using the «2 script Inez.
Moss, Leaves & Vines:
1. Multi-load the scruffy brush with Thicket, Wicker White, and Sunflower. Pounce moss.
[Refer to Wisteria. Leaves & Wildflowers Worksheet.)
2. Paint leaves and vines with double loaded Thicket and Sunflower, using the «0 fiat
brush, i Refer to Birdhouses, Ribbon i Dragonfly Worksheet
Rowers:
1. Paint the yellow five-petal and trailing Howers with double loaded Yellow Ochre ano
Wicker White, using the «6 Hat brush. Refer to Multi-Rower Worksheet for Cve-petal
flowers, using colors given here instead of on worksheet
2. Dot flower centers with Thicket, using handle end or brush.
3 Pain-, the blue five-petal and trailing Cowers with double loaded .Midnight and Wicker
White, using the #6 flat brush.
BOW:
Refer to Birdhouses, Ribton & Dragonfly Worksheet.
Paint the inky Midnight and a touch of Wicker White < instead of color on worksheet),
using the «2 script liner.
1 Finish
When dry. finish with two coats of sealer. □
25
Garden Totes
Use one wood pattern to create two different tote designs.
Spring in the Garden
--------- --------
I Gather These Supplies
FolkArt Acrylic Colors:
Bi?.! Green #o45
Berry Wine #434
Butter Pecan #939
Green Forest #448
Licorice #938
Midnight #964
Wicker White #901
Thicket #924
Sunflower #432
School Bus Yeliow #736
Periwinkle #404
Folk Art' Artists’ Pigment Colors:
Burnt Sknna #943 Burnt I Imber f462 Yellow Ochre #917
FolkArt One Stroke™ Brushes:
Rats- sizes #12and 3/4" Scruffy
Script liner- size #2
Painting Surface:
Garden tote .cut by pattern from I 2" wood)
Wood dowel handle. 1 /2” dlam.
Other Supplies:
FolkArt floating Medium #808
Househoid sponge
FolkArt' QearCote™ Matte Acrylic Sealer «789
2 Preparation
1. Lightly sand and clean surface.
2. Basecoat with one or two coals o! Wicker White. Let dry.
3. Transfer design pattern to frame.
26
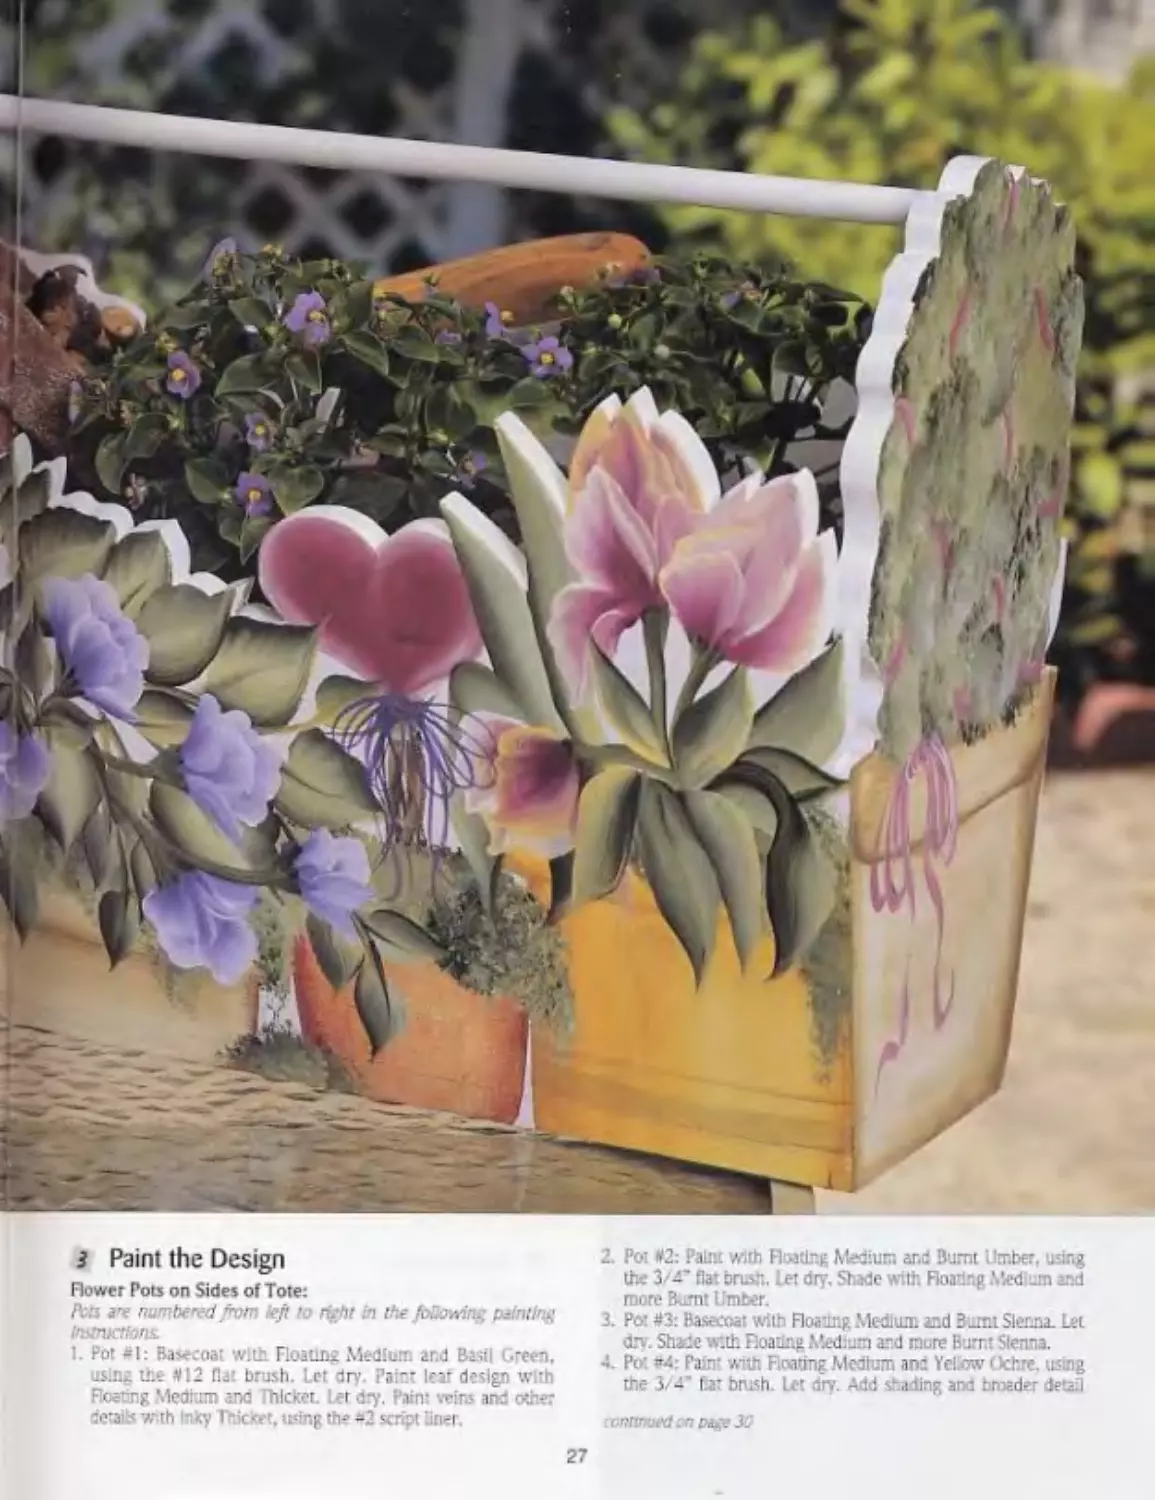
3 Paint the Design
Rower Pots on Sides of Tote:
Poa ev numbered from left to right in the following painting
instructions.
1. Pot el: Basecoa: with Floating Medium and Basil Green,
using the #12 flat brush. Let dry. Pair.- lear design with
Floating Medium and Thicket. Let dry. Paint veins and other
seta:? with Inxy Thicket, using the =2 script Ипег.
2. Pot 42: Paint with Floating Medium and Burnt Umber, using
the 3/-' flat brut. 1 et dry. Shade with Floating Med and
more B-mt Umber.
3. Pot #3: Basecoat with Roating Medium ar.d Burnt Sienna. Let
dry. Shade with Roaring Medium ar.d more Burnt Sienna.
Pit У4: Pa;?t with Boating Medium and Yellow (khre. using
the 3/4" Bat bnish. let dry. Add shading and broader detail
continued on Mge 30
27
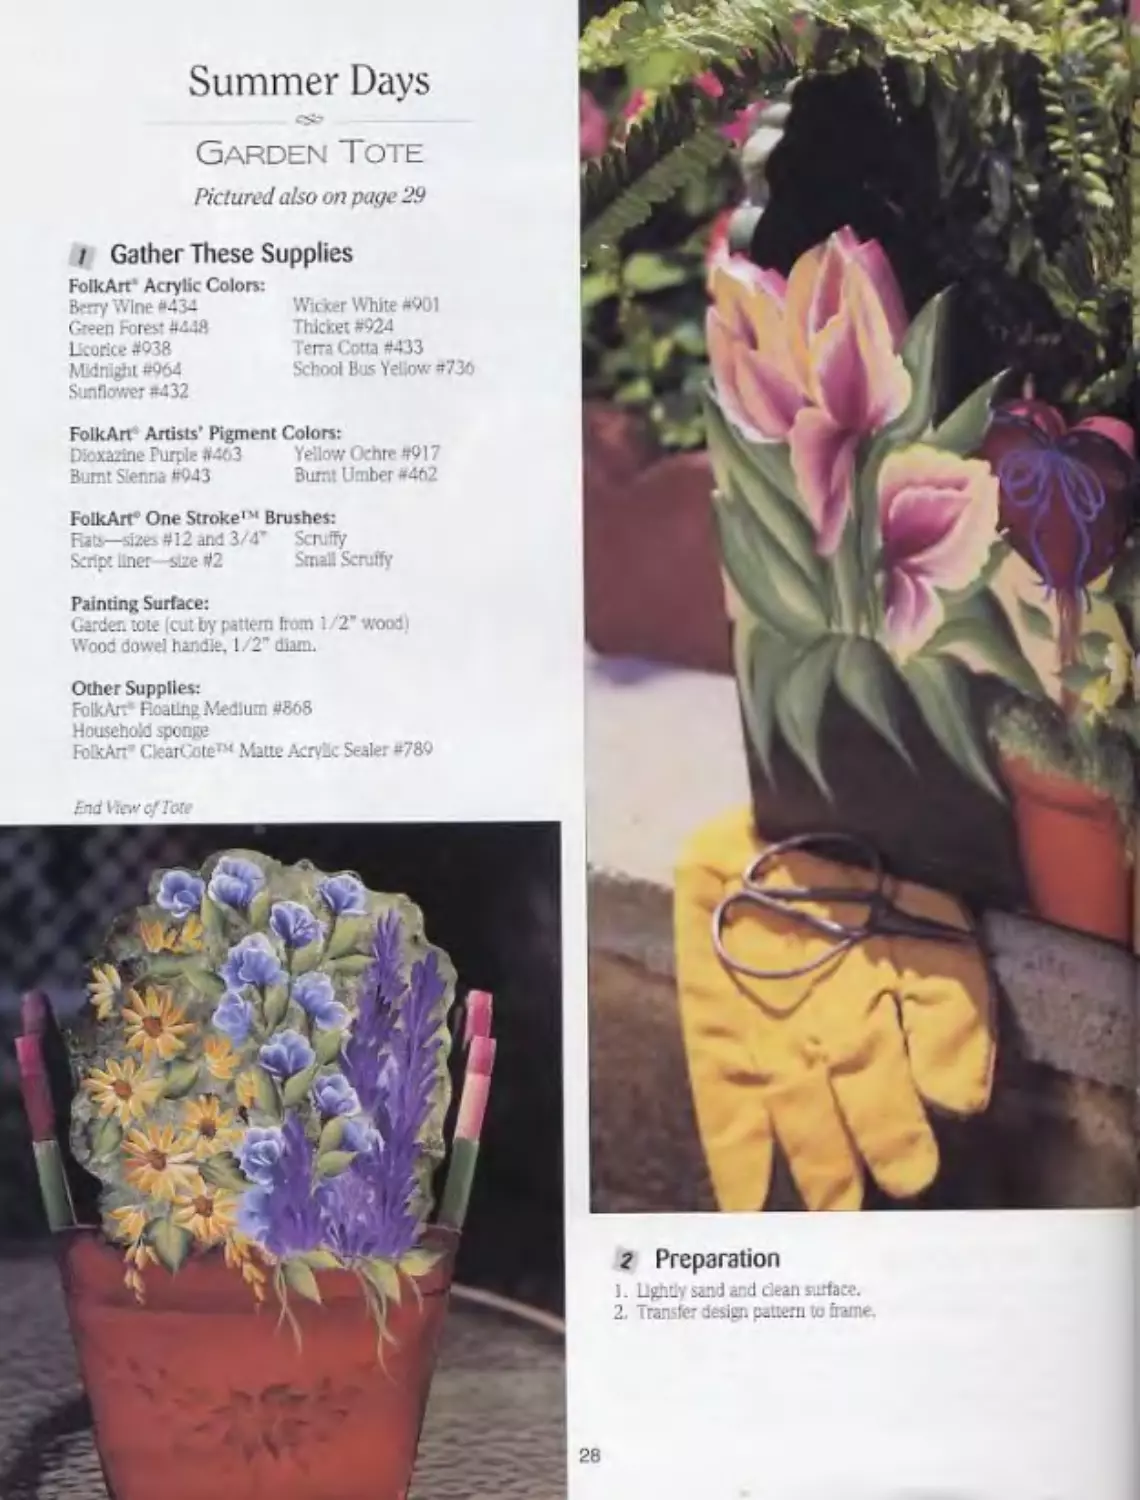
Summer Days
Garden Tote
Pictured also on page 29
i Gather These Supplies
FolkArt' Acrylic Colors:
Berry Wine #-134
Green Forest #448
Licorice $038
Midnight «064
Sunflower =432
Wic ker White *901
Thicket #924
Terra Cotta #433
School Bus Yellow =730
FolkArt Artists’ Pigment Colors:
Dioxazine Purple «463 Yellow Ochre #917
Burnt Sienna #943 Burnt Umber *4fi2
FolkArt1 One Stroke1' Brushes:
Kats—sizes #12 and 3/4’ Scruffy
Script liner—size #2 Small Scruffy
Painting Surface:
Garden tote (cut by pattern from 1 2* wood)
Wooc dowel handle, 1/2" diam.
Other Supplies:
FolkAr/ Floating Medium #868
Household sponge
Г-olkAn" ClearG te‘4 Matte Acrylic Sealer =789
r.-'.d View cf Tote
2 Preparation
1. Lightly sand and clean surface.
2. Transfer design pattern to name.
28
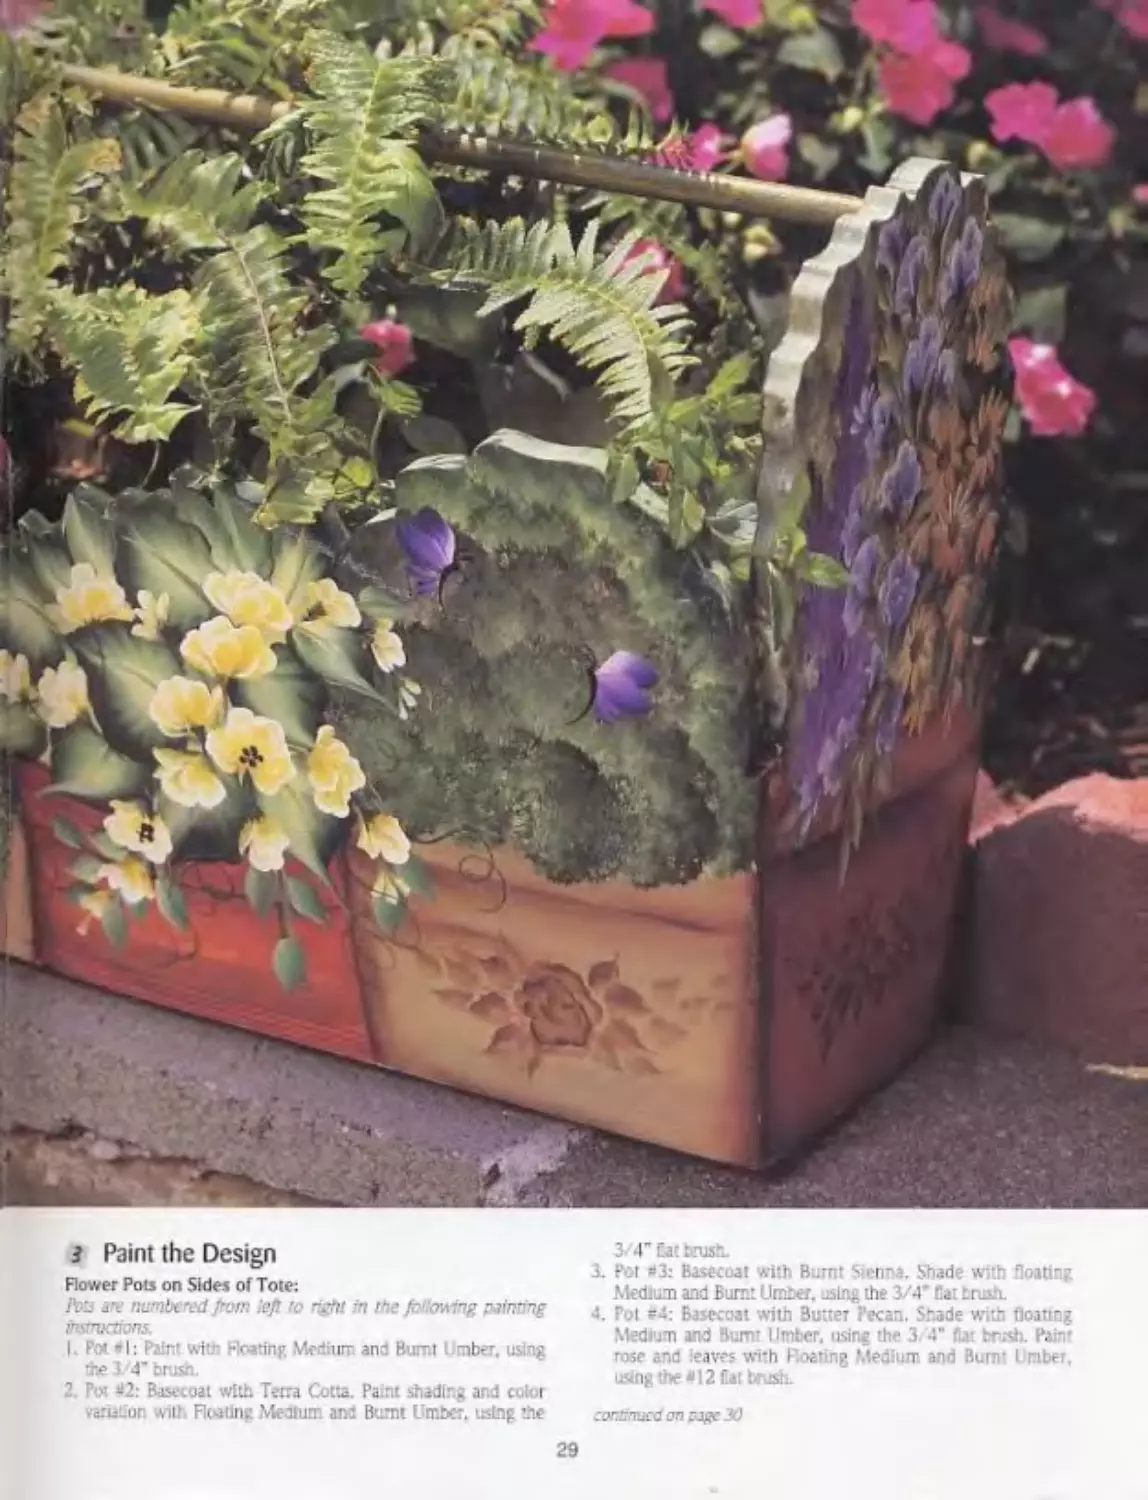
3 Paint the Design
Rower Pots on Sides of Tote:
Л>3 а.т numbered from left to -.-h! in the fr towing painting
irwnxtions.
|. Pot <1: Paint witr Heating Medium and Burnt mber, using
Ле 3/4’ brush.
2. Pot ^2: Basecoat with Terra Cotta. Paint shading and color
variation .vitt, Floating Medium and Burnt Umber, using Ле
3/4" Eat brush.
X Pot «3: Basecoat with Burnt Sienna. Shade with floating
Medium and Burnt Umber, using Ле 3/4’ Cat brush.
4. Pot =4: Basecoat with Butter Pecan. Shade with floating
Medium and Burnt Umber, using the 3/4" flat brush. Paint
rose and eaves with I -«ting '.ledi im and Burnt I mbe
using the *12 fat kush.
sondhuctf on pjgc 30
29
Spring in the Garden
Pictured on pages 26 & 27
continued ftcm page 27
areas with inky Basil Green, using the #12 flat brash. Add linework
detail with Inky Basd Green, using the #2 script llnc-r.
Moss:
Refer to Wisteria. Lea-.es tr МИ/Ьм? Worksheet.
Multi-load the scruffy brash with Thicket. Wicker White, and Sunflower.
Pounce moss tn all areas shown or. pattern.
Heart
Lead the #12 fiat brush with Berry W.e and a touch of Wicker White.
Paint heart with Wicker White t amed to outer edge.
Tulips:
Refer to Tutp& Sweetpea Worksheet.
1. Paint petals with multi loaded Berry Wine, Wicker White, and
Sunflower. u£32 the 3/4' Hat brush. Turn light color ro outer edge.
Paint outer petals, center petal, and front petals in that order.
2. Paint leaves with multi loaded Thicket, Wicker White, and
Sunflower. using the 3/4” flat brush. Turn Thickes to outer edge.
String Bow.
Paint with inky Midnight and Wicker White, double loaded on the #2
scnp< liner.
White Blossoms:
1. Paint with Wicker White and School Bus Yellow, double loaded on
the s 12 Cat brush. Turn Wicker Whitt to outer edges,
2. Do: centers with Green Forest, using handle end of brash.
Bloc Rowers:
1. Paint with double loaded Periwinkle and Wicker White, using the
“12 flat brush. Tum Wicker White to outer edges-
2. Paint stems and calyxes with double loaded Thxket and Sunflower,
uring &c chBei edge of #12 flat brush.
Leaves:
Refer to IlZsterig Lea-res fr libntsteer.
Paint leaves with doable baded Thicket and Sunflower.
Pot at Ends of Tote
1. Basecoat pot with Butter Тесал and a touch of Wicker White.
2. Using same brush, pick ap Butter Pecan and aid ihadflTg *»d accents
on pot.
3. Multi-load scruffy brush with Thicket, Wicker White, and Sunflower.
Paint mots, i Refer co Wisteria, Leaves & Wfldflowers Worksheet.,
4. I'aint ribbat and tow with inky Berre Wine and Wider White, dou-
ble loaded on the m2 script liner. iRefrr to Birdhouses. Ribbon 4
Dragonfly Worksheet. I
4 Finish
l. Dip dampened spcr.ge into Thicket. Pain: irsitJe of box. This wifl ere
ate a washed loci.
2. When dry, finish with two or three coats o! sealer. □
Summer Days
Pictured on pages 28 & 29
continuedfrom page 2C
5. Multi load the scruffy brush with Thicket. Wicker White, and
Sunflower. Pounce том on pots #2 and #4. Refer to Wisteria,
Leaves & WUdflowere Worksheet.)
Heart:
1. Paint trunk of heart (pa #2! With Burnt Umber and Wicker White,
double Aided on the 3/4" brush. Tum Bum: Umber to outer edge.
2. Paint heart with Berry Wine, using the #12 brush. Sideload same
brush into Burnt Umber and add shading.
Tulips:
Refer to Tulip fr Sweetpea Worishcct
1. Multi lead the 3/4' flat brush with Berry Wine. Wicker White, and
Sunflower. With light color to outer edges, paint alter petals, then
center petal, then front peiah In that order.
2. Paint leaves with multi loaded Thicket. Wicker White, ano
Sunflower, using the 3/4' flat brush. Turn Thicket to outer edge.
Ribbon Lacing & String Bow:
Refer to Birdhouses, Ribbon £r Dragonfly Worksheet.
Paint with inky Midnight and Wicker White, double loaded on the #2
script later. Vary the values «these colors.
White Blossoms:
I. i’aint with Wicker White and School Bus YriJcW, double Aided on
the #12 flat brash. Turn Wkker White to outer edges.
2. Dot centers with Green Forest, using handle end of brush.
Butterflies:
Refer to Birds fr Bees Woricsteei.
1. Faint wings with double loaded Dioxazine and Wicker White
(instead of colors on worksheet!, using the =12 Sat brush.
2. Paint bodies and antennae with inky Licorice-, using the #2 script
Inter.
Pot at Ends of Tote:
1. Basecoat pot with Terra Cotta, using the 3/4’ trash. Sideload same
brush into Burnt Sienna and shade and add leaf spray.
2. Multi-load the scruffy brush with Thicket, Wicker White, and
Sunflower. Pounce on mossy backgraund ( Refer to Wisteria. Leaves
4 Wildflowers Worksheet!
3. Pounce centers of daxes with Bun.1 Umber and Yellow ochre doe
ble loaded on the small scruffy brush. : Refer to Multi-Rower
Worksheet for daisies, using colors given here. I
4. S’alni daisy petals with Wicker White and Yellow Ochre double
loaded on the #12 flat brush. Use chisel edge of brash and push
fightiy.
5. Blue Howers: Paint with double loaoea Midnight and Wicker White,
'using the #12 flat brush. Tum Wicker White to outer edges.
0. Wildflowers: Refer to Wisteria, Leaves & Wildflowers Worksheet
Paint with double loaded Dioxazinc Purple and Wlccer White
I instead of colors on worksneeti. using the #12 flat brash.
7. Leaves: I'aint leaves with double loaded ТЫскст and Sunflower.
iReftT to Wisteria. Leaves & WUdUcwerx V/ ffcAwt.
4 Finish
1. Dip dampened sponge into Thicket. Paint inside of box. This wJ cre-
ate a washed lock.
2. When dry, finish with two ar three coats of scaler. J
30
Grapevine Heart
Instructions on page 32
3i
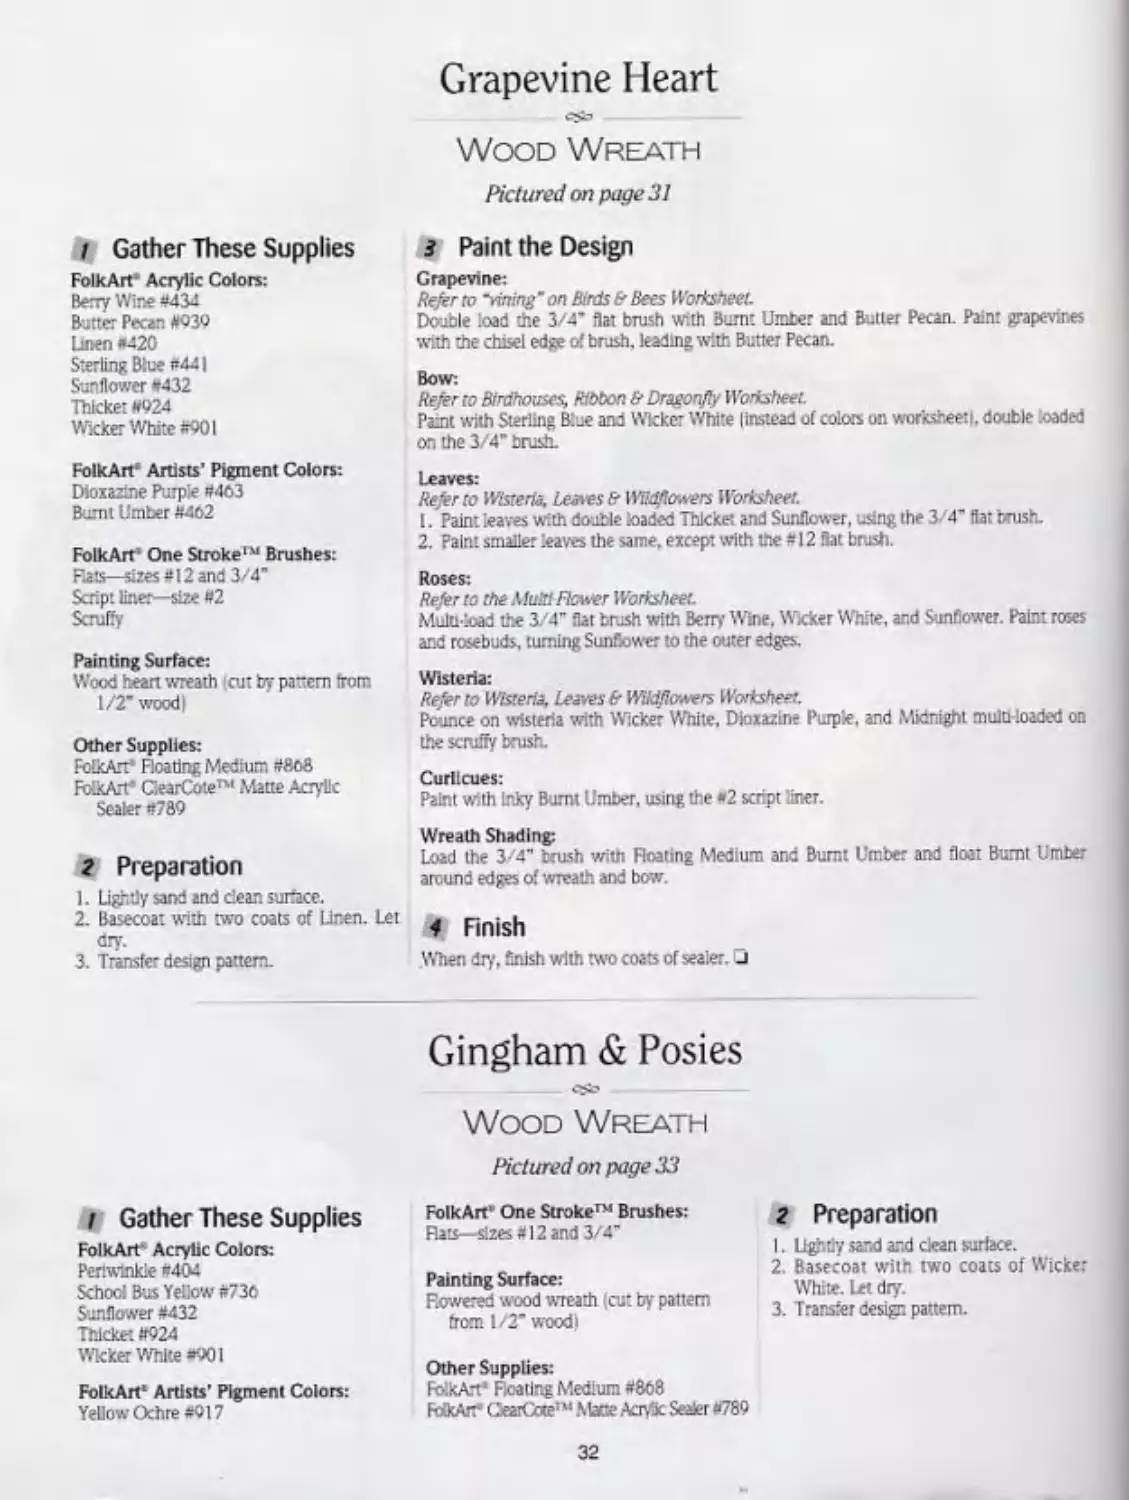
Grapevine Heart
1 Gather These Supplies
FolkArt Acrylic Colors:
Berry Wine #434
Butter Pecan #039
Linen "420
Sterling Blue "441
Sunflower *432
Thicket #924
Wicker White *901
FolkArt- Artists’ Pigment Colors:
Dioxazine Purple #463
Burnt Umber #4o2
FolkArt1 One Stroke141 Brushes:
Rats—sizes "I2 and 3/4"
Script liner—size #2
Scruff)'
Painting Surface:
Wood heart wreath cut by partem front
1/2" wood |
Other Supplies:
FdkArri Floating Medium #8o8
FolkArt ’ ClearCote™ Matte Acrylic
Sealer #789
2 Preparation
1. Lightly sand and clean surface.
2. Basecoat with two coats of Lir.en. Let
dry.
3. Transfer design pattern.
Wood Wreath
Pictured on page 31
3 Paint the Design
Grapevine:
Refer to -vining" on Birds & Bees Worksheet.
Double load the 3/4’ flat brush with Burnt Umber and Butter Pecan. Paint grapevines
with the chisel edge of brush, leading with Butter Pecan.
Bow:
Refer to Birdhouses, Ribbon & Dragonfly Worksheet.
Pamt with Sterling Blue and Wicker White (instead of colors on worksheet), double .oaded
on the 3/4" brush.
Leaves:
Refer to Wisteria. Leaves & Wildflowers Worksheet.
1. Paint leaves with double loaded Thicket and Sunflower, using the 3/4' flat brush.
2. Paint smaller leaves the same, except with the # 12 Bat brush.
Roses:
Refer to the Maid Rower Worksheet.
Multi-load the 3/4" flat brush with Berry Wine, Wicker White, and Sunflower. Paint roses
and rosebuds, turning Sunflower to the outer edges.
Wisteria:
Refer to Wisteria, Leaves & Wildflowers Worksheet.
Pounce on wisteria with Wicker White, Dioxazine Purple, and Midnight multi loaded on
the scruffy brush.
Curlicues:
Paint with Inky Burnt Umber, using the #2 script liner.
Wreath Shading:
Load the 3/4" brush with Floating Medium and Burnt Umber and float Burnt Umber
around edges of -wreath and bow.
4 Finish
When dry, finish with two coats of sealer. □
I Gather These Supplies
FolkArt Acrylic Colors:
Periwinkle #404
Schoo! Bus Yellow #730
Sunflower #432
Thicket #924
Wicker White «901
FolkArt1 Artists' Pigment Colors:
Yellow Ochre 4017
Gingham & Posies
------------- <8to -----------
Wood Wreath
Pictured on page 33
FolkArt” One Stroke™ Brushes:
Rats—sizes # 12 and 3/4’
Painting Surface:
F.owered wood wreath (cut by pattern
from 1/2" wood)
Other Supplies:
FolkArt* Heating Medium #868
fcxkAr ОеиСое7 M Maze Acr/x Sealer #789
2 Preparation
I. Lightly sand and clean surface.
2. Basecoat with two coats of Wicker
White. Let dry.
3. Transfer design pattern.
32
Gingham & Posies
3 Paint the Design
Bow:
Refer to Birdhouses, Ribbon & Dragonfly Worksheet.
Paint bow with Floating Medium and Periwinkle I Instead of col-
ors on worksheet), using#12 Cat brush.
Howers:
Refer to the Multi Flower Worksheet.
1. Paint the flve-peui flowers with double loaded Yellow Ochre
and Wicker white, using the #12 flat brush. Occasonaliy pick
up a touch of School Bus Ydlow to create a variety of shades.
Turn the Wicker White side of brush to cuter edges.
2. Da comers of flown, with Thicket, using the hand* end of brush.
Leaves:
Refer to Wisteria. Leaves & Wildflowers Worksheet.
1. Pain: larger leaves with Thicket and Sunflower, double loaded
on the 3/4* flat brush.
2. Pant smaller “One Stroke* leaves with same colors, using the
#12 flat brush.
4 Finish
When dty. finish with two coats of sealer. □
33
/ Gather These Supplies
FolkArt1 Acrylic Colors:
Basil Green #645
Beny Wine #434
Butter Pecan «939
licorice #938
Linen #420
Midnight #964
Purple Passion «638
Sunflower "432
Thicket #924
Wicker While #901
FolkArt’ Artists' Pigment Colors:
Burnt Carmine «686
Burnt Umber #462
Yellow Ochre «917
FolkArt" One StrokeIM Brushes:
Flats—sizes #12 and 3/4'
Script liner—size #2
Scruffy
Painting Surface:
Topiary wood cutout (cut by pattern from
1/2’ wood |
Base (cut by pattern from 1-1/4’ wood I
Other Supplies:
FolkArt* Floating Medium #868
Household sponge
FolkArt1 ClearCote,w Matte Acrylic
Sealer #789
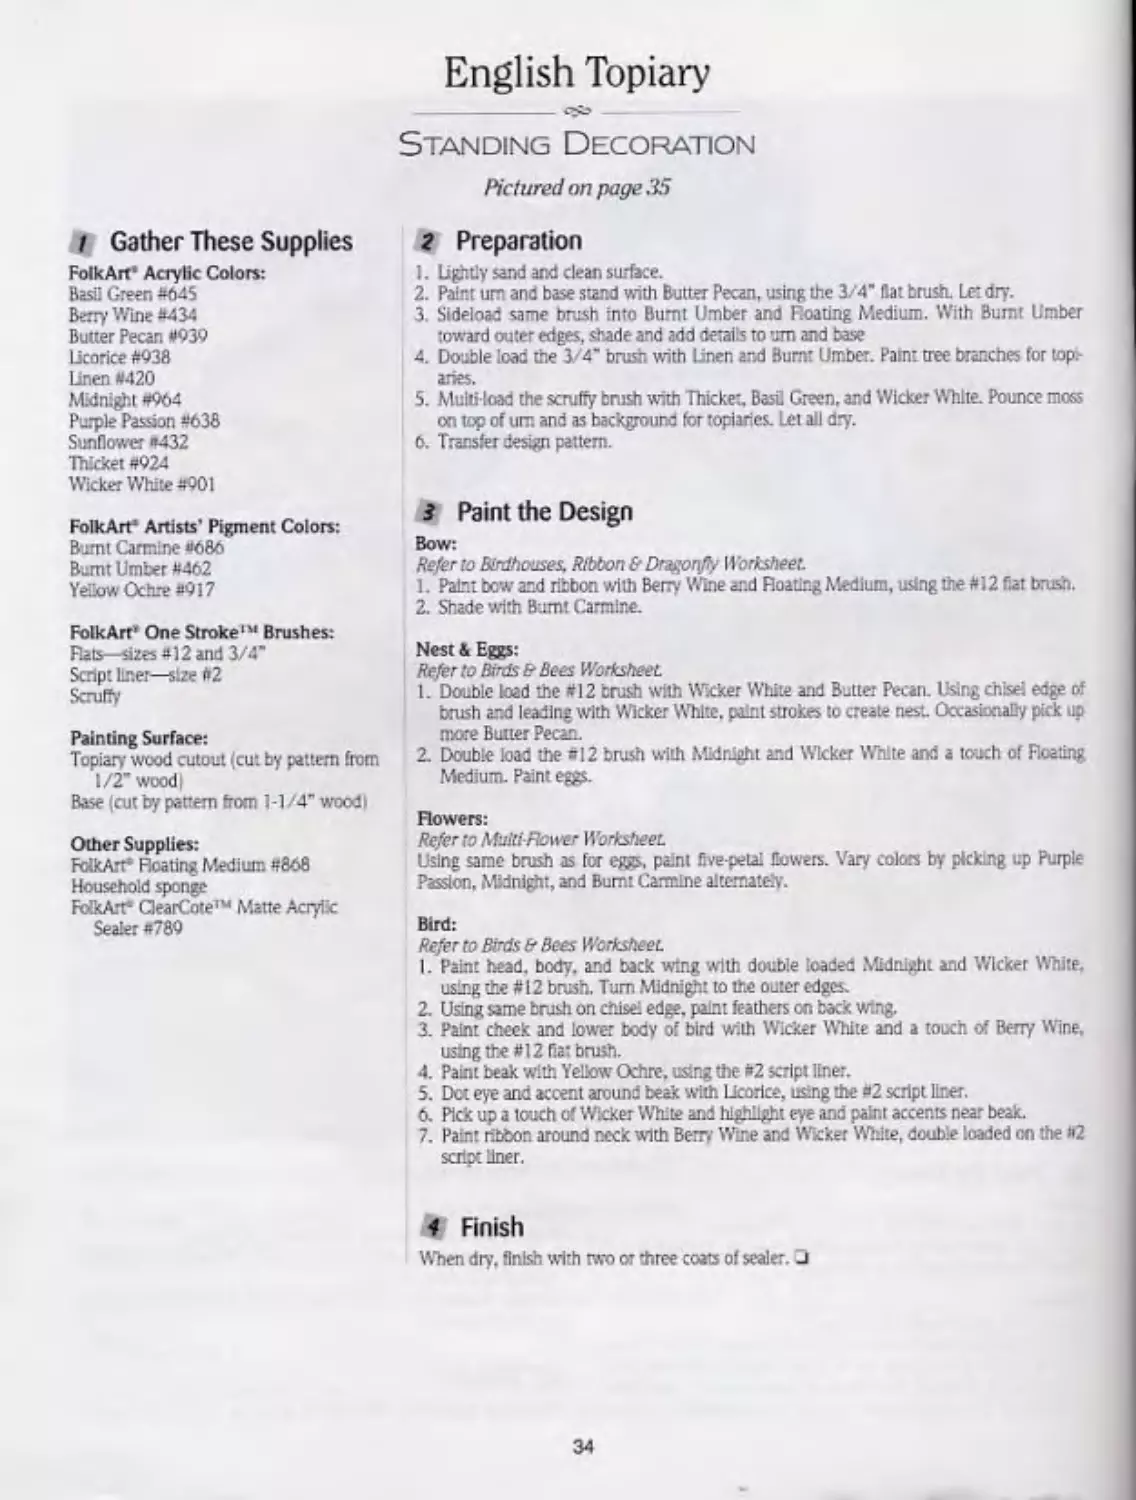
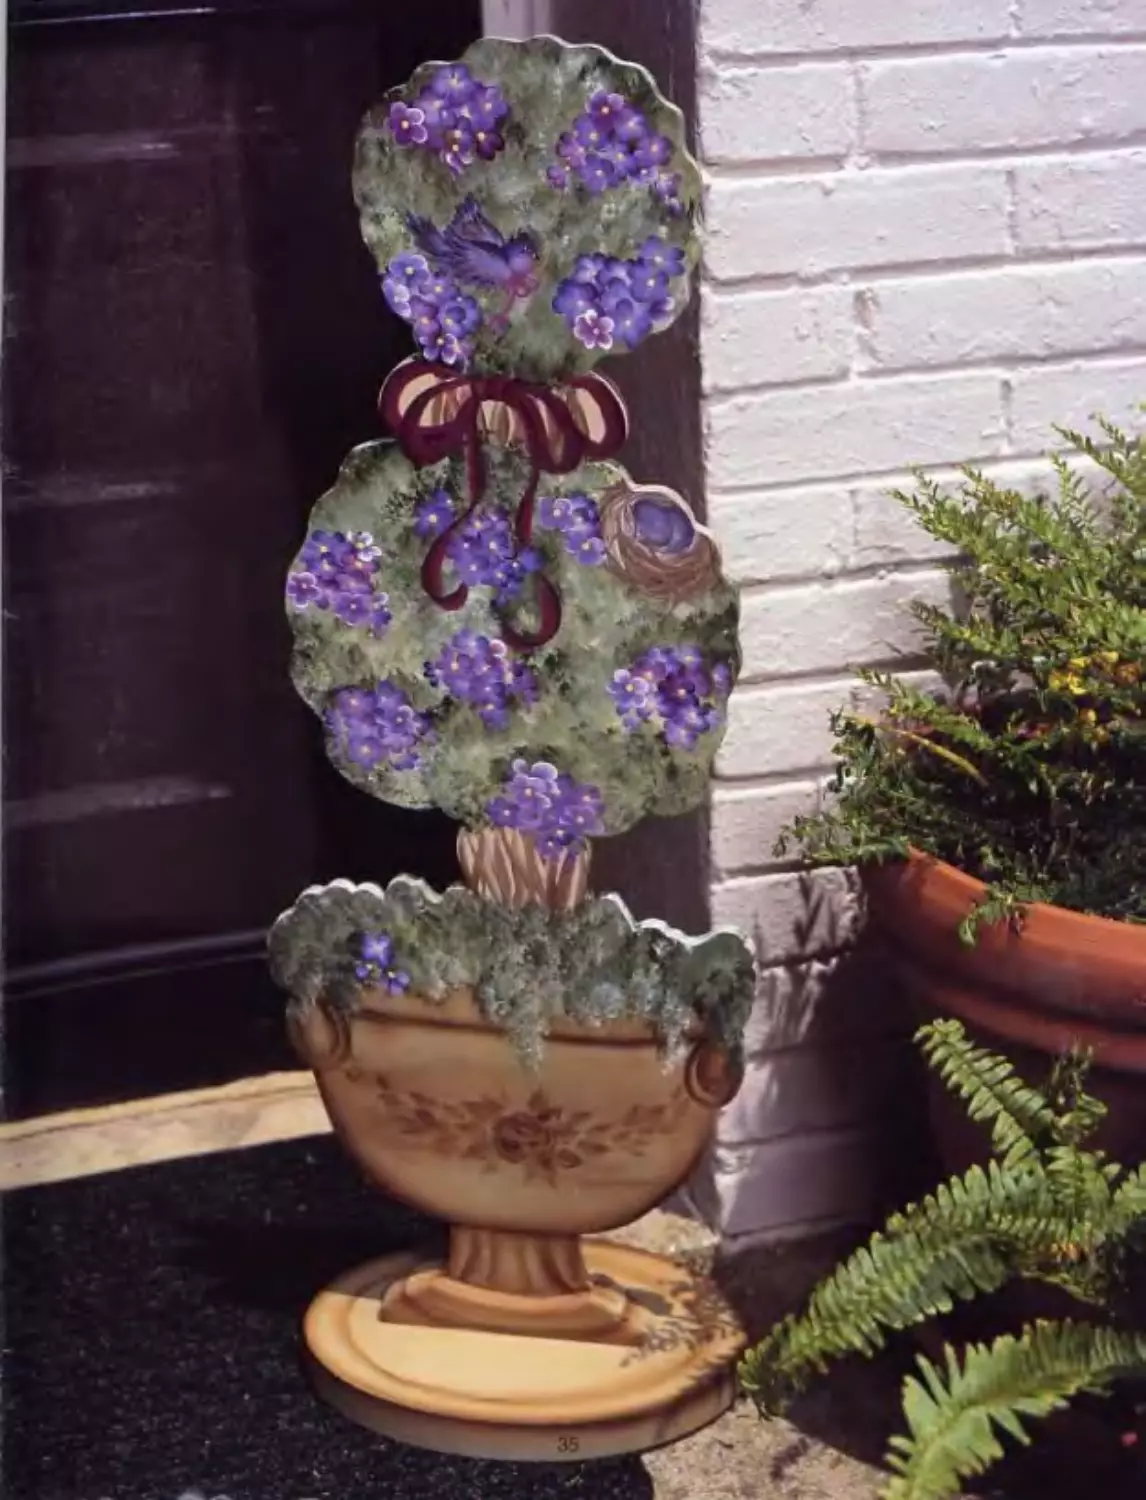
English Topiary
----------- CS-'*
Standing Decoration
Pictured on page 35
2 Preparation
1. Lightly sand and clean surface.
2. Paint um and base stand with Butter Pecan, using the 3/4* flat brush. Let dry.
3. Sideload same brush into Burnt Umber and Boating Medium. With Burnt Umber
toward outer edges, shade and add details to um and base
4. Double load the 3/4’ brush with Linen and Bum: Umber. Paint tree branches for top.
aries.
5. Multi load the scruffy brush with Thicken Basil Green, and Wicker White. Pounce moss
on top of um and as background for topiaries. Let all dry.
6. Transfer design pattern.
3 Paint the Design
Bow:
Refer to Birdhouses. Rfbbon & Draspnfy Worksheet.
1. Patil bow and ribbon with Berry Wine and Floating Medium, using the #12 far brush.
2. Shade with Burnt Carmine.
Nest & Eggs:
Refer to Birds & Bees Worksheet.
I. Double toad the #12 brush with Wicker White and Butter Pecan. Usingchisei edge o'
brush and leading with Wicker White. paint strokes to create nest Occasionally pick up
more Butter Pecan.
2. Double load the #12 brush with Midnight and Wicker White and a touch of Boating
Medium. Paint eggs.
Flowers:
Refer to Multi-Flower Worksheet.
Using same brush as for eggs, paint five-petal flowers. Vary colors by pkk.ng up Purple
Passion, Midnight, and Burnt Carmine alternately.
Bird:
Refer to Birds & Bees Worksheet.
I. Paint head. body, and back wtng with double loaded Midnight and Wicker White,
using the #12 brush. Turn Midnight to the outer edges.
2. Using same brush on chisel edge, paint feathers on back w.ng.
3. Paint check and lower body of bird with Wicker White and a touch of Berry Wine,
usingthe#12f!a: brush.
4. Paint beak with Yellow Ochre, using the #2 script liner.
5. Det eye and accent around beak with Licorice, using the #2 script liner.
6. Pick up a touch of Wicker White and highlight eye and paint accents near beak.
7. Paint ribbon around neck with Berry Wine and Wicker White, double loaded on the #2
script liner.
4 Finish
When dry. finish with two or three coats of sealer. □
34