/


Text
К кт ReuvEiiu CROSS STITCH
DECORATIVE DESIGNS FROM THE IURN OF THE C ENTURY Tiffany $ De Motgan & Crane Kliml * Mackintosh V Voyscy Xf Mucha
BARBARA HAMMET
CONTENTS
INTRODUCTION 6
V
POSTER ART INSPIRATION 12
Champagne Eady Picture 14 ♦' Celebration Card 15
ASYMMETRICAL FLORAL DESIGN 19
Sunflower Table Mat 20 ♦' Sunflower Coaster 22
INSPIRED BY PERSIA AND PEACOCKS 24
bolster Cushion 26 • Peacock Rug 27
KLIMT GOLD AND SPIRAL DECORATION 38
Spiralling Mirror Frame 40 '< Decorative Pot Lids 42
ART NOUVEAU FLOWERS 46
Iris Tulip and Columbine Pictures 48
TIFFANY’S DECORATIVE GLASS 52
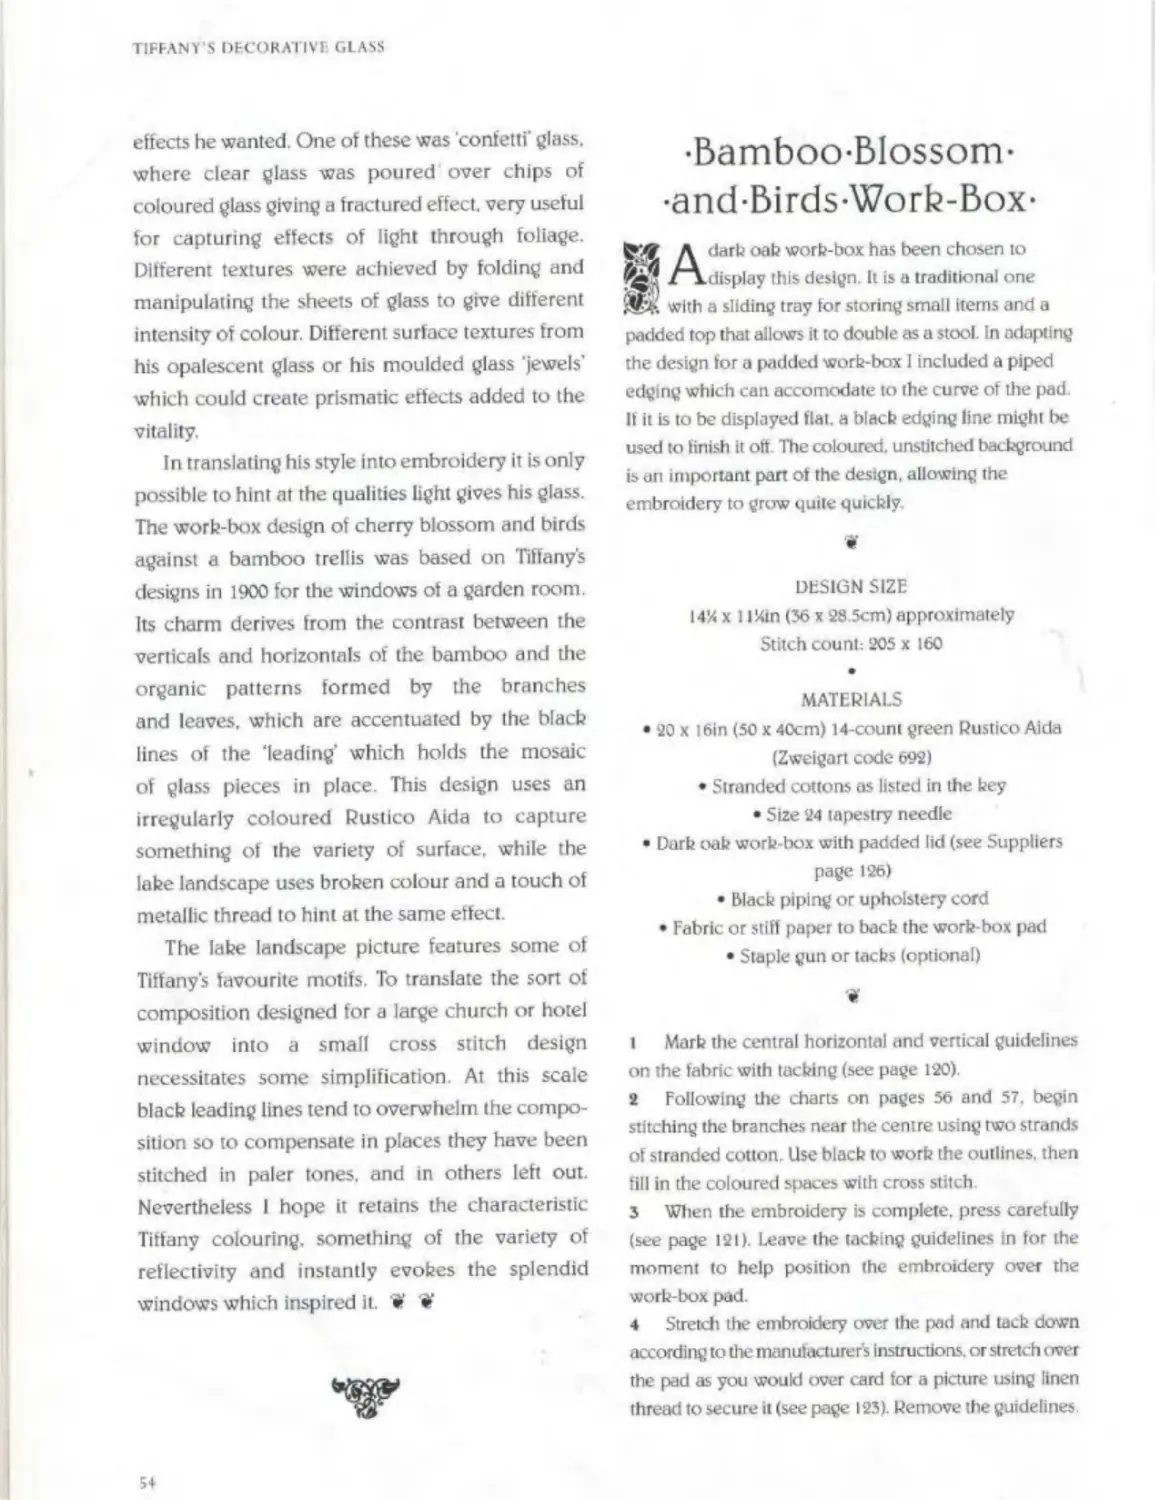
Bamboo. Blossom and Birds Work-box 54 «’ Blossom Pincushion 55 *
Lake Landscape Picture 58
WALTER CRANE'S FLOWER LADIES 62
The Daffodil Lady 64 The Poppy Lady 66 • The Anemone Lady 68
LANDSCAPE AS DECORATION 71
Voysey Landscape Clock 72
PATTERNS FROM FLORAL FOLIOS 76
Snowdrop Pillow Band 78 « Snowdrop Cushion 79
THE MACKINTOSH ROSE 82
Pose Cushions 86 i' Rose Lady Picture 90 » Rose Clock 90 •
Art is the Flower Picture 94
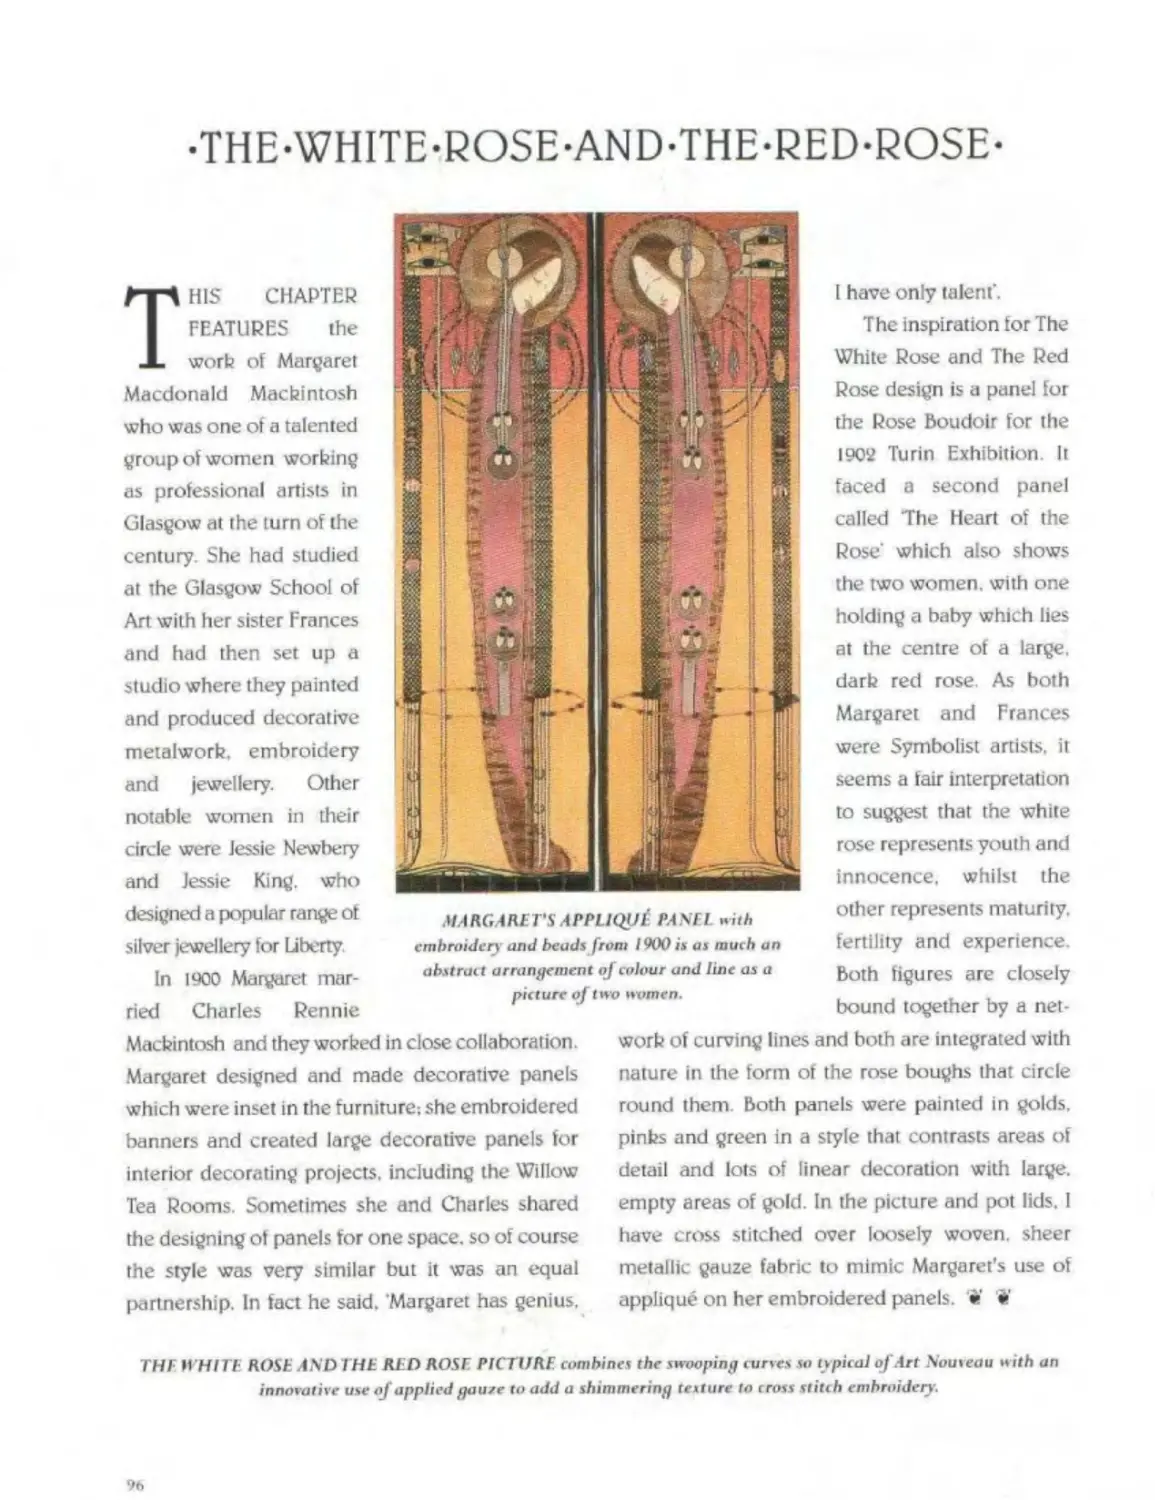
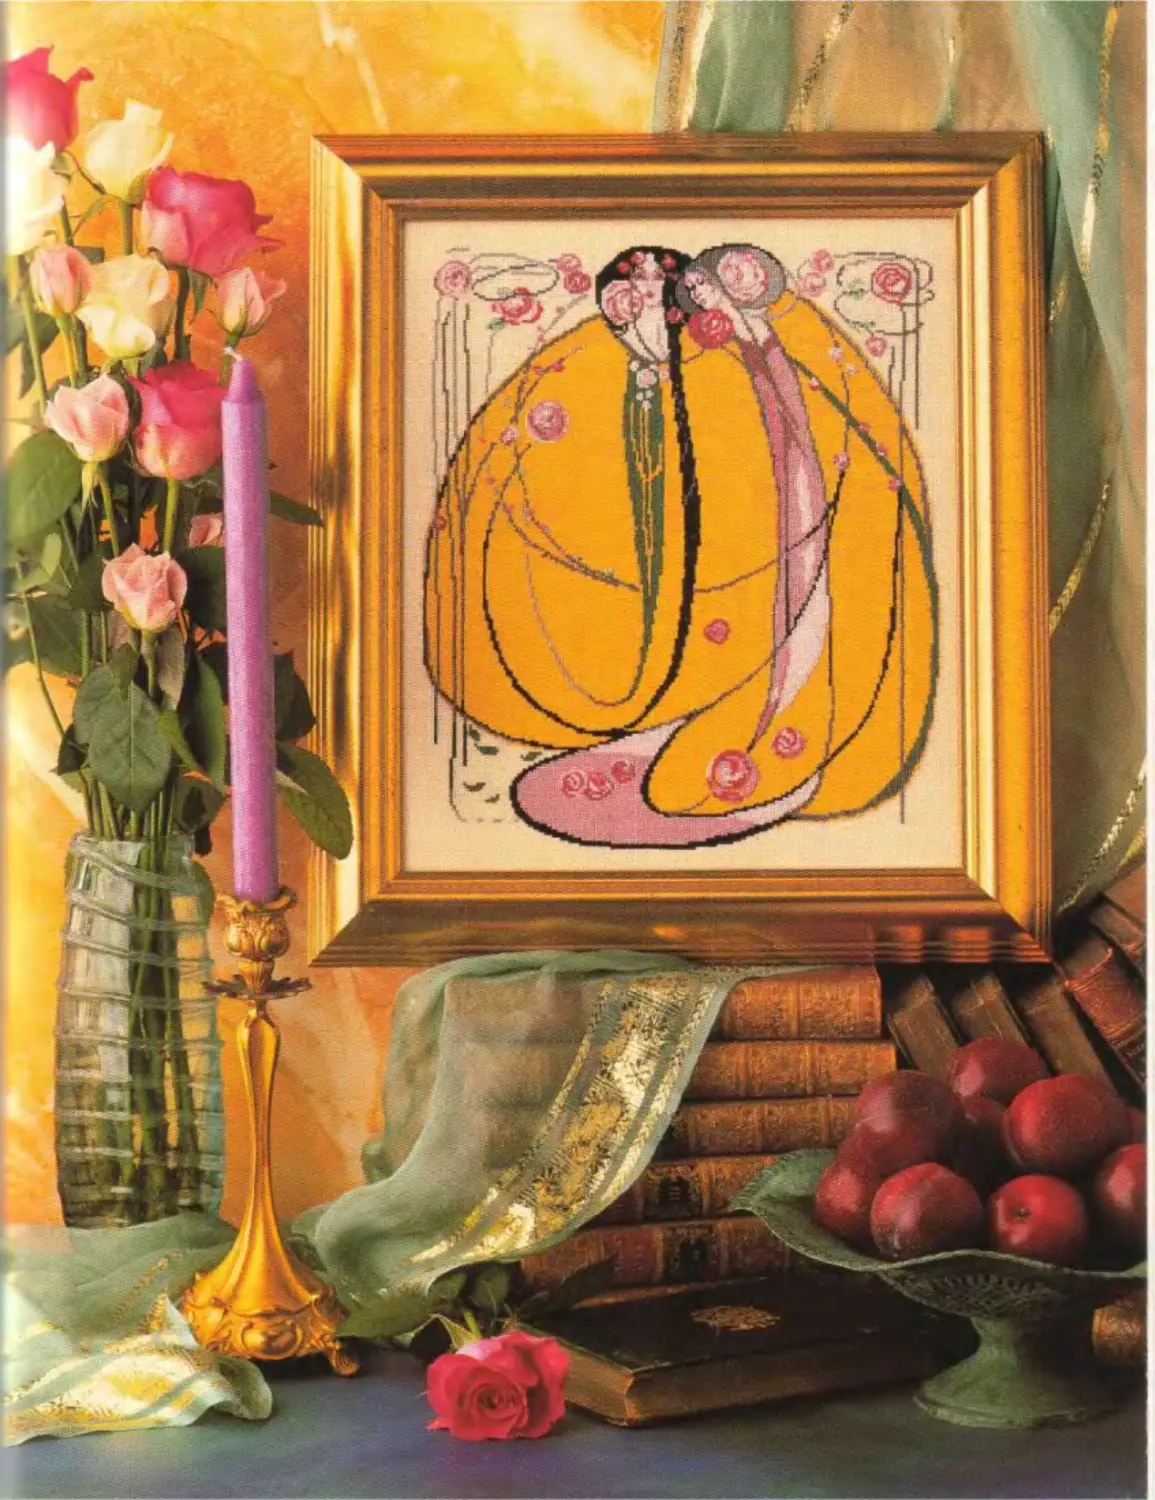
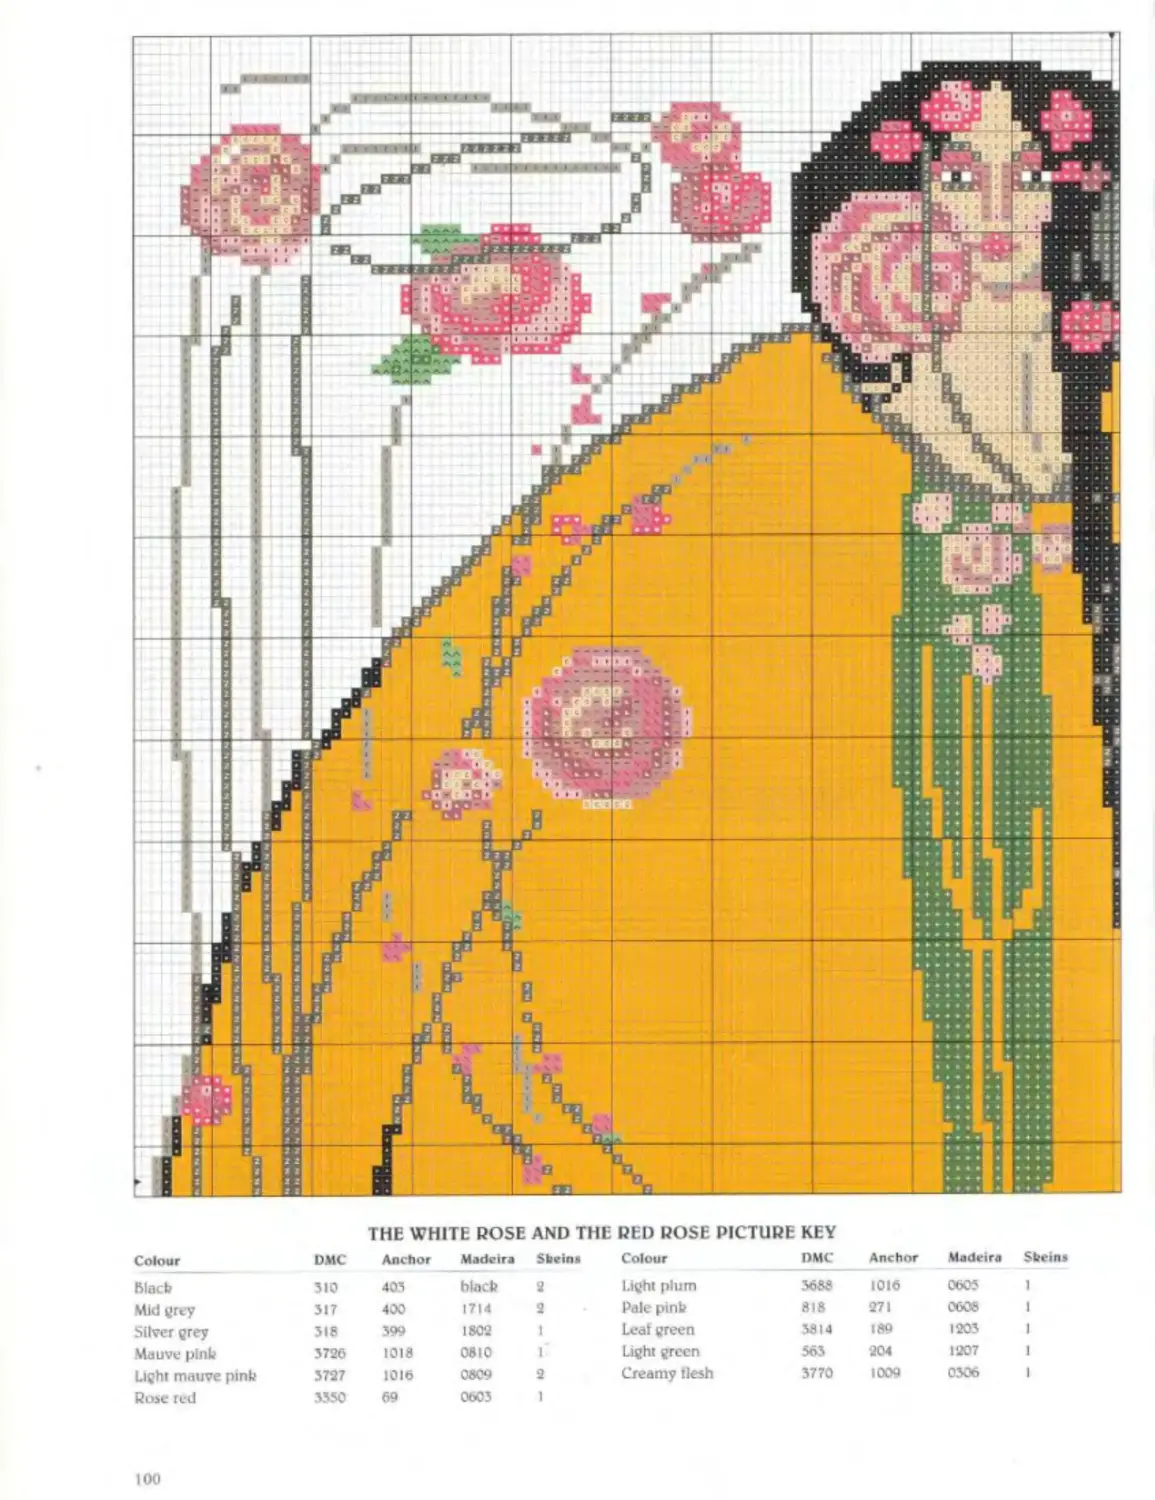
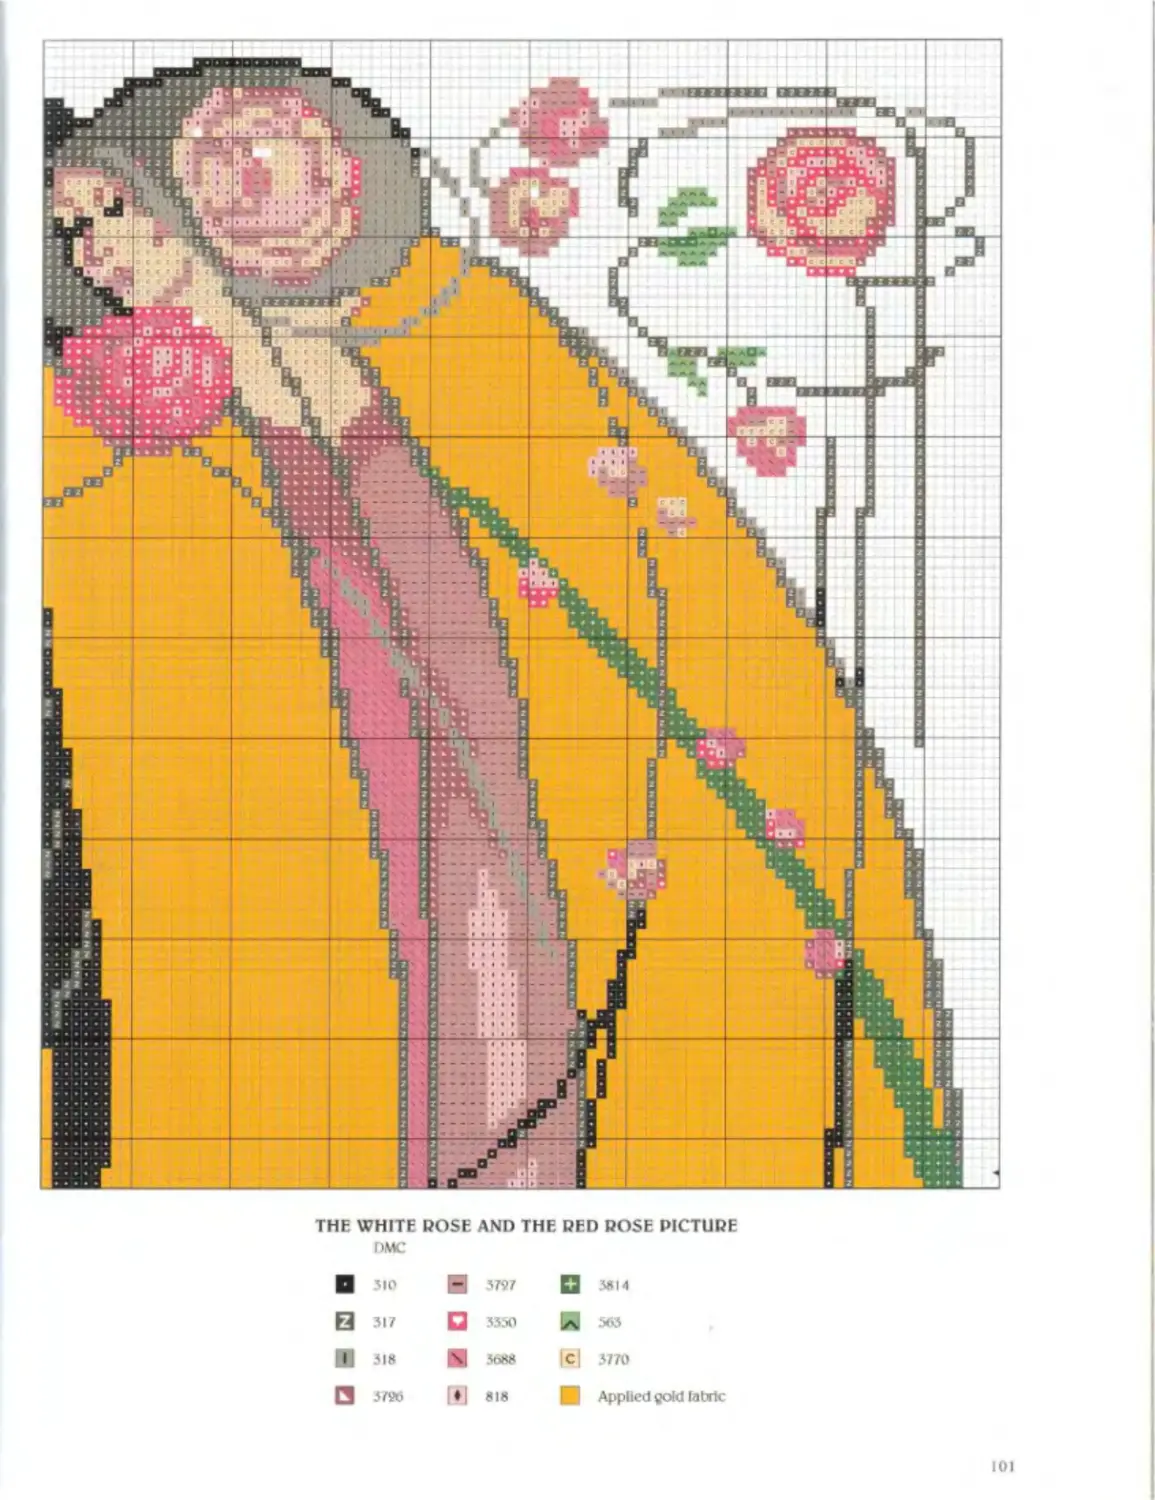
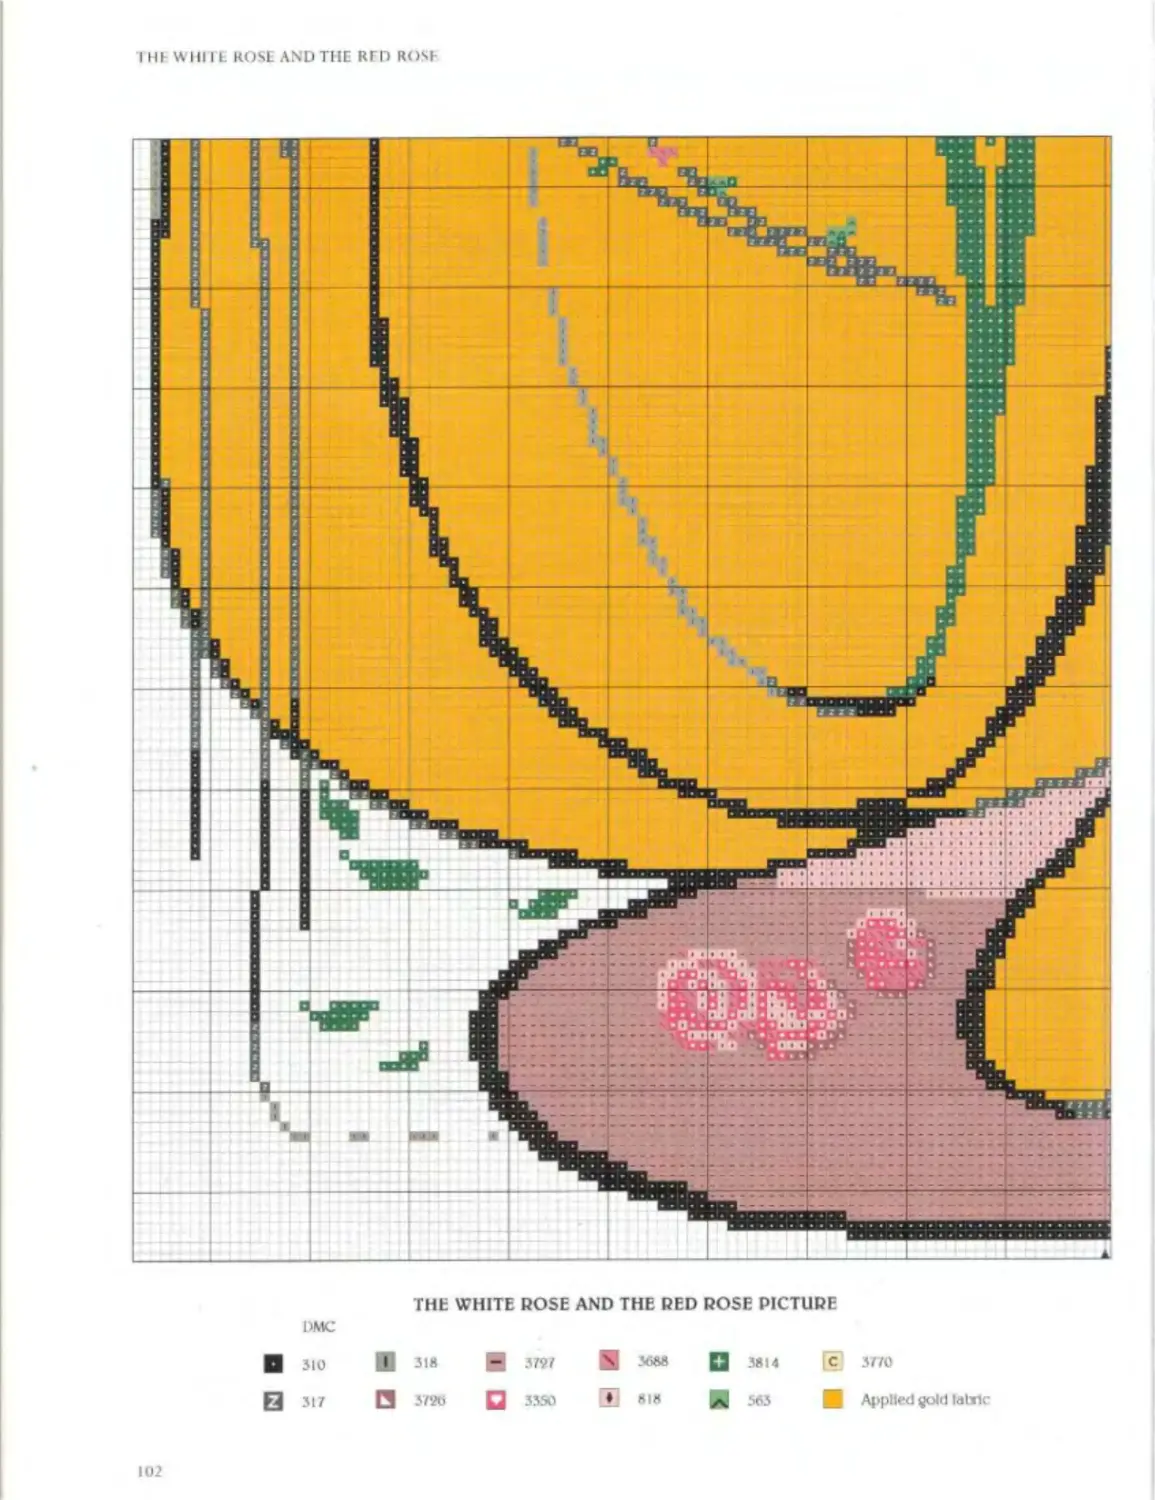
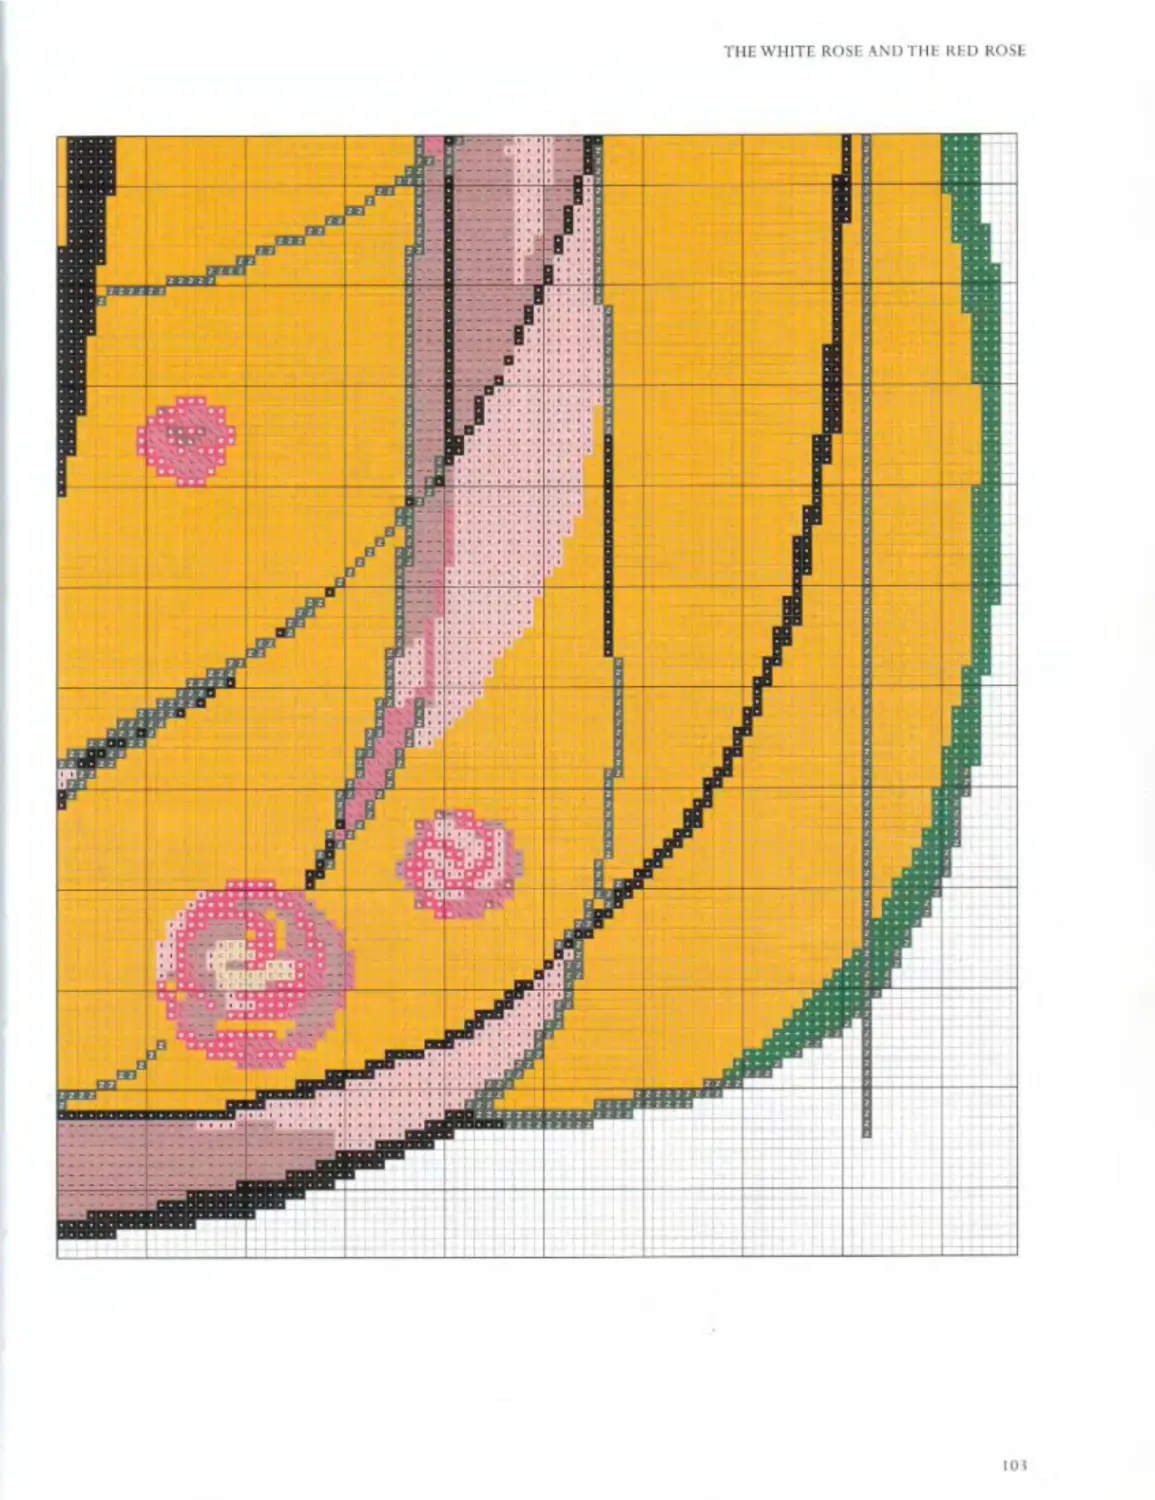
THE WHITE ROSE AND THE RED ROSE 96
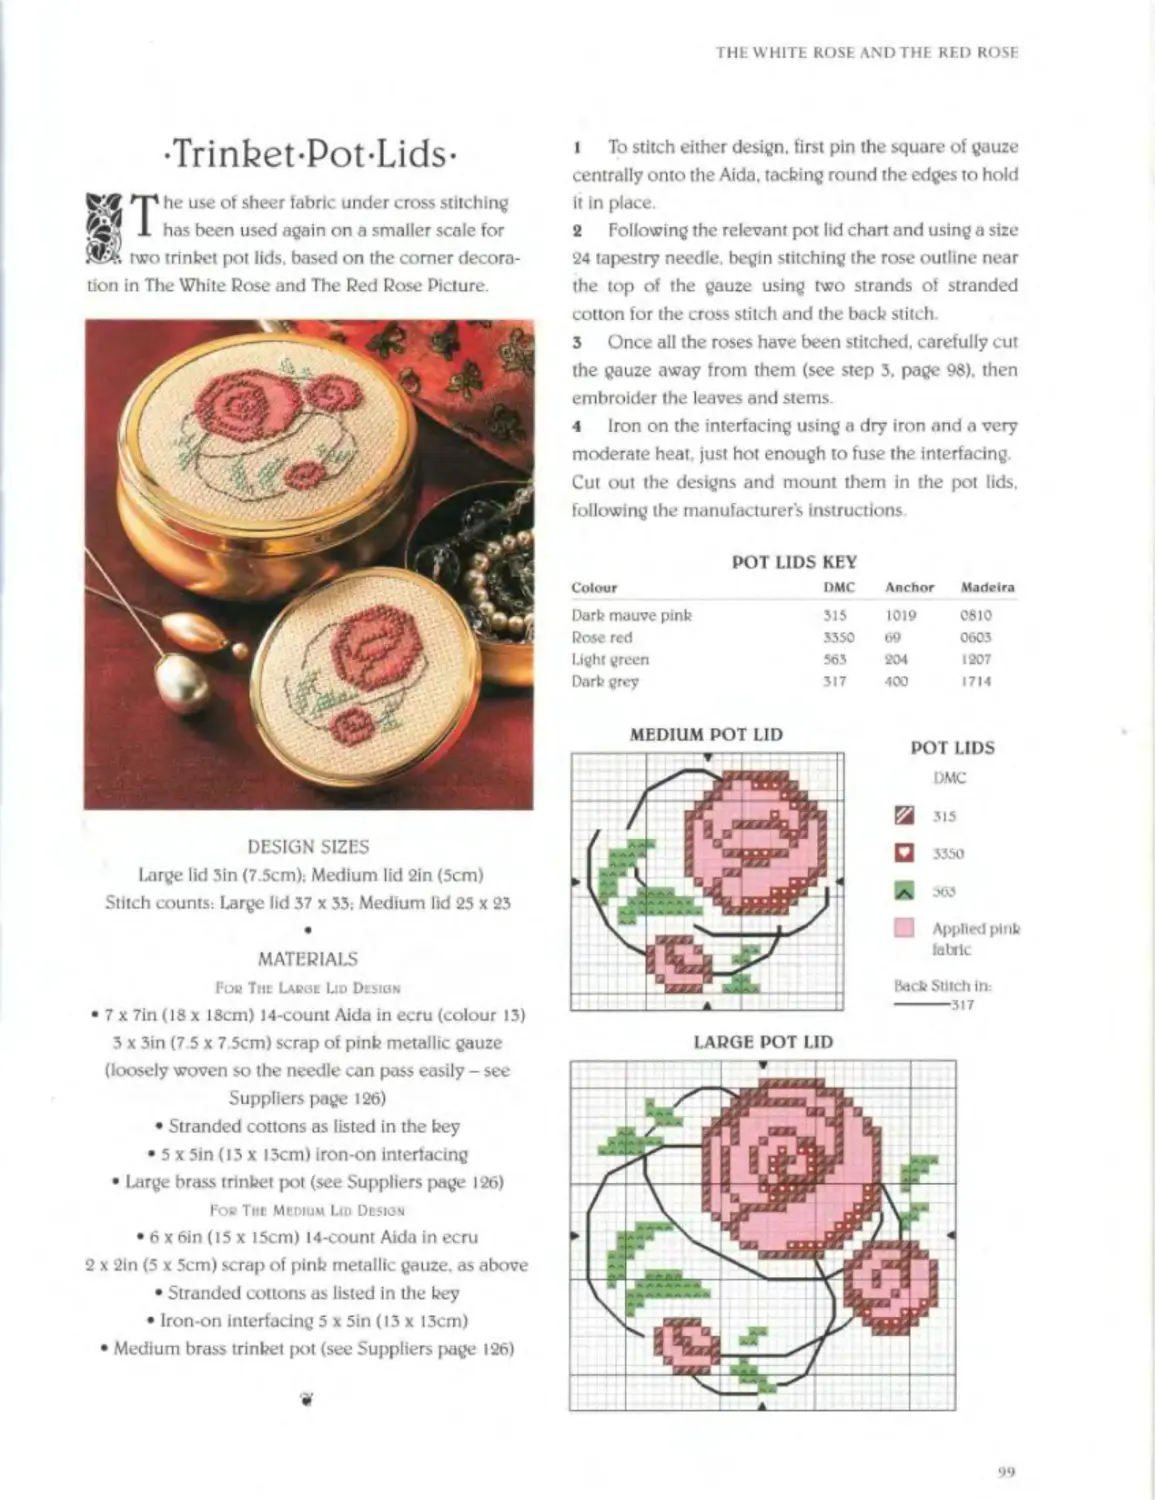
The White Rose and the Red Rose Picture 98 V Trinket Pot Lids 99
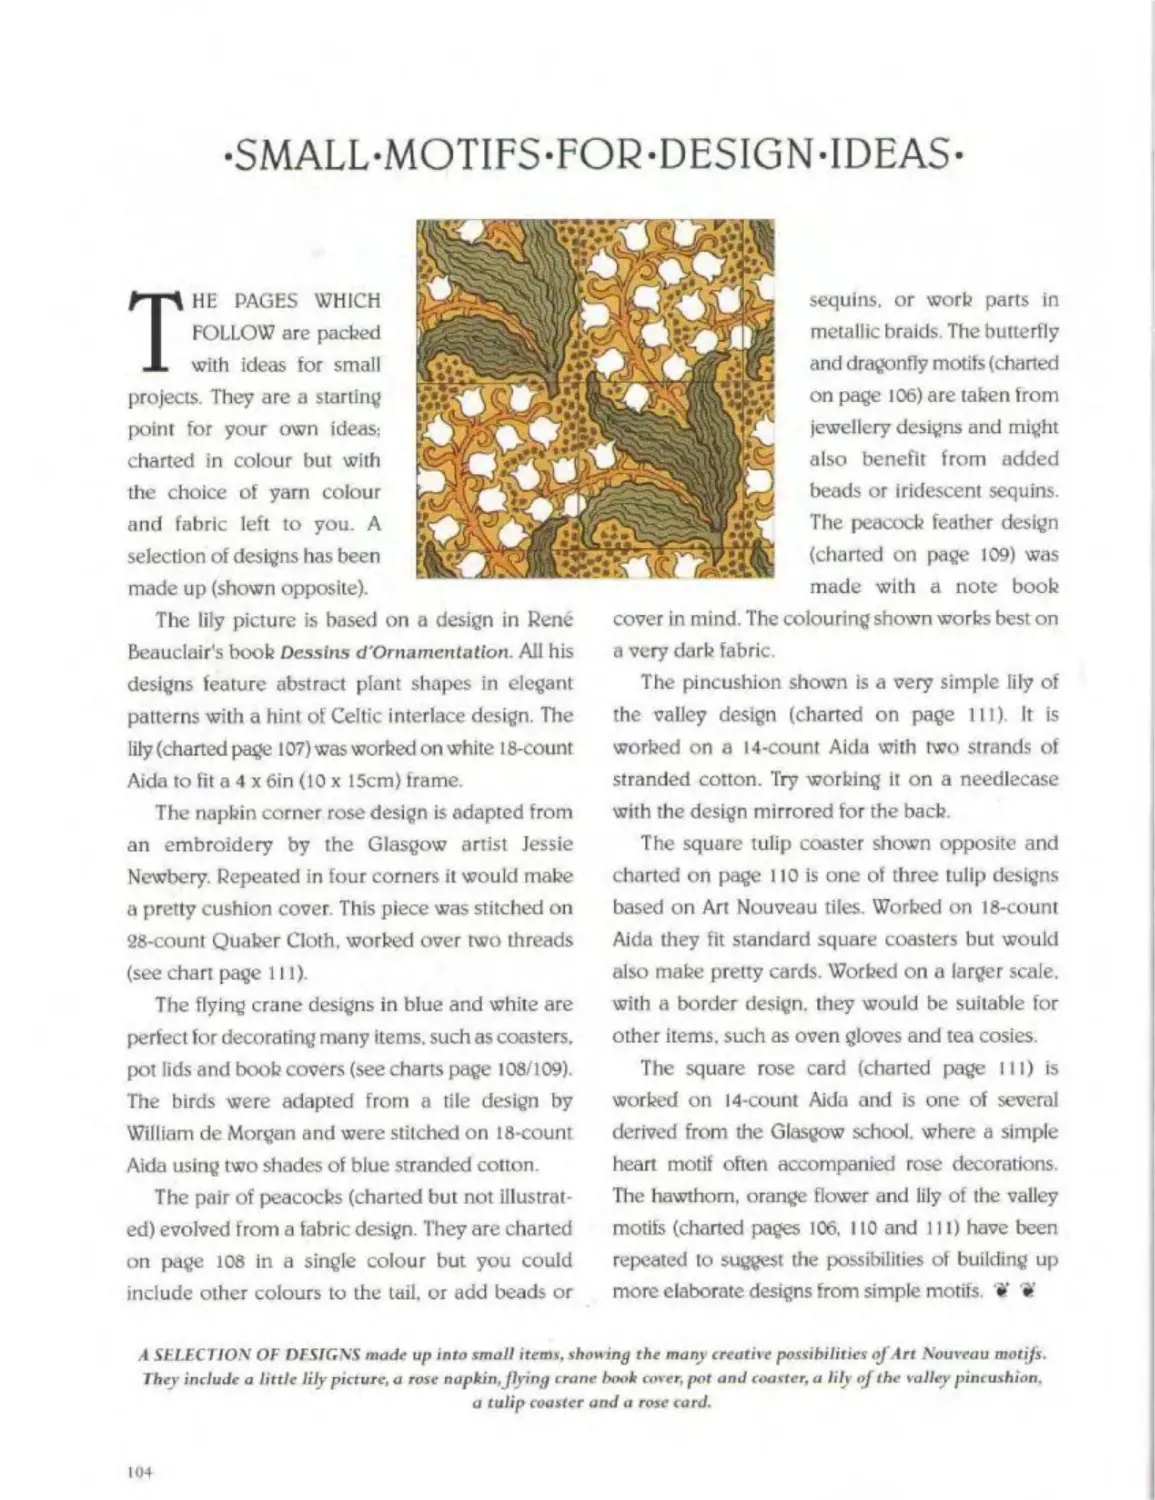
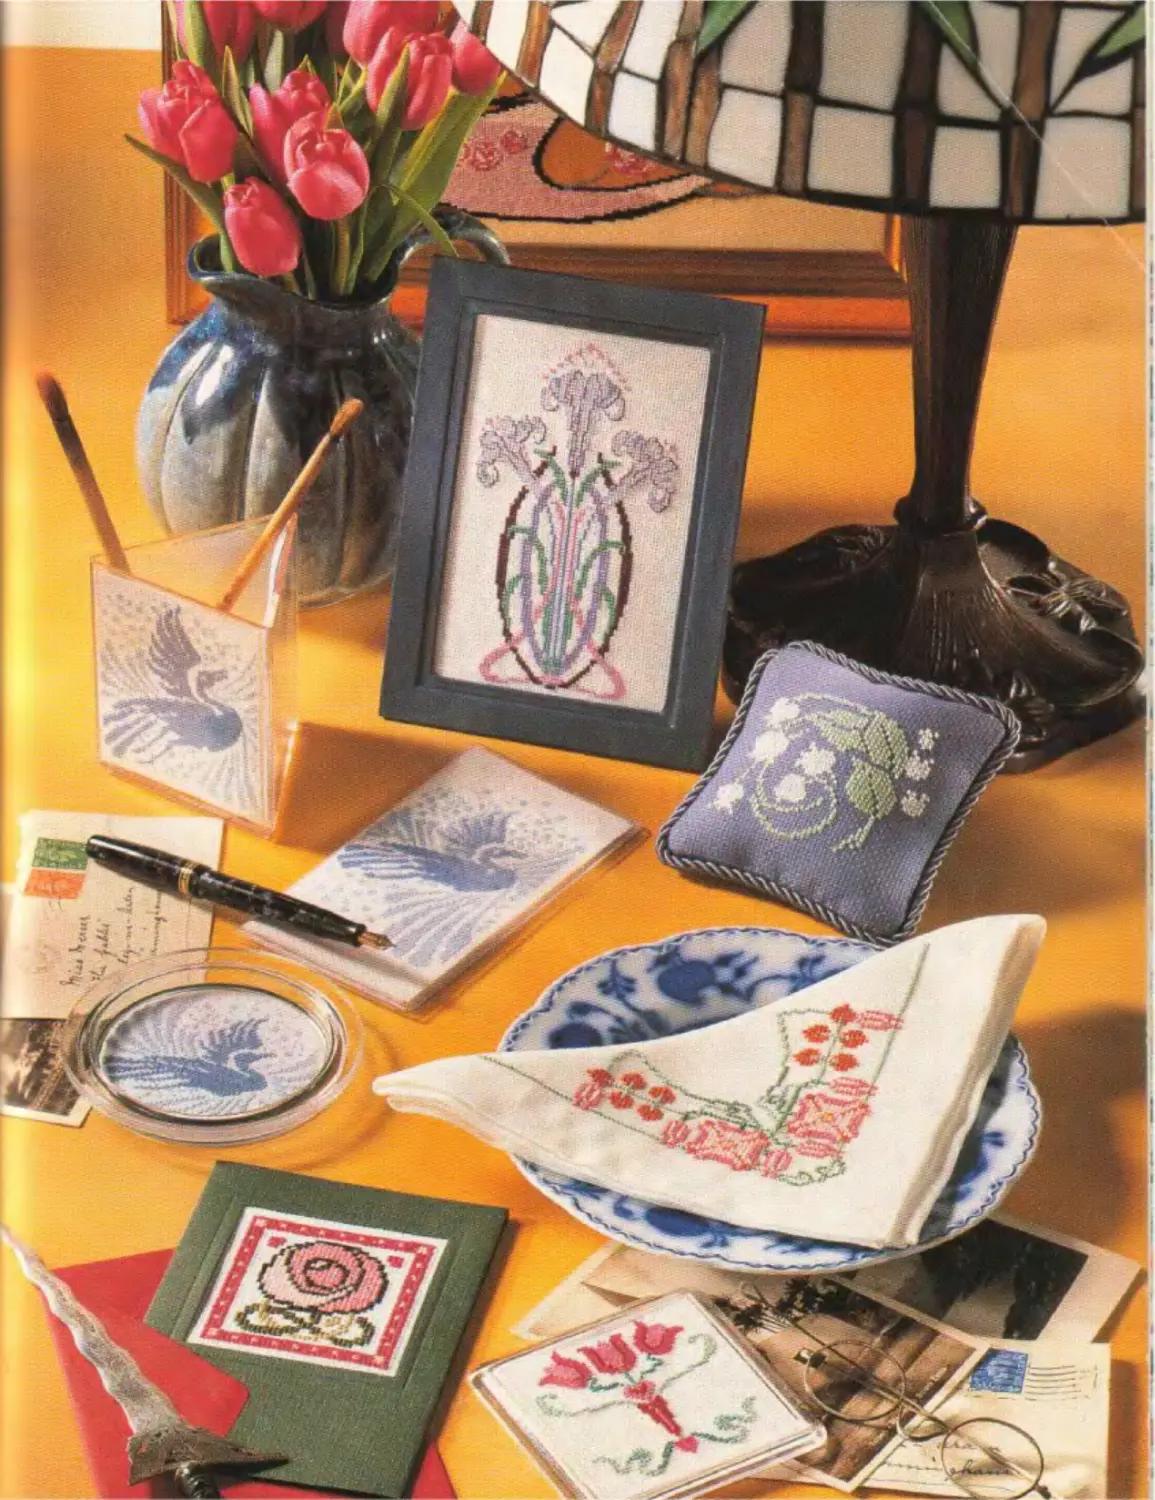
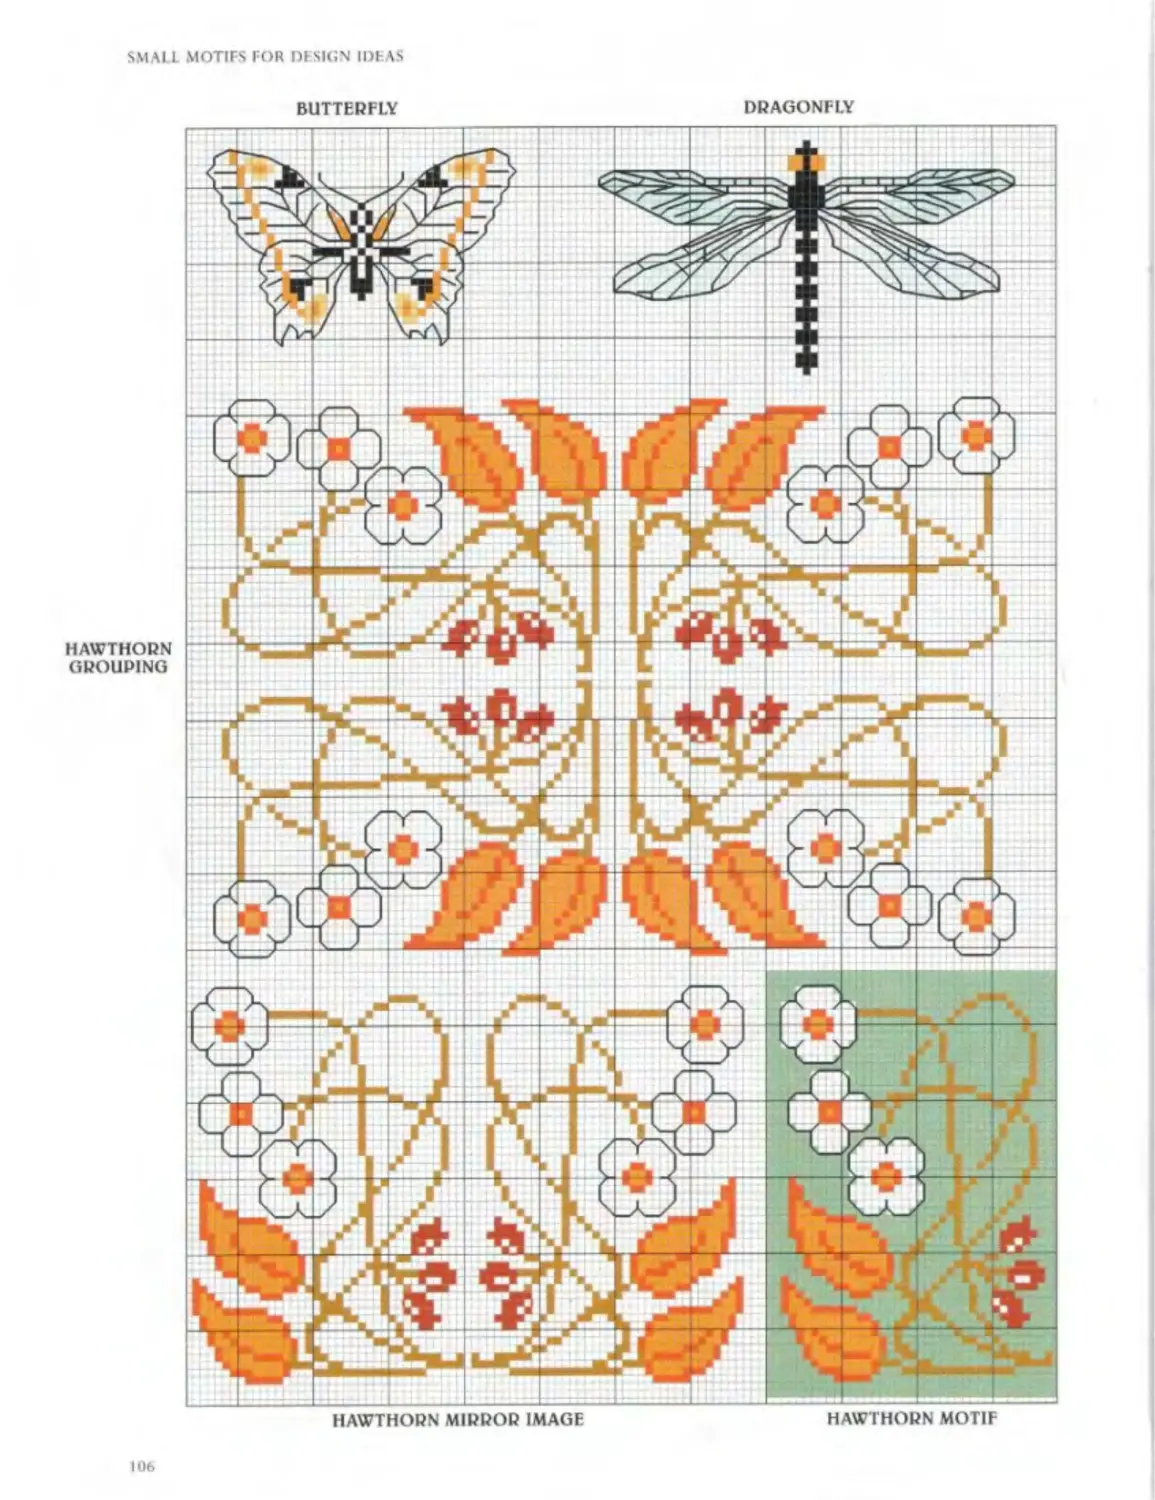
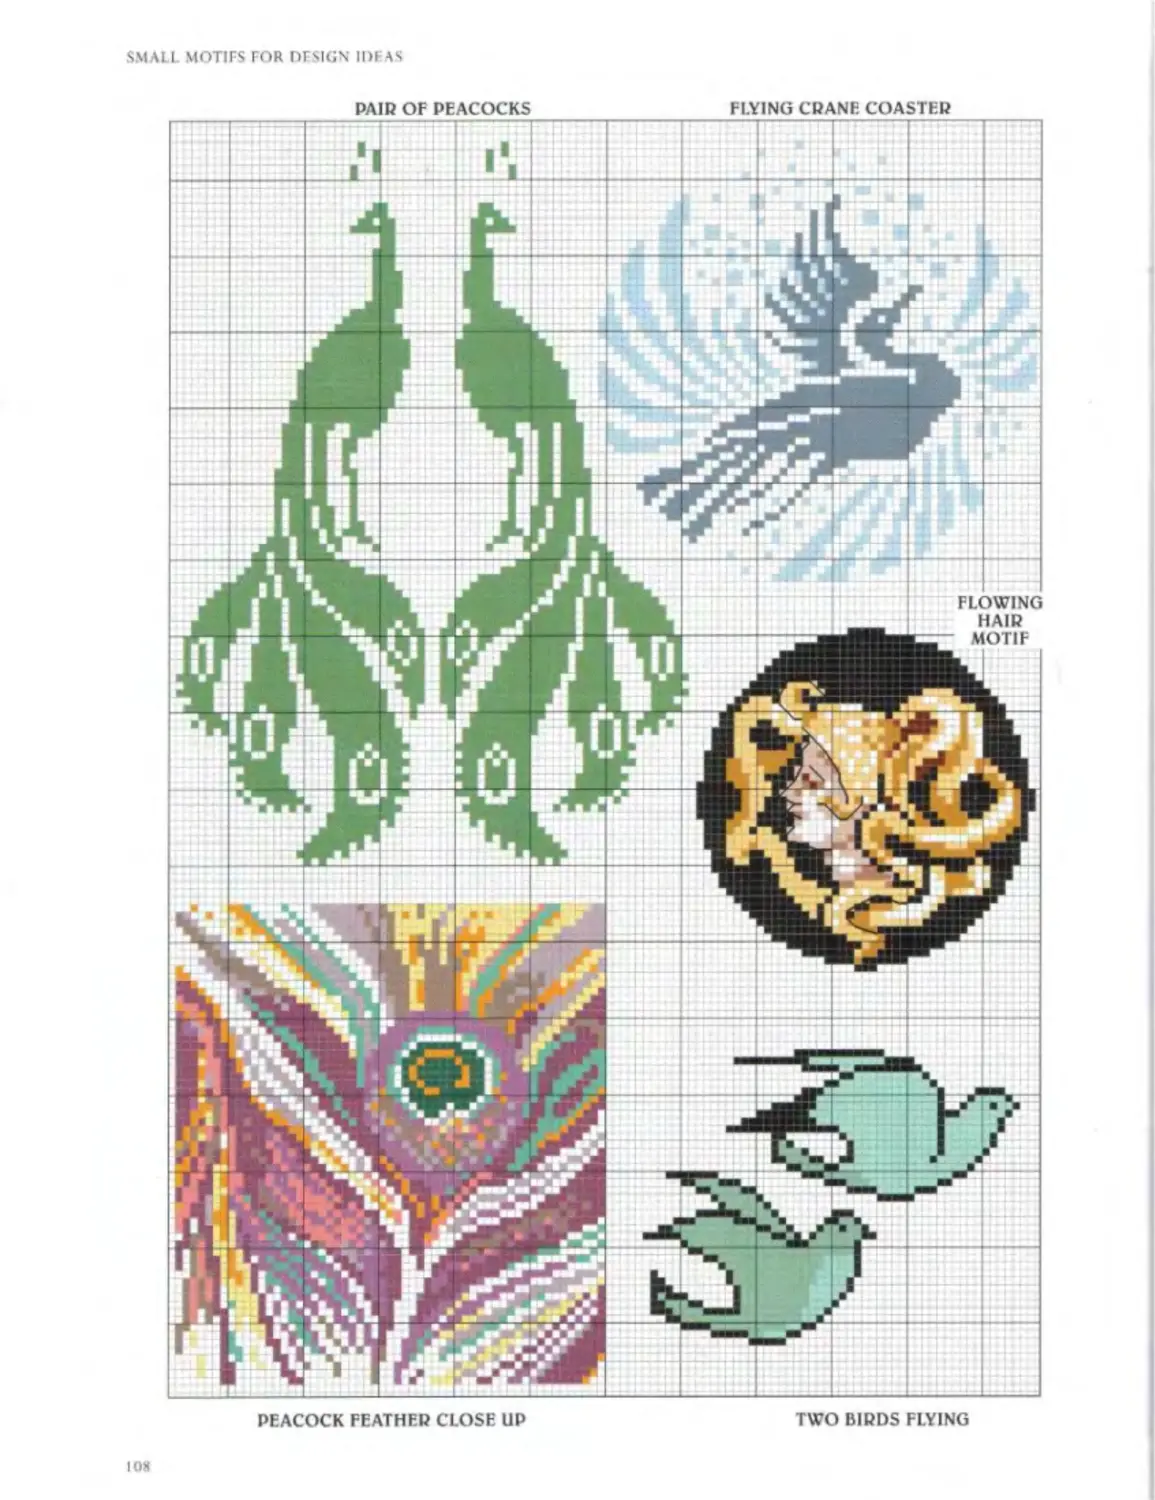
SMALL MOTIFS FOR DESIGN IDEAS 104
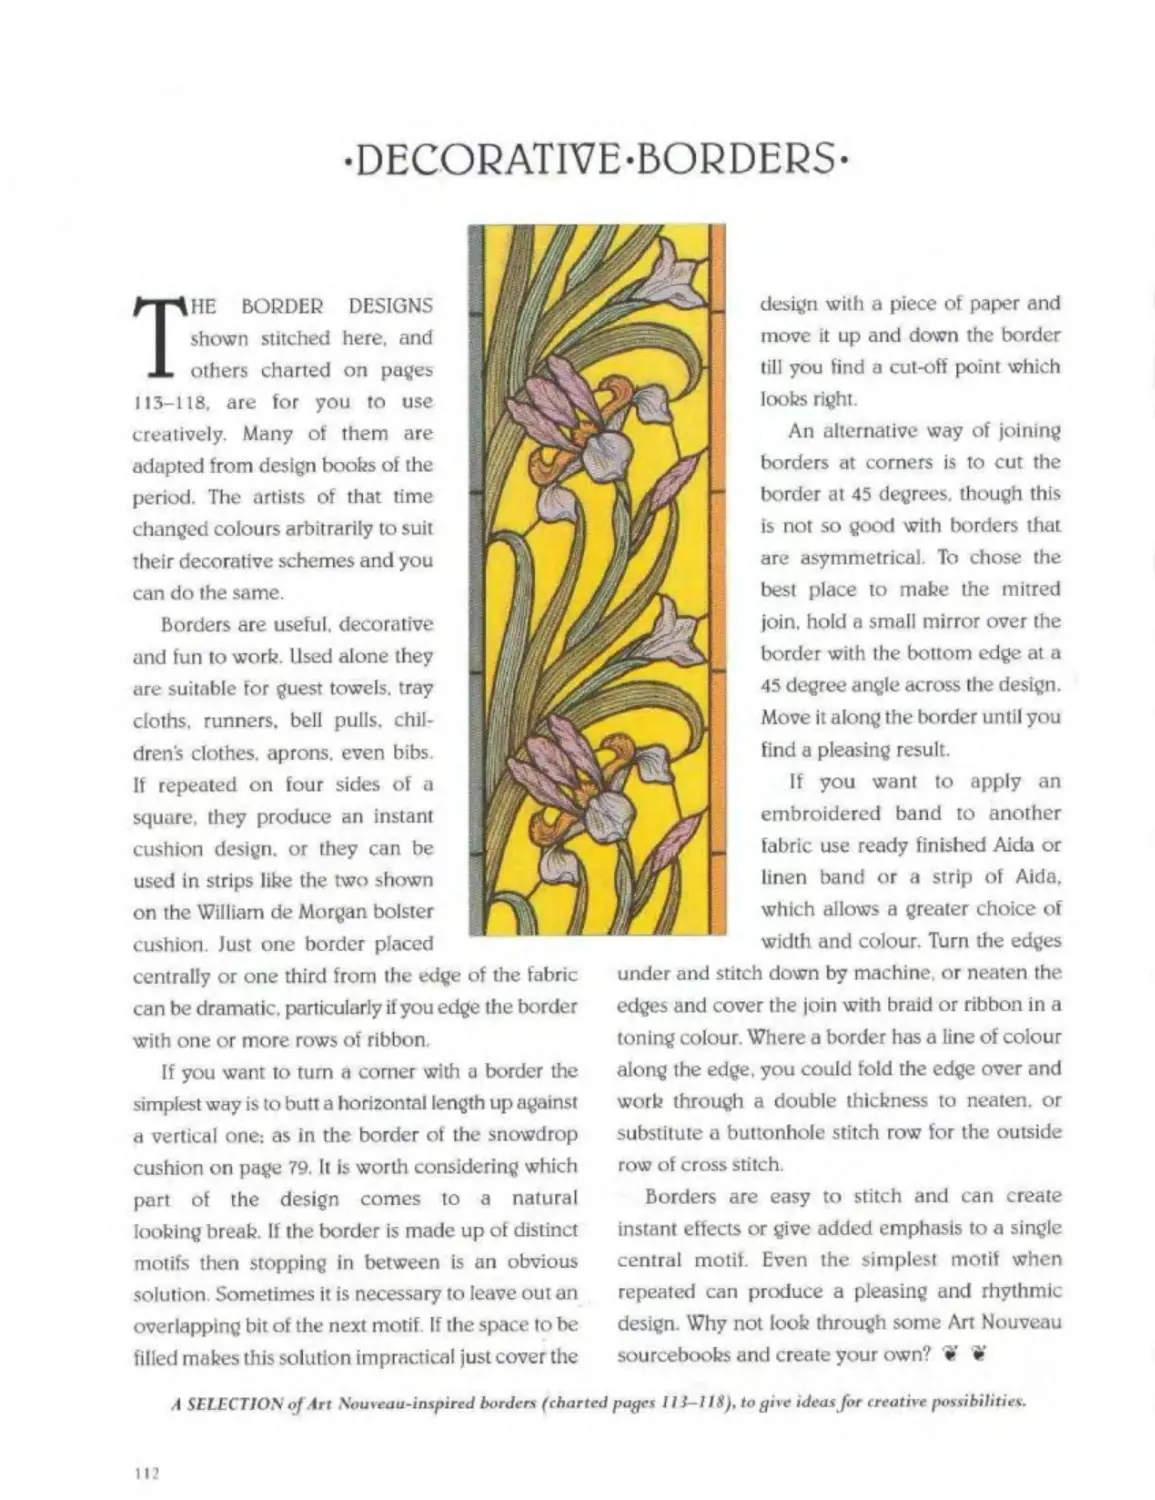
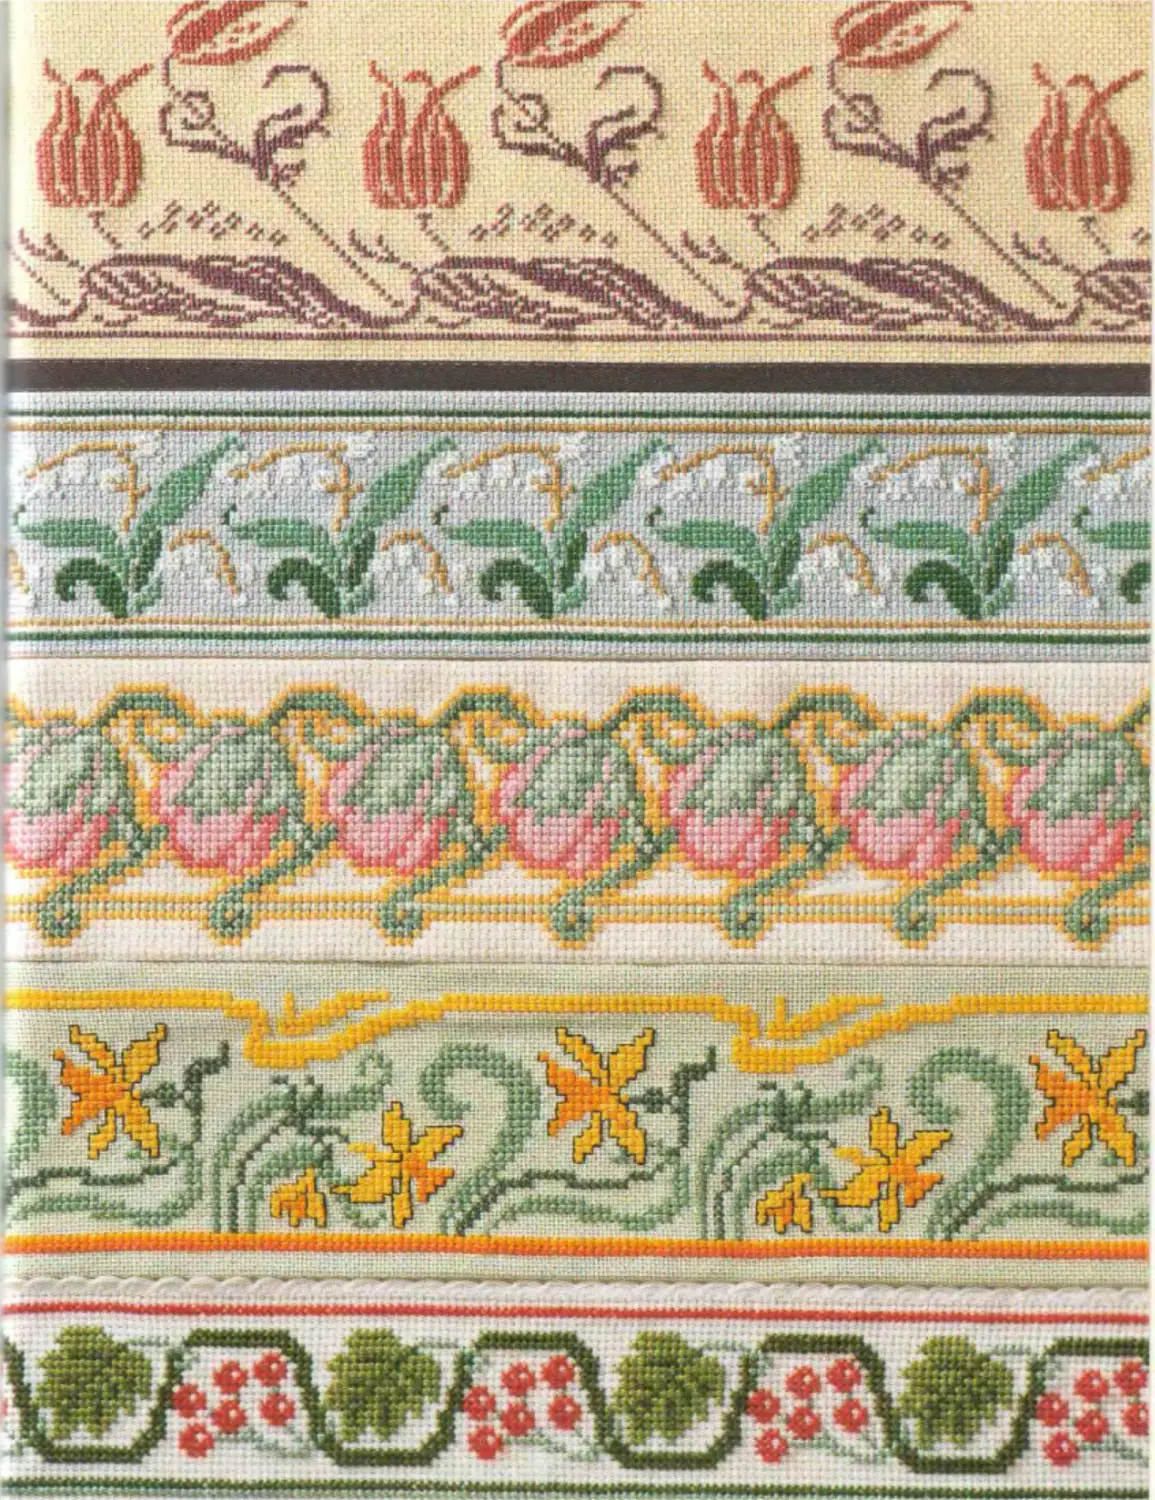
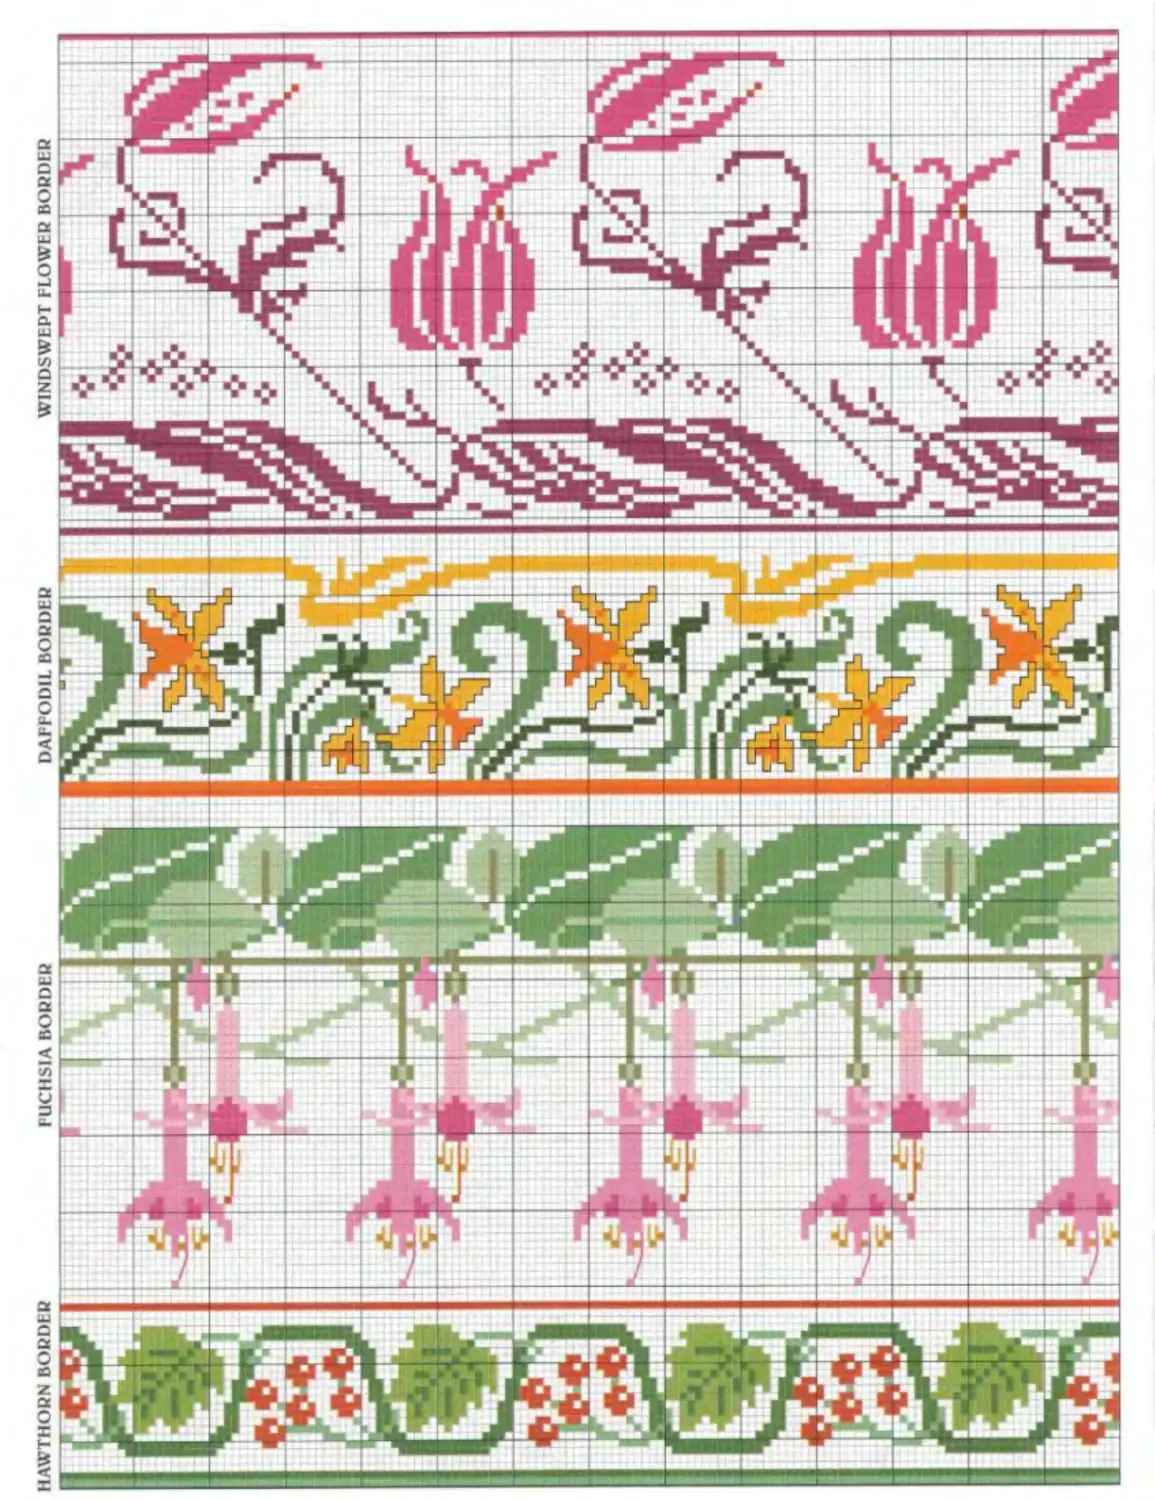
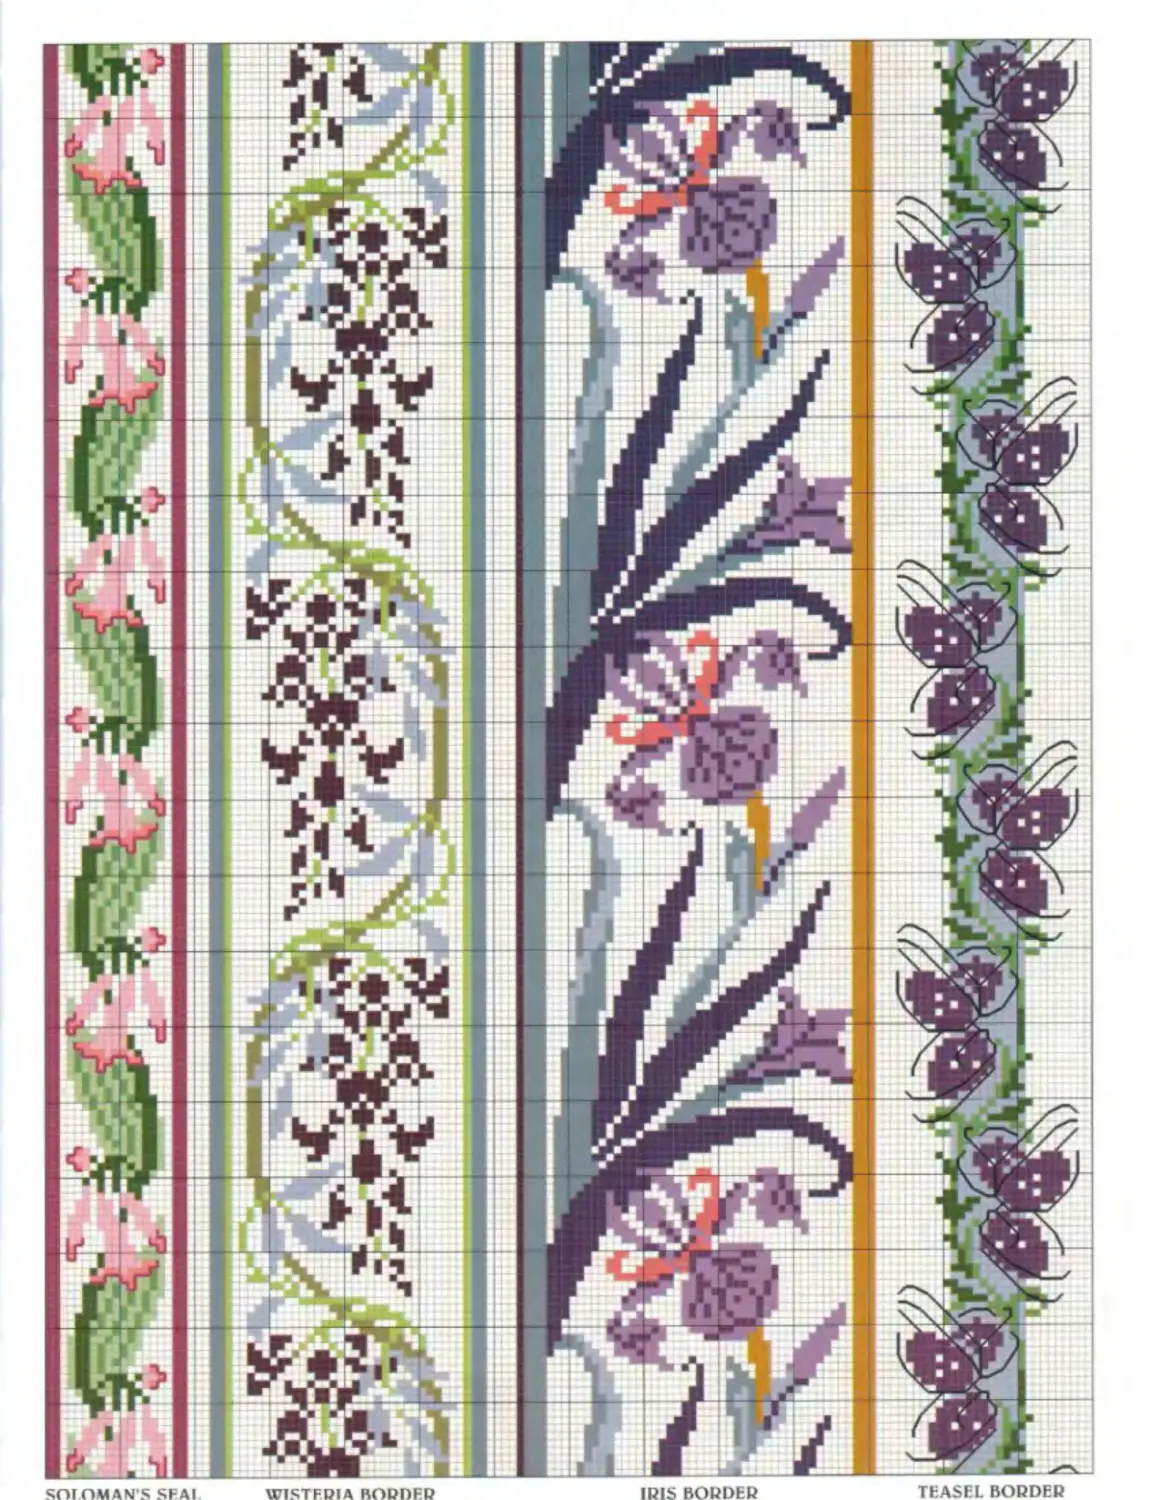
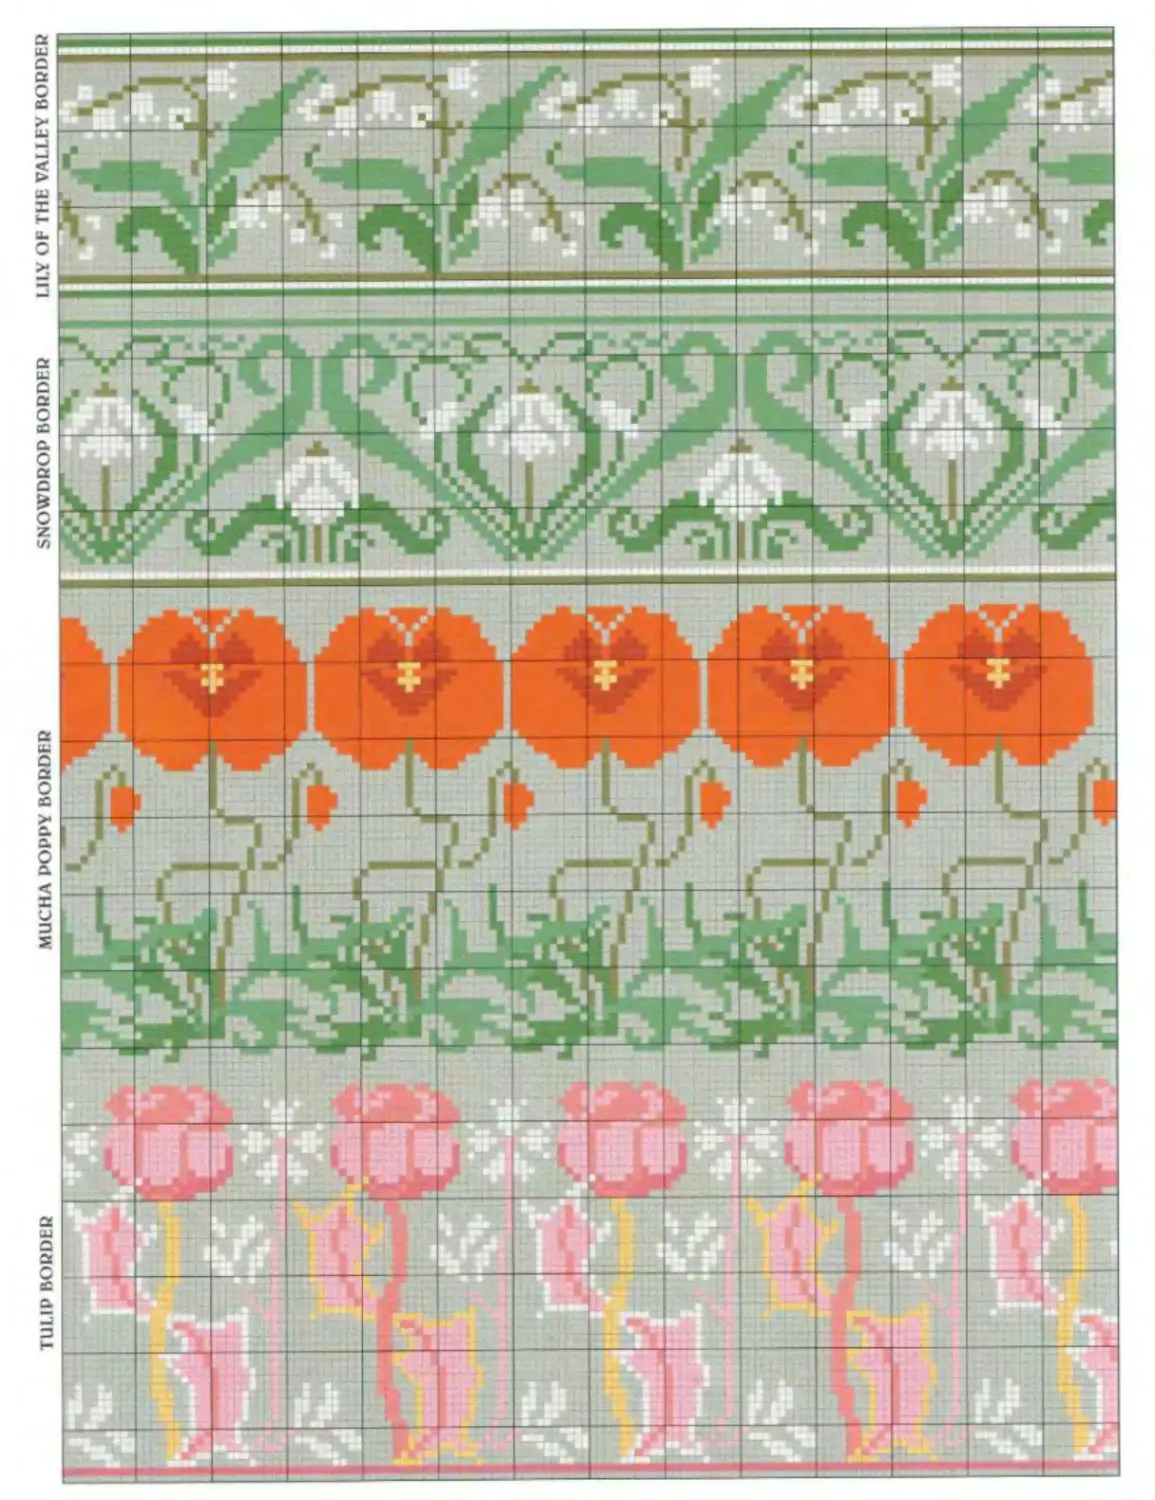
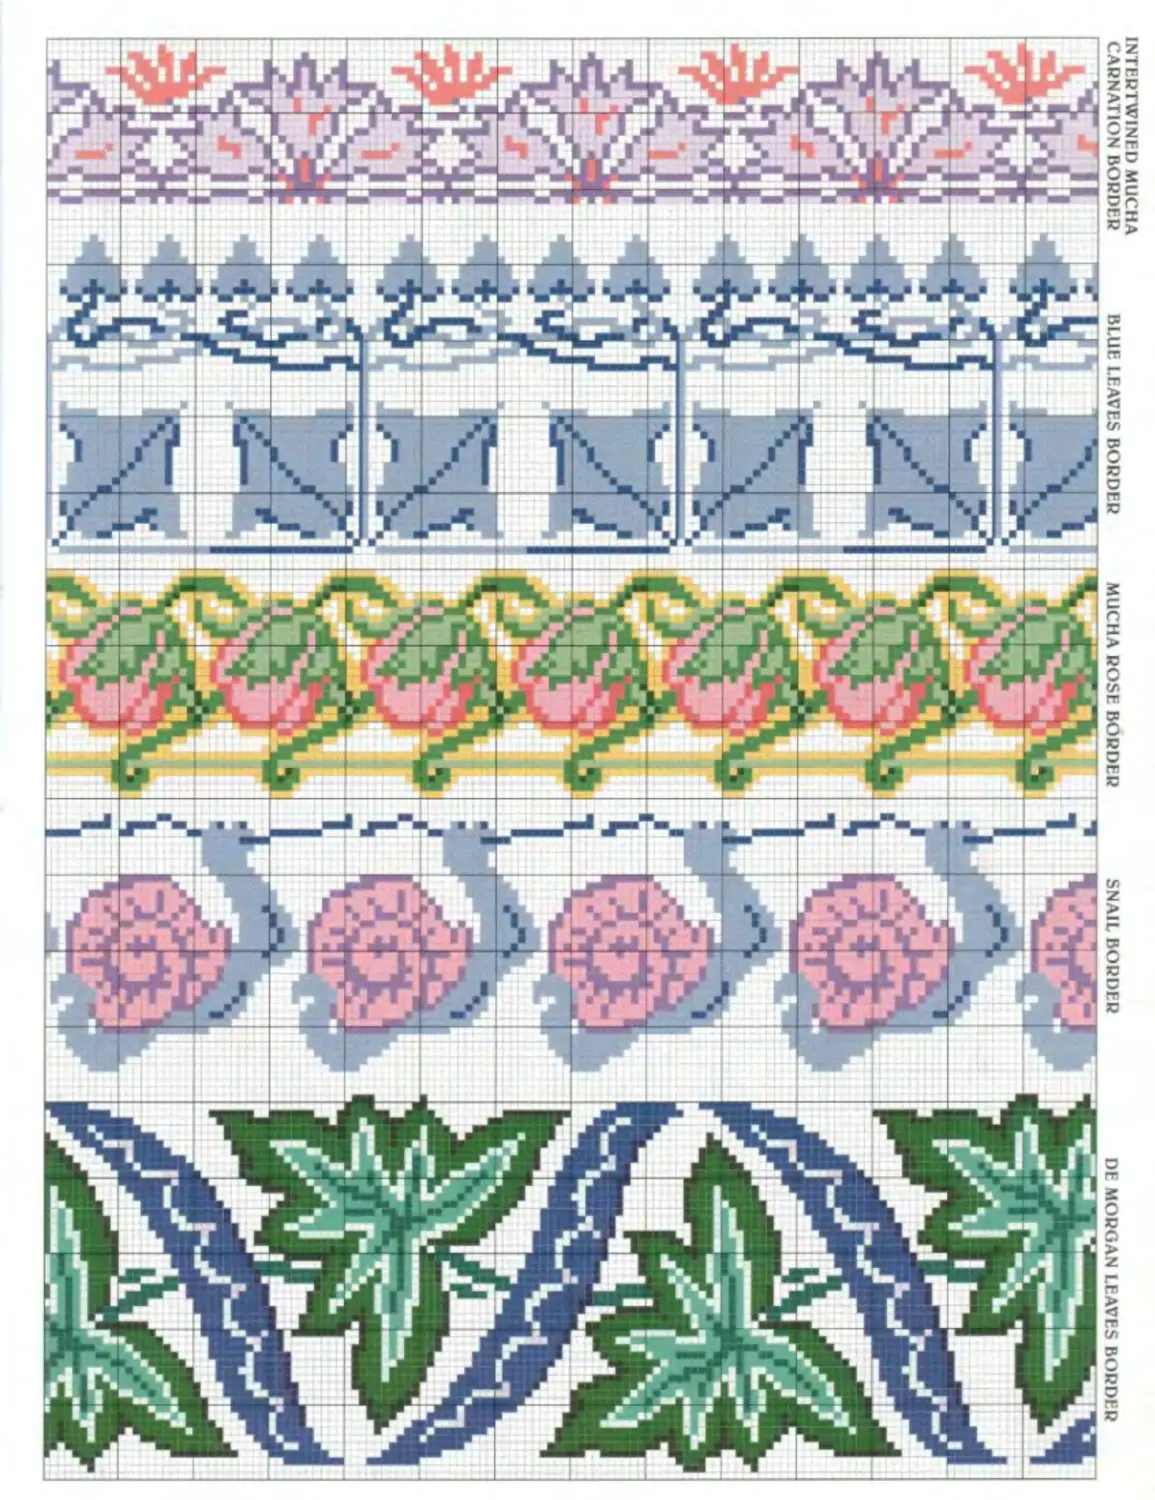
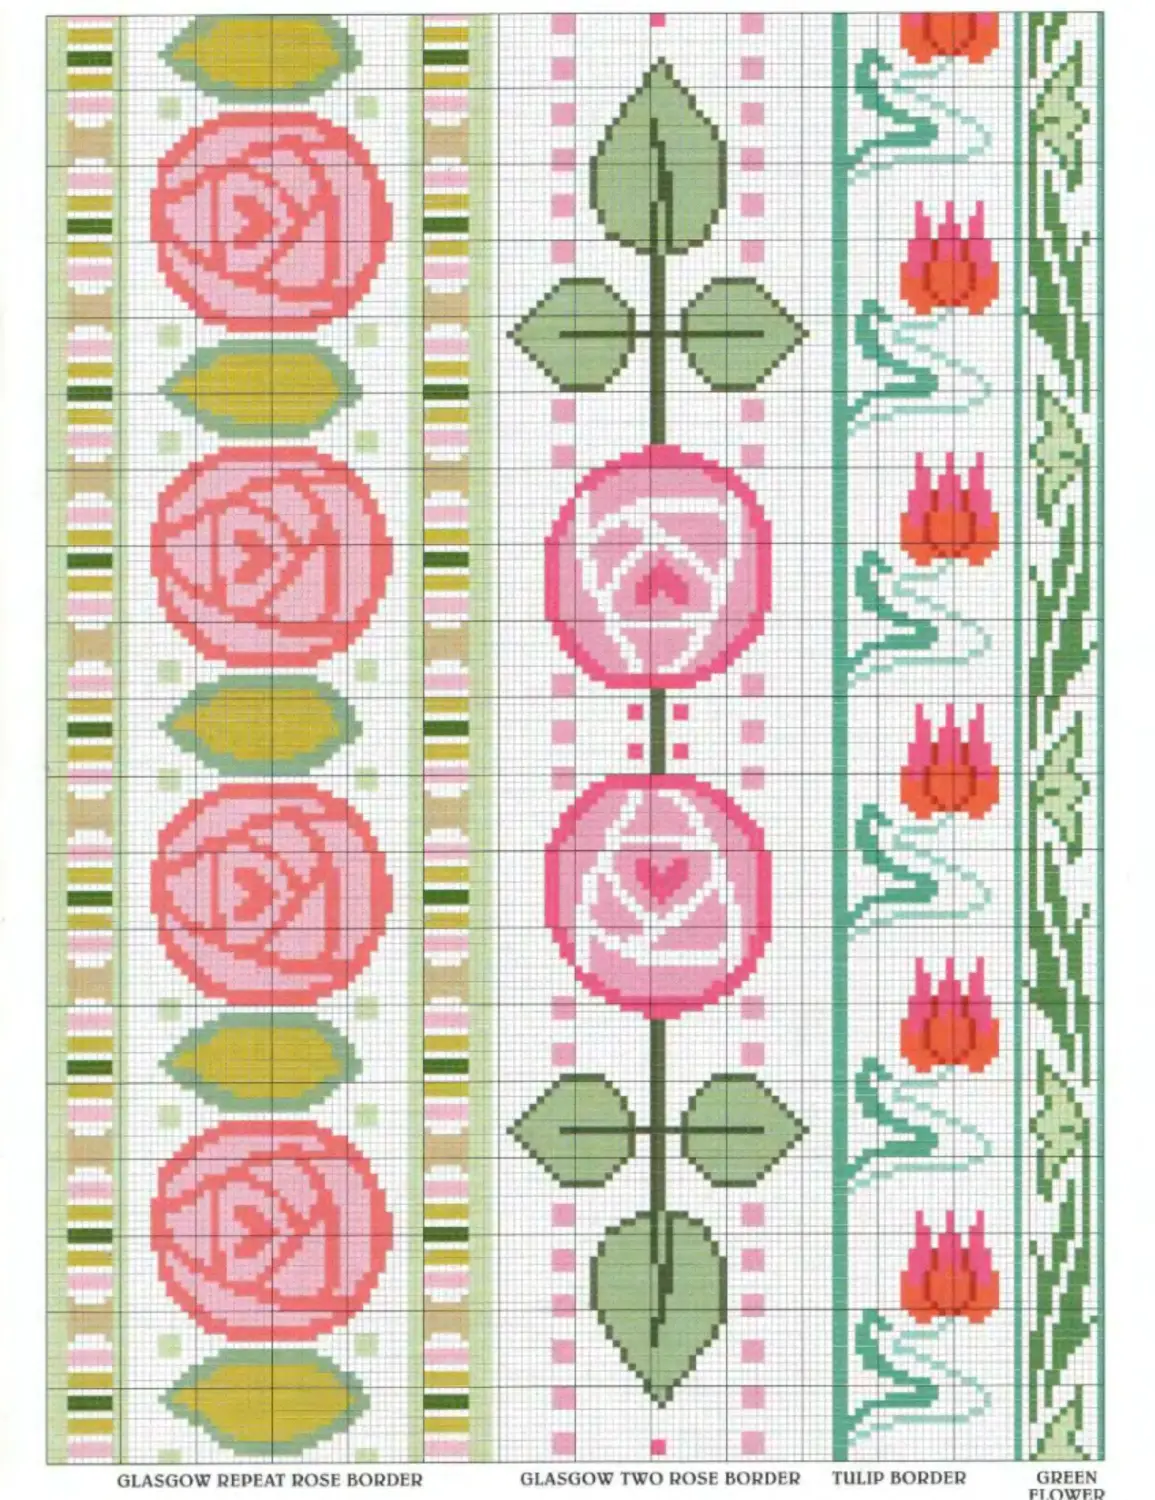
DECORATIVE BORDERS 112
BASIC TECHNIQUES 119
Bibliography 125
Suppliers 126 Acknowledgements 127 Index 128
К
•POSTER-ART-INSPIRATION-
Alphonse mucha was a poster artist whose works evoke the gaiety and glamour of society at the turn of the century. Hallmarks of his style are beautiful ladies with luxuriant hair, abun-
dant flowers and superb decorative borders.
Born in Czechoslovakia
in 1860, he struggled to succeed in the art world, beginning as a painter of stage scenery in Vienna. His breakthrough came in
period of fame and fortune. He designed posters tor products including cigarettes. beer, champagne, bicycles and train travel
I have used his poster of 1897 for Champagne Ruinart of Rheims as inspiration for a picture and a card. For the Champagne Lady I have kept the long, narrow proportions of the original poster, but replaced the advertising with a choice of messages suitable for the celebratory
Paris in the 1890s when he was in the studio of a printing firm finishing some work for a friend. The printer had an urgent request for a theatre poster for the actress Sarah Bernhardt, for a play opening on New Year's day. Mucha was asked to help and after a few hectic days designing and drawing onto lithographic stones, the posters were ready. The printer was appalled when he saw them because they were different from anything he had seen before, but the theatre needed them so urgently they were delivered.
Mucha was downcast when he was summoned to see Sarah Bernhardt, but she loved his work and asked him to do all her posters. He went on to design sets, costumes and jewellery for her, notably a gold serpent bracelet set with opals, rubies and diamonds It was the beginning of a
subject. The Celebration Card concentrates on the chamjxigne glass and the bubbles. Champagne glasses at the time were wide and shallow, quite unlike the flutes fashionable now.
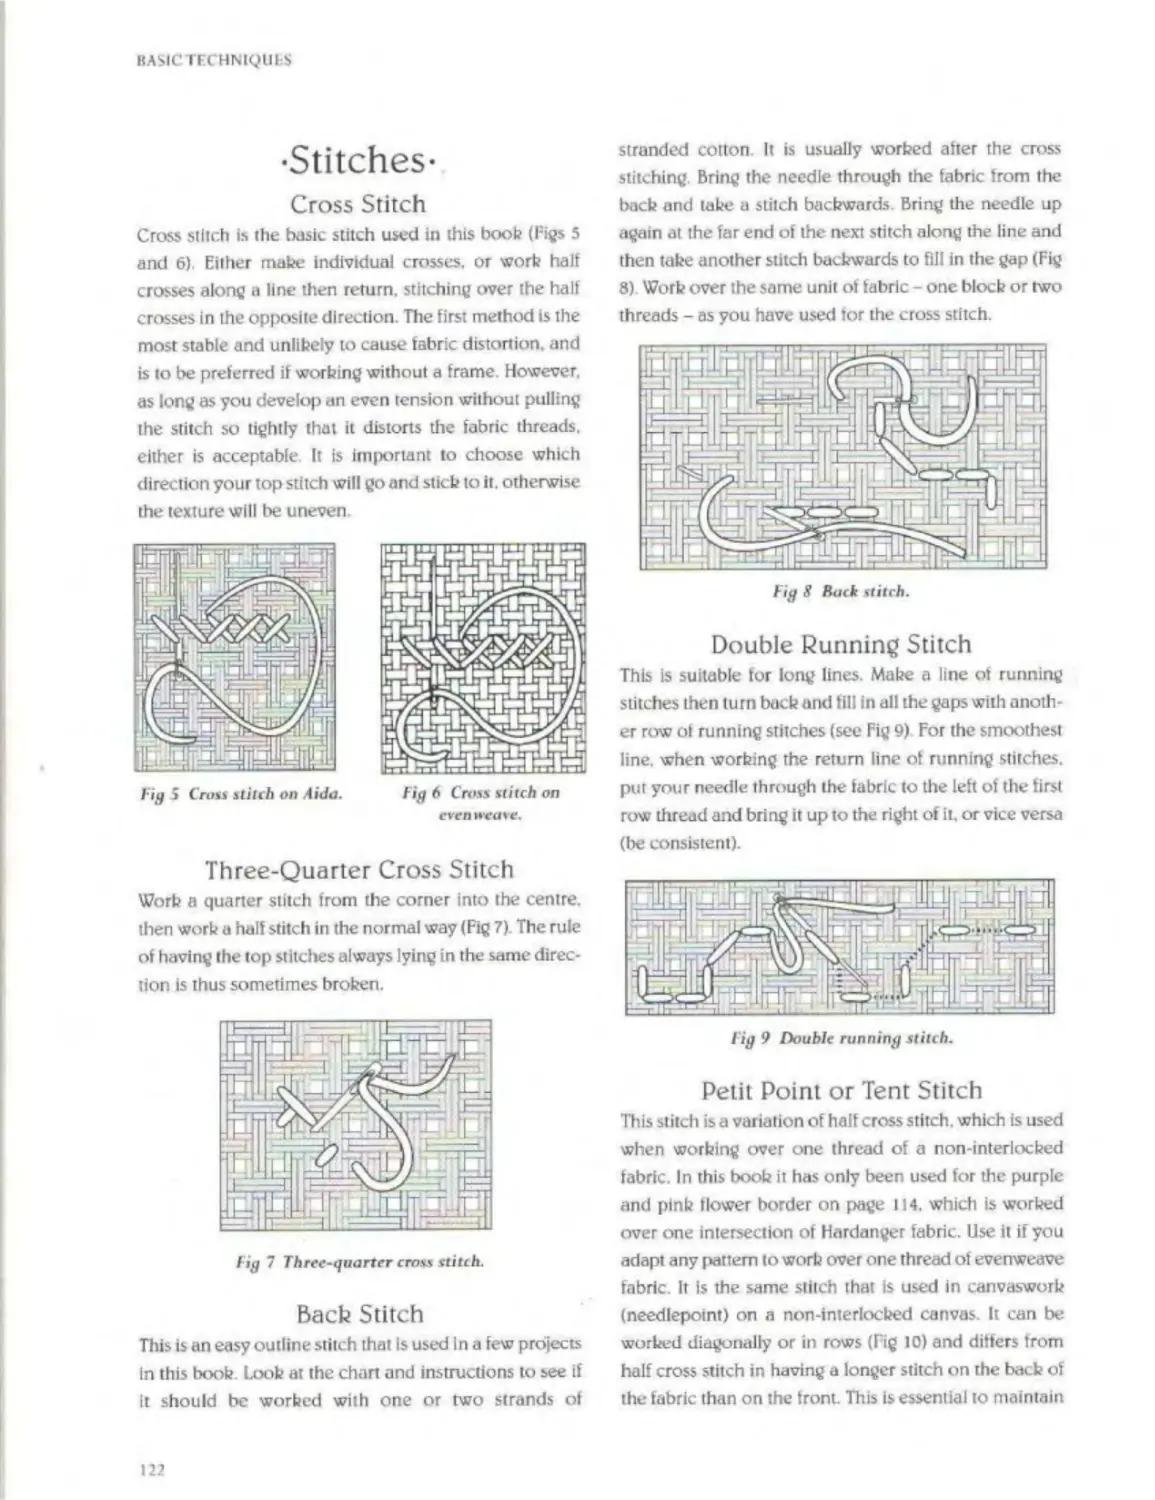
In the Champagne Lady. Mucha's swirling outlines are stitched in back stitch or double running stitch. The black and gold colouring and decorative nature of blackwork seemed appropriate for this design, so I have translated the areas of colour on the poster into different blackwork patterns.
Blackwork is a traditional counted technique made from the same basic stitches as cross stitchers use all the time. Traditionally it was worked on fine linen but is equally suitable for Aida. All the patterns are created out of basic straight stitches from one hole in the fabric to an adjacent one, either vertically, horizontally or diagonally. *
ALPHONSE MUCHA'S Art Nouveau style is characterised by sensuous ladies with twisting, swirling hair. This Champagne Lad) Picture and Celebration Card capture his flamboyant style and flowing lines.
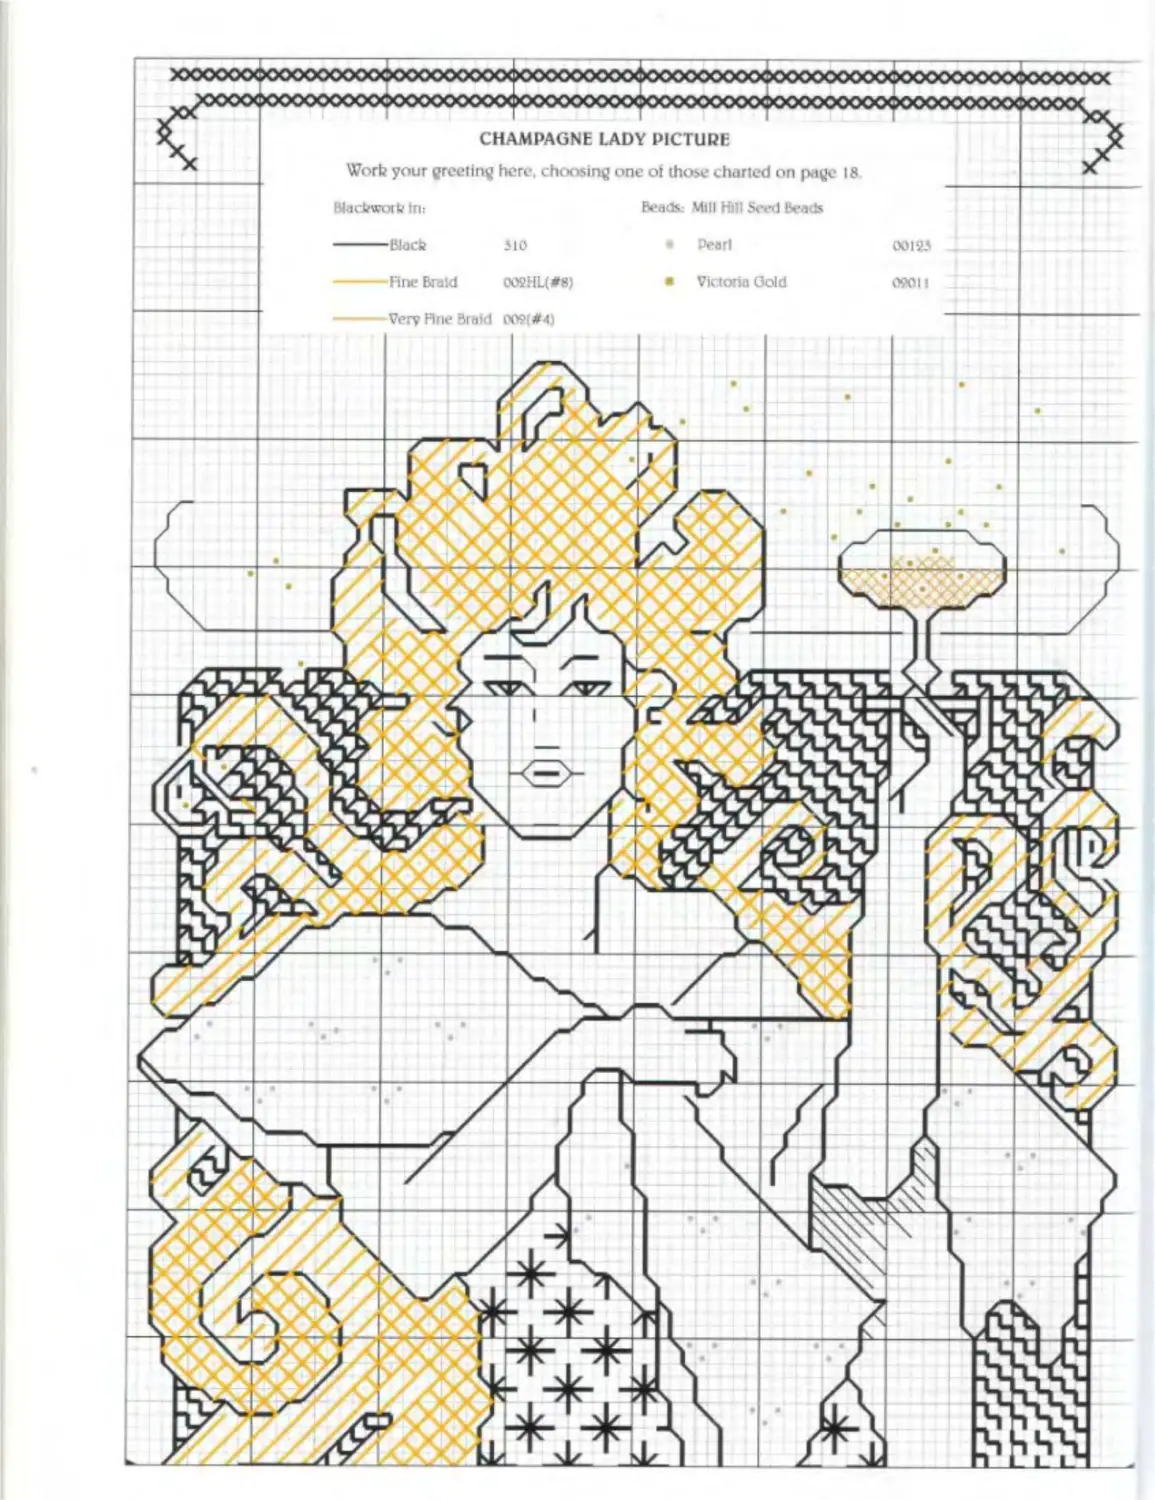
-Champagne-Lady-
-Picture-
{MJ T nspired by the poster art of Alphonse Mucha, 1 this lady comes trom a poster advertising champagne. Blackwork embroidery is traditionally worked in black silk and decorated with gold or silver thread, gilt spangles and pearls. Here, the black ixirts are worked with stranded cotton and gold highlights in Kreinik braids. Glass beads represent champagne bubbles and pearly beads add decoration lo ihe stole.
a
FINISHED SIZE
Design size. 5% x I54in (14 x 39.5cm) approximately (mounted in a 8 x 20 in (20 x 51cm) frame) Stitch count: 78x217
MATERIALS
• 14 x 26in (35.5 x 66cm) 14-count cream Aida (for a larger picture. 7 x 20in (18 x 51cm) on 11-count Aida use 15 x 30in (38 x 76cm))
• DMC black (310) stranded cotton. 2 skeins
• Kreinik Fine (#8) Braid 002HL. 2 spools
• Kreinik Very Fine (#4) Braid 002. 1 spool
• Mill Hill gold glass beads 02011. 1 packet
• Mill Hill pearl glass beads 00123. 1 packet
• Size 24 tapestry needle
• Beading needle and cream sewing thread
i
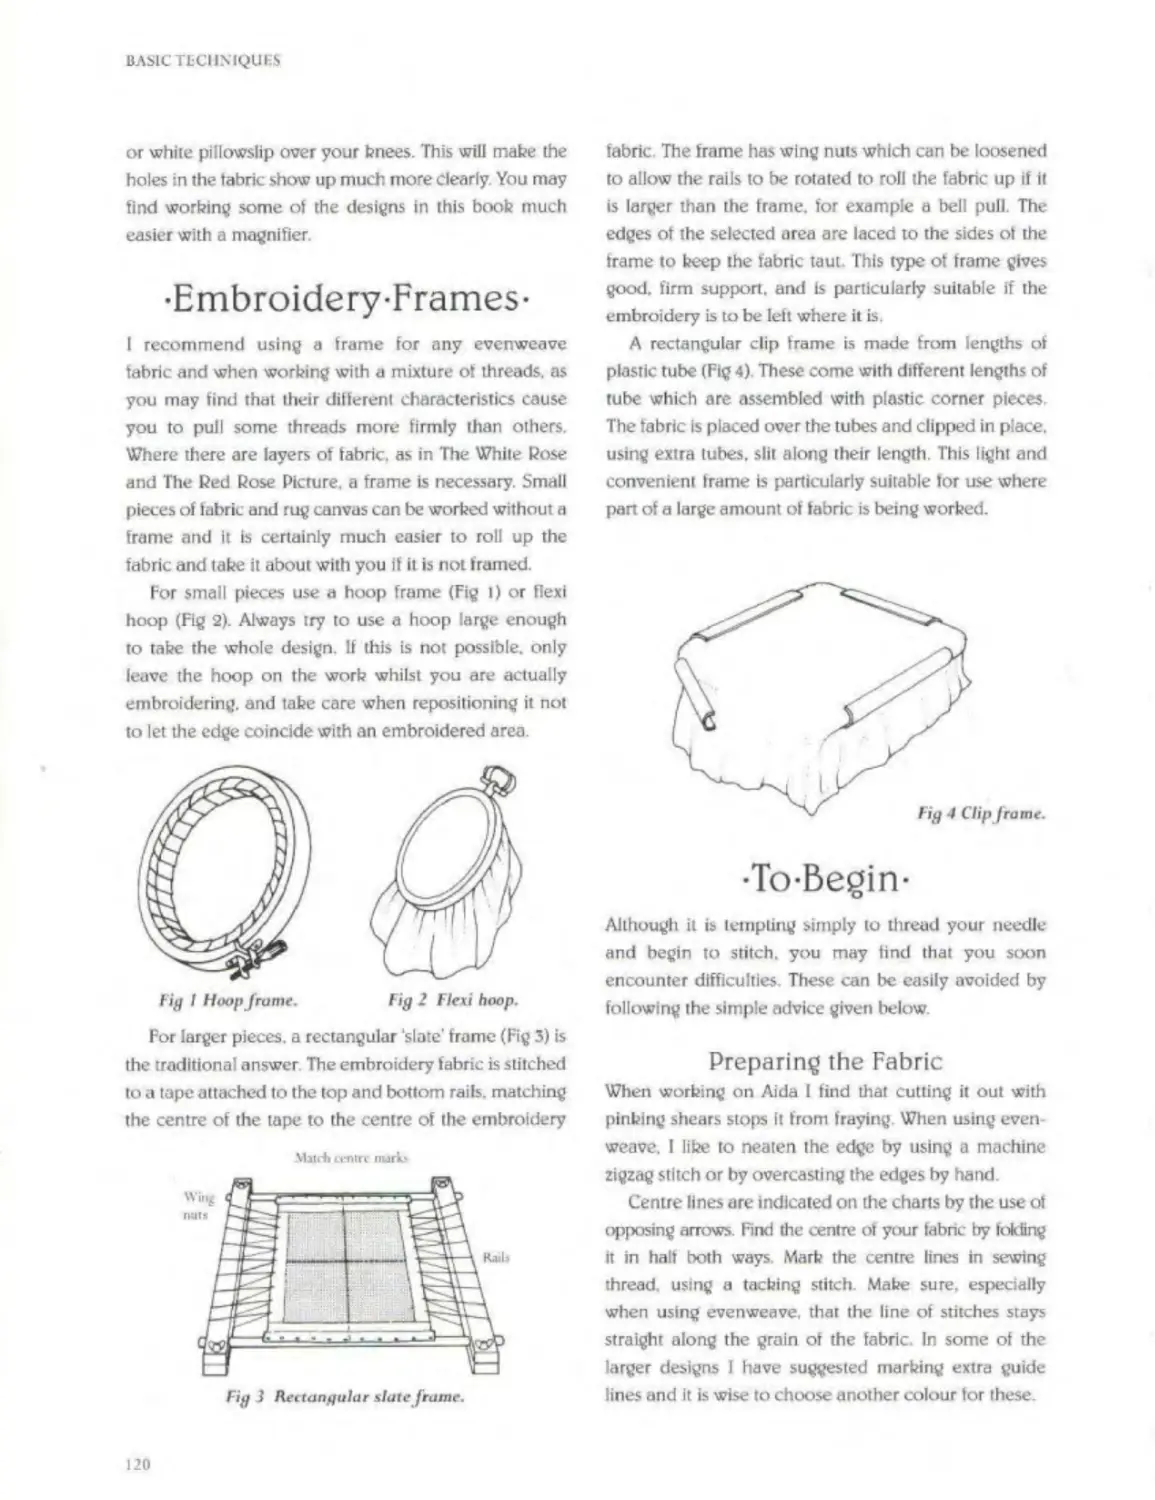
1 Mark the central horizontal and vertical guidelines on the fabric with tacking (see page 120) It is best to work this design using an embroidery frame.
2 Following the chart on page 16. begin by outlining the figure and hair in back stitch or double running stitch (see page 122) using two strands of black stranded cotton Begin near the centre guidelines and keep checking your position. Continue to outline the panel behind the figure and the glass stem and sides Avoid carrying threads across areas to lie left cream or they may show through: either finish off and start again or thread the cotton through other stitches on the back.
3 Work the top and bottom borders in cross stitch, using two strands of black
4 Using back stitch and a single strand of stranded cotton, embroider the curving line behind the head, the lip of the champagne glass and the lines of the dress which spill over the step.
5 Following the chart and Fig I. work the star pattern all over her dress
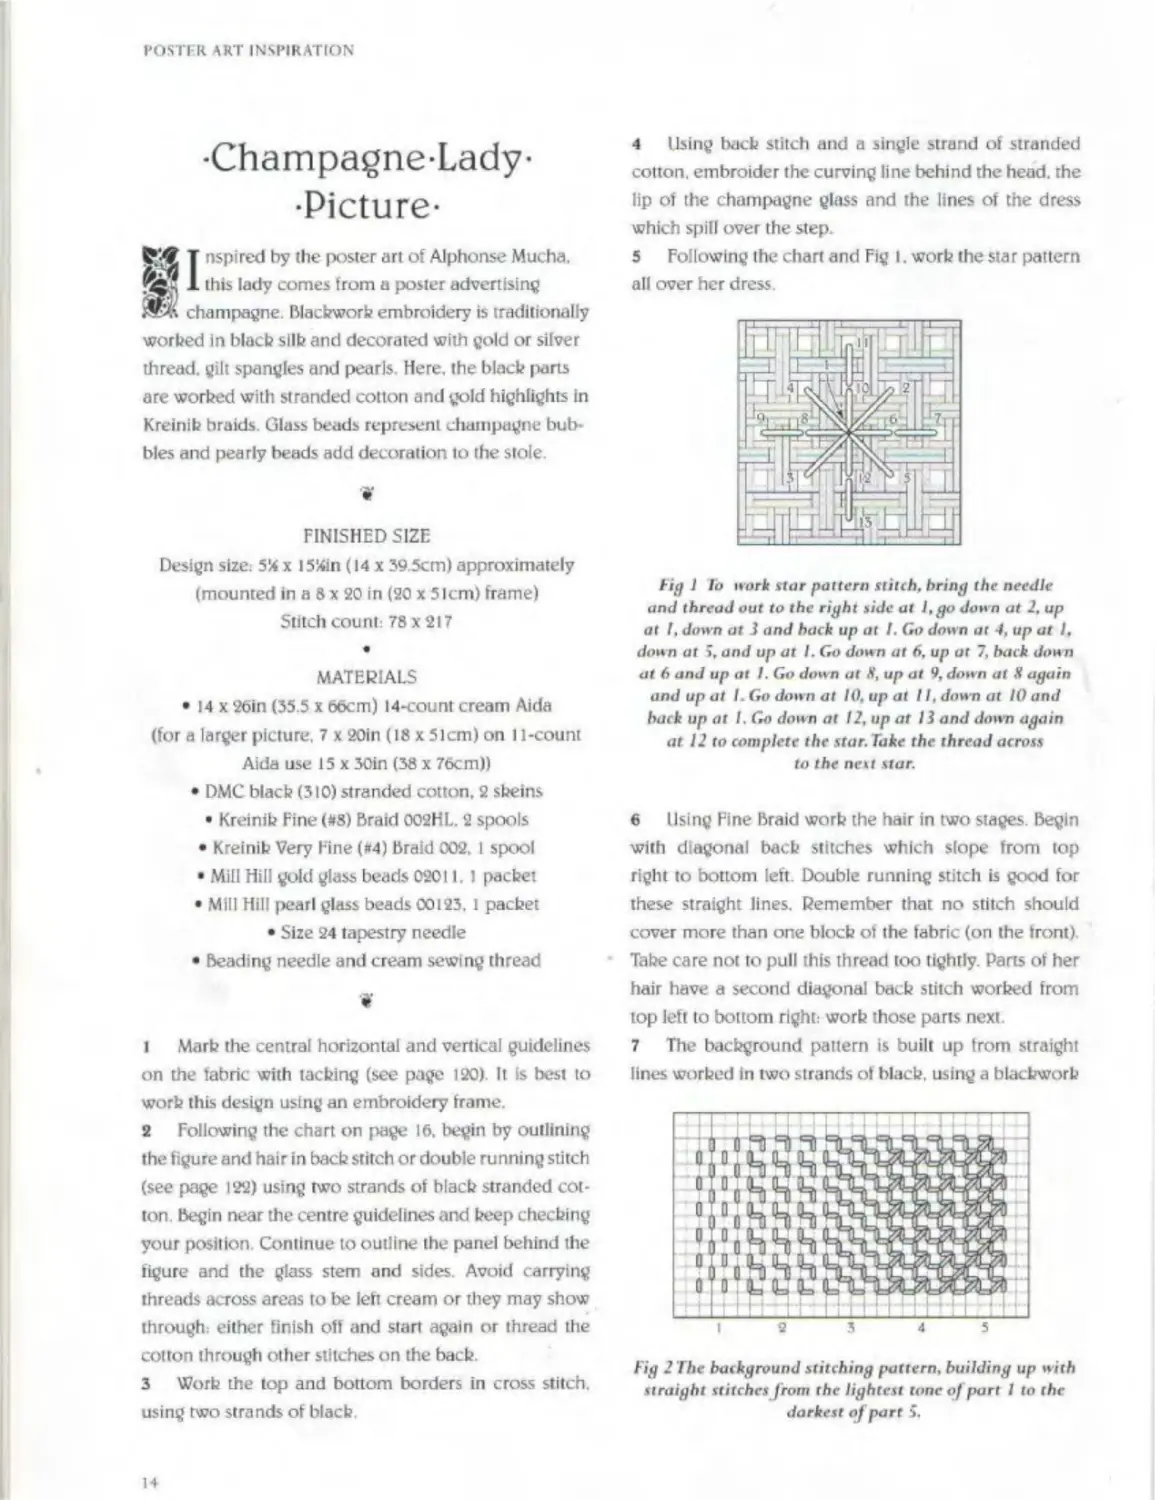
fig 1 lo work star pattern stitch, bring the needle and thread out to rhe right side at 1, go down at 2, up at I, down at J and hack up at t. Go down at 4, up at I, down at 5, and up at I. Go down at 6, up at 7, back down at 6 and up at I. Go down at Я, up at 9, down at X ajjain and up at I. Go down at 10, up at 11, down at 10 and back up at I. Go down at 12, up at I i and down again at 12 to complete the star. Take the thread across to the nett star.
6 Using Fine Braid work the hair in two stages. Begin with diagonal back stitches which slope from top right to bottom left. Double running stitch is good for these straight lines. Remember that no stitch should cover more than one block of the fabric (on the front) Take care not to pull this thread too tightly. Parts of her hair have a second diagonal back stitch worked from top left to bottom right: work those parts next
7 The background pattern is built up from straight lines worked in two strands of black, using a blackworh
fig 2 The background stitching pattern, building up with straight stitches from the lightest tone of part I to the darkest of part 5.
pattern to achieve a gradual tonal variation. Follow the chart closely tor the various parts (see Fig 2 tor details). Part 5 of Fig 2 shows the additional diagonal pattern needed to achieve the darkest tone around the head and left side of the body.
8 Work the facial features, using a single strand of black to define the nose and the outside of the lips and two strands elsewhere Work the shading under her left elbow with one strand
9 Using Very Fine Braid, work the cross stitch champagne in the glass and then work a greeting from those charted on page 18 If none of these suit you then you could create your own greeting.
Ю Remove the guidelines, press carefully then sew on the beads using the beading needle and cream sewing thread (see chart and Fig 3). To finish, mount and frame your picture (see page 123).
big 3 Attaching a bead.
i MX
celebratory
-Celebration-Card-
was an expert at representing gaiety, aur and celebration, and nothing is as as a glass of champagne. Here, rhe bubbles are represented by little gold glass beads.
W
FINISHED SIZE
Design size: To fit a 3%in (8.25cm) diameter aperture card
Stitch count: 35 x 38
•
MATERIALS
• 4x6in(l0x 15cm) 14-count Aida gold fleck code 118
• DMC black (310) stranded cotton, a small amount
• Kreinik Very Fine (#4) Braid 002. a small amount
• Mill Hill gold glass beads 02011. a tew
• Size 24 tapestry needle
• Beading needle and cream sewing thread
• Gold three-fold card with SWn (8.25cm) circular aperture
• Double-sided adhesive tape
W
1 Place the card over the piece of Aida and mark the centre of the aperture with a pin.
2 Following the chart on page 18. begin at the centre and stitch the design using two strands ol black stranded cotton for all the bach stitch (except the top of the glass which uses one strand) and a single strand of Very Fine Braid for the cross stitch.
3 Sew on the gold beads to complete the embroidery then attach to the card with double-sided adhesive tape.
Variations
< The Champagne Lady design could also be used to celebrate a golden wedding anniversary or a special birthday
• You could work the Champagne I^dy design in cross stitch rather than blackwork. working the outlines and then filling in with cross stitch. Use a gold colour for the hair and choose other colours for the dress and stole.
IS
Blacbwurb iru Beads: Mill Hill Seed Beads
-------Blacb 310 • Peart 00123
-------fine Braid 008НЦ#8) • Victoria Gold 09011
Very Fine Braid 0O9(#4)
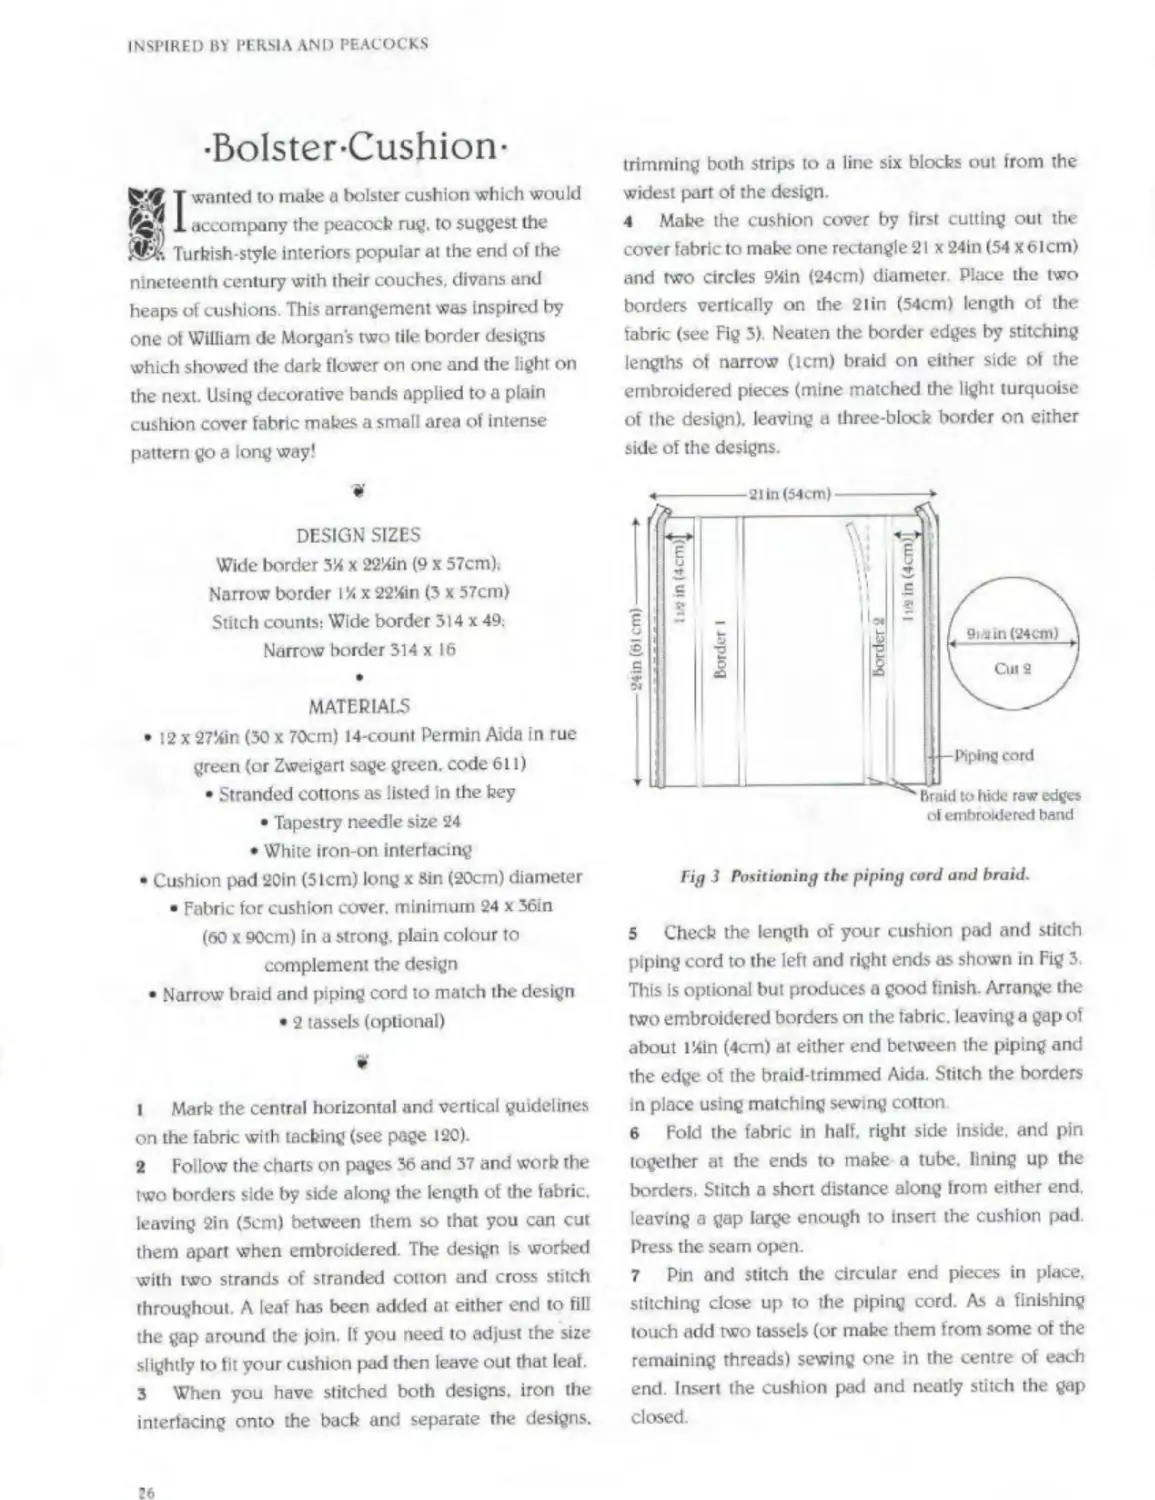
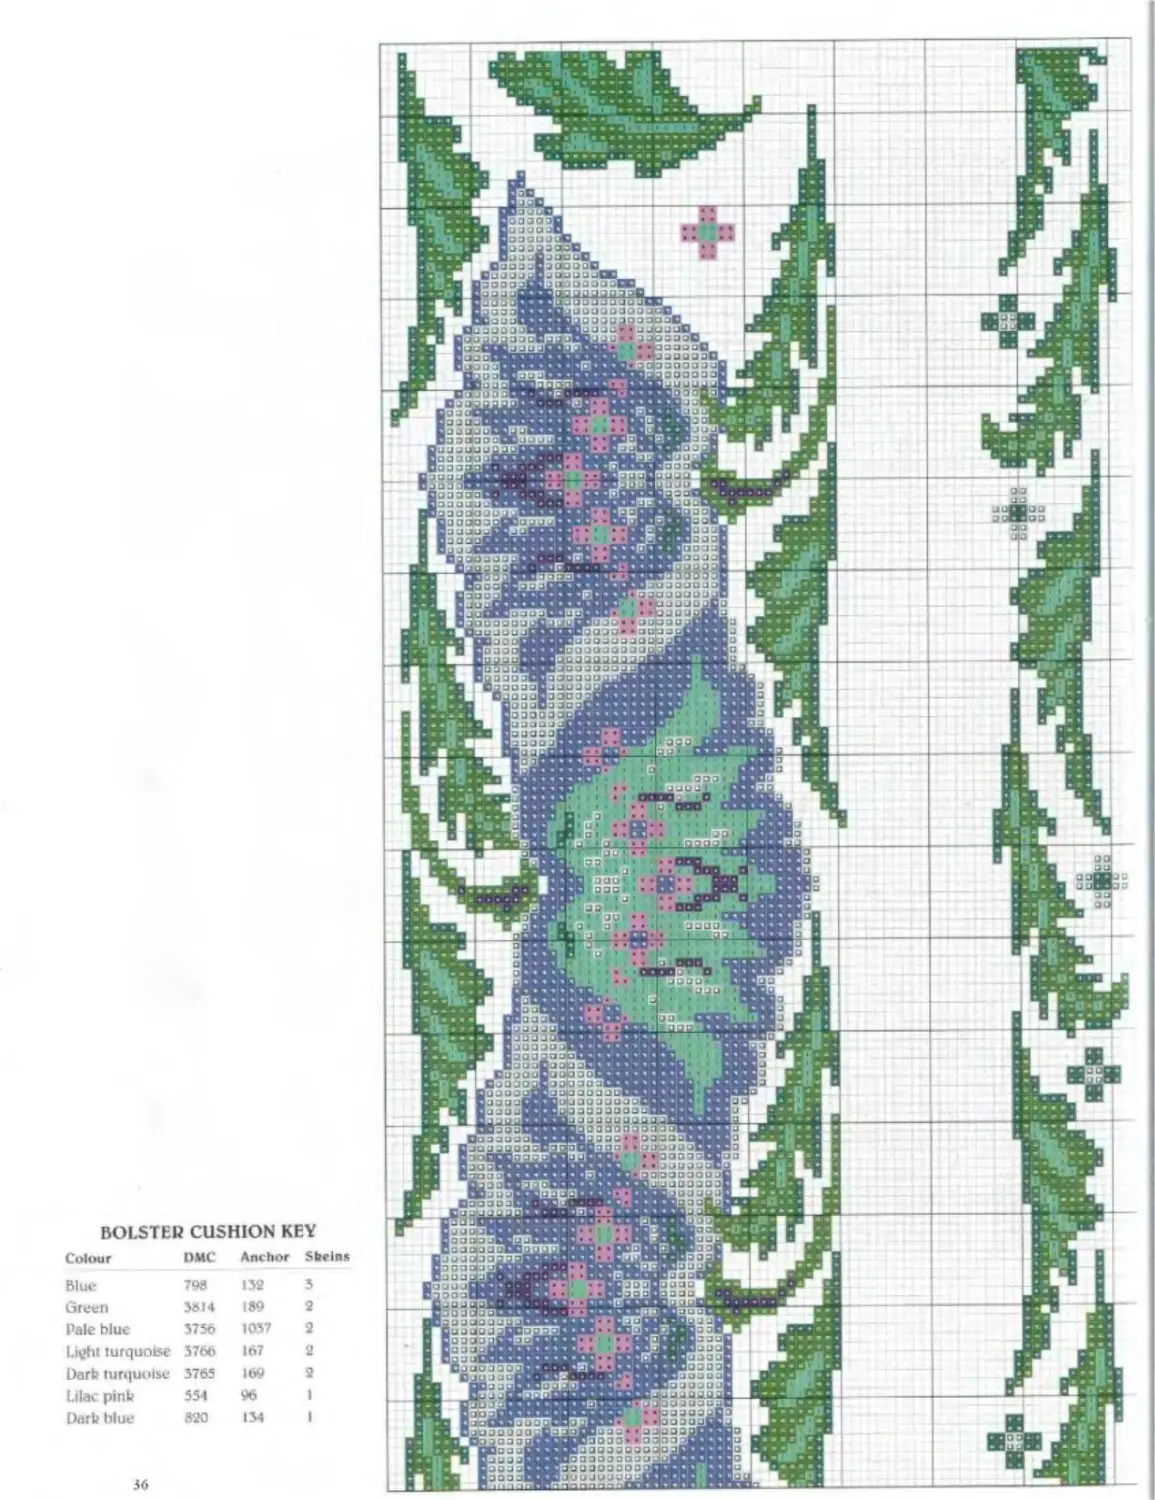
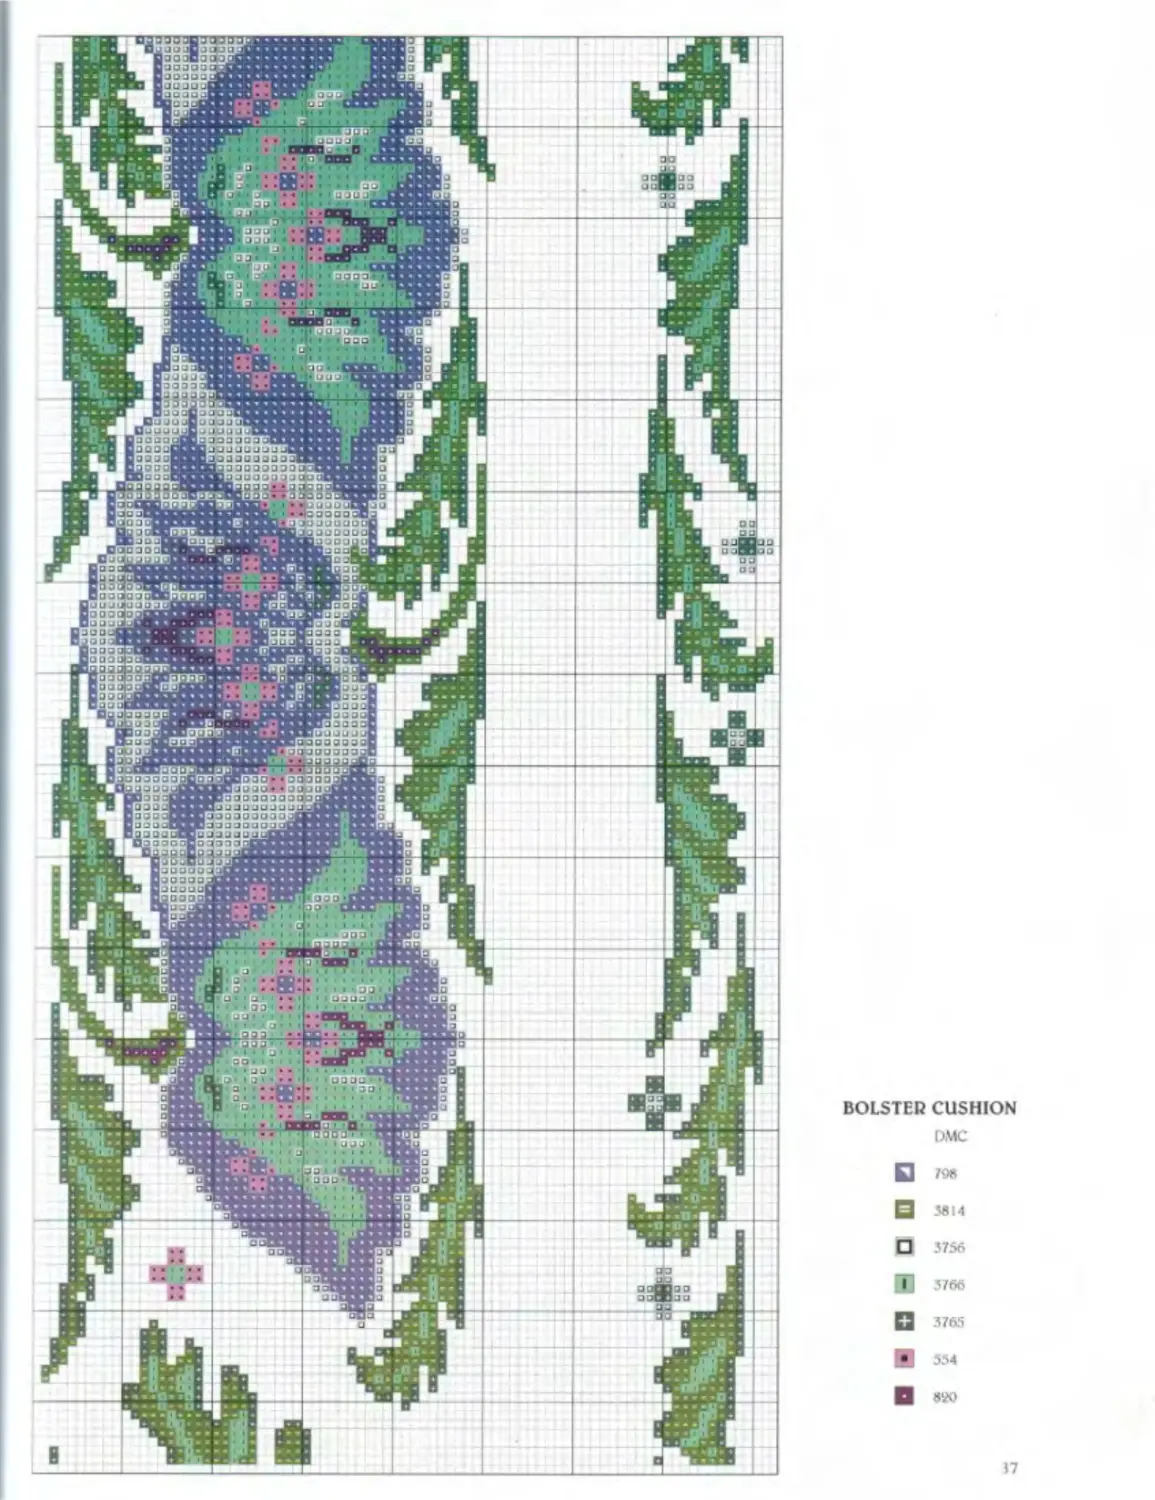
-Bolster-Cushion-
T wanted to make a bolster cushion which would 1 accompany the peacock rug. to suggest the Turkish-style interiors popular at the end of the nineteenth century with their couches, divans and heaps of cushions. This arrangement was inspired by one ot William de Morgans two tile border designs which showed the dark flower on one and the light on the next. Using decorative bands applied to a plain cushion cover fabric makes a small area of intense pattern go a long way!
W
DESIGN SIZES
Wide border 314 x 22%in (9 x 57cm); Narrow border I % x 22!4in (3 x 57cm) Stitch counts: Wide border 314 x 49;
Narrow border 314 x 16
•
MATERIALS
• 12 x 27!4in (30 x 70cm) 14-count Permin Aida in rue green (or Zweigart sage green, code 611)
• Stranded cottons as listed in the hey
• Tapestry needle size 24
• White iron-on interfacing
• Cushion pad 20in (51cm) long x Sin (20cm) diameter • Fabric for cushion cover, minimum 24 x 36in
(60 x 90cm) in a strong, plain colour to complement the design
• Narrow braid and piping cord to match the design • 2 tassels (optional)
1 Mark the central horizontal and vertical guidelines on the fabric with tacking (see page 120).
2 Follow the charts on pages 36 and 37 and work the two borders side by side along the length ot the fabric, leaving 2in (5cm) between them so that you can cut them apart when embroidered. The design is worked with two strands of stranded cotton and cross stitch throughout. A leaf has been added at either end to fill the gap around the join. If you need to adjust the size slightly to fit your cushion pad then leave out that leal. 3 When you have stitched both designs, iron the interfacing onto the back and separate the designs.
trimming both strips to a line six blocks out from the widest part of the design.
4 Make the cushion cover by first cutting out the cover fabric to make one rectangle 21 x 24in (54 X 61cm) and two circles 9!4in (24cm) diameter Place the two borders vertically on the 2lin (54cm) length of the fabric (see Fig 3). Neaten the border edges by stitching lengths of narrow (1cm) braid on either side of the embroidered pieces (mine matched the light turquoise of the design), leaving a three-block border on either side of the designs.
Pig 3 Positioning the piping cord and braid.
5 Check the length of your cushion pad and stitch piping cord to the left and right ends as shown in Fig 3. This is optional but produces a good finish. Arrange the two embroidered borders on the fabric, leaving a gap of about l!4in (4cm) at either end between the piping and the edge of the braid-trimmed Aida. Stitch the borders in place using matching sewing cotton
6 Fold the fabric in half, right side inside, and pin together at the ends to make a tube, lining up the borders. Stitch a short distance along from either end. leaving a gap large enough to insen the cushion pad Press the seam open.
7 Pin and stitch the circular end pieces in place, stitching close up to the piping cord. As a finishing touch add two tassels (or make them from some of the remaining threads) sewing one in the centre of each end Insert the cushion pad and neatly stitch the gap closed
INSPIRED BY PERSIA AND PEACOCKS
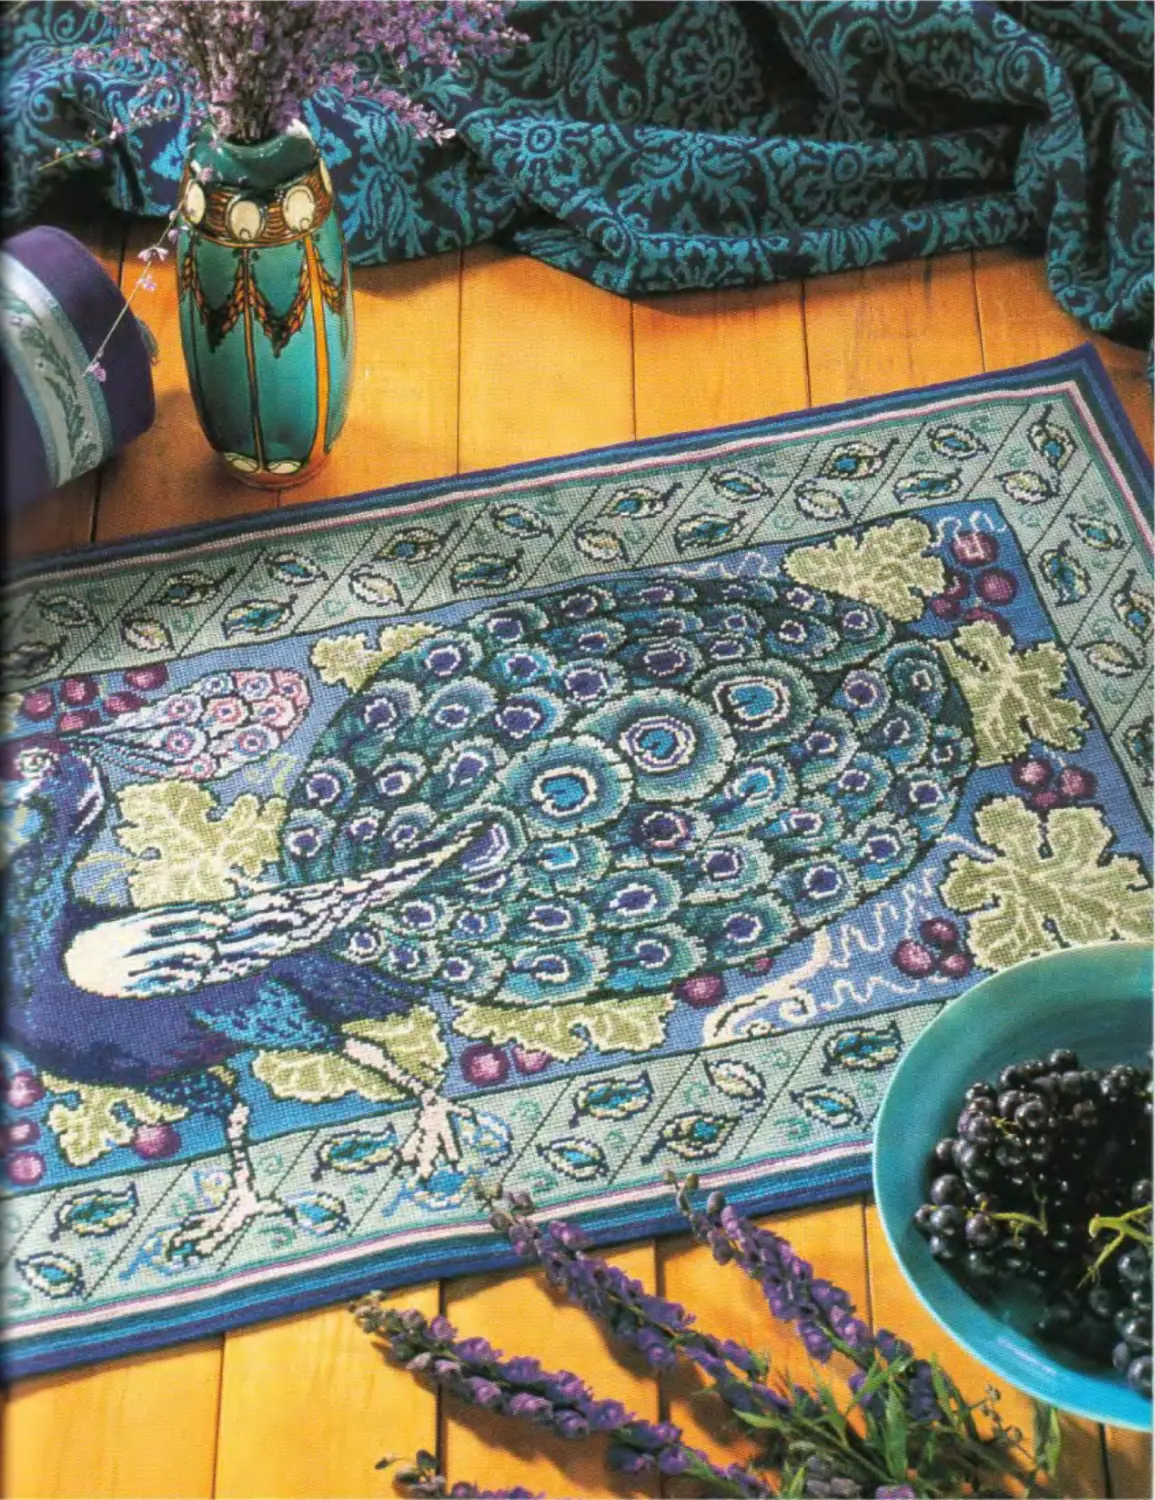
•Peacock-Rug-
*T* he peacock for this rug was the left part ot a . 1 decorative tile panel designed by William de
Morgan showing the peacock repeated as a mirror image lo the right with a vase of flowers filling the space between the two bird's tails, I adapted the design by omitting the vase of flowers and filling the space with more vine leaves. The border design repeats the leaf-strewn paving in the original. A striped outer border picks up the colours of the peacock. The rug is large, but grows quite quickly on 7-count canvas
DESIGN SIZE
53 x 29in (154 x 73cm) approximately Stitch count: 389 x 213
•
MATERIALS
• 60 x 36in (150 x 90cm) 7-count Zweigart interlock canvas (code 699)
• Tapestry wools as listed in the key • Tapestry needle size 18
W
I Centre the design on the canvas by marking the horizontal and vertical centre lines and finished size on the canvas with a marker pen. Mark the line of the edge of the border. The rug in the illustration was worked without a frame (and did not distort at all) and it is more manageable if it can be rolled as you work. Be careful not to pull the wool so tight that it distorts the mesh of the canvas.
2 Following the charts on pages 28-35 and Fig 1 below, use one strand of tapestry wool and cross stitch over one thread of the canvas Work with lengths of wool about 20in (50cm) to avoid tangling. By using several needles you can have various colours ready to work in multicoloured areas. It may be easier to work some of the outlines before filling in the details
3 Leave the outer borders until last. I suggest turning in the edges and stitching over the double thickness, but you may prefer to stitch to the edge then stretch (see page 121) and back your rug or neaten with a tape.
4 To finish your rug without a visible hem. trim to six threads beyond the marked edge all round, then fold the extra canvas under along the rug edge, making sure the threads line up exactly A few stitches in sewing thread at the corners to hold in position may be helpful (the woollen cross stitches will cover them) First mitre the corners (see Fig 2) but before cutting away the excess canvas at the corners, reinforce the threads which meet at the corner by stitching over them for a short distance using a close zigzag stitch on your sewing machine
5 Work cross stitch in colours according to the chart over the double thickness of canvas. The outermost row should be left until last and worked in plaited cross stitch edging (see page 123) which gives a neat finish. It is possible to do this at the beginning of the stitching of the rug but leaving it until the end means that any counting errors can be accomodated.
Trim to six threads beyond edge of rug
Close machine stitched zig zag stitch to reinforce comer then trim away along
Edge of ug comes to this row
Fig 2 Reinforcing the rug corner before mitring.
Chan I Chan 2 Chan 5 Chart Л
Charts Chan 6 Chart? Chart в
Fig I layout of rug charts.
Variations
* The peacock rug could be displayed over the back of a couch or used as a wall hanging. The decorative bars intended for hanging quilts could be used if some tape loops were sewn to the top edge of the embroidery • You could use the bolster borders to decorate a square or circular cushion or use one alone on an Aida or linen band for a belt, bookmark, hat band or camera strap. H The borders could also be used in combination with others from the border section on pages 112-118.
PEACOCK RUG
At id lot ТаррИеПе Wool
• 8006 8688 |\| 8812 □ 8990
SI 8586 H 8690 a 8890 l~l 9014
в 8500 □ 8694 Q 8822 IM 9016
8596 88(16 8874 + 97/2
8679 □ 8808 D 8884
PEACOCK RUG KEY
Colour Anchor Tappiserie wool Sheins Colour Anchor Tappiserie wool Sheins
Cream 8006 * 20 Very pale sby blue 8812 * 8
Liyht lilac 8586 1 Darb sby blue 8820 4
Lilac 8590 6 Very darb sby blue 8822 * 20
Very dark lilac 8596 9 Very light gobelin green 8874 ‘ 48
Light sea blue 8672 9 Very darb gobelin green 8884 * 28
Light cornflower blue 3688 20 Peacocb green 8920 13
Cornflower blue 8690 15 Very light forest green 9014 11
Very darb cornflower blue 8694 16 Light forest green 9016 9
Turquoise 8806 3 Light granite 9772 9
Darb turquoise 8808 8 * These colours can be ordered in 20g hanks, in which case
divide the number of sbeins by 4
CHART 3
Anchor Tappiserte Wool
8006
8586
8590
П Я596
E 8672
| 8688
Q 8690 □ 8808
□ 8694 s 8812
T 8806 8820
Q 8822 □ 8920
•i 8874 Я 9014
n 8884 9016
+ 9772
CHART 4
CHART 5
[3 8006
1Л 8586
ГП 8590
8596
E 8679
J 8688
Anchor Tappiserle Wool
a 8690 □ 8808 Q 8899
□ 8694 \| 8812 И 8874
8806 a 8890 П 8884
□ 8920
- 9014
n, 9016
9ТП
CHART 6
CHART 7
Anchor Tappiscrfe Wool
i tkWo Q 8596 H 8690 □ 8808 Q 8899 GJ 8920
S 8586 |f 8672 □ 8694 К 8812 8874 — 9014
m 8590 8688 8806 я 8890 П 8884 9016
|+ 9779
st
9 1C1VH3
SN3O3V3J QNV VISM M AH (HHIdSNI
BOLSTER CUSHION KEY
Colour DMC Anchor Sbeins
Blue 708 132 5
Green 5814 180 2
Pale blue 3756 1037 2
LiQht turquoise 5766 167 2
Darb turquoise 3765 160 2
Lilac pinb 554 96 1
Darb blue 820 134 1
BOLSTER CUSHION
DMC
□ 19»
□ MI4
О 3756
5766
□ 3765
554
D 880
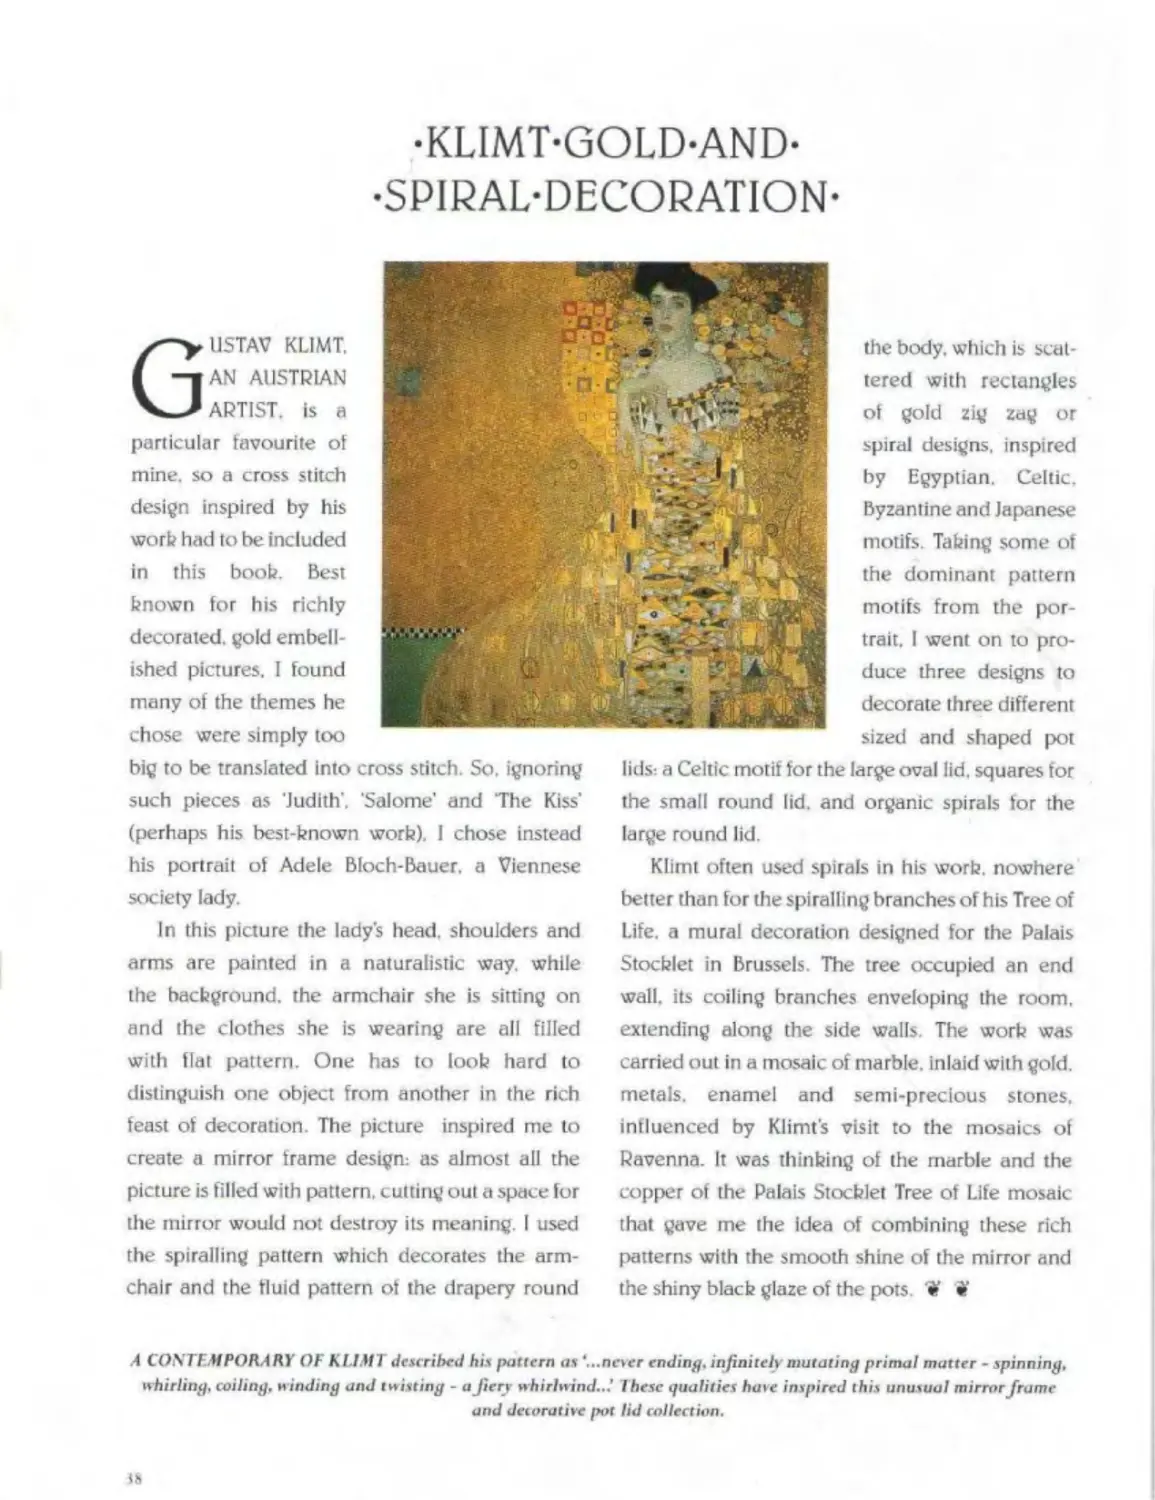
-KLIMT-GOLD-AND-
•SPIRAL-DECORATION-
Gustav klimt. AN AUSTRIAN ARTIST, is a particular favourite of mine, so a cross stitch design inspired by his work had to be included
in this boob. Best known for his richly decorated, gold embellished pictures. I found many of the themes he chose were simply too
the body, which is scattered with rectangles of gold zig zag or spiral designs, inspired by Egyptian. Celtic. Byzantine and Japanese motifs. Taking some of the dominant pattern motifs from the portrait. I went on to produce three designs to decorate three different sized and shaped pot
big to be translated into cross stitch. So. ignoring such pieces as ‘Judith’. Salome' and The Kiss’ (perhaps his best-known work). 1 chose instead his portrait of Adele Bloch-Bauer, a Viennese society lady.
In this picture the lady's head, shoulders and arms are painted in a naturalistic way. while the background, the armchair she is sitting on and the clothes she is wearing are all filled with flat pattern. One has to look hard to distinguish one object from another in the rich feast of decoration. The picture inspired me to create a mirror frame design: as almost all the picture is filled with pattern, cutting out a space for the mirror would not destroy its meaning. I used the spiralling pattern which decorates the armchair and the fluid pattern of the drapery round
lids: a Celtic motif for the large oval lid. squares for the small round lid. and organic spirals for the large round lid.
Klimt often used spirals in his work, nowhere better than for the spiralling branches of his Tree of Life, a mural decoration designed for the Palais Stochlet in Brussels The tree occupied an end wall, its coiling branches enveloping the room, extending along the side walls. The work was carried out in a mosaic of marble, inlaid with gold, metals, enamel and semi-precious stones, influenced by Klimt’s visit to the mosaics of Ravenna. It was thinking of the marble and the copper of the Palais Stochlet Tree of Life mosaic that gave me the idea of combining these rich patterns with the smooth shine of the mirror and the shiny black glaze of the pots. • »
.4 CONTEM PORARY OF KLIMT described his pattern as “...never ending, infinitelymutating primal matter - spinning, whirling, coiling, winding and twisting - a fiery whirlwind...’ These qualities haie inspired this unusual mirror frame and decorative pot lid collection.
,Ч)Н
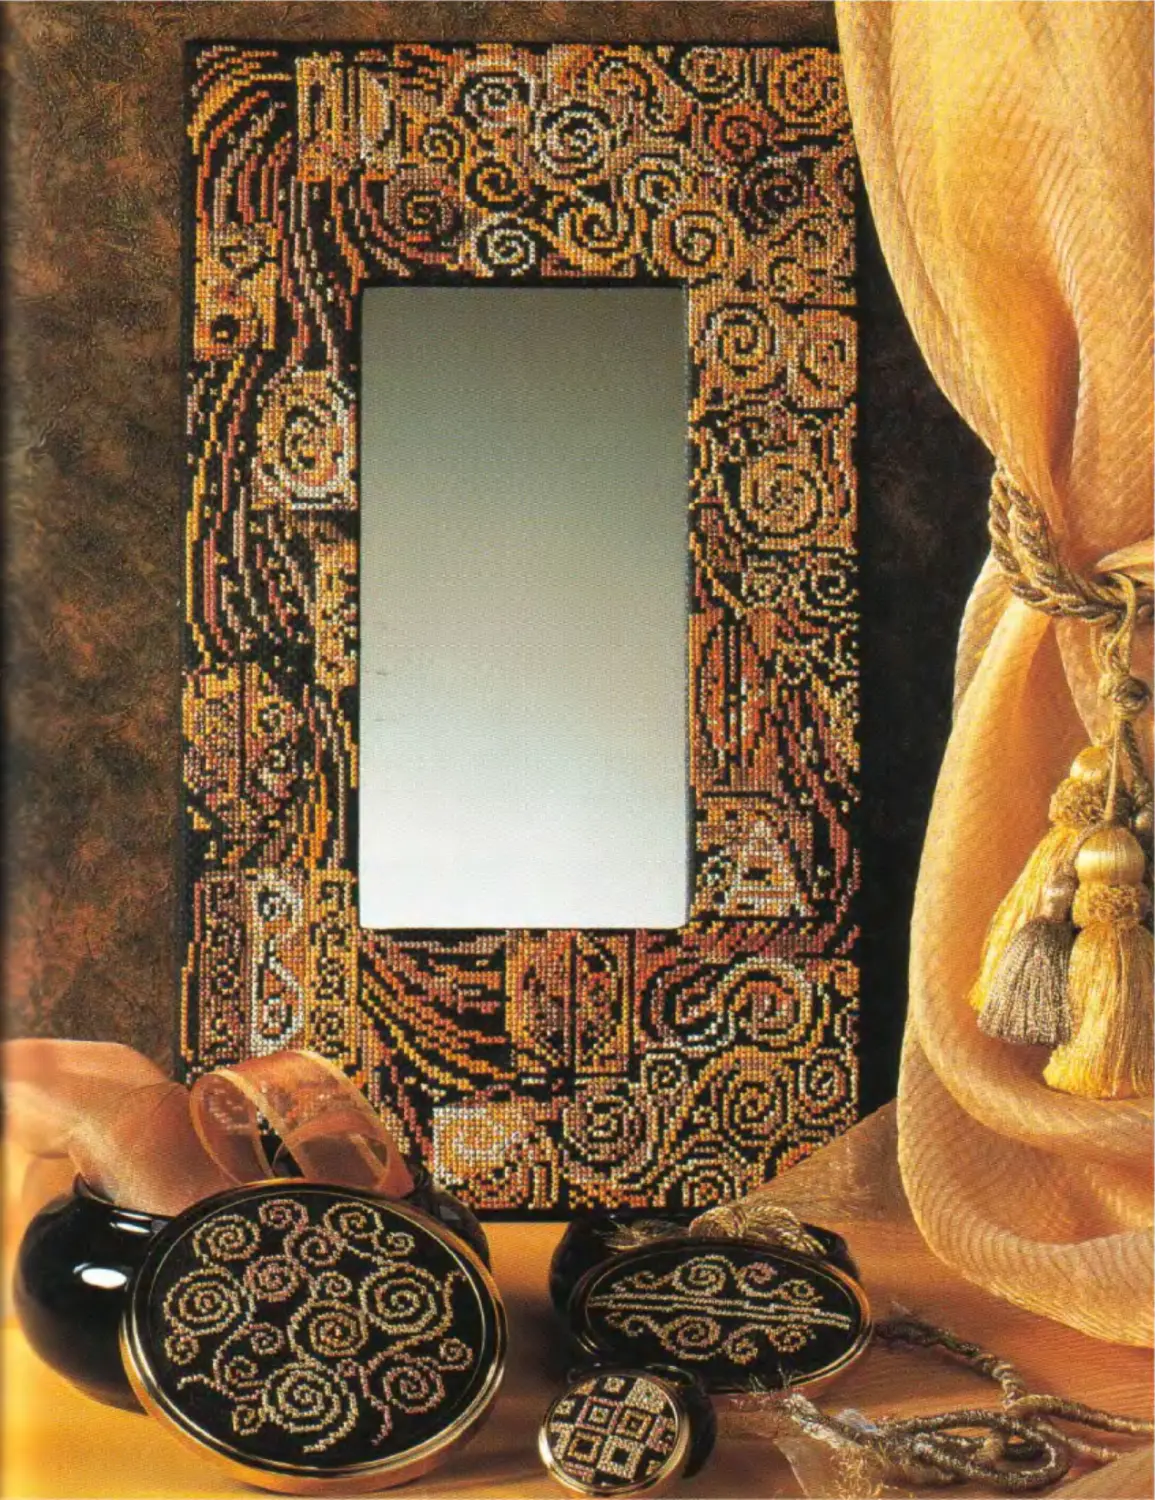
•Spiralling-Mirror-Frame-
rp he overwhelming colouring of the portrait of «Я, J. Adele Bloch-Bauer, the original inspiration ЙГХ for this project, is gold, though there are touches of red to echo the mouth and sbin tones, and of brown to act as a foil for the gold To try to recreate Klimts extraordinary palette. I have used metallic braids in five colours: a silvery gold, a gold, a red gold, a copper and a bronze. To create extra variety of colour and texture a range of stranded cottons is integrated into the design
W
DESIGN SIZE
8'4 x 14!4in (21.5 x 37cm)
•
MATERIALS
• 15 X 22in (38 x 55cm) 14-count Aida in blacb
• Kreinih Fine (#8) Braid as listed in the bey
• Stranded cottons as listed in the bey
• Size 22 tapestry needle
• Blacb iron-on interfacing, same size as the Aida
• Al sheet of blacb mount board
• Ruler and craft bnife
• Double-sided adhesive tape
• PVA fabric glue
• 6 x I2in (15 x 30cm) mirror tile
• Corrugated cardboard
• 40in (1m) fine blacb cord (optional)
• 40in (1m) slightly thicber blacb cord (optional)
• Fabric to neaten bacb
• Needle and blacb thread for finishing
• 2 curtain rings and strong thread for hanging
W
1 Marb the central horizontal and vertical guidelines on the fabric with tacbing (see page 120) To help beep your place when stitching, continue to marb out the fabric into 20 blocb squares, starting from centre lines.
2 Follow the charts on pages 44 and 45 The embroidery is worked in both stranded cottons and metallic threads to give a variety ot texture. The metallic threads act as highlights and give emphasis to the design. Use the metallic threads singly straight from the reel, in quite short lengths, approximately 20in (50cm). To avoid the
thread fraying, move the position of the needle on the thread from time to time. If the thread does start to fray, start a new length. When working with the stranded cottons, use two strands in the needle.
3 When the embroidery is complete, remove the guidelines and press (see page 121). Bond the black iron-on interfacing to the reverse of the embroidery following the manufacturer's instructions.
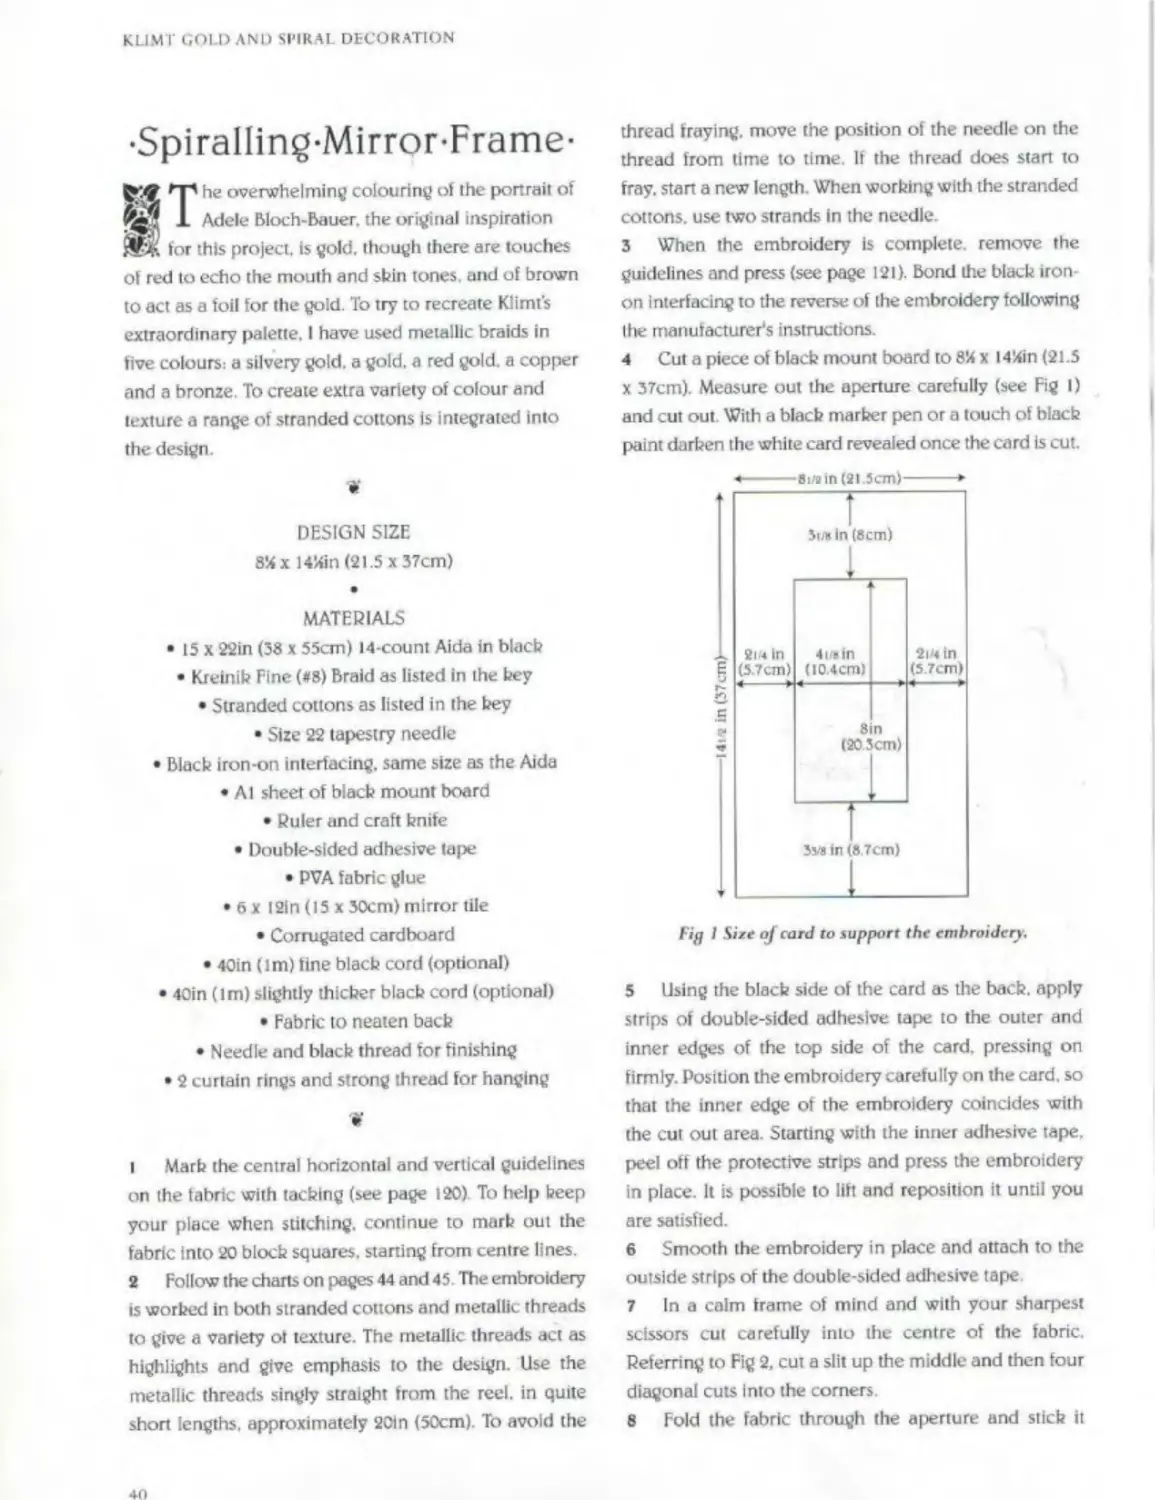
4 Cut a piece of black mount board to 8'4 x 14%in (21.5 x 37cm). Measure out the aperture carefully (see Fig I) and cut out With a blacb marker pen or a touch of black paint darken the white card revealed once the card is cut.
Fip I Size oj card to support the embroidery.
5 Using the blacb side of the card as the bacb. apply strips of double-sided adhesive tape to the outer and inner edges of the top side of the card, pressing on firmly. Position the embroidery carefully on the card, so that the inner edge of the embroidery coincides with the cut out area. Starting with the inner adhesive tape, peel oft the protective strips and press the embroidery in place. It is possible to lift and reposition it until you are satisfied.
6 Smooth the embroidery in place and attach to the outside strips of the double-sided adhesive tape
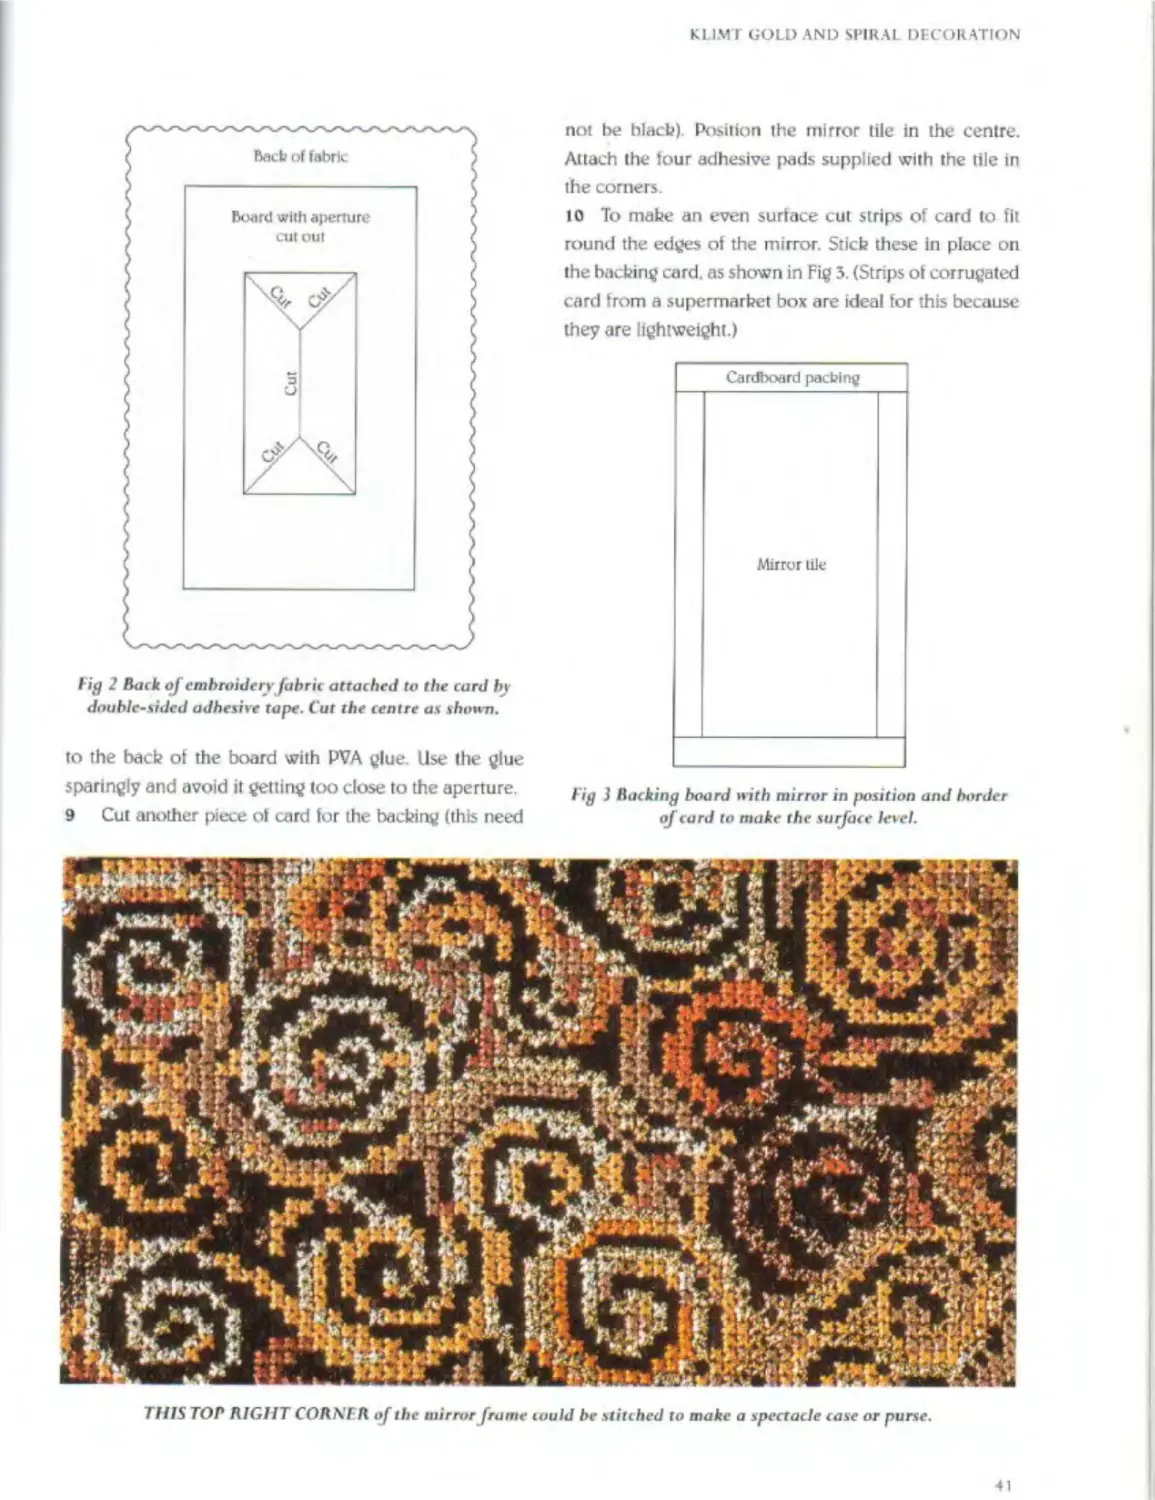
7 In a calm frame of mind and with your sharpest scissors cut carefully into the centre of the fabric. Referring to Fig 2, cut a slit up the middle and then four diagonal cuts into the corners.
8 Fold the fabric through the aperture and stick it
Hg 2 Rack oj embroidery fabric attached to the card by double-sided adhesive tape. Cut the centre as shown.
to the bach of the board with PVA glue. Use the glue
not be blacb). Position the mirror tile in the centre. Attach the lour adhesive pads supplied with the tile in the corners.
10 To mahe an even surface cut strips of card to fit round the edges of the mirror. Stick these in place on the backing card, as shown in Fig 3. (Strips of corrugated card from a supermarket box are ideal for this because they are lightweight.)
Cardboard packing
Mirror tile
sparingly and avoid it getting too close to the aperture.
9 Cut another piece of card for the backing (this need
Tig 3 Hacking board with mirror in position and border of card to make the surface level.
THIS TOP RIGHT CORKIR of the mirror frame could be stitched to make a spectacle case or purse.
11 Place (he embroidered frame over the inset mirror Check that the corners look neat where they are reflected in the mirror. If you wish, you can add a fine black cord round the edge of the aperture held in place with invisible stitches into the folded edge of the embroidery. Glue the layers together
12 Fold the surplus fabric round the bach of the baching board. Fold and mitre the corners neatly (see page 124). Hold in place with double-sided adhesive tape or glue. If using glue, keep well away from the edges of the frame. Cut a piece of firm, dark fabric to the size of the backing board Turn in the edges and stitch in place about V»in (Icm) in from the edge all round.
13 At this stage you might want to consider whether to add a further, thicker cord round the outside edge of the mirror frame.
14 On the back of the mirror frame, position two curtain rings at each side near to the top to take a suspension cord, or use a single ring in the centre. Stitch firmly in place to complete.
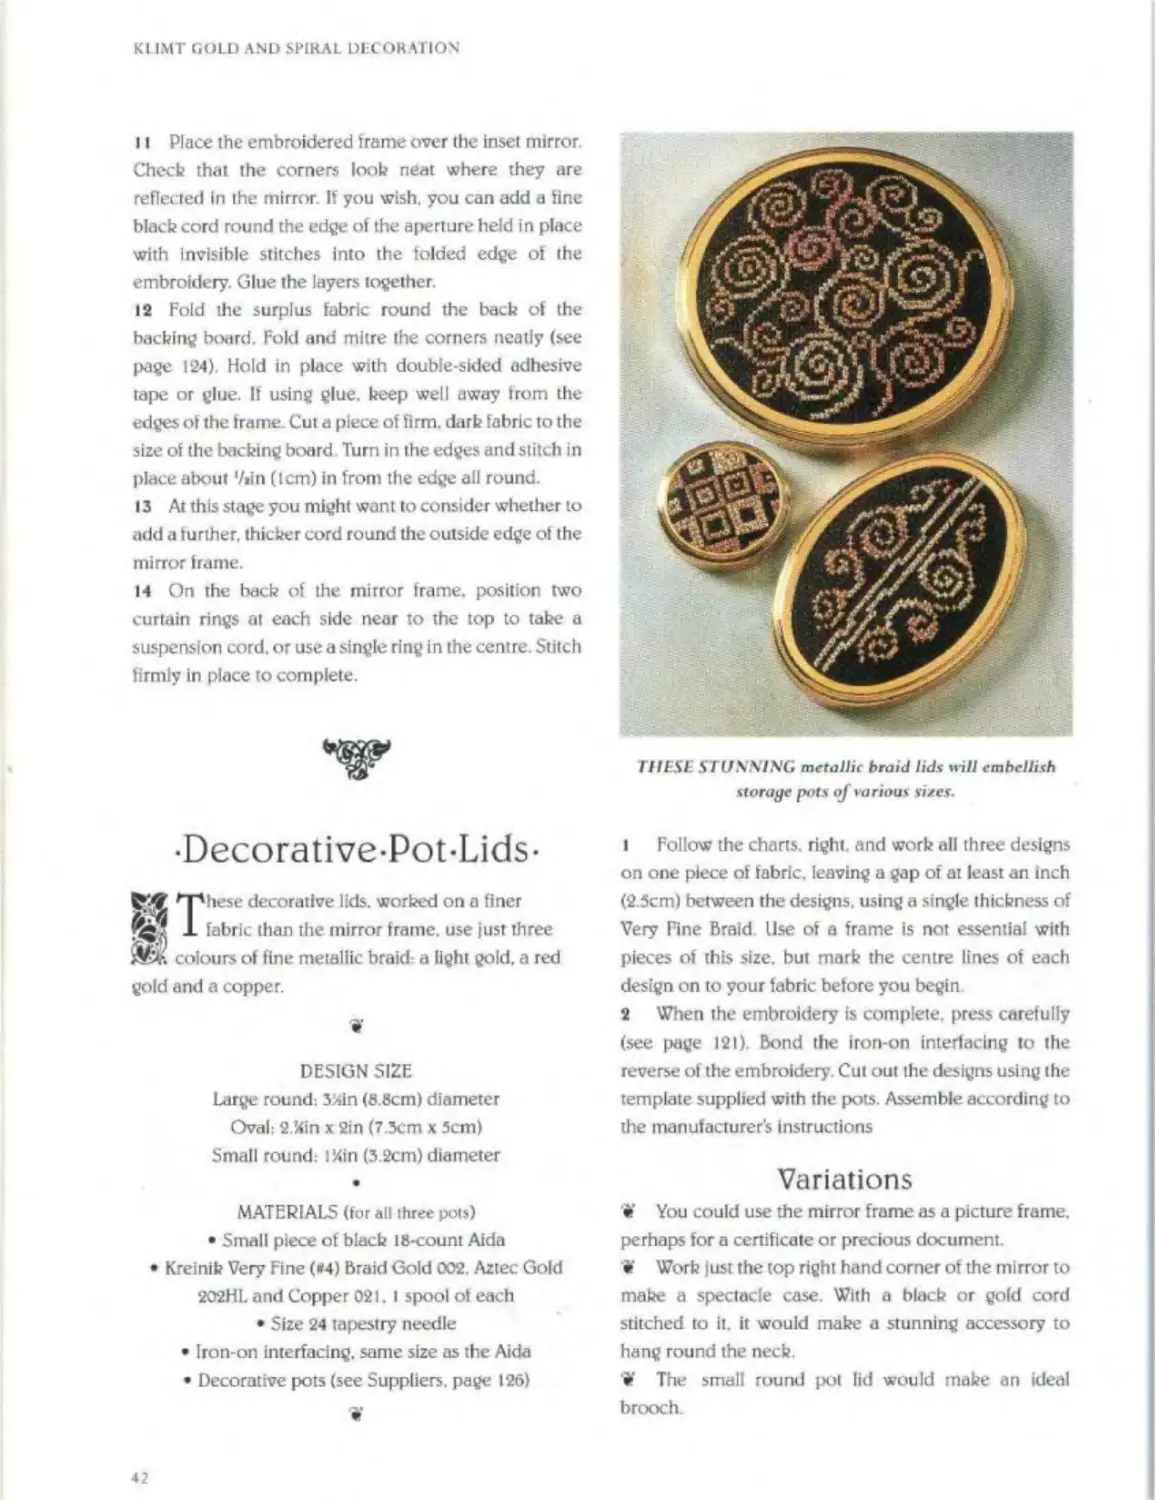
THESE STUNNING metallic braid lids Will embellish storage pots of various sixes.
•Decorative-Pot-Lids-
*"phese decorative lids, worked on a finer J. fabric them the mirror frame, use just three
colours of fine metallic braid a light gold, a red gold and a copper.
W
DESIGN SIZE
Large round: 3;dn (8.8cm) diameter
Oval: 2 Kin x 2in (7.3cm x 5cm)
Small round: I Kin (3.2cm) diameter
•
MATERIALS (for all three pots)
• Small piece of black 18-count Aida
• Kreinik Very Fine («4) Braid Gold 002. Aztec Gold
202HL and Copper 021, I spool ot each
• Size 24 tapestry needle
• Iron-on interfacing, same size as the Aida
• Decorative pots (see Suppliers, page 126)
*
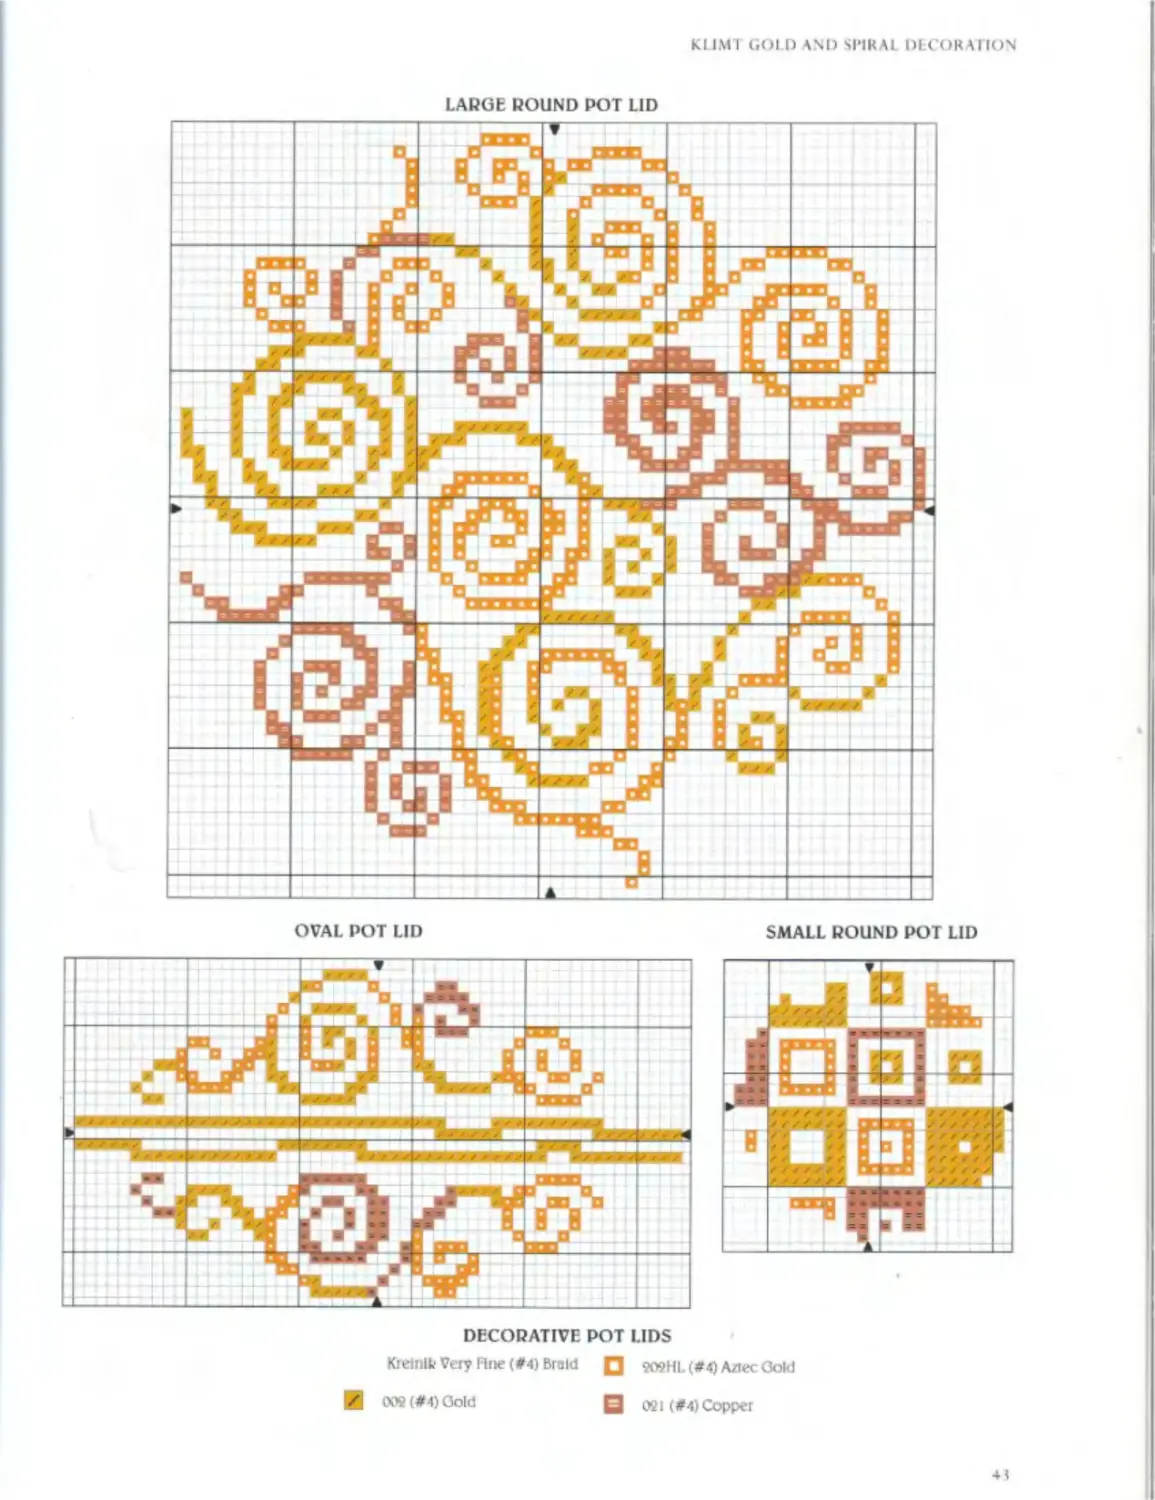
I Follow the charts, right, and work all three designs on one piece of fabric, leaving a gap of at least an inch (2.5cm) between the designs, using a single thickness of Very Fine Braid Use of a frame is not essential with pieces of this size, but mark the centre lines of each design on to your fabric before you begin
2 When the embroidery is complete, press carefully (see page 121). Bond die iron-on interfacing to the reverse of the embroidery. Cut out the designs using the template supplied with the pots. Assemble according to the manufacturer's instructions
Variations
• You could use the mirror frame as a picture frame, perhaps for a certificate or precious document.
* Work just the top right hand corner of the mirror to make a spectacle case. With a black or gold cord stitched to it. it would make a stunning accessory to hang round the neck.
if The small round jx>t lid would make an ideal brooch
LARGE ROUND POT LID
OVAL POT LID
DECORATIVE POT LIDS
Kreinlk Very Hne (#4) Braid Q 909HI. (#4) Алее ОоИ / 002 (#4) Gold Q 021 (#4) Copper
SMALL ROUND POT LID
SPIRALLING MIRROR FRAME KFY
Kreinik Fine (*8) Braid
Colour
Revis
002 HL
2122
о a
]□ з
|« аза
2O2HL
02IHL
Gold High Lustre
Vatican (silvery gold)
Aztec Gold
Copper High Lustre
Curry (bronze)
DODDG3’
□□□□aQ WGnan
an na • P т •
□ □□□ a na□зИ
gon n •
gfj • • •
IT'-I S • oaon;
□ Vatican Gold metallic iSlCutTV metallic
tec Gold metallic
Gold metallic
Hl'MCASC Д/Я9 Boss Qv«l
Я» 40 S?29 Цзв9б
□ a | oaa I Я5 an
; □□ 1 □□
no I oo Я о a a a о a КД
□ am
□ aao]
Inr Г I
OQ .O'
Sheins
I I
2
I
I
I
I
STRANDED COTTONS
Colour
Hazel
------Aztec ochre
Gold cotton
Bright rust
Darb copper CoHee Mocha brown
DMC Anchor Madeira
4'20 375 2105
782 901 2213
729 890 2009
582b 1049 2306
632 936 2304
840 379 1912
3781 1050 2003
BOTTOM
-ART-NOUVEAU-
-FLOWERS-
HESE FLORAL STUDIES of stylized iris, tulip and columbine are brought together as a series by the unifying border design used on each. The border is based on one used to advertise the new E Art Nouveau’ gallery which opened in Paris in 1895. The motifs at the comers are stylised plant forms, and the shallow, flattened curves with sudden, sharp angles are very characteristic of the Art Nouveau style. Long, thin proportion is typical of the period. There had been a tendency to elongate figures - Edward Burne-Jones' ladies were a good example. Aubrey Beardsley continued and exaggerated the trend, and other artists applied it to plant forms as well as to the human form. Japanese prints, so very influential on the art of the late nineteenth century, often came in extremely long, thin proportions a novelty that artists and designers wanted to experiment with.
The iris was a favourite flower at the time. Its proportion and its strong, sculptural shapes appealed to designers Its habit of growing near water was an added attraction. The curves and eddies of water and the long, sinuous curves of waterweed were ideal subjects for Art Nouveau artists. There was a vogue during this period tor creating patterns from the most unlikely insects, but the most popular was the dragonfly, shown
PROPONE NTS OPART NOU TP AU found plant* and insects a never-ending source of inpiration. Undulating lines and elongated proportions so typical of the style produce these delicate columbine, tulip and iris pictures.
here hovering over the iris. The inspiration for the iris design was a textile designed by Linsay P. Butterfield and woven by Alexander Morton & Co. around 1900 The original textile repeated groups of plants, but 1 have chosen just one here.
The tulip is also derived from a textile design. The original is printed on a dark navy cotton background and has an additional leaf, a large five-sided, waterlily leaf, behind the two flower heads. This is one of my favourite designs. The way the leaves curve and relate to the curves of the stems appeals to me very much. It is
undoubtedly artificial and contrived but that, I feel, gives it its beauty.
The columbine, or aquilegia, design is based on a plate in Eugene Grasset's collection of plant studies, published as La Plante et ses Applications Ornementaies in 1897. The columbine is an unusual and pretty flower with attractively shaped leaves. In the original it is shown in yellows against dark blue, but 1 chose the more naturalistic colours of mauvey pinks because they bring together the mauves of the iris and the pinks of the tulip. • •
-Iris-TuIip-and-
•Columbine-Pictures-
T4 ,iese *l°ral pictures of columbine, tulip and
1 iris, all elegant and curving in the typical Art Ж& Nouveau style, are easy to stitch using only cross stitch and bach stitch and would make lovely gifts, either singly or as a set.
DESIGN SIZE
Each 44 x 94tn (tlx 24cm) approximately, tor a frame or mount aperture of 5% x 1 lin (14 x 28cm) Stitch count; each 63 x 130
•
MATERIALS (for each design)
• 94 x 164in (24 x 42cm) 28-count Zweigart very pale blue Annabelle evenweave, colour 550 (or 27% x 1 64in (70 x 42cm) for all three designs)
• Stranded cottons as listed in each key
W
l Mark the central horizontal and vertical guidelines on the fabric with tacking (see page 120). If you have chosen to use the evenweave fabric illustrated (a 28-count cotton, slightly slubbed to give a linen look) then use an embroidery frame for best results (see page 120).
If you prefer to work on Aida choose Fabric Flair 14-count Aida in snow blue, colour 550. For each design about half a skein of the dark smoky green 3768 will be needed and small amounts of the other colours
2 Following the relevant chart on pages 49-51, work the design over two threads oi the fabric, using two strands of stranded cotton for the cross stitch. Work the cross stitch first, leaving the bach stitching detail until the end. If you want to start with the border, begin at the centre line and work outwards, counting carefully. When you begin the flower designs, start near to the centre guidelines so that you have a reference point to count from
3 To work the bach stitch in the tulip and columbine designs, use two strands. To work the bacb stitch in the iris design, use two strands for the flower. Instead of keeping to the vertical and horizontal, the lines stretch diagonally over longer distances, though try to avoid making a single stitch cover more than two squares on the chan. Using an evenweave will allow you to be more flexible with the placement ot stitches. Outline the dragonfly wings in the dark blue used to outline the flower. The leading edges of the upper wings, between the dark pink cross stitches, is worked in two strands, the rest in one. All the lines inside the wings are worked with a single strand of the dark pink
4 When all the embroidery Is complete, remove the guidelines, press and frame (see page 123 for advice).
TULIP
DMC
Q 3768
IT 3817'-
S 509
JJ 504
В «ю
□ 602
Й 604
Я 3689
II 738
Q B59OO
Back Slltcii in: -------3768
TULIP KEY
Colour DMC Anchor Madeira
Dart smoky green 3768 851 1706
Light misty green 3817 875 1209
Medium misty green 502 876 1703
Very pale green 504 1042 1701
Dark pink 60C 1006 0704
Vivid pink 602 63 0702
Sugar pink 604 55 0614
Pale pink 3689 49 0607
Light tan 738 942 2013
White B5200 1 white
IRIS
DMC
Q 3768
IT MI7
S 502
+ 341
□ 791
* 340
EJ 3746
В 600
= 3899
BS200
Bacb Stitch in: ------600
791
IRIS KEY
Colour DMC Anchor Madeira
Dark smoky green 3768 851 1706
Light misty green 3817 875 1209
Medium misty green 502 876 1703
Light blue 341 117 0901
Dark blue 791 123 0904
Lavender 340 118 0902
Bright violet 3746 1030 0703
Dark Pink 600 1006 0704
Yellow 3822 305 0109
White B5200 1 white
COLUMBINE
DMC
Q 3768 T 3811 0 502 + 341
;; 340 Q 3746 И 3689 П 3'6 □ 315 [gj 738 Back Stitch in: ------791 ------315
COLUMBINE KEY
Colour DMC Anchor Madeira
Dark smoky green 3768 851 1706
Light misty green 3817 875 1209
Medium misty green 502 876 1703
Light blue 341 117 0901
Dark blue 791 123 0904
Lavender 340 118 0902
Bright violet 3746 1030 0703
Pale pink 3689 49 0607
Medium antique 316 1017 0809
mauve
Dark antique mauve 315 1019 0810
Light tan 738 942 2013
•TIFFANY’S-DECORATIVE-GLASS-
LOUIS COMFORT TIFFANY was one of the giants of the Art Nouveau period, a brilliant artist in coloured glass at the height of his creative powers around the turn of the century. He is remembered for his achievements in coloured glass windows, in his sinuous,
iridescent, decorative vases anti for his lamps that combined coloured glass shades with bronze or pottery sculptured bases. The projects in this chapter derive their inspiration from his decorative glass windows.
Born in 1848. Tiffany was the rich son of a family who owned the famous Tiffany and Co jewellery shops: consequently he grew up surrounded by objets d art - by decorated Japanese fans and sun shades, prints, decorative metalwork, Islamic tiles and textiles and by creative craftsmen from a variety of disciplines. When he decided to become an artist he had money to study abroad and to travel widely, and when he devoted his energies to glass creations he could afford to employ experts from around the world
Stained glass had seen a very strong revival during the second half of the nineteenth century, largely because of the rebirth of Gothic-style church building. Morris and Co created memorable windows from different coloured glass with details painted onto them. Tiffany wanted to create all his effects using the glass itself, with patterns being produced by the leading. In this he was inspired by the early examples he had seen at Chartres, and by Byzantine glass mosaics he had seen on his travels abroad As the range of glass available commercially was inadequate he started to make his own, experimenting by adding various oxides and chemicals to his glass. By the 1890s he was a leading glass producer, his stock including a phenomenal 5,000 varieties of glass in a full range of colours and a variety of textures and degrees of translucency.
Movement and vitality were important aims in Art Nouveau and by exploiting the shifting light through his glass Tiffany achieved a constantly changing image He wanted to capture the almost kaleidoscopic effect of varied reflections he had seen in the mosaics of the east. During the 1880s and 90s Tiffany developed many glassmaking techniques in order to create the
THIS WORK-BOX AND PINCUSHION use favourite motifs from the repertoire of American designer Louis Comfort Tiffany. Compare these with the reproduction on page 11, where Tiffany has used the same colour scheme and blossom in conjunction with a goldfish bowl circled by parrots.
effects he wanted. One of these was confetti’ glass, where clear glass was poured over chips of coloured glass giving a fractured effect, very useful for capturing effects of light through foliage. Different textures were achieved by folding and manipulating the sheets of glass to give different intensity of colour. Different surface textures from his opalescent glass or his moulded glass ’jewels’ which could create prismatic effects added to the vitality.
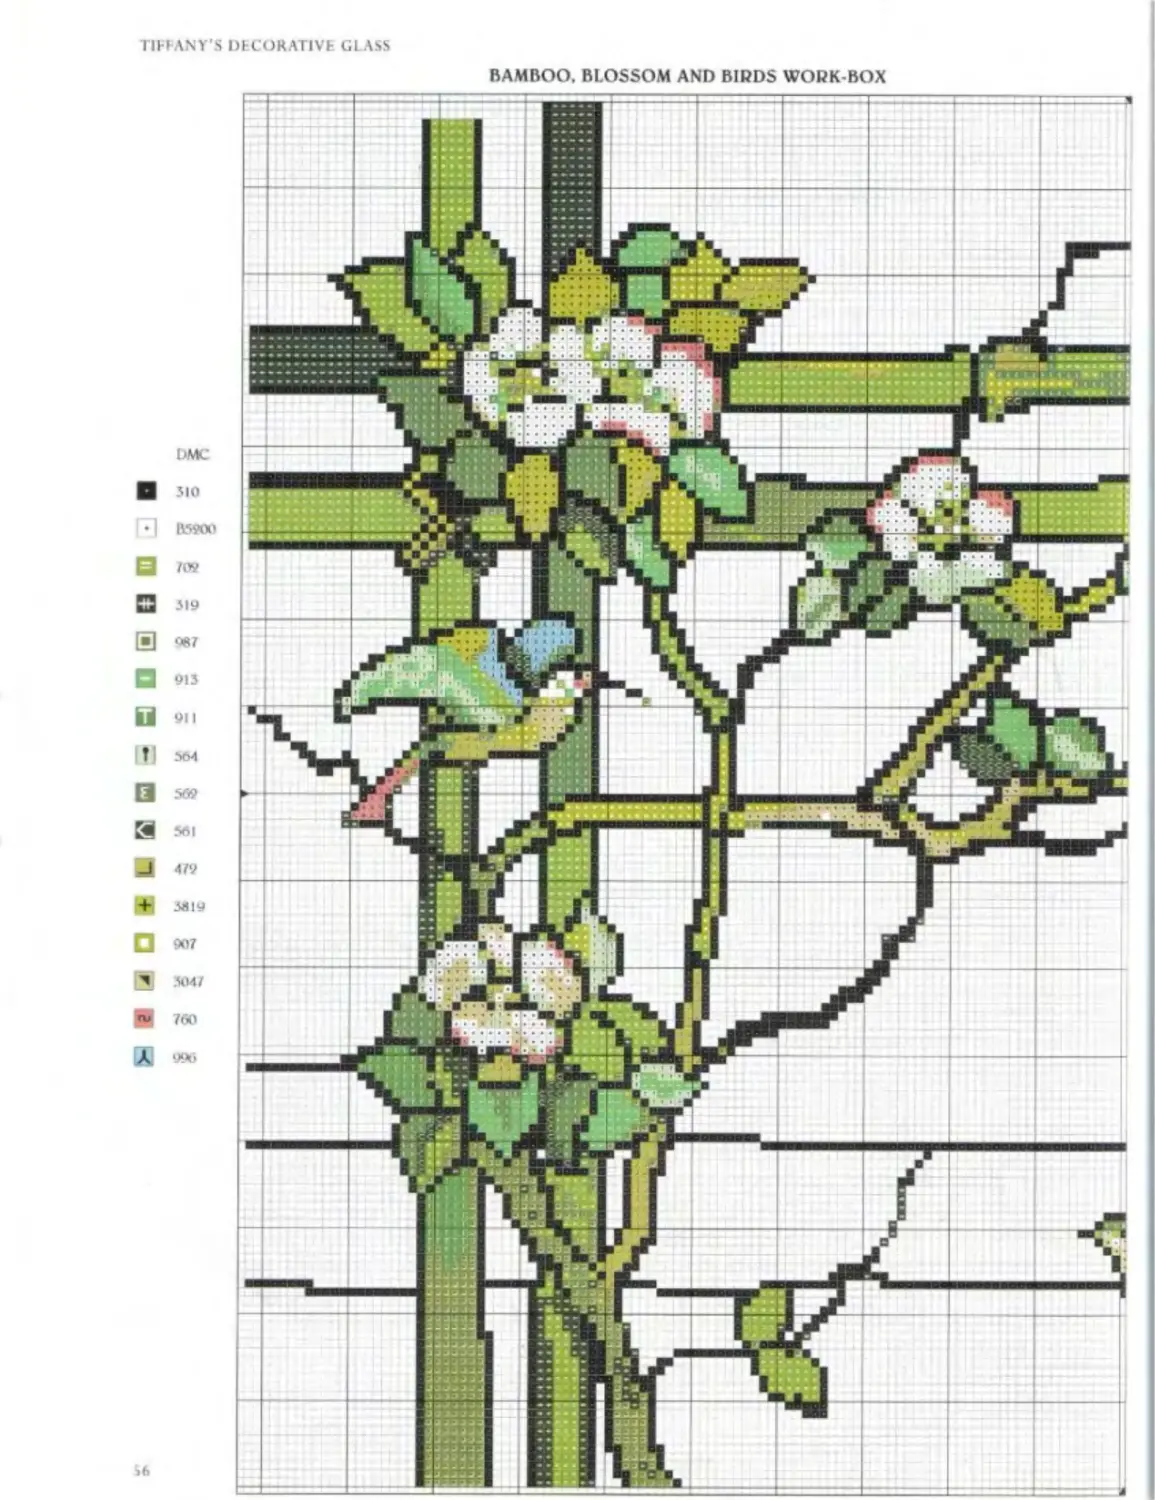
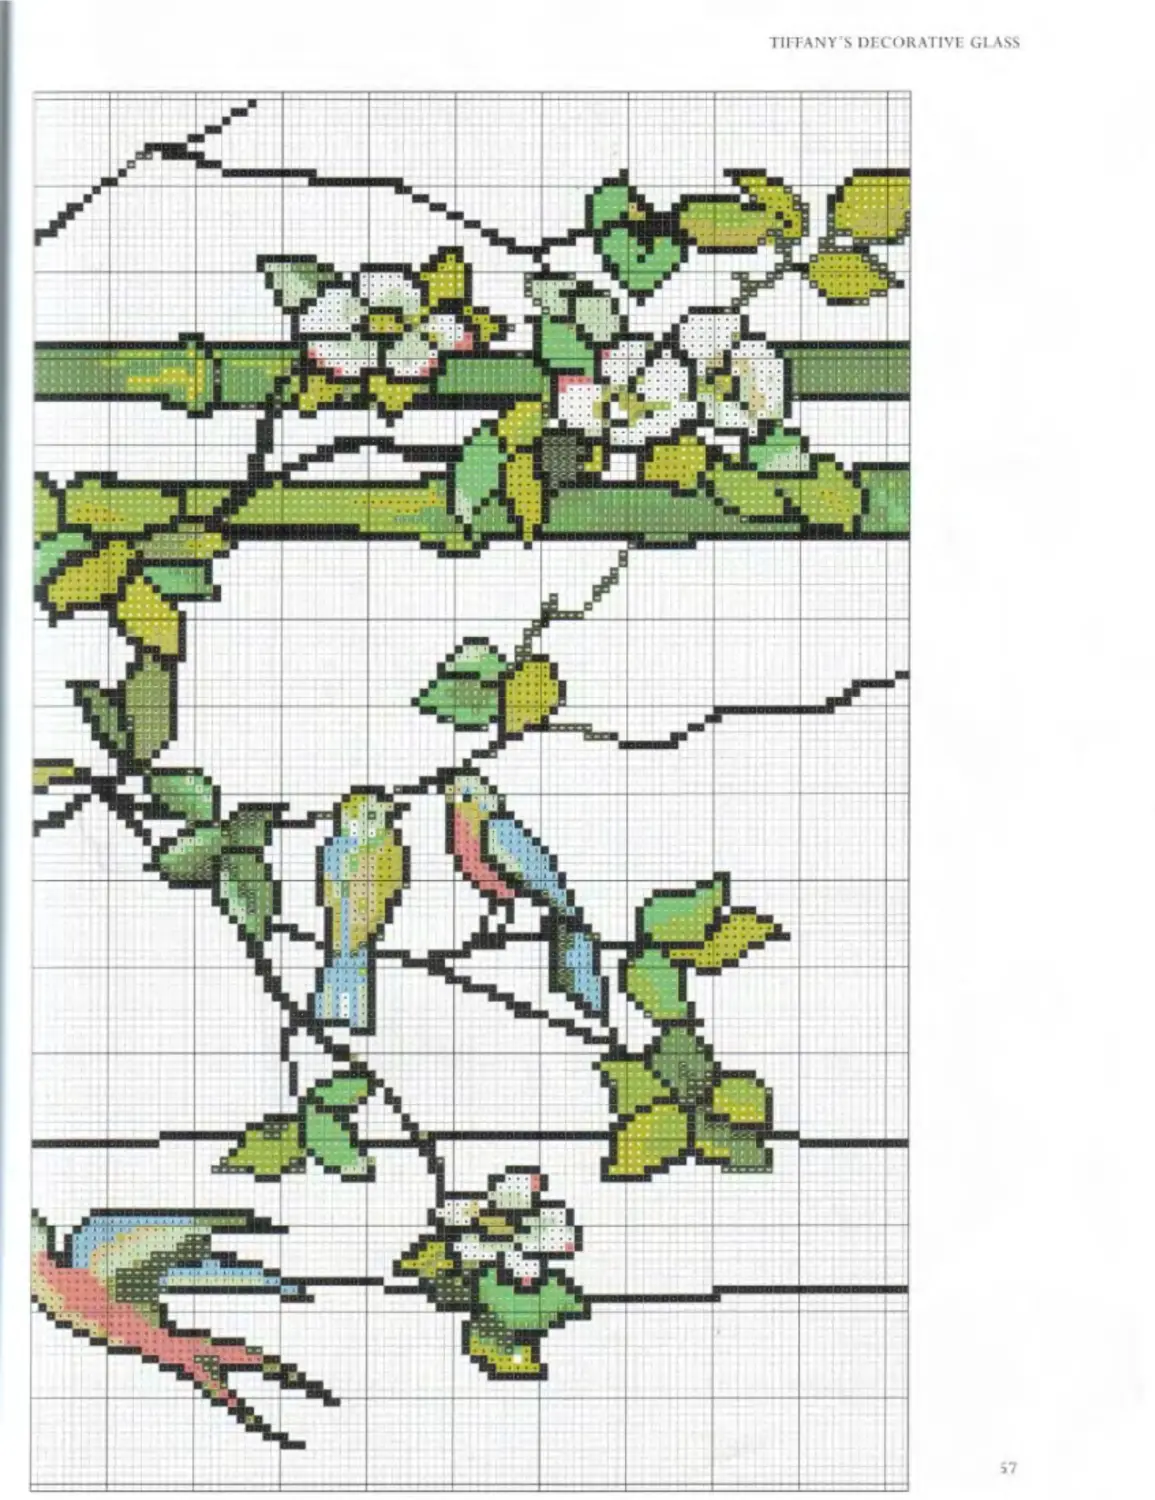
In translating his style into embroidery it is only possible to hint at the qualities light gives his glass. The work-box design of cherry blossom and birds against a bamboo trellis was based on Tiffany’s designs in 1900 for the windows of a garden room. Its charm derives from the contrast between the verticals and horizontals of the bamboo and the organic patterns formed by the branches and leaves, which are accentuated by the black lines of the ‘leading’ which holds the mosaic of glass pieces in place. This design uses an irregularly coloured Rustico Aida to capture something of the variety of surface, while the lake landscape uses broken colour and a touch of metallic thread to hint at the same effect.
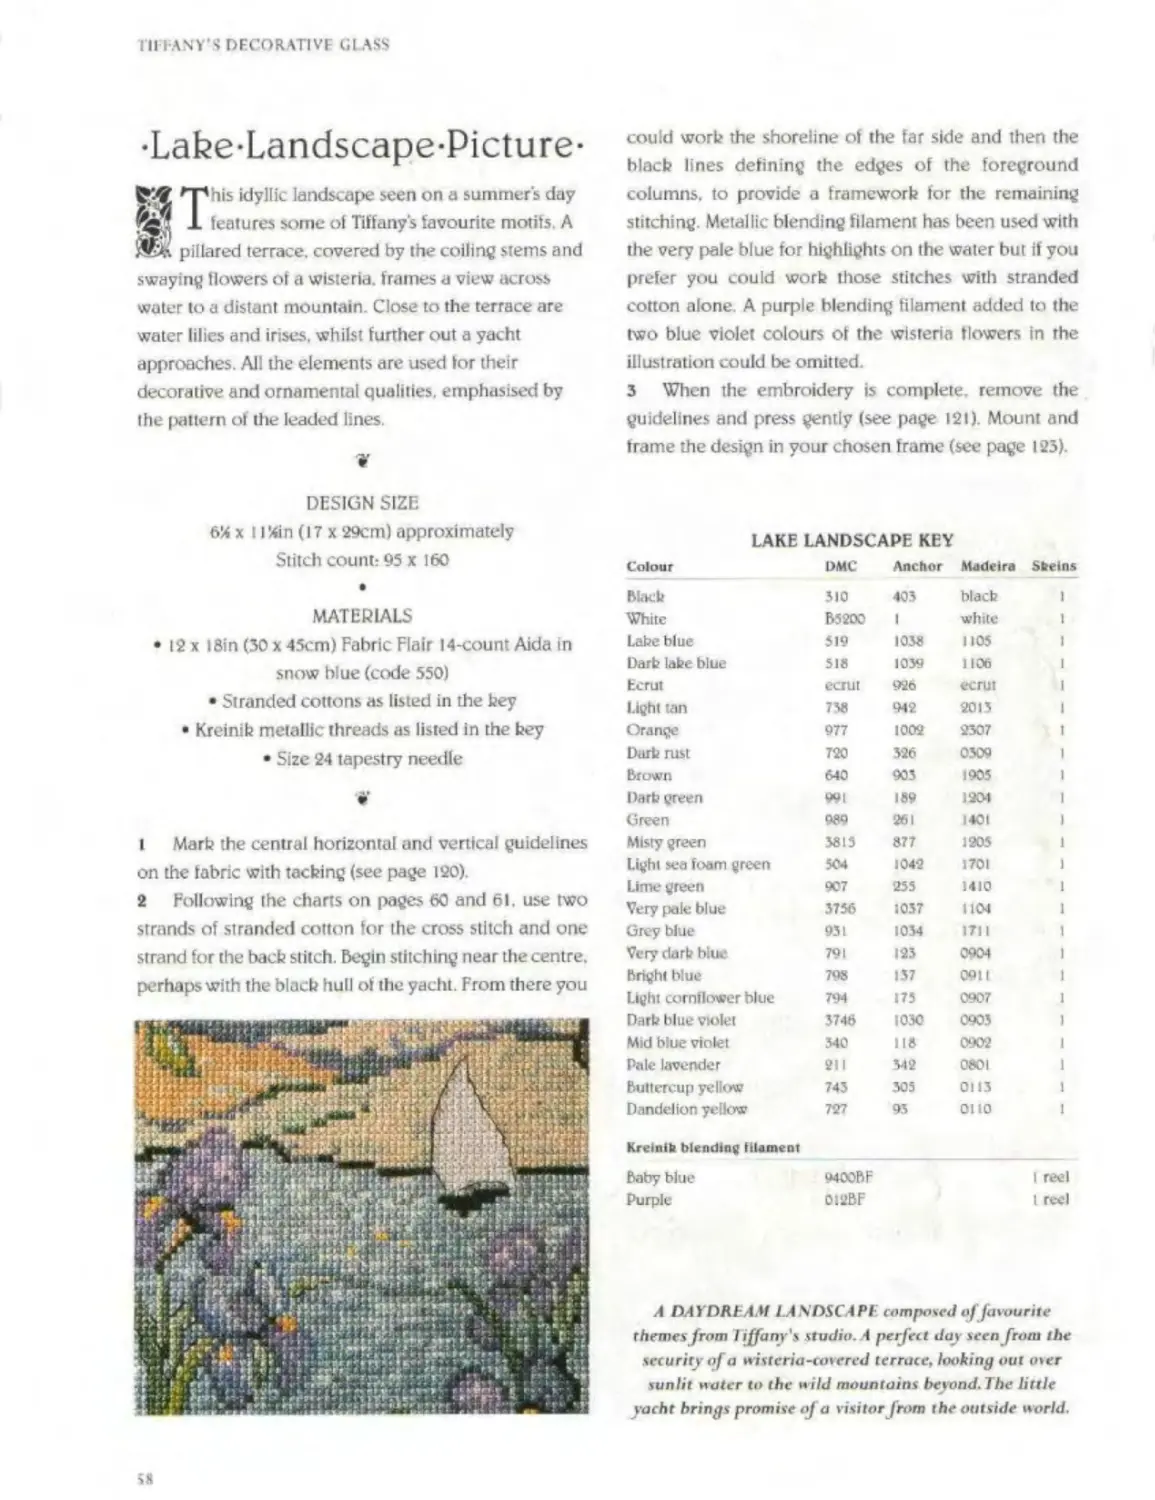
The lake landscape picture features some of Tiffany’s favourite motifs. To translate the sort of composition designed for a large church or hotel window into a small cross stitch design necessitates some simplification At this scale black leading lines tend to overwhelm the composition so to compensate in places they have been stitched in paler tones, and in others left out. Nevertheless I hope it retains the characteristic Tiffany colouring, something of the variety of reflectivity and instantly evokes the splendid windows which inspired it. • <
-Bamboo-Blossom-
-and-Birds-Work-Box-
Д dark oak work-box has been chosen to /^.display this design. It is a traditional one
Ж& with a sliding tray for storing small items and a padded top that allows it to double as a stool. In adapting the design for a padded work-box 1 included a piped edging which can accomodate to the curve of the pad II it is to be displayed flat, a blacb edging line might be used to finish it off The coloured, unstitched background is an important part of the design, allowing the embroidery to grow quite quickly.
W
DESIGN SIZE
1414 x 1 IXtn (36 x 28.5cm) approximately Stitch count: 205 x 160
MATERIALS
• 20 x 16in (50 x 40cm) 14-count green Rustico Aida (Zweigart code 692)
♦ Stranded cottons as listed in the hey
• Size 24 tapestry needle
Dark oak work-box with padded lid (see Suppliers page 126)
• Black piping or upholstery cord
• Fabric or stiff paper to bach the work-box pad
• Staple gun or tacks (optional)
1 Mark the central horizontal and vertical guidelines on rhe fabric with tacking (see page 120)
2 Following the charts on pages 56 and 57. begin stitching the branches near the centre using two strands of stranded cotton. Use black to work the outlines, then fill in the coloured spaces with cross stitch
3 When the embroidery is complete, press carefully (see page 121). Leave (he tacking guidelines in for the moment to help position the embroidery over the work-box pad.
4 Stretch the embroidery over the pad and tack down according to the manufacturer's instructions, or stretch over the pad as you would over card for a picture using linen thread to secure it (see page 123). Remove the guidelines
5 To finish, tach piping or upholstery cord with a tape edging to the edge of the pad so that it conceals the narrow gap and provides a blacb outline for the design.
6 Assemble In the work-box lid according to the manufacturer’s instructions, with the stiff paper or fabric concealing the underside.
Variations
♦ The worb-box shown can accommodate a design stitched with tapestry wools as well as stranded cottons, so you could substitute harder-wearing wools on 14-count canvas.
The bamboo, blossom and birds design could be framed as a picture or worked as a cushion instead of being mounted in a work-box in which case a black line should be worked in cross stitch around the edge to replace the black cord edging.
WORK-BOX AND PINCUSHION KEY
•Blossom-Pincushion-
T'Ns pincushion features a small spray of
* 1 flowers with leaves, mounted in a darb wood Жл pincushion with a simple turned decoration. The design could be used on any small item, or you could embroider one or two of the birds from the worb-box chart on page 56 anti make a matching needlecase.
W
DESIGN SIZE
2% X 2%in (5.5 X 5.5cm) Stitch count: 31 x 32
•
MATERIALS
• 6 x 6in (15 x 15cm) 14-count Rustico Aida in green (Zweigart code 692)
• Stranded cottons as listed in the bey
• Size 24 tapestry needle
• 3%in (9cm) diameter wooden base pincushion (see Suppliers page 126)
V
l Follow the chart and work the design using two strands ot stranded cotton and cross stitch
2 When the embroidery is complete, place the fabric over the pincushion pad and secure it with a few pins near the base. Fasten it to the bottom of the pad with a tew staples. Alternatively, you could run a gathering stitch around about Min (1.25cm) in from the edge, pulling the thread tight and fastening oft
3 Trim the edges of the embroidered fabric so that there is room for the securing screw, then assemble according to the manufacturer’s instructions
Colour DMC Anchor Madeira Sheins
Black 310 403 blacb 3
White B52CC 1 white 1
Christmas green 702 257 1306 1
Darb bay leal green 319 218 1313 1
Medium green 987 210 1407 1
Light emerald green 913 204 1212 1
Mid emerald green 911 227 1301 1
Very light jade 564 206 1208 1
Mid |ade 562 208 1213 1
Very dark jade 561 212 1205 1
Pale lime ice 472 253 1414 1
Light lime 3819 279 1610 1
Lime green 907 255 1410 1
Yellow beige 3047 842 2205 1
Salmon pink 760 1022 0405 1
Electric blue 996 433 1103 1
0B58OO П<?13 0562 l+l 3819
BAMBOO. BLOSSOM AND BIRDS WORK-BOX
DMC
В 3io ГЯ R590O S zw П 319 S <*7 Q 913 Q 911 HI 364 S 569 3 561 □ 479 + ЗН1У □ 907
4 3047
В 760 X 990
TIFFANY'S DECORATIVE Gl ASS
•Lake-Landscape-Picture-
his idyllic landscape seen on a summers day fe* J. features some of Tiffany’s favourite motifs. A ЖАз pillared terrace, covered by the coiling stems and swaying flowers ot a wisteria, frames a view across water to a distant mountain Close to the terrace are water lilies and irises, whilst further out a yacht approaches. All the elements are used for their decorative and ornamental qualities, emphasised by the pattern of the leaded lines
¥
DESIGN SIZE
6% x I l%in (17 x 29cm) approximately Stitch count: 95 x 160
•
MATERIALS
• 12 x 1 Bin (30 x 45cm) Fabric Flair 14-count Aida in snow blue (code 550)
• Stranded cottons as listed in the hey
• Kreinib metallic threads as listed in the bey • Size 24 tapestry needle
l Marb the central horizontal and vertical guidelines on the fabric with tacbing (see page 120).
2 Following the chans on pages 60 and 61. use two strands of stranded cotton for the cross stitch and one strand for the bacb stitch. Begin stitching near the centre, perhaps with the blacb hull of the yacht. From there you
could worb the shoreline of the far side and then the blacb lines defining the edges of the foreground columns, to provide a frameworb for the remaining stitching. Metallic blending filament has been used with the very pale blue for highlights on the waler but if you prefer you could worb those stitches with stranded cotton alone. A purple blending filament added to the two blue violet colours ot the wisteria flowers in the illustration could be omitted.
3 When the embroidery is complete, remove the guidelines and press gently (see page 121). Mount and frame the design in your chosen frame (see page 123).
LAKE LANDSCAPE KEY
Cotour DMC Anchor Madeira Skeins
Вккк 310 403 blacb 1
White B5200 1 white I
Labe blue 519 1038 1105 1
Darb labe blue 518 1039 1106 1
Ecrut ecrut 926 ecrut 1
Light tan 738 942 2013 1
Orange 977 1002 2307 1
Darb rust 720 326 0309 1
Brown 640 903 1905 1
Darb green 991 189 1204 1
Green 989 261 1401 1
Misty green 3815 877 1205 1
Light sea foam green 504 1042 1701 1
Lime green 907 255 1410 1
Very pale blue 3756 1037 1104 1
Grey blue 931 1034 1711 1
Very darb blue 791 123 0904 1
Bright blue 798 137 0911 1
Light cornflower blue 794 175 0907 1
Darb blue violet 3746 1030 0903 1
Mid blue violet 340 118 0902 1
Pale lavender 211 342 0801 1
Buttercup yellow 743 305 0113 1
Dandelion yellow 727 9.3 0110 1
Kreinib blending UUment
Baby blue 9400bF 1 reel
Purple 012BF l reel
A DAYDREAM LANDSCAPE composed of favourite themes from hffanv's studio. A perfect das seen from the security of a wisteria-covered terrace, looking out oser sunlit water to the wild mountains beyond. The little yacht brings promise of a visitor from the outside world.
ад
LAKE LANDSCAPE PICTURE
о «- о — osSX — — « — — 2 о о о о =
ЗЯЙЗЯ?2йг8;й8Йй2ггС38<аййЯ8^ и . s n x j - / й □ □ я □ и □ -i м п * * я
ьо
MN
nnnn!
J NN 1 J OD ntiMMMNNNNNM ------NNN Э Э 3
-----nnnD-^ - '£?
NN
VI
8 3 3
NOTE
Use Baby blue Blending Filament 9400BF with 575b. Add Purple Blending Filament OliBF to 574b and 540 when stitching the flowers
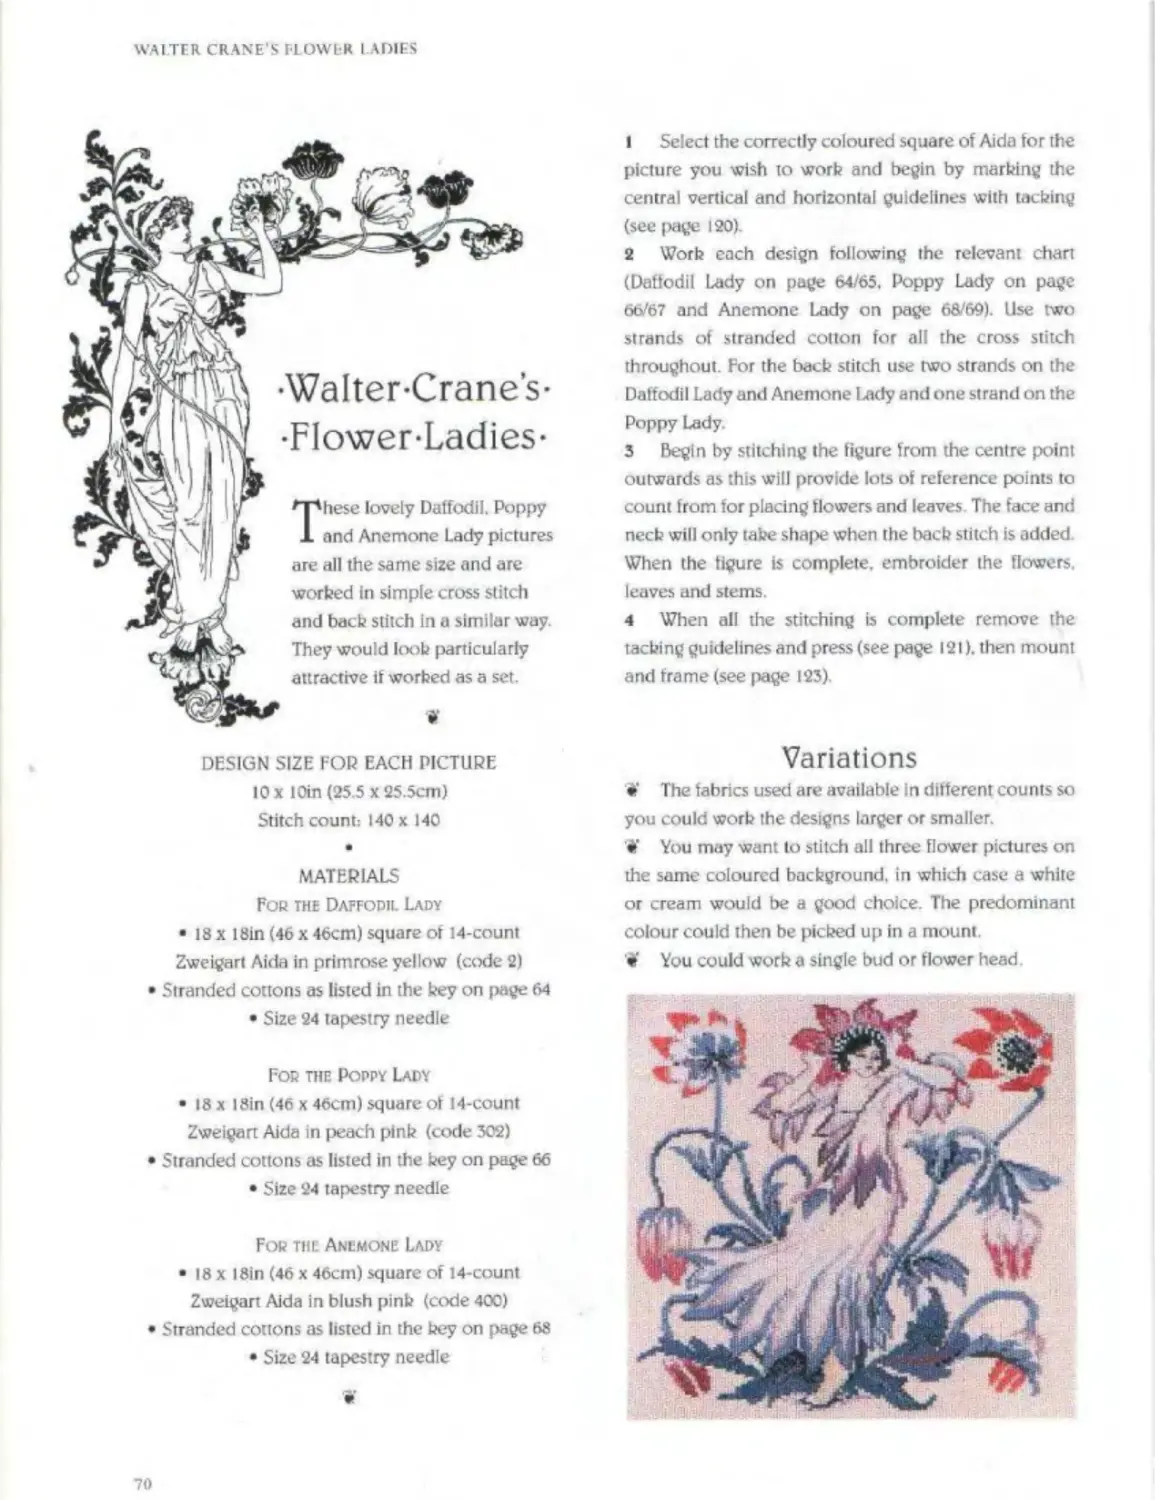
•WALTER-CRANE’S-
-FLOWER-LADIES-
THE INSPIRATION for these three designs is a series of decorative tiles designed by Walter Crane in 1902. Walter Crane was one
of the foremost illustrators of the late nineteenth
century, specialising in books tor children. He was a versatile artist designing for many media including books, printed fabric, carpets, wallpaper and ceramics. A favourite theme of Crane's.
epitomising Art Nouveau, was the association of women and flowers. Often they become the flowers, otherwise they carry armfuls ot lilies or wear blossoms in their hair. In these three pictures each lady is the spirit, the personification of the flower. Their figures take on something ot the organic energy of the plant forms, accommodating to the sinuous curves of natural growth. For each design. I have chosen a different coloured background to accentuate the largely monochrome colouring that is typical of each flower. • •
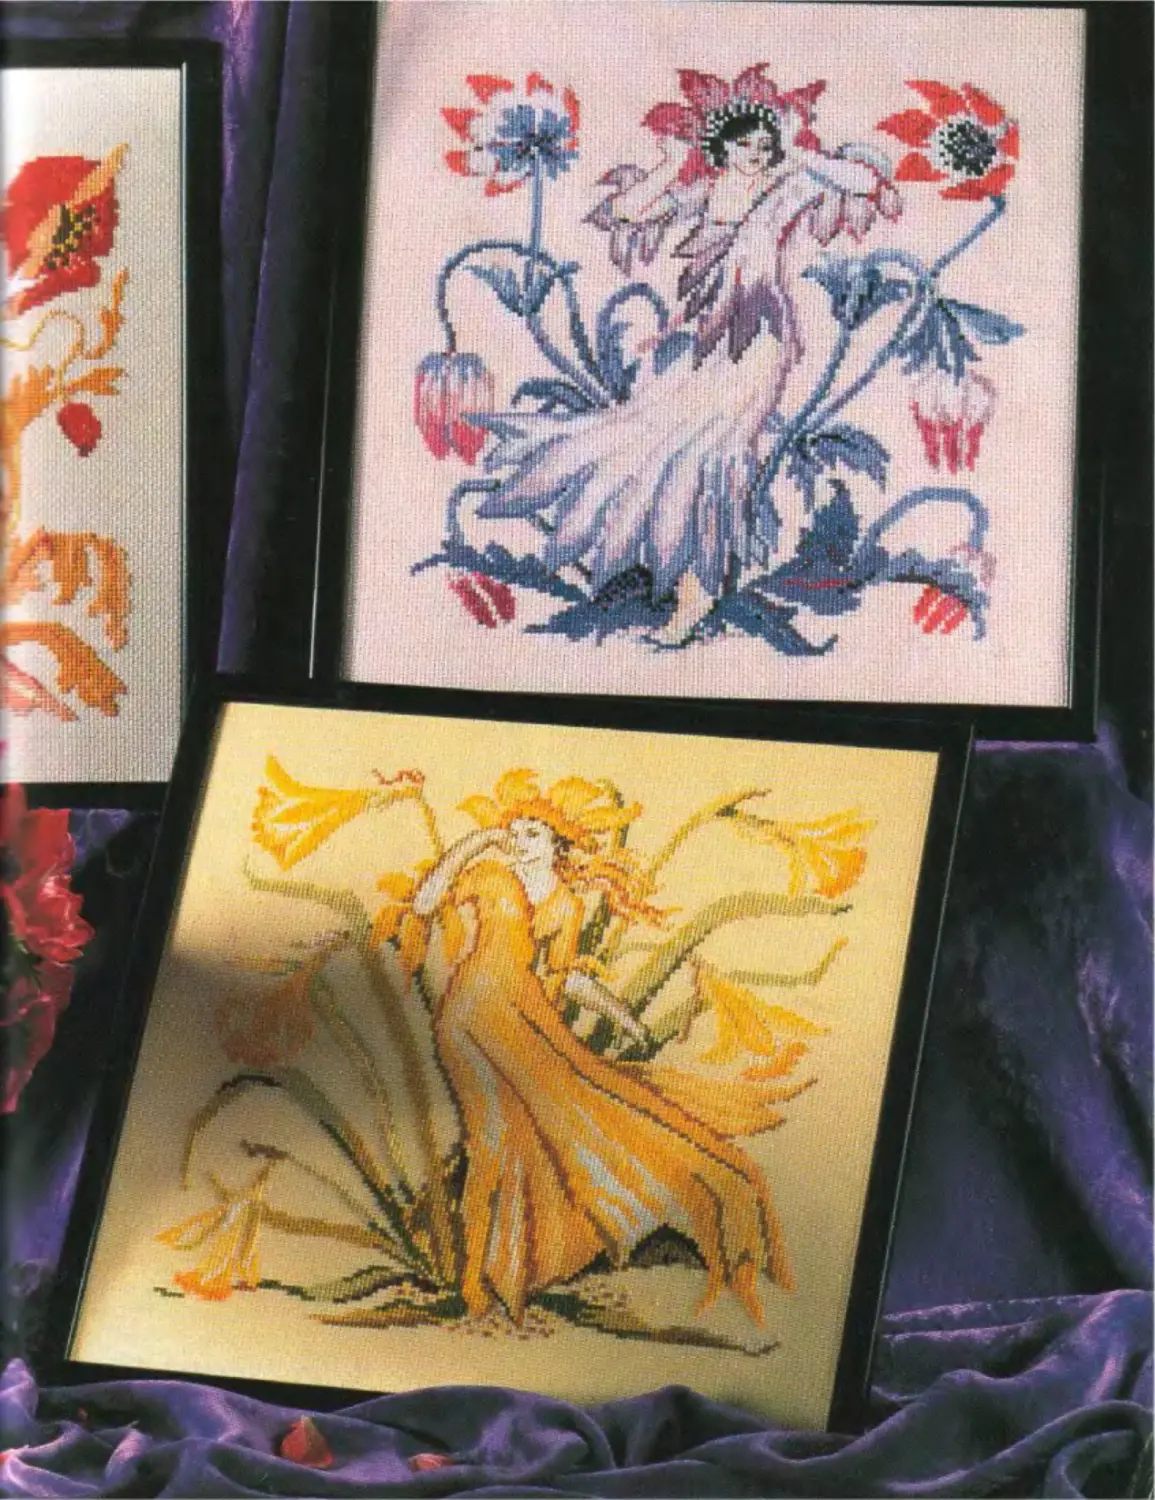
FHFSF PICTURES, inspired by the work of Walter Crane, bring together two of the favourite theme* of the turn of the century - beautiful women and power*. These are the antecedents of Cicely If ary Barker's Flower Fairies.
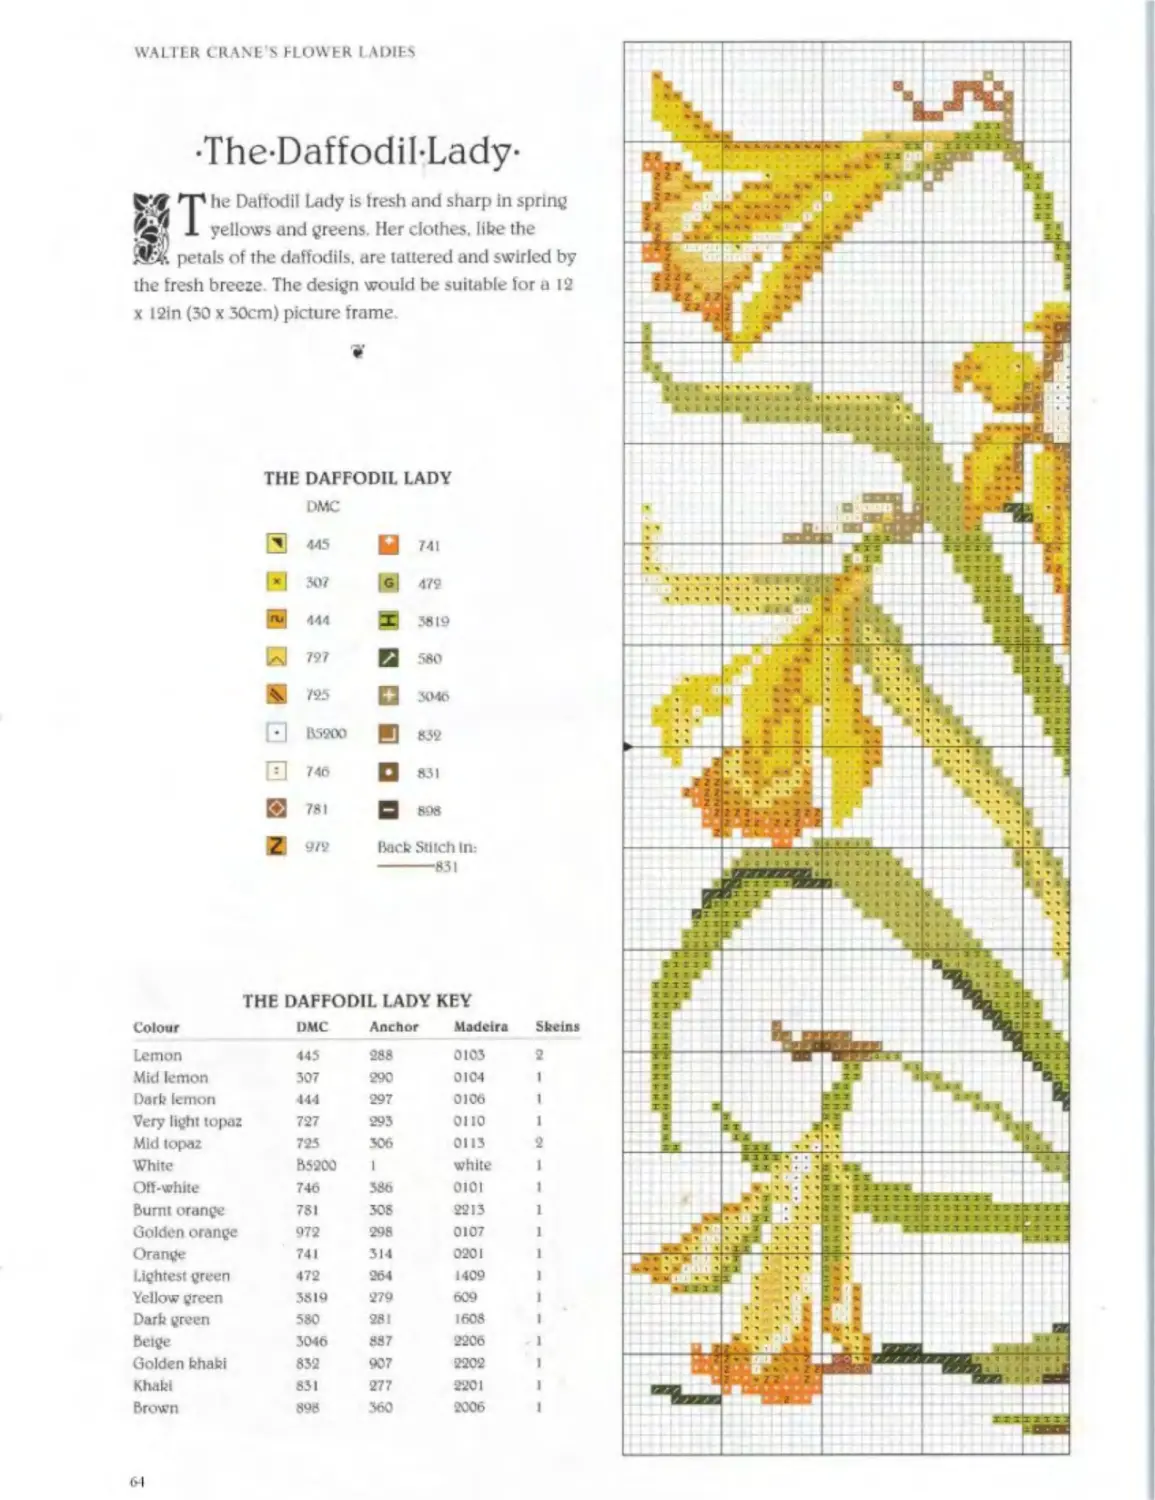
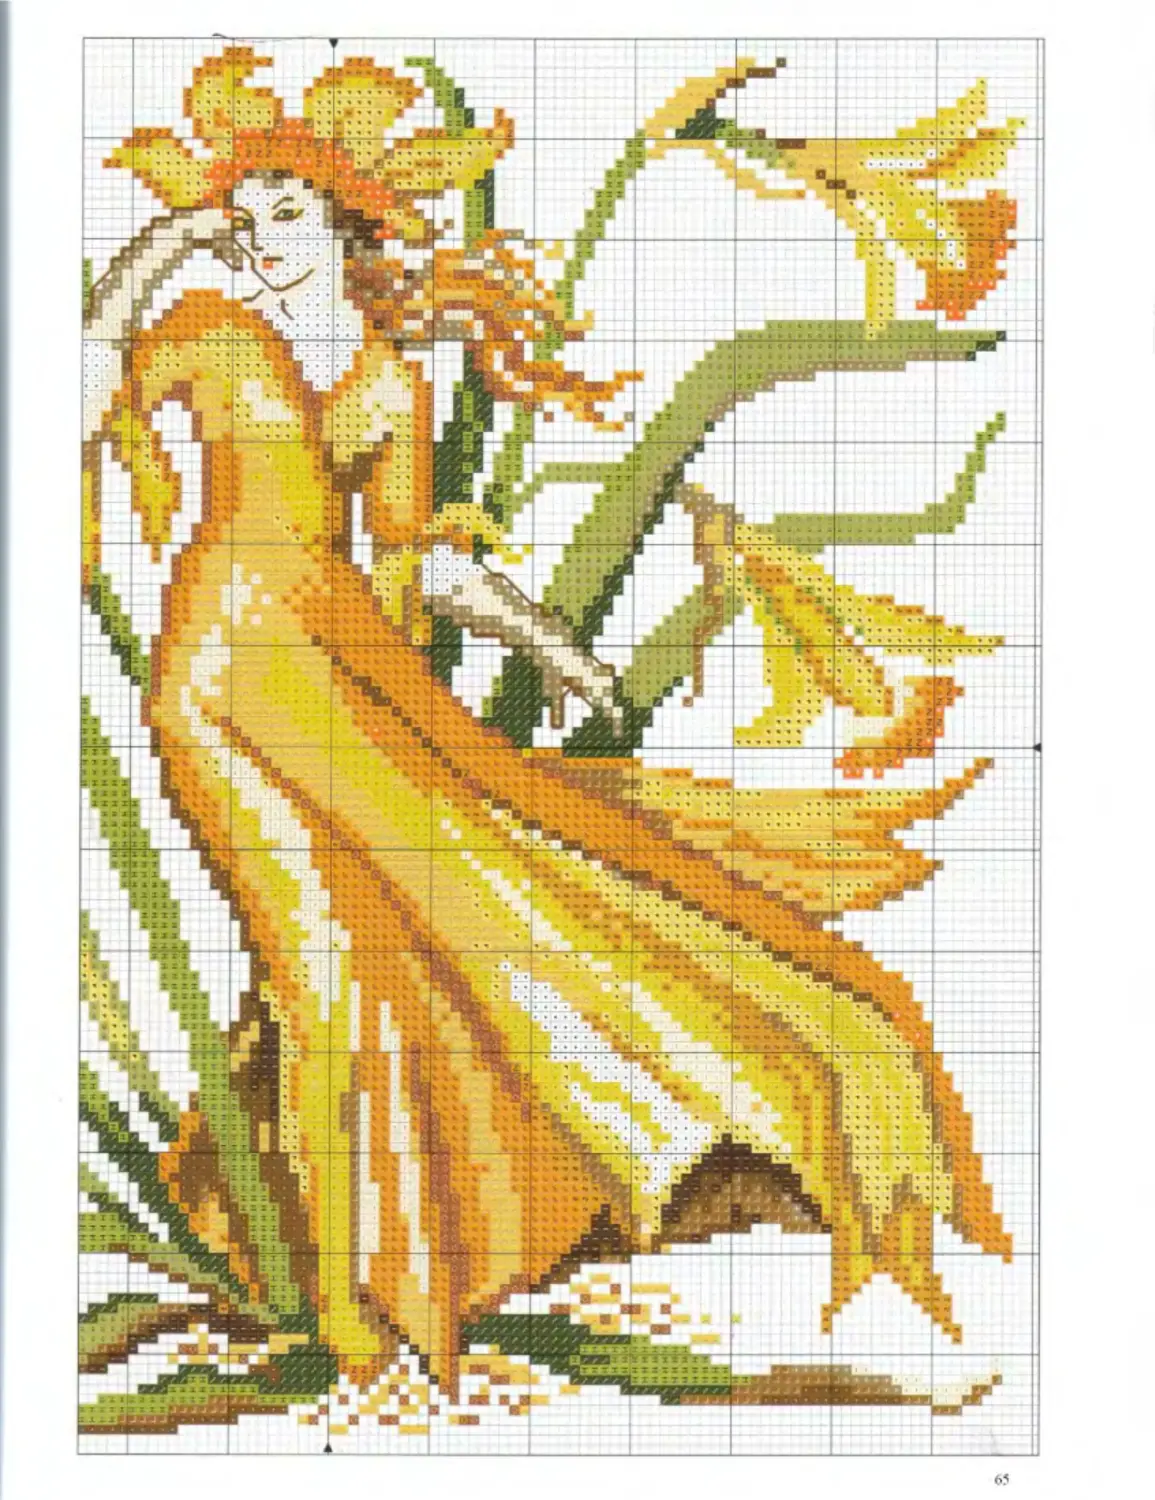
-The-Daffodil-Lady-
rp he Datkxlil Lady Is fresh and sharp in spring
* 1 yellows and greens. Her clothes. libe the Ж& petals of the daffodils, are tattered and swirled by the fresh breeze The design would be suitable for a 12 x 12in (30 x 30cm) picture frame
THE DAFFODIL LADY DMC
S 445 Ы 741
307 |«| 479
W 444 s 3819
И 797 Q 580
8 755 Q 3046
□ B5900 В 835
[Ц 746 Q 831
S 781 Q 898
Z 97» Becb Stitch 1П: ---------------------831
THE DAFFODIL LADY KEY
Colour DMC Anchor Madeira Sheins
Lemon 445 288 0103 2
Mid lemon 307 290 0104 1
Darb lemon 444 297 0106 1
Very light topaz 727 293 0110 1
Mid topaz 725 306 0113 2
White B5200 I white 1
Ой-white 746 386 0101 I
Burnt orange 781 308 2213 1
Golden orange 972 298 0107 1
Orange 741 314 0201 1
Lightest green 472 264 1409 1
Yellow green 3819 279 609 1
Darb green 580 281 1608 1
Beige 3046 887 2206 . 1
Golden bhabi 832 907 2202 1
Khabi 831 277 2201 1
Brown 898 360 2006 1
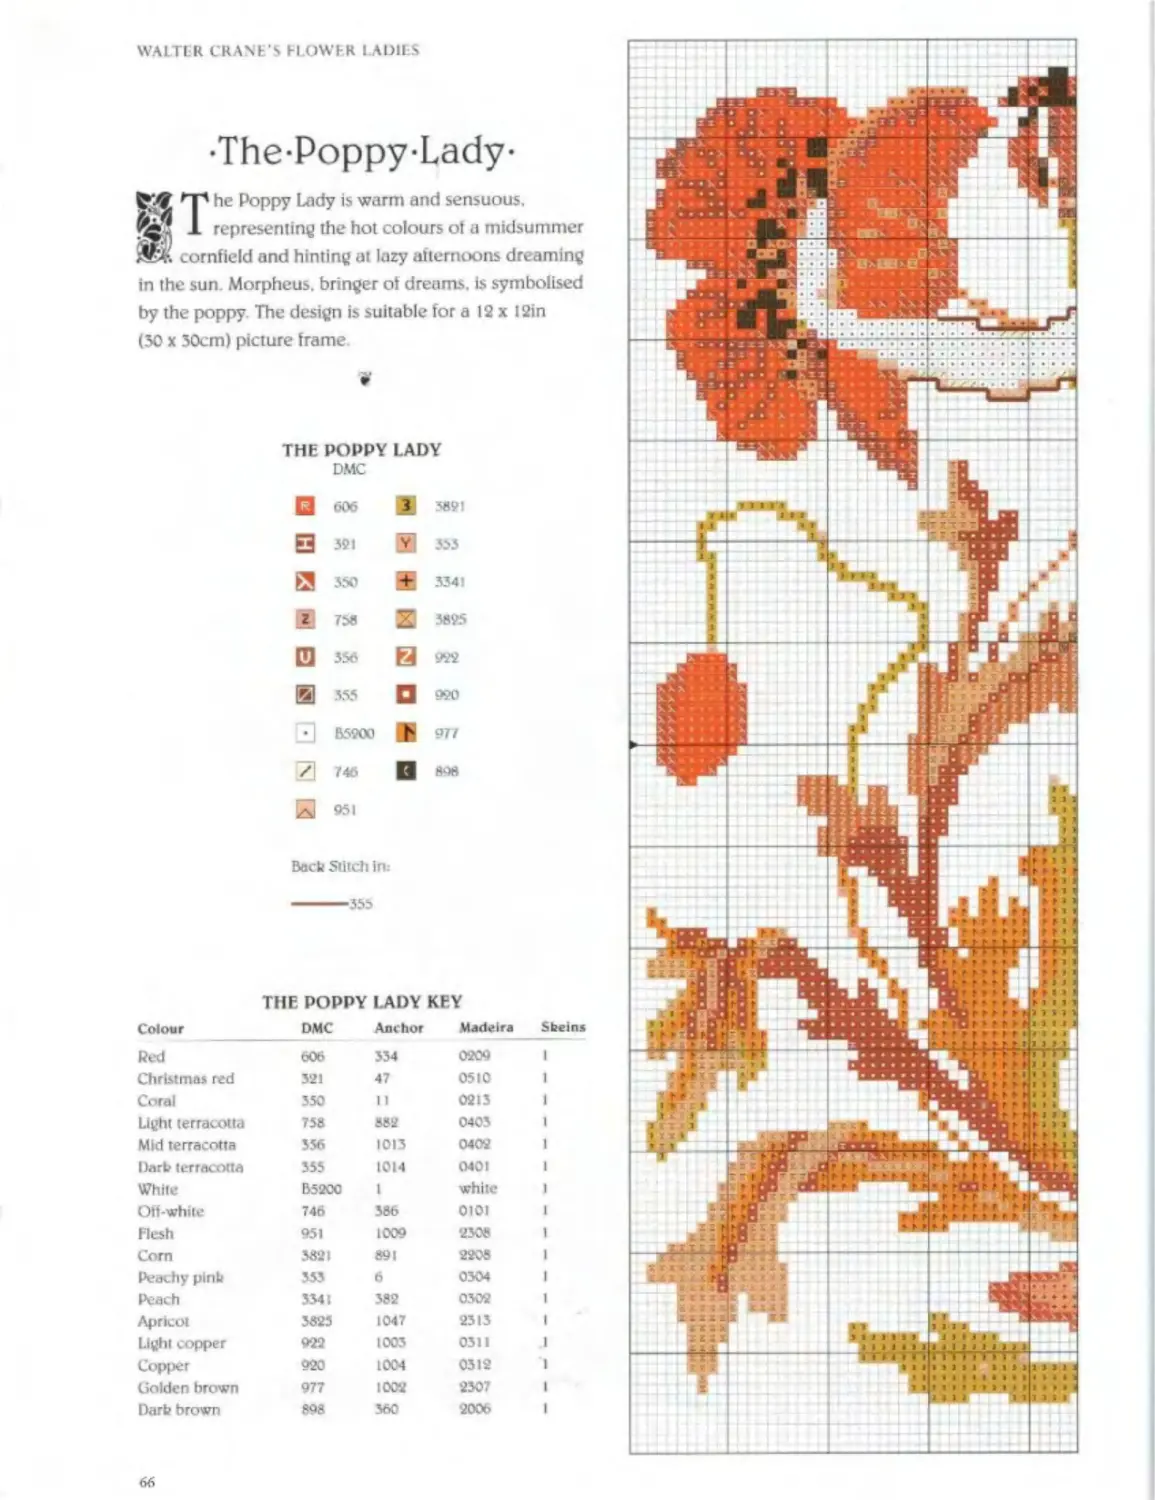
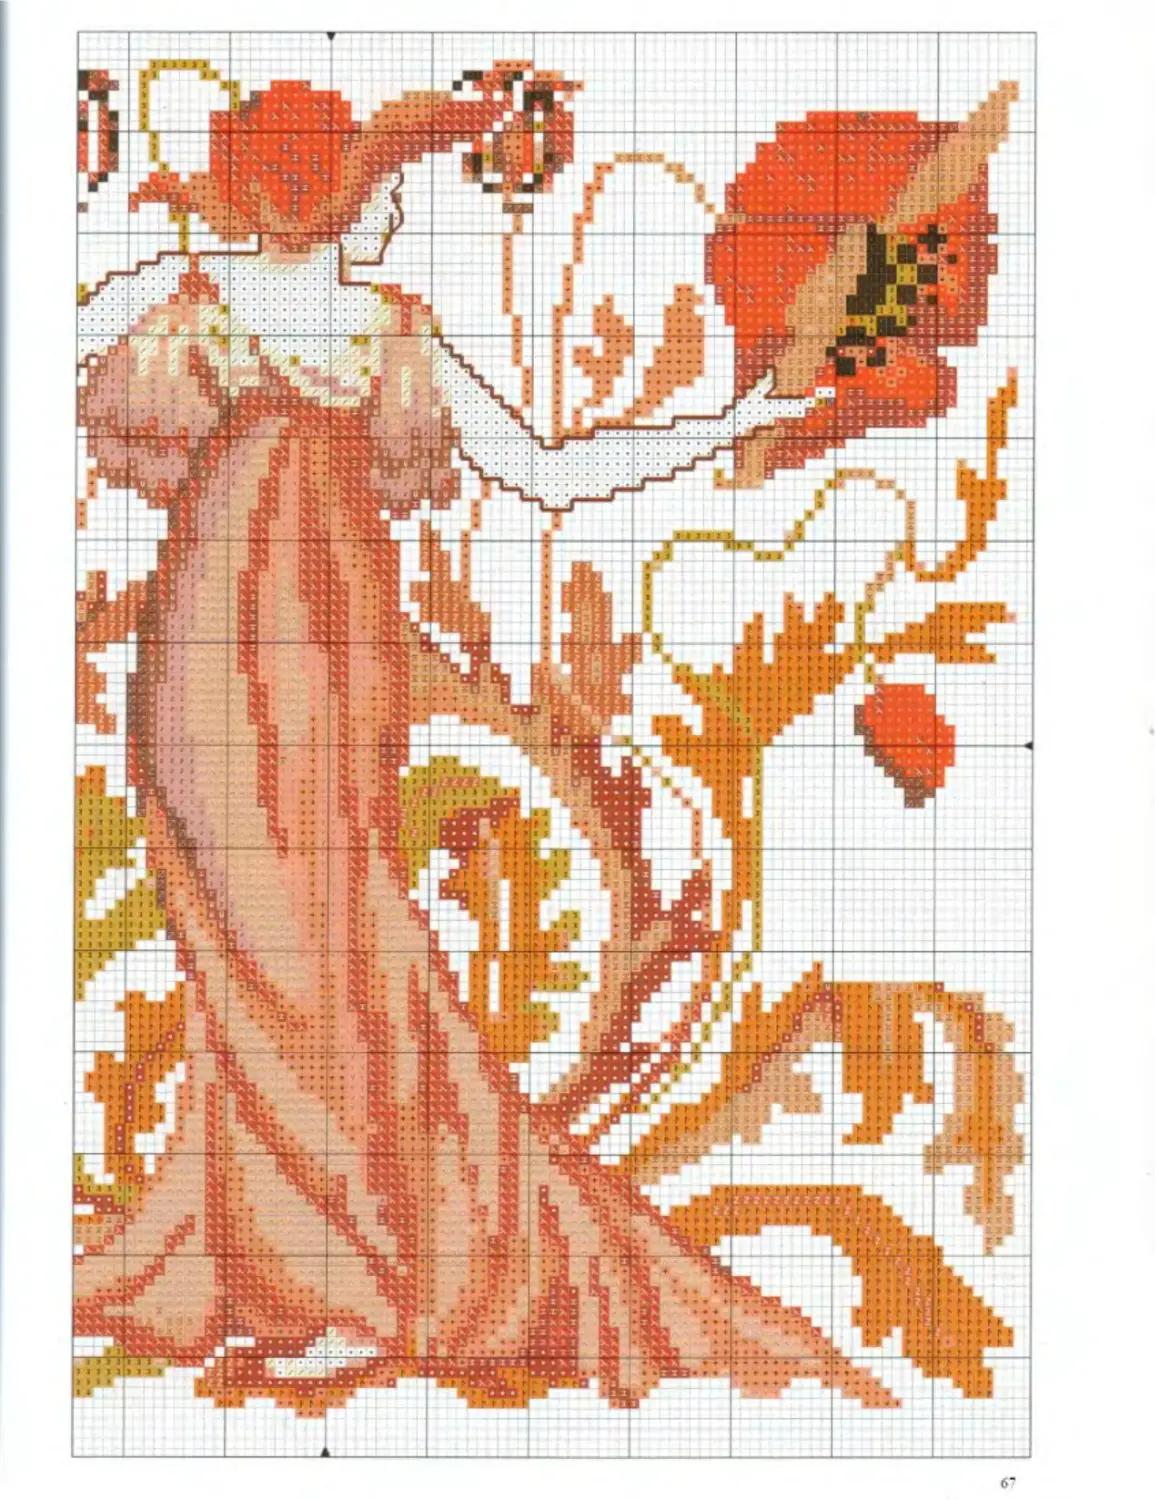
•The-Poppy-Lady-
he Poppy Lady is warm and sensuous.
* 1 representing the hot colours of a midsummer ДЙ cornfield and hinting at lazy afternoons dreaming
in the sun. Morpheus, bringer of dreams, is symbolised by the poppy The design is suitable for a 12 x 12in (30 x 30cm) picture frame.
THE POPPY LADY
DMC
Q 606 3 5091
E3 321 * 353
П 350 ± 3341
2 750 К 3085
И 356 0 922
[Й] 355 Q 920
3 B5900 ifj 977
0 746 Q 090
И 951
Back Stitch in.-
--------355
THE POPPY LADY KEY
Colour DMC Anchor Madeira Sbeins
Ped 606 334 0209 1
Christmas red 32! 47 0510 t
Coral 350 11 0213 1
Light terracotta 758 882 0403 t
Mid terracotta 356 1013 040*2 1
Dark terracotta 355 1014 0401 1
While Б5200 1 white 1
Off-white 746 386 0101 1
Flesh 951 1009 2308 t
Com 3821 891 2208 1
Peachy pink 353 6 0304 1
Peach 3341 382 0302 1
Apricot 3825 1047 2313 1
Light copper 922 1003 0311 .1
Copper 920 1004 0312 1
Golden brown 977 1002 2307 1
Dark brown 898 360 2006 I
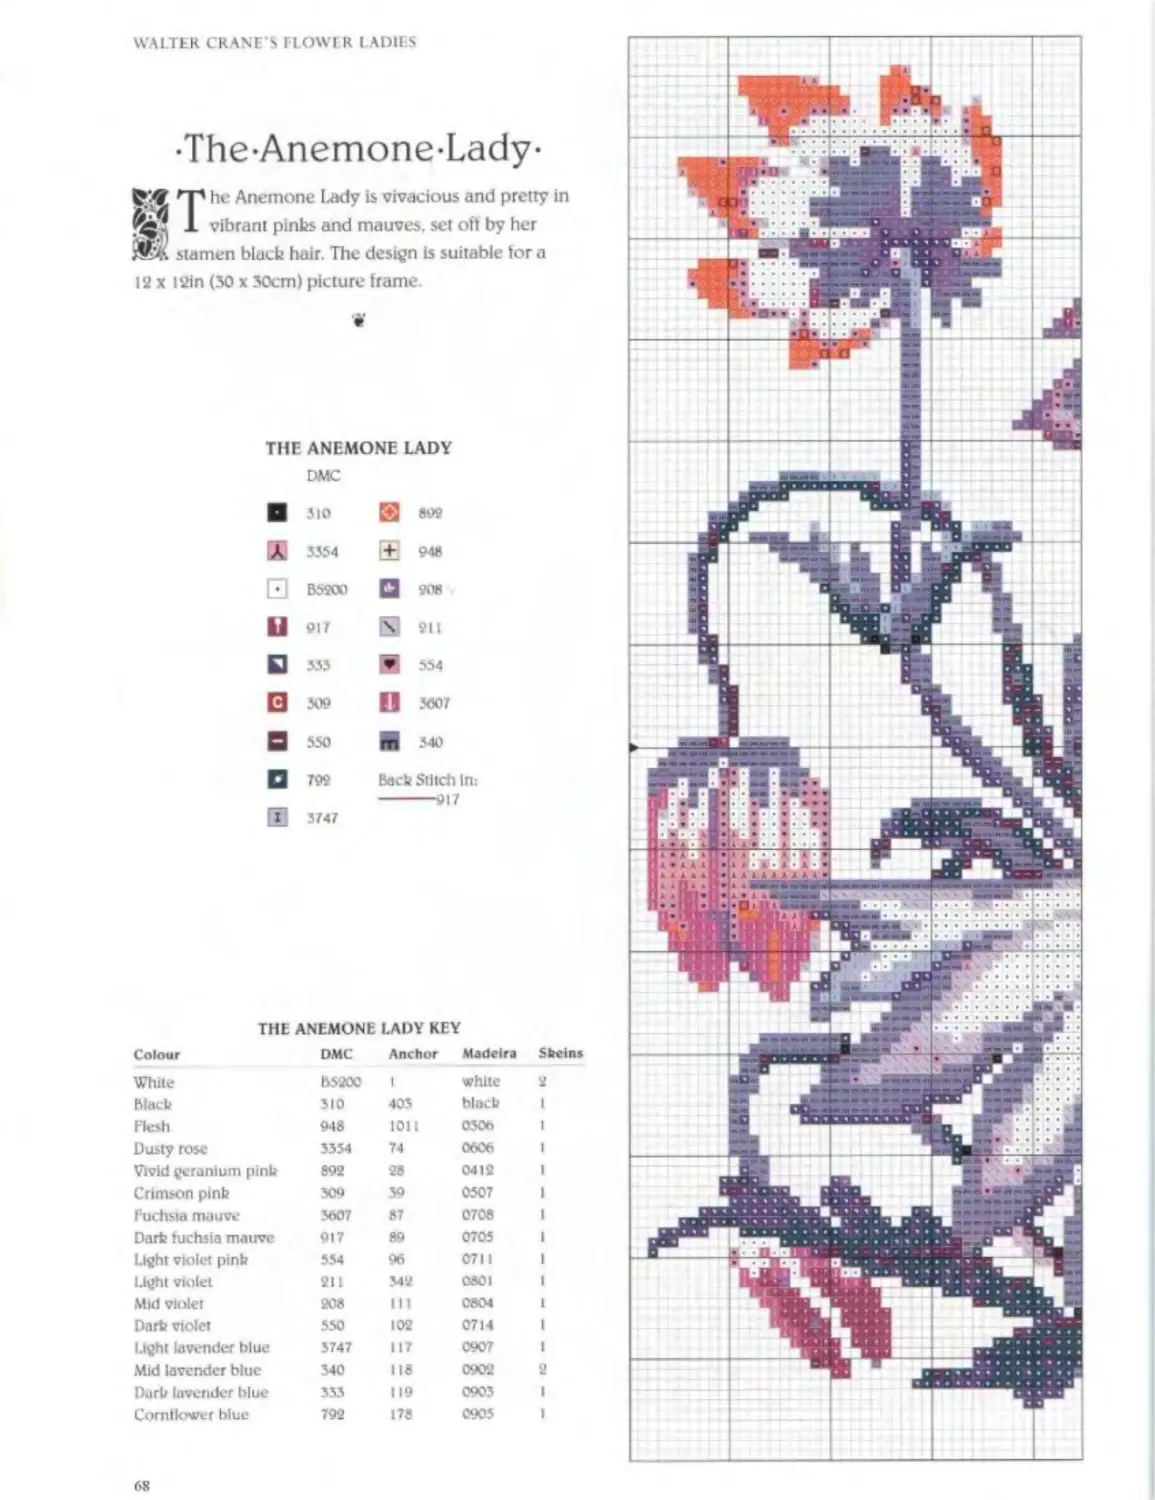
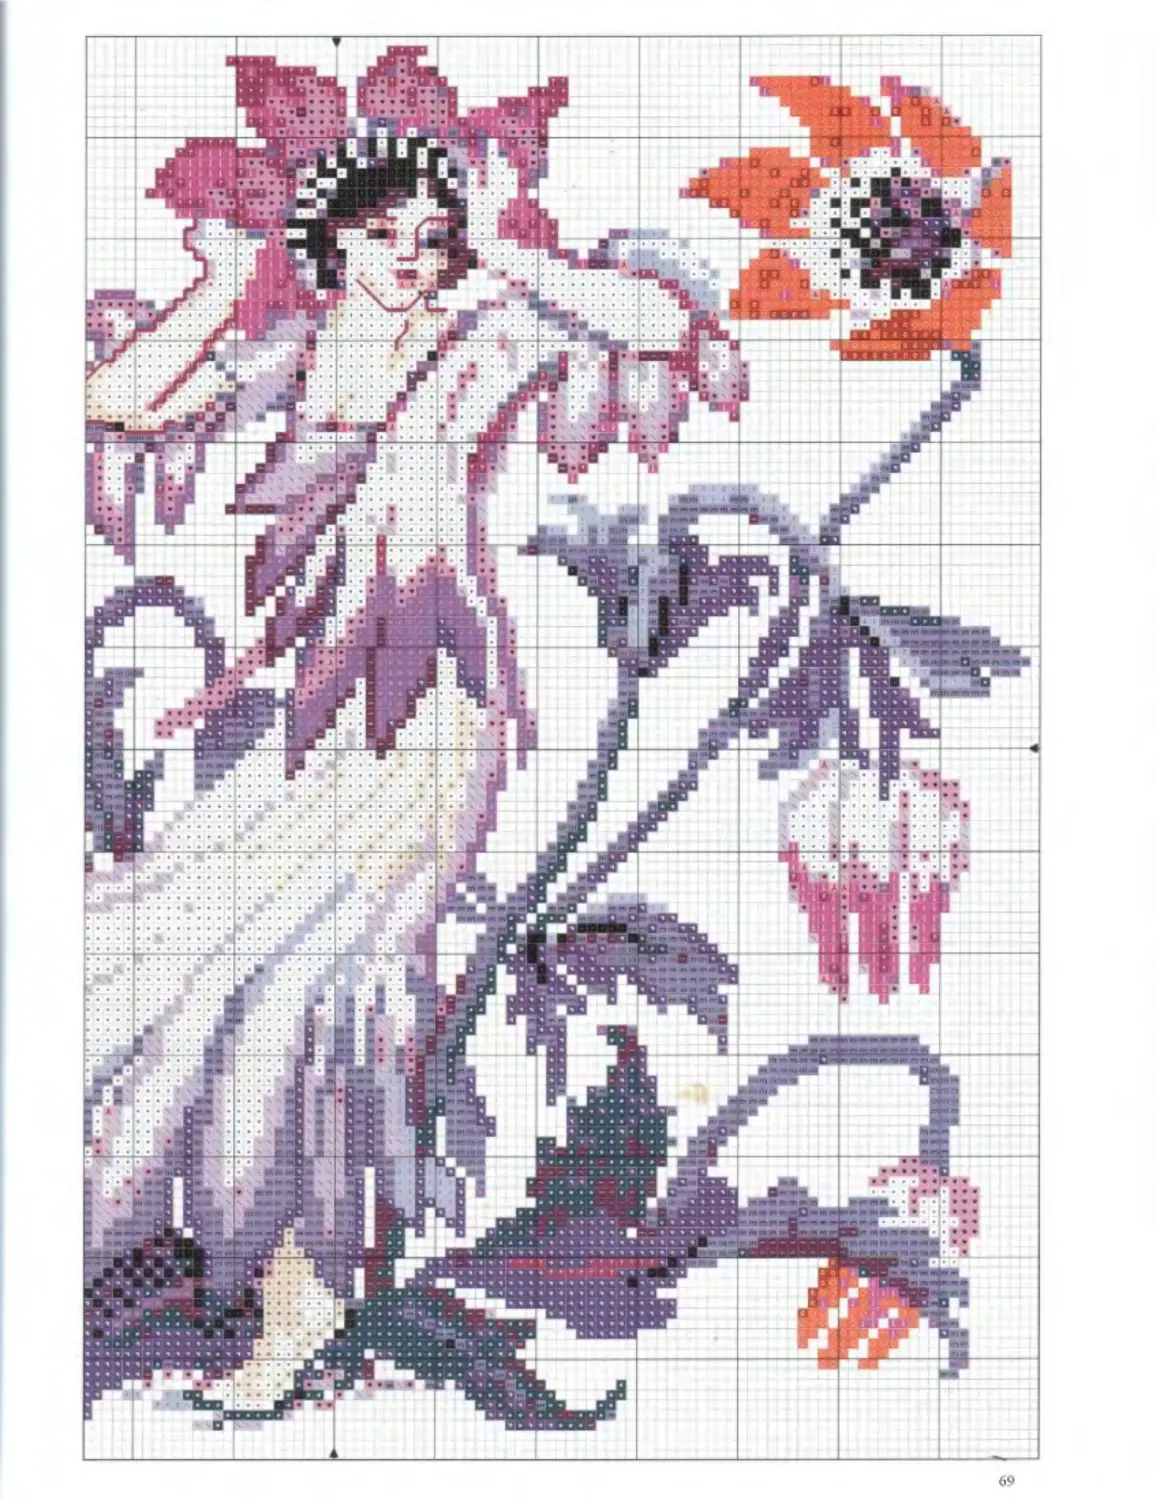
•The-Anemone-Lady-
Hp he Anemone I-ady is vivacious and pretty in J. vibrant pints and mauves. set off by her stamen black hair. The design is suitable for a
12 x I2in (50 x 30cm) picture frame.
THE ANEMONE LADY
DMC
В 310 H 892
Qj 5354 Щ 948
И B5200 □ 908
U 917 4 9>1
□ 333 V 554
Q 309 О 3007
О 550 ГП 340
□ 799 Back Stitch In: --------------------917
® 3747
THE ANEMONE LADY KEY
Colour DMC Anchor Madeira Sheins
White B5200 I white 2
Black 310 403 black I
Flesh 948 1011 0306 t
Dusty rose 3354 74 0606 1
Vivid geranium pint 892 28 0412 1
Crimson pink 309 39 0507 1
Fuchsia mauve 3607 87 0708 1
Dark fuchsia mauve 917 89 0705 1
Light violet pink 354 96 0711 1
Light violet 211 342 0801 1
Mid violet 208 111 0804 I
Dark violet 550 102 0714 1
Light lavender blue 3747 117 0907 1
Mid lavender blue 340 118 0902 2
Dark lavender blue 333 119 0903 1
Comilower blue 792 178 0905 1
69
Walter-Crane’s-Flower-Ladies-
These lovely Daffodil. Poppy and Anemone Lady pictures are all the same size and are worked in simple cross stitch and back stitch in a similar way. They would kx>k particularly attractive if worked as a set.
if
I Select the correctly coloured square of Aida for the picture you wish to work and begin by marking the central vertical and horizontal guidelines with tacking (see page 120).
2 Work each design following the relevant chart (Daffodil Lady on page 64/65. Poppy Lady on page 66/67 and Anemone Lady on page 68/69). Use two strands of stranded cotton for all the cross stitch throughout For the back stitch use two strands on the Daffodil Lady and Anemone i-ady and one strand on the Poppy Lady.
3 Begin by stitching the figure from the centre point outwards as this will provide lots of reference points to count from for placing flowers and leaves The face and neck will only take shape when the bach stitch is added When the figure is complete, embroider the flowers, leaves and stems.
4 When all the stitching is complete remove the tacking guidelines and press (see page 121). then mount and frame (see page 123).
DESIGN SIZE FOR EACH PICTURE
10 x lOin (25.5 X 25.5cm) Stitch count: 140 x 140
MATERIALS
For the Daffodil Lady
• 18 x 1 Bin (46 x 46cm) square of 14-count
Zweigart Aida in primrose yellow (code 2)
• Stranded cottons as listed in the key on [xige 64
• Size 24 tapestry needle
For the Poppy Lady
• 18 x I Bin (46 x 46cm) square oi 14-count Zweigart Aida in peach pink (code 302) • Stranded cottons as listed in the key on page 66
• Size 24 tapestry needle
For the Anemone Lady
• 18 x I8in (46 x 46cm) square of 14-count Zweigart Aida in blush pink (code 400) • Stranded cottons as listed in the bey on page 68 • Size 24 tapestry needle
Variations
'tf The fabrics used are available in different counts so you could work the designs larger or smaller.
*' You may want to stitch all three flower pictures on the same coloured background, in which case a white or cream would be a good choice. The predominant colour could then be picked up in a mount
'< You could work a single bud or flower head
•LANDSCAPE-AS-DECORATION-
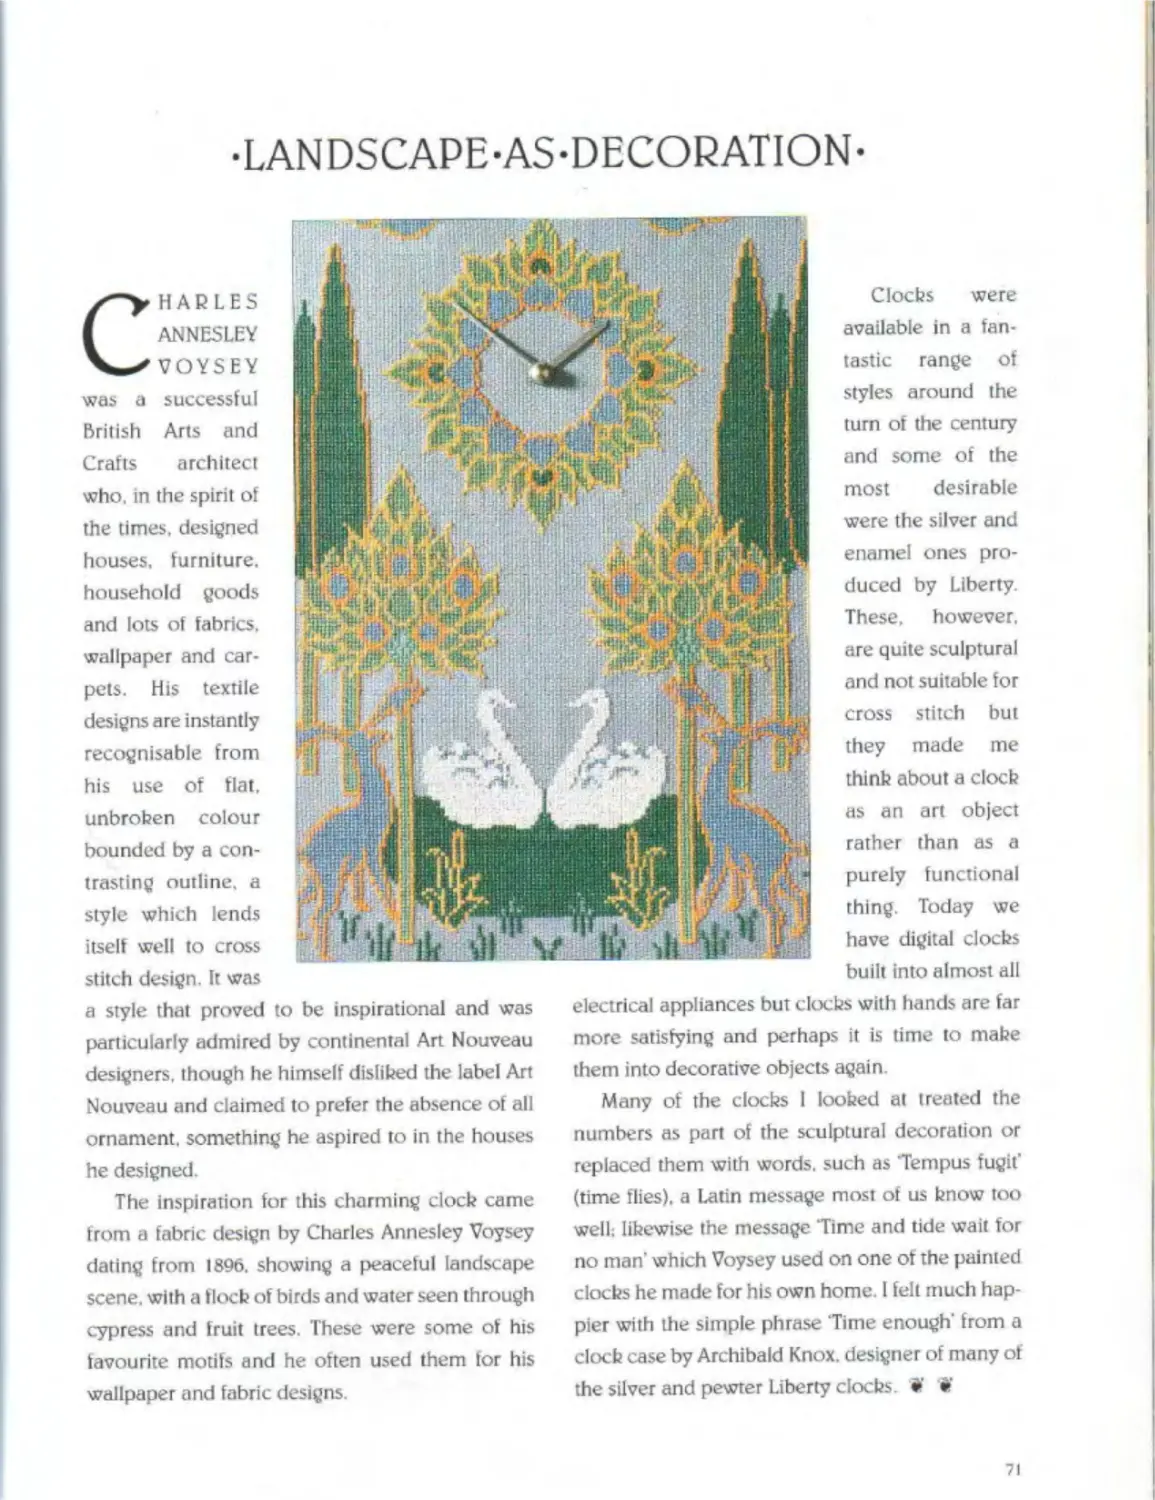
CHARLES ANNESLEY VOYSEY was a successful British Arts and Crafts architect
who, in the spirit of the times, designed houses, furniture, household goods and lots of fabrics, wallpaper and carpets. His textile designs are instantly recognisable from his use of flat, unbroken colour bounded by a contrasting outline, a style which lends itself well to cross stitch design. It was
Clocks were available in a fantastic range of styles around the turn of the century and some of the most desirable were the silver and enamel ones produced by Liberty. These, however, are quite sculptural and not suitable for cross stitch but they made me think about a clock as an art object rather than as a purely functional thing. Today we have digital clocks built into almost all
a style that proved to be inspirational and was particularly admired by continental Art Nouveau designers, though he himself disliked the label Art Nouveau and claimed to prefer the absence of all ornament, something he aspired to in the houses he designed.
The inspiration for this charming clock came from a fabric design by Charles Annesley Voysey dating from 1896. showing a peaceful landscape scene, with a flock of birds and water seen through cypress and fruit trees. These were some of his favourite motifs and he often used them for his wallpaper and fabric designs.
electrical appliances but clocks with hands are far more satisfying and perhaps it is time to make them into decorative objects again.
Many of the clocks I looked at treated the numbers as part of the sculptural decoration or replaced them with words, such as Tempus fugit’ (time flies), a Latin message most of us know too well; likewise the message ‘Time and tide wait for no man' which Voysey used on one of the painted clocks he made for his own home. I felt much happier with lite simple phrase ‘Time enough' from a clock case by Archibald Knox, designer of many of the silver and pewter Liberty clocks # •
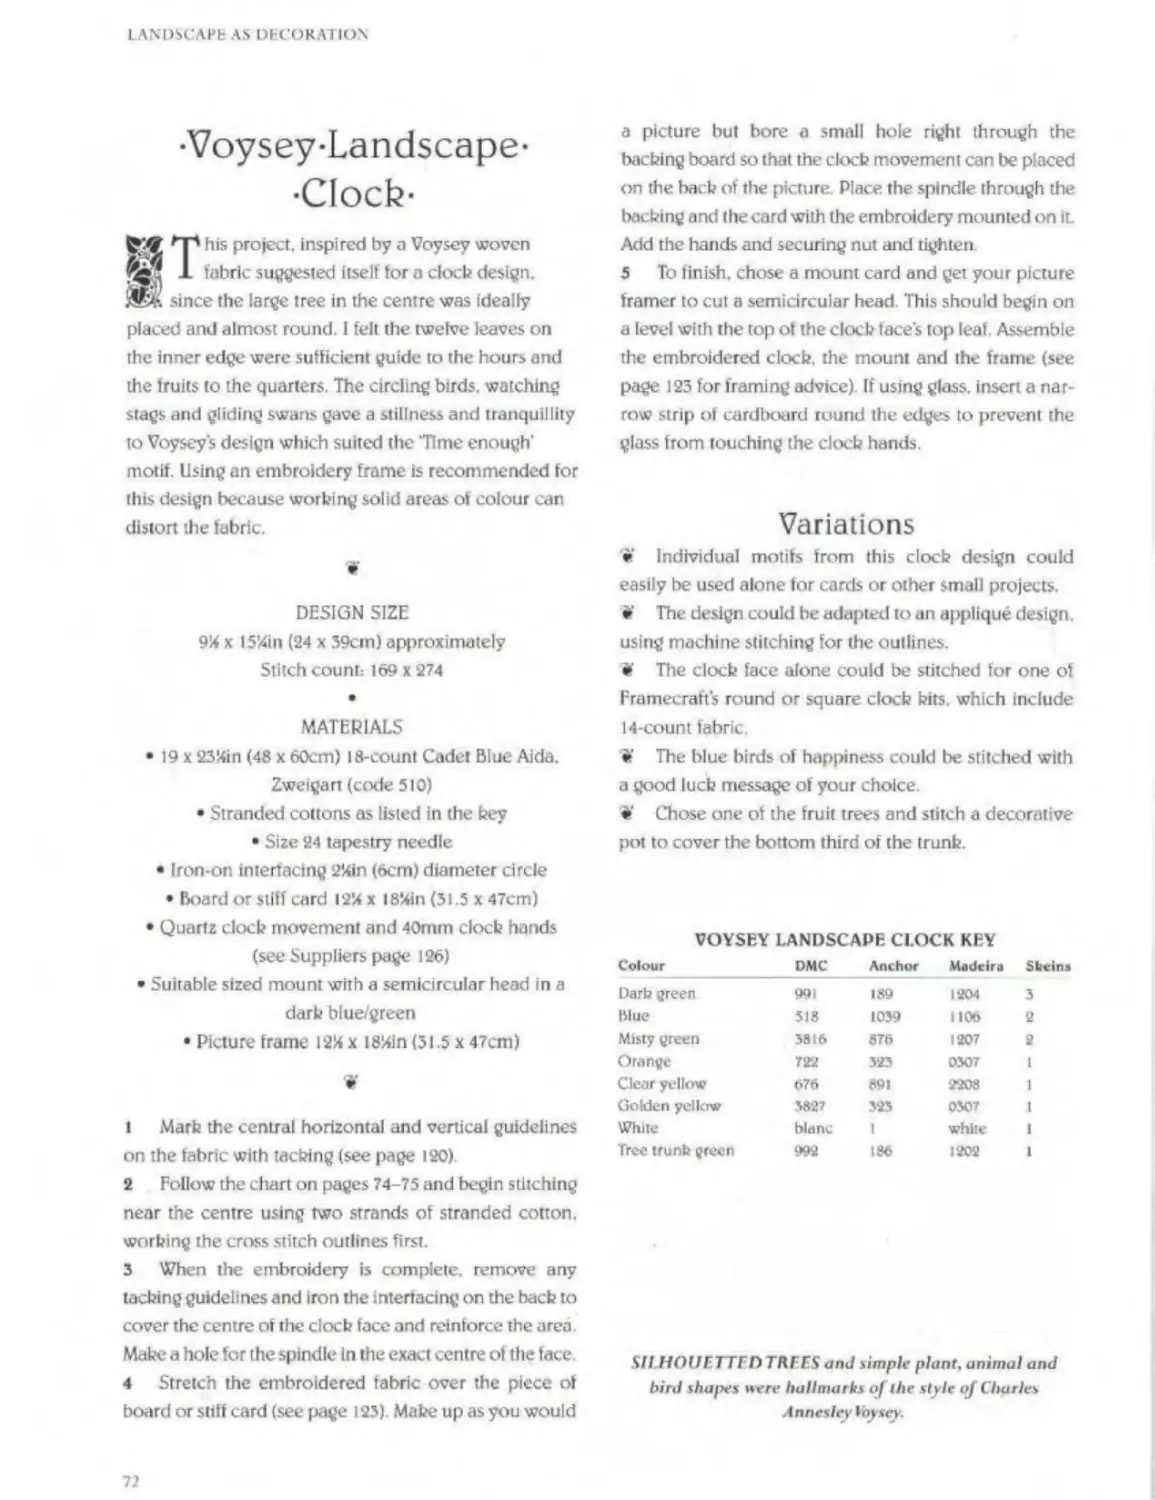
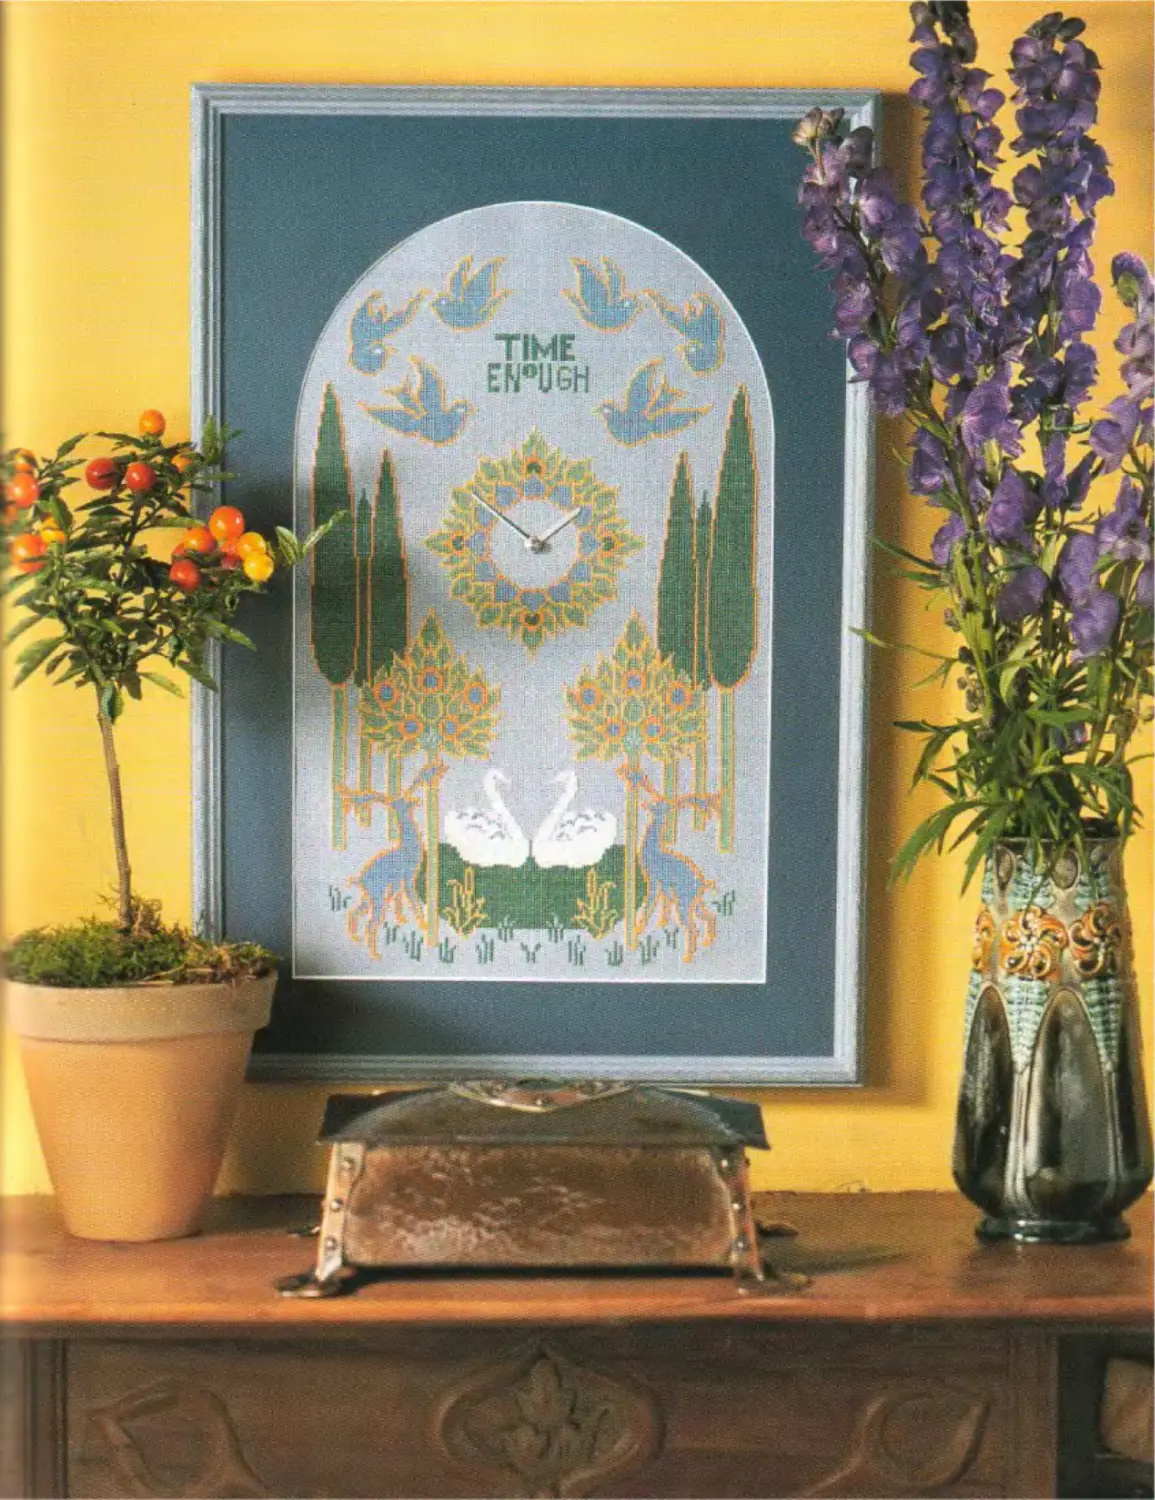
-Voysey-Landscape-•Clock-
*Tp his project, inspired by a Voysey woven
1 fabric suggested itself tor a clock design. Ж* since the large tree in the centre was ideally placed and almost round. I felt the twelve leaves on the inner edge were sufficient guide to the hours and the fruits to the quarters. The circling birds, watching stags and gliding swans gave a stillness and tranquillity to Voysey s design which suited the Time enough' motif. Using an embroidery frame is recommended for this design because working solid areas of colour can distort the fabric.
DESIGN SIZE
9% x I5!4in (24 x 39cm) approximately Stitch count: 169 x 274
•
MATERIALS
• 19 x 234in (48 x 60cm) 18-count Cadet Blue Aida. Zweigart (code 510)
• Stranded cottons as listed in the key
• Size 24 tapestry needle
• Iron-on interfacing 2%in (6cm) diameter circle
• Board or stiff card 12% x I8%in (31.5 x 47cm)
• Quartz clock movement and 40mm clock hands (see Suppliers page 126)
• Suitable sized mount with a semicircular head in a dark blue/green
• Picture frame 12% x 184in (31.5 x 47cm)
W
1 Mark the central horizontal and vertical guidelines on the fabric with tacking (see page 120)
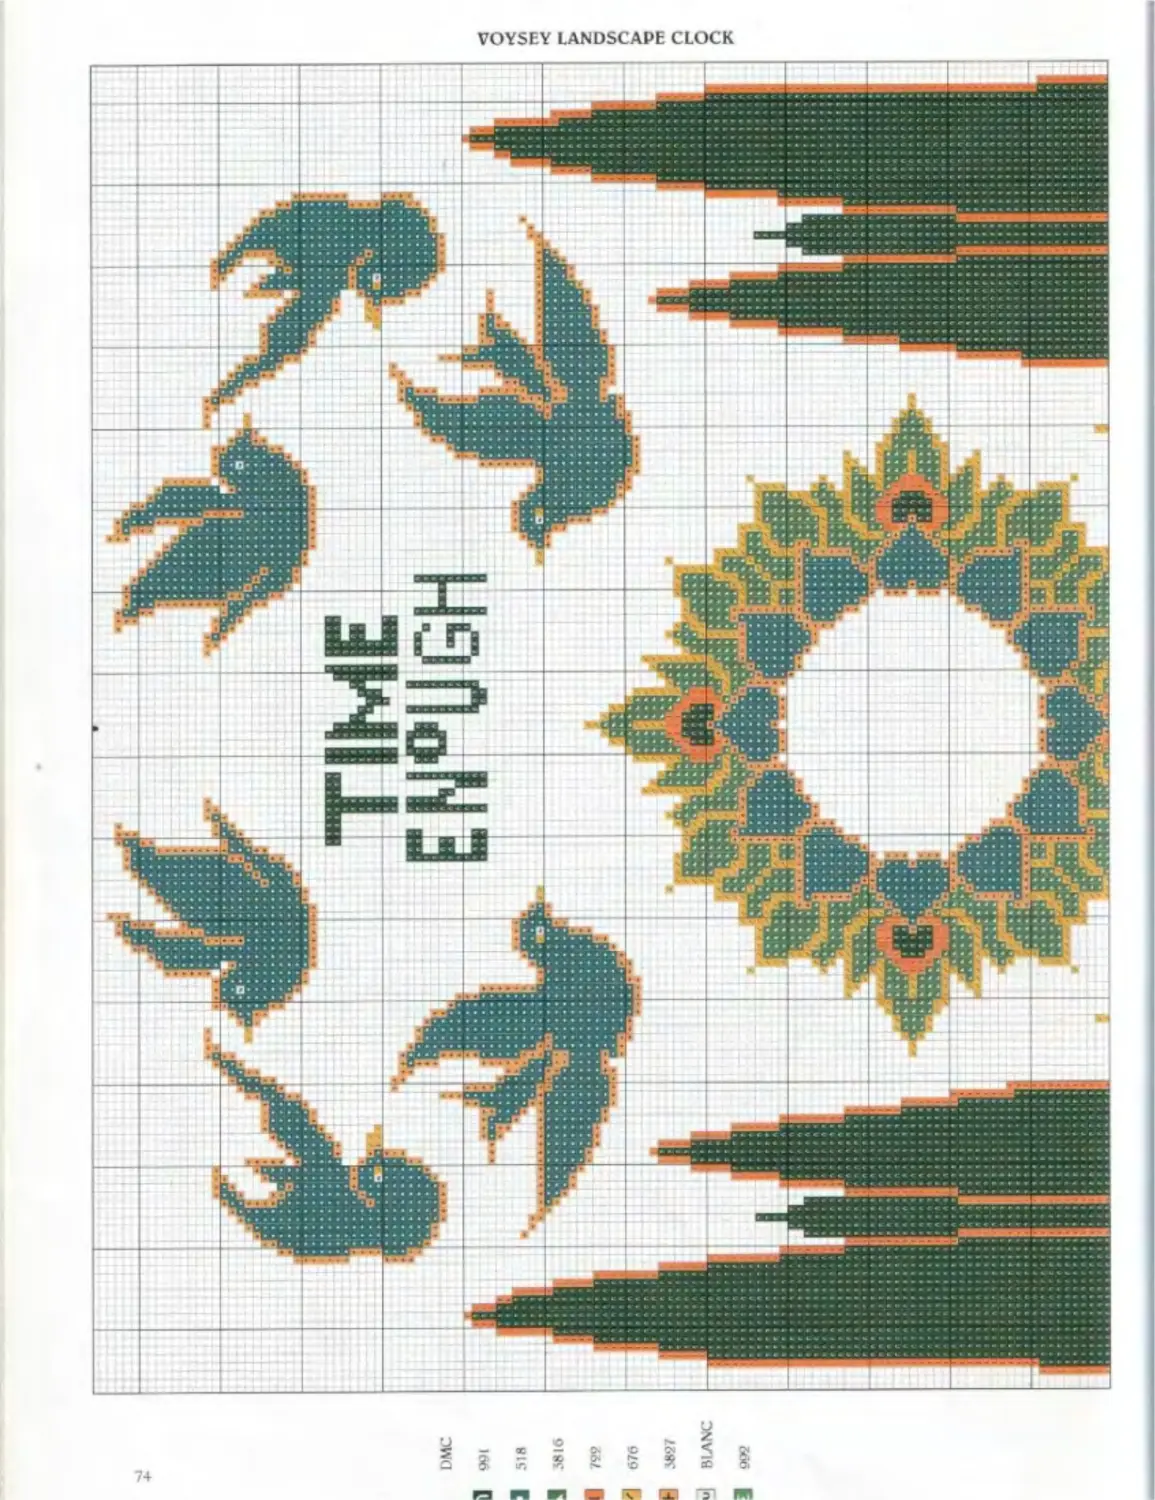
2 Follow the chart on pages 74-75 and begin stitching near the centre using two strands of stranded cotton, working the cross stitch outlines first.
3 When the embroidery is complete, remove any tacking guidelines and iron the interfacing on the bach to cover the centre of the clock face and reinforce the area Make a hole for the spindle in the exact centre of the face 4 Stretch the embroidered fabric over the piece of board or stiff card (see page 123). Make up as you would
a picture but bore a small hole right through the bitching board so that the clock movement can be placed on the back of the picture. Place the spindle through the backing and the card with the embroidery mounted on iL Add the hands and securing nut and tighten
5 To finish, chose a mount card and get your picture framer to cut a semicircular head This should begin on a level with the top of the clock faces top leaf. Assemble the embroidered clock, the mount and the frame (see page 123 for framing advice) If using glass, insert a narrow strip of cardboard round the edges to prevent the glass from touching the clock hands
Variations
• Individual motifs from this clock design could easily be used alone for cards or other small projects.
» The design could be adapted to an applique design, using machine stitching for the outlines.
«*' The clock face alone could be stitched for one of Framecrafts round or square clock hits, which include 14-count fabric.
if The blue birds of happiness could be stitched with a good luck message of your choice.
• Chose one of the fruit trees and stitch a decorative pot to cover the bottom third of the trunk.
VOYSEY LANDSCAPE CLOCK KEY
Colour DMC Anchor Madeira Skeins
Dark green 991 189 1204 3
blue 518 1039 1106 2
Misty green 3816 676 1207 2
Orange 722 323 0307 1
Clear yellow 676 891 2208 1
Golden yellow 3827 323 0307 1
White blanc 1 white 1
Tree trunk green 992 186 1202 1
Sil HOUFTTFD TUFFS and simple plant, animal and bird shapes were hallmarks о/ the style of Charles Annesley Ihjsey.
TIME
ENeUGH
i- Г 1.-«;
• 4 V i
'3SI
VOYSEY LANDSCAPE CLOCK
•PATTERNS-FROM-FLORAL-FOL1OS-
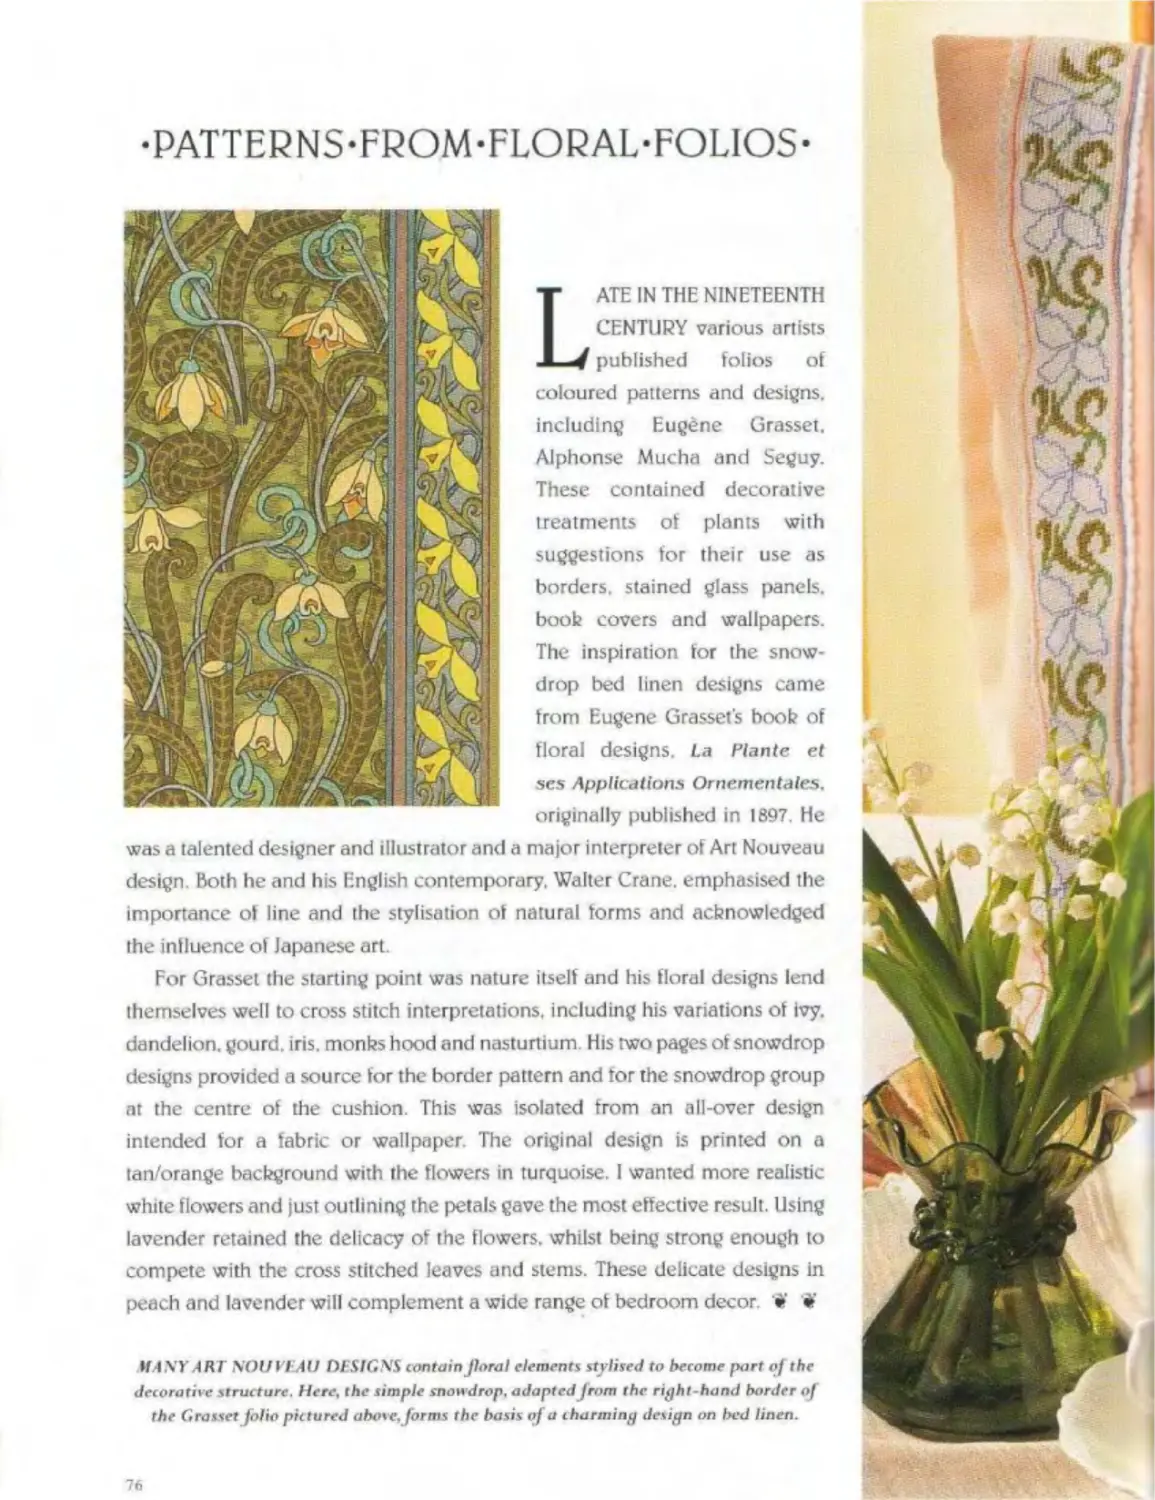
Late in the nineteenth CENTURY various artists published folios of coloured patterns and designs, including Eugene Grasset. Alphonse Mucha and Seguy. These contained decorative treatments of plants with suggestions for their use as borders, stained glass panels, boob covers and wallpapers. The inspiration for the snowdrop bed linen designs came from Eugene Grasset's boob of floral designs. La Plante et ses Applications Ornementales. originally published in 1897. He
was a talented designer and illustrator and a major interpreter of Art Nouveau design. Both he and his English contemporary, Walter Crane, emphasised the importance of line and the stylisation of natural forms and acknowledged the influence of Japanese art.
For Grasset the starting point was nature itself and his floral designs lend themselves well to cross stitch interpretations, including his variations of ivy. dandelion, gourd, iris, monks hood and nasturtium. His two pages of snowdrop designs provided a source for the border pattern and for the snowdrop group at the centre of the cushion. This was isolated from an all-over design intended for a fabric or wallpaper. The original design is printed on a tan/orange background with the flowers in turquoise. I wanted more realistic white flowers and just outlining rhe petals gave the most effective result. Using lavender retained the delicacy of the flowers, whilst being strong enough to compete with the cross stitched leaves and stems. These delicate designs in peach and lavender will complement a wide range of bedroom decor W •
lf.4.VY.4RT NOUVEAU DESIGNS containfloral elements stylised to become part of the decorative structure. Here, the simple snowdrop, adapted from the right-hand border of the Grasset folio pictured above.Jorms the basis of a charming design on bed linen.
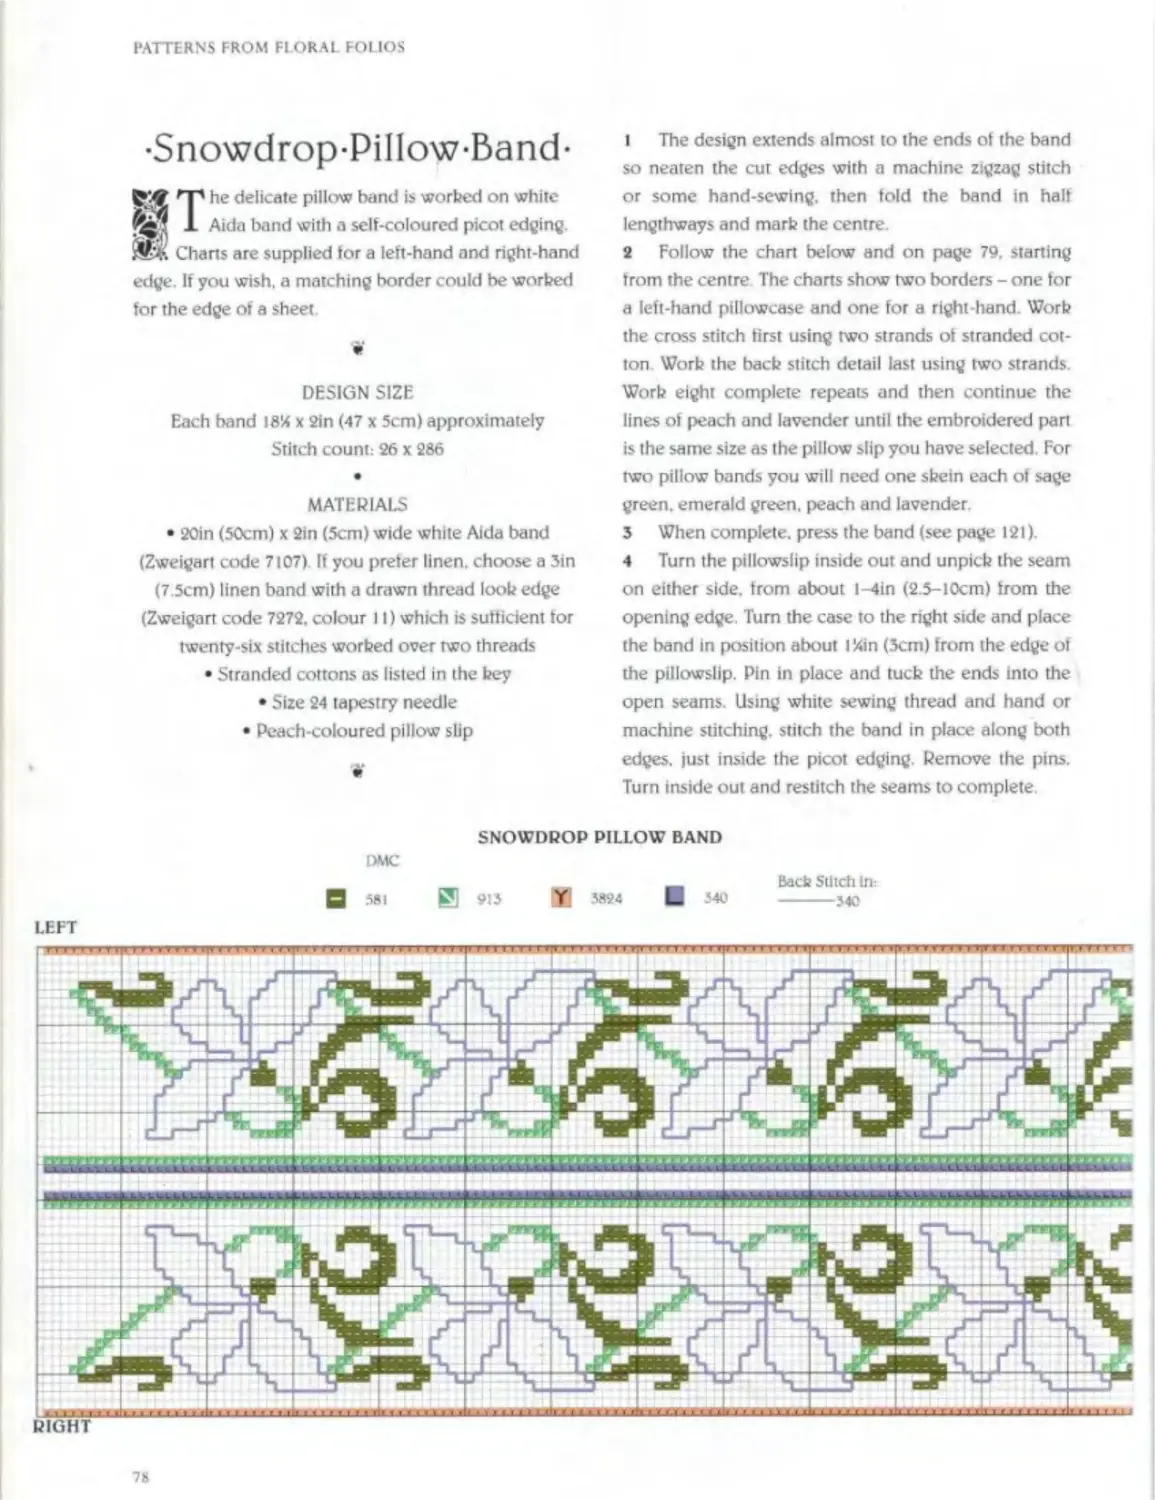
•Snowdrop-Pillow-Band-
(K# ПП he delicate pillow band is «orbed on white ЙЯ J. Aida band with a self-coloured picot edging ЖК Chans are supplied tor a left-hand and right-hand edge. If you wish, a matching border could be worked for the edge of a sheet.
DESIGN SIZE
Each band 184 x 2in (47 x 5cm) approximately Stitch count: 26 x 286
•
MATERIALS
• 20in (50cm) x 2in (5cm) wide white Aida band (Zweigart code 7107) If you prefer linen, choose a Sin (7 5cm) linen band with a drawn thread look edge (Zweigart code 7272, colour 11) which is sufficient for twenty-six stitches worked over two threads
• Stranded cottons as listed in the hey
• Size 24 tapestry needle
• Peach-coloured pillow slip
1 The design extends almost to the ends of the band so neaten the cut edges with a machine zigzag stitch or some hand-sewing, then fold the band in halt lengthways and mark the centre.
2 Follow the chart below and on page 79. starting from the centre The charts show two borders - one for a left-hand pillowcase and one for a right-hand Work the cross stitch first using two strands of stranded cotton Work the back stitch detail last using two strands Work eight complete repeats and then continue the lines of peach and lavender until the embroidered part is the same size as the pillow slip you have selected. For two pillow bands you will need one skein each of sage green, emerald green, peach and lavender.
3 When complete, press the band (see page 121).
4 Turn the pillowslip inside out and unpick the seam on either side, from about l-4in (2.5-10cm) from the opening edge. Turn the case to the right side and place the band in position about I %in (3cm) from the edge of the pillowslip. Pin in place and tuck the ends into the open seams. Using white sewing thread and hand or machine stitching, stitch the band in place along both edges, just inside the picot edging. Remove the pins. Turn inside out and restitch the seams to complete.
SNOWDROP PILLOW BAND
DMC
Back Stitch in:
H 581 S 913 T 3824 I— 340 -------340
LEFT
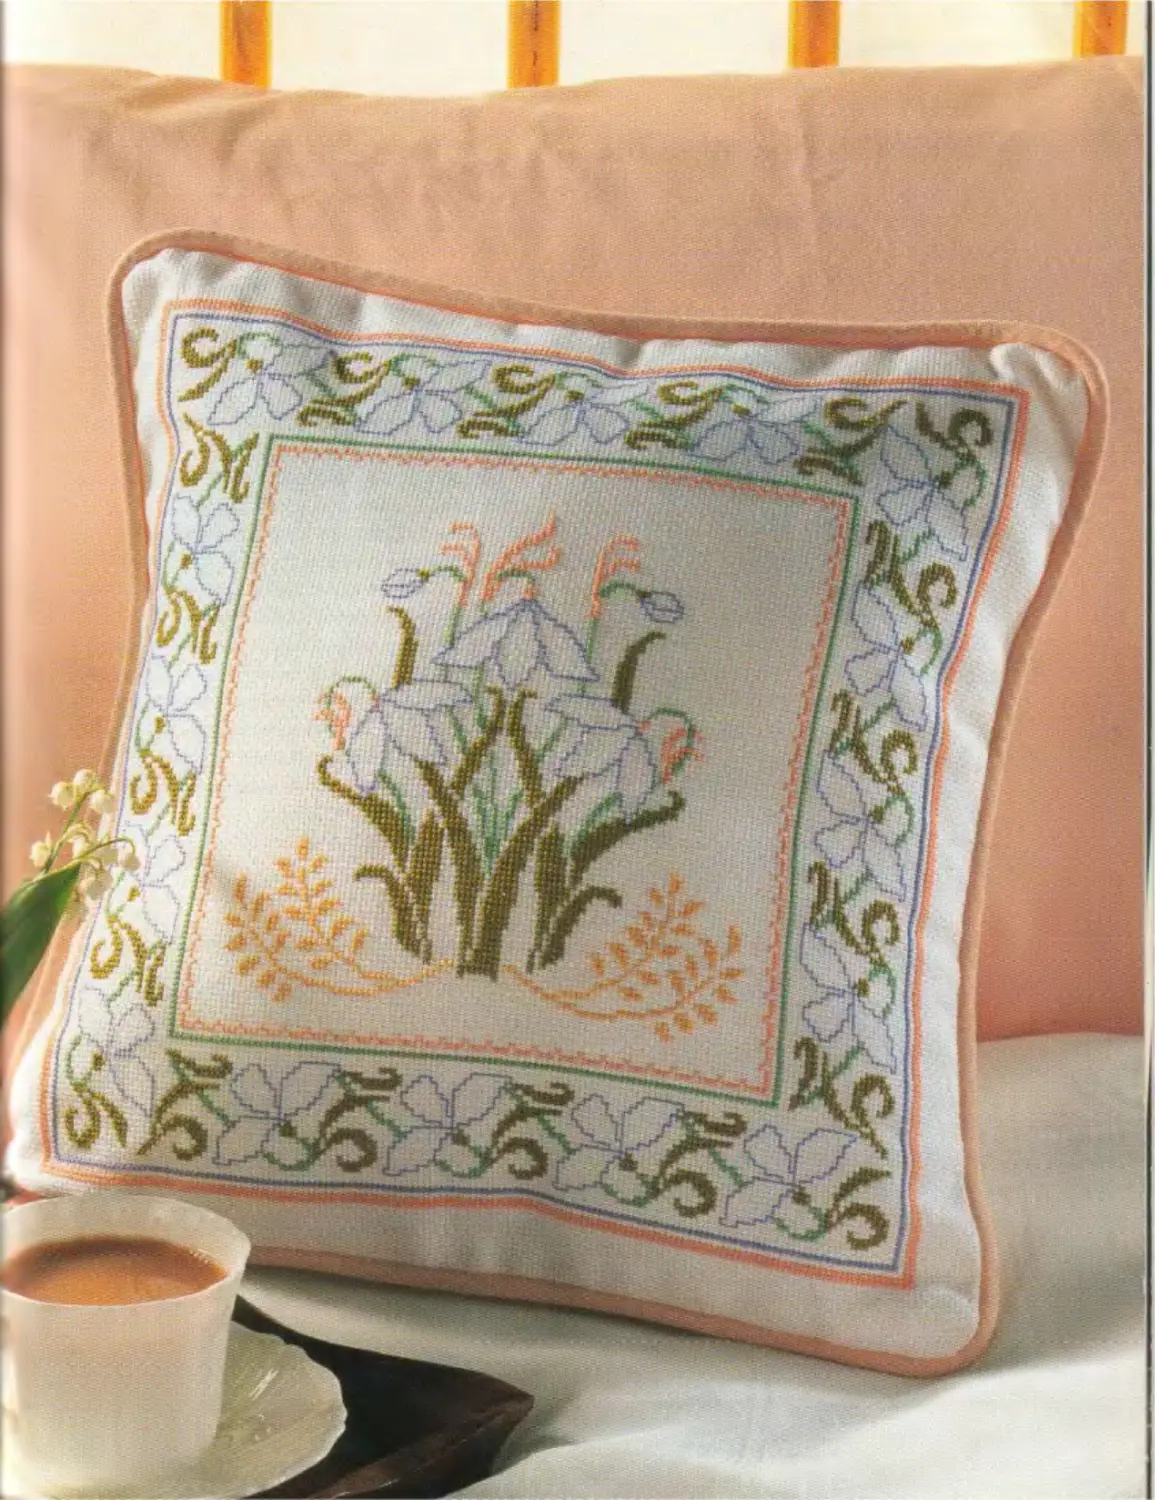
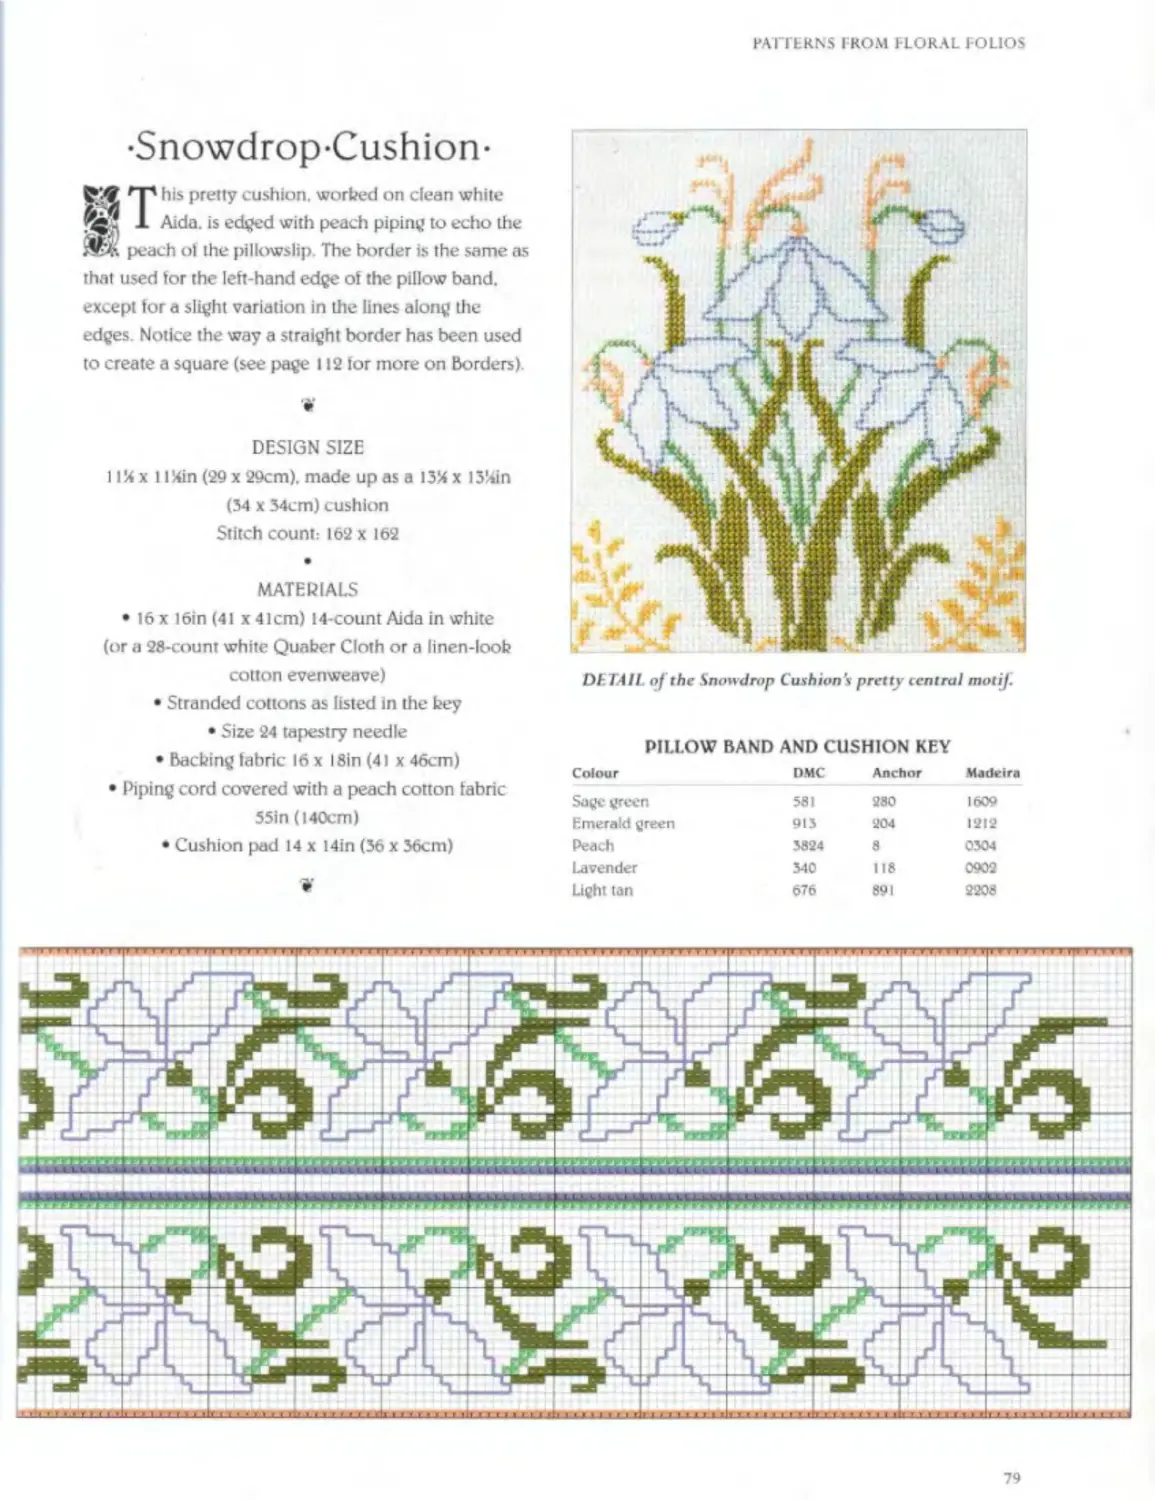
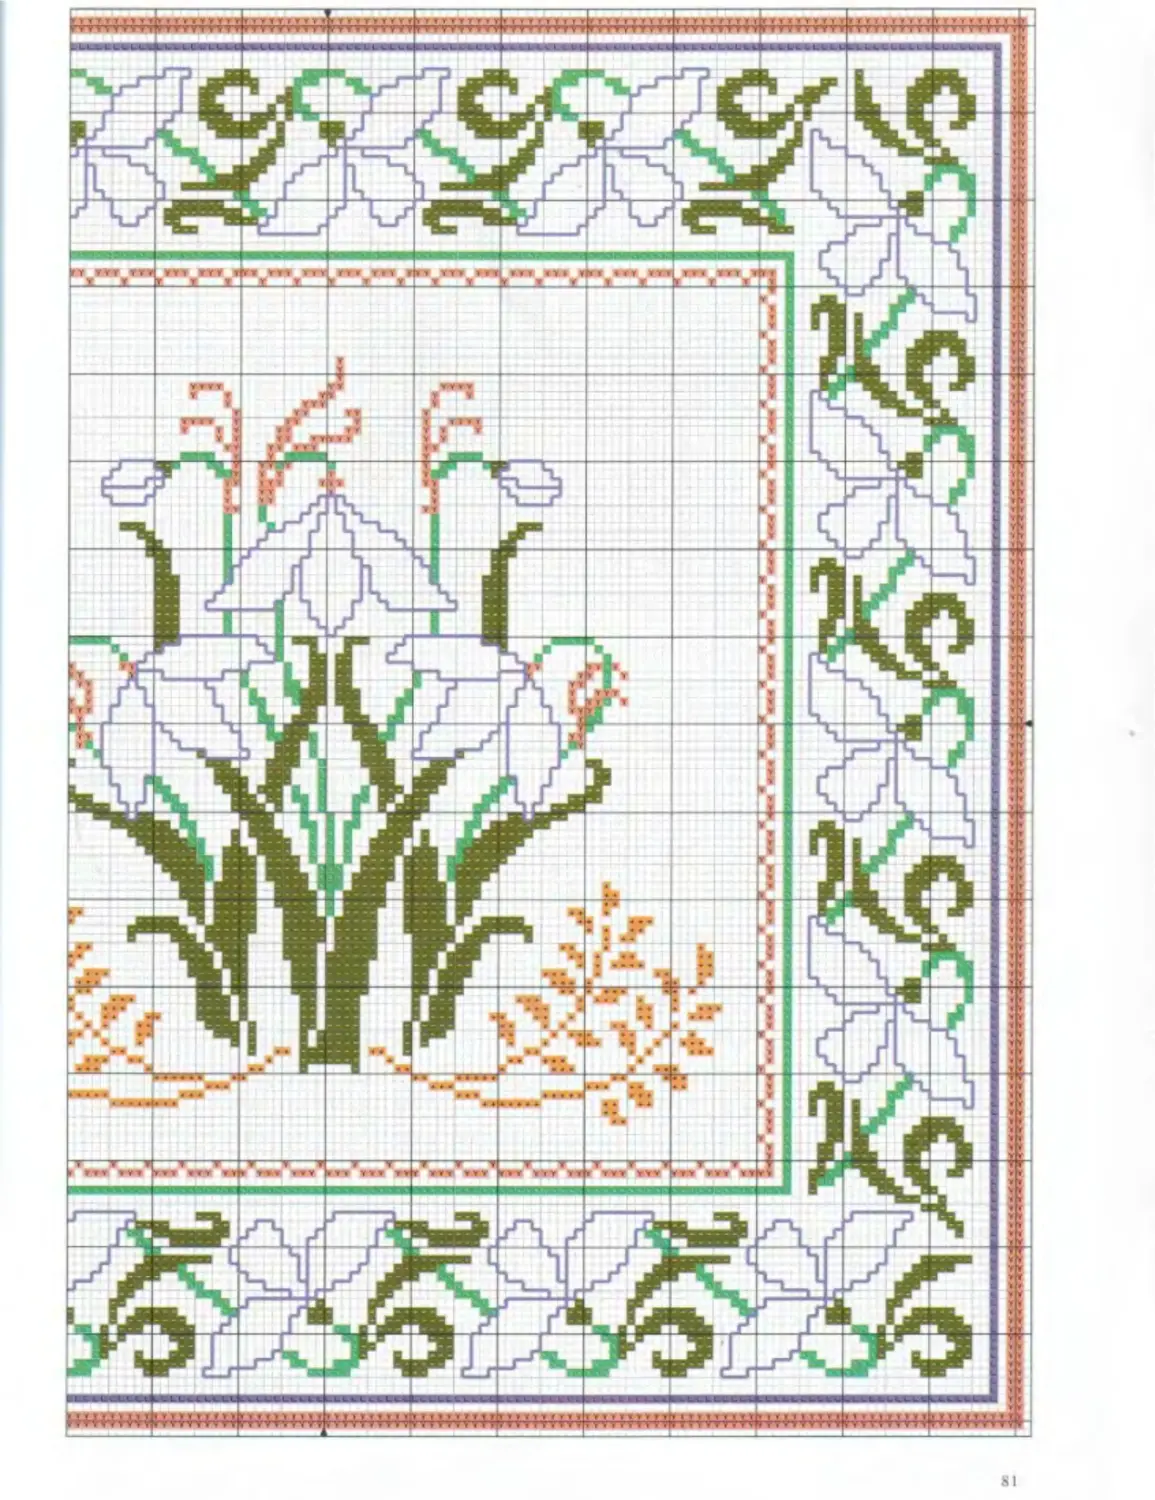
-Snowdrop-Cushion-
his pretty cushion, worked on clean white Aida, is edged with peach piping to echo the
ЛГЧ'. peach of the pillowslip. The border is the same as that used for the left-hand edge of the pillow band, except tor a slight variation in the lines along the edges Notice the way a straight border has been used to create a square (see page 112 tor more on Borders).
W
DESIGN SIZE
11% x 11 Kin (29 x 29cm). made up as a 13% x 13Ч1П (34 x 34cm) cushion
Stitch count: 162 x 162
•
MATERIALS
• 16 x 16in (41 x 41cm) 14-count Aida in white (or a 28-count white Quaker Cloth or a linen-looh cotton evenweave)
• Stranded cottons as listed in the key • Size 24 tapestry needle
• Backing fabric 16 x I8in (41 x 46cm)
• Piping cord covered with a peach cotton fabric 55in (140cm)
• Cushion pad 14 x 14in (36 x 36cm)
W
DETAIL of the Snowdrop Cushion's pretty central motif.
PILLOW BAND AND CUSHION KEY
Colour DMC Anchor Madeira
Sage green 581 230 1609
limeraid green 913 204 1212
Peach 3824 8 0304
Lavender 340 118 0902
Light tan 676 891 2208
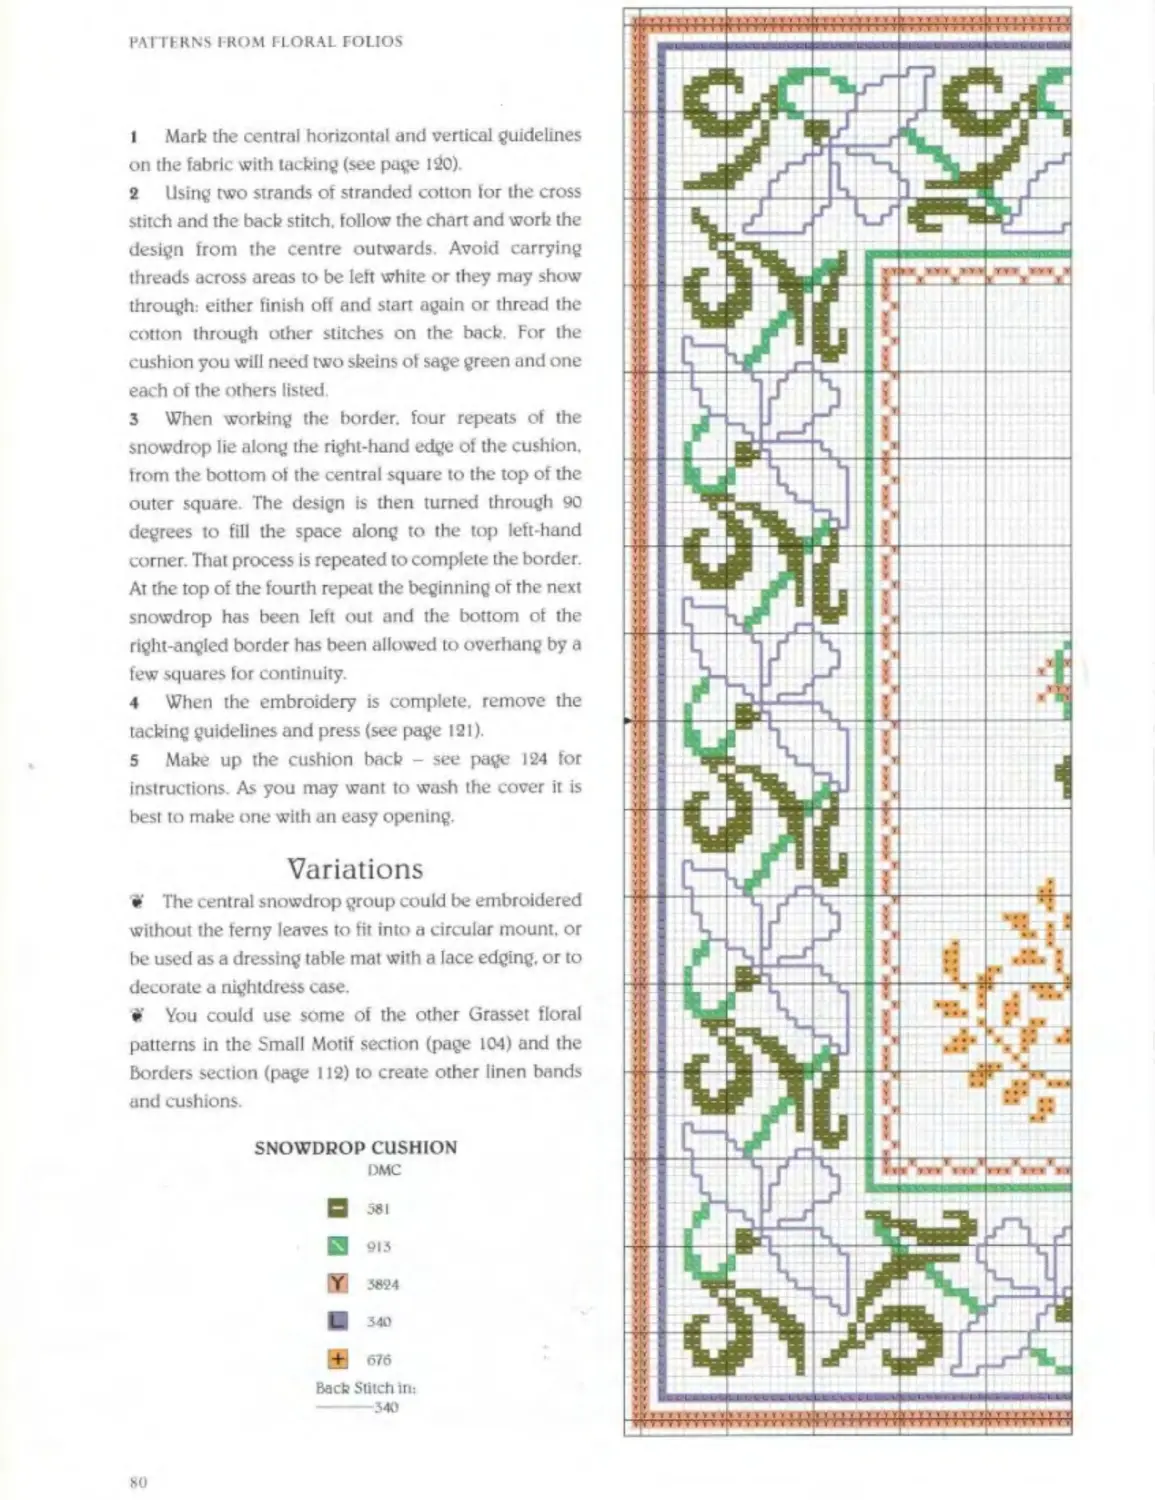
1 Mark the central horizontal and vertical guidelines on (he fabric with tacking (see page 120).
2 Using two strands of stranded cotton for the cross stitch and the back stitch, follow the chan and work the design from the centre outwards. Avoid carrying threads across areas to be left white or they may show through: either finish off and start again or thread the cotton through other stitches on the back For the cushion you will need two skeins of sage green and one each of the others fisted
3 When working the border, four repeats of the snowdrop lie along the right-hand edge of the cushion, from the bottom of the central square to the top of the outer square. The design is then turned through 90 degrees to fill the space along to the top left-hand corner. That process is repeated to complete the border. At the top of the fourth repeal the beginning of the next snowdrop has been left out and the bottom of the right-angled border has been allowed to overhang by a few squares for continuity
4 When the embroidery is complete, remove the tacking guidelines and press (see page 121).
5 Make up the cushion back - see page 124 for instructions. As you may want to wash the cover it is best to make one with an easy opening.
Variations
• The central snowdrop group could be embroidered without the ferny leaves to fit into a circular mount, or be used as a dressing table mat with a lace edging, or to decorate a nightdress case.
You could use some of the other Grasset floral patterns in the Small Motif section (page 104) and the Borders section (page 112) to create other linen bands and cushions.
SNOWDROP CUSHION
DMC
H set
S3 9i3
Y 3864
G 340
±1 676
Bacb Stitch in: ------340
HO
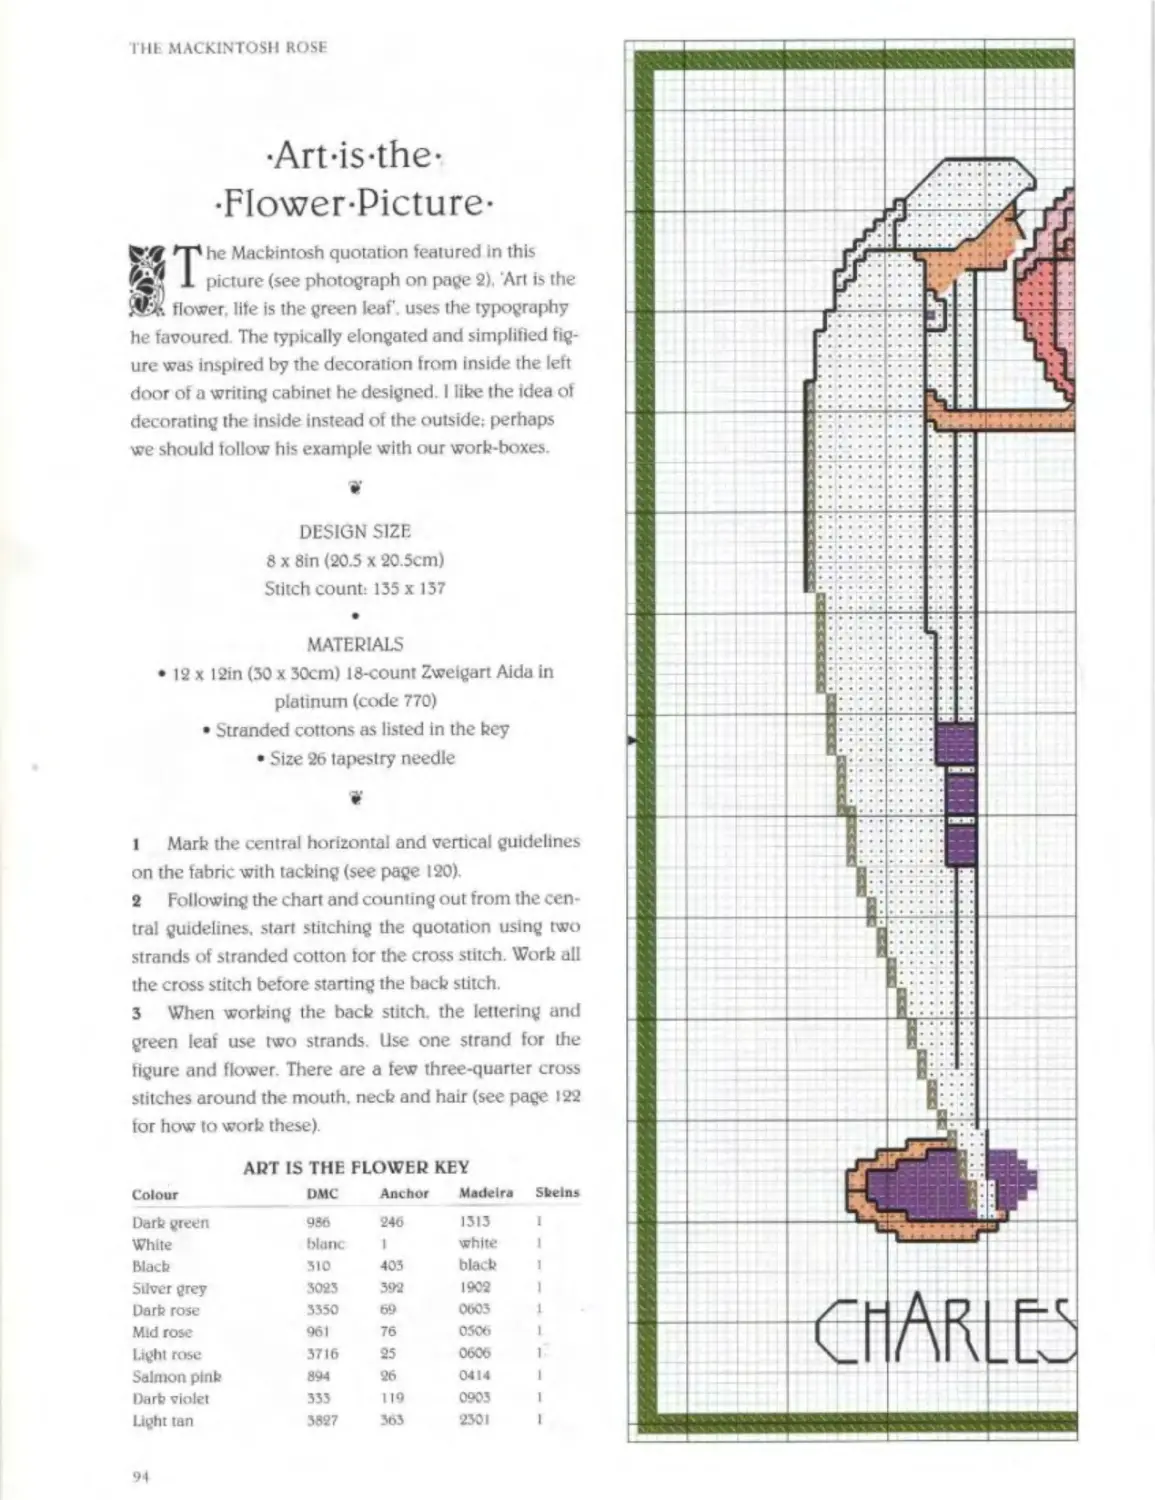
SI
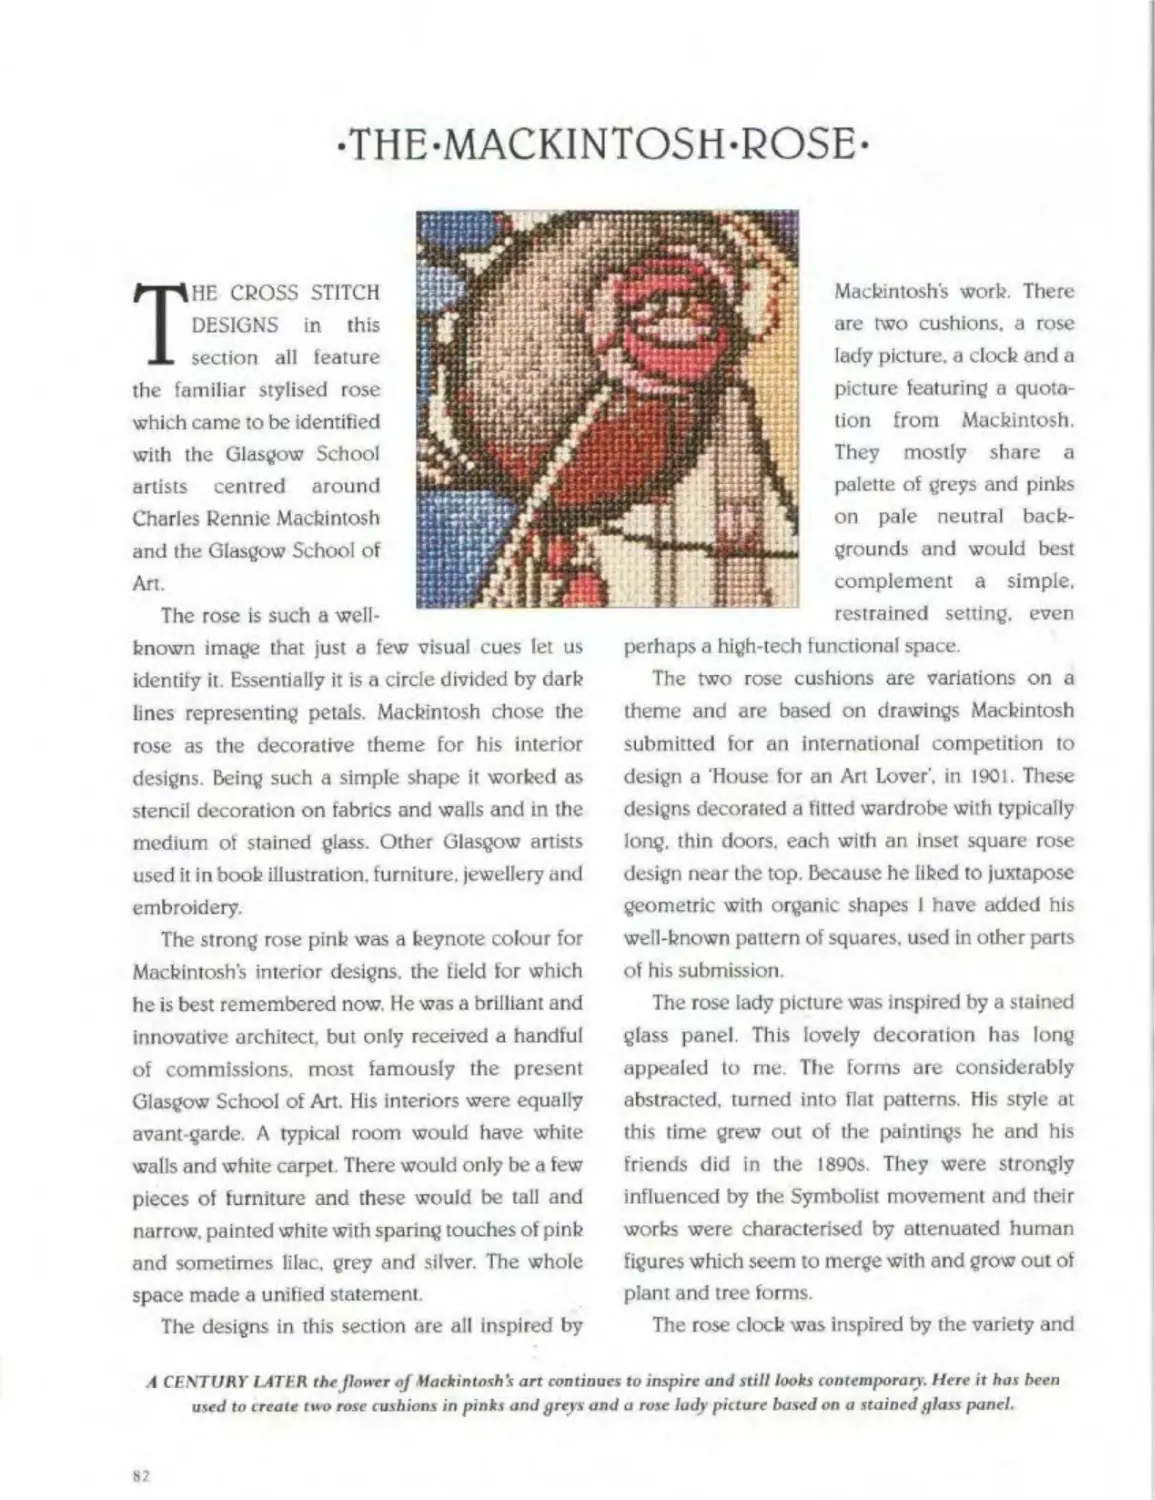
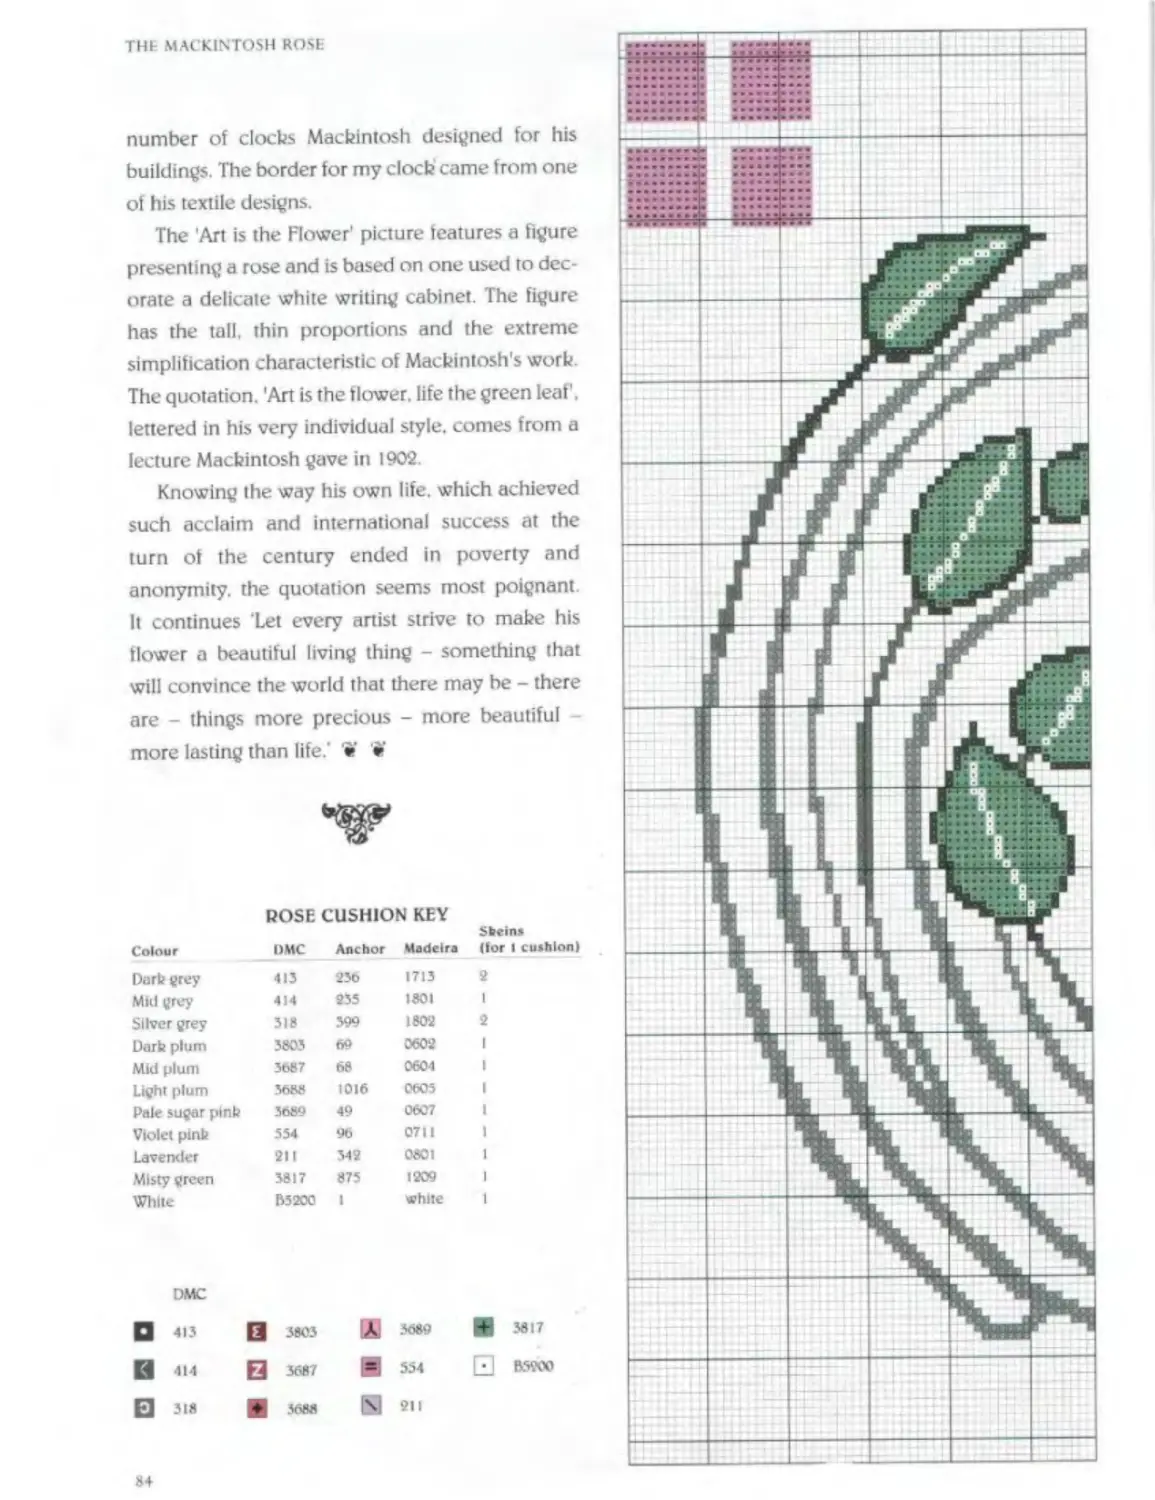
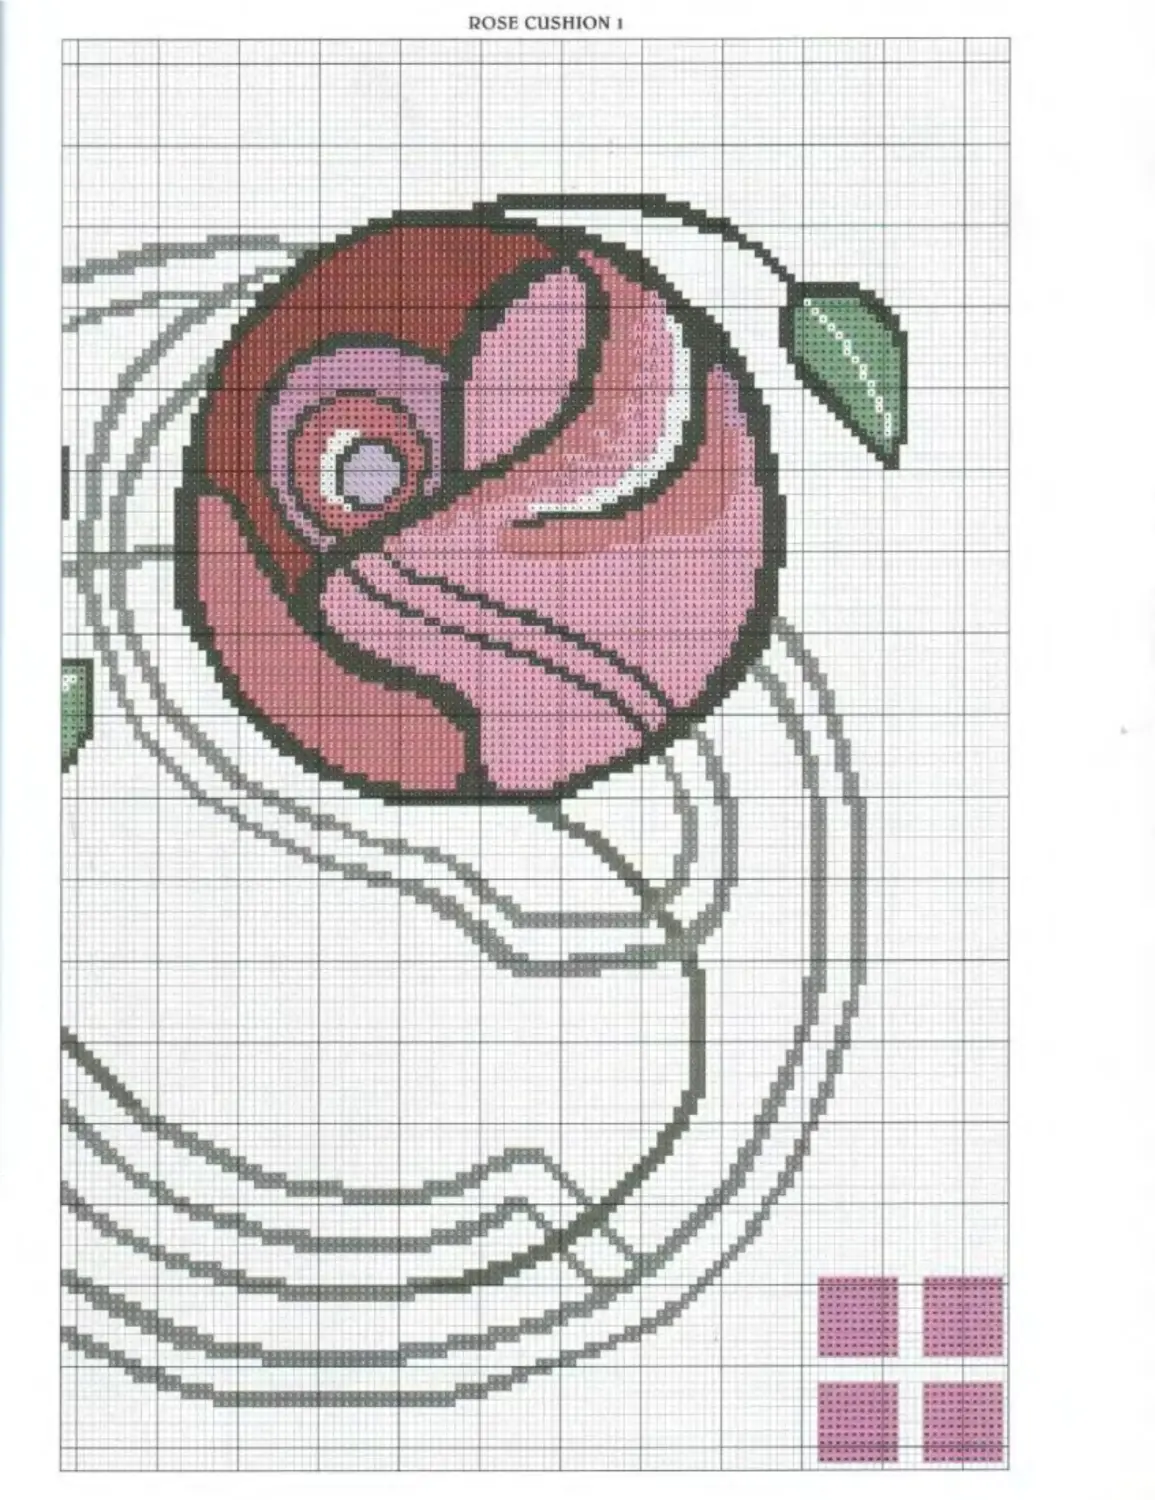
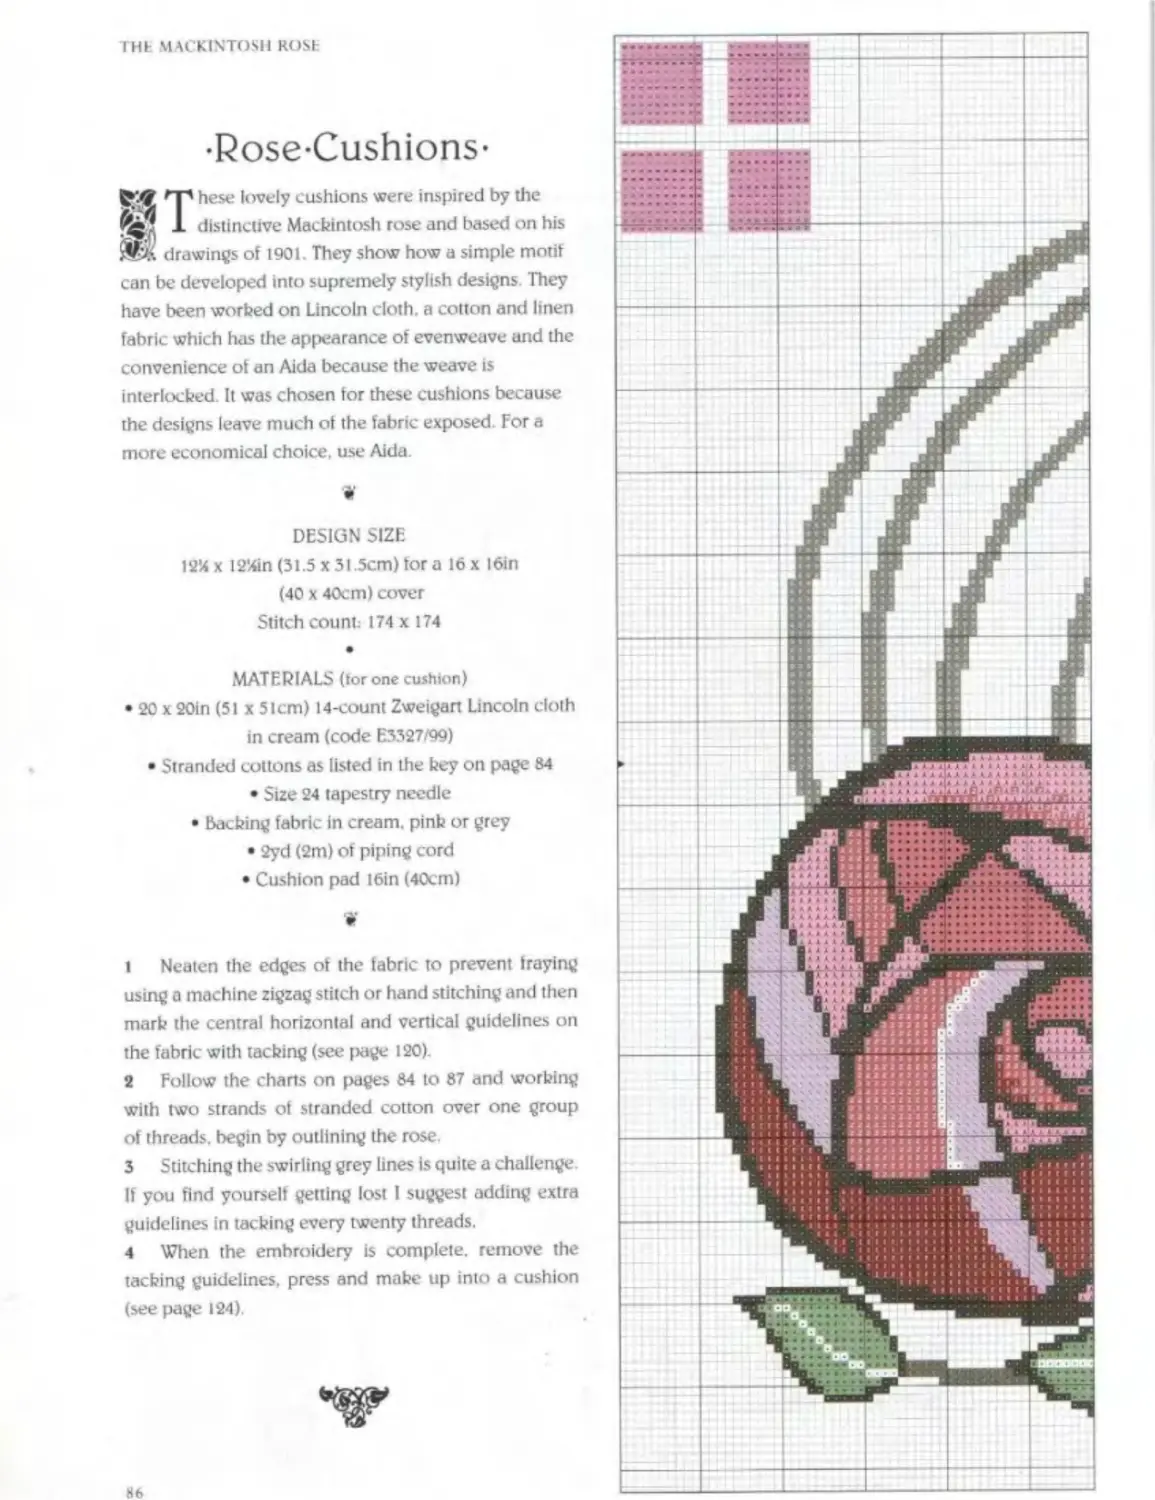
•THE-MACKINTOSH-ROSE-
THE CROSS STITCH DESIGNS in this section all feature the familiar stylised rose which came to be identified with the Glasgow School artists centred around Charles Rennie Mackintosh and the Glasgow School of Art.
The rose is such a well-
Mackintosh's work. There are two cushions, a rose lady picture, a clock and a picture featuring a quotation from Mackintosh. They mostly share a palette of greys and pinks on pale neutral backgrounds and would best complement a simple, restrained setting, even
known image that just a few visual cues let us identity it. Essentially it is a circle divided by dark lines representing petals. Mackintosh chose the rose as the decorative theme for his interior designs. Being such a simple shape it worked as stencil decoration on fabrics and walls and in the medium of stained glass. Other Glasgow artists used it in book illustration, furniture, jewellery and embroidery.
The strong rose pink was a keynote colour for Mackintoshs interior designs, the tield tor which he is best remembered now. He was a brilliant and innovative architect, but only received a handful of commissions, most famously the present Glasgow School of Art. His interiors were equally avant-garde. A typical room would have white walls and white carpet. There would only be a few pieces of furniture and these would be tall and narrow, painted white with sparing touches of pink and sometimes lilac, grey and silver. The whole space made a unified statement.
The designs in this section are all inspired by
perhaps a high-tech functional space.
The two rose cushions are variations on a theme and are based on drawings Mackintosh submitted for an international competition to design a House for an Art Lover', in 1901. These designs decorated a fitted wardrobe with typically long, thin doors, each with an inset square rose design near the top. Because he liked to juxtapose geometric with organic shapes I have added his well-known pattern of squares, used in other parts of his submission.
The rose lady picture was inspired by a stained glass panel. This lovely decoration has long appealed to me. The forms are considerably abstracted, turned into flat patterns. His style at this time grew out of the paintings he and his friends did in the 1890s. They were strongly influenced by the Symbolist movement and their works were characterised by attenuated human figures which seem to merge with and grow out of plant and tree forms.
The rose clock was inspired by the variety and
A CENTURY I.ATER the flower oj Mackintosh's art continues to inspire and still looks contemporary. Here it has been used to create tsco rose cushions in pinks and greys and a rose lady picture based on a stained glass panel.
number of clocks Mackintosh designed for his buildings. The border for my clock came from one ol his textile designs.
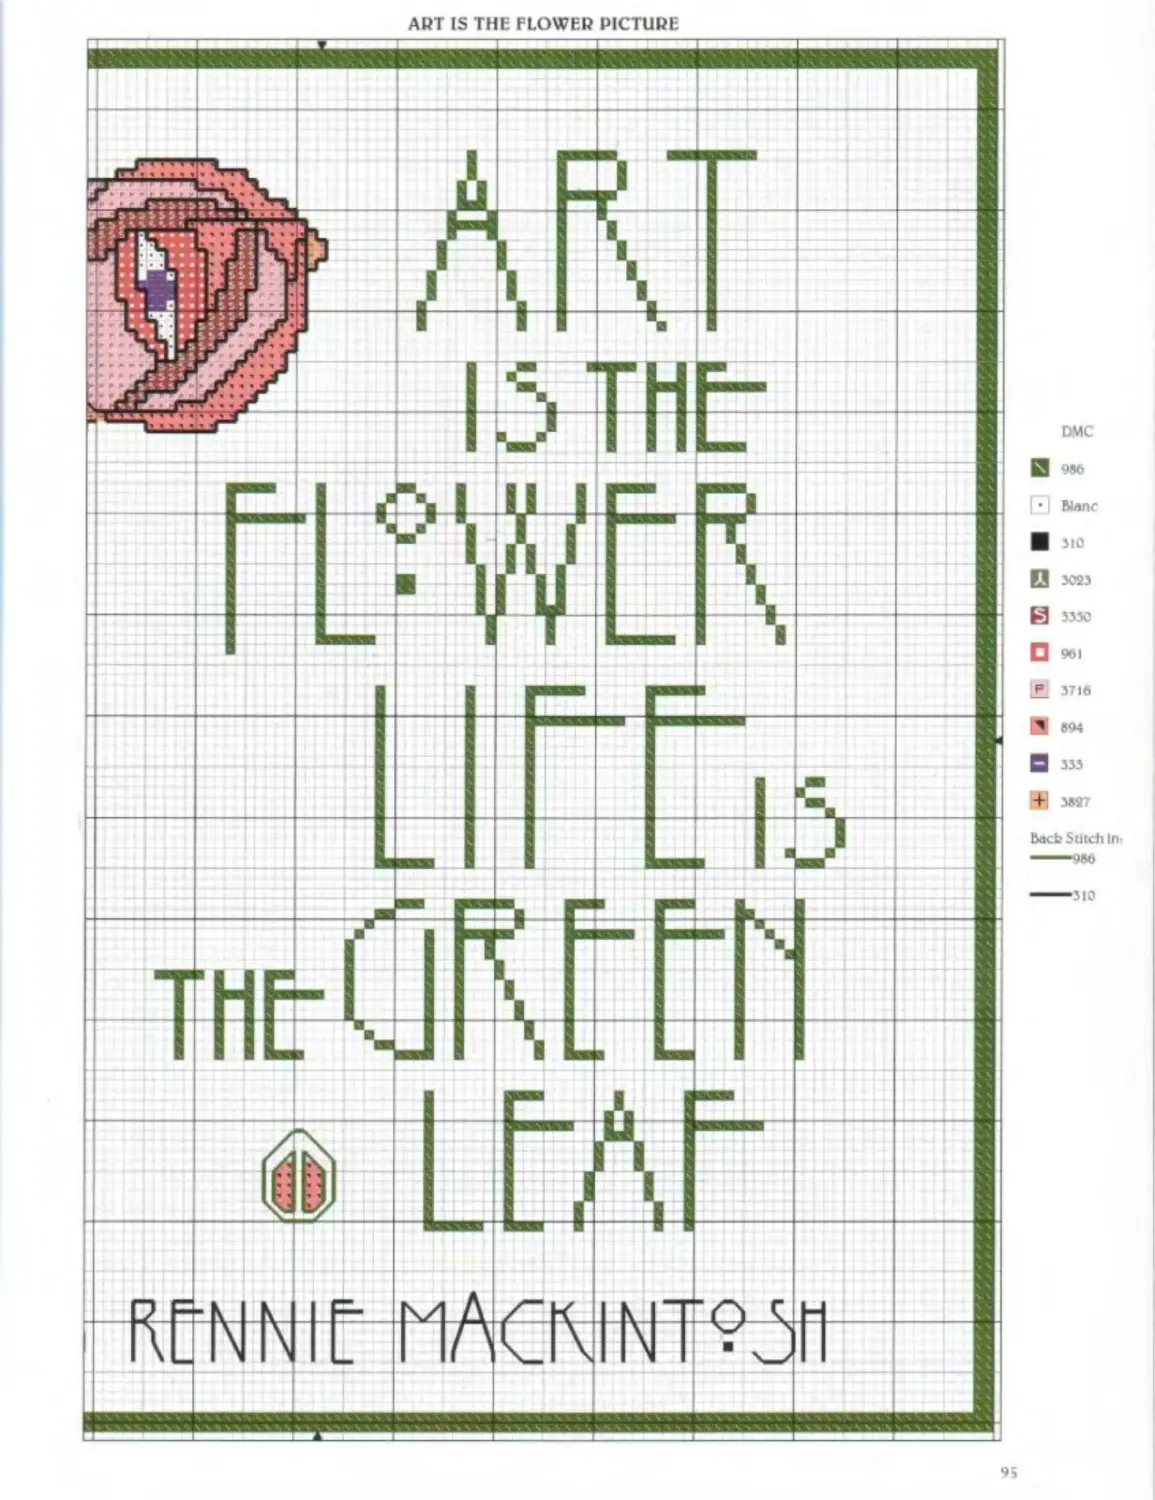
The 'Art is the Flower' picture features a figure presenting a rose and is based on one used to decorate a delicate white writing cabinet. The figure has the tall, thin proportions and the extreme simplification characteristic of Mackintosh's work. The quotation. 'Art is the flower, life the green leaf, lettered in his very individual style, comes from a lecture Mackintosh gave in 1902.
Knowing the way his own life, which achieved such acclaim and international success at the turn of the century ended in poverty and anonymity, the quotation seems most poignant It continues Let every artist strive to make his flower a beautiful living thing - something that will convince the world that there may be - there are - things more precious - more beautiful more lasting than life.’ '• »
ROSE CUSHION KEY
Colour DMC Anchor Madeira Sheins (for 1 cushion)
Dark grey 413 236 1713 2
Mid grey 414 235 1801 1
Silver grey 318 399 1802 2
Darb plum 3803 69 0602 1
Mid plum 3687 68 0604 1
Light plum 3688 1016 0605 1
Pale sugar pint? 3689 49 0607 1
Violet pinh 554 96 0711 1
Lavender 211 342 0801 1
Misty green 3817 875 1209 1
White B5200 1 white 1
DMC
413 □ 3803 3689
414 □ 3687 = 554
□ 318 5688 KI 211
+ 3817
И B5200
-Rose-Cushions-
ПП hese lovely cushions were inspired by the
1 distinctive Mackintosh rose and based on his drawings of 1901. They show how a simple motif can be developed into supremely stylish designs They have been worked on Lincoln cloth, a cotton and linen fabric which has the appearance of evenweave and the convenience of an Aida because the weave is interlocked. It was chosen for these cushions because the designs leave much of the fabric exposed For a more economical choice, use Aida.
V
DESIGN SIZE
12'4 x 12%in (31.5 x 31.5cm) tor a 16 x I6in (40 x 40cm) cover
Stitch count: 174 x 174
•
MATERIALS (tor one cushion)
• 20 x 20in (51 x 51 cm) 14-count Zweigart Lincoln cloth in cream (code E3327/99)
• Stranded cottons as listed in the key on page 84
• Size 24 tapestry needle
• backing fabric in cream, pink or grey
• 2yd (2m) of piping cord
• Cushion pad 16in (40cm)
W
l Neaten the edges of the fabric to prevent iraying using a machine zigzag stitch or hand stitching and then mark the central horizontal and vertical guidelines on the fabric with tacking (see jsage 120).
2 Follow the charts on pages 84 to 87 and working with two strands ot stranded cotton over one group of threads, begin by outlining the rose.
3 Stitching the swirling grey lines is quite a challenge If you find yourselt getting lost I suggest adding extra guidelines in tacking every twenty threads.
4 When the embroidery is complete, remove the tacking guidelines, press and make up into a cushion (see page 124).
ОМС
□ 413
H 414
О 318
H 3803
□ 3*587
♦ 3688
Д1 3889
»! 554
S I
4" 3817
• BW00
ROSE LADY PICTURE
DMC
□ 961 □ /98 Эй 453
И 5550 □ 896 451
ru 5689 □ 813 844
□ 909 ffl 950 в 3/78
Q 355 И 739 в 639
ROSE LADY PICTURE KEY
Colour DMC Anchor Madeira Sheins Colour DMC Anchor Madeira Skeins
Dusty rose pinb 961 76 0506 1 Peachy pink 950 376 2309 1
Darb rose 5350 69 0603 1 Antique Ivory 739 1009 2014 1
Pale sugar pinb 3689 49 0607 1 Light shell grey 453 231 1806 1
Darb garnet red 902 897 0601 1 Mid shell grey 451 233 1808 1
Darb violet 333 119 0903 1 Dark beaver grey 844 1041 1810 2
Darb blue 798 137 0912 1 Terracotta 3778 337 2310 1
Mid blue 826 136 1011 1 Brown 632 936 2311 1
Ughi blue 813 130 0909 1
Rose-Lady-Picture-
Rose-Clock-
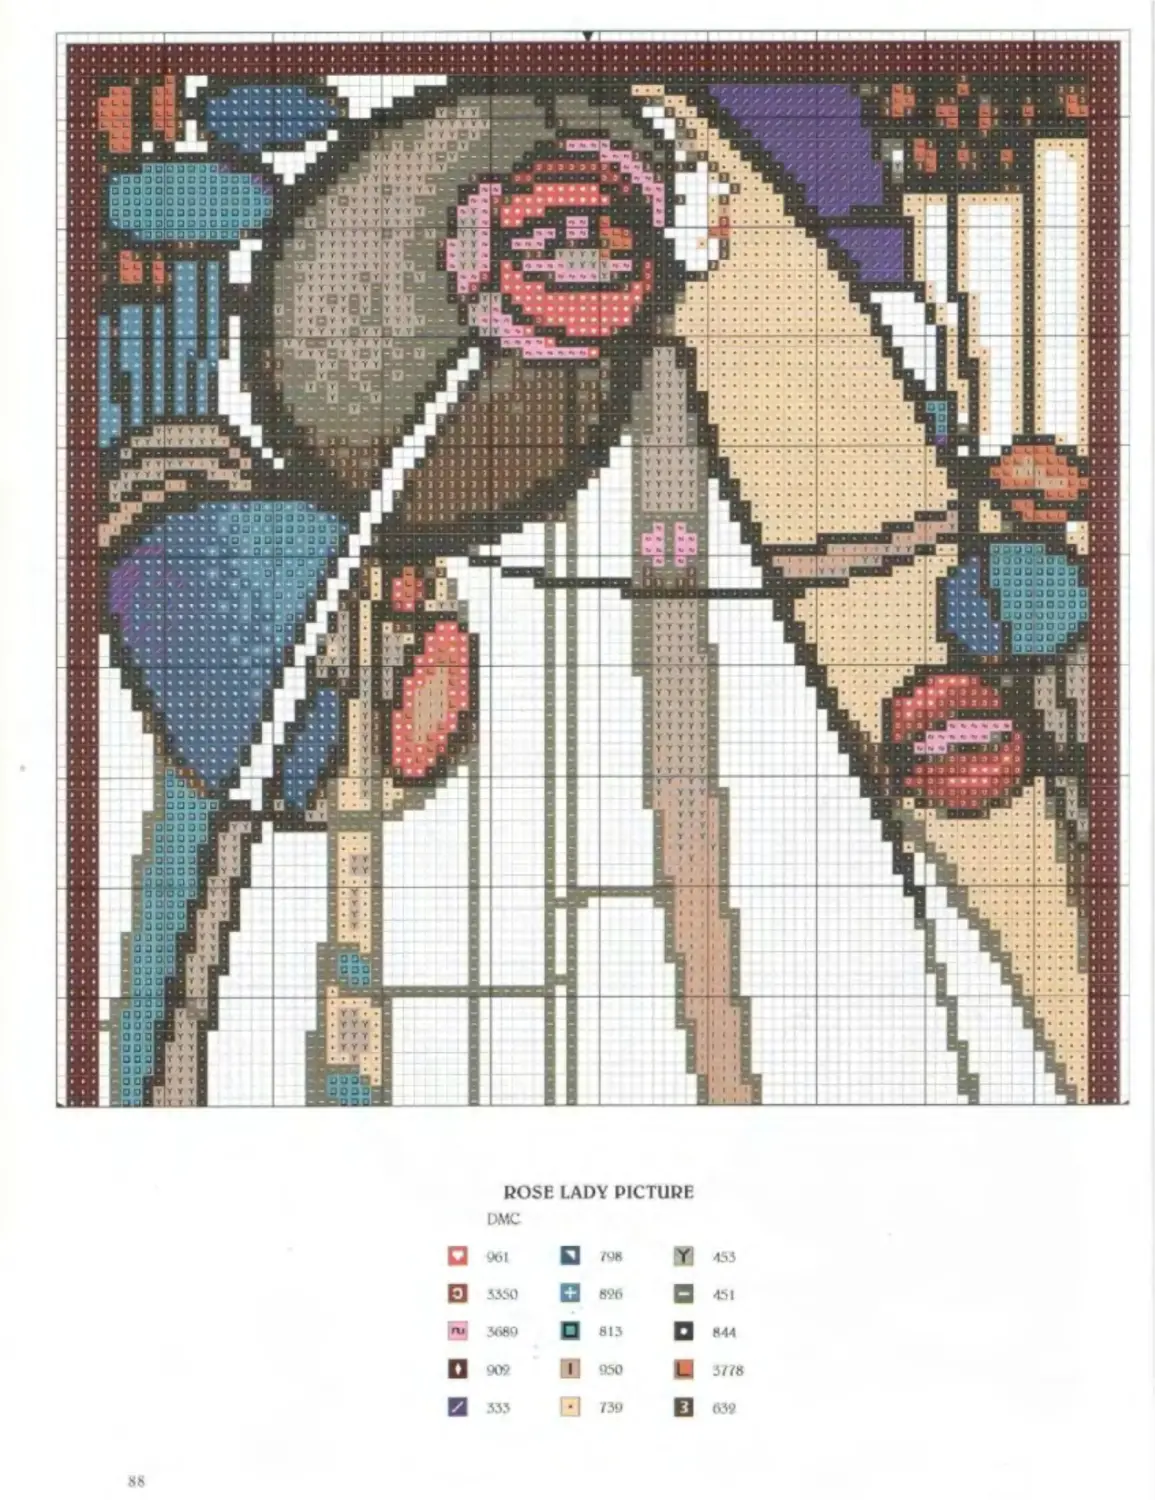
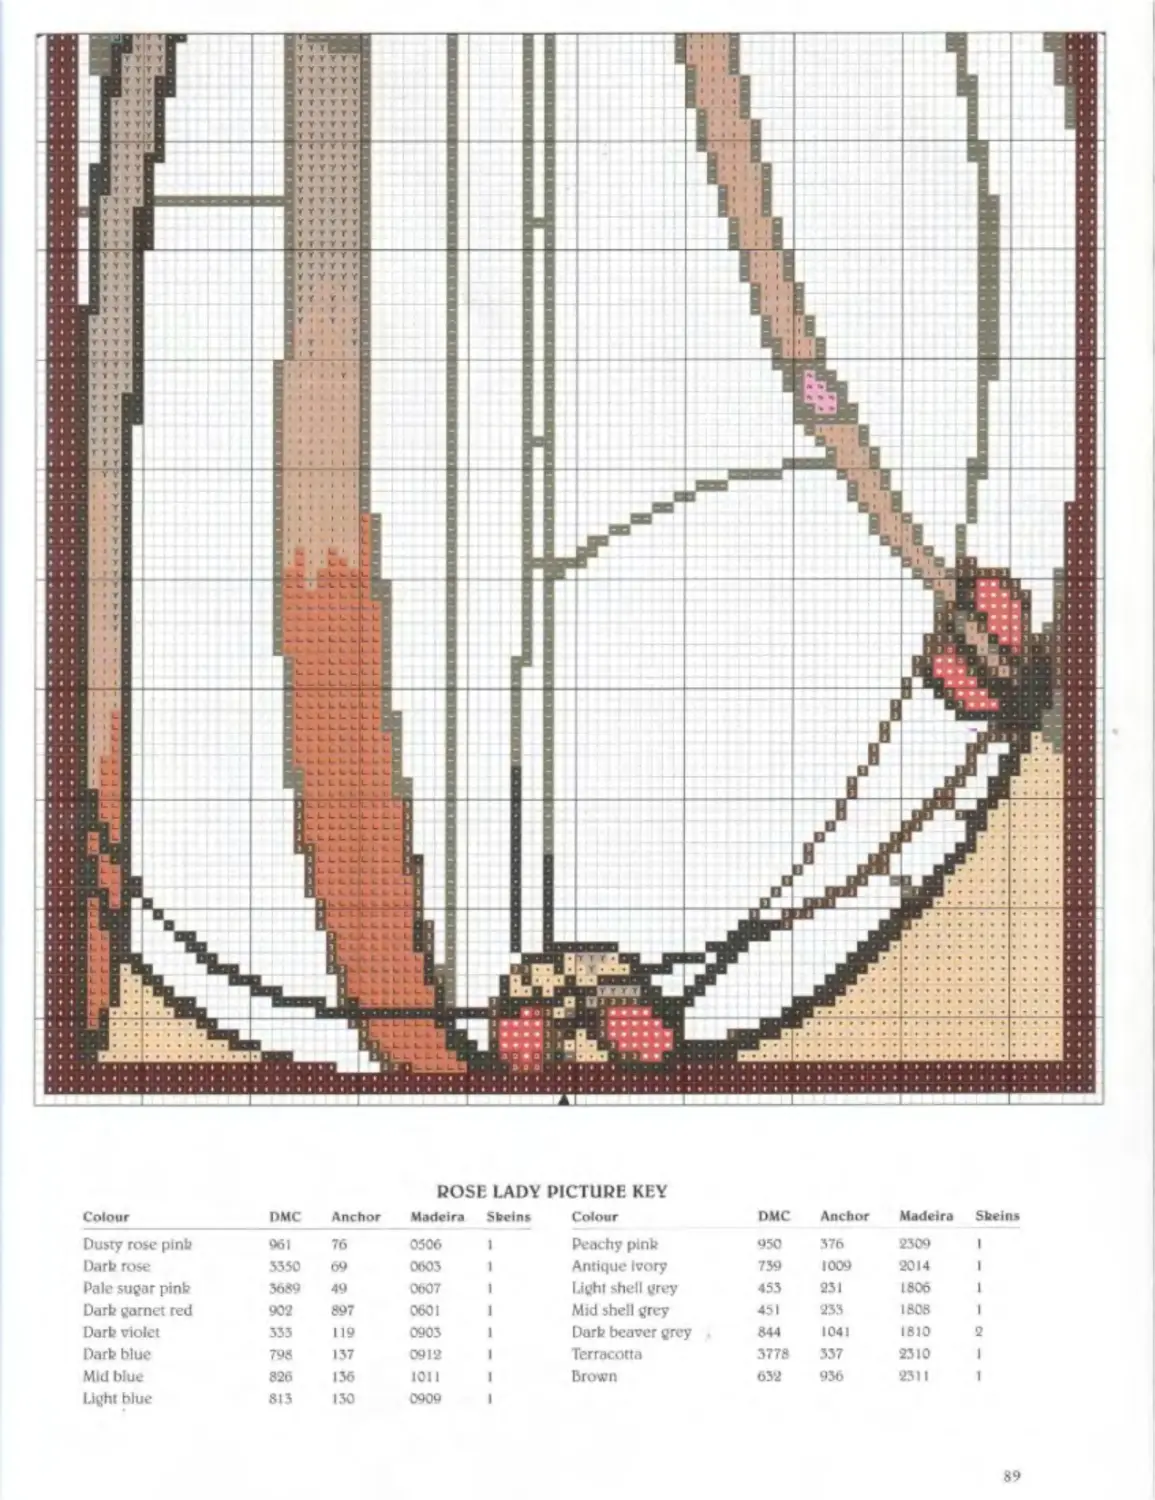
he design for this elegant lady came from an original Mackintosh stained glass jianel It three-quarter back view with her face looking
out towards the right The main focus of the picture (shown on fxige 83) is the rose decorating her hair at the top of the panel Her long, pale robe takes on a raindrop shape, which can also be seen as a leaf or a bud. while the long peachy-pink curve suggests her right arm
DESIGN SIZE
7 x Min (17.5 x 35cm) Stitch count: 97 x 194
•
MATERIALS
• 11 x 18in (30 x 46cm) M-count Zweigart Aida in ivory (code 264)
• Stranded cottons as listed in the hey • Size 24 tapestry needle
W
1 Mark the central horizontal and vertical guidelines on the fabric with tacking (see page 120).
2 Following the charts on pages 88 and 89. work the design with two strands of stranded cotton and cross stitch throughout It is best to begin at the series of vertical lines in mid shell grey and work all the outlines first, noticing that the lines change to dark beaver grey in places.
3 Cross stitch the coloured areas (which were coloured glass in the original Mackintosh design) and finally embroider the dark garnet red border to complete the picture.
4 Remove the racking guidelines, press and frame (see page 123). leaving a margin of fabric showing round the border.
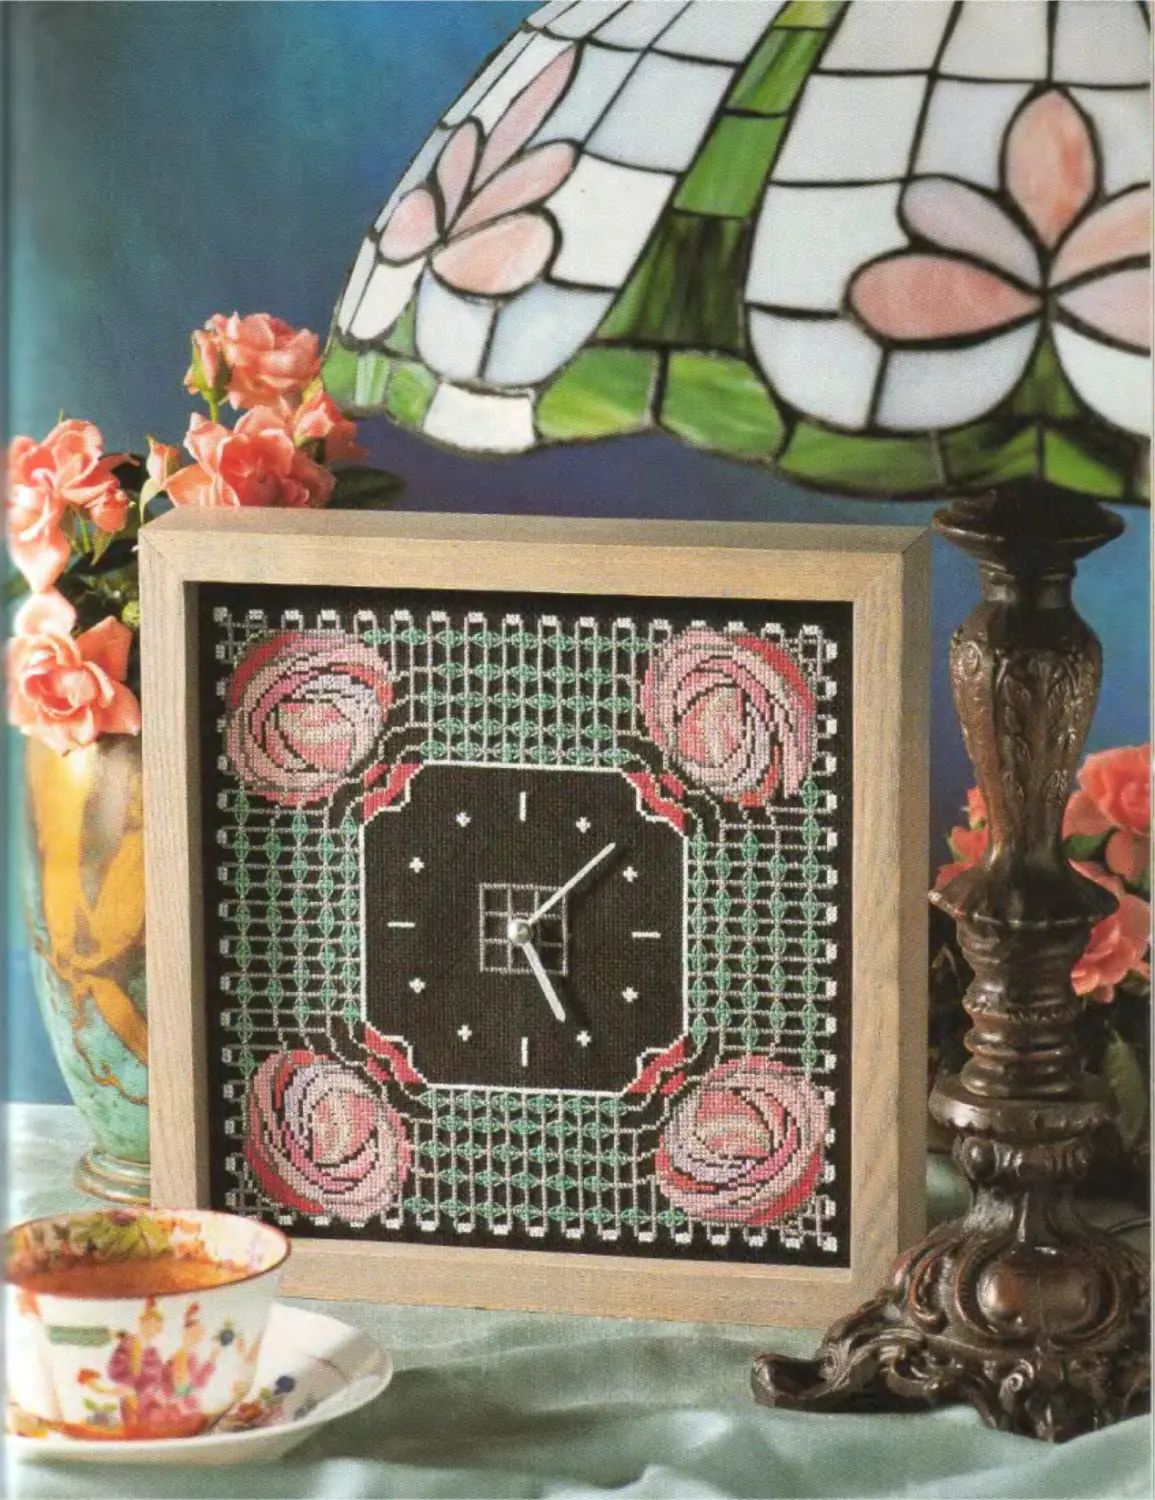
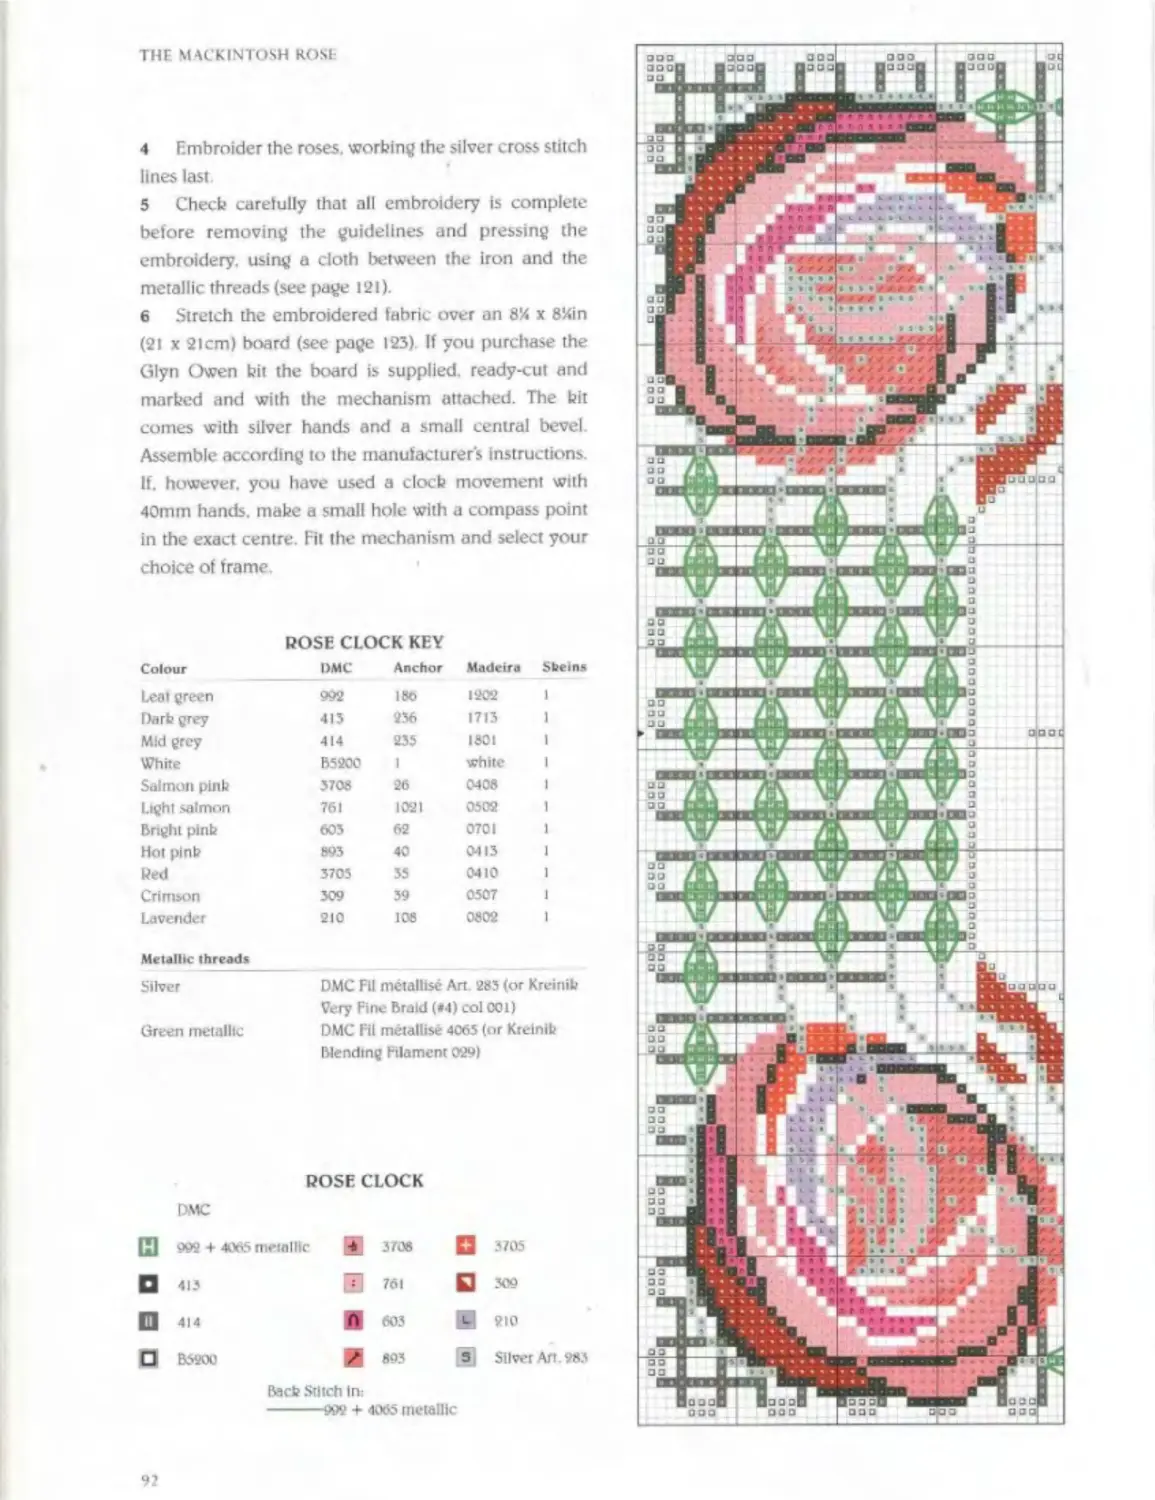
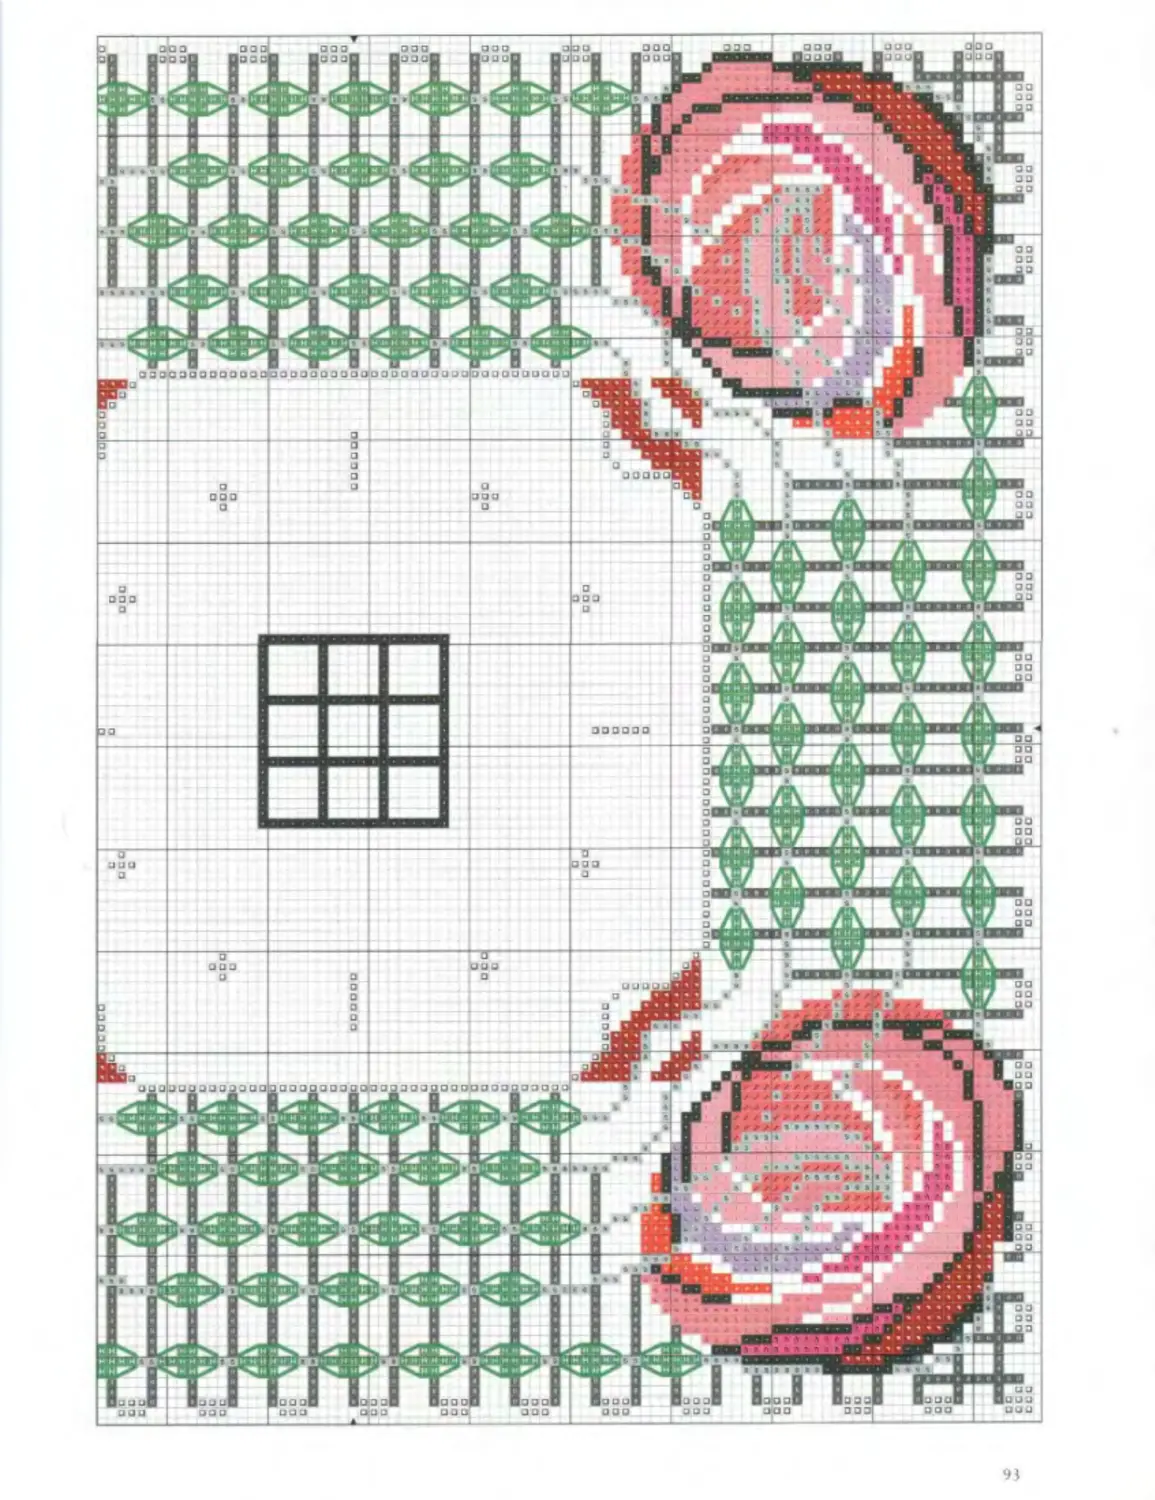
"p nthused by the wide variety of clocks J—/ Mackintosh produced. I chose his design for
a rose border to make this mantle clock. The
flowing sliver lines which originate at the hearts of lhe roses flow clockwise round the design, echoing the movement of the clock hands. The design has maximum impact on a black background, but it is not easy to sew. so use a good craft light and a magnifier.
W
DESIGN SIZE 74 X 7!4in (19 X I9cm) Stitch count: 135 x 135 • MATERIALS
• 12 x 12in (30 x 30cm) 18-count Aida in black
• Stranded cottons as listed in the key
• Metallic threads as listed in the hey
• Size 26 tapestry needle
• Mackintosh clock kit as shown, with exclusive case in hand-crafted, grey-stained ash and silver hands from Glyn Owen (see Suppliers page 126), or a separate clock movement and 40mm hands (sprayed silver) with your choice of surround
W
I Mark the central horizontal and vertical guidelines on the fabric with tacking (see page 120). As it is important to count accurately when working this design to ensure the border joins up. you may find it best to add some extra guidelines.
2 Follow the charts on pages 92 and 93 and work with two strands of stranded cotton The green is worked with two strands of stranded cotton plus one of blending filament (DMC Fll metallise). The silver is used as it comes, begin with the centre, followed by the white inner border
3 To work the metallic leaf sections, begin each leaf by working the cross stitch, then the back stitch, taking stitches over two blocks at a time.
З/N'G/.VG COLOUR AND METALLIC HIGHLIGHTS decorate this little mantle clock. The combination of curving roses and regular trellis demonstrate the tension between organic and geometric which fascinated Mackintosh. If you do not want to make a clock,you could just stitch the border for a photograph frame.
»*•>
ШЖ'ЖЛа
ж»* а
4 Embroider the roses, working the silver cross stitch lines last
5 Check carefully that all embroidery is complete before removing the guidelines and pressing the embroidery, using a cloth between the iron and the metallic threads (see page 121).
6 Stretch the embroidered fabric over an 8% x 8%in (21 x 21cm) board (see page 123) If you purchase the Glyn Owen hit the board is supplied, ready-cut anti marked and with the mechanism attached. The hit comes with silver hands and a small central bevel Assemble according to the manufacturers instructions If. however, you have used a clock movement with 40mm hands, make a small hole with a compass point in the exact centre. Hl the mechanism and select your choice of frame.
ROSE CLOCK KEY
Colour DMC Anchor Madeira Sheins
Leal green 992 186 1202 1
Derb grey 415 236 1713 1
Mid grey 414 235 1801 1
White B52OO 1 white 1
Salmon pink 3708 26 0408 1
Light salmon 761 1021 0502 1
bright pink 603 62 0701 1
Hot pink 893 40 0413 1
Red 3705 35 0410 1
Crimson 309 39 0507 1
Lavender 210 108 0802 1
Metallic threads
Silver
Green metallic
DMC Fil metallise Art. 283 (or Kreinib
Very Fine braid (*4) col 001)
DMC Fil metallise 4065 (or Kreinib blending Filament 029)
ROSE CLOCK
DMC
992 + 4065 metallic 3708 □ 3705
□ 413 761 □ 309
□ 414 ft 603 S] 210
о B5200 fl 893 Silver An. 983
back Stitch In? ---------992 + 4065 metallic
О con ОС
-Art-is-the-
-Flower-Picture-
he Mackintosh quotation featured in this fe’ 1 picture (see photograph on page 2), Art is the ЯЕл flower, lite is the green leaf, uses the typography he favoured The typically elongated and simplified figure was inspired by the decoration from inside the left door of a writing cabinet he designed. I like the idea of decorating the inside instead of the outside; perhaps we should follow his example with our work-boxes.
V
DESIGN SIZE
8 x Sin (20.5 X 20.5cm) Stitch count: 135 x 137
•
MATERIALS
• 12 x 12in (30 x 30cm) 18-count Zweigart Aida in platinum (code 770)
• Stranded cottons as listed in the key
• Size 26 tapestry needle
W
1 Mark the central horizontal and vertical guidelines on the fabric with tacking (see page 120).
2 Following the chart and counting out from the central guidelines, start stitching the quotation using two strands of stranded cotton tor the cross stitch. Work all the cross stitch before starting the buck stitch.
3 When working the back stitch, the lettering and green leaf use two strands. Use one strand for the figure and flower. There are a few three-quarter cross stitches around the mouth, neck and hair (see page 122 for how to work these).
APT IS THE FLOWEP KEY
Colour DMC Anchor Madeira Sheins
Dark green 986 246 1313 1
White blanc 1 white 1
Nack 310 403 black 1
Silver grey 3023 392 1902 1
Dark rose 3350 69 0603 1
Mid rose 961 76 0504, 1
Light rose 3716 25 0606 f
Salmon pink 894 26 0414 1
Dark violet 333 119 0903 1
Light tan 3827 363 2301 I
APT IS THE FLOWER PICTURE
DMC
В
[_• | Blanc 510 П 3025 Й 5550 □ 961 >, 5716 Я 894 В 355
3827
Bacb Stitch in: 986
MO
•THE-WH1TE-ROSE-AND-THE-RED-ROSE-
THIS CHAPTER FEATURES the work of Margaret Macdonald Mackintosh who was one of a talented group of women working as professional artists in Glasgow at the turn of the century. She had studied at the Glasgow School of Art with her sister Frances and had then set up a studio where they painted and produced decorative metalwork, embroidery and jewellery. Other notable women in their circle were Jessie Newbery and Jessie King, who designed a popular range of silver jewellery for Liberty
In 1900 Margaret married Charles Rennie
MARGARET'S APPUQUt PANEL with embroidery and beads from 1900 is as much an abstract arrangement of colour and line as a picture of two women.
I have only talenf.
The inspiration for The White Rose and The Red Rose design is a panel for the Rose Boudoir for the 1902 Turin Exhibition. It faced a second panel called The Heart of the Rose’ which also shows the two women, with one holding a baby which lies at the centre of a large, dark red rose. As both Margaret and Frances were Symbolist artists, it seems a fair interpretation to suggest that the white rose represents youth and innocence, whilst the other represents maturity, fertility and experience. Both figures are closely bound together by a net-
Mackintosh and they worked in close collaboration. Margaret designed and made decorative panels which were inset in the furniture; she embroidered banners and created large decorative panels for interior decorating projects, including the Willow Tea Rooms. Sometimes she and Charles shared the designing of panels for one space, so of course the style was very similar but it was an equal partnership. In fact he said. Margaret has genius,
work of curving lines and both are integrated with nature in the form of the rose boughs that circle round them. Both panels were painted in golds, pinks and green in a style that contrasts areas of detail and lots of linear decoration with large, empty areas of gold. In the picture and pot lids. I have cross stitched over loosely woven, sheer metallic gauze fabric to mimic Margaret's use of applique on her embroidered panels. w ♦’
THE WHITE ROSE AND THE RED ROSE PICTURE combines the swooping curves »o typical of Art Nouveau with an innovative use of applied gauze to add a shimmering tenure tn cross stitch embroidery.
•The-White-Rose-and-•The-Red-Rose-Picture-
A A argaret Macdonald Mackintosh used ДЙ 1VI appliqu^ In her embroidered banners and Ж*. 1 have adapted the idea to this design, using a loosely woven, sheer metallic gold gauze fabric through which it is possible to see the holes of the Aida. It is an interesting technique that adds a new dimension to cross stitch work though I would recommend it for an embroiderer with patience and experience. The sheer gauze is tacked down and cross stitch worked over it. When the edges of the dress have been worked the sheer gauze is cut away.
W
DESIGN SIZE
12 X 14in (30 x 35cm) Stitch count; 192 x 222
•
MATERIALS
• 18 x 1 Sin (46 x 46cm) 18-count Zweigart Aida in ecru (code 13)
• 12 x 12in (30 x 30cm) of loosely woven sheer gold gauze fabric (allowing the needle to pass through easily - see Suppliers page 126)
• Stranded cottons as listed in the bey
• Size 2b tapestry needle and a crewel needle
W
I If the sheer gauze fabric you have chosen trays very badly, first seal the very edges with a little fabric glue. Attach the sheer gauze to the Aida by first marking the centre of both pieces with pins Place the centre of the sheer gauze over the centre of the Aida, making sure that the grain of the weave is square with the Aida Pin in the centre and round the edges, then place face down on a flat surface and. beginning in the middle, tack in place (see Fig 1). If you have done any quilting you may be familiar with this grid-like tacking procedure Mark the centre horizontal and vertical lines and then the diagonals. If you use a different coloured tacking thread and count every twenty lines then you will provide a grid for reference that will be helpful during the embroidery.
Fig 1 Tacking the Aida and sheerfabric together.
2 Mount the joined fabrics in an embroidery frame and following the charts on pages 100-103 begin stitching near the centre with two strands ot stranded cotton Where cross stitch is worked through the sheer gauze it may be easier to use a crewel needle. I also recommend a magnifier and a strong light When working the large pink areas, work the two rows ot outlining stitches and then cut away (he area to be filled in with cross stitch
3 When the cross stitch on the dress areas is complete. use embroidery scissors to trim back the gauze but do not try to cut around every stitch - follow the curve smoothly and do not worry about a small gold margin (see Fig 2).
Fig 2 Trimming the sheer fabric.
4 Once the dress has been trimmed round close to the stitching, embroider the heads, the long lines and rose decorations in the corners.
5 When the embroidery is complete, remove the guidelines, and press gently at a low temperature with a dry iron. Use a pressing cloth between the embroidery and the iron (see page 121). I would not recommend washing this piece.
•Trinket-Pot-Lids-
he use of sheer fabric under cross stitching has been used again on a smaller scale for Ж two trinbet pot lids, based on the comer decoration in The White Rose and The Red Rose Picture.
DESIGN SIZES
Large lid 3in (7.5cm); Medium lid 2in (5cm) Stitch counts: Large lid 37 x 33: Medium lid 25 x 23
•
MATERIALS
Foe The Larue Lid Design
• 7 x 7in (18 x 18cm) 14-count Aida in ecru (colour 13) 3 x 3in (7.5 x 7.5cm) scrap of pint? metallic gauze (loosely woven so the needle can pass easily - see Suppliers page 126)
• Stranded cottons as listed in the bey
• 5 x 5in (13 x )3cm) iron-on interfacing
• Large brass trinbet pot (see Suppliers page 126) For The Medium Lin Design
• 6 x 6in (15 x 15cm) 14-count Aida in ecru
2 x 2in (5 x 5cm) scrap of pinb metallic gauze, as above • Stranded cottons as listed in the bey
• Iron-on interfacing 5 x 5in (13 x 13cm)
• Medium brass trinbet pot (see Suppliers page 126)
W
1 To stitch either design, first pin the square of gauze centrally onto the Aida, tacking round the edges to hold it in place.
2 Following the relevant pot lid chart and using a size 24 tapestry needle, begin stitching the rose outline near the top of the gauze using two strands of stranded cotton for the cross stitch and the bacb stitch
3 Once all the roses have been stitched, carefully cut the gauze away from them (see step 3. page 98). then embroider the leaves and stems.
4 Iron on the interfacing using a dry iron and a very moderate heat, just hot enough to fuse the interfacing. Cut out the designs and mount them in the pot lids, following the manufacturer's instructions
POT LIDS KEY
Colour DMC Anchor Madeira
Dark mauve pinb 315 1019 0810
Rose red 3350 69 0603
Light green 563 204 1207
Dark grey 317 400 1714
MEDIUM POT LID
POT LIDS DMC
Si 315 □ 3350 563
П Applied pink fabric
Bacb Stitch in: --------317
THE WHITE ROSE AND THE RED ROSE PICTURE KEY
Colour DMC Anchor Madeira Sheins Colour DMC Anchor Madeira Sheins
hlacb 510 403 blacb 2 Light plum 3688 1016 0605 1
Mid grey 517 400 1714 2 Pale pinb 818 271 0608 1
Silver grey 518 399 1802 1 Leaf green 3814 189 1203 1
Mauve pint 5726 1018 0810 1 Light green 563 204 1207 1
Light mauve pint 5727 1016 0809 2 Creamy flesh 3770 1009 0306 1
Rose red 5350 69 0603 1
THE WHITE POSE AND THE PED ROSE PICTURE
Ц DMC 3814
310 H 3797 □
□ 317 □ 3350 I*! 563
318 я 3688 |c| 3770
□ 3796 111 818 Applied cold fabric
I HE WHITE ROSE AND THE RED ROSE
THE WHITE ROSE AND THE RED ROSE PICTURE
DMC
H 310 1 318 3797 \ 3688 Q 3814 C 37/0
a 317 □ 3/80 Q 3350 * 818 5«3 Applied gold fabric
l()<
•SMALL-MOTIFS-FOR-DESIGN-IDEAS-
THE PAGES WHICH FOLLOW are packed with ideas for small projects. They are a starting point for your own ideas; charted in colour but with the choice of yarn colour and fabric left to you. A selection of designs has been made up (shown opposite).
The lily picture is based on a design in Rene Beauclair's boob Dessins d'Ornamentation. All his designs feature abstract plant shapes in elegant patterns with a hint of Celtic interlace design. The Шу (charted page 107) was worked on white 18-count Aida to fit a 4 x 6in (10 x 15cm) frame.
The napkin corner rose design is adapted from an embroidery by the Glasgow artist Jessie Newbery. Repeated in four corners it would make a pretty cushion cover This piece was stitched on 28-count Quaker Cloth, worked over two threads (seechart page ill).
The flying crane designs in blue and white are perfect for decorating many items, such as coasters, pot lids and book covers (see charts page 108/109). The birds were adapted from a tile design by William de Morgan and were stitched on 18-count Aida using two shades of blue stranded cotton
The pair of peacocks (charted but not illustrated) evolved from a fabric design. They are charted on page 108 in a single colour but you could include other colours to the tail, or add beads or
sequins, or work parts in metallic braids. The butterfly and dragonfly motifs (charted on page 106) are taken from jewellery designs and might also benefit from added beads or iridescent sequins. The peacock feather design (charted on page 109) was made with a note book
cover in mind. The colouring shown works best on a very dark fabric.
The pincushion shown is a very simple lily of the valley design (charted on page 111). It is worked on a 14-count Aida with two strands of stranded cotton. Try working it on a needlecase with the design mirrored for the back.
The square tulip coaster shown opposite and charted on page 110 is one of three tulip designs based on An Nouveau tiles. Worked on 18-count Aida they fit standard square coasters but would also make pretty cards. Worked on a larger scale, with a border design, they would be suitable for other items, such as oven gloves and tea cosies.
The square rose card (charted page III) is worked on 14-count Aida and is one of several derived from the Glasgow school, where a simple heart motif often accompanied rose decorations The hawthorn, orange flower and lily of the valley motifs (charted pages 106. 110 and 111) have been repeated to suggest the possibilities of building up more elaborate designs from simple motifs. W *'
.4 SELECTION OF OF SIGNS made up into small items, show ing the many creative possibilities of Art Nouveau motifs. They include a little lily picture, a rose napkin,flying crane book cover, pot and coaster, a lily of the valley pincushion, a tulip coaster and a rose card.
Мм $ ' ' |В
HAWTHORN GROUPING
PURPLE FLOWER SPRAY INTERLACED SHIELD TULIP BOOKMARK
INTERLACED HEART EDGINGS
IOS
FLYING CRANE COASTER
PAIR OF PEACOCKS
PEACOCK FEATHER CLOSE UP
TWO BIRDS FLYING
GLASGOW ROSE CARD
GLASGOW ROSE CORNER
IRIS
LILY OF THE VALLEY SPIRAL
NASTURTIUM
•DECORATIVE-BORDERS-
THE BORDER DESIGNS shown stitched here, and others charted on pages 113-118, are for you to use creatively. Many of them are adapted from design books of the period. The artists of that time changed colours arbitrarily to suit their decorative schemes and you can do the same.
Borders are useful, decorative and fun to work. Used alone they are suitable for guest towels, tray cloths, runners, bell pulls, children's clothes, aprons, even bibs If repeated on four sides of a square, they produce an instant cushion design, or they can be used in strips like the two shown on the William de Morgan bolster cushion. Just one border placed
design with a piece of paper and move it up and down the border till you find a cut-off point which looks right.
An alternative way of joining borders at corners is to cut the border at 45 degrees, though this is not so good with borders that are asymmetrical. To chose the best place to make the mitred join, hold a small mirror over the border with the bottom edge at a 45 degree angle across the design. Move it along the border until you find a pleasing result.
If you want to apply an embroidered band to another fabric use ready finished Aida or linen band or a strip of Aida, which allows a greater choice of width and colour. Turn the edges
centrally or one third from the edge of the fabric can be dramatic, particularly if you edge the border with one or more rows of ribbon
If you want to turn a comer with a border the simplest way is to butt a horizontal length up against a vertical one: as in the border of the snowdrop cushion on page 79. It is worth considering which part of the design comes to a natural looking break. If the border is made up of distinct motifs then stopping in between is an obvious solution. Sometimes it is necessary to leave out an overlapping bit of the next motif If the space to be filled makes this solution impractical just cover the
under and stitch down by machine, or neaten the edges and cover the join with braid or ribbon in a toning colour. Where a border has a line of colour along the edge, you could fold the edge over and work through a double thickness to neaten. or substitute a buttonhole stitch row for the outside row of cross stitch.
Borders are easy to stitch and can create instant effects or give added emphasis to a single central motif. Even the simplest motif when repeated can produce a pleasing and rhythmic design. Why not look through some Art Nouveau sourcebooks and create your own? • ¥
4 SELECTION of Art Nouveau-inspired borders (charted pages Hi—118), to give ideas for creative possibilities.
DAFFODIL BORDER WINDSWEPT FLOWER BORDER
SNOWDROP BORDER LILY OF THE VALLEY BORDER
INTERTWINED MUCHA CARNATION BORDER BLUE LEAVES BORDER MUCHA ROSE BORDER
GLASGOW REPEAT ROSE BORDER
GLASGOW TWO ROSE BORDER TULIP BORDER
GREEN FTOWFR
•BASIC-TECHNIQUES-
Those who have not done much embroidery before may find the following pages useful.
-Fabrics-
Each project gives the fabric required tor working the piece as shown in the accompanying photograph, but you could substitute one fabric for another.
The blockweave fabrics, such as Aida, are probably the simplest to work. The weave locks each block of threads in place, resulting in a very stable, firm fabric.
'Evenweave' just means that there are the same number of warp threads as weft threads to the inch or centimetre. The higher the thread count number, the more threads or blocks of threads there are to the inch Evenweave is usually embroidered over two threads at a time. Thus a 28-count (or 28 holes per inch) evenweave fabric can be substituted for a 14-count Aida, a 32-count evenweave for a 16-count Aida, and vice versa.
Calculating the Design Size
As you gain confidence you may choose to work on a larger or smaller count of fabric. This will, of course, result in the finished piece being a slightly different size. To find out how large a piece would become, divide the stitch count given by the number of holes per inch of the fabric For example, the iris border on page 115 is 48 stitches wide. To find out how wide it would be if worked on a 14-count fabric, simply divide 48 by 14 The result is almost З'/ап (8.5cm).
Remember that most designs need a margin of blank fabric around the edge of the stitched area, plus an extra 2in (5cm) on all sides to allow for any framing The fabric amount stated in the projects allows for this. Where measurements are given, the width is usually quoted first, followed by the height.
-Threads-
Many of the projects described use stranded cottons, with which most people are familiar 1 used DMC stranded
cottons but if you prefer one of the alternatives given, bear in mind that they are not always an exact colour match. The names of the colours 1 have used are for convenience and are not official colour names which manufacturers will recognise. Always order by the code number. Divide skeins into lengths of about 20in (50cm) and divide each length into its six strands, then recombine the number needed - usually two.
Metallic braid is used as it comes. Blending filament is used in conjunction with stranded cottons. I thread a length along with the cotton, but the packs show other ways of knotting the thread to the needle, which you may wish to try. Tapestry wool is available in skeins and some colours come in hanks. 1 have not given alternatives for the colours in the Peacock Rug because I could not match the colours well enough from other manufacturer's ranges. Anchor Tappiserie wool is quite easy to find, but if you have problems contact the telephone numbers in the Suppliers list on page 126.
-Needles-
All the embroidery is done with blunl-ended tapestry needles, except for parts of The White Rose and The Red Rose Picture, where you can use a crewel needle. Beading needles are required to attach seed beads. 1 have recommended needle sizes, but you may prefer a different size - it is a matter of compromise between having a large enough eye to take the thread and a size of needle which will pass through the fabric holes without too much friction.
-General-Accessories-
Арап from fabric, thread and needles you must have a good pair of embroidery scissors with sharp points, as well as cutting-out scissors. I also think a bright light is essential. Many are made especially tor embroidery, but a studio-type light will do just as well It is important to position it correctly When working on dark fabrics it is really helpful to place a brightly reflective sheet of paper
or white pillowslip over your knees. This will make the holes in the fabric show up much more clearly You may find working some of the designs in this boob much easier with a magnifier
•Embroidery-Frames-
I recommend using a frame for any evenweave fabric and when working with a mixture ot threads, as you may find that their different characteristics cause you to pull some threads more firmly than others. Where there are layers of fabric, as in The White Rose and The Red Rose Picture, a frame is necessary. Small pieces of fabric and rug canvas can be worked without a frame and It is certainly much easier to roll up the fabric and take it about with you if it is not framed.
For small pieces use a hoop frame (Fig 1) or flexi hoop (Fig 2). Always try to use a hoop large enough to take the whole design. If this is not possible, only leave the hoop on the work whilst you are actually embroidering, and take care when repositioning it not to let the edge coincide with an embroidered area.
Fig 1 Hoopframe. Fig 2 Flexi hoop.
For larger pieces, a rectangular slate' frame (Fig 3) is the traditional answer The embroidery fabric is stitched to a tape attached to the top and bottom rails, matching the centre of the tape to the centre of the embroidery
Maiit> centre nurk>
Fig 3 Rectangular slate frame.
fabric The frame has wing nuts which can be loosened to allow the rails to be rotated to roll the fabric up if it is larger than the frame, for example a bell pull. The edges ot the selected area are laced to the sides ot the frame to keep the fabric taut This type ot frame gives good, firm support, and is particularly suitable if the embroidery is to be left where it is.
A rectangular clip frame is made from lengths of plastic tube (Fig 4) These come with different lengths of tube which are assembled with plastic corner pieces. The fabric Is placed over the tubes and clipped in place, using extra tubes, slit along their length. This light and convenient frame is particularly suitable for use where part of a large amount of fabric is being worked.
Fig 4 Clip frame.
•To-Begin-
Although it is tempting simply to thread your needle and begin to stitch, you may find that you soon encounter difficulties These can be easily avoided by following the simple advice given Mow.
Preparing the Fabric
When working on Aida I find that cutting it out with pinking shears slops it from fraying. When using even weave. I like to neaten the edge by using a machine zigzag stitch or by overcasting the edges by hand
Centre lines are indicated on the charts by rhe use of opposing arrows. Find the centre of your fabric by folding it in half both ways Mark the centre lines in sewing thread, using a tacking stitch. Make sure, especially when using evenweave, that the line of stitches stays straight along the grain of the fabric. In some of the larger designs 1 have suggested marking extra guide lines and it is wise to choose another colour tor these.
Following the Charts
Each coloured square on the charts represents one cross stitch. The beys accompanying the charts list the threads used, their colours and codes (including alternatives to DMC stranded cottons where appropriate). in some cases I have used similar shades in the embroidery and so symbols have been added to aid identification in all projects except the Borders and Small Motifs. A few of the designs use quarter or three-quarter cross stitches: these are represented by a square divided diagonally, with the relevant section coloured and containing the symbol. Where back stitch is used it is represented by a thick coloured line with the colour given in the hey. The charts show slightly more pronounced grid lines after every ten squares to help you count.
You may want to use the charts straight from the book or you can photocopy them in colour tor your own use This allows you to enlarge or reduce and tape various sections of the larger charts together. Il also allows you to cross off areas as you work them, which some people find helpful You can also draw in the centre lines and any extra guidelines in felt pen to match the lines you have worked. Generally I start embroidering at the centre and work blocks of colour at a time.
Although this boob is devoted to cross stitch, the charts could also be used for canvaswork (needlepoint) embroidery. Simply use half cross stitch or petit point (tent stitch) instead of cross stitch. Remember you will need to add a background colour to most of the designs, though not the Peacock Rug which could be worked on a finer canvas. Designs which rely on bach stitch detail are not really suitable for canvaswork
Starting to Stitch
To begin stitching in an empty area of fabric, first bnot the thread and take it through the fabric from the front about I in (2.5cm) from where you wish to begin When you have stitched over the thread the knot can be safely trimmed off and the end persuaded through to the bach To start a new thread in a stitched area, just thread it under four or five stitches on the bach of the work before beginning to stitch. These techniques eliminate ugly bumps that could spoil the look of the finished piece.
•To-Finish-
To finish off an area of stitching, thread your needle bach through the last four or five stitches on the wrong side of the fabric and then trim the thread.
Pressing
A finished piece of embroidery will need careful pressing to smooth out the fabric and correct any distortion without flattening the stitches and spoiling the texture. A layer of towel covered with a piece of sheet should give a soft enough surface to rest the embroidery Ixiy the embroidery face down, pull it into shape making sure the grain of the fabric is straight. Press it gently on the bach at a heat suitable for the type of fabric and thread. Do not use steam on metallic threads and cover the piece with a pressing cloth. Cottons embroidered on Aida or cotton cloth can be pressed at the two- or three-spot setting on the iron; any piece using synthetics, wool or silk, require the one-spot setting
Cleaning
Wash embroidery in water as hot as the fabric will stand using a mild detergent, thoroughly dissolved in water. It the colour bleeds, separate the item from other pieces of embroidery, wash it thoroughly but without rubbing, and rinse until all trace of the stain disappears Never leave the embroidery wet. Remove excess water by rolling the item in a towel and squeezing it gently. Dry it flat then iron from the back whilst still damp.
Stretching
To stretch an embroidered canvas you will need a clean board larger than the canvas, rust-proof tachs or small nails and a set square Begin by nailing the canvas right side down onto die board, starting in the centre of one side. You could dampen the canvas. Add nails at intervals all along the side to one corner and then the other making sure the canvas is fixed straight against the line Now begin tacking the canvas down onto the board on the other side, measuring and stretching to ensure it is square. Finish the other sides in the same way. Once you are satisfied that the measurements and angles are correct add more nails all around until the edges are straight. Leave in a warm place for about two days, then pull out the nails and finish your rug or piece.
-Stitches-
Cross Stitch
Cross stitch is the bask stitch used in this boob (Figs 5 and 6). Either make individual crosses, or work half crosses along a line then return, stitching over the half crosses in the opposite direction. The first method is the most stable and unlikely to cause fabric distortion, and is to be preferred if working without a frame However, as long as you develop an even tension without pulling the stitch so tightly that it distorts the fabric threads, either is acceptable It is important to choose which direction your top stitch will go and stick to it. otherwise the texture will be uneven
Fig 5 Cross stitch on Aida.
tig 6 Cross stitch on even »«<» w.
Three-Quarter Cross Stitch
Work a quarter stitch from the corner into the centre, then work a half stitch in the normal way (Fig 7) The rule of having the top stitches always lying in the same direction is thus sometimes broken.
f ig 7 Three-quarter cross stitch.
Back Stitch
This is an easy outline stitch that Is used In a few projects in this book Look ar the chart and instructions to see if it should be worked with one or two strands of
stranded cotton It is usually worked after the cross stitching. Bring the needle through the fabric from the back and take a stitch backwards Bring the needle up again at the far end of the next stitch along the line and then take another stitch backwards to fill in the gap (Fig 8) Work over the same unit of fabric - one block or two threads - as you have used for the cross stitch.
Fig 8 Rack stitch.
Double Punning Stitch
This is suitable lor long lines. Make a line of running stitches then turn buck and till in all the gaps with another row of running stitches (see Fig 9) For the smoothest line, when working the return line of running stitches, put your needle through the fabric to the left of the first row thread and bring it up to the right of it. or vice versa (be consistent).
I'ig 9 Double running stitch.
Petit Point or Tent Stitch
This stitch is a variation of half cross stitch, which is used when working over one thread of a non-interlocked fabric. In this booh it has only been used for the purple and pink flower border on page 114, which is worked over one intersection of Hardanger fabric. Use it if you adapt any pattern to work over one thread of evenweave fabric. It is the same stitch that is used in canvaswork (needlepoint) on a non-interlocked canvas. It can be worked diagonally or in rows (Tig 10) and differs from half cross stitch in having a longer stitch on the bach of the fabric than on the front. This is essential to maintain
the stability of the design and fabric. It is recommended that this stitch is worked with the fabric on a frame.
Fig 10 Petit point (over one thread oj' evenweave).
Plaited Cross Stitch Edging
This is recommended for finishing off the Peacock Rug on page 27. Starting a little way from a comer, work from right to left along the folded edge of the canvas Hold the wool along the top edge as shown in stage 1 of Fig II. Bring the wool through from the bach at A. then take the wool over the loose end and through from the back again at В The wool is then taken back to A and brought through from the bach again to form the first cross. The wool always passes from the bach to the front ot the canvas. For stage 2. take the wool forward three squares to C. Cross back to В then go forwards three holes. Continue, always counting three holes forwards, then two back, and always taking the wool through from the back to the front
•Making-Up-
Pictures
To make your work up into a picture you can simply press it and take it to a framer specialising in embroidery who will do the rest for you. It you prefer to do it yourself then read on. The embroidery will need to be bached by a piece of backing board (stiff card) which fits inside the frame (Fig 12). A white board is suitable for pale coloured fabrics but choose a toning card for dark colours. When framing behind a mount I sometimes just stick the embroidery to the card around the extreme edges (Never allow glue on an area where it could be seen as a stain can develop over time.) 1 have used double-sided tape or occasionally staples.
Fig 12 Framing embroidery' with a mount.
Fig 11 Plaited cross stitch edging.
If the piece is to be framed without a mount then it must be laced round the card. This method should also be used if you need to cure any wrinkles or distortions. Cut l he baching card lo fit easily inside the frame, remembering to allow for the thickness of fabric pulled round the edge. Mark the centre of each side on the back ot the card Mark where you want the centre of the embroidery to be by pins at the edges. Lay the front of the card on the wrong side of the fabric, matching the centre marks. Fold the fabric round the card and hold it in place by pushing pins through into the edge ot the card (Fig 13). Stan at the centres and work outwards on opposite sides. Every so often, turn the work over to check that the fabric is held taut and that the grain of the fabric is straight When you are satisfied, take a long
length ot buttonhole or linen thread and lace from side to side, pulling the thread tightly enough to hold the fabric firmly in place without bending the card. Repeat this operation with the other two sides This method is reversible, giving you the option of changing your mind later. I prefer to frame without glass, but if you choose to use it. ask the framer not to squash the glass up against the embroidery, flattening its texture.
Fig I i lacing embroidery for framing without a mount.
Mitring a Corner
This is a neat way of removing excess fabric from a corner. Fold the fabric along the edges as far as required and mark the fold line. Unfold die turnings. Al the corner, fold the fabric on the diagonal as shown in Fig 14. Press the crease Allowing for a small turning along the creased side, trim away the excess fabric Turn in the long edges and the creased diagonal sides should meet in a neat mitre. Stitch them together invisibly. See page 27 for details of mitring the corners ot the Peacock Pug.
Cushions
On the back of the embroidered fabric, mark exactly where you want the edge of the cushion to be, bearing in mind the sizes of cushion pad available. Choose a
backing fabric that matches or tones with the embroidered fabric Cut it to the finished size plus turnings, then place the fabrics right sides logetfter and pin them With the wrong side ot the embroidered fabric uppermost, machine stitch following the marked edge line. Start a short distance from one corner, go round three sides and finish by stitching a little way round the last corner, leaving a gap to put the cushion |»d through (Fig 15). Work another line of stitching round the corners to reinforce them, then cut diagonally across the corners, quite close to the stitching, and trim the other edges, leaving the usual seam allowance. Turn the cushion to the right side and press the seam. Insert the pad and invisibly stitch the edges together.
An alternative method is to make up the baching piece with a zip inserted (Fig 16) To do this you need a slightly larger backing piece cut in half Place the two halves right sides together. Sew 2in (5cm) of the seam al top and bottom and insert a zip in the gap. Proceed as above but sew round all four sides. Open the zip to turn the cushion and insert the pad. You could add cord or piping round the edges, for an attractive finish but this should be inserted before sewing the front to the bach
Fig lb Backing fabric with tip inserted.