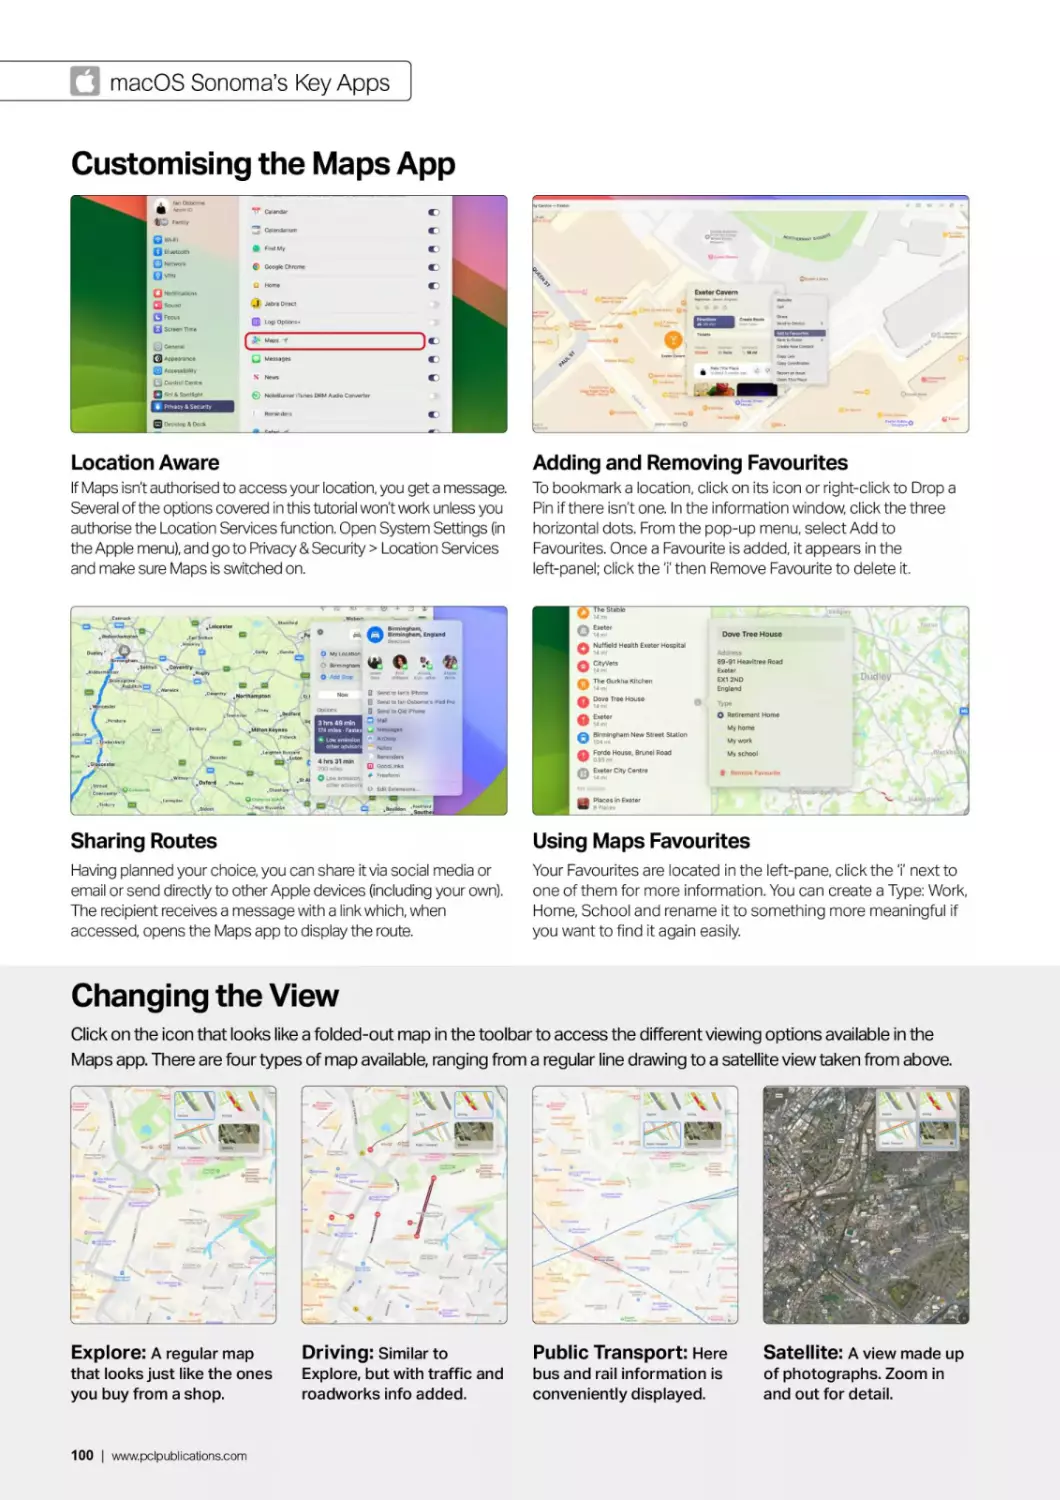
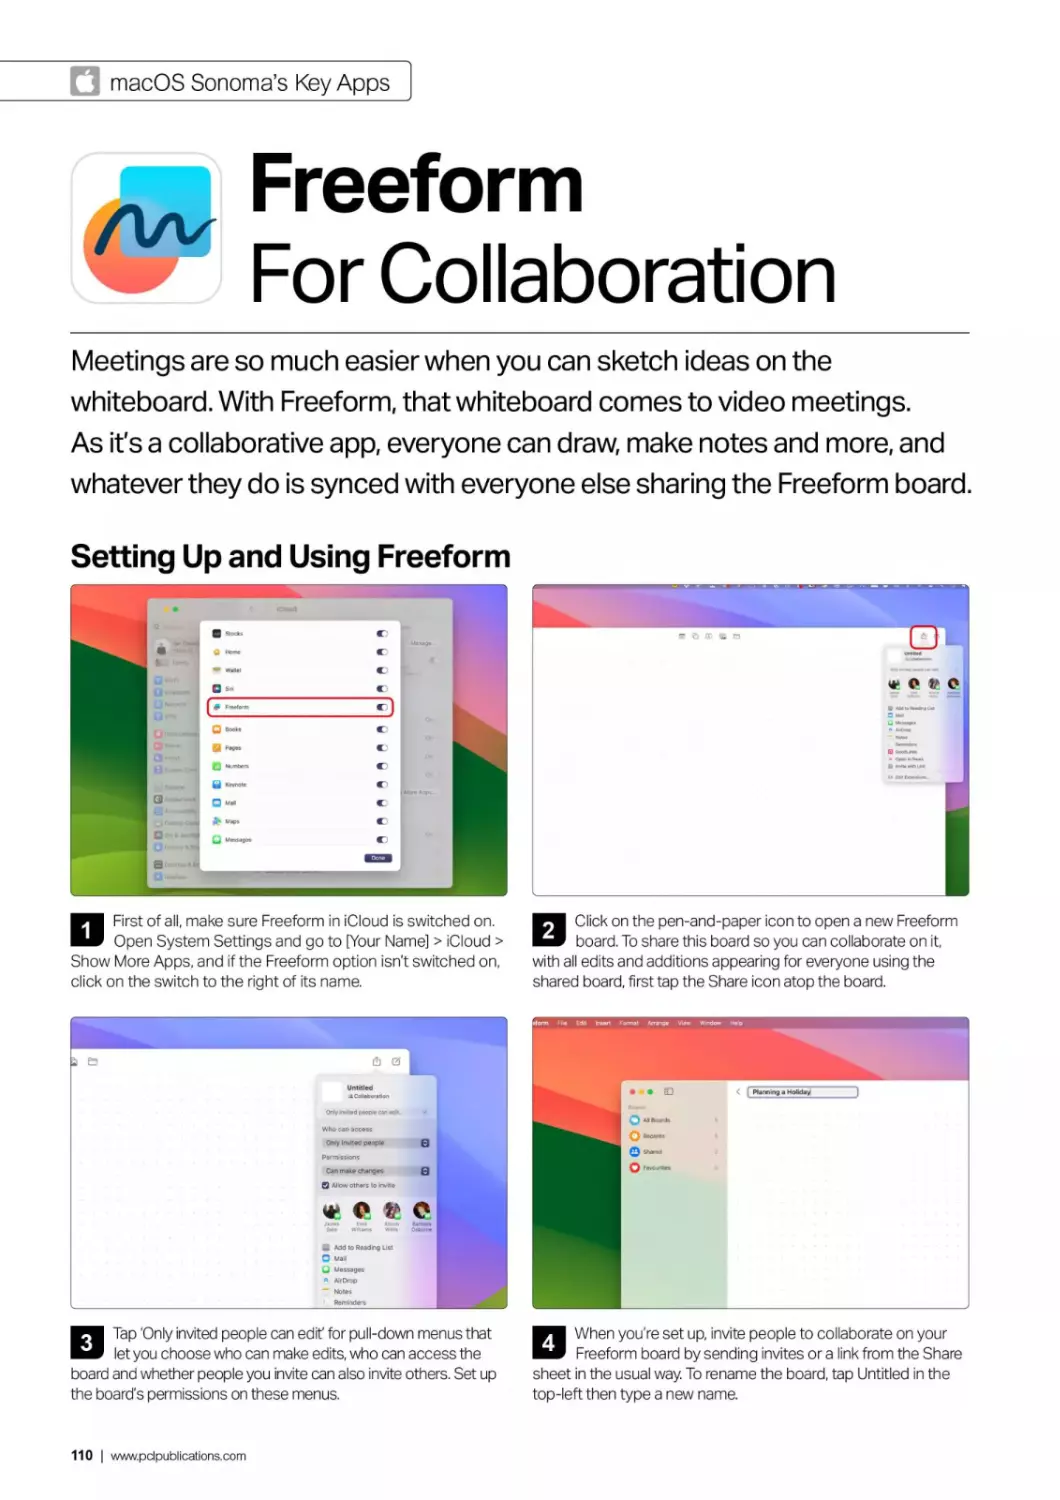
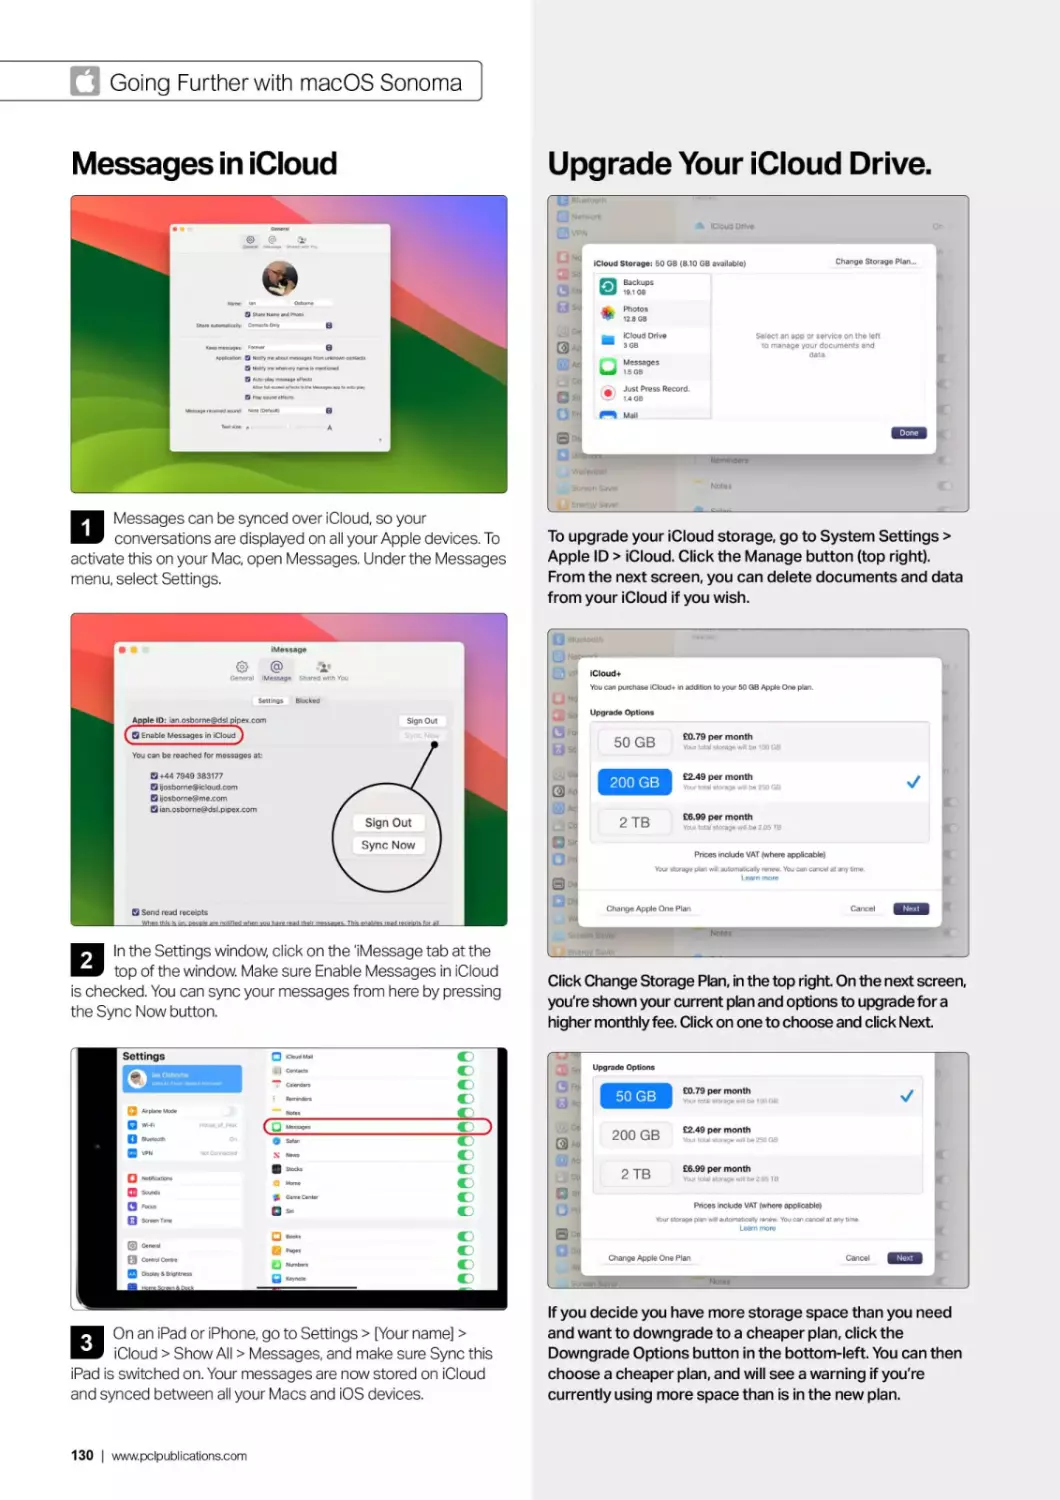
/


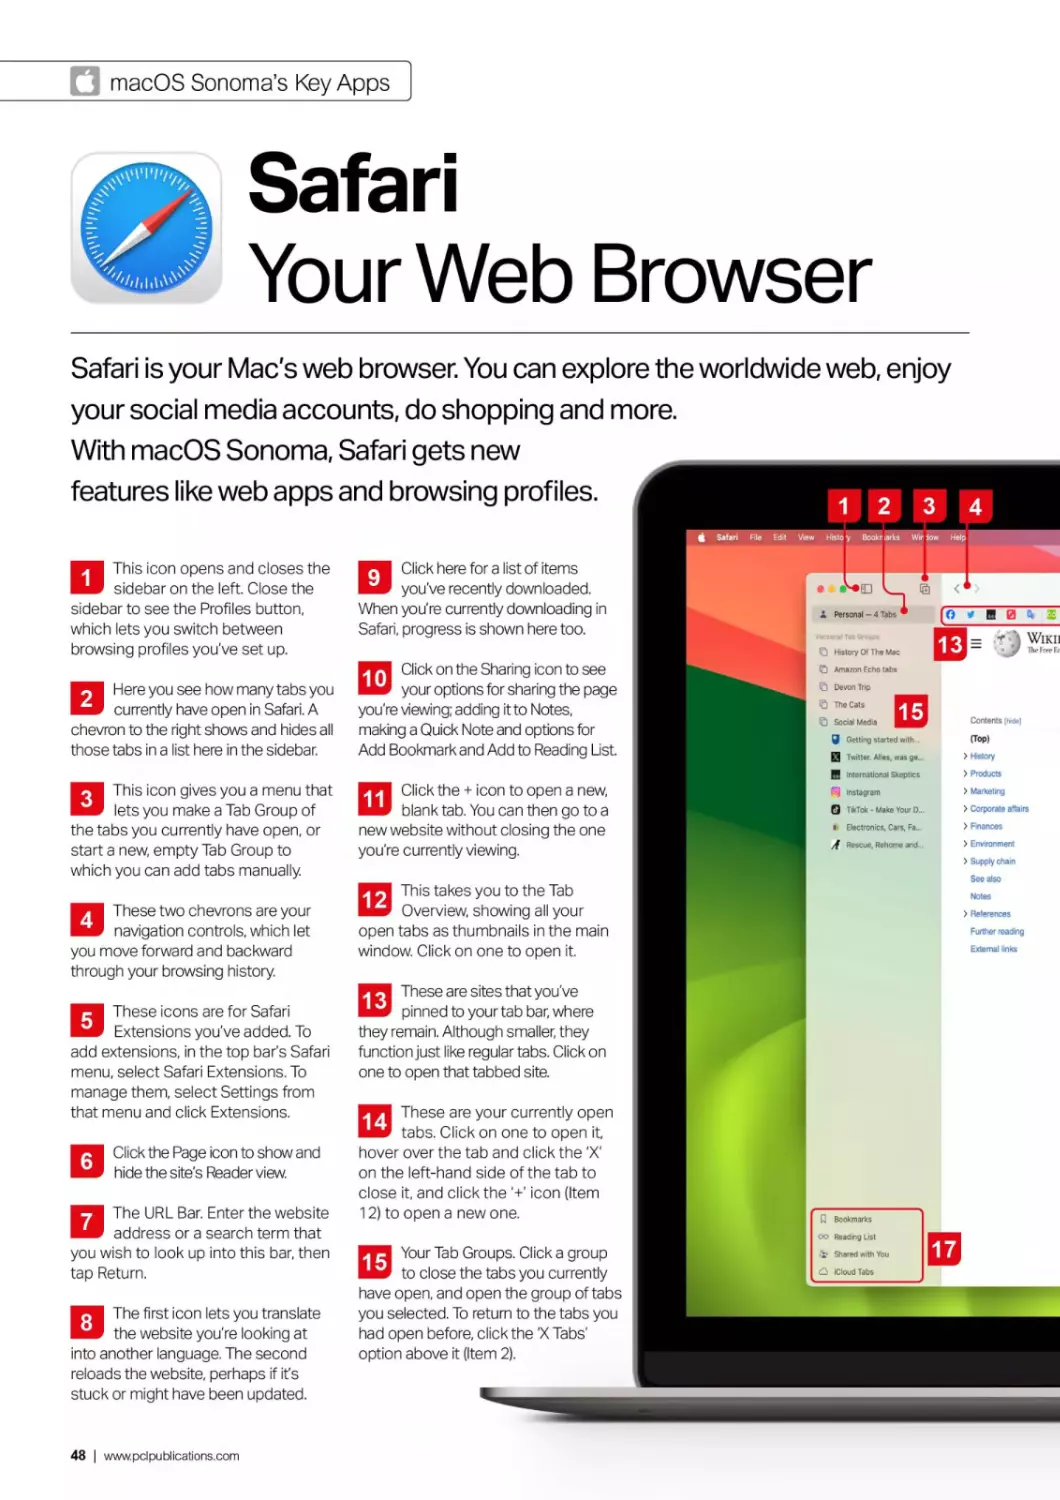


Text
FOR USE WITH ALL MACBOOKS
у The Complete
MacBook
User Manual
The essential step-by-step guide to your
MacBook and macOS Sonoma
www.pclpublications.com
100% INDEPENDENT
О Popercut
UPDATED FOR IPHONE 15 MODELS
The Complete
Manual Series
Mac. Hook and macOS Sonoma
Readly
A vailable on
FOR USE WITH All MACBOOKS
895
DESKTOP PC. LAPTOP» SURFACE
FOR ANDROID, APPLE, PC* MAC
BEAT HACKERS, VIRUSES S MALWARE Q
885
bl**
FOR ALL iPADS & iPadOS 17 £
UPDATED FOR macOS SONOMA
The Complete
Mac
User Manual
mastering yw .name геглчх* ano sma7 tjences
2 Popercut
ffl
Networking
Manual
Computing
Manual
&iOS -
User Manual
FOR APPLE WATCH & wafchOS 10
The Complete
Apple
Watch
watchOS 10 Manual
r The Complete
MacBook
User Manual
у The Complete
iPad
&iPadOSE
User Manual
FOR SMARTPHONES & TABLETS
The Complete
Windows 11
User Manual
The essential step-by-step manual
to mastering Microsoft's Windows II
r The Complete
Samsung
Galaxy
Manual "
FOR ALL COMPUTERS A MOBILES
FOR ALL CHROMEBOOK MODELS
MASTER PYTHON PROGRAMMING </>
The Complete
JUwTi
Coding Manual
The essential рг&ушшмпд manual
to improve your РуТпЛ coding skills
The Complete
Instagram
User Manual
INUX, PYTHON A
Coding Manual
Pie essential sfep-O>»-slep
The Complete
The Complete
Google
User Manual
c-cbontnrl Gtop-hy-Ktop плгктст. to /гютпрглд
cmuyte* шпа&тд ffett upps
The Complete
Chromebook
User Manual
Master your Chromebook and
Google's Chrome OS
.+ FOR ANDROID, APPLE. PC Л MAC
r The Complete
WhatsApp
Manual
LEARN PYTHON & C++ CODING
The Complete
& Python
Manual
I Internet w
Security | д
i/s-\ Manual to m
B^Eaasa
еввпйя
ф PROGRAM UNUX. PYTHON 8 C < + </>
The Complete
jjk RASPBERRY Pi 5, Pi 4,400 ЯРКО
r The Complete
Master programming and
improve your Python,
Linux & C++ skills
FOR PC. MAC « MOBILE DEVICES
The Complete
Windows 10
User Manual
The essential step-by-step guide
to mastering Microsoft's Windows Ю
operating system
(890
Home
The Complete
Cloud
For a full list of titles available please visit
www.pclpublications.com
The Complete
MacBook
User Manual
macOS Sonoma has some awesome new features for your
MacBook, and we're here to tell you all about them. Over
the following pages, we bring you tip-top tutorials and
plain-English guides to Apple's latest Mac operating
system, its bundled apps and its advanced features. For
beginners, we show you how to set up your MacBook out
of the box, and get to grips with its key functions such as
Finder, trackpad gestures and the Dock. Our guides to
Sonoma's key apps cover both the basics and their
advanced features. Look out for guides to the Safari web
browser, Stage Manager, Mail email client and FaceTime
for audio and video chats. We cover Sonoma's brand new
features too, like Desktop Widgets, Dock Applications, Safari
Profiles, Screen Sharing and more.
With our help, you'll soon be using your MacBook like a pro.
Э Papercut
www.pclpublications.com
* Contents
Contents
The Complete MacBook User Manual >
6 First Steps with macOS Sonoma
46 macOS Sonoma's Key Apps
8 Set Up Your Mac - For the First Time 48 Safari - Your Web Browser
12 Using Touch ID On Your Mac's Keyboard 49 Browser Translations
14 Welcome to the Sonoma Desktop 58 Mail - Send & Receive Email
16 Screen Savers and Wallpapers 59 The Column Layout
18 Gesture Controls - On Your Trackpad 65 Home - For the Smart Home
20 Desktop Widgets - New in Sonoma 66 Music - Play Your Tunes
22 Dark Mode And Night Shift 67 Importing Your CDs into Music
23 Desktop Stacks For Organisation 68 Signing Up for Apple Music
24 Getting Online - With Wi-Fi or Ethernet 70 News - Stories and Features
26 Sonoma's Menus - A Key Mac Feature Z1 _ My Sports
28 Using Finder - Files, Folders & Apps 72 Photos - Manage Your Images
34 Sonoma's Dock - For Most-used Apps 74 The Editing Tools
36 Notifications - See What's Going On 77 Editing Photo Information
38 The Spotlight Feature - Search Your Mac 78 Contacts - Your Address Book
40 Launching Apps - And Quitting Them 79 Sharing Contacts
42 Setting Up Email - For the Mail App 80 Calendar - Plan Your Events
44 Installing New Apps - Including Third Party 81 Creating an Event
4 | www.pclpublications.com
84 Reminders - Never Forget Again
85 Creating and Using Reminders
87 Screen Sharing - A Better Way
88 Messages - For On-screen Chats
92 FaceTime - Video & Audio Calls
94 Group FaceTime Calls
95 More FaceTime Features
96 Sonoma Video Chat Features
98 Maps - Plan Your Routes
99 Route Planning Explained
101 Viewing Maps in 3D
102 Notes - Store Your Jottings
104 Advanced Notes Features
106 Quick Note
108 Find My - Find Your Gear
109 Share AirTags
110 Freeform - For Collaboration
112 App Store - Buy More Software Г - fl
121 Redeem/Add Funds
114 Going Further with macOS Sonoma
116 Stage Manager - A New Feature
118 Continuity Feature - On Apple Devices
122 Universal Control On Macs and iPads
124 Continuity Camera - Use Your iPhone
126 Using iCloud - For Storage & Syncing
130 Upgrade Your iCloud Drive
132 iCloud Desktop - Documents & Folders
133 The App Switcher - Speed Your Workflow
134 The Siri Feature - Your Digital PA
136 The Time Machine - Back Up & Restore
138 External Hard Drives Advice
140 Update macOS - To Sonoma
142 What Else is New in Sonoma?
145 Privacy and Security Features
Home Security
Inside & Out!
TECH,'7?
SH9PP6R E
FREE
Digital Magazine
See
I Page
4^146
for download details
www.pclpublications.com | 5
First Steps
with macOS
Sonoma
Here we get to grips with the basics of
macOS, such as setting it up out of the
box, using Gesture Controls, the Finder,
getting online and more. The new
macOS Sonoma wallpapers and
screensavers are covered, as are the
Desktop Widgets that let you check
important information straight from
your Desktop. Look out too for guides
to Spotlight, Notifications, the Dock,
Sonoma's menus and more.
6 | www.pclpublications.com
First Steps with
macOS Sonoma
www.pclpublications.com | 7
First Steps with macOS Sonoma
Set Up Your Mac
For the First Time
If you have a new Mac but have not yet set it up, follow this guide. It's
nothing to be afraid of; follow the guide and the on-screen instructions, and
step by step, you get to set your Mac's language, take it onto the Internet
with your Wi-Fi network, sign in with your all-important Apple ID and more.
1
First, you might see this window, inviting you to choose
the language you use to set up your Mac. The most
popular languages are at the top of the list, but if you want to
use an alternative one, scroll up until you find it, click on it and
then click the arrow (bottom right).
2
Now you must choose your territory, that is, where you
live and will be using your Mac. You can scroll the list of
countries up and down to find your own, or start to type it to
get there quicker. Click your country to highlight your choice,
then click Continue.
3
Now select your Mac's language and input source. The
default ones for your chosen territory are offered, but if
you want to change them, click Customise Settings and set
the language your Mac uses and the keyboard layout to best
suit your needs.
If you have a disability that makes it harder to use a
computer, the Mac's Accessibility tools could be of
interest. If you want to set up your Accessibility settings now,
click one of the buttons. If not, click Not Now - you can do it
later in Settings.
8 | www.pclpublications.com
Set Up Your Mac
Next comes the Data & Privacy screen. You're shown an
icon that appears when an Apple feature collects
information, and needs your permission. There’s nothing you
need to do on this screen, just read it for reference and move
on once more.
6
You're invited to transfer information from a Mac or Time
Machine backup, a Windows PC or not at all. To transfer
data from your old computer, choose the correct option and
follow the on screen instructions. Otherwise, choose the last
option to start afresh.
О Now it’s time to sign in with your Apple ID. If you already
have an Apple ID, sign in now with your password. If you
don't click the Create New Apple ID link and follow the
on-screen instructions. There's also a link for if you've
forgotten your Apple ID.
8
You’re shown a screen of Terms and Conditions, which
you can read by scrolling if you wish. When you're ready,
click the checkbox labelled 'I have read and agreed to the
iCloud terms and conditions', then click the Agree button in the
bottom-right corner of the window.
9
Your account name is based on your Apple ID name but
your password, which unlocks the computer, should be
chosen now. Choose something you can remember and enter
a hint in case you forget. Click the small picture to choose a
different one, or take a photo using the Mac's camera.
10
You can also change your avatar now, if you wish. Simply
click on the one you have at the moment - the image in
the circle to the right of your full name and account name -
and you're given the chance to change it to a Memoji, Emoji,
monogram, a photo and more.
www.pclpublications.com | 9
П First Steps with macOS Sonoma
11
Now you decide whether to Enable Location Services or
not It's up to you, but there’s a lot of Mac features that
depend on being able to tell where you are to work, for
example, finding your location in Maps. Click the box if you
want to enable it, and then click Continue.
12
You can now choose whether you allow analytic
information to be sent to Apple and/or third-party
software developers so they can improve their products. If
you're concerned about privacy, you can decline, but it's helpful
if you agree to share.
13
You now decide whether or not you want to set up
Screen Time. Click Continue to have Screen Time give
you updates on how you're using your Mac, or the Set Up Later
link at the top to leave it be for now. You can activate it later in
macOS Sonoma's System Settings.
14
It’s time to set up Siri, and decide whether or not you
want Apple’s own digital personal assistant to activate
when you say, 'Hey Siri.' Click the checkbox in the middle of the
window if you wish to do so, then click Continue and follow the
on-screen instructions.
15
You can now choose a Siri Voice, that is, the voice used
by the Siri digital assistant when you use this feature on
your Mac. Click on each voice in turn to hear what it sounds
like, and then click the one you want and click Continue. You
can change it in Settings later if you wish.
16
Do you wish to send information to Apple for it to use in
improving the Siri and Dictation features? These
recordings are shared with privacy in mind, and Apple never
knows who sent which recording. Click Share Audio
Recordings or Not Now.
10 | www.pclpublications.com
Set Up Your Mac
17
Choose how your Mac will look when in use. You can
go for the default light look, with white as the
predominant background colour, or dark, with black
backgrounds. Auto switches between light and dark
depending on the ambient light
18
Your Mac soon boots into macOS Sonoma, the latest
version of the Mac's operating system. If you open
System Settings (from the Apple menu, Dock or Applications
folder), you can change its appearance and wallpaper, should
you not like it as it is.
Reset to Factory Conditions
If you acquired your Mac second hand, you might want to wipe it clean and start again. Just follow this guide.
First, restart your Mac whilst holding down cmd-Shift-Alt-R (Intel
Mac) or by pressing and holding the power button (Apple Silicon
Mac). The Mac continues to boot, but instead of the regular
desktop, a window appears showing four options as seen here.
From the window, select Disk Utility (the bottom of the four
options) and click Continue. Select your startup disk (called
Macintosh HD by default) and in the toolbar at the top of the
Disk Utilities window, click the Erase icon to wipe it clean.
On the next screen, the Format pull-down menu should read
APFS if it's available or Mac OS Extended (Journaled) if it isn't.
Select the appropriate option and click Erase to wipe your boot
drive. When it's finished, click Done, then quit Disk Utility (cmd-Q).
Now choose to install macOS and continue. When invited to install
the operating system, do so; you might have to click on the Wi-Fi
icon in the menu bar and rejoin your wireless network. Agree to
T&Cs, select your main drive and click Install to start afresh.
wwwpclpublications.com | 11
П First Steps with macOS Sonoma
Using Touch ID
On Your Mac
If your Mac supports it, you can unlock your computer using your fingerprint
instead of entering a password. Just place your finger on the fingerprint
sensor and it springs into life. You can also use Touch ID to unlock your Mac,
input passwords and make purchases, all by using your fingerprint.
Setting Up Touch ID
3
Type your admin password when asked, the one you use
to unlock your Mac. As instructed, you must now place
the finger you intend to register on the Touch ID sensor, on the
top-right of the keyboard.
Keep raising and lifting your finger. As you can see, the
grey fingerprint in the window gradually turns red, as
Touch ID reads, analyses and records your fingerprint Keep
doing this until the centre section is full.
12 | www.pclpublications.com
Using Touch ID
И
Touch ID now needs to cover the edges of your finger.
Continue lifting and placing your finger, but concentrate on
having the edges of that fingerprint on the Touch ID sensor.
The edges gradually go red. Eventually, all the fingerprint
area is red, and the registration is complete. Click the
Done button in the bottom-right corner.
Ci) General
Q Appearance
0 Accessibility
Ц Control Centro
□ Siri & Spotlight
О Privacy 8 Security
a Desktop 8 Dock
£J Displays
Wallpaper
Screen Sever
Q Battery
Q Lock Screen
7 Touch ID & Password
Password
A login password has been set for this user. Change...
Touch ID
О Users 8 Groups
О Passwords
Internet Accounts
Game Ginitt
• +
Finger 1 Finger 2 Add Fingerprint
Use Touch IO to unlock your Mac <J
Use Touch IO for Apple Pay
Use Touch ID for purchases in iTunes Store. App Store CD
and Apple Books
Use Touch ID lor autofilling passwords «3
Use Touch IO for fast user switching <D
Apple Watch
Use Apple Watch to unlock your applications and row Mac
0 tan's Apple Watch
И There's a list of things you can do with your Touch ID
instead of typing your admin password. Take a look and
uncheck any that you don't wish to use.
Purchases & Passwords
Unlocking Your Mac
With Touch ID, you can place your finger on the sensor to
unlock your Mac, without your admin password. You still
need the password after it restarts.
Purchases and Log-Ins
You can use your Touch ID to make App Store purchases
and enter login details. Instead of typing a password to
complete the purchase or log in, use Touch ID.
Fast User Switching
If two people have accounts on your Mac, and you've
enabled Fast User Switching from the menu bar, you can
use your Touch ID to switch between users too.
www.pclpublications.com | 13
First Steps with macOS Sonoma
Welcome to the
Sonoma Desktop
The desktop is at the heart of your Mac. Everything you do takes place on
the desktop, including opening apps, interacting with files and folders and
using the Dock. Here we show you how to use your desktop, app and folder
windows, the top bar menu, Bin and more.
1
From the Apple menu you can
log out, shut down, restart or
put the computer into sleep mode,
get comprehensive information on
the computer's hardware and
software, access the System
Settings and open items you've
recently closed.
2
The menu bar running along
the top of the desktop gives
access to functions and controls for
the app you currently have open at
the time. The app currently in use is
shown to the right of the Apple icon.
In this case it's Finder. Open or click
on an app and its name is shown
here instead; and its menus are listed
in the menu bar.
3
The Control Centre is where
you can access Bluetooth,
Wi-Fi settings, display brightness,
volume, Stage Manager, Screen
Mirroring and much more.
Application windows come in
all shapes, sizes and designs.
Your Mac's applications can be
launched from the Launchpad, the
Dock, from Spotlight or using
Applications window in Finder.
□
5
This is a Finder Window. The
Finder utility is the central
point for navigation and file
manipulation. You can browse and
navigate applications, documents,
external drives and even access
other computers; as long as they're
connected to the same network
(cabled or wireless).
6
This is your Mac's Desktop.
Click on it to hide all open
windows, showing your Desktop
Widgets, if you've added them. You
can change the picture (or
wallpaper) used for the Desktop in
System Settings > Wallpaper. The
one we have here is the standard
macOS 14: Sonoma desktop, but
there are plenty of awesome
pictures to choose from.
In macOS, folders work just like
their real-world counterparts.
You can use them to store files, data
and even other folders. You can call
them anything you like; click on a
folder's name and type in a new one.
The Dock offers quick and
easy access to your favourite
8
applications, documents, folders
and even the Bin. It’s easily edited
and customised to make the most
of the way you work. Apps you
currently have open are always
shown in the Dock.
9
You can also put folders in the
Dock, as shown here. Click on
a folder to open it within the dock,
and then click on something inside
the folder to open or launch it.
10
The Bin, formerly called the
Trash. To delete a file, folder or
application, drag it into here, then
right-click on it and choose 'Empty
Bin' from the menu.
Щ Finder File Edit View Go Window Help
14 | www.pclpublications.com
The Sonoma Desktop
Siri
Siri is Apple’s
personal digital
assistant and you
can use it on your
Mac. Just click on
this icon and a Siri
window opens. See
the Siri tutorial for
more information
on howto use
this feature.
Date, Time,
Notifications &
Widgets
Click on the time here and to open
the Notifications and Widgets
sidebar. If you go into System
Settings > Control Centre and
click the Clock Options button,
you can set how the date and time
are displayed here.
www.pclpublications.com | 15
П First Steps with macOS Sonoma
Screen Savers
and Wallpapers
Screen savers have come a long way since the flying toasters. Now you
can have all sorts of graphics and images activate when your computer
goes to sleep, and even integrate your screen saver with your Desktop's
wallpaper. Here's how to use this great new Sonoma feature.
Choosing a Screen Saver
Open System Settings from the Apple menu in the
top-left of the screen. In the left-hand sidebar, click on
Screen Saver. A range of savers is on offer, including current and
past macOS savers, aerial photos and various graphics.
2
There’s some great slow-mo aerial shots on offer, divided
into categories; Landscape, Cityscape, Underwater, Earth.
The Shuffle Aerials option lets you use a screen saver chosen at
random from one of these categories.
3
Scroll left and right along a row to see more screen
savers, or click Show All for all the options in a category.
When choosing an aerial screen saver, it has to download; see
the progress circle in the top-right corner of the window.
When it's downloaded, you can preview the screen saver
by moving the pointer to the thumbnail and clicking on
Preview. The screen saver is shown. Press a key, move the
mouse or touch the trackpad to stop the preview.
16 | www.pclpublications.com
Customising the Sonoma Desktop
Choosing a Wallpaper
5
Turn on Show as Wallpaper and a still from the slow-mo
screen saver is used as your desktop image. Show on All
Spaces makes it so for all your desktops. Leave this off and you
can have different wallpapers for each desktop.
In System Settings, click Wallpaper in the left-hand column.
These options let you set the wallpaper independently of
the screen saver. The aerial photo wallpapers are there,
along with some from older versions of macOS.
6
When waking your Mac from sleep, login information is now
at the foot of the screen, out of the way of the beautiful aerial
video. When you unlock your Mac, the slow-mo video turns into the
desktop, if you're using it as a wallpaper too.
There are options to Show as Screen Saver and Show on All
Spaces atop the window too. You can also Add Photo or
Add Photo or Album using the pull-downs if you want to use
a picture on your Mac as wallpaper.
О At the foot of the Screen Saver options is a category
called 'Other'. These give access to options you might
have used on older versions of macOS. You can also use one of
your own photos as a screen saver here.
Some wallpapers have a Light and Dark mode, set using
the pulldown at the top of the Wallpaper options.
'Automatic' changes between light and dark according to
the time. You can also use a solid colour as a wallpaper.
www.pclpublications.com | 17
П First Steps with macOS Sonoma
аоиооооиив
:=“ Gesture Controls
On Your Trackpad
You can navigate your Mac using gesture controls, just like you do on
your iPhone or iPad. These gesture controls can be performed on a Mac
notebook's trackpad or on the Apple Magic Trackpad, which is available for
desktop Macs. You can even do a few of them on a Magic Mouse.
One of the things that makes the Mac such a pleasure to use is its large and responsive MacBook multi-touch
trackpad or the desktop Mac's Magic Trackpad. You can use the trackpad in much the same way as you would use
the touchscreen of an iPhone or iPad: to quickly and easily access menus, sort through stacks of pictures or
documents, scroll through documents and to zoom in and out of displayed images. Once you get used to it, you'll
find that it's a very easy and intuitive way of controlling your Mac and that it can do far more than just scrolling.
Secondary Clicking.
Some people like to use a two-button
~ mouse with their Mac, and this can be handy
for quick access to shortcut menus by
) secondary clicking or right-clicking. To set up
two-finger secondary clicking using the
В trackpad, select Secondary Click in the Point
t & Click pane of Trackpad preferences. To set
В up a one finger secondary click zone in the
W bottom left or right corner of the trackpad or
Г mouse, select Secondary Click in the Point &
Click pane of Trackpad preferences, and choose
an option from the pop-up menu.
Multi-touch Gestures.
The MacBook's advanced trackpad and Apple's Magic
Trackpad support Multi-touch gestures. They might seem
a bit complicated at first but once you get used to them,
they quickly become second nature. Before long you'll
wonder how you ever managed without them. The trick to
using the trackpad properly is to practise using more than
one finger at once. Some gestures use two fingers, whilst
others use three or even four. You need to apply light, firm
pressure and move your fingers smoothly and evenly, all at
the same time. Like we said, it takes a little practice but you
quickly become proficient at it. To enable Multi-touch
gestures, view instructional videos of the gestures and set
up various other trackpad options, choose Apple > System
Settings and then click Trackpad in the left-hand sidebar.
Single Click
Unlike most other trackpads, the entire MacBook trackpad
works the same as the mouse button; and you can click
anywhere on the track pad to activate apps and select icons.
Scroll Vertically
Place two fingers together on the trackpad, then move them up
or down. This will scroll vertically up or down the document or
web page you’re currently viewing.
18 | wvwv.pclpublications.com
Gesture Controls
Zoom In and Out
Two-finger pinching lets you zoom in or out on PDFs, images,
photos, and other large visual documents or web pages. Place
two fingers on the trackpad, then move them apart to zoom in,
or together to zoom out. The quicker you move your fingers,
the more you'll zoom.
Rotating Images
You can rotate images by placing two fingers on the trackpad
and then turning your hand so that your fingers both move in a
curve. It can be a little awkward on the wrist at first but you’ll
soon get used to it. It's a very handy gesture if you're laying out a
page in a desktop publishing app.
Воооазаоаавазвооокво
вввввввввввве
MBQBBBDQBBBBBB
ВПавЁбЁЁЁЕИВЕ
MBBBBOQQBBBM
Access Mission Control
You can access the macOS Mission Control at any time, even if
you've got a full-screen app open. Simply place three fingers at
the bottom of the trackpad and move them quickly upwards and
Mission Control appears.
Switching Between Full-screen Apps
If you’ve got several apps open full screen at once, you can
quickly flip between them using a gesture. Place three fingers on
the trackpad and quickly slide them to the left or right. This will
scoot the current app aside, revealing the next in line.
Force Click
The very latest Apple notebooks feature Force Touch
trackpads, which can tell a soft tap from a hard tap. A hard
tap, or Force Click, can be used to preview a file, drop a pin
in Maps, preview a Safari link, rename a file or folder and
more. It's a concept that should prove very familiar to
those who have used the latest iPhone models.
Turn Off Force Click
If you dislike the Force Click gesture, and find it gets in the
way of your workflow, it's easy to turn it off. Open System
Settings (under the Apple menu in the top left corner), and
click Trackpad in the left sidebar. Look for the option
'Force Click and haptic feedback’. There's a switch to its
right; use it to turn the Force Click option on and off.
www.pclpublications.com | 19
First Steps with macOS Sonoma
Desktop Widgets
New in Sonoma
If you click on the Mac's time in the top-right corner of the screen, you get
a sidebar showing notifications and Widgets. You knew that, right? But did
you know that with macOS 14: Sonoma, you can also place Widgets on the
desktop? They're unobtrusive, easy to use and packed with information.
Widgets on the Desktop
Right-click on your Mac's desktop for a contextual menu.
From this menu, choose the Edit Widgets option. A
Widgets picker appears. In the sidebar is a list of apps that offer
Widgets, with the Widgets themselves on the right.
2
Scroll up and down the right-hand section on the picker to
explore available Widgets. Click on an app in the left to
see what Widgets it has to offer. Sometimes, Widgets of
different sizes are available. Scroll to see them all.
3
Drag Widgets out of the picker and onto your Desktop.
You can place them wherever you like. To delete a Widget,
either click the minus sign in its top-left comer on the picker
screen, or right-click on it and select Remove Widget.
You can edit a Widget by right-clicking on it and selecting
Edit "[Widget Name]". What editing options are there
depends on the Widget in question. If multiple sizes are
available, you can change its size from this menu too.
20 | www.pclpublications.com
Desktop Widgets - New in Sonoma
Widgets in the Sidebar
5
If you're doing something else on your Mac, Widgets
become monochrome and fade into the background.
Click on the Desktop to hide open windows and turn your
Widgets coloured again. Click a Widget to open its parent app.
The Widgets sidebar used in previous versions of macOS
is still there, and still displays Widgets of your choice. To
open it, click on the time in the right-hand side of your
Mac's top bar. The Widgets sidebar springs into place.
6
To keep them coloured or monochrome at all times, go to
System Settings > Desktop & Dock and in the Widgets
section, use the Widget Style pull-down to select Monochrome or
Full-colour. They then stay that way at all times.
Scroll this sidebar all the way up and at the bottom you see
a button marked 'Edit Widgets'. Click on this and the Widget
picker appears once more. From here, you can drag and
drop Widgets into the sidebar to customise it.
О Also in the Widgets section of the Desktop & Dock
settings, you can choose whether to use Widgets from
your iPhone on your Mac’s Desktop, and whether they appear
on the Desktop, in Stage Manager or both.
Click on the minus sign in the top-left corner of a Widget to
remove it from the sidebar. When you've finished, click the
Desktop or click the Done button at the foot of the Widget
picker. Your customised sidebar is then ready for use.
www.pclpublications.com | 21
П First Steps with macOS Sonoma
=5
Dark Mode
And NightShift
If your screen's too bright, there's a couple of great desktop features that
help. Dark Mode inverts the Mac's colour scheme, making it much darker,
and Night Shift Mode changes the colour hue, reducing blue light that can
keep you awake if you use your Mac before going to bed.
Dark Mode
Night Shift Mode
o —
1
From the Apple menu, open System Settings. In the
left-hand column, click on the Appearance option. At the
top of the right-hand section are the Light, Dark, and Auto
buttons. Dark and Light buttons switch to those modes, and
Auto sets it according to your Night Shift schedule.
1
From the Apple menu, open System Preferences. Click on
Displays in the left sidebar and then on the Night Shift
button. From here you can schedule Night Shift Mode to run
from sunrise to sunset or during custom times; or you can simply
turn it on by checking the Manual box.
With Dark Mode on, the colours are subdued or
reversed in Finder, windows, the Mac's built-in apps and
more. Third-party apps can be built to take advantage of Dark
Mode too. If you find it more comfortable to work on a darker
screen, this is excellent news.
2
With Night Shift Mode enabled, the colour spectrum
shifts from blue to yellow. If you use your Mac late at
night, too much blue light can interfere with sleep patterns, so
using Night Shift Mode when on your Mac close to bedtime
can prevent this from happening.
22 | www.pclpublications.com
Dark Mode & Desktop Stacks •*.
Desktop Stacks
For Organisation
If your Mac's desktop regularly gets cluttered with folders, file icons and
other such material that you're currently working on, there's a solution at
hand in macOS. With a click of your mouse or trackpad, you can organise
them into stacks, grouped according to their file type. Here’s how to do it.
1
Your Mac's desktop often fills with files and folders you
know you need regularly but that can mean a very
cluttered workspace. To use Desktop Stacks, first click on the
desktop to make sure Finder is active, then click on the View
menu in the top bar.
2
From the View menu, select the Use Stacks option. Your
files are stacked on the right-hand side of your desktop,
according to their type. For example, images are stacked
together, as are documents. To turn this off again go to View
and click Use Stacks.
3
To open a stack on your desktop, click on it. The items
contained in that stack are revealed, allowing you to
access and open individual files. To close a stack again, click
on the down-pointing triangle icon that replaced the stack
when you clicked to open it.
4
You can choose how you group your stacks. In View, go
to Group Stacks By and then pick an option. If you use
finder tags (see later in this book) to identify files from the
same project, for example, grouping by Tags keeps them
together and easier to find.
www.pclpublications.com | 23
Q First Steps with macOS Sonoma
Getting Online
* With Wi-Fi or Ethernet
As is the case with any modern computer, access to the Internet is a vital
component for upgrading and getting hold of new apps that will help you
get the most from your Mac. Getting online in Sonoma is remarkably easy
and here's howto do it both wirelessly and with a cabled connection.
Connecting with Wi-Fi
1
Make sure that your Mac is within range of your wireless
router’s Wi-Fi signal, then click on the Wi-Fi icon in the top
menu bar. You'll see a list of Wi-Fi networks. If your Wi-Fi is off
click the switch to turn it on.
2
Click the Other Networks chevron and see a list of Wi-Fi
networks available in your area. A lock to the right shows
a password is required. Click on the network you wish to join,
whether it's your own router or a public Wi-Fi in a cafe or bar.
Using Public
Wi-Fi
Some high street locations
such as libraries, bars and
restaurants offer free Wi-Fi
to their customers. There
are many different ways
you can access public
Wi-Fi. Some locations may
have an unsecured
connection, some require
you to ask for their Wi-Fi
password, and for others you have to register via their
pop-up website; just open Safari while in such a Wi-Fi
zone and then follow the on-screen instructions that
appear when your Mac connects to the network.
3
If a password is required (it probably is), a window appears.
Enter the password here. If you're setting up at home, the
password is probably supplied with your router. Your Mac then
joins the network, and remembers it so you don't have to add the
password every time you go online.
24 | www. pci pu bl ications.com
Getting Online | ®
Configuring Your Wi-Fi
1
Click on the Wi-Fi icon in the top bar, and in the menu that
is shown, click Wi-Fi Settings at the bottom. The System
Settings window appears, with Wi-Fi already open. Scroll up and
click on the Advanced button.
2
You can see a list of all the Wi-Fi networks your Mac has
connected to, in order of preference. Where two
networks are available, the higher one is used. If you want to
change this order, simply drag and drop them.
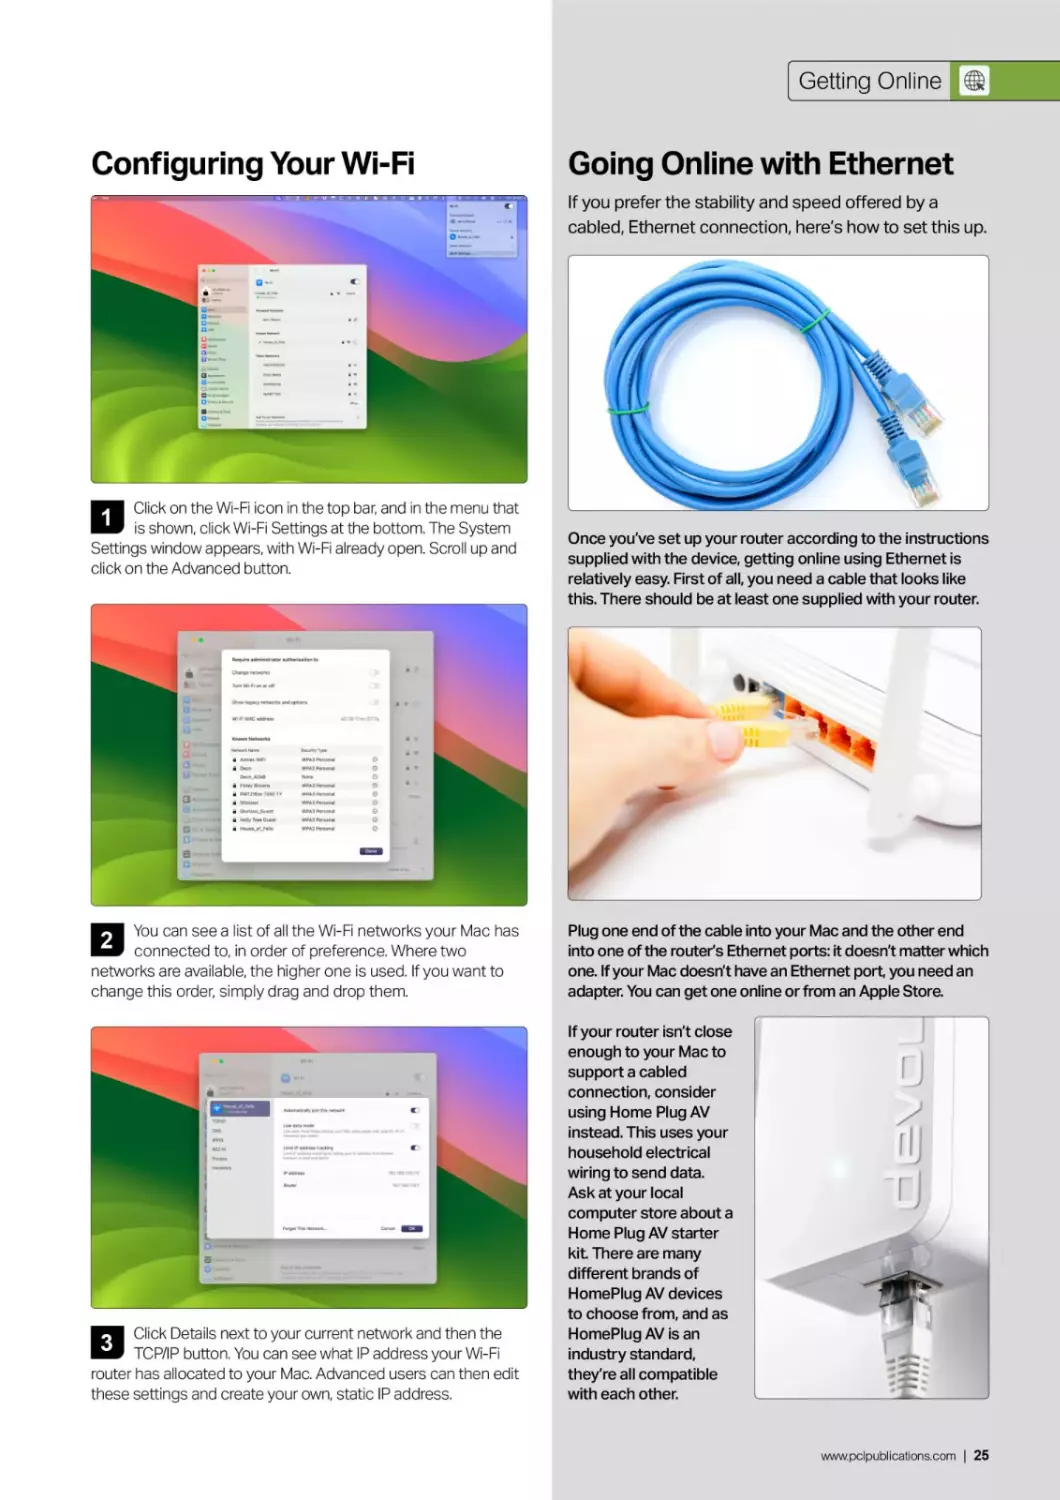
Going Online with Ethernet
If you prefer the stability and speed offered by a
cabled, Ethernet connection, here's how to set this up.
Once you've set up your router according to the instructions
supplied with the device, getting online using Ethernet is
relatively easy. First of all, you need a cable that looks like
this. There should be at least one supplied with your router.
Plug one end of the cable into your Mac and the other end
into one of the router's Ethernet ports: it doesn't matter which
one. If your Mac doesn't have an Ethernet port you need an
adapter. You can get one online or from an Apple Store.
Click Details next to your current network and then the
TCP/IP button. You can see what IP address your Wi-Fi
router has allocated to your Mac. Advanced users can then edit
these settings and create your own, static IP address.
3
If your router isn’t close
enough to your Mac to
support a cabled
connection, consider
using Home Plug AV
instead. This uses your
household electrical
wiring to send data.
Ask at your local
computer store about a
Home Plug AV starter
kit. There are many
different brands of
HomePlug AV devices
to choose from, and as
HomePlug AV is an
industry standard,
they're all compatible
with each other.
www.pclpublications.com | 25
First Steps with macOS Sonoma
Sonoma's Menus
A Key Mac Feature
Whether it's a pull-down menu accessed by clicking on the top bar of your
desktop or a contextual menu found by right-clicking or Ctrl-clicking on a
file or folder, you need to know how to use your menus if you are to get the
most out of your Mac and Sonoma. Here's a guide to your Mac's menus.
The Apple Menu
1
The Apple menu is
always found in the
top-left corner of Sonoma’s
desktop. To open it, click on
the Apple icon once, then
choose an option. This
menu is always there,
whatever it is that you’re
doing on your Mac.
2
Choose About This Mac
for a window showing
you technical information about
your computer Clicking More
Info... lets you delve further;
looking at its Display, Storage
and more; and you can get a
full System Report by clicking
the System Report button too.
3
The System Settings
option opens the Mac’s
System Settings, which we
discuss later in this book.
4
This option opens the
App Store. If updates
are available for your Mac or
any of its apps.
5
Hover your pointer over
the Recent Items option
to see the sub-menu showing
apps, documents and servers
you’ve recently used. You can
click on one of these items
and open it, offering a
convenient way of accessing
things you recently closed.
26 | www. pci pu bl ications.com
Sonoma’s Menus
6
Click here for the Force
Quit window. This
window lists all currently open
applications and notes if any
of them are unresponsive,
that is, they’ve crashed. You
can force a crashed app to
quit from here.
Click here to put your
Mac into Sleep Mode.
This saves energy and
password-protects your Mac
while you’re away from your
keyboard for any time.
8
Click here to restart
your Mac. This is useful
if you’ve installed new
software or your Mac isn’t
behaving as it should.
9
Click to shut down your
Mac, that is, switch it off.
10
Lock screen brings up
your password screen.
You have to enter your
password to continue to use
your Mac. It’s useful if you’re
leaving your Mac for a while.
11
Click here to log
yourself out but not
shut down your Mac. This is
useful if you have more than
one user account on your
Mac. You can then log out so
another user can log in.
By hovering over the
Recent Items option,
you get this sub-menu. This is
a list of the applications
you’ve recently used. Click on
one of them to open it again
rather than use the Dock.
12
13
These are the
documents you’ve
recently used. If you need to
open one again, this menu is a
quick and easy way to do so.
14
Servers you’ve recently
accessed on your
wireless or Ethernet network
appear here. To open one
again, simply click on it.
15
Click here to completely
clear the entire Recent
Items sub-menu.
Contextual Menu
Files and folders have a Contextual Menu that you can access
by right-clicking or ctrl-clicking on the item, or clicking with two
fingers on a trackpad. This menu gives a range of options, which
change according to what it was you clicked on. There's usually
a Share and a Move to Bin option in there, and the Get Info
option brings up an information window.
Application Menus
Each application has its own unique set of menus located next
to the Apple menu. They will change when an application is
active and will revert back to the Finder menu when no apps
are active. Each is clearly labelled to make it easier. We'll add
specific details for application menus when we look into the
applications themselves later.
Right-clicking and ctrl-clicking.
Mac mice and trackpads only have one button, so how do you make a right-click? It's actually easier than you think.
1
Your Magic Mouse or Trackpad doesn’t have two buttons,
but you can still secondary-click by holding the Control
(Ctrl) key and clicking your mouse or trackpad. Alternatively,
enable right-clicking. Go to Apple menu > System Settings >
Mouse/Trackpad, depending on which you're using.
Use the pull-down to choose an option for Secondary
Click. With Secondary Click activated, clicking using
your chosen option is the equivalent of right-clicking on a
two button mouse. You can change the tracking speed and
click strength here too, and more.
www.pclpublications.com | 27
First Steps with macOS Sonoma
. . Using Finder
b' Files, Folders & Apps
Finder is the main app that underpins everything you do in macOS, so
it's worth taking the time to discover its features and functions. On these
pages you'll see how Finder works and how you can use the Finder window;
including its navigation controls, viewing tabs and many more useful options.
1
Window Control Options: Use the gumdrops to
close or minimise the window or open it in full-screen
mode. We’ll cover this on the next page.
Qltem Arrangement List: Click on the button shown
here to order the contents of the window; according to
date, alphabetically and more.
2
Navigation Controls: The chevron buttons in the
top left corner of the window take you forwards or
backwards through your navigation history
View Options: These four buttons let you set-up
how you view the files and folders in the Finder window;
whether as icons, a list, in columns or as a cover flow which
gives you a much larger visual preview.
Share Button: The Share button is found in many
places throughout macOS. Here you can highlight a file or
folder and click the button to send it by email, AirDrop and
Messages, add it to Notes and more.
Tags Button: You can tag a file or folder to make it
easier to spot or group it with other documents and
folders. An item can have more than one tag. Click on a tag in
the sidebar to show items labelled with that particular tag.
28 | www.pclpublications.com
Using the Finder
7
Perform Tasks: The Perform Tasks icon enables you
to perform certain tasks within the folder or highlighted file,
such as create a New Folder; Move to Bin, Duplicate and more.
8
Search Field: If you’re looking for a specific item, type
its name or contents into the Search field and press Enter.
File/Folder View: This shows the files and folders
contained in the currently open folder. They’re shown
in the format chosen in the View Options (see Item 3). Here,
as you can see, we’ve gone for the icon view.
10
11
Preview: This is a preview of the currently selected file
in the main window. It shows the title, file size and various
Sidebar: There are various options on the Finder
window’s sidebar. You can open specific folders like
Documents or Downloads, access external or network drives
and more. To hide and show the sidebar, use the View menu
or enter ctrl-cmd-S.
details about it. There are also options at the foot of the
Preview sidebar, such as rotating or marking up a graphic or
creating a PDF from a document. The preview sidebar is
optional; you can close it in the View menu or by pressing
Shift-cmd-P on your keyboard.
Displaying a Finder Window
There are several ways of opening a new Finder window
on your Mac's desktop. Let’s take a look at each in turn.
Using Menus
Click a clear space on the desktop once, open the File menu
and select New Finder Window. A window then appears.
Shortcut Keys
Click a clear space on the desktop once to make sure you're
in Finder, then press cmd-N together. A new Finder window
appears on the desktop.
Using the Dock
If it isn't already displayed, move your mouse cursor to the
bottom of the screen to open the Dock. Click the Finder Window
to create a new window.
Howto Relaunch Finder
If the Finder has crashed or isn't behaving as it should,
follow this tip to close it like a crashed app and relaunch it.
If the Finder crashes, you can relaunch it like you would with any
other crashed app. The easiest way to do this is to click on the
desktop to make sure you're in Finder, hold down the Shift key
and click on the Apple menu. The Force Quit option has
become Force Quit Finder. Incidentally, you can use this method
to quit any running app. Just click on one of its windows to bring
it to the fore, hold Shift and click on the Apple menu.
Window Controls Options.
The coloured buttons, or gumdrops, are found in the top left
corner. Hover over them and a symbol appears in each of them.
Navigation Controls.
These simple controls allow you to retrace your steps
backwards and forwards through Finder.
Close
Click once on the red button containing
a cross. This will work with the majority
of windows and applications.
Minimise
Click the orange button containing a
sign. Again this will work with almost
all windows and apps.
Full Screen
Click the green button with two
triangles. This will full-screen most
Finder and app windows.
Navigate to a
Previous Page
Click the left hand arrow. To
continue stepping backwards,
repeat step one as many times
as necessary.
The Forward Control
If you’ve moved to a previous
page, this button offers
step-by-step navigation to your
original starting point. Simply
click the right-hand arrow as
many times as needed.
www.pclpublications.com | 29
First Steps with macOS Sonoma
View Options
View Window Contents as Icons
To display your files and folders as a collection of icons, first
open a Finder window then click the first button on the toolbar,
showing a group of four squares.
View Window Contents as Lists
With an open Finder window, click the second button on the
toolbar to use a simple but effective list display.
View Window Contents as Columns
Click the third button on the toolbar to view your files as a series
of columns. It’s great for quick navigation and easy visual
identification using a handy image preview column.
View Window Contents as Gallery View
The Gallery View gives a large preview of the file or folder that's
currently selected and a scrollable strip of everything else. Click on
one of the files in the strip to see a larger version of its thumbnail.
Change the Way Items
are Arranged
As well as changing the way the items are displayed, you
can also change the way they are arranged.
Name: Alphabetical. Displays numbers first, then A-Z.
Kind: This groups each type of item together.
Application: Groups together items according to the
application in which they were created or are opened.
Date Last Opened: Groups according to time and
date they were opened.
Date Added: Displays items in order of when they
were added to the folder.
Date Modified: Displays items in the order they were
last modified or edited.
Date Created: Displays the items according to when
they were created.
Size: Arrange the files according to their size.
Tags: Files are arranged according to tags you've added.
30 | www. pci pu bl ications.com
Using the Finder
More Sidebar Functions
If your sidebar is getting cluttered, you can show or hide its
listed items by hovering over the title (Favourites, Locations,
iCloud, Tags) and clicking the small down-facing chevron or
right-facing chevron - the right-facing chevron appears when
the title is hidden, and the down-facing chevron when they're
expended. You can also eject external drives, CDs and disk
images from the sidebar by clicking the eject icon next to the
device or image you wish to remove.
O iCloud Drive
E? Shared
• Grey
Л Using Finder, Relaunch Finder.png
using rinuet, cnange way Arranyea png----
Using Finder, Navigation Controls.png
Using Finder, Window Controls.png
Using Finder, Relaunch Finder.png
Using Finder, Displaying Finder Window png
Using Finder, Annotation Guide.png
Using Finder, Annotation Shot, png
Using Finder - Files, Folders & Apps.rtf
Sonoma's Menus, Right Clicking Step 2
Sonoma's Menus, Right Clicking Step 2 png
Sonoma's Menus, Right Clicking Step 1
Sonoma's Menus, Right Clicking Step l.png
Sonoma's Menus, Application Menus
Sonoma's Menus, Application Menus.png
Sonoma's Menus. Contextual Menu
Sonoma's Menus, Contextual Menu.png
Sonoma's Menus, Annotation.png
Sonoma's Menus, Annotation.png
The macOS Sonoma Manual, vt.numbers
MAC399.feat1-0pb.pdf
macOS Ventura Manual.pdf
iPhone-15-Manual-HD.pdf
Sonoma's Menus - A Key Mac Feature.rtf
Sonoma's Menus - A Key Mac Feature.rtf
Getting Online, Configuring Step 3
Getting Online. Configuring Step 3.png
PNG Im
PNG im
PNG im
PNG im
PNG im
PNG im
RTF Do
PNG im
PNG im
PNG im
PNG Im
PNG irr
PNG iff
PNG im
PNG im
PNG im
PNG im
Numbe
PDF Do
PDF Do
PDF De
RTF Do
RTF Do
PNG iff
PNG iff]
Perform Tasks Within the Finder
1
Highlight an item within your Finder window, and click on the
three-dots-in-a-circle icon for a drop-down menu. Here you
can do a range of operations, from opening a highlighted file in a
specific application to checking the file size via the Get Info option.
2
You can also clean up the entire Finder Window,
automatically tidying up and or reorganising the order of
the files according to various criteria such as their name
(alphabetically), date, size and more.
The Finder's Preview Panel
Finder windows have a right-hand sidebar that shows a
preview of the currently selected file from the window. You
can turn this sidebar on or off in the View menu (Hide/Show
Preview) or press Shift-CMD-P on the keyboard.
At the foot of the preview sidebar are a set of new options.
These vary according to the type of file you're previewing in
the main window. For example, an image can be rotated,
annotated or converted into a PDF.
www.pclpublications.com | 31
First Steps with macOS Sonoma
Full-screen Mode
If you want to view the Finder window better or any other window for that matter, then you can always opt to view it in
full-screen mode. Full-screen removes distractions and makes everything a little easier to read. Here's how it works.
И Enter Full Screen
E Tile Window to Left of Screen
Tile Window to Right of Screen
B О Move to SMB2230H
□ Move to Ian Osborne's iPad Pro
ICloud
О iCloud Drive
< > Millie
1
You can view a Finder window and indeed an application
window, in full-screen mode. Click on the green gumdrop
in the upper left corner of the window and fills the entire screen.
Alternatively, use the View pull-down menu or press ctrl-cmd-F.
Hovering over the gumdrop gives this menu.
2
In full-screen mode, the menus usually found at the top of
the Mac desktop are still there but they're hidden away
until you need them. To see them, move the mouse cursor to
the top of the screen and the menu bar slides into view and
disappears when the cursor is moved away.
3
To exit from full-screen mode back to the usual window
view, bring up the Menu bar and then simply click on the
green button again. The window shrinks to its previous size and
no longer takes up the entire desktop.
4
You can also take a window out of full screen mode using
the View pull-down menu at the top of the screen or by
pressing ctrl-cmd-F. You can still close a full-screen window with
the red button (top left).
32-Bit Apps No Longer Run
Apple has phased out support for applications built for 32-bit architecture. These will no longer run in macOS.
In Monterey and Ventura, you can no longer open applications
made for older 32-bit processors (modern processors are 64-bit).
If you have such an app on your Mac, it appears in the Applications
window, or Launchpad, with a crossed-out icon atop it.
Try to open a 32-bit app and you get a message saying it's
not compatible with this version of macOS. Check with its
developer whether the app has since been updated to 64-bit,
but if it hasn’t by now, it might well have been abandoned.
32 | www.pclpub1ications.com
Using the Finder
Changing the Finder Window's
Background Colour or Image
1
When you're using the Finder's Icon View, you can replace
the white background with a coloured one or even a
picture. To begin, with the Finder window in question open, select
Show View Options from the View menu or press cmd-J.
Accessing iCloud Drive
iCloud Drive can store and share files across Mac or iOS
devices logged into the same iCloud account.
Click on iCloud Drive in the Finder window's sidebar. You
see the iCloud Drive folder is organised according to apps.
You can create your own folders here too.
Colour' and click on the white square. You can now use the various
options to change the background colour.
background. Alternatively, click on the box and then navigate to
the picture you want to use through the Finder.
Files and folders found here are synced using iCloud Drive,
so they're available online at www.icloud.com and also on
other devices linked to the same iCloud account.
Here we've opened the Pages iOS app on an iPad. As you
can see, the documents in the Mac's Pages iCloud Drive
folder are also available to open and edit here.
www.pclpublications.com | 33
First Steps with macOS Sonoma
Sonoma's Dock
For Most-used Apps
The macOS Dock is a feature that greatly speeds your workflow. It's
perfect for gaining quick access to the most relevant and frequently used
applications, documents and folders. It's customisable too, which means
you'll come to personalise your Dock to best fit your own unique needs.
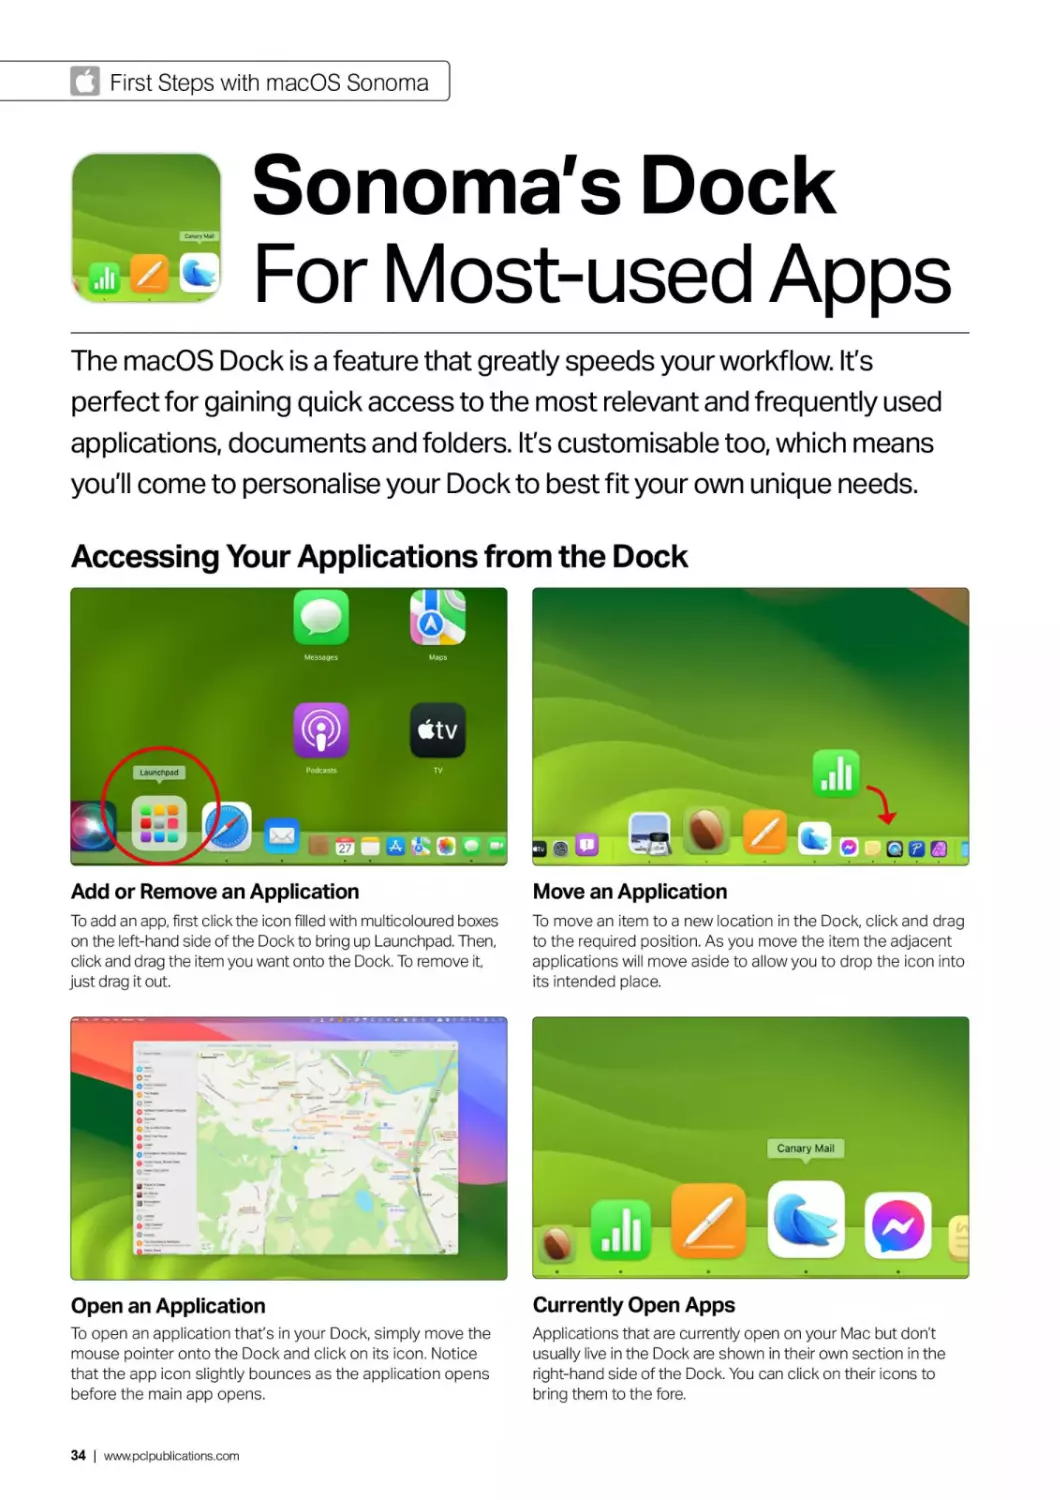
Accessing Your Applications from the Dock
Add or Remove an Application
To add an app, first click the icon filled with multicoloured boxes
on the left-hand side of the Dock to bring up Launchpad. Then,
click and drag the item you want onto the Dock. To remove it,
just drag it out.
Move an Application
To move an item to a new location in the Dock, click and drag
to the required position. As you move the item the adjacent
applications will move aside to allow you to drop the icon into
its intended place.
Open an Application
To open an application that’s in your Dock, simply move the
mouse pointer onto the Dock and click on its icon. Notice
that the app icon slightly bounces as the application opens
before the main app opens.
Currently Open Apps
Applications that are currently open on your Mac but don't
usually live in the Dock are shown in their own section in the
right-hand side of the Dock. You can click on their icons to
bring them to the fore.
34 | www.pclpublications.com
Sonoma’s Dock
» -3
Adding and Removing Stacks
You can add, remove and move folders in your Dock, in the
same way you do with apps. These sit to the right of the
Dock’s second divider and are called Stacks.
The Bin
The Bin icon is located at the far right of the Dock and
can be filled and emptied just like a real rubbish bin.
You can delete a file, folder or app by dragging it into the
Bin on the right-hand side of the Dock. Alternatively,
right-click or Ctrl-click on it and select Move to Bin from
the contextual menu that appears.
Accessing Stacks
To access the files and folders within a Stack, click on it to
display the contents. Clicking on a document or image opens
it with an appropriate application and clicking on a folder
opens it in Finder.
Viewing Options
Right-click or ctrl-click on a Stack for a pop-up menu with a
range of options. You can show your files as a Stack (a pile of
files) or as a folder. You can also choose how they're displayed
when you click the Stack.
To retrieve a file from Bin, click on the Bin icon in the Dock to
open it in Finder, then drag the file out of the Bin window. To
empty Bin, right-click on it and choose 'Empty Bin’, or in the
Bin window, click on the Empty button (top right).
Customising the Dock
You can customise your Dock in System Settings from the
Apple menu and selecting Desktop & Dock. From here, you
can place the Dock on the right, left or bottom of the
screen, opt to show and hide it, change its size, change its
magnification, choose a minimisation effect and more.
www.pclpublications.com | 35
Q First Steps with macOS Sonoma
Notifications
See What's Going On
Apps and functions on your Mac can send you notifications, which let you
know what's going on. When you receive a message or an email, for example,
you can be notified that it's arrived. You can customise them too.
from gen Z to 80-plus
Moving notifications to the Date and Time and combining them
with widgets is a clever move on the part of Apple. All you
need to do to view your notifications is to click on the Date and Time
in the top-right of the desktop. If there are any, they appear at the top
of the slide-in area that appears from the right-side of the screen.
Notifications are grouped together depending on the app
they're coming from. For example, the News app displays
notifications based on what news channels you've decided can
send alerts to you. If you click on a notification in the group, the
rest expand so you can see all the available notifications of that
group. And clicking on a notification, whether it's from Messages,
News and so on, opens up the corresponding app.
This makes viewing notifications a much more efficient
process, since there's a minimal need for mouse clicks, and
it's easy to see which notification belongs to which app. If
you're on the lookout for an important news flash report, for
example, you can quickly get the information you need when it
appears on your screen.
Mike Johnson, key figure in efforts to v—
overturn the 2020 election, ele
House speaker Read Story
tNews Top Stories 2 days ago
Tories braced for another by-election with
MP Peter Bone facing six-week suspension
over bullying report
Hover over a notification for an expansion chevron in the
upper-right comer. Click it and the notification expands to display
more information. In addition, by moving the mouse pointer over
the notification bubble you’ll also see an 'X' in the opposite top
corner, for dismissing the notification.
36 | www.pclpublications.com
Notifications
Creating and Removing Notifications
1
Adding and removing app notifications is as simple as
navigating to System Settings > Notifications. It’s the 'Bell'
icon in the left-hand sidebar of the System Settings window.
In the Notifications panel on the right, there's a few options at
the top followed by a long list of the applications you have
installed on your Mac. Scroll through the list and find the app for
which you want to set the notifications. Click the app in question.
Banner* appear In the upper-right corner and go away automatically. Alert*
stay on screen until dismissed.
Q
ф Apple ID
Family
Q Wi-FI
Q Bluetooth
Q Network
Q VPN
Ж Notifications
Q Sound
£3 Focus
О Screen Time
General
□ Appearance
Gj) Accessibility
i ~.j Control Centre
О Siri & Spotlight
Q Privacy & Security
a Desktop & Dock
Show notifications on Lock Screen
Show in Notification Centre €D
Badge application icon <D
Play sound for notification О
Show previews Always C
Notification grouping Automatic C
?
2
When you've found the app you want to set the
Notification for, click on the 'Allow Notifications' slider
button to activate and deactivate notifications from that
particular application.
adjusted to None, Banners (the default, and the one that most
folk will use), and Alerts. You can also opt to display Notifications
on the lock screen - although this is considered a security risk if
you leave your Mac unattended. There's also options to play a
sound when a Notification comes in and you can set the
Notification Grouping to Automatic, By App or Off.
О As you continue to use your Mac, the number of
Notifications you’ll generate over the course of a week or
even a day increases. Open the Notifications window, and click
the oval button marked 'X more Notifications’ to show all the
notifications currently available. The chevron next to the words,
'Notification Centre' closes them again.
www.pclpublications.com | 37
First Steps with macOS Sonoma
®TheSpotlight Feature
Search Your Mac
Spotlight Search is Apple's unique and ultra-powerful search system that
can find almost anything on your Mac. There's a raft of great features,
making it a really powerful and useful tool, and you can even use it to
launch applications. Here's how to use the Mac's Spotlight feature.
Using Spotlight's Features
1
Press cmd-space bar or click the magnifying glass in the
top menu to open Spotlight. You can drag this window to
wherever you want on the screen. Type your search query into
Spotlight and answers appear, with suggestions based on the
contents of your computer as well as other sources.
2
Spotlight can do conversions. To convert from imperial to
metric (or vice versa) type in the number and a type of unit,
such as kilograms or pounds and then click the chevron next to
the top result. Spotlight offers other commonly used units. It
works in a similar way with distances and lengths.
3
To do currency conversions at current market value, just
type in the amount you want to convert followed by ’in
[new currency]'. Here, we typed '£300 in €', but '£300 in euros' or
'300 pounds in euros’ works just as well.
For more conventional searches, Spotlight pulls its
information from a wide range of sources, such as
Wikipedia and documents it finds on your Mac. Double-click on a
result to open a document or glean more information.
38 | www.pclpublications.com
If you’re looking for local businesses or sites of interest,
simply type its name into Spotlight and you'll quickly find
what you're looking for, complete with a link to the Maps app and
the option of travel directions from your current location. Again,
click on the result to open.
6
You can find people with Spotlight too. Start typing the
name of someone you know, and Spotlight quickly finds
that person in your Contacts list and displays their contact
details in the results window. Things like chat threads, Facebook
comments and emails are also listed.
О Spotlight is also closely integrated into the core macOS
apps, such as Photos. Start typing in your search term,
like the title of a particular image or photo album in your Photos
app, and Spotlight quickly locates it and takes you straight to it.
8
Spotlight can find music by searching through your Music
collection to find albums, tracks and artists. Type a band
name, a track name or even the name of a band member.
Recordings with that name or by that band or person are shown.
9
Avery useful feature in Spotlight is Quick Look
integration. After doing a spotlight search, single-click
on a search result to highlight it, then press the space bar to
get a Quick Look preview. While previewing, move up and down
the list with the arrow keys.
10
Another useful feature feature is Quick Actions. These let
you instantly begin a process, such as starting a timer,
running a shortcut, turning on a Focus and more. To start a
timer, for example, type 'Clock' find the Start Timer option and
click it for an in-Spotlight timer.
www.pclpublications.com | 39
First Steps with macOS Sonoma
Launching Apps
And Quitting Them
There are several ways of launching an app on your Mac. You can: use the
Launchpad, which is found in the Dock; you can open a Finder window and
navigate your way to the application you wish to use; or you can click on the
Spotlight feature and simply type its name. Here's how to do it.
Using Launchpad
1
To open the Launchpad, go to the Dock and click on it, or
place four fingers on your trackpad and bring them
together. The screen darkens and your apps are shown as
icons. To launch an app from this screen, click on it. To close
Launch pad, press Esc or click on the desktop.
2
If you have more than one page of apps, move between
them by swiping left and right with two fingers or hold
cmd and use the arrow keys. Click and hold on an app and an 'X'
appears in the top left corner; click 'X' to delete. Not all apps can
be deleted in this way.
3
You can arrange your apps into folders on Launchpad too,
just like on an iOS and iPadOS Home screen. Just drag
one app onto another and a folder is created. You can click on
the name if you wish to change it and to remove an app from
that folder, drag it off the grey folder area.
4
Open and close folders by clicking on and off the folder
icon on the Launchpad screen. You can add new apps
into the folder by simply dragging them onto the folder. You can
also drag apps around the Launchpad window to change the
order in which they're arranged.
40 | www.pclpublications.com
Launching Apps if
Using Spotlight
1
To launch an app using the Spotlight feature, first click on
the magnifying glass found in the top right corner of the
screen. A window saying 'Spotlight Search’ pops up. If it's
inconveniently located, you can drag it around the desktop and
move it to wherever you like.
2
Begin to type the name of the app you want to launch and
Spotlight tries to complete it for you. When you see the
name of the app you want, scroll down to it and press Enter and
it launches. To close the Spotlight search window without
launching anything, just click anywhere on the screen.
Using the Finder
Using the Dock
You can also launch an app using the Finder. Open a new
Finder window (or use one that’s already open) and click on
Applications in the sidebar. All of your Mac’s apps are shown.
Scroll to find the one you want to use and then double click
on the icon to launch.
You can launch an app from the Dock. If your Dock is hidden,
move your pointer to the foot of the screen to reveal it and
click on the app you wish to use. To find out more about the
Dock and how to customise it with your favourite apps, see our
tutorial later in the book.
Quitting Apps
Open apps are shown in the Dock. On the app's Dock icon, you
can click using the right-hand side of a Magic Mouse or trackpad
(right-click), hold the Control key and click anywhere (ctrl-click) or
click and hold, then click on Quit in the pop-up window.
Alternatively, with the app to the fore in Fnder, click on its name in
the top left comer and select Quit [app name] from the menu; or
hold the Command key and press 'Q'. Just make sure the app is
open on your desktop or you might quit the wrong application.
www.pclpublications.com | 41
П First Steps with macOS Sonoma
Setting Up Email
For the Mail App
With email, you can send mails and attachments anywhere in the world, at
the push of a button. Here we take a look at what email is, how you can get
yourself an email address and how you can use your email accounts on
your Mac, with Apple's bundled email client, the Mail app.
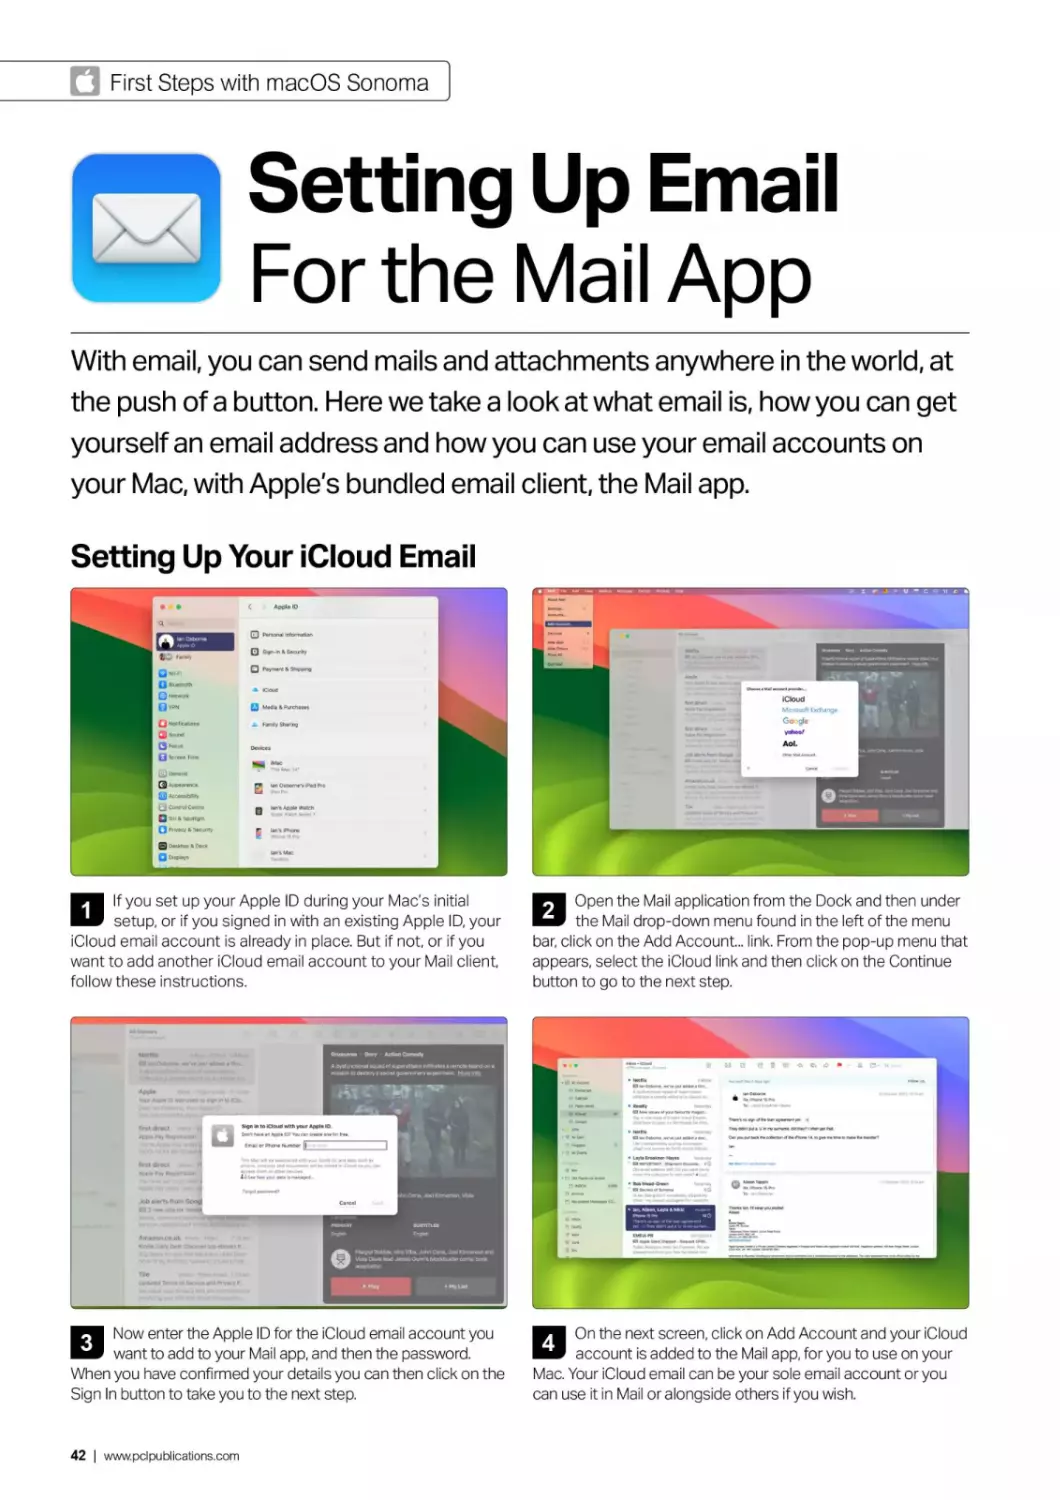
Setting Up Your iCloud Email
1
If you set up your Apple ID during your Mac's initial
setup, or if you signed in with an existing Apple ID, your
iCloud email account is already in place. But if not, or if you
want to add another iCloud email account to your Mail client,
follow these instructions.
2
Open the Mail application from the Dock and then under
the Mail drop-down menu found in the left of the menu
bar, click on the Add Account... link. From the pop-up menu that
appears, select the iCloud link and then click on the Continue
button to go to the next step.
3
Now enter the Apple ID for the iCloud email account you
want to add to your Mail app, and then the password.
When you have confirmed your details you can then click on the
Sign In button to take you to the next step.
On the next screen, click on Add Account and your iCloud
account is added to the Mail app, for you to use on your
Mac. Your iCloud email can be your sole email account or you
can use it in Mail or alongside others if you wish.
42 | www.pclpublications.com
Setting Up Email О
Setting Up Other Emails
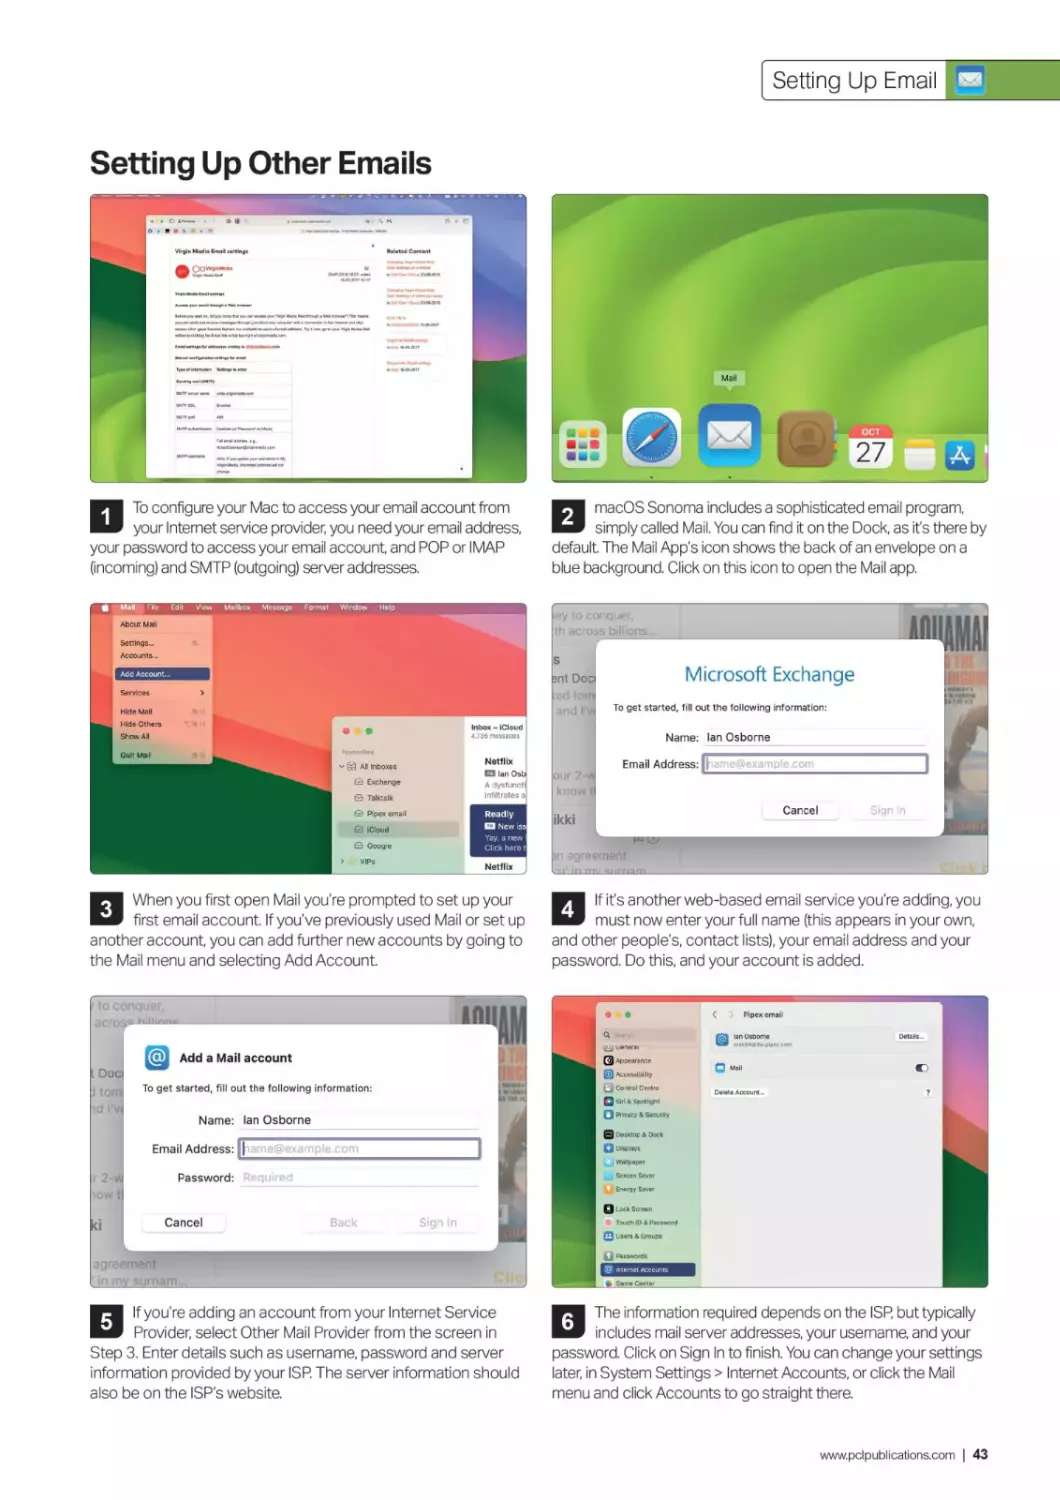
To configure your Mac to access your email account from
your Internet service provider, you need your email address,
your password to access your email account, and POP or IMAP
(incoming) and SMTP (outgoing) server addresses.
macOS Sonoma includes a sophisticated email program,
simply called Mail. You can find it on the Dock, as it’s there by
default. The Mail App's icon shows the back of an envelope on a
blue background. Click on this icon to open the Mail app.
3
When you first open Mail you’re prompted to set up your
first email account. If you've previously used Mail or set up
another account, you can add further new accounts by going to
the Mail menu and selecting Add Account.
4
If it's another web-based email service you’re adding, you
must now enter your full name (this appears in your own,
and other people's, contact lists), your email address and your
password. Do this, and your account is added.
A
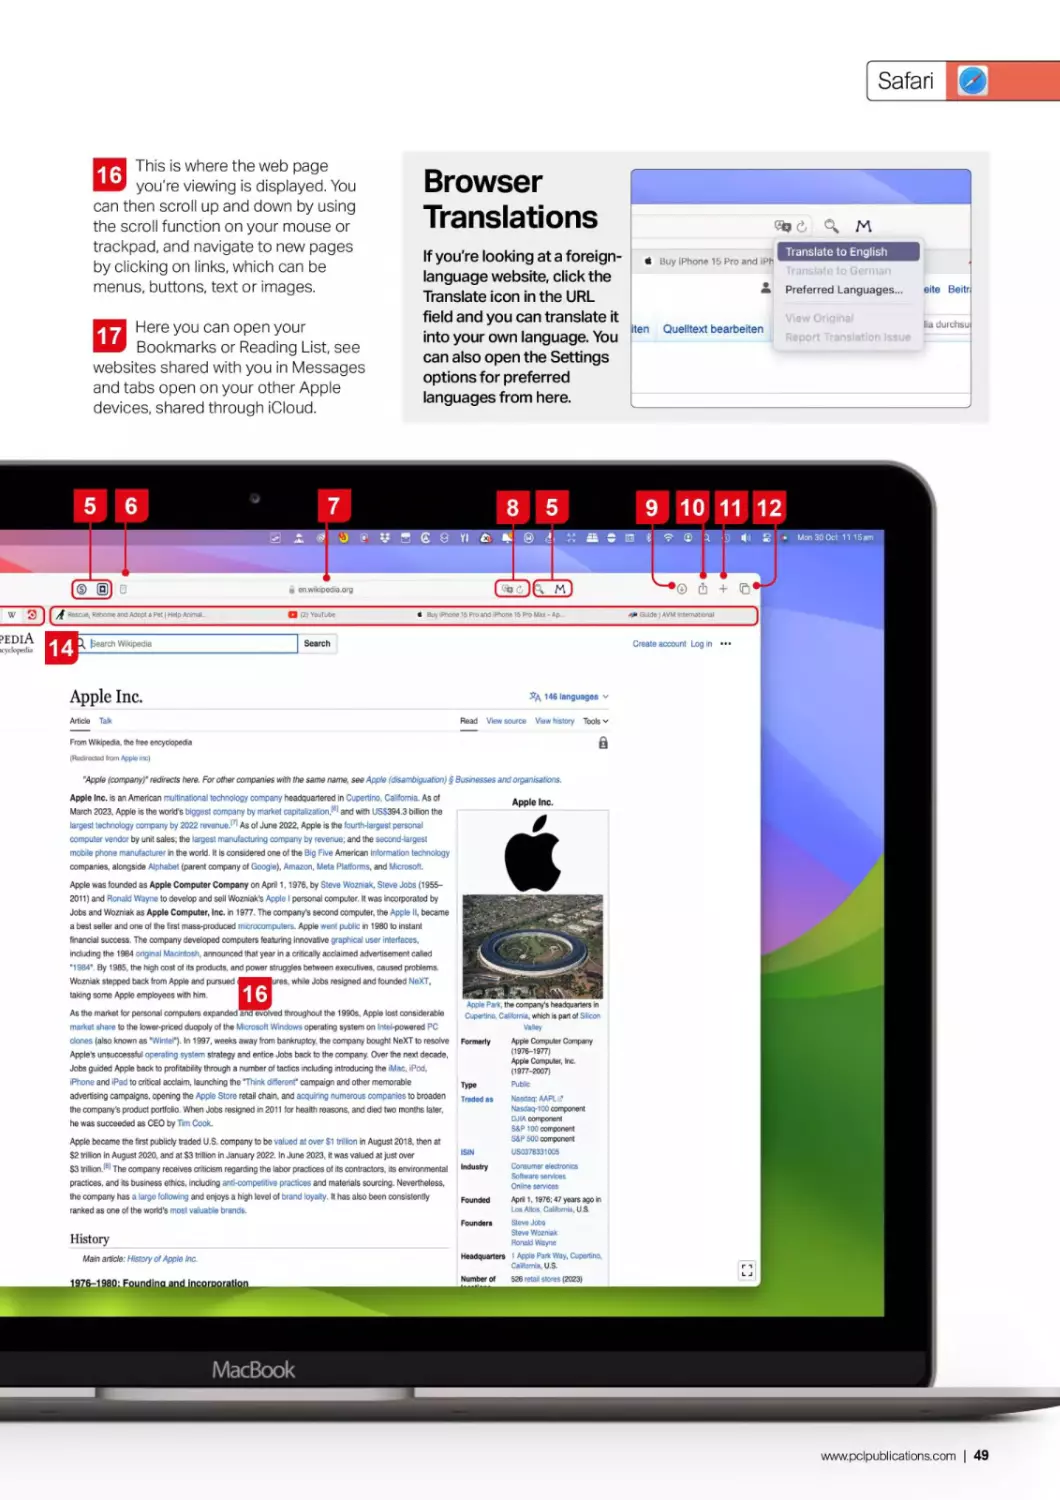
vst general
QJ Appearance
0 Accessibility
Control Centre
О як a spotlight
Q Privacy & Security
В Desktop & Dock
Q Uspiays
(J Wallpaper
Screen Sever
Energy Saver
□ Lock Screen
Touch ID A Password
Q Users & Groups
О Password*
@ internet Accoints
E Game Center
< > Pipex email
5
If you're adding an account from your Internet Service
Provider, select Other Mail Provider from the screen in
Step 3. Enter details such as username, password and server
information provided by your ISP. The server information should
also be on the ISP's website.
6
The information required depends on the ISP, but typically
includes mail server addresses, your username, and your
password. Click on Sign In to finish. You can change your settings
later, in System Settings > Internet Accounts, or click the Mail
menu and click Accounts to go straight there.
www.pclpublications.com | 43
First Steps with macOS Sonoma
0 Installing New Apps
Including Third Party
As you get to grips with your Mac, it's likely you'll want to install more
software, or 'apps'. There are two ways to do this. You can use the Mac App
Store, just like you do on the iPhone or iPad, or you can download an app
from the Internet and install it manually. Here we show you howto do both.
From The App Store
1
Downloading new apps from the Mac App Store is the
easiest way to get new software for your Mac. First open
the App Store app; you can use the Apple menu to open this
particular app, or the Dock, Launchpad or Apps folder.
2
You can use the Search field to look for an app by its
name, what it does and more, or simply navigate the App
Store using the categories in the left-hand sidebar. Note the
filters, opened by clicking the chevron in the top right too.
3
Scroll up and down for more apps. If button to the right
displays a price, that's how much it costs. If it says 'Get', it's
free, but might offer in-app purchases. A cloud symbol means you
already bought it but it isn't on your Mac; download it again for free.
If it says 'Open', you already have it Click the button to open it.
Click on an app title for more information on that app. Click
its button to download it. If it’s a paid-for app, follow the
on-screen instructions to make a purchase. If it's free, just click
'Install'. You might have to sign in with your Apple ID. When it's
downloaded, you can open it just like any other app on your Mac.
44 | www.pclpublications.com
Installing New Apps
From Other Sources
1
Not every app is found in the App Store. If there’s one you
want to install that isn’t, first find its home page on the web,
and go to the Downloads section. Make sure you're downloading
the correct version for your Mac. Here we're downloading
Handbrake, the popular open source video transcoder.
2
Click the download link, and the app downloads. If you're
using the Safari web browser, click the down-pointing arrow
icon to open a pop-up window showing how much has downloaded
so far. It may take a long time if it’s a big app. When it's done, the app
is found in your Downloads folder in the Dock or Finder.
3
The app usually downloads as a .dmg image, that is, a virtual
disk. Double-click on it to open. The window here shows
what's inside the downloaded file; the app and a folder containing
documentation. Double-click on the app to open it. Because it's not
from the App Store, you're asked if you want to open it.
4
Opt to open it and the app opens; you can now use it on
your Mac. If you want to use the app more than once, it's a
good idea to drag it out of the disk image window and into the
Applications folder as shown, which is found in the sidebar of
most Finder windows. After that, you can bin the .dmg file.
Q Apple Advertising
Security
Allow applications downloaded from
App Store
О App Store and identified developers
•DeSmuME' was blocked from use because it is not from an
identified developer.
Open Anyway
□ FileVault On >
1 zvnlrHzMtm ЧлЯд----------------------------------------------Cdl-----
5
If you get a warning like this one, saying the developer
could not be verified, it’s still possible to open the app.
Open System Settings and go to Privacy & Security. Scroll the
window up until you see the Security section, and click the Open
Anyway button. You do so at your own risk, of course. Be careful.
Using Installers and
Downloaders
Larger apps might download an installer, which installs the
app automatically to your Applications folder, or a
downloader, a small program that downloads the app from
the Internet before installing it. If this is the case, simply
follow the on-screen instructions as they appear. There's
nothing difficult about it.
www.pclpublications.com | 45
macOS
Sonoma's
Key Apps
One of the best things about the Mac is the
great apps that come bundled with macOS.
For web browsing, there's Safari. For emails,
check out Mail. Keep your scribblings in the
Notes app, plan your events in Calendar
and store your addresses in Contacts. We
cover all these and more, including new
Sonoma features such as Dock
Applications, Safari Profiles, the new
Screen Sharing app and more.
Learn more >
46 | www. pci pu bl ications.com
fl Personal
hildHWvvngrarx согт
CITY ARBORETUM
NATURC INSTALLATION
<
itu:c-tevcl com
STUDIO TEVEL
Last year, we received more tl
8.000 applications tor projecti
ranging from experiences to f
installations, and more.
Bookmarks Wine*»
Sonoma
76°
HILDE NEVEN ~
GRANT
RECIPIENT
» 02
MT. MURAL FESTIVAL
LOCALtVLNT
• •• Ю
Ptoy Ambent Ptayftcl
Ф
Focus Timer
Installation
Handlin
www.pclpublications.com | 47
П macOS Sonoma’s Key Apps
• Safari
Your Web Browser
Safari is your Mac's web browser. You can explore the worldwide web, enjoy
your social media accounts, do shopping and more.
With macOS Sonoma, Safari gets new
features like web apps and browsing profiles.
This icon opens and closes the
sidebar on the left. Close the
sidebar to see the Profiles button,
which lets you switch between
browsing profiles you've set up.
Here you see how many tabs you
currently have open in Safari. A
chevron to the right shows and hides all
those tabs in a list here in the sidebar.
2
This icon gives you a menu that
lets you make a Tab Group of
the tabs you currently have open, or
start a new, empty Tab Group to
which you can add tabs manually.
3
These two chevrons are your
navigation controls, which let
you move forward and backward
through your browsing history.
These icons are for Safari
Extensions you've added. To
add extensions, in the top bar's Safari
menu, select Safari Extensions. To
manage them, select Settings from
that menu and click Extensions.
5
6
Click the Page icon to show and
hide the site's Reader view.
The URL Bar. Enter the website
address or a search term that
you wish to look up into this bar, then
tap Return.
7
The first icon lets you translate
the website you're looking at
into another language. The second
reloads the website, perhaps if it's
stuck or might have been updated.
8
15
Getting started with...
Twitter. Alles, was ge...
International Skeptics
instagram
TikTok - Make Your D...
Electronics, Cars, Fa-
Rescue, Rehome and...
Click here for a list of items
you've recently downloaded.
When you're currently downloading in
Safari, progress is shown here too.
9
О
в
о
в
Amazon Echo tabs
Devon Trip
The Cats I
Social Media Г
0
□
Click on the Sharing icon to see
your options for sharing the page
you're viewing; adding it to Notes,
making a Quick Note and options for
Add Bookmark and Add to Reading List.
10
Click the + icon to open a new,
blank tab. You can then go to a
new website without closing the one
you're currently viewing.
11
This takes you to the Tab
Overview, showing all your
open tabs as thumbnails in the main
window. Click on one to open it.
12
Contents
(Top)
> History
> Products
> Marketing
> Corporate affairs
> Finances
> Environment
> Supply chain
See also
Notes
> References
Further reading
External links
These are sites that you've
pinned to your tab bar, where
they remain. Although smaller, they
function just like regular tabs. Click on
one to open that tabbed site.
13
These are your currently open
tabs. Click on one to open it,
hover over the tab and click the 'X'
on the left-hand side of the tab to
close it, and click the'+' icon (Item
12) to open a new one.
14
Your Tab Groups. Click a group
to close the tabs you currently
have open, and open the group of tabs
you selected. To return to the tabs you
had open before, click the 'X Tabs'
option above it (Item 2).
15
Bookmarks
Reading List
Shared with You
iCloud Tabs
48 | www. pci pu bl ications.com
Safari
This is where the web page
you're viewing is displayed. You
can then scroll up and down by using
the scroll function on your mouse or
trackpad, and navigate to new pages
by clicking on links, which can be
menus, buttons, text or images.
16
Here you can open your
Bookmarks or Reading List, see
websites shared with you in Messages
and tabs open on your other Apple
devices, shared through iCloud.
17
Browser
Translations
If you're looking at a foreign-
language website, click the
Translate icon in the URL
field and you can translate it
into your own language. You
can also open the Settings
options for preferred
languages from here.
5
6
(gj)
>ediA
i kipnlu
14
b Search Wikipedia
Apple Inc.
Article Talk
From Wikipedia the free encyclopedia
(Redirected from Apple me)
9 10 11 12
8
£ 8 fl t к
Won 30 Oct 11 15am
16
© □ + ©
a en.wikipedia.org
Q (2) YouTube
Buy iPtione 15 Pro and iPhone 15 Рю Max • Ap
4» Guide | AVM international
1 Search
Create account Login
146 languages v
Read View source View history Tools
в
Apple Inc.
lures, while Jobs resigned and founded NeXT,
Formerly
Type
ISIN
Industry
Founders
Headquarters
Number of
"Apple (company)" redirects here. For other companies with the same name, see Apple (disambiguation) § Businesses and organisations.
Apple Inc. is an American multinational technology company headquartered in Cupertino. California. As of
March 2023, Apple is the world's biggest company by market capitalization,161 and with US$394 3 billion the
largest technology company by 2022 revenue.171 As of June 2022, Apple is the fourth-largest personal
computer vendor by unit sales; the largest manufacturing company by revenue; and the second-largest
mobile phone manufacturer in the world. It is considered one of the Big Five American information technology
companies, alongside Alphabet (parent company of Google). Amazon, Meta Platforms, and Microsoft.
Apple was founded as Apple Computer Company on April 1,1976. by Sieve Wozniak, Steve Jobs (1955-
2011) and Ronald Wayne to develop and sell Wozniak's Apple I personal computer, it was incorporated by
Jobs and Wozniak as Apple Computer, Inc. m 1977 The company's second computer, the Apple II, became
a best seller and one of the first mass-produced microcomputers. Apple went public in 1960 to instant
financial success. The company developed computers featuring innovative graphical user interfaces,
including the 1984 original Macintosh, announced that year in a critically acclaimed advertisement called
*1964* By 1985, the high cost of its products, and power struggles between executives, caused problems
Wozniak stepped back from Apple and pursued
taking some Apple employees with him.
As the market for personal computers expanded andevoived throughout the 1990s. Apple lost considerable
market share to the lower-priced duopoly of the Microsoft Windows operating system on Intel-powered PC
clones (also known as "Winter). In 1997, weeks away from bankruptcy, the company bought NeXT to resolve
Apple's unsuccessful operating system strategy and entice Jobs back to the company Over the next decade,
Jobs guided Apple back to profitability through a number of tactics including introducing the iMac, iPod,
iPhone and iPad to critical acclaim, launching the Think different" campaign and other memorable
advertising campaigns, opening the Apple Store retail chain, and acquinng numerous companies to broaden
the company's product portfolio When Jobs resigned in 2011 for health reasons, and died two months later,
he was succeeded as CEO by Tim Cook.
Apple became the first publicly traded U.S. company to be valued at over $1 trillion in August 2018. then at
$2 trillion in August 2020, and at $3 trillion in January 2022. In June 2023, it was valued at just over
$3 tnllion.181 The company receives criticism regarding the labor practices of its contractors, its environmental
practices, and its business ethics, including anti-competitive practices and materials sourcing. Nevertheless,
the company has a large following and enjoys a high level of brand loyaRy. It has also been consistently
ranked as one of the world's most valuable brands.
History
Main article: History of Apple Inc
J9Z6-1980; Founding and incarooratioi
MacBook
Apple Park, the company's headquarters In
Cupertino. California, which is part of Silicon
Valley
Apple Computer Company
(1976-1977)
Apple Computer, inc.
(1977-2007)
Public
Nasdaq: AAPLl?
Nasdaq-100 component
DJIA component
SAP 100 component
SAP 500 component
US0378331005
Software services
Online services
April 1.1976; 47 years ago m
Los Aftos, California, U.S
Steve Jobs
Steve Wozniak
Ronald Wayne
1 Apple Park Way, Cupertino.
California, U.S.
526 retail stores (2023)
www.pclpublications.com | 49
П macOS Sonoma’s Key Apps
Set New Home Page
Accessing Websites
1
Open a new Safari window and navigate to the web page
that you want Safari to load each time you launch the app.
Click the Safari menu (top left comer), then select Settings to
display Safari's preferences dialog box.
1
To access a new website in the Safari browser, first
double-click in the URL bar, highlighting the text within it,
then type a new URL in this bar. A URL is the website's address,
which starts ‘www*. Press return at the end to go there.
General
General Tab* AutoFill Passwords Search Security Privacy Webtites Profiles Extensions Advanced
Safari opens with: A new window Q
New windows open with: Start Page 0
New tabs open with: Start Page 0
Homepage: | https://www-apple.conV |
Set to Current Page
Remove history items: After one year Q
Start Page Favourites: Favourites 0
File download location: B Downloads 0
Remove download list items: After one day 0
Open ‘safe’ files after downloading
'Safa* in»» include movies, picture», sounds,
________________________________________________leal ttorjimfiniA aafl atrJuvfs_____________________________
2
Ensure the General tab is selected and press the Set to
Current Page button. The required page address now
appears in the text box above. It's now your default home page.
The Home menu in the toolbar will take you there.
2
If you want to search for something on the web, instead of
typing a URL in the URL bar, type what it is you're
searching for, then hit Return. Your search results show relevant
sites. Scroll up and down the list and click one to go to it.
Using Links
You navigate the Internet in Safari using hyperlinks, or simply
'links'. A link can be a piece of underlined text, a picture, a
button or simply an area of the screen. To open a link you'll
need to move the mouse pointer over it and click. When the
pointer is over a link, its replaced by a hand.
Clicking a link takes you to a new page or opens a new window
based on what you’ve just clicked. If you don’t want to navigate
away from the page that you're currently on, right-click or
Ctrl-click on the link and from the pop-up menu, choose Open
in New Tab or Open in New Window.
50 | www. pci pu bl ications.com
Safari
Add Tools to the Toolbar
Pinned Sites
1
Right-click or Ctrl-click on the toolbar and select
Customise Toolbar; or click the View menu and select the
option from there. A window slides down. To add a button to the
toolbar, simply drag it from the selection in the window onto the
Toolbar within the Flexible Space sections.
If your tab bar isn't showing, go to the View menu and
select the Always Show Tab Bar option near the top. Now
open the site you intend to pin and right or ctrl-click on its
tab. From the pop-up menu, select the Pin Tab option.
2
Repeat this with as many tools as you need. When you’re
finished, click Done. To remove a tool from the toolbar,
simply drag it out of the toolbar, release and it vanishes. To
reset the tools to how they were originally displayed, drag the
default set of tools onto the Toolbar.
Status, Favourite & Tab Bars
The site gets a small tab in the left-hand side of the tabs
bar. This is always in place, ready for you to click on it and
open the site. You can pin multiple sites in this way. They
all appear as small tabs, showing a symbol or letter.
You can show or hide the Tab, Favourites and/or Status Bar (a
strip along the bottom of the window showing the full URL) by
clicking the View option in the menu bar atop the screen, and
selecting the option in question.
To remove a site's pinned tab, right-click or Ctrl-click on it
and from the pop-up menu, select Unpin Tab. The previously
pinned tab then becomes a regular tab. You can reorder
your pinned tabs by dragging them within the tabs bar.
www.pclpublications.com | 51
П macOS Sonoma’s Key Apps
Bookmarks and Reading List
1
You can save a website you're likely to return to often as a
Bookmark. A site you're interested in but don't have time
to read can be put on your Reading List Both options are
available from the Share icon in the toolbar.
2
When adding a bookmark, a pop-up window appears. You
can add a custom title for the website you're saving, plus
there's an optional description field and a pull-down menu that
lets you add your site one of your bookmark folders.
3
To access your Bookmarks and Reading List, open the
sidebar and click on the option, found at the foot of the bar.
Click a site to open it. In the Bookmarks sidebar, as shown, you can
right/Ctrl click and add a new folder if you wish.
In the Reading List, drag a site left to save it for offline
reading or to delete it. The right/Ctrl click menu has an
option to remove/delete a site from either list. Click the small
chevron, top left, to return to the regular sidebar.
The Start Page
pQDaa*q<
Q0**QrQQ i
Й£йо=S«QDHQ*
э с О
□ • □ Q "* Q • i
QT « QOQoV B « ®
Start Page gives you a window full of useful shortcuts to your
most frequently visited sites alongside its default choices. Click
on the URL field at the top of the browser or in the Bookmarks
menu. Select Show Start Page to access a window showing a
grid view of website icons, along with those you've visited most
recently and the default links to other sites.
To add a site, click the URL field to open the Start Page and
drag the URL into it. You can drag sites and folders into this
window from your Bookmarks too. Drag icons around the Start
Page to reorder them, or drag out of it to remove them. Click a
Show More/Less link to expand/contract lists. Use the icon
(bottom-right) to include or exclude Start Page categories.
52 | www.pclpublications.com
Safari
Tab Groups
• ED @ F”
Q 5 Tabs New Empty Tab Group ф W
New Tab Group with 5 Tabs
a Buy Mac - Apple (UK)
••I Medium Q Search
Tab Groups ----------------
© History Of The Mac
© Amazon Echo tabs
© Devon Trip
© The Cats
© Social Media
Shop h
Q OTabs
© History Of The Mac
© Amazon Echo tabs
© Devon Trip
© The Cats
© Social Media
Safari lets you save groups of tabs. You can then open a
group of tabs, temporarily closing what's open at the
moment. Open the sidebar, then tap the New Tab Group icon in
the top-right of the sidebar for a menu.
From the menu, you can make a group from all the tabs
you currently have open, or start a new, empty group and
then add tabs to it. We'll do the former here. Either way, you get
to name the new tab group. Press Return when done.
3
With your new tab group open (see the highlight in the
sidebar), tap the + icon (top right) to open a new tab, then
navigate to the site you wish to save in the tab group. Do this as
many times as you like to fill your tab group.
Use the sidebar to switch between tab groups and the
tabs you have open on your Mac. Tap a tab group and
then tap the chevron to its right for a list of tabs. Tap the icon in
the top-right corner to see tabs as thumbnails.
Shared Tab Groups
In macOS Sonoma, you can share a group of tabs. Just the
thing for when working on a group project. To do so, hover
the pointer over the tab group in the sidebar, click the three-
dots icon and select Share Tab Group.
Tab Groups Start Pages
Each tab group can now have its own Start page, which
you can customise. Click on a tab group and click the +
icon to give it a Start page. Click the bottom-right icon
and you can customise this Start page.
www.pclpublications.com | 53
П macOS Sonoma’s Key Apps
Private Browsing
Tailor Site Settings
1
Private Browsing lets you browse the Internet without adding
tracking cookies or recording where you've been in your
history. Activate Privacy Mode by selecting New Private Window in
the Fie menu. In a private window the URL field is darkened.
1
There’s a number of useful tools for tailoring your
experience on a per-site basis. Open the website and in
the Safari menu, select Settings for [the website]. You can enable
or disable content blockers, go straight to Reader View, change
the page zoom, stop auto-playing videos and more.
2
Private Browsing windows are locked when your Mac
goes to sleep, and have to be unlocked on an individual
basis with your password or Touch ID. To change this, go to
Safari > Settings > Privacy and uncheck 'Require Touch ID to
view locked tabs'.
2
Page Zoom and Auto-Play are set with pull-down menus that
appear when you click their current values. By default the
Auto-Play function stops videos with sound automatically playing
but you can override this using the Auto-Play menu. These settings
are applied whenever you load that site.
The Reader View
3
If you have a paid-for Cloud subscription you can turn on
Private Relay, which prevents websites from viewing your
IP address. To turn it on and off, go to System Settings > Apple
ID > iCloud and under Private Relay, click the Options button.
If a Page icon appears in the left of the URL bar, that site can be
viewed in Reader View. Click it to toggle Reader View on and off.
Right-click on this icon for a settings window, that allows you to
set some sites to automatically open in the Reader View.
54 | www.pclpublications.com
Safari О
Getting More from Safari
Tabs Audio Indicator
If a tab is playing audio, it has a speaker icon on its right. Click this
to toggle the sound on and off without having to open the tab.
Right-click on the icon for an options window, which lets you mute
more than one tab at once, or use Picture-in-Picture.
Clear Browsing History
In the Safari menu, there's an option Clear History which erases your
browsing history and website data. Hold Alt while you select it to
delete your browsing history, but not website data. In the pop-up,
choose whether to delete all or recent history with the pull-down.
< BacktoTesco.com
Sign in to your account New to Tesco? Register for an account
Email address
ian.osbome@dsl.pipex.com
Password
f4ee^-vafko2-*octiV Hide
I've forgotten my password
Sign in
Suggested Passwords
When setting up a log-in account in Safari, the app suggests a
strong password for you. If you choose to use it, you can edit it
in case it doesn’t fulfil the site's specific requirements. You can
review all of your web passwords by opening Settings in the
Safari menu, and clicking on Passwords in the toolbar.
Change Your Search Engine
To change the search engine Safari uses by default, select
Settings from the Safari menu. Click on the Search tab and
from the pull-down select the search engine you want to use.
You can use different search engines for regular browsing and
for private browsing if you wish.
Integrated Spotlight Search
Spotlight search is a tightly integrated feature of macOS,
including Safari. From the search bar you can find links to web
pages, bookmarks and browsing history; simply by typing a
search term. Click on one of the responses to open that
particular website in your browser.
Safari Extensions
To extensions to Safari to expand its functionality, open Safari's
Settings window (Safari > Settings) and select Extensions. Click
More Extensions to access the App Store’s extensions page,
from where they can be installed. Your extensions are synced
across your Apple devices through iCloud.
www.pclpublications.com | 55
П macOS Sonoma’s Key Apps
Add a Website to the Dock
FW* Window
MwT*
New fmoty Т»ь Ьгаию < Ф ®
New TabOroup wrth TN, Т.Л
Oo»nFM * “ *
Ooer LOCMUei...
Э PaperCUt S*VCh_
Oom AU Window,
Apple For Beginner* coding & Computing Photogi
Master photo
editing with
Photoshop
1
You can add a website to the Mac's Dock and use it as if it
was a stand-alone application. In Safari, open the page you
want to add to the Dock as a Web App. In the top bar's Ale menu,
select the Add to Dock option found towards the foot of the menu.
2
In the window that pops up, you can edit the name of the
site, which is to be the Web App's name, and also its URL
if necessary. Short app names work best. When you're ready,
click the Add button in the bottom-right of the window.
Latest Publications
Improve your
photographic
skills & more
3
Take a look in your Mac's Dock. The new Web App is
there, and has the name you entered in the previous
step as its app name. It also has the website’s icon for an app
icon. You can launch this app from the Dock, just like any
other Dock application.
The app, when it is opened, functions just like the
website. You can navigate from page to page using
links, enter text in text fields and move forwards and
backwards through your browsing history with the chevrons
in the (much-simplified) toolbar.
5
Click on the app's name on the left-hand side of the top
menu and select Settings. A window appears. In this window,
you can edit the name of the app and/or its URL, change its icon
and more. The Privacy tab gives access to still more settings.
6
You don't have to keep a web app in the Dock to use it as an
app. You can also find it in the Applications folder, or launch it
from Launchpad or Spotlight If you want to delete it, you can drag it
into the bin from the Applications folder, like any other app.
56 | www.pclpublications.com
Safari
Safari Profiles
1
You can divide your browsing into profiles, allowing you to
divide your saved websites into groups such as 'Personal',
'Work' or 'School'. Each Profile has its own favourites, cookies,
browsing history, Tab Groups, Safari extensions and website data.
In the Safari app, click on the word 'Safari' on the left-hand
side of the top bar. From the menu, select Settings. In the
Settings window, click the Profiles icon in the toolbar. As this is
your first profile, click the Start Using Profiles button.
Choose a name for your profile. You also get to choose an
icon representing what the profile is for - click the
three-dots icon for more choices. You can also give the icon a
new background colour; click the rectangle next to Colour and
choose one from those on offer.
4
You can create a new Favourites folder for bookmarks
to go with this profile, or if you already have a folder
containing the bookmarks you wish to use, click Use Existing
Folder and select it from the menu that appears. When
finished, click Create Profile.
5
You can make a few customisations on the next window
(which you can open at anytime using Safari > Settings >
Profiles). Click Extensions, and you can choose which extensions
are active with the profile selected on the left.
Customise the default 'Personal' profile by clicking it in
profiles settings. Click the Plus to add a new profile, or
click a profile and click minus to delete one. The pull-down
menu in the browser toolbar lets you open a new profile.
www.pclpublications.com | 57
О macOS Sonoma’s Key Apps
Mail
Send & Receive Email
Sonoma has a great bundled email application, so sending and receiving
emails is as easy as typing a message and clicking a button. Here's howto
get the most from the Mail app.
This is the sidebar, which lets you select
mailboxes, see emails from VIP senders
or those which you've flagged, and more. You
can resize and even close this sidebar by
clicking and dragging the divider between this
and your emails list.
1
The list of emails contained in the
currently selected mailbox, in this case,
All Mailboxes. The number of emails in the
box, and the number of unread emails, are
shown. You can resize this column by clicking
and dragging its left or right edge.
Click this circular icon to toggle
between showing all emails and only
unread emails.
DThis button downloads new emails. You
can set your Mail app to check
automatically but this button does so manually.
3
© Exchange
© Talktalk
Q Pipex email
© iCloud
© Google
VIPs
All Sent
p Flagged
> В All Drafts
Q Bin
В Old Papercut emails
В INBOX
0 Archive
В Recovered Messages (iCI...
22
23
All Inboxes
Rob Mead-Green Inbox-Pip 3:30pm
Future Publishing Ltd Brief - Secrets... 2 0
Hi Ian As promised - sorry for the delay ;)
Future Source Commission (publishing Bri...
All Inboxes
23,483 messages, 5 unread
list-ITCorpSys@futur...
Invoice for Purchase Order PFPL299901
pear Ian Osborne Please find enclosed
copy of your invoice for purchase order P...
Nectar and British Air... In... 3:05 pm
Your Nectar points can take you further...
Convert your points Into Avios to spend on
flights, upgrades, hotels and much more...
eBay Inbox - Pipex email 3:21pm
Help us protect your account
Get a higher level of protection Hello Ian,
It's been more than a year since you last u...
Nick & Ian
Is Rob away? 20
Hey Nick, Is Rob away at the moment? I
have a feature for him, and he hasn't yet p...
Nectar and British Airways
Your Nectar points can take you fur
To: Ian Osborne,
Reply-То: Nectar
5
When you want to write a new email
from scratch, click on this button to
open a blank one.
6
This button archives the selected
message. Very useful if you want to
make sure you don't delete it.
Dlf you want to throw away the currently
selected email, click here to send it to
the Trash folder.
8
This button moves the selected email to
your junk mail folder. Use it to help the
Mail app identify 'spam', which is junk emails.
9
This button lets you reply to the
currently selected email, with the reply
going to its sender only.
© Inbox
В Drafts
Sent
Junk
24
® Bin
a Archive
В Conversation History
© Inbox
В Drafts
Sent
& Junk
® Bin
В SavedlMs
LinkedIn Inbox - Pipex email 2:55pm
Editor and Proof Reader VQ role at Pears...
Your skills seem to match this job Top job
picks for you Editor and Proof Reader VQ...
STM Goods Inbox - Pipex em... 1139am
25% Off Sitewide Use Code: SCARY25 |...
The Scary Good Sale
support@mysugr.com Inb... 10:57am
Weekly Report
You vs. Monster 0:7 Total score: 4 points
How can I earn points? Hey, this is how y...
Jo & Ian
EJ Finished article 30
Great stuff, sorry for the lack of response
from us! — Jo Membery Operations Editor...
MCV/DEVELOP Awar... In 10 02am
Don't forget to book your tickets!
IRL 2023 is getting closer and closer, book
a ticket now! DON'T FORGET TO BOOK Y...
© Inbox
В Drafts
Sent
1
Anriazon.co.uk Inbox - Pipex... 7:04 am
Kindle Daily Deal: Discover top eBooks fr...
Top deals for you Point Blanc (Alex Rider
Book 2) by Anthony Horowitz £3.49 £7.99...
Cavern club Inbox - iCloud Yesterday
EJ Re: A cloakroom
58 | www.pclpublications.com
Mail
10
The two left-pointing
arrows here is the
Reply All icon. Use this button
to reply to the sender of the
currently selected email, but
also to everyone else that
received it.
11
The single arrow curling
to the right is the
Forward button. If you want to
forward an email to a third
party, that is, not the person
who sent it to you, use this.
12
Click the flag to mark
the currently open
email with a flag of this
colour. Click the chevron next
to the flag for a pull-down
menu that lets you select a
different flag.
Use this button to
silence notifications
on threads that are sending
you too many alerts. The
emails still arrive, but they
don't send notifications.
13
14
This pull-down menu
is another way of
moving an email into another
mailbox or folder.
15
Information about what
mailbox the open email
is in, what time it was received
and the paper clip shows it
has attachment.
16
To search for a specific
subject, person or word/
phrase use the field here.
17
These are email
inboxes and as you
can see, we have four email
accounts set up in Mail;
however, you can have more
or fewer if you prefer.
18
Your emails appear
here. Unread emails are
shown with a blue dot to the
left. Click on an email to open
it in the main window.
19
__4
If you have a picture of
the email's sender in
20
21
22
23
24
25
Contacts, it appears here. If
not, it’s a grey circle with
initials. To the right is info about
who sent and received the
open email, and its subject.
Here you can access
emails you've flagged,
or those you have sent from
your email accounts.
When new emails are
downloading or
sending, it says so here.
If the open email has
attachments, click here
for a pull-down listing them all.
You can select and open them.
Hover over the top of the
open email and icons
from the toolbar are repeated.
They function is the same
Various other mailboxes
associated with the
accounts you've set up in Mail.
If you've identified
senders as VIPs, they're
listed here. Click 'VIPs’ to open
and close this section, and click
on a VIP name to see emails
from that person.
The Column Layout
To use the old-school,
column-based layout, in
the View menu, select
Use Column Layout.
Repeat this step to revert
to the modern layout.
www.pclpublications.com | 59
П macOS Sonoma’s Key Apps
Sending a New Email
to let him know. Cheers, Nic...
British Air... In... 3:05 pm
pints can take you further...
points into Avios to spend on
es, hotels and much more...
Inbox - Pipex email 2:55 pm
of Reader VQ role at Pears...
m tn match this, inh Tnn inh______
Nectar and British A
Your Nectar points c<
To: Ian Osborne,
Reply-То: Nectar
1
Here we show you how to open a new blank email, write a
message and send it to a given email address using the
Mac's Mail app. To open a new email, first click on the Compose
New Message icon in the toolbar on top of the window; the one
that looks like a pen writing on paper.
2
To send someone an email, type their email address into
the box marked To:. To also send it to someone else, add
their email address in the Cc: box. Add multiple email addresses
in either box, separated by commas, to send the same message
to a group of people.
3
It's always a good idea to put something in the subject
line, even if it’s just 'Hello!'. Type the body of your
message in the large space below. An email can be as long
as you like and you can use different fonts, colours and sizes
if you really feel the need.
Once you've finished typing your letter, click the Send
button in the top left corner of the email panel to send it
on its way. Email is usually sent very quickly, and your addressee
should receive it within a couple of minutes, as long as there are
no issues with their connection or provider.
Customising Mail
You can customise your Mail app by opening it and, in the
Mail pull-down menu, selecting Settings. Under the General
tab, you can set an interval to check for new messages,
decide where downloaded attachments go and more.
The Fonts & Colours tab lets you change the fonts and text
size used with incoming emails and change the colours of
quoted text. Explore the Mail settings and set up how you
choose, but be careful with the server settings.
60 | www.pclpublications.com
Mail О
Receiving Email
When you receive an email in your inbox, this is how
you open and read it using the macOS Mail app.
Once you've set up your email account, you can send and
receive email. As soon as you launch Mail, it connects to
your email service and collect any email that is waiting for
you. These messages are shown as a list in your Inbox.
Click on one and it's displayed on the right.
Replying to & Forwarding Email
If someone you know sends you an email, you’ll probably want
to reply to them. Simply click on the email so you are viewing the
text of it, then at the top of the screen you'll find a row of three
buttons, as you can see here.
The leftmost one has a single left-pointing arrow on it. This is
the Reply button. If you click on this you'll see a window pop
up that looks a lot like the window for a new email, but it will have the
responder's email address already in the To: box.
x - iCloud Yesterday
ats •
F Our top picks for
se spooktacular ma...
Next to the Reply button is a similar button with two left
arrows on it. This is the Reply All button; use this with
extreme care. If you have been sent an email that has also been
sent to a number of other recipients, hitting Reply All will send
your reply to everyone who received the original mail. Obviously
if your reply was meant to be private this is a very bad idea, and
has got many people into trouble.
While Mail is running, it periodically checks the server
for new messages. You can also prompt Mail to look at
the server immediately by clicking the button in the top
left of the screen that looks like an envelope.
The rightmost button of these three is the Forward button,
which is used to send an email you’ve received to another
recipient Forwarding emails is another thing that requires care;
make sure that you don't accidentally send private information to
someone who was not meant to receive it.
Adding Attachments
Almost any type of file can be attached and sent over the Internet along with your email.
To add an attachment, first start an email (or reply to one
you received), and then click on the button bearing the
picture of a paperclip, at the top right of the email panel.
This will open a Finder window, allowing you to navigate to
the file or files that you want to send. Select the ones you
want, then click Choose File to attach them.
Pictures you've added as attachments are shown in the body
of the email. If you don't want to display it as an attachment,
right-click on it and from the contextual menu, choose View
as Icon. It can still be opened by the recipient. If your email
suggests you're sending an attachment but you forget to
add it, you get a reminder when you try to send the message.
www.pclpublications.com | 61
П macOS Sonoma’s Key Apps
The Mail Markup Feature
1
The Markup feature lets you add notes and scribbles to
pictures that are attached to an email before you send it
Write an email and attach it to the email. Click on the image, then
click the chevron in the upper right comer of the photo. Select the
Markup option to open the Mail app's Markup feature.
2
Now use the interface to add text, drawings, or a range
of shapes and symbols directly onto the photo, in the
email environment. When you're finished, click the Done button
and either mark up more pictures or send your email as
normal. You can also use certain third-party apps to edit
photos this way.
Move to...
Highlight or open an email. In the top-right corner
there's a pull-down menu showing a folder icon in the
toolbar. If your Mail window is small, you might have to
click on a chevron and select it from a menu. This lets
you move it to one of your folders including Trash,
Junk, and folders you've set up yourself.
Show Only Unread Messages
You can hide emails you've already read by clicking this
icon. Now only unread messages are shown. Click it again
to show all your emails once more. It's great for finding
emails that you received a while ago but haven't seen yet.
All Inboxes
Filter by: Unread (2 messages)
Netflix Inbox-iCloud 5:07 r
E2 Ian Osborne, we've just added a doc..
Told from both sides of the law, this
docuseries from the makers of "Fe
MyHeritage DNA Mat... In
Ian Osborne, you've got DNA M
Having problems reading this em
in your browser. Hi Ian, Good news! ?>
Remind Me
If an important email arrives but you don't have time to reply,
use Remind Me to select a date and time for it to jog your
memory. Right-click the email in the middle column, and select
Remind Me. You can be reminded in an hour, tonight, tomorrow
or 'later', which lets you set a custom time and date.
Flagging an Email
To mark an email with a flag, highlighting it for later
reference, click on the Flag pull-down and choose a colour.
You can add more than one flag to a single email. To
remove them again, choose Clear Flag. The ‘Flagged’
option in the side bar shows emails you’ve marked.
62 | www. pci pu bl ications.com
Mail Drop
If you need to send large attachments via email,
the Mail Drop feature is very useful.
If an attachment you wish to email is too large for a
regular email, it's stored on Apple's server and offered
as a download instead. Depending on whether the
recipient is using Mail, the attachment could appear
as a download link or as thumbnails.
Here, we received huge photos, which are displayed as
thumbnails. You can download them all by hovering over the
email and clicking on the paperclip as shown. They're kept
on Apple's server for a month from the date they were sent.
Searching Your Emails
1
Click the magnifying glass icon and type your search term
into the search field. Suggestions are offered for items
such as people, subjects and attachments; emails that meet
your search requirements are shown in the email list.
2
After clicking on one of the suggested items, you can
adjust your search by clicking the first word in the field
and choosing a new option, as shown here, or even adding a
second search term for more advanced searches.
Scheduling Emails
In Sonoma, you can schedule when your pre-prepared emails are sent, choosing a date and time.
You can now prepare an email now, but send it some time
in the future. First write the email in the usual way, and
then click the small, down-pointing chevron between the
Send and To Fields buttons as shown.
Choose to send the email in an hour, tonight, tomorrow or
'later'. Choose this last option and you get a window in which
you can set a custom date and time. Use the buttons, or click
on a number and type over it. When finished, click Schedule.
www.pclpublications.com | 63
О macOS Sonoma’s Key Apps
Using Mail Signatures
You can add a signature to your emails, that is, a short
piece of text that's at the foot of every email you send.
Unsend an Email
Ever sent an email and spotted a mistake in it just as you
pressed Send? You can now recall it, if you're quick.
A signature is a piece of text that you can add to the foot
of your email automatically. To set one or more up, open
Mail Preferences (from the Mail menu), click on Signatures
in the top bar and then on the account to which you wish
to add a signature in the accounts on the left. Click on the
'+' button under the middle column to add a signature.
You can click on the name of it in the middle column and
change it to anything you like, and write your chosen
signature in the right-hand column. It can be anything
you want. Now, when writing, forwarding, or replying to
an email, you can add or remove your signature using the
pull-down menu to the right of the From field.
First of all, make sure you have the sidebar open. The
sidebar is the one on the left, next to the incoming emails
list. If it's not there, select Show Sidebar in the View menu, or
press ctrl-cmd-S. The sidebar will then appear.
2
When you send the email, a link labelled 'Undo Send’
appears at the foot of the sidebar. You have ten seconds
to click this link; when you do, the email reappears so you can
edit it. If it's not there, it's too late to recall.
Accessing Emojis
Unsubscribe
The Mail app has an emoji picker to use when writing an
email. Click on the smiley face in the toolbar and you get
a choice of emoji to add to your email. To add it, just click
on the one you want. Scroll up and down, or click the
icons at the bottom for more choices.
If an incoming email is from a mailing list, the Unsubscribe link now
appears right at the top of the email. Click the Unsubscribe link to
stop this mailing list from sending you emails in the future.
64 | www. pci pu bl ications.com
Mail and Home App
Home
For the Smart Home
Apple's HomeKit gave developers the means to control compatible household
gadgets from devices such as the Mac, iPhone, iPad and iPod touch. Your
connected home gear can be controlled under one application. You can set up
automations too, so multiple devices can be activated with a single instruction.
1
Before you can make use of the Home app, you have to
add HomeKit compatible devices. You can only do this
from an iOS device, you can't use your Mac. There's a list of
HomeKit compatible devices online at www.apple.co/2MFjhb3.
2
After adding some devices using your iOS device, you
can access them through Home on the Mac. Right-click
a device's window and click the cog (bottom-right) for the
Settings, and you can change the room they're assigned to.
3
Click Automation in the sidebar and you can set timers,
actions and more What they do depends on what kit you've
incorporated into your Home app. Click the + icon to add
automations or groups of automations (scenes).
For example, you can use the Home app to control and
configure speakers that are compatible with HomeKit.
Naturally, Apple's own HomePod, pictured here, fits the bill but
there are plenty more.
www.pclpublications.com | 65
macOS Sonoma’s Key Apps
Music
Play Your Tunes
The Music app is great for enjoying all your sounds on the Mac. If you
subscribe to the Apple Music service, you can stream from over 90 million
tracks and numerous online radio stations. You can rip your CDs and store
them on your Mac, and you can also compile your own playlists.
Little has changed in the
macOS Sonoma Music app, but
collaborative playlists have been
introduced - invite each other to
select and edit tracks, and add
emoji reactions to specific songs.
1
When you're using the Music
app, the top bar gives you
pull-down menus offering controls and
options. It's worthwhile familiarising
yourself with them.
Completion suggestions are
offered as you type, and results
can be limited to Apple Music, or your
on-Mac library, as you wish. Results
include artists, songs, albums and more.
3
□
These are, in turn, Shuffle Tracks,
Previous track, Play/Pause, Next
track, Repeat Play.
When you're playing music, the
album art, artist and title are
shown here. Click on the album art to
switch to the mini player, which shows
the album art and controls only and
takes up much less space on the
screen. The line under the track name
lets you scrub through the song.
5
Click and drag the dot, and move it
left and right to change the volume.
6
These three icons, in turn are;
wirelessly transmit your music to
Bluetooth headphones or speakers;
open a sidebar showing the lyrics to
the track that's currently playing; show
a sidebar giving both a list of what's
playing next and your history; that is,
what you've played.
66 I www. pci pu bl ications.com
Music
Importing Your CDs into Music
Insert the CD into your Mac's CD drive if
it has one. If not, use an external optical
drive like Apple's USB SuperDrive. A message
pops up asking you if you want to import the
album into your iTunes library; click Yes.
You see the track listing of the album
appear. The spinning circle indicates
which track is currently being copied, while
a green tick next to a track tells you it has
already been copied successfully.
2
Once you've successfully
imported your album, don’t
forget to click on the Eject button in
the sidebar or the top-right so you
can store your CD away.
3
If you have an Apple Music
account, Listen Now is the main
page, offering suggestions of music you
might like and showing what you played
recently. Browse is great for finding new
music, and Radio gives access to
streaming stations.
7
This is the Listen Now page, your
gateway to the Apple Music
streaming service.
8
Click here for your profile, and also
the Apple Music social network
where you can find out what sounds your
friends are listening to, and discover and
enjoy new music together.
9
These are the options for your
Library, that is, music you've
installed on your Mac. It can be arranged
into Artists, Albums, or Songs, and there
are sections for music you've recently
added and music videos.
10
At the top of the Listen Now page
is Top Picks, a series of playlists made
up of tracks chosen for you based on
previous plays, tunes you play a lot, themed
playlists, etc. Scroll left and right for more.
These are your playlists. The top
ones are Smart Playlists, which
add songs automatically according to
rules, and the lower ones are playlists
you build yourself.
This is a round-up of music you've
recently streamed. Scroll this page
up for more suggestions, again based on
previous listens.
11
12
13
14
___4
Hover over the row and click the
chevron for more music options.
www.pclpublications.com | 67
П macOS Sonoma’s Key Apps
Signing Up for Apple Music
1
With an Apple Music account, you can stream from 90
million songs for a set monthly fee. To sign up for an account,
click on Listen Now in the left-hand sidebar. You can then click Try it
For Free to learn about and sign up to the service.
A pop-up window appears inviting you to subscribe as an
individual, for £10.99/$ 10.99/10.99 € after your free trial.
Click Try it For Free to do so, or See All Plans to choose a Family
or Student account
3
You must then sign using to your Apple ID. Enter your
Apple ID’s email address, then your password, and then
click Sign In to proceed to the next step. If you’ve forgotten
your details, click the Forgot Apple ID or Password? link.
If you have other Apple devices logged into the same
Apple ID, you’re sent a verification code. Enter it, then
follow the on-screen instructions regarding what kind of music
you like. When done, you're ready to start.
Changing or Cancelling Your Subscription
1
If you want to cancel your Apple Music subscription, first
of all, click Account in the top bar and select Account
Settings. You’re taken to your account page. Scroll down to
Subscriptions (under Settings) and click the Manage link.
You're shown your active subscriptions. Click on Apple
Music's or Apple One’s Edit link. On the next page, you
can change your subscription to a different one (individual, family
or yearly, Apple One or just Music) or cancel it altogether.
68 | www.pclpublications.com
Music Q
Using Apple Music
1
Browse or search for the artist, album, or track to which you
want to listen. Here we're looking at an album. Click Play to
play it in its entirety, or Shuffle to play the tracks in a random order.
Tracks marked with an E in a box have explicit lyrics.
2
Music controls such as Play and Pause are found at the top of
the window. To identify tracks on an album you especially like,
hover the pointer to the left of a track, and click the heart that
appears. To cancel this, click on the heart a second time.
3
Click the three-dots icon on the right above the tracks for
a menu. Here you can add the album to a playlist or create
a new one, share it with your friends, like or dislike the album as a
whole, or create a station based on its artist.
4
Each individual song also has a three-dots icon, offering a
similar menu that applies to that track alone. You can also
play the track by clicking the Play icon that appears when you
hover the mouse/trackpad pointer over it.
5
Apple Music is all about helping you to find music you enjoy
listening to. When viewing an album, you can scroll up and
other titles by the artist in question are shown. Click on one to
open it in the main window, click the chevron to see more.
6
The Browse section offers tracks, artists, albums, and
playlists based on Apple Music editors’ choices and new
releases. It also offers current charts for various countries. The
Radio section lets you listen by station or genre, and more.
www.pclpublications.com | 69
□
macOS Sonoma’s Key Apps
News
Stories and Features
The News app is great for getting the important headlines as they break,
from news sources around the world. If you subscribe to Apple News+ you
can read a huge range of magazines and news publications on your Mac,
and you can even fill in crosswords on your screen. Here's how it works.
1
When you first open the News app, you see a sidebar and
a main window. The sidebar's Today option is selected,
giving you a range of the day's top stories. Click on a story to
open it and read it in full.
2
When you open a news story, if it has a video it can be
watched within the News app. In the File menu, there's an
option to open the story in Safari. This takes you to the web page
from which the story was drawn.
3
The Special Coverage section gives you a selection of
features chosen by Apple's editors. If you find a story you
particularly like or dislike, use the thumbs up/down icons in the
top-right comer to improve future suggestions.
In the sidebar section titled 'Suggested by Siri', you see
various subjects the News app thinks might interest you.
The stories work just like in the other sections; click one to open
it, click the chevron in the top-left to go back a page.
70 | www.pclpublications.com
News | X
5
In the File menu is an option called Discover Channels.
Click it for a range of news sources and subjects for you
to choose from. Select this option for a window showing news
sources you might like to follow.
6
Scroll down the window for more channels and topics.
Select as many or as few as you like. When you're finished,
click the Done link in the top-right corner. Your new sources have
been added to your sidebar.
•INDKKKIMNT
Apple MacBook Pro: New
laptops revealed with new
chips - and new colour
Enter a search term for a subject or source you're interested
in for a list of relevant stories and channels. Click the plus
sign to add that channel or topic to your sidebar. To remove a
channel or topic, right-click on it and then select Unfollow.
8
To save a story for later reading, select Save Story in the
File menu. Click Saved Stories in the sidebar to see the
pages you've saved. To go back to a story you've previously
read, click the History option in the sidebar.
My Sports
Click on the Sport option found near the top of the
sidebar for a section dedicated to (you guessed it)
sports. Click Get Started and you can choose teams
and categories you wish to to follow in the News app.
Shared with You
You can share News articles using the macOS Share icon.
If someone shares a story with you using Messages, it
appears in a sidebar category called Shared with You. The
person who shared it is indicated under each story.
2
www.pclpublications.com | 71
П macOS Sonoma’s Key Apps
Photos
Manage Your Images
The Photos app gains a couple of new
features in macOS Sonoma. The People
album can now recognise your pets as
well as fellow humans, and Visual Lookup
recognises food and gives you recipes, and
can work on video stills as well as photos.
2
ф —
12
5 May 2020-31 Oct 2023
Use this button to toggle
between regular thumbnails of
your photos, as seen here, and
square-shaped images that leave
little border.
This slider increases and
decreases the size of your
preview images.
2
Use these buttons to view your
photos arranged according to
the year, month, or day in which they
were taken.
3
Click here to see all your
photographs in the Photos app,
arranged as thumbnails. Double-click
on a thumbnail to open a photo, filling
the application window.
Select or open a photo and
then click the T for the
information window. Here you can
review and edit where and when it
was taken, add captions and more.
5
The Share button lets you add
the picture to shared albums,
send it using Mail, AirDrop, Messages
and more, add it to Notes or Reminders
and even set a desktop picture.
6
Choose a photo and click the
heart to identify a picture as
one of your favourites.
11
15
17
> Media Types
> Shared Albums
> f*n Mv Albums
Library
0 Memories
® People
X Places I
C Favourites I
0 Recents
Й Imports
© Duplicates
Q Recently Deleted
Rotate the image 90%
anti-clockwise. Hold Alt to turn
it clockwise instead. Useful if a
picture that's been imported is not
the right way up.
8
The search field. Thanks to the
Photo app’s machine learning,
you can search for terms like 'birthday',
'holiday', 'Christmas' and more, to find
photos taken on these occasions.
9
14j
16
Filter to display all pictures,
favourites, those you've edited,
only photos, only videos and
according to keywords.
10
These sidebar options
represent different ways of
viewing photos found in your library.
Photos shows all your photos,
Memories arranges them into groups,
Favourites shows your best pics, and
Places groups them according to
where they were taken. Recents,
Imports and Recently Deleted are
self-explanatory.
11
These are the dates between
which the currently visible
pictures were taken and the locations.
12
The heart seen in the corner
here shows you've identified
this photo as a favourite. Click the
heart to unfavourite it again.
13
72 | www.pclpublications.conn
Photos
14
___J
Click here to arrange
and view your media
according to type, such as
Videos, Selfies, Live Photos,
Screenshots and more,
depending on what media you
have in your Photos app. This
doesn't remove them from the
main Library; it's simply a way
of arranging its contents so
you can better find your media.
Click the chevron to
expand the Shared
Albums category. Photos
you've shared on iCloud are
listed in Activity and Shared
Albums shows the albums in
which they were shared.
Hover over Shared Albums
and click the plus sign that
appears to the right to start a
new, shared album.
15
These are your albums,
whether created by
yourself or put together
automatically by the app. Click
'Shared Albums then the plus
sign to open a new one, which
you can then share with others.
Projects is for creating
photo books and more
using third-party apps.
16
17
Your pictures, arranged
as thumbnails. Click on
one to open it, after which you
can swipe through them or
choose one from the preview
bar under an open photo.
At the foot of the screen
you're shown how many
photos and videos you have in
the currently selected album.
18
19
www.pclpublications.com | 73
П macOS Sonoma’s Key Apps
The Editing Tools
1
Open a photo and click Edit. Use the Wand tool to
automatically enhance your pic or click the Edit button to
make manual adjustments. In Editing Mode, the Edit button
changes to 'Done'. Click this when you've finished your edits.
Edit With
Right-click on an open photo and you get a
sub-menu. Hover over Edit With and, if you have
third-party photo editors on your Mac, you can open
the photo in one of them and then edit it using that
app. Edits are carried over into the Photos app.
Ф 0 Q O' X Щ
ADJUST
> Ф Light
> О Colour
_> О Black & White
v & Retouch ♦> ©
Z Size 105.04
> Red-Eye
> И White Balance
> Й Curves
> Q Levels
> Z3 Definition
2
Click a triangle in the sidebar to open a tool. The Light,
Colour and Black & White tools give you sliders to
increase or reduce the brightness and saturation or switch to
a monochrome image. Click the Options triangles for more
advanced editing tools.
3
Retouch removes unwanted objects from a picture.
Click the brush, then click and drag to paint over the
object. Let go and it's removed. Red Eye lets you paint out
red pupils caused by camera flash. You can adjust the brush
size with both tools.
In White Balance, select the feature to adjust with the
pull-down and use the slider to change it. Levels take time
to master. Hover your pointer over the graph and drag the dots
at the foot of the vertical lines to adjust.
5
In Curves, drag the diagonal line or the dots under the
right and left ends. A useful trick is to click on the left
dropper and click something black, then the right dropper and
click on something white. The Definition tool is another slider.
74 | www.pclpublications.com
Photos
6
Selective Colour and Noise Reduction are sliders. The
former lets you make adjustments to one colour at a time,
using the pickers and sliders and Noise Reduction is for smoothing
out speckles and other such imperfections in the photo.
□ The Sharpen tool lets you sharpen pictures that are out of
focus. You can sharpen the edges, adjust the intensity and
more. The Vignette option lets you add an adjustable shadow to
the edges of the photograph, as you can see we've done here.
8
Select the Filters tab and you can automatically add an
effect to your photo. Here we've gone for Vivid Warm
but you can also set it cooler, make it monotone and more.
Choosing another filter overrides the last one. Choose
Original to remove all filters.
9
You can the Crop tab to rotate your photo if it isn't
looking straight and also to crop it by dragging the
corners into the photo. The Flip option in the sidebar mirrors
the pic and Aspect lets you resize the photo according to an
aspect ratio of your choice.
10
Edits made in the Photos app are non-destructive, so your
edits can be reversed. If you don’t like your edits, click Reset
Adjustments in the bottom right comer to reverse the last edit, or
Revert to Original in the top left to erase all the edits.
Universal Tools
All the options in Edit Mode have these three tools,
which appear when you hover over or open one of
the settings tools. The curly arrow reverses the last
adjustment you made. Auto makes an automatic
enhancement with that tool only and the tick in a
circle toggles the last edit you did on and off, so you
can see the difference it has made.
www.pclpublications.com | 75
П macOS Sonoma’s Key Apps
Projects
Copy & Paste Edits
Choose the pictures you want to use (hold cmd and click on
them one by one), then click'+’ next to Projects and select one.
If no apps are listed here, choose App Store and download one.
Using your chosen app, follow the on-screen instructions to
create a project like prints, cards, books and calendars.
If you have a series of photos you wish to edit in the same
way, you can now copy these edits and apply them to the
next picture. After making your edits, right-click on the picture
and choose Copy Edits. Then open the next photograph you
wish to edit, and then right-click and select Paste Edits.
Adding People or Pets
1
___J
Open a photo with people in and click the T icon for the
information window. Click one of the faces shown in this
window. The face is circled, and you can add a name. Faces that
are recognised are already tagged. Click the Plus sign again to
add further tags, which you can drag into place as needed.
2
Click 'People & Pets' in the sidebar to see photos you've
identified by name. Click on a person to see all the
photos you have of them. If a photo doesn't contain that
person, right-click on it and select the option 'X is not in this
photo' to remove it. Scroll down and click Confirm Additional
Photos to check pics the app thinks are of that person.
Memories
1
Click on Memories in the sidebar to show photos
grouped according to various factors, including time and
content. For example, a series of pictures taken over a week in
a certain location might be identified as a holiday. Photos also
picks your best shots too.
2
Right-click on a memory and you can delete it or add it
to your favourites. Open a memory and hover over the
picture at the top to see a Play/Pause button. Hover over the
slideshow for more controls. Click the Music icon to change
the background music.
76 | www. pci pu bl ications.com
Photos
Making New Albums
[£) Imports
IQ Duplicates
f] Recently Deleted
Albums
> Г Media Types
> £J Shared Albums
> □ My Albums
v Q My Projects
1
Cmd-click the pictures you want to make into an album,
then hover over My Albums in the sidebar. Click the plus
sign and choose whether to make a regular album, a smart
album or a folder. If you choose a smart album, you can set the
album's rules to anything you like.
2
Set its title in this window too. In the future, all photos
that meet the rules will automatically be added. The new
album appears in your sidebar; click the triangle next to My
Albums to see them all. You can drag photos onto a new album
to add them to that album.
Editing Photo Information
Visual Lookup
Open a photo and click on the T icon in the top bar to open the
information window. You can add a title, caption, key words and
more here. You can also click on the date and time that it was
taken to open a second window
If your photo contains landmarks, art, plants, flowers, pets, food
and more, the information icon turns into a Visual Lookup icon.
Click on it and icons appear on the objects in the photo. Click
one of these for information on what it is.
Merge Duplicates
If you have a lot of duplicate photographs in your
Photos app, there's an easy way to merge them. In the
sidebar, select Duplicates. All your duplicated pics are
shown. To merge them, simply click on the link 'Merge
X Items’ above each collection of duplicated pics. Do
this on a per-picture basis.
Deleted & Hidden Photos
To delete or hide a photo, right-click on it and select the
option you want. The Recently Deleted album is in the
sidebar. In the View menu, choose Show Hidden Photos
Album to add this one. Click on one of them, and you can
open it with your password or biometrics. Right-click
one for options to unhide or recover it.
www.pclpublications.com | 77
П macOS Sonoma’s Key Apps
Contacts
Your Address Book
Contacts is your digital address book, in which you can store details for
friends, family, workmates, professional associates and more. You can add
addresses, telephone numbers, social media accounts and other such
information, and store your contacts in user-defined categories.
Managing and Maintaining Contacts
1
This guide shows you to how to add new contacts to
your Contacts address book, edit existing ones and
share a completed contact card with other people. To create a
new contact card, click on the plus button in the bottom left of
the current card. Select New Contact from the window that
pops up and you're given a blank card to fill in.
2
To add details, click on the field and then type in the
information. After entering a phone number or address,
another blank is offered, in case you want to add a second one.
Click on the name of the detail (in blue) for a pop-up window that
lets you change it. When you're finished, click Done. To change or
add information to a card you’ve completed, click Edit
3
To add a photo to a contact card, which is then displayed
against messages, incoming calls and emails from that
contact, drag a picture onto the grey circle then crop and resize
it to your requirements. You can also click on this circle or the
Picture tab and navigate to a photo or default image or even
take a new one using the Camera option.
4
If you need a piece of information in a contact card that
doesn’t currently have a blank field, open the Card
menu from the top bar and go to Add Field. You can then
choose one of the options on offer, such as: Maiden Name,
Nickname or Twitter name. This new field is then added to the
card, for you to fill in.
78 | www.pclpublications.com
Contacts
5
You can organise your contact cards into groups. To
show and hide the Lists panel, click on the View menu
and select Show/Hide Lists. To add a contact to a group,
simply drag it from the middle panel onto the group in
question. A card can be in more than one group at a time,
without being duplicated.
Smart Lists are groups with a set of rules. They
automatically include every card that satisfies the
parameters of chosen rules. Go to File > New Smart List to
open one. Here we're making a Smart List for every contact
that says 'Xmas card' in the notes. Great for sending out
greetings cards at Christmas!
TivraTech
Kurt Andrews
Q Company
mobile * Phone
work 0 0121 555 32575
home 0 07946 96032
work 0 kandrews@tivratech.com
7
To set up a card from a company rather than an
individual or display a contact according to the person's
employer instead of his or her name, check the box marked
Company at the top of the card. This reverses the name and
company details of the contact and indexes them according to
the company name.
8
If you get an email, a message or other communication
with contact details in them, you can add them directly to
Contacts. Click on the details in question, and a pop-up window
lets you start a new Contacts card with those details already in
place. If you want to add the details to an existing card, click
Contacts and click on it in the new sidebar.
Sharing Contacts
If you want to share a contact card with someone else, click the
icon showing a box with an up-pointing arrow and choose a
sharing option. You can send the contact as a v-card by
AirDrop, Mail, Messages and more. The person receiving it then
double-clicks the v-card to add it to their own address book.
Using Contacts on iCloud
You can also access your contacts using a web browser on any
computer, tablet or smartphone that's connected to the Internet
Just go to www.icloud.com, enter your details and then click on
Contacts. Only cards stored under iCloud in your Contacts app
appear here, so bear this in mind when adding cards.
Phone 07984 986890
hone fred.edems4Ncloud.com
homo 28 Fleeting Street
Yorkshire
BF11 3AK
www.pclpublications.com | 79
П Your MacBook’s Key Apps
Calendar
'' Plan Your Events
The Calendar app, as you'd expect, is there to help you organise your life.
With it you can add events, set reminders and synchronise your calendars
with your iPad or iPhone. Birthdays and anniversaries can be stored and
you're able to set annually reoccurring events, as well as scheduled alerts.
Changing the View
1
There are several different ways to view your calendars.
To move between Day, Week, Month and Year views,
you can use the corresponding buttons that appear in the
top bar of the Calendar application.
The Year view shows you a complete year in a single
window. Clicking on the title bar for any month takes you to
its Month view. Double-click a specific day in either Year, Week or
Month view to open its page in the Day view.
3
Click the Calendars button (top left) to open and close the
sidebar, as shown here. This sidebar is visible regardless
of whether you're in Day, Week, Month or Year view and lets you
mute or reveal individual calendars and more.
Click the Today button in the top right corner to get to the
Day, Week, Month or Year (depending on view) with the
current day in it The arrows either side take you forward or back
one year, month, week or day at a time; depending on the display.
80 | wvwv.pclpublications.com
Calendar
Creating an Event
Searching Calendar
In Day and Week views, to add an event double-click
the time slot, then drag and/or expand/contract it into
place. The hours are divided into quarter-hour sections for
adding events. For all-day events, click the top bar.
Make your events more easily searchable by labelling them
clearly and adding details in the notes section. The search
function scans both event names and notes for keywords, so the
more details you put in, the easier they are to find.
menu in the top right of this window lets you change
which calendar it’s stored in.
in a pane at the bottom of the main window. The more keywords
you type in, the more unwanted results are filtered out
Clicking the'+' button in the toolbar lets you create a
quick event. Type in a title or brief description, day and or
time and Calendar intelligently enters it at the appropriate place.
For example, type 'Dentist, 10th May, 11 am' and it's added.
Creating a Backup
You can manually create a complete backup of all the
calendars in your Calendars app. Open the File menu,
choose Export and select Calendar Archive. You can
rename the file and select a location to save it to. To load
it again, use the Import option.
www.pclpublications.com | 81
macOS Sonoma’s Key Apps
Adding and Viewing Additional Calendars
1
The flexible, versatile Calendar app lets you add as many
different calendars as you want and use them for different
things. To add a new calendar, open the File menu and select
New Calendar. A box appears, prompting you to enter a name
for your new calendar.
2
To see a complete list of all the calendars you've created in
the Calendars app, click the calendars button on the left side
of the top bar of the Calendar window, shown as a calendar icon. A
sidebar on the left of the window is revealed, showing all the
calendars you currently have set up.
lew Kite... 9 am
ow’s 53rd Bi... ©Jem Roberts’s 46th Birth...
Estimate for New Kitchen
Add Location or Video Call
12 Jun 2024 9 am to 10 am
Add Alert, Repeat or Travel
Add Invitees
Coogle
Family
baronnoise@gmail.com
ICloud
V Personal
Gigs
Odds & Ends
Add Notes, URL or Attachment
To do ig th
Deadlines
Apple and Industry Dates
Holidays
Birthdays
3
To select which calendars you want to appear active in the
main view, check or uncheck the boxes as appropriate Each
calendar is colour-coded, as are their events Unchecked calendars
aren't erased: you can check them again later if you wish.
4
To change the calendar under which an event is listed,
double-click the event to edit it then select a different calendar
from the drop-down menu. Alternatively right or ctrl-click the event,
go to Calendar on the pop-up menu and select a new one.
Calendar Settings
To open the Calendar Settings, use the Calendar menu as shown.
Under the General tab, you can change the way the app presents
itself, set when a day starts and ends, change the default calendar
and even switch to a Chinese, Hebrew or Islamic calendar.
Under the Accounts tab, you can disable calendars you don't wish
to be active on the Mac in question, and also choose how each
calendar account refreshes. The Alerts tab lets you set default alert
settings, and under 'Advanced' you can make more customisations.
82 | www.pclpublications.com
Calendar
17
Sending Invitations
iCloud Calendar
1
Double-click an event you created. In the pop-up window
that appears, click Add Invitees and begin typing the name
of a person in your Contacts whom you'd like to invite; or if the
person isn't in your contacts, enter their email address instead.
1
Open System Settings from the Apple menu in the top-left
comer of the screen. Click on Apple ID (top of the sidebar),
and under Apps Using iCloud, click the Show More Apps button.
Scroll to iCloud Calendar and make sure it's switched on.
2
When you've finished adding all the people you intend to
invite to your Calendar event, click on the Send button
and an invitation is sent to everyone on the list. You'll get
notifications of responses. You can cancel invitations or send
them to more of your contacts later if you wish.
2
To activate iCloud syncing on an iPadOS or iOS device,
open Settings, tap your name at the top and then tap
iCloud. Make sure the Calendars switch is on. If it isn't, switch
it on to sync your calendars between the device in question
and all other Macs and iOS devices with syncing on.
3
Your calendar entry shows who you’ve invited, and
whether they've replied. If your invitee has an iCloud email,
the event is automatically added to their Calendar app and
updated whenever you make edits.
3
Now, when you return to your Calendar app, all the
entries you made on your iOS devices are also shown
on your Mac and vice versa. It's a great way of keeping your
computer and your tablet or smartphone calendars in sync.
www.pclpublications.com | 83
П macOS Sonoma’s Key Apps
• Reminders
® Never Forget Again
If you want to make a shopping list, set up a regular reminder or schedule
an alert, you need the Reminders app. It syncs across your Apple devices
using iCloud; add a reminder on your Mac and get an alert on your iPhone.
1
This is your search field.
Use it to search
throughout your reminders.
2
This is the Reminders
app's front page,
showing smart lists as well as
the lists you've created
yourself. A list' is a group of
reminders you’ve set up and
can be titled anything you like.
3
Click the plus sign to
add a reminder to the
open list. Call it anything you
like. It appears in that list until
you mark it as done.
□ These are smart lists.
Click one to open it.
Today' is reminders scheduled
for that day. This list is divided
into Morning, Afternoon and
Tonight 'Scheduled' shows
reminders due in the future. This
is now organised into months,
and days for those due this
week. All lists all your reminders
and 'Flagged' shows those that
you've flagged. 'Completed' is a
new smart list showing
reminders marked as done.
5
The currently selected list
or smart list is displayed
in the main Reminders window.
As 'All' is selected, this column
shows all your reminders,
wherever they're stored.
6
You can add text
formatting options
such as bullets, underlined
text, bold text, italics and
strikethrough for notes
you've added to a reminder.
7
Your lists can be called
anything you like.
Choose a useful name and
an eye-catching icon. Click
one to open it and see the
individual reminders you've
added to that list, mark
reminders for tasks you've
done as complete and also
add new reminders.
8
Click on a reminder and
then on its information
icon (the T in a circle) and you
can add notes and tags, have
the app remind you about it
on a day, at a location or when
messaging a person, set a
priority, assign it to a person
or add a URL and or images.
9
These icons here,
showing a silhouette in
a circle, show the reminders
list is shared. Click on it and
you can manage the people
you share it with.
10
The numbers on the
right of each list show
how many outstanding
reminders it contains. When
you mark one as done, it's
removed from the list.
11
To mark a reminder as
done, click the circle next
to it and it disappears from the
list If you want to get it back
click Show (top right), and then
click a filled circle to clear it
12
Right click on a reminder
list for an options list
You can pin the list to the top
of the sidebar show its info,
open the list in a new window
and more.
13
To add a tag, put a word
preceded by a hashtag
(#) in the Notes section. The
hashtag appears here as a
button. Click it to see all the
reminders you've flagged with
this hashtag.
Click here to create a
new list, which appears
14
__J
in the My Usts section of the
Reminders home page. You
can then add reminders to it.
84 | www.pclpublications.com
Reminders I?
Creating and Using Reminders
1
To create a new list, click the Add List link in the bottom
left. Add a title, choose a colour and click on the smiley
or the three lines to add an emoticon or an icon. Check the
'Make into Smart List box’, if you want to create a Smart List
based on tags or filters.
2
To add a reminder to a list click the Plus button (top right).
Add a name and, if you wish, tap the T icon next to it to: add
notes, a URL or a flag or tag, set a priority as low, medium or high
and more. When you’ve carried out the task, tap the circle to its left
to check and dismiss it
3
Click a reminder then the T icon and you can turn on
reminders. You can add an alarm, set a date and time and
set it to repeat, if necessary Click the Add Image link near the
bottom of the Details window and you can add a photo, take a
new one or scan a document. Add notes or URLs too.
To share a list with another Mac or iOS user, hover over
the list in the sidebar, then click on the Silhouette icon
that appears. Choose a method of inviting people. Reminders
created in Sonoma are compatible with macOS Catalina but
not earlier than that.
Templates
You can save out a list as a template, which can then be
reused for a new reminders list later in the day. To do so, in
the File menu, choose Save as Template. To reuse a template,
again in File, choose View Templates, and in the window that
opens, click on one and then Create List to make a new
reminders list based on that template.
Using Tags
If you have a lot of reminders you’d like to group but
they're distributed throughout your lists, use Tags. Tap a
reminder's 'i' icon, and either type a new tag, or choose
an existing one from the list that appears. You can then
click on one of your tags at the foot of the sidebar to see
all the reminders on which you've used that tag.
----------
oday Scheduled
3 46 О 0
JI Flagged
3 To Do In 2022
Shopping/Car Boot Sale
mpiBtea •—:----------------------------------
Decorate the bedroom
#DIY
Decorate the Living room
О Add Date •* Add Location » О
Decorate the bathroom New Ta9
Decorate the hall *DIY
«Flights
Decorate the kitchen
www.pclpublications.com | 85
П macOS Sonoma’s Key Apps
Column View
1
Start a new list In the View menu in the top bar, select As
Columns. Right-click or two-finger click on the main window,
and from the pop-up menu, select New Column. Or use the
keyboard shortcut Option-CMD-N. Name it whatever you like.
Click the three-dots icon on the top of a column to Rename
or Delete it. Right-click and select Edit Columns for a list of
your columns, which you can rename or reorder. Just drag and
drop the name of the one you want to move into a new place.
Each column has a blank reminder at the top by default.
Click on it and enter a name. Hover over one and click
the T that appears for the reminder options. A new blank
reminder appears under the one you edited; click on it to add a
further reminder.
3
Move a reminder between columns by right-clicking on it
and choosing Move to Column. The 'Custom' column is
there by default. Hold Shift and click multiple reminders and you
can move several at once. Click the empty circle on a reminder
to mark it as done.
Smart Shopping Lists
1
You can create a smart shopping list, which automatically
sorts your groceries into categories. First, open a new list
in the usual way. On the window where you name it and choose
an icon and so on, use the pulldown to select 'Shopping'.
2
Almost anything you add to the list is now automatically
arranged into categories such as 'Fruit & Veg', 'Produce'
and so on. If an item is in the wrong category, click and drag it into
the correct one, or right-click it and use an option in the menu.
86 | www.pclpublications.com
Reminders and Screen Sharing App •
Screen Sharing
A Better Way
Screen sharing has been improved in macOS Sonoma, with increased
speeds and the ability to stream higher-quality images. There's a dedicated
application for the job, called (inevitably) Screen Sharing. You can find it in
Applications > Utilities, so let's launch the app and see what it does.
1
Launch Screen Sharing app. You see a list of previous
connections; click on one to make this connection
again. If the screen you want to connect to isn’t on this list,
click the plus symbol in the top right and enter the Apple ID of
the person in question.
2
The person who's screen you want to share gets a
notification. They should click on it for this window, which
lets them choose to allow to control their screen, watch it
without controlling it, decline altogether or block the person
who requested it.
3
You can now see the other person’s screen, shown in a
window in your own screen. If you've been given
permission to operate it, you can use it as if you were right in
front of the Mac in question. It's great for showing someone
how to do something.
4
If you're too close to the person who's screen you're
sharing, you might get an annoying feedback. If so, in
the Connection menu in the top bar, choose Mute
Microphone. Click the red gumdrop in the top-left corner of
the shared window to disconnect.
www.pclpublications.com | 87
macOS Sonoma’s Key Apps
Messages
For On-screen Chats
Messages is one of the most popular apps in macOS. You can exchange
short text messages with friends, family and colleagues, attach photos,
web links and more and brighten up your messages with emoticons and
emojis. If you're sending to another Apple device, they're free too.
Setting Up Messages
1
Open Messages and sign in. Select Settings from the
Messages menu in the top bar, click the iMessage tab
and check all emails and phone numbers you wish to use in
Messages. Check the Enable Messages in the iCloud box, to
sync Messages with your other Apple gear.
2
In the General tab, you can change your Messages image,
which appears on outgoing messages, to any picture on
your Mac, as well as the Memoji that are available through
macOS. You're also able to create your own unique Memoji via
the new Memoji Editor.
Start a Conversation
1
To message someone you're already chatting with, click
their name on the left. To start a new message, click on the
pencil and paper icon for a blank message. Type the email
address, phone number or name (if they’re in your Contacts app)
of the person you want to message in the To field.
Type your message into the text field at the bottom of the
window. Click the wave form icon in the right of the text
field to send a voice message instead of text. Record your
message then click the Stop icon. Click on the smiling face on
the right-hand side of the text field to add an emoticon.
88 | www.pclpublications.conn
Messages
/-----44/ IU/Z.UZ.J
ate. No
ou start feeling...
19/09/2023
ieck-ир with
3
Click on the button left of the text entry box for a pop-up
box where you can opt to add a Photo, #lmage for
pictures and memes, Stickers which now includes Memoji or
use Message Effects. When you've finished your message, click
the up-pointing arrow in the text field or tap return to send.
4
When conversing, messages you’ve sent are shown on
the right-hand side of the conversation window, and
replies are shown in grey on the left. Under your last message,
you’re shown when it was read. While your contact is typing, a
three-dots speech bubble is shown.
5
Paste a web link into a message, and a site preview is
shown. Paste a link to a video and it can be played within
Messages or clicked on to go to the site. You can drag photos
onto the conversation and send them as an attachment too. Click
on the icon above the pics to see their thumbnails.
6
Type more than one person's details into the To field and
you can start a group conversation. Your outgoing
messages are sent to everyone in the group, and their replies in
grey show the picture and the name of the person who sent it;
so you can see who said what.
О If it's been a while since you last looked at an ongoing
chat, tap the chevron on the right to go straight to the
last message you read. Also, if you want to reply to a specific
message in a Group Chat, swipe it right with two fingers. Your
reply is then made directly to that message.
Search Filters
In Messages, you can combine search terms to find what
your looking for faster. Start to type a name, place or some
other term, and when the completion window appears,
click what it is you need. You can then add further terms,
narrowing down the search.
www.pclpublications.com | 89
П macOS Sonoma’s Key Apps
More Messages Tips
Pinned Conversations
You can pin up to nine conversations, so they’re always at the
top of the list. To pin a conversation, right-click on it and select
’Pin' from the menu; it appears as a circle atop the list. To unpin,
right-click it again and select ‘Unpin’. Incoming messages from
pinned chats are shown on the pin.
Blue or Green?
Messages sent by you appear as blue or green speech bubbles.
If the bubble is blue, your message is being sent to an Apple
device. These messages are free, as they’re sent over the
Internet. If the bubbles are green, they're sent to a non-Apple
device and might incur SMS charges.
The Details Window
In a conversation, click the T in the top right comer for a details
window on that person. This window shows their location (if
they're sharing it) and buttons to contact them by phone, video,
email and more. Scroll up to see photos, links and other
attachments you've shared with each other.
FaceTime Calls
Click the video camera icon in the top-right of the window to
initiate a FaceTime call to the person you're messaging with. The
pop-up window that appears lets you make a FaceTime video or
audio call. This icon only appears when the person you're
messaging with also has an Apple device.
Deleting and Muting
If you want to delete an individual speech bubble, right-click on it
and select Delete from the contextual menu. To delete an entire
conversation, swipe it left in the left-hand panel and click the
dustbin icon. The bell icon mutes notifications from that
conversation. Repeat to unmute it.
Photo Stacks
If someone sends you several photos at once, they appear
in the Messages conversation as a stack of fanned
thumbnails. Double-click on this stack to open them in
Preview. Above the stack is an icon and an indication of
how many photos are stacked. Click this for thumbnails.
90 | www.pclpublications.com
Shared with You
Photos, Podcasts, web links, Apple News and Apple TV
shared in Messages are now shown in their respective
apps too. If you don't want this, you can disable it on a per-app
basis by opening Messages preferences, clicking Shared with You
at the top and unchecking apps.
2
Items shared with you in Messages then appear in their
native apps. For example, in News, Safari, Podcasts and
Photos, there's a Shared with You option in the sidebar. In the
Apple TV app, it's under the Watch Now tab. You can open and
enjoy these shared items in those native apps.
Undo Send
Mark Unread
If you regret sending a message, or notice a mistake,
right-click the message and select Undo Send or Edit. You
can do this for up to 15 minutes after sending. It’s only
available in blue-bubble messages, and both parties must be
on Ventura or iOS/iPadOS 16 or later.
If you've read a message but want to mark the conversation
as unread again, maybe to remind you to look at it again later,
either right-click it in the sidebar and select Mark as Unread,
or swipe it to the right and click the Speech icon. Repeat to
mark as read again.
Recover Deleted Messages
SharePlay
In the View menu, select the Recently Deleted option to see
messages you've deleted within the last 30 days (after that,
they're gone for good). To recover one, click on the
conversation in the sidebar, and click the Recover button. The
Delete button erases it forever.
If you want to share activities such as movies, music,
workouts, games and more, so you're enjoying them at the
same time as your friends, share them in Messages as well as
FaceTime. Third party apps such as TikTok, NBA and Twitch
are SharePlay compatible too.
www.pclpublications.com | 91
□
macOS Sonoma’s Key Apps
FaceTime
Video & Audio Calls
With FaceTime, you can make both video and audio calls directly from your
Mac. As well as one-to-one conversations, you can make group calls. You
can even initiate a call with a Windows or Android device, and if you have an
Apple Silicon Mac, you can have the speech appear as subtitles too.
Using FaceTime
1
Click on the FaceTime app to launch the program. It
should start straight away, and you'll see your own face on
the screen, as well as a panel inviting you to log in with your
Apple ID. Type in your Apple ID password and click OK.
2
Next you’ll need to log on with your Apple ID. People can
use your Apple ID email to call you through the FaceTime
app. There might be a brief pause while FaceTime verifies your
details and logs you on.
3
Before you make a video call, it’s a good idea to make sure
they can see you properly. Using the camera view shown
here, make sure there are no distracting bright lights behind you
and your face is well lit You don't need to light up like a movie
studio, but turning on a desk light could help.
When you receive a call, the app automatically opens and
you're given several options. These are Accept or Decline
the call, and under the chevron, Remind me in five minutes, 15
minutes or an hour, or Reply with Message. You also see your
camera view in a small inset window.
92 I www.pclpublications.com
FaceTime
5
Mute the mic by hovering your pointer over the picture and
clicking the icon that appears at the bottom. Hover over
the inset video feed of yourself and you can toggle between
landscape and portrait modes. Take a Live Photo with the button
at the bottom left. To end the call click on the red button.
6
Hover over the FaceTime window and click the green
gumdrop in the top left corner to go full-screen with your
video chat. If the other person's chat is shown in portrait mode,
it's because they’re holding an iOS device in that orientation.
Ask them to turn it to landscape mode for a bigger picture.
You can use FaceTime to make and receive regular phone
calls on your Mac, as long as it’s signed into the same
Apple ID as your iPhone, and your phone is nearby and on Wi-Fi.
Click the FaceTime menu and select Preferences. In the window
that appears, check the box marked Calls From iPhone.
Live Captions
If you’re lucky enough to have an iPhone 11 or later, an
iPad with an A12 processor or later, or a Mac with an
Apple Silicon CPU, you can have your FaceTime calls
captioned. Just open System Settings, Click on
Accessibility, and in the Hearing section, click Live
Captions. Turn them on.
FaceTime Audio Calls
It's also possible to make audio only FaceTime calls. From
the Contacts app, find the person you want to call and
right-click on the telephone receiver icon at the top. Choose
the option for a FaceTime Audio call. Alternatively, in the
FaceTime app, right-click on a previous video conversation
found in the left-hand sidebar, and select FaceTime Audio. If
the entry shows a telephone receiver icon, it was already an
audio conversation, so you can just click it to repeat the call.
Naturally, you can enter an email or phone number in the top
field and as long as the other person has registered that
email or number with their FaceTime account, you can make
the FaceTime call. Because they're made over the Internet,
FaceTime calls, audio and video, are free.
www.pclpublications.com | 93
П macOS Sonoma’s Key Apps
Group FaceTime Calls
1
To add another person to a FaceTime chat, drag the
pointer onto the FaceTime window and open the
sidebar. Click Add People and then enter their details, followed
by Add. That person then gets a call and can join the chat,
alongside the person you're already chatting with.
2
To launch a Group FaceTime Chat, click the New
FaceTime button, and then add as many people as you
like in the New FaceTime window, either from the suggestions or
using their name, email or number. Tap FaceTime to send a text
message inviting them to the chat.
3
To invite people to a chat that's to take place in the future, on
the FaceBook window, click the button marked Create Link.
You can send this link with a range of apps, or copy it to distribute
another way. This link can be used to join a Group Chat, immediately
or at an agreed time.
Up to 32 people can join a Group FaceTime chat. To leave,
click on the red button marked with an 'X'. The rest of the
group is unaffected. During a Group Chat, the tile of the person
who's speaking automatically becomes larger, but you can turn
this off in FaceTime Preferences.
5
Providing your operating systems are up to date, you can mix
Macs, iPhones, iPads and iPod touches, and even Android
and Windows devices in Group Chats. They all work fine.
6
You can even Group FaceTime from an Apple Watch or a
HomePod speaker, though as these devices don't have
built-in cameras, you are limited to audio chat only.
94 | www.pclpublications.com
FaceTime IQ
More FaceTime Features
Grid View
macOS Sonoma brings a host of improvements and new
features to the FaceTime app. In a Group Chat toggle the
floating tiles and have a regular grid that gives everyone the
same space by clicking the Grid button in the top-right. Click it
again to go back to the default view.
FaceTime Handoff
You can use FaceTime with Handoff, which means you can transfer
the call between your Apple gear just by moving them close
together, as long as they're running iOS 16, iPadOS 16 and macOS
Ventura or later. If you answer a call on your iPhone, for example,
then get home you can continue on your Mac with its bigger
screen. To use Handoff, move the devices close together, tap the
FaceTime icon in the corner of the screen (mobile devices) or click
on it in the menu bar (Mac) then tap/click the Switch button that
Collaboration
When you're collaborating on a document in Files, the Finder,
Keynote, Numbers, Pages, Notes, Reminders, Safari and
supported third-party apps, you can start a FaceTime call with
the people with whom you're collaborating with a single click.
Just click the collaboration icon - for example, the circle with a
silhouette in the Notes toolbar-and click on the FaceTime
Audio or Video icon in the window that appears.
Windows & Android
You can take a FaceTime video call initiated on a device
running macOS Ventura or later, iOS 15 or later, or iPadOS 15
or later, on a Windows or Android device. The Apple user
sends a link, and the Windows/Android user opens it in a
Google Chrome or Microsoft Edge web browser.
New Mic Modes
Click the camera icon in the top bar and then click the
chevron next to Mic Mode. You can change between
Standard, Voice Isolation (which only picks up your voice),
and Wide Spectrum Mode (picks up every sound going on
around you).
SharePlay
The SharePlay feature, that was introduced in Ventura, lets
you play your movies, TV shows and music with your
friends over a FaceTime chat. Your media is played in sync,
so you can chat about it as you enjoy it.
To share movies and TV shows during a FaceTime chat,
open the TV app or a compatible third-party TV app and
press Play. For audio, open Apple Music, find a track or
album and press Play. Everyone can add and queue songs.
www.pclpublications.com | 95
П macOS Sonoma’s Key Apps
Sonoma Video Chat Features
There's some great video conferencing features in macOS Sonoma, and
they work with almost any video chat app, including FaceTime, Microsoft
Teams, Zoom and more! Here's how to use and enjoy chat reactions.
Reactions
Turn On Reactions
To use Reactions, you have to switch them on first. In a
video chat, click on the white-on-green video camera icon
in the top bar, and
look for the
Reactions option
at the foot of the
menu. If the icon
to its left is green,
Reactions are on.
If it isn't green,
click on it to turn
them on.
FaceTime HD Camera
f Portrait
© Studio Light
Reactions
Requires macOS Sonoma and either an Apple Silicon Mac
or a Mac using Continuity Camera with iPhone 12 or later.
In macOS Sonoma, you can use awesome 3D graphical effects
in video chats, by choosing them from a menu or, better still,
making a simple hand gesture. They're great fun, and work in
almost any video chat application. Here's how they work.
To use a Reaction from the menu, click the white-on-green
camera icon in the top bar, and in the drop-down window, click
the chevron to the right of the word 'Reaction'. Click on one of
the icons that are shown to produce its graphical effect. The
other way of doing this, of course, is using hand gestures,
which are as follows. You might have to hold the gesture in
place for a few seconds before you get the effect. Make sure
the entire gesture is on the screen too.
Hearts
To get a spray of red hearts
to shoot from your hands,
make the heart symbol.
Thumbs Up
To get a thumbs-up in a
bubble, you should
(obviously) give a thumbs up!
Rain
For a rain shower, make a
thumbs-down with both
hands at once.
Fireworks
Hold two thumbs up for a
fantastic fireworks display
that lights up your screen.
Balloons
Thumbs Down
To make helium balloons rise
from the foot of the screen,
make a peace sign.
Another obvious one. For a
thumbs-down bubble, make
a thumbs-down gesture.
Confetti
It's party time! For falling
confetti, make a peace sign
with both hands.
Lasers
For an awesome on-screen
laser light show, make two
'horns' gestures.
96 | www.pclpublications.com
FaceTime
Presenter Overlay
ANNEX
STAGE
When sharing content on a video conference,
you no longer have to choose between
showing your screen or appearing in the video
feed yourself. With Presenter Overlay, you can
do both, and again it works with almost any
video conferencing application.
To start using Presenter Overlay, click the
screen sharing icon in the top bar - it’s the one
showing a screen with a silhouette in the
bottom-right corner Under Presenter Overlay,
you see three options illustrated by icons; Off,
Small and Large. To start sharing with
Presenter Overlay, choose Small or Large.
Requires macOS Sonoma or later on a Mac with Apple silicon.
Presenter Overlay - Large
With Presenter Overlay in Large Mode, you sit in front of your
Presenter Overlay - Small
content, which in turn sits in front of the background to your
With Presenter Overlay in Small Mode, you appear in a small
video feed. Virtual Backgrounds are disabled when using Large
bubble that sits atop your content. If it's in the way of something,
Presenter Overlay. You can walk around, talk and move in front
you can drag it around the screen and leave it wherever you like.
You can switch between Small and Large Presenter Overlay, or
turn it off altogether, in the aforementioned menu at any time.
of the screen. If you want to move your content to the other
side of the you, hover your pointer over it and click the icon
showing two arrows pointing in opposite directions.
More Video Chat Features
These features are also activated using the white-on-green
video chat icon found in the Mac's top bar when using a
video conferencing app.
Centre Stage
Use your video chat app’s Video menu in the top bar to select
your iPhone 11 or later as a camera (excludes SE models). This
is called Continuity Camera. Now use the white-on-green
video camera icon to select Centre Stage. This keeps you in
the centre of the video feed while you move around.
Portrait Mode
Click the Portrait Mode option during a video chat and the
background is blurred, while you are still sharp. It’s great for
avoiding distractions. To switch it on, click the icon next to
'Portrait'. Portrait Mode requires a Mac with Apple silicon using
the built-in camera, or a Mac using Continuity Camera with
iPhone XR or later
Desk View
You can only use this when using Continuity Camera with
iPhone 11 or later, excluding iPhone SE models. It shows your
desk as well as your face, so viewers can see what you're
typing, or anything else you want to demo. You can zoom in
and out of your desktop by dragging the onscreen control in
your Desk View window.
Studio Light
This feature demands macOS Sonoma or later on a Mac
laptop with Apple silicon using the built-in camera, or
macOS Sonoma or later on a Mac using Continuity Camera
with Phone 12 or later. It dims the background and
illuminates your face.
www.pclpublications.com | 97
П macOS Sonoma’s Key Apps
Maps
Plan Your Routes
With the Maps app, you can plan a route on your Mac, then when you're
ready to go, send it to your iPhone or iPad. You can plan a route with
multiple stops along the way, and in some territories, calculate how much a
route would cost you in fares. It has great 3D features too.
Finding Places with Maps
To focus the view on your current location, click the arrow
icon in the toolbar. The map zooms to your current
whereabouts. To search for a specific location, type the address,
postcode/zip code or road name into the search field. Possible
matches are shown as you type.
2
You can search for a business by entering the business
name or type, for example 'Fast Food', into the search
field. Icons appear on the map indicating all matching
businesses in the area. To get more information, click on an icon,
then on any relevant information that accompanies it.
Getting and Using
Traffic Information
When on a road journey, there's nothing
worse than getting caught up in a traffic
jam or running into major roadworks.
Luckily, Maps covers that one too. To get
traffic information in Maps, click the
folding map icon in the toolbar as shown,
and select the Driving option. When
traffic information is turned on, closed
roads are shown as no-entry signs,
roadworks as road men and accidents as
a red sign. Click on one of these
indicators for more details, including
possible length of delays and for how
long the works is likely to continue. Where
traffic is heavier than usual, an orange line
is added on the road. If it's very heavy, a
red line is used.
98 | www.pclpublications.com
Maps
Route Planning Explained
1
For directions, click the Directions button (arrow in a
circle), and enter your start (if it’s not your current
location), and finish points. Alternatively, search for your
destination and click Directions in the pop-up. Choose your
transport method with the four buttons in the window.
2
Maps calculates the best route, based on your chosen
transport. Its displayed on the map as a blue line. The
distance and travel time are also offered. If alternative routes are
available, they're shown as lighter blue lines. You can switch
between routes by clicking on a light blue line.
When you've chosen a route, click on the right-facing
chevron next to the route in the window to expand the
details. You can view a step-by-step breakdown of the journey. Click
on any of these points to be taken to that stage on the route.
If there are alternative branches leading off your chosen
route, they're displayed as lighter blue lines once more.
Again, you can opt to follow these alternative routes by clicking
on them, causing Maps to change your route.
5
You can add up to 15 mid-journey stops by clicking Add
Stop in the floating window, and typing where it is you
want to stop. Also in this window click the Now tab if you're likely
to leave now or the Plan tab if you want to plan a date and time
to leave or arrive.
Drop a Pin
To add a pin to your map, right-click and choose Drop
Pin. A pin is placed where you clicked, giving access to
an information box like the one shown here. To remove
the pin, right-click on it and choose Remove Pin.
www.pclpublications.com | 99
П macOS Sonoma’s Key Apps
Customising the Maps App
Location Aware
If Maps isn't authorised to access your location, you get a message.
Several of the options covered in this tutorial won’t work unless you
authorise the Location Services function. Open System Settings (in
the Apple menu), and go to Privacy & Security > Location Services
and make sure Maps is switched on.
Adding and Removing Favourites
To bookmark a location, click on its icon or right-click to Drop a
Pin if there isn't one. In the information window, click the three
horizontal dots. From the pop-up menu, select Add to
Favourites. Once a Favourite is added, it appears in the
left-panel; click the 7 then Remove Favourite to delete it.
Sharing Routes
Having planned your choice, you can share it via social media or
email or send directly to other Apple devices (including your own).
The recipient receives a message with a link which, when
accessed, opens the Maps app to display the route.
Using Maps Favourites
Your Favourites are located in the left-pane, click the 7 next to
one of them for more information. You can create a Type: Work,
Home, School and rename it to something more meaningful if
you want to find it again easily.
Changing the View
Click on the icon that looks like a folded-out map in the toolbar to access the different viewing options available in the
Maps app. There are four types of map available, ranging from a regular line drawing to a satellite view taken from above.
Explore: A regular map
that looks just like the ones
you buy from a shop.
Driving: Similar to
Explore, but with traffic and
roadworks info added.
Public Transport: Here
bus and rail information is
conveniently displayed.
Satellite: A view made up
of photographs. Zoom in
and out for detail.
100 | www.pclpublications.com
Maps o^
Viewing Maps in 3D
1
To get the best effect when viewing the maps in 3D,
switch to Satellite view You can show or hide the labels
such as the street names and feature locations using the View
top-bar menu or the checkboxes under the map options.
2
To now switch to 3D view, click the 3D button next to the
map selection icon in the top bar. The camera angle will
shift when you do this but if you're zoomed out too far, you'll
hardly notice any difference.
3
Zoom in and the 3D aspect begins to unfold. While not
everything on the planet is rendered in 3D, you can get
to see some of the more famous buildings and locations,
usually within major cities and with major landmarks. It’s like
you’re there, minus the crowds!
You can use trackpad gestures such as pinch in and out
to zoom and twist to rotate the camera and see different
parts of buildings and features. You can also tilt the camera by
using the slider located next to the compass, in the bottom-right
of the map screen.
3D Flyover Tours
•*” 0 d)
Some of the world's major cities offer Flyover Tours. To
start a 3D Flyover Tour search for a city by name, and on
the window that appears, click the Flyover Tour button. If
it's not there, that city doesn't offer Flyover Tours.
The 3D camera flies over major features and attractions,
showing them off in great detail. What you're looking at is
indicated in a panel at the foot of the Maps window. To end
a Flyover Tour, click the 'x' found at the end of this panel.
www.pclpublications.com | 101
П macOS Sonoma’s Key Apps
Notes
Store Your Jottings
The Notes app is a remarkably powerful, yet simple, virtual notepad. With
it you can jot down your thoughts and ideas or create complex notes that
are easily edited and fully searchable; and you can also sync your notes to
your iCloud account. There's more to Notes than first meets the eye.
Creating, Editing and Searching Notes
1
To create a new note, first of all, click on the
pen-and-paper symbol found in the toolbar at the top of
the Notes window. A new blank note appears. Start typing your
note. The first line of a new note is used as its title in the notes
list, so bear this in mind.
2
Your notes are listed in the left-hand pane. Click on a note
to open it. To change the font or use bold, underline or
italicise, select the text and right-click or ctrl-click for a menu;
these options are found under Font. To attach an image, simply
drag it onto the note or copy and paste it.
3
To search notes, use the search icon (the magnifying glass)
in the top right. Searches cover all your notes, not just the
titles. Searches are very powerful and can recognise objects and
scenes in attached images. When you click on the search field, you
get a window that helps you focus your search.
To delete a note, open it and use the Delete option in the
Edit menu, the dustbin button in the toolbar or swipe it left
and click the dustbin. Deleted notes are kept in the Recently
Deleted folder for 30 days. To email a note or share it in
Messages, click on the Share button.
102 | www.pclpublications.com
Notes
Using Folders
О All iCloud
Ej Notes
В Personal
a Software
a * AppleUser mogozii
Beta Readers - Reporting Ba...
28/09/2021 Tracey Hatfield
a Work
В * Web articles
0 Recently Deleted
В Notes
28/09/2021 https //thejohnf oxc
https://theiohnfox,com/
Closed to submission!
Falstaff Books
Rosarium Publishing
Got to: Apex Book Com
Rename Folder
Delete Folder
New Folder
Share Folder
Sort By
Group By Date
Convert to Smart Folder
2015
о try
jlblishers: htt.
no...
Г/ww
Novel Word Counts
08/11/2015
1
There are several ways to create a new folder in your
sidebar. Press cmd-N, use the New Folder/New Smart
Folder in the File menu or press New Folder in the bottom-left
corner. Notes created in the iCloud section are stored on your
iCloud and can be synced with other Apple devices.
Highlight a folder by clicking on it to view all the notes in that
folder. Click on the All option at the top of each category to
list every note stored there, including those in individual folders.
Click on a folder and then on the three-dots icon that's revealed
when you hover over it for more folder options.
You can edit the name of a folder by clicking on it to
highlight it, then clicking on its name to turn it into a text
field. You can then type in your new name. You can also reorder
folders by dragging them up and down the folders list, and
dropping them into a new position.
If you're syncing your notes with iCloud, they sync with
other Macs and iOS devices logged into the same iCloud
account. In System Settings, click on Apple ID > iCloud and then
make sure Notes is on. This is useful if you use an iPhone, as the
note is always in your pocket
5
You can view your notes either as a list or as thumbnails. To
switch between the two, use the buttons at the top of the
Folders panel. Click the left-hand button, showing lines, for a list or
the right-hand button, showing four squares, for thumbnails.
Smart Folders
Create a Smart Folder using the File menu or by clicking
New Folder (bottom-left) and clicking the Make into
Smart Folder box. Set up rules using the pull-down
menus, and then any notes you create that meet these
rules are automatically shown in this Smart Folder.
www.pclpublications.com | 103
П macOS Sonoma’s Key Apps
Advanced Notes Features
6 November 2023 c
Quentin Tarantino Movies
0 Reservoir Dogs (1992)
Pulp Fiction (1994)
О Jackie Brown (1997)
e Kill Bill vol 1 (2003)
Kill Bill vol 2 (2004)
© Death Proof (2007)
IflSJfiWriftU? BflSteKl? (2009)
Django Unchained (2012)
1
To format a piece of text, highlight it then press the Aa
icon. In the pop-up window, you can make several
formatting changes. You can also highlight a word or phrase and
use cmd-l, В or U to make it Italic, Bold or Underlined.
2
You can turn any list into a handy checklist. Highlight all
the items in a list, then click on the lines-and-ticks icon.
Your list becomes a checklist. Click a circle to tick and untick it.
You can reorder lists by dragging items up and down within it.
3
Click on the grid icon for a table. You can type in each of
the table's cells. Click on a row or column, then the small
icon that appears and drag it to move. Click this icon, then the
chevron that appears for options to delete it or add another.
You can drag pictures onto your Notes from anywhere.
There's also a Photo Browser for using pics from your
Photos app. Choose Photos from the Photos icon in the toolbar
and drag photos from the browser into your notes.
> an idea for a feature about how we as a tea
TO Home/X Add Link
I on app like this website: cutout.pro and a n “J
Is like a great idea for a second feature, 'interview* each member of the team, talk about what they use individual)
bout Bean, for example), and what we use together (Dropbox, FaceTime, etc)
nly difficulty I con think of is getting photography. We'd need a pic of each member of the team at their desks, as <
f photo byline. I’m sure that's surmountable, though. I’ll have a think.
5
If you have a Safari window open, you can paste a link into
a note using the Add Link icon. Click it, and you're invited
to add a link to your note, which appears as an attractive preview
instead of a regular underlined URL.
6
Click on a photo in a note and then click on the button
that appears in the top-right corner for the Markup
feature. This lets you scribble on and add text to the picture,
using the Markup drawing tools, just like those in the Mail app.
104 | www.pclpublications.com
Notes
To password-protect a note, click the lock icon and select
Lock Note. You can then set a password for the Notes
app. Then you can only open locked notes with that password.
Also use the lock icon to open and close all locked notes, and
remove a lock.
The Share icon lets you send a note to someone else
using Mail, Messages or AirDrop: or add it to a reminder.
You can make a note with an attachment from another app
using the Share icon in the app in question; just select Notes.
Here we did it with a website.
You can pin a note, so it always appears at the top of your list
regardless of how that list is sorted. To do this, swipe the
note right and click the Pin icon. To unpin a note, repeat this step.
You can pin as many notes this way as you like.
10
Type a word with a hash (#) at the front and it becomes a tag.
Tags you've created are listed at the foot of the left-hand
panel. Click on a tag to see all notes that share that tag. A note can
have more than one tag if you wish.
Collaborative Notes and Folders
14: ‘Stay hungry, stay foolish
Steve Jobs Sayings, Apple Stores, Cc
* <k S'
oo Ada to Reading
to lose. You are already naked
10: ‘Being the richest mon in the cemetery doesn't matte
Invite with Link
11: 'Details motter, It's worth waiting to get it right -
U Messages
Reminders
□ Goodlinks
mghly understand
Collaborative Notes are shared with other people, and can be
edited by more than one person too. You can also make a folder
collaborative, and share notes and folders giving read-only
rights too. Open a note, or highlight a folder, and click the Share
button. Choose whether to collaborate or just send a copy.
Click the chevron next to 'Only invited people can edit', and
set the necessary permissions using the pull-downs. Choose
how you want to send the invite, and the chosen app
prepares the invite, which you can then send. Once
accepted, they can share the note or folder.
www.pclpublications.com | 105
П macOS Sonoma’s Key Apps
Quick Note
1
To open a Quick Note, drag your pointer to the
bottom-right corner of the screen and click the white
box that appears. In Safari, you can highlight text and right/ctrl
click on it, and select New Quick Note from the menu.
2
The keyboard shortcut Fn-Q also opens Quick Note. When
you've opened one, you can write and format it just like
you can with regular notes. Review your Quick Notes in the Notes
app, in the folder at the top of the sidebar.
3
To turn a Quick Note into a regular note, right/ctrl click on its
thumbnail in the Notes app, and in the menu, select Move To,
then the folder you want to move it to. You can then treat it like a
regular note instead of a Quick Note
If you'd rather a new note appear when you open your
Quick Note instead of the last one you created being
opened, in the Notes app, under the Notes menu open Settings.
Uncheck the box 'Always resume to last Quick Note'.
Move to Pages
1
You can take a note in the Notes app, and move it to the
Pages app if you want. All the formatting, attachments
and more are retained. First open the note you want to move,
and click the share icon. Select Open in Pages.
2
The note's contents then appear as a Pages document, with
the title of the note used for the name of the document. The
note doesn’t disappear from the Notes app, but edits made in one
app aren't synced with the other.
106 I www.pclpublications.com
Link Notes
1
You can link notes to each other, taking a note and adding
a link to another note to it When you click on this link,
you're then taken directly to the note it's been linked to. First
open the note to which you want to add the link.
Here we're planning a weekend away, and want to link notes
about attractions to the 'main' holiday note showing the train
times and B&B details. Right/ctrl click where you want to add the
link, and choose Add Link. Or press CMD-K.
3
A window opens. In the top field, type or paste the name
of the note or the URL you want to link to. If you’re typing a
note title, completion options are soon displayed. Click on one
to finish the title, or simply type the rest of it.
By default, the Use Note Title option is checked. Uncheck it
if you want to use something different for the link text, and
type in whatever you want in the Name field. If you’re adding a URL
as a link, you have to type a name.
Notes
• Ring the B&B an hour before you arrive. We can leave our lugt
be available until midday.
• Pick up tickets for the Scilly Isles from the travel centre on Frit
(D Scilly Isles ]
5
A link is now shown on your note. Click it and the URL or the
note you linked to is displayed. If you need to edit the link
after you've created it, right/ctrl-click on the link and choose the
Edit Link option from the contextual menu.
6
You can add as many links as you wish to a note. Here we
linked several notes about things to do on our weekend
away to the main note, which then acts as a cover. You can link
notes to each other too by adding a link to each.
www.pclpublications.com | 107
macOS Sonoma’s Key Apps
Find My
Find Your Gear
With Find My, you can keep track of your friends' whereabouts, and they
can see yours. Track down a missing Mac, iPad, iPhone or Apple Watch, find
your missing AirPods and keep track of your AirTags, and if you don't have
an Apple device to hand, find it from any web browser at www.icloud.com.
The People Tab
1
____J
Click the People tab. Click on your own picture in the
left-hand sidebar, and click on the T in the window that
pops up on the map. In the next window, you can change the
device through which your location is represented, switch off
sharing, Notifications and more.
2
To start sharing your location with someone else, click
Share My Location in the bottom-left comer, Enter the
name, phone number or email of another Apple user in the To
field or navigate to their details using the + icon. People with
whom you've recently shared your location are listed below.
3
Decide whether to share for an hour, the rest of the day or
indefinitely, and your location is shared with that person. If
they reciprocate, you can see their whereabouts on the map in
the right-hand side of the window. Click their picture, then the T
for information on them.
4
If someone starts sharing their location with you, you get a
notification letting you know. Using this notification - or by
opening that person's information window in the Find My app
itself - you can choose to share your location with them too; so
they can see where you are.
108 | www.pclpublications.com
The Devices and Items Tabs
1
The Devices and Items tabs work in the same way, with
Devices being for Macs, iPhones, iPads, AirPods and
Apple Watches, and Items being for gear you've protected by
attaching an Apple AirTag to it. Click on either tab to see your
property's current whereabouts.
2
If you've mislaid something in the house, click on it in the
left-hand sidebar and then click the device's T icon on
the map. In the window that pops up, click Play Sound in the
top-left and the missing device beeps, allowing you to locate it.
Just follow the sounds.
WoAxMOughlrm©
rj Ian’s Apple Watch
“ Home • 1 mlnule ago
И Ian Osborne's iPad Pro 0
Home Now
iMac
Home • 1 minute ago
Alison's MacBook
No location round
Ian’s iMac
No location found
3
If one of your gadgets is missing, in its information
window, click Activate under Mark as Lost. You can then
(optionally) add a phone number that can be used if someone
finds your device and a message for the finder. You can then
click Activate to mark it as lost.
4
A lost device is marked by a red lock on your Find My
app. It cannot be used without your passcode, so a
thief cannot make use of your missing gadget. You can also
follow its whereabouts on the map, so you've an excellent
chance of getting it back.
5
If you think your device is lost forever, click Erase This
Device in its information window. This wipes it clean, so
your information can't be accessed from it. You can no longer
track it in the Find My app, though, so don’t use this option
unless you've given up hope of seeing it again.
Share AirTags
You can share AirTags with other people, so more than one
person can check their whereabouts. In the Find My app,
click the Items tab and then click the AirTag in the left-hand
sidebar. Click the T icon next to the name of the AirTag that
appears, and under Share AirTag, click Add Person.
www.pclpublications.com | 109
П macOS Sonoma’s Key Apps
.. Freeform
For Collaboration
Meetings are so much easier when you can sketch ideas on the
whiteboard. With Freeform, that whiteboard comes to video meetings.
As it's a collaborative app, everyone can draw, make notes and more, and
whatever they do is synced with everyone else sharing the Freeform board.
Setting Up and Using Freeform
First of all, make sure Freeform in iCloud is switched on.
Open System Settings and go to [Your Name] > iCloud >
Show More Apps, and if the Freeform option isn’t switched on,
click on the switch to the right of its name.
Click on the pen-and-paper icon to open a new Freeform
board. To share this board so you can collaborate on it,
with all edits and additions appearing for everyone using the
shared board, first tap the Share icon atop the board.
3
Tap 'Only invited people can edit' for pull-down menus that
let you choose who can make edits, who can access the
board and whether people you invite can also invite others. Set up
the board's permissions on these menus.
When you're set up, invite people to collaborate on your
Freeform board by sending invites or a link from the Share
sheet in the usual way. To rename the board, tap Untitled in the
top-left then type a new name.
110 | www.pdpublications.com
Freeform
5
To manage the board, tap the circle with the silhouette in
the top-right. In the pop-up window, you can start a
Messages, telephone or FaceTime conversation, which appears
atop the Freeform board.
6
In this window, tap Manage Shared Board for another
pop-up, from where you can change the share options, copy
a link to the board or stop sharing. Click on a person to change
permissions for the person in question.
DThe first two toolbar tools are for stickies and shapes. Tap.
the stickie icon to open one, tap it to add text, use the
handles to resize. Tap the shapes icon to choose a sticker,
geometrical shape or arrow. Tap it for controls.
Click the text icon to add a text box, then double tap it to
type. Tap the photos icon and you can choose to add a
photo from the Photos app or take a new one. You can also add a
URL using this menu, or insert from a folder.
9
Click on the folder icon and you can navigate your storage
drives, and choose a file to add to the board in this way.
These attachments can include photos, video, audio, documents,
PDFs, web links and more.
10
Click on an item and drag it around the board, and pinch/
spread to zoom in and out If you need more space, drag the
board with two fingers. Close the board with the chevron (top left)
and see the boards you’ve worked on.
www.pclpublications.com | 111
П macOS Sonoma’s Key Apps
App Store
Buy More Software
The App Store is the best place to download applications for your Mac.
It's quick and secure, and has an easy-to-use interface so you can find all
those obscure apps and utilities you've been wondering about. There's
some great software out there to discover, purchase and download.
Finder File Edit View Go Window Help
About This Mac
System Settings...
App Store...
3 updates
Recent Items
To open the App Store,
click the Apple menu and
select App Store.
Alternatively, you can use
the Sonoma Launchpad
or the App Store icon
found in the Dock.
Force Quit Finder
_____
Q Search
If you know the name of the application
you're looking for, type it in the Search Bar
to go straight to it. Suggestions are offered as
you type, so click on one to select it. You can
search for developers here too.
Ever wanted to write your own software?
The Develop section is where they list
the apps for developers, including art and
drawing tools, as well as coding.
Click on Discover for the App Store's
main page, where you can see
Apple's picks of the best and most essential
apps for your Mac.
Click on the Categories link for a list of
genres such as Business, Entertainment,
Finance, Music and more. It’s another easy way
to navigate the App Store.
☆ Discover
4? Arcade
£ Create
Work
<0 Play
Л Develop
88 Categories
g) Updates
For a monthly fee, Apple's all-you-
can-eat Arcade gaming subscription
service lets you play as many games as you
want, for as long as you want.
If any apps on your Mac have been
updated, the Updates page is badged in
the sidebar, as it is here. Click on this page to
update these apps and see the ones that have
been recently updated.
Click Create to look for apps designed for
creativity such as image editing, music
making, photography, video editing, desktop
publishing and more.
Featured Apps are chosen by Apple's
editors, and are shown at the top of each
of the pages listed in the sidebar. Here we're
showing the Discover page.
10
Be
Under Work you'll find the App Store's
productivity apps, such as note taking
apps, software for getting things done, apps to
organise your life and more.
11
Unsurprisingly, the Play section is for
video games. The number and quality
of games on the Mac has increased
dramatically over the last few years, and this is
where you get them.
Underneath the featured apps are lists
showing the top paid-for, top free and
editor's choice apps in the category in question.
Click See All for the full list.
12
*
Click here for your account details,
including a list of apps you've already
purchased. You can download those that
aren't on your Mac by clicking the cloud
symbol next to the app.
2
8
9
2
4
6
8
5
6
112 | www.pclpublications.com
App Store
Install Applications.
When you've found an app you want
to install, click on its icon to open the
details page. To install the app, simply
click the price button under the app’s
title (or 'Get' for free apps), followed
by the Install button that replaces it,
then input your Apple ID.
Redeem/Add Funds.
In the App Store, if you scroll all the way
to the bottom of the page, you see two
buttons: Redeem and Add Funds to
Apple ID. The Redeem button is for
adding the value of an iTunes gift card to
your account. Add Funds to Apple ID lets
you pay money in by other means.
Auto App Updates.
You can update your apps in the
background, removing the need to
check for app updates manually. To
activate this very useful addition, open
the App Store settings from the App
Store menu and ensure that the
Automatic Updates option is selected.
Jet more out of Microsoft 365
e Latest Must-Play Mac Games
Things 3
Organize your
Ma
WORLD PREMIERE
Warcraft Rumble
is here!
GET STARTED
New to Mac?
Get the best apps for every
task.
«1
Fantastical -
Calendar
Reminders & T...
Mercury
Weather
Local Forecast.
Affinity
Designer 2
Professional G...
Affinity
Publisher 2
Pro Desktoo P.
See All
Lockera
Widgets
Essential Desk...
st New Apps and Updates
What's new in
macOS Sonoma
Desktop widgets, Game
Mode and much morel
Posture Pal -
Improve &
Straight Back,.
Adobe
Lightroom
Edit, manage a...
Sketch
Design,
prototype &
Affinity Photo
2
Professional p
Logoist 5
Powerful Vector
Design App
MacBook Pro
www.pclpublications.com | 113
Going Further
with macOS
Sonoma
When you're ready to take things further,
check out our advanced tips for macOS
Sonoma. We bring you guides to Stage
Manager, Continuity, Universal Control,
iCloud, the App Switcher and more. We
round off with a four-page feature
showing you some more great features
introduced with the macOS Sonoma
operating system. With our help, you'll be
using your Mac like a pro!
Learn more >
114 | www.pclpublications.com
Going Further with macOS Sonoma
Й Music
Controls Account
Browse
88 Browse
H Radio
Z Artists
(£) Music Videos
@ Classical Music
<°> Music Videos
My Top Rated
<3> Recently Added
<°> Recently Played
Alanis Morissette Essentials
Alison's music
Apple Watch
Classical and Jazz
Extreme Metal
V Female vocal
0 Albums
/ Songs
Playlists
В All Playlists
<3> 90's Music
A-List Pop
Apple Music Pop
Store
☆ iTunes Store
Library *
0 Recently Added
Strandz and Lane
Alive*
Apple Music
® Listen Now
UPDATED PLAYLIST
The Agenda
Apple Music Hip-Hop
NEW ALE
1989 (
Taylor
@ Top 25 Most Played
Г From iPad
Full о
Blooc
Today’s Hits
Apple Music Hits
Charlie S
Charlie S
www.pclpublications.com | 115
П Going Further with macOS Sonoma
Stage Manager
Organise Your Desktop
Having a lot of windows open at once on your Mac can be messy and
confusing. Stage Manager is a new way of organising those windows.
Activate it and all your windows are arranged at the side of your desktop,
leaving the one you're currently using open and central.
1
To open Stage Manager for the first time, click the Control
Centre icon in the menu bar (the one that looks like two
switches), and in the Control Centre window that appears, click the
box titled 'Stage Manager.'
Stage Manager opens, and you see all your open
windows except the one you're currently using move to a
space on the left of the desktop. The screen then looks much
cleaner, and less messy and cluttered.
3
Click on a window on the left, and it's brought to the fore.
Click on an app icon in the Dock and it opens. If a window
is too close to the left side of the desktop to allow Stage
Manager to be seen, drag your mouse pointer there to reveal it.
4
With an app open, you can open further windows in that
app without closing the old one. If you want to minimise
any open window in Stage Manager, click the yellow gumdrop
(top left) and it’s sent to the left with the other files and apps.
116 I www.pdpublications.com
Stage Manager
If you have more than one window open for an app,
clicking on the window pile on the left opens the top
one. Click that app's pile again to open further windows, and
click the yellow gumdrop to collapse those you don't need.
6
To open a new app window from the Stage Manager
column without collapsing the current one back into it,
simply hold the Shift key when you click on it. This way, both the
applications' windows are available on the Desktop.
И If you have two or more applications' windows open, when
you click on something else when the open windows
collapse into Stage Manager they’re grouped. Here we used
Safari, Notes and Maps, which are now in their own pile.
8
If you need to get at your desktop files while using Stage
Manager, click on the desktop. You see all your files, which
you can import into an application by dragging it in. To turn off
Stage Manager, use the Control Centre or Menu Bar item.
Customising Stage Manager
Customise Stage Manager at System Settings > Desktop &
Dock; here you can turn it on and off. Click the Options button
and you can change a few parameters, like having desktop
icons always visible or show and hide the Stage Manager bar.
If you intend to use Stage Manager regularly, you might want
to access it directly from the menu bar. Go to System
Settings > Control Centre > Stage Manager, and using the
pulldown, set it to Show in Menu Bar.
www.pclpublications.com | 117
□ Going Further with macOS Sonoma
Continuity Feature
On Apple Devices
With a MacBook running OS X10.10 or later, and a mobile device with iPadOS
or iOS 8 or later, your Apple gear works together seamlessly. You can make
and receive calls on your Mac, send and receive messages on your devices,
or share files between your Mac, iPad, and iOS devices with AirDrop.
Wi-Fi Instant Hotspot
1
Instant Hotspot's system requirements are stringent. A
Mac must be mid-2012 or newer and running Yosemite or
later. To find out when your Mac was made, click on the Apple
icon in the top left and select About This Mac. An iOS device
must be an iPhone 5 or later, iPad (4th gen) or later, an iPod
touch (5th gen) or later or any iPad mini.
Make sure your Mac and all the devices you want to use
with Instant Hotspot are signed into the same iCloud
account. On an iPadOS or iOS device, open the Settings app
and check your Apple ID atop the screen. On a Mac, open the
System Settings (it’s in the Apple menu, left hand side of the
menu bar), and check at the top of the sidebar.
3
Make sure your iPhone
has a cellular connection
to the Internet You should see
a 3G or 4G symbol at the top of
the screen. Make sure Personal
Hotspot is switched on too. To
do this open the Settings app
and then open the Mobile Data
link. Look for the Personal
Hotspot option, and if it isn't on
already, switch it on.
12:40 u 4G €S
< Settings Personal Hotspot
Personal Hotspot on your IPhone can provide internet
access to olher devices signed in to your iCloud
account without requiring you tc enter the password.
Allow Others to Join О
. Wi-Fi Password___________
To access your Instant Hotspot Internet connection, on a
Mac, click on the Wi-Fi menulet in the top right of the screen
and select your iPhone from the list. On an iOS device, do the
same through Settings > Wi-Fi. An indicator on the top of the
iPhone's screen shows a connection. If this fails, check your
mobile phone carrier supports personal hotspots.
4
118 | www.pclpublications.com
Continuity Feature
Phone Calls
1
All Macs and iOS devices you wish to use for Continuity
phone calls must be logged into the same iCloud
account, and also on the same Wi-Fi network. On your Mac,
click the Wi-Fi menulet in the top right end of the menu bar at
the top of the desktop. On an iPadOS or iOS device, open
Settings and look at what's listed under Wi-Fi.
2
All devices must be signed into FaceTime with the same
iCloud account. On a Mac, launch FaceTime and sign in. If
already signed in with a different account, from the FaceTime
pull-down menu, open Preferences and sign out. On an iOS device,
go to Settings > FaceTime and sign in. On your iPhone, FaceTime
and iPhone Mobile Calls must be on.
3
To answer a call on your Mac, wait for the notification to
appear. You can then click on one of the options.
Answering the call on your Mac means using its built-in mic and
speakers, so be careful about taking a private call in a public
place. To make a call on your Mac, click a phone number in
Contacts, Calendar or Safari.
□ To initiate a call using
an iPad or iOS device
other than an iPhone, tap on
a number in Contacts,
Calendar or Safari. To
answer an incoming call on
this device, use Slide to
Answer, as instructed on the
screen. With your Mac and
your iOS devices set up to
use Continuity Phone Calls,
all your devices ring when
there's an incoming call.
5
To switch Continuity Phone Calls on one or more of your
Apple devices on or off, on a Mac or iPad, open
FaceTime's settings and uncheck the box marked 'Calls From
iPhone’. On an iPhone, go to Settings > Phone > Calls on Other
Devices and toggle them on and off. You can in this way choose
which devices accept Continuity Phone Calls.
Calling from a Mac
You can place a call from your Mac too. Wherever you see
a phone number, you can click on it and get a menu. From
this menu, select the 'call from your iPhone’ option and
the call is placed. It works in most Apple apps, such as
Safari (as seen here), Notes and Messages.
Contact Us
BDM Extras
(+44) 01803446068
enquiries@bdmpublic<
Advertise
Licensing
Privacy Policy
?bies
jnt
iback
^shop
Website Terms of Use
www.pclpublications.com | 119
Going Further with macOS Sonoma
SMS and MMS Messaging
1
To send or receive an SMS (Short Message Service) or
MMS (Multimedia Messaging Service), from your Mac you
must be running Yosemite or later. You also need an iPhone
running iOS 8.1 or later. Text messaging from an iPad or iPod
touch also demands they be using iOS 8.1 or later.
2
On a Mac, open Messages and in the Messages menu,
open Settings. Click on iMessage, then on Settings and
make sure the required numbers and email addresses are
enabled. On an iOS device, go to Settings > Messages > Send &
Receive and again enter your Apple ID if necessary.
Finally on your iPhone,
you must go to Settings >
Messages and turn on Text
Message Forwarding. Tap on
this option, and you're shown a
list of devices logged into the
same iCloud account. Switch
on all the ones with which you
want to share your text
messages. Each device
displays a verification code you
must type on your iPhone.
3
< Back Text Message Forwarding
мп this »Pbone
Ian Osborne's iPad Pro (iPad) О
iMac (Mac) <D
Ian's MacBook Pro (Mac) «3
All your SMS and MMS messages now appear on your
Mac and/or iOS devices, regardless of whether the
person who sent them uses an iPhone. If the sender is using a
non-Apple device, the speech bubbles you send are green
instead of the blue that's used for iMessages, that is, messages
sent between Apple devices.
£
5
Sending text messages through your Mac is incredibly
convenient, especially for long messages. It’s great for
replying too - you can just use whichever device is nearest. If
you're working on your Mac, you get to read and reply to your
text messages without even reaching for your phone.
6
You can initiate a text message chat regardless of whether
the other person uses an Apple device by clicking a
phone number or Message icon in Safari, Contacts or Calendar.
Here, in Contacts, click on the icon and select a number from
the pop-up. A message window soon appears.
120 | www.pclpublications.com
Continuity Feature
Universal Clipboard
Handoff
Joe’s Cafe cooks the best breakfasts in
AnytQwn With succulent sausages,
beautiful bacon, tantalising tomatoes
and marvellous mushrooms, it really sets
мои iixifnr a harrl daw's mnrit----- ------
Joe's Cafe,
23 Fore
Street
1
You can copy and paste text and images from one
device to another if they’re signed into the same iCloud
account. On a Mac, copy it to your clipboard by highlighting
the text or image in question, then pressing either cmd-X to
cut or cmd-C to copy.
1
On your Mac, open the document you wish to import a
photo into, or start a new one. Right-click where you want
it to appear, select Import from iPhone or iPad, then Take Photo
on whichever device you're using. Devices only appear here if
they're on the same Apple ID as your Mac.
2
Now, on your iPhone, iPad or another Mac, double tap or
click on the place where you want to paste the text you cut
or copied on your Mac. From the mobile device's pop-up menu,
select Paste: or on a Mac, press CMD-V. It appears. There might be
a slight lag while the text uploaded to iCloud.
Switch to the device you chose to take the photo from. The
Camera app should already be open, so take a photo. You
get fewer options in the Camera app than usual. When you've
taken your snap, you can discard it or use it make your choice
from the links at the bottom of the screen.
3
You can copy text from your device running iPadOS, or
iOS 10 or later, and paste it on your Mac using cmd-V. It
works for images and video too. We copied this photo from
Safari on our iPad and pasted it into TextEdit on our Mac.
3
The photo appears on your Mac, in the app. Edit and use it
like you would any other photo. The pic isn't retained on
your mobile device though, so if you want it there too, you might
be better off taking a photo in the traditional manner.
www.pclpublications.com | 121
• I Going Further with macOS Sonoma
Universal Control
On Macs and iPads
Universal Control is a Continuity feature that lets you use a Mac and an
iPad side by side; using your Mac's keyboard and mouse/trackpad. You can
control up to three computers and tablets with one set of input devices.
Universal Control is available with compatible Macs and iPads
running at least macOS Ventura and iPadOS 16 respectively. They
have to be signed into the same iCloud account, and both must have
Wi-Fi and Bluetooth switched on.
Switch on 'Allow Handoff between this Mac and your
iCloud devices' by clicking the box next to this option.
Open System Settings from the Apple menu (top left),
and go to General > AirDrop & Handoff.
When using Universal Control, you can drag your Mac's pointer off
the Mac's screen and onto the iPad's screen, and then operate the
iPad with the keyboard and mouse/trackpad from your Mac. Unlike
Sidecar, Apple's earlier Continuity feature that let you use your iPad
as a second screen for your Mac, Universal Control lets you use your
iPad's own apps and features, and even drag files between your
computer and your tablet.
Here’s howto set up and use Universal Control.
/ °^*^***
/ «aBs
On Your Mac
122 | www.pclpublications.conn
Universal Control Д
Using Universal Control
Having set up Universal Control, place your iPad next to
your Mac. With your Mac's mouse or trackpad (on a
desktop or notebook Mac), move your pointer off the
screen. A bar appears showing a connection with your iPad
has been made. Continue moving your pointer until it
appears on your iPad. You can then use your pointer to
open and close apps, click links, drag files between your
iPad to your Mac and more; while your keyboard can type
in text fields on your iPad. To return control to your Mac,
just move your pointer back onto the Mac’s screen again. It
works with up to three devices, so add another if you wish.
On your Mac, you can
hover the pointer over
a green gumdrop for
the option to move the
window to your iPad.
System Requirements
• Macs
MacBook Pro (2016 and later)
MacBook (2016 and later)
MacBook Air (2018 and later)
iMac (2017 and later)
iMac (5K Retina 27-inch, Late 2015)
iMac Pro
Mac mini (2018 and later)
Mac Pro (2019)
Mac Studio (2022 and later)
•iPads
iPad Pro
iPad Air (3rd generation and later)
iPad (6th generation and later)
iPad mini (5th generation and later)
On Your iPad
• Go to Settings > General > AirPlay &
Handoff, and switch on Handoff.
• Turn on the Cursor and Keyboard
option underneath it.
www.pclpublications.com | 123
• Going Further with macOS Sonoma
Continuity Camera
with Your iPhone
The Mac's webcam has come on in leaps and bounds, but it's still not as
good as your iPhone's camera. Using this guide, you can use your iPhone as
a webcam, using a wireless connection.
Continuity Camera is a
macOS and iOS feature
that lets you use your
iPhone as a webcam,
connecting wirelessly with
your Mac and giving access
to the iPhone camera’s
great features such as
Centre Stage, Portrait
mode and Studio Light
which illuminates a user's
face while dimming the
background. If your iPhone
has an Ultra Wide camera,
you can enable Desk View,
which simultaneously
shows your face and an
overhead view of your
desk. To set up and use
Continuity Camera, use
these simple steps.
1: On the iPhone, open the Settings
app and go to General > AirPlay &
Handoff, and tap the switch marked
Continuity Camera Webcam. Close
the Settings app.
2: On the Mac, open whichever
video app you intend to use, such as
FaceTime, Zoom, QuickTime and
more. Select the iPhone as the
app's camera. How to do this
depends on the app; on FaceTime,
for example, you simply select
'iPhone' in the Video menu.
w-
your iPhone s rear camera. A control
window on the iPhone allows you to
pause or disconnect the stream.
n -
4: To turn on Portrait Mode, Centre
Stage (iPhone 11 or later required)
which keeps the person speaking
in the middle of the picture, or
Studio Light (iPhone 12 or later
required), on your Mac, open
Control Centre from the Menu Bar,
click on Video Effects and select
3: In the FaceTime app on your Mac,
the video feed now comes from
124 | www.pclpublications.com
Continuity Camera
What You Need
To use your iPhone as a webcam with Continuity Camera, your Apple
gear must meet the following standards:
• A Mac running macOS 13: Ventura or later
• An iPhone XR or iPhone 8 or later
• iPhone must be on iOS 16 or later
• Wi-Fi and Bluetooth enabled on both devices
• Both devices must be logged onto the same Apple ID
A camera mount to attach your phone to your computer is optional.
To use Centre Stage and Desk View, you need an iPhone 11 or later.
To use Studio Light, you need an iPhone 12 or later.
Desk View
MacBook Pro
This is what it looks like when the person you're talking to is using Desk View. Use the slider
between the two pictures to set their respective sizes.
Desk View utilises the iPhone's (iPhone 11 or later required) wide-
angled lens to show your desktop as well as your face; just the thing for
instructional videos or when you need to show a sketch or model while
you're talking.
To turn on Desk View, open the Control Centre and click on Video
Effects. Select Desk View, and when instructed, use the on-screen
controls to align your desktop within the frame shown. Click Start Desk
View and a second window is displayed, showing your desktop.
To turn off Desk View, simply close that second window.
www.pclpublications.com | 125
П Going Further with macOS Sonoma
Using iCloud
For Storage & Syncing
With Apple's iCloud service, you can store documents and data on a 'cloud
server', that is, a storage facility accessed over the Internet. Files stored on
iCloud can be worked on using any device with a browser anywhere in the
world, and you can sync settings and information over iCloud too.
Storing Your Documents in iCloud
1
Click on your desktop to open Finder, then open iCloud
Drive from the Go menu. You may need to log into iCloud
using your Apple ID. You’ll see a Finder window showing the
contents of your iCloud drive folder, with folders for some apps
that store output in iCloud.
2
To save files of any type into your iCloud Drive folder,
simply drag them from their current location (in this
screenshot, that's the desktop) and drop them in the open
iCloud window. They are now stored remotely and accessible
from any connected Apple device.
3
You can organise your iCloud folder like any other
folder, including creating new folders within it. To move
files into a new folder in your iCloud Drive, just drag and drop
them to where you want them, just like you would with any
other Finder folder.
4
To move files out of iCloud storage and back to your
hard drive, drag them out of the iCloud folder and onto
your desktop or into a folder that isn't in your iCloud Drive.
Confirm the move when you're asked to and the files are
removed from your iCloud storage.
126 | www.pclpublications.com
iCloud
iCloud Photos
1
To enable iCloud Photo Library on your Mac, first of all,
open the Photos app and in the Photos pull-down menu,
select Settings as shown, to get the Settings window
2
In the Settings window, click on iCloud and then check the
box labelled iCloud Photos. Your photos are uploaded to
your iCloud. This may take some time.
Q iCloud Photos
Automatically upload and store all your photos and videos in iCloud so you can
access them from any of your devices and on the web
О Download Originals to this Mac
Store original photos and videos on this Mac Choose this option It you want to
access full-resolution versions of your entire library, even when offline
Optimise Mac Storage
if your Mac is low on space, full-resolution photos and videos are
automatically replaced with smaller, device-sized versions. Full-resolution
versions can be downloaded from iCloud at any time.
Q Shared Albums
Create albums to share with other people, and subscribe to other people's
shared albums
You can choose between 'Download Originals to this
Mac', to keep a backup copy of your library on your Mac
and 'Optimise Mac Storage' to leave it all on the cloud.
Now do the same on any other Macs you have. Any
duplicates should be resolved by iCloud as you go.
Naturally, you only need a backup of your library on one Mac.
5
To sync your iPhone or iPad's Photos app with your iCloud
Photo Library, first open the Settings app from the Home
screen or the Dock. It looks like a machine cog.
Click your name at the top of the left column, then iCloud
in the right. Click Photos and switch on Sync This iPad to
enable syncing and upload your device's photos to iCloud.
www.pcipublications.com | 127
П Going Further with macOS Sonoma
7
All your photos are shown as thumbnails and you can
select and import them. Here you can see a collection
of photos imported to our Mac using iCloud Photo Library.
iCloud Shared Photo Library
Syncing Apps in iCloud
You can sync apps such as Mail, Contacts and Notes in
iCloud, so edits made on one device also appear on others.
Open System Settings, through the Apple menu, the
Dock or the Applications Folder. Go to Apple ID > iCloud
and click Show More Apps to see which apps are
currently set to sync.
1
You can set up a shared library where up to five people
can collaborate. In the Photos pull-down menu in the top
bar, select Settings. Click on Shared Library in the toolbar, and
Make sure apps you want to sync are switched on. These
apps are now synced with all your Apple devices, as long
as they're switched on to sync on that device too.
click the Get Started button to set up a shared library.
2
Add up to five people to the shared library, then choose
what photos you want to move to it. Everyone who's
sharing your library can add and remove photos. It's truly
collaborative, and great for families or organisations.
In your iCloud Drive, when you click on a file or folder and then
click the Share icon, you can choose whether to send a copy or
collaborate on that file or folder. Choose from the pull-down and
then send it in the usual way.
128 | www.pclpublications.com
iCloud
Safari in iCloud
iCloud Keychain
To let iCloud share your information from Safari across
your devices, first of all, open System Settings and click on
the Apple ID option atop the sidebar. Now click on iCloud in
the right-hand panel, then click Show More Apps.
DWhen you sign up for an account on a website in Safari,
maybe to join a forum or register for a newsletter, Safari
suggests a password to use. You can use that password at
the click of a button.
Make sure Safari is on. You can now access your bookmarks
and reading list on your other Apple devices, as long as
they’re linked to the same iCloud account and also have Safari
ticked. Click OK to merge information, should the box appear.
2
It’s then saved to your iCloud Keychain and synced
across your Apple devices. If you ever need to see your
password, open the Keychain Access app (it's in the
Applications > Utilities folder).
If you have tabs open in Safari on another Apple device,
you can access them on your Mac via the cloud. In Safari,
click the URL bar to see the Start Page icons, and scroll it
up to see the sites you have open on other devices.
3
Find and double-click on the account you wish to
view, then in the pop-up window, click the Show
Password box. Type your admin password in the next
window and the password is shown.
www.pclpublications.com | 129
П Going Further with macOS Sonoma
Messages in iCloud
Upgrade Your iCloud Drive.
-
О Network
Messages can be synced over iCloud, so your
conversations are displayed on all your Apple devices. To
activate this on your Mac, open Messages. Under the Messages
menu, select Settings.
In the Settings window, click on the 'iMessage tab at the
top of the window. Make sure Enable Messages in iCloud
is checked. You can sync your messages from here by pressing
the Sync Now button.
To upgrade your iCloud storage, go to System Settings >
Apple ID > iCloud. Click the Manage button (top right).
From the next screen, you can delete documents and data
from your iCloud if you wish.
Click Change Storage Plan, in the top right. On the next screen,
you’re shown your current plan and options to upgrade for a
higher monthly fee. Click on one to choose and click Next
0
qjo
QSK
О Р»
61
□ Du
Upgrade Options
50 GB
200 GB
2 TB
£0.79 per month
£2.49 per month
£6.99 per month
Prices include VAT (where applicable)
Change Apple One Plan
Cancel
KSB
On an iPad or iPhone, go to Settings > [Your name] >
iCloud > Show All > Messages, and make sure Sync this
iPad is switched on. Your messages are now stored on iCloud
and synced between all your Macs and iOS devices.
If you decide you have more storage space than you need
and want to downgrade to a cheaper plan, click the
Downgrade Options button in the bottom-left. You can then
choose a cheaper plan, and will see a warning if you're
currently using more space than is in the new plan.
130 | www.pclpublications.com
iCloud
Apple's iCloud+ Service
1
iCloud* is a service offering new iCloud features for
subscribers to iCloud. You can't get it with the free 5GB
you have with your Apple account, but if you pay for more space
- at whatever level - the iCloud* features are yours.
2
iCloud Private Relay routes your web-browsing traffic
through a relay to hide your IP address (Internet Protocol,
the identifier on your networked devices), your location and
your browsing habits. It encrypts your data too.
3
To activate it, go to System Settings > Apple ID and, under
Private Relay, tick the checkbox to its left and click the
Options button to its right. From there, you can turn the Private
Relay on and off, and read about the feature.
□ Hide my email is also in System Settings > Apple ID. It
generates a random email address connected to your
own email account. Use it for mail subscriptions and
competitions, and if you’re getting too much spam - delete it.
5
Click the'+' icon on the left of the new window to create a
new random email address, which you can use to sign up
to newsletters, register for accounts and more. You can manage
your generated emails here too.
6
With iCloud+, you can use up to five custom domains to
send and receive email with iCloud Mail. Go to www.icloud.
com, click Account Settings and under Custom Email Domain, click
the Manage button. Follow the on-screen instructions.
www.pclpublications.com | 131
П Going Further with macOS Sonoma
iCloud Desktop
Documents & Folders
With macOS and iOS, you can not only store your documents on your
iCloud but also files and folders that are found on your desktop. It's done
automatically, so a file on your Mac's desktop is accessible from your iOS
device and other Macs. Here's how to use the iCloud Desktop.
1
To switch on iCloud Desktop Documents and Folders,
open System Settings and click Apple ID > iCloud > iCloud
Drive. Turn on the Desktop & Documents Folders option in the
pop-up window. It may take time to set up.
2
On an iPhone or an iPad, first of all open the Files app.
Go to the left-hand sidebar, under Locations (tap the
chevron to its right to open it if necessary). Tap on iCloud, and
then tap the Desktop folder.
3
Files on your Mac's desktop can be accessed in this
way through the iCloud Drive folder of any Mac or iOS/
iPadOS device signed into the same Apple ID. All Macs must
be running High Sierra or later, and all mobile devices must
have iOS 10 or later.
4
You can also access your Desktop documents and
folders using the website. Just point your browser at www.
icloud.com and sign in. Open the iCloud Drive and the Desktop
folder is there. You can do this on any Internet-capable device
with a web browser.
132 | www.pclpublications.com
iCloud Desktop & App Switcher l»@
The App Switcher
Speed Your Workflow
With App Switcher you can toggle between apps that are currently open
and running on your Mac without taking your hands off the keyboard. It's a
really great feature that significantly speeds your workflow if you use it on a
regular basis. If you don't use the App Switcher already you should try it out.
1
The App Switcher is easy to use. Hold the cmd key and press Tab. A window showing the icons of all your open apps is
displayed in a floating panel in the centre of your desktop. If you release the keys, they disappear again.
You can toggle through these apps by repeatedly pressing the Tab key and releasing cmd when you've highlighted the app
you want. This app is then brought to the front of your Mac, so you can make use of it straight away.
3
You can move forwards or backwards through the list of open apps using the arrow keys at the bottom right of your keyboard,
or to the left of the numeric keypad on a large keyboard. Alternatively, just click on one with your pointer.
4
If you see an icon on the left with a badge in the corner, it means you have that app open on another Apple device. Click it to
open it on your Mac too, showing the same document, page or site as it does on your mobile device.
www.pclpublications.com | 133
П Going Further with macOS Sonoma
The Siri Feature
Your Digital PA
Apple's digital personal assistant lets you communicate with your computer
by speaking, just like you do with the iPad and iPhone. Siri can organise your
day, access your apps and even share a joke. Here's a look at what the Siri
digital assistant can do for you and your Mac, and howto make the most of it.
Setting Up Siri
You might have activated Siri during the set up
procedure. If not, under the Apple menu, select System
Settings. Click on Siri in the sidebar. If it isn't already on, click
on Ask Siri's switch. You can also set whether you use 'Hey
Siri' to wake it, and other Siri options.
2
You can change the language that Siri understands and
also speaks in using the pull-down menu. You can also
change the English language voice from a British male to a
female voice and a different accent, and set up a keyboard
shortcut for Siri if you wish.
f?®Q. ф ф) S7 • Tue 7 Nov 5:10 pm
3
To launch Siri, click on the icon in the Dock, click on the
menu bar icon if you've opted for one or press the
keyboard shortcut, again if you have one set up. A Siri window
appears in the top right corner of the screen.
Using Siri requires an Internet connection, so your Mac
can send your voice message to Apple’s servers to be
analysed. If you don’t currently have an Internet connection, you
cannot use Siri until you take your Mac back online again.
134 | www.pclpublications.com
Siri
Using Siri
Check Appointments: Siri is great for checking your
appointments. You can ask what appointments you have coming
up for the rest of the week or month, what's coming up between
two dates, and more. Just ask Siri a question in regular English and
it will probably understand you perfectly.
Send a Message: You can send a message using Siri,
instead of looking up the person in Contacts and then typing
the message itself. Just say, "Send a message to X", and Siri will
find the person and ask what you want to say. Speak your
message and you can then check and send it.
9 Calculator
Conversions: You can use Siri to do conversions between
weights, length, time, currencies and more. Just ask, for example,
'What is 12 kilometres in miles?, and Siri tells you. Its great for
currency conversions when shopping online.
Open Apps: You can open an app with Siri. Just say, 'Open
the [X] app', with 'X' being replaced by the name of the app in
question. The app is then opened, without your having to use
Launchpad. You can’t close an app with Siri, though.
Siri Dictation Commands.
Siri also understands dictation as well as words, so if you are dictating an email, for instance, this useful list of dictation commands
that Siri recognises prove very useful. Just "speak the word" and the action or punctuation is added.
"New line" lowercase ' "Apostrophe" - "Dash" ° "Degree sign”
Move to the next line "No caps on ... no caps I "Exclamation mark" - "Hyphen” A "Caret"
"New paragraph" off" ? "Question mark" - "Em dash" @ "At sign
Start a new paragraph Make sure part of & "Ampersand" % "Percent sign" # "Pound sign"
"All caps" what you say is all * "Asterisk" > "Greater than sign"
Make the next word lowercase
( "Open parenthesis" © "Copyright sign" < "Less than sign"
all uppercase "Space bar"
"All caps on ... all caps Prevent a hyphen ) "Close ® "Registered sign” / "Forward slash"
off" from appearing in a parenthesis" § "Section sign” \ "Back slash"
Make part of what normally hyphenated [ "Open bracket" $ "Dollar sign" I "Vertical bar"
you say uppercase word ] "Close bracket" Ф "Cent sign" :-) "Smiley"
"No caps" . "Period" { "Open brace" £ "Pound Sterling :-( "Frownyface"
Make the next word , "Comma" } "Close brace" sign" ;-) "Wink"
www.pclpublications.com | 135
П Going Further with macOS Sonoma
Time Machine
Back Up & Restore
It's always a good idea to back up your data to guard against disk failure and
accidental deletion. macOS Sonoma has a built-in backup system called
Time Machine. With it, you can retrieve files that have been lost or corrupted,
and even reinstall an entire system after a major drive problem.
Getting started
1
Connect an external hard drive, via USB, FireWire or
Thunderbolt, to your Mac. It should be at least the size of
your Mac's hard drive. The larger the drive, the further back in
time you will be able to store backups. 'Open System Settings,
click General in the side bar then click Time Machine.
Click the Add Backup Disk button and you're presented
with a window listing your connected drives. Select the
drive on which you would like to store your backups. If your
external drive isn't already formatted as 'Mac OS Extended
(Journaled)', Time Machine invites you to erase and reformat it.
You're invited to add a password to encrypt your backups.
This is optional - click the Encrypt Backup switch if you
don't want your drive encrypted. If you do encrypt it, make sure
you remember the password. If you forget it, all backup data on
the Time Machine drive is lost and irretrievable.
When you're done, the backup drive appears in your
Time Machine settings page. Click'+' to add another
backup drive, or highlight one and clickto remove it. During a
backup, you can monitor its progress on this page. The first
one takes a long time, but after that, only new things change.
136 | www.pclpublications.com
Time Machine ©
Backing Up to Time Machine
1
On System Settings > General > Time Machine, click on
your backup drive in the right-hand panel and then click
the Options button. To set how often your data is backed up,
use the pulldown menu next to Backup Frequency Set it to
back up manually only, or automatically, with no intervention
from yourself, every hour, day or week.
2
By default, Time Machine backs up all the data on the
hard drive set up in the 'Getting Started' section of this
tutorial. Click the Options button and add locations not to be
backed up by pressing the'+’ icon under Exclude from Backups
to reveal the file browser. Browse to the file or folder you don't
want included in your backups and click the Exclude button.
3
To remove an item from the list, click it once to highlight it
and then click theicon. The item you removed is
dropped from the list and is once more backed up with your next
Time Machine backup. Remember, this list is of items and
containers that are NOT backed up with Time Machine.
In the menu bar atop the screen is an icon for Time
Machine - it's the clock with the circular arrow around it.
Click this icon and you can start a manual backup, find out when
the last backup was made, open your Time Machine settings in
the System Settings and browse your Time Machine backups.
5
To retrieve a file from Time Machine, Choose Enter Time
Machine in the Time Machine menu and then navigate to
the file you want. You can get hold of an older version of a
current file or one you’ve deleted. When you've found it,
highlight it and press Restore.
6
It’s important that you keep your Time Machine backups
separate to your data files. Never, for example, partition a
hard drive and keep data on one partition and Time Machine
backups on the other. If you do, both your data and your backups
are lost if the hard drive fails.
www.pclpublications.com | 137
• Going Further with macOS Ventura
Restoring a Mac from a
Time Machine Backup
If something has gone very wrong with your Mac, and
you want to wipe your hard drive clean and reinstall
from a Time Machine backup, this is what you should do. |
Naturally, to restore from a backup you need to actually
have a backup, and anything you’ve done on your Mac
between the last time you ran Time Machine and the
time when you restore to your last backup, will be lost.
That's why you should back up on a regular basis.
External Hard Drives Advice
£
• First of all, make sure a notebook Mac is powered using
the power adapter, and regardless of what Mac you have,
make sure your Time Machine backup drive is connected.
• The system is restored, and you're invited to restart
Once you do, your Mac should be up and running again.
• Your Mac boots up into Recovery Mode. Click on your
name in the macOS Recovery window, then click Next
Enter your administrator's password, and click Next again.
• After a screen of information on what restoring a Time
Machine backup will do, click Continue if you're sure you
want to proceed with it.
• The drive is scanned for Time Machine backups. Choose
the most recent backup made before your problems
started; click on it and then click Continue.
• You must now select the drive containing your Time
Machine backups. Click on your Time Machine drive - and
if it isn't there, make sure its plugged in - then click the
Continue button.
• Now select the drive you want to install the Time
Machine backup on. This is presumably your hard drive,
but you could install it on a secondary drive if you wanted.
If you have FileVault turned on, you have to enter your
password again to unlock the disk.
• Power down your Mac, count to ten. For an Apple Silicon
Mac, press and hold the power button until you're shown
the 'Loading startup options'. Click 'options', then
Continue. Follow the on-screen instructions until you get
to the Recovery screen. If you have an Intel Mac, press the
Mac's power button then immediately press cmd-R. Hold
these keys until the Apple logo appears on the screen.
Again, follow the on-screen instructions until you get to
the Recovery screen.
• On the next screen, you're offered four options; Restore
from Time Machine, Reinstall macOS Sonoma, Safari and
Disk Utility. If you think reinstalling macOS over the top of
your current install, keeping your files and folders as they
are will work, do this. But if you've tried this, or you’re sure
your system is beyond help, go for Restore from Time
Machine. Click Continue.
A word to the wise about external Time Machine hard drives.
It's tempting to get a huge drive and partition it, with your data
on one side and your Time Machine backups on the other.
This is a really bad idea. If your external drive fails, you lose
not only your data, but also your backups of that data. It’s
best to make sure everything - your boot drive and any data
drives you use - is backed up, but do it on a different drive.
138 | www. pcipublications.
Time Machine [э]
Which Backup?
When restoring a Time Machine backup, you don’t have to
use the most recent one. If your Mac started giving you grief
last Tuesday, for example, you might prefer to use the last
backup on Monday evening, and see if that solves the
problem. Any documents created or edited after this
backup won’t be carried over, of course, but you can always
delve back into Time Machine and recover individual files.
Setting Up a New Mac from a
Time Machine Backup
If you've bought a new Mac and want to set it up using a Time
Machine backup from your old one, follow the First-Time
Setup guide until you get to this step, the Migration Assistant.
Click on the first option, which includes transferring from a
Time Machine backup, then Continue. Follow the on-screen
instructions to have your files, folders and settings
transferred to your new Mac from Time Machine.
www.pclpublications.com I 139
□
Going Further with macOS Sonoma
Update macOS
To Sonoma
You can also use these tips
to upgrade to future macOS
releases, whenever they are
made available.
If your Mac is running an older version of the operating system, you're
probably keen to upgrade to the latest release of macOS Sonoma. It's
completely free of charge, and as long as your Mac meets the minimum
system requirements, it's very easy to do. To update to macOS Sonoma,
you need an Internet connection, and it's best to plug in your charger too.
When an update to your current version of macOS - or a
new release entirely - is available, Software Update is
badged in System Preferences. In the Apple menu, there's an
update listed in System Settings too.
2
Open System Settings from the Apple menu, the Dock or
LaunchPad (it doesn’t matter which), and click on the
badged Software Update icon. It checks for an update, then tells
you what it is. Click the Upgrade Now button.
Minimum Requirements
For macOS Sonoma
Apple can’t support older Macs forever, and in the step up to macOS
Sonoma, a few models have been left behind. If you're running
macOS Ventura on a 2017 MacBook Pro, a 2017 iMac or a 12-inch
2017 MacBook, you’re out of luck. But if you have one of the models
listed below, you can upgrade to the latest version of macOS right
now. If you're unsure which model of Mac you have, click on the
Apple icon in the menu bar (top left), and select About This Mac.
Make a Backup
Before You Start
Upgrading the macOS operating system is a big step, so as always,
before making any major change to your computer, its a good idea
to make a backup of your data using Time Machine. The upgrade is
a very safe process and won't damage your files by itself, but
there's always the unexpected risk of a drive failure or a power cut
during the installation process, which could leave your Mac
crippled. In the unlikely event of this happening, you can simply
restore your Time Machine backup to your Mac and try again.
MacBook Pro from 2018 and later
MacBook Air from 2018 and later
Mac Pro from 2019 and later
Mac Mini from 2018 and later
Mac Studio from 2022 and later
iMac from 2019 and later
iMac Pro from 2017
140 | www.pclpublications.com
Update macOS
There next follows a licence agreement for macOS Sonoma,
the terms of which you must accept if you're to proceed with
the update. Read it all if you wish, but its not very interesting.
Click Agree to accept the terms and conditions, you're
asked for your administrator’s password. It's the one you
use to unlock your Mac. Type it, and click the OK button.
Your Mac now downloads the macOS Sonoma update It's
6.37GB large, so it will take quite a while to download,
especially if you have a slow Internet connection.
When the operating system has downloaded, it's installed.
You see a black screen with the Apple logo and a progress
bar. In fact, several progress bars might be filled.
О Your computer eventually reboots into the new macOS
Sonoma operating system, with its distinctive yellow,
orange and blue desktop. You can change this later.
8
To customise the appearance of your new OS, open
System Settings (Apple menu) and use the Appearance
and Wallpaper options, depending on what you want to do.
www.pclpublications.com | 141
П Going Further with macOS Sonoma
What Else is New
in Sonoma?
macOS 14: Sonoma is packed with exciting
new features that help you get more from
your Mac. Let's take a look at some more.
Improved Keyboard and Dictation Integration
Before macOS Sonoma, you had to choose between
Dictation, that is, speaking what you want to type and having
the Mac convert it into text, and typing it out on the keyboard.
Better keyboard and Dictation integration now means you can
seamlessly switch between these input methods. For
example, you can use speech to text for your main input and
switch to the keyboard to correct an error or add a
non-standard word without switching Dictation off.
To turn Dictation on, in the Apple menu select System
Settings and go to Keyboard. Turn on the Dictation feature
here, as well as selecting a language, mic source and if you
wish, change the keyboard shortcut to activate it and turn it off
again. When you're ready to use it, if you haven't changed the
keyboard shortcut, tap F5 on your keyboard. You can then
type simply by speaking. If you make a mistake, use the
keyboard to correct it and then return to using speech-to-text.
Disable Pointer Acceleration
When using a mouse on your Mac, by default the pointer moves at
the same speed you move the mouse. If you drag your mouse
slowly across your mouse pad, the pointer moves slowly too. Drag
it quickly, and the pointer speeds up. If you want to change this
behaviour and want the pointer to move at a constant speed, open
System Settings, go to Mouse > Advanced and switch off the
Pointer Acceleration option. This is especially useful for gamers
who might not want the pointer to accelerate with the mouse.
Audio Messages in Messages
When someone leaves you a voice message in the Messages app,
its also transcribed so you can read it as well as listen to it You can
also change the speed at which the audio is played. Do a long click
instead of a regular click on the Play icon and you get a window that
lets you play the message at regular speed, one and a quarter
speed, one and a half speed or double speed.
142 | www.pclpublications.com
What Else is New in Sonoma?
Live Speech
A new Accessibility feature, designed for people who are likely
to lose the use of their voice in the foreseeable future, allows
you to train your Mac's text-to-speech feature to speak in your
own voice. While not perfect, it's an excellent reproduction of
how you sound.
Before you can do this, you need to train the Mac to speak in
your voice. If you have an external microphone, plug it in, but the
Mac's own in-built mic is sufficient if not. In System Settings,
open Accessibility and click on Personal Voice, which is found in
the Speech section. Click Create a Personal Voice, and enter
your password or Touch ID to begin. Follow the on-screen
instructions. You have to read out 150 phrases, which should
take about a quarter of an hour. You can stop and return to it
later if interrupted. All information is processed on your Mac and
isn't sent to Apple's servers; it's private and secure, and no one
can 'steal' your voice to use for nefarious purposes.
Go to System Settings > Accessibility, and in the Speech
section, click on Live Speech. In the Voice menu, select the
voice you created and saved. Click the switch at the top to
turn on Live Speech, and whenever you use text-to-speech, it
will be in a decent simulation of your own voice.
Hide All Windows
A default behaviour you've probably already noticed in
Sonoma is if you click an empty space on the Desktop, all
your open windows - Finder and app - move off the screen,
leaving your desk space clear. Click on the desk again, and
they come back. This might be confusing at first, as it isn’t
how the Desktop behaved in previous versions of macOS. If
you really don't like it and want to go back to bringing Finder
to the fore when you click the Desktop, open System
Settings and go to Desktop & Dock. Under 'Click wallpaper
to reveal desktop’, use the pull-down menu to change the
setting to 'Only in Stage Manager'.
Caps Lock Indicator
Communication Preferences
When you have your caps lock on, and LED on the keyboard
key turns on to show it's active. Now you get an indicator on
If you want to change what emails you get from Apple, you can
do it in System Preferences. Click on Apple ID at the top of the
the screen too. A blue icon showing the caps lock arrow
appears under your cursor when you type, so you know the
feature is on without having to look at your keyboard. It's a real
boon for fast typers.
left-hand sidebar; it's the option with your name on it too. In the
right-hand window, click Personal Information at the top. On
the next screen, click the T icon next to Communication
Preferences for a pop-up offering various categories of emails
www.pclpublications.com | 143
П Going Further with macOS Sonoma
Share Passwords and Passkeys
In macOS Sonoma's Safari app, you can share passwords and
passkeys with family and friends. You choose which ones you
share, so you can (for example) let them use your log-in details
for the local supermarket's website while keeping your personal
information for your favourite forums private. You can stop
sharing a password at any time, and the group you share with
can add to and update the shared passwords collection too.
In the Safari app, open the Safari menu in the top bar and
select Settings. In the Settings window’s top bar, click on
Passwords. Open them using your password or Touch ID. In
the Share Passwords with Family section, click Get Started.
There's already a group in there called Family Passwords,
and it has one member - yourself. You can add more
members, but they have to be on an Apple device and be in
your Contacts app. Click Add People and choose from the
suggestions offered. You can, of course, type a name into the
To field, selecting the person in question when they appear in
the suggestions. Having added people, you can choose which
passwords to share by scrolling through them and clicking the
checkbox next to those you wish to share. Click the Move
button to transfer them to the sharing group.
You can remove a person from your group at any time. In
Safari Settings, go to Passwords > Family Passwords. Click
Manage on that group, click the three-dots icon next to his or
her name and click Remove from Group.
Verification Codes
Websites often send you confirmation codes by email or in
the Message app, which you then enter and send to confirm
you're the person you say you are. Of course, when you've
done so the email or message containing the code is of no
further use. To have them automatically deleted after you've
used them, in Safari Settings, click Passwords and then
Password Options. Make sure the switch marked Clean Up
Automatically is on, and spent verification emails or
messages no longer clog up your Mail or Messages app.
macOS Sonoma's Game Mode Game Porting Toolkit
Game Mode is an exciting new feature designed to improve
performance when you're playing a game It does this by
automatically detecting when a game is running and then
prioritising resources on your Mac's Central Processing Unit (CPU)
and Graphics Processing Unit (GPU) for the game, reducing the
priority given to background tasks and other apps that are running.
As a result frame rates are improved, making everything run more
smoothly. Game Mode also doubles the Bluetooth sampling rate,
making wireless hand controllers even more responsive, reducing
lag to almost nothing, and improving synchronisation between
Bluetooth earbuds or headphones and the on-screen action.
You don't have to do anything to activate Game Mode. It comes
on automatically when you boot up a game, a notification in the
top-right corner of the screen letting you know it's on. If you can still
see the menu bar at the top of the screen (whether you can or not
depends on the game), there's a new menulet showing a game
controller. Click on this for a menu that lets you switch Game Mode
on and off. If you switch it off, it remains off for that game until you
switch it on again, even if you quit and reopen the game.
Я Game Mode: On
Game mode prioritises the performance of
this game while in full screen.
This new feature is for games developers. Game Porting Toolkit
makes it much easier to convert a game from another platform
to the Mac, reducing development time and making the
process much cheaper. Evaluating how well a game would
perform on a Mac, for example, used to take months. With
Game Porting Toolkit, it can be done in days. The actual
conversion is much quicker too.
Reducing development time in this way makes it cheaper to
bring a gaming title to the Mac, and therefore, the game needs
to sell far fewer copies to make a profit. This makes it less risky
for publishers. If all goes well, Game Porting Toolkit will see
many more games come to Apple’s computers.
144 | www.pclpublications.com
What Else is New in Sonoma?
Privacy and Security
Your privacy is always important to Apple, as is security. These features
keep your information private and safe.
Set Private Browsing Search Engine
You've long been able to set your own default search engine,
used when you enter a search term into Safari's URL field. In
Sonoma, you can use different search engines depending on
whether you're in a regular browser or a private browser. You
can, for example, use Google for all your regular browsing
needs, but when you open a Private Browsing window, use
the more secure Duck Duck Go.
To set up which search engines you use in Safari, in the top
bar, click the Safari menu and select Settings. In the toolbar,
click Search. At the top of the window, you see two options
to choose a search engine; one marked 'Search engine' and
the other 'Private Browsing search engine'. Set them using
the pull-down menus.
Communication Safety
If you're concerned about receiving explicit pictures and
videos, you can use the Communication Safety feature to
detect and redact them. It's automatically enabled for children
under 13 in your family group, and you can activate it for
yourself or older children if you wish.
Open System Settings, from the Apple menu on the left-hand
side of the toolbar. Click Screen Time in the left-hand sidebar, and
then turn on the Communications Safety option. Then, in
compatible apps such as Messages and FaceTime, incoming
pictures and videos that contain nudity are automatically
detected and blurred, and the recipient warned. All processing is
done on your Mac: Apple is not sent the videos or pictures.
Safari Extensions
You can now set up your Safari extensions on a per-site basis;
you no longer have to switch individual extensions on or off for
every site you browse. You can also have specific extensions
active or inactive when browsing with specific Safari Profiles.
To set this up, open Safari's settings from the Safari menu
in the top bar. Click on Extensions in the toolbar, and in the
left-hand sidebar, you see a list of installed extensions.
There's a checkbox next to each extension; if it's ticked, it’s
on. If it's blank, it’s off. if it shows a dash, it’s on for some sites
and off for others. Click on an extension, and in its window
you can choose whether or not it's active in Private Browsing
by checking or unchecking the 'Allow in Private Browsing' box.
Click Edit Websites - or click the Websites icon in the top
bar - and use each website's pull-down menu to set whether
that particular extension is on or off, or has to ask permission
to activate on that particular site. The websites listed are those
you currently have open, so if you want to set your extensions
up for a specific website, just point your browser at it.
To set up extensions on a per-profile basis, either click
Extensions in the toolbar and click the Manage Profiles
button, or click the Profiles icon in the toolbar. You can then
set up extensions to be on or off for every profile except the
default one (which is called 'Personal (Default)’, unless you’ve
renamed it). Simply click the profile you want to edit in the
left-hand column, and click Extensions in the right-hand
section. You can then check and uncheck your installed
extensions, turning them on and off for that profile.
www.pclpublications.com | 145
Get Your Exclusive
FREE Gift Worth
£9.99 Here!
Download
Your FREE
2g££Software.' Great Games! Essential Hardware!
TECHiPj
«3
Tech Shopper
Magazine
*IQO amazing
«^•GADGETS,
APPS & GAMES INSIDE!
Head over to your web
browser and follow these
simple instructions...
b
'«my WJ
Home Security
Inside & Out!
1/ Enter the following URL: www.pclpublications.com/exclusives
2/ Sign up/in and from the listings of our exclusive customer
downloads, highlight the Tech Shopper Magazine option.
3/ Enter your unique download code (Listed below) in the "Enter
download code" bar.
4/ Click the Download Now! Button and your file will automatically
download.
5/ Your file is a high resolution PDF file, which is compatible with
the majority of customer devices/platforms.
Exclusive Download Code: pcl37862re
NOTE: This is a limited reader offer running from 1st March to 1st July 2024.
Terms and conditions apply and can be found at www.pclpublications.com
Save a whopping
25% Off!
Apple Tech Manuals
with 3 Popercut
s
.The I
iPhone
Manual
BTJP’' FOR use WITH ALL MACBOOK
fr The Complete
i MacBook
g WATCH & wchOS 8 к
TheiOQ'’"’ ~~ The Complete "
Я& V®h
Manual
rhe ultimate guide to getting the
best from Apple s NEW iPhones.
User Manual
Foe essentia) step by step manual to mastering
your MacBook and macOS Ventura
;*jPooercur
The
y^CDmp'cteManjja^ncs
Insider
Secrets
The Complete
iPad
& iPadOSr
ios
Manual
The^™,e 9“** '° ^п9
cost from Apple's NEW OS!
User Manual
Ventura
. MANUAL
iPhone
&iOS®,
850
FREE
SB
«адм
SEP 2022 Е01ТЮЧ
'^Popercut
«ь.п-ьуЛес
™ macOS ~
^3 ®
Not only can you learn new skills and master your
Apple tech, but you can now SAVE 25% off all of our tech
digital and print publications!
Simply use the following exclusive code at checkout
NYHF23CN
www.pclpublications.com
Want to master your iPhone?
Then don't miss our NEW iPhone & iOS
magazine on Readlij now!
NEW
Master Your iPhone and iOS
i Phonep
Issue Eight | December 20231100b INDEPENDENT
Bumper Holiday Special! BONUS DOUBLE EDITION!
! USER i
Eli»K. St. Denis
Q ©
76°
Which iPhone Model is
Going to be Right for You?
SHOPPER
FREE
SPEC AL BONUS
Your First
iPhone
Mastered!
The Essential User Guide for the
New iPhone Owner!
TECH
FULL 170 Page
Magazine!
The Best of The Best
iPhone Hardware?
Amazing Apps from
Apple Themselves!
Learn How to Get The
Best from Your Apps.
It's Time to Ditch Your
Digital Camera!
Make The Most of Your
Amazing iPhone Cameras.
Click our handy link to read now: https://bit.ly/3y7gi LO
Want to master your Mac?
Then don't miss our Mac & MacBook
magazine on » Read 1ц now!
FULL 170 Page
Magazine'
^FREE
SPECIAL BONUS
^^lOte^eMSIIOMIHOEPeHDEW
macOS
Sonoma
Mastered!
The Essential User Guide
for the Mac Owner!
NEW Bumper
USER
; It Time to Ditch
Your Old Mac?
Have You Upgraded to
macOS Sonoma?
Learn What's New and
Improved in Apple's Apps.
Amazing Apps from
Apple Themselves!
TECH
SHOPPER
Click our handy link to read now: https://bit.ly/3tPJHdl
The Complete Manual Series:
MacBook & macOS
21 | ISBN: 978-1-907306-13-6
Published by: Papercut Limited
Digital distribution by: Readly, Zinio & Pocketmags
© 2024 Papercut Limited All rights reserved. No part of this
publication may be reproduced in any form, stored in a retrieval
system or integrated into any other publication, database or
commercial programs without the express written permission of
the publisher. Under no circumstances should this publication and
its contents be resold, loaned out or used in any form by way of
trade without the publisher’s written permission. While we pride
ourselves on the quality of the information we provide. Papercut
Limited reserves the right not to be held responsible for any
mistakes or inaccuracies found within the text of this publication.
Due to the nature of the tech industry, the publisher cannot
guarantee that all apps and software will work on every version of
device. It remains the purchaser’s sole responsibility to determine
the suitability of this book and its content for whatever purpose.
We advise all potential buyers to check listing prior to purchase
for confirmation of actual content. All editorial opinion herein is
that of the reviewer - as an individual - and is not representative of
the publisher or any of its affiliates. Therefore the publisher holds
no responsibility in regard to editorial opinion and content.
This is an independent publication and as such does not
necessarily reflect the views or opinions of the producers of apps
or products contained within. This publication is not endorsed or
associated in any way with Apple or any associate or affiliate
company. All copyrights, trademarks and registered trademarks
for the respective computer software and hardware companies
are acknowledged. MacBook, MacBook Pro, MacBook Air, macOS
Ventura, Mac, iMac, iMac Pro, Mac Pro, Mac mini, Mac Silicon,
Mac Studio are trademarks of Apple Inc., registered in the US
and other countries. MacBook, macOS Ventura, macOS Sonoma
© 2023-2024 Apple Inc.
Relevant graphic imagery reproduced with courtesy of Apple.
Additional images contained within this publication are
reproduced under licence from Shutterstock.
Any images reproduced on the front cover are solely for design
purposes and are not representative of content.
Prices, international availability, ratings, titles and content are
subject to change. All information was correct at time of
publication. Some content may have been previously published
in other volumes or titles.
Э Papercut Limited
Registered in England & Wales No: 04308513
ADVERTISING - For our latest media packs please contact:
Brad Francis - brad@papercutltd.co.uk
Web - www.pclpublications.com
INTERNATIONAL LICENSING - Papercut Limited has many great
publications and all are available for licensing worldwide.
For more information email: jgale@pclpublications.com
Want to master Apple's Tech?
Then don't miss our NEW iPhone, iPad
& Mac magazine on Readkj now!
Click our handy link to read now: https://bit.ly/3HDL9pw