/


Similar

Text
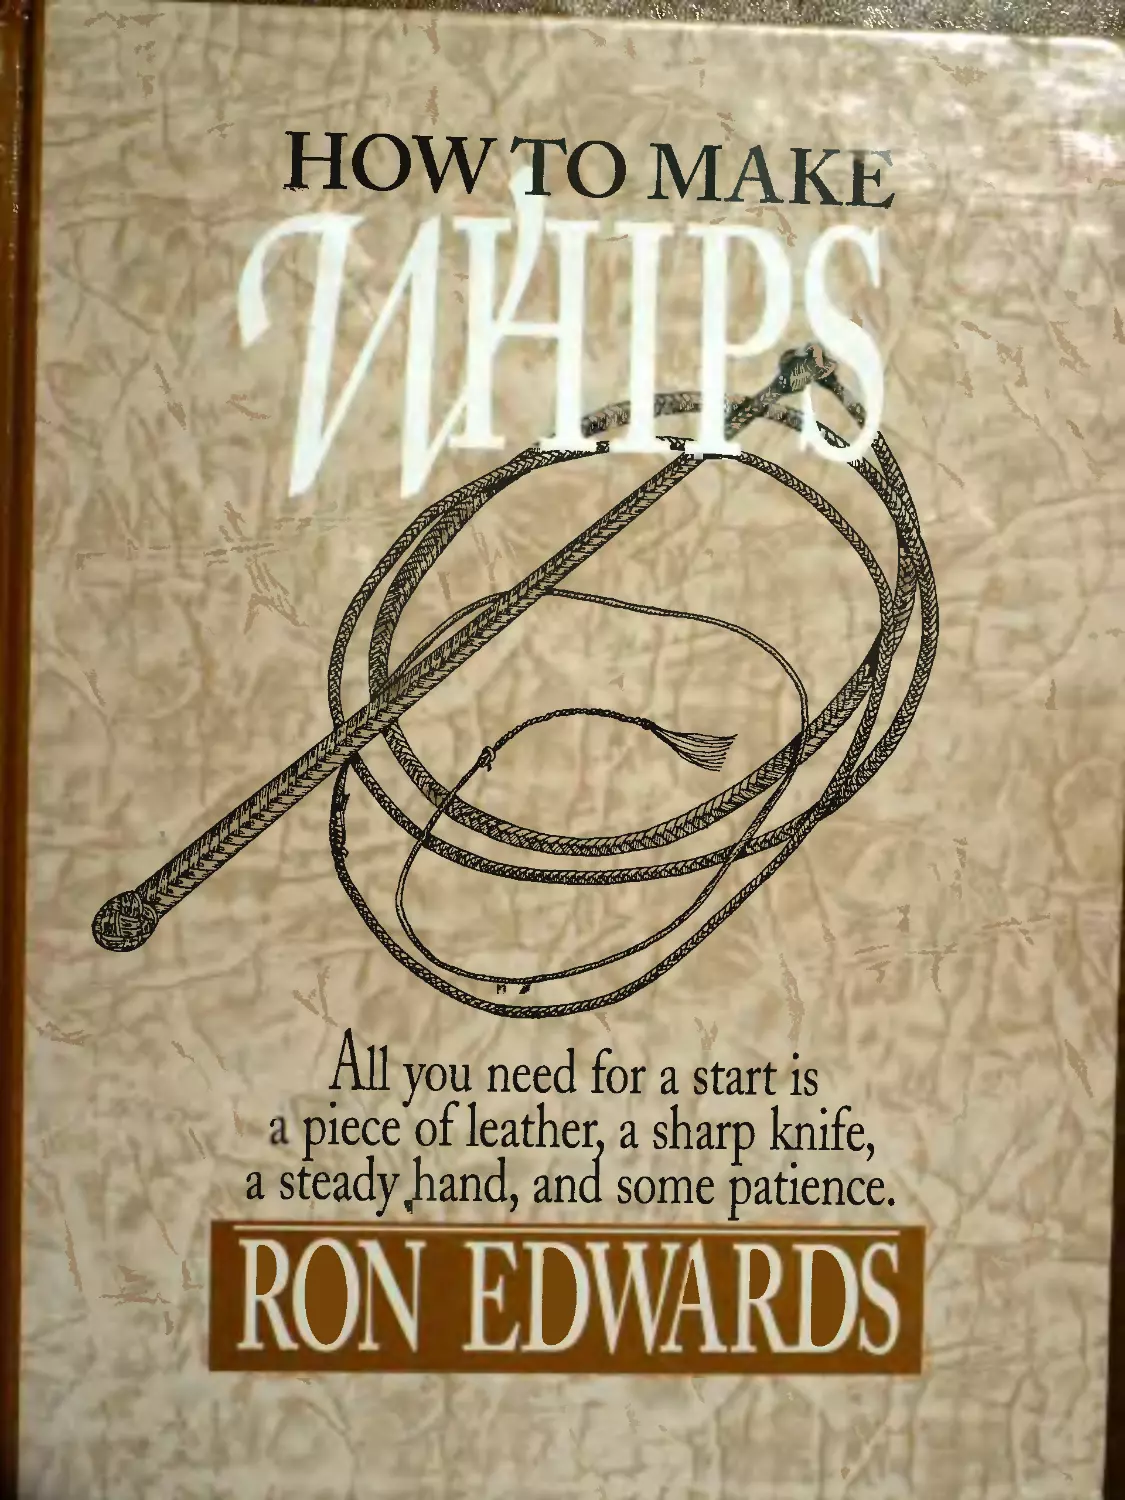
HOW TO MAKE
All you need for a start is
a piece of leather, a sharp knife,
a steady Jiand, ana some patience.
RON EDWARDS!
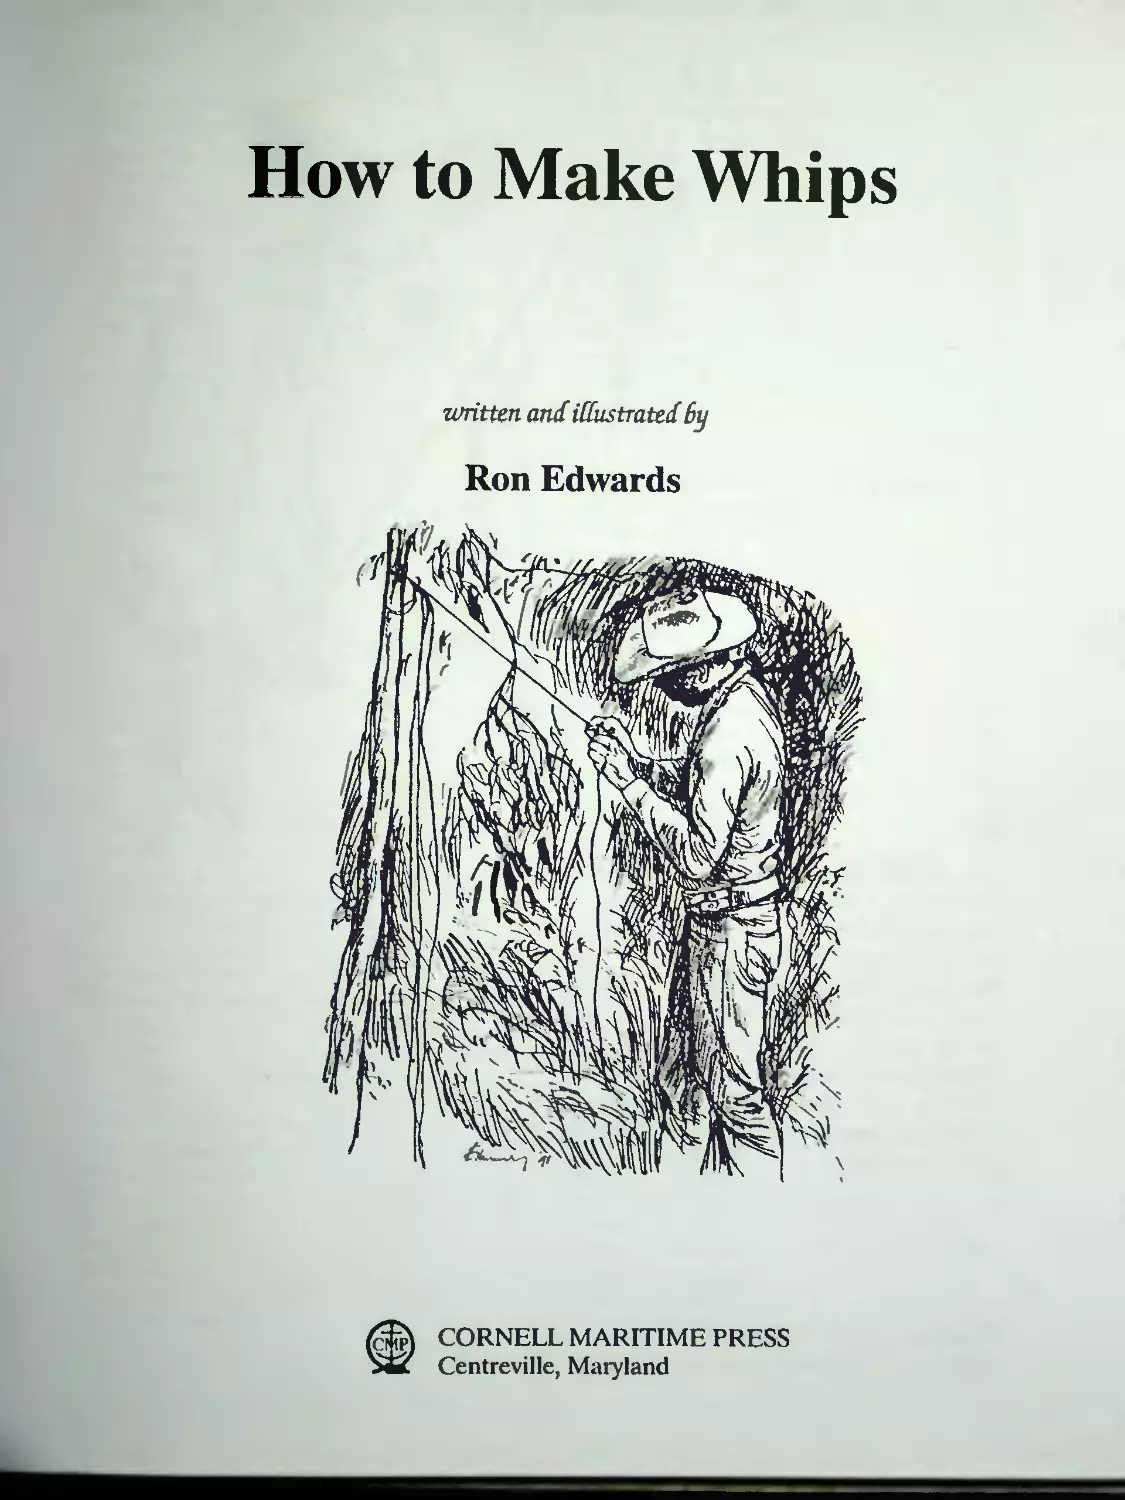
How to Make Whips
written and illustrated by
Ron Edwards
CORNELL MARITIME PRESS
Centreville, Maryland
Reprinted by arrangement with
The Rams Skull Press ^6
All rights reserved. No part of this
book may be used or reproduced
in any manner whatsoever without
written permission except in the case
of brief quotations embodied in critical
articles or reviews. For information, address
Cornell Maritime Press, Inc., Centreville, Maryland 21617.
www.cmptp.com
ISBN 0-87033-513-8
Manufactured in the United States of America
First Cornell Maritime Press edition, 1998; second printing, 2005
Contents
Foreword................................. 8
Introduction................................. 9
Chapter 1: WhipmaJang Book 1—How to
Make a Basic 4-Plait Stockwhip.............ц
A Good Basic Whip............................12
Whip Names...................................12
Styles of Whip...............................12
Types of Leather.............................12
Choosing the Leather.........................13
Points to Watch..............................13
Buying a Strip of Leather....................14
4-Plait Basic Whip...........................14
Step 1: Making the Belly.....................14
Step 2: Cutting Out the Whip.................15
Using a Pair of Dividers.....................15
Using a Template.............................16
Using Fingers as Guides......................16
Cutting Methods..............................16
Cutting and Skiving..........................16
Splitting the Strands........................16
Skiving......................................16
Angled Cut...................................17
Cutting on the Beam..........................18
Step3: Plaiting the 4-Plait Whip.............19
Working in a Confined Space..................19
Plaiting Soap................................20
Leather Dressing.............................20
Cleaning Tallow..............................20
Use of Acid in Cleaning Fat..................20
Plaiting the Whip............................21
Step 4: The Fall.............................21
Cutting the Slit in a Whip Fall..............21
Common Fall Hitch............................23
Rolling the Whip.............................23
Resin Board for Whip Rolling.................23
Step 5: The Cracker..........................23
Speeding Up the Job..........................24
Finishing Off the Cracker....................24
Fastening the Cracker to the Fall............24
Attaching the Cracker—Another Method. ... 25
Cracking the Whip ...........................25
Step 6: Making the Handle,...................25
Half-Plaited Handle..........................25
Straightening a Whip Handle..................26
Step 7: Covering the Handle..................26
Handle with Dog’s Knot ......................26
Forming the Knob.............................27
Crown Knot...................................27
Wall Knot....................................28
Final Crown Knot.............................28
Handle with an 8-Plait and Turk’s Head.......29
12-Plait Handle..............................29
8-Plait for Half-Plaited Whip Handle. . 30
Square Start for Half-Plaited Handle
12-PIait..........................' 31
Wraparound Handle......................
Secret Plait Worked into a Whip Handle . . / 32
Binding on the Keeper ....................... 33
Rib Rattling................................. 34
French Grapevine............................. 35
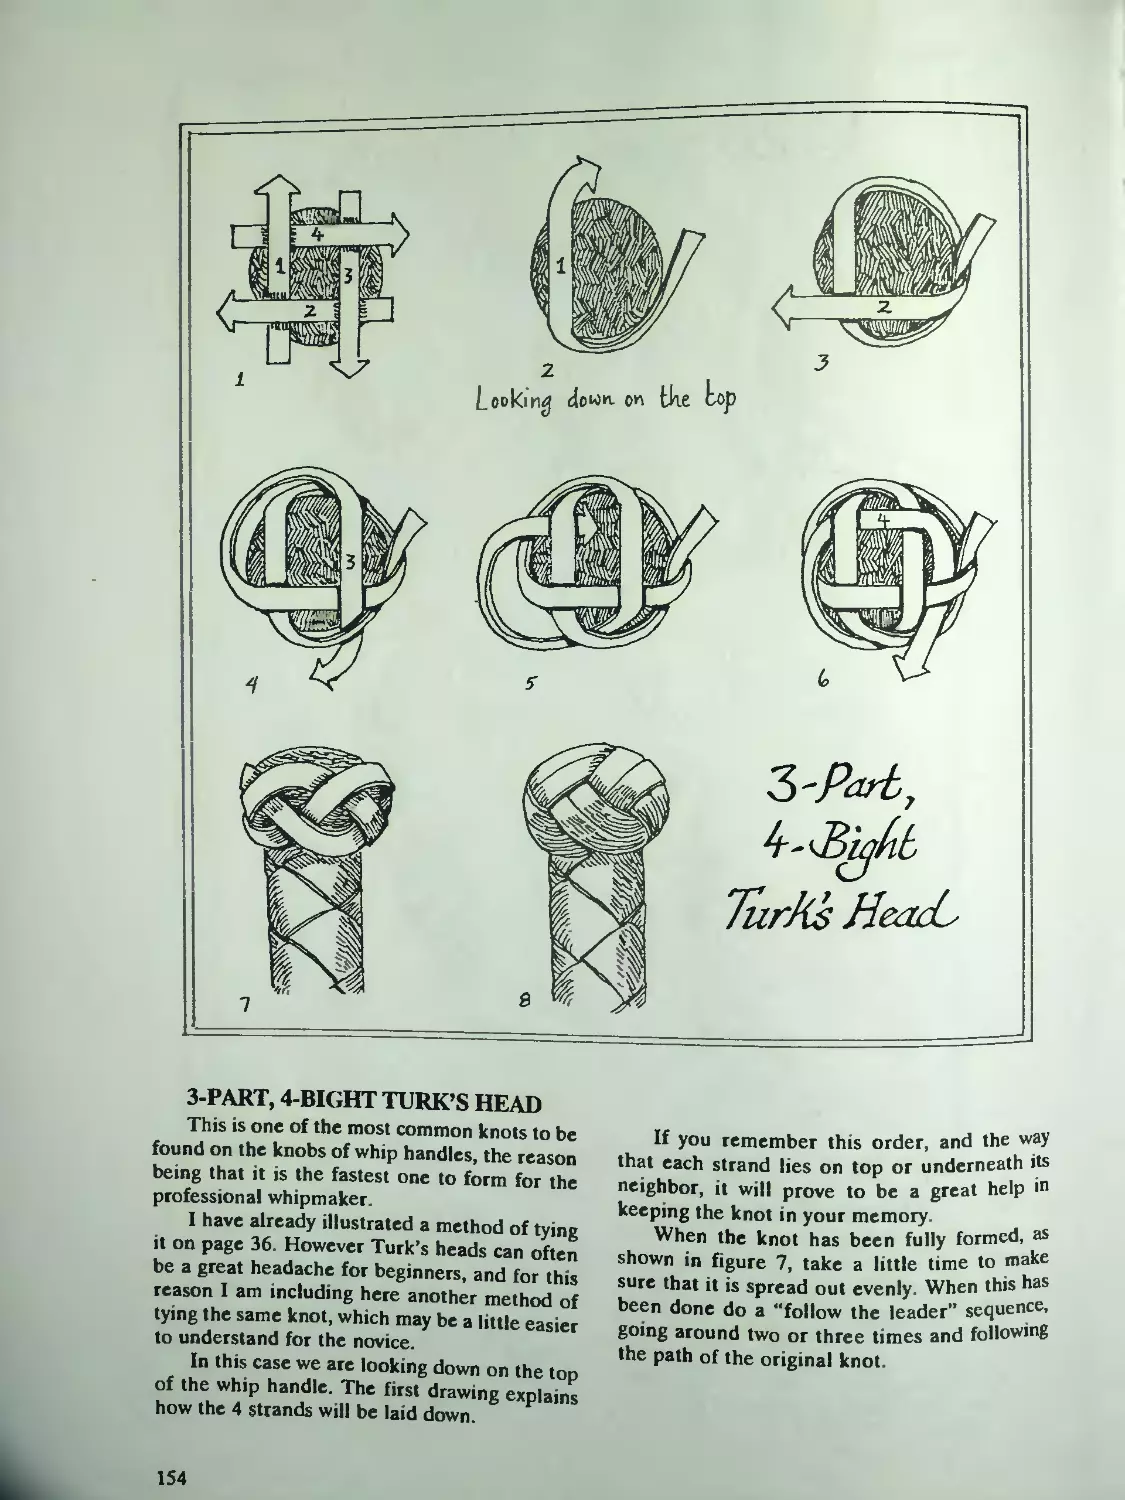
3-Part, 4-Bight Turk’s Head...................36
Attaching Whip and Handle.....................37
6-Plait Basic Whip........................... 38
Beginning a Round 6-Plait.................... 39
Round 6-Plait.....................................
Reducing from 6-Plait to 4-Plait............. 40
The Built-in Belly............................41
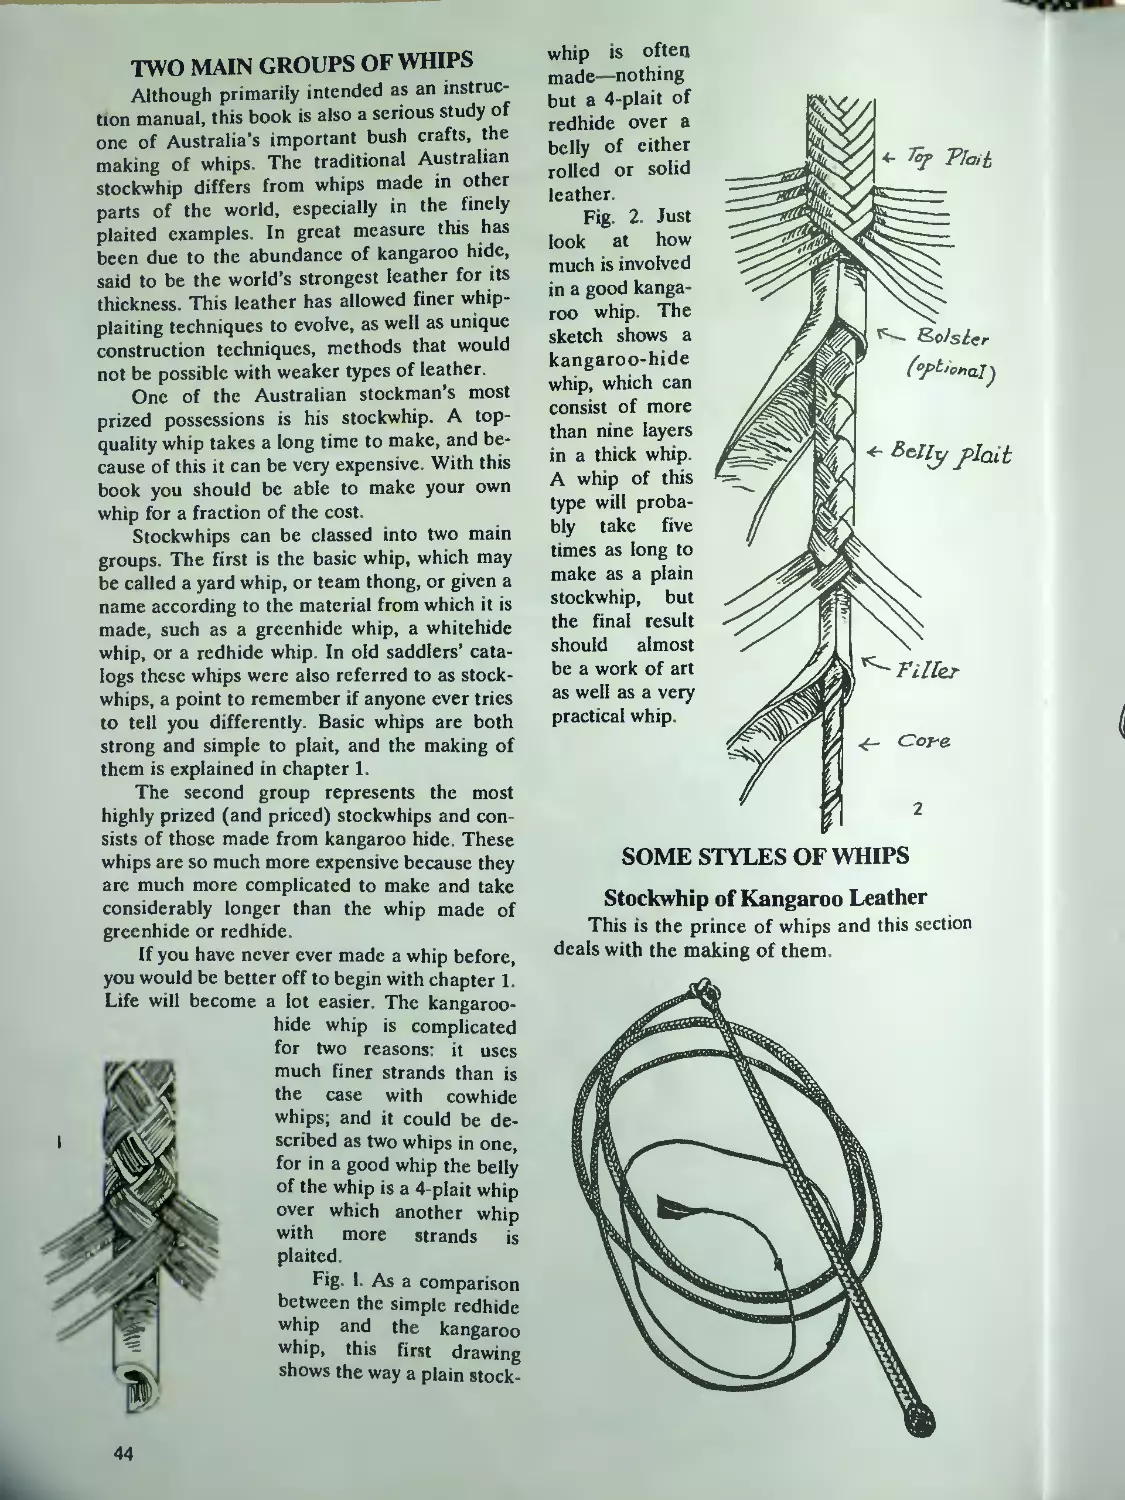
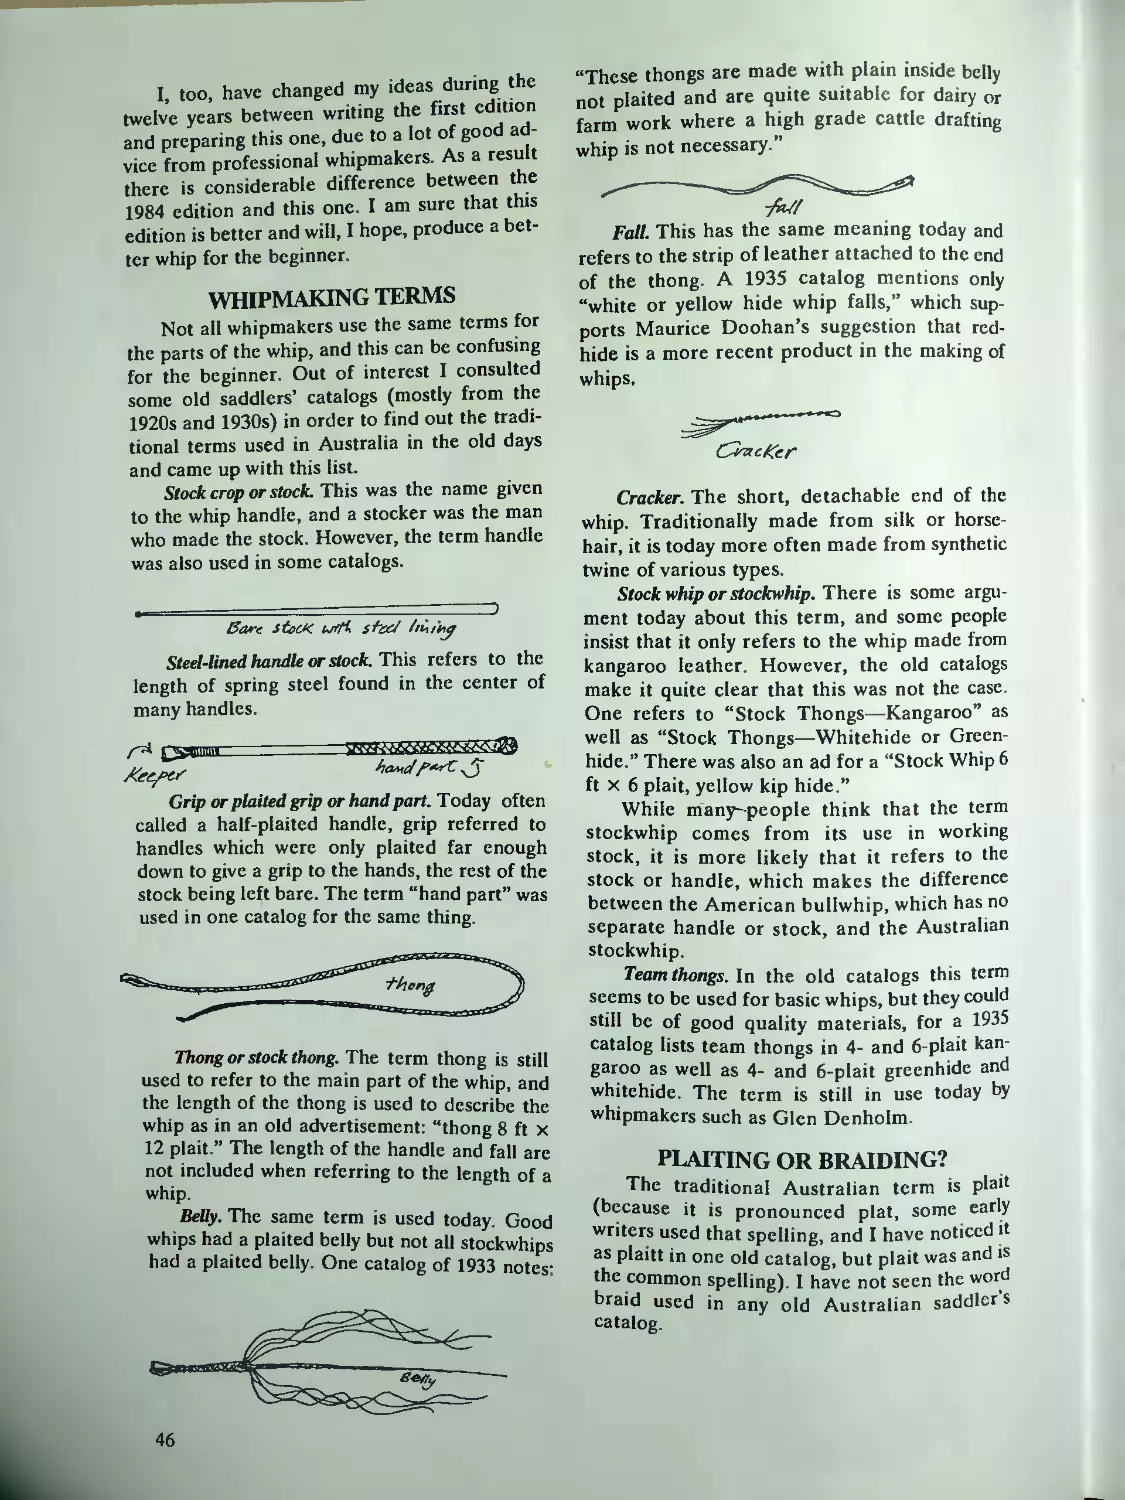
Kangaroo-Hide Whips...........................41
Kid’s Whip....................................41
Slit Braid....................................42
Chapter 2: Whipmaking Book 2—How to Make an
8-Plait Kargaroo Stockwhip..................43
Two Main Groups of Whips......................44
Some Styles of Whips..........................44
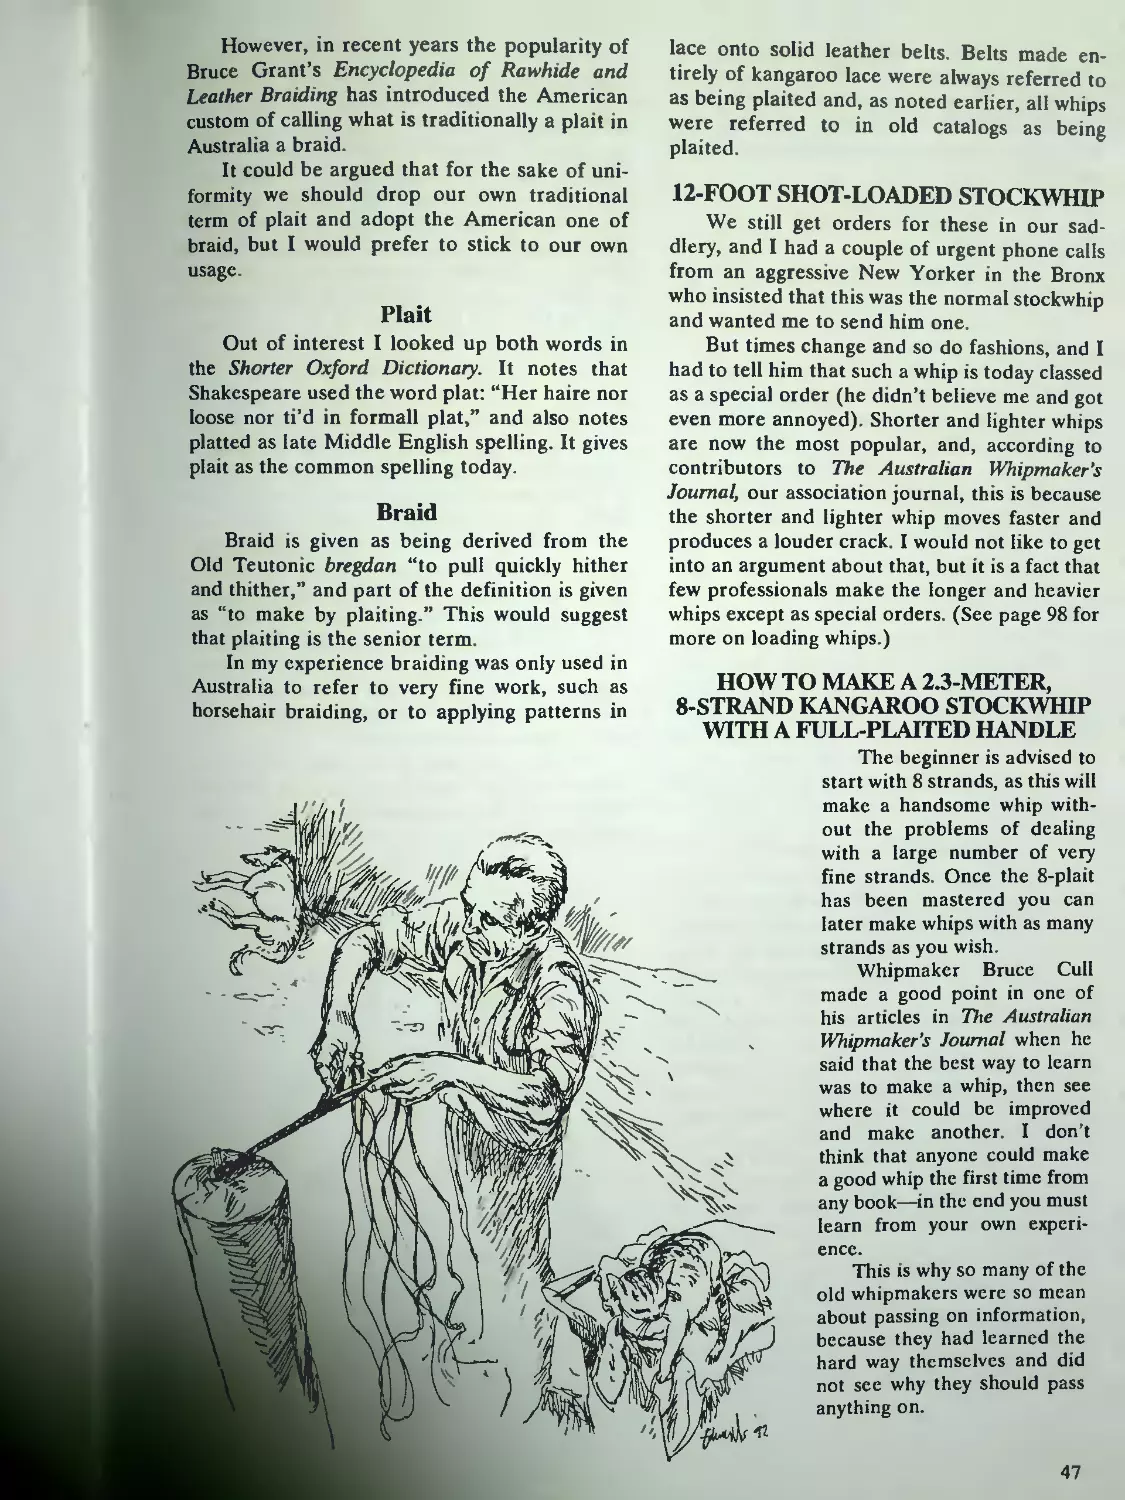
Stockwhip of Kangaroo Leather...............44
Redhide Whip............................... 45
Bullwhip....................................45
Snake Whip..................................45
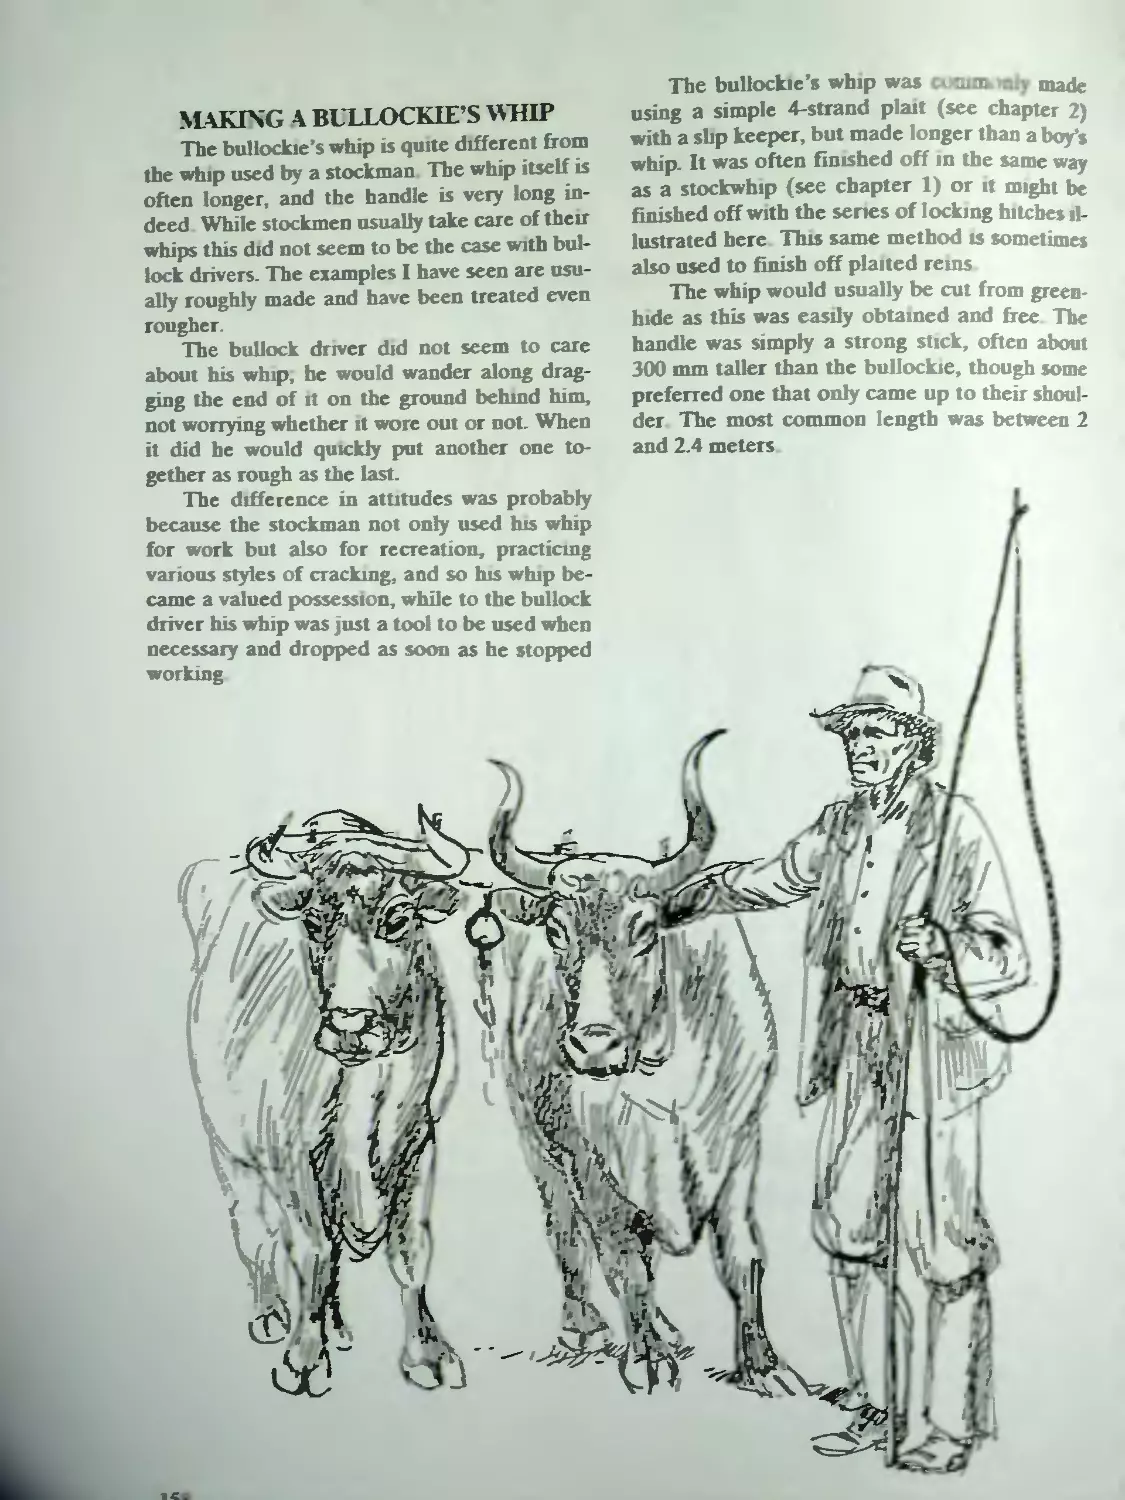
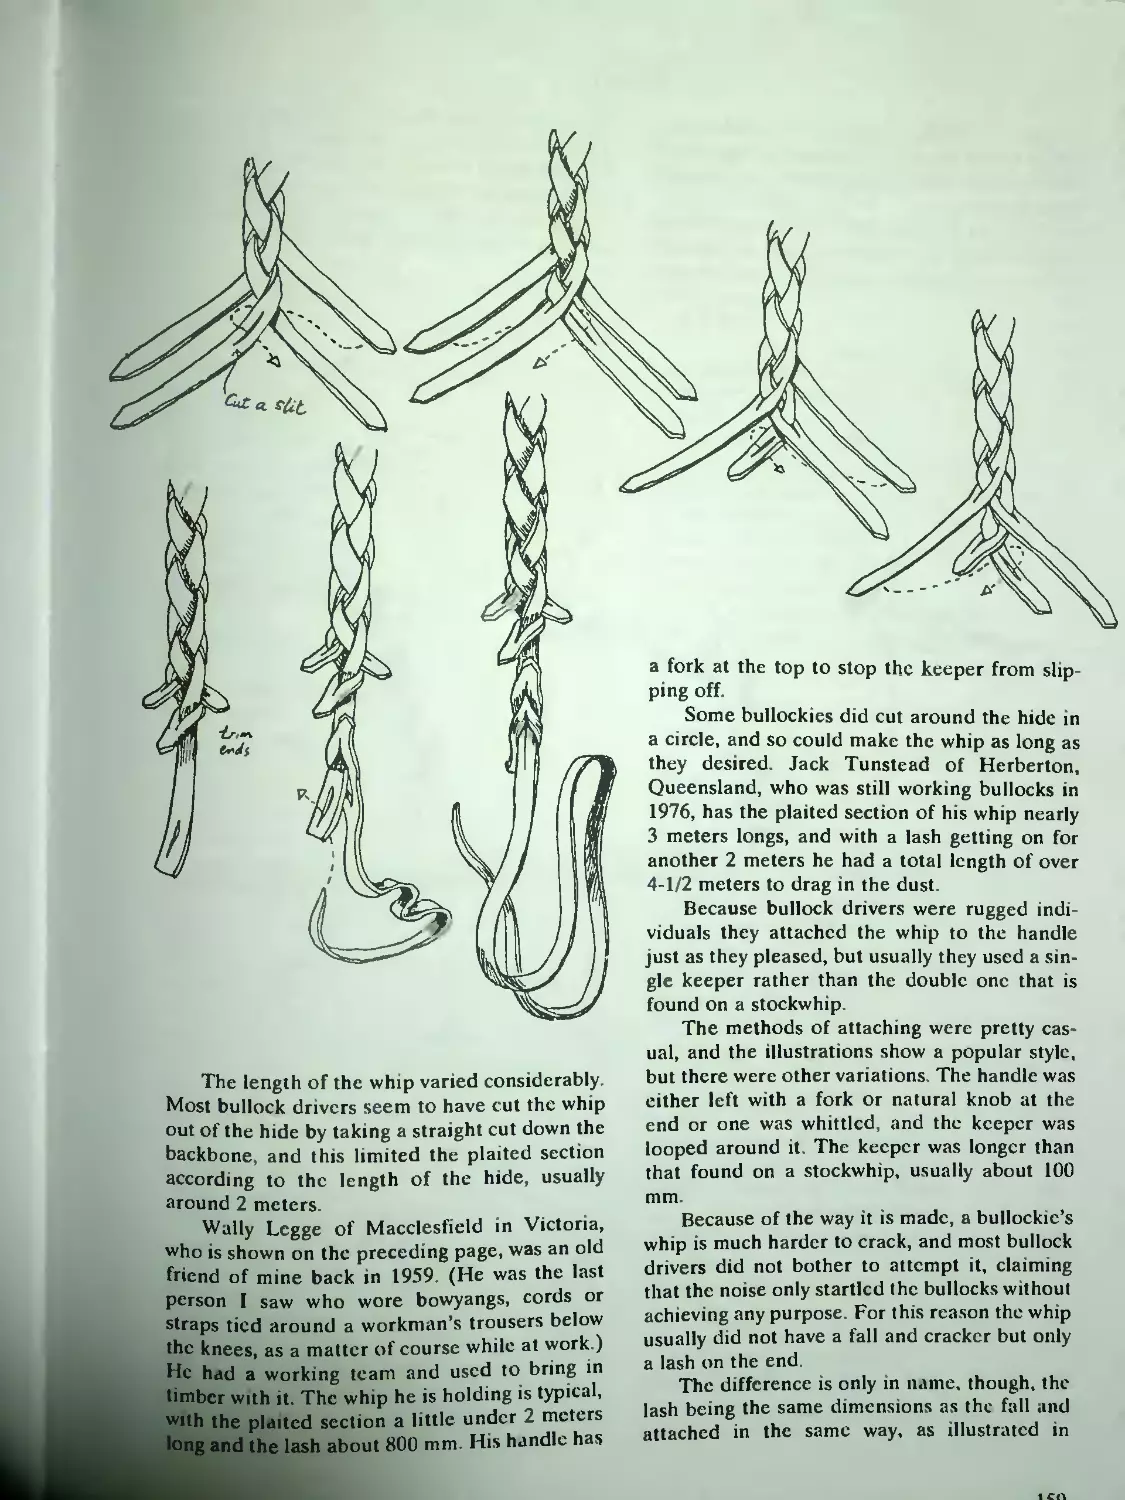
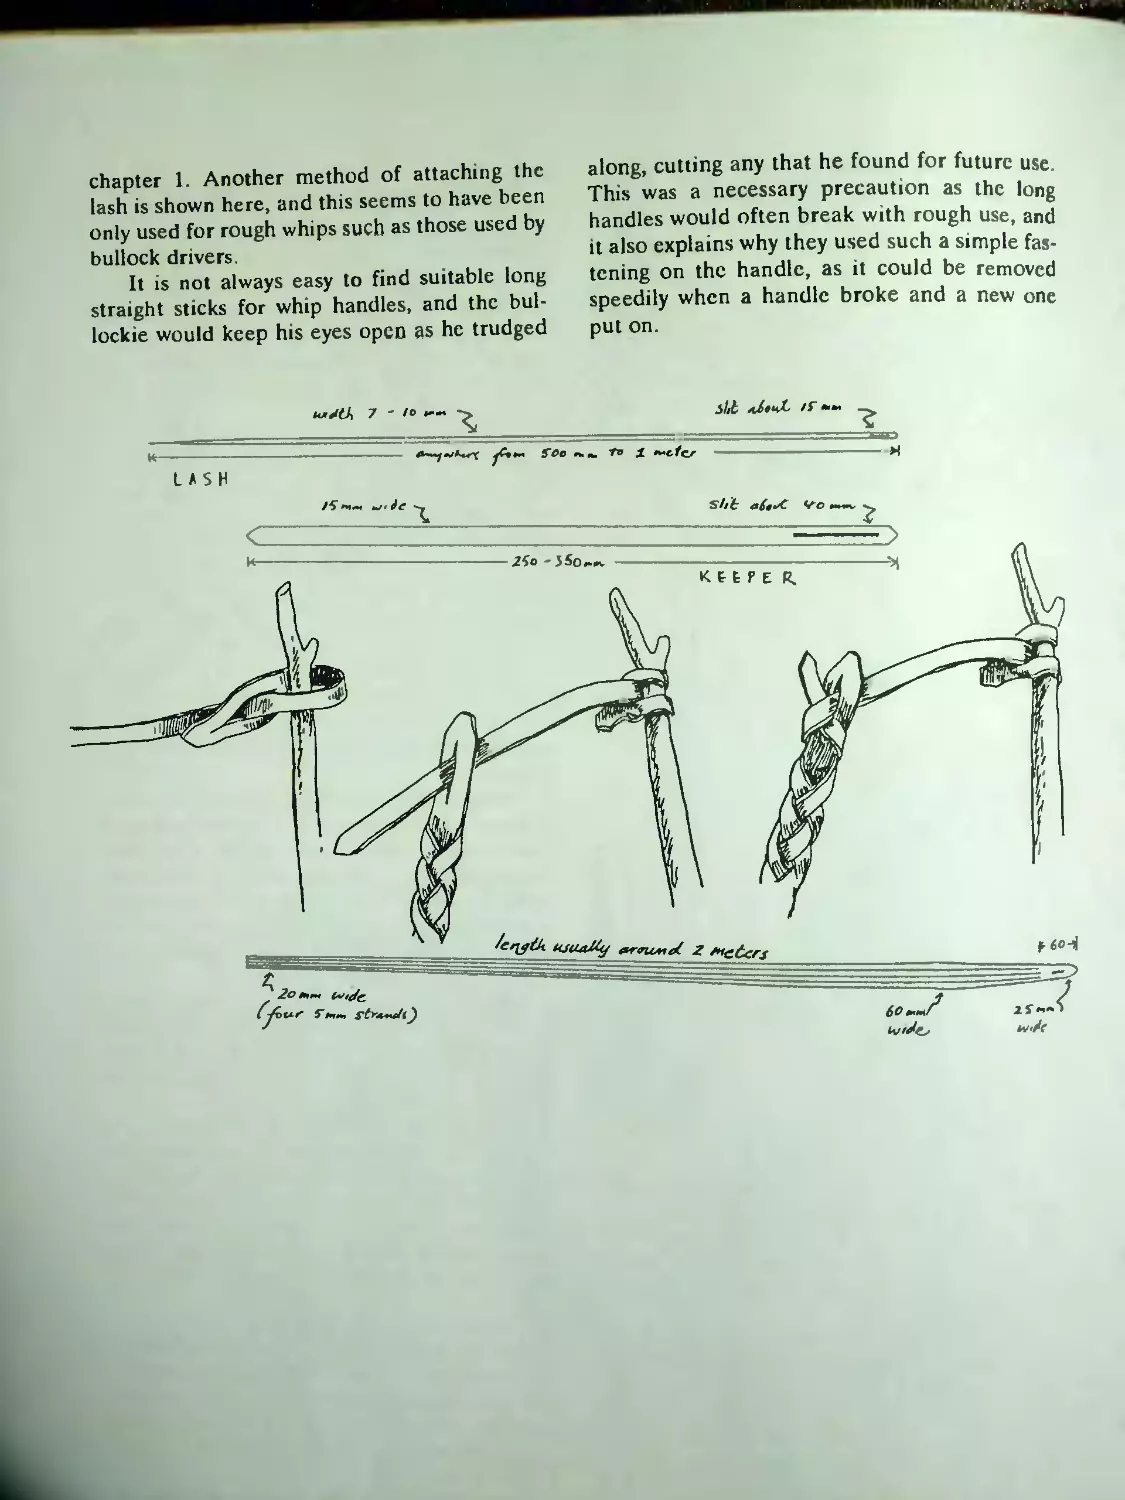
Bullockie’s Whip............................45
First Rule about Whipmakers...................45
Whipmaking Terms 46
Plaiting or Braiding9....................... .46
Plait.......................................47
Braid.......................................47
12-Foot Shot-Loaded Stockwhip.................47
How to Make a 2.3-Meter 8-Strand Kangaroo
Stockwhip with a Full-Plaited Handle........47
Materials Needed........................... 48
Selecting the Kangaroo Skin.................48
Using Precut Lace.......................... 48
Testing for Stretch.........................48
Step 1: The Core or Filler....................49
Redhide Core................................49
Kangaroo Core...............................49
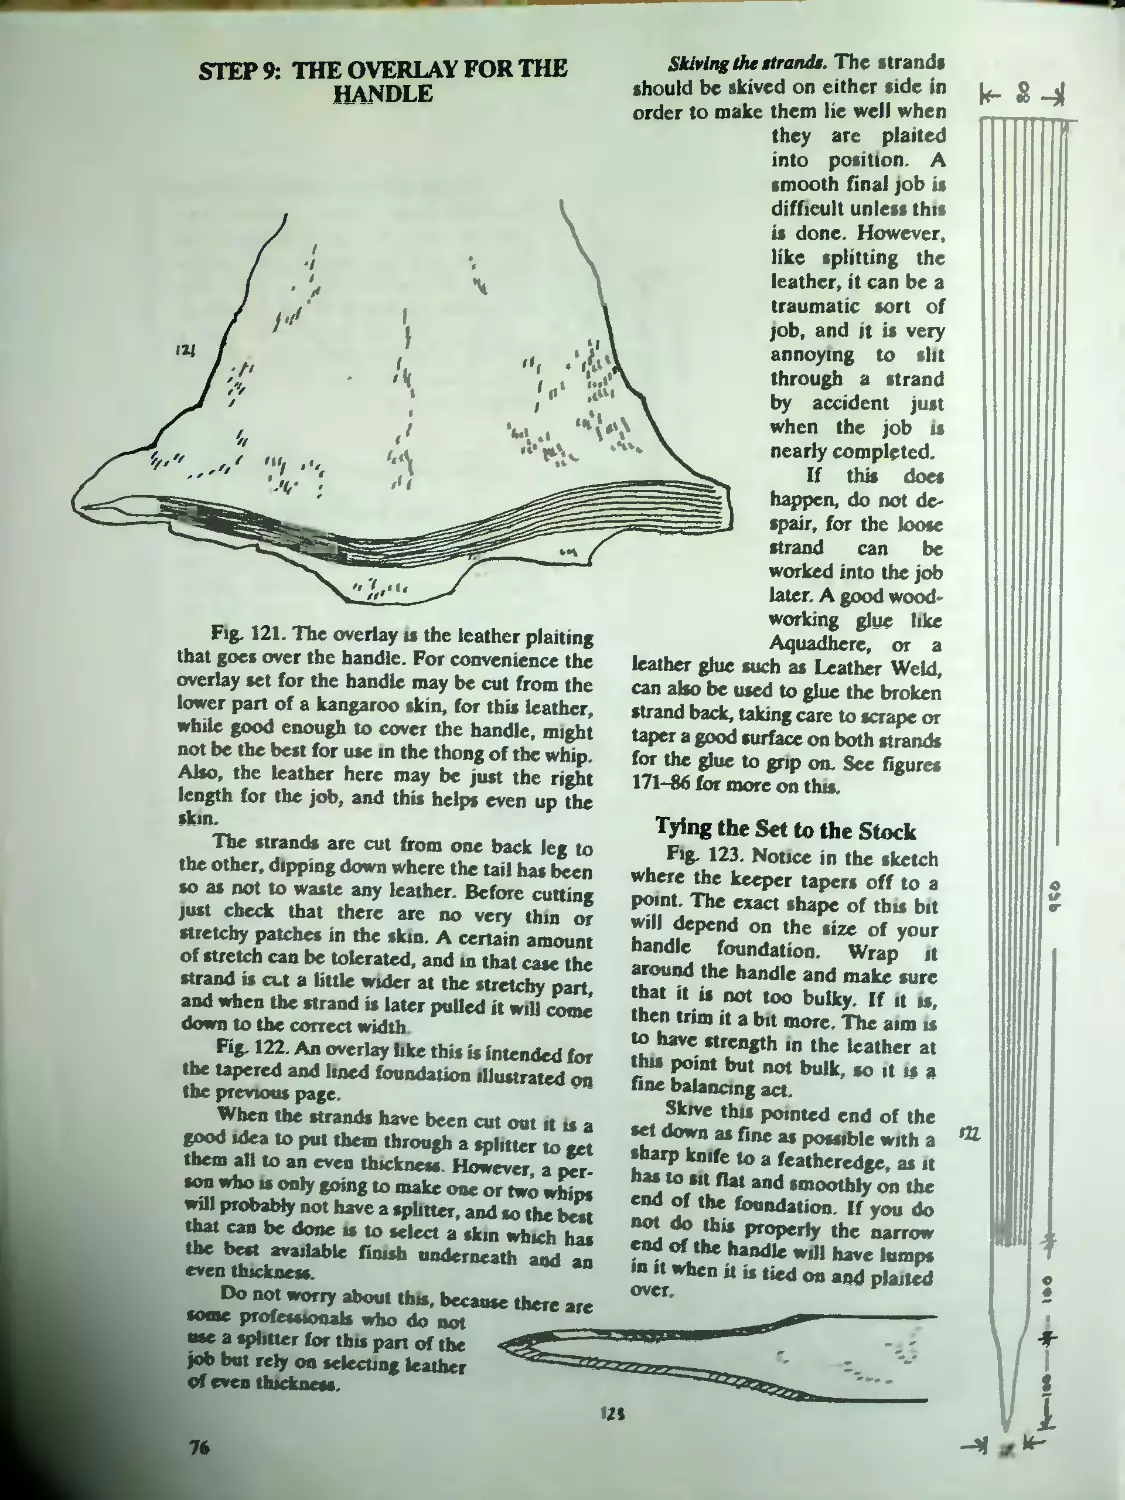
Lead Loading ...............................51
Step 2: The Belly.............................51
The Filler and Belly Plait..................51
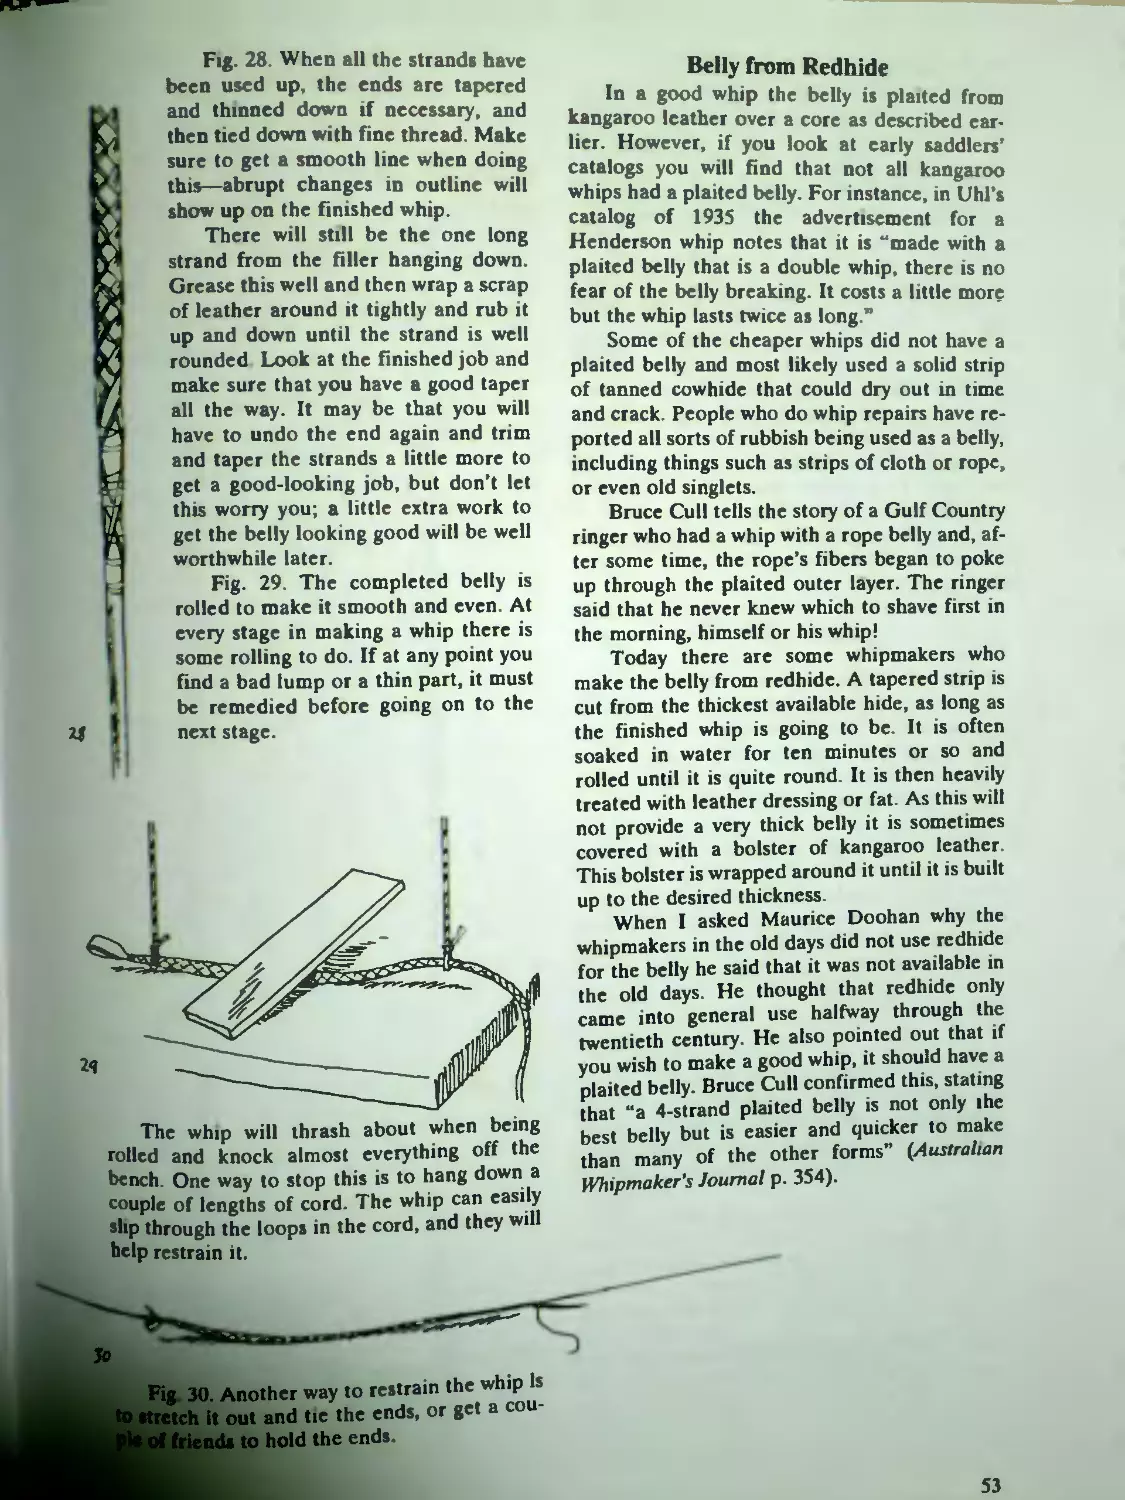
Belly from Redhide..........................53
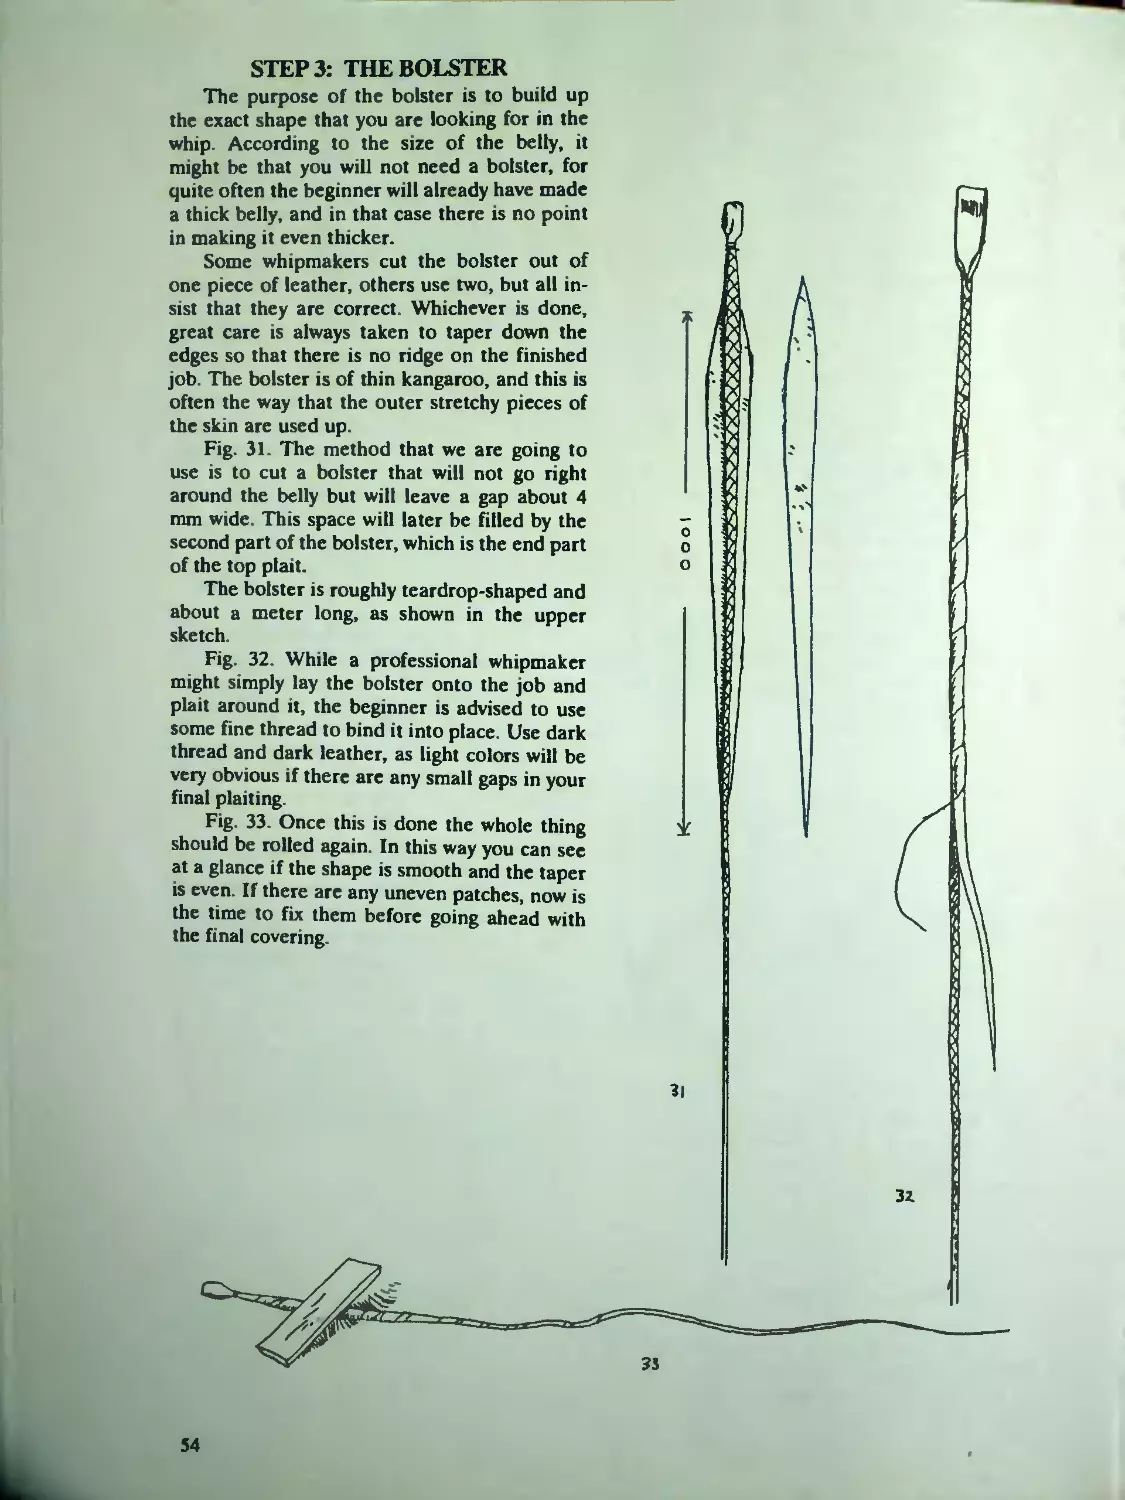
Step 3: The Bolster...........................54
Step 4: Cutting Out the Top Plait or Overlay. . . 55
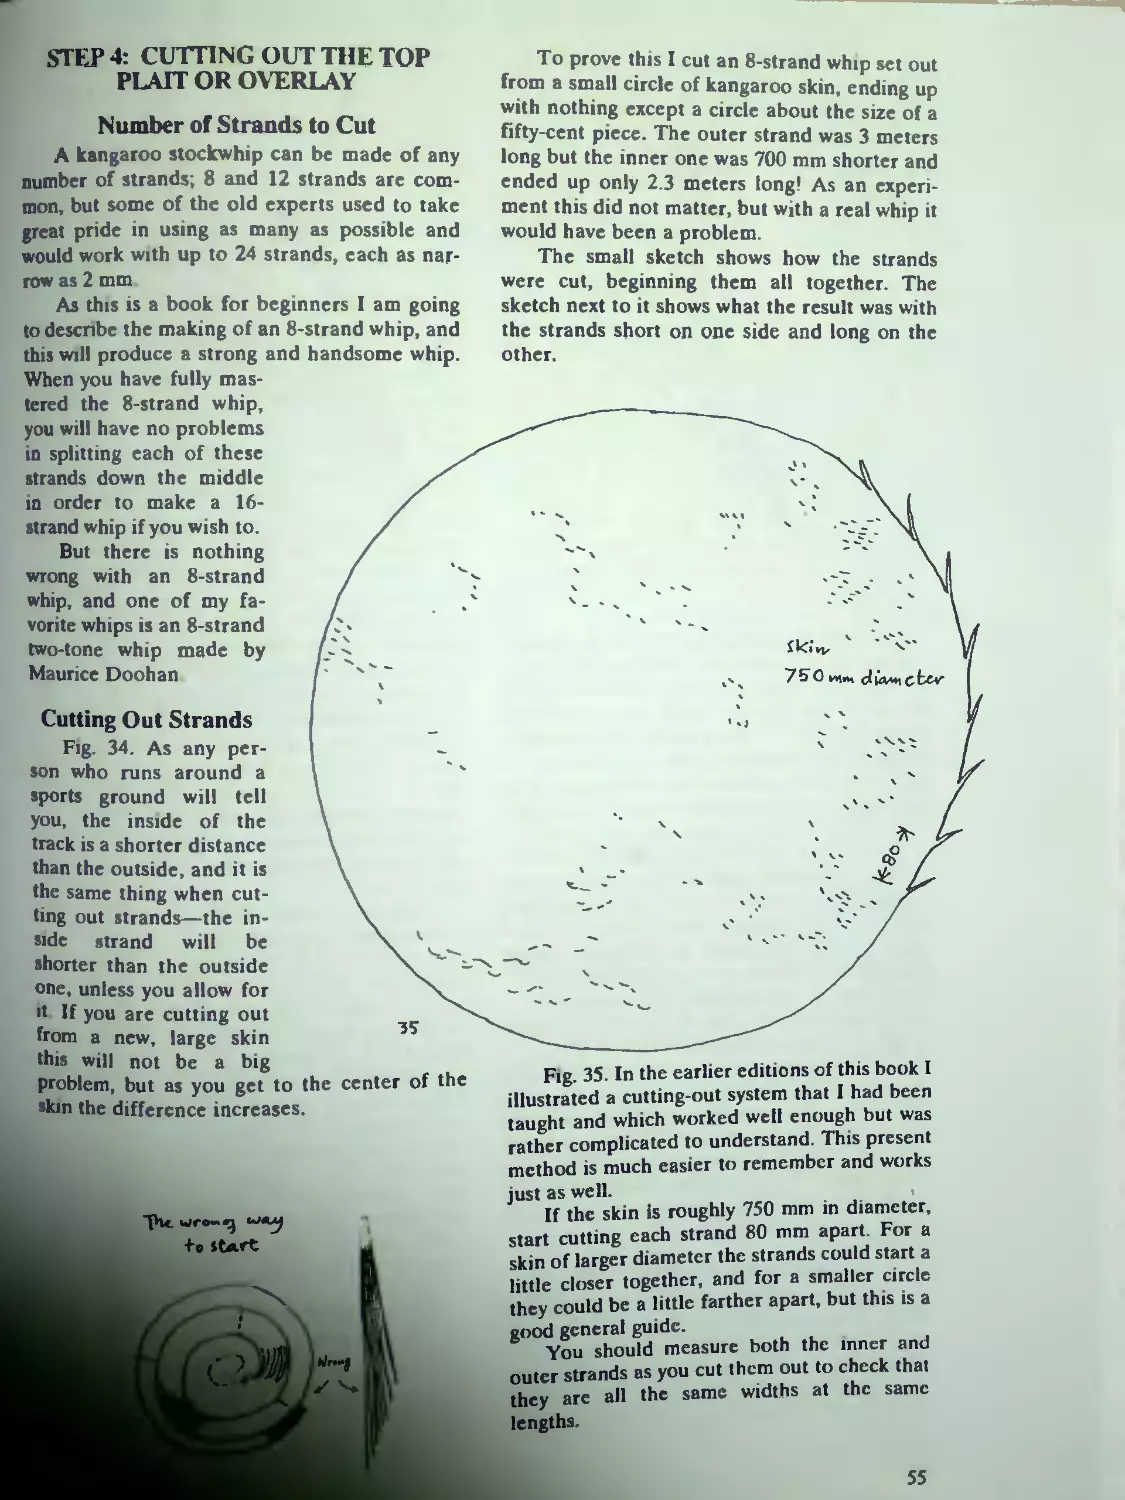
Number of Strands to Cut................... 55
Cutting Out Strands.........................55
Stretch in the Leather......................56
Length of Strands in Overlay................56
Knife Sharpness.............................56
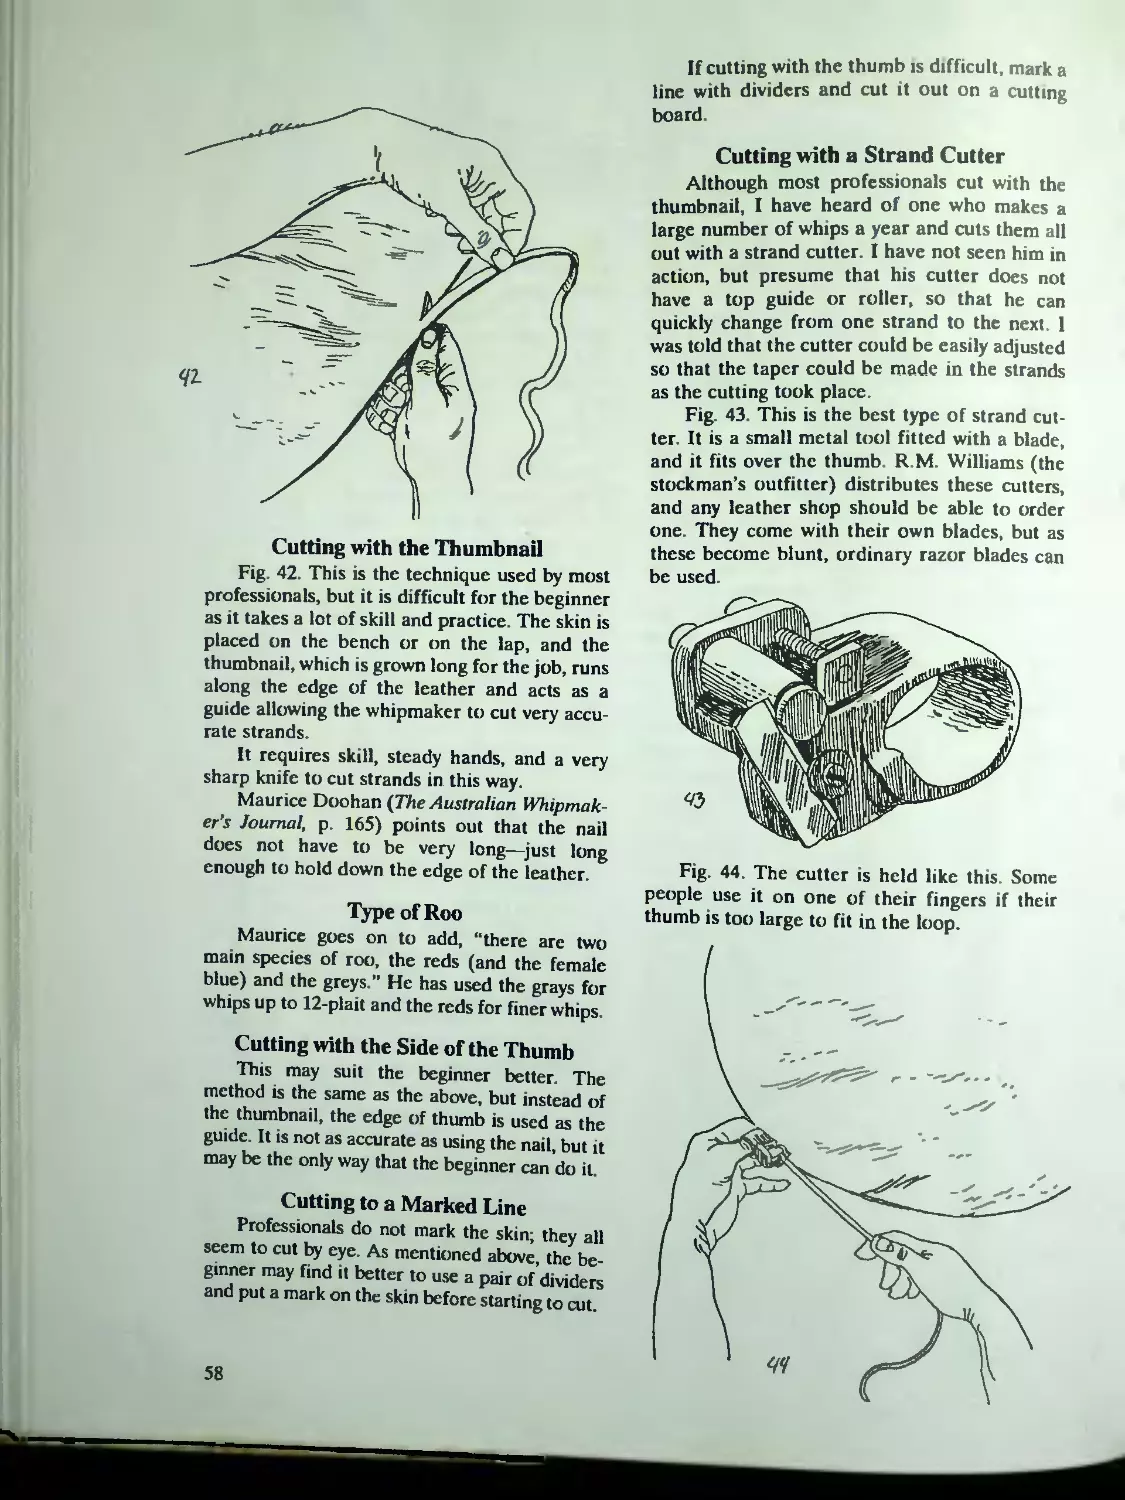
Cutting with th« Thumbnail. 58
TVpeofRoo..................• ' '.......sg
Cutting with the Side of the Thumb........
Cutting to a Marked Line..................
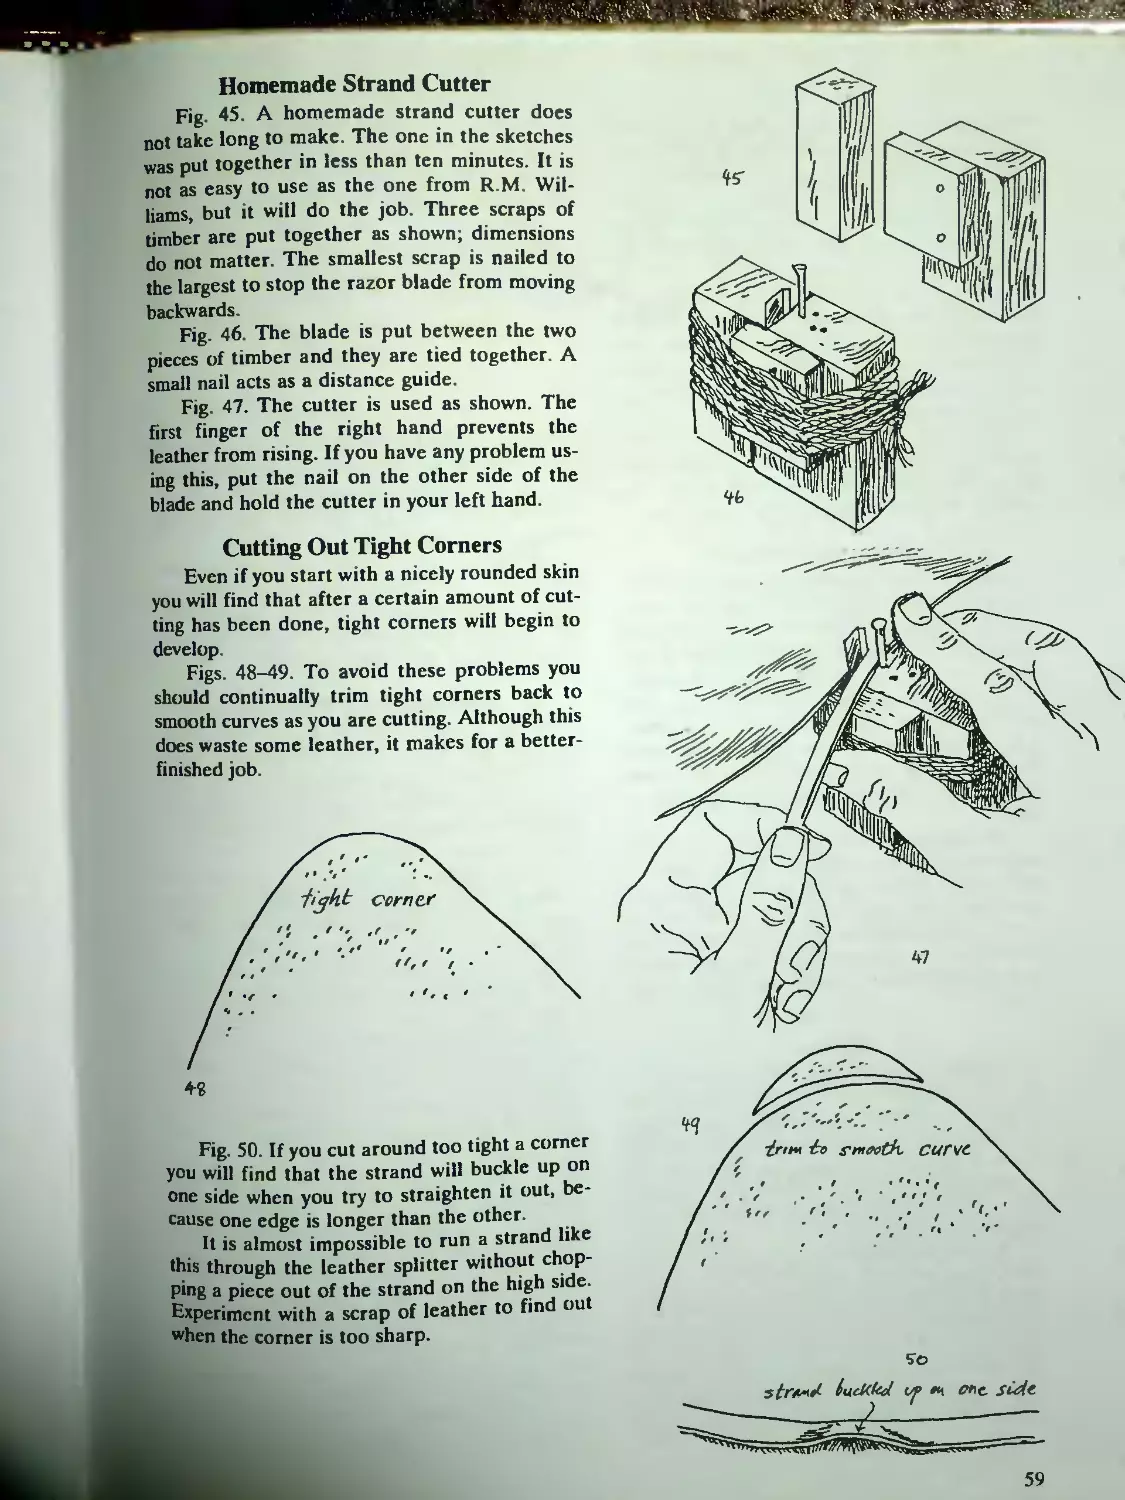
Cu ting with i Str nd Cutter..............
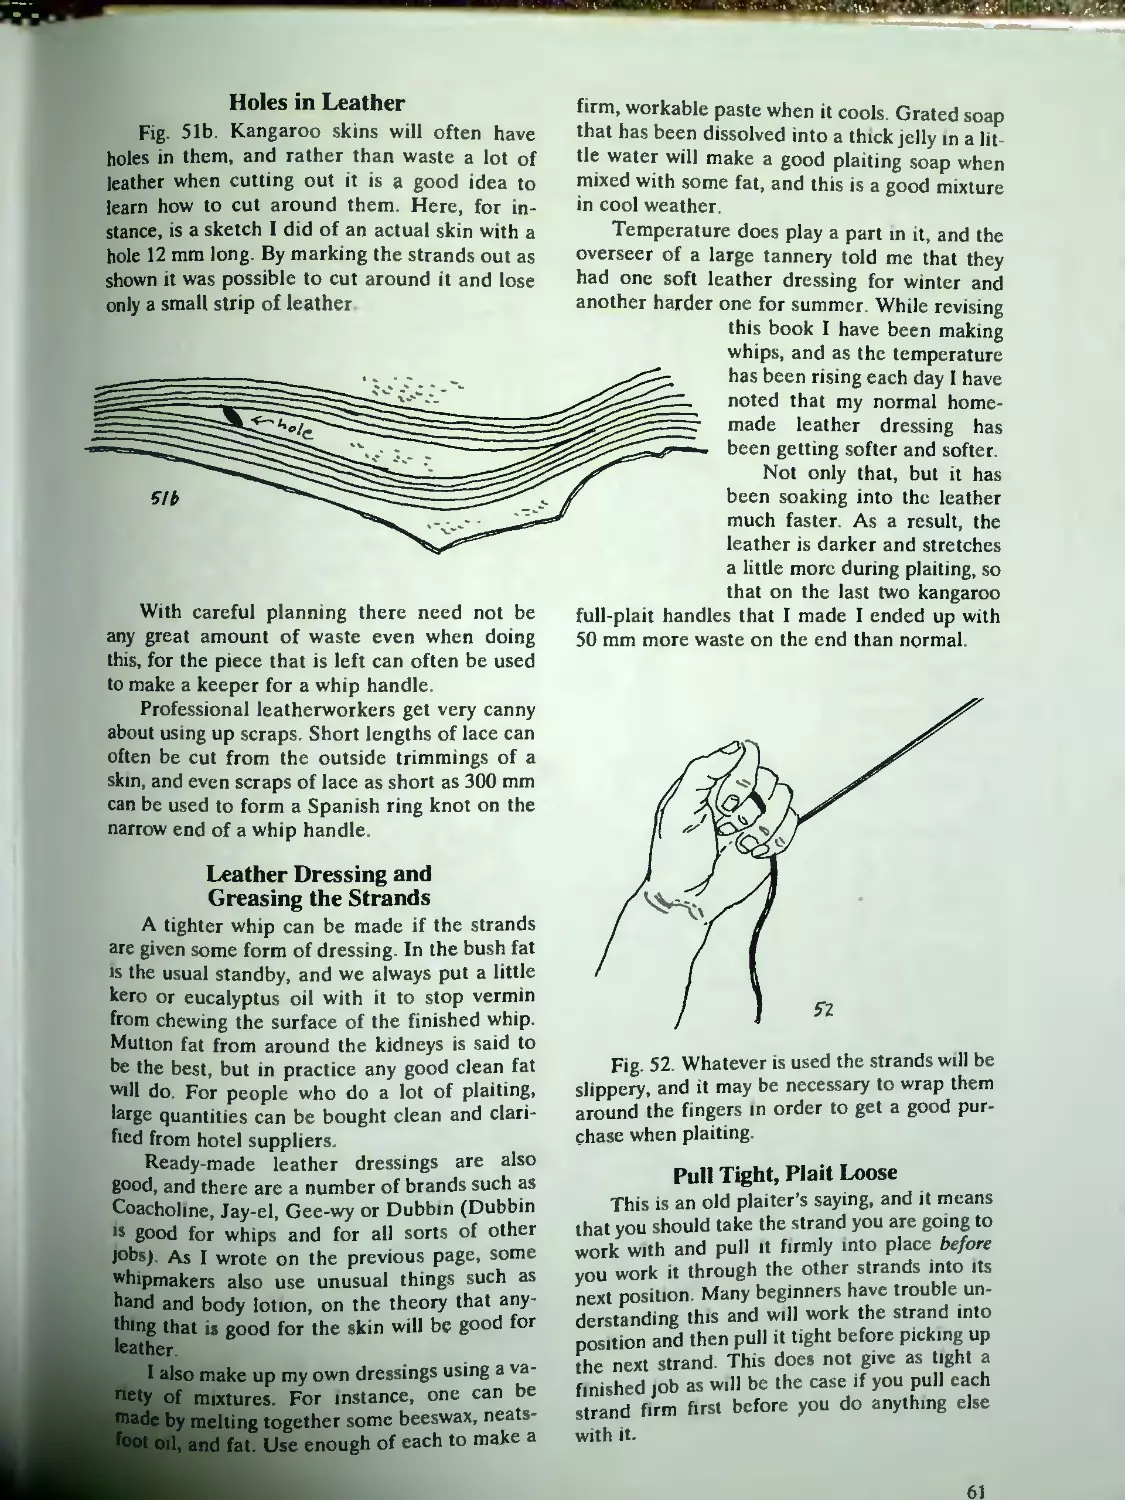
Homemade Strand Cutter....................
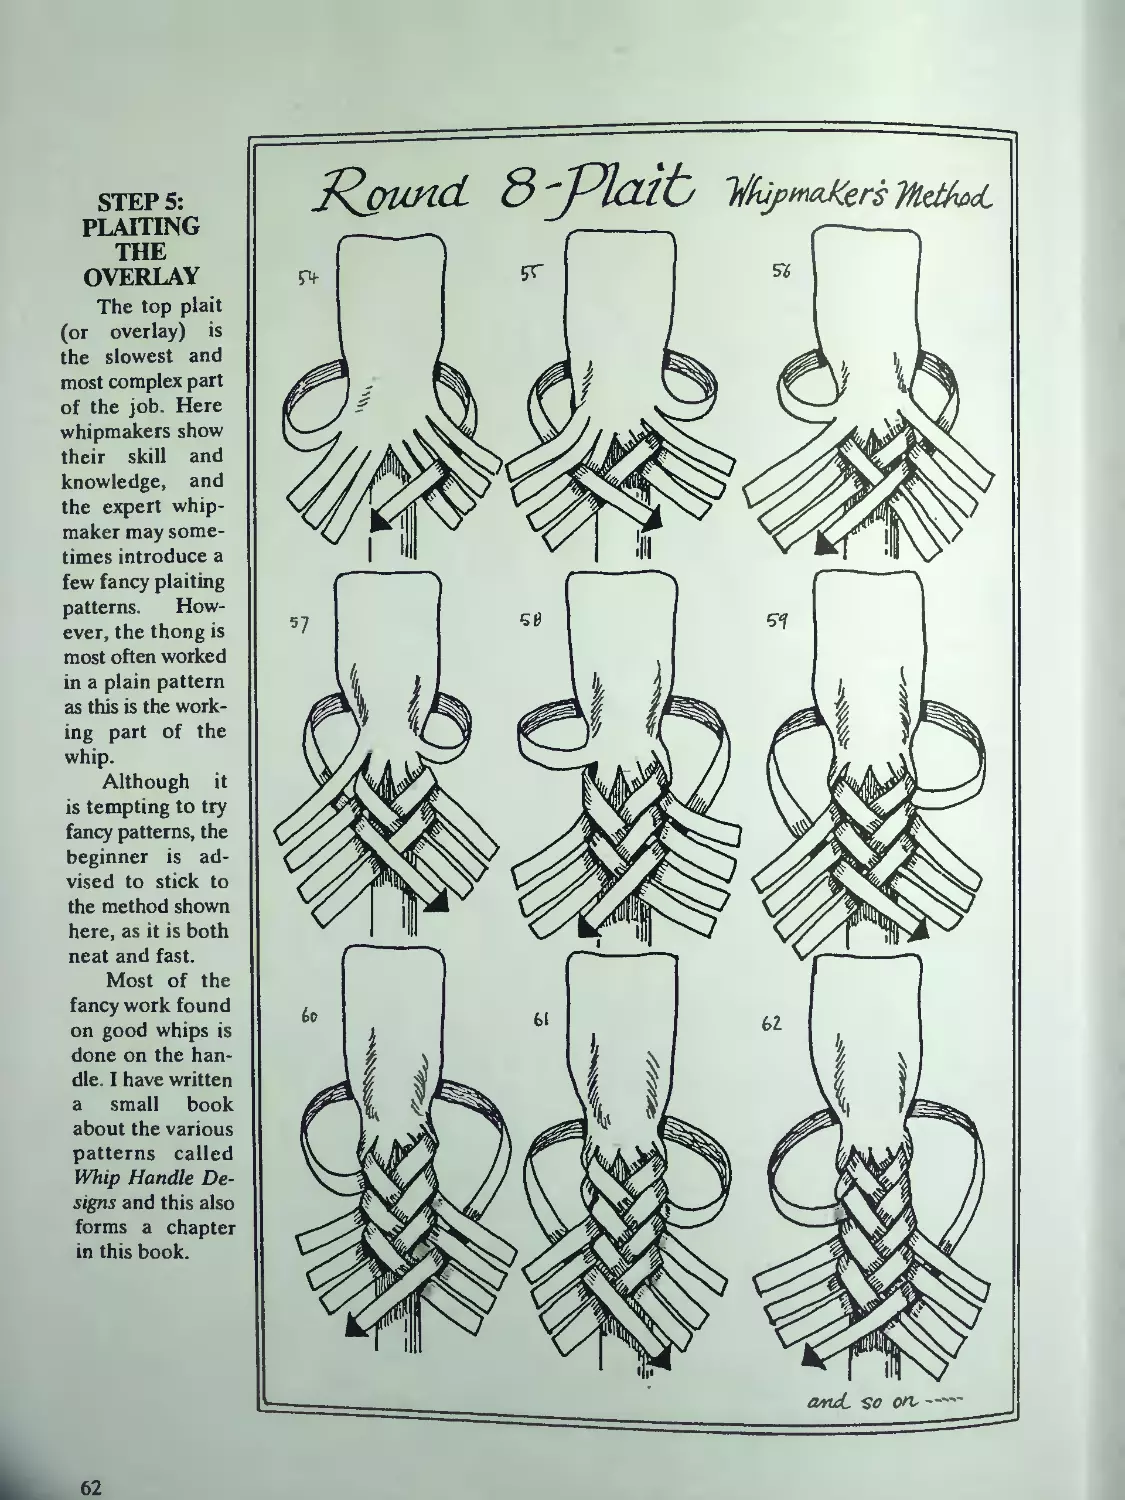
Cutting Out Tight Corners.................
Splitting the Strands.............. ‘ '
Skiving..................."...............
Leather Chattering While Skiving..........
Holes tn Leather 1
Leather Dressing and Creasing the Strands. . . 61
Pull Tight Plait Loose....................61
Step 5: Plaiting the Overlay..............62
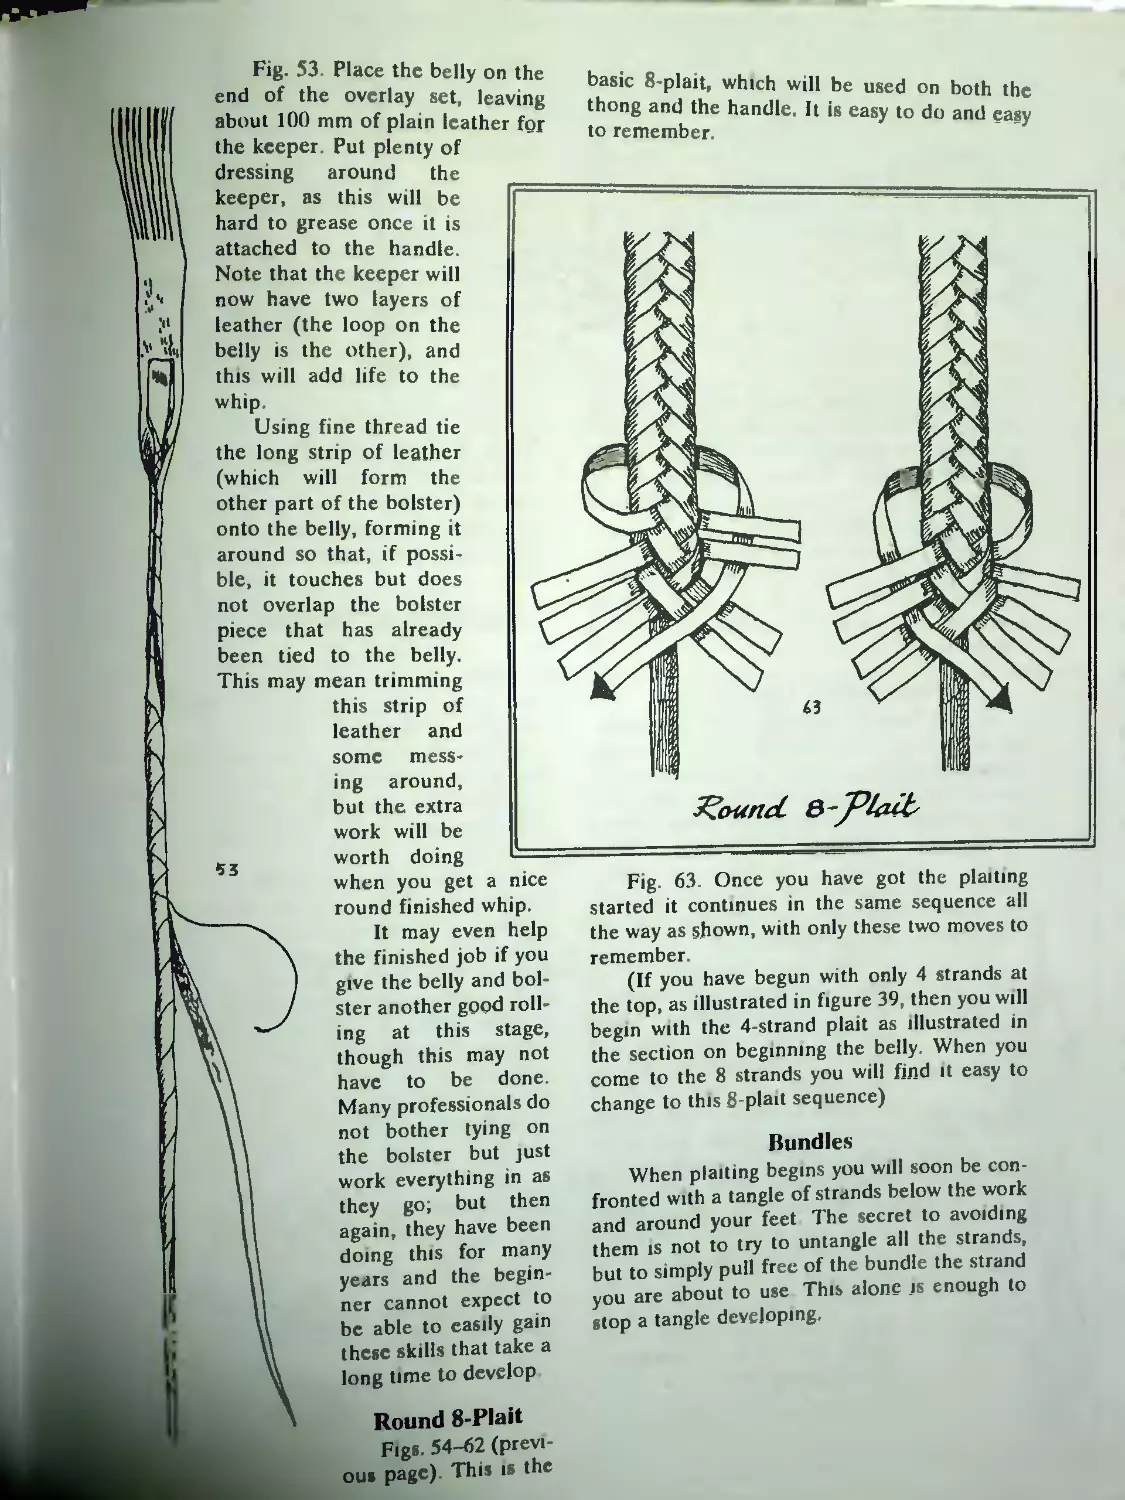
Round S Plait Whipmaker's Method .........62
Round 8-Plait........................... 63
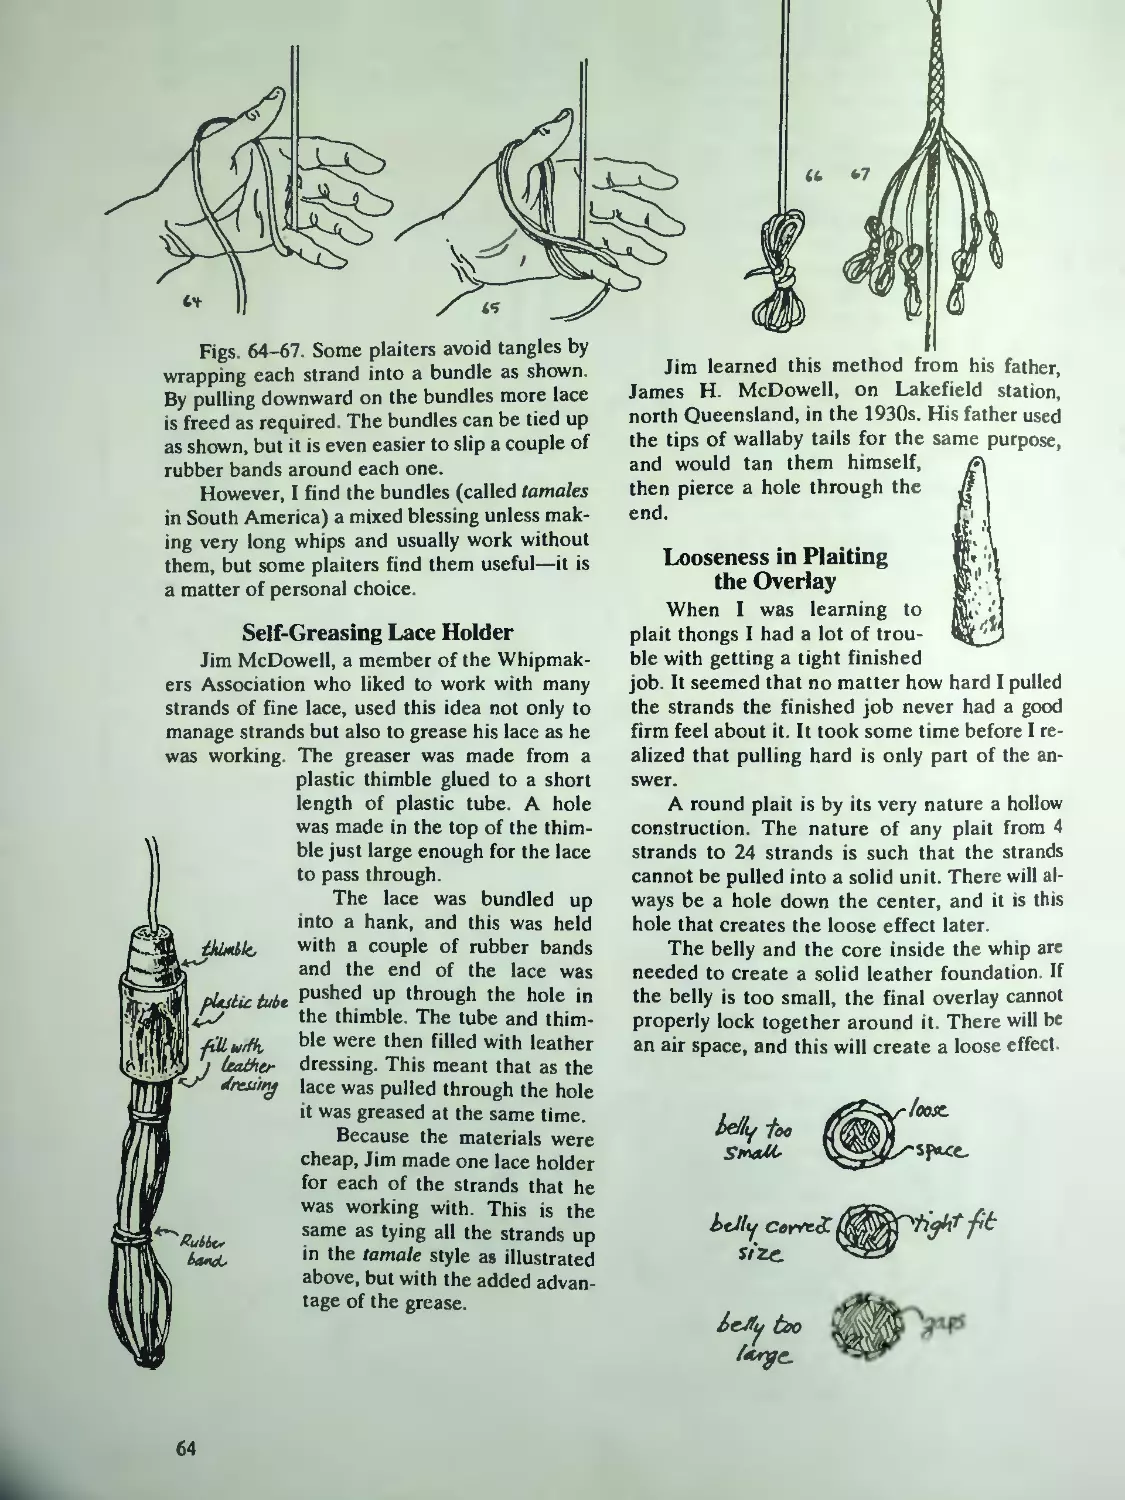
Bundles ..................................
Se (Greasing Lace Holder..................64
Looseness in Plaiting the Overlay.........64
Gaps n the Plait ng 65
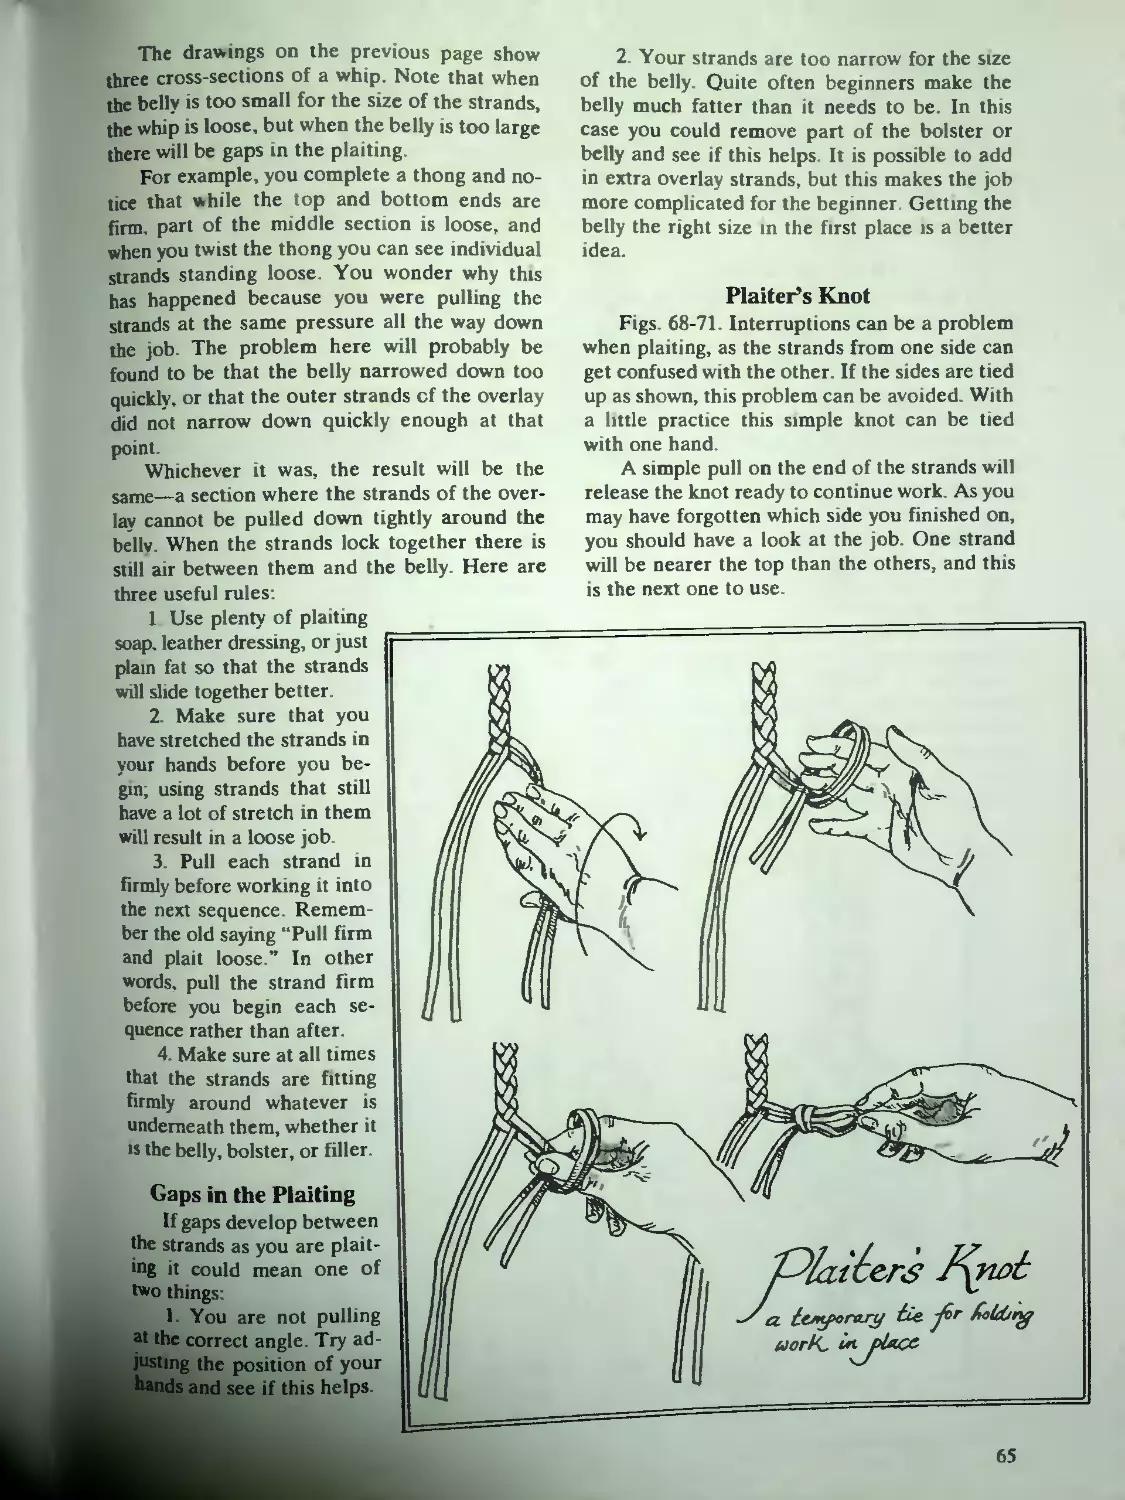
Plait s Knot 65
Broken Strands............................66
Dropping Strands..........................66
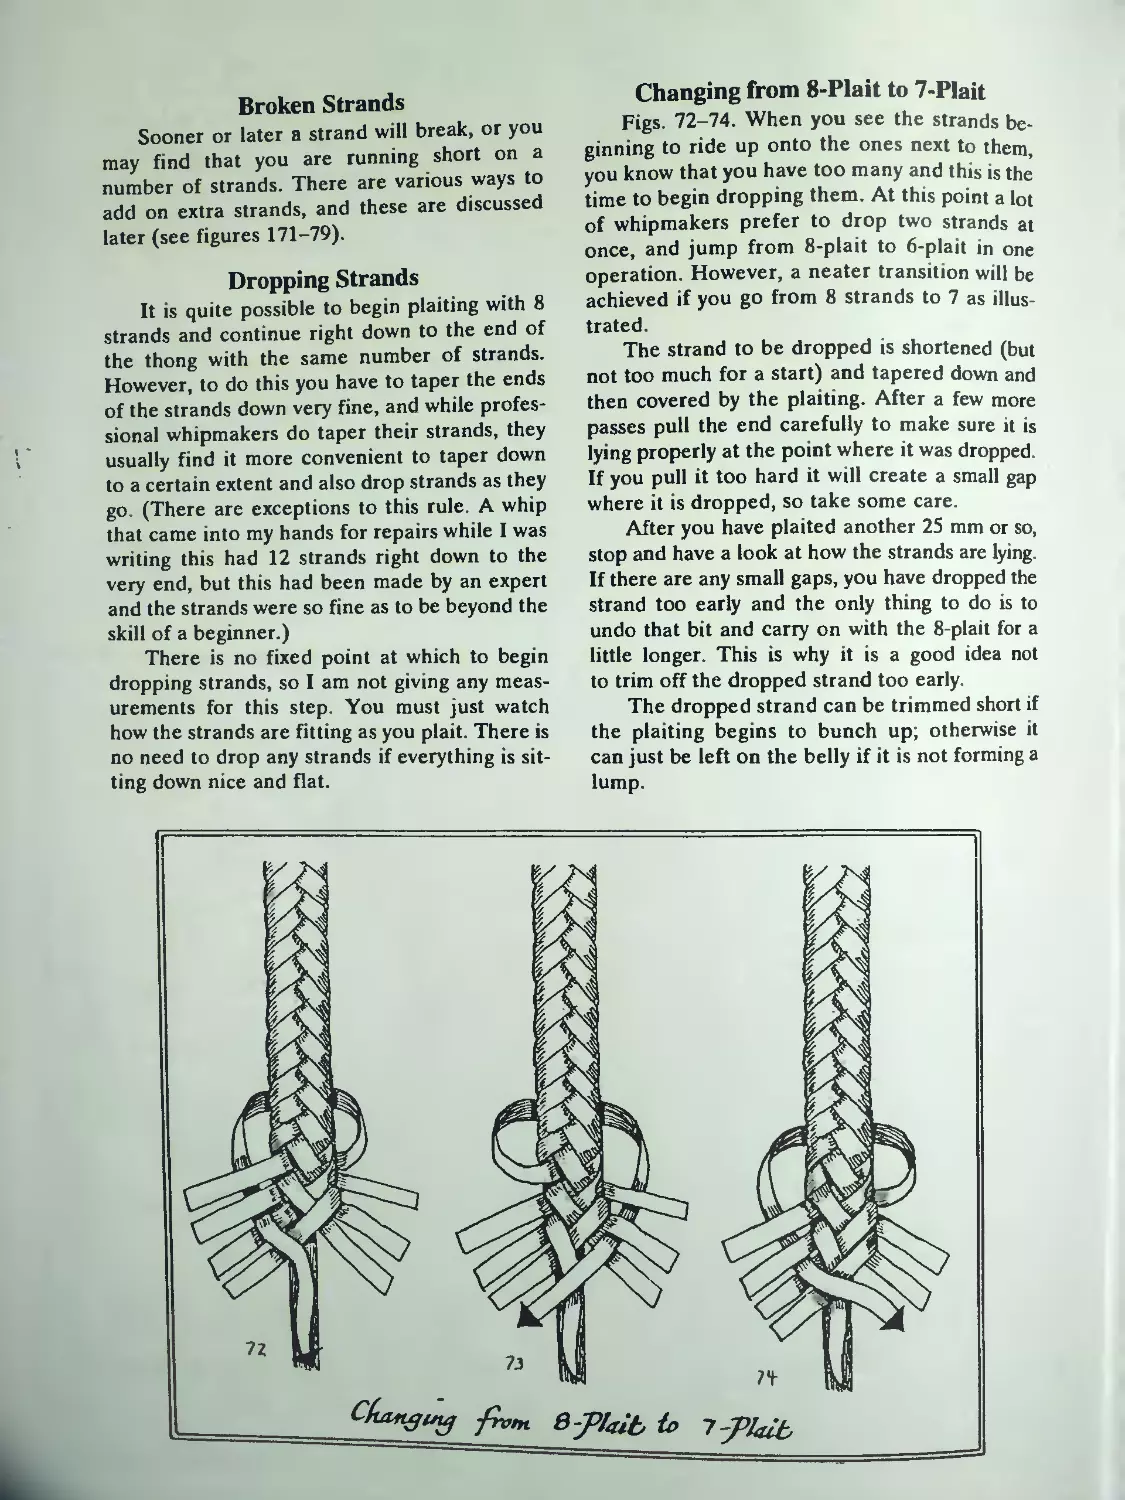
Changing from 8 Pl t to 7-Plait........... . 66
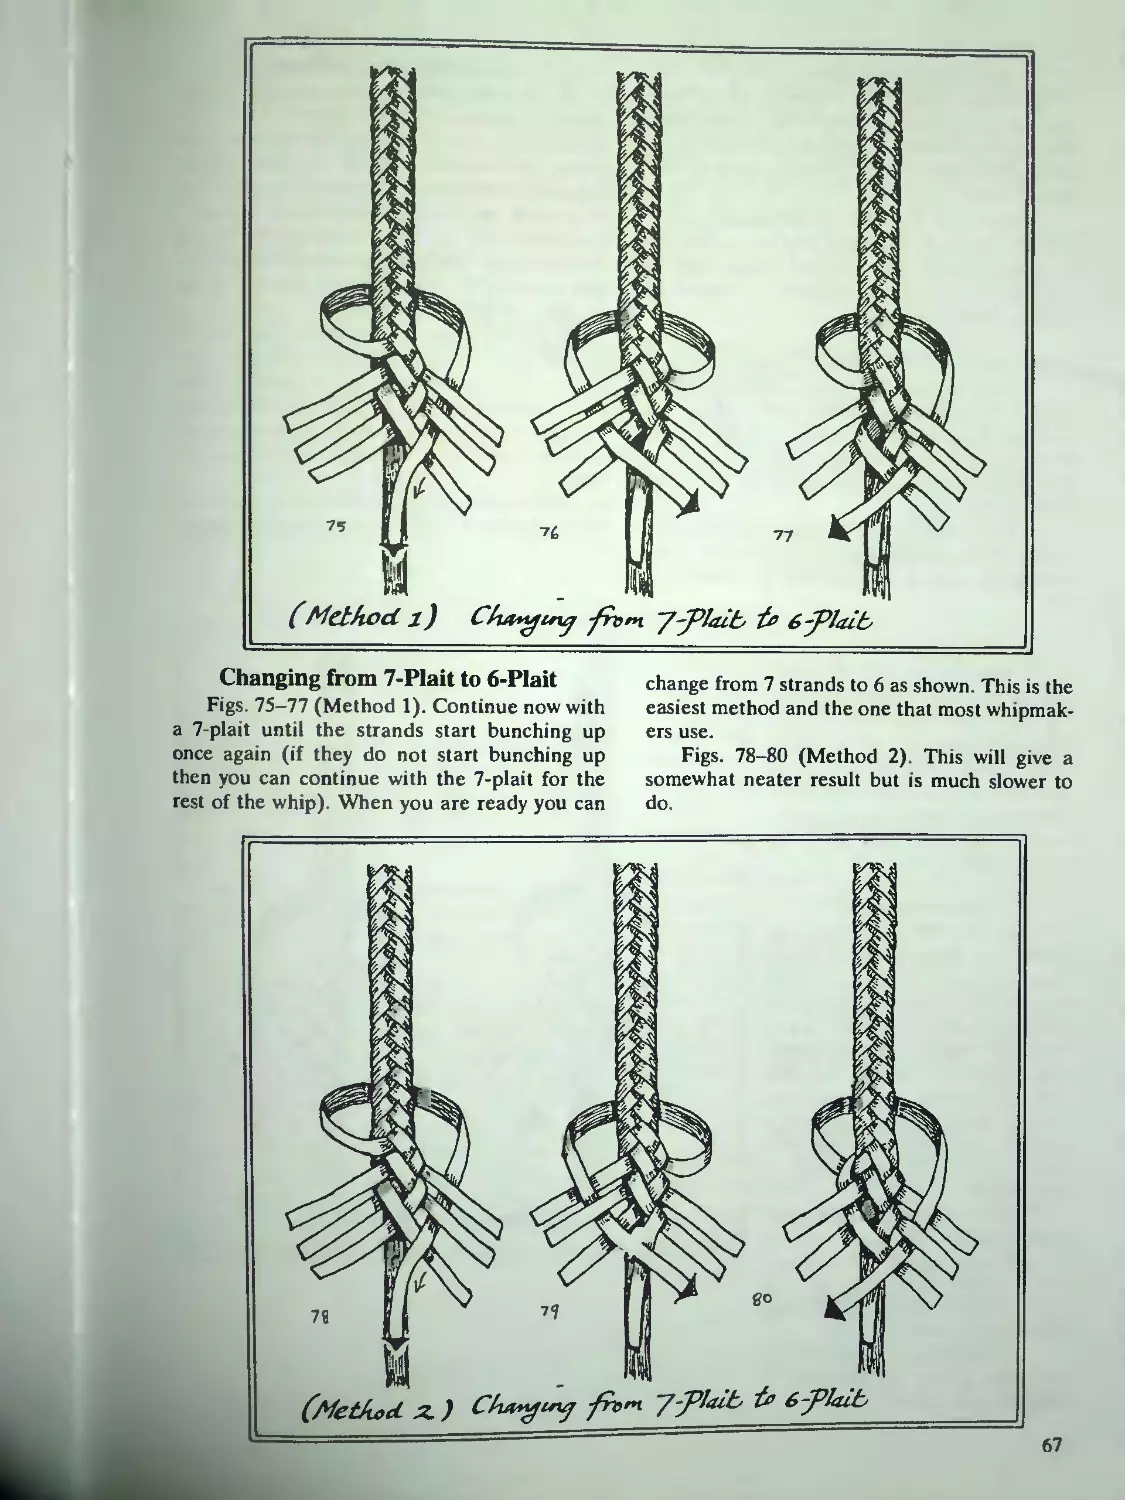
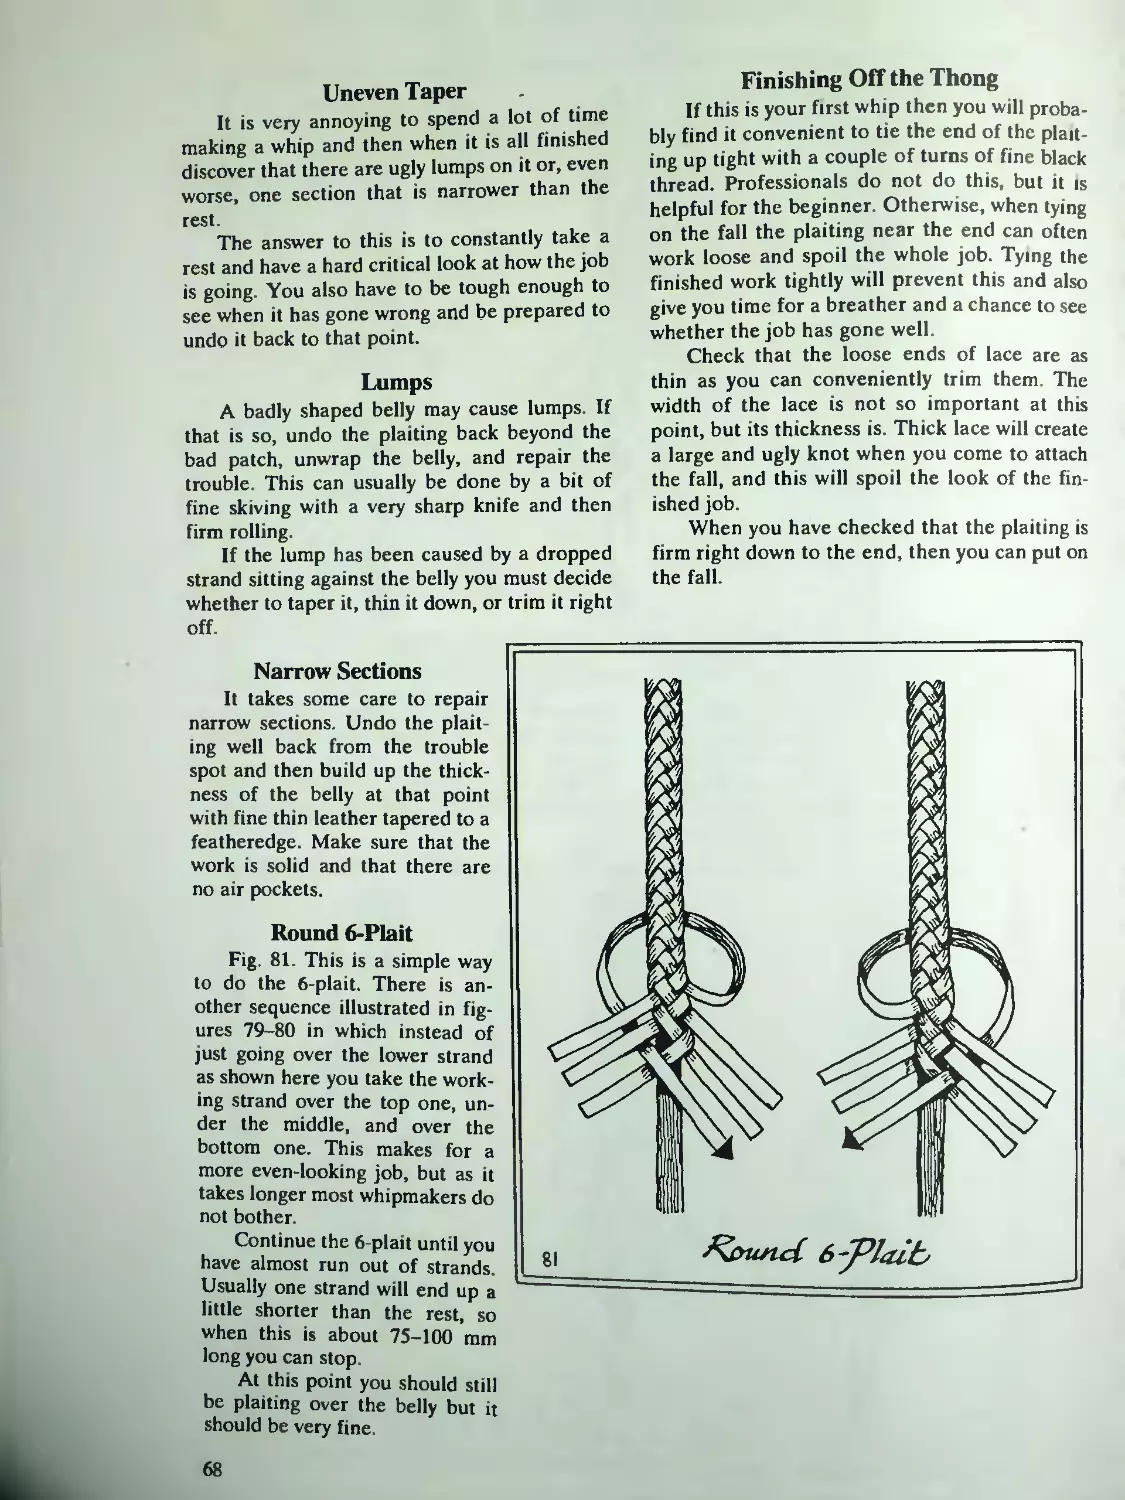
Changing from 7-Plait to 6-Plait..........67
Uneven Taper............................ .... 68
Lumps.....................................68
Narrow Sections...........................68
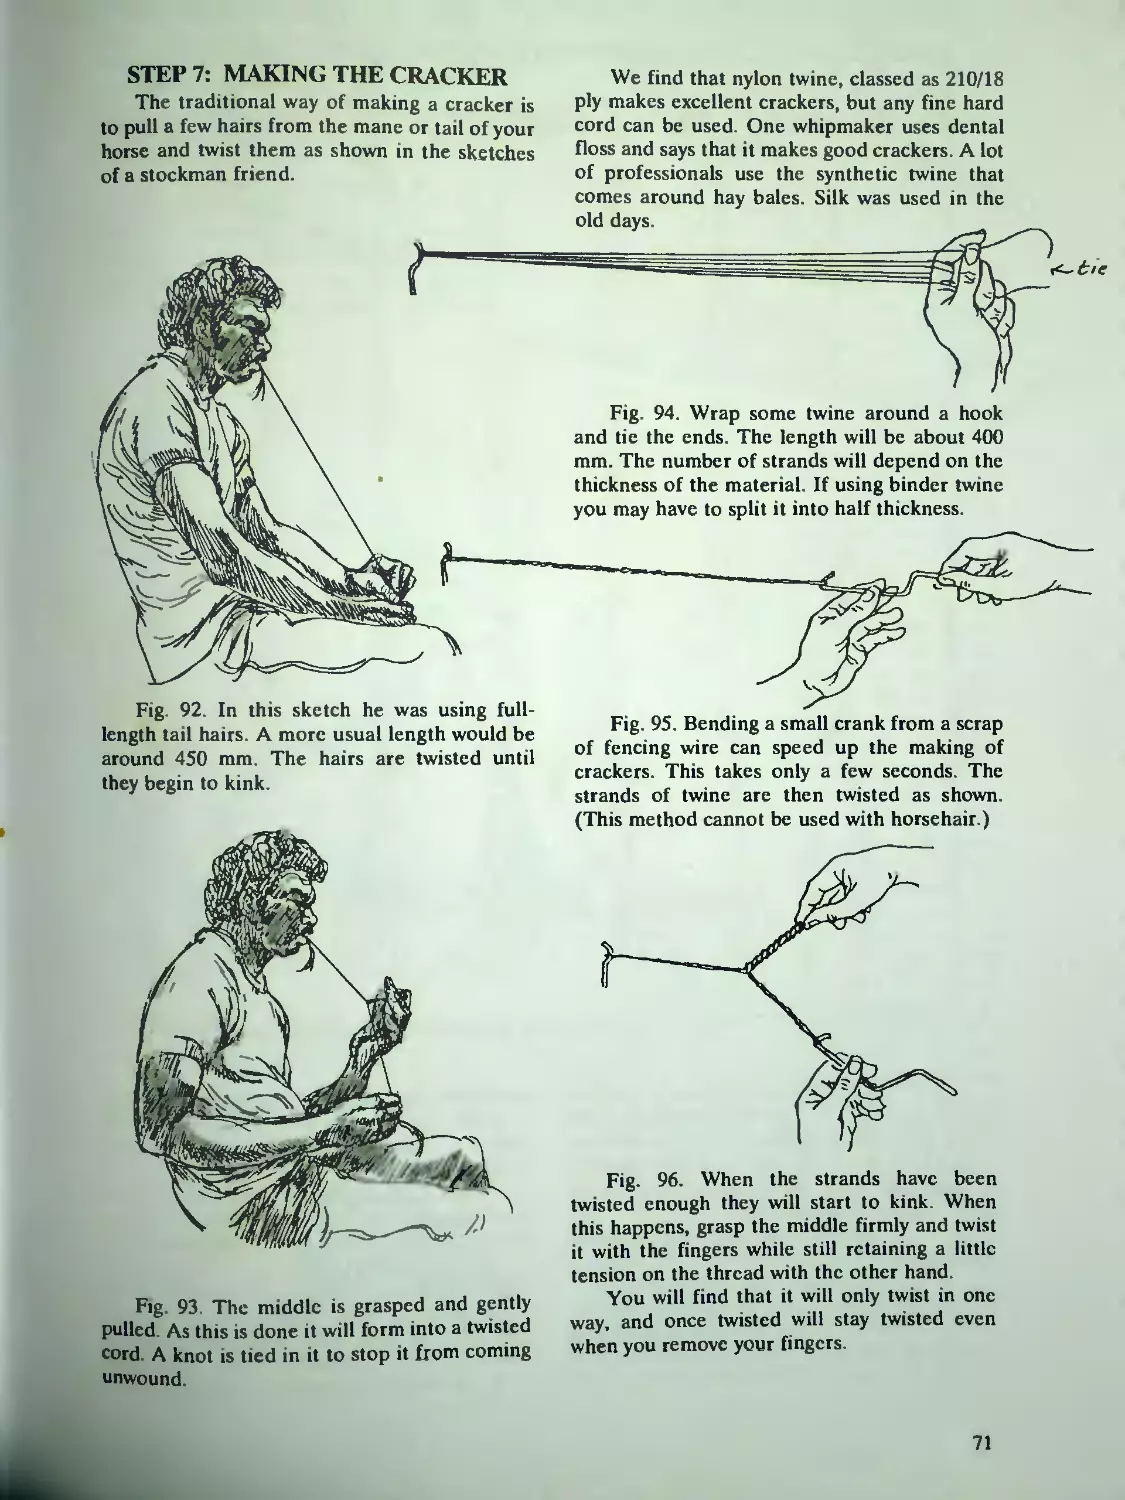
Round 6-Plait.............................68
Fimshin Off the Thong.....................68
Step 6. The Fall............................69
Attaching the Fall........................69
Rep ng the Fall...........................69
Step 7. Making the Cracker................ 71
Finishing the Cracker.....................72
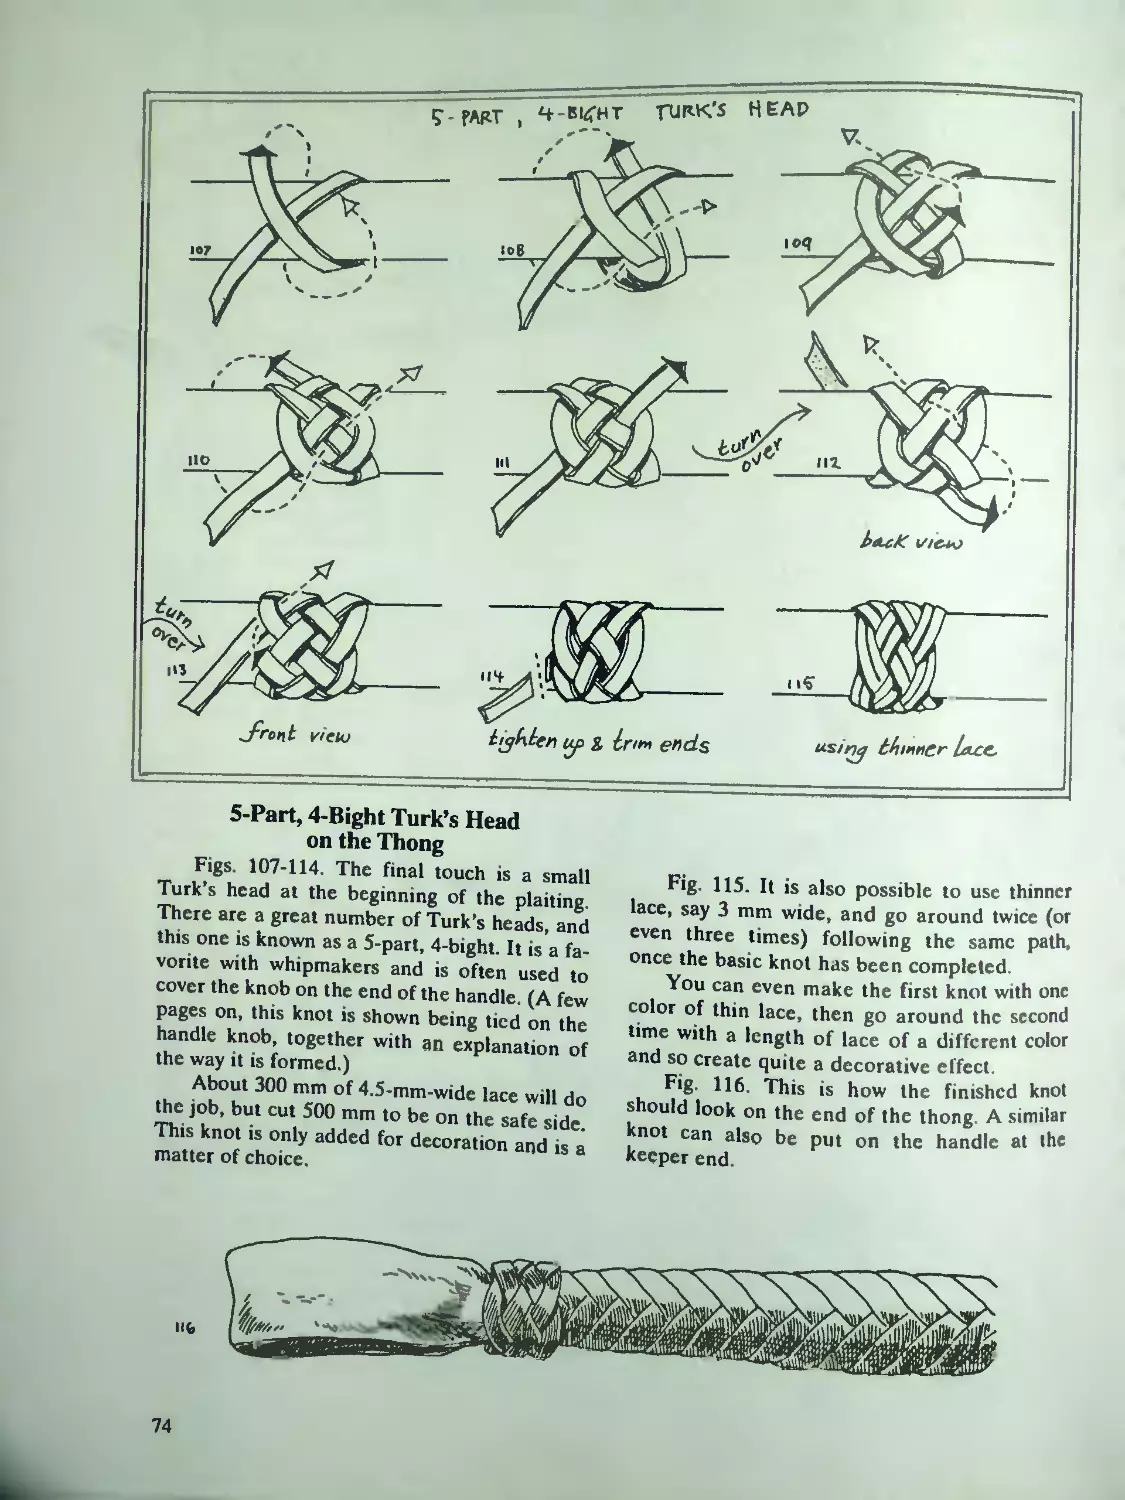
5-Part, 4-Bight Turk's Head on the Thong . . 74
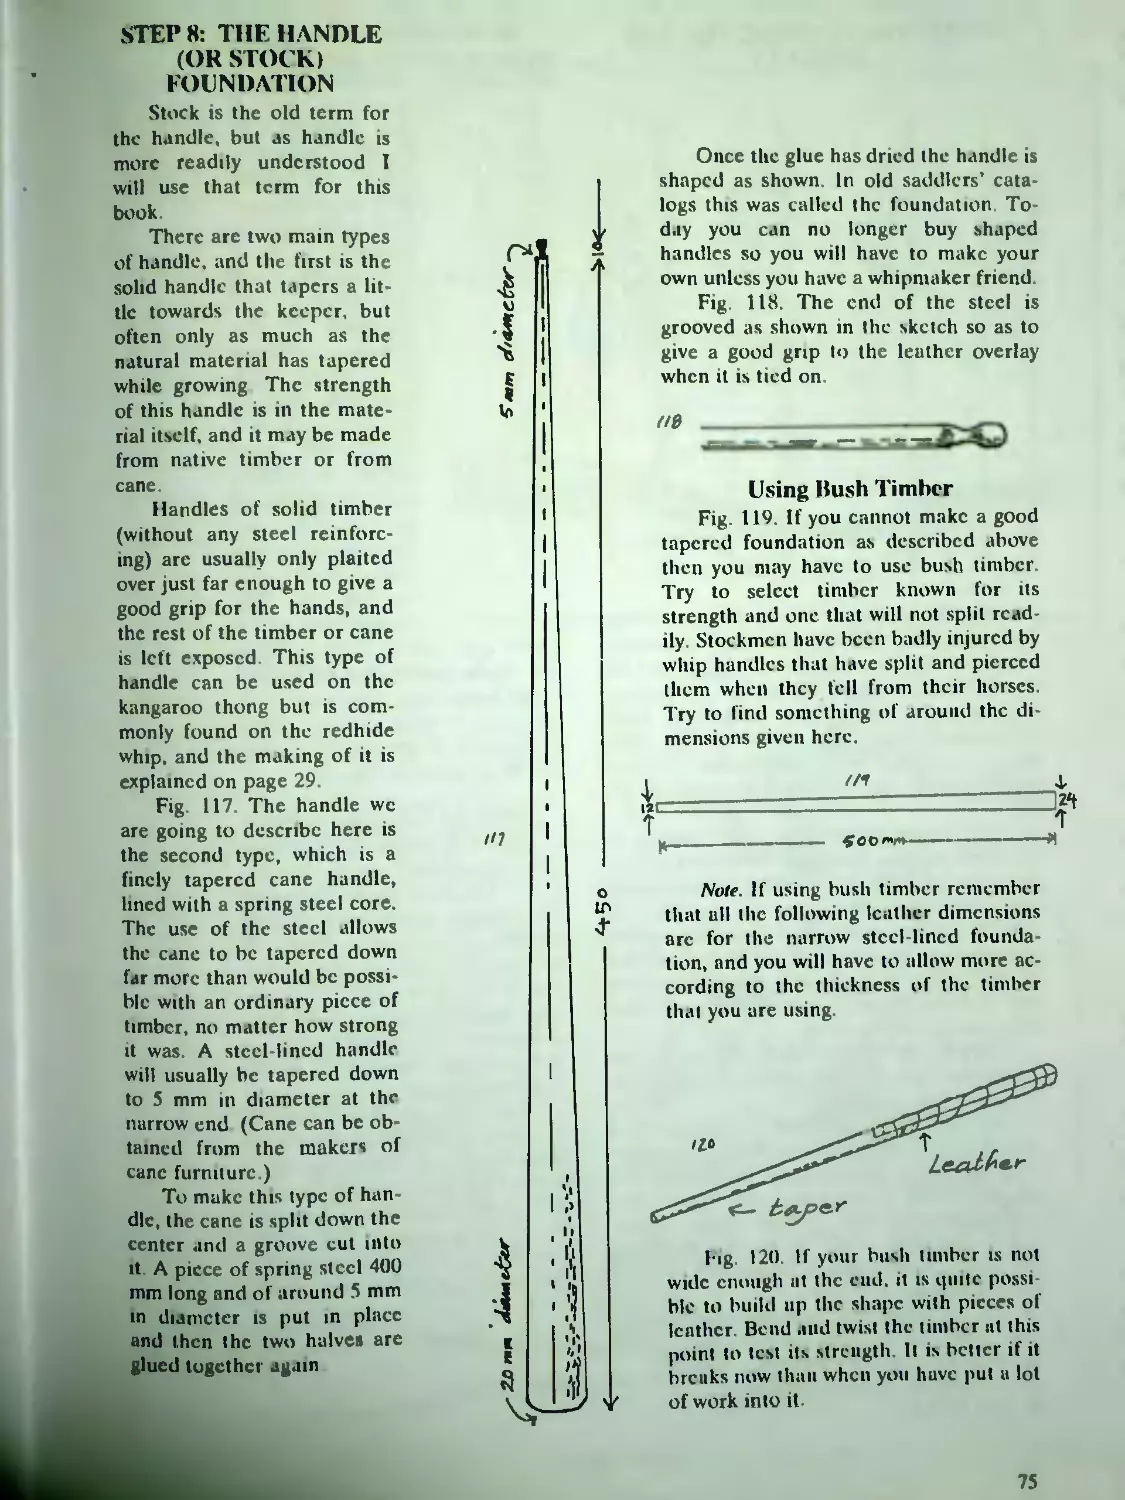
Step 8* The Handle (or Stock Foundation .... 75
Ustn Bush Timber..........................75
Step 9- The Overlay for the Handle..........76
Tying the Set to the Stock................76
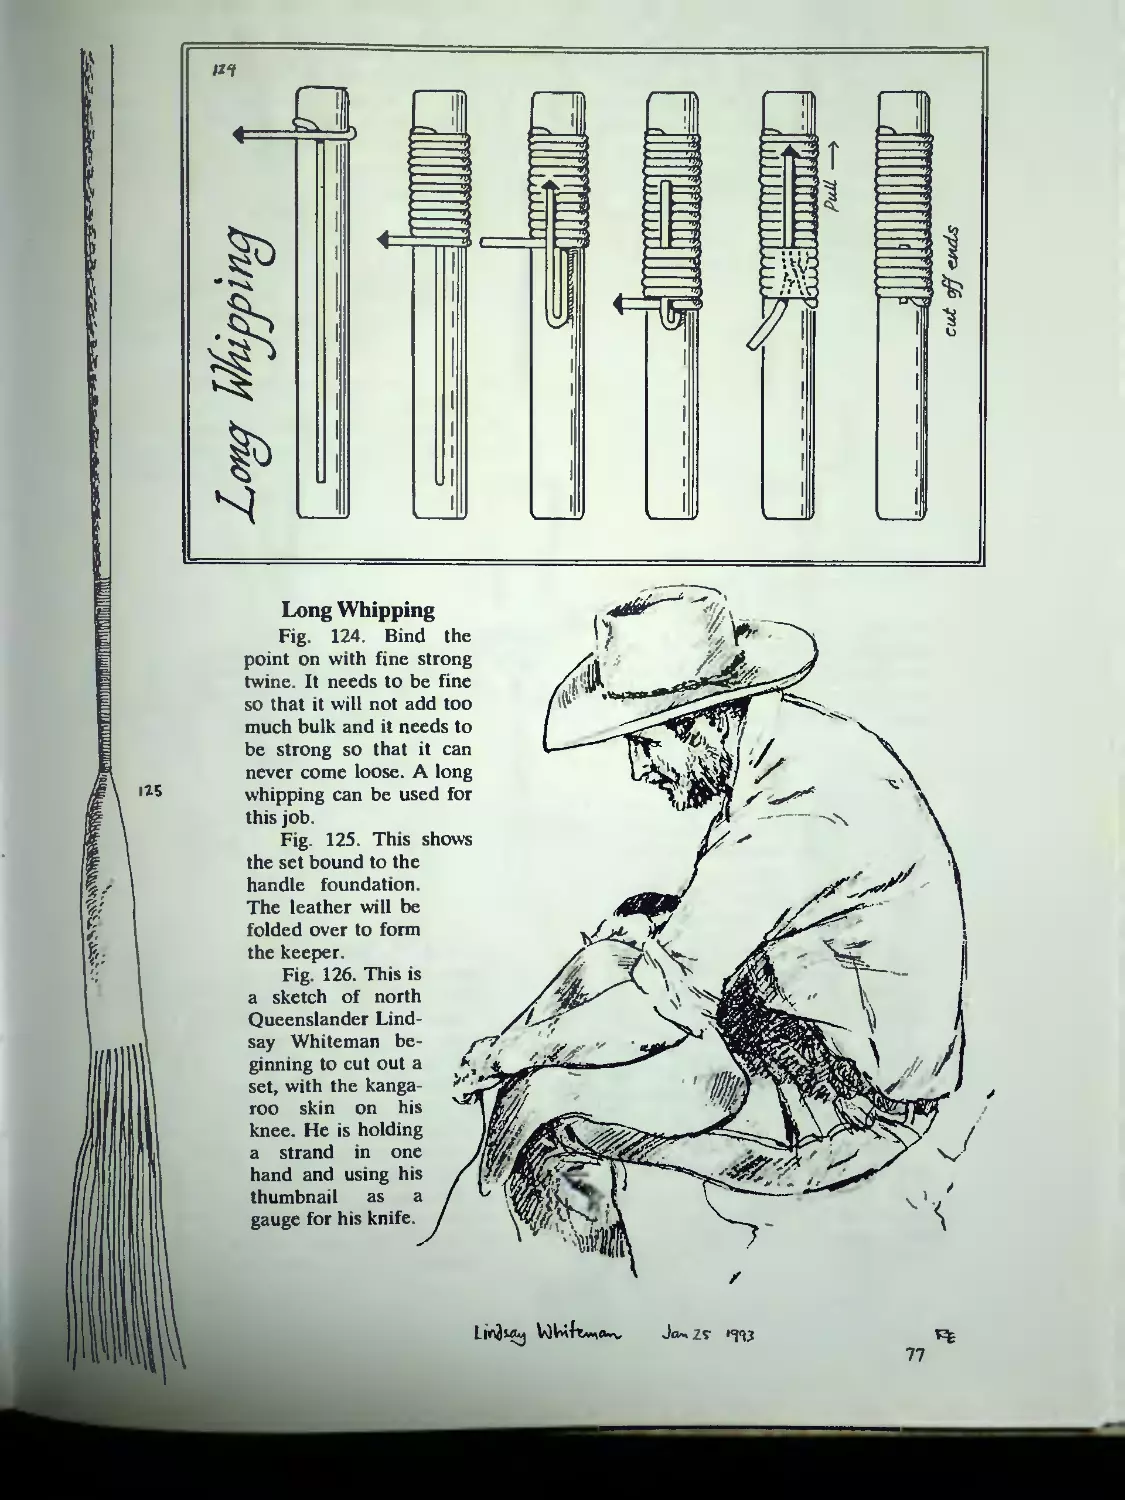
Long Whipping ............................77
Step 10. The Knob on the Handle.............79
Shaping the Knob. . . 80
The Shape of the Knob.....................80
5-Part, 4-Bight Turk's Head ..............go
Gaps in the Turk's Head...................gj
Finishing the Knob....................... g2
Turk's Head on Keeper End................ 82
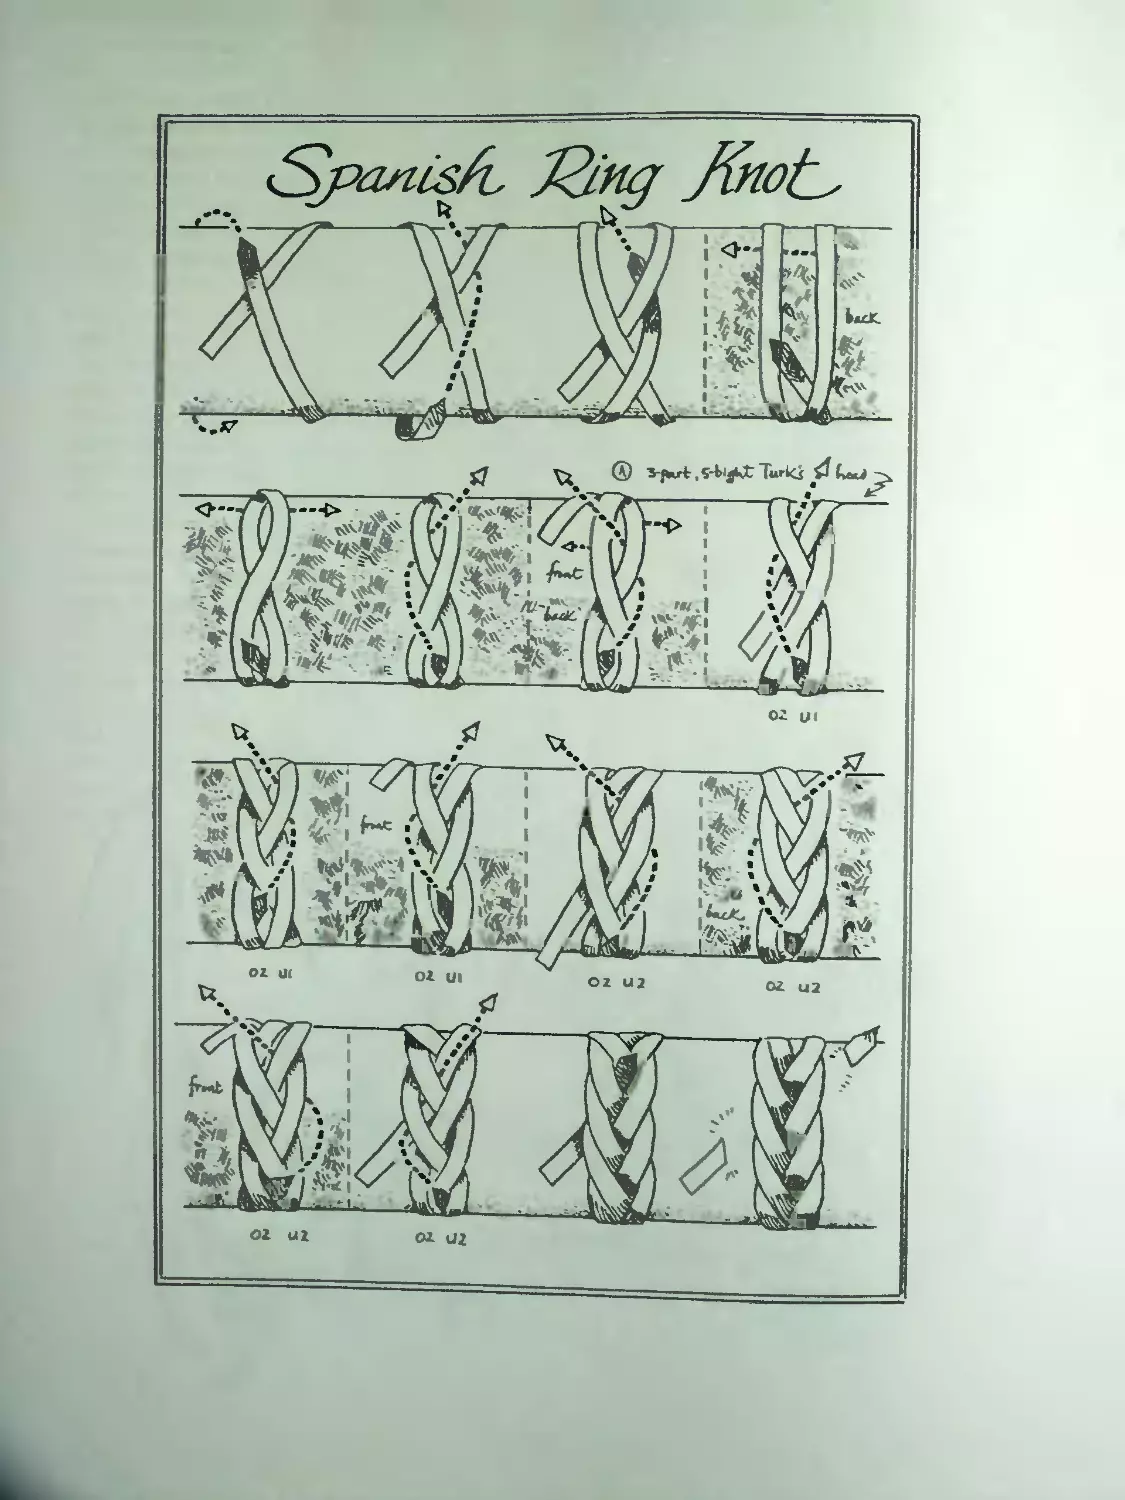
Spam h Ring Knot ...........................
A More Elaborate Handle............. ... 84
Two-Tone Work.......... ..........,84
Fitting the Handle and Thong Together..... 84
Care of the Whip.......................' " 84
A Few Tips.......
Broken Strands .......................... g^
Joining without Glue .................... w
Another Method . . ..." 86
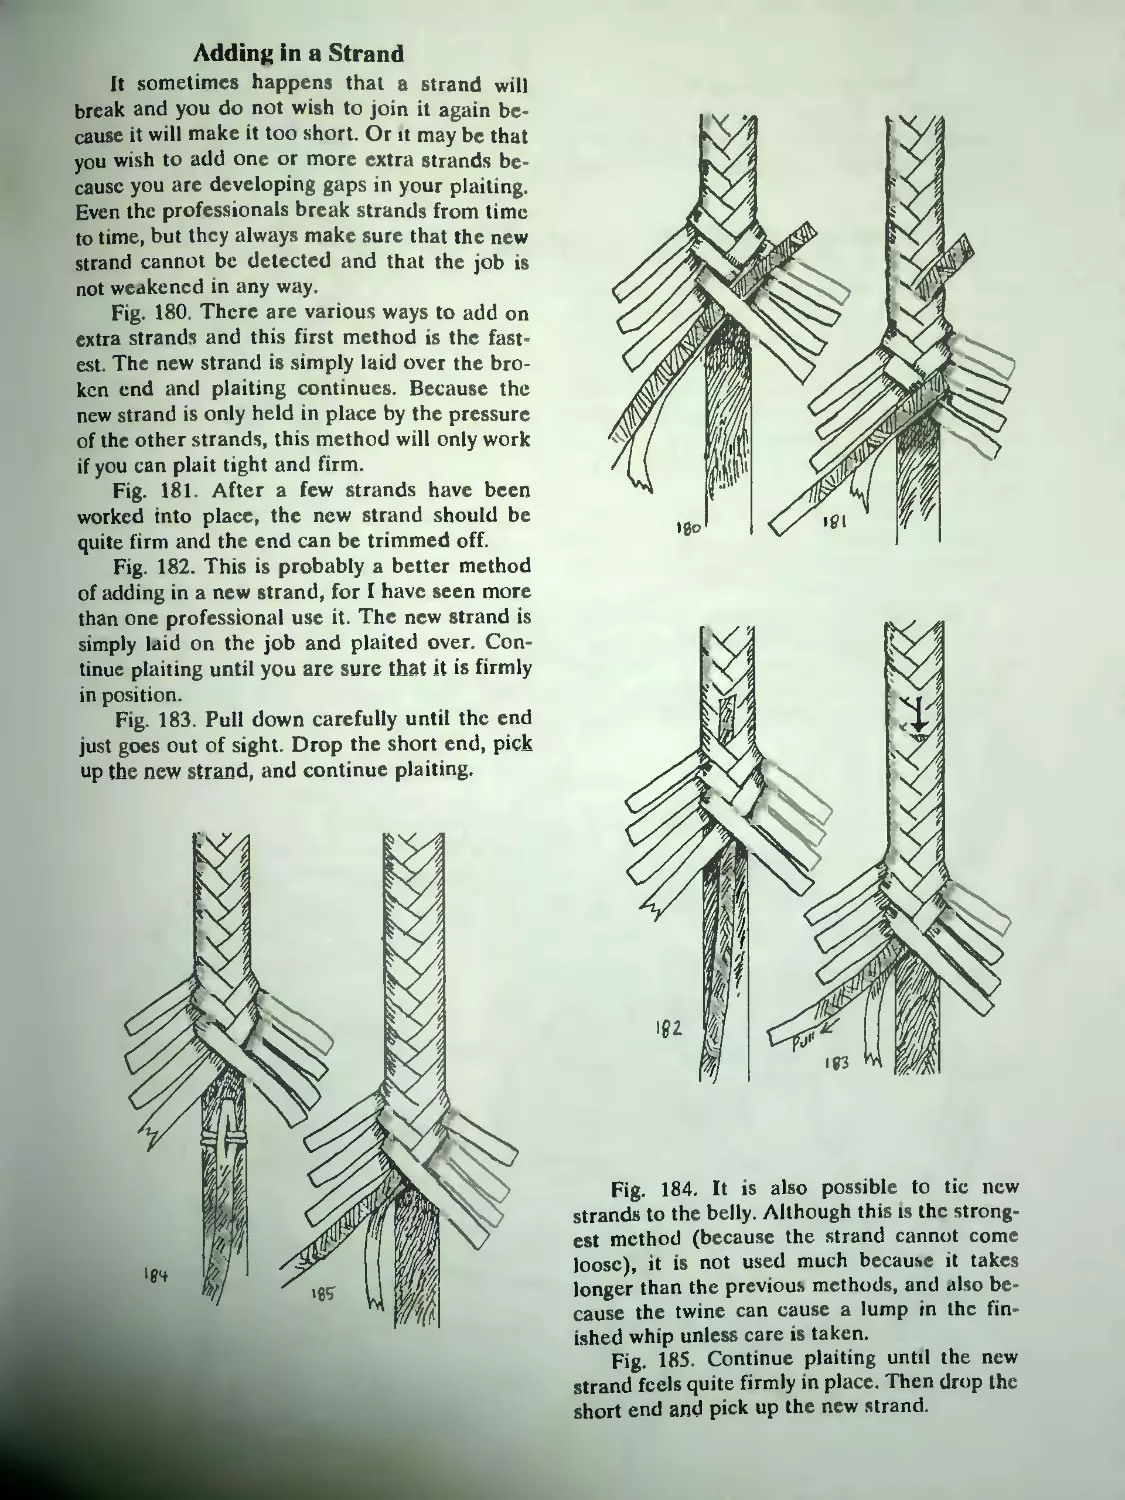
Adding in a Strand......... gy
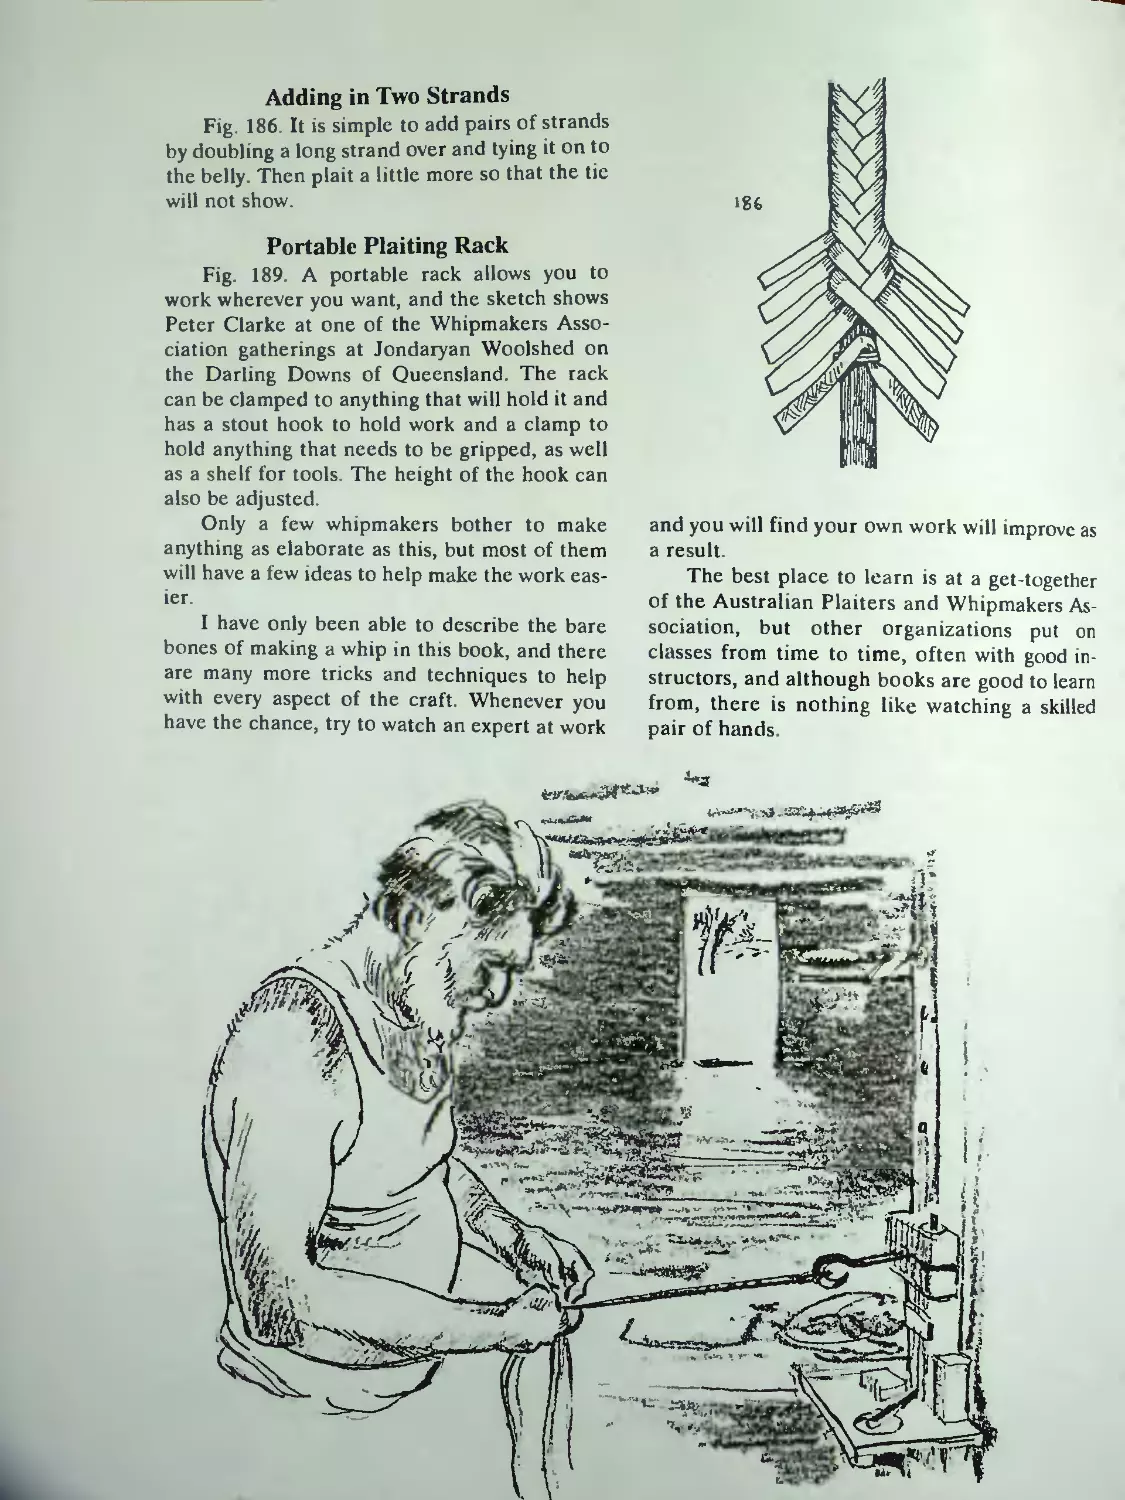
Adding in TVo Strands gg
Portable Plaiting Rack . gg
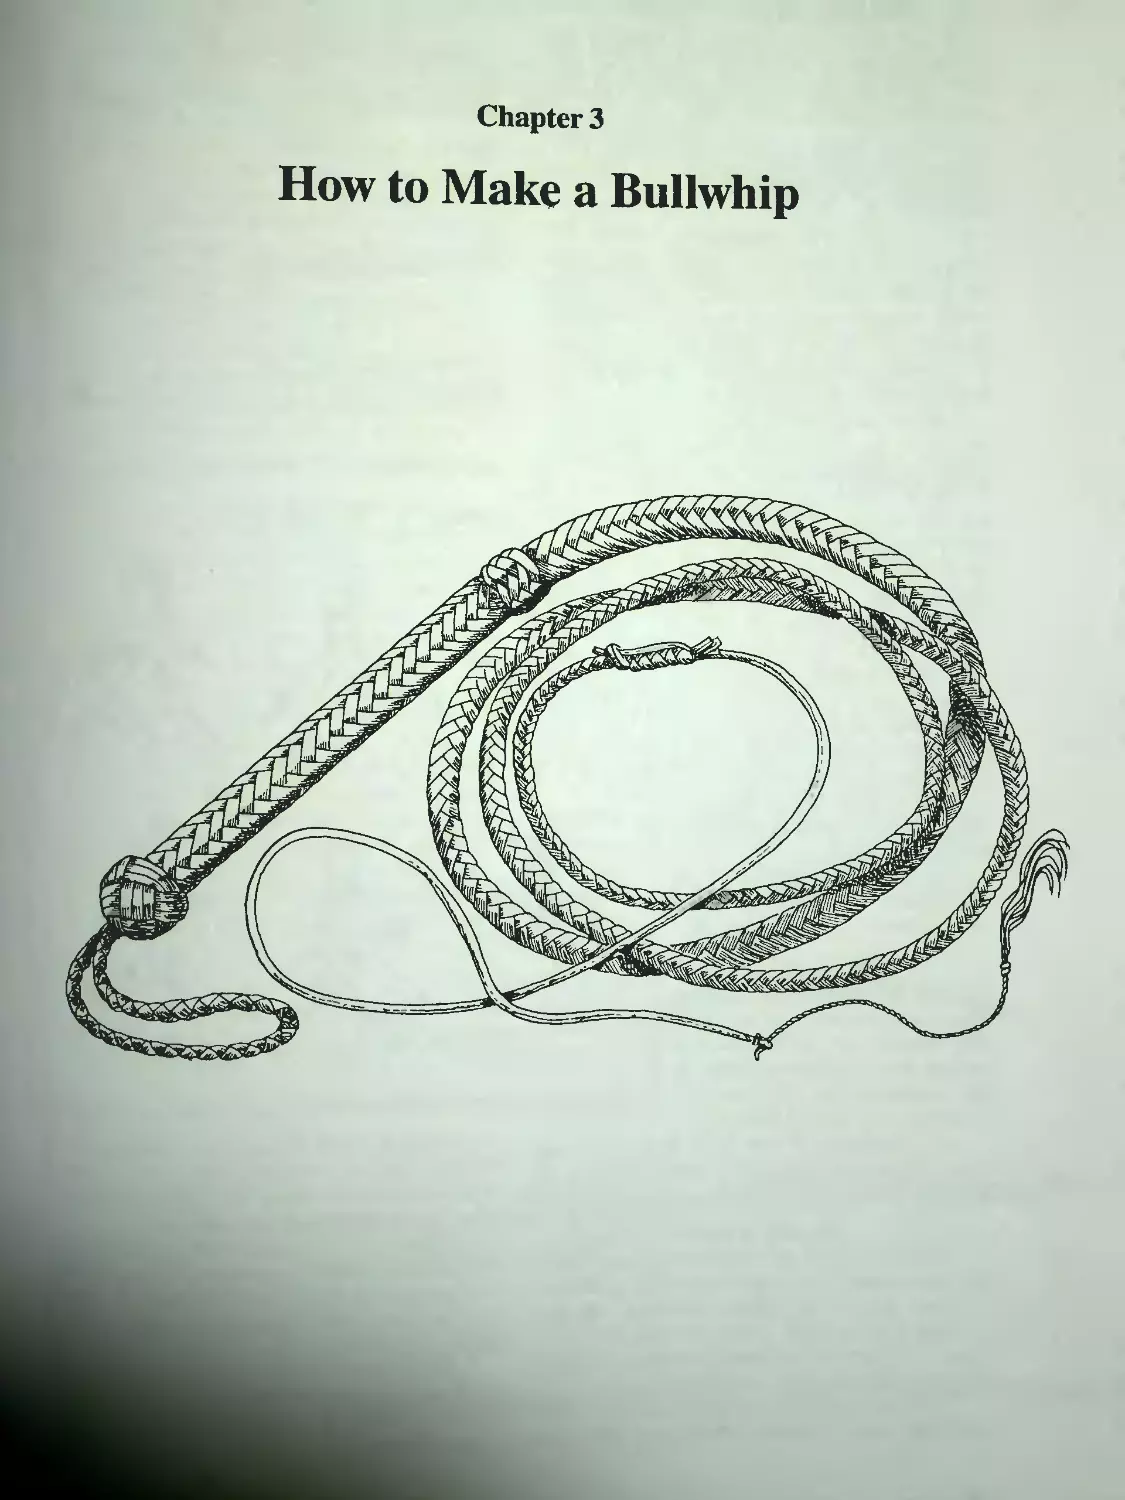
Chapter 3: How to Make a Bullwhip gq
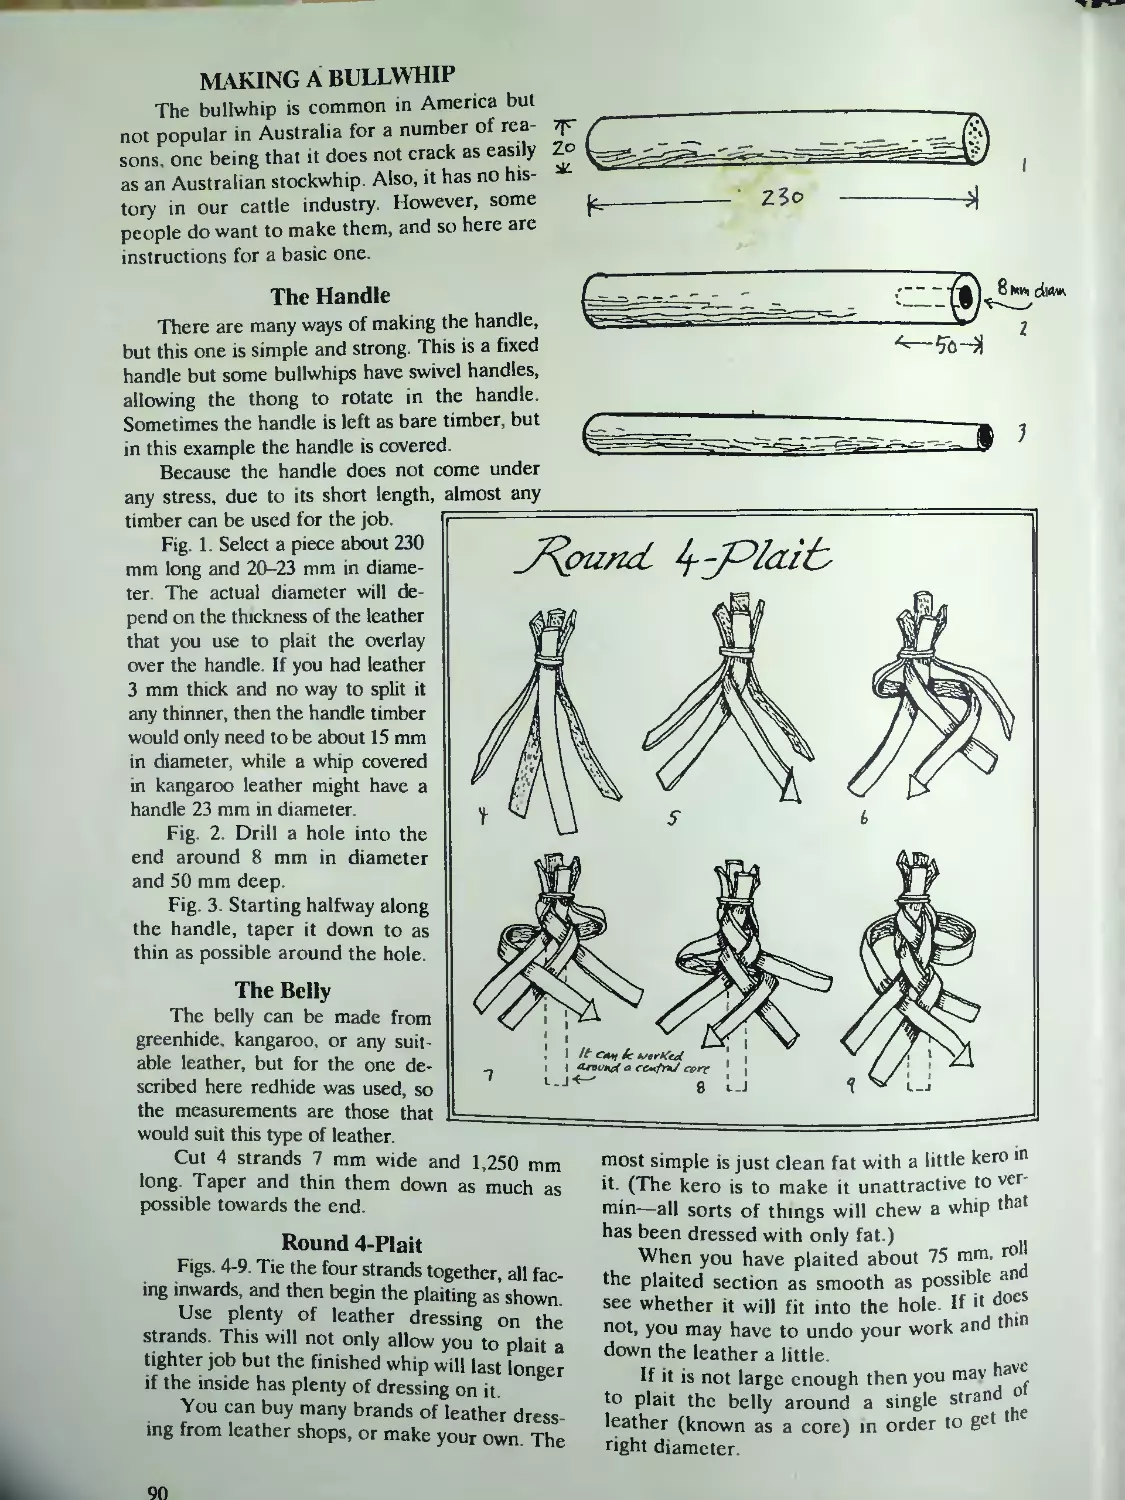
Making a Bullwhip. . .
The Handle........................... 90
The Belly....................... 90
Round 4-Plait.............................. 90
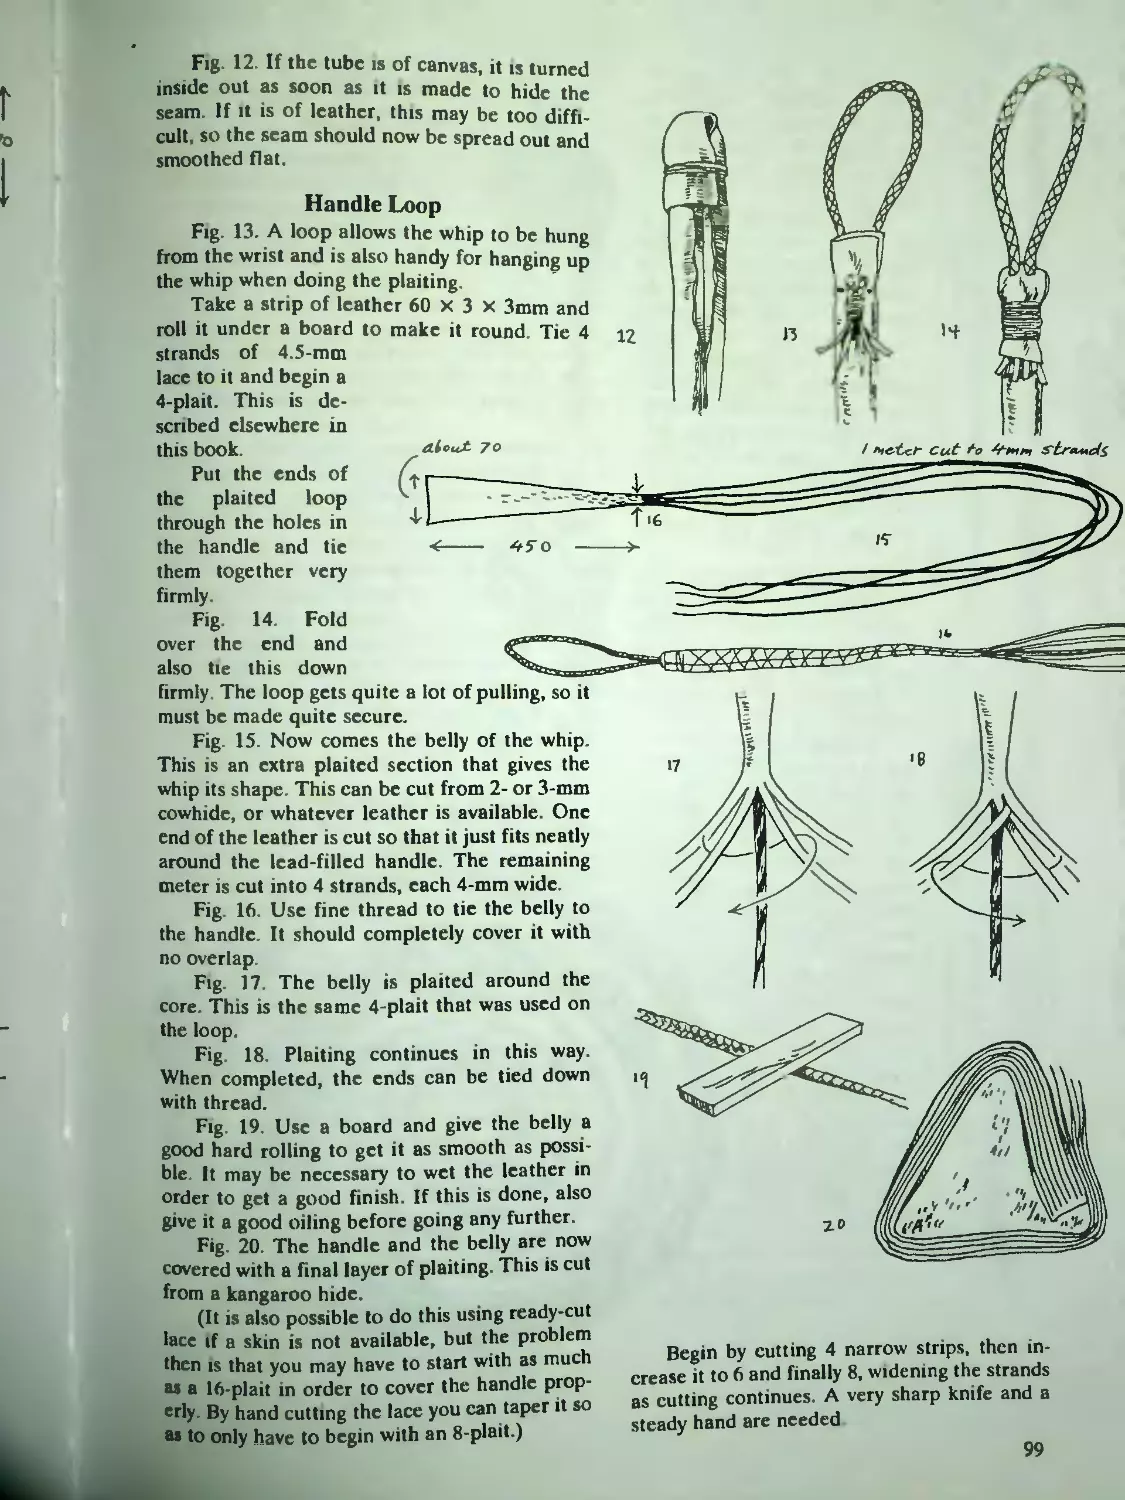
Handle Loop............................. 92
Plaiting the Overlay................. 92
Precut Lace.......................... 92
12-Plait. Under 2 Sequence . . 93
12-Plait. Under 3 Sequence .......... .94
Changing from 12-Plait to IO-Plait 94
Round 10-Plail............. .94
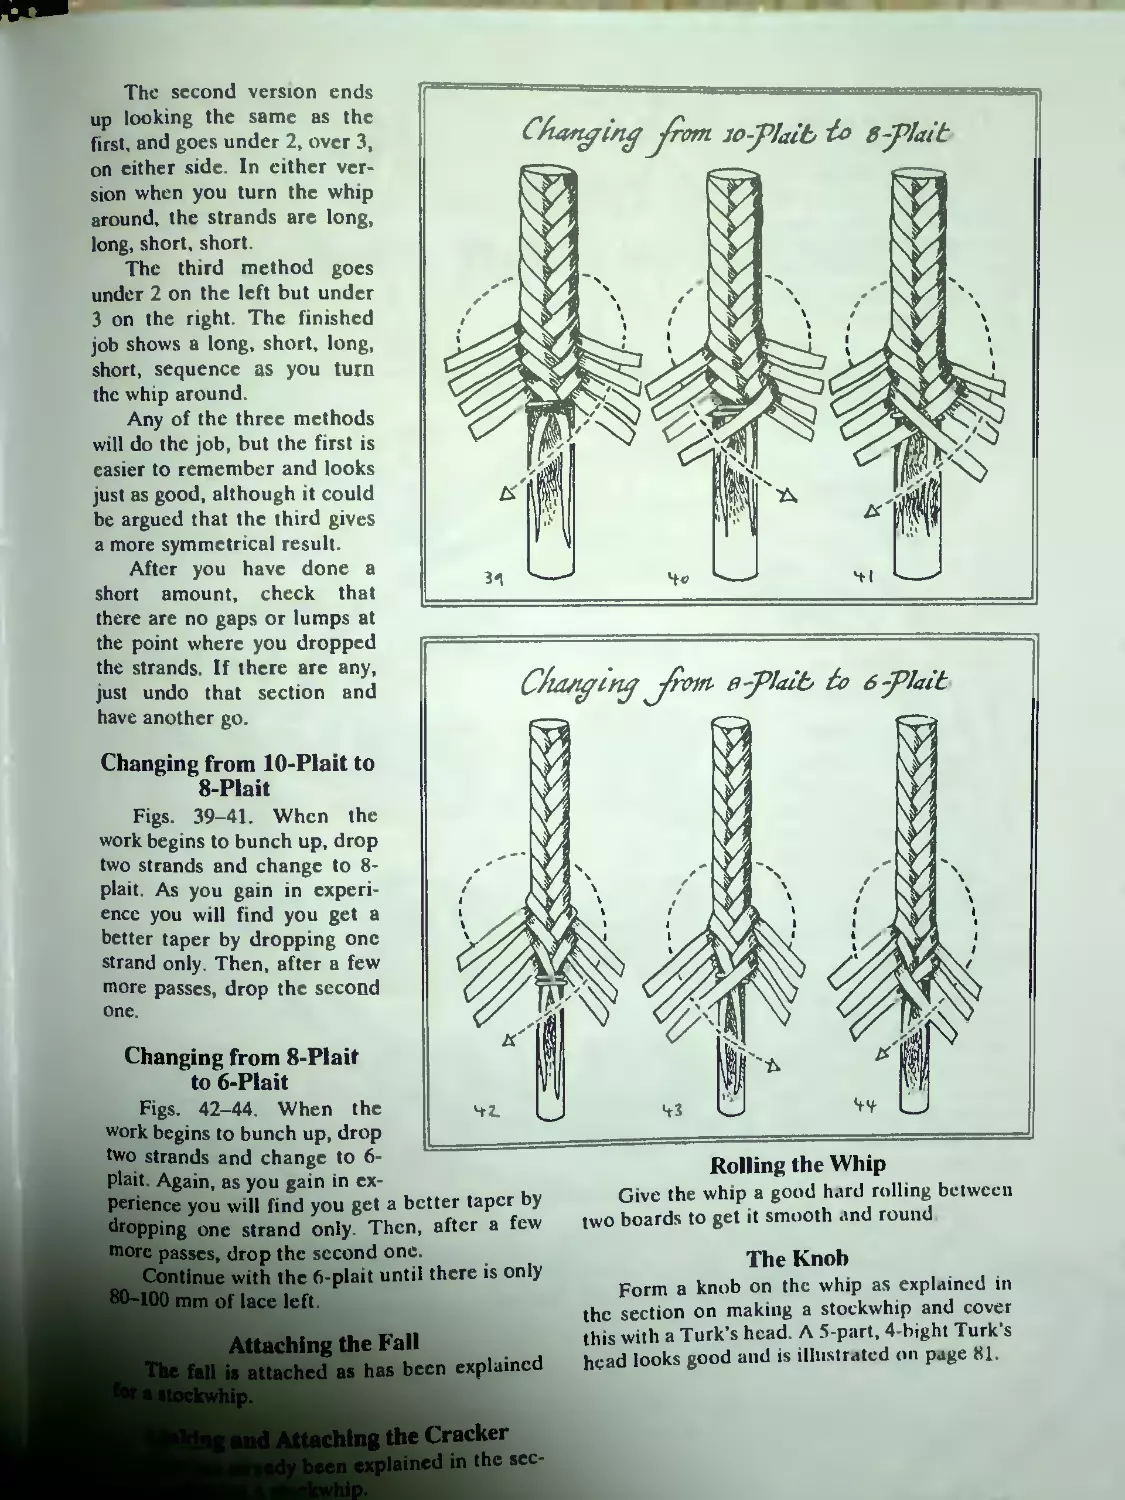
Changing from 10-Plan to 8-Plait . 95
Changing from 8-Plait to 6-Plait .... 95
Attaching the Fall..........................95
Making and Attaching the Cracker........ 95
Rolling the Whip............................95
The Knob.......................... - . . 95
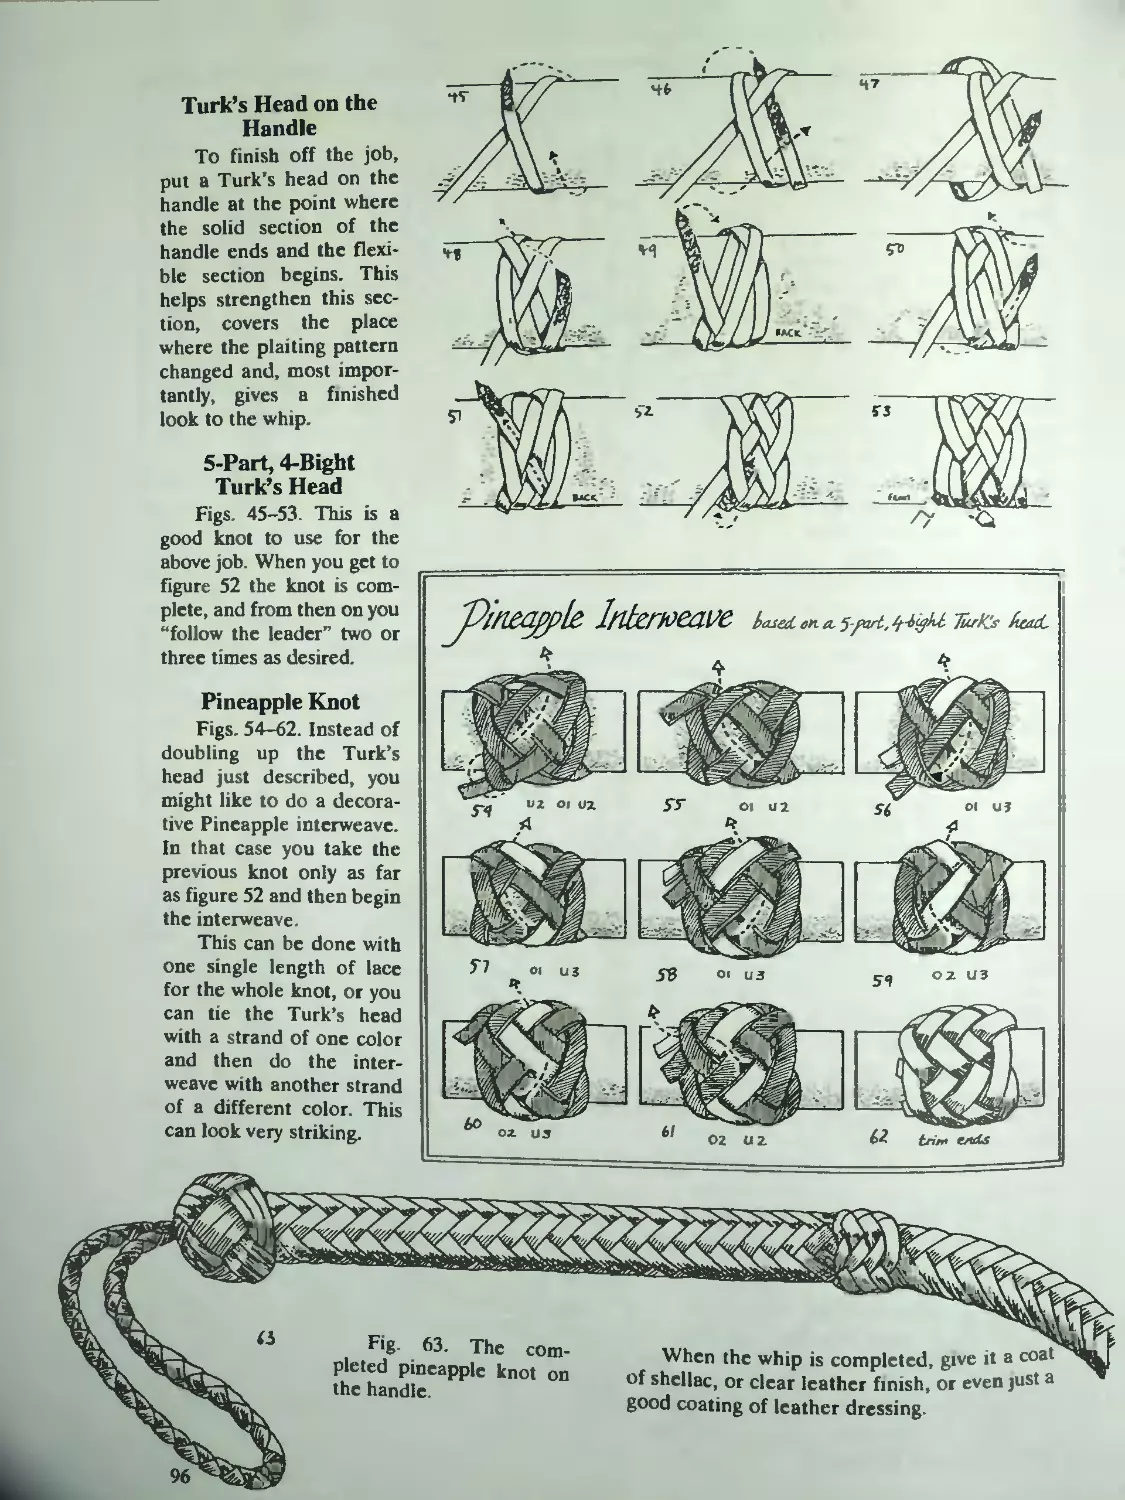
Turk's Head on the Handle...............96
5-Part, 4-Bight Turk's Head.......... 96
Pineapple Knot..............................96
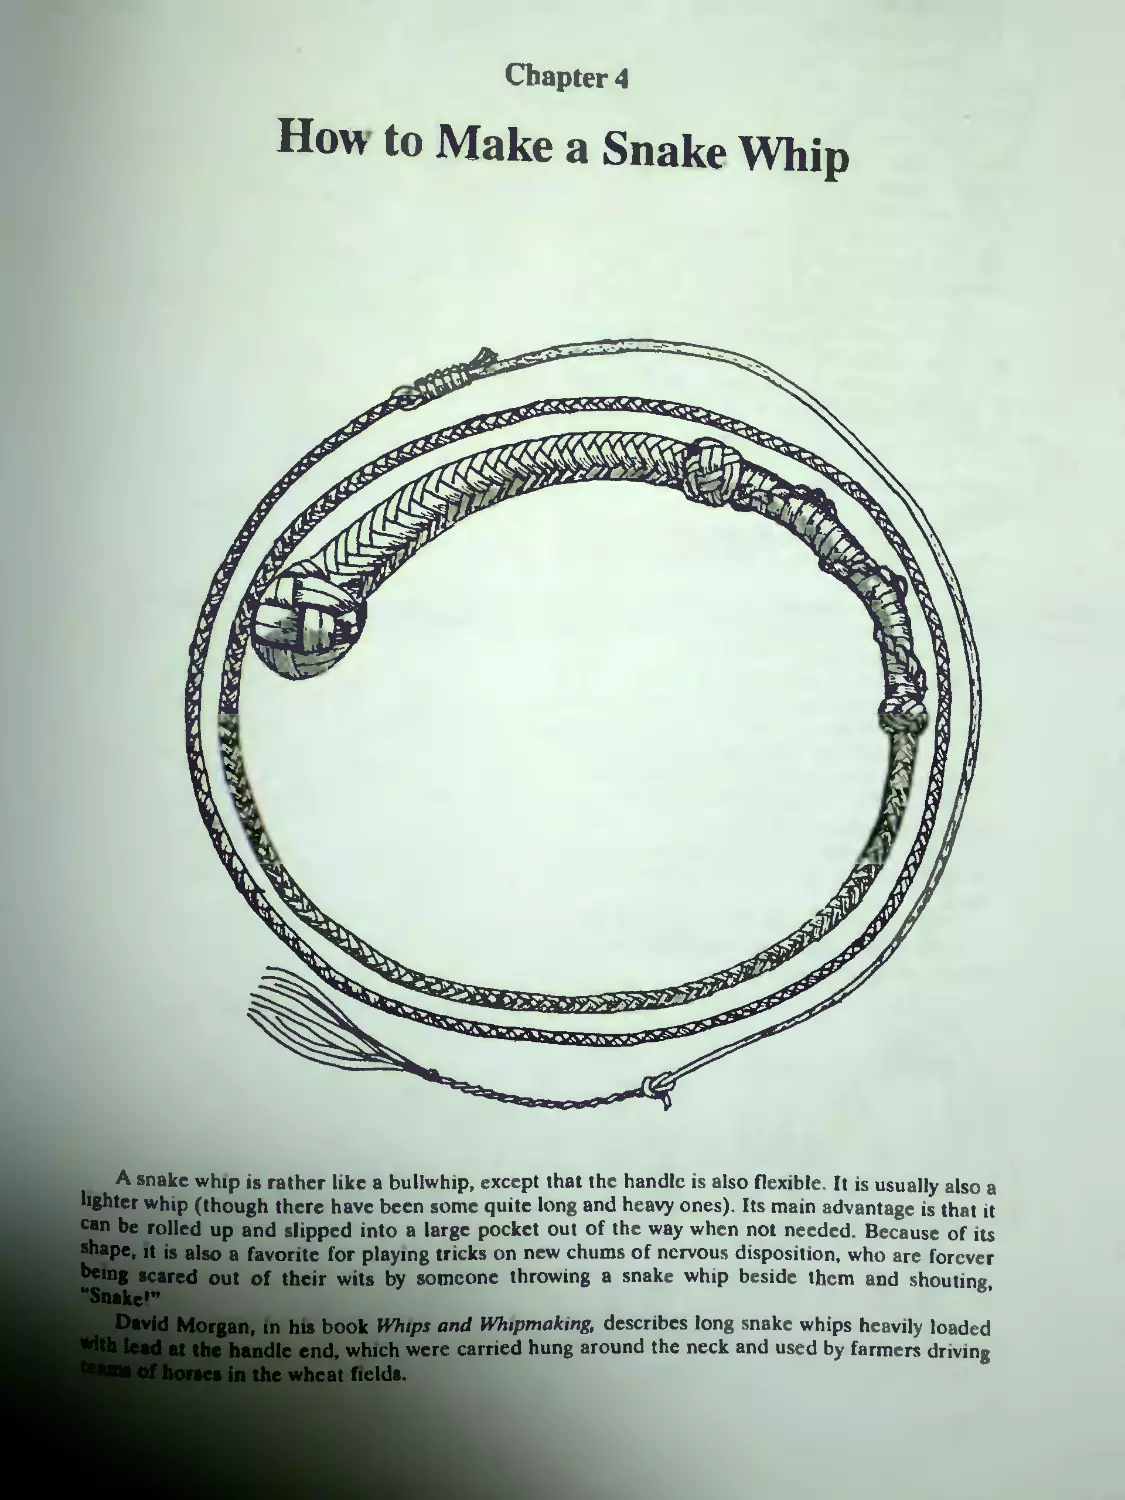
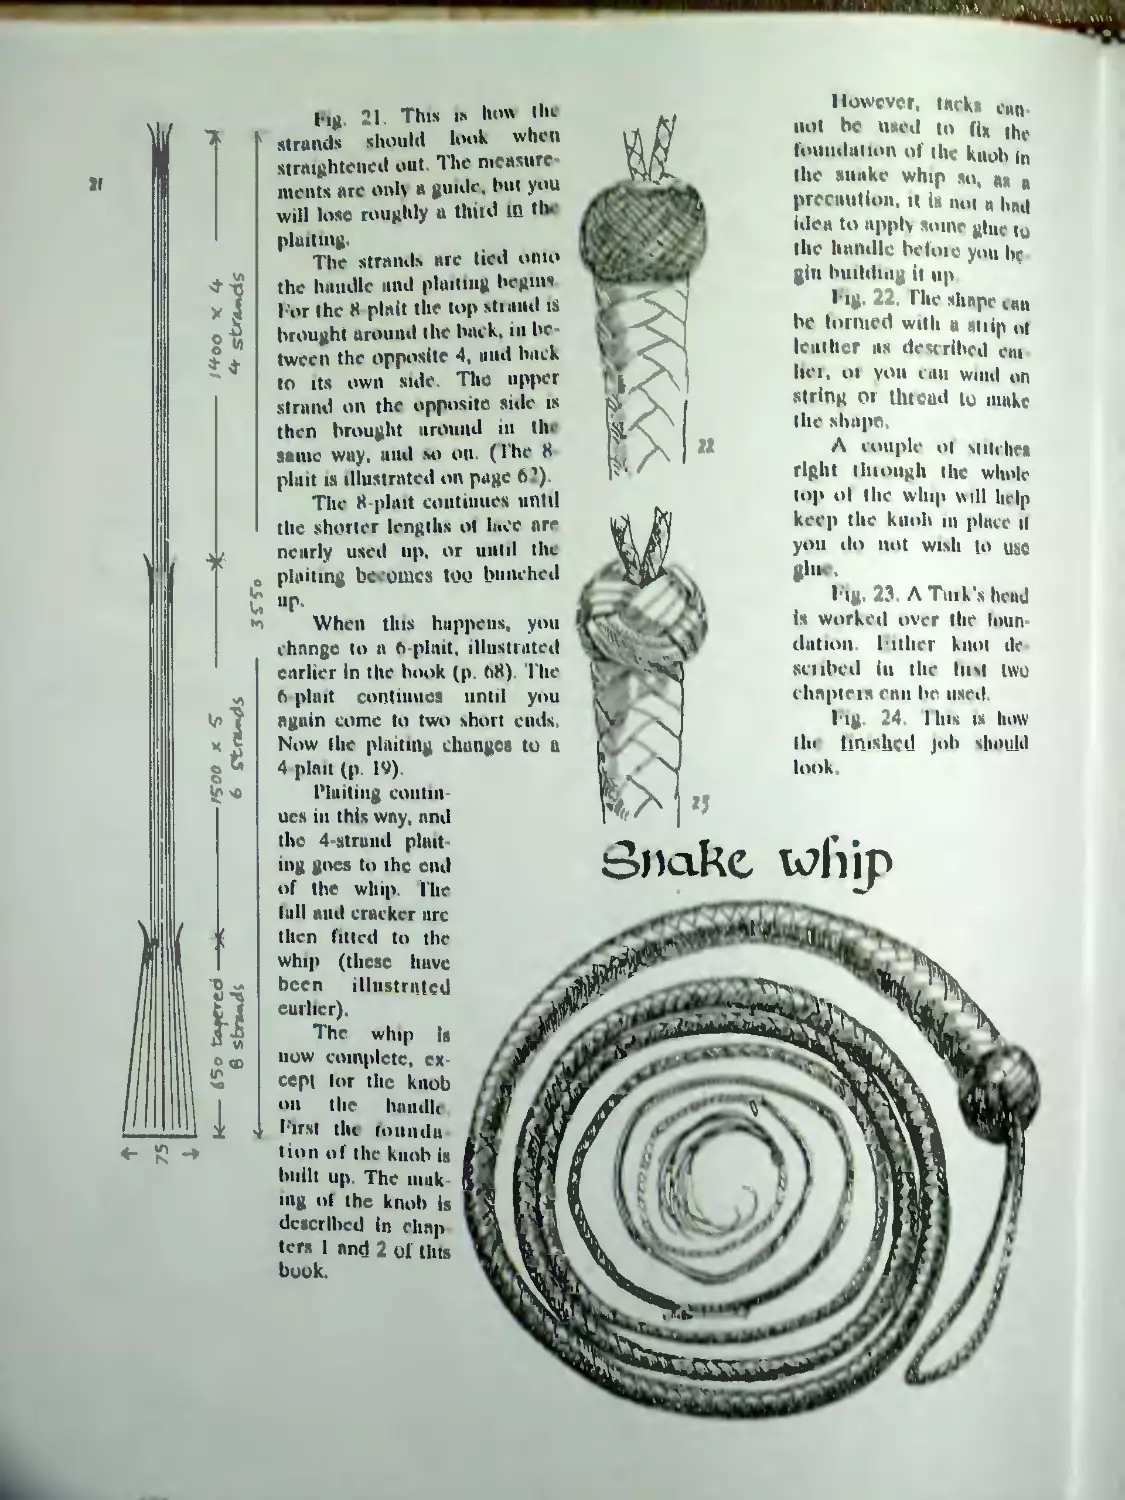
Chapter 4: How to Make a Snake Whip ... .97
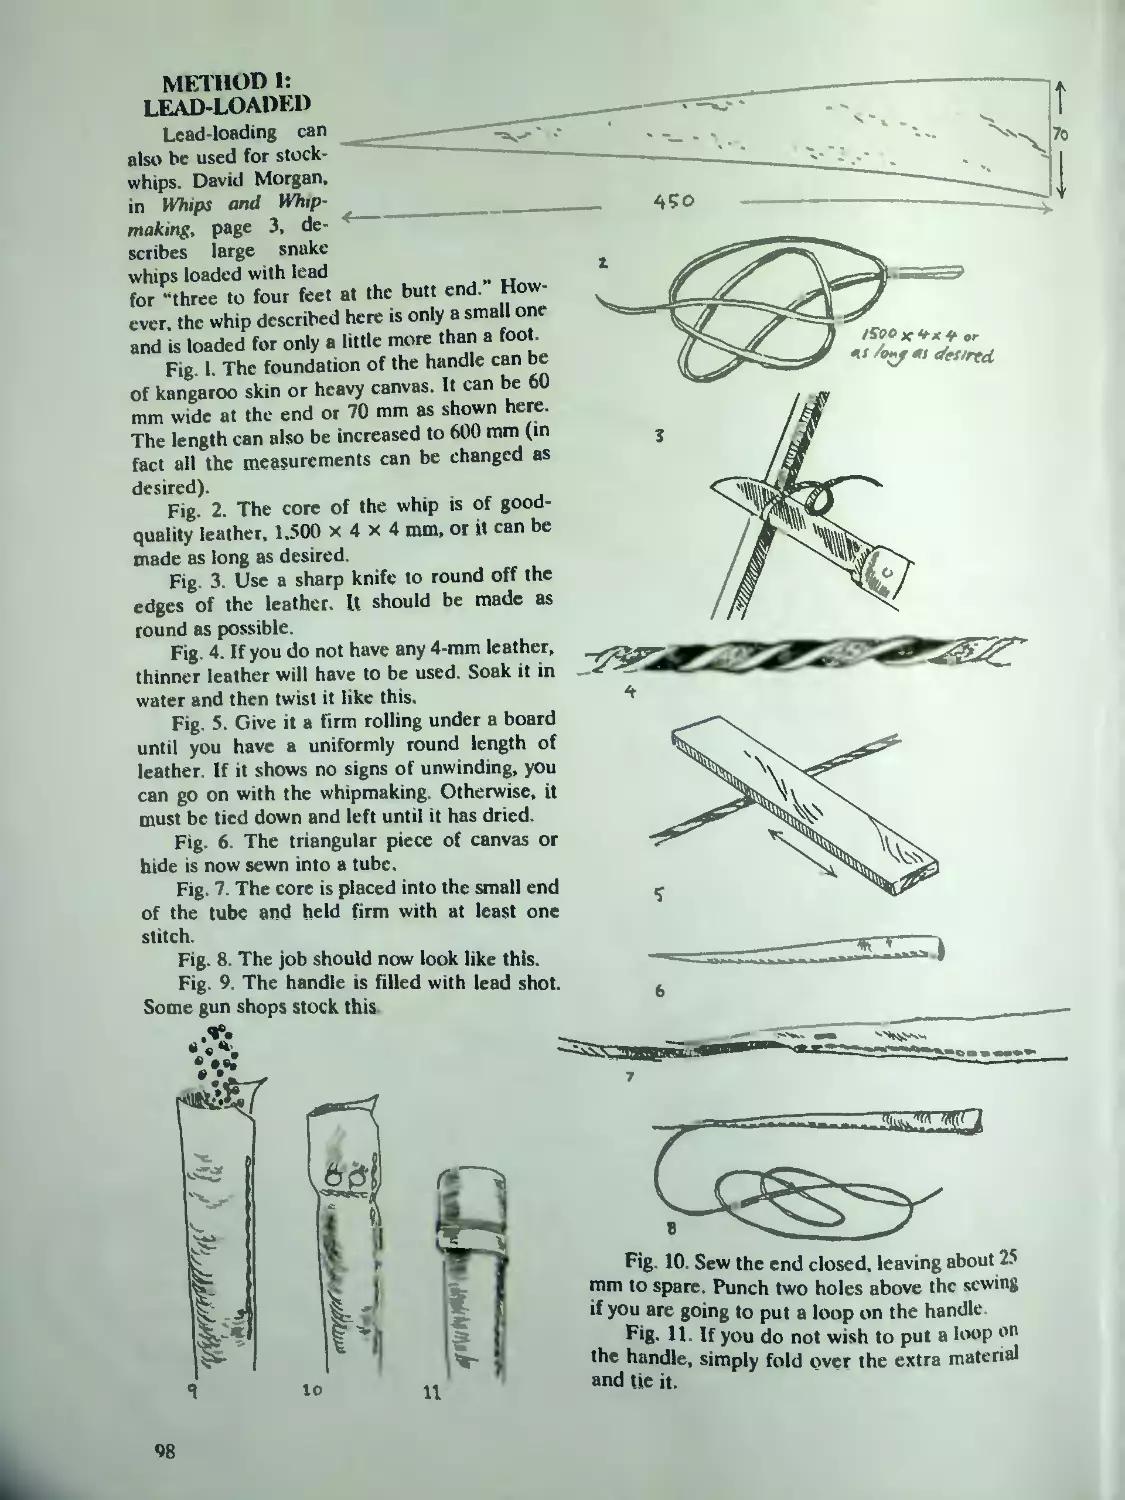
Method I: Lead-Loaded . ...... . . 98
Handle Loop................................ 99
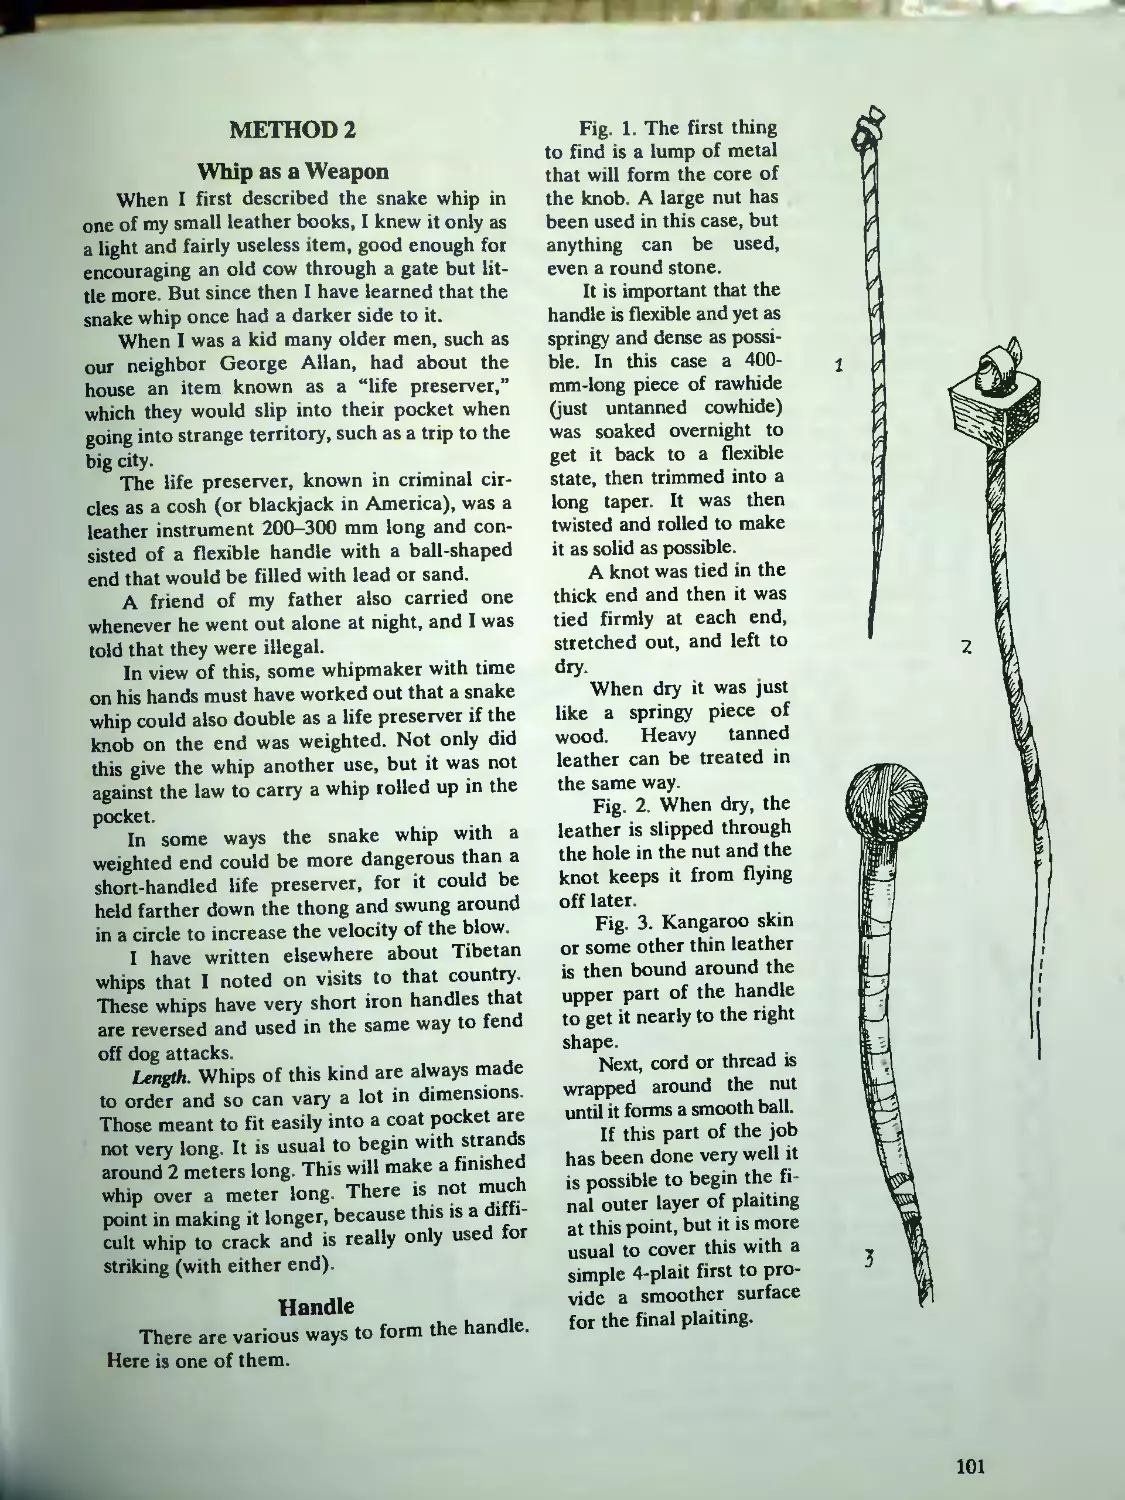
Method 2...................................101
Whip as a Weapon........................... 101
Handle.....................................101
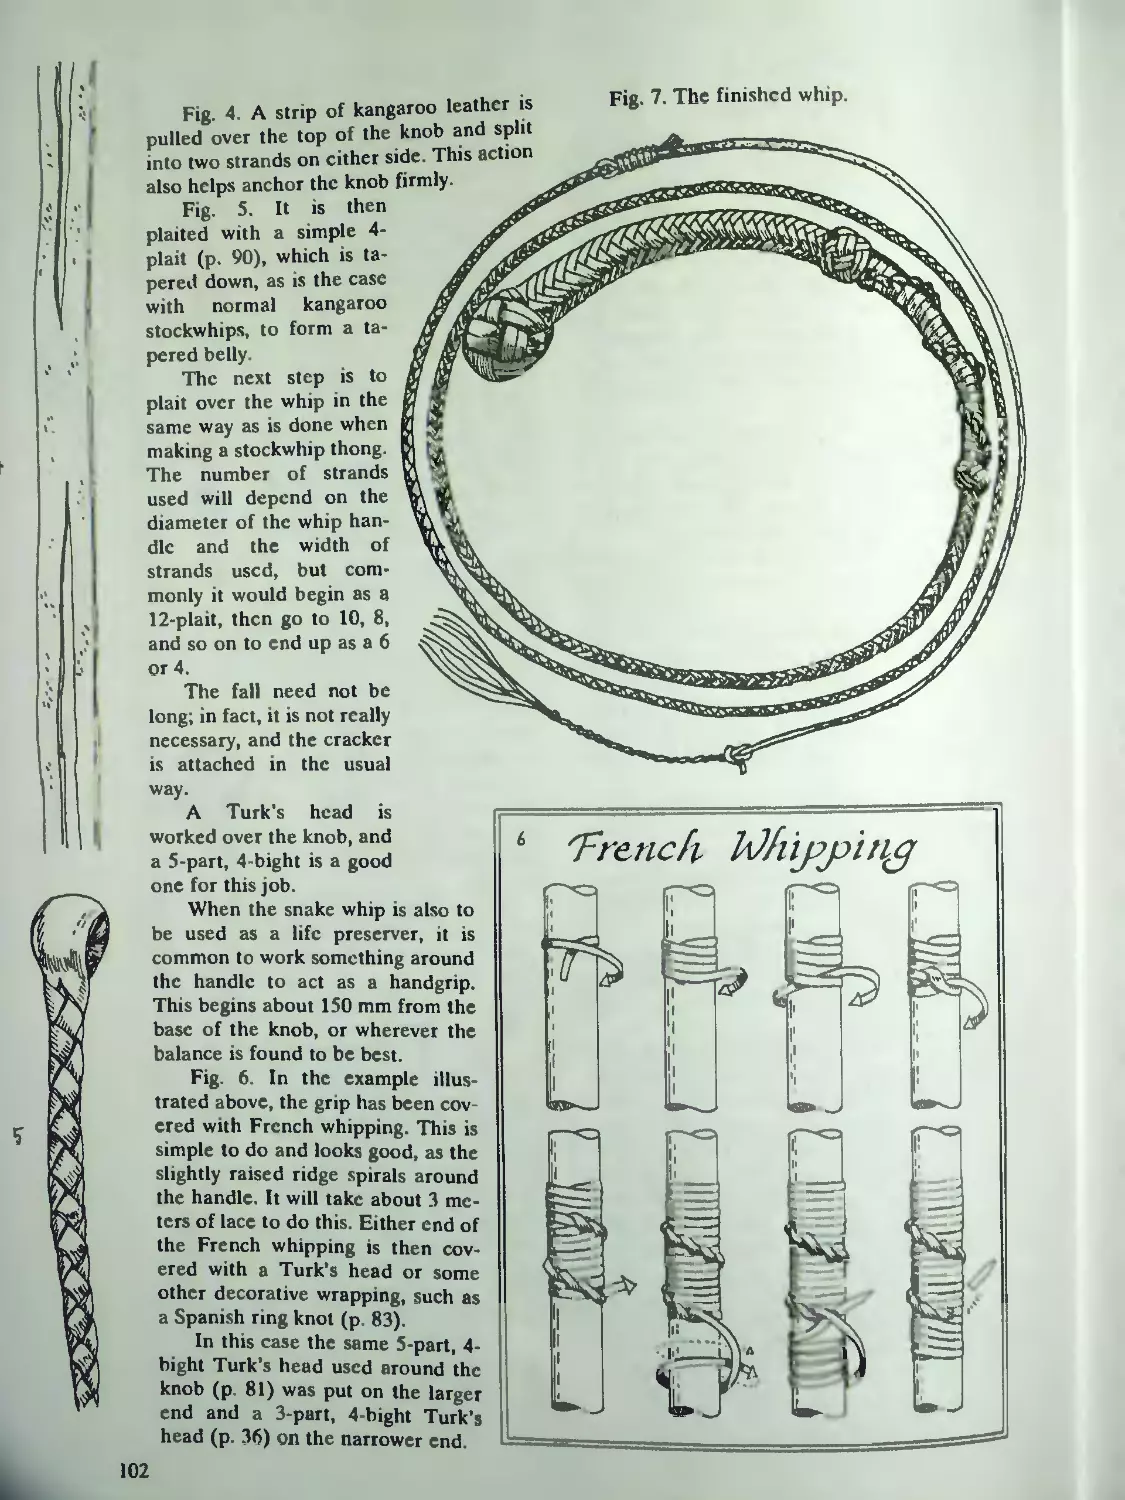
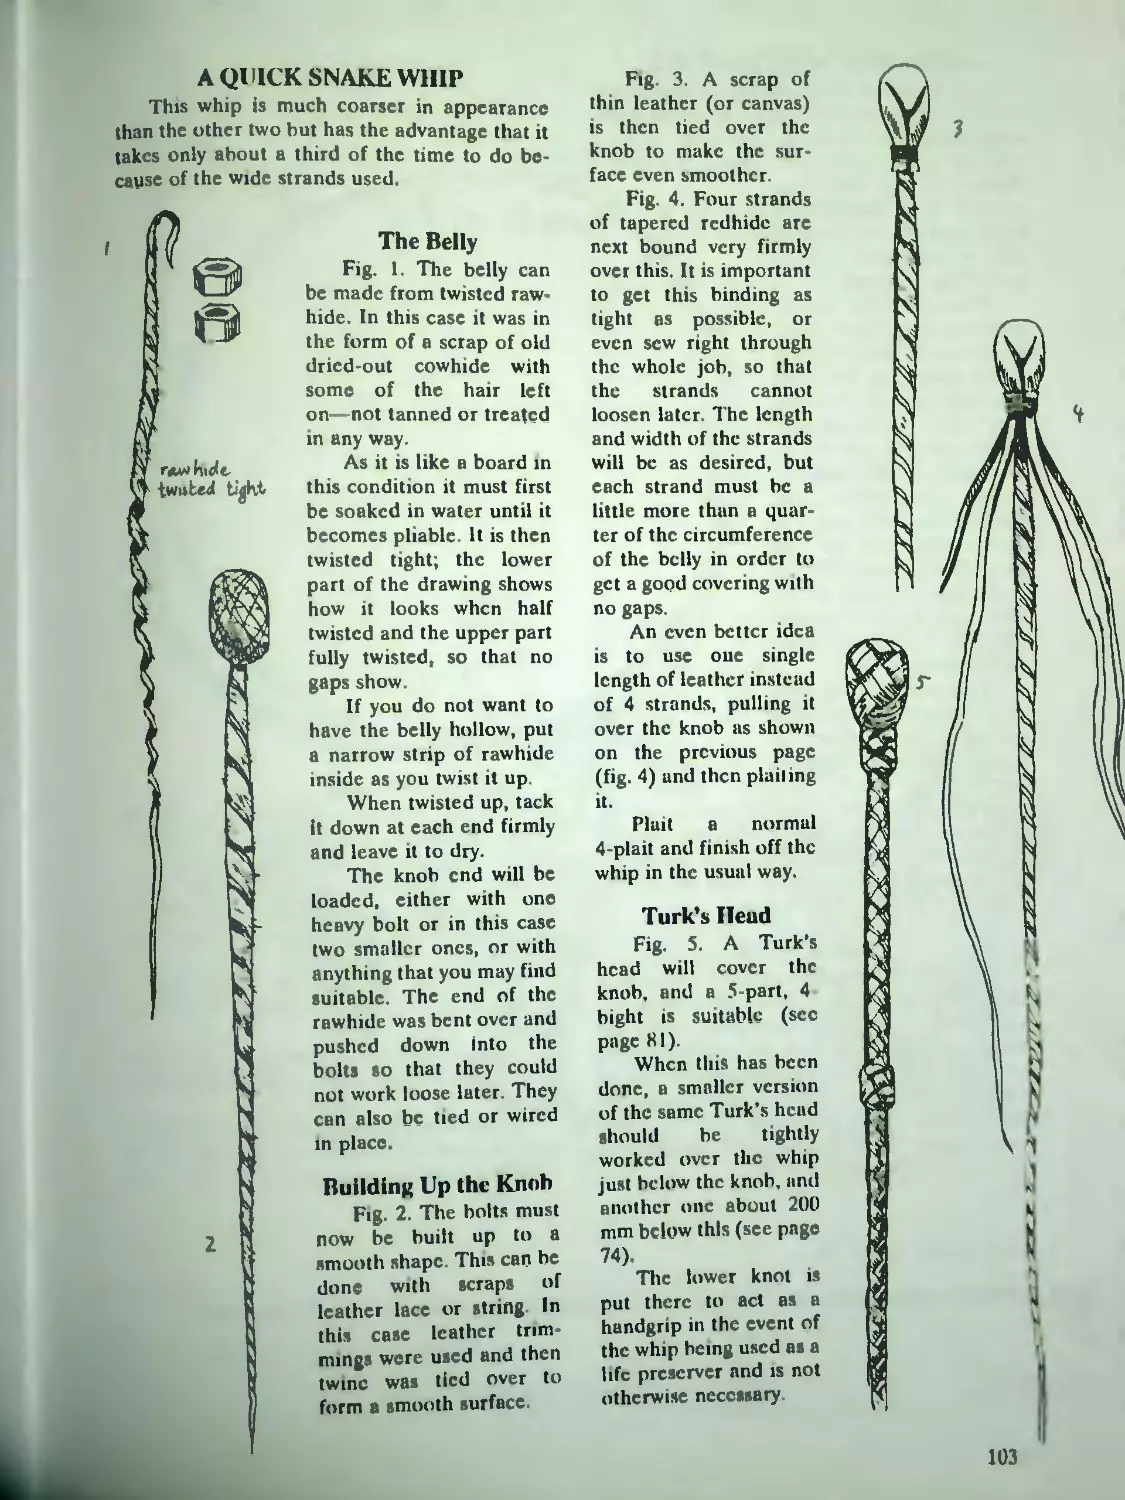
A Quick Snake Whip.........................103
The Belly................................. 103
Building Up the Knob...................... 103
Turk's Head 103
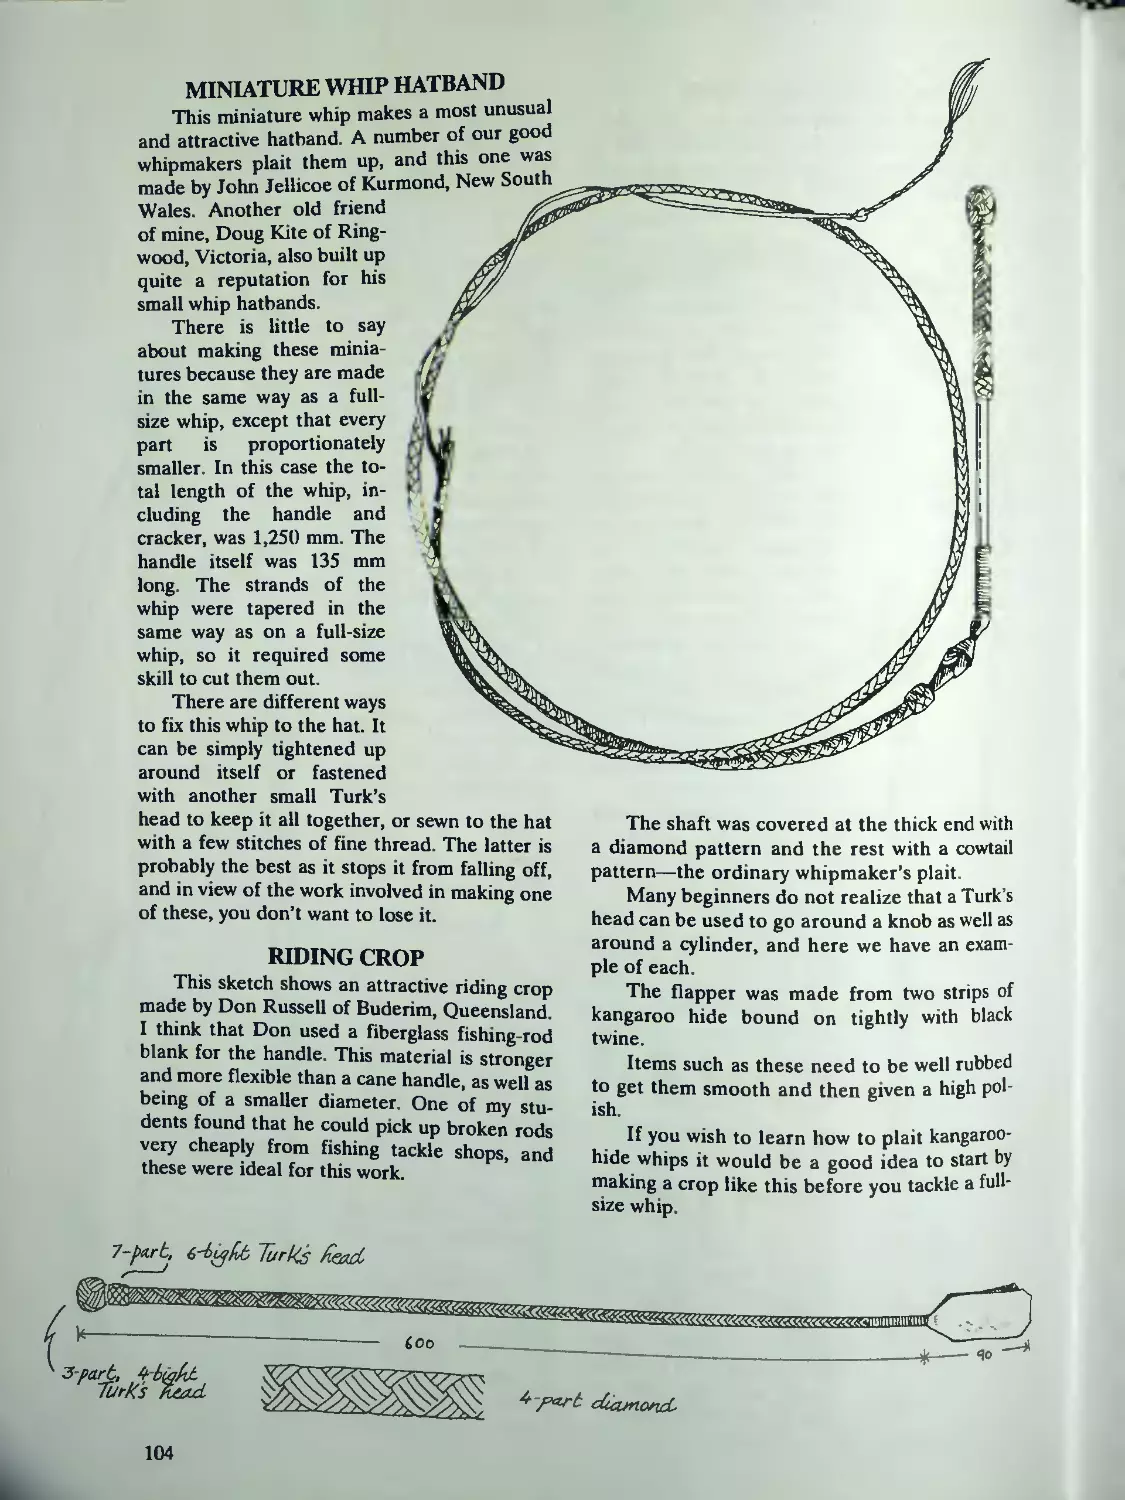
Miniature Whip Hi tband....................104
Riding Crop ...............................104
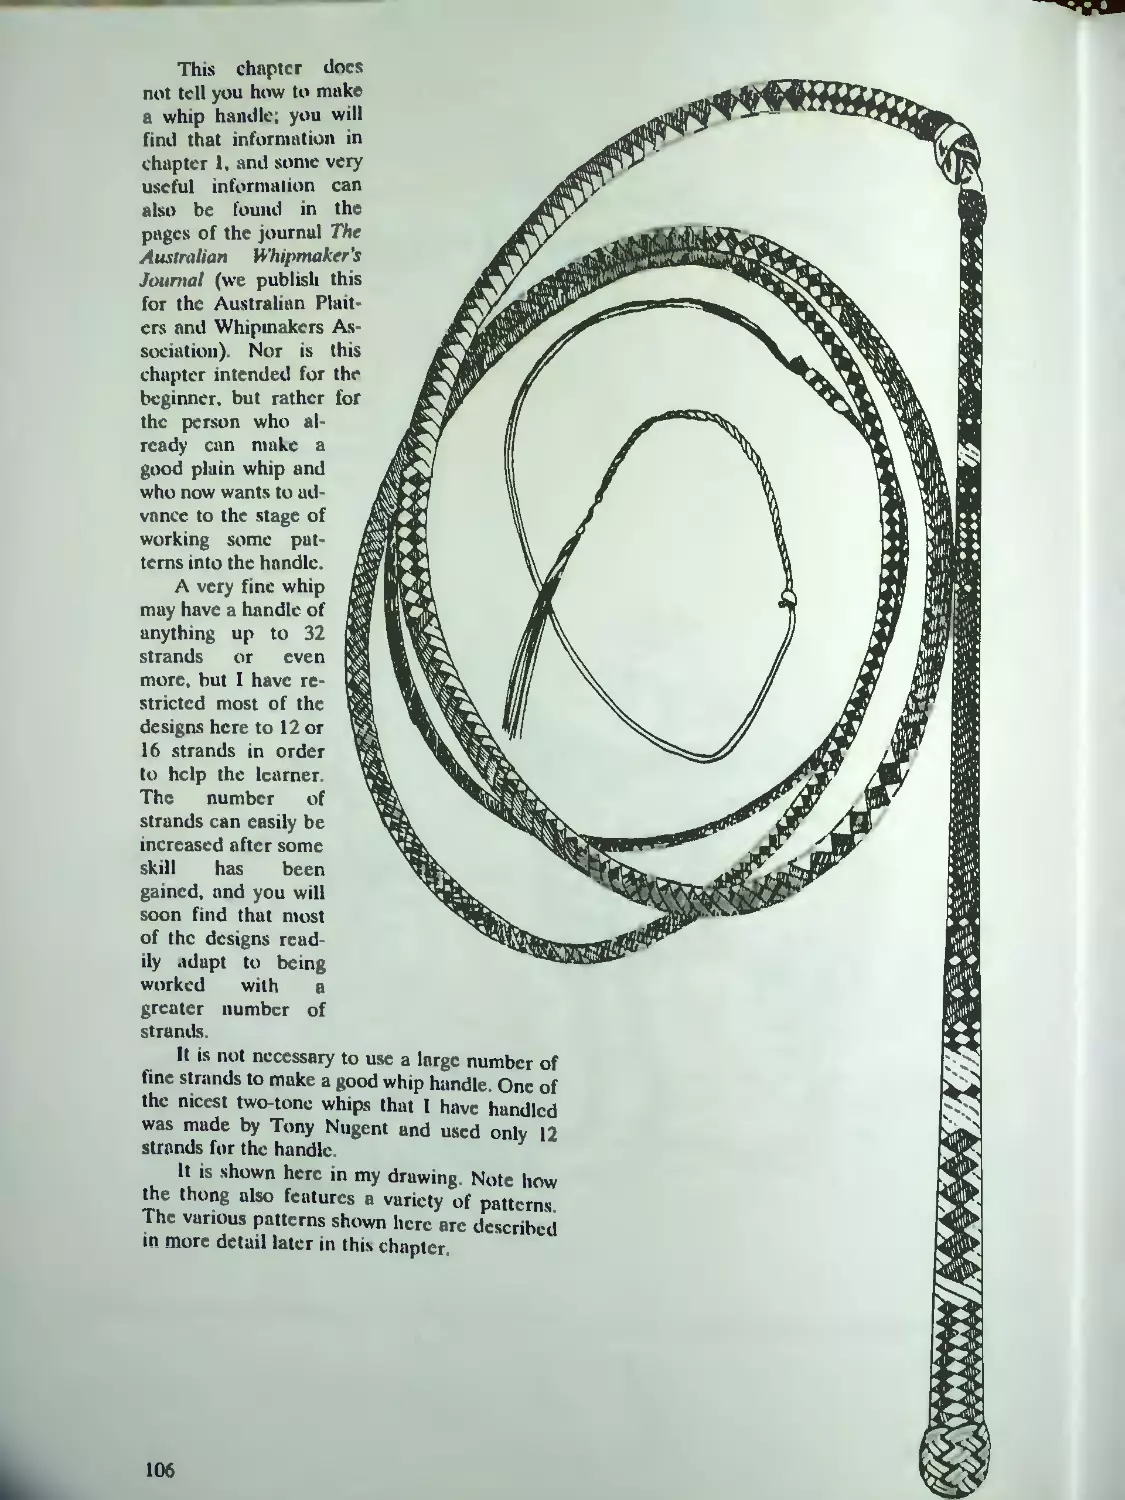
Chapter 5: Whip Handle Designs . 105
Twisted Handles.......................... 108
Carved Timber Handles..................... 109
Cowtail Handle ............................110
Lunging Whip...............................110
Designs for Whip Handles 111
Plaiting Soap............................. Ill
Cowtail or Whipmaker's Plait............. 112
Doubled Herringbone....................... 113
Short Herringbone ................ . 113
Chessboard Pli it 114
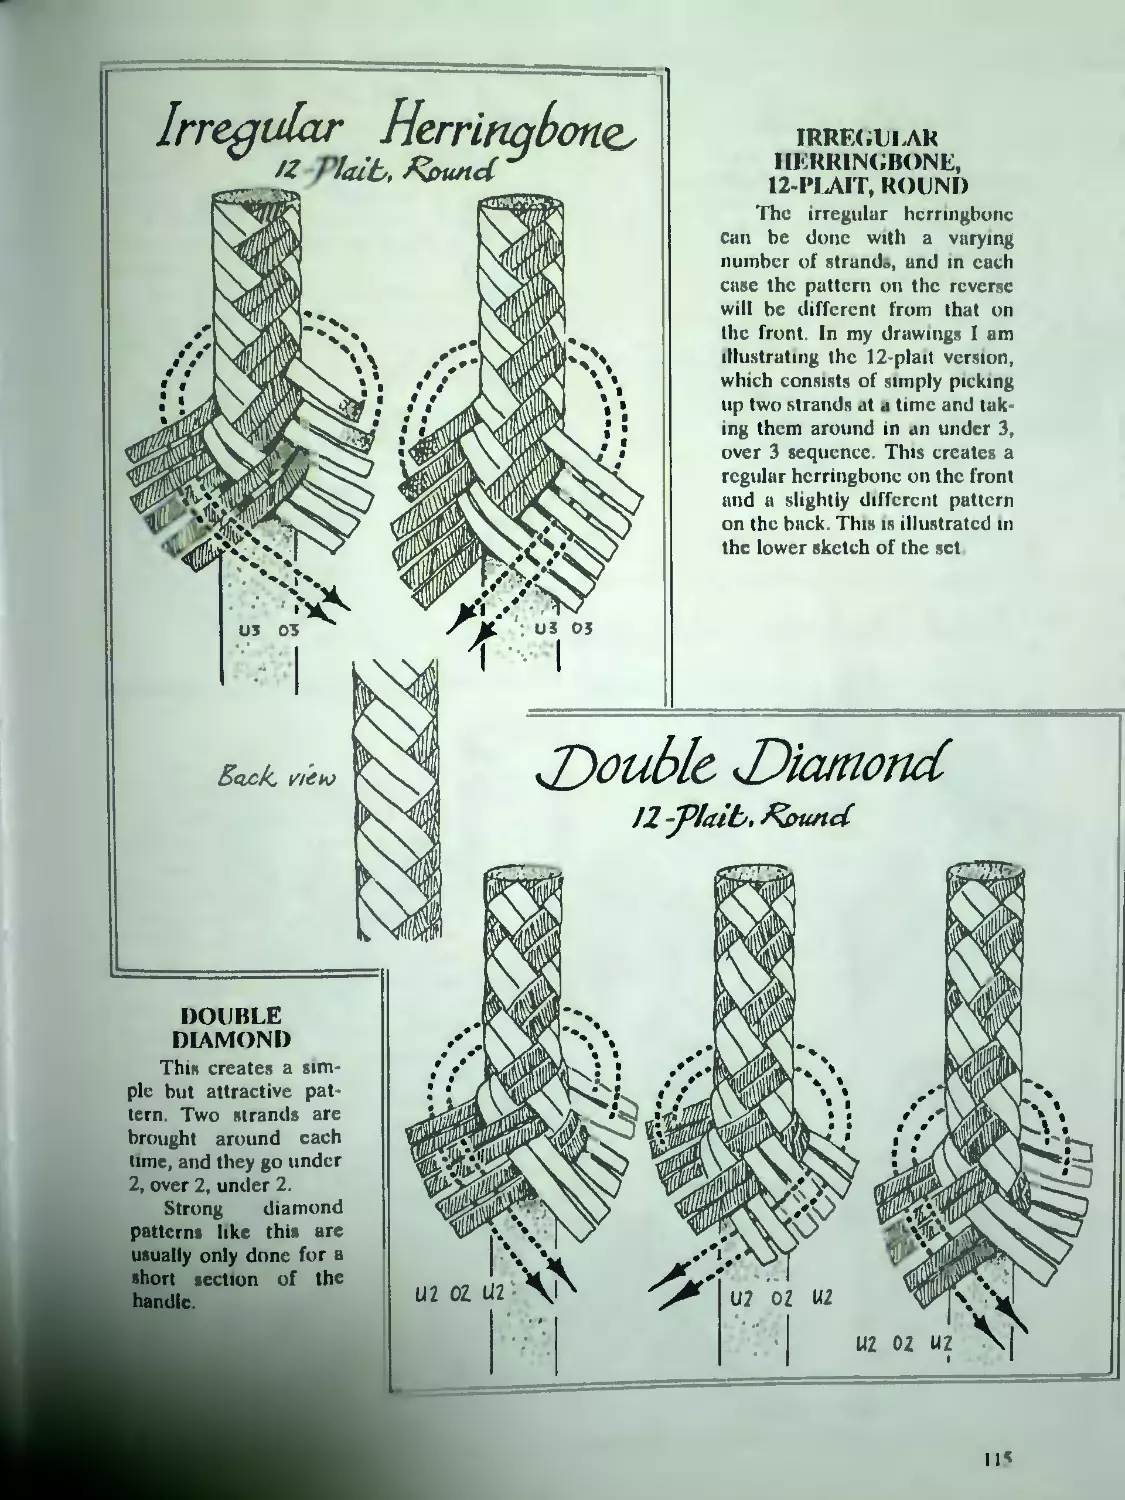
Double Diamond . . , , . 115
Irregular Herringbone 12-Plait, Round 11S
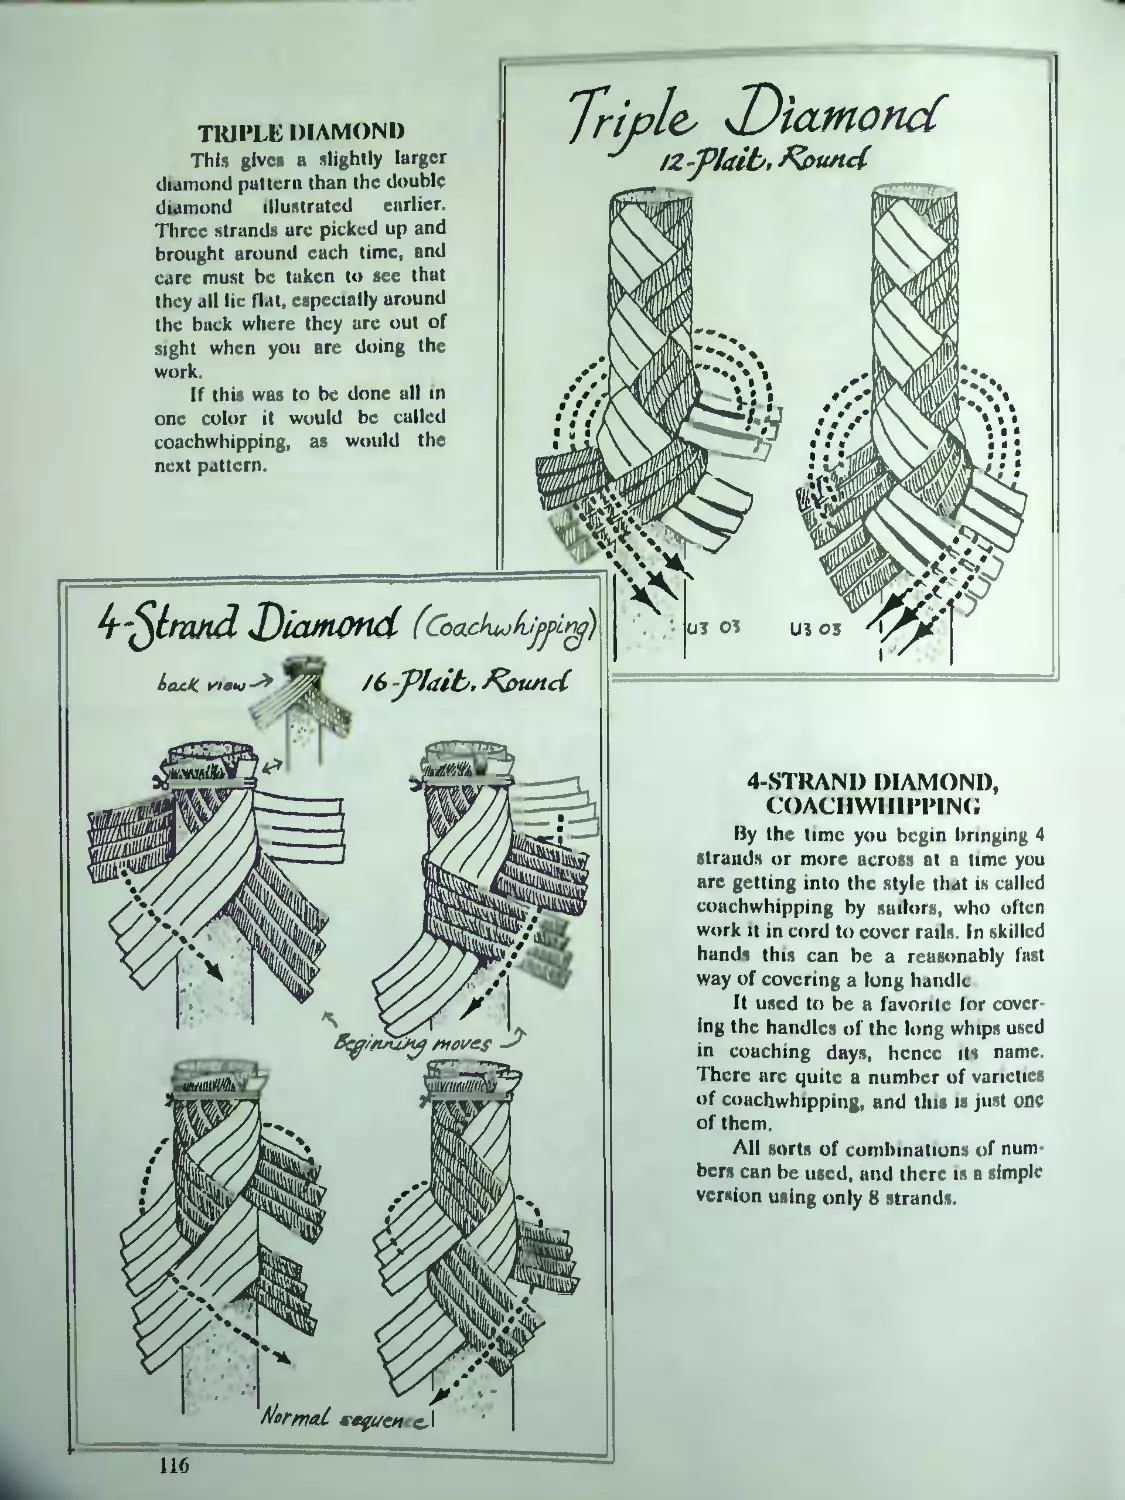
Triple Diamond............. . . 116
4 Strand Diamond. Coachwhipping 116
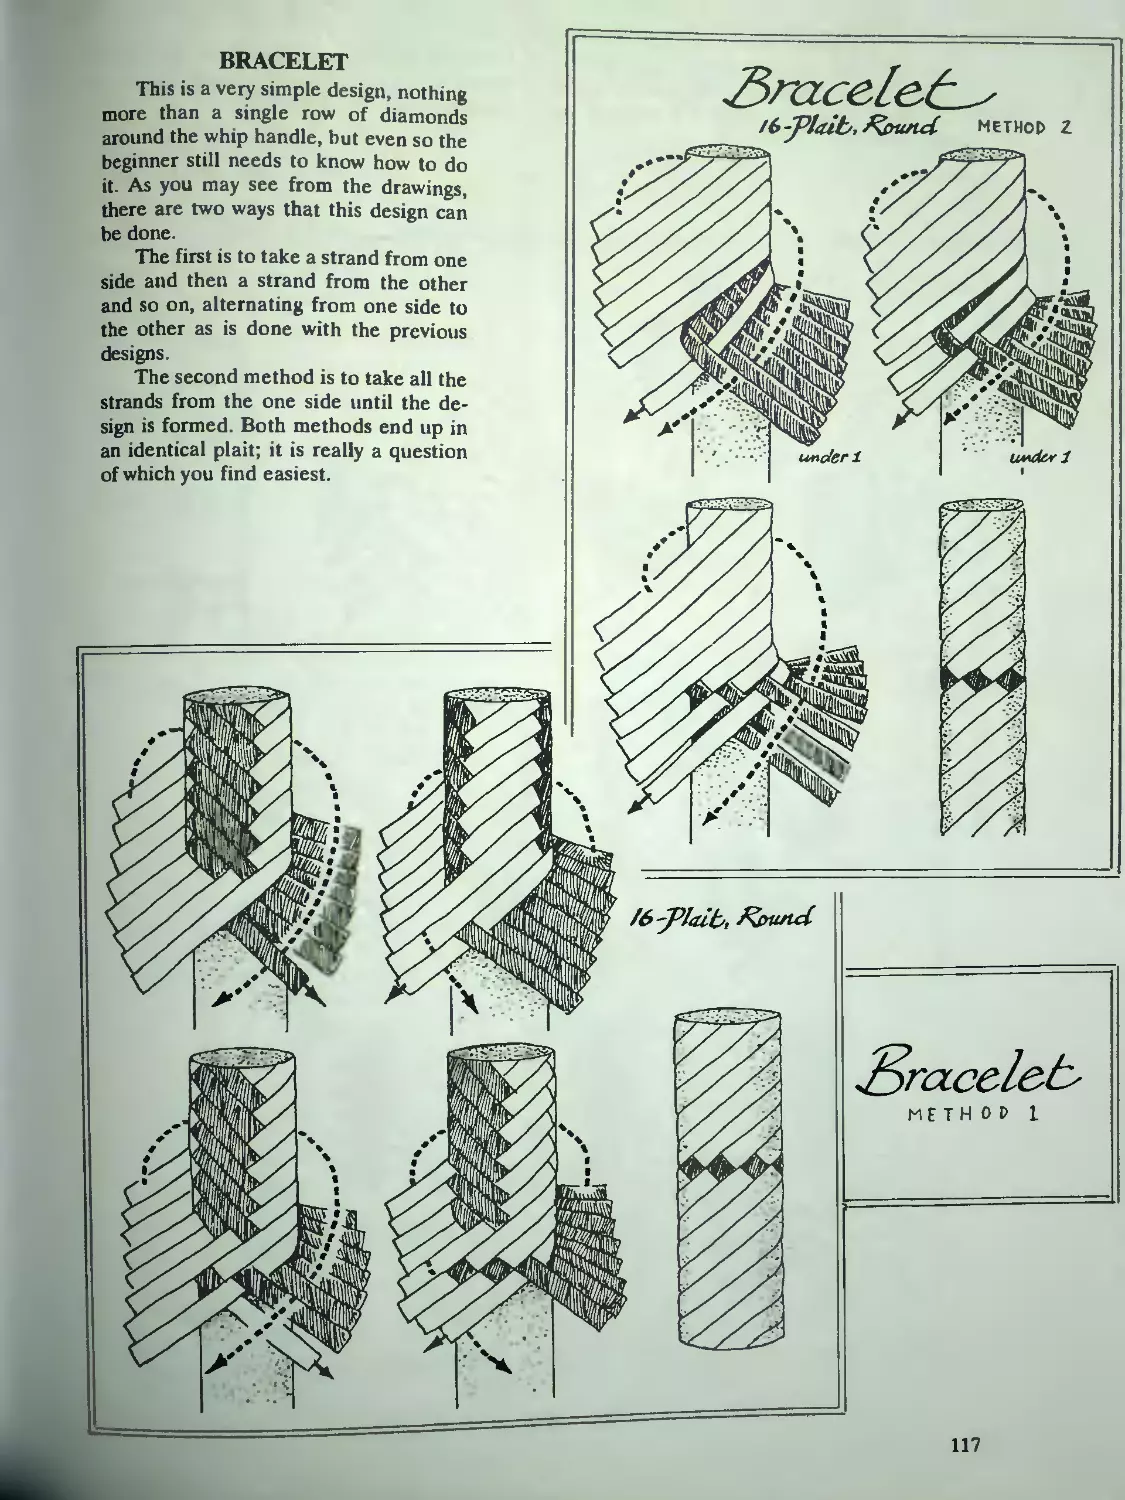
Bracelet ................. . ... H?
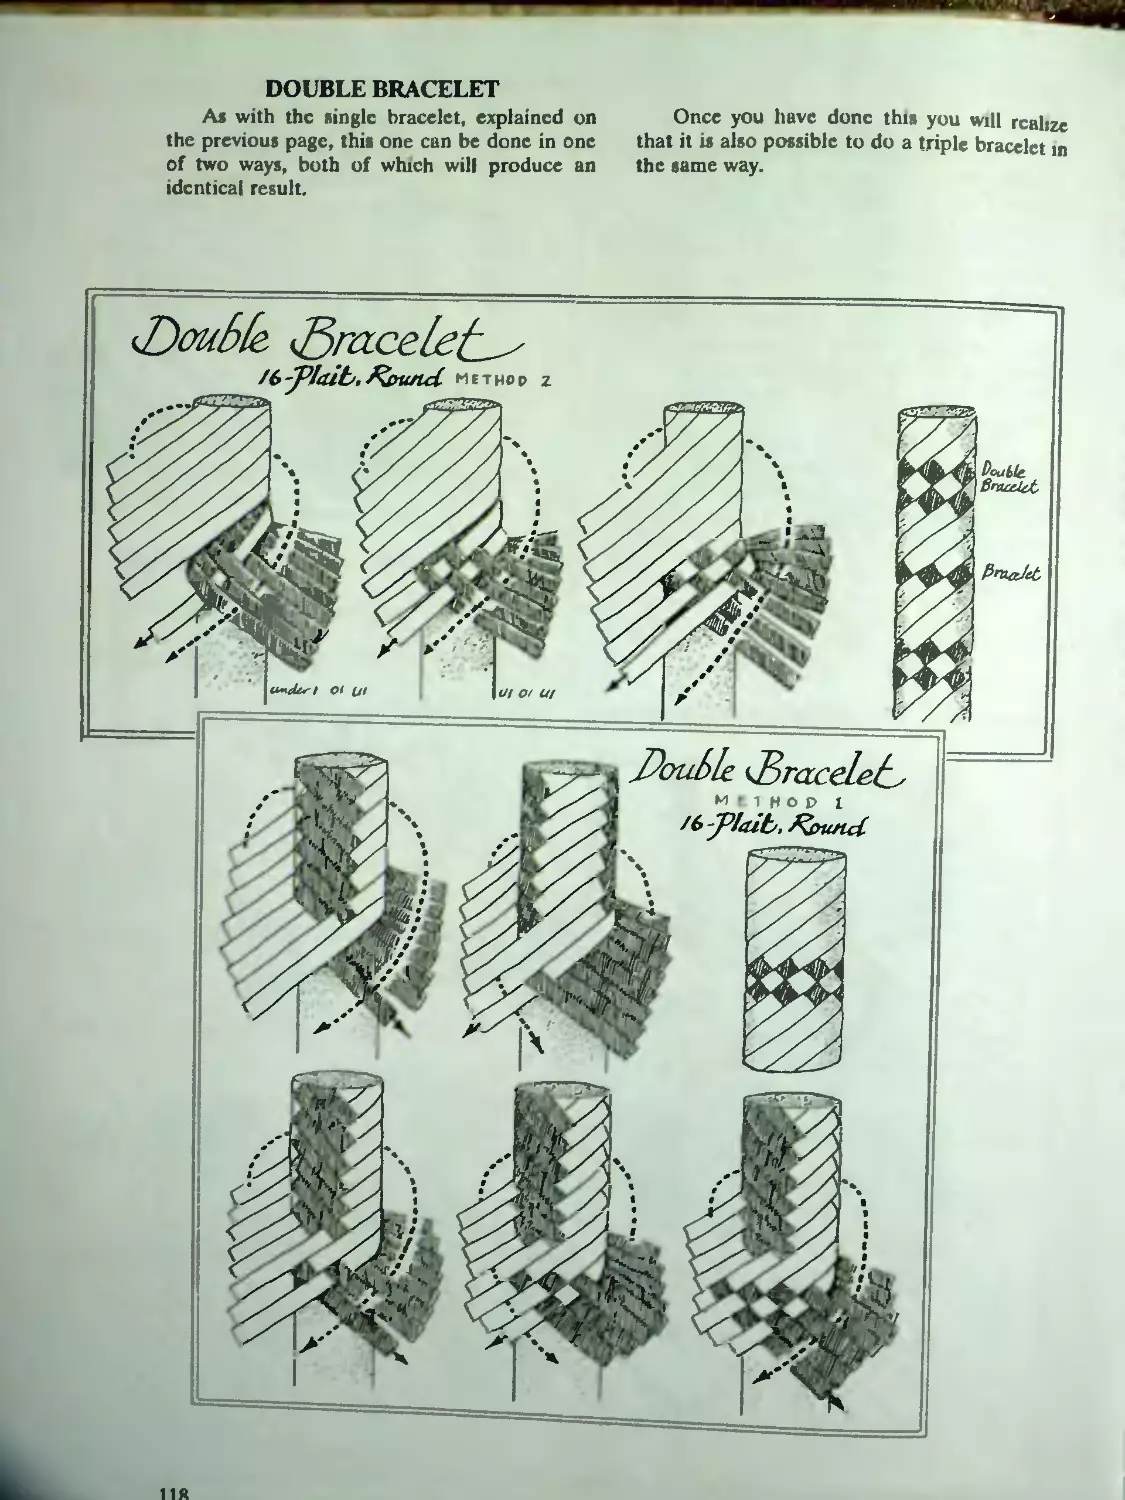
Double Bracelet........................... 118
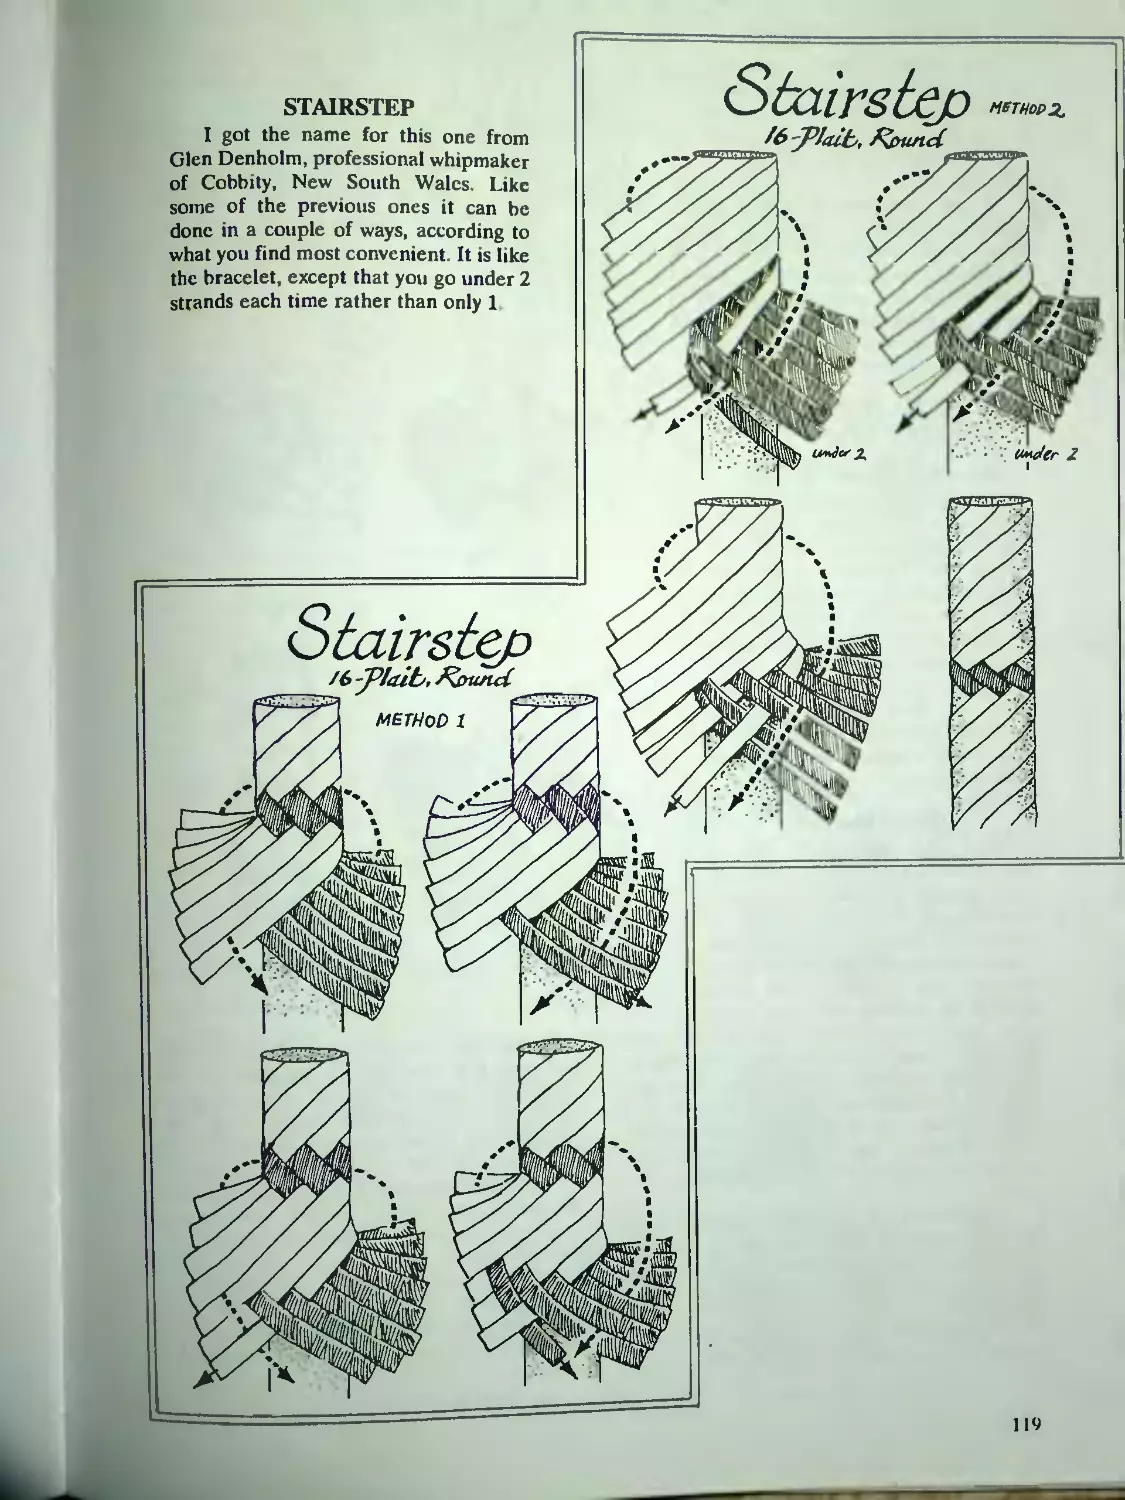
Stairstep .................. . 119
6
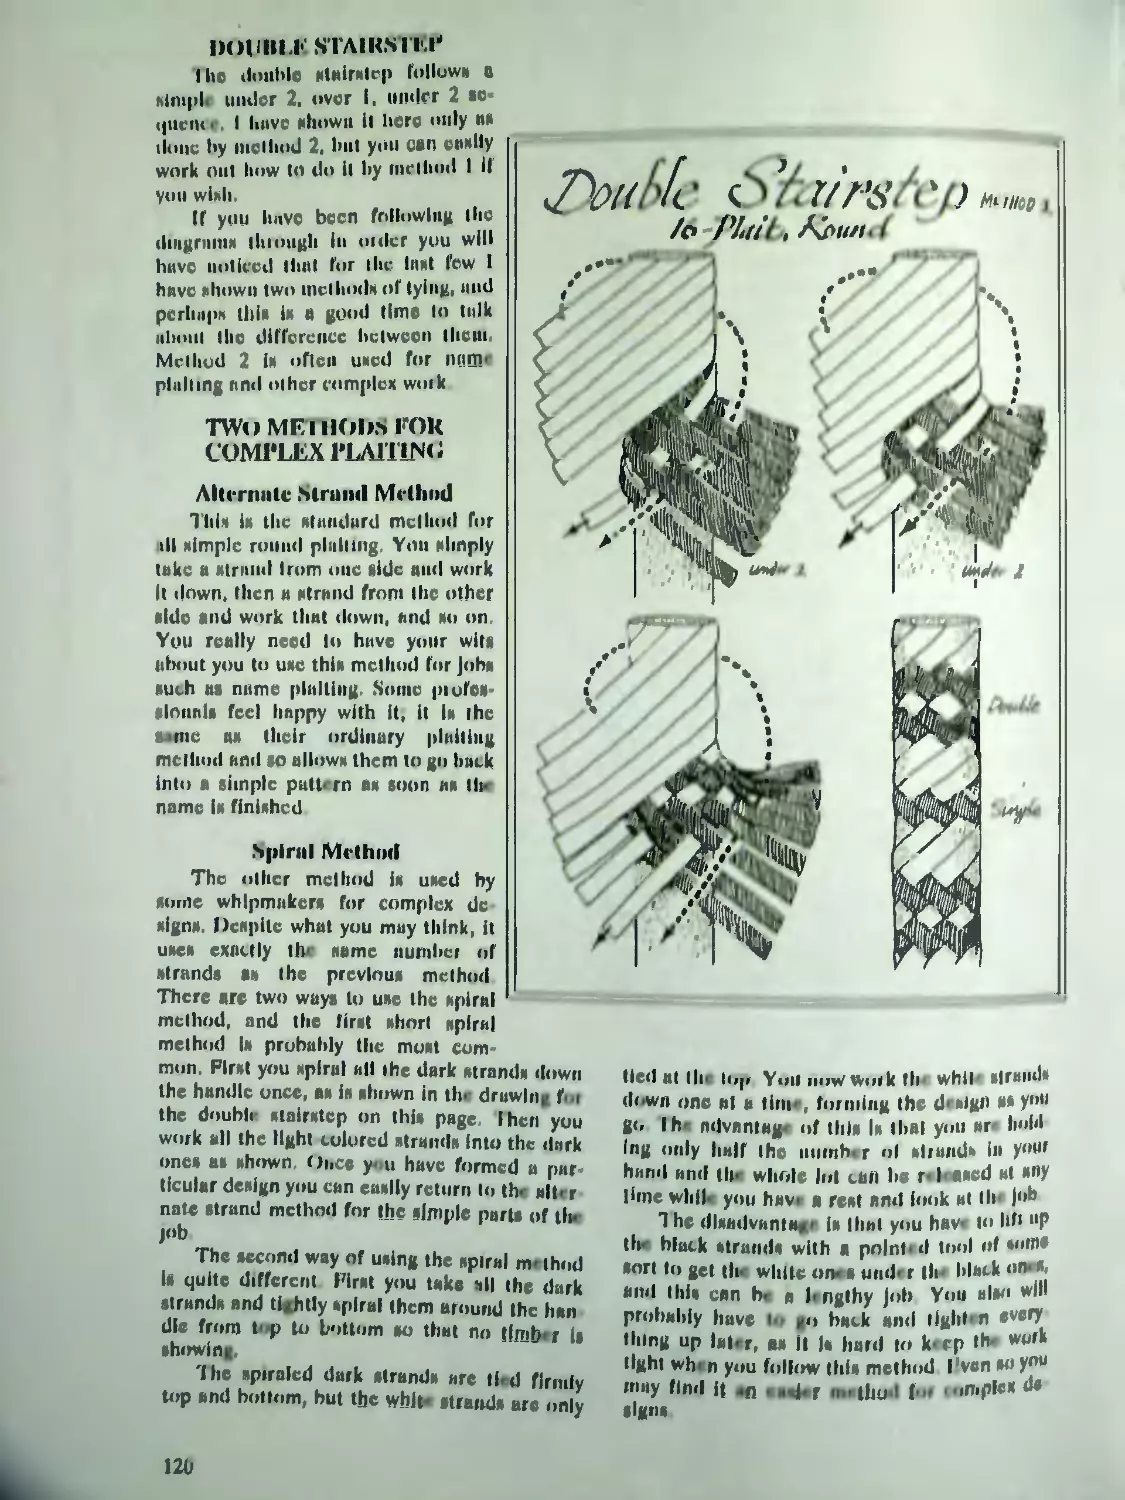
Double Stairstep. ... .120
Two Methods for Complex Plaiting . 120
Alternate Strand Method................. ... 120
Spiral Method .... 120
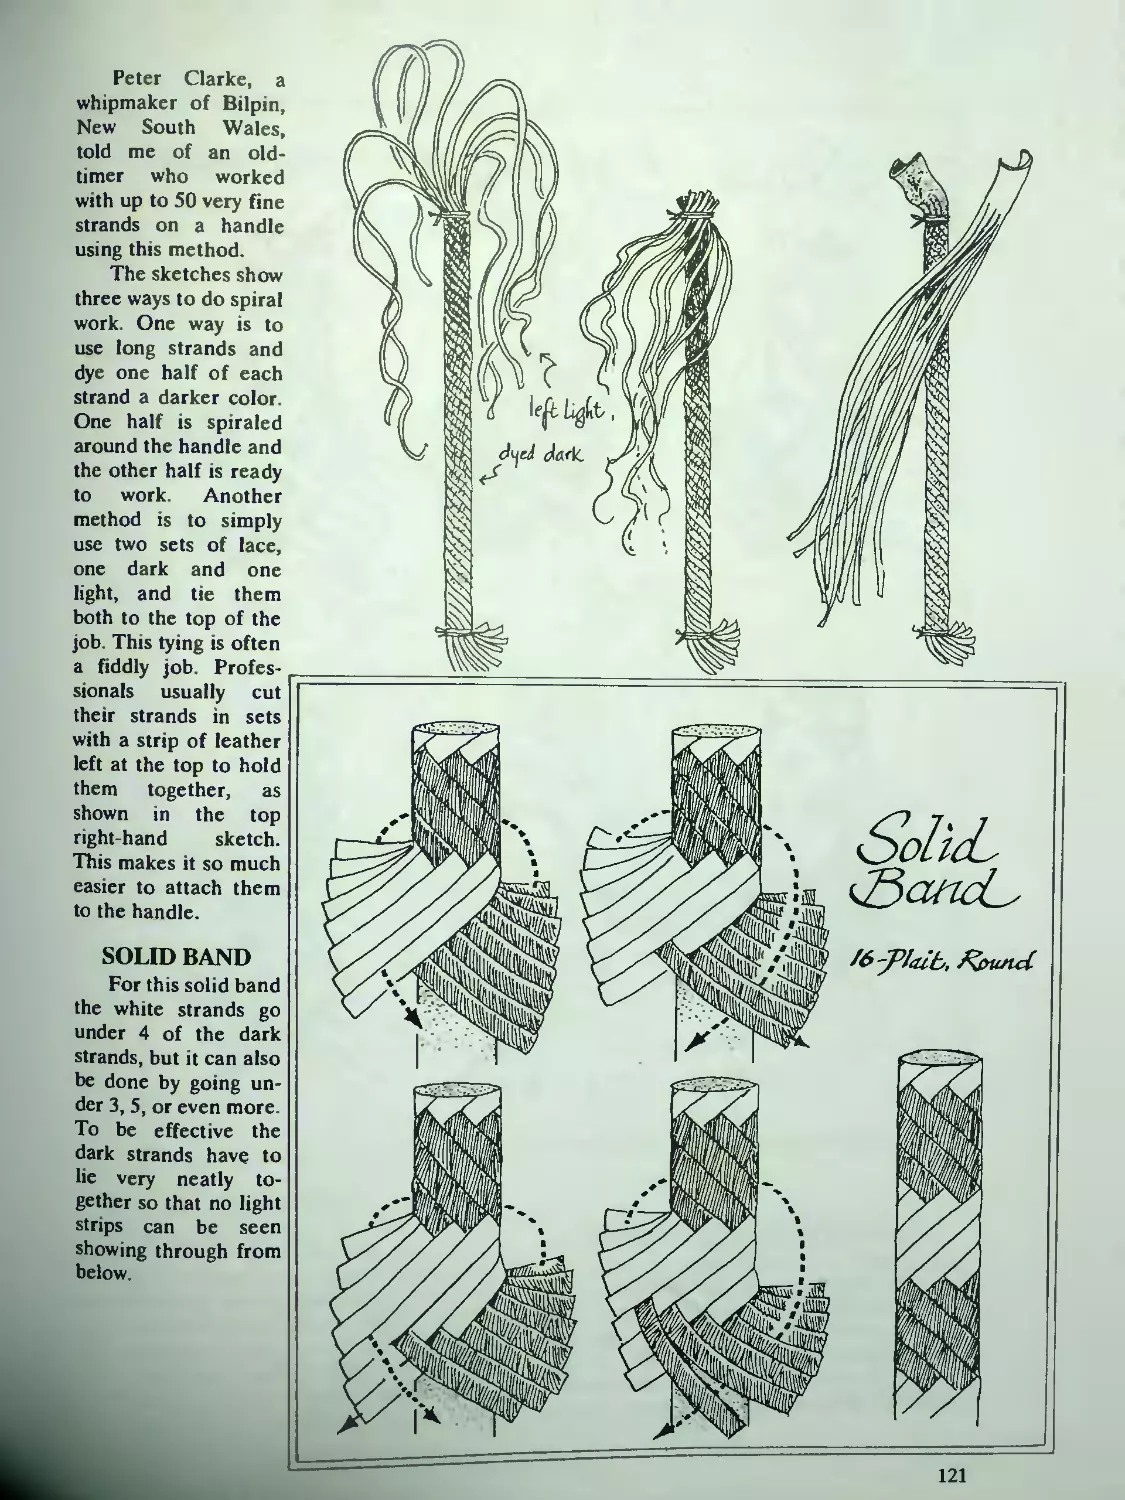
Solid Band 121
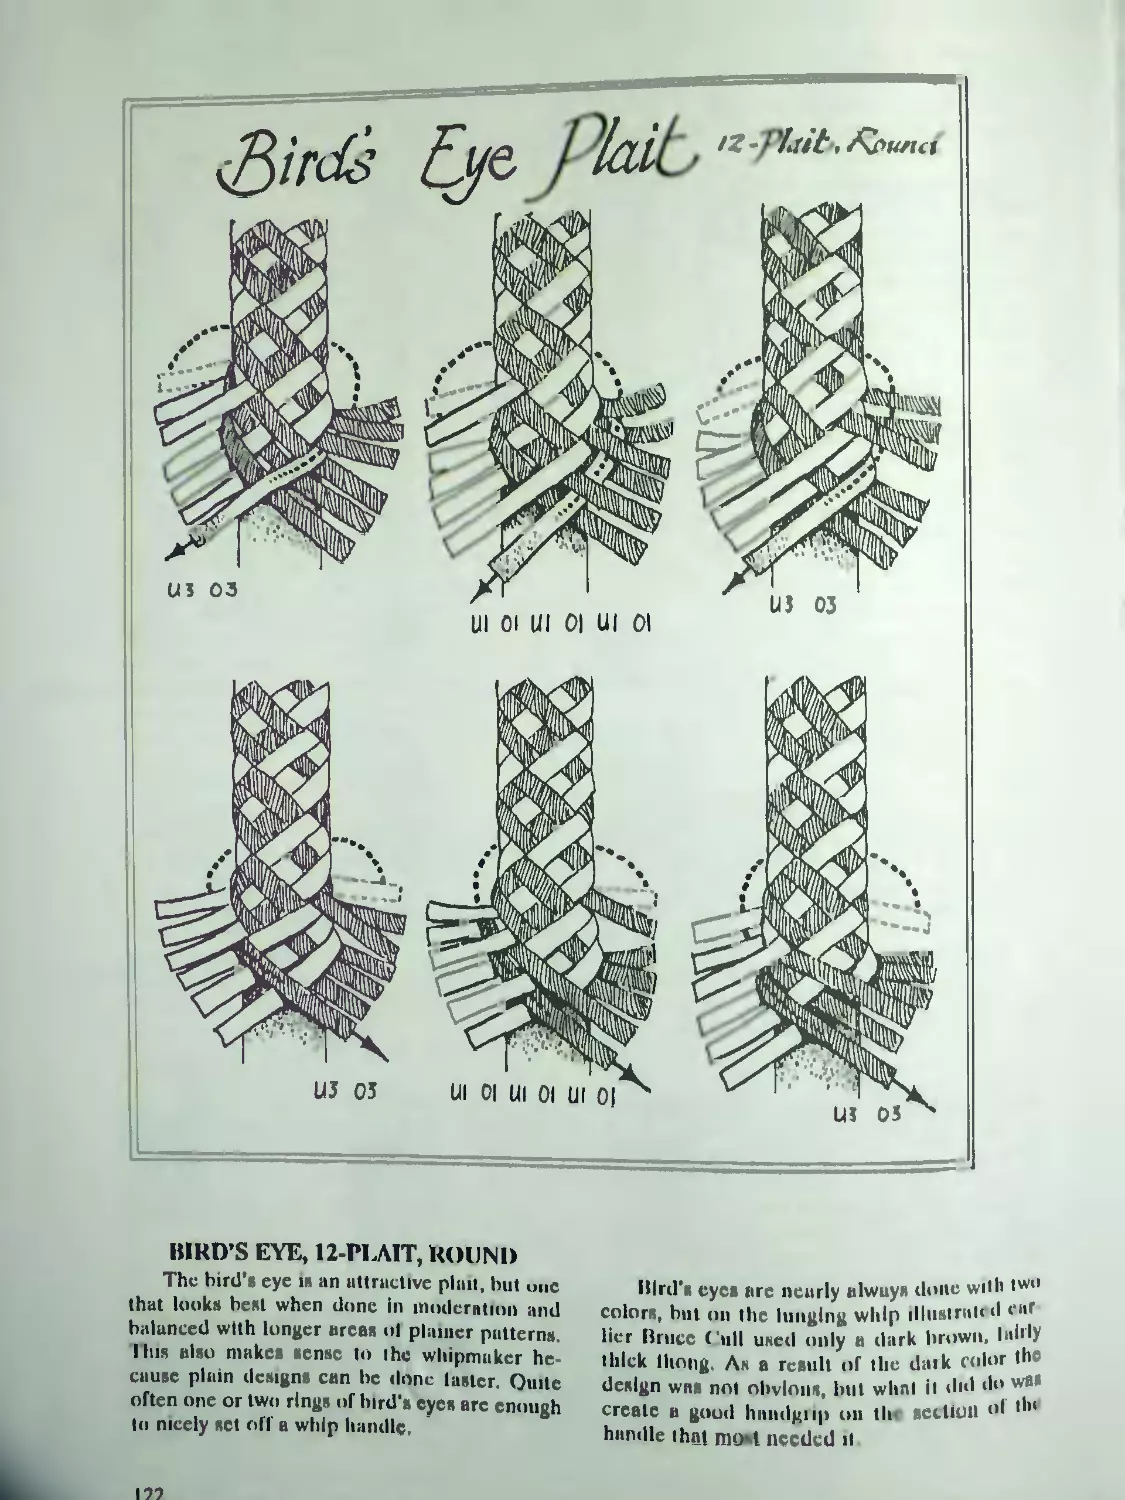
Bird s Eye, 12-Plait, Round ..................122
Egyptian Eyes.................................123
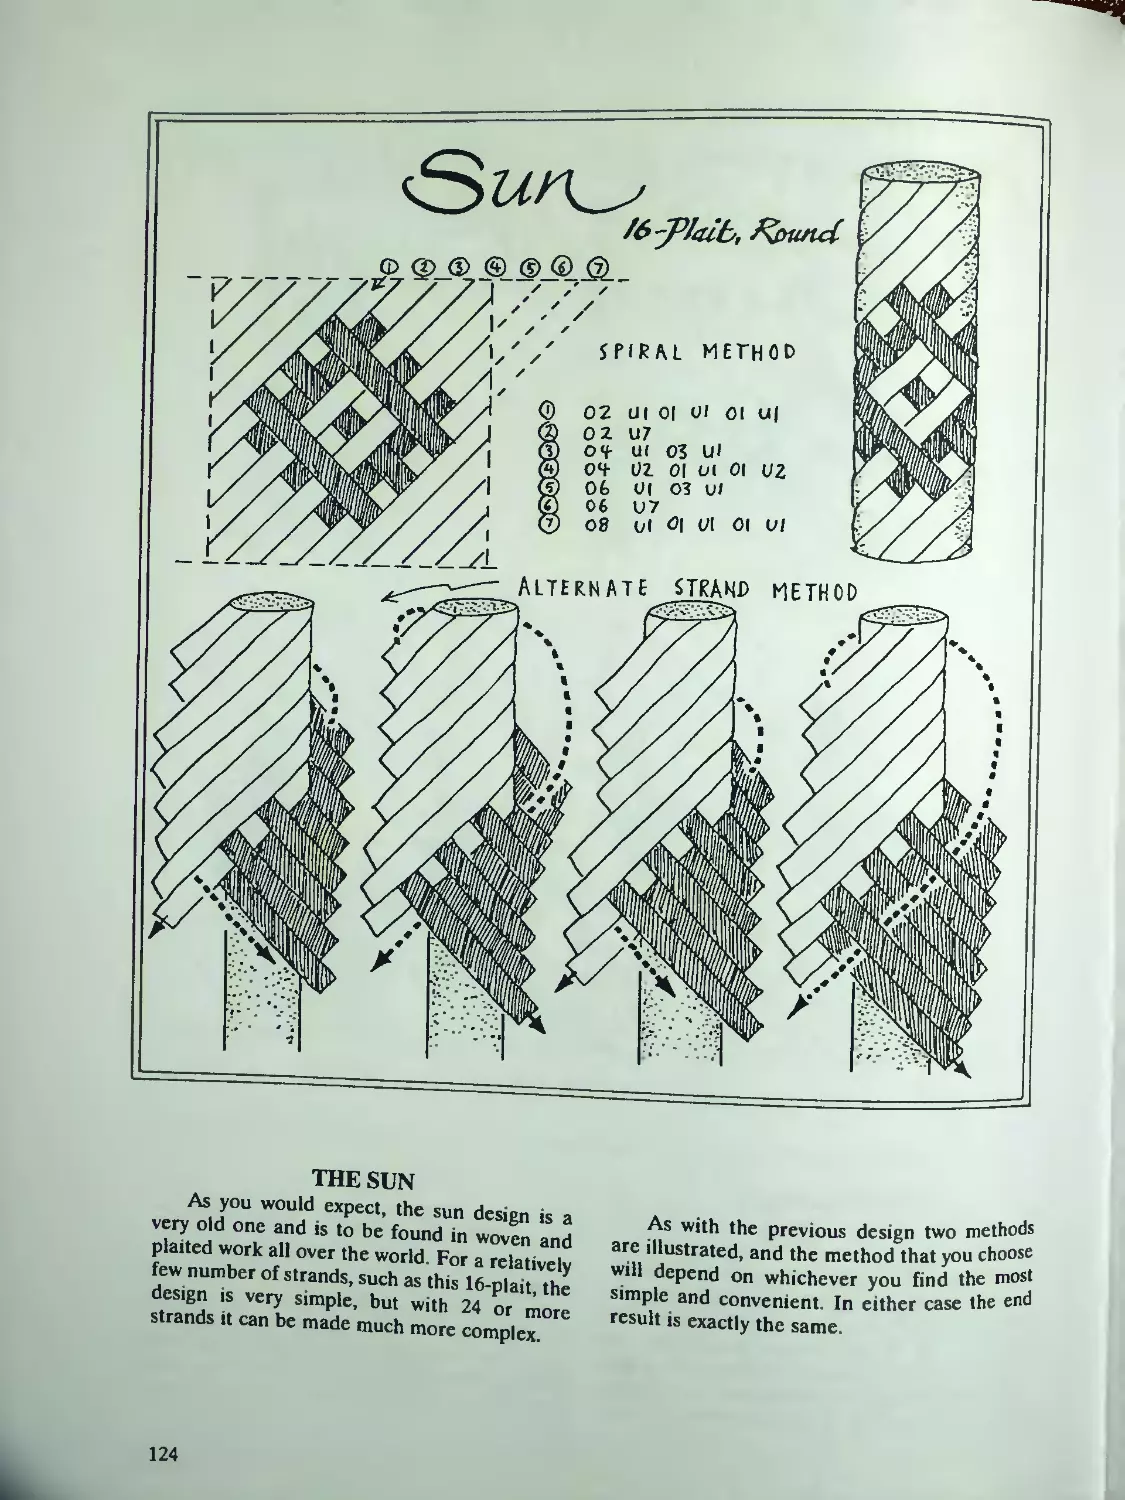
The Sun...................................... 124
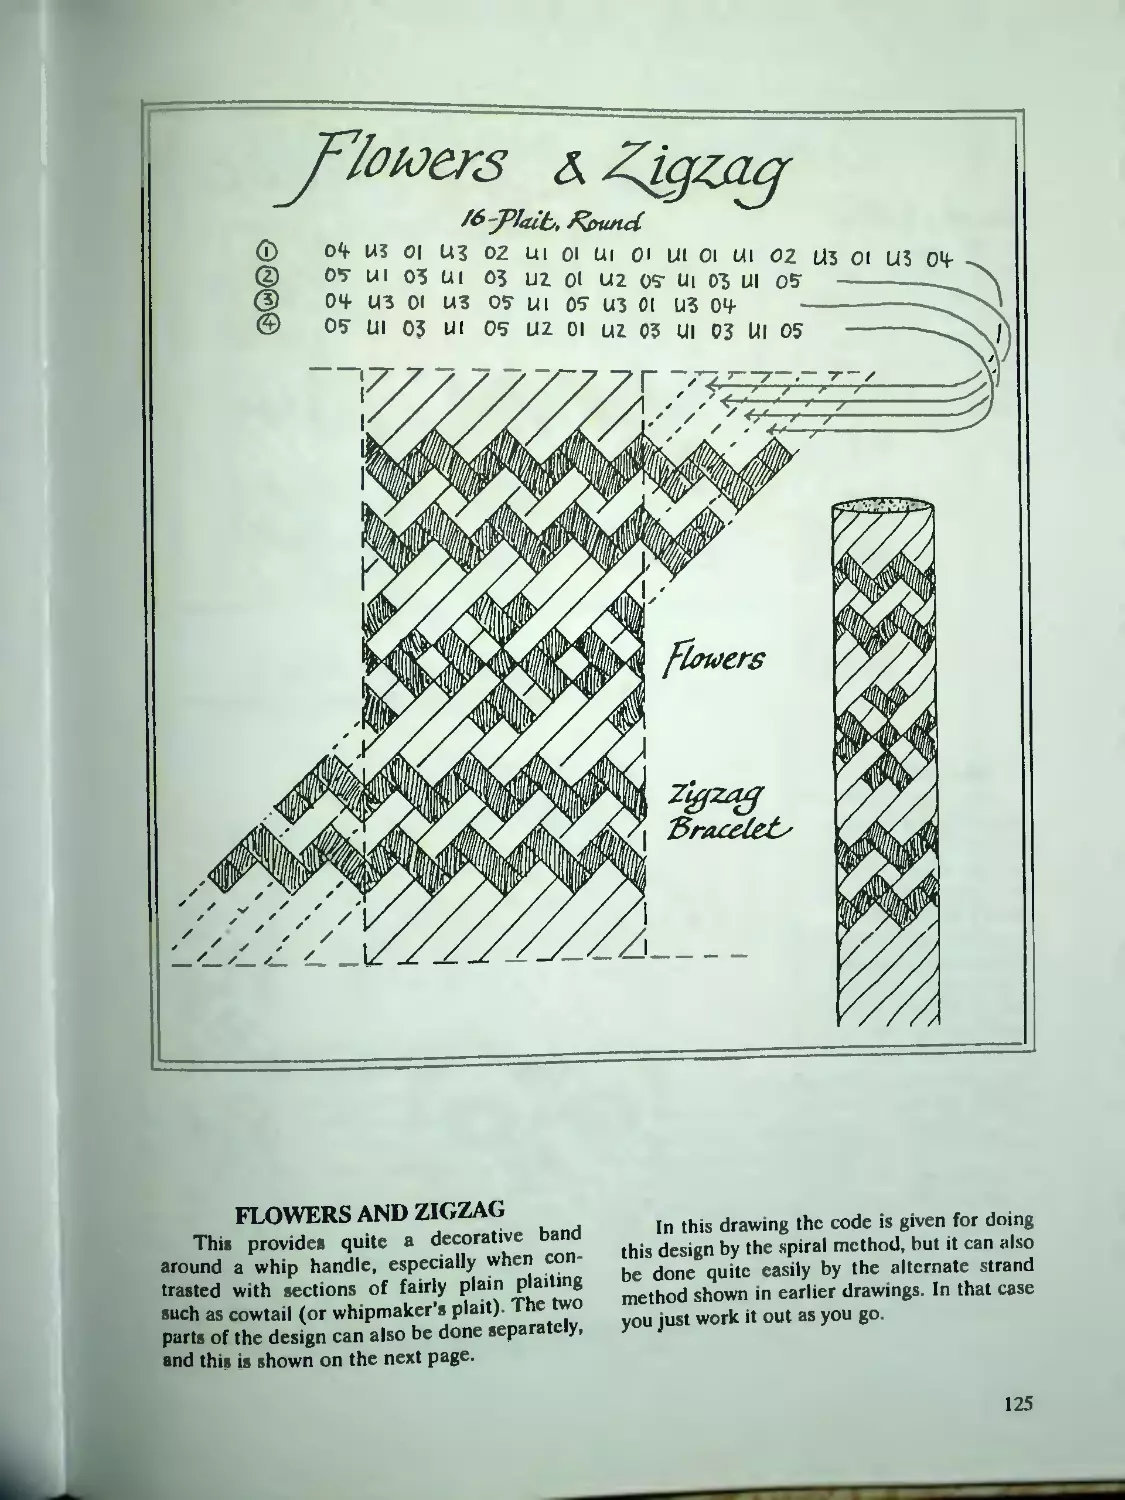
Flowers and Zigzag 125
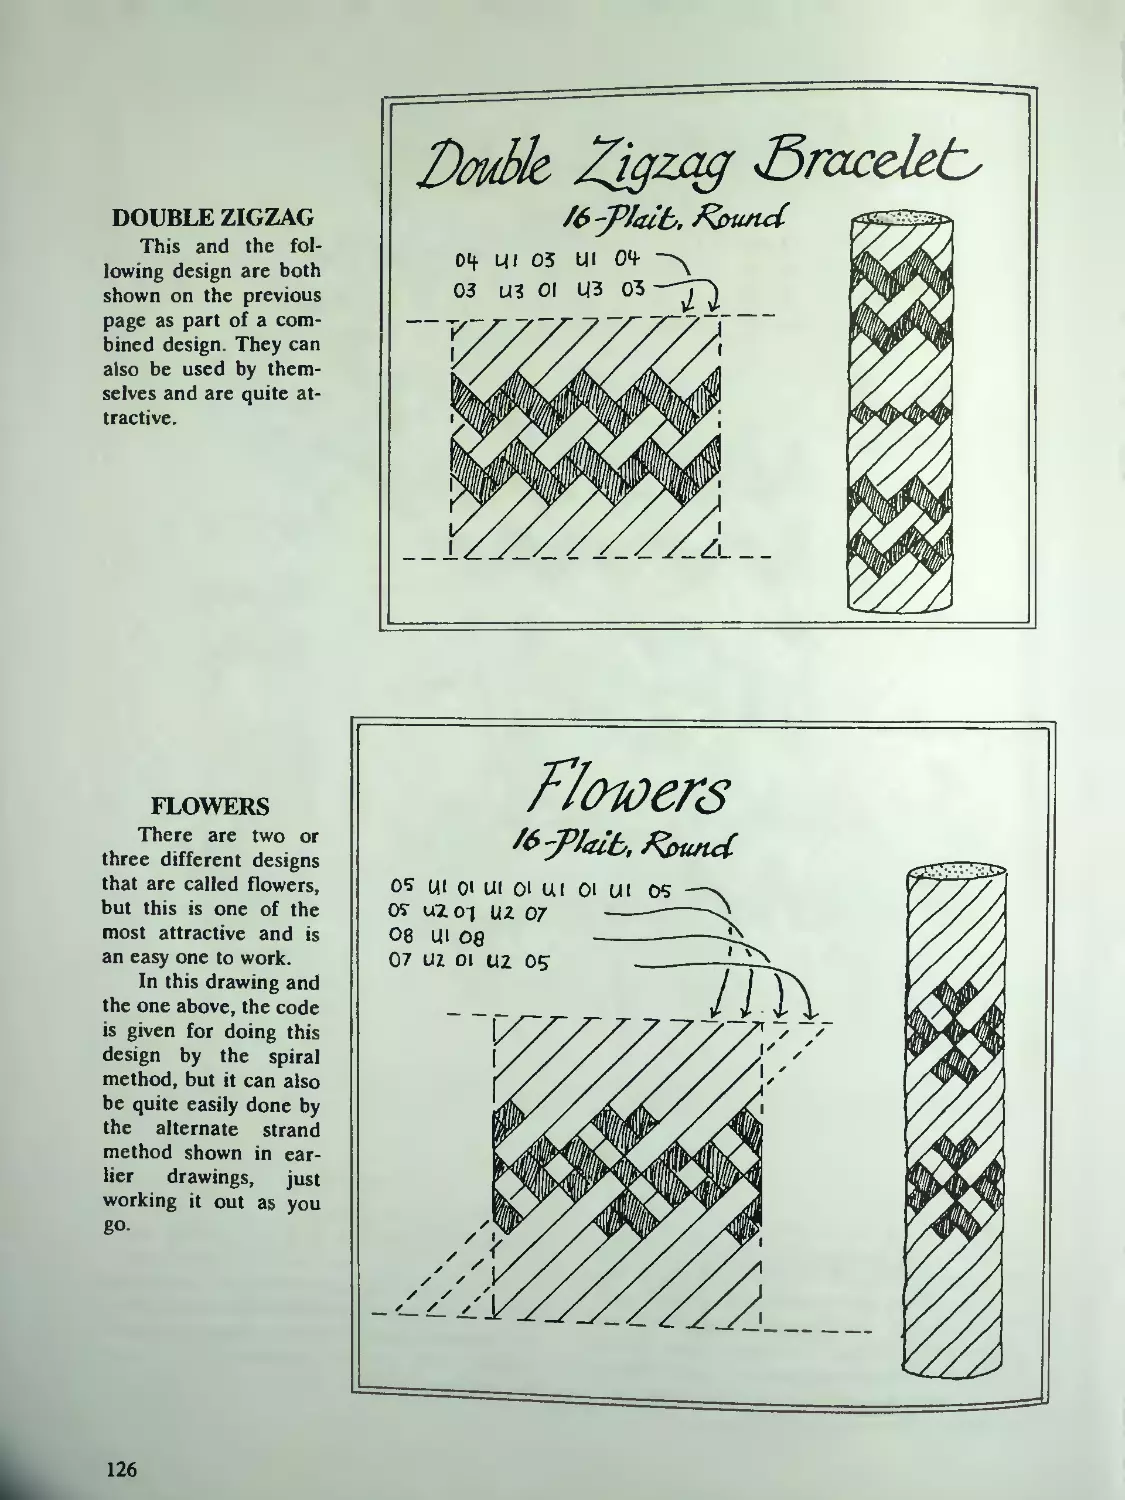
Double Zigzag.................................126
Flowers................................. . . 126
Interlocking Diamonds, 16-Plait, Round . . 127
The Ship of the Dead......................... 128
Two-Seam Plait................................129
Vee Pattern, Whipmaker’s Plan 129
Barber’s Pole Plait ...................... . . 130
Chapter 6: Plaiting Names in Whips 131
Name Plaiting................................ 132
Joining One Pattern to the Next . . 132
Plaiting Names with Short Pieces..............132
Working the Letters into the Weave 132
Colors to Use............. . . 132
Never Believe What You Are Told...............133
Using Precut Lace . . . 134
Chessboard Start: Calculating the Length
of the Lace................................134
Locking the Back .... ... 135
Working in the Letters....................... 135
White-on-Black Letters......... 137
Vertical and Horizontal Letters...............137
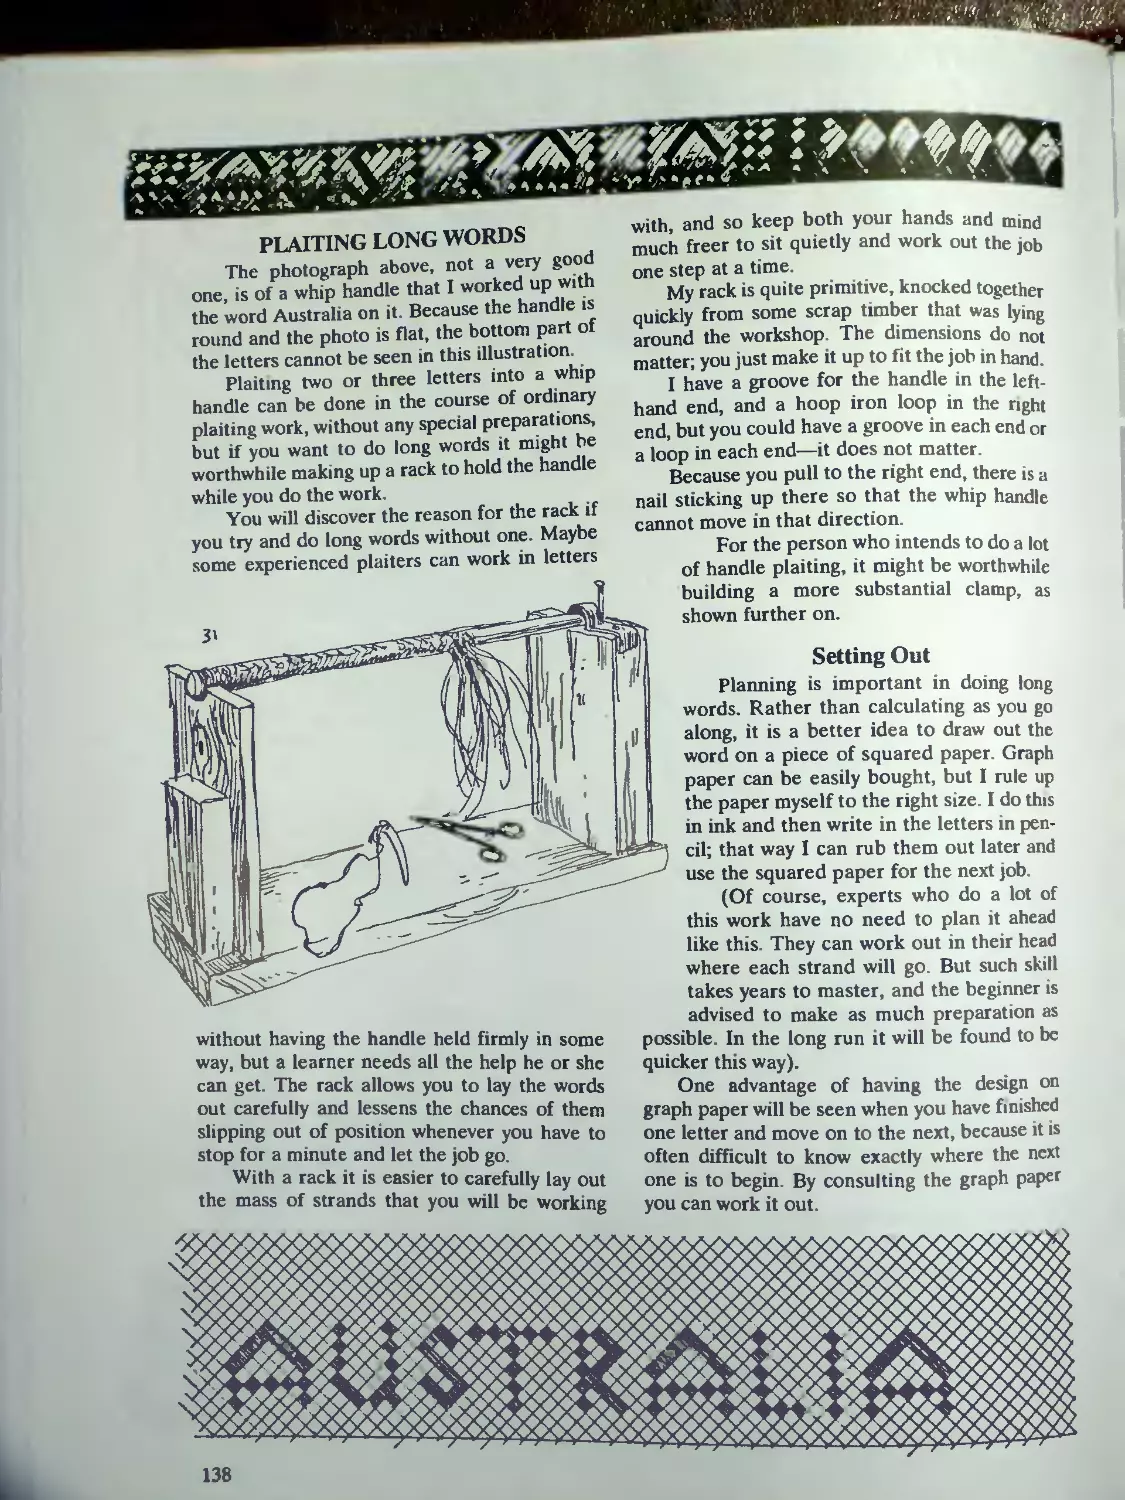
Plaiting Long Words 13g
Setting Out . . 138
Amount Needed..............................139
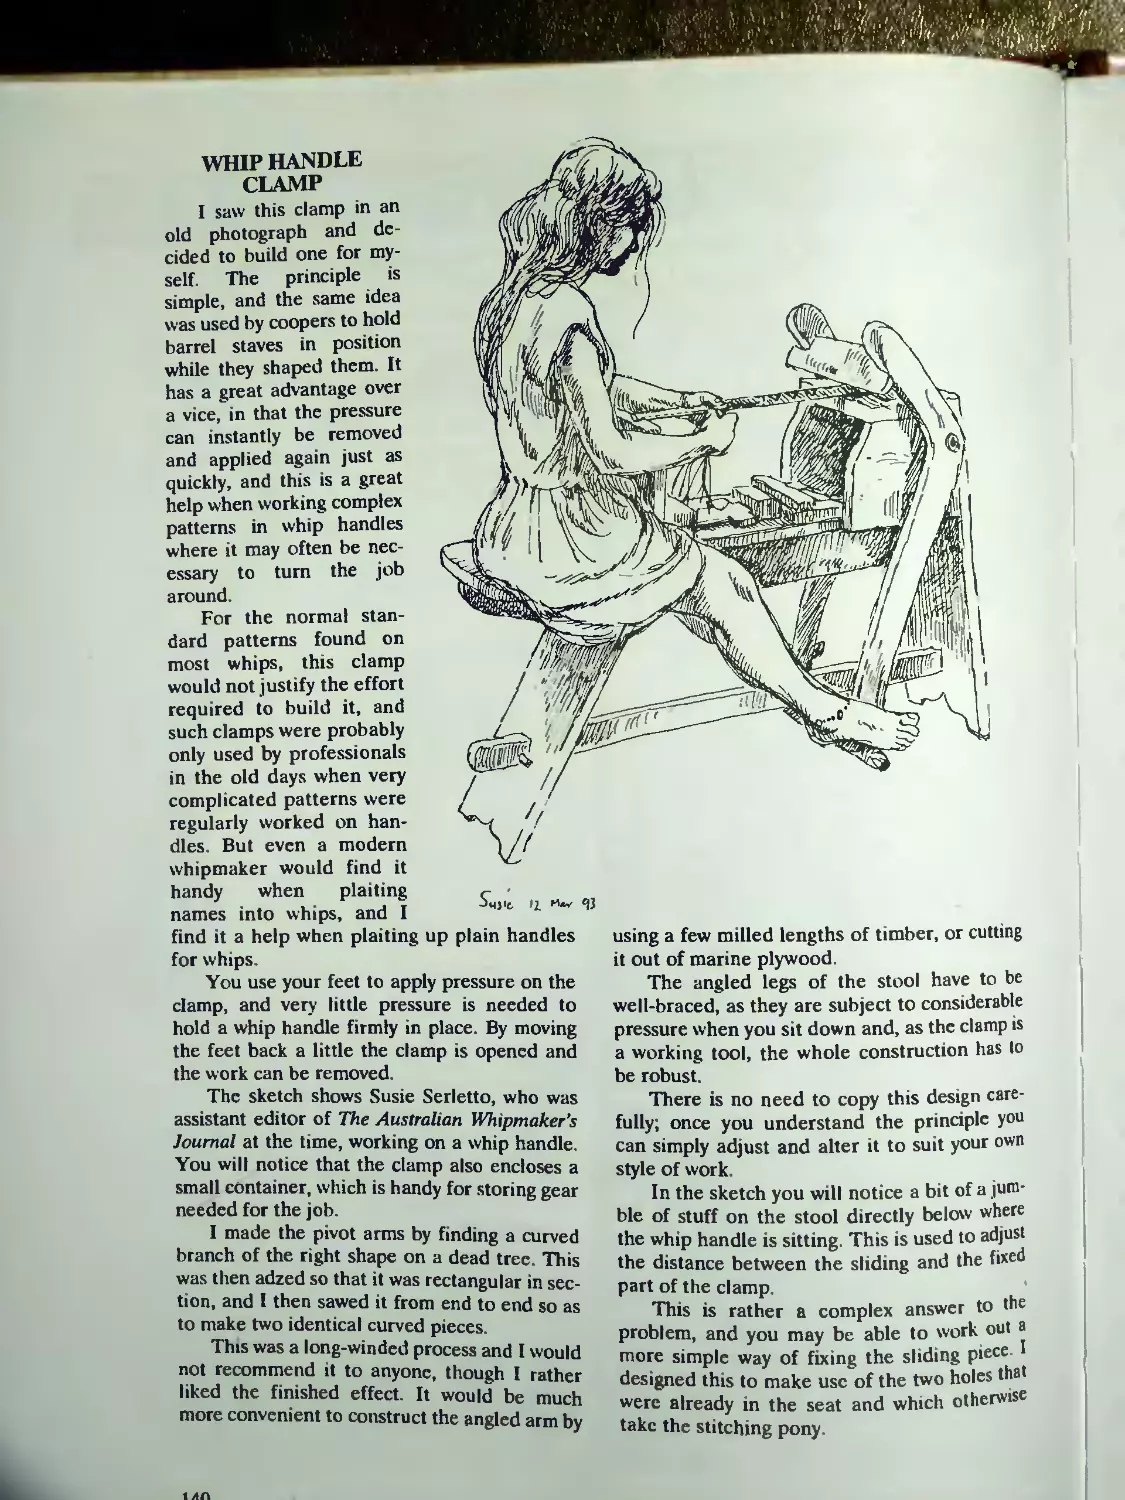
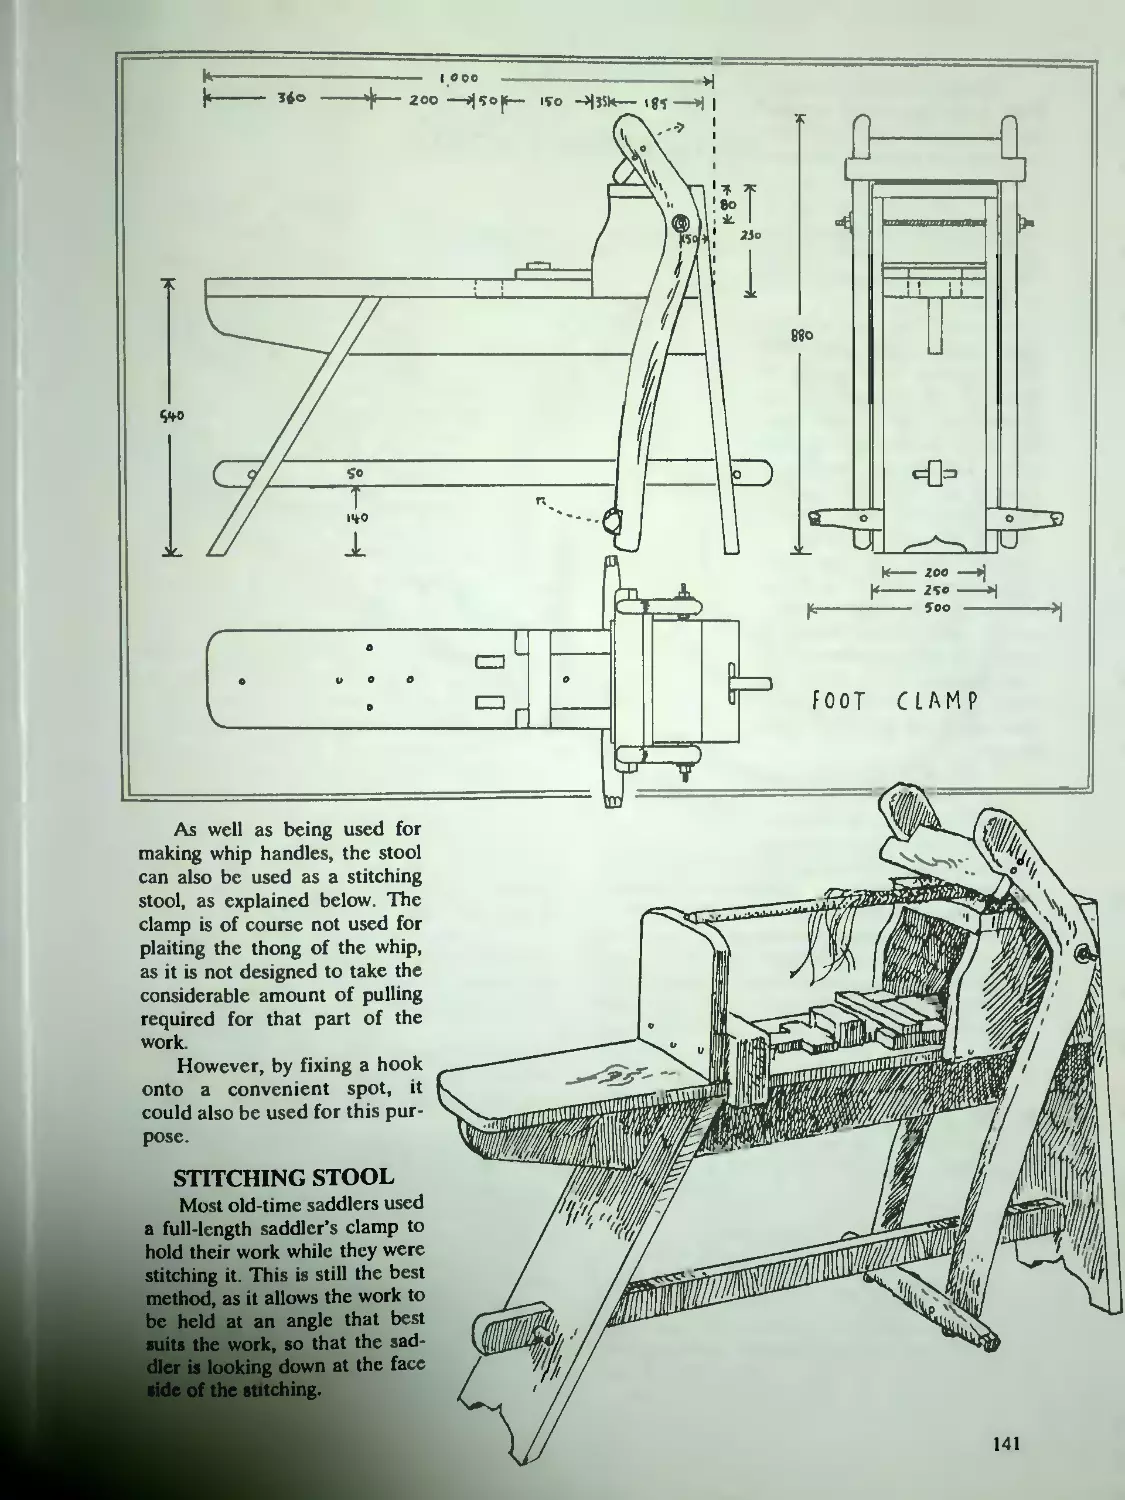
Whip Handle Clamp....................... 140
Stitching Stool 141
Chapter 7: Some Us ,-ful Tips.............142
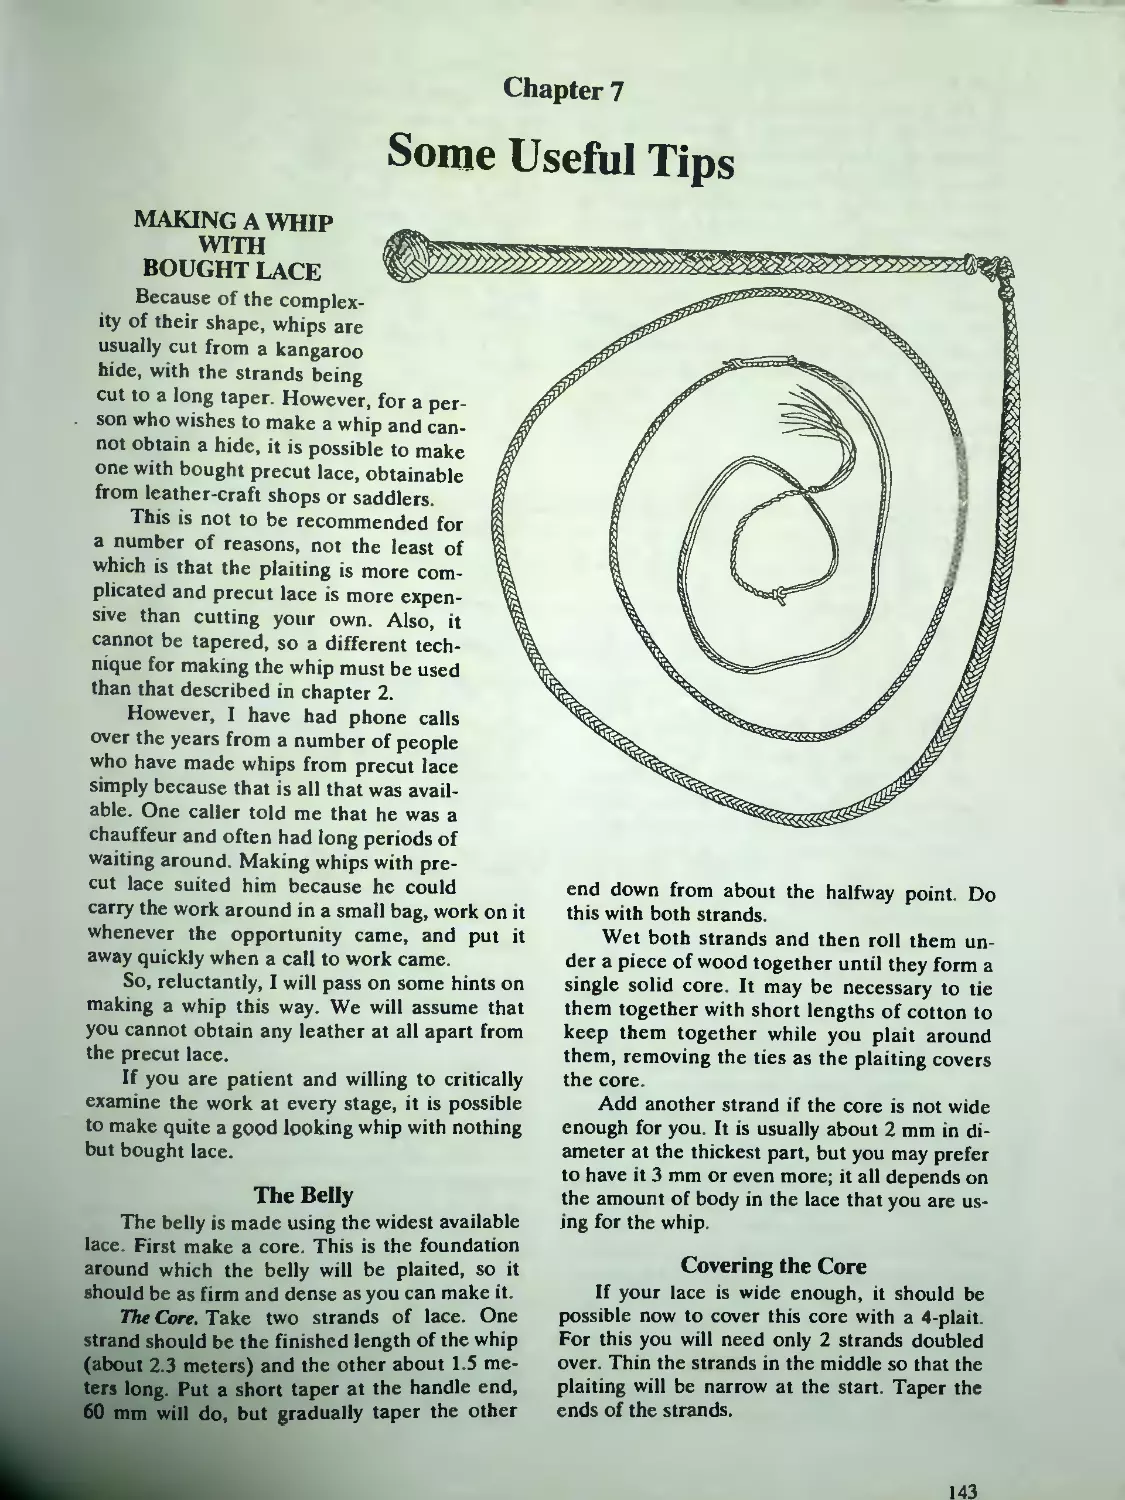
Making a Whip with Bought Lace . 143
The Belly . . . .... 143
Covering the Core..........................143
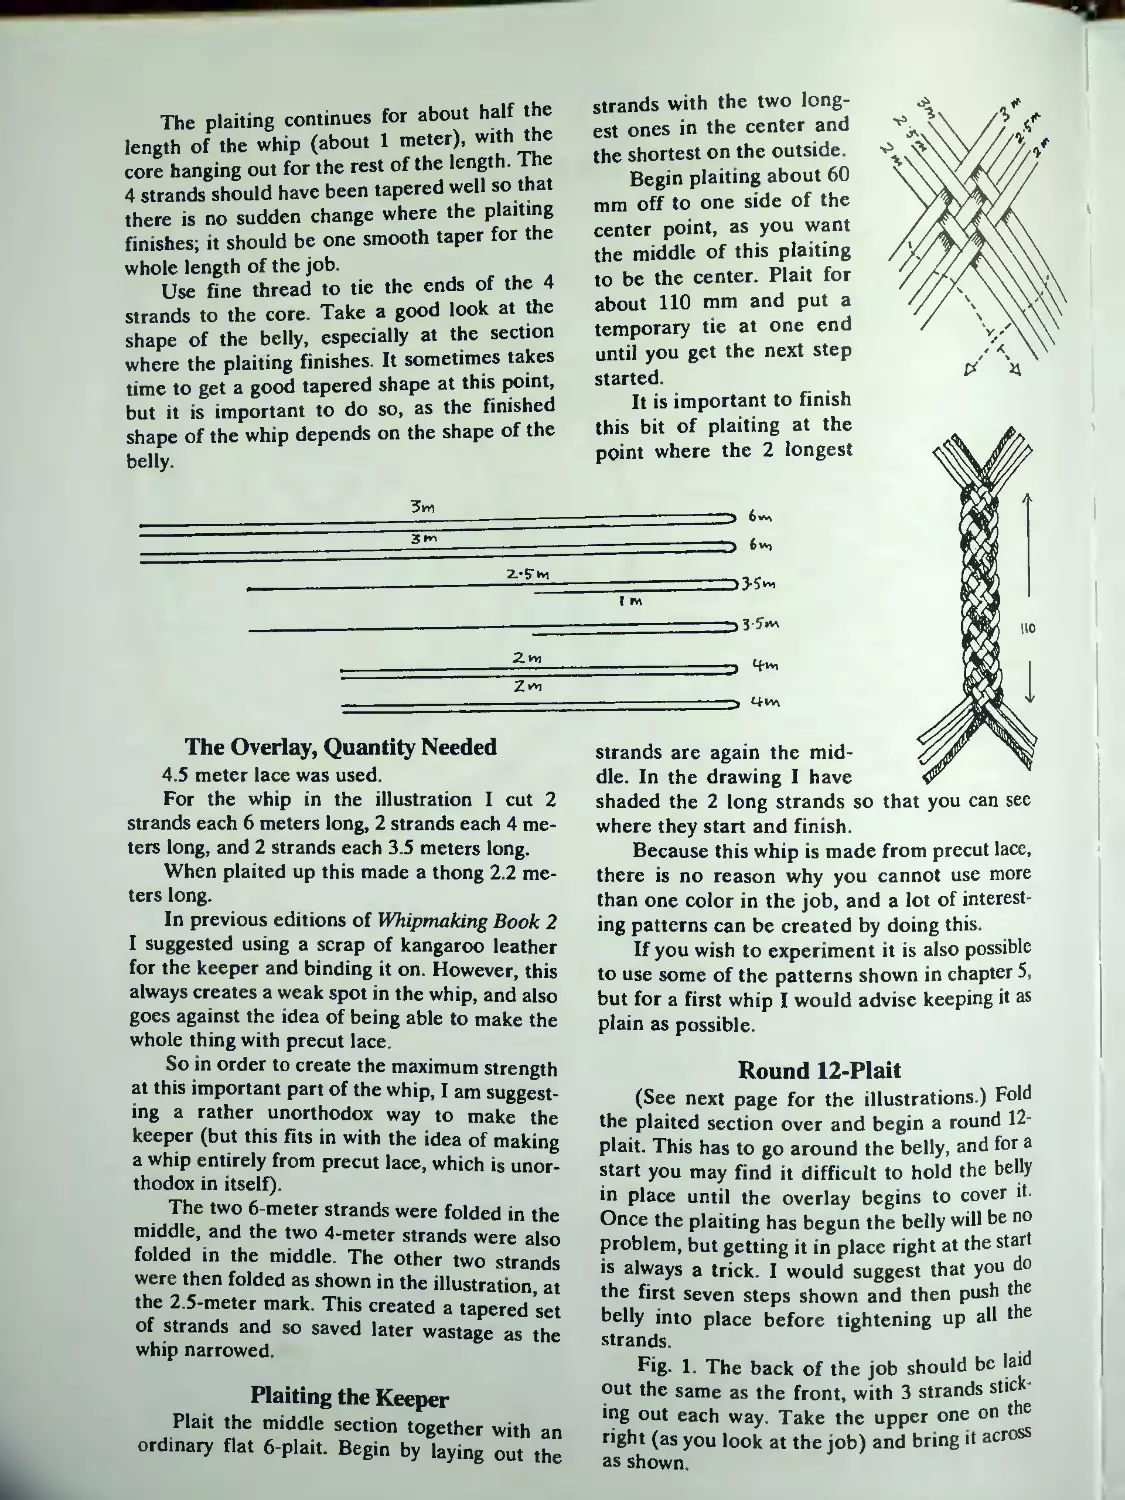
The Overlay, Quantity Needed . . 144
Plaiting the Keeper....................... 144
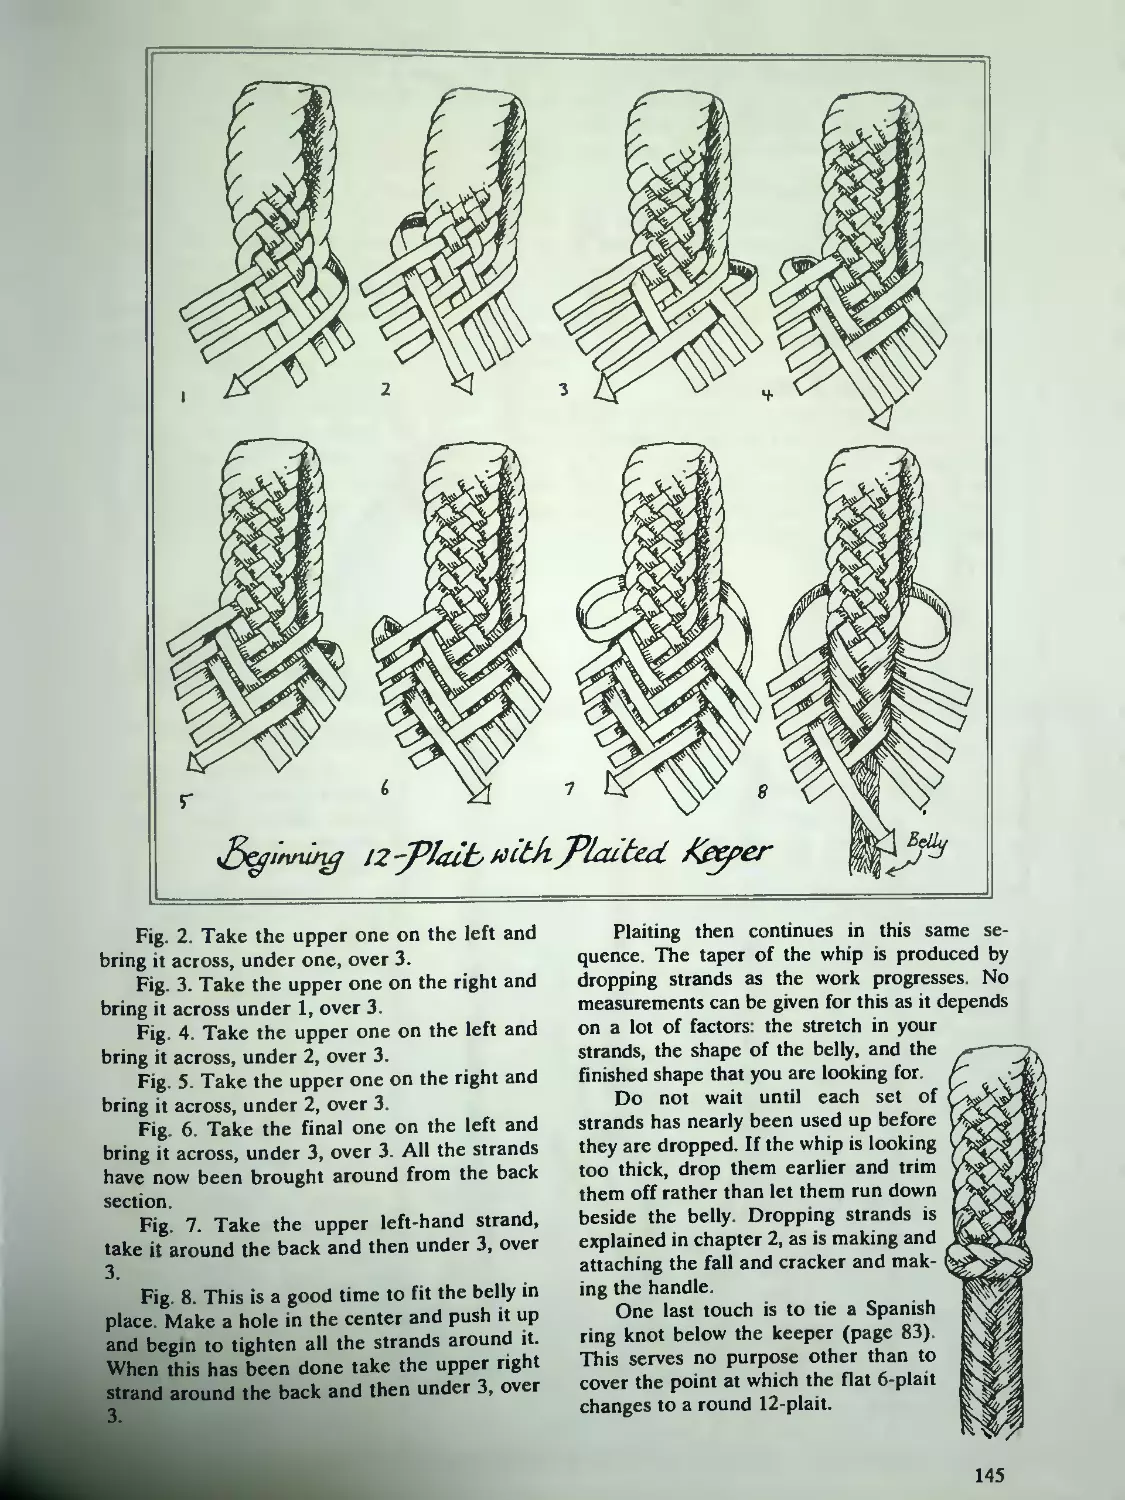
Round 12-Plait.............................144
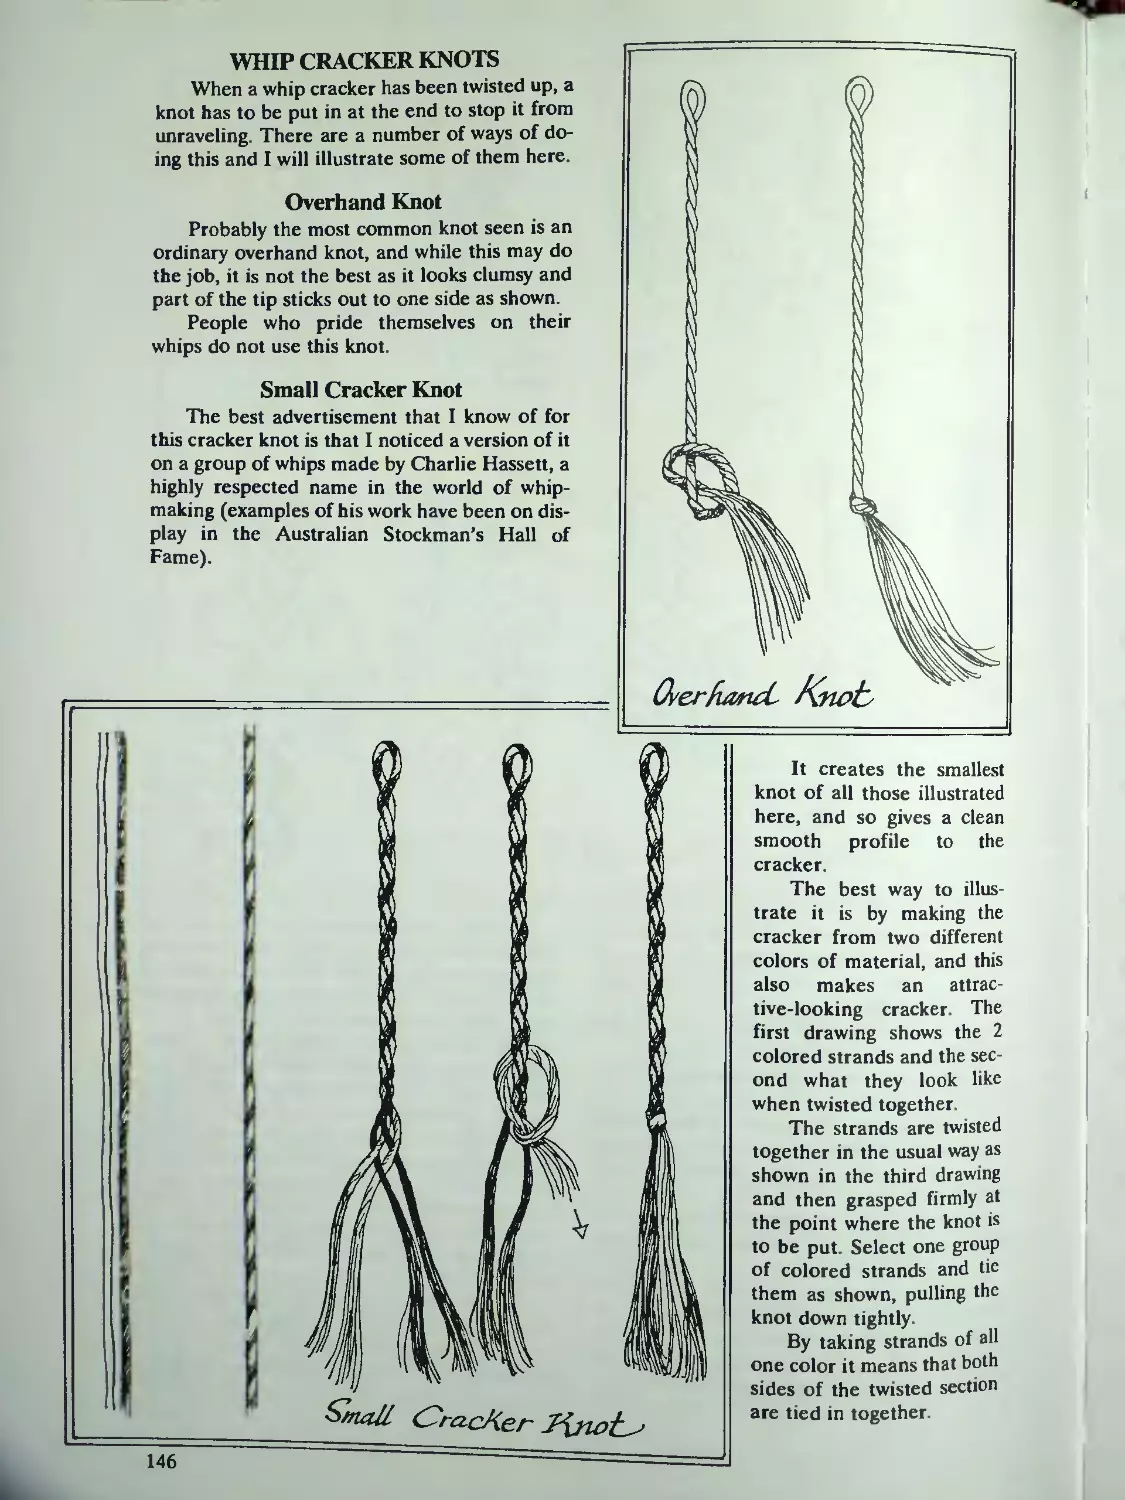
Whip Cracker Knots....... 146
Overhand Knot............................. 146
Small Cracker Knot. 146
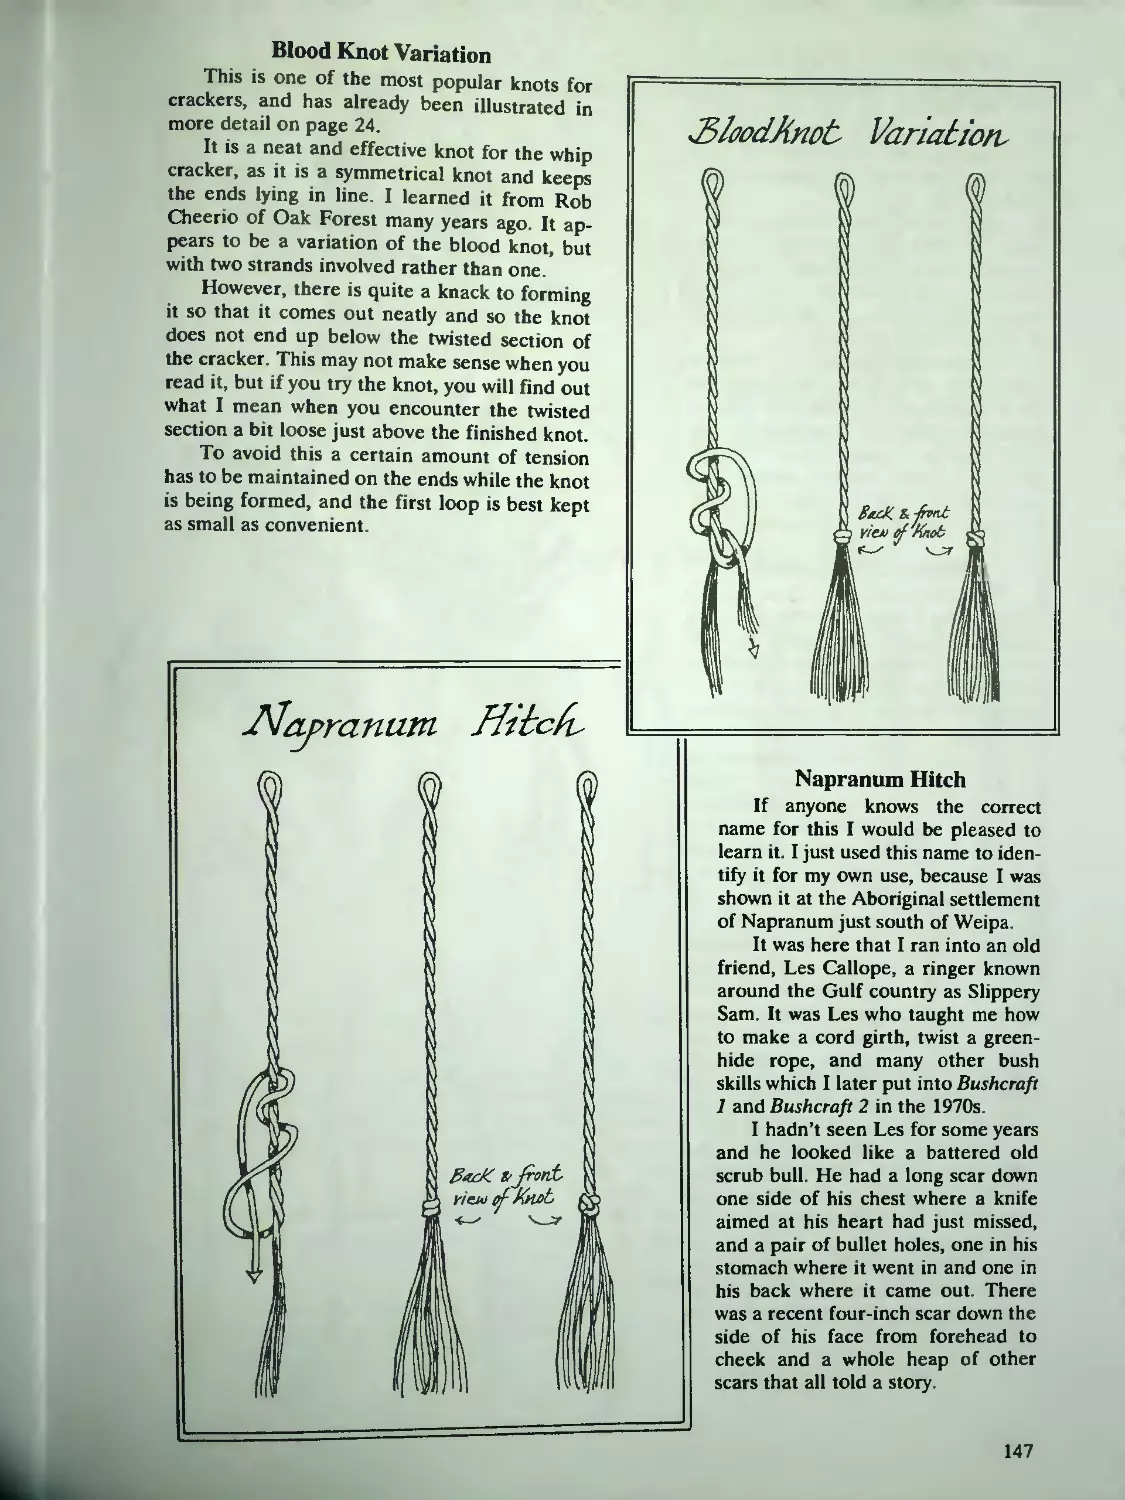
Blood Knot Variation.......................147
Napranum Hitch........... 147
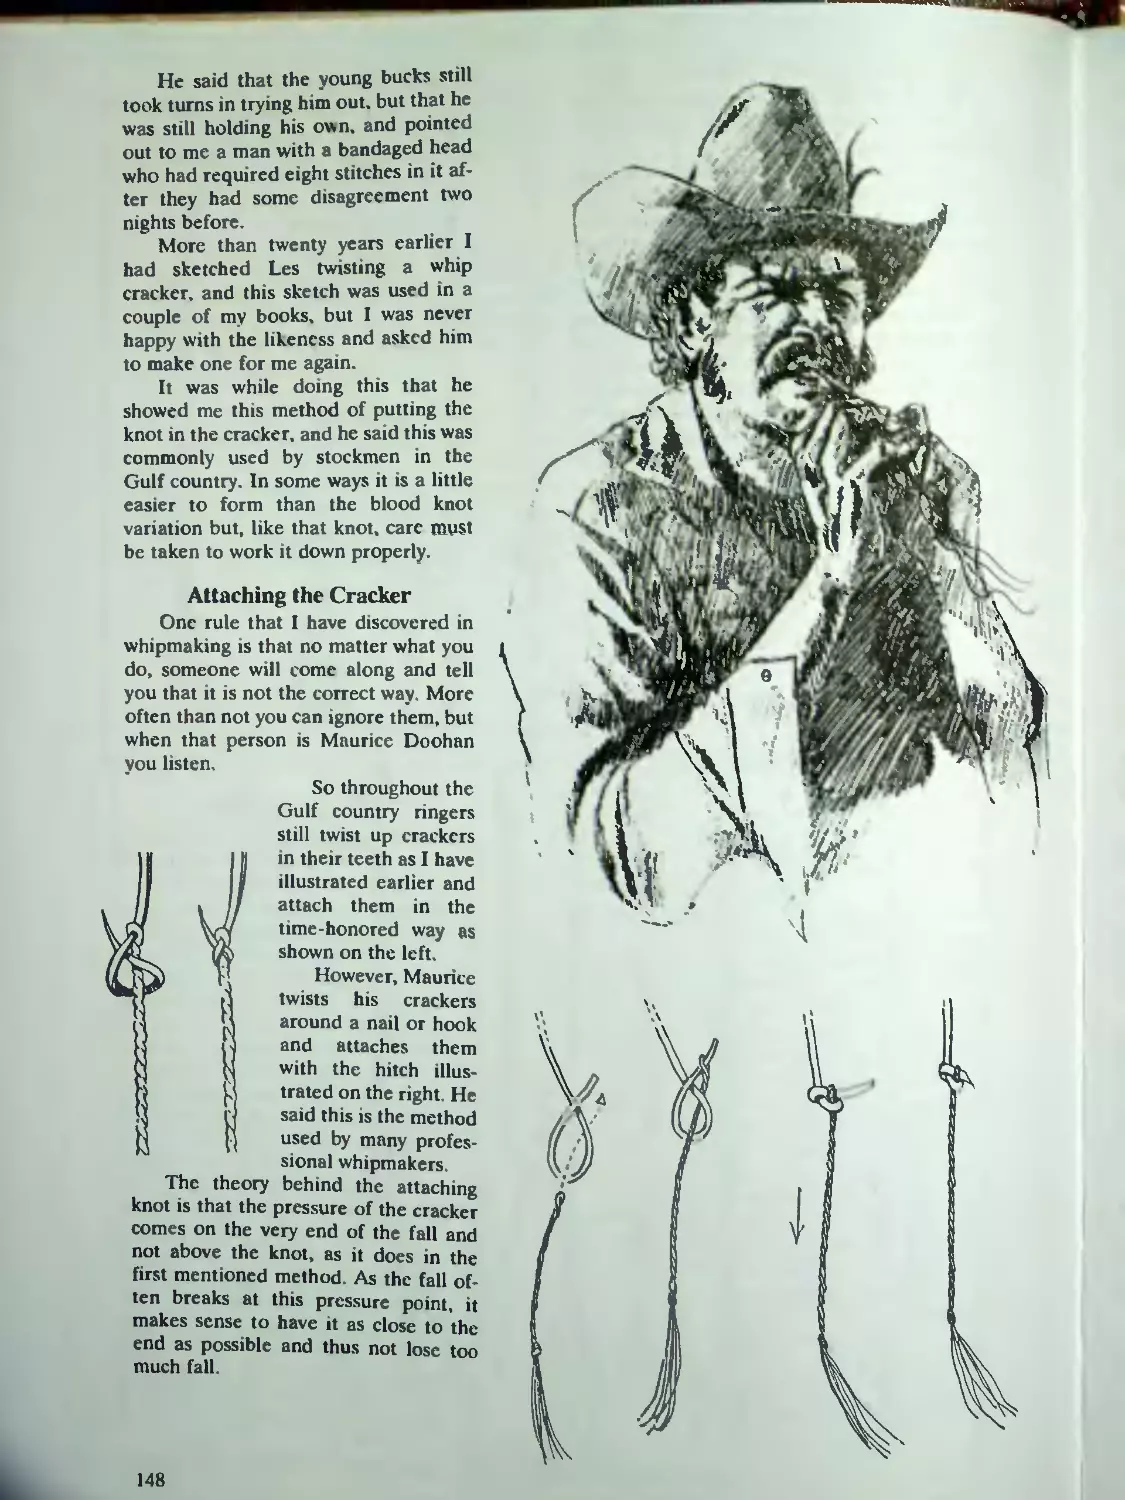
Attaching the Cracker . . 148
Fall Hitches............................. 149
Morris Doohan’s Hitch......................149
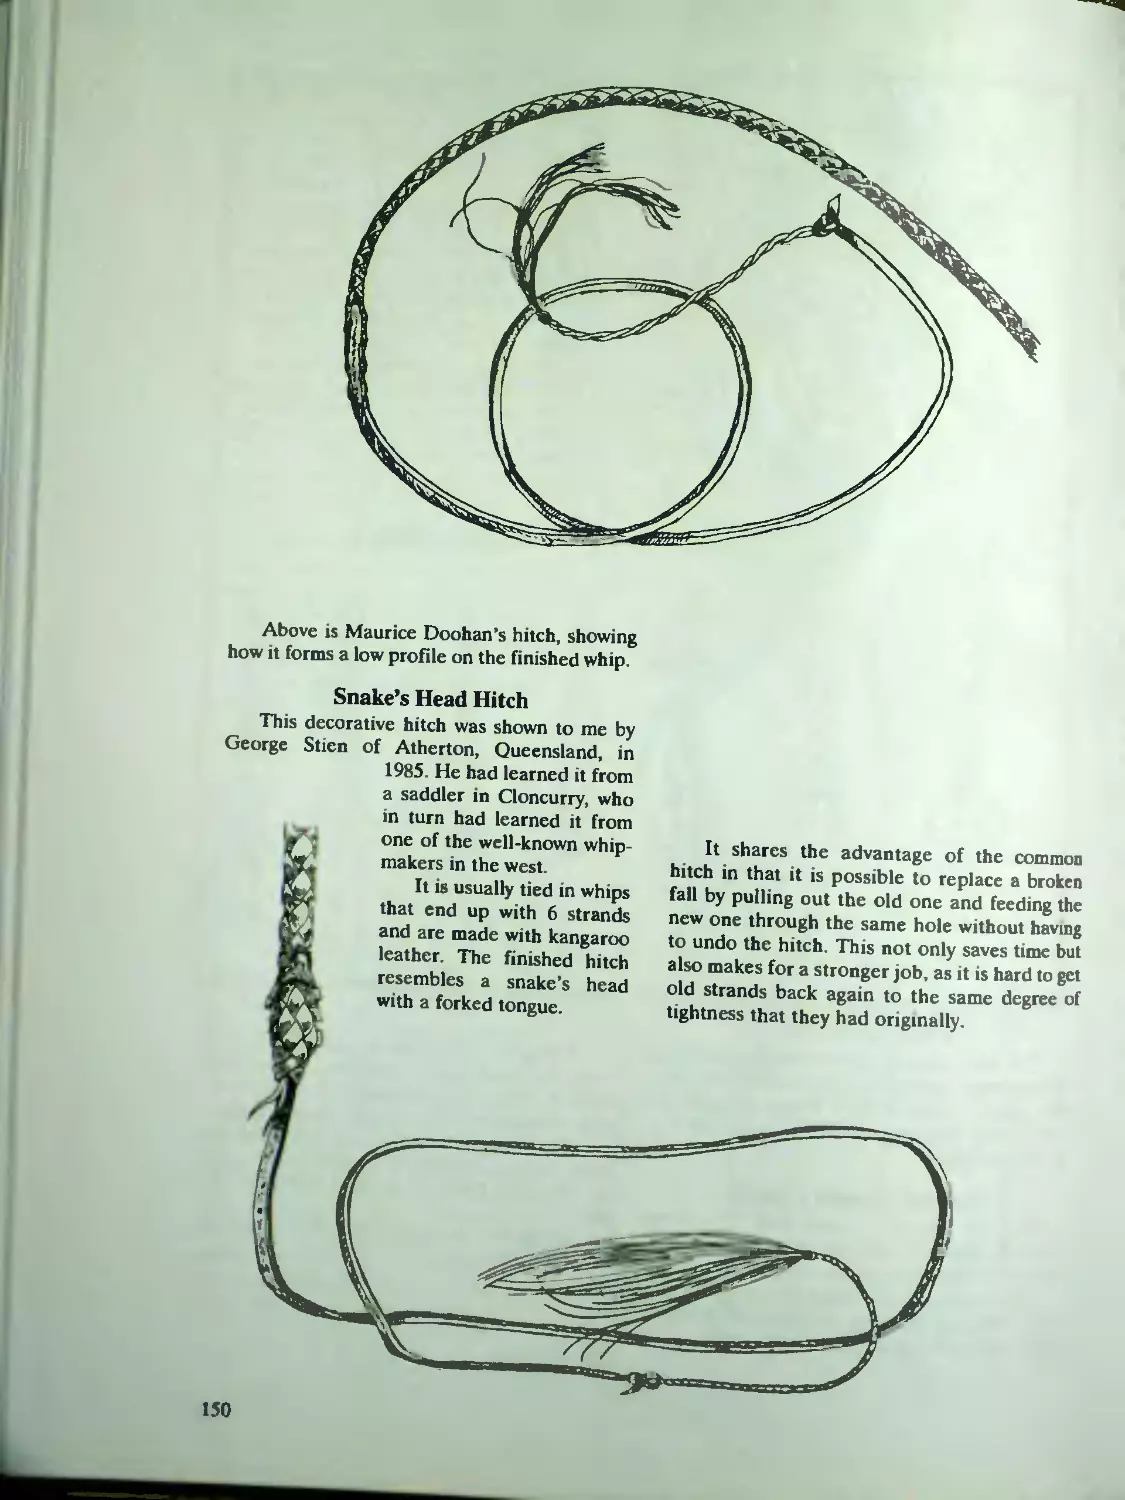
Snake’s Head Hitch 150
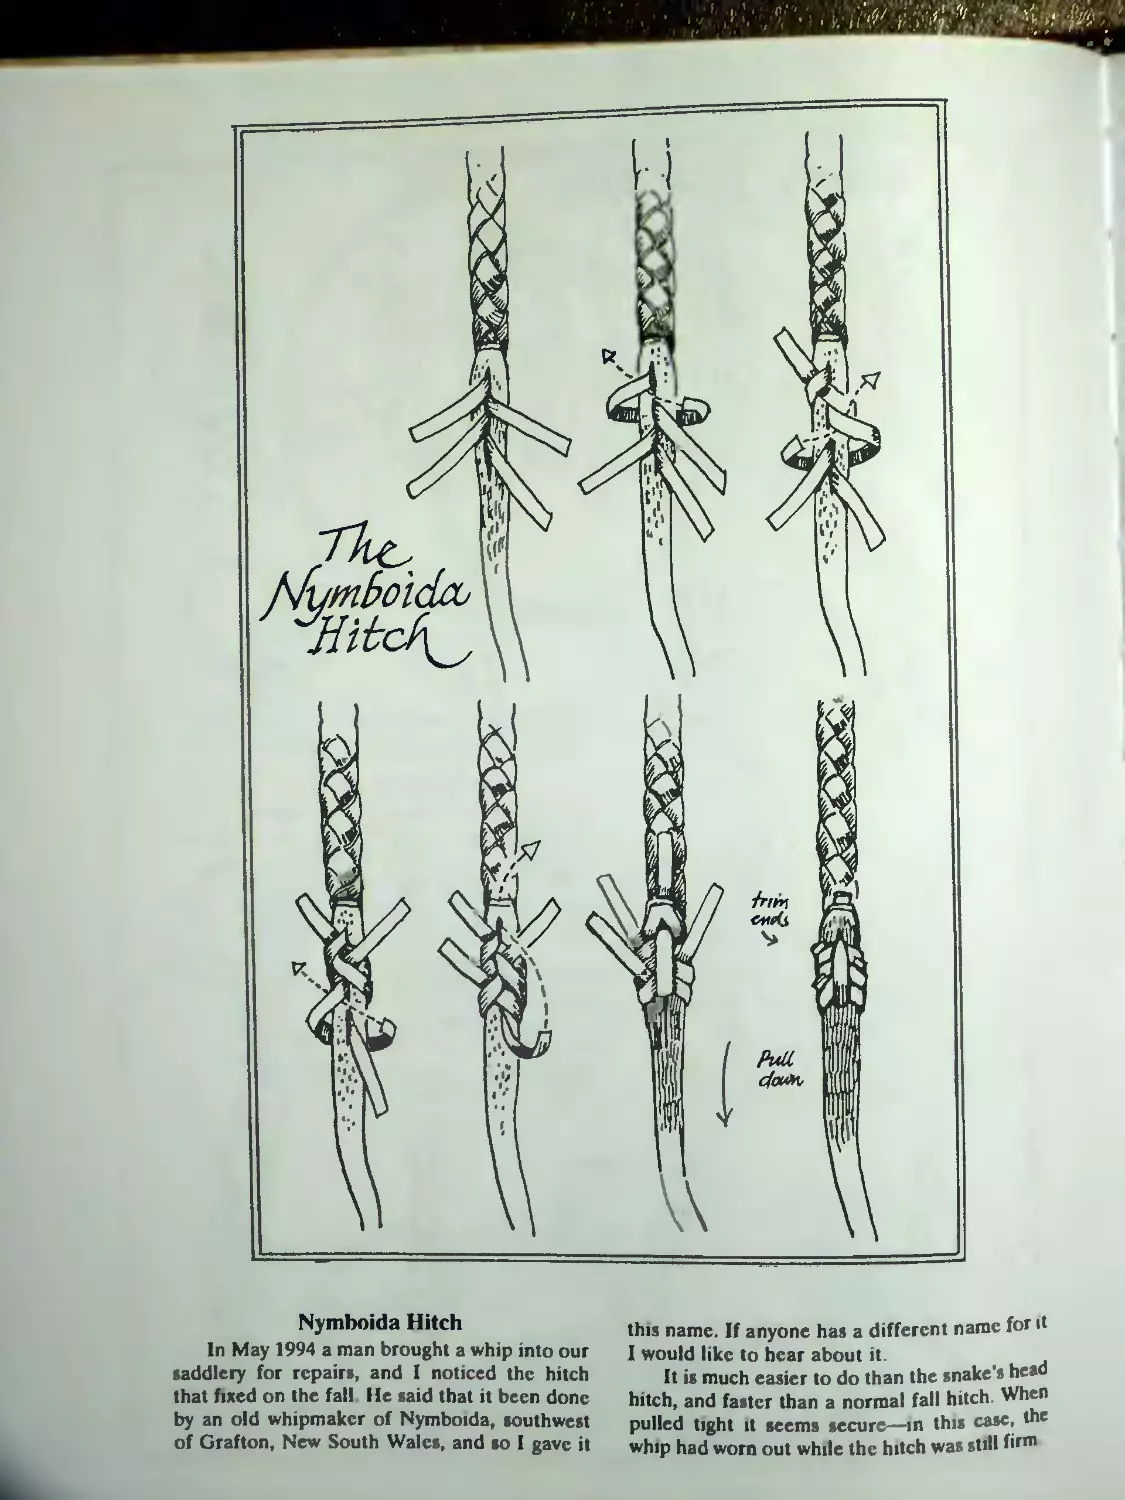
Nymbotda Hitch............................ 152
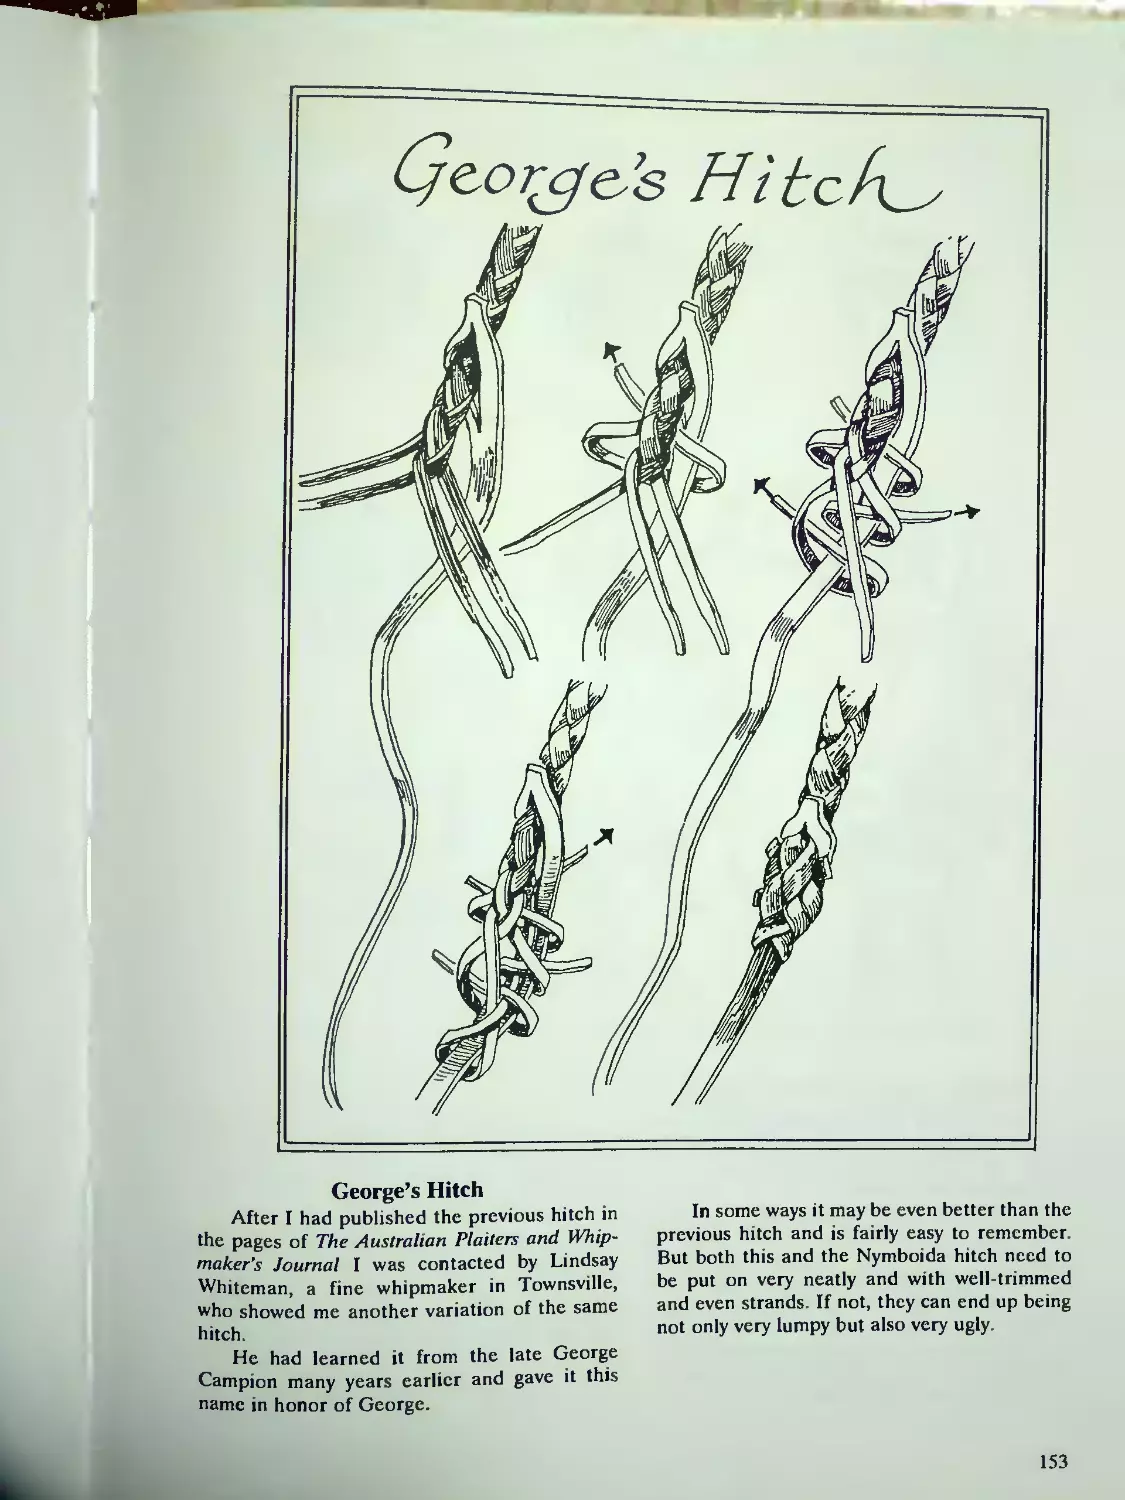
George’s Hitch.............................153
3-Part, 4-Bight Turk’s Head. . 154
Appendix...................................155
Index .....................................161
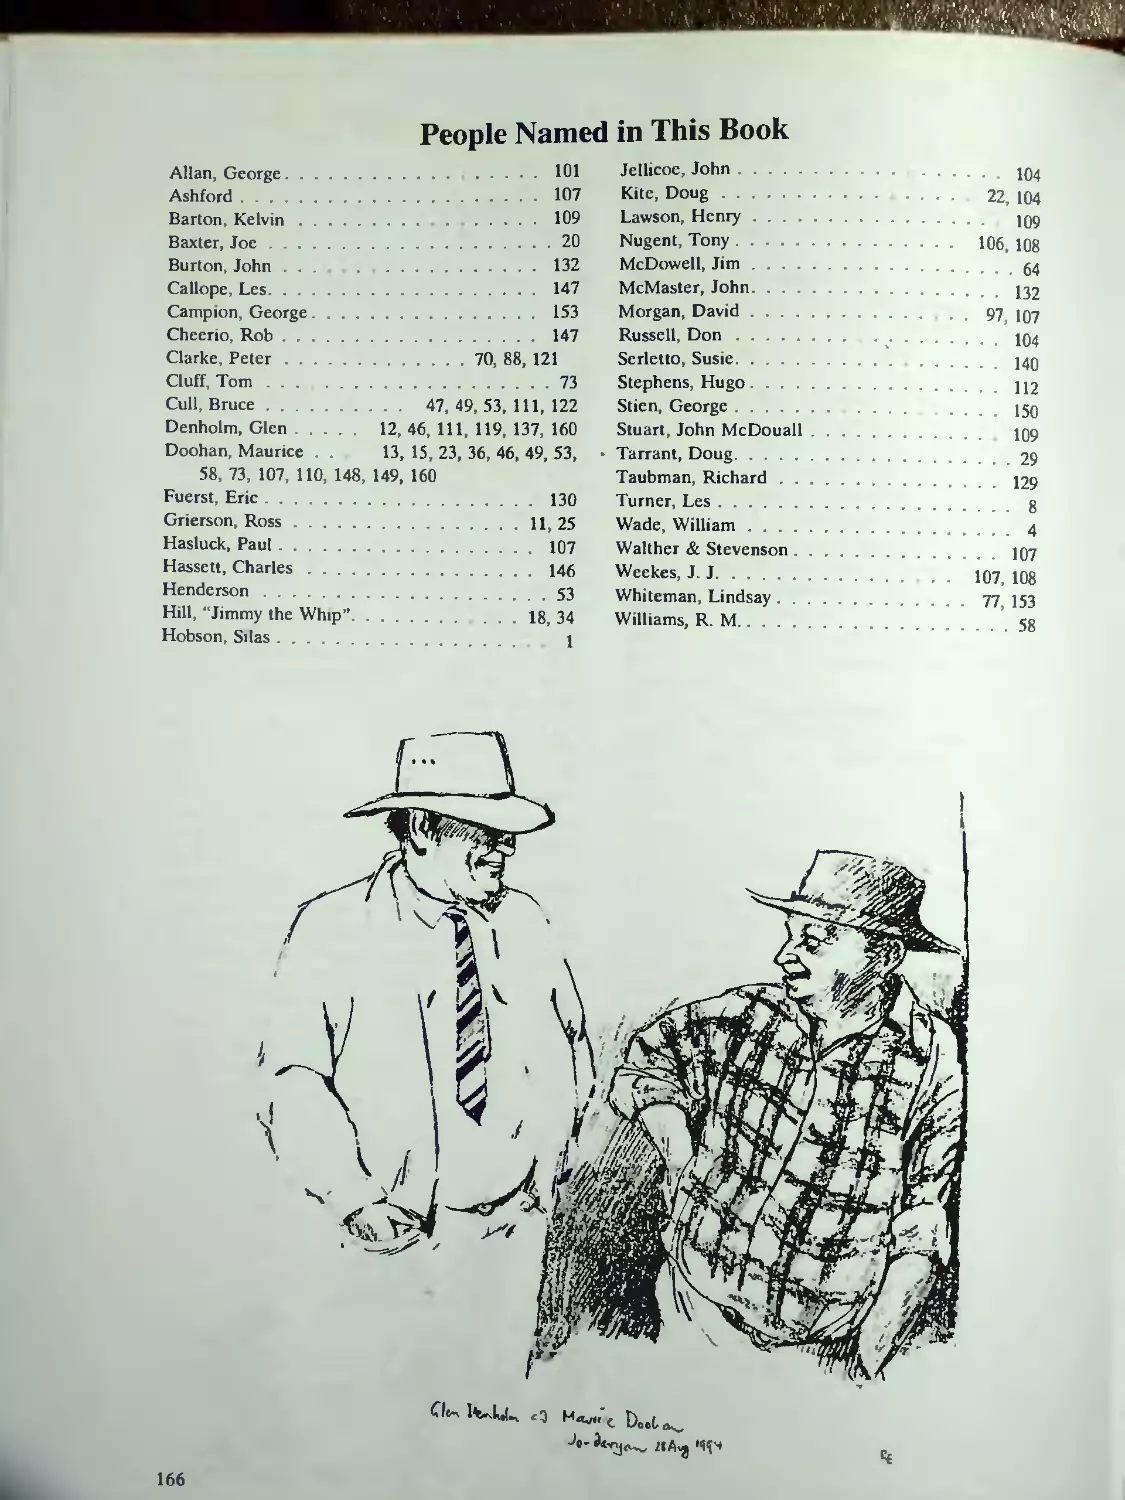
People Named in This Book................. 166
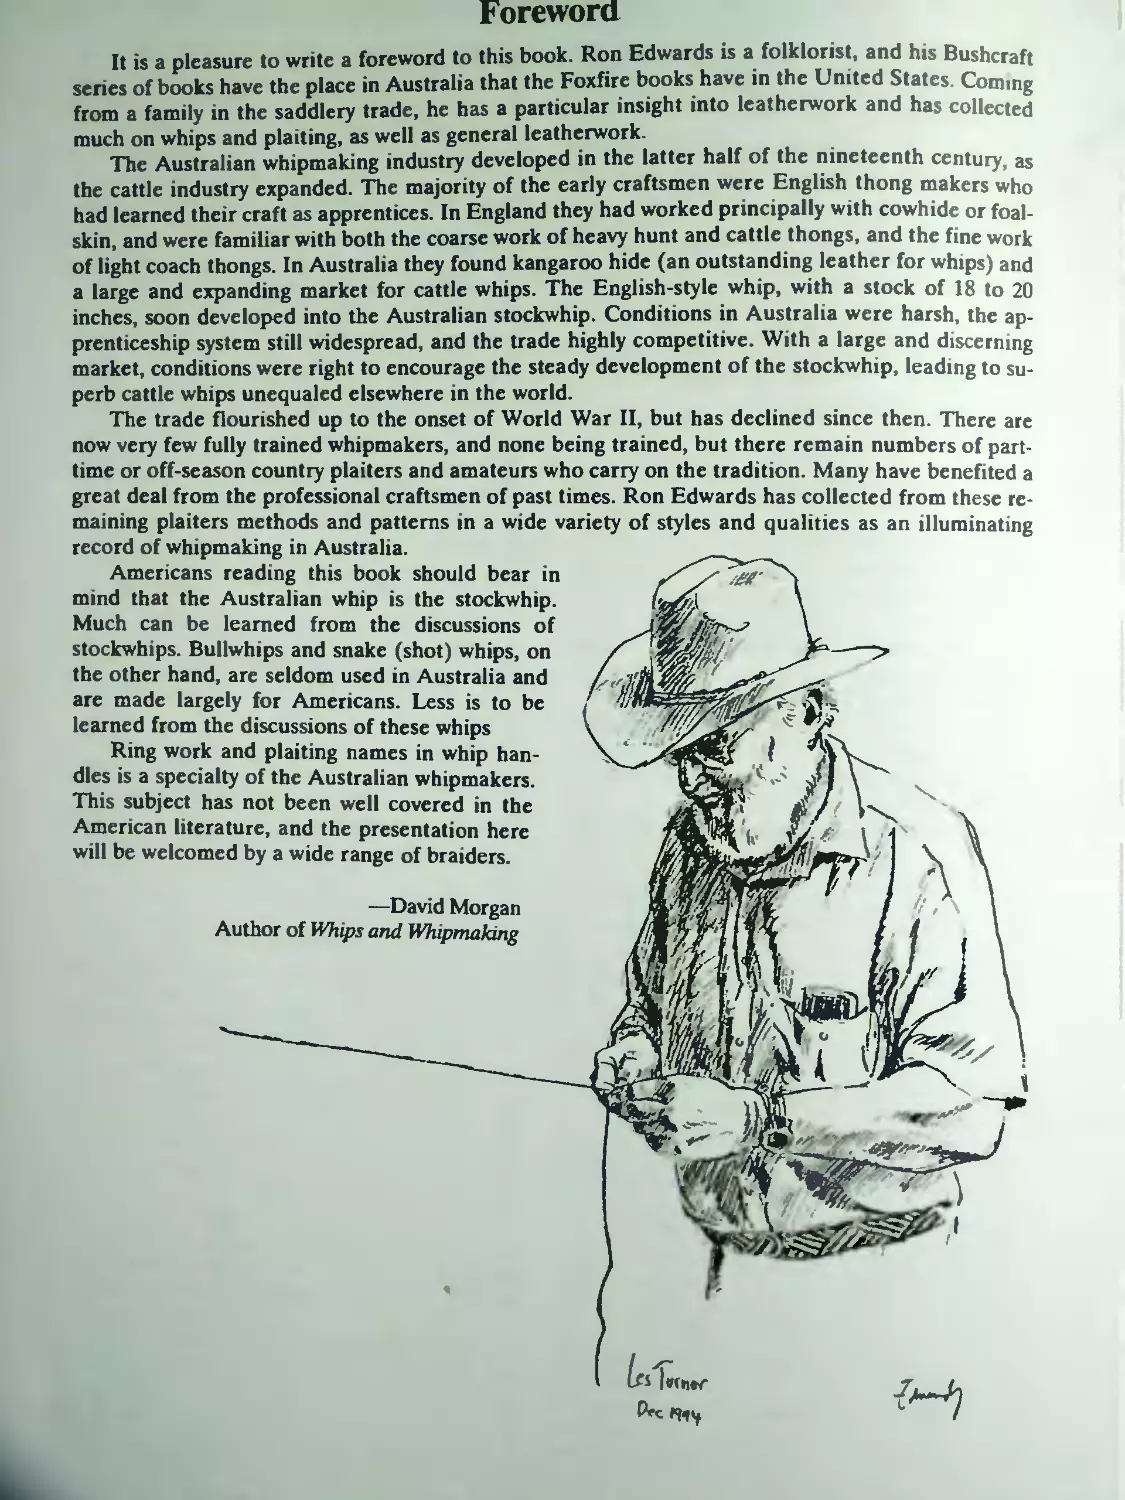
Foreword
It is a pleasure to write a foreword to this book. Ron Edwards is a folklorist, and his Bushcraft
series of books have the place in Australia that the Foxfire books have in the United States. Coming
from a family in the saddlery trade, he has a particular insight into leatherwork and has collected
much on whips and plaiting, as well as general leatherwork.
The Australian wbipmaking industry developed in the latter half of the nineteenth century, as
the cattle industry expanded. The majority of the early craftsmen were English thong makers who
had learned their craft as apprentices. In England they had worked principally with cowhide or foal-
skin, and were familiar with both the coarse work of heavy hunt and cattle thongs, and the fine work
of light coach thongs. In Australia they found kangaroo hide (an outstanding leather for whips) and
a large and expanding market for cattle whips. The English-style whip, with a stock of 18 to 20
inches, soon developed into the Australian stockwhip. Conditions in Australia were harsh, the ap-
prenticeship system still widespread, and the trade highly competitive. With a large and discerning
market, conditions were right to encourage the steady development of the stockwhip, leading to su-
perb cattle whips unequaled elsewhere in the world.
The trade flourished up to the onset of World War II, but has declined since then. There are
now very few fully trained whipmakers, and none being trained, but there remain numbers of part-
time or off-season country plaiters and amateurs who carry on the tradition. Many have benefited a
great deal from the professional craftsmen of past times. Ron Edwards has collected from these re-
maining plaiters methods and patterns in a wide variety of styles and qualities as an illuminating
record of wbipmaking in Australia.
Americans reading this book should bear in
mind that the Australian whip is the stockwhip.
Much can be learned from the discussions of
stockwhips. Bullwhips and snake (shot) whips, on
the other hand, are seldom used in Australia and
are made largely for Americans. Less is to be
learned from the discussions of these whips
Ring work and plaiting names in whip han-
dles is a specialty of the Australian whipmakers.
This subject has not been well covered in the
American literature, and the presentation here
will be welcomed by a wide range of braiders.
—David Morgan
Author of Whips and Whipmaking
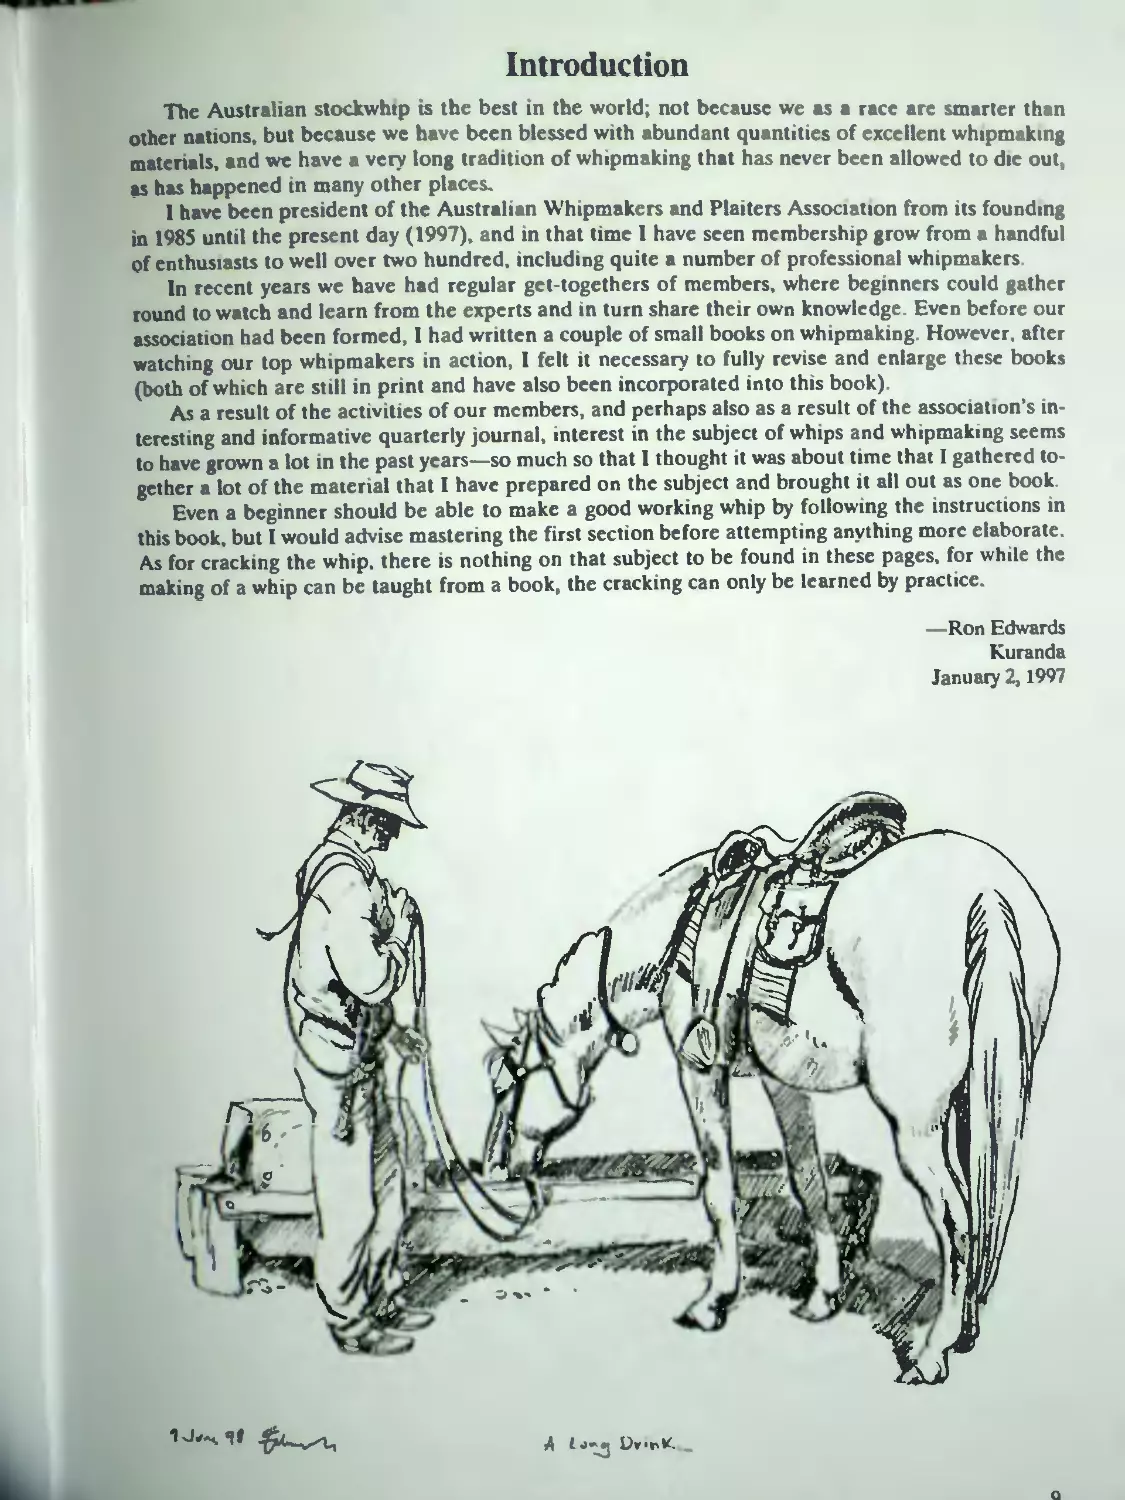
Introduction
The Australian stockwhip ts the best in the world; not because we as a race are smarter than
other nations, but because we have been blessed with abundant quantities of excellent whipmaking
materials, and we have a very long tradition of whipmaking that has never been allowed to die out,
as has happened tn many other places.
I have been president of the Australian Whipmakers and Plaiters Association from its founding
in 1985 until the present day (1997), and in that time I have seen membership grow from a handful
of enthusiasts to well over two hundred, including quite a number of professional whipmakers
In recent years we have had regular get-togethers of members, where beginners could gather
round to watch and learn from the experts and in turn share their own knowledge. Even before our
association had been formed, I had written a couple of small books on whipmaking However, after
watching our top whipmakers in action, I felt it necessary to fully revise and enlarge these books
(both of which are still in print and have also been incorporated into this book).
As a result of the activities of our members, and perhaps also as a result of the association’s in-
teresting and informative quarterly journal, interest in the subject of whips and whipmaking seems
to have grown a lot in the past years—so much so that I thought it was about time that I gathered to-
gether a lot of the material that I have prepared on the subject and brought it all out as one book.
Even a beginner should be able to make a good working whip by following the instructions in
this book, but I would advise mastering the first section before attempting anything more elaborate.
As for cracking the whip, there is nothing on that subject to be found in these pages, for while the
making of a whip can be taught from a book, the cracking can only be learned by practice.
—Ron Edwards
Kuranda
January 2,1997
A tj*j ,
Chapter 1
Whipmaking Book 1
How to Make a Basic 4-Plait Whip
A GOOD BASIC WHIP
This is not only an instruction book on how
to make stockwhips but is also the result of re-
search into a traditional Australian craft. Un-
like manv other traditional bush crafts, the art
of whipmaking is far from dead, and there are
still many whipmakers working in different
parts of the country. I have had the honor to be
the President of the Australian Plaiters and
Whipmakers Association from 1985 up to the
present (1997), and the membership in 1996
was over two hundred and still growing.
In Bushcraft 1 I gave some simple instruc-
tions for a whip, but that was over twenty years
ago and a lot of water has flowed under the
bridge since then. Over the years the Austra-
lian Plaiters and Whipmakers Association has
published a quarterly journal and members ha-
ven’t stopped arguing about what makes a
good, standard whip. In Bushcraft 1 and in the
early editions of Whipmaking Book 1 (now
chapter 1 of this book), I wrote about the 6-
strand whip, but today the 4-strand is the most
common for a yard whip.
My original book has been revised here in
order to simplify the system for the beginner.
This has been achieved by adding extra draw-
ings to more fully explain some of the basic
steps. For the beginner I would suggest starting
with a 4-plait whip. I would also suggest that
for a first whip you make the strands just the
length of the side of leather rather than curving
it around in order to gain more length.
All you need for a start is a piece of leather,
a sharp knife, a steady hand, and some pa-
tience. If you can spare the time, it is a good
idea to think of your first couple of whips as
presents for other people, and by the time you
get to your third one you will probably have im-
proved to the stage of wanting to keep it for
yourself.
Whip Names
Considering what an apparently simple
thing a basic 4-strand whip is, there is an im-
mense amount of difference between one
maker and another. Even the name of such a
whip is open to controversy.
Whipmaker Glen Denholm calls such a 4-
strand a team whip, because in the days of horse
teams this was the common term for them. In
many parts of inland Queensland they are
known as yard whips, because they are mainly
used as the basic knockabout whip m the cattle
yards, while many other people refer to them as
stockwhips. Still others insist that a stockwhip
can only be of kangaroo lace (this last argu-
ment is wrong, as early saddler’s catalogs list all
whips with a stock, that is to say a handle, as
stockwhips, even down to 4-plait whips of cow
hide).
Some wholesalers call them redhide whips,
but this only refers to the material that thev are
made from, and the same whip may be made of
redhide, whitehide, greenhide, or rawhide Mi
advice is to go along with whatever name is
common in your area, but be prepared to allow
others the right to use whatever term is the
common one for them.
Styles of Whip
There is no such thing as one correct
length, width, or shape for a 4-strand whip
Some people want long thick whips, others
want shorter, lighter whips. Both stiles are
equally correct and neither is better than the
other; it is just a question of the intended use
for the whip.
A few years ago our saddlery made ordi-
nary long whips for our shop and verv short
thick whips for a group of graziers in western
New South Wales. They wanted something short
enough to be just thrown across the pommel of
a saddle rather then being carried on the shoul-
der, and this was the style of w hip that suited
them but which they could not buy readih.
People who want a whip for cracking will
require a different style from those who want
one for working stock, and people who work
stock in the yard will want a different style of
whip from those who work from horses in the
bush.
Types of Leather
If you do not have a full side of leather to
work with, then you should go to a saddler and
buy a wide strap the full length of the hide Л
strap 50 mm wide should give you enough for a
whip, the fall, and still leave enough left over to
do a half-plaited handle.
Redhide is the usual leather for the basic
whip, but you can also use greenhide, or any
other strong leather. Redhide is properli
tanned greasy leather that has been heavily
oiled during the tanning process. It is red m
color.
Greenhide is simply made by pegging out a
fresh hide, covering it with a layer of salt, and
leaving it to dry for a few days. This is green-
hide, as it is known in my part of the world
Rawhide is the skin as it comes off the beast,
dried without salting. Both greenhide and raw-
hide become hard when dry and have to be
oiled and worked a lot to keep them flexible.
Because these hides are basically raw meat,
they can also provide food for dogs and mice.
Early polar explorers used rawhide for dog har-
nesses, one reason being that when things got
tough the explorers could chew the harness for
some nourishment. (There is some disagree-
ment about the terms rawhide and greenhide. I
won’t go into the various arguments except to
note that whipmakers all have their own terms
for their work as well as their own methods and
all, without exception, insist that they are the
only one who is right.)
Whitehide can make good whips, and home-
cure methods can be found in The Australian
Whipmaker, vol. 1, p 19, and vol. 4, p. 921 (in-
quiries may be addressed to the Editor, 12 Fairy-
land Road, Kuranda, Australia 4872). The great
disadvantage of home-cured whitehide is that
in humid conditions it will weep salty liquid.
Chrome-tanned leather. Some people (includ-
ing a few writers) confuse greenhide with
chrome-tanned leather. Chrome leather is light
gray in color but when cut the inside is blue-
green, hence the confusion. This leather can be
used for whips, but is not highly regarded.
Bark-tanned leather (also called vegetable
tanned) Bark-tanned leather can be used for
whips as long as it is well oiled, strong, and
flexible. Old saddler’s catalogs list whips made
from kip and similar bark-tanned leather.
Stockwhips are also made from kangaroo
hide, and the making of these whips is de-
scribed in chapter 2.
Choosing the Leather
When choosing a side, it is best to avoid
thick leather—try and get it around 2.5 to 3 mm
thick, and also make sure that it is not soft and
spongy. Leather that is cut from the belly part
of the hide is often very weak and will break
easily when cut into thin strands.
On the other hand, thick leather is hard to
plait well, and needs to be skived down. So, the
aim is to go for leather that can be plaited
nicely and that remains strong even in the thin-
nest sections
Cut a narrow strip from the leather you are
thinking about using, taper it down to a thin
point, and then see how easily it breaks. If the
break has a loose, hairy look about it, then the
leather at that part of the hide is not good
enough for whipmaking.
The sections that have been under the ani-
mal’s armpits are often weak, but the leather
100 mm above this may be quite strong.
Leather that can be stretched is usually not
suitable. If you pull a strap of redhide and one
section of it changes color to a pale shade of
pink and then goes back to red when you let go,
that means the strap has a weak section of
leather at that point This can sometimes still
be used, but not if it occurs where the fine
strands are to be cut.
These soft sections of leather need not be
wasted; after all, you probably paid good
money for them. They can be used for the belly
of a whip, and can often be used for the plaiting
on the handle, as this does not need the
strength that the thong will need.
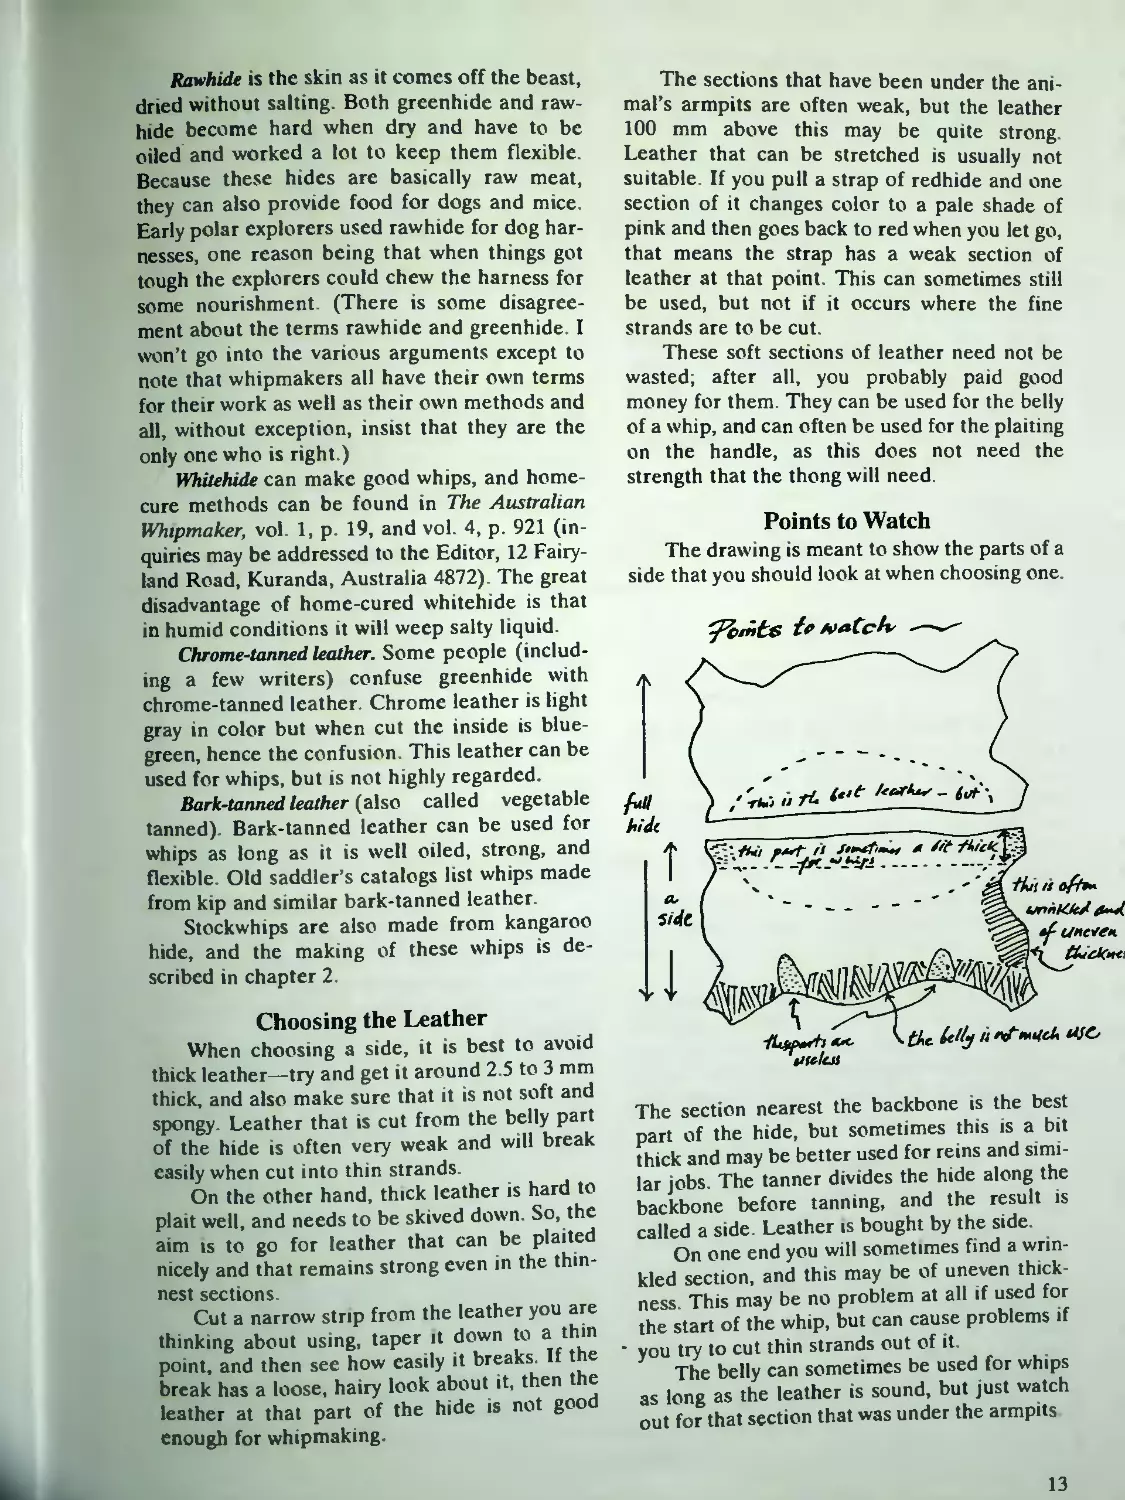
Points to Watch
The drawing is meant to show the parts of a
side that you should look at when choosing one.
The section nearest the backbone is the best
part of the hide, but sometimes this is a bit
thick and may be better used for reins and simi-
lar jobs. The tanner divides the hide along the
backbone before tanning, and the result is
called a side. Leather is bought by the side.
On one end you will sometimes find a wrin-
kled section, and this may be of uneven thick-
ness. This may be no problem at all if used for
the start of the whip, but can cause problems if
you try to cut thin strands out of it.
The belly can sometimes be used for whips
as long as the leather is sound, but just watch
out for that section that was under the armpits
13
Fig. 2. There are two ways of cutting out
the leather for a whip. For a long whip the cut
will run along the straight side and then curve
down However, professional whipmakers only
cut like this when they have an order for a long
whip, because each whip cut out shortens the
length of the side and so makes the cutting out
of the next one that much more difficult.
Fig. 3. Professional whipmakers, with few
exceptions, cut straight across the length of the
side as shown. In this way they can get the
maximum number of whips from the side with
the minimum amount of waste. Because of the
irregular shape of the side, each whip will be a
different length.
All the thin, weak parts of the belly are dis-
carded before marking out begins. Some whip-
makers then use a straight edge to get a line
before marking out the first whip.
Others simply follow the general shape of
the leather. Many years ago when I first saw
this done by a local saddler I was very sur-
prised, but the old fellow said that it saved a lot
of leather and made no difference to the final
job.
Buying a Strip of Leather
This is a useful method for the beginner
who does not have the money or need to pur-
chase a full side of leather. Leather shops will
not usually cut out fancy shapes except for
fancy prices, but they will sell a 50-mm strip cut
the full length of the side,
and this is what the
beginner should
start with.
i‘=o _
Such a strip will provide the leather for the
whole whip, including the thong, the fall, and
enough to do a bit of a plait on the handle.
Ask for redhide and try and make sure that
it comes from the upper part of the side and
not from the weak belly section. The stretch
test is the easiest way to check on a strip of
leather. Give it a pull and if sections change
from red to pink and get narrow, then the
leather has too much stretch
4-PLAIT BASIC WHIP
The most common whip for everyday use is
the 4-plait. This can be made with the keeper
and belly in one piece, or with the belly added
as a separate piece. For your first whip I would
suggest one with the belly added, as this is the
type made today by professional whipmakers,
and this is what I will describe here.
STEP1: MAKING THE BELLY
The belly is needed to give weight and den
sity to the whip. Round plaits are, by the nature
of their construction, hollow, even when the
strands are pulled very tight; so a whip made
without a belly will be light and will not crack
well.
Whips made of kangaroo leather usually
have a plaited belly, but redhide whips do not,
because of the thickness of the leather that is
used for the outer covering of the whip. If you
were to make a plaited belly for a redhide whip,
the finished product could very well look like a
pregnant sausage.
Unless you want a very heavy whip the belly
need not be very thick, 4 mm at the widest is
common, and that is thinner than a pencil.
There are three ways to prepare the belly, ac-
cording to the thickness of the leather that is
available
Whichever method is used you will find
that the job will be easier if you soak the
leather in water for five minutes or so before
you roll it smooth. Remember to give it a good
coating of leather dressing once it has dried
out, in order to replace any oil that was lost
during the soaking.
Method 1. If the leather is very thick, a strip
may be cut and tapered each end as shown A
sharp knife is then used to round off the cor-
ners and it is then rolled firmly under a board
until it is round all the way down its length.
2 meters ______________________________
14
К—150---*
2 NetcfS
-Я
/г
4 ividest; point
chatter Cuts
rott tuyfdLy
Method2. Fig. 5. The second method is for
leather that is not thick enough for the first
method, perhaps 2-3 mm thick. Cut out a tear-
drop shape as shown and score it down its
length to help make it roll up easier. Soak it in
water and then roll it firmly under a board until
it is as tight as it can possibly be.
Let it at least partly dry and give it a heavy
coating of fat or leather dressing. Put it to one
side while you go to the next step.
4— 15*0 ----------------lorfftk 2 M
- 2.(Sx Алле к ЯЯЙКдм»
Ividut pomf,
Method 3. Fig. 6. This method is not so com-
mon because it takes a little longer, but it is
handy if you only have thin leather to use for
the belly. The strand can be 4-5 mm wide, the
same shape as the previous method, and should
be given a good soaking in water.
STEP 2: CUTTING OUT
THE WHIP
Fig. 9. Some professionals
cut out whips by eye without
needing to make any measure-
ments at all, but the beginner
should not attempt this be-
cause it is a skill developed
from years of practice. Mark
carefully and cut equally as
carefully and
you will have
fewer prob-
lems. Maurice
Doohan, a pro-
fessional who
makes beauti-
fully tapered
whips, always marks the
leather and then cuts.
There are a few ways to
mark and cut out leather, and
I will describe some of them
here and
you can
make your
own deci-
sion about
which you
would like
Fig. 7. Twist the strand into a spiral. It
should not be hollow, so if it seems to be devel-
oping a hole down the center, the strand should
be wrapped around a thin rounded strand of
leather.
When fully wound up it is pulled out tight
and tied or tacked down at each end. When dry
it should be given a good rolling and well cov-
ered in leather dressing or fat.
Fig. 8. A long fine tapered belly can be
made in this way.
8
to use.
Using a Pair of Dividers
This is a common method
and will suit most people. The
dividers are set to the desired
width and will make a clear
groove in the leather.
15
ска/leu; ci/Cf
Cutting Methods
ZZZZZ There are two
-----r- - ways to cut out the
,/uaf « en'fc and the one that you choose will de-
Using a Template
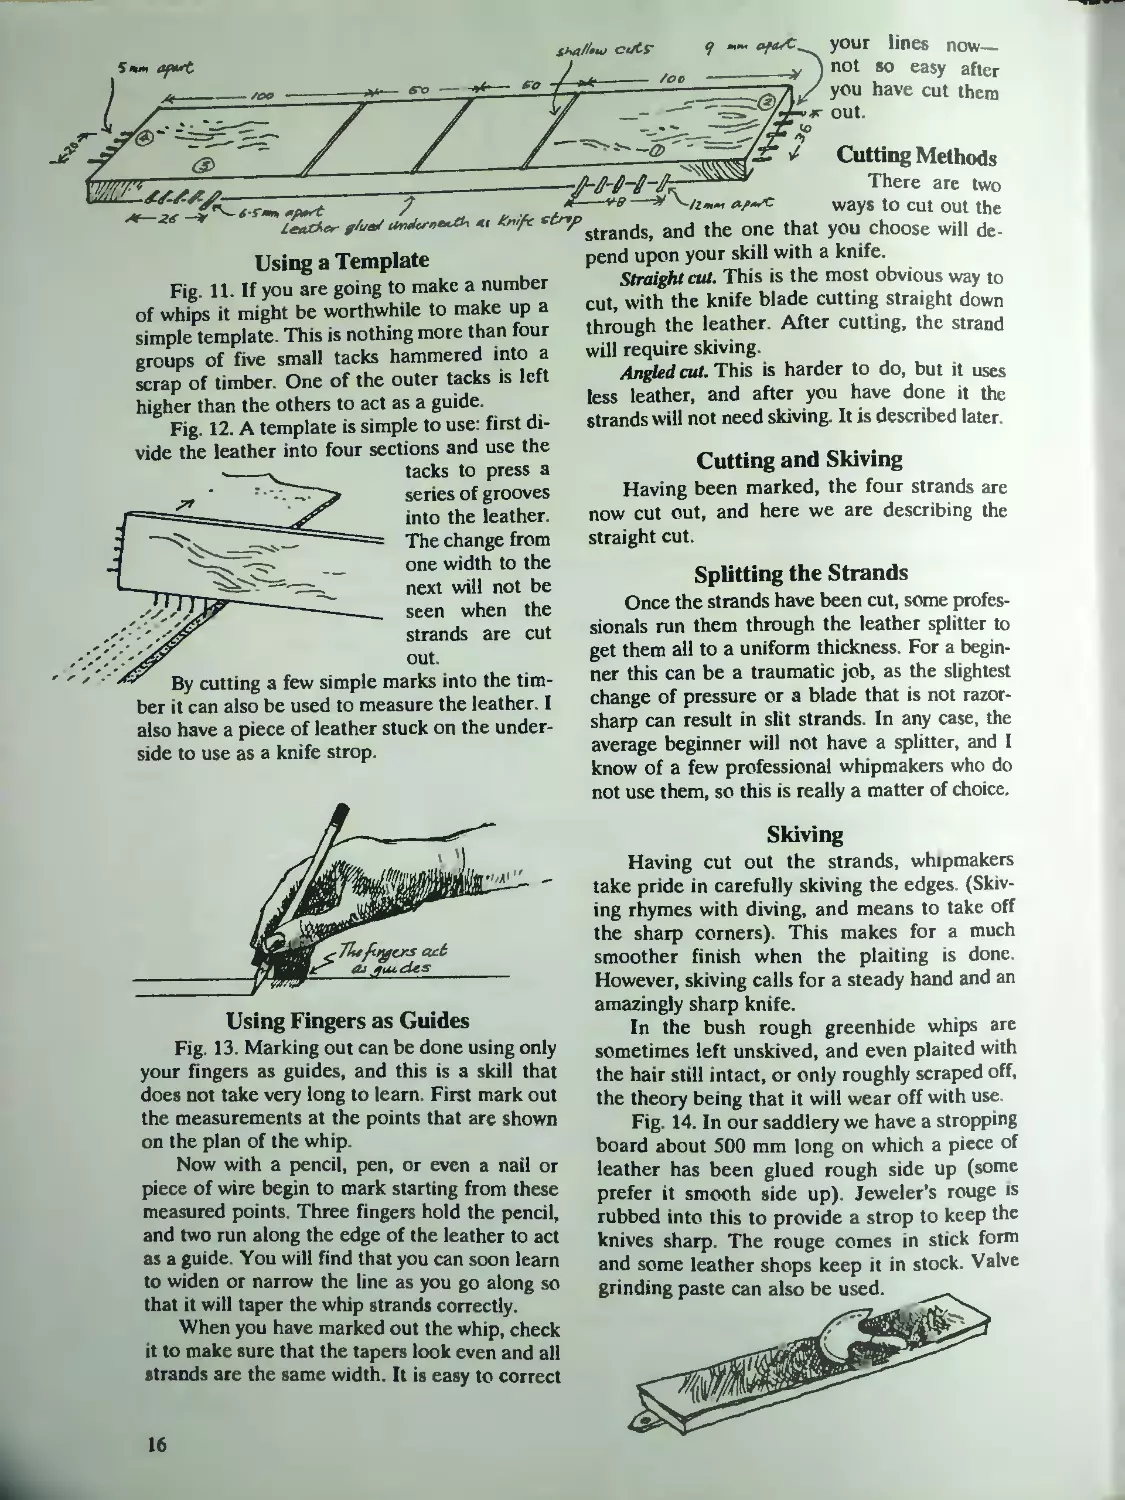
Fig. 11. If you are going to make a number
of whips it might be worthwhile to make up a
simple template. This is nothing more than four
groups of five small tacks hammered into a
scrap of timber. One of the outer tacks is left
higher than the others to act as a guide.
Fig. 12. A template is simple to use: first di-
vide the leather into four sections and use the
tacks to press a
series of grooves
into the leather
The change from
one width to the
next will not be
seen when the
strands are cut
out.
By cutting a few simple marks into the tim-
ber it can also be used to measure the leather. I
also have a piece of leather stuck on the under-
side to use as a knife strop.
Using Fingers as Guides
Fig. 13 Marking out can be done using only
your fingers as guides, and this is a skill that
does not take very long to learn. First mark out
the measurements at the points that are shown
on the plan of the whip.
Now with a pencil, pen, or even a nail or
piece of wire begin to mark starting from these
measured points Three fingers hold the pencil,
and two run along the edge of the leather to act
as a guide. You will find that you can soon learn
to widen or narrow the line as you go along so
that it will taper the whip strands correctly.
When you have marked out the whip, check
it to make sure that the tapers look even and all
strands are the same width. It is easy to correct
)your lines now—
not so easy after
you have cut them
•r out.
pend upon your skill with a knife.
Straight cut. This is the most obvious way to
cut, with the knife blade cutting straight down
through the leather. After cutting, the strand
will require skiving.
Angled cut. This is harder to do, but it uses
less leather, and after you have done it the
strands will not need skiving. It is described later.
Cutting and Skiving
Having been marked, the four strands are
now cut out, and here we are describing the
straight cut.
Splitting the Strands
Once the strands have been cut, some profes-
sionals run them through the leather splitter to
get them all to a uniform thickness. For a begin-
ner this can be a traumatic job, as the slightest
change of pressure or a blade that is not razor-
sharp can result in slit strands. In any case, the
average beginner will not have a splitter, and I
know of a few professional whipmakers who do
not use them, so this is really a matter of choice.
Skiving
Having cut out the strands, whipmakers
take pride in carefully skiving the edges. (Skiv-
ing rhymes with diving, and means to take off
the sharp corners). This makes for a much
smoother finish when the plaiting is done.
However, skiving calls for a steady hand and an
amazingly sharp knife.
In the bush rough greenhide whips are
sometimes left unskived, and even plaited with
the hair still intact, or only roughly scraped off,
the theory being that it will wear off with use.
Fig. 14. In our saddlery we have a stropping
board about 500 mm long on which a piece of
leather has been glued rough side up (some
prefer it smooth side up). Jeweler's rouge is
rubbed into this to provide a strop to keep the
knives sharp The rouge comes in stick form
and some leather shops keep it in stock. Valve
grinding paste can also be used. ___
I
16
For the home workshop the rouge can be
rubbed on the rough side of any small scrap of
leather and this is then used as a strop. Only
when the knife is sharp enough to shave the
hairs on an arm can skiving begin.
Fig 15. Everyone develops his or her own
method of holding the leather and knife when
skiving, and the sketch shows a typical style.
As you skive you walk backwards, so make
sure the area behind you is clear and that the whip
is firmly tied to something. Wam people not to
walk behind you—if you bump into something you
can cut yourself badly. Also wrap something
around your forefinger or make a small fingerstall
so that the knife will not cut you if it slips.
If the knife is really sharp, then skiving is
easy if not, then continue sharpening the knife.
I have seen an Aboriginal stockman friend spend
a full hour patiently sharpening a knife before
starting work. ________
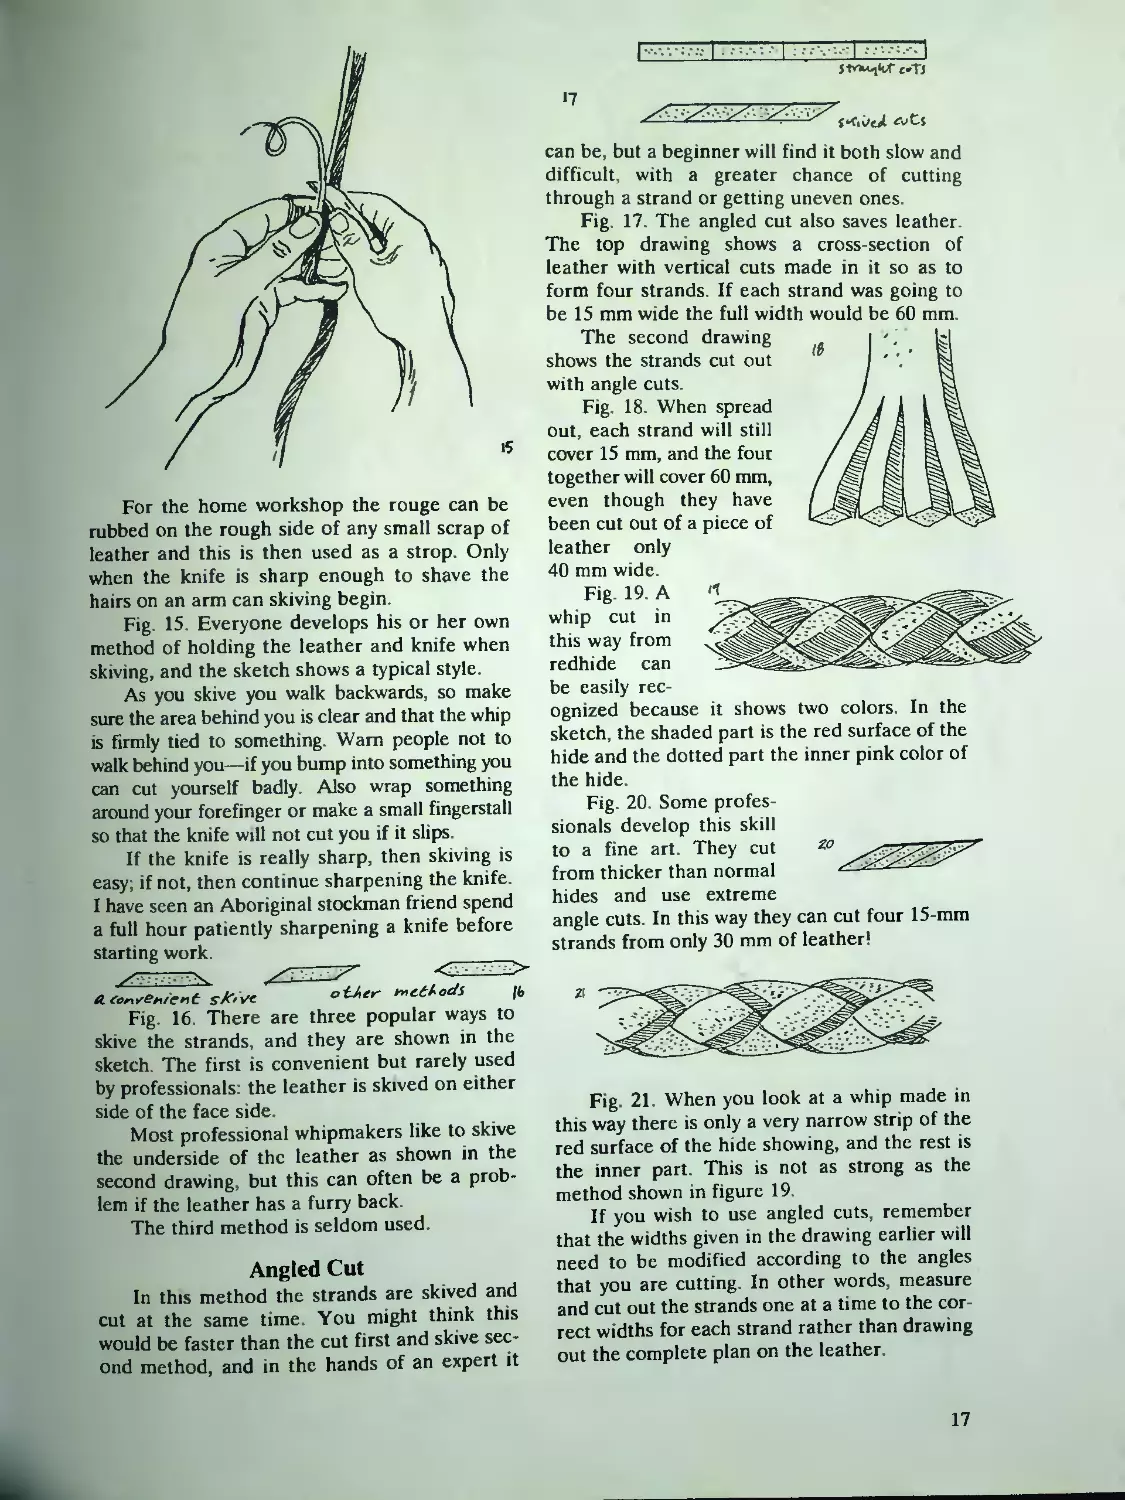
Л Convenient sfovc ot-Aer rnetAods fb
Fig 16. There are three popular ways to
skive the strands, and they are shown in the
sketch. The first is convenient but rarely used
by professionals: the leather is skived on either
side of the face side.
Most professional whipmakers like to skive
the underside of the leather as shown in the
second drawing, but this can often be a prob-
lem if the leather has a furry back.
The third method is seldom used.
Angled Cut
In this method the strands are skived and
cut at the same time You might think this
would be faster than the cut first and skive sec-
ond method, and in the hands of an expert it
can be, but a beginner will find it both slow and
difficult, with a greater chance of cutting
through a strand or getting uneven ones.
Fig. 17. The angled cut also saves leather.
The top drawing shows a cross-section of
leather with vertical cuts made in it so as to
form four strands. If each strand was going to
be 15 mm wide the full width would be 60 mm.
The second drawing
shows the strands cut out
with angle cuts.
Fig. 18. When spread
out, each strand will still
cover 15 mm, and the four
together will cover 60 mm,
even though they have
been cut out of a piece of
leather only
40 mm wide.
Fig. 19. A
whip cut in
this way from
redhide can
be easily rec-
ognized because it shows two colors In the
sketch, the shaded part is the red surface of the
hide and the dotted part the inner pink color of
the hide.
Fig. 20. Some profes-
sionals develop this skill
to a fine art. They cut
from thicker than normal
hides and use extreme
angle cuts. In this way they can cut four 15-mm
strands from only 30 mm of leather!
Fig. 21. When you look at a whip made in
this way there is only a very narrow strip of the
red surface of the hide showing, and the rest is
the inner part. This is not as strong as the
method shown in figure 19.
If you wish to use angled cuts remember
that the widths given in the drawing earlier will
need to be modified according to the angles
that you are cutting. In other words, measure
and cut out the strands one at a time to the cor-
rect widths for each strand rather than drawing
out the complete plan on the leather.
17
at an angle to the leather so
that the greater the angle,
the more tapered the skive.
For the first whip from a
side, a skive must be first
put on the leading edge, but
after that the final cut of
each whip set w ill automati
cally produce a skived edge
for the next set
The cutting is done a
section at a time, the sec-
tion being as long as the
vvhipmaker finds convenient
to cut in one action (usually
about 500 mm) Cutting the
four strands out in this way
makes it easier to get them
evenly matched, and is also
faster than cutting one com
plete strand out at a time
The drawing shows
Janies Hill (Jimmy the
Whip) of the well-known
whipmaking fanu'lv, using
this technique at Jondarvan
in 1944, He was cutting
extra-long whips anil so his
side of leather had become
oval
He used both redhide
and chrome-tanned leather,
and his knife had to be ex
tremelv sharp in order to
cut the long bevel that is
needed for this technique
This is a difficult skill to
master, and I would advise
beginners not to bother
with it until thev have made
a number of whips using the
first method.
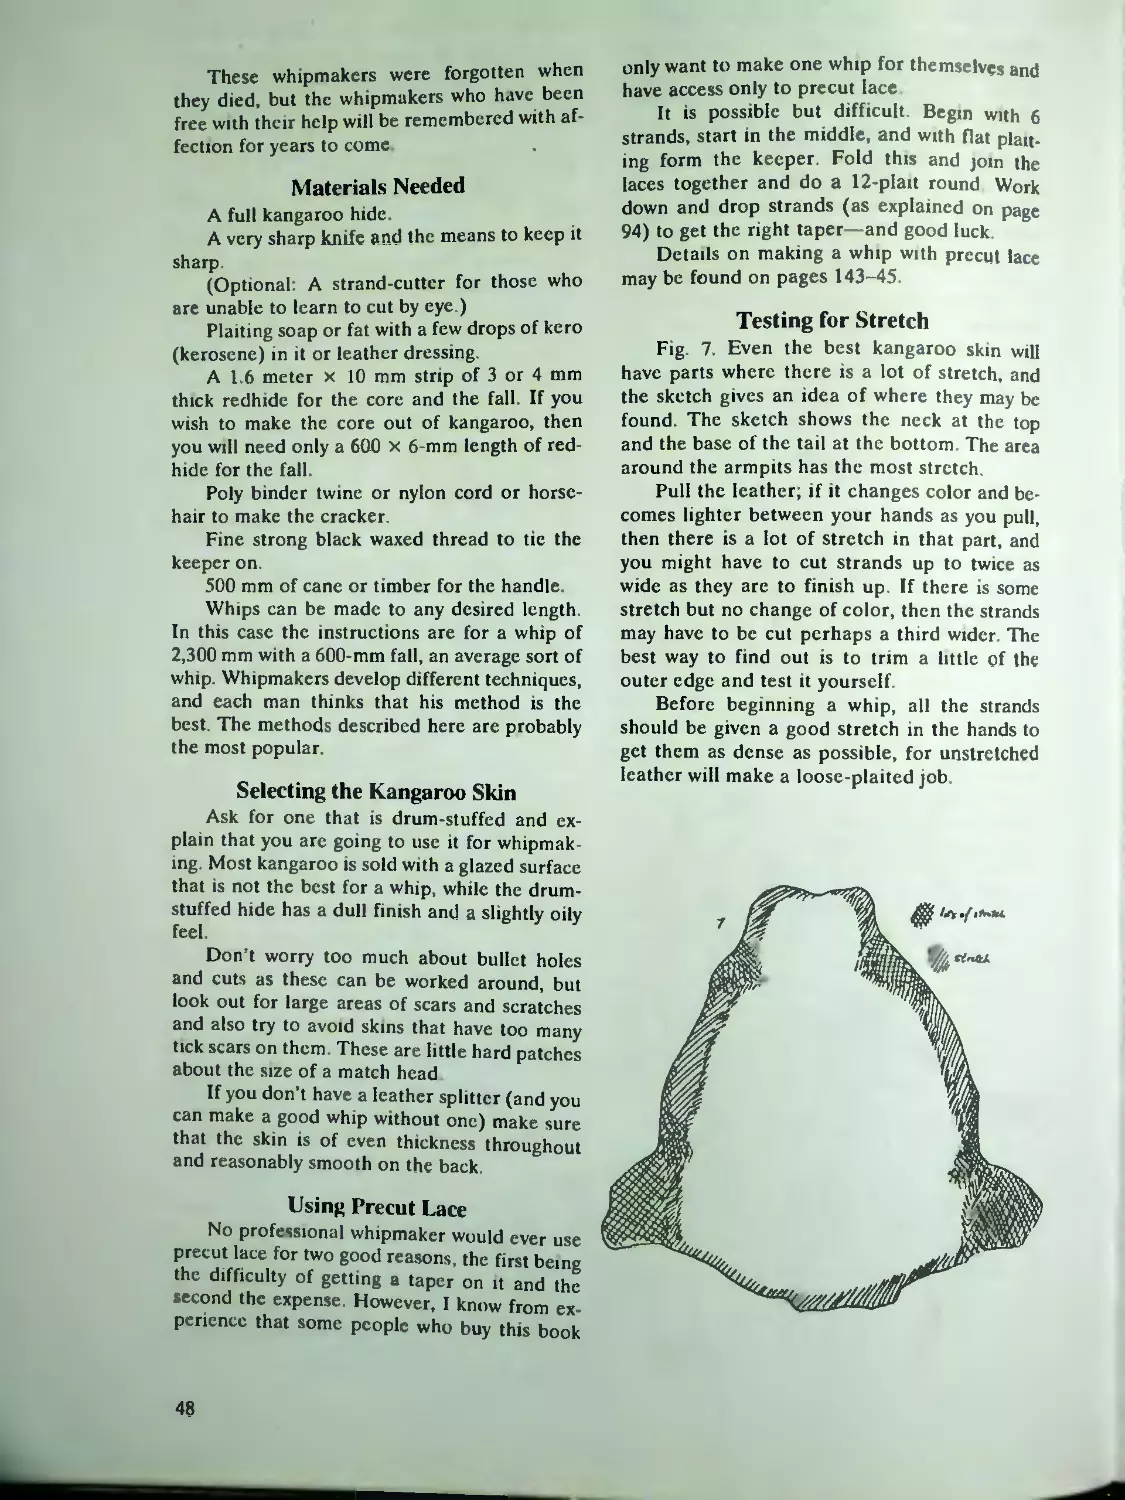
Cutting on the Bcnm
Professionals who use the technique of
cutting out strands at an angle usually "cut
on the beam." as the saying goes. Thai is to
say, ihe side is thrown over some sort of
rail—it might be over the top rail of a fence
or over a special length of timber fitted
into the workshop.
The leather is held In place with the
side of the body—one hand holds out the
strand being cut and the other hand holds
the knife. Cutimg commences from the
narrow end of the whip. The knife is held
18
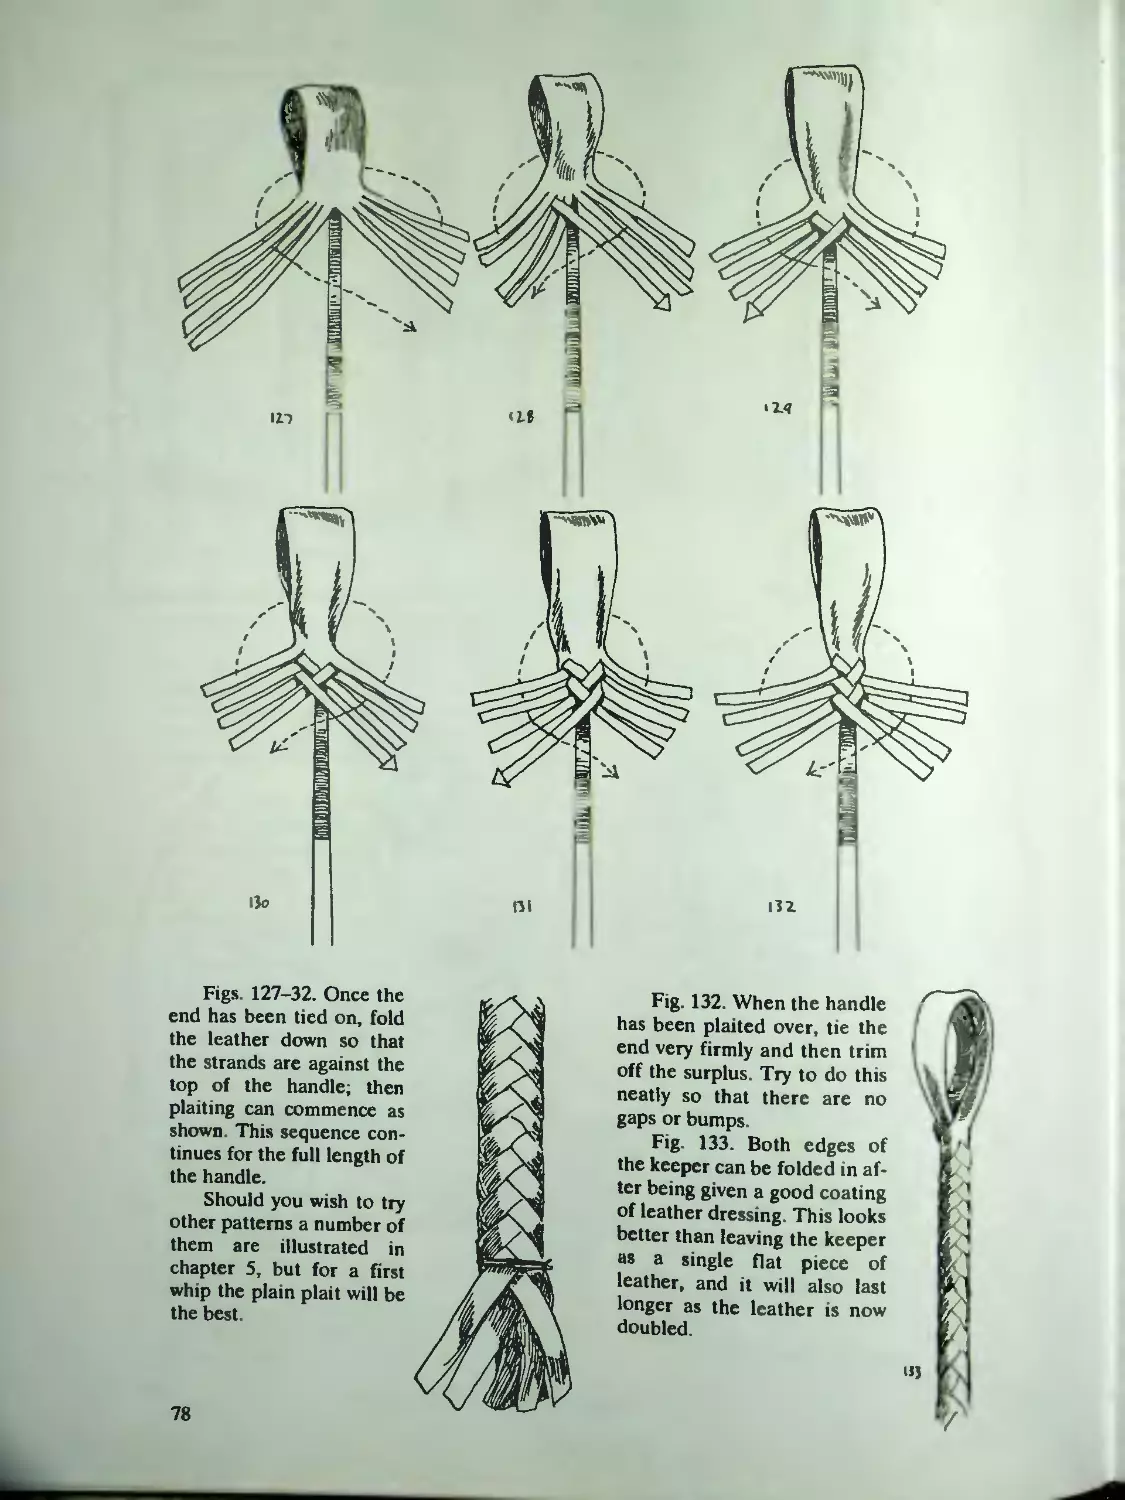
little more plaiting has been done the belly can
be pulled down inside the whip so the upper
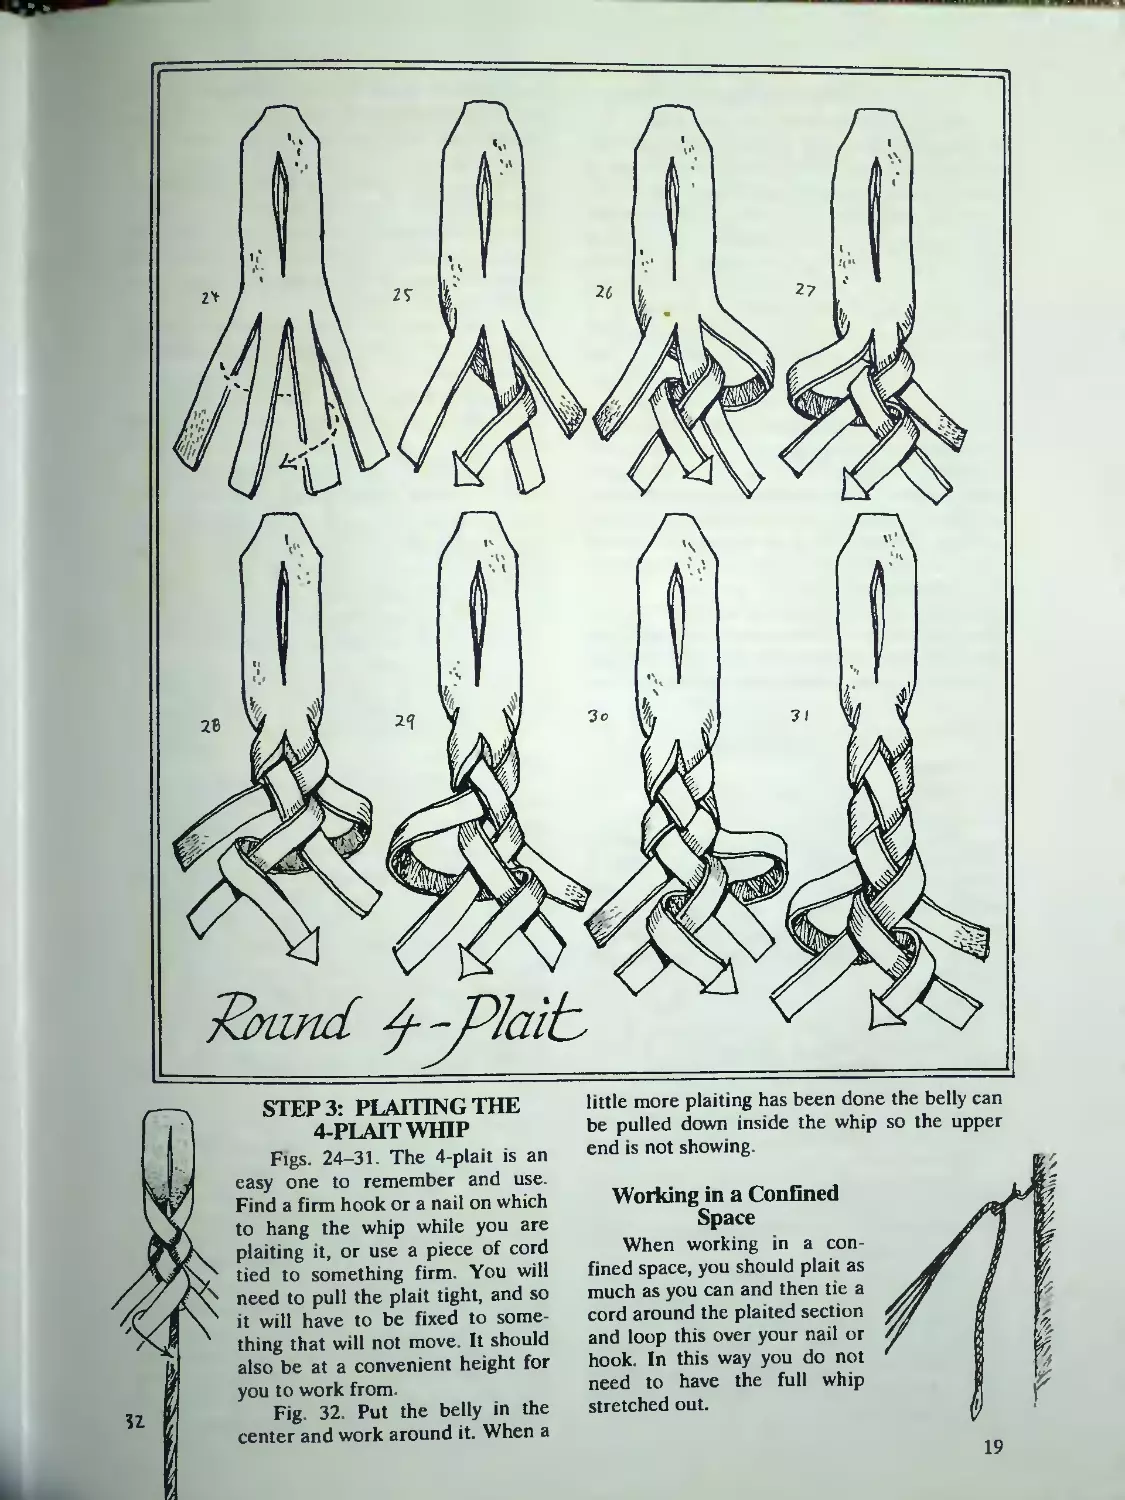
STEP3: PLAITING THE
4-PLAIT WHIP
Figs. 24-31. The 4-plait is an
easy one to remember and use.
Find a firm hook or a nail on which
to hang the whip while you are
plaiting it, or use a piece of cord
tied to something firm. You will
need to pull the plait tight, and so
it will have to be fixed to some-
thing that will not move. It should
also be at a convenient height for
you to work from.
Fig. 32. Put the belly in the
center and work around it. When a
end is not showing.
Working in a Confined
Space
When working in a con-
fined space, you should plait as
much as you can and then tie a
cord around the plaited section
and loop this over your nail or
hook In this way you do not
need to have the full whip
stretched out.
19
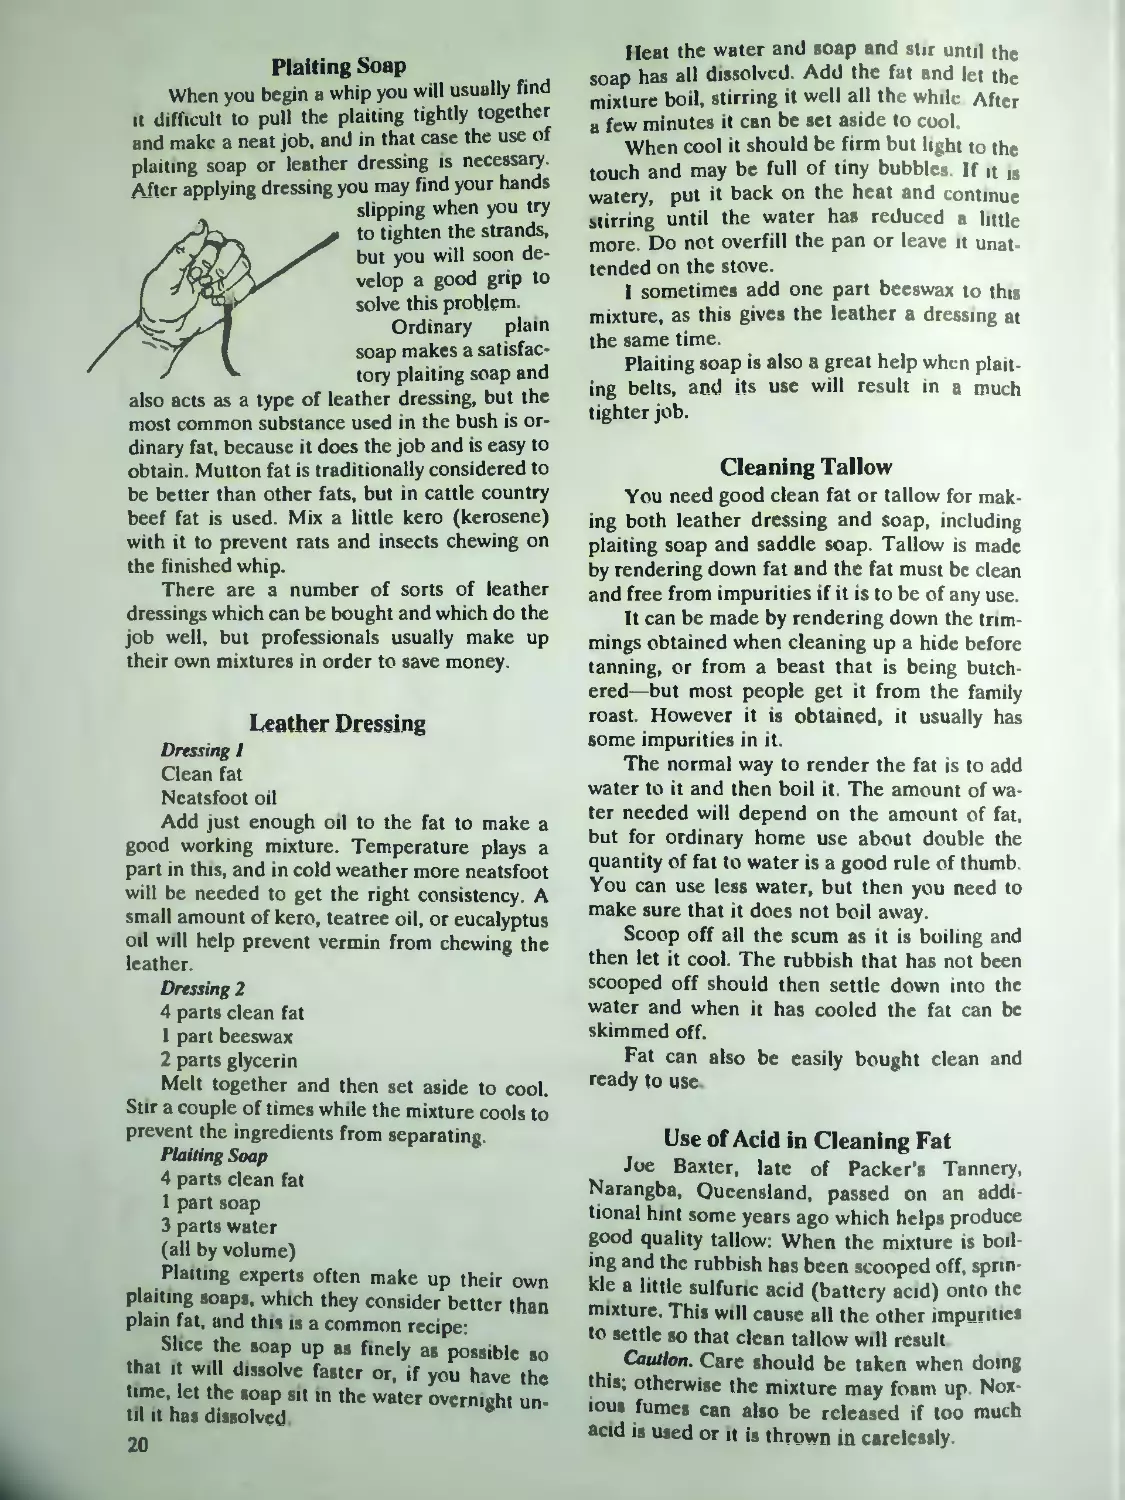
Plaiting Soap
When you begin a whip you will usually find
it difficult to pull the plaiting tightly together
and make a neat job, and in that case the use of
plaiting soap or leather dressing is necessary.
After applying dressing you may find your hands
slipping when you try
л to tighten the strands,
/ but you will soon de-
f WKyr velop a good grip to
[ solve this problem.
Ordinary plain
''^7 I soap makes a satisfac-
J tory plaiting soap and
also acts as a type of leather dressing, but the
most common substance used in the bush is or-
dinary fat, because it does the job and is easy to
obtain. Mutton fat is traditionally considered to
be better than other fats, but in cattle country
beef fat is used. Mix a little kero (kerosene)
with it to prevent rats and insects chewing on
the finished whip.
There are a number of sorts of leather
dressings which can be bought and which do the
job well, but professionals usually make up
their own mixtures in order to save money.
Leather Dressing
Dressing I
Clean fat
Ncatsfoot oil
Add just enough oil to the fat to make a
good working mixture. Temperature plays a
part in this, and in cold weather more neatsfoot
will be needed to get the right consistency. A
small amount of kero, teatree oil, or eucalyptus
oil will help prevent vermin from chewing the
leather.
Dressing 2
4 parts clean fat
1 part beeswax
2 parts glycerin
Melt together and then set aside to cool.
Stir a couple of times while the mixture cools to
prevent the ingredients from separating.
Plaiting Soap
4 parts clean fat
1 part soap
3 parts water
(all by volume)
Plaiting experts often make up their own
plaiting soaps, which they consider better than
plain fat, and this is a common recipe:
Slice the soap up as finely as possible so
that it will dissolve faster or, if you have the
time, let the soap sit tn the water overnight un-
til it has dissolved
20
Heat the water and soap and stir until the
soap has all dissolved. Add the fat and let the
mixture boil, stirring it well all the while After
a few minutes it can be set aside to cool.
When cool it should be firm but light to the
touch and may be full of tiny bubbles. If it is
watery, put it back on the heat and continue
stirring until the water has reduced a little
more. Do not overfill the pan or leave it unat
tended on the stove.
I sometimes add one part beeswax to this
mixture, as this gives the leather a dressing at
the same time.
Plaiting soap is also a great help when plait-
ing belts, and its use will result in a much
tighter job.
Cleaning Tallow
You need good clean fat or tallow for mak-
ing both leather dressing and soap, including
plaiting soap and saddle soap Tallow is made
by rendering down fat and the fat must be clean
and free from impurities if it is to be of any use.
It can be made by rendering down the trim-
mings obtained when cleaning up a hide before
tanning, or from a beast that is being butch-
ered—but most people get it from the family
roast. However it is obtained, it usually has
some impurities in it.
The normal way to render the fat is to add
water to it and then boil it The amount of wa-
ter needed will depend on the amount of fat,
but for ordinary home use about double the
quantity of fat to water is a good rule of thumb.
You can use less water, but then you need to
make sure that it does not boil away.
Scoop off all the scum as it is boiling and
then let it cool. The rubbish that has not been
scooped off should then settle down into the
water and when it has cooled the fat can be
skimmed off.
Fat can also be easily bought clean and
ready to use
Use of Acid in Cleaning Fat
Joe Baxter, late of Packer’s Tannery,
Narangba, Queensland, passed on an addi
tional hint some years ago which helps produce
good quality tallow. When the mixture is boil
mg and the rubbish has been scooped off, sprin-
kle a little sulfuric acid (battery acid) onto the
mixture. This will cause all the other impurities
to settle so that clean tallow will result
Caution. Care should be taken when doing
this; otherwise the mixture may foam up. Nox-
ious fumes can also be released if too much
acid is used or it is thrown ш carelessly.
Plaiting the Whip
The 4-plait is very easy once you have
learned it. Whipmakers have a saying: “Pull
tight and plait loose.” This means that when
you pick up the next strand to be worked in,
you first pull it tight before working it into the
next position. This is the secret to plaiting a
good tight whip.
The other secret is to have a good firm
belly around which to plait.
Study your work as you go if you want to
end up with a good-looking whip. There are a
couple of things to watch out for.
Strands bunching up. If the strands start to
get too crowded together and bunch up it may
mean that you are pulling at too acute an angle,
but it is more likely that the strands are too
wide for the size of the belly. At this stage it
will be too late to narrow the strands, and so a
thicker belly should be used. Some flat strands
of thin leather can be used to build up its thick-
ness.
When making kangaroo whips, a strip of
thin kangaroo leather, called a bolster, is
wrapped around the belly to build up its diame-
ter if this is needed.
Gaps forming. If there are gaps in the plait-
ing it may be that your strands are all of differ-
ent widths, and there is little that can be done
about this. Or it might be that you are pulling
the strands down at too long an angle. If it is
neither of these then it probably means that
your belly is too fat for the size strands that you
are using, and you should trim it down or re-
place it.
Although the plaiting of the whip may take
the longest time, it is the shortest step to write
about, since the same plaiting sequence contin-
ues for the whole length of the whip. Every now
and then you will need to untangle the strands,
but that is about all. For very long whips you
may want to make the strands up into bundles
to stop some of the tangles. This is discussed in
chapter 2. However, this is hardly necessary for
the average redhide whip.
Keep plaiting until only about 100 mm of
the strands are left. If you are a beginner, it is a
good idea to use some thread to put a tempo-
rary tie around the end of the plaiting at this
stage. This will leave your hands free to put on
the fall. With a little more experience you will
be able to do away with this tie, but it will help
with your first whip.
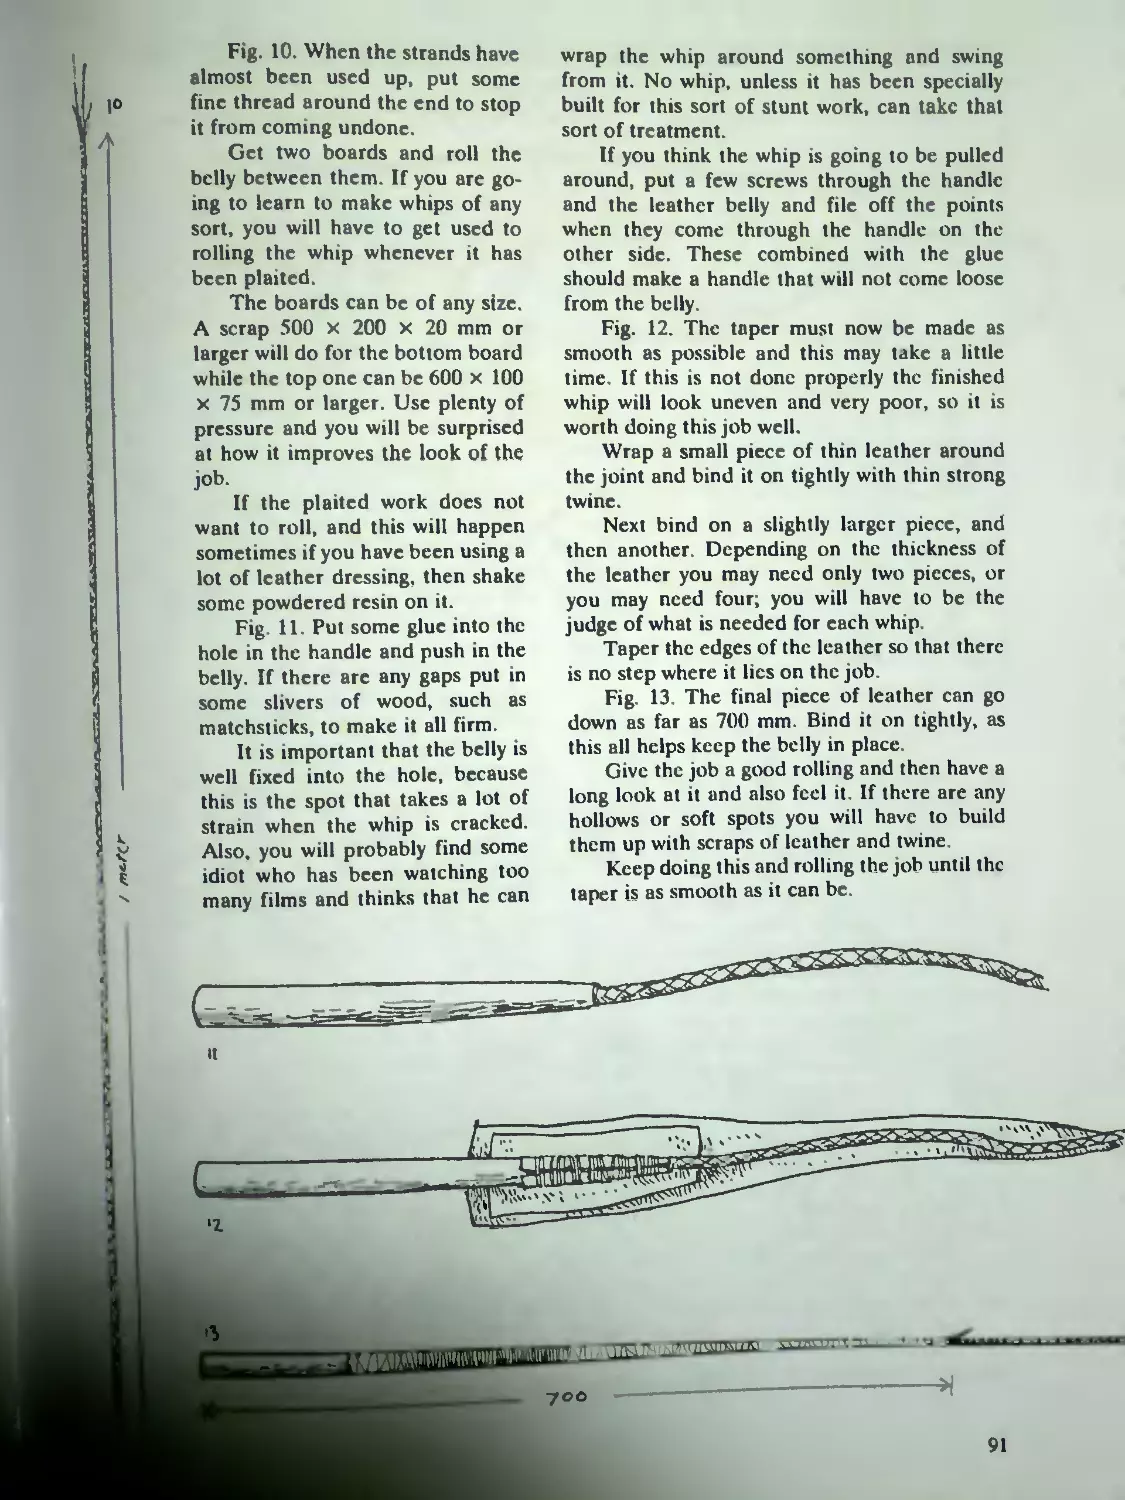
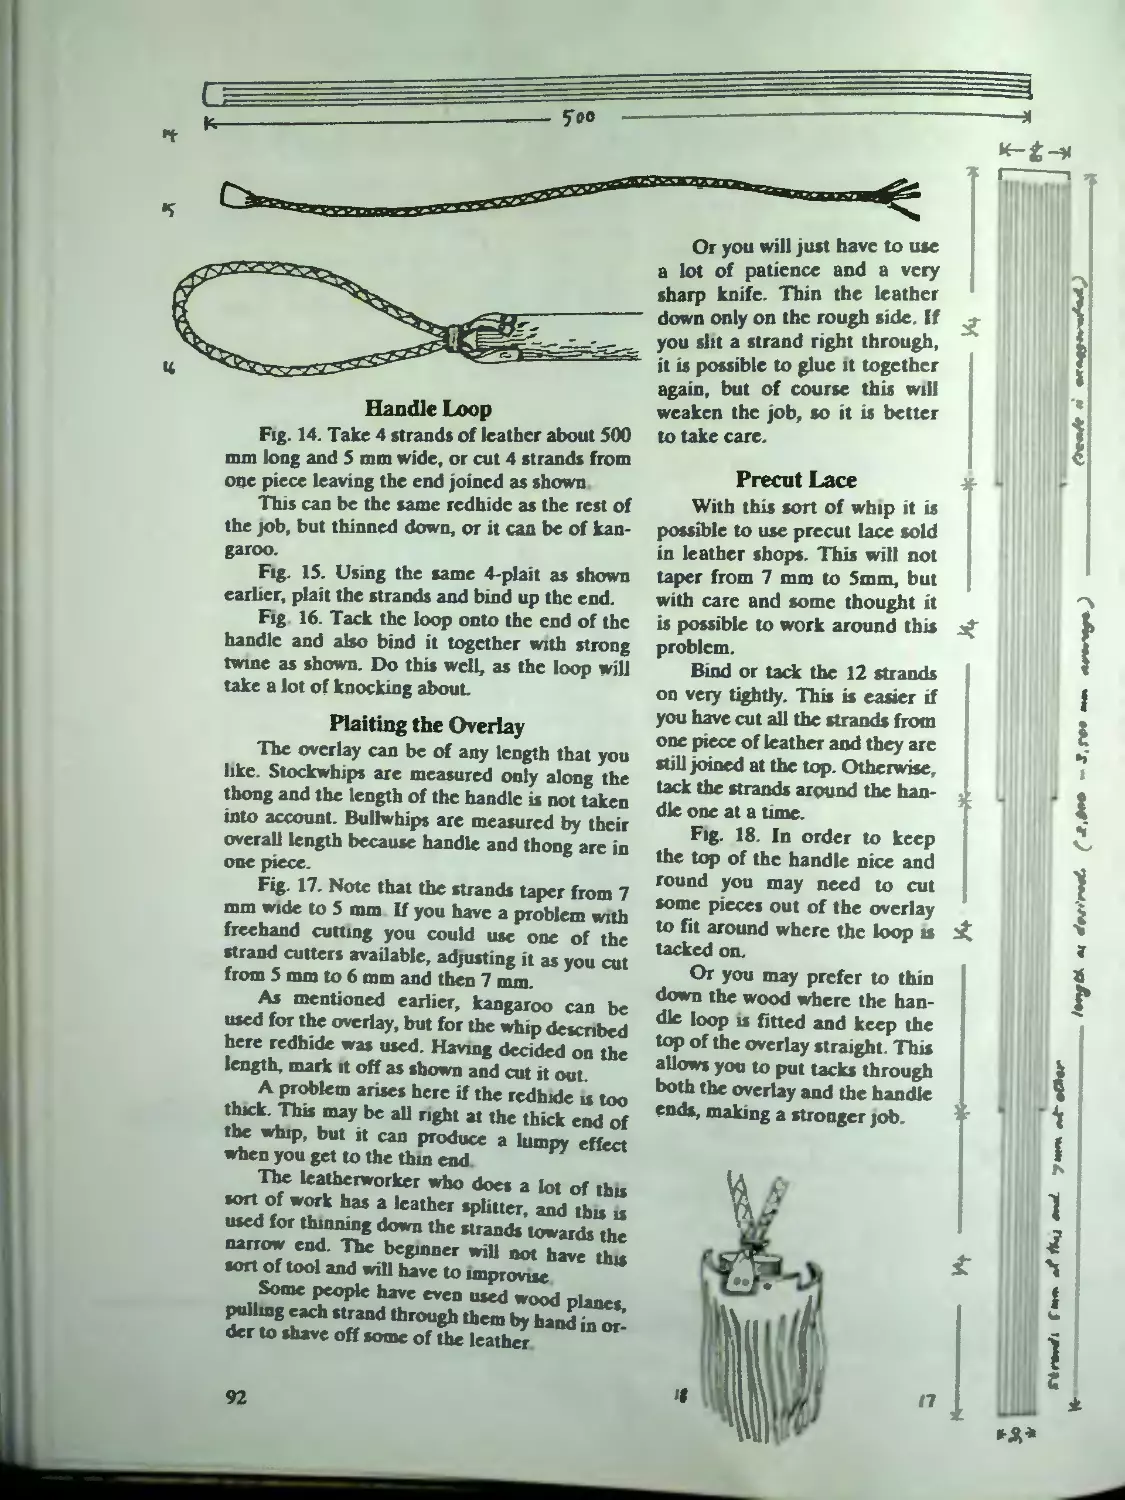
STEP 4: THE FALL
The fall is a strip of leather attached to the
end of the whip. The end of the whip gets a lot
of knocking around, so it is better to have a fall
that can be replaced rather than let the plaited
section take the damage.
The fall is usually made from redhide be-
cause it does not dry out and crack as readily as
greenhide (but greenhide falls are all right as
long as they are well greased).
The exact dimensions are according to
taste, but 600 mm long is average. The width is
decided by the thickness of the leather—it
should be both thin and strong.
Cut the fall from the best and thickest part
of the side, along the backbone, and it can then
be made almost square in section for most of its
length.
For the sake of appearance the edges
should be skived and then a scrap of leather
wrapped around the fall (which has been well
greased with whatever dressing you are using)
and pulled vigorously up and down to round off
the edges. The fall is made a little wider at the
top and a slit is put in it just large enough to
take the end of the whip.
Cutting the Slit in a Whip Fall
Cutting the slit in a whip fall is simple—all
you need is a sharp knife and a single cut. How-
ever, in our saddlery business we
sometimes make up a lot of falls at
one time, and then I look around I &
for some way to speed up the work. / I y\
This simple tool is a great help be- ilk/
cause it gives a cut of exactly the I v н
right length. \ | 1
I often make whip falls when I I
have to straighten the long edge of
a new side of redhide. This is the
best part of the leather and so ideal for the job,
and these trimmings would otherwise be
wasted.
This simple tool can be made from any
piece of scrap steel. The size of the slit will de-
pend on what your customers want; I usually
cut it about 13 mm long to suit the sort of whips
that are most common here
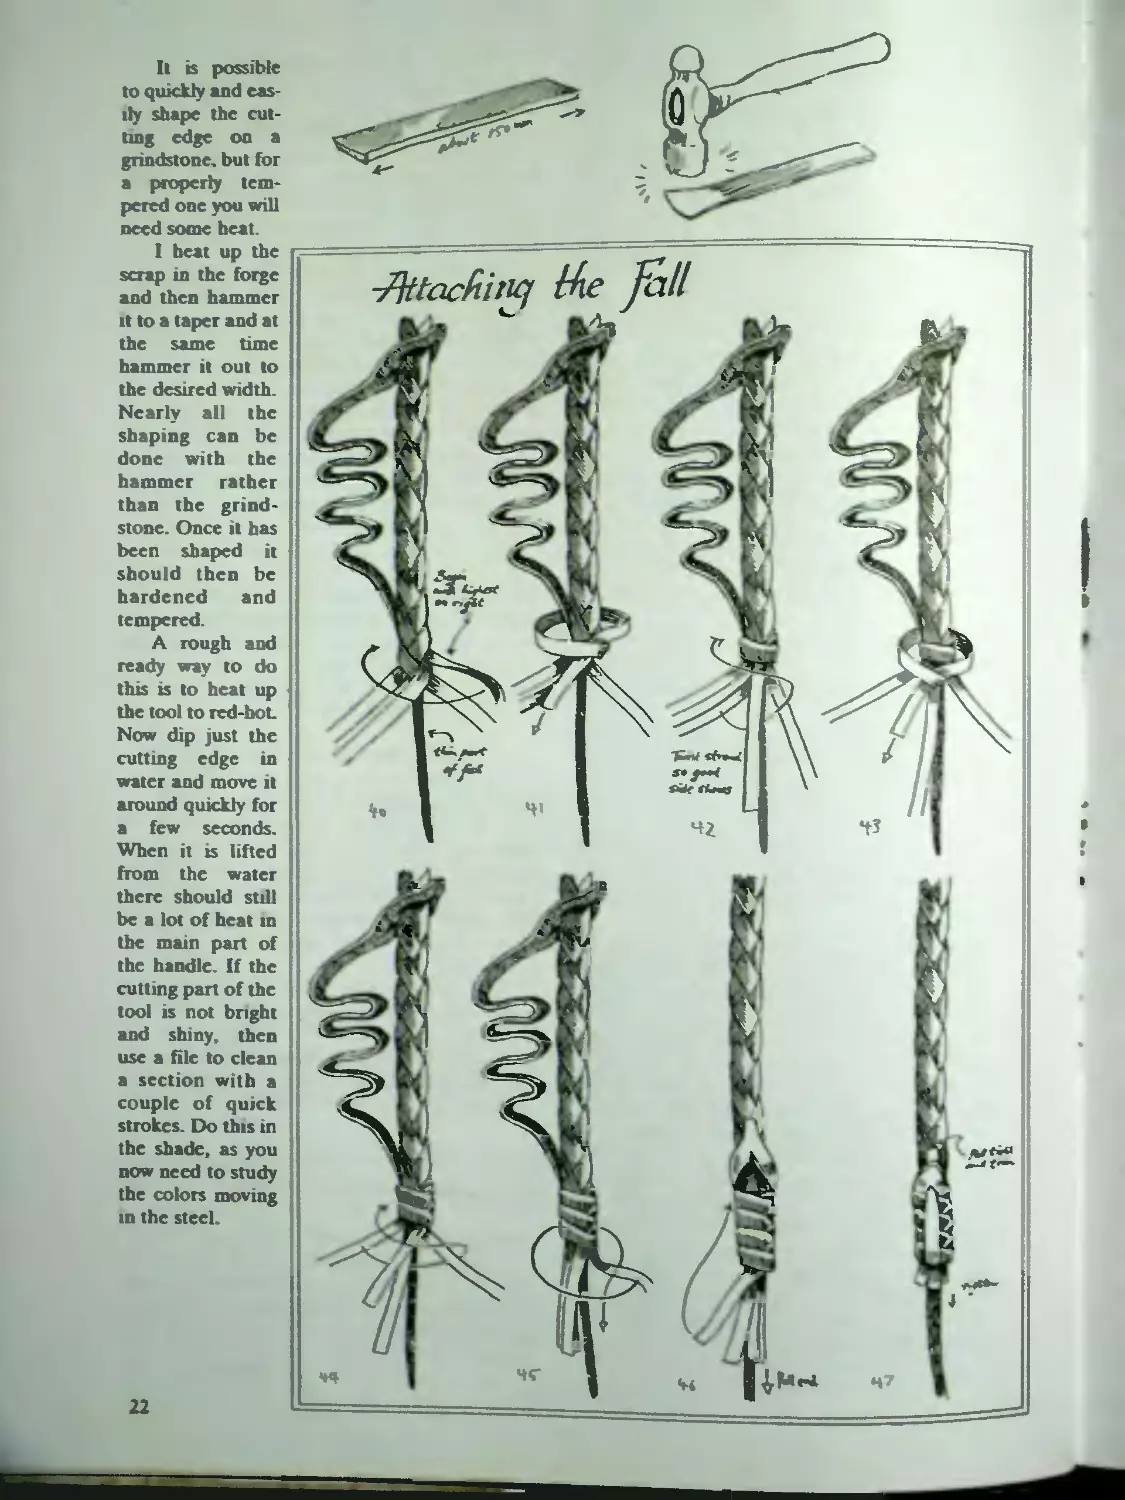
It is possible
to quickly and eas-
ily shape the cut-
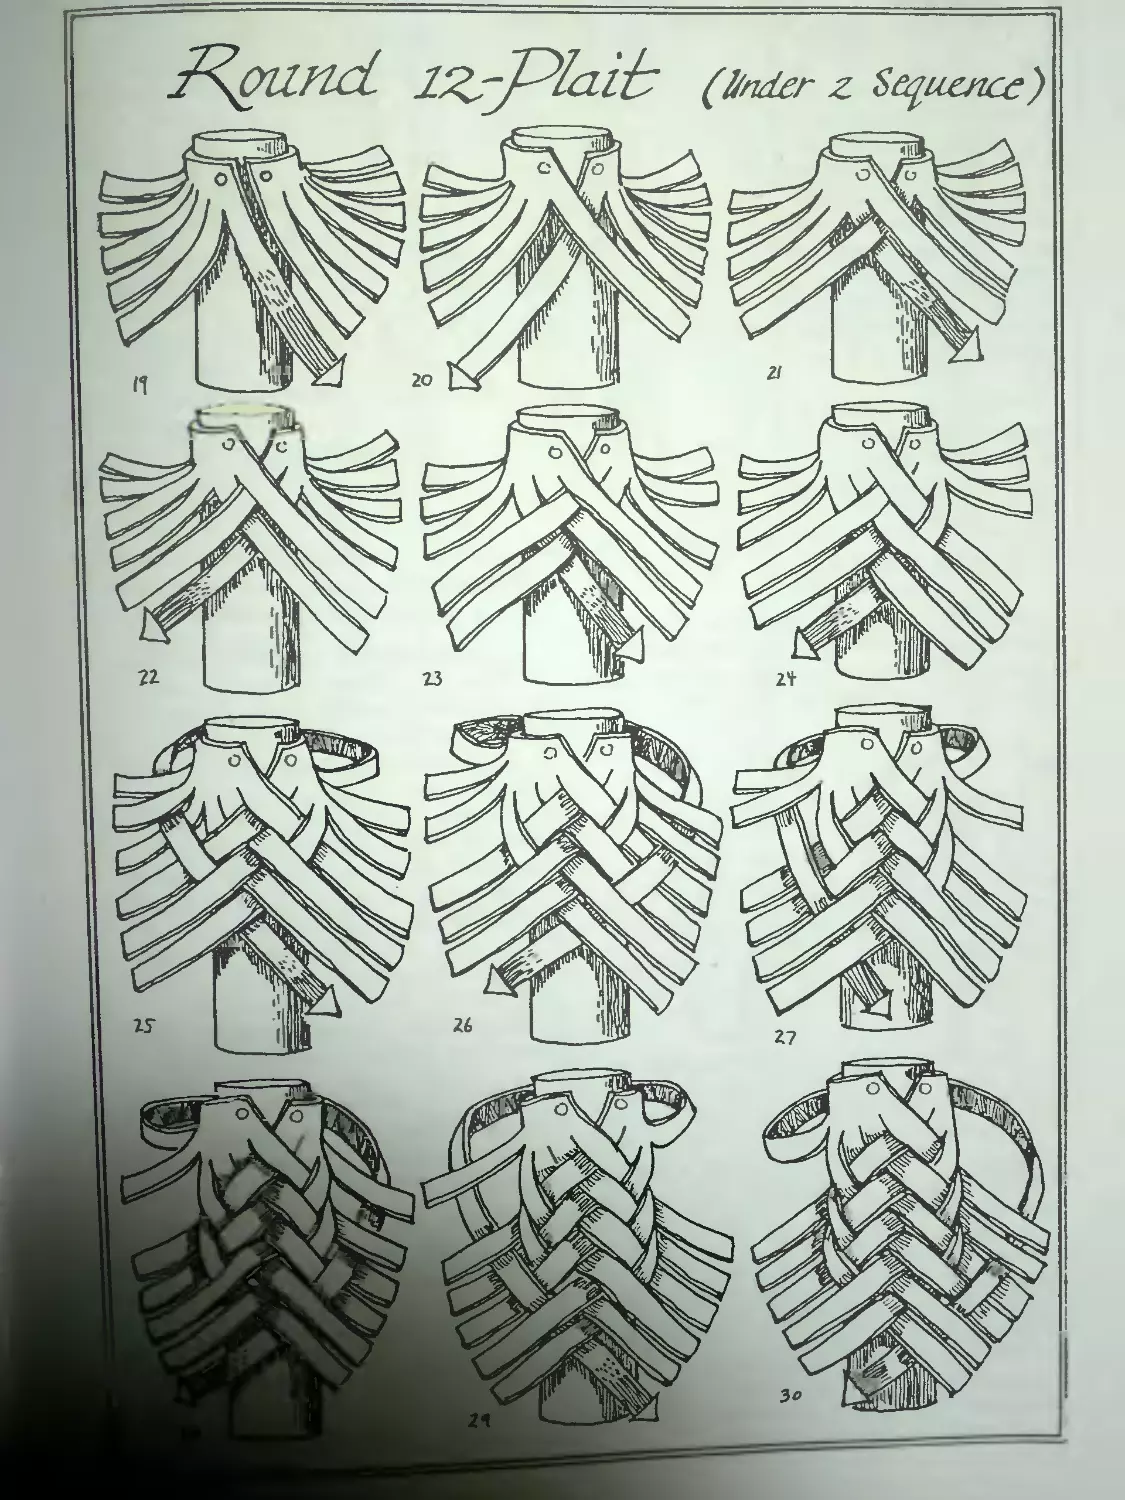
ting edge on a
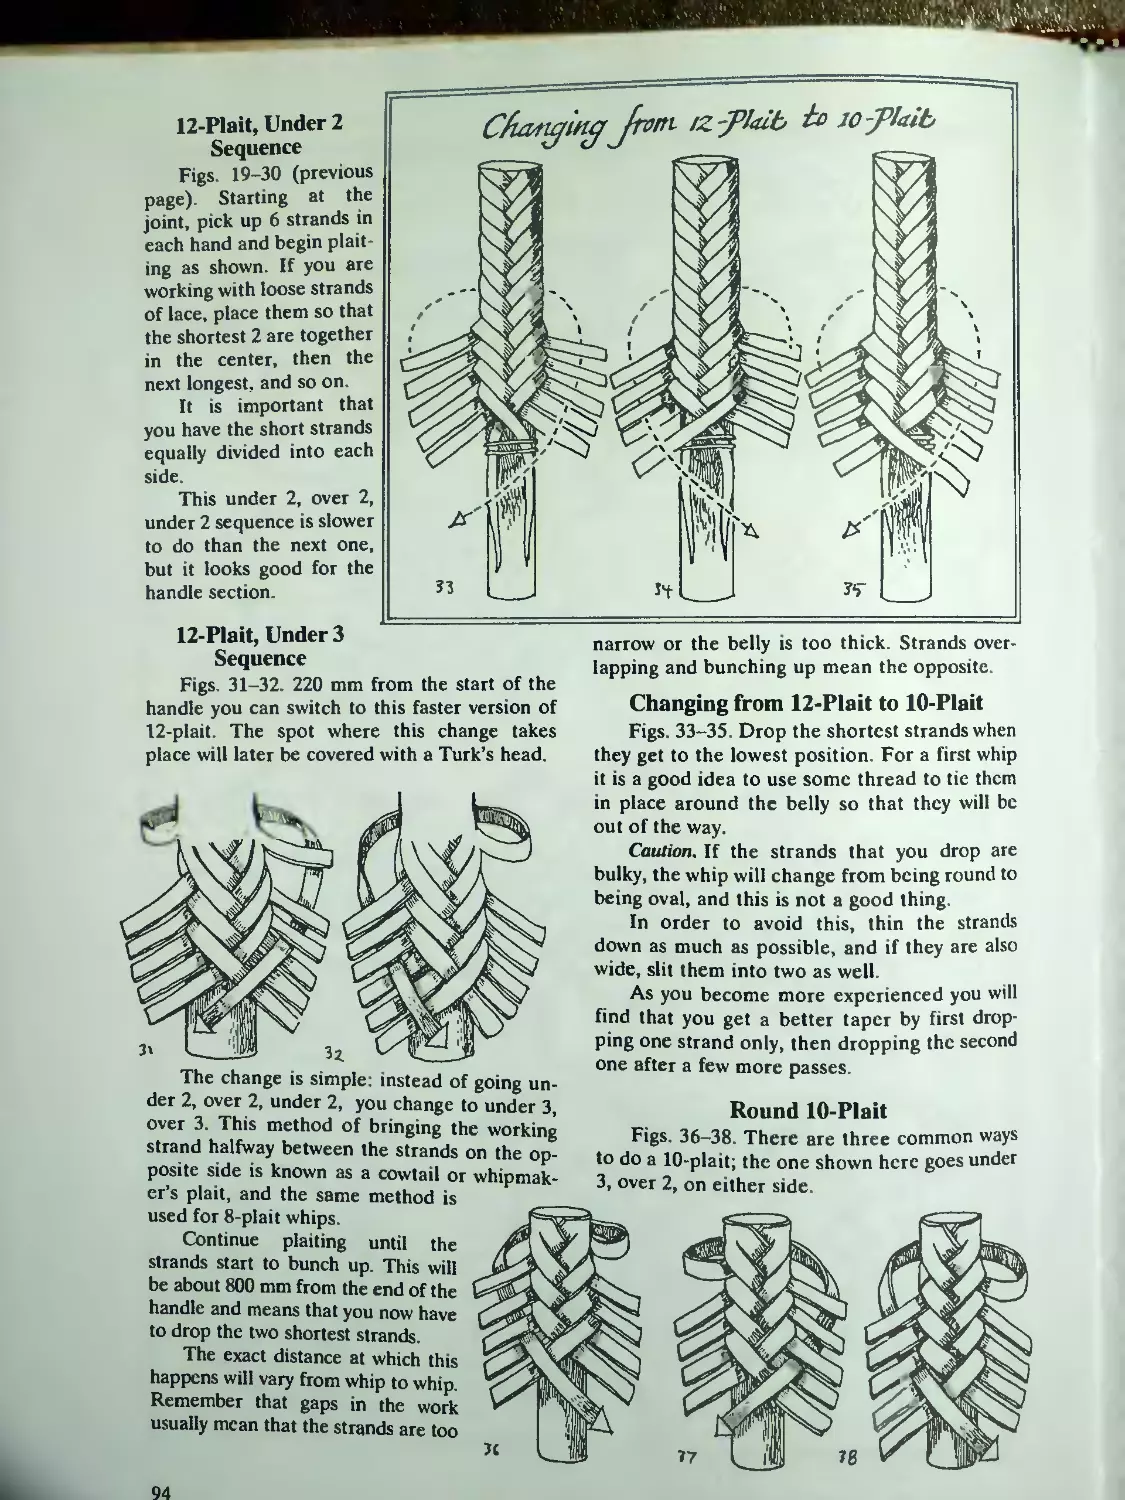
grindstone, but for
a properly tem-
pered one you will
need some heat.
I heat up the
scrap in the forge
and then hammer
it to a taper and at
the same time
hammer it out to
the desired width.
Nearly all the
sh ping can be
done with the
hammer rather
than the grind-
stone. Once it has
been shaped it
should then be
hardened and
tempered.
A rough and
ready way to do
this is to heat up
the tool to red-hoL
Now dip just the
cutting edge in
water and move it
around quickly for
a few seconds.
When it is lifted
from the water
there should still
be a lot of heat m
the main part of
the handle. If the
cutting part of the
tool is not bright
and shiny, then
use a file to clean
a section with a
couple of quick
strokes. Do this m
the shade, as you
now need to study
the colors moving
in the steel.
22
The heat from the middle part of the tool
will now start to spread towards the cutting edge.
First you will see what blacksmiths call yellow,
but what is really just a dull yellowish tint that
can hardly be seen. This will spread towards the
cutting edge and be followed by a blue band of
color that is a bit easier to see. When the yellow
band has reached the cutting edge and the blue
¥8 -----'---------
band is just about to get there, plunge the tool
back into the water and move it around until it
is cool.
A grindstone can be used to get an edge on
the tool. When cutting the slits in the fall, using
a wood or leather hammer will avoid burring
the end of the tool. Hammer into a block of
wood.
Common Fall Hitch
Figs. 40-47. The fall is tied on as shown on
the previous page. When the last hitch has been
made, the end of the hitch is put through the
slit as shown in the second to last drawing and
then the fall is pulled down hard. This prevents
it from coming loose. y-------л
Rolling the Whip
Fig. 49. When the fall has been at-
tached, the whip should be rolled. This
should be done as firmly as possible, us-
ing a board on the bench or between
two boards and putting all your weight
behind it. The effect will be to produce
a good smooth finish on the whip.
Resin Board for
Whip Rolling
Newly made whips
are usually greasy from
leather dressing—red-
hide whips particularly
so—and after a few
whips the board on
which the rolling is
done becomes
slippery and it is
difficult to roll a
new whip For a
oncc-a-year whip-
maker this is no
problem, but for
the professional it
is a real nuisance.
Maurice Doo-
han has an old
sock filled with powdered resin (bought from a
sports store). By shaking this over the whip a
light dusting of resin is deposited and this al-
lows the board to get a good grip on the whip.
STEP 5: THE CRACKER
When a whip is cracked, a sharp noise is
caused when the speed of the cracker at the
end of the whip breaks the sound barrier
Traditionally the cracker is made from
horsehair, which the stockman pulls directly
from the horse’s mane or tail.
Nylon twine also makes excellent crackers
and we use spools classed as 210/18 ply in our
saddlery. Other materials can also be used, in-
cluding most synthetic twines. In the old days
silk thread was popular, but today many profes-
sionals use baling twine.
The traditional way of making a cracker is
to take a few lengths of horsehair or twine
around 700 mm long and grip one end firmly in
the teeth while twisting the other. The sketch
shows a couple of friends doing this at Lockhart
River, November 1995.
The direction of the twist does not matter
with horsehair, but with twine it is thought best
to twist it in the opposite direction to which it
has been made. However, for all practical pur
poses, this does not matter.
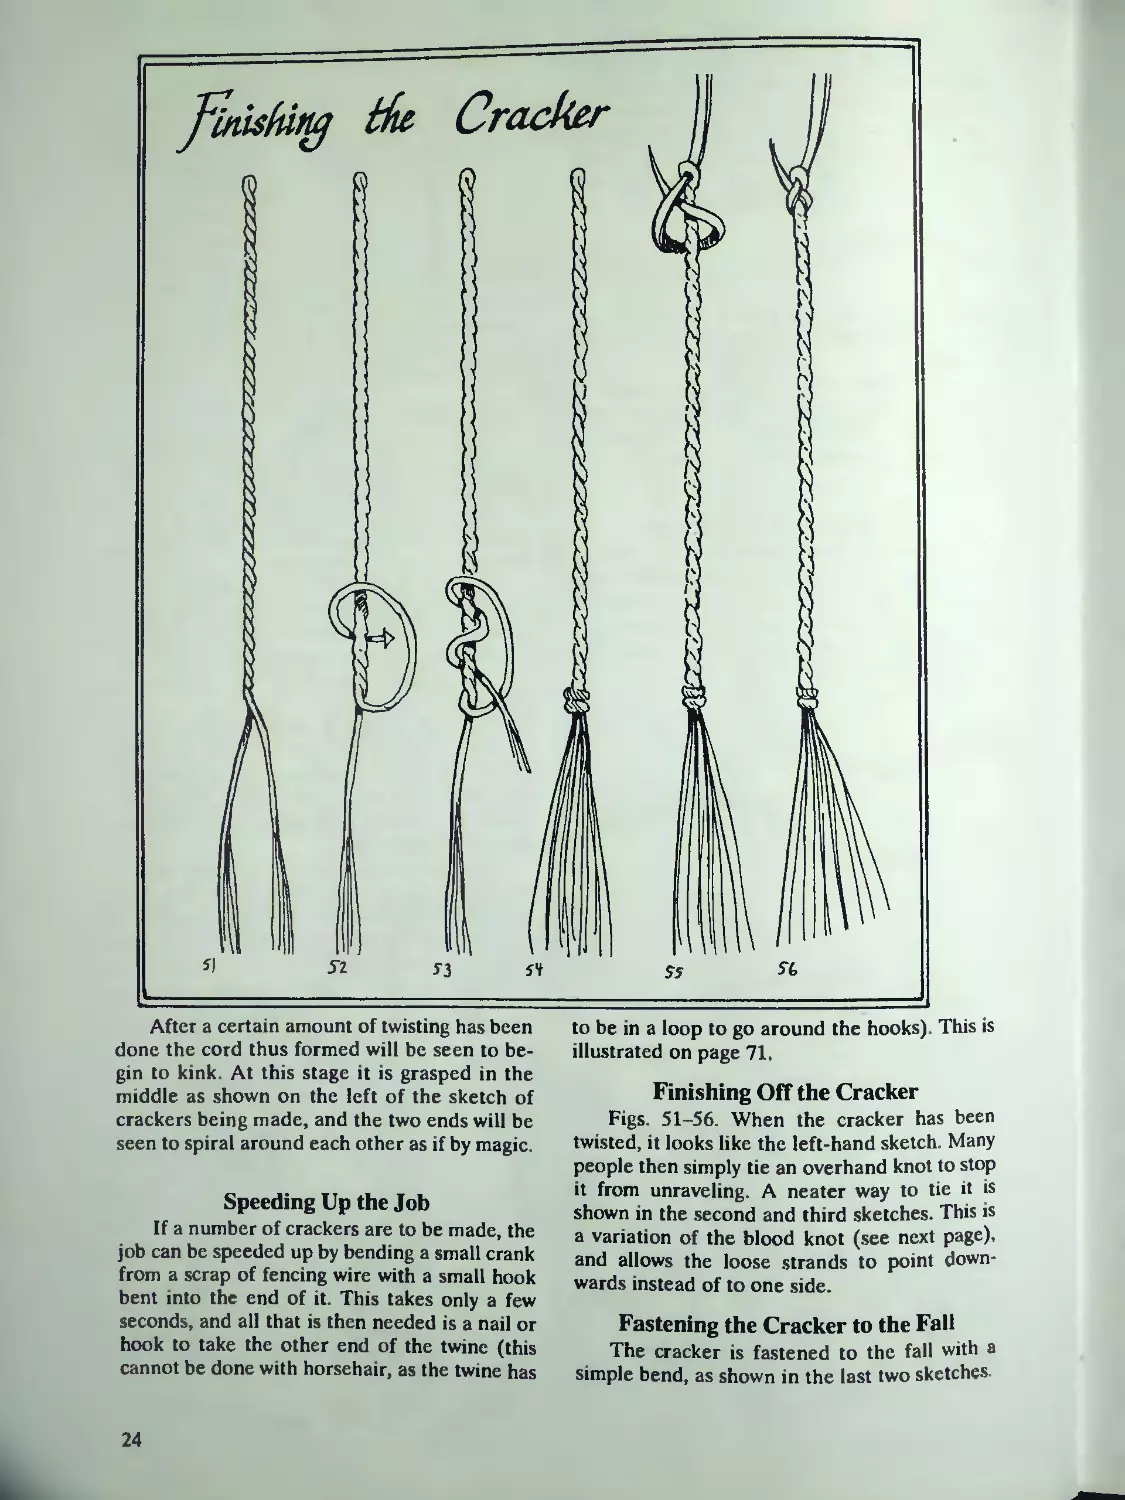
After a certain amount of twisting has been
done the cord thus formed will be seen to be-
gin to kink. At this stage it is grasped in the
middle as shown on the left of the sketch of
crackers being made, and the two ends will be
seen to spiral around each other as if by magic.
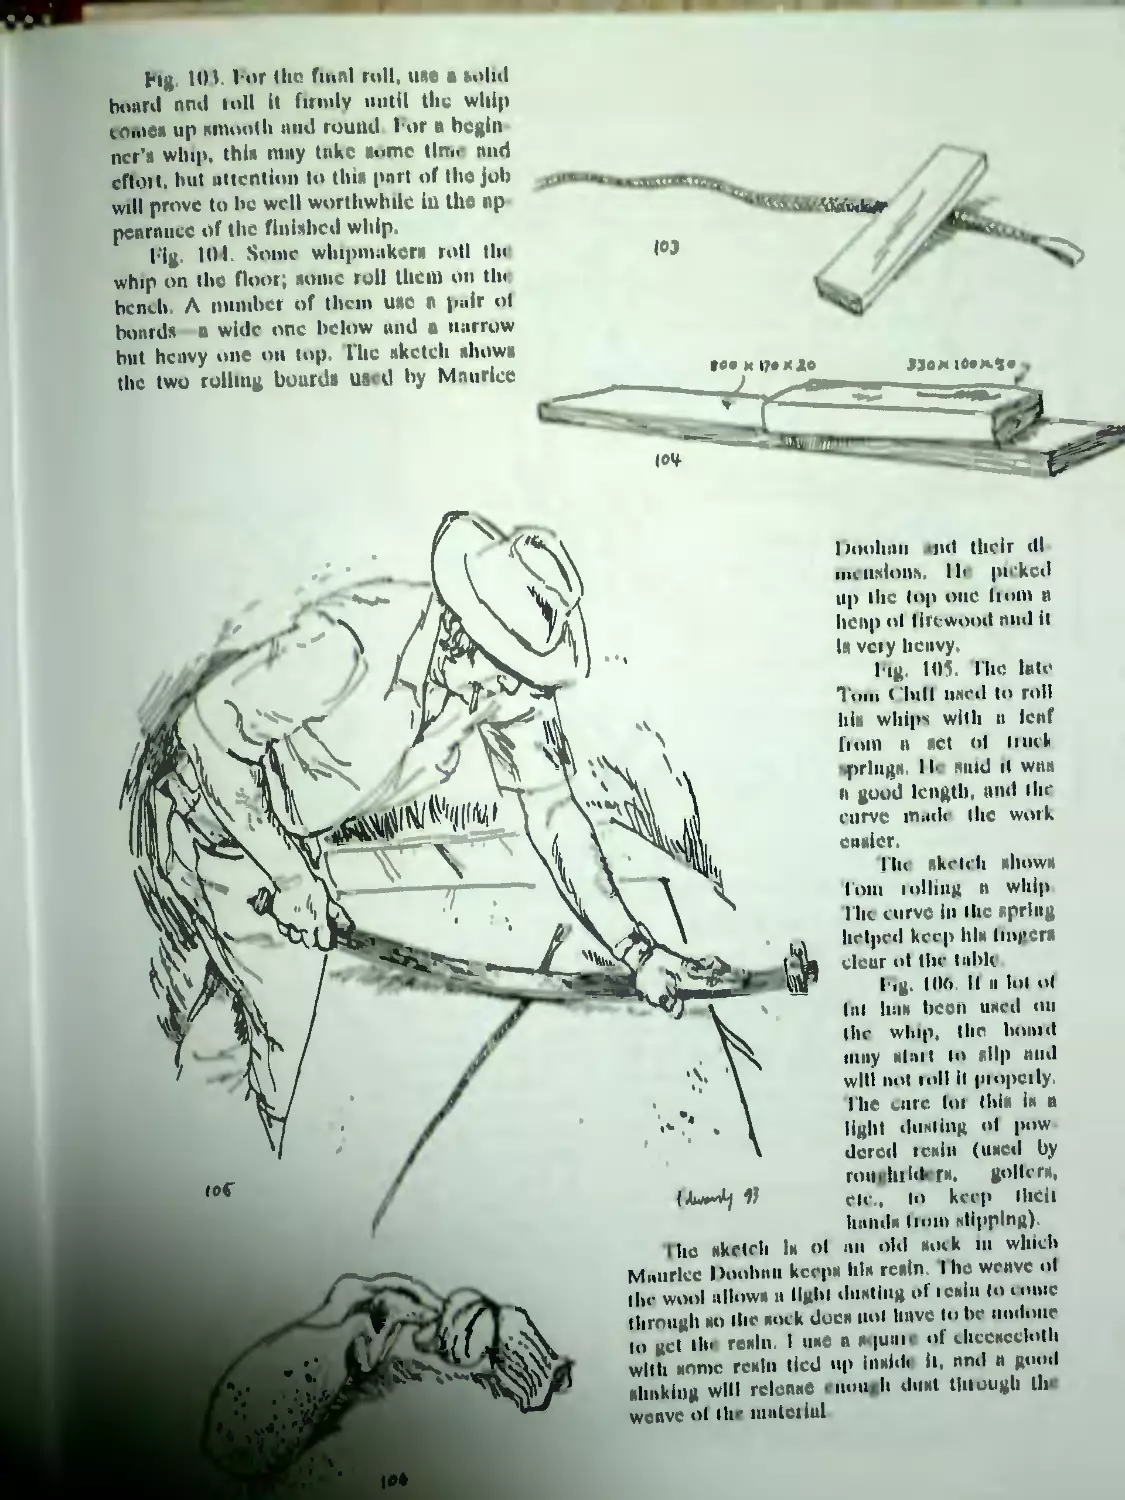
Speeding Up the Job
If a number of crackers are to be made, the
job can be speeded up by bending a small crank
from a scrap of fencing wire with a small hook
bent into the end of it. This takes only a few
seconds, and all that is then needed is a nail or
hook to take the other end of the twine (this
cannot be done with horsehair, as the twine has
to be in a loop to go around the hooks). This is
illustrated on page 71,
Finishing Off the Cracker
Figs. 51-56. When the cracker has been
twisted, it looks like the left-hand sketch. Many
people then simply tie an overhand knot to stop
it from unraveling. A neater way to tie it is
shown in the second and third sketches. This is
a variation of the blood knot (see next page),
and allows the loose strands to point down-
wards instead of to one side.
Fastening the Cracker to the Fall
The cracker is fastened to the fall with a
simple bend, as shown in the last two sketches.
24
It is a good idea if making a whip for sale or
for someone else to give it a few cracks before
you get rid of it, as sometimes the cracker will
fly off at the first couple of cracks unless you
have this bend nice and firm.
Attaching the Cracker—Another Method
Figs. 60-63. Here is another method of at-
taching the cracker that is used by some whip-
makers. They argue that if the cracker is to be
replaced you lose less of the tip, but in practice
they all seem to cut off the whole knot which-
ever method was used to attach it. Like many
things, I think that it is just tradition, and this is
the way they have been taught.
Cracking the Whip
Having just mentioned cracking the whip re-
minds me that I sometimes get phone calls from
people asking where they can get a book that
gives instructions for cracking a whip. Unfortu-
nately, this is a skill that cannot be explained in
words or pictures and can only be
gained by practice.
STEP 6: MAKING THE HANDLE
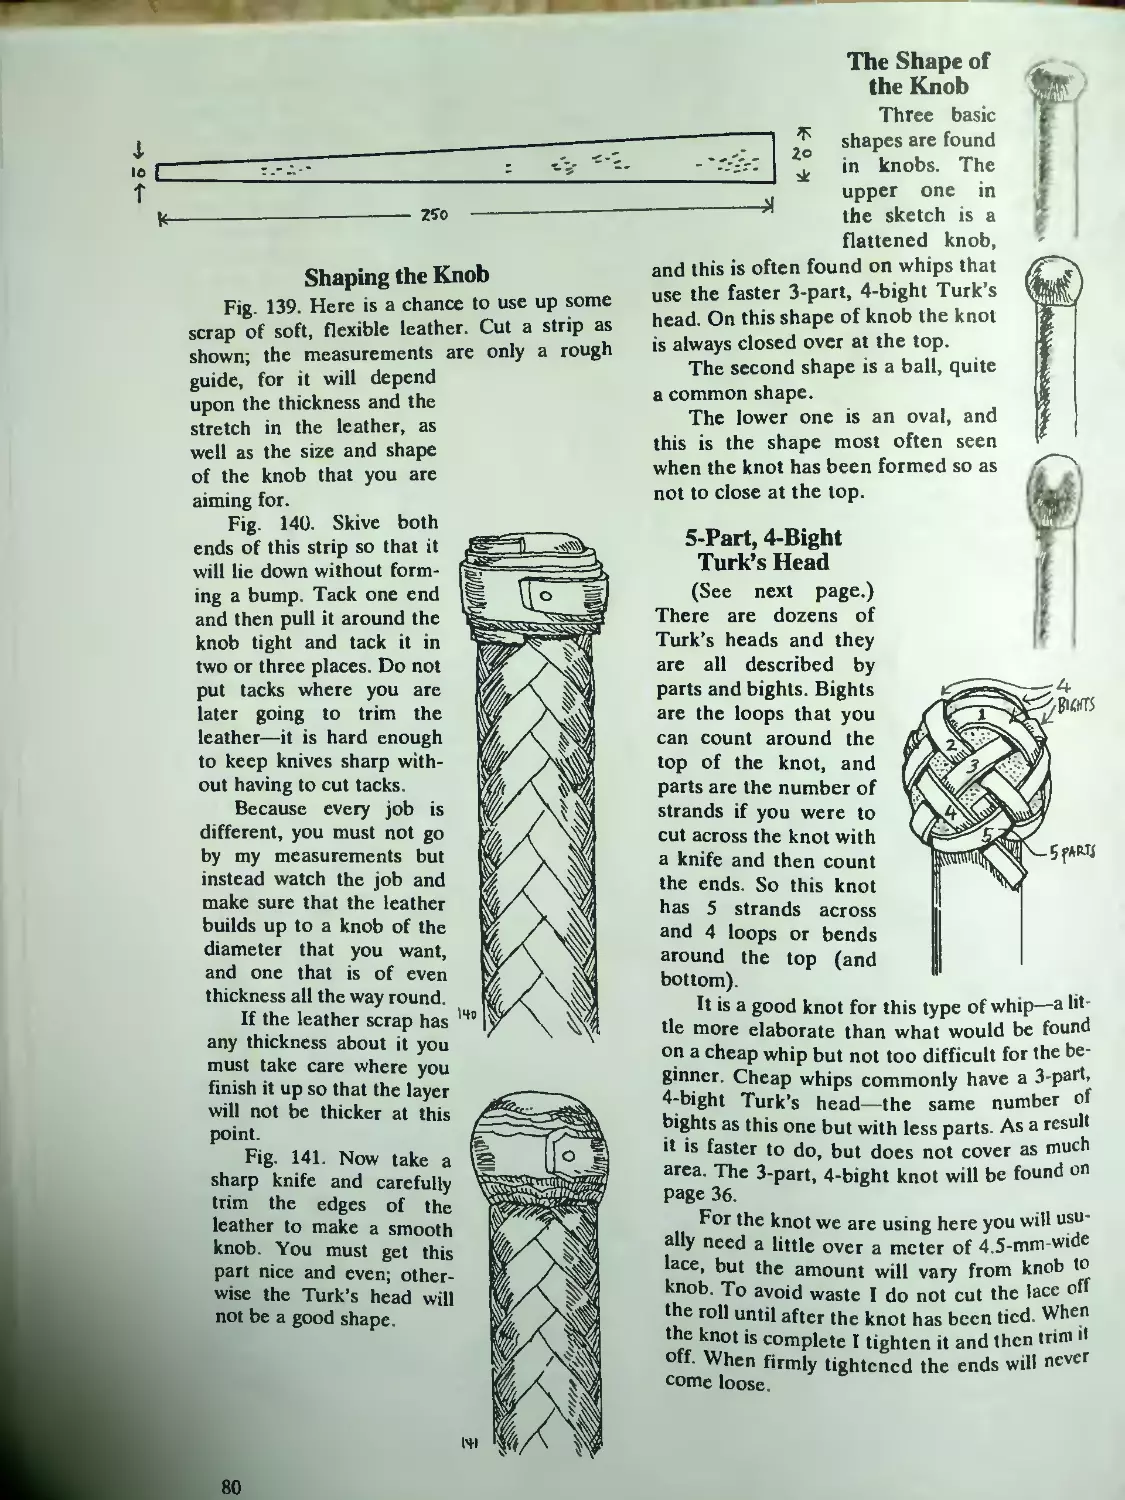
Any strong timber can be used
for a whip handle, but old stockmen
warn against using any wood that
splits into long, sharp slivers, as this
could cause injuries in a fall from a
horse.
A wide variety
of timbers are suit-
able for whip han-
dles, and certain
woods are considered the best
in different areas. You should
be able to find a suitable timber
without too much trouble if you
first inquire. The best idea is to
ask old bushmen in your dis-
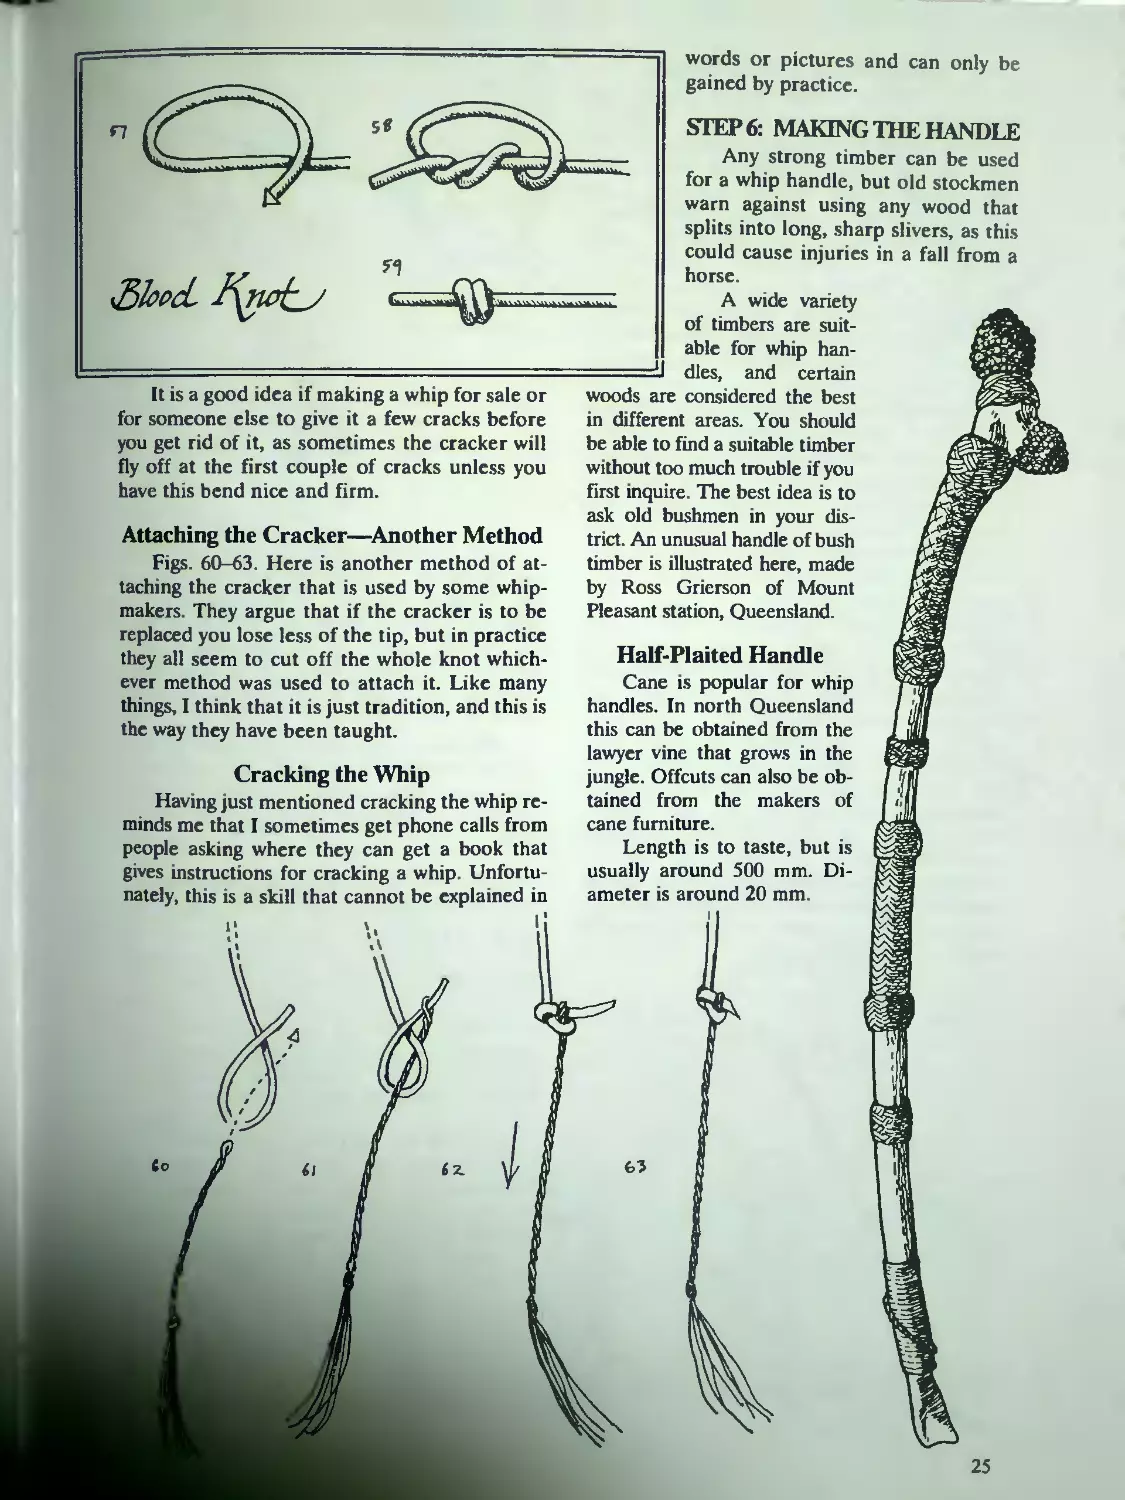
trict. An unusual handle of bush
timber is illustrated here, made
by Ross Grierson of Mount
Pleasant station, Queensland.
Half-Plaited Handle
Cane is popular for whip
handles. In north Queensland
this can be obtained from the
lawyer vine that grows in the
jungle. Offcuts can also be ob-
tained from the makers of
cane furniture.
Length is to taste, but is
usually around 500 mm. Di-
ameter is around 20 mm.
25
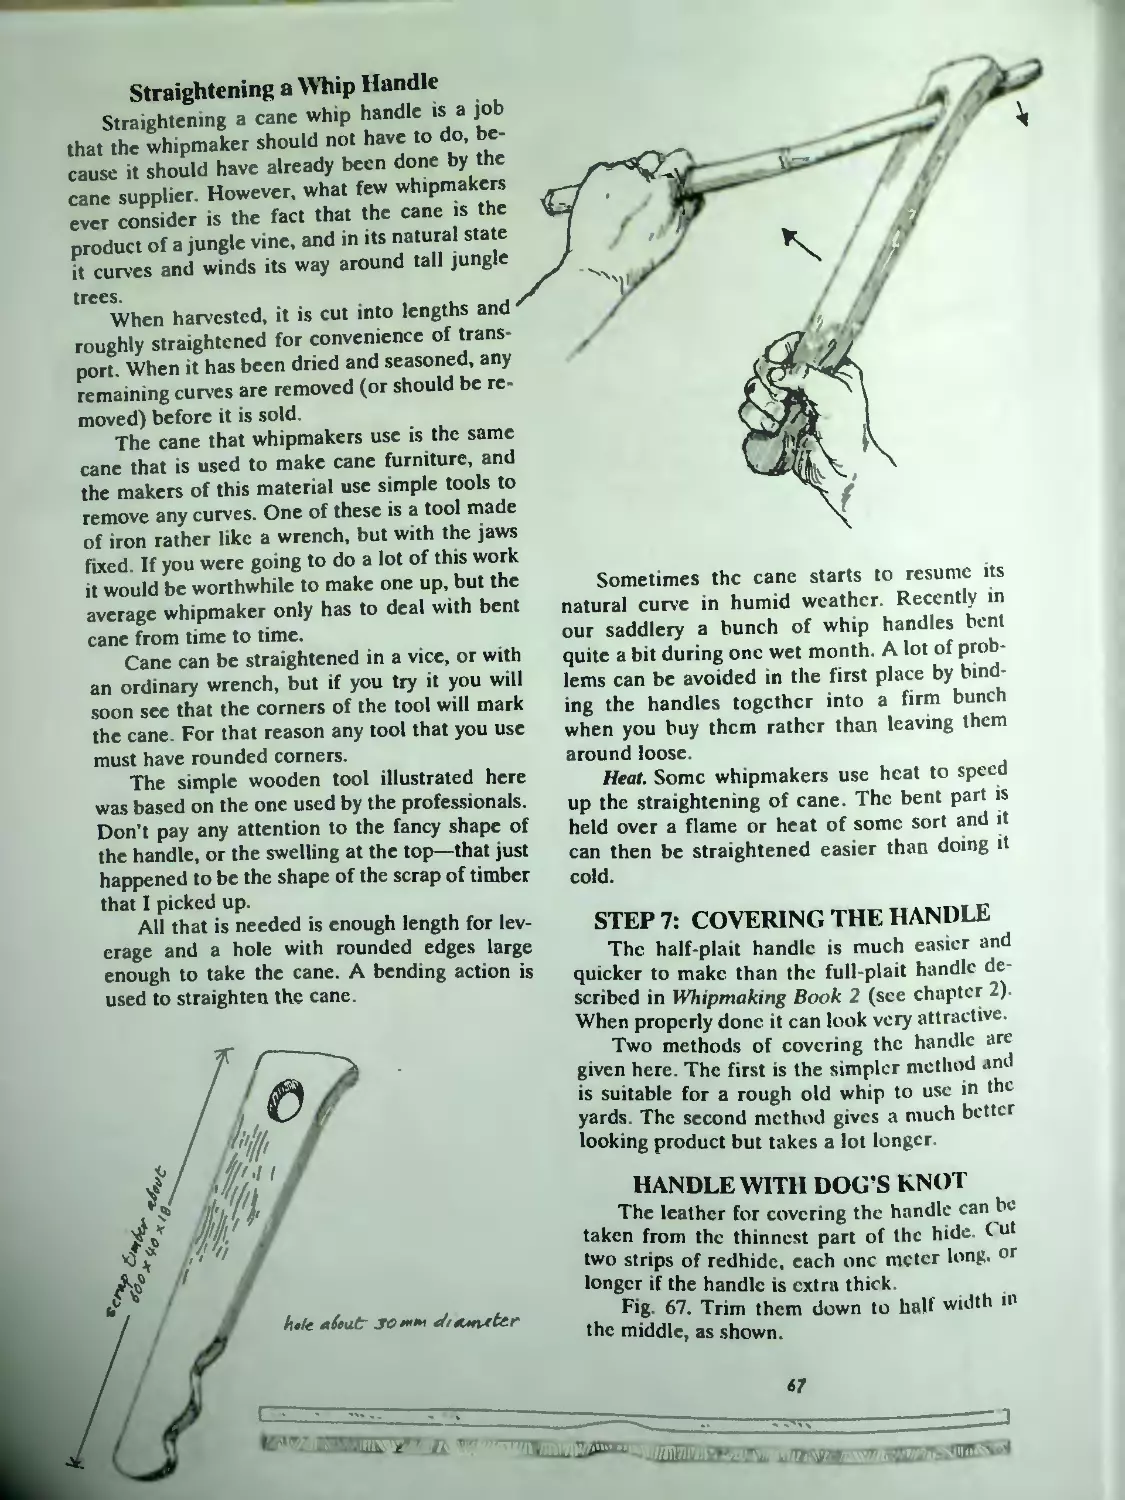
Straightening a Whip Handle
Straightening a cane whip handle is a job
that the whipmaker should not have to do, be-
cause it should have already been done by the
cane supplier. However, what few whipmakers
ever consider is the fact that the cane is the
product of a jungle vine, and in its natural state
it curves and winds its way around tall jungle
trees.
When harvested, it is cut into lengths and
roughly straightened for convenience of trans-
port. When it has been dried and seasoned, any
remaining curves are removed (or should be re-
moved) before it is sold
The cane that whipmakers use is the same
cane that is used to make cane furniture, and
the makers of this material use simple tools to
remove any curves. One of these is a tool made
of iron rather like a wrench, but with the jaws
fixed. If you were going to do a lot of this work
it would be worthwhile to make one up, but the
average whipmaker only has to deal with bent
cane from time to time.
Cane can be straightened in a vice, or with
an ordinary wrench, but if you try it you will
soon see that the corners of the tool will mark
the cane. For that reason any tool that you use
must have rounded corners.
The simple wooden tool illustrated here
was based on the one used by the professionals.
Don’t pay any attention to the fancy shape of
the handle, or the swelling at the top—that just
happened to be the shape of the scrap of timber
that I picked up.
All that is needed is enough length for lev-
erage and a hole with rounded edges large
enough to take the cane. A bending action is
used to straighten the cane.
ТГГ^ -' 'Ш?
hde a(eut~ so** d
Sometimes the cane starts to resume its
natural curve in humid weather. Recently in
our saddlery a bunch of whip handles bent
quite a bit during one wet month. A lot of prob-
lems can be avoided in the first place by bind-
ing the handles together into a firm bunch
when you buy them rather than, leaving them
around loose.
Heat. Some whipmakers use heat to speed
up the straightening of cane. The bent part is
held over a flame or heat of some sort and it
can then be straightened easier than doing it
cold.
STEP 7: COVERING THE HANDLE
The half-plait handle is much easier and
quicker to make than the full plait handle de-
scribed in Whipmaking Book 2 (see chapter 2).
When properly done it can look very attractive.
Two methods of covering the handle are
given here. The first is the simpler method and
is suitable for a rough old whip to use in the
yards. The second method gives a much better
looking product but takes a lot longer.
HANDLE WITH DOG’S KNOT
The leather for covering the handle can be
taken from the thinnest part of the hide. C ut
two strips of redhide, each one meter long, or
longer if the handle is extra thick.
Fig 67. Trim them down to half width in
the middle, as shown.
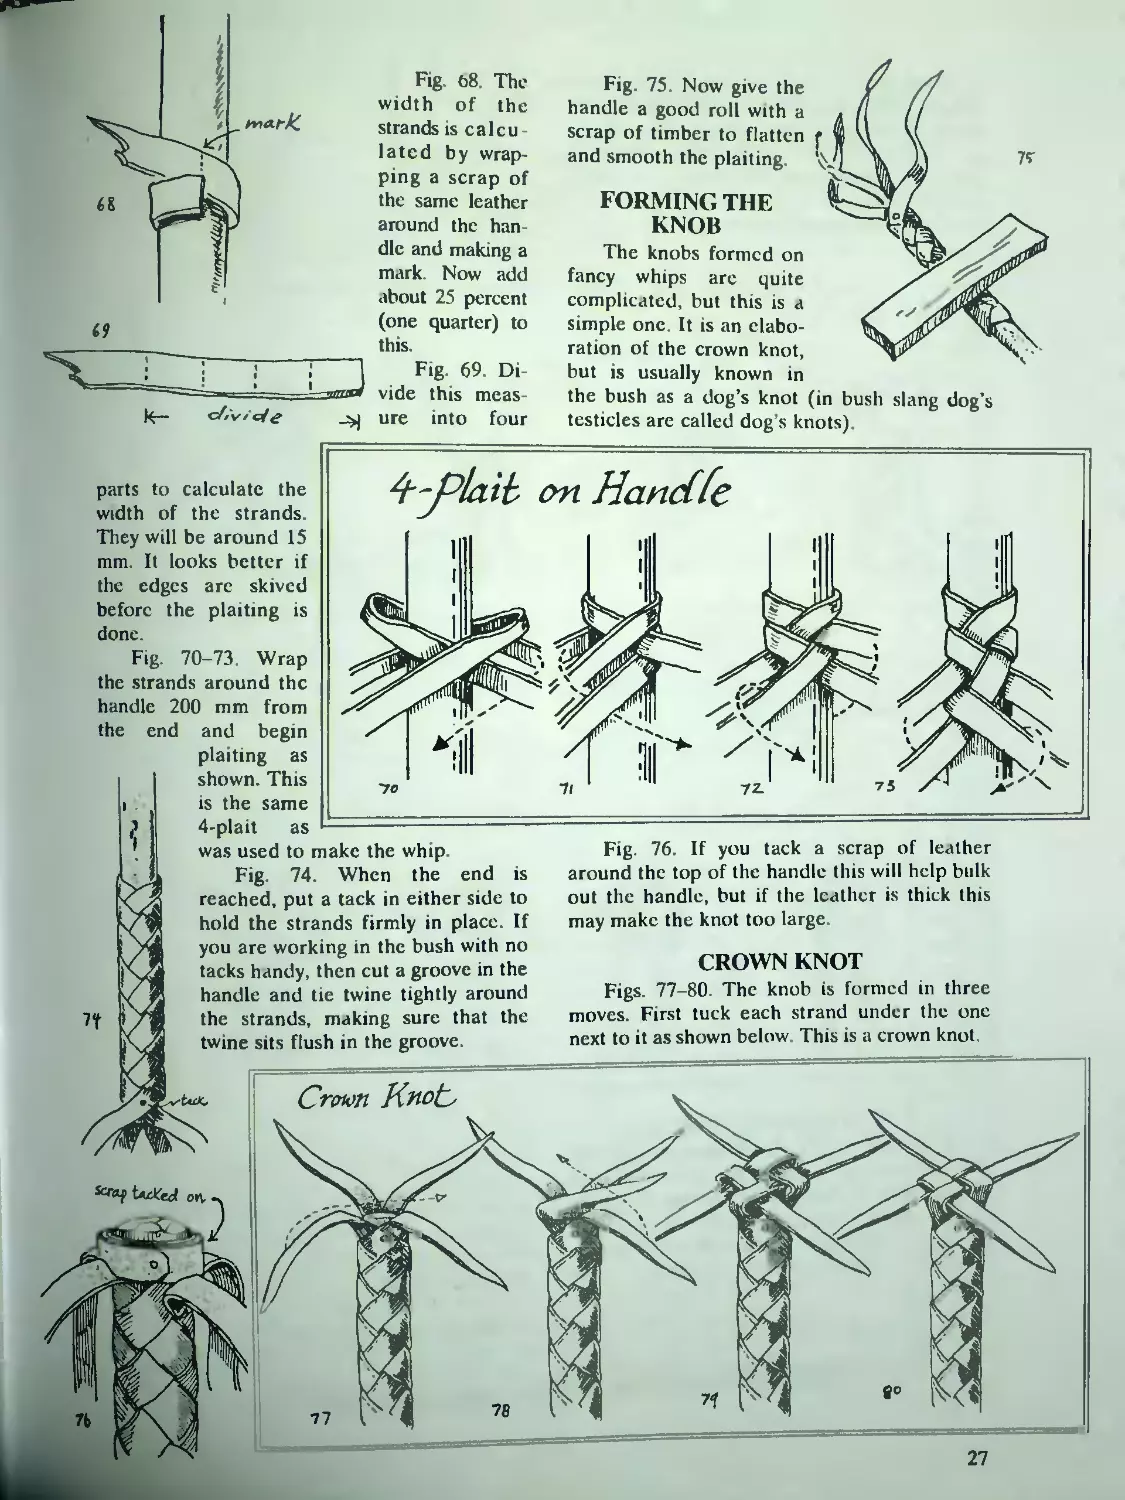
Fig. 68. The
width of the
strands is calcu-
lated by wrap-
ping a scrap of
the same leather
around the han-
dle and making a
mark Now add
about 25 percent
(one quarter) to
this.
Fig. 69. Di-
vide this meas-
ure into four
Fig. 75. Now give the
handle a good roll with a
scrap of timber to flatten f
and smooth the plaiting.
FORMING THE
KNOB
The knobs formed on
fancy whips arc quite
complicated, but this is a
simple one. It is an elabo-
ration of the crown knot,
but is usually known in
the bush as a dog’s knot (in bush slang dog’s
testicles arc called dog’s knots).
Fig. 76. If you tack a scrap of leather
around the top of the handle this will help bulk
out the handle, but if the leather is thick this
may make the knot too large
CROWN KNOT
Figs. 77-80. The knob is formed in three
moves. First tuck each strand under the one
next to it as shown below This is a crown knot.
OH.
on Hanctfe
parts to calculate the
width of the strands.
They will be around 15
mm. It looks better if
the edges are skived
before the plaiting is
done.
Fig. 70-73. Wrap
the strands around the
handle 200 mm from
the end and begin
plaiting as
shown. This
is the same
4-plait as -------------------------------------
was used to make the whip.
Fig. 74. When the end is
reached, put a tack in either side to
hold the strands firmly in place. If
you are working in the bush with no
tacks handy, then cut a groove in the
handle and tie twine tightly around
the strands, making sure that the
twine sits flush in the groove.
27
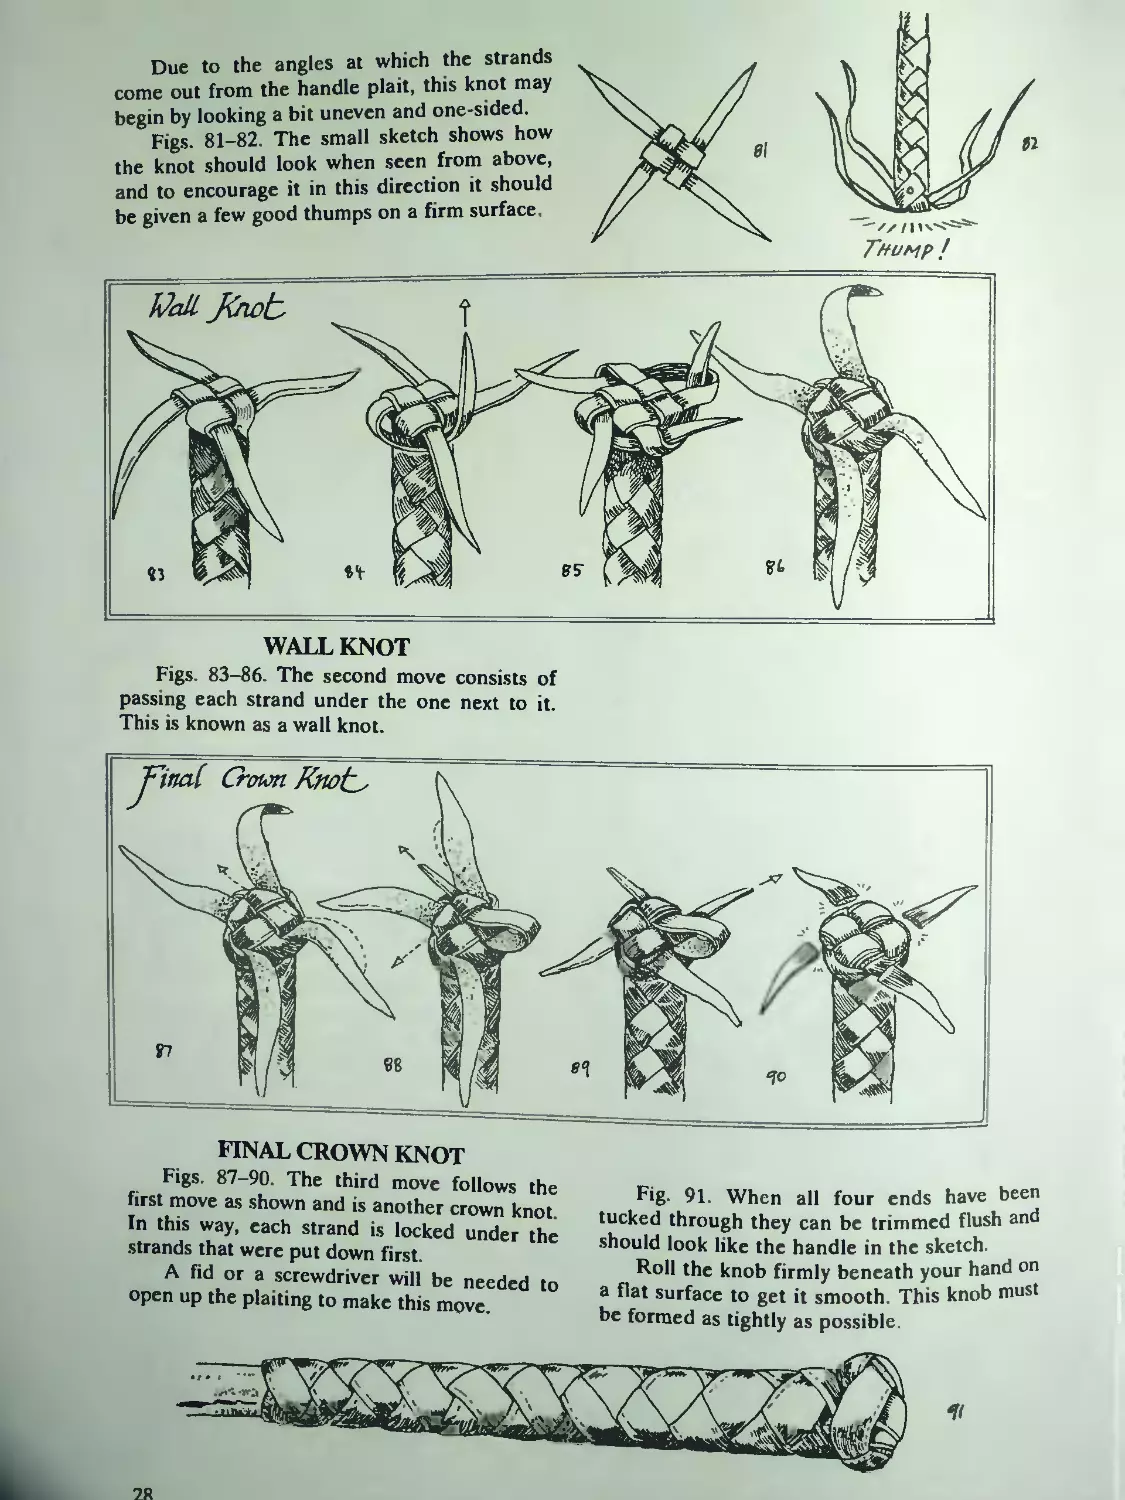
Due to the angles at which the strands
come out from the handle plait, this knot may
begin by looking a bit uneven and one-sided.
Figs. 81-82 The small sketch shows how
the knot should look when seen from above,
and to encourage it in this direction it should
be given a few good thumps on a firm surface.
WALL KNOT
Figs. 83-86. The second move consists of
passing each strand under the one next to it.
This is known as a wall knot.
FINAL CROWN KNOT
Figs. 87-90. The third move follows the
first move as shown and is another crown knot.
In this way, each strand is locked under the
strands that were put down first.
A fid or a screwdriver will be needed to
open up the plaiting to make this move.
Fig. 91. When all four ends have been
tucked through they can be trimmed flush and
should look like the handle in the sketch.
Roll the knob firmly beneath your hand on
a flat surface to get it smooth. This knob must
be formed as tightly as possible.
OSZ---------------------------------------------------------— О 62
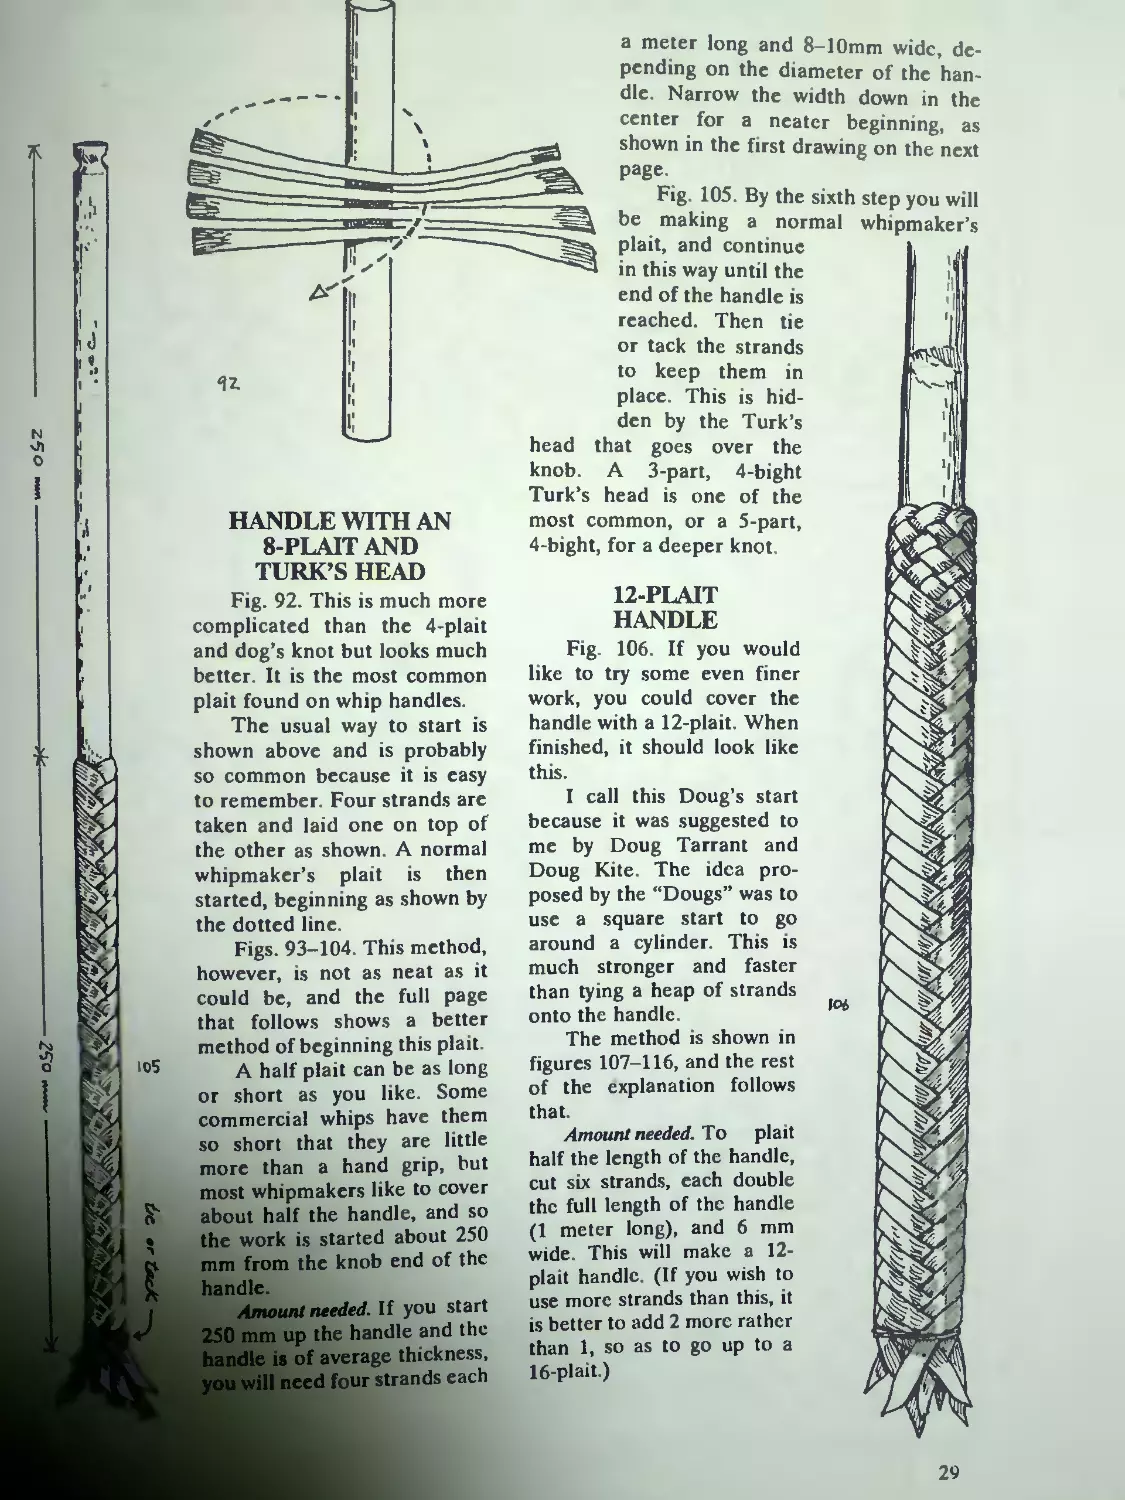
HANDLE WITH AN
8-PLAIT AND
TURK’S HEAD
Fig. 92. This is much more
complicated than the 4-plait
and dog’s knot but looks much
better. It is the most common
plait found on whip handles.
The usual way to start is
shown above and is probably
so common because it is easy
to remember. Four strands are
taken and laid one on top of
the other as shown A normal
whipmaker’s plait is then
started, beginning as shown by
the dotted line.
Figs. 93-104. This method,
however, is not as neat as it
could be, and the full page
that follows shows a better
method of beginning this plait
A half plait can be as long
or short as you like. Some
commercial whips have them
so short that they are little
more than a hand grip, but
most whipmakers like to cover
about half the handle, and so
the work is started about 250
mm from the knob end of the
handle.
Amount needed. If you start
250 mm up the handle and the
handle is of average thickness,
you will need four strands each
a meter long and 8-10mm wide, de-
pending on the diameter of the han-
dle. Narrow the width down in the
center for a neater beginning, as
shown in the first drawing on the next
page.
Fig. 105. By the sixth
be making a normal
plait, and continue
in this way until the
end of the handle is
reached. Then tie
or tack the strands
to keep them in
place. This is hid-
den by the Turk’s
head that goes over the
knob A 3-part, 4-bight
Turk’s head is one of the
most common, or a 5-part,
4-bight, for a deeper knot
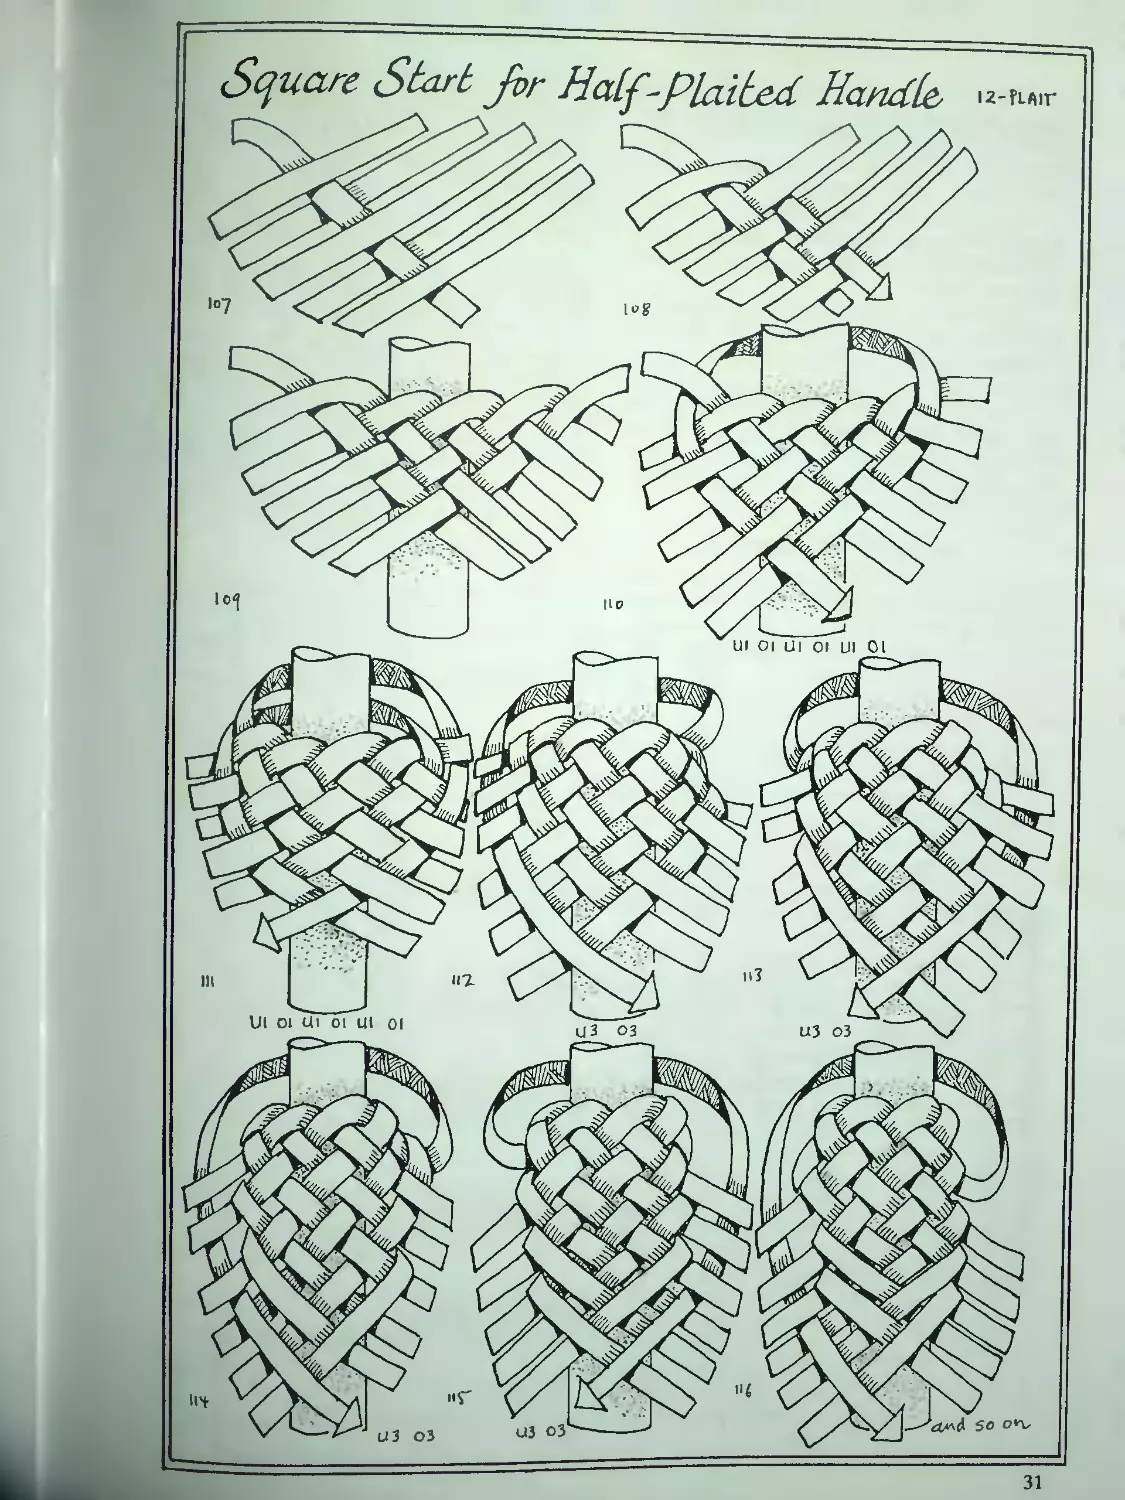
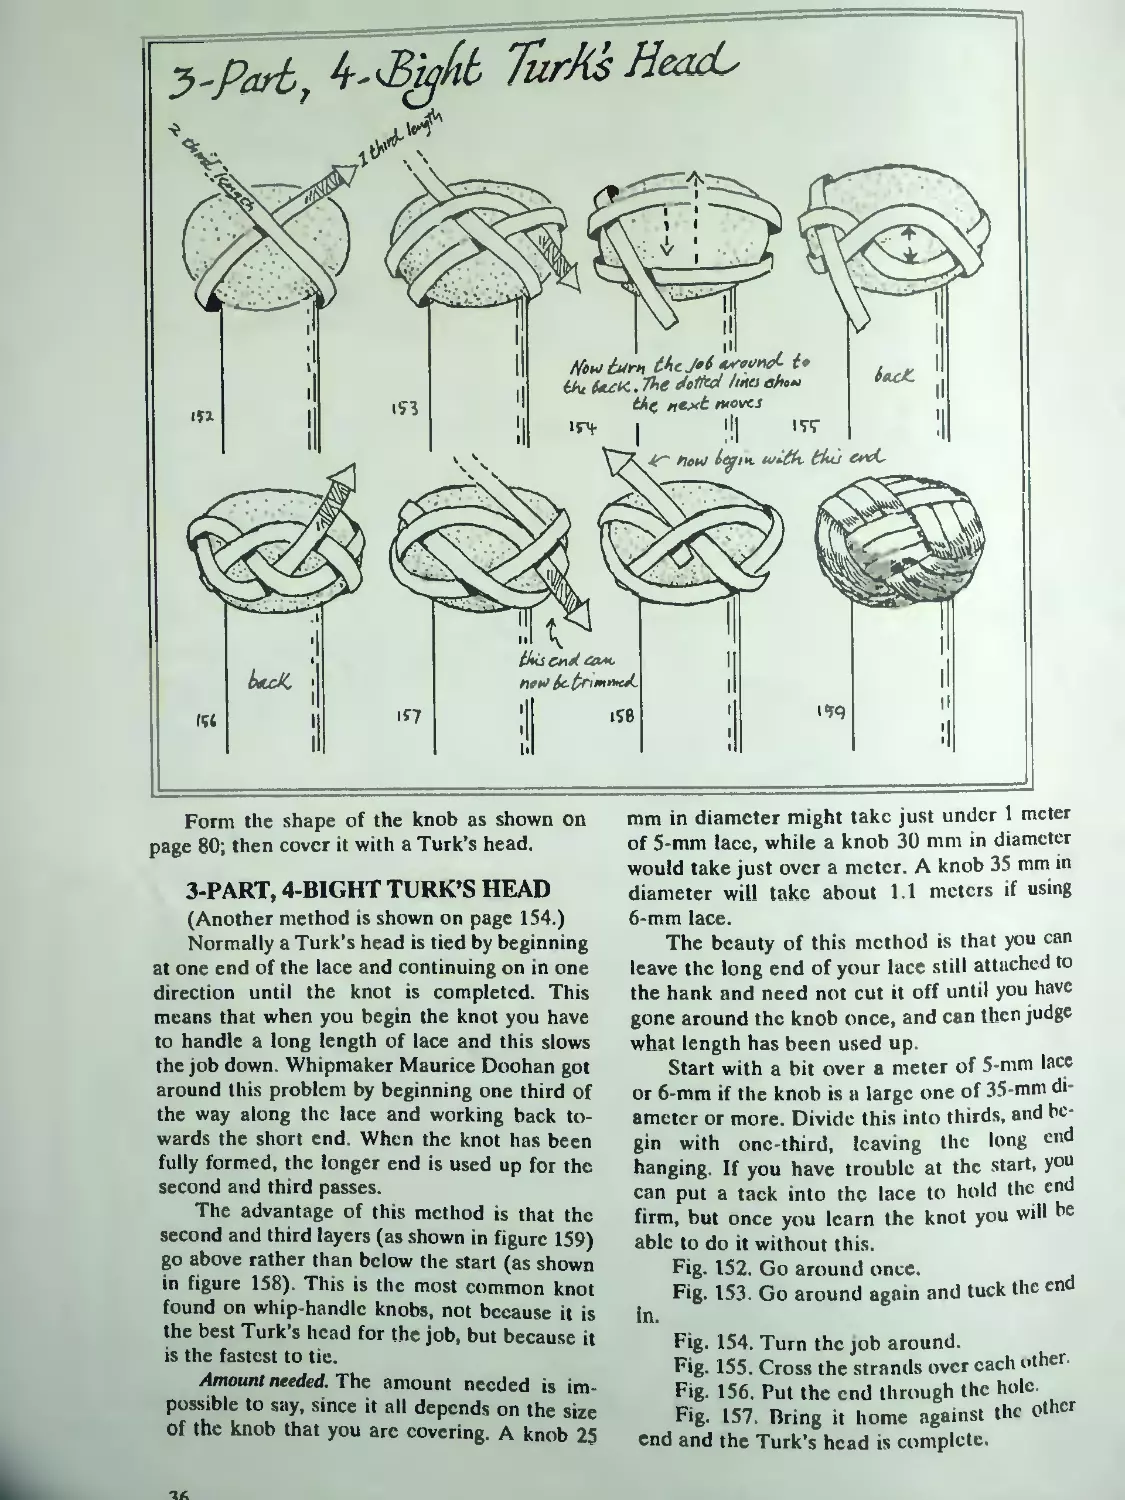
12-PLAIT
HANDLE
Fig. 106. If you would
like to try some even finer
work, you could cover the
handle with a 12-plait. When
finished, it should look like
this.
I call this Doug’s start
because it was suggested to
me by Doug Tarrant and
Doug Kite. The idea pro-
posed by the “Dougs” was to
use a square start to go
around a cylinder This is
much stronger and faster
than tying a heap of strands
onto the handle
The method is shown in
figures 107-116, and the rest
of the explanation follows
that.
Amount needed. To plait
half the length of the handle,
cut six strands, each double
the full length of the handle
(1 meter long), and 6 mm
wide This will make a 12-
plait handle. (If you wish to
use more strands than this, it
is better to add 2 more rather
than 1, so as to go up to a
16-plait.)
step you will
whipmaker’s
29
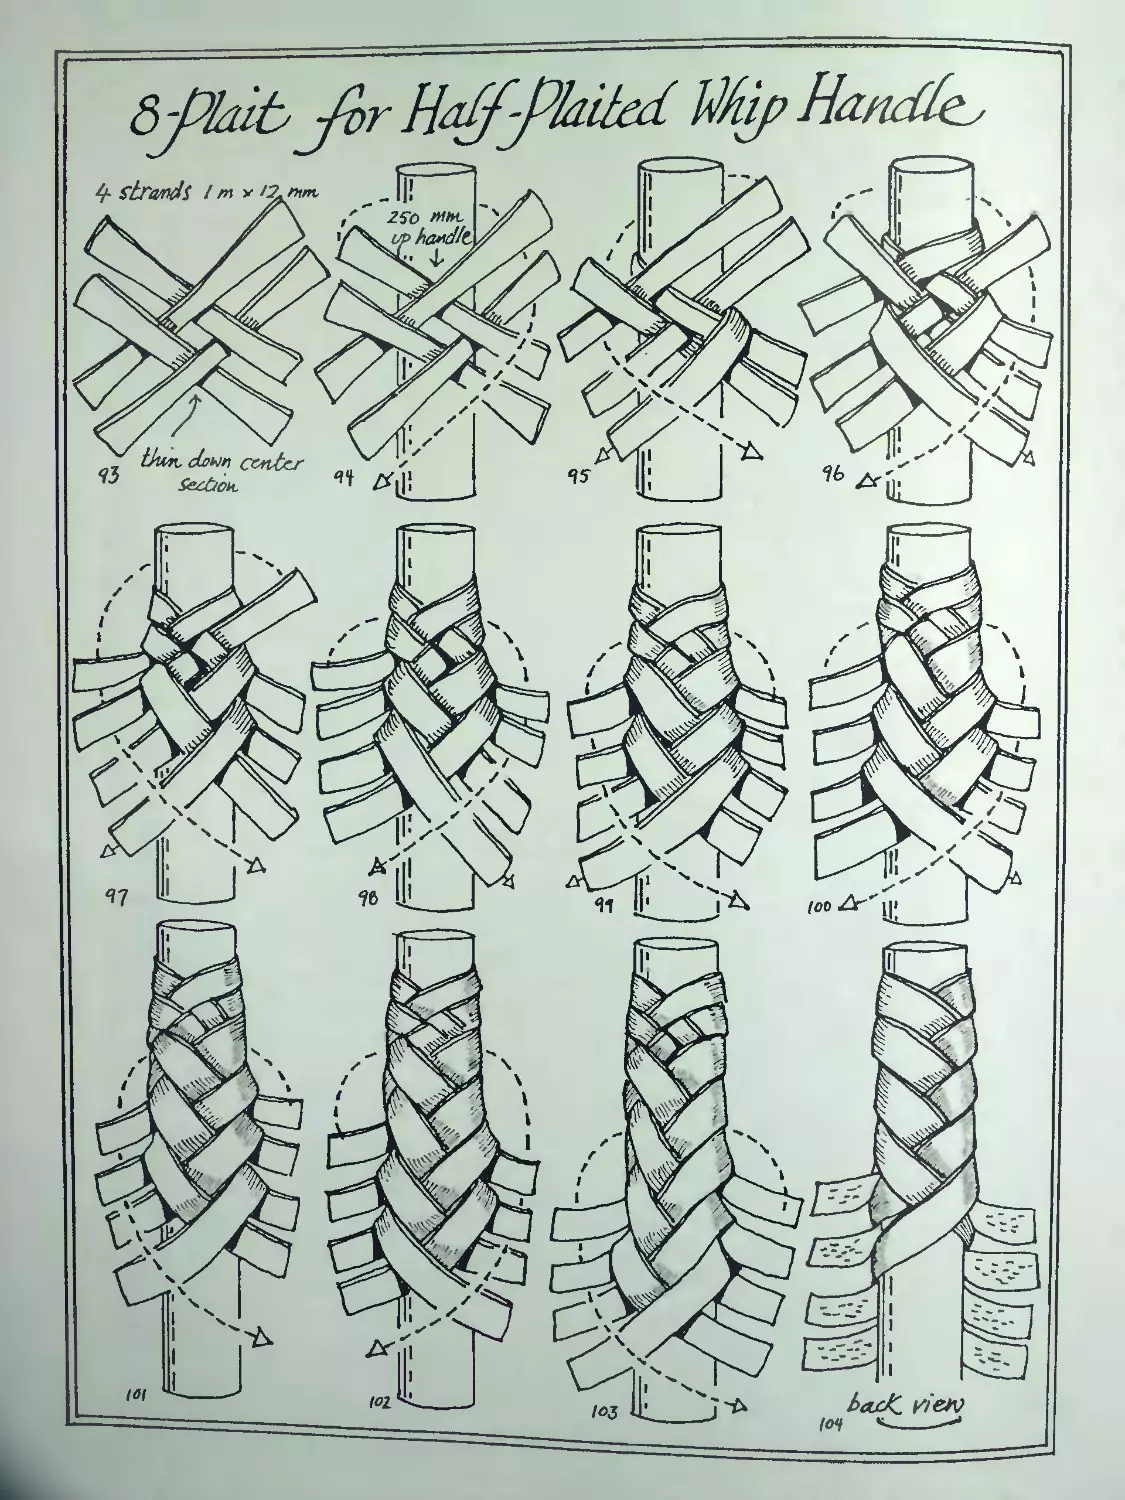
31
Figs. 107-116 The first step is to form the
square end, and this can be done in the hand.
Next lay this on the whip handle at the halfway
mark, take one end around the back, and con-
tinue as shown in the drawings
When you have brought all the strands
around and got them in place, carefully tighten
up the whole job and make it nice and even be-
fore continuing.
The ordinary whipmaker’s 12-plait consists
only of the two actions shown in the last two
drawings. Continue this to the end of the handle
and then firmly tie it before cutting off the ends.
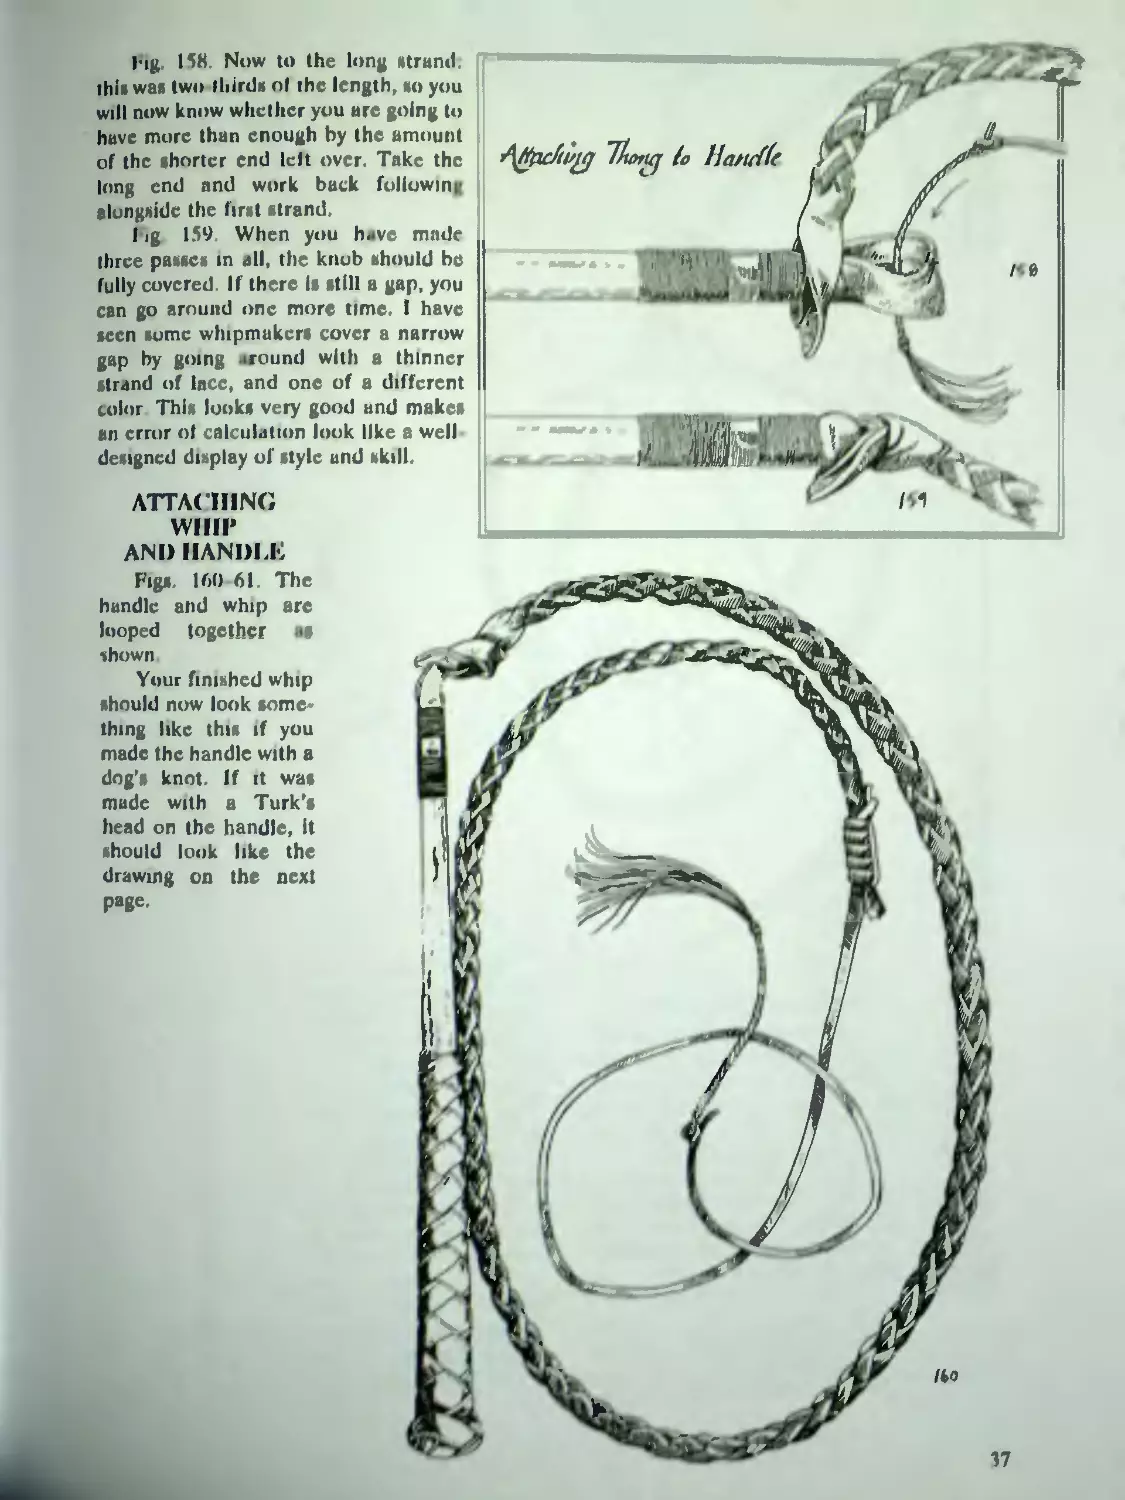
This will be covered later with a Turk’s
head, and a 5-part 4-bight will look good on
this handle. This may be found on page 81 or
you can use the 3-part, 4-bight on page 36 or
page 154 (another method).
WRAPAROUND HANDLE
Fig. 117. I feel a bit ashamed about even
mentioning this form of whip handle covering,
as it is only seen on very cheap whips. However,
as it is also commonly found on drafting canes,
it should be given some space.
The method could not be simpler: a length
of leather is taken and the ends trimmed to a
point as shown. It is tightly wrapped around the
handle and tacked at each end. To make it look
a bit more acceptable, a small Turk’s head or
Spanish Ring knot (page 83) should be put on
the bottom to cover
the tacks and a proper
knob should be put on
the end.
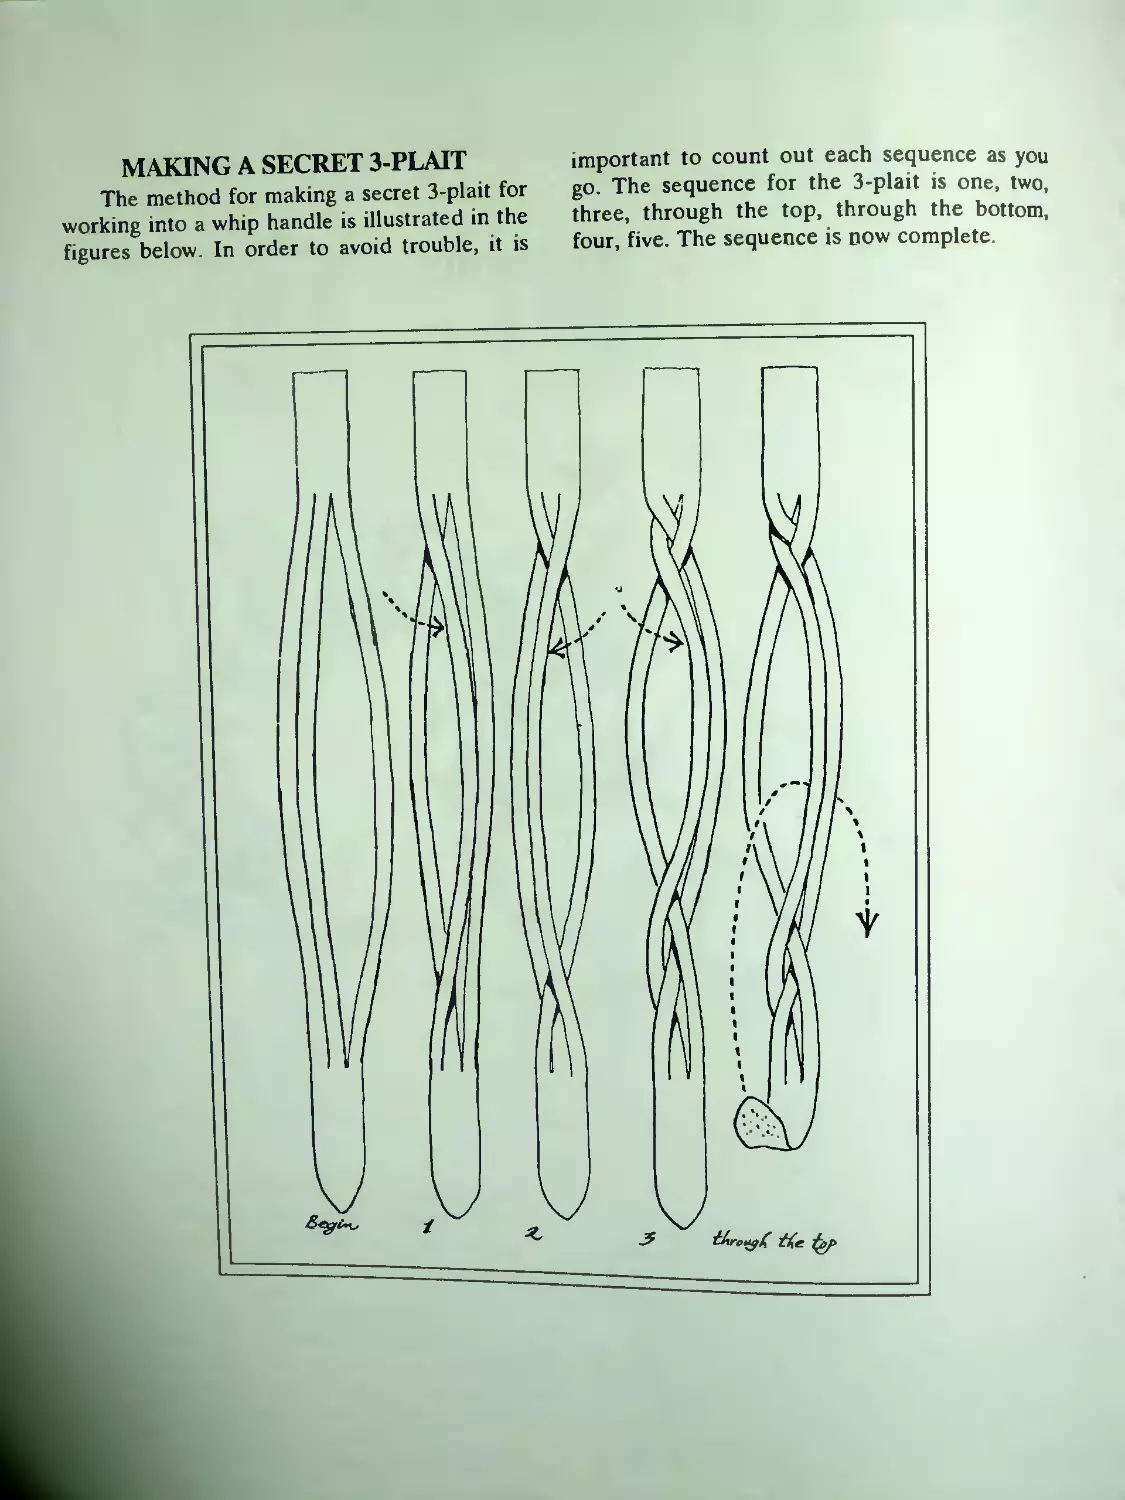
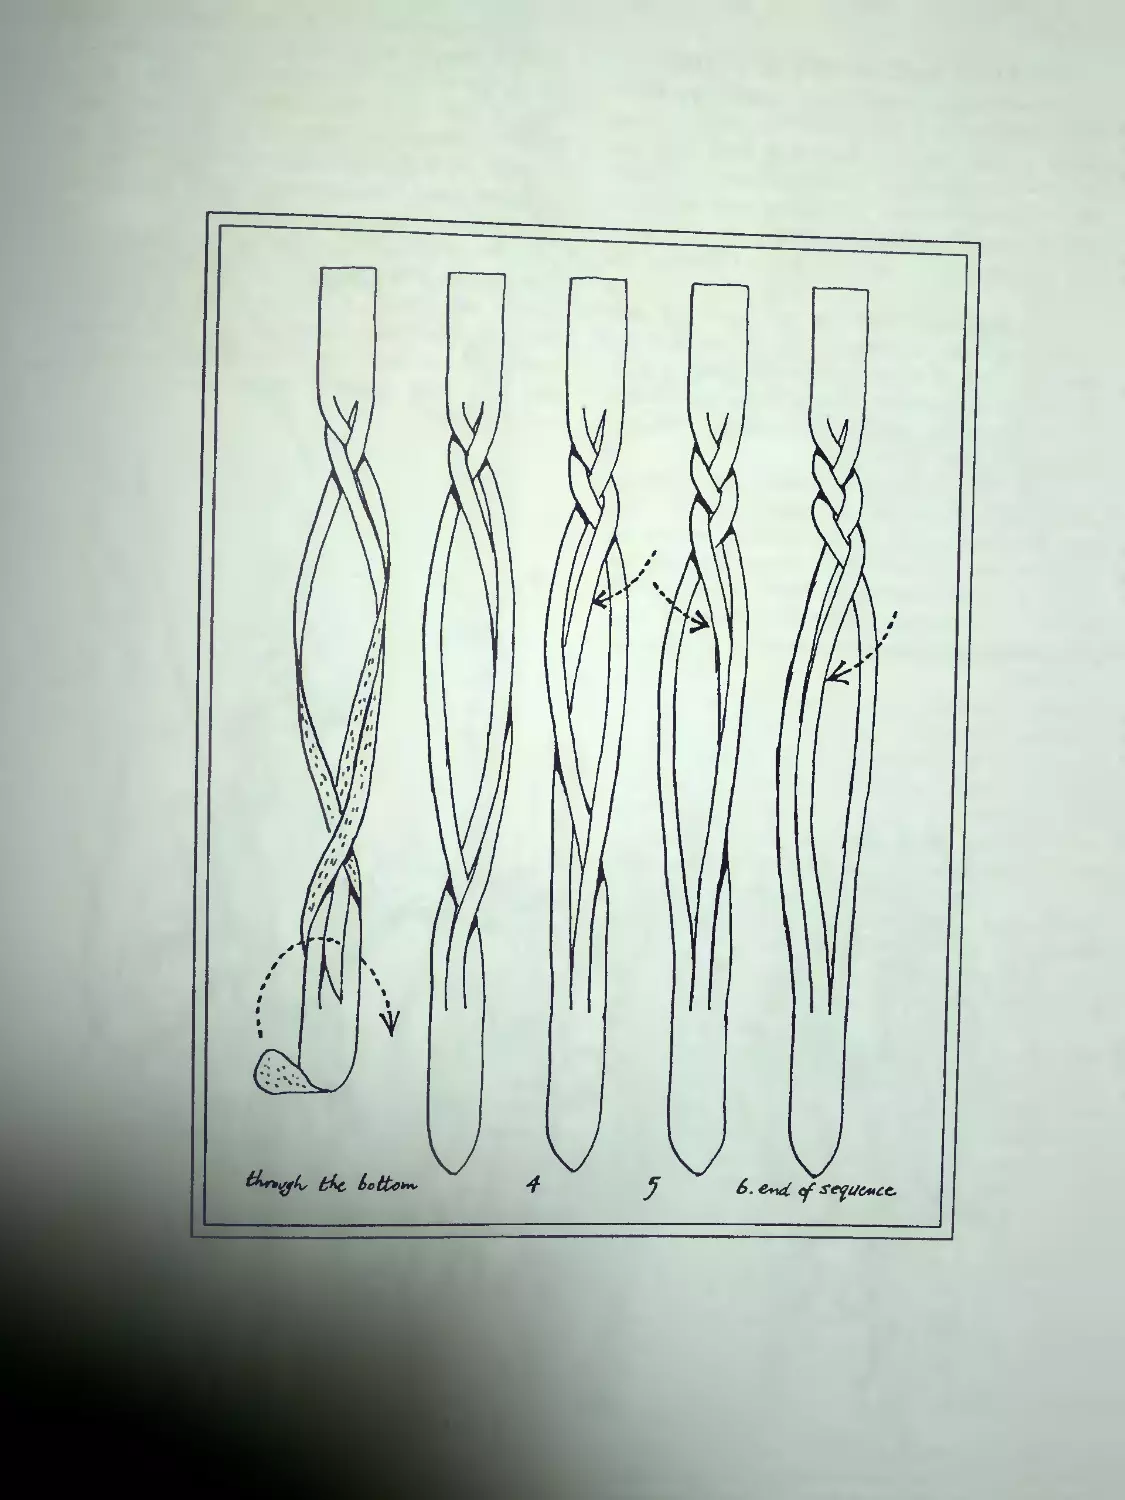
SECRET PLAIT
WORKED INTO A
WHIP HANDLE
Simply wrapping
a length of leather
around a cane will give
a whip handle a grip,
but it looks rather
plain An interesting
texture can be worked
into the handle by us-
ing the secret plait in
one section of the
leather as illustrated.
(The method of
forming the secret plait
is explained in a book
let of that name that I
have written and in the
appendix starting on
Page 155
Figs. 118-19. The leather is slit and ihe
plait worked into it and then Ihe whole strap is
wrapped around the handle and tacked at each
end. Additional prominence can be given to
this plaited section by wrapping a scrap of
leather around the handle just at the point
where the secret plait is wrapped—this will
make it bulge out a little.
Fig. 120. A normal knob and Turk’s head is
then put on the end and a small Turk's head or
a Spanish ring knot is put at
the spot where the wrapping
is finished on the handle. In
this case I used a head-
hunter’s knot,
will do.
foot
but anything
Sport /A-bight
Tt-ukS heart-
200
60
shfs
I'B
32
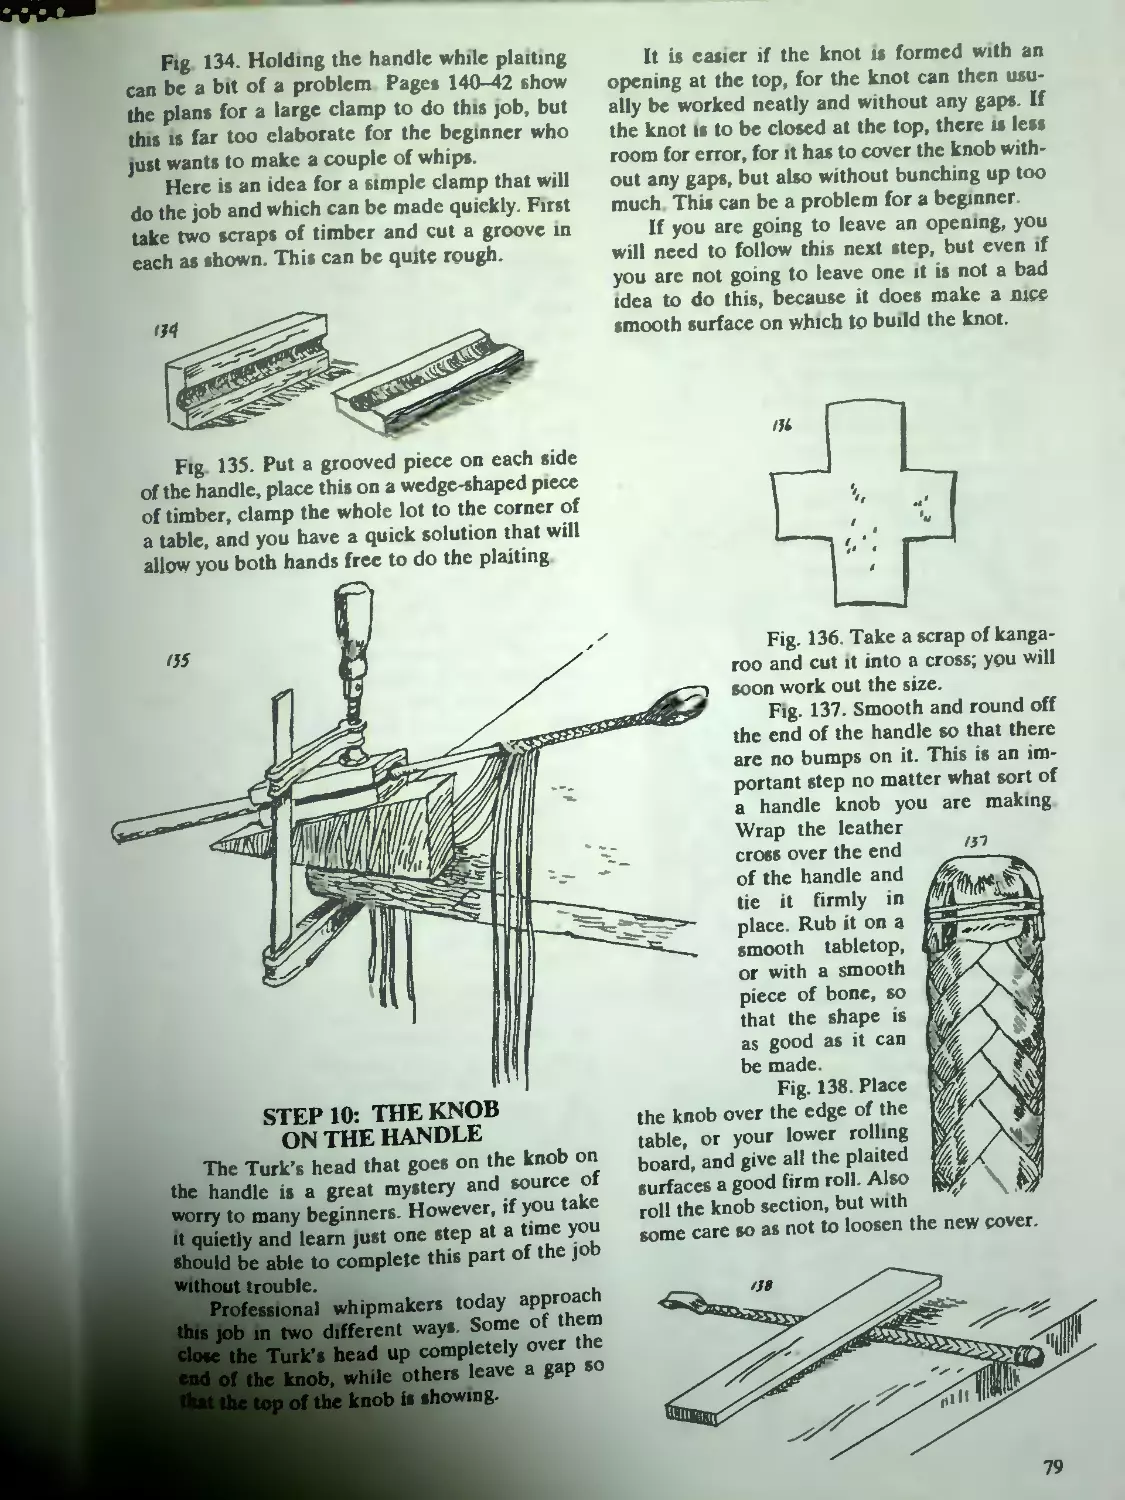
BINDING ON THE KEEPER
Fig. 121. The end of the handle should have
a groove cut or filed into it so that the twine
that holds the keeper will not come loose.
Fig. 122. A strip of heavy kangaroo hide
180 mm long by 30-40mm wide is used for the
keeper, or a strip of redhide 180 x 20 mm. The
edges are trimmed down so that they do not
overlap each other when placed on the handle.
The ends are also skived thin so that they will
not make a bulge in the finished job.
Fig 123. The keeper is tied on with strong
thread. Today strong synthetic twine is used,
but if you do wish to use natural twine it should
be waxed to help preserve it In order to get a
tight job, one end of the thread is made firm to
something and the whipmaker winds the thread
on as shown, moving forward as he or she
winds.
You get a stronger job
if you wind the handle
around the twine instead of
winding the twine around
the handle.
Here are three ways to
tie on the keeper. The first
is probably the most com-
mon one used today.
Method 1. Figs. 124-130.
Begin as shown, and when
there is only about 15 mm
to go, drop a loop of strong
twine onto the job and wrap
the twine around this, leav-
ing either end of the loop
sticking out.
When enough has been
wound on, the end of the
twine is pushed through
one end of this loop Grasp
the other end with the pli-
ers and pull until the loop
has been removed and the
end of the thread will be
ready to trim off.
33
Method 2. Figs. 131-36. This method is
probably a little faster than the previous method
because there is no need to make or find a loop.
If the end is pulled too hard when finishing
up, both ends will come out together. Though
this will not weaken the knot, it does tend to
make a gap on the job.
Methods. Figs. 137-41. The last method is
an old one dating from the days of natural
thread, when care had to be taken not to put
too much pressure on it. It is slower than the
previous methods but some people still use it.
If there are no pliers handy, a loop is put
into the end of the twine and a piece of stick is
pushed through this to provide a handle that
can be pulled.
Begin by tucking one end of the thread under
and begin winding. When most of the winding
has been done, undo the thread from whatever it
is tied to and cut it off
with about 500 mm
left hanging.
Form a bridge, as
shown by the arrow,
and wind the thread
back towards the
keeper. Grasp the
bridge at the point
shown by the arrow
and tightly wind it
around the handle.
When all the thread
has been wound on,
pull the end tight and
cut it off flush
RIB
RATTLING
The sketch shows
Jimmy the Whip “rib
rattling,” as he called
this old-fashioned
34
li
i
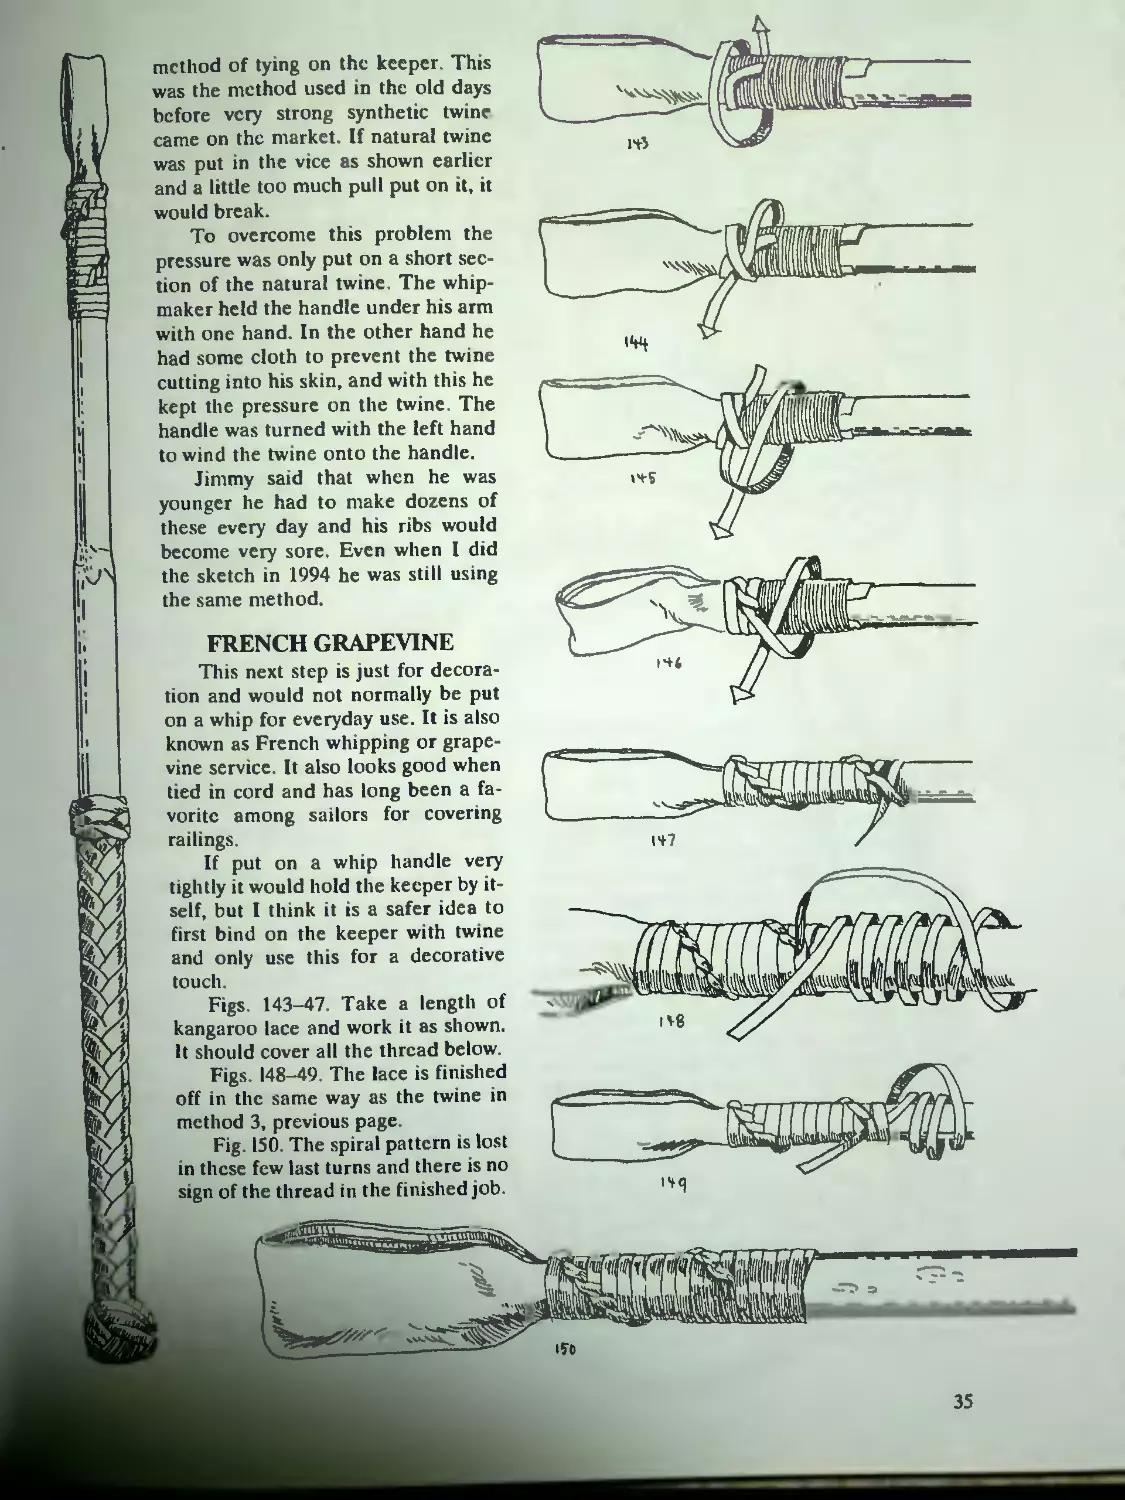
method of tying on the keeper. This
was the method used in the old days
before very strong synthetic twine
came on the market. If natural twine
was put in the vice as shown earlier
and a little too much puli put on it, it
would break.
To overcome this problem the
pressure was only put on a short sec-
tion of the natural twine. The whip-
maker held the handle under his arm
with one hand. In the other hand he
had some cloth to prevent the twine
cutting into his skin, and with this he
kept the pressure on the twine. The
handle was turned with the left hand
to wind the twine onto the handle.
Jimmy said that when he was
younger he had to make dozens of
these every day and his ribs would
become very sore. Even when I did
the sketch in 1994 he was still using
the same method.
FRENCH GRAPEVINE
This next step is just for decora-
tion and would not normally be put
on a whip for everyday use. It is also
known as French whipping or grape-
vine service It also looks good when
tied in cord and has long been a fa-
vorite among sailors for covering
railings.
If put on a whip handle very
tightly it would hold the keeper by it-
self, but I think it is a safer idea to
first bind on the keeper with twine
and only use this for a decorative
touch.
Figs. 143-47. Take a length of
kangaroo lace and work it as shown.
It should cover all the thread below.
Figs. 148-49. The lace is finished
off in the same way as the twine in
method 3, previous page
Fig. 150. The spiral pattern is lost
in these few last turns and there is no
sign of the thread in the finished job.
35
Form the shape of the knob as shown on
page 80; then cover it with a Turk’s head.
3-PART, 4-BIGHT TURK’S HEAD
(Another method is shown on page 154.)
Normally a Turk’s head is tied by beginning
at one end of the lace and continuing on in one
direction until the knot is completed. This
means that when you begin the knot you have
to handle a long length of lace and this slows
the job down. Whipmaker Maurice Doohan got
around this problem by beginning one third of
the way along the lace and working back to-
wards the short end. When the knot has been
fully formed, the longer end is used up for the
second and third passes.
The advantage of this method is that the
second and third layers (as shown in figure 159)
go above rather than below the start (as shown
in figure 158). This is the most common knot
found on whip-handle knobs, not because it is
the best Turk’s head for the job, but because it
is the fastest to tie.
Amount needed. The amount needed is im-
possible to say, since it all depends on the size
of the knob that you arc covering. A knob 25
mm in diameter might take just under 1 meter
of 5-mm lace, while a knob 30 mm in diameter
would take just over a meter. A knob 35 mm in
diameter will take about 1.1 meters if using
6-mm lace.
The beauty of this method is that you can
leave the long end of your lace still attached to
the hank and need not cut it off until you have
gone around the knob once, and can then judge
what length has been used up.
Start with a bit over a meter of 5-mm lace
or 6-mm if the knob is a large one of 35-mm di-
ameter or more. Divide this into thirds, and be-
gin with one-third, leaving the long end
hanging. If you have trouble at the start, you
can put a tack into the lace to hold the end
firm, but once you learn the knot you will be
able to do it without this.
Fig. 152. Go around once.
Fig. 153. Go around again and tuck the end
in.
Fig. 154. Turn the job around.
Fig. 155. Cross the strands over each other.
Fig. 156. Put the end through the hole.
Fig. 157. Bring it home against the other
end and the Turk’s head is complete.
Pig ИК Now to the long strand
this was two I bird» of the length, so you
will now know whether you are going to
have more than enough by the amount
of the ghortcr end left over. Take the
long end and work back following
alongside the first strand.
I ig 159 When you have made
three раме» in all, the knob should be
fully covered. If there I» till a gap, you
can go around one more time. I have
seen some whipmakers cover a narrow
gap by going around with a thinner
strand of lace, and one of a different
color Thia look» very good and make»
an error of calculation look like a well
de»igncd display of style and skill.
ATTACHING
WHIP
AND HANDLE
Fig». 160 61 The
handle and whip are
looped together as
shown
Your finished whip
should now look some-
thing like this if you
made the handle with a
dog’s knot. If it was
made with a Turk’s
head on the handle, it
should look like the
drawing on the next
page.
37
г
t
6-PLAIT BASIC WHIP
The most common whip is the
4-plait, because it is the quickest
and easiest to make. However,
some people prefer the appear-
ance of the 6-plait, and so a cut-
ting plan is included here.
The 6-plait can be made ac-
cording to the same plan given for
the 4-plait. Give it the same over-
all widths, but cut out 6 strands in-
stead of 4 strands
It can also be made with a
built-in belly instead of a separate
belly as described earlier When cut
ting out this pattern it will have to
curve all around the side of leather
Some people think
that the 6-plait whip looks
neater because there are
no wide strands used, but
this is only a matter of
opinion. I have handled
many fine whips made
with only 4 strands.
If you compare the
plans for the basic 4-plait
with the basic 6-plait, you
will notice that almost the
same amount of leather is
used for both. Extra
strands do not use up more
leather because the more
strands that are used the
narrower they have to be
cut.
38
BEGINNING A ROUND 6-PLAIT
There are several ways to begin a 6-plait,
and it is not hard to work out other methods,
but this will do for a beginner.
Two other methods of working the 6-plait
can be found on the next page. The chessboard
pattern is the neatest, but it is also the slowest
to do.
39
-foo 6-ffait MetMs (Mpwtd)
ROUND 6-PLAIT
Figs. 177-80. Above are two other methods
of working a 6-plait.
REDUCING FROM 6-PLAIT TO 4-PLAIT
Figs. 181-88. When you are partway down
the whip you will find that you are getting to-
wards the end of the two shorter strands, and so
it is time to reduce from 6-plait to 4-plait.
The short strands are dropped as shown,
and the plaiting goes around them so that the
ends are hidden from sight. Now a 4-plait con-
tinues for the rest of the whip.
This method suits a beginner, but people
who have had some practice at plaiting whips
will usually cut the 6 strands to run the full
length of the whip, tapering the strands quite
fine towards the end
4U
THE BUILT-IN BELLY
When making a whip with a built-in belly to
the plan shown on page 38, the belly section is
bent over and the strands plaited over it leav-
ing a loop of leather which forms the keeper
KANGAROO-HIDE WHIPS
Anyone can make a reasonable 4-plait whip
if they take the time, but the kangaroo-hide
whip is another matter. For the beginner I
would suggest that you spend time making basic
whips and not even consider beginning a
kangaroo-hide whip until you can make a really
smooth and even 4- or 6-plait whip.
Many beginners think that when they have
made one basic whip they are ready to move to
advanced work, but it does not work that
way—skills must be developed first.
When you have made a number of good ba-
sic whips of the type described in this section,
you may feel that you want to move to the next
stage and work in kangaroo leather. Instruc-
tions for the making of kangaroo whips will be
found in chapter 2.
For even more infor-
mation on the making of
good quality whips I sug-
gest that you join the
Australian Plaiters and
Whipmakers Association
and read their journal.
Write to me at the ad-
dress on page 2 for more
details.
KID’S WHIP
Fig. 189. The kid’s
whip is usually just
that—quick and easy to
make, it is usually a bush
child’s first whip, and is
used for such traditional
Australian sports as
whipping the rooster and
chasing the cat.
Fig. 190. The whip is
made from a single
strand of leather, usually
about 8 mm wide and the
full length of the hide
The end widens to 15
mm and three or more
slits are cut in it. The
loop is then formed as
shown in the drawings
A cracker is attached
to the end, as illustrated
elsewhere, and the han-
dle attached, also ex-
plained elsewhere, and
the whip is complete
The handle in the sketch
is of cane, but any tim
ber can be used.
-*ГО»- 2Г ЧЦ0+ (5K-
41
SLIT BRAID
Figs. 191-94. The loop is formed with a
simple form of slit braid. Longer slit braids can
easily be made by making more holes in the
leather, and South American quirts are some-
times made with the slit braid going almost the
full length of the lash.
Although shown here as a child’s whip, this
type of whip can also have practical uses. The
driver of the horse coach that used to drive
tourists around the streets of our village of Ku-
randa always had one of them.
Fig. 195. He used a handle made from a
length of fiberglass fishing rod and it was much
cheapter, and just as efficient, as a proper
coach whip. The sketch shows him in the main
street with the traces slack as the vehicle was
coming down a slight slope.
42
Chapter 2
Whipmaking Book 2
How to Make an 8-Plait Kangaroo Stockwhip
TWO MAIN GROUPS OF WHIPS
Although primarily intended as an instruc-
tion manual, this book is also a serious study of
one of Australia’s important bush crafts, the
making of whips. The traditional Australian
stockwhip differs from whips made in other
parts of the world, especially in the finely
plaited examples. In great measure this has
been due to the abundance of kangaroo hide,
said to be the world’s strongest leather for its
thickness. This leather has allowed finer whip-
plaiting techniques to evolve, as well as unique
construction techniques, methods that would
not be possible with weaker types of leather.
One of the Australian stockman’s most
prized possessions is his stockwhip. A top-
quality whip takes a long time to make, and be-
cause of this it can be very expensive. With this
book you should be able to make your own
whip for a fraction of the cost.
Stockwhips can be classed into two main
groups. The first is the basic whip, which may
be called a yard whip, or team thong, or given a
name according to the material from which it is
made, such as a greenhide whip, a whitehide
whip, or a redhide whip. In old saddlers’ cata-
logs these whips were also referred to as stock-
whips, a point to remember if anyone ever tries
to tell you differently. Basic whips are both
strong and simple to plait, and the making of
them is explained in chapter 1.
The second group represents the most
highly prized (and priced) stockwhips and con-
sists of those made from kangaroo hide. These
whips are so much more expensive because they
are much more complicated to make and take
considerably longer than the whip made of
greenhide or redhide.
If you have never ever made a whip before,
you would be better off to begin with chapter 1.
Life will become a lot easier. The kangaroo-
hide whip is complicated
for two reasons: it uses
much finer strands than is
the case with cowhide
whips; and it could be de-
scribed as two whips in one,
for in a good whip the belly
of the whip is a 4-plait whip
over which another whip
with more strands is
plaited.
Fig. I. As a comparison
between the simple redhide
whip and the kangaroo
whip, this first drawing
shows the way a plain stock-
whip is often
made—nothing
but a 4-plait of
redhide over a
belly of either
rolled or solid
leather.
Fig. 2. Just
look at how
much is involved
in a good kanga-
roo whip. The
sketch shows a
kangaroo-hide
whip, which can
consist of more
than nine layers
in a thick whip.
A whip of this
type will proba-
bly take five
times as long to
make as a plain
stockwhip, but
the final result
should almost
be a work of art
as well as a very
practical whip.
SOME STYLES OF WHIPS
Stockwhip of Kangaroo Leather
This is the prince of whips and this section
deals with the making of them.
44
Redhide Whip
Here is a typical 4-plait redhide whip. In-
structions for the making of this kind of whip
may be found in chapter 1.
Besides these two main groups of whips
there are others such as the bullwhip, popular
with Americans. In this type of whip the handle
and thong are all part of a single unit, the solid
part of the handle being very short (see p. 89).
Bullockie’s Whip
At the other extreme is the bullockie’s whip,
which often had a handle taller than the bullock
driver himself, and a thong twice as long as that
found on a stockwhip. The making of these
whips is described in Bushcraft 3 page 95 and in
the appendix starting on page 155.
Snake Whip
There is also the snake whip, which is like a
short flexible bullwhip that can fit into the
pocket (see p. 97).
FIRST RULE ABOUT
WHIPMAKERS
In the eleven years that passed between the
first and this present edition of Whipmaking
Book 2, I met quite a few whipmakers through
the Australian Plaiters and Whipmakers Asso-
ciation. Their ideas have brought about a major
revision of this material in a way that should
make it much easier for the beginner to make a
good whip at first attempt
Every whipmakcr has his own special way
of doing things, and insists that this is the only
true and correct way of doing it This is the first
rule, and as a beginner you have to remember
it. Talk to ten old whipmakers and you will get
ten different sets of rules. This is why old whip-
makers always look down on other whipmakers,
for they know that they are the only ones who
are doing it properly
When I first wrote Whipmaking Book 2 in
1984, getting information from these old pos-
sums was like pulling teeth. Fortunately in 1985,
the Australian Plaiters and Whipmakers Asso-
ciation was formed and this brought about a
great sharing of knowledge among the whip
makers and a grudging admission by many of
the old timers that some of the other whipmak
ers were not all that bad.
45
I, too, have changed my ideas during the
twelve years between writing the first edition
and preparing this one, due to a lot of good ad-
vice from professional whipmakers. As a result
there is considerable difference between the
1984 edition and this one. I am sure that this
edition is better and will, I hope, produce a bet-
ter whip for the beginner.
WHIPMAKING TERMS
Not all whipmakers use the same terms for
the parts of the whip, and this can be confusing
for the beginner Out of interest I consulted
some old saddlers’ catalogs (mostly from the
1920s and 1930s) in order to find out the tradi-
tional terms used in Australia in the old days
and came up with this list.
Stock crop or stock. This was the name given
to the whip handle, and a stocker was the man
who made the stock. However, the term handle
was also used in some catalogs.
Баге stecK urft sfzd /еьТну
Steel-lined handle or stock. This refers to the
length of spring steel found in the center of
many handles.
л-1 езда
Grip or plaited grip or hand part. T oday often
called a half-plaited handle, grip referred to
handles which were only plaited far enough
down to give a grip to the hands, the rest of the
stock being left bare. The term “hand part” was
used in one catalog for the same thing.
Thong or stock thong. The term thong is still
used to refer to the main part of the whip, and
the length of the thong is used to describe the
whip as in an old advertisement: “thong 8 ft x
12 plait.” The length of the handle and fall are
not included when referring to the length of a
whip.
Belly. The same term is used today Good
whips had a plaited belly but not all stockwhips
had a plaited belly. One catalog of 1933 notes:
“These thongs are made with plain inside belly
not plaited and are quite suitable for dairy or
farm work where a high grade cattle drafting
whip is not necessary.”
Fall. This has the same meaning today and
refers to the strip of leather attached to the end
of the thong. A 1935 catalog mentions only
“white or yellow hide whip falls,” which sup-
ports Maurice Doohan’s suggestion that red-
hide is a more recent product in the making of
whips.
GmcKer
Cracker. The short, detachable end of the
whip. Traditionally made from silk or horse-
hair, it is today more often made from synthetic
twine of various types.
Stock whip or stockwhip. There is some argu-
ment today about this term, and some people
insist that it only refers to the whip made from
kangaroo leather. However, the old catalogs
make it quite clear that this was not the case.
One refers to “Stock Thongs—Kangaroo” as
well as “Stock Thongs—Whitehide or Green-
hide.” There was also an ad for a “Stock Whip 6
ft x 6 plait, yellow kip hide.”
While many-people think that the term
stockwhip comes from its use in working
stock, it is more likely that it refers to the
stock or handle, which makes the difference
between the American bullwhip, which has no
separate handle or stock, and the Australian
stockwhip.
Team thongs. In the old catalogs this term
seems to be used for basic whips, but they could
still be of good quality materials, for a 1935
catalog lists team thongs in 4- and 6-plait kan-
garoo as well as 4- and 6-plait greenhide and
whitehide. The term is still in use today by
whipmakers such as Glen Denholm.
PLAITING OR BRAIDING?
The traditional Australian term is plait
(because it is pronounced plat, some early
writers used that spelling, and I have noticed it
as plaitt in one old catalog, but plait was and is
the common spelling). I have not seen the word
braid used in any old Australian saddlers
catalog.
46
However, in recent years the popularity of
Bruce Grant’s Encyclopedia of Rawhide and
Leather Braiding has introduced the American
custom of calling what is traditionally a plait in
Australia a braid.
It could be argued that for the sake of uni-
formity we should drop our own traditional
term of plait and adopt the American one of
braid, but I would prefer to stick to our own
usage
Plait
Out of interest I looked up both words in
the Shorter Oxford Dictionary. It notes that
Shakespeare used the word plat: “Her haire nor
loose nor ti’d in formall plat,” and also notes
platted as late Middle English spelling. It gives
plait as the common spelling today.
Braid
Braid is given as being derived from the
Old Teutonic bregdan “to pull quickly hither
and thither,” and part of the definition is given
as “to make by plaiting.” This would suggest
that plaiting is the senior term.
In my experience braiding was only used in
Australia to refer to very fine work, such as
horsehair braiding, or to applying patterns in
lace onto solid leather belts. Belts made en-
tirely of kangaroo lace were always referred to
as being plaited and, as noted earlier, all whips
were referred to in old catalogs as being
plaited.
12-FOOT SHOT-LOADED STOCKWHIP
We still get orders for these in our sad-
dlery, and I had a couple of urgent phone calls
from an aggressive New Yorker in the Bronx
who insisted that this was the normal stockwhip
and wanted me to send him one.
But times change and so do fashions, and I
had to tell him that such a whip is today classed
as a special order (he didn’t believe me and got
even more annoyed) Shorter and lighter whips
are now the most popular, and, according to
contributors to The Australian Whipmaker’s
Journal, our association journal, this is because
the shorter and lighter whip moves faster and
produces a louder crack. I would not like to get
into an argument about that, but it is a fact that
few professionals make the longer and heavier
whips except as special orders. (See page 98 for
more on loading whips.)
HOW TO MAKE A 2.3-METER,
8-STR AND KANGAROO STOCKWHIP
WITH A FULL-PLAITED HANDLE
The beginner is advised to
start with 8 strands, as this will
make a handsome whip with-
out the problems of dealing
with a large number of very
fine strands. Once the 8-plait
has been mastered you can
later make whips with as many
strands as you wish.
Whipmaker Bruce Cull
made a good point in one of
his articles in The Australian
Whipmaker’s Journal when he
said that the best way to learn
was to make a whip, then see
where it could be improved
and make another. I don’t
think that anyone could make
a good whip the first time from
any book—in the end you must
learn from your own experi-
ence.
This is why so many of the
old whipmakers were so mean
about passing on information,
because they had learned the
hard way themselves and did
not see why they should pass
anything on.
47
These whipmakers were forgotten when
they died, but the whipmakers who have been
free with their help will be remembered with af-
fection for years to come
Materials Needed
A full kangaroo hide.
A very sharp knife and the means to keep it
sharp
(Optional: A strand-cutter for those who
are unable to learn to cut by eye.)
Plaiting soap or fat with a few drops of kero
(kerosene) in it or leather dressing.
A 1.6 meter x 10 mm strip of 3 or 4 mm
thick redhide for the core and the fall. If you
wish to make the core out of kangaroo, then
you will need only a 600 x 6-mm length of red-
hide for the fall.
Poly binder twine or nylon cord or horse-
hair to make the cracker
Fine strong black waxed thread to tie the
keeper on.
500 mm of cane or timber for the handle
Whips can be made to any desired length
In this case the instructions are for a whip of
2,300 mm with a 600-mtn fall, an average sort of
whip. Whipmakers develop different techniques,
and each man thinks that his method is the
best The methods described here arc probably
the most popular.
Selecting the Kangaroo Skin
Ask for one that is drum-stuffed and ex-
plain that you are going to use it for whipmak-
ing. Most kangaroo is sold with a glazed surface
that is not the best for a whip, while the drum-
stuffed hide has a dull finish and a slightly oily
feel.
Don’t worry too much about bullet holes
and cuts as these can be worked around, but
look out for large areas of scars and scratches
and also try to avoid skins that have too many
tick scars on them. These are little hard patches
about the size of a match head
If you don’t have a leather splitter (and you
can make a good whip without one) make sure
that the skin is of even thickness throughout
and reasonably smooth on the back.
Using Precut Lace
No professional whipmaker would ever use
precut lace for two good reasons, the first being
the difficulty of getting a taper on it and the
second the expense. However, I know from x
penencc that some people who buy this book
only want to make one whip for themselves and
have access only to precut lace
It is possible but difficult. Begin with 6
strands, start in the middle, and with flat plait-
ing form the keeper. Fold this and join the
laces together and do a 12-plait round Work
down and drop strands (as explained on page
94) to get the right taper—and good luck
Details on making a whip with precut lace
may be found on pages 143-45.
Testing for Stretch
Fig. 7 Even the best kangaroo skin will
have parts where there is a lot of stretch, and
the sketch gives an idea of where they may be
found. The sketch shows the neck at the top
and the base of the tail at the bottom The area
around the armpits has the most stretch.
Pull the leather; if it changes color and be-
comes lighter between your hands as you pull,
then there is a lot of stretch in that part, and
you might have to cut strands up to twice as
wide as they are to finish up. If there is some
stretch but no change of color, then the strands
may have to be cut perhaps a third wider. The
best way to find out is to trim a little of the
outer edge and test it yourself.
Before beginning a whip, all the strands
should be given a good stretch in the hands to
get them as dense as possible, for unstretched
leather will make a loose-plaited job
48
STEP 1: THE CORE OR FILLER
The core can be made either from cowhide
or kangaroo; in the hands of a good whipmaker
both will do a good job. In The Australian Whip-
maker’s Journal, page 354, Bruce Cull says that
“redhide is ideal for cores as you can select
natural thickness and taper,” while on page 375
Maurice Doohan explains how he made cores
from three pieces of kangaroo, his feeling being
that “a roo hide whip should contain all roo
hide.” As both are expert whipmakers you can
take your pick.
Redhide Core
Fig. 8. This is simple to make. As the core
has to be round, the strip that is cut should be
not much wider than the thickness of the
leather, only 3-4 mm. It is tapered at either end
with a short taper at the top and then a long ta-
per at the bottom, the same shape as the fin-
ished whip.
Some whipmakers make this core the full
length of the finished whip, while I have meas-
ured others under a meter. Ours will measure
somewhere between 900 mm and 1.5 m.
8
___________________________
U-------------------------- ЧОО
Fig. 9. The core is then
skived on all edges until it
is round. (Skive rhymes
with dive, and means to
take a shaving off the edge
with a very sharp knife.)
Fig. 10. While redhide is the best, the core
can also be cut from an ordinary hide of any
strong leather 3-4 mm thick. No attempt is
made to cut it from a straight strip of leather;
the strip is simply cut by running around the
outer edge of the leather, whatever shape it is.
It will pull out straight quite all right later.
Soak it in water for ten minutes and then
give it a good rolling under a board and this will
help in getting it round A good rubbing with
io
leather dressing will be needed after the roll-
ing; otherwise, the wet leather will tend to dry a
little hard. If you don’t have leather dressing,
use fat with a little kero in it.
If your core or belly has any lumps, bumps,
or hollows, these will show up on the finished
whip So make sure that you trim and roll it as
evenly as you can.
botfou,
-i-rw. -------------------------------
Kangaroo Core
There are at least three ways of doing this,
and as the whole aim is to get a dense and solid
core you should pick the one that works best
for you. All of them use the most flexible
leather that you can find, so this is a good
chance to use up the outer edge of the kanga-
roo skin.
Fig. 11. The first method is to cut a long
teardrop-shaped piece of kangaroo—the length
can be 900 mm. The width will depend on the
thickness of the leather, but 20 mm at the thick-
est part will probably be enough.
Rub it well with the fat mixture and then
roll it into a hard core. If it will not roll easily
then use a sharp knife to cut a few shallow
scores in the leather and this will make it eas-
ier to roll. The finished job should be quite
dense
Use scraps of thread or lace to make a few
ties around it to stop it unrolling as you work
with it; they can be discarded as the plaiting
takes place.
49
(*
Round a strip of redhide about 300 mm
long. Soak a long strip of leather about 5 mm
wide and wrap this around the redhide. When
the redhide is all covered, keep twisting the rest
of the strip as described above.
Fig. 15. When all the pieces are twisted up,
they can be pulled tight and left to dry for a'
short time, and then given a good hard rolling.
Fig. 12. The second method is to cut out
three small pieces of flexible leather. Give
them a heavy coating of fat or leather dressing.
Roll up the smallest one, and then roll the
other two around it. Roll the whole thing as
tightly as possible and leave it to dry before us-
ing it. Use some scraps of lace or thread to tie it
tightly together if it looks like it might come un-
rolled. These can be removed later as you are
plaiting around it. (If you have any problems
with getting the pieces rolled tightly, soak them
m water first and then a heavy layer of fat).
Fig. 13. The third method is really the same
as the previous one, and this is the one that I
saw Maurice Doohan using in 1995. Instead of
using three small pieces of leather, he left them
all connected at the top. This meant that he
could put the end into the
vice and then roll them by
putting a scrap of leather
around them and rubbing up
and down briskly, using
plenty of leather dressing.
Fig 14. Another method
of making a core is to take a
strip of leather about 5 mm
wide, soak it in water for ten
minutes, and then twist it.
This can be done by hand or
with an old-fashioned drill.
Fig. 17, Thick
core for a heavy
whip.
For your first
whip, make a core
using one of the pre-
vious methods—not
this one, which is
only for later refer-
ence should you ever
need to make a very
heavy whip.
Fig. 16. This should result in a tight dense
string like this.
sn
Fig. 18. When the whole thing looks rea-
sonably smooth and even, pull it tight and
tack it down at each end or leave it in the vice
as shown until it is all but dry. Then put it on
the bench and give it a good hard rolling until
Fig. 19. It may be necessary to slightly
dampen the leather again if it will not roil prop-
erly. After rolling the core put some sort of
weights on it so that it will not unwind. Once
properly rolled it will remain in this form per-
manently.
The life of a whip will depend upon regular
oiling, and this should start right from the be-
ginning. Use leather dressing of any type, or
even fat (with a little kero in it to stop cock-
roaches and rats eating it), and thoroughly oil
the core and then roil it again before plaiting
over it.
Lead Loading
In the old days lead loading was all the
rage, but many whipmakers today think that it
slows down the whip and that a loaded whip
will not crack as well as an unloaded one. To
load a whip a small cotton or fine leather tube
filled with lead shot would be built into the end
of the whip instead of the core.
Once this was done it was
also then necessary to pour
some lead (about 50 grams)
into the handle at the knob end
in order to balance the whole
thing.
STEP 2: THE BELLY
The Filler and Belly Plait
Planning ahead is impor-
tant if you are to get the best
use out of your kangaroo hide.
As mentioned earlier, you will
probably find it best to cut the
strands for the handle from the
tail section, across the bottom
part of the roughly triangular
shape of the skin. Pieces such
as cores and bolsters can be cut
from the soft and stretchy sec-
tion around the edge of the
skin where the armpits were,
and then the strands for the
belly can be cut. This should
trim the skin down to the good
leather that will be needed for
the outer layer of the whip.
Fig. 20. The filler and belly
plait are cut from one single
strip of kangaroo. The method
of cutting out the kangaroo
hide is illustrated further on.
The plan given here has
been exaggerated in order to
make it easier to understand,
and so the taper of the strands
is not as severe as it
looks—they taper from 10 mm
wide at the thickest down to a
point.
The filler should be the
length of the finished whip—in
this case, make it 2.5 meters,
and the width should be just
enough to wrap around the
core, tapering down to only
about 4 mm at the end.
You don’t want it to overlap
around the core, for that will
cause a lump; nor do you want it
to only go part of the way
around the core, for that will
spoil the roundness of the job.
fe//y stran/t;
ZO
51
Fig 21. Place the core on the filler no that
the end of the core is in thia position.
Fig 22a Beginners will find it convenient
to use fine cotton thread to tie the filler up be-
fore beginning to plait. Professional whipmak-
ers omit this step and simply fold the filler
around the core as they arc doing the plaiting,
but this takes practice and we want to make the
first whip as easy as possible
Fig. 22b. The fully wrapped core.
Fig. 23. Fold over the leather to form a
loop and tic it in place. This loop will be part of
the keeper of the whip. (As you get more profi-
cient you will not have to bother about tying
this but will just begin plaiting).
The loop that is formed should be
big enough to put a couple of fingers
through. With the filler tied up and in
place around the core plaiting can now
begin.
Figs. 24-27. A 4-plait is now worked
over the filler When you get to figure
27 just keep repeating steps 26 and 27 to
continue plaiting The sequence is to
take the top strand around the back and
between the two strands on the other
side and back to the original side
Use plaiting soap, leather dressing,
or some fat with a little kero in it in or
dcr to get the strands well greased This
will allow you to plait much tighter than
with dry strands.
Fig. 28 When all the strands have
been used up, the ends are tapered
I and thinned down if necessary, and
then tied down with fine thread. Make
sure to get i smooth line when doing
this—abrupt changes in outline will
show up on the finished whip.
There will still be the one long
strand from the filler hanging down.
Grease this well and then wrap a scrap
of leather around it tightly and rub it
up and down until the strand is well
rounded Look at the finished job and
make sure that you have a good taper
all the way. It may be that you will
have to undo the end again and trim
and taper the strands a little more to
get a good-looking job, but don’t let
this worry you; a little extra work to
get the belly looking good will be well
worthwhile later.
i_ Fig. 29. The completed belly is
rolled to make it smooth and even At
every stage in making a whip there is
isome rolling to do. If at any point you
find a bad lump or a thin part, it must
be remedied before going on to the
if ’ next stage.
The whip will thrash about when being
rolled and knock almost everything off the
bench. One way to stop this is to hang down a
couple of lengths of cord. The whip can easily
slip through the loops in the cord, and they will
help restrain it.
Belly from Redhide
In a good whip the belly is plaited from
kangaroo leather over a core as described ear-
lier However, if you look at early saddlers’
catalogs you will find that not all kangaroo
whips had a plaited belly. For instance, in Uhl’s
catalog of 1935 the advertisement for a
Henderson whip notes that it is “made with a
plaited belly that is a double whip, there is no
fear of the belly breaking. It costs a little more
but the whip lasts twice as long."
Some of the cheaper whips did not have a
plaited belly and most likely used a solid strip
of tanned cowhide that could dry out in time
and crack. People who do whip repairs have re-
ported all sorts of rubbish being used as a belly,
including things such as strips of cloth or rope,
or even old singlets.
Bruce Cull tells the story of a Gulf Country
ringer who had a whip with a rope belly and, af-
ter some time, the rope’s fibers began to poke
up through the plaited outer layer. The ringer
said that he never knew which to shave first in
the morning, himself or his whip!
Today there are some whipmakers who
make the belly from redhide. A tapered strip is
cut from the thickest available hide, as long as
the finished whip is going to be It is often
soaked in water for ten minutes or so and
rolled until it is quite round It is then heavily
treated with leather dressing or fat. As this will
not provide a very thick belly it is sometimes
covered with a bolster of kangaroo leather
This bolster is wrapped around it until it is built
up to the desired thickness.
When I asked Maurice Doohan why the
whipmakers in the old days did not use redhide
for the belly he said that it was not available in
the old days. He thought that redhide only
came into general use halfway through the
twentieth century. He also pointed out that if
you wish to make a good whip, it should have a
plaited belly. Bruce Cull confirmed this, stating
that “a 4-strand plaited belly is not only ihe
best belly but is easier and quicker to make
than many of the other forms” (Australian
Whipmaker's Journal p. 354).
Fig 30. Another way to restrain the whip Is
to stretch it out and tie the ends, or get a cou-
ple of friends to hold the ends.
53
STEP3: THE BOLSTER
The purpose of the bolster is to build up
the exact shape that you are looking for in the
whip. According to the size of the belly, it
might be that you will not need a bolster, for
quite often the beginner will already have made
a thick belly, and in that case there is no point
in making it even thicker.
Some whipmakers cut the bolster out of
one piece of leather, others use two, but all in-
sist that they are correct. Whichever is done,
great care is always taken to taper down the
edges so that there is no ridge on the finished
job. The bolster is of thin kangaroo, and this is
often the way that the outer stretchy pieces of
the skin are used up.
Fig. 31. The method that we are going to
use is to cut a bolster that will not go right
around the belly but will leave a gap about 4
mm wide. This space will later be filled by the
second part of the bolster, which is the end part
of the top plait.
The bolster is roughly teardrop-shaped and
about a meter long, as shown in the upper
sketch.
Fig. 32. While a professional whipmaker
might simply lay the bolster onto the job and
plait around it, the beginner is advised to use
some fine thread to bind it into place Use dark
thread and dark leather, as light colors will be
very obvious if there are any small gaps in your
final plaiting.
Fig. 33. Once this is done the whole thing
should be rolled again. In this way you can see
at a glance if the shape is smooth and the taper
is even. If there are any uneven patches, now is
the time to fix them before going ahead with
the final covering.
31
3Z
54
STEP 4: CUTTING OUT THE TOP
PLAIT OR OVERLAY
Number of Strands to Cut
A kangaroo stockwhip can be made of any
number of strands; 8 and 12 strands are com-
mon, but some of the old experts used to take
great pride in using as many as possible and
would work with up to 24 strands, each as nar-
row as 2 mm
As this is a book for beginners I am going
to describe the making of an 8-strand whip, and
this will produce a strong and handsome whip.
When you have fully mas-
tered the 8-strand whip,
you will have no problems
in splitting each of these
strands down the middle
in order to make a 16-
strand whip if you wish to.
But there is nothing
wrong with an 8-strand
whip, and one of my fa-
vorite whips is an 8-strand
two-tone whip made by
Maurice Doohan
Cutting Out Strands
Fi 34. As any per-
son who runs around a
sports ground will tell
you, the inside of the
track is a shorter distance
than the outside, and it is
the same thing when cut-
ting out strands—the in-
side strand will be
shorter than the outside
one, unless you allow for
it If you are cutting out
from a new, large skin
this will not be a big
problem, but as you get to the center of the
skin the difference increases.
To prove this I cut an 8-strand whip set out
from a small circle of kangaroo skin, ending up
with nothing except a circle about the size of a
fifty-cent piece. "Die outer strand was 3 meters
long but the inner one was 700 mm shorter and
ended up only 2.3 meters long! As an experi-
ment this did not matter, but with a real whip it
would have been a problem.
The small sketch shows how the strands
were cut, beginning them all together. The
sketch next to it shows what the result was with
the strands short on one side and long on the
other.
Fig. 35. In the earlier editions of this book I
illustrated a cutting-out system that I had been
taught and which worked well enough but was
rather complicated to understand. This present
method is much easier to remember and works
just as well.
If the skin is roughly 750 mm in diameter,
start cutting each strand 80 mm apart. For a
skin of larger diameter the strands could start a
little closer together, and for a smaller circle
they could be a little farther apart, but this is a
good general guide.
You should measure both the inner and
outer strands as you cut them out to check that
they are all the same widths at the same
lengths.
55
Figs. 36. As you start cutting out the strands,
they will gradually widen as cutting continues.
Fig 37. Continue the inner cuts to bring
the whole lot together, then go to the outer
strand and cut this for another short distance,
whatever is convenient, and do the same to the
rest of the strands. Continue cutting around the
skin until all the strands are three meters long.
Stretch in the Leather
As explained earlier, when cutting out
strands the whipmakcr takes into account any
stretch in the leather (see figure 7). For in-
stance, a 4-mm strand cut from the best part of
the skin will end up as 4 mm wide. However, a
4-mm strand cut from the softest part of the
skin can stretch so much as to end up as only 2
mm wide after being plaited into the job.
Your overlay should use the best part of
the leather, but even so you may have to use a
skin with some stretch in it. Try to work out
where the skin has stretch in it and allow for
this. In these areas the strands are cut wider
than needed and are then stretched by pulling
them. This will bring them down to the proper
width without loss of strength.
Length of Strands in Overlay
For the sake of this example we are cutting
the 8 strands at 3 meters long each. The size of
the belly, the degree of pull you use to plait, and
the amount of stretch in the leather will all alter
the finished length of the thong, but it should
end up about 2.2 meters, or roughly 7 feet.
plan of the top plait for
the whip. Of course, you
can make it longer and
the strands wider if you
wish; this is only intended
as a guide. I think it is a
better plan than that
given in earlier editions
of this book, and is cer-
tainly much easier to cut
out and plait.
The professional whip-
maker might cut only 6 of
the strands to 3 meters
and leave two of them
shorter, because the whip
is going to begin as an 8-
strand plait and finish as a
6-strand plait. However,
the beginner is advised to
cut all strands to the same
length, as this means that
you can later choose
which strands to drop, or
you might even just drop
them and let them bc-
«•etxvS
come part of the belly
Knife Sharpness
When cutting out
kangaroo leather the
knife must be sharp
enough to shave with (sec
page 16)
56
There are a number of ways to cut out the
set (the group of strands that make up the
outer covering is known as the set). The great
advantage of this method, which includes a
eXMnic strip at the top that will form part of
die bolster, is that the keeper can never be
pulled loose, as it is permanently locked into
place. The keeper is the 100-mm section shown
in the upper half of figure 38.
Fig. 39. Some beginners who have not had
mnch experience in cutting out thin strands run
into problems when it comes to narrowing the
strands down towards the keeper. One way to
get around this is to cut 8 strands up to the wid-
est part of the job, and then continue with only
4 strands for the last 150 or 200 mm.
If you do this, begin plaiting a 4-plait (the
same as for the start of the belly), and then
switch to 8-plait when you come to the 8
strands. It is quite simple to make the change
from 4-plait to 8-plait.
The cutting out of the strands would be
much easier if kangaroo skins were five meters
bug and straight along one side, but they are
not, so the cutting has to work
around whatever shape the
skin happens to be.
Fig. 40. When you buy a
skin it win have a rough edge
and so the first thing to do is
to trim off the sides so that
they are a series of s.i-.Mb
curves.
Fig. 41. There are two
quite different aptwuarher to
cutting a set. The first method
is to taper the strands along
their entire length as shown in
figure 38. This calls for great
skill, and though it is not rec-
ommended for the beginner it
is the method that you will
eventually learn to use.
The w.ural method is to
use a pair of dividers to mark
out an even width, then cut
strands of uniform length for
750 mm. The dividers are then
widened a fraction and the
next 750 mm marked and cut
out, and so on until the whole
strand has been cut up to the
widest мсгк«
In the sketch I have exag-
gerated the width of the
strand so that there is a visible
jump from one size to the
next, but in practice this will
not be seen, as the difference
in each section is ouly just
over a millimeter.
Cutting with the Thumbnail
Fig. 42. This is the technique used by most
professionals, but it is difficult for the beginner
as it takes a lot of skill and practice. The skin is
placed on the bench or on the lap, and the
thumbnail, which is grown long for the job, runs
along the edge of the leather and acts as a
guide allowing the whipmaker to cut very accu-
rate strands.
It requires skill, steady hands, and a very
sharp knife to cut strands in this way.
Maurice Doohan (The Australian Whipmak-
er’s Journal, p. 165) points out that the nail
does not have to be very long—just long
enough to hold down the edge of the leather.
Type of Roo
Maurice goes on to add, “there are two
main species of roo, the reds (and the female
blue) and the greys." He has used the grays for
whips up to 12-plait and the reds for finer whips.
Cutting with the Side of the Thumb
This may suit the beginner better. The
method is the same as the above, but instead of
the thumbnail, the edge of thumb is used as the
guide. It is not as accurate as using the nail, but it
may be the only way that the beginner can do it.
Cutting to a Marked Line
Professionals do not mark the skin; they all
seem to cut by eye. As mentioned above, the be-
ginner may find it better to use a pair of dividers
and put a mark on the skin before starting to cut.
If cutting with the thumb is difficult, mark a
line with dividers and cut it out on a cutting
board.
Cutting with a Strand Cutter
Although most professionals cut with the
thumbnail, I have heard of one who makes a
large number of whips a year and cuts them all
out with a strand cutter. I have not seen him in
action, but presume that his cutter does not
have a top guide or roller, so that he can
quickly change from one strand to the next. 1
was told that the cutter could be easily adjusted
so that the taper could be made in the strands
as the cutting took place.
Fig. 43. This is the best type of strand cut-
ter. It is a small metal tool fitted with a blade,
and it fits over the thumb. R.M. Williams (the
stockman’s outfitter) distributes these cutters,
and any leather shop should be able to order
one. They come with their own blades, but as
these become blunt, ordinary razor blades can
be used.
Fig. 44. The cutter is held like this. Some
people use it on one of their fingers if their
thumb is too large to fit in the loop.
58
Homemade Strand Cutter
Fig. 45. A homemade strand cutter does
not take long to make The one in the sketches
was put together in less than ten minutes. It is
not as easy to use as the one from R.M. Wil-
liams, but it will do the job. Three scraps of
timber are put together as shown; dimensions
do not matter. The smallest scrap is nailed to
the largest to stop the razor blade from moving
backwards
Fig. 46. The blade is put between the two
pieces of timber and they are tied together A
small nail acts as a distance guide.
Fig. 47. The cutter is used as shown. The
first finger of the right hand prevents the
leather from rising. If you have any problem us-
ing this, put the nail on the other side of the
blade and hold the cutter in your left hand.
Cutting Out Tight Corners
Even if you start with a nicely rounded skin
you will find that after a certain amount of cut-
ting has been done, tight corners will begin to
develop.
Figs. 48-49. To avoid these problems you
should continually trim tight corners back to
smooth curves as you are cutting. Although this
does waste some leather, it makes for a better-
finished job.
Fig. 50. If you cut around too tight a corner
you will find that the strand will buckle up on
one side when you try to straighten it out, be-
cause one edge is longer than the other.
It is almost impossible to run a strand like
this through the leather splitter without chop-
ping a piece out of the strand on the high side.
Experiment with a scrap of leather to find out
when the corner is too sharp.
59
Rburtkniwe.. One of the biggest problems in
cutting out whips is a knife that is not sharp
enough for the job. If you cannot shave with the
knife then it is not sharp enough If vou eau
shave with it then it is getting close to sharp.
Have strop handv and continually touch up
the blade.
A strop can be quickly made by gluing a
piece of leather about WO x 100 nun onto a
board the same sise. Rub jeweler’s rouge into
it, or valve grinding paste, or any fine grinding
powder. Autosol. a chrome polish for cars, is
also popular at present
Some people glue down the leather with
the smooth side up. some with the rough side
up. The rough side brings the knilc up sharper
faster, but the smooth side gives a finer edg
Splitting the Strands
there are two schools ol thought about the
need to split the leather in order to get a thin
uniform thickness One of our professional
whipmakers writing in The Australian Whip
maker's Journal said that he never used a spill
ter but always made sure that he bought skins
of the thickness that he wanted mid checked
that they were even all over. On the other hand
there arc other professional whipmakers who
always split (he strands before beginning to
plait
The beginner will usually have the decision
made tor them according to whether they al
rcudv have a splitter or not. Buying a splitter is
not worthwhile unless you plan to do n great
deal of Icathcrwork. In our saddlery we seldom
have to use the splitter because we have access
to a good variety of leather in various thick
ncsses
Skiving
Skiving (rhymes with diving) Is the tech
niquc ol cuiting a bevel nn the edges of the
Icuthcr. By thinning down the edges the strands
nit flatter and ihc finished job looks better
There is another advantage to skiving If you
have been a little uneven In cutting the width ol
the strands, for while skiving the strands tend
to get evened up
Skiving kangaroo leather requires a deli
cate touch with the kaile The professional
starts at one cud of a 1 meter long striind and
pares off an unbroken strip Ihc full length ol
the strand and not much thicker than n needle
Yet this strip is still so strong and even that I
have seen people work a 4 plait string with
these offeuts In order to mnkc a necklace!
big. 5tn. Some piofessiounls skive the top
edge of the strand on one side, and then skive
Ihc opposite edge underneath, while others
skive both sides on the top (the beginner may
find this the easiest wav)
Hany, n leather worker who used to make
whips tor our saddlery business, skived his
sounds on the underside, but this is dilticult foi
the beginner ns it is hinder to take u thin strip
from the rough side ol the leather.
I .cuther Г haltering While Skiving
11 the leather is at nil dry it tuny chatter
while you nre skiving the edges. That is. instead
ol the strnud running smoothly thiough youi
lingers it will keep gripping and releasing. mid
this cun cause uneven work and may lead to nr
cidenlally cutting strands.
Го avoid this, give the sliands soon soil nt
dressing A rub wilh n bin ol ordinals soap will
do if you want to keep the leather pale; othct
wise, any sort ol leather dressing is Inn
Cheap hand lotion from the supcimarkct is
quite good liii this job it is not loo gieasy mid
it smoothes the leather and nets ns n dicssing
Another advantage is that you will not have to
wipe your hands clean constantly, us is th ease
when using hit.
A number ot skin-cine pioihicts cun be
used in this way; after all. it stands to reason
thut anything Intended to tnkc cure ol human
skin will do a good job on leather ot any sort
Whenever my wife tired of a skin cure produ* I
it went into oui workshop io be used as u dress
Ing, and I never found one that did not wink
well.
Skiving needs a very sharp knife Since the
edge of the knife is almost in contact wilh tout
first finger when doing this job. it is a good idea
to wrap и scrap of leather mound il. oi make a
small lube ol Icnlhci to slip on the liilgei when
ever doing ihis work The linger out ol uu old
leather glove Is ideal, or a piece nt rubber tubing
nu
Holes in Leather
Fig. 51b. Kangaroo skins will often have
holes in them, and rather than waste a lot of
leather when cutting out it is a good idea to
learn how to cut around them. Here, for in-
stance, is a sketch I did of an actual skin with a
hole 12 mm long By marking the strands out as
shown it was possible to cut around it and lose
only a small strip of leather
With careful planning there need not be
any great amount of waste even when doing
this, for the piece that is left can often be used
to make a keeper for a whip handle.
Professional leatherworkers get very canny
about using up scraps Short lengths of lace can
often be cut from the outside trimmings of a
skin, and even scraps of lace as short as 300 mm
can be used to form a Spanish ring knot on the
narrow end of a whip handle.
Leather Dressing and
Greasing the Strands
A tighter whip can be made if the strands
are given some form of dressing. In the bush fat
is the usual standby, and we always put a little
kero or eucalyptus oil with it to stop vermin
from chewing the surface of the finished whip
Mutton fat from around the kidneys is said to
be the best, but in practice any good clean fat
will do. For people who do a lot of plaiting,
large quantities can be bought clean and clari-
fied from hotel suppliers.
Ready-made leather dressings are also
good, and there are a number of brands such as
Coachohne, Jay-el, Gee-wy or Dubbin (Dubbin
is good for whips and for all sorts of other
jobs) As I wrote on the previous page, some
whipmakers also use unusual things such as
hand and body lotion, on the theory that any-
thing that ii good for the skin will be good for
leather.
I also make up my own dressings using a va-
r,ety of mixtures. For instance, one can be
made by melting together some beeswax, neats-
foot oil, and fat. Use enough of each to make a
firm, workable paste when it cools. Grated soap
that has been dissolved into a thick jelly in a lit-
tle water will make a good plaiting soap when
mixed with some fat, and this is a good mixture
in cool weather.
Temperature does play a part in it, and the
overseer of a large tannery told me that they
had one soft leather dressing for winter and
another harder one for summer. While revising
this book I have been making
whips, and as the temperature
has been rising each day I have
noted that my normal home-
made leather dressing has
been getting softer and softer.
Not only that, but it has
been soaking into the leather
much faster. As a result, the
leather is darker and stretches
a little more during plaiting, so
that on the last two kangaroo
full-plait handles that I made I ended up with
50 mm more waste on the end than normal.
Fig. 52. Whatever is used the strands will be
slippery, and it may be necessary to wrap them
around the fingers in order to get a good pur-
chase when plaiting.
Pull Tight, Plait Loose
This is an old plaiter’s saying, and it means
that you should take the strand you are going to
work with and pull it firmly into place before
you work it through the other strands into its
next position. Many beginners have trouble un-
derstanding this and will work the strand into
position and then pull it tight before picking up
the next strand. This does not give as tight a
finished job as will be the case if you pull each
strand firm first before you do anything else
with it.
61
STEPS:
PLAITING
THE
OVERLAY
The top plait
(or overlay) is
the slowest and
most complex part
of the job. Here
whipmakers show
their skill and
knowledge, and
the expert whip-
maker may some-
times introduce a
few fancy plaiting
patterns. How-
ever, the thong is
most often worked
in a plain pattern
as this is the work-
ing part of the
whip.
Although it
is tempting to try
fancy patterns, the
beginner is ad-
vised to stick to
the method shown
here, as it is both
neat and fast.
Most of the
fancy work found
on good whips is
done on the han-
dle. I have written
a small book
about the various
patterns called
Whip Handle De-
signs and this also
forms a chapter
in this book.
62
Fig. 53. Place the belly on the
end of the overlay set, leaving
about 100 mm of plain leather for
the keeper. Put plenty of
dressing around the
keeper, as this will be
hard to grease once it is
attached to the handle
Note that the keeper will
now have two layers of
leather (the loop on the
belly is the other), and
this will add life to the
whip.
Using fine thread tie
the long strip of leather
(which will form the
other part of the bolster)
onto the belly, forming it
around so that, if possi-
ble, it touches but does
not overlap the bolster
piece that has already
been tied to the belly.
This may mean trimming
this strip of
leather and
some mess-
ing around,
but the extra
work will be
worth doing
when you get
round finished whip.
It may even help
the finished job if you
give the belly and bol-
ster another good roll-
ing at this stage,
though this may not
have to be done
Many professionals do
not bother tying on
the bolster but just
work everything in as
they go, but then
again, they have been
doing this for many
years and the begin-
ner cannot expect to
be able to easily gain
these skills that take a
long time to develop
Round 8-Plait
Figs. 54-62 (previ-
ous page) This is the
basic 8-plait, which will be used on both the
thong and the handle. It is easy to do and easy
to remember.
Fig. 63. Once you have got the plaiting
started it continues in the same sequence all
the way as shown, with only these two moves to
remember.
(If you have begun with only 4 strands at
the top, as illustrated in figure 39, then you will
begin with the 4-strand plait as illustrated in
the section on beginning the belly. When you
come to the 8 strands you will find it easy to
change to this 8-plait sequence)
Bundles
When plaiting begins you will soon be con-
fronted with a tangle of strands below the work
and around your feet The secret to avoiding
them is not to try to untangle all the strands,
but to simply pull free of the bundle the strand
you are about to use This alone is enough to
stop a tangle developing.
nice
Figs. 64-67. Some plaiters avoid tangles by
wrapping each strand into a bundle as shown.
By pulling downward on the bundles more lace
is freed as required. The bundles can be tied up
as shown, but it is even easier to slip a couple of
rubber bands around each one.
However, I find the bundles (called tamales
in South America) a mixed blessing unless mak-
ing very long whips and usually work without
them, but some plaiters find them useful—it is
a matter of personal choice.
Self-Greasing Lace Holder
Jim McDowell, a member of the Whipmak-
ers Association who liked to work with many
strands of fine lace, used this idea not only to
manage strands but also to grease his lace as he
was working. The greaser was made from a
thliatle,
Rubber
ЬакЛг
pUdx. tube
filLuifh,
J leather
plastic thimble glued to a short
length of plastic tube. A hole
was made in the top of the thim-
ble just large enough for the lace
to pass through.
The lace was bundled up
into a hank, and this was held
with a couple of rubber bands
and the end of the lace was
pushed up through the hole in
the thimble. The tube and thim-
ble were then filled with leather
dressing. This meant that as the
lace was pulled through the hole
it was greased at the same time.
Because the materials were
cheap, Jim made one lace holder
for each of the strands that he
was working with. This is the
same as tying all the strands up
in the tamale style as illustrated
above, but with the added advan-
tage of the grease.
Jim learned this method from his father,
James H. McDowell, on Lakefield station,
north Queensland, in the 1930s. His father used
the tips of wallaby tails for the same purpose,
and would tan them himself,
then pierce a hole through the
end.
Looseness in Plaiting
the Overlay
When I was learning to
plait thongs I had a lot of trou-
ble with getting a tight finished
job. It seemed that no matter how hard I pulled
the strands the finished job never had a good
firm feel about it. It took some time before I re-
alized that pulling hard is only part of the an-
swer.
A round plait is by its very nature a hollow
construction. The nature of any plait from 4
strands to 24 strands is such that the strands
cannot be pulled into a solid unit. There will al-
ways be a hole down the center, and it is this
hole that creates the loose effect later.
The belly and the core inside the whip are
needed to create a solid leather foundation. If
the belly is too small, the final overlay cannot
properly lock together around it. There will be
an air space, and this will create a loose effect.
Wy toe
Senator
beJly ।
Jtze.
ieJtu too
64
The drawings on the previous page show
three cross-sections of a whip. Note that when
the belly is too small for the size of the strands,
the whip is loose, but when the belly is too large
there will be gaps in the plaiting.
For example, you complete a thong and no-
tice that while the top and bottom ends are
firm, part of the middle section is loose, and
when you twist the thong you can see individual
strands standing loose. You wonder why this
has happened because you were pulling the
strands at the same pressure all the way down
the job. The problem here will probably be
found to be that the belly narrowed down too
quickly, or that the outer strands of the overlay
did not narrow down quickly enough at that
point.
Whichever it was, the result will be the
same—a section where the strands of the over-
lay cannot be pulled down tightly around the
bellv. When the strands lock together there is
still air between them and the belly. Here arc
three useful rules:
1 Use plenty of plaiting
soap, leather dressing, or just
plain fat so that the strands
will slide together better.
2 . Make sure that you
have stretched the strands in
your hands before you be-
gin; using strands that still
have a lot of stretch in them
will result in a loose job.
3 Pull each strand in
firmly before working it into
the next sequence. Remem-
ber the old saying “Pull firm
and plait loose.” In other
words, pull the strand firm
before you begin each se-
quence rather than after
4 . Make sure at all times
that the strands are fitting
firmly around whatever is
underneath them, whether it
is the belly, bolster, or filler.
Gaps in the Plaiting
If gaps develop between
the strands as you are plait-
ing it could mean one of
two things:
1 You are not pulling
at the correct angle. Try ad-
justing the position of your
hands and see if this helps
2. Your strands are too narrow for the size
of the belly. Quite often beginners make the
belly much fatter than it needs to be. In this
case you could remove part of the bolster or
belly and see if this helps It is possible to add
in extra overlay strands, but this makes the job
more complicated for the beginner Getting the
belly the right size in the first place is a better
idea.
Platter’s Knot
Figs. 68-71. Interruptions can be a problem
when plaiting, as the strands from one side can
get confused with the other If the sides are tied
up as shown, this problem can be avoided. With
a little practice this simple knot can be tied
with one hand.
A simple pull on the end of the strands will
release the knot ready to continue work. As you
may have forgotten which side you finished on,
you should have a look at the job. One strand
will be nearer the top than the others, and this
is the next one to use.
65
Broken Strands
Sooner or later a strand will break, or you
may find that you are running short on a
number of strands. There are various ways to
add on extra strands, and these are discussed
later (see figures 171-79).
Dropping Strands
It is quite possible to begin plaiting with 8
strands and continue right down to the end of
the thong with the same number of strands.
However, to do this you have to taper the ends
of the strands down very fine, and while profes-
sional whipmakers do taper their strands, they
usually find it more convenient to taper down
to a certain extent and also drop strands as they
go. (There are exceptions to this rule. A whip
that came into my hands for repairs while I was
writing this had 12 strands right down to the
very end, but this had been made by an expert
and the strands were so fine as to be beyond the
skill of a beginner.)
There is no fixed point at which to begin
dropping strands, so I am not giving any meas-
urements for this step. You must just watch
how the strands are fitting as you plait. There is
no need to drop any strands if everything is sit-
ting down nice and flat.
Changing from 8-Plait to 7-Plait
Figs. 72-74. When you see the strands be-
ginning to ride up onto the ones next to them,
you know that you have too many and this is the
time to begin dropping them. At this point a lot
of whipmakers prefer to drop two strands at
once, and jump from 8-plait to 6-plait in one
operation. However, a neater transition will be
achieved if you go from 8 strands to 7 as illus-
trated.
The strand to be dropped is shortened (but
not too much for a start) and tapered down and
then covered by the plaiting. After a few more
passes pull the end carefully to make sure it is
lying properly at the point where it was dropped.
If you pull it too hard it will create a small gap
where it is dropped, so take some care.
After you have plaited another 25 mm or so,
stop and have a look at how the strands are lying.
If there are any small gaps, you have dropped the
strand too early and the only thing to do is to
undo that bit and carry on with the 8-plait for a
little longer. This is why it is a good idea not
to trim off the dropped strand too early.
The dropped strand can be trimmed short if
the plaiting begins to bunch up; otherwise it
can just be left on the belly if it is not forming a
lump
(Method 1) pom plait ta 6 plait
Changing from 7-Plait to 6-Plait
Figs. 75-77 (Method 1). Continue now with
a 7-plait until the strands start bunching up
once again (if they do not start bunching up
then you can continue with the 7-plait for the
rest of the whip). When you are ready you can
change from 7 strands to 6 as shown. This is the
easiest method and the one that most whipmak-
ers use.
Figs. 78-80 (Method 2). This will give a
somewhat neater result but is much slower to
do.
67
Uneven Taper
It is very annoying to spend a lot of time
making a whip and then when it is all finished
discover that there are ugly lumps on it or, even
worse, one section that is narrower than the
rest.
The answer to this is to constantly take a
rest and have a hard critical look at how the job
is going. You also have to be tough enough to
see when it has gone wrong and be prepared to
undo it back to that point.
Lumps
A badly shaped belly may cause lumps. If
that is so, undo the plaiting back beyond the
bad patch, unwrap the belly, and repair the
trouble This can usually be done by a bit of
fine skiving with a very sharp knife and then
firm rolling.
If the lump has been caused by a dropped
strand sitting against the belly you must decide
whether to taper it, thin it down, or trim it right
off.
Finishing Off the Thong
If this is your first whip then you will proba-
bly find it convenient to tie the end of the plait-
ing up tight with a couple of turns of fine black
thread. Professionals do not do this, but it is
helpful for the beginner. Otherwise, when tying
on the fall the plaiting near the end can often
work loose and spoil the whole job. Tying the
finished work tightly will prevent this and also
give you time for a breather and a chance to see
whether the job has gone well.
Check that the loose ends of lace are as
thin as you can conveniently trim them. The
width of the lace is not so important at this
point, but its thickness is. Thick lace will create
a large and ugly knot when you come to attach
the fall, and this will spoil the look of the fin-
ished job.
When you have checked that the plaiting is
firm right down to the end, then you can put on
the fall.
Narrow Sections
It takes some care to repair
narrow sections. Undo the plait-
ing well back from the trouble
spot and then build up the thick-
ness of the belly at that point
with fine thin leather tapered to a
featheredge. Make sure that the
work is solid and that there are
no air pockets.
Round 6-PIait
Fig. 81. This is a simple way
to do the 6-plait. There is an-
other sequence illustrated in fig-
ures 79-80 in which instead of
just going over the lower strand
as shown here you take the work-
ing strand over the top one, un-
der the middle, and over the
bottom one. This makes for a
more even-looking job, but as it
takes longer most whipmakers do
not bother.
Continue the 6-plait until you
have almost run out of strands.
Usually one strand will end up a
little shorter than the rest, so
when this is about 75-100 mm
long you can stop
At this point you should still
be plaiting over the belly but it
should be very fine.
68
STEP 6: THE FALL
The fall of the whip serves a useful pur-
pose, but it is not meant to last the lifetime of
the whip. Many people when cracking a whip
will let it hit the ground, sometimes with con-
siderable force. If there was no fall, then a
plaited section of the whip would be taking this
punishment and in time would get worn down
and finally break.
Once the strands of a whip
start to break it is difficult to
repair them and, as a result,
the whip will tend to get
shorter and become useless.
The fall is there to prevent
this. It fits on the end of the g£
whip where the damage usu-
ally takes place and is re-
placed whenever it has been
worn out or broken. The fall can generally be
replaced without losing any of the length of the
whip.
Fig 82 The fall of the whip is usually of
redhide or greenhidc. If you have neither, then
A flat fall should also have its edges skived
and be partly rounded by applying fat or
leather dressing and rubbing the fall firmly with
a scrap of waste leather.
The falls on kangaroo whips arc usually
better finished and narrower than the robust
falls found on heavier redhide whips, though
made from the same materials.
e 1 Slit
5'-“’
бос /оу
a heavily oiled strip of any good strong leather
can be used. It can be cut to whatever length
you hke, but 500 600 mm is the most common.
However, some people who follow the sport of
whip cracking prefer short falls of around 300
mm.
Some professional whipmakers prefer flat
falls of the type illustrated here, and these can
be 5-6 mm wide at the thickest and cut from
3-4-mm-thick leather.
Other whipmakers prefer to use the thick-
est leather that they can find, cut a strand that
has an almost square section, and then round it
so that the final job is as round as possible. Be-
cause this takes a little longer than the first
method, it is not used as much.
Fig 83. Wrap a scrap of leather around the
fall two or three times and have the top of the
fall attached to a hook. Pull the scrap back-
wards and forwards fast and firmly and it will
not only round the leather but give it a good
finish Use plenty of leather dressing or fat
S3
Fig. 84 One of the secrets to getting a neat,
tight joint between the plaited section and the
fall is to bind the strands around the narrowest
part of the fall as shown. Grease the fall very
well before beginning the binding and it will
pull through easier.
Attaching the Fall
Figs. 85-90. (See next page.) This is a com-
mon method used to fix on the fall, it is easy to
remember and works well It can be used for
any number of strands. A similar method but
with slight variations and using only 4 strands,
is shown on page 22.
There are other methods of attaching the
fall (sec pages 149-53), but this is the most
popular, partly because it does not have to
be undone when it comes time to replace the
fall
Replacing the Fall
To replace the fall: cut the remains of the
old fall off close to cither the top or bottom of
the knot (depending on what is most conven-
ient), apply a good
layer of fat or
leather dressing, and
then use pliers to
pull out the remains
of the old fall
scrap leuxAev
69
ttacfling tficFcdL
If this can be done without interfering with
the knot, then the new, greased, fall can be
slipped up the thong, the point of it fed through
the hole where the old fall had been, and pulled
down tightly into place.
Fig. 91. Professional whipmakers who have
to cut a lot of falls often cut a number of them
in gangs, hang them up on a hook, and cut one
off whenever it is needed.
This sketch is of a gang cut by Peter Clarke,
a maker of fine kangaroo whips.
70
STEP 7: MAKING THE CRACKER
The traditional way of making a cracker is
to pull a few hairs from the mane or tail of your
horse and twist them as shown in the sketches
of a stockman friend.
Fig. 92. In this sketch he was using full-
length tail hairs. A more usual length would be
around 450 mm. The hairs are twisted until
they begin to kink.
Fig. 96. When the strands have been
twisted enough they will start to kink. When
this happens, grasp the middle firmly and twist
it with the fingers while still retaining a little
tension on the thread with the other hand.
You will find that it will only twist in one
way, and once twisted will stay twisted even
when you remove your fingers.
Fig. 93. The middle is grasped and gently
pulled. As this is done it will form into a twisted
cord. A knot is tied in it to stop it from coming
unwound.
We find that nylon twine, classed as 210/18
ply makes excellent crackers, but any fine hard
cord can be used. One whipmaker uses dental
floss and says that it makes good crackers. A lot
of professionals use the synthetic twine that
comes around hay bales. Silk was used in the
old days.
Fig. 94. Wrap some twine around a hook
and tie the ends. The length will be about 400
mm. The number of strands will depend on the
thickness of the material. If using binder twine
you may have to split it into half thickness.
Fig. 95. Bending a small crank from a scrap
of fencing wire can speed up the making of
crackers. This takes only a few seconds. The
strands of twine are then twisted as shown.
(This method cannot be used with horsehair.)
71
Figs. 97-102. This shows a neat way to fin-
ish off the cracker. This is a variation of the
blood knot and is popular with a lot of stock-
men. Other knots can also be used to finish it
off, and a selection of them may be found later
in the book (see pages 146-47).
The last two drawings show how to attach
the cracker to the fall. Although this is a very
simple hitch, it is also a very strong one.
It is at this point that the fall is at its weak-
est, so try to ensure that you have good quality
leather at this end. When the whip has been
completed, give it a few good cracks just to
make sure that everything is holding properly.
It is very annoying for a customer to buy a new
whip and have the cracker fly off at the first
crack.
There is something to be said for using col
ored material for the cracker rather than black,
for it is a little easier to find if it docs come off-
On the subject of matcri il for crackers,
while nylon does make a good cracker it also
wears down to very fine filaments at the end,
and this fine stuff is the very devil to pick чр
burrs and bits of rubbish. Synthetic binder
twine is nowhere near as bad in this respect.
Fig. HH lor (he final roll, use в solid
board nnd loll it firmly until the whip
co..ies up smooth mid round l or a begin
ncr’s whip, this may tnkc Some tin., mid
cftoit, but attention to thin pnrt of th job
will prove to be well worthwhile in th up
pearmicc of the finished whip.
li 101 Some wlnpmakcrs roti tin
whip on the floor; some roll them on th.
bench Л number of them use a pair ot
boards a wide one below nnd narrow
but heavy one on top I'he sketch shown
the two rolling boards ue d by Maurice
lioohnu nd their dl
uh unions, lb picked
up ihe lop one from a
licnp ol lirewood mid it
Is very heavy.
Pig 105. I'hc late
Torn < hill used to roll
his whips with n lent’
lioin n set ol 11mt
firings IL Nnld il was
и good length, and Hie
curve in.irh ihe work
easier.
I’lir sketch shows
Гош lolling a whip
I'he curve in Ihe spring
helped keep his lingers
clear ot the table
I lg. 11)6 II n lol ol
Ini hus been used on
Ihe whip, the tumid
tuny slai I lo slip mid
wltl not loll il piopcily
I'he cure, lot (his Is a
light dusting ol pow
dcred tesiu (used by
roiH'ltild* rs. goiters,
eic, Ю keep ihcii
hands lioni slipping)
an old sock ш which
Ihe sketch Is ol
Maurice Doohmi keeps his resin. I he weave ol
the wool allows n light dusting of icsin Io r.uiic
through so Hie socк docs noi have to be undone
lo get lit. resin. I use a squill, of cheesecloth
with some resin tied up insid. it, nnd a good
linking will release non. h dust tlnuugh lh<
weave ol ih>' undeiiul
5-Part, 4-Bight Turk’s Head
on the Thong
Figs. 107-114. The final touch is a small
Turk’s head at the beginning of the plaiting.
There are a great number of Turk’s heads, and
this one is known as a 5-part, 4-bight. It is a fa-
vorite with whipmakers and is often used to
cover the knob on the end of the handle. (A few
pages on, this knot is shown being tied on the
handle knob, together with an explanation of
the way it is formed.)
About 300 mm of 4.5-mm-wide lace will do
the job, but cut 500 mm to be on the safe side.
This knot is only added for decoration and is a
matter of choice.
Fig. 115. It is also possible to use thinner
lace, say 3 mm wide, and go around twice (or
even three times) following the same path,
once the basic knot has been completed.
You can even make the first knot with one
color of thin lace, then go around the second
time with a length of lace of a different color
and so create quite a decorative effect.
Fig. 116. This is how the finished knot
should look on the end of the thong. A similar
knot can also be put on the handle at the
keeper end.
74
STEP 8: THE HANDLE
(OR STOCK)
FOUNDATION
Stock is the old term for
the handle, but as handle is
more readily understood I
will use that term for this
book
There are two main types
of handle, and the first is the
solid handle that tapers a lit-
tle towards the keeper, but
often only as much as the
natural material has tapered
while growing The strength
of this handle is in the mate-
ria) itself, and it may be made
from native timber or from
cane
Randles of solid timber
(without any steel reinforc-
ing) are usually only plaited
over just far enough to give a
good grip for the hands, and
the rest of the timber or cane
is left exposed. This type of
handle can be used on the
kangaroo thong but is com-
monly found on the redhide
whip, and the making of it is
explained on page 29.
Fig. 117 The handle we
are going to describe here is
the second type, which is a
finely tapered cane handle,
lined with a spring steel core.
The use of the steel allows
the cane to be tapered down
far more than would be possi-
ble with an ordinary piece of
timber, no matter how strong
it was. A steel-lined handle
will usually be tapered down
to 5 mm in diameter at the
narrow end (Cane can be ob-
tained from the makers of
cane furniture.)
To make this type of han
die, the cane is split down the
center and a groove cut into
it A piece of spring steel 400
mm long and of around 5 mm
in diameter is put in place
and then the two halves are
glued together again
HI
tn
Once the glue has dried the handle is
shaped as shown In old saddlers' cata-
logs this was called the foundation. To-
day you can no longer buy shaped
handles so you will have to make your
own unless you have a whipmaker friend
Fig 118. The end of the steel is
grooved as shown in the sketch so as to
give a good grip to the leather overlay
when it is tied on
f/0
Using Hush Timber
Fig. 119. If you cannot make a good
tapered foundation as described above
then you may have to use bush timber.
Try to select timber known for its
strength and one that will not split read
ily. Stockmen have been badly injured by
whip handles that have split and pierced
them when they fell from their horses
Try to find something of around the di
mensions given here.
/Vo/е If using bush timber remember
that all the following leather dimensions
arc for the narrow steel-lined founda
tion, and you will have to allow more ac-
cording to the thickness of the timber
that you are using.
Fig. 120. If your bush timber is not
wide enough nt the cud. it is quite possi
blc to build up the shape with pieces of
leather. Bend and twist the timber nt this
point to test its strength. It is better if it
breaks now than when you have put a lot
of work into it
75
STEP 9: THE OVERLAY FOR THE
HANDLE
Fig. 121. The overlay is the leather plaiting
that goes over the handle. For convenience the
overlay set for the handle may be cut from the
lower part of a kangaroo skin, for this leather,
while good enough to cover the handle, might
not be the best for use in the thong of the whip.
Also, the leather here may be just the right
length for the job, and this helps even up the
skin.
The strands are cut from one back leg to
the other, dipping down where the tail has been
so as not to waste any leather. Before cutting
just check that there are no very thin or
stretchy patches in the skm. A certain amount
of stretch can be tolerated, and in that case the
strand is cut a little wider at the stretchy part,
and when the strand is later pulled it will come
down to the correct width
Fig. 122. An overlay like this is intended for
the tapered and lined foundation illustrated on
the previous page.
When the strands have been cut out it is a
good idea to put them through a splitter to get
them all to an even thickness. However, a per-
son who is only going to make one or two whips
will probably not have a splitter, and so the best
that can be done is to select a skm which has
the best available finish underneath and an
even thickness.
Do not worry about this, because there are
some professionals who do not
use a splitter for this part of the
job but rely on selecting leather
of even thickness.
SkMng the rtrandi. The strands
should be skived on either side in
order to make them lie well when
they are plaited
into position. A
smooth final job is
difficult unless this
is done. However,
like splitting the
leather, it can be a
traumatic sort of
job, and it is very
annoying to sht
through a strand
by accident just
when the job is
nearly completed.
If this does
happen, do not de-
spair, for the loose
strand can be
worked into the job
later. A good wood-
working glue like
Aquadhere, or a
leather glue such as Leather Weld,
can also be used to glue the broken
strand back, taking care to scrajic or
taper a good surface on both strands
for the glue to grip on. See figure*
171-86 for more on this.
k- £-4
Tying the Set to the Stock
Fig. 123. Notice in the sketch
where the keeper tapers off to a
point. The exact shape of this bit
will depend on the size of your
handle foundation. Wrap it
around the handle and make sure
that it is not too bulky. If it is,
then trim it a bit more. The aim is
to have strength in the leather at
this point but not bulk, so it is a
fine balancing act.
Skive this pointed end of the
set down as fine as possible with a
sharp knife to a featheredge, as it
has to sit flat and smoothly on the
end of the foundation. If you do
not do this property the narrow
end of the handle will have lumps
in it when it is tied on and plaited
over.
76
LinJutM
№4
Long Whipping
Fig. 124. Bind the
point on with fine strong
twine. It needs to be fine
so that it will not add too
much bulk and it needs to
be strong so that it can
never come loose. A long
whipping can be used for
this job.
Fig. 125. This shows
the set bound to the
handle foundation.
The leather will be
folded over to form
the keeper.
Fig. 126. This is
a sketch of north
Queenslander Lind-
say Whiteman be-
ginning to cut out a
set, with the kanga-
roo skin on his
knee. He is holding
a strand in one
hand and using his
thumbnail as a
gauge for his knife.
Figs. 127-32. Once the
end has been tied on, fold
the leather down so that
the strands are against the
top of the handle; then
plaiting can commence as
shown This sequence con-
tinues for the full length of
the handle.
Should you wish to try
other patterns a number of
them are illustrated in
chapter 5, but for a first
whip the plain plait will be
the best.
Fig. 132. When the handle
has been plaited over, tie the
end very firmly and then trim
off the surplus. Try to do this
neatly so that there are no
gaps or bumps
Fig. 133. Both edges of
the keeper can be folded in af-
ter being given a good coating
of leather dressing. This looks
better than leaving the keeper
as a single flat piece of
leather, and it will also last
longer as the leather is now
doubled.
78
Fig 134. Holding the handle while plaiting
can be a bit of a problem Page» 140-42 show
the plans for a large ciamp to do this job, but
this is far too elaborate for the beginner who
just wants to make a couple of whips.
Here is an idea for a simple clamp that will
do the job and which can be made quickly. First
take two scraps of timber and cut a groove in
each as shown. This can be qujte rough.
Fig 135. Put a grooved piece on each side
of the handle, place this on a wedge-shaped piece
of timber, clamp the whole lot to the corner of
a table, and you have a quick solution that will
allow you both hands free to do the plaiting
STEP 10: THE KNOB
ON THE HANDLE
The Turk’s head that goes on the knob on
the handle is a great mystery and source of
worry to many beginners. However, if you take
it quietly and learn just one step at a time you
should be able to complete this part of the job
without trouble.
Professional whipmakers today approach
this job in two different ways. Some of them
close the Turk’s head up completely over the
end of the knob, while others leave a gap so
that the top of the knob is showing.
It is easier if the knot is formed with an
opening at the top, for the knot can then usu-
ally be worked neatly and without any gaps. If
the knot is to be closed at the top, there и less
room for error, for it has to cover the knob with-
out any gaps, but also without bunching up too
much This can be a problem for a beginner.
If you are going to leave an opening, you
will need to follow this next step, but even if
you are not going to leave one it is not a bad
idea to do this, because it does make a nice
smooth surface on which to build the knot.
Fig. 136 Take a scrap of kanga-
roo and cut it into a cross; you will
soon work out the size.
Fig. 137. Smooth and round off
the end of the handle so that there
are no bumps on it. This is an im-
portant step no matter what sort of
a handle knob yi
Wrap the leather
cross over the end
of the handle and
tie it firmly in
place. Rub it on a
smooth tabletop,
or with a smooth
piece of bone, so
that the shape is
as good as it can
be made.
Fig. 138. Place
the knob over the edge of the
table, or your lower rolling
board, and give all the plaited
surfaces a good firm roll. Also
roll the knob section, but with
some care so as not to loosen the new cover.
79
J.
10 C
T
k-
zso
Shaping the Knob
Fig. 139. Here is a chance to use up some
scrap of soft, flexible leather. Cut a strip as
shown; the measurements are only a rough
guide, for it will depend
upon the thickness and the
stretch in the leather, as
well as the size and shape
of the knob that you are
aiming for.
Fig. 140. Skive both
ends of this strip so that it
will lie down without form-
ing a bump. Tack one end
and then pull it around the
knob tight and tack it in
two or three places. Do not
put tacks where you are
later going to trim the
leather—it is hard enough
to keep knives sharp with-
out having to cut tacks.
Because every job is
different, you must not go
by my measurements but
instead watch the job and
make sure that the leather
builds up to a knob of the
diameter that you want,
and one that is of even
thickness all the way round.
If the leather scrap has
any thickness about it you
must take care where you
finish it up so that the layer
will not be thicker at this
point.
Fig. 141. Now take a
sharp knife and carefully
trim the edges of the
leather to make a smooth
knob. You must get this
part nice and even; other-
wise the Turk’s head will
not be a good shape.
The Shape of
the Knob
Three basic
shapes are found
in knobs. The
upper one in
the sketch is a
flattened knob,
and this is often found on whips that
use the faster 3-part, 4-bight Turk’s
head. On this shape of knob the knot
is always closed over at the top.
The second shape is a ball, quite
a common shape.
The lower one is an oval, and
this is the shape most often seen
when the knot has been formed so as
not to close at the top.
5-Part, 4-Bight
Turk’s Head
(See next page.)
There are dozens of
Turk’s heads and they
are all described by
parts and bights. Bights
are the loops that you
can count around the
top of the knot, and
parts are the number of
strands if you were to
cut across the knot with
a knife and then count
the ends. So this knot
has 5 strands across
and 4 loops or bends
around the top (and
bottom).
It is a good knot for this type of whip—a lit-
tle more elaborate than what would be found
on a cheap whip but not too difficult for the be-
ginner. Cheap whips commonly have a 3-part,
4-bight Turk’s head—the same number of
bights as this one but with less parts. As a result
it is faster to do, but does not cover as much
area. The 3-part, 4-bight knot will be found on
page 36.
For the knot we are using here you will usu-
ally need a little over a meter of 4.5-mm-wide
lace, but the amount will vary from knob to
knob. To avoid waste I do not cut the lace off
the roll until after the knot has been tied. When
the knot is complete I tighten it and then trim <
off. When firmly tightened the ends will never
come loose.
When you do
the Turk’s head it
is a good idea to
try to break it
down into three
steps, because it is
easier to remem-
ber it in this way
rather than trying
to learn the whole
sequence by rote.
The steps con-
sist of first form-
ing a very simple
Turk’s head, mak-
ing tracks, and fi-
nally splitting the
tracks, creating a
larger and more
complex knot than
the first one. This
process can be re-
peated again to cre-
ate an even larger
and more complex
Turk’s head, but
this will not be
necessary for this
knob.
Figs. 142-44,
Forming the first
Turk’s head. This
is a complete knot
in itself, but too
simple to use for a
knob. When you
have done it, you
can let go of the
lace and have a
good look at it.
You will notice that all the lace follows an
under-over sequence.
Figs. 145-46, Making tracks (also called
making pairs). This means that you are follow-
ing the path that the lace took at the start of
the job, going up alongside it on the right side
and then crossing over and coming down on the
other side.
Figs. 147-148, Splitting the tracks The lac
now joes between the tracks that ha ju t
made and pushes them apart to create an
»r sequence all over the knot Гак
• he top of the knot to follow the sc-
-5'Parb, PJPjTtb Turks HeasC
Fig. 149. When the knot is completed you
should carefully arrange it so that all the
strands are evenly placed around the knob, and
also have the knot firm enough so that it is sit-
ting properly and will not slip off.
Fig. 150. Now you can decide whether you
want to go around the second time on the left
or the right of the original strand. There is no
fixed rule about this despite what some whip-
makers say; you can make up your own mind.
Go around on the right if you want to close the
hole in the middle, on the left if you want to
leave it open.
Gaps in the Turk’s Head
Fig. 151. It may be when you have gone
around the Turk’s head twice there is not
enough room to go around for a third time but
there are still narrow gaps. The way to get
around this problem is to cut a narrow strand
and work this around as the third one. If you
choose a contrasting color of leather, it will
look very fine and appear as if that is what you
had intended to do all the time.
(In this example the smooth leather put
over the knob before the Turk’s head is show-
ing at the top of the knob, while in the next one
the knot has been closed at the top.)
Fig. 152. Going around three times. If there
is enough space you can go around the Turk’s
head three times, and this looks good. How-
ever, it is best to limit it to three. If there are
still gaps then it means that you have made the
knob too large, or are using lace that is too nar-
row. My book Turk’s-heads will give you some
knots that will cover a larger area, but for the
beginner it will probably be easier to reduce the
size of the knob or get wider lace.
Finishing the Knob
When the covering of the knob has been
completed it should be rolled to make it
smooth. Some of this can be done in the same
way that the handle was rolled, but a piece of
bone or the back of a large spoon will help rub
down smooth those parts that cannot be rolled
on the board.
I5|
152
155
Turk’s Head on Keeper End
Fig. 153. The same Turk’s head used on the
end of the thong (p. 74) can now be put on the
end of the handle near the keeper. This is not
essential but it makes for a neat finish.
Once this has been done the handle should
be given a good coating of shellac or a clear
eather fmish. Not only does this give a good-
lookmg surface, but more importantly it acts to
Uve s^n 8 tOgethCr Under a Protec-
Shellac is the traditional coating for a whip.
It not only protects the surface but also acts to
lock all the strands together and thus prevent
any of the ends of the knots working loose
It is bought in flake form and soaked in
methylated spirits, where in time it will dissolve
into a useable liquid. It can be put on with cot-
ton wool. Several coats may be needed.
famish tynyfywt
bated on a- y-pari, Turk's AeatT-
Spanish Ring Knot
If you would like to try something different
you could put a Spanish ring knot on the nar-
row end of the handle instead of the Turk’s
head. It may take a little longer to get it right
the first time, but once you understand how it is
done it becomes simple.
Figs. 154-59. The Spanish ring knot can be
built up from a number of Turk’s heads. It can
easily be built on a 3-part, 5-bight Turk’s head
(as shown on page 10), while in these drawings
it is built on a 3-part, 4-bight Turk’s head.
It is the same 3-part, 4-bight Turk’s head
that is popular for basic whips because it is
quick and easy to tie (though the beginner may
think otherwise).
Figs. 160-66. Once the Turk’s head is tied
the next step is the interweave, and this is
where you must take care because if the strands
are taken under in the wrong place just once
then the even pattern will not work out. If you
do have any problems be prepared to undo it as
far back as figure 159 and have another try.
83
Fig. 167. By now the handle
should look like the sketch on the
left. The Spanish ring knot can be
seen at the narrow end, just below
the keeper.
A More Elaborate Handle
Fig. 168. Once you have made
a couple of whips with a plain
handle you can begin experiment-
ing with some patterns. For in-
stance, the handle can be
commenced with the 6-plait
shown in figure 81, page 68. Then,
after a third has been done it is
changed to the 6-plait shown in
figures 79-80, page 67.
After a section of this has
been completed the strands
(which have been previously split
into two up to this point) change
to a 12-plait (p. 31). This follows
the same system as the 8-plait pre-
viously described, each strand go-
ing around the back and coming
out halfway between the strands
on the other side.
Two-Tone Work
Interesting effects can also be
obtained by using leather stain to
change the color of some of the
strands. Traditionally only two
colors are ever found in a
whip—one dark and one light.
The problem with leather
stains is that many of them fade,
especially with use, and some-
times the kangaroo leather will
have been given a finish in the
tannery that is hard to stain.
Two-tone work needs several
coats of shellac to seal it in.
Fitting the Handle and
Thong Together
Care of the Whip
Even as I write this the bugs
have been chewing the corners of
the half dozen whips that I had to
make while preparing the
sketches for this book. They had
all been given a good coating of
leather dressing, as mentioned
earlier, but it seems I did not put
enough kero in the mixture, so I
have had to add more.
I cannot give any proportions,
as I tend to make the dressing up
by eye and it differs each time, but
perhaps two teaspoons of kero to
a liter of the mixture would be
better than the one teaspoon that
I probably put in Or perhaps a bit
more eucalyptus or teatree oil
would help.
So make sure that your
leather dressing has something in
it that will deter vermin (most of
the leather dressings that you buy
are all right in this respect).
After the dressing has been
allowed to soak in, or has been
rubbed in, leave the whip for a
day or two to make sure that the
surface is no longer greasy. Then
give the whole whip a number of
coats of shellac, or use one of the
clear leather finishes which can be
bought at a saddler’s or leather
shop
According to the amount of
use the whip has it should be
given a good rub with leather
dressing every few months. If this
is done it will last fifty years with-
out any trouble.
Fig. 169. The final step is to
fit the handle and thong together
by this simple action. Work them
together until they are tightly
locked.
84
85
A FEW TIPS
Broken Strands
Sooner or later a strand will break, and al-
though this is very annoying it is usually possi-
ble to repair it without weakening the job.
Whenever using a repaired strand try to posi-
tion it so that the joint is covered by other
strands in the plaiting.
Fig. 171. This is the neatest way, but it has
to be done properly. Wipe all the grease off the
strand before skiving in order to get a clean
surface for the glue. Both ends of the lace are
skived back for as long as possible—25 mm is
good. The ends are then glued together with
Kwik Grip, Leather Weld, Aquadhere, Contact
Cement, or some other similar glue. When
done properly the joint will be almost undetect
able.
Bought lace will often have strands joined
like this, and quite often they are not noticed
unless you are trying to get the lace through
small holes where the extra bulk will make it-
self felt.
171
Joining without Glue
Fig. 172. It is possible to join the strands
without gluing them if you can ensure that an
overlapping strand in the plait will hide the
joint. This first method is the neatest. Cut a
small slit in the short end of the lace and two
angled cuts in the new piece.
Fig. 173. Push the new piece through the
old one and then pull them together.
Fig. 174. This shows the back view The an-
gled cuts will act like arrows and hold the
pieces together. The idea of having a 20-mm
overlap on the pieces is so that when the lace is
plaited in, the weakness of the lace at this point
will be minimized.
Fig. 175. This is what the completed joint
will look like from the front.
Another Method
Figs 176-178. This is an easier method of
making a joint without glue by simply putting a
slit in each end and joining them as shown.
Fig. 179. This is how the finished joint
looks. This type of joint is easy to remember,
and is stronger than the previous one, but does
not look as neat
17V £>ac.K victO
'7?
Addin}' in a Strand
It sometimes happens that a strand will
break and you do not wish to join it again be-
cause it will make it too short. Or it may be that
you wish to add one or more extra strands be-
cause you are developing gaps in your plaiting.
Even the professionals break strands from time
to time, but they always make sure that the new
strand cannot be detected and that the job is
not weakened in any way.
Fig. 180 There are various ways to add on
extra strands and this first method is the fast-
est. The new strand is simply laid over the bro-
ken end and plaiting continues. Because the
new strand is only held in place by the pressure
of the other strands, this method will only work
if you can plait tight and firm.
Fig. 181 After a few strands have been
worked tnto place, the new strand should be
quite firm and the end can be trimmed off
Fig. 182. This is probably a better method
of adding in a new strand, for I have seen more
than one professional use it. The new strand is
simply laid on the job and plaited over. Con-
tinue plaiting until you are sure that it is firmly
in position.
Fig. 183 Pull down carefully until the end
just goes out of sight. Drop the short end, pick
up the new strand, and continue plaiting.
Fig. 184. It is also possible to tic new
strands to the belly. Although this is the strong-
est method (because the strand cannot come
loose), it is not used much because it takes
longer than the previous methods, and also be-
cause the twine can cause a lump in the fin-
ished whip unless care is taken.
Fig. 185. Continue plaiting until the new
strand feels quite firmly in place. Then drop the
short end and pick up the new strand.
Adding in Two Strands
Fig. 186. It is simple to add pairs of strands
by doubling a long strand over and tying it on to
the belly. Then plait a little more so that the tie
will not show.
Portable Plaiting Rack
Fig. 189 A portable rack allows you to
work wherever you want, and the sketch shows
Peter Clarke at one of the Whipmakers Asso-
ciation gatherings at Jondaryan Woolshed on
the Darling Downs of Queensland. The rack
can be clamped to anything that will hold it and
has a stout hook to hold work and a clamp to
hold anything that needs to be gripped, as well
as a shelf for tools The height of the hook can
also be adjusted.
Only a few whipmakers bother to make
anything as elaborate as this, but most of them
will have a few ideas to help make the work eas-
ier.
I have only been able to describe the bare
bones of making a whip in this book, and there
are many more tricks and techniques to help
with every aspect of the craft. Whenever you
have the chance, try to watch an expert at work
and you will find your own work will improve as
a result.
The best place to learn is at a get-together
of the Australian Plaiters and Whipmakers As-
sociation, but other organizations put on
classes from time to time, often with good in-
structors, and although books are good to learn
from, there is nothing like watching a skilled
pair of hands
Chapter 3
How to Make a Bullwhip
MAKING A BULLWHIP
The bullwhip is common in America but
not popular in Australia for a number of rea-
sons, one being that it does not crack as easily
as an Australian stockwhip Also, it has no his-
tory in our cattle industry. However, some
people do want to make them, and so here are
instructions for a basic one.
The Handle
There are many ways of making the handle,
but this one is simple and strong. This is a fixed
handle but some bullwhips have swivel handles,
allowing the thong to rotate in the handle.
Sometimes the handle is left as bare timber, but
in this example the handle is covered.
Because the handle does not come under
any stress, due to its short length, almost any
timber can be used for the job
Fig. 1. Select a piece about 230
mm long and 20-23 mm in diame-
ter. The actual diameter will de-
pend on the thickness of the leather
that you use to plait the overlay
over the handle If you had leather
3 mm thick and no way to split it
any thinner, then the handle timber
would only need to be about 15 mm
in diameter, while a whip covered
in kangaroo leather might have a
handle 23 mm in diameter
Fig. 2. Drill a hole into the
end around 8 mm in diameter
and 50 mm deep.
Fig. 3. Starting halfway along
the handle, taper it down to as
thin as possible around the hole.
The Belly
The belly can be made from
greenhide, kangaroo, or any suit-
able leather, but for the one de-
scribed here redhide was used, so
the measurements are those that
would suit this type of leather.
Cut 4 strands 7 mm wide and 1,250 mm
long Taper and thin them down as much as
possible towards the end
Round 4-Plait
Figs. 4-9. Tie the four strands together, all fac-
ing inwards, and then begin the plaiting as shown
Use plenty of leather dressing on the
strands This will not only allow you to plait a
tighter job but the finished whip will last longer
if the inside has plenty of dressing on it
You can buy many brands of leather dress-
ing from leather shops, or make your own. The
most simple is just clean fat with a little kero in
it. (The kero is to make it unattractive to ver-
min—all sorts of things will chew a whip that
has been dressed with only fat.)
When you have plaited about 75 mm. roll
the plaited section as smooth as possible an
see whether it will fit into the hole. If it does
not, you may have to undo your work and thin
down the leather a little.
If it is not large enough then you mav have
to plait the belly around a single strand о
leather (known as a core) in order to get * e
right diameter.
90
Fig. 10. When the strands have
almost been used up, put some
fine thread around the end to stop
it from coming undone.
Get two boards and roll the
belly between them. If you are go-
ing to learn to make whips of any
sort, you will have to get used to
rolling the whip whenever it has
been plaited.
The boards can be of any size.
A scrap 500 x 200 x 20 mm or
larger will do for the bottom board
while the top one can be 600 x 100
x 75 mm or larger. Use plenty of
pressure and you will be surprised
at how it improves the look of the
job.
If the plaited work docs not
want to roll, and this will happen
sometimes if you have been using a
lot of leather dressing, then shake
some powdered resin on it.
Fig. 11. Put some glue into the
hole in the handle and push in the
belly. If there are any gaps put in
some slivers of wood, such as
matchsticks, to make it all firm.
It is important that the belly is
well fixed into the hole, because
this is the spot that takes a lot of
strain when the whip is cracked.
Also, you will probably find some
idiot who has been watching too
many films and thinks that he can
wrap the whip around something and swing
from it. No whip, unless it has been specially
built for this sort of stunt work, can take that
sort of treatment
If you think the whip is going to be pulled
around, put a few screws through the handle
and the leather belly and file off the points
when they come through the handle on the
other side. These combined with the glue
should make a handle that will not come loose
from the belly.
Fig. 12. The taper must now be made as
smooth as possible and this may take a little
time. If this is not done properly the finished
whip will look uneven and very poor, so it is
worth doing this job well.
Wrap a small piece of thin leather around
the joint and bind it on tightly with thin strong
twine.
Next bind on a slightly larger piece, and
then another. Depending on the thickness of
the leather you may need only two pieces, or
you may need four; you will have to be the
judge of what is needed for each whip.
Taper the edges of the leather so that there
is no step where it lies on the job
Fig. 13 The final piece of leather can go
down as far as 700 mm. Bind it on tightly, as
this all helps keep the belly in place.
Give the job a good rolling and then have a
long look at it and also feel it If there are any
hollows or soft spots you will have to build
them up with scraps of leather and twine
Keep doing this and rolling the job until the
taper is as smooth as it can be.
91
5>о
Handle Loop
Fig. 14. Take 4 strands of leather about 500
nun long and 5 mm wide, or cut 4 strands from
one piece leaving the end joined as shown
This can be the same redhide as the rest of
the job, but thinned down, or it can be of kan-
garoo.
Fig. 15. Using the same 4-plait as shown
earlier, plait the strands and bind up the end.
Fig 16. Tack the loop onto the end of the
handle and also bind it together with strong
twine as shown. Do this well, as the loop will
take a lot of knocking about.
Plaiting the Overlay
The overlay can be of any length that you
like. Stockwhips are measured only along the
thong and the length of the handle is not taken
into account. Bullwhips are measured by their
overall length because handle and thong are in
one piece.
Fig. 17. Note that the strands taper from 7
mm wide to 5 mm If you have a problem with
freehand cutting you could use one of the
strand cutters available, adjusting it as you cut
from 5 mm to 6 mm and then 7 mm.
As mentioned earlier, kangaroo can be
used for the overlay, but for the whip described
here redhide was used. Having decided on the
length, mark it off as shown and cut it out.
A problem arises here if the redhide is too
thick. This may be all right at the thick end of
the whip, but it can produce a lumpy effect
when you get to the thin end
The leatherworker who does a lot of this
sort of work has a leather splitter, and this is
used for thinning down the strands towards the
narrow end. The beginner will not have this
sort of tool and will have to improvise
Some people have even used wood planes,
pulling each strand through them by hand in or-
der to shave off some of the leather
Or you will just have to use
a lot of patience and a very
sharp knife. Thin the leather
down only on the rough side. If
you slit a strand right through,
it is possible to glue it together
again, but of course this will
weaken the job, so it is better
to take care.
Precut Lace
With this sort of whip it is
possible to use precut lace aid
in leather shops. This will not
taper from 7 mm to 5mm, but
with care and some thought it
is possible to work around this
problem.
Bind or tack the 12 strands
on very tightly. This is easier if
you have cut all the strands from
one piece of leather and they are
still joined at the top. Otherwise,
tack the strands around the han-
dle one at a time.
Fig. 18. In order to keep
the top of the handle nice and
round you may need to cut
some pieces out of the overlay
to fit around where the loop is
tacked on.
Or you may prefer to thin
down the wood where the han-
dle loop is fitted and keep the
top of the overlay straight. This
allows you to put tacks through
both the overlay and the handle
ends, making a stronger job.
П
^ound izrplaii: (им
12-Plait, Under 2
Sequence
Figs. 19-30 (previous
page) Starting at the
joint, pick up 6 strands in
each hand and begin plait-
ing as shown. If you are
working with loose strands
of lace, place them so that
the shortest 2 are together
in the center, then the
next longest, and so on.
It is important that
you have the short strands
equally divided into each
side
This under 2, over 2,
under 2 sequence is slower
to do than the next one,
but it looks good for the
handle section.
12-Plait, Under 3
Sequence
Figs. 31-32. 220 mm from the start of the
handle you can switch to this faster version of
12-plait. The spot where this change takes
place will later be covered with a Turk’s head.
The change is simple: instead of going un-
der 2, over 2, under 2, you change to under 3,
over 3. This method of bringing the working
strand halfway between the strands on the op-
posite side is known as a cowtail or whipmak-
er’s plait, and the same method is
used for 8-plait whips.
Continue plaiting until the
strands start to bunch up. This will
be about 800 mm from the end of the
handle and means that you now have
to drop the two shortest strands.
The exact distance at which this
happens will vary from whip to whip.
Remember that gaps in the work
usually mean that the strands are too
narrow or the belly is too thick. Strands over-
lapping and bunching up mean the opposite.
Changing from 12-Plait to 10-Plait
Figs 33-35 Drop the shortest strands when
they get to the lowest position. For a first whip
it is a good idea to use some thread to tie them
in place around the belly so that they will be
out of the way.
Caution. If the strands that you drop are
bulky, the whip will change from being round to
being oval, and this is not a good thing.
In order to avoid this, thin the strands
down as much as possible, and if they are also
wide, slit them into two as well
As you become more experienced you will
find that you get a better taper by first drop-
ping one strand only, then dropping the second
one after a few more passes.
Round 10-Plait
Figs. 36-38. There are three common ways
to do a 10-plait; the one shown here goes under
3, over 2, on either side.
94
The second version ends
up looking the same as the
first, and goes under 2, over 3,
on either side. In either ver-
sion when you turn the whip
around, the strands are long,
long, short, short.
The third method goes
under 2 on the left but under
3 on the right. The finished
job shows a long, short, long,
short, sequence as you turn
the whip around.
Any of the three methods
will do the job, but the first is
easier to remember and looks
just as good, although it could
be argued that the third gives
a more symmetrical result.
After you have done a
short amount, check that
there are no gaps or lumps at
the point where you dropped
the strands. If there arc any,
just undo that section and
have another go.
Changing from 10-Plait to
8-Plait
Figs. 39-41. When the
work begins to bunch up, drop
two strands and change to 8-
plait. As you gain in experi-
ence you will find you get a
better taper by dropping one
strand only. Then, after a few
more passes, drop the second
one.
Changing from 8-Plait
to 6-Plait
Figs. 42-44. When the
work begins to bunch up, drop
two strands and change to 6-
plait. Again, as you gain in ex-
perience you will find you get a better taper by
dropping one strand only. Then, after a few
more passes, drop the second one.
Continue with the 6-plait until there is only
80-100 mm of lace left.
Attaching the Fall
The fall is attached as has been explained
fot a stockwhip.
С/шлрпд в-plait £o 6 plait
Rolling the Whip
Give the whip a good hard rolling between
two boards to get it smooth and round
The Knob
Form a knob on the whip as explained in
the section on making a stockwhip and cover
this with a Turk's head. A 5-part, 4-bight Turk’s
head looks good and is illustrated on page 81.
tachlng the Cracker
been explained in the sec-
Turk’s Head on the
Handle
To finish off the job,
put a Turk’s head on the
handle at the point where
the solid section of the
handle ends and he flexi-
ble section begins. This
helps strengthen this sec-
tion, covers the place
where the plaiting pattern
changed and, most impor-
tantly, gives a finished
look to the whip.
5-Part, 4-Bight
Turk’s Head
Figs. 45-53. This is a
good knot to use for the
above job. When you get to
figure 52 the knot is com-
plete, and from then on you
“follow the leader” two or
three times as desired.
Pineapple Knot
Figs. 54-62. Instead of
doubling up the Turk’s
head just described, you
might like to do a decora-
tive Pineapple in erweave.
In that case you take the
previous knot only as far
as figure 52 and then begin
the interweave.
This can be done with
one single length of lace
for the whole knot, or you
can tie the Turk’s head
with a strand of one color
and then do the inter-
weave with another strand
of a different color. This
can look very striking.
(3
Fig- 63. The com-
pleted pineapple knot on
the handle.
When the whip is completed, give it a coat
of shellac, or clear leather finish, or even just a
good coating of leather dressing.
96
Chapter 4
How to Make a Snake Whip
A snake whip is rather like a bullwhip, except that the handle is also flexible. It is usually also a
lighter whip (though there have been some quite long and heavy ones). Its main advantage is that it
can be rolled up and slipped into a large pocket out of the way when not needed. Because of its
shape, it is also a favorite for playing tricks on new chums of nervous disposition, who are forever
being scared out of their wits by someone throwing a snake whip beside them and shoutine
“Snake'" 8'
David Morgan, in his book Whips and Whipmaking, describes long snake whips heavily loaded
with lead at the handle end, which were carried hung around the neck and used by farmers driving
*®aeta of horses in the wheat fields.
METHOD 1:
LEAD-LOADED
Lead-loading can
also be used for stock-
whips. David Morgan,
in Whips and Whip-____________________________
making, page 3, de- *"
scribes large snake
whips loaded with lead
for “three to four feet at the butt end." How-
ever, the whip described here is only a small one
and is loaded for only a little more than a foot
Fig. 1. The foundation of the handle can be
of kangaroo skin or heavy canvas. It can be 60
mm wide at the end or 70 mm as shown here.
The length can also be increased to 600 mm (in
fact all the measurements can be changed as
desired).
Fig. 2. The core of the whip is of good-
quality leather, 1,500 x 4 x 4 mm, or it can be
made as long as desired.
Fig 3. Use a sharp knife to round off the
edges of the leather. It should be made as
round as possible.
Fig. 4. If you do not have any 4-mm leather,
thinner leather will have to be used. Soak it in
water and then twist it like this.
Fig. 5. Give it a firm rolling under a board
until you have a uniformly round length of
leather. If it shows no signs of unwinding, you
can go on with the whipmaking. Otherwise, it
must be tied down and left until it has dried.
Fig. 6. The triangular piece of canvas or
hide is now sewn into a tube.
Fig. 7. The core is placed into the small end
of the tube and held firm with at least one
stitch.
Fig. 8. The job should now look like this.
Fig. 9 The handle is filled with lead shot.
Some gun shops stock this
Fig. 10. Sew the end closed, leaving about 25
mm to spare. Punch two holes above the sewing
if you are going to put a loop on the handle
Fig. 11. If you do not wish to put a loop on
the handle, simply fold over the extra material
and tie it.
98
Fig. 12. If the tube is of canvas, it is turned
inside out as soon as it is made to hide the
seam. If it is of leather, this may be too diffi-
cult, so the seam should now be spread out and
smoothed flat.
Handle Loop
Fig 13. A loop allows the whip to be hung
from the wrist and is also handy for hanging up
the whip when doing the plaiting.
Take a strip of leather 60 x 3 x 3mm and
roll it under a board to make it round. Tie 4
strands of 4.5-mtn
lace to it and begin a
4-plait. This is de-
scribed elsewhere in
this book.
Put the ends of
the plaited loop
through the holes in
the handle and tie
them together very
firmly.
Fig 14 Fold
over the end and
also tie this down
firmly. The loop gets quite a lot of pulling, so it
must be made quite secure.
Fig 15 Now comes the belly of the whip.
This is an extra plaited section that gives the
whip its shape. This can be cut from 2- or 3-mm
cowhide, or whatever leather is available. One
end of the leather is cut so that it just fits neatly
around the lead-filled handle. The remaining
meter is cut into 4 strands, each 4-mm wide.
Fig. 16. Use fine thread to tie the belly to
the handle. It should completely cover it with
no overlap.
Fig. 17 The belly is plaited around the
core This is the same 4 plait that was used on
the loop
Fig. 18. Plaiting continues in this way.
When completed, the ends can be tied down
with thread.
Fig 19 Use a board and give the belly a
good hard rolling to get it as smooth as possi-
ble It may be necessary to wet the leather in
order to get a good finish. If this is done, also
give it a good oiling before going any further.
Fig 20 The handle and the belly are now
covered with a final layer of plaiting This is cut
from a kangaroo hide.
(It is also possible to do this using ready-cut
lace if a skin is not available, but the problem
then is that you may have to start with as much
as a 16-plait in order to cover the handle prop-
erly By hand cutting the lace you can taper it so
as to only have to begin with an 8-plait.)
Begin by cutting 4 narrow strips, then in-
crease it to 6 and finally 8, widening the strands
as cutting continues. A very sharp knife and a
steady hand are needed
99
1
v>
o-S
big. 21 This IS how I hl
strands should look when
straightened out. The measure
inents arc only a guide. Inn you
will lose roughly u thitd Ш the
plaiting.
The strands are tied onio
the handle and pinning begins
Tor the 8 plait the top stiniid is
brought around the back, in be
tween the opposite 4, and buck
to its own side. The upper
strand on the opposite side is
then brought nround in th*
same way. and so on. (I'he 8
phi it is illustrated on page 62).
The 8-pluit continues until
the shorter lengths ot luce are
nearly used up, or until the
plaiting becomes too bunched
up
When this happens, you
change to а б -plnit. illustrated
earlier in the book (p 68) I'he
6 phut continues until you
again come lo two short cuds
Now ihe plaiting changes to a
4 plait (p. 19).
Plaiting contiii
ues in this wny, nnd
the 4-strund phut
ing goes to ihe end
of the whip The
I
lull and cracker arc
then fitted to the
whip (these have
been illustrated
curlier).
The whip Is
now complete, ex
cept lor the knob
on the handle
Tirst the toiindu
lion of the knob is
built up The niak
mg ol the knob is
described in chap
ters 1 and 2 of Hits
book.
However, tacks cun
not be used to fix ihe
foundation of the knob in
the snake whip so, a* #
precaution, n is not «
idea to apply some glue to
ihe handle befoie you hr
giti building it up
Tig. 22. Hie shape can
be formed with a snip nt
leal her ns described cm
liei, ol you can wind on
string or thtend to тике
Ihe shape.
Л couple ot studies
right iliiough the whole
lop ol the whip will help
keep the knob in place il
you do not wish to use
gills'.
Tig. 23 A link's head
is worked over Ihe Inun-
dation lither knot de
scubed (u the lust two
chnpteis enn be used
Tig. 24 1 his is how
il>< finished job should
look
Snake wftip
METHOD 2
Whip as a Weapon
When I first described the snake whip in
one of my small leather books, I knew it only as
a light and fairly useless item, good enough for
encouraging an old cow through a gate but lit-
tle more But since then I have learned that the
snake whip once had a darker side to it.
When I was a kid many older men, such as
our neighbor George Allan, had about the
house an item known as a “life preserver,”
which they would slip into their pocket when
going into strange territory, such as a trip to the
big city.
The life preserver, known in criminal cir-
cles as a cosh (or blackjack in America), was a
leather instrument 200-300 mm long and con-
sisted of a flexible handle with a ball-shaped
end that would be filled with lead or sand.
A friend of my father also carried one
whenever he went out alone at night, and I was
told that they were illegal.
In view of this, some whipmaker with time
on his hands must have worked out that a snake
whip could also double as a life preserver if the
knob on the end was weighted. Not only did
this give the whip another use, but it was not
against the law to carry a whip rolled up in the
pocket.
In some ways the snake whip with a
weighted end could be more dangerous than a
short-handled life preserver, for it could be
held farther down the thong and swung around
in a circle to increase the velocity of the blow.
I have written elsewhere about Tibetan
whips that I noted on visits to that country.
These whips have very short iron handles that
are reversed and used in the same way to fend
off dog attacks.
Length. Whips of this kind are always made
to order and so can vary a lot in dimensions.
Those meant to fit easily into a coat pocket are
not very long. It is usual to begin with strands
around 2 meters long. This will make a finished
whip over a meter long. There is not much
point in making it longer, because this is a diffi-
cult whip to crack and is really only used for
striking (with either end).
Handle
There are various ways to form the handle.
Here is one of them.
Fig. 1. The first thing
to find is a lump of metal
that will form the core of
the knob. A large nut has
been used in this case, but
anything can be used,
even a round stone.
It is important that the
handle is flexible and yet as
springy and dense as possi-
ble. In this case a 400-
mm-long piece of rawhide
(just untanned cowhide)
was soaked overnight to
get it back to a flexible
state, then trimmed into a
long taper. It was then
twisted and rolled to make
it as solid as possible.
A knot was tied in the
thick end and then it was
tied firmly at each end,
stretched out, and left to
dry.
When dry it was just
like a springy piece of
wood. Heavy tanned
leather can be treated in
the same way.
Fig. 2. When dry, the
leather is slipped through
the hole in the nut and the
knot keeps it from flying
off later
Fig. 3. Kangaroo skin
or some other thin leather
is then bound around the
upper part of the handle
to get it nearly to the right
shape.
Next, cord or thread is
wrapped around the nut
until it forms a smooth ball.
If this part of the job
has been done very well it
is possible to begin the fi-
nal outer layer of plaiting
at this point, but it is more
usual to cover this with a
simple 4-plait first to pro-
vide a smoother surface
for the final plaiting.
1
101
Fig. 4. A strip of kangaroo leather is
pulled over the top of the knob and split
* « •.«_тЫс artinn
Fig. 7. The finished whip.
kangaroo
form a ta-
step is to
into two strands on cither side. This action
also helps anchor the knob firmly.
Fig. 5. It is then
plaited with a simple 4-
plait (p. 90), which is ta-
pered down, as is the case
with normal
stockwhips, to
pered belly.
The next
plait over the whip in the
same way as is done when
making a stockwhip thong.
The number of strands
used will depend on the
diameter of the whip han-
dle and the width of
strands used, but com-
monly it would begin as a
12-plait, then go to 10, 8,
and so on to end up as a 6
or 4.
The fall need not be
long; in fact, it is not really
necessary, and the cracker
is attached in the usual
way.
A Turk's head is
worked over the knob, and
a 5-part, 4-bight is a good
one for this job.
When the snake whip is also to
be used as a life preserver, it is
common to work something around
the handle to act as a handgrip.
This begins about 150 mm from the
base of the knob, or wherever the
balance is found to be best.
Fig. 6. In the example illus-
trated above, the grip has been cov-
ered with French whipping. This is
simple to do and looks good, as the
slightly raised ridge spirals around
the handle. It will take about 3 me-
ters of lace to do this. Either end of
the French whipping is then cov-
ered with a Turk’s head or some
other decorative wrapping, such as
a Spanish ring knot (p. 83).
In this case the same 5-part, 4-
bight Turk’s head used around the
knob (p. 81) was put on the larger
end and a 3-part, 4-bight Turk’s
head (p. 36) on the narrower end.
6 'French Wfujjpiqg
102
A QUICK SNAKE WHIP
This whip is much coarser in appearance
than the other two but has the advantage that it
takes only about a third of the time to do be-
cause of the wide strands used.
The Belly
Fig. 1. The belly can
be made from twisted raw-
hide. In this case it was in
the form of a scrap of old
dried-out cowhide with
some of the hair left
on—not tanned or treated
in any way.
As it is like a board m
this condition it must first
be soaked in water until it
becomes pliable. It is then
twisted tight; the lower
part of the drawing shows
how it looks when half
twisted and the upper part
fully twisted, so that no
gaps show.
If you do not want to
have the belly hollow, put
a narrow strip of rawhide
inside as you twist it up
When twisted up, tack
it down at each end firmly
and leave it to dry.
The knob end will be
loaded, either with one
heavy bolt or in this case
two smaller ones, or with
anything that you may find
suitable. The end of the
rawhide was bent over and
pushed down into the
bolts so that they could
not work loose later. They
can also be tied or wired
m place.
Building Up the Knob
Fig. 2. The bolts must
now be built up to a
smooth shape. This can be
done with scraps of
leather lace or string, in
this case leather trim
mings were used and then
twine was tied over to
form a smooth surface.
Fig. 3. A scrap of
thin leather (or canvas)
is then tied over the
knob to make the sur-
face even smoother
Fig. 4. Four strands
of tapered redhide are
next bound very firmly
over this. It is important
to get this binding as
tight as possible, or
even sew right through
the whole job, so that
the strands cannot
loosen later. The length
and width of the strands
will be as desired, but
each strand must be a
little more than a quar-
ter of the circumference
of the belly in order to
get a good covering with
no gaps.
An even better idea
is to use one single
length of leather instead
of 4 strands, pulling it
over the knob as shown
on the previous page
(fig. 4) and then plaiting
it.
Plait a normal
4-plait and finish off the
whip in the usual way.
Turk’s Head
Fig. 5. A Turk’s
head will cover the
knob, and a 5 part, 4
bight is suitable (sec
page KI).
When this has been
done, a smaller version
of the same Turk’s head
hould be tightly
worked over the whip
just below the knob, and
another one about 200
mm below this (see page
74).
The lower knot is
put there to act as a
handgrip in the event of
the whip being used as a
life preserver and is not
otherwise necessary.
103
MINIATURE WHIP HATBAND
This miniature whip makes a most unusual
and attractive hatband. A number of our good
whipmakers plait them up, and this one was
made by John Jellicoe of Kurmond, New South
Wales. Another old friend
of mine, Doug Kite of Ring-
wood, Victoria, also built up
quite a reputation for his
small whip hatbands.
There is little to say
about making these minia-
tures because they are made
in the same way as a full-
size whip, except that every
part is proportionately
smaller. In this case the to-
tal length of the whip, in-
cluding the handle and
cracker, was 1,250 mm. The
handle itself was 135 mm
long. The strands of the
whip were tapered in the
same way as on a full-size
whip, so it required some
skill to cut them out.
There are different ways
to fix this whip to the hat. It
can be simply tightened up
around itself or fastened
with another small Turk’s
head to keep it all together, or sewn to the hat
with a few stitches of fine thread. The latter is
probably the best as it stops it from falling off,
and in view of the work involved in making one
of these, you don’t want to lose it.
RIDING CROP
This sketch shows an attractive riding crop
made by Don Russell of Buderim, Queensland.
I think that Don used a fiberglass fishing-rod
blank for the handle. This material is stronger
and more flexible than a cane handle, as well as
being of a smaller diameter. One of my stu-
dents found that he could pick up broken rods
very cheaply from fishing tackle shops, and
these were ideal for this work.
The shaft was covered at the thick end with
a diamond pattern and the rest with a cowtail
pattern—the ordinary whipmaker’s plait.
Many beginners do not realize that a Turk s
head can be used to go around a knob as well as
around a cylinder, and here we have an exam-
ple of each.
The flapper was made from two strips of
kangaroo hide bound on tightly with black
twine.
Items such as these need to be well rubbed
to get them smooth and then given a high pol-
ish.
If you wish to learn how to plait kangaroo-
hide whips it would be a good idea to start by
making a crop like this before you tackle a full-
size whip.
7-t>arb, б~ЬьаИЬ Turks Tead
104
Chapter 5
Whip Handle Designs
This chapter docs
not tell you how to make
a whip handle; you will
find that information in
chapter 1, and some very
useful informalion can
also be found in the
pages of the journal The
Australian Whipmaker’s
Journal (we publish this
for the Australian Plait-
ers and Whipmakers As-
sociation). Nor is this
chapter intended for the
beginner, but rather for
the person who al-
ready can make a
good plain whip and
who now wants to ad-
vance to the stage of
working some pat- I
terns into the handle. Я
A very fine whip fj
may have a handle of Ss
anything up to 32 №
strands or even ГЙ
more, but I have re- Q|
stricted most of the №
designs here to 12 or C
16 strands in order r
to help the learner.
The number of
strands can easily be
increased after some
skill has been
gained, and you will
soon find that most
of the designs read-
ily adapt to being
worked with a
greater number of
strands.
It is not necessary to use a large number of
fine strands to make a good whip handle. One of
the nicest two-tone whips that I have handled
was made by Tony Nugent and used only 12
strands for the handle.
It is shown here in my drawing. Note how
the thong also features a variety of patterns.
The various patterns shown here are described
in more detail later in this chapter.
106
Being somewhat of a
slow learner, I have al-
ways assumed that a
stockwhip was given that
name because it was used
to move stock. But one
day when browsing
through Hasluck’s Sad-
dlery and Harness Making
first published in 1904, I
realized that a stockwhip
was so called because it
was a whip with a stock,
stock being another name
for the handle. Of course,
any good whipmaker
could have told me that,
and some probably have,
but it did come as a sur-
prise.
Then I had a look in
the J.J Weekes Sydney
catalog of 1916 and found
that the handles for stock-
whips were listed as stock
crops, while the longer
handles for cart whips
were listed as cart crops.
The problem with us-
ing the term crop today is
that it is easy to confuse it
with riding crops, which of
course are not whips as
such but consist only of a
handle with a pair of short
flaps attached.
From here I went to
W. G. Ashford’s Whips
and Whip-Making, origi-
nally published in 1893
and to be found in the
back section of Morgan’s
book of the same name.
Ashford called the handle
the stock, and referred to
the men who made them
as Stockers. Whipmaker
Maurice Doohan recently
told me that the stock is
really the foundation of
the handle before it is
covered.
Old saddlers’ catalogs are very hard to get,
but I do have a Walther & Stevenson catalog
printed in Sydney in 1933. Both the terms crop
and stock have been dropped in this and the
handle is referred to as just that, a handle. You
could have a 16-plait kangaroo handle for ten
WALTHER 4 STEVENSON PTV. LTD.. — 305 GEORGE STREET. SYDNEY
A BEAUTIFUL EXAMPLE OF THE WHIP PLAITERS
ART.
THE "APEX” STOCKWHIP Is a superb piece of Australian workmanship
In rwo-colour plaiting with a neat fancy design worked In both handle
and thong The handle Is platted o\er a best ZtUr atee| lined foundation
and the thong Is 8ft long and 20 plait.
PRICE, as illustrated, 73/6.
HANDLE ALONE. 35/-. THONGS 6ft. 31/6, 7ft. 35/-, «ft- 38/6.
Гог 2/6 extra you can have Initials plaited In the handle which will make
ihe whip a very acceptable present These Whips are eent out in a neat
a!aze<V box so that they open up very attractively.
THE "NIGGER” STOCKWHIP.—This Is made In all black kangaroo with a
32 plait handle and Aft 20 plait ' K burra*' quality thong. A good falling
whip-PRICE COMPLETE. 57/6
Postage on Whips 1/3 N* 8 W , 2/- Qld . Vic Thong or Handle. >d. N 8
XJ- Qld . Vic.
66_________________________________
shillings ($1) or a cheap turned-wood handle
for two shillings (20 cents). The illustration
above comes from that catalog and shows the
style of decoration popular in the 1930s for ex-
pensive whips up to 73/6 ($7.35).
107
(Note in the illustra-
tion on the previous page
the reference to the whip
plaiter’s art, not whip
braider, which is an Ameri-
can term.)
So it would seem that
around the turn of the cen-
tury whip handles were
called crops or stocks, but
by the 1930s at least some
saddlers were simply call-
ing them handles.
Very few bush people
know that the term stock
was used in the whipmak-
ing trade for the handle,
and many will still insist
that stockwhip means a
whip to move stock, as in
animals.
As for the other half of
the whip, the end that does
the work, all the catalogs
agreed in calling them
thongs, and this term is still
the common one today.
Weekes’s catalog listed
hunting thongs, stock
thongs, cart thongs, team
thongs, buggy thongs and
bullock thongs.
On the end of the thong is the fall and,
though a few people today call this a lash, fall
is by far the most common term. Last of all is
the cracker, though many Americans call it a
popper.
TWISTED HANDLES
I obtained the whip in the sketch some time
ago from Tony Nugent. It was made around the
1940s or earlier by a well-respected whipmaker
of northern New South Wales whose name I
have unfortunately mislaid.
The handle was 530 mm long and was made
of a light-colored timber (probably willow),
which had been split into four and then twisted
into a spiral.
Weekes’s catalog of 1916 showed a similar
handle and it was described as a “Twisted steel
lined stock crop.” I imagine that the timber was
steamed and twisted, but do not really know the
details and have never met anyone who has
made this type of handle.
About twenty years
ago we used to stock
them in our saddlery,
and they were sold to
us as twisted-willow
handles and were made
in Italy. Since then they
seem to have vanished
from the scene, which
is a pity because this
was an unusual and
quite attractive handle.
The splitting and twist-
ing made them much
more flexible than
straight timber, as well
as seeming to make
them stronger—espe-
cially those with a
spring-steel core.
CARVED TIMBER
HANDLES
Some old bushmen
made quite a name for
themselves carving whip /
handles. One became well f '
known for his carving of
handles featuring the head \
of Henry Lawson on the \
end. A number of people \
have told me about these У
carved heads, and good Л
well-carved ones are valu- f
able collector’s items. L
The handles in the Л
sketch are considerably L/
older than Henry Lawson L
and came from the collec- <
tion of Kelvin Barton of i
Wodonga, Victoria, who
had an important collec-
tion of historic whips.
They are said to have
been carved by an Aborigi-
nal who gave them to one of the
men on one of John McDouall Stu-
art’s overland explorations between
1860 and 1862.
After seeing these I tried mak-
ing one for myself and found it to
be an interesting project and well
within the range of anyone who has
done a little wood carving, though
the finished product in my case was
nowhere near the quality of the
original.
I used a piece of our local red
mahogany—not a great carving
timber but one with an attractive
grain and color. Silver ash is said to
be another good timber for this
work, and each area of Australia
seems to have its own favored tim-
ber.
Because whip handles come
under a lot of stress, it is important
when choosing timber for them to
select one that will not break and
splinter under pressure.
COWTAIL HANDLE
This whip handle, 500
mm long, was made by
Maurice Doohan of Casino,
New South Wales, one of
Australia’s best makers of
redhide and whitehide stock-
whips.
Cowtails (and bull piz-
zles) have long been tradi-
tional forms of covering
whip handles, and are espe-
cially useful when the timber
of the handle is of a type that
might split under stress. The
tail, as it dries and shrinks,
puts great pressure on the
timber and prevents this
from happening.
For this reason tails are
often used for bush repair
jobs and are put over han-
dles which have actually be-
gun to show hairline splits,
and this prevents the splits
from opening up any further.
Some people put the
tails on and then scrape off
the hair when the tail has
dried, but Maurice prefers to
dehair the tail first. This is
done by mixing about one
part of hardwood ash by vol-
ume to four parts of water.
This should be done two or
three days before the mix-
ture is wanted if it is to work
at its best.
The tail (or even a whole
hide) is now soaked in this
mixture for three or more
days, until the hair can be
Za/ I
seen to be loosening.
Maurice says it is a good
idea to put the container in some place where
you pass it a few times a day, and then you can
give it a stir each time you pass by. When the
hairs are loose they are all scraped off.
Some people also use a mixture of lime and
water as a method of removing hair. Ordinary
builder’s lime or agricultural lime is used
(around 15 parts water to one part lime). This
is discussed in the section on tanning in Bush-
craft 3, page 159.
The tail is then pulled over the whip handle
and it is hung up with a weight at the lower end,
about as heavy as a house brick This pulls the
whole thing tight, and as it dries it shrinks even
tighter. In the handle illustrated there is a spi-
ral pattern in the grip section. This was done
very simply by fixing a cord around the handle
before the tail was placed on. The leather
shrinks over this and creates an attractive pat-
tern. Both ends of the tail are cut off when it к
fully dry, and a couple of Turk’s heads at the
thin end set it off nicely.
It is a good idea to give the tail a good coat-
ing of leather dressing inside and out as it1S
ing put on, as this will help preserve t e
leather.
I ungingvvhip
The handsome lunging whip in the
sketch whs made In professional whip
maker Druce Cull of Conroy,
Queensland. I obtained it from him in
January IWl. It was based on a liber
glass fishing-rod blank, which provided
a good, strong yet flexible shaft One
end had been plaited with single-color
kangaroo ihongnig, and a number of dif
ferent styles had been used, as shown on
the right of the sketch The making of
these patterns is explained in the follow
ing pages.
DESIGNS FOR WHIP UANDI ES
There are do ens of designs that enn
be worked into a whip hundb , and this
section denis only with the most coni
mon ones. Handles cun be worked with
any number of strands, from 8 lor a ba-
sic type of redhide whip to 24 und more
for a fine kangaroo whip.
To make it easier for beginners I
have drawn most of th< following de
signs as either 12- or 16 plait, but nearly
all the standard design i can be worked
with any even number of strands. How
ever, sonic will only work with strands
that arc in multiples ot 4 or some other
number. Interlocking diamonds, for in
stance, can be done with 16 strands but
not with 14.
'Ihc names of the various designs
arc still matter of argument Whip
maker Glen Denholm contributed a list
of mimes to our journal (The liistralian
Whipmaker's Journal, November 1991),
and these have been used wherever pos-
sible here, but a number of designs have
mure than one name.
PLAITING SOAP
It is very hard to work handle de
signs in n< tty if the leather Is at all dry,
and some sort of leather dressing is ul
most always necessary. For yard whips
nd other simple work this can be noth
mg more than plain hit, though this pro
vides a feast for cockroaches, rats, and
even dogs, unless a little kero is added
to the mixture.
A simple planing oap Is made from
4 parts clean fat
I part soap
* parts water (all by volume)
Heat the water and soap until the
soap has dissolved. Add the fat and
bring it slowly to simmer for n few min-
utes and let it cool. When cool it should
be firm but light to the touch; if it is still
watery it will need more cooking.
A different recipe used by Hugo
Stephens of Mareeba consisted of
clean fat
emulsifying wax (from the chemist)
ordinary soap
He heated these together until eve-
rything was melted and then beat the
mixture to make it as light and full of
bubbles as possible. The advantage of
this mixture is that it does not make the
hands greasy and yet gets the strands so
that they will easily tighten up.
COWTAIL OR
WHIPMAKER’S PLAIT
Let us now start with a few basic de-
signs and then go on to some more com-
plex ones.
This one is sometimes known as a
herringbone, but this can be confusing,
ns there are quite a number of herring-
bone plaits. Some professionals just call
it the whipmaker’s plait, as it is the
most common one used. I once heard
someone call it a cowtail I don’t know
how it got that name, but at least it is
memorable.
I have drawn it with 12 strands and
also with 16 It is also commonly used
on 8-strand redhide covered handles,
and this is illustrated in chapter 1
DOUBLED HERRINGBONE
If you pick up two strands at
once instead of one when doing the
previous plait, you will get quite a
different effect and the result is
shown here.
Though you may think that
bringing over a number of strands at
a time will be faster than one at a
time, this is not always the case, and
for fast work professional whipmak-
ers work with one strand at a time.
Doubled Herringbone,
b\0U/td
SkorL Herringbone^
/2 ^und
SHORT HERRINGBONE
If you compare this to the
basic plait on the previous
page, you will notice an impor-
tant difference. The plait at the
top of the previous page had
the working strand passing
through the center of the
strands on the opposite side in
an U3, 03 (under 3, over 3) se-
quence.
In the version on the left
the working strand goes under
2, over 2, under 2, and this
gives a shorter herringbone
pattern.
CHESSBOARD PLATT
This is the most basic plait of all, a
simple over one, under one sequence.
If, however, you start it in the same way
as you begin a belt, you will find that the
pattern does not work out.
For that reason I have shown a dif-
ferent way to start that will get the col-
ors divided into two groups, one on the
left and the other on the right.
The professional does not usually
begin with precut lace, but instead cuts
a pair of sets out of two pieces of kanga-
roo hide. In this case a strip of light-
colored hide would be cut out first,
about 24 mm wide and a little more than
one and a half times the length of the
whip handle. This would then be divided
into 6 strands, but a little bit at the top
would be left so that they remained to-
gether at the top. The same thing would
then be done with a piece of dark hide.
These two pieces would then be tied to
the end of the whip handle.
The beginner using precut lace finds
that it is a bother trying to tie a big mob
of strands to the end of the handle. One
idea is to cut 6 strands twice as long as
necessary and then double them over to
make 12 strands—this is much easier to
tie on.
Another way that I find even faster
is to begin as shown here I have shown
12 strands but you can build it up to as
many as you wish. Once they are all in-
terlocked it is much easier to wrap them
around the handle and fix them as
shown
From then on you just do a normal
under, over sequence as shown. This is a
convenient way to start any handle when
using precut lace, and then go into other
patterns as you wish
The start of this plait will be later
trimmed and covered with a Turk’s
head.
114
Irregular Herringbone
/Z riaib, /\pumcC
IRREGUl AR
HERRINGBONE,
12-PLAIT ROUND
The irregular herringbone
can be done with a varying
number of strand», and in each
case the pattern on the reverse
will be different from that on
the front. In my drawings I am
illustrating the 12-plait version,
which consists of simply picking
up two strands at a time and tak-
ing them around in an under 3,
over 3 sequence. This creates a
regular herringbone on the front
and a slightly different pattern
on the back. This is illustrated in
the lower sketch of the set
12 -"Plaits, ^pwid
из 03
Бчск, n/<fw
U2 02 U2
02 U2
U2 02 U2
Rouble ^Diamond
DOUBLE
DIAMOND
This creates a sim-
ple but attractive pat-
tern. Two strands are
brought around each
time, and they go under
2, over 2, under 2.
Strong diamond
patterns like this are
usually only done for a
short section of the
handle.
TRIPLE DIAMOND
This gives a slightly larger
diamond pattern than the double
diamond illustrated earlier.
Three strands are picked up and
brought around each time, and
care must be taken to see that
they all lie flat, especially around
the back where they are out of
sight when you are doing the
work.
If this was to be done all in
one color it would be called
coachwhipping, as would the
next pattern.
Triple, ТУимпопсС
J iz-Jtfaib,
4-STRAND DIAMOND,
COACIIWIIIPPING
By the time you begin bringing 4
strands or more across at a time you
are getting into the style that is called
coachwhipping by sailors, who often
work it in cord to cover rads. In skilled
hands this can be a reasonably fast
way of covering a long handle
It used to be a favorite lor cover-
ing the handles of the long whips used
in coaching days, hence its name.
There arc quite a number of varieties
of coachwhipping, and this is just one
of them.
All sorts of combinations of num-
bers can be used, and there is a simple
version using only 8 strands.
BRACELET
This is a very simple design, nothing
more than a single row of diamonds
around the whip handle, but even so the
beginner still needs to know how to do
it. As you may see from the drawings,
there are two ways that this design can
be done.
The first is to take a strand from one
side and then a strand from the other
and so on, alternating from one side to
the other as is done with the previous
designs.
The second method is to take all the
strands from the one side until the de-
sign is formed. Both methods end up in
an identical plait; it is really a question
of which you find easiest.
DOUBLE BRACELET
As with the single bracelet, explained on
the previous page, this one can be done in one
of two ways, both of which will produce an
identical result.
Once you have done this you will realize
that it is also possible to do a triple bracelet in
the same way.
/Ь-Jtfaib,метнор z
Pou bte
BnueJtt.
PnzaJci,
STAIRSTEP
I got the name for this one from
Glen Denholm, professional whipmaker
of Cobbity, New South Wales. Like
some of the previous ones it can be
done in a couple of ways, according to
what you find most convenient. It is like
the bracelet, except that you go under 2
strands each time rather than only 1
Stairstep MSTHOPZ.
/6 'Plaib, f\pund
119
DOlUll.l STAIKSI I I'
Ihc double stairstep follow» 0
Mmpk under 2. over I. under 2 so-
<pictu I have shown II here only «'
done by method 2. but you can easily
work out how to do it by method I 1
you wish.
И you have been following Ihc
diagrams ihioiigh in older you will
hiivo noticed that for Ihc Inst few I
hnvc shown two method» of lying, мне!
perhaps this is a good tint to talk
iibout the difference between them.
Method 2 is often u«cd for nnm<
plaiting nnd other complex woik
TWoMETHOb.srOK
COMPLEX I’LAl 1 LN< J
Alternnte Strand Method
Thia is the standard method for
dl simple round plaiting Yon simply
take a strand Irom one (ide and work
it down, then и иtrand from Ihc other
side and work that down, and no on.
You really need Io have your wit*
about you to use thia method for job»
such a name plaiting. Some piofes-
llminla feel happy with it, it in the
same ax their ordinary plaiting
method and io allow» them to go back
into a simple patkrn ax soon ax lie
name lx finished
Spiral Method
The other method is used by
хоте whlpmakcrs for complex de
signs. Despite what you may think, it
uses exactly the same number of
strands as the previous method
There are two ways to use the spiral
method, and the first short spiral
method Is probably the moat com-
mon First you spiral all the dark strands down
the handle once, ax is shown in the drawln f
the double stairstep on this page I hen you
work all the light colored strands Into the dark
ones as shown, Once you have formed a par
ticular design you can easily return to th» altrr
note strand method for the simple purls of tin
job
The second way of using the spiral m thud
is quite different First you take all the dark
strands and tightly spiral them around the han
die from lop to bottom u> that no flnib'f is
showing,
'fhe spiraled dark strands are tl-d firmly
top and bottom, but the whit- strands arc only
tied at tin lop You now Work th whit' sirands
down one al a tim<, forming the d' sign »• У11*1
g<> Ih ndvnntug< of this la thal you ar hold
Ing only half the uumh<r ol strand* in yl,ur
hand nnd th< whole lot can be r based al «"У
lime whil you hay, a rest and look at Hi l”b
1 he dlxadvantug i is lltal you hav« l<> l*fl “P
th- black strands with a point'd tool of «’th
sort to get th- while oiws undr r th black ot»*<
and this can b« л hngthy job You shwi tv»1
probably have to go back and light'n **еГУ
thing up later, as It Is hard to keep t ’ *p,*‘
tight wh it you follow tlds method I'vcn so Упи
may fin.I и ,n , „ф r ,r, tjw.i fur < implex ds
signs
12b
Peter Clarke, a
whipmaker of Bilpin,
New South Wales,
told me of an old-
timer who worked
with up to 50 very fine
strands on a handle
using this method.
The sketches show
three ways to do spiral
work. One way is to
use long strands and
dye one half of each
strand a darker color.
One half is spiraled
around the handle and
the other half is ready
to work. Another
method is to simply
use two sets of lace,
one dark and one
light, and tie them
both to the top of the
job. This tying is often
a fiddly job. Profes-
sionals usually cut
their strands in sets
with a strip of leather
left at the top to hold
them together, as
shown in the top
right-hand sketch.
This makes it so much
easier to attach them
to the handle.
SOLID BAND
For this solid band
the white strands go
under 4 of the dark
strands, but it can also
be done by going un-
der 3, 5, or even more.
To be effective the
dark strands have to
lie very neatly to-
gether so that no light
strips can be seen
showing through from
below.
121
BIRD’S EYE, 12-PLAIT, ROUND
The bird’» eye is an attractive plait, but one
that looks best when done in moderation and
balanced with longer areas ot planter patterns.
Hus also makes sense to the whipmakcr he
cause plain designs can be done taster. Quite
often one or two rings of bird's eyes are enough
lo nicely set off a whip handle.
Bird’s eyes arc nearly always done with two
colors, but on the hinging whip i I lust rut ml ent
Her Bruce Cull used only a dark brown, I'd' У
thick thong As a result of the dark color 11
design was not obvious, but what it did do
create a good hnndgnp on Ни section <d 111
handle that mo*t needed it
197
EGYPTIAN EYES
You can call this design by whatever name
you choose, for the name that I use has nothing
•o do with either Egypt or eyes. This is an old
bush term for a breakfast dish that seems to
have been totally forgotten. A circle would be
Cut in a slice of bread and it would then be
thrown into the frypan and fried on one side.
When done it would be turned over and an egg
broken into the hole so that the other side of
the bread and the egg fried together. The re-
sults were known as Egyptian eyes.
I have shown two methods for making this
design. In the spiral method you first spiral the
dark strands around the handle and then follow
the code given on the drawing. For the alter-
nate strand method you simply take a strand
from one side and then one from the other, work-
ing down and forming the pattern as you go.
123
THE SUN
As you would expect, the sun design is a
very old one and is to be found in woven and
plaited work all over the world For a relatively
few number of strands, such as this 16-plait the
design is very simple, but with 24 or more
strands it can be made much more complex.
As with the previous design two methods
are illustrated, and the method that you choose
will depend on whichever you find the most
simple and convenient. In either case the end
result is exactly the same
124
FLOWERS AND ZIGZAG
This provides quite a decorative band
around a whip handle, especially when con-
trasted with sections of fairly plain plaiting
such as cowtail (or whipmaker’s plait). The two
parts of the design can also be done separately,
and this is shown on the next page.
In this drawing the code is given for doing
this design by the spiral method, but it can also
be done quite easily by the alternate strand
method shown in earlier drawings. In that case
you just work it out as you go.
125
DOUBLE ZIGZAG
This and the fol-
lowing design are both
shown on the previous
page as part of a com-
bined design. They can
also be used by them-
selves and are quite at-
tractive.
FLOWERS
There are two or
three different designs
that are called flowers,
but this is one of the
most attractive and is
an easy one to work.
In this drawing and
the one above, the code
is given for doing this
design by the spiral
method, but it can also
be quite easily done by
the alternate strand
method shown in ear-
lier drawings, just
working it out as you
go-
126
INTERLOCKING DIAMONDS,
16-PLAIT, ROUND
As I mentioned elsewhere, there are two
basic methods of plaiting complex patterns on
whip handles. One is to hold all the strands in
the hands and work down one strand at a time.
The other is to first spiral the dark lace around
the handle and then work the light lace into
this. Beginners will probably find the spiral
method the best for designs such as this one,
but it can be done quite easily with the ordinary
alternate strand method.
The design begins with a bracelet, then in-
terlocking diamonds, and then a double brace-
let. You will notice that though the design
looks complex, there are in fact only two runs
of lace, as given at the top of the drawing that
shows the design opened out.
Both runs begin with 07 (over 7) and end
with 09 (over 9), but you can alter this to make
whatever amount of blank space you need
above and below the design.
If you are going to do the design with the
alternate strands method you will not need the
code given in the drawing, but will work the de-
sign out as you go along.
127
THE SHIP OF
THE DEAD
The Ship of
the Dead is a very
ancient Viking de-
sign and has been
found engraved on
rocks in Scandina-
via. To modern
eyes it does not
really look like
anything, but to
the ancients it had
a lot of supernatu-
ral meaning.
There is a fir
tree in the center
of the boat, for it
seems that in an-
cient ship burials a
tree was cut and
placed in the boat,
and above it is de-
picted the sun, the
symbol of life.
In this draw-
ing the code is
given for doing
this design by the
spiral method, but
it can also be done
by the alternate
strand method as
shown in earlier
drawings, just
working it out as
you go.
The drawing
at the bottom left
shows how it looks
when using the
alternate strand
method (interweav-
ing left and right
side strands one
after the other),
while the drawing
next to it shows
how it looks when
you first spiral
down the dark
strands.
TWO-SEAM PLAIT
Professional whipmaker Peter
Clarke used this name for this par-
ticular design and it is probably
the most appropriate, as there are
only two seams in the pattern. As
a result, one half of the handle is
dark and the other half light.
Although it might look like
the cowtail (or whipmaker’s plait)
shown earlier, it is quite different,
as the cowtail divides the handle
into four bands of color while this
only divides it into two.
It is very simple to do as you
can see from the drawings. Each
strand simply wraps around the
other. However, it is not used by
itself all that often, but can be
used as the basis on which to plait
names in whips.
For instance, I was told that
whipmaker Richard Taubman of-
ten used this plait and would work
dark letters on light on one side of
the handle, and at the same time
work in the date in light letters on
w Seam J^hib
any even нши^ег vfstrands
dark on the other side. This
requires considerable skill
and patience.
VEE PATTERN,
WHIPMAKER’S PLAIT
All the designs in this
section shown up to this
page have been based on
the rule of having all the
dark strands in one hand
and all the light strands in
the other
However, if you change
the pattern in which the
strands are laid, then a to-
tally different set of designs
can be worked out.
In this example the
strands are alternated, one
dark, one light, one dark,
and so on. When worked in
a cowtail (or whipmaker’s
plait), a series of vees are
formed.
129
The effect of this is un-
usual, but tends to be a bit too
bold, especially if done in
dark and light lace. It looks
better if done in two tones
that are not too far apart, say
a light and a middle tan.
The whip in the sketch
was made by Eric Fuerst as an
experiment and gives a good
idea of some of the effects
that can be achieved. Note
that towards the knob on the
handle the strands have been
split so that you have a se-
quence of two light and two
dark strands. There is also an
experimental zigzag pattern at
the thin end of the handle,
and the striped effect has also
been carried through to the
Turk’s heads at each end of
the handle.
BARBER’S POLE PLAIT
This is the same sequence
as the Chessboard Plait, a sim-
ple over one, under one se-
quence, but done with strands
of alternating colors instead
of having all the dark
strands in one hand and
ail the light strands in
the other, as is the usual
case.
The effect is a spiral
from one end of the
handle to the other, like
that found on a barber’s
pole. As in the previous
design, this is best done
with, say, light and dark
tan rather than with
black and white lace, as
the effect can be far too
bold if strongly con-
trasting colors are used.
Chapter 6
Plaiting Names in Whips
NAME PLAITING
The plaiting of names into the handles of
whips represents the highest form of complex
braiding, and while there are quite a number of
whipmakers who can plait names, there are very
few who can do it well. I am not one of these be-
cause I simply do not have the patience to do it.
But I can do basic name plaiting, and in this sec-
tion we will look at some of the techniques.
Joining One Pattern to the Next
Name plaiting is usually confined to the
handle of the whip (though people have plaited
names into thongs), and it is always combined
with some of the decorative patterns shown in
the previous section.
All the patterns shown in chapter 5 can be
combined one with another, but because there
are so many possible combinations, it would be
impossible to show all the various ways of chang-
ing from one design to another. When in doubt,
put in a bracelet, or do a band of double dia-
monds or some other simple pattern. A well-
designed whip handle should be planned in ad-
vance, and you should try to avoid putting too
many different designs on one handle.
Plaiting Names with Short Pieces
In Leather Projects 1 I described a simple
method of plaiting names into a belt and ex-
plained that this method could also be used for
a whip handle. The handle is first entirely
plaited over with an even layer of plain light
strands. Using a fid to open up gaps under the
strands, dozens of short lengths of dark lace are
then worked into the weave to form the letters
tiny spots of glue helping to fix them in place. ’
The only problem with this method is that
if the article is handled roughly, or if poor glue
is used, then parts of the letters can come adrift
in time.
For this reason the method is not recom-
mended for whip handles, though I must admit
that I have seen quite good work done this way.
Working the Letters into the Weave
The next method is the one used by many
of the old time whipmakers It is more difficult
to do, but the result cannot come loose no mat-
ter how the whip is handled.
It can be used on any part of the whip
thong or the whip handle, but is nearly always
found on the thickest part of the whip handle,
as this gives the best display area for the work.
This method is not suitable for belts.
I must warn you that this is not for the be-
ginner. You must first be able to plait over 20
strands onto a handle without even thinking
about it before you can tackle this work, and you
should also be able to handle two-tone pattern
plaiting before you move onto name plaiting.
Colors to Use
The colors used are your decision. However,
traditionally, jet black and snow white are con-
sidered too much of a contrast. In fact, many of
the old-timers regarded black-and-white work as
a bit flashy, unless it was done with black-and-
white horsehair, which is another skill again.
Dark brown and light flesh color are con-
sidered to be better looking, but I have also
seen beautiful work done with black and deep
red.
It is usual to put a
bracelet at either end of
a name so that it stands
clear of other designs.
In November 1990 I visited Burton's Sad-
dlery in Armidale, New South Wales, and John
Burton showed me a whip that he said had been
made for him by John McMaster of Baringo
This had John Burton’s initials worked into the
handle, which was of 24 strands, so I did
sketch of it on the spot (shown here) and then
later decided to use the same initials to iUus'
trate this method of name plaiting.
First I had to plait up a handle with t e
same initials in order to show the step-by-steP
method used. However, I did not want to waste
time plaiting up a whole handle and so only 1
a half handle, finishing it off with a pineapp e
knot.
I also spiraled the strands in the opposl|e
direction and finished off with some differen
patterns just to show that you have a lot of van
ety available in this sort of work. My version 1
at the top of the page.
Never Believe What You Are Told
Years ago I was told by an old bushman
that the method used to calculate the number
of strands was to lay them as shown in the first
sketch, and then count them.
I believed him, and so did a lot of other
people, because I have heard this method
talked about quite often. I think that I even
wrote about it in one of my books and said that
this is how you calculate the strands.
Nonsense! That method is quite wrong and
you can easily prove it for yourself, as I should
have done all those years ago.
Figs. 3 & 4. Take a few strands
and tie them around a handle as
shown in figure 3. Go all the way
around so that all the wood is cov-
ered and then count the strands.
Now tie them at an angle as shown
in figure 4 and again cover all the
wood, and you will see that you
need far less.
I tried this experiment around
the timber that I was going to plait
over. When I hung the strands
down as in figure 3 it took 16
strands to cover the timber. When I
put it on the diagonal it took only
12 to cover it.
However, this did not mean
that I would be working a 12-plait.
Think about it for a minute: in all
plaited work you always have one strand going
over the top of another. In other words, t e
work is always 2 strands thick. So in this case i
would take not 16, not 12, but twice 12, which is
24, to do the job. . , f. ,
In name plaiting the rule is that t <
the lace, the better the letters will be.
plait is okay—24 is better. The most : co mi
and convenient numbers for this sor
are the multiples of 4; that is, 20, 24, or 28. If
necessary, you could use 16, and if you are very
good at this sort of work you could go up to 32.
Fig. 5. To give you an idea of how fine
plaiting compares with less fine, have a look at
figure 5. The vertical stroke of the left-hand В
is made up of 4 diamonds, one on top of the
other. The next В has a vertical stroke of 5 dia-
monds and is a little better. The right-hand В is
worked with lace twice as fine as the others
and, as a result, the finished letter is very much
better and is 10 diamonds high. However, for
most practical whip work, the middle example
is the most useful.
When making a whip handle it is customary
to begin at the keeper end and do some pat-
terns first, then the letters, and then some more
patterns. Even if you are only practicing with
the method, it would be best to do some ordi-
nary chessboard-type patterns first, in order to
get everything locked
in place around the
handle.
Fig. Many
whipmakers cut the
leather for the handle
as is shown in figure
6. The uncut center
section forms the
keeper of the whip and they then begin plaiting
with an 8-plait. As the handle gets thicker, this
changes to a 16-plait, and it is at this end that
the name plaiting takes place.
For two-color work one end of the leather
is stained a dark color before the plaiting be-
gins, using a good, permanent leather stain.
If you are using this method, ignore the
next section and go on to figure 14.
I JnifiK I'rrcut I-tier
И you яге uaing ptccut luce, ua f have dioic
in tin* example, you have two choice», f lie Inal
I» to tic the individual xtiuiiil» iiround the him
dh —я alow and olti-n annoying job (but then
name plaiting cannot rcitlly b< dcainbcd na
luu li a minute work) Hu accond choice I» to
une the chcaa
board atiirt
I ig 7 tl lol
lowing the firal
choice, begin by
tying the dark luce
lo Ihe handle
When thia I »pi
rated around tin
handle diagonally
It ahiuihl entirely
'em
cover the timber and at the «.one tint not „ver
lap Itaelf anywhere
Ihe direction la which It wind* do a not
matter It cun go to the left in right FlguicM
7 H ahow the game letter winked Into luce, th
flrat spiraling tn the ojipoaltc direction to tin
accond Note that the final ahape ol the l< I lent
la exactly the aamc in both drawing», even
though then are aliyhi dill renoee In the con
atruction
Having attached Ihe dark hue, you now th
on light lace in the aamc way, but thia tunc they
will go In oppoaitc direction» aa yoij lorm th
letter»
< ‘hegabourd Sturt: ( ulculuting the
Ix-icgth of the Lute
Keeping lo a 45 degree angh , aplrul a
length of lace jII the way down the hand! in
order to calculate how long each lace will nc«d
to be Add a little to be on the aaf .Ide (Bui
do not forget that thi chcaaboaid pattern la
made up of pair» of lacca, an cut accordingly)
I ig. It) If you find that lying on th. luce la
a problem (and It can be), then here la n Rim
pier method I'irat hold the lace In your hand
and make a cheaabourd pattern atari na ahown,
juat aa if you were beginning a belt K<cp on
domw thia unlit you have enough Ki wrap
round the handh
Fig 11 f or my example I uacd an extra
thick handle and «о ended up with 24 atrunda ax
ahown, but you may gat by quite well with 16
at rand»
Fig 12 Juel keep building up the plan until
It reachea right around the handle and паки
without cither gap or overlap
l ig 11 When Ihe plaiting mt I» around
th* b< ;k, begin to work each «traud in »o that
Hu plotting be* ши » a lumpier unit na ahown
in figure 11 Before going any futthcr lake a
good look al ihe jtdi If (here an nny gap», you
may n-cd lo undo il and add in exit a lace How
ever, if th work begin» to get too crowded
then you may have to remove aom« atrand» It
i» beat io do thia right now t-th-r thun have
problem- lat< r on
114
Locking the Back
Fig. 14. If you are working on
a wide handle it may be that you
will find it best to interlock the
black and white laces on the re-
verse side to the name plaiting;
otherwise, the white laces can ride
up on each other with rough usage.
The type of interlocking pat-
tern you use is your choice The
one I have shown here is about
the most simple. This is not all
done at one time but progres-
sively, as the letters are worked
into the front section.
Working in the Letters
Figs. 15-21 show how the let-
ters are worked in. In my drawings
the strands are shown all neatly
sitting together in groups, but in
reality it is nothing like that at all and more like
a can of worms. But this is the only way to draw
it so that it can be understood.
Fig. 15. The white strand goes under one
black strand. This forms the top of the letter J.
Fig. 16. The white strand goes under two of
the black strands, thus forming the start of the
lower hook of the letter J.
You must fully understand how you are go-
ing to form the letters before you begin to do
them, otherwise you will be forever picking out
the work and doing it again. For instance, first
have a look at the alphabet (figure 26) and you
will see how the loop of the J is formed at the
same time as you are working in the main down
stroke.
Fig. 17. Now you can see the J beginning to
be formed.
Fig. 18. The J is now formed, and at the
same time as you complete it the next letter is
begun
135
Fig 14. This is Ihe start of the letter R
Fig 20. The letter R is complete end the
shaded section shows how the В is begun
Fig 21 В is complete and some decoration
has begun This is simple. Take the while
strand under 1, over I, under 1
Fig. 22 shows how it looks when completed
Fig 23 The next band is also simple; under
1, over 1, under I. over 1. under I
Fig 24. The wider band is made by taking
the white strand under 3, over 1 under I, over
1, under 3 , . .
zvWvTZ/"
Fig. 25. Once you have covered as much of
the handle as you wish, tie some twine around
the end of the strands and trim them off neatly
Hut before trimming make sure all the letters
are as neat and as straight as possible \ou
might have to spend some time getting every-
thing in just Ihe right position but this is time
well spent
Turn the whip over and look at the back,
the black line that runs down it (fig. 14) should
be straight. If it is not straight, then your letters
cannot be straight.
& У jy
136
Having got everything
straight and worked tight,
the end of the handle can
be covered with a Turk’s
head (page 81) and the end
of the plaiting covered with
a pineapple knot (page 96).
Rub the handle with
something smooth, such as
a piece of bone. This will
push down any slight bumps
and also burnish the
leather. Then give it a clear
leather dressing or a couple
of good coats of shellac.
Fig. 26. Here is an al-
phabet to work from—this
one is 5 diamonds high. A
smaller alphabet, 4 dia-
monds high, may be found
in Leather Projects 2 in the
section on how to plait let-
ters using small scraps of
lace.
V\ hite-on-Black Letters
For the purposes of these exam-
ples I am talking about having black
lettering on a white background. It is
just as easy to have white lettering on
a black background; you just begin by
reversing the instructions given above
and attach the light layer first.
Vertical and Horizontal Letters
Figs. 27-28. The same skill is re-
quired to produce letters that can be
read when the handle is held upright,
as in figure 27, rather than on its side,
as in figure 28. It is just a question of
planning.
Name plaiting is all about plan-
ning. You must think in terms of just
one letter at a time. In fact, for the be-
ginner, it is probably better to think in
terms of just one stroke at a time even
though this will mean a slower job.
28
-^Cuine ____ > ' 111 I til 11 ГЛ t-t 11
Glen Denholm of Cobbity, New South
Wales, finds it easier to work the letters so that
they are read when the handle is held vertically,
as in figure 27. rather than placing them so that
they are read when the handle is horizontal,
which is the more common practice.
Technically, there is reallv no difference in
the way the letters are formed, but the advan-
tage seems to be that when you are plaiting the
handle it is pointing away from your body, and
so the letters are easier to read while you are
forming them.
Fig. 29. As an example I decided to work
the word CAIRNS into a whip handle, as that is
where we have our saddlery. It was not until I
had plaited in CAIN that I real-
ized something was going wrong!
I have illustrated just the be-
ginning of plaiting to give an
idea of the method (not to dem-
onstrate my bad spelling). The
white strand is the next to be
brought around, and then the
top black one will follow.
Letters can be plaited in by
the spiral method as shown in
this chapter or by the alternate
strands method explained in
chapter 5. whichever
you feel happier
with. Having
tried out a vari-
ety of methods of
plaiting names, I think
that the best for the be
ginner is to spiral the dark
strands around the handl
first.
137
PLAITING LONG WORDS
The photograph above, not a very good
one, is of a whip handle that I worked up with
the word Australia on it. Because the handle is
round and the photo is flat, the bottom part of
the letters cannot be seen in this illustration.
Plaiting two or three letters into a whip
handle can be done in the course of ordinary
plaiting work, without any special preparations,
but if you want to do long words it might be
worthwhile making up a rack to hold the handle
while you do the work.
You will discover the reason for the rack if
you try and do long words without one. Maybe
some experienced plaiters can work in letters
without having the handle held firmly in some
way, but a learner needs all the help he or she
can get. The rack allows you to lay the words
out carefully and lessens the chances of them
slipping out of position whenever you have to
stop for a minute and let the job go.
With a rack it is easier to carefully lay out
the mass of strands that you will be working
with, and so keep both your hands and mind
much freer to sit quietly and work out the job
one step at a time.
My rack is quite primitive, knocked together
quickly from some scrap timber that was lying
around the workshop. The dimensions do not
matter; you just make it up to fit the job in hand.
I have a groove for the handle in the left-
hand end, and a hoop iron loop in the right
end, but you could have a groove in each end or
a loop in each end—it does not matter.
Because you pull to the right end, there is a
nail sticking up there so that the whip handle
cannot move in that direction.
For the person who intends to do a lot
of handle plaiting, it might be worthwhile
building a more substantial clamp, as
shown further on.
Setting Out
Planning is important in doing long
words. Rather than calculating as you go
along, it is a better idea to draw out the
word on a piece of squared paper. Graph
paper can be easily bought, but I rule up
the paper myself to the right size. I do this
in ink and then write in the letters in pen-
cil; that way I can rub them out later and
use the squared paper for the next job.
(Of course, experts who do a lot of
this work have no need to plan it ahead
like this. They can work out in their head
where each strand will go. But such skill
takes years to master, and the beginner is
advised to make as much preparation as
possible In the long run it will be found to be
quicker this way).
One advantage of having the design on
graph paper will be seen when you have finished
one letter and move on to the next, because it is
often difficult to know exactly where the next
one is to begin By consulting the graph paper
you can work it out
138
« t Л
Fig 33 For in-
stance, say you have
finished the A in my ex-
ample and want to
know where to begin
the U.
Fig. 34. If you look
along the diago-
nal line from the
top of the U, you
will see that it be-
gins 3 strands
away from the
sloping stroke of
the A.
Although an expert will be doing
parts of the next letter as he completes
the first one, the beginner is advised to
do just one letter at a time; it is a little
slower but easier.
kmount Needed
For the sample I chose a cane handle
18-mm in diameter. In order to cover this
I needed 24 strands of 3-mm lace. The
strands were each 700 mm long because I
was only covering three-quarters of the
handle, a full handle would need strands
over a meter long. Twelve of the strands
were dark tan, the other 12 natural.
Because I was using precut lace, I
did not taper the handle where the word
was going to go. Had the handle been ta-
pered at this section, the lace would also
have had to be tapered down.
It takes a long time to plait in a word
like this. When you have the word com-
pleted, it is a good idea to tie a string
around the ends of the lace to hold eve-
rything firm and then carefully work all
the strands tight, at the same time mak-
ing sure that the letters are in line.
When the job is finished and every-
thing is firm, tie the ends down perma-
nently and then cover them with a Turk’s
head, as shown on page 81.
Try to smooth down the surface as
much as possible. One way to do this is to
bone it. A beef rib makes a good bone, or
you can shape one from a shoulder bone.
Rubbing the leather firmly with a bone, a
piece of heavy plastic, or even the back of
a spoon will smooth it down as well as
giving it a gloss.
After doing this give it a few coats of shel-
lac to get a good smooth finish. Shellac can be
bought in hardware shops and is mixed with
methylated spirits. Apply it with a piece of
cloth and give several thin coats rather than
one heavy coat.
139
WHIP HANDLE
CLAMP
I saw this clamp in an
old photograph and de-
cided to build one for my-
self. The principle is
simple, and the same idea
was used by coopers to hold
barrel staves in position
while they shaped them. It
has a great advantage over
a vice, in that the pressure
can instantly be removed
and applied again just as
quickly, and this is a great
help when working complex
patterns in whip handles
where it may often be nec-
essary to turn the job
around.
For the normal stan-
dard patterns found on
most whips, this clamp
would not justify the effort
required to build it, and
such clamps were probably
only used by professionals
in the old days when very
complicated patterns were
regularly worked on han-
dles. But even a modern
whipmaker would find it
handy when plaiting
names into whips, and I
find it a help when plaiting up plain handles
for whips
You use your feet to apply pressure on the
clamp, and very little pressure is needed to
hold a whip handle firmly in place. By moving
the feet back a little the clamp is opened and
the work can be removed.
The sketch shows Susie Serletto, who was
assistant editor of The Australian Whipmaker’s
Journal at the time, working on a whip handle.
You will notice that the clamp also encloses a
small container, which is handy for storing gear
needed for the job.
I made the pivot arms by finding a curved
branch of the right shape on a dead tree. This
was then adzed so that it was rectangular in sec-
tion, and I then sawed it from end to end so as
to make two identical curved pieces.
This was a long-winded process and I would
not recommend it to anyone, though I rather
liked the finished effect. It would be much
more convenient to construct the angled arm by
using a few milled lengths of timber, or cutting
it out of marine plywood.
The angled legs of the stool have to be
well-braced, as they are subject to considerable
pressure when you sit down and, as the clamp is
a working tool, the whole construction has Io
be robust.
There is no need to copy this design care-
fully; once you understand the principle you
can simply adjust and alter it to suit your own
style of work.
In the sketch you will notice a bit of a jum-
ble of stuff on the stool directly below where
the whip handle is sitting. This is used to adjust
the distance between the sliding and the fixed
part of the clamp.
This is rather a complex answer to the
problem, and you may be able to work out a
more simple way of fixing the sliding piece 1
designed this to make use of the two holes that
were already in the seat and which otherwise
take the stitching pony.
As well as being used for
making whip handles, the stool
can also be used as a stitching
stool, as explained below. The
clamp is of course not used for
plaiting the thong of the whip,
as it is not designed to take the
considerable amount of pulling
required for that part of the
work.
However, by fixing a hook
onto a convenient spot, it
could also be used for this pur-
pose.
STITCHING STOOL
Most old-time saddlers used
a full-length saddler’s clamp to
hold their work while they were
stitching it. This is still the best
method, as it allows the work to
be held at an angle that best
suits the work, so that the sad-
dler is looking down at the face
side of the stitching.
141
The fixed, vertical stitching
pony holds the work upright
and so is not so convenient;
however, it is useful for certain
types of work, and it is not
hard to make one that will fit
onto the clamp stool described
here. This turns the stool into
a useful all-round leather
working stool.
The stitching pony is made
from two lengths of timber
held together by a length of
threaded rod. When the pony
is needed, it is dropped into
two holes in the stool and is
then ready for use. When you
wish to use the whip handle
clamp, the pony is simply lifted
from its holes and put away.
For ease of use the
threaded rod should be fitted
with wing nuts. I did not have
any of these and so brazed a
couple of short lengths of rod
onto ordinary nuts. This only
takes a few minutes (if you
have the gear) and works just
as well.
It is best to make the pony
out of hardwood and plane it
well so that it will not mark the
leather. The measurements
given suit me, but you can ad-
just them as you wish.
On my stool I have also fit-
ted a couple of leather loops so
that the traditional saddler’s
clamp is close at hand and can
be reached without getting up.
CIA и p
142
Chapter 7
Some Useful Tips
MAKING A WHIP
WITH
BOUGHT LACE
Because of the complex-
ity of their shape, whips are
usually cut from a kangaroo
hide, with the strands being
cut to a long taper. However, for a per-
son who wishes to make a whip and can-
not obtain a hide, it is possible to make
one with bought precut lace, obtainable
from leather-craft shops or saddlers.
This is not to be recommended for
a number of reasons, not the least of
which is that the plaiting is more com-
plicated and precut lace is more expen-
sive than cutting your own. Also, it
cannot be tapered, so a different tech-
nique for making the whip must be used
than that described in chapter 2.
However, I have had phone calls
over the years from a number of people
who have made whips from precut lace
simply because that is all that was avail-
able. One caller told me that he was a
chauffeur and often had long periods of
waiting around. Making whips with pre-
cut lace suited him because he could
carry the work around in a small bag, work on it
whenever the opportunity came, and put it
away quickly when a call to work came.
So, reluctantly, I will pass on some hints on
making a whip this way. We will assume that
you cannot obtain any leather at all apart from
the precut lace.
If you are patient and willing to critically
examine the work at every stage, it is possible
to make quite a good looking whip with nothing
but bought lace.
The Belly
The belly is made using the widest available
lace. First make a core. This is the foundation
around which the belly will be plaited, so it
should be as firm and dense as you can make it.
The Core. Take two strands of lace. One
strand should be the finished length of the whip
(about 2.3 meters) and the other about 1.5 me-
ters long. Put a short taper at the handle end,
60 mm will do, but gradually taper the other
end down from about the halfway point. Do
this with both strands.
Wet both strands and then roll them un-
der a piece of wood together until they form a
single solid core It may be necessary to tie
them together with short lengths of cotton to
keep them together while you plait around
them, removing the ties as the plaiting covers
the core.
Add another strand if the core is not wide
enough for you. It is usually about 2 mm in di-
ameter at the thickest part, but you may prefer
to have it 3 mm or even more; it all depends on
the amount of body in the lace that you are us-
ing for the whip.
Covering the Core
If your lace is wide enough, it should be
possible now to cover this core with a 4-plait.
For this you will need only 2 strands doubled
over. Thin the strands in the middle so that the
plaiting will be narrow at the start Taper the
ends of the strands.
143
The plaiting continues for about half the
length of the whip (about 1 meter), with the
core hanging out for the rest of the length. T e
4 strands should have been tapered well so that
there is no sudden change where the plaiting
finishes; it should be one smooth taper for the
whole length of the job.
Use fine thread to tie the ends of the 4
strands to the core. Take a good look at the
shape of the belly, especially at the section
where the plaiting finishes. It sometimes takes
time to get a good tapered shape at this point,
but it is important to do so, as the finished
shape of the whip depends on the shape of the
belly.
5m
3m
2.-gm
Zm
The Overlay, Quantity Needed
4.5 meter lace was used.
For the whip in the illustration I cut 2
strands each 6 meters long, 2 strands each 4 me-
ters long, and 2 strands each 3.5 meters long.
When plaited up this made a thong 2.2 me-
ters long.
In previous editions of Whipmaking Book 2
I suggested using a scrap of kangaroo leather
for the keeper and binding it on. However, this
always creates a weak spot in the whip, and also
goes against the idea of being able to make the
whole thing with precut lace.
So in order to create the maximum strength
at this important part of the whip, I am suggest-
ing a rather unorthodox way to make the
keeper (but this fits in with the idea of making
a whip entirely from precut lace, which is unor-
thodox in itself).
The two 6-meter strands were folded in the
middle, and the two 4-meter strands were also
folded in the middle. The other two strands
were then folded as shown in the illustration, at
the 2.5-meter mark. This created a tapered set
of strands and so saved later wastage as the
whip narrowed.
Plaiting the Keeper
Plait the middle section together with an
ordinary flat 6-plait. Begin by laying out the
strands with the two long-
est ones in the center and
the shortest on the outside.
Begin plaiting about 60
mm off to one side of the
center point, as you want
the middle of this plaiting
to be the center. Plait for
about 110 mm and put a
temporary tie at one end
until you get the next step
started.
It is important to finish
this bit of plaiting at the
point where the 2 longest
—. u
--
—, 3 5m
, 4-m
----> Qm
strands are again the mid-
dle. In the drawing I have
shaded the 2 long strands so that you can see
where they start and finish.
Because this whip is made from precut lace,
there is no reason why you cannot use more
than one color in the job, and a lot of interest-
ing patterns can be created by doing this.
If you wish to experiment it is also possible
to use some of the patterns shown in chapter 5,
but for a first whip I would advise keeping it as
plain as possible.
Round 12-PIait
(See next page for the illustrations.) Fold
the plaited section over and begin a round 12-
plait. This has to go around the belly, and for a
start you may find it difficult to hold the belly
in place until the overlay begins to cover it
Once the plaiting has begun the belly will be no
problem, but getting it in place right at the start
is always a trick. I would suggest that you do
the first seven steps shown and then push the
belly into place before tightening up all the
strands.
Fig. 1. The back of the job should be laid
out the same as the front, with 3 strands stick-
ing out each way. Take the upper one on the
right (as you look at the job) and bring it across
as shown
Fig. 2. Take the upper one on the left and
bring it across, under one, over 3.
Fig. 3. Take the upper one on the right and
bring it across under 1, over 3.
Fig. 4 Take the upper one on the left and
bring it across, under 2, over 3.
Fig. 5. Take the upper one on the right and
bring it across, under 2, over 3.
Fig. 6 Take the final one on the left and
bring it across, under 3, over 3. All the strands
have now been brought around from the back
section.
Fig. 7. Take the upper left-hand strand,
take it around the back and then under 3, over
3.
Fig. 8. This is a good time to fit the belly in
place Make a hole in the center and push it up
and begin to tighten all the strands around it.
When this has been done take the upper right
strand around the back and then under 3, over
3.
Plaiting then continues in this same se-
quence. The taper of the whip is produced by
dropping strands as the work progresses. No
measurements can be given for this as it depends
on a lot of factors: the stretch in your
strands, the shape of the belly, and the
finished shape that you are looking for.
Do not wait until each set of
strands has nearly been used up before
they are dropped. If the whip is looking
too thick, drop them earlier and trim
them off rather than let them run down
beside the belly. Dropping strands is
explained in chapter 2, as is making and
attaching the fall and cracker and mak-
ing the handle.
One last touch is to tie a Spanish
ring knot below the keeper (page 83).
This serves no purpose other than to
cover the point at which the flat 6-plait
changes to a round 12-plait.
145
WHIP CRACKER KNOTS
When a whip cracker has been twisted up, a
knot has to be put in at the end to stop it from
unraveling. There are a number of ways of do-
ing this and I will illustrate some of them here.
Overhand Knot
Probably the most common knot seen is an
ordinary overhand knot, and while this may do
the job, it is not the best as it looks clumsy and
part of the tip sticks out to one side as shown.
People who pride themselves on their
whips do not use this knot.
Small Cracker Knot
The best advertisement that I know of for
this cracker knot is that I noticed a version of it
on a group of whips made by Charlie Hassett, a
highly respected name in the world of whip-
making (examples of his work have been on dis-
play in the Australian Stockman’s Hall of
Fame).
It creates the smallest
knot of all those illustrated
here, and so gives a clean
smooth profile to the
cracker.
The best way to illus-
trate it is by making the
cracker from two different
colors of material, and this
also makes an attrac-
tive-looking cracker. The
first drawing shows the 2
colored strands and the sec-
ond what they look like
when twisted together.
The strands are twisted
together in the usual way as
shown in the third drawing
and then grasped firmly at
the point where the knot is
to be put. Select one group
of colored strands and tie
them as shown, pulling the
knot down tightly.
By taking strands of all
one color it means that both
sides of the twisted section
are tied in together.
146
Blood Knot Variation
This is one of the most popular knots for
crackers, and has already been illustrated in
more detail on page 24.
It is a neat and effective knot for the whip
cracker, as it is a symmetrical knot and keeps
the ends lying in line. I learned it from Rob
Cheerio of Oak Forest many years ago It ap-
pears to be a variation of the blood knot, but
with two strands involved rather than one.
However, there is quite a knack to forming
it so that it comes out neatly and so the knot
does not end up below the twisted section of
the cracker. This may not make sense when you
read it, but if you try the knot, you will find out
what I mean when you encounter the twisted
section a bit loose just above the finished knot.
To avoid this a certain amount of tension
has to be maintained on the ends while the knot
is being formed, and the first loop is best kept
as small as convenient.
tBioodArwt- Variation.
Naprantitn
Napranum Hitch
If anyone knows the correct
name for this I would be pleased to
learn it. I just used this name to iden-
tify it for my own use, because I was
shown it at the Aboriginal settlement
of Napranum just south of Weipa.
It was here that I ran into an old
friend, Les Callope, a ringer known
around the Gulf country as Slippery
Sam. It was Les who taught me how
to make a cord girth, twist a green-
hide rope, and many other bush
skills which I later put into Bushcraft
1 and Bushcraft 2 in the 1970s.
I hadn’t seen Les for some years
and he looked like a battered old
scrub bull He had a long scar down
one side of his chest where a knife
aimed at his heart had just missed,
and a pair of bullet holes, one in his
stomach where it went in and one in
his back where it came out. There
was a recent four-inch scar down the
side of his face from forehead to
cheek and a whole heap of other
scars that all told a story
147
He said that the young bucks still
took turns in trying him out. but that he
was still holding his own. and pointed
out to me a man with a bandaged head
who had required eight stitches in it af-
ter they had some disagreement two
nights before.
More than twenty years earlier I
had sketched Les twisting a whip
cracker, and this sketch was used in a
couple of my books but I was never
happy with the likeness and asked him
to make one for me again.
It was while doing this that he
showed me this method of putting the
knot in the cracker, and he said this was
commonly used by stockmen in the
Gulf country. In some ways it is a little
easier to form than the blood knot
variation but, like that knot, care must
be taken to work it down properly.
Attaching the Cracker
One rule that I have discovered in
whipmaking is that no matter what you
do, someone will come along and tell
you that it is not the correct way. More
often than not you can ignore them, but
when that person is Maurice Doohan
you listen.
The theory
knot is that the
So throughout the
Gulf country ringers
still twist up crackers
in their teeth as I have
illustrated earlier and
attach them in the
time-honored way as
shown on the left.
However, Maurice
twists his crackers
around a nail or hook
and attaches them
with the hitch illus-
trated on the right. He
said this is the method
used by many profes-
sional whipmakers,
behind the attaching
pressure of the cracker
comes on the very end of the fall and
not above the knot, as it does in the
first mentioned method. As the fall of-
ten breaks at this pressure point, it
makes sense to have it as close to the
end as possible and thus not lose too
much fall.
148
FALL HITCHES
The knot that attaches the fall to the thong
must be very strong, but it should also be neat.
The most common hitch is shown on pages 22
and 70, but there are other variations that are
quite interesting.
Maurice Doohan’s Hitch
Maurice Doohan learned this hitch from
his uncle and told me that he only knew of a
couple of other whipmakers who used it.
It gives a very fine taper to the end of the
whip, avoiding the lump that is usually found
where the fall is fixed on.
When tied and pulled up tight it is a good
hitch, but it takes a little practice to learn how
to do it properly. It is not a good hitch for re-
pair work and is best used only on new whips.
Slits are cut into the fall, not holes, and the
ends are then worked in as shown. The final
two drawings show the finished hitch from ei-
ther side.
On the next page is a sketch of the hitch on
a finished whip.
149
Above is Maurice Doohan’s hitch, showing
how it forms a low profile on the finished whip.
Snake’s Head Hitch
This decorative hitch was shown to me by
George Stien of Atherton, Queensland, in
1985. He had learned it from
one of the well-known whip-
makers in the west.
It is usually tied in whips
that end up with 6 strands
and are made with kangaroo
leather. The finished hitch
resembles a snake’s head
with a forked tongue.
a saddler in Cloncurry, who
in turn had learned it from
It shares the advantage of the common
hitch in that it is possible to replace a broken
fall by pulling out the old one and feeding the
new one through the same hole without having
to undo the hitch. This not only saves time but
also makes for a stronger job, as it is hard to get
old strands back again to the same degree of
tightness that they had originally.
150
flead flitch,
151
Nymboida Hitch
In May 1994 a man brought a whip into our
saddlery for repairs, and I noticed the hitch
that fixed on the fall He said that it been done
by an old whipmaker of Nymboida, southwest
of Grafton, New South Wales, and so I gave it
this name. If anyone has a different name for it
I would like to hear about it.
It is much easier to do than the snake’s head
hitch, and faster than a normal fall hitch When
pulled tight it seems secure—in this case, the
whip had worn out while the hitch was still firm
George’s Hitch
After I had published the previous hitch in
the pages of The Australian Plotters and Whip-
maker’s Journal I was contacted by Lindsay
Whiteman, a fine whipmaker in Townsville,
who showed me another variation of the same
hitch.
He had learned it from the late George
Campion many years earlier and gave it this
name in honor of George.
In some ways it may be even better than the
previous hitch and is fairly easy to remember.
But both this and the Nymboida hitch need to
be put on very neatly and with well trimmed
and even strands If not, they can end up being
not only very lumpy but also very ugly.
153
3-PART, 4-BIGHT TURK’S HEAD
This is one of the most common knots to be
found on the knobs of whip handles, the reason
being that it is the fastest one to form for the
professional whipmaker.
I have already illustrated a method of tying
it on page 36. However Turk’s heads can often
be a great headache for beginners, and for this
reason I am including here another method of
tying the same knot, which may be a little easier
to understand for the novice.
In this case we are looking down on the top
of the whip handle. The first drawing explains
how the 4 strands will be laid down.
If you remember this order, and the way
that each strand lies on top or underneath its
neighbor, it will prove to be a great help in
keeping the knot in your memory.
When the knot has been fully formed, as
shown in figure 7, take a little time to make
sure that it is spread out evenly. When this has
been done do a "follow the leader” sequence,
going around two or three times and following
the path of the original knot.
154
Appendix
MAKING A SECRET 3-PLAIT
The method for making a secret 3-plait for
working into a whip handle is illustrated in the
figures below. In order to avoid trouble, it is
important to count out each sequence as you
go. The sequence for the 3-plait is one, two,
three, through the top, through the bottom,
four, five. The sequence is now complete.
MAKING 4 BULLOCKIE’S WHIP
The bullockie’s whip is quite different from
the whip used by a stockman The whip itself is
often longer, and the handle is very long in-
deed While stockmen usually take care of their
whips this did not seem to be the case with bul-
lock drivers. The examples I have seen are usu-
ally roughly made and have been treated even
rougher.
The bullock driver did not seem to care
about his whip, he would wander along drag-
ging the end of it on the ground behind him,
not worrying whether it wore out or not. When
it did be would quickly put another one to-
gether as rough as the last.
The difference in attitudes was probably
because the stockman not only used his whip
for work but also for recreation, practicing
various styles of cracking, and so his whip be-
came a valued possession, while to the bullock
driver his whip was just a tool to be used when
necessary and dropped as soon as he stopped
working
and 2.4 meters
The bullockie’s whip was cooimun.;. made
using a simple 4-strand plait (see chapter 2)
with a slip keeper, but made longer than a boy’s
whip. It was often finished off in the same way
as a stockwhip (see chapter 1) or it might be
finished off with the senes of locking hitches il-
lustrated here This same method is sometimes
also used to finish off plaited reins
The whip would usually be cut from green-
hide as this was easily obtained and free The
handle was simply a strong stick, often about
300 mm taller than the bullockie, though some
preferred one that only came up to their shoul-
der The most common length was between 2
The length of the whip varied considerably.
Most bullock drivers seem to have cut the whip
out of the hide by taking a straight cut down the
backbone, and this limited the plaited section
according to the length of the hide, usually
around 2 meters.
Wally Legge of Macclesfield in Victoria,
who is shown on the preceding page, was an old
friend of mine back in 1959. (He was the last
person I saw who wore bowyangs, cords or
straps tied around a workman’s trousers below
the knees, as a matter of course while at work.)
He had a working team and used to bring in
timber with it. The whip he is holding is typical,
with the plaited section a little under 2 meters
long and the lash about 800 mm. His handle has
a fork at the top to stop the keeper from slip
ping off
Some bullockics did cut around the hide in
a circle, and so could make the whip as long as
they desired. Jack Tunstead of Herberton,
Queensland, who was still working bullocks in
1976, has the plaited section of his whip nearly
3 meters longs, and with a lash getting on for
another 2 meters he had a total length of over
4-1/2 meters to drag in the dust.
Because bullock drivers were rugged indi-
viduals they attached the whip to the handle
just as they pleased, but usually they used a sin-
gle keeper rather than the double one that is
found on a stockwhip.
The methods of attaching were pretty cas-
ual, and the illustrations show a popular style,
but there were other variations. The handle was
either left with a fork or natural knob at the
end or one was whittled, and the keeper was
looped around it. The keeper was longer than
that found on a stockwhip, usually about 100
mm.
Because of the way it is made, a bullockic’s
whip is much harder to crack, and most bullock
drivers did not bother to attempt it, claiming
that the noise only startled the bullocks without
achieving any purpose. For this reason the whip
usually did not have a fall and cracker but only
a lash on the end.
The difference is only in name, though, the
lash being the same dimensions as the fall and
attached in the same way, as illustrated in
chapter 1. Another method of attaching the
lash is shown here, and this seems to have been
only used for rough whips such as those used by
bullock drivers.
It is not always easy to find suitable long
straight sticks for whip handles, and the bul-
lockie would keep his eyes open as he trudged
along, cutting any that he found for future use.
This was a necessary precaution as the long
handles would often break with rough use, and
it also explains why they used such a simple fas-
tening on the handle, as it could be removed
speedily when a handle broke and a new one
put on.
Index
A
Acid used in cleaning fat ....................20
Angled cut to strand.................. . . 17
Attaching the cracker . . .... 25 72, 148
Attaching the fall ................ 21, 69, 149-53
Attaching whip and handle ...............37, 84
В
Barber’s pole plait..........................130
Bark-tanned leather.......................... 13
Basic whip 12
Beam, cutting on the......................... 18
Beginning a round 6-plait.....................39
Belly, for bullwhip ..........................90
Belly from redhide............................53
Belly, making the basic belly . . 14
Belly, for snake whip....................... 103
Belly, for stockwhip ... 51
Belly with bought lace.......................143
Binding on the keeper.........................33
Bird's eye, whip handle design...............122
Blood knot ... 25
Blood knot variation........................ 147
Bolster . . ... .54
Bracelet, whip handle design . . . . 117
Braid, definition.............................47
Braiding or plaiting........................ 46
Braid, slit.................................. 42
Broken strands............................... 86
Building up the knob . .... 103
Bullockie’s whip • • - 45
Bullwhip, handle loop.........................92
Bullwhip, making a.........................89-96
Bullwhip, plaiting the overlay 92
Bullwhip................................. •
Bullwhip, the belly...........................
Bullwhip, the handle..........................90
Bullwhip, the knob............................95
Bullwhip, Turk’s head on the handle...........96
Bundles of lace . 63
Bush timber for handles................... . . 75
Buying a strip of leather .
C
84
Care of the whip
r 109
Carved timber handles......................
Changing from 8-plait to 7- plait
Changing from 7-plait to 6-plait.............. ®
Chessboard plait, whip handle design H4
Chessboard start ..........................
Choosing leather..............................
Chrome-tanned leather.........................
Clamp for handle, simple method
Clamp, whip handle clamp...................
Cleaning tallow...............................20
Coachwhipping, whip handle design............116
Colors to use for name plaiting 132
Common fall hitch.............................23
Complex plaiting, two methods 120
Confined space, working in a................. 19
Core, kangaroo................................49
Core or filler . 49
Core, redhide ... .... 49
Covering the core............................143
Covering the handle.......................... 26
Cowtail-covered handle......... 110
Cowtail or whipmaker’s plait.................112
Cracker, blood knot variation................147
Cracker, fastening the cracker to the fall . 24, 25
Cracker, finishing off the cracker 24, 72, 146-47
Cracker, making the cracker 23, 71
Cracker, Napranum hitch . 147
Cracker, overhand knot.......................146
Cracker, small cracker knot..................146
Crackers, speeding up the job of making . . 24
Cracking the whip.............................25
Crop, riding . 104
Crown knot 27, 28
Cutting and skiving...........................16
Cutting methods...............................16
Cutting on the beam...........................18
Cutting out a basic whip......................15
Cutting out strands from kangaroo hide......55
Cutting out the strands.......................58
Cutting out the top plait or overlay..........55
Cutting out the whip......................... 15
Cutting out tight corners.................... 59
Cutting out whips.............................16
Cutting out with thumbnail 58
Cutting the slit in a whip fall .... 21
Cutting with skiving cut......................17
D
Designs for whip handles
Dividers, for marking leather
Dog’s knot
Double bracelet, whip handle design. . . .
Doubled herringbone, whip handle design. .
Double diamond, whip handle design ....
Double stairstep, whip handle design ....
Double zigzag, whip handle design.
Dressing, leather............................
Dropping strands . . ....................
105-30
15
26-28
118
. 113
. 115
. 120
126
20
66
E
Egyptian eyes, whip handle design
Elaborate handle..............
123
84
161
F
Fall, attaching the fall..........
Fall, common fall hitch...
Fall cutting the slit in a whip fall . .
Fall, George’s hitch
Fall hitches......................
Fall, making the..................
Fall, Morris Doohan’s hitch.......
Fall, replacing the fall..........
Falls cut in gangs................
Fall snake’s head hitch...........
Fall, the Nymboida Hitch..........
Fastening the cracker to the fall . . .
Fat, cleaning.....................
Filler and belly plait............
Filler............................
Fingers as guides for marking leather
Finishing off the cracker
Finishing off the thong...........
First rule about whipmakers.......
Fitting the handle and thong together .... 37, 84
Five-part, 4-bight Turk’s head...............81
Flowers and zigzag, whip handle design . . 125
Flowers, whip handle design .................126
Foundation for the handle (or stock).........75
Four-strand diamond whip handle design 116
French grapevine or French whipping . 35, 102
. ... 21,69
.... 22, 70
.........21
.... 153
149-53
21, 69
.......149
.......69
.......70
150
.......152
.......24
.......20
.......51
.......49
.........16
24 72, 146-47
.........68
.........45
G
Gaps in the plaiting..........................65
George s hitch.................................153
Grapevine, French . . . ... 35, 102
Grapevine whipping 35, 102
Greasing the strands 61
Greenhide.......................................12
H
Half-plaited handle.............................25
Handle, a more elaborate handle.................84
Handle and thong, fitting together. . . . 37,84
Handle, binding on the keeper...................33
Handle, bullwhip . 90
Handle, calculating the length of the lace . . 134
Handle, chessboard start.......................134
Handle clamp, simple method ....................79
Handle, covering the ... 26
Handle crown knot...............................27
Handle finishing the knob ......................82
Handle, forming the knob ................. 27 79
Handle foundation, snake whip................. jqj
Handle, half-plaited........................... 25
Handle, joining one pattern to the next .... 132
Handle loop for snake whip .
Handle loop for bull whip
Handle, making the.
Handle for snake whip ................ 101 -
Handle (or stock) foundation...........
Handle, 12-plait handle 29, 31
Handle, plaiting names in whip handles .... 131
Handle, plaiting names with short pieces 132
Handle, 12-plait........................ .31
Handle, 8-plait ... 30
Handle rib rattling . . .34
Handles, carved timber handles ... 109
Handles, cowtail handle ... no
Handles, designs for whip handles........ 105-30
Handle, secret plait worked into a whip handle 32
Handle, shaping the knob . ... 80
Handles, lunging whip.........................110
Handle, straightening a whip handle............26
Handles, twisted handles......................108
Handle, the knob on the handle.................79
Handle, the overlay for the handle.............76
Handle, Turk’s head on keeper end..............82
Handle, two-tone work . 84
Handle tying the set to the stock..............76
Handle, using bush timber ... 75
Handle with an 8-plait and Turk’s head.......29
Handle with 4-plait and dog’s head knot......26
Handle, wraparound handle .32
Hand part . 46
Hat band, miniature whip......................104
Hitch, fall hitches................. 22,70 149-53
Holding strands................................61
Holes in leather...............................61
Homemade strand cutter.........................59
I
Irregular herringbone, whip handle design. . . 115
J
Joining broken strands without glue............86
Joining one pattern to the next...............132
Joining whip and handle........................37, 84
К
Kangaroo, best use of the leather..............48
Kangaroo core................................. 49
Kangaroo, holes in leather.................... 61
Kangaroo leather, stockwhip of.................44
Kangaroo leather, types . . .............58
Kangaroo skin, selecting the . 48
Kangaroo testing for stretch 48
Keeper, attaching to handle 33, 34
Kid’s whip 41
Knob, forming the..............................27
Knob on the handle............................ 79
Knot, blood knot...............................25
Knot, blood knot variation 147
Knot, crown knot............................. 27
Knot, dog’s knot.............................. 27
Knot, 5-part, 4-bight Turk's head 80, 81,96
Knot, overhand knot.......................... I48
Knot, plaitcr’s knot. ... . 65
162
Knot, small cracker knot .................... 146
Knot, Spanish ring knot .......................10, 83
Knot, 3-part, 4-bight Turk’s head........36, 154
Knot, wall knot................................27
Knot, whip cracker knots.................. 146-47
L
Lace for overlay, quantity needed.............144
Lace holder, self-greasing................... .64
Lace, making a whip with bought lace..........143
Lace, precut lace for bullwhip.................92
Lace, using precut lace for stockwhip . . . 143-45
Lead-loaded snake whip.........................98
Lead loading...................................51
Leather, bark-tanned leather...................13
Leather, buying a strip of.....................14
Leather chattering while skiving ... .60
Leather choosing, points to watch..............13
Leather, chrome-tanned leather.................13
Leather dressing ..............20, 61
Leather, greenhide . 12
Leather, rawhide ..............................13
Leather, redhide ..............................12
Leather splitter...............................60
Leather, stretch in the kangaroo leather.......56
Leather, types of..............................12
Leather, vegetable tan.........................13
Leather, whitchide.............................13
Length of strands in overlay...................56
Loading whip, lead loading...............47,51,98
Locking the back for name plaiting............135
Long whipping .................................27
Looseness in plaiting the overlay..............64
Lumps, when plaiting...........................68
Lunging whip . . 11®
M
Making a bullwhip ..................
Making the best use of the leather.
Marking leather, using a template
Marking leather, using dividers . .
89-96
. . 48
. . 16
. . 15
. . 16
. 104
149
Marking leather, using fingers as guides
Miniature whip hatband..............
Morris Doohan’s hitch...............
N
Name plaiting.............................
Names, colors to use ... .............
Names, locking the back...................
Names of whips............................
Names, plaiting long words................
Names, plaiting names with short pieces.
Names, setting out........................
Names, using precut lace..................
Names, vertical and horizontal letters . . •
^Narnes, white on black letters...........
itfjtMS, working the letters into the weave.
131-39
. 132
. 135
. . 12
. 138
. 132
, 138
. 134
137
. 137
. 132
Napranum hitch . . . 147
Nymboida hitch...................... 152
О
Overhand knot....................................146
Overlay, cutting out the top plait or overlay. . . 55
Overlay, length of strands in overlay.............56
Overlay, looseness in plaiting the overlay .... 64
Overlay, plaiting the overlay.....................62
Overlay, quantity needed.........................144
P
Pineapple knot....................................96
Plait, barber’s pole plait.......................130
Plait, beginning a round 6-plait..................39
Plait, bird’s eye................................122
Plait, bracelet. ... 117
Plait, chessboard plait 114
Plait, coachwhipping.............................116
Plait, cowtail or whipmaker’s plait..............112
Plait, definition.................................47
Plait, double bracelet...........................118
Plait, double herringbone........................113
Plait, double diamond............................115
Plait, double stairstep..........................120
Plait, double zigzag............................ 126
Plait, Egyptian eyes.............................123
Plaiter’s knot....................................65
Plait, flowers and zigzag........................125
Plait, flowers...................................126
Plaiting, adding in a strand......................87
Plaiting, adding in two strands...................88
Plaiting, changing from 12-plait to 10-plait ... 94
Plaiting, changing from 10-plait to 8-plait .... 95
Plaiting, changing from 8-plait to 7-plait.......66
Plaiting, changing from 8-plait to 6-plait.......95
Plaiting, changing from 7-plait to 6-plait.......67
Plaiting, changing from 6-plait to 4-plait.......40
Plaiting, gaps in.................................65
Plaiting in a confined space......................19
Plaiting long words.................. 138
Plaiting, lumps, avoiding.........................68
Plaiting names in whips..........................131
Plaiting names with short pieces.................132
Plaiting, narrow sections............ -68
Plaiting or braiding..............................46
Plaiting, 6-plait basic whip..................... 38
Plaiting, 12-plait handle.........................29
Plaiting, portable plaiting rack..................88
Plaiting soap.................................20, 111
Plaiting the basic whip...........................21
Plaiting the keeper..............................I44
Plaiting the overlay, bullwhip ... • 92
Plaiting the overlay..............................62
Plaiting the 4-plait whip ........................19
Plaiting, uneven taper............................68
Plait, irregular herringbone.....................115
Plait, round 4-plait.................... 19 27, 90
Plait, round 6-plait......................39, ^0, 68
Plait, round 8-plait..........................30, 63
Plait, round 8-plait, whipmaker’s method ... 62
Plait, round 10-plait............................ $4
Plait, round 12-plait ... 31, 93, 94, 115, 122, 144
Plait, round 16-plait, vee pattern ..............129
Plait round 16-strand barber's pole plait 130
Plait short herringbone.........................
Plait, solid band *21
Plait, stairstep..................... • • H9
Plait, 4-strand diamond.......................... 116
Plait, the ship of the dead.................128
Plait, the sun .............................124
Plait, triple diamond . 116
Plait, two methods for complex plaiting . 120
Plait two-seam plait........................129
Plait, vee pattern (whipmaker’s plait)......129
Plait whip handle, 12-plait. . .........31
Plait, whip handle, 8-plait..................30
Portable plaiting rack.......................88
Precut lace for whip.........................92
Problems in plaiting the whip................21
Pull tight, plait loose......................61
Q
Quick snake whip .... ........103
R
Rawhide......................................13
Redhide belly from...........................53
Redhide core 49
Redhide......................................12
Redhide whip.................................45
Reducing from 12-plait to 10-plait...........94
Reducing from 10-plait to 8-plait............95
Reducing from 8-Plait to 7-plait . . 66
Reducing from 8-plait to 6-plait ........... 95
Reducing from 7-plait to 6-plait .67
Reducing from 6-plait to 4-plait .............40
Replacing the fall...........................69
Resin board for whip rolling ................23, 73
Rib rattling 34
Riding crop.................................104
Ring knot....................................10, 83
Rolling the whip .............................23
Rolling the whip with truck spring ...........73
Round 4 plait ..............90
Round 6 plait ........... . 40 68
Round 8 plait ..............63
Round 8-plait, whipmaker’s method ... 62
Round 10-plait...............................94
Round 12-plait ... ........... 122, 144
Round 16-plait............................. 127
Round 16-plait, vee pattern............... 129
Round 16-strand barber’s pole plait 130
S
Secret plait worked into a whip handle . ... 32
Selecting the kangaroo skin.................. 4g
Self-greasing lace holder.....................^4
Setting out for name plaiting................13g
Shaping the handle knob .... g0
Sharpening strop .16
Ship of the dead, whip handle design 12g
Short herringbone, whip handle design Ц3
Shot loaded stockwhip 47
16-plait, round . . 127
Skiving cut................................. .17
Skiving.......................................16, 60
Slit braid....................................42
Small cracker knot............................146
Snake’s head hitch ... ........150
Snake whip, a quick snake whip .... 103
Snake whip as a weapon...................... 101
Snake whip, building up the knob.............103
Snake whip, handle foundation. . ... 101
Snake whip, handle loop................... 99
Snake whip, method one.....................98
Snake whip, method two....................101
Snake whip, the belly.....................103
Soap, plaiting............................20,111
Solid band, whip handle design ..............121
Spanish ring knot based on 3-part 4 bight . 83
Spanish ring knot based on 3-part, 5 bight . 10
Splitting the strands............... 16, 60
Square start for handle...................... 31
Stairstep, whip handle design. ... 119
Steel-lined handle . . 46, 75
Stitching stool..............................140
Stock crop or thong.......................... 46
Stockwhip, definition.........................46
Stockwhip, how to make a 4-strand stockwhip 11
Stockwhip, how to make an 8-strand stockwhip 43
Stockwhip of kangaroo leather . . 44
Stool, stitching.............................140
Straightening a whip handle ................. 26
Strand cutter, homemade.......................59
Strand cutters ... ...............58,59
Strands, broken strands. . . ®6
Strands, cutting and skiving..................’6
Strands, cutting out the strands............ 55 58
Strands, dropping strands
Strands, greasing the strands....................
Strands, joining without glue...............
Strands, keeping in bundles......................
Strands, number of strands to cut
Strands, skiving 16, 60
Strands, splitting the . . 16 60
Stretch in the leather................
Strop for sharpening ....
Styles of whips . . ................12,44
Sun, whip handle design
т
Tallow, cleaning. ................. 20
Tamales............................................
Team thong.........................................
Template, for marking leather............. . . 16
Testing for stretch ...............................
Thong, team........................................
Thong, Turk’s head on the thong.............. 74
3-part, 4-bight Turk’s head..................154
Thumbnail cutting.............................58
Tight corners, cutting out....................59
Tony Nugent whip.............................106
Triple diamond, whip handle design...........116
Turk’s head, finishing the knob...............82
Turk’s head, gaps in the Turk’s head..........82
Turk’s head on bullwhip handle................96
Turk’s head on keeper end.....................82
Turk’s head, 3-part, 4-bight.......... 36, 83, 154
Turk’s head, 5-part, 4-bight.............74, 81, 96
Turk’s head on the thong, 5-part, 4- bight.... 74
Twelve foot shot-loaded stockwhip.............47
12-plait, round.................. 93, 94, 115, 122
12-plait, under 2 sequence....................93
12-plait, under 3 sequence....................94
Twisted handles..............................108
Two-seam plait, whip handle design...........129
Two-tone work.................................84
Tying the set to the stock....................76
Types of roo leather...................... . . 58
U
Uneven taper..................................68
Using precut lace for name plaiting..........134
Using precut lace for a whip.................1^3
V
Vee pattern, whip handle design..............129
Vegetable tanned leather.......................
Vertical and horizontal letters ............137
W
Wall knot....................................28
Whip as a weapon............................101
Whip belly...................................51
Whip bolster.................................54
Whip, Bullockie’s whip.......................45
Whip, bullwhip.......................... ... 45
Whip by Tony Nugent.........................106
Whip, care of . . . 84
Whip cracker knots..........................146
Whip cracker.................................23
Whip cracking................................25
Whip handle clamp........................79, 140
Whip handle designs.........................105
Whip handle with an 8-plait and Turk’s head . . 29
Whip, kid’s whip.............................41
Whip, loaded.................................51
Whipmaker’s plait, vee pattern..............129
Whipmakers, first rule about.................45
Whipmaking terms.............................46
Whip, making the belly , . . . 14
Whip names...................................12
Whip of bought lace, plaiting the Keeper . . . 144
Whipping, long...............................77
Whip, 4-plait basic..........................14
Whip, 6-plait basic..........................38
Whip, redhide................................45
Whips and handles...........................107
Whips, main groups of........................44
Whip, snake whip.............................45
Whip with bought lace.......................143
Whitehide....................................13
White on black letters......................137
Working names into the weave................132
Wraparound handle............................32
People Named in This Book
Allan, George...............................101
Ashford......................................107
Barton, Kelvin .... 109
Baxter, Joe 20
Burton, John 132
Callope, Les.................................147
Campion, George.............................. 153
Cheerio Rob .................................147
Clarke, Peter 70, 88, 121
Cluff, Tom.........................................73
Cull, Bruce................. 47,49,53,111,122
Denholm, Glen........ 12, 46, 111, 119, 137, 160
Doohan, Maurice . . 13, 15, 23, 36, 46, 49, 53,
58 73 107, 110, 148 149, 160
Fuerst, Eric..............................130
Grierson, Ross ........................11, 25
Hasluck, Paul.............................107
Hassett, Charles..........................146
Henderson..................................53
Hill, “Jimmy the Whip’’................... 18, 34
Hobson Silas 1
Jellicoe, John............................... 194
Kite, Doug............................... 22, 104
Lawson, Henry 199
Nugent, Tony 106 108
McDowell, Jim 94
McMaster, John.............................. 132
Morgan, David.............................97, 107
Russell, Don ..... 194
Serletto, Susie. . .... ......149
Stephens, Hugo Ц2
Stien, George................................. .150
Stuart, John McDouall.......................... 199
Tarrant, Doug.......................... - ... 29
Taubman, Richard 129
Turner, Les...................................... g
Wade, William.................................... 4
Walther & Stevenson.............................107
Weekes, J. J.............................. 107, 108
Whiteman, Lindsay..........................77 153
Williams, R. M........ ............ ... 58
Ct
166
S24.95
Ron Edwards was born in Australia in 1930 and brought up in tb“
country where the small farmers still plowed with horses and harves*
ed their half acres with sickles and scythes, while the larger
properties relied on the annual visit of the steam-driven threshing
machines to process their crops. By the 1940s all this had vanished, but
by then Edwards had realized that the country’s traditional crafts were
also disappearing. He began to note some of them in drawings and text
and later published these materials in his native country. How to Make
Whips is the American edition of his ninth book.
The first section of How to Make Whips gives instructions for a basic
8-strand whip; the second deals with the making of fine kangaroo lide
whips. Other chapters explain the making of bullwhips, snake whips,
and whips made from precut lace. Also included are instructions on
plaiting names in whips and using plaiting designs for whip handles.
Ron Edwards is president of the Australian Plaiters and Whipmakers
Association. For many years he has been a partner with his wife in a
saddlery business in Cairns.
J)ineag>!e
fcg CORNELL MARITIME PRESS
CENTREVILLE, MARYLAND 21617