/

Text
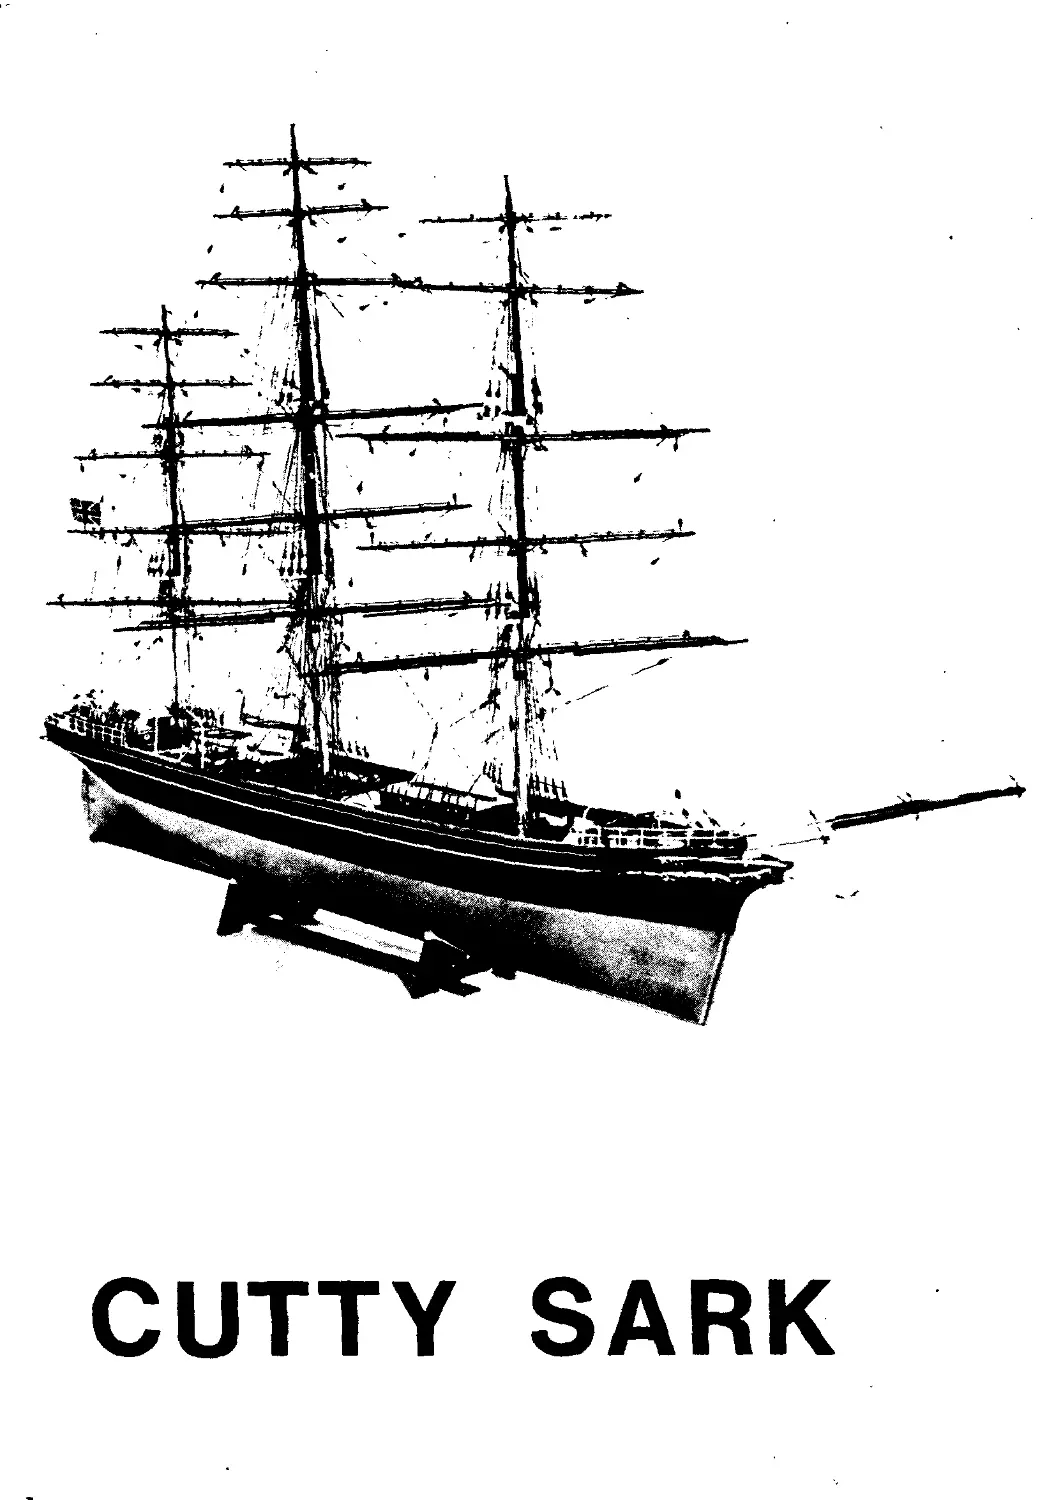
CUTTY SARK
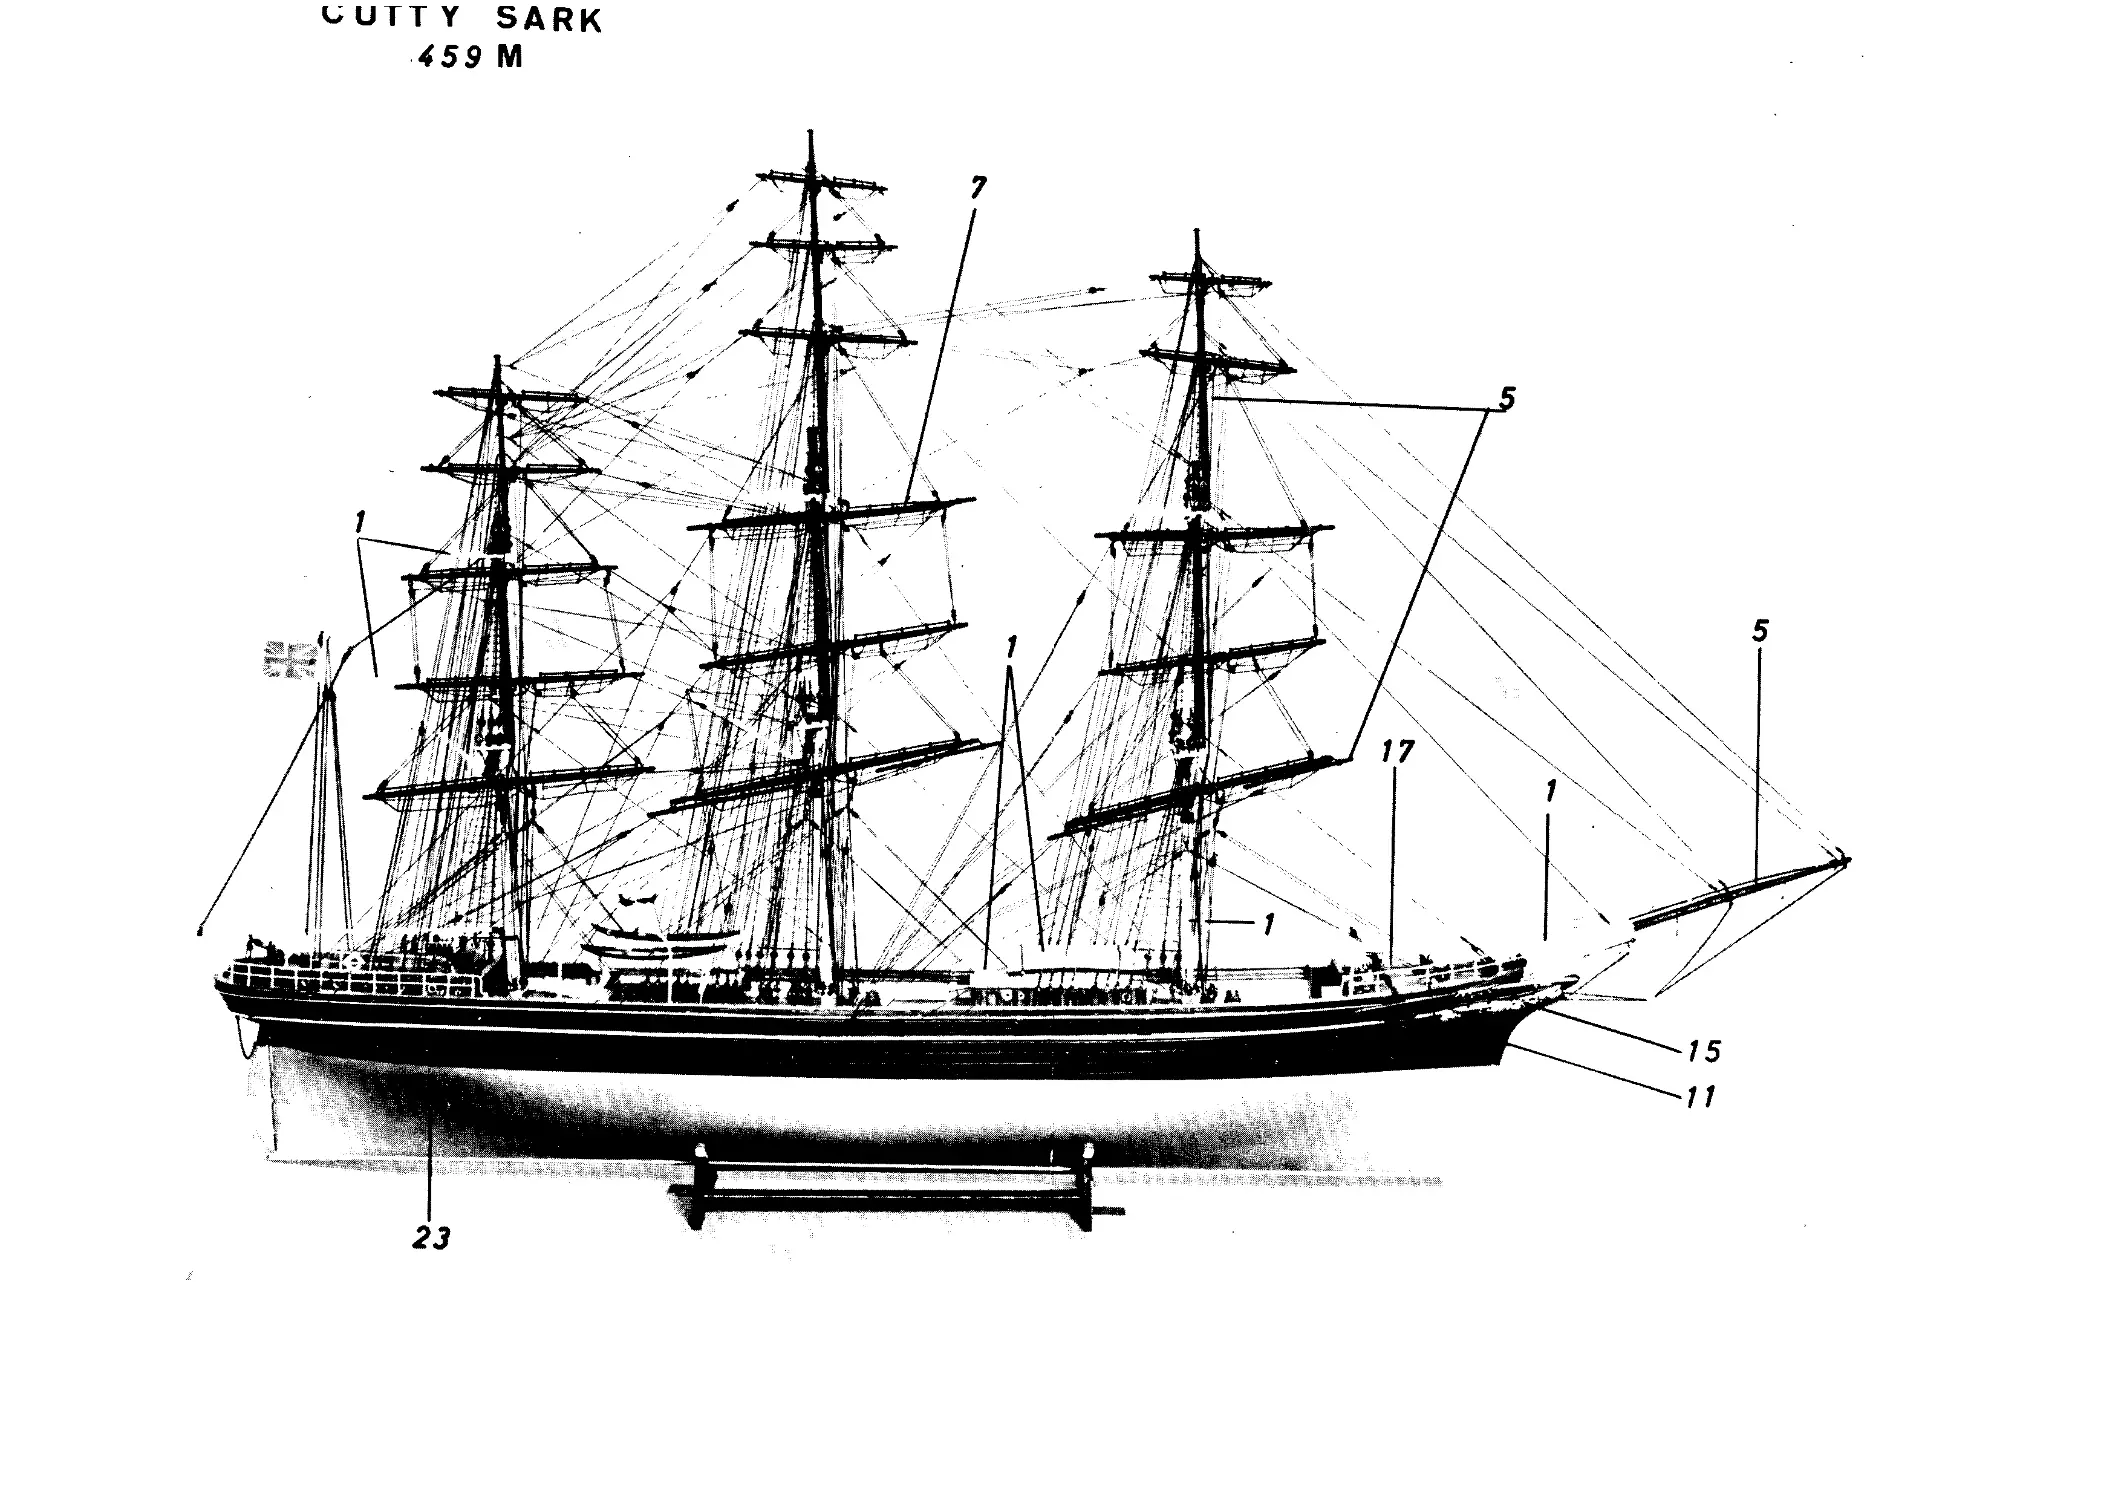
^UTTY SARK
459 M
23
т
CUTTY SARK
Before attempting construction of the model, examine, the plans carefully and control the
various pieces and fittings, so that you know where each part goes before starting to build
the model.
Besides the wooden kit you can buy a box with fittings for Cutty Sark, including the main
parts of the fittings to be used in the ship. Some parts are not included which the modeller
can make himself, without any difficulty. We feel that the modeller is served better by ma-
king these himself, otherwise, the price for the fitting box has to be robed with the costs of
production, of these fittings. From the enclosed list you will see which fittings ore included
in this box. The main parts of the fittings ore made from lathed brass. The modeller who is
able to make a number of fittings himself, but does not have the necessary tools for oil of
it, can buy the other fittings separately.
Cradle.
Construct a cradle from a piece of wood, e.g. 20mm x 200 mm x 1000 mm, and affix the two
pieces of wood 5x5x800 mm (see illustrations la and b). The lists are pinned on
the piece of wood in the same distance as the thickness of the keel. Yau have to make sure
that the lists are straight and that the keel is tight between the lists.
Keel.
The keel is split into two parts and is put together with fish-plates 14 (illustration 1).
Bulkheads.
The bulkheads are numbered 0 - 10J. Be sure that the cuts in the bulkheads can fit down
the keel, because the thickness of the plywood can range from -0,2 mm Io -10,2 mm, and
if is necessary to make an adj us keen f. If these ate loo tight they hove Io be sandpapered
slightly. You can place eaeoll pieces of paper between them. Wlieu all the bulkheocb are
djusted, they can be placed an their right places as numbered. The middle pieces 11, 12
13 ora now pressed in the bsdkheads bom ahorse, and they mest go completely dawn in Hr
tom of the cuts. II and 12 are put tggnthrw wiA 2 fnb-pia*es 12A (illustration 11) one as
side of the middle piece. When you are sure that everything is placed correctly, place I
decks before you start to glue. The decks are cut out of Ike base-pkwes number 16, 17 as
which are fitted exactly in the cuts an Ae brrBiheads.
Before the desk number 47 is glued on, the bowsprit is fitted and fastened. The bowsprit is
made of the enclosed pole 8 mm x 170 mm, and drill a hale in bulkhead 10J for the bowsprit.
Then the deck is glued on the bulkheads, and they can be fastened with pins. Now the gluing
of all the bulkheads can be made, ond before Ae work is continued the hull must be set aside
far a few hours, to dry.
Planking.
When the glue is thoroughly dry the hull can be taken off the craddle. The most important
point during the construction of the hull is the sandpapering and polishing, of the bulkheads,
before the planking is made. Bulkheads number 8-9 and 10 da have to be sanded, shaped
with the bending of the ship. Da exactly the some with the bulkheads number 0 - 1 and 2,
otherwise it makes it difficult to put on the planking.
The planking is made of the enclosed 7x1,8 mm strips. You start at the keel an each side.
First 7 or 8 strips are glued on, and then a wedge is cut out from bulkhead 1 to bulkhead 10, so
that the following strips ore running in a straight line. Then you glue on 2 mare strips, after
which you again moke a wedge so that the rest of the planking is fallowing the ships sheer.
The best glue to use is the white glue, because this dries on wet materials. Remember to put
glue on the side of the strips. After this we can put on the bulwark, which you can find on
base-plates number 48 - 49. The middle piece a 7 x 1,8 mm strips and the bulwark must be
1,5 mm outside the baulding. From bulkhead number 0 round in stem at the bulwark marked
X (illustration 11) glue a 7 x 1,8 mm strip on the bulkhead and deck. The strip is bent best
after having been in hat water, in a battle with almost the same diameter.
The stem is made of two enclosed blocks which are glued on bulkhead 0 and the keel. After the
glue is dry, this is sanded and shaped as shown on the drawing.
5
We will recommend that you use a piece of sandpaper during the work with the planking, be-
cause sanding while the glue is still wet means that the cracks between the planking strips are
filled out with a mixture of the glue and find dust from the wood and will make these almost
invisible. Now the hull can be sanded, so that it becomes completely smooth. The belaying-
pin bench below the rail is glued on 16A (illustration III) but it will make the fixing of the
dead eyes easier if this is done before. The dead eyes are fixed with a piece of thin copper
wire, the place can be seen on the rigging drawing. When you have finished the polishing
of the hull, you can glue on the thin 0,5 x 1,5 mm strips and 0,5 x 2 mm strips, see cut cc
and the place of the strips as shown on the some cut.
Naw it is time to paint the model. Do this work very carefully because this is very important
to get a beautiful model. When the model is sanded carefully with sandpaper it is given a
primary colour, except the deck, which is coated with clear varnish. Let the primary colour
dry and polish again. Any uneveness can be puttied with oilpaint polish and paint. When the
model is dry hold it towards the light to see if there are any defects, which can be corrected
by putting and sanding. The model must be smooth. After this the hull is painted white. When
the varnish is dry the waterline is marked all the way around the hull. Place a piece of mas-
king tope along this line and point the buttam with bronze colour, the paint has to be comple-
tely dry before the tape is removed. Above the waterline the hull is painted the same way.
Ta get a very nice mode) you can polish the block paint off the thin strips until the while
painting is clear. The bulwark can be painted light brown or with clear varnish.
The cradle to the finished model is mode of the pieces 7A and 4A, that fits to the bulkheads
7 and 4,. They are put together with 2 ea. 8x8x250 mm strips The cradle is
painted black.
While the model is drying the dry-limits and the companionways and rhe cabins and so an
can be put together.
In this connection, we shall mention that there is a supplement Io rhe set made of wood.
A fitting set can be delivered, which contains the necessary holders for the bulwarks part-
hole pymps, winches and so on.
The cabin over the bridge in the stem is put together of the pieces 18, 19, 20, 21, 22, 23
and 24. If you decide to use the separate fitting set, it is the best to paint the port-holes
before these ore put in, and these must be white. The cabin is varnished with clear varnish.
Sky-light is put together of block number 70, and the pieces number 40. This is cooled with
clear varnish. The barrel of the steering wheel is put together of the blocks number 54 and 55
and coated with clear varnish. Two chests ore put together from pieces 41, 42 and 43, which
are cooled with clear varnish. The top is painted white. The ladder that runs from the bridge
to the deck is mode of strips 0,5 x 3 mm and is coated with clear varnish.
The tabernacle number 32 is coated with clear varnish. The companionway» are put together
with pieces 34, 35, 36, 37, 38 and 39. And the sides are varnished. The tap of number 37
is painted white and way number 39 is coated with clear varnish. The two big galleys are
built from the pieces 25A, 25, 26, 27 ond 28, plus 25, 29, 30 and 31, all the sides are coa-
ted and the top is painted white. The port-holes are painted white before they ore put in.
The hatch on deck is built from the pieces 44, 50 and 45, 51. The sides on 44 and 45 are pain
ted steelgrey. Hatch 50 and 51 are coated with clear varnish and the edges on the hatch are
pointed grey. The toilets are pvt together around block number 71 of the pieces 72, 73 and
74. The sides and doors are coated with clear varnish and the roof number 74 is painted white.
The campanionurays below the front deck are put together of block number 67 and way numsber
68. 67 is coated and 68 and 69 are painted white. The railings are mode best of those in the
fitting set, when you use balusters F. 91 through »4>ich you can pull a 1 mm brass wire.
The roiling's on the cabin plus all the railings on the bulwark are pointed white.
At the roilings on the bridge, the handlist deck is made of 1,8 x 3 mm mahogany strips, and
cooled with clear varnish, the bakisters are brawn.
Belaying pin bench No. 62 -63-66 are cut out of the printed sheet No. E 713 .
. As a leg you can use a strip 3x2 mm ar leg nweber F224, as shown
in the fitting set.
6
Ям beams for the lifeboats are mods of 3n3 mm strips (Hlashoticn Ьб wllh glued blocks
amber 46. The stays are bent os the drawing shows, bet the buttress most only be on the
stem, because the one in the front is laying on the cabinroof, with small middlepieces of
wood. The stays and the buttress are painted white.
If you want ta do something extra, ta get a very nice model, you can caver the deek with
thin strips 0,5 x 2 mm, these are glued on the deck as shown with a thin wire between e-
very list, and they ore given a coat of clear varnish. This work is done best before the eo-
bins are glued on, and it takes some patience and accuracy.
Яге dinghies are covered with number 167a and is coated with clear varnish.
The gunwhale on the dinghy is painted brown 4 nee down and the seoto and the deck brawn
and the rest is painted white.
Details of the deck fitting as bollards and so on, these are shown well an the drawings, so
more explanation should not be necessary.
All that is I eh ta do on the hull is the glueing of the figure-head and the ornament, which
ore enclosed in the building sot in plastic.
On the main drawing the numbering of the colours, is shown.
No. 1 ' Brown No. 5 in the paintingbox
No. 2 Gold Na. 15 in the paintingbox
No. 3 White Na. 1 in the paintingbox
No. 4 Block No. 11 in the paintingbox
Rigging.
The exists are built from poles (the size can be controlled cRreetly on the drawings) with
lop number 57, 5) and the cross trees 56, 56a and 58. Under the tap, lhe piece 60 is
placed and ot the bottom of lhe mast, the belaying-pin ring number 61 is placed. Before
Ae masb are pfosed ami before the real rigging work starts, it is good to have all the
blocks and fittings placed an lhe masts, an their right places. This can be controlled bp
following the rigging drawing. When you are sure this is done correctly the masts can be
placed, but remember to give them the right slope as shown on the drawings.
Then we are ready to start lhe ready riggmg work. It starts in tae bow wifo rope masbce I,
which is put together with two dead eyes and goes op asosred lhe most, so that the mast
does not come out of its settlement.
You can moke a temporary stay of rope.
The first time you see the drawing, it seems very difficult. However, the system is very
simple, because every piece of rope is numbered. You have only to follow every single
number on the drawing to control the rapes placed from the beginning to the end. Remember
that the numbering has gat nothing to do with the separate parts of the building set. Also,
remember it is not only correct to fasten the rope with a knot, there has to be a fashing
with black wire. It is very good ta use a small piece of tape ta life like the lashing.
You might have some trouble getting the soft wire through the small hales and it makes
the work easier, if the wires are stiff. This can be done by dipping the wire into glue
and letting it dry.
All the shrouds are put together with dead eyes, which are used to tighten the ships rig-
ging. Across the shrouds the ratlines, steps of lhe wire are glued on, and the extra ends
can be cut off when the glue is dry.
The ratlines are placed in a distance of 4,5 - 5 mm.
System in No. an the rigging
\
Foremast mark M 1 inclusive bowsprit Contents Na. from 1 ta 23
Ma inmost mark H 2 Contents No. from 1 to 24
Mizzen mast L 3 Contents No. from 1 ta 18
Maindrawing
shows the running stores from No. 19 to 38, the 4 gallows No. 78 where the running stores
Na. 21 H - X H - 19 H and the corresponding M Nos, there are used 4 rail stanchion Na. 30
foam the fittmgset.
If you are not going to buy this fittingset, you can use 4 ea. 2 mm brass wire instead.
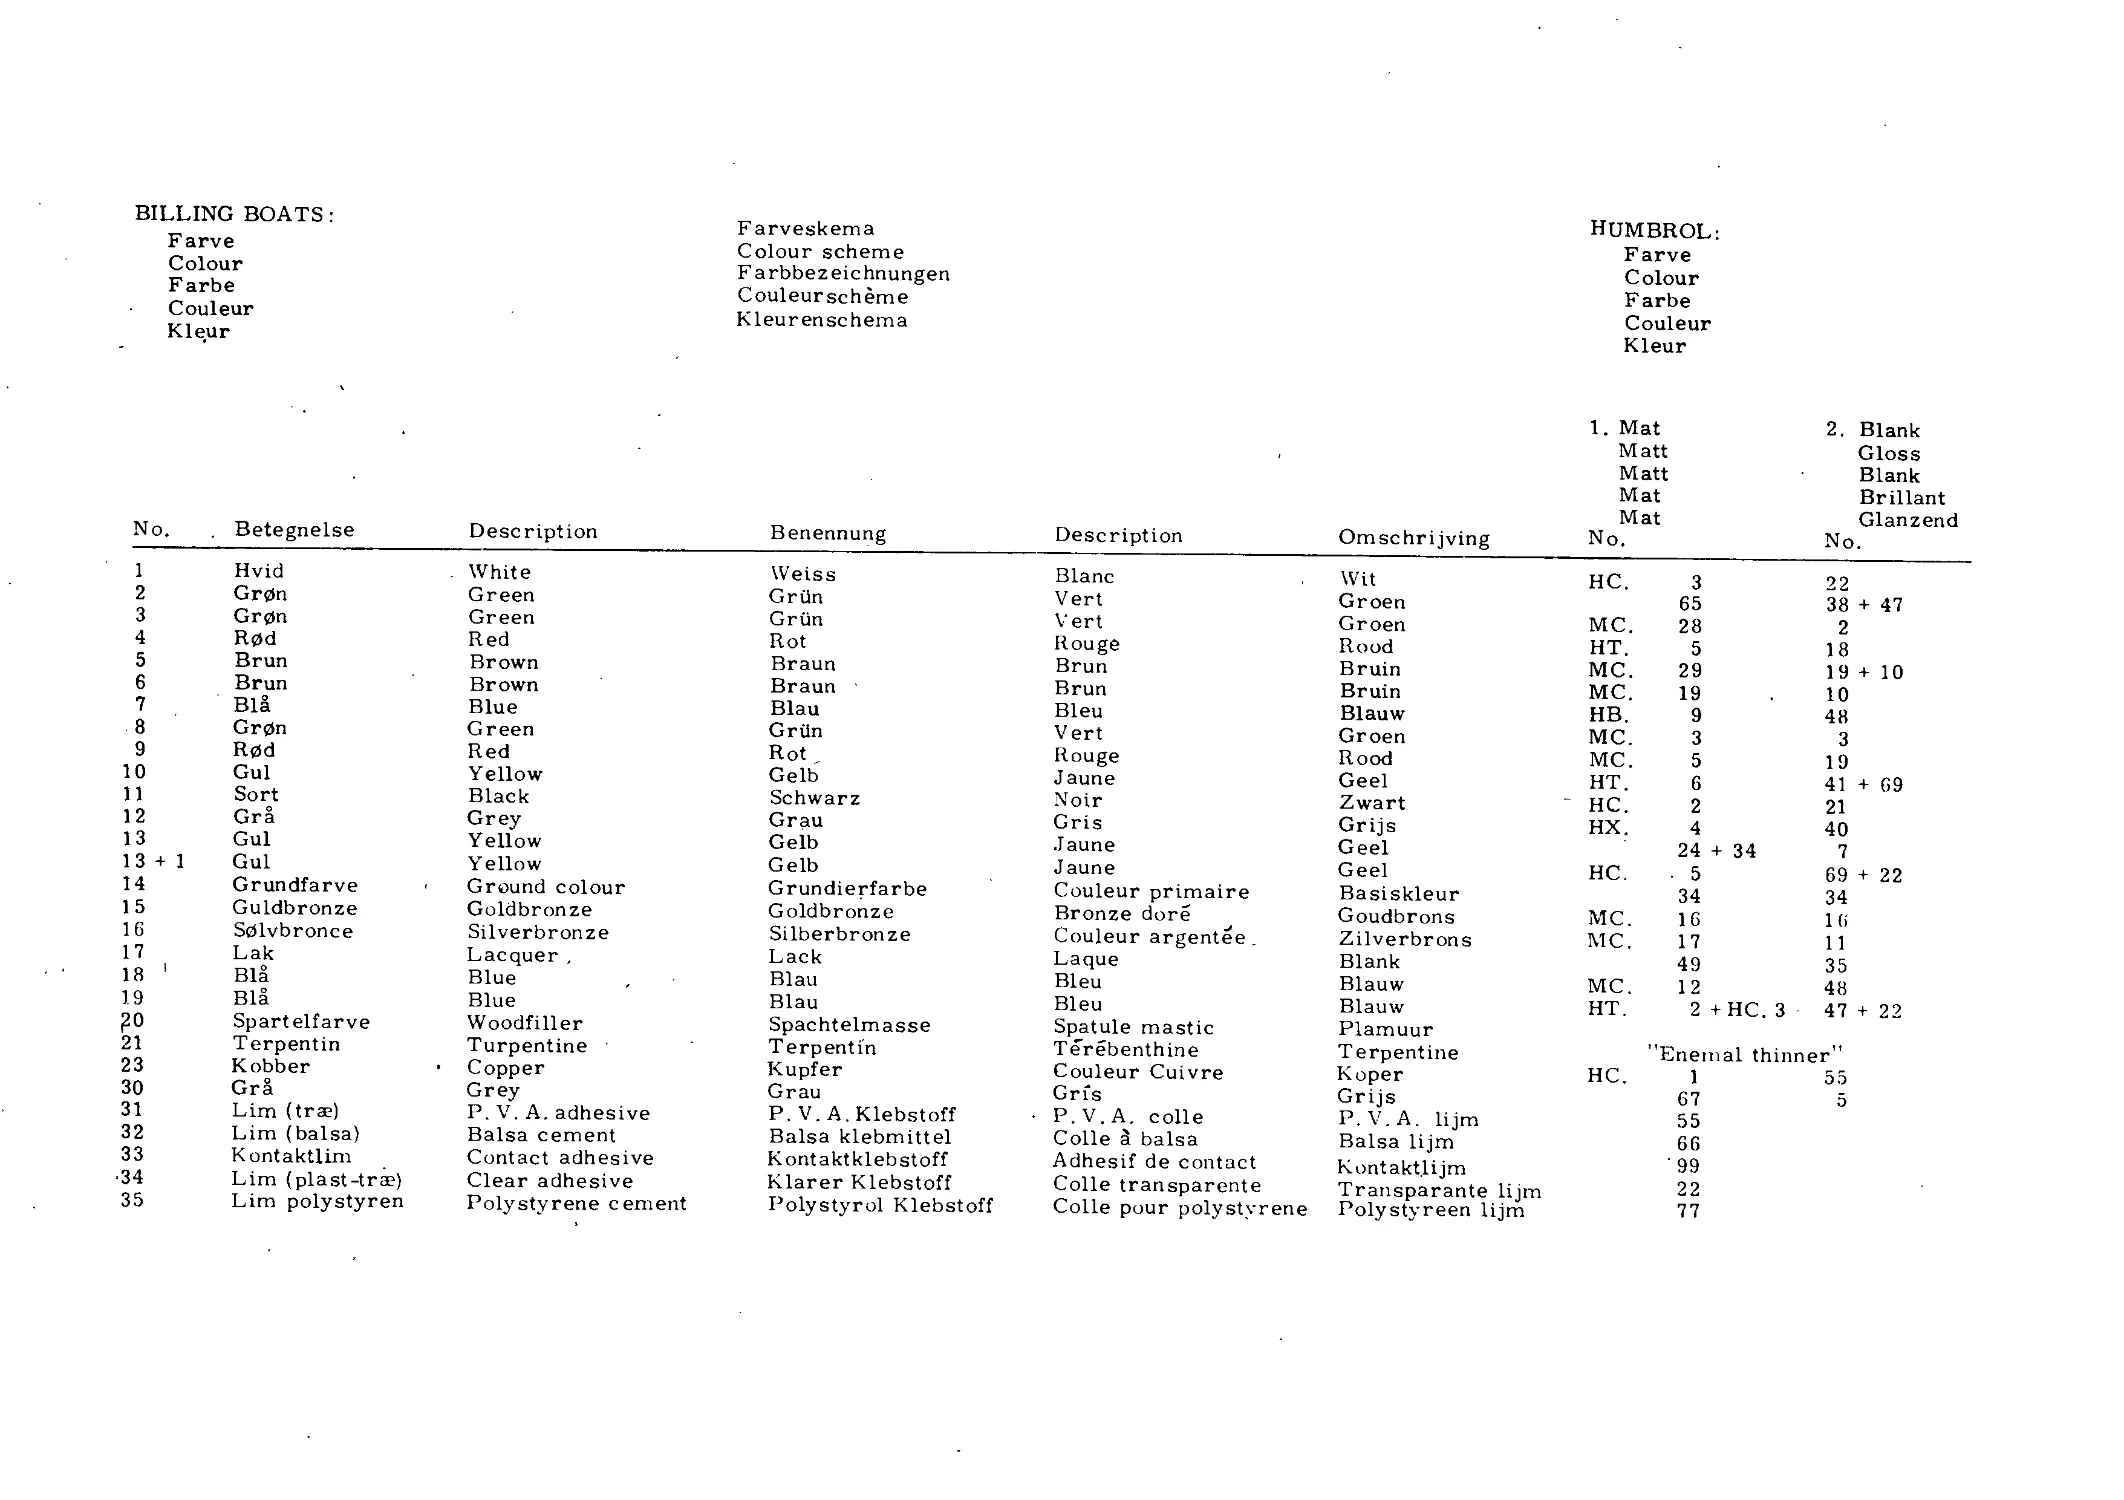
BILLING BOATS :
Farve
Colour
Farbe
Couleur
Kleur
Farveskema
Colour scheme
Farbbezeichnungen
Couleurscheme
К leu ren sc hem a
No. Betegnelse Description Benennung
1 Hvid - White Weiss
2 Gr0n Green Griin
3 Gr0n Green Griin
4 R0d Red Rot
5 Brun Brown Braun
6 Brun Brown Braun
7 Bia Blue Blau
8 Gr0n Green Griin
9 R0d Red Rot
10 Gul Yellow Gelb
11 Sort Black Schwarz
12 Gra Grey Grau
13 Gul Yellow Gelb
13 + 1 Gul Y ellow Gelb
14 Grundfarve Ground colour Grundierfarbe
15 Guldbronze Goldbronze Goldbronze
16 S01vbronce Silverbronze Silberbronze
17 Lak Lacquer , Lack
18 ' Bia Blue Blau
19 Bia Blue Blau
?o Spartelfarve Woodfiller Spachtelmasse
21 Terpentin Turpentine Terp ent in
23 Kobber • Copper Kupfer
30 Gra Grey Grau
31 Lim (trae) P.V. A.adhesive P. V.A.Klebstoff
32 Lim (balsa) Balsa cement Balsa klebmittel
33 Kontaktlim Contact adhesive Kontaktklebstoff
34 Lim (plast-trse) Clear adhesive Klarer Klebstoff
35 Lim polystyren Polystyrene cement Polystyrol Klebstoff
HUMBROL:
Farve
Colour
Farbe
Couleur
Kleur
1. Mat 2. Blank
Matt Gloss
Matt Blank
Mat Brillant
Mat Glanzend
Description Omschrijving No. No.
Blanc Wit HC. 3 22
Vert Groen 65 38 + 47
Vert Groen MC. 28 2
Rouge Rood HT. 5 18
Brun Bruin MC. 29 19 + 10
Brun Bruin MC. 19 10
Bleu Blauw HB. 9 48
Vert Groen MC. 3 3
Rouge Rood MC. 5 19
J aune Geel HT. 6 41 + 69
Noir Zwart ' HC. 2 21
Gris Grijs HX. 4 40
Jaune Geel 24 + 34 7
J aune Geel HC. 5 69 + 22
Couleur primaire Basiskleur 34 34
Bronze dore Goudbrons MC. 16 16
Couleur argentee . Zilverbrons MC. 17 11
Laque Blank 49 35
Bleu Blauw MC. 12 48
Bleu Blauw HT. 2 +HC. 3 47 + 22
Spatule mastic Plamuur
Terebenthine Terpentine "Enemal thinner
Couleur Cuivre Koper HC. 1 55
Gris Grijs P.V.A. lijm 67 5
• P.V.A. colie 55
Colle 3 balsa Balsa lijm 66
Adhesif de contact Kontakt.lijm 99
Colle transparente Transparante lijm 22
Colle pour polystyrene Polystyreen lijm 77
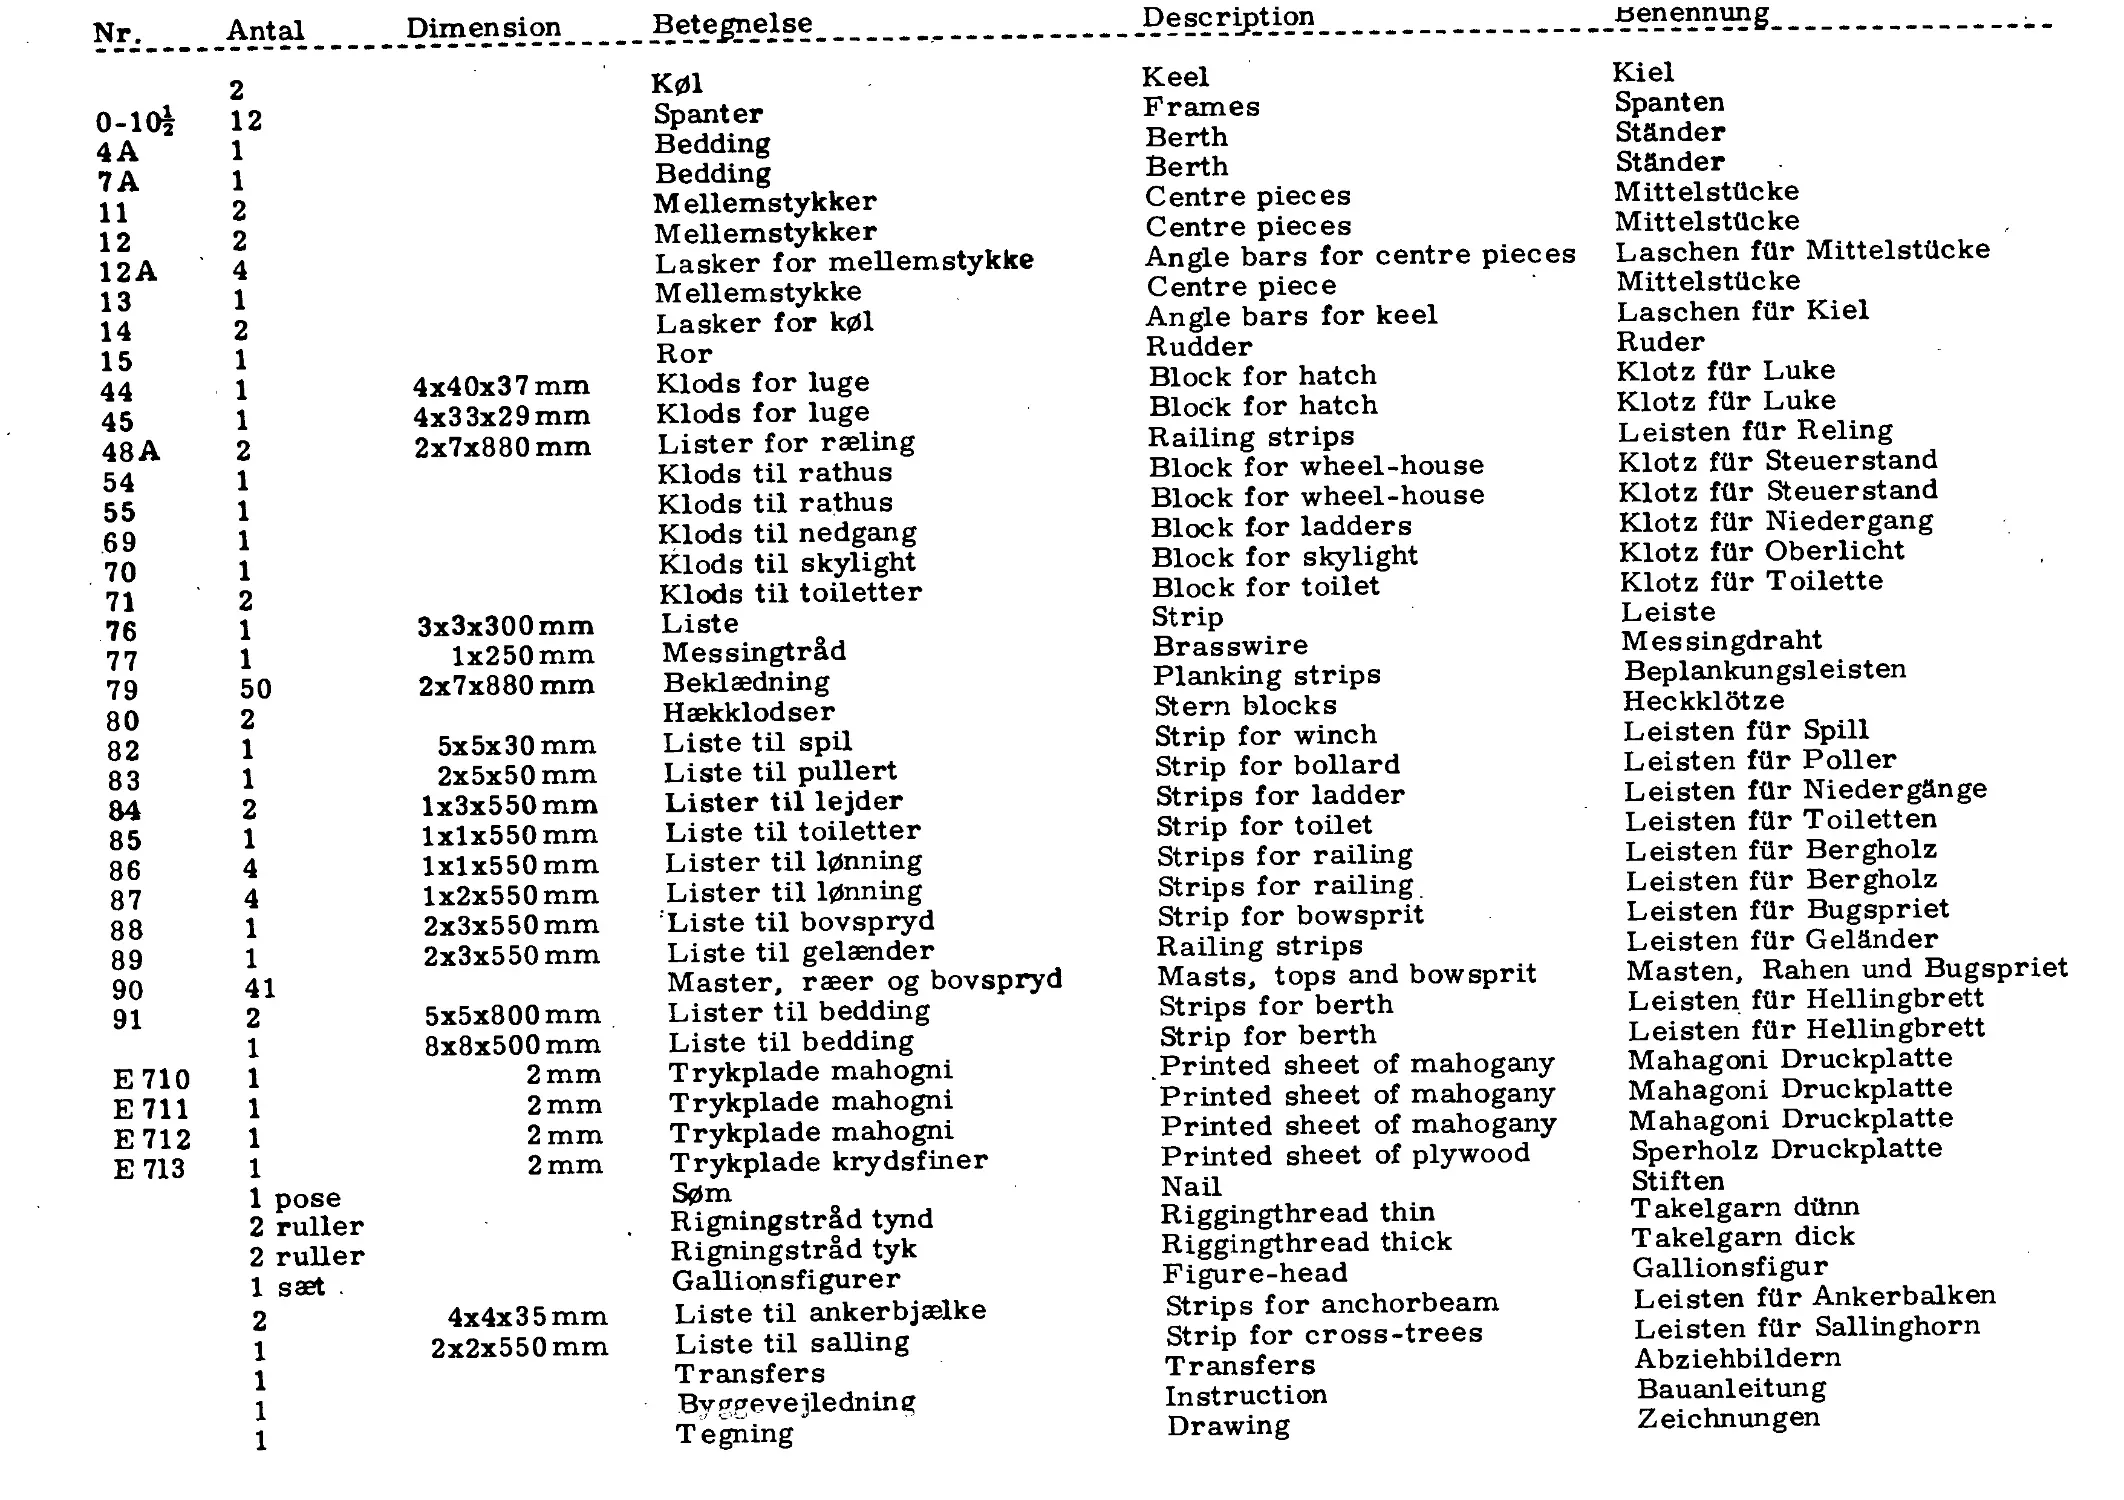
Nr. Antal Dimension Betegnelse Description
2 K01 Keel
o-ioj 12 Spanter Frames
4A 1 Bedding Berth
7A 1 Bedding Berth
11 2 M ellemstykker Centre pieces
12 2 Mellemstykker Centre pieces
12A 4 Lasker for mellemstykke Angle bars for centre pieces
13 1 Mellemstykke Centre piece
14 2 Lasker for k01 Angle bars for keel
15 1 Ror Rudder
44 1 4x40x37 mm Klods for luge Block for hatch
45 1 4x3 3x2 9 mm Klods for luge Block for hatch
48A 2 2x7x880 mm Lister for raeling Railing strips
54 1 Klods til rathus Block for wheel-house
55 1 Klods til rathus Block for wheel-house
69 1 Klods til nedgang Block for ladders
70 1 Klods til skylight Block for skylight
71 2 Klods til toiletter Block for toilet
76 1 3x3x300 mm Liste Strip
77 1 1x250mm Messin gtr&d Brasswire
79 50 2x7x880 mm Beklaedning Planking strips
80 2 Haekklodser Stern blocks
82 1 5x5x30 mm Liste til spil Strip for winch
83 1 2x5x50 mm Liste til pullert Strip for bollard
84 2 1x3x550 mm Lister til lejder Strips for ladder
85 1 1x1x550 mm Liste til toiletter Strip for toilet
86 4 1x1x550 mm Lister til 10nning Strips for railing
87 4 1x2x550 mm Lister til 10nning Strips for railing
88 1 2x3x550 mm 'Liste til bovspryd Strip for bowsprit
89 1 2x3x550 mm Liste til gelsender Railing strips
90 41 Master, raeer og bovspryd Masts, tops and bowsprit
91 2 5x5x800 mm Lister til bedding Strips for berth
1 8x8x500 mm Liste til bedding Strip for berth
E710 1 2 mm Trykplade mahogni .Printed sheet of mahogany
E711 1 2 mm Trykplade mahogni Printed sheet of mahogany
E712 1 2 mm Trykplade mahogni Printed sheet of mahogany
E713 1 2 mm Trykplade krydsfiner Printed sheet of plywood
1 pose S0m Nail
2 ruller Rigningstr&d tynd Riggingthread thin
2 ruller Rigningstrad tyk Riggingthread thick
1 saet . Gallion sfigurer Figure-head
2 4x4x3 5 mm Liste til ankerbjaelke Strips for anchorbeam
1 2x2x550 mm Liste til sailing Strip for cross-trees
1 Transfers Transfers
1 By gge ve jlednin g Instruction
1 Tegning Drawing
jaenennung
Kiel
Spanten
Stftnder
StSnder
Mitt el stile ke
Mittelsttlcke
Laschen filr Mittelsttlcke
Mittelsttlcke
Laschen filr Kiel
Ruder
Klotz filr Luke
Klotz filr Luke
Leisten ftlr Reling
Klotz ftlr Steuerstand
Klotz filr Steuer st and
Klotz ftlr Niedergang
Klotz ftlr Oberlicht
Klotz ftlr Toilette
Leiste
Messingdraht
Beplankungsleisten
Heckklotze
Leisten ftlr Spill
Leisten ftlr Poller
Leisten ftlr Niedergange
Leisten ftlr Toiletten
Leisten ftlr Bergholz
Leisten ftlr Bergholz
Leisten ftlr Bugspriet
Leisten ftlr Geiander
Masten, Rahen und Bugspriet
Leisten ftlr Hellingbrett
Leisten filr Hellingbrett
Mahagoni Druckplatte
Mahagoni Druckplatte
Mahagoni Druckplatte
Sperholz Druckplatte
Stiffen
Takelgarn dilnn
Takelgarn dick
Gallionsfigur
Leisten ftlr Ankerbalken
Leisten ftlr Sallinghorn
Abziehbildern
Bauanleitung
Zeichnungen