/


Tags: weapons military affairs
Year: 1942

Text
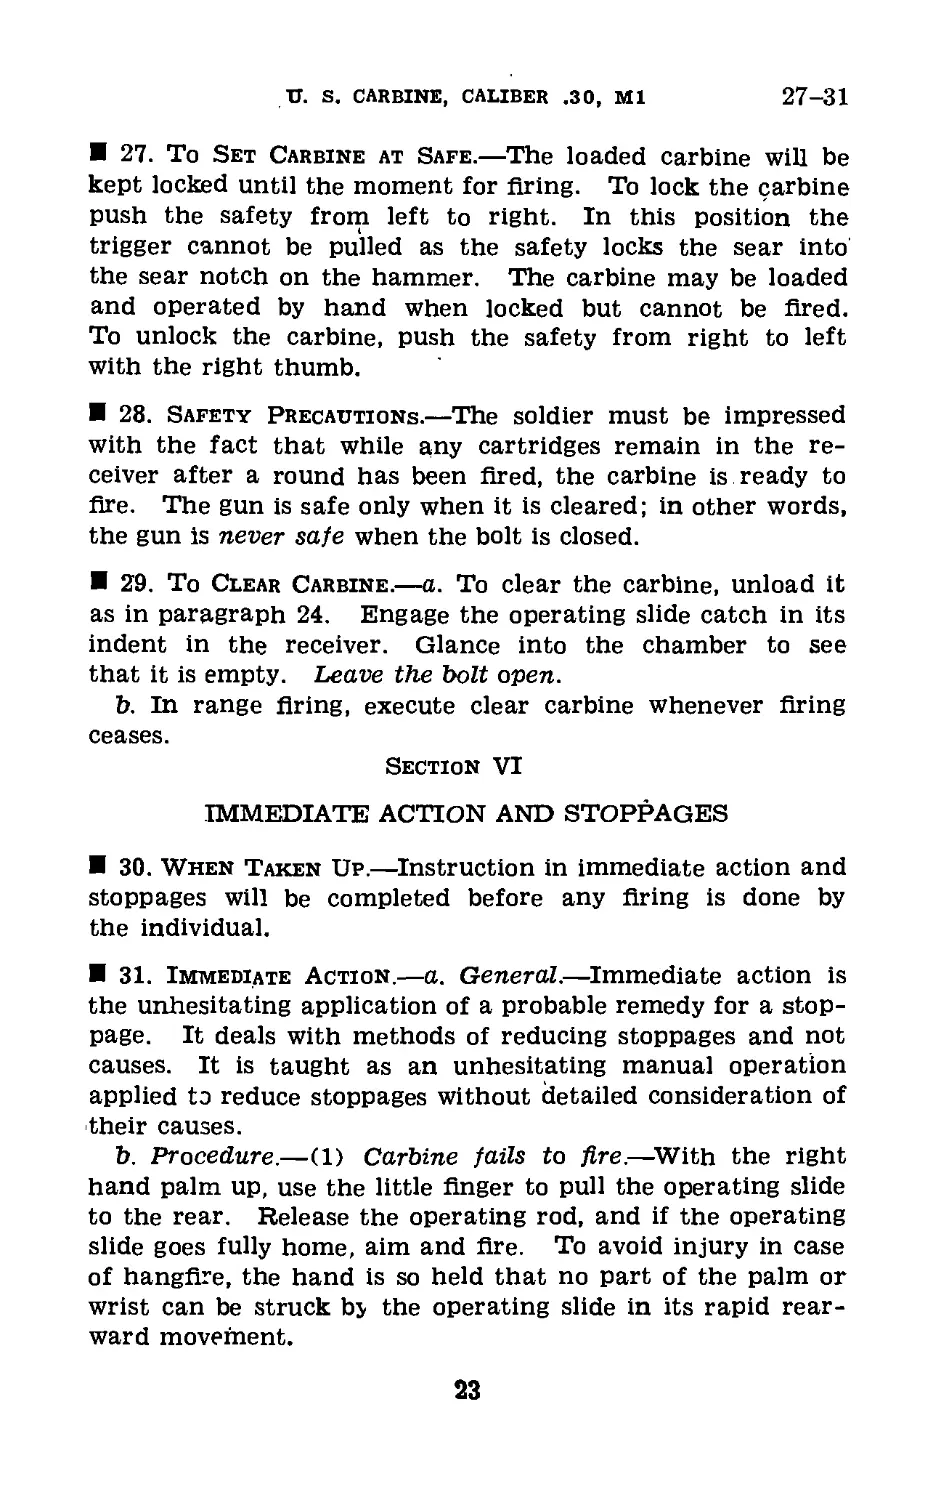
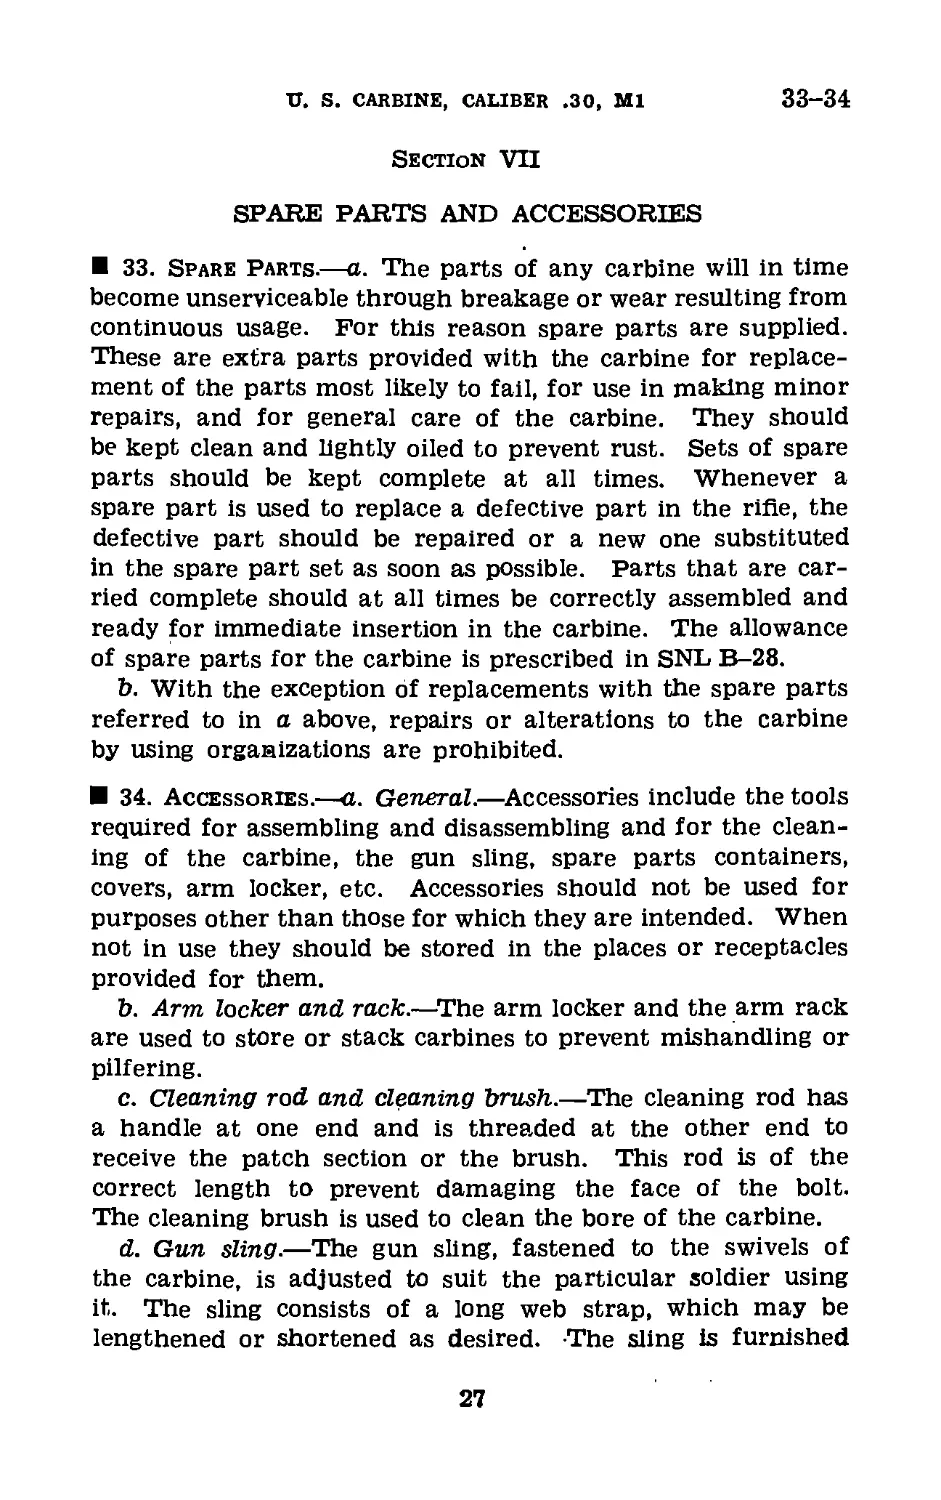
FM 23-7
WAR DEPARTMENT
BASIC FIELD MANUAL
U. S. CARBINE, CALIBER
.30, Ml
May 20, 1942
FM 23-7
BASIC FIELD MANUAL
U. S. CARBINE, CALIBER .30, Ml
UNITED STATES
GOVERNMENT PRINTING OFFICE
WASHINGTON : 1942
WAR DEPARTMENT,
Washington, May 20, 1942.
PM 23-7, U. S. Carbine, Caliber .30, Ml, is published for
the information and guidance of all concerned.
[A. G. 062.11 (4-24-42).]
By order of the Secretary of War :
G. C. MARSHALL,
Chief of Staff.
Official:
J. A. ULIO,
Major General,
The Adjutant General.
Distribution:
R 1-7, 10, 11, 17, 18 (3); Bn 2-7, 9-11, 17-19 (3); IBn
1 (3) ; C 2, 5-7, 17, 18 (20) ; 3, 4, 9, 10, 19 (10); IC 1,
11 (20).
(For explanation of symbols see FM 21-6.)
n
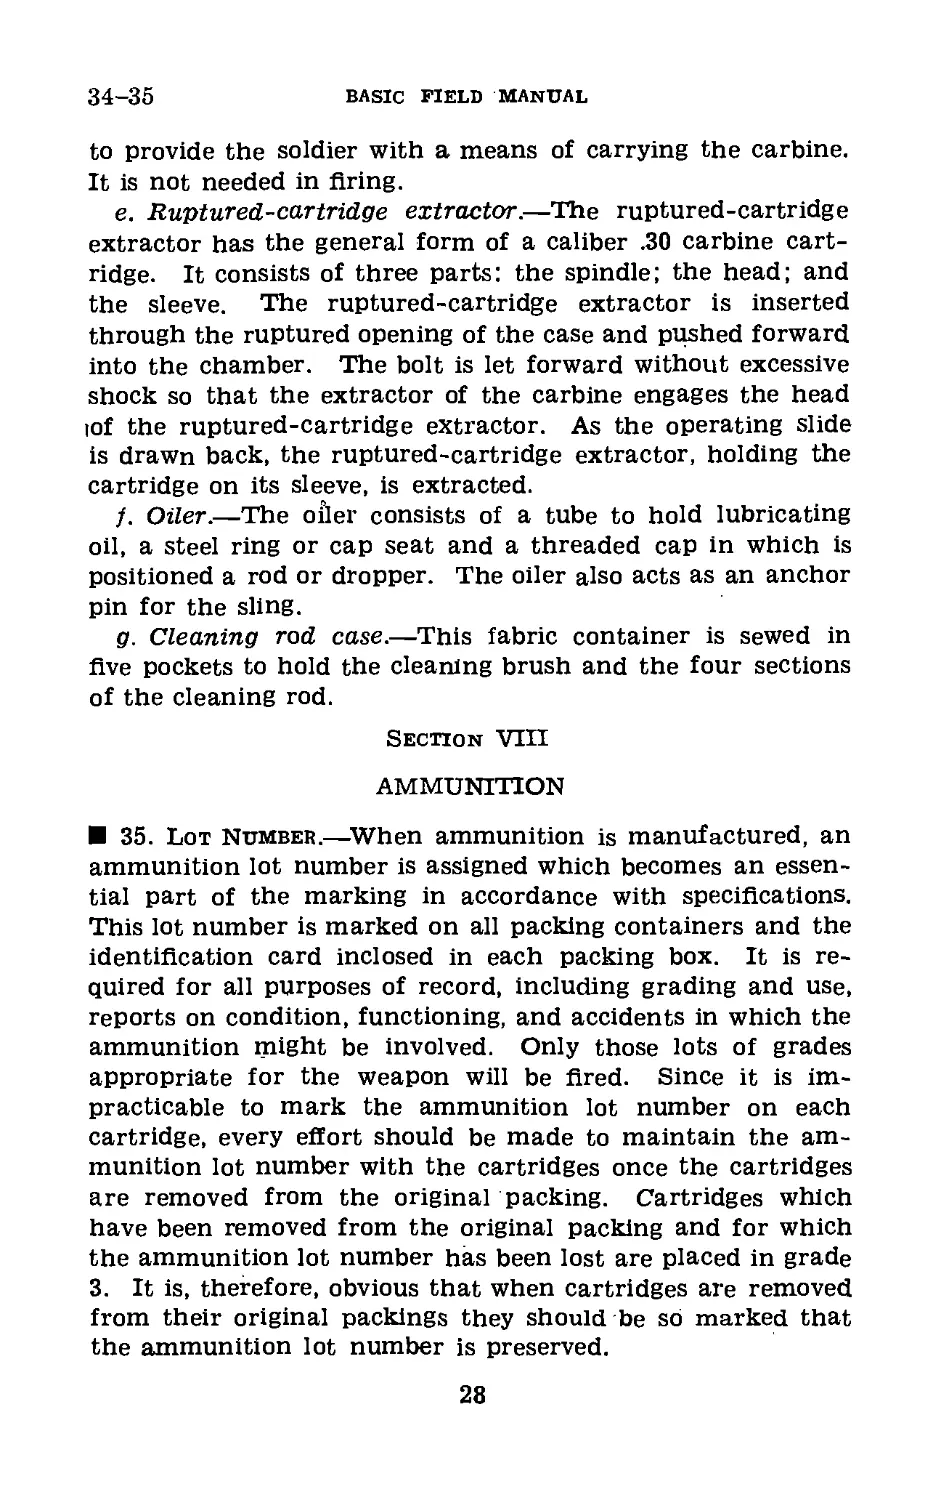
TABLE OF CONTENTS
Paragraphs
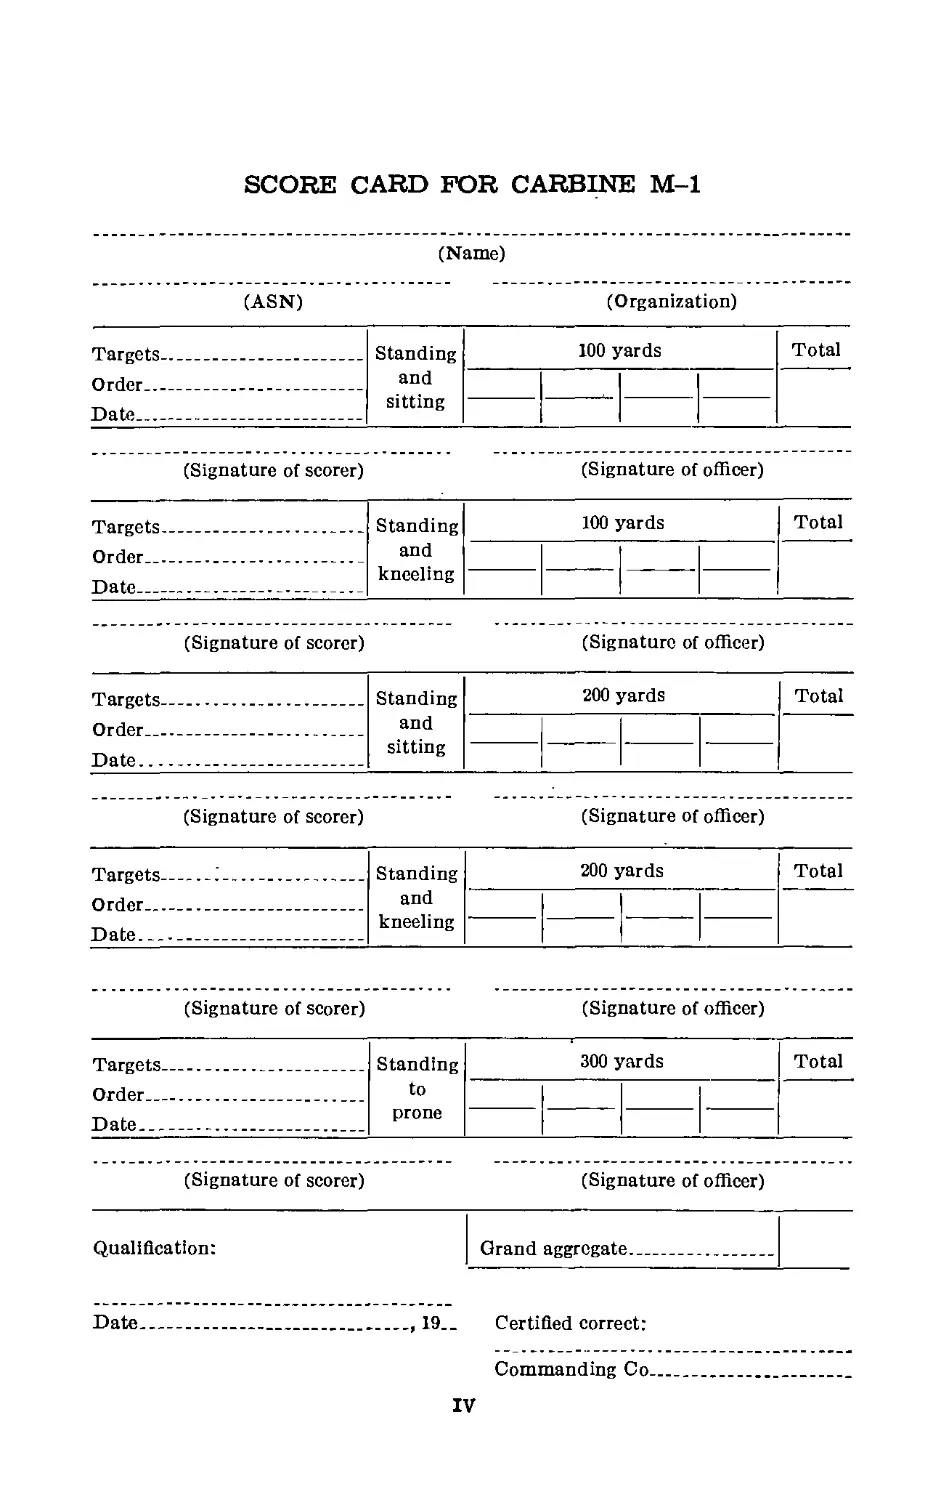
Appendix. Score card for carbine, caliber .30 Ml______
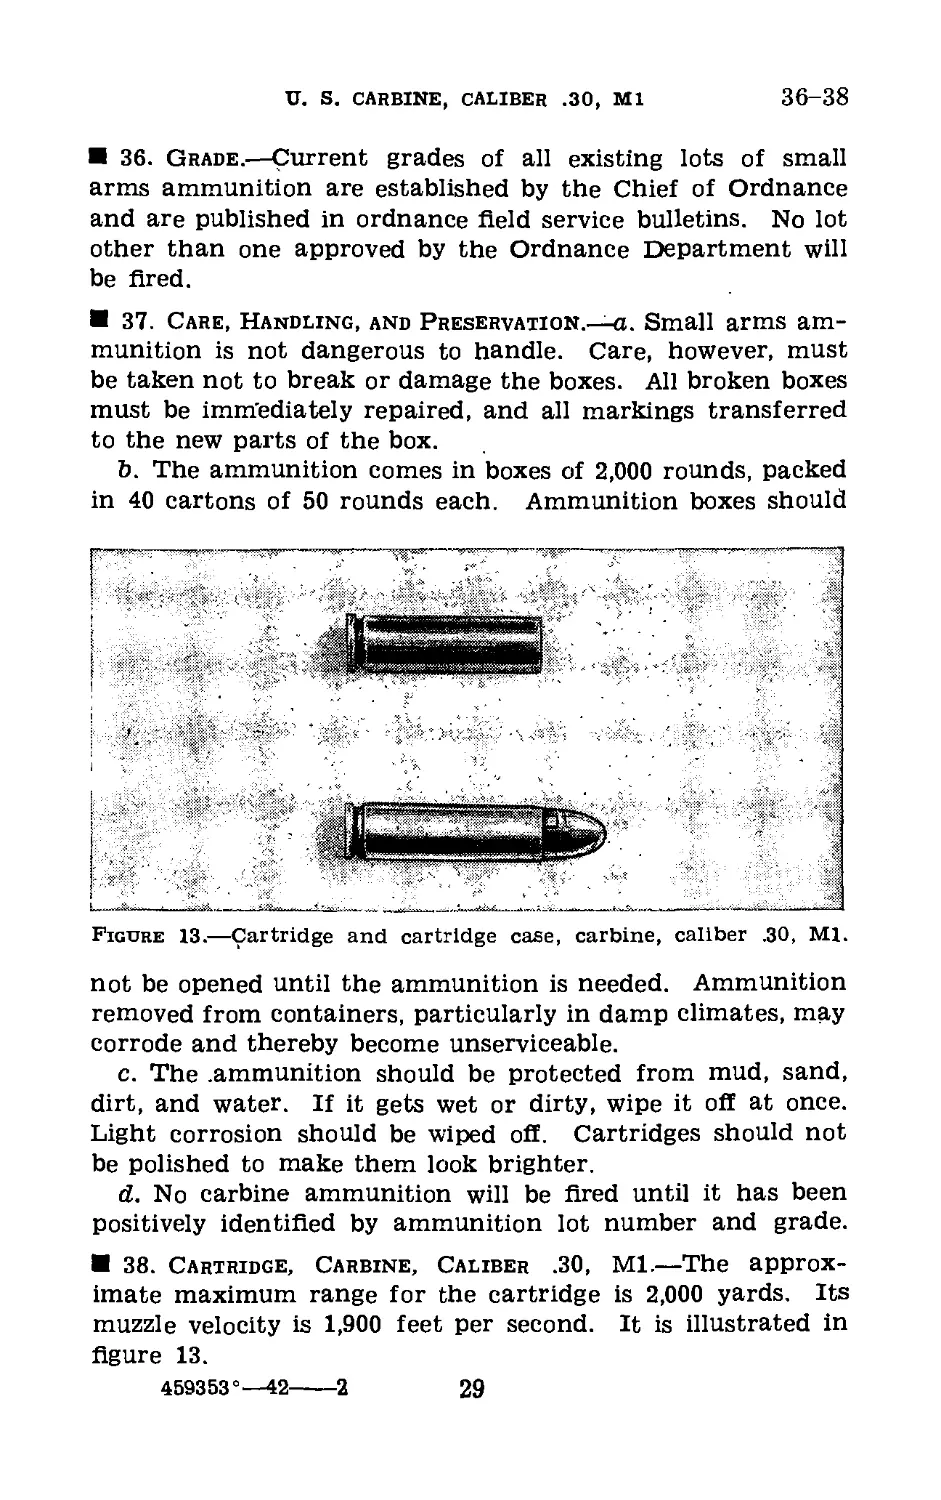
Chapter 1. Mechanical training.
Section I. General_________'_________________ 1-6
II. Disassembly and assembly_______ 7-11
III. Care and cleaning_____________ 12-18
IV. Functioning___________________ 19-20
V. Operation______________________21-29
VI. Immediate action and stoppages___30-32
VII. Spare parts and accessories______33-34
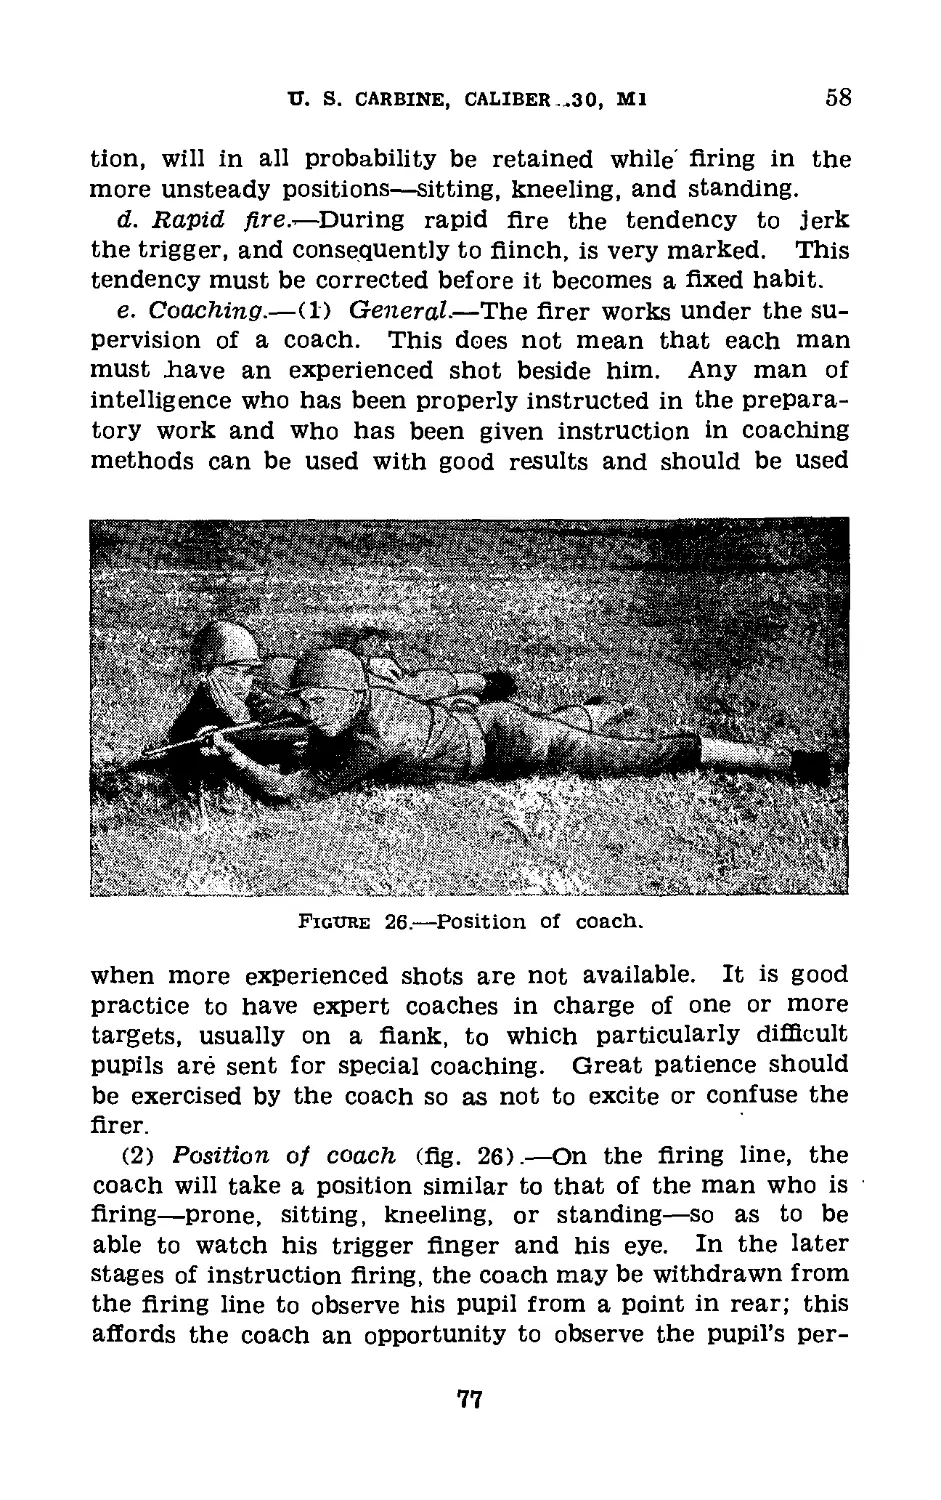
VIII. Ammunition____________________ 35-38
IX. Individual safety precautions____ 39
Chapter 2. Marksmanship—known-distance targets.
Section I. General__________________________ 40-45
II. Preparatory marksmanship train-
ing______________________________ 46-53
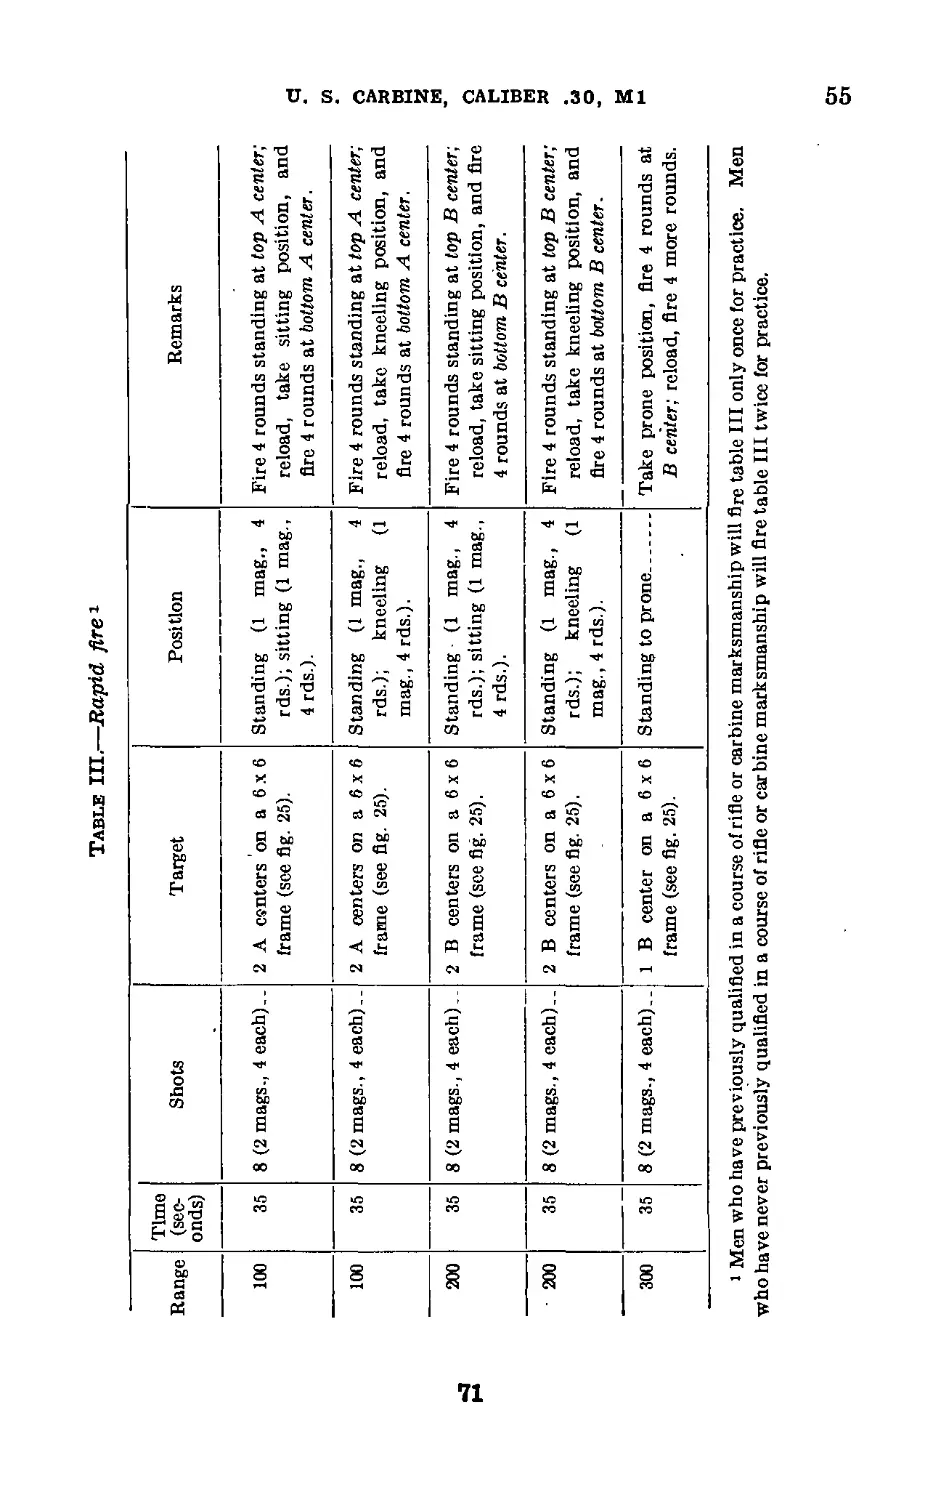
III. Qualification courses_________ 54-56
IV. Range practice________________ 57-59
V. Equipment—known-distance t a r -
gets and ranges____________________60-61
Chapter 3. Marksmanship—moving ground targets.
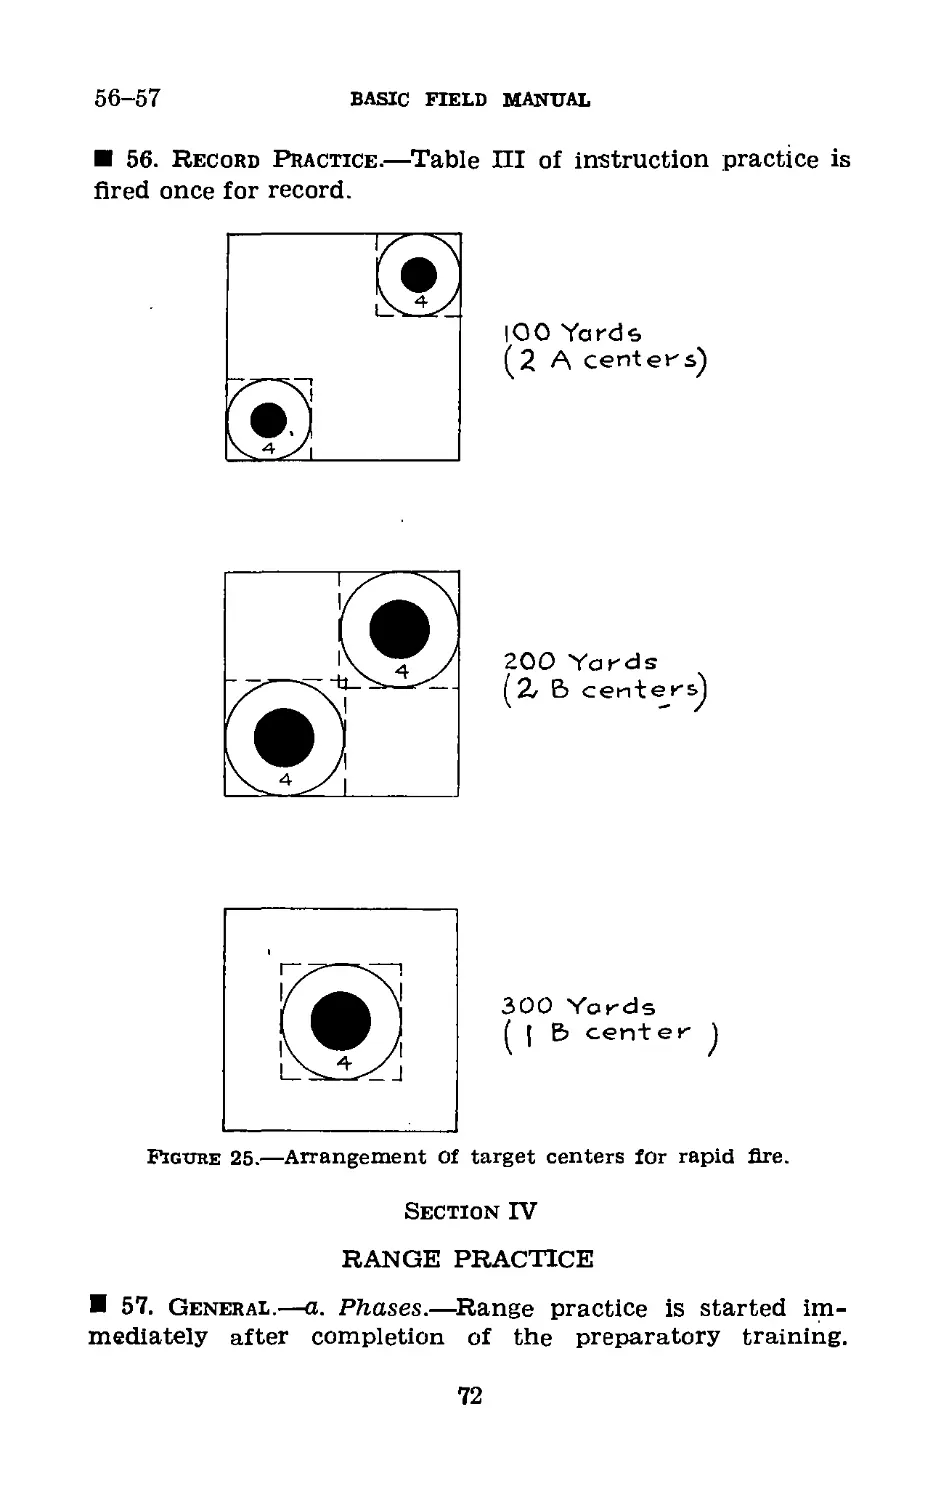
Section I. General------------------------62-63
II. Moving personnel_________________ 64
III. Moving vehicles________________65-67
IV. Moving targets and ranges and
range precautions_________________68-69
Chapter 4. Marksmanship—air targets.
Section I. Air targets for carbine-------70-71
II. Technique of fire______________72-74
III. Marksmanship training----------75-78
IV. Miniature range practice______79-82
V. Ranges, targets, >and equipment-83-85
Chapter 5. Firing at field targets-------------86-93
Chapter 6. Advice to Instructors.
Section I. General ________________________ 94
П. Mechanical training--------------- S5
Ш. Marksmanship—known-d 1 s t a n c e
targets_______________________________96-110
IV. Marksmanship—air targets---------Ш-113
V. Field target firing-------------- 114
Index______________________________________________
Pages
IV
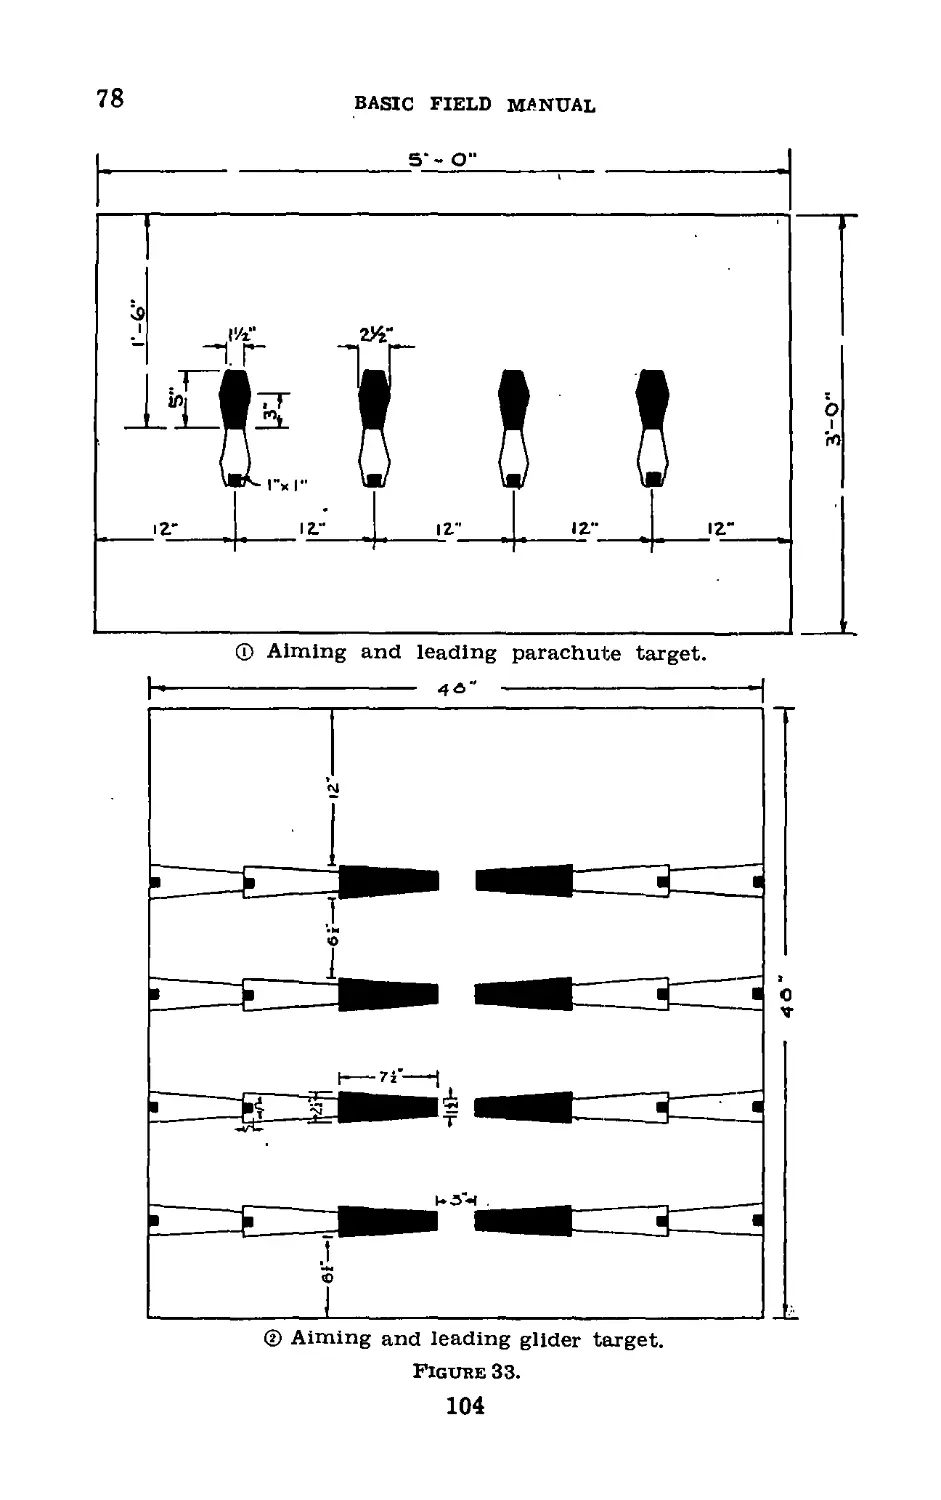
1
4
13
18
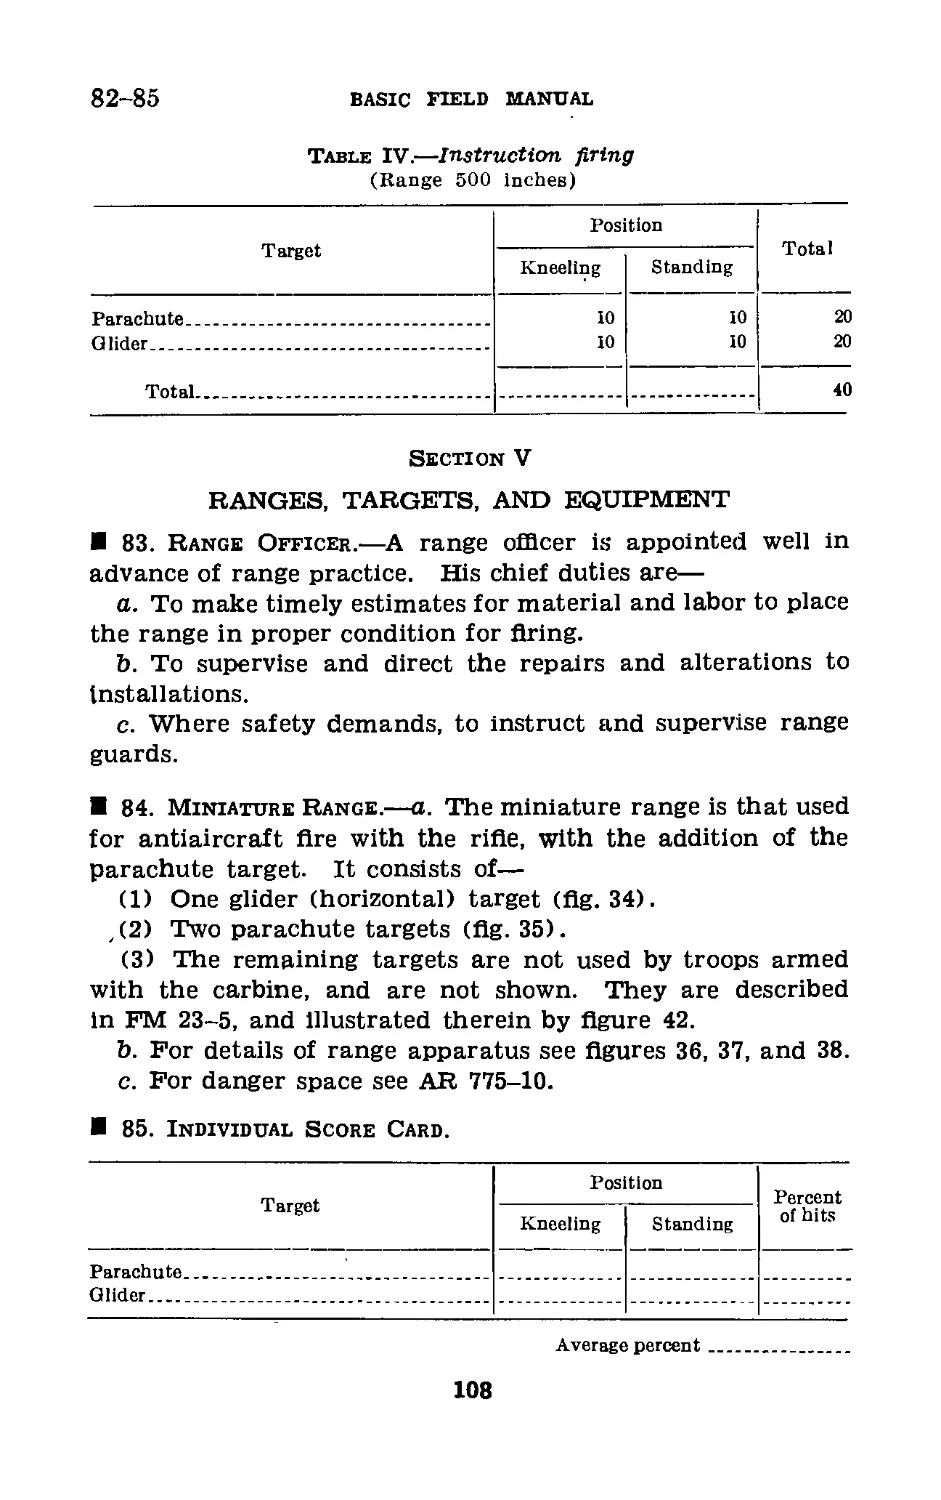
21
23
27
28
30
31
33
70
72
88
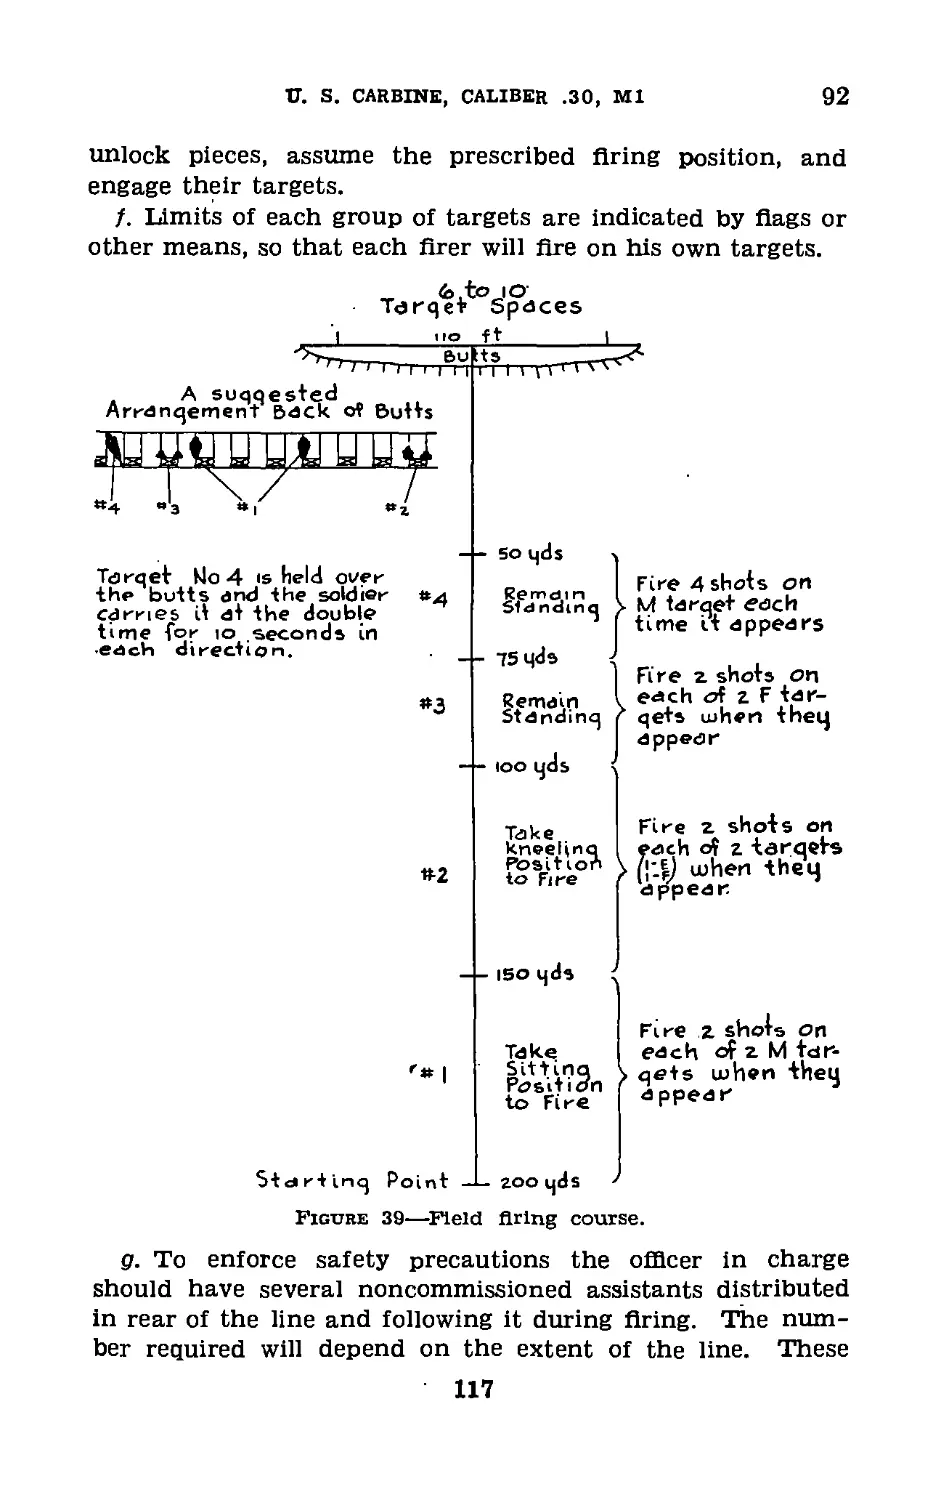
93
94
94
95
97
97
99
105
108
109
119
119
119
135
136
137
Ш
SCORE CARD FOR CARBINE M-l
(Name)
(ASN) (Organization)
Targets Order Date Standing and sitting 100 yards Total
(Signature of scorer)
(Signature of officer)
Targets Order Date Standing and kneeling 100 yards Total
— — _
(Signature of scorer)
(Signature of officer)
Targets Order Date Standing and sitting 200 yards Total
(Signature of scorer)
(Signature of officer)
Targets Order Date Standing and kneeling 200 yards Total
1 1
1 i
(Signature of scorer)
(Signature of officer)
Targets Order— Date Standing to prone 300 yards Total
1
1
(Signature of scorer)
(Signature of officer)
Qualification:
Grand aggregate_________________
Date_____________________________________ 19__ Certified correct:
Commanding Co.................
IV
FM 23-7
BASIC FIELD MANUAL
ГГ. S. CARBINE, CALIBER .30 Ml
CHAPTER I
MECHANICAL TRAINING
Paragraphs
Section I. General________________________________________ 1-6
II. Disassembly and assembly_____________________ 7-11
III. Care and cleaning____________________________12-18
IV. Functioning_________________________________ 19-20
V. Operation___________________________________ 21-29
VI. Immediate action and stoppages_______________30-32
VII. Spare parts and accessories__________________33-34
VIII. Ammunition_________________________________ 35-38
IX. Individual safety precautions___________________ 39
Section I
GENERAL
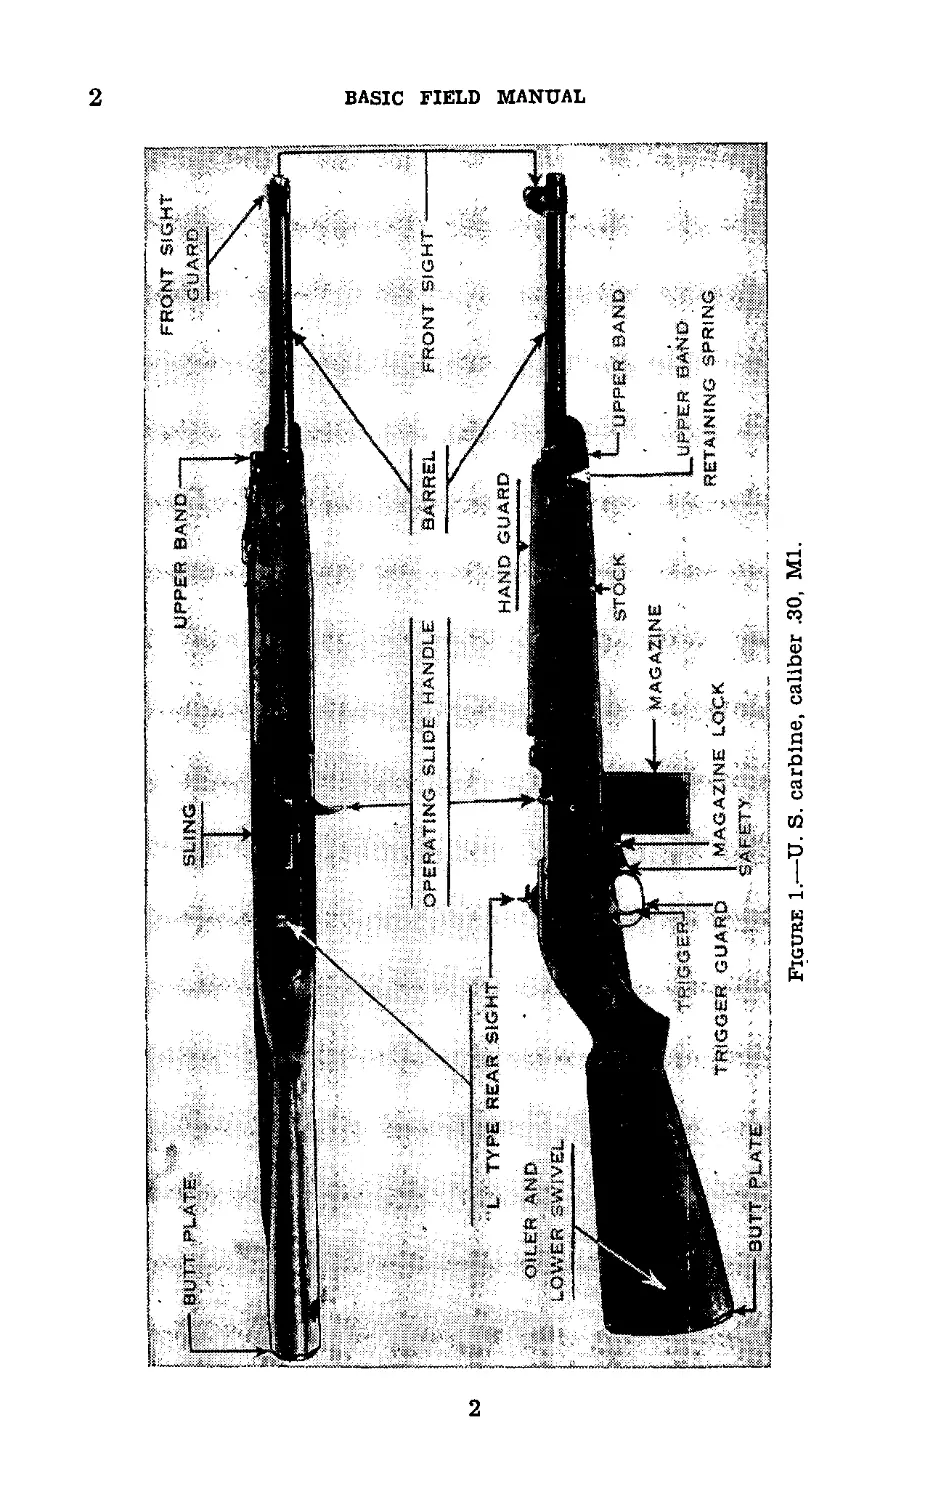
1. Description of'Carbine.—The U. S. carbine, caliber .30,
Ml, is a self-loading shoulder weapon (see fig. 1). It is gas
operated, magazine fed, and air cooled. It weighs approxi-
mately 5 pounds. The weapon is fed from a box type maga-
zine having a capacity of 15 rounds.
2. General Data.—a. Dimensions.—(1) Barrel.
Diameter of bore_______________inches— .30
Number of grooves_____________________ 4
Length of barrel_______________inches 17.75
(2) Carbine.
Over-all length of carbine_____inches 35.50
Sight radius___________________do_____22.
b. Weight.
Carbine without sling__________pounds— 5.12
Carbine with sling______________do____ 5. 23
Magazine, empty_________________do____ . 17
Magazine, loaded________________do____ . 57
Total weight w/sling and loaded
magazine________________________do_ 5. 80
1
2
BASIC FIELD MANUAL
2
U. S. CARBINE, CALIBER .30, Ml
3-4
3. Miscellaneous Data.
Muzzle velocity_______________feet per second__ 1900
Pressure in chamber (approx.)
pounds per square inch__ 40, 000
Weight of ball cartridge (approx.)
grains— 195
Weight of bullet (approx.)______grains__ 110
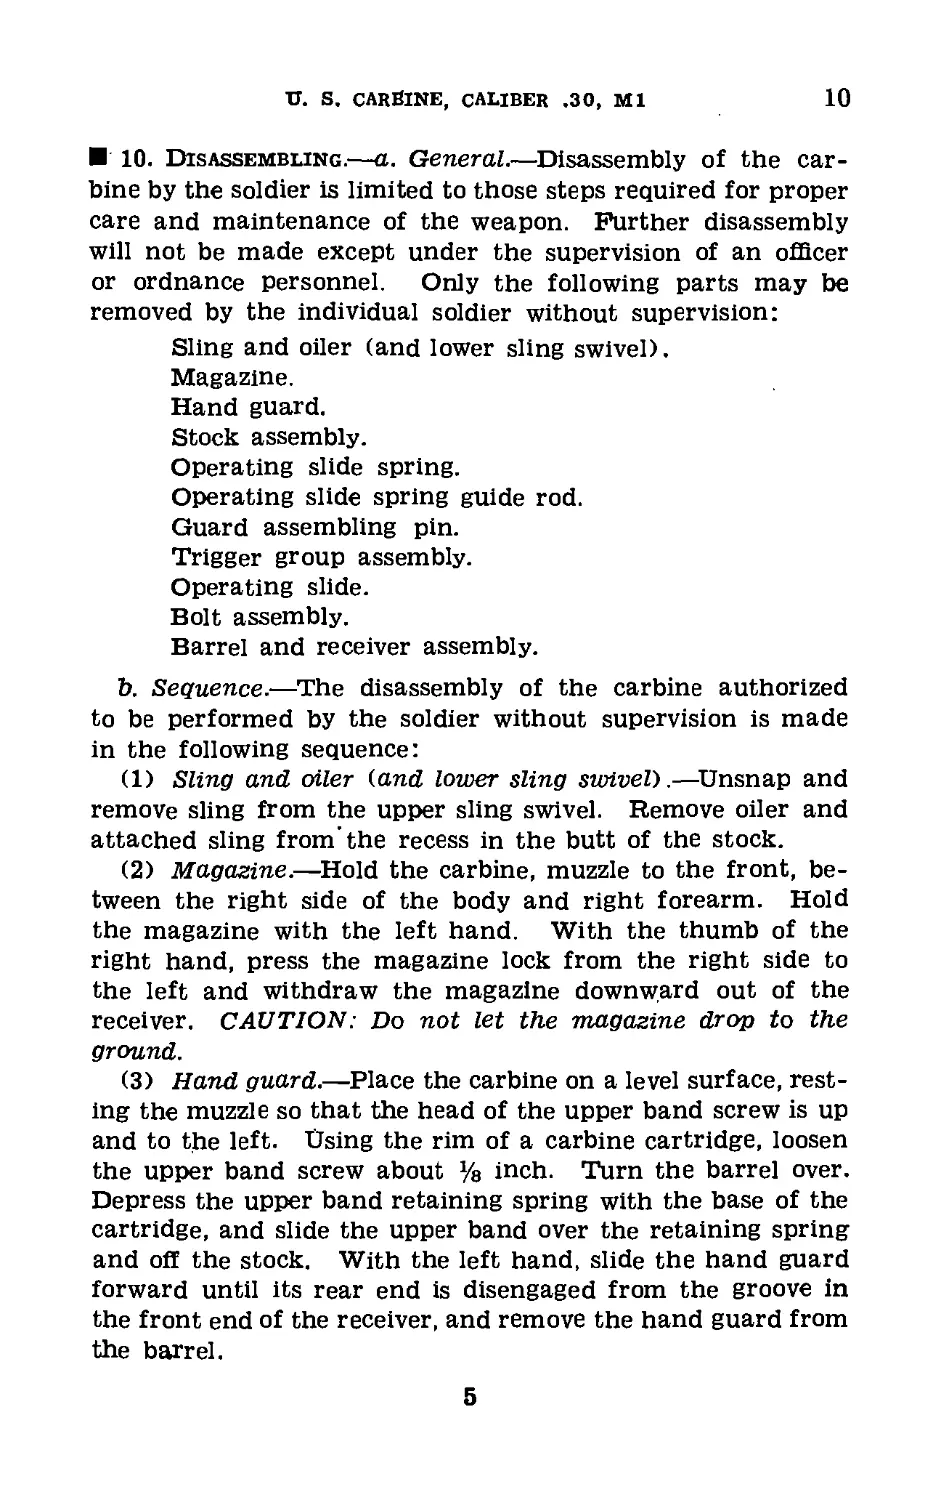
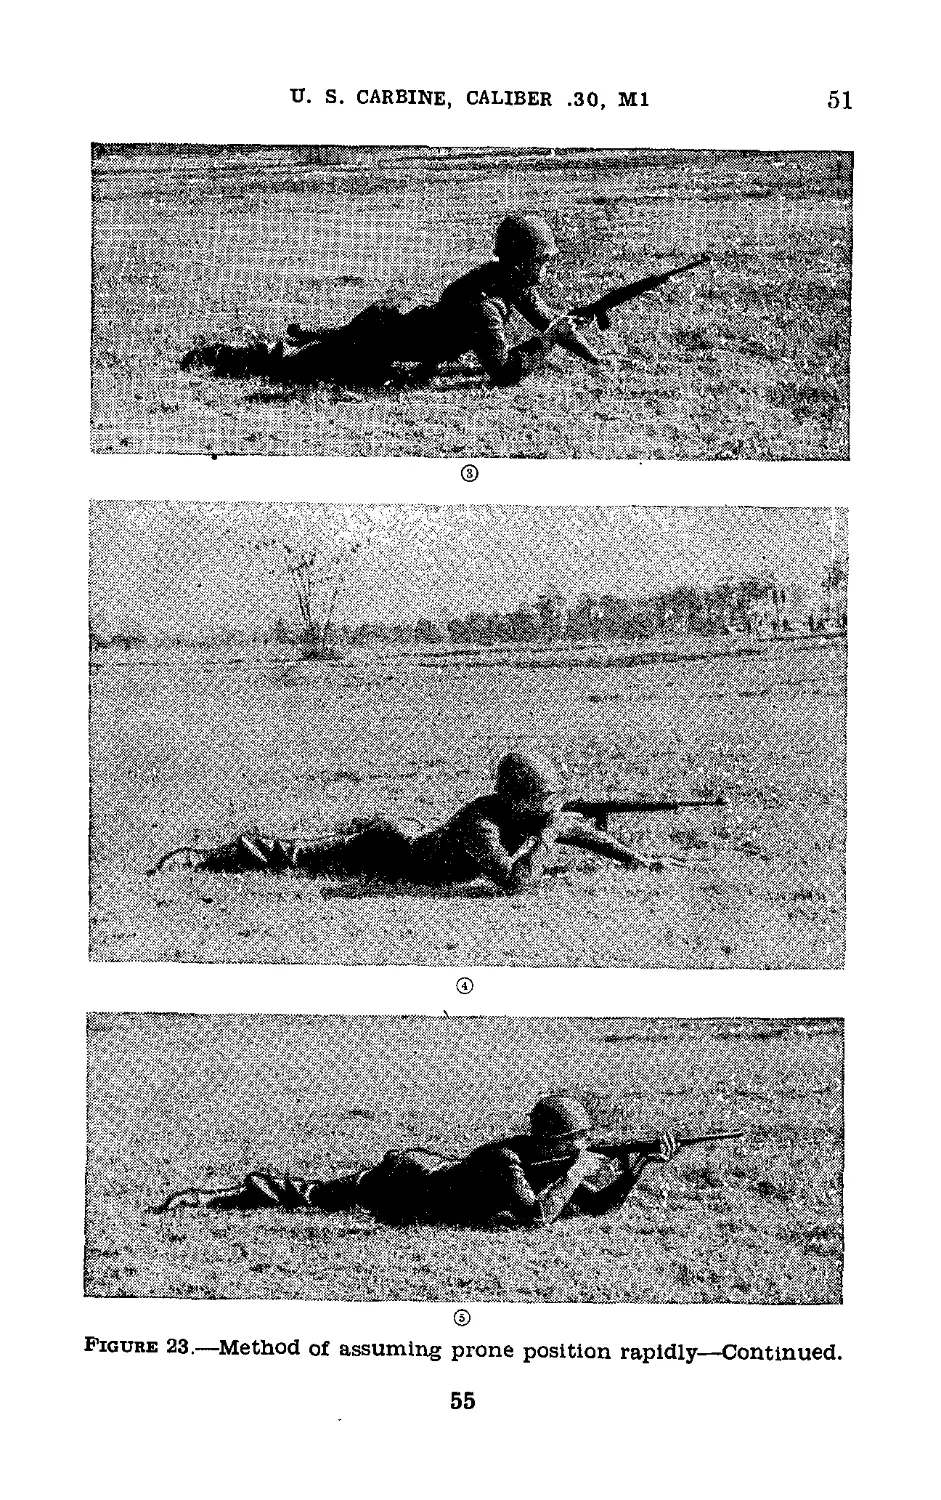
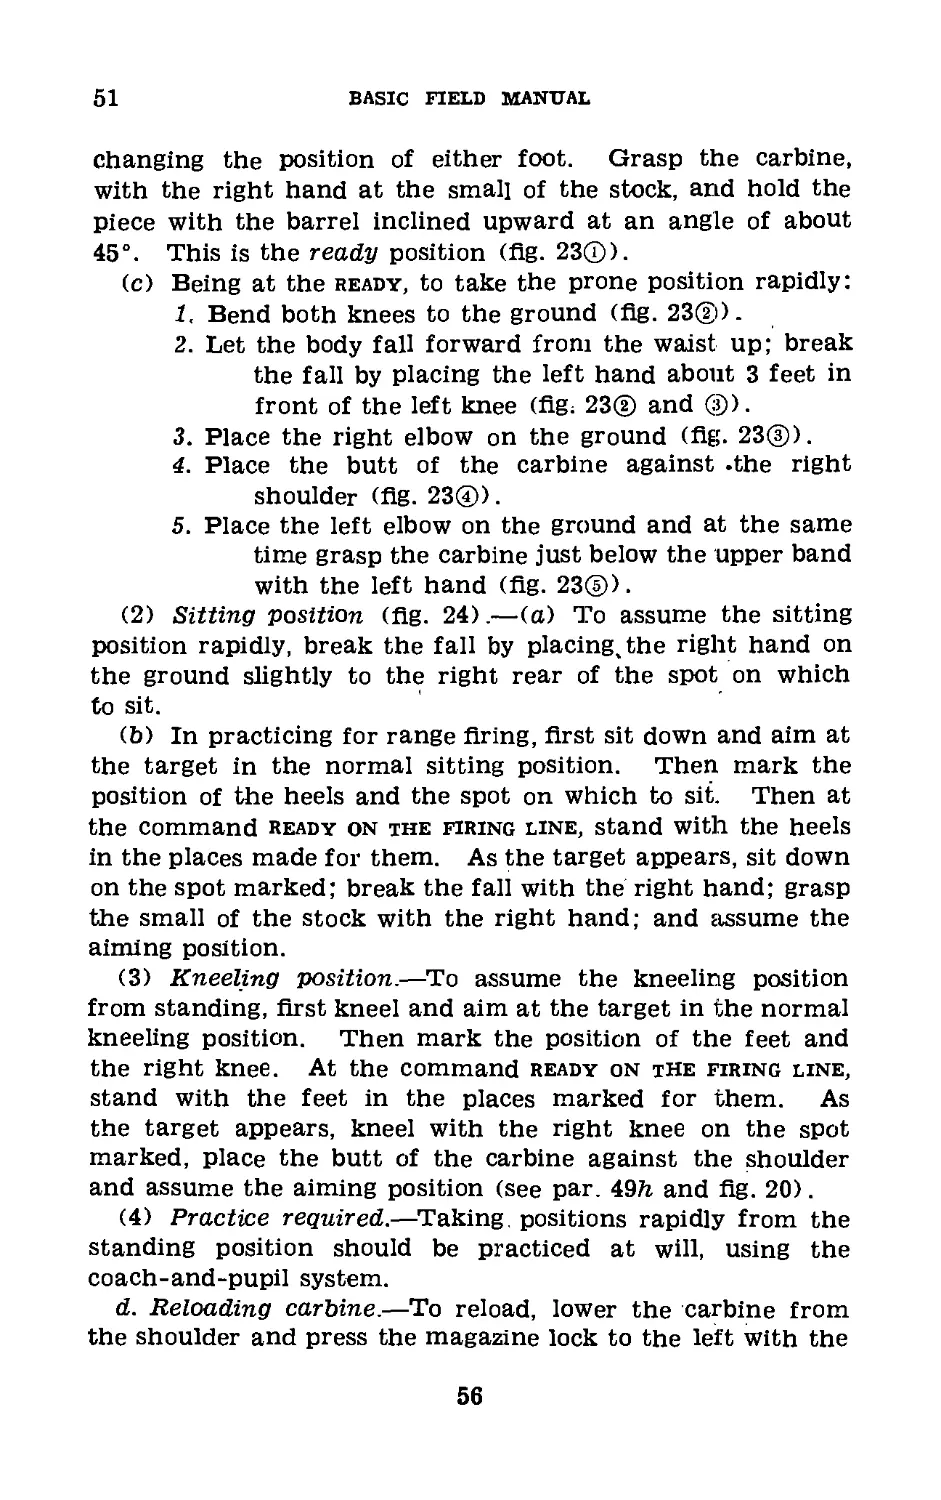
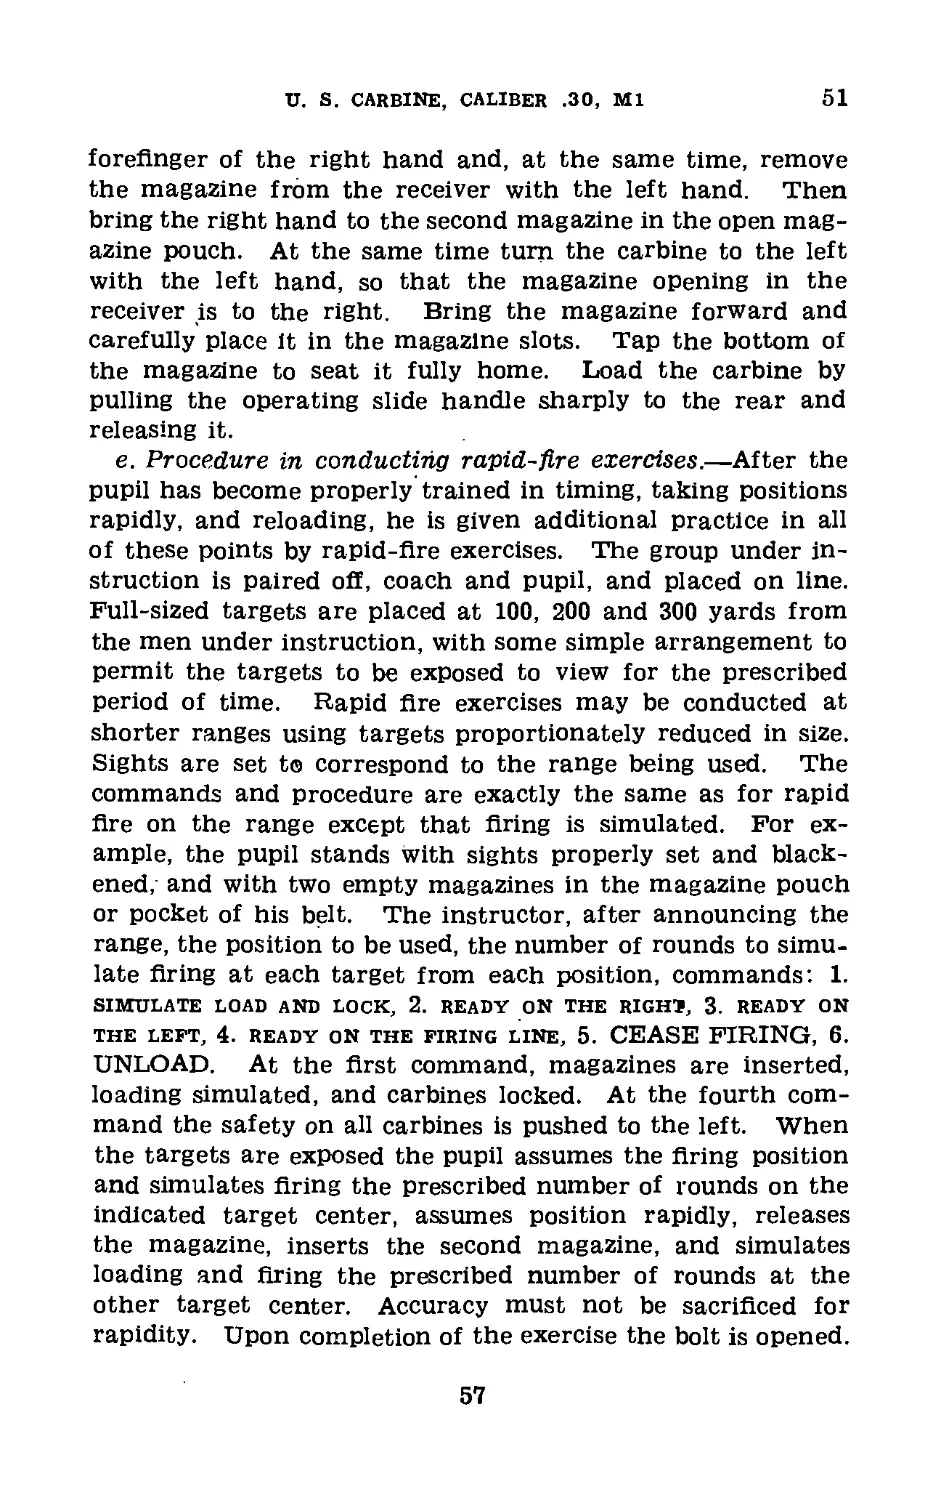
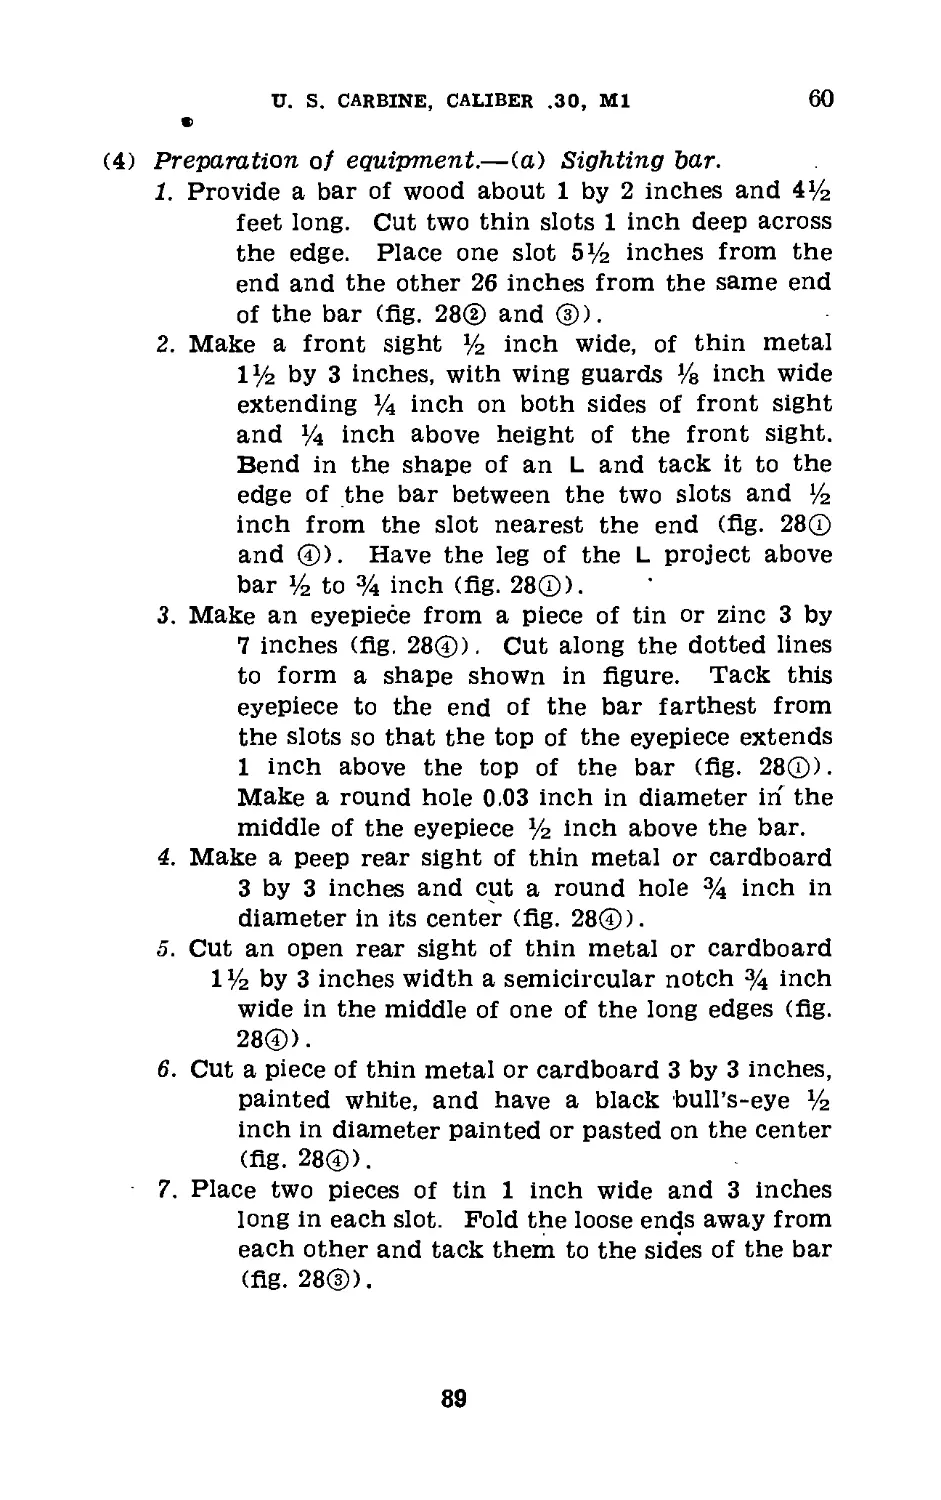
4. Rear Sight.—a. Models of the carbine initially issued
will be equipped with an L-type rear sight, consisting of
ISO Yds
300 Yds
Figure 2.—L-type rear sight.
two arms at right angles, each pierced with an aperture.
A fiat spring is placed between the sight leaf and sight base
to retain the sight leaf in position. Either sight may be
raised into position by turning with the fingers, and the leaf
is held correctly by the pressure of the spring. The aper-
tures provided are computed for ranges of 150 and 300. yards.
With this sight it will be necessary to aim off the target
to secure intermediate changes in range and windage
corrections. (See fig. 2.)
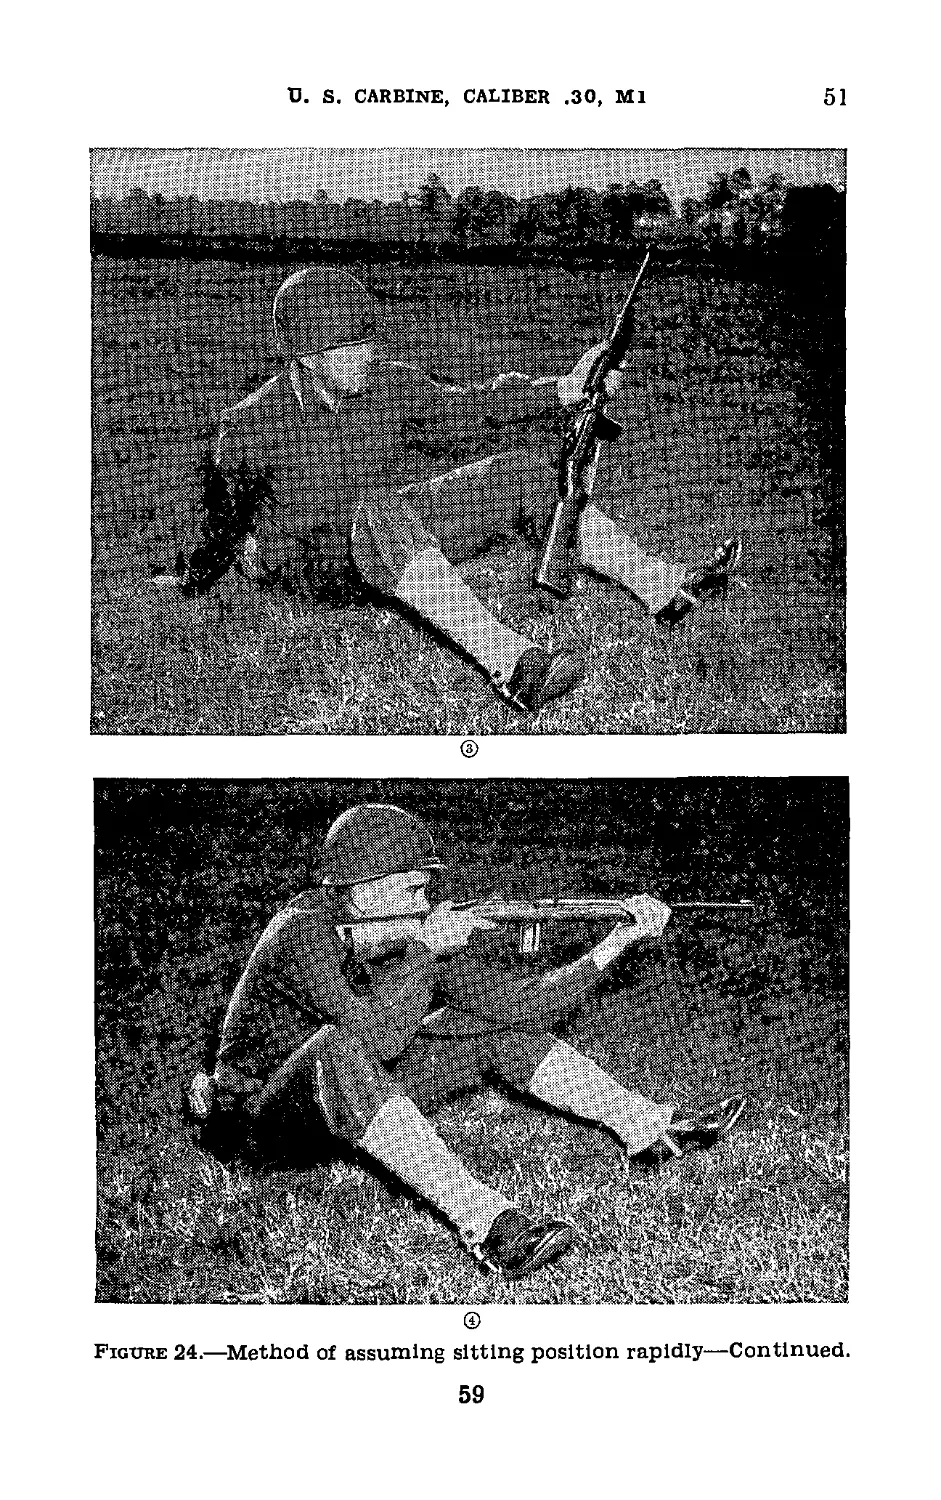
3
4-9
BASIC FIELD MANUAL
b. Later models of the carbine will be equipped with an
adjustable sight generally similar to that shown in other
figures in this manual. This sight will be graduated from
100 to 300 yards in increments of 50 yards and will provide
for 3 points of left and 3 points of right windage. The
amount which changes of elevation and windage will move
the point of strike must be determined by experiment.
5. Front Sight.—The front sight is the post type, protected
by wings and adjusted laterally during assembly at the
arsenal. It is locked in position, after adjustment, by rivet-
ing part of the metal base into the lock seat with a punch.
6. Nomenclature and References.—a. Nomenclature.—The
soldier should be familiar with the names of those parts
of the carbine which are frequently referred to in drill
and range practice (figs. 3 to 6, inclusive).
b. References.—Safety precautions to be observed by troops
are complete in this manual. Range officers, the officer
in charge of firing, and the commander responsible for the
location of ranges and conduct of firing should refer to
AR 750-10 for additional safety precautions.
Section II
DISASSEMBLY AND ASSEMBLY
7- When Taken Up.—Training in disassembly and assembly
is taken up as soon as practicable after the soldier receives
his carbine. This training is completed before the indi-
vidual does any firing with the weapon.
8. Organization.—In the company or platoon, men armed
with the carbine are organized into one or more groups under
their officers or selected noncommissioned officers as instruc-
tors and supervisors.
9. Care To Be Exercised.—a. The carbine can be readily
disassembled and assembled without applying force. The
application of force is prohibited.
b. The weapon will not be disassembled or assembled against
time. In all practice in disassembling the carbine, individ-
uals will be taught to lay the parts out on a smooth, clean
surface in the proper sequence for assembling.
4
U. S. CARBINE, CALIBER .30, Ml 10
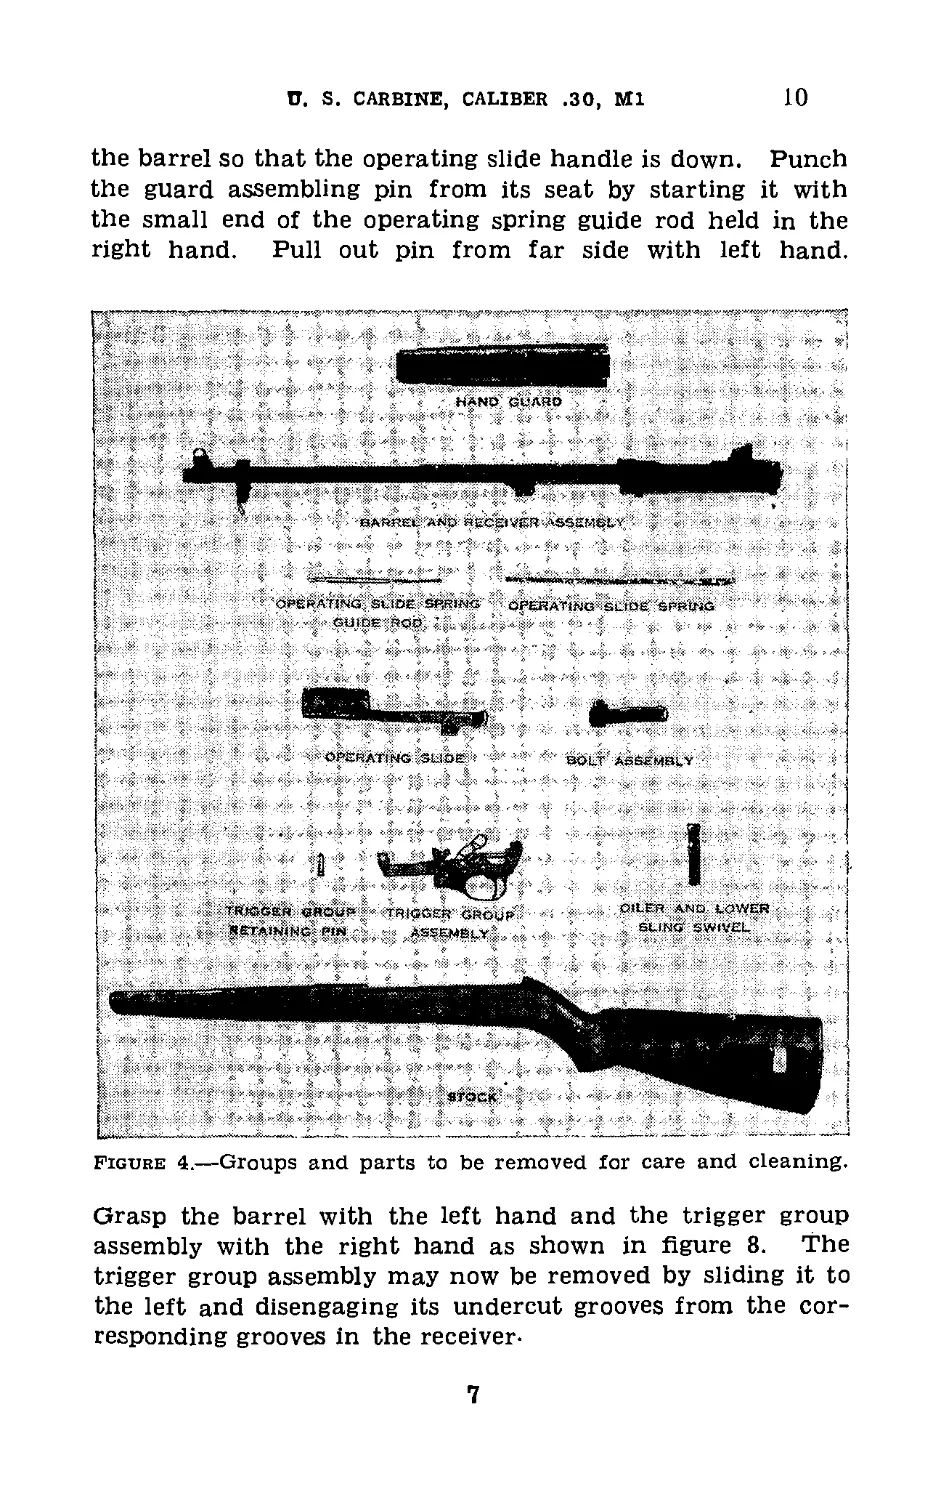
10. Disassembling.—a. General.—Disassembly of the car-
bine by the soldier is limited to those steps required for proper
care and maintenance of the weapon. Further disassembly
will not be made except under the supervision of an officer
or ordnance Personnel. Only the following parts may be
removed by the individual soldier without supervision:
Sling and oiler (and lower sling swivel).
Magazine.
Hand guard.
Stock assembly.
Operating slide spring.
Operating slide spring guide rod.
Guard assembling pin.
Trigger group assembly.
Operating slide.
Bolt assembly.
Barrel and receiver assembly.
b. Sequence.—The disassembly of the carbine authorized
to be performed by the soldier without supervision is made
in the following sequence:
(1) Sling and oiler (.and lower sling swivel).—Unsnap and
remove sling from the upper sling swivel. Remove oiler and
attached sling from’the recess in the butt of the stock.
(2) Magazine.—Hold the carbine, muzzle to the front, be-
tween the right side of the body and right forearm. Hold
the magazine with the left hand. With the thumb of the
right hand, press the magazine lock from the right side to
the left and withdraw the magazine downward out of the
receiver. CAUTION; Do not let the magazine drop to the
ground.
(3) Hand guard.—Place the carbine on a level surface, rest-
ing the muzzle so that the head of the upper band screw is up
and to the left. Using the rim of a carbine cartridge, loosen
the upper band screw about Ув inch. Turn the barrel over.
Depress the upper band retaining spring with the base of the
cartridge, and slide the upper band over the retaining spring
and off the stock. With the left hand, slide the hand guard
forward until its rear end is disengaged from the groove in
the front end of the receiver, and remove the hand guard from
the barrel.
5
10
BASIC FIELD MANUAL
(4) Stock assembly.—Grasp the small of the stock with the
right hand and the barrel with the left hand, palm up. Push
the safety to the left. Raise the muzzle end of the barrel
from the stock until the receiver is released from the stock
abutment. Remove the stock from the barrel, trigger group
assembly, and receiver.
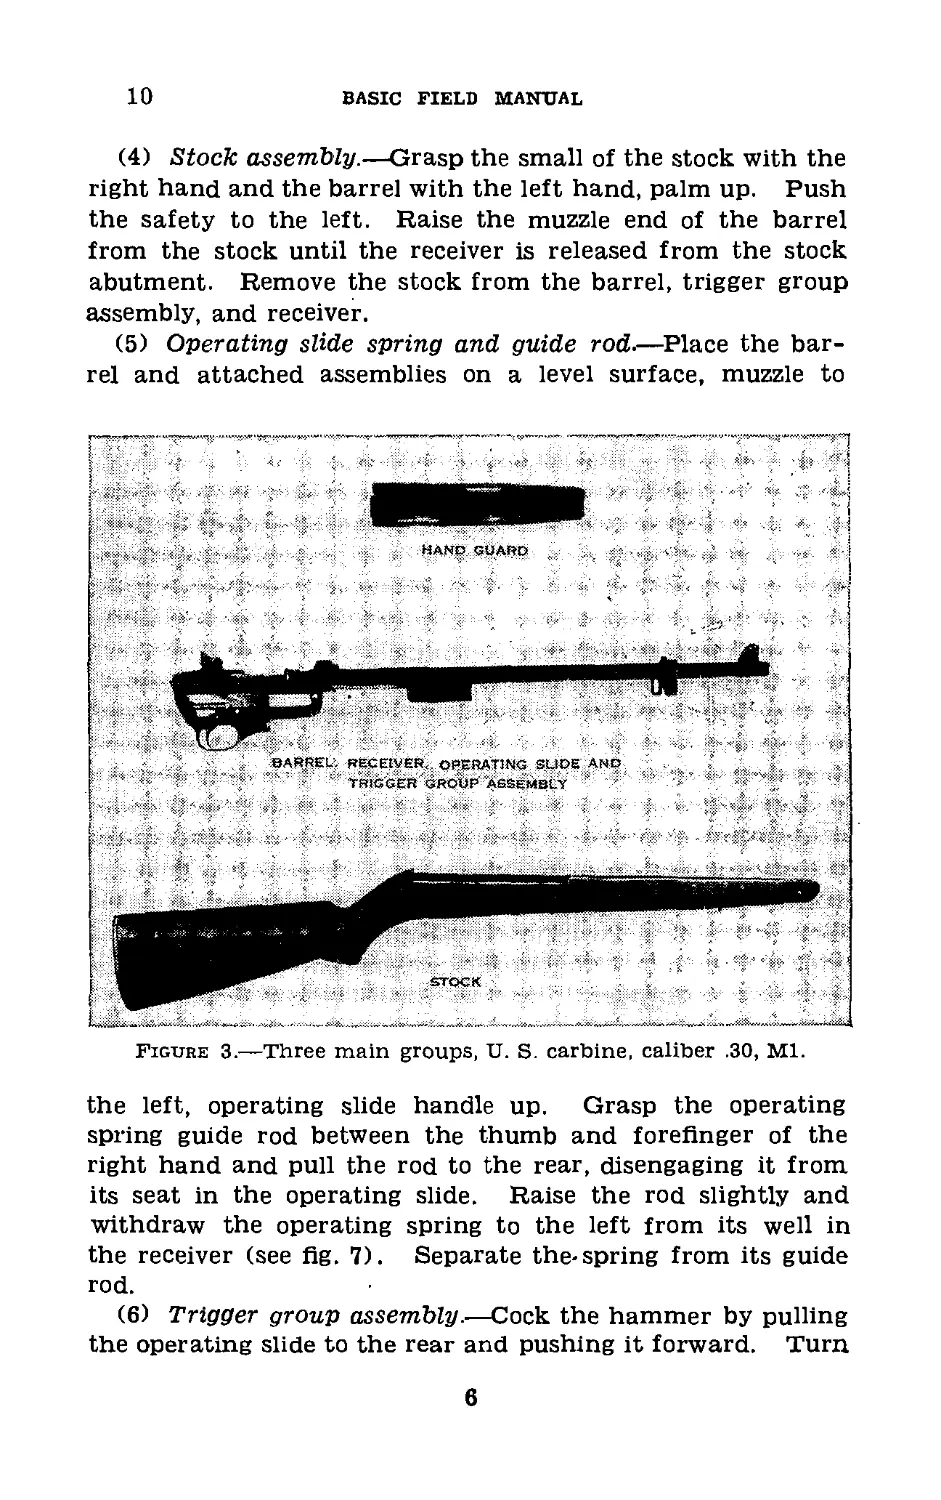
(5) Operating slide spring and guide rod.—Place the bar-
rel and attached assemblies on a level surface, muzzle to
Figure 3.—Three main groups, U. S. carbine, caliber .30, Ml.
the left, operating slide handle up. Grasp the operating
spring guide rod between the thumb and forefinger of the
right hand and pull the rod to the rear, disengaging it from
its seat in the operating slide. Raise the rod slightly and
withdraw the operating spring to the left from its well in
the receiver (see fig. 7). Separate the-spring from its guide
rod.
(6) Trigger group assembly.—Cock the hammer by pulling
the operating slide to the rear and pushing it forward. Turn
6
U. S. CARBINE, CALIBER .30, Ml
10
the barrel so that the operating slide handle is down. Punch
the guard assembling pin from its seat by starting it with
the small end of the operating spring guide rod held in the
right hand. Pull out pin from far side with left hand.
OPERATING Sutt>£ SPRING
OPERATING SUBS SRRH4G
GUIDE *
BOLT ASSLMHLV
Figure 4.—Groups and parts to be removed lor care and cleaning.
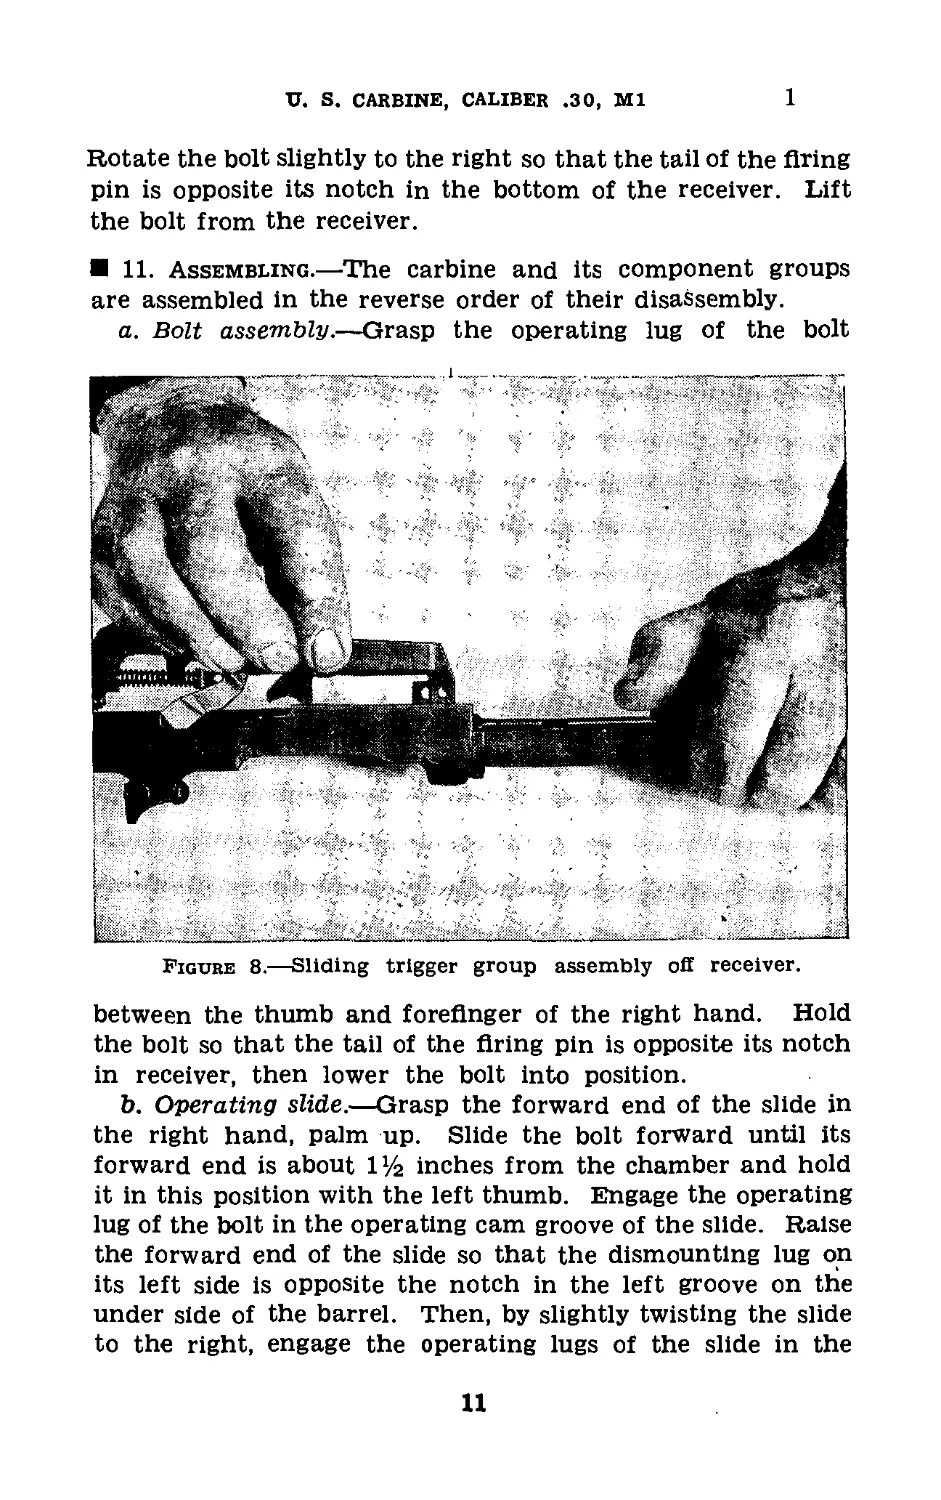
Grasp the barrel with the left hand and the trigger group
assembly with the right hand as shown in figure 8. The
trigger group assembly may now be removed by sliding it to
the left and disengaging its undercut grooves from the cor-
responding grooves in the receiver-
7
о
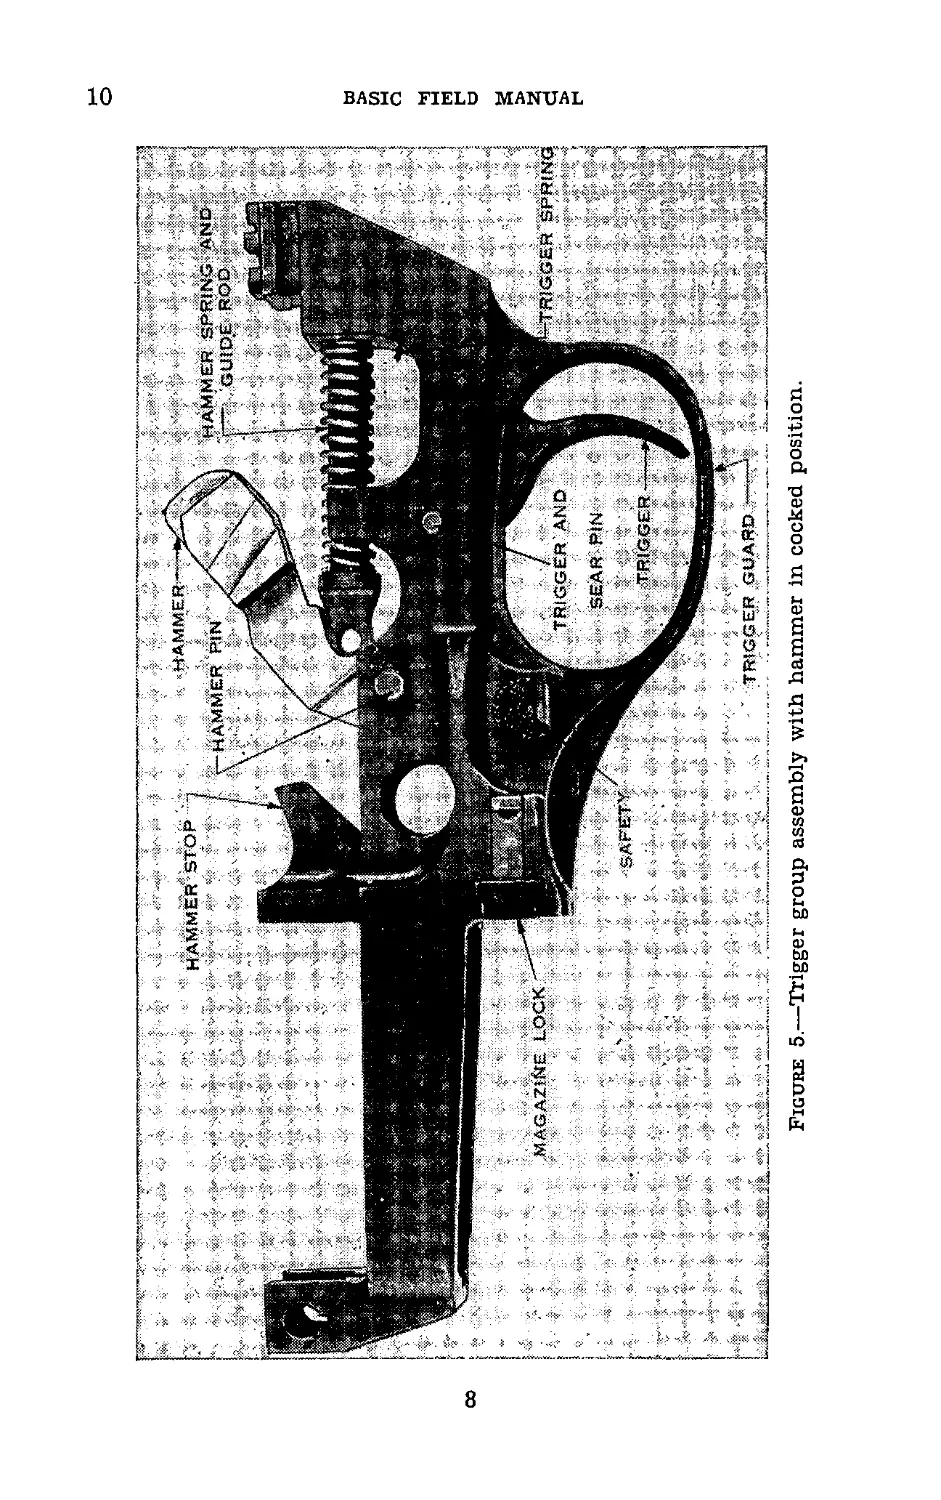
Figure 5.—Trigger group assembly with hammer in cocked position.
BASIC FIELD MANUAL
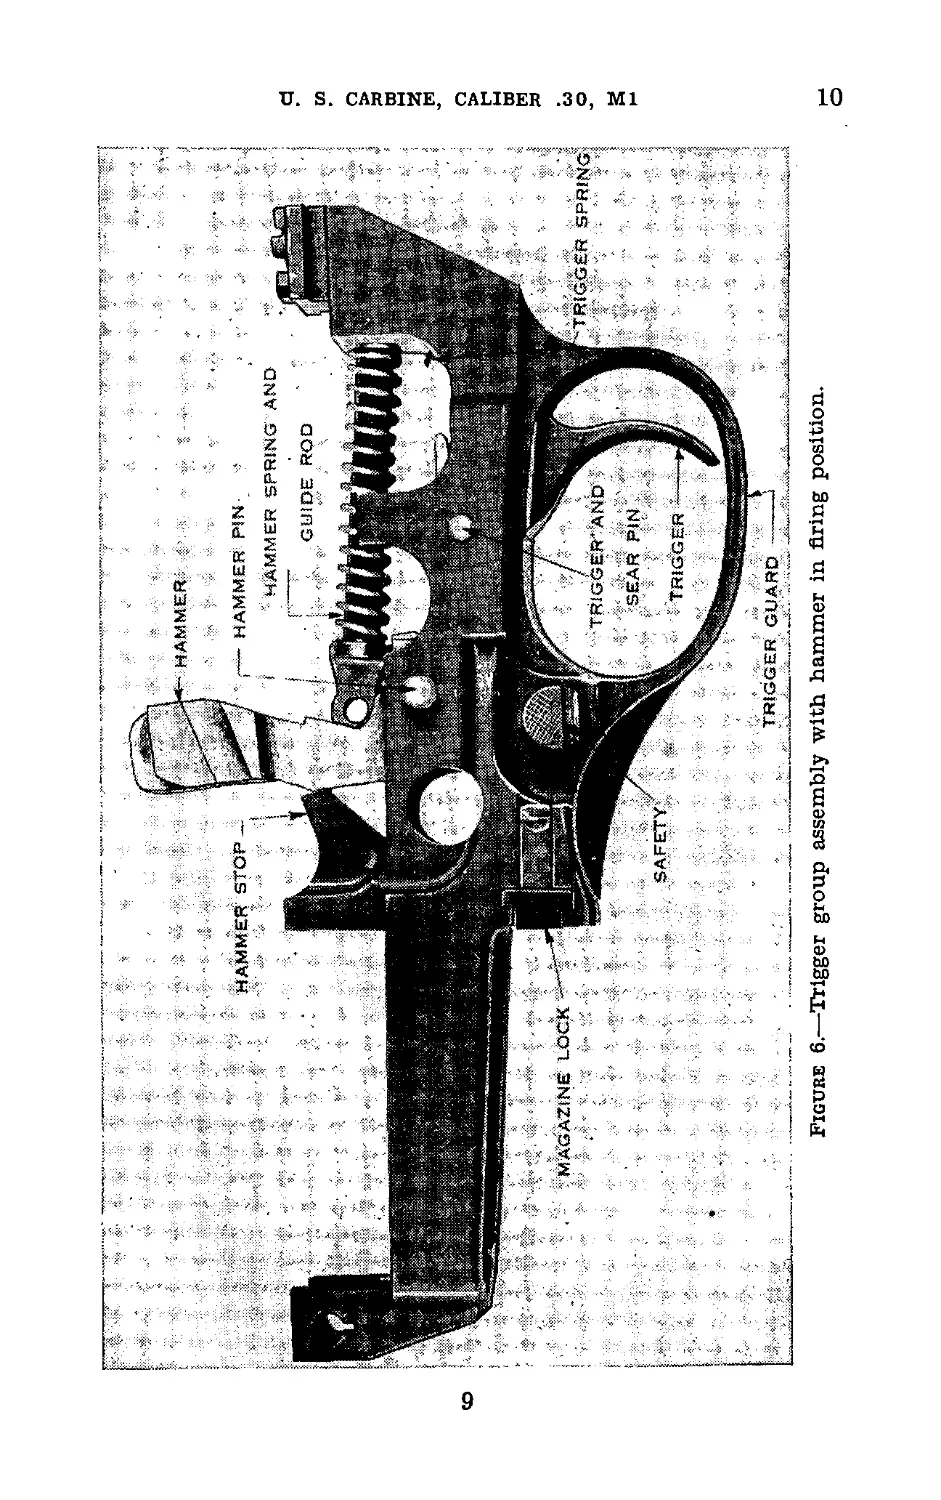
Figure 6.—Trigger group assembly with hammer in firing position.
d
co
CARBINE, CALIBER .30, Ml
О
10
BASIC FIELD MANUAL
(7) Operating slide (see fig. 9).—Rest the barrel on a level
surface, muzzle to the front, receiver down. Hold the rear
end of the receiver against the body with the left hand, thumb
resting on top of the left side of the operating slide. Grasp
the operating slide handle with the thumb and forefinger
of the right hand and draw the slide slowly to the rear until
the lug on the inner side of the rear end of the slide is opposite
Figure 7.—Removing operating slide spring and guide rod.
the operating slide dismounting notch in the operating groove
of the receiver. Pull the operating handle to the right and
up and disengage the rear end of the slide from the operat-
ing lug on the bolt. The slide may now be removed from
the barrel by a downward pressure of the left thumb on the
left side of the slide, thus disengaging the lug on the slide
from the left guiding groove in the under side of the barrel.
(8) Bolt assembly.—Hold the barrel as described in (7)
above. Grasp the operating lug on the bolt between the
thumb and forefinger of the right hand and move the bolt so
that its front end is just in rear of the locking recesses in the
receiver. Raise the front end of the bolt about 1 inch.
10
U. S. CARBINE, CALIBER .30, Ml
1
Rotate the bolt slightly to the right so that the tail of the firing
pin is opposite its notch in the bottom of the receiver. Lift
the bolt from the receiver.
11. Assembling.—The carbine and its component groups
are assembled in the reverse order of their disassembly.
a. Bolt assembly.—Grasp the operating lug of the bolt
Figure 8.—Sliding trigger group assembly off receiver.
between the thumb and forefinger of the right hand. Hold
the bolt so that the tail of the firing pin is opposite its notch
in receiver, then lower the bolt into position.
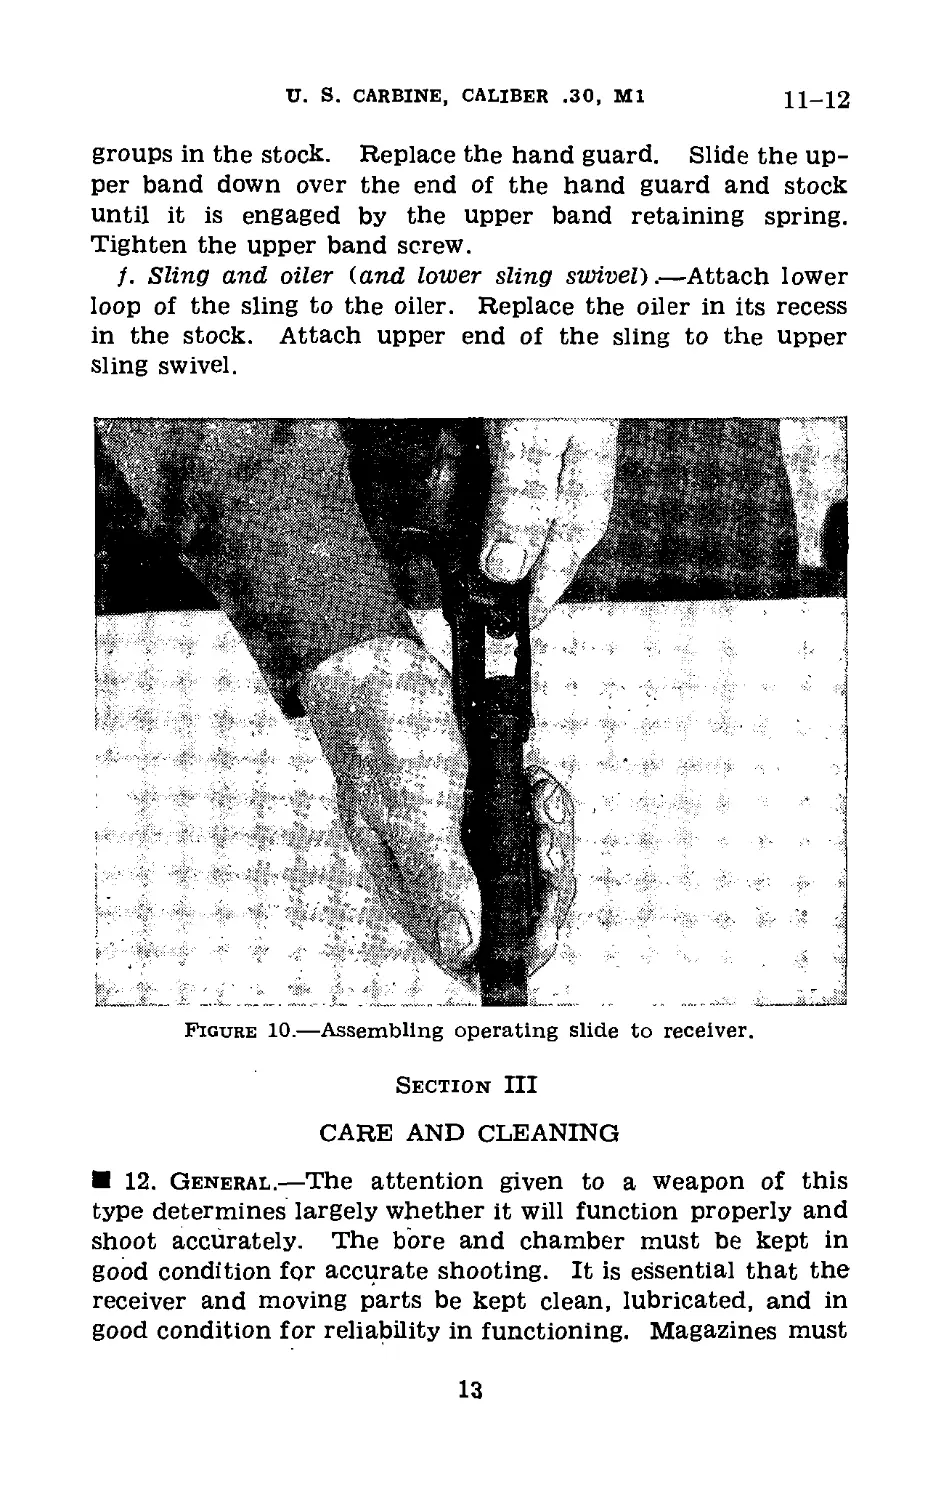
b. Operating slide.—Grasp the forward end of the slide in
the right hand, palm up. Slide the bolt forward until its
forward end is about P/2 inches from the chamber and hold
it in this position with the left thumb. Engage the operating
lug of the bolt in the operating cam groove of the slide. Raise
the forward end of the slide so that the dismounting lug on
its left side is opposite the notch in the left groove on the
under side of the barrel. Then, by slightly twisting the slide
to the right, engage the operating lugs of the slide in the
11
BASIC FIELD MANUAL
operating grooves of the barrel. Move the slide and bolt to
the rear until the operating slide lug is seated in its groove
in the receiver. Close the bolt. (See fig. 10.)
c. Trigger group assembly.—Place the barrel and receiver
on its left side, muzzle to the left. Replace the trigger group
assembly by engaging its undercut grooves with the cor-
Figure 9.—Removing the operating slide.
responding grooves in the receiver. Replace the guard
assembling pin.
d. Operating slide spring and guide rod.—Insert the small
end of the guide rod in the loosely coiled end of the spring.
Insert the closely coiled end of the spring into its well in the
receiver. Steady the barrel with the left hand, and with the
thumb and forefinger of the right hand on the shoulder of
the guide rod, compress the spring so that the end of the
guide rod may be inserted in its seat in the slide.
e. Stock assembly and hand guard.—Make certain the
safety is to the left. Replace the barrel and assembled
12
U. S. CARBINE, CALIBER .30, Ml
11-12
groups in the stock. Replace the hand guard. Slide the up-
per band down over the end of the hand guard and stock
until it is engaged by the upper band retaining spring.
Tighten the upper band screw.
j. Sling and oiler (and lower sling swivel).—Attach lower
loop of the sling to the oiler. Replace the oiler in its recess
in the stock. Attach upper end of the sling to the upper
sling swivel.
Figure 10.—Assembling operating slide to receiver.
Section III
CARE AND CLEANING
12. General.—The attention given to a weapon of this
type determines largely whether it will function properly and
shoot accurately. The bore and chamber must be kept in
good condition for accurate shooting. It is essential that the
receiver and moving parts be kept clean, lubricated, and in
good condition for reliability in functioning. Magazines must
13
12-13
BASIC FIELD MANUAL
be kept free from rust, grit, gum, and dents or other damage
in order to function properly.
13. In Garrison and Camp.—a. General.—Keep the carbine
well cleaned and oiled so as to preserve its condition and
appearance during the periods when no firing is being done.
Carbines in the hands of troops should be inspected daily to
insure proper condition and cleanliness.
b. Bore.—The bore of the carbine will always be cleaned
with a cleaning rod inserted from the muzzle. The rod used
should be of such length as to permit cleaning the bore with-
out damage to the face of the bolt. If a longer rod is used
the bolt must be removed or the face of the bolt protected.
This can be done in several ways. The simplest way is
to cover the face of the bolt with a cloth stuffed into the
receiver. To clean the bore, attach a cloth patch to the
cleaning rod. Insert the cleaning rod into the bore at the
muzzle and move it back and forth several times. Remove
the patch. CAUTION: In cleaning the bore, care must be
taken not to foul the gas port with threads from the clean-
ing patch itself or with other extraneous matter. Repeat
until several successive patches come out absolutely clean.
Inspect the bore. If the bore is clean, saturate a patch in
light rust-preventive compound and swab the bore thoroughly
so that al] interior surfaces have a coating of the compound.
If the bore still has residue in it swab it with a patch satu-
rated with rifle bore cleaner, until it is clean, then apply the
rust preventive.
c. Chamber.—The chamber should be cleaned when the
bore is cleaned. A roughened or rusty chamber may cause
cartridges to stick. To clean the chamber use a chamber
cleaning brush and scrub the chamber vigorously. After
this scrubbing, the chamber is further cleaned and oiled in
the process of cleaning the bore.
d. Exterior surfaces.—To clean the screw heads and crevices,
use a small cleaning brush or small stick. To clean the
metal surfaces, wipe with a dry cloth to remove moisture,
perspiration, and dirt; then wipe with a cloth containing
a small quantity of light preservative lubricating oil. A light
film of this oil should be applied to all moving parts, and
this protective film should be maintained at all times. The
14
U. S. CARBINE, CALIBER .зо, Ml 13-15
stock and hand guard should be wiped with raw linseed oil.
e. Magazines.—It is imperative that magazines be given
the best of care and kept in perfect condition. They should
be disassembled, wiped clean and dry, and thinly coated with
oil. Dirt that gets into them must be removed. In handling
magazines, care should be taken to avoid denting or bending
them, especially the lips of the mouth of the magazine.
/. After cleaning.—After cleaning the carbine, place it in
the rack without covering and without a plug in the muzzle
or chamber. Muzzle covers, carbine covers, rack covers, and
plugs must not be used because they collect moisture and
promote rust. To protect the carbines from dust, covers
may be placed over racks when squad rooms or tents are
swept; they must be removed after the rooms have been
swept.
14. Preparatory to Firing.—The following procedure before
firing insures efficient functioning of the carbine:
a. Dismount main groups.
b. Wipe oil or grease from the bore.
c. Thoroughly clean and lightly oil all metal parts. Use
light preservative lubricating oil.
d. Apply a thin, uniform coating of light preservative lu-
bricating oil to the parts listed below:
(1) Bolt lugs (locking and operating).
(2) Bolt guides.
(3) Cocking cam on bolt.
(4) Piston.
(5) Contact surfaces of barrel and operating slide.
(6) Operating slide cam.
(7) Operating slide guide groove in receiver and barrel.
(8) Operating slide spring.
(9) Operating slide spring guide rod.
CAUTION: Do not apply oil to the under surface of the
bolt, as the introduction of oil into the chamber may lead to
the generation of excessive pressure.
e. Assemble carbine and rub all outer surfaces with a lightly
oiled rag to remove dust.
15. After Firing.—The bores of all carbines must be thor-
oughly cleaned by the evening of the day on which they are
15
15-16
BASIC FIELD MANUAL
fired. They should be cleaned in the same manner for the
next three days. CAUTION: Under no circumstances will
metal fouling solution be used in the carbine.
a. Cleaning immediately after firing, or as soon as pos-
sible.—For this purpose water must be used; warm water is
good, but warm, soapy water is better. Hold the carbine
bottom side up, so that no water will enter the gas port.
Run several wet patches through the bore. Remove the
patch section from the cleaning rod, substitute the brush,
and work this back and forth through the bore several times.
Care should be used to see that the brush goes all the way
through the bore before the direction is reversed. Detach
the brush and run several wet patches through the bore,
removing them from the breech end. Follow this with dry
patches until the patches come out clean and dry. Saturate
a patch in light preservative lubricating oil and push it
through the bore, holding the rifle, top side up, so that some
of the oil will flow into the gas port. CAUTION: In cleaning
the bore, be careful not to foul the cleaning patch in the
gas port.
b. Complete cleaning.—This cleaning should be done as soon
as possible after that described in a above. If the carbine
is to be fired the next day proceed as in paragraph 14. If
the carbine is not to be fired in the next few days repeat pro-
cedure in a above for 3 days. In addition, the instructions
prescribed in paragraphs 13 and 14 will be observed.
D 16. On Range or in Field.—The carbine must be kept clean
and free from dirt and properly lubricated with oil. To obtain
its maximum efficiency the following points must be observed:
a. Never fire a carbine with dust, dirt, mud, or snow in the
bore.
b. Keep the chamber clean and free from oil and dirt.
c. Never leave a patch, plug, or other obstruction in the
chamber or bore. Neglect of this precaution may result in
serious injury.
d. If the carbine gives indications of lack of lubrication and
excessive friction, apply additional oil to the parts. Exces-
sive friction exists if the empty cases are being ejected to the
right rear. When this occurs, oil should be applied at the first
16
U. S. CARBINE, CALIBER .30, Ml 16-17
opportunity, as failures to feed and eject Will occur if the
condition is not corrected.
e. Keep a light coating of oil on all other metal parts.
/. Oil the piston without Joosening the gas cylinder nut.
g. In general, it should not be necessary to remove any of
the parts of the carbine in the field for cleaning except the
trigger group assembly, the operating slide spring and rod, the
operating slide and the bolt assembly.
h. During range firing a well-qualified man should be
placed in, charge of the cleaning of carbines at the cleaning
racks or tables.
17. Preparation for Storage.—a. Light preservative lubri-
cating oil is the most suitable oil for preserving the mech-
anism of carbines. This oil is efficient for preserving the
polished surfaces, the bore, and the chamber for a period of
from 2 to 6 weeks, depending on the climatic and storage
conditions.
b. Light rust-preventive compound is efficient for pre-
serving the polished surfaces, the bore, and the chamber
for a period of 1 year or less, depending on the climatic and
storage conditions.
c. The carbine should be cleaned and prepared with par-
ticular care. The bore, all parts of the mechanism, and the
exterior of the carbine should be thoroughly cleaned and
then dried completely with rags. In damp climates par-
ticular care must be taken to see that the rags are dry. After
drying a metal part it should not be touched with bare hands.
All metal parts should then be coated either with light pre-
servative lubricating oil or light rust-preventive compound,
depending on the length of storage. (See a and Ъ above.)
Application of the rust-preventive compound to the bore of
the carbine is best done by dipping the cleaning brush in the
compound and running it through the bore two or three
times. Before placing the carbine in the packing chest see
that the bolt is in its forward position and that the firing
pin is released. Paint the wooden supports at the butt and
muzzle with rust-preventive compound. Then, handling
the carbine by the stock and hand guard only, it should be
placed in the packing chest. Under no circumstances should
a carbine be placed in storage in a cloth or other cover or
17
17-20
BASIC FIELD MANUAL
with a plug in the bore. Such articles collect moisture which
causes the weapon to rust.
18. Cleaning of Rifles as Received from Storage.—a. Car-
bines which have been stored in accordance with paragraph
17 will be coated with either light preservative lubricating oil
or light rust-preventive compound. Carbines received from
ordnance storage will, in general, be coated with heavy rust-
preventive compound. Use a dry-cleaning solvent to remove
all traces of the compound or oil, particular care being taken
that all recesses in which springs or plungers operate are
cleaned thoroughly. After using the dry-cleaning solvent
make sure it is completely removed from' all parts. Then
follow instructions contained in paragraph 13. If the car-
bines are to be fired immediately, follow instructions con-
tained in paragraph 14.
b. Dry-cleaning solvent is a petroleum distillate used for
removing grease. It is noncorrosive and of low inflamma-
bility. It is generally applied with rag swabs to large parts
and as a bath for small parts. The surfaces must be thor-
oughly dried immediately after removal of the solvent. To
avoid leaving finger marks, which are ordinarily acid and
induce corrosion, gloves should be worn by persons handling
parts after this cleaning. Dry-cleaning solvent will attack
and discolor rubber.
Section TV
FUNCTIONING
19. When Taken Up.—Instruction in functioning will be
taken up after instruction in the disassembly, assembly, and
care and cleaning of the carbine.
20. Description of Cycle.—a. Rearward movement.—(1)
When the carbine.is loaded and the bolt is closed, the ham-
mer is held in the cocked position by the front end of the
sear engaging in the sear notch on the hammer. The trig-
ger lip under action of the trigger spring is seated under
the rear end of the sear. If pressure is then applied to the
trigger, the trigger pivots about the trigger pin causing the
trigger lip to rise and carry with it the rear end of the sear.
The sear also pivots about the trigger pin and now has its
18
U. S. CARBINE, CALIBER .30, Ml
20
front end drawn downward to the point where it disengages
from the sear notch on the hammer. The hammer, thus
released, is actuated by the hammer spring which causes it
to rotate about the hammer pin and strike the firing pin,
through which its blow is transmitted to the primer of the
cartridge. The above action can take place only if the tang
of the firing pin is seated in the receiver. This cannot occur
unless the bolt is fully rotated into its locked position. If
the hammer should strike the firing pin when the bolt is in
any other position the cartridge will not fire; the effect will
be to deaden the hammer blow and rotate the bolt toward
its locked position. In addition, the safety must be in its-
off position so that it will not lock the trigger and thus pre-
vent the release of the hammer.
(2) When the bullet passes the gas port some of the powder
gases pass through the port in the barrel into the cylinder
where they strike the piston and then escape through the
cylinder port. The piston is driven sharply to the rear about
34 inch, where its motion is stopped by the gas cylinder nut.
The sharp rearward motion of the piston is transmitted by
contact to the operating slide, driving it to the rear. The
rearward movement of the slide compresses the operating
spring.
(3) The initial movement of the operating slide to the rear
for about % inch is independent of the bolt mechanism, the
operating lug on the bolt merely sliding in the straight sec-
tion of the recess in the operating slide. The cam surface
in this recess then comes in contact with the operating lug
of the bolt and cams it upward rotating the bolt counter-
clockwise and disengaging the locking lugs on the bolt from
their recesses in the receiver. The delay between the initial
movement of the operating slide and the unlocking of the
bolt enables the bullet to leave the muzzle before unlocking
begins, thus relieving the pressure in the barrel before the
bolt is opened. The rotation of the bolt also cams the ham-
mer back from the base of the firing pin and withdraws the
point of the firing pin into the bolt.
(4) As the operating slide continues its movement to the
rear, it carries with it the bolt which slides along the receiver.
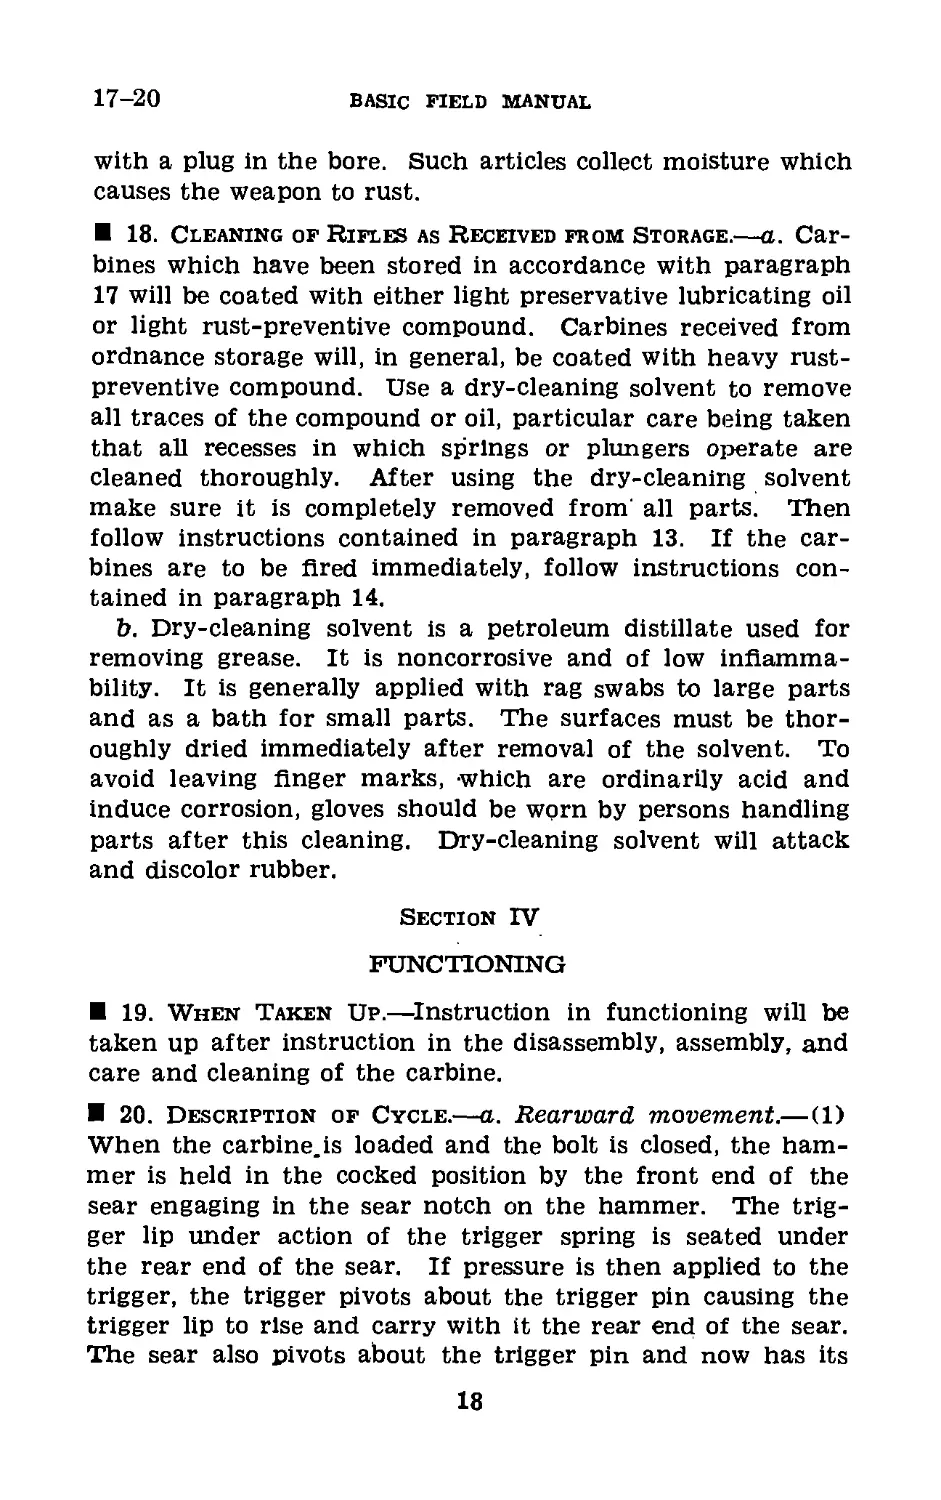
The empty cartridge case is withdrawn from the chamber
19
20
BASIC FIELD MANUAL
by the extractor (fig. 11). When the mouth of the empty
cartridge case clears the breech, the ejector, which is con-
tinually pressing on the base of the cartridge, ejects the
empty case to the right front through the action of the
ejector spring. While the bolt is moving rearward, its rear
end bears against the hammer and forces it back and down,
thus compressing the hammer spring. The bolt finally loses
its rearward motion near the rear end of the receiver. With
the bolt at its extreme rearward position, the magazine is
uncovered. The magazine follower, actuated by the maga-
zine spring, forces the cartridges upward in the magazine
so that the top cartridge lies in the path of the bolt. The
rearward movement of the operating slide terminates when
the rear end of the sleeve section contacts the front face
of the receiver.
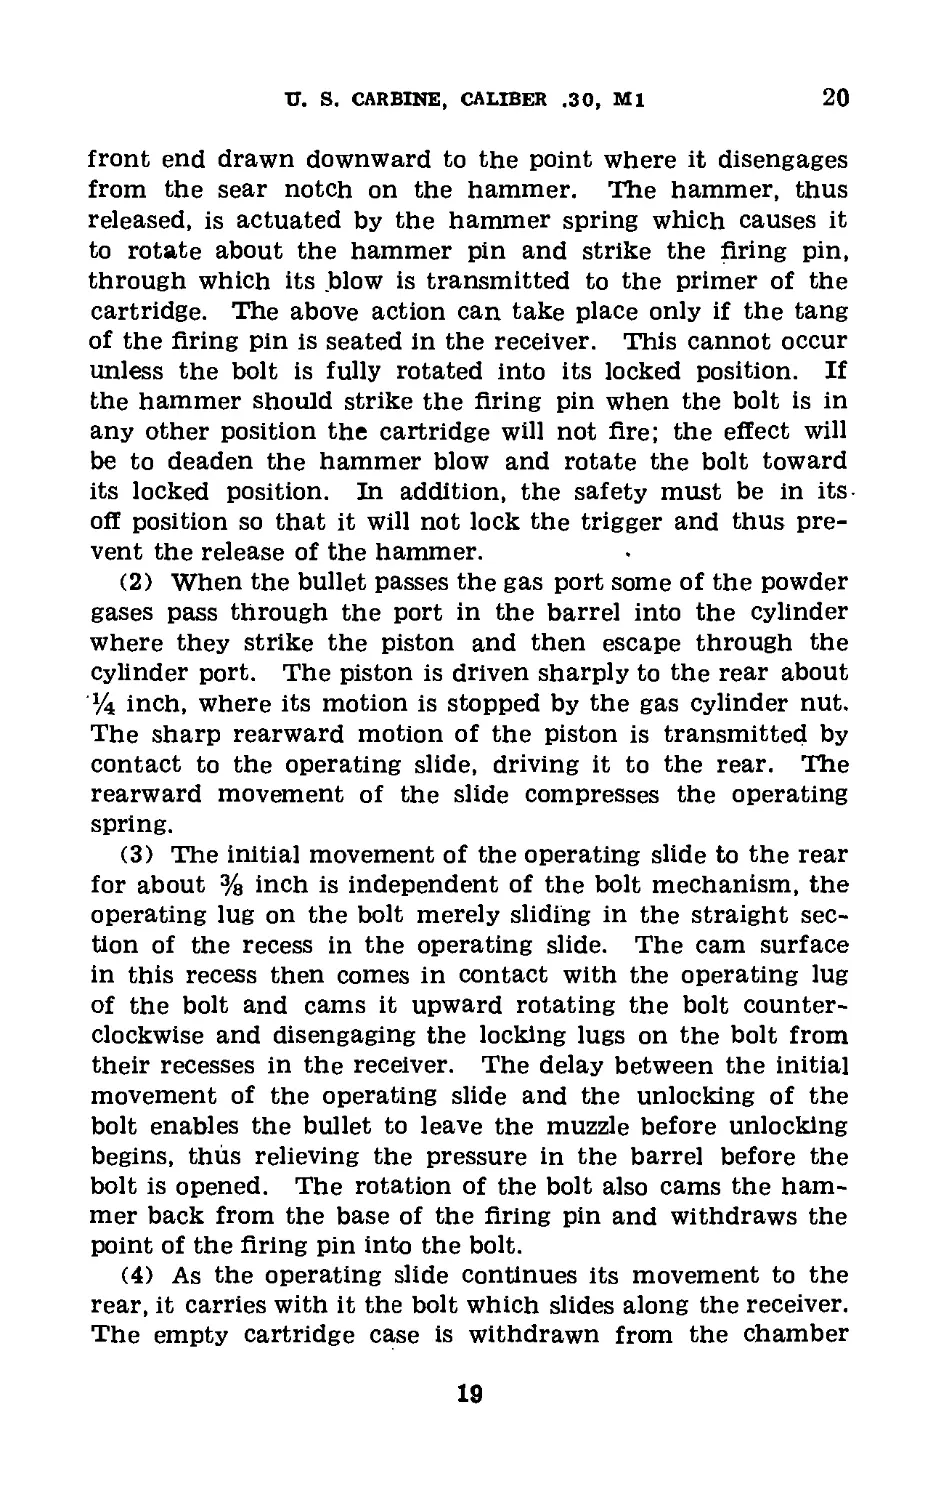
b. Forward movement.—(1) As the bolt moves forward,
actuated by the compressed operating slide spring, the lower
front face of the bolt comes in contact with the base of the
top cartridge and slides it forward into the chamber (see
fig. 12). The hammer, under pressure from the hammer
spring rides on the bottom of the bolt and tends to follow it,
but is caught and held by the front end of the sear, which
engages in the rear notch on the hammer. When pressure
on the trigger is released, the hammer spring imparts a slight
forward motion to the hammer, which pivots just enough to
push the sear slightly backward and cause its rear end to
ride over the trigger lip, completing the cocking action. If,
20
и. s. carbine, caliber .зо, mi
20-21
however, the pressure on the trigger has not been released,
that is, if the trigger is held back after firing, the rear end of
the sear cannot rise above the trigger lip, and the cocking
action cannot be completed.
(2) When the bolt approaches its forward position the
rim of the cartridge is engaged by the extractor, and the base
of the cartridge forces the ejector into the bolt, thus com-
pressing the ejector spring. The operating lug on the bolt
is cammed downward by the rear surface of the cam recess
in the operating slide, and in this manner the operating slide
rotates the bolt clockwise to engage the locking lugs in the
receiver. This action locks the bolt. The operating slide
then continues to move forward for about %e inch until the
Figure 12.—Start of forward movement.
rear end of the straight section of the recess in the operating
slide contacts the operating lug on the bolt. The carbine
is now ready to be fired again.
(3) The cycle described in (1) and (2) above is repeated
each time the trigger is squeezed until the magazine is
empty.
Section V
OPERATION
21. When Taken Up.—The operation of the carbine will
be taken up at any convenient time after instruction in care
and cleaning has been completed.
21
22-26
BASIC FIELD MANUAL
22. To Load Magazine.—Insert 15 rounds in the magazine so
that the base of each cartridge is close to the rear wall of the
magazine and all cartridges are properly alined.
23. To Load Carbine.—The operation of loading is per-
formed with the piece locked, that is, with the safety of the
piece pushed to the right, except in sustained firing. Hold
the carbine with the left hand just in front of the maga-
zine opening. With the right hand insert a fully loaded mag-
azine in the magazine opening, making sure that it snaps into
place. With the forefinger of the right hand, pull the oper-
ating slide smartly all the way back and release it, closing the
bolt. The closing of the bolt may be assisted by a push for-
ward on the operating slide handle with the heel of the
right hand.
24. To Unload Carbine.—The operation of unloading is
also performed with the piece locked. Hold the carbine at
the small of the stock with the right hand. Press the maga-
zine lock to the left with the forefinger of the right hand,
and at the same, time withdraw the magazine from the
receiver with the left hand, taking care that it does not drop
on a hard surface and suffer damage. With the forefinger of
the right hand, pull the operating slide all the way back
noting that a cartridge or empty cartridge case is ejected.
If nothing is ejected, glance into the chamber to see that it
is empty. Ease the operating slide forward gently. CAU-
TION: Note that removal of magazine does not unload
carbine.
25. To Operate Carbine as Single Loader.—Making sure
the receiver is empty, pull the operating slide to the rear
and press down on the operating slide catch with the right
thumb, locking the operating slide in its rear position. With
the thumb and forefinger of the right hand, insert a single
cartridge into the chamber. Pull back on the operating slide
handle and release it allowing the bolt to go forward.
26. To Fire Carbine.—With the right thumb push the
safety from right to left into the off position. Squeeze the
trigger for each shot, releasing the pressure on the trigger
between shots.
22
U. S. CARBINE, CALIBER .30, Ml 27-31
27. To Set Carbine at Safe.—The loaded carbine will be
kept locked until the moment for firing. To lock the carbine
push the safety from left to right. In this position the
trigger cannot be pulled as the safety locks the sear into
the sear notch on the hammer. The carbine may be loaded
and operated by hand when locked but cannot be fired.
To unlock the carbine, push the safety from right to left
with the right thumb.
28. Safety Precautions.—The soldier must be impressed
with the fact that while any cartridges remain in the re-
ceiver after a round has been fired, the carbine is ready to
fire. The gun is safe only when it is cleared; in other words,
the gun is never safe when the bolt is closed.
29. To Clear Carbine.—a. To clear the carbine, unload it
as in paragraph 24. Engage the operating slide catch in its
indent in the receiver. Glance into the chamber to see
that it is empty. Leave the bolt open.
b. In range firing, execute clear carbine whenever firing
ceases.
Section VI
IMMEDIATE ACTION AND STOPPAGES
30. When Taken Up.—Instruction in immediate action and
stoppages will be completed before any firing is done by
the individual.
31. Immediate Action.—a. General.—Immediate action is
the unhesitating application of a probable remedy for a stop-
page. It deals with methods of reducing stoppages and not
causes. It is taught as an unhesitating manual operation
applied to reduce stoppages without detailed consideration of
their causes.
b. Procedure.—(1) Carbine fails to fire.—With the right
hand palm up, use the little finger to pull the operating slide
to the rear. Release the operating rod, and if the operating
slide goes fully home, aim and fire. To avoid injury in case
of hangfire, the hand is so held that no part of the palm or
wrist can be struck by the operating slide in its rapid rear-
ward movement.
23
31-32
BASIC FIELD MANUAL
(2) Bolt cannot be locked.—If after following the procedure
prescribed in (1) above, the bolt does not go completely for-
ward and lock, again pull operating handle to the rearf"
Check for a battered round, dirt or obstruction on the face
of the bolt, in the chamber, or in the locking recess. Dis-
card the battered round; remove the obstruction. Release
the operating slide handle, aim, and fire.
(3) Bolt locks but carbine again fails to fire.—If after pro-
cedure prescribed in (1) above, the bolt locks and the carbine
still does not fire, again pull operating handle to the rear.
If no cartridge is ejected, reduce obstruction in magazine
by pressing and rotating the upper cartridges. Release the
operating slide handle, aim, and fire.
(4) Carbine fails to feed.—Keep carbine in action by man-
ually working operating slide. A detailed examination for
the malfunction may be made later when time permits.
c. Detailed examination.—The above procedure of im-
mediate action will almost invariably keep the carbine in ac-
tion. In case this immediate action is not successful, a more
detailed examination for the possible malfunctions listed in
paragraph 32e may be made as circumstances permit.
32. Stoppages___a. General.—While immediate action and
stoppages are closely related as to subject matter, the former
is treated separately to emphasize its importance as an
automatic and definite procedure to be applied to overcome
stoppages. Proper care of the carbine before, during, and
after firing will usually eliminate stoppages. Stoppages
which cannot be remedied by the application of immediate
action can best be eliminated if the soldier has an under-
standing of the functioning of the weapon and the causes
of stoppages."
b. Failure to fire.—(1) Causes.—Failure to fire is generally
caused by.—
(a) Defective ammunition.
(b) Defective firing pin,
(c) Bolt not fully closed when hammer strikes firing pin.
(2) Action.—If the primer of a round is deeply indented,
the round is defective. Discard the round. If the primer
is not indented or is lightly indented, the firing pin may be
short or broken, or the bolt may not have been fully closed.
24
U. S. CARBINE, CALIBER .30, Ml
32
Check for dirt or some obstruction which does not permit
the bolt to lock fully. Remove the obstruction. If thg car-
bine is clean and lubricated, check the firing pin. Replace
it if defective. As the disassembly of the bolt requires special
tools, replacement of the firing pin should be made
by specialists or ordnance personnel.
c. Failure to feed.—(1) Types.—Failure to feed is caused
by the bolt not going far enough to the rear to pick up a
new round. A failure to feed may have a number of causes
and results generally in one of the following types of
stoppages:
(a) That in which the bolt fails to go fully home.
(b> That in which the bolt does go fully home.
(2) Action to reduce stoppage of these types.—Stoppages
of the first type may be caused by a battered round, dirt in
the locking recesses, an obstruction on the face of the bolt,
a dirty chamber, or a ruptured cartridge case, part of which
remains in the chamber. Remove the battered round, dirt,
or other obstruction; clean the chamber; or remove the rup-
tured cartridge case. Sometimes this stoppage may be
caused by a magazine which has lost its spring tension and
does not hold the cartridge firmly in line. Occasionally,
when a stoppage of the second type occurs, the spent case
is not ejected but is re-fed into the chamber. This condition
is caused by lack of lubrication, excessive friction of the mov-
ing parts, or lack of sufficient gas pressure due to formation
of carbon in the gas port. In any event the bolt has not
moved far enough to the rear to permit proper functioning.
d. Failure to extract.—(1) Causes.—Failures to extract are
generally caused by—
(a) Extremely dirty chamber.
(b) Extremely dirty ammunition.
(c) Improper assembly of the carbine, that is, failure to
replace the extractor plunger and spring.
(d) Cartridge case chambered in a hot barrel.
(e) Broken extractor.
(2) Action.—(a) When a failure to extract occurs, the
bolt may be found fully locked with a spent case in the
chamber. Generally, most failures to extract can be remedied
by pushing the operating slide fully forward and then pulling
25
32
BASIC FIELD MANUAL
it smartly to the rear. If this does not remove the case,
use the cleaning rod.
(b> Sometimes the empty case will be left in the chamber,
the extractor ripping through the base of the cartridge.
When this occurs the bolt generally will attempt to feed a fresh
cartridge into, the chamber. It will then be necessary to
remove this round before the spent case can be removed.
(c) When the chamber or ammunition is dirty, clean the
chamber and discard or wipe off the ammunition. Faulty
assembly or a broken extractor will cause recurring failures
to extract. Replace missing or broken parts.
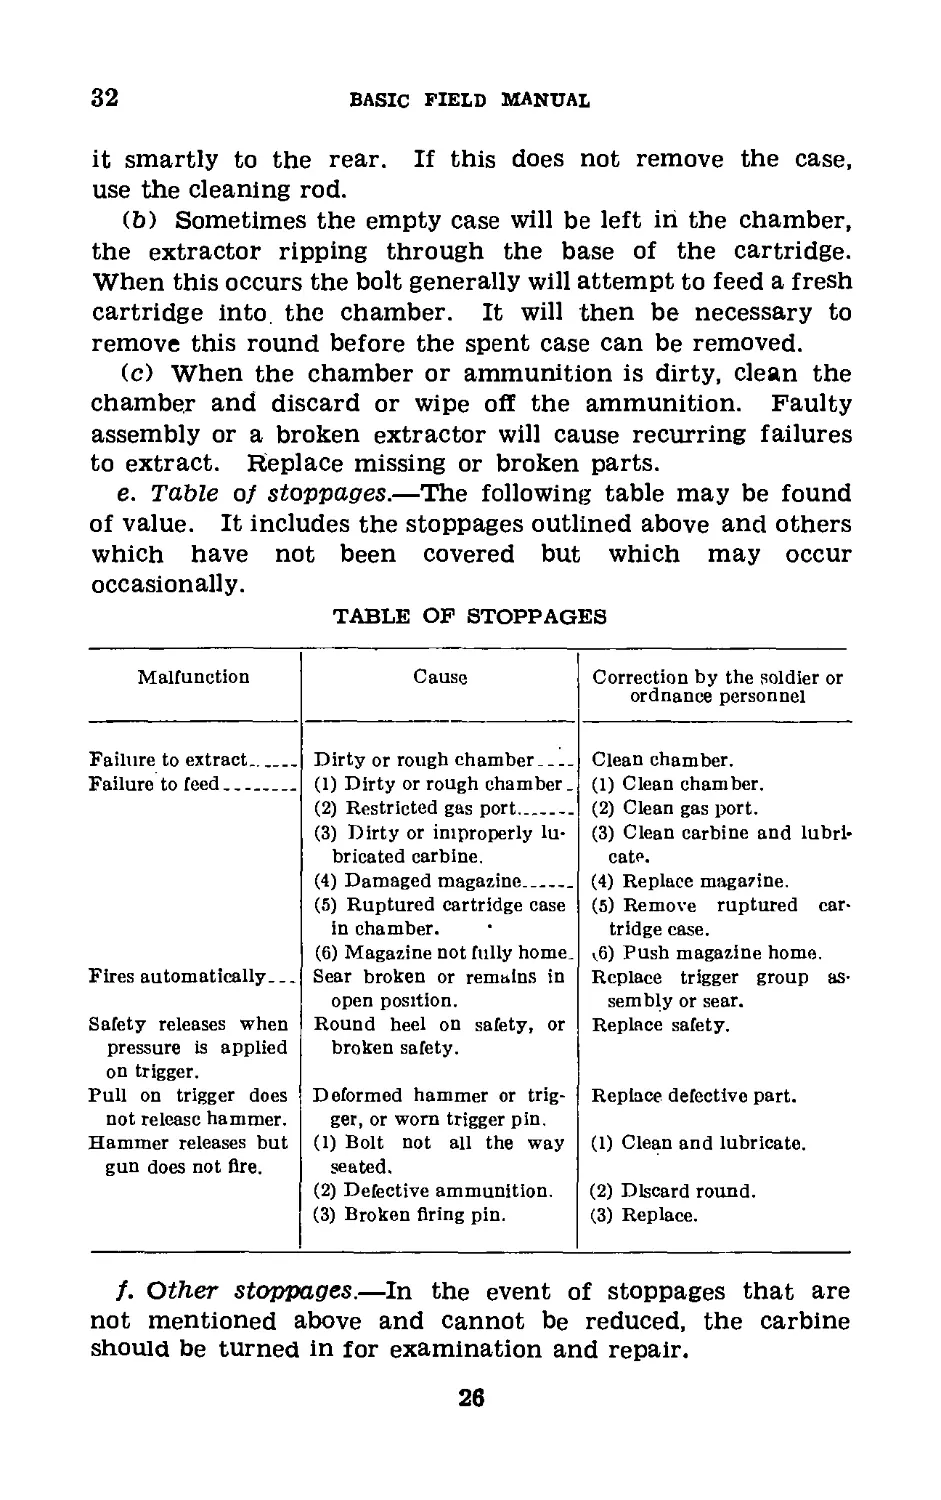
e. Table of stoppages.—The following table may be found
of value. It includes the stoppages outlined above and others
which have not been covered but which may occur
occasionally.
TABLE OF STOPPAGES
Malfunction Cause Correction by the soldier or ordnance personnel
Failure to extract Dirty or rough chamber Clean chamber.
Failure to feed (1) Dirty or rough chamber. (2) Restricted gas port (3) Dirty or improperly lu- bricated carbine. (4) Damaged magazine (5) Ruptured cartridge case in chamber. (6) Magazine not fully home. (1) Clean chamber. (2) Clean gas port. (3) Clean carbine and lubri* cate. (4) Replace magazine. (5) Remove ruptured car- tridge case. v6) Push magazine home.
Fires automatically Sear broken or remains in open position. Replace trigger group as- sembly or sear.
Safety releases when pressure is applied on trigger. Round heel on safety, or broken safety. Replace safety.
Pull on trigger does not release hammer. Deformed hammer or trig- ger, or worn trigger pin. Replace defective part.
Hammer releases but gun does not fire. (1) Bolt not all the way seated. (2) Defective ammunition. (3) Broken firing pin. (1) Clean and lubricate. (2) Discard round. (3) Replace.
f. Other stoppages.—In the event of stoppages that are
not mentioned above and cannot be reduced, the carbine
should be turned in for examination and repair.
26
U. S. CARBINE, CALIBER .30, Ml
33-34
Section VII
SPARE PARTS AND ACCESSORIES
33. Spare Parts.—a. The parts of any carbine will in time
become unserviceable through breakage or wear resulting from
continuous usage. For this reason spare parts are supplied.
These are extra parts provided with the carbine for replace-
ment of the parts most likely to fail, for use in making minor
repairs, and for general care of the carbine. They should
be kept clean and lightly oiled to prevent rust. Sets of spare
parts should be kept complete at all times. Whenever a
spare part is used to replace a defective part in the rifle, the
defective part should be repaired or a new one substituted
in the spare part set as soon as possible. Parts that are car-
ried complete should at all times be correctly assembled and
ready for immediate insertion in the carbine. The allowance
of spare parts for the carbine is prescribed in SNL B-28.
b. With the exception of replacements with the spare parts
referred to in a above, repairs or alterations to the carbine
by using organizations are prohibited.
34. Accessories.—a. General.—Accessories include the tools
required for assembling and disassembling and for the clean-
ing of the carbine, the gun sling, spare parts containers,
covers, arm locker, etc. Accessories should not be used for
purposes other than those for which they are intended. When
not in use they should be stored in the places or receptacles
provided for them.
b. Arm locker and rack.—The arm locker and the arm rack
are used to store or stack carbines to prevent mishandling or
pilfering.
c. Cleaning rod and cleaning brush.—The cleaning rod has
a handle at one end and is threaded at the other end to
receive the patch section or the brush. This rod is of the
correct length to prevent damaging the face of the bolt.
The cleaning brush is used to clean the bore of the carbine.
d. Gun sling.—The gun sling, fastened to the swivels of
the carbine, is adjusted to suit the particular soldier using
it. The sling consists of a long web strap, which may be
lengthened or shortened as desired. The sling is furnished
27
34-35
BASIC FIELD MANUAL
to provide the soldier with a means of carrying the carbine.
It is not needed in firing.
e. Ruptured-cartridge extractor.—The ruptured-cartridge
extractor has the general form of a caliber .30 carbine cart-
ridge. It consists of three parts: the spindle; the head; and
the sleeve. The ruptured-cartridge extractor is inserted
through the ruptured opening of the case and pushed forward
into the chamber. The bolt is let forward without excessive
shock so that the extractor of the carbine engages the head
tof the ruptured-cartridge extractor. As the operating slide
is drawn back, the ruptured-cartridge extractor, holding the
cartridge on its sleeve, is extracted.
f. Oiler.—The oiler consists of a tube to hold lubricating
oil, a steel ring or cap seat and a threaded cap in which is
positioned a rod or dropper. The oiler also acts as an anchor
pin for the sling.
g. Cleaning rod case.—This fabric container is sewed in
five pockets to hold the cleaning brush and the four sections
of the cleaning rod.
Section VIII
AMMUNITION
35. Lot Number.—When ammunition is manufactured, an
ammunition lot number is assigned which becomes an essen-
tial part of the marking in accordance with specifications.
This lot number is marked on all packing containers and the
identification card inclosed in each packing box. It is re-
quired for all purposes of record, including grading and use,
reports on condition, functioning, and accidents in which the
ammunition might be involved. Only those lots of grades
appropriate for the weapon will be fired. Since it is im-
practicable to mark the ammunition lot number on each
cartridge, every effort should be made to maintain the am-
munition lot number with the cartridges once the cartridges
are removed from the original packing. Cartridges which
have been removed from the original packing and for which
the ammunition lot number has been lost are placed in grade
3. It is, therefore, obvious that when cartridges are removed
from their original packings they should be so marked that
the ammunition lot number is preserved.
28
U. S. CARBINE, CALIBER .30, Ml
36-38
36. Grade.—Current grades of all existing lots of small
arms ammunition are established by the Chief of Ordnance
and are published in ordnance field service bulletins. No lot
other than one approved by the Ordnance Department will
be fired.
37. Care, Handling, and Preservation.—a. Small arms am-
munition is not dangerous to handle. Care, however, must
be taken not to break or damage the boxes. All broken boxes
must be immediately repaired, and all markings transferred
to the new parts of the box.
b. The ammunition comes in boxes of 2,000 rounds, packed
in 40 cartons of 50 rounds each. Ammunition boxes should
Figure 13.—Cartridge and cartridge case, carbine, caliber .30, Ml.
not be opened until the ammunition is needed. Ammunition
removed from containers, particularly in damp climates, may
corrode and thereby become unserviceable.
c. The .ammunition should be protected from mud, sand,
dirt, and water. If it gets wet or dirty, wipe it off at once.
Light corrosion should be wiped off. Cartridges should not
be polished to make them look brighter.
d. No carbine ammunition will be fired until it has been
positively identified by ammunition lot number and grade.
38. Cartridge, Carbine, Caliber .30, Ml.—The approx-
imate maximum range for the cartridge is 2,000 yards. Its
muzzle velocity is 1,900 feet per second. It is illustrated in
figure 13.
459353°—42---2 29
93
BASIC FIELD MANUAL
Section IX
INDIVIDUAL SAFETY PRECAUTIONS
39. Rules.—a. Consider every carbine to be loaded until it
has been examined and proved to be unloaded. Never trust
your memory as to its condition in this respect.
b. Never point the carbine at anyone you do not intend to
shoot, nor in a direction where an accidental discharge may
do harm.
c. Always unload the carbine if it is to be left where some-
one else may handle it.
d. Always point the carbine up when snapping the trigger
after examination.
e. If it is desired to carry the piece cocked with a cartridge
in the chamber, the bolt mechanism will be secured by turn-
ing the safety lock to the right.
t. Under no circumstances should the firing pin be let down
by hand on a cartridge in the chamber.
g. Never fire a carbine with any grease, cleaning patch,
dust, dirt, mud, snow, or other obstruction in the bore.
To do so may burst the barrel.
h. Never grease or oil the ammunition or the walls of the
carbine chamber. This creates a hazardous pressure on the
carbine bolt.
i. See that the ammunition is clean and dry. Examine all
live and dummy ammunition. Turn in all cartridges with
loose bullets or which appear to be otherwise defective.
j. Do not allow the ammunition to be exposed to the direct
rays of the sun for any length of time. This creates haz-
ardous chamber pressures.
30
U. S. CARBINE, CALIBER .30, Ml
40-42
CHAPTER 2
MARKSMANSHIP—KNOWN-DISTANCE TARGETS
Paragraphs
Section, I. General_______________________________________40-45
II. Preparatory marksmanship training_____________46-53
III. Qualification courses________________________ 54-56
IV. Range practice_________________________________57-59
V. Equipment—known-distance targets and ranges. 60-61
Section I
GENERAL
40. Purpose.—The purpose of this chapter is to provide
a thorough and uniform method of training individuals to be
good carbine shots and of testing their proficiency in firing
at known-distance targets.
41. Necessity for Training.—a. Without proper training
a man instinctively does the wrong thing in firing the carbine.
He gives the trigger a sudden pressure which causes flinch-
ing. However, if he is thoroughly instructed and drilled in
the mechanism of correct shooting, and is then carefully and
properly coached when he begins firing, he rapidly acquires
correct shooting habits.
b. Carbine firing is a mechanical operation which anyone
who is physically and mentally fit to be a soldier can learn
to do well if properly instructed. The methods of instruc-
tion are the same as those used in teaching any mechanical
operation. The training is divided into steps which must
be taught in proper sequence. The soldier is carefully
coached and is corrected whenever he starts to make a
mistake.
42. Fundamentals.—To become a good carbine shot the
soldier must be thoroughly trained in the following essentials
of good shooting:
a. Correct sighting and aiming.
b. Correct positions.
31
42-45
BASIC FIELD MANUAL
c. Correct trigger squeeze.
d. Correct application of rapid fire principles.
e. Knowledge of proper sight adjustments.
43. Phases of Training.—a. Marksmanship training is
divided into two phases:
(1) Preparatory marksmanship training.
(2) Range practice.
b. No soldier should be given range practice until he has
had a thorough course of preparatory training.
c. The soldier should be proficient in mechanical training
and related subjects before he receives marksmanship
training.
d. Every man who is to fire on the range will be put
through the entire preparatory course. No distinction will
be made between recruits and men who have had range prac-
tice, regardless of their previous qualification. Some part of
the preparatory instruction may have escaped them in pre-
vious years; it is certain that some of it has been forgotten,
and in any case it will be helpful to go over it again and
refresh the mind on the subject.
e. All of the noncommissioned officers and other men se-
lected as assistant instructors and special coaches of the unit
will be put through a course of instruction and required to
pass a rigid test before being used as instructors.
44. Recruit Instruction.—As a part of their recruit train-
ing, all recruits armed with the carbine will be given thor-
ough mechanical training and instructed in the fundamental
elements of carbine marksmanship—sighting and aiming,
positions, trigger squeeze, and rapid fire. Instruction in car-
bine marksmanship will commence with the initial instruction
of the recruit and will continue throughout the period of
recruit training.
45. Leaders and Commanders—Duties and Equipment.—a.
General.—In units where relatively small numbers of men
are armed with the carbine, it may be found desirable both
for instruction purposes and for range practice to assemble
the carbineers in each battalion into a provisional company.
Well-qualified instructors should be attached to the provi-
sional company by the battalion commander.
32
U. S. CARBINE, CALIBER .30, Ml 45-46
b. Duties.—(1) Squad leader.—(a) Organizes the work in
his squad so that each man is occupied during the prepara-
tory period in the prescribed form of training for target
practice.
(b) Tests each man in his squad at the end of the training
on each preparatory step and assigns him a mark in the
proper place on the blank form showing state of training.
(c> Sees that each man takes proper care of his carbine
and that he cleans it at the end of each day’s firing.
(d) Requires correct aiming, correct positions, and proper
trigger squeeze when fire is simulated in drills and maneuvers.
(2) Platoon leader.—Supervises and directs the squad
leaders in training their squads; personally checks each man
in his platoon on the points enumerated on the blank form;
and examines each man generally along the lines outlined
in paragraph 53.
(3) Company commander.—Requires the prescribed
methods of instruction and coaching to be carried out in
detail; supervises and directs the squad and platoon leaders;
in companies of less than 60 men performs the duties pre-
scribed for platoon leaders in (2) above.
(4) Battalion commander.—Sees that his instructors know
the prescribed methods of instruction and coaching; super-
vises the instruction of his battalion and requires his in-
structors to follow the preparatory exercises and methods
of coaching in detail.
c. Equipment.—All equipment used in the preparatory ex-
ercises must be accurately and carefully made. One of the
objects of these exercises is to cultivate a sense of exactness
and carefulness in the minds of the men undergoing instruc-
tion. They cannot be exact with inexact instruments, and
they will not be careful when working with equipment that
is carelessly made.
Section П
PREPARATORY MARKSMANSHIP TRAINING
46. General.—a. The purpose of preparatory marksman-
ship training is to teach the soldier the essentials of good
shooting, and to develop fixed and correct shooting habits
before he undertakes range practice.
33
46
BASIC FIELD MANUAL
b. Preparatory marksmanship training is divided into the
six following steps and should be concentrated in the period
of time allotted:
(1) Sighting and aiming exercises.
(2) Position exercises.
(3) Trigger-squeeze exercises.
(4) Rapid-fire exercises.
(5) Instruction in the effect of wind, in sight changes, and
in the use of ,the score book.
(6) Examination of men before starting range practice.
c. Each step is divided into exercises designed to teach the
soldier the importance of each operation and to drill him in
those operations until he is able to execute them correctly.
d. Instruction in the effect of wind, sight changes, and the '
use of the score book can be taught indoors during inclement
weather. It is not a training step that need be given in any
particular sequence but it must be covered prior to the
examination. The first four steps are taught in the order
listed; each one involves the technique learned in the preced-
ing steps.
e. Each of the first four steps starts with a lecture by the
instructor to the assembled group. This lecture includes a
demonstration by a squad which the instructor puts through
the exercises that are to constitute the day’s work. He
shows exactly how to do the exercises that are to be taken up
and explains why they are done and their application to car-
bine shooting. He shows how the squad leader organizes
the work so that no men are idle, and how they coach each
other when they are not under instruction by an officer or
noncommissioned officer. These talks and demonstrations
are an essential part of the training. If properly given they
awaken the interest and enthusiasm of the whole command
for the work and give an exact knowledge of how each step
is to be carried on—something that men cannot get from
reading a description, no matter how accurate and detailed
that description may be. The instructor who gives these
talks and demonstrations may be the platoon leader of his
platoon, the company commander of his company, or the
battalion commander of his battalion; or he may be a spe-
34
U. S. CARBINE, CALIBER .30, Ml
46
cially qualified officer who has been detailed as officer in
charge of carbine instruction.
/. The form below shows the state of instruction and should
be kept by each squad leader and by each platoon leader in-
dependently of his squad leaders.
METHOD OF MARKING
Fair:
Good:
X
X
Excellent:
Excellent and
has instruc-
tional ability:
g. The instruction must be thorough and it must be in-
dividual. Each man must understand every point and be able
to explain each one in his own words. The company com-
mander carefully supervises the work. He should pick out men
at random from time to time and put them through a test
to see if the instruction is thorough and is progressing satis-
factorily.
h. Interest and enthusiasm must be sustained. If these
exercises become perfunctory, they do more harm than good.
t. Careful attention must be paid to the essential points
covered in the questions and answers in paragraph 53. In-
structors will consult these during each step of the prepara-
tory work. Each man must be tested thoroughly before he
is allowed to fire.
35
46-48
BASIC FIELD MANUAL ,
j. The coach-and-pupil system is used during the prepara-
tory exercises, whenever a man is in a firing position. The
men are grouped in pairs and take turns in coaching each
other. The man giving instruction is Called the coach. The
man undergoing instruction is called the pupil. When the
men of a pair change places, the pupil becomes the coach and
the coach becomes the pupil.
k. Correct shooting habits should be acquired during the
preparatory training period. All errors must be noted,
brought to the attention of the pupil, and corrected. Each
soldier must be impressed with the importance of exactness
in every detail. For example, there is no such thing as
a trigger squeeze that is “about right”; it is either perfect
or it is wrong.
47. Blackening Sights.—In all preparatory exercises in-
volving aiming, and in all range firing, both sights of the
carbine should be blackened. Before blackening the sights,
they should be cleaned and all traces of oil removed. The
blackening is done by holding each sight for a few seconds
in the point of a small flame so that a uniform coating of
lampblack will be deposited on the metal. Materials com-
monly used for this purpose are carbide lamp, cylinder of
carbide gas, kerosene lamp, candles and small pine sticks.
Shoe paste may also be used.
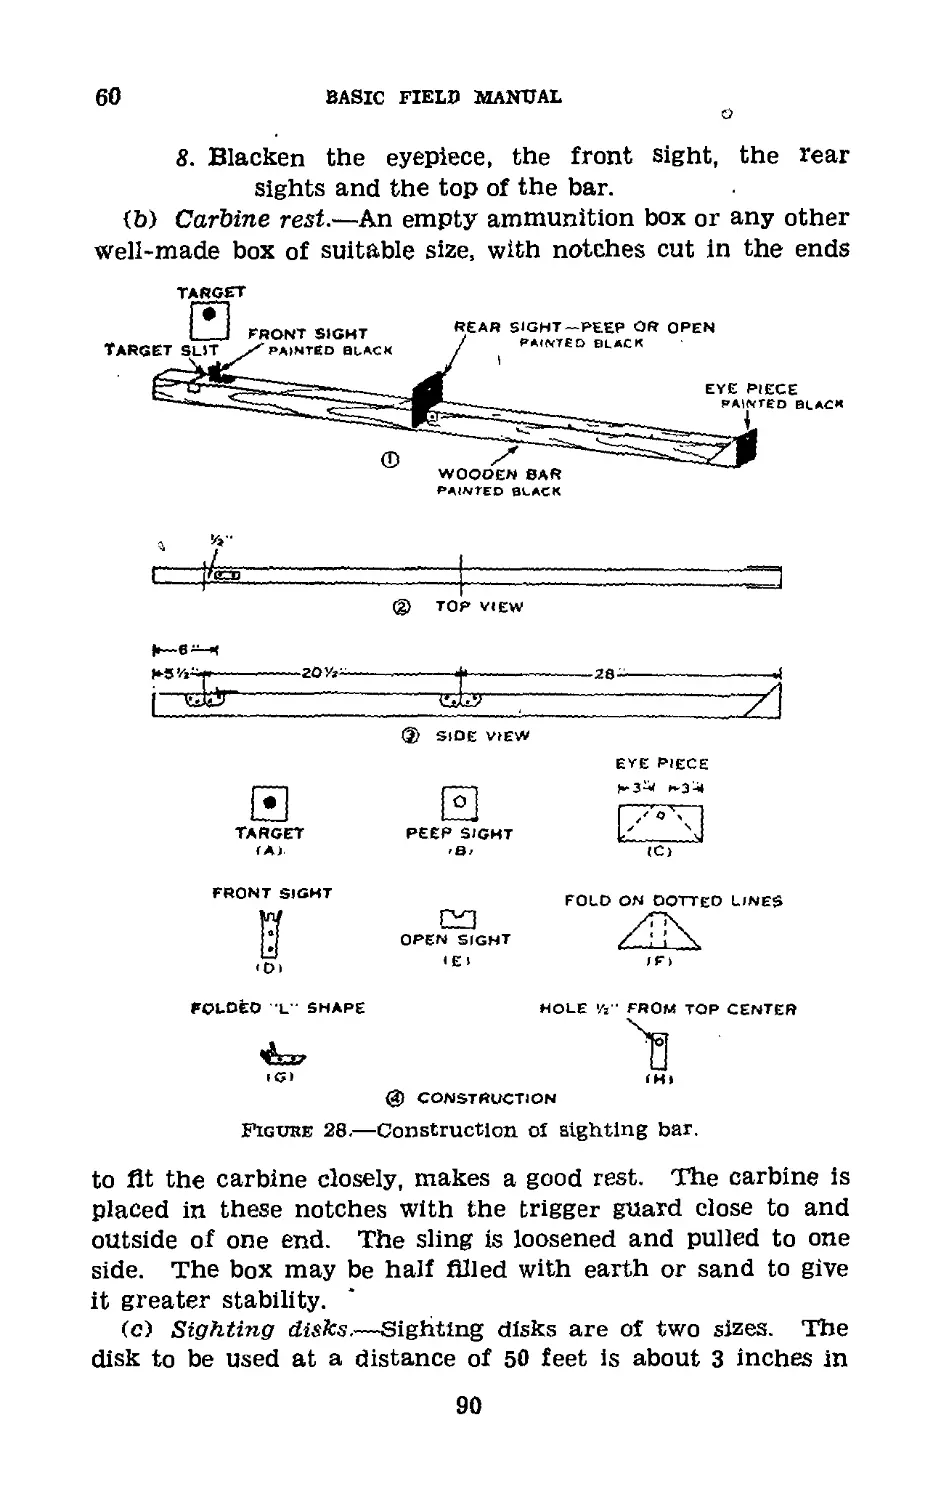
48. First Step—Sighting and Aiming.—a. First exercise-—
The instructor shows a sighting bar (fig. 14) to his group and
explains its use as follows:
(1) The front and rear sights on the sighting bar repre-
sent enlarged carbine sights.
(2) The sighting bar is used in the first sighting and aim-
ing exercise because with it small errors can be seen easily
and explained to the pupil.
(3) The eyepiece requires the pupil to place his eye in
such a position that he sees the sights in exactly the same
alinement as seen by the coach.
(4) There is no eyepiece on the carbine, but the pupil learns
by use of the sighting bar how to aline the sights when using
the carbine.
(5) Attaching the removable target to the end of the sight-
36
U. S. CARBINE, CALIBER .30, Ml
48
ing bar is a simple method of readily alining the sights on
a bull’s-eye.
(6) The instructor explains the peep sight to the assembled
group and shows each man the illustrations of a correct sight
alinement (fig. 15).
(7) With the target removed, the instructor adjusts the
sights of the sighting bar to illustrate a correct alinement
of the sights. Each man of the assembled group looks
through the eyepiece at the sight adjustments.
(8) He then adjusts the sights of thfe sighting bar with
various small errors in alinement and has each man try to
detect the error.
(9) The instructor describes a correct aim, showing the
illustration to each man. He explains that the top of the
TARGET
TARGET SLIT
•FRONT SIGHT
REAR SIGHT
EYE PIECE
Figure 14.—Sighting bar.
front sight is seen through the middle of the circle and just
touches the bottom of the bull’s-eye, so that all the bull’s-eye
can be clearly seen (fig. 15).
(10) The eye should be focused on the bull’s-eye in aiming,
and the instructor assures himself, by questioning the men,
that each understands what is meant by focusing the eye on
the bull’s-eye.
(11) The instructor adjusts the sights of the sighting bar
and the removable target so as to illustrate a correct aim
and requires each man of the group to look through the eye-
piece to observe the correct aim.
(12) He adjusts the sights and the removable target of
the sighting bar so as to illustrate various small errors and
requires each man in the group to attempt to detect the error.
(13) The exercise described above having been completed
by the squad leader or other instructor, the men are placed
37
48
BASIC ‘FIELD MANUAL
38
U. S. CARBINE, CALIBER .30. Ml
48
in pairs and repeat the exercise by the coach-and-pupil
method.
(14) As soon as the pupil is considered proficient in the
first sighting and aiming exercise, he is put through the
second and third sighting and aiming exercises by the in-
structor. Such pupils are then placed in pairs to instruct
each other in these two exercises by the coach-and-pupil
method.
b. Second exercise.—(1) A carbine with sights blackened
is placed in a carbine rest (fig. 16®) and pointed at a blank
sheet of paper mounted on a box. Without touching the
carbine or the carbine rest, the coach takes the position
illustrated and looks through the sights (fig. 16® and ®).
The coach directs the marker by command or signal to move
the small disk until the bottom of the bull’s-eye is in correct
alinement with the sights and then commands: HOLD, to
the marker. The coach moves away from the carbine and
directs the pupil to look through the sights in order to observe
the correct aim.
(2) After the pupil has observed the correct aim, the
marker moves the disk out of alinement. The pupil then
takes position and directs the marker to move the disk until
the bottom of the bull’s-eye is in correct alinement with
the sights. The coach then looks through the sights to see
if the alinement is correct.
(3) The coach alines the sights on the bull’s-eye with vari-
ous slight errors to determine whether or not the pupil can
detect them.
c. Third exercise.—(1) The object of this exercise is to
show the importance of uniform and correct aiming, and to
foster a sense of exactness. At 50 feet and with a small
bull’s-eye a man should be able to place all three marks so that
they can be covered by the unsharpened end of a lead pencil.
(2) This exercise is conducted as follows: The carbine with
the sights blackened is placed in a carbine rest and pointed at
a blank sheet of paper mounted on a box. The pupil takes
the position illustrated and looks through the sights without
touching the carbine or carbine rest. The pupil directs the
marker to move the disk until the bottom of the bull’s-eye is
in correct alinement with the sights, and then commands:
39
48
BASIC FIELD MANUAL
HOLD, to the marker. The coach then looks through the
sights to see if the alinement is correct. Without saying any-
thing to the pupil, he commands: MARJ<, to the marker.
The marker, without moving the disk, makes a dot on the
paper with a sharp-pointed pencil inserted through the hole
in the center of the bull’s-eye. The marker then moves the
disk to change the alinement. The pupil and coach without
touching the carbine or carbine rest repeat this operation
until three dots, numbered 1, 2, 3, respectively, have been
made. These dots outline the shot group, and the pupil’s
name is written under it. The size and shape of the shot
group are then discussed and the errors pointed out. This
exercise is repeated until proficiency is attained.
(3) This exercise should also be practiced at 100 yards and
200 yards on a 10-inch movable bull’s-eye. These shot group
exercises at longer ranges teach the men to aim accurately
at a distant target, the outlines of which are indistinct. At
100 yards a man should be able to make a shot group that
can be covered with a half dollar, and at 200 yards one that
can be covered with a dollar.
(4) Tissue paper may be used to trace each man’s shot
group at the longer ranges. The name of the pupil is written
on the tissue paper under the shot group he made. These
tracings are sent back to the firing line so that the pupil can
see what he has done.
(5) The third sighting and aiming exercise, especially the
40
Figure 16.—Position for second sighting and aiming exercise.—Continued.
3
w
CARBINE, CALIBER .30, Ml
4^
00
48-49
BASIC FIELD MANUAL
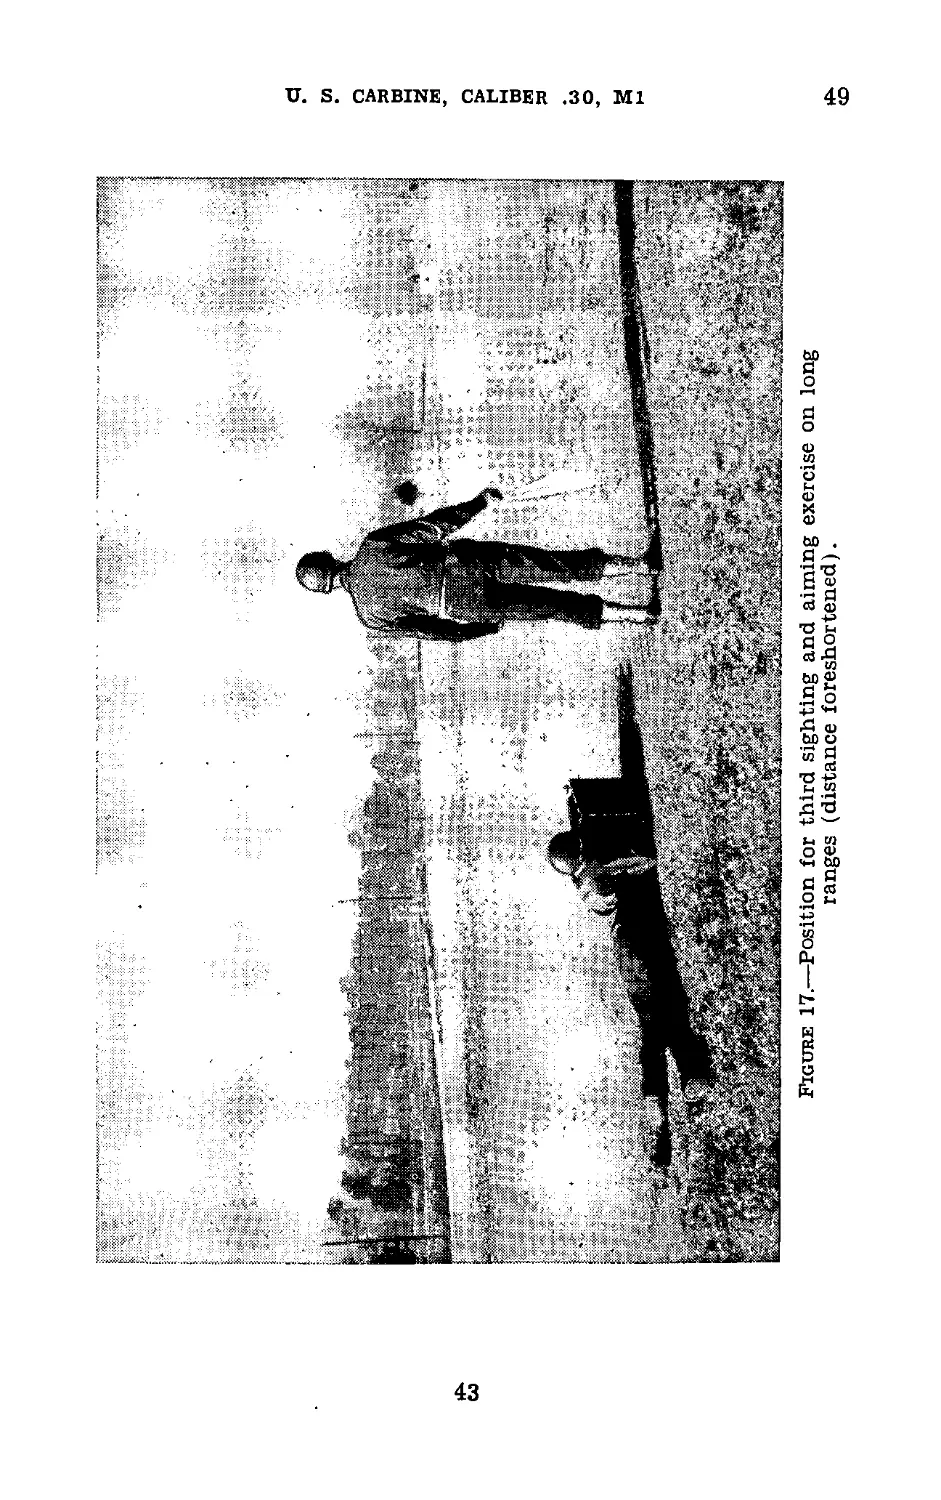
200-yard shot group work, is continued during the time de-
voted to the second and third preparatory steps. The reason
for continuing this exercise is to bring backward men up to
'the required state of proficiency and to maintain interest
(fig. 17).
(6) Competition between the individuals of a squad to see
which one can make the smallest shot group is valuable in
creating and maintaining interest.
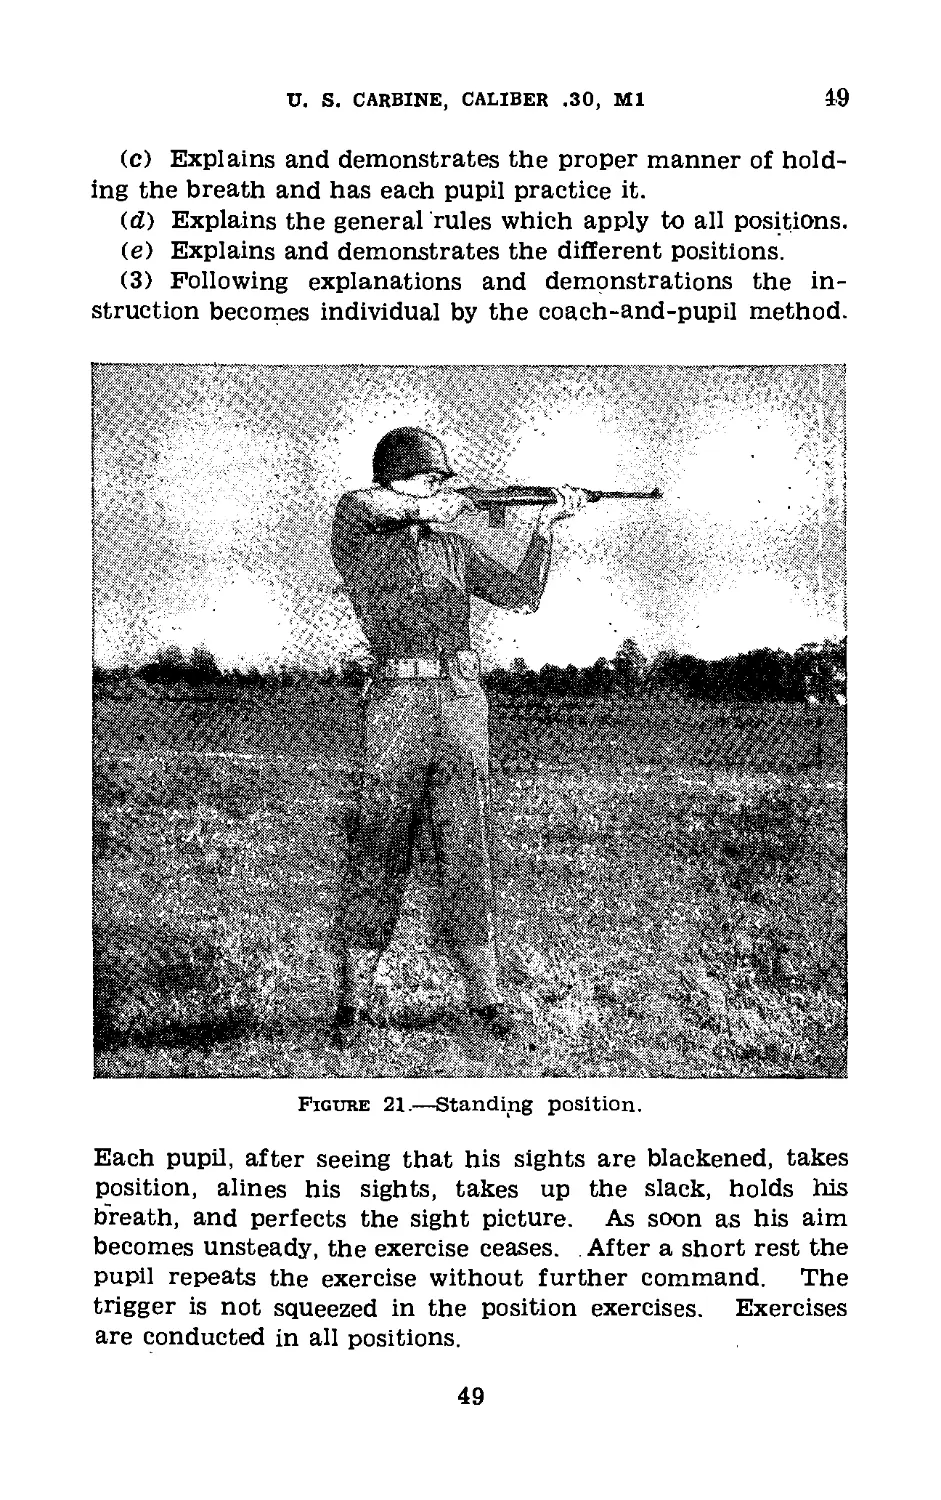
49. Second Step—Positions.—a. General.—Instruction in
position with the carbine includes taking up the slack, holding
the breath, and aiming.
b. Taking up the slack.—The first movement of the trigger
which takes place when light pressure is applied is called
taking up the slack. It is part of the position exercise be-
cause this play must be taken up by the finger as soon as
the correct position is assumed and before careful aiming is
begun. The entire amount of slack in the trigger is taken
up by one positive movement of the finger.
c. Holding the breath.—(1) Holding the breath in the
proper manner while aiming is very important. It will be
found that a large proportion of men in any group under-
going instruction in carbine marksmanship do not know how
to hold the breath in the proper manner. Each man must
be carefully instructed and tested on this point. The correct
manner of holding the breath must be practiced at all times
during position and trigger-squeeze exercises and whenever
firing or simulating fire.
(2) To hold the breath properly, draw into the lungs a
little more air than is used in an ordinary breath. Let out
a little of this air and stop the remainder by closing the
throat so that the air remaining in the lungs will press
against the closed throat. . Do not hold the breath with the
throat open or by the muscular action of the diaphram as if
attempting to draw in more air. The important point is to
be comfortable and steady while aiming and squeezing the
trigger.
d. Aiming.—The carbine is carefully aimed at a target
each time a firing position is assumed.
e. General rules for positions.—The general rules which
follow are common to the prone, sitting, kneeling, and stand-
42
60
Figure 17.—Position for third sighting and aiming exercise on long
ranges (distance foreshortened).
a
pj
CARBINE, CALIBER .30, Ml
CD
49
BASIC FIELD MANUAL
Ing positions. The exact details of a position for any indi-
vidual depend on his conformation.
(1) To assume any position, half face to right and then
assume the position.
(2) In assuming any position there is some point at which
the carbine points naturally and without effort. If this point
is not the center of the target, the whole body and carbine
must be shifted so as to bring the carbine into proper alin^-
ment. Otherwise the flrer will be firing under a strain be-
cause he will be pulling the carbine toward the target by
muscular effort for each shot.
(3) The right hand grasps the small of the stock. The
right thumb may be either over the small of the stock or on
top of the stock; it should not be placed alongside the stock.
(4) The left hand is in rear of the upper band swivel, the
hand and wrist joint straight, carbine resting in the crotch
formed by the thumb and index finger and resting on the base
of the thumb and heel of the palm of the hand.
(5) The left elbow is placed as nearly under the carbine
as it can be placed without appreciable effort.
(6) Ordinarily the second joint of the index finger contacts
the trigger. The first joint may be used by men the length
of whose arm or the size of whose hand is such as to make
it difficult to reach the trigger with the second joint, or to
whom the first joint of the finger seems more natural and
comfortable.
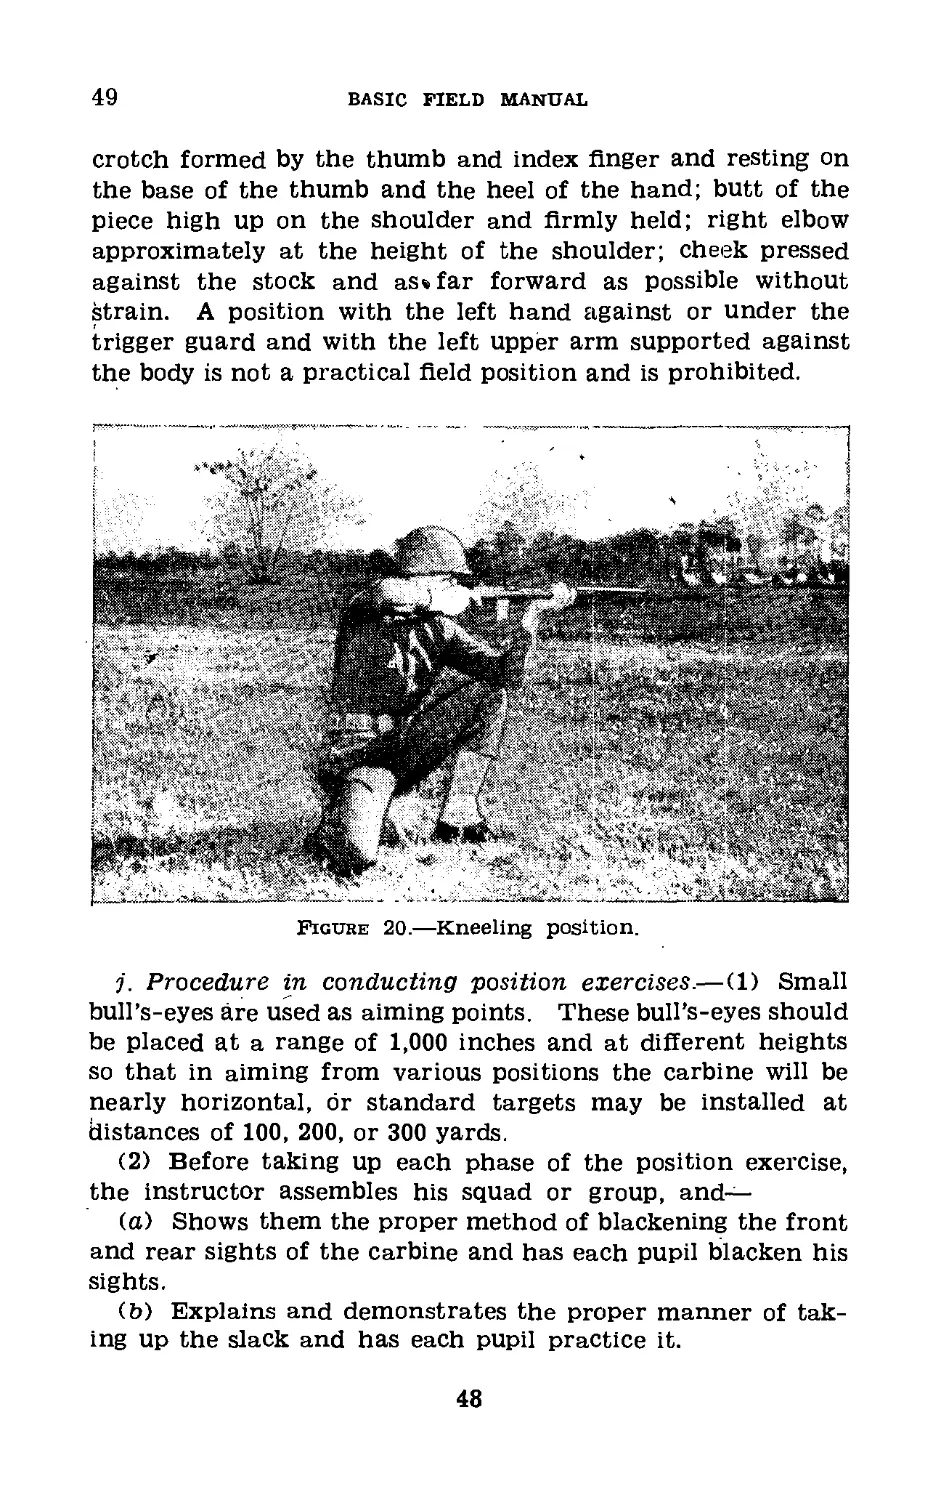
(7) The cheek is pressed firmly against the stock and placed
as far forward as possible without strain to bring the eye
near the rear sight.
(8) The butt of the carbine is held firmly against the
shoulder.
(9) The carbine should not be canted.
(10) Left-handed men who have difficulty with the right-
hand position will be allowed to use the left-hand position.
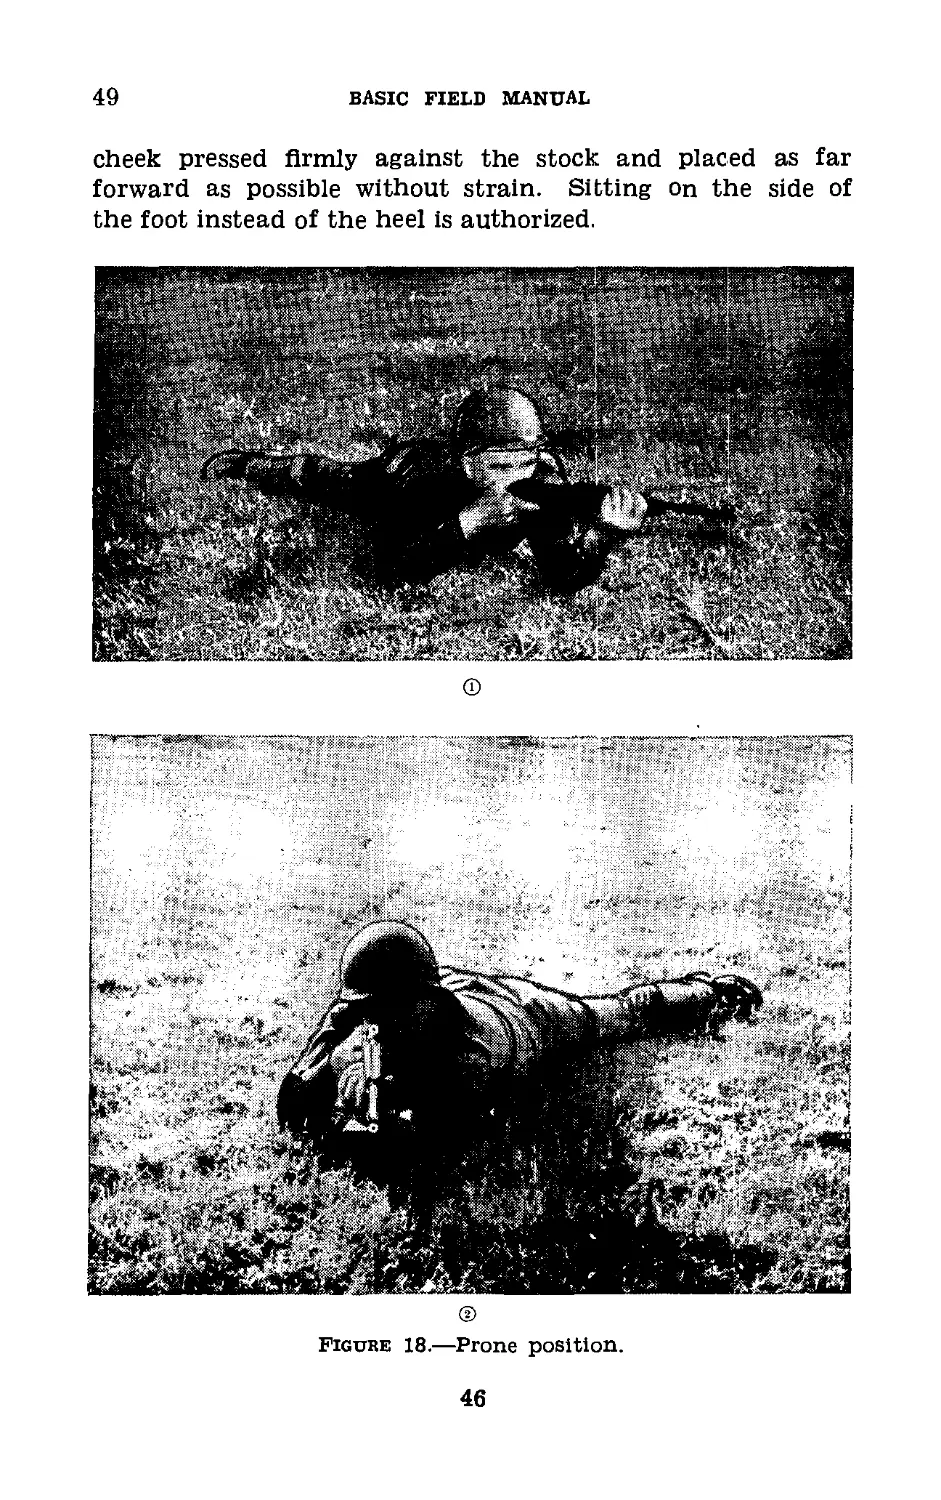
f. Prone position (fig. 18).—(1) In assuming the prone
position the body should lie at ah angle of about 45° to the
line of aim with the. spine straight. The exact angle of the
body to the line of aim depends upon the conformation of
the flrer. The legs should be well apart, the inside of the
feet fiat on the ground, or as nearly so as can be attained
44
U. S. CARBINE, CALIBER .30, Ml
49
without strain. Elbows should be well under the body so as
to raise the chest off the ground. The right hand grasps'
the small of the stock. The left hand is near the upper band
swivel, as far forward as is comfortable and convenient for
the firer, wrist straight, carbine placed in the crotch formed
by the thumb and index finger and resting on the base of
the thumb and heel of the hand. The cheek should be
firmly pressed against the stock with the eye as close to the
rear sight as possible, without straining the neck muscles.
(2) The exact details of the position will vary, depending
upon the conformation of the firer. However, the firer must
secure a position that will not be changed by the recoil of the
weapon'? When the correct position has been attained, it
will be found that upon discharge the muzzle will move slight-
ly up and very slightly to the right, and that it will then
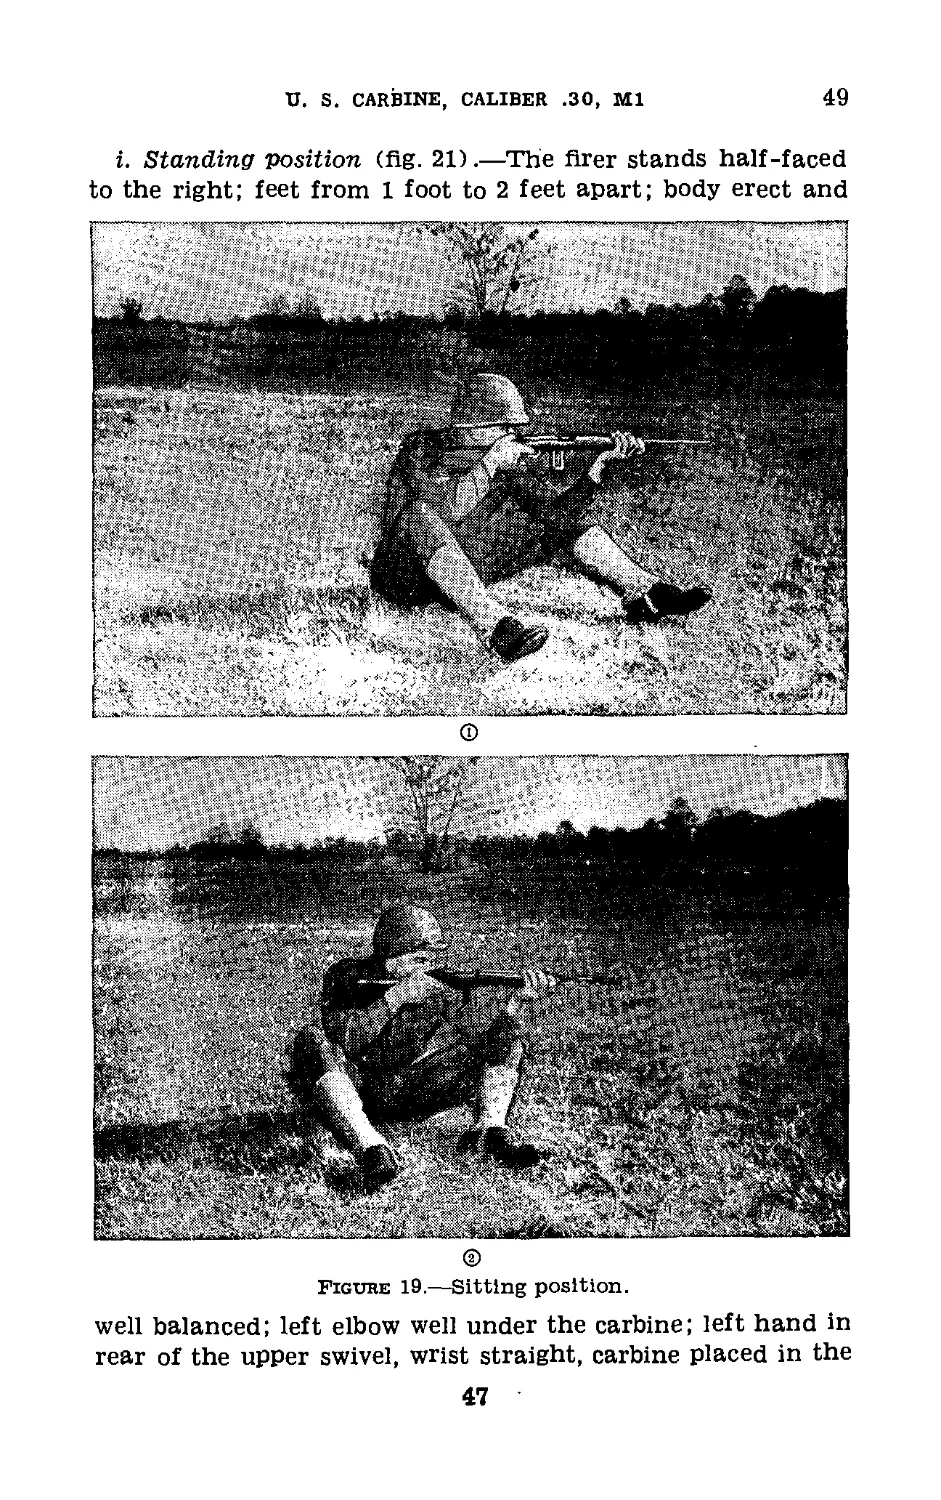
settle back close to the original aiming point.
g. Sitting position (fig. 19).—(1) The firer sits half-faced
to the right; feet well apart and well braced on the heels which
are dug slightly into the ground; body leaning well forward
from the hips with back straight; both arms resting inside
the legs and well supported; cheek pressed firmly against the
stock and placed as far forward as possible without straining;
left hand near the upper band swivel, wrist straight, carbine
placed in the crotch formed by the thumb and index finger
and resting on the base of the thumb and heel of the hand.
(2) The sitting position is used in the field when firing
from ground that slopes downward to the front. In practic-
ing this position the feet may be slightly lower than the
ground upon which the soldier sits. Sitting on a low sandbag
is authorized.
(3) In the event the conformation of the firer is such that
he can not assume the prescribed normal position, such
changes as may be necessary to secure a steady, comfortable
position are authorized.
h. Kneeling position (fig. 20).—The firer kneels half-faced
to the right on the right knee, sitting on the right heel; the
left knee bent so that the left lower leg is vertical (as seen
from the front); left arm well under the carbine and resting
on the left knee with the point of the elbow beyond the knee-
cap; right elbow above or' at the height of the shoulder;
45
49
BASIC FIELD MANUAL
cheek pressed firmly against the stock and placed as far
forward as possible without strain. Sitting on the side of
the foot instead of the heel is authorized.
®
Figure 18.—Prone position.
46
U. S. CARBINE, CALIBER .30, Ml
49
i. Standing position (fig. 21).—The flrer stands half-faced
to the right; feet from 1 foot to 2 feet apart; body erect and
©
Figure 19.—Sitting position.
well balanced; left elbow well under the carbine; left hand in
rear of the upper swivel, wrist straight, carbine placed in the
47
49
BASIC FIELD MANUAL
crotch formed by the thumb and index finger and resting on
the base of the thumb and the heel of the hand; butt of the
piece high up on the shoulder and firmly held; right elbow
approximately at the height of the shoulder; cheek pressed
against the stock and as» far forward as possible without
strain. A position with the left hand against or under the
trigger guard and with the left upper arm supported against
the body is not a practical field position and is prohibited.
Figure 20.—Kneeling position.
j. Procedure in conducting position exercises.—(1) Small
bull’s-eyes are used as aiming points. These bull’s-eyes should
be placed at a range of 1,000 inches and at different heights
so that in aiming from various positions the carbine will be
nearly horizontal, dr standard targets may be installed at
distances of 100, 200, or 300 yards.
(2) Before taking up each phase of the position exercise,
the instructor assembles his squad or group, and—
(a) Shows them the proper method of blackening the front
and rear sights of the carbine and has each pupil blacken his
sights.
(t>> Explains and demonstrates the proper manner of tak-
ing up the slack and has each pupil practice it.
48
U. S. CARBINE, CALIBER .30, Ml
49
(c) Explains and demonstrates the proper manner of hold-
ing the breath and has each pupil practice it.
(d) Explains the general rules which apply to all positions.
(e) Explains and demonstrates the different positions.
(3) Following explanations and demonstrations the in-
struction becomes individual by the coach-and-pupil method.
Figure 21.—Standing position.
Each pupil, after seeing that his sights are blackened, takes
position, alines his sights, takes up the slack, holds his
breath, and perfects the sight picture. As soon as his aim
becomes unsteady, the exercise ceases. After a short rest the
pupil repeats the exercise without further command. The
trigger is not squeezed in the position exercises. Exercises
are conducted in all positions.
49
49-50
BASIC FIELD MANUAL
(4) In the position exercises, it is the duty of the coach to
see that—
(a) The sights are blackened.
(b) The proper position is taken.
(c) The slack is taken up promptly.
(d) The pupil aims.
(e) The breath is held while aiming. The coach checks
the pupil’s manner of holding his breath by watching his
back.
I 50. Third Step—Trigger Squeeze.—a. Importance of trig-
ger squeeze.—(1) The most important item in shooting is to
squeeze the trigger in such a way as to fire the carbine with-
out affecting the aim. Misses and poor shots are due to
spoiling the aim just before the discharge takes place. This
is caused by jerking the trigger and flinching. The trigger
must be squeezed so steadily that the flrer cannot know the
instant the piece will be fired. If a man squeezes the trigger
so steadily that he cannot know when the discharge will take
place, he does not spoil his aim and he will not flinch, because
he does not know when to flinch.
(2) No good shot attempts to discharge the piece the
instant his sights are alined on the mark. Instead, he holds
his aim as accurately alined on the mark as possible and
maintains a steadily increasing pressure upon the trigger
until the shot is fired. This method of squeezing the trigger
must be carried out in all simulated firing or the value of
the practice is lost.
(3) There is only one correct method of squeezing the
trigger—a steady increase of pressure so that the flrer does
not know when the explosion will take place.
(4) Expert shots are men who through training have
learned to increase the pressure only when the sights are in
correct alinement with the bull’s-eye. When the sights
become slightly out of alinement, they hold what they have
with the finger and only continue the increase of pressure
when the sights again become properly alined.
(5) The difference between poor shots and good shots
is measured in their ability to squeeze the trigger properly.
Any man with fair eyesight and strength can aline the sights
on the target and hold them there for an appreciable length
50
U. S. CARBINE, CALIBER .30, Ml
50
of time. When he has acquired sufficient will power and
self-control to forget that there is to be an explosion and a
shock, and squeezes the trigger with a steady increase of
pressure until the carbine is fired, he has become a good shot,
and not until then. This squeeze of the trigger applies to
rapid fire as well as slow fire. The increase of pressure is
faster in rapid fire, but the process is the same.
b. Calling the shot.—The pupil must always notice where
the sights are pointed at the instant the carbine is fired,
and must call out at once where he thinks the bullet will
hit. Shots are called even when simulating fire at a mark,
in order to acquire the habit and to develop a closer hold.
No man can become a good shot until he is able to call his shot
before it is marked. Inability to call a shot indicates the
firer did not know where the sights were pointing at the
time the carbine was fired; in other words, he shut his eyes
first and fired afterward.
c. Procedure in conducting trigger-squeeze exercises.—(1)
(a) The instructor explains to the assembled squad or group
the importance of correct trigger squeeze. He assures him-
self by questions that each pupil understands what is meant
by a steady increase of pressure, and that he understands
that the increase is only applied when the aim is correct
and then by a steady, not by a sudden pressure. The instruc-
tor explains the necessity for calling the shot. After the
above points have been explained the instruction becomes
individual by the coach-and-pupil method supervised by the
Instructor.
(b) . The pupil is first taught the trigger squeeze in the
prone position. In this position he can hold steadily and
has not the temptation to snap the shot the instant the
front sight touches the bull’s-eye, as he has in a less steady
position. After he has learned the principles of correct
trigger squeeze in the prone position, he applies them in
the other positions.
(c) A great deal of trigger-squeeze exercise is necessary,
but it must be carefully watched and coached. Trigger
squeeze exercise that is not along the right lines is worse
than none.
(d) Soldiers should not be allowed to simulate fire until
51
50-51
BASIC FIELD MANUAL
they have been thoroughly instructed in trigger squeeze,
and then in all drills and field exercises where fire is simulated
they should be cautioned to aim at definite objects and to
carry out the correct principles of aiming, squeezing the
trigger, and calling the shot.
(2) The instruction is individual by the coach-and-pupil
method. Aiming targets similar to those mentioned for the
position exercises are used. The exercise is conducted at
will as outlined for the position exercises.
d. Duties of the coach.—In the trigger-squeeze exercises
the coach sees that—
(1) The sights are blackened.
(2) The proper position is taken.
(3) The slack is taken up promptly.
(4) The pupil aims.
(5) The breath is held while aiming. (He checks the
breathing by watching the back of the pupil.)
(6) The trigger is squeezed properly.
(7) The pupil calls the shot.
51. Fourth Step—Rapid Fire.—a. General.—All points
learned in slow fire are applied in rapid fire. It is especially
important that the men understand that the aim and the
trigger squeeze are the same as in slow fire. Time is gained
by taking position rapidly and by reloading quickly and
without fumbling.
b. Timing.—A most important element in rapid fire is
the development of correct timing in firing. Correct timing
in firing will vary from about 5 seconds per shot for the
beginner to about 2 seconds per shot for the experienced
man. The development of proper timing in firing rests
mainly on the correct position of the firer. The filer’s posi-
tion is not correct unless the sights return automatically to
the aiming point after each shot is fired. As soon as the
sights come back on the aiming point the firer concentrates
on the sight picture and squeezes the trigger quickly. This
is repeated for each shot. Through training, accurate fire
becomes more and more rapid until the ability to fire 25
or more accurate shots per minute is acquired.
(1) In timing exercises the instructor first assembles his
group and explains and demonstrates—
52
U. S. CARBINE, CALIBER .30, Ml 51
(a) The importance of correct position.
(b) The importance of correct aiming and keeping the eye
on the target while firing.
(c) How the coach promptly presses back the operating
handle with a sharp motion to cock the piece and then re-
leases the pressure to permit the operating handle to go
forward (see fig. 22).
(d) Correct trigger squeeze.
(e) What is meant by correct timing.
(f) How speed in timing is gradually increased as skill is
Figure 22.—Coach manipulating operating slide.
acquired, until an approximate rate of one shot every .2
seconds is attained. :
(2) Following the above explanation and demonstration by
the instructor, timing exercises using the coach-and-pupil
method are given in all positions except standing.
c. Taking positions rapidly.—(1) Prone position (fig. 23).—
(a) The movement is described by the numbers for the pur-
pose of instruction in the sequence of the movement. After
this sequence is learned the position is taken as one motion.
(b) First assume the correct position and aim at the
target as explained in paragraph 49f. Mark the position of
the elbows, rise to the knees and then to the feet, without
53
51
BASIC FIELD MANUAL
Figure 23.—Method of assuming prone position rapidly.
54
U. S. CARBINE, CALIBER .30, Ml
51
®
Figure 23.—Method of assuming prone position rapidly—Continued.
55
51
BASIC FIELD MANUAL
changing the position of either foot. Grasp the carbine,
with the right hand at the small of the stock, and hold the
piece with the barrel inclined upward at an angle of about
45°. This is the ready position (fig. 23®).
(c) Being at the ready, to take the prone position rapidly:
1. Bend both knees to the ground (fig. 23®).
2. Let the body fall forward from the waist up; break
the fall by placing the left hand about 3 feet in
front of the left knee (fig; 23® and @).
3. Place the right elbow on the ground (fig. 23®).
4. Place the butt of the carbine against .the right
shoulder (fig. 23®).
5. Place the left elbow on the ground and at the same
time grasp the carbine just below the upper band
with the left hand (fig. 23@).
(2) Sitting position (fig. 24).—(a) To assume the sitting
position rapidly, break the fall by placing, the right hand on
the ground slightly to the right rear of the spot on which
to sit.
(b) In practicing for range firing, first sit down and aim at
the target in the normal sitting position. Then mark the
position of the heels and the spot on which to sit. Then at
the command ready on the firing line, stand with the heels
in the places made for them. As the target appears, sit down
on the spot marked; break the fall with the right hand; grasp
the small of the stock with the right hand; and assume the
aiming position.
(3) Kneeling position.—To assume the kneeling position
from standing, first kneel and aim at the target in the normal
kneeling position. Then mark the position of the feet and
the right knee. At the command ready on the firing line,
stand with the feet in the places marked for them. As
the target appears, kneel with the right knee on the spot
marked, place the butt of the carbine against the shoulder
and assume the aiming position (see par. 497i and fig. 20).
(4) Practice required.—Taking positions rapidly from the
standing position should be practiced at will, using the
coach-and-pupil system.
d. Reloading carbine.—To reload, lower the carbine from
the shoulder and press the magazine lock to the left with the
56
U. S. CARBINE, CALIBER .30, Ml
51
forefinger of the right hand and, at the same time, remove
the magazine from the receiver with the left hand. Then
bring the right hand to the second magazine in the open mag-
azine pouch. At the same time turn the carbine to the left
with the left hand, so that the magazine opening in the
receiver is to the right. Bring the magazine forward and
carefully place it in the magazine slots. Tap the bottom of
the magazine to seat it fully home. Load the carbine by
pulling the operating slide handle sharply to the rear and
releasing it.
e. Procedure in conducting rapid-fire exercises.—After the
pupil has become properly trained in timing, taking positions
rapidly, and reloading, he is given additional practice in all
of these points by rapid-fire exercises. The group under in-
struction is paired off, coach and pupil, and placed on line.
Full-sized targets are placed at 100, 200 and 300 yards from
the men under instruction, with some simple arrangement to
permit the targets to be exposed to view for the prescribed
period of time. Rapid fire exercises may be conducted at
shorter ranges using targets proportionately reduced in size.
Sights are set to correspond to the range being used. The
commands and procedure are exactly the same as for rapid
fire on the range except that firing is simulated. For ex-
ample, the pupil stands with sights properly set and black-
ened, and with two empty magazines in the magazine pouch
or pocket of his belt. The instructor, after announcing the
range, the position to be used, the number of rounds to simu-
late firing at each target from each position, commands: 1.
SIMULATE LOAD AND LOCK, 2. READY ON THE RIGHT, 3. READY ON
THE LEFT, 4. READY ON THE FIRING LINE, 5. CEASE FIRING, 6.
UNLOAD. At the first command, magazines are inserted,
loading simulated, and carbines locked. At the fourth com-
mand the safety on all carbines is pushed to the left. When
the targets are exposed the pupil assumes the firing position
and simulates firing the prescribed number of rounds on the
indicated target center, assumes position rapidly, releases
the magazine, inserts the second magazine, and simulates
loading and firing the prescribed number of rounds at the
other target center. Accuracy must not be sacrificed for
rapidity. Upon completion of the exercise the bolt is opened.
57
51
BASIC FIELD MANUAL
Figure 24.—Method of assuming sitting position rapidly.
58
U. S. CARBINE, CALIBER .30, Ml
51
®
®
Figure 24.—Method of assuming sitting position rapidly—Continued.
59
51-52
BASIC FIELD MANUAL
During simulated firing the pupil should never take his
eye from the target except to change position and to simu-
late reloading. He should count his shots as he fires in order
to know when to take the next position and when to reload.
The exercise is conducted from the standing firing position
to kneeling and sitting firing positions, and from the standing
position to the prone position (see par. 55).
/. Duties of coach.—In rapid-fire exercises the coach sees
that—
(1) The sights are set for the range designated and are
blackened.
(2) The correct position is taken.
(3) The slack is taken up promptly.
(4) The breath is held while aiming.
(5) The trigger is squeezed properly.
(6) The firer simulates firing the prescribed number of
shots on each target. (Each time the pupil squeezes the
trigger, the coach promptly presses back the operating handle
with a sharp motion and then releases the pressure to permit
the operating rod handle to go forward.)
(7) The shots of'the first magazine are counted.
(8) The firer assumes next position rapidly and correctly.
(9) The firer simulates reloading correctly.
(10) The eye is kept on the target, the elbows kept in place,
and the butt of the carbine kept to the shoulder except when
reloading.
(11) The carbine is reloaded quickly and without fumbling.
52. Fifth Step—Effect of Wind; Sight Changes; Use of
Score Book.—a. Wind.—(1) In firing at 300 yards or under,
the effect of the weather conditions (except that of the wind)
on the bullet can be disregarded. The influence of wind
must be carefully studied.
(2) The horizontal clock system is used in describing the
direction of the wind. The firer is considered at the center
of the clock, and the target is at 12 o’clock. A 3 o'clock wind
comes directly from the right. A 6 o’clock wind comes
straight from the rear. A 9 o’clock wind comes directly
from the left. A wind that is constantly changing its direc-
tion back and forth is called a “fishtail wind.”
(3) The force of the wind is described in miles per hour
60
U. S. CARBINE, CALIBER .30, Ml
52
and is estimated by throwing up light, dry grass, dust, or
light paper and watching how fast it travels, and by observing
the danger flags. In general, a light breeze is a 5- to 8-mile
wind; a fairly strong breeze is a 10- to 12-mile wind. Wind
blowing 20 miles an hour is very strong.
(4) Wind from either side blows the bullet out of its path.
Thus, a wind coming from the right’ of the firer is blowing
on the right side of the bullet and will deflect it to the left.
Therefore instead of hitting the bull’s-eye it will strike to
the left of the bull’s-eye (see note below). Correction for
this deflection, if using a carbine equipped with the L-sight,
should be made by moving the aiming point toward the wind.
This is called “taking windage,” and is accomplished by shift-
ing the body so that the sights of the carbine, instead of
being pointed naturally on the normal point of aim, that is,
the bottom of the bull’s-eye, will be directed to the right or
left of the bull’s-eye, depending on the wind. If the stand-
ard sight is used, the correction for this deflection is made
by applying proper windage to the rear sight. The worst
kind of wind in which to shoot is a fishtail wind varying in
direction from 11 to 1 o’clock or from 7 to 5 o’clock. The
amount the bullet will be blown from its path depends on
the force and direction of the wind and on the distance to
the target.
Note.—Initially, the carbine will be Issued equipped with the
L-sight. This being a fixed sight, allowance for the effect of wind
must be made by aiming the carbine to the right or left aS the
case may be. The carbine will eventually be fitted with a standard
sight that will be adjustable for windage.
(5) The amount of windage to allow for the first shot
can be approximately determined by the following rule:
(a) Wind rule (approximate only).—The range (expressed
in hundreds of yards) squared, multiplied by the velocity
of the wind and divided by 5, equals the number of inches to
allow for a 3 o’clock or 9 o’clock wind.
(b) Example.—At 300 yards the wind is blowing at 10
3 x 3 x 10
miles per hour from 3 o’clock;---------- equals 18 inches.
5
Therefore under the conditions stated the aiming point for
the first shot would be 18 inches to the right of the normal
aiming point.
459353°—42---3 61
52
BASIC FIELD MANUAL
(6) If a correction in windage is necessary after the first
shot is marked, it is determined as follows: The shot is
plotted on the recording target of the score book; from the
vertical center line through the bull’s-eye the proper correc-
tion is noted and the aiming point for the following shot is
shifted by this amount in the proper direction. The point
of impact of the bullet will move in the same direction on
the target as the aim is moved. For example, if it is desired
to move the hits to the left, the aim must be moved to the
left; if it is desired to make the hits strike to the right, the
aim must be moved to the right.
b. Elevation.—Changing the elevation of the sight, or the
aiming point at any range will cause a change in the location
of the hit on the target. Changing the rear sight from the
aperture set for 150 yards to that set for 300 will change the
strike of the bullet on the target 20 inches for each hundred
yards of range. For example: At 200 yards the first shot is
fired with the 150 yard aperture. If the second shot is fired
with the 300 yard aperture, the strike of the bullet will be
40 inches (approximate) higher than the strike of the first
shot.
c. Zero of a carbine.—(1) The zero of a carbine for each
range is the windage and elevation to be set on the rear sight,
or the point on the target on which the sights of a carbine,
without adjustable windage and elevation, must be alined in
order to hit the center of the bull’s-eye on a normal day when
there is no wind. The zero of any carbine may differ with
different men, owing to the difference in their hold or manner
of aim.
(2) Each man must determine the zero of his own carbine
for each range. He does this by studying the data which
he has written in his score book concerning elevation of the
rear sight, aiming points, changes in sight settings and aim-
ing points, and the direction and velocity of the wind. The
zero of a carbine is best found on a day when the sky is
overcast and there is no wind. Having learned the zero of
his carbine, the soldier computes all his windage and eleva-
tion allowances for the first shot from this zero, and the
normal 6 o’clock aiming point.
d. Shooting up or down hill.—In shooting either up or
down hill, less elevation is needed than when shooting on
62
U. S. CARBINE, CALIBER .30, Ml
52
the level. The steeper the hill the less elevation is needed,
so that when firing vertically up or down no elevation at all
is needed, no matter how distant the target. Slight slopes
that may be found on target ranges have no appreciable
effect upon the elevation used and require no correction.
e. Sight-setting and aiming point exercises using the L
sight.—In these exercises the instructor uses the full-sized A
and В targets, with spotters to indicate the position of the
hits.
(1) The instructor assembles his squad or group (each
pupil having his carbine, score book, and pencil) and conducts
the exercise as follows:
(a) Points out the two sight settings on the sight leaf.
(b) Explains the effect of wind and cautions the class to
disregard all atmospheric influences except wind.
(c) Explains and demonstrates the methods of determining
the amount of windage, that is, aiming point, for the first
shot, and the corrections to make for subsequent shots.
(d) Tests the ability of the group to change sights or aim-
ing point intelligently after the first shot by giving windage
and elevation exercises.
(2) Examples of windage exercises are as follows:
(a) “You are at 200 yards and estimate the wind to be 10
miles from 9 o’clock. Plot your aiming point on the В record-
ing target in your score book for the first shot. Evans, where
has Little plotted his aiming point? Suppose you fired and
the spotter marked the hit here (placing a spotter in the 4
space near the bull’s-eye at 3 o’clock) and you were sure
your hold and trigger squeeze were such that you have a per-
fect shot; plot your aiming point to bring the next shot in the
vertical center line of the bull’s-eye. Johnson, where has
Williams plotted his aiming point? Each man whose team-
mate has not changed his aiming point to the left 12 inches,
hold up his hand.” The instructor assists those men who
have decided errors by further explanation and illustration.
(b) The instructor gives a number of examples until the
class thoroughly understands the methods of determining
the amount of windage to take for the first shot and correc-
tions, if necessary, in aiming points for subsequent shots.
(3) Following the instructions in taking windage, the in-
63
52
BASIC FIELD MANUAL
structor puts the class through similar exercises which re-
quire changes in elevation.
(4) Examples of elevation exercises are as follows:
(a) “You are at 200 yards, set your sights for 300 yards.
There is no wind. Walsh, where is your aiming point for the
first shot?” The instructor explains that since there is no
wind the aim should be normal. “You fired and at the in-
stant the shot went off you noticed that your sights were
alined a little below and a little to the right of your zero aim-
ing point. When the shot is marked you see that it struck a
little to the right and 4 inches below (placing a spotter in the
4 space at 5 o’clock). You fired one more shot, and this time
the aim was correct at the instant, that the rifle went off.
This time the shot is marked here (placing a spotter about 3
inches in the 4 space just below the bottom edge of the bull’s-
eye). Allen, what are you going to do now? Lowe, what are
you going to do? Both shots hit about the same distance
below the bull’s-eye, your trigger squeeze was perfect because
you were able to call your shots close to where they actually
hit, the variation in aim was very slight. Therefore you are
justified in making a correction in your aiming point to raise
the next shot to hit the center of the bull’s-eye. Where will
your new aiming point be?”
(b) The instructor then by explanations and illustrations
assists those men who do not understand the procedure in
arriving at the correct result.
(5) The instructor gives a number of examples which re-
quire changes in aiming point until the principles of aiming
point changes are well understood.
(6) Examples of other sight-setting and aiming point ex-
ercises are as follows:
(a) “Set your sights at 300 yards, and place your aiming
point on the 4 ring at 7 o’clock. Suppose you fire four shots
hitting here (place four spotters in the bull’s-eye), and your
fifth shot here (place spotter on 3 space at 11 o’clock). Jones,
what are you going to do now? Jenkins, what are you going
to do? You should not do anything to the sight. It is prac-
tically certain that you squeezed the trigger improperly and
flinched. Not even a sudden change in the weather could
cause that much difference. Don’t try to correct your own
faults by changing the sights or aiming point.”
64
U. S. CARBINE, CALIBER .30, Ml
52-53
(b) “For your first score in rapid fire at 200 yards you are
using the same sight elevation that you used in zeroing
the carbine on the rapid fire targets. Suppose this to be
150 yards elevation and your group goes here' (putting 2
spotters low and to the left). What change in your aiming
point would you make to bring the next score into the
figure?”
(7) A group in rapid fire should strike the same place as
in slow fire. Variation in the position of rapid-fire groups
from slow-fire groups is due to imperfect, trigger squeeze in
rapid fire.
/. Use of the score book.—(1) Each man must keep a score
book in which he records not only the value of the hits but
the location of each hit, the sight setting and sight changes,
the force and direction of the wind, the kind of light, the
hour, the date, and such other data as may be of use in the
future. Spaces for these notes are provided on the score
sheets of the score book.
(2) The use of the score book on the range is important
for the following reasons:
(a) The plotting of the shots shows the flrer the location
of his group and assists in determining the correct aiming
point.
(b) Plotting the shots and recording the data as to light
and wind help the soldier to learn the zero of his carbine.
(c) The data written down as to sight settings, aiming
points and weather conditions while firing at any range are
of great assistance in using the correct sight setting and de-
termining the aiming point when again firing at that range.
Where a number of scores have been fired and recorded, the
flrer should use the sight settings and aiming point from
previous scores fired on days that were similar as to light
and wind.
(3) The score book will be kept personally by the man
firing. The coach assists him when necessary to decide what
to write down, but the coach will neither plot the shots nor
enter any data.
53. Sixth Step—Examination of Men Before Starting
Range Practice.—(The answers, given herein are merely ex-
amples. Men should be required to explain them in their
own words.)
65
53
BASIC FIELD MANUAL
Q. What is this (drawing a circle on the ground or holding
up a cut-out circle) ?—A.. A circle.
Q. Where is the center of it?—A. Here (pointing to the
center).
Q. What does this represent (showing an improvised en-
larged front sight made of cardboard) ?—A. The front sight
of the carbine.
Q. Where should the top of the front sight be when it
is correctly alined in the peep sight?—A. The top of the
front sight should.be in the center of the peep sight. (By
use of the movable sights the instructor requires the pupil
to adjust the front sight in proper alinement with the peep
sight.)
Q. What is this (showing a movable bull’s-eye)?—A. A
bull’s-eye.
Q. In aiming, is the bull’s-eye in the center of the peep
sight?—A. No; the bottom edge of it is in the center.
Q. Why?—A. Because the top of the front sight is in the
center of the peep sight and just touches the bottom of the
bull’s-eye.
Q. Should the front sight be held up into the bottom of
the bull’s-eye?—A. No; it just touches the bottom edge of
the bull’s-eye, so that all of the bull’s-eye can still be clearly
seen.
Q. Why?—A. Because the front sight would blend with
the bull’s-eye and its position could not be accurately de-
termined each time the aim is taken. Furthermore the top
of the front sight would not be clearly defined and an error
would result in centering the front sight in the peep. (The
instructor requires the pupil to adjust the sights and bull’s-
eye to show the correct aim.)
Q. What is this (indicating sighting bar) ?—A. Sighting
bar.
Q. What is it for?—A. To teach me how to aim.
Q. Why is it better than a carbine for this purpose?—A.
Because the sights on it are much larger and slight errors
can be more easily seen and pointed out.
Q. What does this represent (indicating)?—A. The front
sight.
Q. And this (indicating) ?—A. The rear sight.
Q. What is this (indicating) ?—A. The eyepiece.
66
U. S.. CARBINE, CALIBER .30, Ml
53
Q. What is the eyepiece for?—A. To cause me to place
my eye in such a position as to see the sights in the same
alinement as that seen by the coach.
Q. Is there any eyepiece on the carbine?—A. No; I learn
by the sighting bar how the sights look when properly alined,
and I must hold my head so as to see the sights the same
way when aiming a carbine.
Q. How do you hold your head steadily in this position
when aiming a carbine?—A. By resting my cheek firmly
against the side of the stock.
Q. Where do you focus your eye when aiming a carbine?—
A. On the bull’s-eye.
Q. What do you understand by the term “correct sight
picture?”—A. It means that all the elements of the aim are
in proper relationship to each other.
Q. Tell me what is wrong with these sight pictures. (The
Instructor now adjusts the sights of the bar, making various
slight errors; first, to show the correct and incorrect adjust-
ments of the sights, and then, with the sights properly ad-
justed, he sights on the small bull’s-eye to demonstrate cor-
rect and incorrect adjustments, requiring the man to point
out any errors.)
Q. Now, take this sighting bar and adjust the sights prop-
erly. (Verified by the instructor.)
Q. Now that the sights are properly adjusted, have the
small bull’s-eye moved until the sights are properly aimed
at it.
Q. How do you breathe while aiming?—A. After I get my
sights lined up on the bull’s-eye, I draw in a little more than
an ordinary breath, then let out a little and hold the re-
mainder while.aiming and squeezing the trigger.
Q. Take the prone position, aim and simulate firing a shot
at that mark. (The instructor must assure himself that
the man knows how to hold his breath properly while aiming.
Many men have great difficulty in learning to do this cor-
rectly.)
Q. I will take the carbine and assume the kneeling, sitting,
and prone positions, and you will tell me whether the position
is correct or incorrect in each case.
Q. Now show me how you take the sitting and prone posi-
tions rapidly from a standing position.
67
53
BASIC FIELD MANUAL
Q. How do you squeeze the trigger?—A. By pressing the
trigger straight to the rear so steadily'and smoothly that I
do not know when the rifle will go off.
Q. What do you check and concentrate on while you are
squeezing the trigger?—A. On the sight picture to see that it
is correct.
Q. If the sights are out of alinement with the aiming point,
what do you do?—A. I hold the pressure I have on the trigger
and only resume the increase of pressure when the sights
become lined upon the aiming point again.
Q. If you do this, can your shot be a bad one?—A. No.
Q. Why?—A. Because I cannot flinch, for I do not know
when to flinch; and the sights will always be lined up with
the aiming point when the rifle goes off, because I never in-
crease the pressure on the trigger, except when they are
properly lined up.
Q. Is it necessary to take a long time to press the trigger
in this way?—A. No. The method of squeezing the trigger is
slow at first, but rapidity is developed by practice.
Q. How do you squeeze the trigger in rapid fire?—A. I
squeeze it the same way as in slow fire, with a steady con-
tinuous increase of pressure so I do not know when the rifle
will fire.
Q. In rapid fire how do you gain time so as not to be com-
pelled to hurry in aiming and squeezing the trigger?—A. I
gain time by taking the position rapidly, by counting the
shots of the first magazine, by quick reloading, and by keeping
my eye on the target.
Q. Is it important to get into the correct position before
beginning to shoot in rapid fire?—A. Yes; even though it
takes more time, I should always get into the correct position
before beginning to shoot.
Q. What is meant by calling the shot?—A. To say where
you think the bullet hit as soon as you shoot and before the
shot is marked.
Q. How can you do this?—A. By noticing exactly where the
sights point when the rifle goes off.
Q. If a man cannot call his shot properly, what does it
usually indicate?—A. That he did not squeeze the trigger
properly and did not know where the sights pointed at the
time the carbine went off.
' Q. What is this (showing a score book) ?—A. A score book.
68
U. S. CARBINE, CALIBER .30, Ml
53
Q. If a shot hits here (indicating), what change in your
sight or aiming point would you make to bring the next shot
to the center of the bull’s-eye?
Q. What effect does changing the setting of your rear sight
or your aiming point have on the shot?—A. It moves it in
the same direction as the change in setting of the fear sight
or aiming point is moved.
Q. If you want to make a shot hit higher, what do you
do?—A. I increase my elevation or raise my aiming point.
Q. If you want to make your shots hit more to the right,
what do you do?—A. I move my aiming point to the right.
Q. How do you determine the amount of windage to take
for the first shot?—A. By estimating the velocity and direc-
tion of the wind, then by using the windage rule I get ap-
proximately the number of inches to change my aiming
point.
Q. Give me an example.
Q. How do you determine the direction of the wind?—
A. I face the target and consider myself as occupying the
center of the dial of a horizontal clock. I then note the direc-
tion of the wind in reference to the numbers on the dial.
Q. I will place this spotter on this target (full size 300-yard
target) to represent a shot properly fired by you at 300 yards
with sight set at 300 yards. What change would you make
in your aiming point for your next shot? (Instructor now
tests in various ways the man’s ability to make proper aiming
point corrections.)
Q. What are the three principal uses of the score book?—
A. To show me where my shot group is located, to indicate
how much change in windage and elevation (aiming point) is
necessary to move a shot or group of shots to the center of
the target, and to make a record of the sight settings and
aiming point of my carbine for the different ranges under
various weather conditions so that I will know how to set my
sight and where to aim when starting to shoot at each range
under different weather conditions.
Q. Tell me what effect different light and weather condi-
tions have on a man’s shooting.
Q. In firing at ranges up to and including. 300 yards, what
is the only weather condition for which you make correc-
tions?—A. Wind.
69
53-55
BASIC FIELD MANUAL
Q. What three things do you do in cleaning a carbine after
it has been fired?—A. I first remove the powder fouling from
the bore. I then dry the bore thoroughly. After this is
done I swab the bore thoroughly with light rust-preventive
compound to protect it from rust.
Q. How do you remove the powder fouling from the bore?—
A. By swabbing it thoroughly with cleaning patches saturated
with warm water or warm, soapy water.
Q. How do you dry the bore?—A. By running clean patches
through the bore until it is thoroughly dry.
Q. How do you protect the bore from rust?—A. By swab-
bing it thoroughly with a cleaning patch saturated with light
rust-preventive compound or light preservative lubricating oil
issued for this purpose.
Section III
QUALIFICATION COURSES
54. General.—See AR 775-10 for information as to who
will fire the course, individual classification, qualification,
ammunition allowances, etc.
55. Instruction Practice.—The following tables prescribe
the firing of instruction practice in the order followed by the
individual soldier.
Table I.—Slow fire1
Range Time Shots Target Position Remarks
100 No limit 10 A Prone W/siing.
200 ___-__do 10 В do Do.
300 do 10 В do Do.
i To be fired only by men who have never previously qualified in a course in rifle
or carbine marksmanship.
Table II.—Slow fire1
Range Time Shots Target Position Remarks
100 1 min. per shot 4 A Sitting W/o sling.
100 do 4 A Kneeling Do.
100 do 4 A Standing Do.
200 do._ 4 В Sitting Do.
200 _-___do 4 В Kneeling.... Do.
200 do 5 В Standing Do.
300 _do 5 В Prone Do.
1 Men who have previously qualified in a course of rifle or carbine marksmanship
will fire table II only once for practice. Men who have never previously qualified
in a course of rifle or carbine marksmanship will fire table II twice for practice.
70
Table Ш,—Rapid fire1
Range Time (sec- onds) Shots Target Position Remarks
100 35 8 (2 mags., 4 each).. 2 A centers on a 6x6 frame (see fig. 25). Standing (1 mag,, 4 rds.); sitting (1 mag., 4 rds.). Fire 4 rounds standing at top A center; reload, take sitting position, and fire 4 rounds at bottom A center.
100 35 8 (2 mags., 4 each).. 2 A centers on a 6x6 frame (see fig. 25). Standing (1 mag., 4 rds.); kneeling (1 mag., 4 rds.). Fire 4 rounds standing at top A center; reload, take kneeling position, and fire 4 rounds at bottom A center.
200 35 8 (2 mags., 4 each).. 2 В centers on a 6x6 frame (see fig. 25). Standing (1 mag., 4 rds.); sitting (1 mag., 4 rds.). Fire 4 rounds standing at top В center; reload, take sitting position, and fire 4 rounds at bottom В center.
200 35 8 (2 mags., 4 each).. 2 В centers on a 6x6 frame (see fig. 25). Standing (1 mag., 4 rds.); kneeling (1 mag., 4 rds.). Fire 4 rounds standing at top В center; reload, take kneeling position, and fire 4 rounds at bottom В center.
300 35 8 (2 mags., 4 each).. 1 В center on a 6 x 6 frame (see fig. 25). Standing to prone Take prone position, fire 4 rounds at В center; reload, fire 4 more rounds.
CARBINE, CALIBER .30, Ml
i Men who have previously qualified in a course of rifle or carbine marksmanship will fire table III only once for practice. Men
who have never previously qualified in a course of rifle or carbine marksmanship will fire table III twice for practice.
56-57
BASIC FIELD MANUAL
56. Record Practice.—Table Ш of instruction practice is
fired once for record.
ICO Yards
(2 A centers)
200 Yards
(2z В centers)
300 Yards
( [ b center
Figure 25.—Arrangement Of
target centers for rapid fire.
Section IV
RANGE PRACTICE
57. General.—a. Phases.—Range practice is started im-
mediately after completion of the preparatory training.
72
U. S. CARBINE, CALIBER .30, Ml 57
Range practice is divided into two parts—instruction prac-
tice and record practice.
b. Sequence.—Each person will complete instruction prac-
tice before he proceeds with record practice.. Instruction
practice and record practice will not be conducted simul-
taneously except on ranges where the firing points are in
echelon or where the two types of practice are conducted on
different parts of the same range.
c. Range personnel.—(1) Officer in charge oj firing.—An
officer in charge of firing will be designated by the responsi-
ble commander. It is desirable that he be the senior officer
of the largest organization occupying the range. The officer
in charge, of firing, or his deputy, will be present during all
firing and will be in charge of the firing and safety precau-
tions on the range.
(2) Range officer.—The range officer is appointed by the
post commander and is responsible to him for maintaining
and assigning ranges, designating danger zones, and closing
roads leading into danger zones. The range officer makes
timely arrangements for material and labor to place the
ranges in proper condition for range practice. He directs
and supervises all necessary repairs to shelters, butts, targets,
firing points, and telephone lines. He provides for the safety
of the markers, and when necessary he provides range guards
and instructs them in the methods to be used for the pro-
tection of life and property within the danger area. He
assists the officer in charge of firing by using the means
necessary to provide efficient service from the maintenance
personnel of the ranges.
(3) Range noncommissioned officer.—A noncommissioned
officer and such assistants as the post commander may deem
necessary will be detailed permanently during the range
practice season as assistant to the range officer. He is re-
sponsible to the range officer that the target and pit equip-
ment is kept in serviceable condition; that the desired targets
are ready for use at the appointed time; and that all targets
and pit details are provided with the proper flags, marking
disks, pasters, and spotters.
(4) Pit details.—Commanders of organizations firing will
provide such detail of officers, noncommissioned officers, and
73
57
BASIC FIELD MANUAL
privates as may be necessary to supervise, operate, mark, and
score the targets used by their respective organizations.
d. Uniform.—The uniform to be worn during instruction
practice and record practice will be prescribed by the com-
manding officer.
e. Pistol belt.—The pistol belt with magazine pouch will be
worn during instruction practice and record firing.
f. Safety precautions.—(1) Safety precautions for troops
are complete in this manual. Reference to AR 750-10 is
necessary for range officers, the officer in charge of firing,
and the commander responsible for the location of ranges and
the conduct of firing. All officers and men who are to fire
or who are concerned with range practice will be familiarized
with the safety precautions before firing is commenced.
(2) Danger flags will be displayed at prominent positions
on the range during firing. There will be no firing until
these flags are displayed.
(3) The carbines of an organization will be inspected upon
their arrival at the range by the officers to see that chambers
and barrels are free from obstruction and that all bolts are
open.
(4) Consider every carbine to be loaded until it is exam-
ined and found to be unloaded. Never trust your memory
as to its condition in this respect.
(5) When the bolt is closed, never point the carbine in any
direction where an accidental discharge may cause harm.
(6) Firing will not begin on any range until the officer in
charge of firing has determined that the range is clear and
has given the commands load and commence firing.
(7) At least one officer will be present at all firing.
(8) All carbines on the range except those in use on the
firing line and those in use during supervised preparatory
training will be clear, with bolts open at all times.
(9) No carbine will be removed from the firing line until
an officer ,or specially selected noncommissioned officer has
inspected it to see that it is clear and the bolt open.
(10) No person will be allowed in front of the firing line
for any purpose until directed by an officer who has ordered
all carbines to be cleared and determined that the order has
been carried out.
74
U. S. CARBINE, CALIBER .30, Ml
57-58
(11) All firing will immediately cease and carbines be
cleared at the command: CEASE FIRING.
(12) Cartridges will not be left chambered in hot barrels.
(13) All loading and unloading will be executed on the
firing line with the muzzles directed toward the targets.
Carbines will never be loaded in rear of the firing line.
(14) Care will be taken to avoid undue exposure of ammu-
nition to the direct rays of the sun. This creates hazardous
chamber pressures.
(15) Never grease or oil the ammunition or walls of the
carbine chamber.
(16) See that the ammunition is clean and dry. Examine
all ammunition and turn in all with loose bullets or which
appear to be otherwise defective.
(17) Never fire a carbine with any rust-preventive com-
pound, cleaning patch, dust, dirt, sand, snow, or other
obstruction in the bore. To do so may burst the barrel.
(18) Before leaving the range, all carbines and magazine
pouches will be inspected by an officer to see that they do
not contain ammunition. Men in ranks will be directed to
search their clothing to be sure that they have no ammuni-
tion in their possession.
(19) See AR 45-30 for regulations covering report of acci-
dent involving ordnance materiel.
58. Instruction Practice.—a. General.—Instruction prac-
tice represents the application with service ammunition of
the principles taught in the preparatory training. The in-
struction practice outlined for the course is designed to serve
as a guide only. Within authorized ammunition allowances
the number of shots to be fired at each range is discretionary
with the organization commander. The amount of instruc-
tion practice is not limited to that outlined in the tables.
Such additional practice as time and ammunition allowances
permit should be given.
b. Organization of firing line.—(1) General.—The firing
line will be organized so as to insure safe and orderly conduct,
to provide maximum training and instruction, so that all
men will be kept busy all the time, and to facilitate super-
vision by the officer in charge of firing, and his assistants.
(2) Procedure.—(a) Two teams, each consisting of a pupil
75
58
BASIC FIELD MANUAL
and his coach, are assigned t6 a target. One team works
on the right and the other team on the left of the stake
indicating the number of the target, or pair of targets on
the firing point. The pupil on the right, assisted by his
coach fires his instruction practice first. During this firing
the pupil of the team on the left “dry shoots.” When the
firer of the right team completes his instruction practice,
the “dry shooter” of the team on the left fires his instruction
practice from the same position he used while “dry shoot-
ing.” During this firing the team on the right exchange
places, i. e., the coach becomes the pupil and the pupil the
coach, and the pupil “dry shoots.” The teams, and the indi-
viduals within the teams thus alternate firing, dry shooting,
and coaching until all men of both teams have completed
their practice firing.
(b) If sufficient space is not available to provide room on
the firing line for two teams per target or pair of targets,
remaining teams are given “dry shooting” practice on the
flanks or at a point not less than 50 yards in rear of the firing
line while awaiting their turn to fire. Safety precautions
will be strictly enforced during such practice.
(3) Rest periods.—No men are permitted to fall out of their
training assignment, except at the 10-minute rest period
given at the end of each hour. The beginning and termina-
tion of this period is indicated by- the officer in charge of
instruction.
(4) Slow and rapid fire.—The above organization and pro-
cedure is applicable to both slow and rapid fire.
c. Slow fire.—The first few shots fired on the range by
beginners will be slow fire from the prone position to facili-
tate instruction in the proper method of squeezing the trigger.
The prone position assures such a steady. hold that the
temptation of the beginner to snap in his shot at the instant
the sight touches the bull’s-eye is eliminated. This fault is
the cause of nearly all poor shooting. In the prone position
the sights can be held close to the bottom of the bull’s-eye
while the firer squeezes the trigger with such a smooth, steady
pressure as not to know exactly when the carbine will fire.
This is the basis of all good shooting. The habit of squeezing
the trigger correctly, acquired by firing from the prone posi-
76
U. S. CARBINE, CALIBER .30, Ml
58
tion, will in all probability be retained while' firing in the
more unsteady positions—sitting, kneeling, and standing.
d. Rapid fire.—During rapid fire the tendency to jerk
the trigger, and consequently to flinch, is very marked. This
tendency must be corrected before it becomes a fixed habit.
e. Coaching.—(1) General.—The firer works under the su-
pervision of a coach. This does not mean that each man
must .have an experienced shot beside him. Any man of
intelligence who has been properly instructed in the prepara-
tory work and who has been given instruction in coaching
methods can be used with good results and should be used
Figure 26.—Position of coach.
when more experienced shots are not available. It is good
practice to have expert coaches in charge of one or more
targets, usually on a flank, to which particularly difficult
pupils are sent for special coaching. Great patience should
be exercised by the coach so as not to excite or confuse the
firer.
(2) Position of coach (fig. 26).—On the firing line, the
coach will take a position similar to that of the man who is
firing—prone, sitting, kneeling, or standing—so as to be
able to watch his trigger finger and his eye. In the later
stages of instruction firing, the coach may be withdrawn from
the firing line to observe his pupil from a point in rear; this
affords the coach an opportunity to observe the pupil’s per-
77
58
BASIC FIELD MANUAL
formance while he is working alone, as he will be in record
practice. The pupil’s errors should be noted and brought to
his attention at the completion of the score.
(3) Watching the eye.—Errors in trigger squeeze, which are
the most serious and the hardest to correct, can be detected
by watching the pupil’s eye. If his eye closes as the carbine
goes off, he knew when it was going off and therefore did not
squeeze the trigger properly. The explosion and the.shock
cause a man to wink, but this wink cannot be seen, because
of the sudden movement of the head that takes place at the
same time. If the flrer can be seen to wink it is because he
winked first and jerked the trigger afterward.
(4) Preventing flinching.—The best method of curing
flinching is to prevent it. One of the most important duties
of the coach Is to detect indications that his pupil is about
to flinch. Inclination to flinch can be detected by watching
the pupil’s head and eye while he is squeezing the trigger.
If, during the application of squeeze to the trigger, the pupil’s
eye begins to twitch and his head is gradually drawn away
from the thumb or stock it is a sure sign he will flinch. As
soon as the coach notices these conditions he should require
the pupil to bring the carbine down from the firing position,
rest a few seconds and start all over again. While the pupil
is resting, the coach points out his errors, such as not taking
up the slack, applying the squeeze with a series of im-
pulses instead of continuous pressure, and concentrating on
the discharge instead of on the sight picture. If the pupil
is seen to be flinching the coach has him turn his head
aside while he, the coach, puts in a cartridge and shoves the
bolt home. The coach frequently simulates loading without
letting the pupil know what he has done. Thus the flinch,
indicated by the shoulder being shoved forward at the same
time that the trigger is pressed, will be evident even to the
flrer himself. The coach then proves to him by squeezing the
trigger a few times (as explained in (5) below) that his poor
shooting is due to faulty trigger squeeze.
(5) Coach squeezing trigger.—(a) To squeeze the trigger
for the flrer, the coach lies with his right elbow on the
ground to steady his hand, places his thumb against the
trigger, and his first Anger against the back of the trigger
78
U. S. CARBINE, CALIBER .30, Ml
58
guard. In this way he can apply pressure to the trigger by
a pinching action of his thumb and first finger (see fig. 27).
(t>) The coach then watches the firer’s back, and between
5 and 10 seconds after the firer begins to hold his breath,
he applies enough pressure to discharge the piece. Shots
fired in this way are almost always accurately placed. After
firing the piece a few times the coach lets the firer try a
Figure 27.—Coach squeezing trigger.
few shots alone to see if he can squeeze the trigger the
same way the coach squeezed it, so as not to know just when
the piece will go off. Sometimes it is necessary to repeat
this exercise, but the majority of beginners can be perma-
nently cured of the tendency to flinch by a few minutes of
this kind of coaching. Old shots who are flinchers require
more time and patience.
(6) Duties of coach in slow fire.—The coach observes the
pupil carefully and corrects all errors. He pays particular
attention to see—
(a) That the sights are blackened and that they are
set at the correct range.
79
58
BASIC FIELD MANUAL
(b) That the ammunition is free from dirt.
(c) That the pupil has the correct position, body at the
proper angle, elbows correctly placed, and the cheek pressed
firmly against the stock.
(d) That the pupil is holding his breath properly (by
watching his back occasionally).
(e) That the slack is taken up promptly.
(/) That the trigger squeeze is continued from that point
with a smooth, steady, continuous increase.
(gr) Whether or not the pupil flinches (by watching his
eye, the head, or the front sight for flips).
(7i) That the pupil calls his shot each time he fires.
(i). That the pupil keeps his score book correctly.
(7) Duties of .coach in rapid fire.—(a) The coach observes
the pupil carefully and corrects all errors. He pays particu-
lar attention to see—
1. That the sights are blackened and that they are set
at the proper range.
2. That the pupil assumes the correct position before
he starts firing.
3. That he takes up the slack promptly.
4. That he presses the trigger continuously until the
shot is fired.
5. Whether or not the pupil flinches (by watching his
eye).
6. That he changes position promptly.
7. That he reloads deliberately and accurately.
8. That he fires the required number of shots at each
target center.
(b) These operations follow each other, and the coach can
watch each in turn. The coach will also at times watch the
pupil’s back to see if he holds his breath while firing each
shot.
(c) Any lack of smooth and proper timing in firing in-
dicates that the preparatory training has not be sufficient,
and additional preparatory rapid-fire practice will be given.
f. Individual precautions.—(1) Slow fire.—The pupil
should take the following precautions during every slow-fire
score:
80
U. S. CARBINE, CALIBER .30, Ml
58-59
(a) Be sure that both the front and rear sights of the car-
bine are properly blackened.
(b) Be sure that the rear sight is properly set for the first
shot.
(c) Take the score book with preliminary data properly
filled in, to the firing point.
(d) Fire the first shot very carefully and then, if necessary,
change the sights (or the aiming point) to bring the second
shot into the bull’s-eye.
(e) Plot each shot in the score book.
(/) Before changing the sight setting, or the aiming point,
note the setting on the sights and determine the amount of
change required from a study of the shots plotted in the score
book. Record the corrected sight setting and the aiming
point.
(ff) Do rfot change the sights or the aiming point unneces-
sarily. If a bad shot is made closely following several good
shots it is almost certain to be the fault of the flrer.
(2) Rapid fire.—In rapid-fire practice the pupil should be
sure that his sights are blackened and properly set. Upon
completion of a score he should carefully plot each shot in
the score book and promptly record any changes in the aiming
point that may be necessary to center the group in the
bull’s-eye.
g. Use of instruments.—The use of binoculars, telescopes,
sight-setting instruments, and instruments or devices for de-
termining the force and direction of the wind is authorized
and encouraged during instruction practice.
h. Procedure prescribed in paragraph 59 for record prac-
tice is applicable to instruction practice with the following
exceptions:
(1) Scores are not required to be kept in the pits.
(2) Only such officers and noncommissioned officers are
on duty in the pits as are necessary to preserve order and
insure efficient pit service.
(3) The manner in which the scores are kept on the firing
line is discretionary with the organization commander.
59. Record Practice.—a. General.—(1) The purpose of
record practice is to test the soldier’s skill with the carbine
81
59
BASIC FIELD MANUAL
and to determine his qualification. The qualification course
is prescribed in section III.
(2) The sequence in which the scores are fired in record
practice is discretionary with the officer in charge of firing.
(3) Whenever practicable during record practice the offi-
cers required for duty in the pits will be detailed from troops
not firing.
b. Organization of firing line.—(1) General.—The firing
line will be organized to insure safe and orderly conduct and
to facilitate supervision of the firing by the officer in charge
of firing and his assistants. The distances specified in (2)
below should be used as a guide only and may be modified at
the discretion of the officer in charge of firing to meet local
conditions.
(2) Establishments.—(a) Scorers stationed in rear of the
firing line and close to the soldier being scored.
(b) Ammunition line 5 yards in rear of the firing line.
(c) Telephone operators 5 yards in rear of the ammunition
line.
(d) Soldiers awaiting their turn to fire (ready line), 5 yards
in rear of the line of telephone operators.
(e) Carbine rests and cleaning racks 10 yards in rear of
the ready line.
(3) Firing assignments.—Individuals who are to fire will be
assigned targets and the order in which they will take turn
in firing the several scores, that is, first order, second order,
etc.
c. Pit details.—The details for the supervision, operation,
marking, and scoring of targets during record practice consist
of—
(1) One commissioned officer assigned to each two targets.
When it is impracticable to detail one officer to each two
targets, an officer will be assigned to supervise the marking
and scoring of not to exceed four targets. In this event
the pit scores will be kept by the noncommissioned officer in
charge of each target, who will sign the score card.
(2) One noncommissioned officer assigned to each target,
or set of two targets, to direct and supervise the markers.
This noncommissioned officer will be selected from a company
or organization other than the one firing on the target which
82
U. S. CARBINE, CALIBER .30, Ml
59
he supervises. If this is not possible the officer assigned to
the target will exercise special care to insure correct scoring.
(3) One or two privates assigned to operate and mark each
target. These privates may be selected from the organiza-
tion firing on the target to which they are assigned.
d. Score cards and scoring.—(1) Two score cards will be
kept, one at the firing point and one in the pit.
(2) Entries on all score cards will be made in ink or with
indelible pencil. No alteration or correction will be made on
the card except by the organization commander, who will
Initial each alteration or correction made^
(3) The cards at the firing point will bear the date, the
firer’s name, the number of the target and the order of firing.
The pit card will not show the firer’s name but will bear the
date, the number of the target, and the order of firing.
(4) The scores at each firing point will be kept by a non-
commissioned officer of some organization other than that
firing on the target to which he is assigned. If this is not
possible company officers will exercise special care to insure
correct scoring. As soon as a score is completed the score
card will be signed by the scorer, taken up, signed by the
officer supervising the scoring, and turned over to the organ-
ization commander. Except when required for entering new
scores on the range, score cards will be retained in the personal
possession of the organization commander.
(5) In the pit the officer keeps the scores for the targets
to which he is assigned. As soon as a score is completed he
signs the score card. He turns these cards over to the organ-
ization commander at the end of the day’s firing. The or-
ganization commander will check the pit records against the
firing line records. In case of discrepancy between the two
records the provisions of AR 345-1000 will apply.
(6) Upon completion of record firing and after the quali-
fication order is issued, the pit score cards of each man will
be attached to his official score card kept at the firing point.
For records and reports of qualification see AR 345-1000.
e. Marking.—(1) The value of the shot is indicated as
follows:
(a) A bull’s-eye, or five, with a white disk.
(b) A four with a red disk.
83
59
BASIC FIELD MANUAL
(c) All other shots are spotted but marked as misses by
waving a red flag across the front of the target, once for
each shot.
(2) Spotters are placed in the shot holes before the target
is run up for marking.
(3) The marking begins with the hits of highest value,
the center of the disk being placed over the spotter, then
swung off the target and back again to the next spotter,
care being taken each time to show only the face of the
disk indicating the value of the shot being marked. The
marking will be slow enough to avoid confusing the scorer
at the firing point. When one spotter covers more than one
shot hole the disk is placed over it the required number of
times.
f. Procedure.—(1) On firing line.—(a) One person will be
assigned to a target in each order (see fig. 25).
(b) When all is ready in the pit a red flag is displayed
at the center target. At that signal the officer in charge of
the firing line commands: LOAD. The carbines are loaded
and locked.
(c) The officer in charge of the firing line then calls so
that all may hear, “Ready on the right?” “Ready on the
left?” Anyone who is not ready calls out, “Not ready on
No. —.”
(d) All being ready on the firing line, the officer in charge
commands: READY ON, THE FIRING LINE. Carbines are
unlocked and the position of ready assumed. The telephone
orderly notifies the pit, “Ready on the firing line.”
(e) The flag at the center target is waved and then with-
drawn. Five seconds after Ijhe flag is withdrawn the targets
appear, remain fully exposed for the prescribed Period of
time, and are then withdrawn. The firer takes the pre-
scribed position as soon as the targets appear and commences
firing. At 100 and 200 yards he fires or attempts to fire four
shots at the upper target center, changes position, if .required,
reloading from a magazine containing four rounds taken
from the magazine pouch, fires or attempts to fire four
rounds at the lower target center. At 300 yards he fires
two magazines of four rounds each from the same position
84
U. S. CARBINE, CALIBER .30, Ml
59
at one target center. If any individual fails to fire at. all
he will be given another opportunity.
(/) As soon as the targets are withdrawn the officer in
charge commands: UNLOAD. All unfired cartridges are
removed from the carbines, and the bolts are left open. The
men remain in position on the firing line until they are
ordered off by the officer in charge.
(g) As each shot is signaled it is announced as follows:
“Target No. —, 1 five, 2 fives, 3 fives, 1 four, 2 fours, 3 fours,
1 miss.” The scorer notes these values on a pad and watches,
the target as he calls the shot. After the marking is finished
he counts the number of shots marked, and if more or less
than 8 calls “Re-mark No. —.” If 8 shots have been marked
he then enters the score on the soldier’s score card and totals
it as follows: 55544400 equals 27.
(2) In pit.—(a) The time is regulated in the pit by the
officer in charge.
(b) When all is ready in the pit the targets are fully with-
drawn and a red flag is displayed at the center target.
(c) When the message is received that the firing line is
ready, the red flag at the center target is waved and with-
drawn and the command: READY is given to the pit
details.
(d) Five seconds after the red flag is withdrawn the tar-
gets, by command or signal, are run up, left fully exposed
for the prescribed period of time, and then withdrawn.
(e) The officers in the pit examine each of their targets
in turn, announce the score, and record it on the pit score
card. Spotters are then placed in the shot holes, and the
targets run up and marked. The noncommissioned officer
supervises the marking of each shot. The officer exercises
general supervision over the marking.
(/> The targets are left up for about 1 minute after being
marked and are then withdrawn, pasted, and made ready for
another score. They may be left up until ordered pasted by
the officer in charge of the firing line.
g. Use of telephones.—(1) Telephones will be used for
official communication only.
(2) No one will ask over the telephone for information as
to the name or organization of any person firing on any
85
59
BASIC FIELD MANUAL
particular target, and no information of this nature will be
transmitted.
(3) The following expressions will be used over the tele-
phone in the situations indicated:
(a) When a shot has been fired and the target has not been
withdrawn from the firing position, “Mark No.---
(b) When a shot has been fired and the target withdrawn
from the firing position but not marked, “Disk No.-.”
(c) When the target has been withdrawn from the firing
position and marked, but the value of the shot has not been
understood, “Re-disk No.---
(d) When the firing line is ready for rapid fire, “Ready
on the firing line.”
(e) When a shot is marked on a target and the person
assigned thereto has not fired, “Disregard the last shot on
No. .”
h. Miscellaneous rules governing record practice.—(1)
Identity of firer to be unknown to personnel in pit.—Officers
and men in the pit should not know who is firing on any
particular target.
(2) Trigger pull.—The trigger pull will be at least 3 pounds
and before record firing will be tested (with the barrel ver-
tical) by an officer.
(3) Ammunition.—The ammunition used will be the U. S.
carbine cartridge, caliber .30, Ml, as issued by the Ordnance
Department, unless the use of other ammunition is authorized.
(4) Cleaning.—Cleaning will be permitted only between
scores.
(5) Pads.—Pads of moderate size and thickness may be
worn on both elbows. Shoulder pads will not be worn.
(6) Sling.—The sling will not be used.
(7) Loading pieces.—Pieces will not be loaded except by
command or until position for firing has been taken.
(8) 'Warming or fouling shots.—No warming or fouling
shots will be allowed.
(9) Coaching.—Firers may be coached during record prac-
tice except when additional compensation for qualification is
authorized.
(10) Action in case of disabled carbine.—Should a break-
age occur the carbine will be repaired or a different carbine
86
U. S. CARBINE, CALIBER .30, Ml
59
substituted. If a different carbine is substituted the flrer
will be allowed to zero the sustituted carbine and then re-flre
the exercise.
(11) Shots cutting the edge of bull’s-eye or line.—Any shot
cutting the edge of the figure or bull’s-eye will be signaled and
recorded as a hit in the figure or the bull’s-еУе. Because the
limiting line of each division of the target is the outer edge
of the line separating it from the exterior division, a shot
touching this line will be signaled and recorded as a hit in
the higher division.
(12) Misses.—In all firing, before any miss is signaled, the
target will be withdrawn from the firing position and care-
fully examined by an officer, if an officer is on duty in the pit.
Whenever the target is run up and a miss is signaled, it will
be presumed that this examination has been thoroughly
made. No challenge of the value signaled will be entertained
or resignaling of the shot allowed.
(13) Accidental discharges.—All shots fired by the soldier
after he has taken his place at the firing point (and it is his
turn to fire, the target being ready) will be considered in his
score even if his piece was not directed toward the target or
was accidentally discharged.
(14) Firing on wrong target.—Shots fired upon the wrong
target will be entered as a miss upon the score of the man
firing, no matter what the value of the hit upon the wrong
target may be. The soldier at fault is credited with only
such shots as he may have made on his own target.
(15) Misfires.—In event of a misfire the soldier will cease
firing immediately, the target will not be marked, and the
score will be repeated.
(16) Unfired cartridges.—Each unfired cartridge will be
recorded as a miss. If the number of hits marked exceeds
the number of rounds fired, the soldier firing on that target
will be credited with the hits of highest value corresponding
to the number of rounds fired.
(17) Disabled carbine.—If during the firing of a score the
carbine becomes disabled through no fault of the soldier, the
pit officer will be directed to disregard the score, the target
will not be marked, and the flrer will repeat the score.
(18) More than 8 hits.—When a pair of targets (or the
87
59-60
BASIC FIELD MANUAL
single target at 300 yards) has more than 8 hits, the score
will not be marked, and the soldier will fire again; except
when all the hits have the same value, the score will be
marked, and the firer will be given that value for each shot
fired by him.
Section V
EQUIPMENT—KNOWN-DISTANCE TARGETS AND
RANGES
60. Equipment.—a. Equipment for preparatory marksman-
ship training.—(1) General.—The use during preparatory
marksmanship training of complicated apparatus which can-
not be readily improvised from materials at hand is un-
necessary. The simple apparatus described below is ample
for all purposes.
(2) Equipment for each four men.
1 sighting bar, complete.
1 large peep sight, 1 large front sight, and 1 large
bull’s-eye (all made of cardboard)
1 carbine rest.
1 small sighting disk.
2 small aiming targets (target A and B, rifle, 1,000-
inch range are suitable)
1 10-inch sighting disk.
1 small box, approximately the size of an ammunition
box.
1 frame covered with blank paper for long-range
triangles.
2 sandbags.
1 pencil.
4 score books (1 per man).
1 form showing state of training for each squad.
Material for blackening sights.
(3) Equipment for general use.
1 double bull’s-eye target with curtain for each three
squads.
1 A and 1 В target on frames for score-book exercises.
Cleaning and preserving materials.
88
U. S. CARBINE, CALIBER ,30, Ml
60
(4) Preparation of equipment.—(a) Sighting bar.
1. Provide a bar of wood about 1 by 2 inches and 4У2
feet long. Cut two thin slots 1 inch deep across
the edge. Place one slot 5Уг inches from the
end and the other 26 inches from the same end
of the bar (fig. 28® and ®).
2. Make a front sight y2 inch wide, of thin metal
Р/г by 3 inches, with wing guards Ув inch wide
extending y4 inch on both sides of front sight
and y4 inch above height of the front sight.
Bend in the shape of an L and tack it to the
edge of the bar between the two slots and У2
inch from the slot nearest the end (fig. 28®
and ®). Have the leg of the L project above
bar У> to % inch (fig. 28®).
3. Make an eyepiece from a piece of tin or zinc 3 by
7 inches (fig. 28®). Cut along the dotted lines
to form a shape shown in figure. Tack this
eyepiece to the end of the bar farthest from
the slots so that the top of the eyepiece extends
1 inch above the top of the bar (fig. 28®).
Make a round hole 0.03 inch in diameter in the
middle of the eyepiece y2 inch above the bar.
4. Make a peep rear sight of thin metal or cardboard
3 by 3 inches and cut a round hole % inch in
diameter in its center (fig. 28®).
5. Cut an open rear sight of thin metal or cardboard
1 Уг by 3 inches width a semicircular notch % inch
wide in the middle of one of the long edges (fig.
28®).
6. Cut a piece of thin metal or cardboard 3 by 3 inches,
painted white, and have a black bull’s-eye У2
inch in diameter painted or pasted on the center
(fig. 28®).
7. Place two pieces of tin 1 inch wide and 3 inches
long in each slot. Fold the loose ends away from
each other and tack them to the sides of the bar
(fig. 28®).
89
60
BASIC FIELD MANUAL
о
8. Blacken the eyepiece, the front sight, the rear
sights and the top of the bar.
(b) Carbine rest.—An empty ammunition box or any other
well-made box of suitable size, with notches cut in the ends
@ TOP VIEW
Ф SIDE VIEW
TARGET
PEEP SIGHT
EYE PIECE
FRONT SIGHT
s
<O)
FOLDfcO “L" SHJ
OPEN SIGHT
< E 1
FOLD ON DOTTED LINES
HOLE Vi' FROM TOP CENTER
@ CONSTRUCTION
Figure 28.—Construction of sighting bar.
to fit the carbine closely, makes a good rest. The carbine is
placed in these notches with the trigger guard close to and
outside of one end. The sling is loosened and pulled to one
side. The box may be half filled with earth or sand to give
it greater stability.
(c) Sighting disks.—Sighting disks are of two sizes. The
disk to be used at a distance of 50 feet is about 3 inches in
90
U. S. CARBINE, CALIBER .30, Ml
60-61
diameter. The disk is made of tin or cardboard and mounted
on a handle as shown in figure 29. The bull’s-eye will be
mounted on a background of clean, white paper. The disks
to be used at 100 and 200 yards are 10 inches in diameter.
These disks are painted black and mounted on white handles
which are 4 or 5 feet long. All bull’s-eyes will be black and
circular and will have a hole in the center large enough to
admit the point of a pencil.
b. Range equipment.—(1) Used at firing, point.
Cleaning racks.
Scorers’ tables.
Field glasses (1 per target).
Score cards.
Score board.
Cleaning and preserving materials.
Material for blackening sights.
Score books.
Indelible pencils.
Containers for empty cartridge cases.
Telephones.
(2) Used in pit.
Pit record cards.
Indelible pencils.
Telephones.
Eight 3-inch spotters per target.
Eight 6-inch spotters per target.
One red flag per target.
Marking disks.
Pasters.
Paste.
61. Targets.—a. The A target center is used for 100 yards.
It is a square 27 inches on a side. It contains a 10-inch black,
circular bull’s-eye and one ring 26 inches in diameter. A hit
in the bull’s-eye has a value of five. A hit outside the
bull’s-eye but within the 26-inch ring has a value of four.
Hits outside the 26-inch ring have no value.
b. The В target center is used for 200 and 300 yards. It
is a square 38 inches on a side. It contains a 20-inch black,
circular bull’s-eye and one ring 37 inches in diameter. The
values of hits are the same as on the A target center.
91
Figure 29.—Sighting disk.
BASIC FIELD MANUAL
U. S. CARBINE, CALIBER .30, Ml
62-63
CHAPTER 3
MARKSMANSHIP—MOVING GROUND TARGETS
Paragraphs
Section I. General__________________________________________ 62-63
II. Moving personnel__________________________________ 64
III. Moving vehicles_________________________________65-67
IV. Moving targets and ranges and range precautions. 68-69
Section I
GENERAL
62. Employment.—Personnel armed with the carbine will
be trained to fire at moving ground targets, such as personnel,
trucks, and reconnaissance vehicles at appropriate ranges.
(For air targets sec. ch. 4.) Fire directed at the vision slits
and periscopes of moving tanks may blind the occupants.
Personnel armed with the carbine will be trained to use their
weapons against these targets.
63. Fundamentals.—The fundamentals of shooting at
moving targets are presented in this chapter. In applying
these fundamentals the flrer must adjust his aim and trigger
squeeze to conform to the movement of the target.
a. Effective, range.—Under ideal conditions moving targets
may be engaged'with the carbine at ranges up to 300 yards.
For this reason training in the technique of fire is- limited
to ranges up to 300 yards.
b. Sights.—Moving targets are seldom exposed for long
periods of time, and can be expected to move at maximum
speed during exposure. Accurate correction of sight setting
is seldom practicable. Firing should be opened at the exist-
ing sight setting, with corrections for range and wind applied
by shifting the point of aim.
c. Leads.—Targets which cross the line of sight at any
range are classified as crossing targets. In firing at such
targets the flrer must aim ahead of the target so that the
paths of the target and bullet will meet. This distance ahead
of the target is called the “lead.” Targets which move di-
rectly toward the flrer or directly away from him "require
no lead.
459353°—42--4 93
64-65
BASIC FIELD MANUAL
Section II
MOVING PERSONNEL
64. Technique.—a. Sight to be used.—Under field condi-
tions moving personnel present a fleeting target which is
difficult to hit. This fact makes an accurate sight setting
desirable. However, the fleeting character of these targets
renders sight setting impractical. Up to the limiting range
to 300 yards, any sight setting may be used for range, while
the point of aim may be shifted into the wind for deflection.
The soldier will be trained in this type of sight correction.
b. Method of aiming.—An elaborate system of calculating
leads is neither necessary nor desirable. The following rules
form the basis for estimating the proper leads. When firing
at a man walking across or at right angles to the line of
fire, the points of aim at the various ranges are—
(1) At 100 yards or less, aim at the forward half of his
body.
(2) At 100 to 200 yards, aim at forward edge of his body.
(3) At 200 to 300 yards, lead him one-half the width of his
body. Proficiency in this type of firing depends largely upon
the amount of training the individual receives in aiming,
squeezing the trigger, and leading with appropriate speed.
Section III
MOVING VEHICLES
65. Determination and Application of Leads.—a. The lead
necessary to hit a moving vehicle depends upon the speed
of the target, the range to .the target, and its direction of
movement with respect to the line of sight. At 10 miles
per hour, a vehicle travels approximately its own length
(5 yards) in 1 second. A carbine bullet travels 300 yards
in about y2 second. Therefore, to hit a vehicle moving at
10 miles an hour at a range of 300 yards, the lead should be
2Уа yards, that is, y2 the target length or y2 lead.
b. Leads are applied by using the length of the target
(as it appears to the-firer) as the unit of measure. This
eliminates the necessity for corrections due to the angle
at which the target crosses the line of sight, because the
94
U. S. CARBINE, CALIBER .30, Ml
65-68
more acute the angle the smaller the target, appears and
the less lateral speed it attains.
c. The following lead table is furnished as a guide:
Target speed mph 100 200 300
10 Leading edge и и
20 и и ¥.
30 и ¥<. 1
66. Technique of Fire.—The following technique is sug-
gested for firing at rapidly moving targets, using any sight
setting up to 300 yards:
a. Approaching or receding targets.—The firer holds his
aim on the center ,of the, target and squeezes off his shot.
b. Crossing targets.—The firer alines his sights on the
bottom of the target at its rearmost point, and swings
straight across it to the estimated lead. The rifle is kept
swinging and the shot squeezed off while the proper lead is
maintained.
c. Rate of fire.—Fire is delivered as rapidly as proper aim-
ing permits.
67. Place in Training.—The technique of firing at moving
personnel and vehicles should follow instruction in known
distance firing.
Section IV
MOVING TARGETS AND RANGES AND RANGE
PRECAUTIONS
68. Moving Targets and Ranges.—a. Firing at moving per-
sonnel.—Any class A range, or field range, is suitable for
this purpose. E targets on sticks carried by men walking,
running, and ducking provide excellent training. On the
field range, targets on booms may be drawn from one Pit
to another. This training affords great scope for the inge-
nuity of the instructor.
b. Firing at moving vehicles.—No elaborate set-up is re-
quired. A sled shown in figure 30 provides a satisfactory
.95
68-69
BASIC FIELD MANUAL
target. It may be towed by any vehicle in such a manner
that the range from target to flrer varies from 300 to 100
yards. No provision need be made for changing direction
as the range is too short for maneuvering, but the courses
towed by the towing vehicle should be varied.
69. Safety Precautions.—For general range precautions
including danger areas, see AR 750-10. In addition to the
TARGET FRAME
FRONT VIEW OF TARGET
! • 5 -4
-------------------
EDGE COVERED WITH TIN
ELEVATION OF BASE
Figure 30.—Target'frame for moving target range.
individual safety precautions prescribed in section IX, chap-
ter 1, the following precautions will be observed:
a. Firing at moving targets will not be permitted on any
range until the safety angles have been carefully checked
and markers have been placed so as to define clearly the
right and left limits of fire.
b. Personnel of trucks towing targets will operate far
enough from the line of fire to be protected not only from
direct hits but also from ricochets.
c. Trucks replacing targets on the course, or personnel
making repairs, will be equipped with red flags.
96
U. S. CARBINE, CALIBER .30, Ml
70-72
CHAPTER 4
MARKSMANSHIP—AIR TARGETS
Paragraphs
Section I. Air targets for carbine___________________70-71
II. Technique of Are__________________________72-74
III. Marksmanship training_____________________75-78
IV. Miniature range practice___________________79-82
V. Ranges, targets, and equipment_____________83-85
Section I
AIR TARGETS FOR CARBINE
70. General.—The effectiveness of carbine fire against air-
craft is far less than that of the rifle. For this reason, troops
armed with the carbine will not fire on airplanes other than
those delivering a low horizontal or dive-bombing attack.
Enemy parachute troops while descending, and enemy gliders
in the act of landing, are considered the primary aerial targets
for personnel armed with the carbine, and the antiaerial train-
ing of this personnel will be such as to enable them to deliver
effective fire on these targets.
71. Classification.—From the point of view of the man
armed with the carbine, air targets may be classified as—
a. Parachutists in the act of descent.
b. Gliders in the act of descent.
c. Airplanes passing overhead at low altitudes.
d. Airplanes diving.
Section П
TECHNIQUE OF FIRE
72. General.—All aerial targets suitable for the carbine are
fleeting in character, and fire must be opened promptly.
Methods must be simple, and speed must be stressed. This
section deals with actual fire on hostile targets. Details of
marksmanship are contained in section HI.
97
73-74
BASIC FIELD MANUAL
73. Leads.—a. General.—In order to hit a moving target,
such as a parachutist, a glider, or an airplane in flight, it is
necessary to aim an appropriate distance ahead of it and on
its projected path so that the bullet and target will meet.
This distance ahead of the target is called “lead.” A lead
must be applied in all firing except on the diving airplane.
b. Determination of leads.—(1) The lead necessary to en-
gage a moving target depends upon—
(a) Speed of target.
(b) Range to target.
(c) Time of flight of bullet.
(d) Direction of flight of target with respect to line of fire.
(2) It is obviously impossible for a carbineer to consider the
above factors, and to compute the required lead in the short
time available to him. Therefore, leads are computed and
placed in lead tables for the use of leaders in training their
units. (See par. 73d.)
c. Application of leads.—Leads are tabulated in apparent
target lengths. It is very difficult to estimate with any de-
gree of accuracy a lead such as 15 yards or 30 yards at ranges
from 100 to 300 yards. Therefore, the length of the target
as it appears to the firer is used as the unit of measure for
applying leads. The carbineer is trained to apply the length
of the target, as it appears to him, along the projected path of
the target to determine the aiming point for each shot.
d. Lead table.—The following lead table is furnished as a
guide:
Slant range Time of flight of bullet in seconds (approxi- mate) Lead required (target lengths)
Parachutist 6 feet high at 17 fps Glider 40 feet long at 20 mph Airplane 30 feet long at 250 mph
100 0.17 и 0 2
200 .43 1 и 5
300 .70 2 a 9
74. Delivery of Fire.—a. Range.—(1) The maximum ef-
fective range of carbine fire at any target is 300 yards. How-
98
U. s. carbine, caliber .30, mi 74-75
ever, carbineers should assume the firing position on receipt
of warning of aerial attack, either by plane, parachute, or
glider, and upon the approach of any such target they should
start tracking. As the target comes within effective range,
fire is opened.
(2) Range estimation is the product of experience. The
flrer bases his estimate on his knowledge of appearance of
objects (gliders, parachutes, and planes) at known ranges.
The following data are approximate:
300 yards____The flrer can plainly distinguish small
parts of the plane or glider, and can
identify portions of the parachutists’
equipment.
200 yards-___All items of equipment carried by the
parachutists are plainly visible. On
planes and gliders, symbols, numbers
and letters can be distinguished.
b. Rate of fire.—The rate of fire at aerial targets is about
the same as rapid fire at ground targets. Experience indi-
cates that an attempt to fire faster than is consistent with
proper aim and trigger squeeze results in waste of ammuni-
tion. A well-trained carbineer can fire about one accurate
shot each 2 seconds.
c. Sights.—The peep sight set at 300 yards is used.
Section III
MARKSMANSHIP TRAINING
75. Instruction.—a. Object.—The object of aerial marks-
manship instruction is to train the carbineer in the technique
of firing at rapidly moving aerial targets.
b. Basis.—(1) Prior to instruction in aerial marksmanship,
the soldier should have completed a course of training in
ground firing and have acquired the fundamentals of good
shooting. To become a good aerial marksman, he must be
able to apply the fundamentals of target practice to firing
at rapidly moving targets and to perform the following opera-
tions with accuracy and precision:
(a) Apply the length of the target as a unit of measure in
measuring the required lead.
99
75-76
BASIC FIELD MANUAL
(b) Aline the sights of the carbine on the required lead
rapidly.
(c) Swing the carbine with a smooth, uniform motion so
as to maintain the aim on the required lead while getting off
the shot.
(d) Apply continuous trigger squeeze so as to fire in a
minimum of time and without disturbing the aim.
(2) The correct performance of these four operations com-
bined into one continuous, smooth motion when firing in any
direction at moving aerial targets is the basis of the course
of training outlined herein.
c. Sequence.—Aerial marksmanship for the carbine is di-
vided into preparatory exercises and miniature range
practice.
d. Personnel to receive training.—All persons armed with
the carbine should receive aerial marksmanship training.
76. Preparatory Exercises. — a. General.— (1) Descrip-
tion.—The preparatory exercises are designed to teach the
soldier the fundamentals of aerial marksmanship for the
carbine, and to drill him therein until the correct procedure
becomes a fixed habit. In addition to a brief explanation of
the technique of aerial carbine fire, the preparatory exercises
consist of the following two distinct steps which should be
completed on targets as later indicated, prior to firing on
those targets:
(a) Position exercise.
(b) Aiming, leading, and trigger squeeze exercises.
(2) Method.—A conference by the instructor should pre-
cede each exercise. This conference should include an ex-
planation of the necessity of the exercise, and a demonstra-
tion by the instructor and a qualified squad. In order to
awaken interest and stimulate the soldiers’ enthusiasm, the
preliminary instruction should be individual and.thorough.
Each man should understand and be able to explain each
point.
(3) Coaching.—During all preparatory exercises and min-
iature range firing, when a man is in a firing position he
should have a coach whose duty it is to watch him and point
out his errors. For this purpose soldiers should be grouped
in pairs and take turns in acting as coach and pupil. Unit
100
U. S. CARBINE, CALIBER .30, Ml
76-77
leaders are the instructors and should supervise and prompt
the coaches.
b. Organization.—With the targets and target range de-
scribed in paragraphs 82 and 84, a group of 32 men per
target is the most economical training unit. For the prepara-
tory exercises this will permit 16 men to perform the exer-
cises on each type of target, while the remaining 16'men act
as coaches. Each group should complete all preparatory
training and instruction firing on its assigned target. Groups
should then change places. The preparatory training and
instruction firing should then be undertaken on the new
type target.
77. First Step—Position Exercises.—a. General.—The
positions used in aerial target firing are those which can be
assumed rapidly, which afford maximum flexibility to the
body for manipulation of the carbine, and which do not
require undue exposure of the firer. These positions will
usually be either kneeling or standing. The kneeling posi-
tion best meets the requirements listed above as it is less
vulnerable than the standing position (fig. 31).
b. Firing positions.—(1) Aerial target firing positions differ
from those used in ground firing in that—
(a) The arms are not supported, but move freely in any
direction with the body.
(b) The hands grasp the piece firmly, the left hand near
the upper band.
(c) The butt of the carbine is pressed firmly against the
shoulder with the right hand, and the cheek is pressed against
the stock.
(d) In the kneeling position the buttock does not rest
on the heel, and the left foot is well advanced to the left front.
The weight is slightly forward (see fig. 32).
(2) The positions must be such that the carbine, the body
from the waist up, the arms, and the head are as one unit.
(3) When leading a target the firer swings the carbine with
a smooth, uniform motion. This is done by pivoting the body
at the waist. There should be no independent movement of
the arms, head, shoulders, or the carbine.
(4) The instructor explains and demonstrates the posi-
tion, and points out that if the carbine is pulled or pushed
101
77
BASIC FIELD MANUAL
Figure 32.—Kneeling antiaircraft firing position.
102
U. S. CARBINE, CALIBER .30, Ml
77-78
in the desired direction by means of the left hand and arm
the carbine will move with a jerky motion, thereby increasing
the possibility of jerking the trigger, or the front sight may
be pulled or pushed out of alinement with the rear sight and
the eye.
(5) Position exercises should be conducted until the sol-
dier becomes proficient in assuming positions rapidly for
aerial firing in any direction.
78. Second Step—Aiming, Leading, and Trigger-Squeeze
Exercise.—a. Purpose.—The purpose of this exercise is to
teach the correct method of aiming, to develop skill in swing-
ing the carbine with a smooth, uniform motion so as to
maintain the correct aim on aerial targets, and to develop
proper trigger squeeze.
b. Method —-(1) Parachute target (fig. 33©).—Pupils as-
signed to the parachute targets take up the ready position
in one line at about IV2 yards interval, 500 inches from and
facing their respective targets. Coaches take positions that
enable them to observe their pupils. The commands for the
exercise are: 1. aiming and leading exercise, 2. one lead, 3.
TARGETS. At the command targets, the upper target is
pulled down at a speed of approximately 1 foot per second;
the pupils assume the designated position rapidly, aline the
sights on the spotter indicating the proper lead, and swinging
the carbine with a smooth, uniform motion of the body,
maintain a steady aim on the spotter (see fig. 33© and @).
During this motion the trigger is squeezed steadily until the
shot goes off; following the shot the motion is maintained, the
trigger released, and another squeeze begun. During the
30 seconds of the target’s descent, the firer endeavors to fire
five simulated shots. When the target reaches the ground,
coaches and pupils exchange places, the group on the other
target of the pair, that is, the one now at the top, are
readied, and the exercise repeated. The exercise is con-
tinued until all men have acquired skill in aiming, leading,
and trigger squeeze.
(2) Glider target.—Firers assigned to the glider target
are formed parallel to and 500 inches from the horizontal
103
78
BASIC FIELD MANUAL
Figure 33.
104
TJ. S. CARBINE, CALIBER .30, Ml 78-80
target as used for rifle antiaircraft fire (see fig. 34). The pro-
cedure is the same except as follows:
(a) Target is operated at a speed of 3 feet per second.
(b) Eight men of the firing group track the target in each
direction.
(c) One and two leads are used.
c. Importance of position, trigger squeeze, and follow-
through.—The importance of correct position and the smooth
swing with constant trigger squeeze must be constantly
emphasized.
d. Duties of the coach.—In this exercise the coach sees
that the—
(1) Firer has taken the proper position.
(2) Trigger is squeezed steadily.
(3) Carbine is swung smoothly, with the arms, shoulders,
carbine, and head moving as a unit.
(4) Eye is kept open and does not blink as the hammer
falls.
(5) Muzzle does not jerk coincidentally with the release
of the hammer.
(6) Aim is continuous during the entire length of travel of
the target.
Section TV
MINIATURE RANGE PRACTICE
79. General.—a. Miniature range practice is divided into
two parts, instruction firing and group firing. There is no
record firing.
b. All firing is on moving targets on the 500 inch range.
A suggested arrangement of the range is given in paragraph
84. Provision is made for the simultaneous firing by two
groups on the parachute and glider targets.
c. The course is fired with the carbine Ml.
d. All carbines are targeted before 'range practice starts.
80. Safety Precautions.—a. Bolts of carbines should be
open at all times except when on the firing line, firing, or
simulating fire.
b. Carbines should be loaded only at the command of the
officer in charge of the firing on each target.
105
80-81
BASIC FIELD MANUAL
c. At the completion of the firing of a score all carbines
should be unloaded and bolts opened.
d. If firers go forward to inspect their targets, carbines
should be left on the firing line.
e. No one will be permitted in advance of the firing line
except by permission of the officer in charge of that partic-
ular target. He will not give such permission until he has
assured himself that all carbines have been unloaded and
the bolts are open.
f. Target operators will remain behind the protective wall
except when ordered to leave by the officer in charge of the
target which they are operating.
81. Instruction Firing.—a. General.—(1) The purpose of
instruction firing is to provide a means of applying the prin-
ciples taught in the preparatory exercises to actual firing.
(2) During instruction firing the coach-and-pupil method
is followed.
(3) As a "group completes preparatory training on a tar-
get, instruction firing should be taken up on that target and
completed before the group moves to another target.
(4) Instruction firing consists of that indicated in table
IV, paragraph 82.
b. Procedure.—(1) As the instruction firing on'each type
of target follows immediately after the preparatory exercises
on that target, organization of the training unit should be
in groups of 32 men (see par. 76b).
(2) Sixteen men of each group are formed on the firing
line in the ready position. The remaining 16 men, in the
rear rank, act as coaches.
(3) (a) On the parachute target one half of the firers fire
on the right target of each frame, and one half on the left
target.
(b) On the glider (horizontal) target one half of the firers
fire while the target is moving from right to left, and the
other half fires while it travels from left to right.
(c) Coaches and pupils exchange places after each string
of 5 shots.
(4) All men not firing during a run of the target will
simulate fire.
(5) Silhouettes are assigned to each firer. For example,
106
U. S. CARBINE, CALIBER .30, Ml
81-82
the four silhouettes on the right of the glider target are
assigned to the first four men for the first run of the target.
For the return (from left to right) the four silhouettes on
the left of the target are assigned to the second four men.
This procedure is followed four times until all men have fired
a string, when coaches and pupils exchange places. On the
parachute target the right frame is assigned the first and
third groups of four; the left target to the second and fourth
groups.
(6) The officer in charge of the target commands:
1. LOAD, 2 one (two) leads, 3. TARGETS. At the com-
mand targets, the targets are operated at the proper speed.
Men assigned silhouettes use the announced lead and attempt
to fire 5 shots during the target run in the prescribed manner.
Men not firing on any run will simulate fire on any silhouette.
(7) One point is scored for each hit in the proper scoring
space or silhouette.
(8) Modifications of this method to meet local conditions
are authorized.
82. Group Firing.—a. General.—(1) Group firing is the
final phase of aerial marksmanship with the carbine.
(2) It provides competitions, and illustrates the effective-
ness of the combined fire of a number of men armed with the
carbine.
(3) Group firing should not be undertaken until the pre-
paratory training and instruction firing have been completed.
b. Procedure.—(1) Two silhouettes on the glider target,
one to be fired on from right to left, and one' to be fired on
from left to right, are assigned to each squad or similar
group. On the parachute target one silhouette only is so
assigned.
(2) Each man of the squad, in order as assigned, fires
five rounds on each passage of the target.
(3) Targets are not scored .until completion of the firing
of each squad, or group.
c. Scoring.—1 point is scored for each hit in the proper
scoring space on the silhouette.
107
82-85
BASIC FIELD MANUAL
Table IV.—Instruction firing
(Range 500 Inches)
Target Position Total
Kneeling Standing
Parachute 10 10 10 10 20 20
Glider
Total
40
Section V
RANGES, TARGETS, AND EQUIPMENT
83. Range Officer.—A range officer is appointed well in
advance of range practice. His chief duties are—
a. To make timely estimates for material and labor to place
the range in proper condition for firing.
b. To supervise and direct the repairs and alterations to
installations.
c. Where safety demands, to instruct and supervise range
guards.
84. Miniature Range.—a. The miniature range is that used
for antiaircraft fire with the rifle, with the addition of the
parachute target. It consists of—
(1) One glider (horizontal) target (fig. 34).
,(2) Two parachute targets (fig. 35).
(3) The remaining targets are not used by troops armed
with the carbine, and are not shown. They are described
in FM 23-5, and Illustrated therein by figure 42.
b. For details of range apparatus see figures 36, 37, and 38.
c. For danger space see AR 775-10.
85. Individual Score Card.
Target Position Percent
Kneeling Standing of hits
Parachute
Glider
Average percent.............
108
U. S. CARBINE, CALIBER .30, Ml
86-89
CHAPTER 5
FIRING AT FIELD TARGETS
86. Characteristics of Fire.—The characteristics of the
carbine determine the manner in which it is to be used. It
is an individual weapon like the rifle, pistol, or revolver and
was designed primarily to replace the pistol or revolver. It
is highly effective at close quarters and at ranges up to 300
yards. Its 15-round magazine and semiautomatic action, to-
gether with its greater effective range, make it much superior
to the pistol or revolver as a close-defense weapon. Men
armed with the carbine are capable of dealing effectively with
parachutists landing in their immediate vicinity, and with
other hostile personnel encountered at ranges up to 300
yards. Carbineers are not organized into squads or other
fire units, but deliver their fire as individuals. However, a
small group of such personnel may be collected for the execu-
tion of group fire in situations where this action promises the
best results. Carbines may be grouped with other available
weapons, especially automatic rifles.
87. Type of Fire Orders.—Except when firing is executed
by a group of carbineers, fire orders are seldom necessary or
desirable. When group firing is done the simplest type of
fire order, giving the target and the command to commence or
cease firing, is used.
88. Target Designation.—The usual employment of the
carbine is such that target designation, as employed for
longer range weapons, is not necessary. Targets for such a
close range weapon will generally be obvious. In most situa-
tions recognition of targets must be left to the carbineer.
89. Range Estimation.—a. General.—(1) The carbineer
must be well trained in hasty range estimation and its appli-
cation to marksmanship in the field. Because the maximum
range for which the sights can be set in 300 yards and be-
cause the weapon is normally employed quickly at those ranges
or under, the following methods of range estimation are used:
Estimation by eye.
Observation of fire.
(2) The usual method of range estimation is by eye. The
carbineer is taught to estimate accurately and fix permanently
109
89
BASIC FIELD MANUAL
in his mind two distances, 50 yards and 100 yards. Targets
at other ranges are estimated in comparison with these units
of measure.
Figure 34.—Glider (horizontal) target.
(3) When the effect of a shot or series of shots can be
seen by the carbineer he corrects the range setting applied by
estimation in order to increase the effectiveness of his fire.
110
П. s. CARBINE, CALIBER .30, Ml
89
b. Exercises.—The following exercises can be used as
guides in instructing the carbineer in range estimation.
Ranges used are short and ’ at no time greater than 300
yards. The exercises are especially suitable for class instruc-
Fxgube 34.—Glider (horizontal) target—Continued.
(1) No. 1.—(a) Purpose.—To familiarize the carbineer
with the units of measure, 50 yards and 100 yards.
(b) Method.—The units of measure, 50 yards and 100 yards,
are staked out on the ground up to 300 yards. The carbineer
is required to become familiar with the appearance of the
unit of measure from the prone, kneeling, and standing
positions.
(2) No. 2.—(a) Purpose.—To give practice in range
estimation.
(b) Method.—From a suitable point, ranges are previously
111
89
BASIC FIELD MANUAL
Figure 35.
112
и. s. carbine, caliber .30, mi 89
measured to normal targets within 300 yards. The carbineer
is required to estimate the ranges to the various objects as
they are pointed out by the instructor and record his estima-
• • • •
© Parachute silhouettes.
Figure 35—Continued.
tion on a sheet of paper. At least one-half of the estimates
are made from the kneeling and sitting positions.. Thirty
Figure 36.—Details of construction of operating drum.
seconds are allowed for each estimate. When all the ranges
have been estimated the paper is checked by the instructor,
and the true ranges given to the student.
113
89
BASIC FIELD MANUAL
c. Appearance of objects.—If much of the ground between
the observer and. the target is hidden from view, he estimates
the range by the appearance of objects. Whenever the ap-
pearance of objects is used as a basis for range estimation,
the observer must make allowance for the following effects:
(1) Objects seem nearer—
(a) When the object is in a bright light.
114
U. S. CARBINE, CALIBER .30, Ml
89-90
(b) When the color of the object contrasts sharply with
the color of the background.
(c) When looking over water, snow, or a uniform surface
like a wheat field.
(d) When looking downward from a height.
(e) In the clear atmosphere of high altitudes.
<7) When looking over a depression, most of which is
hidden.
(2) Objects seem more distant—
(a) When looking over a depression most of which is
visible.
(b) When there is a poor light or fog.
Figure 38.—Details of construction of parachute target.
(c) -When only a small part of the object can be seen.
(d) When looking from low ground upward toward higher
ground.
d. If the carbine is equipped with an adjiistible sight, the
sights are set to correspond to the estimated range. If the
L-type sight is used the correct aiming point at the various
distances as determined during marksmanship training is
used.
90. Training in Field Firing.—a. Upon completion of
marksmanship practice, firing at field targets will be done
by all individuals armed with the carbine.
b. This firing is done by groups. The size of the group
will depend upon the number of men to fire and the range
facilities available. Usually the size of the area and safety
115
90-92
BASIC FIELD MANUAL
requirements will not permit the firing of more than 20 men
at one time.
91. Field Firing Range.—The known distance range, class
В range, or any other suitable area may be used for firing
at field targets. It is desirable to select an area which will
permit the advance of the firers and allow firing at ranges
from 200 to 50 yards.
92. Field Firing Course.—The following field target firing
course is given as a guide and may be modified to suit range
facilities, equipment, ammunition and time available. (See
fig. 39.)
a. On a known distance range, class В range, or other
suitable area, partially concealed prone silhouettes (E
targets) are placed in groups of three in an Irregular line
with Intervals of about 5 yards between targets and about
20 yards between groups..
b. The men to fire are formed in line about 200 yards from
the targets so that each man is opposite the center of his
assigned targets. Each man has two magazines, one con-
taining 6 and one 12 rounds. Carbines are carried at the
“ready,” loaded, and locked.
c. The officer in charge of firing, from a position in rear
of the center of the line, commands or signals: FORWARD
MARCH, and himself moves forward behind the advancing
line. The advance from the Initial point is at a walk. At a
whistle signal given by the officer in charge the men take
the sitting position and fire or attempt to fire-2 rounds at
each of their targets. After 20 seconds the signal to cease
firing is given, and the advance resumed at double time
toward the next firing position. Upon signal the men
halt and fire a similar score from the kneeling position.
After' 20 seconds the advance is resumed at a run to the
next firing position and the final score fired from the standing
position.
d. To add interest and instructional value the distance
of each advance should vary but in no case should exceed
50 yards.
e. Carbines are locked and carried at the “ready” , while
advancing. When the firing signal is given men individually
116
U. S. CARBINE, CALIBER .30, Ml
92
unlock pieces, assume the prescribed firing position, and
engage their targets.
f. Limits of each group of targets are indicated by flags or
other means, so that each firer will fire on his own targets.
_ (oJx>\0
Tarqet Spaces
BU>tS
A suggested
Arrangement Sack of Butts
Tdrqef Mo 4 held over
the butts and the soldier
carries it at the double
time for io .seconds in
•each direction.
- - So qds
*zi Remain
Sldndinq
-- 75 qds
*3 Remain
Standing
— ioo yds
Fire 4 shots on
> M target each
time it appears
Fire z shots on
each of z F tar-
* qets when they
appear
-- iso yds
Fire z shots on
Take each of z M tar-
'» । Sitting I gets when theq
Position лппллг ’
to Fire appear
Starting Point —L zoo yds '
Figure 39—Field firing course.
g. To enforce safety precautions the officer in charge
should have several noncommissioned assistants distributed
in rear of the line and following it during firing. The num-
ber required will depend on the extent of the line. These
117
92-93
BASIC FIELD MANUAL
assistants prevent individuals from getting ahead of or behind
the general line and see that loaded pieces are locked and
kept pointed toward the targets during the advance.
h. Upon completion of the firing carbines are unloaded.
Firers move forward, inspect their targets, assist in scoring,
and paste their targets.
i. Should a difficult stoppage occur during the course of
firing the man concerned continues forward with the rest
of the group and reduces the stoppage when the course is
finished. If practicable he should reduce the stoppage dur-
ing the firing and continue with the rest of the group. He
must not, however, be permitted to lag behind the general
line of men for this purpose.
93. Scoring.—To stimulate interest and competition,
scores are kept for all firing and are posted where participants
can see them. The following system of scoring is suggested:
For each hit__________________________________ 4
Total possible for hits_____________________ 18 x 4=72
Bonus for hitting all targets_________________ 10
Bonus for hitting all targets 6 times_________ 18
Total possible_________________________ 100
118
U. S. CARBINE, CALIBER .30, Ml
94-96
CHAPTER 6
ADVICE TO INSTRUCTORS
Paragraphs
Section I. General _______________:_________________ 94
II. Mechanical training_________________________ 95
III. Marksmanship—known-distance targets_____ 96-110
IV. Marksmanship—air targets_______________ 111-113
V. Field target firing________________________ 114
Section I
GENERAL
94. Purpose.—The provisions of this chapter are to be
accepted as a guide and not as having the force of regulations.
They are particularly applicable to emergency conditions when
large bodies of troops are being trained under officers and
noncommissioned officers who are not thoroughly familiar
with approved training methods.
Section П
MECHANICAL TRAINING
95. Conduct of Training.—a. As a general rule instruction
is so conducted as to insure the uniform progress of the unit.
b. The instructor briefly explains the subject to be taken
up and demonstrates it himself or with a trained assistant.
c. The instructor then causes one man in each squad or
subgroup to perform the step while he again explains it.
d. The instructor next causes all members of the squads
or subgroups to perform the step, checked by their
noncommissioned officers. This is continued until all men
are proficient in the particular operation, or until those whose
progress is slow have been placed under special instructors.
e. Subsequent steps are taken Up in like manner during the
instruction period.
Section in
MARKSMANSHIP—KNOWN-DISTANCE TARGETS
96. General.—a. Training is preferably organized and
conducted as outlined in paragraphs 45 and 46. Officers
should generally be considered as the instructors of their
units. As only one step is taken up at a time, and as each
step begins with a lecture and a demonstration showing ex-
119
96-99
BASIC FIELD MANUAL
actly what to do, the trainees, although not previously in-
structed, can carry on the work under the supervision of the
instructor,
b. It is advisable that units be relieved from routine gar-
rison duty during the period of preparatory marksmanship
training and range practice.
97. Place of Assembly for Lectures.—Any small ravine
or cup-shaped area makes a good amphitheater for giving
the lecture in case no suitable building Is available.
98. Assistant Instructions.—a. It is advantageous to have
all officers and as many noncommissioned officers as pos-
sible trained in advance in the prescribed methods of in-
struction. When units are undergoing marksmanship train-
ing for the first time, this is not always practicable nor Is
it absolutely necessary. A good instructor can give a clear
idea of how to carry on the work in his lecture and demon-
stration preceding each step. In the supervision of the work
following the demonstration, he can correct any mistaken
ideas or misinterpretations.
b. When an officer in charge of carbine instruction (see
par. 46) is conducting successive organisations through tar-
get practice, it is advisable to attach to the first organiza-
tion taking the course officers and noncommissioned officers
of the organizations that are to follow for the period of
preparatory work and for a few days of range firing. These
act as assistant instructors when their own units take Up
the work. These assistants are particularly useful when one
group is firing on the range and another is going through the
preparatory exercises, both under the supervision of one
instructor.
99. Equipment.—The instructor should personally inspect
the equipment for the preparatory exercises before the train-
ing begins. A set of model equipment should be prepared in
advance by the instructor for the information and guidance
of the organization about to take up the preparatory work.
The sighting bars must be made as described, and the hole
representing the peep sight must be absolutely circular. If
the sights are made of tin the holes should be bored by
a drill. Good rear sights can be made for the sighting
bars by using cardboard and cutting the holes with a punch
120
U. S. CARBINE, CALIBER .30, Ml
99-102
for cutting wads for 10-gage shotgun shells. Bull’s-eyes
painted on a white disk are not satisfactory. Bull’s-eyes cut
out of black paper with a shotgun-wad cutter and pasted on
white paper make satisfactory aiming points either to paste
on the face of the disk or to use in position and trigger-
squeeze exercises when small gallery targets are not avail-
able for this purpose.
100. Inspection of Carbines.—No man is required to fire
with an unserviceable or inaccurate carbine. All carbines
should be carefully inspected far enough in advance of the
period of training to permit organisation commanders to
replace all inaccurate or defective carbines. Carbines hav-
ing badly pitted barrels are not accurate and should not
be used.
101. Ammunition.'—The best ammunition available should
be reserved for record firing, and the men should have
a chance to learn their sight settings with that am-
munition before record practice begins. Ammunition of
different makes and of different lots should not be used
indiscriminately.
102. Organization.—a. In preparatory training.—(1) The
field upon which the preparatory work is to be given should
be selected in advance and a section of it assigned to each
organization The equipment and apparatus for the work
should be on the ground and in place before the morning
lecture is given, so that each organization can move to its
place and begin work immediately and without confusion.
(2) Each company should be organized in two lines facing
away from each other. In this way the officers and other
instructors, whose position is normally between the lines,
have all of their squads under close supervision. In figure
40 the groups represented consist of 8 men each.
(3) The arrangement of the equipment is as follows:
(a) On each line are placed the sighting bars and carbine
rests at sufficient intervals to permit efficient work.
(b) Fifty feet from each line is placed a line of small
boxes with blank paper tacked on one side, one box and one
small sighting disk to each carbine rest.
(c) Two hundred yards from each line is placed a line of
121
102
BASIC FIELD MANUAL
200 yd aiming targets
Figure 40.—Part of field laid out for sighting and aiming exercises.
frames suitable for 200-yard shot group exercises, one frame
to each squad. These frames have blank paper tacked or
pasted on the front. A 10-inch sighting disk is placed with
each frame. Machine-gun targets make acceptable frames
for this work.
(4) In position, trigger-squeeze, and rapid-fire exercises
targets should be placed at 1,000 inches and 200 yards. The
groups represented in figure 41 consist of 8 men each.
(5) When sufficient level ground is not available for the
above arrangement the organizations will have to vary from
it in some particulars. It will usually be found, however, that
all of the work except the long-range shot group work can be
carried on in two lines.
- 122
и. s. carbine, caliber ,30, Ml
102
„ 4-s--"A” and "D” Targets
«------200 yds
----x*- 1000-inch Targets
<-1000~
group ;
— 28"----< 8 yds—»
' 8 yds—*
4-‘’Firing Line"
4- 25 yds
Tape Line, Start of 25 yd. Rush
,4- Center Rifle Racks
>-Tape line, start of 25 yd rush.
<- 25 Yds.
*-"‘Firing line”
4-1000"
----у4— 1000-inch Targets
<--- 200 Yds.
Figure 41.—Part of field laid out for position, trigger squeeze, and
rapid fire exercises.
b. In range practice.—(1) The range work should be so
organized that there is a minimum of lost time on the part
of each man. Long periods of inactivity while awaiting a
turn on the firing line should be avoided. For this reason
the number of men on the range should be accommodated to
the number of targets available.
(2) As a general rule six men per target are about the
maximum and four men per target the minimum for efficient
handling.
(3) Subject to ammunition allowances, the following
method of carrying on range practice has been found to
produce uniformly excellent results when the full allowance
of time is devoted to the training:
(a) Firing is begun by a group consisting of approximately
half of each organization. This group is made up of those
proved to be the best by the examination on preparatory
work and those known to be good shots. The men who are
not included in this first group make up all fatigue details
and undergo additional preparatory training.
(b) At the completion of instruction practice, all of the
first group, except those few who have not been shooting
well, fire for record.
(c) When the first group has completed firing, the second
123
102-103
BASIC FIELD MANUAL
group, made up of those who have not fired and those who
were rejected from the first group begin their firing. The men
who have completed record firing perform all fatigue.
(d) At the completion of instruction practice, all of this
second group who have been shooting well and have a very
good chance to qualify fire for record.
(e) During the remainder of the allotted time the efforts
of the officers and noncommissioned officers are concentrated
on the men who were not ready to fire for record with the
second group. This last group must complete firing for rec-
ord by the end of the allotted time for range practice.
(4) When range facilities are such that the entire organi-
zation can fire at one time without having more than six
men per target, the same general scheme as that outlined
above may be applied. The details of this plan follow:
(a) Firing is begun with all of the men of the organization
taking part.
(b) At the completion of instruction practice, all except
those who have not been shooting well fire for record.
(c) The efforts of the instructors are concentrated on the
remainder of the organization for the rest of the' allotted
time.
103. Model Schedules.—The following schedule of prepa-
ratory exercises and practice firing is suggested as a guide:
(1) For men who have recently completed a course in
rifle marksmanship.—This schedule is based on a 14-hour
course. The practice firing is based on a maximum of six
orders per target, or pair of two targets.
FIRST DAY Hours
AM PM
Review of sighting and aiming exercises__________ 1
Position exercises (% hour In each position)_____ 1
Trigger squeeze exercises (y2 hour In each position) 2
Zeroing rifles, Instruction practice (table II)__ 4
SECOND DAY
Instruction practice (simulated), table III______ 2)4
Instruction practice, table III__________________ 1)4
Instruction practice (simulated), table III______ 1)4
Record practice, table III_______________________ 1)4
(2) For men who have not had a course in rifle marks-
manship.—This schedule is based on a 39 hour course. The
124
U. S. CARBINE, CALIBER .30, Ml
103
practice and record firing is based on a maximum of six
orders per target, or pair of targets.
FIRST DAY
Mechanical Training____________________________________
First Step: Sighting and aiming exercises______________
First sighting and aiming exercise____:___________
Sight blackening and second sighting and aiming
exercise__________________________________________
Third sighting and aiming exercise to include
long range shot group exercise____________________
Safety precautions________________________________
Second Step: Position exercises.
Holding breath, trigger slack, general rules for
positions_______________________________________
Position exercise.
Prone_____________________________________________
Sitting_________________________________________
Kneeling________________________________________
Standing________________________________________
’This period should be conducted so that the practical work In
each position is preceded by a 15-minute lecture and demonstration
of that position.
SECOND DAY
Third Step: Trigger squeeze exercises__________________ */2
Prone___________-________________________________ y2
Sitting____________________________________________ !/2
Kneeling___________________________________________ '/2
Standing___________________________________________ */2
Assuming positions rapidly______________________ ’/2
Practical work assuming positions rapidly (all
positions)_____________________________________ 1
Fourth Step: Rapid Are exercises_____________________ V4
Standing to prone (simulate firing, table II, 300
yards)___________________________________________ '/2
Standing and sitting (simulate firing, table II, 200
yards)___________________________________________ '/2
Standing and kneeling (simulate firing, table II,
200 yards)_______________________________________ '/2
Standing and kneeling (simulate firing, table II,
100 yards)_______________________________________ 1
THIRD DAY
Fifth Step: Sight settings, aiming points, and score-
book______________________________________________ !/2
Scorebook exercises______________________________
Trigger squeeze exercises (all positions slow flre)„ 1
Rapid fire exercises (all positions)_____________ 1
Examination of all men by group instructors------1
Instruction practice slow fire (table I)_________ 3
FOURTH DAY
Instruction practice (simulated), table II (all posi-
tions)____________________________________________ '/2
Instruction practice, Table II_______________________3'/2
Instruction practice (simulated), table III---------- 1
Instruction practice, table III--------------------2
459353°—42-----5 125
103-105
BASIC FIELD MANUAL
FIFTH DAY
Instruction practice, table II__________________
Instruction practice (simulated), table III_____ %
Instruction practice (simulated), table 1П______ iya
Instruction practice, table III_________________ 1%
SIXTH DAY
Instruction practice (simulated), table 1П______ iy2
Record practice_________________________________ 1%
104. Lectures and Demonstrations.—a. The lectures at
the beginning of each step are an important part of the in-
struction methods. The lectures may be given to the as-
sembled group undergoing preparatory training up to and
including a group formed into a provisional battalion or body
of recruits of similar size. However, when the men of a bat-
talion formed into a provisional company take up carbine
training, the talks and demonstrations as a rule are made
by the officer designated to conduct the training. It is not
necessary that the lecturers be expert shots.
b. The notes on lectures which follow are to be used merely
as a guide. The points which usually require elucidation and
demonstration are placed in side headings in italics. The
notes which follow each heading are merely to assist the
instructor in preparing his lecture. The lecturer should know
in advance what he is going to say on the subject. Under
no circumstances will he read over to a class the outlines for
lectures contained herein, nor will he read a lecture prepared
by himself. During the lecture the headings in italics, jotted
down as notes, serve as a guide to the order in which the
points are to be discussed. If he cannot talk interestingly
and instructively on each subject without elaborate notes, he
should not give the lectures at all.
c. It is important to show the men undergoing instruction,
by explanation and demonstration, just how to go through
the exercises and to tell them why they are given these
exercises.
105. First Lecture—Sighting and Aiming.—a. The class is
assembled in a building or natural amphitheater in the open
where all can hear the instructor and see the demonstrations.
b. The following equipment is necessary:
1 sighting bar.
1 carbine rest.
126
U. S. CARBINE, CALIBER .30, Ml
105
1 carbine.
1 small sighting disk.
1 long range sighting disk.
1 small box.
Material for blackening sights.
c. The following subjects are usually discussed in the first
lecture:
(1) Value of knowing how to shoot.—(a) The carbine is
the close-protection weapon of the individual in war. Ex-
pertness in its use gives the individual confidence and a
higher morale.
(b) Individual proficiency increases the efficiency of the
organization as a whole.
(c) Carbine firing is good sport.
(2) Object of target practice.—(a) To teach men how to
shoot.
(b) To show them how to teach others.
(c) To train future instructors.
(3) Training to shoot well.—(a) Any man can be taught
to shoot well. Shooting is a purely mechanical operation
which can be taught to anyone physically fit to be a soldier.
(b) It requires no inborn talent.
(c) There are only a few simple things to do in order to
shoot well, but these things must be done exactly right.
If they are done only approximately right the result will
be poor.
(4) Method of instruction.—(a) The method of instruc-
tion is the same as that used in teaching any mechanical
operation.
(b) The instruction is divided into steps. The man is
taught each step and practices it before going to the next
step. When he has been taught all of the steps he is taken
to the range to apply what he has learned.
(c) If he has been properly taught the various preparatory
steps, he will do good shooting from the very beginning
of range practice.
(d) Explain coach-and-pupil method and why used.
(5) Reflecting attitude of instructor.—If the instructor is
interested, enthusiastic, and energetic, the men will be the
same. If the instructor is inattentive, careless, and bored,
the men will be the same, and the scores will be low.
127
105
BASIC FIELD MANUAL
(6) Examination of men on preparatory work.—Each man
is examined in the preparatory work before going to the
range. An outline of this examination is given in para-
graph 53.
(7) Method of marking blank form.—Explain blank form
(par. 46/). Explain marking system by the Use of a black-
board if available.
। (8) Five essentials to good shooting.—(a) Correct sighting
and aiming.
(b) Correct position.
(c) Correct trigger squeeze.
(d) Correct application of rapid-fire principles.
(e) Knowledge of proper sight and aiming-point adjust-
ments.
(9) Today’s work.—First step—sighting and aiming.
(10) Demonstration of first sighting-and-aiming exer-
cise.-—Have a squad on stage or platform show just how
this exercise is carried on.
(11) Blackening the sights.—Explain why this is done, and
demonstrate how.
(12) Demonstration of second sighting-and-aiming exer-
cise.—Assume that some of the squad have qualified in the
first exercise. Put these men through the second sighting-
and-aiming exercise and show just, how it is done.
(13) Demonstration of third- sighting-and-aiming exer-
cise.—(a) Assume that some of the squad have qualified in
the second sighting-and-aiming exercise. Put these men
through the third sighting-and-aiming exercise and show
just how it is done.
(b) Show how the squad is organized for the coach-and-
pUpil method so as to keep each man busy all the time.
(14) Long-range shot group work.—Show the class the
disk for 100-yard shot group work. Explain how this work
is carried on and why. Show some simple system of signals
that may be used.
(15) Final word.—(a) Start keeping your blank form
today.
(b) Organize your work so that all men are busy at all
times.
(16) Are there any questions?
(17) Next lecture will be________(state hour and place).
128
U. S. CARBINE, CALIBER .30, Ml
106
106. Second Lecture—Position.—a. The following equip-
ment is necessary for the demonstrations in this lecture:
1 carbine.
1 box with small aiming target.
b. The following subjects are usually discussed in the
second lecture:
(1) Importance of each step.—(a) Each step includes all
that has preceded.
(b) Each step must be thoroughly learned and practiced
or the instruction will not be a success.
(2) Necessity for correct positions.—No excellent shot
varies from the normal positions. Few men witli poor posi-
tions are even fair shots. Few men with good positions are
poor shots. Instruction in positions involves correct aiming.
(3) Taking up slack.—Show the class the slack on the trig-
ger. Explain why it is taken up in the position exercises.
(Cannot begin to squeeze the trigger until the slack has been
taken up.)
(4) Holding breath.—Explain the correct manner of hold-
ing the breath and have the class practice it a few times.
Explain how the coach observes the pupil’s breathing by
watching his back.
(5) Position of thumb.—May be either over the, stock or
on top of the stock but never along the side of the stock.
Explain why.
(6) Joints of finger.—Trigger may be pressed with first or
second joint; second joint is preferable when it can be done
conveniently.
(7) Prone position.—(a) Demonstrate correct prone posi-
tion, calling attention to the elements which go to make up
a correct prone position: body at the correct angle, legs
spread well apart, position of the butt on the shoulder, posi-
tion of the hands on the carbine, position of cheek against
the stock, position of elbows.
(b) Mention the usual faults which occur in prone position.
(c) Demonstrate the correct position again.
(8) Sitting position.—Demonstrate in the same manner as
described above for-the prone position.
(9) Kneeling position.—Demonstrate in the same manner
as described for the prone position.
129
106-107
BASIC FIELD MANUAL
(10) Standing position.—Demonstrate in the same manner
as described above for the prone position.
(11) Today’s work—position exercises.—(a) Demonstrate
the duties of a coach in a position exercise, calling attention
to each item.
(b) Demonstrate the position of the coach. Always placed
so that he can watch the pupil’s finger and eye.
(c) Place a squad on an elevated platform and show how
the squad leader organizes it by employing the coach-and-
pupil method so as to keep every man occupied.
(d) Continue the long-range triangle work today.
(12) Do'not squeeze trigger today.—Take up the slack in
these exercises but do not squeeze the trigger.
(13) Keep blank forms up-to-date.—Examine each man
in the squad at the end of the day’s work and assign him a
mark.
(14) Are there any questions?
(15) Next lecture will be (state hour
and place).
107. Third Lecture—Trigger Squeeze.—a. The following
equipment is necessary for demonstration:
1 carbine.
1 box with small aiming target.
b. The following subjects are usually discussed in the third
lecture:
(1) Trigger squeeze most important.—Read paragraph 50.
Explain that there is only one correct method of squeezing
the trigger—a steady increase of pressure so that the firer
does not know when the explosion will take place. Empha-
size the fact that this method of squeezing the trigger
secures good results and must be applied in rapid fire.
(2) Machine rest example.—Lay the carbine on a table
pointing down the room toward an actual or imaginary
target; assume that it is in a machine rest which runs on a
track parallel to the line of targets; assume that you fire
a shot which hits the left edge of a 20-inch bull’s-eye, 300
yards away; then move the rifle 20 inches to the right on
the table as if it were sliding along the parallel track and
assume that another shot is fired. Where does it hit? An-
swer: The right edge of the bull’s-eye. Move the rifle back-
130
U. S. CARBINE, CALIBER .30, Ml
107
ward and forward between these two positions, and assume a
shot is fired anytime while it is moving. Where will it hit?
Answer: In the bull’s-eye. Now assume that you hold the
butt of the rifle still and move the muzzle a fraction of an
inch. Where will it hit? Answer: It will miss the whole
target. It hits the target when the whole rifle moves but
misses it when only one end moves.
(3) Pulsations of body.—The natural movements of the
body and its pulsations produce more or less parallel move-
ment of the carbine. Often men who are apparently very
unsteady make good scores. You thus see that if you squeeze
the trigger so as not to know when the carbine will go off,
the shot is displaced only by the amount of the parallel
movement and will be a good one. But if you give the trigger
a sudden jerk you deflect one end of the carbine and the
shot will be a poor one.
(4) Aim and hold—Any man can easily learn to hold a
good aim for 15 to 20 seconds, which is a much longer period
than is necessary to fire a well-aimed shot. Poor shots are
usually the men who spoil their aim when they fire.
(5) Coach squeezing trigger.—(a) The fact that when the
coach squeezes the trigger for the flrer the shot is almost
invariably a good one proves that poor shooting is principally
due to errors in the trigger squeeze.
(b) By watching the firer’s back the coach knows when
the flrer is aiming and then presses steadily on the trigger.
Demonstrate how it is done.
(6) When carbine goes off before man is ready.—Often a
man who has been doing poor shooting will state upon firing
a shot, “I cannot call that shot. It went off before I was
ready.” Almost invariably these shots are well-placed.
His poor shooting has been caused by “getting ready” for
them.
(7) Calling shot.—Explain calling the shot and why it is
done.
(8) Today’s work—trigger-squeeze exercise.—(a) Demon-
strate the duties of a coach in a trigger-squeeze exercise by
calling attention to each item.
(b) The work is carried on as in position exercises with
the squeezing of the trigger added.
131
107-108
BASIC FIELD MANUAL
(c) Practice only in the prone position this morning.
(d) Finish up the long-range shot group work today.
(9)Keep blank form up to date.—Examine each man in
the squad at the end of the day’s work and assign him a
mark.
(10) Final word.—Do not let yourselves become bored with
this work. It is easy to learn, but it takes a lot of practice
to train the muscles and to get in the habit of doing the right
thing without thinking.
(11) Are there any questions?
(12) Next lecture will be_____________(state hour and
place).
108? Fourth Lecture—Rapid Fire.—a. The following equip-
ment is necessary for the demonstrations:
1 carbine.
b. The following subjects are usually discussed in the fourth
lecture:
(1) Rapid fire true test of good shot.—Superiority of fire
in battle depends on the ability to deliver rapid and accurate
fire.
(2) Trigger squeeze same as in slow fire.
(3) Meaning of rapid fire.—Rapid fire is merely continuous
fire. The rapidity comes from the development of timing,
reloading the magazines smoothly, and keeping the eye on
the target.
(4) Keeping eye on target.—Explain the advantages of
this and how it gains time.
(5) Application in war.—Explain the advantage of keep-
ing eye on the target in combat.
(6) Timing exercise.—(a) Explain timing in rapid fire.
(b) Demonstrate timing.
(7) Operation of bolt in rapid-fire exercise.—Show how
the coach presses the operating handle with a sharp motion,
and then releases the pressure to permit the operating handle
to go forward each time the pupil squeezes the trigger in the
prone, sitting, and -in the kneeling positions. Call attention
to the details in each case.
(8) Necessity for rapid-fire practice.—A natural' rhythm
in firing on the part of a soldier materially increases his
rapid-fire scores and his efficiency in battle.
132
U. S. CARBINE, CALIBER .30, Ml 108-109
(9) Assuming positions rapidly.—(a) The prone position
can be assumed and an aimed shot fired more rapidly than
from any other position.
(b) Application in combat.
(c) Demonstrate rapid-fire exercises, standing to prone,
standing to kneeling, and standing to sitting, first by the
numbers and then as one smooth movement.
(d) Even if it takes a few seconds longer, get into the cor-
rect position before starting to shoot.
(10) Today’s work—rapid fire exercise.—(a) Explain how
exercises are to be carried on.
(b) Demonstrate the duties of a coach in a rapid-fire exer-
cise, calling attention to each item.
(11) Keep blank forms up to date.—Examine each man
in the squad at the end of the day’s work and assign him a
mark.
(12) Are there any questions?
(13) Next lecture will be_______(state hour and place).
109. Fifth Lecture—Effect of Wind and Light; Sight
Changes; Score Book.—a. This part of the preparatory in-
struction can be given on any day in which the weather
forces the work to be done Indoors. If no bad weather
occurs, this work should follow rapid-fire instruction.’
b. The following equipment is necessary for the demon-
strations:
(1) One A and В target and an A and В target center for
each range at which each of these targets is to be used in
range practice. These targets are to be mounted on a frame.
(2) Eight spotters that can readily be stuck into the target.
(3) Each man to have his carbine and a scorebook.
c. The following subjects are usually discussed in the fifth
lecture:
(1) Targets.—Explain the divisions on the target, and the
target centers and give the dimensions of each.
(2) Weather conditions.—All weather conditions dlsre-’
garded except wind.
(3) Wind.—(a) Explain how the direction of the wind is
described.
(b) Explain how the velocity of the wind is estimated.
133
109-110
BASIC FIELD MANUAL
(c) Explain the effect of wind. Effect increases with dis-
tance from target.
(4) Windage for first shot.—State windage rule and ex-
plain it.
(5) Elevation.—State rule and explain it.
(6) Shooting up or down hill.—Explain the effect on
elevation.
(7) Scorebook.—(a) Explain the uses of scorebook on
range.
(b) Have class open scorebooks and explain items of keep-
ing a score point by point.
(8) Exercises.—Give the class a number of small problems
as a demonstration as to how the day’s work is to be carried
on.
(9) This period.—(.a) Study and practice sight setting,
sight and aiming-point changes, and the use of scorebook.
(b) Additional practice in the exercises of the preceding
days and rapid-fire exercises.
(10) Are there any questions?
(11) Next lecture will be__________________ (state hour
and place).
110. Sixth Lecture—Range Practice.—This lecture and
demonstration should immediately precede range firing. If
the class is not too large, it should be given on a firing point
of the rifle range.
a. The following equipment is necessary for the demonstra-
tions:
1 carbine.
Material for blackening sight.
b. The following subjects are usually discussed in the sixth
lecture:
(1) Preparatory work applied.—Range practice is carried
on practically the same as a trigger-squeeze exercise except
that ball cartridges are used.
(2) Coaching.—Coach watches the man not the target.
Coach does not keep the score for the pupil. Pupil must make
his own entries in his scorebook. Coach sees that he does this.
(3) Officers and noncommissioned officers.—(a) Supervise
and prompt the men acting as coaches.
134
U. S. CARBINE, CALIBER 1.30, Ml
110-112
(b) Personally coach pupils who are having difficulty in
making good scores.
(4) Spotters.—(a) Use in both slow and rapid fire.
(b) If a spotter near the edge of the bull’s-eye bothers the
pupil in aiming, it may be removed before he fires again.
(5) Watching the eye.—Explain how this indicates whether
or not the pupil is squeezing the trigger properly.
(6) Position of coach.—Demonstrate in each one of the
positions.
(7) Demonstration of coaching in slow fire.—(a) Place a
man on the firing point and show just what a coach does, by
calling attention to each item. (See par. 58e.)
(b) Demonstrate coach squeezing the trigger for pupil.
(8) Demonstration of coaching in rapid fire.—Same pro-
cedure as in paragraph 58e(7).
(9) Read final precautions for slow fire.—See paragraph
58c.
Section IV
MARKSMANSHIP—AIR TARGETS
111. Preliminary Preparation.—a. The officer in charge of
aerial target training should be thoroughly familiar with the
subject; should have detailed sufficient officers as assistant
instructors;’ and should train the assistant instructors and
a demonstration group before the first training period.
b. He should inspect the range and equipment in sufficient
time prior to the first training period to permit correction of
deficiencies.
Bl 112. Description of Miniature Range.—a. Targets.—(1)
Glider.—This target is designed to represent a glider flying
parallel to the firing point.
(2) Parachute.—This target is in two sections each of two
balanced targets, one of which is used on each run. Each
frame contains four conventionalized silhouettes five inches
high, below which is a similar recording (blank) silhouette.
The target is operated at a speed of descent of 1 foot per
second, which corresponds approximately to the angular
travel of a parachutist descending 17 feet per second at a
range of 300 yards.
135
112-114
BASIC FIELD manual
b. Size and speed of silhouette.—The black silhouette is a
representation at 500 inches of a proper target at a range
of 300 yards. The speed of the silhouettes should be 3 feet
and 1 foot per second. These speeds represent a glider flying
between 20 and 25 miles per hour at a range of 300 yards
and a parachutist dropping at a rate of 17 feet per second.
113. Preparatory Exercises.—a. A method of conducting
the preparatory exercises is given in paragraph 76.
b. Each assistant instructor is assigned a target and con-
ducts the preparatory training and firing of all groups on his
target.
c. In preparatory training, coach and pupil should change
places frequently.
d. Forty-five minutes at each type of target should be
sufficient to train each soldier in the preparatory exercises.
e. A detail of one noncommissioned officer and four or
six men should be provided to operate each type of target.
Section V
FIELD TARGET FIRING
114. Preparation.—The instructor should secure necessary
equipment, inspect ranges, and detail and train necessary
assistants, including demonstration units, prior- to the first
period of instruction. Instructors should use their initiative in
arranging additional exercises in the application of the prin-
ciples herein contained. It should be explained to trainees
how the exercises used illustrate the principles in the tech-
nique of marksmanship in field target firing. Good work as
well as errors in the conduct of the exercises should be called
to the attention of all trainees.
136
INDEX
Paragraph Page
Accessories_____________________________________ 34 27
Advice to Instructors:
Field target firing_______________________________ 114 136
Marksmanship:
Air targets------------------------------- 111-113 135
Known-distance targets_________________ 96-110 119
Mechanical training____________________________ 95 119
Aiming:
Air targets_________________________________________ 78 103
Lectures______________________________________ 105 126
Preparatory training____________________________ 48 36
Air targets:
Classification______________________________________ 71 97
Delivery of fire________________________________ 74 98
Effectiveness of carbine fire___________________ 70 97
Leads_______________________________________, 73 98
Marksmanship training:
Aiming_________________________________________ 78 103
Instruction________________________________ 75 99
Leading____________________________________ 78 103
Position exercises________________1_____ 77 101
Preparation________________________•____ 111 135
Preparatory exercises___________________ 76,113 100, 136
Trigger-squeeze_________________________ 78 103
Miniature range practice:
Equipment__________________________________84, Д12 108, 135
Group firing____________________________ ' 82 107
Instruction firing_________________________ 81 106
Safety precautions_________________________ 80 105
Range officer__________________________________ 83 108
Score card__________________________________ 85 i 108
Ammunition:
Care___________________________________________ 37 29
Cartridge, carbine, caliber .30________________ 38 29
Grade__________________________________________ 36 29
Handling_______________________________________ 37 29
Lot number________:_________________________ 35 28
Preservation___________________________________ 37 29
Record firing_________________________________ 101 121
Assistant Instructors______________________________ 98 120
Blackening sights__________________________________ 47 36
Bore, cleaning_____________________________________ 13 14
Care____________________________________________ 12-18 13
Chamber, cleaning__________________________________ 13 14
Cleaning________________________________________ 12-18 13
Clearing carbine______________________'--------- 29 23
Commanders_________________________________________ 45 32
Course, field firing_______________________________ 92 116
Cycle, functioning--------------------------------- 19 18
137
INDEX
Data______________________
Demonstration_____________
Description_______________
Dimensions________________
Disassembly and assembly:
Assembly______________
Care to be exercised__
Disassembling_________
Instruction___________
Organization _________
Equipment_________________
Examination_______________
Paragraph Page
2,3 1
104 126
1-6 1
2 1
11 11
9 4
10 5
7 4
8 4
60, 61, 99 89,91,120
53 65
Field firing:
Advice to Instructors_________________________ 114 136
Characteristics of fire_______________________ 86 109
Course________________________________________ 92 116
Fire orders, type_____________________________ 87 109
Preparation___________________________________ 114 136
Range_________________________________________ 91 116
Range estimation______________________________ 89 109
Scoring_______________________________________ 93 118
Target designation____________________________ 88 109
Training______________________________________ 90 115
Fire orders, field firing_________________________ 87 109
Firing____________________________________________ 26- 22
Functioning__________2____________________________ 19, 20 18
Immediate action_______________________________ 30, 31 23
Instruction practice_______________________________ 55 70
Leads:
Aircraft_______________________________________ 73 98
Definition_____________________________________ 63 93
Personnel______________________________________ 64 94
Vehicles_______________________________________ 65 94
Lectures:
Aiming________________________________________ 105 126
Demonstration_________________________________ 104 126
Effect of wind and light______________________ 109 133
Importance____________________________________ 104 126
Place of assembly______________________________ 97 120
Position________________________1__________ 106 129
Rapid fire____________________________________ 108 132
Range practice________________________________ 110 134
Scorebooks____________________________________ 109 133
Sight changes_________________________________ 109 133
Sighting______________________________________ 105 126
Trigger-squeeze_______________________________ 107 130
Loading—
Carbine________________________________________ 23 22
Magazine______________________________________ 22 22
Magazine:
Cleaning_______________________________________ 13 14
Loading________________________________________ 22 22
138
INDEX
Paragraph Page
Mechanical training________________________________ 95 119
Metal fouling solution_____________________________ 15 15
Moving ground targets:
Fundamentals_______________________________________ 63 93
Personnel______________________________________ 64 94
Place in training______________________________ 67 95
Practice:
Safety precautions_____________________________ 69 96
Targets and ranges_______________________ 68 95
Training_______________________________________ 62 93
Vehicles:
Leads__________________________________________ 65 94
Technique__________________________________ 66 95
Nomenclature____________________________________ 6 4
Oil, preserving_____________________________13, 16-18 14,16
Operation: ,
Instruction____________________________________ 21 21
To—
Clear carbine__________________________________ 28 23
Fire carbine_______________________________ 26 22
Load carbine_______________________________ 23 22
Load magazine______________________________ 22 22
Operate carbine as single loader___________ 25 22
Set carbine at safe________________________ 27 23
Unload carbine_______;__________________ 24 22
Safety precautions______________________________ 28 23
Organization______________________________________ 102 121
Parts, spare________________________________________ 33 27
Position exercises:
Aerial target firing________________________________ 77 101
Lectures_______________________________________ 106 129
Preparatory exercises___________________________ 49 42
Preparatory marksmanship training:
Aerial target firing:
Aiming_________________________________________ 78 103
Leading__________________________________ 78 103
Position__________________________________ 77 101
Procedure__________________________________ 76 100
Trigger-squeeze____________________________ 78 103
Aiming__________________________________•___ 48 36
Blackening sights______________________________ 47 36
Examination____________________________________ 53 • 65
Positions_____________________________________ 49 42
Procedure____•_________________________________ 46 33
Purpose________________________________________ 46 33
Rapid fire_____________________________________ 51 52
Scorebook______________________________________ 52 60
Sight changes__________________________________ 52 60
Sighting_______________________________________ 48 36
Trigger-squeeze________________________________ 50 50
Wind_________________________-______________ 52 60
Qualification courses:
Instruction practice____________________________ 55 70
Record practice --------------------------- 56 72
139
INDEX
Paragraph Page
Estimation______________________________________ 89 109
Field flring____________________________________ 91 116
Officer_________________________________________ 83 108
Practice:
Instruction____________________________________ 58 75
Miniature_______________________________ 79-82 105
Personnel__________________________________ 57 72
Phases_____________________________________ 57 72
Record_____________________________________ 59 81
Safety precautions_________________________ 57 72
Sequence___________________________________ 57 72
Uniform____________________________________ 57 72
Rapid Are_______________________________________ 51, 108 52, 132
Rear sight___________________________________________ 4 3
Record practice____________________________________ .56 72
Recruit instruction_________________________________ 44 32
References___________________________________________ 6 4
Safe, setting carbine at____________________________ 27 23
Safety precautions:
Firing___________________________________________ 28 23
Individual, rules________________________________ 39 30
Miniature range practice_________________________ 80 105
Moving target firing_____________________________ 69 96
References_________________________>________ 6 4
Schedules__________________________________________ 103 124
Score card, individual______________________85, App. . 108, iv
Scorebook_______________________________________ 52, 109 60, 133
Scoring, field practice______________________________ 93 118
Sighting________________________________________ 48, 105 36, 126
Sights:
Blackening______________________________________ 47 36
Changes_____________________________________ 52, 109 60, 133
Front____________________________________________ 5 4
Rear_____________________________________________ 4 3
Single loader, operating carbine as_________________ 25 22
Spare parts_________________________________________ 33 27
Stoppages___________________________________________ 32 24
Storage----------------------------------------- 17, 18 17, 18
Tables, instruction practice________________________ 55 70
Target designation______ ___________________________ 88 109
Targets_______________‘_________________________ 61 91
Training:
Field firing________________________________ 90 115
Fundamentals_________________________________ 42 31
Necessity___________________________________" 41 31
Phases______________________________________ 43 32
Trigger-squeeze_____________________________ 50, 78, 107 50,
105, 130
Unloading_______________________________________ 24 22
Vehicles, firing at_____________________________ 65, 66 94, 95
Weights_________________________________________ 2 1
Wind____________________________________________ 52, 109 60, 133
О
140