/


Tags: weapons military affairs
Year: 1969
Similar


Text
DA Pam 750-30 1 July 1969
(Supersedes DA Pam 750-30, 28 June 1968)
r DO ME A ^-<4
FAVOR, TIGER...
DO A QUICK
S BEFORE- <<
<OPERATIONS \
CHECK ON \
, YOUR RIFLE J
> BEFORE WE
COUNTER ATTACK
M16A1
Rifle
OPERATION
AND
PREVENTIVE
MAINTENANCE
GETTIN’
to know ТТЛТДТ
w5" nUW
You want to know her inside out, every
contour and curve, every need and whim,
what makes her tick.
No better time to get all-over acquainted
DISASSEMBLY
ASSEMBLY
Insert and seat
Remove
magazine
Shove ’em in
in reverse order
Be sure selector
lever’s on SAFE or
SEMI-AUTO before
dosing upper and
lower receivers.
Press takedown
pin to right
with cartridge
Pull back on
charging handle
and bolt carrier
assembly.
Open bolt, check
chamber for
ammo.
COMES A 1
FIREFIGHT—
YOURMI6AI J
RIFLE'S У CUR
PEAREST NEXT
O'SKIN-BAR
NONE/ /
YOUR BA
than when you disassemble/assemble her for
servicing.
Take it easy, no force . . . you could damage
vour chances in a showdown.
to know ’em
OK for action
Lay the parts down on a clean tarp or some-
thing in left-to-right order so that you won’t
strip, and stop
OK, by the numbers now, start stripping
but gently. The orange numbers are for taki
it apart; the black for putting it together.
Use the firing
pin to push out
the extractor pin
Install firing pin by
dropping it in the hole
After you install the
cam pin, give it a V4
(90 degree) turn.
Hook the handle in
then shove it in.
Remove the
firing pin.
[?) Put bolt in LOCK
position. Heed
this: Never open
or close the
split end of the
>7 retaining pin.
Remove the
charging handle
Pull the bolt out
of the carrier
assembly.
Insert firing pin retaining
pin, like so.* Put the firing
pin forward. The retaining
pin goes in back of the
large shoulder of the firing
pin.. Turn the retaining pin
as you install it.
Push out the
firing pin retaining
Take out bolt
cam pin, give
it a %
(90 degree)
turn.
DISASSEMBLY
Take out the
bolt and carrier
assembly.
When you install the
bolt, be sure you stag-
ger the ring gaps
to prevent
gas leakage.
Insert the extractor pin
_________ASSEMBLY
Put ’em back the
same way, but be
sure the bolt’s unlocked
3
DISASSEMBLY ASSEMBLY
Remove extractor and spring assembly for i cleaning only. Remember not to lose, damage or separate them. If you goofed and z. separated the spring from the extractor, insert the large end of the spring in the extractor and seat it.
14 Remove the sling. Install the sling. 5
Take handguards off by first pulling down on the slip ring. Install by first Л putting handguards , in place, then push up on slip ring.
Use the firing pin to release the receiver pivot pin. Engage the receiver О ! pivot pin.
->— S* ’ .
<j T Seporate the upper U J and lower receivers. Join the upper and lower receivers.
0 1 Push the buffer ' assembly in about У4 inch, press in on the buffer retainer, then release the guide. J
1! | Take out the ' buffer assembly and spring. Is* Insert the spring 1 and buffer 1 assembly.
ANU
THAT'S
AS FAR
A5
YOU'RE
ALLOWEP
RIGHT
HERE!
THINK COOL,
BUT ACT FAST
Ш T©
refuses to pop
sudden-like —
If your M16A1 rifle
off — or quits popping
you’ve got a stoppage that needs im-
mediate action.
Immediate Action: Instinctively do-
ing the right thing to clear your weapon
Careful, though, never
“ride” the charger—let
it go on its own.
5 -y—
Now, again hit the for-
ward assist to make sure
the bolt’s dosed ... and
pull the trigger.
/ МАУВЕ \
J УОи GOT j
£ BAPROtw/
..IMPERIALIST/
Here’s a slow motion of the proce-
dure you’d best make second nature:
Tap upward on the
magazine to make sure
it’s seated right.
Now pull the charging
handle all the way back
and see if a whole car-
tridge or case comes out.
If a cartridge or case is
ejected, release the charg-
ing handle to feed a new
round.
If she won’t fire, now look for the cause
... a bad round, busted firing pin or hammer
spring, or whatever. Table 3-3 in
your -IZTM covers causes and cures.
If no cartridge or case ejects, first look for
a round in the chamber. If none's there, once
more release the charging handle to feed a
round. Next hit the forward assist and again
pull the trigger.
If she still won’t fire, do what your
TM says on trouble-shooting.
However, if you do find a cartridge
or case in the chamber, be sure you
remove it before you try to reload and
recycle your weapon.
Now, remember, get these steps
down pat.
5
vourM16Al battle-readv.
V J
Learn 'em — use 'em —
and you won’t get caught
short!
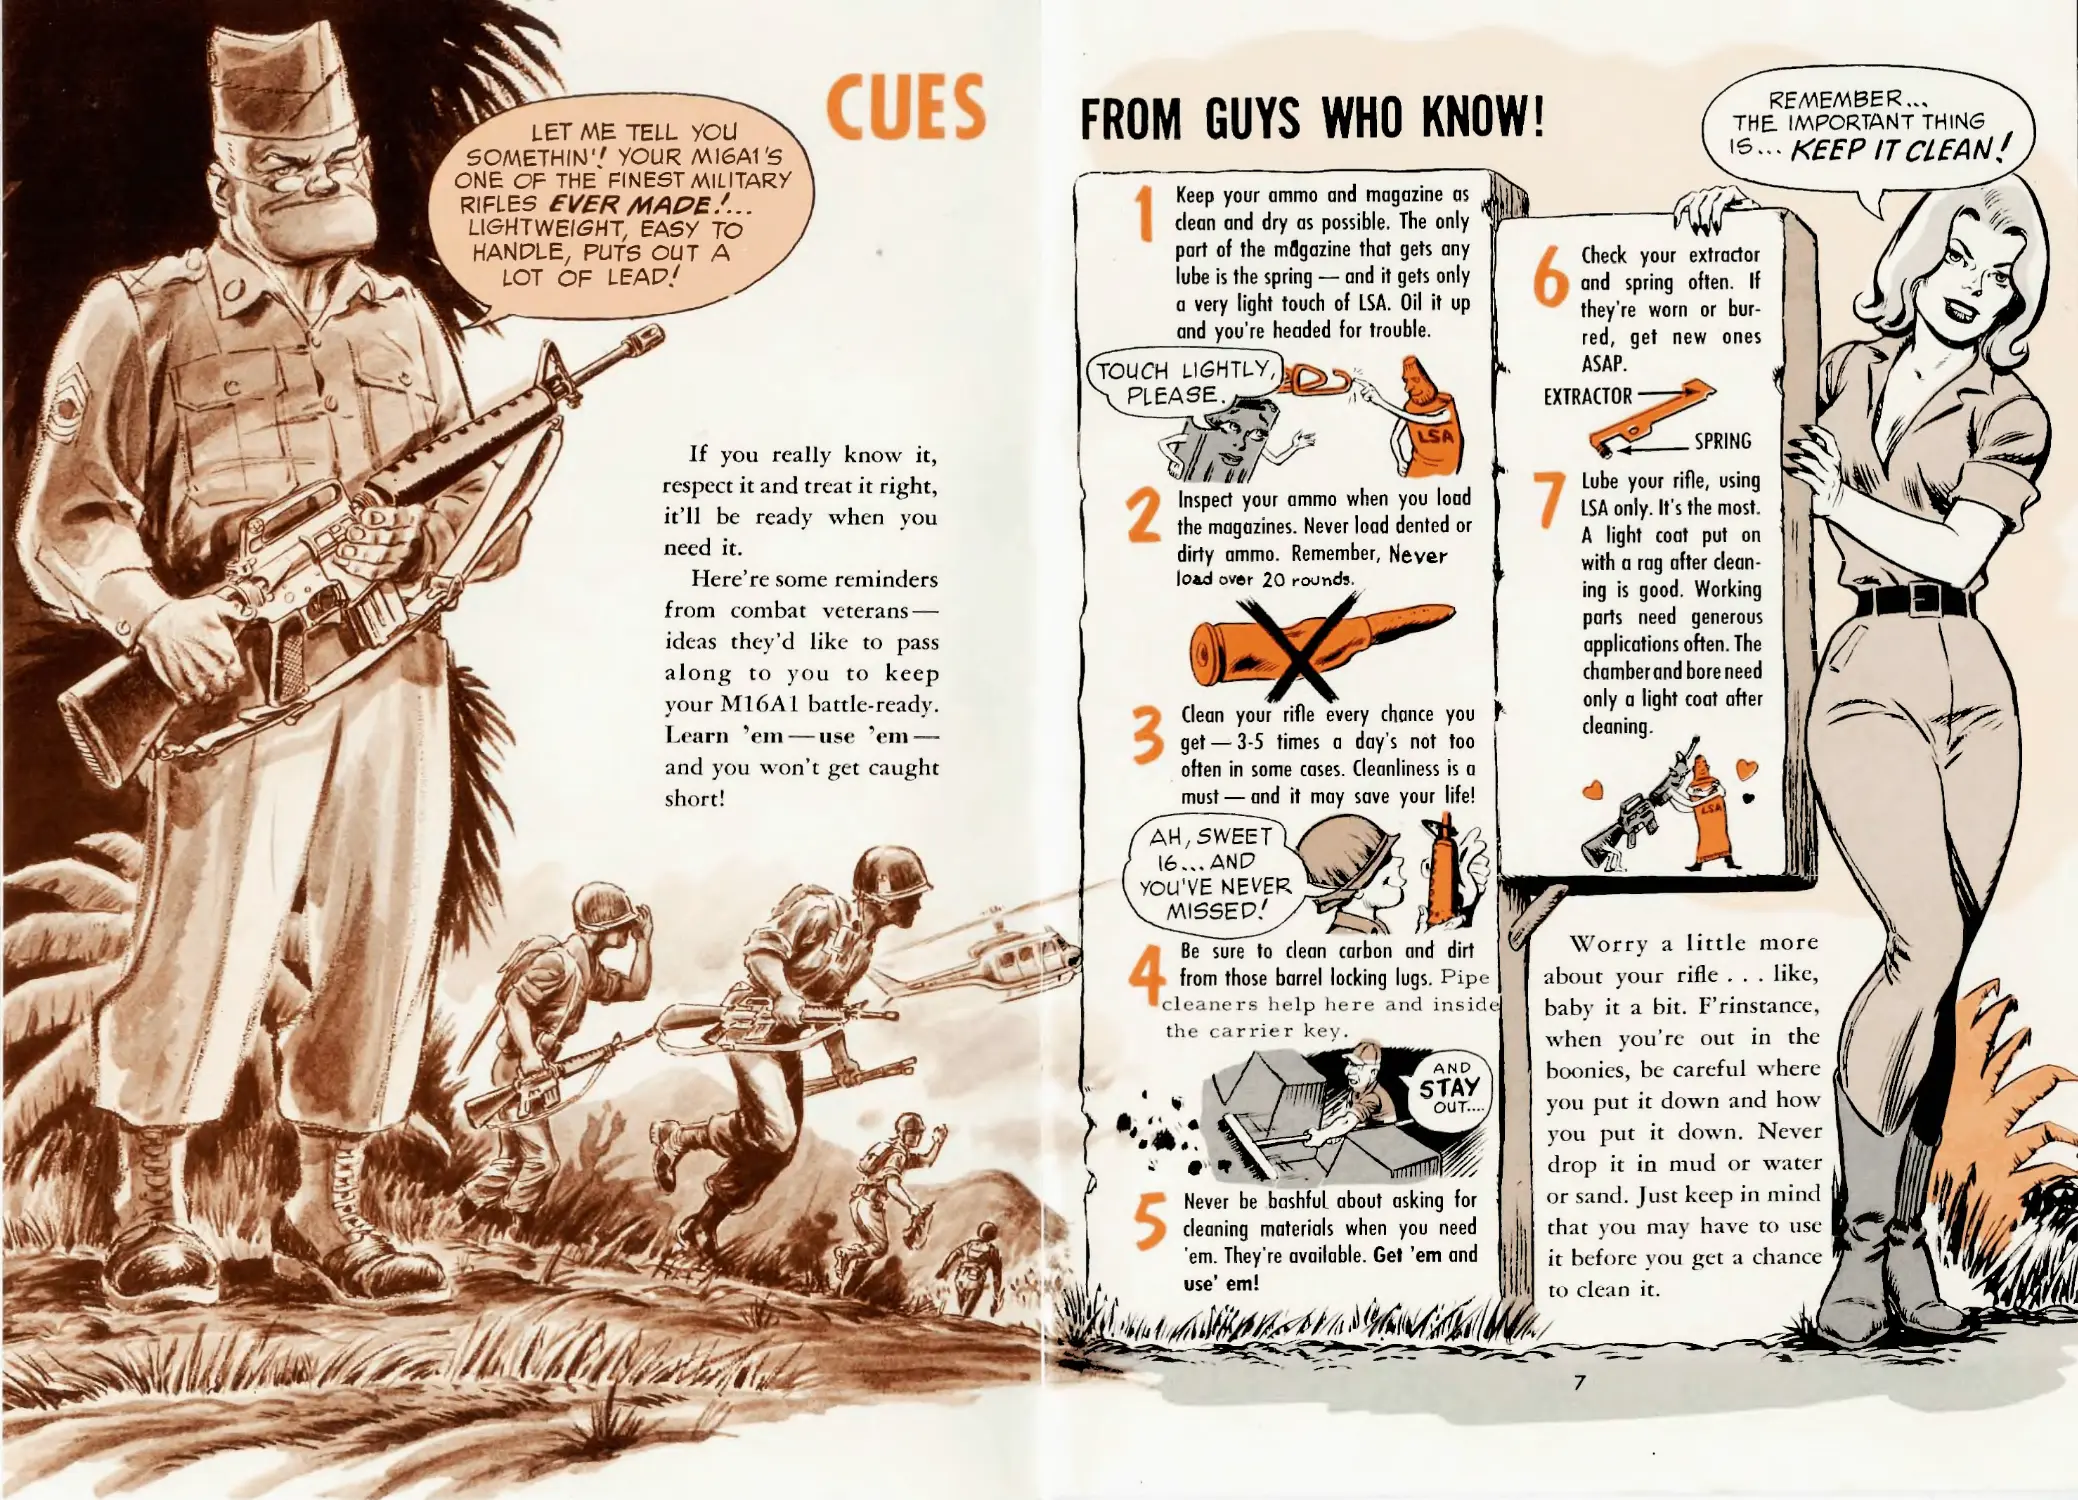
Jr LET ME TELL YOU \
SOMETHIN'/ YOUR MI6A1S
ONE OF THE FINEST MILITARY
RIFLES EVER МАРЕ.'...
LIGHTWEIGHT, EASY TO
HAN PL E, PUTS OUT A /
k LOT OF LEAP/ /
If you really know it,
respect it and treat it right,
it’ll be ready when you
e *
need it.
Here’re some reminders
from combat veterans —
ideas they’d like to pass
FROM GUYS WHO KNOW!
TOUCH LlcSHTL-У,
PLEASE.
Inspect your ammo when you load
the magazines. Never load dented or
dirty ammo. Remember, Never
|oid over 20 rounds.
J Wic V,,b , y |i n1 t
Never be bashful about asking for
cleaning materials when you need
'em. They’re available. Get ’em and
use' em!
STAY
out...-
Be sure to dean carbon and dirt
from those barrel locking lugs. Pipe
cleaners help here
the
Clean your rifle every chance you
get — 3-5 times a day’s not too
often in some cases. Cleanliness is a
must — and it may save your life!
REMEMBER...
THE IMPORTANT THINS
IS... KEEP ITCLEAH!
Keep your ammo and magazine as
dean and dry as possible. The only
part of the magazine that gets any
lube is the spring — and it gets only
a very light touch of ISA. Oil it up
and you’re headed for trouble.
ДН, SWEET
16... ANP
and inside
carrier key.
УОН VE NEVER
MISSEP/
AND
Check your extractor
and spring often. If
they're worn or bur-
red, get new ones
ASAP.
EXTRACTOR
SPRING
Lube your rifle, using
ISA only. It’s the most.
A light coat put on
with a rag after clean-
ing is good. Working
parts need generous
applications often. The
chamberand bore need
only a light coat after
cleaning.
Worry a little more
about your rifle . . . like,
babv it a bit. F’rinstance,
when you’re out in the
boonies, be careful where
you put it down and how
you put it down. Never
drop it in mud or water
or sand. Just keep in mind
that you may have to use
it before you get a chance
to clean it.
TIPS THAT’LL KEEP
IT YOUR EVER-LOVIN...
Here’rc a few cleaning and operating n
tips that’ll help you get best results /
from your weapon. Some of these tips £
sort of put the accent on stuff you’ll ’
find in the rifle’s bible—TM 9-100S-^
249- 12 (1968) with Ch 1. Others are ,
hexes and fixes direct from guys who’ve
been living with this light-weight terror.
8
Q
Q
5EMI
Yauto
Q
SEMI
SAFE< el
Here’s something you want to
be real careful about. Don’t—like
Never!—close the upper and lower
receivers while the selector lever’s in
the AUTO position.
Always—like Always!—point the
lever to SAFE or SEMI before closing
the receivers.
Here’s why-. If you jam the receivers dosed while the selector’s in the AUTO position, you’ll
force the automatic sear down and damage the automatic sear, and the sear pin, and will
likely rough up the bottom of the bolt carrier.
That’s ’cause when the selector lever’s in the AUTO position, the tang
of the automatic sear moves to the rear. You can see how it works by
opening the receiver and turning the selector to Al ГО and watching the
movement of the tang of the automatic scar.
So-o-o ... do it right . . . every time. Point the arrow to SAFE. Then
the receivers will close without any interference.
Speaking of magazines .. . every guy
has his own idea of how firm or loose
he wants the holding action of the
magazine catch to be. Which is A-OK
as far as it goes. But remember this:
The tighter the mag’s held in the re-
ceiver, the more pressure it takes to
release it. And this: The farther the
shaft of the catch sticks through the
catch button, the tighter the magazine’s
held in the receiver.
9
So, take a cue from experience. Adjust the catch button so’s it’s just about
flush with the inner groove or just sticks out a tiny bit. This'll make the
catch firm enough to prevent accidentally bumping the button and letting the
magazine drop out—yet it won’t be so tight that you can't pull the mag out
for a quick re-load.
No sweat adjusting the catch the
way you want it, either . . . and you’re
authorized to pull this deal. Just press
the button on the right side of the rifle
with the nose of a cartridge far enough
so’s you can turn the catch on the left
side of the weapon. You turn the han-
dle clockwise to tighten it and counter-
clockwise to loosen it. Best of all, you
don’t have to take the weapon apart
to do this.
10
TIP -
You won’t have any trouble with the new-type swabs listed in your new
TM (FSN 1005-912-1218).
O’course, some guys’ve been complaining about old-type, big-size clean-
ing swabs jamming in the bore — and breaking the cleaning rod. You won’t
have this trouble if you cut ’em all into four equal squares before using
’em. Your bayonet will do the job if you don’t happen to have a^knife or
a pair of scissors handx
4 EQUAL
PARTS?
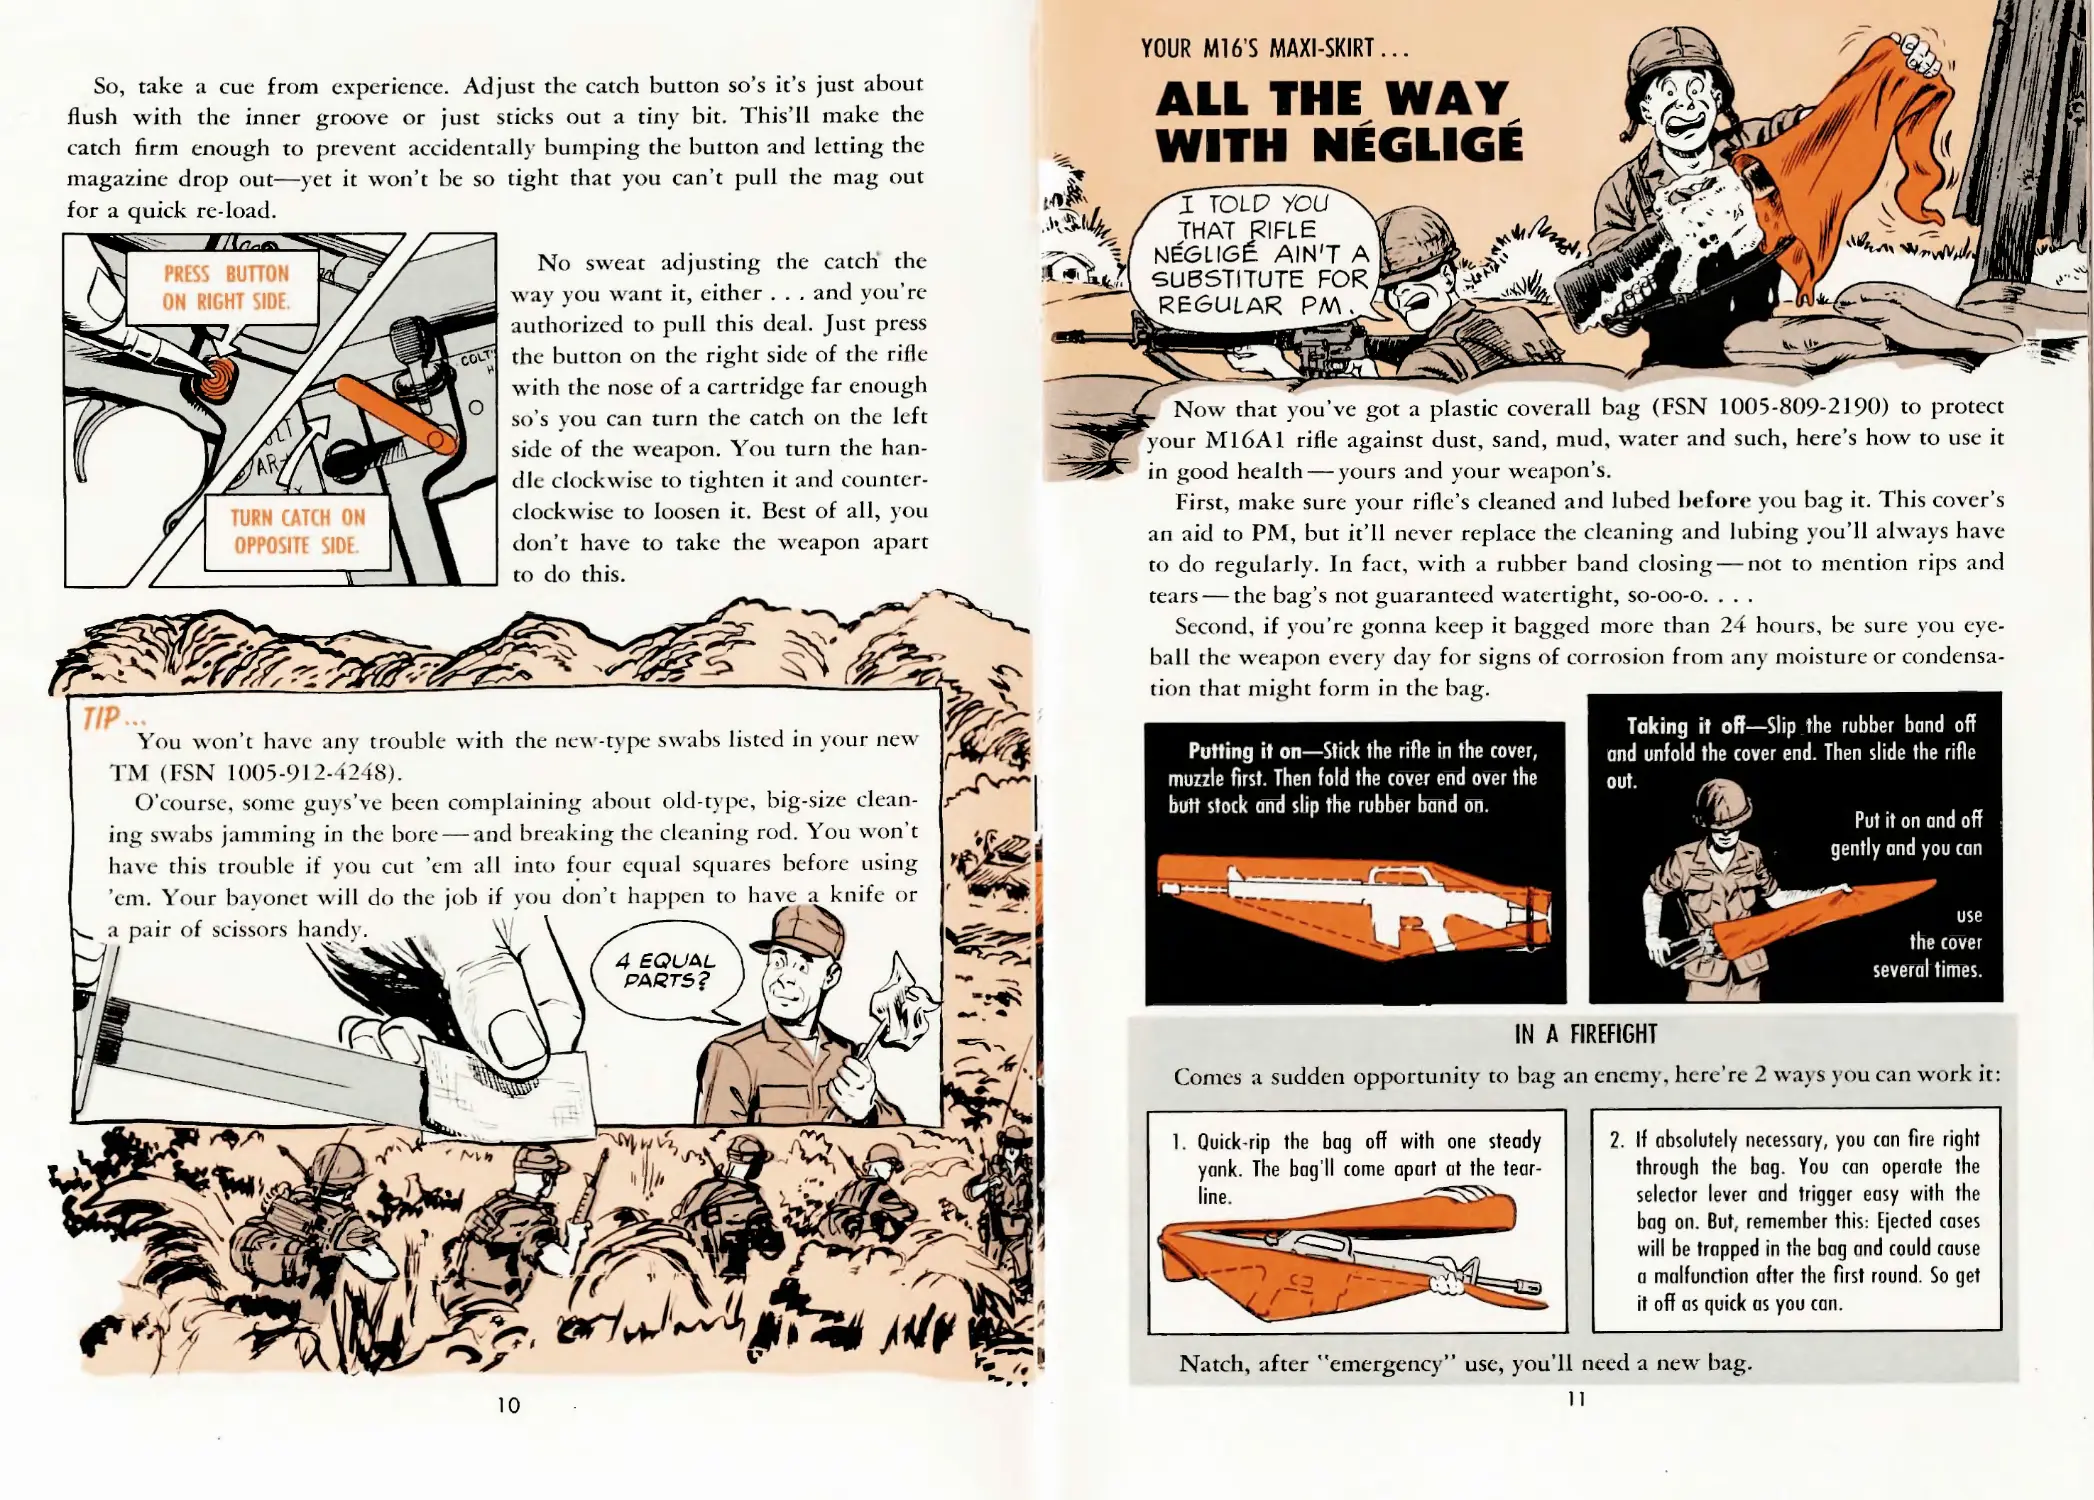
YOUR M16S MAXI-SKIRT...
_ Now that you’ve got a plastic coverall bag (FSN 1005-809-2190) to protect
your M16A1 rifle against dust, sand, mud, water and such, here’s how to use it
in good health — y ours and your weapon’s.
ZCE TOLP you
THAT RIFLE
MEGLIGg AIN'T A
SUBSTITUTE FOR
REGULAR PM. *
First, make sure y7our rifle’s cleaned and lubed before you bag it. This cover’s
ALL THE WAY
WITH NEGLIGE
an aid to PM, but it’ll never replace the cleaning and lubing you’ll always have
to do regularly. In fact, with a rubber band closing — not to mention rips and
tears — the bag’s not guaranteed watertight, so-oo-o. . . .
Second, if you’re gonna keep it bagged more than 24 hours, be sure you eye-
ball the weapon every day for signs of corrosion from any moisture or condensa-
tion that might form in the bag.
Putting it on—Stick the rifle in the cover,
muzzle first. Then fold the cover end over the
butt stock and slip the rubber band on.
Put it on and off
gently and you can
Taking it off—Slip the rubber band off
and unfold the cover end. Then slide the rifle
out.
use
the cover
several times.
IN A FIREFIGHT
Comes a sudden opportunity' to bag an enemy, here’rc 2 ways you can work it:
1. Quick-rip the bag off with one steady
yank. The bag'll come apart at the tear-
2. If absolutely necessary, you can fire right
through the bag. You can operate the
selector lever and trigger easy with the
bag on. But, remember this: Ejected cases
will be trapped in the bag and could cause
a malfunction after the first round. So get
it off as quick as you can.
Natch, after ’'emergency” use, y ou’ll need a new bag.
11
PLASTIC
BOTTLE
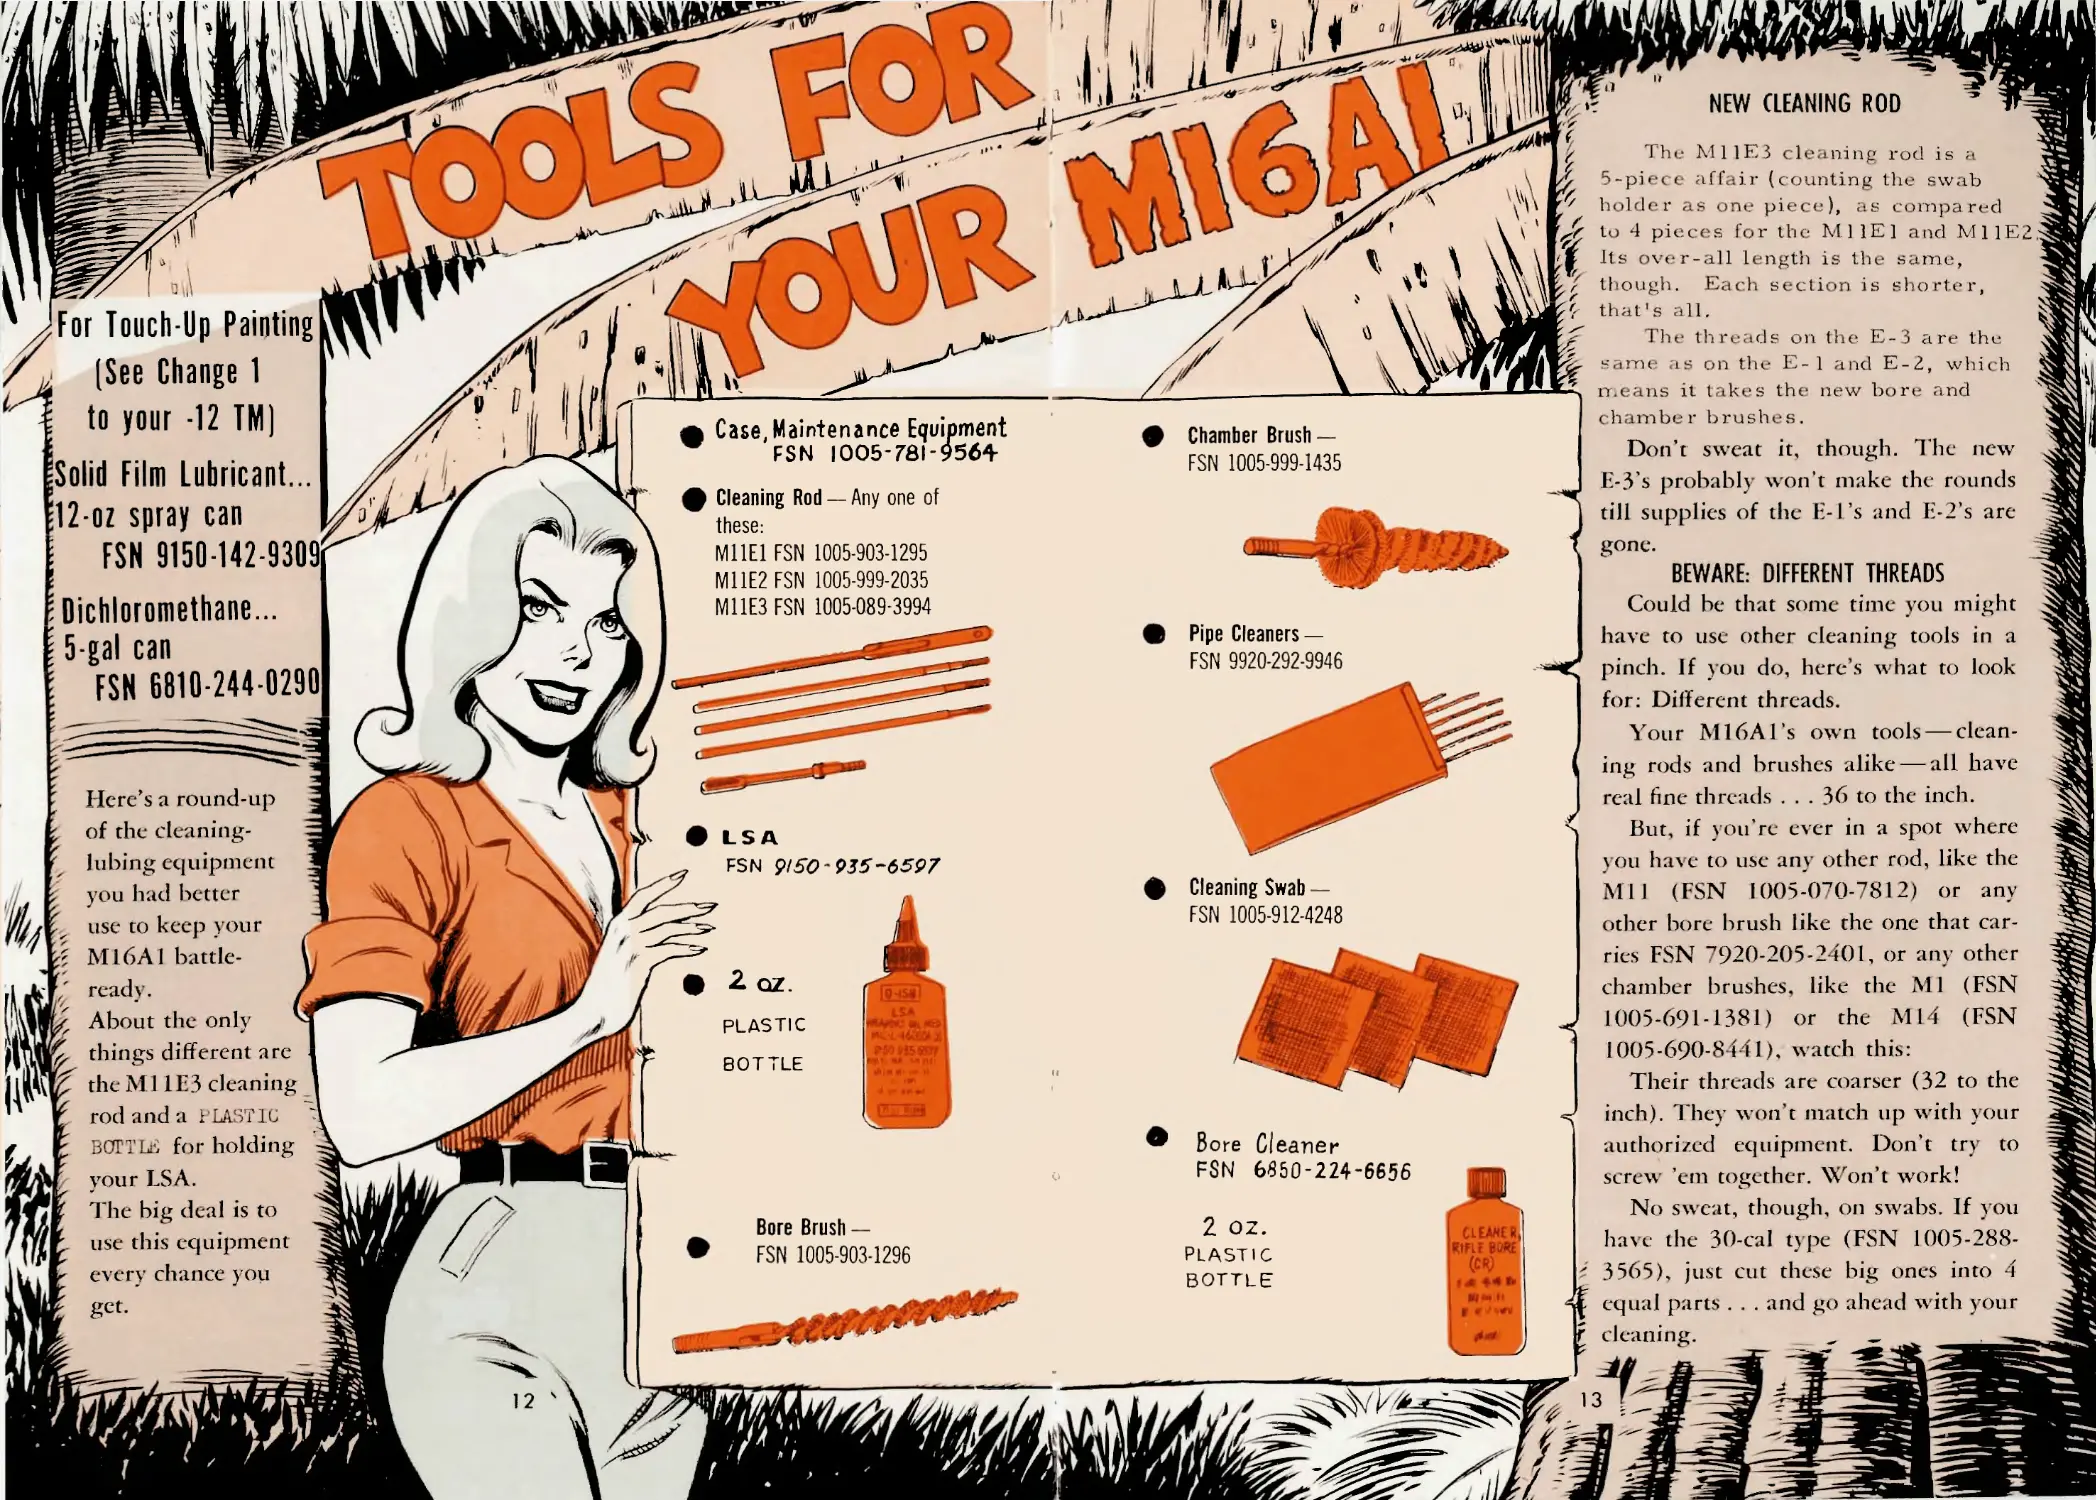
iment
564-
Bore Brush —
FSN 1005-9034296
LS A
FSN 9150-935-6597
Dichloromethane...
5-gal can
FSN 6810-244-0290
Cleaning Rod —Any one of
these:
M11E1 FSN 1005-903-1295
M11E2 FSN 1005-999-2035
M11E3 FSN 1005-089-3994
For Touch-Up Painting
(See Change 1
to your -12 TM)
Solid Film Lubricant...
12-oz spray can
FSN 9150-142-9309
Case, Maintenance Eq
FSN 1005'781
lubing equipment
you had better
use to keep your
M16A1 battle-
ready. .
About the only
things different are
the M11E3 cleaning
rod and a 1 LAST1C
BOTTLE for holding
your LSA.
The big deal is to
use this equipment
every chance you
NEW CLEANING ROD
Chamber Brush —
FSN 1005-9994435
Pipe Cleaners —
FSN 9920-292-9946
The M11E3 cleaning rod is a
5-piece affair (counting the swab
holder as one piece), as compared
to 4 pieces for the Ml IE] and Ml IE’
Its over-all length is the same,
though. Each section is shorter,
that's all.
The threads on the E-3 are the
same as on the E- 1 and E-2, which
means it takes the new bore and
c h am be r brushes.
Don’t sweat it, though. The new
E-3’s probably won’t make the rounds
till supplies of the E-l’s and E-2’s are
gone.
BEWARE: DIFFERENT THREADS
Could be that some time you might
have to use other cleaning tools in a
Cleaning Swab —
FSN 1005-912-4248
for: Different threads.
Your M16Al’s own tools — clean-
ing rods and brushes alike — all have
real fine threads ... 36 to the inch.
But, if you’re ever in a spot where
you have to use any other rod, like the
Mil (FSN IOO5-O7O-7812) or any
other bore brush like the one that car-
ries FSN 7920-205-2401, or any other
chamber brushes, like the Ml (FSN
1005-691-1381) or the Ml 4 (FSN
1005-690-8441), watch this:
Their threads are coarser (32 to the
inch). They won't match up with your
authorized equipment. Don't try to
FSN 6850-224-6656
2 OZ.
PLASTIC
bottle
f'
CLEANER,1
RIFLf 0«
(CR.
1Л ♦ <*
tn-»•
I r tf.
No sweat, though, on swabs. If you
have the 30-cal type (FSN 1005-288-
3565), just cut these big ones into 4
equal parts . . . and go ahead with your
Г cleaning.
/ 4
THE DAMAGE?
hammer assembly, the
the
do it this-a-way— and do it every day.
2. Tip the tower receiver sid
. Soak your artist brush (FSN 8020-244-
0153) or other similar Type brush real
good with bore cleaner. Then scrub all
the parts like there's no tomorrow to get
off all the dirt and carbon you can.
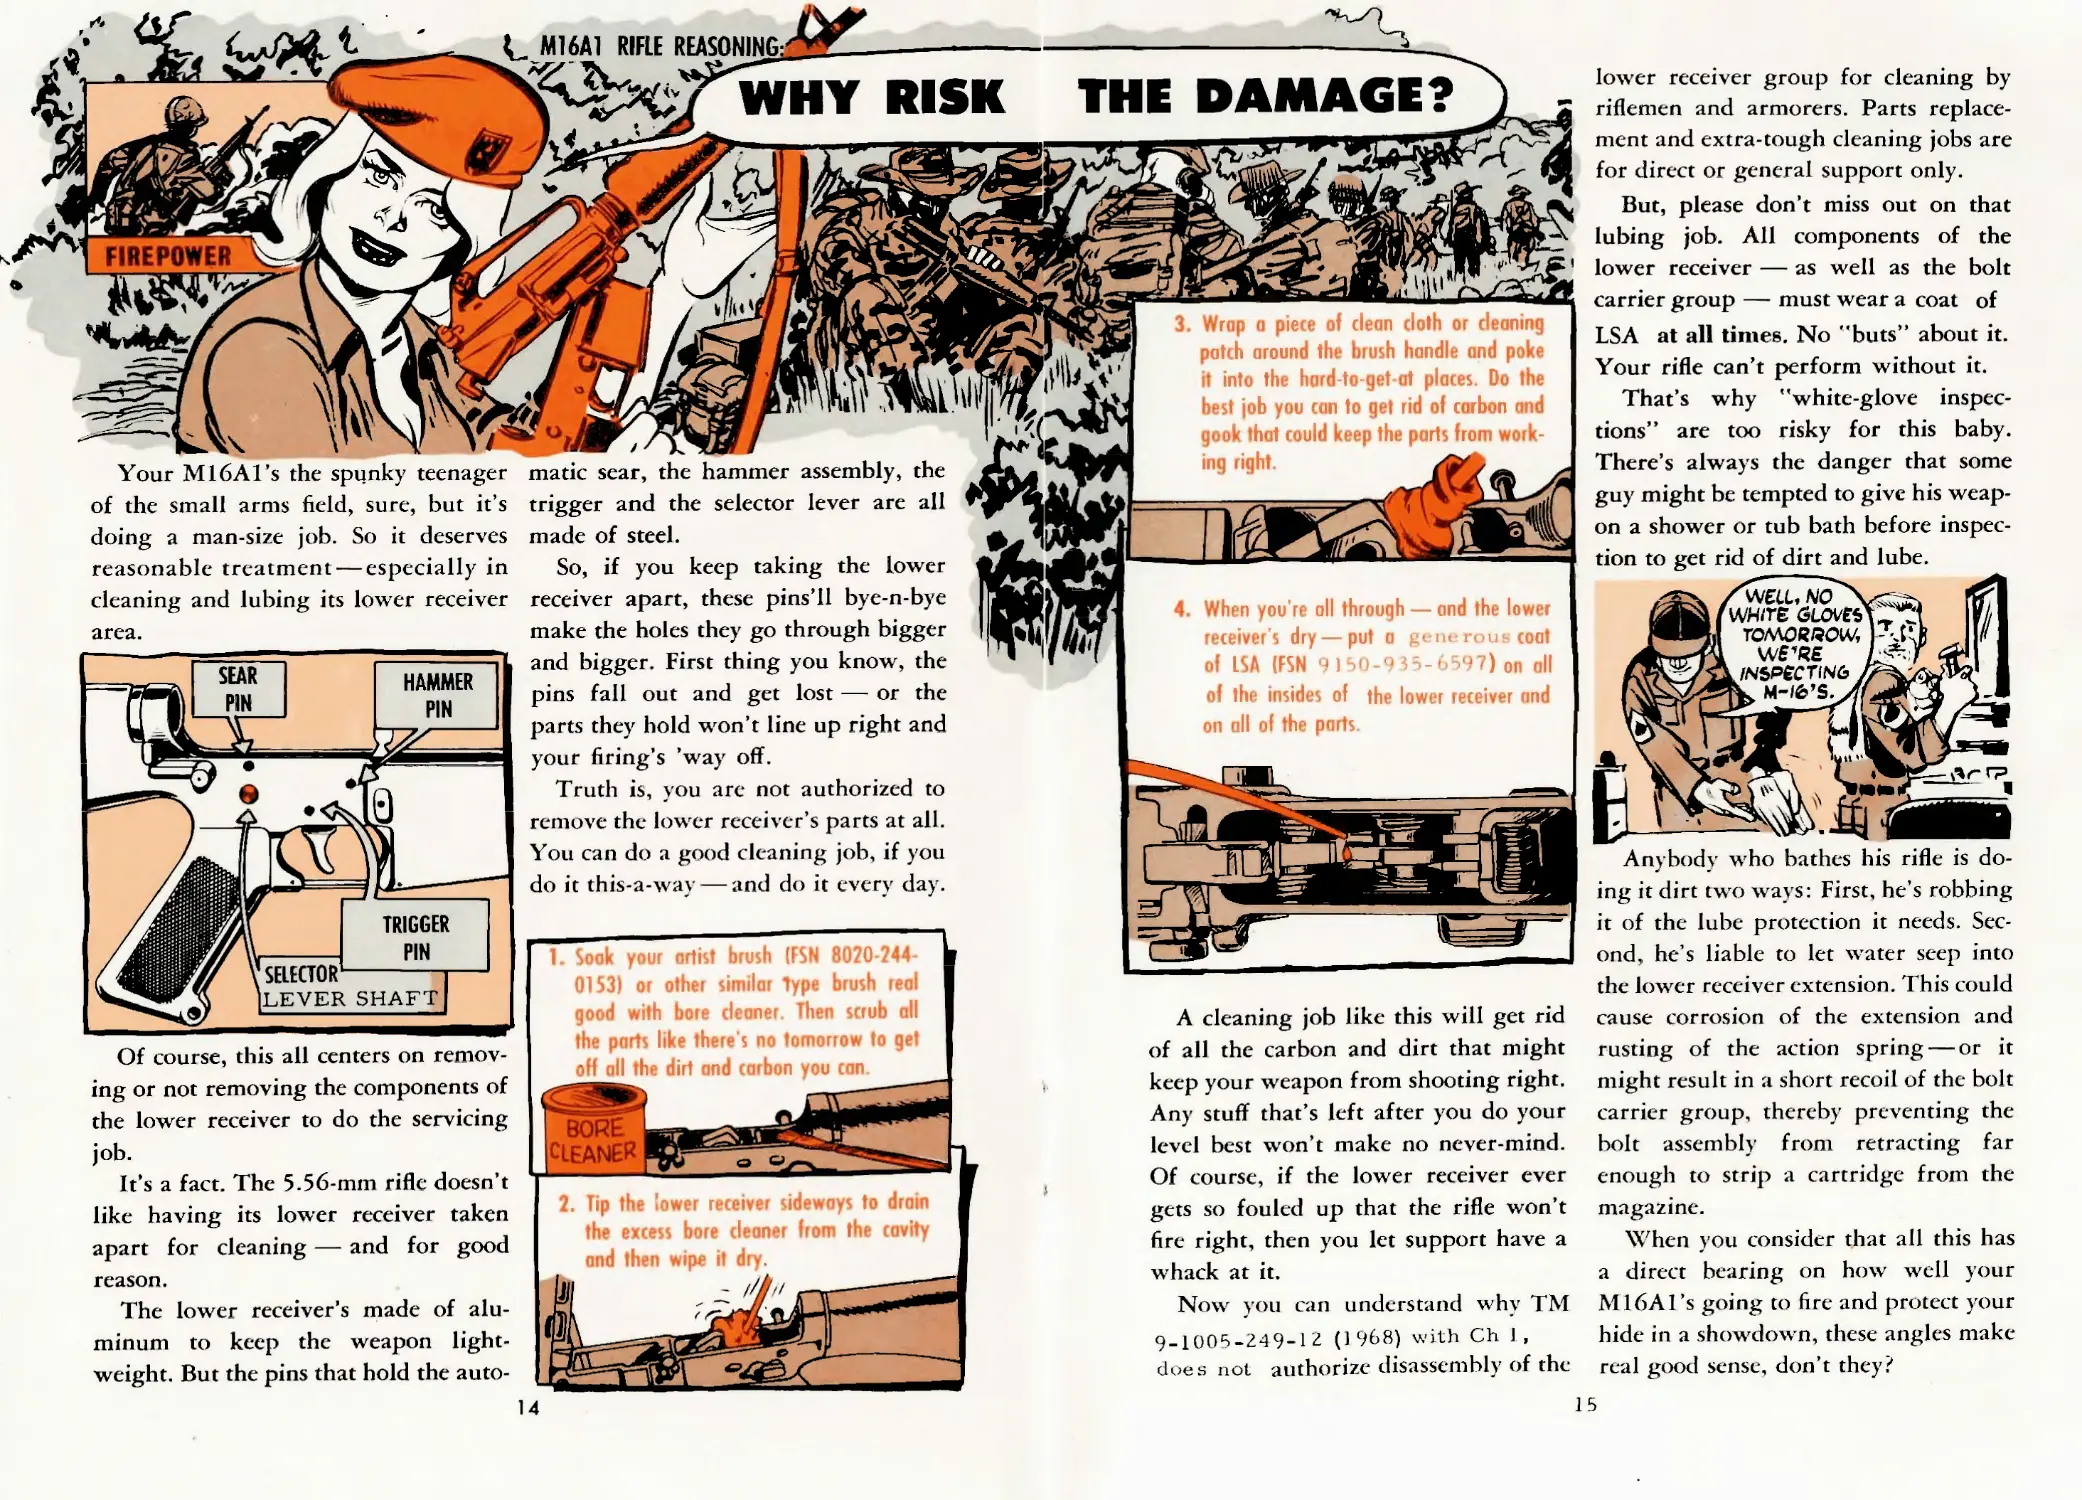
FIREPOWER
о
CJM6A1 RIFLE REASONING^ ,_
WHY RISK
14
Your M16ATs the spunky teenager
of the small arms field, sure, but it’s
doing a man-size job. So it deserves
reasonable treatment — especially in
cleaning and lubing its lower receiver
area.
Truth is, you are not authorized to
remove the lower receiver’s parts at all.
Of course, this all centers on remov-
ing or not removing the components of
the lower receiver to do the servicing
job.
It’s a fact. The 5.56-mm rifle doesn’t
like having its lower receiver taken
apart for cleaning — and for good
reason.
The lower receiver’s made of alu-
minum to keep the weapon light-
weight. But the pins that hold the auto-
matic sear,
trigger and the selector lever are all
made of steel.
So, if you keep taking the lower
receiver apart, these pins’ll bye-n-bye
make the holes they go through bigger
and bigger. First thing you know, the
pins fall out and get lost — or the
parts they hold won’t line up right and
woys to drain
the excess bore cleaner from the covity
and then wipe it dry.
A cleaning job like this will get rid
of all the carbon and dirt that might
keep your weapon from shooting right.
Any stuff that’s left after you do your
level best won’t make no never-mind.
Of course, if the lower receiver ever
gets so fouled up that the rifle won’t
fire right, then you let support have a
whack at it.
Now you can understand why TM
*
9-1005-249-12 (1968) with Ch 1,
does not authorize disassembly of the
lower receiver group for cleaning by
riflemen and armorers. Parts replace-
ment and extra-tough cleaning jobs are
for direct or general support only.
But, please don’t miss out on that
lubing job. All components of the
lower receiver — as well as the bolt
carrier group — must wear a coat of
LSA at all times. No ”buts” about it.
Your rifle can’t perform without it.
That’s why ’’white-glove inspec-
tions” are too risky for this baby.
There’s always the danger that some
guy might be tempted to give his weap-
on a shower or tub bath before inspec-
tion to get rid of dirt and lube.
When you’re all through — and the lower
receiver’s dry — put a generous coat
of ISA (FSN 9 150-9 35-6597) on all
of the insides of the lower receiver and
on oil of the parts.
Anybody who bathes his rifle is do-
ing it dirt two ways: First, he’s robbing
it of the lube protection it needs. Sec-
ond, he’s liable to let water seep into
the lower receiver extension. This could
cause corrosion of the extension and
rusting of the action spring — or it
might result in a short recoil of the bolt
carrier group, thereby preventing the
bolt assembly from retracting far
enough to strip a cartridge from the
magazine.
When vou consider that all this has
*
a direct bearing on how well your
M16Al’s going to fire and protect your
hide in a showdown, these angles make
real good sense, don’t they?
15
MORE POINTERS
TO PONDER
FOR УОи
M16A1
ZAPSrERG'f
HERE ARE SOME
NUM BAH ONE PM
SUGGESTIONS TO
KEEP you GO-GO.'
HOW TO FIGHT CARBON
FREEZE... v
KEEPING A HEALTHY
BOLT...
9)
Another thing: When you re crawl-
ing or walking through the brush,
make a mental note to make sure you
don’t get the flash suppressor caught in
a bush. It catches easy, y’know.
All the way . . . Educate your sixth sense to flip the selector lever all the way
across to get from Safe to Automatic. In an ambush situation, you just might flip
it only halfway — to Semiautomatic—when you’ll need all the fire you can get.
You might practice flipping it all the way till this becomes second nature.
All in all, this M16Al’s a real sweet number. It’ll stay that way as long as
you treat it like one.
16
Combat types can’t emphasize this enough: Clean the gas port in the bolt
carrier group every day — and take it real easy with the lube. Dirt and powder-
fouling—plus an overdose of lube oil — will give you a sluggish rifle. . . .
Numbah 10 Thou’ in a combat situation!
So, when you get your baby stripped for cleaning, like it says in para
3-9 in TM 9-1005-249-12 (1968) with Ch 1, take an extra 5 seconds to
get at the port hole down there in the front end of the gas tube. Like so:
1. Work a worn bore brush full of bore cleaner around
inside the key.
Make sure you get the metal end of the
brush in all the way — right into the bot-
tom of the hole where the gas tube is
seated in the carrier key — and then turn
it to loosen the crud. That last Xe-in in
there is the most neglected part on most
M16A1 rifles.
2. Then use a pipe cleaner or the like to poke the gook out of the port.
Don’t use wire, though, or you might scratch the tube and set up
worse trouble later on.
ESN 9920-292-9946
PIPE CLEANER
3. Use another pipe
cleaner — or air-dry
it by waving it
around — to dry
the tube as well
as you can.
NOW IN YOUR TM
Now doublecheck your job. Remove the bolt. Then stick the carrier body into the receiver slide-
way and push the carrier back and forth slowly to check that the carrier key and gas tube
line up OK. The carrier should move freely ... and should go all the way without friction. If it
won’t go all the way without a struggle, you've got some more cleaning to do. But, if it binds,
turn the weapon in for repair.
V
Here’s the Pitch: The front end of the gas tube is self-cleaning, thanks to the hot gases
and high pressure from the barrel. But, if you don't keep the other end dean — the gas tube
area where it mates with the carrier key inside the receiver — brother! You’ve got to clean
this area with elbow grease to prevent stoppages. Hear!
Now, when you come to lube-preserving, stick to the dope in the lube guide pages22-24
of this pamphlet.
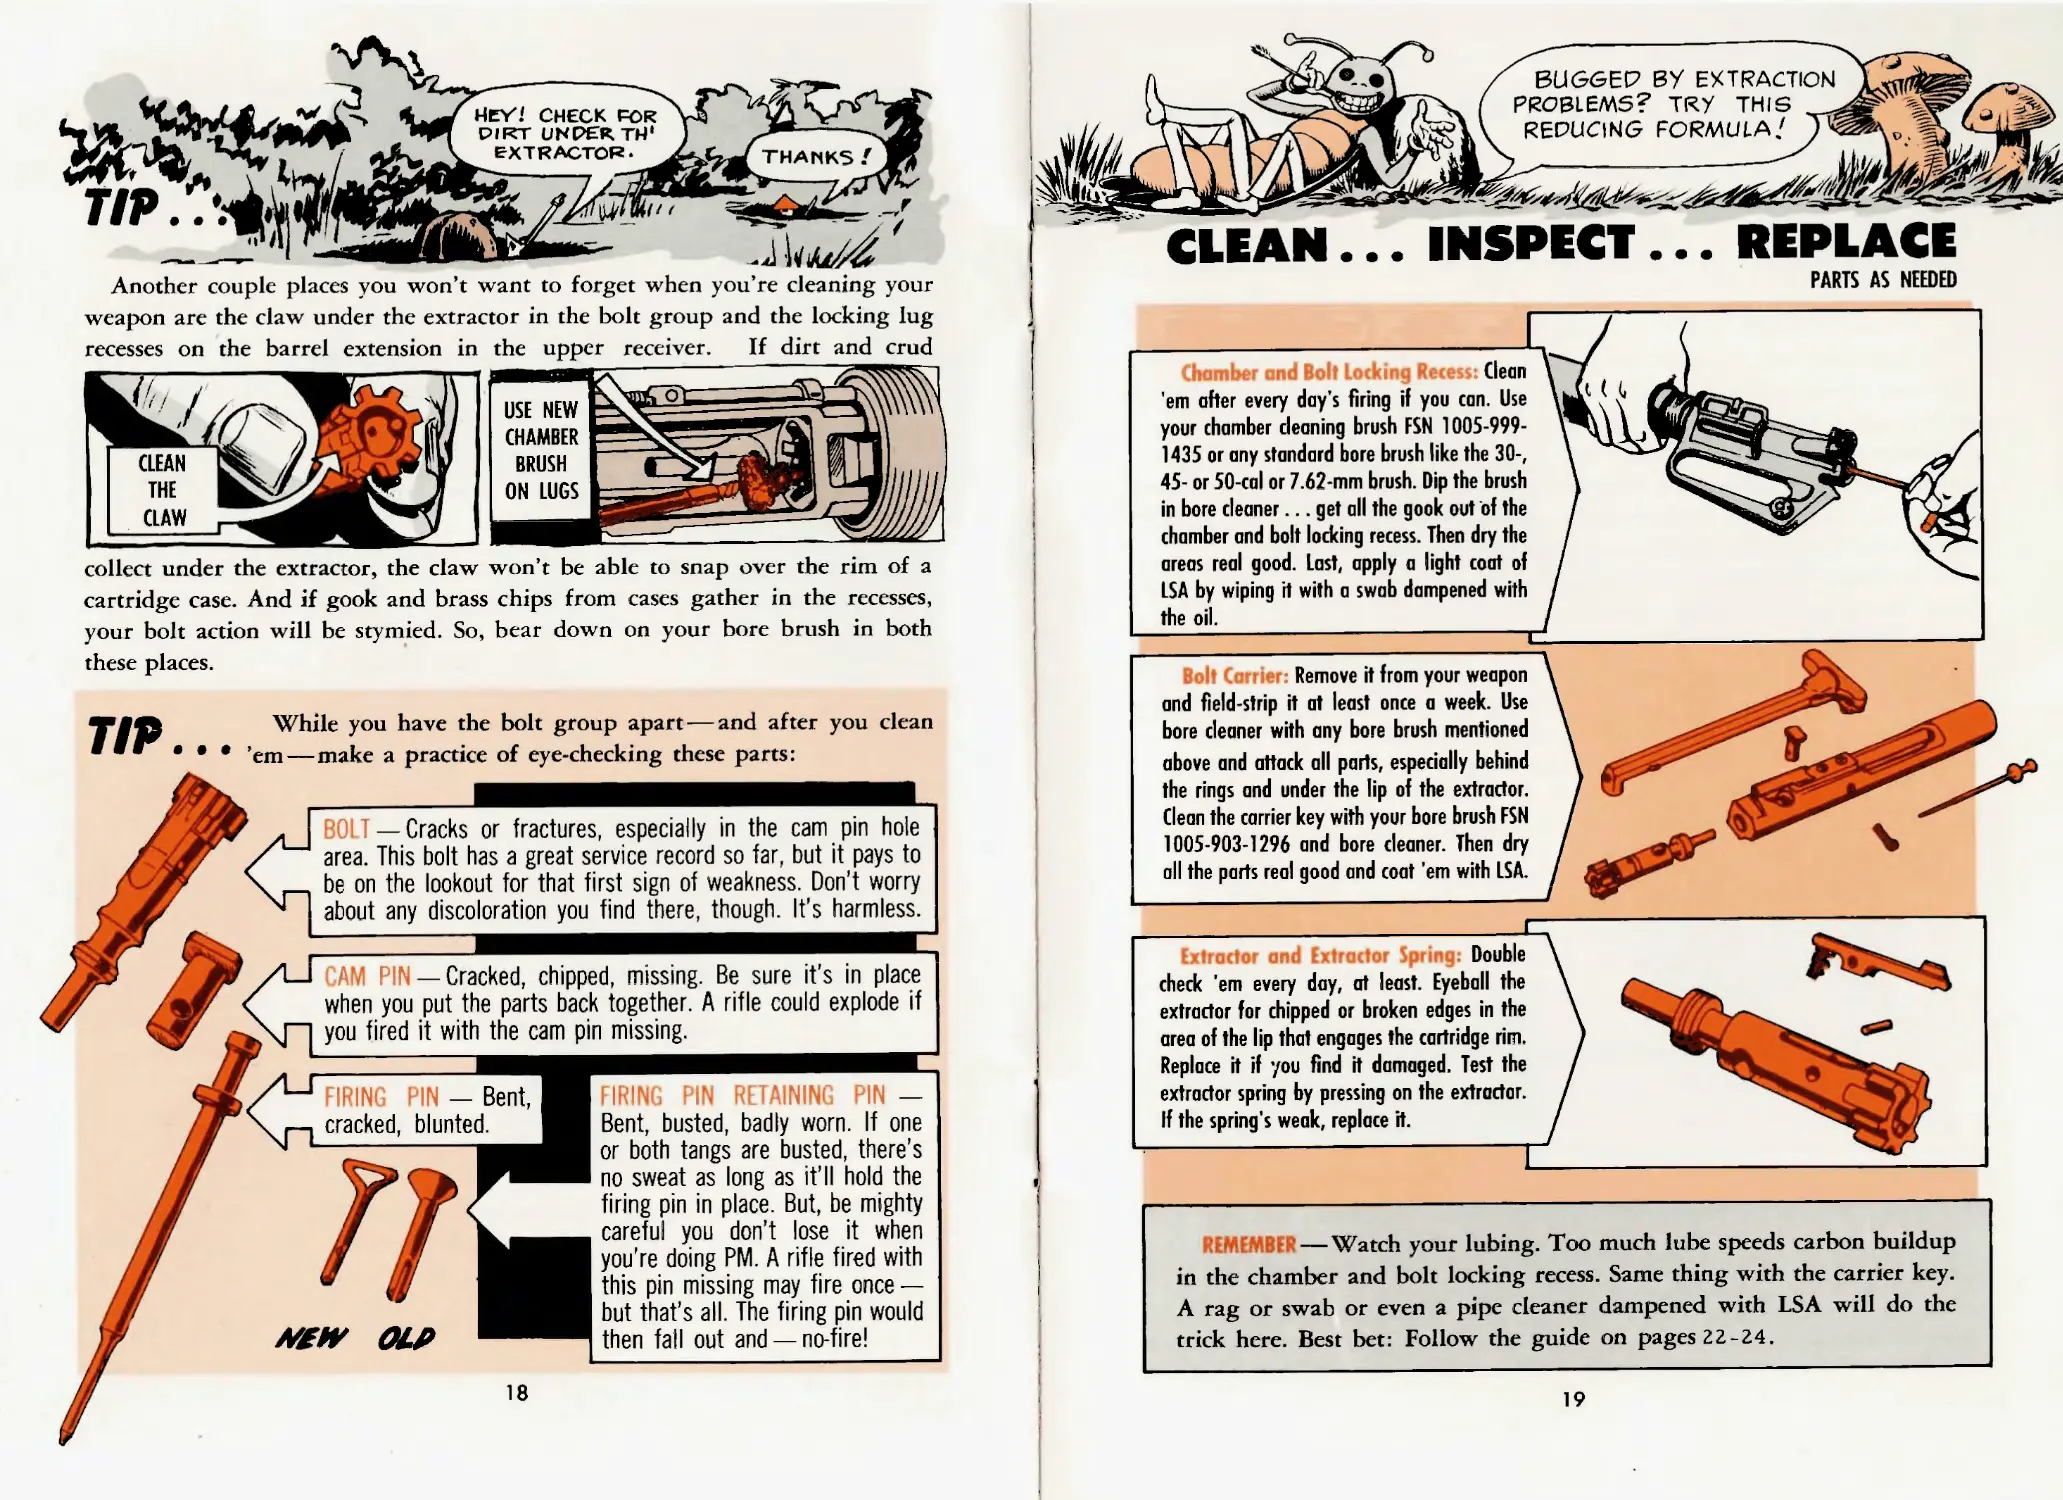
Another couple places you won’t want to forget when you’re cleaning your
weapon are the claw under the extractor in the bolt group and the locking lug
recesses on the barrel extension in the upper receiver. If dirt and crud
collect under the extractor, the claw won’t be able to snap over the rim of a
cartridge case. And if gook and brass chips from cases gather in the recesses,
your bolt action will be stymied. So, bear down on your bore brush in both
these places.
TIP
— Cracks or fractures, especially in the cam pin hole
area. This bolt has a great service record so far, but it pays to
be on the lookout for that first sign of weakness. Don't worry
about any discoloration you find there, though. It’s harmless.
— Cracked, chipped, missing. Be sure it’s in place
when you put the parts back together. A rifle could explode if
you fired it with the cam pin missing.
While you have the bolt group apart — and after you clean
em — make a practice of eye-checking these parts:
AfcHf OLP
UN — Bent,
cracked, blunted.
FIRING PIN RETAINING PIN —
Bent, busted, badly worn. If one
or both tangs are busted, there’s
no sweat as long as it’ll hold the
firing pin in place. But, be mighty
careful you don’t lose it when
you're doing PM. A rifle fired with
this pin missing may fire once —
but that’s all. The firing pin would
then fall out and — no-fire!
18
BUG6EP ВУ EXTRACTION
PROBLEMS? ТКУ THIS
REPUCINS FORMULA'
CLEAN... INSPECT... REPLACE
Clean
'em after every day's firing if you can. Use
your chamber cleaning brush FSN 1005-999-
1435 or any standard bore brush like the 30-,
45- or 50-cal or 7.62-mm brush. Dip the brush
in bore cleaner... get all the gook out of the
chamber and bolt locking recess. Then dry the
areas real good. Last apply a light coat of
ISA by wiping it with a swab dampened with
the oil.
PARTS AS NEEDED
Bolt Cai rie Remove it from your weapon
and field-strip it at least once a week. Use
bore cleaner with any bore brush mentioned
above and attack all parts, especially behind
the rings and under the lip of the extractor.
Clean the carrier key with your bore brush FSN
1005-903-1296 and bore cleaner. Then dry
all the parts real good and coat ’em with ISA.
_________________________________________________C
Extractor a d Extractor Spring: Double
check ’em every day, at least. Eyeball the
extractor for chipped or broken edges in the
area of the lip that engages the cartridge rim.
Replace it if you find it damaged. Test the
extractor spring by pressing on the extractor.
If the spring’s weak, replace it.
—Watch your lubing. Too much lube speeds carbon buildup
in the chamber and bolt locking recess. Same thing with the carrier key.
A rag or swab or even a pipe cleaner dampened with LSA will do the
trick here. Best bet: Follow the guide on pages 22-24.
19
М16А1 RIFLEMEN...
WHEN THE BASES ARE LOADED... EVERY HIT COUNTS
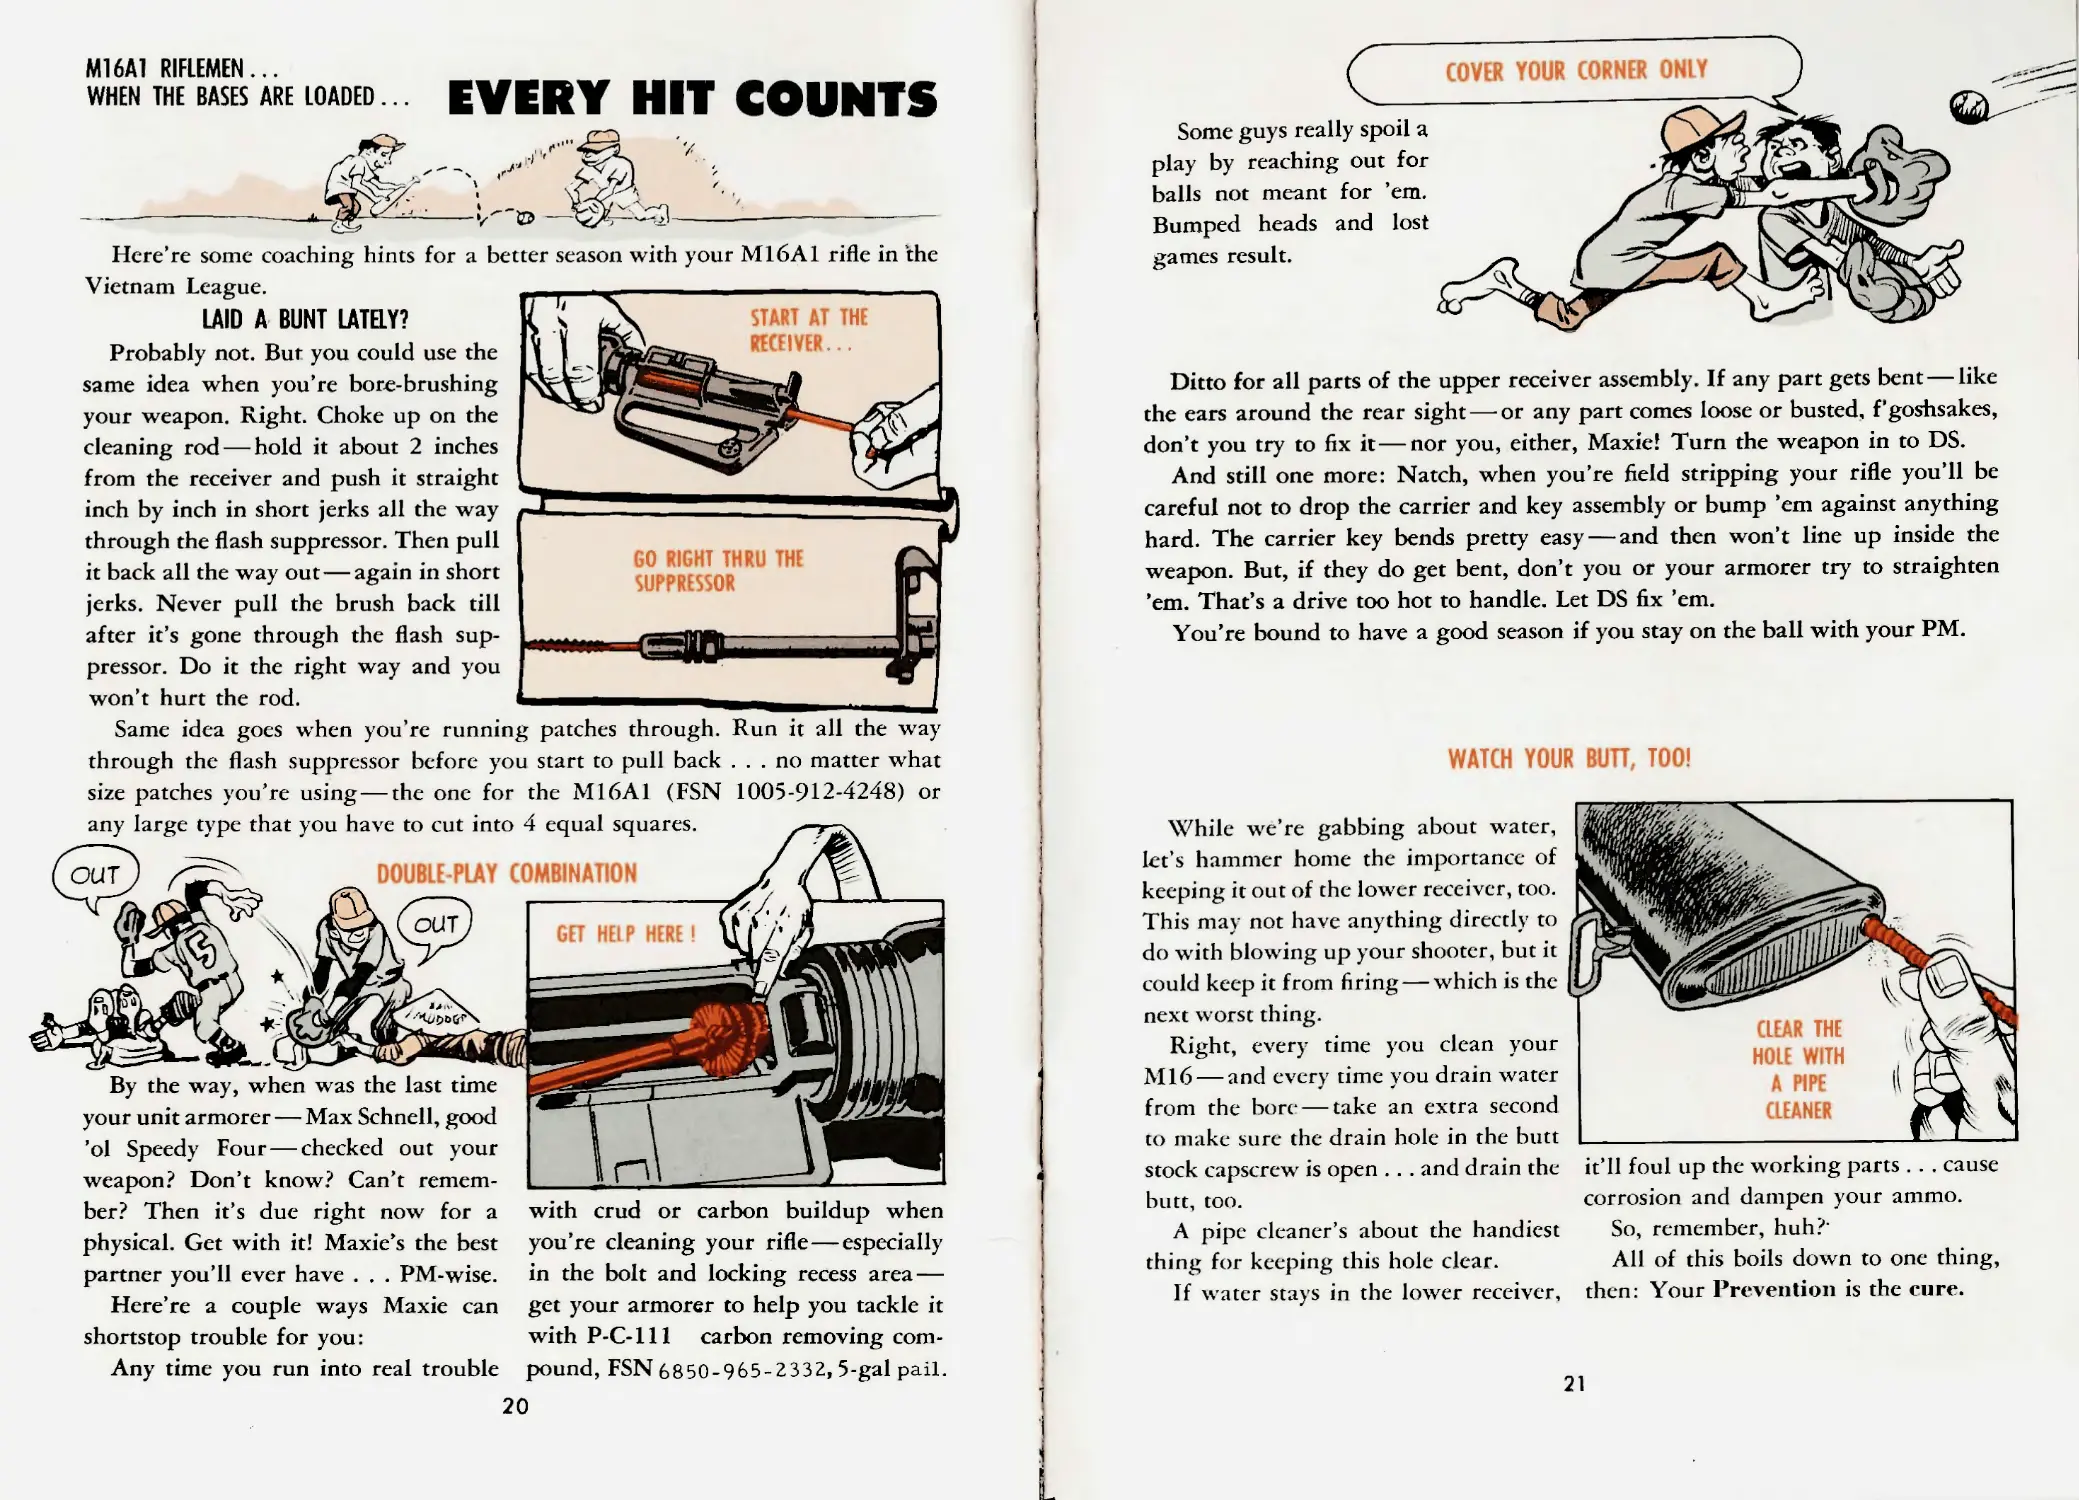
Here’re some coaching hints for a better season with your M16A1 rifle in the
Vietnam League.
LAID A BUNT LATELY?
Probably not. But you could use the
same idea when you’re bore-brushing
your weapon. Right. Choke up on the
cleaning rod — hold it about 2 inches
from the receiver and push it straight
inch by inch in short jerks all the way
through the flash suppressor. Then pull
it back all the way out—again in short
jerks. Never pull the brush back till
after it’s gone through the flash sup-
pressor. Do it the right way and you
won’t hurt the rod.
Same idea goes when you’re running patches through. Run it all the way
through the flash suppressor before you start to pull back ... no matter what
size patches you’re using — the one for the M16A1 (FSN 1005-912-4248) or
any large type that you have to cut into 4 equal squares.
OUT
DOUBLE-PLAY
COMBINATION
OUT
By the way, when was the last time
your unit armorer — Max Schnell, good
’ol Speedy Four — checked out your
weapon? Don’t know? Can’t remem-
ber? Then it’s due right now for a
physical. Get with it! Maxie’s the best
partner you’ll ever have . . . PM-wise.
Here’re a couple ways Maxie can
shortstop trouble for you:
Any time you run into real trouble
with crud or carbon buildup when
you’re cleaning your rifle—especially
in the bolt and locking recess area —
get your armorer to help you tackle it
with P-C-lll carbon removing com-
pound, FSN 6850-965-2332, 5-gal pail.
20
COVER YOUR CORNER ONLY
Some guys really spoil a
play by reaching out for
balls not meant for ’em.
Bumped heads and lost
games result.
Ditto for all parts of the upper receiver assembly. If any part gets bent — like
the ears around the rear sight — or any part comes loose or busted, f’goshsakes,
don’t you try to fix it—nor you, either, Maxie! Turn the weapon in to DS.
And still one more: Natch, when you’re field stripping your rifle you’ll be
careful not to drop the carrier and key assembly or bump ’em against anything
hard. The carrier key bends pretty easy—and then won’t line up inside the
weapon. But, if they do get bent, don’t you or your armorer try to straighten
’em. That’s a drive too hot to handle. Let DS fix ’em.
You’re bound to have a good season if you stay on the ball with your PM.
WATCH YOUR BUTT, TOO!
While we’re gabbing about water,
let’s hammer home the importance of
keeping it out of the lower receiver, too.
This may not have anything directly to
do with blowing up your shooter, but it
could keep it from firing — which is the
next worst thing.
Right, every time you clean your
Ml6 — and every time vou drain water
* *
from the bore — take an extra second
to make sure the drain hole in the butt
stock capscrew is open . . . and drain the
butt, too.
A pipe cleaner’s about the handiest
thing for keeping this hole clear.
If water stays in the lower receiver,
it’ll foul up the working parts . . . cause
corrosion and dampen your ammo.
So, remember, huh?’
All of this boils down to one thing,
then: Your Prevention is the cure.
21
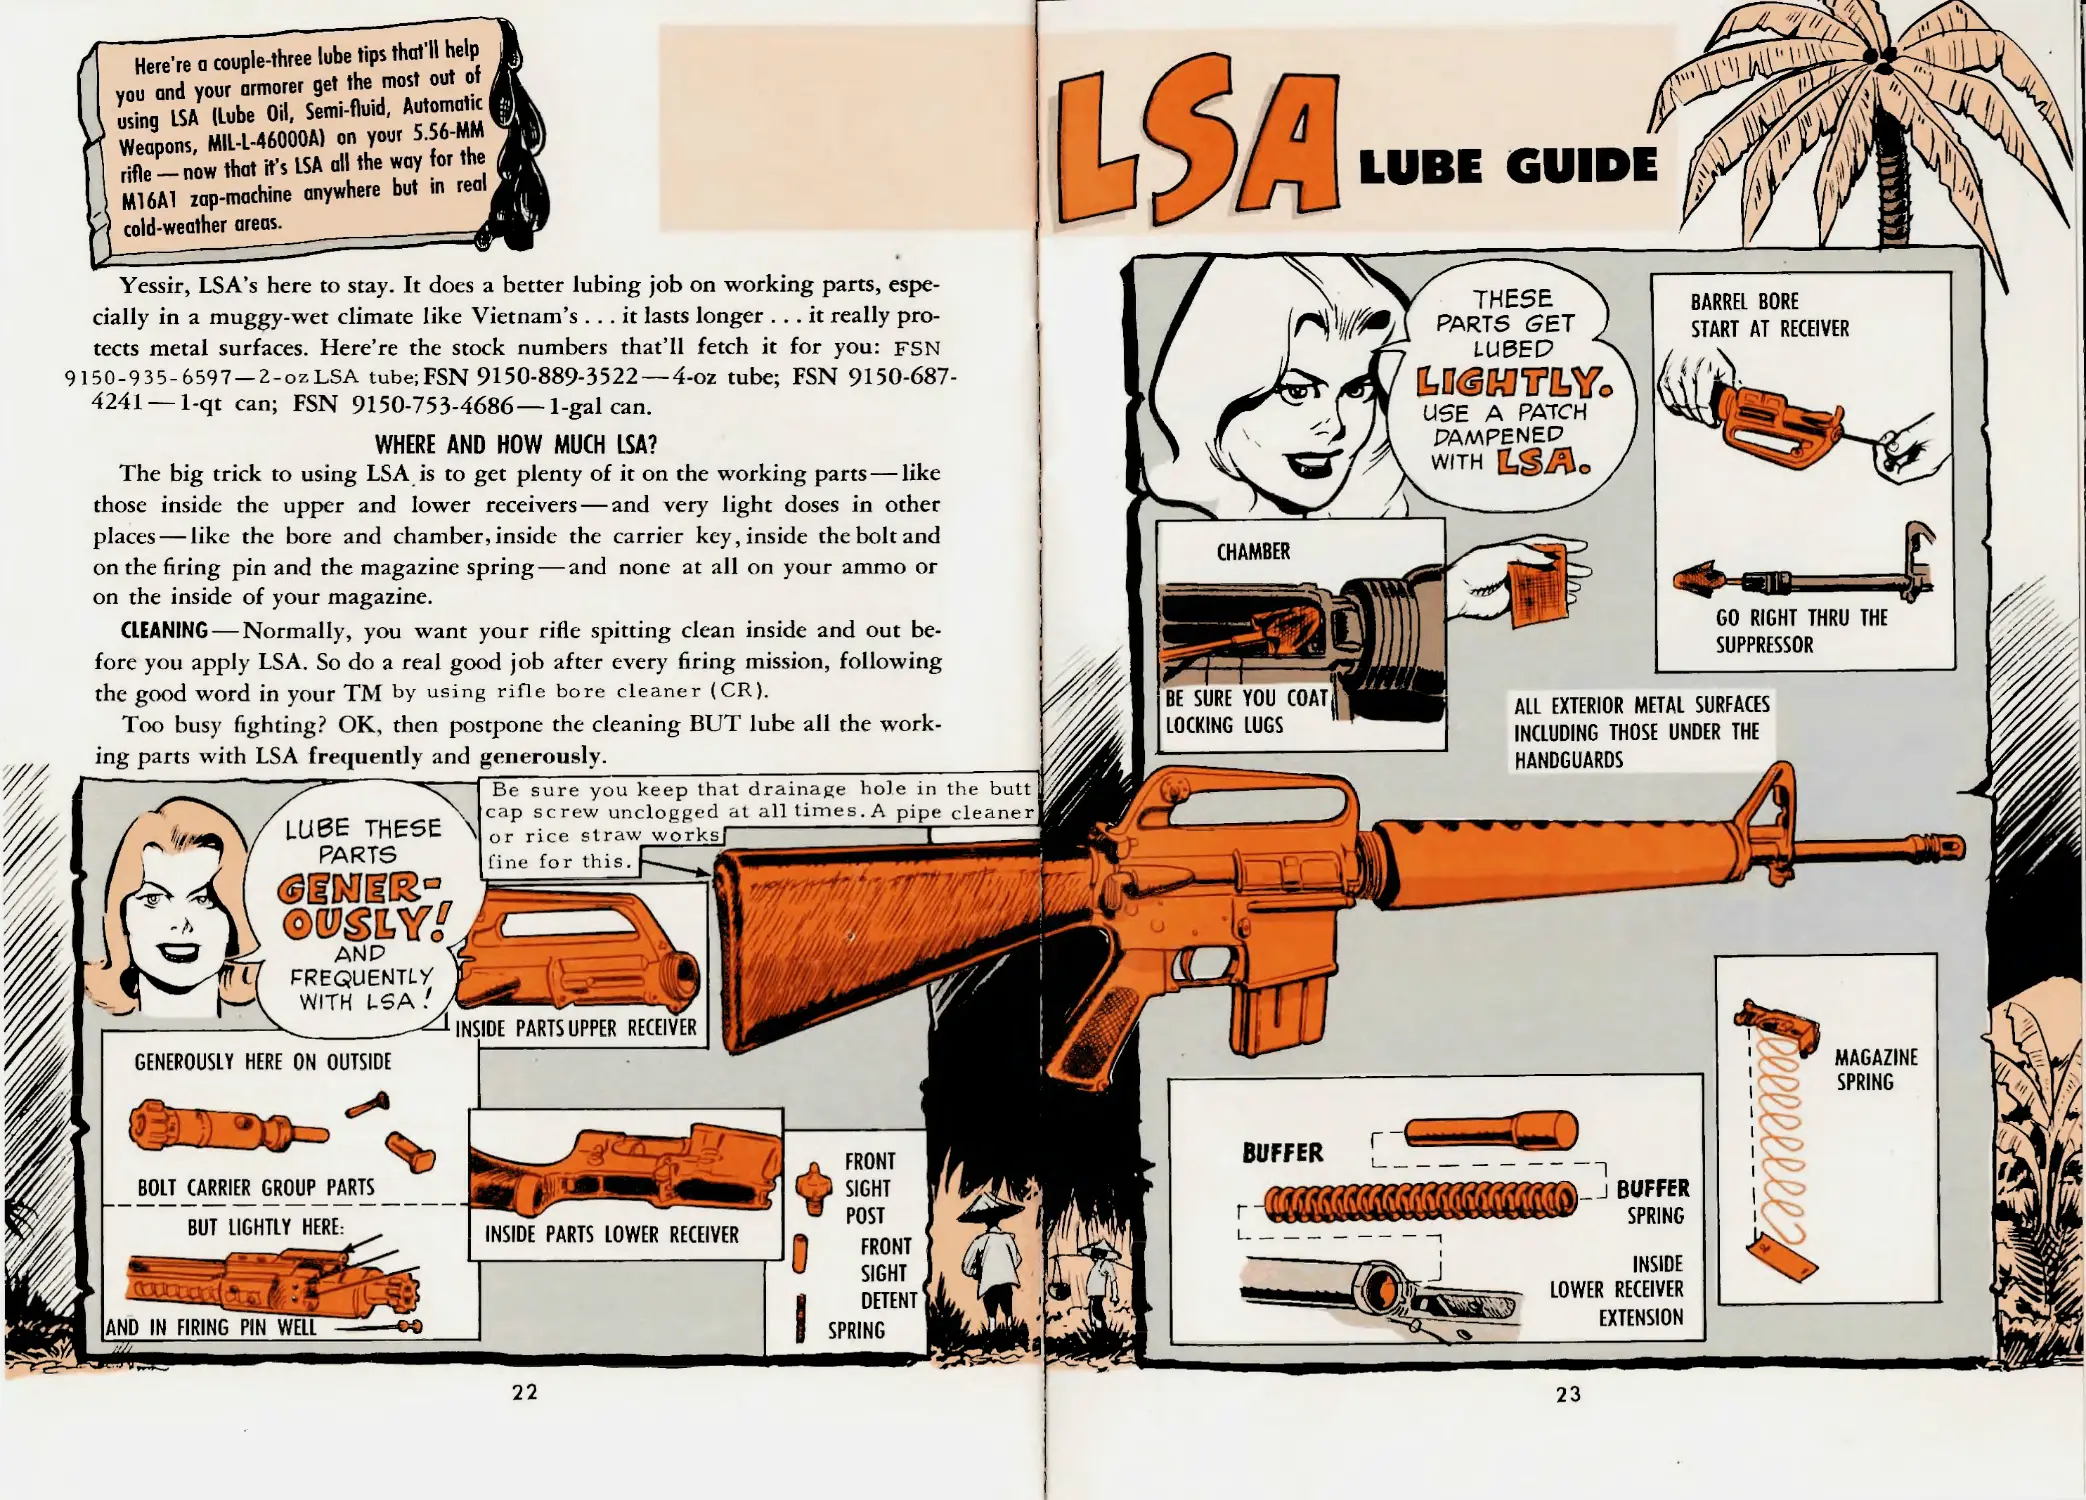
1 couple-three lube tips that'll help
you and your armorer get the "tost out о
I using ISA (Lube Oil, Semi-flurd, Automata
? Weapons, MII-L-46000A) on your 5.56-MM
rifle — now that it’s ISA all the way for the
i M16A1 zap-machine anywhere but in real
И cold-weather areas.________________/
Yessir, LSA’s here to stay. It does a
better lubing job on working parts, espe-
daily in a muggy-wet climate like Vietnam’s ... it lasts longer ... it really pro-
tects metal surfaces. Here’re the stock numbers that’ll fetch it for you: FSN
9150-935-6597 — 2-ozLSA tube; FSN 9150-889-3522 —4-oz tube; FSN 9150-687-
4241 —1-qt can; FSN 9150-753-4686—1-gal can.
WHERE ANO HOW MUCH ISA?
The big trick to using LSA is to get plenty of it on the working parts — like
those inside the upper and lower receivers — and very light doses in other
places — like the bore and chamber, inside the carrier key, inside the bolt and
on the firing pin and the magazine spring — and none at all on your ammo or
on the inside of your magazine.
CLEANING — Normally, you want your rifle spitting clean inside and out be-
fore you apply LSA. So do a real good job after every firing mission, following
the good word in your TM by using rifle bore cleaner (CR).
Too busy fighting? OK, then postpone the cleaning BUT lube all the work-
22
23
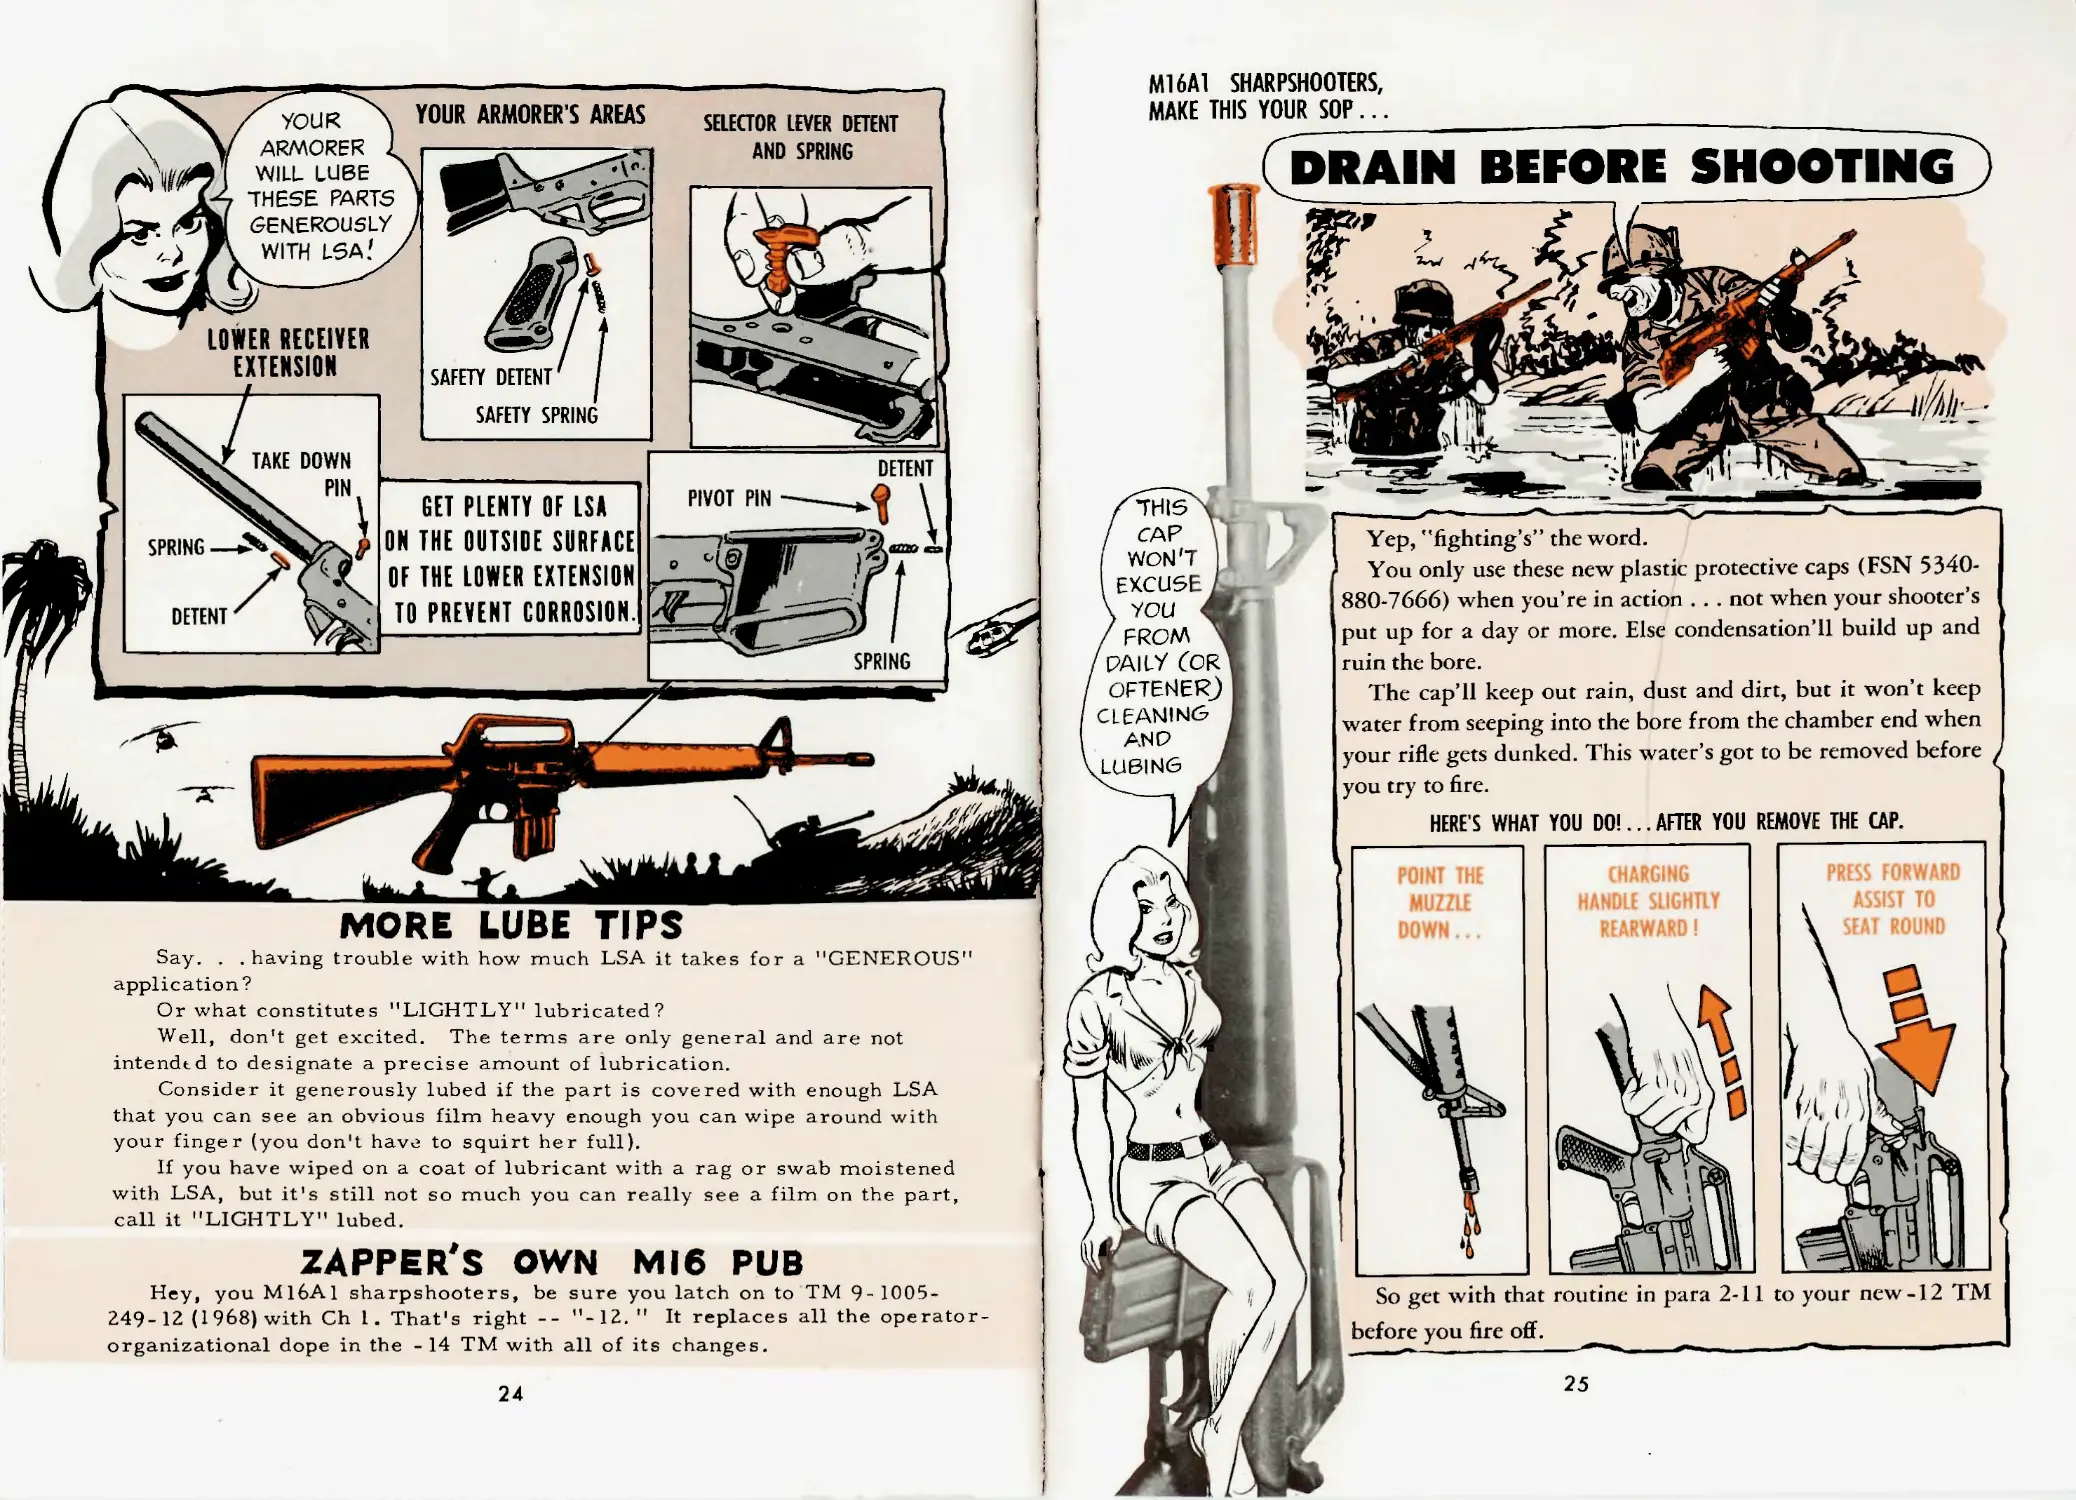
YOUR ARMORER'S AREAS
SELECTOR LEVER DETENT
AND SPRING
you К
ARMORER
WILL LUBE
THESE PARTS
GENEROUSLY
WITH LSA!
LOWER RECEIVER
EXTENSION
TAKE DOWN
PIN
DETENT
SPRING
DETENT
GET PLENTY OF LSA
ON THE OUTSIDE SURFACE
OF THE LOWER EXTENSION
TO PREVENT CORROSION.
PIVOT PIN
SPRING
MORE LUBE TIPS
Say. . . having trouble with how much LSA it takes for a "GENEROUS1'
application?
Or what constitutes "LIGHTLY" lubricated?
Well, don’t get excited. The terms are only general and are not
intended to designate a precise amount of lubrication.
Consider it generously lubed if the part is covered with enough LSA
that you can see an obvious film heavy enough you can wipe around with
your finger (you don’t have to squirt her full).
If you have wiped on a coat of lubricant with a rag or swab moistened
with LSA, but it’s still not so much you can really see a film on the part,
call it "LIGHTLY" lubed.
ZAPPER'S OWN MI6 PUB
Hey, you M16A1 sharpshooters, be sure you latch on to TM 9- 1005*
249-12 (1 968) with Ch I. That’s right -- "-12." It replaces all the operator-
organizational dope in the - 14 TM with all of its changes.
24
М16А1 SHARPSHOOTERS,
MAKE THIS YOUR SOP...
DRAIN BEFORE SHOOTING
So get with that routine in para 2-11 to your new-12 TM
before you fire off.
f THIS \
/ CAP \
I EXCUSE A
\ you 41
/ FROM 1
' paily Cor
OFTENERJ
CLEANING
ANO )
LUBING /
PRESS FORWARD
ASSIST TO
SEAT ROUND
CHARGING
HANDLE SLIGHTLY
REARWARD!
POINT THE
MUZZLE
DOWN...
Yep, "fighting’s” the word.
You only use these new plastic protective caps (FSN 5340-
880-7666) when you’re in action . . . not when your shooter’s
put up for a day or more. Else condensation’ll build up and
ruin the bore.
The cap’ll keep out rain, dust and dirt, but it won’t keep
water from seeping into the bore from the chamber end when
your rifle gets dunked. This water’s got to be removed before
you try to fire.
HERE’S WHAT YOU DO!... AFTER YOU REMOVE THE CAP.
M16A1 RIFLEMAN:
TRY OGLING THESE...
MAGAZINE PINUPS!
From 17
many when you’re loading cartridges
in the magazine of your M16A1 rifle.
It won’t give you extra fighting power
. . . more likely it’ll put you out of the
fight—’cause that extra round will
spread the lips and the ammo won’t
feed right.
When unloading, never flip the
rounds out with another cartridge.
You’ll spread the lips this way, too.
Instead, slide the rounds out straight
When you’re taking your magazine
apart here’s as far as you can go. Any
further and you might damage it.
1. Stick cartridge point in here to press the
floor plate release.
2. Slide out the floor plate.
3. Work the spring back and forth gently as
you tug it outward.
4. Stop tugging when the follower reaches
the tabs and ears and don’t separate the
spring from the follower.
to 20’s fine, but 21’s too
Careful . . . you don’t stretch or bend
the spring and don’t bend the tabs. Easy
does it all the way.
For cleaning the disassembled mag
— Either dunk it in rifle bore cleaner
and shake it good while submerged
OR — scrub the inside with a brush
soaked with cleaner
OR — Use a rag soaked in bore
cleaner.
Then dry it out good with a swab or
rag (or even your shirtail in a pinch).
After you clean the inside of the
magazine, wipe the spring off and see
that it’s not busted or deformed. If it’s
OK, apply a very-very-very light coat
of lube—using a rag dampened with
LSA.
This mag is coated with dry lubri-
cant. It doesn’t need any lubing except
for the spring.
26
PUTTING
TOGETHER
Q
Here’s the easy way . . . gently:
1. Nose the bullet end of the follower into
the body at a 45-degree angle till it
touches the inside edge of the body.
4. Make sure the printing on the floor plate
is on the outside. Slide the plate in this
way, then press the spring down with
your thumb. And make sure the floor plate
goes under all 4 tabs, too.
3. Just wiggle the spring into the mag as far
as it’ll go.
HERE'S AN IMPORTANT ‘Тг'ПьР
IF THE SPRING SHOULD ACCIDENTALLY GET
SEPARATED FROM THE FOLLOWER, TURN THE
MAGAZINE OVER TO YOUR ARMORER.' DON'T
TRY TO FIX IT YOURSELF. LOOKS EA5>' SURE,
BUT WITHOUT THE RIGHT TOOL YOU'D DAMAGE
THE SPRING... AND END UP WITH
FEEDING- TROUBLE.
27
When fording, try to keep your mags out
of the water. This means holding your rifle
'way up there and, if you can, keep the
pouch with the spares above the water
line.
PROTECT ME,
4 YOU BIG STRONG
GUY/
Not easy, that’s for sure, when you’re wading
streams and rice paddies or in heavy rainfall.
Normally clean water itself is not harmful.
Brackish water — that’s another story. But the
real harm comes when you don’t do anything
about it after your stuff gets wet.
Here’re some ideas that might help:
Soon as you come out of the drink — if
Charlie's not interfering, natch — take the
mags out and shake ’em good a couple
of times to get rid of most of the water.
Then at the first breather — when you're sure Charlie's not around — empty each mag-
azine, wipe it dry inside and out with your shirttail or swab and then clean both the ammo
and the magazine.
You M16A1 zapmen using a plastic bag (FSN 1005-052-6942) to protect your loaded
gazine, use your head. The bag’s apt to colled condensation if it’s wet or humid, so, check
your bagged magazine daily. If you see beads of condensation inside the bag, take off the bag and
dry it, the magazine and the ammo thoroughly - and don’t forget that little film of LSA on the mag-
azine spring. This bag, y'know, won’t excuse you from regular PM chores.
и/WW
F’goshsakes, never put oil of any kind — including LSA — on the cartridges
or inside your magazine! Lube ruins ammo and collects gook — could leave
you helpless in a fight! This mag is coated with dry lubricant. It doesn’t need
any lubing except for the spring — and that only very lightly, with LSA. л
Take care of your magazines — and
hang on to ’em. Sure, there’re plenty of
’em in supply—world-wide—but they
could get mighty scarce in your own
sector. So, protect ’em from dents
(aluminum can’t take rough treatment)
— and especially, remember to bring
those "empties” back. The one you save
just might save you some day.
28
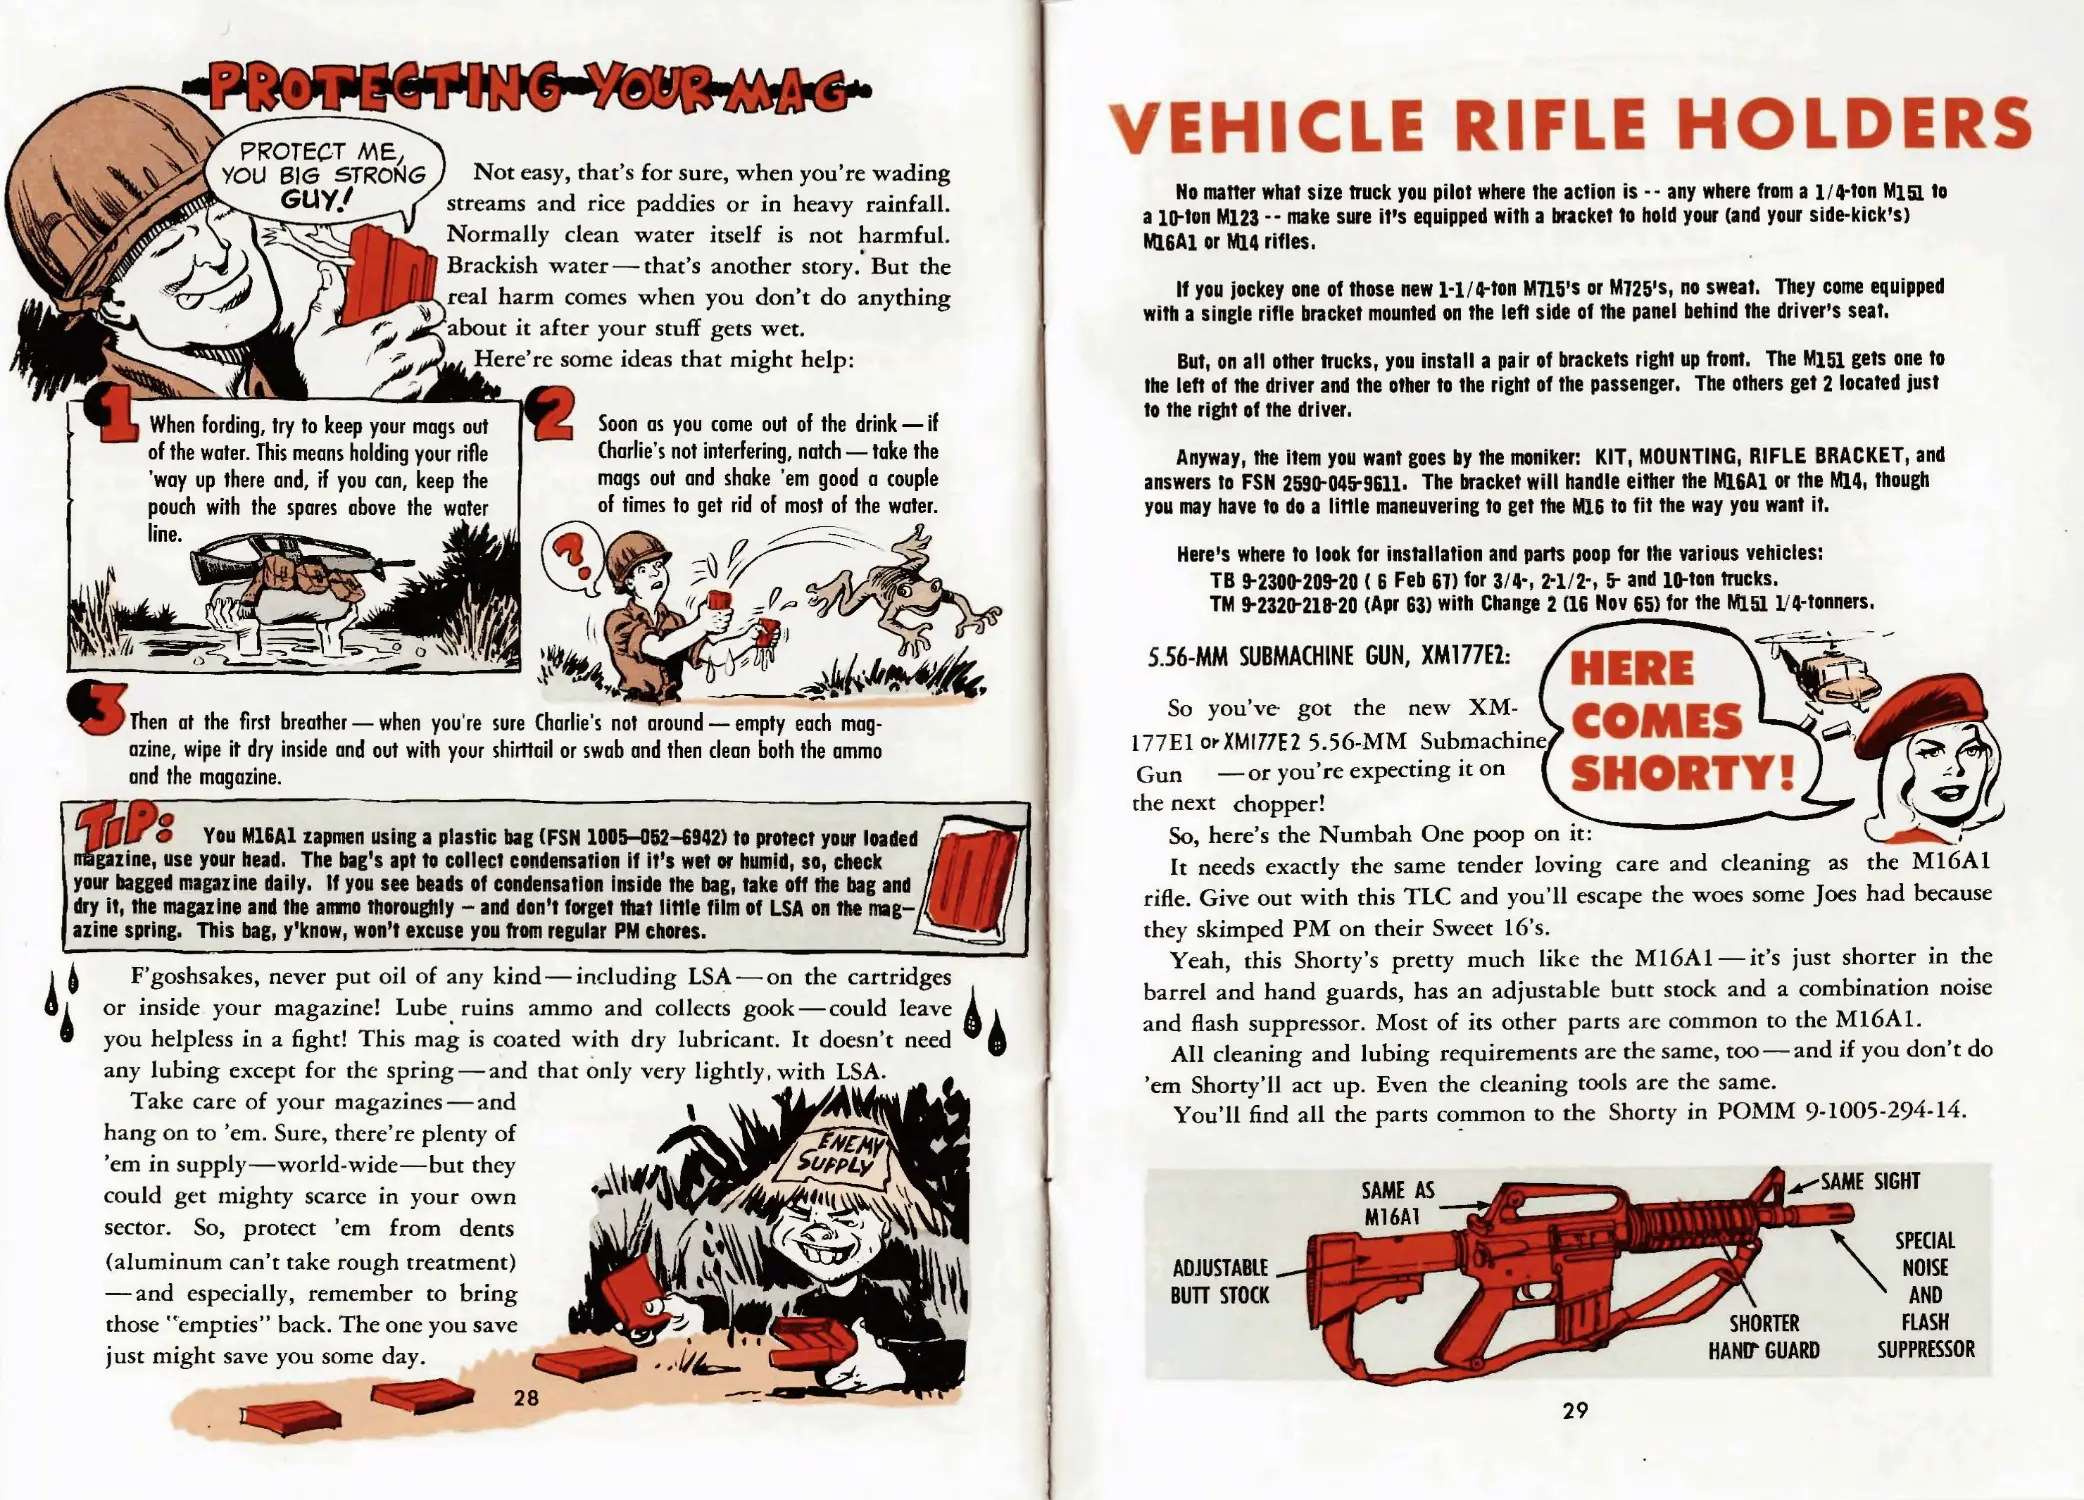
VEHICLE RIFLE HOLDERS
No matter what size truck you pilot where the action is -- any where from a 1/4-ton Mia. to
a 10-ton M123 -- make sure it’s equipped with a bracket to hold your (and your side-kick’s)
M16A1 or M14 rifles.
If you jockey one of those new 1-1/4-ton M715’s or M725’s, no sweat. They come equipped
with a single rifle bracket mounted on the left side of the panel behind the driver's seat.
But, on all other trucks, you install a pair of brackets right up front. The M151 gets one to
the left of the driver and the other to the right of the passenger. The others get 2 located just
to the right of the driver.
Anyway, the item you want goes by the moniker: KIT, MOUNTING, RIFLE BRACKET, and
answers to FSN 2590*045-9611. The bracket will handle either the M16A1 or the M14, though
you may have to do a little maneuvering to get the M16 to fit the way you want it.
Here’s where to look for installation and parts poop for the various vehicles:
ТВ 9-2300-209-20 ( 6 Feb 67) for 3/4-, 2-1/2-, 5- and 10-ton trucks.
TM 9-2320-218-20 (Apr 63) with Change 2 (16 Nov 65) for the M151 l/4~tonners.
5.56-MM SUBMACHINE GUN, XM177E2: f
So you’ve got the new ХМ- I ft f^ ж у у |
177Е1 огХМ177Е2 5.56-MM Submachine/ WRIW
Gun —or you’re expecting it on SHORTY*; 7/n
the next chopper! \
So, here’s the Numbah One poop on it: d
It needs exactly the same tender loving care and cleaning as the M16A1
rifle. Give out with this TLC and you’ll escape the woes some Joes had because
they skimped PM on their Sweet 16’s.
Yeah, this Shorty’s pretty much like the M16A1 — it’s just shorter in the
barrel and hand guards, has an adjustable butt stock and a combination noise
and flash suppressor. Most of its other parts are common to the M16A1.
All cleaning and lubing requirements are the same, too—and if you don’t do
’em Shorty’ll act up. Even the cleaning tools are the same.
You’ll find all the parts common to the Shorty in POMM 9-1005-294-14.
SAME SIGHT
ADJUSTABLE
BUTT STOCK
SHORTER
HANDF GUARD
SPECIAL
NOISE
4 AND
FLASH
SUPPRESSOR
29
H£M ARt TH£
PARTS FOR
SHORTS
© NUT. LOCK PIN
FSN 5310-917-1215
(62368)
© LEVER. RELEASE
FSN 1005-914-3224
(62360)
PIN. LOCK
FSN 1005-914-3229
(62361)
SPRING. LOCKING
FSN 1005-916-9178
(62369)
© STOCK. BUTT, SLIDING
FSN 1005-914-2943
(62359)
© BUFFER ASSEMBLY
FSN 1005-914-4578
(62382)
© SPRING. ACTION © NUT, RECEIVER EXTENSION © BARREL AND
FSN 1005-9144564 FSN 5310-917-1153 SIGHT ASSEMBLY
(62373) (62357) fsN 1005-9144567
© EXTENSION. LOWER © HANDGUARD ASSEMBLY (62378)
RECEIVER FSN 1005-9144572 ® CAP. HANDGUARD
FSN 1005-914-2929 (62381) FSN 1005-914-2922
(62356)
© PLATE, END
RECEIVER
FSN 1005-914-2942
(62358)
SUPPRESSOR.
NOISE AND FLASH
FSN 1005-914-3902
(62370)
(62346)
® TUBE. GAS ASSEMBLY
FSN 1005-914-3504
(62366)
30
BEADQUARTERS '
DEPARTMENT OF THE ARMY
WASHINGTON, D. C„ I July 1969
The proponent agency of this pamphlet is the U. S. Army Materiel Command.
User» oro Invited to tend comments and suggested improvements on DA Form
2028 (Recommended Changes to Publications) to the Commanding General,
U. S. Army Weapons Command, ATTN: AMSWE-SMM, Rock Island, Illinois
61201.
By Order of the Secretary of the Army:
W. C. WESTMORELAND,
General, United States Army,
Official: Chief of Staff.
KENNETH G. WICKHAM,
Major General, United States Army,
The Adjutant General.
Distribution:
To be distributed in accordance with DA Form 12*11, requirements for Rifle, S.56MM, XM16E1.
* U.S. GOVERNMCNT PRINTING OFFICI ; !»•• 0-3SS-720