/


![[likely] and [unlikely] Attributes](https://djvu.online/jpg1/H/I/d/HIdII4moQzkKk/332.webp)


Author: Dmitrović S.
Tags: programming languages programming computer science microprocessors reverse engineering
Year: 2023


Text
Modern C++ for
Absolute Beginners
A Friendly Introduction to the C++
Programming Language and C++11 to
C++23 Standards
—
Second Edition
—
Slobodan Dmitrović
Modern C++ for Absolute
Beginners
A Friendly Introduction to the C++
Programming Language and C++11
to C++23 Standards
Second Edition
Slobodan Dmitrović
Modern C++ for Absolute Beginners: A Friendly Introduction to the C++
Programming Language and C++11 to C++23 Standards
Slobodan Dmitrović
Belgrade, Serbia
ISBN-13 (pbk): 978-1-4842-9273-0
https://doi.org/10.1007/978-1-4842-9274-7
ISBN-13 (electronic): 978-1-4842-9274-7
Copyright © 2023 by Slobodan Dmitrović
This work is subject to copyright. All rights are reserved by the Publisher, whether the whole or part of the
material is concerned, specifically the rights of translation, reprinting, reuse of illustrations, recitation,
broadcasting, reproduction on microfilms or in any other physical way, and transmission or information
storage and retrieval, electronic adaptation, computer software, or by similar or dissimilar methodology now
known or hereafter developed.
Trademarked names, logos, and images may appear in this book. Rather than use a trademark symbol with
every occurrence of a trademarked name, logo, or image we use the names, logos, and images only in an
editorial fashion and to the benefit of the trademark owner, with no intention of infringement of the
trademark.
The use in this publication of trade names, trademarks, service marks, and similar terms, even if they are not
identified as such, is not to be taken as an expression of opinion as to whether or not they are subject to
proprietary rights.
While the advice and information in this book are believed to be true and accurate at the date of publication,
neither the authors nor the editors nor the publisher can accept any legal responsibility for any errors or
omissions that may be made. The publisher makes no warranty, express or implied, with respect to the
material contained herein.
Managing Director, Apress Media LLC: Welmoed Spahr
Acquisitions Editor: Steve Anglin
Development Editor: James Markham
Coordinating Editor: Gryffin Winkler
Cover image designed by eStudioCalamar
Distributed to the book trade worldwide by Springer Science+Business Media New York, 1 New York Plaza,
Suite 4600, New York, NY 10004-1562, USA. Phone 1-800-SPRINGER, fax (201) 348-4505, e-mail orders-ny@
springer-sbm.com, or visit www.springeronline.com. Apress Media, LLC is a California LLC and the sole
member (owner) is Springer Science + Business Media Finance Inc (SSBM Finance Inc). SSBM Finance Inc
is a Delaware corporation.
For information on translations, please e-mail booktranslations@springernature.com; for reprint,
paperback, or audio rights, please e-mail bookpermissions@springernature.com.
Apress titles may be purchased in bulk for academic, corporate, or promotional use. eBook versions and
licenses are also available for most titles. For more information, reference our Print and eBook Bulk Sales
web page at http://www.apress.com/bulk-sales.
Any source code or other supplementary material referenced by the author in this book is available to
readers on GitHub via the book’s product page, located at www.apress.com/. For more detailed information,
please visit http://www.apress.com/source-code.
Printed on acid-free paper
To Mary Anne,
whose work is an inspiration to me.
Table of Contents
About the Author�����������������������������������������������������������������������������������������������������xv
About the Technical Reviewer�������������������������������������������������������������������������������xvii
Acknowledgments��������������������������������������������������������������������������������������������������xix
About the Second Edition���������������������������������������������������������������������������������������xxi
Chapter 1: Introduction�������������������������������������������������������������������������������������������� 1
Chapter 2: What Is C++?������������������������������������������������������������������������������������������ 3
C++ Standards����������������������������������������������������������������������������������������������������������������������������� 3
Chapter 3: C++ Compilers���������������������������������������������������������������������������������������� 5
Installing C++ Compilers�������������������������������������������������������������������������������������������������������������� 5
On Linux����������������������������������������������������������������������������������������������������������������������������������� 5
On Windows����������������������������������������������������������������������������������������������������������������������������� 6
Chapter 4: Our First Program����������������������������������������������������������������������������������� 7
Comments������������������������������������������������������������������������������������������������������������������������������������� 7
Hello World Example��������������������������������������������������������������������������������������������������������������������� 8
Chapter 5: Types����������������������������������������������������������������������������������������������������� 13
Fundamental Types��������������������������������������������������������������������������������������������������������������������� 13
Boolean���������������������������������������������������������������������������������������������������������������������������������� 13
Character Type����������������������������������������������������������������������������������������������������������������������� 14
Integer Types������������������������������������������������������������������������������������������������������������������������� 16
Floating-Point Types�������������������������������������������������������������������������������������������������������������� 18
Type void������������������������������������������������������������������������������������������������������������������������������� 18
Type Modifiers����������������������������������������������������������������������������������������������������������������������������� 19
Variable Declaration, Definition, and Initialization����������������������������������������������������������������������� 19
v
Table of Contents
Chapter 6: Exercises����������������������������������������������������������������������������������������������� 21
Hello World and Comments��������������������������������������������������������������������������������������������������������� 21
Declaration���������������������������������������������������������������������������������������������������������������������������������� 21
Definition������������������������������������������������������������������������������������������������������������������������������������� 22
Initialization��������������������������������������������������������������������������������������������������������������������������������� 22
Chapter 7: Operators���������������������������������������������������������������������������������������������� 25
Assignment Operator������������������������������������������������������������������������������������������������������������������ 25
Arithmetic Operators������������������������������������������������������������������������������������������������������������������� 25
Compound Assignment Operators���������������������������������������������������������������������������������������������� 27
Increment/Decrement Operators������������������������������������������������������������������������������������������������ 28
Chapter 8: Standard Input�������������������������������������������������������������������������������������� 29
Chapter 9: Exercises����������������������������������������������������������������������������������������������� 31
Standard Input���������������������������������������������������������������������������������������������������������������������������� 31
Two Inputs����������������������������������������������������������������������������������������������������������������������������������� 31
Multiple Inputs���������������������������������������������������������������������������������������������������������������������������� 32
Inputs and Arithmetic Operations����������������������������������������������������������������������������������������������� 33
Postincrement and Compound Assignment�������������������������������������������������������������������������������� 33
Integral and Floating-Point Division�������������������������������������������������������������������������������������������� 34
Chapter 10: Arrays�������������������������������������������������������������������������������������������������� 35
Chapter 11: Pointers����������������������������������������������������������������������������������������������� 37
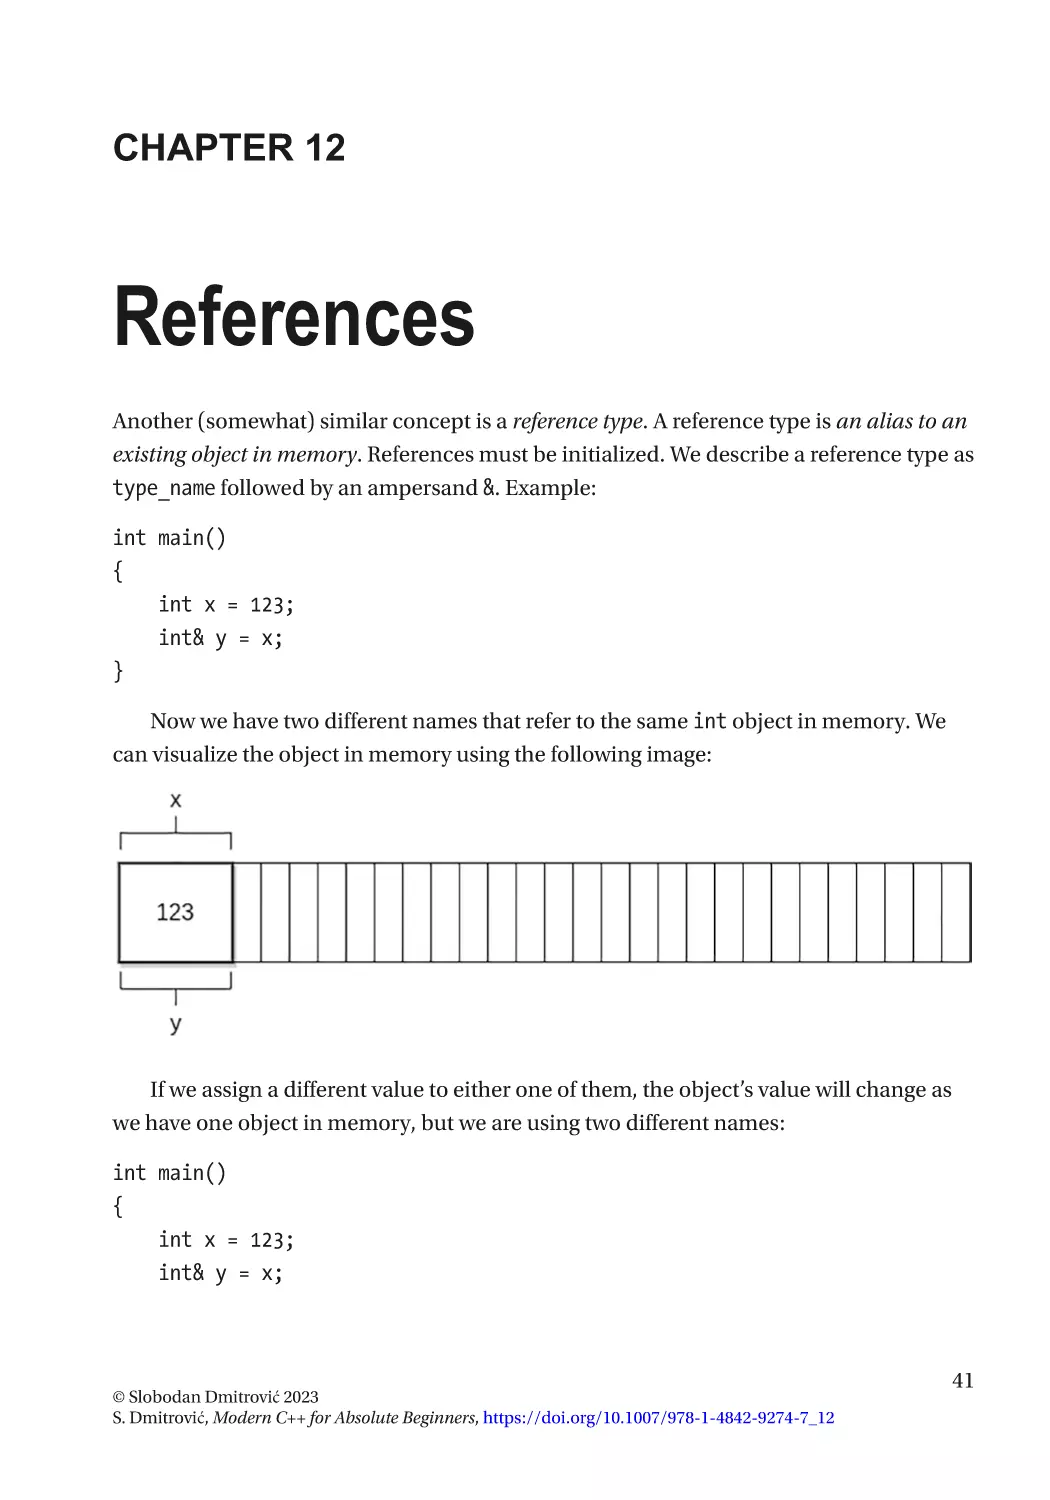
Chapter 12: References������������������������������������������������������������������������������������������ 41
Chapter 13: Introduction to Strings������������������������������������������������������������������������ 43
Defining a String������������������������������������������������������������������������������������������������������������������������� 43
Concatenating Strings����������������������������������������������������������������������������������������������������������������� 44
Accessing Characters����������������������������������������������������������������������������������������������������������������� 45
Comparing Strings���������������������������������������������������������������������������������������������������������������������� 46
String Input��������������������������������������������������������������������������������������������������������������������������������� 47
A Pointer to a String�������������������������������������������������������������������������������������������������������������������� 48
vi
Table of Contents
Substrings����������������������������������������������������������������������������������������������������������������������������������� 48
Finding a Substring��������������������������������������������������������������������������������������������������������������������� 49
Chapter 14: Automatic Type Deduction������������������������������������������������������������������ 51
Chapter 15: Exercises��������������������������������������������������������������������������������������������� 53
Array Definition��������������������������������������������������������������������������������������������������������������������������� 53
Pointer to an Object�������������������������������������������������������������������������������������������������������������������� 54
Reference Type��������������������������������������������������������������������������������������������������������������������������� 54
Strings����������������������������������������������������������������������������������������������������������������������������������������� 55
Strings from Standard Input�������������������������������������������������������������������������������������������������������� 55
Creating a Substring������������������������������������������������������������������������������������������������������������������� 56
Finding a Single Character���������������������������������������������������������������������������������������������������������� 57
Finding a Substring��������������������������������������������������������������������������������������������������������������������� 58
Automatic Type Deduction���������������������������������������������������������������������������������������������������������� 59
Chapter 16: Statements������������������������������������������������������������������������������������������ 61
Selection Statements������������������������������������������������������������������������������������������������������������������ 61
if Statement��������������������������������������������������������������������������������������������������������������������������� 61
Conditional Expression���������������������������������������������������������������������������������������������������������� 63
The Logical Operators����������������������������������������������������������������������������������������������������������� 65
switch Statement������������������������������������������������������������������������������������������������������������������ 70
Iteration Statements������������������������������������������������������������������������������������������������������������������� 71
for Statement������������������������������������������������������������������������������������������������������������������������ 72
while Statement�������������������������������������������������������������������������������������������������������������������� 73
do Statement������������������������������������������������������������������������������������������������������������������������� 75
Chapter 17: Constants�������������������������������������������������������������������������������������������� 77
Chapter 18: Exercises��������������������������������������������������������������������������������������������� 79
A Simple if Statement����������������������������������������������������������������������������������������������������������������� 79
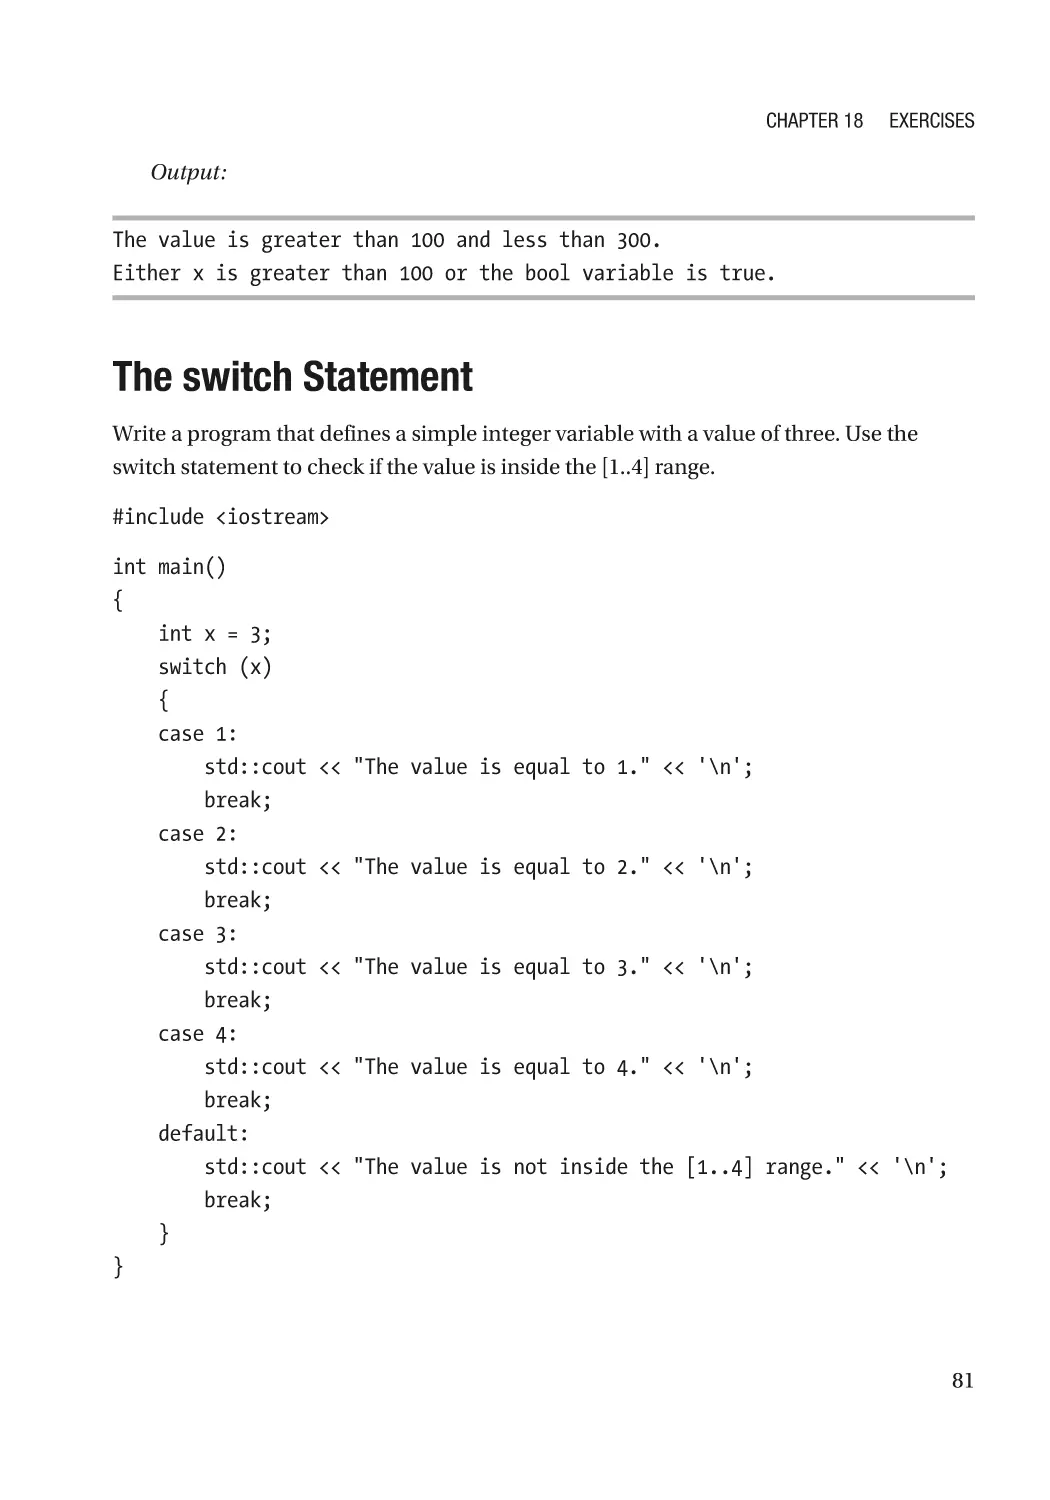
Logical Operators������������������������������������������������������������������������������������������������������������������������ 80
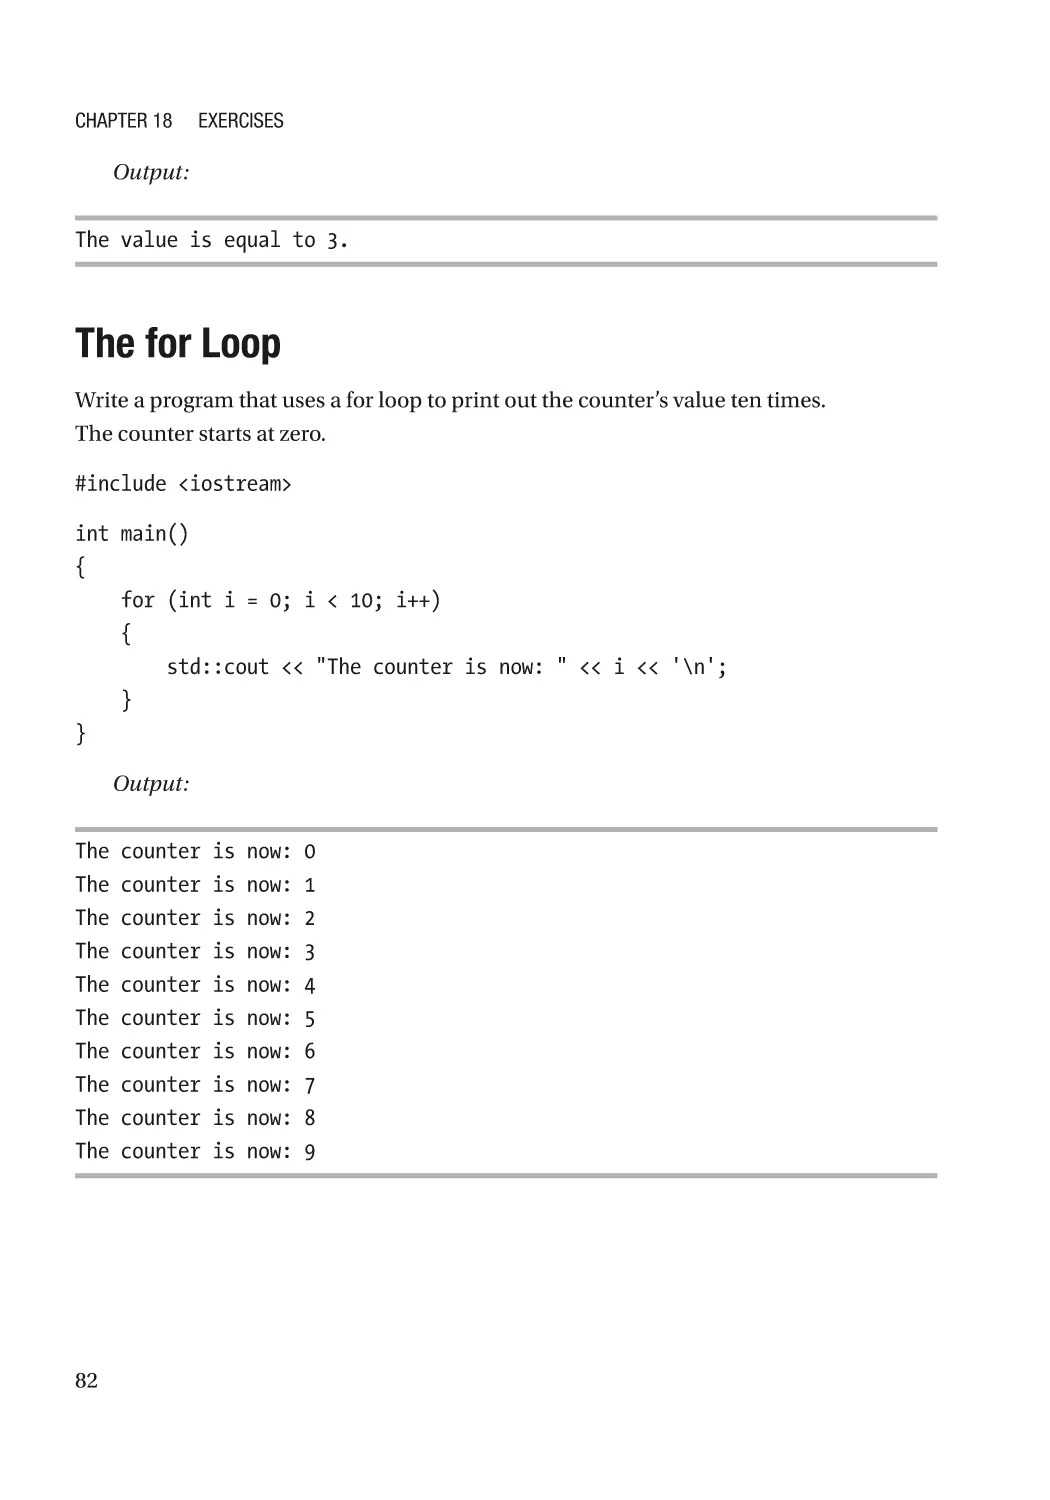
The switch Statement����������������������������������������������������������������������������������������������������������������� 81
vii
Table of Contents
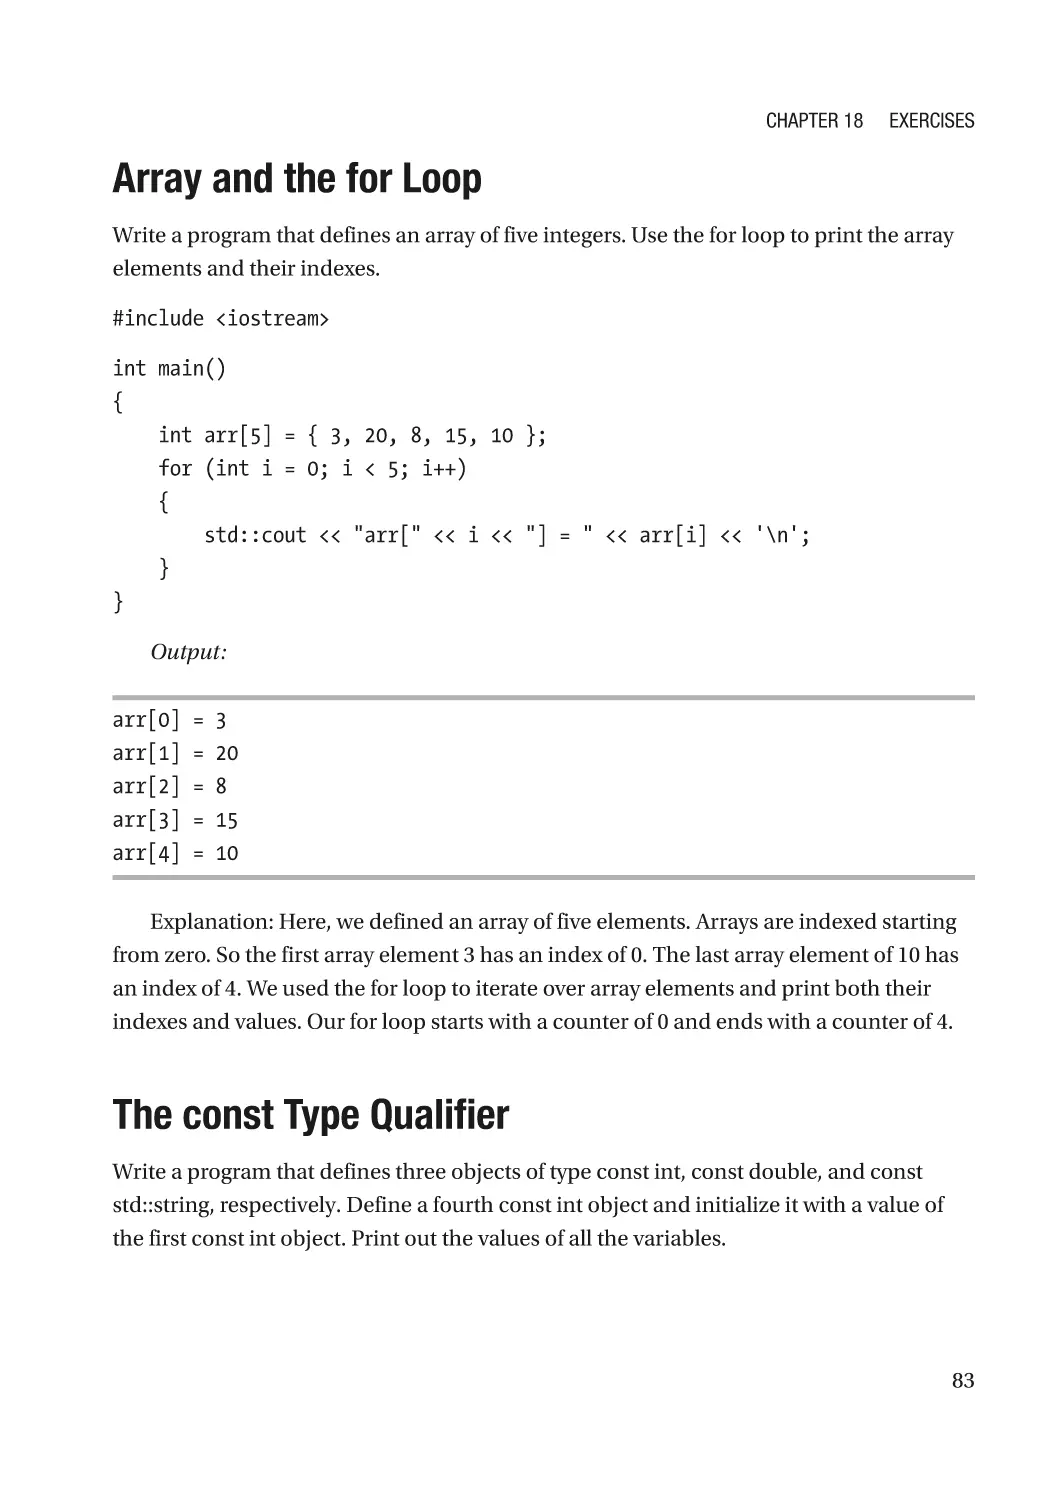
The for Loop�������������������������������������������������������������������������������������������������������������������������������� 82
Array and the for Loop���������������������������������������������������������������������������������������������������������������� 83
The const Type Qualifier�������������������������������������������������������������������������������������������������������������� 83
Chapter 19: Functions�������������������������������������������������������������������������������������������� 85
Introduction��������������������������������������������������������������������������������������������������������������������������������� 85
Function Declaration������������������������������������������������������������������������������������������������������������������� 85
Function Definition���������������������������������������������������������������������������������������������������������������������� 86
Return Statement������������������������������������������������������������������������������������������������������������������������ 89
Passing Arguments��������������������������������������������������������������������������������������������������������������������� 91
Passing by Value/Copy����������������������������������������������������������������������������������������������������������� 91
Passing by Reference������������������������������������������������������������������������������������������������������������ 92
Passing by Const Reference�������������������������������������������������������������������������������������������������� 93
Function Overloading������������������������������������������������������������������������������������������������������������������ 94
Chapter 20: Exercises��������������������������������������������������������������������������������������������� 97
Function Definition���������������������������������������������������������������������������������������������������������������������� 97
Separate Declaration and Definition������������������������������������������������������������������������������������������� 97
Function Parameters������������������������������������������������������������������������������������������������������������������� 98
Passing Arguments��������������������������������������������������������������������������������������������������������������������� 99
Function Overloads��������������������������������������������������������������������������������������������������������������������� 99
Chapter 21: Scope and Lifetime���������������������������������������������������������������������������� 101
Local Scope������������������������������������������������������������������������������������������������������������������������������� 101
Block Scope������������������������������������������������������������������������������������������������������������������������������ 101
Lifetime������������������������������������������������������������������������������������������������������������������������������������� 102
Automatic Storage Duration������������������������������������������������������������������������������������������������������ 102
Dynamic Storage Duration�������������������������������������������������������������������������������������������������������� 102
Static Storage Duration������������������������������������������������������������������������������������������������������������� 103
Operators new and delete��������������������������������������������������������������������������������������������������������� 103
viii
Table of Contents
Chapter 22: Exercises������������������������������������������������������������������������������������������� 105
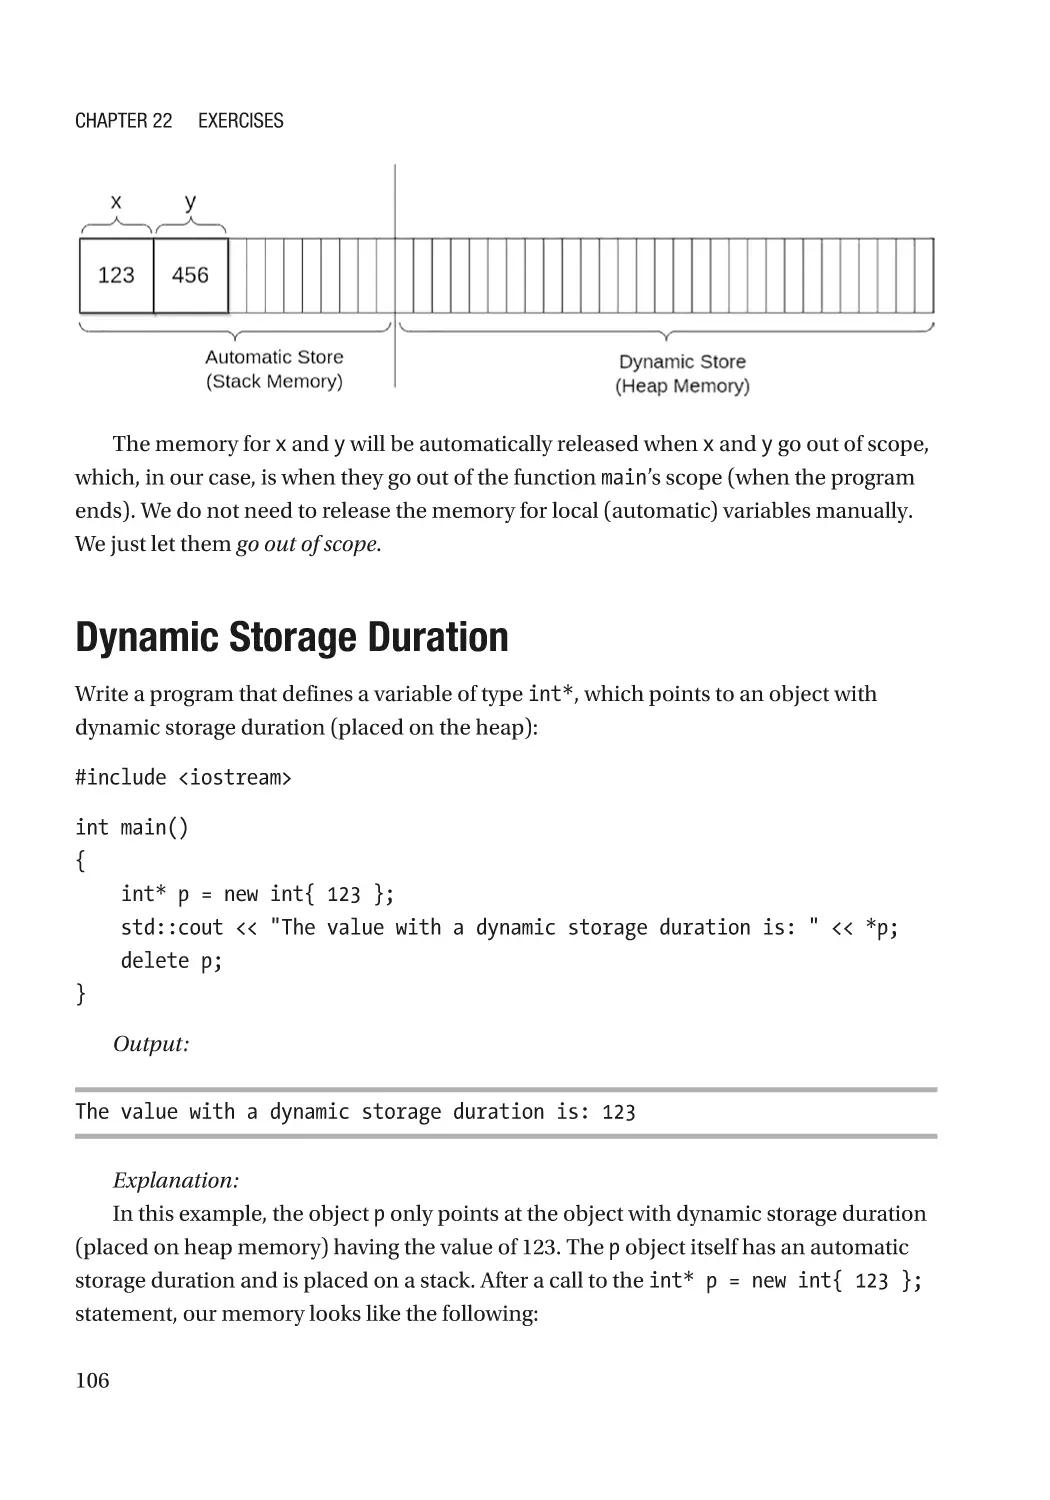
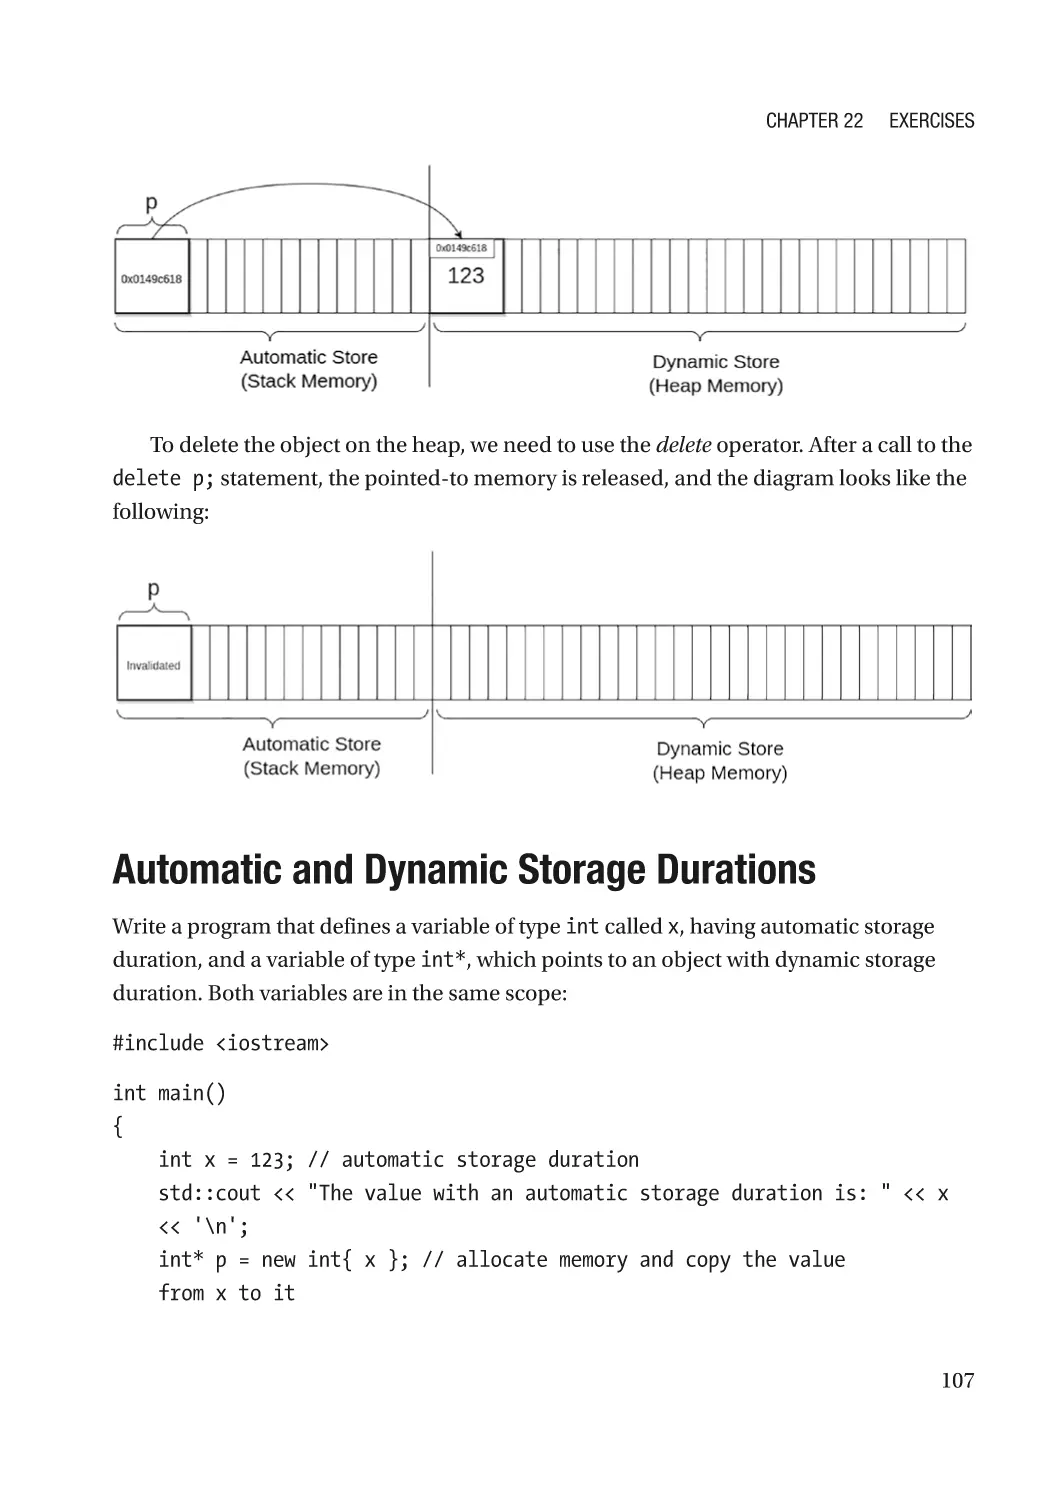
Automatic Storage Duration������������������������������������������������������������������������������������������������������ 105
Dynamic Storage Duration�������������������������������������������������������������������������������������������������������� 106
Automatic and Dynamic Storage Durations������������������������������������������������������������������������������ 107
Chapter 23: Classes – Introduction���������������������������������������������������������������������� 109
Data Member Fields������������������������������������������������������������������������������������������������������������������ 109
Member Functions�������������������������������������������������������������������������������������������������������������������� 110
Access Specifiers���������������������������������������������������������������������������������������������������������������������� 112
Constructors������������������������������������������������������������������������������������������������������������������������������ 116
Default Constructor������������������������������������������������������������������������������������������������������������� 116
Member Initialization����������������������������������������������������������������������������������������������������������� 119
Copy Constructor����������������������������������������������������������������������������������������������������������������� 120
Copy Assignment����������������������������������������������������������������������������������������������������������������� 123
Move Constructor���������������������������������������������������������������������������������������������������������������� 124
Move Assignment���������������������������������������������������������������������������������������������������������������� 126
Operator Overloading���������������������������������������������������������������������������������������������������������������� 128
Destructors������������������������������������������������������������������������������������������������������������������������������� 134
Chapter 24: Exercises������������������������������������������������������������������������������������������� 137
Class Instance��������������������������������������������������������������������������������������������������������������������������� 137
Class with Data Members��������������������������������������������������������������������������������������������������������� 137
Class with Member Function���������������������������������������������������������������������������������������������������� 138
Class with Data and Function Members����������������������������������������������������������������������������������� 139
Class Access Specifiers������������������������������������������������������������������������������������������������������������ 139
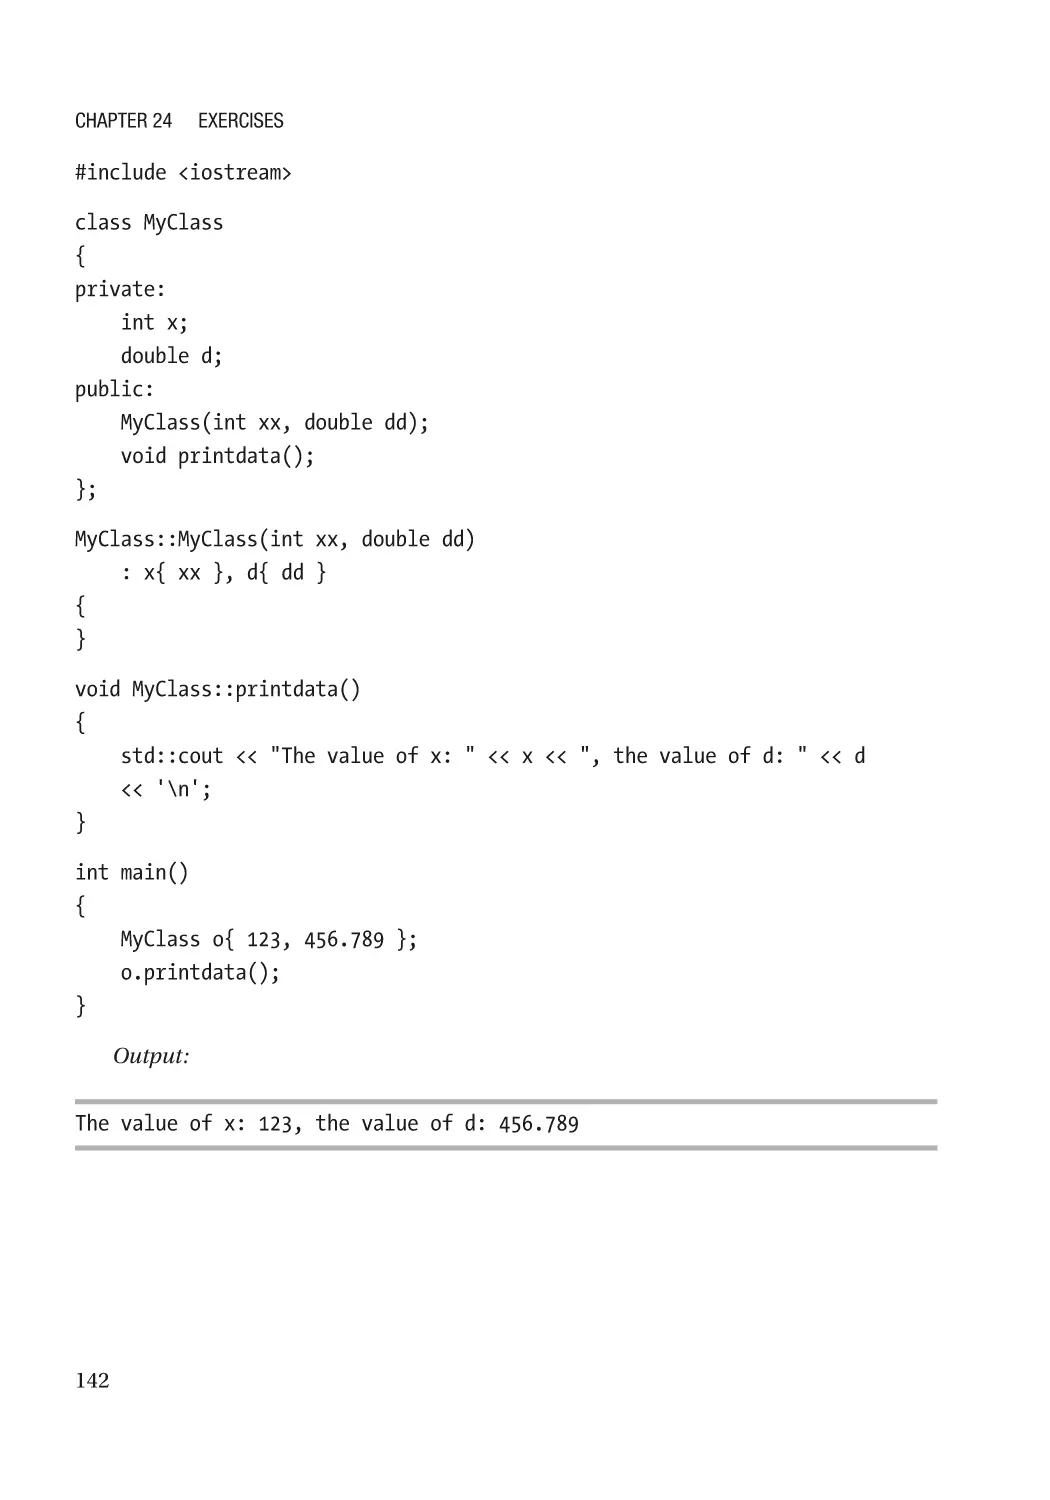
User-Defined Default Constructor and Destructor�������������������������������������������������������������������� 140
Constructor Initializer List��������������������������������������������������������������������������������������������������������� 141
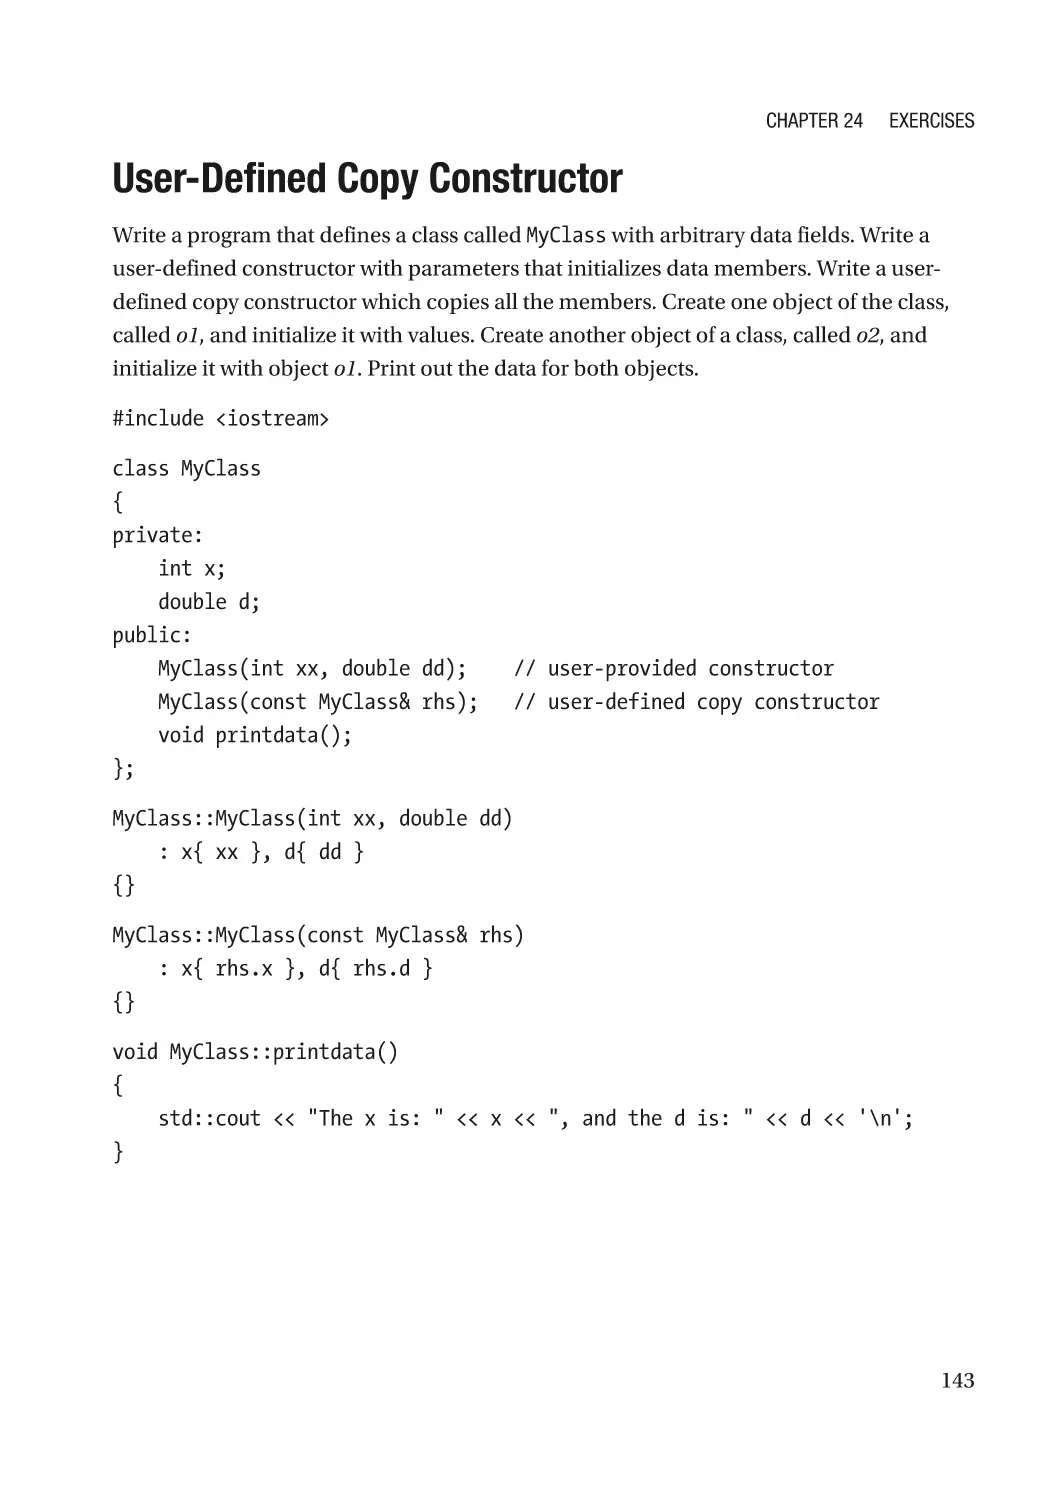
User-Defined Copy Constructor������������������������������������������������������������������������������������������������� 143
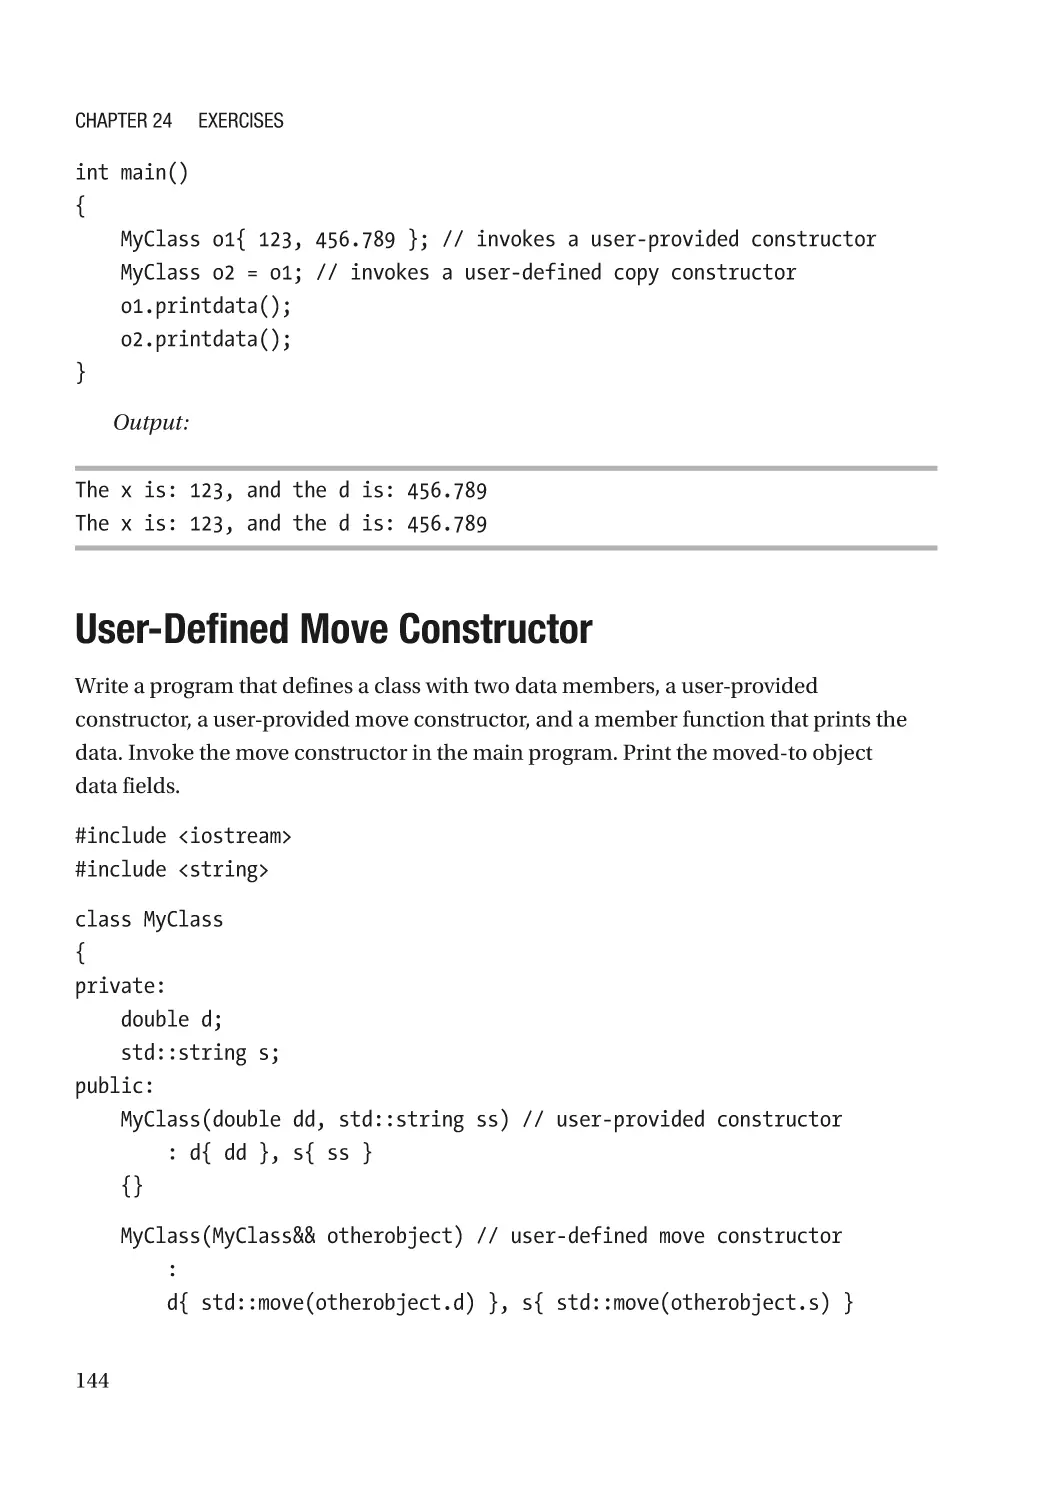
User-Defined Move Constructor������������������������������������������������������������������������������������������������ 144
Overloading Arithmetic Operators��������������������������������������������������������������������������������������������� 145
ix
Table of Contents
Chapter 25: Classes – Inheritance and Polymorphism����������������������������������������� 147
Inheritance�������������������������������������������������������������������������������������������������������������������������������� 147
Polymorphism��������������������������������������������������������������������������������������������������������������������������� 151
Chapter 26: Exercises������������������������������������������������������������������������������������������� 157
Inheritance�������������������������������������������������������������������������������������������������������������������������������� 157
Chapter 27: The static Specifier��������������������������������������������������������������������������� 161
Chapter 28: Templates������������������������������������������������������������������������������������������ 165
Function Templates������������������������������������������������������������������������������������������������������������������� 165
Class Templates������������������������������������������������������������������������������������������������������������������������ 167
Template Specialization������������������������������������������������������������������������������������������������������������ 171
Chapter 29: Enumerations������������������������������������������������������������������������������������ 173
Chapter 30: Exercises������������������������������������������������������������������������������������������� 177
Static Variable��������������������������������������������������������������������������������������������������������������������������� 177
Static Data Member������������������������������������������������������������������������������������������������������������������ 178
Static Member Function������������������������������������������������������������������������������������������������������������ 179
Function Template��������������������������������������������������������������������������������������������������������������������� 180
Class Template�������������������������������������������������������������������������������������������������������������������������� 181
Scoped Enums�������������������������������������������������������������������������������������������������������������������������� 182
Enums in a switch��������������������������������������������������������������������������������������������������������������������� 183
Chapter 31: Organizing Code�������������������������������������������������������������������������������� 185
Header and Source Files����������������������������������������������������������������������������������������������������������� 185
Header Guards�������������������������������������������������������������������������������������������������������������������������� 186
Namespaces����������������������������������������������������������������������������������������������������������������������������� 186
Chapter 32: Exercises������������������������������������������������������������������������������������������� 191
Header and Source Files����������������������������������������������������������������������������������������������������������� 191
Multiple Source Files���������������������������������������������������������������������������������������������������������������� 192
Namespaces����������������������������������������������������������������������������������������������������������������������������� 193
Nested Namespaces����������������������������������������������������������������������������������������������������������������� 194
x
Table of Contents
Chapter 33: Conversions�������������������������������������������������������������������������������������� 197
Implicit Conversions������������������������������������������������������������������������������������������������������������������ 197
Explicit Conversions������������������������������������������������������������������������������������������������������������������ 201
Chapter 34: Exceptions����������������������������������������������������������������������������������������� 205
Chapter 35: Smart Pointers���������������������������������������������������������������������������������� 211
Unique Pointer�������������������������������������������������������������������������������������������������������������������������� 211
Shared Pointer�������������������������������������������������������������������������������������������������������������������������� 214
Chapter 36: Exercises������������������������������������������������������������������������������������������� 217
static_cast Conversion�������������������������������������������������������������������������������������������������������������� 217
A Simple Unique Pointer����������������������������������������������������������������������������������������������������������� 218
Unique Pointer to an Object of a Class�������������������������������������������������������������������������������������� 218
Shared Pointer Exercise������������������������������������������������������������������������������������������������������������ 219
Simple Polymorphism��������������������������������������������������������������������������������������������������������������� 220
Polymorphism II������������������������������������������������������������������������������������������������������������������������ 221
Exception Handling������������������������������������������������������������������������������������������������������������������� 222
Multiple Exceptions������������������������������������������������������������������������������������������������������������������� 223
Chapter 37: Input/Output Streams������������������������������������������������������������������������ 225
File Streams������������������������������������������������������������������������������������������������������������������������������ 225
String Streams�������������������������������������������������������������������������������������������������������������������������� 229
Chapter 38: C++ Standard Library and Friends���������������������������������������������������� 235
Containers��������������������������������������������������������������������������������������������������������������������������������� 235
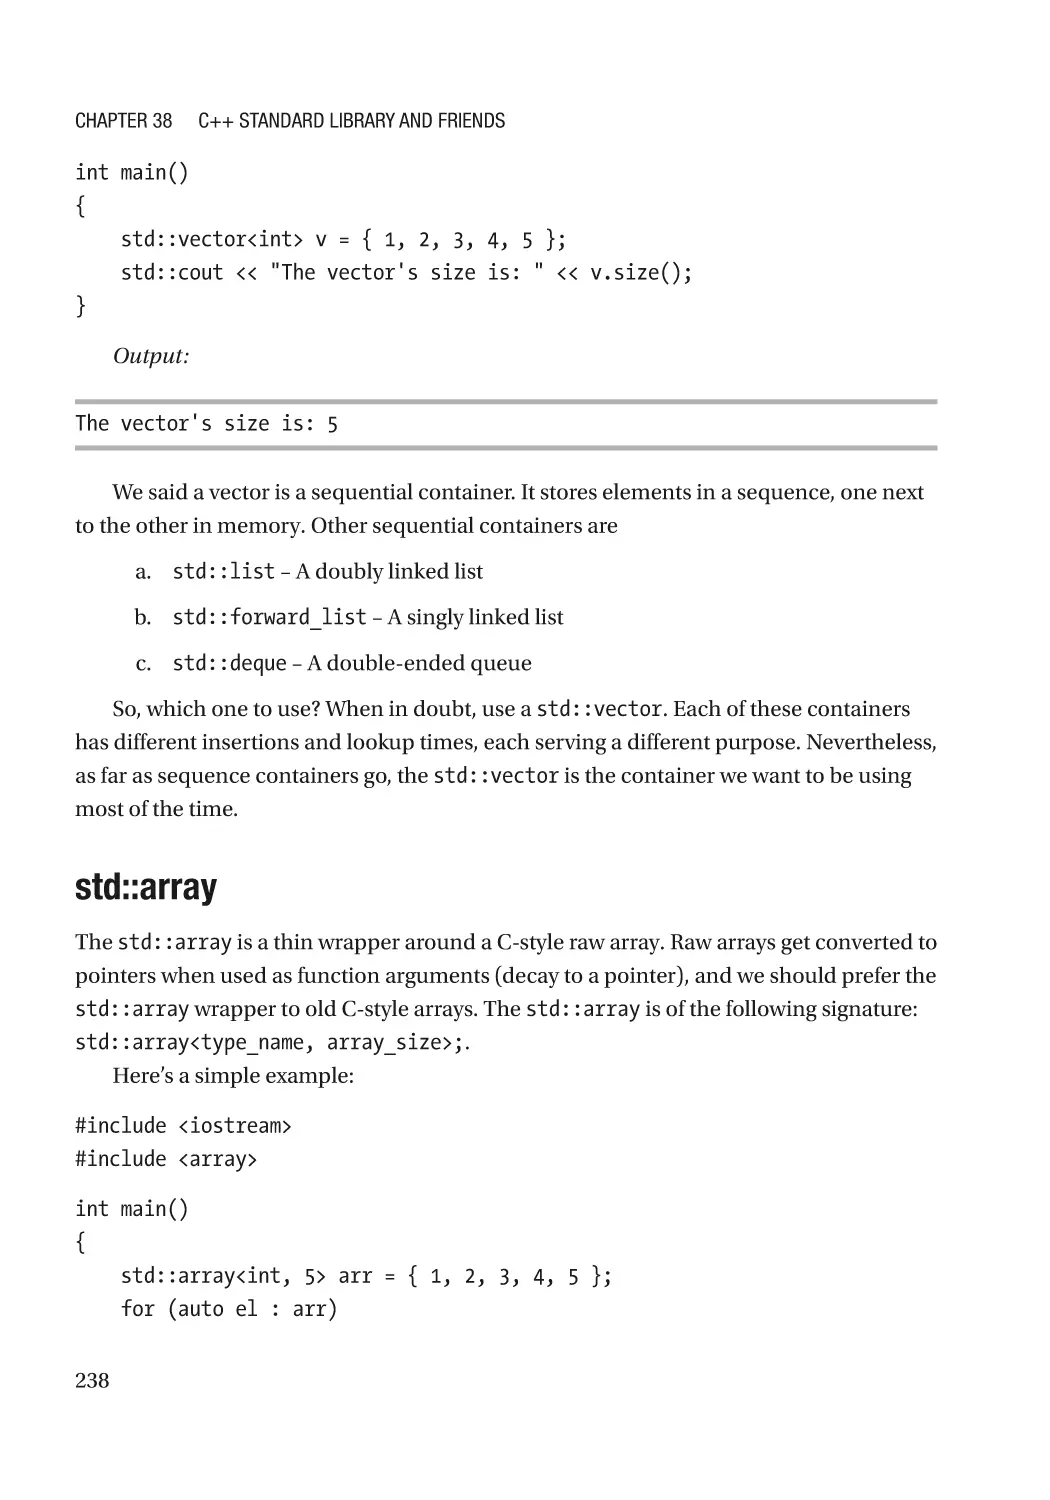
std::vector���������������������������������������������������������������������������������������������������������������������������� 236
std::array����������������������������������������������������������������������������������������������������������������������������� 238
std::set��������������������������������������������������������������������������������������������������������������������������������� 239
std::map������������������������������������������������������������������������������������������������������������������������������ 241
std::pair������������������������������������������������������������������������������������������������������������������������������� 244
Other Containers������������������������������������������������������������������������������������������������������������������ 245
The Range-Based for Loop������������������������������������������������������������������������������������������������������� 245
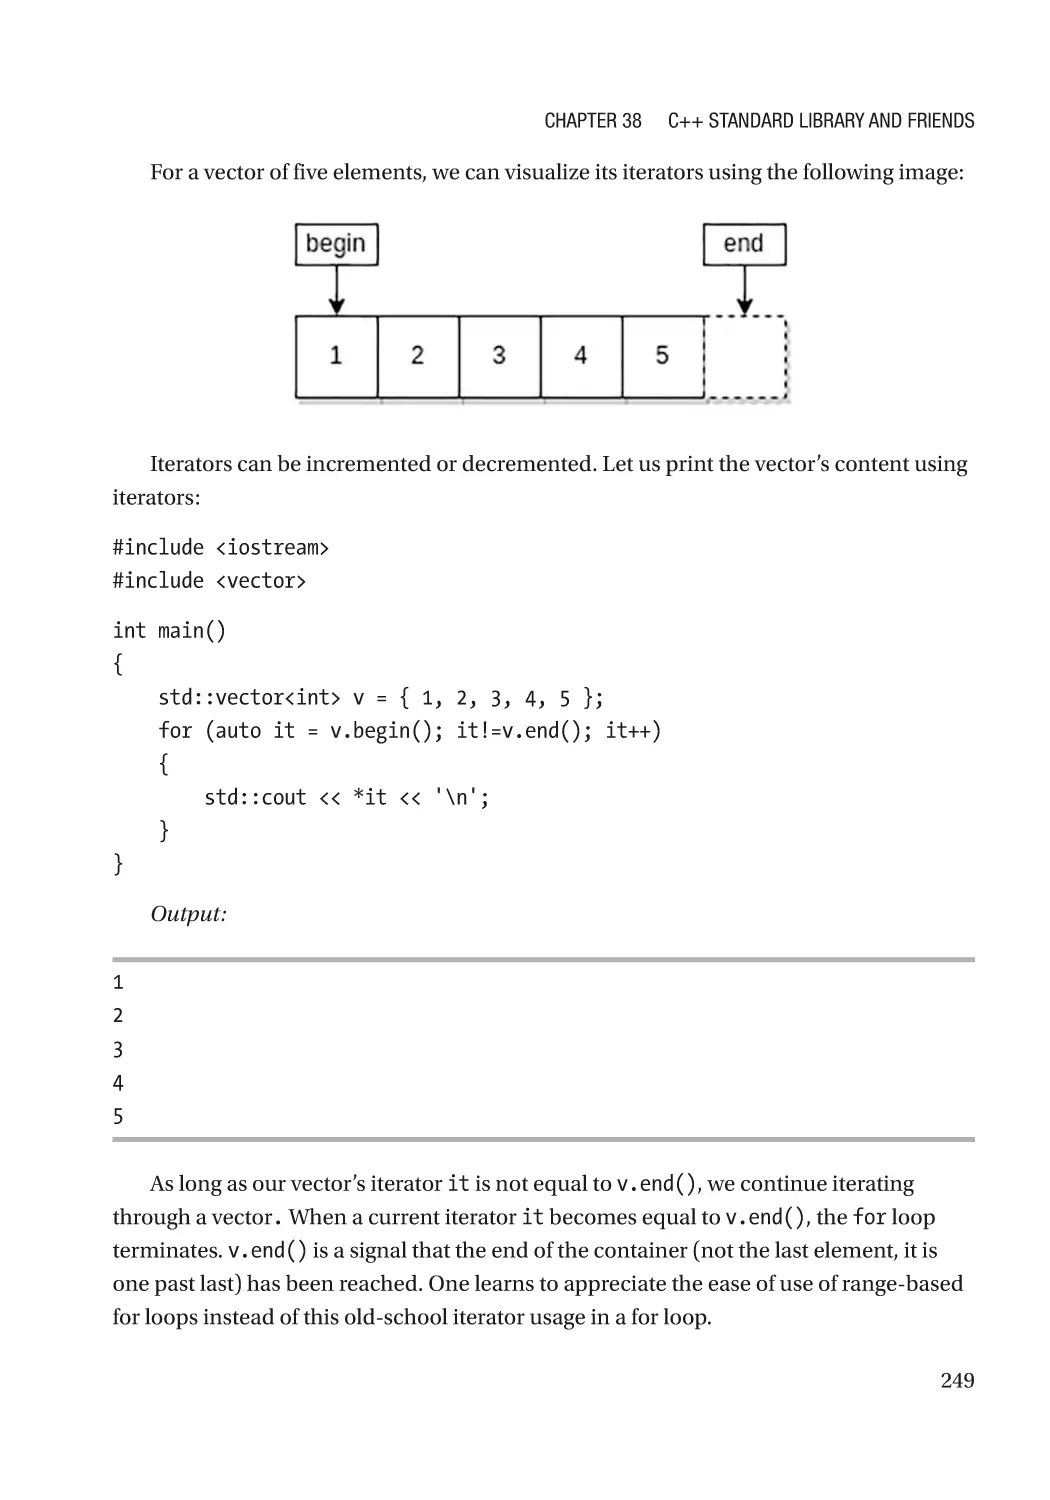
Iterators������������������������������������������������������������������������������������������������������������������������������������ 248
xi
Table of Contents
Algorithms and Utilities������������������������������������������������������������������������������������������������������������� 251
std::sort������������������������������������������������������������������������������������������������������������������������������� 252
std::find������������������������������������������������������������������������������������������������������������������������������� 254
std::copy������������������������������������������������������������������������������������������������������������������������������ 255
Min and Max Elements�������������������������������������������������������������������������������������������������������� 257
Lambda Expressions����������������������������������������������������������������������������������������������������������������� 258
Chapter 39: Exercises������������������������������������������������������������������������������������������� 267
Basic Vector������������������������������������������������������������������������������������������������������������������������������ 267
Deleting a Single Value������������������������������������������������������������������������������������������������������������� 268
Deleting a Range of Elements��������������������������������������������������������������������������������������������������� 268
Finding Elements in a Vector���������������������������������������������������������������������������������������������������� 269
Basic Set����������������������������������������������������������������������������������������������������������������������������������� 270
Set Data Manipulation��������������������������������������������������������������������������������������������������������������� 271
Set Member Functions�������������������������������������������������������������������������������������������������������������� 272
Search for Data in a Set������������������������������������������������������������������������������������������������������������ 273
Basic Map��������������������������������������������������������������������������������������������������������������������������������� 274
Inserting into a Map������������������������������������������������������������������������������������������������������������������ 275
Searching and Deleting from a Map����������������������������������������������������������������������������������������� 277
Lambda Expressions����������������������������������������������������������������������������������������������������������������� 278
Chapter 40: C++ Standards���������������������������������������������������������������������������������� 281
C++11��������������������������������������������������������������������������������������������������������������������������������������� 281
Automatic Type Deduction��������������������������������������������������������������������������������������������������� 282
Range-Based Loops������������������������������������������������������������������������������������������������������������ 282
Initializer Lists��������������������������������������������������������������������������������������������������������������������� 283
Move Semantics������������������������������������������������������������������������������������������������������������������ 284
Lambda Expressions����������������������������������������������������������������������������������������������������������� 284
The constexpr Specifier������������������������������������������������������������������������������������������������������� 285
Scoped Enumerators����������������������������������������������������������������������������������������������������������� 286
Smart Pointers��������������������������������������������������������������������������������������������������������������������� 286
xii
Table of Contents
std::unordered_set�������������������������������������������������������������������������������������������������������������� 288
std::unordered_map������������������������������������������������������������������������������������������������������������ 290
std::tuple����������������������������������������������������������������������������������������������������������������������������� 292
static_assert������������������������������������������������������������������������������������������������������������������������ 293
Introduction to Concurrency������������������������������������������������������������������������������������������������ 294
Deleted and Defaulted Functions���������������������������������������������������������������������������������������� 301
Type Aliases������������������������������������������������������������������������������������������������������������������������� 304
C++14��������������������������������������������������������������������������������������������������������������������������������������� 304
Binary Literals��������������������������������������������������������������������������������������������������������������������� 305
Digit Separators������������������������������������������������������������������������������������������������������������������� 306
Auto for Functions��������������������������������������������������������������������������������������������������������������� 306
Generic Lambdas����������������������������������������������������������������������������������������������������������������� 307
std::make_unique���������������������������������������������������������������������������������������������������������������� 307
C++17��������������������������������������������������������������������������������������������������������������������������������������� 308
Nested Namespaces������������������������������������������������������������������������������������������������������������ 308
Constexpr Lambdas������������������������������������������������������������������������������������������������������������� 309
Structured Bindings������������������������������������������������������������������������������������������������������������� 309
std::filesystem��������������������������������������������������������������������������������������������������������������������� 311
std::string_view������������������������������������������������������������������������������������������������������������������� 315
std::any�������������������������������������������������������������������������������������������������������������������������������� 317
std::variant�������������������������������������������������������������������������������������������������������������������������� 319
C++20��������������������������������������������������������������������������������������������������������������������������������������� 322
Modules������������������������������������������������������������������������������������������������������������������������������� 323
Concepts������������������������������������������������������������������������������������������������������������������������������ 325
Lambda Templates�������������������������������������������������������������������������������������������������������������� 329
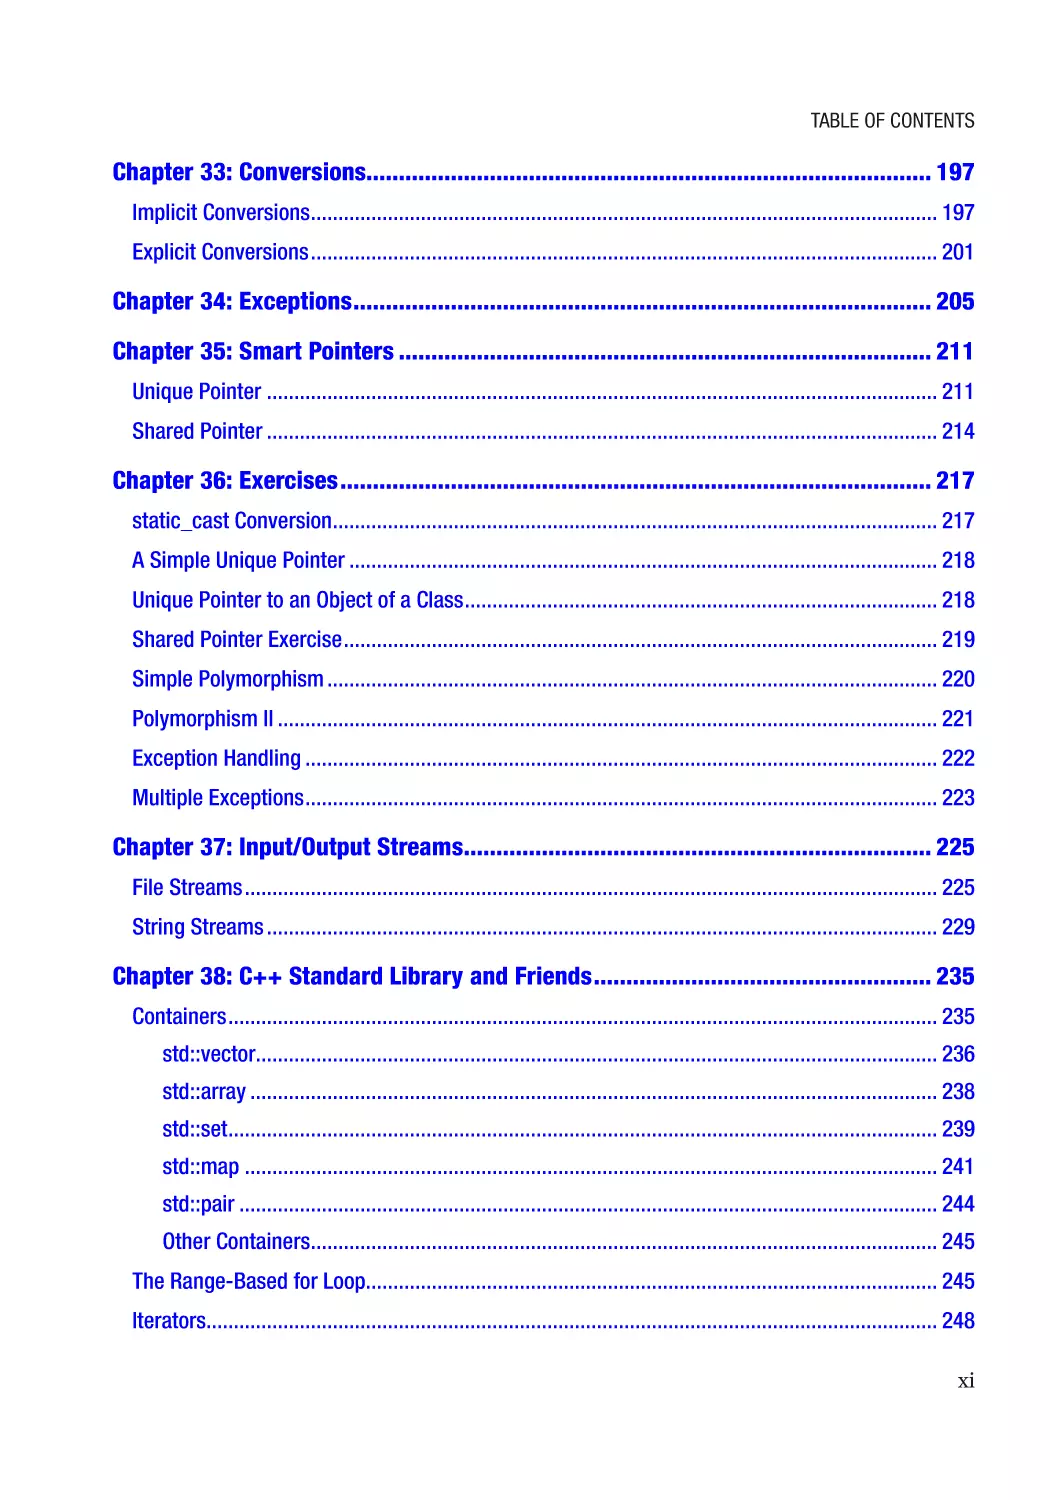
[likely] and [unlikely] Attributes������������������������������������������������������������������������������������������� 330
Ranges��������������������������������������������������������������������������������������������������������������������������������� 332
Coroutines��������������������������������������������������������������������������������������������������������������������������� 336
std::span������������������������������������������������������������������������������������������������������������������������������ 337
Mathematical Constants������������������������������������������������������������������������������������������������������ 338
xiii
Table of Contents
C++23��������������������������������������������������������������������������������������������������������������������������������������� 339
Multidimensional Subscript Operator���������������������������������������������������������������������������������� 340
Literal Suffixes for size_t����������������������������������������������������������������������������������������������������� 340
The #warning Preprocessor Directive��������������������������������������������������������������������������������� 341
The std::string::contains( ) Member Function���������������������������������������������������������������������� 341
std::print������������������������������������������������������������������������������������������������������������������������������ 343
Chapter 41: Projects��������������������������������������������������������������������������������������������� 347
Project I: Book Inventory����������������������������������������������������������������������������������������������������������� 347
Project II: Book Inventory – Multiple Files��������������������������������������������������������������������������������� 362
Project III: Message Logger������������������������������������������������������������������������������������������������������� 367
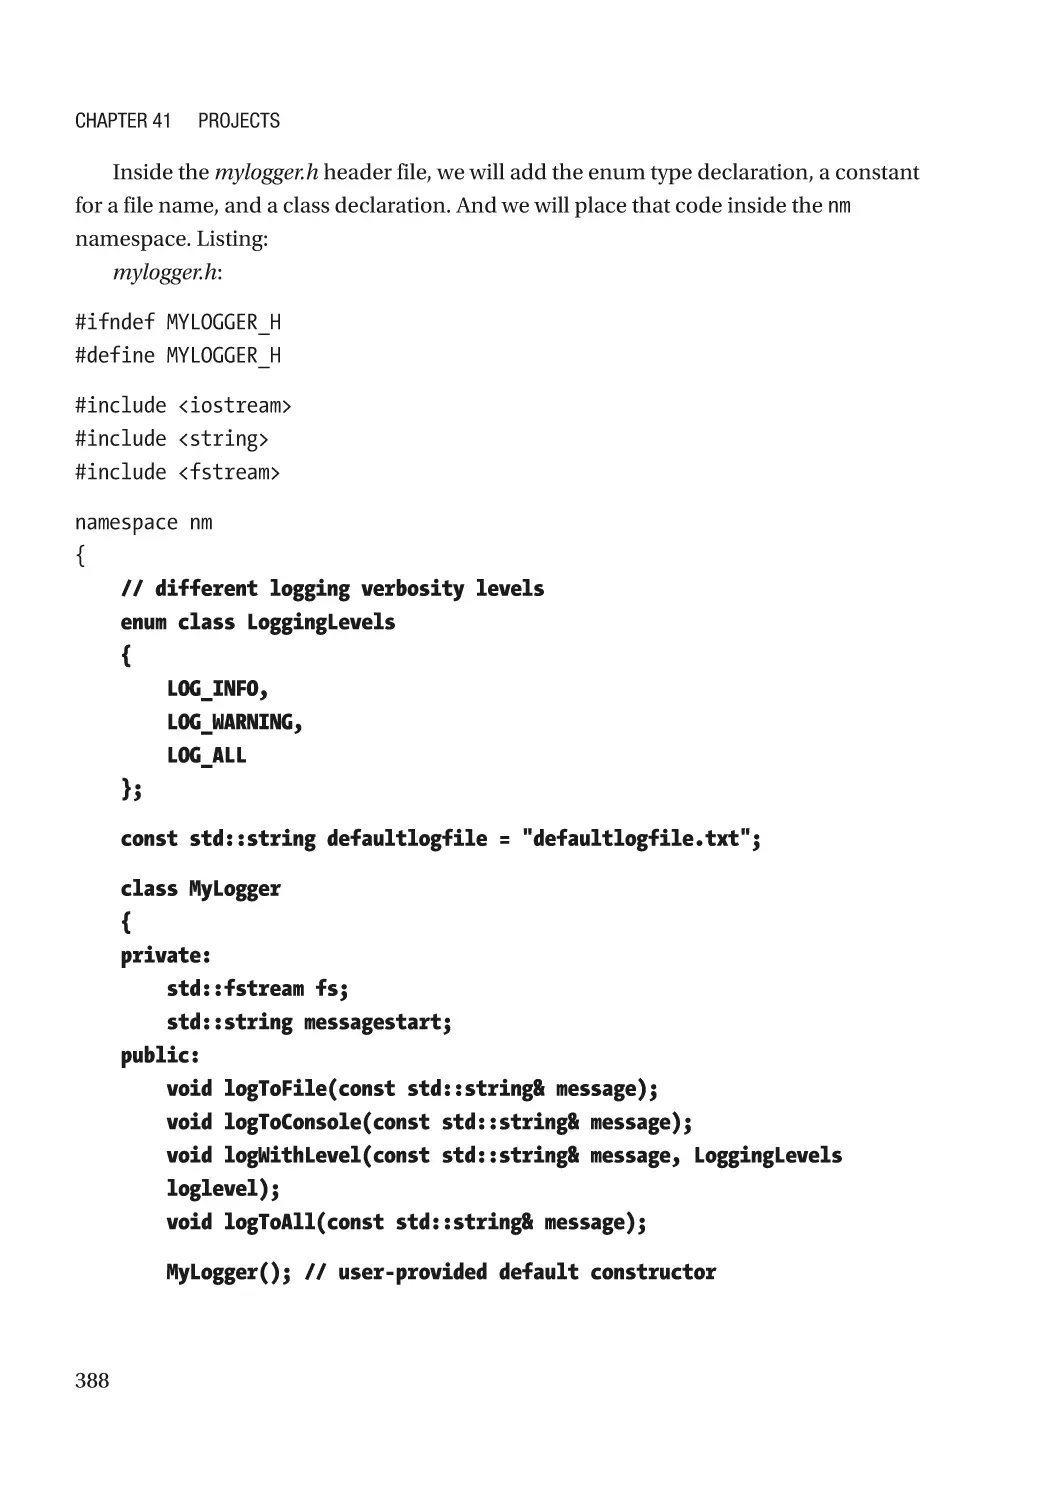
Project IV: Message Logger – Multiple Files����������������������������������������������������������������������������� 386
Project V: Information System��������������������������������������������������������������������������������������������������� 392
Project VI: Information System – Multiple Files������������������������������������������������������������������������ 422
Index��������������������������������������������������������������������������������������������������������������������� 433
xiv
About the Author
Slobodan Dmitrović is a software consultant, trainer, and
author of several programming books. He is a professional
R&D software developer with two decades of experience in
the industry. Slobodan provides C++ training courses for
corporate clients and academic institutions. Connect with
Slobodan at https://www.linkedin.com/in/slobodandmitrovic/.
xv
About the Technical Reviewer
Germán González-Morris is a polyglot software architect/
engineer with 20+ years of experience in the field, having
knowledge in Java, Spring, C, Julia, Python, Haskell, and
JavaScript, among others. He works for cloud (architecture)
and web distributed applications. Germán loves math
puzzles (including reading Knuth), swimming, and table
tennis. Also, he has reviewed several books including an
application container book (WebLogic) and books on
languages (C, Haskell, TypeScript, WebAssembly, Math for
coders, regexp, Julia, Algorithms). For more details, you can
visit his blog (https://devwebcl.blogspot.com/) or Twitter
account (@devwebcl).
xvii
Acknowledgments
I want to thank my friends, readers, and fellow C++ peers who have supported me in
writing the second edition of this book.
I am thankful to the entire C++ community for their help and feedback. I would
like to thank Rainer Grimm, Klaus Iglberger, Jens Weller, Bartłomiej Filipek, and
many others.
My most profound appreciation goes to S. Antonijević, Ron and Brankica, and Saša
Popović for their ongoing support.
xix
About the Second Edition
The second edition of this book is updated to include the notable features inside the
C++23 standard.
I have revised and updated numerous chapters with more relevant information and
clarification.
The second edition includes more diagrams to represent certain concepts better.
I have also added the output for all the code snippets.
The book now has a chapter entirely dedicated to various projects.
My intent with the second edition was to provide a simplified, updated, and accurate
introduction to the modern C++ programming language.
xxi
CHAPTER 1
Introduction
Congratulations on choosing to learn the C++ programming language, and thank you for
picking up this book. I will try to introduce you to a beautiful world of C++ to the best of
my abilities.
This book is an effort to introduce the reader to the C++ programming language in
a structured, straightforward, and friendly manner. We will use the “just enough theory
and plenty of examples” approach whenever possible.
To me, C++ is a wonderful product of the human intellect. Over the years, I have
certainly come to think of it as a thing of beauty and elegance. C++ is a language like no
other, surprising in its complexity yet wonderfully sleek and elegant in so many ways. It
is also a language that cannot be learned by guessing, one that is easy to get wrong and
challenging to get right.
In this book, we will get familiar with the language basics first. Then, we will move on
to classes, templates, and the C++ Standard Library. Once we got these covered, we will
describe the modern C++ standards in more detail.
After each section, source code exercises will help us adopt the learned material
more efficiently.
Finally, we will create a couple of source code projects. Let us get started!
© Slobodan Dmitrović 2023
S. Dmitrović, Modern C++ for Absolute Beginners, https://doi.org/10.1007/978-1-4842-9274-7_1
1
CHAPTER 2
What Is C++?
C++ is a programming language – a standardized, general-purpose, object-oriented,
compiled language. Every C++ compiler is accompanied by a set of useful functions
and containers called the C++ Standard Library. Bjarne Stroustrup created C++ as an
extension to a C programming language. Still, C++ evolved to be a completely different
programming language.
Let us emphasize this: C and C++ are two different languages. C++ started as “C with
classes,” but it is now a completely different language. So, C++ is not C; C++ is not C with
classes; it is just C++. And there is no such thing as a C/C++ programming language.
C++ is widely used for so-called systems programming as well as application
programming. C++ is a language that allows us to get down to the metal where we can
perform low-level routines if needed or soar high using abstraction mechanisms such as
templates and classes.
C++ Standards
C++ is governed by the ISO C++ standard. There are multiple ISO C++ standards listed
here in chronological order: C++03, C++11, C++14, C++17, C++20, and the upcoming
C++23 standard.
Every C++ standard, starting with C++11 onward, is referred to as “modern C++.”
And modern C++ is what we will be teaching in this book.
© Slobodan Dmitrović 2023
S. Dmitrović, Modern C++ for Absolute Beginners, https://doi.org/10.1007/978-1-4842-9274-7_2
3
CHAPTER 3
C++ Compilers
C++ programs are usually a collection of some C++ code spread across one or multiple
source and header files. Source files, by convention, have the .cpp extension, and header
files, by convention, have the .h extension. Other extensions are also possible. Both
header and source files are regular text files containing some C++ source code. The C++
compiler is a program that compiles these files and turns them into object files. A linker
then links object files together to create an executable file or a library. At the time of
writing, some of the more popular C++ compilers are
–– The g++ front end (as part of the GNU Compiler Collection or GCC)
–– Visual C++ (as part of the Visual Studio IDE)
–– Clang (as part of the LLVM)
Installing C++ Compilers
The following sections explain how to install C++ compilers on Linux and Windows and
compile and run our C++ programs.
On Linux
To install a C++ compiler (as part of the GCC) on Linux Ubuntu, type the following inside
the terminal:
sudo apt-get install build-essential
To install a C++ compiler on Fedora, we type
sudo dnf install gcc-c++
© Slobodan Dmitrović 2023
S. Dmitrović, Modern C++ for Absolute Beginners, https://doi.org/10.1007/978-1-4842-9274-7_3
5
Chapter 3
C++ Compilers
To compile the C++ source file, named, for example, source.cpp, we type
g++ source.cpp
This command will produce an executable with the default name of a.out. To run the
executable file, type
./a.out
To compile for a C++11 standard, we add the -std=c++11 flag:
g++ -std=c++11 source.cpp
To enable warnings, we add the -Wall flag:
g++ -std=c++11 -Wall source.cpp
To produce a custom executable name, we add the -o flag followed by an
executable name:
g++ -std=c++11 -Wall source.cpp -o myexe
Alternatively, we can install a Clang compiler on Linux Ubuntu by typing
sudo apt-get install clang
To install Clang on Fedora, we type
sudo dnf install clang
The same rules apply to the Clang compiler when compiling. Substitute g++ with
clang++.
On Windows
On Windows, we can install a free or commercial copy of Visual Studio.
Choose Create a new project, make sure the C++ language option is selected, choose
Empty Project, click Next, and click Create. Go to the Solution Explorer panel, right-click
the project name, choose Add ➤ New Item ➤ C++ File (.cpp), type the name of a file
(source.cpp), and click Add. Press F5 to run the program.
We can also do the following: choose Create a new project, make sure the C++
language option is selected, choose Console App, click Next, and click Create.
If a Create a new project button is not visible, choose File ➤ New ➤ Project and repeat
the remaining steps.
6
CHAPTER 4
Our First Program
Let us create a blank text file using the text editor or C++ IDE of our choice and name it
source.cpp. First, let us create an empty C++ program that does nothing. The content of
the source.cpp file is
int main(){}
The function main is the main program’s entry point, the start of our program. When
we run our executable, the code inside the main function body gets executed. A function
is of type int (and returns a result to the system, but let us not worry about that just yet).
The reserved name main is a function name. It is followed by a list of parameters inside
the parentheses () followed by a function body marked with braces {}. Braces marking
the beginning and the end of a function body can also be on separate lines:
int main()
{
}
This simple program does nothing, it has no parameters listed inside parentheses,
and there are no statements inside the function body. It is essential to understand that
this is the main program signature.
There is also another main function signature accepting two different parameters used
for manipulating the command-line arguments. For now, we will only use the first form.
Comments
Single-line comments in C++ start with double slashes //, and the compiler ignores
them. We use them to comment or document the code or use them as notes:
int main()
{
© Slobodan Dmitrović 2023
S. Dmitrović, Modern C++ for Absolute Beginners, https://doi.org/10.1007/978-1-4842-9274-7_4
7
Chapter 4
Our First Program
// this is a comment
}
We can have multiple single-line comments:
int main()
{
// this is a comment
// this is another comment
}
Multiline comments start with the /* and end with the */. They are also known as
C-style comments. Example:
int main()
{
/* This is a
multi-line comment */
}
Hello World Example
Now we are ready to get the first glimpse at our “Hello World” example. The following
program is the simplest “Hello World” example. It prints out “Hello World.” in the
console window:
#include <iostream>
int main()
{
std::cout << "Hello World.";
}
Output:
Hello World.
8
Chapter 4
Our First Program
Believe it or not, this example’s detailed analysis and explanation can be more than
15 pages long. We can go into it right now, but we will be no wiser at this point as we first
need to know what headers, streams, objects, operators, and string literals are. Do not
worry. We will get there.
Explanation:
The #include <iostream> statement includes the iostream header file content into
our source file via the #include directive. The iostream header is part of the standard
library. We need its inclusion to be able to use the std::cout object, also known as the
standard output stream. The << operator, called the stream insertion operator, inserts
our Hello World string literal into that output stream. A string literal is enclosed in
double quotes "". The ; marks the end of the statement. Statements are pieces of the
C++ program that get executed. Statements end with a semicolon ; in C++. The std is
the standard library namespace, and :: is the scope resolution operator. Object cout
is located inside the std namespace, and to access it, we need to prepend the call with
the std::. We will get more familiar with all of these later in the book, especially the
std:: part.
A brief explanation:
In a nutshell, the std::cout << is the natural way of outputting data to the standard
output/console window in C++.
We can output multiple string literals by separating them with multiple << operators:
#include <iostream>
int main()
{
std::cout << "Some string." << " Another string.";
}
Output:
Some string. Another string.
To output data on a new line, we need to output a newline character \n literal. A
single character literal, including the escape sequence characters in C++, is enclosed in
single quotes '', like 'a', 'B', 'c', '\n', etc.
9
Chapter 4
Our First Program
Example:
#include <iostream>
int main()
{
std::cout << "First line" << '\n' << "Second line.";
}
Output:
First line
Second line.
Certain characters cannot be easily represented using a single character symbol.
Some character literals start with the \ symbol. The \ represents an escape sequence, a
mechanism to represent certain special characters such as the newline character '\n', a
single quote character '\'', a double quote character '\"', a character '\t', and similar.
Characters can also be part of the single string literal:
#include <iostream>
int main()
{
std::cout << "First line\nSecond line.";
}
Output:
First line
Second line.
Do not use using namespace std;
Many examples on the Web introduce the entire std namespace into the current
scope via the using namespace std; statement only to be able to type cout instead
of the std::cout. While this might save us from typing five additional characters, it is
wrong for many reasons. We do not want to introduce the entire std namespace into the
current scope because we want to avoid name clashes and ambiguity.
10
Chapter 4
Our First Program
Good to remember Do not introduce the entire std namespace into a current
scope via the using namespace std; statement.
So, instead of this wrong approach:
#include <iostream>
using namespace std; // do not use this
int main()
{
cout << "Bad practice.";
}
Use the following:
#include <iostream>
int main()
{
std::cout << "Good practice.";
}
For calls to objects and functions residing inside the std namespace, add the std::
prefix where needed.
11
CHAPTER 5
Types
Every entity has a type. What is a type? A type is a property describing the set of possible
values and operations on those values. Instances of types are called objects. An object is
a region in memory that has a type, a value, and possibly a name. An instance of a simple
type is not to be confused with an instance of a class which is also called an object.
Fundamental Types
C++ has some built-in types. We often refer to them as fundamental types. A declaration
is a statement that introduces a name into a current scope.
Boolean
Let us declare a variable b of type bool. This type holds values of true and false:
int main()
{
bool b;
}
This example declares a variable b of type bool. And that is it. The variable is not
initialized: and no value has been assigned to it at the time of construction. To initialize a
variable, we use an assignment operator = followed by an initializer:
int main()
{
bool b = true;
}
© Slobodan Dmitrović 2023
S. Dmitrović, Modern C++ for Absolute Beginners, https://doi.org/10.1007/978-1-4842-9274-7_5
13
Chapter 5
Types
We can also use braces {} for initialization:
int main()
{
bool b{ true };
}
These examples declare a (local) variable b of type bool and initialize it to a value
of true. Our variable now holds a value of true. All local variables should be initialized.
Accessing uninitialized variables results in undefined behavior, abbreviated as UB. More
on this in the following chapters.
Character Type
Type char, referred to as character type, is used to represent a single character. The type
can store characters such as 'a', 'Z', etc. The size of a character type is exactly one byte.
Character literals are enclosed in single quotes '' in C++. To declare and initialize a
variable of type char, we write
int main()
{
char c = 'a';
}
Now we can print out the value of our char variable:
#include <iostream>
int main()
{
char c = 'a';
std::cout << "The value of variable c is: " << c;
}
Output:
The value of variable c is: a
14
Chapter 5
Types
Once declared and initialized, we can access our variable and change its value:
#include <iostream>
int main()
{
char c = 'a';
std::cout << "The value of variable c is: " << c;
c = 'B';
std::cout << " The new value of variable c is: " << c;
}
Output:
The value of variable c is: a The new value of variable c is: B
The size of the char type in memory is always one byte. We obtain the size of the type
through a sizeof operator:
#include <iostream>
int main()
{
std::cout << "The size of type char is: " << sizeof(char) << "
byte(s)";
}
Output:
The size of type char is: 1 byte(s)
There are other character types, such as wchar_t for holding characters of Unicode
character set and char16_t for holding UTF-16 character sets, but for now, let us stick to
the type char.
A character literal is a character enclosed in single quotes, for example, 'a', 'A', 'z',
'X', '0', etc.
15
Chapter 5
Types
Every character is represented by an integer number in the character set. That is why
we can assign both numeric literals (up to a certain number) and character literals to our
char variable:
int main()
{
char c = 'a';
// is the same as:
// char c = 97;
}
We can write char c = 'a'; or we can write char c = 97; which is (probably) the
same, as the 'a' character in the ASCII table is represented with the number of 97. For
the most part, we will be using character literals to represent the value of a char object.
Integer Types
Another fundamental type is int called integer type. We use it to store integral values
(whole numbers), both negative and positive:
#include <iostream>
int main()
{
int x = 123;
int y = -256;
std::cout << "The value of x is: " << x << ", the value of y
is: " << y;
}
Output:
The value of x is: 123, the value of y is: -256
Here, we declared and initialized two variables of type int. The size of int is usually
4 bytes. We can also initialize the variable with another variable. It will receive a copy of
its value. We still have two separate objects in memory:
16
Chapter 5
Types
#include <iostream>
int main()
{
int x = 123;
int y = x;
std::cout << "The value of x is: " << x << ", the value of y
is: " << y;
// x is 123
// y is 123
x = 456;
std::cout << "The value of x is: " << x << ", the value of y
is: " << y;
// x is now 456
// y is still 123
}
Output:
The value of x is: 123, the value of y is: 123The value of x is: 456, the
value of y is: 123
Once we declare a variable, we access and manipulate the variable name by its name
only, without the type name.
Integer literals can be decimal, octal, and hexadecimal. Octal literals start with a
prefix of 0, and hexadecimal literals begin with a prefix of 0x.
int main()
{
int x = 10; // decimal literal
int y = 012; // octal literal
int z = 0xA; // hexadecimal literal
}
All these variables have been initialized to a value of 10 represented by different
integer literals. For the most part, we will be using decimal literals.
There are also other integer types, such as int64_t and others, but we will stick to
int for now.
17
Chapter 5
Types
Floating-Point Types
There are three floating-point types in C++: float, double, and long double. Mainly,
we will be using the type double (double precision). We use it for storing floating-point
values/real numbers:
#include <iostream>
int main()
{
double d = 3.14;
std::cout << "The value of d is: " << d;
}
Output:
The value of d is: 3.14
Some of the floating-point literals can be
int main()
{
double
double
double
double
double
}
x
y
z
w
d
=
=
=
=
=
213.456;
1.;
0.15;
.15;
3.14e10;
Type void
Type void is a type with no values. Well, what is the purpose of such a type if we cannot
have objects of that type? Good question. While we cannot have objects of type void, we
can have functions of type void – functions that do not return a value. We can also have
a void pointer type marked with void*. More on this in later chapters when we discuss
pointers and functions.
18
Chapter 5
Types
Type Modifiers
Types can have modifiers. Some of the modifiers are signed and unsigned. The signed
(the default if omitted) means the type can hold both positive and negative values,
and unsigned means the type has unsigned representation. Other modifiers affect the
type’s size: short means the type will have a width of at least 16 bits, and long means
the type will have a width of at least 32 bits. Furthermore, we can now combine these
modifiers:
#include <iostream>
int main()
{
unsigned long int x = 4294967295;
std::cout << "The value of an unsigned long integer variable
is: " << x;
}
Output:
The value of an unsigned long integer variable is: 4294967295
Type int is signed by default.
Variable Declaration, Definition, and Initialization
Introducing a name into a current scope is called a declaration. We are letting the world
know there is a name (a variable, for example) of some type from now on in the current
scope. In a declaration, we prepend the variable name with a type name. Declaration
examples:
int main()
{
char c;
int x;
double d;
}
19
Chapter 5
Types
We can declare multiple names on the same line:
int main()
{
int x, y, z;
}
If there is an initializer for an object present, then we call it an initialization. We
are declaring and initializing an object to a specific value. We can initialize an object in
various ways:
int main()
{
int x = 123;
int y{ 123 };
int z = { 123 };
}
A variable definition is setting a value in memory for a name. The definition is
making sure we can access and use the name in our program. Roughly speaking, it is
a declaration followed by an initialization (for variables) followed by a semicolon. The
definition is also a declaration. Definition examples:
int main()
{
char c = 'a';
int x = 123;
double d = 456.78;
}
20
CHAPTER 6
Exercises
Hello World and Comments
Write a program that has a comment in it and outputs “Hello World.” on one line and
“C++ rocks!” on a new line.
#include <iostream>
int main()
{
// this is a comment
std::cout << "Hello World." << '\n';
std::cout << "C++ rocks!";
}
Output:
Hello World.
C++ rocks!
Declaration
Write a program that declares three variables inside the main function. Variables are of
types char, int, and double. The names of the variables are arbitrary. Since we do not
use any input or output, we do not need to include the <iostream> header.
int main()
{
char mychar;
© Slobodan Dmitrović 2023
S. Dmitrović, Modern C++ for Absolute Beginners, https://doi.org/10.1007/978-1-4842-9274-7_6
21
Chapter 6
Exercises
int myint;
double mydouble;
}
Definition
Write a program that defines three variables inside the main function. The variables are
of types char, int, and double. The names of the variables are arbitrary. The initializers
are arbitrary.
int main()
{
char mychar = 'a';
int myint = 123;
double mydouble = 456.78;
}
Initialization
Write a program that defines three variables inside the main function. The variables are
of types char, int, and double. The names of the variables are arbitrary. The initializers
are arbitrary. The initialization is performed using the initializer list. Print the values
afterward.
#include <iostream>
int main()
{
char mychar{ 'a' };
int myint{ 123 };
double mydouble{ 456.78
std::cout << "The value
std::cout << "The value
std::cout << "The value
}
22
};
of a char variable is: " << mychar << '\n';
of an int variable is: " << myint << '\n';
of a double variable is: " << mydouble << '\n';
Chapter 6
Exercises
Output:
The value of a char variable is: a
The value of an int variable is: 123
The value of a double variable is: 456.78
23
CHAPTER 7
Operators
Assignment Operator
The assignment operator = assigns a value to a variable/object:
int main()
{
char mychar = 'c'; //
mychar = 'd'; //
int x = 123; //
x = 456; //
int y = 789; //
y = x; //
}
define
assign
define
assign
define
assign
a char variable mychar
a new value to mychar
an integer variable x
a new value to x
a new integer variable y
a value of x to it
Arithmetic Operators
We can do arithmetic operations using arithmetic operators. Some of them are
+
*
/
%
//
//
//
//
//
addition
subtraction
multiplication
division
modulo
Example:
#include <iostream>
int main()
© Slobodan Dmitrović 2023
S. Dmitrović, Modern C++ for Absolute Beginners, https://doi.org/10.1007/978-1-4842-9274-7_7
25
Chapter 7
Operators
{
int x = 123;
int y = 456;
int result =
result = x result = x *
result = x /
std::cout <<
}
x + y; // addition
y; // subtraction
y; // multiplication
y; // division
"The result is: " << result << '\n';
Output:
The result is: 0
The integer division, in our example, results in a value of 0. It is because the result of
the integral division where both operands are integers is truncated toward zeros. In the
expression x / y, x and y are operands, and / is the operator.
If we want a floating-point result, we need to use the type double and make sure at
least one of the division operands is also of type double:
#include <iostream>
int main()
{
int x = 123;
double y = 456.0;
double result = x / y;
std::cout << "The division result is: " << result << '\n';
}
Output:
The division result is: 0.269737
Similarly, we can have
#include <iostream>
int main()
26
Chapter 7
Operators
{
double result = 123 / 456.0;
std::cout << "The division result is: " << result << '\n';
}
Output:
The division result is: 0.269737
And the result would be the same as in the previous example.
Compound Assignment Operators
Compound assignment operators allow us to perform an arithmetic operation and
assign a result with one operator:
+=
-=
*=
/=
%=
//
//
//
//
//
compound
compound
compound
compound
compound
addition
subtraction
multiplication
division
modulo
Example:
#include <iostream>
int main()
{
int x = 123;
x += 10; // the same
x -= 10; // the same
x *= 2; // the same
x /= 3; // the same
std::cout << "The value
}
as
as
as
as
of
x
x
x
x
x
= x
= x
= x
= x
is:
+
*
/
"
10
10
2
3
<< x;
Output:
The value of x is: 82
27
Chapter 7
Operators
Increment/Decrement Operators
Increment/decrement operators increment/decrement the value of the object. The
operators are
++x
x++
--x
x--
//
//
//
//
pre-increment operator
post-increment operator
pre-decrement operator
post-decrement operator
Here’s a simple example:
#include <iostream>
int main()
{
int x = 123;
x++; // add 1 to the value of x
++x; // add 1 to the value of x
--x; // decrement the value of x by 1
x--; // decrement the value of x by 1
std::cout << "The value of x is: " << x;
}
Output:
The value of x is: 123
Both preincrement and postincrement operators add 1 to the value of our object,
and both predecrement and postdecrement operators subtract one from the value of
our object. The difference between the two, apart from the implementation mechanism,
is that with the preincrement operator, a value of 1 is added first, and then the variable/
object is evaluated/accessed in the expression. With the postincrement, the object is
evaluated/accessed first, and after that, the value of 1 is added. To the next statement
that follows, it does not make a difference. The value of the object is the same, no matter
what version of the operator was used. The only difference is the timing in the expression
where it is used.
28
CHAPTER 8
Standard Input
C++ provides facilities for accepting input from a user. We can think of the standard input
as our keyboard. A simple example of accepting one integer number and printing it out is
#include <iostream>
int main()
{
std::cout << "Please enter a number and press enter: ";
int x = 0;
std::cin >> x;
std::cout << "You entered: " << x;
}
Possible Output:
Please enter a number and press enter: 123
You entered: 123
The std::cin is the standard input stream, and it uses the stream extraction >>
operator to extract what has been read into our variable. The std::cin >> x; statement
means read from standard input into a variable x. The cin object resides inside the std
namespace. So, std::cout << is used for outputting data (to a screen), and std::cin >>
is used for inputting the data (from the keyboard).
We can accept multiple values from the standard input by separating them with
multiple >> operators:
#include <iostream>
int main()
{
© Slobodan Dmitrović 2023
S. Dmitrović, Modern C++ for Absolute Beginners, https://doi.org/10.1007/978-1-4842-9274-7_8
29
Chapter 8
Standard Input
std::cout << "Please enter two numbers separated by a space and press
enter: ";
int x = 0;
int y = 0;
std::cin >> x >> y;
std::cout << "You entered: " << x << " and " << y;
}
Possible Output:
Please enter two numbers separated by a space and press enter: 123 456
You entered: 123 and 456
We can accept values of different types:
#include <iostream>
int main()
{
std::cout << "Please enter a character, an integer, and a double: ";
char c = 0;
int x = 0;
double d = 0.0;
std::cin >> c >> x >> d;
std::cout << "You entered: " << c << ", " << x << " and " << d;
}
Possible Output:
Please enter a character, an integer, and a double: A 123 3.14
You entered: A, 123 and 3.14
30
CHAPTER 9
Exercises
Standard Input
Write a program that accepts an integer number from the standard input and then
prints it out.
#include <iostream>
int main()
{
std::cout << "Please enter a number: ";
int x;
std::cin >> x;
std::cout << "You entered: " << x;
}
Possible Output:
Please enter a number: 123
You entered: 123
Two Inputs
Write a program that accepts two integer numbers from the standard input and then
prints them out.
#include <iostream>
int main()
{
© Slobodan Dmitrović 2023
S. Dmitrović, Modern C++ for Absolute Beginners, https://doi.org/10.1007/978-1-4842-9274-7_9
31
Chapter 9
Exercises
std::cout << "Please enter two integer numbers: ";
int x;
int y;
std::cin >> x >> y;
std::cout << "You entered: " << x << " and " << y;
}
Possible Output:
Please enter two integer numbers: 123 456
You entered: 123 and 456
Multiple Inputs
Write a program that accepts three values of type char, int, and double respectively
from the standard input. Print out the values afterward.
#include <iostream>
int main()
{
std::cout << "Please enter a char, an int, and a double: ";
char c;
int x;
double d;
std::cin >> c >> x >> d;
std::cout << "You entered: " << c << ", " << x << ", and " << d;
}
Possible Output:
Please enter a char, an int, and a double: A 123 456.789
You entered: A, 123, and 456.789
32
Chapter 9
Exercises
Inputs and Arithmetic Operations
Write a program that accepts two int numbers, sums them up, and assigns a result to a
third integer. Print out the result afterward.
#include <iostream>
int main()
{
std::cout << "Please enter two integer numbers: ";
int x;
int y;
std::cin >> x >> y;
int result = x + y;
std::cout << "The result is: " << result;
}
Possible Output:
Please enter two integer numbers: 10 20
The result is: 30
Postincrement and Compound Assignment
Write a program that defines an int variable called x with a value of 100, postincrements
that value in the next statement, and adds the value of 10 in the following statement
using the compound assignment operator. Print out the value afterward.
#include <iostream>
int main()
{
int x = 100;
x++;
x += 10;
std::cout << "The result is: " << x;
}
33
Chapter 9
Exercises
Output:
The result is: 111
Integral and Floating-Point Division
Write a program that divides numbers 9 and 2 and assigns a result to an int and a
double variable. Then modify one of the operands so that it is of type double and observe
the different outcomes of a floating-point division where at least one of the operands is
of type double. Print out the values afterward.
#include <iostream>
int main()
{
int x = 9 / 2;
std::cout << "The result is: " << x << '\n';
double d = 9 / 2;
std::cout << "The result is: " << d << '\n';
d = 9.0 / 2;
std::cout << "The result is: " << d;
}
Output:
The result is: 4
The result is: 4
The result is: 4.5
34
CHAPTER 10
Arrays
Arrays are sequences of objects of the same type. We can declare an array of type
char as follows:
int main()
{
char arr[5];
}
This example declares an array of five characters. To declare an array of type int,
which holds five elements, we would use
int main()
{
int arr[5];
}
To initialize an array, we can use the initialization list {}:
int main()
{
int arr[5] = { 10, 20, 30, 40, 50 };
}
The initialization list in our example { 10, 20, 30, 40, 50 } is marked with braces
and comma-separated values. This initialization list initializes our array with the values
in the list. The first array element will be initialized with a value of 10; the second array
element will be initialized with a value of 20; etc. The last (fifth) array element now has a
value of 50.
We can access individual array elements through a subscript [] operator and an
index. The first array element has an index of 0, and we access it via
© Slobodan Dmitrović 2023
S. Dmitrović, Modern C++ for Absolute Beginners, https://doi.org/10.1007/978-1-4842-9274-7_10
35
Chapter 10
Arrays
int main()
{
int arr[5] = { 10, 20, 30, 40, 50 };
arr[0] = 100; // change the value of the first array element
}
Since the indexing starts from 0 and not 1, the last array element has an index of 4:
int main()
{
int arr[5] = { 10, 20, 30, 40, 50 };
arr[4] = 500; // change the value of the last array element
}
So, when declaring an array, we write how many elements we want to declare, but
when accessing array elements, we need to remember that the indexing starts from 0 and
ends with the number of elements – 1. That being said, in modern C++, we should prefer
the std::array and std::vector containers to raw arrays. More on this in later chapters.
36
CHAPTER 11
Pointers
Objects reside in memory. And so far, we have learned how to access and manipulate
objects through variables. Another way to access an object in memory is through
pointers. Each object in memory occupies a certain amount of bytes and has a type and
an address. This allows us to access the object through a pointer. So, pointers are types
that can hold the address of a particular object. For illustrative purposes only, we will
declare an unutilized pointer that can point to an int object:
int main()
{
int* p;
}
We say that p is of type int*.
To declare a pointer that points to a char (object), we declare a pointer of type char*:
int main()
{
char* p;
}
In our first example, we declared a pointer of type int*. To make it point to
an existing int object in memory, we use the address-of operator &. We say that p
points to x.
int main()
{
int x = 123;
int* p = &x;
}
In our second example, we declared a pointer of type char*, and similarly, we have
© Slobodan Dmitrović 2023
S. Dmitrović, Modern C++ for Absolute Beginners, https://doi.org/10.1007/978-1-4842-9274-7_11
37
Chapter 11
Pointers
int main()
{
char c = 'a';
char* p = &c;
}
To initialize a pointer that does not point to any object, we can use the nullptr
literal:
int main()
{
char* p = nullptr;
}
It is said that p is now a null pointer.
Pointers are variables/objects, just like any other type of object. Their value is
the address of an object, a memory location where the object is stored. To access a
value stored in an object pointed to by a pointer, we need to dereference a pointer.
Dereferencing is done by prepending a pointer (variable) name with a dereferencing
operator *:
int main()
{
char c = 'a';
char* p = &c;
char d = *p;
}
To print out the value of the dereferenced pointer, we can use the following:
#include <iostream>
int main()
{
char c = 'a';
char* p = &c;
std::cout << "The value of the dereferenced pointer is: " << *p;
}
38
Chapter 11
Pointers
Output:
The value of the dereferenced pointer is: a
Now, the value of the dereferenced pointer *p is simply 'a'.
Similarly, for an integer pointer, we would have
#include <iostream>
int main()
{
int x = 123;
int* p = &x;
std::cout << "The value of the dereferenced pointer is: " << *p;
}
Output:
The value of the dereferenced pointer is: 123
And the value of the dereferenced pointer, in this case, would be 123.
We can change the value of the pointed-to object through a dereferenced pointer:
#include <iostream>
int main()
{
int x = 123;
int* p = &x;
*p = 456; // change the value of pointed-to object
std::cout << "The value of x is: " << x;
}
Output:
The value of x is: 456
We will talk about pointers, and especially about smart pointers, when we cover the
concepts such as dynamic memory allocation and the lifetime of an object.
39
CHAPTER 12
References
Another (somewhat) similar concept is a reference type. A reference type is an alias to an
existing object in memory. References must be initialized. We describe a reference type as
type_name followed by an ampersand &. Example:
int main()
{
int x = 123;
int& y = x;
}
Now we have two different names that refer to the same int object in memory. We
can visualize the object in memory using the following image:
If we assign a different value to either one of them, the object’s value will change as
we have one object in memory, but we are using two different names:
int main()
{
int x = 123;
int& y = x;
© Slobodan Dmitrović 2023
S. Dmitrović, Modern C++ for Absolute Beginners, https://doi.org/10.1007/978-1-4842-9274-7_12
41
Chapter 12
References
x = 456;
// both x and y now hold the value of 456
y = 789;
// both x and y now hold the value of 789
}
Another concept is a const reference, a read-only alias to some object. Example:
int main()
{
int x = 123;
const int& y = x; // const reference
x = 456;
// both x and y now hold the value of 456
}
We will discuss references and const reference in more detail when we learn about
functions and function parameters. For now, let us assume they are an alias, a different/
additional name we give to our existing object.
It is important not to confuse the use of * in a pointer type declaration such as
int* p; and the use of * when dereferencing a pointer such as *p = 456. Although the
same star character, it is used in two different contexts.
It is important not to confuse the use of ampersand & in reference type declaration
such as int& y = x; and the use of ampersand as an address-of operator such as int*
p = &x. The same literal symbol is used for two different things.
42
CHAPTER 13
Introduction to Strings
Earlier, we mentioned printing out a string literal such as "Hello World." to a standard
output via:
std::cout << "Hello World.";
We can store these string literals inside a std::string type. The C++ Standard
Library offers a compound type called string or rather std::string as it is part of the
std namespace. We use it for storing and manipulating strings.
Defining a String
To use the std::string type, we need to include the <string> header in our program:
#include <string>
int main()
{
std::string s = "Hello World.";
}
To print out this string on the standard output, we use
#include <iostream>
#include <string>
int main()
{
std::string s = "Hello World.";
std::cout << s;
}
© Slobodan Dmitrović 2023
S. Dmitrović, Modern C++ for Absolute Beginners, https://doi.org/10.1007/978-1-4842-9274-7_13
43
Chapter 13
Introduction to Strings
Output:
Hello World.
Concatenating Strings
We can add a string literal to our string using the compound operator +=:
#include <iostream>
#include <string>
int main()
{
std::string s = "Hello ";
s += "World.";
std::cout << s;
}
Output:
Hello World.
We can add a character to our string using the += operator:
#include <iostream>
#include <string>
int main()
{
std::string s = "Hello";
char c = '!';
s += c;
std::cout << s;
}
Output:
Hello!
44
Chapter 13
Introduction to Strings
We can add another string to our string using the + operator. We say we concatenate
the strings:
#include <iostream>
#include <string>
int main()
{
std::string s1 = "Hello ";
std::string s2 = "World.";
std::string s3 = s1 + s2;
std::cout << s3;
}
Output:
Hello World.
Internally, the type std::string is the so-called class template. It is implemented
using templates, which we will discuss later on. For now, we will just mention that this
string class offers some functionality (member functions) for working with strings.
Accessing Characters
Individual characters of a string can be accessed through a subscript operator [ ] or via a
member function .at(index). The index starts at 0. Example:
#include <iostream>
#include <string>
int main()
{
std::string s = "Hello World.";
char c1 = s[0]; // 'H'
char c2 = s.at(0); // 'H';
char c3 = s[6]; // 'W'
45
Chapter 13
Introduction to Strings
char c4 = s.at(6); // 'W';
std::cout << "First character: " << c1 << ", sixth character: " << c3;
}
Output:
First character: H, sixth character: W
Comparing Strings
A string can be compared to string literals and other strings using the equality ==
operator. Comparing a string to a string literal:
#include <iostream>
#include <string>
int main()
{
std::string s1 = "Hello";
if (s1 == "Hello")
{
std::cout << "The string is equal to \"Hello\"";
}
}
Output:
The string is equal to "Hello"
Comparing a string to another string is done using the equality operator ==:
#include <iostream>
#include <string>
int main()
{
std::string s1 = "Hello";
std::string s2 = "World.";
46
Chapter 13
Introduction to Strings
if (s1 == s2)
{
std::cout << "The strings are equal.";
}
else
{
std::cout << "The strings are not equal.";
}
}
Output:
The strings are not equal.
String Input
The preferred way of accepting a string from the standard input is via the std::getline
function, which takes std::cin and our string as parameters:
#include <iostream>
#include <string>
int main()
{
std::string s;
std::cout << "Please enter a string: ";
std::getline(std::cin, s);
std::cout << "You entered: " << s;
}
Possible Output:
Please enter a string: Sample string.
You entered: Sample string.
We use the std::getline because our string can contain white spaces. And if we
used the std::cin function alone, it would accept only a part of the string.
47
Chapter 13
Introduction to Strings
The std::getline function has the following signature: std::getline(read_from,
into);. The function reads a line of text from the standard input (std::cin) into a string
(s) variable.
A rule of thumb: If we need to use the std::string type, include the <string>
header explicitly.
A Pointer to a String
A string has a member function .c_str() which returns a pointer to its first element. It is
also said it returns a pointer to a null-terminated character array our string is made of:
#include <iostream>
#include <string>
int main()
{
std::string s = "Hello World.";
std::cout << s.c_str();
}
Output:
Hello World.
This member function is of type const char* and is useful when we want to pass our
std::string variable to a function accepting a const char* parameter.
Substrings
We use the .substr() member function to create a substring from a string. The function
returns a substring that starts at a certain position in the main string and is of a certain
length. The signature of the function is .substring(starting_position, length). Example:
48
Chapter 13
Introduction to Strings
#include <iostream>
#include <string>
int main()
{
std::string s = "Hello World.";
std::string mysubstring = s.substr(6, 5);
std::cout << "The substring value is: " << mysubstring;
}
Output:
The substring value is: World
In this example, we have the main string that holds the value of “Hello World.” Then
we create a substring that only has the “World” value. The substring starts from the sixth
character of the main string, and its length is five characters.
Finding a Substring
To find a substring in a string, we use the .find() member function. It searches for the
substring in a string. If the substring is found, the function returns the position of the
first found substring. This position is the position of a character where the substring
starts in the main string. If the substring is not found, the function returns a value that is
std::string::npos. The function itself is of type std::string::size_type.
To find a substring “Hello” inside the “This is a Hello World string” string, we write
#include <iostream>
#include <string>
int main()
{
std::string s = "This is a Hello World string.";
std::string stringtofind = "Hello";
std::string::size_type found = s.find(stringtofind);
49
Chapter 13
Introduction to Strings
if (found != std::string::npos)
{
std::cout << "Substring found at position: " << found;
}
else
{
std::cout << "The substring is not found.";
}
}
Output:
Substring found at position: 10
Here, we have the main string and a substring we want to find. We supply the
substring to the .find() function as an argument. We store the function’s return value
to a variable found. Then we check the value of this variable. If the value is not equal
to std::string::npos, the substring is found. We print the message and the position of a
character in the main string where our substring was found.
50
CHAPTER 14
Automatic Type Deduction
We can automatically deduce the type of an object using the auto specifier. The auto
specifier deduces the type of an object based on the object’s initializer type.
Example:
auto c = 'a'; // char type
This example deduces c to be of type char as the char literal 'a' is of type char.
Similarly, we can have
auto x = 123; // int type
Here, the compiler deduces the x to be of type int because an integer literal 123 is of
type int.
The type can also be deduced based on the type of the expression:
auto d = 123.456 / 789.10; // double
This example deduces d to be of type double as the type of the entire 123.456
/ 789.10 expression is double.
We can use auto as part of the reference type:
int main()
{
int x = 123;
auto& y = x; // y is of int& type
}
© Slobodan Dmitrović 2023
S. Dmitrović, Modern C++ for Absolute Beginners, https://doi.org/10.1007/978-1-4842-9274-7_14
51
Chapter 14
Automatic Type Deduction
or as part of the constant type:
int main()
{
const auto x = 123; // x is of const int type
}
We use the auto specifier when the type (name) is hard to deduce manually or
cumbersome to type due to its length.
52
CHAPTER 15
Exercises
Array Definition
Write a program that defines and initializes an array of five doubles. Change and then
print out the values of the first and last array elements.
#include <iostream>
int main()
{
double arr[5] = { 1.23, 2.45, 8.52, 6.3, 10.15 };
arr[0] = 2.56;
arr[4] = 3.14;
std::cout << "The first array element is: " << arr[0] << '\n';
std::cout << "The last array element is: " << arr[4] << '\n';
}
Output:
The first array element is: 2.56
The last array element is: 3.14
© Slobodan Dmitrović 2023
S. Dmitrović, Modern C++ for Absolute Beginners, https://doi.org/10.1007/978-1-4842-9274-7_15
53
Chapter 15
Exercises
Pointer to an Object
Write a program that defines an object of type double. Define a pointer that points to that
object. Print the value of the pointed-to object by dereferencing a pointer.
#include <iostream>
int main()
{
double d = 3.14;
double* p = &d;
std::cout << "The value of the pointed-to object is: " << *p;
}
Output:
The value of the pointed-to object is: 3.14
Reference Type
Write a program that defines an object of type double called mydouble. Define an object
of reference type called myreference and initialize it with mydouble. Change the value of
myreference. Print the object value using both the reference and the original variable.
Change the value of mydouble. Print the value of both objects.
#include <iostream>
int main()
{
double mydouble = 3.14;
double& myreference = mydouble;
myreference = 6.28;
std::cout << "The values are: " << mydouble << " and " << myreference
<< '\n';
mydouble = 9.45;
std::cout << "The values are: " << mydouble << " and " << myreference
<< '\n';
}
54
Chapter 15
Exercises
Output:
The values are: 6.28 and 6.28
The values are: 9.45 and 9.45
Strings
Write a program that defines two strings. Join them together and assign the result to a
third string. Print out the value of the resulting string.
#include <iostream>
#include <string>
int main()
{
std::string s1 = "Hello";
std::string s2 = " World!";
std::string s3 = s1 + s2;
std::cout << "The resulting string is: " << s3;
}
Output:
The resulting string is: Hello World!
Strings from Standard Input
Write a program that accepts the first and the last name from the standard input using
the std::getline function. Store the input in a single string called fullname. Print out
the string.
55
Chapter 15
Exercises
#include <iostream>
#include <string>
int main()
{
std::string fullname;
std::cout << "Please enter the first and the last name: ";
std::getline(std::cin, fullname);
std::cout << "Your name is: " << fullname;
}
Possible Output:
Please enter the first and the last name: John Doe
Your name is: John Doe
Creating a Substring
Write a program that creates two substrings from the main string. The main string is
made up of first and last names and is equal to “John Doe.” The first substring is the first
name. The second substring is the last name. Print the main string and two substrings
afterward.
#include <iostream>
#include <iostream>
int main()
{
std::string fullname = "John Doe";
std::string firstname = fullname.substr(0, 4);
std::string lastname = fullname.substr(5, 3);
std::cout << "The full name is: " << fullname << '\n';
std::cout << "The first name is: " << firstname << '\n';
std::cout << "The last name is: " << lastname << '\n';
}
56
Chapter 15
Exercises
Output:
The full name is: John Doe
The first name is: John
The last name is: Doe
Finding a Single Character
Write a program that defines the main string with a value of “Hello C++ World.” and
checks if a single character ‘C’ is found in the main string.
#include <iostream>
#include <string>
int main()
{
std::string s = "Hello C++ World.";
char c = 'C';
auto characterfound = s.find(c);
if (characterfound != std::string::npos)
{
std::cout << "Character found at position: " << characterfound
<< '\n';
}
else
{
std::cout << "Character was not found." << '\n';
}
}
Output:
Character found at position: 6
57
Chapter 15
Exercises
Finding a Substring
Write a program that defines the main string with a value of “Hello C++ World.” and
checks if a substring “C++” is found in the main string.
#include <iostream>
#include <string>
int main()
{
std::string s = "Hello C++ World.";
std::string mysubstring = "C++";
auto mysubstringfound = s.find(mysubstring);
if (mysubstringfound != std::string::npos)
{
std::cout << "Substring found at position: " << mysubstringfound
<< '\n';
}
else
{
std::cout << "Substring was not found." << '\n';
}
}
Output:
Substring found at position: 6
Both the ‘C’ character and the “C++” substring start at the same position in our main
string. That is why both examples yield a value of six.
Instead of typing the lengthy std::string::size_type type for our characterfound
and mysubstringfound variables, we used the auto specifier to deduce the type for us
automatically.
58
Chapter 15
Exercises
Automatic Type Deduction
Write a program that automatically deduces the type for char, int, and double objects
based on the initializer used. Print out the values afterward.
#include <iostream>
int main()
{
auto c = 'a';
auto x = 123;
auto d = 3.14;
std::cout << "The type of c is deduced as char, the value is: "
<< c << '\n';
std::cout << "The type of x is deduced as int, the value is: "
<< x << '\n';
std::cout << "The type of d is deduced as double, the value is: "
<< d << '\n';
}
Output:
The type of c is deduced as char, the value is: a
The type of x is deduced as int, the value is: 123
The type of d is deduced as double, the value is: 3.14
59
CHAPTER 16
Statements
Earlier, we described statements as commands, pieces of code that are executed in some
order. Expressions ending with a semicolon are statements. The C++ language also
comes with some built-in statements. We will start with the selection statements.
Selection Statements
Selection statements allow us to execute the appropriate statements based on some
given condition.
if Statement
When we want to execute a statement or more statements based on some condition, we
use the if statement. The if statement has the format of
if (condition) statement(s)
The statement(s) part executes only if the condition is true. Example:
#include <iostream>
int main()
{
bool b = true;
if (b) std::cout << "The condition is true.";
}
Output:
The condition is true.
© Slobodan Dmitrović 2023
S. Dmitrović, Modern C++ for Absolute Beginners, https://doi.org/10.1007/978-1-4842-9274-7_16
61
Chapter 16
Statements
To execute multiple statements if the condition is true, we use the block scope {}:
#include <iostream>
int main()
{
bool b = true;
if (b)
{
std::cout << "This is the first statement.";
std::cout << "\nThis is a second statement.";
}
}
Output:
This is the first statement.
This is a second statement.
Another form is the if-else statement:
if (condition) statement(s) else other_statement(s)
If the condition is true, the first statement(s) executes. Otherwise, the second
other_statement(s) after the else keyword executes. Example:
#include <iostream>
int main()
{
bool b = false;
if (b) std::cout << "The condition is true.";
else std::cout << "The condition is false.";
}
Output:
The condition is false.
62
Chapter 16
Statements
To execute multiple statements in either if or else branch, we use brace-enclosed
blocks {}:
#include <iostream>
int main()
{
bool b = false;
if (b)
{
std::cout <<
std::cout <<
}
else
{
std::cout <<
std::cout <<
}
}
"The condition is true.";
"\nThis is the second statement.";
"The condition is false.";
"\nThis is the second statement.";
Output:
The condition is false.
This is the second statement.
Conditional Expression
An expression that returns a value based on a condition is called a conditional
expression. First, let us have a simple if statement example:
#include <iostream>
int main()
{
bool mycondition = true;
int x = 0;
if (mycondition)
{
63
Chapter 16
Statements
x = 1;
}
else
{
x = 0;
}
std::cout << "The value of x is: " << x << '\n';
}
Output:
The value of x is: 1
To rewrite the previous example using a conditional expression, we write
#include <iostream>
int main()
{
bool mycondition = true;
int x = 0;
x = (mycondition) ? 1 : 0;
std::cout << "The value of x is: " << x << '\n';
}
Output:
The value of x is: 1
The conditional expression is of the following syntax:
(condition) ? expression_1 : expression_2
The conditional expression uses the unary ? operator, which checks the value of
the condition. If the condition is true, it returns expression_1. If the condition is false, it
returns expression_2. It can be thought of as a way of replacing a simple if-else statement
with a one-liner.
64
Chapter 16
Statements
The Logical Operators
The logical operators perform logical and, or, and negation operations on their
operands. The first is the && operator, which is a logical AND operator. The result of a
logical AND condition with two operands is true if both operands are true. Example:
#include <iostream>
int main()
{
bool a = true;
bool b = true;
if (a && b)
{
std::cout << "The entire condition is true.";
}
else
{
std::cout << "The entire condition is false.";
}
}
Output:
The entire condition is true.
The next operator is ||, which is a logical OR operator. The result of a logical OR
expression is always true except when both operands are false. Example:
#include <iostream>
int main()
{
bool a = false;
bool b = false;
if (a || b)
{
std::cout << "The entire condition is true.";
}
65
Chapter 16
Statements
else
{
std::cout << "The entire condition is false.";
}
}
Output:
The entire condition is false.
The next logical operator is the negation operator, represented by a ! symbol.
It negates the value of its only right-hand-side operand. It turns the value of true to
false and vice versa. Example:
#include <iostream>
int main()
{
bool a = true;
if (!a)
{
std::cout << "The condition is true.";
}
else
{
std::cout << "The condition is false.";
}
}
Output:
The condition is false.
66
Chapter 16
Statements
Comparison Operators
Comparison operators allow us to compare the values of operands. Comparison
operators are less than <, less than or equal to <=, greater than >, greater than or equal to
>=, equal to ==, and not equal to !=.
We can use the equality operator == to check if the values of operands are equal:
#include <iostream>
int main()
{
int x = 5;
if (x == 5)
{
std::cout << "The value of x is equal to 5.";
}
}
Output:
The value of x is equal to 5.
Here’s the use case for other comparison operators:
#include <iostream>
int main()
{
int x = 10;
if (x > 5)
{
std::cout << "The value of x is greater than 5.";
}
if (x >= 10)
{
std::cout << "\nThe value of x is greater than or equal to 10.";
}
67
Chapter 16
Statements
if (x != 20)
{
std::cout << "\nThe value of x is not equal to 20.";
}
if (x == 20)
{
std::cout << "\nThe value of x is equal to 20.";
}
}
Output:
The value of x is greater than 5.
The value of x is greater than or equal to 10.
The value of x is not equal to 20.
Now, we can use both logical and comparison operators in the same condition:
#include <iostream>
int main()
{
int x = 10;
if (x > 5 && x < 15)
{
std::cout << "The value of x is greater than 5 and less than 15.";
}
bool b = true;
if (x >5 && b)
{
std::cout << "\nThe value of x is greater than 5 and b is true.";
}
}
68
Chapter 16
Statements
Output:
The value of x is greater than 5 and less than 15.
The value of x is greater than 5 and b is true.
Any literal, object or expression, implicitly convertible to true or false, can be used
as a condition:
#include <iostream>
int main()
{
if (1) // literal 1 is convertible to true
{
std::cout << "The condition is true.";
}
}
Output:
The condition is true.
If we used an integer variable with a value other than 0, the result would be true:
#include <iostream>
int main()
{
int x = 10; // if x was 0, the condition would be false
if (x)
{
std::cout << "The condition is true.";
}
else
{
std::cout << "The condition is false.";
}
}
69
Chapter 16
Statements
Output:
The condition is true.
It is good practice to use the code blocks {} inside the if statement branches, even if
there is only one statement to be executed.
switch Statement
The switch statement is similar to having multiple if statements. It checks the value of the
condition (which must be an integral or enum value) and, based on that value, executes
the code inside one of a given set of case: labels. If none of the case statements is equal
to the condition, the code inside the default: label is executed. General syntax:
switch (condition)
{
case value1:
statement(s);
break;
case value2etc:
statement(s);
break;
default:
statement(s);
break;
}
Here’s a simple example that checks for the value of integer x and executes the
appropriate case label:
#include <iostream>
int main()
{
int x = 3;
switch (x)
{
70
Chapter 16
case 1:
std::cout <<
break;
case 2:
std::cout <<
break;
case 3:
std::cout <<
// executed
break;
default:
std::cout <<
break;
}
}
Statements
"The value of x is 1.";
"The value of x is 2.";
"The value of x is 3."; // this statement will be
"The value is none of the above.";
Output:
The value of x is 3.
The break statement exits the entire switch statement. If there were no break
statements, the code would fall through to the next case statement and execute the code
there regardless of the x value. We need to put breaks in all the case: and default:
switches.
Iteration Statements
If we need some code to execute multiple times, we use iteration statements. Iteration
statements are statements that execute some code in a loop. The code in the loop
executes zero, one, or multiple times, depending on the statement and the condition.
71
Chapter 16
Statements
for Statement
The for statement executes code in a loop. The execution depends on the condition. The
general syntax of the for statement is
for (init_statement; condition; iteration_expression)
{ statement(s) }
Here is a simple example that executes a code ten times:
#include <iostream>
int main()
{
for (int i = 0; i < 10; i++)
{
std::cout << "The counter is: " << i << '\n';
}
}
Output:
The
The
The
The
The
The
The
The
The
The
counter
counter
counter
counter
counter
counter
counter
counter
counter
counter
is:
is:
is:
is:
is:
is:
is:
is:
is:
is:
0
1
2
3
4
5
6
7
8
9
This example executes the code inside the for loop ten times. The init_statement is
int i = 0;. We initialize the counter to 0. The condition is i < 10; and the iteration_
expression is i++;.
72
Chapter 16
Statements
A simple explanation:
Initialize a counter to 0, check if the counter is less than 10, execute the std::cout
<< "The counter is: " << i << '\n'; statement inside the code block, and
increment the counter i by 1. So, the code inside the code block will continue executing
as long as the i < 10 condition is true. Once the counter becomes 10, the condition is
no longer true, and the for loop terminates.
If we wanted something to execute, let us say, five times, we would set a different
condition:
#include <iostream>
int main()
{
for (int i = 0; i < 5; i++)
{
std::cout << "The counter is: " << i << '\n';
}
}
Output:
The
The
The
The
The
counter
counter
counter
counter
counter
is:
is:
is:
is:
is:
0
1
2
3
4
while Statement
The while statement executes code as long as the condition is true. The syntax for the
while loop is
while (condition) { // execute some code }
73
Chapter 16
Statements
As long as the condition is true, the while loop will continue executing the code.
When the condition becomes false, the while loop terminates. Example:
#include <iostream>
int main()
{
int x = 0;
while (x < 10)
{
std::cout << "The value of x is: " << x << '\n';
x++;
}
}
Output:
The
The
The
The
The
The
The
The
The
The
value
value
value
value
value
value
value
value
value
value
of
of
of
of
of
of
of
of
of
of
x
x
x
x
x
x
x
x
x
x
is:
is:
is:
is:
is:
is:
is:
is:
is:
is:
0
1
2
3
4
5
6
7
8
9
The code in this example executes ten times. After each iteration, the condition
x < 10 is evaluated, and as long as it is equal to true, the code in the code block will
keep executing. Once the condition becomes false, the while loop terminates. In this
example, we increment the value of x in each iteration. And once it becomes 10, the loop
terminates.
74
Chapter 16
Statements
do Statement
The do statement is similar to the while statement, but the condition comes after the
body. The code inside the do statement is guaranteed to execute at least once. The
syntax is
do { // execute some code } while (condition);
If we used the previous example, the code would be
#include <iostream>
int main()
{
int x = 0;
do
{
std::cout << "The value of x is: " << x << '\n';
x++;
} while (x < 10);
}
Output:
The
The
The
The
The
The
The
The
The
The
value
value
value
value
value
value
value
value
value
value
of
of
of
of
of
of
of
of
of
of
x
x
x
x
x
x
x
x
x
x
is:
is:
is:
is:
is:
is:
is:
is:
is:
is:
0
1
2
3
4
5
6
7
8
9
The do statement is rarely used and better avoided.
Please note that there is also an iteration statement called the range-for statement.
We will talk about it when we explain the containers later on.
75
CHAPTER 17
Constants
When we want to have a read-only object or promise not to change the value of some
object in the current scope, we make it a constant. C++ uses the const type qualifier to
mark the object as a read-only. We say that our object is now immutable. To define an
integer constant with a value of five, for example, we would write
int main()
{
const int n = 5;
}
We can now use that constant in places such as an array size:
int main()
{
const int n = 5;
int arr[n] = { 10, 20, 30, 40, 50 };
}
Constants are not modifiable. Attempting to modify their values results in a compile-
time error:
int main()
{
const int n = 5;
n++; // error, can’t modify a read-only object
}
© Slobodan Dmitrović 2023
S. Dmitrović, Modern C++ for Absolute Beginners, https://doi.org/10.1007/978-1-4842-9274-7_17
77
Chapter 17
Constants
An object declared const cannot be assigned to, it can only be initialized. So, we
can’t have:
int main()
{
const int n; // error, no initializer
const int m = 123; // OK
}
Worth noticing is that const modifies an entire type, not just the object. So, const
int and int are two different types. The first one is said to be const qualified.
Another const qualifier is the constant expression named constexpr. It is a constant
that can be evaluated at compile time. Initializers for constant expressions can be
evaluated at compile time and must themselves be constant expressions. Example:
int main()
{
constexpr int n = 123; //OK, 123 is a compile-time constant
// expression
constexpr double d = 456.78; //OK, 456.78 is a compile-time constant
// expression
constexpr double d2 = d; //OK, d is a constant expression
int x = 123;
constexpr int n2 = x; //compile-time error
// the value of x is not known during
// compile-time
}
78
CHAPTER 18
Exercises
A Simple if Statement
Write a program that defines a boolean variable whose value is false. Use the variable as
the condition inside the if statement.
#include <iostream>
int main()
{
bool mycondition = false;
if (mycondition)
{
std::cout << "The condition is true." << '\n';
}
else
{
std::cout << "The condition is not true." << '\n';
}
}
Output:
The condition is not true.
© Slobodan Dmitrović 2023
S. Dmitrović, Modern C++ for Absolute Beginners, https://doi.org/10.1007/978-1-4842-9274-7_18
79
Chapter 18
Exercises
Logical Operators
Write a program that defines a variable of type int. Assign the value of 256 to the variable.
Check if the value of this variable is greater than 100 and less than 300. Then, define a
boolean variable with a value of true. Check if the int number is greater than 100 or if the
value of a bool variable is true. Then define a second bool variable whose value will be
the negation of the first bool variable.
#include <iostream>
int main()
{
int x = 256;
if (x > 100 && x < 300)
{
std::cout << "The value is greater than 100 and less than 300.
" << '\n';
}
else
{
std::cout << "The value is not inside the (100 .. 300) range.
" << '\n';
}
bool mycondition = true;
if (x > 100 || mycondition)
{
std::cout << "Either x is greater than 100 or the bool variable is
true." << '\n';
}
else
{
std::cout << "x is not greater than 100 and the bool variable is
false." << '\n';
}
bool mysecondcondition = !mycondition;
}
80
Chapter 18
Exercises
Output:
The value is greater than 100 and less than 300.
Either x is greater than 100 or the bool variable is true.
The switch Statement
Write a program that defines a simple integer variable with a value of three. Use the
switch statement to check if the value is inside the [1..4] range.
#include <iostream>
int main()
{
int x = 3;
switch (x)
{
case 1:
std::cout
break;
case 2:
std::cout
break;
case 3:
std::cout
break;
case 4:
std::cout
break;
default:
std::cout
break;
}
}
<< "The value is equal to 1." << '\n';
<< "The value is equal to 2." << '\n';
<< "The value is equal to 3." << '\n';
<< "The value is equal to 4." << '\n';
<< "The value is not inside the [1..4] range." << '\n';
81
Chapter 18
Exercises
Output:
The value is equal to 3.
The for Loop
Write a program that uses a for loop to print out the counter’s value ten times.
The counter starts at zero.
#include <iostream>
int main()
{
for (int i = 0; i < 10; i++)
{
std::cout << "The counter is now: " << i << '\n';
}
}
Output:
The
The
The
The
The
The
The
The
The
The
82
counter
counter
counter
counter
counter
counter
counter
counter
counter
counter
is
is
is
is
is
is
is
is
is
is
now:
now:
now:
now:
now:
now:
now:
now:
now:
now:
0
1
2
3
4
5
6
7
8
9
Chapter 18
Exercises
Array and the for Loop
Write a program that defines an array of five integers. Use the for loop to print the array
elements and their indexes.
#include <iostream>
int main()
{
int arr[5] = { 3, 20, 8, 15, 10 };
for (int i = 0; i < 5; i++)
{
std::cout << "arr[" << i << "] = " << arr[i] << '\n';
}
}
Output:
arr[0]
arr[1]
arr[2]
arr[3]
arr[4]
=
=
=
=
=
3
20
8
15
10
Explanation: Here, we defined an array of five elements. Arrays are indexed starting
from zero. So the first array element 3 has an index of 0. The last array element of 10 has
an index of 4. We used the for loop to iterate over array elements and print both their
indexes and values. Our for loop starts with a counter of 0 and ends with a counter of 4.
The const Type Qualifier
Write a program that defines three objects of type const int, const double, and const
std::string, respectively. Define a fourth const int object and initialize it with a value of
the first const int object. Print out the values of all the variables.
83
Chapter 18
Exercises
#include <iostream>
int main()
{
const int c1 = 123;
const double d = 456.789;
const std::string s = "Hello World!";
const int c2 = c1;
std::cout << "Constant integer c1 value: " <<
std::cout << "Constant double d value: " << d
std::cout << "Constant std::string s value: "
std::cout << "Constant integer c2 value: " <<
}
Output:
Constant
Constant
Constant
Constant
84
integer c1 value: 123
double d value: 456.789
std::string s value: Hello World!
integer c2 value: 123
c1
<<
<<
c2
<< '\n';
'\n';
s << '\n';
<< '\n';
CHAPTER 19
Functions
Introduction
We can break our C++ code into smaller chunks called functions. A function has a return
type, a name, a list of parameters in a declaration, and an additional function body in a
definition. A simple function definition is:
type function_name(arguments) {
statement(s);
return something;
}
Function Declaration
To declare a function, we need to specify a return type, a name, and a list of parameters,
if any. To declare a function called myfunction of type void that accepts no parameters,
we write:
void myvoidfunction();
int main()
{
}
Type void is a type that represents nothing, an empty set of values. To declare a
function of type int accepting one parameter, we can write:
int mysquarednumber (int x);
© Slobodan Dmitrović 2023
S. Dmitrović, Modern C++ for Absolute Beginners, https://doi.org/10.1007/978-1-4842-9274-7_19
85
Chapter 19
Functions
int main()
{
}
To declare a function of type int, which accepts, for example, two int parameters,
we can write:
int mysum(int x, int y);
int main()
{
}
In function declaration only, we can also omit the parameter names, but we need to
specify their types:
int mysum(int, int);
int main()
{
}
Function Definition
To be called in a program, a function must be defined first. A function definition has
everything a function declaration has, plus the body of a function. Those are a return
type, a function name, a list of function parameters, if any, and a function body.
Example:
#include <iostream>
void myfunction(); // function declaration
int main()
{
}
86
Chapter 19
Functions
// function definition
void myfunction() {
std::cout << "Hello World from a function.";
}
To define a function that accepts one parameter, we can write:
int mysquarednumber(int x); // function declaration
int main()
{
}
// function definition
int mysquarednumber(int x) {
return x * x;
}
To define a function that accepts two parameters, we can write:
int mysum(int x, int y); // function declaration
int main()
{
}
// function definition
int mysum(int x, int y) {
return x + y;
}
To call the preceding function in our program, we specify the function name
followed by empty parentheses () (a function call operator) as the function has no
parameters:
#include <iostream>
void myfunction(); // function declaration
int main()
87
Chapter 19
Functions
{
myfunction(); // a call to a function
}
// function definition
void myfunction() {
std::cout << "Hello World from a function.";
}
Output:
Hello World from a function.
To call a function that accepts one parameter, we can use:
#include <iostream>
int mysquarednumber(int x); // function declaration
int main()
{
int myresult = mysquarednumber(2); // a call to the function
std::cout << "Number 2 squared is: " << myresult;
}
// function definition
int mysquarednumber(int x) {
return x * x;
}
Output:
Number 2 squared is: 4
We called a function mysquarednumber by its name and supplied a value of 2 in place
of the function parameter and assigned the result of a function to our myresult variable.
What we pass into a function is often referred to as a function argument.
88
Chapter 19
Functions
To call a function that accepts two or more arguments, we use the function name
followed by an opening parenthesis, followed by a list of arguments separated by
commas, and, finally, closing parentheses. Example:
#include <iostream>
int mysum(int x, int y);
int main()
{
int myresult = mysum(5, 10);
std::cout << "The sum of 5 and 10 is: " << myresult;
}
int mysum(int x, int y) {
return x + y;
}
Output:
The sum of 5 and 10 is: 15
Return Statement
Functions are of a certain type, also referred to as a return type, and they must return a
value. The value returned is specified by a return statement. Functions of type void do
not need a return statement. Example:
#include <iostream>
void voidfn();
int main()
{
voidfn();
}
89
Chapter 19
Functions
void voidfn()
{
std::cout << "This is a void function and needs no return.";
}
Output:
This is a void function and needs no return.
Functions of other, nonvoid types (except function main) need a return statement:
#include <iostream>
int intfn();
int main()
{
std::cout << "The function returned a value of: " << intfn();
}
int intfn()
{
return 42; // return statement
}
Output:
The function returned a value of: 42
A function can have multiple return statements if needed, but only one of those
statements will be executed. Once any of the return statement is executed, the function exits
and returns the control flow to the caller, and the rest of the code in the function is ignored:
#include <iostream>
int multiplereturns(int x);
int main()
{
90
Chapter 19
Functions
std::cout << "The value of a function is: " << multiplereturns(25);
}
int multiplereturns(int x)
{
if (x >= 42)
{
return x;
}
return 0;
}
Output:
The value of a function is: 0
In short, the return statement does two things:
•
Returns the control flow to a caller (in our examples, the caller was
the function main())
•
Returns the value (if any)
Passing Arguments
There are different ways of passing arguments to a function. Here, we will describe the
three most used.
Passing by Value/Copy
When we pass an argument to a function, a copy of that argument is made and passed to
the function if the function parameter type is not a reference. This means the value of the
original argument does not change. An internal copy of the argument is made, and the
function works with that copy. Example:
#include <iostream>
void myfunction(int byvalue)
{
91
Chapter 19
Functions
std::cout << "An argument passed by value: " << byvalue;
}
int main()
{
myfunction(123);
}
Output:
An argument passed by value: 123
This is known as passing an argument by value or passing an argument by copy.
Passing by Reference
When a function parameter type is a reference type, then the actual argument is passed
to the function, not a copy of that argument. The function can now modify the value of
the argument. Example:
#include <iostream>
void myfunction(int& byreference)
{
byreference++; // we can modify the value of the argument
std::cout << "An argument passed by reference: " << byreference;
}
int main()
{
int x = 123;
myfunction(x);
}
Output:
An argument passed by reference: 124
92
Chapter 19
Functions
Here, we passed an argument of a reference type int&, so the function now works
with the actual argument and can change its value. When passing by reference, we
need to pass the variable itself; we can’t pass in a literal representing a value. Passing by
reference is best avoided.
Passing by Const Reference
What is preferred (for arguments of complex types) is passing an argument by const
reference, also referred to as a reference to const. It can be more efficient to pass an
argument by reference, but to ensure it is not changed, we make it of const reference
type. Example:
#include <iostream>
#include <string>
void myfunction(const std::string& byconstreference)
{
std::cout << "An argument passed by const reference: "
<< byconstreference;
}
int main()
{
std::string s = "Hello World!";
myfunction(s);
}
Output:
An argument passed by const reference: Hello World!
We use passing by const reference for efficiency reasons, and the const modifier
ensures the value of an argument will not be changed.
In the last three examples, we omitted the function declarations and only supplied
the function definitions. Although a function definition is also a declaration, you should
provide both the declaration and a definition as in:
93
Chapter 19
Functions
#include <iostream>
#include <string>
void myfunction(const std::string& byconstreference);
int main()
{
std::string s = "Hello World!";
myfunction(s);
}
void myfunction(const std::string& byconstreference)
{
std::cout << "Arguments passed by const reference: "
<< byconstreference;
}
Output:
Arguments passed by const reference: Hello World!
Function Overloading
We can have multiple functions with the same name but with different parameter types.
This is called function overloading. A simple explanation: When the function names are
the same, but the parameter types differ, then we have overloaded functions. Here’s an
example of function overload declarations:
void myprint(char param);
void myprint(int param);
void myprint(double param);
Then we implement function definitions and call each one:
#include <iostream>
void myprint(char param);
void myprint(int param);
void myprint(double param);
94
Chapter 19
Functions
int main()
{
myprint('c'); // calling char overload
myprint(123); // calling integer overload
myprint(456.789); // calling double overload
}
void myprint(char param)
{
std::cout << "Printing a character: " << param << '\n';
}
void myprint(int param)
{
std::cout << "Printing an integer: " << param << '\n';
}
void myprint(double param)
{
std::cout << "Printing a double: " << param << '\n';
}
Output:
Printing a character: c
Printing an integer: 123
Printing a double: 456.789
When calling our functions, a proper overload is selected based on the type of
argument we supply. In the first call to myprint('c'), a char overload is selected
because the literal 'c' is of type char. In a second function call myprint(123), an
integer overload is selected because the type of argument 123 is int. And lastly, in our
last function call myprint(456.789), a double overload is selected by a compiler as the
argument 456.789 is of type double.
95
Chapter 19
Functions
Indeed, literals in C++ are also of certain types, and the C++ standard precisely
defines what that type is. Here are some of the literals and their corresponding types:
'c' - char
123 - int
123u - unsigned int
123ul - unsigned long
456.789 - double
456.789f - float
true - boolean
"Hello" - const char[6]
96
CHAPTER 20
Exercises
Function Definition
Write a program that defines a function of type void called printmessage(). The
function outputs a "Hello World from a function." message on the standard output.
Call the function from main.
#include <iostream>
void printmessage()
{
std::cout << "Hello World from a function.";
}
int main()
{
printmessage();
}
Output:
Hello World from a function.
Separate Declaration and Definition
Write a program that declares and defines a function of type void called
printmessage(). The function outputs a "Hello World from a function." message on
the standard output. Call the function from main.
© Slobodan Dmitrović 2023
S. Dmitrović, Modern C++ for Absolute Beginners, https://doi.org/10.1007/978-1-4842-9274-7_20
97
Chapter 20
Exercises
#include <iostream>
void printmessage(); // function declaration
int main()
{
printmessage();
}
// function definition
void printmessage()
{
std::cout << "Hello World from a function.";
}
Output:
Hello World from a function.
Function Parameters
Write a program that has a function of type int called multiplication accepting two int
parameters by value. The function multiplies those two parameters and returns a result
to itself. Invoke the function in the main() function, and assign a result of the function to
a local int variable. Print the result in the console.
#include <iostream>
int multiplication(int x, int y)
{
return x * y;
}
int main()
{
int myresult = multiplication(10, 20);
std::cout << "The result is: " << myresult;
}
98
Chapter 20
Exercises
Output:
The result is: 200
Passing Arguments
Write a program that has a function of type void called custommessage. The function
accepts one parameter by reference to const of type std::string and outputs a custom
message on the standard output using that parameter’s value. Invoke the function in the
main program with a local string.
#include <iostream>
#include <string>
void custommessage(const std::string& message)
{
std::cout << "The string argument used is: " << message;
}
int main()
{
std::string mymessage = "My Custom Message.";
custommessage(mymessage);
}
Output:
The string argument used is: My Custom Message.
Function Overloads
Write a program that has two function overloads. The functions are called division,
and both accept two parameters. They divide the parameters and return the result to
themselves. The first function overload is of type int and has two parameters of type
99
Chapter 20
Exercises
int. The second overload is of type double and accepts two parameters of type double.
Invoke the appropriate overload in main, first by supplying integer arguments and then
the double arguments. Observe different results.
#include <iostream>
#include <string>
int division(int x, int y)
{
return x / y;
}
double division(double x, double y)
{
return x / y;
}
int main()
{
std::cout << "Integer division: " << division(9, 2) << '\n';
std::cout << "Floating point division: " << division(9.0, 2.0);
}
Output:
Integer division: 4
Floating point division: 4.5
100
CHAPTER 21
Scope and Lifetime
When we declare a variable, its name is valid only inside some sections of the source
code. And that section (part, portion, region) of the source code is called scope. It is the
region of code in which the name can be accessed. There are different scopes.
Local Scope
When we declare a name inside a function, that name has a local scope. Its scope starts
from the point of declaration till the end of the function block marked with }.
Example:
void myfunction()
{
int x = 123; // Here begins the x's scope
} // and here it ends
Our variable x is declared inside a myfunction() body, and it has a local scope.
We say that name x is local to myfunction(). It exists (can be accessed) only inside the
function’s scope and nowhere else.
Block Scope
The block scope is a section of code marked by a block of code starting with { and ending
with }. Example:
int main()
{
int x = 123; // first x' scope begins here
{
© Slobodan Dmitrović 2023
S. Dmitrović, Modern C++ for Absolute Beginners, https://doi.org/10.1007/978-1-4842-9274-7_21
101
Chapter 21
Scope and Lifetime
int x = 456; // redefinition of x, second x' scope begins here
} // block ends, second x' scope ends here
// the first x resumes here
} // block ends, scope of first x's ends here
There are other scopes as well, which we will cover later in the book. It is important
to introduce the notion of scope at this point to explain the object’s lifetime.
Lifetime
The lifetime of an object is the time an object spends in memory. The lifetime is
determined by a so-called storage duration. There are different kinds of storage
durations.
Automatic Storage Duration
The automatic storage duration is a duration where memory for an object is
automatically allocated at the beginning of a block and deallocated when the code block
ends. This is also called stack memory; objects are allocated on the stack. In this case, the
object’s lifetime is determined by its scope. All local objects have this storage duration.
Dynamic Storage Duration
The dynamic storage duration is a duration where memory for an object is manually
allocated and manually deallocated. This kind of storage is often referred to as heap
memory. The user determines when the memory for an object will be allocated and
when it will be released. The lifetime of an object is not determined by the scope in
which the object was defined. We do it through operator new and smart pointers. In
modern C++, we should prefer the smart pointer facilities to operator new.
102
Chapter 21
Scope and Lifetime
Static Storage Duration
When an object declaration is prepended with a static specifier, it means the storage
for a static object is allocated when the program starts and deallocated when the
program ends. There is only one instance of such objects, and (with a few exceptions)
their lifetime ends when a program ends. They are objects we can access at any given
time during the execution of a program. We will talk about the static specifier and static
initialization later in the book.
Operators new and delete
We can dynamically allocate and deallocate storage for our object and have pointers
point to this newly allocated memory.
The operator new allocates space for an object. The object is allocated on the free
store, often called heap or heap memory. The allocated memory must be deallocated
using the operator delete. It deallocates the memory previously allocated with an
operator new. Example:
#include <iostream>
int main()
{
int* p = new int;
*p = 123;
std::cout << "The pointed-to value is: " << *p;
delete p;
}
Output:
The pointed-to value is: 123
This example allocates space for one integer on the free store. Pointer p now points
to the newly allocated memory for our integer. We can now assign a value to our newly
allocated integer object by dereferencing a pointer. Finally, we free the memory by
calling the operator delete.
103
Chapter 21
Scope and Lifetime
If we want to allocate memory for an array, we use the operator new[]. To deallocate
a memory allocated for an array, we use the operator delete[]. Pointers and arrays
are similar and can often be used interchangeably. Pointers can be dereferenced by a
subscript operator []. Example:
#include <iostream>
int main()
{
int* p = new int[3];
p[0] = 1;
p[1] = 2;
p[2] = 3;
std::cout << "The values are: " << p[0] << ' ' << p[1] << ' ' << p[2];
delete[] p;
}
Output:
The values are: 1 2 3
This example allocates space for three integers, an array of three integers, using the
operator new[]. Our pointer p now points at the first element in the array. Then, using a
subscript operator [], we dereference and assign a value to each array element. Finally,
we deallocate the memory using the operator delete[]. Remember, always delete what
you new-ed and always delete[] what you new[]-ed.
Remember: Prefer smart pointers to operator new. The lifetime of objects allocated
on the free store is not bound by the scope in which the objects were defined. We
manually allocate and manually deallocate the memory for our object, thus controlling
when the object gets created and when it gets destroyed.
104
CHAPTER 22
Exercises
Automatic Storage Duration
Write a program that defines two variables of type int with automatic storage duration
(placed on the stack) inside the main function scope.
#include <iostream>
int main()
{
int x = 123;
int y = 456;
std::cout << "The values with automatic storage durations are: " << x
<< " and " << y;
}
Output:
The values with automatic storage durations are: 123 and 456
We can use the following image to visualize the placement of automatic storage
objects called x and y:
© Slobodan Dmitrović 2023
S. Dmitrović, Modern C++ for Absolute Beginners, https://doi.org/10.1007/978-1-4842-9274-7_22
105
Chapter 22
Exercises
The memory for x and y will be automatically released when x and y go out of scope,
which, in our case, is when they go out of the function main’s scope (when the program
ends). We do not need to release the memory for local (automatic) variables manually.
We just let them go out of scope.
Dynamic Storage Duration
Write a program that defines a variable of type int*, which points to an object with
dynamic storage duration (placed on the heap):
#include <iostream>
int main()
{
int* p = new int{ 123 };
std::cout << "The value with a dynamic storage duration is: " << *p;
delete p;
}
Output:
The value with a dynamic storage duration is: 123
Explanation:
In this example, the object p only points at the object with dynamic storage duration
(placed on heap memory) having the value of 123. The p object itself has an automatic
storage duration and is placed on a stack. After a call to the int* p = new int{ 123 };
statement, our memory looks like the following:
106
Chapter 22
Exercises
To delete the object on the heap, we need to use the delete operator. After a call to the
delete p; statement, the pointed-to memory is released, and the diagram looks like the
following:
Automatic and Dynamic Storage Durations
Write a program that defines a variable of type int called x, having automatic storage
duration, and a variable of type int*, which points to an object with dynamic storage
duration. Both variables are in the same scope:
#include <iostream>
int main()
{
int x = 123; // automatic storage duration
std::cout << "The value with an automatic storage duration is: " << x
<< '\n';
int* p = new int{ x }; // allocate memory and copy the value
from x to it
107
Chapter 22
Exercises
std::cout << "The value with a dynamic storage duration is: "
<< *p << '\n';
delete p;
} // end of scope here
Output:
The value with an automatic storage duration is: 123
The value with a dynamic storage duration is: 123
We can visualize the memory placement of objects using the following image:
The local objects of type int called x, and the pointer p of type int*, reside in the
automatic store memory (stack). The pointer is initialized with a dynamically allocated
object on the heap memory that receives the copy of the value of x. Now both x and *p
objects have the value of 123.
After the call to the delete p; statement, the dynamically allocated memory (object)
is released, and now our diagram looks like the following:
108
CHAPTER 23
Classes – Introduction
A class is a user-defined type. It consists of members. The members are data members
and member functions. A class can be described as data and some functionality on that
data, wrapped into one. An instance of a class is called an object. To only declare a class
name, we write
class MyClass;
To define an empty class, we add a class body marked by braces {}:
class MyClass{};
To create an instance of the class, an object, we use:
class MyClass{};
int main()
{
MyClass o;
}
Explanation:
We defined a class called MyClass. Then we created an object o of type MyClass. It is
said that o is an object, a class instance.
Data Member Fields
A class can have a set of some data in it. These are called member fields. Let us add one
member field to our class and make it of type char:
© Slobodan Dmitrović 2023
S. Dmitrović, Modern C++ for Absolute Beginners, https://doi.org/10.1007/978-1-4842-9274-7_23
109
Chapter 23
Classes – Introduction
class MyClass
{
char c;
};
Now our class has one data member field of type char called c. Let us now add two
more fields of type int and double:
class MyClass
{
char c;
int x;
double d;
};
Now our class has three member fields, and each member field has its name.
Member Functions
Similarly, a class can store functions. These are called member functions. They are mostly
used to perform some operations on data fields. To declare a member function of type
void called dosomething(), we write
class MyClass
{
void dosomething();
};
There are two ways to define this member function. The first is to define it inside the
class (body):
class MyClass
{
void dosomething()
{
std::cout << "Hello World from a class.";
}
};
110
Chapter 23
Classes – Introduction
The second one is to define it outside the class. In that case, we write the function
type first, followed by a class name, followed by a scope resolution :: operator, followed
by a function name, a list of parameters, if any, and a function body:
class MyClass
{
void dosomething();
};
void MyClass::dosomething()
{
std::cout << "Hello World from a class.";
}
Here, we declared a member function inside the class and defined it outside
the class.
We can have multiple member functions in a class. To define them inside a class, we
would write:
class MyClass
{
void dosomething()
{
std::cout << "Hello World from a class.";
}
void dosomethingelse()
{
std::cout << "Hello Universe from a class.";
}
};
To declare member functions inside a class and define them outside the class, we
would write:
class MyClass
{
void dosomething();
void dosomethingelse();
};
111
Chapter 23
Classes – Introduction
void MyClass::dosomething()
{
std::cout << "Hello World from a class.";
}
void MyClass::dosomethingelse()
{
std::cout << "Hello Universe from a class.";
}
Now we can create a simple class that has both a data member field and a member
function:
class MyClass
{
int x;
void printx()
{
std::cout << "The value of x is:" << x;
}
};
This class has one data field of type int called x, and it has a member function called
printx(). This member function reads the value of x and prints it out. This example is an
introduction to member access specifiers or class member visibility.
Access Specifiers
Wouldn’t it be convenient if there was a way we could disable access to member fields
but allow access to member functions for our object and other entities accessing our
class members? To place the code (of a class) into different levels of visibility? And that
is what access specifiers are for. They specify access/visibility levels for class members.
There are three access specifiers/labels – public, protected, and private:
class MyClass
{
public:
112
Chapter 23
Classes – Introduction
// everything in here
// has public access level
protected:
// everything in here
// has protected access level
private:
// everything in here
// has private access level
};
The default visibility/access specifier for a class is private if none of the access
specifiers is present:
class MyClass
{
// everything in here
// has private access by default
};
Another way to write a class is to write a struct. A struct is also a class in which
members have public access by default. So, a struct is the same thing as a class but
with a public access specifier by default:
struct MyStruct
{
// everything in here
// is public by default
};
For now, we will focus only on public and private access specifiers. Public access
members are accessible anywhere. For example, they are accessible to other class
members and to objects of our class. To access a class member from an object, we use
the dot . operator.
We said there are three different visibility levels (access specifiers) for a code inside a
class. They are private, protected, and public. From whose perspective?
113
Chapter 23
Classes – Introduction
From the perspective of three different actors:
•
A class itself
•
A derived class
•
An object of a class
A class itself can see and access any code inside a class, regardless of the
visibility level.
A derived class can see and access only code inside a public and protected region.
An object of a class can see and access only code inside a public area.
Let’s define a class where all the members have public access. To define a class with a
public access specifier, we can write:
class MyClass
{
public:
int x;
void printx()
{
std::cout << "The value of x is:" << x;
}
};
Let us instantiate this class and use it in our main program:
#include <iostream>
class MyClass
{
public:
int x;
void printx()
{
std::cout << "The value of data member x is: " << x;
}
};
114
Chapter 23
Classes – Introduction
int main()
{
MyClass o;
o.x = 123; // x is accessible to object o
o.printx(); // printx() is accessible to object o
}
Output:
The value of data member x is: 123
Our object o now has direct access to all member fields as they are all marked public.
Member fields always have access to each other regardless of the access specifier. That is
why the member function printx() can access the member field x and print or change
its value.
Private access members are accessible only to other class members (other code
inside a class), not objects of a class. Example with full commentary:
#include <iostream>
class MyClass
{
private:
int x; // x now has private access
public:
void printx()
{
std::cout << "The value of x is:" << x; // x is accessible to
// printx()
}
};
115
Chapter 23
Classes – Introduction
int main()
{
MyClass o; //
o.x = 123; //
//
o.printx(); //
}
Create an object
Error, x has private access and is not accessible to
object o
printx() is accessible from object o
Our object o now only has access to a member function printx() in the public
section of the class. It cannot access members in the private section of the class.
If we want the class members to be accessible to our object, then we will put them
inside the public: area. If we want the class members not to be accessible to our object,
then we will put them in the private: section.
We want the data members to have private access and function members to have
public access. This way, our object can access the member functions directly but not the
member fields. There is another access specifier called protected: which we will talk
about later in the book when we learn about inheritance.
Constructors
A constructor is a member function that has the same name as the class. The constructor’s
purpose is to initialize an object of a class. It constructs an object and can set values to
data members. If a class has a constructor, all objects of that class will be initialized by a
constructor call. In short, when an object is created, a code inside the constructor runs.
Default Constructor
A constructor without parameters or with default parameters set is called a default
constructor. It is a constructor which can be called without arguments:
#include <iostream>
class MyClass
{
public:
MyClass()
116
Chapter 23
Classes – Introduction
{
std::cout << "Default constructor invoked." << '\n';
}
};
int main()
{
MyClass o; // invoke a default constructor
}
Output:
Default constructor invoked.
Here’s another example of a default constructor, the constructor with the default
arguments set:
#include <iostream>
class MyClass
{
public:
MyClass(int x = 123, int y = 456)
{
std::cout << "Default constructor invoked." << '\n';
}
};
int main()
{
MyClass o; // invoke a default constructor
}
Output:
Default constructor invoked.
117
Chapter 23
Classes – Introduction
If a default constructor is not explicitly defined in the code, the compiler will
generate a default constructor. But when we define a constructor of our own, the one
that needs parameters, the default constructor gets removed and is not generated by a
compiler.
Constructors are invoked when object initialization takes place. They can’t be
invoked directly.
Constructors can have an arbitrary number of parameters, in which case we can call
them user-provided constructors:
#include <iostream>
class MyClass
{
public:
int x, y;
MyClass(int xx, int yy)
{
x = xx;
y = yy;
}
};
int main()
{
MyClass o{ 1, 2 }; // invoke a user-provided constructor
std::cout << "User-provided constructor invoked." << '\n';
std::cout << o.x << ' ' << o.y;
}
Output:
User-provided constructor invoked.
1 2
118
Chapter 23
Classes – Introduction
In this example, our class has two data fields of type int and a constructor. The
constructor accepts two parameters and assigns them to data members. We invoke the
constructor by providing arguments in the initializer list with MyClass o{ 1, 2 };.
Constructors do not have a return type, they have the same name as the class, and
their purpose is to initialize the object of their class.
Member Initialization
In our previous example, we used a constructor body and assignments to assign value to
each class member. A better, more efficient way to initialize an object of a class is to use
the constructor’s member initializer list in the definition of the constructor:
#include <iostream>
class MyClass
{
public:
int x, y;
MyClass(int xx, int yy)
: x{ xx }, y{ yy } // member initializer list
{
}
};
int main()
{
MyClass o{ 1, 2 }; // invoke a user-defined constructor
std::cout << o.x << ' ' << o.y;
}
Output:
1 2
119
Chapter 23
Classes – Introduction
A member initializer list starts with a colon, followed by member names and
their initializers, where each initialization expression is separated by a comma. In our
previous example, an initialization list is the : x{ xx }, y{ yy } part. This is the
preferred way of initializing class data members.
Copy Constructor
When we initialize an object of the class with another object of the same class, we invoke
a copy constructor. If we do not supply our copy constructor, the compiler generates a
default copy constructor that performs the so-called shallow copy. Example:
class MyClass
{
private:
int x, y;
public:
MyClass(int xx, int yy) : x{ xx }, y{ yy }
{
}
};
int main()
{
MyClass o1{ 1, 2 };
MyClass o2 = o1; // default copy constructor invoked
}
In this example, we initialize the object o2 with the object o1 of the same type. This
invokes the default copy constructor.
We can provide our own copy constructor. The copy constructor has a special
parameter signature of MyClass(const MyClass& rhs). Here’s an example of a user-
defined copy constructor:
#include <iostream>
class MyClass
{
120
Chapter 23
Classes – Introduction
private:
int x, y;
public:
MyClass(int xx, int yy) : x{ xx }, y{ yy }
{
}
// user defined copy constructor
MyClass(const MyClass& rhs)
: x{ rhs.x }, y{ rhs.y } // initialize members with other object's
// members
{
std::cout << "User-defined copy constructor invoked.";
}
};
int main()
{
MyClass o1{ 1, 2 };
MyClass o2 = o1; // user defined copy constructor invoked
}
Output:
User-defined copy constructor invoked.
Here, we defined our own copy constructor in which we explicitly initialized data
members with other objects’ data members, and we printed out a simple message on the
console/standard output.
Please note that the default copy constructor does not correctly copy members of
some types, such as pointers, arrays, etc. In order to make copies properly, we need to
define our own copy logic inside the copy constructor. This is referred to as a deep copy.
For pointers, for example, we need to both create a pointer and assign a value to the
object it points to in our user-defined copy constructor:
121
Chapter 23
Classes – Introduction
#include <iostream>
class MyClass
{
private:
int x;
int* p;
public:
MyClass(int xx, int pp)
: x{ xx }, p{ new int{pp} }
{
}
MyClass(const MyClass& rhs)
: x{ rhs.x }, p{ new int {*rhs.p} }
{
std::cout << "User-defined copy constructor invoked.";
}
};
int main()
{
MyClass o1{ 1, 2 };
MyClass o2 = o1; // user defined copy constructor invoked
}
Output:
User-defined copy constructor invoked.
Here, we have two constructors: one is a user-provided regular constructor, and the
other is a user-defined copy constructor. The first constructor initializes an object and is
invoked here: MyClass o1{ 1, 2 }; in our main function.
The second, user-defined copy constructor is invoked here: MyClass o2 = o1;. This
constructor now properly copies the values from both int and int* member fields.
122
Chapter 23
Classes – Introduction
In this example, we have pointers as member fields. If we had left out the user-defined
copy constructor and relied on a default copy constructor, only the int member field
would be properly copied, and the pointer would not. In this example, we rectified that.
In addition to copying, there is also a move semantic, where data is moved from one
object to the other. This semantic is represented through a move constructor and a move
assignment operator.
Copy Assignment
So far, we have used copy constructors to initialize one object with another object. We
can also copy the values to an object after it has been initialized/created. We use a copy
assignment for that. Simply, when we initialize an object with another object using the =
operator on the same line, then the copy operation uses the copy constructor:
MyClass copyfrom;
MyClass copyto = copyfrom; // on the same line, uses a copy constructor
When an object is created on one line and then assigned to in the next line, it then
uses the copy assignment operator to copy the data from another object:
MyClass copyfrom;
MyClass copyto;
copyto = copyfrom; // uses a copy assignment operator
A copy assignment operator is of the following signature:
MyClass& operator=(const MyClass& rhs)
To define a user-defined copy assignment operator inside a class, we use
class MyClass
{
public:
MyClass& operator=(const MyClass& rhs)
{
// implement the copy logic here
return *this;
}
};
123
Chapter 23
Classes – Introduction
Notice that the overloaded operators having the = symbol must return a dereferenced
this pointer at the end. To define a user-defined copy assignment operator outside the
class, we use
class MyClass
{
public:
MyClass& operator=(const MyClass& rhs);
};
MyClass& MyClass::operator=(const MyClass& rhs)
{
// implement the copy logic here
return *this;
}
Similarly, there is a move assignment operator, which we will discuss later in the
book. More on operator overloading in the following chapters.
Move Constructor
In addition to copying, we can also move the data from one object to the other. We call
it a move semantics. Move semantics is achieved through a move constructor and move
assignment operator. The object from which the data was moved is left in some valid but
unspecified state. The move operation is efficient in terms of speed of execution, as we
do not have to make copies.
Move constructor accepts something called rvalue reference as an argument.
Every expression can find itself on the left-hand side or the right-hand side of the
assignment operator. The expressions that can be used on the left-hand side are called
lvalues, such as variables, function calls, class members, etc. The expressions that can be
used on the right-hand side of an assignment operator are called rvalues, such as literals
and other expressions.
Now the move semantics accepts a reference to that rvalue. The signature of an
rvalue reference type is T&&, with double reference symbols. So, the signature of a move
constructor is
MyClass (MyClass&& rhs)
124
Chapter 23
Classes – Introduction
To cast something to an rvalue reference, we use the std::move function. This
function casts the object to an rvalue reference. It does not move anything. Here’s an
example where a move constructor is invoked:
#include <iostream>
class MyClass { };
int main()
{
MyClass o1;
MyClass o2 = std::move(o1);
std::cout << "Move constructor invoked.";
// or MyClass o2{std::move(o1)};
}
Output:
Move constructor invoked.
In this example, we define an object of type MyClass called o1. Then we initialize
the second object o2 by moving everything from object o1 to o2. To do that, we need to
cast the o2 to an rvalue reference with std::move(o1). This, in turn, invokes the MyClass
move constructor for o2.
If a user does not provide a move constructor, the compiler provides an implicitly
generated default move constructor.
Let us specify our own user-defined move constructor:
#include <iostream>
#include <string>
class MyClass
{
private:
int x;
std::string s;
125
Chapter 23
Classes – Introduction
public:
MyClass(int xx, std::string ss) // user-provided constructor
: x{ xx }, s{ ss }
{}
MyClass(MyClass&& rhs) // move constructor
:
x{ std::move(rhs.x) }, s{ std::move(rhs.s) }
{
std::cout << "Move constructor invoked." << '\n';
}
};
int main()
{
MyClass o1{ 1, "Some string value" };
MyClass o2 = std::move(o1);
}
Output:
Move constructor invoked.
This example defines a class with two data members and two constructors. The first
constructor is user provided, and it is used to initialize data members using provided
arguments.
The second constructor is a user-defined move constructor accepting an rvalue
reference parameter of type MyClass&& called rhs. This parameter will become our
std::move(o1) argument/object. Then in the constructor initializer list, we also use the
std::move function to move the data fields from o1 to o2.
Move Assignment
The move assignment operator is invoked when we declare an object and then try
to assign an rvalue reference to it. This is done via the move assignment operator.
The signature of the move assignment operator is MyClass& operator=(MyClass&&
otherobject).
126
Chapter 23
Classes – Introduction
To define a user-defined move assignment operator inside a class, we use
class MyClass
{
public:
MyClass& operator=(MyClass&& otherobject)
{
// implement the copy logic here
return *this;
}
};
As with any assignment operator overloading, we must return a dereferenced this
pointer at the end. To define a move assignment operator outside the class, we use
class MyClass
{
public:
MyClass& operator=(MyClass&& rhs);
};
MyClass& MyClass::operator=(MyClass&& rhs)
{
// implement the copy logic here
return *this;
}
A move assignment operator example adapted from a move constructor example
would be
#include <iostream>
#include <string>
class MyClass
{
private:
int x;
std::string s;
127
Chapter 23
Classes – Introduction
public:
MyClass(int xx, std::string ss) // user-provided constructor
: x{ xx }, s{ ss }
{}
MyClass& operator=(MyClass&& otherobject) // move assignment operator
{
x = std::move(otherobject.x);
s = std::move(otherobject.s);
return *this;
}
};
int main()
{
MyClass o1{ 123, "This is currently in object 1." };
MyClass o2{ 456, "This is currently in object 2." };
o2 = std::move(o1); // move assignment operator invoked
std::cout << "Move assignment operator used.";
}
Output:
Move assignment operator used.
Here, we defined two objects called o1 and o2. Then we try to move the data from
object o1 to o2 by assigning an rvalue reference (of object o1) using the std::move(o1)
expression to object o2. This invokes the move assignment operator in our object o2. The
move assignment operator implementation itself uses the std::move() function to cast
each data member to an rvalue reference.
Operator Overloading
Objects of classes can be used in an expression as operands. For example, we can do the
following:
128
Chapter 23
Classes – Introduction
myobject = otherobject;
myobject + otherobject;
myobject / otherobject;
myobject++;
++myobject;
Here, objects of a class are used as operands. To do that, we need to overload the
operators for complex types such as classes. It is said that we need to overload them to
provide a meaningful operation on objects of a class. Some operators can be overloaded
for classes; some cannot. We can overload the following operators – arithmetic, binary,
boolean, unary, comparison, compound, function, and subscript operators:
+ - * / % ^ & | ~ ! = < > == != <= >= += -= *= /= %= ^= &= |= << >> >>= <<=
&& || ++ -- , ->* -> () []
Each operator carries its signature and set of rules when overloading for classes.
Some operator overloads are implemented as member functions and some as
freestanding functions. Let us overload a unary prefix ++ operator for classes. It is of
signature MyClass& operator++():
#include <iostream>
class MyClass
{
private:
int x;
double d;
public:
MyClass()
: x{ 0 }, d{ 0.0 }
{
}
// prefix operator ++
MyClass& operator++()
{
++x;
++d;
std::cout << "Prefix operator ++ invoked." << '\n';
129
Chapter 23
Classes – Introduction
return *this;
}
};
int main()
{
MyClass myobject;
// prefix operator
++myobject;
// the same as:
myobject.operator++();
}
Output:
Prefix operator ++ invoked.
Prefix operator ++ invoked.
In this example, when invoked in our class, the overloaded prefix increment
++ operator increments each of the member fields by one. We can also invoke an
operator by calling .operatoractual_operator_name(parameters_if_any); such as
.operator++();.
Operators often depend on each other and can be implemented in terms of other
operators. To implement a postfix operator ++, we will implement it in terms of a prefix
operator:
#include <iostream>
class MyClass
{
private:
int x;
double d;
public:
MyClass()
: x{ 0 }, d{ 0.0 }
{
}
130
Chapter 23
Classes – Introduction
// prefix operator ++
MyClass& operator++()
{
++x;
++d;
std::cout << "Prefix operator ++ invoked." << '\n';
return *this;
}
// postfix operator ++
MyClass operator++(int)
{
MyClass tmp(*this); // create a copy
operator++(); // invoke the prefix operator overload
std::cout << "Postfix operator ++ invoked." << '\n';
return tmp; // return old value
}
};
int main()
{
MyClass myobject;
// postfix operator
myobject++;
// is the same as if we had:
myobject.operator++(0);
}
Output:
Prefix operator ++ invoked.
Postfix operator ++ invoked.
Prefix operator ++ invoked.
Postfix operator ++ invoked.
Please do not worry too much about the somewhat inconsistent rules for operator
overloading. Remember, each (set of ) operator has its own rules for overloading.
131
Chapter 23
Classes – Introduction
Let us overload a binary operator +=:
#include <iostream>
class MyClass
{
private:
int x;
double d;
public:
MyClass(int xx, double dd)
: x{ xx }, d{ dd }
{
}
MyClass& operator+=(const MyClass& rhs)
{
this->x += rhs.x;
this->d += rhs.d;
return *this;
}
};
int main()
{
MyClass myobject{ 1, 1.0 };
MyClass mysecondobject{ 2, 2.0 };
myobject += mysecondobject;
std::cout << "Used the overloaded += operator.";
}
Output:
Used the overloaded += operator.
Now, myobject member field x has a value of 3, and member field d has a
value of 3.0.
132
Chapter 23
Classes – Introduction
Let us implement the arithmetic + operator in terms of the += operator:
#include <iostream>
class MyClass
{
private:
int x;
double d;
public:
MyClass(int xx, double dd)
: x{ xx }, d{ dd }
{
}
MyClass& operator+=(const MyClass& rhs)
{
this->x += rhs.x;
this->d += rhs.d;
return *this;
}
friend MyClass operator+(MyClass lhs, const MyClass& rhs)
{
lhs += rhs;
return lhs;
}
};
int main()
{
MyClass myobject{ 1, 1.0 };
MyClass mysecondobject{ 2, 2.0 };
MyClass myresult = myobject + mysecondobject;
std::cout << "Used the overloaded + operator.";
}
133
Chapter 23
Classes – Introduction
Output:
Used the overloaded + operator.
When we need to perform arithmetic, logic, and other operations on our objects of
a class, we need to overload the appropriate operators. There are rules and signatures
for overloading each operator. Some operators can be implemented in terms of other
operators.
We do not have to learn all the operator overloading rules by heart. We should simply
look them up. For a complete list of operator overloading rules, please refer to the C++
reference at: https://en.cppreference.com/w/cpp/language/operators.
Destructors
As we saw earlier, a constructor is a member function that gets invoked when the object
is initialized. Similarly, a destructor is a member function that gets invoked when an
object is destroyed. The signature of the destructor starts with a tilde ~ followed by a
class name:
class MyClass
{
public:
MyClass() {} // constructor
~MyClass() {} // destructor
};
A destructor takes no parameters, and there is one destructor per class. Example:
#include <iostream>
class MyClass
{
public:
MyClass() {} // constructor
134
Chapter 23
Classes – Introduction
~MyClass()
{
std::cout << "Destructor invoked.";
} // destructor
};
int main()
{
MyClass o;
} // destructor invoked here when o gets out of scope
Output:
Destructor invoked.
Destructors are invoked when an object goes out of scope or when a pointer to an
object is deleted. We should not call the destructor directly.
Destructors can be used to clean up the allocated resources. Example:
#include <iostream>
class MyClass
{
private:
int* p;
public:
MyClass()
: p{ new int{123} }
{
std::cout << "Created a pointer in the constructor." << '\n';
}
~MyClass()
{
delete p;
std::cout << "Deleted a pointer in the destructor." << '\n';
}
};
135
Chapter 23
Classes – Introduction
int main()
{
MyClass o; // constructor invoked here
} // destructor invoked here
Output:
Created a pointer in the constructor.
Deleted a pointer in the destructor.
Here, we allocate memory for a pointer in the constructor and deallocate the
memory in the destructor. This style of resource allocation/deallocation is called RAII or
Resource Acquisition Is Initialization. Destructors should not be called directly.
Important The use of new and delete, as well as the use of raw pointers in
modern C++, is discouraged. We should use smart pointers instead.
We will talk about them later in the book. Let us do some exercises for the class’s
introductory part.
136
CHAPTER 24
Exercises
Class Instance
Write a program that defines an empty class called MyClass and makes an instance of
MyClass in the main function.
class MyClass
{
};
int main()
{
MyClass o;
}
Class with Data Members
Write a program that defines a class called MyClass with three data members of type
char, int, and bool. Make an instance of that class inside the main function.
class MyClass
{
char c;
int x;
bool b;
};
© Slobodan Dmitrović 2023
S. Dmitrović, Modern C++ for Absolute Beginners, https://doi.org/10.1007/978-1-4842-9274-7_24
137
Chapter 24
Exercises
int main()
{
MyClass o;
}
Class with Member Function
Write a program that defines a class called MyClass with one member function called
printmessage(). Define the printmessage() member function inside the class and have
it output the "Hello World" message. Create an instance of that class and use the object
to call the class member function.
#include <iostream>
class MyClass
{
public:
void printmessage()
{
std::cout << "Hello World.";
}
};
int main()
{
MyClass o;
o.printmessage();
}
Output:
Hello World.
138
Chapter 24
Exercises
Class with Data and Function Members
Write a program that defines a class called MyClass with one member function called
printmessage(). Define the printmessage() member function outside the class and
have it output the "Hello World." string. Create an instance of that class and use the
object to call the member function.
#include <iostream>
class MyClass
{
public:
void printmessage();
};
void MyClass::printmessage()
{
std::cout << "Hello World.";
}
int main()
{
MyClass o;
o.printmessage();
}
Output:
Hello World.
Class Access Specifiers
Write a program that defines a class called MyClass with one private data member of
type int called x and two member functions. The first member function called setx(int
myvalue) will set the value of x to its parameter myvalue. The second member function is
called getx(), is of type int, and returns a value of x. Create an instance of the class and
use the object to access both member functions.
139
Chapter 24
Exercises
#include <iostream>
class MyClass
{
private:
int x;
public:
void setx(int myvalue)
{
x = myvalue;
}
int getx()
{
return x;
}
};
int main()
{
MyClass o;
o.setx(123);
std::cout << "The value of x is: " << o.getx();
}
Output:
The value of x is: 123
User-Defined Default Constructor and Destructor
Write a program that defines a class called MyClass with a user-defined default
constructor and user-defined destructor. Define both constructor and destructor outside
the class body. Both member functions will output a free-to-choose text on the standard
output. Create an object of a class in function main.
140
Chapter 24
Exercises
#include <iostream>
class MyClass
{
public:
MyClass();
~MyClass();
};
MyClass::MyClass()
{
std::cout << "Constructor invoked." << '\n';
}
MyClass::~MyClass()
{
std::cout << "Destructor invoked." << '\n';
}
int main()
{
MyClass o;
}
Output:
Constructor invoked.
Destructor invoked.
Constructor Initializer List
Write a program that defines a class called MyClass, with two private data members of
type int and double. Outside the class, define a user-provided constructor accepting
two parameters. The constructor initializes both data members with arguments using
the initializer. Outside the class, define a function called printdata() which prints the
values of both data members.
141
Chapter 24
Exercises
#include <iostream>
class MyClass
{
private:
int x;
double d;
public:
MyClass(int xx, double dd);
void printdata();
};
MyClass::MyClass(int xx, double dd)
: x{ xx }, d{ dd }
{
}
void MyClass::printdata()
{
std::cout << "The value of x: " << x << ", the value of d: " << d
<< '\n';
}
int main()
{
MyClass o{ 123, 456.789 };
o.printdata();
}
Output:
The value of x: 123, the value of d: 456.789
142
Chapter 24
Exercises
User-Defined Copy Constructor
Write a program that defines a class called MyClass with arbitrary data fields. Write a
user-defined constructor with parameters that initializes data members. Write a user-
defined copy constructor which copies all the members. Create one object of the class,
called o1, and initialize it with values. Create another object of a class, called o2, and
initialize it with object o1. Print out the data for both objects.
#include <iostream>
class MyClass
{
private:
int x;
double d;
public:
MyClass(int xx, double dd); // user-provided constructor
MyClass(const MyClass& rhs); // user-defined copy constructor
void printdata();
};
MyClass::MyClass(int xx, double dd)
: x{ xx }, d{ dd }
{}
MyClass::MyClass(const MyClass& rhs)
: x{ rhs.x }, d{ rhs.d }
{}
void MyClass::printdata()
{
std::cout << "The x is: " << x << ", and the d is: " << d << '\n';
}
143
Chapter 24
Exercises
int main()
{
MyClass o1{ 123, 456.789 }; // invokes a user-provided constructor
MyClass o2 = o1; // invokes a user-defined copy constructor
o1.printdata();
o2.printdata();
}
Output:
The x is: 123, and the d is: 456.789
The x is: 123, and the d is: 456.789
User-Defined Move Constructor
Write a program that defines a class with two data members, a user-provided
constructor, a user-provided move constructor, and a member function that prints the
data. Invoke the move constructor in the main program. Print the moved-to object
data fields.
#include <iostream>
#include <string>
class MyClass
{
private:
double d;
std::string s;
public:
MyClass(double dd, std::string ss) // user-provided constructor
: d{ dd }, s{ ss }
{}
MyClass(MyClass&& otherobject) // user-defined move constructor
:
d{ std::move(otherobject.d) }, s{ std::move(otherobject.s) }
144
Chapter 24
Exercises
{
std::cout << "Move constructor invoked." << '\n';
}
void printdata()
{
std::cout << "The value of a double is: " << d << ", and the value
of a string is: " << s << '\n';
}
};
int main()
{
MyClass o1{ 3.14, "This was in object 1." };
MyClass o2 = std::move(o1); // invokes the move constructor
o2.printdata();
}
Output:
Move constructor invoked.
The value of a double is: 3.14, and the value of a string is: This was in
object 1.
Overloading Arithmetic Operators
Write a program that overloads the arithmetic operator – in terms of a compound
arithmetic operator -=. Subtract one object from the other and assign the result to a third
object. Print out the values of the resulting object’s member fields.
#include <iostream>
class MyClass
{
private:
int x;
double d;
145
Chapter 24
Exercises
public:
MyClass(int xx, double dd)
: x{ xx }, d{ dd }
{
}
void printvalues()
{
std::cout << "The values of x is: " << x << ", the value of d
is: " << d;
}
MyClass& operator-=(const MyClass& rhs)
{
this->x -= rhs.x;
this->d -= rhs.d;
return *this;
}
friend MyClass operator-(MyClass lhs, const MyClass& rhs)
{
lhs -= rhs;
return lhs;
}
};
int main()
{
MyClass myobject{ 3, 3.0 };
MyClass mysecondobject{ 1, 1.0 };
MyClass myresult = myobject - mysecondobject;
myresult.printvalues();
}
Output:
The values of x is: 2, the value of d is: 2
146
CHAPTER 25
Classes – Inheritance
and Polymorphism
In this chapter, we discuss some of the fundamental building blocks of object-oriented
programming, such as inheritance and polymorphism.
Inheritance
We can build a class from an existing class. It is said that a class can be derived from an
existing class. This is known as inheritance and is one of the pillars of object-oriented
programming, abbreviated as OOP. To derive a class from an existing class, we write:
class MyDerivedClass : public MyBaseClass {};
A simple example would be
class MyBaseClass
{
};
class MyDerivedClass : public MyBaseClass
{
};
int main()
{
}
© Slobodan Dmitrović 2023
S. Dmitrović, Modern C++ for Absolute Beginners, https://doi.org/10.1007/978-1-4842-9274-7_25
147
Chapter 25
Classes – Inheritance and Polymorphism
In this example, MyDerivedClass inherits the MyBaseClass.
Let us get the terminology out of the way. It is said that MyDerivedClass is derived
from MyBaseClass, or MyBaseClass is a base class for MyDerivedClass. It is also said that
MyDerivedClass is MyBaseClass. They all mean the same thing.
Now the two classes have some sort of relationship. This relationship can be
expressed through different naming conventions, but the most important one is
inheritance. The derived class and objects of a derived class can access public members
of a base class:
class MyBaseClass
{
public:
char c;
int x;
};
class MyDerivedClass : public MyBaseClass
{
// c and x also accessible here
};
int main()
{
MyDerivedClass o;
o.c = 'a';
o.x = 123;
}
The following example introduces the new access specifier called protected:. The
derived class itself can access protected members of a base class. The protected access
specifier allows access to the base class and derived class but not to objects:
class MyBaseClass
{
protected:
char c;
int x;
};
148
Chapter 25
Classes – Inheritance and Polymorphism
class MyDerivedClass : public MyBaseClass
{
// c and x also accessible here
};
int main()
{
MyDerivedClass o;
o.c = 'a'; // Error, not accessible to an object
o.x = 123; // error, not accessible to an object
}
The derived class cannot access private members of a base class:
class MyBaseClass
{
private:
char c;
int x;
};
class MyDerivedClass : public MyBaseClass
{
// c and x NOT accessible here
};
int main()
{
MyDerivedClass o;
o.c = 'a'; // Error, not accessible to object
o.x = 123; // error, not accessible to object
}
149
Chapter 25
Classes – Inheritance and Polymorphism
The derived class inherits public and protected base class members and can
introduce its own new members. Here’s a simple example:
class MyBaseClass
{
public:
char c;
int x;
};
class MyDerivedClass : public MyBaseClass
{
public:
double d;
};
int main()
{
MyDerivedClass o;
o.c = 'a';
o.x = 123;
o.d = 456.789;
}
Here, we inherited everything from the MyBaseClass class and introduced a new
member field in MyDerivedClass called d. So, with MyDerivedClass, we are extending the
capability of MyBaseClass. The field d only exists in MyDerivedClass and is accessible to the
derived class and its objects. It is not accessible to MyBaseClass class as it does not exist there.
Please note that there are other ways of inheriting a class, such as through protected
and private inheritance, but the public inheritance, such as class MyDerivedClass :
public MyBaseClass, is the most widely used, and we will stick to that one for now.
A derived class itself can be a base class. Example:
class MyBaseClass
{
public:
char c;
int x;
};
150
Chapter 25
Classes – Inheritance and Polymorphism
class MyDerivedClass : public MyBaseClass
{
public:
double d;
};
class MySecondDerivedClass : public MyDerivedClass
{
public:
bool b;
};
int main()
{
MySecondDerivedClass o;
o.c = 'a';
o.x = 123;
o.d = 456.789;
o.b = true;
}
Now our class has everything MyDerivedClass has, which includes everything
MyBaseClass has, plus an additional bool field. It is said that inheritance produces a
particular hierarchy of classes.
This approach is widely used when we want to extend the functionality of our
classes.
The derived class is compatible with a base class. A pointer to a derived class is
compatible with a pointer to a base class. This allows us to utilize polymorphism, which
we will talk about in the next chapter.
Polymorphism
It is said that the derived class is a base class. Its type is compatible with the base class
type. Also, a pointer to a derived class is compatible with a pointer to the base class. This
is important, so let’s repeat this: a pointer to a derived class is compatible with a pointer
to a base class. Together with inheritance, this is used to achieve the functionality known
as polymorphism. Polymorphism means the object can morph into different types.
151
Chapter 25
Classes – Inheritance and Polymorphism
Polymorphism in C++ is achieved through an interface known as virtual functions. A
virtual function is a function whose behavior can be overridden in subsequent derived
classes. And our pointer/object morphs into different types to invoke the appropriate
function. Example:
#include <iostream>
class MyBaseClass
{
public:
virtual void dowork()
{
std::cout << "Hello from a base class." << '\n';
}
};
class MyDerivedClass : public MyBaseClass
{
public:
void dowork()
{
std::cout << "Hello from a derived class." << '\n';
}
};
int main()
{
MyBaseClass* o = new MyDerivedClass;
o->dowork();
delete o;
}
Output:
Hello from a derived class.
152
Chapter 25
Classes – Inheritance and Polymorphism
In this example, we have a simple inheritance where MyDerivedClass is derived from
MyBaseClass.
The MyBaseClass class has a function called dowork() with a virtual specifier.
Virtual means this function can be overridden/redefined in subsequent derived classes,
and the appropriate version will be invoked through a polymorphic object. The derived
class has a function with the same name and the same type of arguments (none in our
case, for now) in the derived class.
In our main program, we create an instance of a MyDerivedClass class through a
base class pointer. Using the arrow operator ->, we invoke the appropriate version of
the function. The -> (arrow) operator does two things: it dereferences a pointer to an
object and accesses the member of a class. Here, the o object morphs into different types
to invoke the appropriate function. Here, it invokes the derived version. That is why the
concept is called polymorphism.
If there were no dowork() function in the derived class, it would invoke the base class
version:
#include <iostream>
class MyBaseClass
{
public:
virtual void dowork()
{
std::cout << "Hello from a base class." << '\n';
}
};
class MyDerivedClass : public MyBaseClass
{
};
int main()
{
MyBaseClass* o = new MyDerivedClass;
o->dowork();
delete o;
}
153
Chapter 25
Classes – Inheritance and Polymorphism
Output:
Hello from a base class.
Functions can be pure virtual by specifying the = 0; at the end of the function
declaration. Pure virtual functions do not have definitions and are also called interfaces.
Pure virtual functions must be redefined in the derived class. Classes having at least one
pure virtual function are called abstract classes and cannot be instantiated. They can
only be used as base classes. Example:
#include <iostream>
class MyAbstractClass
{
public:
virtual void dowork() = 0;
};
class MyDerivedClass : public MyAbstractClass
{
public:
void dowork()
{
std::cout << "Hello from a derived class." << '\n';
}
};
int main()
{
MyAbstractClass* o = new MyDerivedClass;
o->dowork();
delete o;
}
Output:
Hello from a derived class.
154
Chapter 25
Classes – Inheritance and Polymorphism
One important thing to add is that a base class must have a virtual destructor if it
is to be used in a polymorphic scenario. This ensures the proper deallocation of objects
accessed through a base class pointer via the inheritance chain:
class MyBaseClass
{
public:
virtual void dowork() = 0;
virtual ~MyBaseClass() {};
};
Please remember that the use of operator new and raw pointers is discouraged in
modern C++. We should use smart pointers instead. More on this later in the book.
So, the three pillars of object-oriented programming are
–– Encapsulation
–– Inheritance
–– Polymorphism
Encapsulation is grouping the fields into different visibility zones, hiding
implementation from the user, and exposing the interface, for example.
Inheritance is a mechanism where we can create classes by inheriting from a base
class. Inheritance creates a certain class hierarchy and relationship between them.
Polymorphism is an ability of an object to morph into different types during runtime,
ensuring the proper function is invoked. This is achieved through inheritance, virtual
and overridden functions, and base and derived class pointers.
155
CHAPTER 26
Exercises
Inheritance
Write a program that defines a base class called Person. The class has the following
members:
–– A data member of type std::string called the name
–– A single-parameter, user-defined constructor which initializes the name
–– A getter function of type std::string called getname(), which returns the
name’s value
Then, write a class called Student, which inherits from the class Person. The class
Student has the following members:
–– An integer data member called the semester
–– A user-provided constructor that initializes the name and semester fields
–– A getter function of type int called getsemester(), which returns the
semester’s value
In a nutshell, we have a base class Person, and we extend its functionality in the
derived Student class:
#include <iostream>
#include <string>
class Person
{
private:
std::string name;
© Slobodan Dmitrović 2023
S. Dmitrović, Modern C++ for Absolute Beginners, https://doi.org/10.1007/978-1-4842-9274-7_26
157
Chapter 26
Exercises
public:
explicit Person(const std::string& aname)
: name{ aname }
{}
std::string getname() const { return name; }
};
class Student : public Person
{
private:
int semester;
public:
Student(const std::string& aname, int asemester)
: Person::Person{ aname }, semester{ asemester }
{}
int getsemester() const { return semester; }
};
int main()
{
Person person{ "John Doe." };
std::cout << person.getname() << '\n';
Student student{ "Jane Doe.", 2 };
std::cout << student.getname() << '\n';
std::cout << "The semester is: " << student.getsemester() << '\n';
}
Output:
John Doe.
Jane Doe.
The semester is: 2
158
Chapter 26
Exercises
Explanation:
We have two classes: one is a base class (Person), and the other (Student) is a derived
class. Single-parameter constructors should be marked with explicit to prevent the
compiler from making implicit conversions. This is the case with Person’s user-provided,
single-parameter constructor:
explicit Person(const std::string& aname)
: name{ aname }
{}
Member functions that do not modify the member fields should be marked as const.
The const modifier in member functions promises the functions will not modify the data
members and are easier for the compiler to optimize the code. This is the case with both
getname():
std::string getname() const { return name; }
and getsemester() member functions:
int getsemester() const { return semester; }
The Student class inherits from the Person class and adds additional data field
semester and member function getsemester(). The Student class has everything a base
class has, plus it extends the functionality of a base class by adding new fields. The
Student’s user-provided constructor uses the base class constructor in its initializer list to
initialize a name field:
Student(const std::string& aname, int asemester)
: Person::Person{ aname }, semester{ asemester }
{}
In the main() program, we instantiate both classes:
Person person{ "John Doe." };
and
Student student{ "Jane Doe", 2 };
159
Chapter 26
Exercises
And call their member functions:
person.getname();
and
student.getname();
student.getsemester();
Important We will make a polymorphism exercise later in the book when we
cover the smart pointers. This is because we want to depart from the use of new
and delete and raw pointers.
160
CHAPTER 27
The static Specifier
The static specifier says the object will have a static storage duration. The memory
space for static objects is allocated when the program starts and deallocated when
the program ends. Only one instance of a static object exists in the program. If a local
variable is marked as static, the space for it is allocated the first time the program control
encounters its definition and deallocated when the program exits.
To define a local static variable inside a function, we use:
#include <iostream>
void myfunction()
{
static int x = 0; // defined only the first time, skipped every
other // time
x++;
std::cout << "Function ran: " << x << " time(s)." << '\n';
}
int main()
{
myfunction(); // x == 1
myfunction(); // x == 2
myfunction(); // x == 3
}
Output:
Function ran: 1 time(s).
Function ran: 2 time(s).
Function ran: 3 time(s).
© Slobodan Dmitrović 2023
S. Dmitrović, Modern C++ for Absolute Beginners, https://doi.org/10.1007/978-1-4842-9274-7_27
161
Chapter 27
The static Specifier
This variable is initialized the first time the program encounters this function. The
value of this variable is preserved across function calls. What does this mean? The last
changes we made to it stay. It will not get initialized to zero for every function call, only
the first time.
This is convenient as we do not have to store the value inside some global variable x.
We can define static class member fields. Static class members are not part of the
object. They live independently of an object of a class. We declare a static data member
inside the class and define it outside the class only once:
#include <iostream>
class MyClass
{
public:
static int x; // declare a static data member
};
int MyClass::x = 123; // define a static data member
int main()
{
MyClass::x = 456; // access a static data member
std::cout << "Static data member value is: " << MyClass::x;
}
Output:
Static data member value is: 456
Here, we declared a static data member inside a class. Then we defined it outside the
class. When defining a static member outside the class, we do not need to use the static
specifier. Then, we access the data member by using the MyClass::data_member_name
notation.
To define a static member function, we prepend the function declaration with the
static keyword. The function definition outside the class does not use the static keyword:
162
Chapter 27
The static Specifier
#include <iostream>
class MyClass
{
public:
static void myfunction(); // declare a static member function
};
// define a static member function
void MyClass::myfunction()
{
std::cout << "Hello World from a static member function.";
}
int main()
{
MyClass::myfunction(); // call a static member function
}
Output:
Hello World from a static member function.
163
CHAPTER 28
Templates
Templates are mechanisms to support the so-called generic programming. Generic broadly
means we can define a function or a class without worrying about what types it accepts.
We define those functions and classes using some generic type. And when we
instantiate them, we use a concrete type. So, we can use templates when we want to
define a class or a function that can accept almost any type.
We define a template by typing
template <typename T>
// the rest of our function or class code
which is the same as if we used
template <class T>
// the rest of our function or class code
T here stands for a type name. Which type? Well, any type. Here, T means for all
types T.
Function Templates
Using template functionality, we can create function templates that can accept any type.
Let us create a function that can accept an argument of any type:
#include <iostream>
template <typename T>
void myfunction(T param)
{
std::cout << "The value of a parameter is: " << param;
}
© Slobodan Dmitrović 2023
S. Dmitrović, Modern C++ for Absolute Beginners, https://doi.org/10.1007/978-1-4842-9274-7_28
165
Chapter 28
Templates
int main()
{
}
To instantiate a function template, we call a function by supplying a specific type
name surrounded by angle brackets:
#include <iostream>
template <typename T>
void myfunction(T param)
{
std::cout << "The value of a parameter is: " << param << '\n';
}
int main()
{
myfunction<int>(123);
myfunction<double>(123.456);
myfunction<char>('A');
}
Output:
The value of a parameter is: 123
The value of a parameter is: 123.456
The value of a parameter is: A
We can think of T as a placeholder for a specific type, the one we supply when we
instantiate a template. So, in place of T, we now put our specific type. This way, we can
utilize the same code for different types.
Templates can have more than one parameter. We list the template parameters and
separate them using a comma. Here’s an example of a function template that accepts two
template parameters:
#include <iostream>
template <typename T, typename U>
void myfunction(T t, U u)
166
Chapter 28
Templates
{
std::cout << "The first parameter is: " << t << '\n';
std::cout << "The second parameter is: " << u << '\n';
}
int main()
{
int x = 123;
double d = 456.789;
myfunction<int, double>(x, d);
}
Output:
The first parameter is: 123
The second parameter is: 456.789
Class Templates
Using templates, we can also create class templates, which are basically classes that can
have data members of any type, member functions, and member functions’ arguments
of any type.
To define a simple class template, we use the following approach:
#include <iostream>
template <typename T>
class MyClass {
private:
T x;
public:
MyClass(T xx)
:x{ xx }
{
}
167
Chapter 28
Templates
T getvalue()
{
return x;
}
};
int main()
{
MyClass<int> o{ 123 };
std::cout << "The value of x is: " << o.getvalue() << '\n';
MyClass<double> o2{ 456.789 };
std::cout << "The value of x is: " << o2.getvalue() << '\n';
}
Output:
The value of x is: 123
The value of x is: 456.789
Here, we defined a simple class template. The class accepts generic type T, meaning
it can accept any given type at the point of instantiation, which happens in our function
main. We use those types wherever we find appropriate in our class. In our main
function, we instantiate those classes with concrete types int and double. Instead of
writing the same code for two or more different types, we use a template.
To define class template member functions outside the class, we need to make
them templates themselves by prepending the member function definition with the
appropriate template declaration. In such definitions, a class name must be called with a
template argument. Here’s a simple example:
#include <iostream>
template <typename T>
class MyClass {
private:
T x;
public:
MyClass(T xx);
};
168
Chapter 28
Templates
template <typename T>
MyClass<T>::MyClass(T xx)
: x{xx}
{
std::cout << "Constructor invoked. The value of x is: " << x << '\n';
}
int main()
{
MyClass<int> o{ 123 };
MyClass<double> o2{ 456.789 };
}
Output:
Constructor invoked. The value of x is: 123
Constructor invoked. The value of x is: 456.789
Let us make it simpler. If we had a class template with a single void member
function, we would write
template <typename T>
class MyClass {
public:
void somefunction();
};
template <typename T>
void MyClass<T>::somefunction()
{
// function implementation
}
169
Chapter 28
Templates
If we had a class template with a single member function of type T, we would use
template <typename T>
class MyClass {
public:
T genericfunction();
};
template <typename T>
T MyClass<T>::genericfunction()
{
// function implementation
}
Now, if we had both of them in a single class and we wanted to define both of them
outside the class scope, we would use the following:
template <typename T>
class MyClass {
public:
void somefunction();
T genericfunction();
};
template <typename T>
void MyClass<T>::somefunction()
{
// the rest of the code
}
template <typename T>
T MyClass<T>::genericfunction()
{
// the rest of the code
}
170
Chapter 28
Templates
Template Specialization
If we want our template to behave differently, only for a specific type, we provide the so-
called template specialization. Let us say we want our class template to behave differently
only in case an int type was used. To do that, first, we prepend our function or class with
the following:
template <>
// the rest of our template code
To specialize our template function for type int, we write
#include <iostream>
template <typename T>
void myfunction(T arg)
{
std::cout << "The value of an argument is: " << arg << '\n';
}
template <>
// the template specialization code follows
void myfunction(int arg)
{
std::cout << "This is a specialization for an int. The value is: "
<< arg << '\n';
}
int main()
{
myfunction<char>('A');
myfunction<double>(345.678);
myfunction<int>(123); // invokes specialization
}
171
Chapter 28
Templates
Output:
The value of an argument is: A
The value of an argument is: 345.678
This is a specialization for an int. The value is: 123
172
CHAPTER 29
Enumerations
Enumeration, or enum for short, is a type whose values are symbolic, user-defined,
named constants called enumerators.
There are two kinds of enums: the unscoped enums and scoped enums. The unscoped
enum type can be defined with
enum MyEnum
{
myfirstvalue,
mysecondvalue,
mythirdvalue
};
To declare a variable of enumeration type MyEnum, we write
enum MyEnum
{
myfirstvalue,
mysecondvalue,
mythirdvalue
};
int main()
{
MyEnum myenum = myfirstvalue;
myenum = mysecondvalue; // we can change the value of our enum object
}
© Slobodan Dmitrović 2023
S. Dmitrović, Modern C++ for Absolute Beginners, https://doi.org/10.1007/978-1-4842-9274-7_29
173
Chapter 29
Enumerations
Each enumerator has a value of the underlying type. We can change those:
enum MyEnum
{
myfirstvalue = 10,
mysecondvalue,
mythirdvalue
};
These unscoped enums have their enumerators leak into an outside scope, the scope
in which the enum type itself is defined. Old enums are best avoided. Prefer scoped enums
to unscoped enums, as scoped enums do not leak their enumerators into an outer scope
and are not implicitly convertible to other types. To define a scoped enum, we write
enum class MyEnum
{
myfirstvalue,
mysecondvalue,
mythirdvalue
};
To declare a variable of type enum class (scoped enum), we write
enum class MyEnum
{
myfirstvalue,
mysecondvalue,
mythirdvalue
};
int main()
{
MyEnum myenum = MyEnum::myfirstvalue;
}
To access an enumerator value, we prepend the enumerator with the enum
name and a scope resolution operator :: such as MyEnum::myfirstvalue,
MyEnum::mysecondvalue, etc.
174
Chapter 29
Enumerations
With these enums, the enumerator names are defined only within the enum’s
internal scope and do not implicitly convert to underlying types. We can specify the
underlying type for the scoped enum:
enum class MyCharEnum : char
{
myfirstvalue,
mysecondvalue,
mythirdvalue
};
We can also change the initial underlying values of enumerators by specifying
the value:
enum class MyEnum
{
myfirstvalue = 15,
mysecondvalue,
mythirdvalue = 30
};
Prefer enum class enumerations (scoped enums) to old, plain, unscoped enums. Use
enumerations to represent states, for example, when our object can have one value out
of a set of predefined named values.
175
CHAPTER 30
Exercises
Static Variable
Write a program that checks how many times a function was called from the main
program. We will use a local static variable inside a function, and we will increment this
variable each time the function is called in main():
#include <iostream>
void myfunction()
{
static int counter = 0;
counter++;
std::cout << "The function is called " << counter << " time(s)."
<< '\n';
}
int main()
{
myfunction();
myfunction();
for (int i = 0; i < 5; i++)
{
myfunction();
}
}
© Slobodan Dmitrović 2023
S. Dmitrović, Modern C++ for Absolute Beginners, https://doi.org/10.1007/978-1-4842-9274-7_30
177
Chapter 30
Exercises
Output:
The
The
The
The
The
The
The
function
function
function
function
function
function
function
is
is
is
is
is
is
is
called
called
called
called
called
called
called
1
2
3
4
5
6
7
time(s).
time(s).
time(s).
time(s).
time(s).
time(s).
time(s).
Static Data Member
Write a program that defines a class with one static data member of type std::string.
Make the data member public. Then, define this static data member outside the class.
Change the static data member’s value from the main function:
#include <iostream>
#include <string>
class MyClass
{
public:
static std::string name;
};
std::string MyClass::name = "John Doe";
int main()
{
std::cout << "Static data member value: " << MyClass::name << '\n';
MyClass::name = "Jane Doe";
std::cout << "Static data member value: " << MyClass::name << '\n';
}
178
Chapter 30
Exercises
Output:
Static data member value: John Doe
Static data member value: Jane Doe
Static Member Function
Write a program that defines a class with one static member function and one regular,
nonstatic member function. Make both functions public. Define both member
functions outside the class. Invoke both functions from the main program:
#include <iostream>
#include <string>
class MyClass
{
public:
static void mystaticfunction();
void myfunction();
};
void MyClass::mystaticfunction()
{
std::cout << "Hello World from a static member function." << '\n';
}
void MyClass::myfunction()
{
std::cout << "Hello World from a regular member function." << '\n';
}
int main()
{
MyClass::mystaticfunction();
MyClass myobject;
myobject.myfunction();
}
179
Chapter 30
Exercises
Output:
Hello World from a static member function.
Hello World from a regular member function.
Function Template
Write a program that defines a template for a function that sums two numbers. Numbers
are of the same generic type, T, and are passed to the function as arguments. Instantiate
the function in the main program using types int and double:
#include <iostream>
template <typename T>
T mysum(T x, T y)
{
return x + y;
}
int main()
{
int intresult = mysum<int>(10, 20);
std::cout << "The integer sum result is: " << intresult << '\n';
double doubleresult = mysum<double>(123.456, 789.101);
std::cout << "The double sum result is: " << doubleresult << '\n';
}
Output:
The integer sum result is: 30
The double sum result is: 912.557
180
Chapter 30
Exercises
Class Template
Write a program that defines a simple class template with one data member of a generic
type, a constructor, a getter function of a generic type, and a setter member function.
Instantiate the class template in the main function using types int and double:
#include <iostream>
template <typename T>
class MyClass
{
private:
T x;
public:
MyClass(T xx)
: x{ xx }
{}
T getx() const
{
return x;
}
void setx(T ax)
{
x = ax;
}
};
int main()
{
MyClass<int> o{123};
std::cout << "The value of the data member is: " << o.getx() << '\n';
o.setx(456);
std::cout << "The value of the data member is: " << o.getx() << '\n';
MyClass<double> o2{ 4.25 };
181
Chapter 30
Exercises
std::cout << "The value of the data member is: " << o2.getx() << '\n';
o2.setx(6.28);
std::cout << "The value of the data member is: " << o2.getx() << '\n';
}
Output:
The
The
The
The
value
value
value
value
of
of
of
of
the
the
the
the
data
data
data
data
member
member
member
member
is:
is:
is:
is:
123
456
4.25
6.28
Scoped Enums
Write a program that defines a scoped enum representing days of the week. Create
an object of that enum, assign it a value, and check if it is Monday. If it is, change the
object’s value to another enum value:
#include <iostream>
enum class Days
{
Monday,
Tuesday,
Wednesday,
Thursday,
Friday,
Saturday,
Sunday
};
int main()
{
Days myday = Days::Monday;
std::cout << "The enum value is now Monday." << '\n';
if (myday == Days::Monday)
182
Chapter 30
Exercises
{
myday = Days::Friday;
}
std::cout << "The value is now Friday.";
}
Output:
The enum value is now Monday.
The value is now Friday.
Enums in a switch
Write a program that defines an enumerator type. Create an object of that enum and use
it in a switch statement. Use the switch statement to print the value of an object:
#include <iostream>
enum class Colors
{
Red,
Green,
Blue
};
int main()
{
Colors mycolors = Colors::Green;
switch (mycolors)
{
case Colors::Red:
std::cout << "The color is Red." << '\n';
break;
case Colors::Green:
std::cout << "The color is Green." << '\n';
break;
183
Chapter 30
Exercises
case Colors::Blue:
std::cout << "The color is Blue." << '\n';
break;
default:
break;
}
}
Output:
The color is Green.
184
CHAPTER 31
Organizing Code
We can split our C++ code into multiple files. By convention, there are two kinds of files
into which we can store our C++ source: header files (headers) and source files.
Header and Source Files
Header files are source code files where we usually put various declarations. Header
files usually have the .h (or .hpp) extension. Source files are files where we can store our
definitions and the main program. They usually have the .cpp (or .cc) extension.
Then we include the header files into our source files using the #include
preprocessor directive. To include a standard library header, we use the #include
statement followed by a header name without an extension, enclosed in angled brackets
such as <headername>. Example:
#include <iostream>
#include <string>
// etc
To include user-defined header files, we use the #include statement, followed by a
full header name with an extension enclosed in double quotes. Example:
#include "myheader.h"
#include "otherheader.h"
// etc
The realistic scenario is that sometimes we need to include both standard library
headers and user-defined headers:
#include <iostream>
#include "myheader.h"
// etc
© Slobodan Dmitrović 2023
S. Dmitrović, Modern C++ for Absolute Beginners, https://doi.org/10.1007/978-1-4842-9274-7_31
185
Chapter 31
Organizing Code
The compiler stitches the code from the header file and the source file together and
produces what is called a translation unit. The compiler then uses this file to create an
object file. A linker then links object files together to create an executable program or a
library.
We should put the declarations and constants into header files and put definitions
and executable code in source files.
Header Guards
Multiple source files might include the same header file. We use a mechanism called
header guards to ensure that our header is included only once in the compilation
process. It ensures that our header content is included only once in the compilation
process. We surround the code in our header file with the following macros:
#ifndef MY_HEADER_H
#define MY_HEADER_H
// header file source code
// goes here
#endif
This approach ensures the code inside a header file is included only once during the
compilation phase.
Namespaces
So far, we have seen how to group parts of our C++ code into headers and source files.
There is another way we can logically group parts of our C++ source code, and that is
through namespaces. A namespace is a scope with a name. To declare a namespace,
we write
namespace MyNameSpace
{
}
186
Chapter 31
Organizing Code
To declare, for example, objects inside a namespace, we use
namespace MyNameSpace
{
int x;
double d;
}
To refer to these objects outside the namespace, we use their fully qualified names.
This means we use the namespace_name::our_object notation. Here’s an example where
we define the objects outside the namespace they were declared in:
namespace MyNameSpace
{
int x;
double d;
}
int main()
{
MyNameSpace::x = 123;
MyNameSpace::d = 456.789;
}
To introduce an entire namespace into the current scope, we can use the using
directive:
namespace MyNameSpace
{
int x;
double d;
}
using namespace MyNameSpace;
int main()
{
x = 123;
d = 456.789;
}
187
Chapter 31
Organizing Code
If we have several separate namespaces with the same name in our code, we are
extending that namespace, we are not redefining it. Example:
namespace MyNameSpace
{
int x;
double d;
}
namespace MyNameSpace
{
char c;
bool b;
}
int main()
{
MyNameSpace::x
MyNameSpace::d
MyNameSpace::c
MyNameSpace::b
}
=
=
=
=
123;
456.789;
'a';
true;
We now have x, d, c, and b inside our MyNameSpace namespace. We are extending the
MyNameSpace, not redefining it.
A namespace can be spread across multiple files, both headers and source files. We
will often see production code wrapped into namespaces. It is an excellent mechanism
to group the code into namespaces logically.
Two namespaces with different names can hold an object with the same name. Since
every namespace is a different scope, they now declare two different, unrelated objects
with the same name. It prevents name clashes:
#include <iostream>
namespace MyNameSpace
{
int x;
}
188
Chapter 31
Organizing Code
namespace MySecondNameSpace
{
int x;
}
int main()
{
MyNameSpace::x = 123;
MySecondNameSpace::x = 456;
std::cout << "The 1st x is: " << MyNameSpace::x << ", the 2nd x is: "
<< MySecondNameSpace::x;
}
Output:
The 1st x is: 123, the 2nd x is: 456
189
CHAPTER 32
Exercises
Header and Source Files
Write a program that declares an arbitrary function in a header file. The header file
is called myheader.h. Define this function inside the main program source file called
source.cpp. The main function is also located inside a source.cpp file. Include the header
into our source file and invoke the function.
The content of the myheader.h file:
void myfunction(); //function declaration
The content of the source.cpp file:
#include "myheader.h" //include the header
#include <iostream>
int main()
{
myfunction();
}
// function definition
void myfunction()
{
std::cout << "Hello World from multiple files.";
}
Output:
Hello World from multiple files.
© Slobodan Dmitrović 2023
S. Dmitrović, Modern C++ for Absolute Beginners, https://doi.org/10.1007/978-1-4842-9274-7_32
191
Chapter 32
Exercises
Multiple Source Files
Write a program that declares an arbitrary function in a header file. The header file is
called mylibrary.h. Define a function inside the source file called mylibrary.cpp. The
main function is inside a second source file called the source.cpp file. Include the header
in both source files and invoke the function.
The content of the mylibrary.h file:
void myfunction(); //function declaration
The content of the mylibrary.cpp file:
#include "mylibrary.h"
#include <iostream>
// function definition
void myfunction()
{
std::cout << "Hello World from multiple files.";
}
The content of the source.cpp file:
#include "mylibrary.h"
int main()
{
myfunction();
}
Output:
Hello World from multiple files.
192
Chapter 32
Exercises
Explanation:
This program has three files:
–– A header file called mylibrary.h is where we put our function
declaration.
–– We put our function definition in a source file called mylibrary.cpp. We
include the header file mylibrary.h into the mylibrary.cpp source file.
–– A source file called source.cpp is where the main program is. We also
include the mylibrary.h header file into this source file.
Since our header file is included in multiple source files, we should put header guard
macros into it. The mylibrary.h file now looks like the following:
#ifndef MY_LIBRARY_H
#define MY_LIBRARY_H
void myfunction();
#endif // !MY_LIBRARY_H
To compile a program that has multiple source files, with g++, we use
g++ source.cpp mylibrary.cpp
The Visual Studio IDE organizes multiple source and header files into projects and
automatically compiles all the files.
Namespaces
Write a program that declares a function inside a namespace and defines the function
outside the namespace. Invoke the function in the main program. Namespace and
function names are arbitrary.
#include <iostream>
namespace MyNameSpace
{
void myfunction();
}
193
Chapter 32
Exercises
void MyNameSpace::myfunction()
{
std::cout << "Hello World from a function inside a namespace.";
}
int main()
{
MyNameSpace::myfunction();
}
Output:
Hello World from a function inside a namespace.
Nested Namespaces
Write a program that defines a namespace called A and another namespace called B,
nested inside the namespace A. Declare a function inside the namespace B and define
the function outside both namespaces. Invoke the function in the main program. Then,
introduce the entire namespace B to the current scope and invoke the function.
#include <iostream>
namespace A
{
namespace B
{
void myfunction();
}
}
void A::B::myfunction()
{
std::cout << "Hello World from a function inside a nested namespace."
<< '\n';
}
194
Chapter 32
Exercises
int main()
{
A::B::myfunction();
using namespace A::B;
myfunction();
}
Output:
Hello World from a function inside a nested namespace.
Hello World from a function inside a nested namespace.
195
CHAPTER 33
Conversions
Types can be converted to other types. For example, built-in types can be converted to
other built-in types. Here, we will discuss the implicit and explicit conversions.
Implicit Conversions
Some values can be implicitly converted into each other. This is true for all the built-in
types. We can convert char to int, int to double, etc. Example:
int main()
{
char mychar = 64;
int myint = 123;
double mydouble = 456.789;
bool myboolean = true;
myint = mychar;
mydouble = myint;
mychar = myboolean;
}
We can also implicitly convert double to int. However, some information is lost, and
the compiler will warn us about this. This is called narrowing conversions:
int main()
{
int myint = 123;
double mydouble = 456.789;
myint = mydouble; // the decimal part is lost
}
© Slobodan Dmitrović 2023
S. Dmitrović, Modern C++ for Absolute Beginners, https://doi.org/10.1007/978-1-4842-9274-7_33
197
Chapter 33
Conversions
When smaller integer types such as char or short are used in arithmetic operations, they
get promoted/converted to integers. This is referred to as integral promotion. For example, if
we use two chars in an arithmetic operation, both get converted to an integer, and the whole
expression is of type int. This conversion happens only inside the arithmetic expression:
int main()
{
char c1 = 10;
char c2 = 20;
auto result = c1 + c2; // result is of type int
}
Any built-in type can be converted to a boolean. For objects of those types, any
value other than zero gets converted to a boolean value of true, and values equal to zero
implicitly convert to a value of false. Example:
int main()
{
char mychar = 64;
int myint = 0;
double mydouble = 3.14;
bool myboolean = true;
myboolean = mychar; // true
myboolean = myint; // false
myboolean = mydouble; // true
}
Conversely, a boolean type can be converted to int. The value of true converts to an
integer value of one, and the value of false converts to an integer value of zero.
A pointer of any type can be converted to void* type. Here’s an example where we
convert an integer pointer to a void pointer:
int main()
{
int x = 123;
int* pint = &x;
void* pvoid = pint;
}
198
Chapter 33
Conversions
While we can convert any data pointer to a void pointer, we cannot dereference the
void pointer. To be able to access the object pointed to by a void pointer, we need to cast
the void pointer to some other pointer type first. To do that, we can use the explicit cast
function static_cast described in the next chapter:
#include <iostream>
int main()
{
int x = 123;
int* pint = &x;
void* pvoid = pint; // convert from int pointer
int* pint2 = static_cast<int*>(pvoid); // cast a void pointer to int
// pointer
std::cout << *pint2; // dereference a pointer
}
Output:
123
Arrays are implicitly convertible to pointers. When we assign an array name to the
pointer, the pointer points at the first element in an array. Example:
#include <iostream>
int main()
{
int arr[5] = { 1, 2, 3, 4, 5 };
int* p = arr; // pointer to the first array element
std::cout << *p;
}
Output:
1
199
Chapter 33
Conversions
In this case, we have an implicit conversion of type int[] to type int*.
When used as function arguments, the array gets converted to a pointer. More
precisely, it gets converted to a pointer to the first element in an array. In such cases, the
array loses its dimension, and it is said it decays to a pointer. Example:
#include <iostream>
void myfunction(int arg[])
{
std::cout << arg;
}
int main()
{
int arr[5] = { 1, 2, 3, 4, 5 };
myfunction(arr);
}
Possible Output:
004FFE40
Here, the arr argument gets converted to a pointer to the first element in an array.
Since arg is now a pointer, printing it outputs a pointer value similar to the 004FFE40, not
the value it points to. To output the value it points to, we need to dereference the pointer:
#include <iostream>
void myfunction(int arg[])
{
std::cout << *arg;
}
int main()
{
int arr[5] = { 1, 2, 3, 4, 5 };
myfunction(arr);
}
200
Chapter 33
Conversions
Output:
1
It is important to adopt the following: in modern C++, we prefer std::vector and
std::array containers to raw arrays and pointers.
Explicit Conversions
We can explicitly convert the value of one type to another. Let us start with the static_
cast function. This function converts between implicitly convertible types. A signature
of the function is
static_cast<type_to_convert_to>(value_to_convert_from)
If we want to convert from a double to an int, we write
int main()
{
auto myinteger = static_cast<int>(123.456);
}
Prefer this verbose function to implicit conversions, as the static_cast is the
idiomatic way of converting between convertible types. This function performs a
compile-time conversion.
The following explicit conversion functions should be used rarely and carefully.
They are dynamic_cast and reinterpret_cast. The dynamic_cast function converts
pointers of the base class to pointers to the derived class and vice versa up the
inheritance chain. Example:
#include <iostream>
class MyBaseClass {
public:
virtual ~MyBaseClass() {}
};
201
Chapter 33
Conversions
class MyDerivedClass : public MyBaseClass {};
int main()
{
MyBaseClass* base = new MyDerivedClass;
MyDerivedClass* derived = new MyDerivedClass;
// base to derived
if (dynamic_cast<MyDerivedClass*>(base))
{
std::cout << "OK. Convertible.\n";
}
else
{
std::cout << "Not convertible.\n";
}
// derived to base
if (dynamic_cast<MyBaseClass*>(derived))
{
std::cout << "OK. Convertible.\n";
}
else
{
std::cout << "Not convertible.\n";
}
delete base;
delete derived;
}
Output:
OK. Convertible.
OK. Convertible.
If the conversion succeeds, the result is a pointer to a base or derived class,
depending on our use case. If the conversion cannot be done, the result is a pointer of
value nullptr.
202
Chapter 33
Conversions
To use this function, our class must be polymorphic, which means our base class
should have at least one virtual function. To try to convert some unrelated class to one of
our classes in the inheritance chain, we would use the following:
#include <iostream>
class MyBaseClass {
public:
virtual ~MyBaseClass() {}
};
class MyDerivedClass : public MyBaseClass {};
class MyUnrelatedClass {};
int main()
{
MyBaseClass* base = new MyDerivedClass;
MyDerivedClass* derived = new MyDerivedClass;
MyUnrelatedClass* unrelated = new MyUnrelatedClass;
// base to derived
if (dynamic_cast<MyUnrelatedClass*>(base))
{
std::cout << "OK. Convertible.\n";
}
else
{
std::cout << "Not convertible.\n";
}
// derived to base
if (dynamic_cast<MyUnrelatedClass*>(derived))
{
std::cout << "OK.\n";
}
else
{
std::cout << "Not convertible.\n";
}
203
Chapter 33
Conversions
delete base;
delete derived;
delete unrelated;
}
Output:
Not convertible.
Not convertible.
This would fail as the dynamic_cast can only convert between related classes inside
the inheritance chain. In reality, we would hardly ever have to use dynamic_cast in the
real world.
The third and most dangerous cast is reinterpret_cast. This one is best avoided
as it does not offer guarantees of any kind. With that in mind, we will skip its description
and move on to the next chapter.
Important: The static_cast function is probably the only cast we will be using most
of the time.
204
CHAPTER 34
Exceptions
If an error occurs in our program, we want to be able to handle it in some way. One way
to do this is through exceptions. Exceptions are mechanisms where we try to execute
some code in the try{} block, and if an error occurs, an exception is thrown. The control
is then transferred to a catch clause, which handles that exception. A structure of a try/
catch block would be:
int main()
{
try
{
// your code here
// throw an exception if there is an error
}
catch (type_of_the_exception e)
{
// catch and handle the exception
}
}
A simple try/catch example would be
#include <iostream>
int main()
{
try
{
std::cout << "Let's assume some error occurred in our program."
<< '\n';
std::cout << "We throw an exception of type int, for example." << '\n';
© Slobodan Dmitrović 2023
S. Dmitrović, Modern C++ for Absolute Beginners, https://doi.org/10.1007/978-1-4842-9274-7_34
205
Chapter 34
Exceptions
std::cout << "This signals that something went wrong." << '\n';
throw 123; // throw an exception if there is an error
}
catch (int e)
{
// catch and handle the exception
std::cout << "Exception raised!" << '\n';
std::cout << "The exception has a value of " << e << '\n';
}
}
Output:
Let's assume some error occurred in our program.
We throw an exception of type int, for example.
This signals that something went wrong.
Exception raised!
The exception has a value of 123
Explanation: Here, we try to execute code inside the try block. If an error occurs,
we throw an exception that signals something went wrong. The exception in our case
is of type int, but it can be of any type. When the exception is thrown, the control is
transferred to a catch clause, which handles the exception. In our case, it handles the
exception of type int.
We can throw an exception of a different type, std::string, for example:
#include <iostream>
#include <string>
int main()
{
try
{
std::cout << "Let's assume some error occurred in our program."
<< '\n';
std::cout << "We throw an exception of type string, for example."
<< '\n';
206
Chapter 34
Exceptions
std::cout << "This signals that something went wrong." << '\n';
throw std::string{ "Some string error" }; // throw an exception
// if there is an error
}
catch (const std::string& e)
{
// catch and handle the exception
std::cout << "String exception raised!" << '\n';
std::cout << "The exception has a value of: " << e << '\n';
}
}
Output:
Let's assume some error occurred in our program.
We throw an exception of type string, for example.
This signals that something went wrong.
String exception raised!
The exception has a value of: Some string error
We can have/raise multiple exceptions. They can be of different types. In this
case, we have one try and multiple catch blocks. Each catch block handles a different
exception.
#include <iostream>
#include <string>
int main()
{
try
{
throw 123;
// the following will not execute as
// the control has been transferred to a catch clause
throw std::string{ "Some string error" };
}
207
Chapter 34
Exceptions
catch (int e)
{
std::cout << "Integer exception raised! The value is "
<< e << '\n';
}
catch (const std::string& e)
{
// catch and handle the exception
std::cout << "String exception raised!." << '\n';
std::cout << "The exception has a value of: " << e << '\n';
}
}
Output:
Integer exception raised! The value is 123
Here, we throw multiple exceptions in the try block. The first is of type int, and the
second is of std::string type. The moment the first exception is thrown, the control of
the program is transferred to a catch clause. This means that the remainder of the code
inside the try block will not be executed.
A more realistic scenario would be:
#include <iostream>
#include <string>
int main()
{
try
{
bool someflag = true;
bool someotherflag = true;
std::cout << "We can have multiple throw exceptions." << '\n';
if (someflag)
{
std::cout << "Throwing an int exception." << '\n';
throw 123;
208
Chapter 34
Exceptions
}
if(someotherflag)
{
std::cout << "Throwing a string exception." << '\n';
throw std::string{ "Some string error" };
}
}
catch (int e)
{
// catch and handle the exception
std::cout << "Integer exception raised!." << '\n';
std::cout << "The exception has a value of: " << e << '\n';
}
catch (const std::string& e)
{
// catch and handle the exception
std::cout << "String exception raised!" << '\n';
std::cout << "The exception has a value of: " << e << '\n';
}
}
Output:
We can have multiple throw exceptions.
Throwing an int exception.
Integer exception raised!
The exception has a value of: 123
Here, we are throwing multiple exceptions inside the try block. The control is
transferred to an appropriate catch clause when a first exception is encountered.
209
CHAPTER 35
Smart Pointers
Smart pointers are pointers that own the object they point to and automatically destroy
the object they point to and deallocate the memory once the pointers go out of scope.
This way, we do not have to manually delete the object, which was the case with the new
and delete operators.
Smart pointers are declared in the <memory> header. We will cover the following
smart pointers – unique and shared.
Unique Pointer
A unique pointer called std::unique_ptr is a pointer that owns an object it points
to. The pointer cannot be copied. A unique pointer deletes the object and deallocates
memory for it once it goes out of scope. To declare a unique pointer to a simple int
object, we write
#include <iostream>
#include <memory>
int main()
{
std::unique_ptr<int> p(new int{ 123 });
std::cout << *p;
}
Output:
123
© Slobodan Dmitrović 2023
S. Dmitrović, Modern C++ for Absolute Beginners, https://doi.org/10.1007/978-1-4842-9274-7_35
211
Chapter 35
Smart Pointers
This example creates a pointer to an object of type int and assigns a value of 123 to
the object. A unique pointer can be dereferenced in the same way as a regular pointer
using the *p notation. The object gets deleted once p goes out of scope, which, in this
case, is at the closing brace }. No explicit use of the delete operator is required.
A better way to initialize a unique pointer is through a std::make_unique<some_
type>(some_value) function, where we specify the type for the object in angle brackets
and the value for the object the pointer points at in parentheses:
#include <iostream>
#include <memory>
int main()
{
std::unique_ptr<int> p = std::make_unique<int>(123);
std::cout << *p;
}
Output:
123
The std::make_unique function was introduced in the C++14 standard. Make sure to
compile with the -std=c++14 flag to be able to use this function.
We can create a unique pointer that points to an object of a class and then use
its -> operator to access object members:
#include <iostream>
#include <memory>
class MyClass
{
public:
void printmessage()
{
std::cout << "Hello from a class.";
}
};
212
Chapter 35
Smart Pointers
int main()
{
std::unique_ptr<MyClass> p = std::make_unique<MyClass>();
p->printmessage();
}
Output:
Hello from a class.
The object gets destroyed once p goes out of scope. So, prefer a unique pointer to a
raw pointer and their new-delete mechanism. Once p goes out of scope, the pointed-to
object of a class gets destroyed.
We can utilize polymorphic classes using a unique pointer:
#include <iostream>
#include <memory>
class MyBaseClass
{
public:
virtual void printmessage()
{
std::cout << "Hello from a base class.";
}
};
class MyderivedClass: public MyBaseClass
{
public:
void printmessage()
{
std::cout << "Hello from a derived class.";
}
};
213
Chapter 35
Smart Pointers
int main()
{
std::unique_ptr<MyBaseClass> p = std::make_unique<MyderivedClass>();
p->printmessage();
}
Output:
Hello from a derived class.
With smart pointers, there is no need to explicitly delete the allocated memory, the
smart pointer does it for us, hence the smart part.
Shared Pointer
We can have multiple pointers point to a single object. We can say that all of them own
our pointed-to object. That is, our object has shared ownership. And our pointed-to
object gets deleted only when the last of those pointers get destroyed. This is what a
shared pointer is for. Multiple pointers point to a single object, and when all of them get
out of scope, the object gets destroyed.
A shared pointer is defined as std::shared_ptr<some_type>. It can be initialized
using the std::make_shared<some_type>(some_value) function. Shared pointers can be
copied. To have three shared pointers pointing at the same object, we can write
#include <iostream>
#include <memory>
int main()
{
std::shared_ptr<int>
std::shared_ptr<int>
std::shared_ptr<int>
std::cout << "Shared
std::cout << "Shared
std::cout << "Shared
}
214
p1 = std::make_shared<int>(123);
p2 = p1;
p3 = p1;
pointer 1 points at: " << *p1 << '\n';
pointer 2 points at: " << *p2 << '\n';
pointer 3 points at: " << *p3 << '\n';
Chapter 35
Smart Pointers
Output:
Shared pointer 1 points at: 123
Shared pointer 2 points at: 123
Shared pointer 3 points at: 123
When all pointers get out of scope, the pointed-to object gets destroyed, and the
memory for it gets deallocated.
The main differences between unique and shared pointers are
–– With unique pointers, we have one pointer pointing at and owning a
single object, whereas with shared pointers, we have multiple pointers pointing at and owning a single object.
–– Unique pointers cannot be copied, whereas shared pointers can.
If you wonder which one to use, let us say that 90% of the time, you will be using the
unique pointer. Shared pointers can be used to represent data structures such as graphs.
Smart pointers are class templates themselves, meaning they have member
functions. We will just briefly mention they can also accept custom deleters, a code that
gets executed when they get out of scope.
Notice that with smart pointers, we do not need to specify the <some_type*>, we just
need to specify the <some_type>.
Important!
Prefer smart pointers to raw pointers. With smart pointers, we do not have to worry
if we properly match calls to new with calls to delete, as we do not need them. We let the
smart pointer do all the heavy lifting.
215
CHAPTER 36
Exercises
static_cast Conversion
Write a program that uses a static_cast function to convert between fundamental types.
#include <iostream>
int main()
{
int x = 123;
double d = 456.789;
bool b = true;
double doubleresult = static_cast<double>(x);
std::cout << "Int to double: " << doubleresult << '\n';
int intresult = static_cast<int>(d); // double to int
std::cout << "Double to int: " << intresult << '\n';
bool boolresult = static_cast<bool>(x); // int to bool
std::cout << "Int to bool: " << boolresult << '\n';
}
Output:
Int to double: 123
Double to int: 456
Int to bool: 1
© Slobodan Dmitrović 2023
S. Dmitrović, Modern C++ for Absolute Beginners, https://doi.org/10.1007/978-1-4842-9274-7_36
217
Chapter 36
Exercises
A Simple Unique Pointer
Write a program that defines a unique pointer to an integer value. Use the std::make_
unique function to create a pointer.
#include <iostream>
#include <memory>
int main()
{
std::unique_ptr<int> p = std::make_unique<int>(123);
std::cout << "The value of a pointed-to object is: " << *p << '\n';
}
Output:
The value of a pointed-to object is: 123
Unique Pointer to an Object of a Class
Write a program that defines a class with two data members, a user-defined constructor,
and one member function. Create a unique pointer to an object of a class. Use the smart
pointer to access the member function.
#include <iostream>
#include <memory>
class MyClass
{
private:
int x;
double d;
public:
MyClass(int xx, double dd)
: x{ xx }, d{ dd }
{}
218
Chapter 36
Exercises
void printdata()
{
std::cout << "Data members values are: " << x << " and: " << d;
}
};
int main()
{
std::unique_ptr<MyClass> p = std::make_unique<MyClass>(123, 456.789);
p->printdata();
}
Output:
Data members values are: 123 and: 456.789
Shared Pointer Exercise
Write a program that defines three shared pointers pointing at the same object of type
int. Create the first pointer through a std::make_shared function. Create the remaining
pointers by copying the first pointer. Access the pointed-to object through all the
pointers.
#include <iostream>
#include <memory>
int main()
{
std::shared_ptr<int> p1 = std::make_shared<int>(123);
std::shared_ptr<int> p2 = p1;
std::shared_ptr<int> p3 = p1;
std::cout << "Value accessed through a first pointer: " << *p1 << '\n';
std::cout << "Value accessed through a second pointer: " << *p2
<< '\n';
std::cout << "Value accessed through a third pointer: " << *p3 << '\n';
}
219
Chapter 36
Exercises
Output:
Value accessed through a first pointer: 123
Value accessed through a second pointer: 123
Value accessed through a third pointer: 123
Simple Polymorphism
Write a program that defines a base class with a pure virtual member function. Create
a derived class that overrides a virtual function in the base class. Create a polymorphic
object of a derived class through a unique pointer to a base class. Invoke the overridden
member function through a unique pointer.
#include <iostream>
#include <memory>
class BaseClass
{
public:
virtual void dowork() = 0;
virtual ~BaseClass() {}
};
class DerivedClass : public BaseClass
{
public:
void dowork() override
{
std::cout << "Do work from a DerivedClass." << '\n';
}
};
int main()
{
std::unique_ptr<BaseClass> p = std::make_unique<DerivedClass>();
p->dowork();
} // p1 goes out of scope here
220
Chapter 36
Exercises
Output:
Do work from a DerivedClass.
Here, the override specifier explicitly states that the dowork() function in the derived
class overrides the virtual function in the base class.
Here, we used the unique pointer to create and automatically destroy the object and
deallocate the memory once the pointer goes out of scope in the main() function.
Polymorphism II
Write a program that defines a base class with a pure virtual member function. Derive
two classes from the base class and override the virtual function behavior. Create two
unique pointers of base class type to objects of these derived classes. Use the pointers to
invoke the proper polymorphic behavior.
#include <iostream>
#include <memory>
class BaseClass
{
public:
virtual void dowork() = 0;
virtual ~BaseClass() {}
};
class DerivedClass : public BaseClass
{
public:
void dowork() override
{
std::cout << "Do work from a DerivedClass." << '\n';
}
};
class SecondDerivedClass : public BaseClass
{
221
Chapter 36
Exercises
public:
void dowork() override
{
std::cout << "Do work from a SecondDerivedClass." << '\n';
}
};
int main()
{
std::unique_ptr<BaseClass> p = std::make_unique<DerivedClass>();
p->dowork();
std::unique_ptr<BaseClass> p2 = std::make_unique<SecondDerivedClass>();
p2->dowork();
} // p1 and p2 go out of scope here
Output:
Do work from a DerivedClass.
Do work from a SecondDerivedClass.
Exception Handling
Write a program that throws and catches an integer exception. Handle the exception and
print its value:
#include <iostream>
int main()
{
try
{
std::cout << "Throwing an integer exception with the value of 123."
<< '\n';
int x = 123;
throw x;
}
222
Chapter 36
Exercises
catch (int ex)
{
std::cout << "An integer exception of value: " << ex << " was
caught and handled." << '\n';
}
}
Output:
Throwing an integer exception with the value of 123.
An integer exception of value: 123 was caught and handled.
Multiple Exceptions
Write a program that can throw integer and double exceptions in the same try block.
Implement the exception handling blocks for both exceptions.
#include <iostream>
int main()
{
try
{
std::cout << "Throwing an int exception..." << '\n';
throw 123;
std::cout << "Throwing a double exception..." << '\n';
throw 456.789;
}
catch (int ex)
{
std::cout << "Integer exception: " << ex << " caught and handled."
<< '\n';
}
223
Chapter 36
Exercises
catch (double ex)
{
std::cout << "Double exception: " << ex << " caught and handled."
<< '\n';
}
}
Output:
Throwing an int exception...
Integer exception: 123 caught and handled.
224
CHAPTER 37
Input/Output Streams
We can convert our objects to streams of bytes. We can also convert streams of bytes
back to objects. The I/O stream library provides such functionality.
Streams can be output streams and input streams.
Remember the std::cout and std::cin? Those are also streams. For example, the
std::cout is an output stream. It takes whatever objects we supply to it and converts them
to a byte stream, which then goes to our monitor. Conversely, std::cin is an input stream.
It takes the input from the keyboard and converts that input to our objects.
There are different kinds of I/O streams, and here we will explain two kinds: file
streams and string streams.
File Streams
We can read from a file, and we can write to a file. The standard library offers such
functionality via file streams. Those file streams are defined inside the <fstream> header,
and they are
1. std::ifstream – Read from a file
2. std::ofstream – Write to a file
3. std::fstream – Read from and write to a file
The std::fstream can both read from and write to a file, so let us use that one. To
create a std::fstream object, we use
#include <fstream>
int main()
{
std::fstream fs{ "myfile.txt" };
}
© Slobodan Dmitrović 2023
S. Dmitrović, Modern C++ for Absolute Beginners, https://doi.org/10.1007/978-1-4842-9274-7_37
225
Chapter 37
Input/Output Streams
This example creates a file stream called fs and associates it with a file name
myfile.txt on our disk. To read from such file, line by line, we use
#include <iostream>
#include <fstream>
#include <string>
int main()
{
std::fstream fs{ "myfile.txt" };
std::string s;
while (fs)
{
std::getline(fs, s); // read each line into a string
std::cout << s << '\n';
}
}
Possible Output:
This is line of text no. 1.
This is line of text no. 2.
This is line of text no. 3.
Once associated with a file name, we use our fs file stream to read each line of text
from the file and print it out on a screen. To do that, we declare a string variable s, which
will hold our read line of text. Inside the while loop, we read a line from a file to a string.
This is why the std::getline function accepts a file stream and a string as arguments.
Once read, we output the text line on a screen. The while loop terminates once we reach
the end of the file.
To read from a file, one character at a time, we can use the file stream’s >> operator:
#include <iostream>
#include <fstream>
int main()
{
226
Chapter 37
Input/Output Streams
std::fstream fs{ "myfile.txt" };
char c;
while (fs >> c)
{
std::cout << c;
}
}
Possible Output:
Thisislineoftextno.1.Thisislineoftextno.2.Thisislineoftextno.3.
This example reads the file contents one character at a time into our char
variable. By default, this skips the reading of white spaces. To rectify this, we add the
std::noskipws manipulator to the preceding example:
#include <iostream>
#include <fstream>
int main()
{
std::fstream fs{ "myfile.txt" };
char c;
while (fs >> std::noskipws >> c)
{
std::cout << c;
}
}
Possible Output:
This is line of text no. 1.
This is line of text no. 2.
This is line of text no. 3.
227
Chapter 37
Input/Output Streams
To write to a file, we use the file stream’s insertion << operator:
#include <fstream>
int main()
{
std::fstream fs{ "myoutputfile.txt", std::ios::out };
fs << "First line of text." << '\n';
fs << "Second line of text." << '\n';
fs << "The third line of text." << '\n';
}
Possible File Output:
First line of text.
Second line of text.
The third line of text.
We associate an fs object with an output file name and provide an additional
std::ios::out flag which opens a file for writing and overwrites any existing
myoutputfile.txt file. Then we output our text to a file stream using the << operator.
To append text to an existing file, we include the std::ios::app flag inside the file
stream constructor:
#include <fstream>
int main()
{
std::fstream fs{ "myoutputfile.txt", std::ios::app };
fs << "This is appended text" << '\n';
fs << "This is also an appended text." << '\n';
}
Possible File Output:
First line of text.
Second line of text.
The third line of text.
228
Chapter 37
Input/Output Streams
This is appended text
This is also an appended text.
We can also output strings to our file using the file stream’s << operator:
#include <iostream>
#include <fstream>
#include <string>
int main()
{
std::fstream fs{ "myoutputfile.txt", std::ios::out };
std::string s1 = "The first string.\n";
std::string s2 = "The second string.\n";
fs << s1 << s2;
}
Possible File Output:
The first string.
The second string.
String Streams
Similarly, there is a stream that allows us to read from and write to a string. It is defined
inside the <sstream> header, and there are three different string streams:
1. std::istringstream – The stream to read from a string
2. std::ostringstream – The stream to write to a string
3. std::stringstream – The stream to both read from and write to
a string
229
Chapter 37
Input/Output Streams
We will describe the std::stringstream class template as it can both read from and
write to a string. To create a simple string stream, we use
#include <sstream>
int main()
{
std::stringstream ss;
}
This example creates a simple string stream using a default constructor. To create a
string stream and initialize it with a string literal, we use
#include <iostream>
#include <sstream>
int main()
{
std::stringstream ss{ "Hello World." };
std::cout << ss.str();
}
Output:
Hello World.
Here, we created a string stream and initialized it with a string literal in a constructor.
Then we used the string stream’s .str() member function to print the content of the
stream. The .str() member function gets the string representation of the stream. To
initialize a string stream with a string, we use
#include <iostream>
#include <sstream>
int main()
{
std::stringstream ss;
ss << "Hello World.";
std::cout << ss.str();
}
230
Chapter 37
Input/Output Streams
Output:
Hello World.
We use the string stream’s member function .str() to assign the string stream’s
content to a string variable:
#include <iostream>
#include <string>
#include <sstream>
int main()
{
std::stringstream ss{ "Hello World from a string stream." };
std::string s = ss.str();
std::cout << s;
}
Output:
Hello World from a string stream.
To insert data into a string stream, we use the formatted output operator <<:
#include <iostream>
#include <string>
#include <sstream>
int main()
{
std::string s = "Hello World.";
std::stringstream ss{ s };
std::cout << ss.str();
}
Output:
Hello World.
231
Chapter 37
Input/Output Streams
We can also insert values of fundamental types into a string stream using the
formatted output operator <<:
#include <iostream>
#include <sstream>
int main()
{
char c = 'A';
int x = 123;
double d = 456.78;
std::stringstream ss;
ss << c << x << d;
std::cout << ss.str();
}
Output:
A123456.78
To make the output more readable, we can insert text between the variables:
#include <iostream>
#include <sstream>
int main()
{
char c = 'A';
int x = 123;
double d = 456.78;
std::stringstream ss;
ss << "The char is: " << c << ", int is: "<< x << " and double
is: " << d;
std::cout << ss.str();
}
232
Chapter 37
Input/Output Streams
Output:
The char is: A, int is: 123 and double is: 456.78
To output data from a stream into an object, we use the >> operator:
#include <iostream>
#include <sstream>
#include <string>
int main()
{
std::string s = "A 123 456.78";
std::stringstream ss{ s };
char c;
int x;
double d;
ss >> c >> x >> d;
std::cout << c << ' ' << x << ' ' << d << ' ';
}
Output:
A 123 456.78
This example reads data from a string stream into our variables. String streams are
useful for formatted input/output and when we want to convert from built-in types to a
string and from a string to built-in types.
233
CHAPTER 38
C++ Standard Library
and Friends
The C++ language is accompanied by a library called the C++ Standard Library. It is a
collection of containers and useful functions that we access and use in our program by
including the proper header file. The containers and functions inside the C++ Standard
Library are defined in the std namespace. Remember the std::string type mentioned
earlier? It is also a part of the standard library. The standard library is implemented
through class templates. In short, prefer using the standard library to user-provided
libraries for everyday tasks.
Some functionalities explained in this chapter, such as range-based for loop and
lambda expressions, are part of the language itself, not the standard library. The reason
we put them here is they are mostly used in conjunction with standard library facilities.
Containers
A container is a place where we store our objects. There are different categories of
containers. Here, we mention the two:
–– Sequential containers
–– Associative containers
Sequential containers store objects in a sequence, one next to the other in memory.
© Slobodan Dmitrović 2023
S. Dmitrović, Modern C++ for Absolute Beginners, https://doi.org/10.1007/978-1-4842-9274-7_38
235
Chapter 38
C++ Standard Library and Friends
std::vector
A vector is a container defined in the <vector> header. A vector is a sequence of
contiguous elements. Of what type, we may ask? Of any non-const type. A vector and all
other containers are implemented as class templates allowing for storage of (almost) any
type. To define a vector, we use the following: std::vector<some_type>. Here’s a simple
example of initializing a vector of five integers:
#include <vector>
int main()
{
std::vector<int> v = { 1, 2, 3, 4, 5 };
}
Here, we defined a vector, called v, of five integer elements, and we initialized a
vector using the brace initialization. We can visualize the vector’s content using the
following image:
A vector can grow and shrink itself as we insert and delete elements into and from
a vector. To insert an element at the end of the vector, we use the vector’s .push_back()
member function. Example:
#include <vector>
int main()
{
std::vector<int> v = { 1, 2, 3, 4, 5 };
v.push_back(10);
}
This example inserts a value of 10 at the end of our vector. We can think of the push_
back function as the insert_at_the_end functionality:
236
Chapter 38
C++ Standard Library and Friends
Now we have a container of six elements, 1 2 3 4 5 10, and our vector in memory
looks like the following:
Vector elements are indexed. The first element has an index of 0. Individual elements
can be accessed via the subscript operator [element_index] or a member function
at(element_index):
#include <iostream>
#include <vector>
int main()
{
std::vector<int> v = { 1, 2, 3, 4, 5 };
std::cout << "The third element is: " << v[2] << '\n';
std::cout << "The fourth element is :" << v.at(3) << '\n';
}
Output:
The third element is: 3
The fourth element is: 4
The vector’s size (number of elements inside a vector) can be obtained through a
.size() member function:
#include <iostream>
#include <vector>
237
Chapter 38
C++ Standard Library and Friends
int main()
{
std::vector<int> v = { 1, 2, 3, 4, 5 };
std::cout << "The vector's size is: " << v.size();
}
Output:
The vector's size is: 5
We said a vector is a sequential container. It stores elements in a sequence, one next
to the other in memory. Other sequential containers are
a. std::list – A doubly linked list
b. std::forward_list – A singly linked list
c. std::deque – A double-ended queue
So, which one to use? When in doubt, use a std::vector. Each of these containers
has different insertions and lookup times, each serving a different purpose. Nevertheless,
as far as sequence containers go, the std::vector is the container we want to be using
most of the time.
std::array
The std::array is a thin wrapper around a C-style raw array. Raw arrays get converted to
pointers when used as function arguments (decay to a pointer), and we should prefer the
std::array wrapper to old C-style arrays. The std::array is of the following signature:
std::array<type_name, array_size>;.
Here’s a simple example:
#include <iostream>
#include <array>
int main()
{
std::array<int, 5> arr = { 1, 2, 3, 4, 5 };
for (auto el : arr)
238
Chapter 38
C++ Standard Library and Friends
{
std::cout << el << '\n';
}
}
Output:
1
2
3
4
5
This example creates an array of five elements using a std::array container and
prints them out.
Note In modern C++, prefer std::array or std::vector to old/raw
C-style arrays.
std::set
A set is a container that holds unique, sorted objects. It is a binary tree of sorted
objects. To use a set, we must include the <set> header. To define a set, we use the
std::set<type> set_name syntax. To initialize a set of five integers, we can write
#include <iostream>
#include <set>
int main()
{
std::set<int> myset = { 1, 2, 3, 4, 5 };
for (auto el : myset)
{
std::cout << el << '\n';
}
}
239
Chapter 38
C++ Standard Library and Friends
Output:
1
2
3
4
5
We use the set’s .insert(value) member function to insert an element into a set. To
insert, for example, two new elements, we use
#include <iostream>
#include <set>
int main()
{
std::set<int> myset = { 1, 2, 3, 4, 5 };
myset.insert(10);
myset.insert(42);
for (auto el : myset)
{
std::cout << el << '\n';
}
}
Output:
1
2
3
4
5
10
42
Since the set holds unique values, the attempt to insert duplicate values will not
succeed.
240
Chapter 38
C++ Standard Library and Friends
std::map
A map is an associative container that holds key-value pairs. Keys are sorted and unique.
A map is also implemented as a balanced binary tree/graph. So now, instead of one
value per element, we have two. To use a map, we need to include the header. To define a
map, we use the std::map<type1, type2> map_name syntax. Here, type1 represents the
type of the key, and type2 represents the type of a value. To initialize a map of int char
pairs, for example, we can write
#include <map>
int main()
{
std::map<int, char> mymap = { {1, 'a'}, {2, 'b'}, {3,'w'} };
}
In this example, integers are keys, and the characters are the values. Every map
element is a pair. The pair’s first element (the key) is accessed through a .first member
variable, and the second element (the value) is accessed through a .second member
variable. To print out our map, we can use
#include <iostream>
#include <map>
int main()
{
std::map<int, char> mymap = { {1, 'a'}, {2, 'b'}, {3,'w'} };
for (auto el : mymap)
{
std::cout << el.first << ' ' << el.second << '\n';
}
}
241
Chapter 38
C++ Standard Library and Friends
Output:
1 a
2 b
3 w
We can also construct a map through its default constructor and some help from
its key subscript operator []. If the key accessed through a subscript operator does not
exist, the entire key-value pair gets inserted into a map. Example:
#include <iostream>
#include <map>
int main()
{
std::map<int, char> mymap;
mymap[1] = 'a';
mymap[2] = 'b';
mymap[3] = 'w';
for (auto el : mymap)
{
std::cout << el.first << ' ' << el.second << '\n';
}
}
Output:
1 a
2 b
3 w
To insert into a map, we can use the .insert() member function:
#include <iostream>
#include <map>
int main()
{
242
Chapter 38
C++ Standard Library and Friends
std::map<int, char> mymap = { {1, 'a'}, {2, 'b'}, {3,'w'} };
mymap.insert({ 20, 'c' });
for (auto el : mymap)
{
std::cout << el.first << ' ' << el.second << '\n';
}
}
Output:
1 a
2 b
3 w
20 c
To search for a specific key inside a map, we can use the map’s .find(key_value)
member function, which returns an iterator. If the key was not found, this function
returns an iterator with a value equal to .end(). If the key was found, the function
returns the iterator pointing at the pair containing the searched-for key:
#include <iostream>
#include <map>
int main()
{
std::map<int, char> mymap = { {1, 'a'}, {2, 'b'}, {3,'w'} };
auto it = mymap.find(2);
if (it != mymap.end())
{
std::cout << "Found: " << it->first << " " << it->second << '\n';
}
else
{
std::cout << "Not found.";
}
}
243
Chapter 38
C++ Standard Library and Friends
Output:
Found: 2 b
The iterator now points at a map element. Map elements are pairs that consist of
the first element – the key – and the second element, the value. To access these using an
iterator, first, we must dereference an iterator using the arrow operator ->. Then we call
the pair’s first member variable for a key and second for a value.
std::pair
The std::pair class template is a wrapper that can represent a pair of values. To use the
std::pair, we need to include the <utility> header. To access the first value in a pair, we
use the .first member variable. To access the second value in a pair, we use the .second
member variable. Example:
#include <iostream>
#include <utility>
int main()
{
std::pair<int, double> mypair = { 123, 3.14 };
std::cout << "The first element is: " << mypair.first << '\n';
std::cout << "The second element is: " << mypair.second << '\n';
}
Output:
The first element is: 123
The second element is: 3.14
Another way to create a pair is through a std::make_pair function:
#include <iostream>
#include <utility>
int main()
{
244
Chapter 38
C++ Standard Library and Friends
int x = 123;
double d = 3.14;
std::pair<int, double> mypair = std::make_pair(x, d);
std::cout << "The first element is: " << mypair.first << '\n';
std::cout << "The second element is: " << mypair.second << '\n';
}
Output:
The first element is: 123
The second element is: 3.14
Other Containers
There are other less used containers in the standard library as well. We will mention a
few of them:
a. std::forward_list – A singly linked list
b. std::list – A doubly linked list
c. std::deque – A double-ended container that allows insertion and
deletion at both ends
The Range-Based for Loop
Now is an excellent time to introduce the range-based for loop, which allows us
to iterate over the container/range content. The range-based for loop is of the
following syntax:
for (some_type element_name : container_name)
{
}
245
Chapter 38
C++ Standard Library and Friends
We read it as for each element_name of some_type inside the container_name (do
something inside the code block {}). To iterate over the elements of a vector, we can use
#include <iostream>
#include <vector>
int main()
{
std::vector<int> v = { 1, 2, 3, 4, 5 };
v.push_back(10);
for (int el : v)
{
std::cout << el << '\n';
}
}
Output:
1
2
3
4
5
10
The el name represents a copy of each of the vector's elements. If we want to operate
on the actual vector elements, we use a reference type:
#include <iostream>
#include <vector>
int main()
{
std::vector<int> v = { 1, 2, 3, 4, 5 };
v.push_back(10);
for (int& el : v)
{
246
Chapter 38
C++ Standard Library and Friends
std::cout << el << '\n';
}
}
Output:
1
2
3
4
5
10
Now, el is the actual vector element, so any changes we make on el will be the
changes to actual vector elements.
We can also use the auto specifier and let the compiler deduce the type of the
elements in the container:
#include <iostream>
#include <vector>
int main()
{
std::vector<int> v = { 1, 2, 3, 4, 5 };
v.push_back(10);
for (auto el : v)
{
std::cout << el << '\n';
}
}
Output:
1
2
3
247
Chapter 38
C++ Standard Library and Friends
4
5
10
To iterate over a vector of strings, we would use a const auto& specifier, as we should
pass strings via const reference for performance reasons:
#include <iostream>
#include <vector>
#include <string>
int main()
{
std::vector<std::string> v = { "Hello", "World,", "C++"};
v.push_back("Is great!");
for (const auto& el : v)
{
std::cout << el << '\n';
}
}
Output:
Hello
World,
C++
Is great!
Iterators
Containers have iterators. Iterators are pointer-like entities capable of pointing to
individual container elements. The iterator pointing at the first element of a vector is
expressed through a .begin() member function. The iterator pointing at the (not the last
but) one past the last element is expressed through a .end() member function.
248
Chapter 38
C++ Standard Library and Friends
For a vector of five elements, we can visualize its iterators using the following image:
Iterators can be incremented or decremented. Let us print the vector’s content using
iterators:
#include <iostream>
#include <vector>
int main()
{
std::vector<int> v = { 1, 2, 3, 4, 5 };
for (auto it = v.begin(); it!=v.end(); it++)
{
std::cout << *it << '\n';
}
}
Output:
1
2
3
4
5
As long as our vector’s iterator it is not equal to v.end(), we continue iterating
through a vector. When a current iterator it becomes equal to v.end(), the for loop
terminates. v.end() is a signal that the end of the container (not the last element, it is
one past last) has been reached. One learns to appreciate the ease of use of range-based
for loops instead of this old-school iterator usage in a for loop.
249
Chapter 38
C++ Standard Library and Friends
Now that we know about iterators, we can use them to erase elements from a vector.
Let us say we want to erase the fourth element. We position the iterator to the fourth
element so that our image now looks like the following:
And use the .erase(iterator_name) member function:
#include <iostream>
#include <vector>
int main()
{
std::vector<int> v = { 1, 2, 3, 4, 5 };
auto it = v.begin() + 3;
v.erase(it);
for (auto el : v)
{
std::cout << el << '\n';
}
}
Output:
1
2
3
5
Please note that due to the nature of the vector’s implementation, it is not sufficient
only to use the .erase function to remove the element from the container. Instead, we
should use the so-called erase-remove idiom for vectors and rewrite the preceding code
as follows:
250
Chapter 38
C++ Standard Library and Friends
#include <iostream>
#include <vector>
int main()
{
std::vector<int> v = { 1, 2, 3, 4, 5 };
auto it = v.begin() + 3;
// erase-remove idiom
v.erase(std::remove(v.begin(), v.end(), *it), v.end());
for (auto el : v)
{
std::cout << el << '\n';
}
}
Output:
1
2
3
5
A call to std::remove is usually followed by a call to the container’s .erase member
function, thus ensuring the proper removal/deletion of the container’s element.
We also mentioned another group of containers called associative containers. These
containers are implemented as binary trees. They allow for quick search times, and
the data in these containers are sorted. These associative containers are std::set and
std::map. The set holds unique values. The map holds pairs of key-value elements. Maps
hold unique keys. Please note that there is also another group of associative containers
that allow for duplicate values. They are std::multiset and std::multimap.
Algorithms and Utilities
The C++ Standard Library provides a set of useful functions located in the <algorithm>
header. These functions allow us to perform various operations on our containers.
251
Chapter 38
C++ Standard Library and Friends
std::sort
For example, if we want to sort our container, we can use the std::sort function. To sort
our vector in ascending order, we use
#include <iostream>
#include <vector>
#include <algorithm>
int main()
{
std::vector<int> v = { 1, 5, 2, 15, 3, 10 };
std::sort(v.begin(), v.end());
for (auto el : v)
{
std::cout << el << '\n';
}
}
Output:
1
2
3
5
10
15
The std::sort function sorts a range of elements. It accepts arguments representing
the start and the end of the range (one past the end of the range, to be exact). Here,
we passed in the entire vector’s range, where v.begin() represents the beginning and
v.end() represents one past the end of the range.
To sort a container in descending order, we pass in an additional argument called
a comparator. There is a built-in comparator called std::greater, which does the
comparisons using the operator > and allows the std::sort function to sort the data in
ascending order. Example:
252
Chapter 38
#include
#include
#include
#include
C++ Standard Library and Friends
<iostream>
<vector>
<algorithm>
<functional>
int main()
{
std::vector<int> v = { 1, 5, 2, 15, 3, 10 };
std::sort(v.begin(), v.end(), std::greater<int>());
for (auto el : v)
{
std::cout << el << '\n';
}
}
Output:
15
10
5
3
2
1
A comparator or a comparison function is a so-called function object defined inside
the <functional> header. We can define our custom function object via the so-called
unnamed functions called lambda functions or lambdas. More on this later in the book.
The third parameter of the std::sort function is often called a predicate. A predicate
is a function or a function object returning true or false. Standard library functions
such as the std::sort accept predicates as one of their arguments.
253
Chapter 38
C++ Standard Library and Friends
std::find
To find a certain element by value and return an iterator pointing at that element, we use
the std::find function. To search for a value of 5 in our vector, we use
#include <iostream>
#include <vector>
#include <algorithm>
int main()
{
std::vector<int> v = { 1, 5, 2, 15, 3, 10 };
auto result = std::find(v.begin(), v.end(), 5);
if (result!=v.end())
{
std::cout << "Element found: " << *result;
}
else
{
std::cout << "Element not found.";
}
}
Output:
Element found: 5
If the element is found, the function returns an iterator pointing at the first found
element in the container. If the value is not found, the function returns a .end() iterator.
Instead of using the container’s .begin() and .end() member functions, we can
also use freestanding std::begin(container_name) and std::end(container_name)
functions:
#include
#include
#include
#include
254
<iostream>
<vector>
<algorithm>
<iterator>
Chapter 38
C++ Standard Library and Friends
int main()
{
std::vector<int> v = { 1, 5, 2, 15, 3, 10 };
auto result = std::find(std::begin(v), std::end(v), 5);
if (result!=std::end(v))
{
std::cout << "An element found: " << *result;
}
else
{
std::cout << "Element not found.";
}
}
Output:
An element found: 5
There is also a conditional std::find_if function which accepts a predicate.
Depending on the predicate value, the function performs a search on elements for which
the predicate returns true. More on this when we discuss lambda expressions in later
chapters.
std::copy
The std::copy function copies the elements from one container to another. It can copy
a range of elements marked with (starting_position_iterator, ending_position_iterator)
from the starting container to a specific position marked with (destination_position_
iterator) in the destination container. The function is declared inside the <algorithm>
header. Before we copy the elements, we need to reserve enough space in the destination
vector by supplying the size to a vector’s constructor. Example:
#include <iostream>
#include <vector>
#include <algorithm>
255
Chapter 38
C++ Standard Library and Friends
int main()
{
std::vector<int> copy_from_v = { 1, 2, 3, 4, 5 };
std::vector<int> copy_to_v(5); // reserve the space for 5 elements
std::copy(copy_from_v.begin(), copy_from_v.end(), copy_to_v.begin());
for (auto el : copy_to_v)
{
std::cout << el << '\n';
}
}
Output:
1
2
3
4
5
Explanation: We define a source vector called copy_from_v and initialize it with
some values. Then we define a copy_to_v destination vector and reserve enough space
for it to hold five elements by supplying the number 5 to its constructor. Then we copy
all the elements from the beginning to the end of a source vector to the (beginning of )
destination vector.
To copy only the first three elements, we would use the appropriate range marked
with copy_from_v.begin() and copy_from_v.begin() + 3. And we only need to reserve the
space for three elements in the destination vector:
#include <iostream>
#include <vector>
#include <algorithm>
int main()
{
std::vector<int> copy_from_v = { 1, 2, 3, 4, 5 };
std::vector<int> copy_to_v(3);
256
Chapter 38
C++ Standard Library and Friends
std::copy(copy_from_v.begin(), copy_from_v.begin() + 3, copy_to_v.
begin());
for (auto el : copy_to_v)
{
std::cout << el << '\n';
}
}
Output:
1
2
3
Min and Max Elements
To find the greatest element in the container, we use the std::max_element function
declared in the <algorithm> header. This function returns an iterator to the max element
in the container:
#include <iostream>
#include <vector>
#include <algorithm>
int main()
{
std::vector<int> v = { 1, 2, 3, 4, 5 };
auto it = std::max_element(std::begin(v), std::end(v));
std::cout << "The max element in the vector is: " << *it;
}
Output:
The max element in the vector is: 5
257
Chapter 38
C++ Standard Library and Friends
Similarly, to find the smallest element in the container, we use the std::min_element
function, which returns an iterator to the min element in the container or a range:
#include <iostream>
#include <vector>
#include <algorithm>
int main()
{
std::vector<int> v = { 1, 2, 3, 4, 5 };
auto it = std::min_element(std::begin(v), std::end(v));
std::cout << "The min element in the vector is: " << *it;
}
Output:
The min element in the vector is: 1
Lambda Expressions
Lambda expressions, or lambdas for short, are the so-called anonymous function objects.
A function object, or a functor, is an object of a class that can be called as a function. To
be able to call an object like a function, we must overload the function call operator () for
our class:
#include <iostream>
class MyClass
{
public:
void operator()()
{
std::cout << "Function object called." << '\n';
}
};
258
Chapter 38
C++ Standard Library and Friends
int main()
{
MyClass myobject;
myobject(); // invoke the function object
}
Output:
Function object called.
The function object can have one or more parameters; in this case, there is one
parameter called x:
#include <iostream>
class MyClass
{
public:
void operator()(int x)
{
std::cout << "Function object with a parameter " << x << "
called.";
}
};
int main()
{
MyClass myobject;
myobject(123); // invoke the function object
}
Output:
Function object with a parameter 123 called.
259
Chapter 38
C++ Standard Library and Friends
The function object can also return a value. For example, the following function
object checks if the parameter is an even number:
#include <iostream>
class MyClass
{
public:
bool operator()(int x)
{
if (x % 2 == 0)
{
return true;
}
else
{
return false;
}
}
};
int main()
{
MyClass myobject;
bool isEven = myobject(123);
if (isEven)
{
std::cout << "The number is even." << '\n';
}
else
{
std::cout << "The number is odd." << '\n';
}
}
260
Chapter 38
C++ Standard Library and Friends
Output:
The number is odd.
It is said that function objects carry their values. Since they are objects of a class,
they can have data members they carry with them. This separates them from regular
functions.
As we can see, overloading the operator () and writing the entire class can be
cumbersome if we only want a simple function object. That is where the lambda
expressions come into play. Lambda expressions are anonymous/unnamed function
objects. The lambda expression signature is
[captures](parameters){lambda_body};
To define and invoke a simple lambda, we use
#include <iostream>
int main()
{
auto mylambda = []() {std::cout << "Hello from a lambda
expression."; };
mylambda();
}
Output:
Hello from a lambda expression.
Here, we assign the result of a lambda expression []() {std::cout << "Hello from
a lambda expression."; } to a variable mylambda. Then we invoke this lambda by
using the function call operator (). Since lambdas are unnamed functions, here we gave
it the name of mylambda, to be able to invoke the code from the lambda expression itself.
261
Chapter 38
C++ Standard Library and Friends
To be able to use the variables in the scope in which the lambda was defined, we
need to capture them first. The capture section marked by [] can capture local variables
by copy:
#include <iostream>
int main()
{
int x = 123;
auto mylambda = [x]() { std::cout << "The value of x is: " << x; };
mylambda();
}
Output:
The value of x is: 123
Here, we captured the local variable x by value and used it inside our lambda body.
Another way to capture variables is by reference, where we use the [&name] notation.
Example:
#include <iostream>
int main()
{
int x = 123;
auto mylambda = [&x]() {
x++;
std::cout << "The value of x is: " << x;
};
mylambda();
}
Output:
The value of x is: 124
262
Chapter 38
C++ Standard Library and Friends
To capture more than one variable, we use the comma operator in the capture list:
[var1, var2]. For example, to capture two local variables by value, we use
#include <iostream>
int main()
{
int x = 123;
int y = 456;
auto mylambda = [x, y]() { std::cout << "The x is: " << x << ", and y
is: " << y; };
mylambda();
}
Output:
The x is: 123, and y is: 456
To capture both local variables by reference, we use
#include <iostream>
int main()
{
int x = 123;
int y = 456;
auto mylambda = [&x, &y]() {
x++;
y++;
std::cout << "The x is: " << x << ", and y is: " << y;
};
mylambda();
}
Output:
The x is: 124, and y is: 457
263
Chapter 38
C++ Standard Library and Friends
Lambdas can have optional parameters inside the parentheses: [](param1, param2)
{}. Example:
#include <iostream>
int main()
{
auto mylambda = [](int x, int y)
{
std::cout << "The value of x is: " << x << ", and y is: " << y;
};
mylambda(123, 456);
}
Output:
The value of x is: 123, and y is: 456
Lambdas are most often used as predicates inside the standard library algorithm
functions. For example, if we want to count the number of even elements in the
container, we would supply a lambda to a std::count_if function. Example:
#include <iostream>
#include <vector>
#include <algorithm>
int main()
{
std::vector<int> v = { 1, 2, 3, 4, 5, 6, 7, 8, 9, 10, 20, 30 };
auto counteven = std::count_if(std::begin(v), std::end(v),
[](int x) {return x % 2 == 0; });
std::cout << "The number of even vector elements is: " << counteven;
}
Output:
The number of even vector elements is: 7
264
Chapter 38
C++ Standard Library and Friends
Here, we have a lambda function that checks if an argument is an even number and
returns true if it is. This lambda is then used as a predicate inside the std::count_if
function. This function only counts the numbers for which the predicate (our lambda
expression) returns true. The std::count_if function iterates through all the vector
elements, and each element becomes a lambda argument.
We can use lambdas in other standard library algorithm functions accepting
expressions named callables. Examples of callables are lambdas and function objects.
By using lambdas, we can more clearly express ourselves, and we do not have
to write the verbose class function objects. Lambdas were introduced in the C++11
standard.
265
CHAPTER 39
Exercises
Basic Vector
Write a program that defines a vector of integers. Insert two elements into a vector. Print
out the vector content using the range-based for loop.
#include <iostream>
#include <vector>
int main()
{
std::vector<int> v = { 10, 5, 8, 4, 1, 2 };
v.push_back(15); // insert the value 15
v.push_back(30); // insert the value of 30
for (auto el : v)
{
std::cout << el << '\n';
}
}
Output:
10
5
8
4
1
© Slobodan Dmitrović 2023
S. Dmitrović, Modern C++ for Absolute Beginners, https://doi.org/10.1007/978-1-4842-9274-7_39
267
Chapter 39
Exercises
2
15
30
Deleting a Single Value
Write a program that defines a vector of integers. Erase the second element from the
vector. Print out the vector content using the range-based loop.
#include <iostream>
#include <vector>
int main()
{
std::vector<int> v = { 10, 5, 8, 4, 1, 2 };
v.erase(v.begin() + 1); // erase the second element which is 5
for (auto el : v)
{
std::cout << el << '\n';
}
}
Output:
10
8
4
1
2
Deleting a Range of Elements
Write a program that defines a vector of integers. Erase the range of three elements
starting from the beginning of the vector. Print out the vector content using the range-
based for loop.
268
Chapter 39
Exercises
#include <iostream>
#include <vector>
int main()
{
std::vector<int> v = { 10, 5, 8, 4, 1, 2 };
v.erase(v.begin(), v.begin() + 3); // erase the first 3 elements
for (auto el : v)
{
std::cout << el << '\n';
}
}
Output:
4
1
2
In this case, the .erase() function overload accepts two arguments. One is the
beginning of the range to be deleted. In our case, it is marked with v.begin(). The
second argument is the end of the range to be deleted. In our case, it is the v.begin() +
3 iterator. Please note that instead of the .begin() member function, we could have used
a freestanding std::begin(v) function.
Finding Elements in a Vector
Write a program that searches for a vector element using the std::find() algorithm
function. If the element has been found, delete it. Print out the vector content.
#include <iostream>
#include <vector>
#include <algorithm>
269
Chapter 39
Exercises
int main()
{
std::vector<int> v = { 10, 5, 8, 4, 1, 2 };
int findnumber = 4;
auto foundit = std::find(std::begin(v), std::end(v), findnumber);
if (foundit != std::end(v))
{
std::cout << "Element found. Deleting the element." << '\n';
v.erase(foundit);
std::cout << "Element deleted." << '\n';
}
else
{
std::cout << "Element not found." << '\n';
}
for (auto el : v)
{
std::cout << el << '\n';
}
}
Output:
Element found. Deleting the element.
Element deleted.
10
5
8
1
2
Basic Set
Write a program that defines a set of integers. Print out the set content and observe
the following: the data is sorted, regardless of how we define the set. This is because,
internally, std::set is a sorted container that holds unique values.
270
Chapter 39
Exercises
#include <iostream>
#include <set>
int main()
{
std::set<int> myset = { -10, 1, 3, 5, -20, 6, 9, 15 };
for (auto el : myset)
{
std::cout << el << '\n';
}
}
Output:
-20
-10
1
3
5
6
9
15
Set Data Manipulation
Write a program that defines a set and inserts two new values using the set’s .insert()
member function. Then, delete one arbitrary value from a set using the set’s .erase()
member function. Print out the set content afterward.
#include <iostream>
#include <set>
int main()
{
std::set<int> myset = { -10, 1, 3, 5, 6, 9, 15 };
myset.insert(-5); // inserts a value of -5
myset.insert(30); // inserts a value of 30
271
Chapter 39
Exercises
myset.erase(6); // deletes a value of 6
for (auto el : myset)
{
std::cout << el << '\n';
}
}
Output:
-10
-5
1
3
5
9
15
30
Set Member Functions
Write a program that defines a set of integers and utilizes the set’s member function to
check the set’s size, check whether it is empty, and clear the set’s content.
#include <iostream>
#include <set>
int main()
{
std::set<int> myset = { -10, 1, 3, 5, 6, 9, 15 };
std::cout << "The set's size is: " << myset.size() << '\n';
std::cout << "Clearing the set..." << '\n';
myset.clear(); // clear the set's content
if (myset.empty())
{
std::cout << "The set is empty." << '\n';
}
272
Chapter 39
Exercises
else
{
std::cout << "The set is not empty." << '\n';
}
}
Output:
The set's size is: 7
Clearing the set...
The set is empty.
Search for Data in a Set
Write a program that searches for a particular value in a set using the set’s .find()
member function. If the value is found, delete it. Print out the set content.
#include <iostream>
#include <set>
int main()
{
std::set<int> myset = { -10, 1, 3, 5, 6, 9, 15 };
int findvalue = 5;
auto foundit = myset.find(findvalue);
if (foundit != myset.end())
{
std::cout << "Value found. Deleting the value..." << '\n';
myset.erase(foundit);
std::cout << "Element deleted." << '\n';
}
else
{
std::cout << "Value not found." << '\n';
}
273
Chapter 39
Exercises
for (auto el : myset)
{
std::cout << el << '\n';
}
}
Output:
Value found. Deleting the value...
Element deleted.
-10
1
3
6
9
15
Basic Map
Write a program that defines a map where keys are of type char and values are of type
int. Print out the map’s content.
#include <iostream>
#include <map>
int main()
{
std::map<char, int> mymap = { {'a', 1}, {'b', 5}, {'e', 10},
{'f', 10} };
for (auto el : mymap)
{
std::cout << el.first << ' ' << el.second << '\n';
}
}
274
Chapter 39
Exercises
Output:
a
b
e
f
1
5
10
10
Explanation:
Map elements are key-value pairs. These pairs are represented by a std::pair class
template which can store a pair. So the type of a map element is std::pair<char, int>. In
a map container, keys are unique, and values do not have to be unique. We initialize the
map with our key-value pairs inside the initializer list {}. Using a range-based for loop,
we iterate over map elements. To access the key in a pair, we use the pair’s .first member
function, which represents the first element in a pair – in our case, the key. Similarly, we
access the second element using the pair’s .second member function, which represents
the map element value.
Inserting into a Map
Write a program that defines a map of strings and integers. Insert an element into a map
using the map’s .insert() member function. Then use the map’s operator [] to insert
another key-value element into a map. Print the map’s content afterward.
#include <iostream>
#include <map>
#include <string>
int main()
{
std::map<std::string, int> mymap = { {"red", 1}, {"green", 20},
{"blue", 15} };
mymap.insert({ "magenta", 4 });
mymap["yellow"] = 5;
275
Chapter 39
Exercises
for (const auto& el : mymap)
{
std::cout << el.first << ' ' << el.second << '\n';
}
}
Output:
blue 15
green 20
magenta 4
red 1
yellow 5
When using the map’s [] operator, there are two scenarios. The key inside the []
operator exists in the map. This means we can use it to change the value of an element.
The key does not exist. In this case, when using the map’s operator [], the key-value
element gets inserted into the map. This was the case with our mymap["yellow"] = 5;
statement. Remember, maps are graphs, and the map’s elements are sorted based on a
key. And since our keys are strings, the order does not necessarily need to be the one we
provided in the initializer list.
If, for example, we have a map of ints and strings, and we provide sorted int keys in
the initializer list, the order would be the same when printing out the elements:
#include <iostream>
#include <map>
#include <string>
int main()
{
std::map<int, std::string> mymap = { {1, "First"}, {2, "Second"}, {3,
"Third"}, {4, "Fourth"} };
for (const auto& el : mymap)
{
std::cout << el.first << ' ' << el.second << '\n';
}
}
276
Chapter 39
Exercises
Output:
1
2
3
4
First
Second
Third
Fourth
Searching and Deleting from a Map
Write a program that defines a map of integers and strings. Search for an element by key
using the map’s .find() member function. If the element is found, delete it. Print out the
map content.
#include <iostream>
#include <map>
#include <string>
int main()
{
std::map<int, std::string> mymap = { {1, "First"}, {2, "Second"}, {3,
"Third"}, {4, "Fourth"} };
int findbykey = 2;
auto foundit = mymap.find(findbykey);
if (foundit != mymap.end())
{
std::cout << "Key found." << '\n';
std::cout << "Deleting the element..." << '\n';
mymap.erase(foundit);
}
else
{
std::cout << "Key not found." << '\n';
}
277
Chapter 39
Exercises
for (const auto& el : mymap)
{
std::cout << el.first << ' ' << el.second << '\n';
}
}
Output:
Key found.
Deleting the element...
1 First
3 Third
4 Fourth
Lambda Expressions
Write a program that defines a vector of integers. Sort the vector in a descending order
using the std::sort function and a user-provided lambda function as a predicate.
#include <iostream>
#include <vector>
#include <algorithm>
int main()
{
std::vector<int> v = { 5, 10, 4, 1, 3, 15 };
std::sort(std::begin(v), std::end(v), [](int x, int y) {return x
> y; });
for (const auto& el : v)
{
std::cout << el << '\n';
}
}
278
Chapter 39
Exercises
Output:
15
10
5
4
3
1
Write a program that defines a vector of integers. Use the std::count_if function and a
user-provided lambda function to count only even numbers.
#include <iostream>
#include <vector>
#include <algorithm>
int main()
{
std::vector<int> v = { 5, 10, 4, 1, 3, 8 };
int mycount = std::count_if(std::begin(v), std::end(v), [](int x)
{return x % 2 == 0; });
std::cout << "The number of even numbers is: " << mycount;
}
Output:
The number of even numbers is: 3
Now, let us write a program that defines a local lambda expression that can capture
and modify the variable defined inside the main() function:
#include <iostream>
int main()
{
int x = 123;
std::cout << "The value of a local variable is: " << x << '\n';
auto mylambda = [&x](){ x++; };
279
Chapter 39
Exercises
mylambda();
std::cout << "Lambda captured and changed the local variable to: "
<< x << '\n';
}
Output:
The value of a local variable is: 123
Lambda captured and changed the local variable to: 124
280
CHAPTER 40
C++ Standards
C++ is an ISO standardized programming language. There are different C++ standards:
C++98, C++03, C++11, C++14, C++17, C++20, and C++23.
Everything starting with C++11 is referred to as “modern C++.” These standards
define the language in great technical detail. They also serve as manuals for C++
compiler writers. It is a mind-boggling set of rules and specifications. The C++ standards
can be bought, or a draft version can be downloaded for free. These drafts closely
resemble the final C++ standard. When C++ code can be successfully transferred
and compiled on different platforms (machines or compilers), and when C++
implementation closely follows the standard, we say that the code is portable. This is
often referred to as portable C++.
The standards surrounded by braces represent the so-called “modern C++.” Each
standard describes the language and introduces new language and library features. It
may also introduce changes to the existing rules. We will describe notable features in
each of these standards.
C++11
C++11 is an ISO C++ standard published in 2011. To compile for this standard, add
the -std=c++11 flag to a command-line compilation string if compiling with g++ or clang.
If using Visual Studio, choose Project ➤ Options ➤ Configuration Properties ➤ C/C++
➤ Language ➤ C++ Language Standard and choose C++11. New Visual Studio versions
already support this standard out of the box. We have already described the notable
C++11 features in previous chapters, and here we will briefly go through them once again
and introduce a few new ones.
© Slobodan Dmitrović 2023
S. Dmitrović, Modern C++ for Absolute Beginners, https://doi.org/10.1007/978-1-4842-9274-7_40
281
Chapter 40
C++ Standards
Automatic Type Deduction
This standard introduces the auto keyword, which deduces the type of the variable
based on the variable’s initializer:
int main()
{
auto mychar = 'A';
auto myint = 123 + 456;
auto mydouble = 456.789;
}
Range-Based Loops
The range-based loops allow us to iterate over the range, such as C++ Standard Library
containers:
#include <iostream>
#include <vector>
int main()
{
std::vector<int> v = { 10, 20, 40, 5, -20, 75 };
for (auto el : v)
{
std::cout << el << '\n';
}
}
Output:
10
20
40
5
-20
75
282
Chapter 40
C++ Standards
The range-based for loop is of the following form: for (type element :
container). This is read as for each element in a container (do something).
Initializer Lists
Initializer lists, represented by braces { }, allow us to initialize objects in a uniform way.
We can initialize single objects:
int main()
{
int x{ 123 };
int y = { 456 };
double d{ 3.14 };
}
and containers:
#include <vector>
int main()
{
std::vector<int> v = { 1, 2, 3, 4, 5 };
}
List initialization also prevents narrowing conversions. If we tried to initialize our
integer object with a double value inside the initializer list, the compilation would fail:
int main()
{
int x = { 123.45 }; // Error, does not allowing narrowing
}
When initializing our objects, we should prefer initializer lists {} to old-style
parentheses ().
283
Chapter 40
C++ Standards
Move Semantics
The C++11 standard introduces the move semantics for classes. We can initialize
our objects by moving the data from other objects. This is achieved through move
constructors and move assignment operators. Both accept the so-called rvalue reference
as an argument. Lvalue is an expression that can be used on the left-hand side of the
assignment operation. Rvalues are expressions that can be used on the right-hand
side of an assignment. The rvalue reference has the signature of some_type&&. To cast
an expression to an rvalue reference, we use the std::move function. A simple move
constructor and move assignment signature are
class MyClass
{
public:
MyClass(MyClass&& otherobject) // move constructor
{
//implement the move logic here
}
MyClass& operator=(MyClass&& otherobject) // move assignment operator
{
// implement the move logic here
return *this;
}
};
Lambda Expressions
Lambda expressions are anonymous function objects. They allow us to write a short
code snippet to be used as a standard library function predicate. Lambdas have a
capture list marked by [ ] where we can capture local variables by reference or copy, a
parameter list with optional parameters marked with ( ), and a lambda body marked
with { }. An empty lambda looks like [](){};. A simple example of counting only the
even numbers in a set using the lambda as a predicate:
284
Chapter 40
C++ Standards
#include <iostream>
#include <vector>
#include <algorithm>
int main()
{
std::vector<int> v = { 1, 2, 3, 4, 5 };
auto counteven = std::count_if(std::begin(v), std::end(v),
[](int x) {return x % 2 == 0; }); // lambda expression
std::cout << "The number of even vector elements is: " << counteven;
}
Output:
The number of even vector elements is: 2
The constexpr Specifier
The constexpr specifier promises the variable or a function can be evaluated during
compile time. If the expression cannot be evaluated during compile time, the compiler
emits an error:
int main()
{
constexpr int n = 123; //OK, 123 is a compile-time constant
// expression
constexpr double d = 456.78; //OK, 456.78 is a compile-time constant
// expression
constexpr double d2 = d; //OK, d is a constant expression
int x = 123;
constexpr int n2 = x; //compile-time error
// the value of x is not known during
// compile-time
}
285
Chapter 40
C++ Standards
Scoped Enumerators
The C++11 standard introduces the scoped enumerators. Unlike the old enumerators,
the scoped enumerators do not leak their names into the surrounding scope. Scoped
enums have the following signature: enum class Enumerator_Name {value1, value2, etc.}
signature. A simple example of a scoped enum is
enum class MyEnum
{
myfirstvalue,
mysecondvalue,
mythirdvalue
};
int main()
{
MyEnum myenum = MyEnum::myfirstvalue;
}
Smart Pointers
Smart pointers point to objects, and when the pointer goes out of scope, the object
gets destroyed. This makes them smart in the sense that we do not have to worry about
the manual deallocation of allocated memory. The smart pointers do all the heavy
lifting for us.
There are two kinds of smart pointers, the unique pointer with a std::unique_ptr<
Type> signature and a shared pointer with a std::shared_ptr< Type> signature. The
difference between the two is that we can have only one unique pointer pointing at the
object. In contrast, we can have multiple shared pointers pointing at an object. When
the unique pointer goes out of scope, the object gets destroyed, and the memory is
deallocated. When the last of the shared pointers pointing at our object goes out of
scope, the object gets destroyed. The memory gets deallocated.
Here’s a unique pointer example:
#include <iostream>
#include <memory>
int main()
286
Chapter 40
C++ Standards
{
std::unique_ptr<int> p(new int{ 123 });
std::cout << "The pointed-to element is: " << *p;
} // p goes out of scope here, the memory gets deallocated, the object gets
// destroyed
Output:
The pointed-to element is: 123
A unique pointer cannot be copied, only moved. To have multiple shared pointers
pointing at the same object, we would write
#include <iostream>
#include <memory>
int main()
{
std::shared_ptr<int> p1(new int{ 123 });
std::shared_ptr<int> p2 = p1;
std::shared_ptr<int> p3 = p1;
std::cout << "The pointed-to element is: " << *p2;
} // when the last shared pointer goes out of scope, the memory gets
// deallocated
Output:
The pointed-to element is: 123
Shared pointers can be copied. It is said they share ownership of the object. When
the last shared pointer gets out of scope, the pointed-to object gets destroyed, and the
memory gets deallocated.
287
Chapter 40
C++ Standards
std::unordered_set
The std::unordered_set is a container that allows for constant time insertion, searching,
and removal of elements. This container is implemented as an array of buckets of linked
lists. The hash value of each element is calculated, and the object is placed into an
appropriate bucket based on the hash value. The object themselves are not sorted in any
particular order. To define an unordered set, we need to include the <unordered_set>
header. Example:
#include <iostream>
#include <unordered_set>
int main()
{
std::unordered_set<int> myunorderedset = { 1, 2, 5, -4, 7, 10 };
for (auto el : myunorderedset)
{
std::cout << el << '\n';
}
}
Output:
1
10
2
5
7
-4
The values are not sorted but are unique. To insert single or multiple values into an
unordered_set, we use the .insert() member function:
#include <iostream>
#include <unordered_set>
int main()
{
288
Chapter 40
C++ Standards
std::unordered_set<int> myunorderedset = { 1, 2, 5, -4, 7, 10 };
myunorderedset.insert(6); // insert a single value
myunorderedset.insert({ 8, 15, 20 }); // insert multiple values
for (auto el : myunorderedset)
{
std::cout << el << '\n';
}
}
Output:
1
10
2
5
7
-4
6
8
15
20
To delete a value from an unordered set, we use the .erase() member function:
#include <iostream>
#include <unordered_set>
int main()
{
std::unordered_set<int> myunorderedset = { 1, 2, 5, -4, 7, 10 };
myunorderedset.erase(-4); // erase a single value
for (auto el : myunorderedset)
{
std::cout << el << '\n';
}
}
289
Chapter 40
C++ Standards
Output:
1
10
2
5
7
std::unordered_map
Similar to std::unordered_set, there is also a std::unordered_map, an unordered
container of key-value pairs with unique keys. This container also allows for fast
insertion, searching, and removal of elements. The container’s data is implemented
through buckets. What element goes into what bucket depends on the element’s key
hash value. To define an unordered map, we include the <unordered_map> header.
Example:
#include <iostream>
#include <unordered_map>
int main()
{
std::unordered_map<char, int> myunorderedmap = { {'a', 1}, {'b', 2},
{'c', 5} };
for (auto el : myunorderedmap)
{
std::cout << el.first << ' '<< el.second << '\n';
}
}
Output:
a 1
b 2
c 5
290
Chapter 40
C++ Standards
Here, we initialize an unordered map with key-value pairs. In the range-based
for loop, we print both the key and the value. Map elements are pairs. Pairs have data
members .first for accessing a key and .second for accessing a value. To insert an element
into a map, we can use the .insert() member function:
#include <iostream>
#include <unordered_map>
int main()
{
std::unordered_map<char, int> myunorderedmap = { {'a', 1}, {'b', 2},
{'c', 5} };
myunorderedmap.insert({ 'd', 10 });
for (auto el : myunorderedmap)
{
std::cout << el.first << ' '<< el.second << '\n';
}
}
Output:
a
b
c
d
1
2
5
10
We can also use the map’s operator [] to insert an element. Normally, this operator is
used to access an element value by key. However, if the key does not exist, the operator
inserts a new element into the map:
#include <iostream>
#include <unordered_map>
int main()
{
std::unordered_map<char, int> myunorderedmap = { {'a', 1}, {'b', 2},
{'c', 5} };
myunorderedmap['b'] = 4; // key exists, change the value
291
Chapter 40
C++ Standards
myunorderedmap['d'] = 10; // key does not exist, insert the new element
for (auto el : myunorderedmap)
{
std::cout << el.first << ' ' << el.second << '\n';
}
}
Output:
a
b
c
d
1
4
5
10
std::tuple
While std::pair can hold only two values, the std::tuple wrapper can hold more than two
values. To use tuples, we need to include the <tuple> header. To access a certain tuple
element, we use the std::get<index_of_an_element>(tuple_name) function:
#include <iostream>
#include <utility>
#include <tuple>
int main()
{
std::tuple<char, int, double> mytuple = { 'a', 123, 3.14 };
std::cout << "The first element is: " << std::get<0>(mytuple) << '\n';
std::cout << "The second element is: " << std::get<1>(mytuple) << '\n';
std::cout << "The third element is: " << std::get<2>(mytuple) << '\n';
}
Output:
The first element is: a
The second element is: 123
The third element is: 3.14
292
Chapter 40
C++ Standards
We can create a tuple using the std::make_tuple function:
#include <iostream>
#include <tuple>
#include <string>
int main()
{
auto mytuple = std::make_tuple<int, double, std::string>(123, 3.14,
"Hello World.");
std::cout << "The first tuple element is: " << std::get<0>(mytuple)
<< '\n';
std::cout << "The second tuple element is: " << std::get<1>(mytuple)
<< '\n';
std::cout << "The third tuple element is: " << std::get<2>(mytuple)
<< '\n';
}
Output:
The first tuple element is: 123
The second tuple element is: 3.14
The third tuple element is: Hello World.
Instead of typing a lengthy tuple type, which is std::tuple<int, double, std::string>, we
used the auto specifier to deduce the type name for us.
static_assert
The static_assert directive checks a static (constexpr) condition during compile time. If
the condition is false, the directive fails the compilation and displays an error message.
Example:
int main()
{
constexpr int x = 123;
static_assert(x == 456, "The constexpr value is not 456.");
}
293
Chapter 40
C++ Standards
Here, the static_assert checks if the value of x is equal to 456 during compile time.
Since it is not, the compilation will fail with a "The constexpr value is not 456."
message. We can think of the static_assert as a way of testing our code during compile
time. It is also a neat way of testing if the value of a constexpr expression is what we
expect it to be.
Introduction to Concurrency
The C++11 standard introduces facilities for working with threads. To enable threading,
we need to add the -pthread flag when compiling with g++ and clang on the command
line. Example:
g++ -std=c++11 -Wall -pthread source.cpp
With clang, it will be
clang++ -std=c++11 -Wall -pthread source.cpp
When we compile and link our source code program, an executable file is produced.
When we start the executable, the program gets loaded into memory and starts running.
This running program is called a process. When we start multiple executable files, we
can have multiple processes. Each process has its own memory and its own address
space. Within a process, there can be multiple threads. What are threads or threads of
execution? They are an OS mechanism that allows us to execute multiple pieces of code
concurrently/simultaneously.
For example, we can execute multiple functions concurrently using threads. In a
broader sense, concurrently can also mean in parallel. A thread is part of the process. A
process can spawn one or more threads. Threads share the same memory and thus can
communicate with each other using this shared memory.
To create a thread object, we use the std::thread class template from a <thread>
header file. Once defined, the thread starts executing. To create a thread that executes
a code inside a function, we supply the function name to the thread constructor as a
parameter. Example:
#include <iostream>
#include <thread>
void function1()
294
Chapter 40
C++ Standards
{
for (int i = 0; i < 5; i++)
{
std::cout << "Executing function1." << '\n';
}
}
int main()
{
std::thread t1{ function1 }; // create and start a thread
t1.join(); // wait for the t1 thread to finish
}
Output:
Executing
Executing
Executing
Executing
Executing
function1.
function1.
function1.
function1.
function1.
Here, we have defined a thread called t1 that executes a function function1. We
supply the function name to the std::thread constructor as a first parameter. In a way, our
program now has a main thread, which is the main() function itself, and the t1 thread,
which was created from the main thread. The .join() member function says: “main
thread, please wait for me to finish my work before continuing with yours." If we left out
the .join() function, the main thread would finish executing before the t1 thread has
finished its work. We avoid this by joining the child thread to the main thread.
If our function accepts parameters, we can pass those parameters when constructing
the std::thread object:
#include <iostream>
#include <thread>
#include <string>
void function1(const std::string& param)
{
295
Chapter 40
C++ Standards
for (int i = 0; i < 5; i++)
{
std::cout << "Executing function1, " << param << '\n';
}
}
int main()
{
std::thread t1{ function1, "Hello World from a thread." };
t1.join();
}
Output:
Executing
Executing
Executing
Executing
Executing
function1,
function1,
function1,
function1,
function1,
Hello
Hello
Hello
Hello
Hello
World
World
World
World
World
from
from
from
from
from
a
a
a
a
a
thread.
thread.
thread.
thread.
thread.
We can spawn multiple threads in our program/process by constructing multiple
std::thread objects. Here’s an example where we have two threads executing two
different functions concurrently/in parallel:
#include <iostream>
#include <thread>
void function1()
{
for (int i = 0; i < 5; i++)
{
std::cout << "Executing function1." << '\n';
}
}
void function2()
{
for (int i = 0; i < 5; i++)
296
Chapter 40
C++ Standards
{
std::cout << "Executing function2." << '\n';
}
}
int main()
{
std::thread t1{ function1 };
std::thread t2{ function2 };
t1.join();
t2.join();
}
Possible Output:
Executing
Executing
Executing
Executing
Executing
Executing
Executing
Executing
Executing
Executing
function1.
function1.
function1.
function1.
function1.
function2.
function2.
function2.
function2.
function2.
This example creates two threads executing two different functions concurrently.
The function1 code executes in a thread t1, and the function2 code executes in a
separate thread called t2.
We can also have multiple threads executing code from the same function
concurrently:
#include <iostream>
#include <thread>
#include <string>
void myfunction(const std::string& param)
{
297
Chapter 40
C++ Standards
for (int i = 0; i < 5; i++)
{
std::cout << "Executing function from a " << param << '\n';
}
}
int main()
{
std::thread t1{ myfunction, "Thread 1" };
std::thread t2{ myfunction, "Thread 2" };
t1.join();
t2.join();
}
Possible Output:
Executing
Executing
Executing
Executing
Executing
Executing
Executing
Executing
Executing
Executing
function
function
function
function
function
function
function
function
function
function
from
from
from
from
from
from
from
from
from
from
a
a
a
a
a
a
a
a
a
a
Thread
Thread
Thread
Thread
Thread
Thread
Thread
Thread
Thread
Thread
2
2
2
2
1
1
1
1
1
2
Threads sometimes need to access the same object. In our example, both threads are
accessing the global std::cout object in order to output the data. This can be a problem.
Accessing the std::cout object from two different threads at the same time allows one
thread to write a little to it, then another thread jumps in and writes a little to it, and we
can end up with some strange text in the console window:
Executi.Executingng function1.Executing function2.
298
Chapter 40
C++ Standards
This means we need to synchronize the access to a shared std::cout object somehow.
While one thread is writing to it, we need to ensure that the thread does not write to it.
We do so by locking and unlocking mutexes. A mutex is represented by a std::mutex
class template from a <mutex> header. A mutex is a way to synchronize access to shared
objects between multiple threads. A thread owns a mutex once it locks the mutex, then
performs access to shared data and unlocks the mutex when access to shared data is no
longer needed. This ensures only one thread at a time can have access to a shared object,
which is std::cout in our case.
Here is an example where two threads execute the same function and guard access
to the std::cout object by locking and unlocking mutexes:
#include
#include
#include
#include
<iostream>
<thread>
<string>
<mutex>
std::mutex m; // will guard std::cout
void myfunction(const std::string& param)
{
for (int i = 0; i < 5; i++)
{
m.lock();
std::cout << "Executing function from a " << param << '\n';
m.unlock();
}
}
int main()
{
std::thread t1{ myfunction, "Thread 1" };
std::thread t2{ myfunction, "Thread 2" };
t1.join();
t2.join();
}
299
Chapter 40
C++ Standards
Possible Output:
Executing
Executing
Executing
Executing
Executing
Executing
Executing
Executing
Executing
Executing
function
function
function
function
function
function
function
function
function
function
from
from
from
from
from
from
from
from
from
from
a
a
a
a
a
a
a
a
a
a
Thread
Thread
Thread
Thread
Thread
Thread
Thread
Thread
Thread
Thread
1
1
1
1
1
2
2
2
2
2
Since we can forget to unlock the mutex manually, a better approach is to use the
std::lock_guard function instead. It locks the mutex, and once it goes out of scope, it
automatically unlocks the mutex. Example:
#include
#include
#include
#include
<iostream>
<thread>
<string>
<mutex>
std::mutex m; // will guard std::cout
void myfunction(const std::string& param)
{
for (int i = 0; i < 5; i++)
{
std::lock_guard<std::mutex> lg(m);
std::cout << "Executing function from a " << param << '\n';
} // lock_guard goes out of scope here and unlocks the mutex
}
300
Chapter 40
C++ Standards
int main()
{
std::thread t1{ myfunction, "Thread 1" };
std::thread t2{ myfunction, "Thread 2" };
t1.join();
t2.join();
}
Possible Output:
Executing
Executing
Executing
Executing
Executing
Executing
Executing
Executing
Executing
Executing
function
function
function
function
function
function
function
function
function
function
from
from
from
from
from
from
from
from
from
from
a
a
a
a
a
a
a
a
a
a
Thread
Thread
Thread
Thread
Thread
Thread
Thread
Thread
Thread
Thread
1
1
1
1
1
2
2
2
2
2
Deleted and Defaulted Functions
If we do not supply a default constructor, the compiler will generate one for us so that we
can write
class MyClass
{
};
int main()
{
MyClass o; // OK, there is an implicitly defined default constructor
}
301
Chapter 40
C++ Standards
However, in certain situations, the default constructor will not be implicitly
generated. For example, when we define a copy constructor for our class, the default
constructor is implicitly deleted. Example:
#include <iostream>
class MyClass
{
public:
MyClass(const MyClass& other)
{
std::cout << "Copy constructor invoked.";
}
};
int main()
{
MyClass o; // Error, there is no default constructor
}
To force the instantiation of a default, compiler-generated constructor, we provide
the =default specifier in its declaration. Example:
#include <iostream>
class MyClass
{
public:
MyClass() = default; // defaulted member function
MyClass(const MyClass& other)
{
std::cout << "Copy constructor invoked.";
}
};
int main()
{
302
Chapter 40
C++ Standards
MyClass o; // Now OK, the defaulted default constructor is there
MyClass o2 = o; // Invoking the copy constructor
}
Output:
Copy constructor invoked.
The =default specifier, when used on a member function, means: whatever the
language rules, I want this default member function to be there. I do not want it to be
implicitly disabled.
Similarly, if we want to disable a member function from appearing, we use the
=delete specifier. To disable the copy constructor and copy assignment, we would write
#include <iostream>
class MyClass
{
public:
MyClass()
{
std::cout << "Default constructor invoked.";
}
MyClass(const MyClass& other) = delete; // delete the copy constructor
MyClass& operator=(const MyClass& other) = delete; // delete the copy
// assignment operator
};
int main()
{
MyClass
MyClass
MyClass
o3 = o;
}
o; // OK
o2 = o; // Error, a call to deleted copy constructor
o3;
// Error, a call to the deleted copy assignment operator
303
Chapter 40
C++ Standards
These specifiers are mostly used in situations where we want to
a. Force the instantiation of implicitly defined member functions
such as constructors and assignment operators when we use the
=default; expression
b. Disable the instantiation of implicitly defined member functions
using the =delete; expression
These expressions can also be used for other functions.
Type Aliases
A type alias is a user-provided name for the existing type. If we want to use a different
name for the existing type, we write using my_type_name = existing_type_name;
Example:
#include <iostream>
#include <string>
#include <vector>
using MyInt = int;
using MyString = std::string;
using MyVector = std::vector<int>;
int main()
{
MyInt x = 123;
MyString s = "Hello World";
MyVector v = { 1, 2, 3, 4, 5 };
}
C++14
C++14 is an ISO C++ standard published in 2014. It brings some additions to the
language and the standard library but mainly complements and fixes the C++11
standard. When we say we want to use the C++11 standard, what we actually want is the
C++14 standard. The following are some of the new features for C++14.
304
Chapter 40
C++ Standards
To compile for C++14, add the -std=c++14 flag to a command-line compilation
string if using the g++ or clang compiler. In Visual Studio, choose Project ➤ Options
➤ Configuration Properties ➤ C/C++ ➤ Language ➤ C++ Language Standard and
choose C++14.
Binary Literals
Values are represented by literals. So far, we have mentioned three different kinds of
binary literals – decimal, hexadecimal, and octal – as in the following example:
int main()
{
int x = 10;
int y = 0xA;
int z = 012;
}
These three variables have the same value of 10, represented by different number
literals. The C++14 standard introduces the fourth kind of integral literals called binary
literals. Using binary literals, we can represent the value in its binary form. The literal has
a 0b prefix, followed by a sequence of ones and zeros representing a value. To represent
the number 10 as a binary literal, we write
int main()
{
int x = 0b1010;
}
The famous number 42 in binary form would be
int main()
{
int x = 0b101010;
}
305
Chapter 40
C++ Standards
Important to remember Values are values; they are some sequence of bits
and bytes in memory. What can be different is the value representation. There
are decimal, hexadecimal, octal, and binary representations of the value. These
different forms of the same thing can be relevant to us humans. To a machine, it is
all bits and bytes, transistors, and electrical current.
Digit Separators
In C++14, we can separate digits with a single quote to make it more readable:
int main()
{
int x =100'000'000;
}
The compiler ignores the quotes. The separators are only here for our benefit, for
example, to split a large number into more readable sections.
Auto for Functions
We can deduce the function type based on the return statement value:
auto myintfn() // integer
{
return 123;
}
auto mydoublefn() // double
{
return 3.14;
}
int main()
{
auto x = myintfn(); // int
auto d = mydoublefn(); // double
}
306
Chapter 40
C++ Standards
Generic Lambdas
We can use auto parameters in lambda functions now. The type of the parameter
will be deduced from the value supplied to a lambda function. This is also called a
generic lambda:
#include <iostream>
int main()
{
auto mylambda = [](auto p) {std::cout << "Lambda parameter: "
<< p << '\n'; };
mylambda(123);
mylambda(3.14);
}
Output:
Lambda parameter: 123
Lambda parameter: 3.14
std::make_unique
C++14 introduces a std::make_unique function for creating unique pointers. It is
declared inside a <memory> header. Prefer this function to a raw new operator when
creating unique pointers:
#include <iostream>
#include <memory>
class MyClass
{
private:
int x;
double d;
public:
MyClass(int xx, double dd)
: x{ xx }, d{ dd } {}
307
Chapter 40
C++ Standards
void printdata() { std::cout << "x: " << x << ", d: " << d; }
};
int main()
{
auto p = std::make_unique<MyClass>(123, 456.789);
p->printdata();
}
Output:
x: 123, d: 456.789
C++17
The C++17 standard introduces new language and library features and changes some of
the language rules.
Nested Namespaces
Remember how we said we could have nested namespaces? We can put a namespace
into another namespace. We used the following nested namespace syntax:
namespace MyNameSpace1
{
namespace MyNameSpace2
{
namespace MyNameSpace3
{
// some code
}
}
}
The C++17 standard allows us to nest namespaces using the namespace resolution
operator. The preceding example can now be rewritten as
308
Chapter 40
C++ Standards
namespace MyNameSpace1::MyNameSpace2::MyNameSpace3
{
// some code
}
Constexpr Lambdas
Lambdas can now be a constant expression, meaning they can be evaluated during
compile time:
int main()
{
constexpr auto mylambda = [](int x, int y) { return x + y; };
static_assert(mylambda(10, 20) == 30, "The lambda condition is not
true.");
}
An equivalent example where we put the constexpr specifier in the lambda itself
would be
int main()
{
auto mylambda = [](int x, int y) constexpr { return x + y; };
static_assert(mylambda(10, 20) == 30, "The lambda condition is not
true.");
}
This was not the case in earlier C++ standards.
Structured Bindings
Structured binding binds the variable names to elements of compile-time known
expressions, such as arrays or maps. If we want to have multiple variables taking values
of expression elements, we use structured bindings. The syntax is
auto [myvar1, myvar2, myvar3] = some_expression;
309
Chapter 40
C++ Standards
A simple example where we bound three variables to be aliases for three array
elements would be
int main()
{
int arr[] = { 1, 2, 3 };
auto [myvar1, myvar2, myvar3] = arr;
}
Now we have defined three integer variables. These variables have array element
values of 1, 2, and 3, respectively. These variables are copies of array elements. Making
changes to variables does not affect the array elements themselves:
#include <iostream>
int main()
{
int arr[] = { 1, 2, 3 };
auto [myvar1, myvar2, myvar3] = arr;
myvar1 = 10;
myvar2 = 20;
myvar3 = 30;
for (auto el : arr)
{
std::cout << el << ' ';
}
}
Output:
1 2 3
We can make structured bindings of reference type by using the auto& syntax.
This means the variables are now references to array elements and making changes to
variables also changes the array elements:
310
Chapter 40
C++ Standards
#include <iostream>
int main()
{
int arr[] = { 1, 2, 3 };
auto& [myvar1, myvar2, myvar3] = arr;
myvar1 = 10;
myvar2 = 20;
myvar3 = 30;
for (auto el : arr)
{
std::cout << el << ' ';
}
}
Output:
10 20 30
It is an excellent way of introducing and binding multiple variables to some
container-like expression elements.
std::filesystem
The std::filesystem library allows us to work with files, paths, and folders on our system.
The library is declared through a <filesystem> header. Paths can represent paths to files
and paths to folders. To check if a given folder exists, we use
#include <iostream>
#include <filesystem>
int main()
{
std::filesystem::path folderpath = "C:\\MyFolder\\";
if (std::filesystem::exists(folderpath))
{
std::cout << "The path: " << folderpath << " exists.";
}
311
Chapter 40
C++ Standards
else
{
std::cout << "The path: " << folderpath << " does not exist.";
}
}
Possible Output:
The path: "C:\\MyFolder\\" exists.
Similarly, we can use the std::filesystem::path object to check if a file exists:
#include <iostream>
#include <filesystem>
int main()
{
std::filesystem::path folderpath = "C:\\MyFolder\\myfile.txt";
if (std::filesystem::exists(folderpath))
{
std::cout << "The file: " << folderpath << " exists.";
}
else
{
std::cout << "The file: " << folderpath << " does not exist.";
}
}
Possible Output:
The file: "C:\\MyFolder\\myfile.txt" does not exist.
To iterate over folder elements, we use the std::filesystem::directory_iterator iterator:
#include <iostream>
#include <filesystem>
int main()
{
312
Chapter 40
C++ Standards
auto myfolder = "C:\\MyFolder\\";
for (auto el : std::filesystem::directory_iterator(myfolder))
{
std::cout << el.path() << '\n';
}
}
Possible Output:
"C:\\MyFolder\\My
"C:\\MyFolder\\My
"C:\\MyFolder\\My
"C:\\MyFolder\\My
Subfolder
Subfolder
Subfolder
Subfolder
1"
1 - Copy"
1 - Copy (2)"
1 - Copy (3)"
Here, we iterate over the directory entries and print every element’s full path using
the .path() member function.
For Linux, we need to adjust the path and use the following instead:
#include <iostream>
#include <filesystem>
int main()
{
auto myfolder = "MyFolder/";
for (auto el : std::filesystem::directory_iterator(myfolder))
{
std::cout << el.path() << '\n';
}
}
Possible Output:
"MyFolder/My
"MyFolder/My
"MyFolder/My
"MyFolder/My
Subfolder
Subfolder
Subfolder
Subfolder
1 - Copy (2)"
1 - Copy"
1 - Copy (3)"
1"
313
Chapter 40
C++ Standards
To iterate over folder elements recursively, we use the std::filesystem::recursive_
directory_iterator. This allows us to iterate recursively over all subfolders in a folder. On
Windows, we would use
#include <iostream>
#include <filesystem>
int main()
{
auto myfolder = "C:\\MyFolder\\";
for (auto el : std::filesystem::recursive_directory_iterator(myfolder))
{
std::cout << el.path() << '\n';
}
}
Possible Output:
"C:\\MyFolder\\My
"C:\\MyFolder\\My
"C:\\MyFolder\\My
"C:\\MyFolder\\My
"C:\\MyFolder\\My
"C:\\MyFolder\\My
Subfolder
Subfolder
Subfolder
Subfolder
Subfolder
Subfolder
1"
1 1 1 1 1 -
Copy"
Copy (2)"
Copy (3)"
Copy (3)\\My File.txt"
Copy (3)\\My Other File.txt"
On Linux and similar OSes, we would use the following path:
#include <iostream>
#include <filesystem>
int main()
{
auto myfolder = "MyFolder/";
for (auto el : std::filesystem::recursive_directory_iterator (myfolder))
{
std::cout << el.path() << '\n';
}
}
314
Chapter 40
C++ Standards
Possible Output:
"MyFolder/My
"MyFolder/My
"MyFolder/My
"MyFolder/My
"MyFolder/My
"MyFolder/My
Subfolder
Subfolder
Subfolder
Subfolder
Subfolder
Subfolder
1 1 1 1 1 1"
Copy (2)"
Copy"
Copy (3)"
Copy (3)/My Other File.txt"
Copy (3)/My File.txt"
The following are some useful utility functions inside the std::filesystem namespace:
–– std::filesystem::create_directory for creating a directory
–– std::filesystem::copy for copying files and directories
–– std::filesystem::remove for removing a file or an empty folder
–– std::filesystem::remove_all for removing folders and subfolders
std::string_view
Copying data can be an expensive operation in terms of CPU usage. Passing substrings
as function parameters would require making a copy of substrings. This is a costly
operation. The string_view class template is an attempt to rectify that.
The string_view is a non-owning view of a string or a substring. It is a reference to
something that is already there in the memory. It is implemented as a pointer to some
character sequence plus the size of that sequence. With this kind of structure, we can
parse strings efficiently.
The std::string_view is declared inside the <string_view> header file. To create a
string_view from an existing string, we write
#include <iostream>
#include <string>
#include <string_view>
int main()
{
315
Chapter 40
C++ Standards
std::string s = "Hello World from a string view.";
std::string_view sw(s);
std::cout << sw;
}
Output:
Hello World from a string view.
To create a string_view for a substring of the first five characters, we use the different
constructor overload. This string_view constructor takes a pointer to the first string
element and the length of the substring:
#include <iostream>
#include <string>
#include <string_view>
int main()
{
std::string s = "Hello World from a string view.";
std::string_view sw(s.c_str() , 5);
std::cout << sw;
}
Output:
Hello
Once we create a string_view, we can use its member functions. To create a substring out
of a string_view, we use the .substr() member function. To create a substring, we supply the
starting position index and length. To create a substring of the first five characters, we use
#include <iostream>
#include <string>
#include <string_view>
int main()
{
316
Chapter 40
C++ Standards
std::string s = "Hello World";
std::string_view sw(s);
std::cout << sw.substr(0, 5);
}
Output:
Hello
A string_view allows us to parse (not change) the data that is already in the memory
without having to make copies of the data. This data is owned by another string or
character array object.
std::any
The std::any container can hold a single value of any type. This container is declared
inside the header file. Example:
#include <any>
int main()
{
std::any a = 345.678;
std::any b = true;
std::any c = 123;
}
To access the value of a std::any object in a safe manner, we cast it to a type of our
choice using the std::any_cast function:
#include <iostream>
#include <any>
int main()
{
std::any a = 123;
std::cout << "Any accessed as an integer: " << std::any_cast<int>(a)
<< '\n';
a = 456.789;
317
Chapter 40
C++ Standards
std::cout << "Any accessed as a double: " << std::any_cast<double>(a)
<< '\n';
a = true;
std::cout << "Any accessed as a boolean: " << std::any_cast<bool>(a)
<< '\n';
}
Output:
Any accessed as an integer: 123
Any accessed as a double: 456.789
Any accessed as a boolean: 1
Important, the std::any_cast will throw an exception if we try to convert, for example,
123 to type double. This function performs only type-safe conversions. Another std::any
member function is .has_value() which checks if the std::any object holds a value:
#include <iostream>
#include <any>
int main()
{
std::any a = 123;
if (a.has_value())
{
std::cout << "Object a contains a value." << '\n';
}
std::any b{};
if (b.has_value())
{
std::cout << "Object b contains a value." << '\n';
}
else
{
std::cout << "Object b does not contain a value." << '\n';
}
}
318
Chapter 40
C++ Standards
Output:
Object a contains a value.
Object b does not contain a value.
std::variant
There is another type of data in C++ called union. A union is a type whose data members
of different types occupy the same memory. Only one data member can be accessed
at a time. The size of a union in memory is the size of its largest data member. The data
members overlap in a sense. To define a union type in C++, we write
union MyUnion
{
char c; // one byte
int x; // four bytes
double d; // eight bytes
};
Here, we declared a union type that can hold characters or integers or doubles. The
size of this union is the size of its largest data member double, which is probably eight
bytes, depending on the implementation. Although the union declares multiple data
members, it can only hold a value of one member at any given time. This is because
all the data members share the same memory location. And we can only access the
member that was the last written to. Example:
#include <iostream>
union MyUnion
{
char c; // one byte
int x; // four bytes
double d; // eight bytes
};
319
Chapter 40
C++ Standards
int main()
{
MyUnion o;
o.c = 'A';
std::cout << o.c <<
// accessing o.x or
o.x = 123;
std::cout << o.c;
// accessing o.c or
o.d = 456.789;
std::cout << o.c;
// accessing o.c or
}
'\n';
o.d is undefined behavior at this point
o.d is undefined behavior at this point
o.x is undefined behavior at this point
Possible Output:
A
{┤
C++17 introduces a new way of working with unions using the std::variant class
template from a <variant> header. This class template offers a type-safe way of storing
and accessing a union. To declare a variant using a std::variant, we would write
#include <variant>
int main()
{
std::variant<char, int, double> myvariant;
}
This example defines a variant that can hold three types. When we initialize or assign
a value to a variant, an appropriate type is chosen. For example, if we initialize a variant
with a character value, the variant will currently hold a char data member. Accessing
other members at this point will throw an exception. Example:
320
Chapter 40
C++ Standards
#include <iostream>
#include <variant>
int main()
{
std::variant<char, int, double> myvariant{ 'a' }; // variant now holds
// a char
std::cout << std::get<0>(myvariant) << '\n'; // obtain a data member by
// index
std::cout << std::get<char>(myvariant) << '\n'; // obtain a data member
// by type
myvariant = 1024; // variant now holds an int
std::cout << std::get<1>(myvariant) << '\n'; // by index
std::cout << std::get<int>(myvariant) << '\n'; // by type
myvariant = 123.456; // variant now holds a double
}
Output:
a
a
1024
1024
We can access a variant value by index using the std::get<index_number>(variant_
name) function. Or we can access the variant value by a type name using std::get<type_
name>(variant_name). If we tried to access a wrong type or wrong index member, an
exception of type const std::bad_variant_access& would be raised. Example:
#include <iostream>
#include <variant>
int main()
{
std::variant<int, double> myvariant{ 123 }; // variant now holds an int
std::cout << "Current variant: " << std::get<int>(myvariant) << '\n';
try
321
Chapter 40
C++ Standards
{
std::cout << std::get<double>(myvariant) << '\n'; // exception is
// raised
}
catch (const std::bad_variant_access& ex)
{
std::cout << "Exception raised. Description: " << ex.what();
}
}
Output:
Current variant: 123
Exception raised. Description: bad variant access
We define a variant that can hold either int or double. We initialize the variant with
a 123 literal of type int. So now our variant holds an int data member. We can access that
member using the index of 0 or a type name that we supply to the std::get function. Then
we try to access the wrong data member of type double. An exception is raised. And the
particular type of that exception is std::bad_variant_access. In the catch block, we handle
the exception by parsing the parameter we named ex. A parameter is of type std::bad_
variant_access, which has a .what() member function that provides a short description of
the exception.
C++20
The C++20 standard promises to bring some big additions to the language. Its impact on
the existing standards is said to be as big as the C++11 was on a C++98/C++03 standard.
Some of the following things may, at first glance, seem intimidating, especially when
beginning C++. However, do not worry. At the time of writing, none of the compilers
fully support the C++20 standard, but that is about to change. Once the compilers fully
support the C++20 standard, trying out the examples will be much easier. With that in
mind, let us go through some of the most exciting C++20 features.
322
Chapter 40
C++ Standards
Modules
Modules are the new C++20 feature, which aims to eliminate the need for the separation
of code into header and source files. So far, in traditional C++, we have organized our
source code using header and source files. We keep our declarations/interfaces in
header files. We put our definitions/implementations in source files. For example, we
have a header file with a function declaration:
mylibrary.h
#ifndef MYLIBRARY_H
#define MYLIBRARY_H
int myfunction();
#endif // !MYLIBRARY_H
Here, we declare a function called myfunction(). We surround the code with
header guards, which ensure the header file is not included multiple times during the
compilation. And we have a source file with the function definition. This source file
includes our header file:
mylibrary.cpp:
#include "mylibrary.h"
int myfunction()
{
return 123;
}
In our main.cpp file, we also include the preceding header file and call the function:
#include "mylibrary.h"
int main()
{
int x = myfunction();
}
We include the same header multiple times. This increases compilation time.
Modules are included only once, and we do not have to separate the code into interface
and implementation. One way is to have a single module file, for example, mymodule.
cpp, where we provide the entire implementation and export of this function.
323
Chapter 40
C++ Standards
To create a simple module file that implements and exports the preceding function,
we write
mymodule.cpp:
export module mymodule;
export int myfunction() { return 123; }
Explanation: The export module mymodule; statement says there is a module called
mymodule in this file. In the second line, the export specifier on the function means the
function will be visible once the module is imported into the main program.
We include the module in our main program by writing the import mymodule;
statement.
main.cpp:
import mymodule;
int main()
{
int x = myfunction();
}
In our main program, we import the module and call the exported myfunction()
function.
A module can also provide an implementation but does need to export it. If we do
not want our function to be visible to the main program, we will omit the export specifier
in the module. This makes the implementation private to the module:
export module mymodule;
export int myfunction() { return 123; }
int myprivatefunction() { return 456; }
If we have a module with a namespace in it, and a declaration inside that namespace
is exported, the entire namespace is exported. Within that namespace, only the exported
functions are visible. Example:
324
Chapter 40
C++ Standards
mymodule2.cpp:
export module mymodule2;
namespace MyModule
{
export int myfunction() { return 123; }
}
main2.cpp:
import mymodule2;
int main()
{
int x = MyModule::myfunction();
}
Concepts
Remember the class templates and function templates providing generic types T? If we
want our template argument T to satisfy certain requirements, then we use concepts. In
other words, we want our T to satisfy certain compile-time criteria. The signature for a
concept is
template <typename T>
concept concept_name = requires (T var_name) { requirement_expression; };
The second line defines a concept name followed by a reserved word requires,
followed by an optional template argument T and a local var_name, followed by a
requirement_expression which is a constexpr of type bool.
In a nutshell, the concept predicate specifies the requirements a template argument
must satisfy in order to be used in a template. Some of the requirements we can write
ourselves, and some are already premade.
We can say that concepts constrain types to certain requirements. They can also be
seen as a sort of compile-time assertions for our template types.
325
Chapter 40
C++ Standards
For example, if we want a template argument to be incrementable by one, we will
specify the concept for it:
template <typename T>
concept MustBeIncrementable = requires (T x) { x += 1; };
To use this concept in a template, we write
template<MustBeIncrementable T>
void myfunction(T x)
{
// code goes in here
}
Another way to include the concept in our template is
template<typename T> requires MustBeIncrementable <T>
void myfunction(T x)
{
// code goes in here
}
A full working example would be
#include <iostream>
#include <concepts>
template <typename T>
concept MustBeIncrementable = requires (T x) { x ++; };
template<MustBeIncrementable T>
void myfunction(T x)
{
x += 1;
std::cout << x << '\n';
}
326
Chapter 40
C++ Standards
int main()
{
myfunction<char>(96); // OK
myfunction<int>(123); // OK
myfunction<double>(345.678); // OK
}
Output:
a
124
346.678
This concept ensures our argument x of type T must be able to accept operator ++,
and the argument must be able to be incremented by one. This check is performed
during the compile time. The requirement is indeed true for types char, int, and double.
If we used a type for which the requirement is not fulfilled, the compiler would issue a
compile-time error.
We can combine multiple concepts. Let us, for example, have a concept that requires
the T argument to be an even or an odd number:
template <typename T>
concept SupportsModulo = requires (T x) { x % 2; };
Now our template can include both the MustBeIncrementable and SupportsModulo
concepts:
template<typename T> requires MustBeIncrementable<T> &&
MustBeEvenNumber<T>;
void myfunction(T x)
{
// code goes in here
}
The keyword requires is used both for the expression in the concept and when
including the concept into our template class/function.
327
Chapter 40
C++ Standards
The complete program, which includes both concept requirements, would be
#include <iostream>
#include <concepts>
template <typename T>
concept MustBeIncrementable = requires (T x) { x++; };
template <typename T>
concept SupportsModulo = requires (T x) { x % 2; };
template<typename T> requires MustBeIncrementable<T> && SupportsModulo<T>
void myfunction(T x)
{
std::cout << "The value conforms to both conditions: " << x << '\n';
}
int main()
{
myfunction<char>(123); // OK
myfunction<int>(124); // OK
myfunction<double>(345); // Error, a floating point number is not even
// nor odd
}
In this example, the template will be instantiated if both concept requirements
are evaluated to be true during compile time. Only the myfunction<char>(123); and
myfunction<int>(124); functions can be instantiated and pass the compilation. The
arguments of types char and int are indeed incrementable and can be either even or odd.
However, the statement myfunction<double>(345); does not pass a compilation. The
reason is that the second requirement SupportsModulo is not fulfilled, as floating-point
numbers are neither odd nor even.
Important! Both concepts say for every x of type T, the statement inside the code
block { } compiles and nothing more. It just compiles. If it compiles, the requirement for
that type is fulfilled.
If we want our type T to have a member function, for example, .empty(), and we want
the result of that function to be convertible to type bool, we write
328
Chapter 40
C++ Standards
template <typename T>
concept HasMemberFunction requires (T x)
{
{ x.empty() } -> std::convertible_to(bool);
};
There are multiple predefined concepts in the C++20 standard. They check if the
type fulfills certain requirements. These predefined concepts are located inside the
<concepts> header. Some of them are
a. std::integral – Specifies that the type should be an integral type
b. std::boolean – Specifies the type that can be used as a
boolean type
c. std::move_constructible – Specifies that the object of a
particular type can be constructed using the move semantics
d. std::movable – Specifies that the object of a certain type T can
be moved
e. std::signed_integral – Says the type is both integral and a
signed integral
Lambda Templates
We can now use template syntax in our lambda functions. Example:
auto mylambda = []<typename T>(T param)
{
// code
};
For example, to print out the generic type names using a templated lambda
expression, we would write
#include <iostream>
#include <vector>
#include <typeinfo>
329
Chapter 40
C++ Standards
int main()
{
auto mylambda = []<typename T>(T param)
{
std::cout << typeid(T).name() << '\n';
};
std::vector<int> v = { 1, 2, 3, 4, 5 };
mylambda(v); // integer
std::vector<double> v2 = { 3.14, 123.456, 7.13 };
mylambda(v2); // double
}
Output:
class std::vector<int,class std::allocator<int> >
class std::vector<double,class std::allocator<double> >
[likely] and [unlikely] Attributes
If we know that some paths of execution are more likely to be executed than others,
we can help the compiler optimize the code by placing attributes. We use the [[likely]]
attribute before the statement that is more likely to be executed. We can also put the
[[unlikely]] attribute before the statement that is unlikely to be executed. For example,
the attributes can be used on case branches inside the switch statement:
#include <iostream>
void mychoice(int i)
{
switch (i)
{
[[likely]] case 1:
std::cout << "Likely to be executed.";
break;
[[unlikely]] case 2:
std::cout << "Unlikely to be executed.";
break;
330
Chapter 40
C++ Standards
default:
break;
}
}
int main()
{
mychoice(1);
}
Output:
Likely to be executed.
If we want to use these attributes on the if-else branches, we write
#include <iostream>
int main()
{
bool choice = true;
if (choice) [[likely]]
{
std::cout << "This statement is likely to be executed.";
}
else [[unlikely]]
{
std::cout << "This statement is unlikely to be executed.";
}
}
Output:
This statement is likely to be executed.
331
Chapter 40
C++ Standards
Ranges
A range, in general, is an object that refers to a range of elements. The new C++20 ranges
feature is declared inside a <ranges> header. The ranges themselves are accessed via the
std::ranges name. With classic containers such as a std::vector, if we want to sort the data,
we would use
#include <iostream>
#include <vector>
#include <algorithm>
int main()
{
std::vector<int> v = { 1, 2, 3, 4, 5 };
std::sort(v.begin(), v.end());
for (auto el : v)
{
std::cout << el << '\n';
}
}
Output:
1
2
3
4
5
The std::sort function accepts the vector’s .begin() and end() iterators. With ranges, it
is much simpler. We just provide the name of the range without iterators:
#include
#include
#include
#include
332
<iostream>
<ranges>
<vector>
<algorithm>
Chapter 40
C++ Standards
int main()
{
std::vector<int> v = { 3, 5, 2, 1, 4 };
std::ranges::sort(v);
for (auto el : v)
{
std::cout << el << '\n';
}
}
Output:
1
2
3
4
5
Ranges have a feature called adaptors. One of the range adaptors is views. The views
adaptors are accessed via std::ranges::views. Views are non-owning. They cannot
change the values of the underlying elements. It is also said they are lazily executed. This
means the code from the views adaptors will not be executed until we iterate over the
result of such views.
Let us create an example that uses range views to filter out even numbers and print
only the odd numbers from a vector by creating a range view:
#include
#include
#include
#include
<iostream>
<ranges>
<vector>
<algorithm>
int main()
{
std::vector<int> v = { 1, 2, 3, 4, 5 };
auto oddnumbersview = v | std::views::filter([](int x) { return x % 2
== 1; });
for (auto el : oddnumbersview)
333
Chapter 40
C++ Standards
{
std::cout << el << '\n';
}
}
Output:
1
3
5
Explanation: We have a simple vector with some elements. Then we create a view
range adaptor on that vector, which filters the numbers in the range. For this, we use the
pipe operator |. Only the numbers for which the predicate is true are included. In our
case, this means the even numbers are excluded. Then we iterate over the filtered view
and print out the elements.
It’s important to note that the underlying vector’s elements are unaffected as we are
operating on a view, not on a vector.
Let us create an example that creates a view that returns only numbers greater
than two:
#include
#include
#include
#include
<iostream>
<ranges>
<vector>
<algorithm>
int main()
{
std::vector<int> v = { 1, 2, 3, 4, 5 };
auto greaterthan2view = v | std::views::filter([](int x) { return x
> 2; });
for (auto el : greaterthan2view)
{
std::cout << el << '\n';
}
}
334
Chapter 40
C++ Standards
Output:
3
4
5
Now, let us combine the two views into one big view by separating them with
multiple pipe | operators:
#include
#include
#include
#include
<iostream>
<ranges>
<vector>
<algorithm>
int main()
{
std::vector<int> v = { 1, 2, 3, 4, 5 };
auto oddandgreaterthan2 = v | std::views::filter([](int x) { return x %
2 == 1; })
| std::views::filter([](int x) { return x
> 2; });
for (auto el : oddandgreaterthan2)
{
std::cout << el << '\n';
}
}
Output:
3
5
This example creates a view range adaptor containing odd numbers greater than
two. We create this view by combining two different range views into one.
Other range adaptors are algorithms. The idea is to have the algorithms
overload for ranges. To call an algorithm adaptor, we use std::ranges::algorithm_
name(parameters).
335
Chapter 40
C++ Standards
Example using the std::ranges::reverse() algorithm:
#include
#include
#include
#include
<iostream>
<ranges>
<vector>
<algorithm>
int main()
{
std::vector<int> v = { 1, 2, 3, 4, 5 };
std::ranges::reverse(v);
for (auto el : v)
{
std::cout << el << '\n';
}
}
Output:
5
4
3
2
1
Unlike views, the ranges algorithms modify the actual vector content.
Coroutines
A coroutine is a function that can be suspended and resumed. The ordinary function is a
coroutine if it uses any of the following operators in its function body:
f. co_await – Suspends the execution of the coroutine until some
other computation is performed, that is, until the coroutine
itself resumes
g. co_yield – Suspends a coroutine and returns a value to the caller
h. co_return – Returns from a coroutine and stops its execution
336
Chapter 40
C++ Standards
std::span
Some containers and types store their elements in a sequence, one next to the other.
This is the case for arrays and vectors. We can represent such containers with a pointer
to their first element plus the length of the container. A std::span class template from a
<span> header is just that – a reference to a span of contiguous container elements. One
reason to use the std::span is that it is cheap to construct and copy. A span does not own
a vector or an array it references. However, it can change the value of the elements. To
create a span from a vector, we use
#include <iostream>
#include <vector>
#include <span>
int main()
{
std::vector<int> v = { 1, 2, 3 };
std::span<int> myintspan = v;
myintspan[2] = 256;
for (auto el : v)
{
std::cout << el << '\n';
}
}
Output:
1
2
256
Here, we created a span that references vector elements. Then we used the span to
change the vector’s third element. With span, we do not have to worry about passing a
pointer and a length around, and we just use the neat syntax of a span wrapper. Since
the size of the vector can change, we say our span has a dynamic extent. We can create a
fixed-size span from a fixed-size array. We say our span now has a static extent. Example:
337
Chapter 40
C++ Standards
#include <iostream>
#include <span>
int main()
{
int arr[] = { 1, 2, 3, 4, 5 };
std::span<int, 5> myintspan = arr;
myintspan[4] = 10;
for (auto el : arr)
{
std::cout << el << '\n';
}
}
Output:
1
2
3
4
10
Mathematical Constants
The C++20 standard introduces a way to represent some of the mathematical constants.
To use them, we need to include the <numbers> header. The constants themselves are
inside the std::numbers namespace. The following example shows how to use numbers
pi and e, the results of logarithmic functions, and the square roots of numbers 2 and 3:
#include <iostream>
#include <numbers>
int main()
{
std::cout << "Pi: " << std::numbers::pi << '\n';
std::cout << "e: " << std::numbers::e << '\n';
std::cout << "log2(e): " << std::numbers::log2e << '\n';
338
Chapter 40
std::cout
std::cout
std::cout
std::cout
std::cout
}
<<
<<
<<
<<
<<
C++ Standards
"log10(e): " << std::numbers::log10e << '\n';
"ln(2): " << std::numbers::ln2 << '\n';
"ln(10): " << std::numbers::ln10 << '\n';
"sqrt(2): " << std::numbers::sqrt2 << '\n';
"sqrt(3): " << std::numbers::sqrt3 << '\n';
Output:
Pi: 3.14159
e: 2.71828
log2(e): 1.4427
log10(e): 0.434294
ln(2): 0.693147
ln(10): 2.30259
sqrt(2): 1.41421
sqrt(3): 1.73205
C++23
The C++23 is a C++ standard following the C++20 standard. Compared to C++20, the
C++23 standard introduces fewer new features. The standard is yet to be officially
published at the time of writing.
To compile for the C++23 standard using GCC, currently, we supply the -std=c++2b
flag to our g++ compilation string:
g++ -std=c++2b source.cpp
In Visual Studio, we choose Project ➤ Project Properties ➤ C/C++ ➤ Language, and
in the C++ Language Standard, we choose the Preview ➤ Features from the Latest C++
Working Draft option, which will eventually be renamed to ISO C++23 Standard.
Let us look at some of the C++23 language and standard library features.
339
Chapter 40
C++ Standards
Multidimensional Subscript Operator
Up to C++23, if we wanted to access a multidimensional array element, let us say in a
two-dimensional array, we had to use the following syntax:
myarr[x_index][y_index];
Before C++23, if we wanted to access an array element in a three-dimensional array,
we would write
myarr[x_index][y_index][z_index];
Starting with the C++23, we can use the multidimensional subscript operator [],
inside which we provide comma-separated indexes:
myarr[x_index, y_index];
For a three-dimensional array, the C++23 syntax would be
myarr[x_index, y_index, z_index];
The syntax for overloading a multidimensional subscript operator for a class
is simple:
MyClass& operator[](size_t dimension_1, size_t dimension_2, etc… )
noexcept {
// code
}
Literal Suffixes for size_t
Before C++23, we had several integer literal suffixes such as u, l, ul, ll, etc. These literal
suffixes made the literals of a certain type. Example:
auto
auto
auto
auto
340
x1
x2
x3
x4
=
=
=
=
123u; // unsigned
123l; // long
123ul; // unsigned long
123ll; // long long
Chapter 40
C++ Standards
Starting with C++23, we have the uz literal suffix, which makes a literal of type
std::size_t. Example:
auto x5 = 123uz; // std::size_t
And we also have the z literal, which makes the literal of the signed integer type
corresponding to the std::size_t type. Example:
auto x6 = 123z; // the signed integer type corresponding to
std::size_t type
The #warning Preprocessor Directive
We can now issue a custom, user-defined warning or diagnostic message without
interrupting the translation process using the #warning preprocessor directive.
The #warning directive has the following syntax: #warning "Custom warning
message".
Example:
#include <iostream>
#warning "User-defined warning message."
#warning "Some diagnostics message."
int main()
{
std::cout << "Custom warning messages issued without interrupting the
compilation.";
}
This example compiles and runs, but the custom warning is issued during the
translation/compilation process.
The std::string::contains( ) Member Function
Starting with the C++23 standard, the std::string type now has the .contains(“given
substring”) member function.
This function checks if the string contains a given substring and returns the value of
true if the string contains the given substring and false otherwise.
341
Chapter 40
C++ Standards
Prior to C++23, if we wanted to check if a string contained a given substring, we had
to use the .find() member function and inspect its return value against the special
value of std::string::npos.
The pre-C++23 example:
#include <iostream>
#include <string>
int main()
{
std::string s = "Hello World!";
if (s.find("World") != std::string::npos)
{
std::cout << "The string contains the given substring." << '\n';
}
else
{
std::cout << "The string does not contain the given substring."
<< '\n';
}
}
Output:
The string contains the given substring.
The easier, more readable C++23 example is
#include <iostream>
#include <string>
int main()
{
std::string s = "Hello World!";
if (s.contains("World"))
{
std::cout << "The string contains the given substring." << '\n';
}
342
Chapter 40
C++ Standards
else
{
std::cout << "The string does not contain the given substring."
<< '\n';
}
}
Output:
The string contains the given substring.
std::print
The std::print function prints the format string to a standard output or a file. The
function is defined inside the <print> header file and has the following syntax:
std::print(<destination>, formatting_string, arguments);
The destination can be a standard output or a file. The formatting string is
a sequence of symbols that will become a formatted output for a string and the
arguments’ values (for more info on the actual formatting rules, look to std::format and
std::formatter).
The formatting string has a placeholder for the argument, marked by {}. The
placeholder will be the position of the argument’s formatted value. To print out a simple
"Hello World." message, we write:
#include <print>
int main()
{
std::print("Hello World.");
}
Output:
Hello World.
343
Chapter 40
C++ Standards
To print out the value of a single integer variable, we write:
#include <print>
int main()
{
int x = 123;
std::print("The value of x is {}.", x);
}
Output:
The value of x is 123.
To print out the values of, for example, two variables, we write:
#include <print>
int main()
{
int x = 123;
int y = 456;
std::print("The x is {}, and the y is {}.", x, y);
}
Output:
The x is 123, and the y is 456.
The std::print is also capable of formatted print of built-in containers such as
vectors, sets, maps, etc. There is also a std::println variant that adds a new line
character at the end of a formatting string.
Other C++23 Features
344
Chapter 40
C++ Standards
There are also other C++23 features whose detailed description is beyond the scope
of an introductory C++ course, so we will briefly mention their names: deducing this,
auto(x), assumptions, std::flatmap, std::flatset, and std::stacktrace::current.
When starting to learn C++, the choice of the C++ standard used is largely irrelevant
(as long as we have at least C++11 in mind).
Congratulations on completing this chapter. Now we can move on to creating a
couple of projects and put the knowledge gained so far into good use. Let us start.
345
CHAPTER 41
Projects
In this chapter, we will create a couple of C++ source code projects. We will start with a
blank sheet and build our projects from the ground up, one code snippet at a time. The
projects will increase in complexity as we progress through the code. Let us get started.
Project I: Book Inventory
Write a program that manages a book inventory. Requirements:
•
Create a Book class with basic functionality (two data members, two
constructors, a couple of getters and setters, and an arbitrary utility
member function).
•
In function main, create a single instance of a Book class using a
default constructor.
•
In function main, create a single instance of a Book class using a user-
provided constructor and invoke the member functions.
•
In function main, create a container of multiple Book objects using
std::vector.
•
Iterate through a container and invoke at least one member function.
First, we will create an empty project skeleton and include the appropriate header
files, such as <iostream> for outputting the data, <vector> for storing the data in the
function main, and <string> for working with std::string data members. The source.
cpp file now looks like this:
#include <iostream>
#include <vector>
#include <string>
© Slobodan Dmitrović 2023
S. Dmitrović, Modern C++ for Absolute Beginners, https://doi.org/10.1007/978-1-4842-9274-7_41
347
Chapter 41
Projects
class Book
{
};
int main()
{
}
Now, let us add a few data member fields that will describe the book better. For
example, we can create a member field called title of type std::string and pages of
type int. Both member fields will be placed inside the private: class section. Our listing
now looks like the following:
#include <iostream>
#include <vector>
#include <string>
class Book
{
private:
std::string title;
int pages;
};
int main()
{
}
Let us now add a declaration for a single default constructor. The constructor will go
into the public section. Listing:
#include <iostream>
#include <vector>
#include <string>
class Book
{
348
Chapter 41
Projects
private:
std::string title;
int pages;
public:
Book();
};
int main()
{
}
Let us define this default constructor outside the class. This constructor will initialize
title and pages data members to hard-coded default values:
#include <iostream>
#include <vector>
#include <string>
class Book
{
private:
std::string title;
int pages;
public:
Book();
};
Book::Book() : title{ "Default Book Title" }, pages{ 0 }
{
}
int main()
{
}
349
Chapter 41
Projects
This constructor would be invoked when we want to create an object with no
parameters. In the function main, let us create an object of type Book whose data
members will have default values. The title would default to "Default Book Title," and the
number of pages will be set to zero. Listing:
#include <iostream>
#include <vector>
#include <string>
class Book
{
private:
std::string title;
int pages;
public:
Book();
};
Book::Book() : title{ "Default Book Title" }, pages{ 0 }
{
}
int main()
{
Book defaultbook;
std::cout << "Default constructor invoked." << '\n';
}
Output:
Default constructor invoked.
Let us now add a second, user-provided constructor declaration that accepts two
arguments. Listing:
#include <iostream>
#include <vector>
#include <string>
350
Chapter 41
Projects
class Book
{
private:
std::string title;
int pages;
public:
Book();
Book(const std::string& atitle, int apages);
};
Book::Book() : title{ "Default Book Title" }, pages{ 0 }
{
}
int main()
{
Book defaultbook;
std::cout << "Default constructor invoked." << '\n';
}
Now, let us add the second constructor's definition outside the body of a class and
use the constructor's initializer list to initialize data members with arguments:
#include <iostream>
#include <vector>
#include <string>
class Book
{
private:
std::string title;
int pages;
public:
Book();
Book(const std::string& atitle, int apages);
};
Book::Book() : title{ "Default Book Title" }, pages{ 0 }
351
Chapter 41
Projects
{
}
Book::Book(const std::string& atitle, int apages) : title{ atitle }, pages{
apages }
{
}
int main()
{
Book defaultbook;
std::cout << "Default constructor invoked." << '\n';
}
In function main, we can invoke this second constructor and provide a custom book
title and a custom number of pages. Listing:
#include <iostream>
#include <vector>
#include <string>
class Book
{
private:
std::string title;
int pages;
public:
Book();
Book(const std::string& atitle, int apages);
};
Book::Book() : title{ "Default Book Title" }, pages{ 0 }
{
}
Book::Book(const std::string& atitle, int apages) : title{ atitle }, pages{
apages }
{
}
352
Chapter 41
Projects
int main()
{
Book defaultbook;
std::cout << "Default constructor invoked." << '\n';
Book mybook{ "My Book Title", 123 };
std::cout << "User-provided constructor invoked." << '\n';
}
Output:
Default constructor invoked.
User-provided constructor invoked.
Next, we will add a member function called void printdata(). This function will
print out the values of both data members, title and pages. Let us pick up the pace
and implement the function declaration inside the class, function definition outside the
class, and function calls in the main program. Listing:
#include <iostream>
#include <vector>
#include <string>
class Book
{
private:
std::string title;
int pages;
public:
Book();
Book(const std::string& atitle, int apages);
void printdata();
};
Book::Book() : title{ "Default Book Title" }, pages{ 0 }
{
}
353
Chapter 41
Projects
Book::Book(const std::string& atitle, int apages) : title{ atitle }, pages{
apages }
{
}
void Book::printdata()
{
std::cout << "The book title is: " << title << ", and the number of
pages is: " << pages << '\n';
}
int main()
{
Book defaultbook;
std::cout << "Default constructor invoked." << '\n';
Book mybook{ "My Book Title", 123 };
std::cout << "User-provided constructor invoked." << '\n';
mybook.printdata();
}
Output:
Default constructor invoked.
User-provided constructor invoked.
The book title is: My Book Title, and the number of pages is: 123
Let us add two getter functions (member functions that get/return the values of
appropriate data members). One function is for returning the title, which we will call
gettitle(), and one function is for returning the number of pages, called getpages().
Both getter functions will be marked as const, thus promising not to change any data
members’ values. The types of these functions will match the types of appropriate
data members. In the next listing, we will implement the declarations, definitions, and
function calls in the main. Listing:
#include <iostream>
#include <vector>
#include <string>
354
Chapter 41
Projects
class Book
{
private:
std::string title;
int pages;
public:
Book();
Book(const std::string& atitle, int apages);
void printdata();
std::string gettitle() const;
int getpages() const;
};
Book::Book() : title{ "Default Book Title" }, pages{ 0 }
{
}
Book::Book(const std::string& atitle, int apages) : title{ atitle },
pages{ apages }
{
}
void Book::printdata()
{
std::cout << "The book title is: " << title << ", and the number of
pages is: " << pages << '\n';
}
std::string Book::gettitle() const
{
return title;
}
int Book::getpages() const
{
return pages;
}
355
Chapter 41
Projects
int main()
{
Book defaultbook;
std::cout << "Default constructor invoked." << '\n';
Book mybook{ "My Book Title", 123 };
std::cout << "User-provided constructor invoked." << '\n';
mybook.printdata();
std::cout << "The book title is: " << mybook.gettitle() << '\n';
std::cout << "The number of pages is: " << mybook.getpages() << '\n';
}
Output:
Default constructor invoked.
User-provided constructor invoked.
The book title is: My Book Title, and the number of pages is: 123
The book title is: My Book Title
The number of pages is: 123
Since we have two getter functions, we can now implement two setter functions.
Setter functions are member functions that simply set the value of appropriate data
members using the argument provided. We will call them void settitle(const
std::string& atitle) and void setpages(int apages). Both setter functions accept a
single parameter. The first function accepts an argument by const reference because its
std::string is a complex type, and we want to avoid creating unnecessary copies. The
second function can accept a parameter by value because it is a simple, built-in type int.
We will use these parameters to set/overwrite the values of appropriate data members.
The function declarations, definitions, and calls in function main are listed as follows:
#include <iostream>
#include <vector>
#include <string>
class Book
{
356
Chapter 41
Projects
private:
std::string title;
int pages;
public:
Book();
Book(const std::string& atitle, int apages);
void printdata();
std::string gettitle() const;
int getpages() const;
void settitle(const std::string& atitle);
void setpages(int apages);
};
Book::Book() : title{ "Default Book Title" }, pages{ 0 }
{
}
Book::Book(const std::string& atitle, int apages) : title{ atitle },
pages{ apages }
{
}
void Book::printdata()
{
std::cout << "The book title is: " << title << ", and the number of
pages is: " << pages << '\n';
}
std::string Book::gettitle() const
{
return title;
}
int Book::getpages() const
{
return pages;
}
357
Chapter 41
Projects
void Book::settitle(const std::string& atitle)
{
title = atitle;
}
void Book::setpages(int apages)
{
pages = apages;
}
int main()
{
Book defaultbook;
std::cout << "Default constructor invoked." << '\n';
Book mybook{ "My Book Title", 123 };
std::cout << "User-provided constructor invoked." << '\n';
mybook.printdata();
std::cout << "The book title is: " << mybook.gettitle() << '\n';
std::cout << "The number of pages is: " << mybook.getpages() << '\n';
std::cout << "Setting the new title... " << '\n';
mybook.settitle("New Book Title");
std::cout << "Setting the new number of pages... " << '\n';
mybook.setpages(456);
mybook.printdata();
}
Output:
Default constructor invoked.
User-provided constructor invoked.
The book title is: My Book Title, and the number of pages is: 123
The book title is: My Book Title
The number of pages is: 123
358
Chapter 41
Projects
Setting the new title...
Setting the new number of pages...
The book title is: New Book Title, and the number of pages is: 456
One final thing left to do is to create a container of objects inside a function main and
loop through the container. We will use std::vector<Book> v; to hold, for example, five
different objects of type Book. In the vector’s initializer list, we will create five temporary
objects whose lifetime is bound to a lifetime of a vector. Next, we will iterate through a
vector using the range-based for loop and invoke the printdata() member function
for each object. For simplicity reasons, we will use the auto& reference type inside the
range-based for loop, thus avoiding creating internal copies of objects. Listing:
#include <iostream>
#include <vector>
#include <string>
class Book
{
private:
std::string title;
int pages;
public:
Book();
Book(const std::string& atitle, int apages);
void printdata();
std::string gettitle() const;
int getpages() const;
void settitle(const std::string& atitle);
void setpages(int apages);
};
Book::Book() : title{ "Default Book Title" }, pages{ 0 }
{
}
Book::Book(const std::string& atitle, int apages) : title{ atitle },
pages{ apages }
359
Chapter 41
Projects
{
}
void Book::printdata()
{
std::cout << "The book title is: " << title << ", and the number of
pages is: " << pages << '\n';
}
std::string Book::gettitle() const
{
return title;
}
int Book::getpages() const
{
return pages;
}
void Book::settitle(const std::string& atitle)
{
title = atitle;
}
void Book::setpages(int apages)
{
pages = apages;
}
int main()
{
Book defaultbook;
std::cout << "Default constructor invoked." << '\n';
Book mybook{ "My Book Title", 123 };
std::cout << "User-provided constructor invoked." << '\n';
mybook.printdata();
std::cout << "The book title is: " << mybook.gettitle() << '\n';
std::cout << "The number of pages is: " << mybook.getpages() << '\n';
360
Chapter 41
Projects
std::cout << "Setting the new title... " << '\n';
mybook.settitle("New Book Title");
std::cout << "Setting the new number of pages... " << '\n';
mybook.setpages(456);
mybook.printdata();
std::cout << "\nCreating an
std::vector<Book> v = {
Book("Sample Book Title
Book("Sample Book Title
Book("Sample Book Title
Book("Sample Book Title
Book("Sample Book Title
};
for (auto& el : v)
{
el.printdata();
}
}
inventory of books... " << '\n';
1",
2",
3",
4",
5",
100),
200),
300),
400),
500),
Output:
Default constructor invoked.
User-provided constructor invoked.
The book title is: My Book Title, and the number of pages is: 123
The book title is: My Book Title
The number of pages is: 123
Setting the new title...
Setting the new number of pages...
The book title is: New Book Title, and the number of pages is: 456
Creating
The book
The book
The book
The book
The book
an inventory of books...
title is: Sample Book Title
title is: Sample Book Title
title is: Sample Book Title
title is: Sample Book Title
title is: Sample Book Title
1,
2,
3,
4,
5,
and
and
and
and
and
the
the
the
the
the
number
number
number
number
number
of
of
of
of
of
pages
pages
pages
pages
pages
is:
is:
is:
is:
is:
100
200
300
400
500
361
Chapter 41
Projects
Project II: Book Inventory – Multiple Files
Write a program that splits the code from Project I into multiple (source and header)
files. Additional requirements:
•
Split the code into multiple header and source files.
•
Put the class declaration inside a book.h header file. Implement
header guards.
•
Put the class definition inside a book.cpp source file. Include the
book.h header file into a book.cpp source file.
•
Put the function main inside the source.cpp source file. Include the
book.h header file into a source.cpp source file.
•
Include additional header files where appropriate.
•
Compile all the source files and run the program.
Now, we have three different files, one header file called book.h and two source files
called book.cpp and source.cpp.
If you are running Visual Studio, choose File ➤ New ➤ Project... ➤ Empty Project,
click Next, give it a name, and click Create. Right-click a project name in the Solution
Explorer, choose Add ➤ New Item..., choose a Header File option, give it the name of
book.h, and click Add. To add a source file, right-click a project name, choose Add ➤
New Item..., choose a Source File option, give it the name of book.cpp, and click Add.
Repeat the process for a source.cpp file.
If you are on Linux or using a different compiler, simply create these three files using
the editor of your choice and place them into the same folder. At the end of this project,
we will learn how to compile multiple source files using GCC and Visual Studio. Since
we have only one class, having only one user-provided header file is sufficient. Now, our
basic source code skeleton would look like this:
book.h:
#include <iostream>
#include <vector>
#include <string>
book.cpp:
#include "book.h"
362
Chapter 41
Projects
source.cpp:
#include "book.h"
int main()
{
}
For now, the header file only holds several standard library headers we will be using
later on. Both source files include the same book.h header file. And source.cpp holds the
function main. This is the basic project layout. Let us expand on this and add the class
declaration inside a book.h header file. Listing:
book.h:
#include <iostream>
#include <vector>
#include <string>
class Book
{
private:
std::string title;
int pages;
public:
Book();
Book(const std::string& atitle, int apages);
void printdata();
std::string gettitle() const;
int getpages() const;
void settitle(const std::string& atitle);
void setpages(int apages);
};
We have placed the Book’s class declaration inside a book.h header file. Let us now
implement the header guards for our header file. Listing:
363
Chapter 41
Projects
book.h:
#ifndef BOOK_H
#define BOOK_H
#include <iostream>
#include <vector>
#include <string>
class Book
{
private:
std::string title;
int pages;
public:
Book();
Book(const std::string& atitle, int apages);
void printdata();
std::string gettitle() const;
int getpages() const;
void settitle(const std::string& atitle);
void setpages(int apages);
};
#endif
Now, the entire content of the header file is wrapped inside a header guard. This
ensures no multiple inclusions of the same header file will occur during the compilation
process, even though we do have multiple inclusions of the same header file in our
source files. Let us implement the Book class definition inside a book.cpp source file.
Listing:
book.cpp:
#include "book.h"
Book::Book() : title{ "Default Book Title" }, pages{ 0 }
{
}
364
Chapter 41
Projects
Book::Book(const std::string& atitle, int apages) : title{ atitle },
pages{ apages }
{
}
void Book::printdata()
{
std::cout << "The book title is: " << title << ", and the number of
pages is: " << pages << '\n';
}
std::string Book::gettitle() const
{
return title;
}
int Book::getpages() const
{
return pages;
}
void Book::settitle(const std::string& atitle)
{
title = atitle;
}
void Book::setpages(int apages)
{
pages = apages;
}
Finally, let us add the functionality to our main program inside the source.cpp file.
Listing:
source.cpp:
#include "book.h"
int main()
{
365
Chapter 41
Projects
Book defaultbook;
std::cout << "Default constructor invoked." << '\n';
Book mybook{ "My Book Title", 123 };
std::cout << "User-provided constructor invoked." << '\n';
mybook.printdata();
std::cout << "The book title is: " << mybook.gettitle() << '\n';
std::cout << "The number of pages is: " << mybook.getpages() << '\n';
std::cout << "Setting the new title... " << '\n';
mybook.settitle("New Book Title");
std::cout << "Setting the new number of pages... " << '\n';
mybook.setpages(456);
mybook.printdata();
std::cout << "\nCreating an
std::vector<Book> v = {
Book("Sample Book Title
Book("Sample Book Title
Book("Sample Book Title
Book("Sample Book Title
Book("Sample Book Title
};
for (auto& el : v)
{
el.printdata();
}
}
inventory of books... " << '\n';
1",
2",
3",
4",
5",
100),
200),
300),
400),
500),
To rebuild a project in Visual Studio, we press Alt+B+R. To compile and run a
program in Visual Studio, press F5 or Ctrl+F5. If we are using GCC, we need to compile
all the source files using the following compilation string:
g++ -Wall -std=c++17 book.cpp source.cpp
And then run the program:
./a.out
366
Chapter 41
Projects
Output:
Default constructor invoked.
User-provided constructor invoked.
The book title is: My Book Title, and the number of pages is: 123
The book title is: My Book Title
The number of pages is: 123
Setting the new title...
Setting the new number of pages...
The book title is: New Book Title, and the number of pages is: 456
Creating
The book
The book
The book
The book
The book
an inventory of books...
title is: Sample Book Title
title is: Sample Book Title
title is: Sample Book Title
title is: Sample Book Title
title is: Sample Book Title
1,
2,
3,
4,
5,
and
and
and
and
and
the
the
the
the
the
number
number
number
number
number
of
of
of
of
of
pages
pages
pages
pages
pages
is:
is:
is:
is:
is:
100
200
300
400
500
This approach, where we separate our code into multiple header and source files,
closely matches the situation we can encounter in real-world scenarios.
Class and even freestanding function declarations are usually placed inside header
files, and definitions go inside a separate source file.
The class code can also be wrapped into a namespace, which can be a bonus
requirement left to the reader as an exercise.
Project III: Message Logger
Write a program that creates a message logger. The logging functionality will be
implemented inside a MyLogger class. The main function creates an instance of a class
and logs messages to a console window and a file. Requirements:
•
Implement the following methods:
•
void logToFile(...) – A member function that logs a message
to a file
•
void logToConsole(...) – A member function that logs a
message to a console window
367
Chapter 41
Projects
•
void logWithLevel(...) – A member function that logs a
message using the specific verbosity level
•
void logToAll(...) – A member function that logs a message
both to a console window and a file
•
Implement at least two constructors.
•
Disable the copy semantics for the MyLogger class.
•
Implement the move semantics for the MyLogger class.
•
In function main, create an instance of a MyLogger class and log
messages using member functions.
Let us start. For simplicity reasons, we will place all the source code into a single
source.cpp file. This file will include several headers, it will have a namespace nm, and
inside the namespace will be a class. Finally, there is a function main at the end of our
source file. Listing:
#include <iostream>
#include <string>
#include <fstream>
namespace nm {
class MyLogger
{
};
}
int main()
{
}
Let us now add an external constant (outside the class) of type const std::string,
called defaultlogfile, that will serve as our default file name. We will also add two class
data members, one of type std::fstream called fs, which will represent our internal
file stream, and one of type std::string called messagestart, which will represent the
beginning of our log message. Listing:
368
Chapter 41
Projects
#include <iostream>
#include <string>
#include <fstream>
namespace nm {
const std::string defaultlogfile = "defaultlogfile.txt";
class MyLogger
{
private:
std::fstream fs;
std::string messagestart;
};
}
int main()
{
}
Now, we are ready to add one default constructor and a destructor. The default
constructor will use the defaultlogfile as a name for our file stream fs. The default
constructor will open a file for appending the data, and the destructor will close the file.
In our main function, we can now create a single instance of a MyLogger class. Listing:
#include <iostream>
#include <string>
#include <fstream>
namespace nm {
const std::string defaultlogfile = "defaultlogfile.txt";
class MyLogger
{
private:
std::fstream fs;
std::string messagestart;
369
Chapter 41
Projects
public:
MyLogger(); // user-provided default constructor
~MyLogger(); // destructor
};
// default constructor
MyLogger::MyLogger()
{
fs.open(defaultlogfile, std::ios::app);
messagestart = "Started logging to a default file. ";
}
// destructor
MyLogger::~MyLogger()
{
fs.close(); // close the file
}
}
int main()
{
// create an object using the default log file name
nm::MyLogger o1;
}
So far, there is no output on a console window, but a few things happen behind the
scenes. In function main, we create an object of a class MyLogger using no parameters,
and we name this object o1. This invokes a default constructor MyLogger(), which opens
(or creates one if nonexistent) a file with the name "defaultlogfile.txt" for appending the
data. When the object o1 goes out of scope, the ~MyLogger() destructor gets invoked and
closes the file.
Let us now add another user-provided constructor that accepts one parameter of
type std::string called customlogfile, which allows us to create an output file with a
custom name. In function main, we create another object and provide a custom file name
as a parameter. Listing:
370
Chapter 41
Projects
#include <iostream>
#include <string>
#include <fstream>
namespace nm {
const std::string defaultlogfile = "defaultlogfile.txt";
class MyLogger
{
private:
std::fstream fs;
std::string messagestart;
public:
MyLogger(); // user-provided default constructor
explicit MyLogger(const std::string& customlogfile);
// user-provided constructor
~MyLogger(); // destructor
};
// default constructor
MyLogger::MyLogger()
{
fs.open(defaultlogfile, std::ios::app);
messagestart = "Started logging to a default file. ";
}
// user-provided constructor
MyLogger::MyLogger(const std::string& customlogfile)
{
messagestart = " Started logging. ";
fs.open(customlogfile, std::ios::app); // open the file
}
371
Chapter 41
Projects
// destructor
MyLogger::~MyLogger()
{
fs.close(); // close the file
}
}
int main()
{
// create an object using the default log file name
nm::MyLogger o1;
// create an object using a custom log file name
nm::MyLogger o2{ "mylogfile.txt" };
}
This example creates a second object called o2 and invokes the second user-
provided constructor. The second constructor creates another log file called using the
name provided as an argument. In our case, it is the "mylogfile.txt" file name. Please
note that single-argument constructors in C++ should be marked as explicit, thus
preventing unwanted constructor conversions by the compiler.
Let us now add two member functions, logToFile() and logToConsole(), for
logging the data to a console window and a file, and we will place them above the
constructors. Finally, in function main, we will invoke these member functions using
both the objects o1 and o2. Listing:
#include <iostream>
#include <string>
#include <fstream>
namespace nm {
const std::string defaultlogfile = "defaultlogfile.txt";
class MyLogger
{
private:
std::fstream fs;
std::string messagestart;
372
Chapter 41
Projects
public:
void logToFile(const std::string& message);
void logToConsole(const std::string& message);
MyLogger(); // user-provided default constructor
explicit MyLogger(const std::string& customlogfile);
// user-provided constructor
~MyLogger(); // destructor
};
void MyLogger::logToFile(const std::string& message)
{
messagestart = "FILE log: ";
fs << message << '\n';
}
void MyLogger::logToConsole(const std::string& message)
{
messagestart = "CONSOLE log: ";
std::cout << messagestart << message << '\n';
}
// default constructor
MyLogger::MyLogger()
{
fs.open(defaultlogfile, std::ios::app);
messagestart = "Started logging to a default file. ";
}
// user-provided constructor
MyLogger::MyLogger(const std::string& customlogfile)
{
messagestart = " Started logging. ";
fs.open(customlogfile, std::ios::app); // open the file
}
373
Chapter 41
Projects
// destructor
MyLogger::~MyLogger()
{
fs.close(); // close the file
}
}
int main()
{
// create an object using the default log file name
nm::MyLogger o1;
o1.logToConsole("Console log message 1.");
o1.logToFile("Default file name log message 1.");
// create an object using a custom log file name
nm::MyLogger o2{ "mylogfile.txt" };
o2.logToConsole("Console log message 1.");
o2.logToFile("Custom file name log message 1.");
}
Output:
CONSOLE log: Console log message 1.
CONSOLE log: Console log message 1.
The logToConsole() and logToFile() member functions modify the value of
a messagestart field and log the argument’s value to appropriate destinations. The
content of the "defaultlogfile.txt" file is
File Output:
Default file name log message 1.
And the content of the "mylogfile.txt" file is
File Output:
Custom file name log message 1.
374
Chapter 41
Projects
Let us now add the member function called logWithLevel that accepts two
arguments, a message to be logged and a message verbosity level. Let us say there are
three verbosity levels: LOG_INFO, LOG_WARNING, and LOG_ALL. The message verbosity
levels can be represented by an enum we place above our class. We will then use this
enum as a type for the function’s second parameter. Finally, we invoke the function for
both objects. Listing:
#include <iostream>
#include <string>
#include <fstream>
namespace nm {
// different logging verbosity levels
enum class LoggingLevels
{
LOG_INFO,
LOG_WARNING,
LOG_ALL
};
const std::string defaultlogfile = "defaultlogfile.txt";
class MyLogger
{
private:
std::fstream fs;
std::string messagestart;
public:
void logToFile(const std::string& message);
void logToConsole(const std::string& message);
void logWithLevel(const std::string& message, LoggingLevels
loglevel);
MyLogger(); // user-provided default constructor
explicit MyLogger(const std::string& customlogfile);
// user-provided constructor
375
Chapter 41
Projects
~MyLogger(); // destructor
};
void MyLogger::logToFile(const std::string& message)
{
messagestart = "FILE log: ";
fs << message << '\n';
}
void MyLogger::logToConsole(const std::string& message)
{
messagestart = "CONSOLE log: ";
std::cout << messagestart << message << '\n';
}
void MyLogger::logWithLevel(const std::string& message, LoggingLevels
loglevel)
{
switch (loglevel)
{
case LoggingLevels::LOG_INFO:
logToConsole("Log level INFO: " + message);
break;
case LoggingLevels::LOG_WARNING:
logToConsole("Log level WARNING: " + message);
break;
case LoggingLevels::LOG_ALL:
logToConsole("Log level ALL: " + message);
break;
default:
logToConsole("No logging level: " + message);
break;
}
}
// default constructor
MyLogger::MyLogger()
376
Chapter 41
Projects
{
fs.open(defaultlogfile, std::ios::app);
messagestart = "Started logging to a default file. ";
}
// user-provided constructor
MyLogger::MyLogger(const std::string& customlogfile) {
messagestart = " Started logging. ";
fs.open(customlogfile, std::ios::app); // open the file
}
// destructor
MyLogger::~MyLogger()
{
fs.close(); // close the file
}
}
int main()
{
// create an object using the default log file name
nm::MyLogger o1;
o1.logToConsole("Console log message 1.");
o1.logToFile("Default file name log message 1.");
o1.logWithLevel("Console log message 2.", nm::LoggingLevels::LOG_INFO);
// create an object using a custom log file name
nm::MyLogger o2{ "mylogfile.txt" };
o2.logToConsole("Console log message 1.");
o2.logToFile("Custom file name log message 1.");
o2.logWithLevel("Console log message 3.", nm::LoggingLevels::LOG_
WARNING);
}
377
Chapter 41
Projects
Output:
CONSOLE
CONSOLE
CONSOLE
CONSOLE
log:
log:
log:
log:
Console log message 1.
Log level INFO: Console log message 2.
Console log message 1.
Log level WARNING: Console log message 3.
In this example, we have added an enum type outside the class. The enum represents
three possible levels of logging verbosity. We pass this enum as a second argument to our
logWithLevel function and opt for one of three choices. The function uses this enum in
a switch statement to update the logging message accordingly. Finally, in function main,
we invoke this function using both objects.
Let us now add the logToAll member function that logs both to the console and a file.
We will invoke this function in the main program using both objects. Listing:
#include <iostream>
#include <string>
#include <fstream>
namespace nm {
// different logging verbosity levels
enum class LoggingLevels
{
LOG_INFO,
LOG_WARNING,
LOG_ALL
};
const std::string defaultlogfile = "defaultlogfile.txt";
class MyLogger
{
private:
std::fstream fs;
std::string messagestart;
378
Chapter 41
Projects
public:
void logToFile(const std::string& message);
void logToConsole(const std::string& message);
void logWithLevel(const std::string& message, LoggingLevels
loglevel);
void logToAll(const std::string& message);
MyLogger(); // user-provided default constructor
explicit MyLogger(const std::string& customlogfile);
// user-provided constructor
~MyLogger(); // destructor
};
void MyLogger::logToFile(const std::string& message)
{
messagestart = "FILE log: ";
fs << message << '\n';
}
void MyLogger::logToConsole(const std::string& message)
{
messagestart = "CONSOLE log: ";
std::cout << messagestart << message << '\n';
}
void MyLogger::logWithLevel(const std::string& message, LoggingLevels
loglevel)
{
switch (loglevel)
{
case LoggingLevels::LOG_INFO:
logToConsole("Log level INFO: " + message);
break;
case LoggingLevels::LOG_WARNING:
logToConsole("Log level WARNING: " + message);
break;
case LoggingLevels::LOG_ALL:
379
Chapter 41
Projects
logToConsole("Log level ALL: " + message);
break;
default:
logToConsole("No logging level: " + message);
break;
}
}
void MyLogger::logToAll(const std::string& message)
{
logToConsole(message);
logToFile(message);
}
// default constructor
MyLogger::MyLogger()
{
fs.open(defaultlogfile, std::ios::app);
messagestart = "Started logging to a default file. ";
}
// user-provided constructor
MyLogger::MyLogger(const std::string& customlogfile) {
messagestart = " Started logging. ";
fs.open(customlogfile, std::ios::app); // open the file
}
// destructor
MyLogger::~MyLogger()
{
fs.close(); // close the file
}
}
int main()
{
380
Chapter 41
Projects
// create an object using the default log file name
nm::MyLogger o1;
o1.logToConsole("Console log message 1.");
o1.logToFile("Default file name log message 1.");
o1.logWithLevel("Console log message 2.", nm::LoggingLevels::LOG_INFO);
o1.logToAll("Logging to both the console and a file from o1.");
// create an object using a custom log file name
nm::MyLogger o2{ "mylogfile.txt" };
o2.logToConsole("Console log message 1.");
o2.logToFile("Custom file name log message 1.");
o2.logWithLevel("Console log message 3.", nm::LoggingLevels::LOG_
WARNING);
o2.logToAll("Logging to both the console and a file from o2.");
}
Output:
CONSOLE
CONSOLE
CONSOLE
CONSOLE
CONSOLE
CONSOLE
log:
log:
log:
log:
log:
log:
Console log message 1.
Log level INFO: Console log message 2.
Logging to both the console and a file from o1.
Console log message 1.
Log level WARNING: Console log message 3.
Logging to both the console and a file from o2.
We have implemented and called the logToAll member function that logs the
message to a console window and a file. It does so by internally calling the logToConsole
and logToFile functions, thus reusing the existing code and saving us from having to
retype the code by hand.
The std::fstream is not copiable, it is only movable, so it makes sense that our
class should not be copiable. It should be movable. Let us disable the copy semantics
for our class (copy constructor and copy assignment operator) and implement the move
constructor and move assignment operator. In function main, we will create the third
object called o3 by moving the data from o2 to o3. Listing:
381
Chapter 41
Projects
#include <iostream>
#include <string>
#include <fstream>
namespace nm {
// different logging verbosity levels
enum class LoggingLevels
{
LOG_INFO,
LOG_WARNING,
LOG_ALL
};
const std::string defaultlogfile = "defaultlogfile.txt";
class MyLogger
{
private:
std::fstream fs;
std::string messagestart;
public:
void logToFile(const std::string& message);
void logToConsole(const std::string& message);
void logWithLevel(const std::string& message, LoggingLevels
loglevel);
void logToAll(const std::string& message);
MyLogger(); // user-provided default constructor
explicit MyLogger(const std::string& customlogfile); // user-
provided constructor
MyLogger(const MyLogger& rhs) = delete; // disable the copy
constructor
MyLogger& operator=(const MyLogger& rhs) = delete; // disable the
copy assignment operator
MyLogger(MyLogger&& rhs) noexcept; // move constructor
MyLogger& operator=(MyLogger&& rhs) noexcept; // move assignment
operator
382
Chapter 41
Projects
~MyLogger(); // destructor
};
void MyLogger::logToFile(const std::string& message)
{
messagestart = "FILE log: ";
fs << message << '\n';
}
void MyLogger::logToConsole(const std::string& message)
{
messagestart = "CONSOLE log: ";
std::cout << messagestart << message << '\n';
}
void MyLogger::logWithLevel(const std::string& message, LoggingLevels
loglevel)
{
switch (loglevel)
{
case LoggingLevels::LOG_INFO:
logToConsole("Log level INFO: " + message);
break;
case LoggingLevels::LOG_WARNING:
logToConsole("Log level WARNING: " + message);
break;
case LoggingLevels::LOG_ALL:
logToConsole("Log level ALL: " + message);
break;
default:
logToConsole("No logging level: " + message);
break;
}
}
void MyLogger::logToAll(const std::string& message)
{
383
Chapter 41
Projects
logToConsole(message);
logToFile(message);
}
// default constructor
MyLogger::MyLogger()
{
fs.open(defaultlogfile, std::ios::app);
messagestart = "Started logging to a default file. ";
}
// user-provided constructor
MyLogger::MyLogger(const std::string& customlogfile) {
messagestart = " Started logging. ";
fs.open(customlogfile, std::ios::app); // open the file
}
// move constructor
MyLogger::MyLogger(MyLogger&& rhs) noexcept
:fs{ std::move(rhs.fs) }, messagestart{ rhs.messagestart }
{
}
// move assignment operator
MyLogger& MyLogger::operator=(MyLogger&& rhs) noexcept
{
messagestart = std::move(rhs.messagestart);
fs = std::move(rhs.fs);
return *this;
}
// destructor
MyLogger::~MyLogger()
{
fs.close(); // close the file
}
}
384
Chapter 41
Projects
int main()
{
// create an object using the default log file name
nm::MyLogger o1;
o1.logToConsole("Console log message 1.");
o1.logToFile("Default file name log message 1.");
o1.logWithLevel("Console log message 2.", nm::LoggingLevels::LOG_INFO);
o1.logToAll("Logging to both the console and a file from o1.");
// create an object using a custom log file name
nm::MyLogger o2{ "mylogfile.txt" };
o2.logToConsole("Console log message 1.");
o2.logToFile("Custom file name log message 1.");
o2.logWithLevel("Console log message 3.", nm::LoggingLevels::
LOG_WARNING);
o2.logToAll("Logging to both the console and a file from o2.");
// create an object using a move operation
nm::MyLogger o3 = std::move(o2);
o3.logToAll("Logging to both the console and a file from o3.");
}
Output:
CONSOLE
CONSOLE
CONSOLE
CONSOLE
CONSOLE
CONSOLE
CONSOLE
log:
log:
log:
log:
log:
log:
log:
Console log message 1.
Log level INFO: Console log message 2.
Logging to both the console and a file
Console log message 1.
Log level WARNING: Console log message
Logging to both the console and a file
Logging to both the console and a file
from o1.
3.
from o2.
from o3.
We have disabled the copy semantics by using the = delete; syntax in the
declaration of a copy constructor and copy assignment. We then implemented the move
constructor and move assignment operator. Finally, in our main function, we created a
third object named o3 by moving data from object o2. Finally, we invoke the logToAll
member function for the third object. Our project is now complete.
385
Chapter 41
Projects
Project IV: Message Logger – Multiple Files
Write a program that splits the code from Project III into multiple (source and header)
files. Additional requirements:
•
Split the code into multiple header and source files.
•
Put the MyLogger class declaration inside a mylogger.h header file.
Implement header guards.
•
Put the enum and a constant inside a mylogger.h header file.
Implement header guards.
•
Put the MyLogger class definition inside a mylogger.cpp source file.
Include the mylogger.h header file into a mylogger.cpp source file.
•
Put the function main inside the source.cpp source file. Include the
mylogger.h header file into a source.cpp source file.
•
Include additional header files where appropriate.
•
Wrap the code inside mylogger.h and mylogger.cpp into a
namespace nm.
•
Compile all the source files and run the program.
Now, we have three different files, one header file called mylogger.h and two source
files called mylogger.cpp and source.cpp. The basic, almost empty project skeleton now
looks like this:
mylogger.h:
#include <iostream>
#include <string>
#include <fstream>
mylogger.cpp:
#include "mylogger.h"
source.cpp:
#include "mylogger.h"
int main()
386
Chapter 41
Projects
{
}
First, let us add a header guard to our mylogger.h header file. Listing:
mylogger.h:
#ifndef MYLOGGER_H
#define MYLOGGER_H
#include <iostream>
#include <string>
#include <fstream>
#endif // !MYLOGGER_H
Let us now add the nm namespace to both the mylogger.h header file and the
mylogger.cpp source file. Listing:
mylogger.h:
#ifndef MYLOGGER_H
#define MYLOGGER_H
#include <iostream>
#include <string>
#include <fstream>
namespace nm
{
}
#endif // !MYLOGGER_H
mylogger.cpp:
#include "mylogger.h"
namespace nm
{
}
387
Chapter 41
Projects
Inside the mylogger.h header file, we will add the enum type declaration, a constant
for a file name, and a class declaration. And we will place that code inside the nm
namespace. Listing:
mylogger.h:
#ifndef MYLOGGER_H
#define MYLOGGER_H
#include <iostream>
#include <string>
#include <fstream>
namespace nm
{
// different logging verbosity levels
enum class LoggingLevels
{
LOG_INFO,
LOG_WARNING,
LOG_ALL
};
const std::string defaultlogfile = "defaultlogfile.txt";
class MyLogger
{
private:
std::fstream fs;
std::string messagestart;
public:
void logToFile(const std::string& message);
void logToConsole(const std::string& message);
void logWithLevel(const std::string& message, LoggingLevels
loglevel);
void logToAll(const std::string& message);
MyLogger(); // user-provided default constructor
388
Chapter 41
Projects
explicit MyLogger(const std::string& customlogfile); // user-
provided constructor
MyLogger(const MyLogger& rhs) = delete; // disable the copy
constructor
MyLogger& operator=(const MyLogger& rhs) = delete; // disable the
copy assignment operator
MyLogger(MyLogger&& rhs) noexcept; // move constructor
MyLogger& operator=(MyLogger&& rhs) noexcept; // move assignment
operator
~MyLogger(); // destructor
};
}
#endif // !MYLOGGER_H
Let us now add the MyLogger class definition to our mylogger.cpp source file. We will
place the definition inside the nm namespace. Listing:
mylogger.cpp:
#include "mylogger.h"
namespace nm
{
void MyLogger::logToFile(const std::string& message)
{
messagestart = "FILE log: ";
fs << message << '\n';
}
void MyLogger::logToConsole(const std::string& message)
{
messagestart = "CONSOLE log: ";
std::cout << messagestart << message << '\n';
}
389
Chapter 41
Projects
void MyLogger::logWithLevel(const std::string& message, LoggingLevels
loglevel)
{
switch (loglevel)
{
case LoggingLevels::LOG_INFO:
logToConsole("Log level INFO: " + message);
break;
case LoggingLevels::LOG_WARNING:
logToConsole("Log level WARNING: " + message);
break;
case LoggingLevels::LOG_ALL:
logToConsole("Log level ALL: " + message);
break;
default:
logToConsole("No logging level: " + message);
break;
}
}
void MyLogger::logToAll(const std::string& message)
{
logToConsole(message);
logToFile(message);
}
// default constructor
MyLogger::MyLogger()
{
fs.open(defaultlogfile, std::ios::app);
messagestart = "Started logging to a default file. ";
}
// user-provided constructor
MyLogger::MyLogger(const std::string& customlogfile) {
messagestart = " Started logging. ";
fs.open(customlogfile, std::ios::app); // open the file
}
390
Chapter 41
Projects
// move constructor
MyLogger::MyLogger(MyLogger&& rhs) noexcept
:fs{ std::move(rhs.fs) }, messagestart{ rhs.messagestart }
{
}
// move assignment operator
MyLogger& MyLogger::operator=(MyLogger&& rhs) noexcept
{
messagestart = std::move(rhs.messagestart);
fs = std::move(rhs.fs);
return *this;
}
// destructor
MyLogger::~MyLogger()
{
fs.close(); // close the file
}
}
One final thing left to do is to add the functionality to our function main inside the
source.cpp source file. Listing:
source.cpp:
#include "mylogger.h"
int main()
{
// create an object using the default log file name
nm::MyLogger o1;
o1.logToConsole("Console log message 1.");
o1.logToFile("Default file name log message 1.");
o1.logWithLevel("Console log message 2.", nm::LoggingLevels::LOG_INFO);
o1.logToAll("Logging to both the console and a file from o1.");
// create an object using a custom log file name
nm::MyLogger o2{ "mylogfile.txt" };
391
Chapter 41
Projects
o2.logToConsole("Console log message 1.");
o2.logToFile("Custom file name log message 1.");
o2.logWithLevel("Console log message 3.", nm::LoggingLevels::LOG_
WARNING);
o2.logToAll("Logging to both the console and a file from o2.");
// create an object using a move operation
nm::MyLogger o3 = std::move(o2);
o3.logToAll("Logging to both the console and a file from o3.");
}
Output:
CONSOLE
CONSOLE
CONSOLE
CONSOLE
CONSOLE
CONSOLE
CONSOLE
log:
log:
log:
log:
log:
log:
log:
Console log message 1.
Log level INFO: Console log message 2.
Logging to both the console and a file
Console log message 1.
Log level WARNING: Console log message
Logging to both the console and a file
Logging to both the console and a file
from o1.
3.
from o2.
from o3.
Now our project source code is broken up into multiple header and source files. We
keep the declarations inside the mylogger.h header file, and we keep the class definitions
inside the mylogger.cpp file. Our main program is located inside the source.cpp file. We
include the mylogger.h header in both source files and compile and run our program.
We should get into a good habit of separating declarations and definitions to multiple
header and source files. This concludes the Project IV requirements.
Project V: Information System
Write a program that represents an employee’s information system. The system is
implemented as a container of polymorphic objects. Requirements:
392
Chapter 41
•
Create a base class called Person, having multiple constructors and at
least one virtual member function.
•
Create a derived class called Employee, extending the Person’s
functionality. The Employee class overrides the virtual member
function from the base class.
•
Wrap the classes into a namespace.
•
Both classes support the copy and move semantics.
•
In function main, create a container of multiple polymorphic objects
(pointers). Iterate through a container and invoke at least one
member function.
Projects
Let us get started. We will place the entire source code inside a single source.cpp
source file. Our project skeleton looks like this:
#include
#include
#include
#include
<iostream>
<string>
<vector>
<memory>
namespace nm
{
}
using namespace nm;
int main()
{
}
So far, we have included several standard library headers we will be using, we
created an empty nm namespace in the global region of a source file, we then introduced
the entire namespace to the current scope, and, finally, we have a function main.
Let us now add the two classes’ declarations inside the nm namespace. Listing:
#include <iostream>
#include <string>
#include <vector>
393
Chapter 41
Projects
#include <memory>
namespace nm
{
// base class Person
class Person
{
};
// derived class Employee
class Employee : public Person
{
};
}
using namespace nm;
int main()
{
}
Now, we will focus on the first class, Person. Let us add a couple of fields to our base
class Person. Listing:
#include <iostream>
#include <string>
#include <vector>
#include <memory>
namespace nm
{
// base class Person
class Person
{
private:
std::string name;
int age;
};
394
Chapter 41
Projects
// derived class Employee
class Employee : public Person
{
};
}
using namespace nm;
int main()
{
}
Next, we will add two constructors – one default constructor with no parameters and
one with two parameters. We will declare them inside the class body and define them
outside the class body. Listing:
#include
#include
#include
#include
<iostream>
<string>
<vector>
<memory>
namespace nm
{
// base class Person
class Person
{
private:
std::string name;
int age;
public:
// default constructor
Person();
// user-provided constructor
Person(const std::string& aname, int argage);
};
395
Chapter 41
Projects
Person::Person() : name{ "Default name" }, age{ -1 }
{
}
Person::Person(const std::string& aname, int argage) : name{ aname },
age{ argage }
{
}
// derived class Employee
class Employee : public Person
{
};
}
using namespace nm;
int main()
{
}
The default constructor initializes an object by setting the data member’s values to
some default values of Default name and -1. The user-provided constructor, on the other
hand, has two parameters and uses them to initialize data members: name and age. It
uses its initializer list to perform the initialization operation.
Next, we will add a couple of member functions for printing out the values of name
and age data members. Listing:
#include
#include
#include
#include
<iostream>
<string>
<vector>
<memory>
namespace nm
{
// base class Person
class Person
{
396
Chapter 41
Projects
private:
std::string name;
int age;
public:
// default constructor
Person();
// user-provided constructor
Person(const std::string& aname, int argage);
void printname();
void printage();
void printdata();
};
Person::Person() : name{ "Default name" }, age{ -1 }
{
}
erson::Person(const std::string& aname, int argage) : name{ aname },
age{ argage }
{
}
void Person::printname()
{
std::cout << name << '\n';
}
void Person::printage()
{
std::cout << age << '\n';
}
void Person::printdata()
{
std::cout << name << ' ' << age << '\n';
}
397
Chapter 41
Projects
// derived class Employee
class Employee : public Person
{
};
}
using namespace nm;
int main()
{
}
Next, we will add getters and setters for both the name and age fields. In total, we will
add four member functions. Getters should be marked as const as they promise not to
change any data members’ values. Listing:
#include
#include
#include
#include
<iostream>
<string>
<vector>
<memory>
namespace nm
{
// base class Person
class Person
{
private:
std::string name;
int age;
public:
// default constructor
Person();
// user-provided constructor
Person(const std::string& aname, int argage);
void printname();
void printage();
void printdata();
398
Chapter 41
Projects
std::string getname() const;
int getage() const;
void setname(const std::string& aname);
void setage(int argage);
};
Person::Person() : name{ "Default name" }, age{ -1 }
{
}
Person::Person(const std::string& aname, int argage) : name{ aname },
age{ argage }
{
}
void Person::printname()
{
std::cout << name << '\n';
}
void Person::printage()
{
std::cout << age << '\n';
}
void Person::printdata()
{
std::cout << name << ' ' << age << '\n';
}
std::string Person::getname() const
{
return name;
}
int Person::getage() const
{
return age;
}
399
Chapter 41
Projects
void Person::setname(const std::string& aname)
{
name = aname;
}
void Person::setage(int argage)
{
age = argage;
}
// derived class Employee
class Employee : public Person
{
};
}
using namespace nm;
int main()
{
}
Next, we will add a virtual member function formatprint that prints the Person’s
data in a more readable way. We will also add a virtual empty destructor to our Person
class, ensuring the proper destruction of polymorphic objects. Listing:
#include
#include
#include
#include
<iostream>
<string>
<vector>
<memory>
namespace nm
{
// base class Person
class Person
{
400
Chapter 41
Projects
private:
std::string name;
int age;
public:
// default constructor
Person();
// user-provided constructor
Person(const std::string& aname, int argage);
void printname();
void printage();
void printdata();
std::string getname() const;
int getage() const;
void setname(const std::string& aname);
void setage(int argage);
virtual void formatprint();
// virtual base class destructor
virtual ~Person() {}
};
Person::Person() : name{ "Default name" }, age{ -1 }
{
}
Person::Person(const std::string& aname, int argage) : name{ aname },
age{ argage }
{
}
void Person::printname()
{
std::cout << name << '\n';
}
void Person::printage()
{
std::cout << age << '\n';
}
401
Chapter 41
Projects
void Person::printdata()
{
std::cout << name << ' ' << age << '\n';
}
std::string Person::getname() const
{
return name;
}
int Person::getage() const
{
return age;
}
void Person::setname(const std::string& aname)
{
name = aname;
}
void Person::setage(int argage)
{
age = argage;
}
void Person::formatprint()
{
std::cout << "Person's name: " << name << ", age: " << age << '\n';
}
// derived class Employee
class Employee : public Person
{
};
}
402
Chapter 41
Projects
using namespace nm;
int main()
{
}
One final thing left to do is to add the copy and move constructors and assignment
operators to our Person class. We will place those functions below our existing
constructors. Listing:
#include
#include
#include
#include
<iostream>
<string>
<vector>
<memory>
namespace nm
{
// base class Person
class Person
{
private:
std::string name;
int age;
public:
// default constructor
Person();
// user-provided constructor
Person(const std::string& aname, int argage);
// copy constructor
Person(const Person& rhs);
// copy assignment operator
Person& operator=(const Person& rhs);
// move constructor
Person(Person&& rhs) noexcept;
// move assignment operator
Person& operator=(Person&& rhs) noexcept;
void printname();
403
Chapter 41
Projects
void printage();
void printdata();
std::string getname() const;
int getage() const;
void setname(const std::string& aname);
void setage(int argage);
virtual void formatprint();
// virtual base class destructor
virtual ~Person() {}
};
Person::Person() : name{ "Default name" }, age{ -1 }
{
}
Person::Person(const std::string& aname, int argage) : name{ aname },
age{ argage }
{
}
Person::Person(const Person& rhs) : name{ rhs.name }, age{ rhs.age }
{
}
Person& Person::operator=(const Person& rhs)
{
name = rhs.name;
age = rhs.age;
return *this;
}
Person::Person(Person&& rhs) noexcept : name{ std::move(rhs.name) },
age{ std::move(rhs.age) }
{
}
Person& Person::operator=(Person&& rhs) noexcept
{
404
Chapter 41
Projects
name = std::move(name);
age = std::move(age);
return *this;
}
void Person::printname()
{
std::cout << name << '\n';
}
void Person::printage()
{
std::cout << age << '\n';
}
void Person::printdata()
{
std::cout << name << ' ' << age << '\n';
}
std::string Person::getname() const
{
return name;
}
int Person::getage() const
{
return age;
}
void Person::setname(const std::string& aname)
{
name = aname;
}
void Person::setage(int argage)
{
age = argage;
}
405
Chapter 41
Projects
void Person::formatprint()
{
std::cout << "Person's name: " << name << ", age: " << age << '\n';
}
// derived class Employee
class Employee : public Person
{
};
}
using namespace nm;
int main()
{
}
We have now completed the Person class functionality. Please note that our move
constructor and move assignment operator are marked as noexcept, thus making a
strong exception guarantee and promising not to raise an exception while executing.
Next, we will extend the derived class Employee. We will add one additional member
field called jobtitle. We will also add two constructors, the default one and a user-
provided one. Listing:
#include
#include
#include
#include
<iostream>
<string>
<vector>
<memory>
namespace nm
{
// base class Person
class Person
{
private:
std::string name;
int age;
406
Chapter 41
Projects
public:
// default constructor
Person();
// user-provided constructor
Person(const std::string& aname, int argage);
// copy constructor
Person(const Person& rhs);
// copy assignment operator
Person& operator=(const Person& rhs);
// move constructor
Person(Person&& rhs) noexcept;
// move assignment operator
Person& operator=(Person&& rhs) noexcept;
void printname();
void printage();
void printdata();
std::string getname() const;
int getage() const;
void setname(const std::string& aname);
void setage(int argage);
virtual void formatprint();
// virtual base class destructor
virtual ~Person() {}
};
Person::Person() : name{ "Default name" }, age{ -1 }
{
}
Person::Person(const std::string& aname, int argage) : name{ aname },
age{ argage }
{
}
Person::Person(const Person& rhs) : name{ rhs.name }, age{ rhs.age }
{
}
407
Chapter 41
Projects
Person& Person::operator=(const Person& rhs)
{
name = rhs.name;
age = rhs.age;
return *this;
}
Person::Person(Person&& rhs) noexcept : name{ std::move(rhs.name) },
age{ std::move(rhs.age) }
{
}
Person& Person::operator=(Person&& rhs) noexcept
{
name = std::move(name);
age = std::move(age);
return *this;
}
void Person::printname()
{
std::cout << name << '\n';
}
void Person::printage()
{
std::cout << age << '\n';
}
void Person::printdata()
{
std::cout << name << ' ' << age << '\n';
}
std::string Person::getname() const
{
return name;
}
408
Chapter 41
Projects
int Person::getage() const
{
return age;
}
void Person::setname(const std::string& aname)
{
name = aname;
}
void Person::setage(int argage)
{
age = argage;
}
void Person::formatprint()
{
std::cout << "Person's name: " << name << ", age: " << age << '\n';
}
// derived class Employee
class Employee : public Person
{
private:
std::string jobtitle;
public:
// default constructor
Employee();
// user provided constructor
Employee(const std::string& aname, int argage, const std::string&
ajobtitle);
};
Employee::Employee() : Person(), jobtitle{ "The Default Role" }
{}
409
Chapter 41
Projects
Employee::Employee(const std::string& aname, int argage, const
std::string& ajobtitle) : Person(aname, argage), jobtitle{ ajobtitle }
{}
}
using namespace nm;
int main()
{
}
In this iteration, we have added an additional field jobtitle and two constructors
to our derived class Employee. The default Employee() constructor calls a base class
Person() default constructor in its initializer list to initialize the base class part. Then it
proceeds to initialize the jobtitle data member.
Similarly, the second, user-provided Employee(parameters) constructor uses a base
class Person(parameters) user-provided constructor to initialize the base class part
using its arguments. Then, it proceeds to initialize the remaining jobtitle field.
Let us now complete our Employee class by
•
Implementing the copy and move semantics
•
Adding getters and setters
•
Overriding the formatprint function
Listing:
#include
#include
#include
#include
<iostream>
<string>
<vector>
<memory>
namespace nm
{
// base class Person
class Person
{
410
Chapter 41
Projects
private:
std::string name;
int age;
public:
// default constructor
Person();
// user-provided constructor
Person(const std::string& aname, int argage);
// copy constructor
Person(const Person& rhs);
// copy assignment operator
Person& operator=(const Person& rhs);
// move constructor
Person(Person&& rhs) noexcept;
// move assignment operator
Person& operator=(Person&& rhs) noexcept;
void printname();
void printage();
void printdata();
std::string getname() const;
int getage() const;
void setname(const std::string& aname);
void setage(int argage);
virtual void formatprint();
// virtual base class destructor
virtual ~Person() {}
};
Person::Person() : name{ "Default name" }, age{ -1 }
{
}
Person::Person(const std::string& aname, int argage) : name{ aname },
age{ argage }
{
}
411
Chapter 41
Projects
Person::Person(const Person& rhs) : name{ rhs.name }, age{ rhs.age }
{
}
Person& Person::operator=(const Person& rhs)
{
name = rhs.name;
age = rhs.age;
return *this;
}
Person::Person(Person&& rhs) noexcept : name{ std::move(rhs.name) },
age{ std::move(rhs.age) }
{
}
Person& Person::operator=(Person&& rhs) noexcept
{
name = std::move(name);
age = std::move(age);
return *this;
}
void Person::printname()
{
std::cout << name << '\n';
}
void Person::printage()
{
std::cout << age << '\n';
}
void Person::printdata()
{
std::cout << name << ' ' << age << '\n';
}
std::string Person::getname() const
412
Chapter 41
Projects
{
return name;
}
int Person::getage() const
{
return age;
}
void Person::setname(const std::string& aname)
{
name = aname;
}
void Person::setage(int argage)
{
age = argage;
}
void Person::formatprint()
{
std::cout << "Person's name: " << name << ", age: " << age << '\n';
}
// derived class Employee
class Employee : public Person
{
private:
std::string jobtitle;
public:
// default constructor
Employee();
// user provided constructor
Employee(const std::string& aname, int argage, const std::string&
ajobtitle);
// copy constructor
Employee(const Employee& rhs);
// copy assignment operator
413
Chapter 41
Projects
Employee& operator=(const Employee& rhs);
// move constructor
Employee(Employee&& rhs) noexcept;
// move assignment operator
Employee& operator=(Employee&& rhs) noexcept;
void setjobtitle(const std::string& ajobtitle);
std::string getjobtitle() const;
void formatprint() override;
};
Employee::Employee() : Person(), jobtitle{ "The Default Role" }
{}
Employee::Employee(const std::string& aname, int argage, const
std::string& ajobtitle) : Person(aname, argage), jobtitle{ ajobtitle }
{}
Employee::Employee(const Employee& rhs) : Person(rhs), jobtitle{ rhs.
jobtitle }
{
}
Employee& Employee::operator=(const Employee& rhs)
{
Person::operator=(rhs);
jobtitle = rhs.jobtitle;
return *this;
}
Employee::Employee(Employee&& rhs) noexcept : Person(std::move(rhs)),
jobtitle{ std::move(rhs.jobtitle) }
{
}
Employee& Employee::operator=(Employee&& rhs) noexcept
{
Person::operator=(std::move(rhs));
jobtitle = std::move(rhs.jobtitle);
414
Chapter 41
Projects
return *this;
}
void Employee::setjobtitle(const std::string& ajobtitle)
{
jobtitle = ajobtitle;
}
std::string Employee::getjobtitle() const
{
return jobtitle;
}
void Employee::formatprint()
{
std::cout << "Employee's name: " << getname() << ", age: " <<
getage() << ", job title: " << jobtitle << '\n';
}
}
using namespace nm;
int main()
{
}
The copy and move constructors of a derived class in their initializer lists utilize the
copy constructors from a base class to initialize the base class parts.
The copy and move assignment operators of a derived class utilize a base class’s copy
and move assignment operators to assign the base class parts of the class.
Finally, we override the behavior of the virtual formatprint() function and give it
new functionality. One last thing left to do is to create a vector of unique pointers inside a
function main and iterate through the container. Listing:
#include
#include
#include
#include
<iostream>
<string>
<vector>
<memory>
415
Chapter 41
Projects
namespace nm
{
// base class Person
class Person
{
private:
std::string name;
int age;
public:
// default constructor
Person();
// user-provided constructor
Person(const std::string& aname, int argage);
// copy constructor
Person(const Person& rhs);
// copy assignment operator
Person& operator=(const Person& rhs);
// move constructor
Person(Person&& rhs) noexcept;
// move assignment operator
Person& operator=(Person&& rhs) noexcept;
void printname();
void printage();
void printdata();
std::string getname() const;
int getage() const;
void setname(const std::string& aname);
void setage(int argage);
virtual void formatprint();
// virtual base class destructor
virtual ~Person() {}
};
Person::Person() : name{ "Default name" }, age{ -1 }
{
}
416
Chapter 41
Projects
Person::Person(const std::string& aname, int argage) : name{ aname },
age{ argage }
{
}
Person::Person(const Person& rhs) : name{ rhs.name }, age{ rhs.age }
{
}
Person& Person::operator=(const Person& rhs)
{
name = rhs.name;
age = rhs.age;
return *this;
}
Person::Person(Person&& rhs) noexcept : name{ std::move(rhs.name) },
age{ std::move(rhs.age) }
{
}
Person& Person::operator=(Person&& rhs) noexcept
{
name = std::move(name);
age = std::move(age);
return *this;
}
void Person::printname()
{
std::cout << name << '\n';
}
void Person::printage()
{
std::cout << age << '\n';
}
417
Chapter 41
Projects
void Person::printdata()
{
std::cout << name << ' ' << age << '\n';
}
std::string Person::getname() const
{
return name;
}
int Person::getage() const
{
return age;
}
void Person::setname(const std::string& aname)
{
name = aname;
}
void Person::setage(int argage)
{
age = argage;
}
void Person::formatprint()
{
std::cout << "Person's name: " << name << ", age: " << age << '\n';
}
// derived class Employee
class Employee : public Person
{
private:
std::string jobtitle;
public:
// default constructor
Employee();
418
Chapter 41
Projects
// user provided constructor
Employee(const std::string& aname, int argage, const std::string&
ajobtitle);
// copy constructor
Employee(const Employee& rhs);
// copy assignment operator
Employee& operator=(const Employee& rhs);
// move constructor
Employee(Employee&& rhs) noexcept;
// move assignment operator
Employee& operator=(Employee&& rhs) noexcept;
void setjobtitle(const std::string& ajobtitle);
std::string getjobtitle() const;
void formatprint() override;
};
Employee::Employee() : Person(), jobtitle{ "The Default Role" }
{}
Employee::Employee(const std::string& aname, int argage, const
std::string& ajobtitle) : Person(aname, argage), jobtitle{ ajobtitle }
{}
Employee::Employee(const Employee& rhs) : Person(rhs), jobtitle{ rhs.
jobtitle }
{
}
Employee& Employee::operator=(const Employee& rhs)
{
Person::operator=(rhs);
jobtitle = rhs.jobtitle;
return *this;
}
419
Chapter 41
Projects
Employee::Employee(Employee&& rhs) noexcept : Person(std::move(rhs)),
jobtitle{ std::move(rhs.jobtitle) }
{
}
Employee& Employee::operator=(Employee&& rhs) noexcept
{
Person::operator=(std::move(rhs));
jobtitle = std::move(rhs.jobtitle);
return *this;
}
void Employee::setjobtitle(const std::string& ajobtitle)
{
jobtitle = ajobtitle;
}
std::string Employee::getjobtitle() const
{
return jobtitle;
}
void Employee::formatprint()
{
std::cout << "Employee's name: " << getname() << ", age: "
<< getage() << ", job title: " << jobtitle << '\n';
}
}
using namespace nm;
int main()
{
// a vector unique pointers
std::vector<std::unique_ptr<Person>> v2;
v2.emplace_back(std::make_unique<Employee>("Sample Name 1", 20,
"Developer"));
420
Chapter 41
v2.emplace_back(std::make_unique<Employee>("Sample
"Engineer"));
v2.emplace_back(std::make_unique<Employee>("Sample
"Quality Assurance"));
v2.emplace_back(std::make_unique<Employee>("Sample
"Human Resources"));
v2.emplace_back(std::make_unique<Employee>("Sample
"Manager"));
v2.emplace_back(std::make_unique<Employee>("Sample
"CEO"));
for (const auto& el : v2)
{
el->formatprint();
}
Projects
Name 2", 25,
Name 3", 30,
Name 4", 35,
Name 5", 40,
Name 6", 45,
std::cout << "Testing..." << '\n';
// testing
Employee o3; // The default constructor invoked
Employee o4("Sample name 7", 50, "Accountant");
// copy assignment test:
o3 = o4;
o3.formatprint();
}
Output:
Employee's
Employee's
Employee's
Employee's
Employee's
Employee's
Testing...
Employee's
name:
name:
name:
name:
name:
name:
Sample
Sample
Sample
Sample
Sample
Sample
Name
Name
Name
Name
Name
Name
1,
2,
3,
4,
5,
6,
age:
age:
age:
age:
age:
age:
20,
25,
30,
35,
40,
45,
job
job
job
job
job
job
title:
title:
title:
title:
title:
title:
Developer
Engineer
Quality Assurance
Human Resources
Manager
CEO
name: Sample name 7, age: 50, job title: Accountant
421
Chapter 41
Projects
In our main function, we create a vector of unique pointers of Persons and add
instances of type Employee, thus creating a vector of polymorphic objects/pointers. As an
alternative to the push_back member function, we used the more efficient emplace_back
member function to insert new objects into a container. Both options are viable.
Then using the range-based for loop, we iterate through a vector of pointers and
invoke the overridden function formatprint using the -> operator.
Please note that most of the time, we want a vector of objects, not a vector of
pointers. But this is one of those rare situations where we indeed want a vector of
pointers to maintain a collection of polymorphic objects.
Finally, in the last few statements, we add a simple test demonstrating the use of a
copy assignment operator. This concludes our fifth project.
Project VI: Information System – Multiple Files
Write a program that splits the code from Project V into multiple (source and header)
files. Additional requirements:
422
•
Put the Person class declaration inside a person.h header file.
Implement header guards.
•
Put the Employee class declaration inside an employee.h header file.
Implement header guards.
•
Put the Person class definition inside a person.cpp source file. Include
the person.h header file into a person.cpp source file.
•
Put the Employee class definition inside an employee.cpp source file.
Include the employee.h header file into a person.cpp source file.
•
In the main program file called source.cpp, include the employee.h
header file and create a vector of polymorphic objects.
•
Include additional header files where appropriate.
•
Wrap the classes’ code inside a namespace nm.
•
Compile all the source files and run the program.
Chapter 41
Projects
Now, we have five different files in total. We have two header files, called person.h
and employee.h, and three source files, called person.cpp, employee.cpp, and source.cpp.
The basic project skeleton with the code guards now looks like this:
person.h:
#ifndef PERSON_H
#define PERSON_H
#include <string>
#include <iostream>
namespace nm
{
}
#endif // !PERSON_H
employee.h:
#ifndef EMPLOYEE_H
#define EMPLOYEE_H
#include "person.h"
namespace nm
{
}
#endif // !EMPLOYEE_H
person.cpp:
#include "person.h"
namespace nm
{
}
423
Chapter 41
Projects
employee.cpp:
#include "employee.h"
namespace nm
{
}
source.cpp:
#include "employee.h"
#include <vector>
#include <memory>
using namespace nm;
int main()
{
}
Let us now add the Person base class declaration to a person.h file. Listing:
person.h:
#ifndef PERSON_H
#define PERSON_H
#include <string>
#include <iostream>
namespace nm
{
// base class Person
class Person
{
private:
std::string name;
int age;
public:
// default constructor
Person();
424
Chapter 41
Projects
// user-provided constructor
Person(const std::string& aname, int argage);
// copy constructor
Person(const Person& rhs);
// copy assignment operator
Person& operator=(const Person& rhs);
// move constructor
Person(Person&& rhs) noexcept;
// move assignment operator
Person& operator=(Person&& rhs) noexcept;
void printname();
void printage();
void printdata();
std::string getname() const;
int getage() const;
void setname(const std::string& aname);
void setage(int argage);
virtual void formatprint();
// virtual base class destructor
virtual ~Person() {}
};
}
#endif // !PERSON_H
Let us add the Person class definition to a person.cpp file. Listing:
person.cpp:
#include "person.h"
namespace nm
{
Person::Person() : name{ "Default name" }, age{ -1 }
{
}
425
Chapter 41
Projects
Person::Person(const std::string& aname, int argage) : name{ aname },
age{ argage }
{
}
Person::Person(const Person& rhs) : name{ rhs.name }, age{ rhs.age }
{
}
Person& Person::operator=(const Person& rhs)
{
name = rhs.name;
age = rhs.age;
return *this;
}
Person::Person(Person&& rhs) noexcept : name{ std::move(rhs.name) },
age{ std::move(rhs.age) }
{
}
Person& Person::operator=(Person&& rhs) noexcept
{
name = std::move(name);
age = std::move(age);
return *this;
}
void Person::printname()
{
std::cout << name << '\n';
}
void Person::printage()
{
std::cout << age << '\n';
}
426
Chapter 41
Projects
void Person::printdata()
{
std::cout << name << ' ' << age << '\n';
}
std::string Person::getname() const
{
return name;
}
int Person::getage() const
{
return age;
}
void Person::setname(const std::string& aname)
{
name = aname;
}
void Person::setage(int argage)
{
age = argage;
}
void Person::formatprint()
{
std::cout << "Person's name: " << name << ", age: " << age << '\n';
}
}
The Employee derived class declaration goes into an employee.h file. Listing:
employee.h:
#ifndef EMPLOYEE_H
#define EMPLOYEE_H
#include "person.h"
427
Chapter 41
Projects
namespace nm
{
// derived class Employee
class Employee : public Person
{
private:
std::string jobtitle;
public:
// default constructor
Employee();
// user provided constructor
Employee(const std::string& aname, int argage, const std::string&
ajobtitle);
// copy constructor
Employee(const Employee& rhs);
// copy assignment operator
Employee& operator=(const Employee& rhs);
// move constructor
Employee(Employee&& rhs) noexcept;
// move assignment operator
Employee& operator=(Employee&& rhs) noexcept;
void setjobtitle(const std::string& ajobtitle);
std::string getjobtitle() const;
void formatprint() override;
};
}
#endif // !EMPLOYEE_H
The definition of the Employee class goes inside the employee.cpp file. Listing:
employee.cpp:
#include "employee.h"
namespace nm
{
Employee::Employee() : Person(), jobtitle{"The Default Role"}
{}
428
Chapter 41
Projects
Employee::Employee(const std::string& aname, int argage, const
std::string& ajobtitle) : Person(aname, argage), jobtitle{ ajobtitle }
{}
Employee::Employee(const Employee& rhs) : Person(rhs), jobtitle{
rhs.jobtitle }
{
}
Employee& Employee::operator=(const Employee& rhs)
{
Person::operator=(rhs);
jobtitle = rhs.jobtitle;
return *this;
}
Employee::Employee(Employee&& rhs) noexcept : Person(std::move(rhs)),
jobtitle{ std::move(rhs.jobtitle) }
{
}
Employee& Employee::operator=(Employee&& rhs) noexcept
{
Person::operator=(std::move(rhs));
jobtitle = std::move(rhs.jobtitle);
return *this;
}
void Employee::setjobtitle(const std::string& ajobtitle)
{
jobtitle = ajobtitle;
}
std::string Employee::getjobtitle() const
{
return jobtitle;
}
429
Chapter 41
Projects
void Employee::formatprint()
{
std::cout << "Employee's name: " << getname() << ", age: "
<< getage() << ", job title: " << jobtitle << '\n';
}
}
Finally, we populate the function main with the remaining source code from Project
V. Listing:
source.cpp:
#include "employee.h"
#include <vector>
#include <memory>
using namespace nm;
int main()
{
// a vector of unique pointers
std::vector<std::unique_ptr<Person>> v2;
v2.emplace_back(std::make_unique<Employee>("Sample
"Developer"));
v2.emplace_back(std::make_unique<Employee>("Sample
"Engineer"));
v2.emplace_back(std::make_unique<Employee>("Sample
"Quality Assurance"));
v2.emplace_back(std::make_unique<Employee>("Sample
Resources"));
v2.emplace_back(std::make_unique<Employee>("Sample
"Manager"));
v2.emplace_back(std::make_unique<Employee>("Sample
"CEO"));
for (const auto& el : v2)
{
el->formatprint();
}
430
Name 1", 20,
Name 2", 25,
Name 3", 30,
Name 4", 35, "Human
Name 5", 40,
Name 6", 45,
Chapter 41
Projects
std::cout << "Testing..." << '\n';
// testing
Employee o3; // The default constructor invoked
Employee o4("Sample name 7", 50, "Accountant");
// copy assignment test:
o3 = o4;
o3.formatprint();
}
In this project, we had two classes, a base class Person and a derived class Employee.
We put the Person class declaration into a person.h header file, and the definition goes
into a person.cpp file.
For a derived class Employee, the declaration goes into an employee.h header file,
and the implementation goes into the employee.cpp source file. The main program is
located inside the source.cpp file. Finally, we compile all the source files together using
the following command if on Linux:
g++ -Wall -std=c++17 person.cpp employee.cpp source.cpp
We then run the program:
./a.out
And observe the results:
Output:
Employee's
Employee's
Employee's
Employee's
Employee's
Employee's
Testing...
Employee's
name:
name:
name:
name:
name:
name:
Sample
Sample
Sample
Sample
Sample
Sample
Name
Name
Name
Name
Name
Name
1,
2,
3,
4,
5,
6,
age:
age:
age:
age:
age:
age:
20,
25,
30,
35,
40,
45,
job
job
job
job
job
job
title:
title:
title:
title:
title:
title:
Developer
Engineer
Quality Assurance
Human Resources
Manager
CEO
name: Sample name 7, age: 50, job title: Accountant
431
Chapter 41
Projects
The output is the same as with Project V, but now we better organize our code by
splitting multiple declarations into header files and multiple definitions into appropriate
source files. We also learned how to better logically manage the code by wrapping
classes and other entities in a namespace.
432
Index
A
Array definition
char, int, and double objects, 59
elements, 53
pointer, 54
reference type, 54
single character, 57
standard input, 55
strings, 55
substring, 56, 58
Arrays
char declaration, 35
elements, 35
implicit conversions, 199
initialization, 35
Automatic storage duration
stack memory, 102
variables, 105, 107
Automatic type deduction
constant type, 52
initialization, 51
reference type, 51
B
Book inventory
arguments, 351, 352
class declaration, 363
compilation string, 366
constructor, 348, 350, 352
getpages() method, 354–357, 359
information system, 392–432
message logger, 367–385
printdata() member function, 359–361
requirements, 347, 362
source and header files,
362–367, 386–392
source.cpp file, 347
source/header files, 362
title method, 348
C
C++11 standards
automatic type deduction, 282
concurrency
command line, 294
executable file, 294
locking/unlocking mutexes,
299, 300
parameters, 295
threads, 294–299
constexpr specifier, 285
definition, 281
delete/default functions, 301–304
erase() member function, 289
features, 281
initializer lists, 283
insert() member function, 288, 291
Lambda expressions, 284
move semantics, 284
range-based loops, 282
rvalue reference, 284
scoped enumerators, 286
© Slobodan Dmitrović 2023
S. Dmitrović, Modern C++ for Absolute Beginners, https://doi.org/10.1007/978-1-4842-9274-7
433
INDEX
C++11 standards (cont.)
shared pointers, 287
smart pointers, 286, 287
static_assert directive, 293
tuple element, 292, 293
type alias, 304
unique pointer, 286
unordered_map, 290–292
unordered_set, 288–290
C++14 standards
binary literals, 305, 306
digit separators, 306
features, 304
function type, 306
generic lambdas, 307
make_unique function, 307, 308
C++17 standards
constexpr lambdas, 309
container, 317–319
expression elements, 309
filesystem library, 311–315
nested namespaces, 308, 309
string_view class template, 315–317
structured bindings, 309–311
union type, 319
variant, 319–322
C++20 standards
adaptors, 333
algorithms, 335
concepts, 325–329
coroutine, 336
features, 322
iterators, 332
lambda functions, 329–333
[likely]/[unlikely] attributes, 330, 331
mathematical constants, 338, 339
modules, 323–325
pipe | operators, 335
434
range, 332–336
reverse() algorithm, 336
span header, 337, 338
C++23 standards
compilation string, 339
contains() member function, 341–343
features, 339
literal suffixes, 340
multidimensional subscript
operator, 340
print function, 343–345
size_t, 341
string type, 341
warning/diagnostic message, 341
C++ programming language
characters, 10
compilers
header/source files, 5
Linux Ubuntu, 5
Windows, 6
escape sequence characters, 9
fundamental types
boolean, 13, 14
character type, 14–16
floating-point literals, 18
hexadecimal literals, 17
initialization, 14
integers, 16, 17
modifiers, 19
numeric/character literals, 16
objects, 13
size of operator, 15
void functions, 18
Hello World, 8–11
Hello World/comments, 21
multiple << operators, 9
multiline comments, 8
scope resolution operator, 9
INDEX
single-line comments, 7
source code projects, 1
standards, 3
standard/stream insertion operator, 9
string literal, 10
systems programming, 3
variable
declaration, 19, 21
definition, 20, 22
initialization, 20, 22
wrong approach, 11
Classes
access specifiers, 139, 140
access specifiers/labels, 112–116
constructor, 116
copy options, 143, 144
initializer list, 141, 142
move option, 144, 145
user-defined destructor, 140, 141
data/function members, 139
data member field, 110
data members, 137
destructors, 134–136
inheritance, 147–151
instance, 137
member function, 110–112, 138
operator overloading, 128–134
overloading arithmetic operator, 145, 146
polymorphism, 151–155
templates, 167–170
user-defined type, 109
Constants
compile-time error, 77
const modification, 78
expressions, 78
integer value, 77
Constructor
arguments, 117
assignment operator, 123, 124, 126–128
copy, 120–123
default parameters, 116
initialization, 118
list initialization, 141, 142
member function, 116
member initialization, 119, 120
move option, 144, 145
move semantics, 124–126
parameters, 119
rvalues reference, 124
user-defined destructor, 140, 141
Conversions, 197–204
static_cast function, 217
Copy constructor, 143, 144
D
Dynamic storage duration
definition, 106
heap memory, 102
variables, 107
E
Encapsulation, 155
Enumeration
C++11 standards, 286
MyEnum variable, 173
scoped enum, 182
switch, 183
unscoped/scoped enums, 173–175
Exception handling
double exceptions, 223
throws/catches, 222
Exceptions
try/catch block
execution code, 206
435
INDEX
Exceptions (cont.)
multiple catch blocks, 207
realistic scenario, 208, 209
source code, 205, 206
structure error, 205
Explicit conversions
dynamic_cast function, 201, 202
inheritance, 203
static_cast function, 201, 204
F, G
File streams
constructor, 228
>> operator, 226
<fstream> header, 225
<< operator, 228, 229
myfile.txt, 226
Functions
arguments, 89
declaration, 85, 86, 97
definition, 85–89, 97
overloading, 94–96
overloads, 99, 100
parameters, 87, 98
passing arguments, 91, 99
const reference type, 93, 94
function overloading, 94–96
reference type, 92, 93
value/copy, 91, 92
return statement, 89–91
templates, 165–167
H
Header/source files
arbitrary function, 191
header guards, 186
436
namespace, 186–189, 193, 194
nested namespace, 194, 195
source files, 192, 193
standard library/user-defined
headers, 185
translation unit, 186
various declarations, 185
I, J, K
Implicit conversions
arguments, 200
array, 199
boolean value, 198
built-in types, 197
integer pointer, 198
integral promotion, 198
narrowing conversions, 197
void pointer, 199
Information system
classes declarations, 393
constructors, 395, 396
constructors/assignment
operators, 403–405
Employee() class, 410–412, 414, 415
employee.cpp file, 428
employee.h file, 427
formatprint() function,
416–418, 420–422
getters/setters member
functions, 398–400
jobtitle class, 406–409
member functions, 396, 397
person base class, 394
person class declaration, 424
requirements, 392
source file, 393
source/header files, 422–432
INDEX
virtual member function, 400–402
Inheritance, 155
base class, 148
derived class, 150, 151
derived student class, 157, 158
existing class, 147
getname()/getsemester() member
functions, 159
member functions, 160
members, 157
MyBaseClass class, 150
private members, 149
protected members, 148
public/protected base class, 150
single-parameter constructor, 159
Input/output (I/O) streams, 225–233
Iteration statements, 71
do/while statement, 75
for statement, 72, 73
while statement, 73, 74
Iterators
elements, 248
erase() member function, 250, 251
increment/decrement elements, 249
for loops, 249
L
Lambda expressions
anonymous function objects, 258
anonymous/unnamed function, 261
C++11 standards, 284
count_if function, 264, 265, 279
elements, 264
function call operator (), 258
local variables, 263
main() function, 279
parameters, 259, 260, 264
sort function, 278–280
variables, 262
Lifetime
automatic storage duration, 102
dynamic storage duration, 102
operators (new/delete), 103, 104
smart pointers, 104
static storage duration, 103
storage durations, 102
M
Map program
definition, 274
elements, 241
function returns, 243
initializer list, 276
insert() member function, 242
key-value pair, 241, 242, 275
search/delete, 277, 278
strings/integers, 275–277
Message logger
constructors, 368
customlogfile, 370, 371
logToConsole and logToFile functions,
381, 383–385
logToFile()/logToConsole() functions,
372, 374
logWithLevel, 375, 377–381
messagestart, 368
methods, 367
MyLogger class, 369, 370
requirements, 367
source and header files, 386–392
source file, 368
verbosity levels, 375
437
INDEX
N
S
Namespaces, 186–189
nested declaration, 194, 195
source files, 193, 194
Scopes/lifetime, 101
block code option, 101
declaration, 101
lifetime, 102
Selection statements
brace-enclosed blocks {}, 63
comparison operators, 67–70
conditional expression, 63, 64
if-else statement, 62
if statement, 61–63
logical operators, 65, 66
switch statement, 70, 71
Set integers
containers, 239, 240
data manipulation, 271, 272
definition, 270, 271
member function, 272, 273
searches, 273, 274
Shared pointer, 214, 215
make_shared function, 219
Smart pointers, 211–215
C++11 standards, 286, 287
Standard input
inputs/arithmetic operations, 33
integer number, 29
integral/floating-point division, 34
multiple inputs, 32
post increment/compound
assignment, 33
source code, 31
stream extraction, 29
two inputs, 31
Standard Library
actual vector element, 247
algorithm/utilities, 251
copy function, 255–257
end() functions, 254
O
Operators
assignment =, 25
arithmetic operators, 25–27
compound assignment, 27
increment/decrement, 28
P, Q
Pointers
array definition, 54
declaration, 37
dereferenced pointer, 38, 39
nullptr literal, 38
objects, 37
smart pointers, 211–215
strings, 48
Polymorphism, 155
abstract classes, 154
dowork() function, 153, 221
inheritance, 155
interfaces, 154
MyBaseClass class, 153
object-oriented programming, 155
overridden member function, 220, 221
virtual functions, 152
virtual member function, 221
R
Reference type, 41, 42
array definition, 54
438
INDEX
find function, 254, 255
find_if function, 255
function object/lambda function, 253
min/max elements, 257, 258
predicates, 253
sort function, 252, 253
containers, 245
categories, 235
map, 241–244
pair class template, 244, 245
set, 239, 240
std::array, 238, 239
vector, 236–238
definition, 235
range-based for loop, 245–248
iterators, 249–252
Lambda expressions, 258–265
Statements
const type qualifier, 83, 84
if statement, 79
logical operators, 80, 81
for loop, 82, 83
switch, 81
static_cast function
fundamental types, 217
Static storage duration, 103
class template, 181
data member, 178
definition, 162
function template, 180
keywords, 162
local variable, 161
main() function, 177
member functions, 179
scoped enum, 182
switch statement, 183
Strings
accessing characters, 45, 46
array definition, 55
class template, 45
comparison, 46, 47
concatenation, 44, 45
definition, 43
find() member function, 49, 50
getline function, 47
Hello World, 43
pointer, 48
standard input, 47, 48, 55
substr() member function, 48
substring, 56, 58
String streams
class template, 230
constructor, 230
insert text, 232
<< operator, 231, 232
<sstream> header, 229
output data, 233
str() member function, 230
string variable, 231
T
Templates
classes, 167–170
function, 165–167
generic programming, 165
member functions, 168
single member function, 170
specialization, 171
U
Unique pointer
access object members, 212
delete operator, 212
make_unique function, 212, 218
439
INDEX
Unique pointer (cont.)
object of a class, 218, 219
polymorphic classes, 213
unique_ptr, 211
V, W, X, Y, Z
Vector content
brace initialization, 236
containers, 236–238
440
elements, 237
erase() function, 269
find() algorithm
function, 269, 270
non-const type, 236
range-based for loop, 267, 268
range elements, 268
sequential containers, 238
single value, 268
size() member function, 237