/


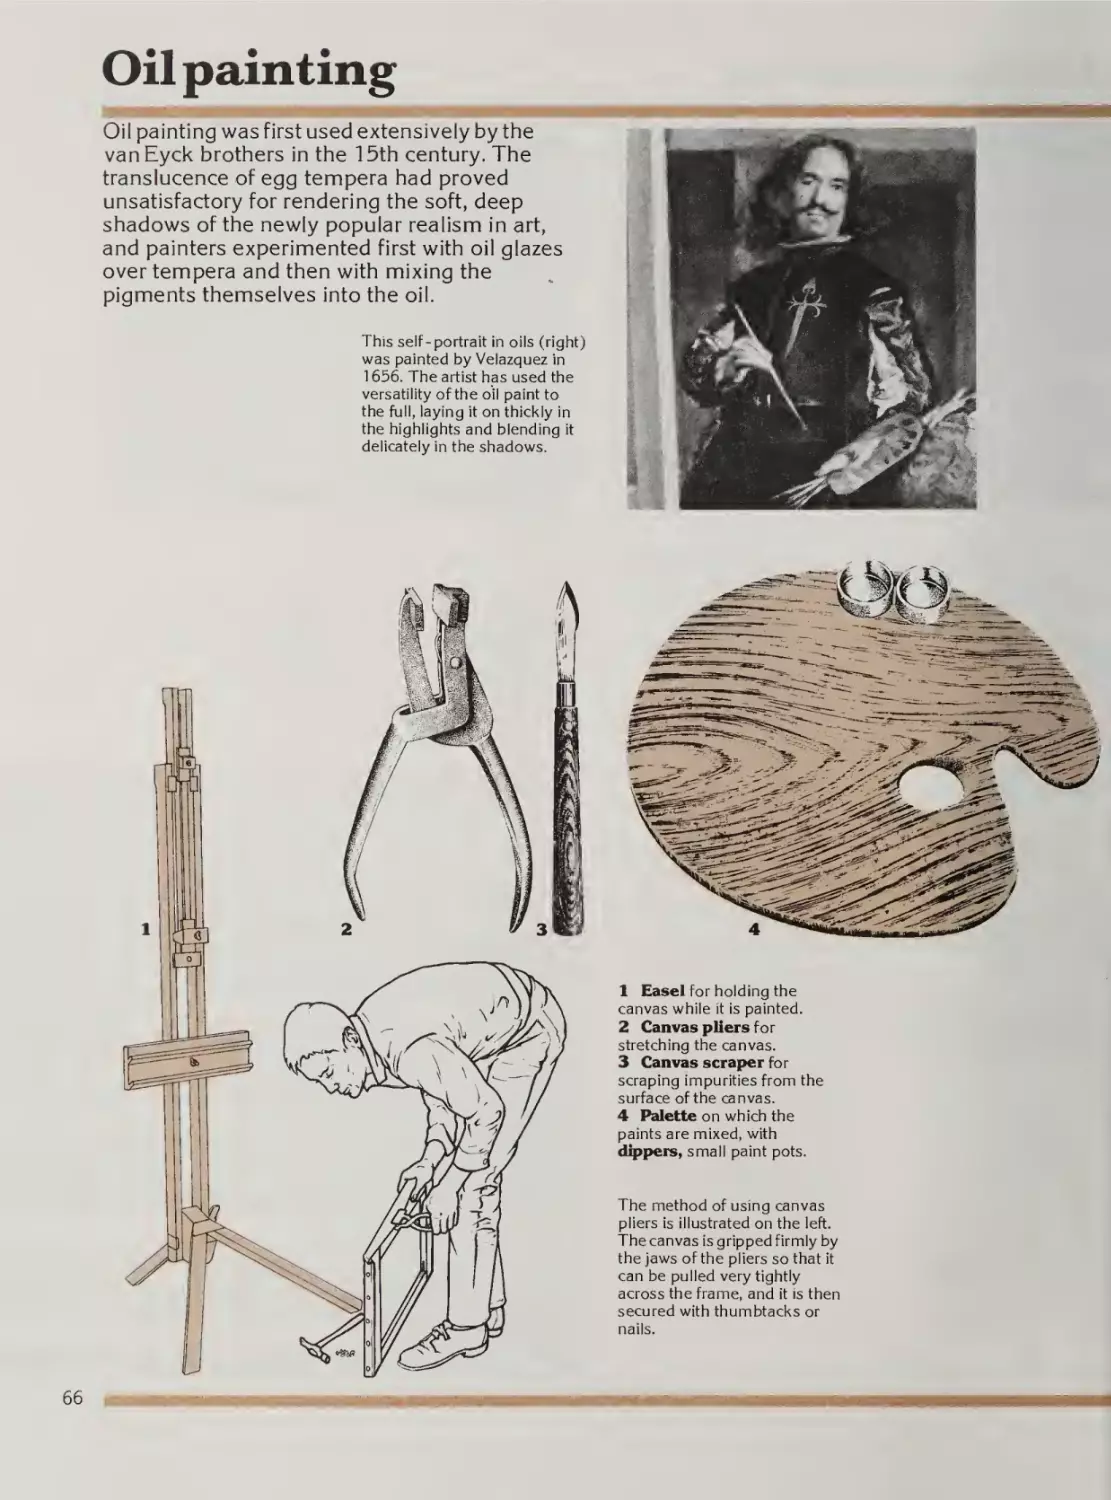


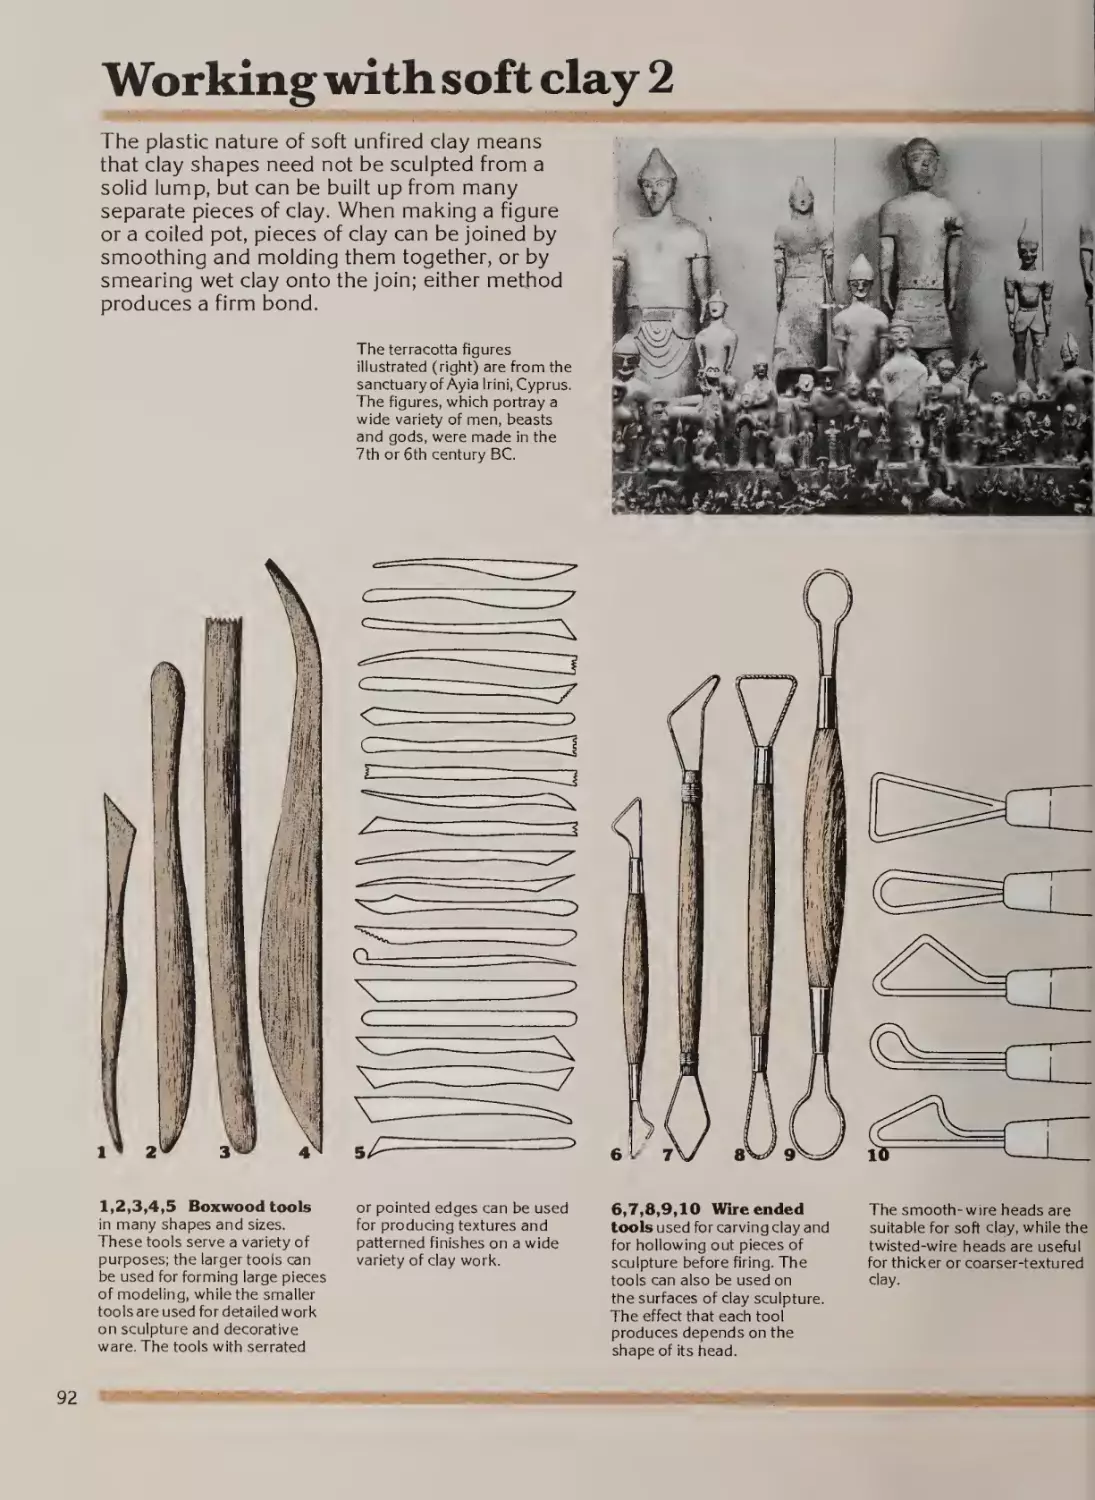
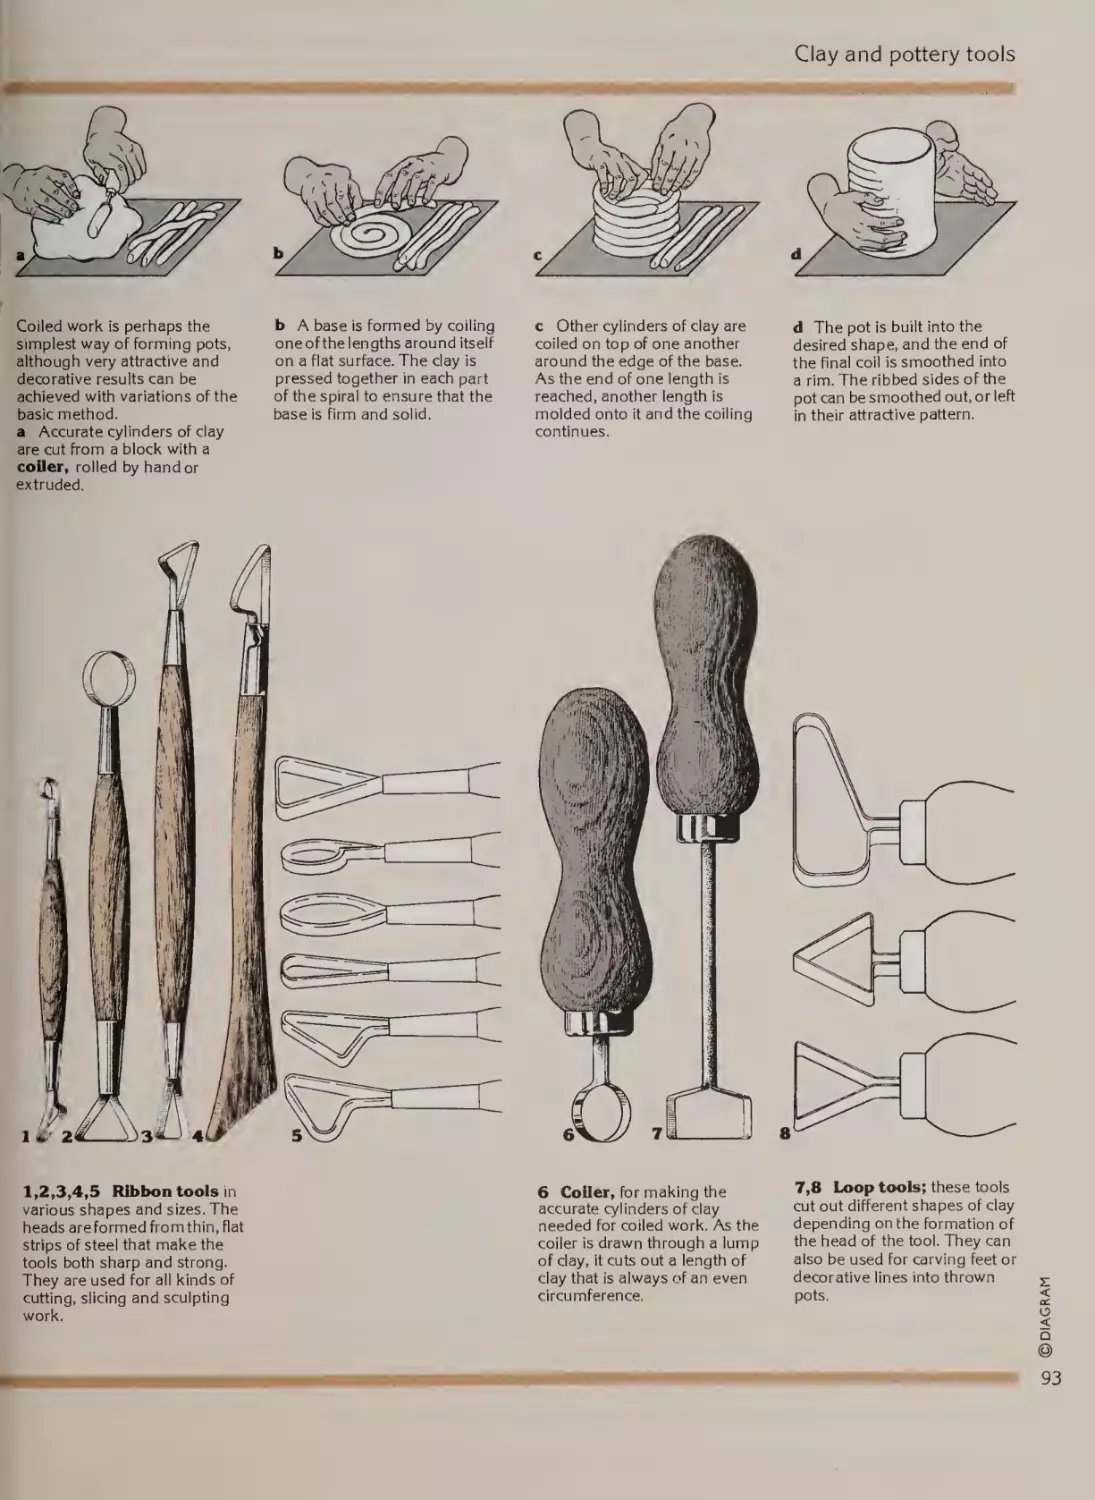
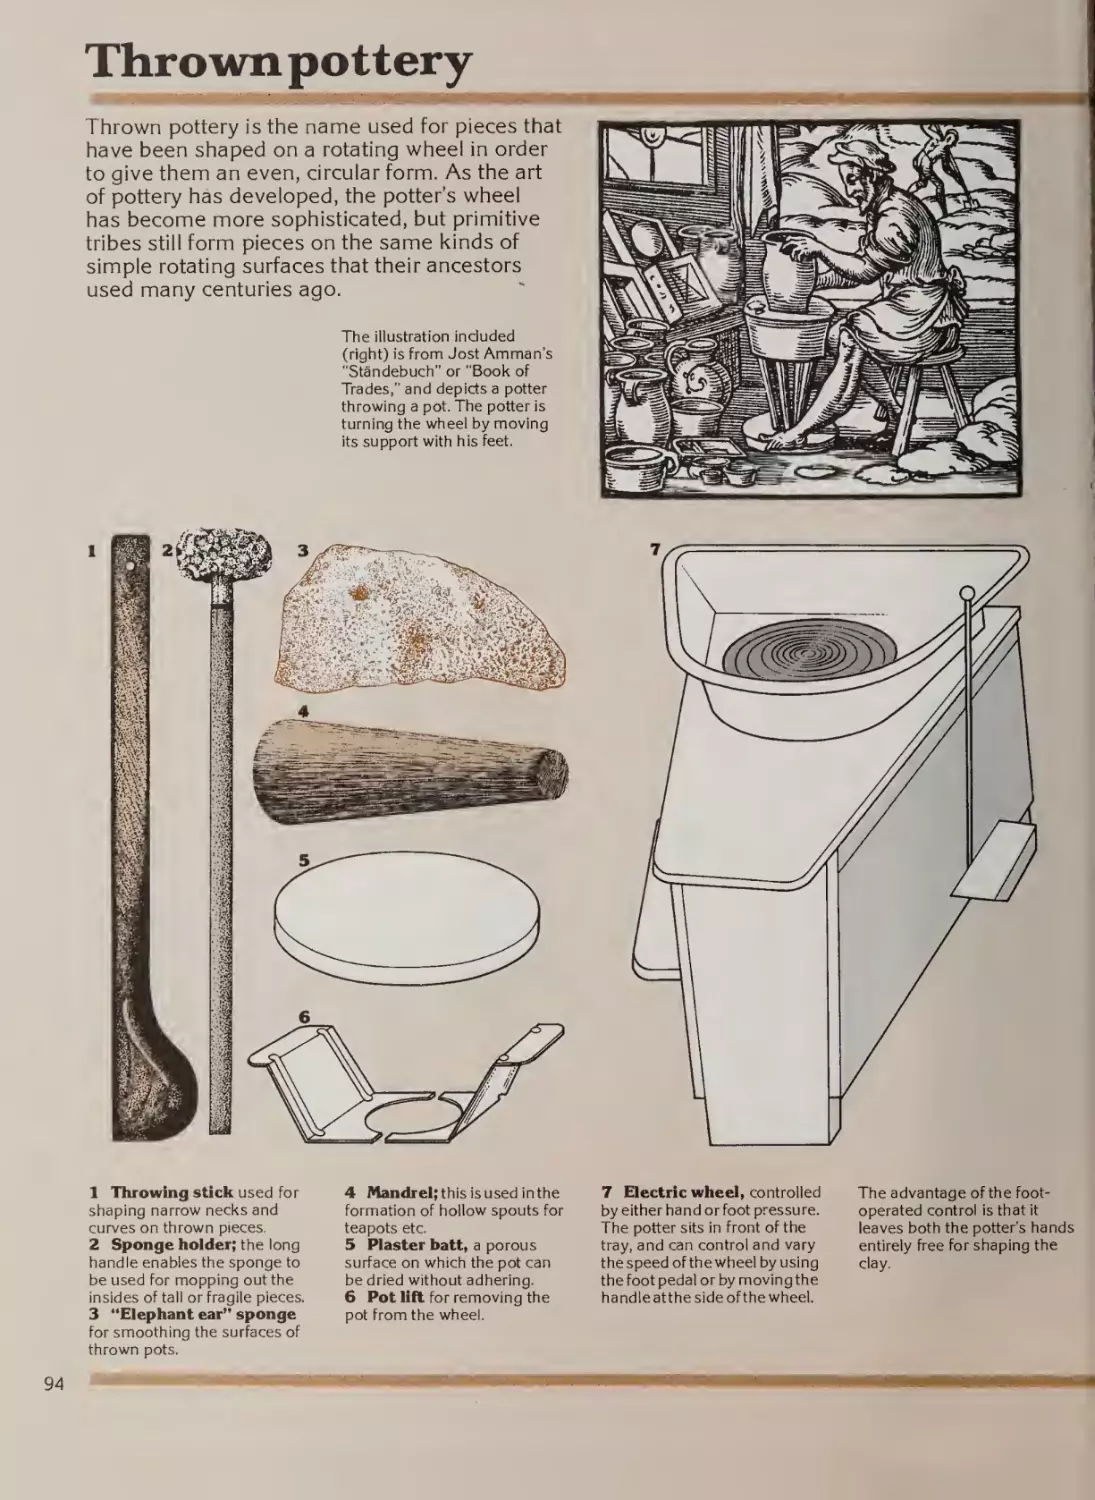
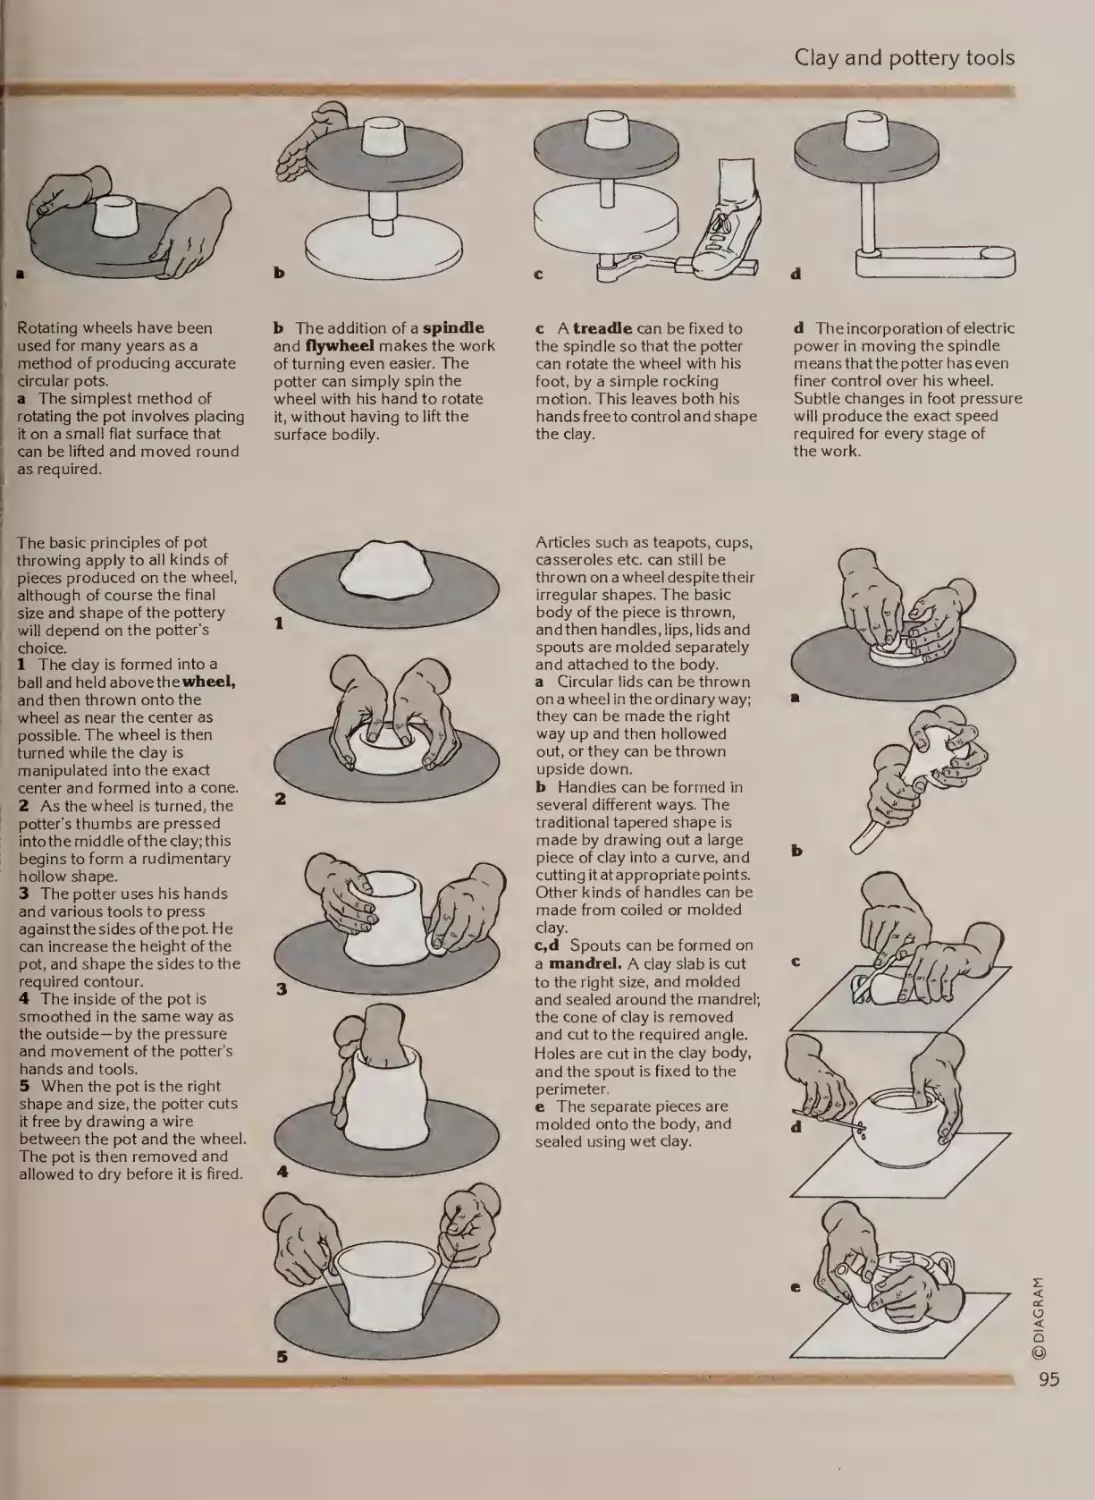


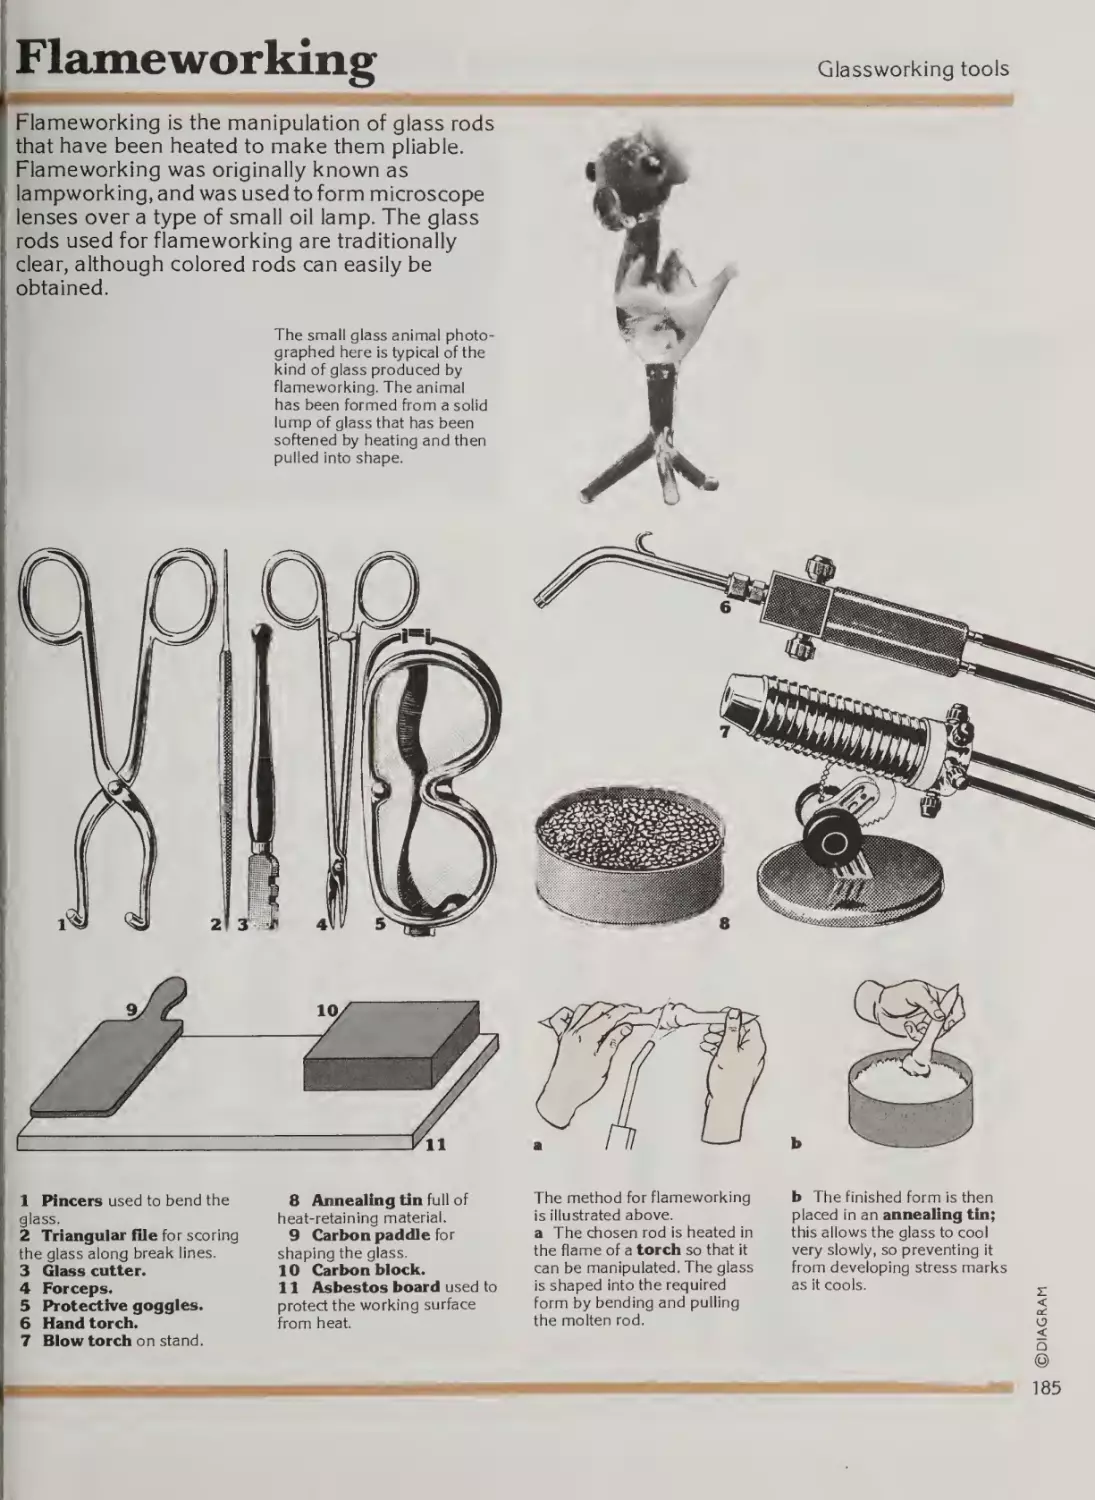


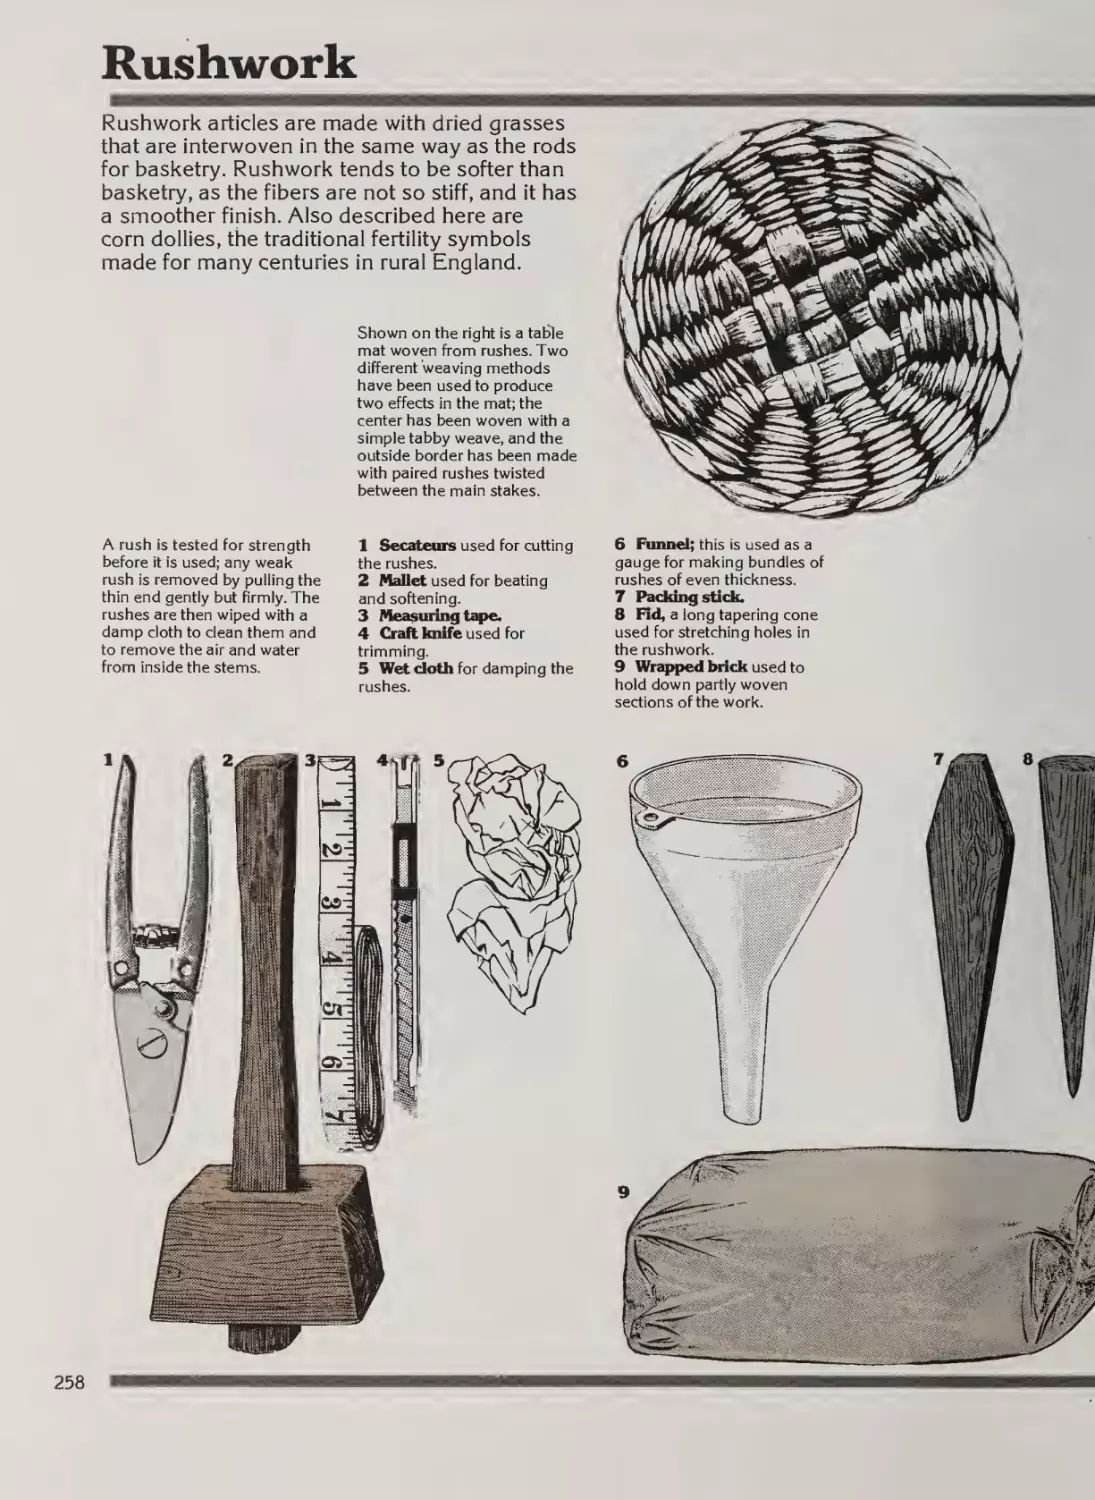
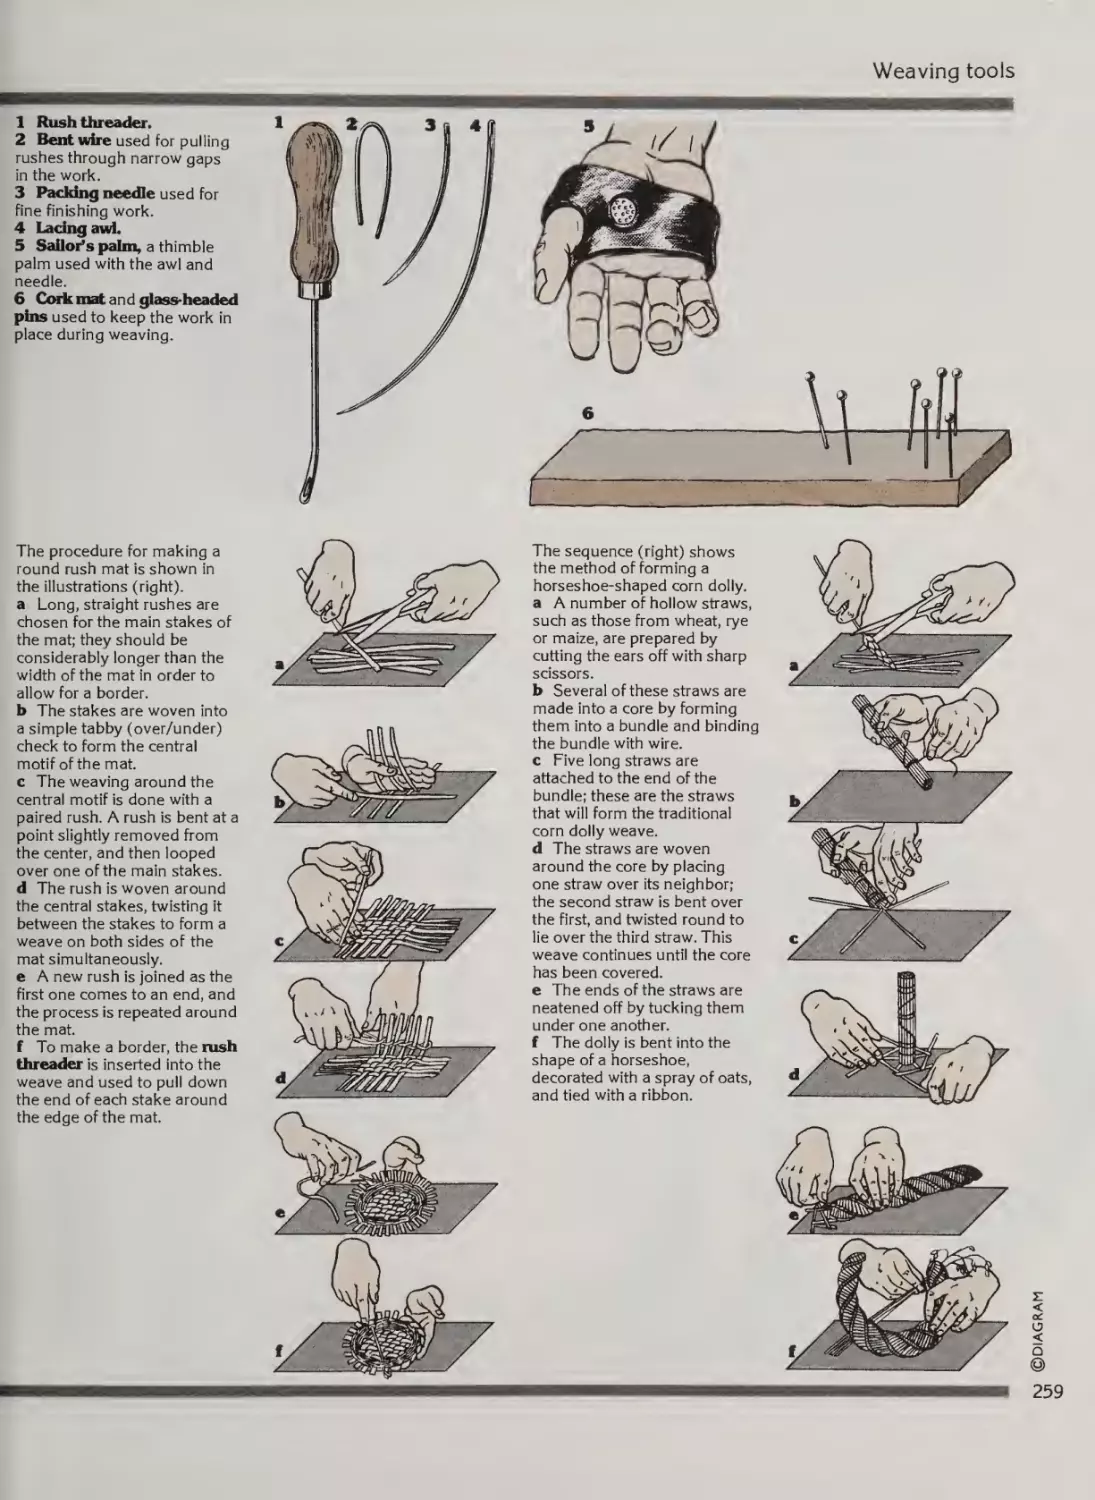
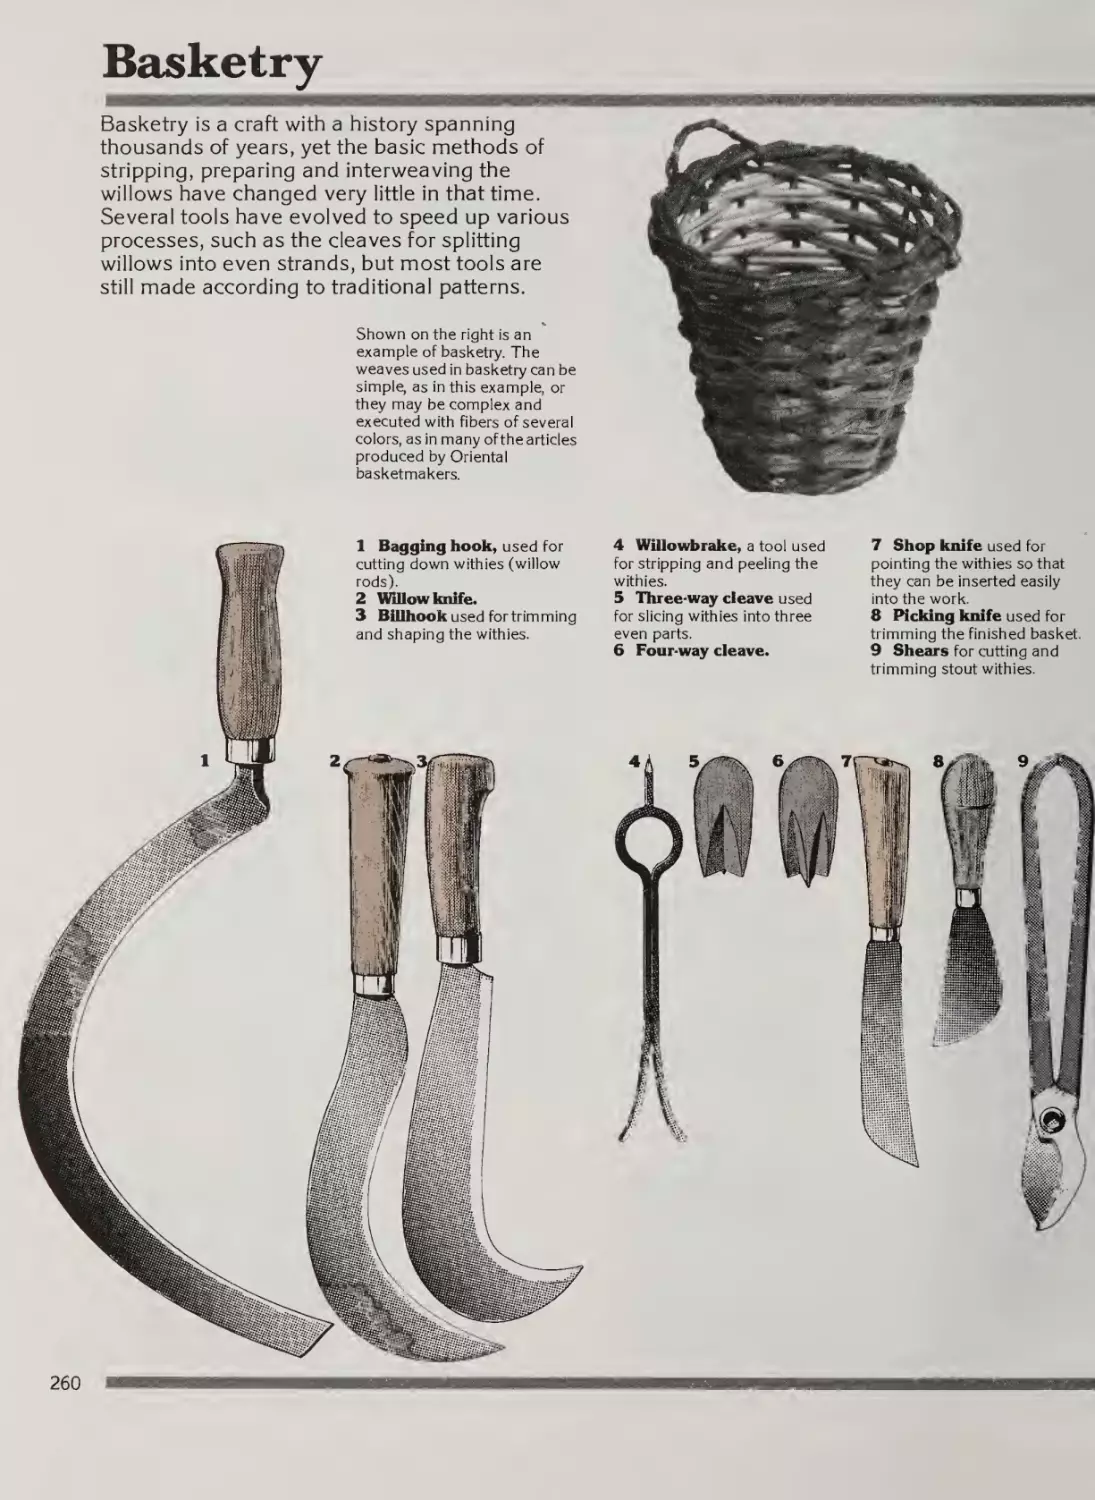


Text
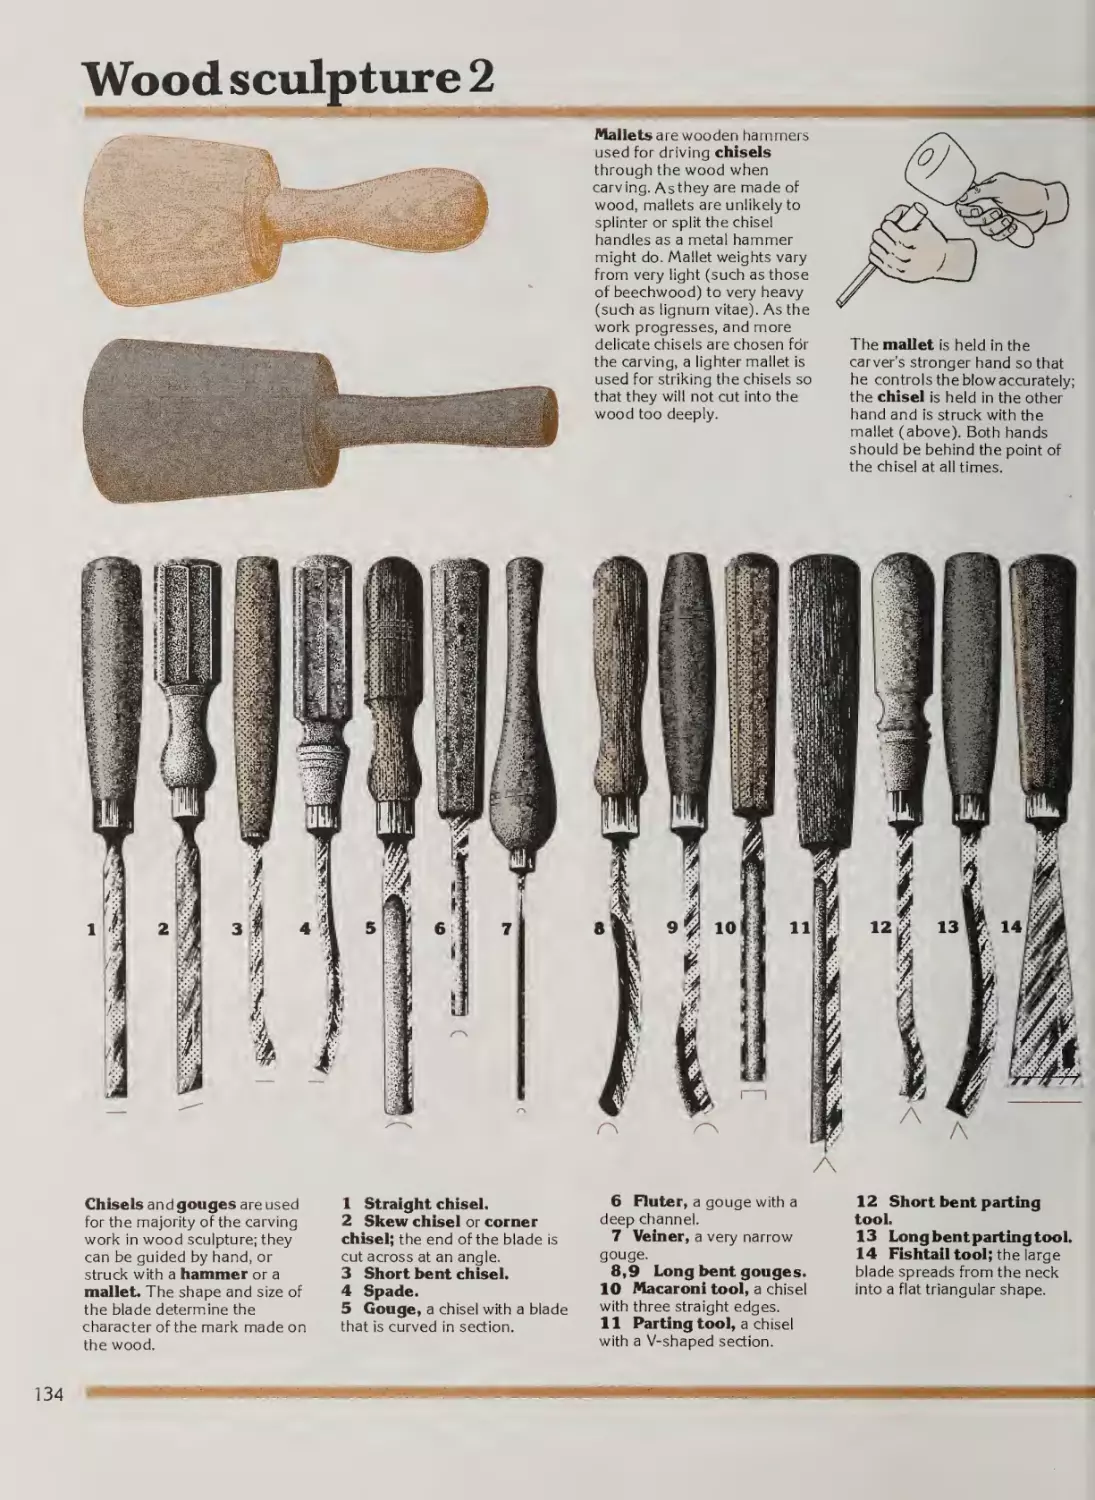
the encyclopedia of the fine,
decorative and applied arts
ISBN 0-31E-3SSfc,0;^';i
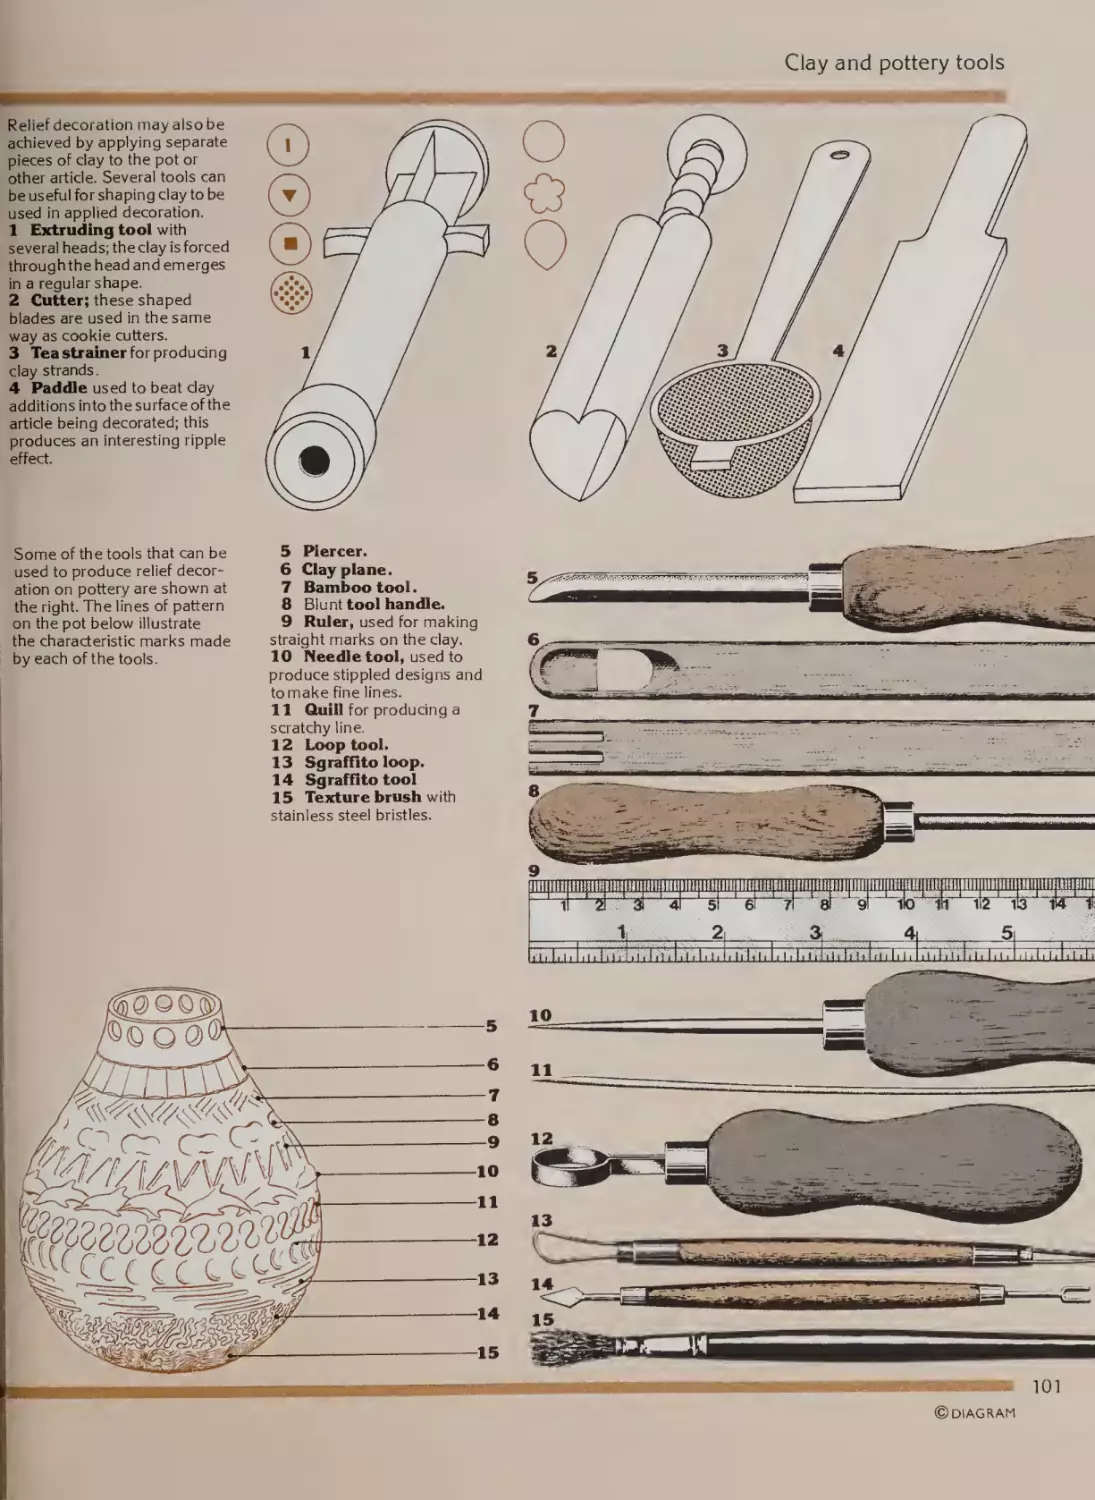
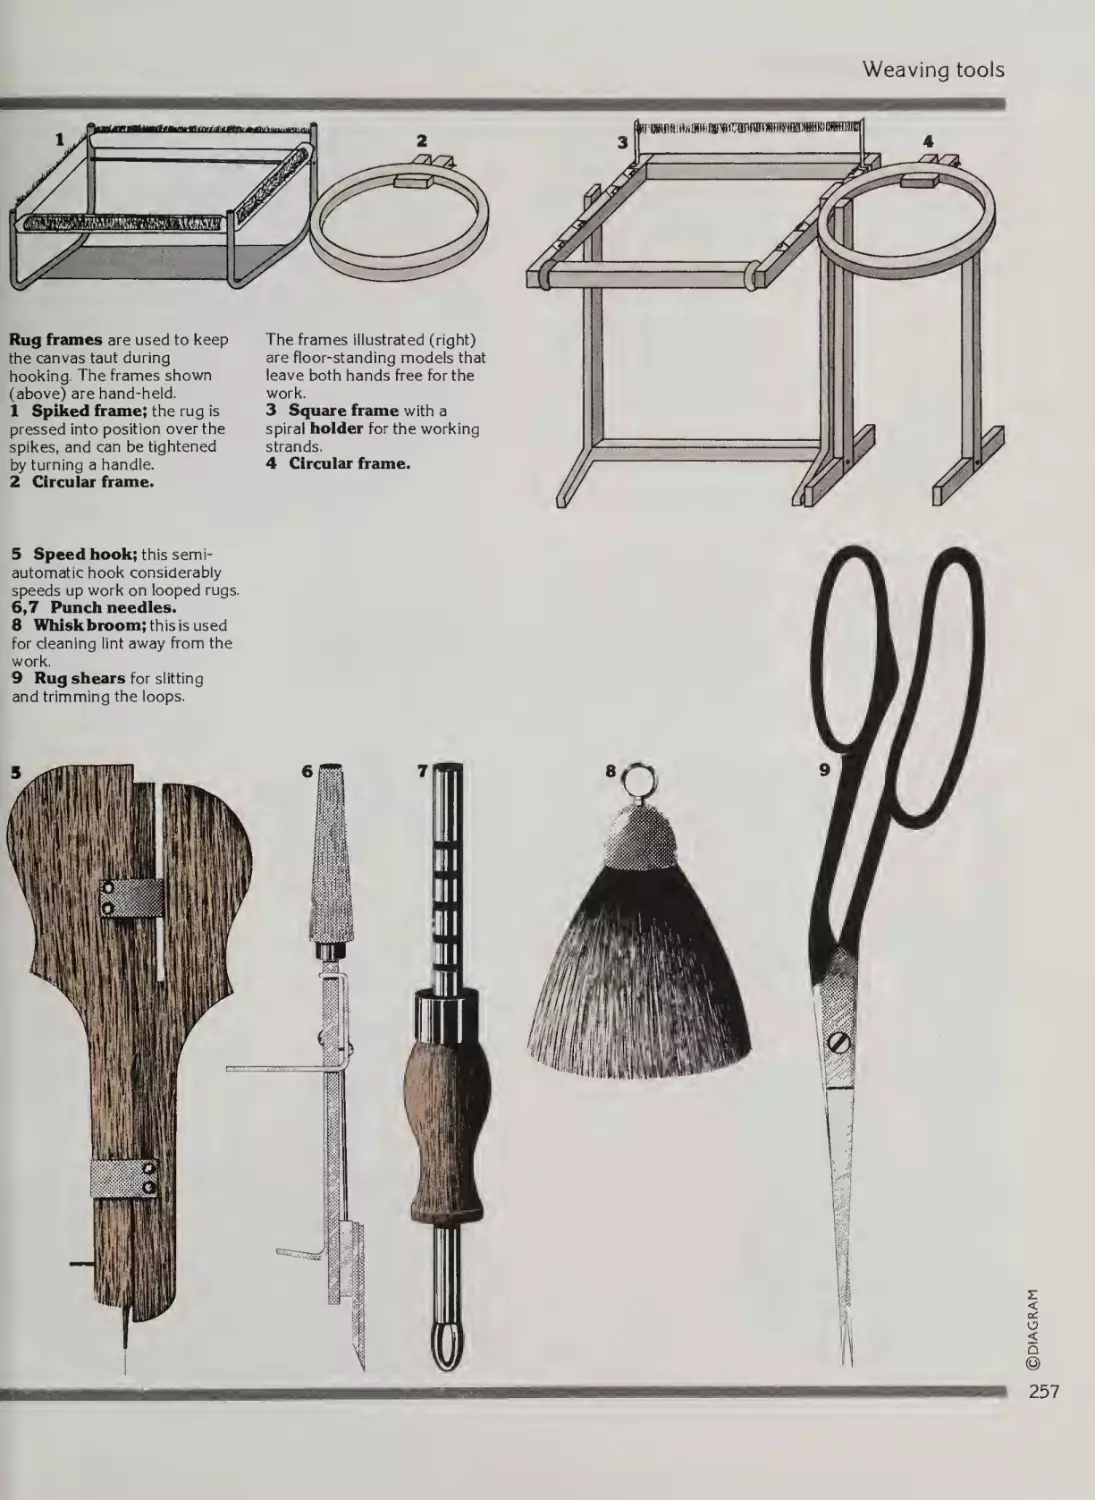
AMDCRAFTS
the encyclopedia of the fine,
decorative and applied arts
the Diagram Group
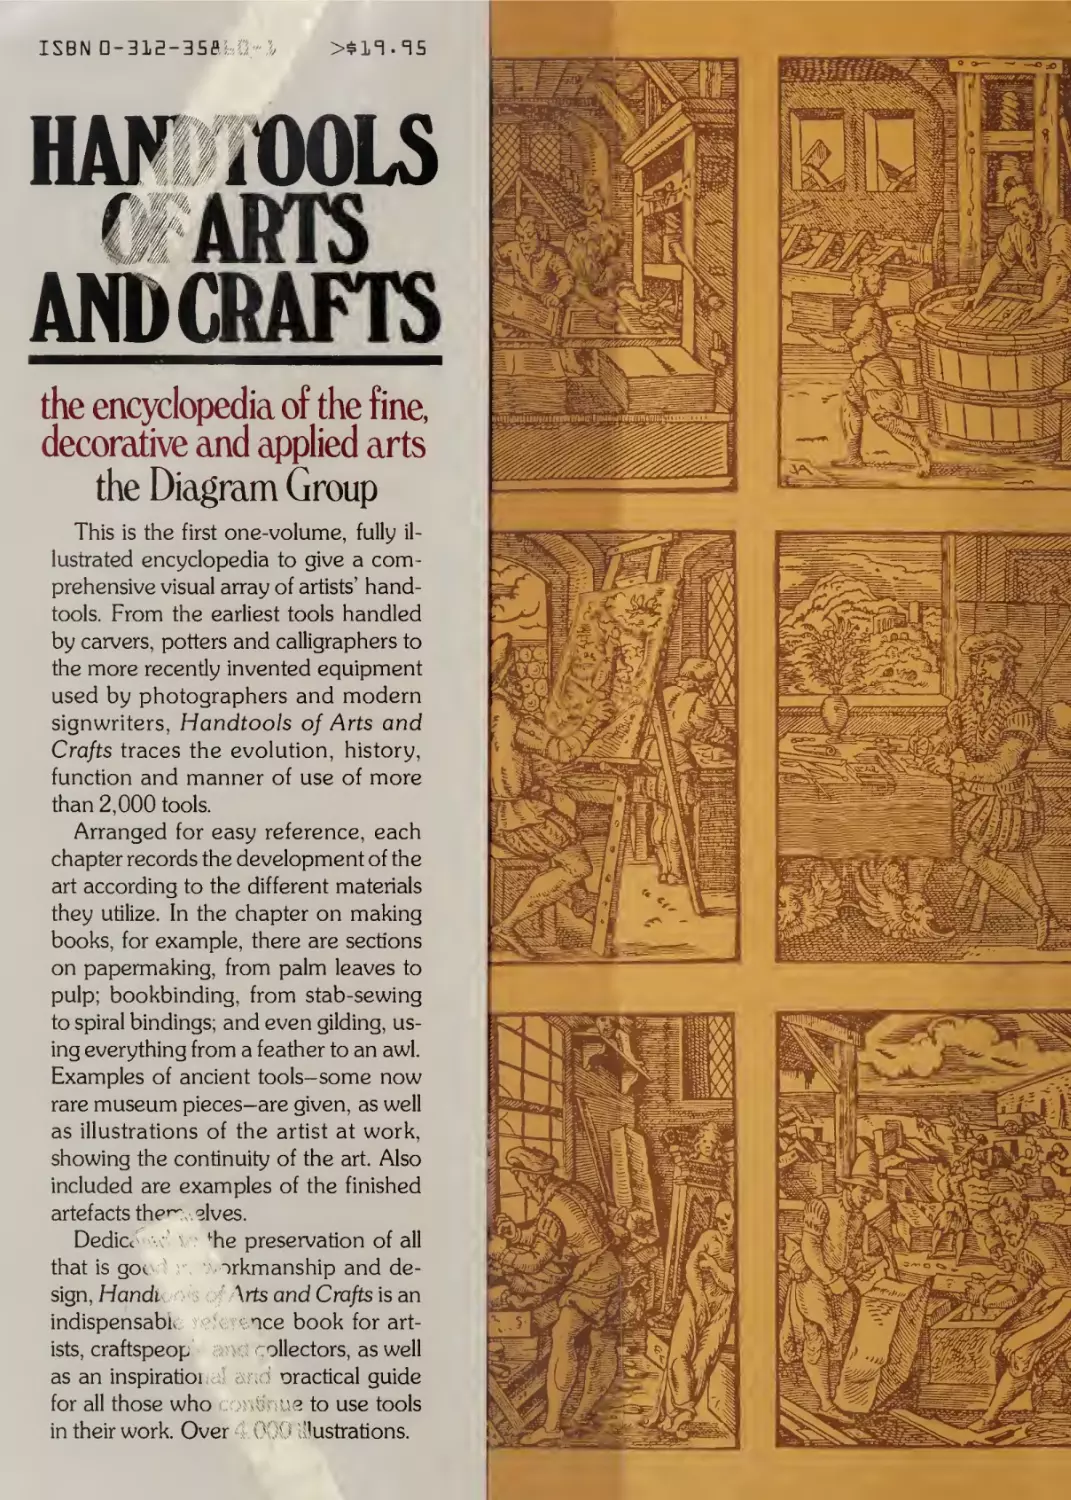
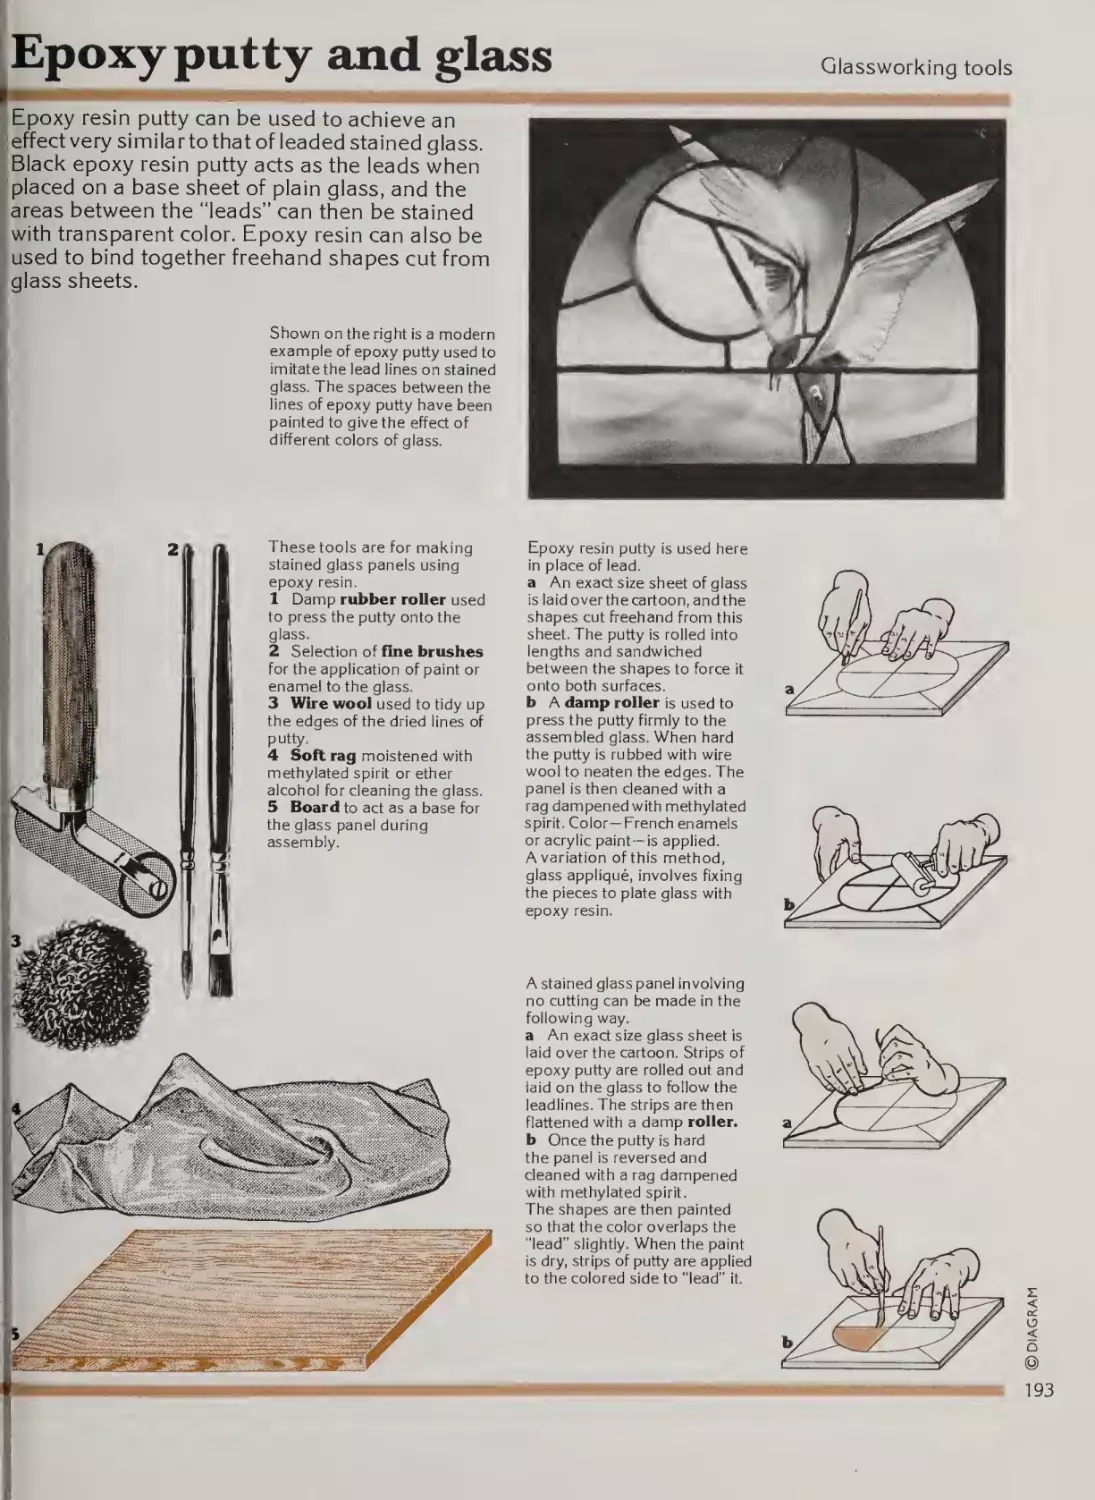
This is the first one-volume, fully il¬
lustrated encyclopedia to give a com¬
prehensive visual array of artists’ handtools. From the earliest tools handled
by carvers, potters and calligraphers to
the more recently invented equipment
used by photographers and modern
signwriters, Handtools of Arts and
Crafts traces the evolution, history,
function and manner of use of more
than 2,000 tools.
Arranged for easy reference, each
chapter records the development of the
art according to the different materials
they utilize. In the chapter on making
books, for example, there are sections
on papermaking, from palm leaves to
pulp; bookbinding, from stab-sewing
to spiral bindings; and even gilding, us¬
ing everything from a feather to an awl.
Examples of ancient tools—some now
rare museum pieces-are given, as well
as illustrations of the artist at work,
showing the continuity of the art. Also
included are examples of the finished
artefacts ther^ elves.
Dedici
^he preservation of all
that is goc '
")rkmanship and de¬
sign, Handle s of Arts and Crafts is an
indispensabk. reference book for art¬
ists, craftspeop arsil ^ .ollectors, as well
as an inspiratioi .a.i and oractical guide
for all those who ci:>r,iiiriue to use tools
in their work. Over 4,(KXf ii'ustrations.
745.028
H
Handtools of arts and crafts
from the
MANTTOVVOC PUCLfC LIBRARY
MANITOWOC PUBLIC LIBRARY
MANITOWOC. WISCONSIN 34220
Digitized by the internet Archive
in 2018 with funding from
Kahle/Austin Foundation
https://archive.0rg/detaiis/handtooisofartscOOOOunse
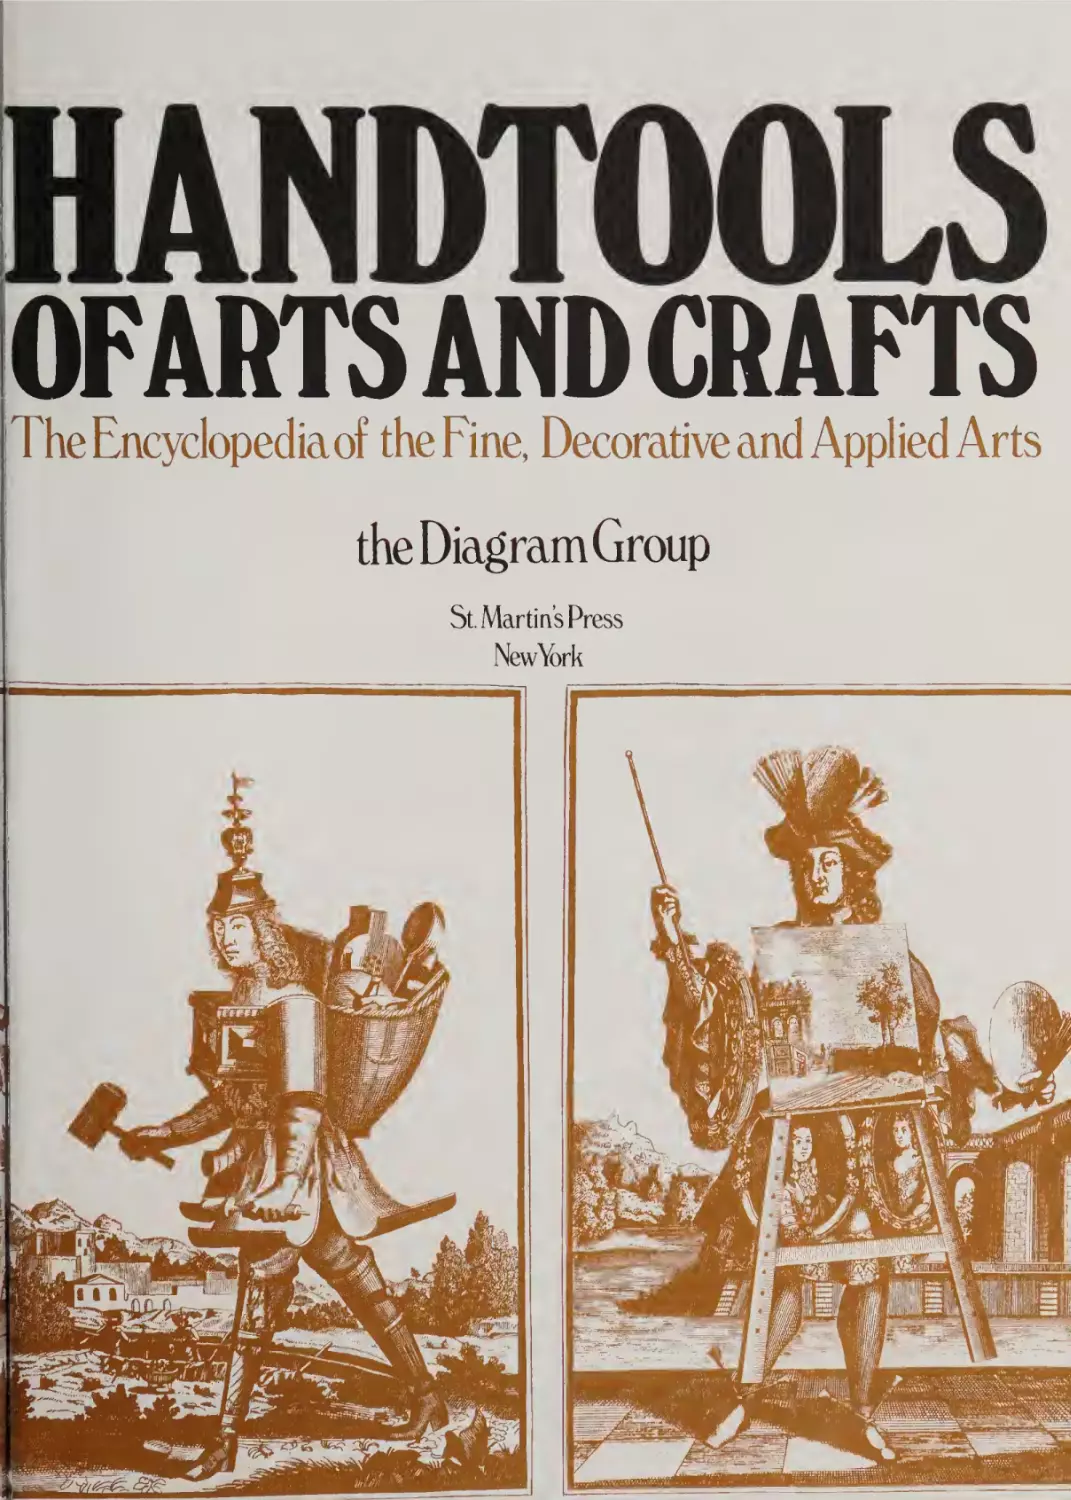
HANiyrOOLS
ofartsandchafts
HANDTOOLS
OFAirrS AND OtAFTS
The Encyclopedia of the Fine, Decorative and Applied Arts
the Diagram Group
St. Martins Press
New¥>rk
T.
.j.
Bk
l^l]
H
Managing editor
Editor
Copy editor
Researchers
Indexer
Art director
Art editor
Artists
Art assistants
The Diagram Group
Copyright ©1981 by Diagram
Visual Information Ltd.
Ruth Midgley
For information, write:
St. Martin's Press,
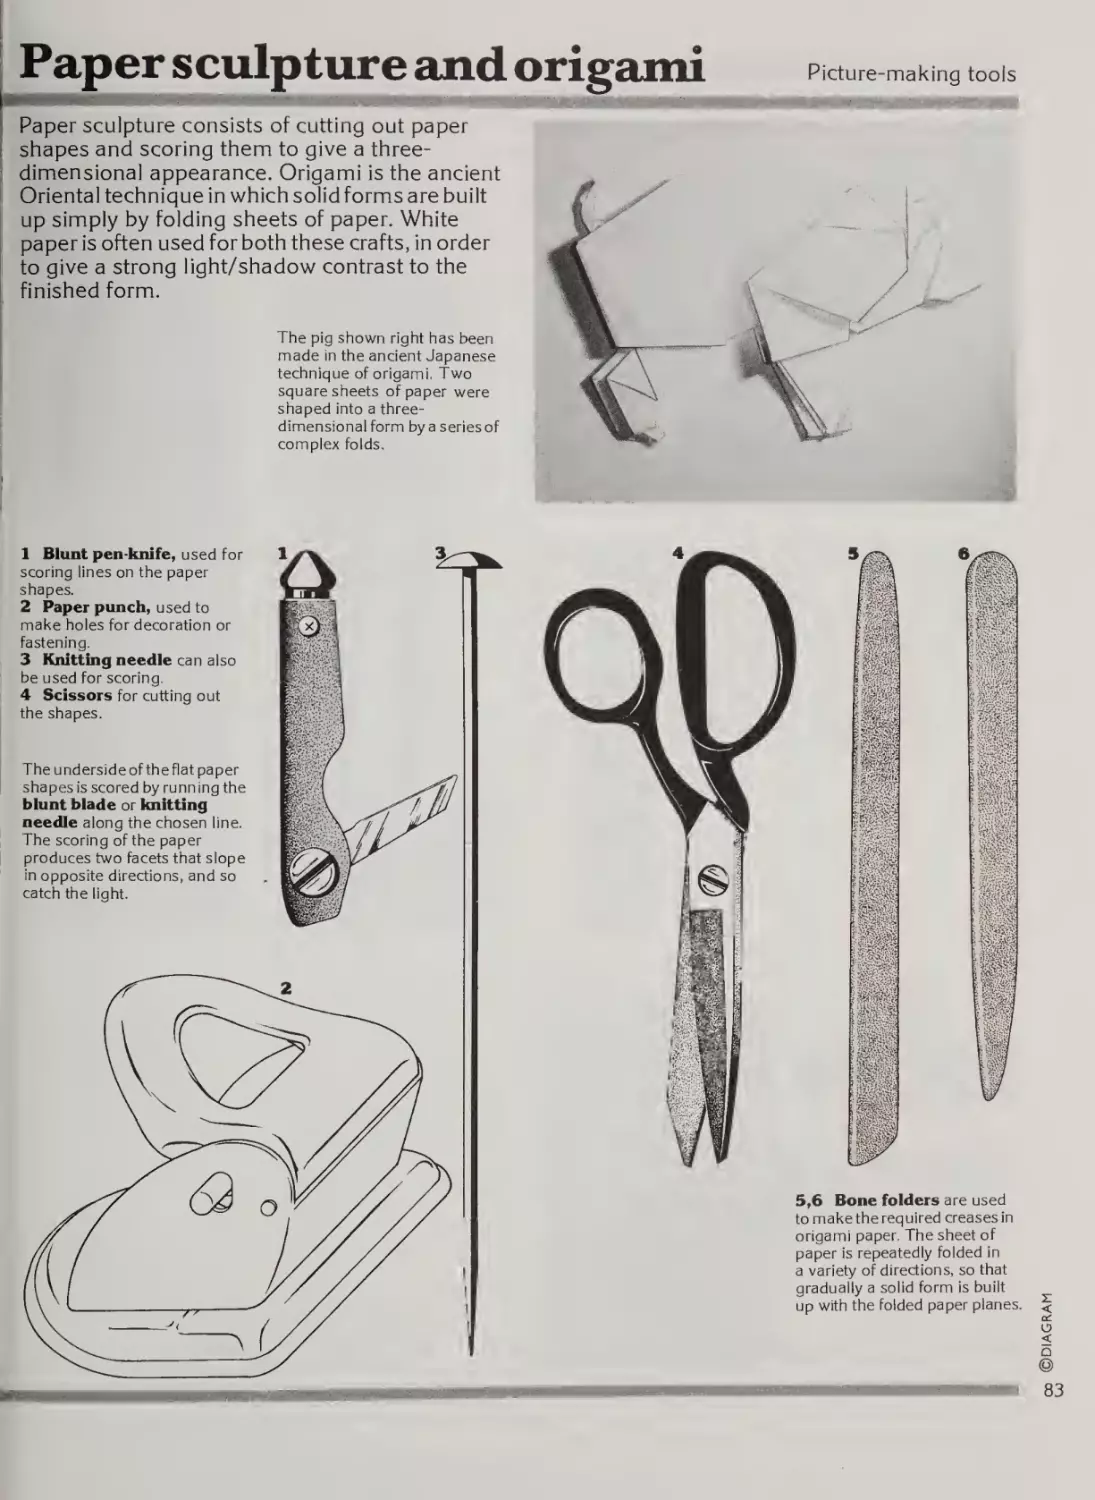
175 Fifth Avenue,
New York, N.Y. 10010
Manufactured in the
United States of America
Gail Lawther
Maureen Cartwright
Hope Cohen, Enid Moore,
Linda Proud,, Marita Westberg
Mary Ling
Kathleen McDougall
Mark Evans
Stephen Clark, Brian Hewson,
Richard Hummerstone, Susan Kinsey,
Janos Marffy, Graham Rosewarne
Richard Colville, Neil Connell,
Paul Fowke, Alan Harris, Richard Prideaux,
Andrew Riley, Ray Stevens, John Woodcock
All rights reserved. No part of
this publication may be repro¬
duced, stored in a retrieval sys¬
tem, or transmitted in any form
by photocopying, recording or
otherwise, without prior permis¬
sion of the publishers.
Foreword
The visitor to Florence, Pompeii, Cairo, Mexico City or any of the art capitals
of the world cannot but be impressed by the buildings, sculptures,
paintings, furnishings and objets d’art which bear testament to the skills
of earlier artists. Television programs and museum exhibitions present
artefacts from every culture and age to an ever widening audience.
Unfortunately the artist of today is becoming the rare custodian of
vanishing human skills. 20th century technology is replacing individual
artistry with repetitive and mechanical techniques. We are losing the
knowledge of how to make paper, carve stone, weave fabric, or even use
a pen and ink to produce clear, beautiful letterforms.
As each new labor-saving device is introduced, the existence of traditional
tools is threatened. Unlike the works of art, the tools that created them
are seldom preserved for their intrinsic value. All too often, as the need
for the tool is reduced, the ability to use it is lost, until finally it becomes
rare and mysterious—its original function is no longer known. So although
the appreciation of art objects is expanding among the public, how they
were—and are —made is becoming a secret known only by a few. How
many people now would know how to make jewelry like that in the tomb
of Tutankhamen, mix colors like those of the Mona Lisa, inlay pearl shell
in tabletops, bind a book, or even make the simplest thrown pot?
The editors of HANDTOOLS have gathered together examples of the
tools for over 150 specialized fine and applied arts, involving the use of
over 2000 tools. Each skill is illustrated by an example of the art form, or
by a documentary illustration of the artist at work. Where possible,
examples of early tools, now rare museum pieces, are placed alongside
present-day tools to show development and continuity within artistic
activities. The implements are presented in the order in which they are
used by the artist, with step-by-step diagrams of the tools in use.
Working from actual artefacts, manufacturers’ catalogs, museum exhibits
and historical documents, it has been necessary for the editors to revive
one of the basic skills of the artist: the ability to draw objects accurately
and in detail. They hope that this study of handtools will help stimulate
and renew general interest in this fascinating subject, and in this way
further extend the appreciation of all the fine and applied arts.
Contents
Chapter 1
Writing and d rawing
10
12
13
14
17
18
20
22
26
Introduction
Writing on bone and stone
Writing on clay and wax
Development of the pen
Modem Western calligraphy
Modem pens
Pencils, chalks, crayons
Technical drawing
Oriental calligraphy
Chapter 2
Printing
28
30
32
33
34
36
38
39
40
42
43
44
46
48
Introduction
Relief printing
Lino cuts and wood engraving
Woodcuts
Oriental woodcuts
Printing type
Intaglio printing
Engraving
Etching
Inking and correcting intaglio plates
Marbling
Lithography
Silkscreen
Photography
Chapter 3
Making books
52
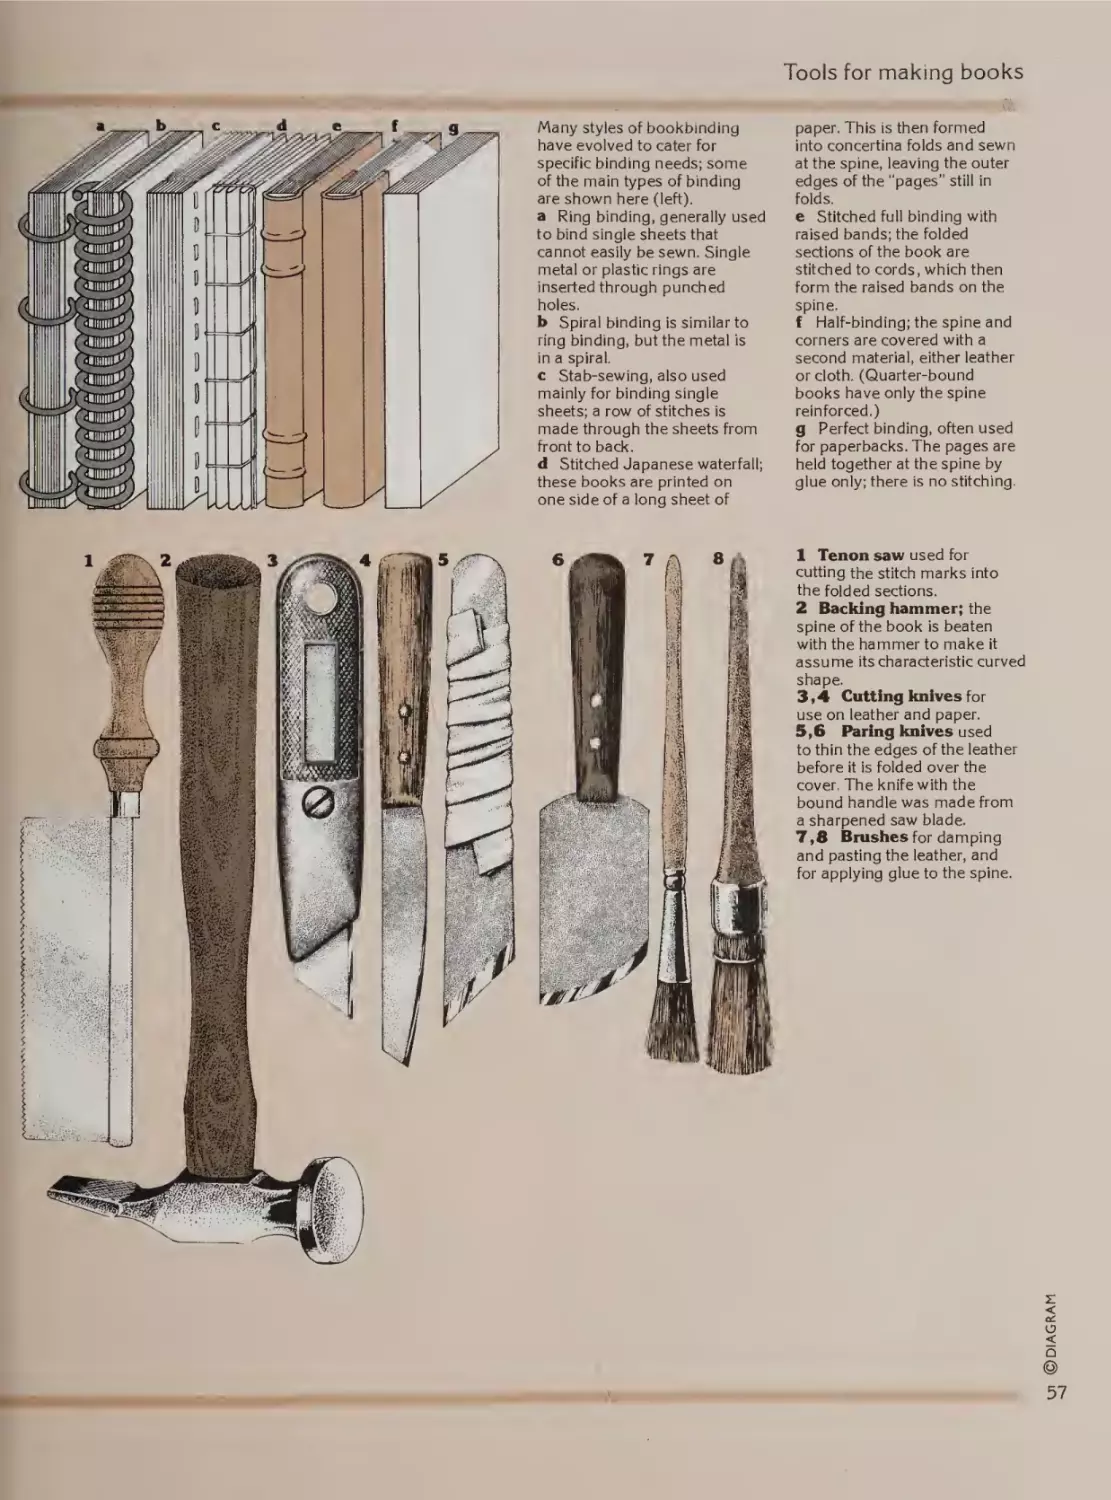
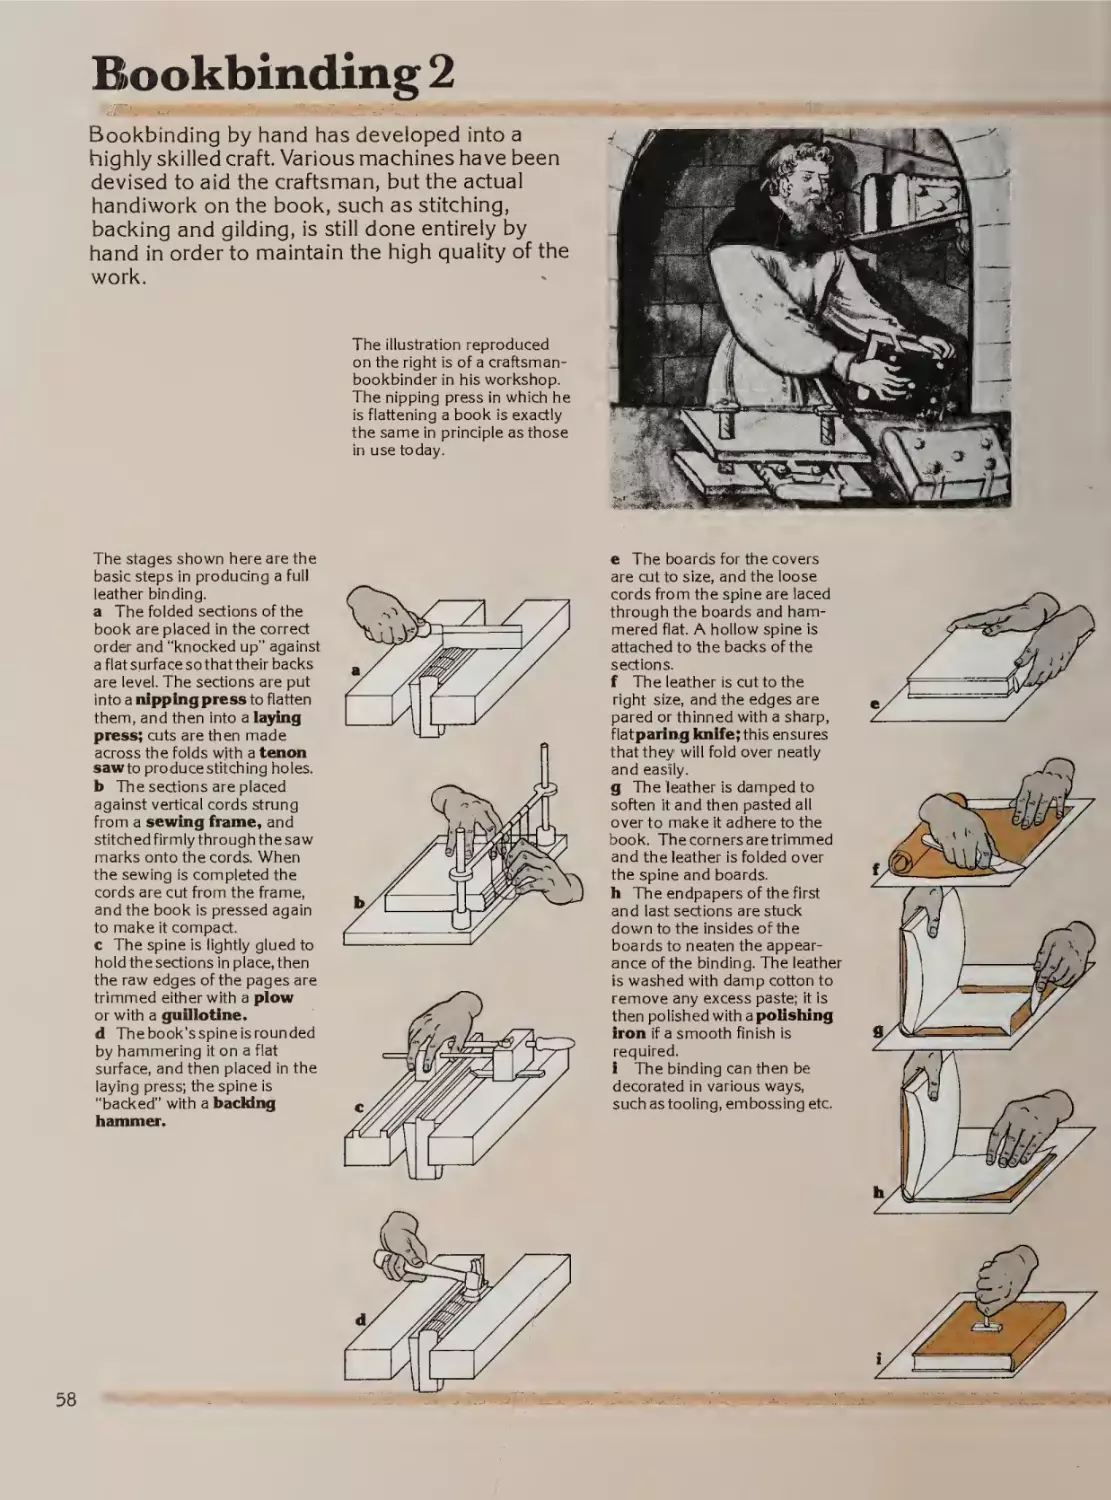
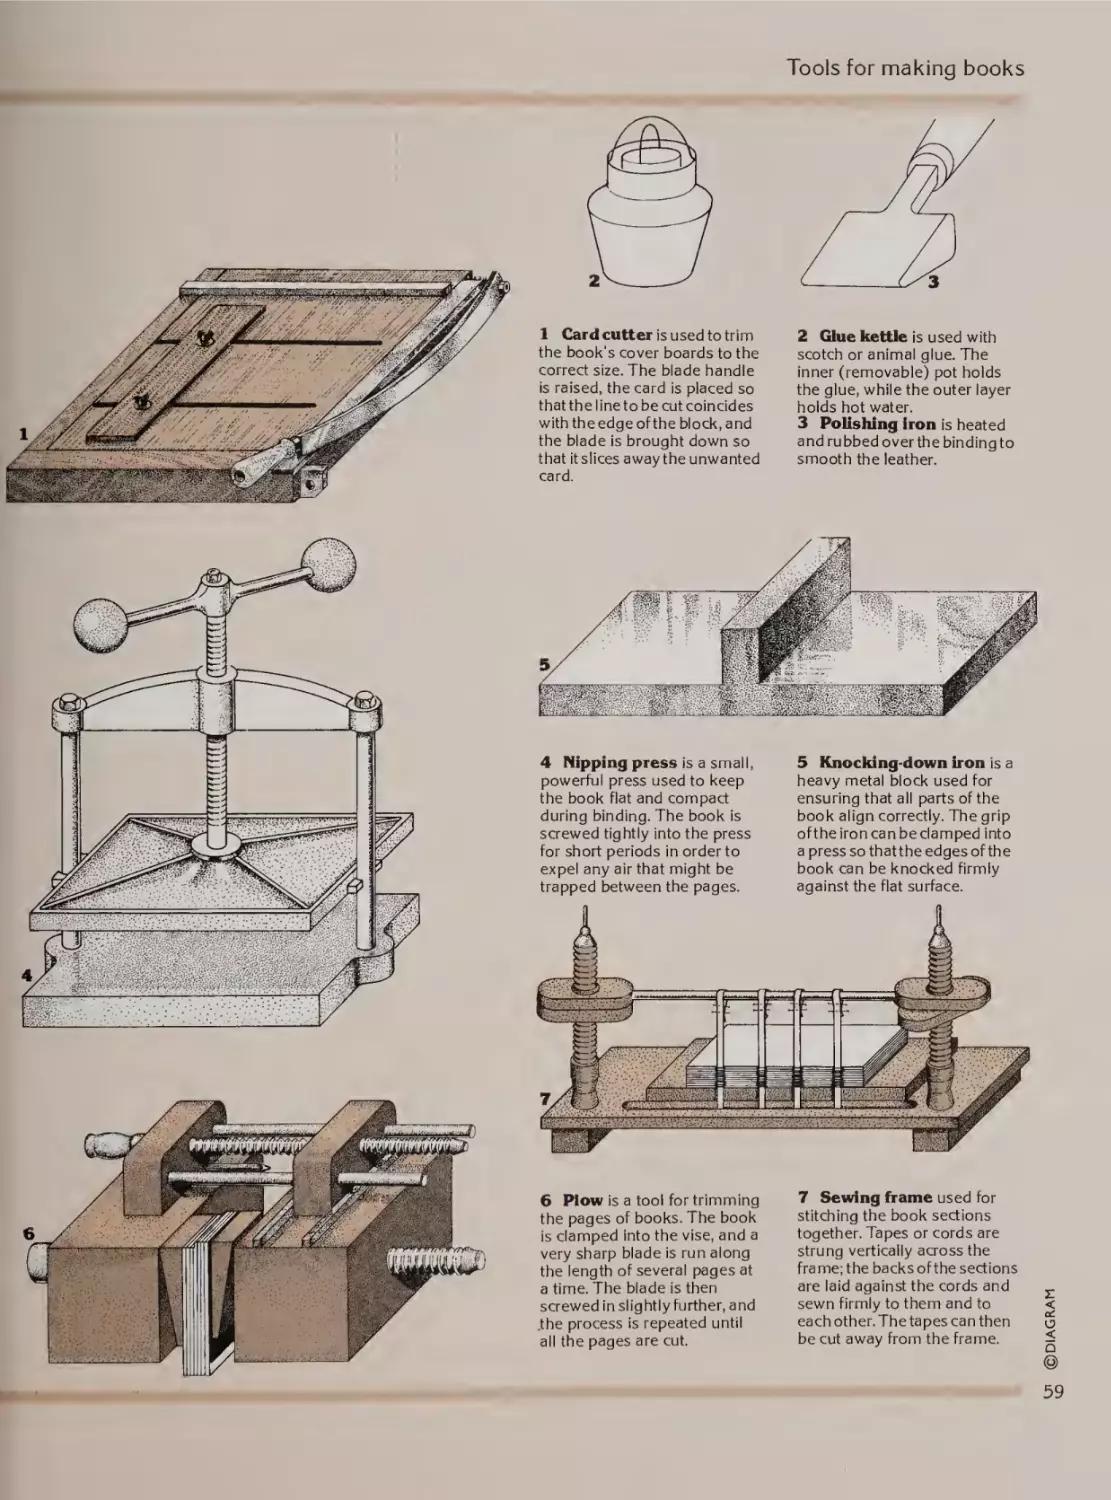
54
56
60
Introduction
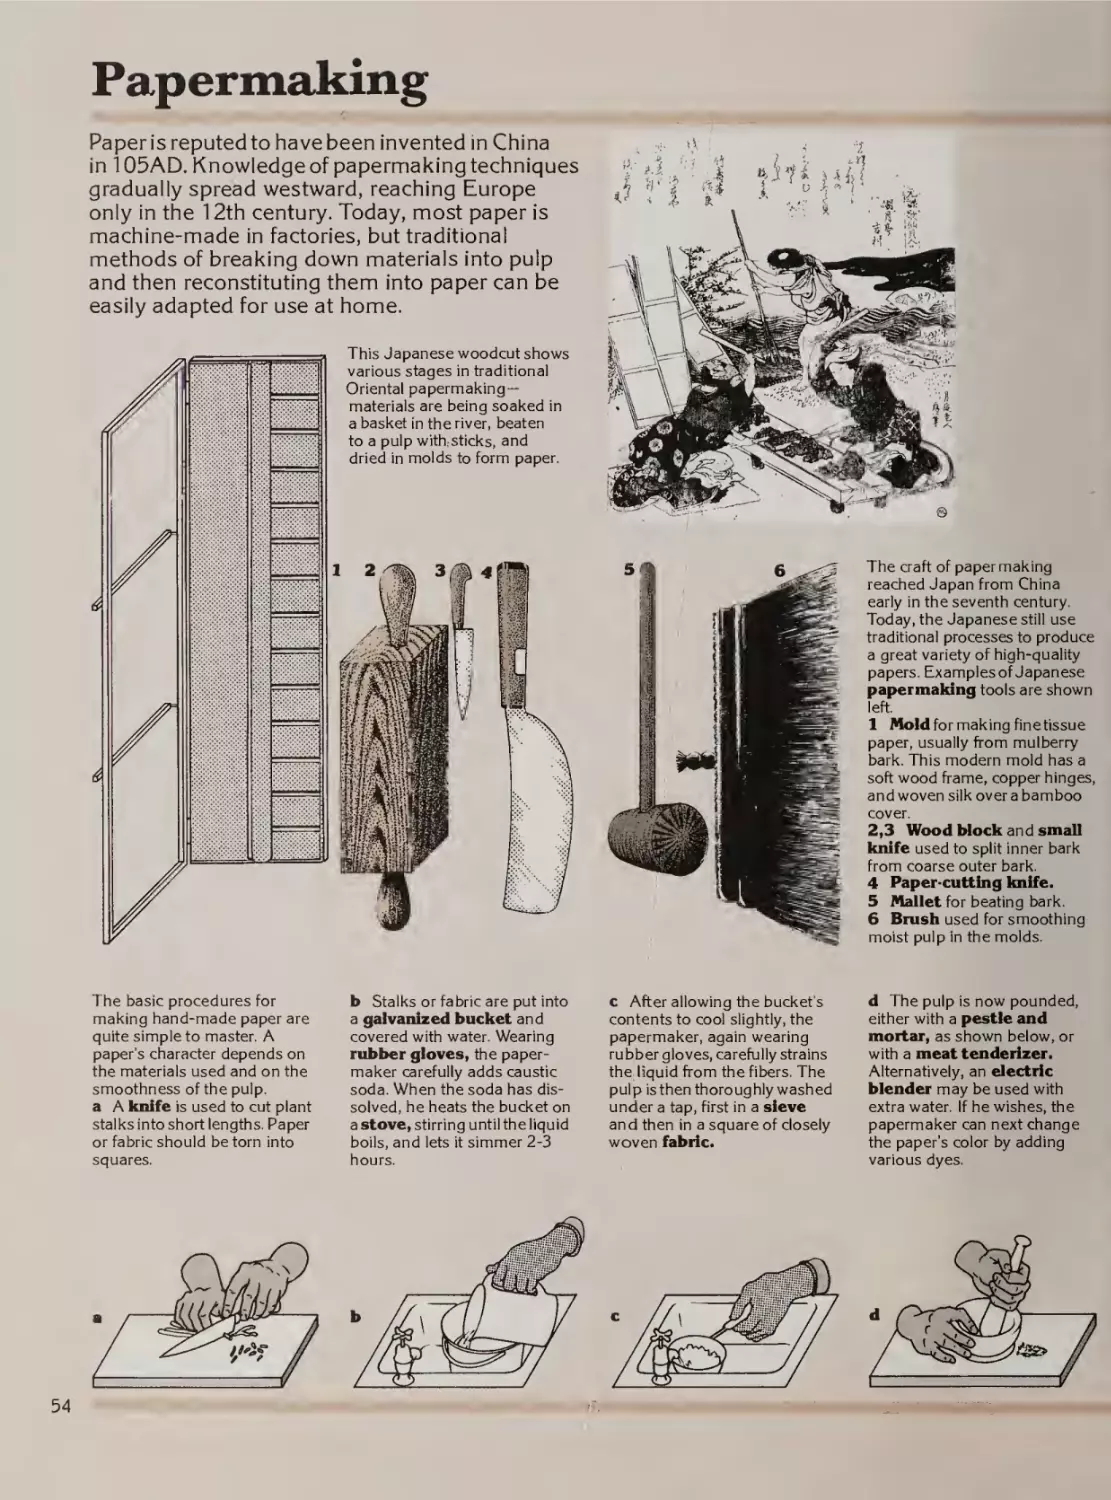
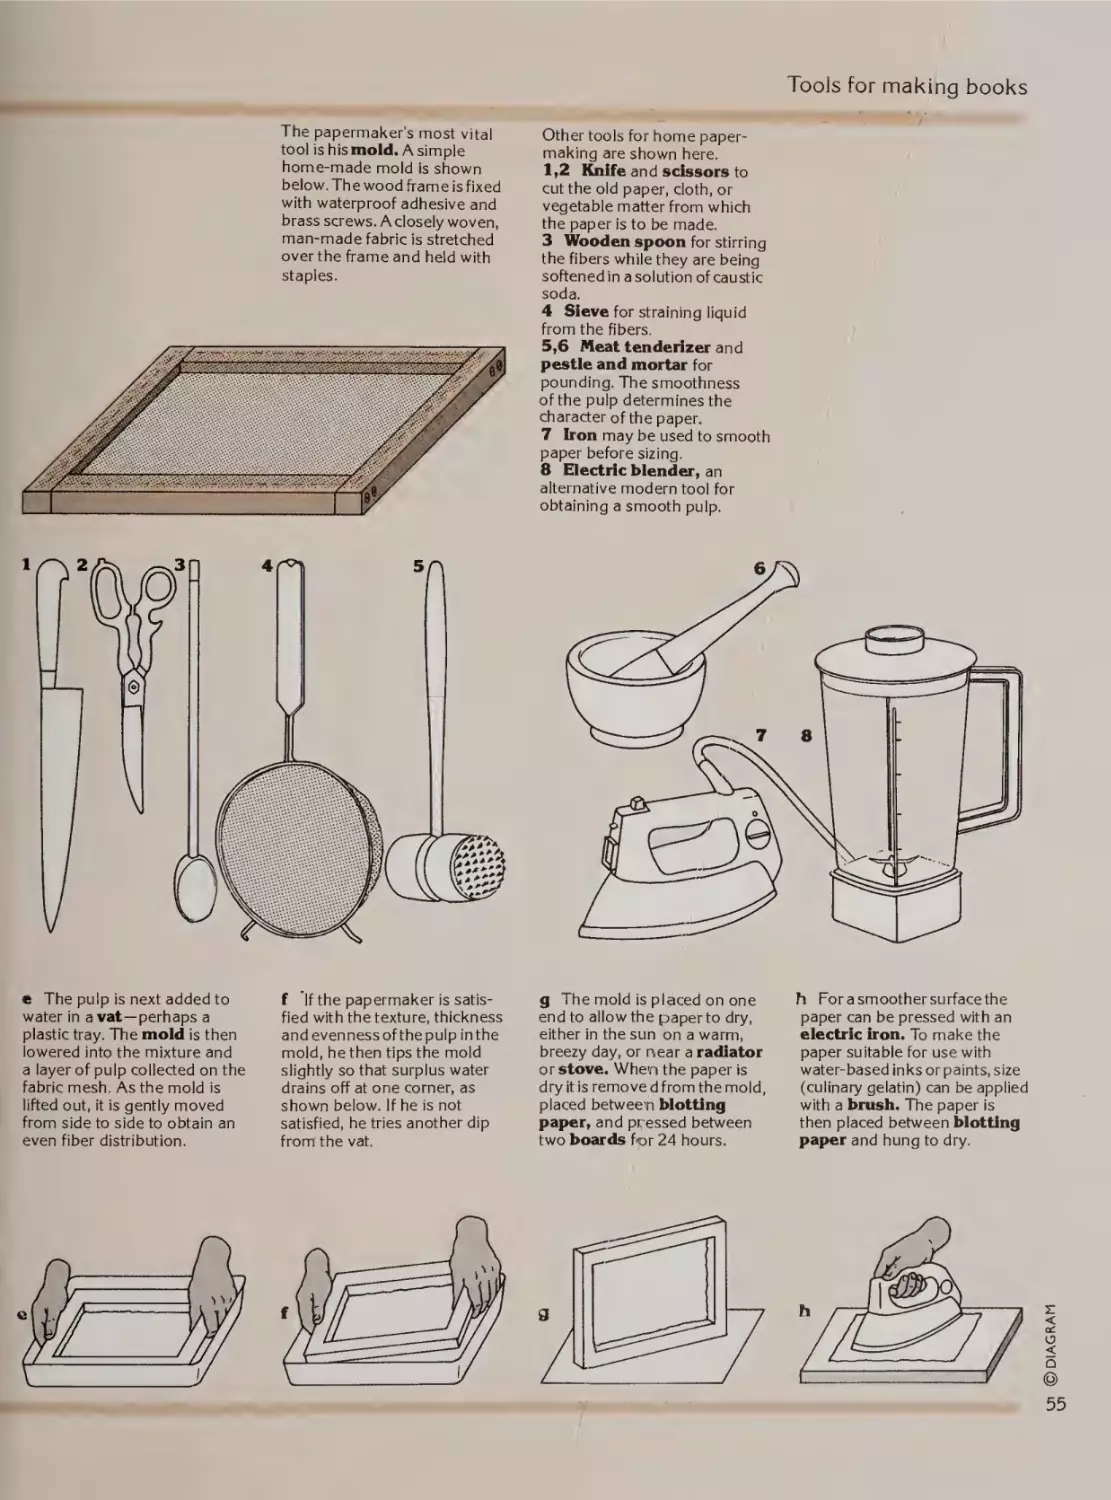
Papermaking
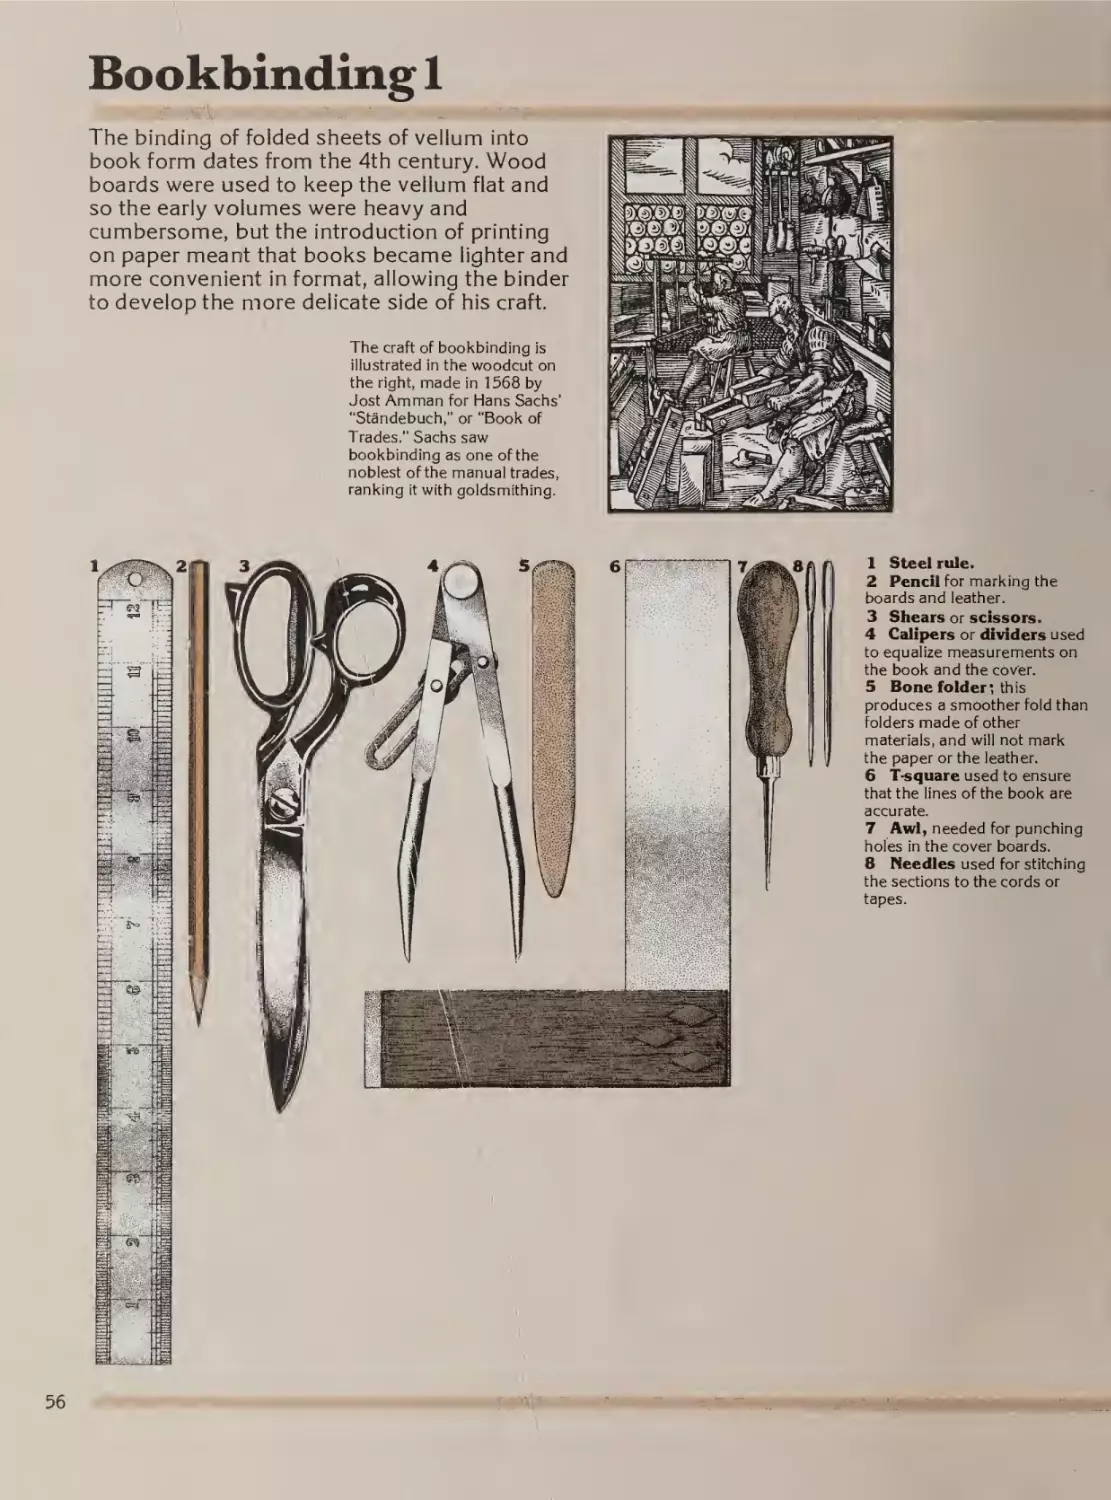
Bookbinding
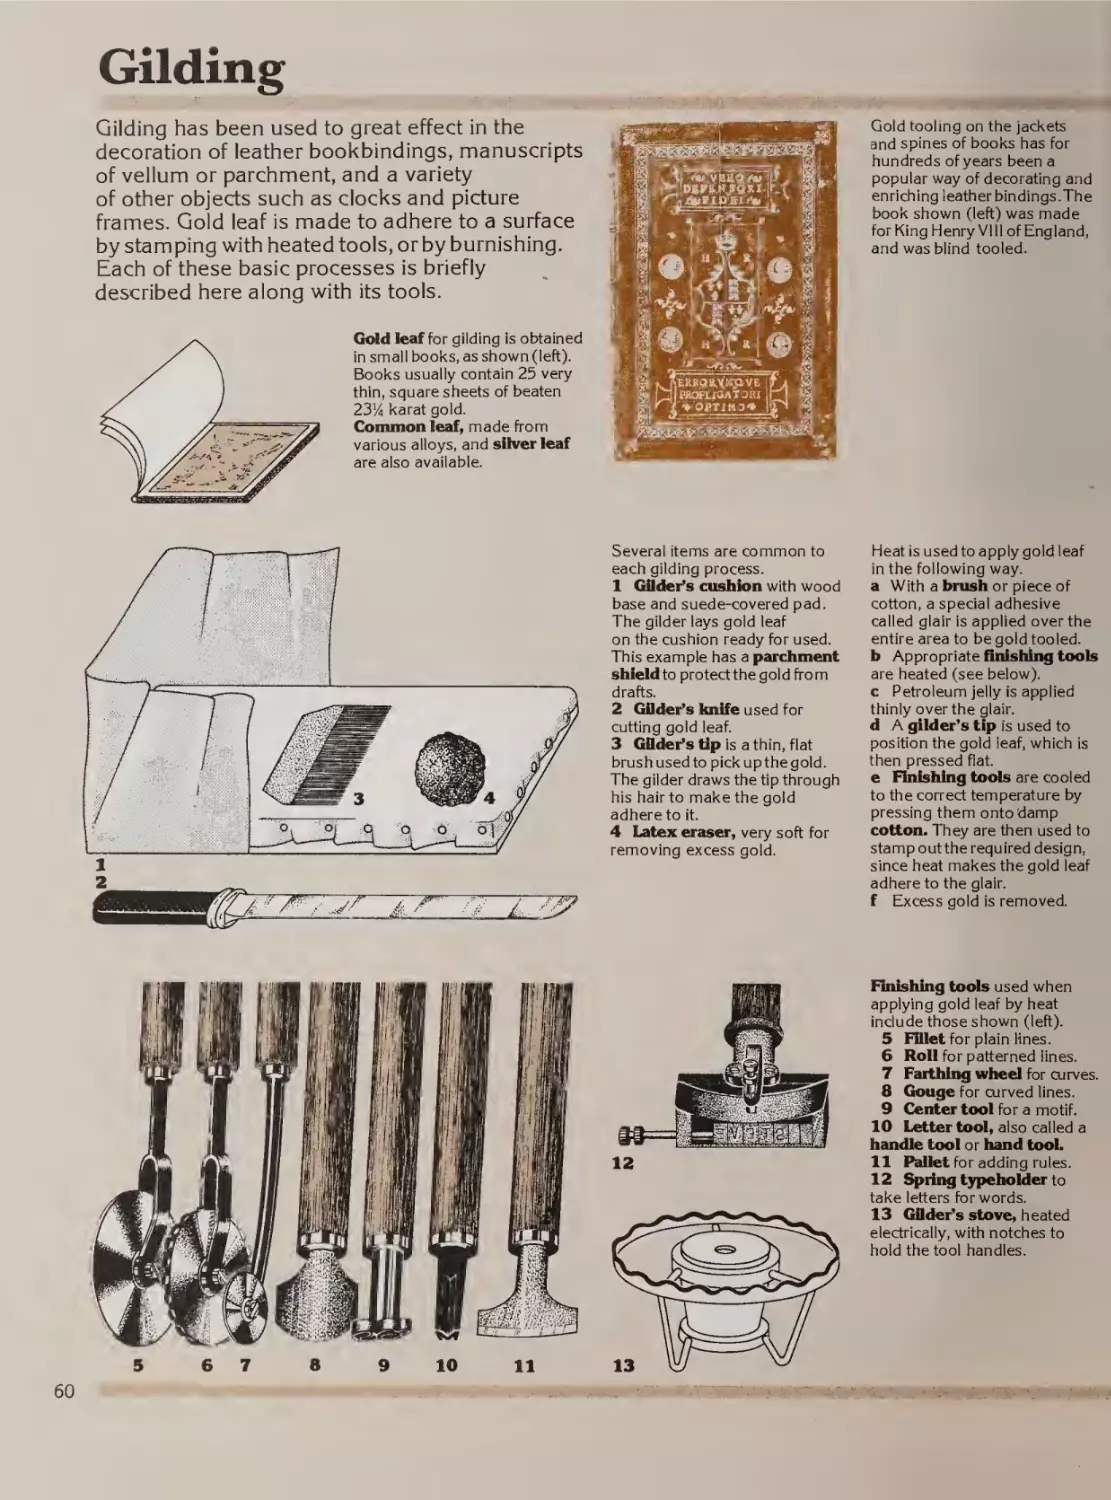
Gilding
Chapter 4
Painting
62
64
65
66
68
69
70
71
72
73
Introduction
Watercolor
Fresco
Oil painting
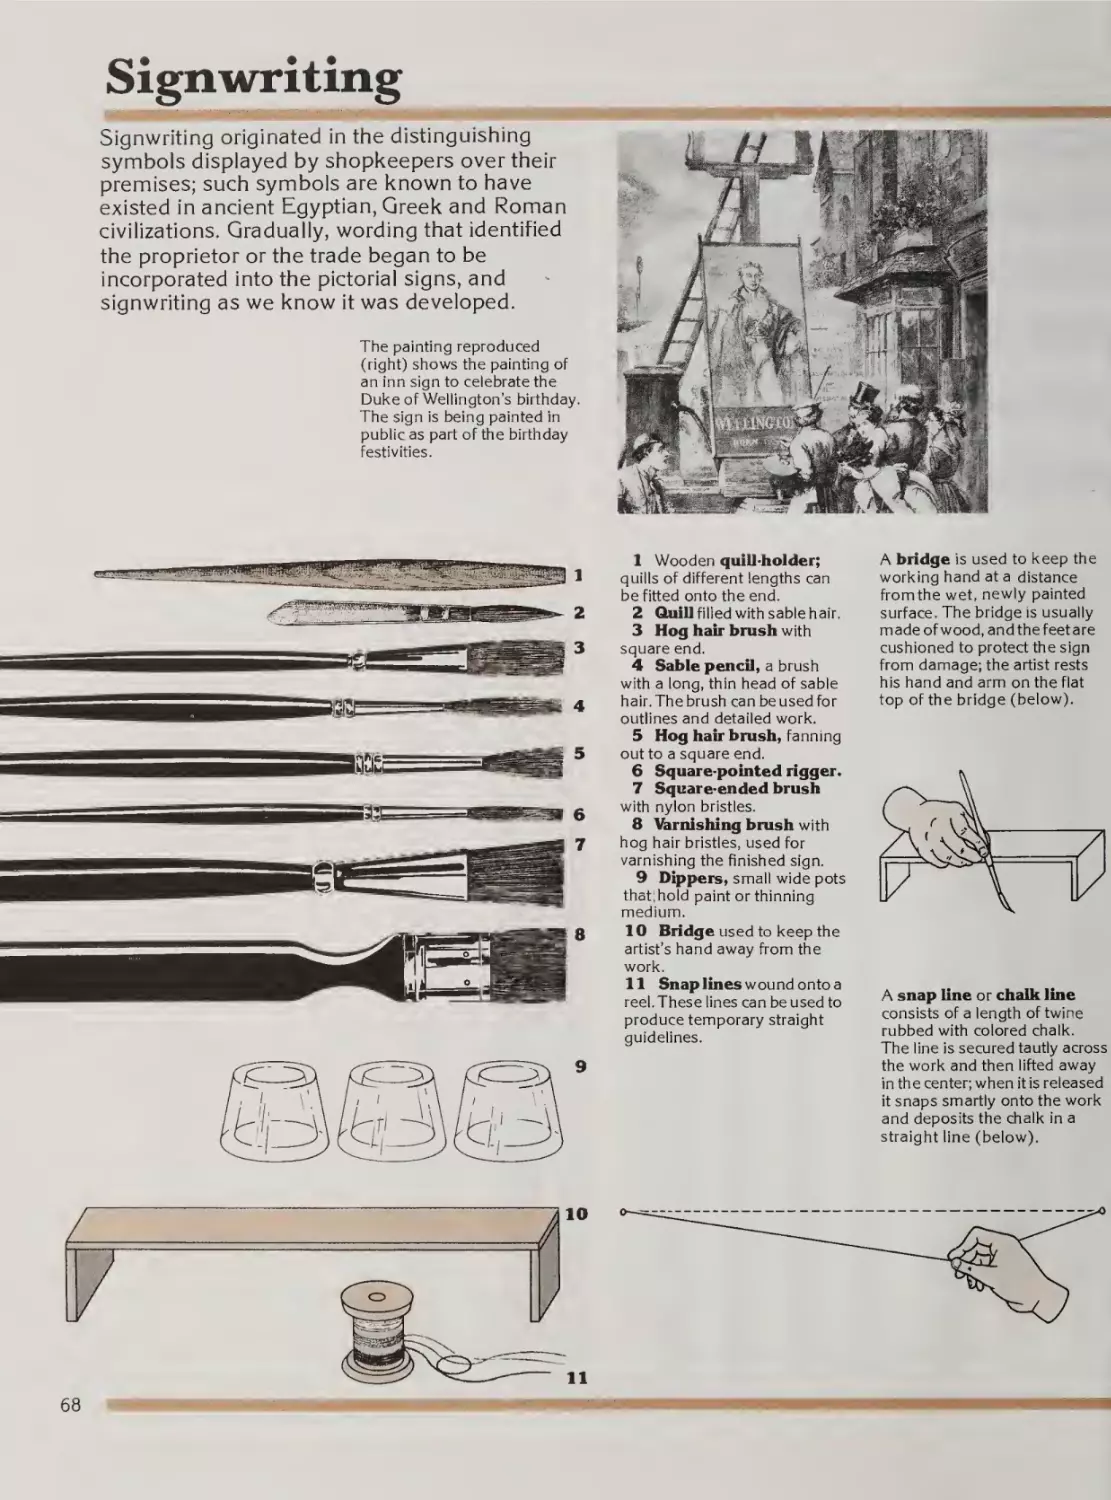
Signwriting
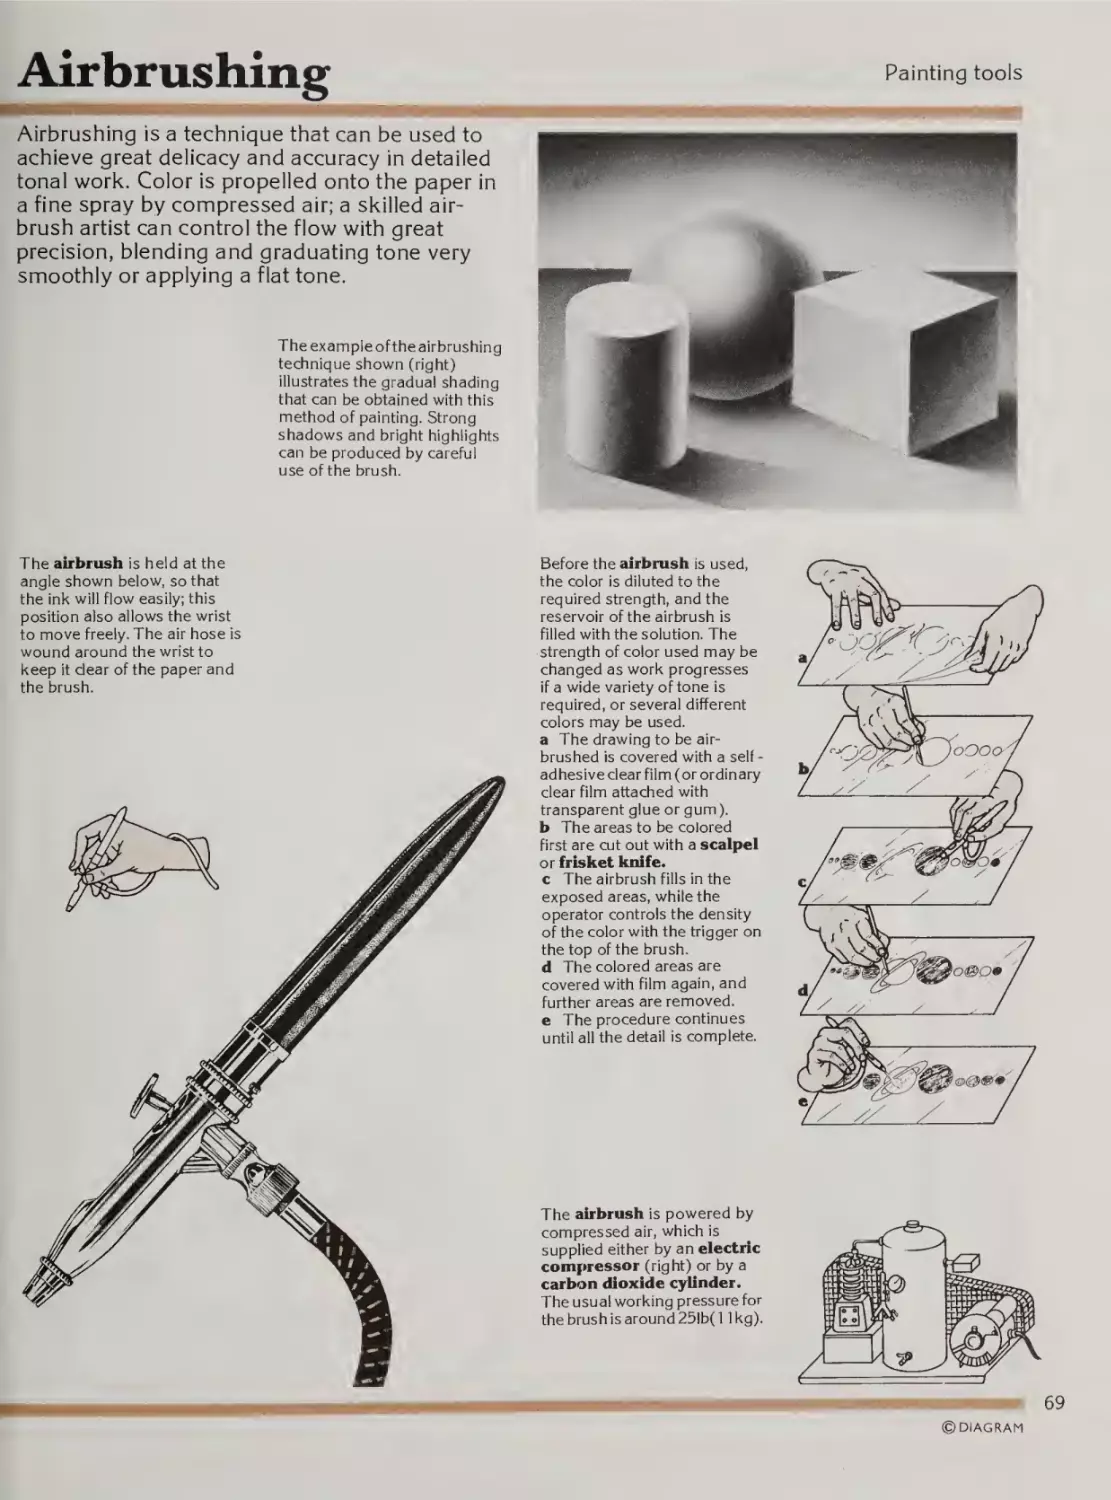
Airbrushing
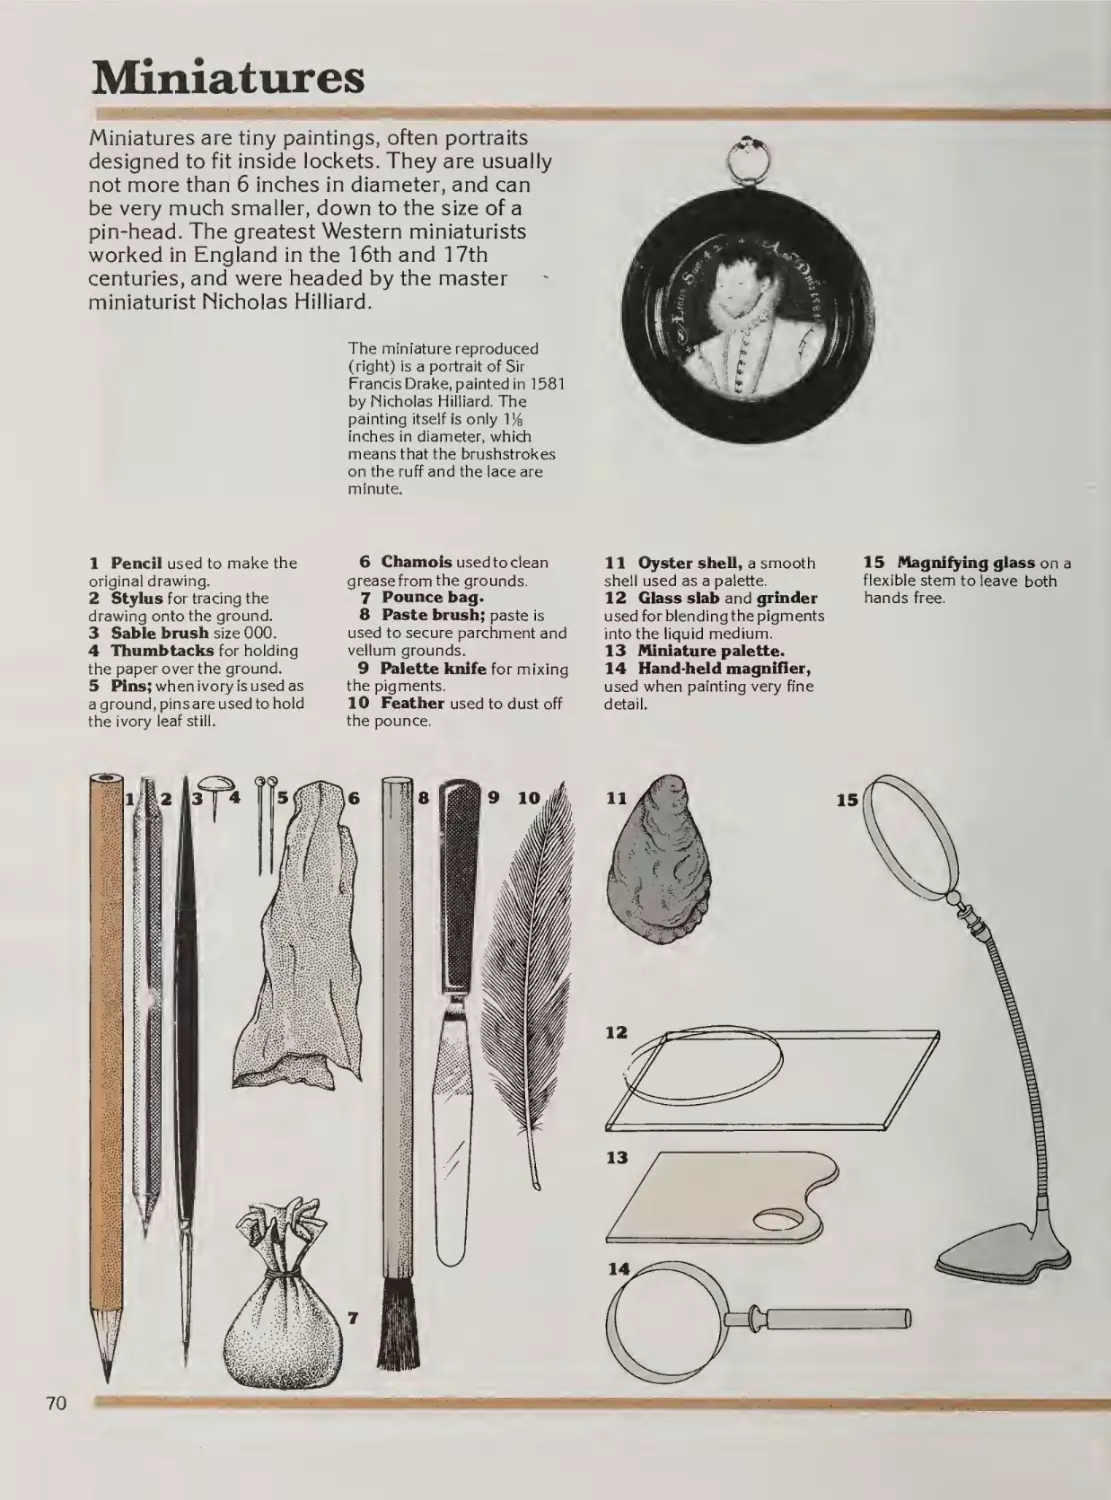
Miniatures
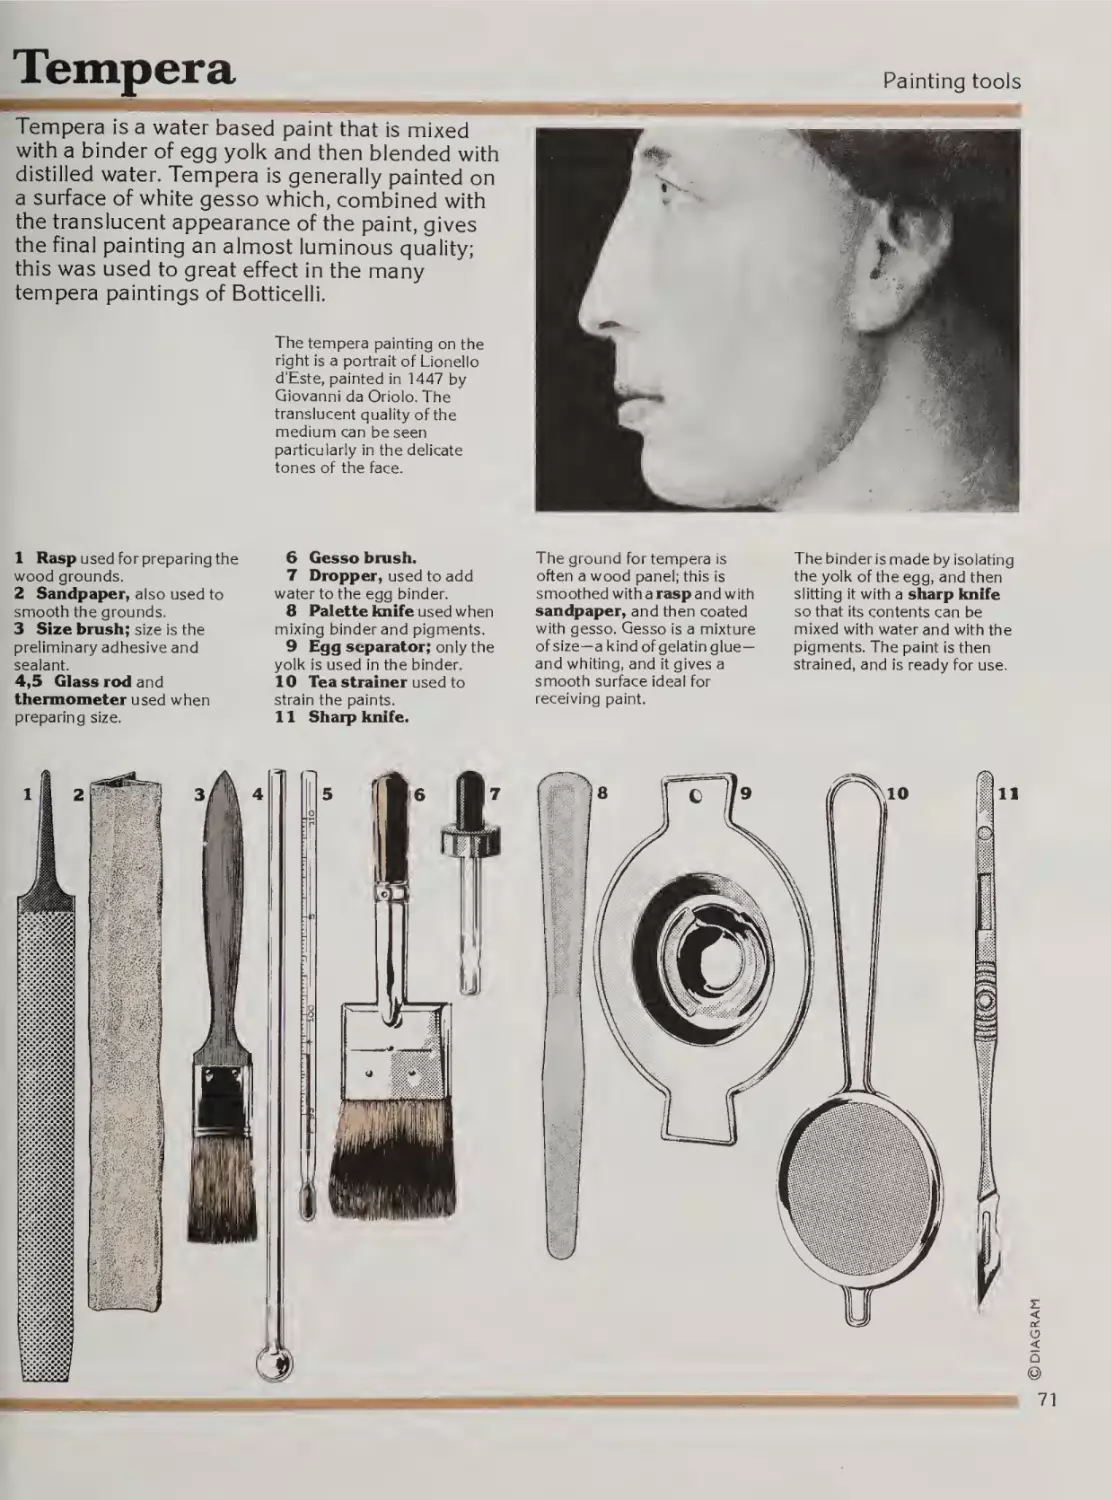
Tempera
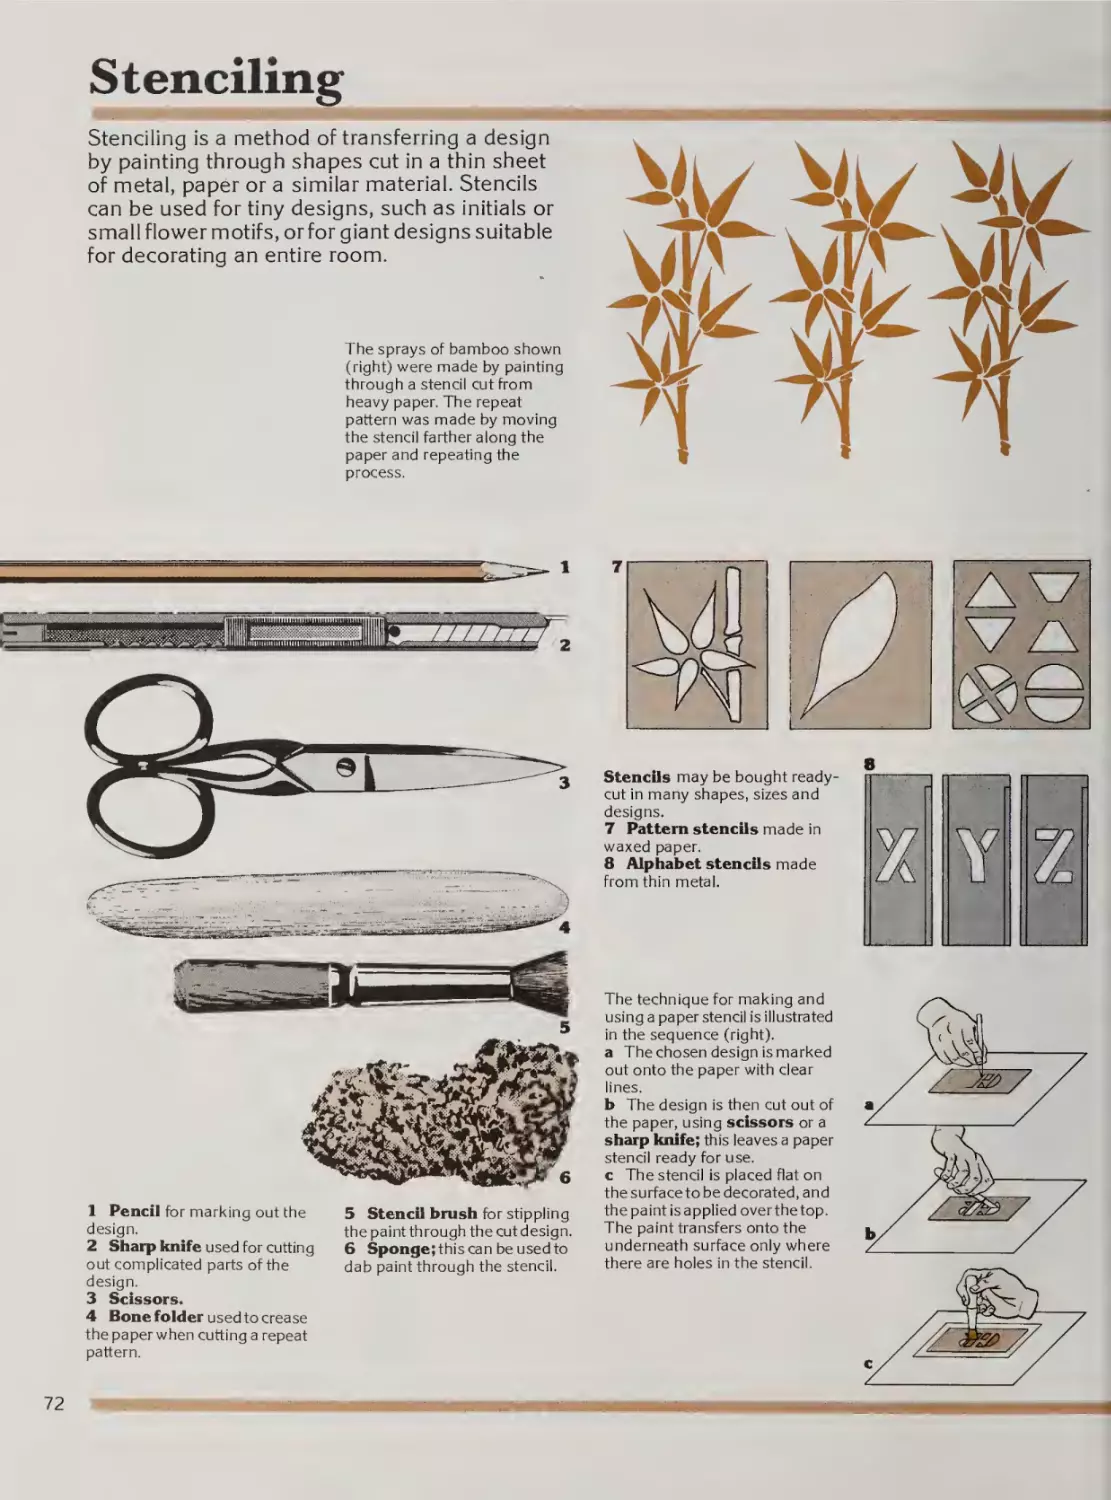
Stenciling
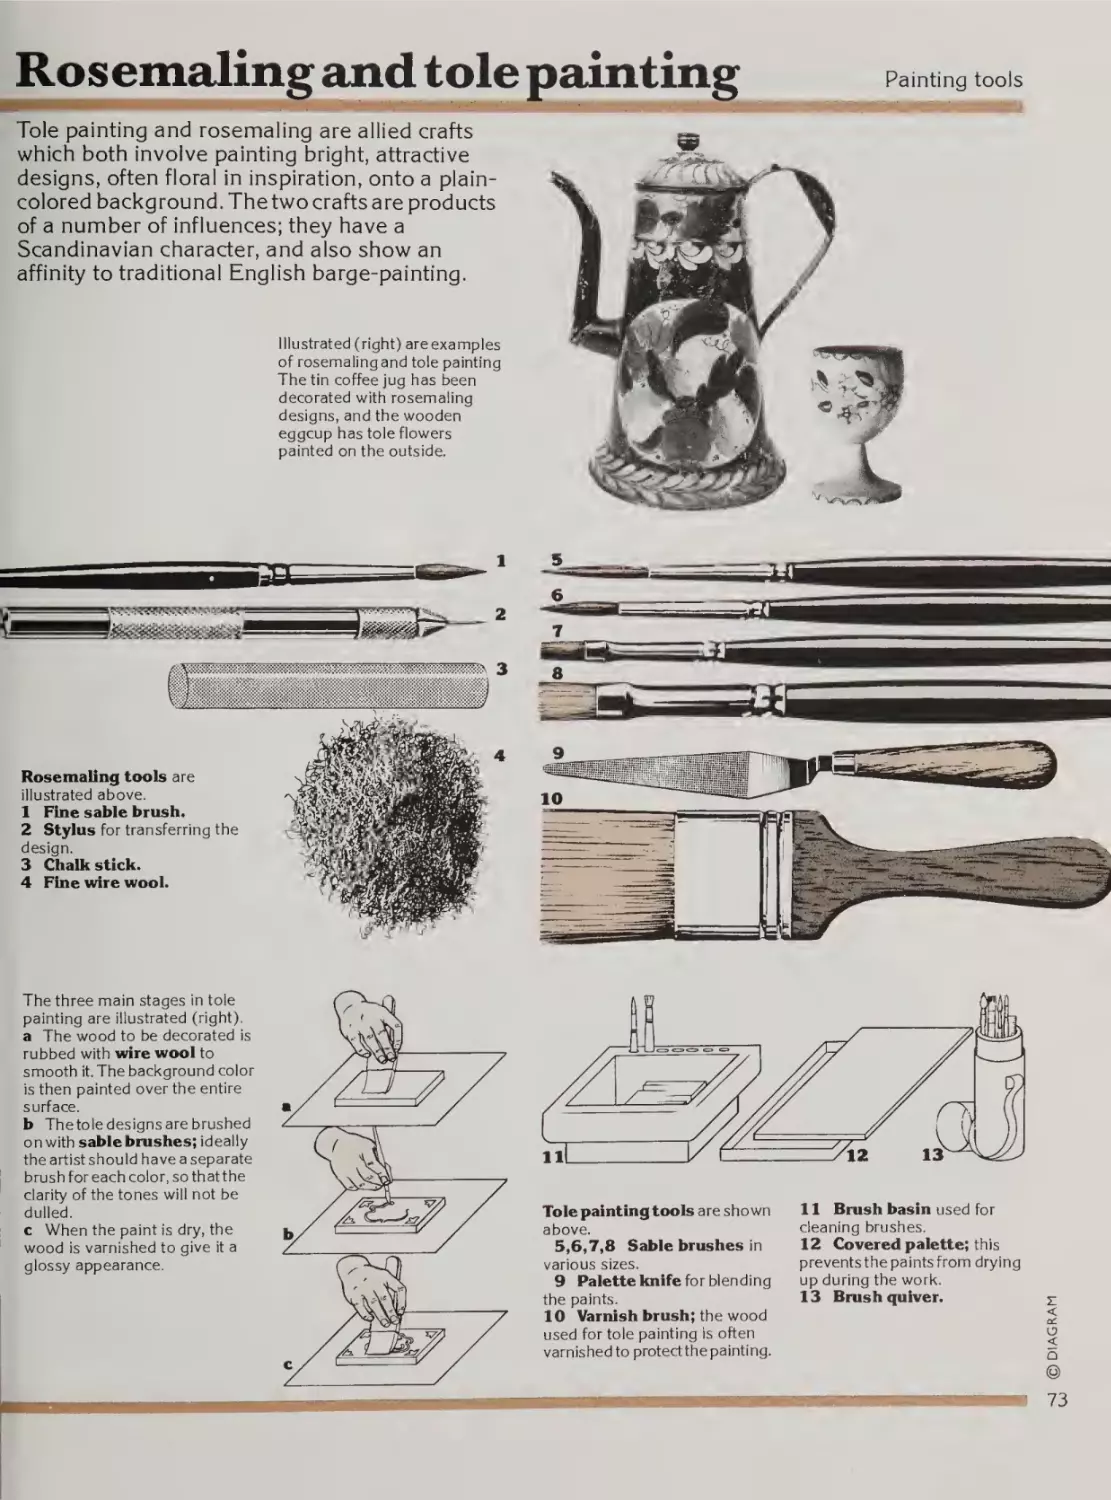
Rosemaling and tole painting
Chapter 5
Pictures without paint
74
76
77
78
79
80
81
82
83
84
85
Introduction
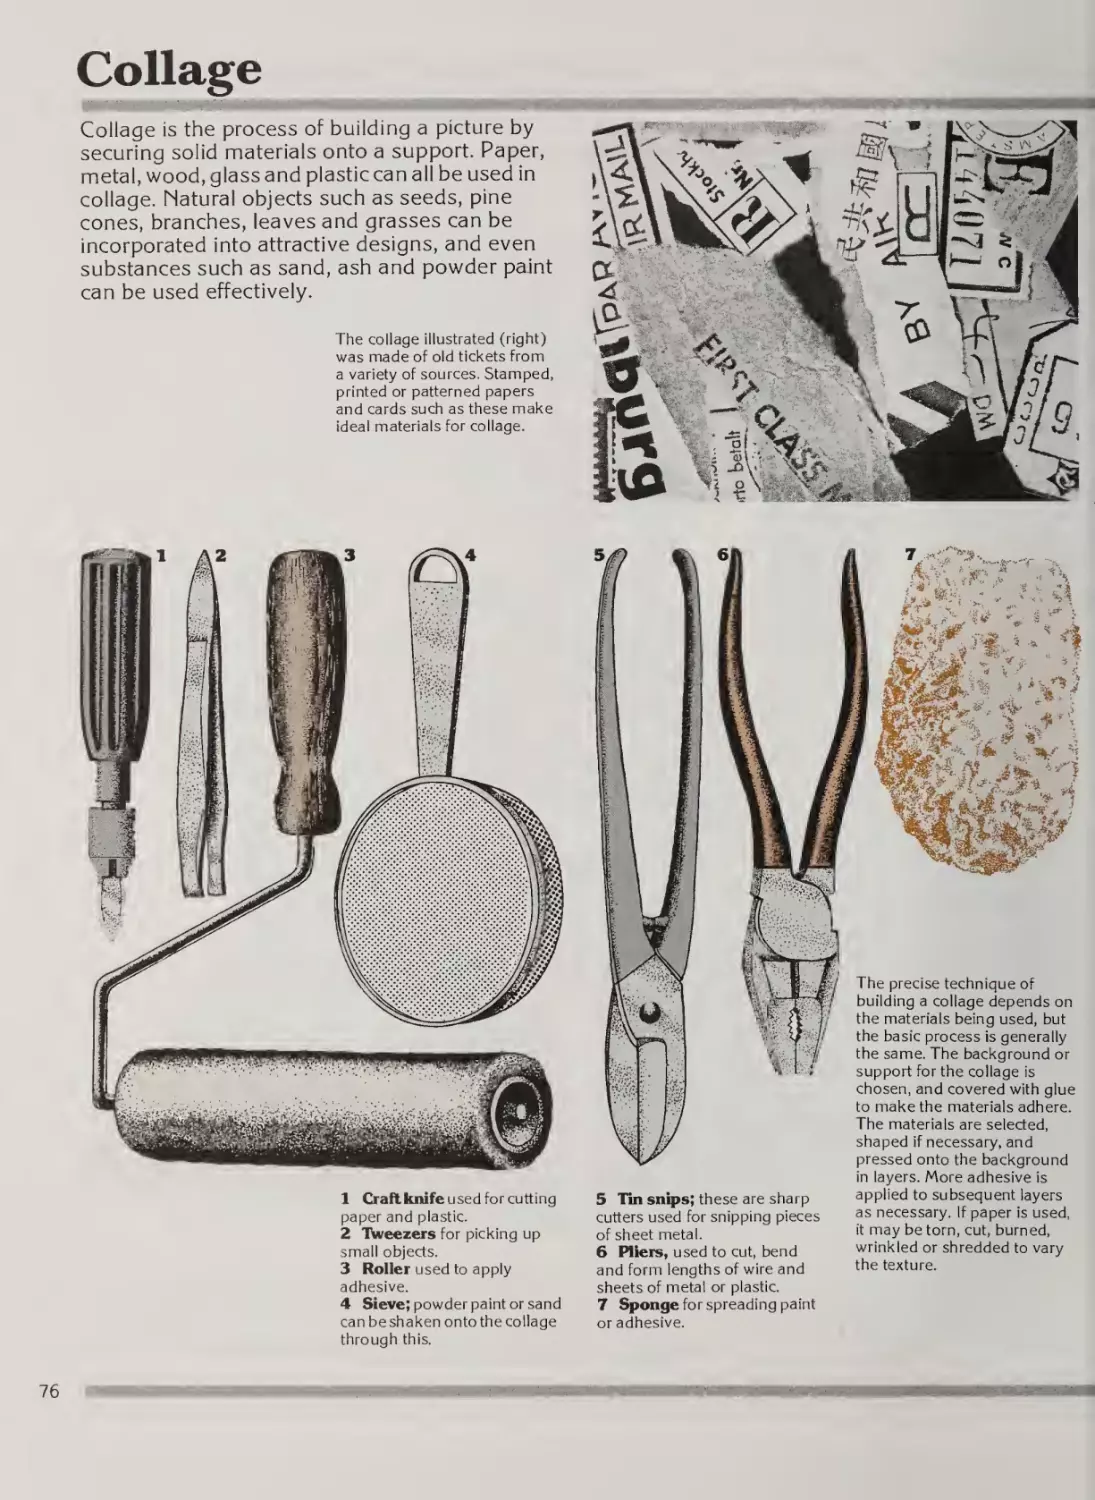
Collage
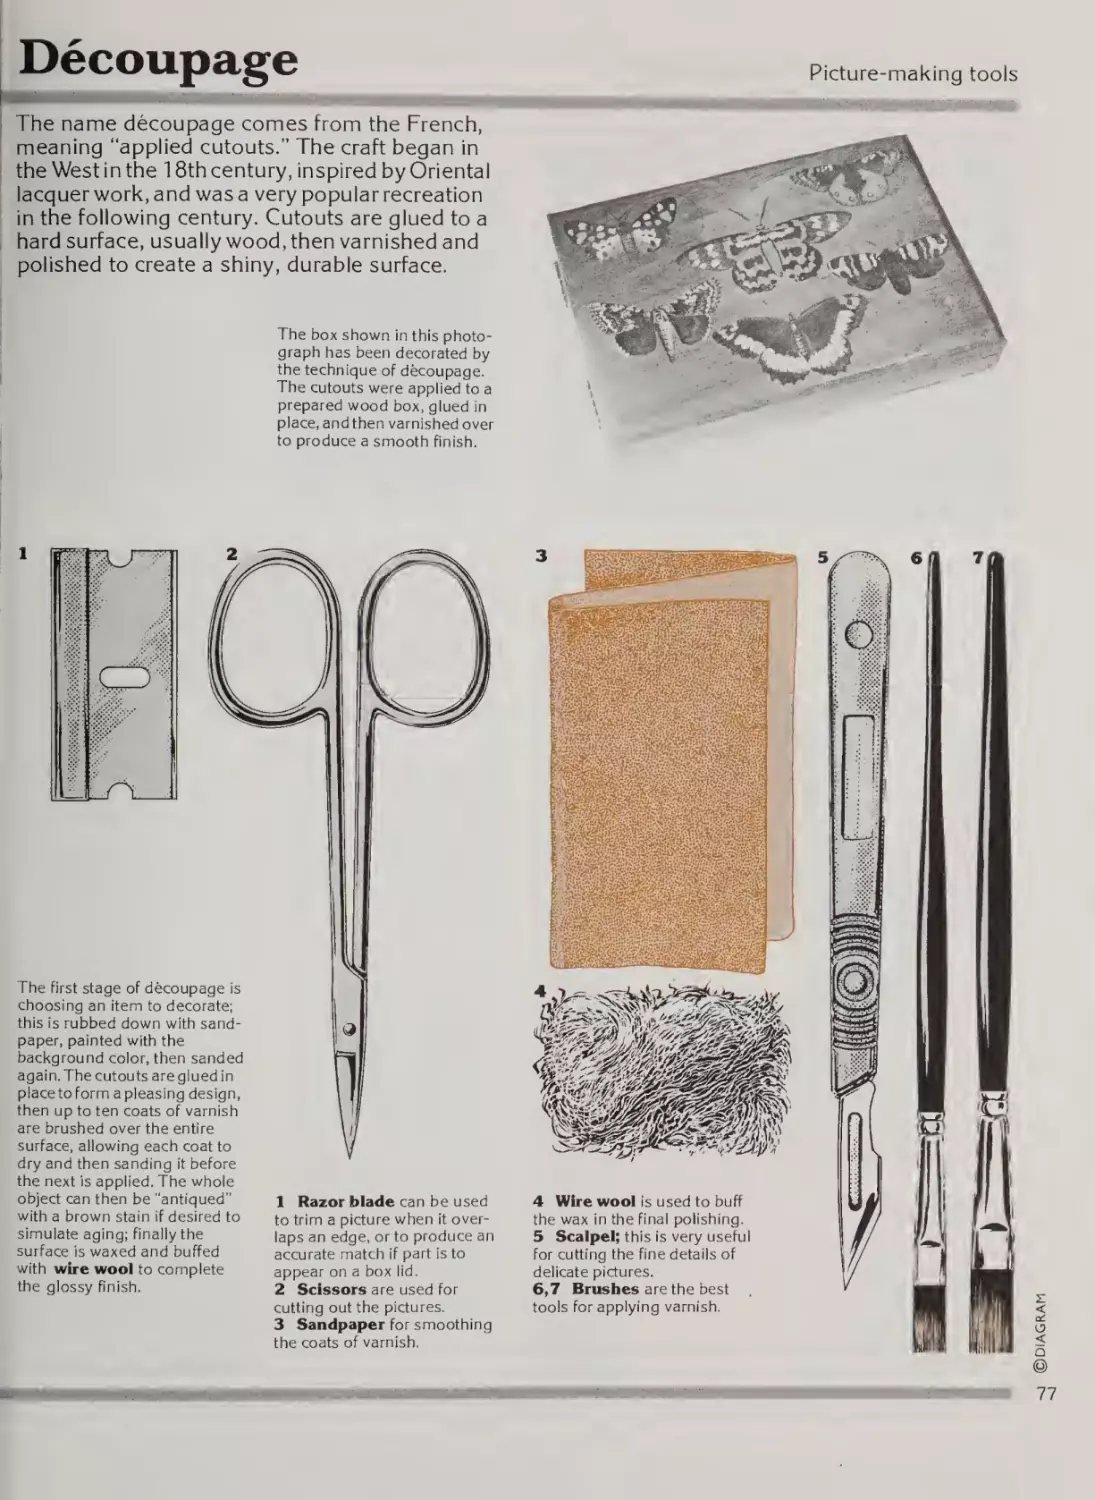
Decoupage
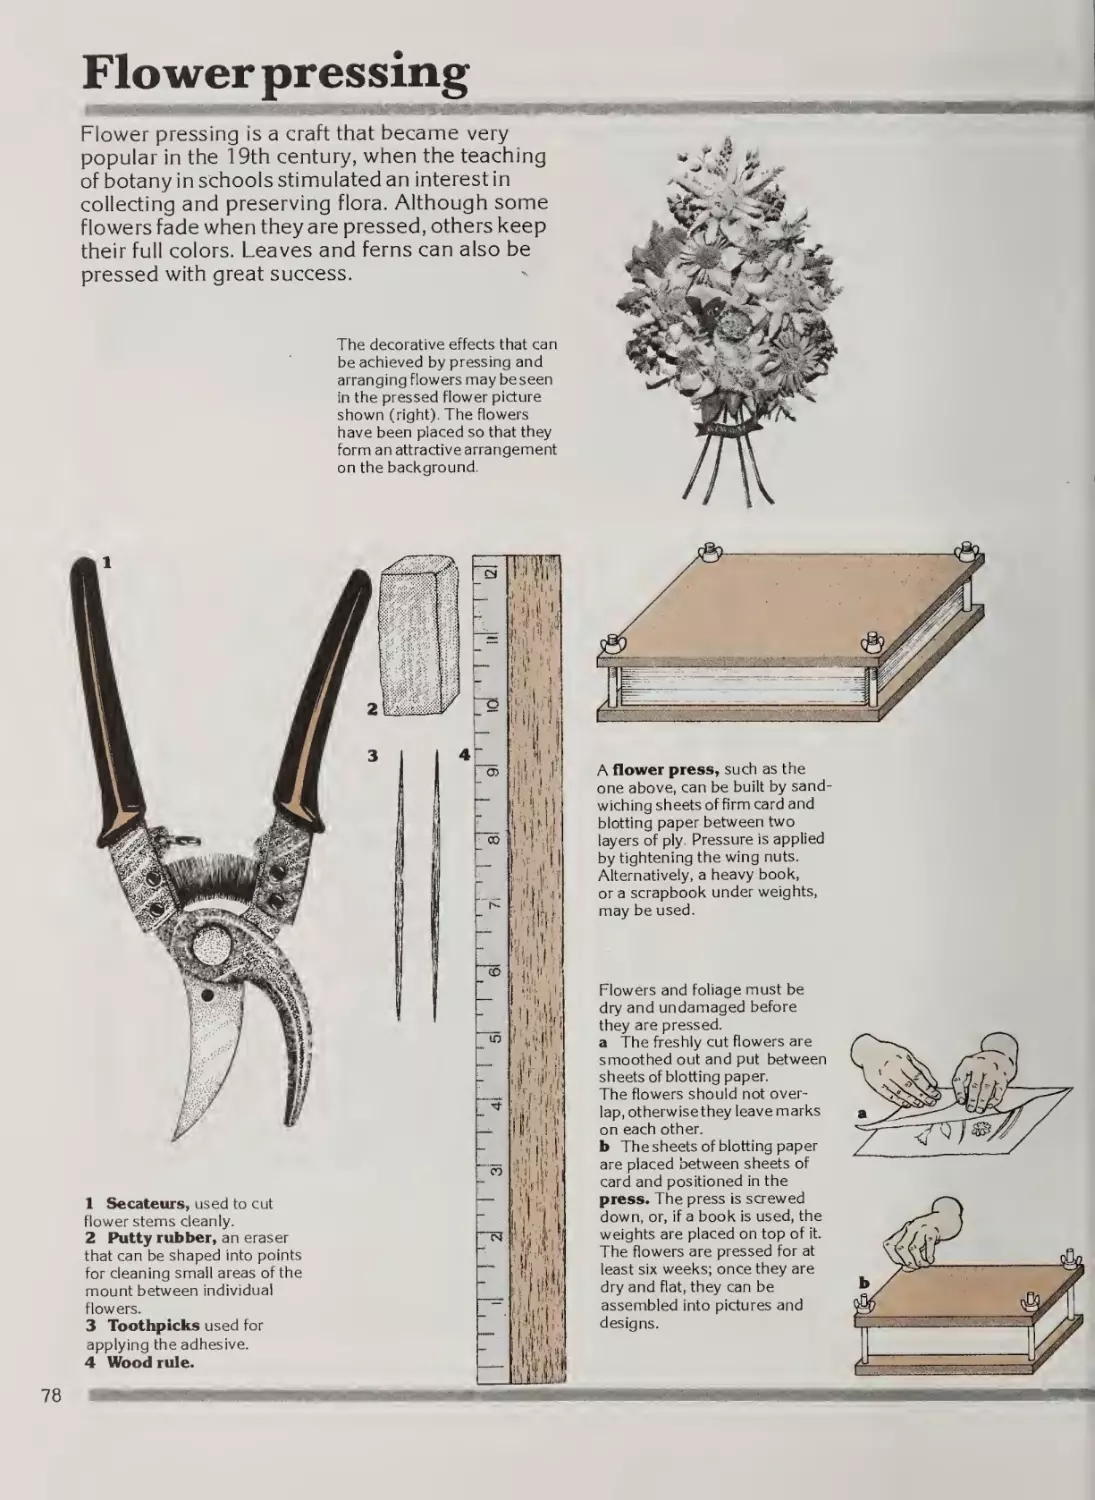
Flower pressing
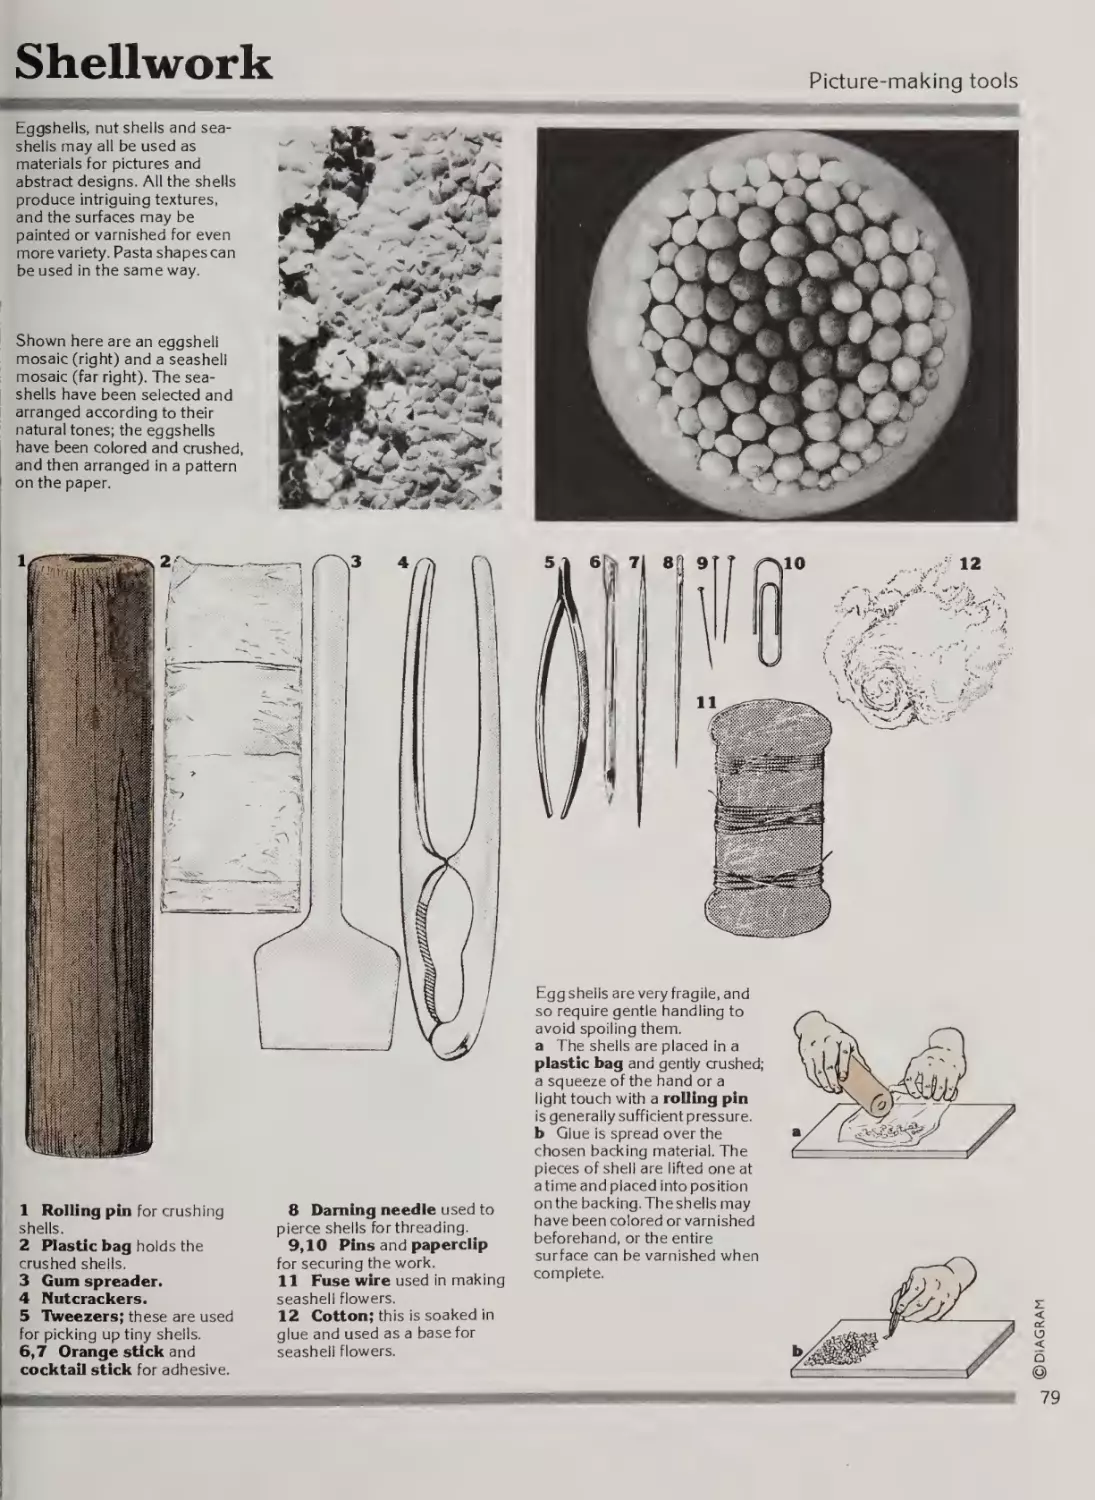
Shellwork
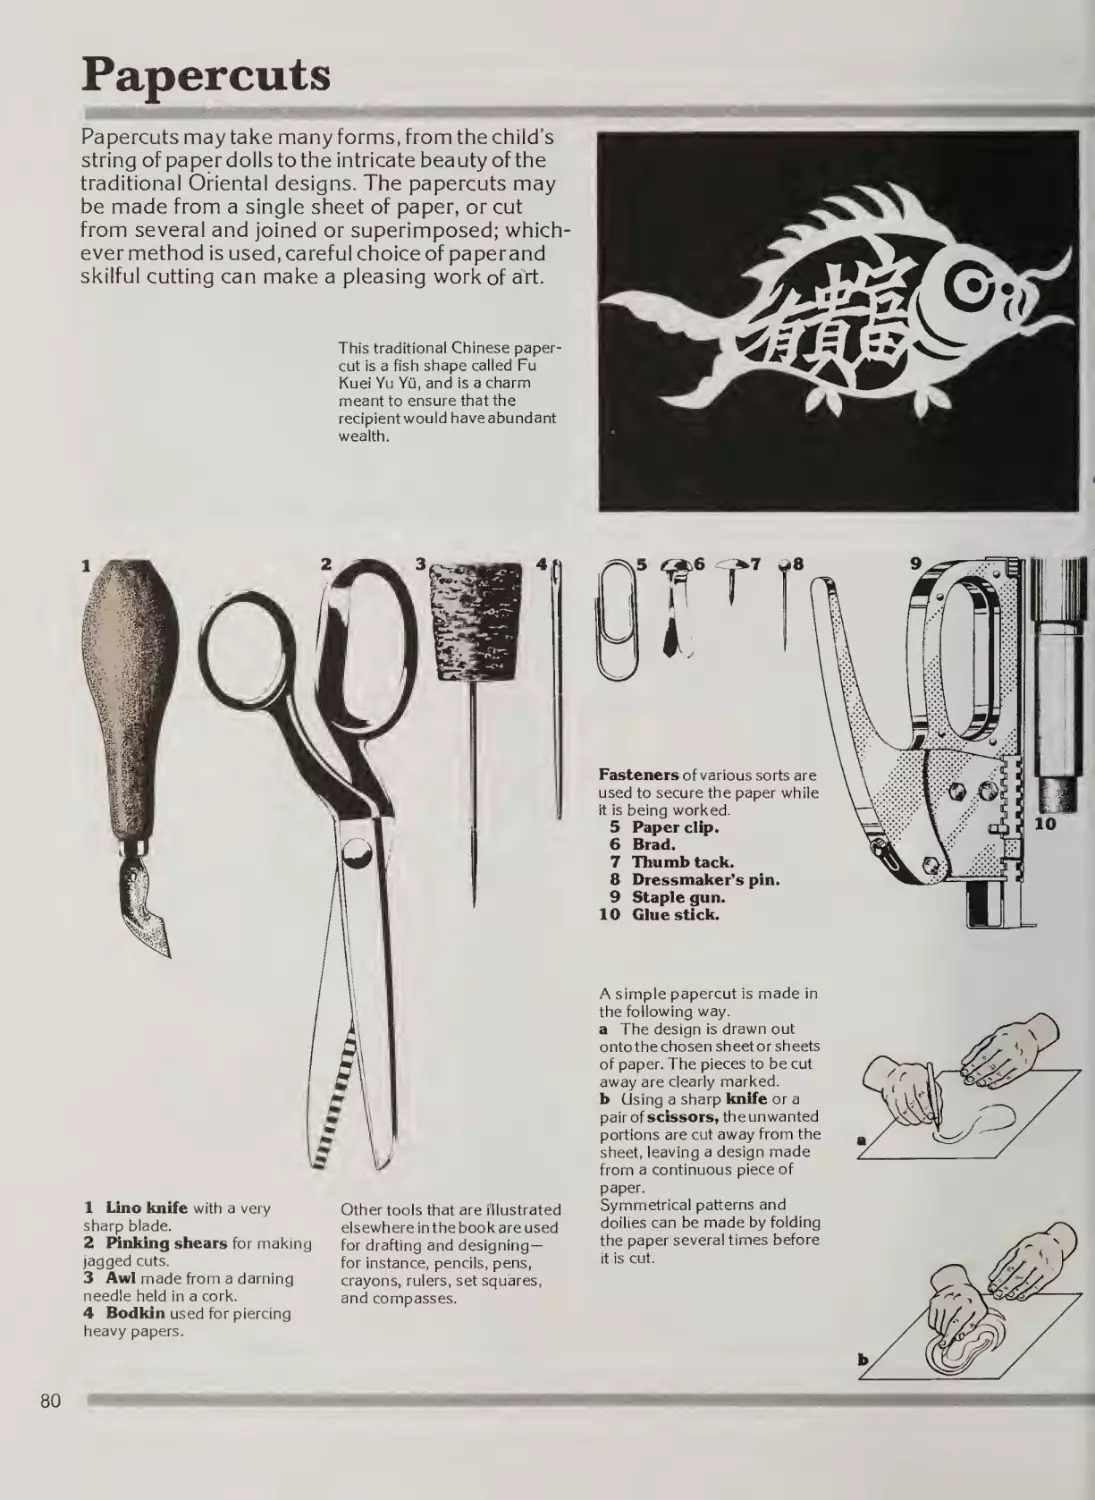
Papercuts
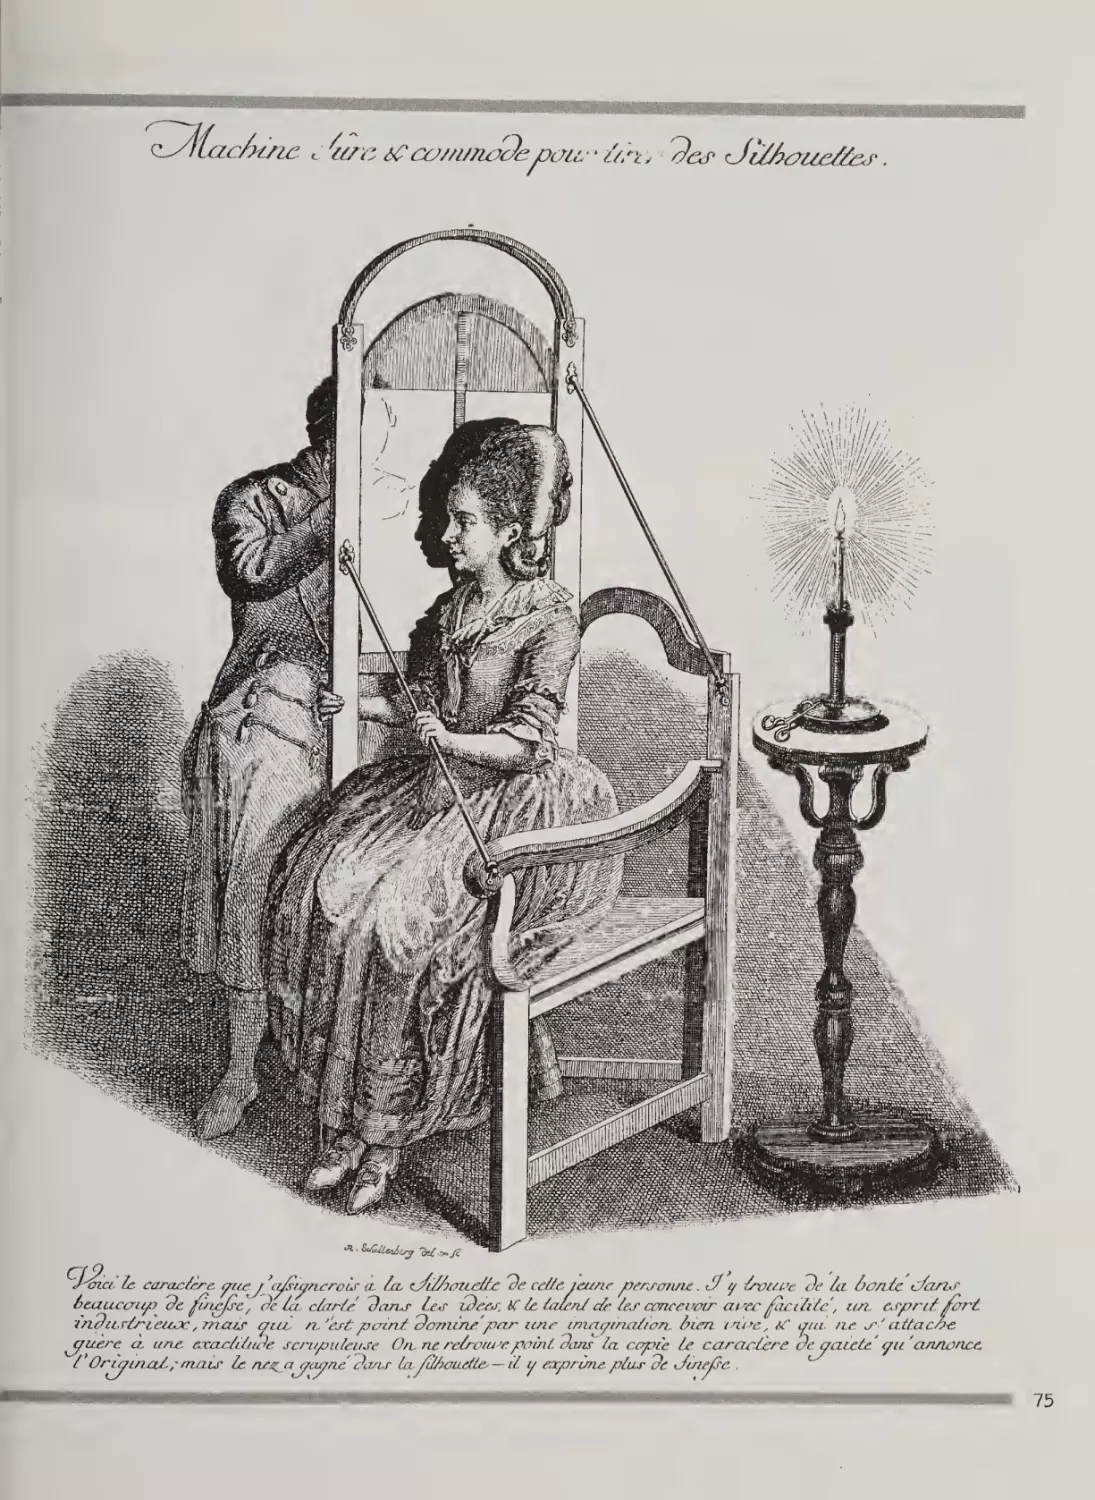
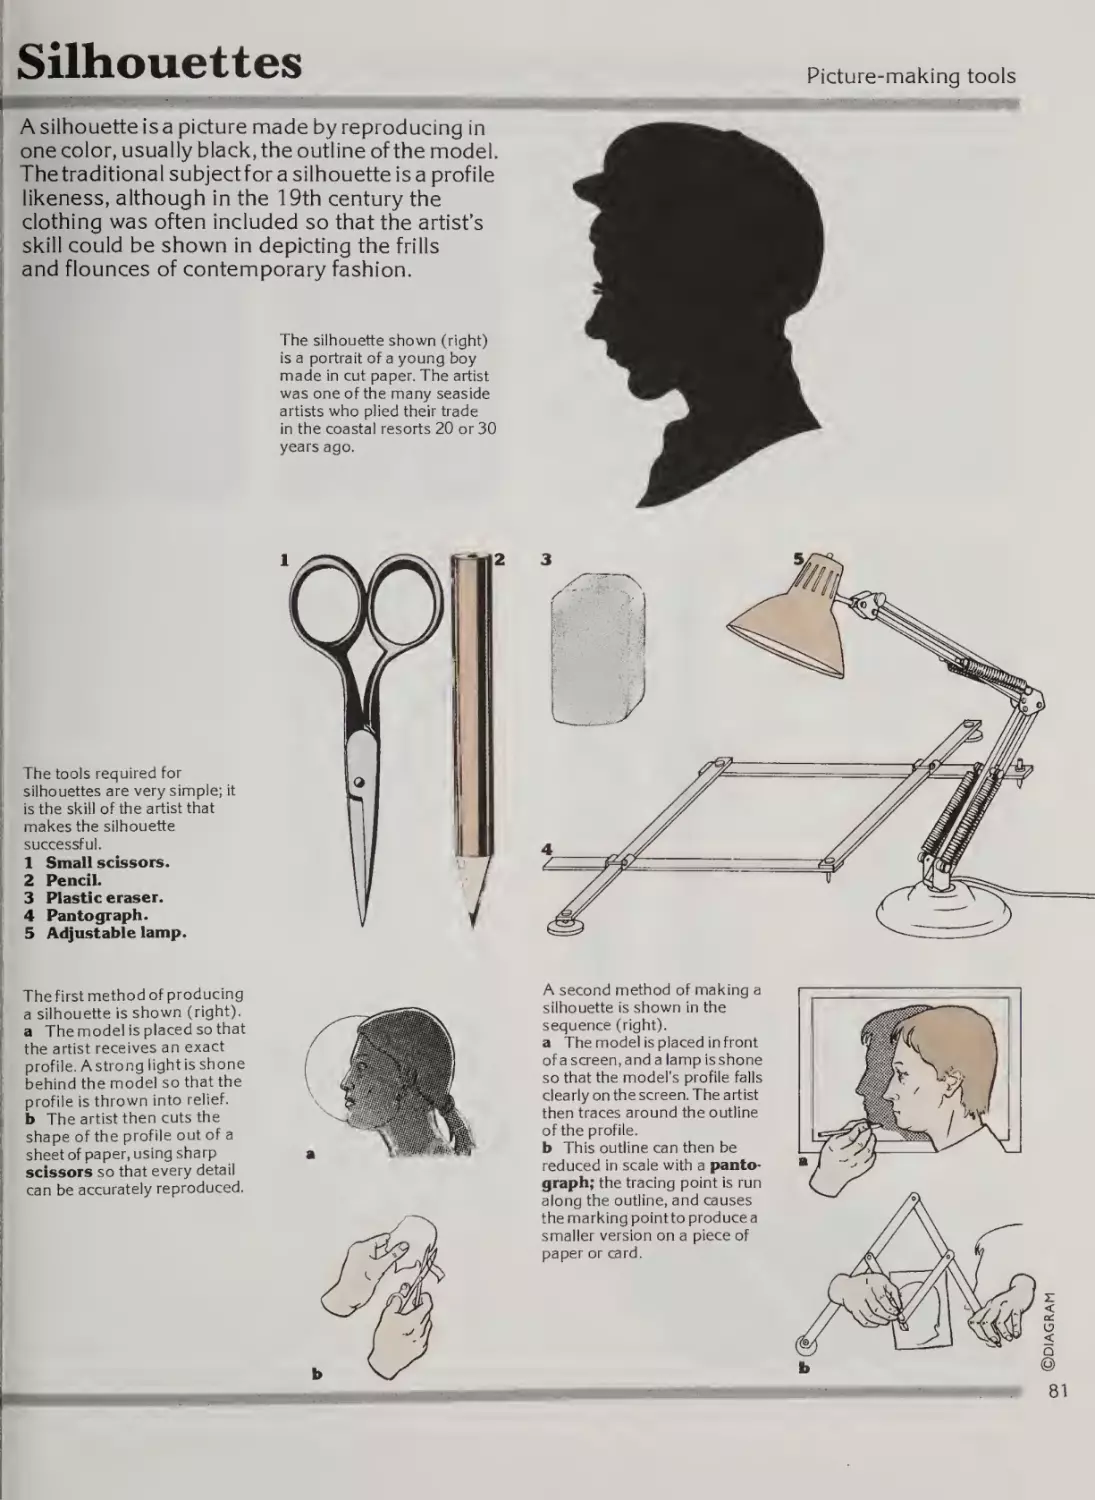
Silhouettes
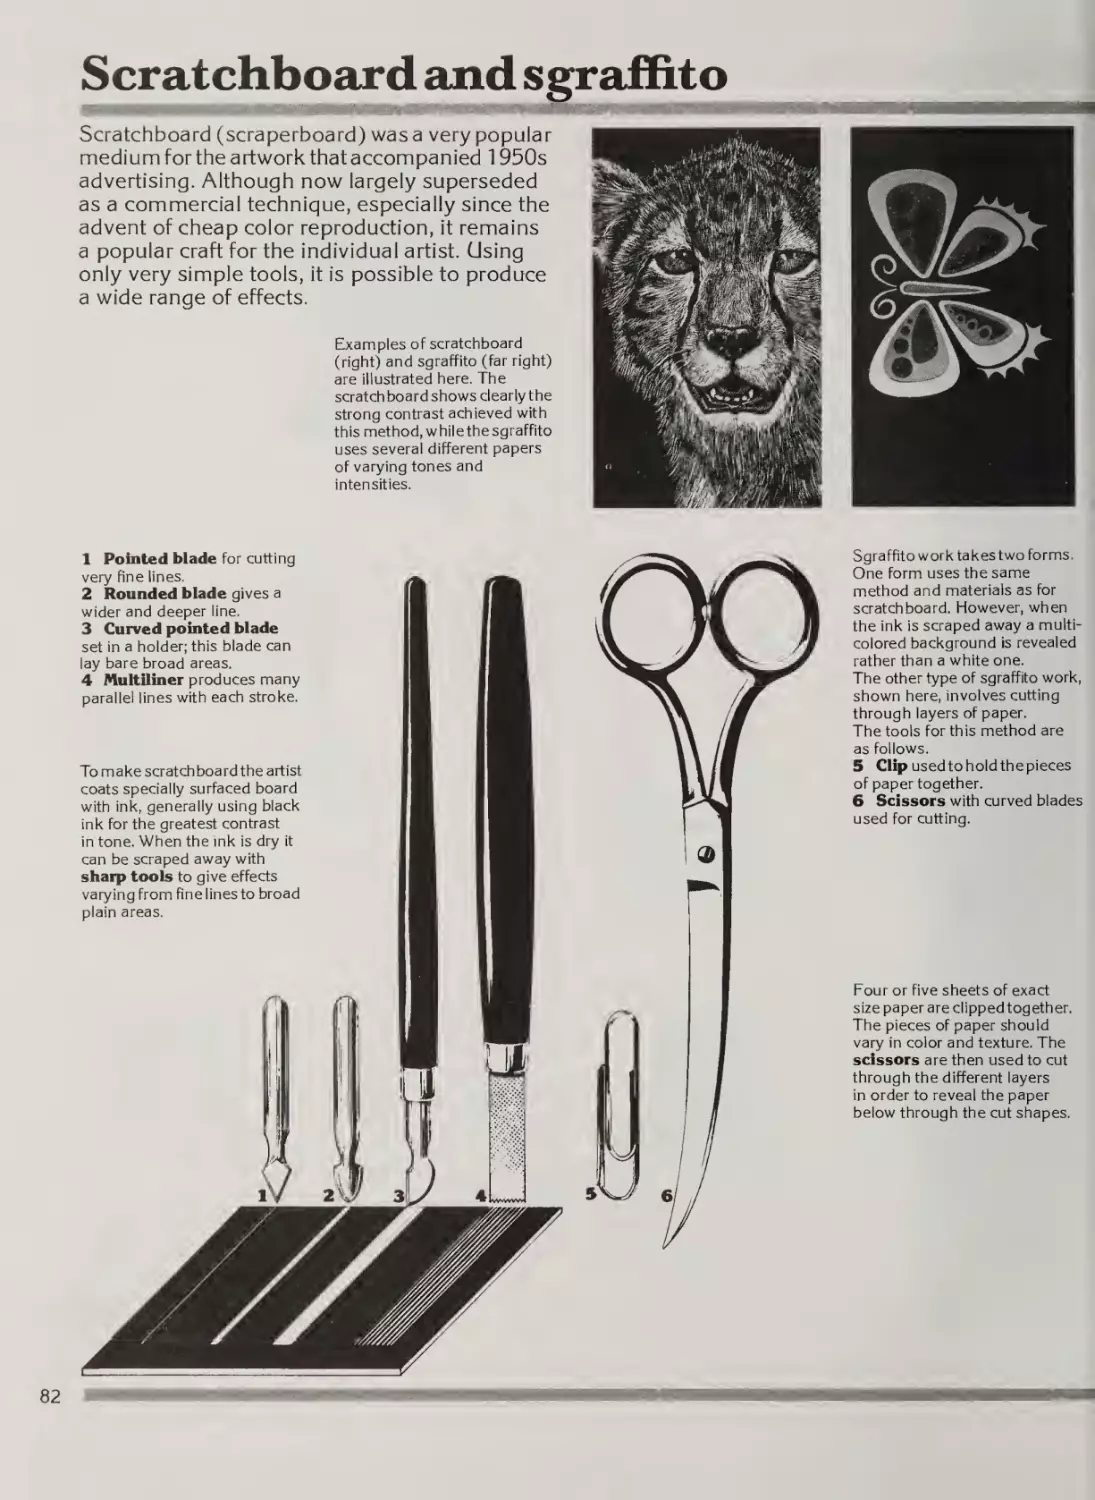
Scratchboard and sgraffito
Paper sculpture and origami
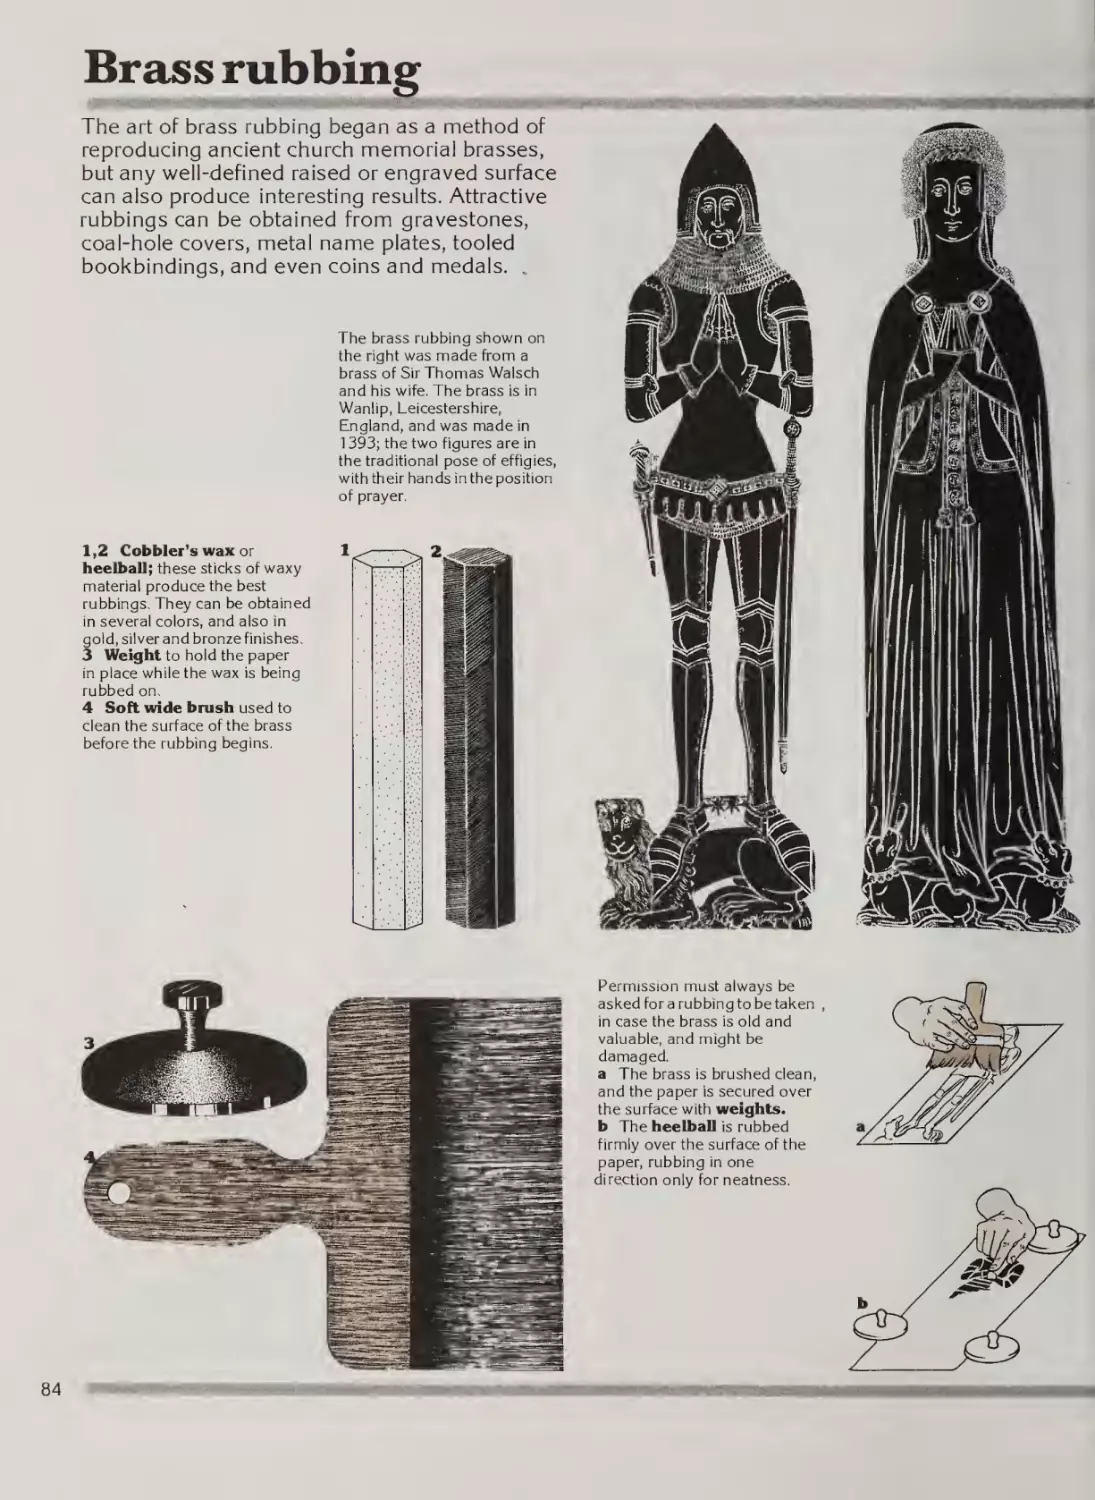
Brass rubbing
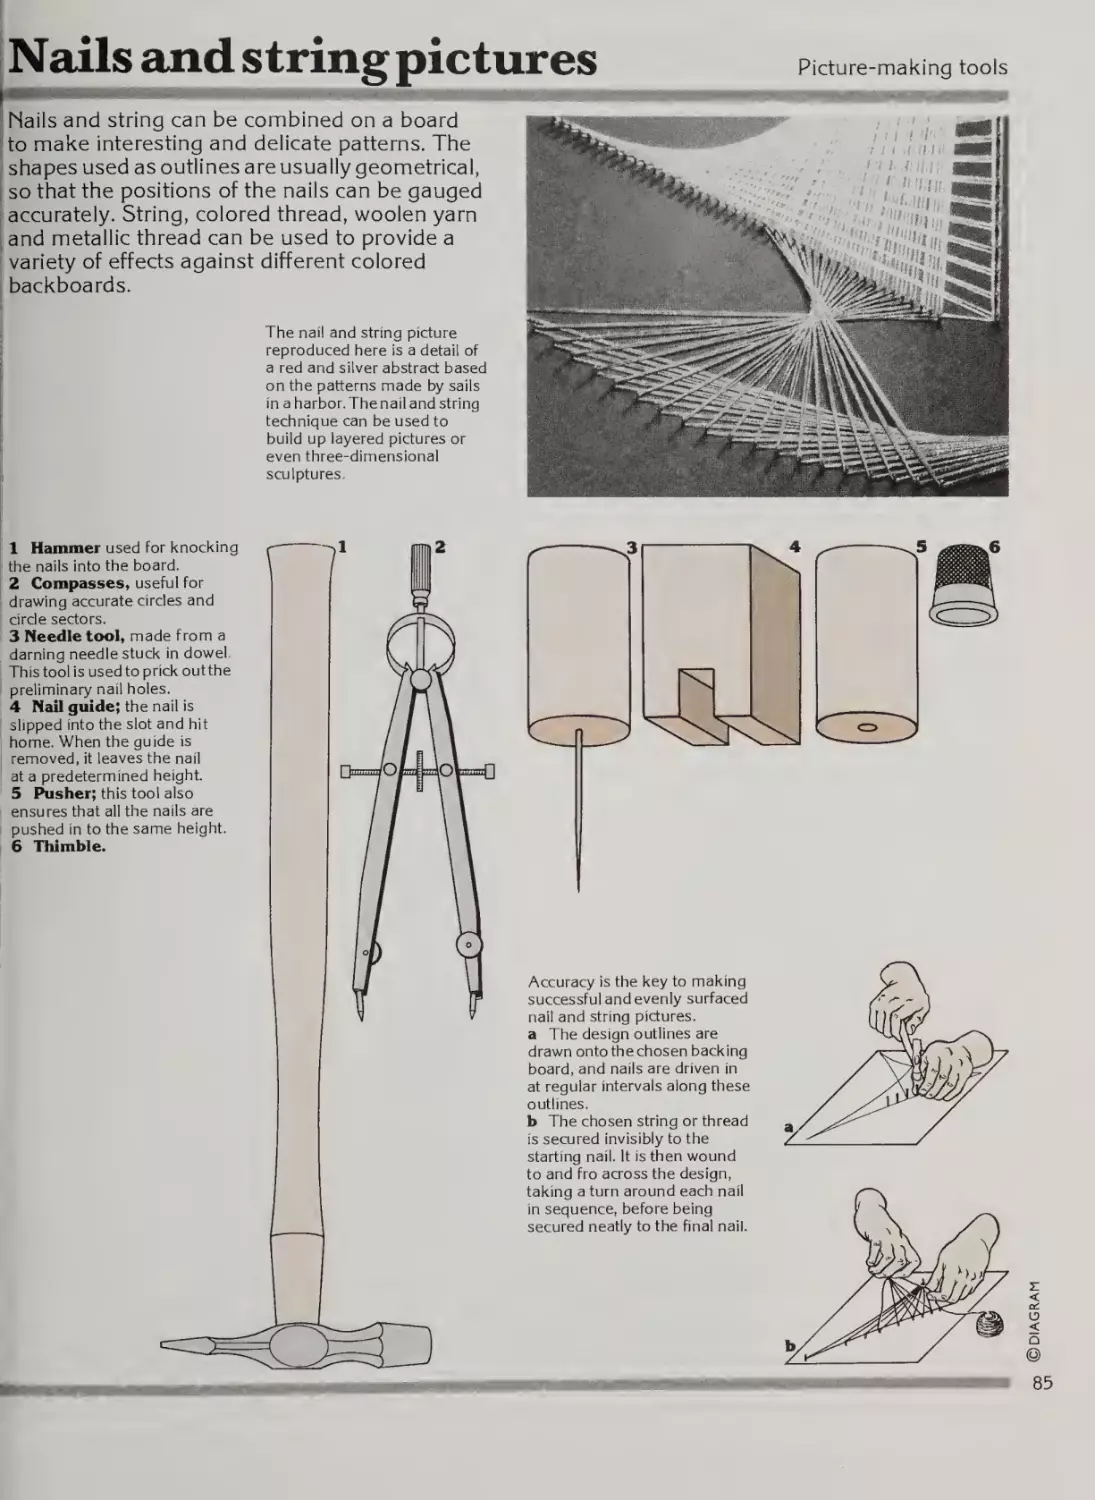
Nails and string pictures
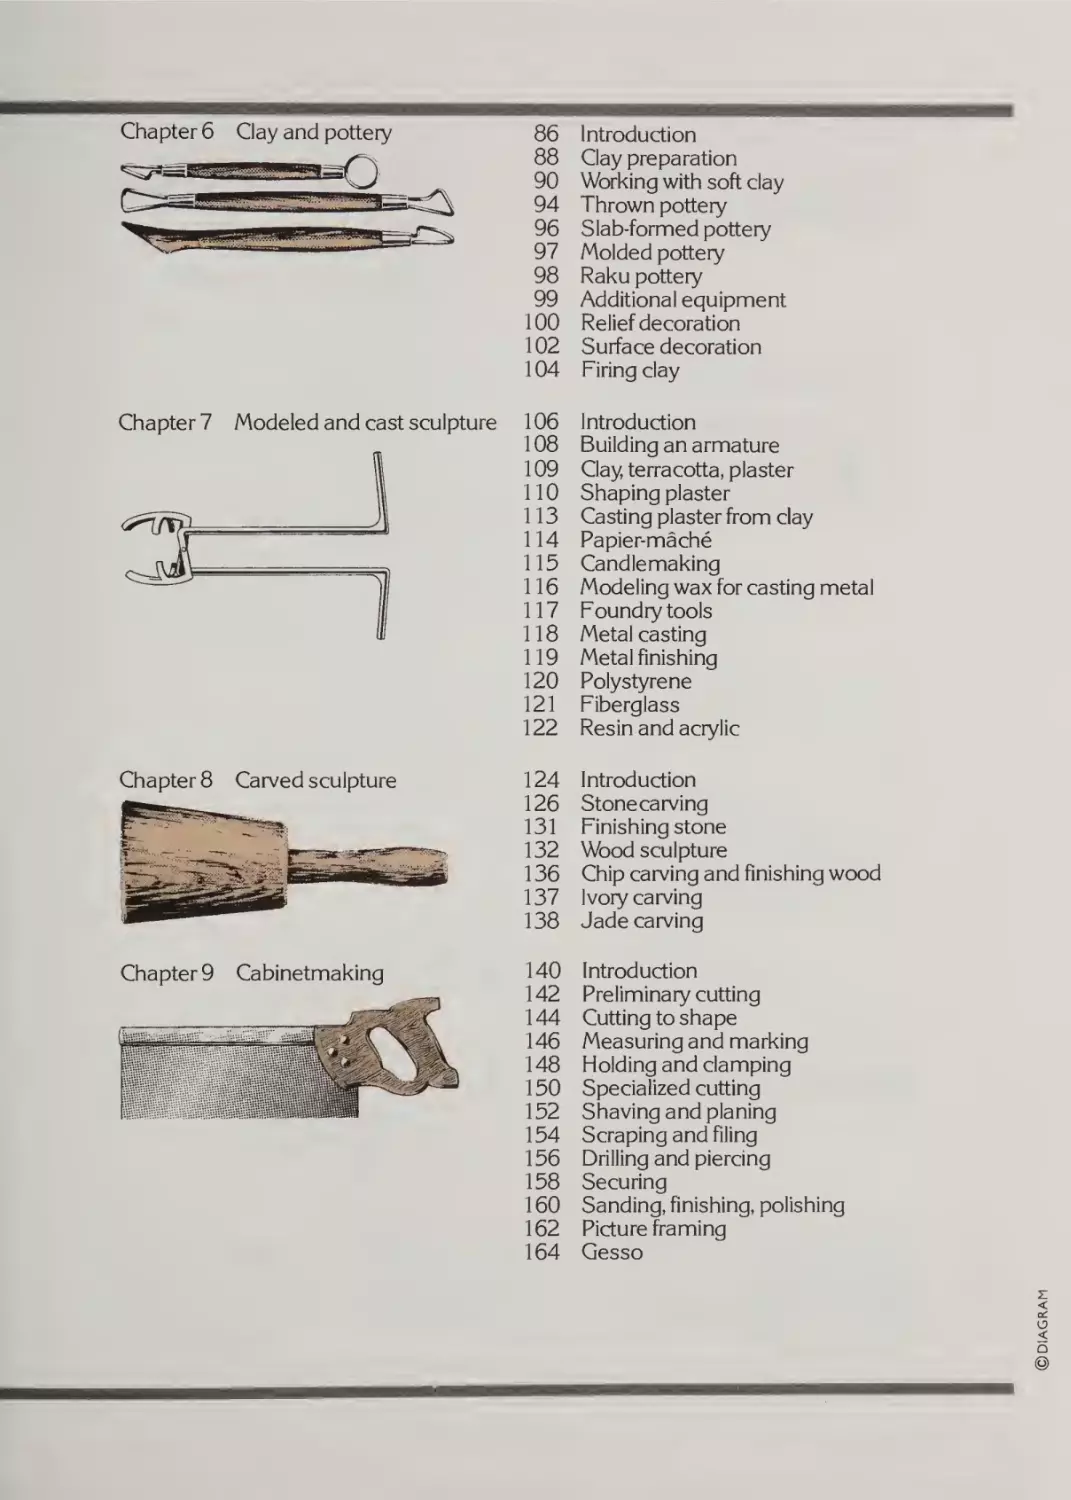
Chapter 6
Clay and pottery
86
88
90
94
96
97
98
99
100
102
104
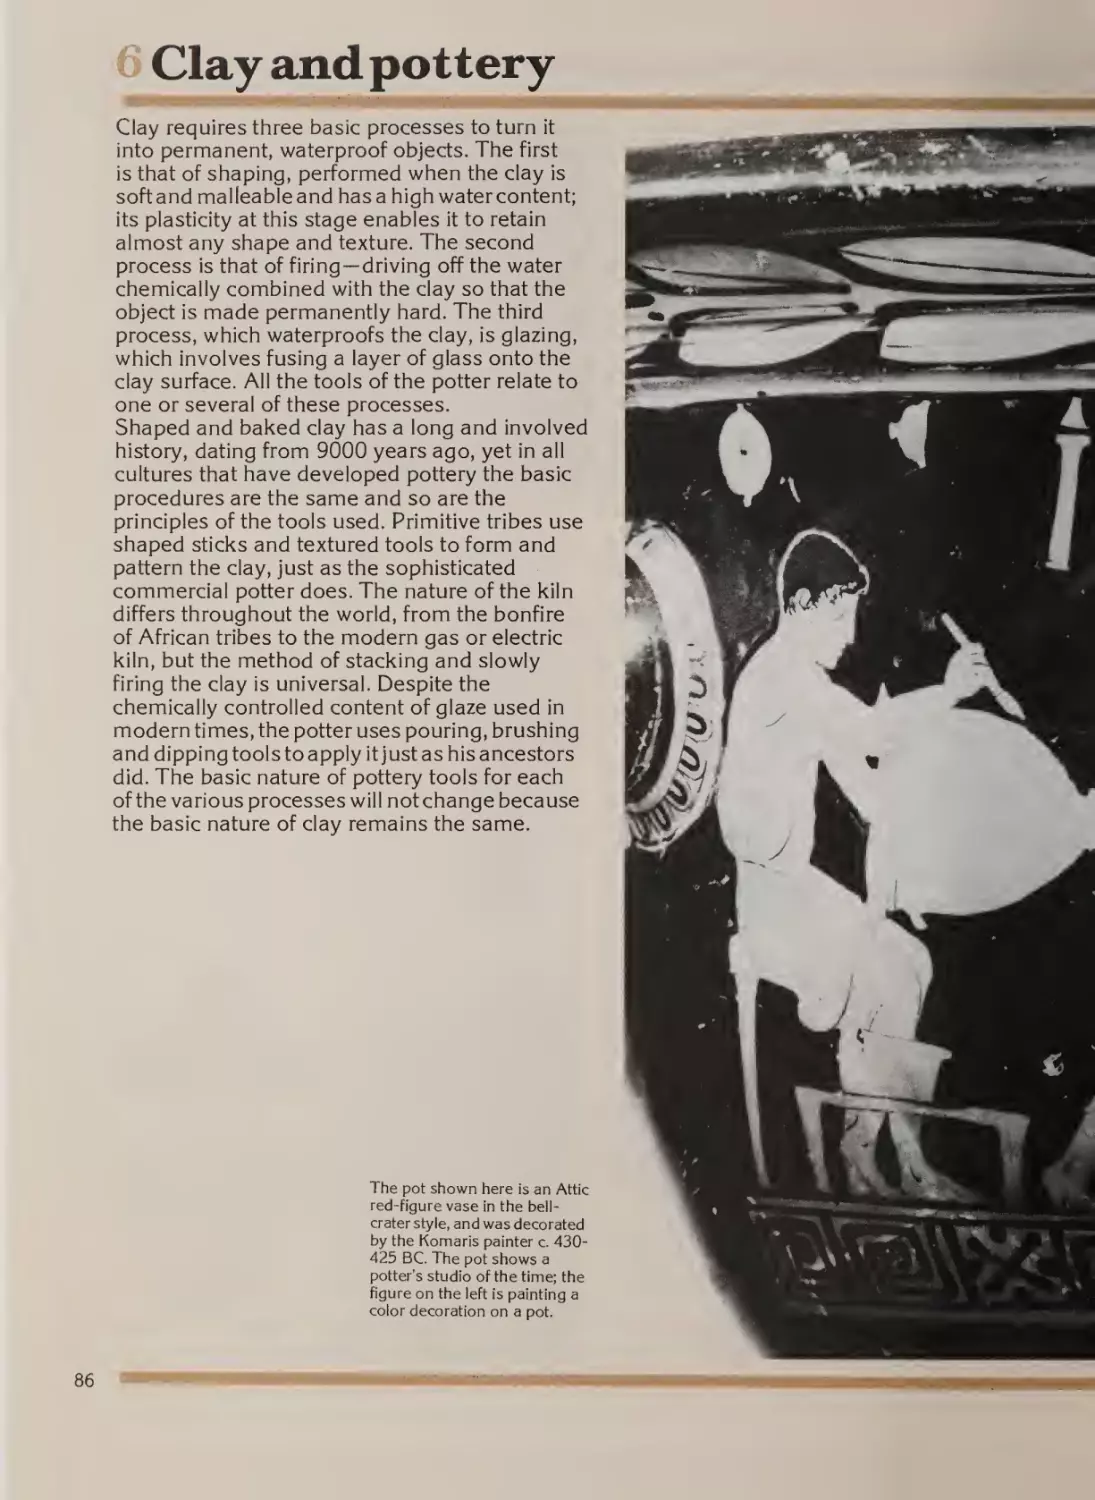
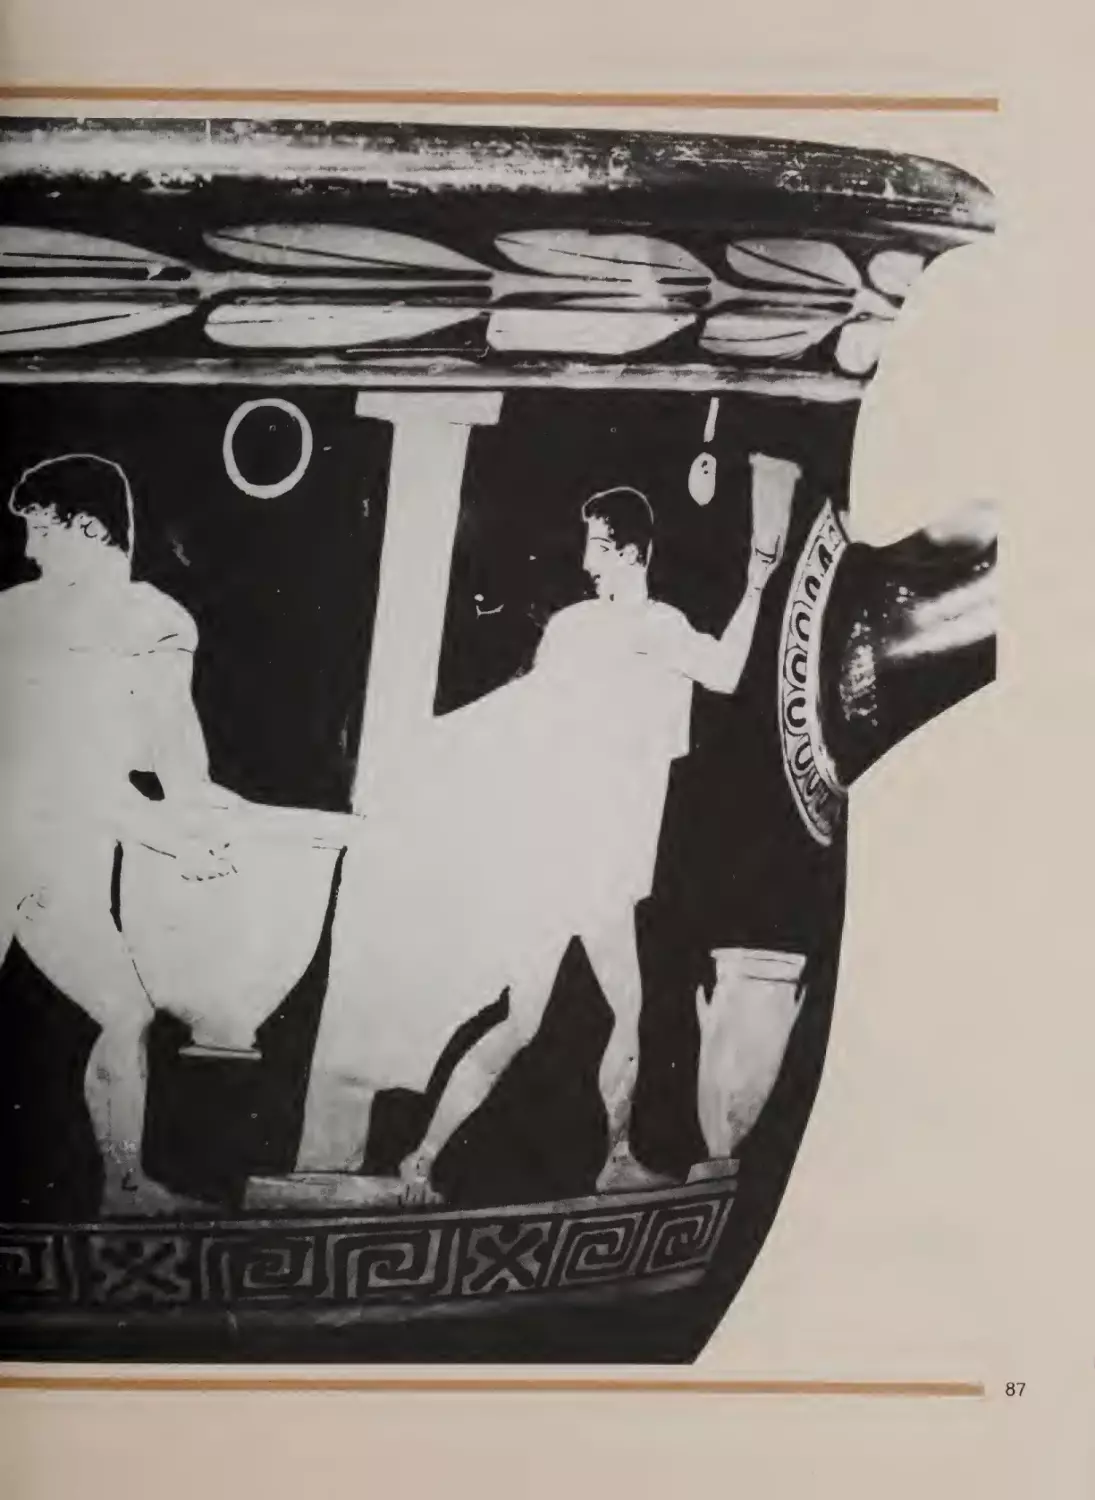
Introduction
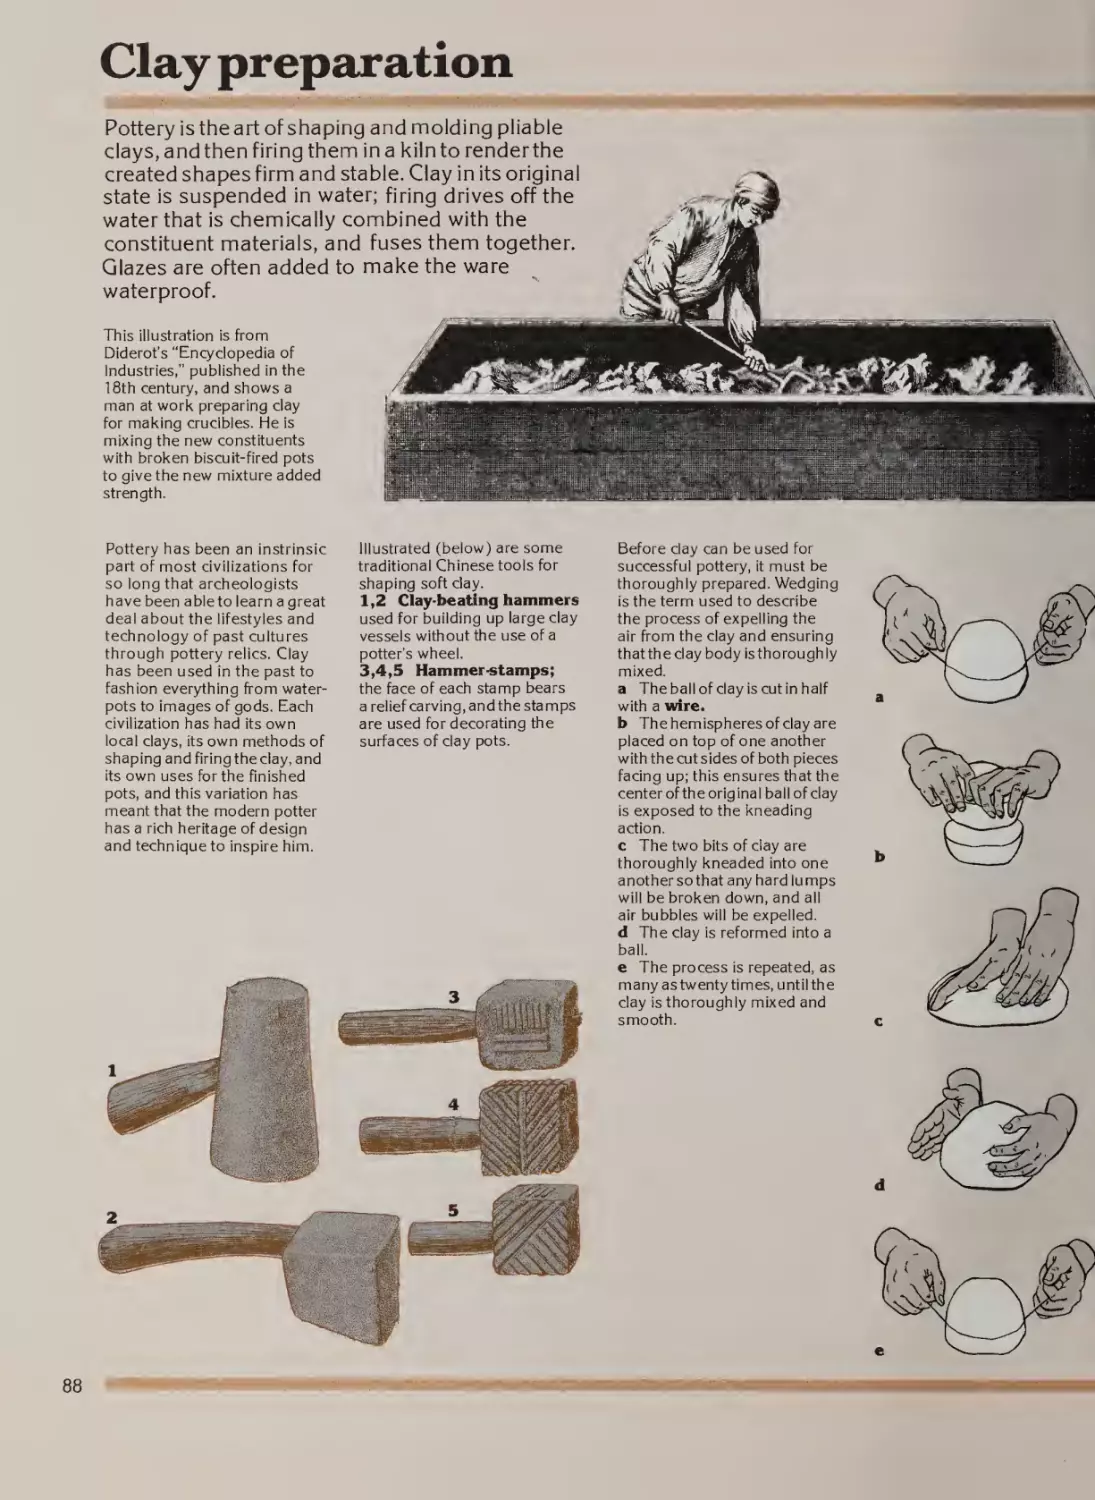
Clay preparation
Working with soft clay
Thrown pottery
Slab-formed pottery
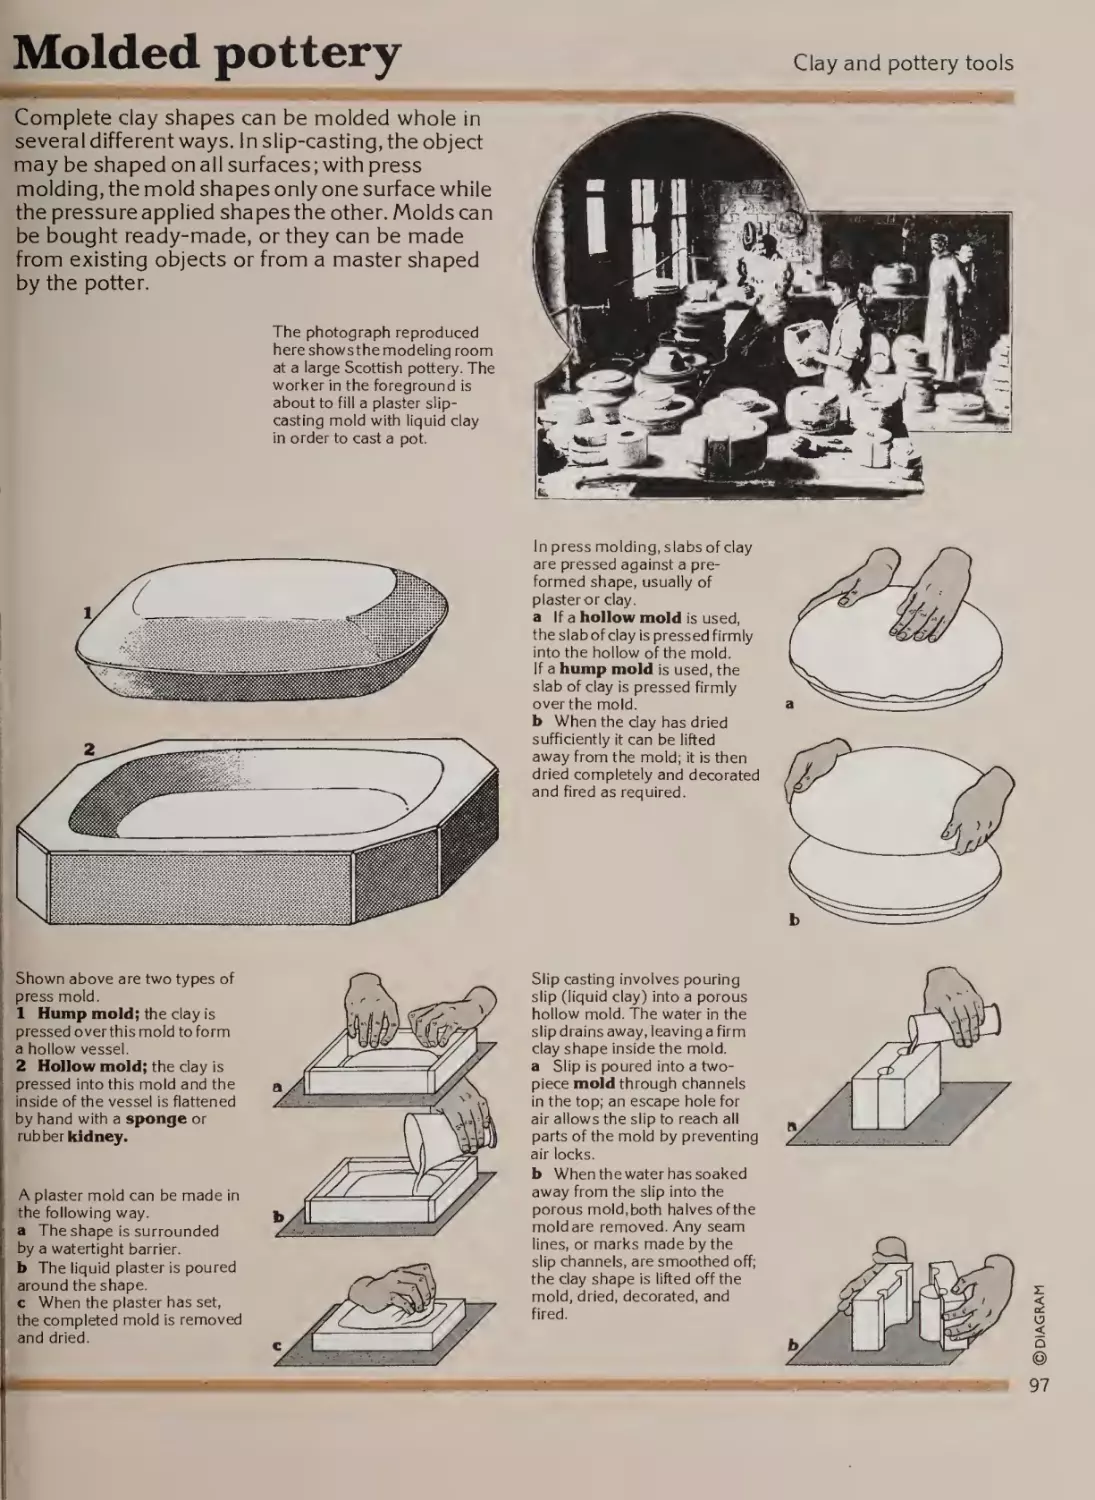
Molded pottery
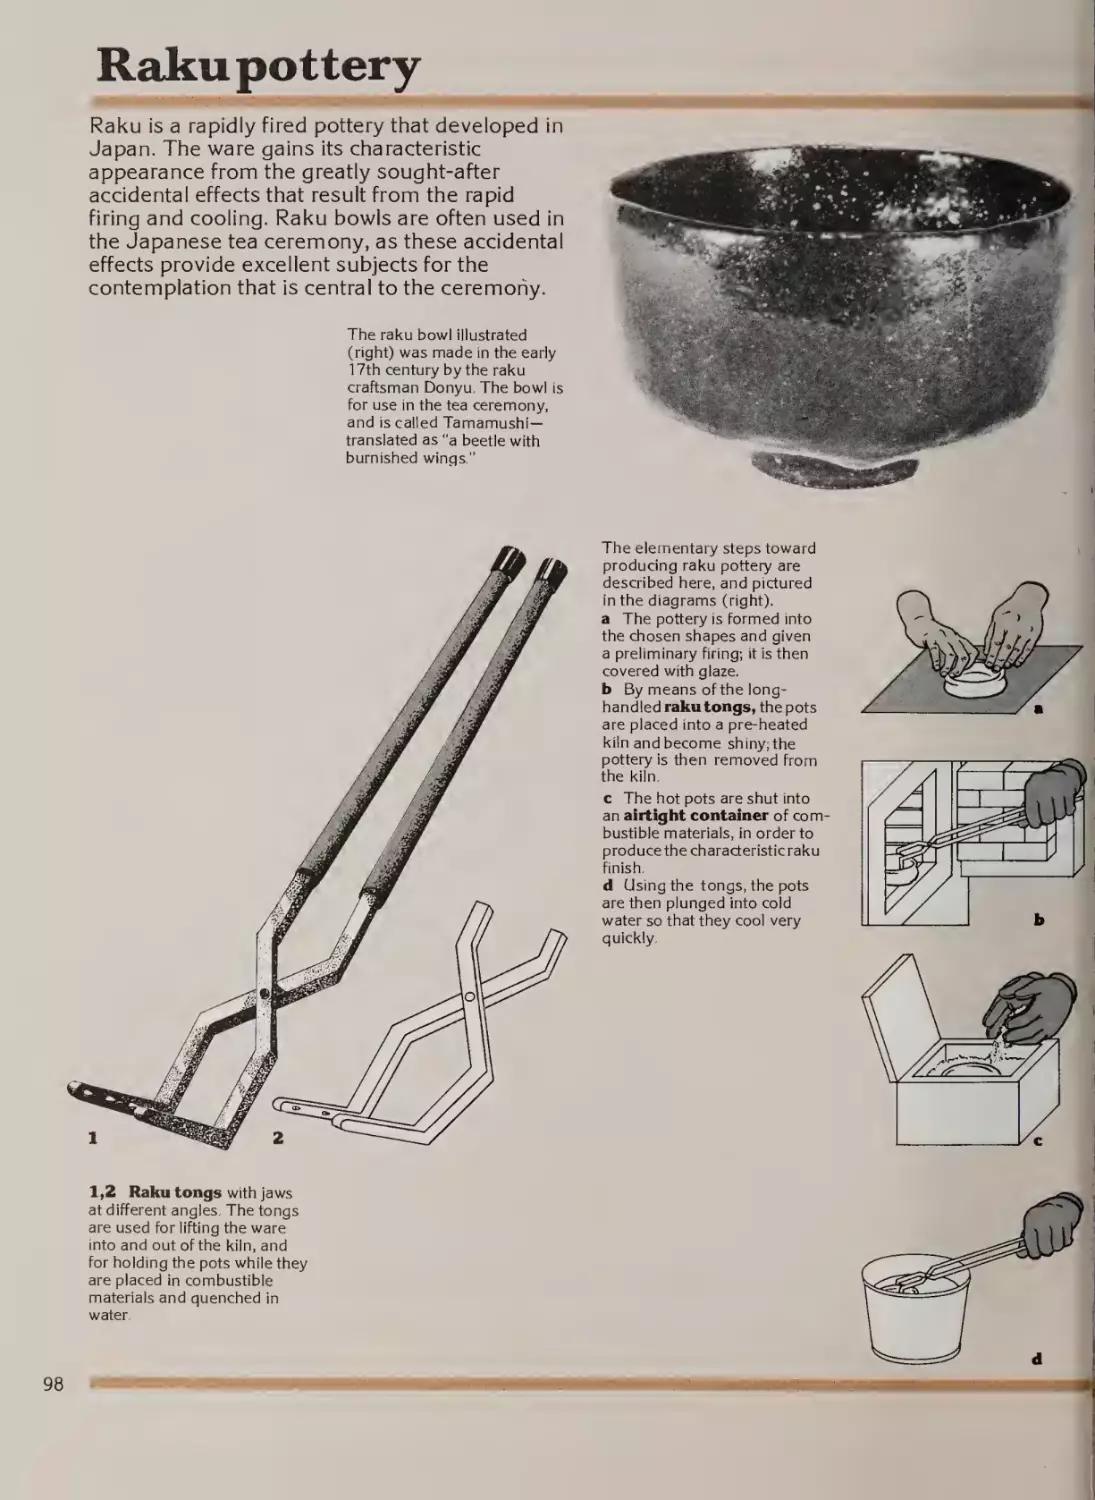
Raku pottery
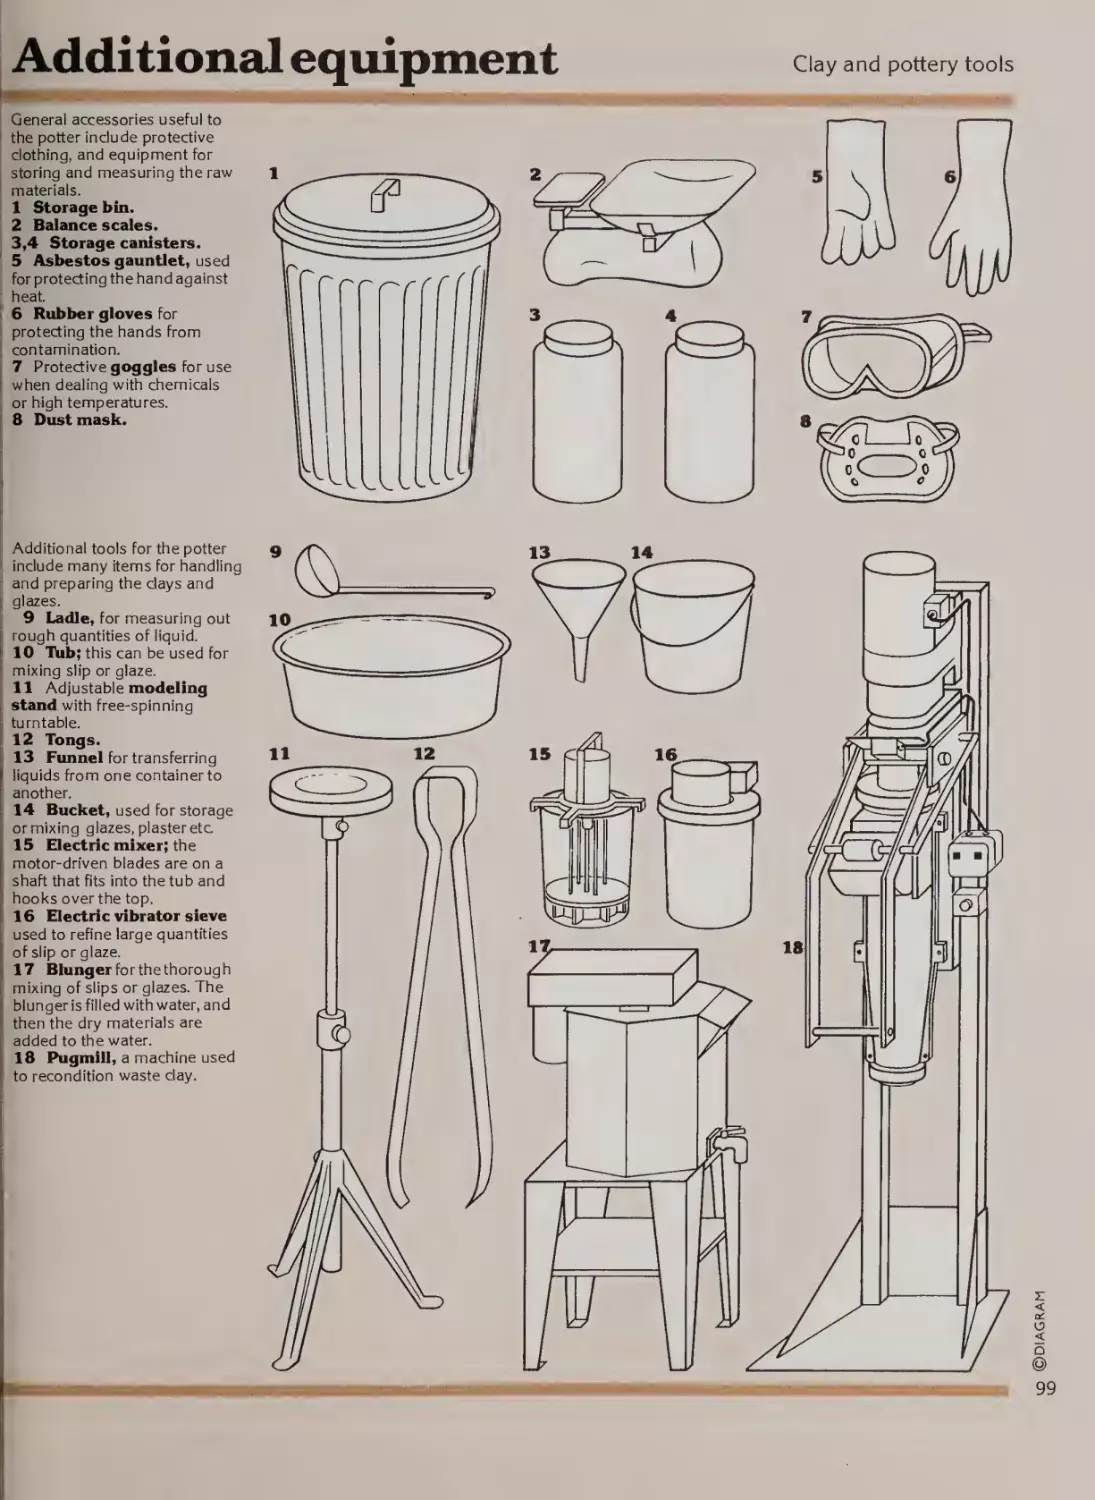
Additional equipment
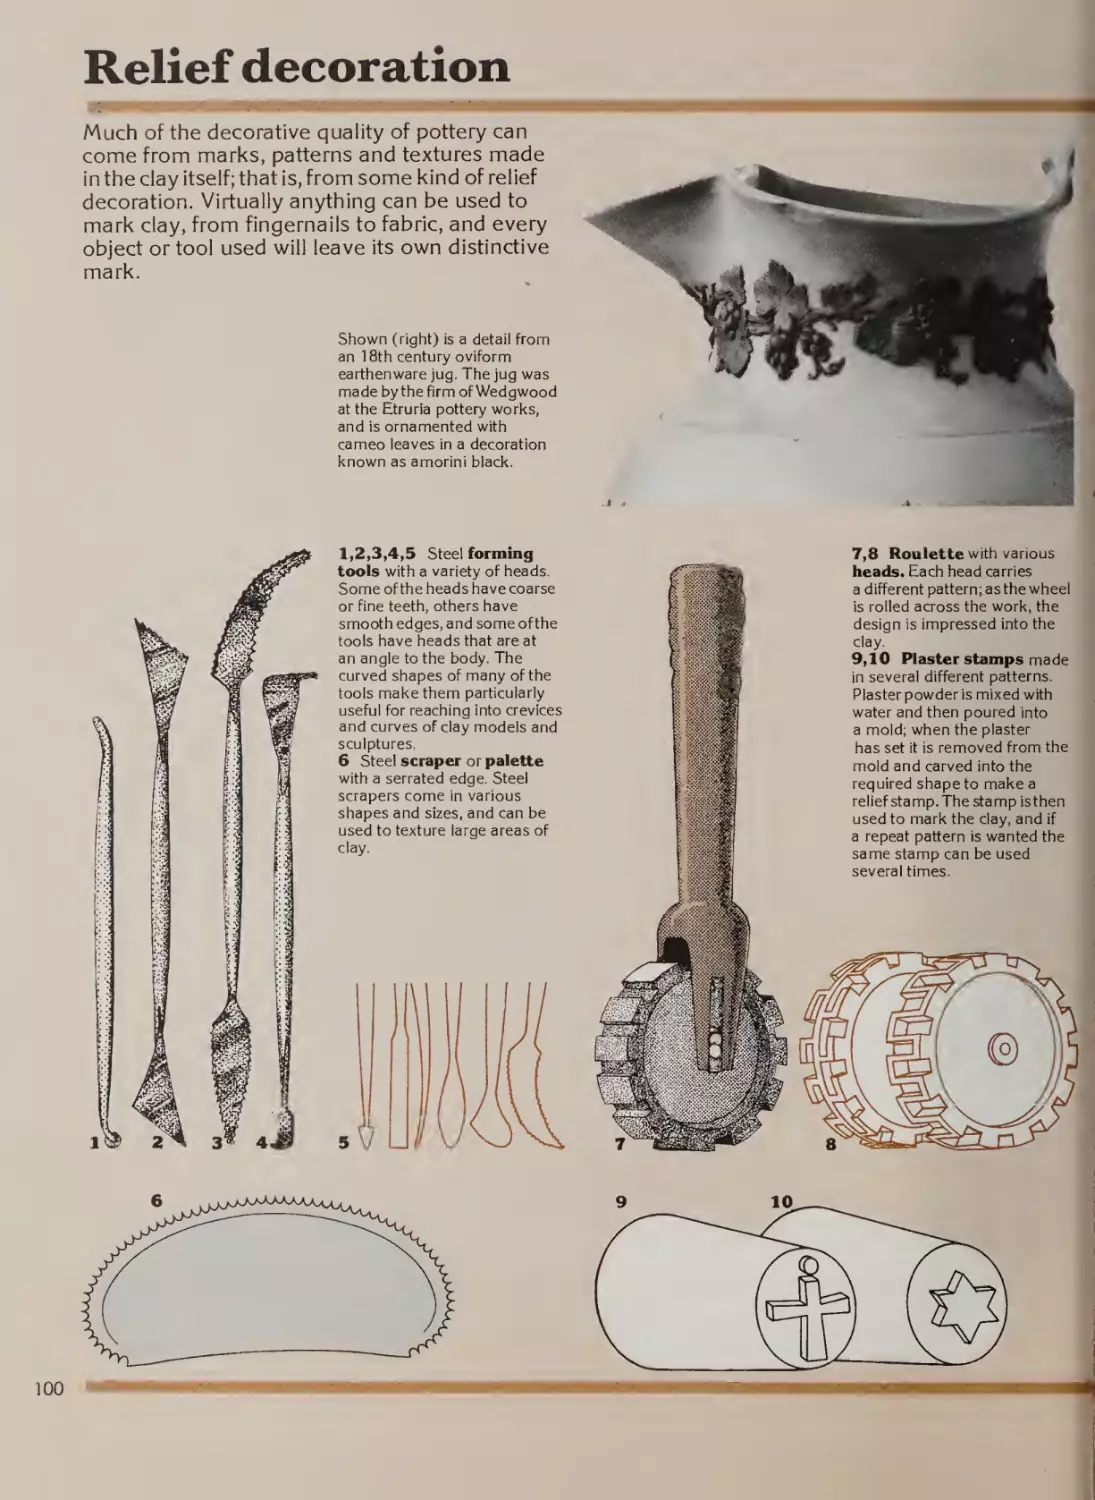
Relief decoration
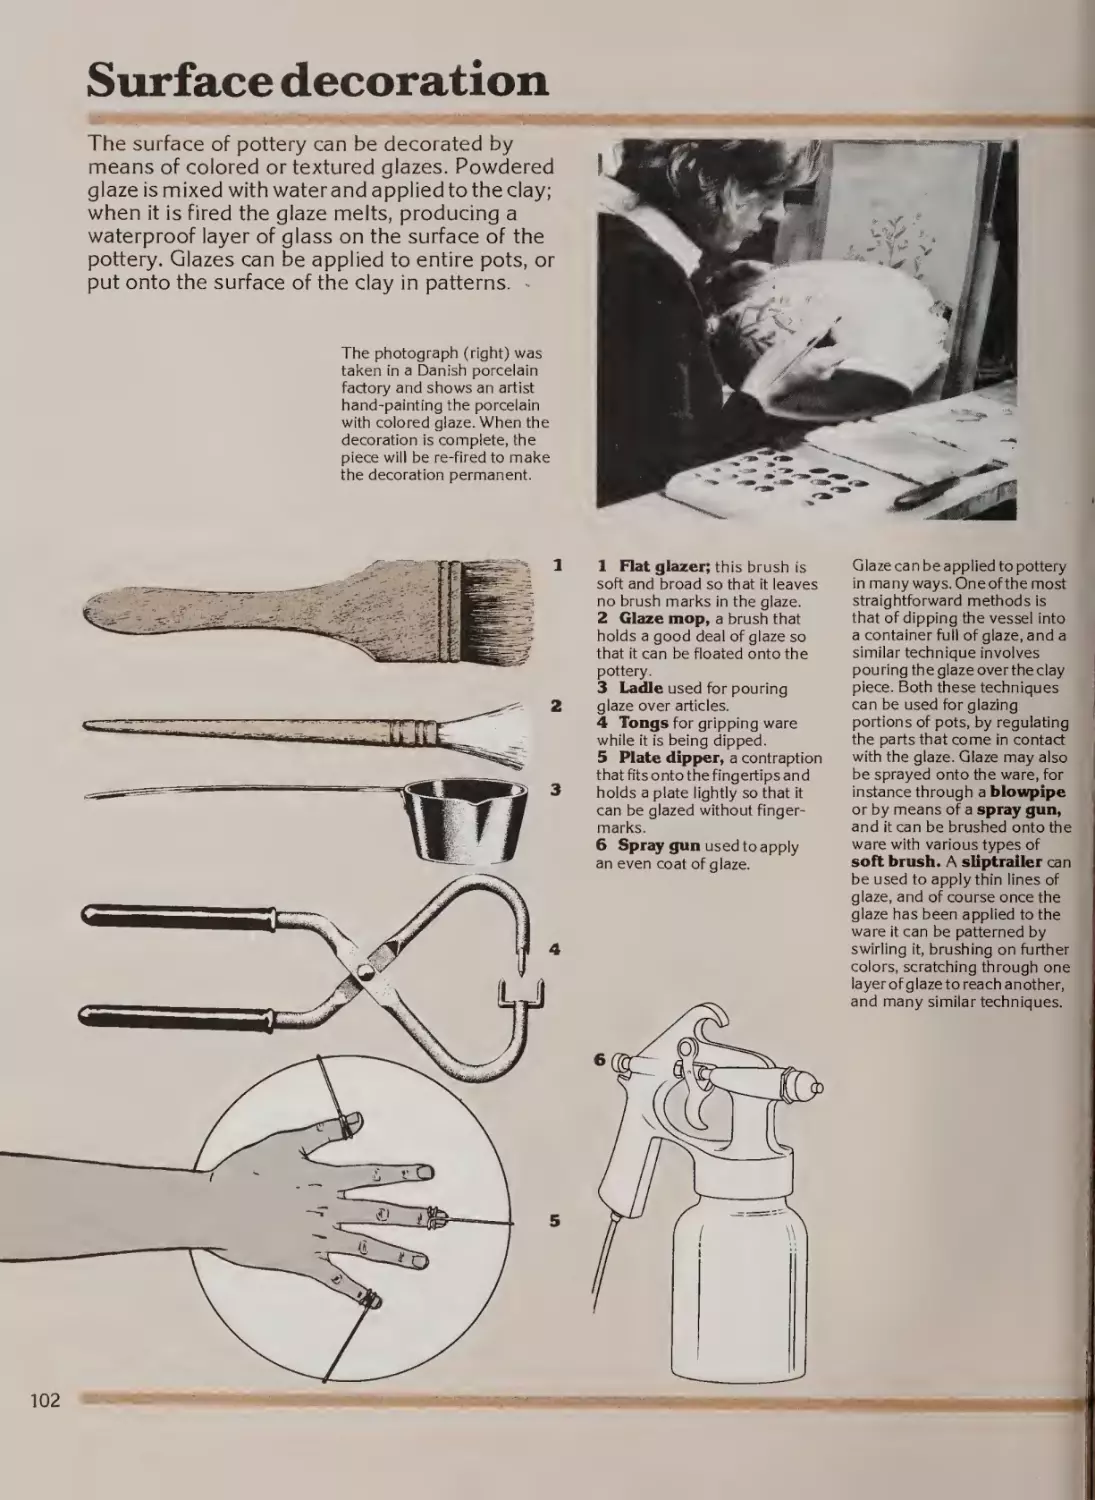
Surface decoration
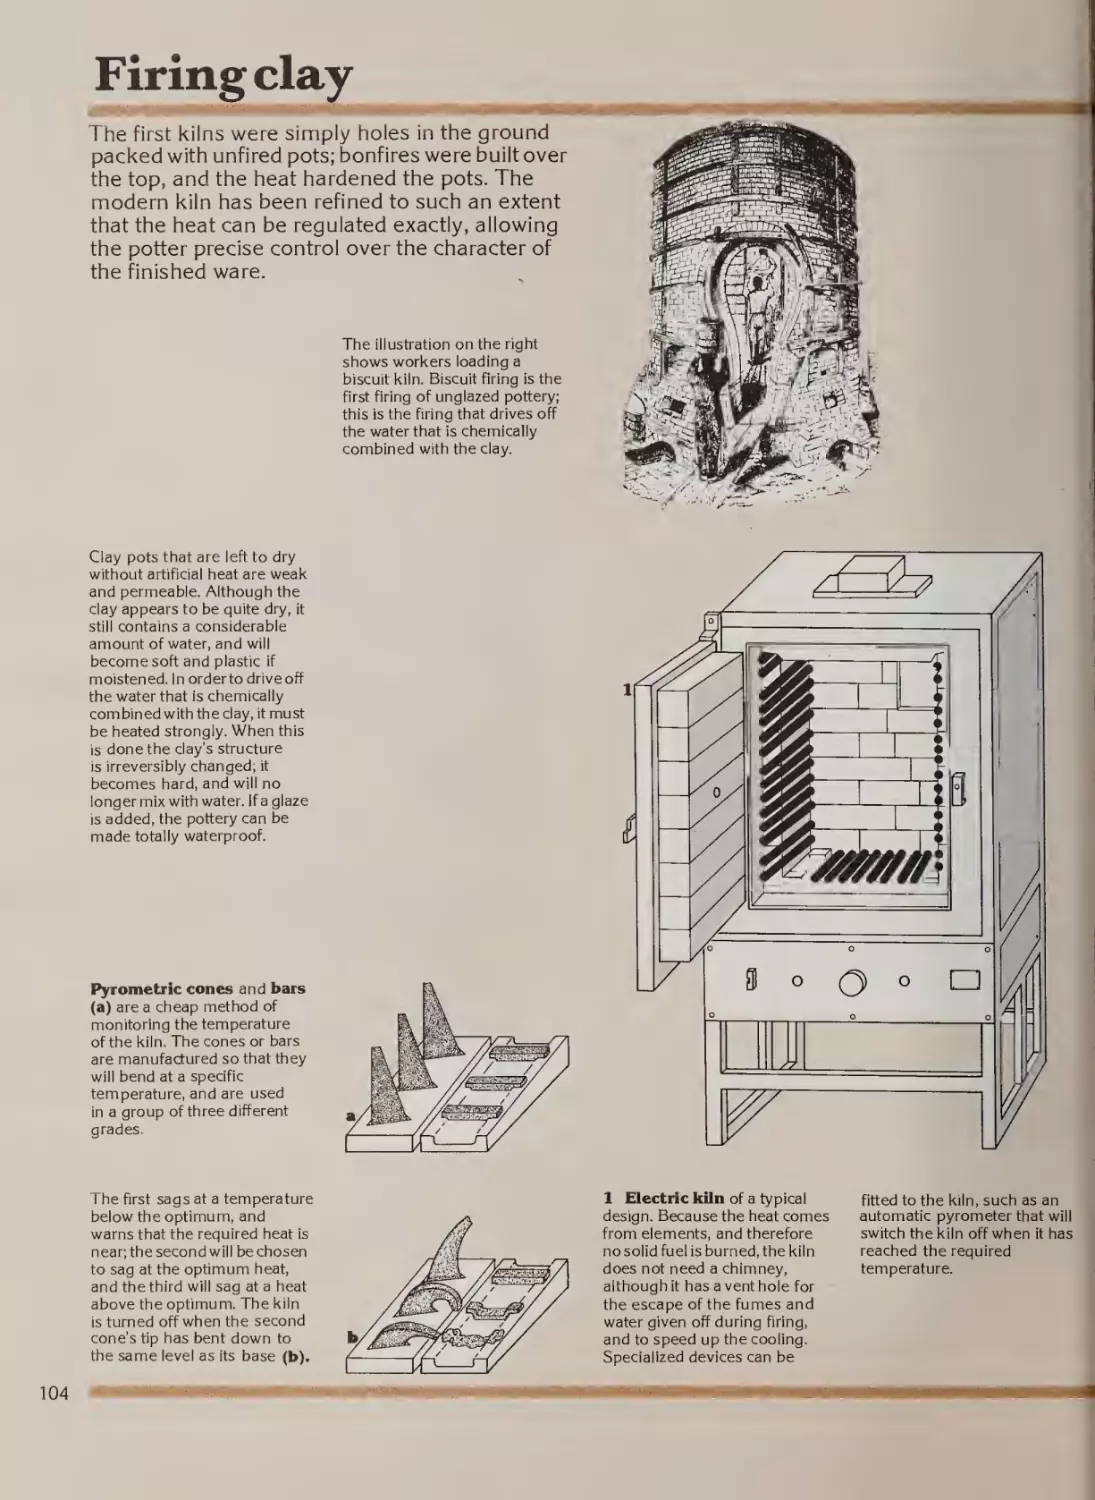
Firing clay
Chapter 7
Modeled and cast sculpture
106
108
109
110
113
114
115
116
117
118
119
120
121
122
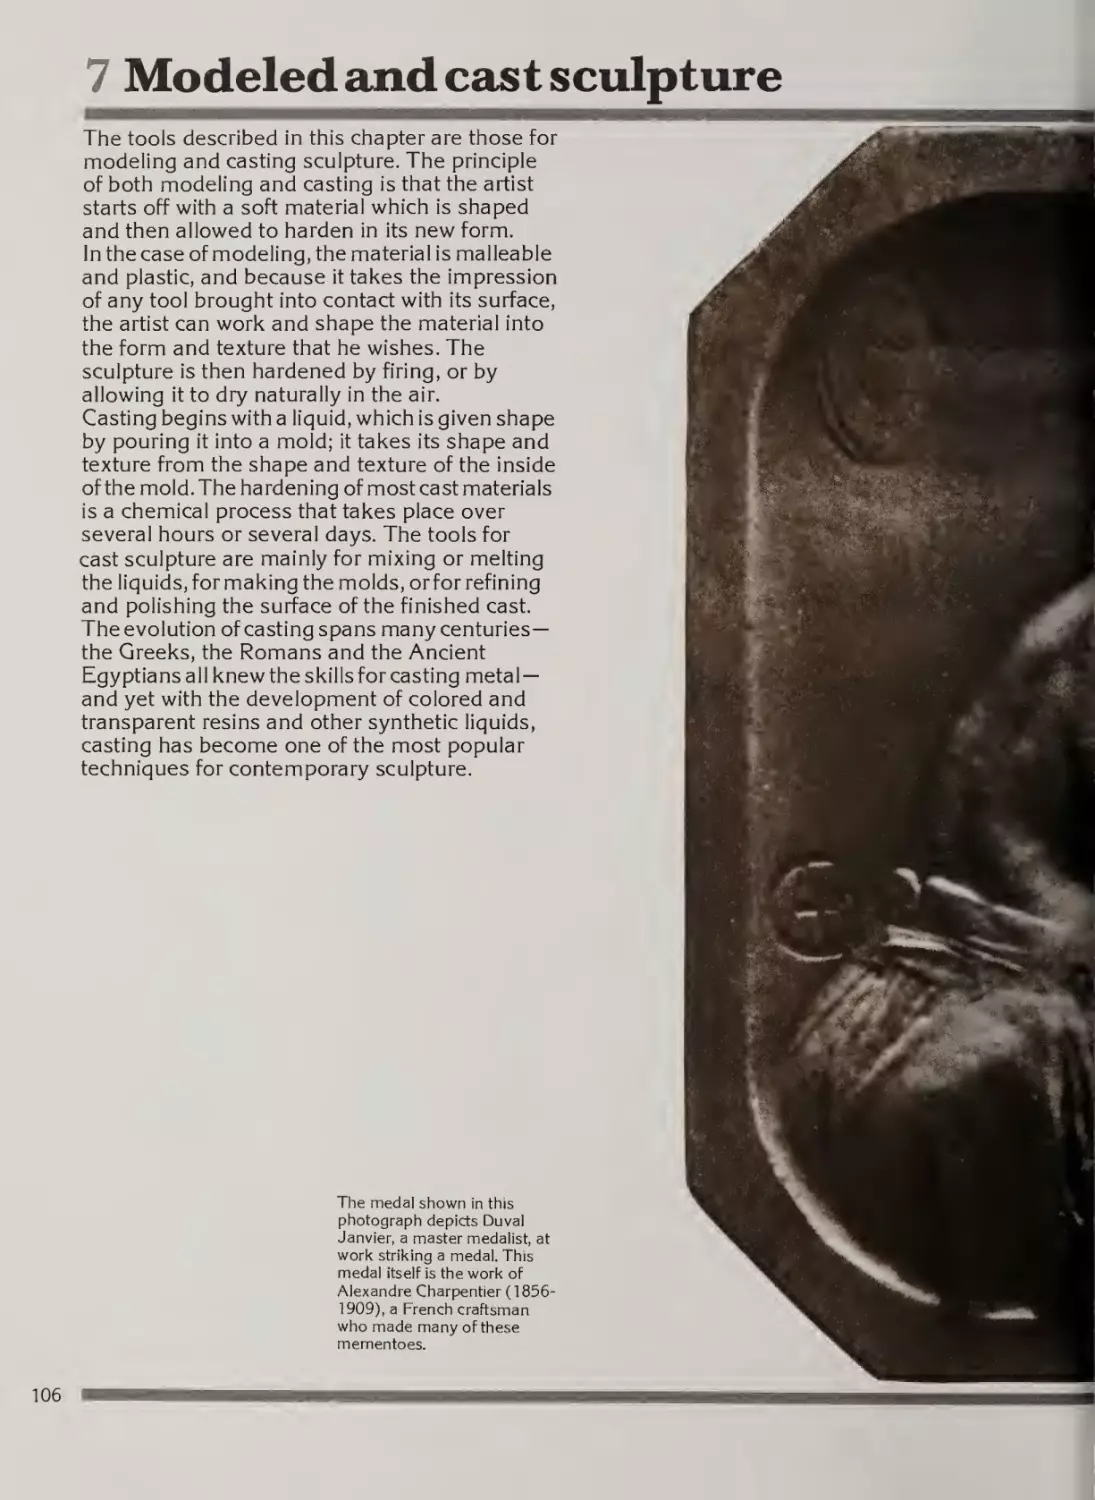
Introduction
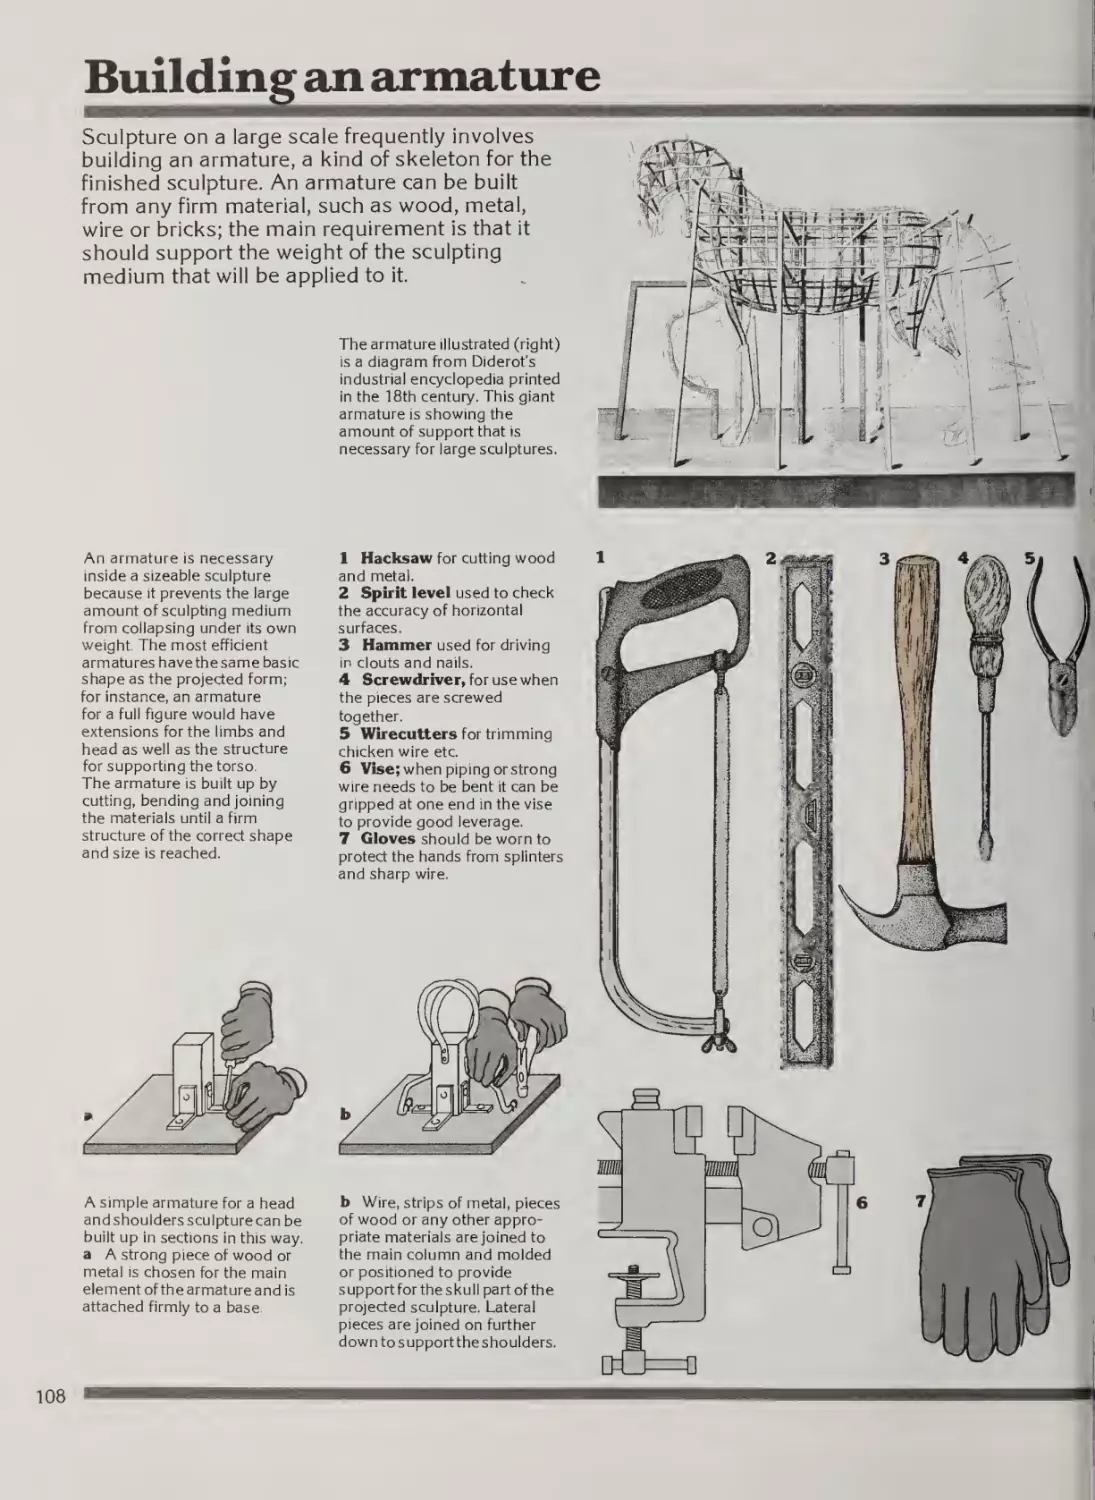
Building an armature
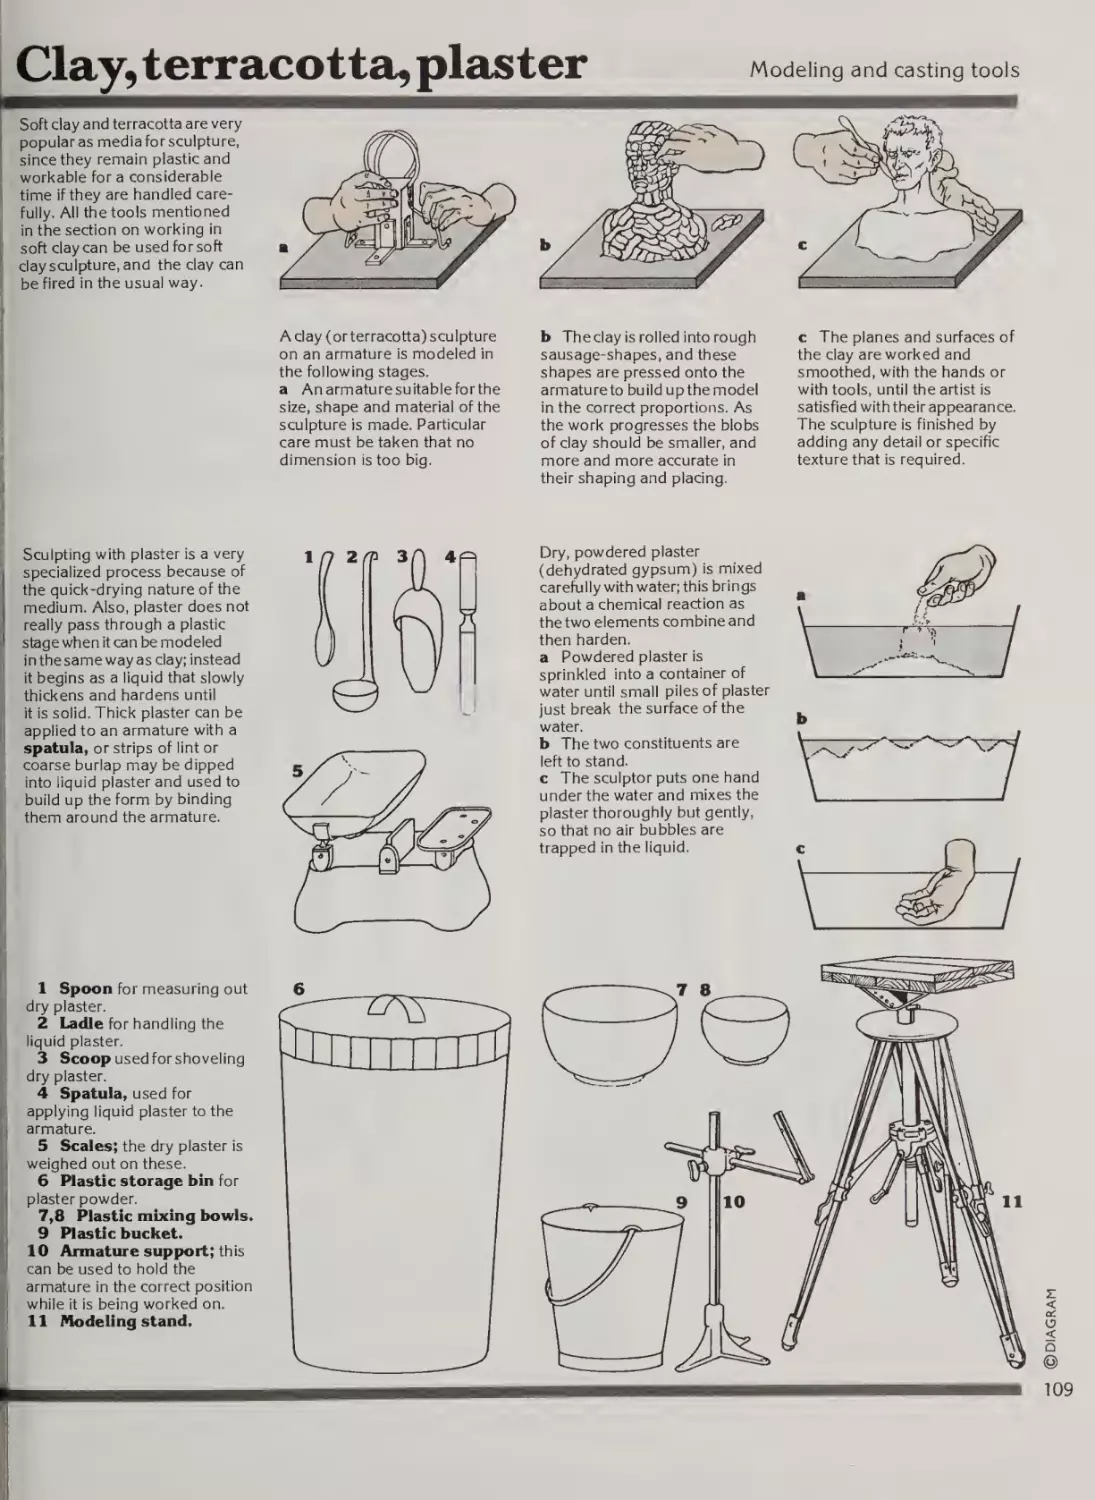
Clay, terracotta, plaster
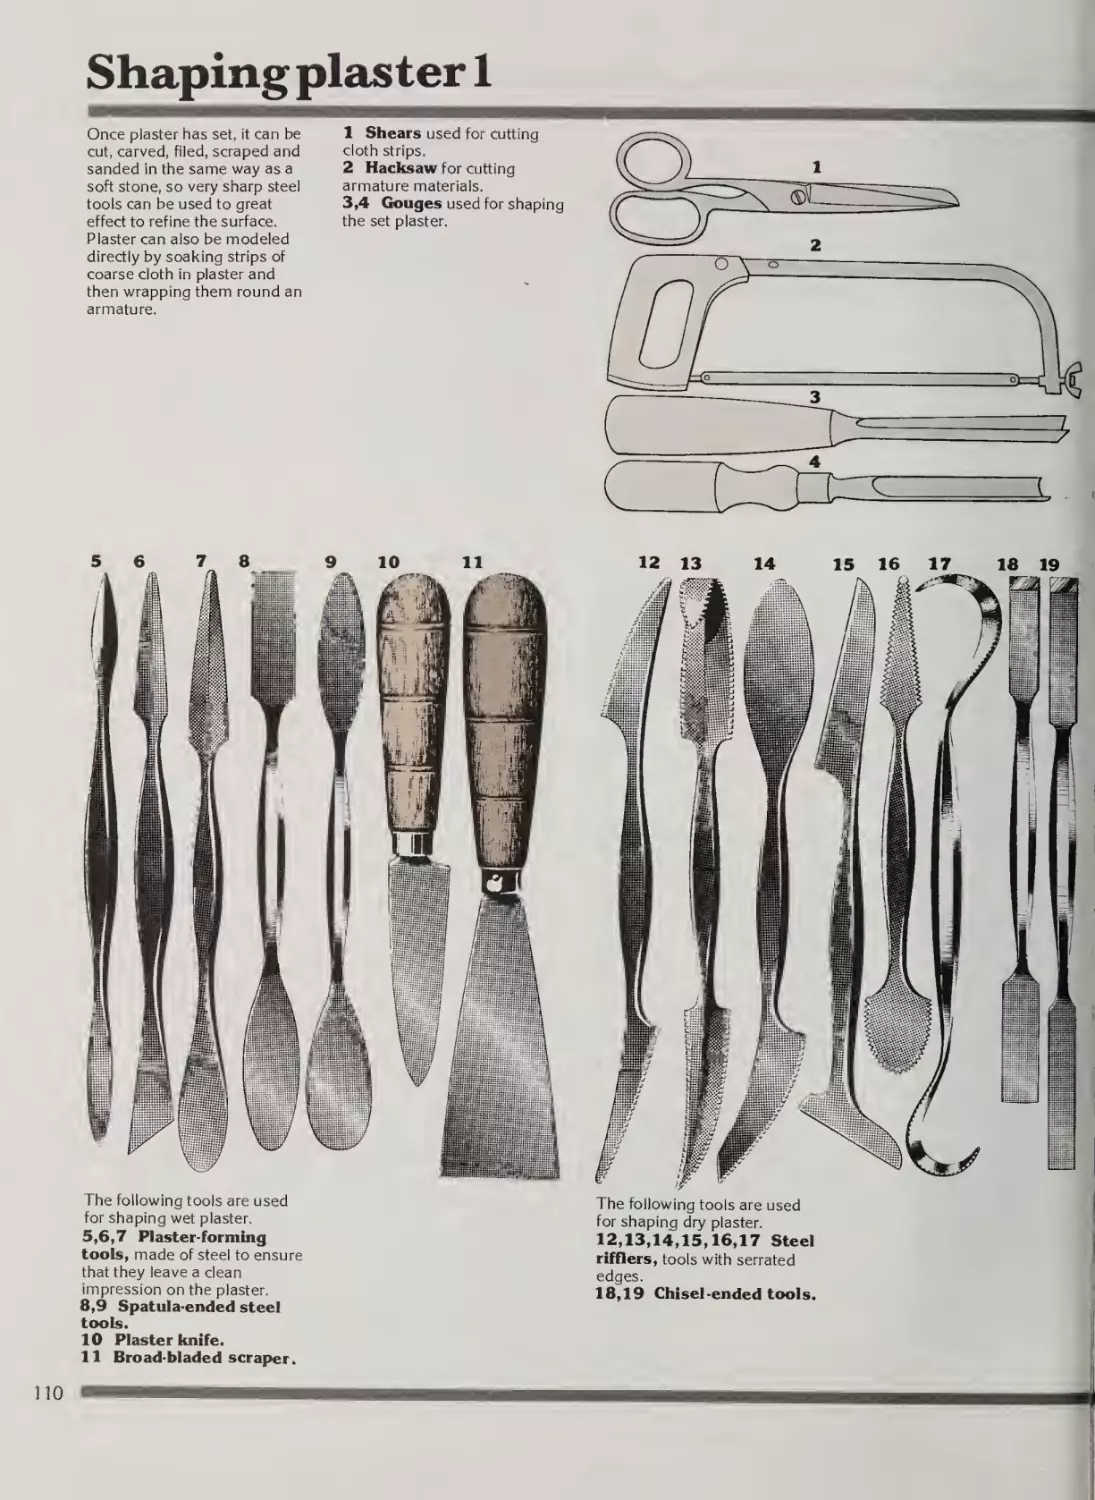
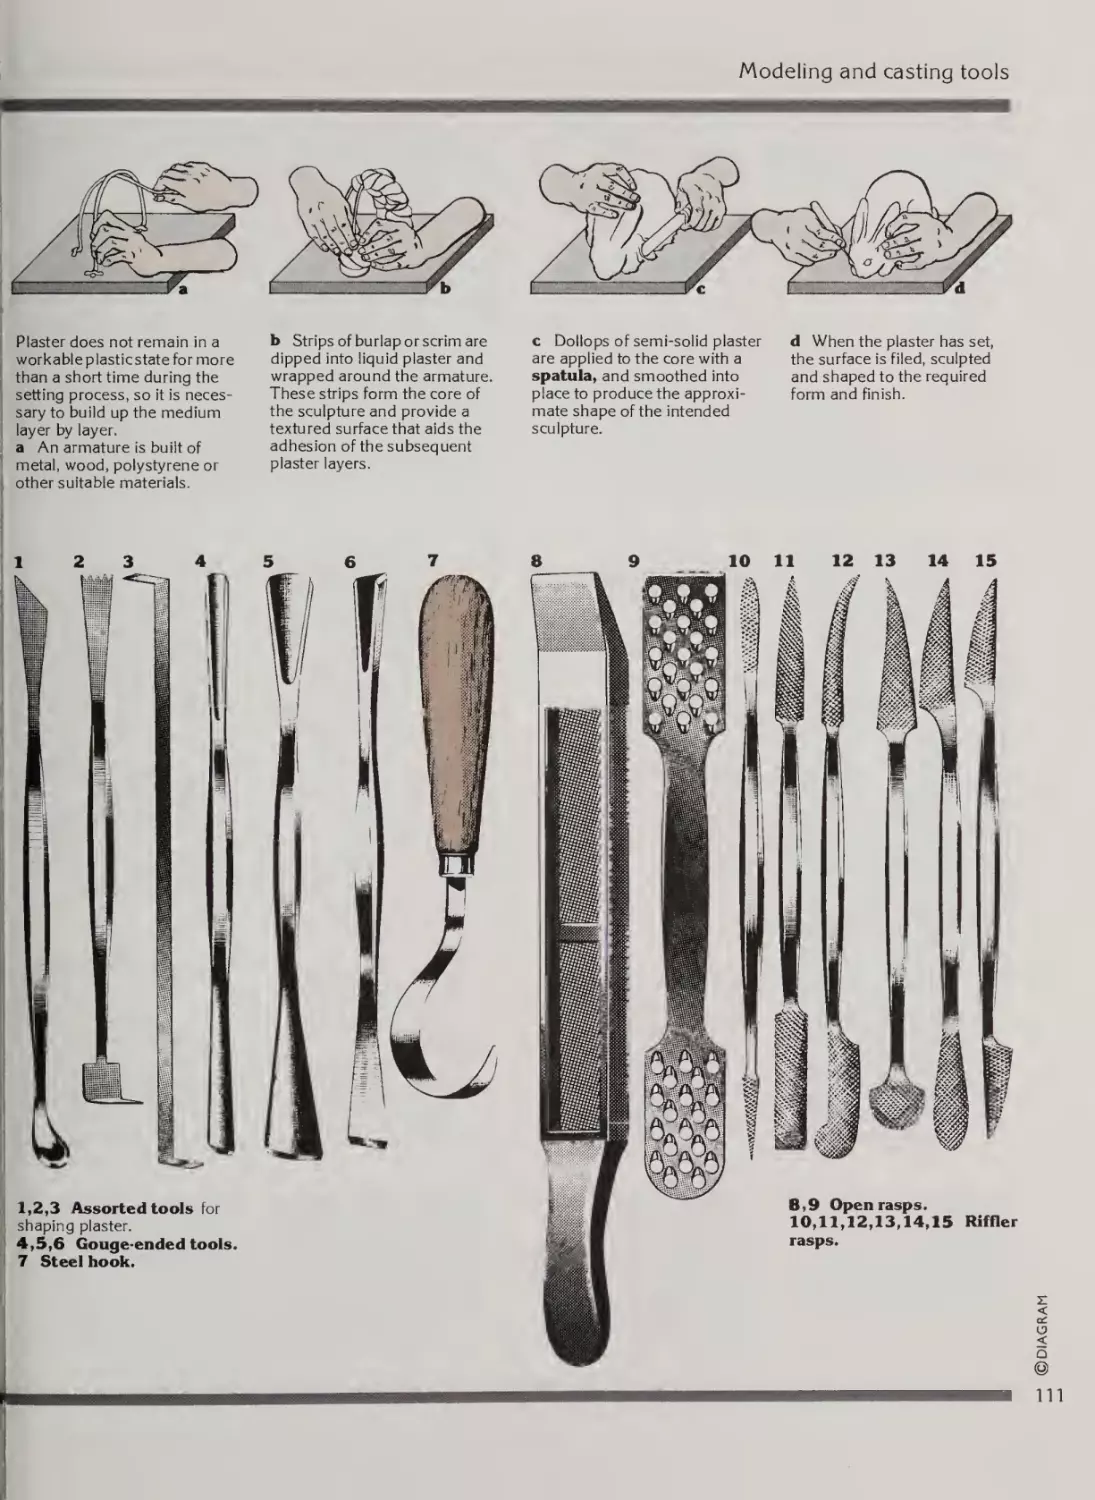
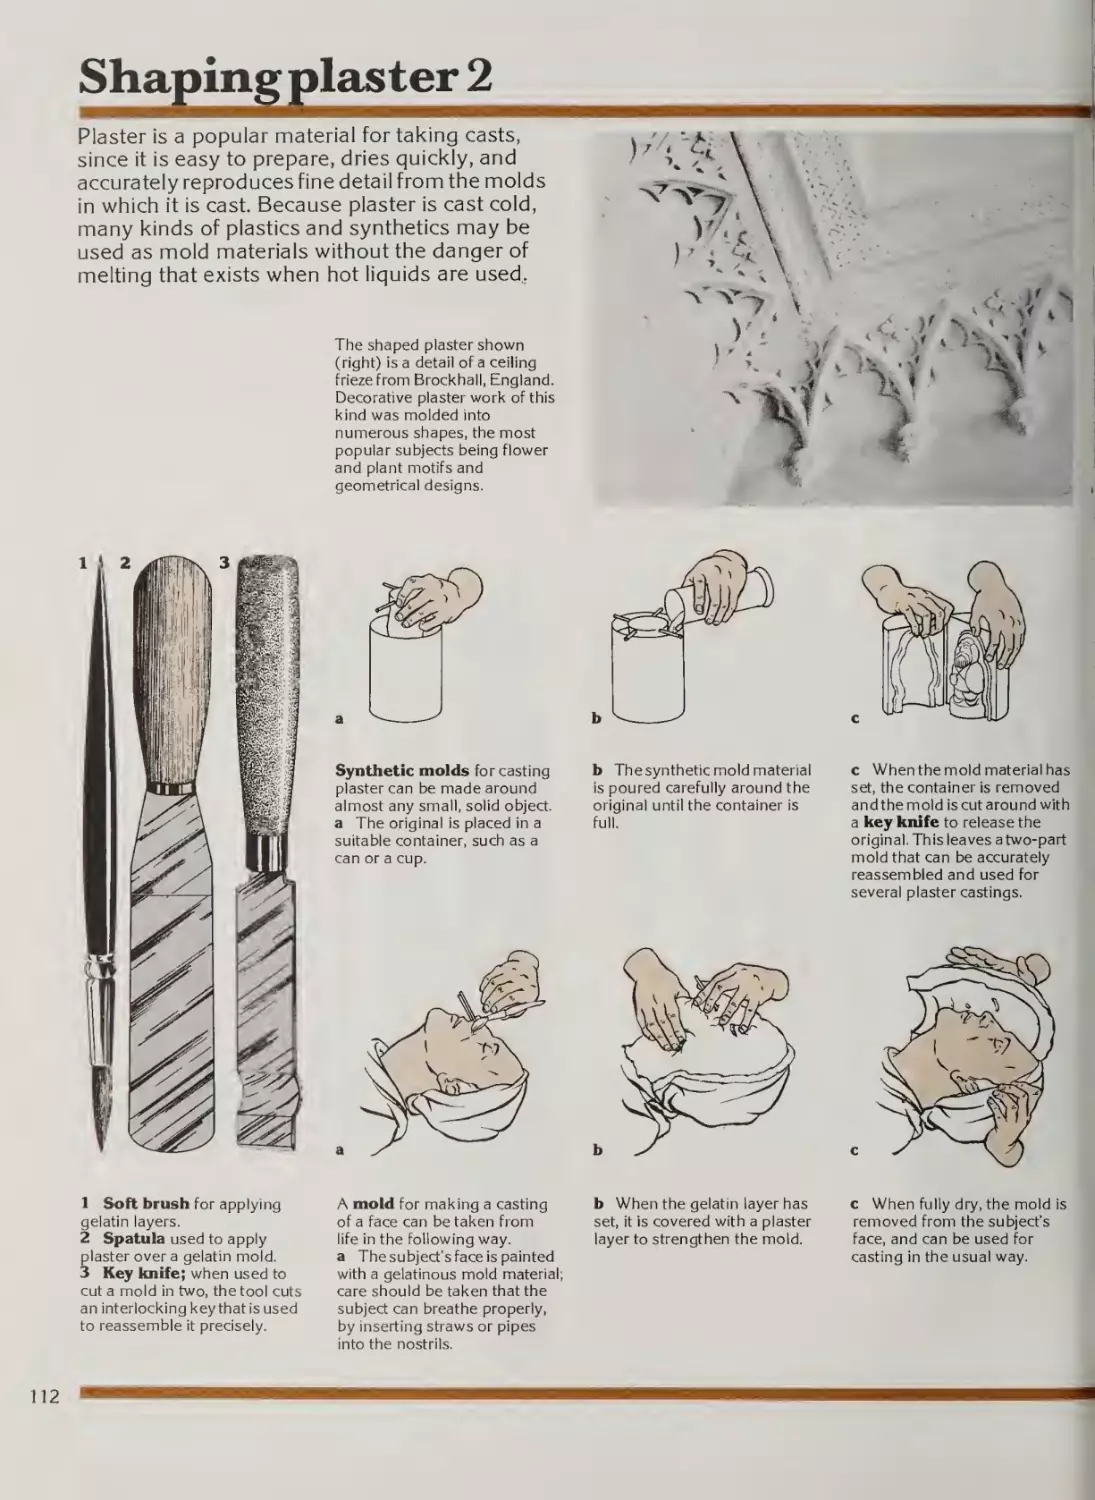
Shaping plaster
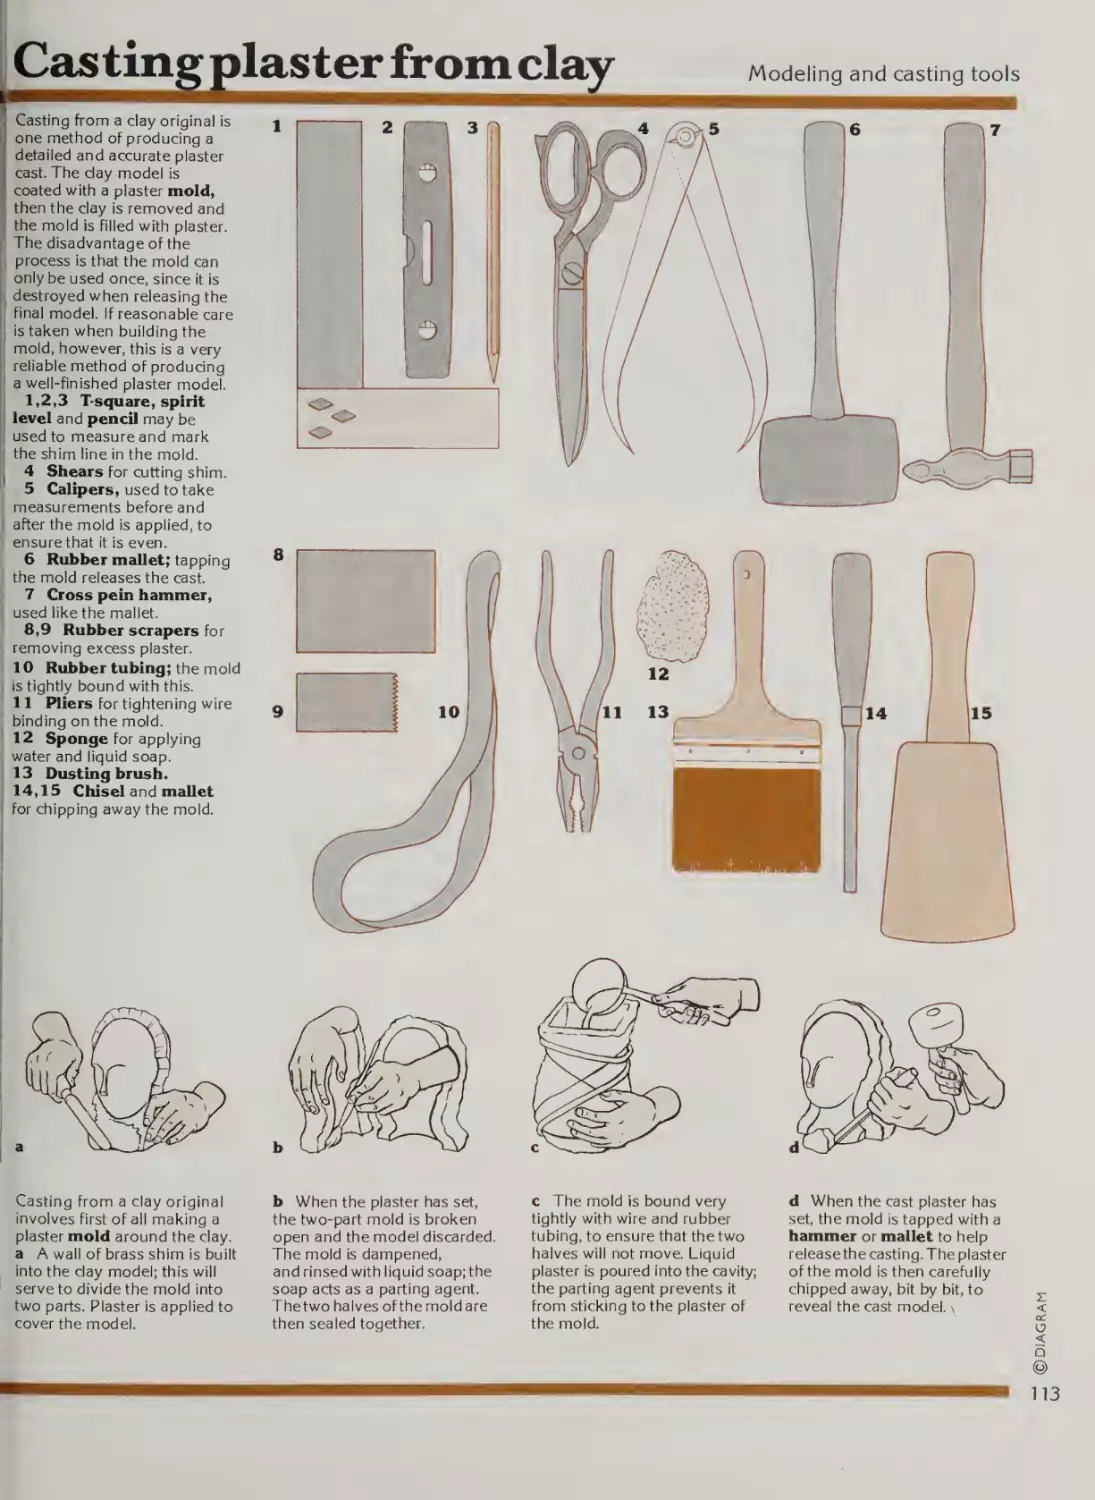
Casting plaster from clay
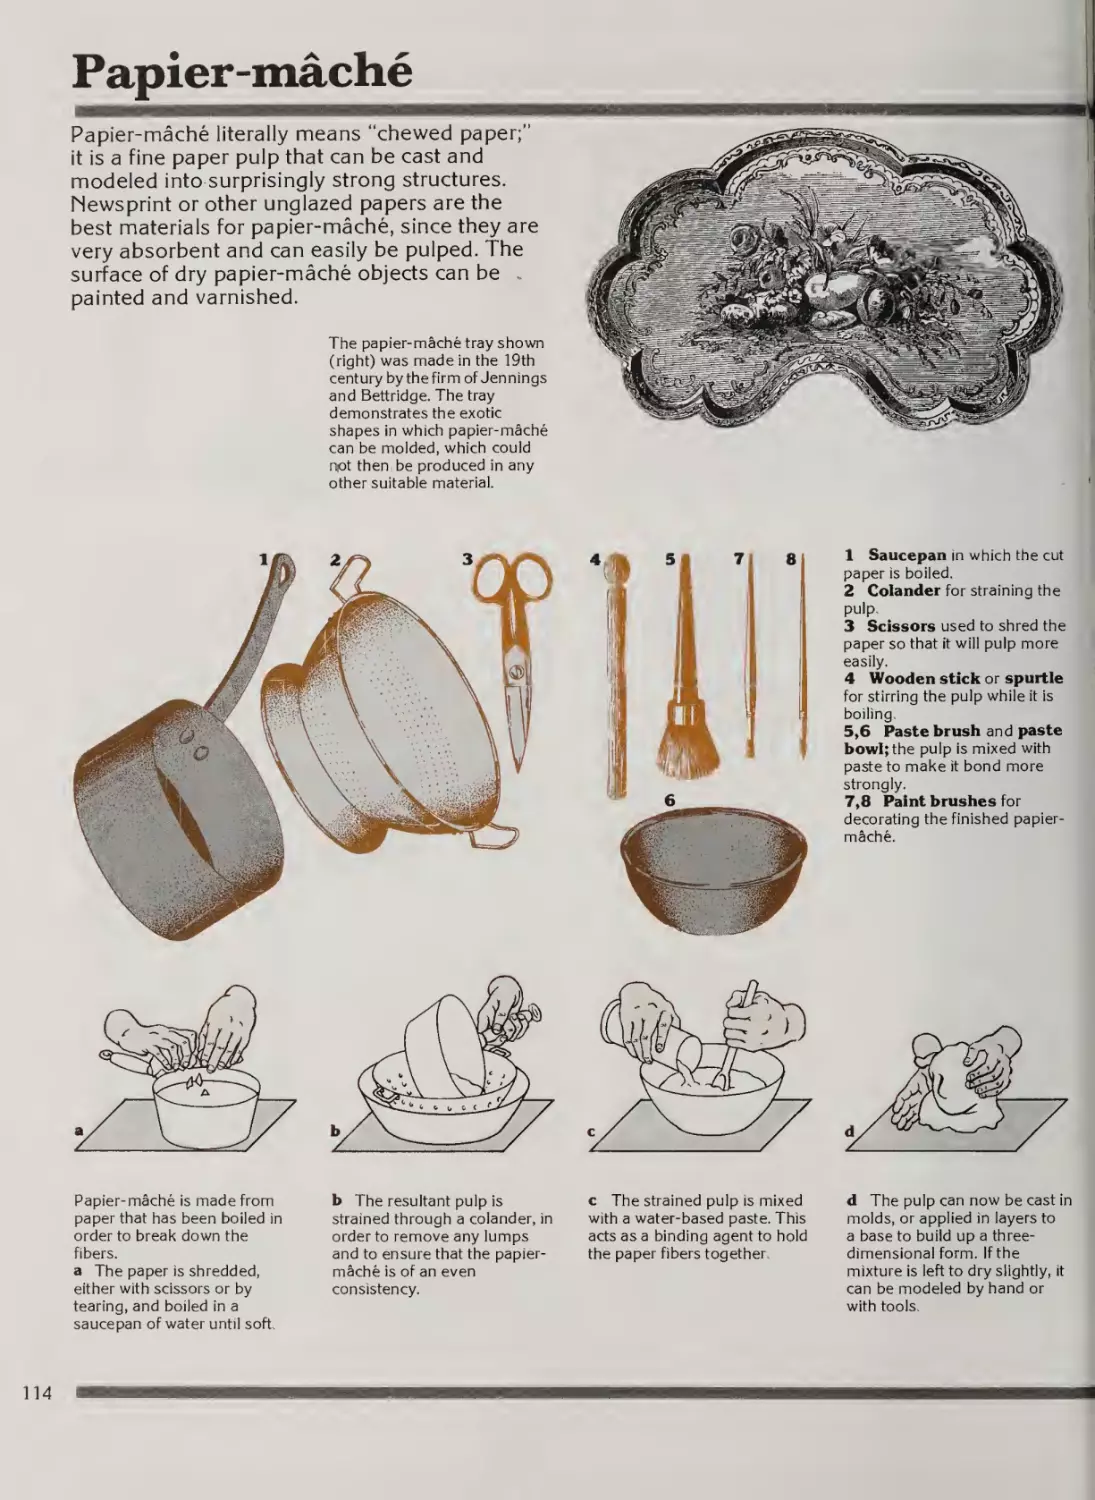
Papier-mache
Candlemaking
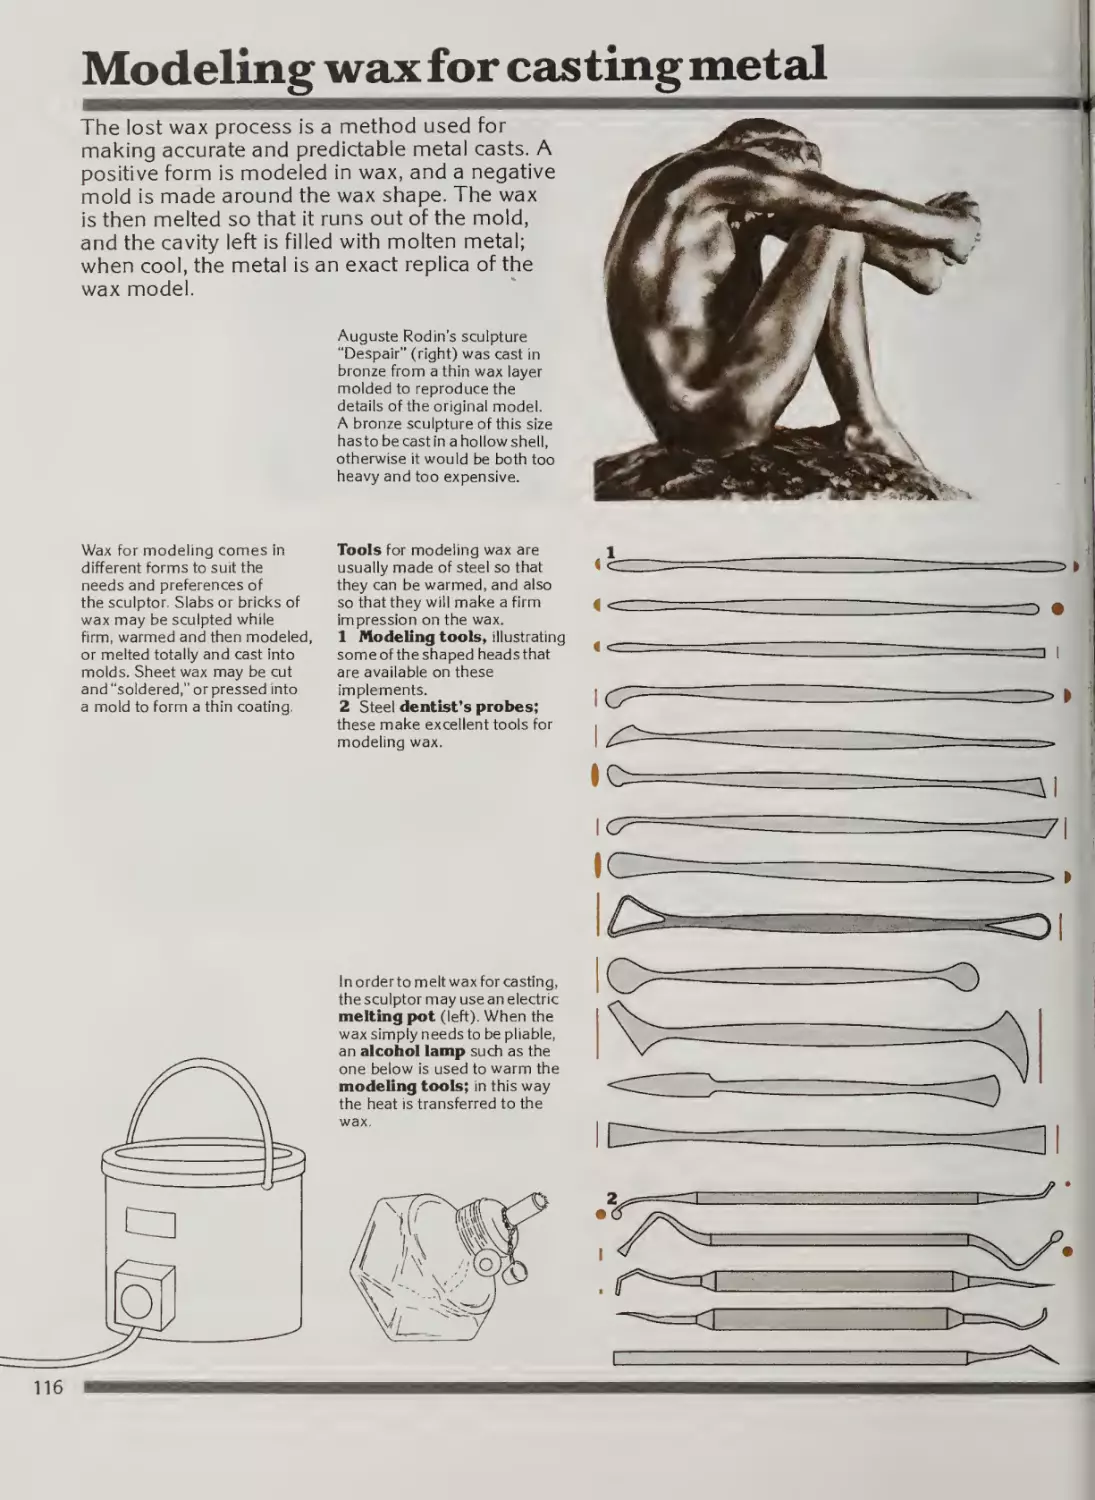
Modeling wax for casting metal
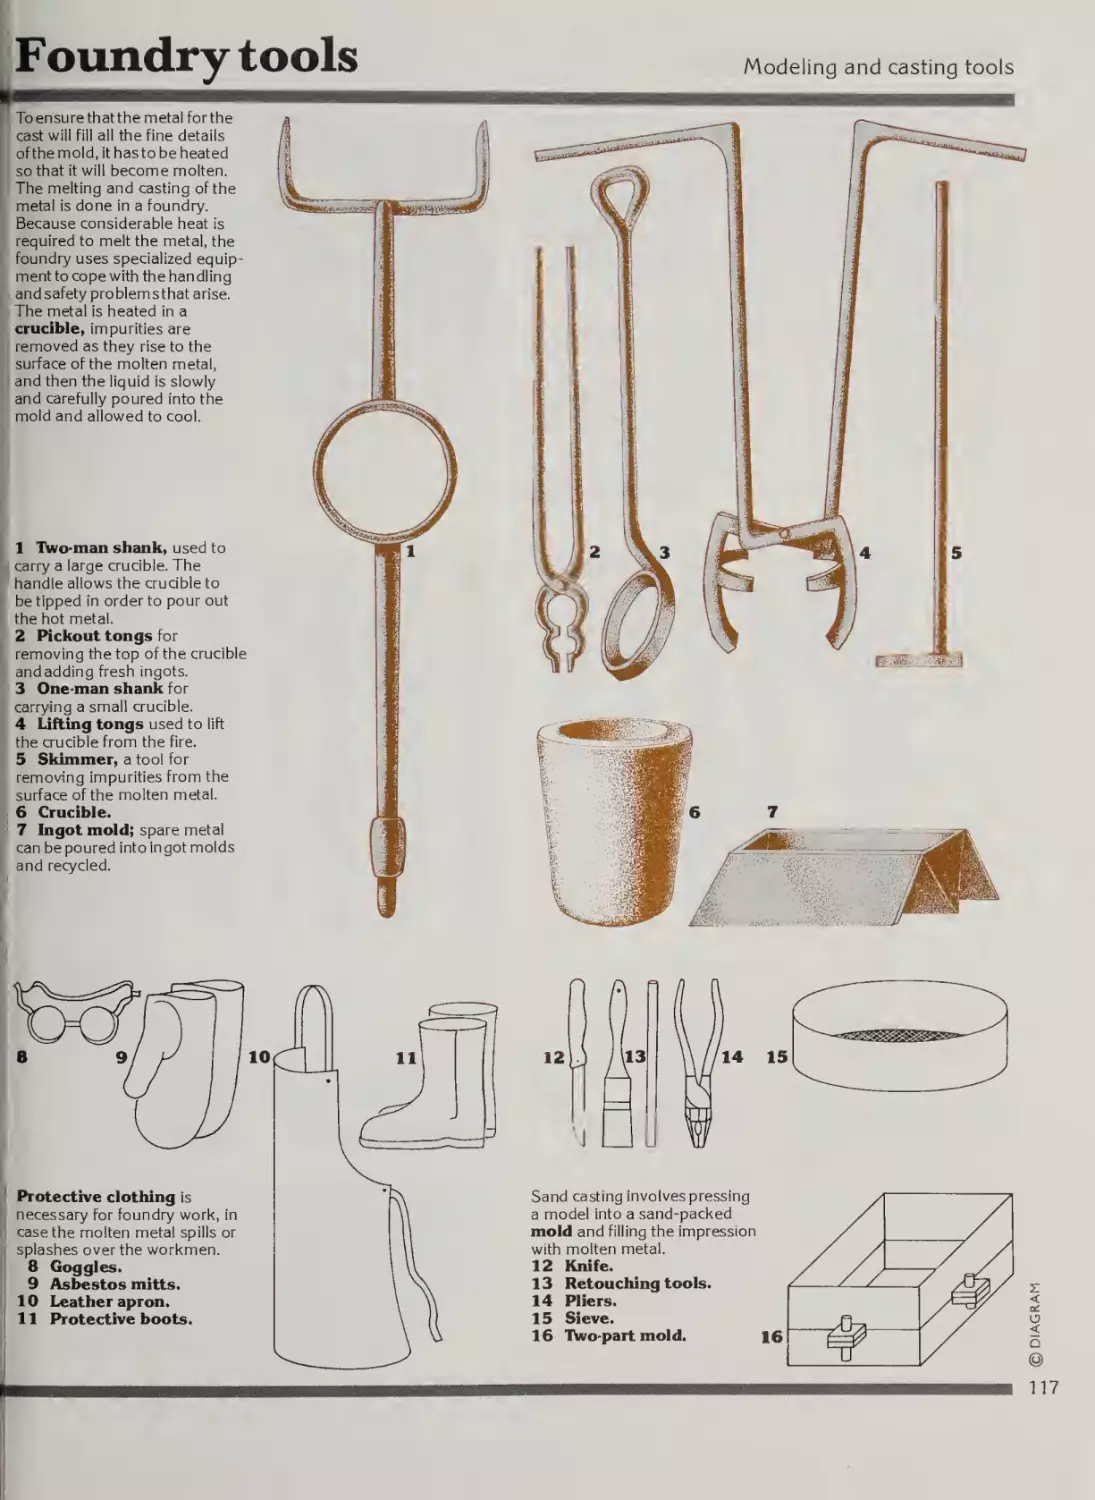
Foundry tools
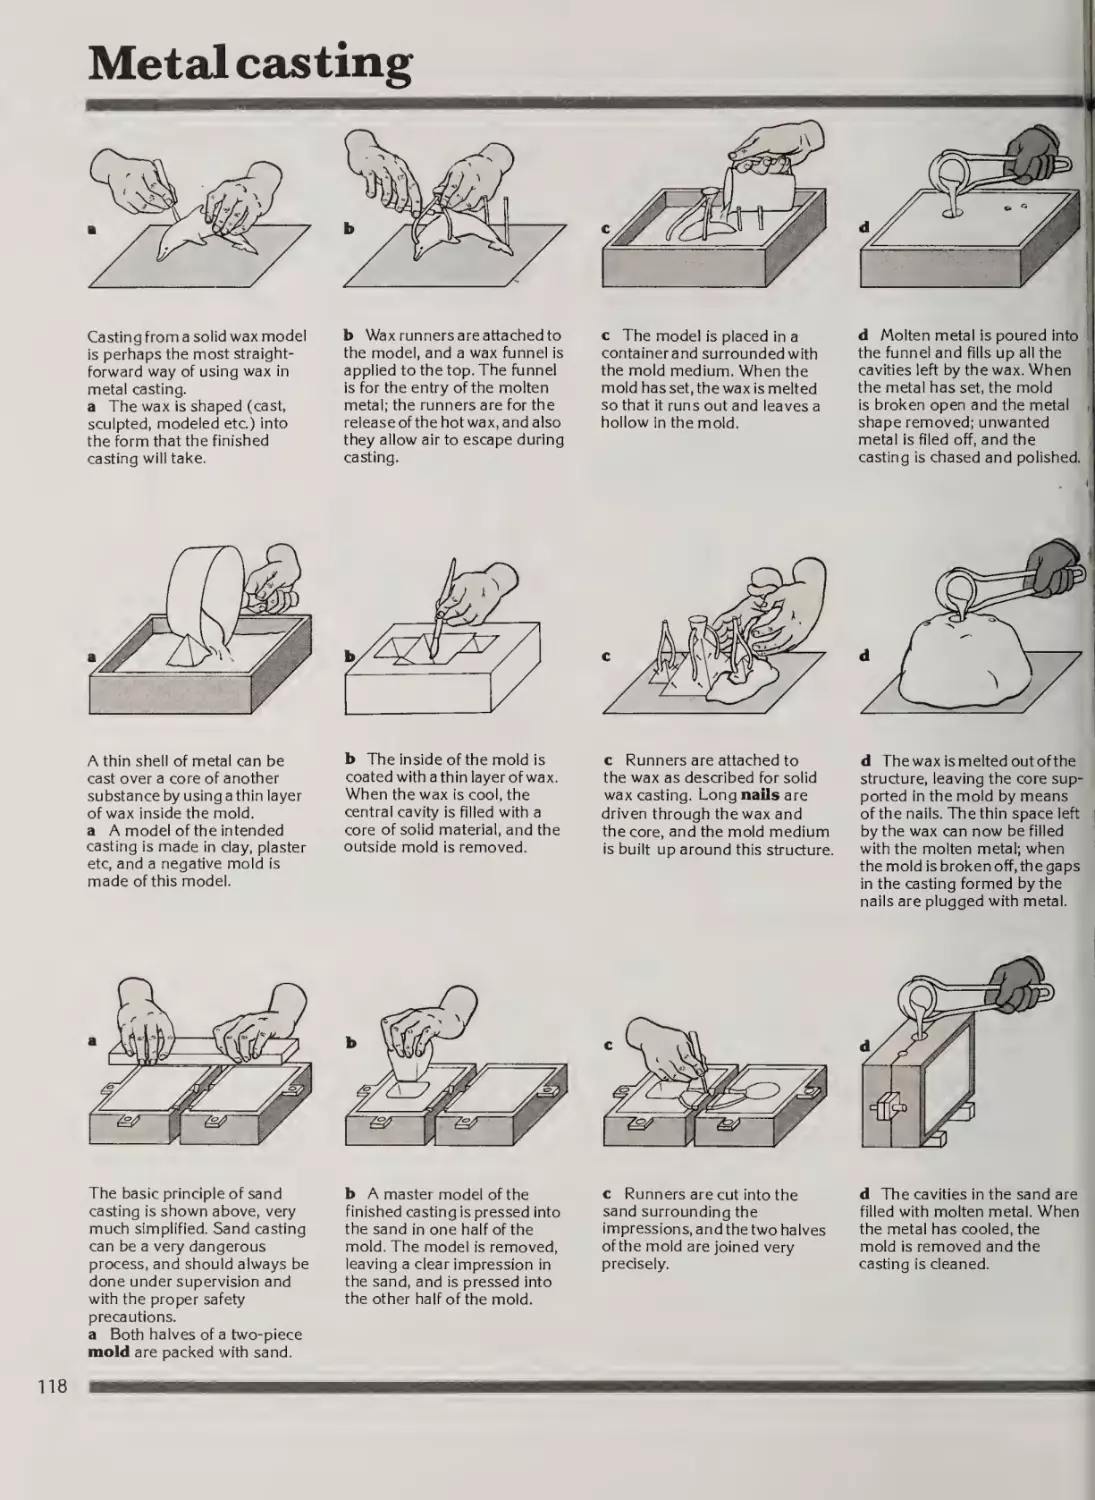
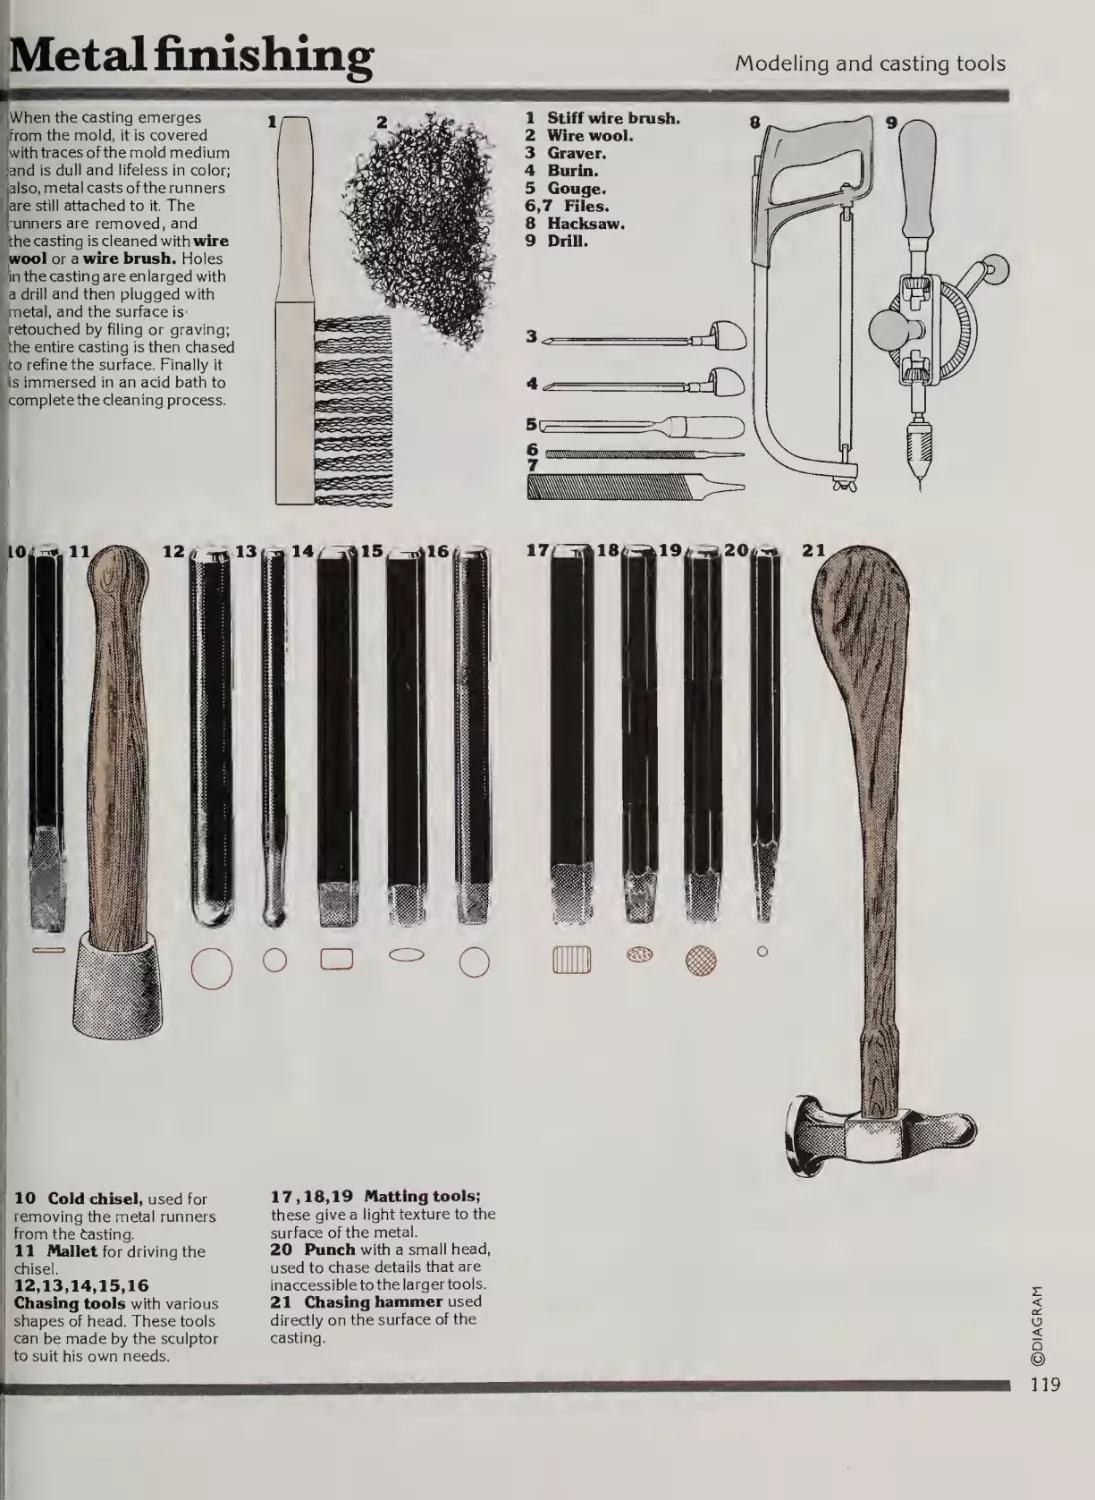
Metal casting
Metal finishing
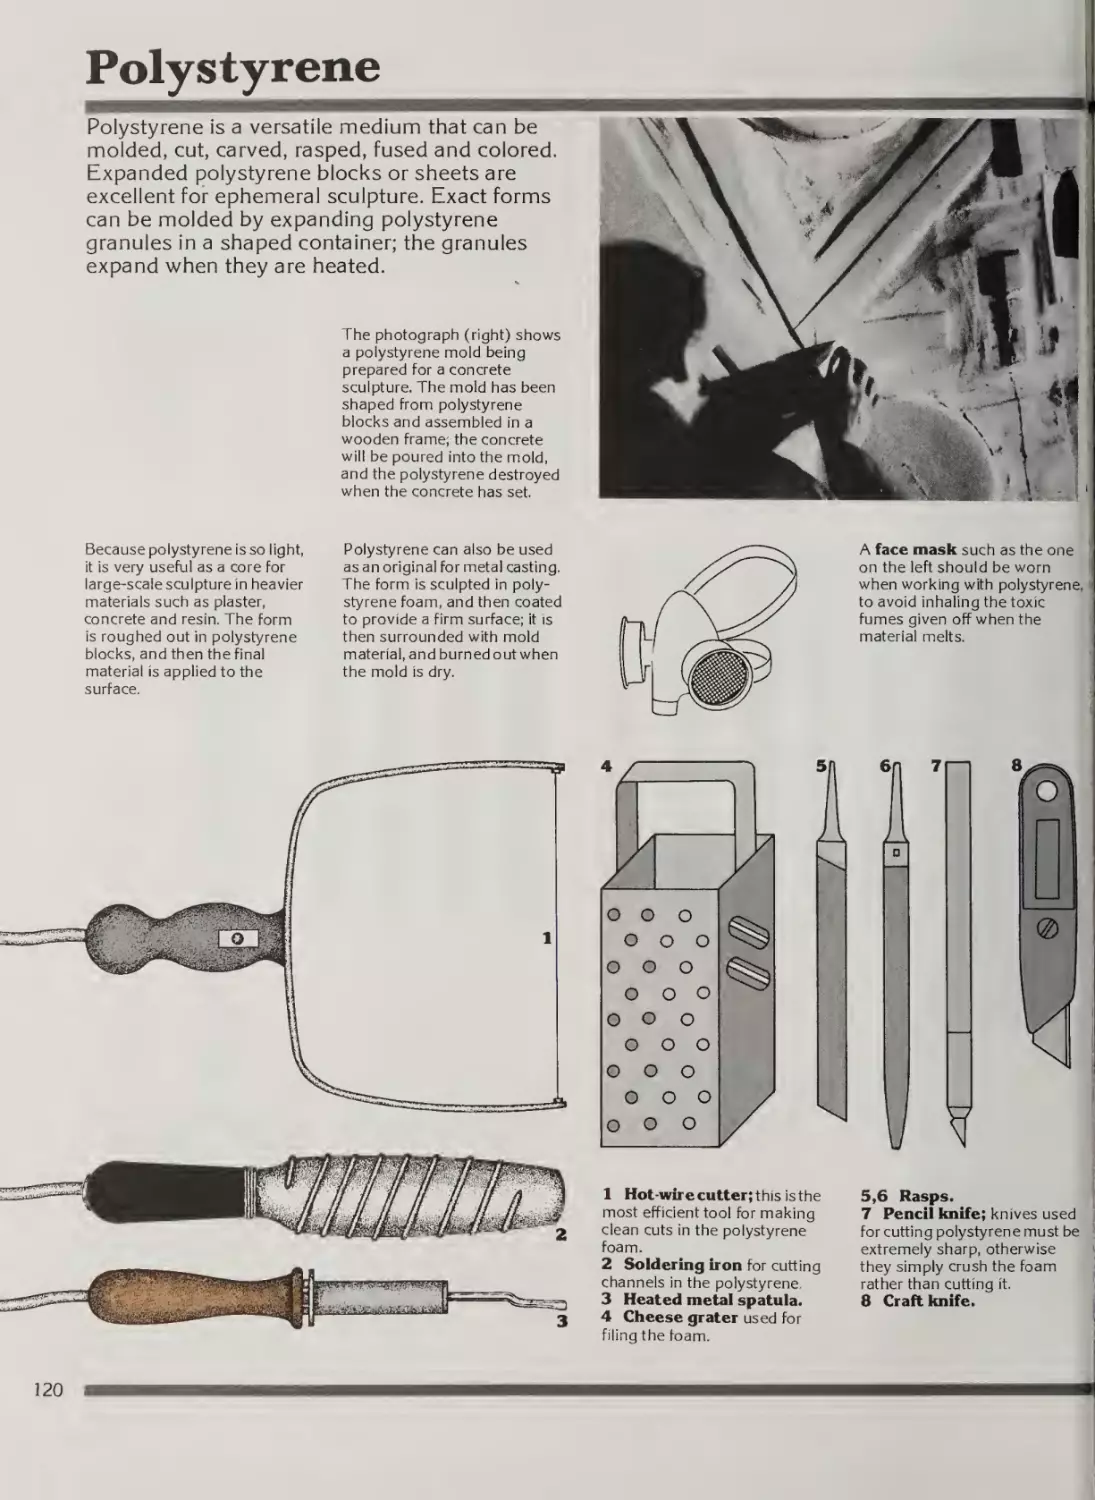
Polystyrene
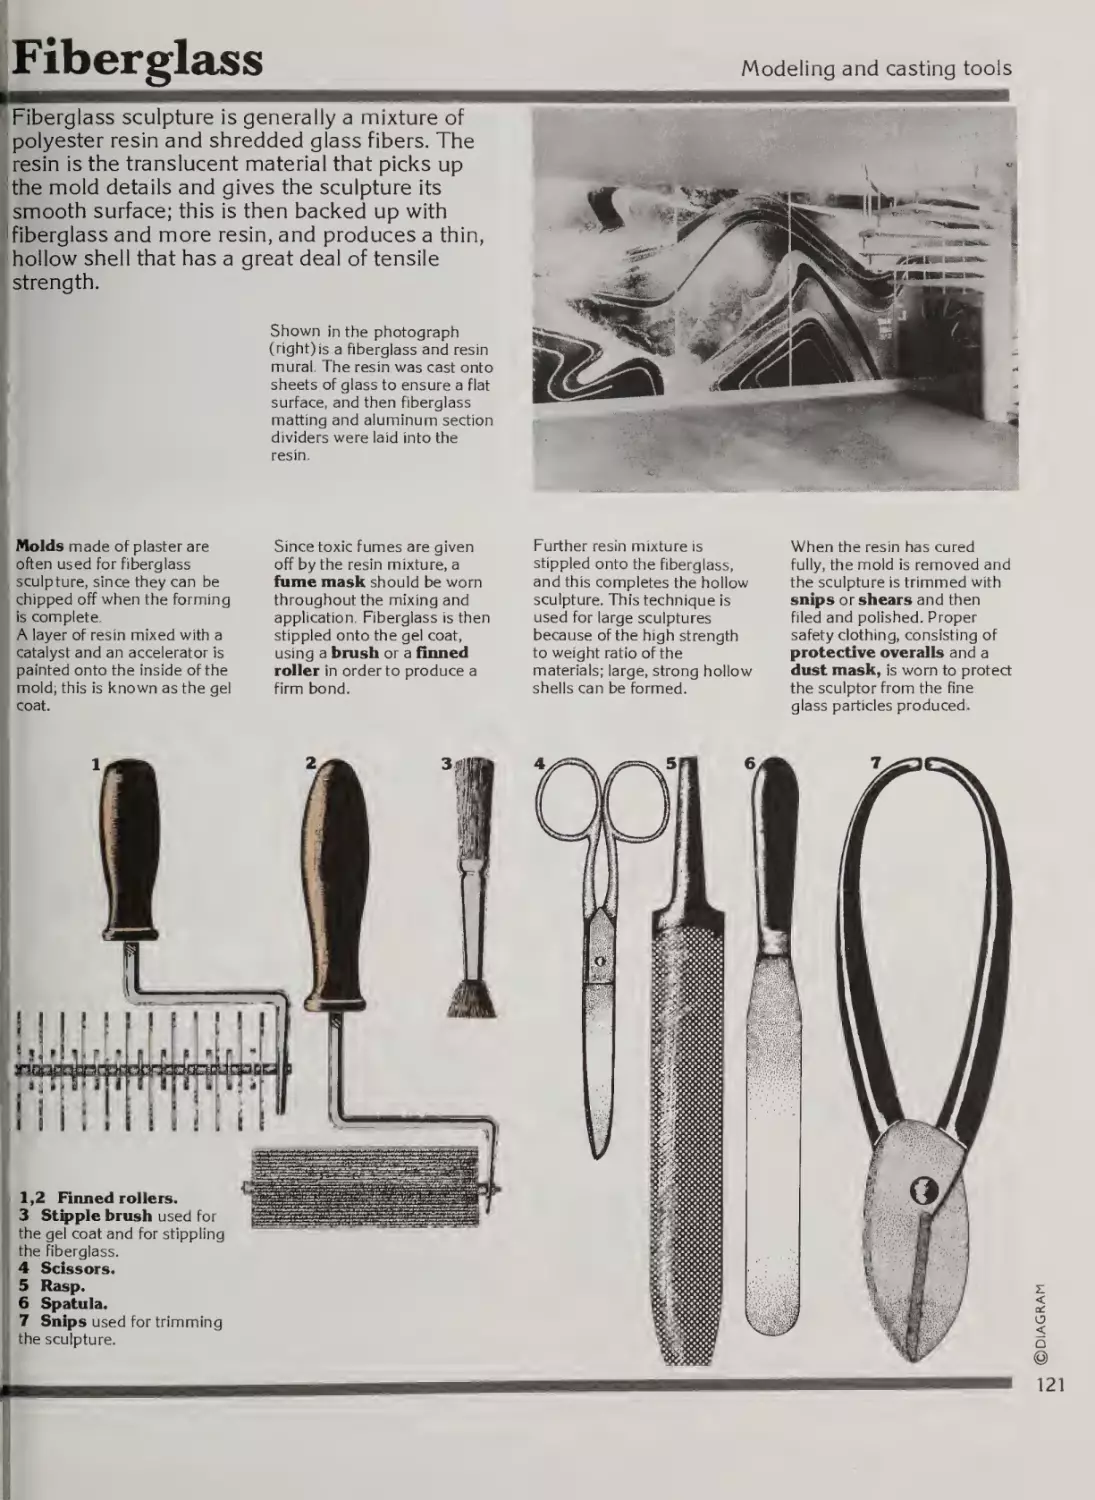
Fiberglass
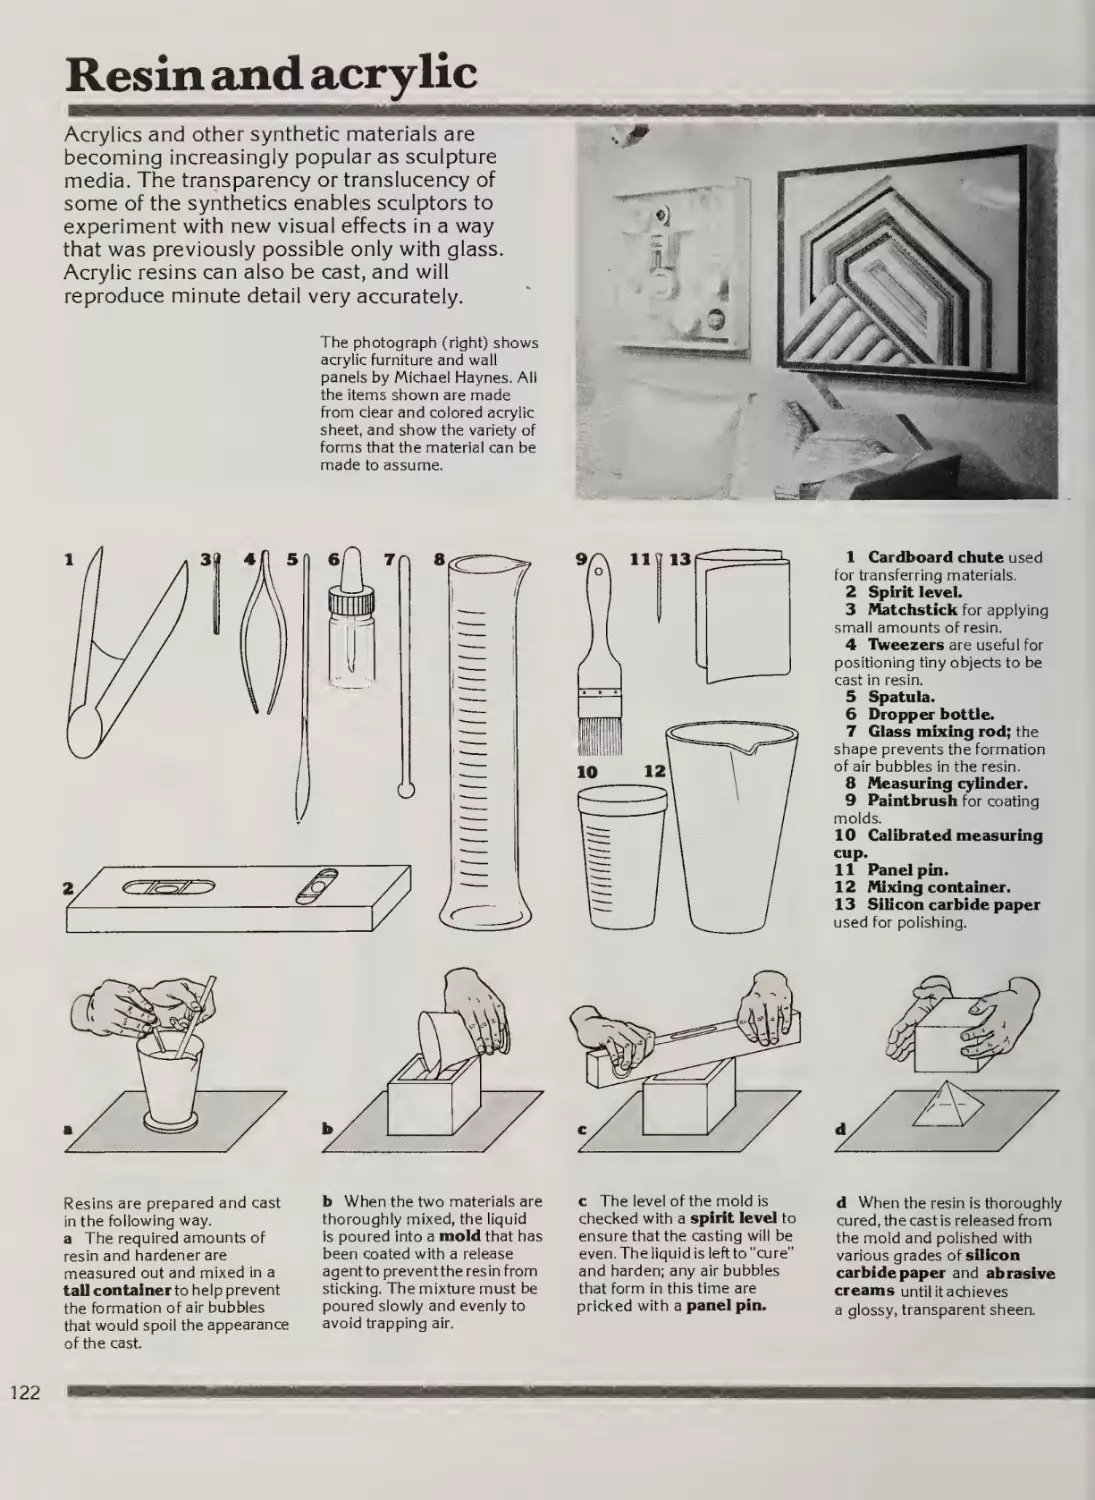
Resin and acrylic
Chapter 8
Carved sculpture
124
126
131
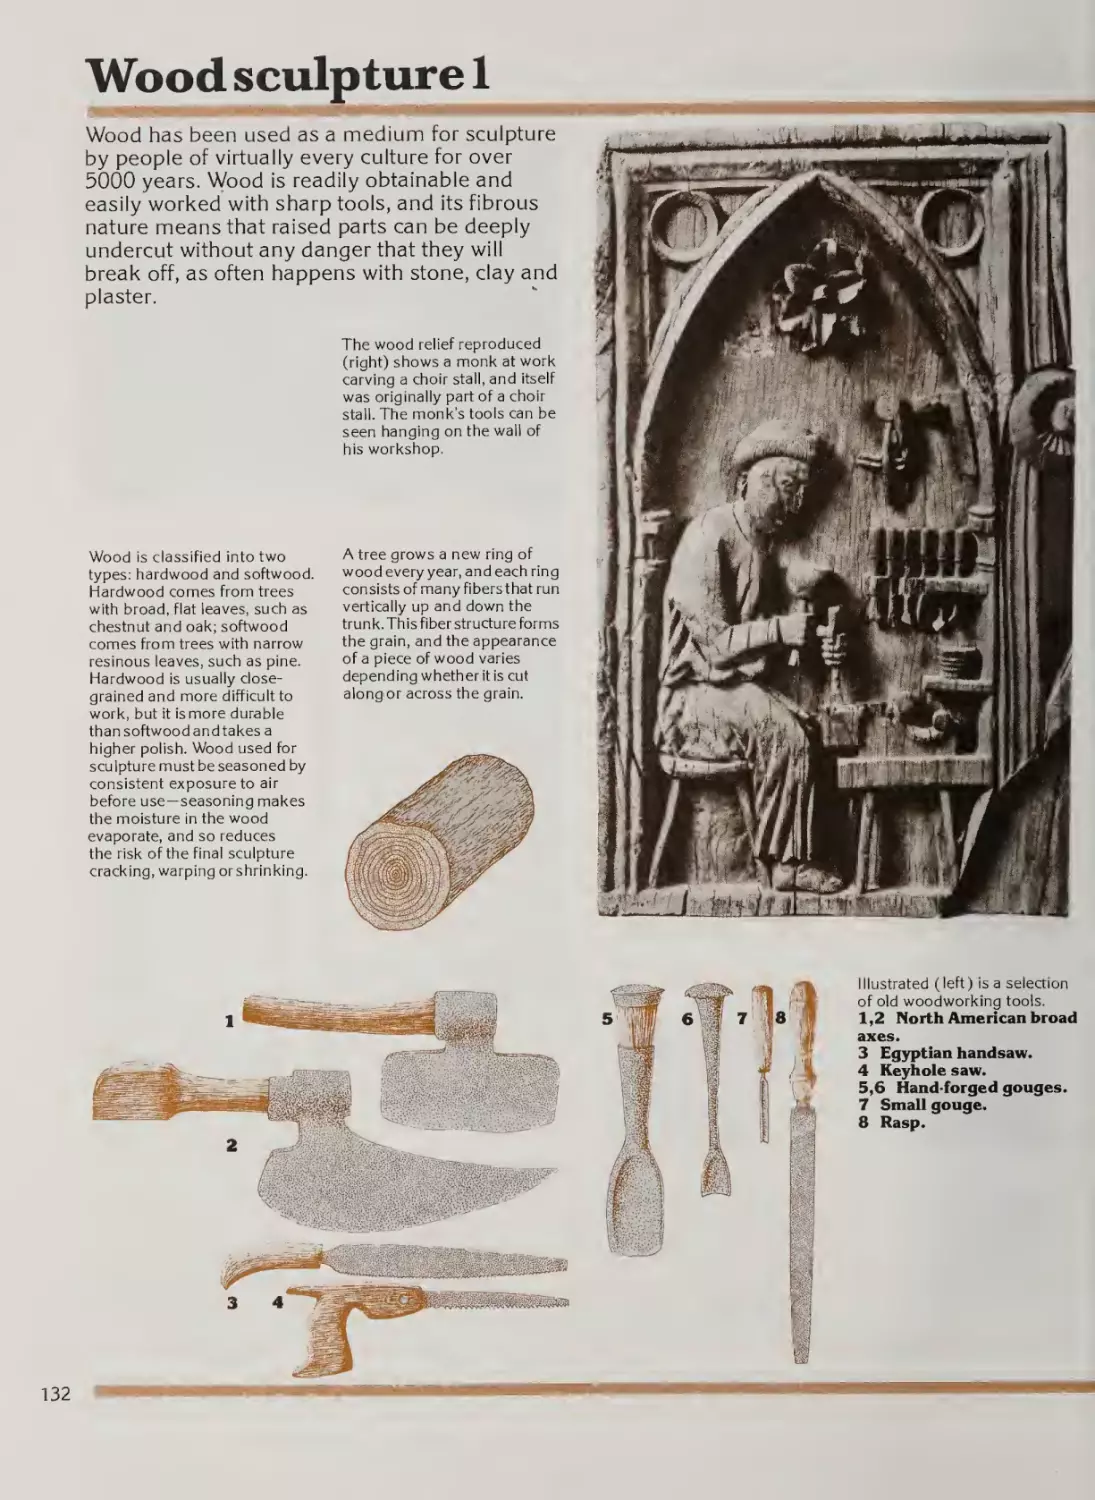
132
136
137
138
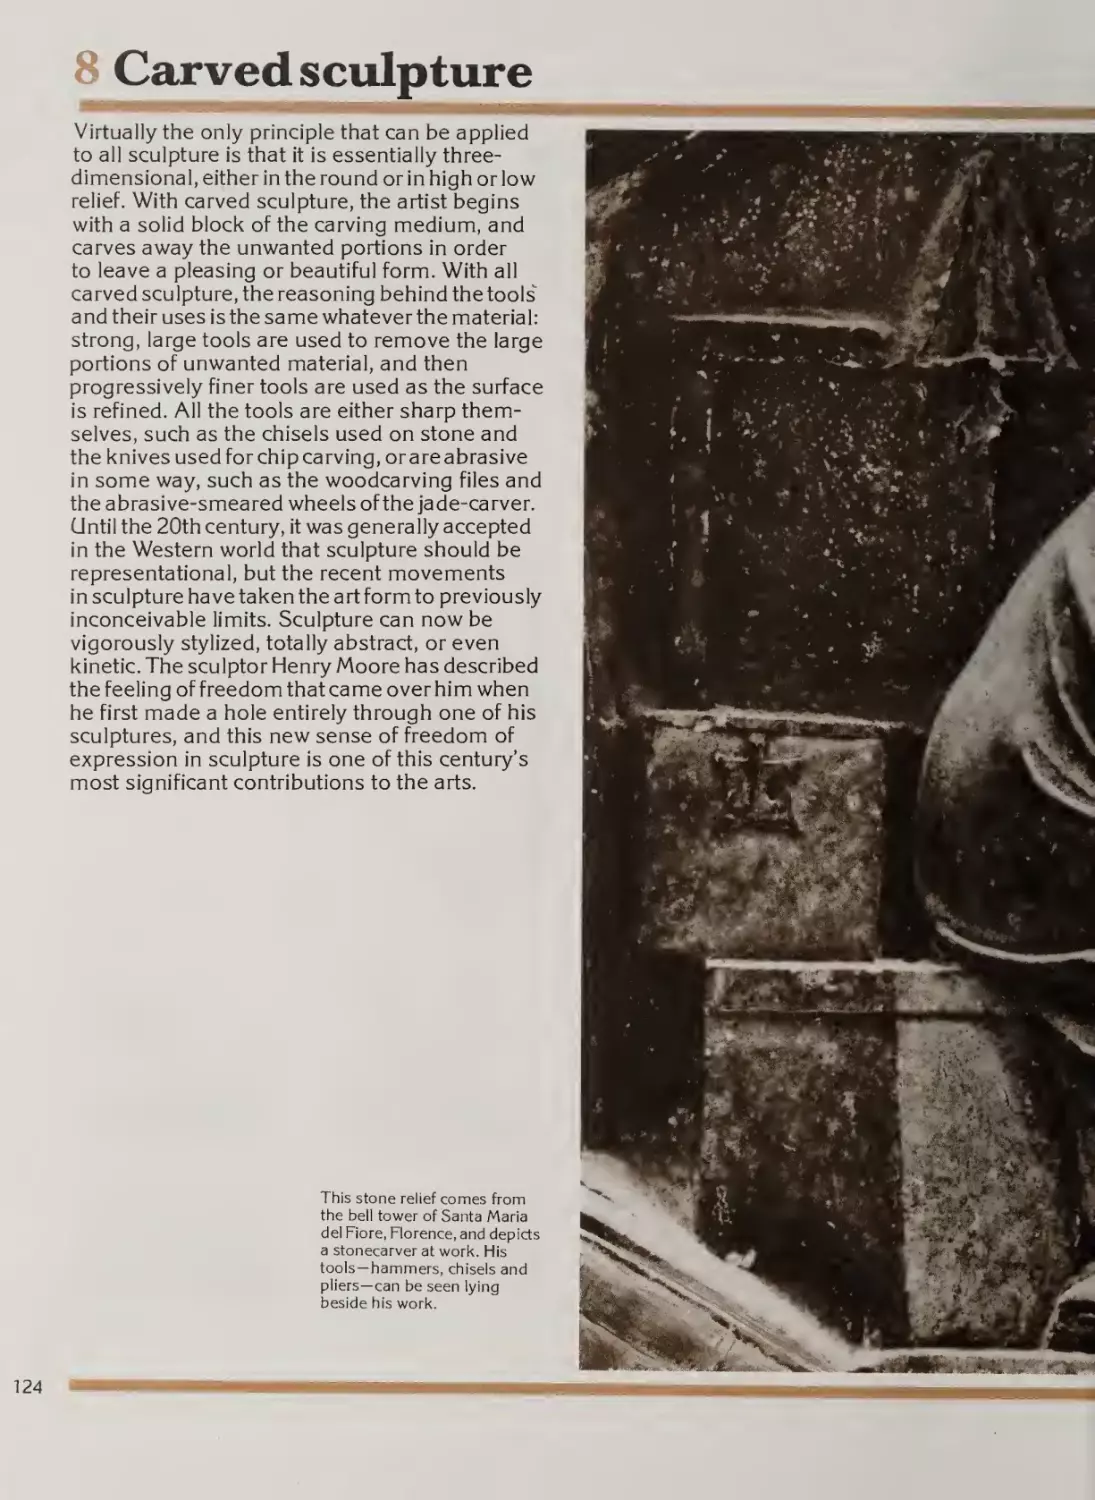
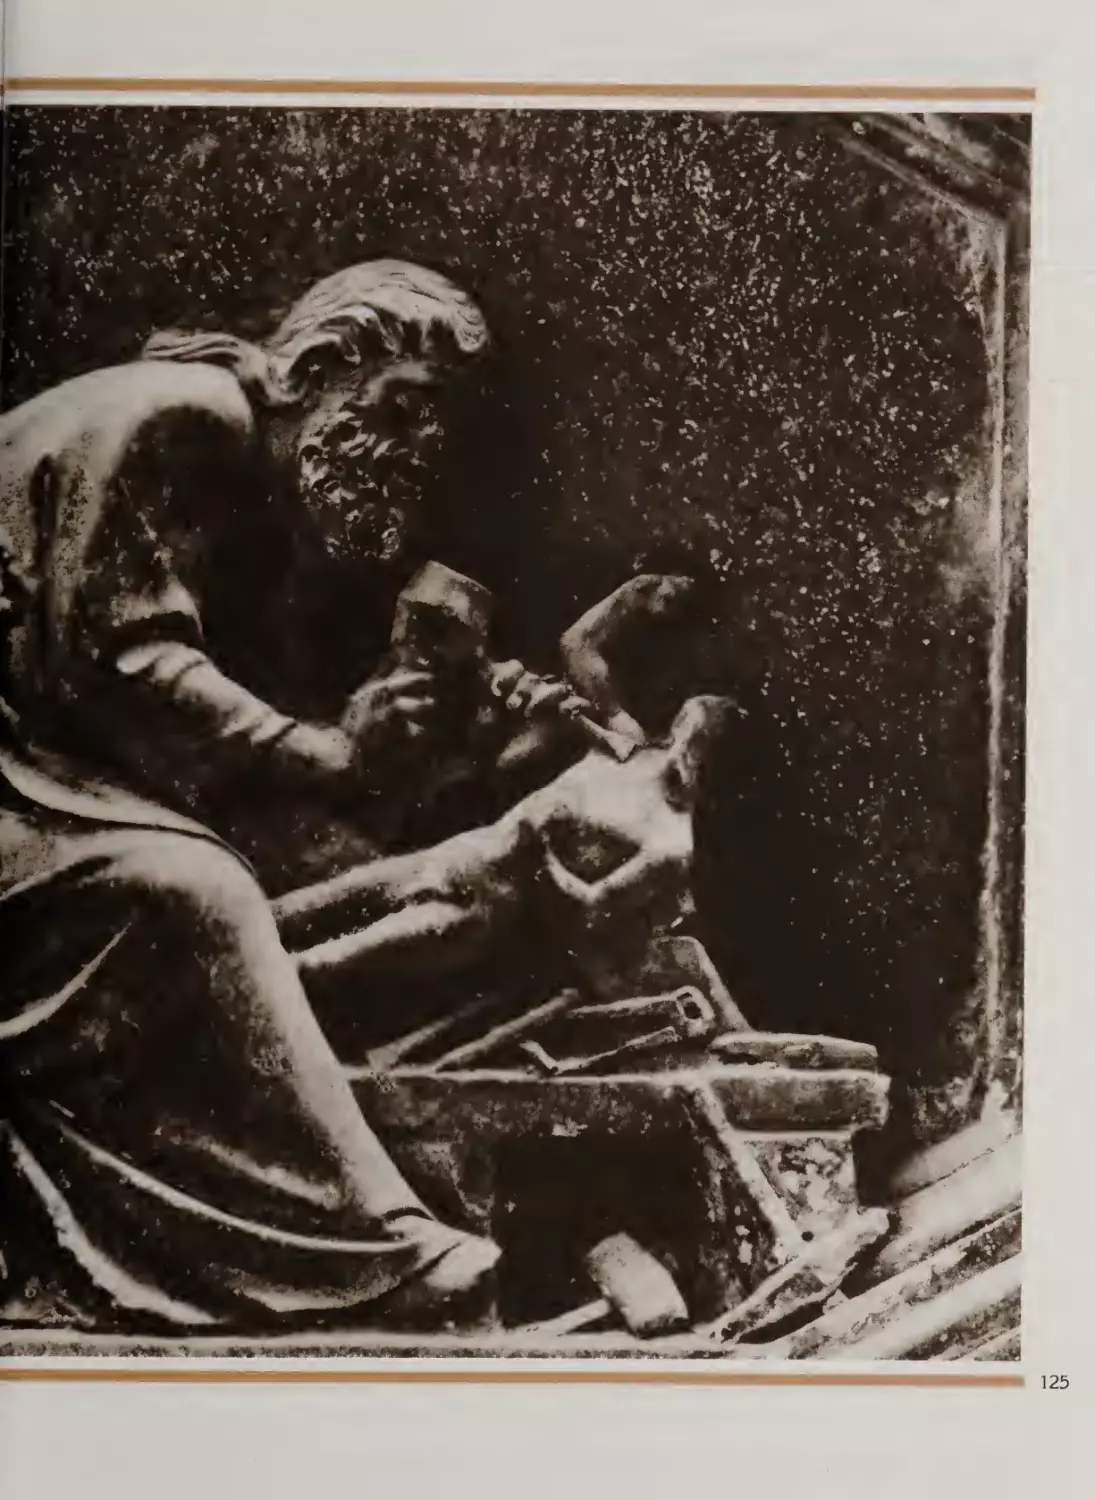
Introduction
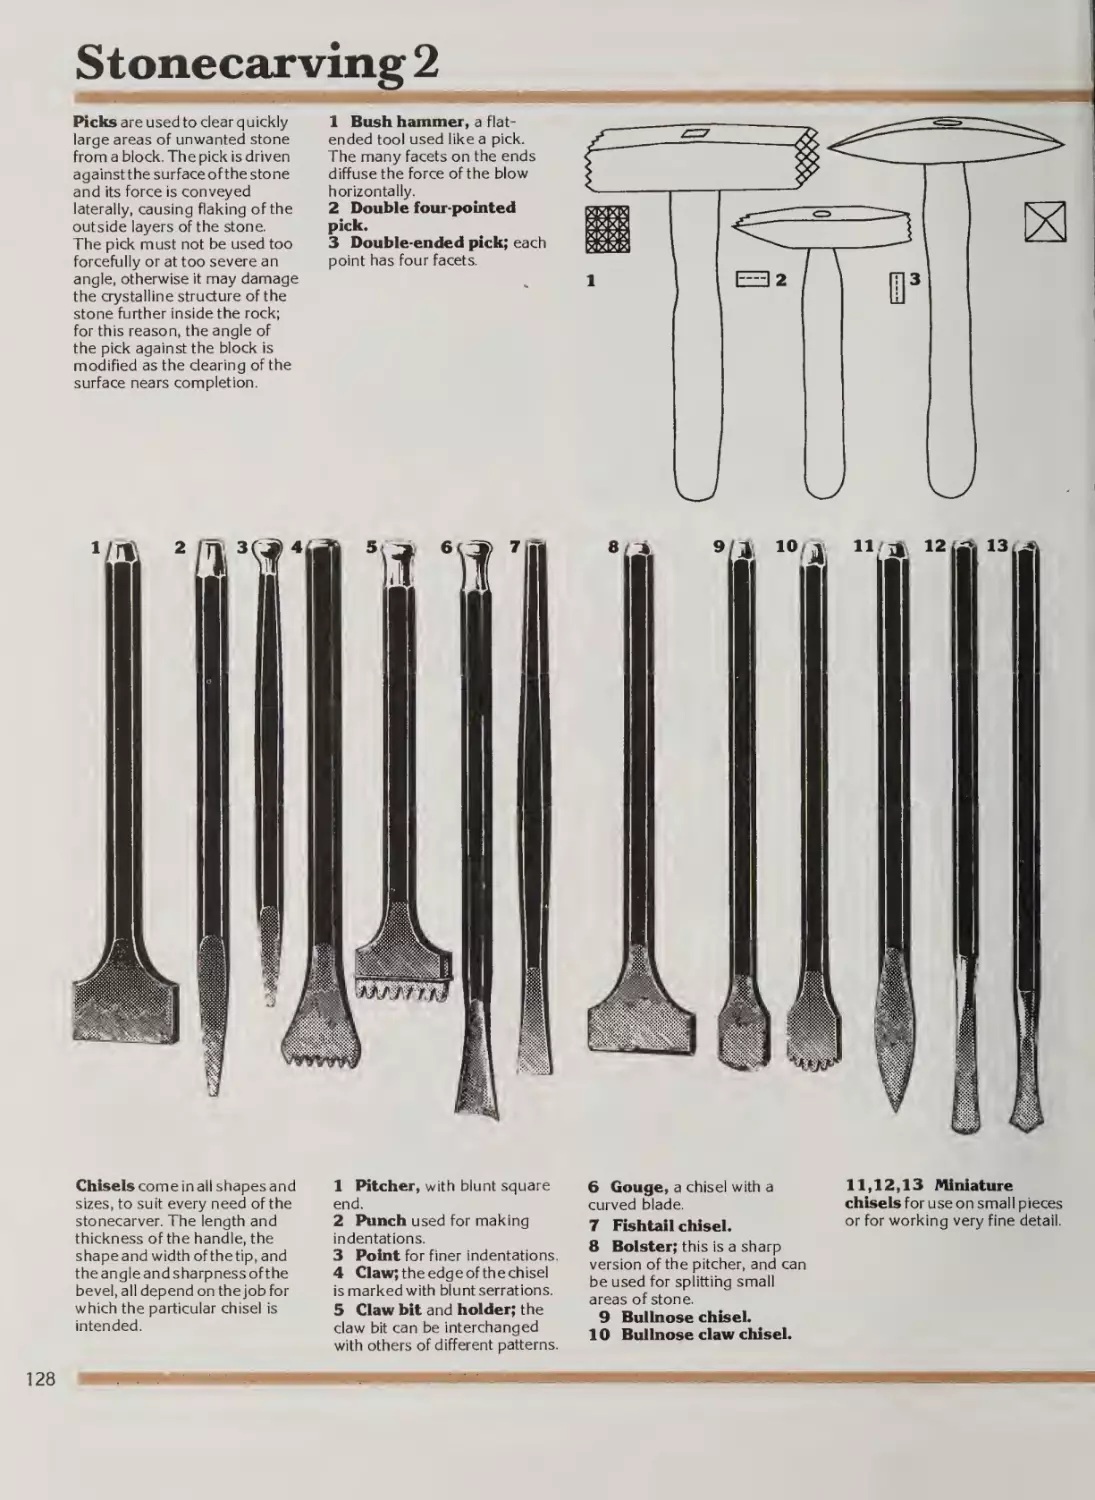
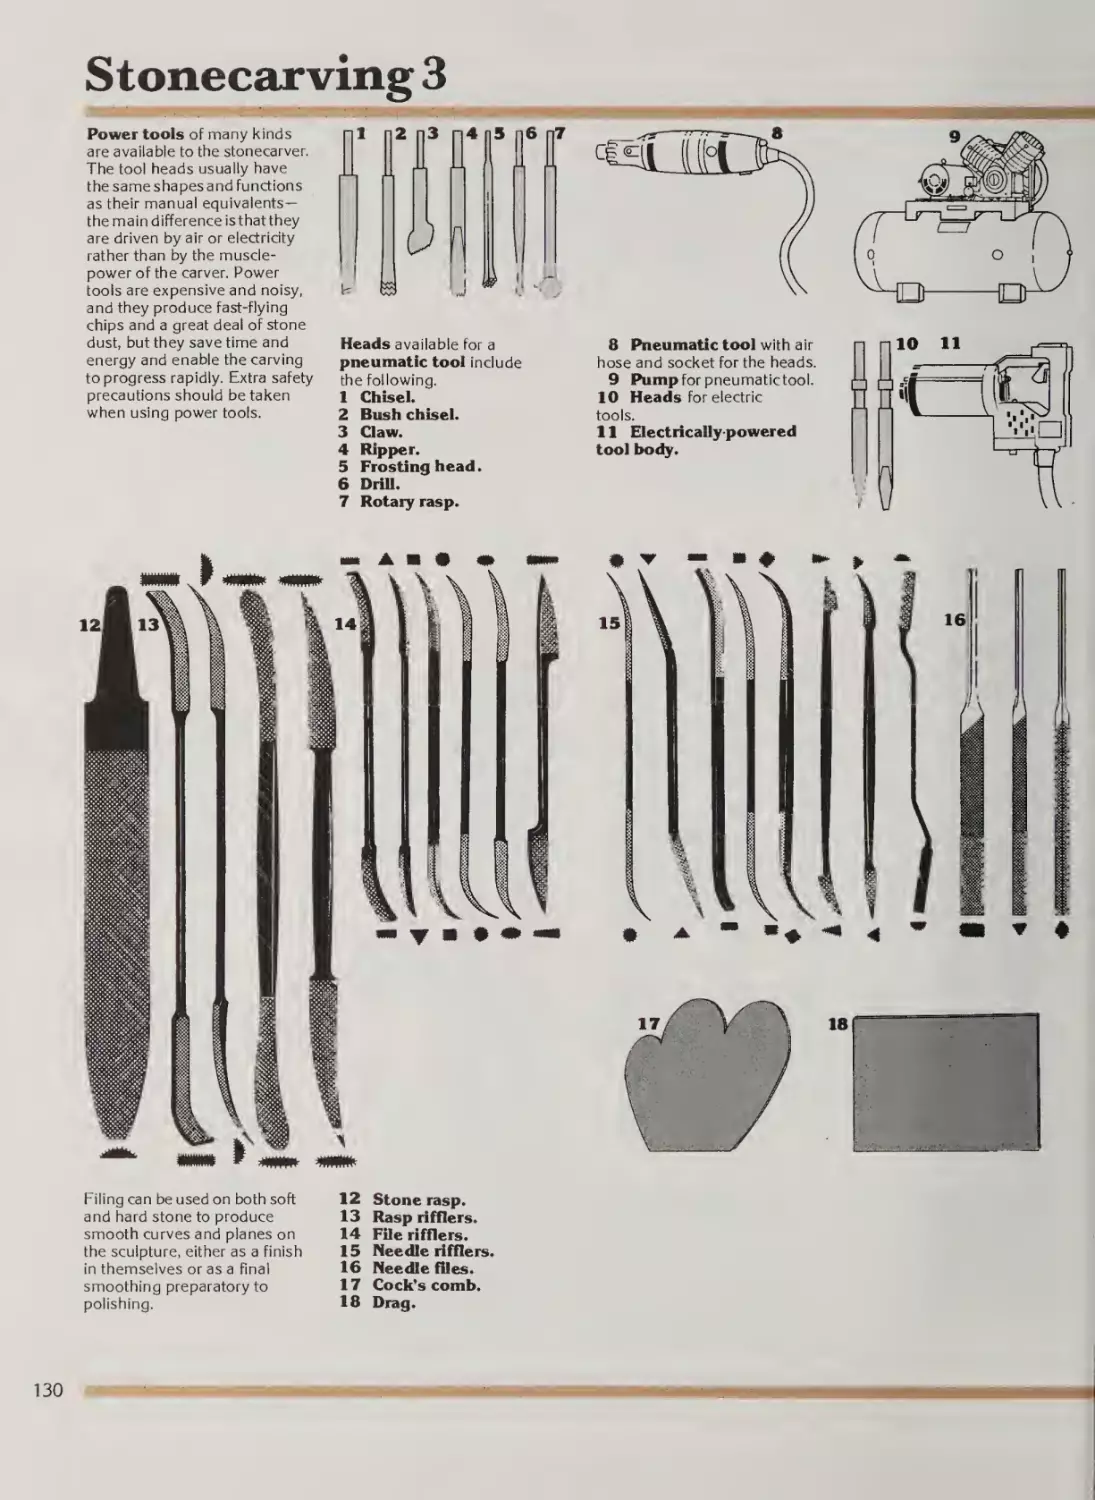
Stonecarving
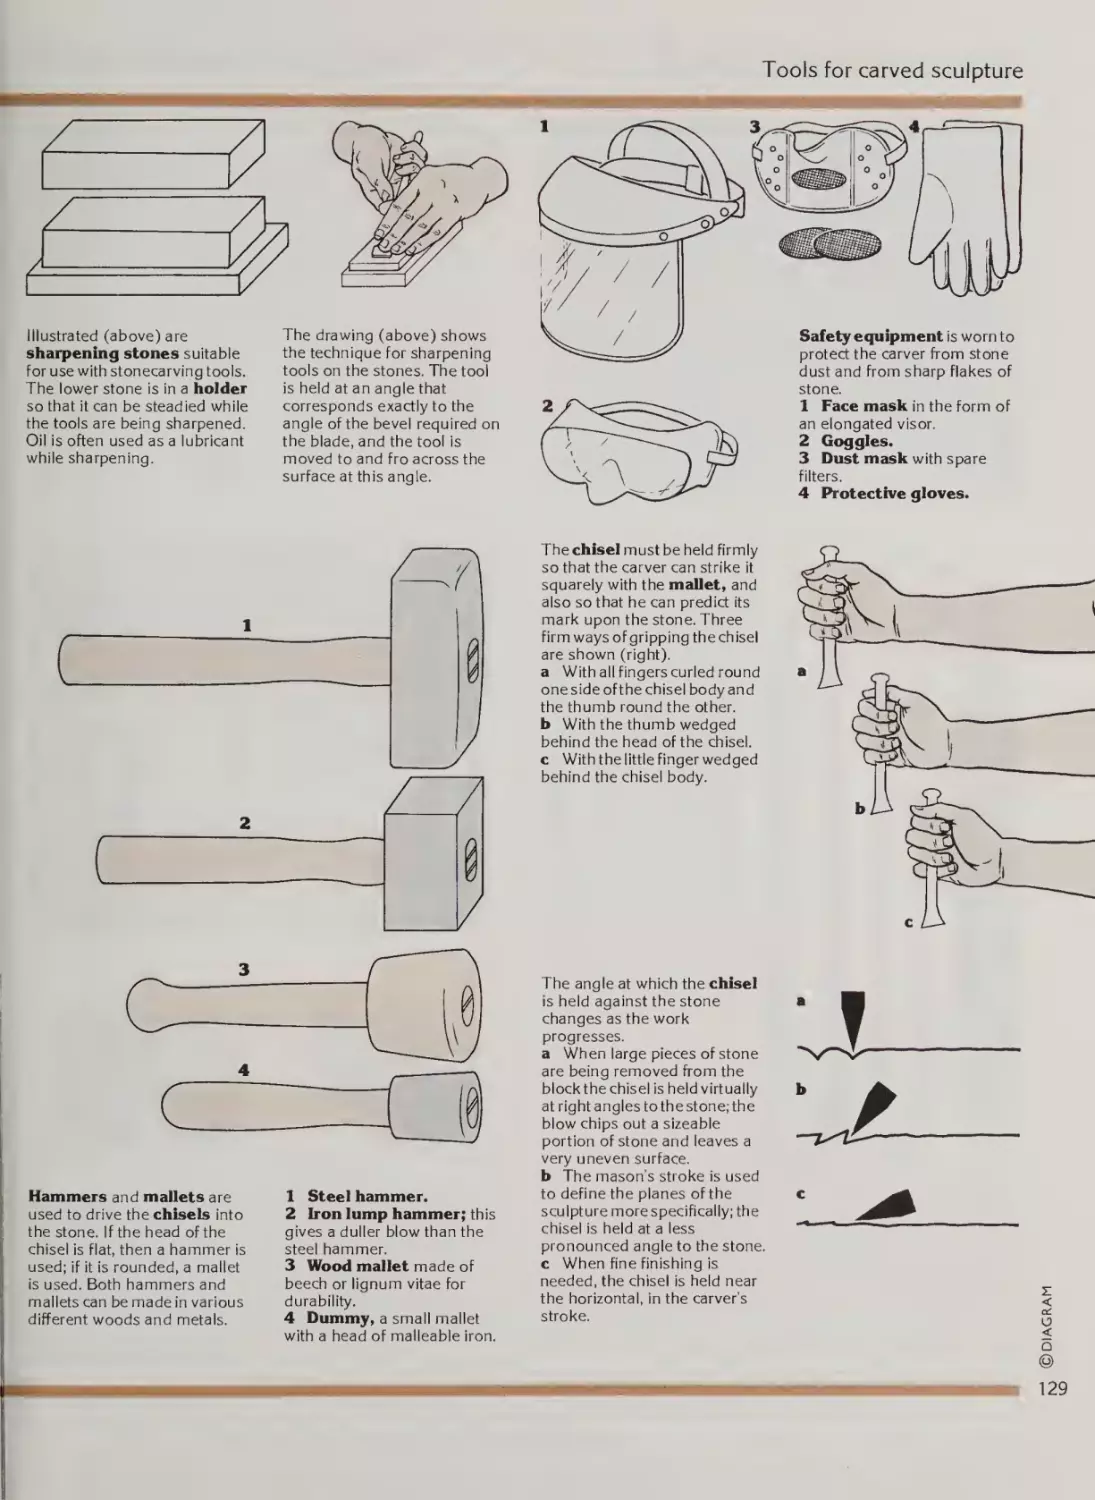
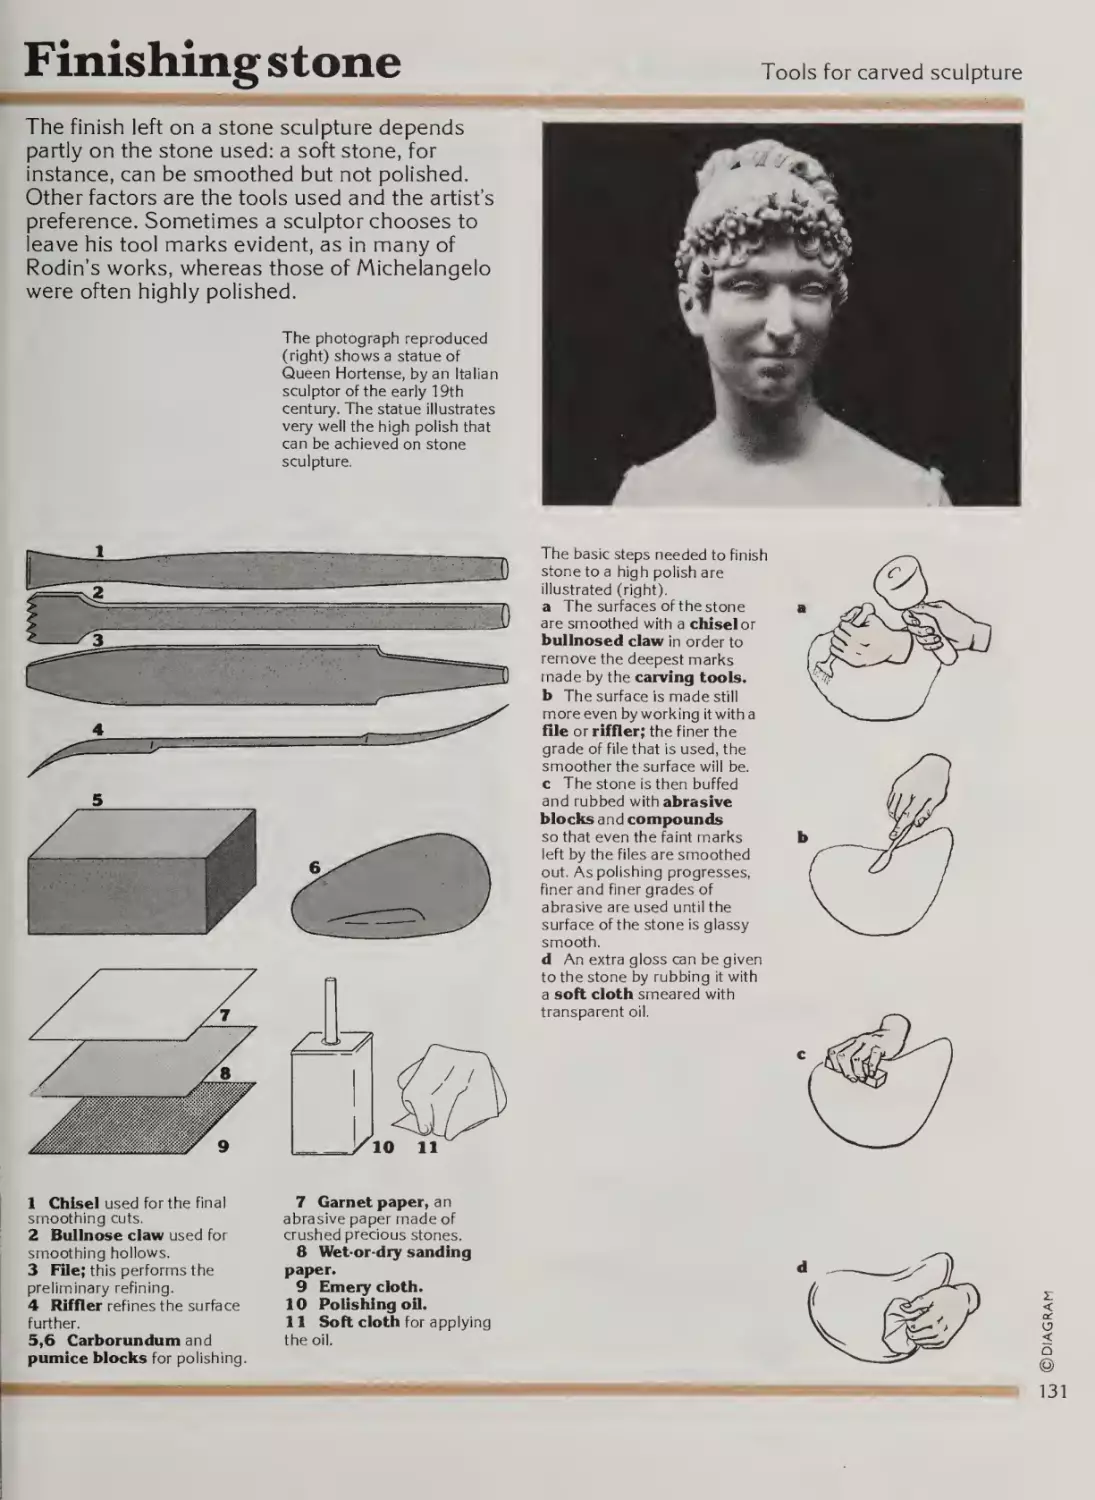
Finishing stone
Wood sculpture
Chip carving and finishing wood
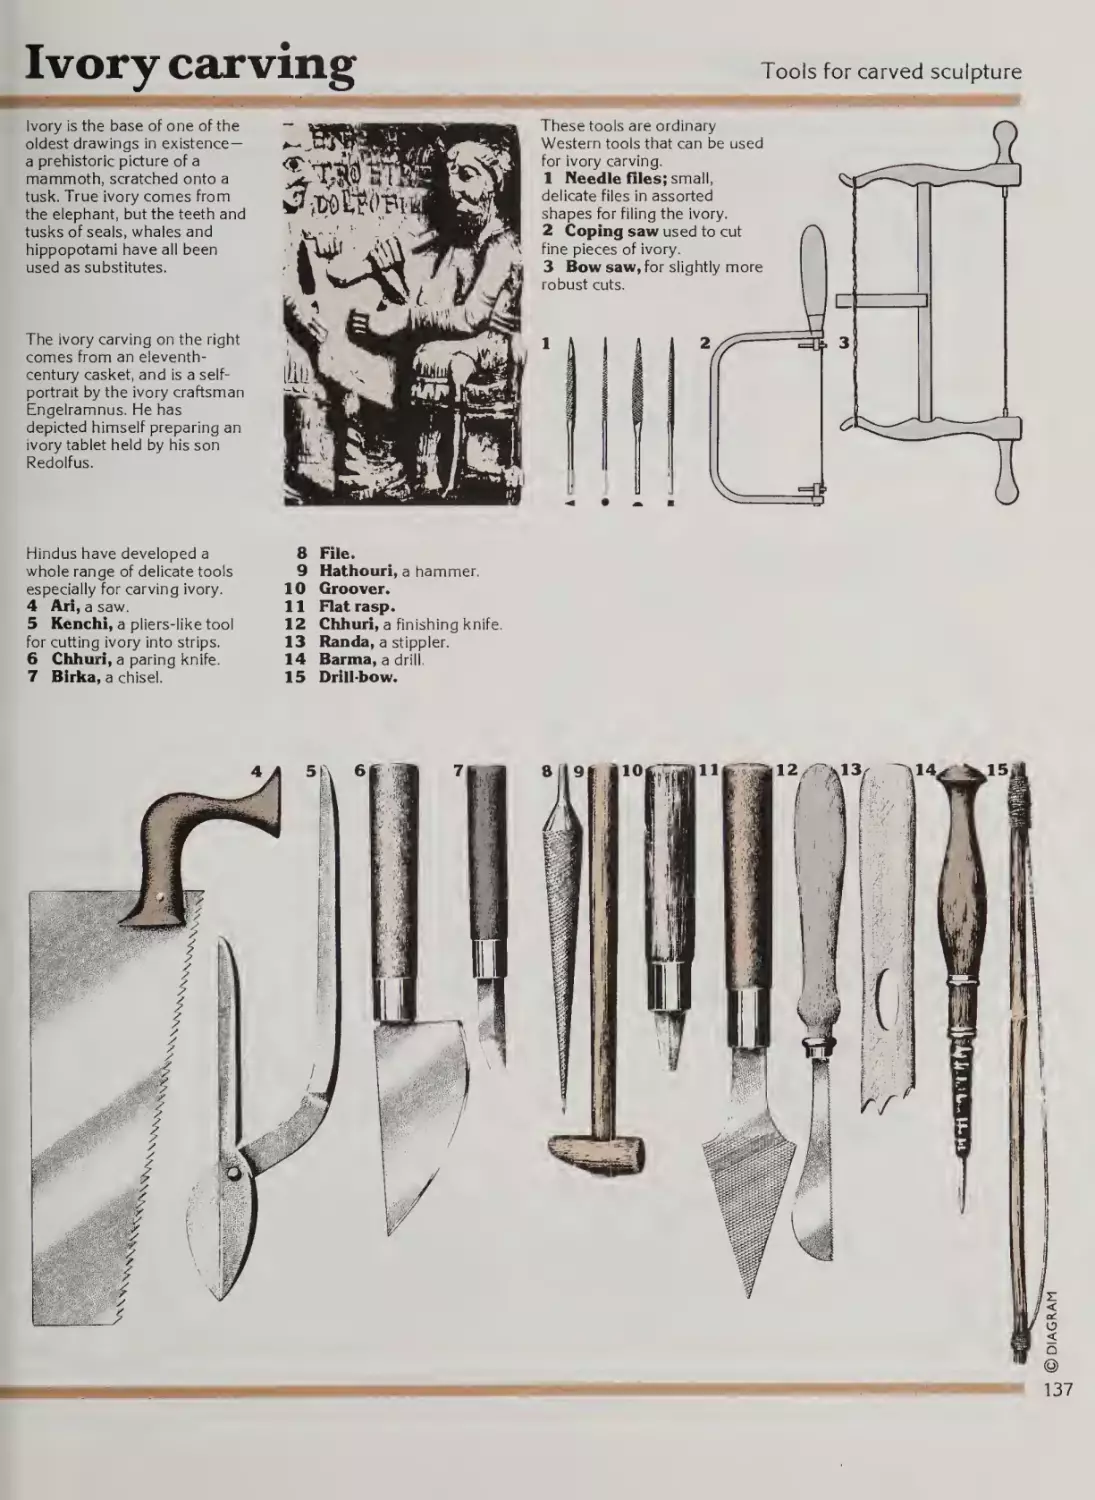
Ivory carving
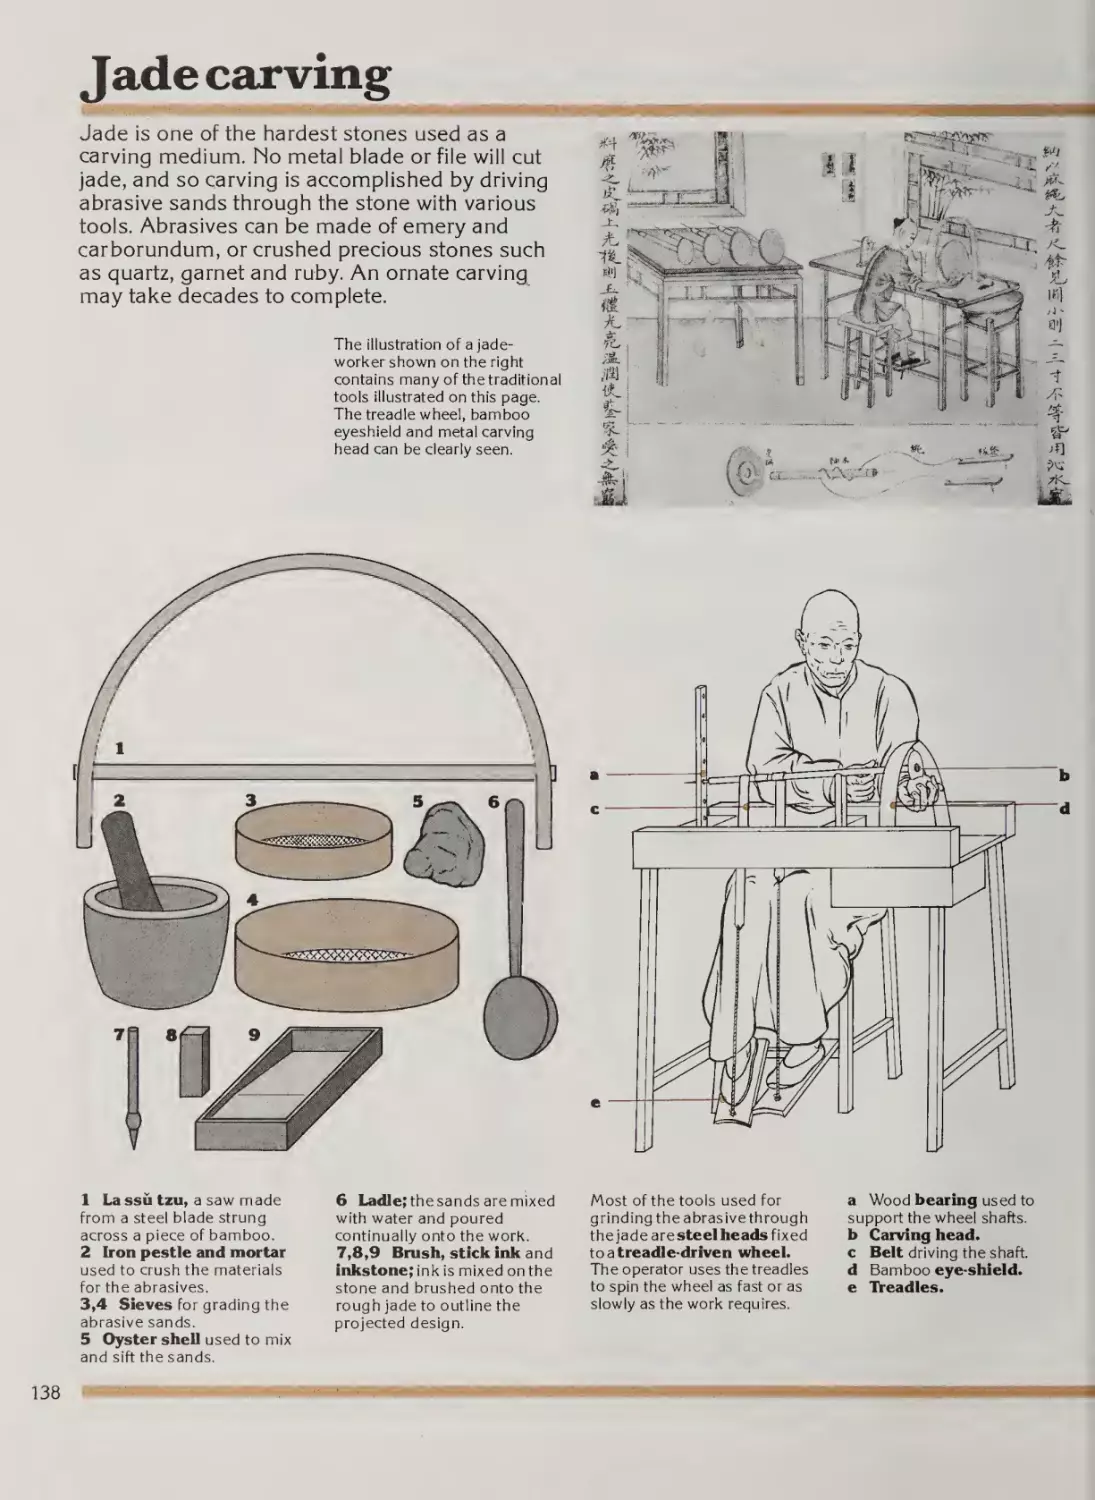
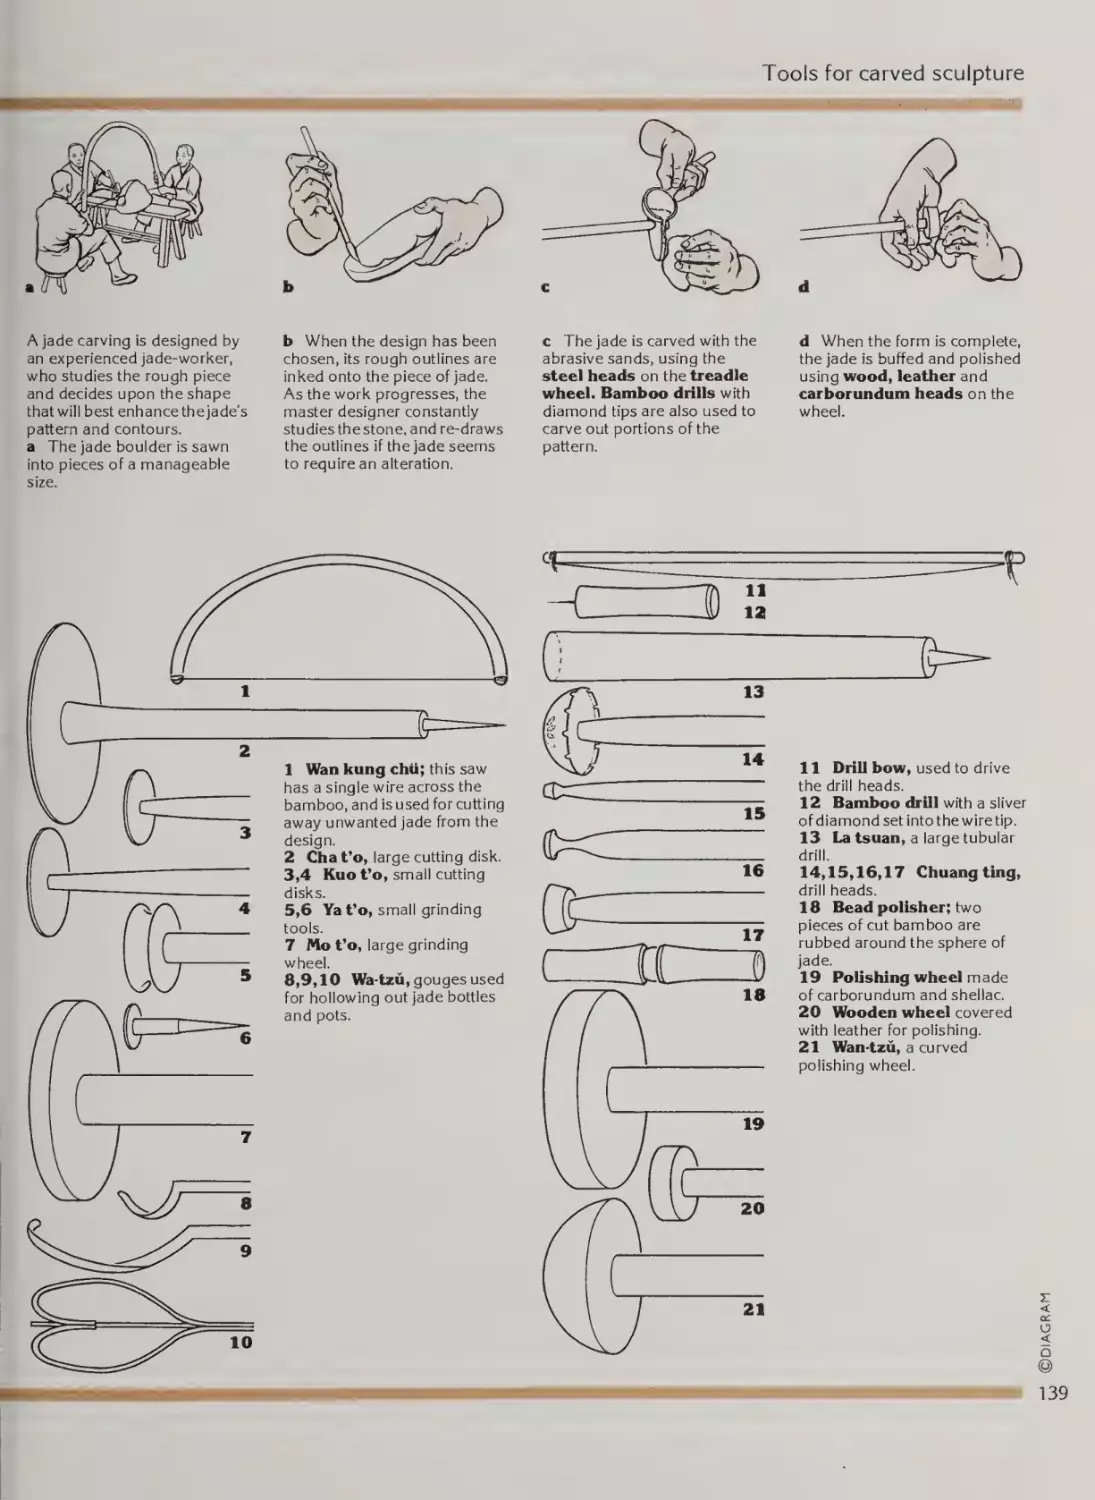
Jade carving
Chapter 9
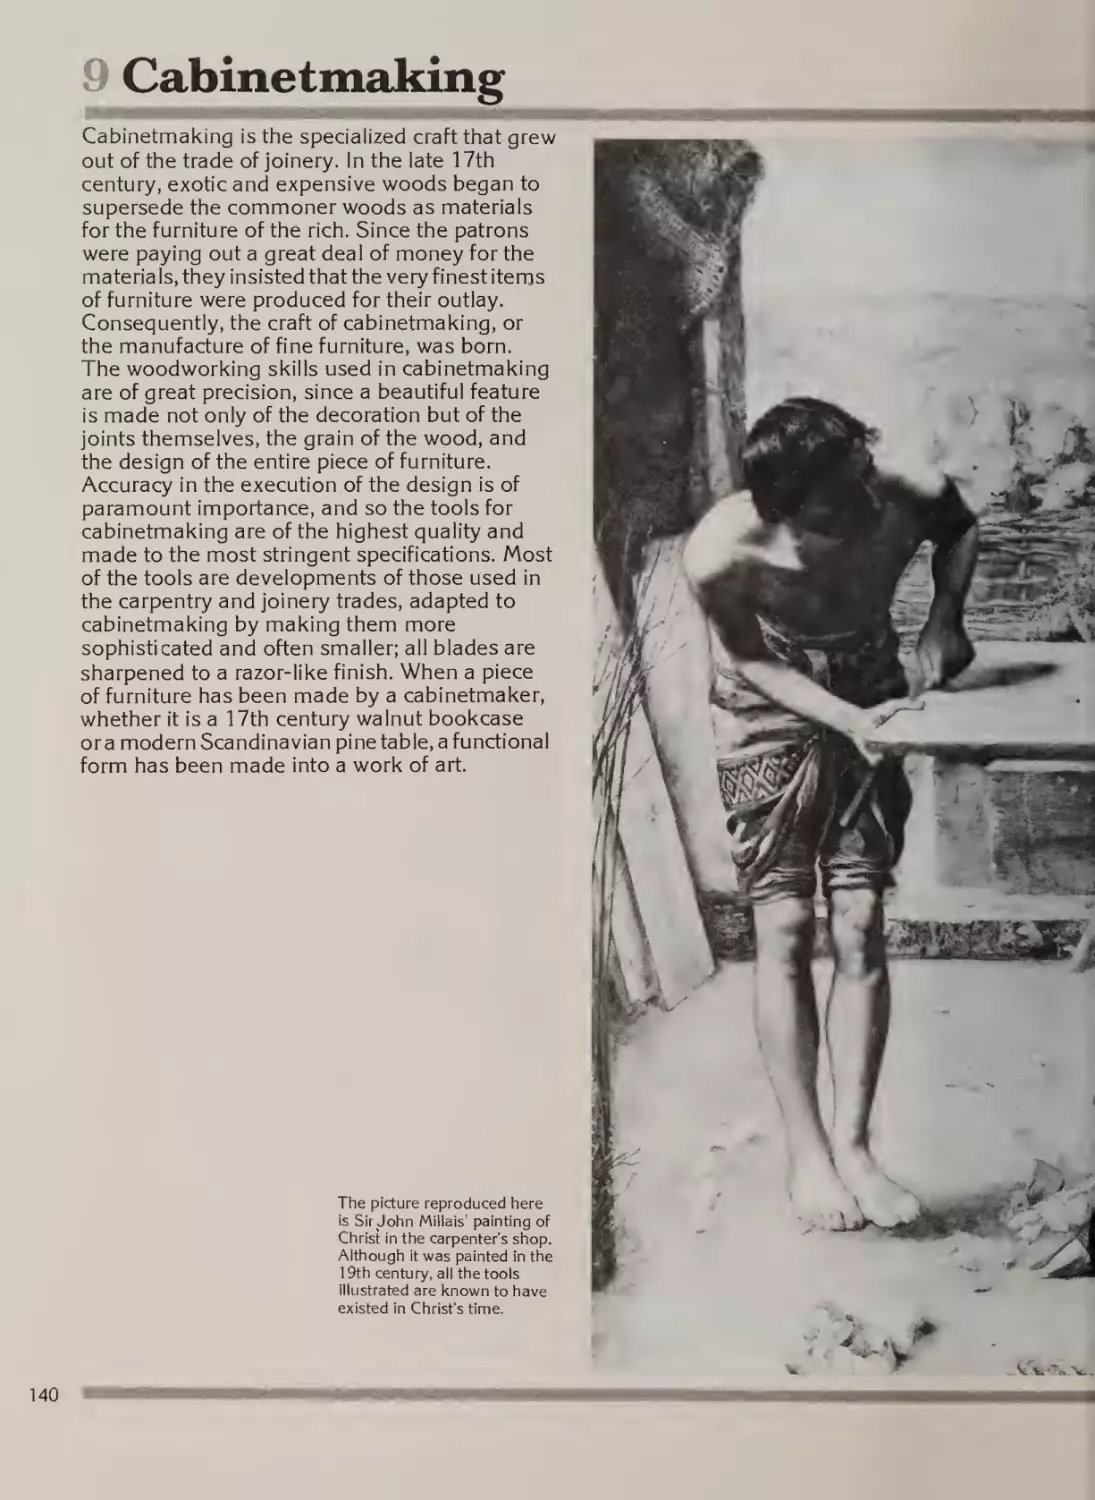
Cabinetmaking
140
142
144
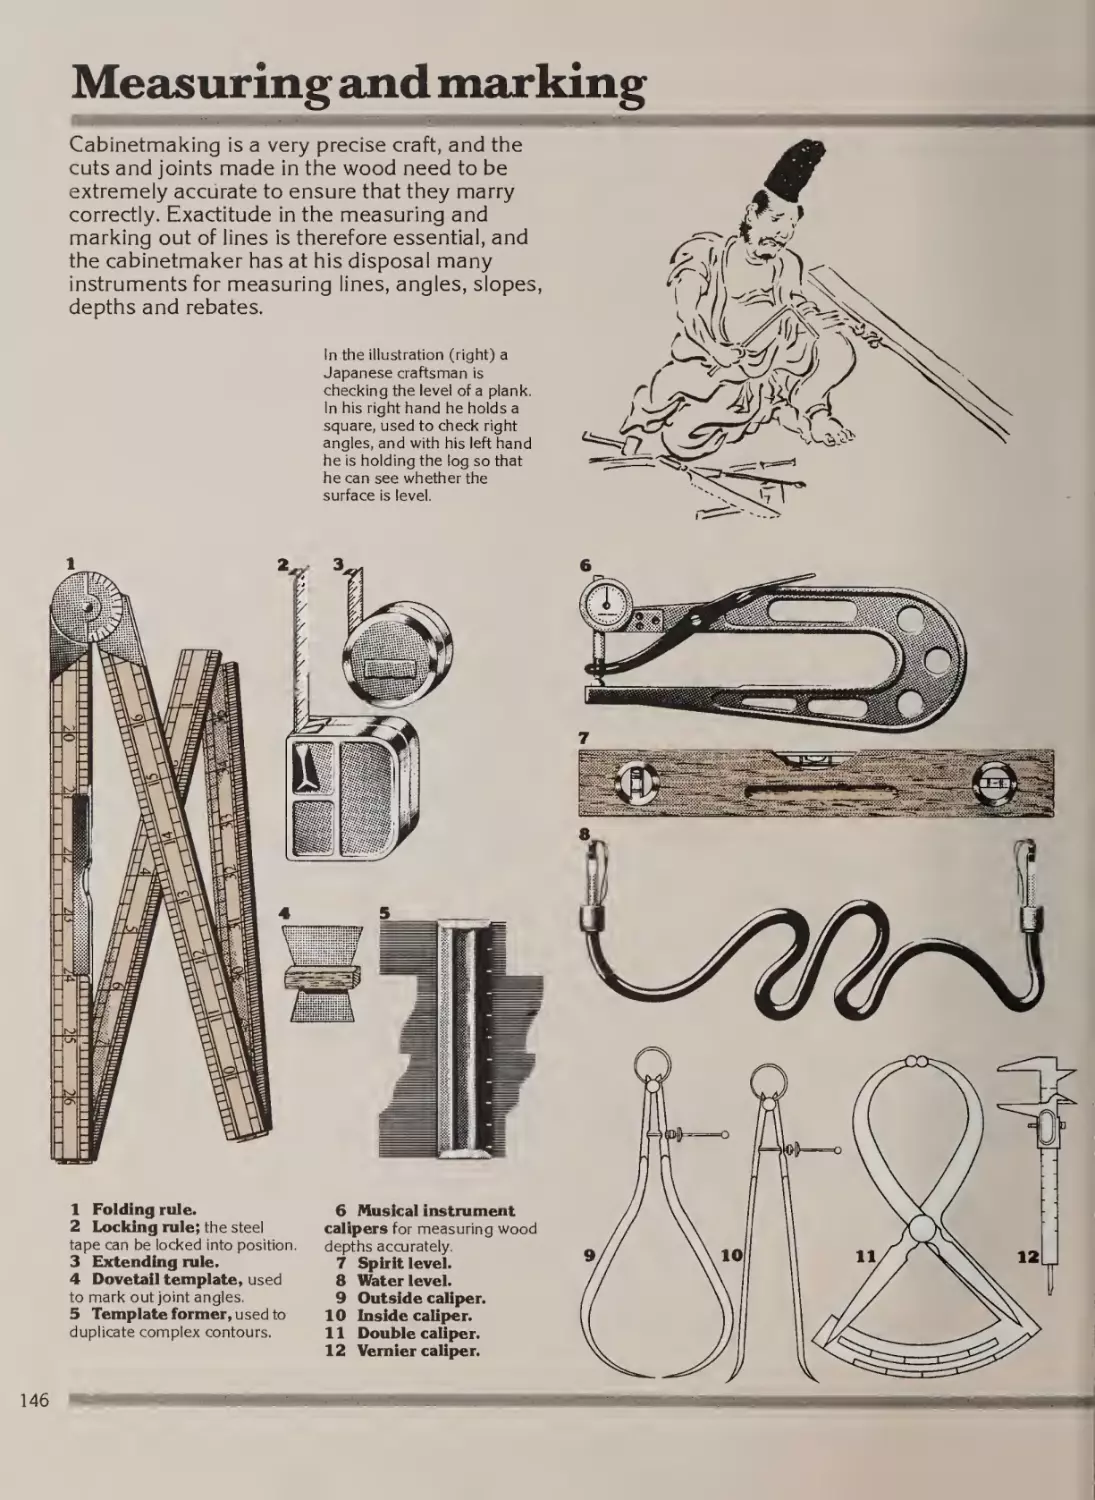
146
148
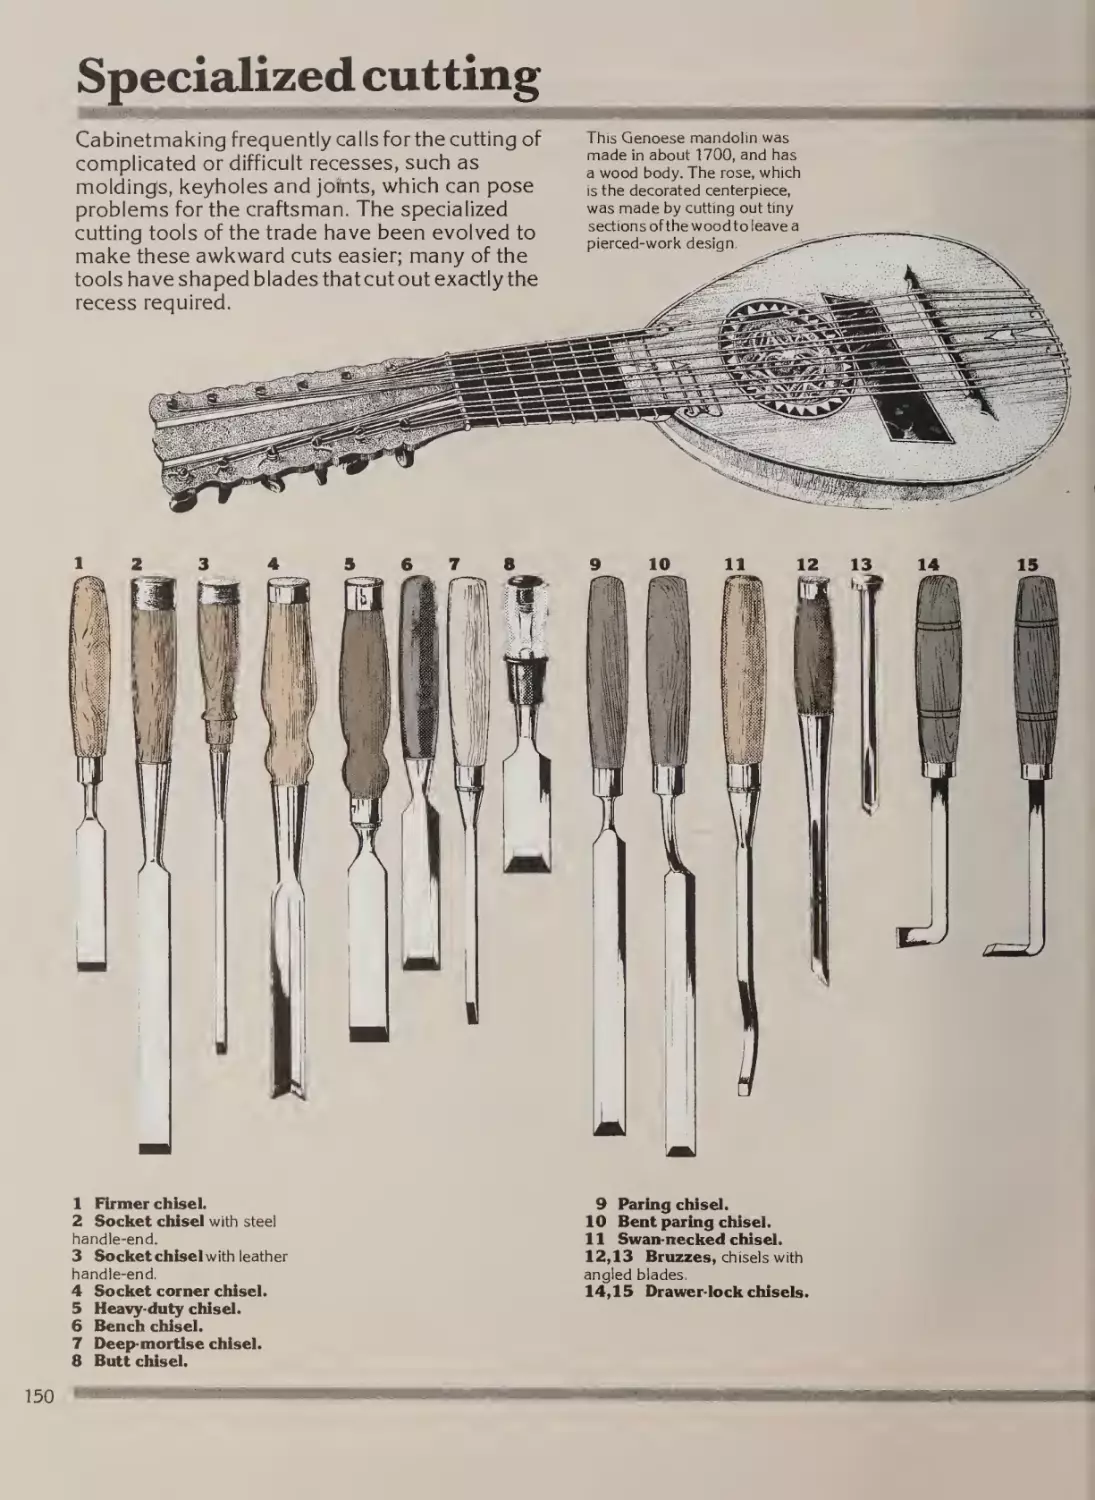
150
152
154
156
158
160
162
164
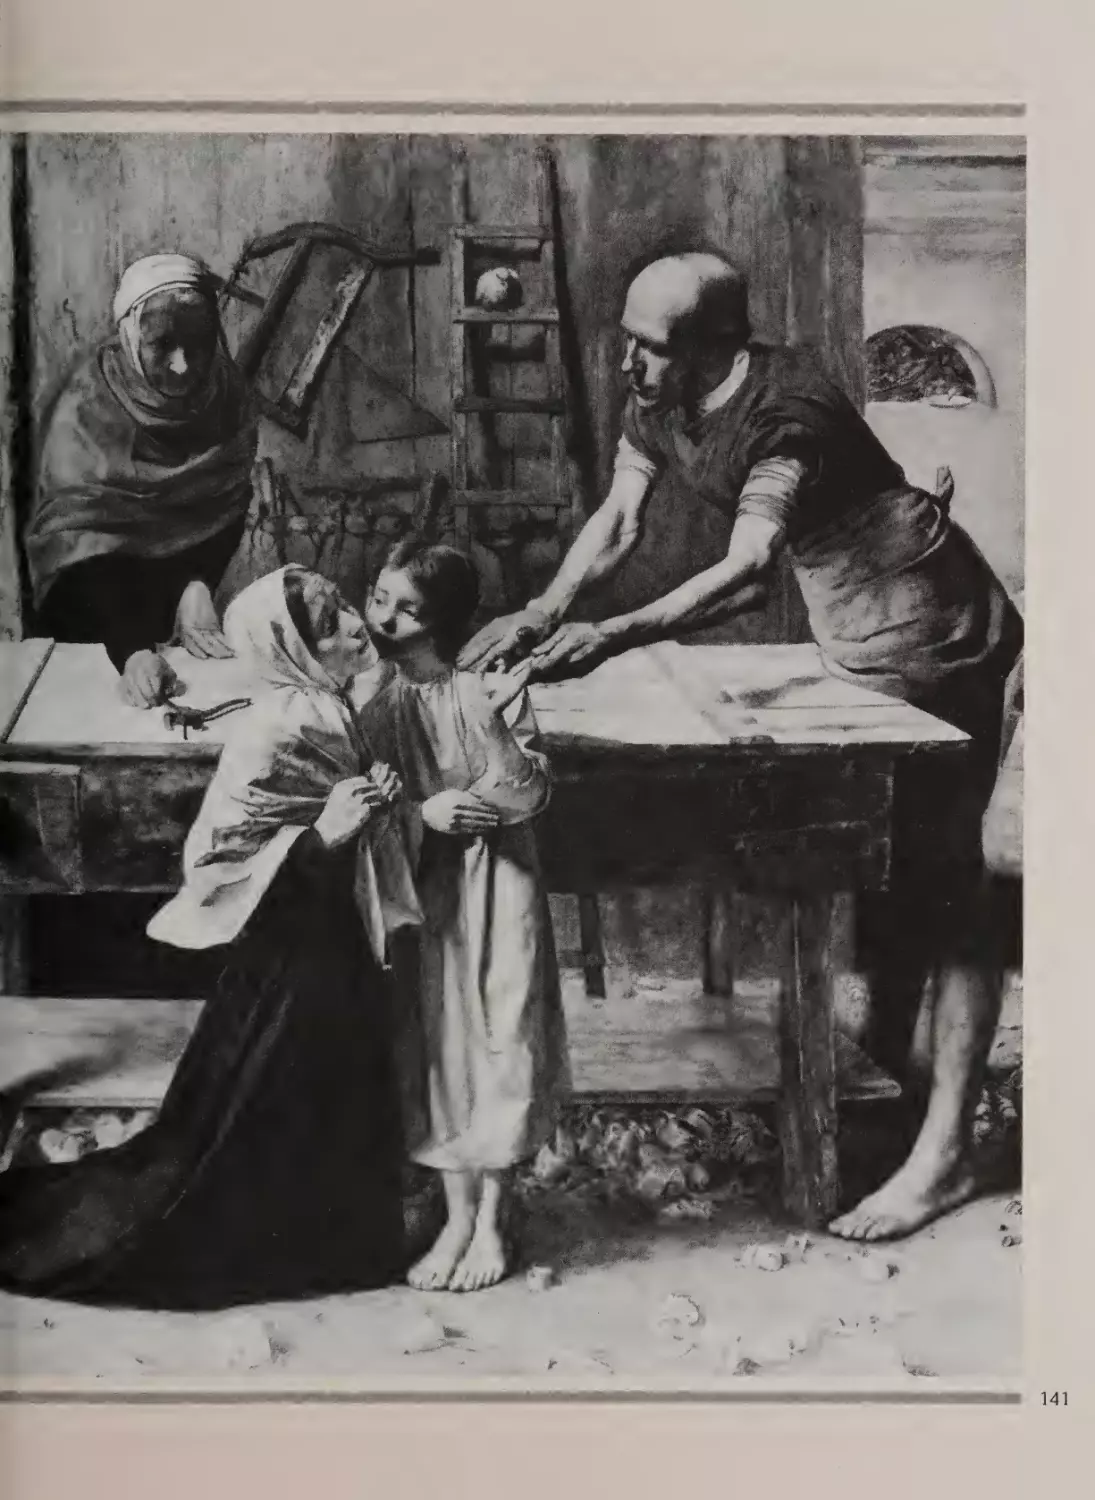
Introduction
Preliminary cutting
Cutting to shape
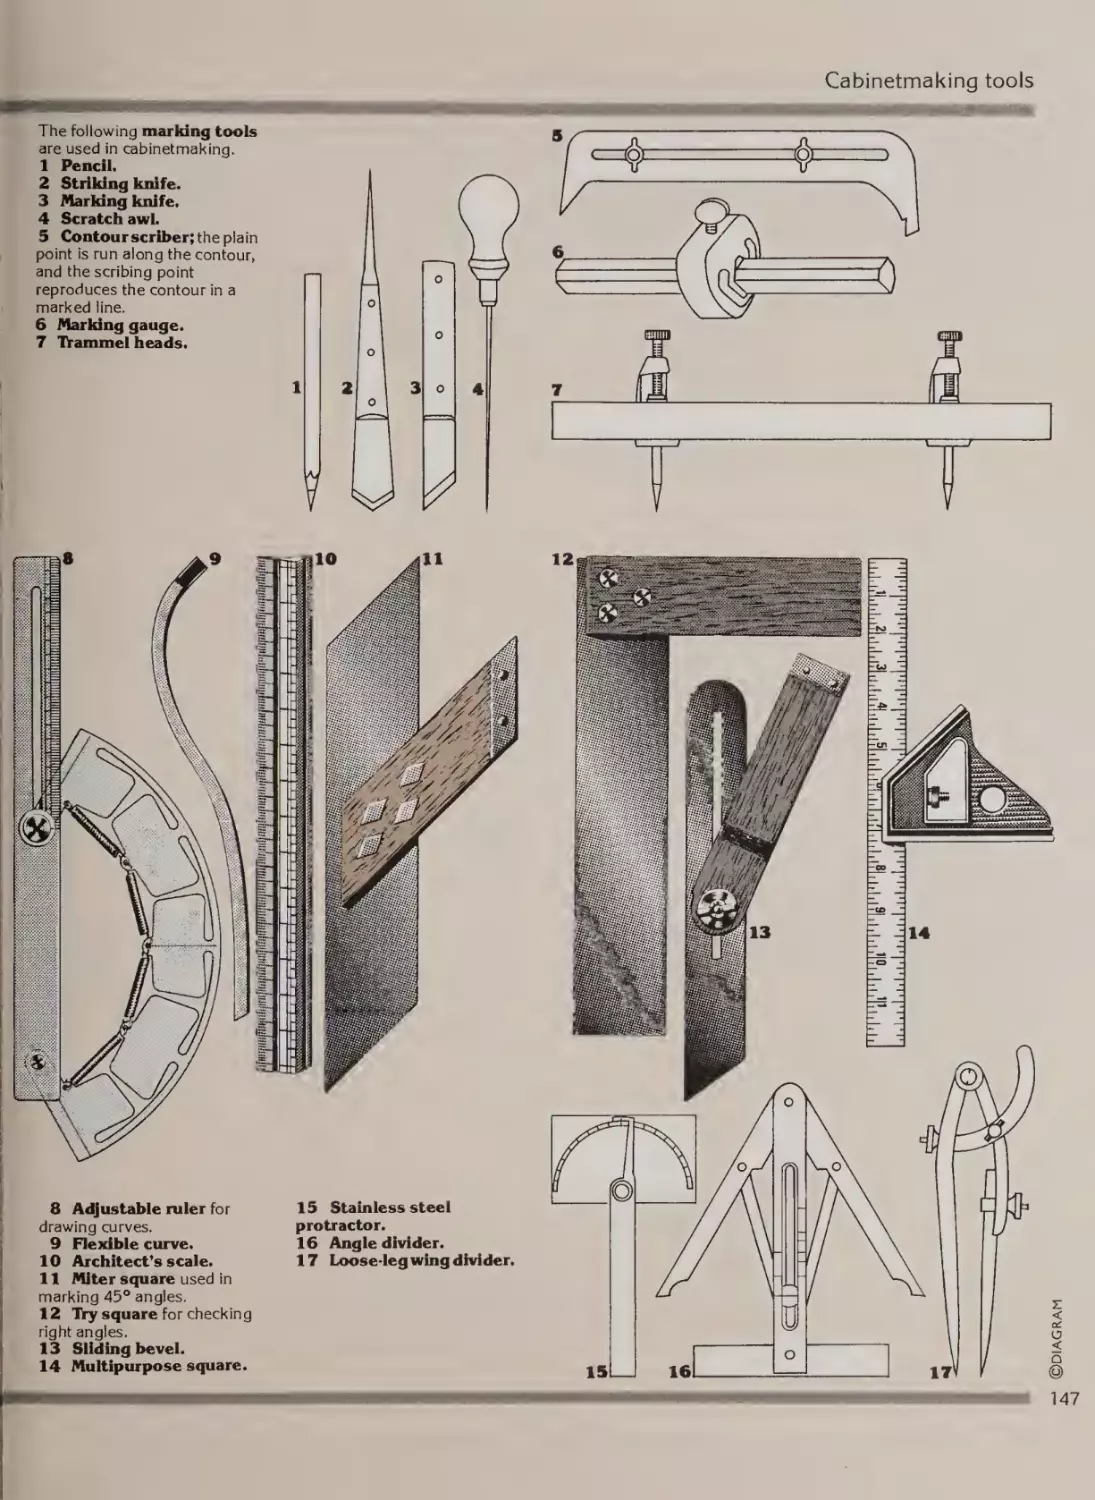
Measuring and marking
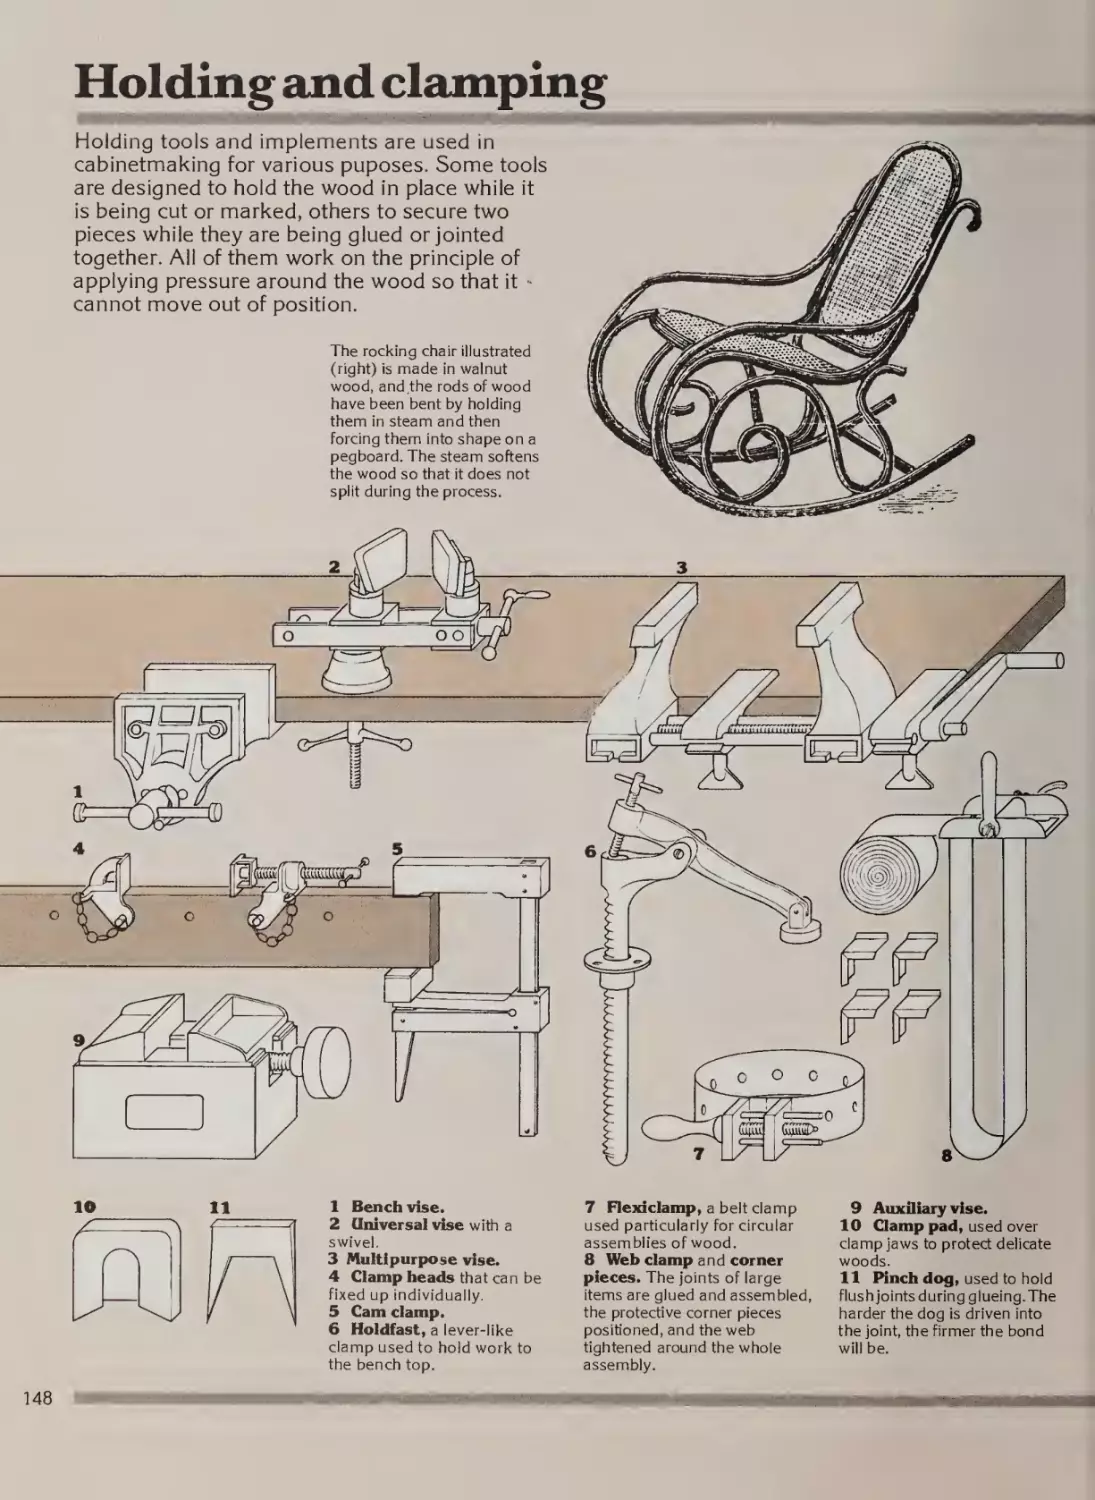
Holding and clamping
Specialized cutting
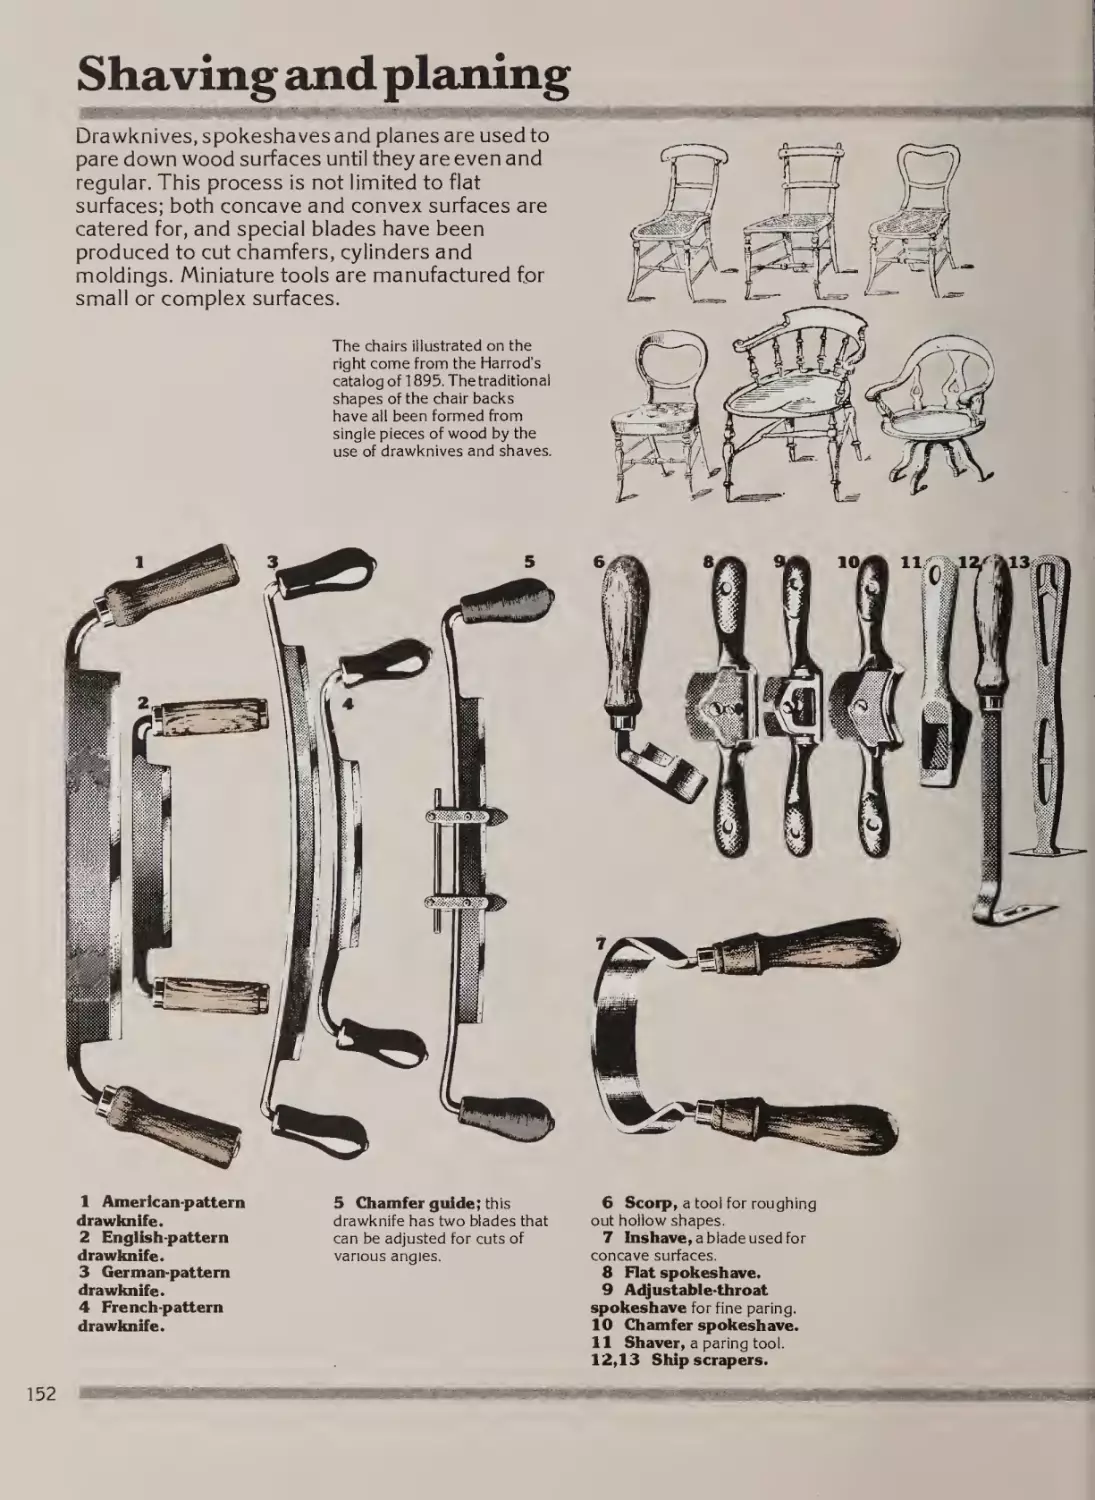
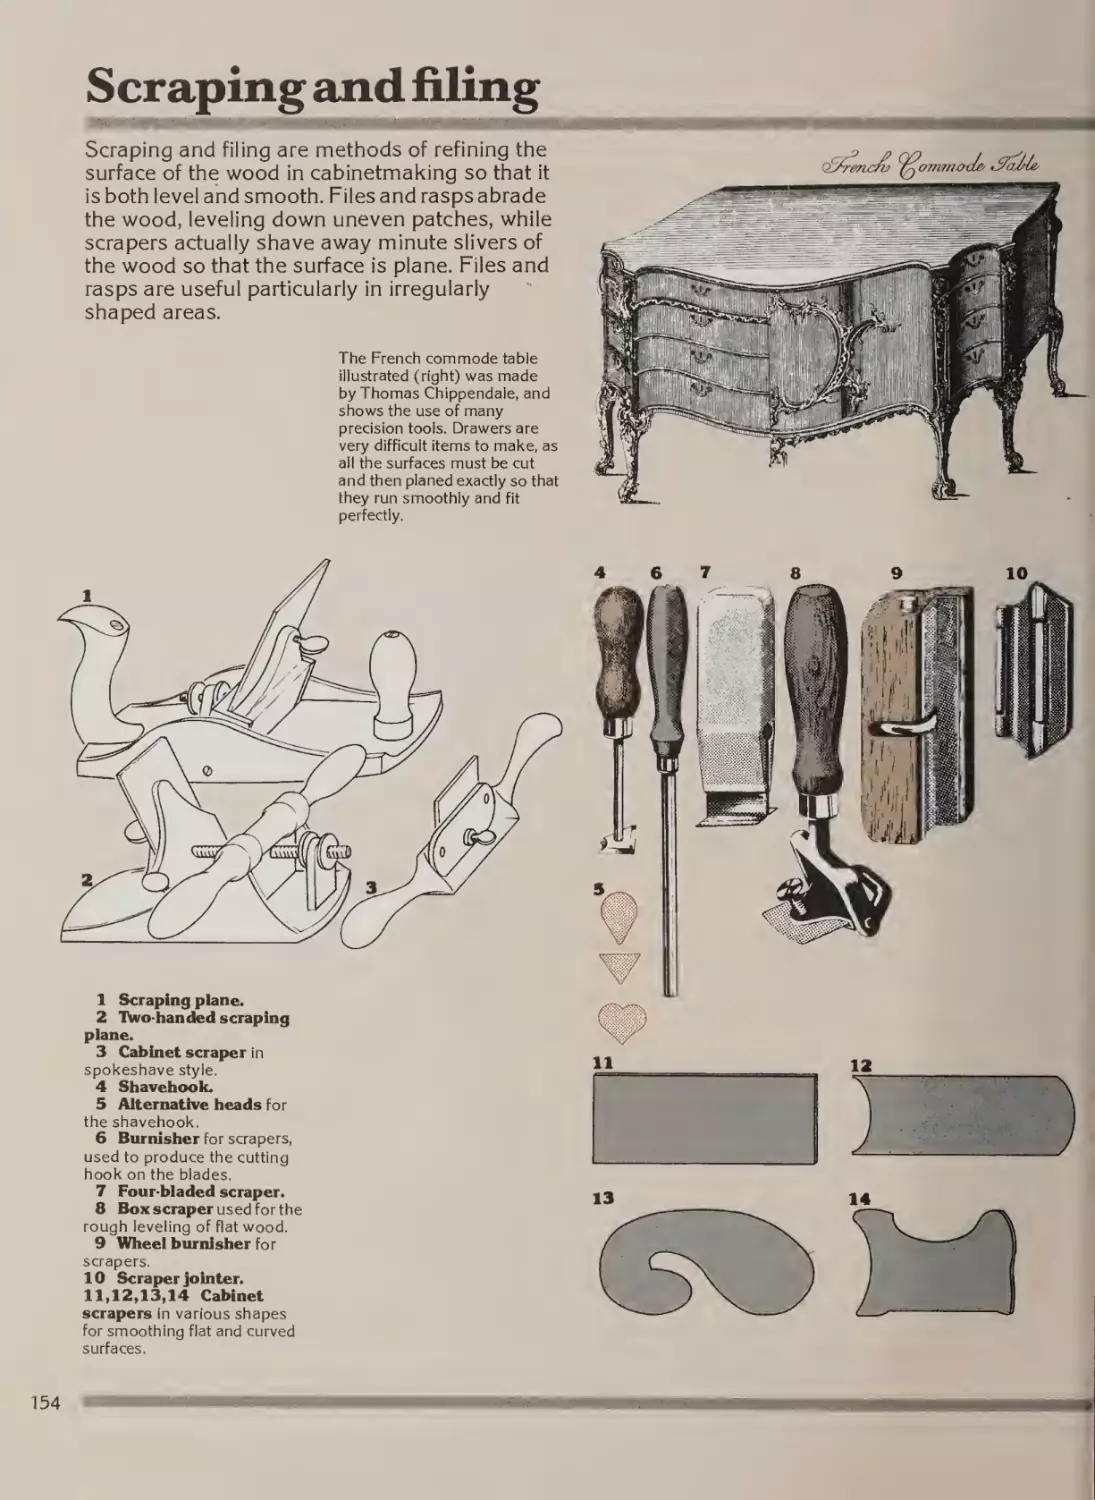
Shaving and planing
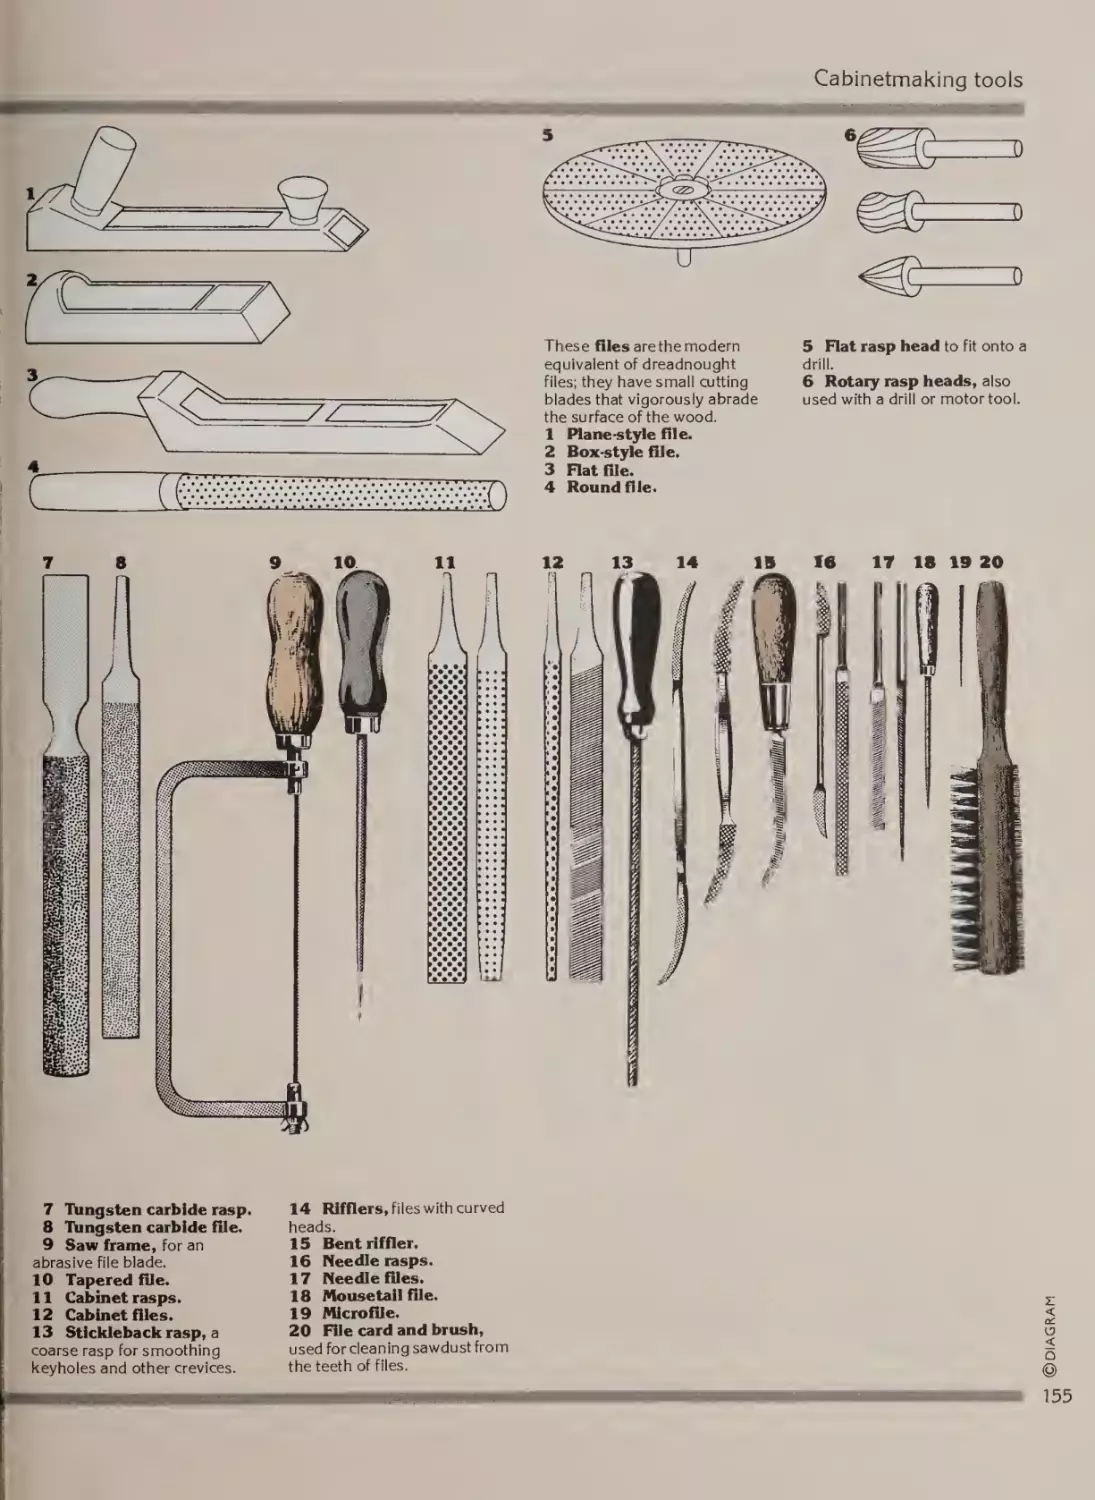
Scraping and filing
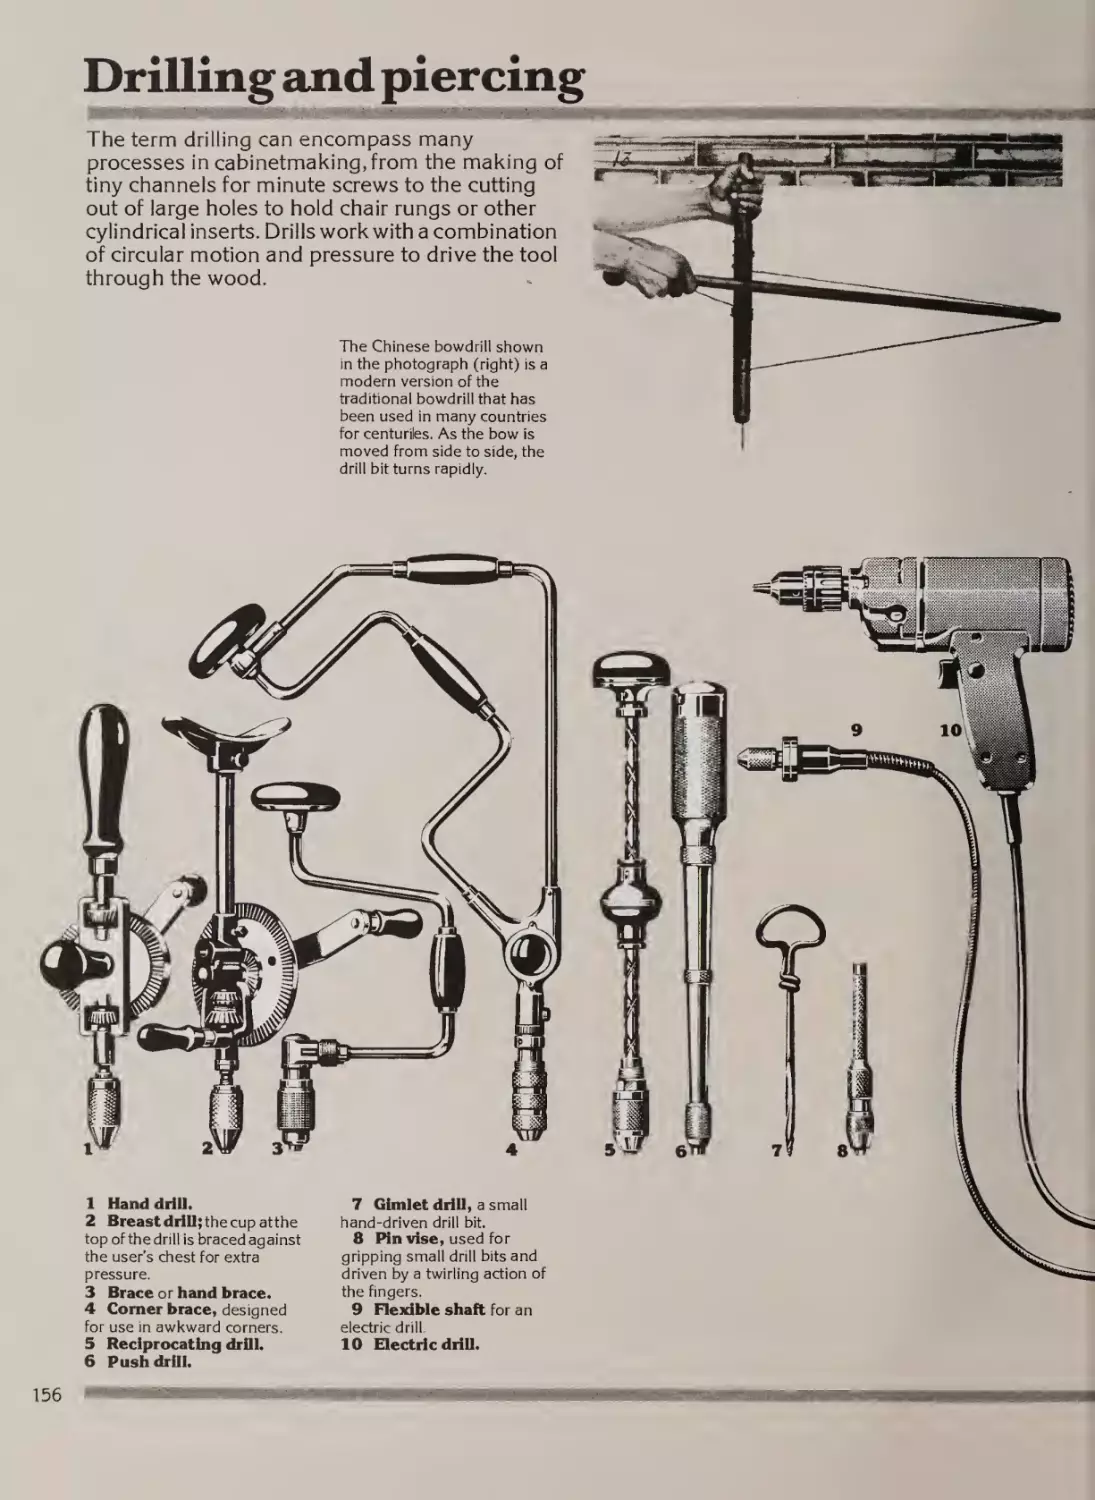
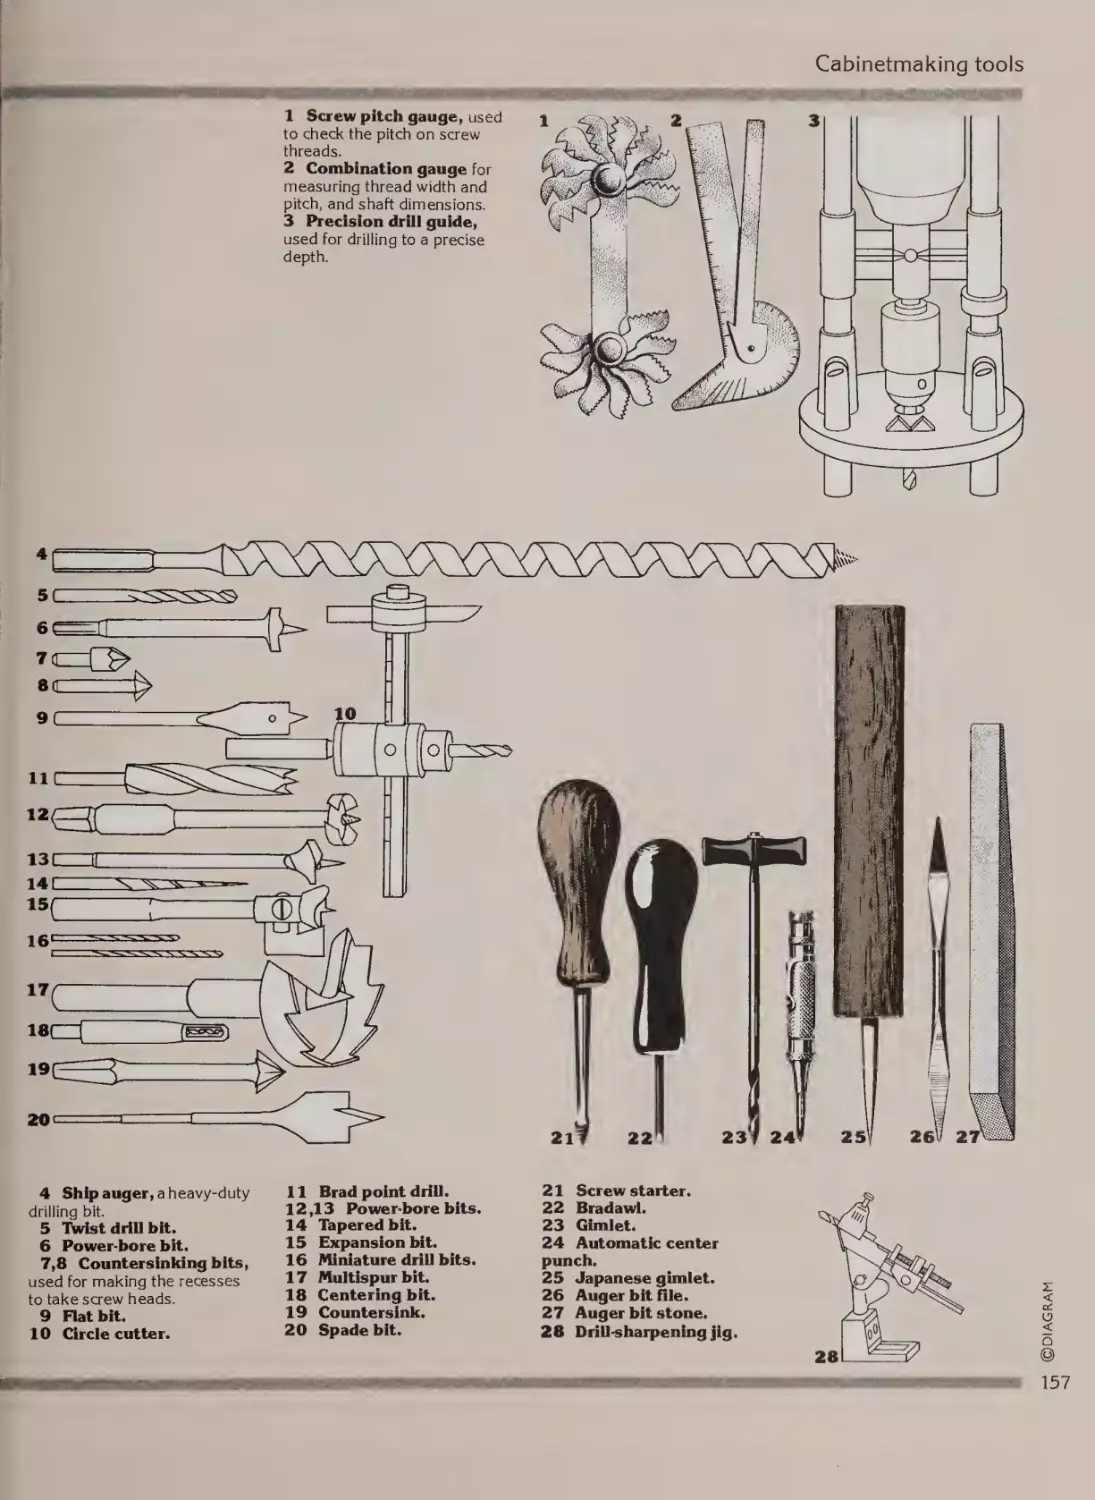
Drilling and piercing
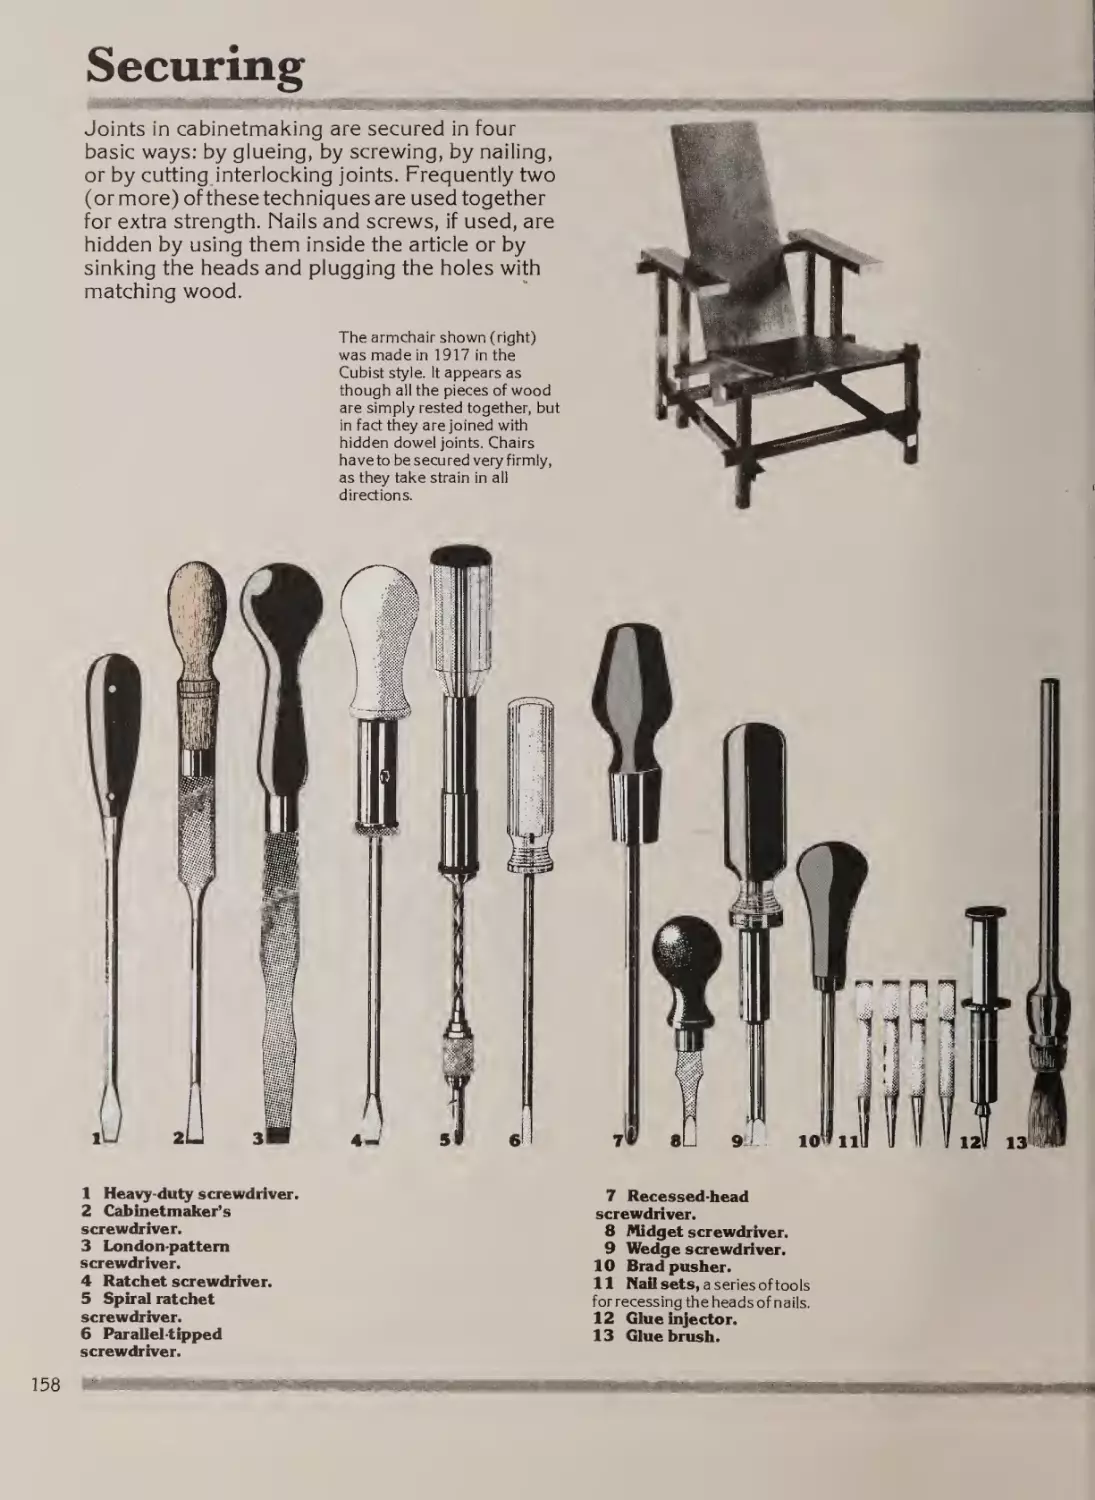
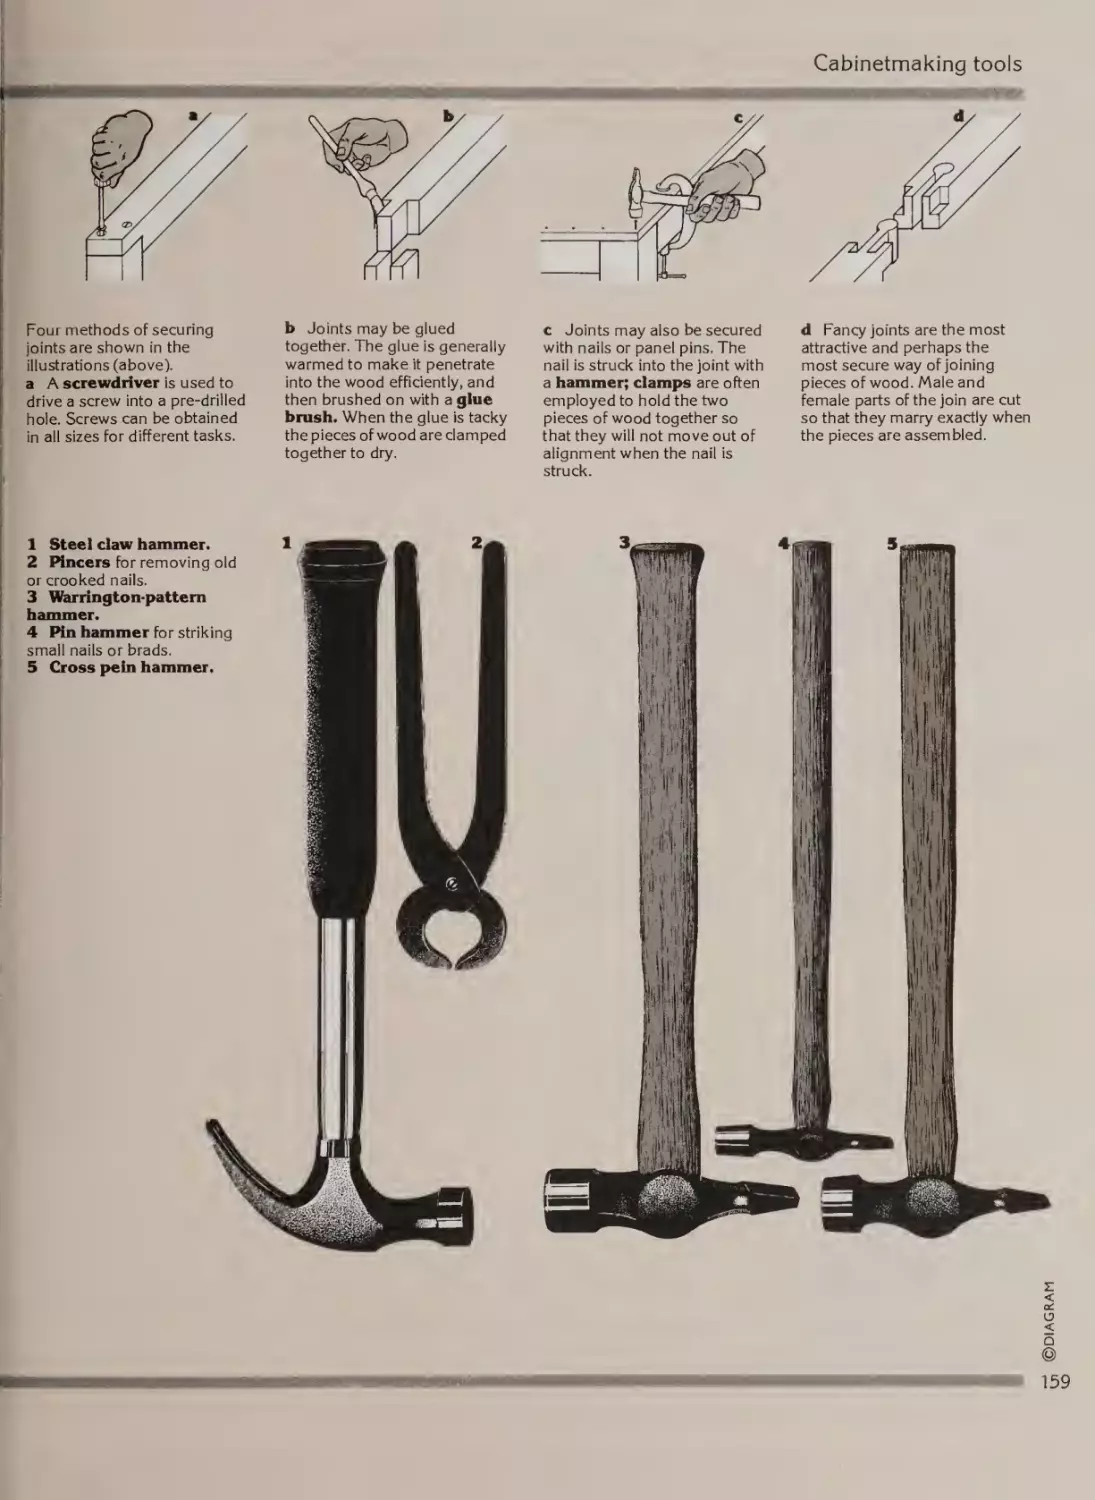
Securing
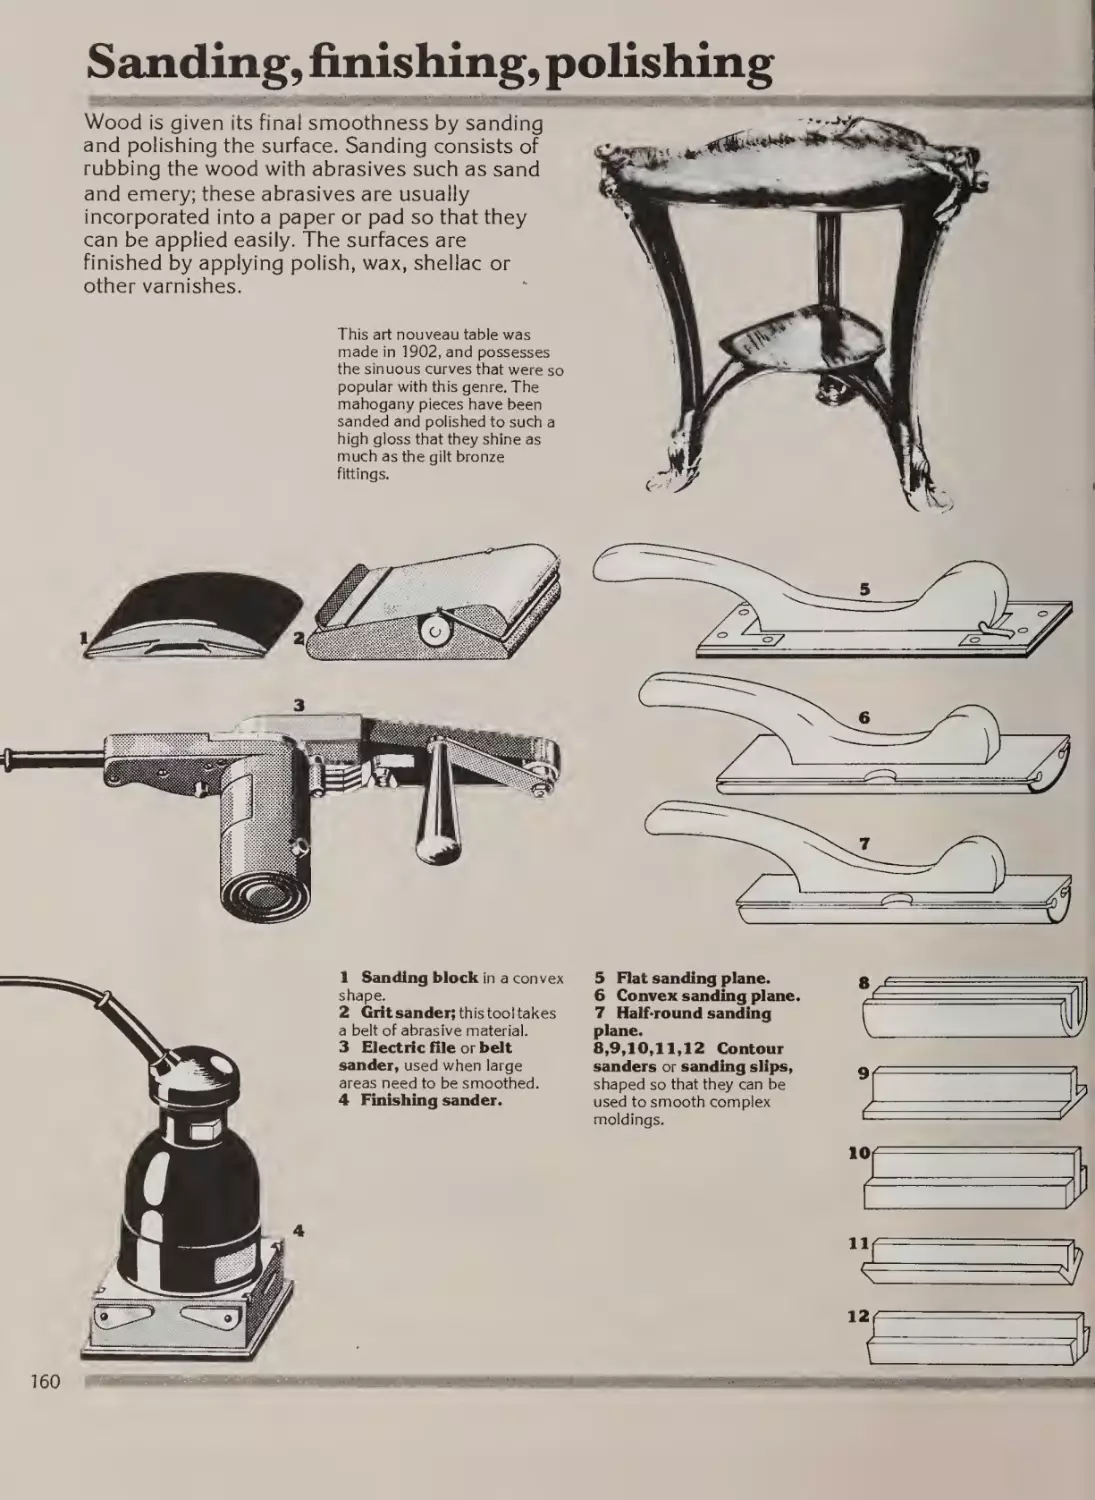
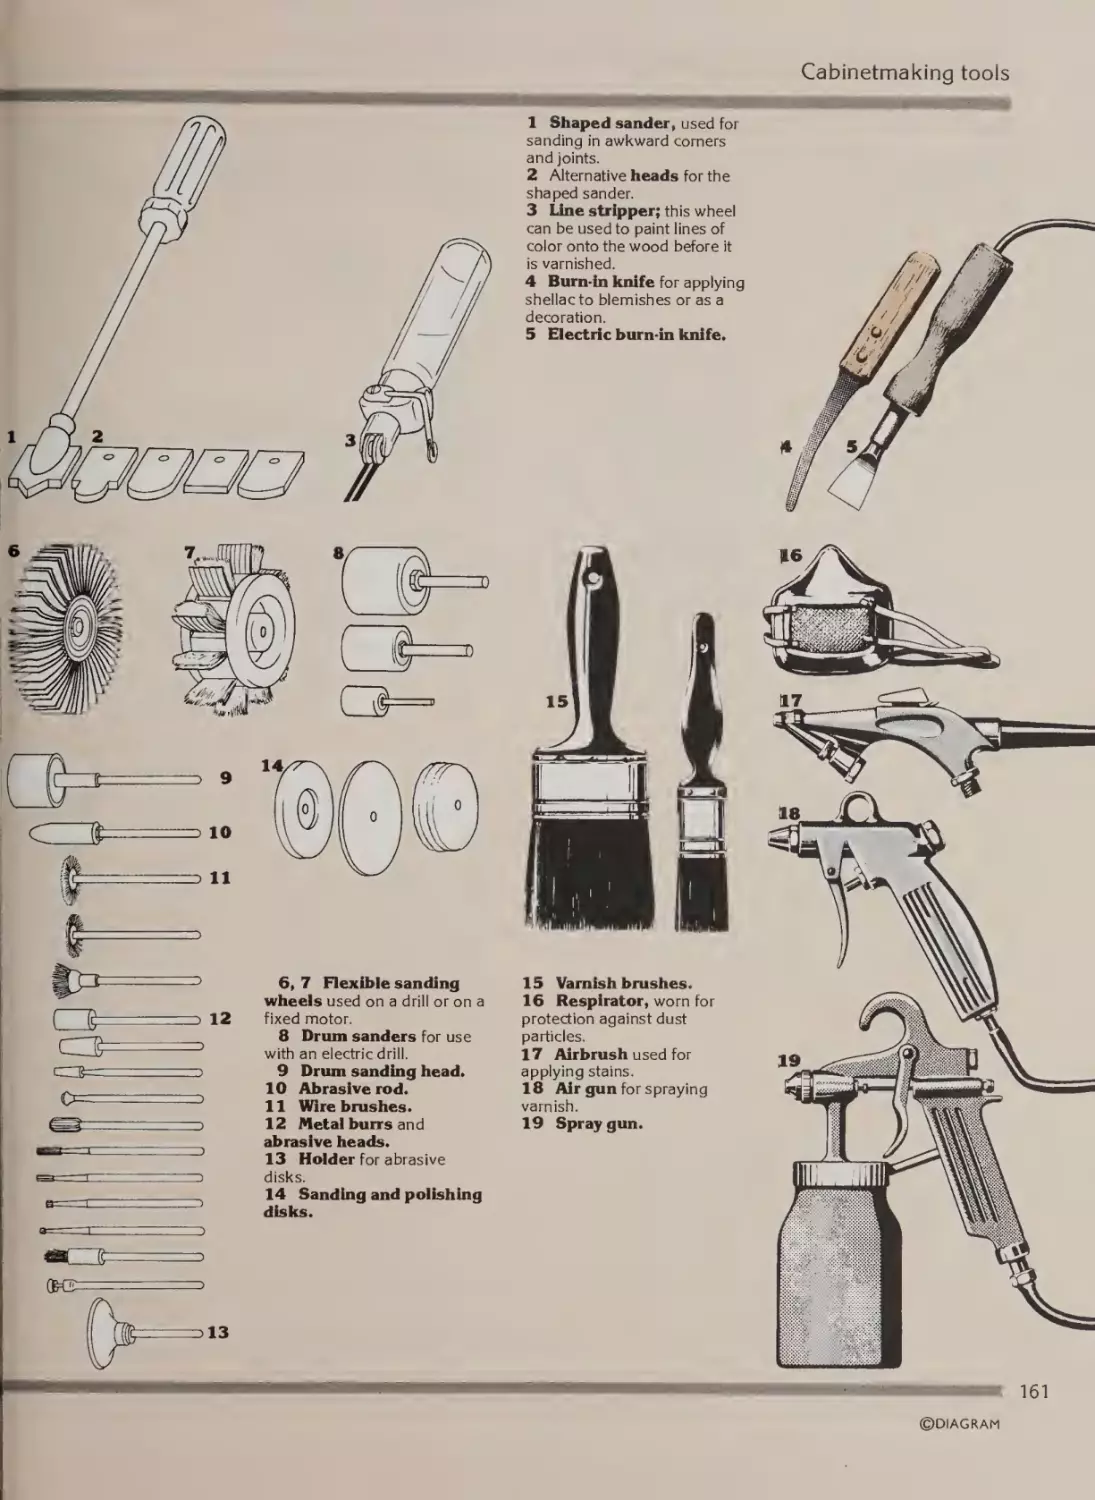
Sanding, finishing, polishing
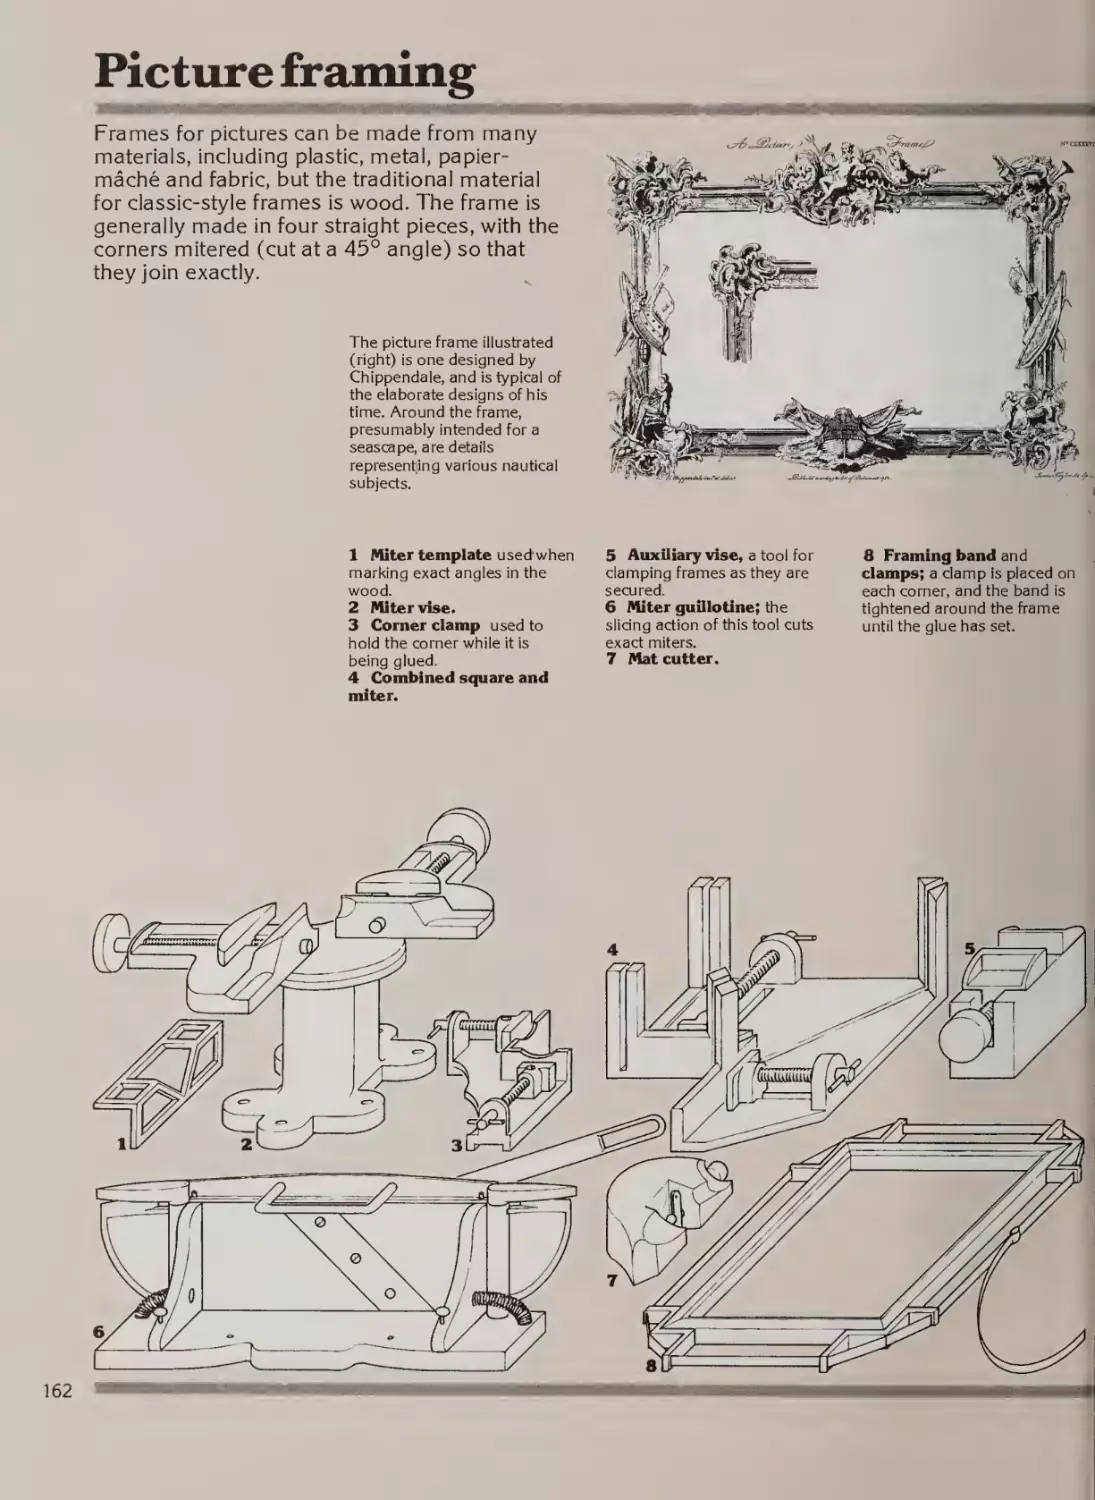
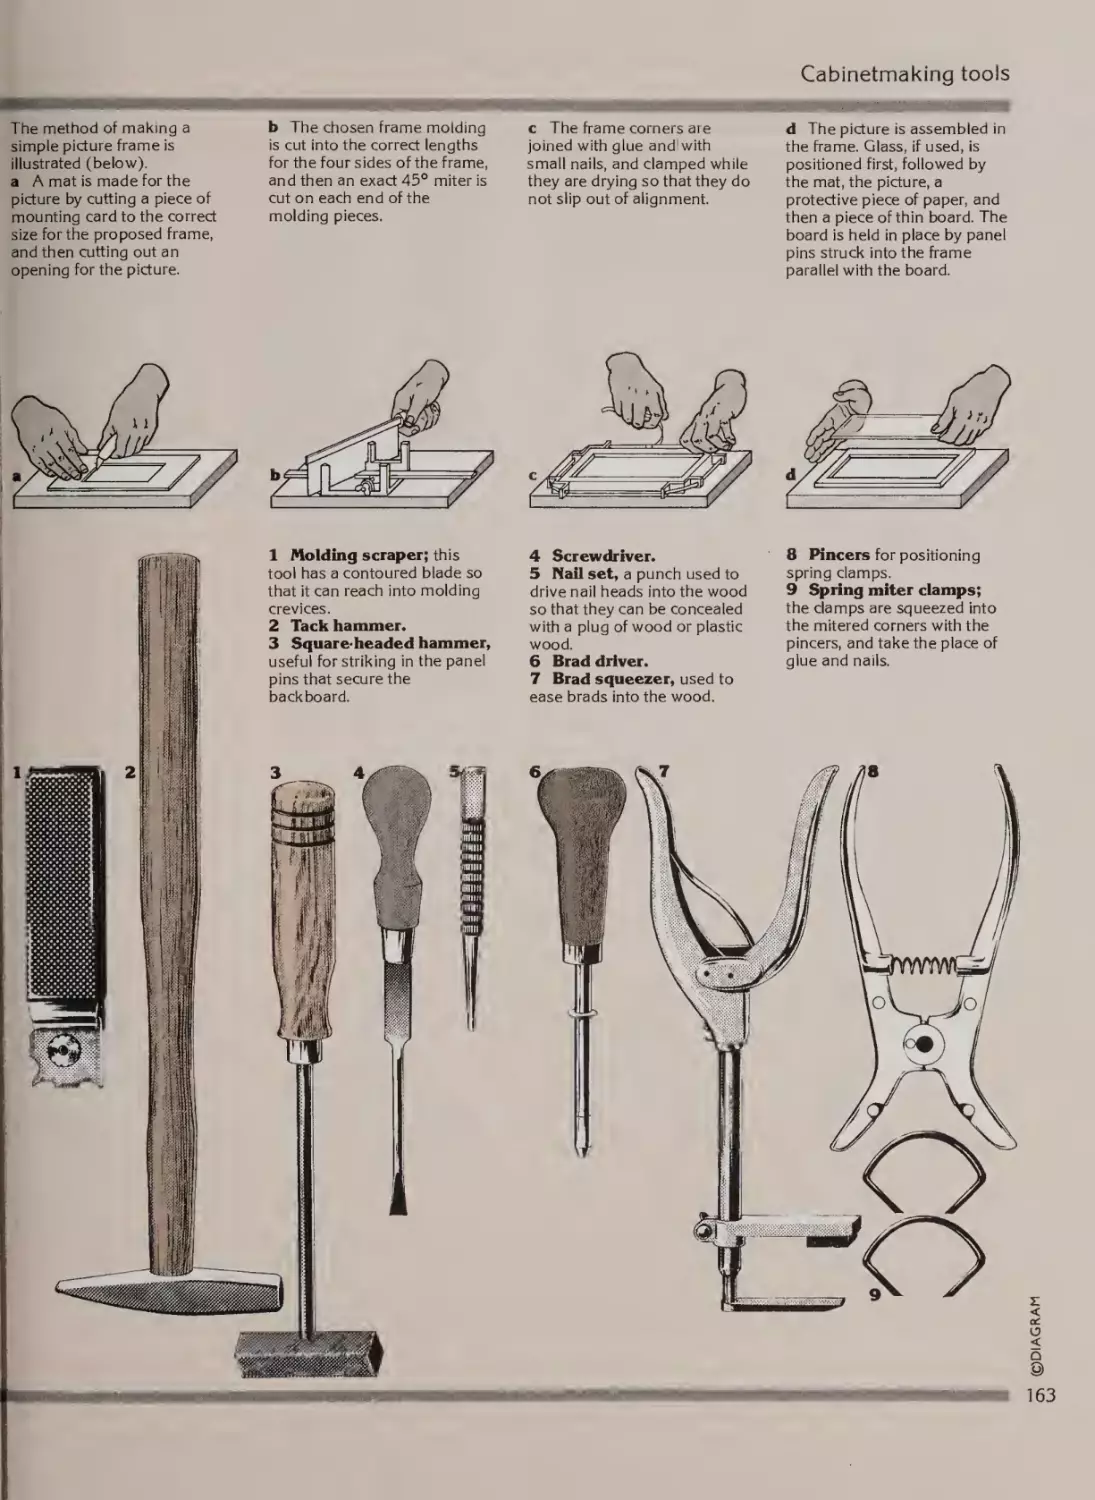
Picture framing
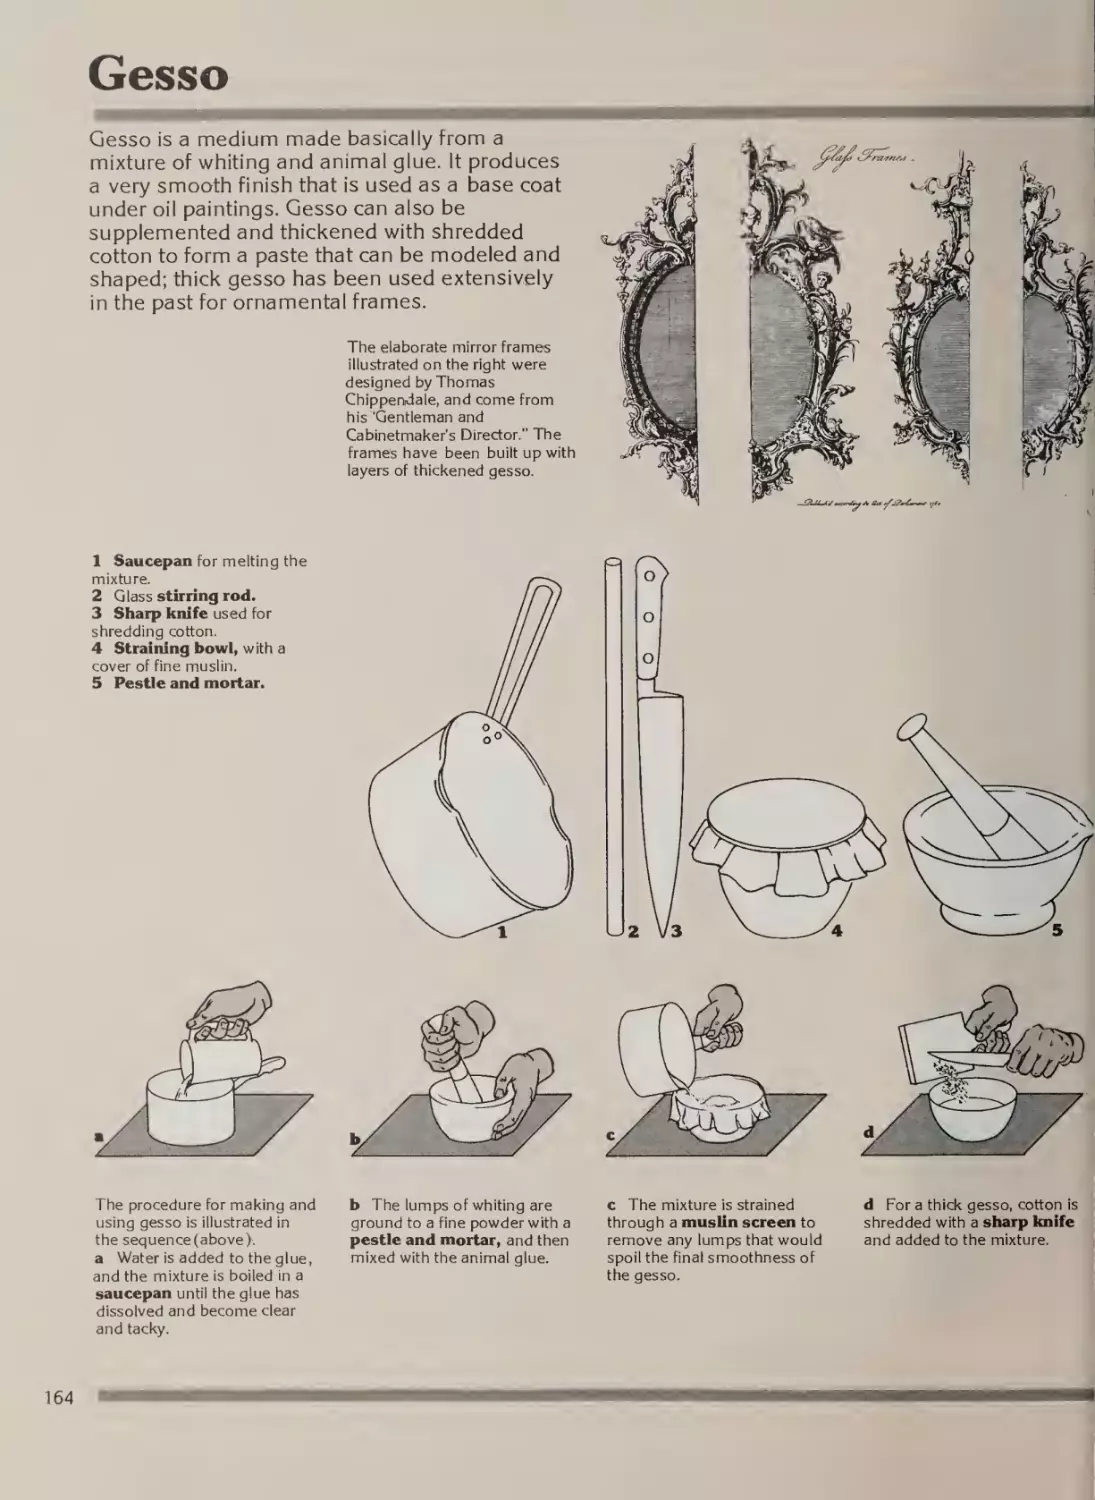
Gesso
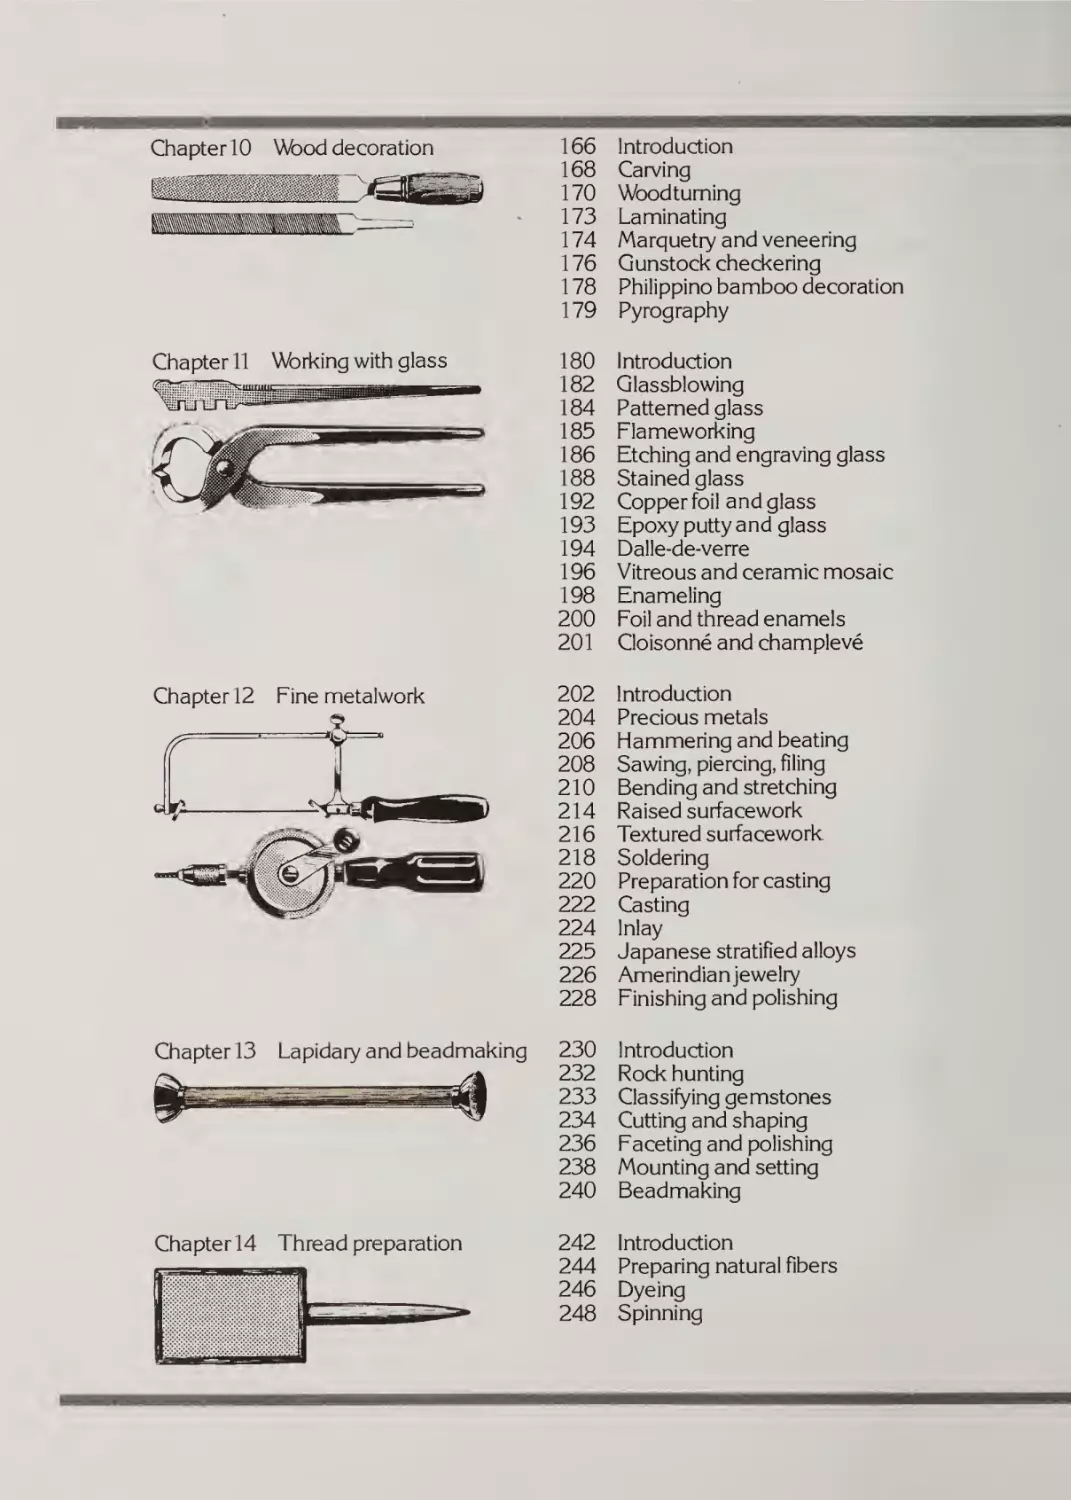
Chapter 10
Wood decoration
166
168
170
173
174
176
178
179
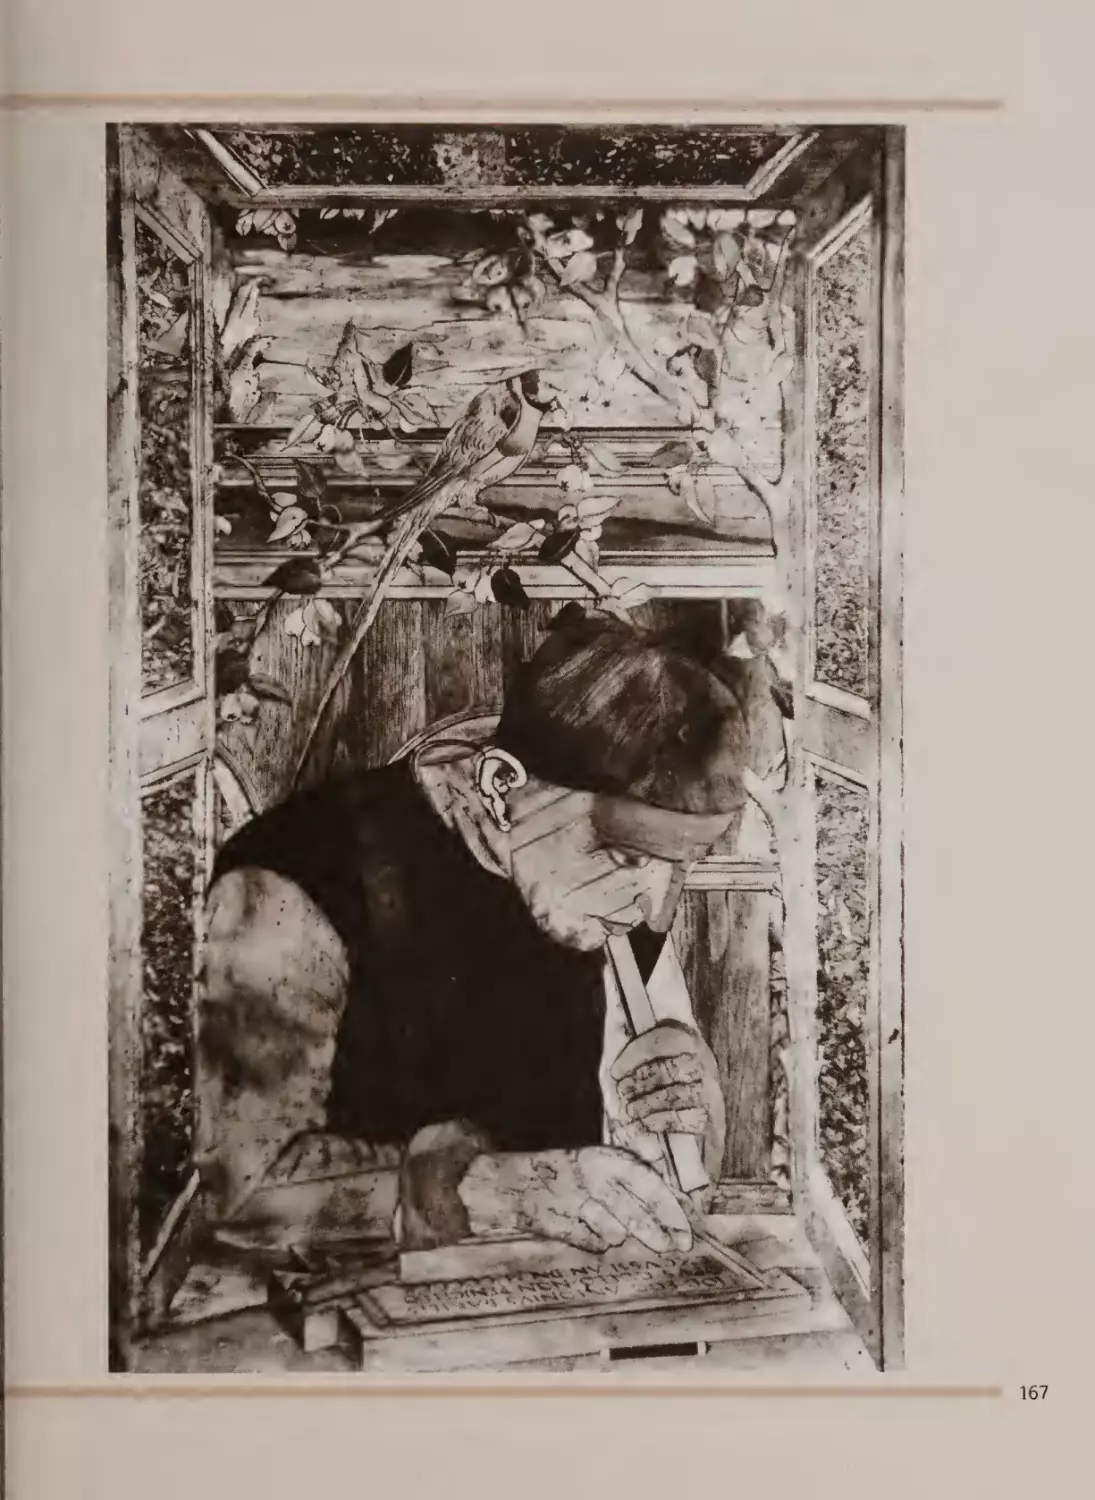
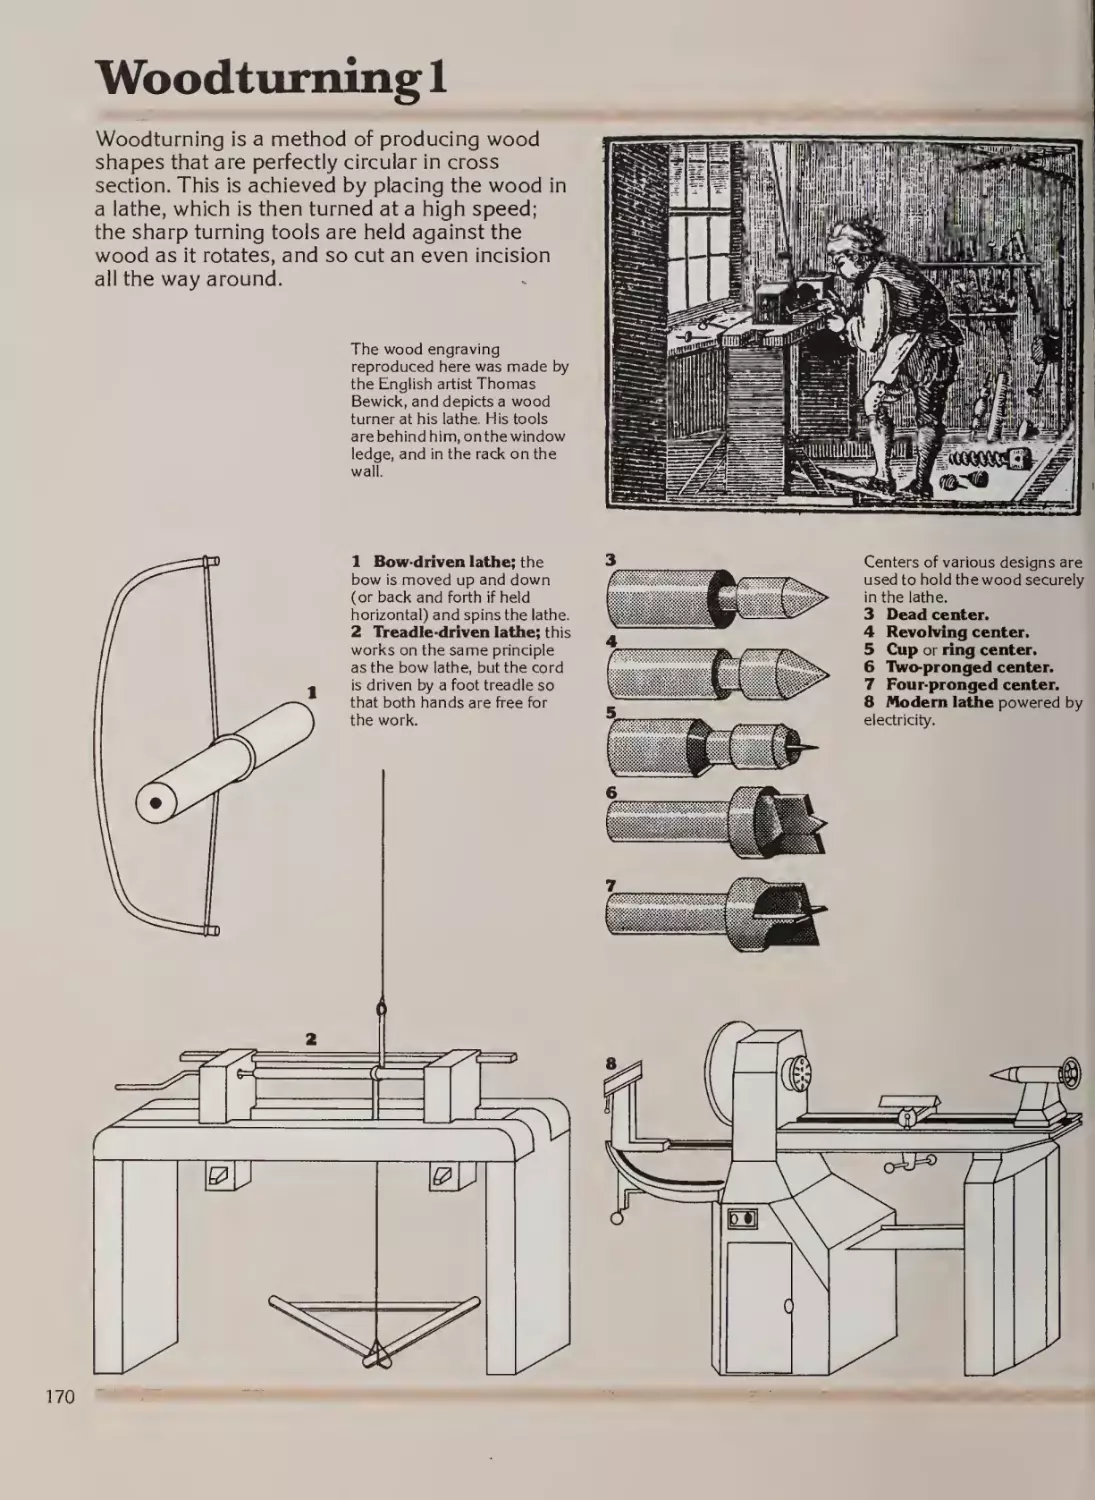
Introduction
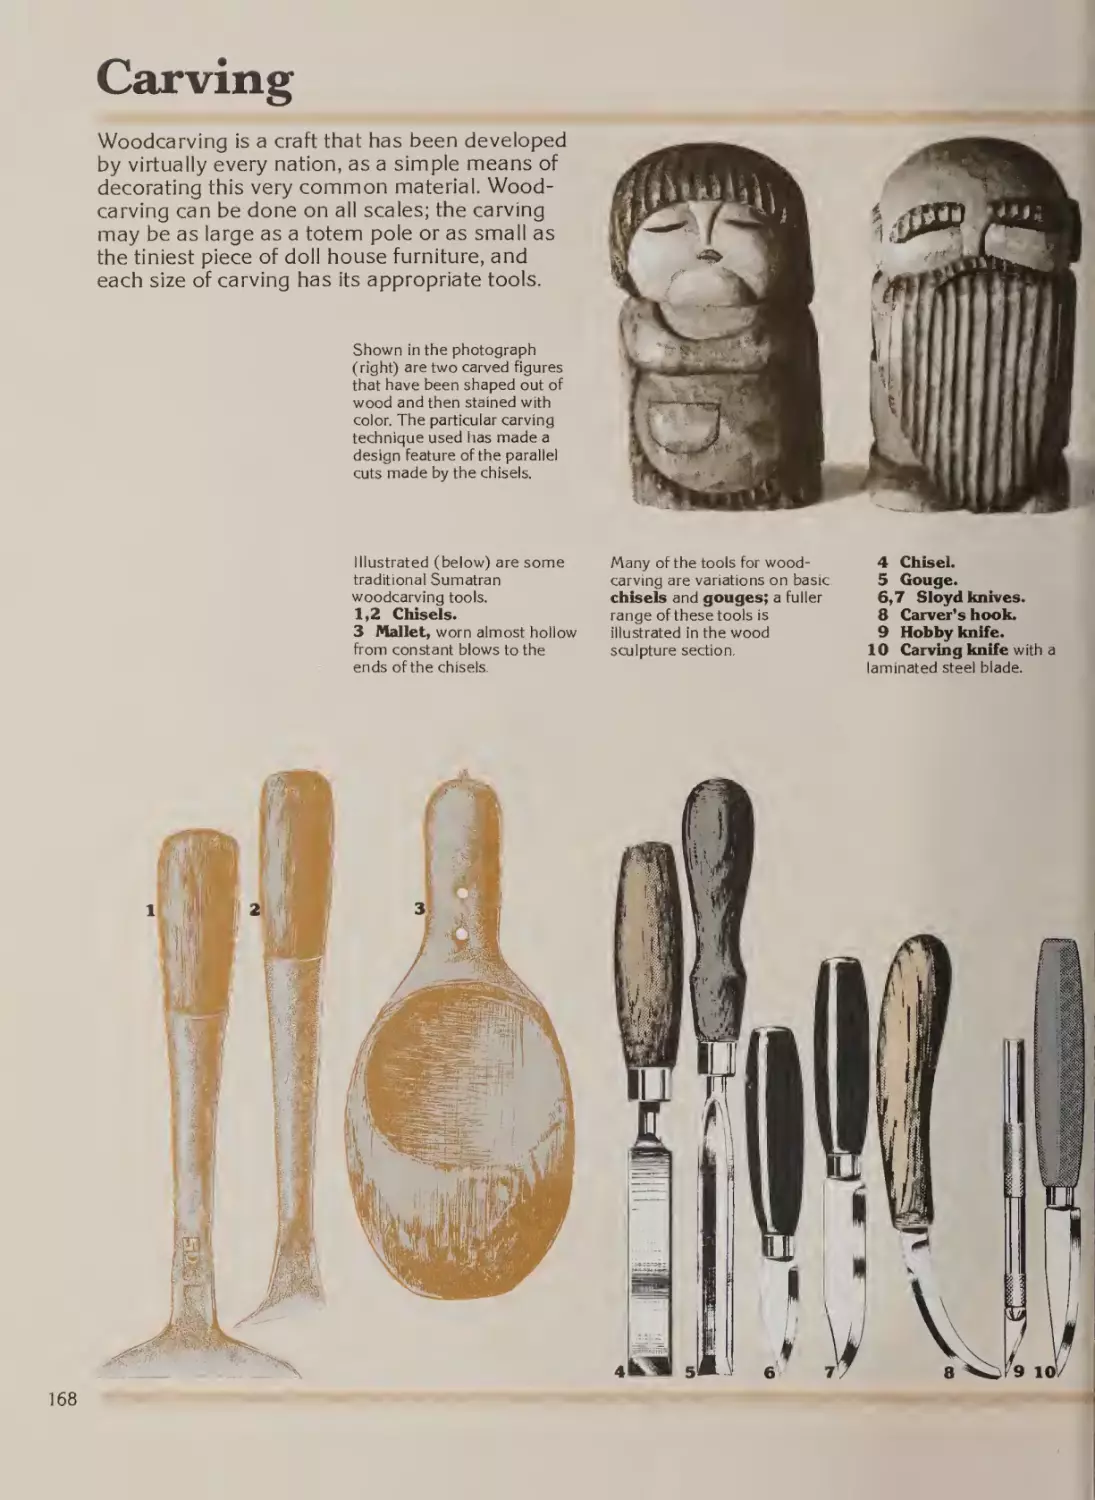
Carving
Woodtuming
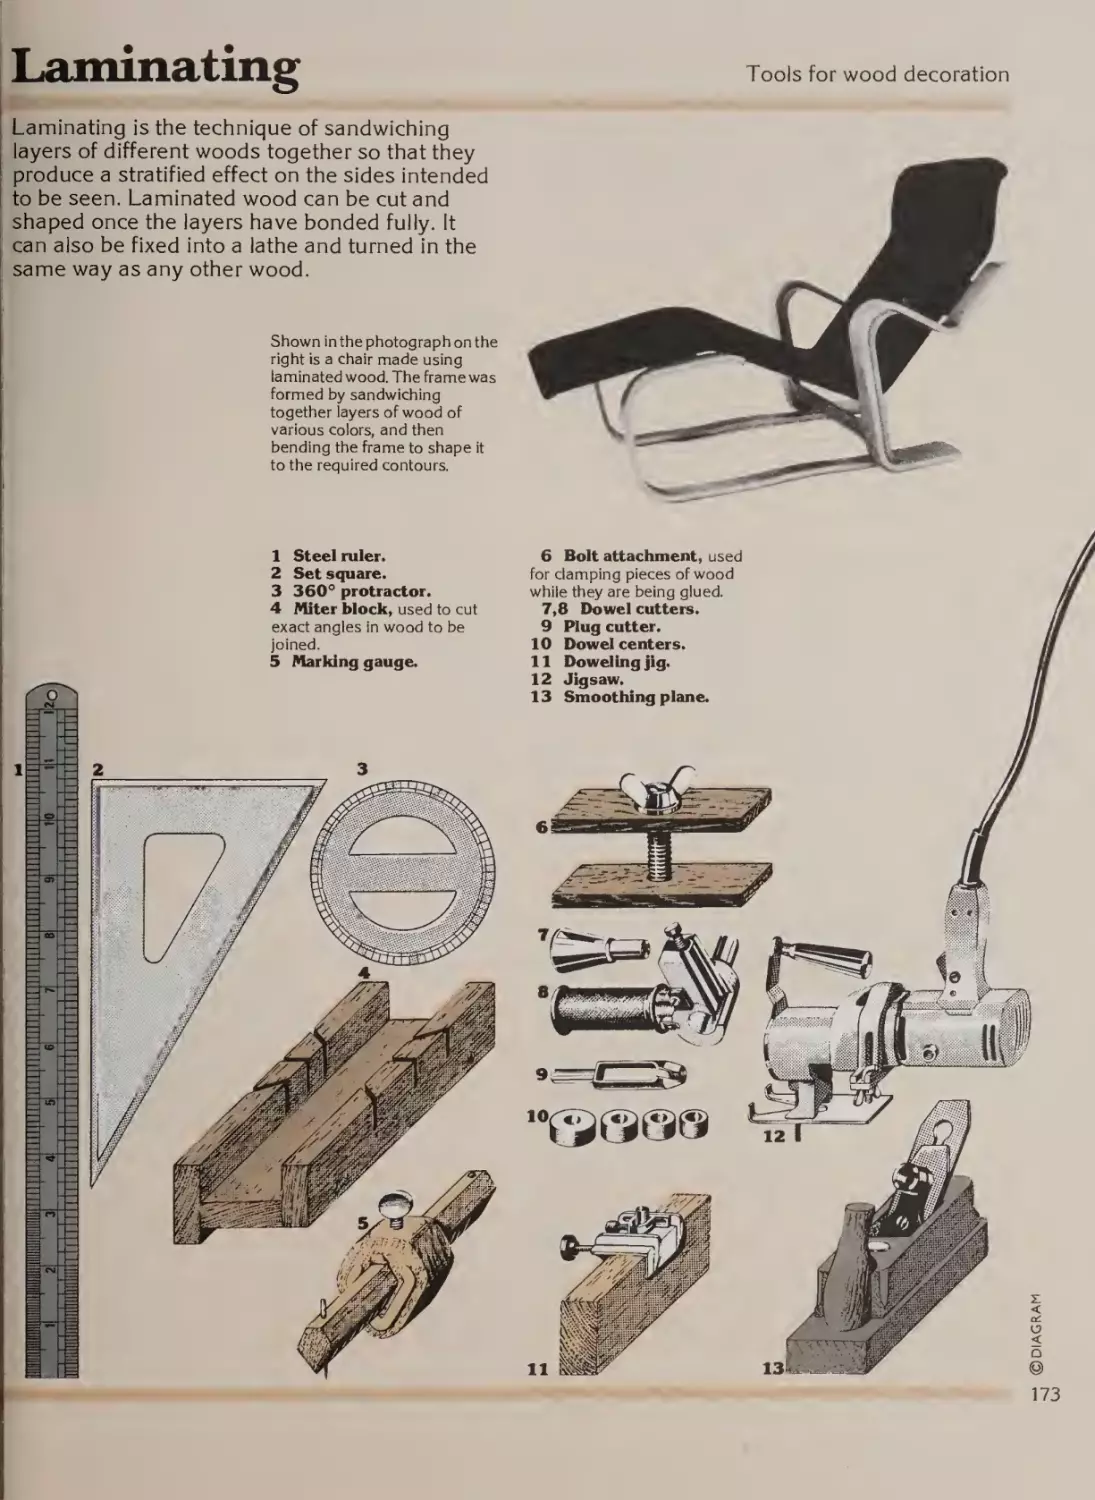
Laminating
Marquetry and veneering
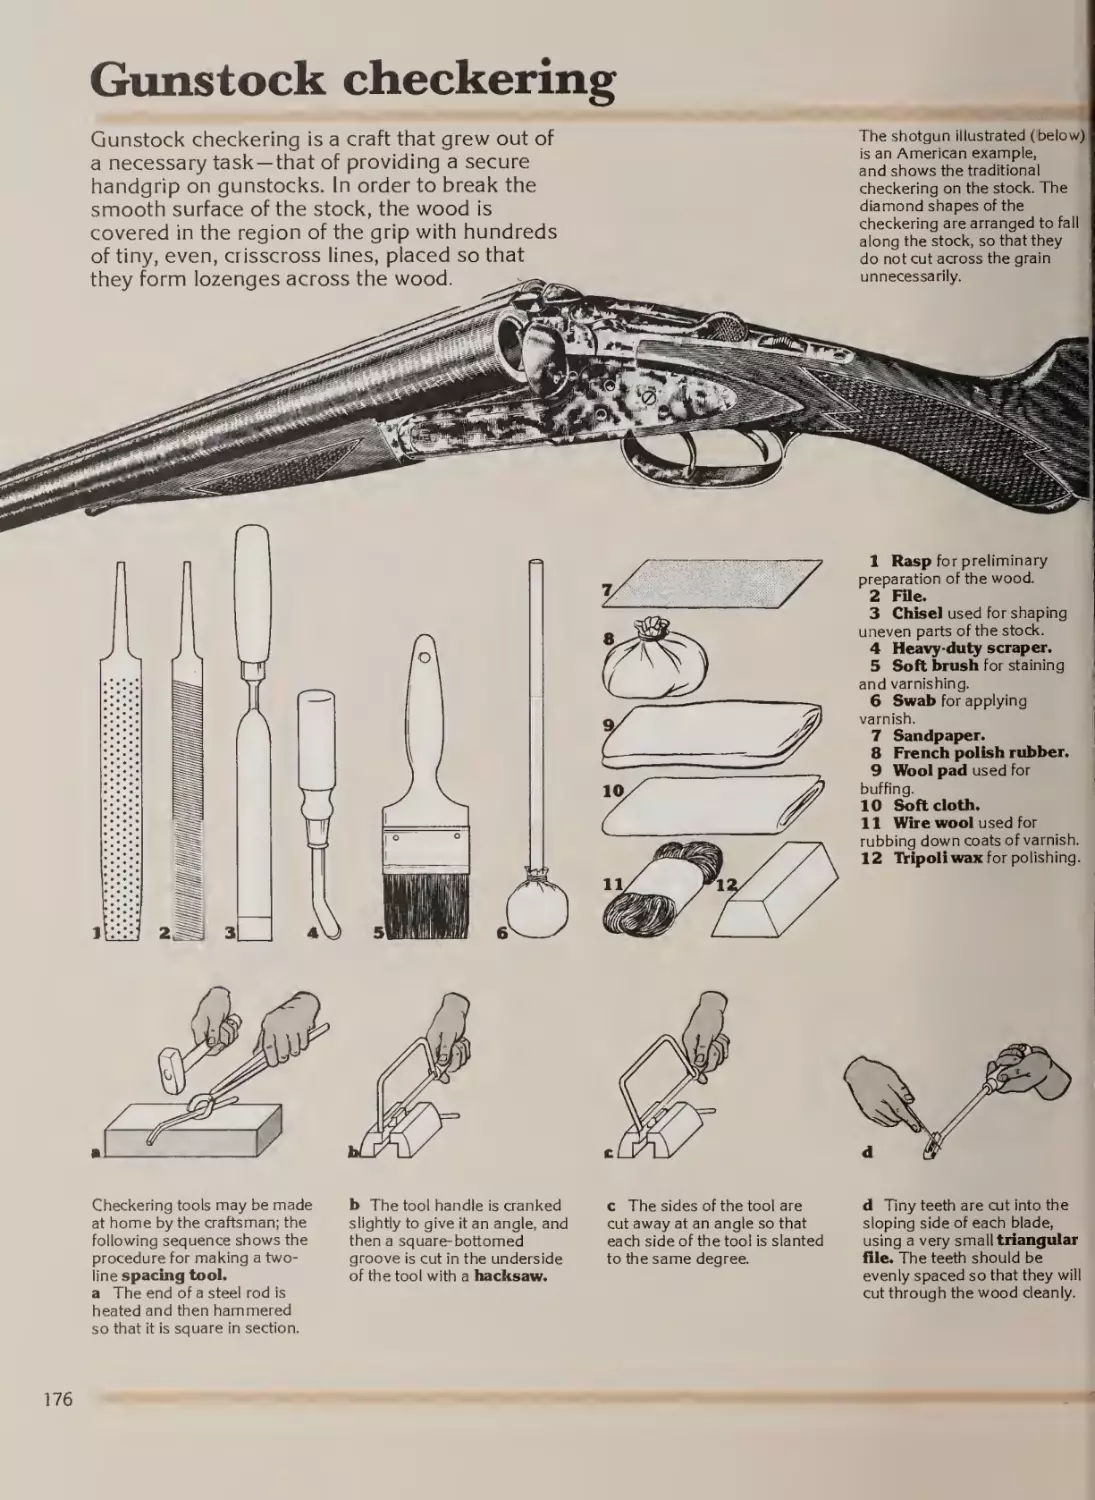
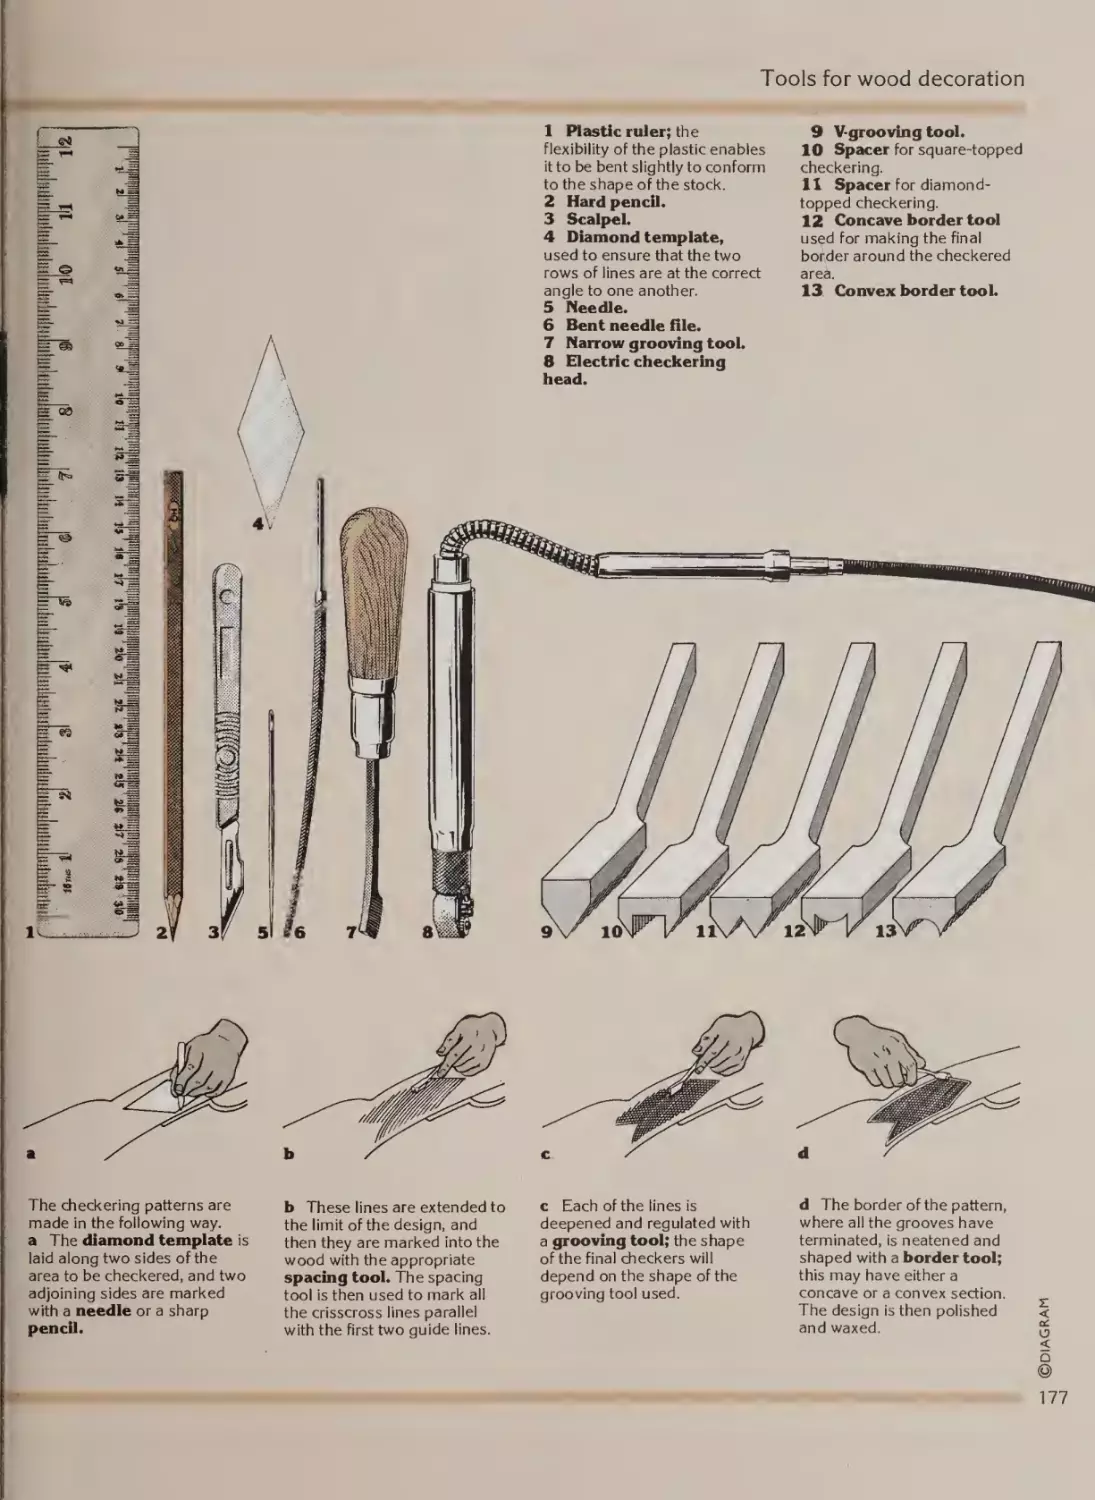
Gunstock checkering
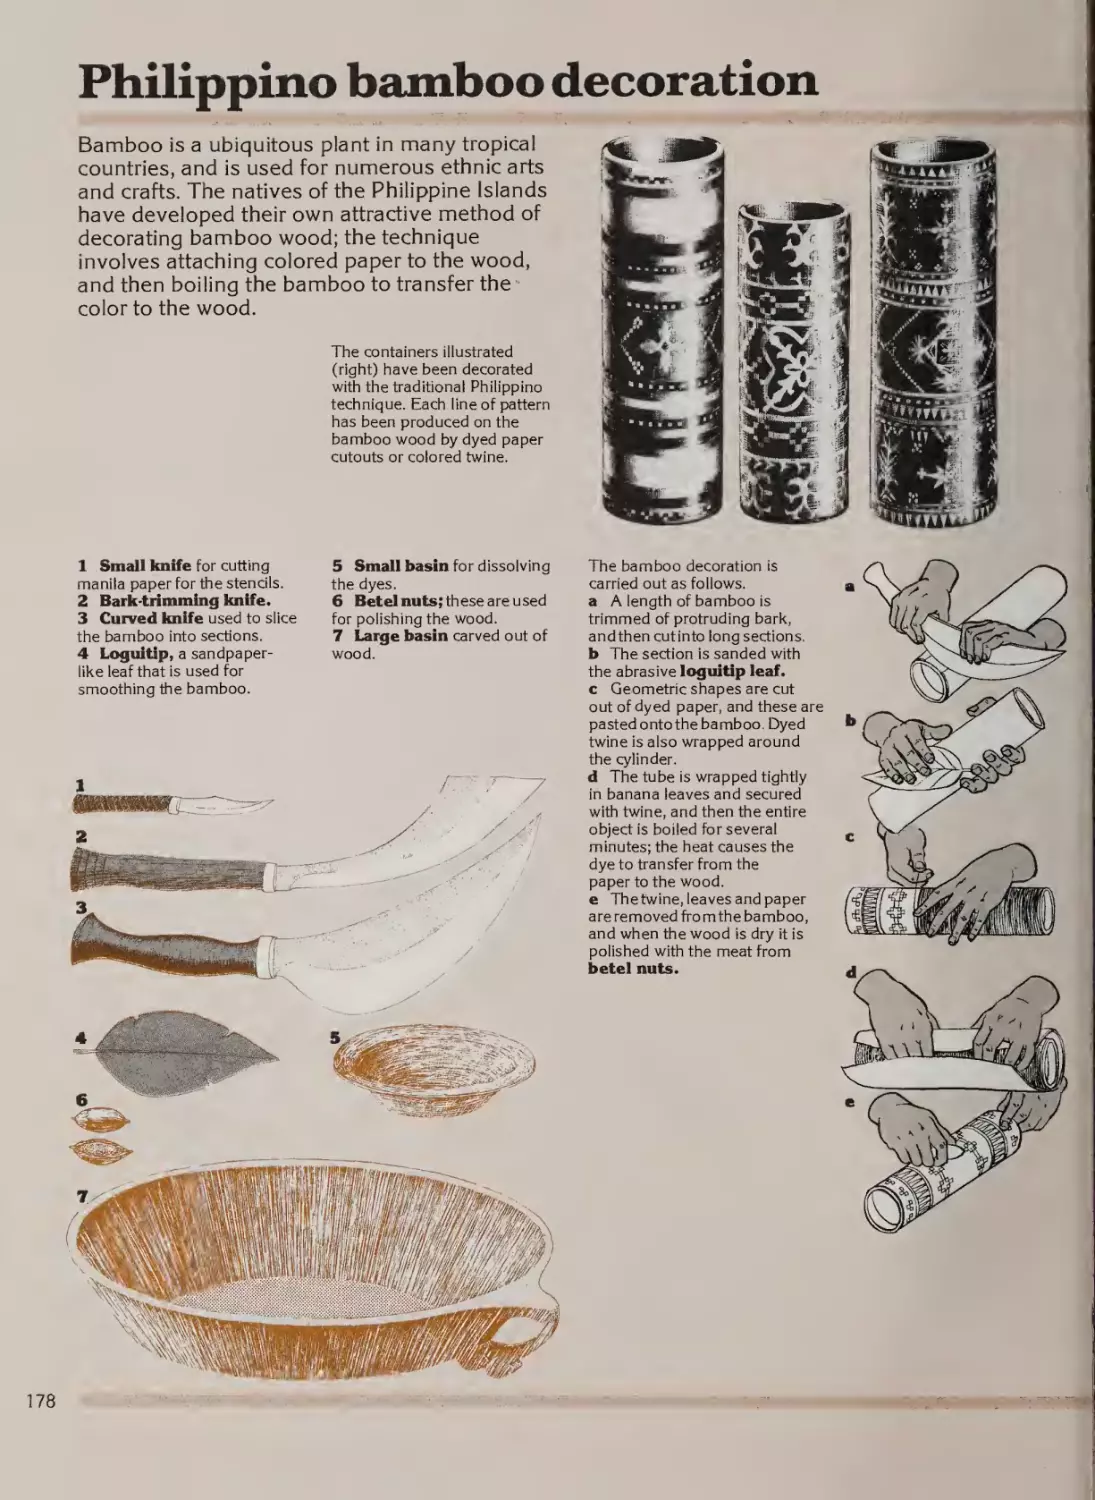
Philippine bamboo decoration
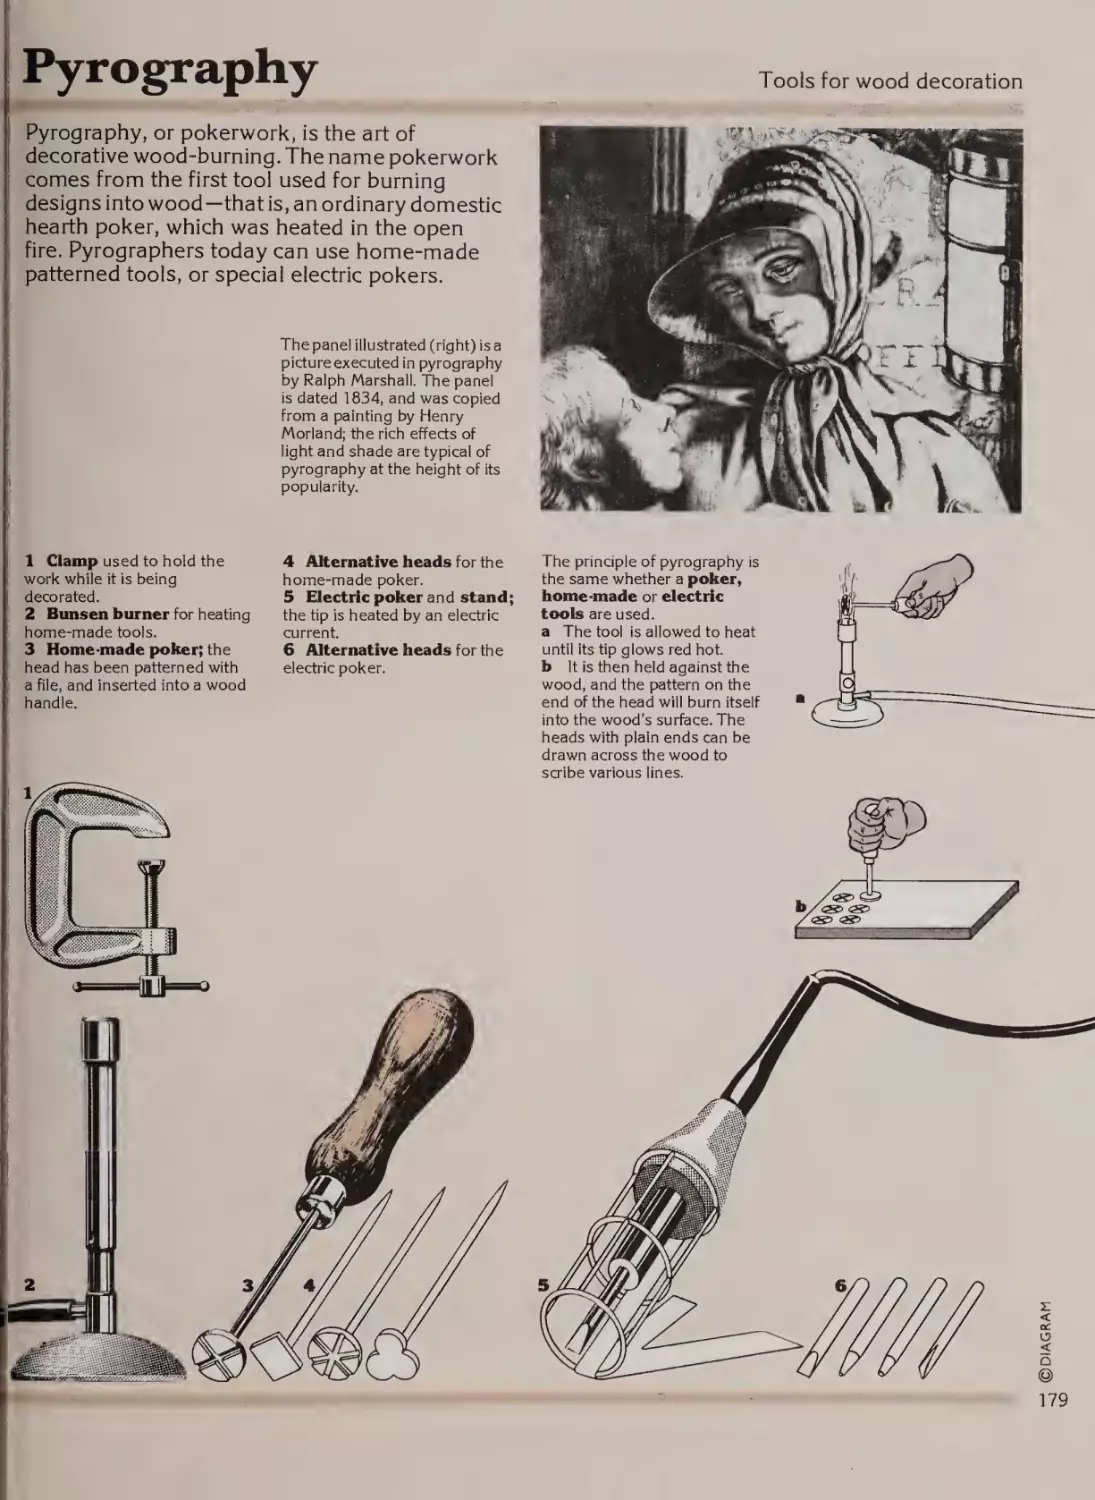
Pyrography
Chapter 11
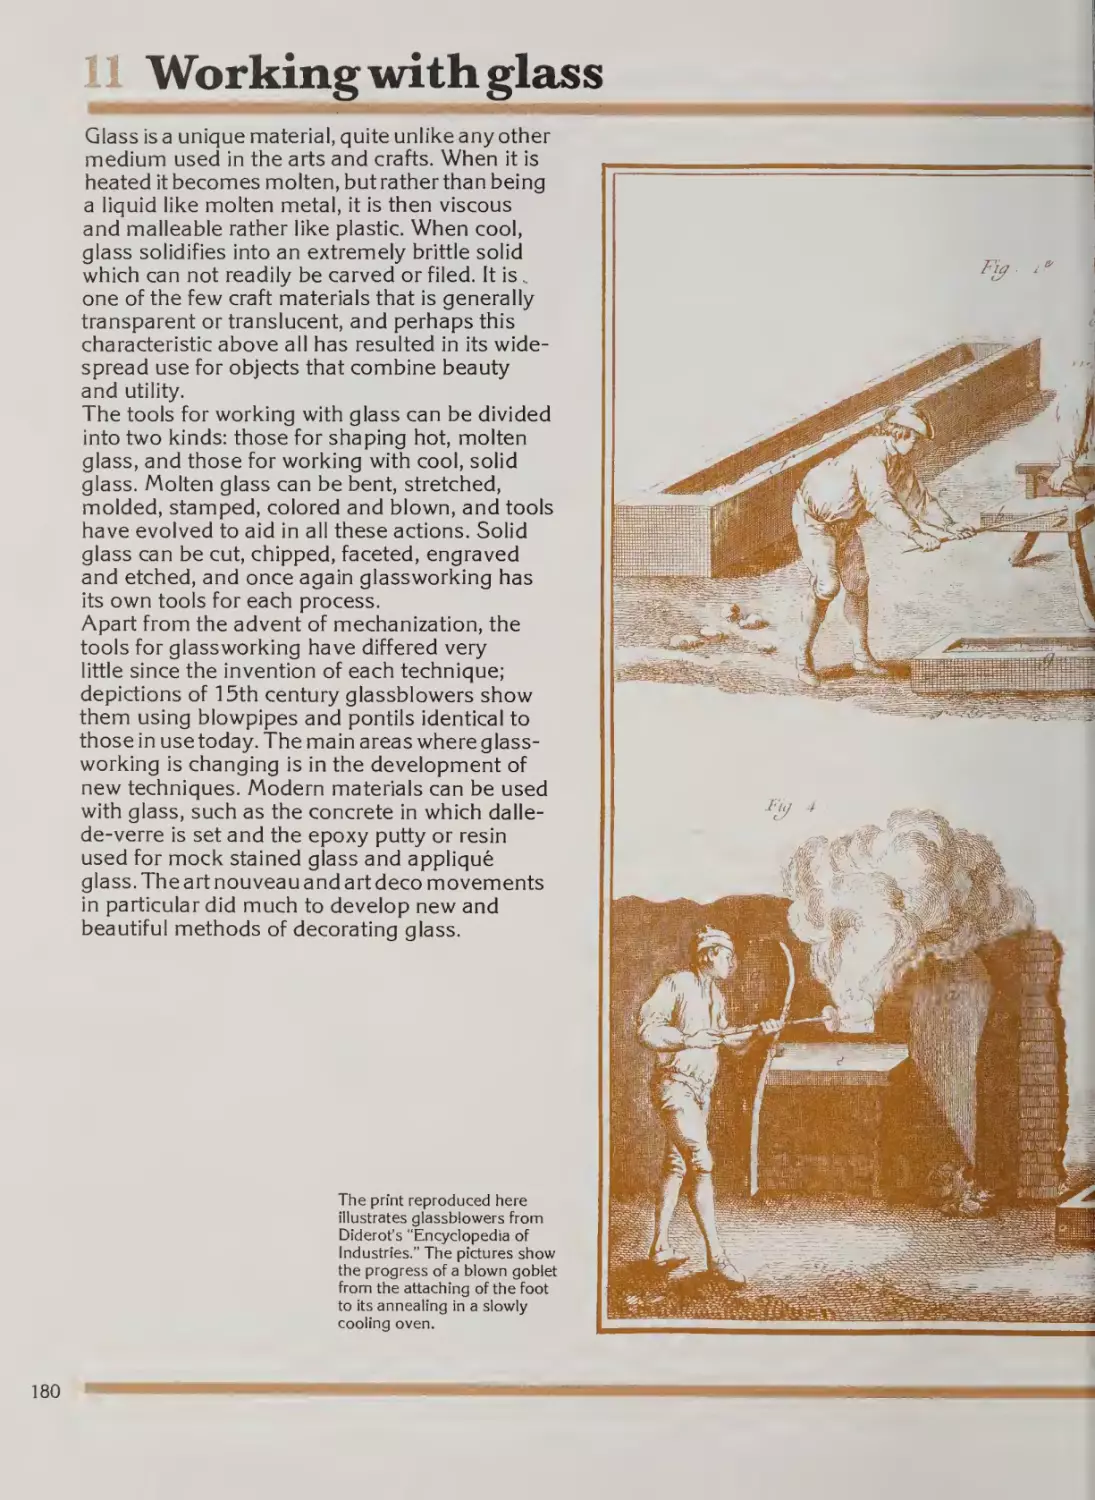
Working with glass
180
182
184
185
186
188
192
193
194
196
198
200
201
Introduction
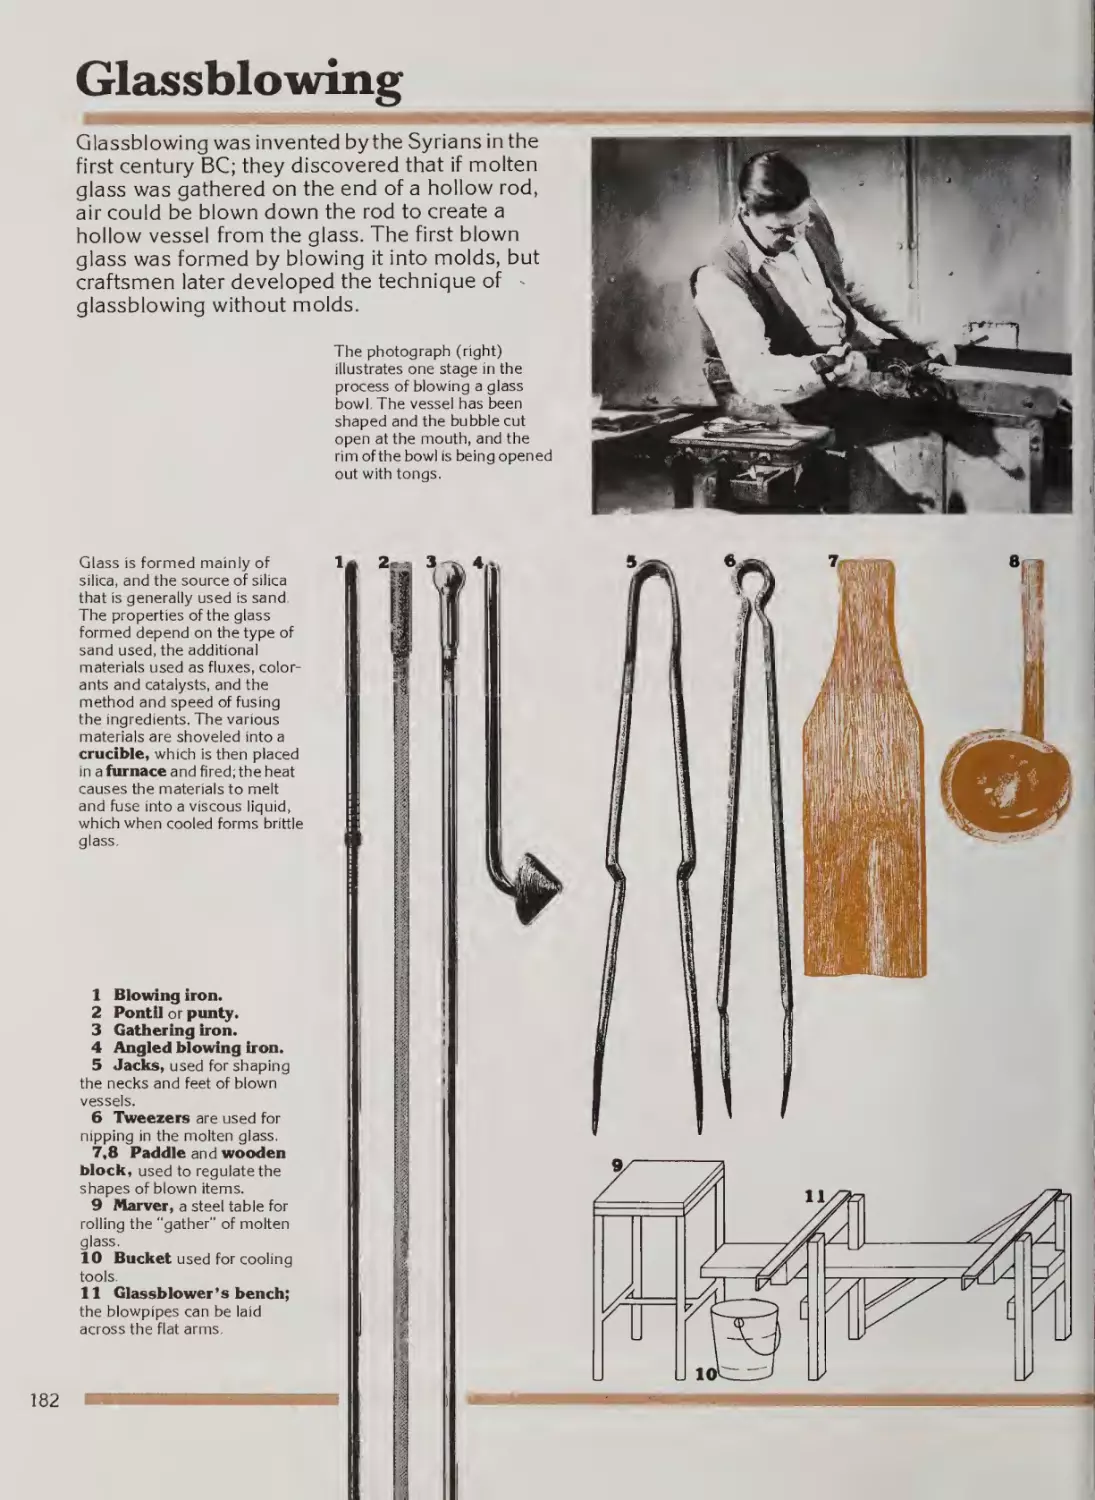
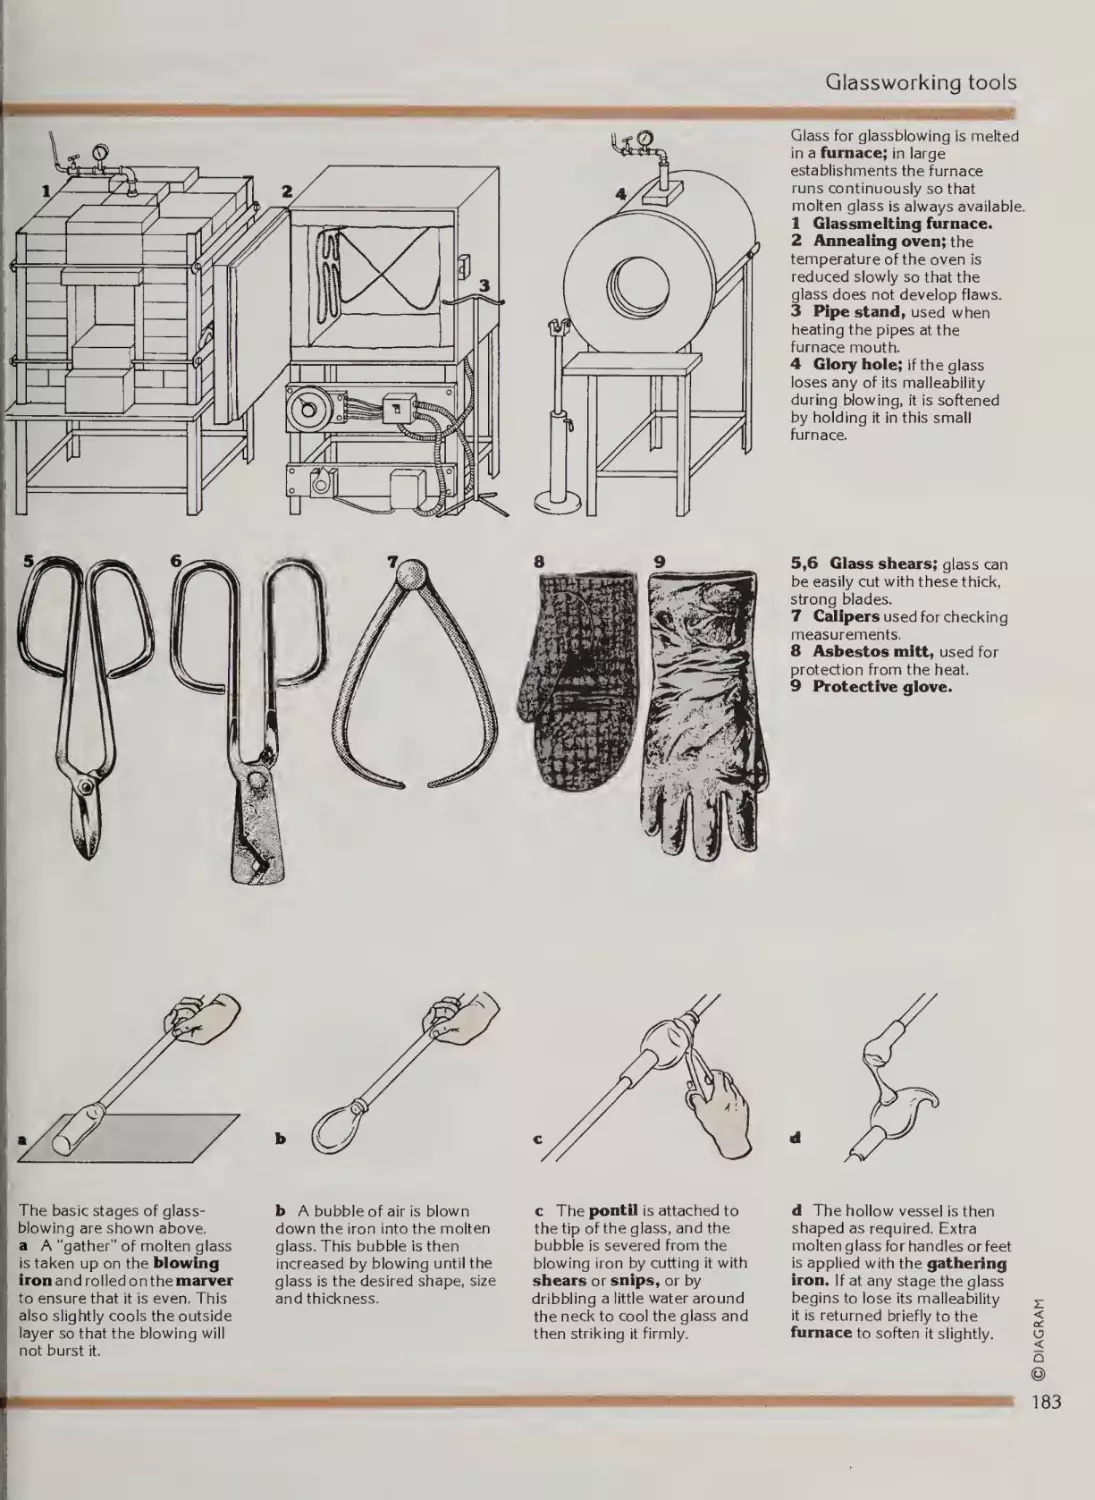
Glassblowing
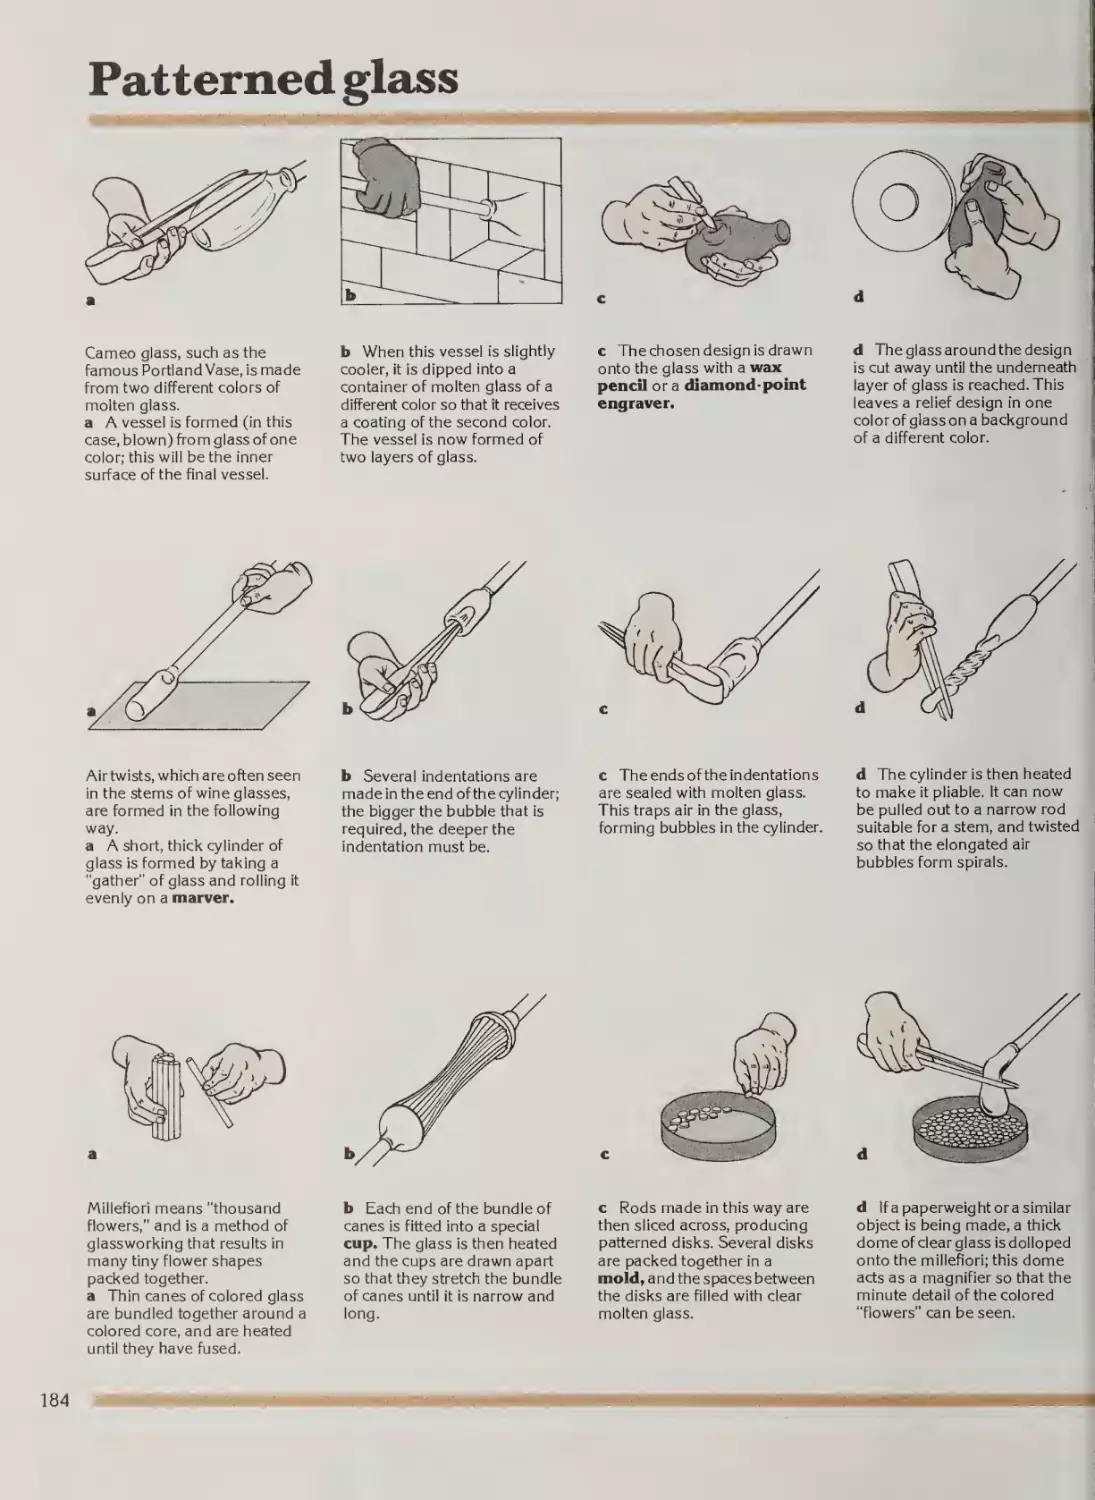
Patterned glass
Flameworking
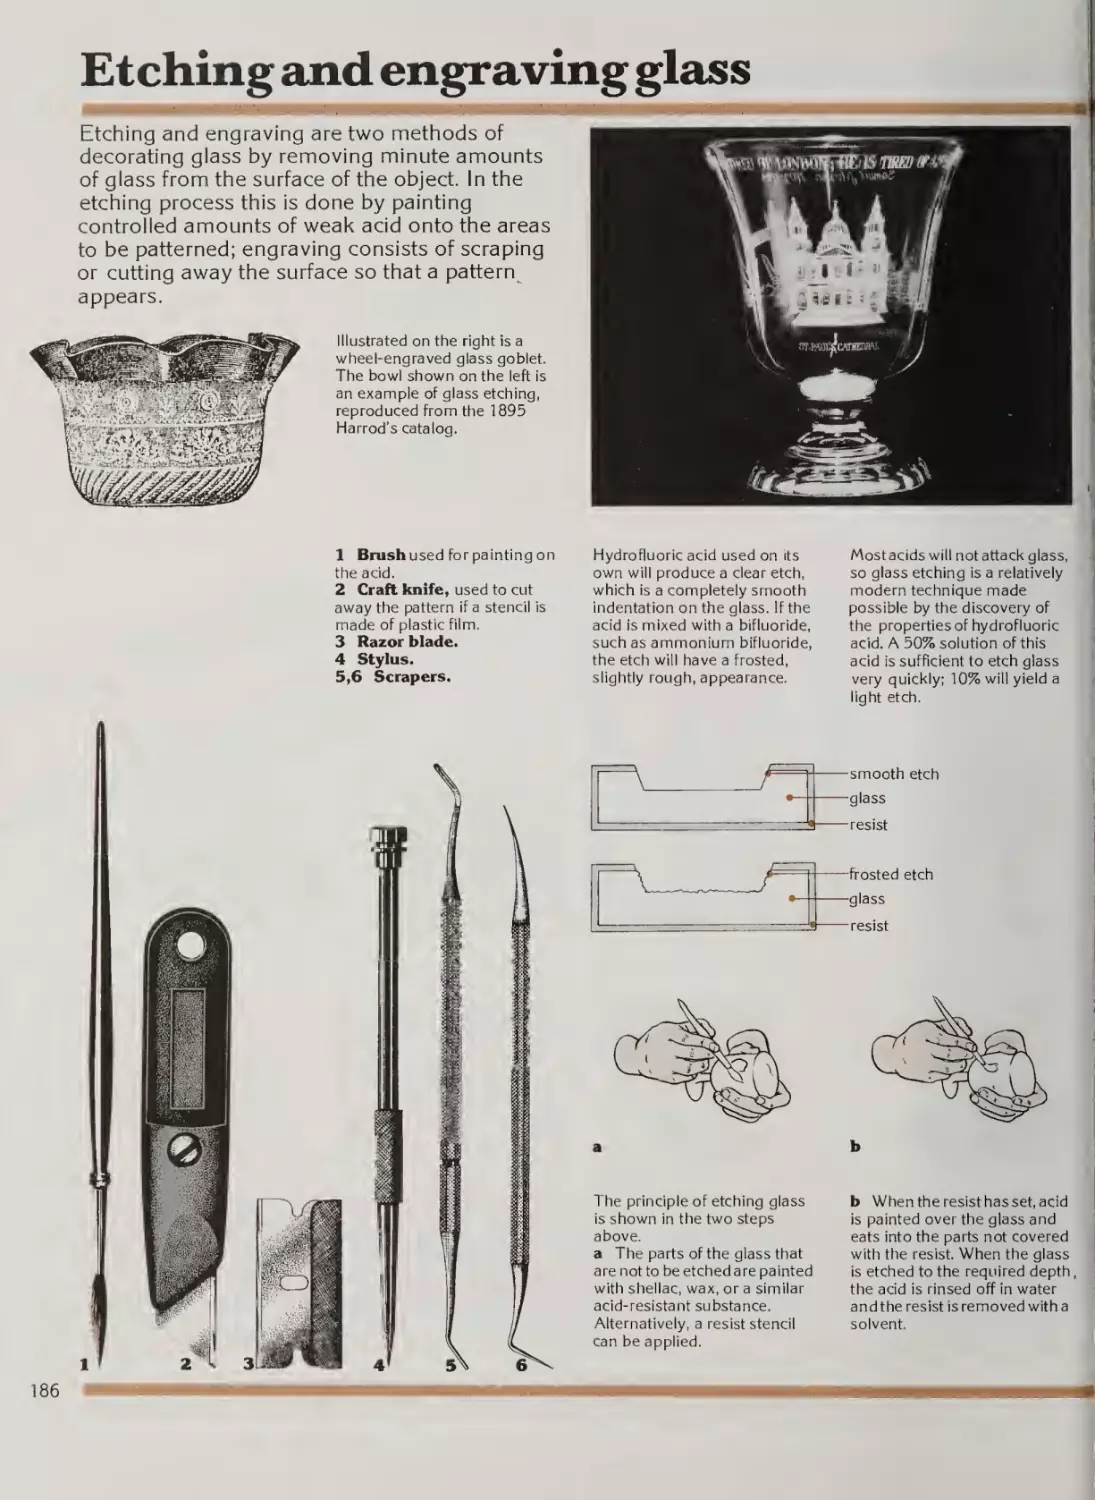
Etching and engraving glass
Stained glass
Copper foil and glass
Epoxy putty and glass
Dalle-de-verre
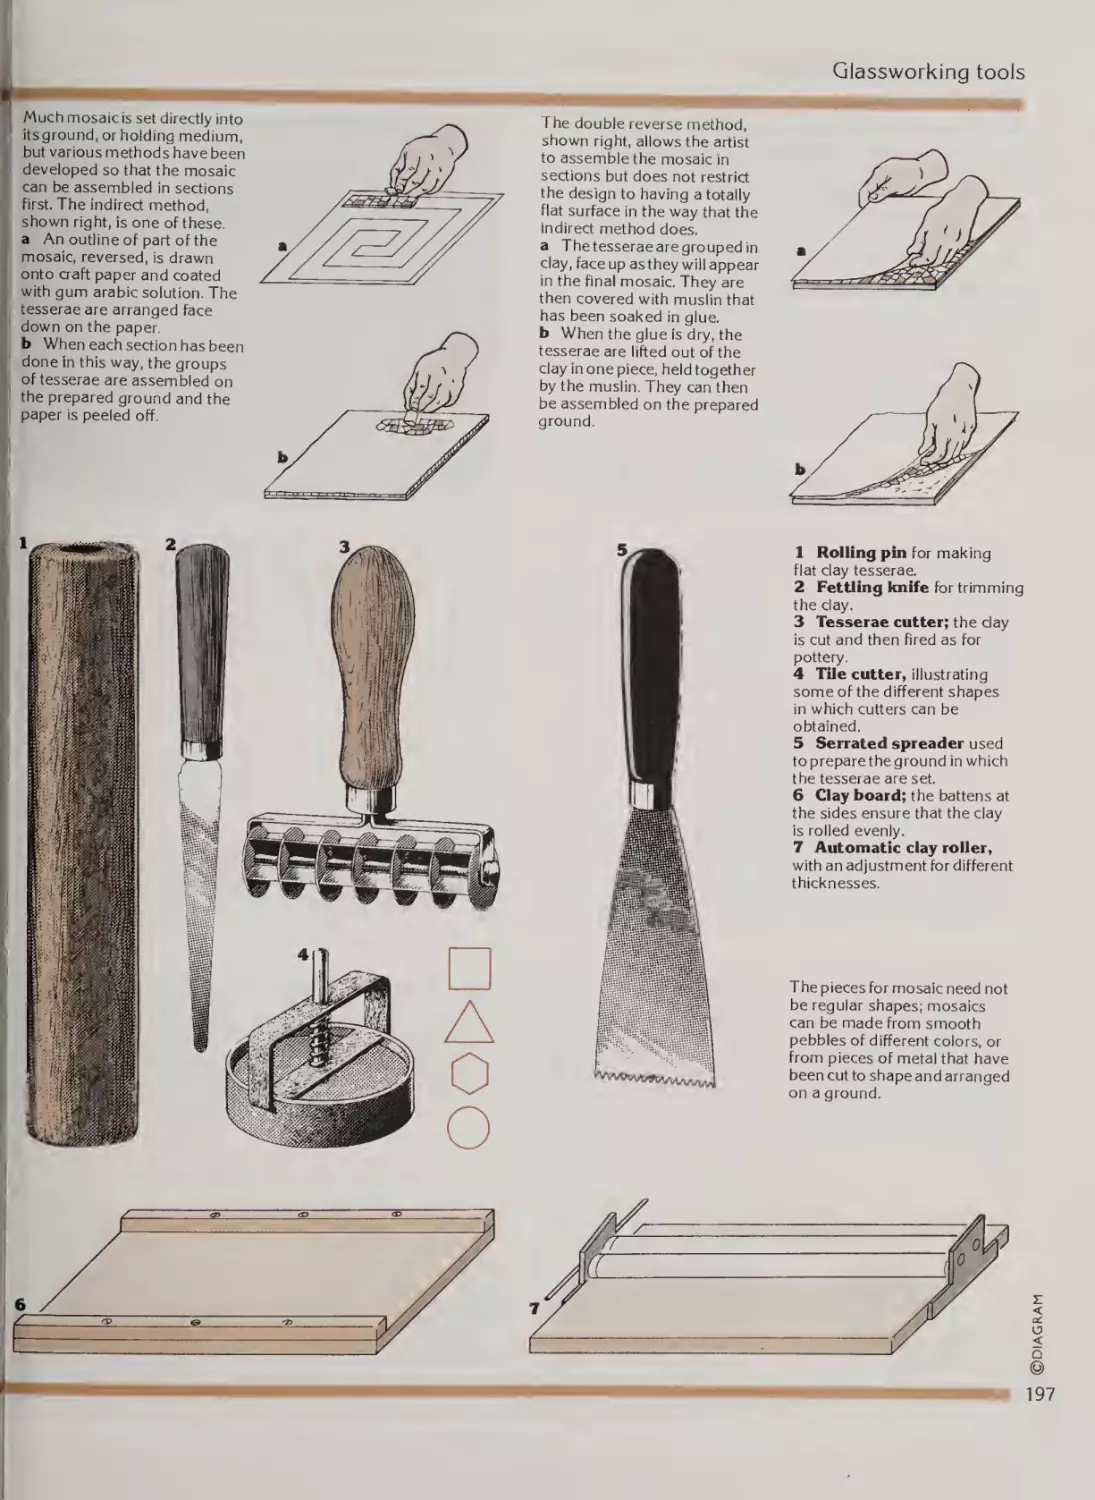
Vitreous and ceramic mosaic
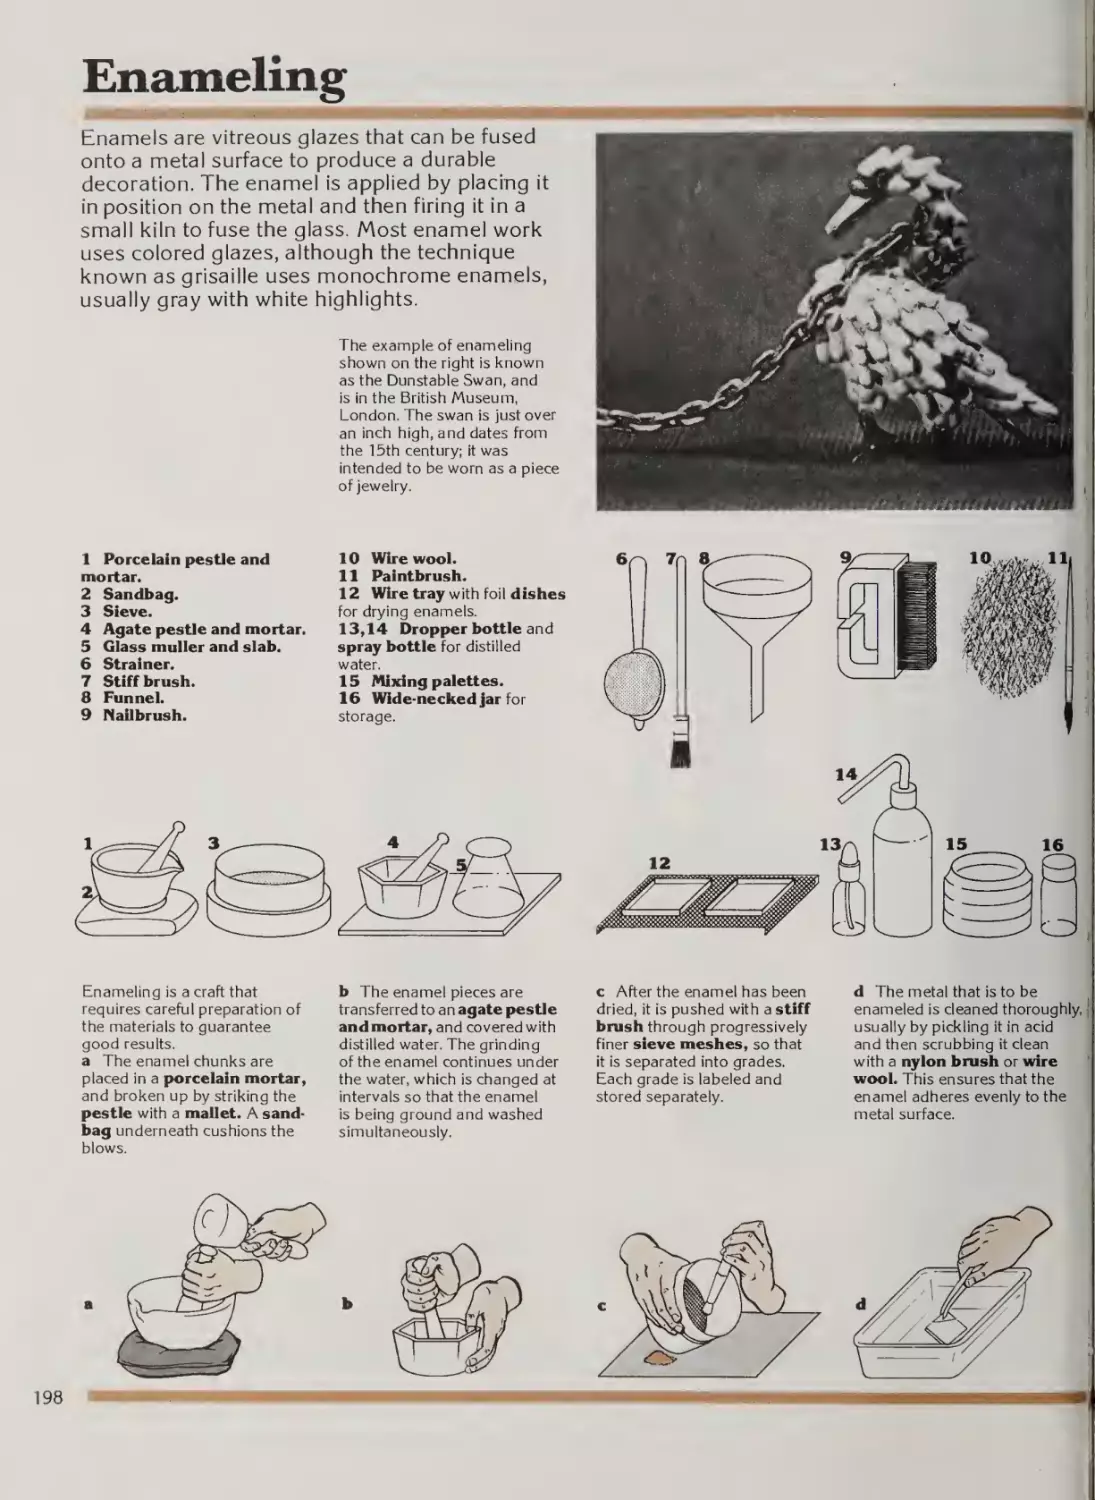
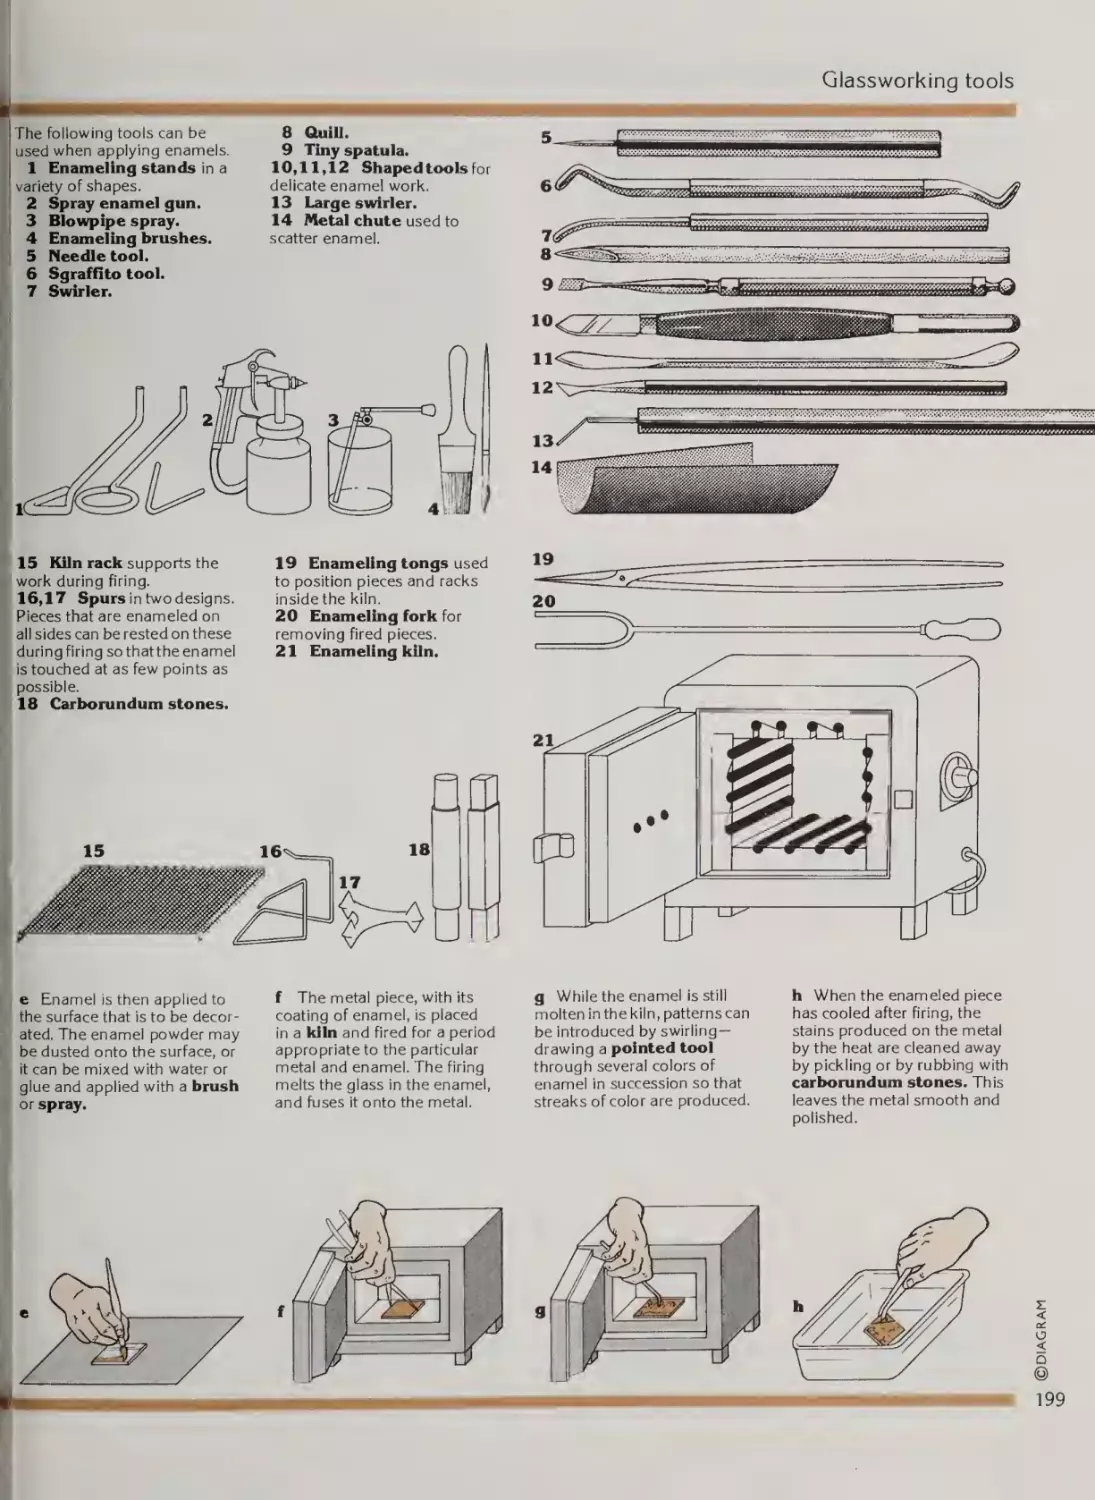
Enameling
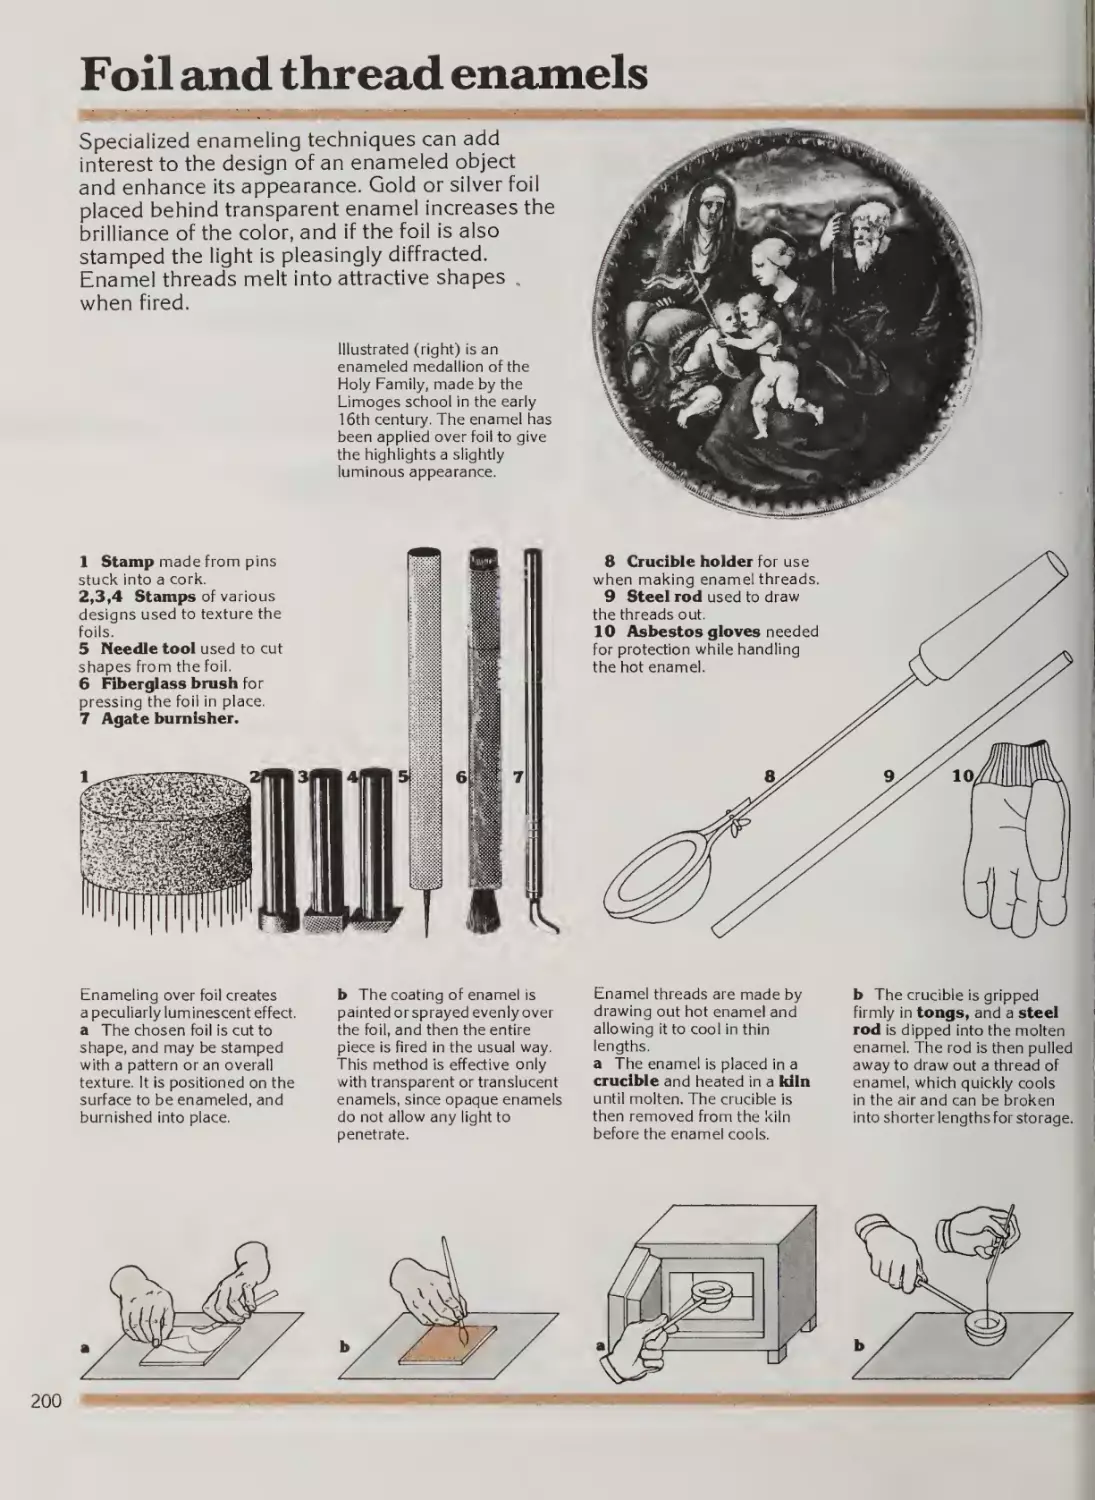
Foil and thread enamels
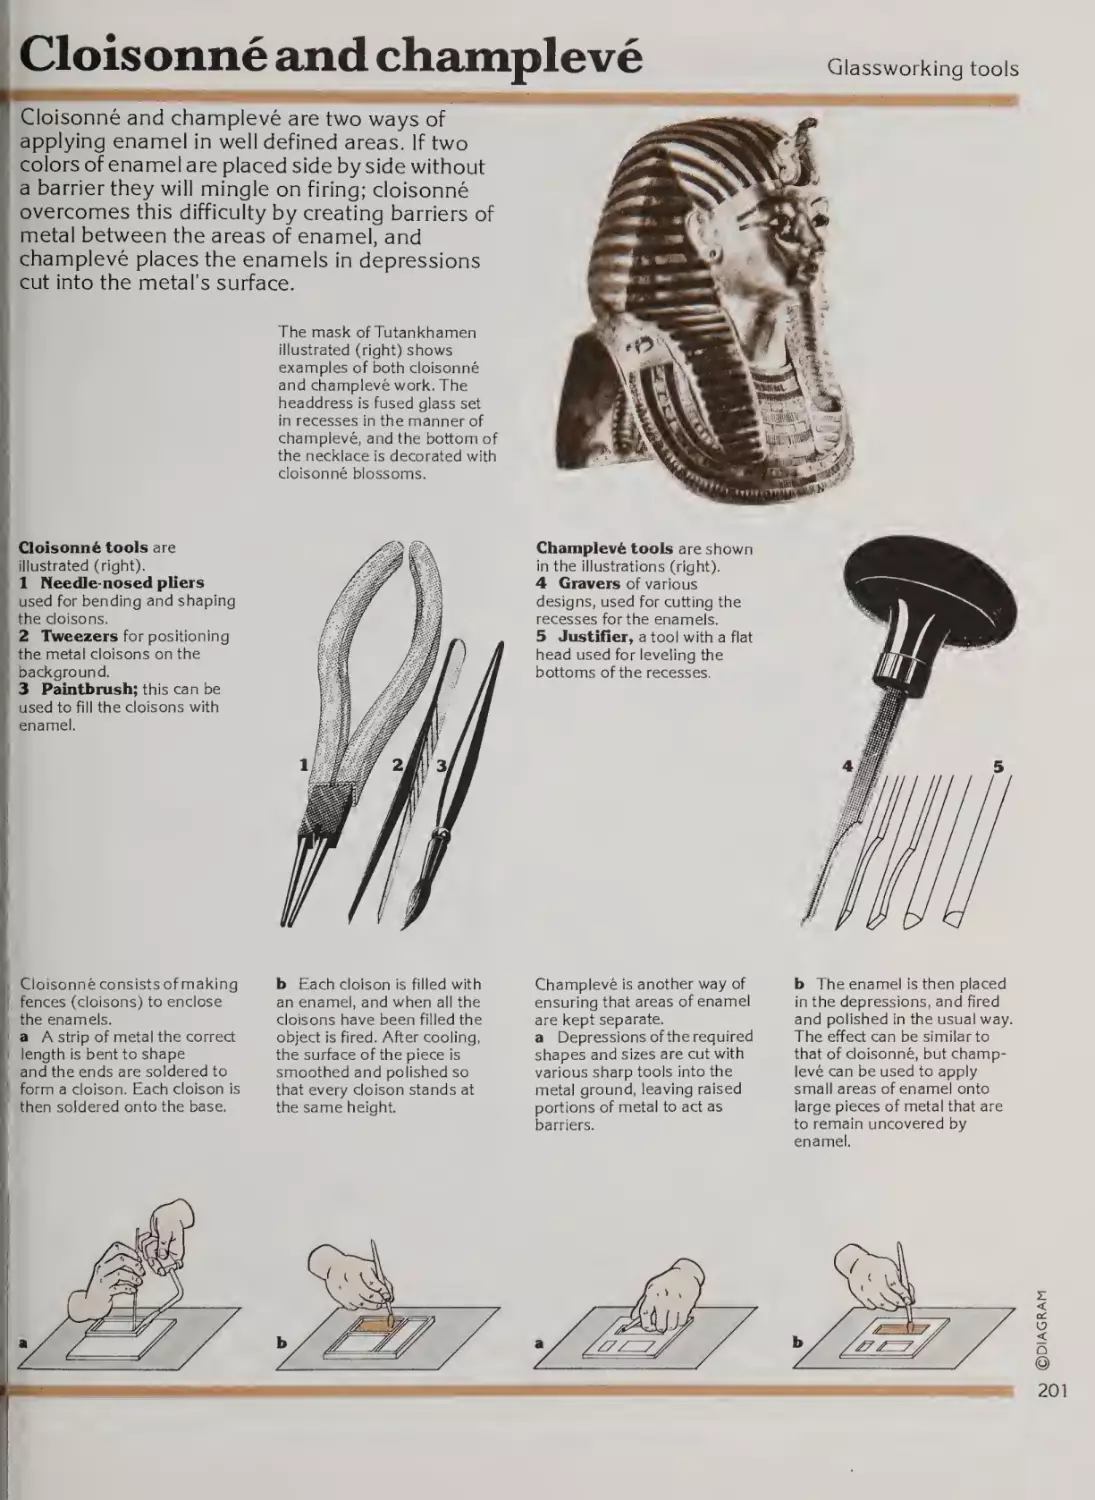
Cloisonne and champleve
Chapter 12
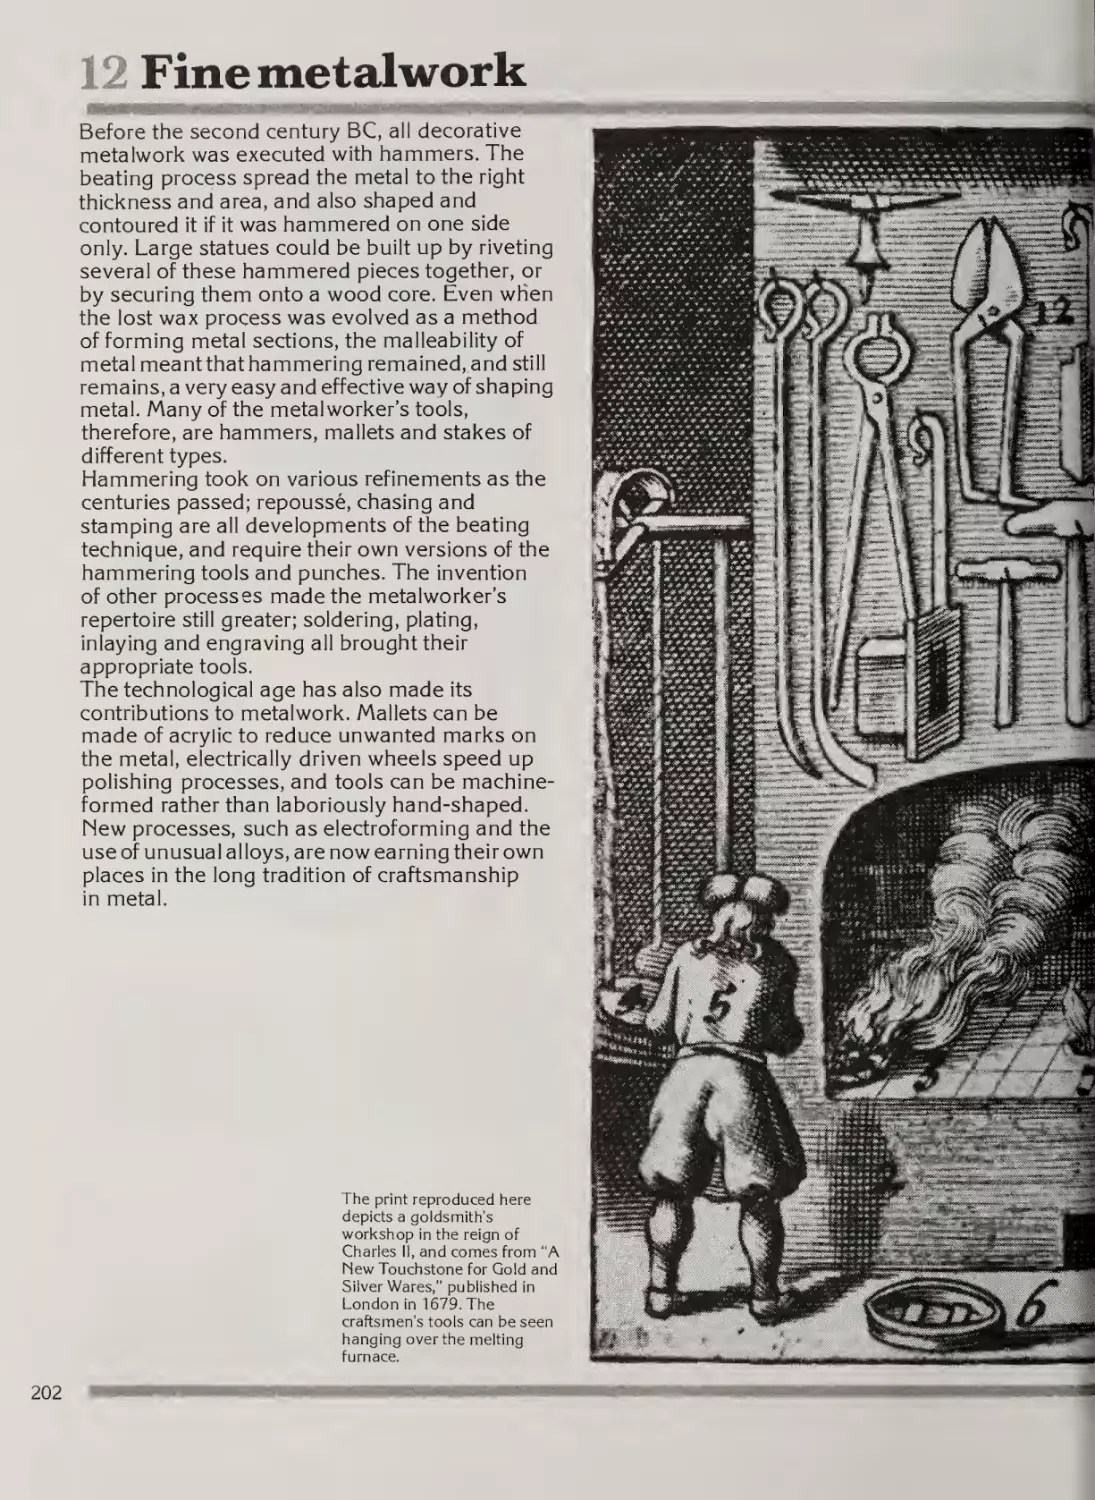
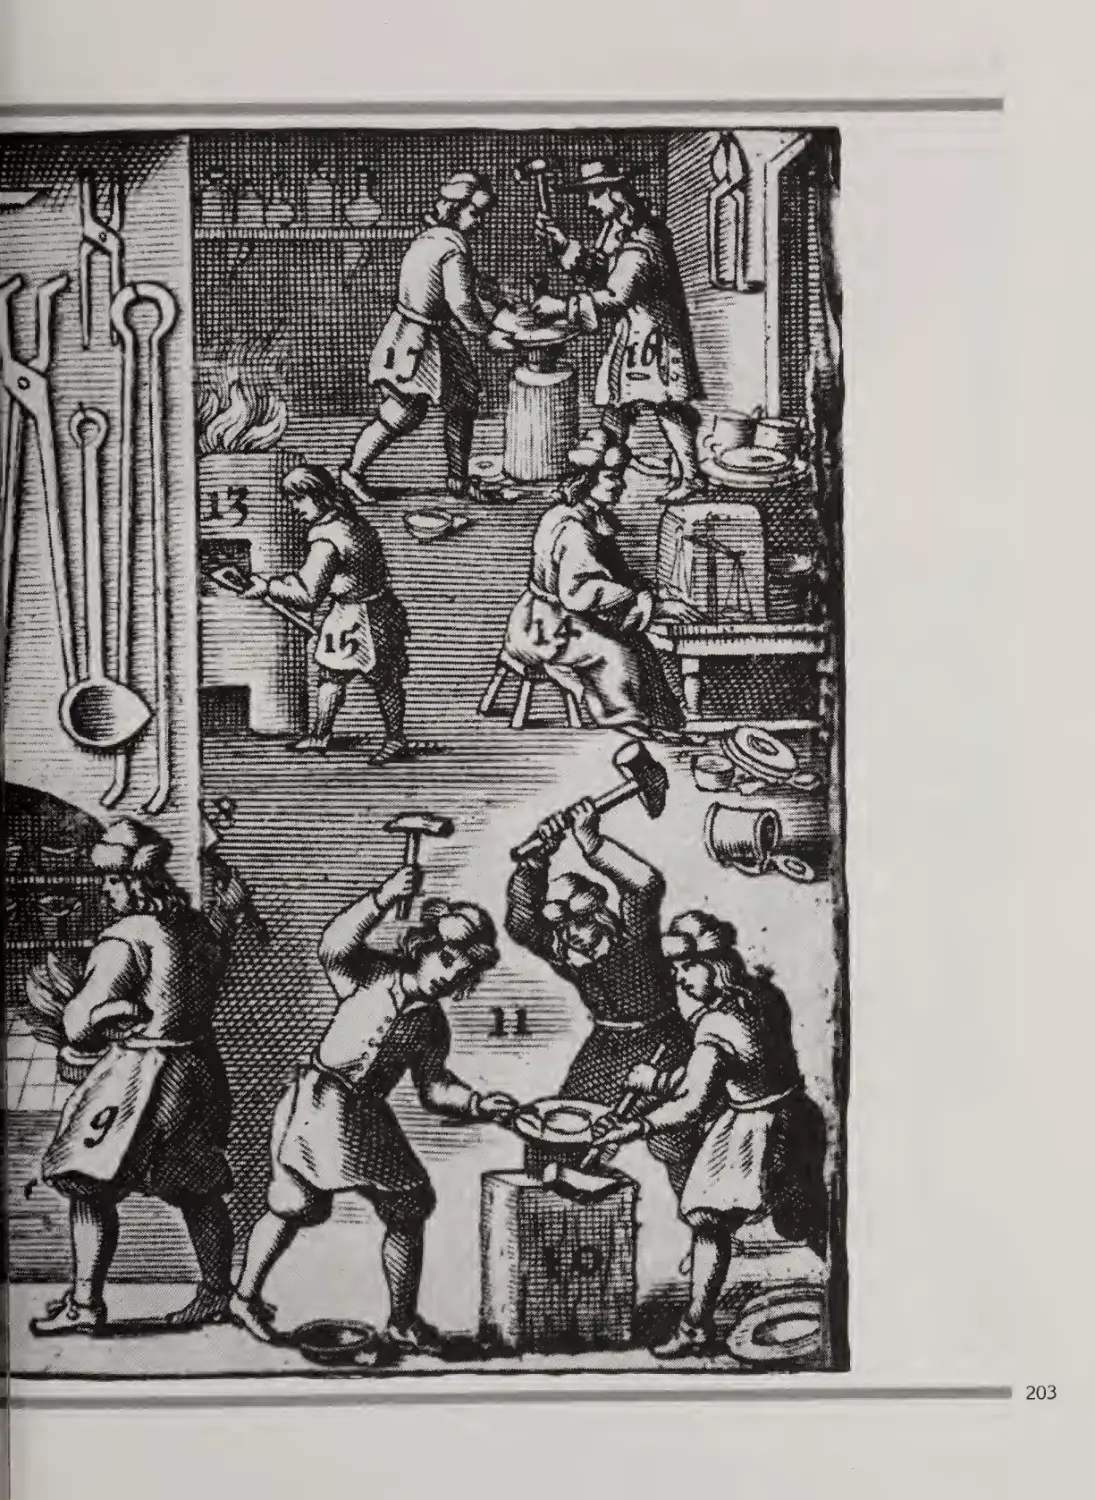
Fine metalwork
202
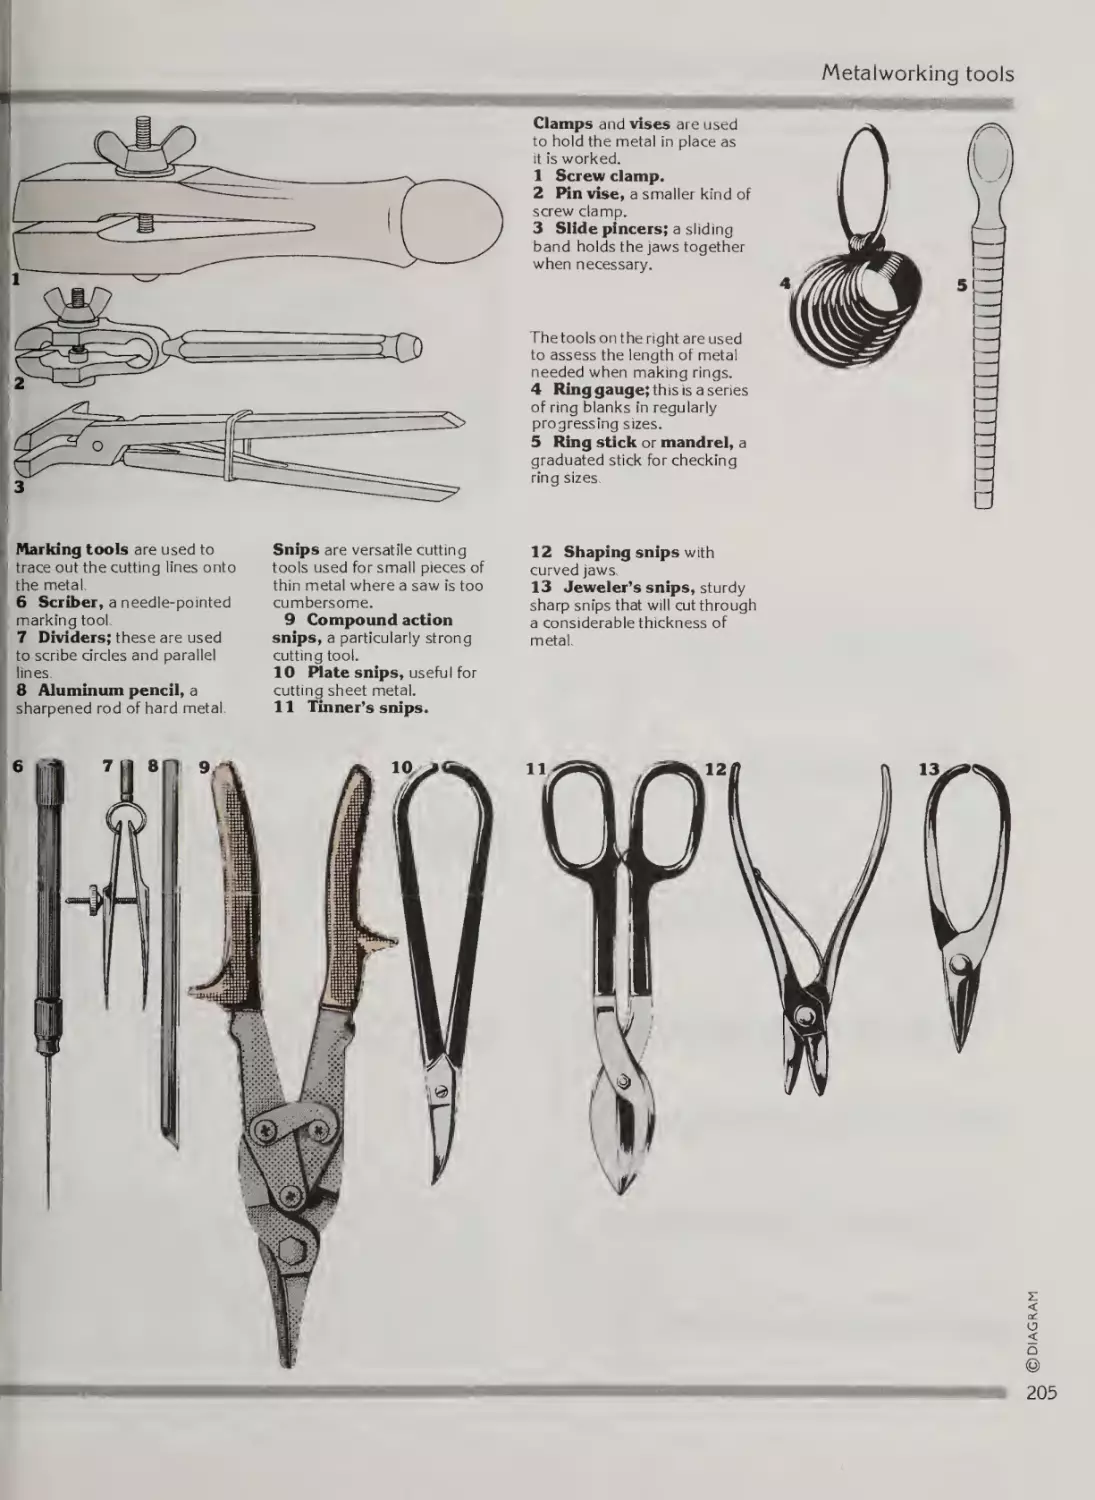
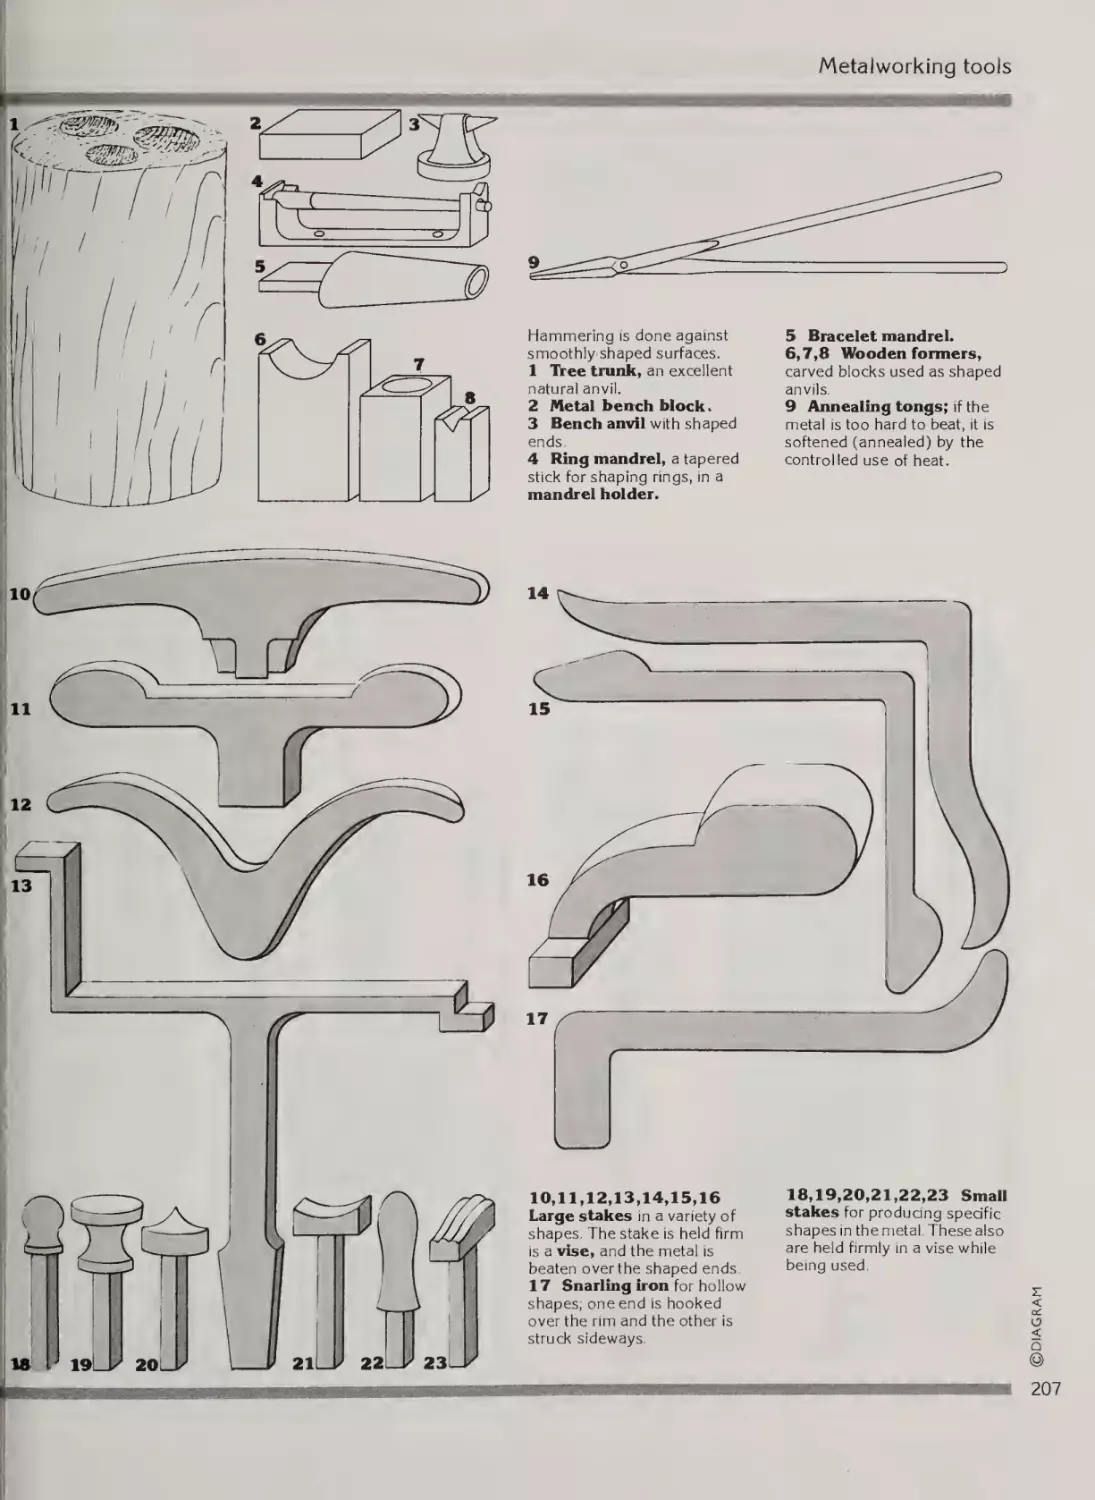
204
206
208
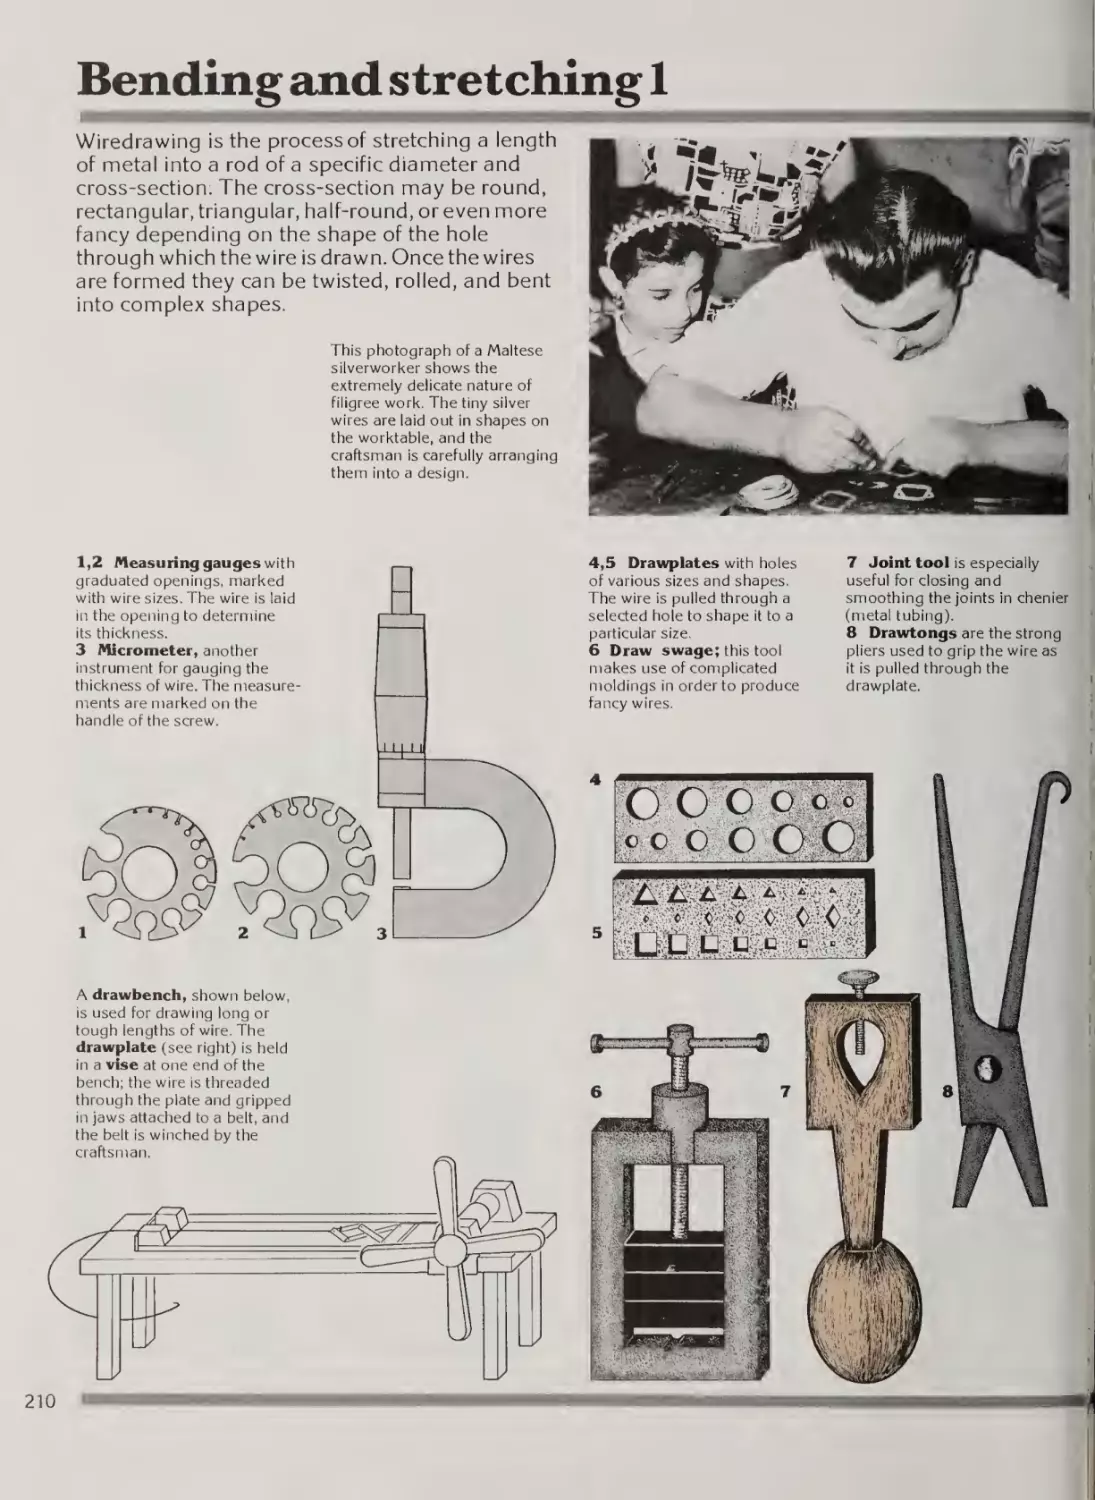
210
214
216
218
220
222
224
225
226
228
Introduction
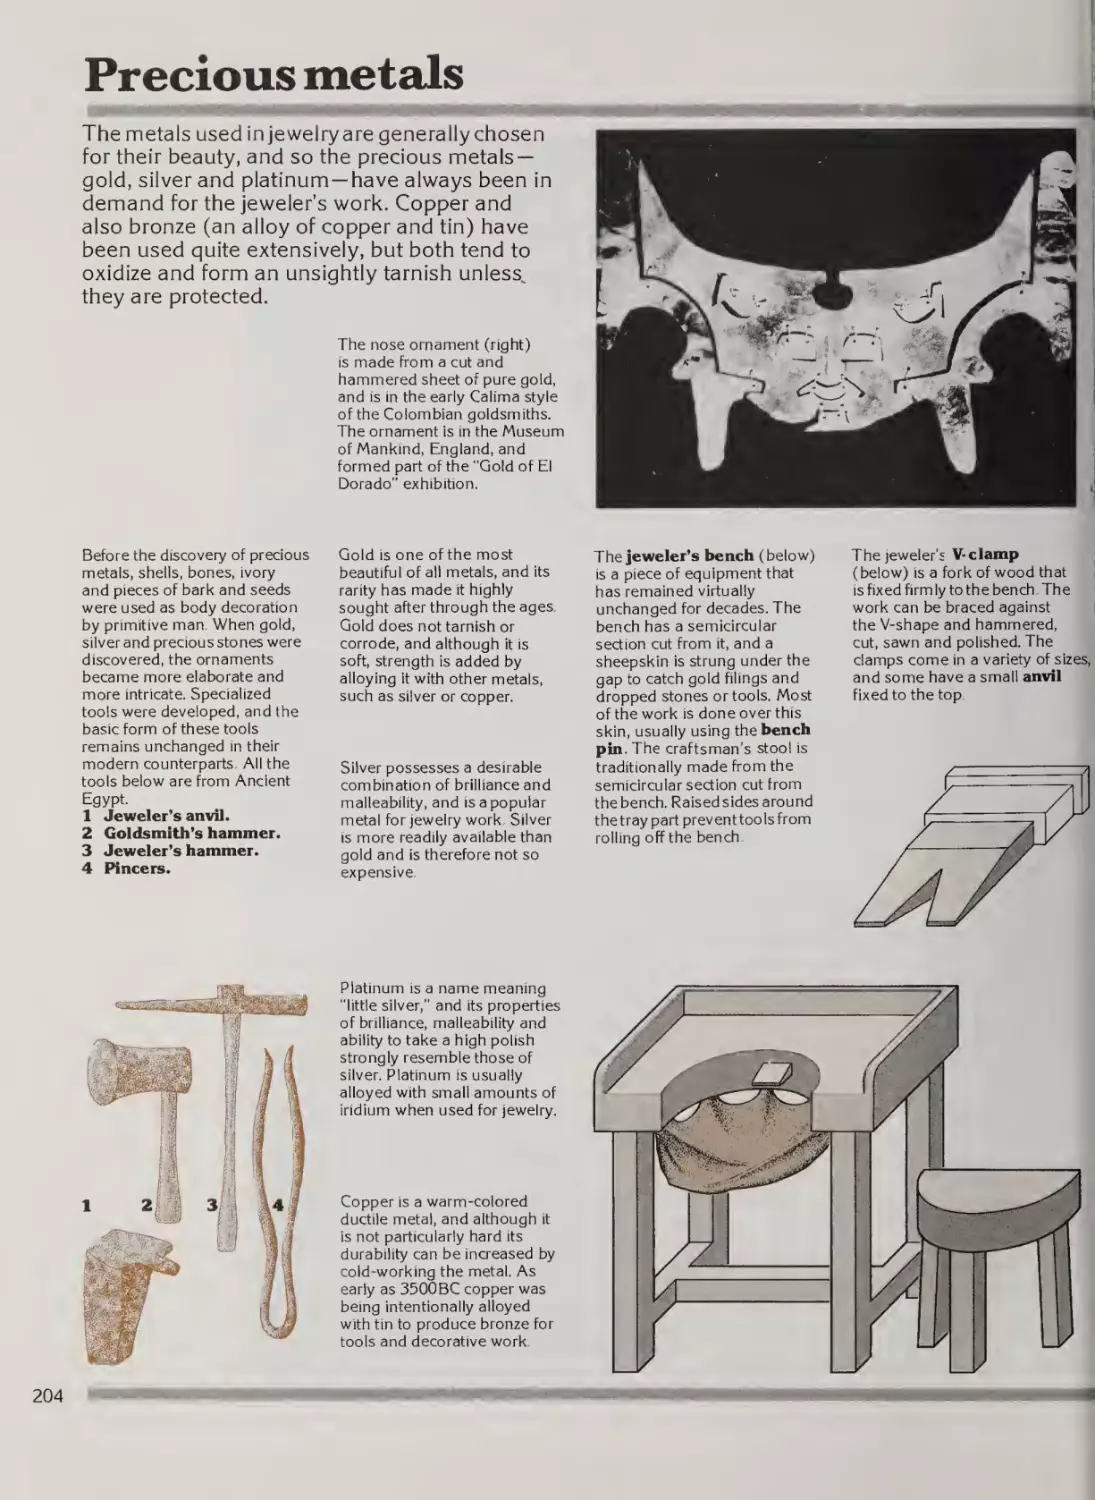
Precious metals
Hammering and beating
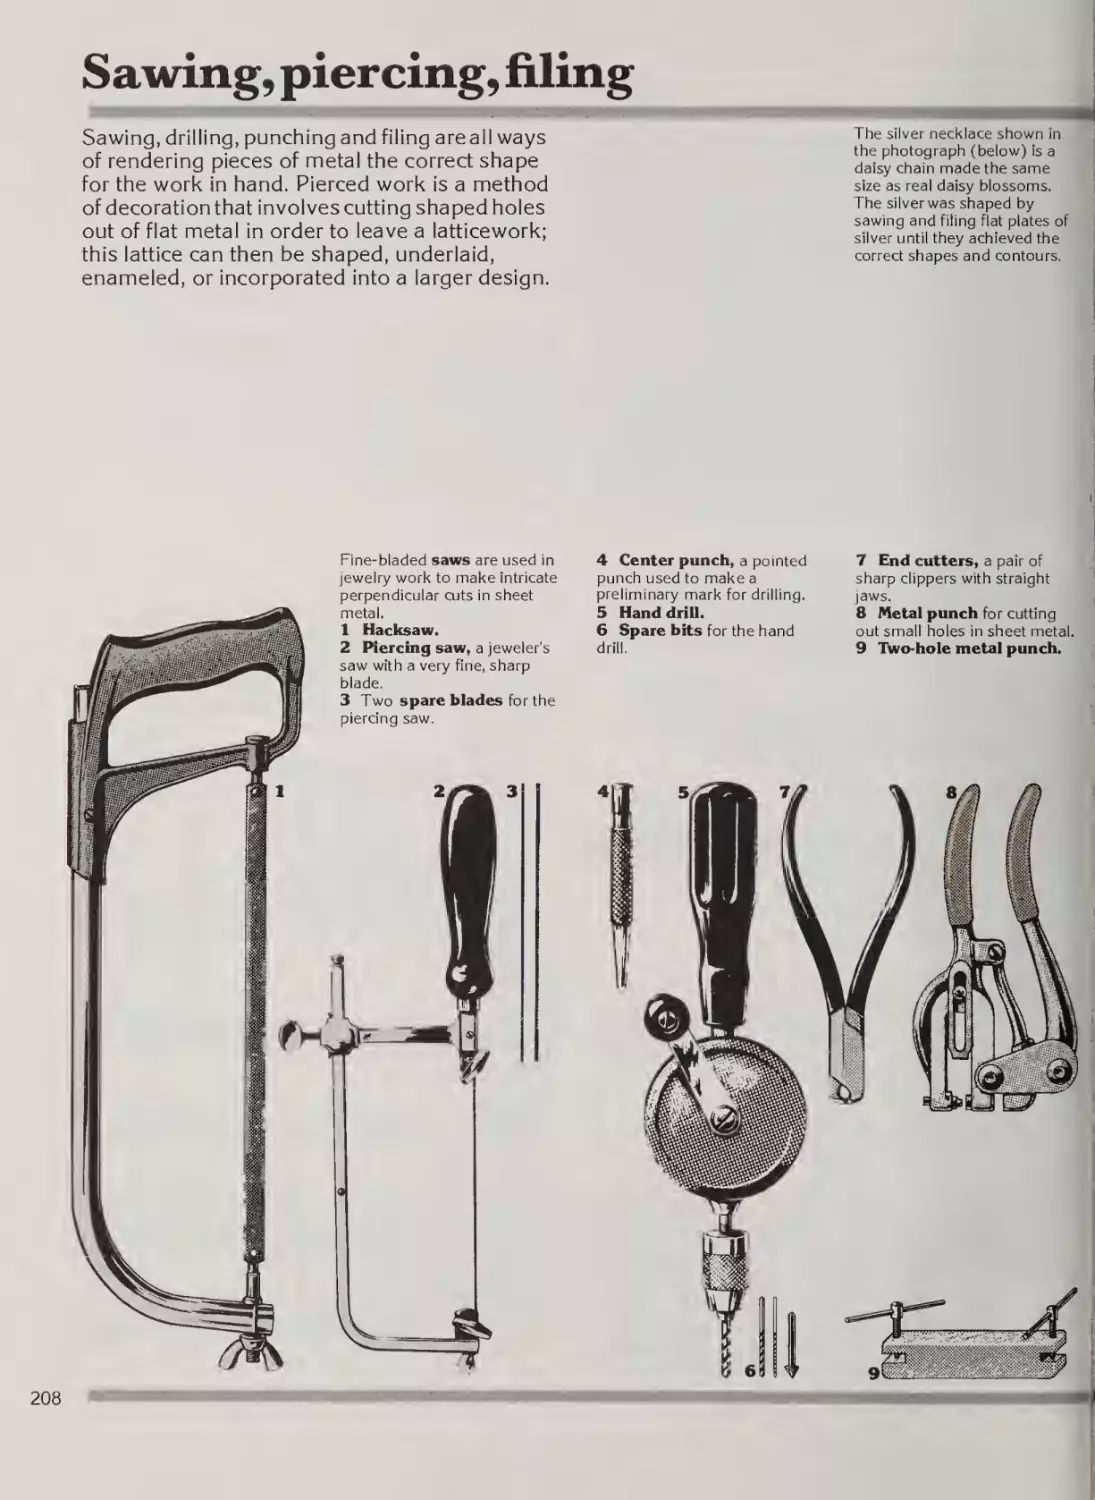
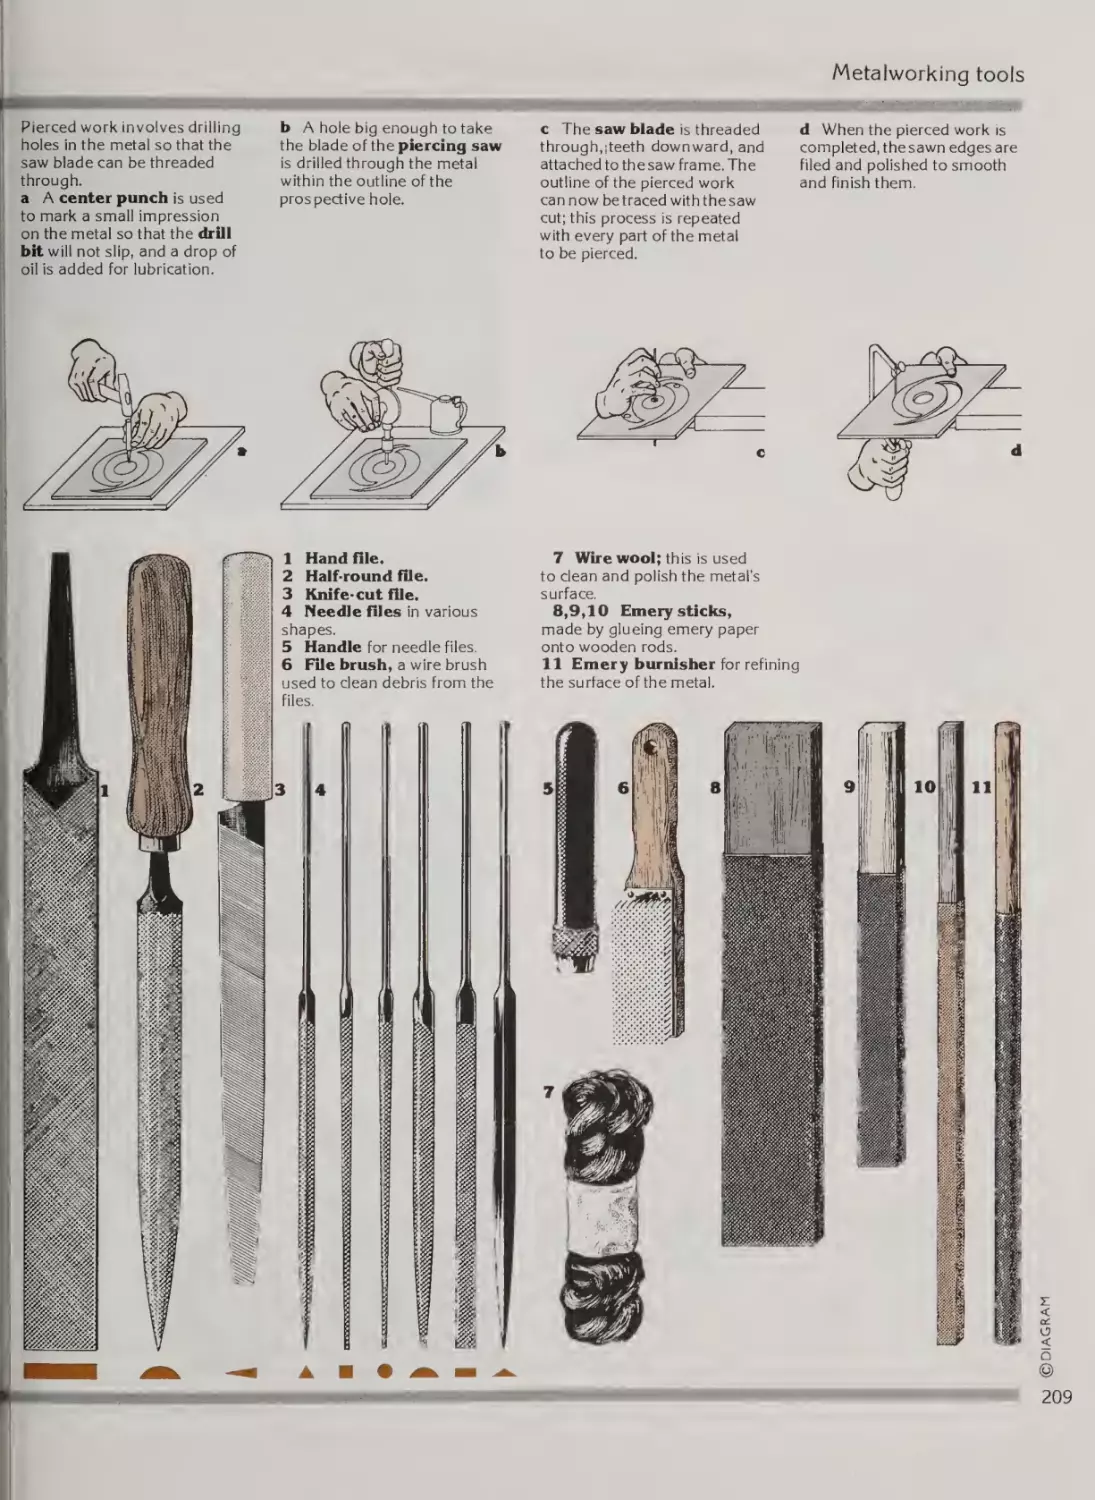
Sawing, piercing, filing
Bending and stretching
Raised surfacework
Textured surfacework
Soldering
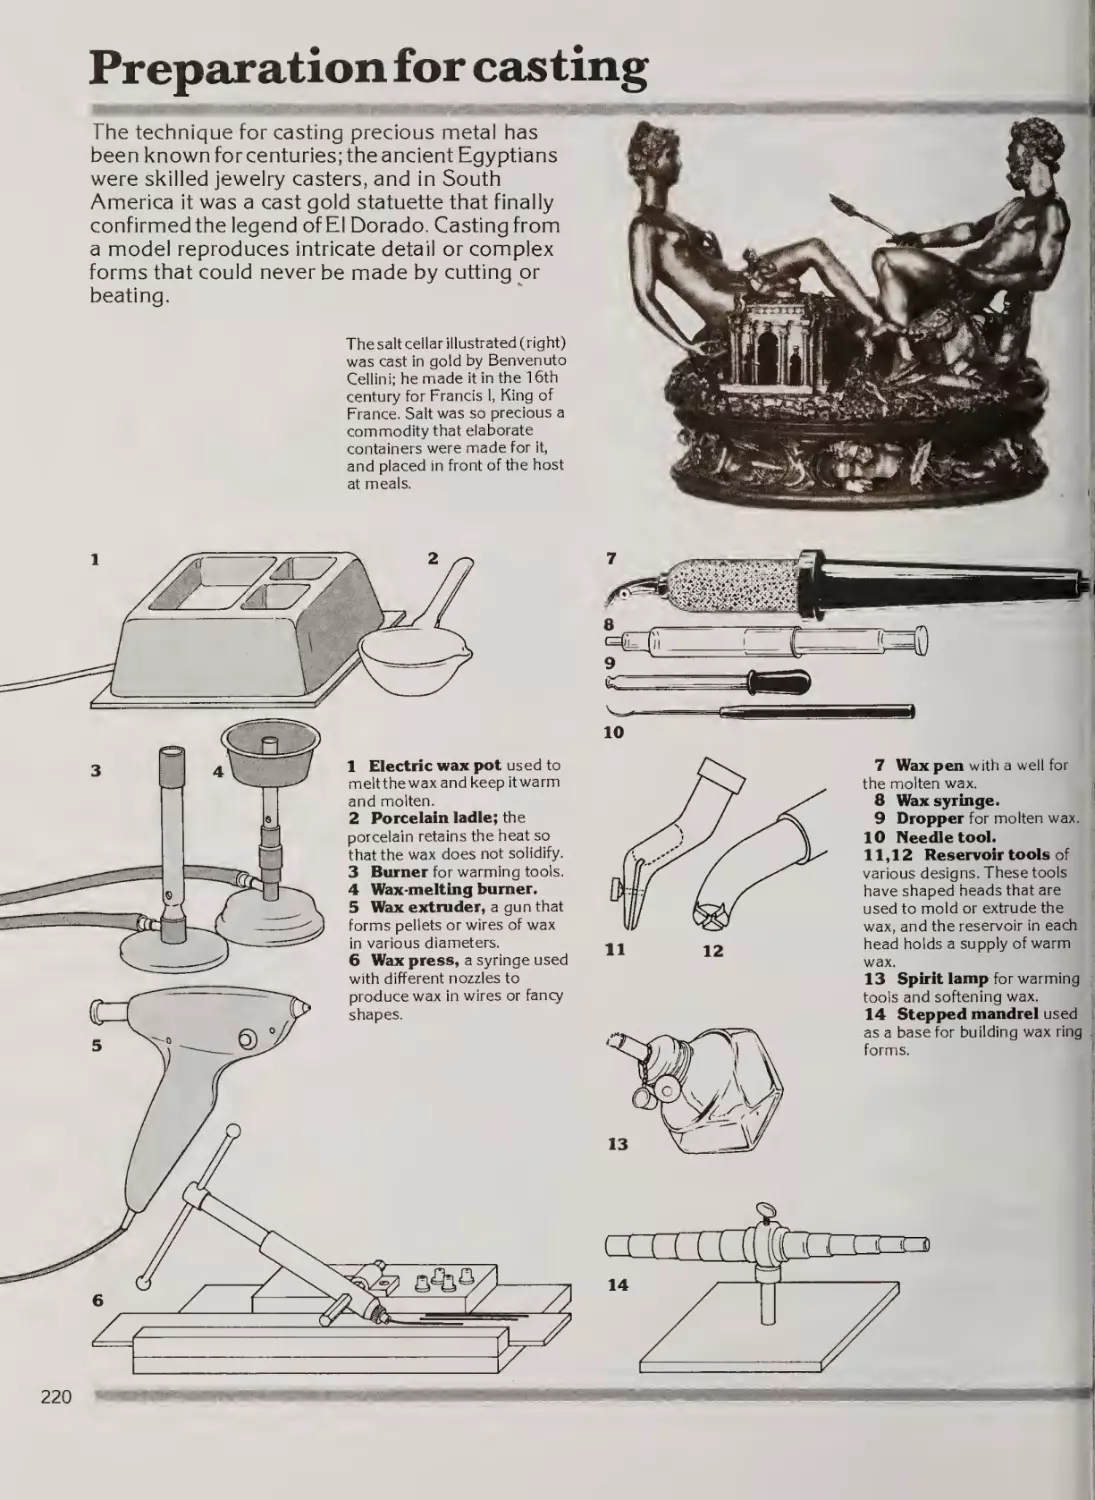
Preparation for casting
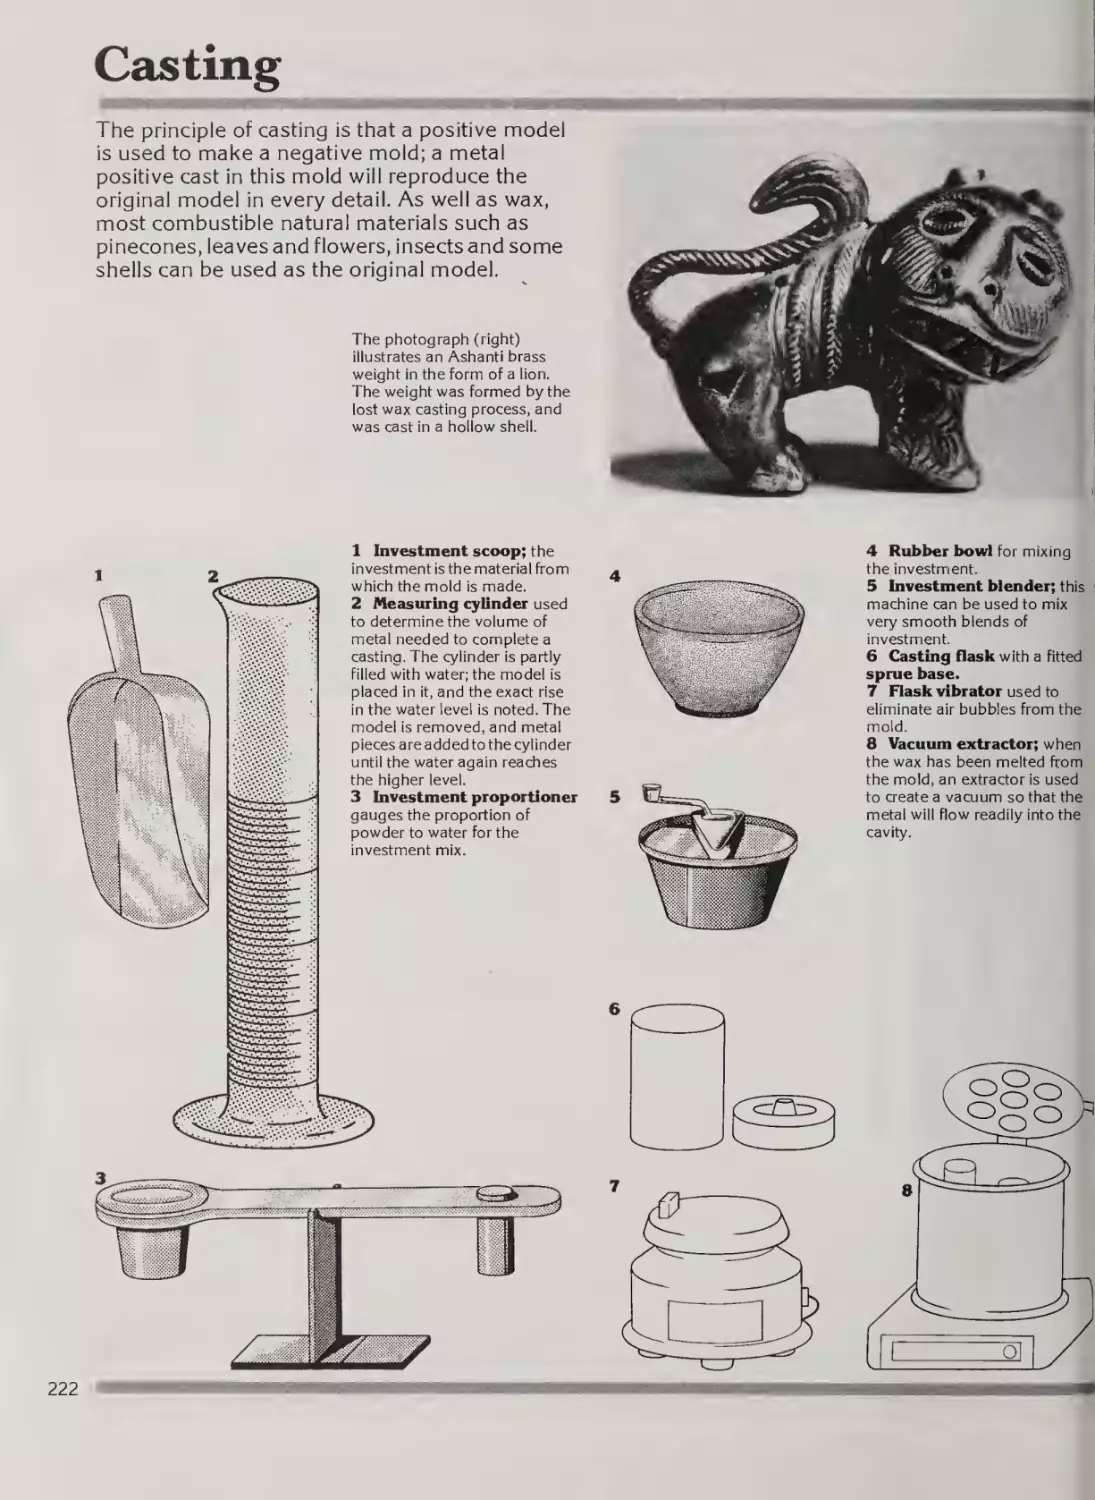
Casting
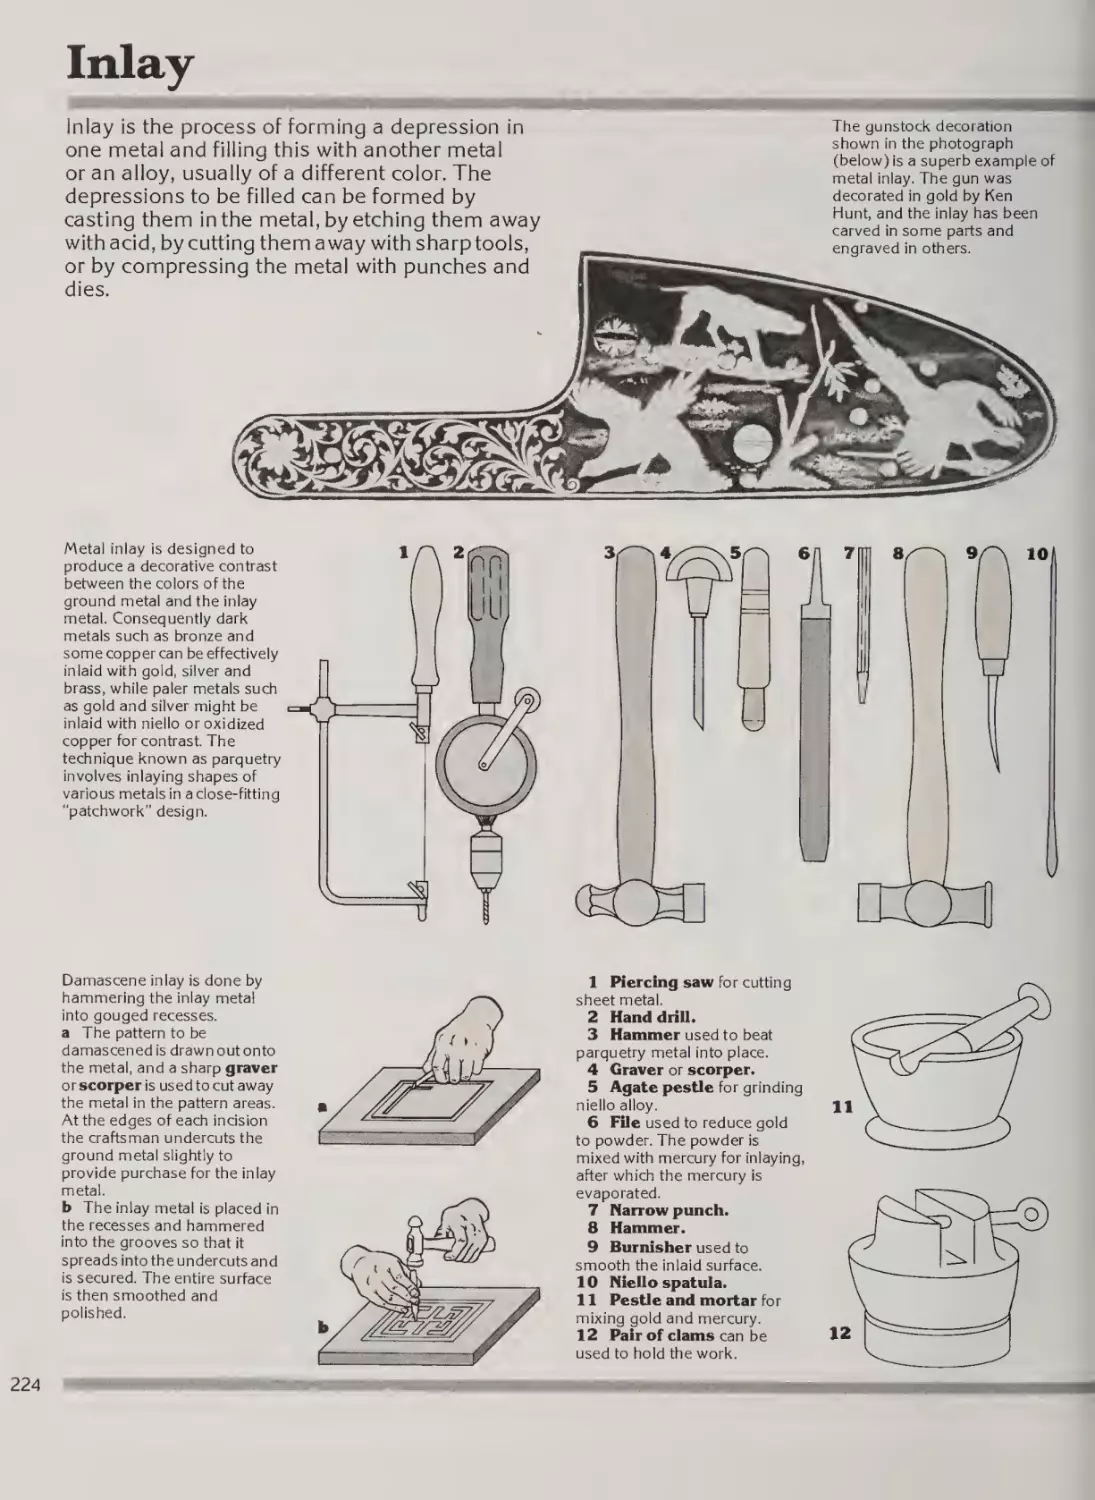
Inlay
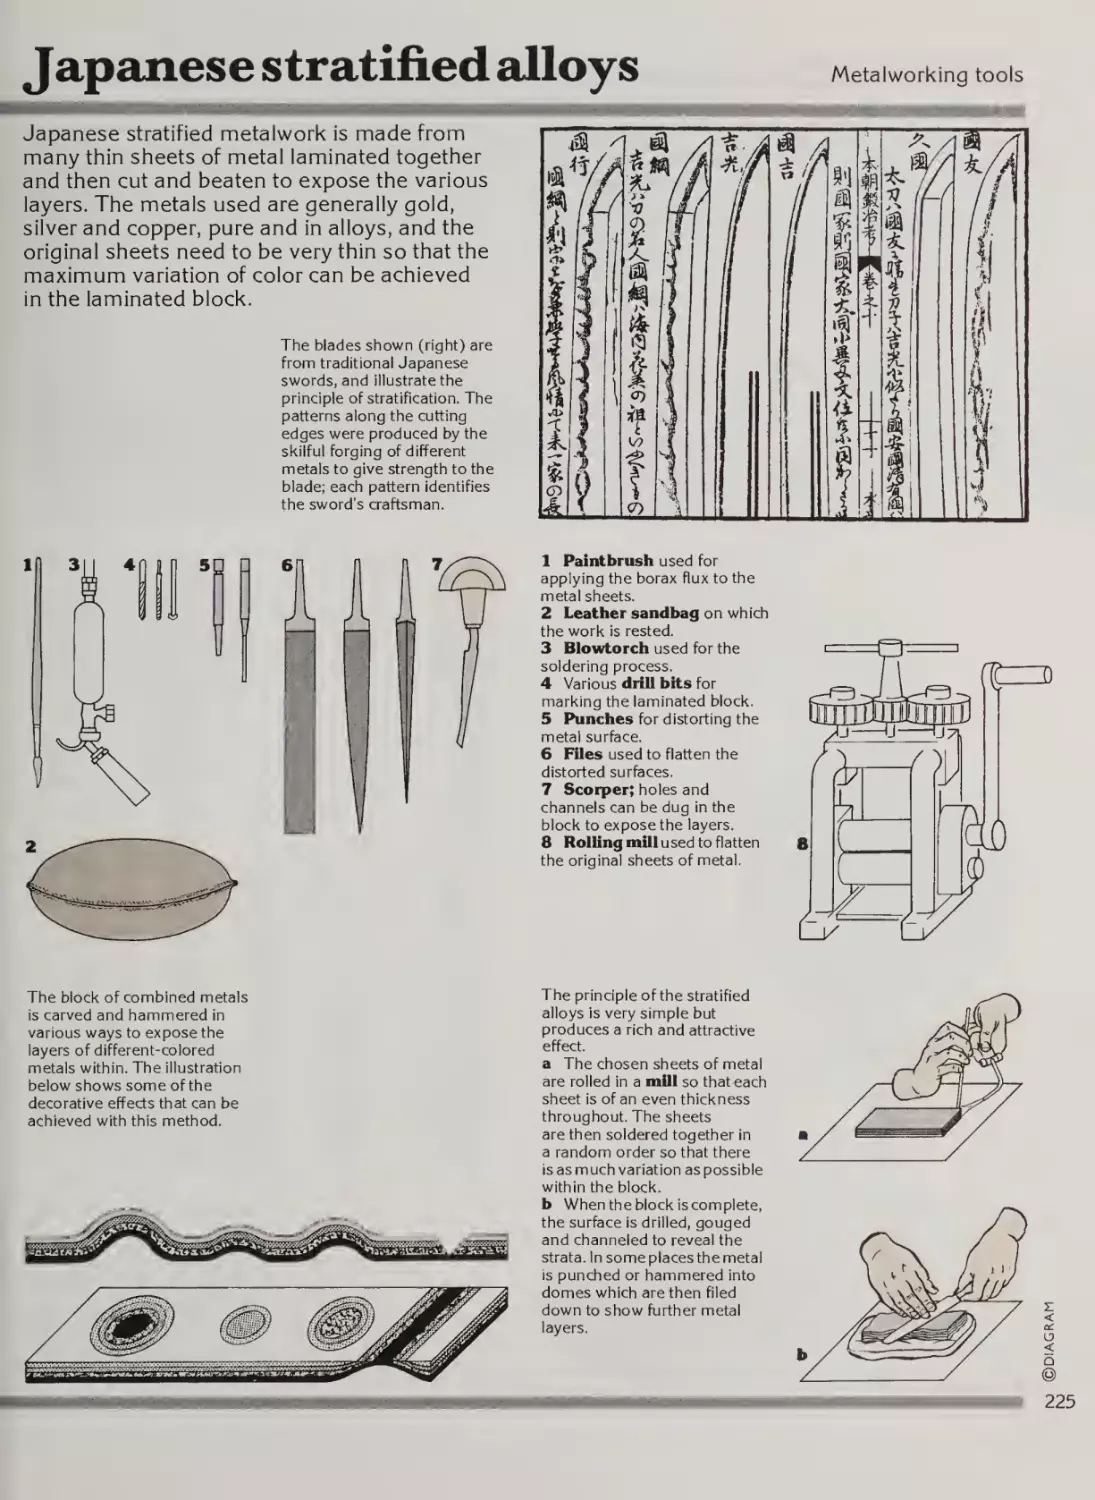
Japanese stratified alloys
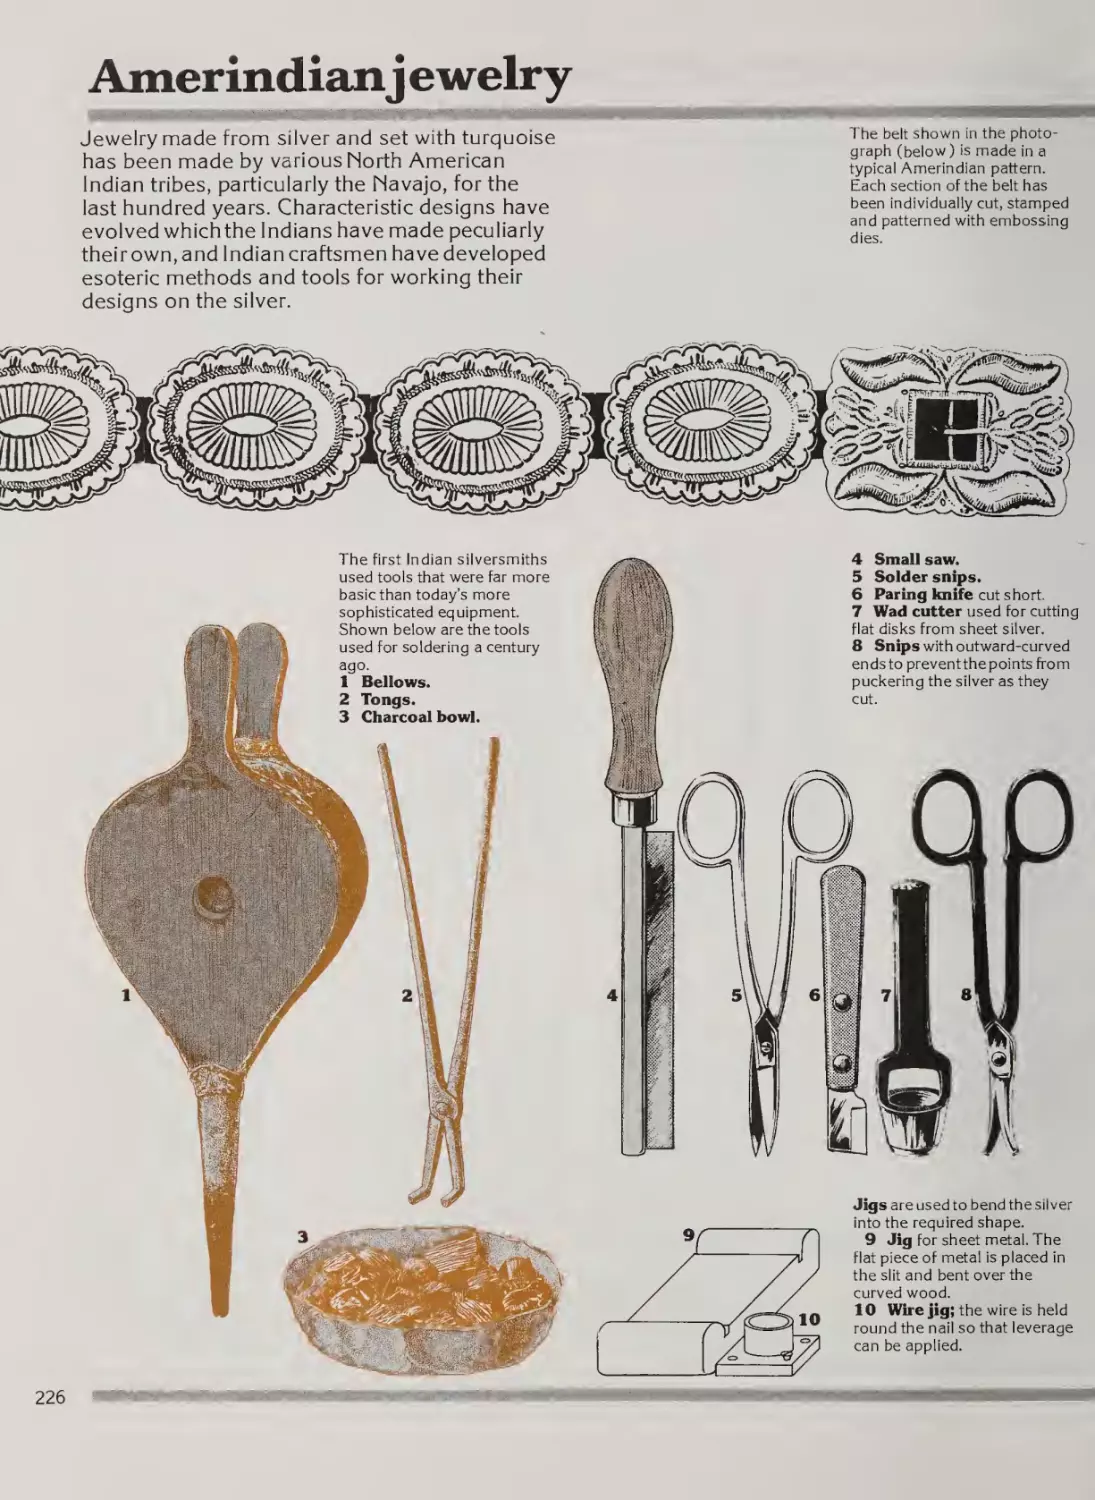
Amerindian jewelry
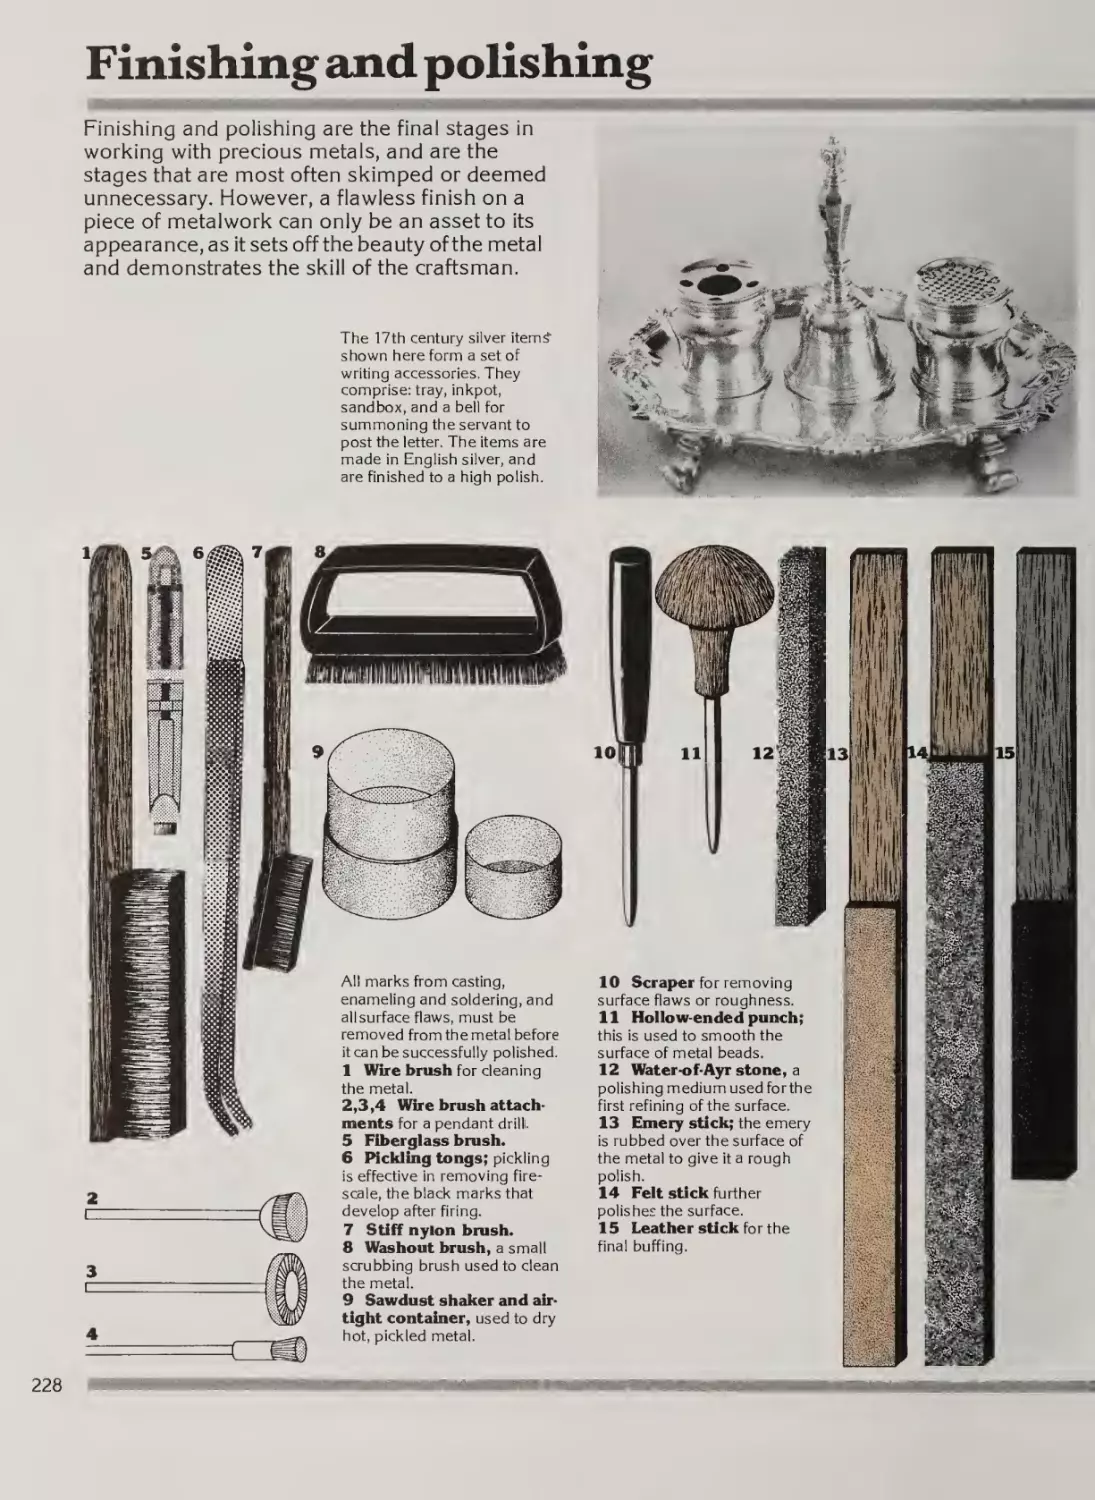
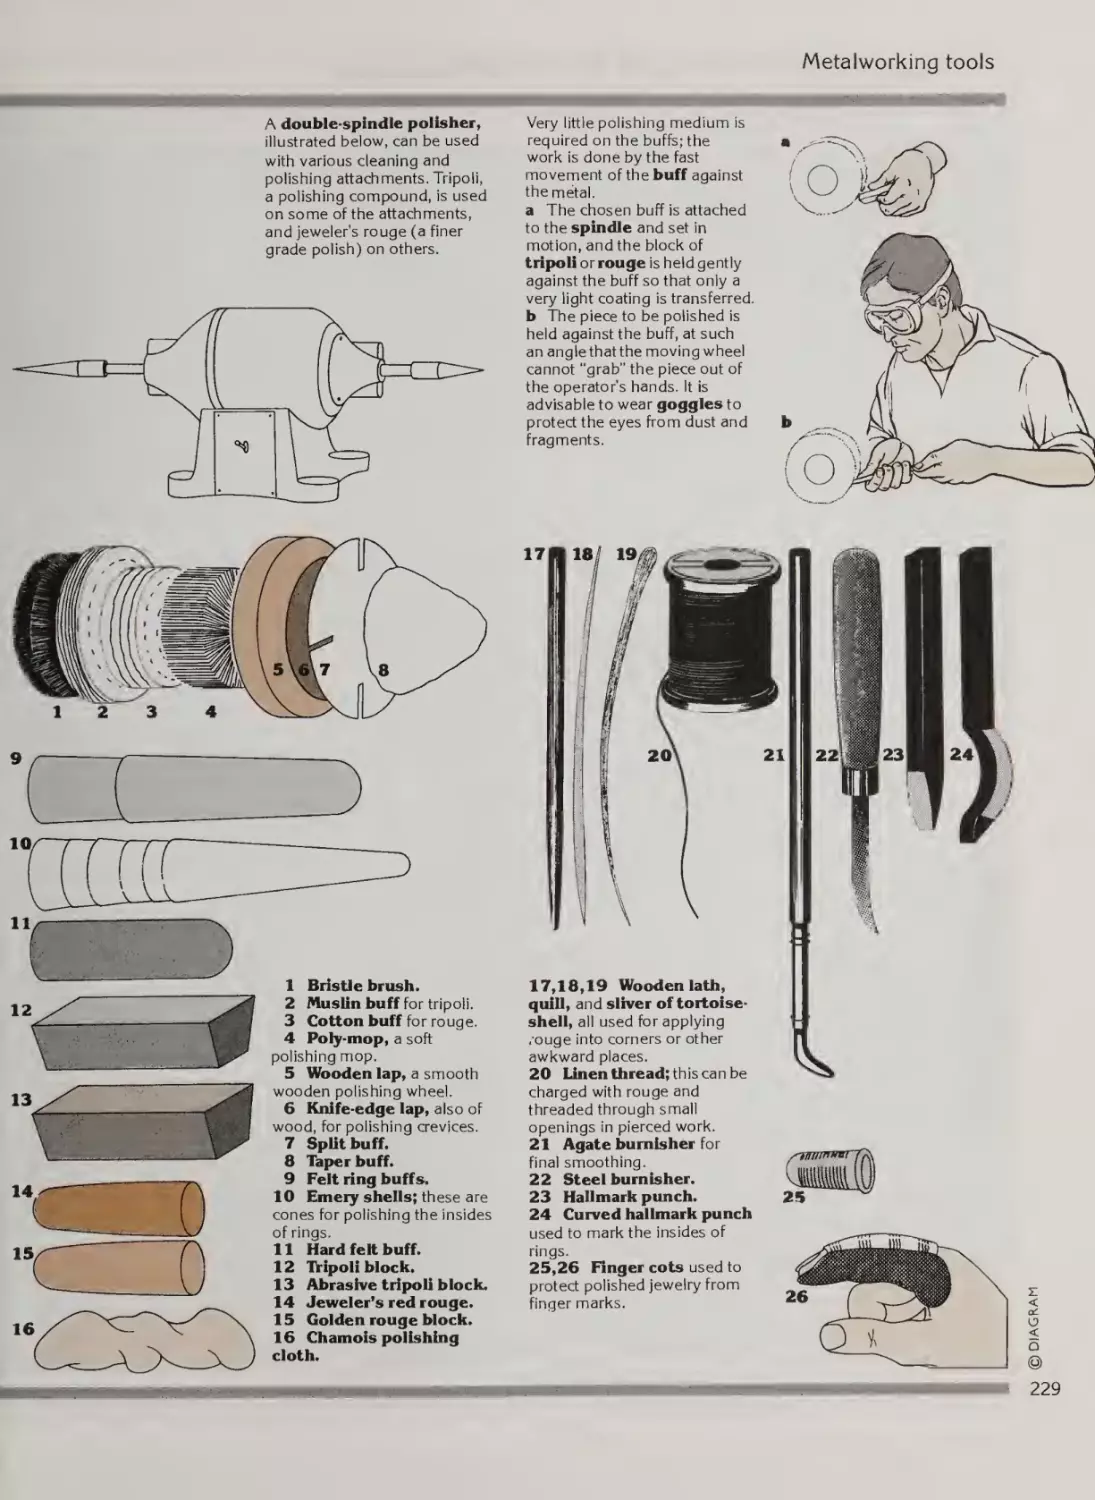
Finishing and polishing
Chapter 13
Lapidary and beadmaking
230
232
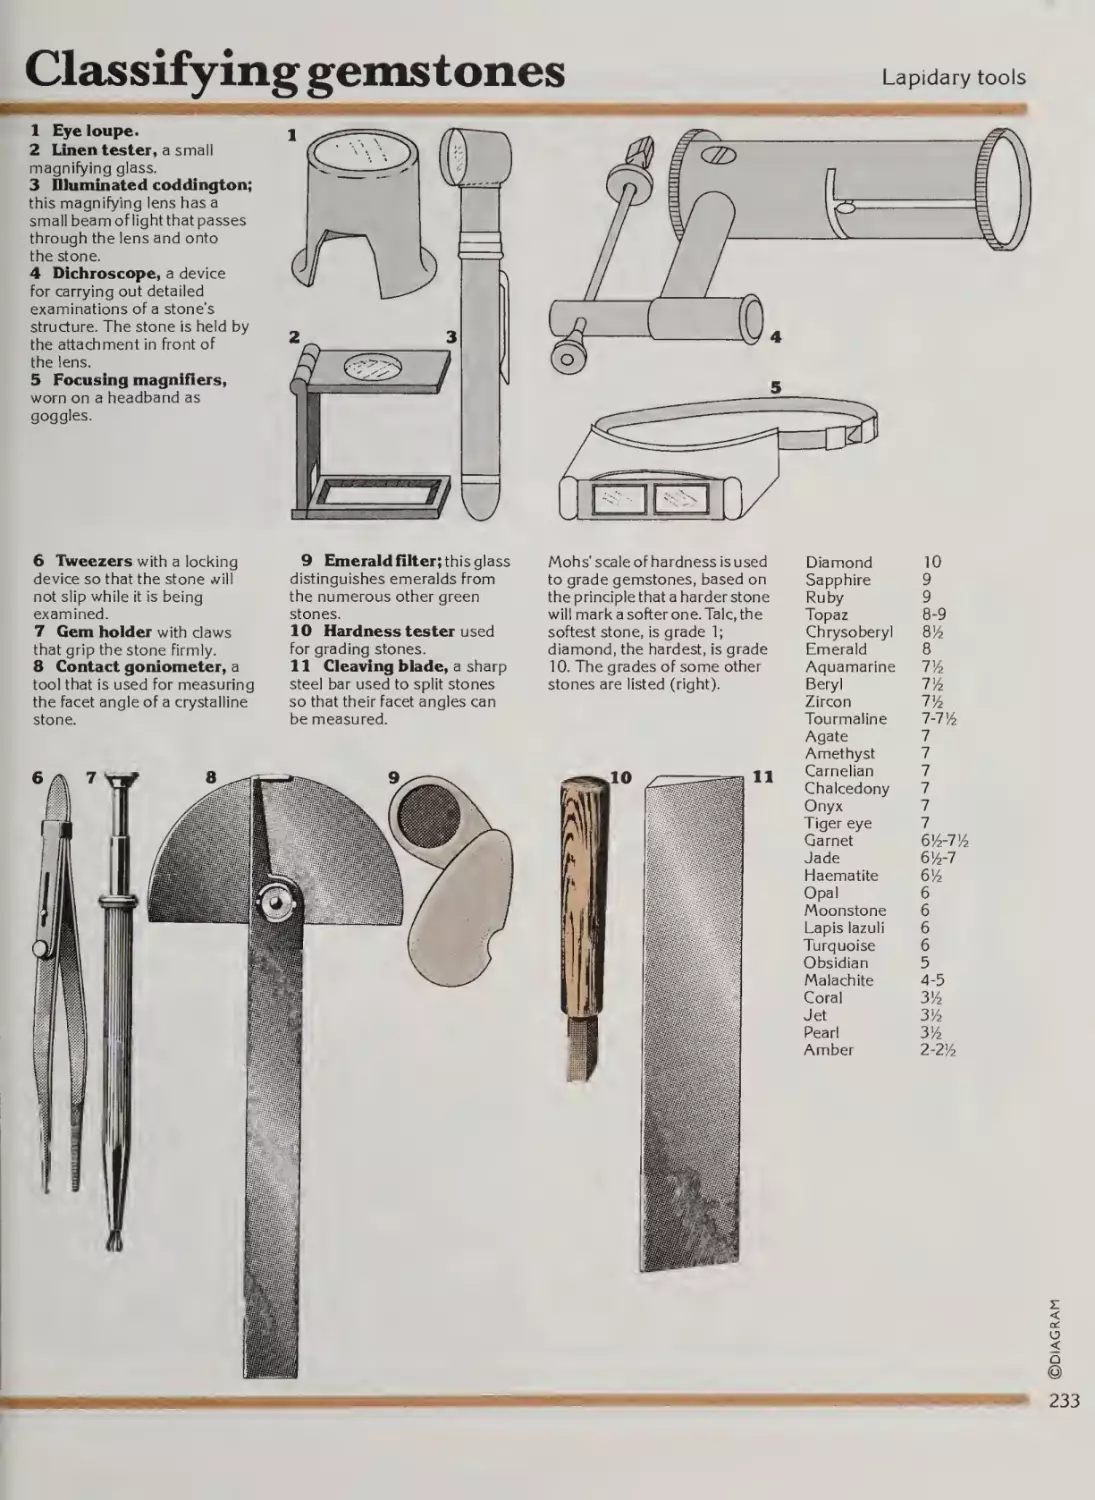
233
234
236
238
240
Introduction
Rock hunting
Classifying gemstones
Cutting and shaping
Faceting and polishing
Mounting and setting
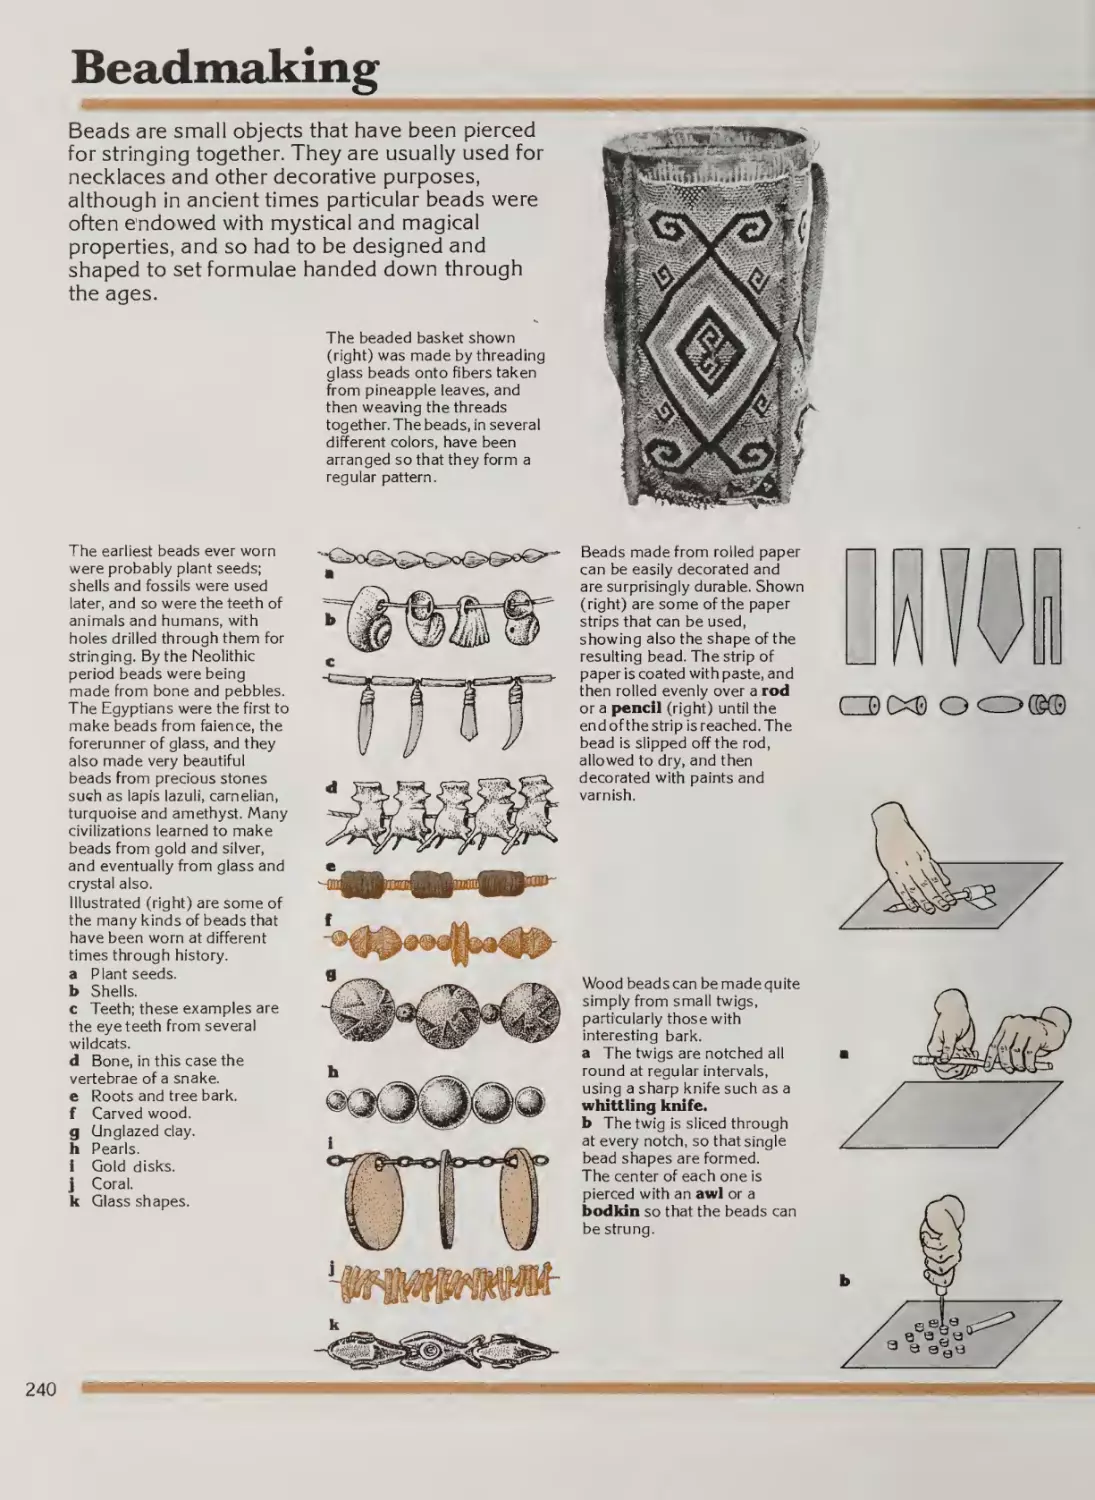
Beadmaking
Chapter 14
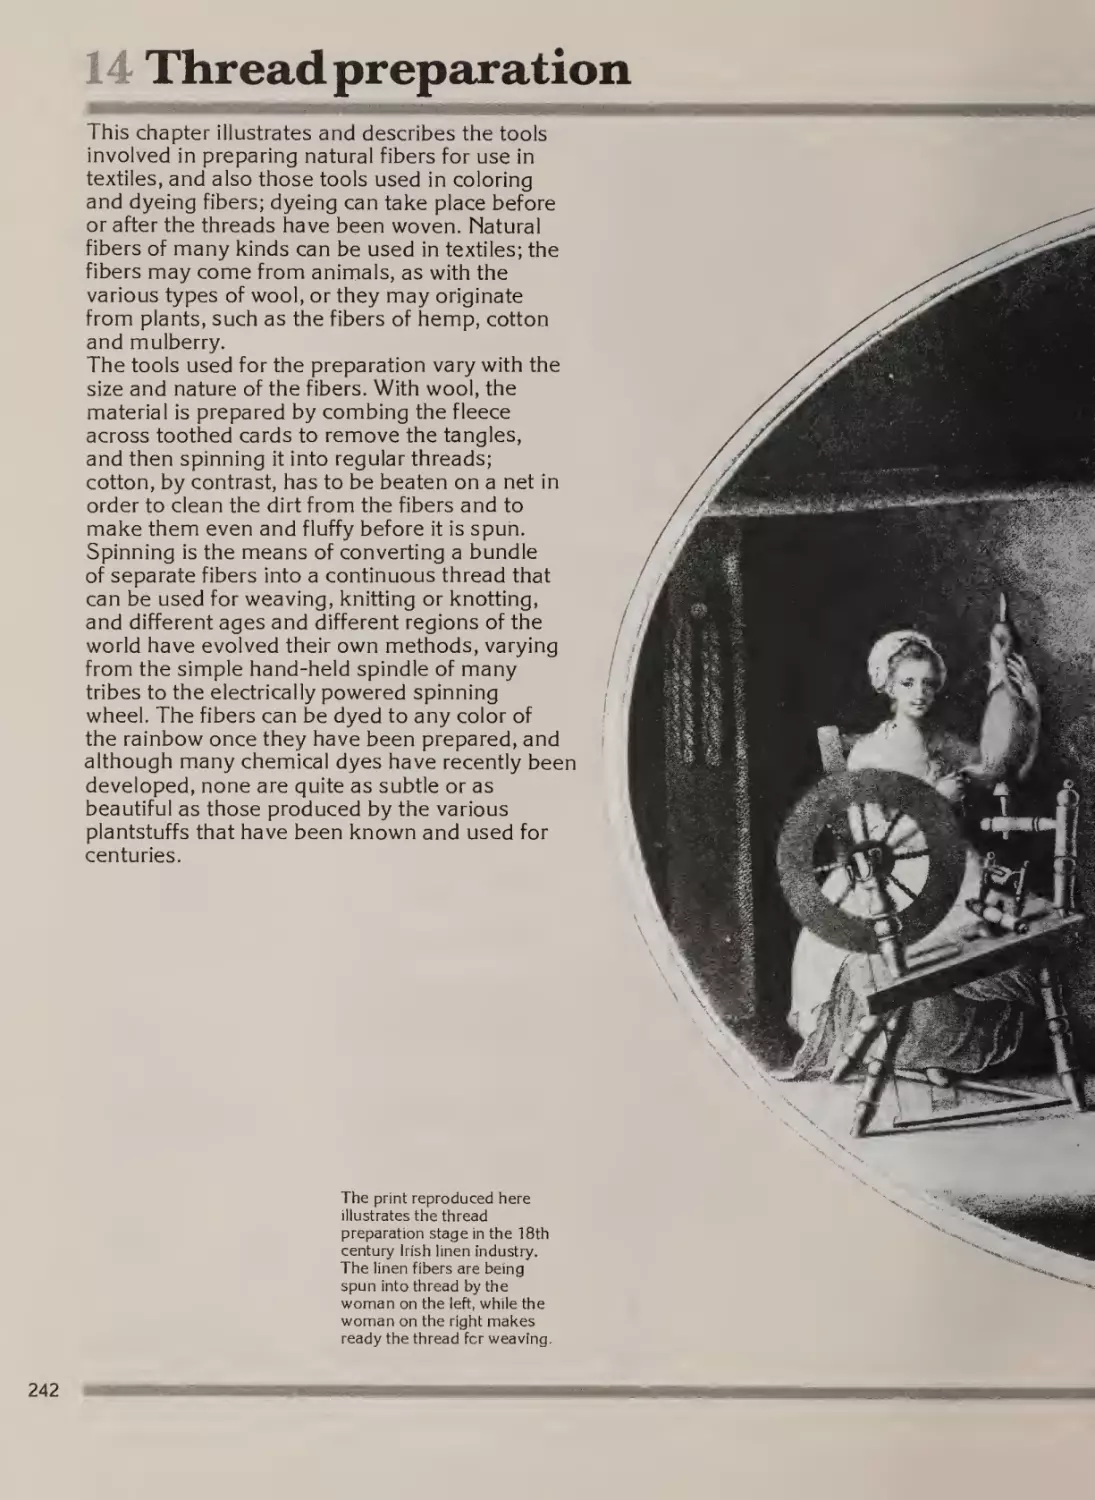
Thread preparation
242
244
246
248
Introduction
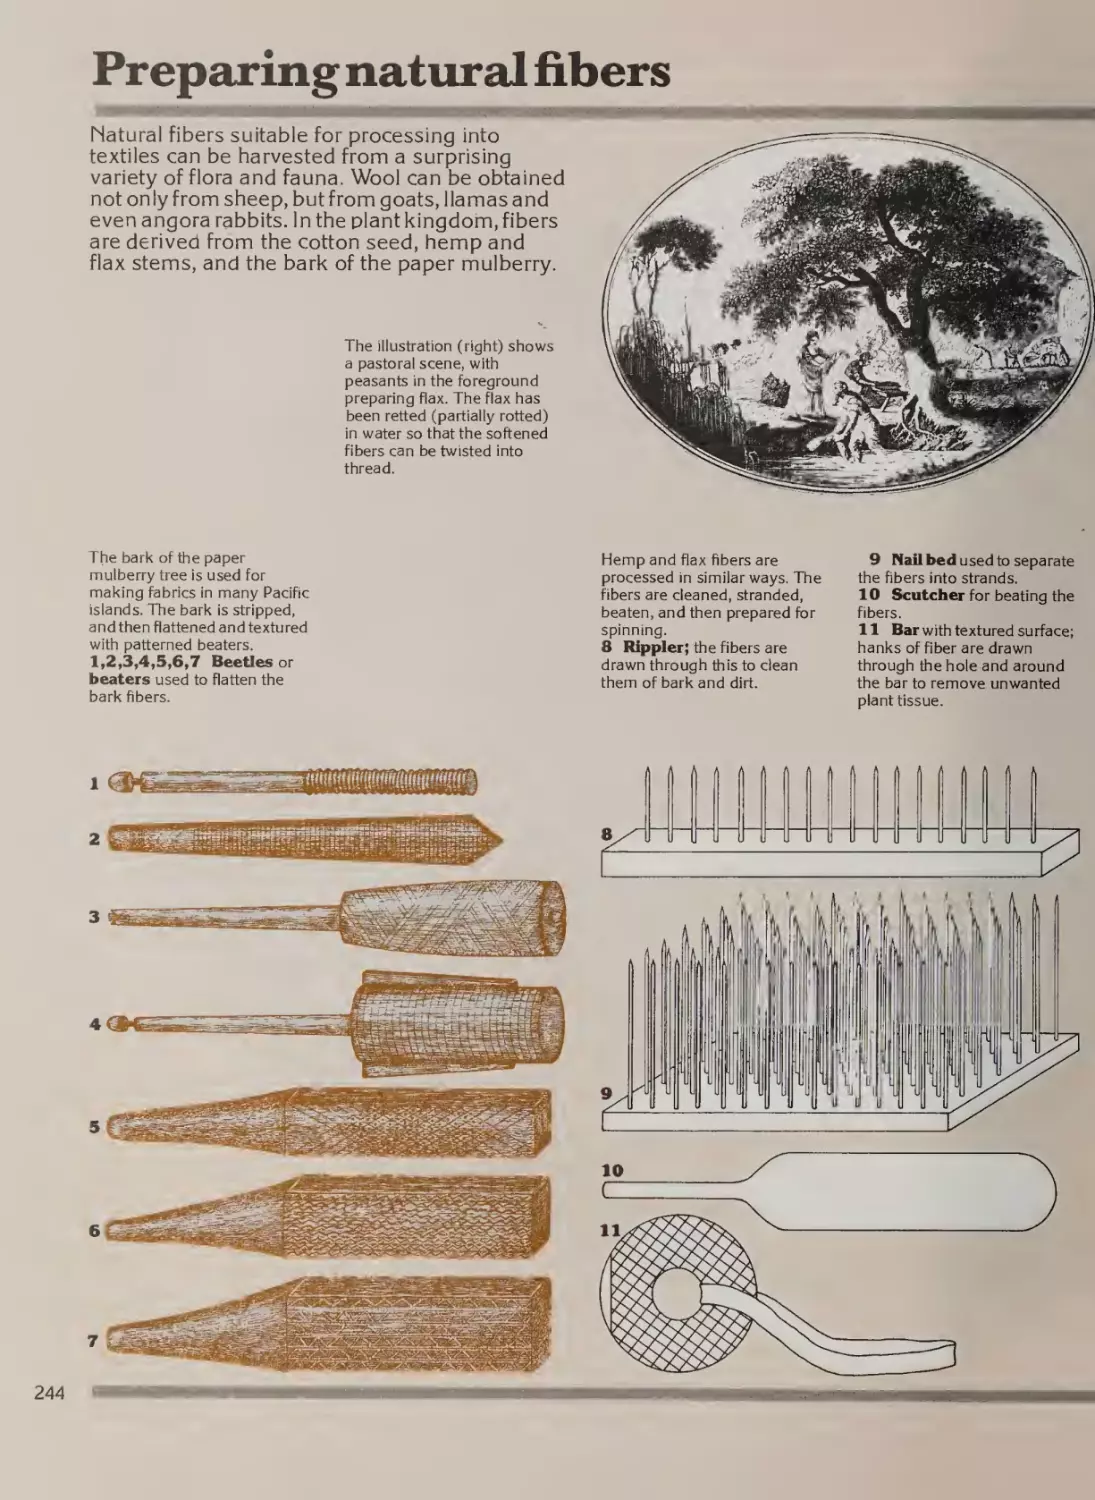
Preparing natural fibers
Dyeing
Spinning
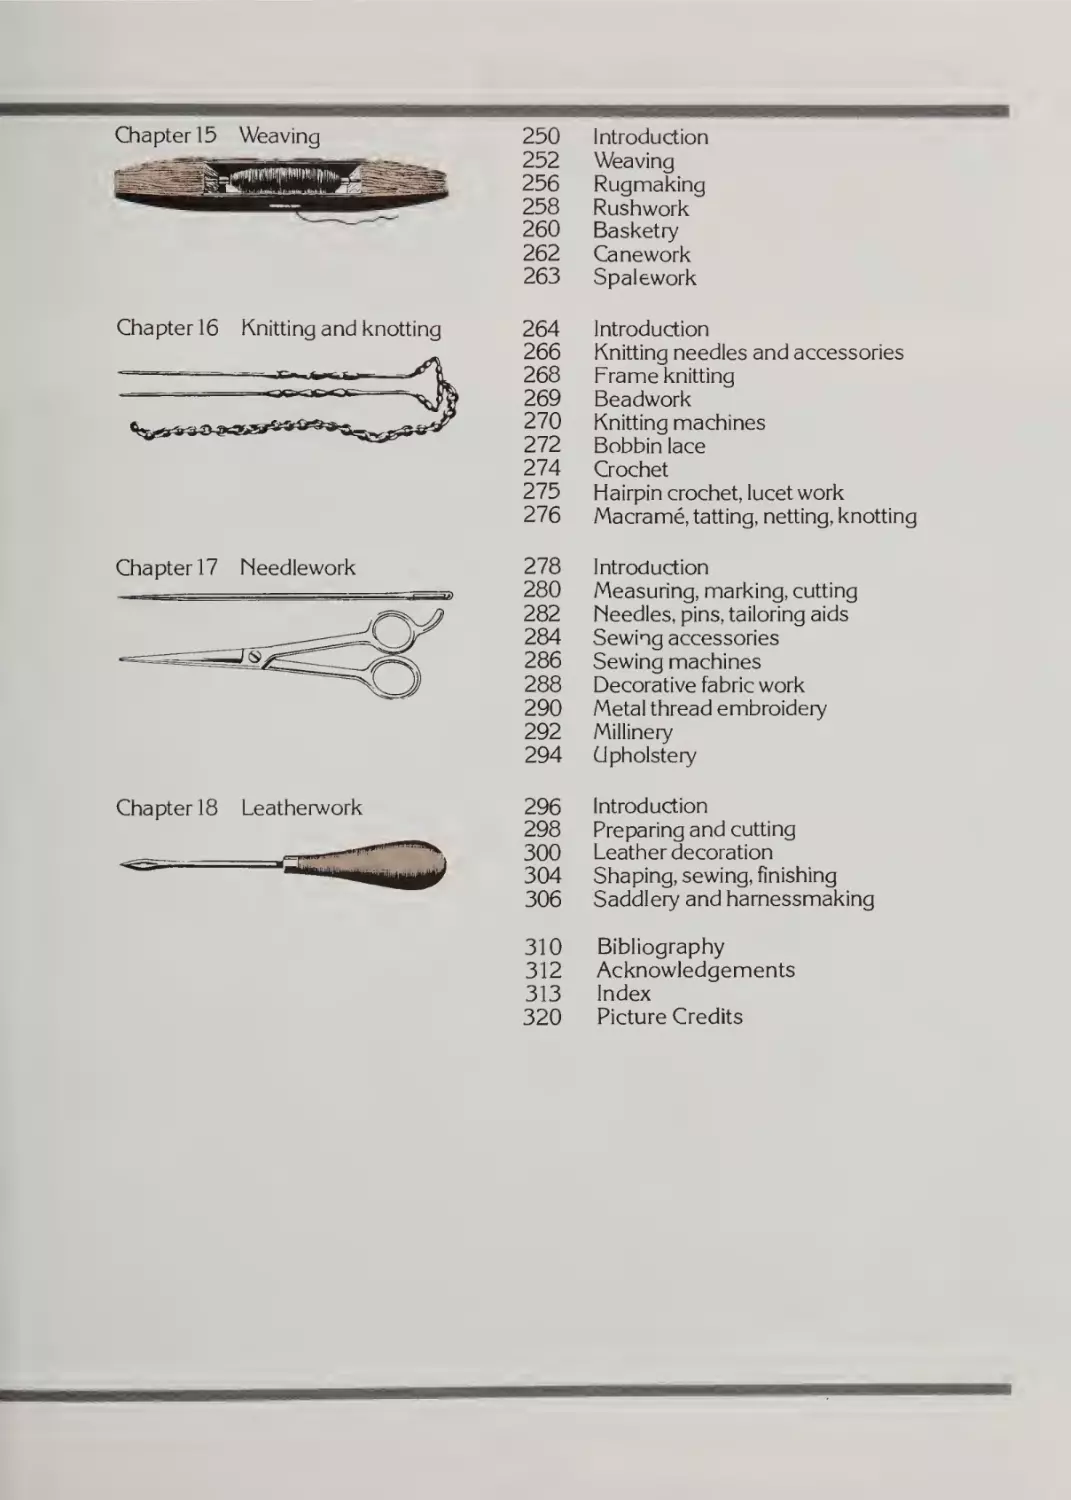
Chapter 15
Weaving
250
252
256
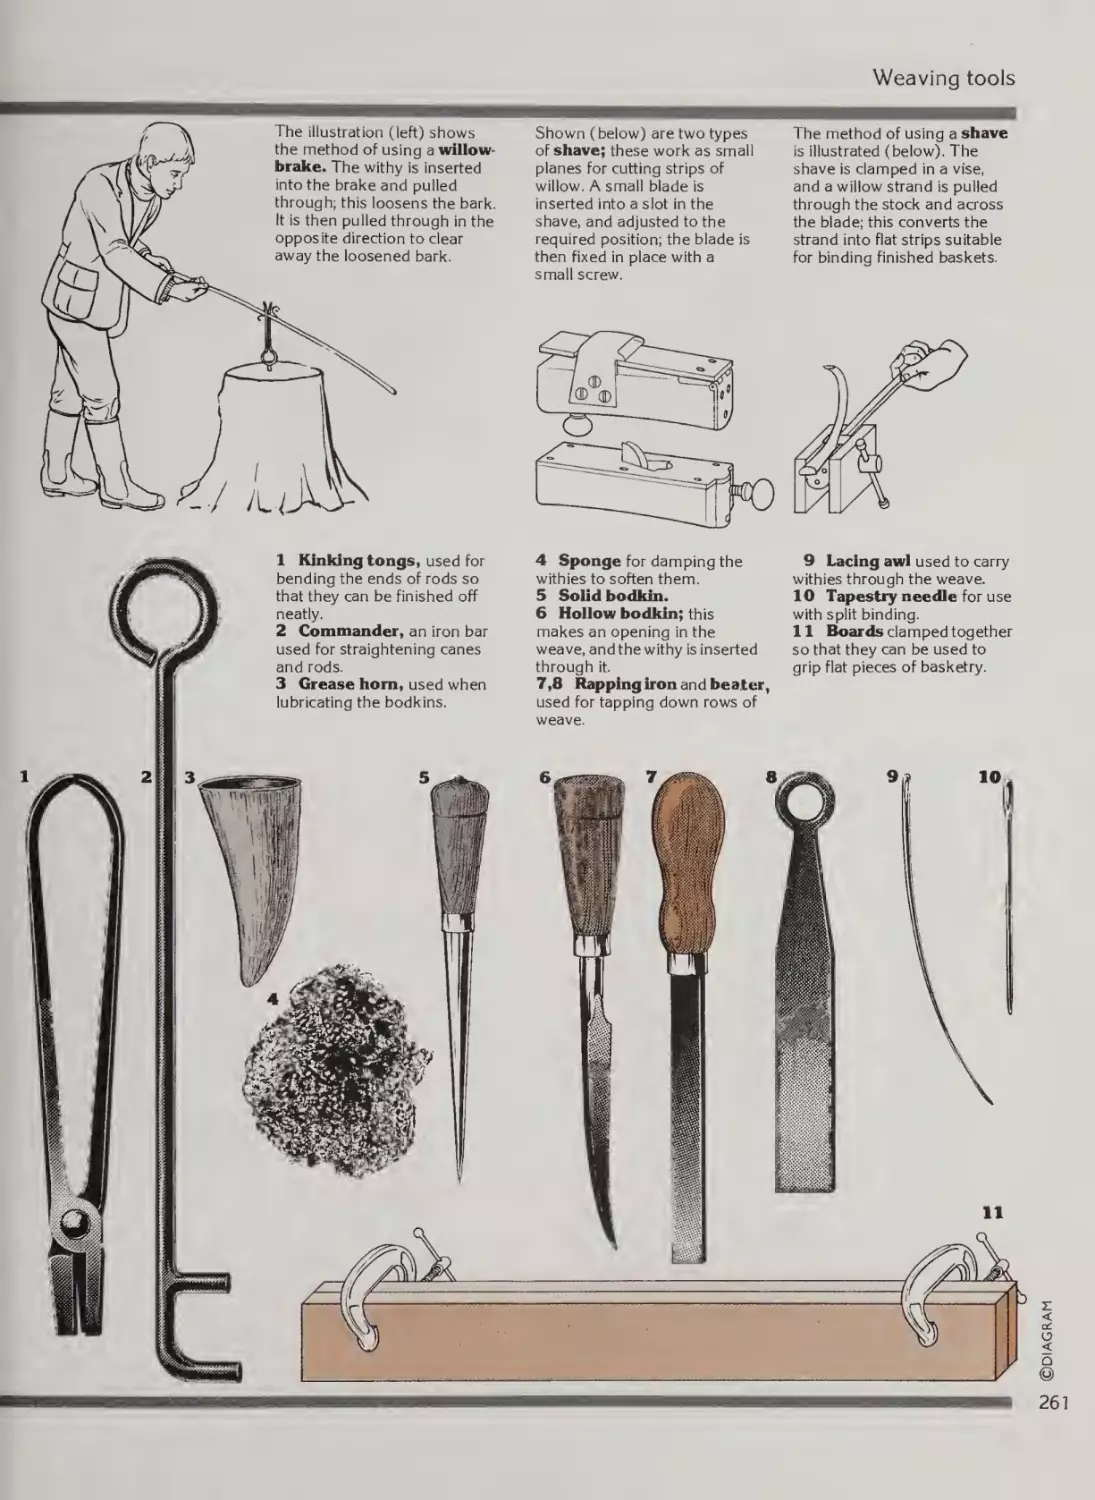
258
260
262
263
Introduction
Weaving
Rugmaking
Rushwork
Basketry
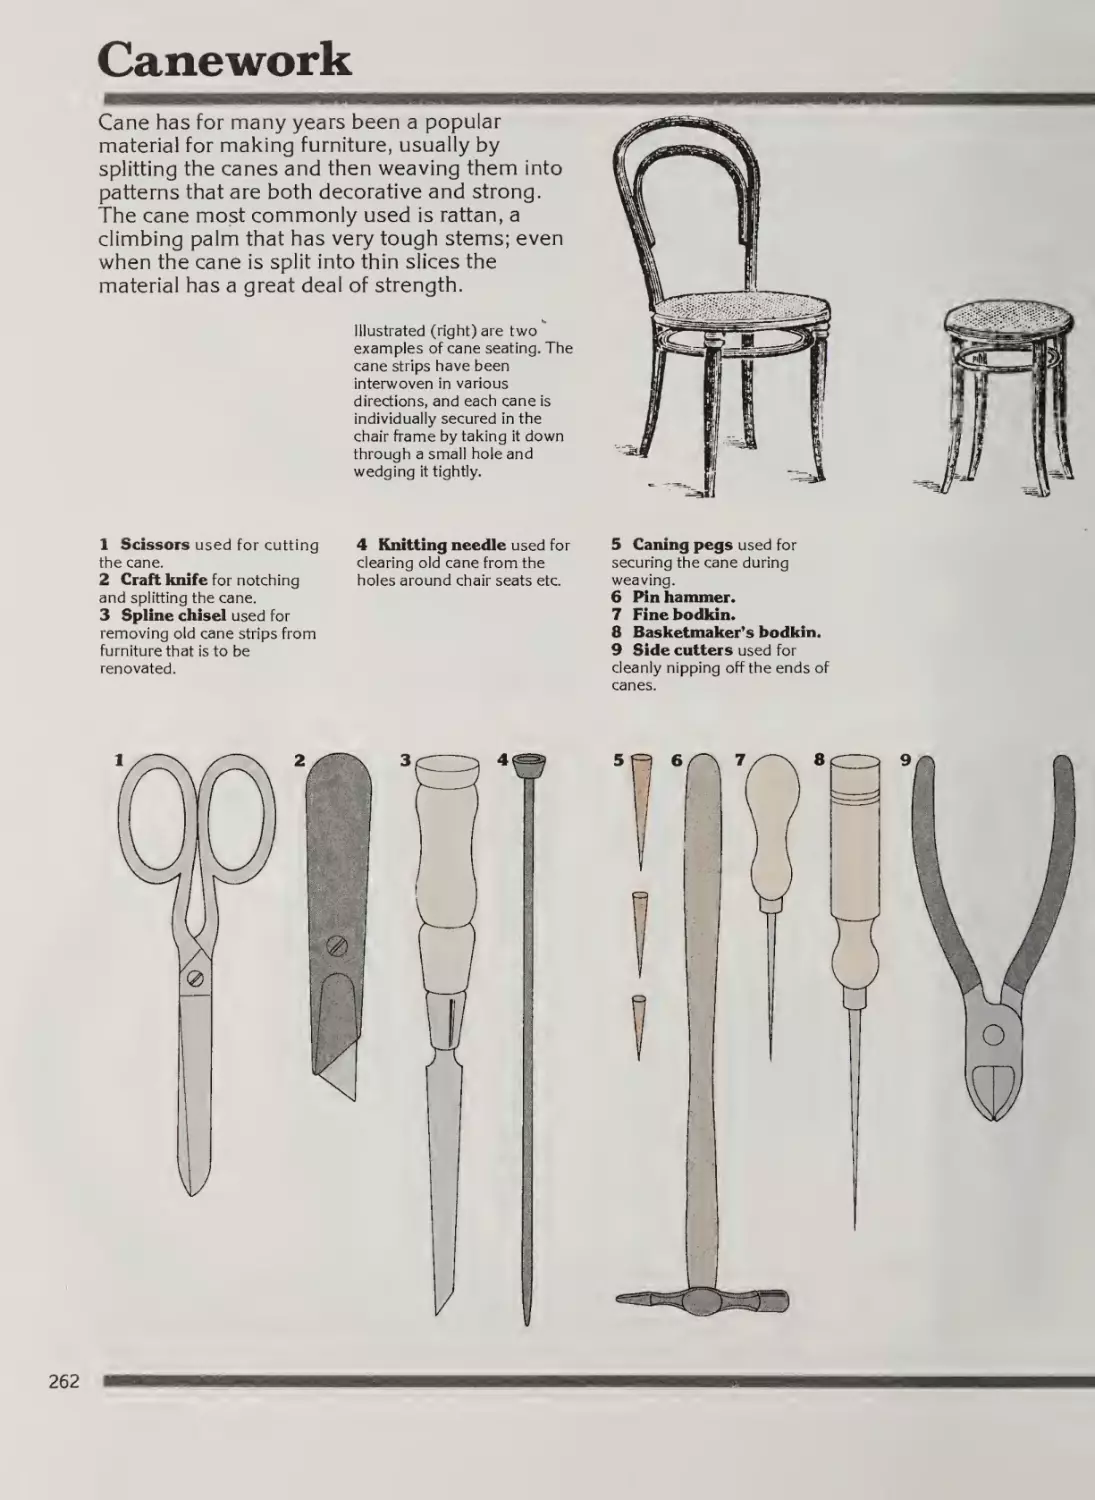
Canework
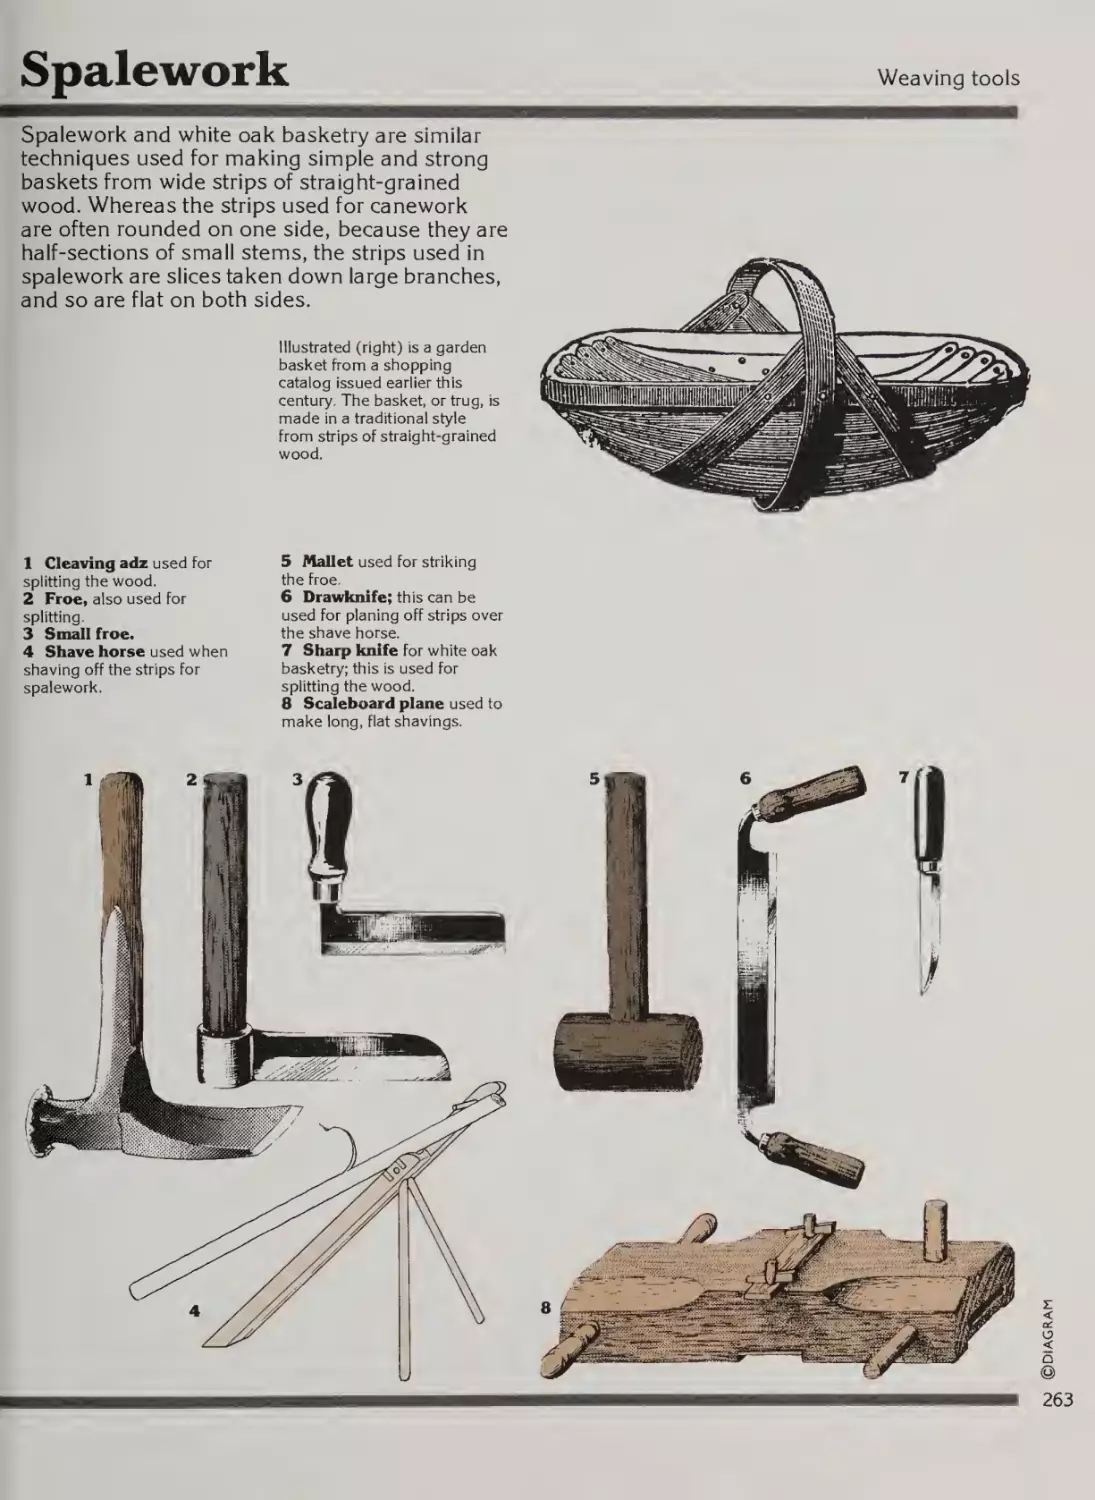
Spalework
Chapter 16
Knitting and knotting
264
266
268
269
270
272
274
275
276
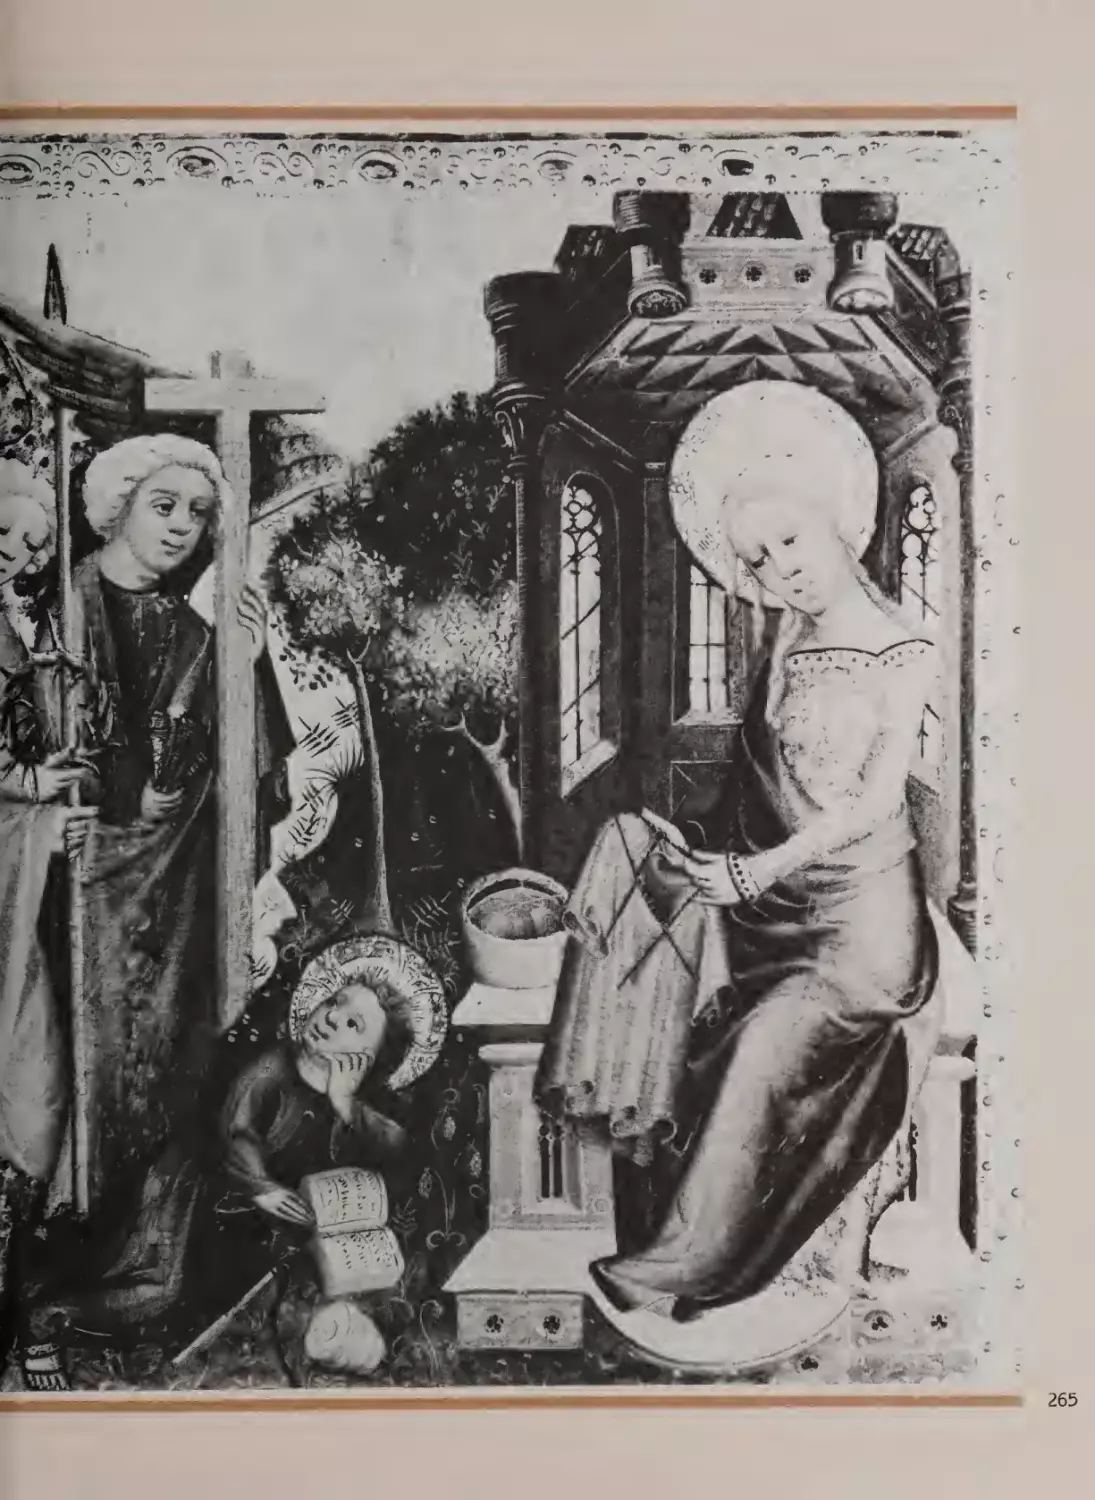
Introduction
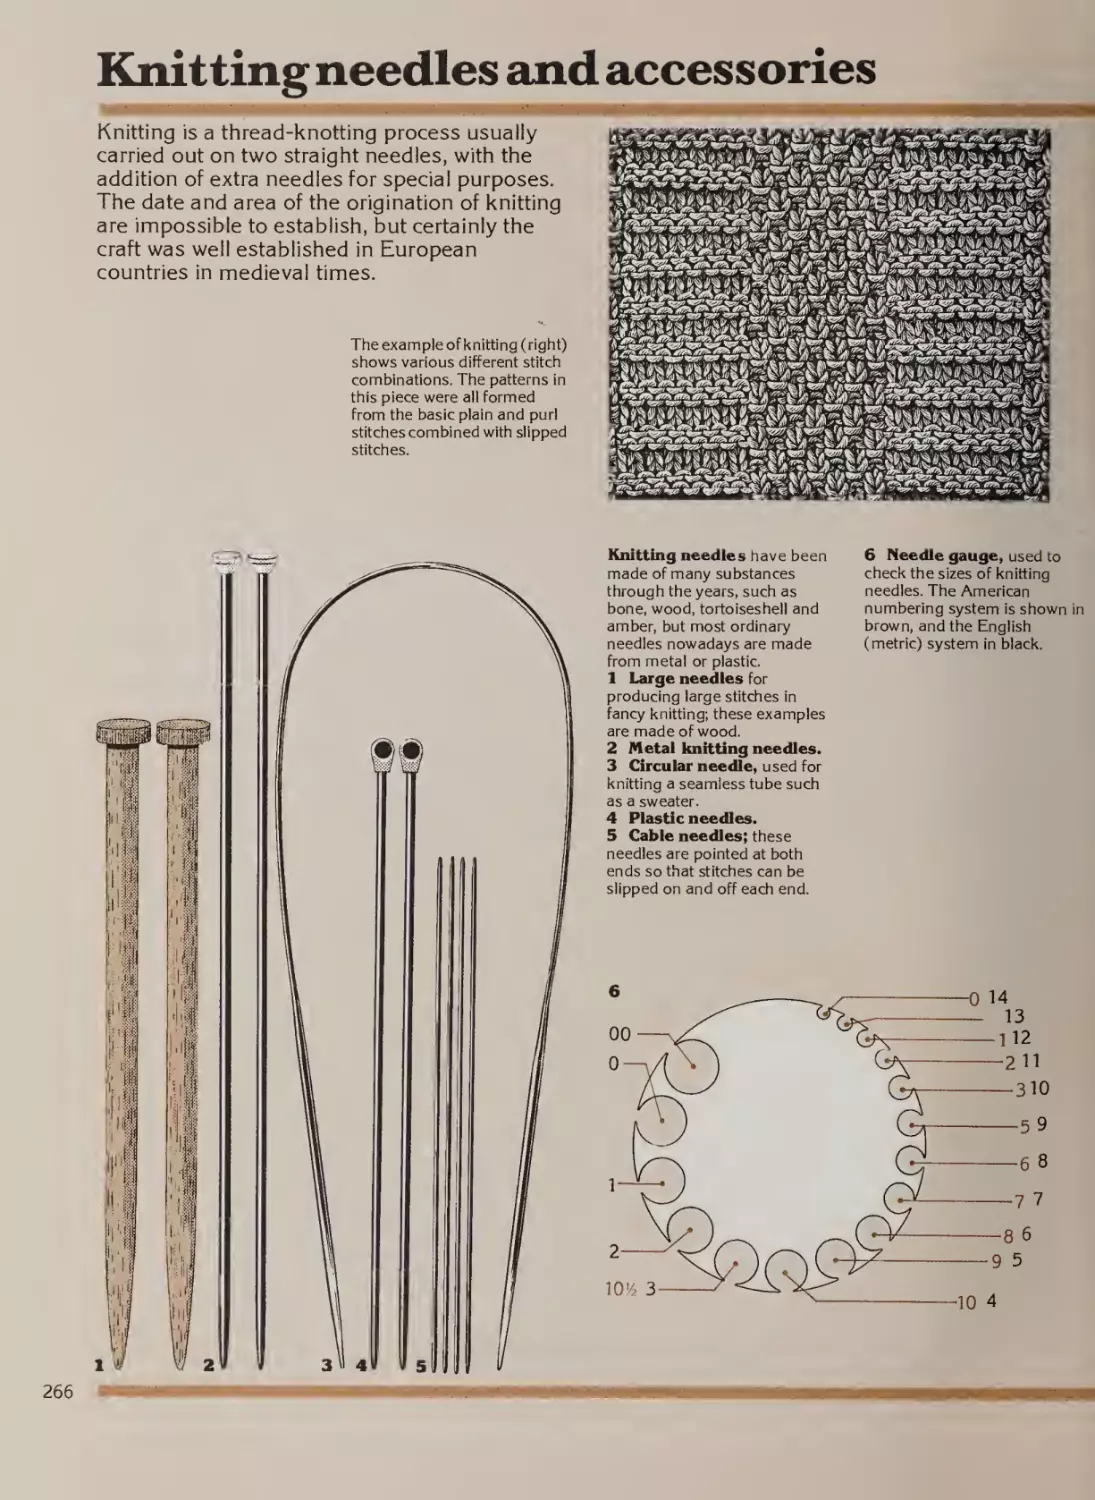
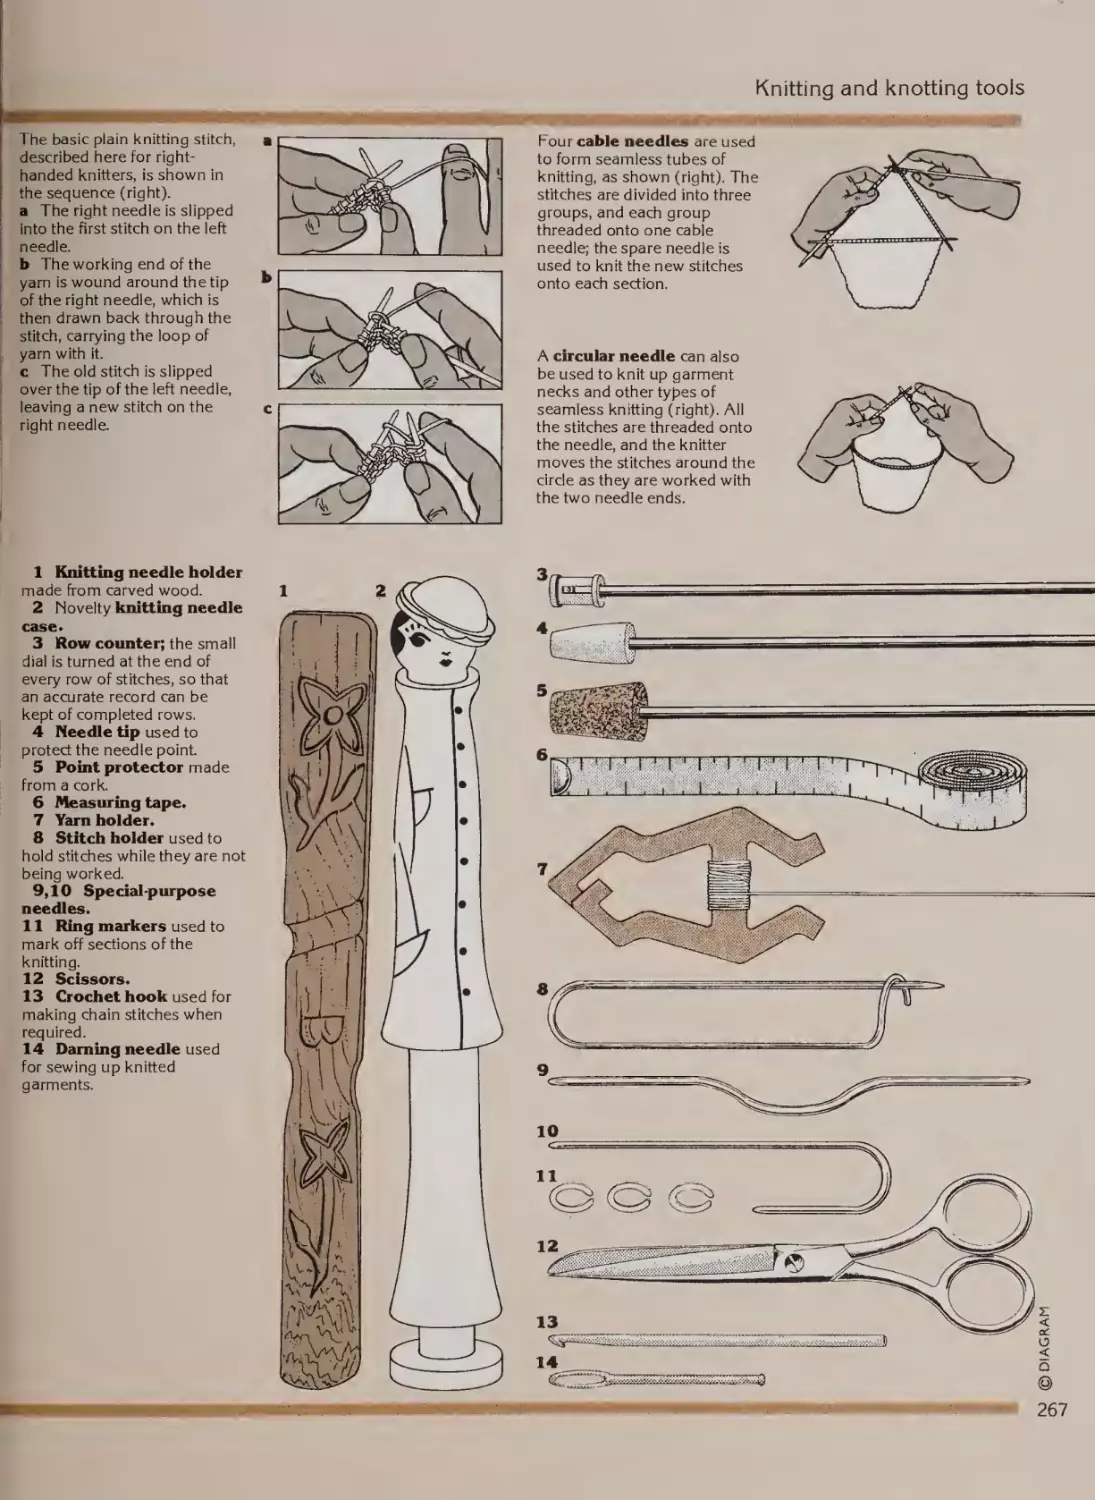
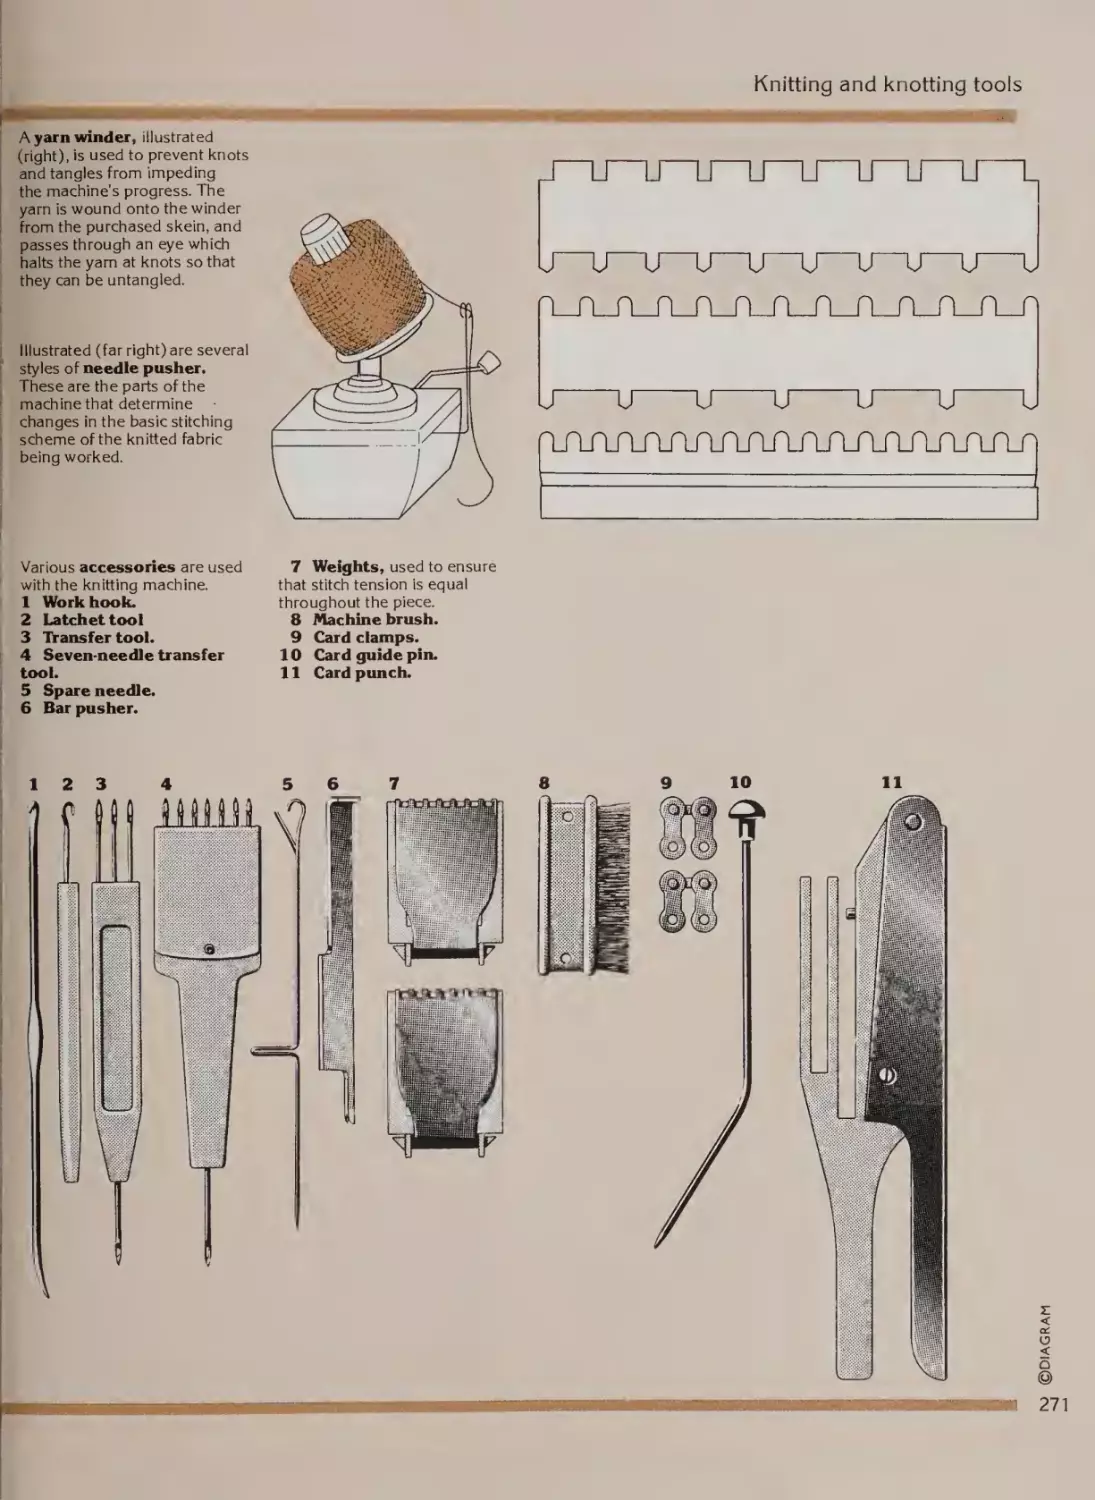
Knitting needles and accessories
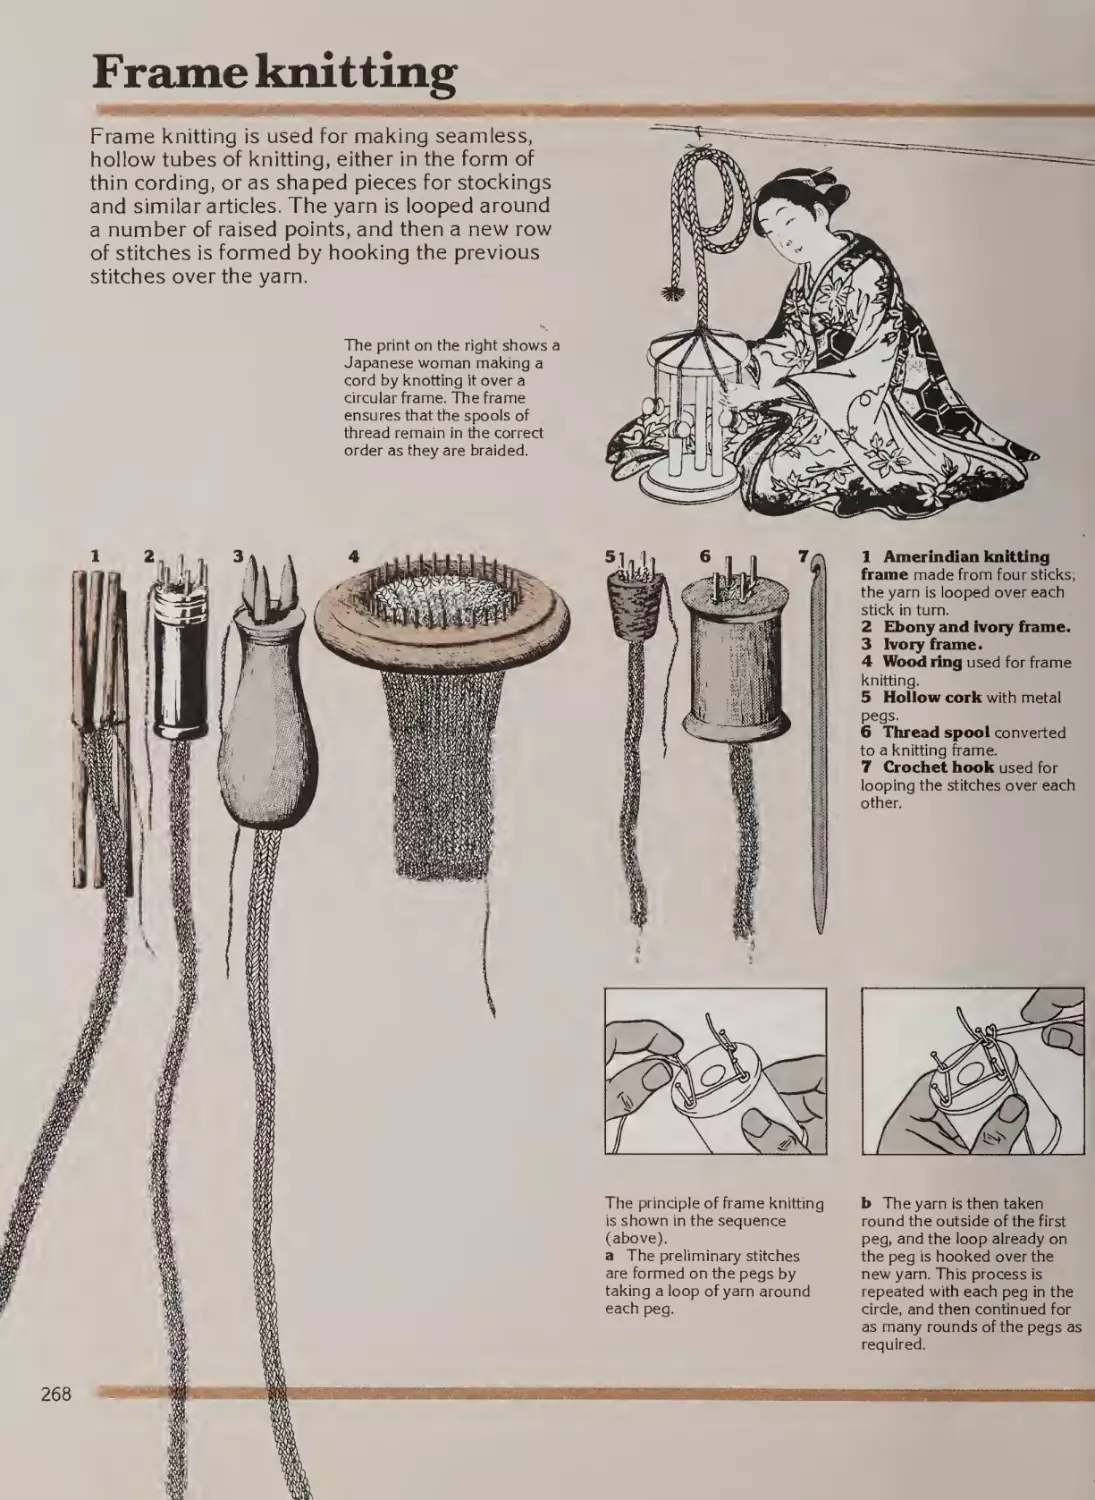
Frame knitting
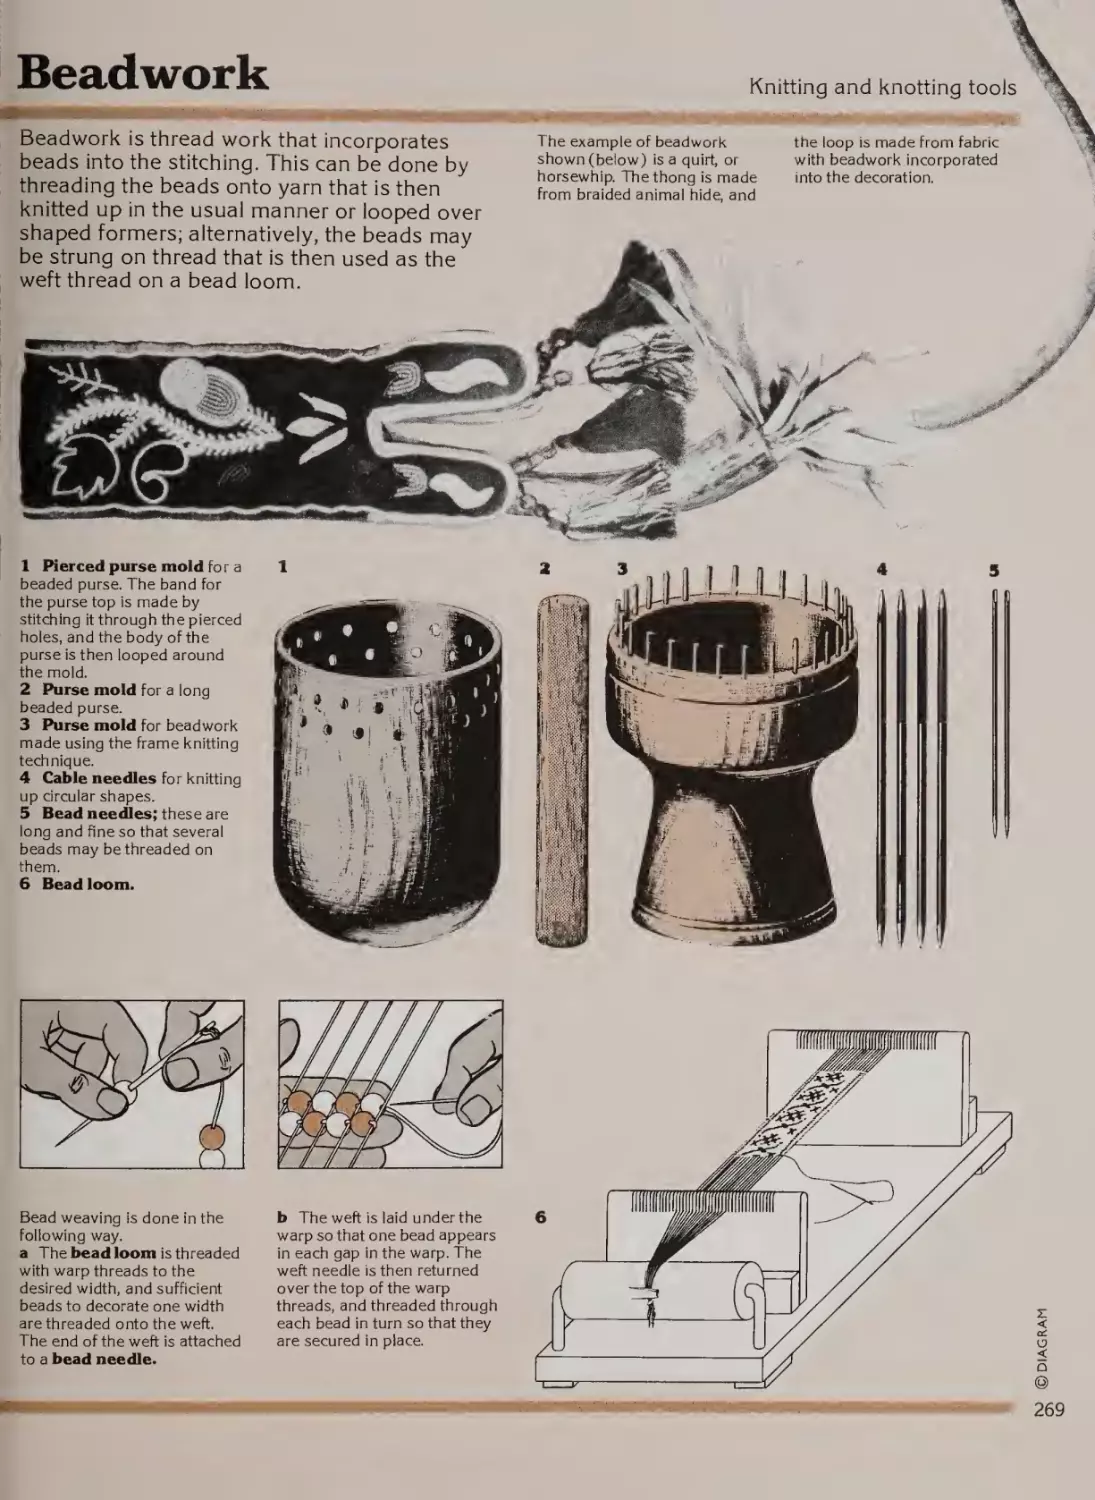
Beadwork
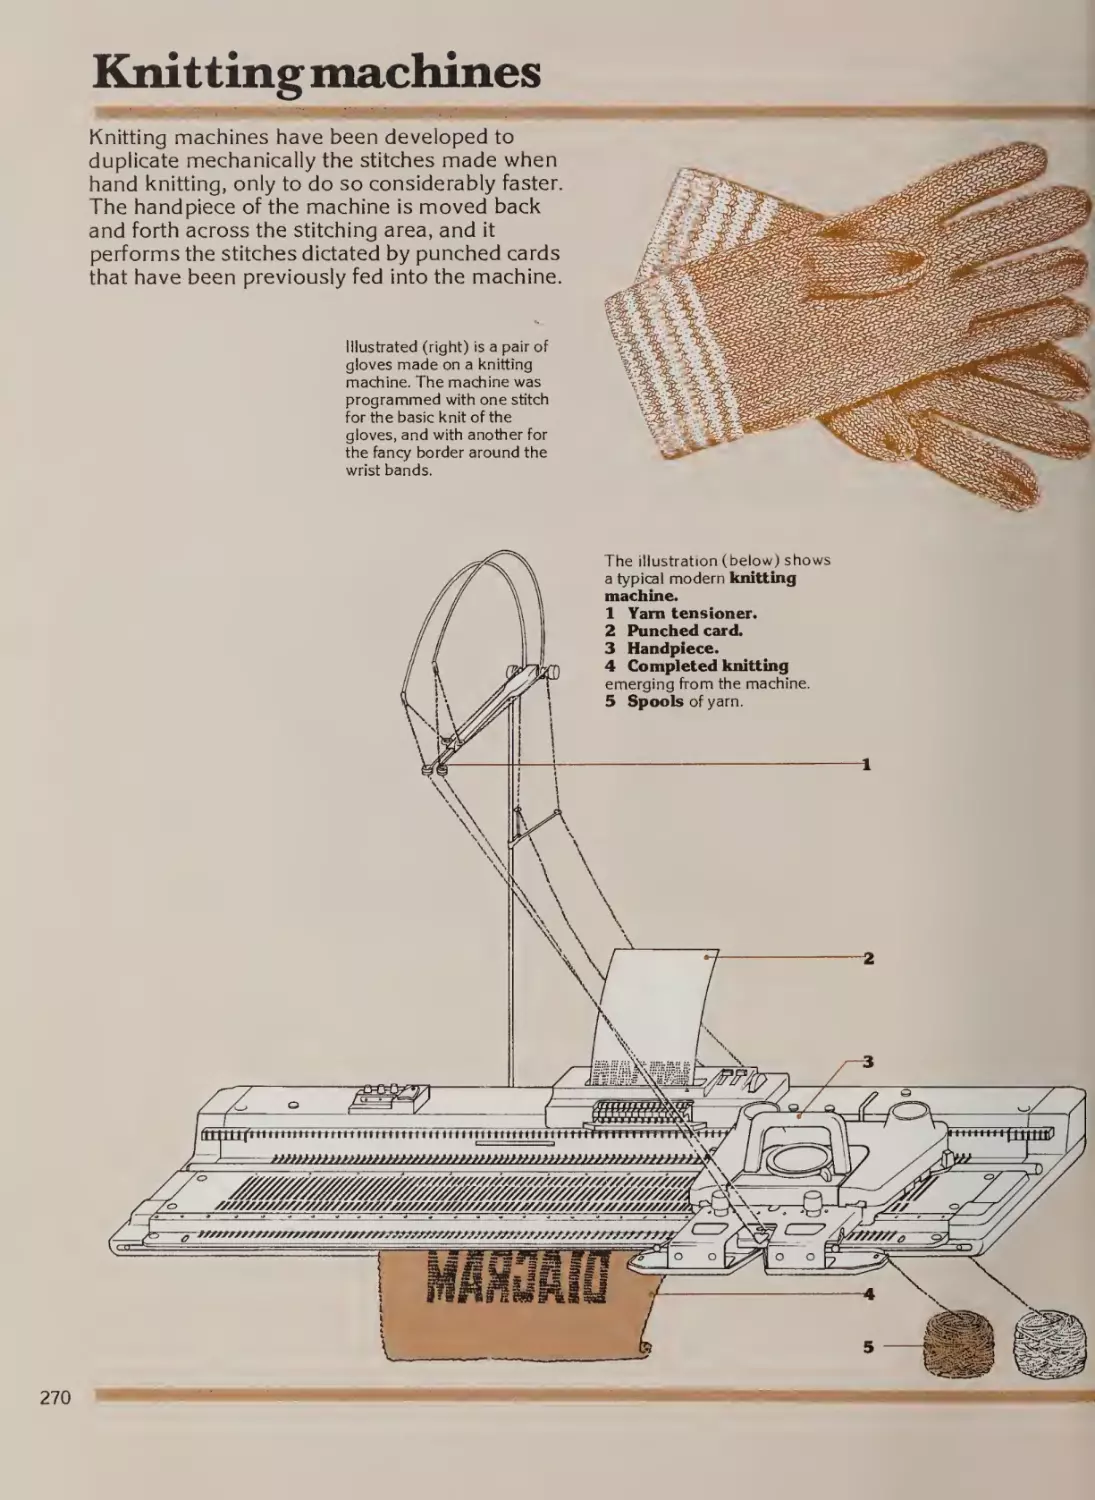
Knitting machines
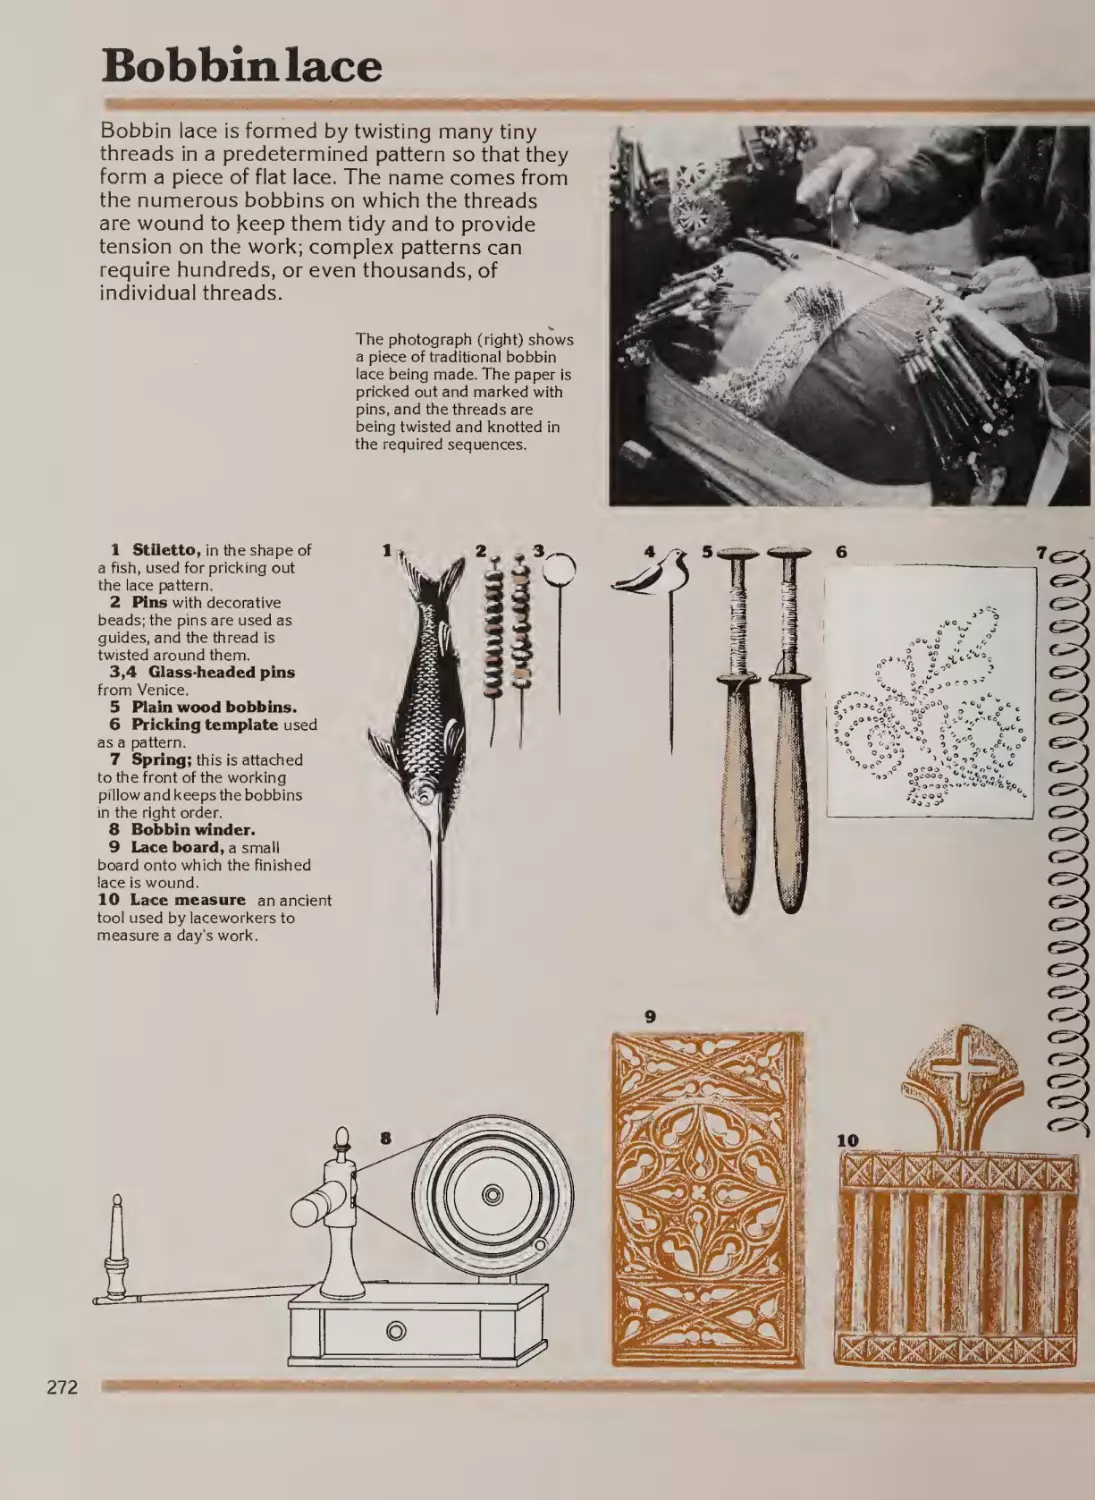
Bobbin lace
Crochet
Hairpin crochet, lucet work
Macrame, tatting, netting, knotting
Chapter 17
Needlework
278
280
282
284
286
288
290
292
294
Introduction
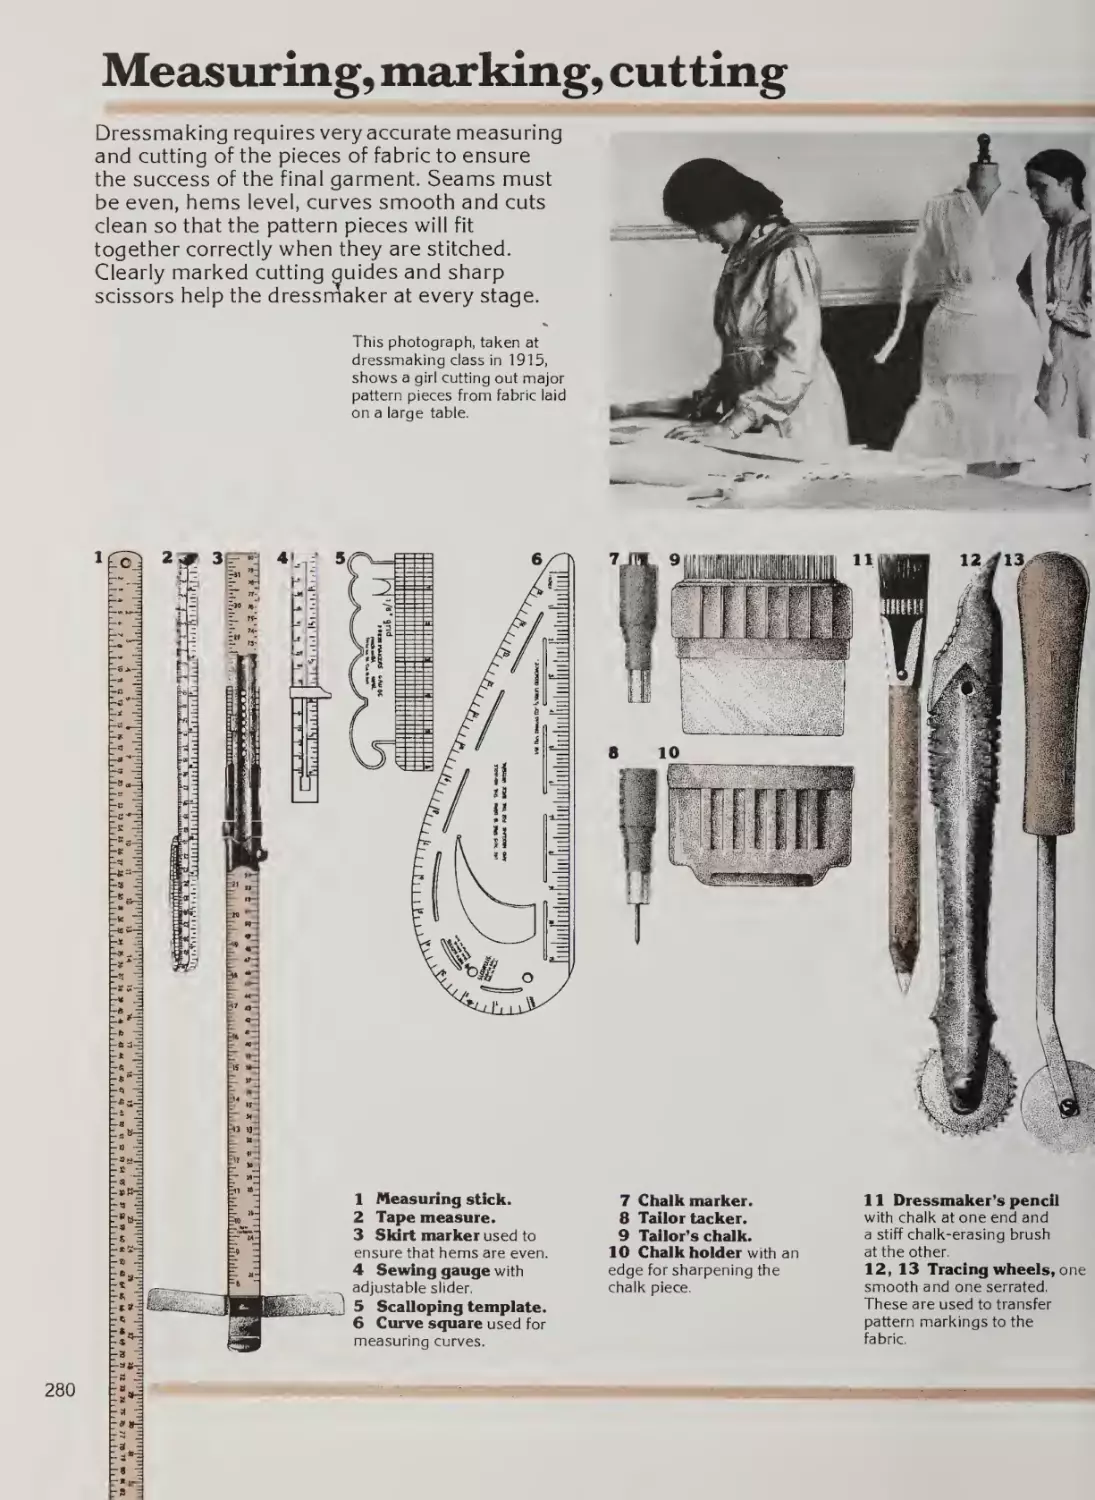
Measuring, marking, cutting
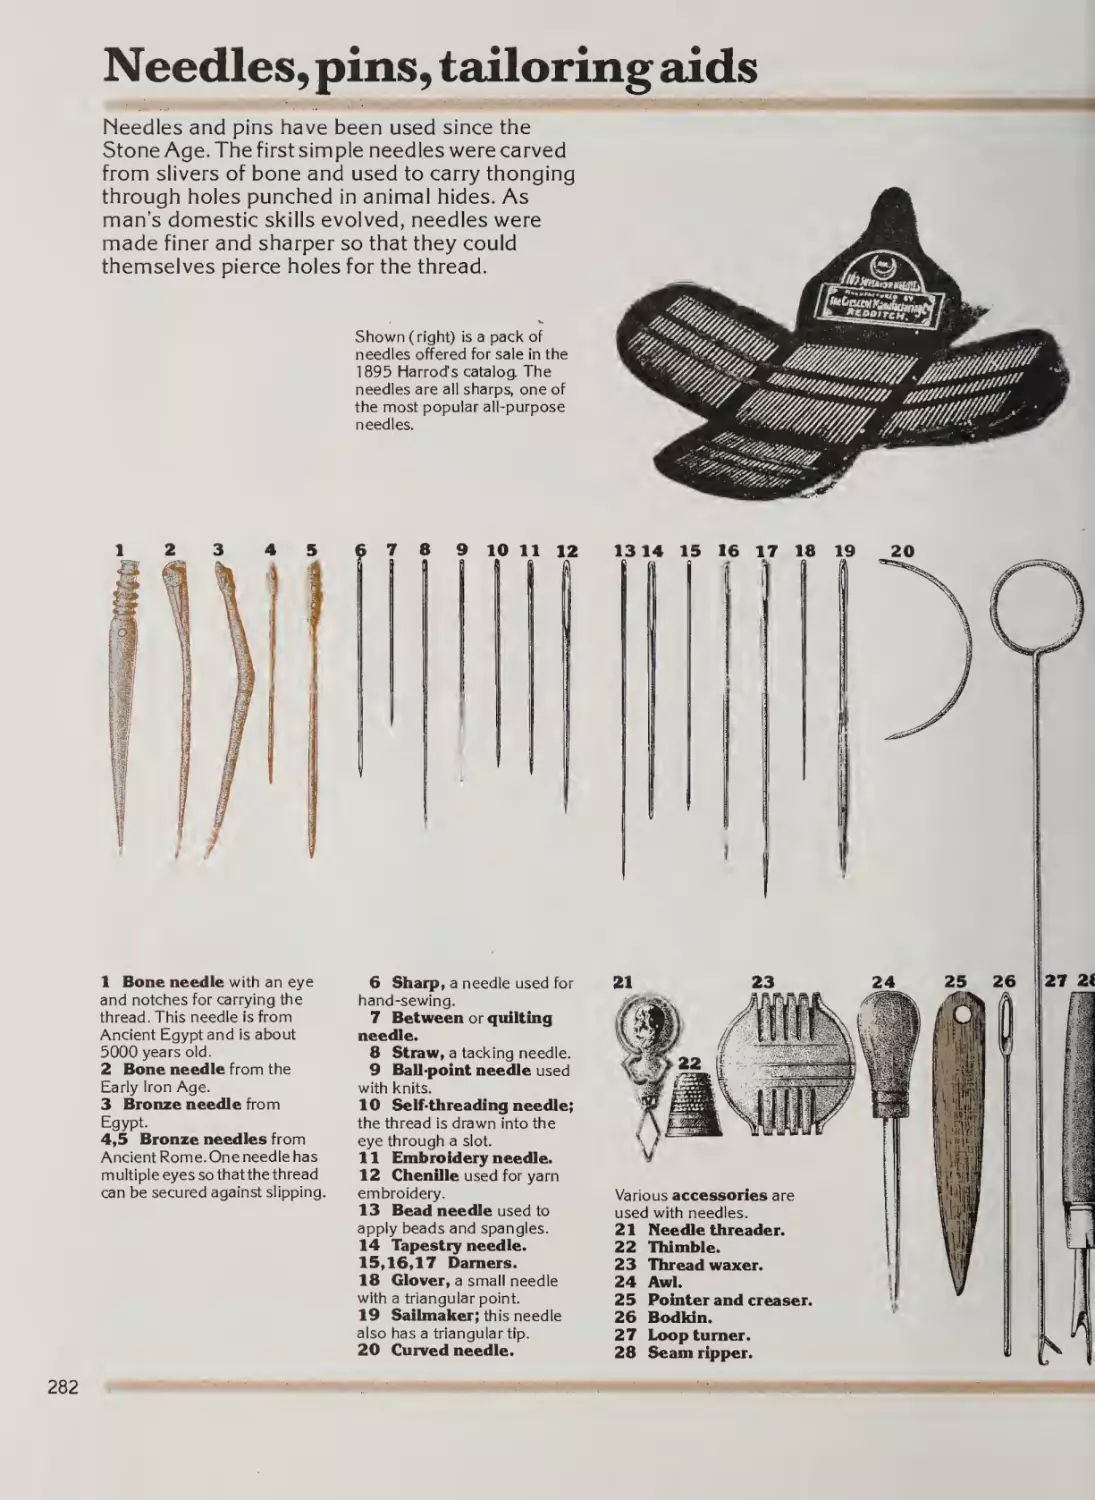
Needles, pins, tailoring aids
Sewing accessories
Sewing machines
Decorative fabric work
Metal thread embroidery
Millinery
Upholstery
Chapter 18
Leathenvork
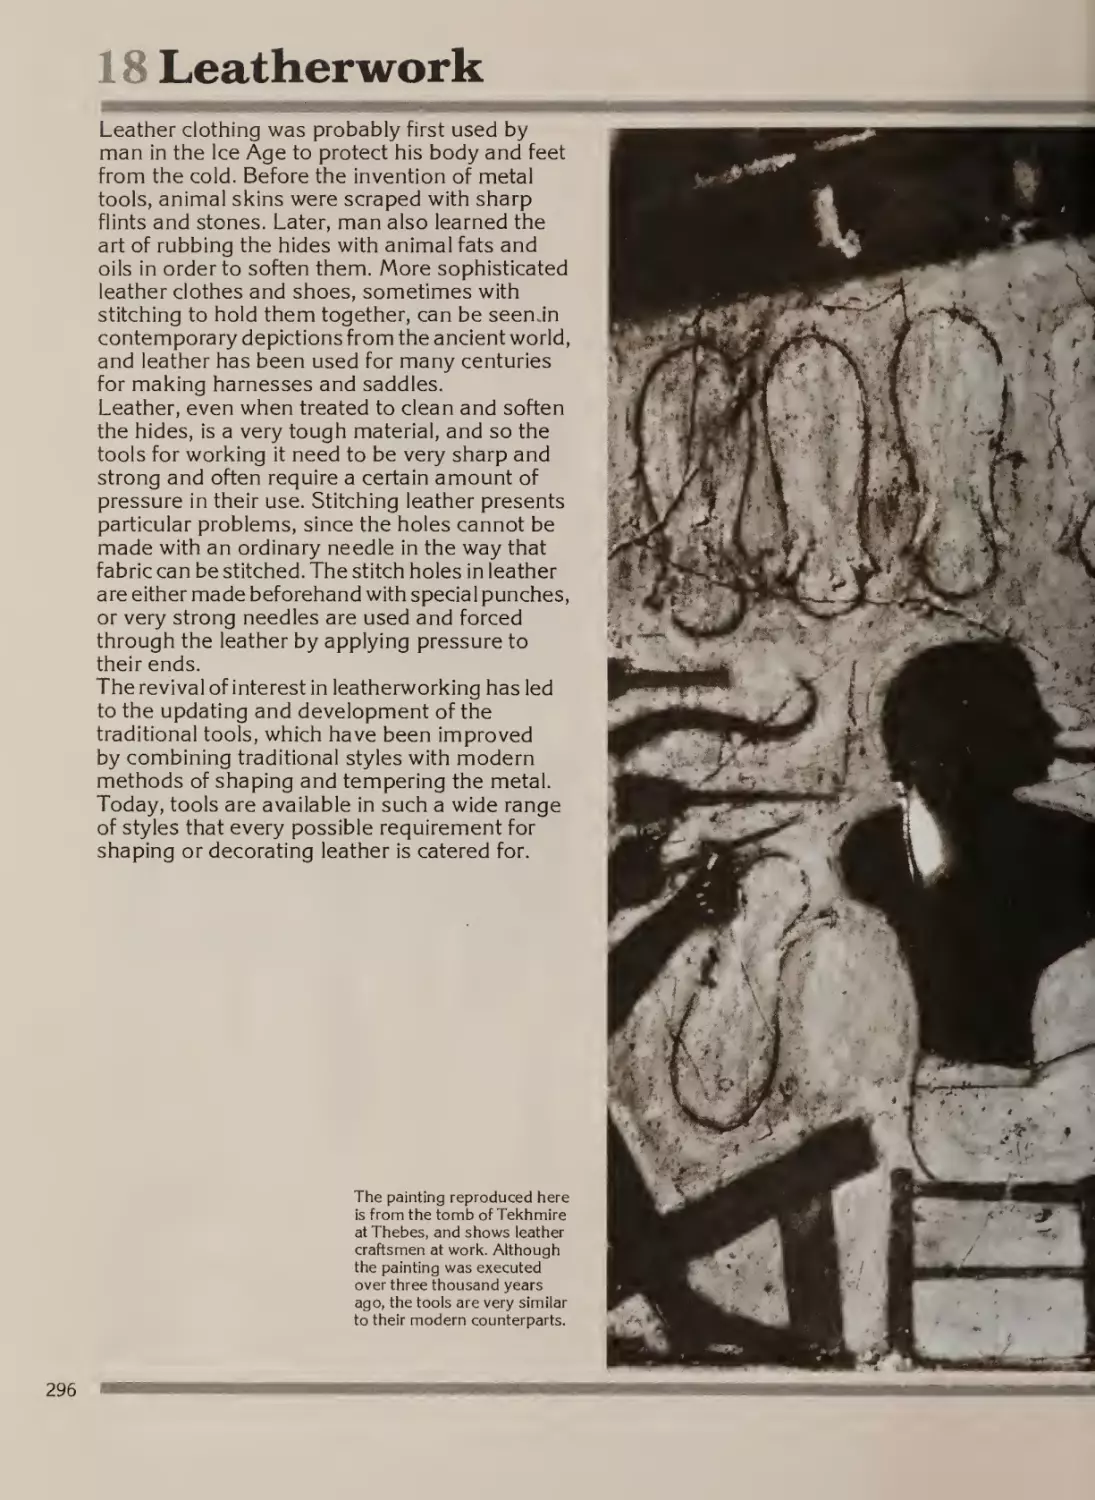
296
298
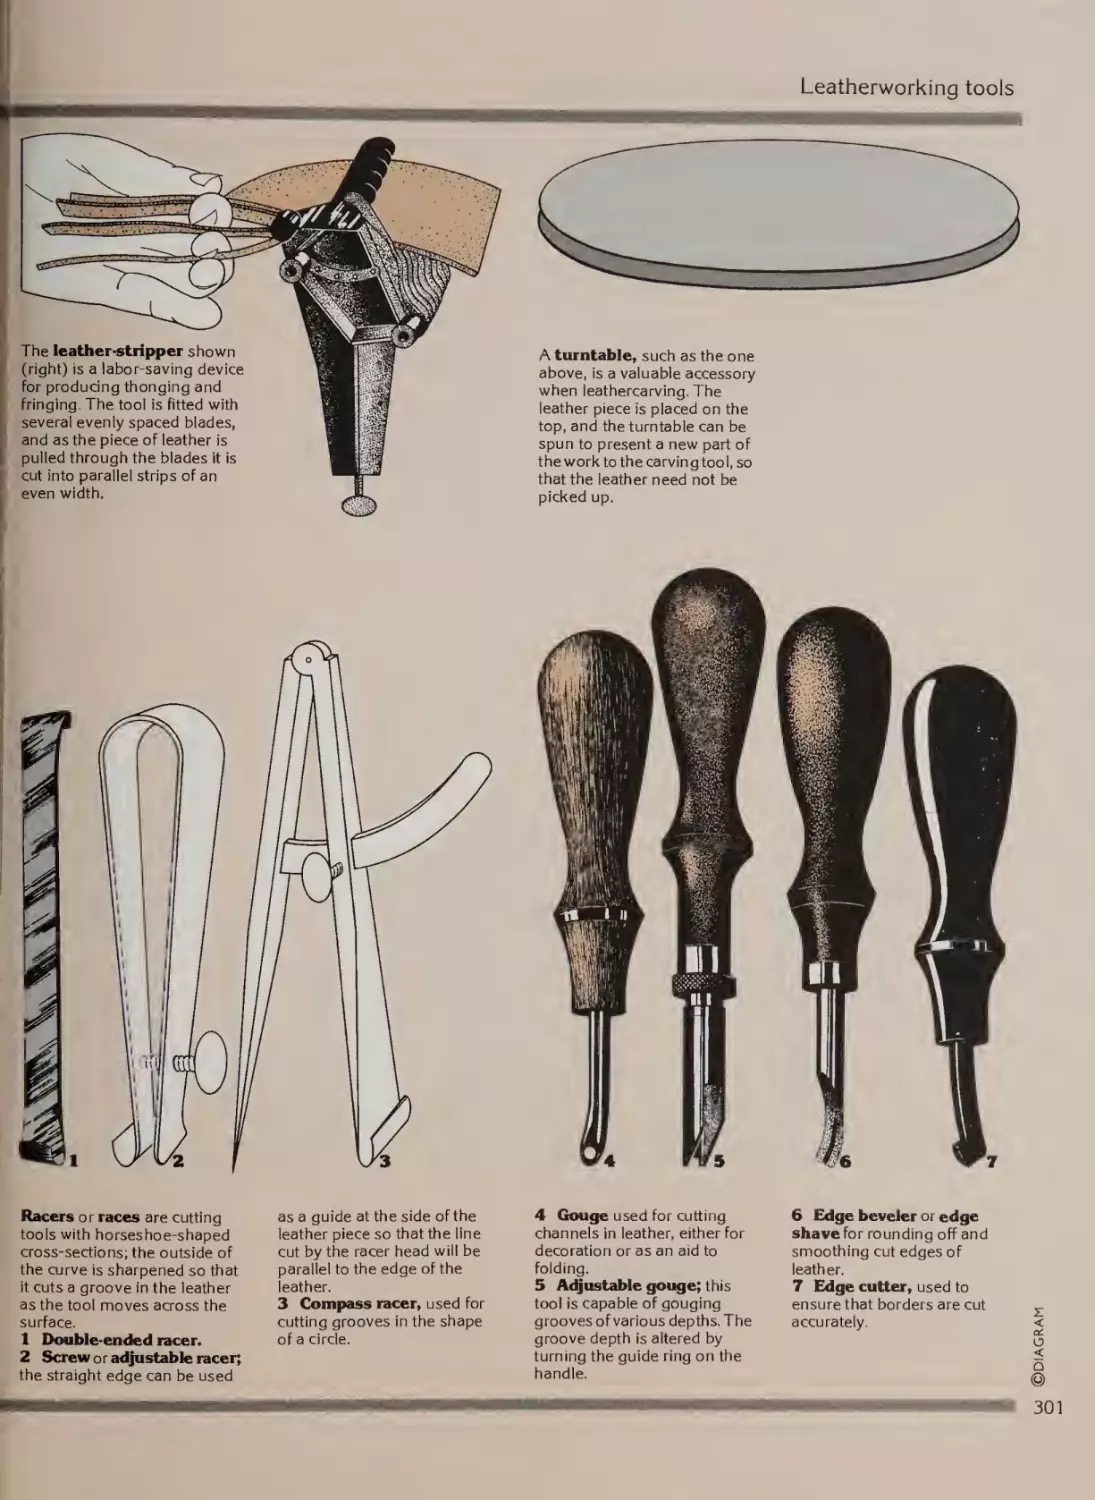
300
304
306
Introduction
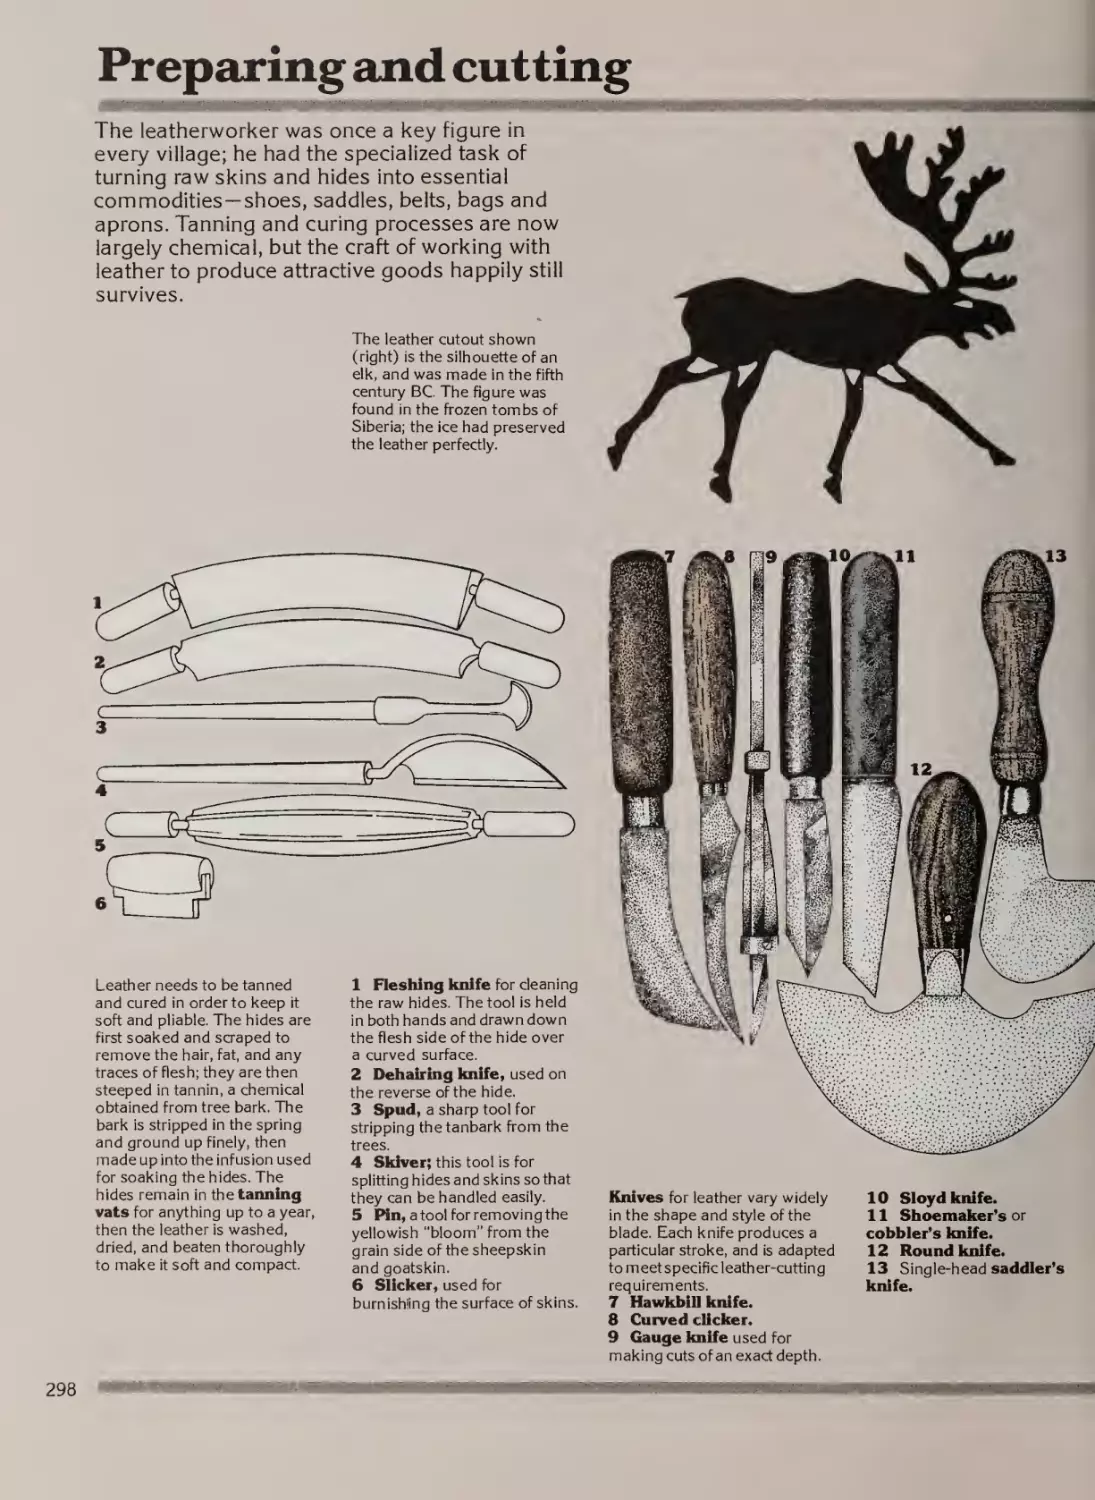
Preparing and cutting
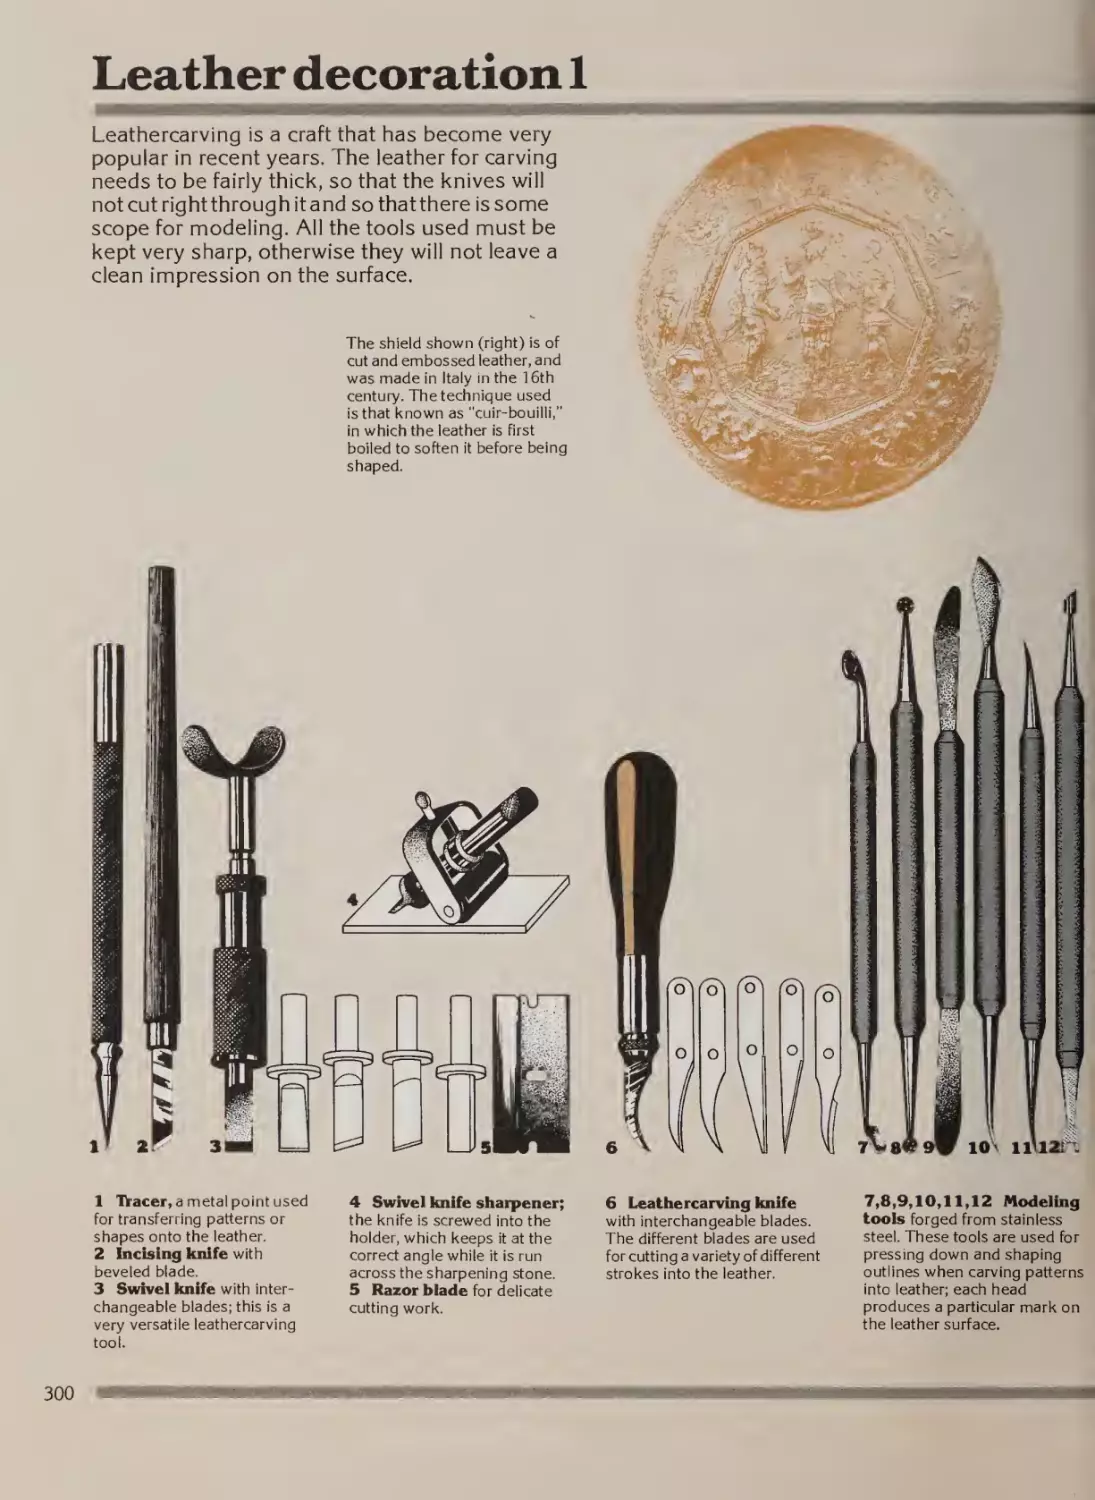
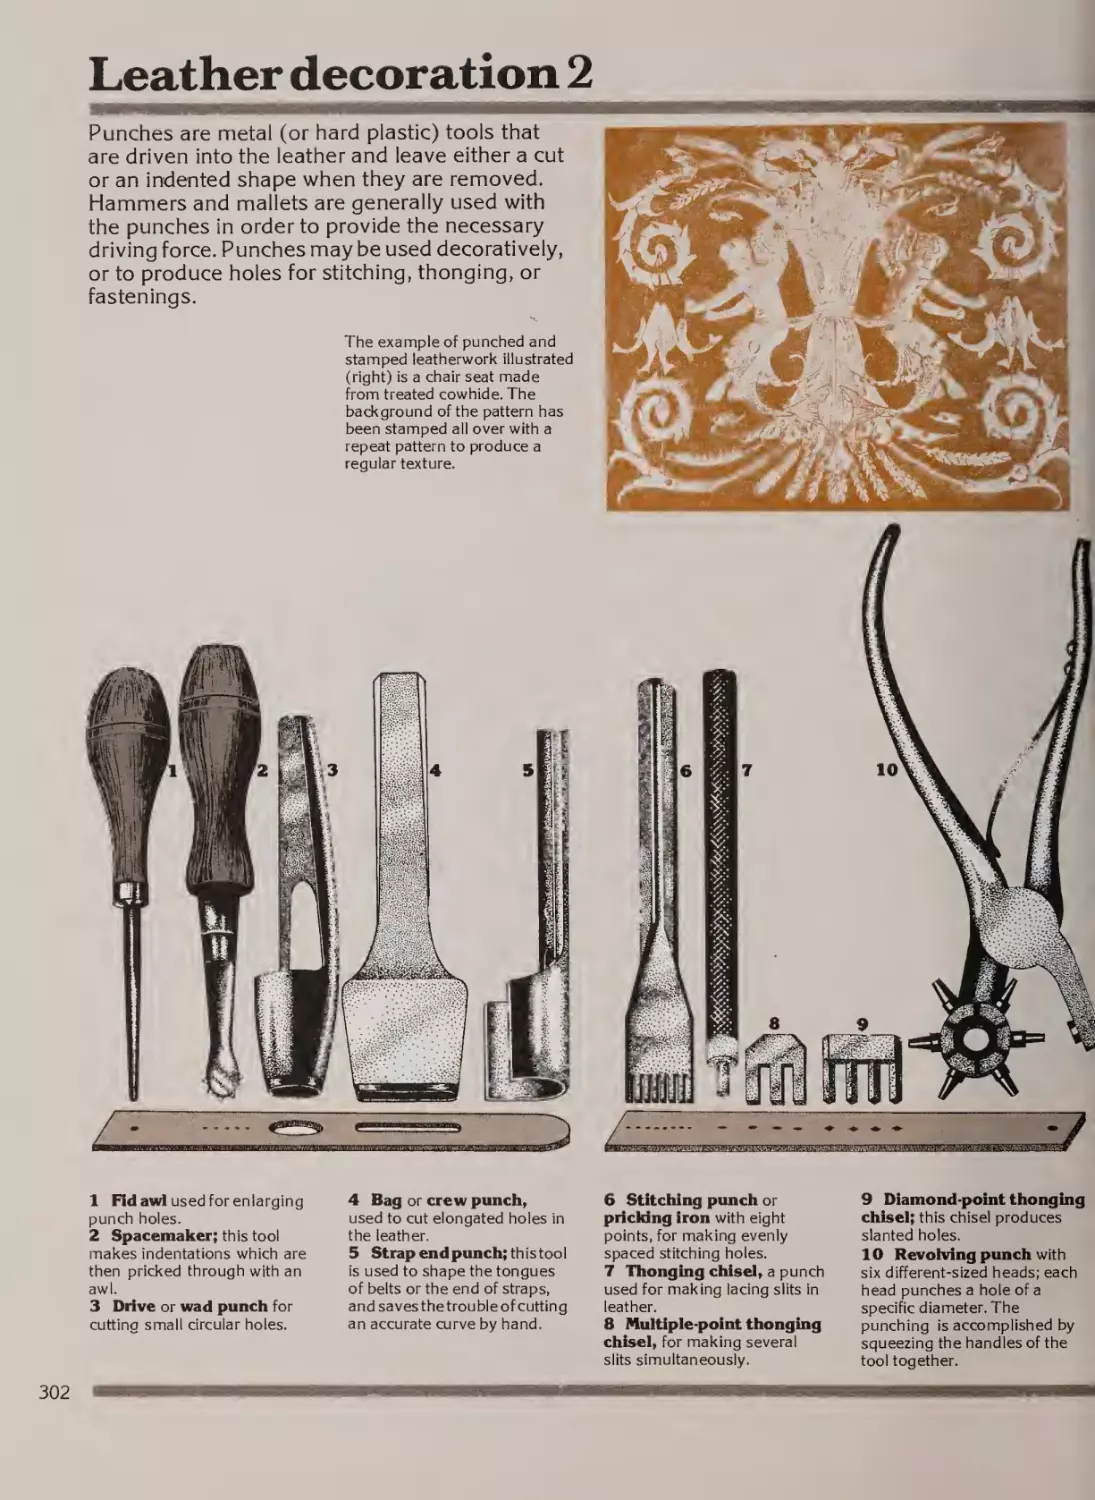
Leather decoration
Shaping, sewing, finishing
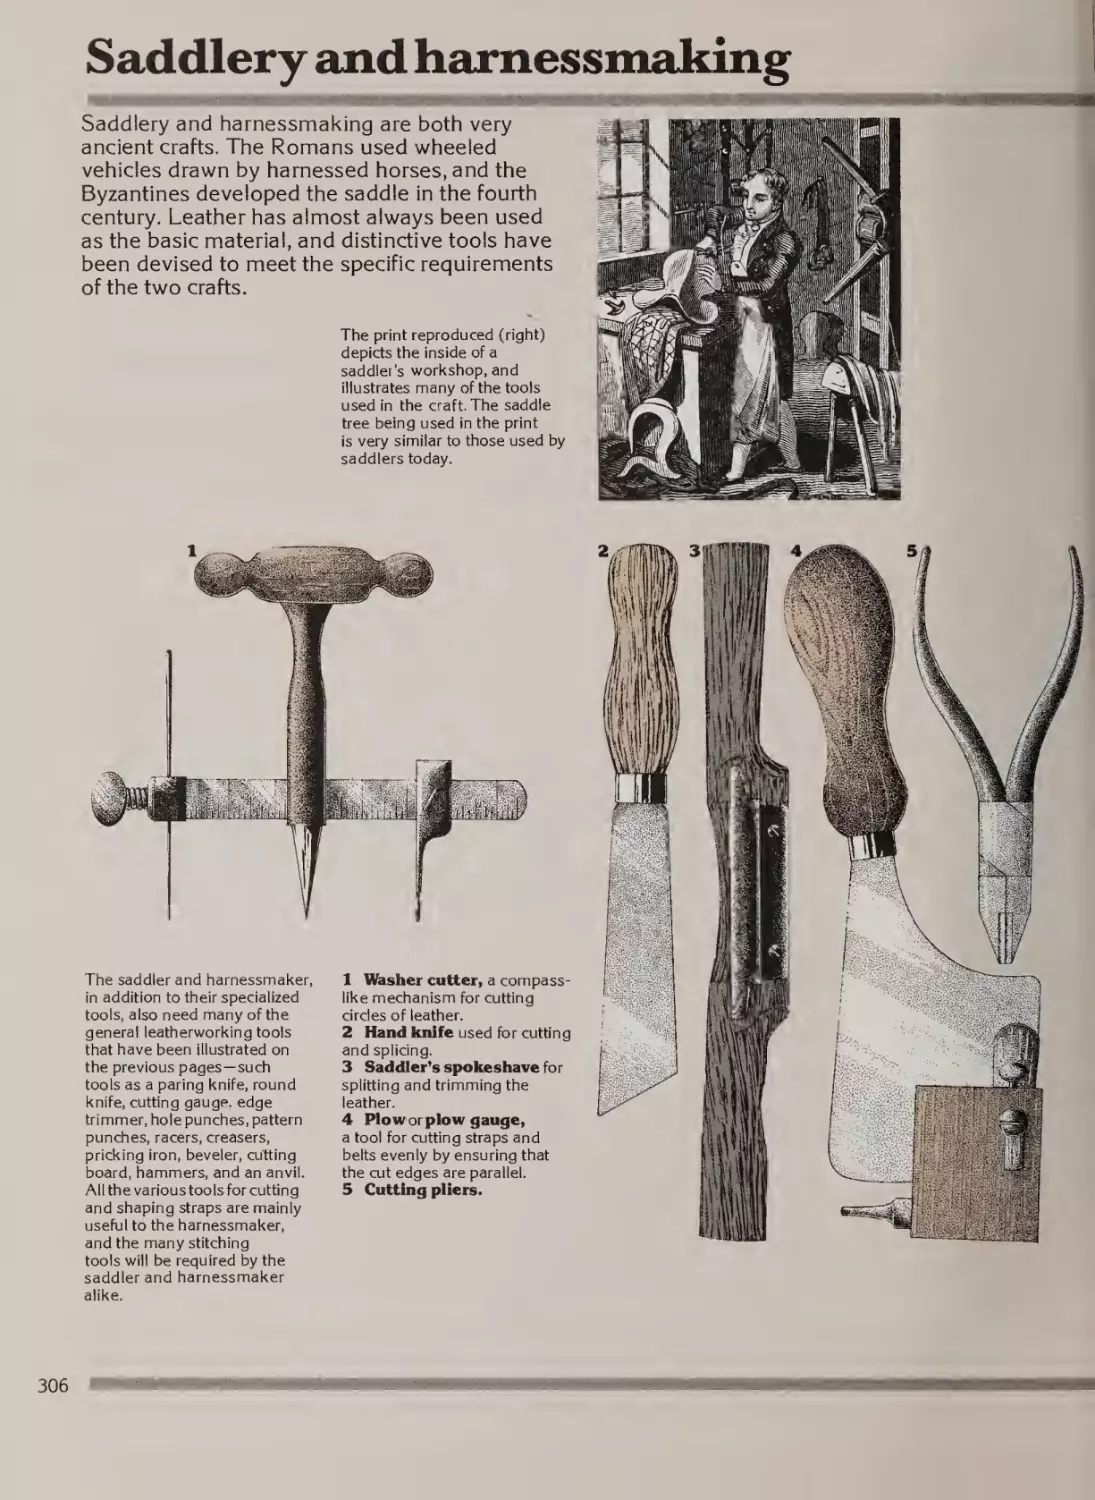
Saddlery and hamessmaking
310
312
313
320
Bibliography
Acknowledgements
Index
Picture Credits
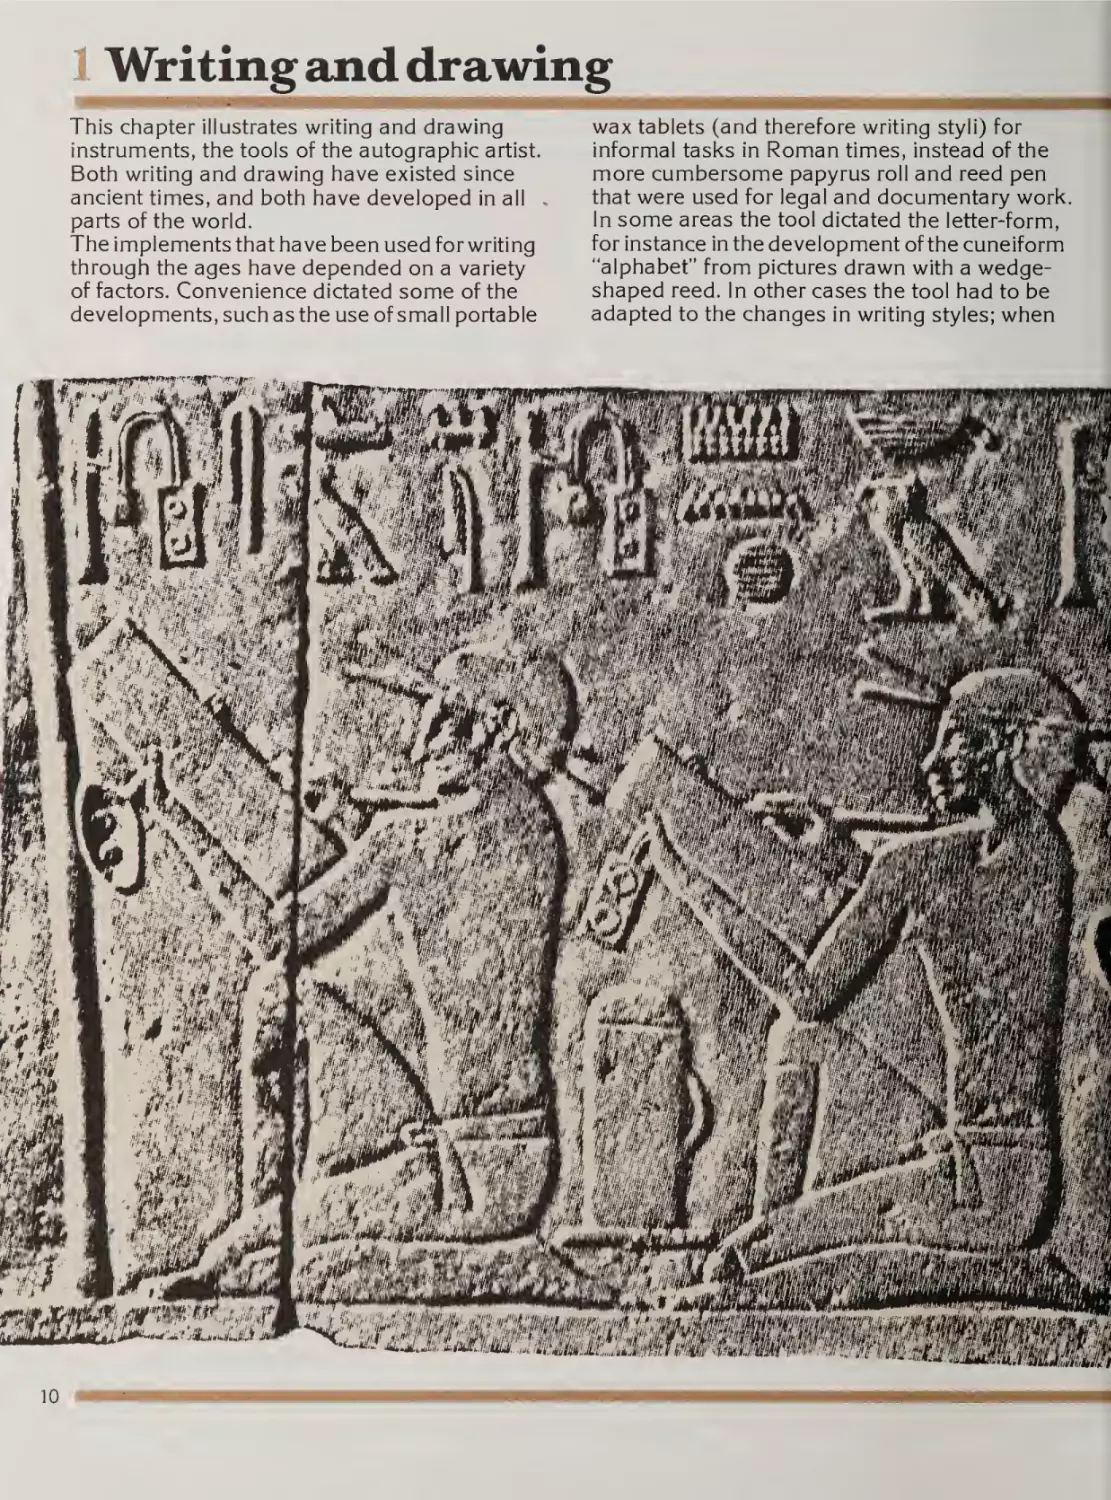
Writing and drawing
..“
.
This chapter illustrates writing and drawing
instruments, the tools of the autographic artist.
Both writing and drawing have existed since
ancient times, and both have developed in all
parts of the world.
The implements that have been used for writing
through the ages have depended on a variety
of factors. Convenience dictated some of the
developments, such as the use of small portable
wax tablets (and therefore writing styli) for
informal tasks in Roman times, instead of the
more cumbersome papyrus roll and reed pen
that were used for legal and documentary work
In some areas the tool dictated the letter-form,
for instance in the development of the cuneiform
“alphabet” from pictures drawn with a wedgeshaped reed. In other cases the tool had to be
adapted to the changes in writing styles; when
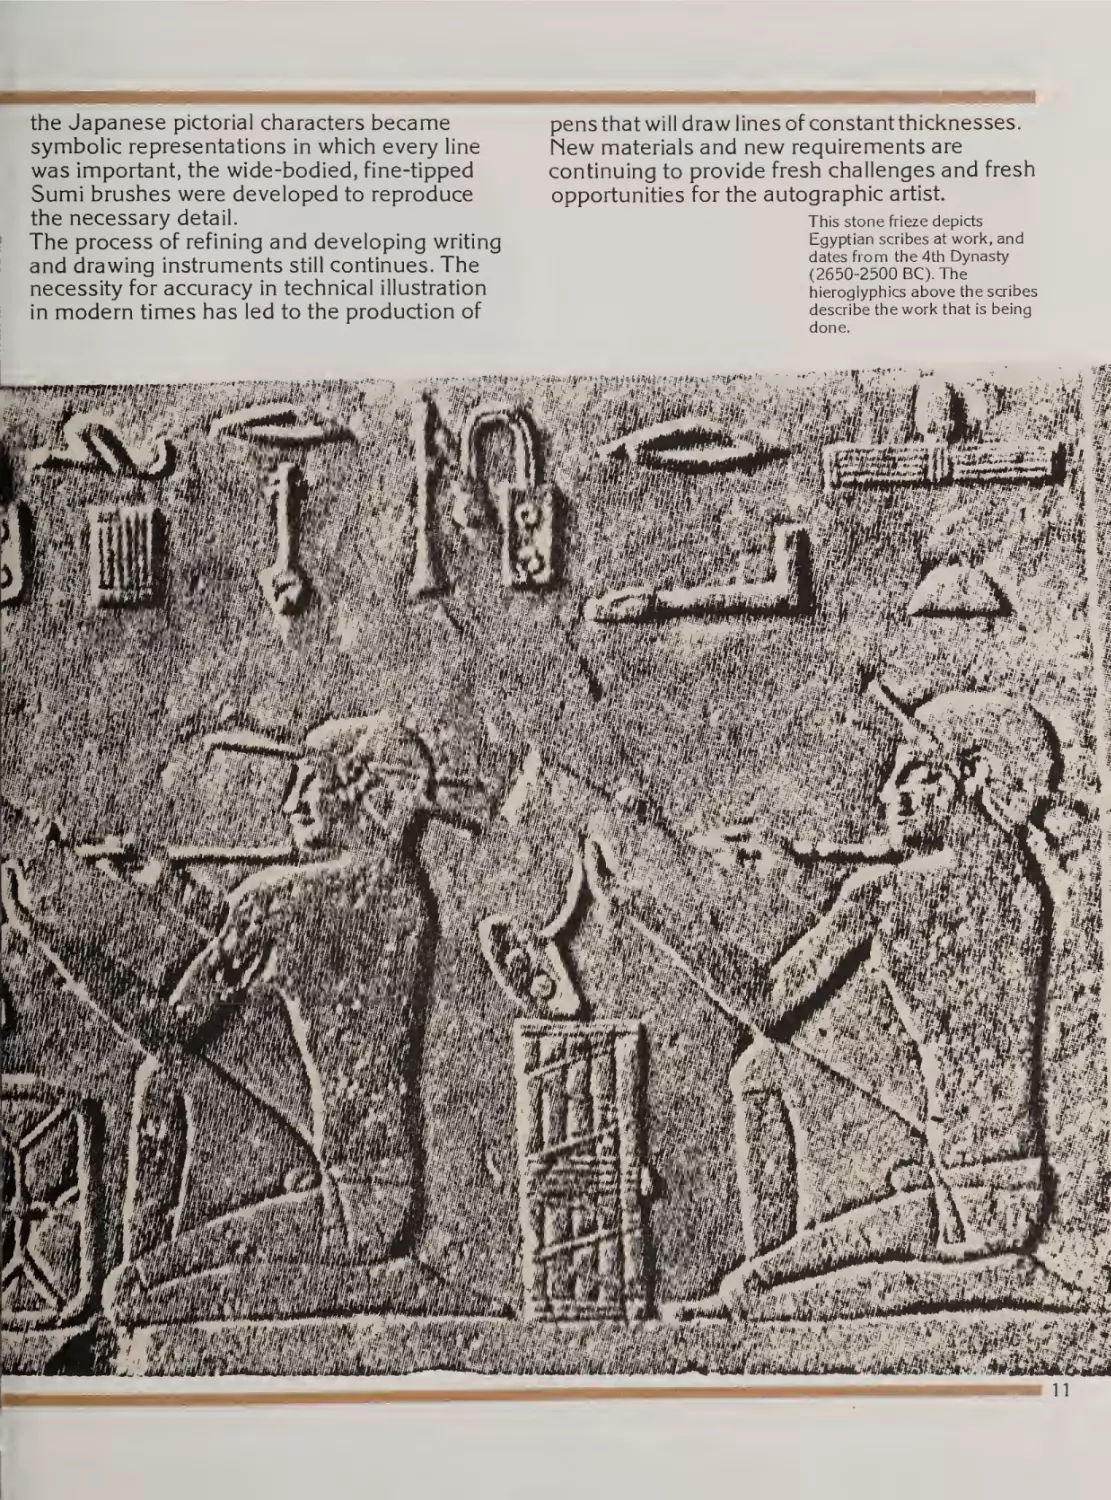
the Japanese pictorial characters became
symbolic representations in which every line
was important, the wide-bodied, fine-tipped
Sumi brushes were developed to reproduce
the necessary detail.
The process of refining and developing writing
and drawing instruments still continues. The
necessity for accuracy in technical illustration
in modern times has led to the production of
pens that will draw lines of constant thicknesses.
New materials and new requirements are
continuing to provide fresh challenges and fresh
opportunities for the autographic artist.
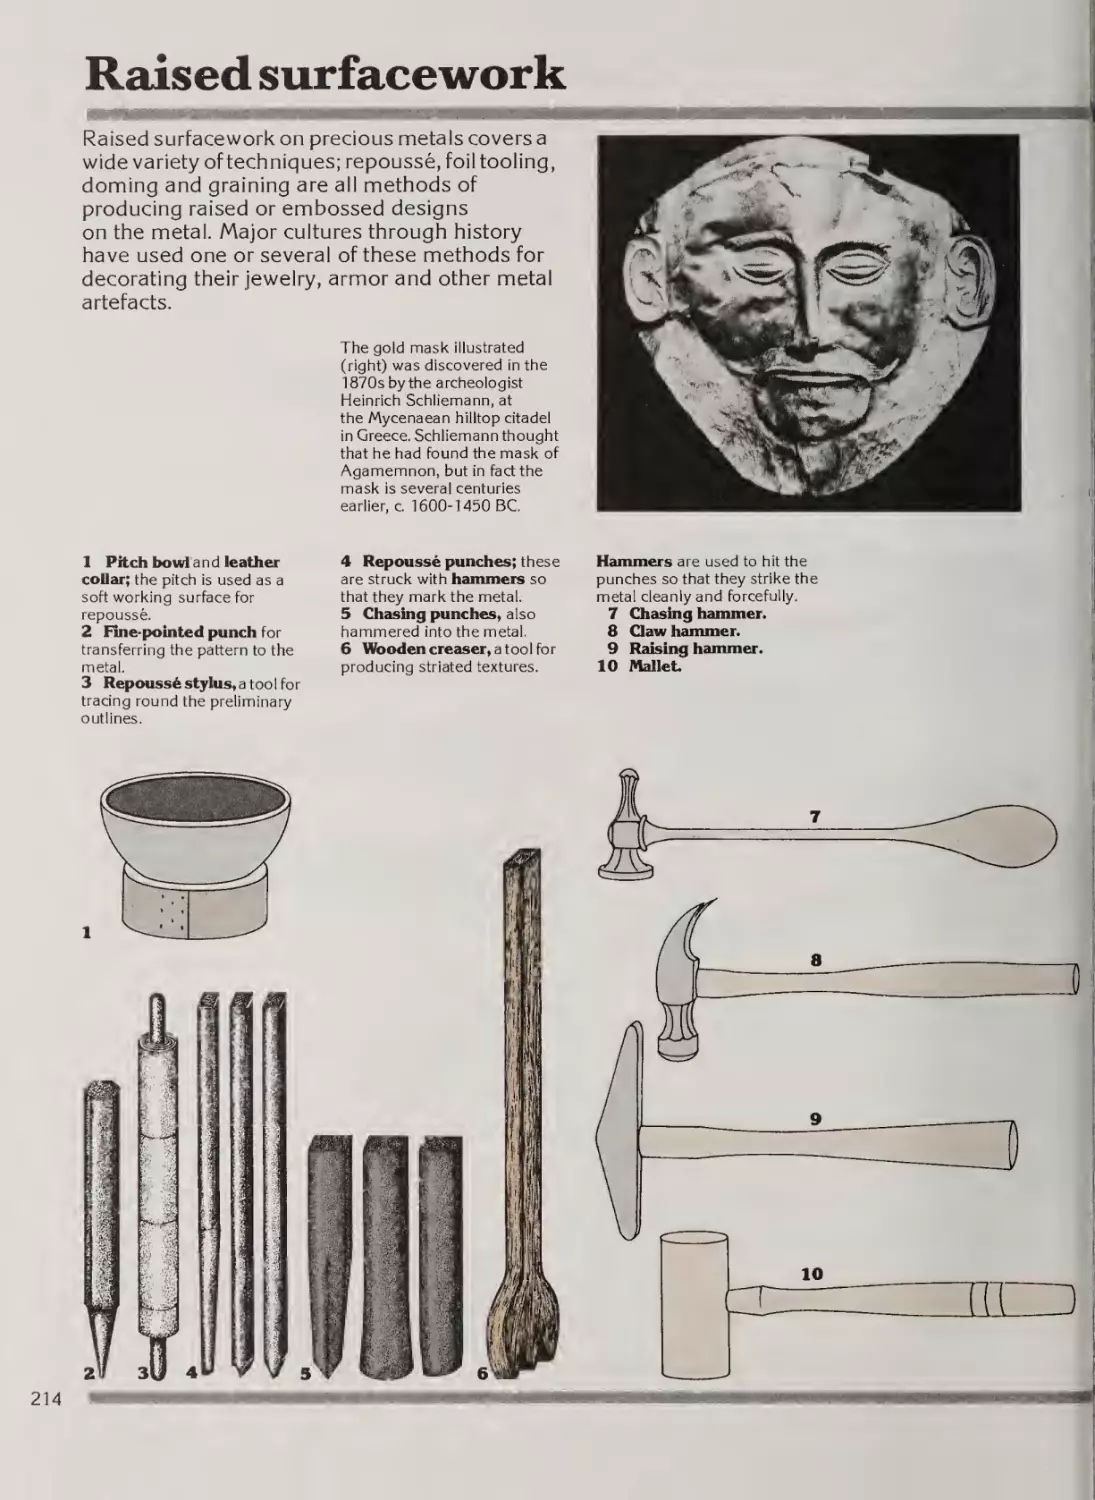
This stone frieze depicts
Egyptian scribes at work, and
dates from the 4th Dynasty
(2650-2500 BC). The
hieroglyphics above the scribes
describe the work that is being
Writing on bone and stone
tad
1
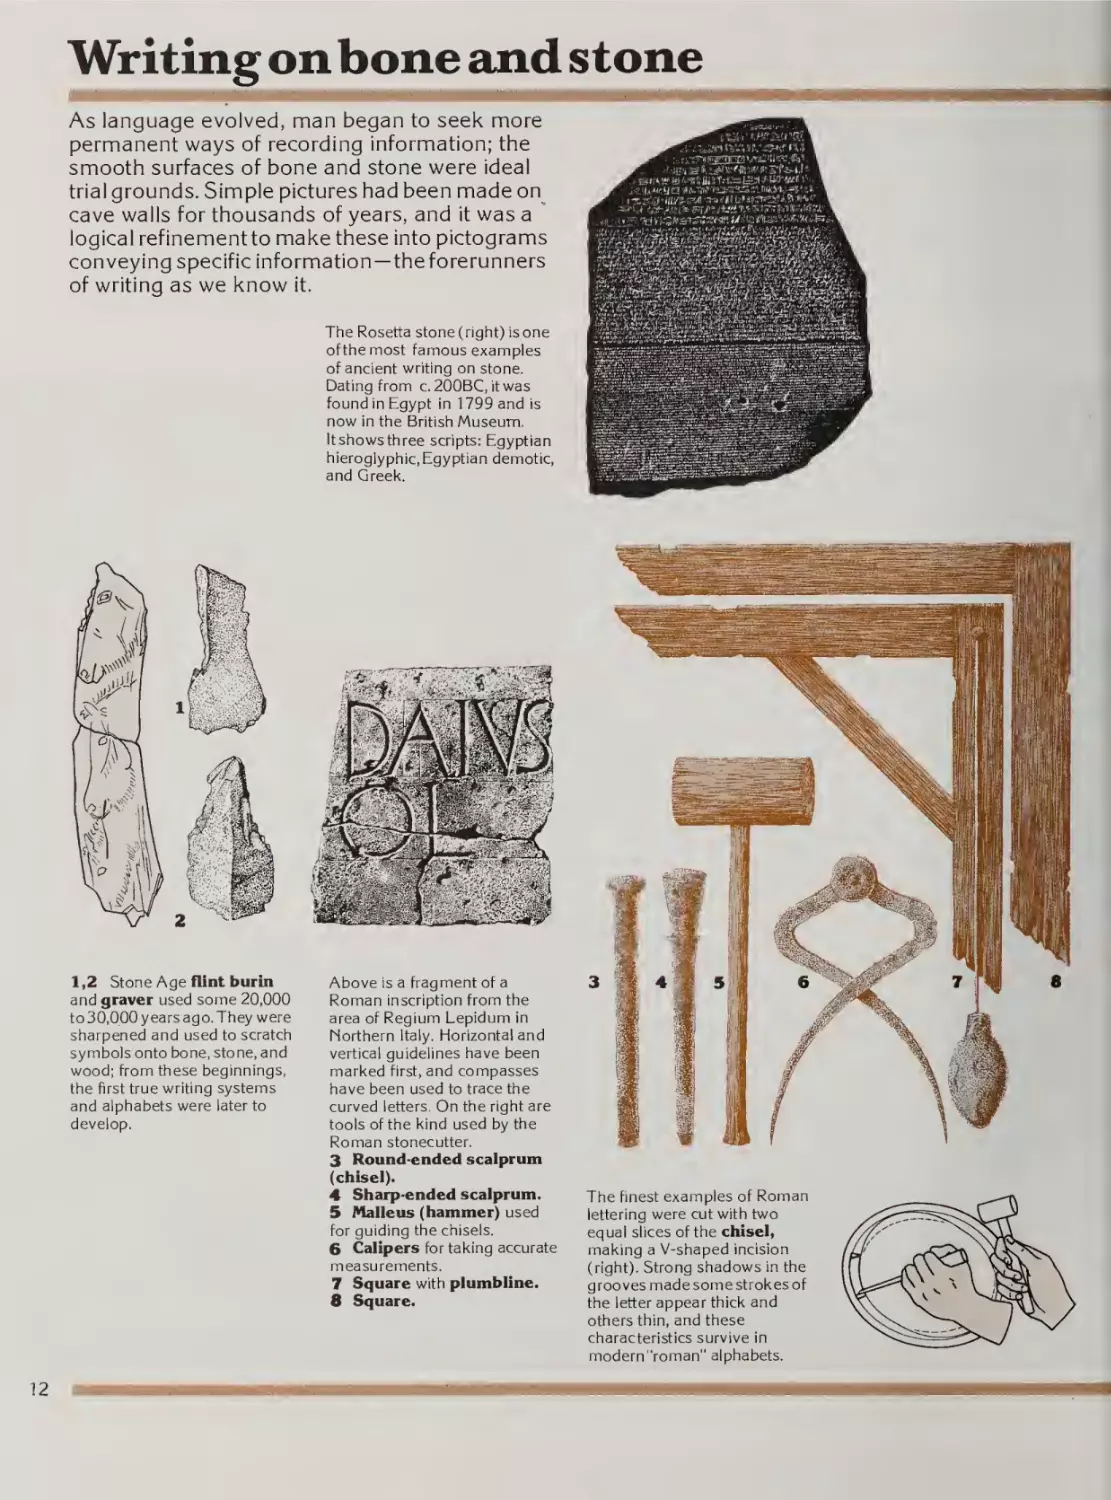
As language evolved, man began to seek more
permanent ways of recording information; the
smooth surfaces of bone and stone were ideal
trial grounds. Simple pictures had been made on
cave walls for thousands of years, and it was a
logical refinementto make these into pictograms
conveying specific information—the forerunners
of writing as we know it.
The Rosetta stone (right) is one
ofthemost famous examples
of ancient writing on stone.
Dating from c. 200BC, it was
found in Egypt in 1799 and is
now in the British Museum.
It shows three scripts: Egyptian
hieroglyphic, Egyptian demotic,
and Greek.
1,2 Stone Age flint burin
and graver used some 20,000
to 30,000 years ago. They were
sharpened and used to scratch
symbols onto bone, stone, and
wood; from these beginnings,
the first true writing systems
and alphabets were later to
develop.
12
Above is a fragment of a
Roman inscription from the
area of Regium Lepidum in
Northern Italy. Horizontal and
vertical guidelines have been
marked first, and compasses
have been used to trace the
curved letters. On the right are
tools of the kind used by the
Roman stonecutter.
3 Round-ended scalprum
(chisel).
4 Sharp-ended scalprum.
5 Malleus (hammer) used
for guiding the chisels.
6 Calipers for taking accurate
measurements.
7 Square with plumhiine.
8 Square.
The finest examples of Roman
lettering were cut with two
equal slices of the chisel,
making a V-shaped incision
(right). Strong shadows in the
grooves made some strokes of
the letter appear thick and
others thin, and these
characteristics survive in
modern'koman” alphabets.
Writing on clay and wax
Writing and drawing tools
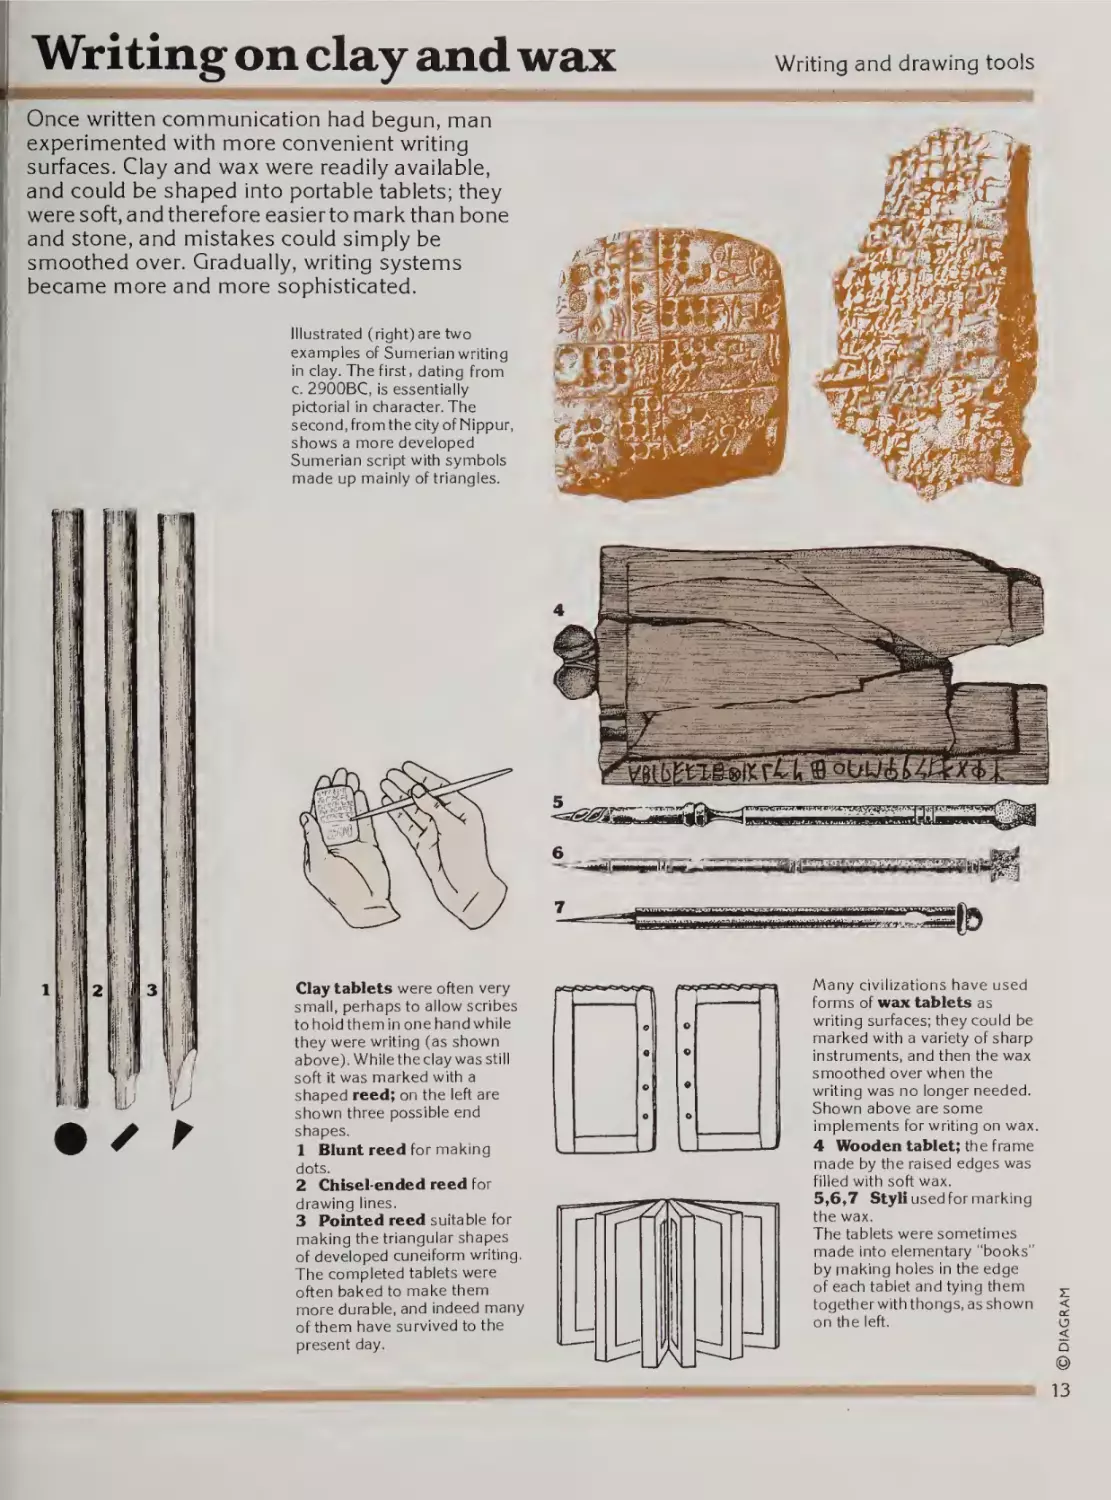
Once written communication had begun, man
experimented with more convenient writing
surfaces. Clay and wax were readily available,
and could be shaped into portable tablets; they
were soft, and therefore easierto mark than bone
and stone, and mistakes could simply be
smoothed over. Gradually, writing systems
became more and more sophisticated.
Illustrated (right) are two
examples of Sumerian writing
in clay. The first, dating from
c. 2900BC, is essentially
pictorial in character. The
second, fromthecity of Nippur,
shows a more developed
Sumerian script with symbols
made up mainly of triangles.
1!
[i
1
;I
1
Ik'
il
1
! i
I 1
i
;1
ii
i
i
1
i
i'i
f
f
\1
'i
!|l
’
11
[
Ill
t
' !.^
ll
;j
2
1
3
Ii
ii
1
I
1
il
Clay tablets were often very
small, perhaps to allow scribes
tohoidthem in one hand while
they were writing (as shown
above). While the clay was still
soft it was marked with a
shaped reed; on the left are
shown three possible end
shapes.
1 Blunt reed for making
dots.
2 Chisel-ended reed for
drawing lines.
3 Pointed reed suitable for
making the triangular shapes
of developed cuneiform writing.
The completed tablets were
often baked to make them
more durable, and indeed many
of them have survived to the
present day.
Many civilizations have used
forms of wax tablets as
writing surfaces; they could be
marked with a variety of sharp
instruments, and then the wax
smoothed over when the
writing was no longer needed.
Shown above are some
implements for writing on wax.
4 Wooden tablet; the frame
made by the raised edges was
filled with soft wax.
5,6,7 Styli used for marking
the wax.
The tablets were sometimes
made into elementary "books"
by making holes in the edge
of each tablet and tying them
together with thongs, as shown
on the left.
DIAGRAM
1
@
mmm
13
Development of the pen 1
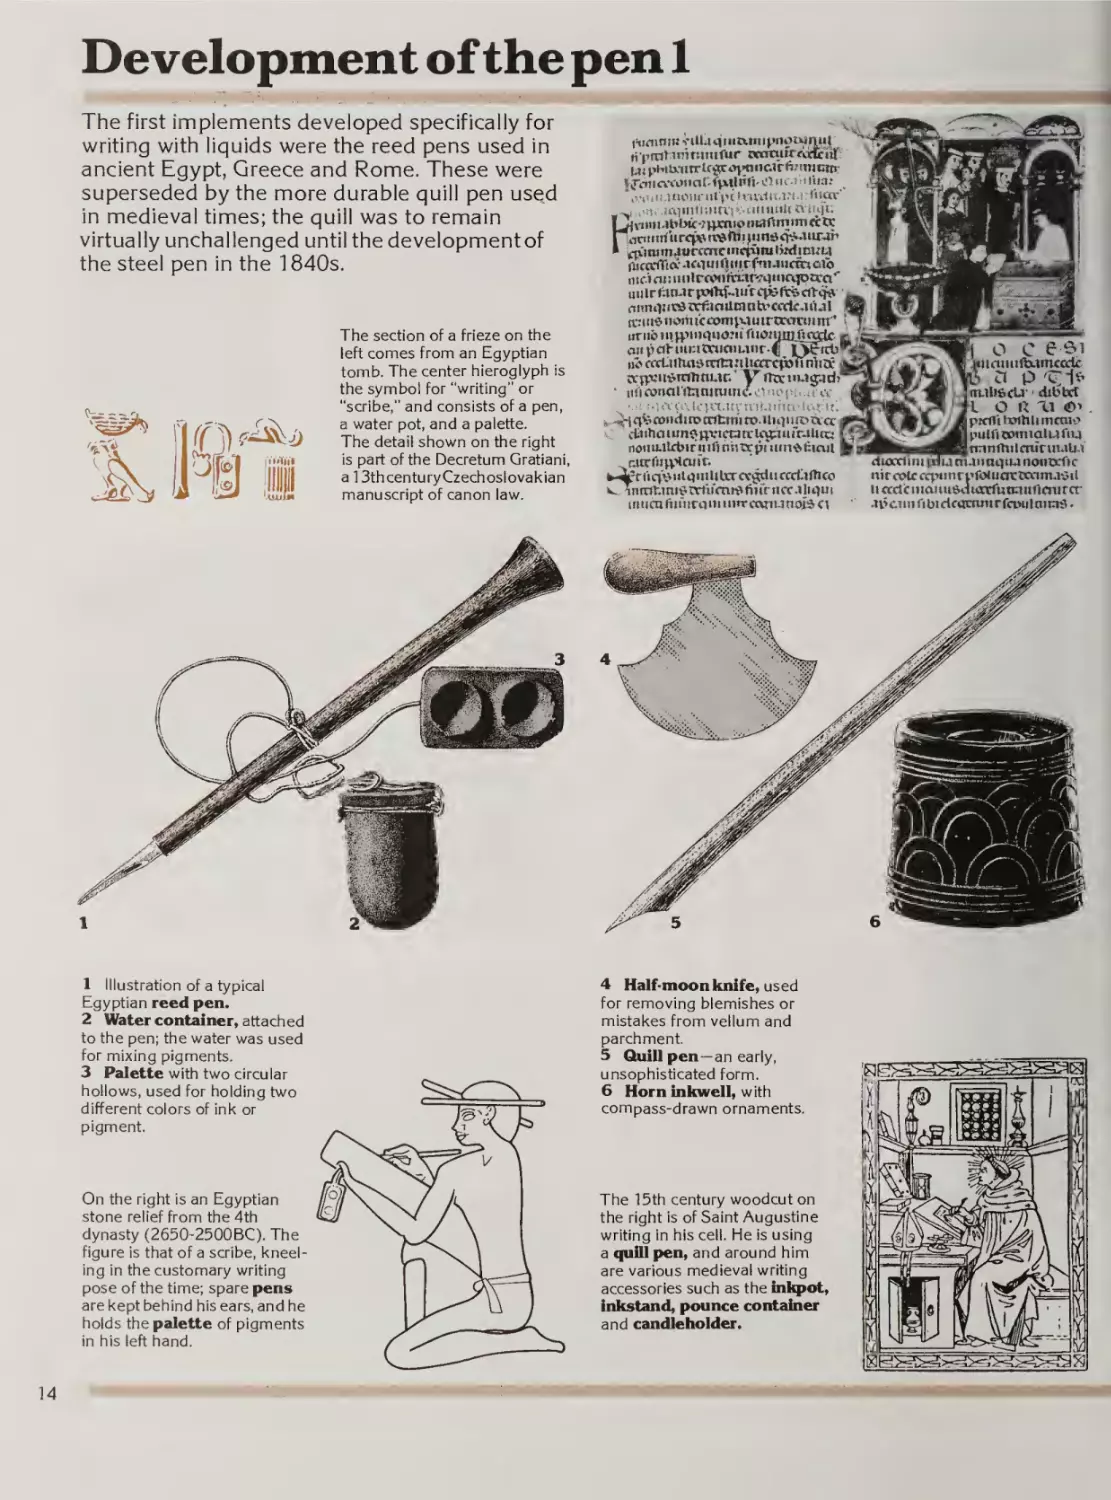
The first implements developed specifically for
writing with liquids were the reed pens used in
ancient Egypt, Greece and Rome. These were
superseded by the more durable quill pen used
in medieval times; the quill was to remain
virtually unchallenged until the development of
the steel pen in the 1840s.
The section of a frieze on the
left comes from an Egyptian
tomb. The center hieroglyph is
the symbol for "writing” or
“scribe,” and consists of a pen,
a water pot, and a palette.
The detail shown on the right
is part of the Decretum Gratiani,
a 13thcenturyCzechoslovakian
manuscript of canon law.
iHiftinliJ'inlliiciiiiUJnipnolymiT
(i'pintiihniinftir otatxiiTfcrfctu
Wj phiMitrtgjcovHiii&irftntiromi.'iiiii.ttuMiciilptHiittit.i.'tnriiar'
•.icq in li mu'i». ■ a 11 imh tf'i 1 hc
ublJ«c-7Bm --^'iniitMurcnici.--iDrtidTiiv(nrfinJuctR alb
iitf.ictr.uiilr(vnfti:ir?qiiic^cca*'
u II ir
r rwtaJCj u'r qfe ftb
citmi}ritdtxificittmnh’ccdc..iii4l
a-:men<wii'cconip4mrnKmnin'’ \
uriib i«H.niiiiM«3Jiiruojinijji5iKlc
oiipcrt-iiiKiWuciiutir-f oSlrt)
ub crci-uluidttititjUarci^nnfnK,
aivcu^Krtmi-ir.' V ntcin4g?id>
■ iii'iccmcil'ilnniniinc.iit!H'piiii! «■
C
cliiihciiun^{;vi(t3n:l^urr4ltcc:
iioiiu.jlct>irnit)nhixptuin«£tcut
rJtrfuH.’lfKiC'*
h-A'f tiqvuiguililrrcv^u coctjllico
Tntatitui5txiuVni9(iifrncc.Uii>ui
1 ti ucn ft I h I rq im inr csMiu nois Cl
1 Illustration of a typical
Egyptian reed pen,
2 Water container, attached
to the pen; the water was used
for mixing pigments.
3 Palette with two circular
hollows, used for holding two
different colors of ink or
pigment.
4 Half-moon knife, used
On the right is an Egyptian
stone relief from the 4th
dynasty (2650-2500BC). The
figure is that of a scribe, kneel¬
ing in the customary writing
pose of the time; spare pens
are kept behind his ears, and he
holds the palette of pigments
in his left hand.
The 15th century woodcut on
the right is of Saint Augustine
writing in his cell. He is using
a quill pen, and around him
are various medieval writing
accessories such as the iniqiot.
for removing blemishes or
mistakes from vellum and
parchment.
5 Quill pen—an early,
unsophisticated form.
6 Horn Inkwell, with
compass-drawn ornaments.
Inkstand, pounce container
and candleholder.
o c ee-1
qittaniifUtmccdc
a p
!m.iUficU’' dibtct
k O R
1i
IpKfli txwhlimcaic
I pulft onn lat u fiu
^
Pti.-inftxilcTunmU-i
dioccltni priu m4iinc|iuno»txrtc
itircou cq«i>iri’fotu0Clixim.isU
liccdcinaiui&duwfunanftcnircr
wcnnfibiacucmiirfcwilnicia.
Writing and drawing tools
i
']
‘
i
i
;
!
1
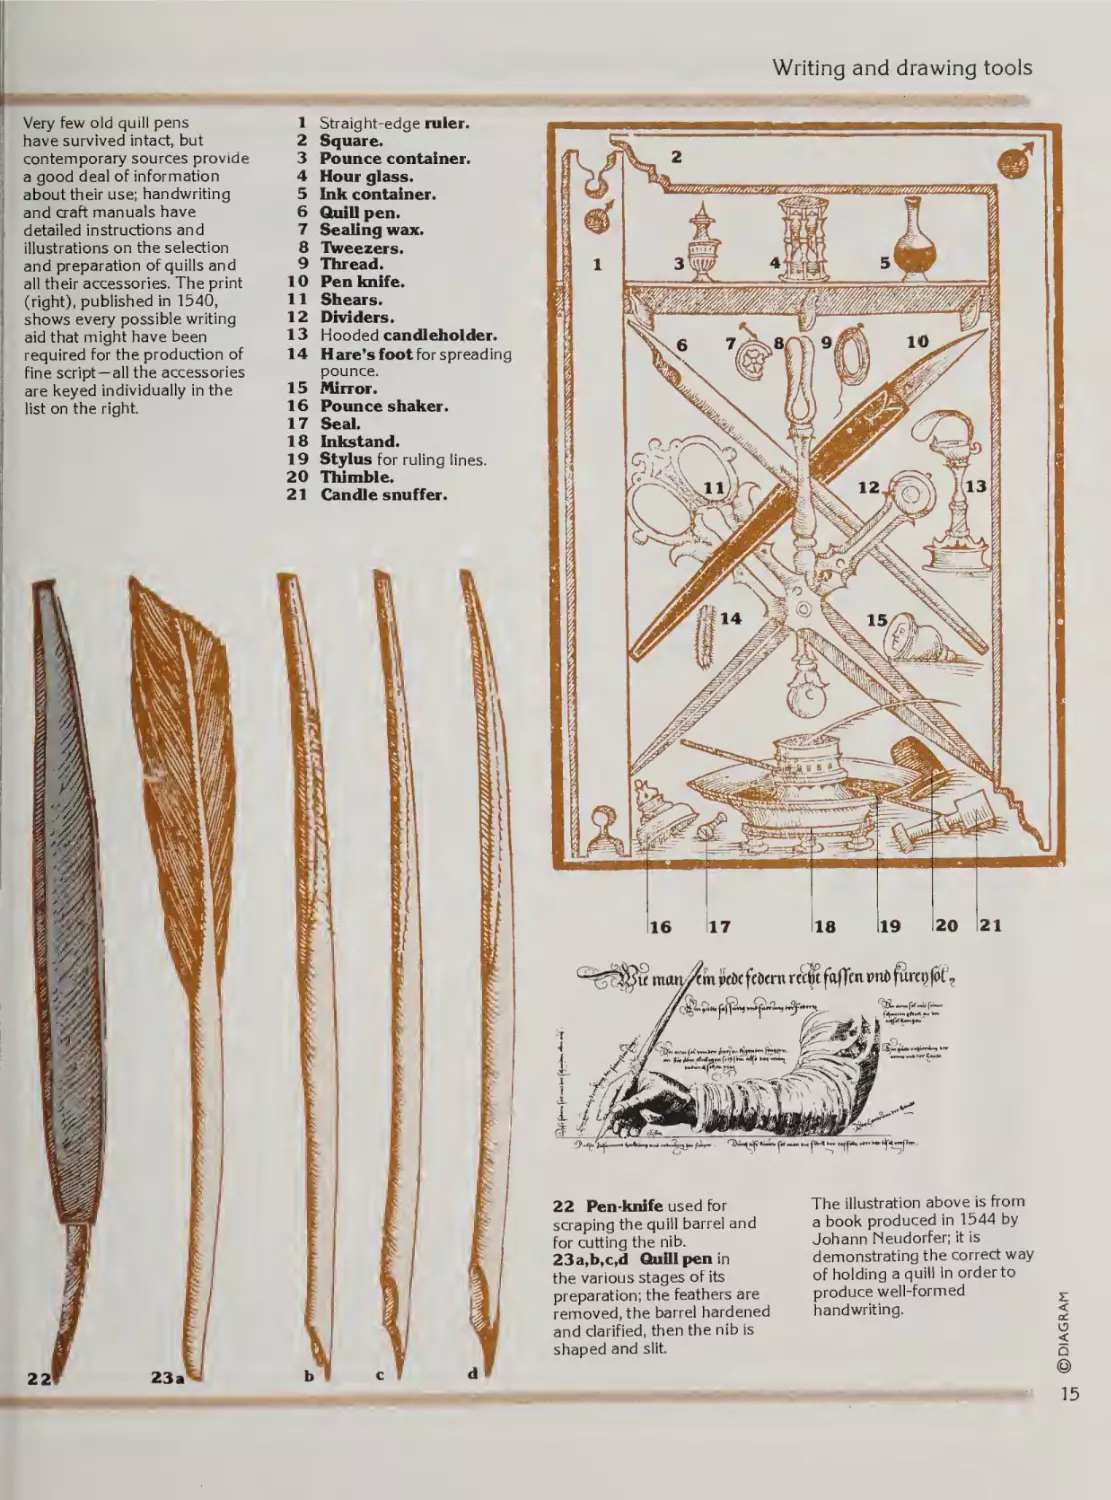
Very few old quill pens
have survived intact, but
contemporary sources provide
a good deal of information
about their use; handwriting
and craft manuals have
detailed instructions and
illustrations on the selection
and preparation of quills and
all their accessories. The print
(right), published in 1540,
shows every possible writing
aid that might have been
required for the production of
fine script—all the accessories
are keyed individually in the
list on the right.
1
2
3
4
5
6
7
8
9
10
11
12
13
14
Straight-edge ruler.
15
16
17
18
19
20
21
Mirror.
Pounce shaker.
Seal.
Inkstand.
Stylus for ruling lines.
Thimble.
Candle snuffer.
Square.
Pounce container.
Hour glass.
Ink container.
Quill pen.
Sealing wax.
IWeezers.
Thread.
Pen knife.
Shears.
Dividers.
Hooded candleholder.
Hare’s foot for spreading
pounce.
22 Pen-knife used for
scraping the quill barrel and
for cutting the nib.
23a,b,c,d Quill pen in
the various stages of its
preparation; the feathers are
removed, the barrel hardened
and clarified, then the nib is
shaped and slit.
The illustration above is from
a book produced in 1544 by
Johann Neudorfer; it is
demonstrating the correct way
of holding a quill in order to
produce well-formed
handwriting.
©DIAGRAM
i;
i;|
15
Development of the pen 2
r "
~
.....
- ■ ' '■ ' ■ ■
Quill pens required tedious preparation, but their
flexibility and adaptability were hard to match.
Many years of experimentation took place before
the steel pen was marketed in the 1820s, but once
the breakthrough had been made ways were
soon found of improving the flexibility of the
nib and of lowering the cost through mass
production.
• —
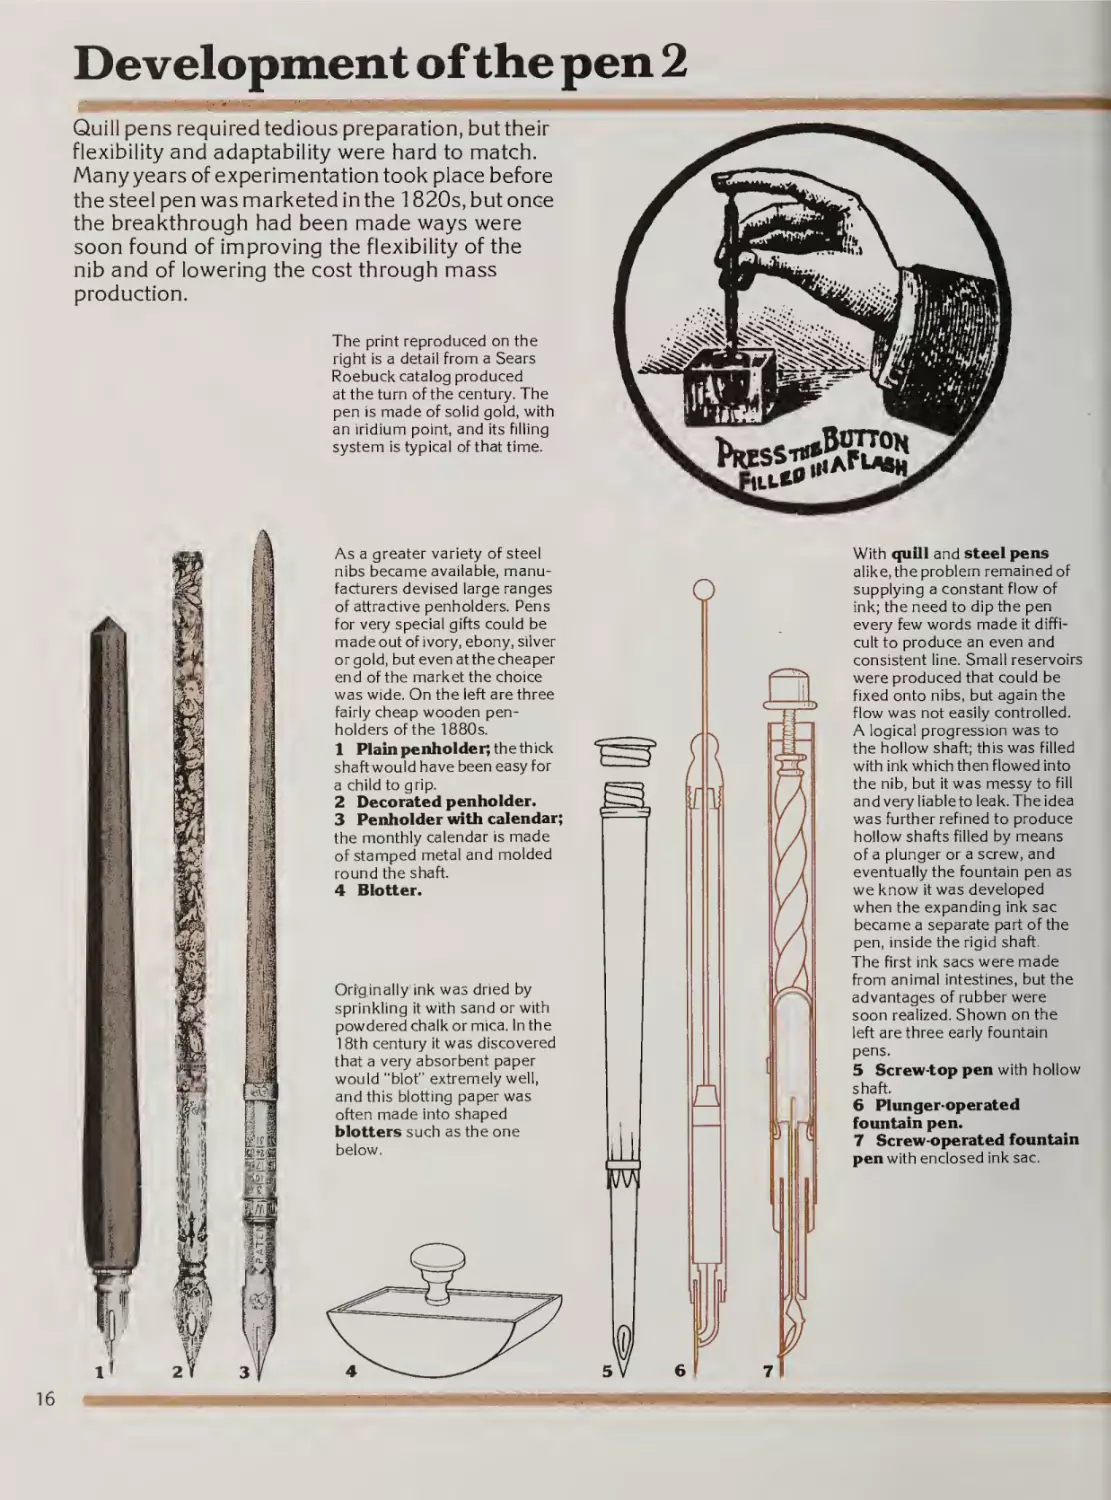
The print reproduced on the
right is a detail from a Sears
Roebuck catalog produced
at the turn of the century. The
pen is made of solid gold, with
an iridium point, and its filling
system is typical of that time.
As a greater variety of steel
nibs became available, manu¬
facturers devised large ranges
of attractive penholders. Pens
for very special gifts could be
made out of ivory, ebony, silver
or gold, but even at the cheaper
end of the market the choice
was wide. On the left are three
fairly cheap wooden pen¬
holders of the 1880s.
1 Plainpenholder;thethick
shaft would have been easy for
a child to grip.
2 Decorated penholder.
3 Penholder with calendar;
the monthly calendar is made
of stamped metal and molded
round the shaft.
4 Blotter.
Originally ink was dried by
sprinkling it with sand or with
powdered chalk or mica. In the
18th century it was discovered
that a very absorbent paper
would "blot” extremely well,
and this blotting paper was
often made into shaped
blotters such as the one
below.
16
•i-; > wsfi'i'.M yrrgit.i
With qufll and steel pens
alike, the problem remained of
supplying a constant flow of
ink; the need to dip the pen
every few words made it diffi¬
cult to produce an even and
consistent line. Small reservoirs
were produced that could be
fixed onto nibs, but again the
flow was not easily controlled.
A logical progression was to
the hollow shaft; this was filled
with ink which then flowed into
the nib, but it was messy to fill
and very liable to leak. The idea
was further refined to produce
hollow shafts filled by means
of a plunger or a screw, and
eventually the fountain pen as
we know it was developed
when the expanding ink sac
became a separate part of the
pen, inside the rigid shaft.
The first ink sacs were made
from animal intestines, but the
advantages of rubber were
soon realized. Shown on the
left are three early fountain
pens.
5 Screw-top pen with hollow
shaft.
6 Plunger-operated
fountain pen.
7 Screw-operated fountain
pen with enclosed ink sac.
Modern Western calligraphy
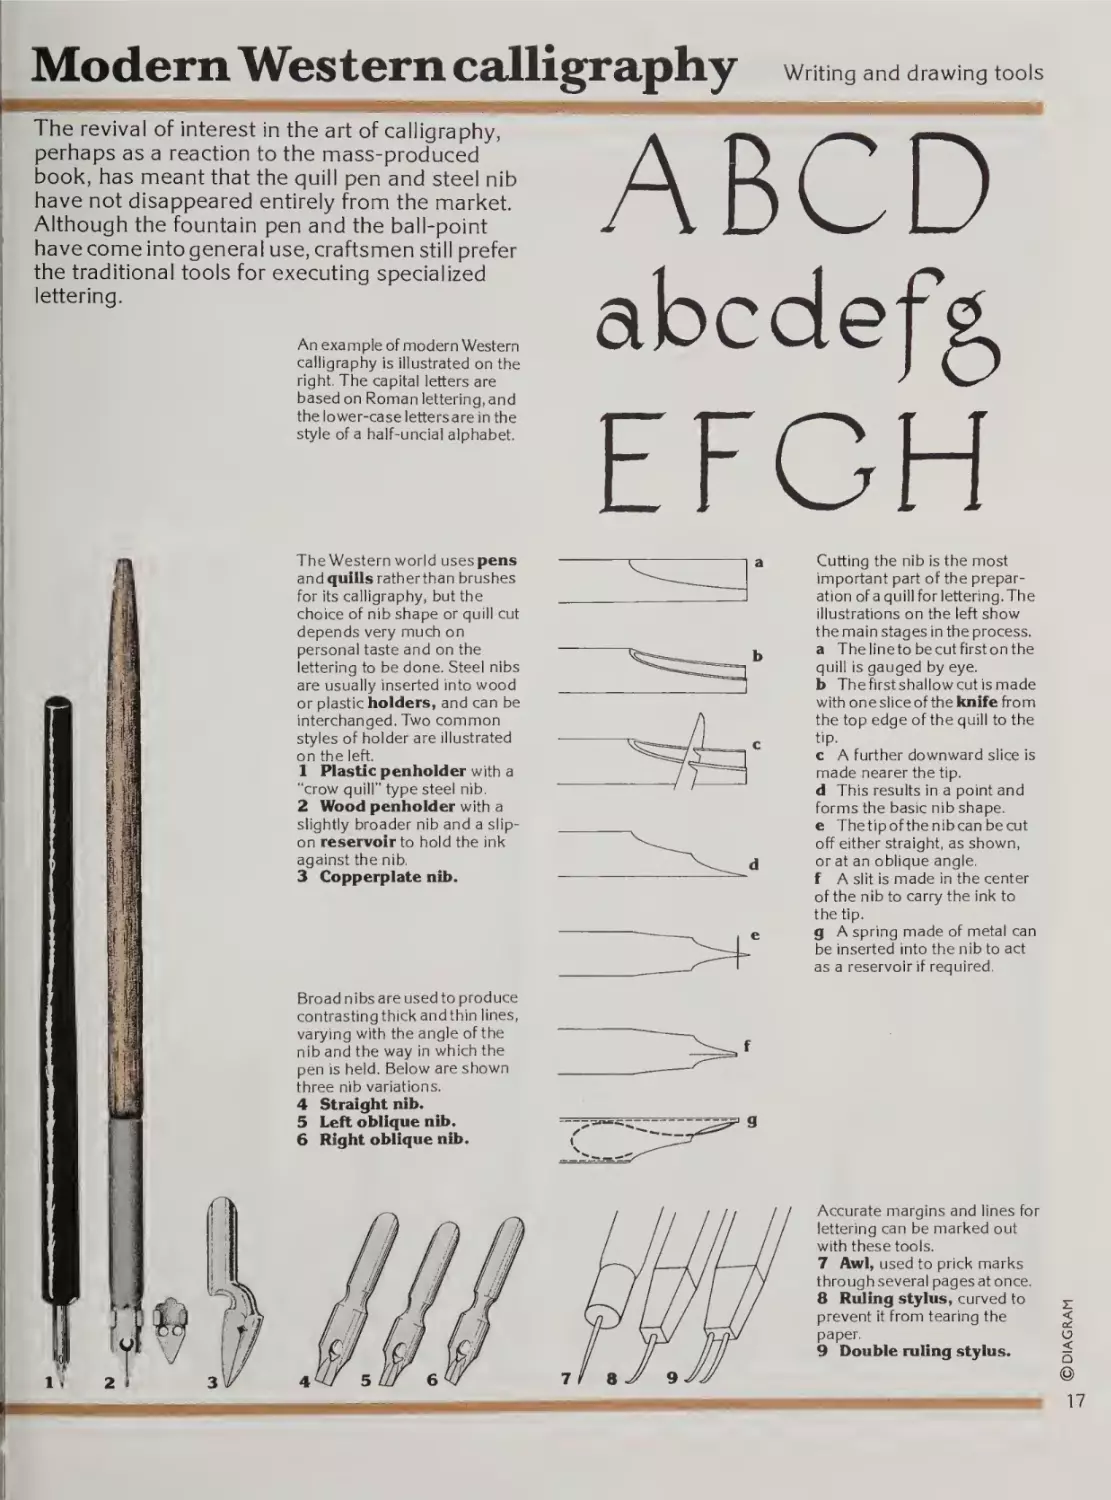
The revival of interest in the art of calligraphy,
perhaps as a reaction to the mass-produced
book, has meant that the quill pen and steel nib
have not disappeared entirely from the market.
Although the fountain pen and the bail-point
have come into general use, craftsmen still prefer
the traditional tools for executing specialized
lettering.
An example of modern Western
calligraphy is illustrated on the
right. The capital letters are
based on Roman lettering, and
the lower-case letters are in the
style of a half-uncial alphabet.
I
The Western world uses pens
and quills ratherthan brushes
for its calligraphy, but the
choice of nib shape or quill cut
depends very much on
personal taste and on the
lettering to be done. Steel nibs
are usually inserted into wood
or plastic holders, and can be
interchanged. Two common
styles of holder are illustrated
on the left.
1 Plastic penholder with a
"crow quill" type steel nib.
2 Wood penholder with a
slightly broader nib and a slipon reservoir to hold the ink
against the nib.
3 Copperplate nib.
Writing and drawing tools
ABCD
abcdef^
EFGH
c
Cutting the nib is the most
important part of the prepar¬
ation of a quill for lettering. The
illustrations on the left show
the main stages in the process,
a The line to be cut first on the
quill is gauged by eye.
b The first shallow cut is made
w ith on e si ice of th e knife fro m
the top edge of the quill to the
tip.
c A further downward slice is
made nearer the tip.
d This results in a point and
forms the basic nib shape,
e Thetipofthenibcan becut
off either straight, as shown,
or at an oblique angle,
f A slit is made in the center
of the nib to carry the ink to
the tip.
g A spring made of metal can
be inserted into the nib to act
as a reservoir if required.
Broad nibs are used to produce
contrastingthickandthin lines,
varying with the angle of the
nib and the way in which the
pen is held. Below are shown
three nib variations.
Accurate margins and lines for
lettering can be marked out
with these tools.
7 Awl, used to prick marks
through several pages at once.
8 Ruling stylus, curved to
prevent it from tearing the
paper.
9 Double ruling stylus.
DIAGRAM
4 Straight nib.
5 Left oblique nib.
6 Right oblique nib.
@
17
Modern pens
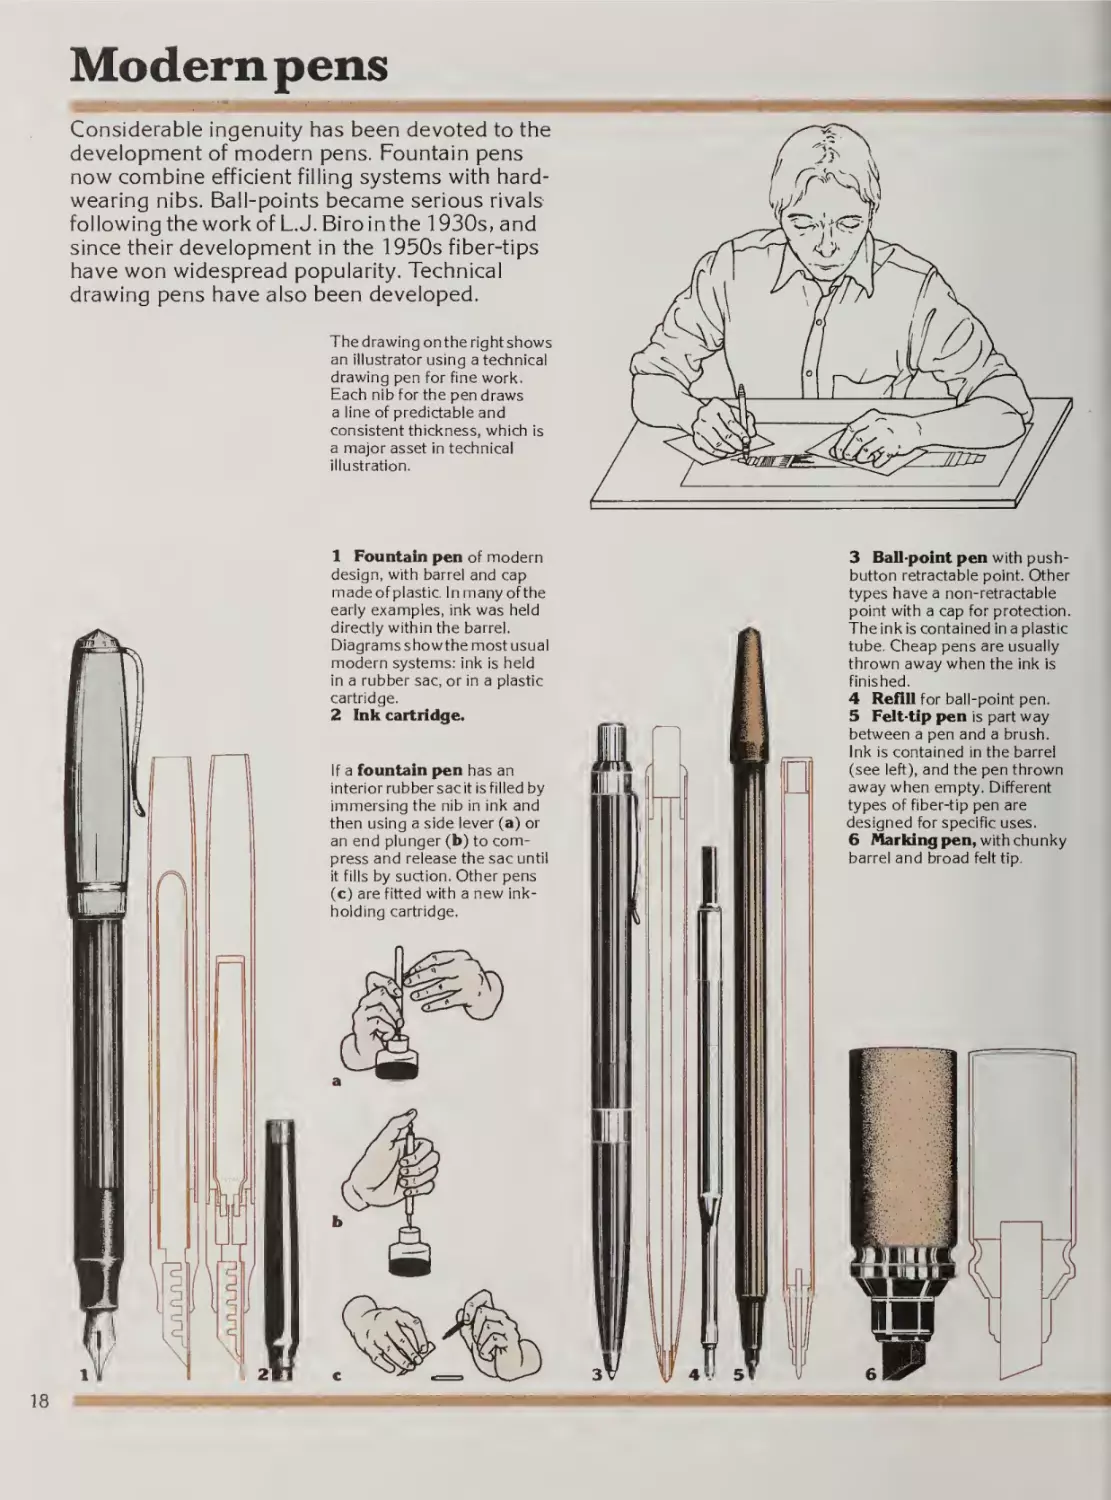
Considerable ingenuity has been devoted to the
development of modern pens. Fountain pens
now combine efficient filling systems with hardwearing nibs. Bail-points became serious rivals
following the work of L. J. Biro in the 1930s, and
since their development in the 1950s fiber-tips
have won widespread popularity. Technical
drawing pens have also been developed.
The drawing on the right shows
an illustrator using a technical
drawing pen for fine work.
Each nib for the pen draws
a line of predictable and
consistent thickness, which is
a major asset in technical
illustration.
1 Fountain pen of modern
design, with barrel and cap
made of plastic. In many ofthe
early examples, ink was held
directly within the barrel.
Diagrams show the most usual
modern systems: ink is held
in a rubber sac, or in a plastic
cartridge.
2 Ink cartridge.
If a fountain pen has an
interior rubber sac it is filled by
immersing the nib in ink and
then using a side lever (a) or
an end plunger (b) to com¬
press and release the sac until
it fills by suction. Other pens
(c) are fitted with a new ink¬
holding cartridge.
types have a non-retractable
point with a cap for protection.
The ink is contained in a plastic
tube. Cheap pens are usually
thrown away when the ink is
finished.
4 Refill for ball-point pen.
5 Felt-tip pen is part way
between a pen and a brush.
Ink is contained in the barrel
(see left), and the pen thrown
away when empty. Different
types of fiber-tip pen are
designed for specific uses.
6 Marking pen, with chunky
barrel and broad felt tip.
Writing and drawing tools
I
i
i'l
ill
'
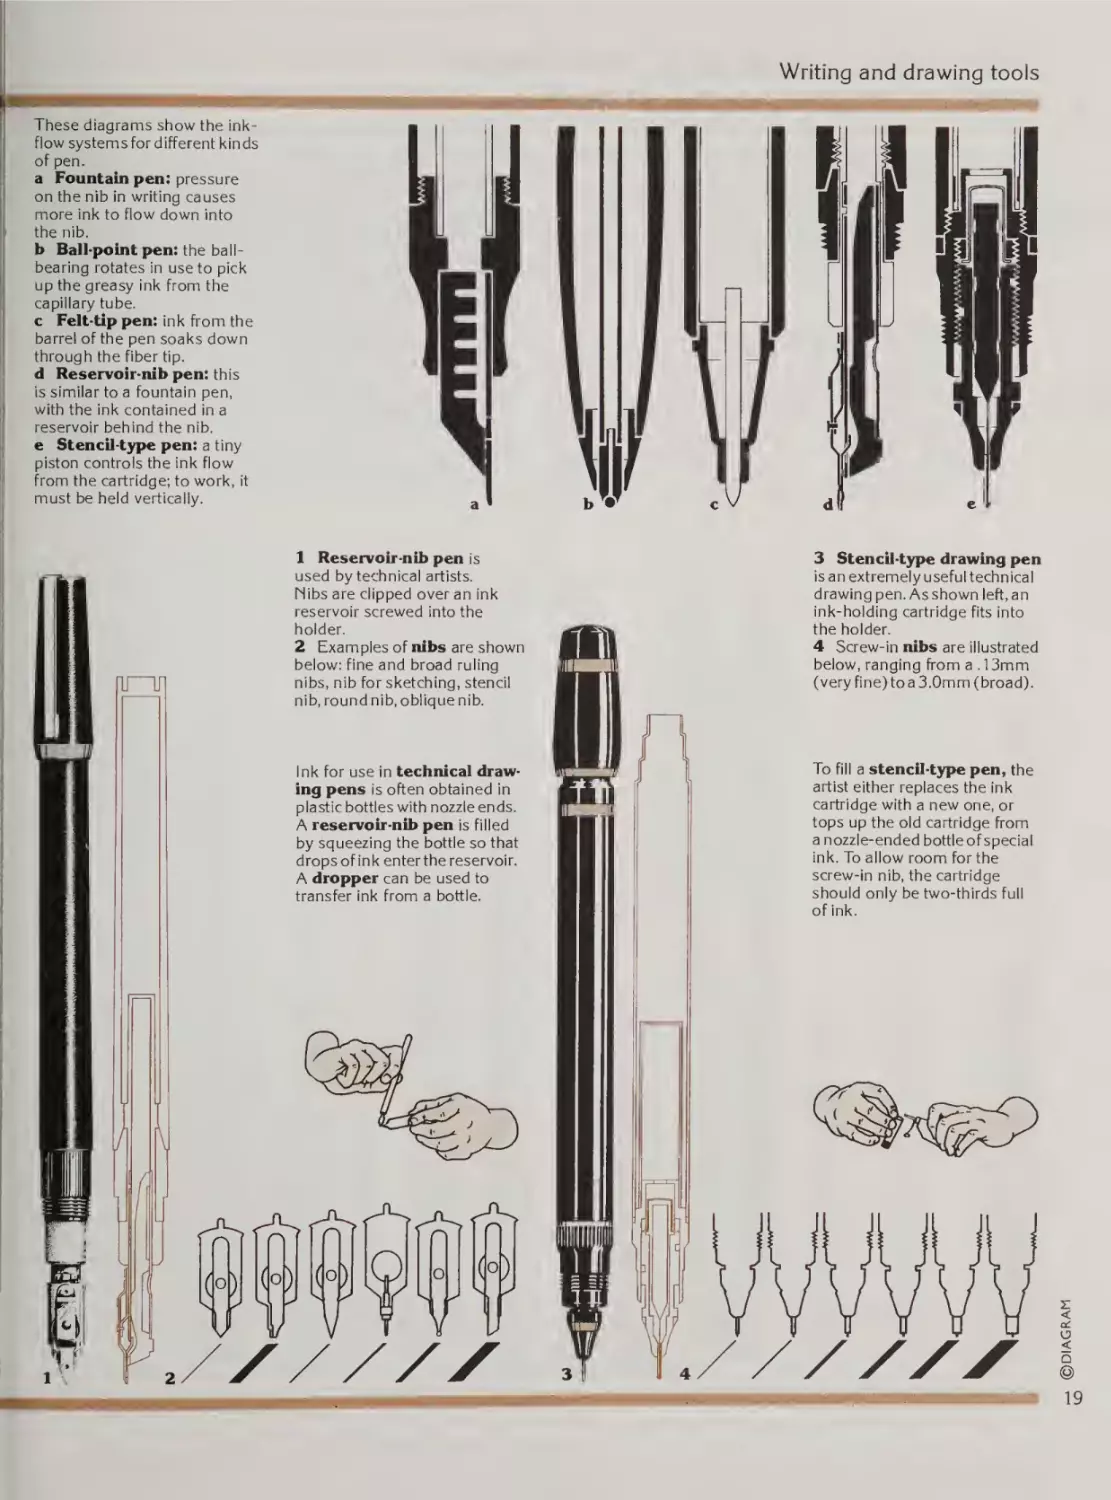
These diagrams show the inkflow systems for different kinds
of pen.
a Fountain pen: pressure
on the nib in writing causes
more ink to flow down into
the nib.
b Ball-point pen: the ball¬
bearing rotates in use to pick
up the greasy ink from the
capillary tube.
c Felt-tip pen: ink from the
barrel of the pen soaks down
through the fiber tip.
d Reservoir-nib pen: this
is similar to a fountain pen,
with the ink contained in a
reservoir behind the nib.
e Stencil-type pen: a tiny
piston controls the ink flow
from the cartridge; to work, it
must be held vertically.
1 Reservoir-nib pen is
used by technical artists.
Mibs are clipped over an ink
reservoir screwed into the
holder.
2 Examples of nibs are shown
below: fine and broad ruling
nibs, nib for sketching, stencil
nib, round nib, oblique nib.
ink for use in technical draw¬
ing pens is often obtained in
plastic bottles with nozzle ends.
A reservoir-nib pen is filled
by squeezing the bottle so that
drops of in k enter the reservoir.
A dropper can be used to
transfer ink from a bottle.
3 Stencil-type drawing pen
is an extremely useful technical
drawing pen. As shown left, an
ink-holding cartridge fits into
the holder.
4 Screw-in nibs are illustrated
below, ranging from a .13mm
(very fine) to a 3.0mm (broad).
To fill a stencil-type pen, the
artist either replaces the ink
cartridge with a new one, or
tops up the old cartridge from
a nozzle-ended bottle of special
ink. To allow room for the
screw-in nib, the cartridge
should only be two-thirds full
of ink.
DIAGRAM
I
rv-trwir-tffiiniTi’BilWi *
w--
19
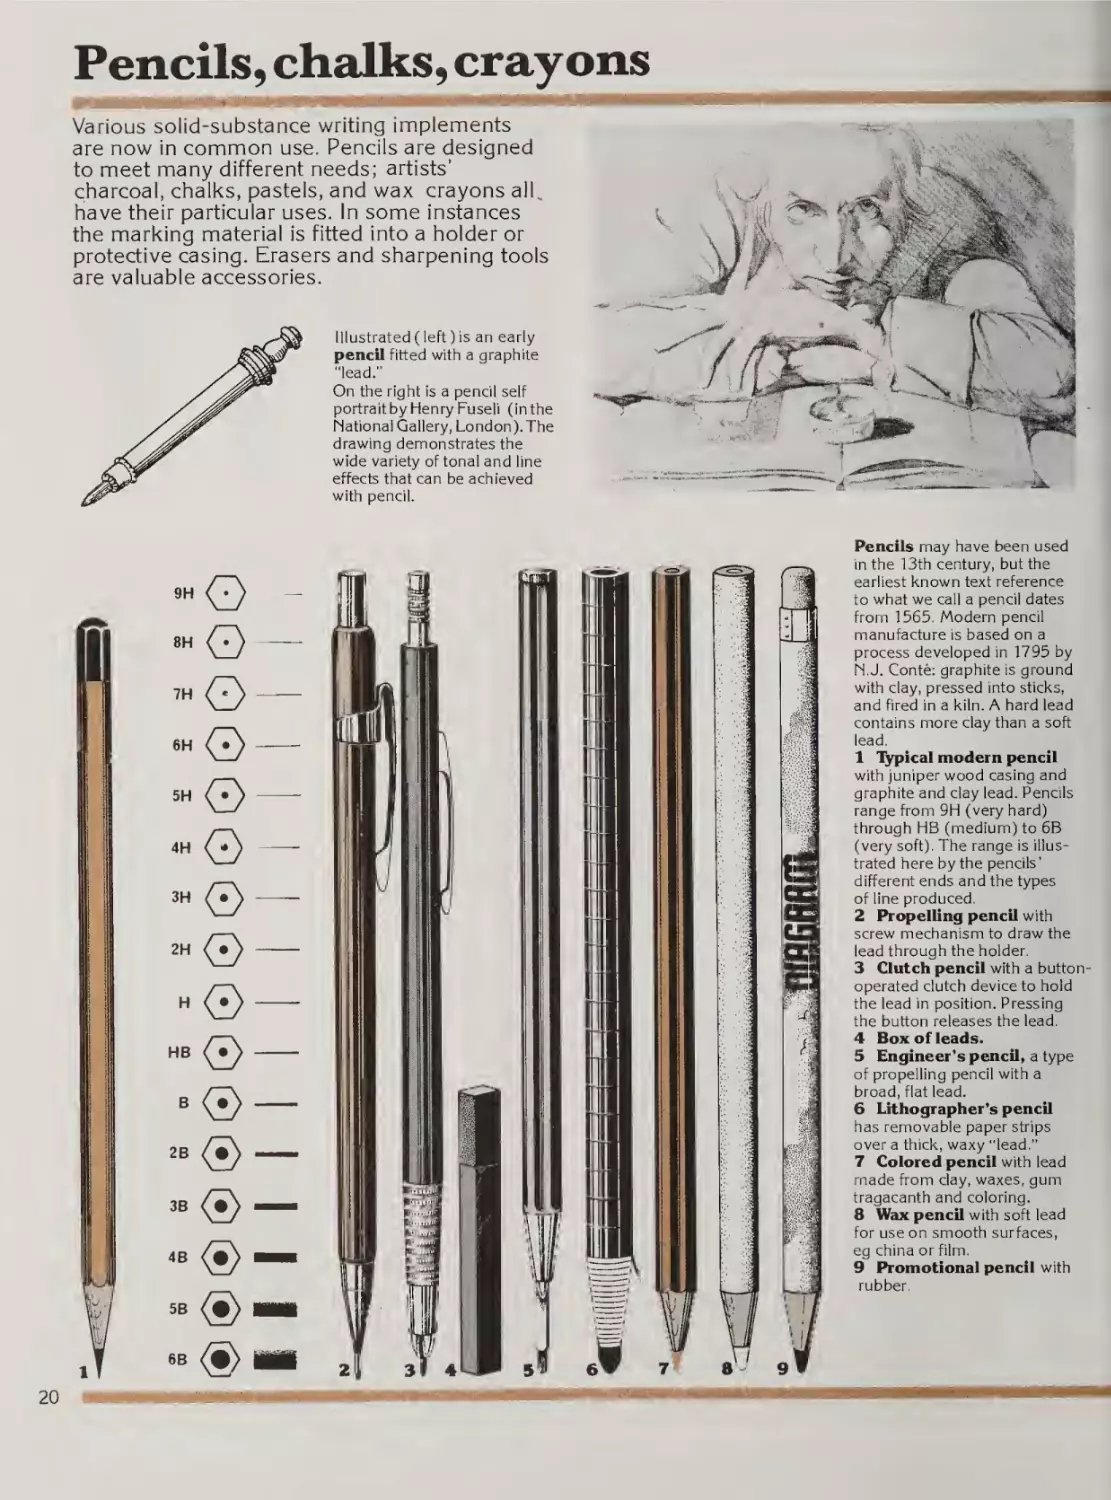
Pencils, chalks, crayons
Various solid-substance writing implements
are now in common use. Pencils are designed
to meet many different needs; artists’
charcoal, chalks, pastels, and wax crayons all,
have their particular uses. In some instances
the marking material is fitted into a holder or
protective casing. Erasers and sharpening tools
are valuable accessories.
Illustrated (left) is an early
pencil fitted with a graphite
“lead.”
On the right is a pencil self
portrait by Henry Fuseli (inthe
Hational Gallery, London). The
drawing demonstrates the
wide variety of tonal and line
effects that can be achieved
with pencil.
Pencils may have been used
in the 13th century, but the
earliest known text reference
to what we call a pencil dates
from 1565. Modern pencil
manufacture is based on a
process developed in 1795 by
N.J. Conte: graphite is ground
with clay, pressed into sticks,
and fired in a kiln. A hard lead
contains more clay than a soft
lead.
1 Typical modern pencil
with juniper wood casing and
graphite and clay lead. Pencils
range from 9H (very hard)
through HB (medium) to 6B
(very soft). The range is illus¬
trated here by the pencils’
different ends and the types
of line produced.
2 Propelling pencil with
screw mechanism to draw the
lead through the holder.
3 Clutch pencil with a button
operated clutch device to hold
the lead in position. Pressing
the button releases the lead.
4 Box of leads.
5 Engineer’s pencO, a type
of propelling pencil with a
broad, flat lead.
6 Lithographer’s pencil
has removable paper strips
over a thick, waxy "lead.”
7 Colored pencil with lead
made from clay, waxes, gum
tragacanth and coloring.
8 Wax pencil with soft lead
for use on smooth surfaces,
eg china or fiim.
9 Promotional pencil with
rubber.
t
Writing and drawing tools
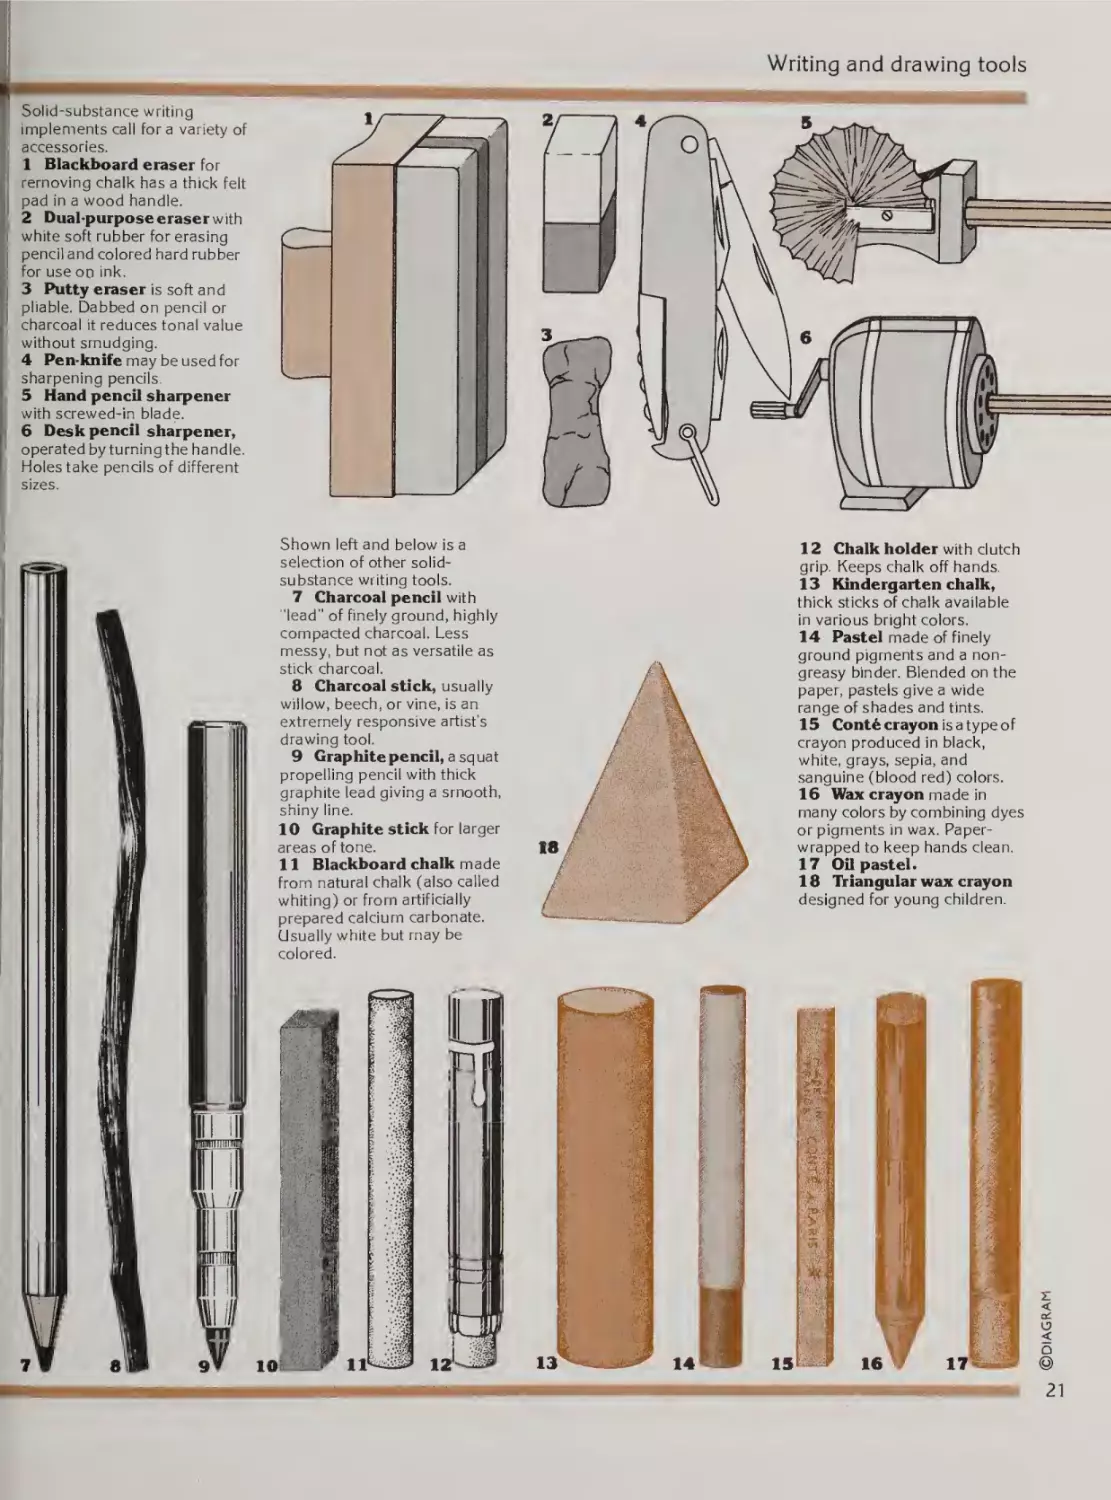
Solid-substance writing
implements call for a variety of
accessories.
1 Blackboard eraser for
removing chalk has a thick felt
pad in a wood handle.
2 Dual-purpose eraser with
white soft rubber for erasing
pencil and colored hard rubber
for use 00 ink.
3 Putty eraser is soft and
pliable. Dabbed on pencil or
charcoal it reduces tonal value
without smudging.
4 Pen-knife may be used for
sharpening pencils.
5 Hand pencil sharpener
with screwed-in blade.
6 Desk pencil sharpener,
operated byturningthe handle.
Holes take pencils of different
sizes.
13 Kindergarten chalk,
thick sticks of chalk available
in various bright colors.
14 Pastel made of finely
ground pigments and a nongreasy binder. Blended on the
paper, pastels give a wide
range of shades and tints.
15 Cont& crayon is a type of
crayon produced in black,
white, grays, sepia, and
sanguine (blood red) colors,
16 Wax crayon made in
many colors by combining dyes
or pigments in wax. Paperwrapped to keep hands clean.
17 Oil pastel.
18 Driangular wax crayon
designed for young children.
'DIAGRAM
Shown left and below is a
selection of other solidsubstance writing tools.
7 Charcoal pencil with
■'lead” of finely ground, highly
compacted charcoal. Less
messy, but not as versatile as
stick charcoal.
8 Charcoal stick, usually
willow, beech, or vine, is an
extremely responsive artist’s
drawing tool.
9 Graphite pencii, a sq uat
propelling pencil with thick
graphite lead giving a smooth,
shiny line.
10 Graphite stick for larger
areas of tone.
11 Blackboard chalk made
from natural chalk (also called
whiting) or from artificially
prepared calcium carbonate.
Usually white but may be
colored.
laa
R
null: I
liKMam,:y.
iMWlia
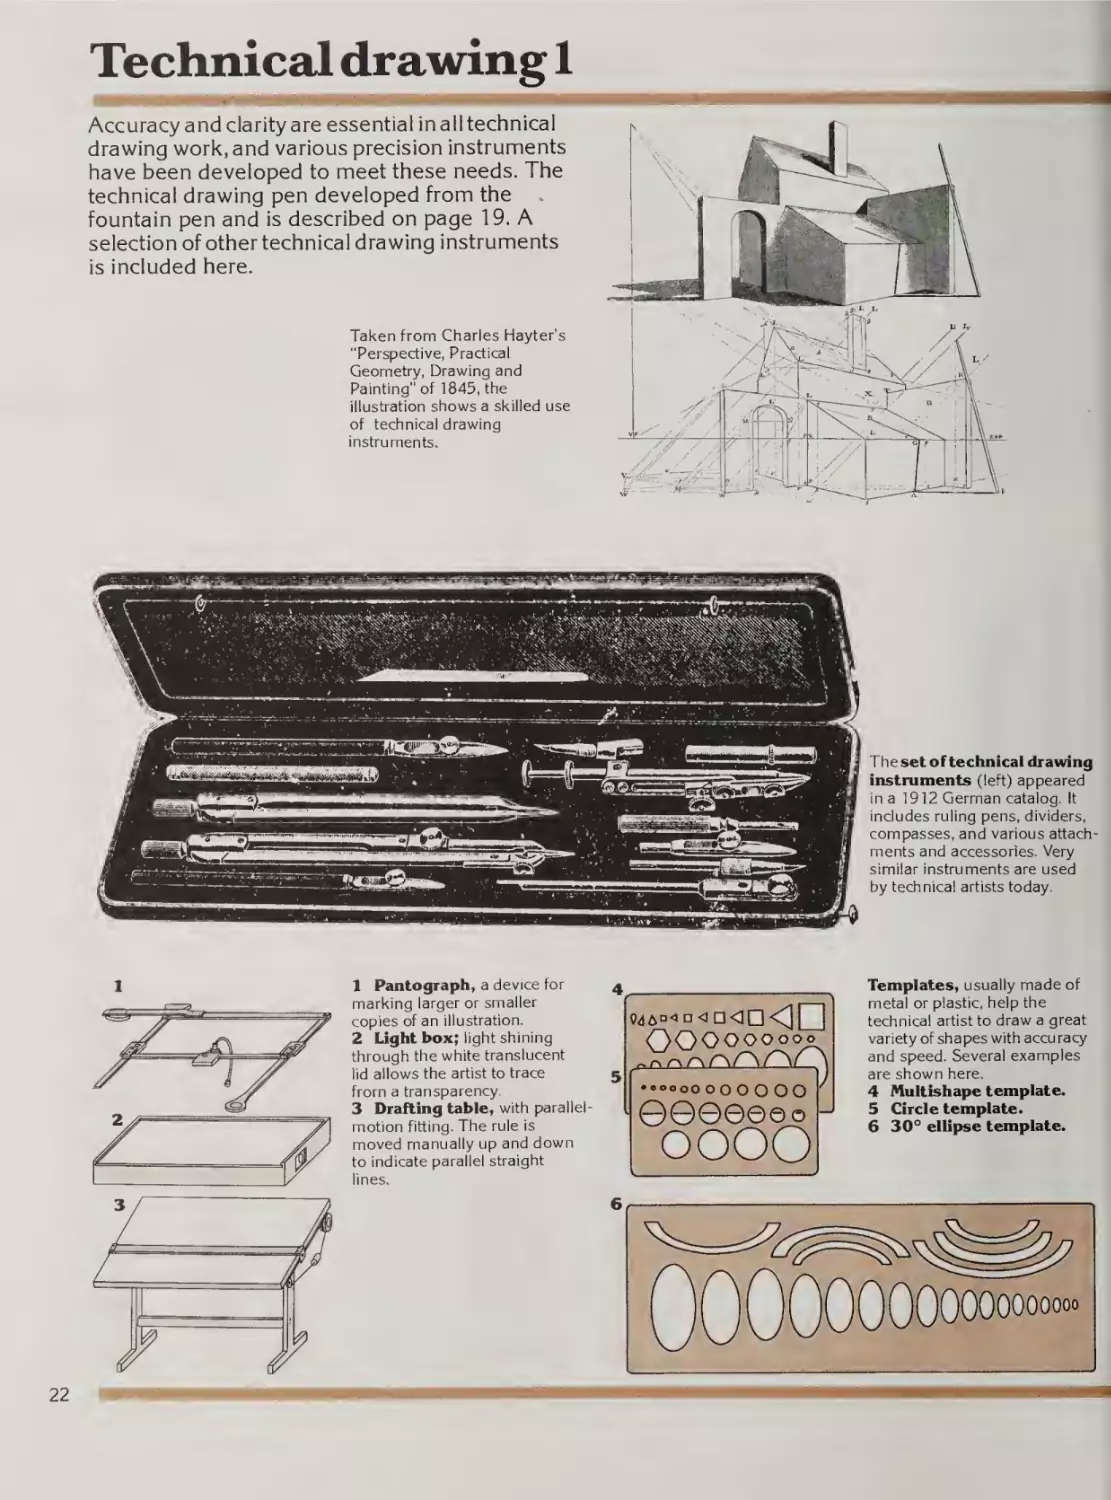
Technical drawing 1
Accuracy and clarity are essential in all technical
drawing work, and various precision instruments
have been developed to meet these needs. The
technical drawing pen developed from the
fountain pen and is described on page 19. A
selection of other technical drawing instruments
is included here.
Taken from Charles Hayter’s
“Perspective, Practical
Geometry, Drawing and
Painting’’ of 1845, the
illustration shows a skilled use
of technical drawing
instruments.
The set of technical drawing
instruments (left) appeared
in a 1912 German catalog. It
includes ruling pens, dividers,
compasses, and various attach¬
ments and accessories. Very
similar instruments are used
by technical artists today.
1 P<mtograph, a device for
marking larger or smaller
copies of an illustration.
2 Light box; light shining
through the white translucent
lid allows the artist to trace
from a transparency.
3 Drafting table, with parallel
motion fitting. The rule is
moved manually up and down
to indicate parallel straight
lines.
22
Templates, usually made of
o,j^a<a<in<lD<3| I
OOOOOOooo
9
©©eeeoo
oooo
• oooooooOOOO
metal or plastic, help the
technical artist to draw a great
variety of shapes with accuracy
and speed. Several examples
are shown here.
4 Hultishape template.
5 Circle template.
6 30° ellipse template.
1
mi
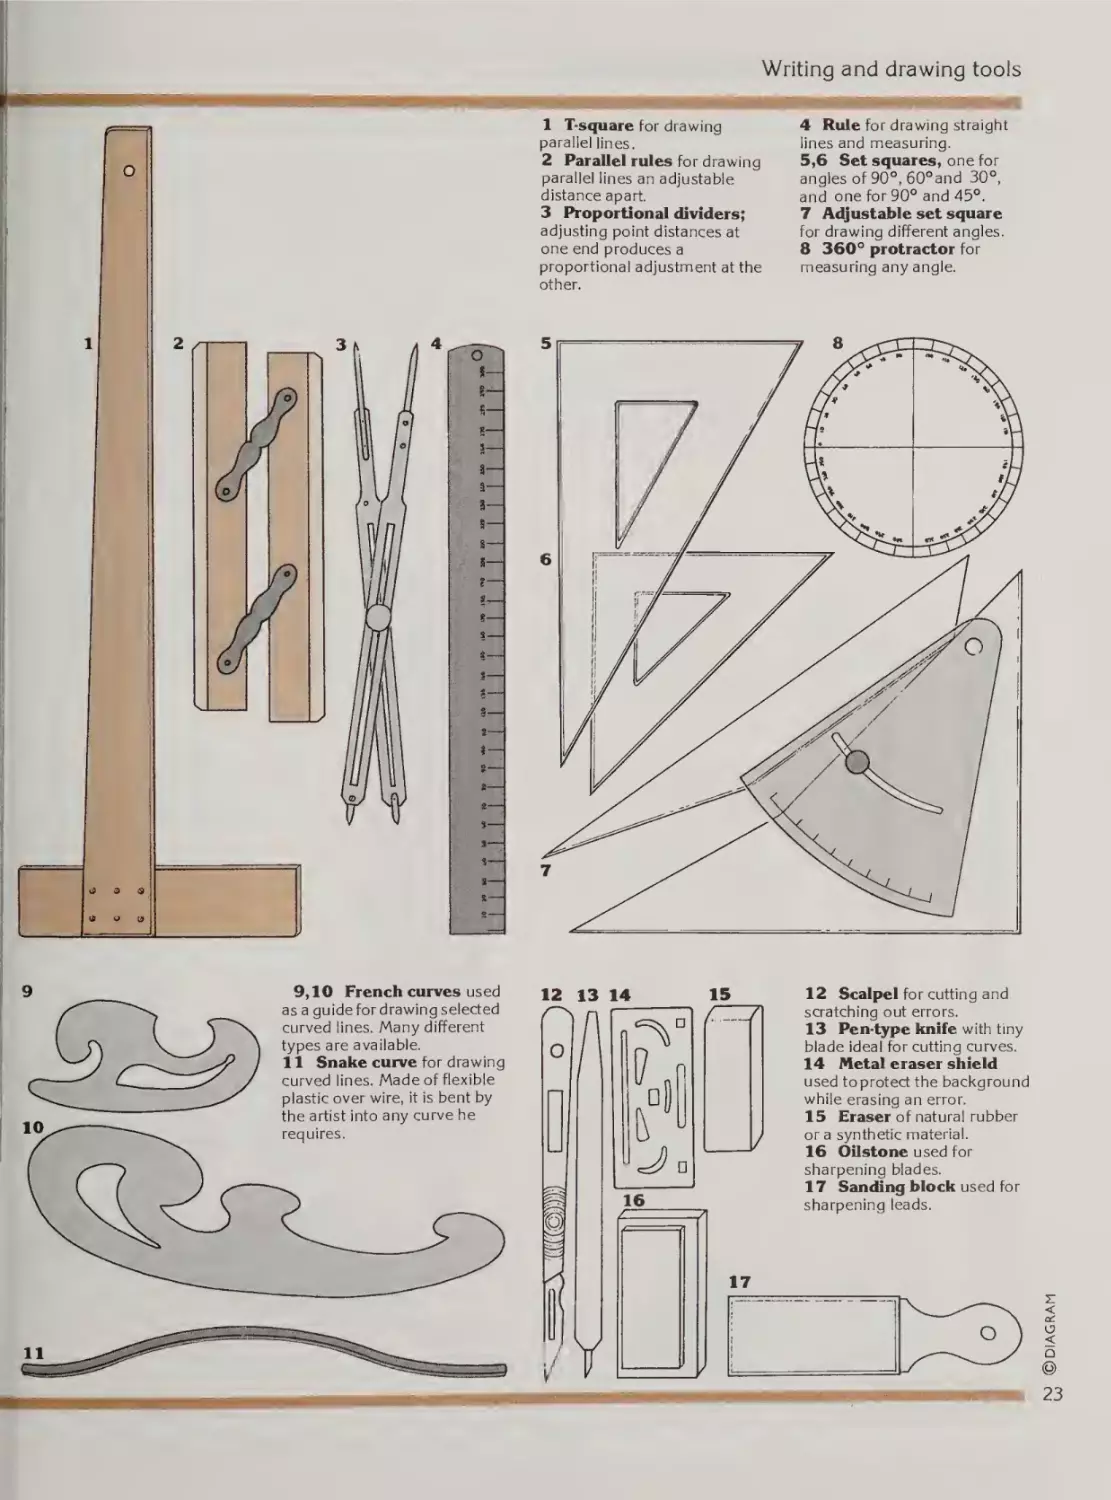
Writing and drawing tools
1 T-scfuare for drawing
4 Rule for drawing straight
parallel lines.
lines and measuring.
5,6 Set squares, one for
angles of 90°, 60°and 30°,
and one for 90° and 45°.
2 Parallel rules for drawing
parallel lines an adjustable
distance apart,
3 Proportional dividers;
7 Adjustable set square
adjusting point distances at
one end produces a
proportional adjustment at the
other.
for drawing different angles.
8 360° protractor for
measuring any angle.
12 Scalpel for cutting and
scratching out errors.
13 Pen-type knife with tiny
blade ideal for cutting curves.
13
14 Metal eraser shield
16
_
used to protect the background
while erasing an error.
15 Eraser of natural rubber
or a synthetic material.
16 Oilstone used for
sharpening blades.
17 Sanding block used for
sharpening leads.
DIAGRAM
12
3
@
23
Technical drawing 2
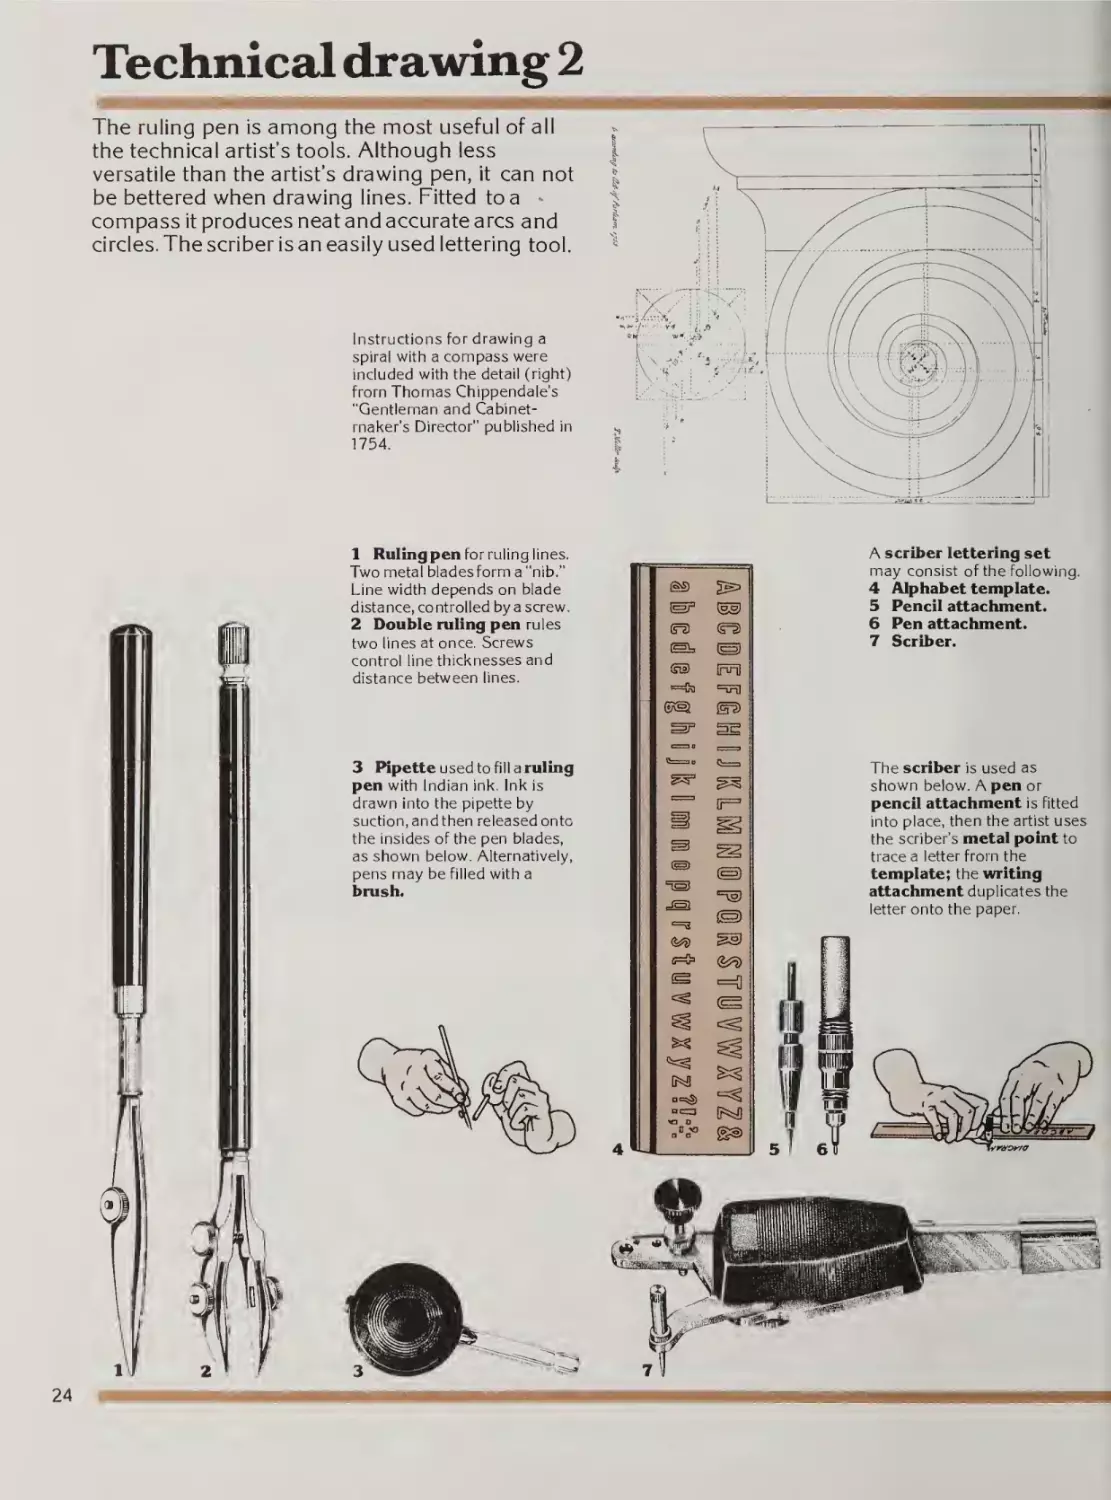
The ruling pen is among the most useful of all
the technical artist’s tools. Although less
versatile than the artist’s drawing pen, it can not
be bettered when drawing lines. Fitted to a
compass it produces neat and accurate arcs and
circles. The scriber is an easily used lettering tool.
Instructions for drawing a
spirai with a compass were
inciuded with the detaii (right)
from Thomas Chippendaie’s
"Qentieman and Cabinet¬
maker's Director" pubiished in
1754.
1 Rulingpenforruiingiines.
Two metai biadesform a “nib."
Line width depends on biade
distance, controiied by a screw
2 Double rating pen ruies
two iines at once. Screws
controi iine thicknesses and
distance between iines.
3 Pipette used to fiii a ruling
pen with indian ink. ink is
drawn into the pipette by
suction, and then reieased onto
the insides of the pen biades,
as shown beiow. Alternativeiy,
pens may be fiiied with a
brash.
24
A scriber lettering set
may consist of the foiiowing.
4
5
6
7
Aiphabet template.
Pencil attachment.
Pen attachment.
Scriber.
The scriber is used as
shown beiow. A pen or
pencii attachment is fitted
into piace, then the artist uses
the scriber’s metal point to
trace a ietter from the
template; the writing
attachment dupiicates the
ietter onto the paper.
Writing and drawing tools
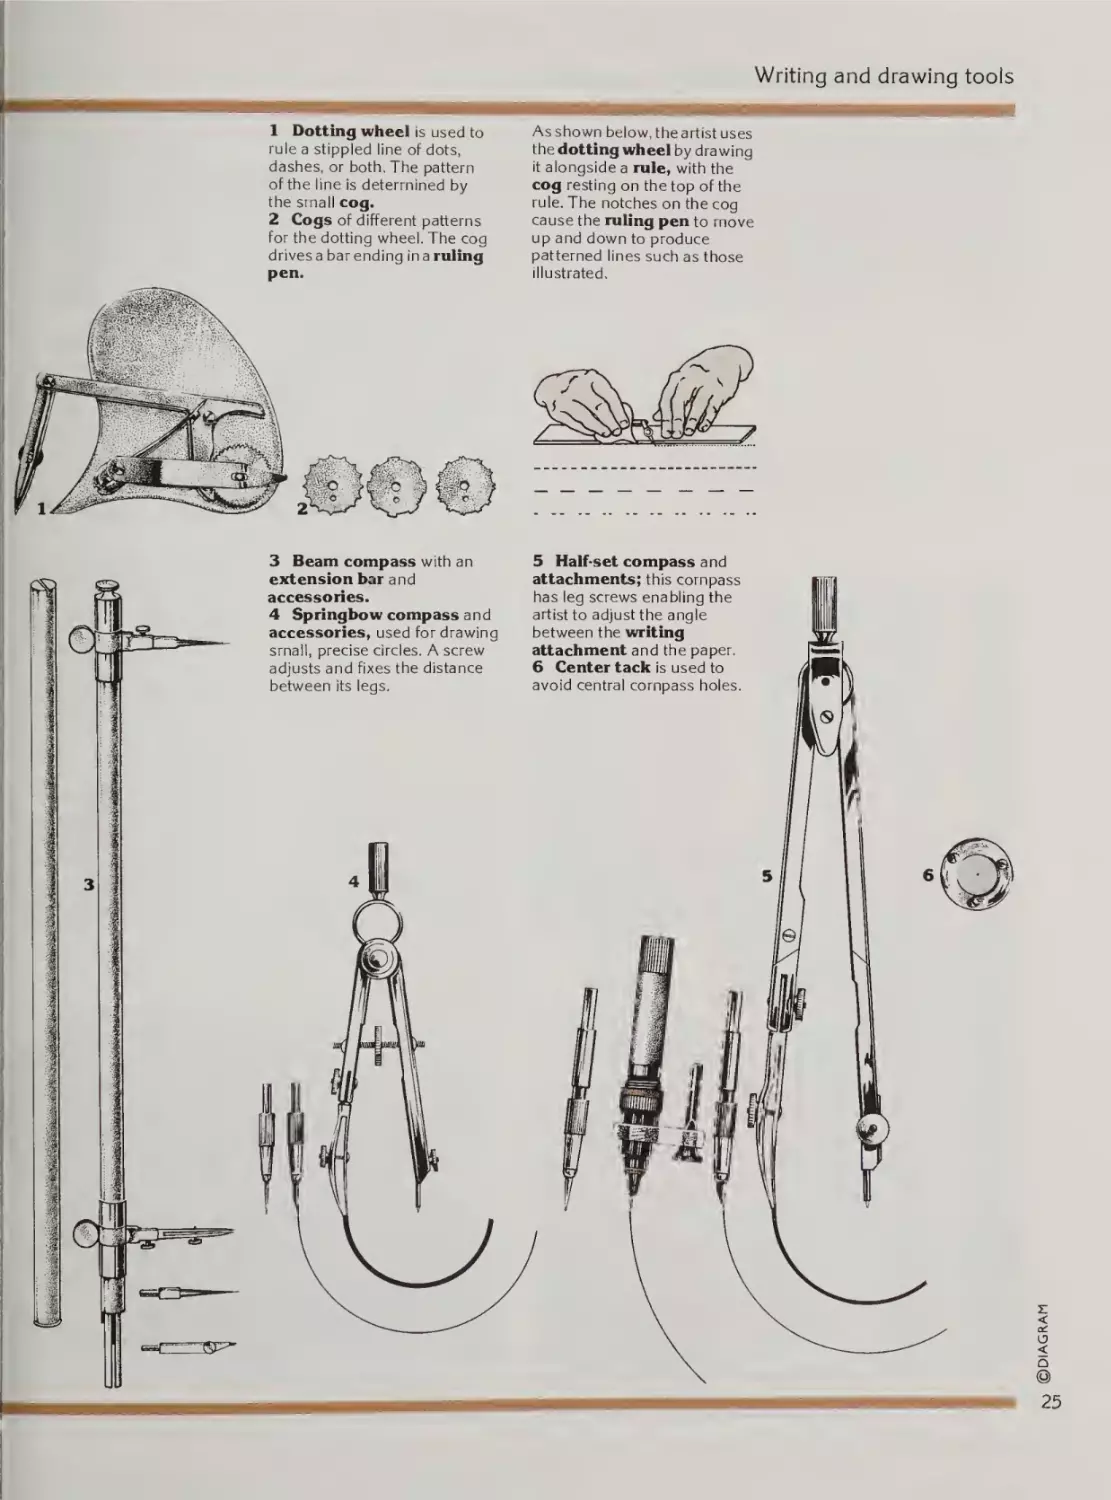
rule a stippled line of dots,
dashes, or both. The pattern
of the line is determined by
the small cog.
2 Cogs of different patterns
for the dotting wheel. The cog
drives a bar ending in a ruling
pen.
3 Beam compass with an
extension bar and
accessories.
4 Springbow compass and
accessories, used for drawing
small, precise circles. A screw
adjusts and fixes the distance
between its legs.
As shown below, the artist uses
the dotting wheel by drawing
it alongside a rule, with the
cog resting on the top of the
rule. The notches on the cog
cause the ruling pen to move
up and down to produce
patterned lines such as those
illustrated.
5 Half-set compass and
attachments; this compass
has leg screws enabling the
artist to adjust the angle
between the writing
attachment and the paper.
6 Center tack is used to
avoid central compass holes.
DIAGRAM
HHHniKiillgSmHBBM
1 Dotting wheel is used to
25
Oriental calligraphy
Since ancient times, calligraphy has been a
major art form in China and elsewhere in the
Orient. The calligrapher uses the structural and
rhythmic qualities of the traditional characters
to produce works of great abstract beauty. The
basic tools—brush, brush holder, ink, and
inkstone —are known in China as the Four
Treasures of the Scholar’s Room.
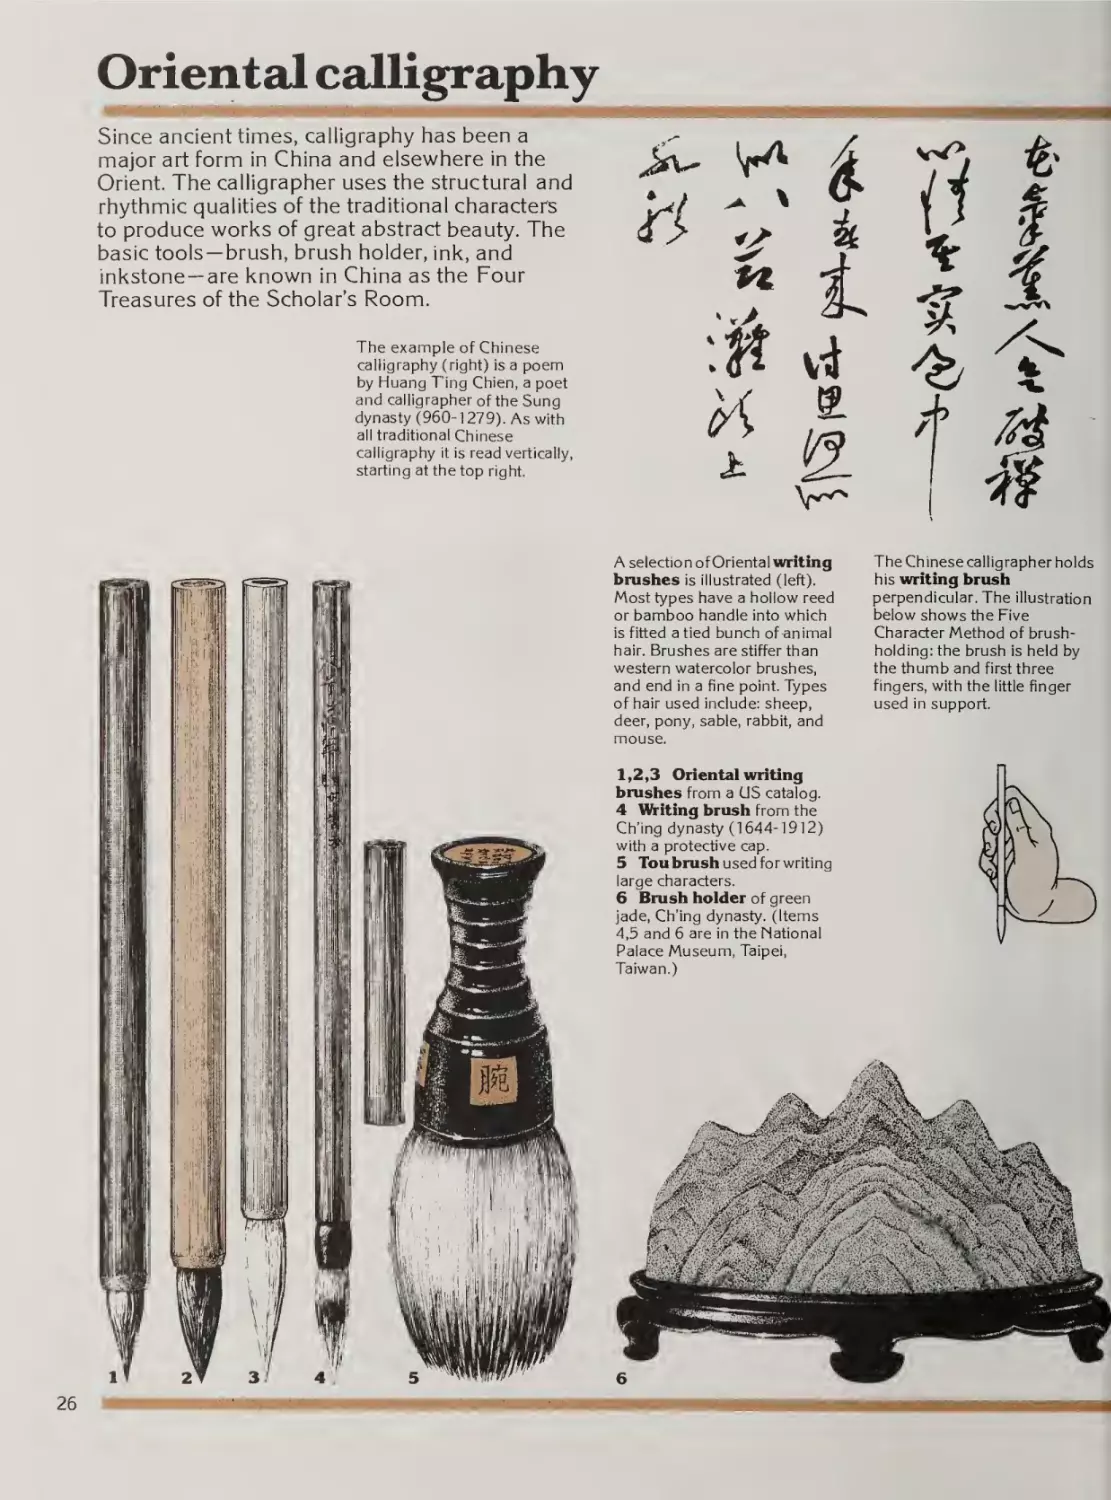
The example of Chinese
calligraphy (right) is a poem
by Huang T’ing Chien, a poet
and calligrapher of the Sung
dynasty (960-1279). As with
all traditional Chinese
calligraphy it is read vertically,
starting at the top right.
A selection of Oriental wnriting
brashes is illustrated (left).
Most types have a hollow reed
or bamboo handle into which
is fitted a tied bunch of animal
hair. Brushes are stiffer than
western watercolor brushes,
and end in a fine point. Types
of hair used include: sheep,
deer, pony, sable, rabbit, and
mouse.
1,2,3 Oriental writing
brashes from a US catalog.
4 Uniting brush from the
Ch’ing dynasty (1644-1912)
with a protective cap.
5 Tou brash used for writing
large characters.
6 Brash holder of green
jade, Ch'ing dynasty, (Items
4,5 and 6 are in the National
Palace Museum, Taipei,
Taiwan.)
The Chinese calligrapher holds
his writing brush
perpendicular. The illustration
below shows the Five
Character Method of brush¬
holding: the brush is held by
the thumb and first three
fingers, with the little finger
used in support.
Writing and drawing tools
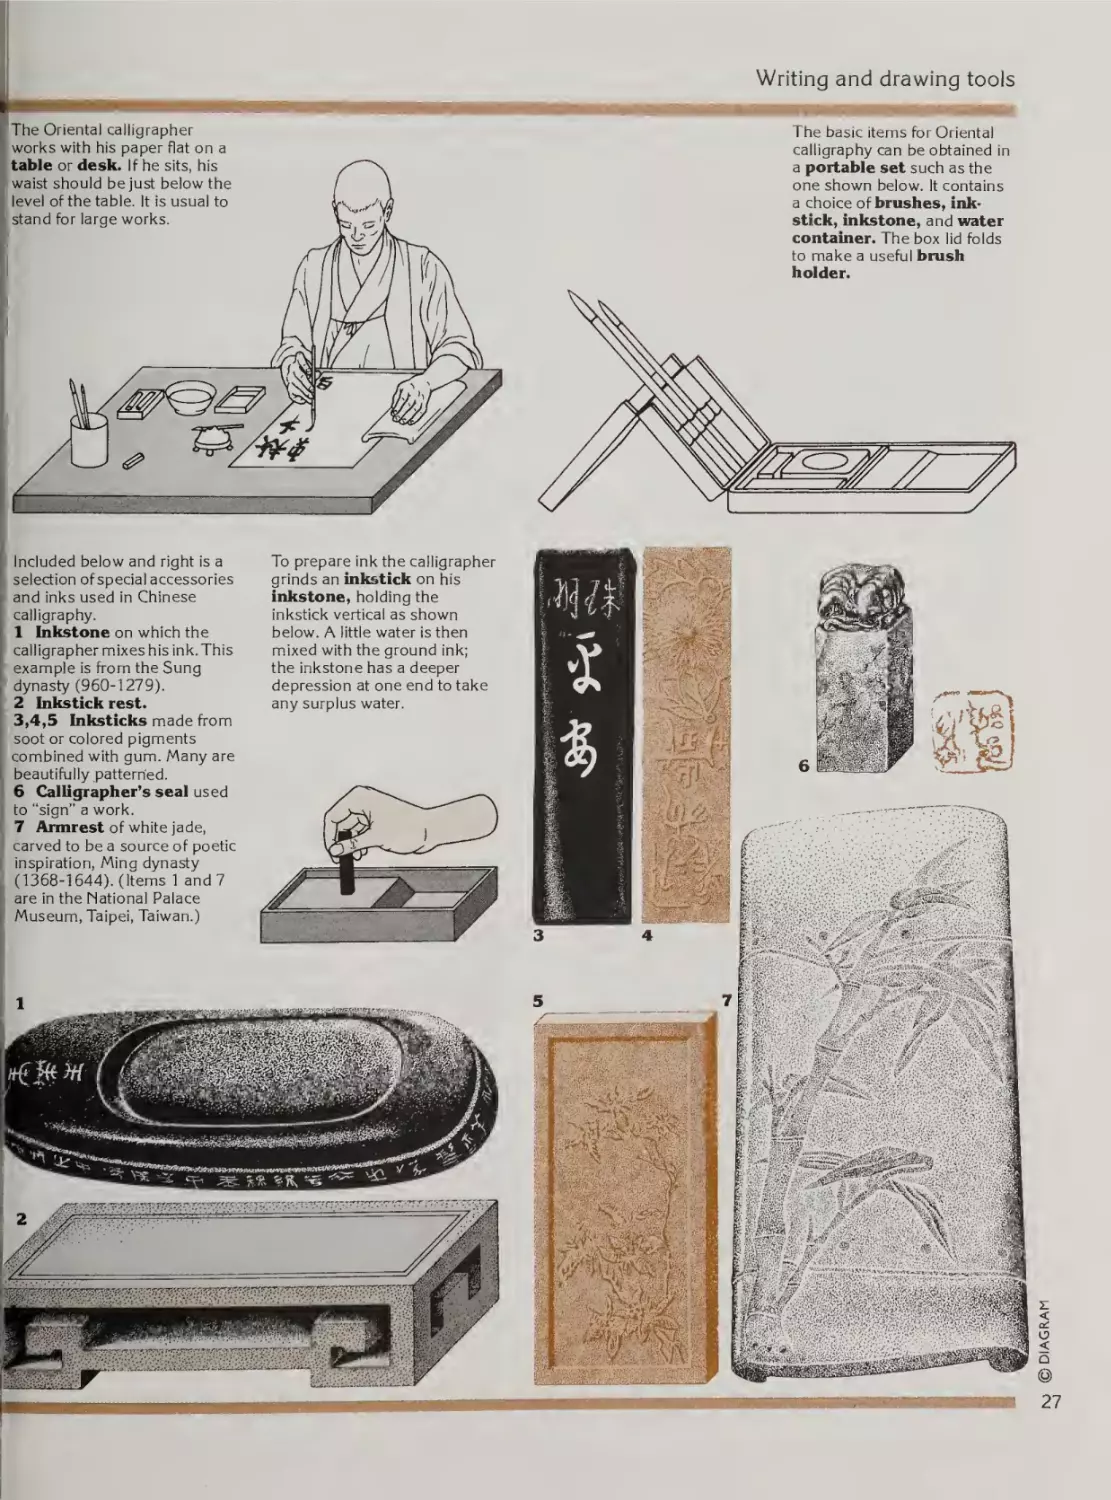
The Oriental calligrapher
works with his paper flat on a
The basic items for Oriental
calligraphy can be obtained in
a portable set such as the
one shown below. It contains
a choice of brushes, inkstick, inkstone, and water
container. The box lid folds
to make a useful brush
holder.
Included below and right is a
selection of special accessories
and inks used in Chinese
calligraphy.
1 Inkstone on which the
calligrapher mixes his ink. This
example is from the Sung
dynasty (960-1279).
2 Inkstick rest.
3,4,5 Inksticks made from
To prepare ink the calligrapher
grinds an inkstick on his
inkstone, holding the
inkstick vertical as shown
below. A little water is then
mixed with the ground ink;
the inkstone has a deeper
depression at one end to take
any surplus water.
DIAGRAM
soot or colored pigments
combined with gum. Many are
beautifully patterned.
6 Calligrapher’s seal used
to “sign" a work.
7 Armrest of white jade,
carved to be a source of poetic
inspiration, Ming dynasty
(1368-1644). (Items 1 and 7
are in the National Palace
Museum, Taipei, Taiwan.)
@
27
2 Printing
The tools in this chapter are those of the printer
and printmaker. The basis of printing is the
preparation of an original, which can then be
used to produce many copies by using it with a
medium that transfers the image onto the surface
to be printed.
The tools of the printmaker vary according to..
the nature of the following requirements: the
original, the medium, and the receptive surface.
Some originals, such as the metal for engraving
or the wood for woodcuts, are hard and therefore
require sharp, strong tools to shape them. Other
originals are prepared by cutting stencils, as in
silkscreen, or by casting them, as with metal
type. In marbling the material used for the
original is water, and the medium is simply
floated on it. The printing media are frequently
liquid, and so require tools for mixing and
spreading them, but in photography the medium
that transfers the image is a carefully directed
light beam.
With the plastic and metal technology of the
present day, techniques have been developed
for printing onto steel, acetate and other
previously problematic surfaces, but in all this
progress the fine art of printing has not been lost.
Craftsmen are more concerned than ever before
that the ancient printing techniques, with their
particular qualities and unique tools, should
not fall into disuse.
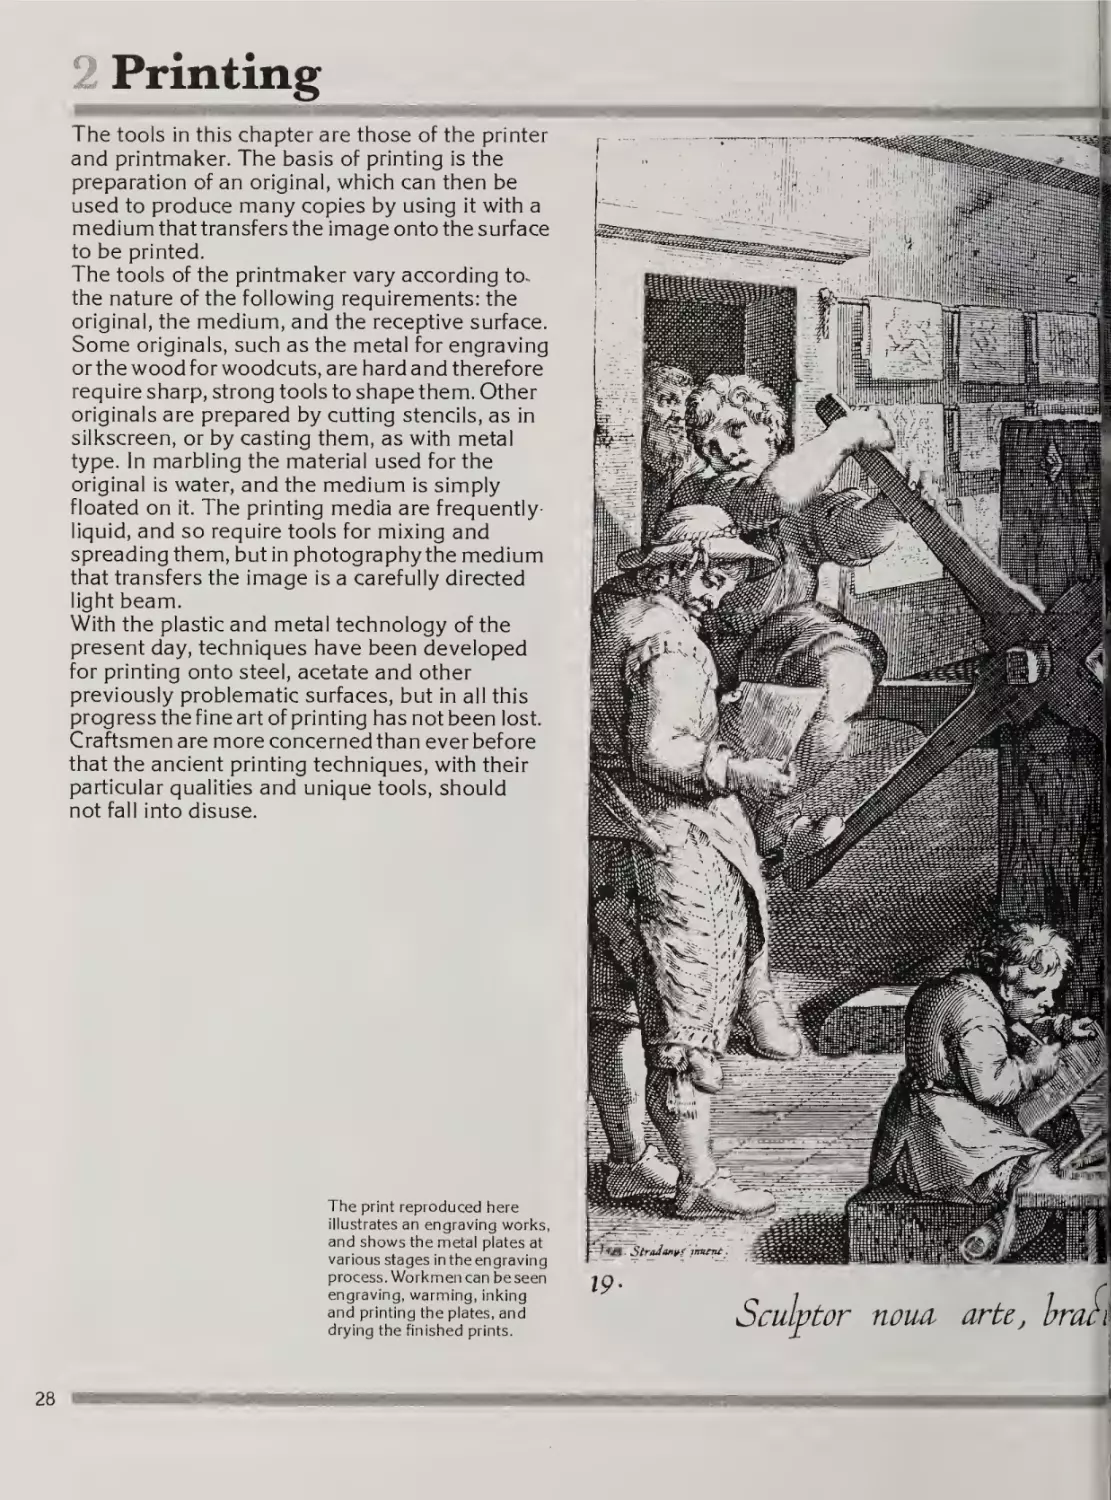
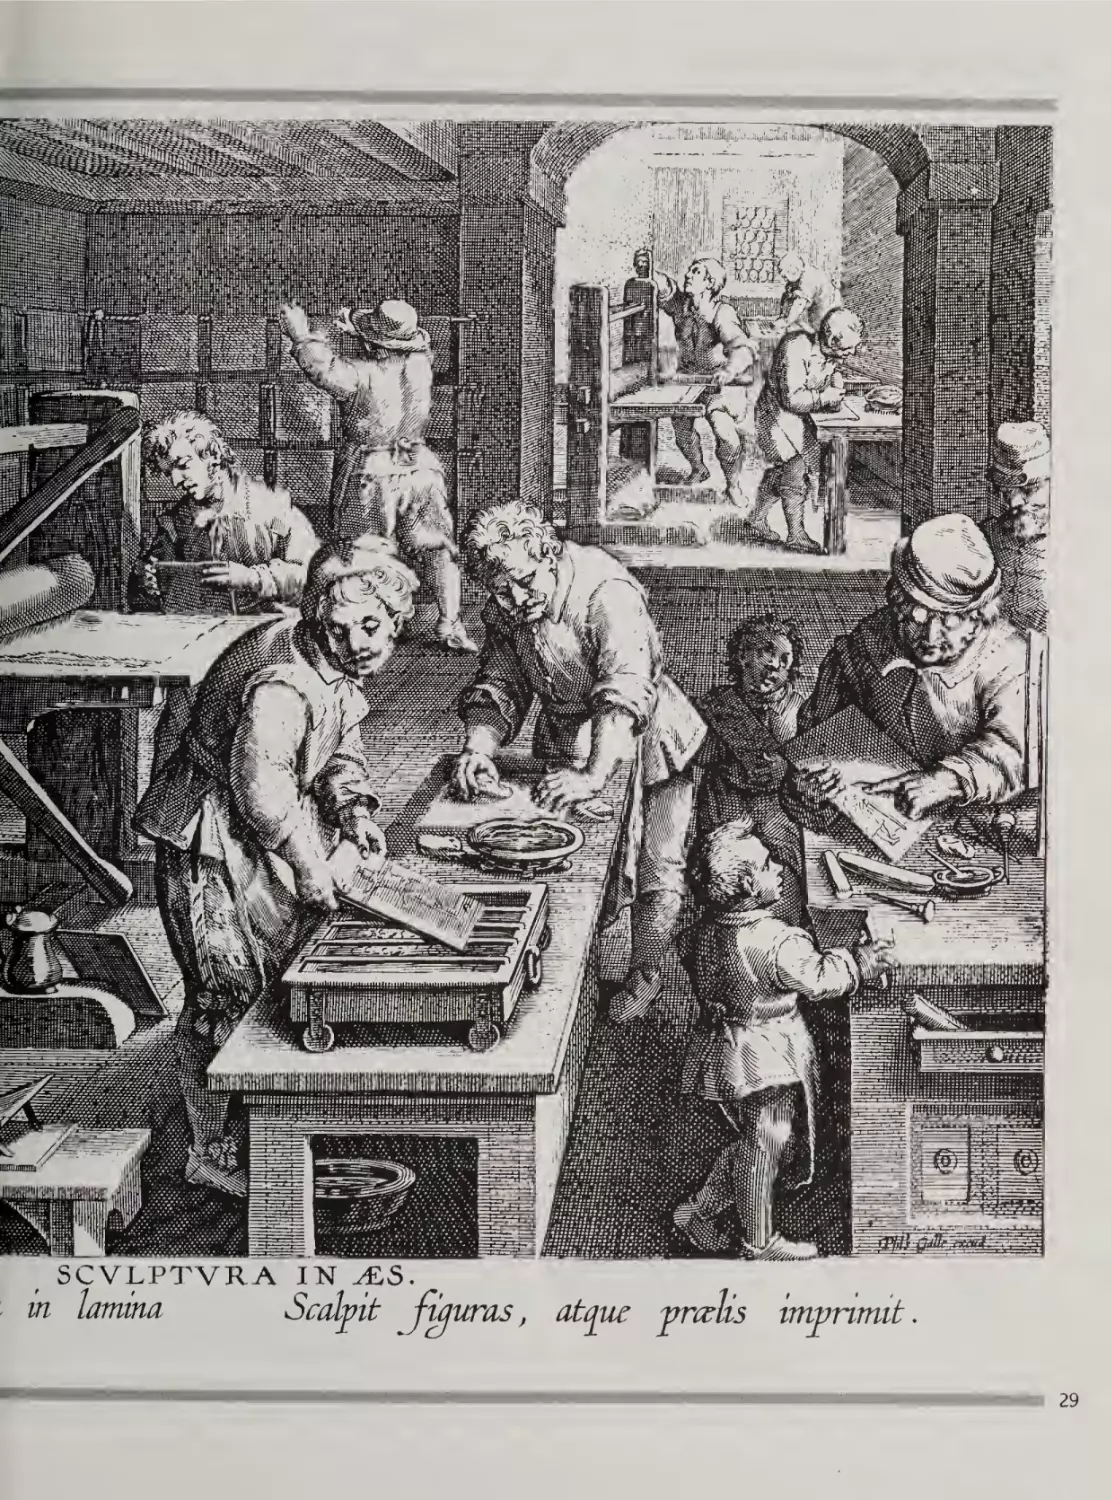
The print reproduced here
illustrates an engraving works,
and shows the metal plates at
various stages in the engraving
process. Workmen can be seen
engraving, warming, inking
and printing the plates, and
drying the finished prints.
28
SCVLPTVRA IN
in lamina
Smlpit
atque ^^cdis
invpnmit
29
Relief printing
.x.
..:,r:"-r
Relief printing involves taking an impression
from a raised surface coated with pigment. In
principle relief is the most straightforward of
the printing processes, and was probably the
earliest; the technique of impressing a blind
design, without pigment, into pottery or leather,
was the ancestor of relief printing as we now
know it.
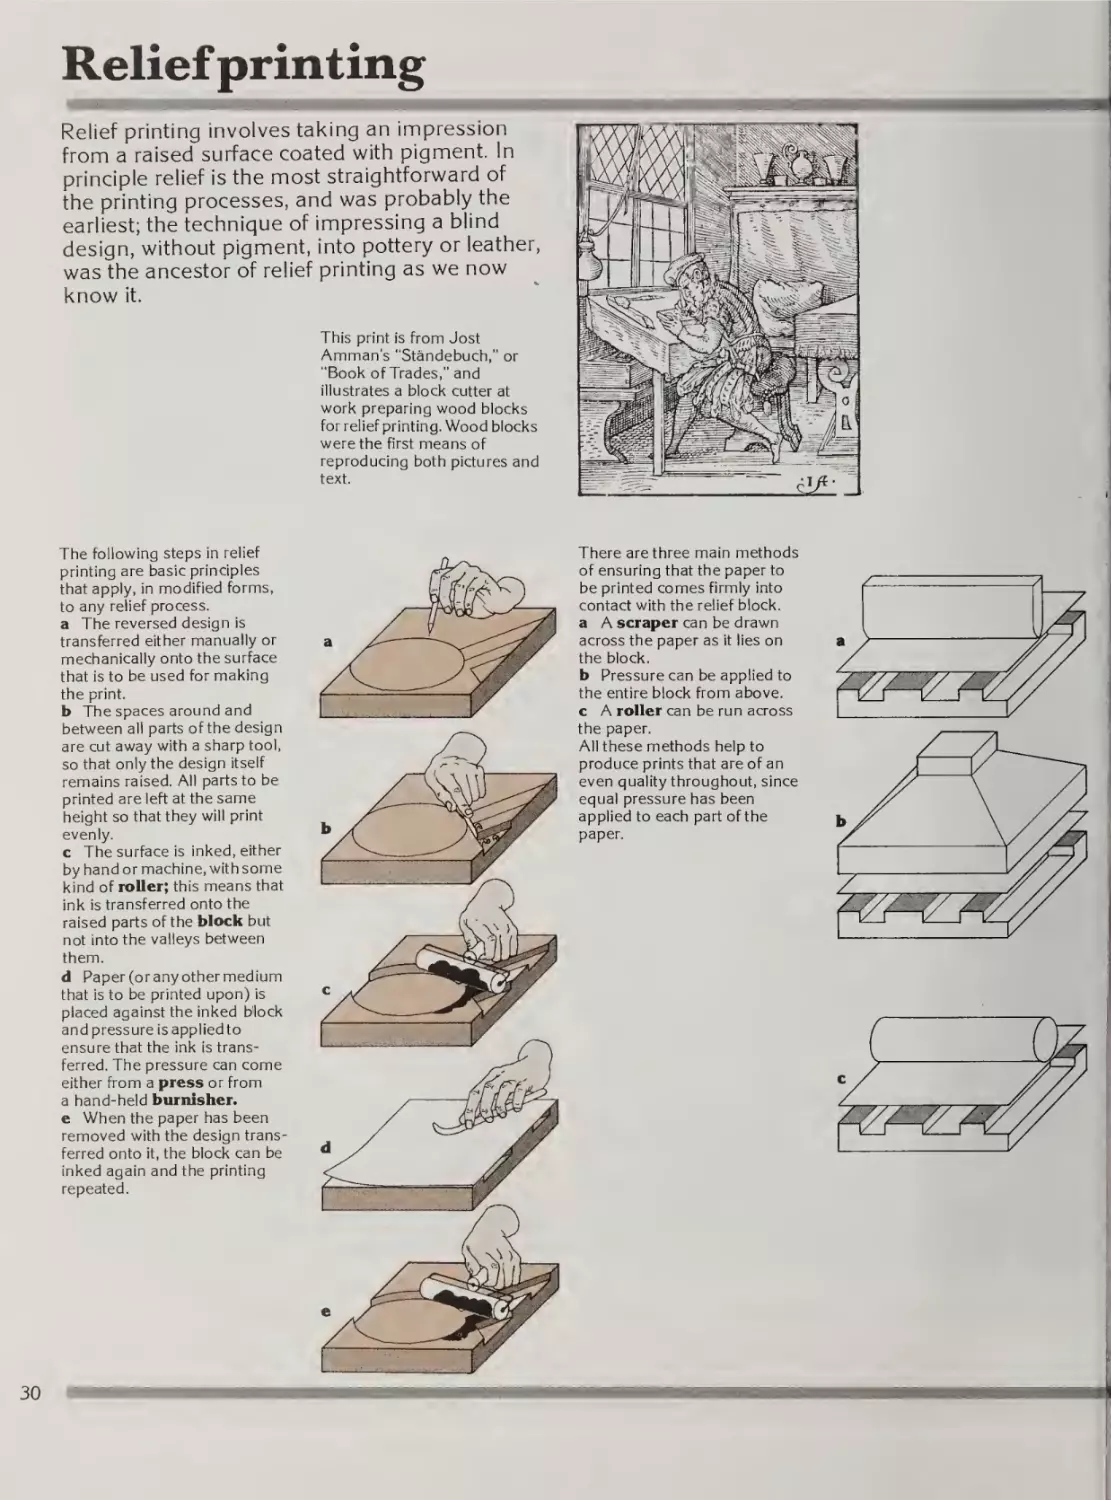
This print is from Jost
Amman's "Standebuch,” or
“Book of Trades," and
illustrates a block cutter at
work preparing wood blocks
for relief printing. Wood blocks
were the first means of
reproducing both pictures and
text.
The following steps in relief
printing are basic principles
that apply, in modified forms,
to any relief process,
a The reversed design is
transferred either manually or
mechanically onto the surface
that is to be used for making
the print.
b The spaces around and
between all parts of the design
are cut away with a sharp tool,
so that only the design itself
remains raised. All parts to be
printed are left at the same
height so that they will print
evenly.
c The surface is inked, either
by hand or machine, with some
kind of roller; this means that
ink is transferred onto the
raised parts of the block but
not into the valleys between
them.
d Paper (or any other medium
that is to be printed upon) is
placed against the inked block
and pressure is applied to
ensure that the ink is trans¬
ferred. The pressure can come
either from a press or from
a hand-held burnisher,
e When the paper has been
removed with the design trans¬
ferred onto it, the block can be
inked again and the printing
repeated.
There are three main methods
of ensuring that the paper to
be printed comes firmly into
contact with the relief block,
a A scraper can be drawn
across the paper as it lies on
the block.
b Pressure can be applied to
the entire block from above,
c A roller can be run across
the paper.
All these methods help to
produce prints that are of an
even quality throughout, since
equal pressure has been
applied to each part of the
paper.
Printing tools
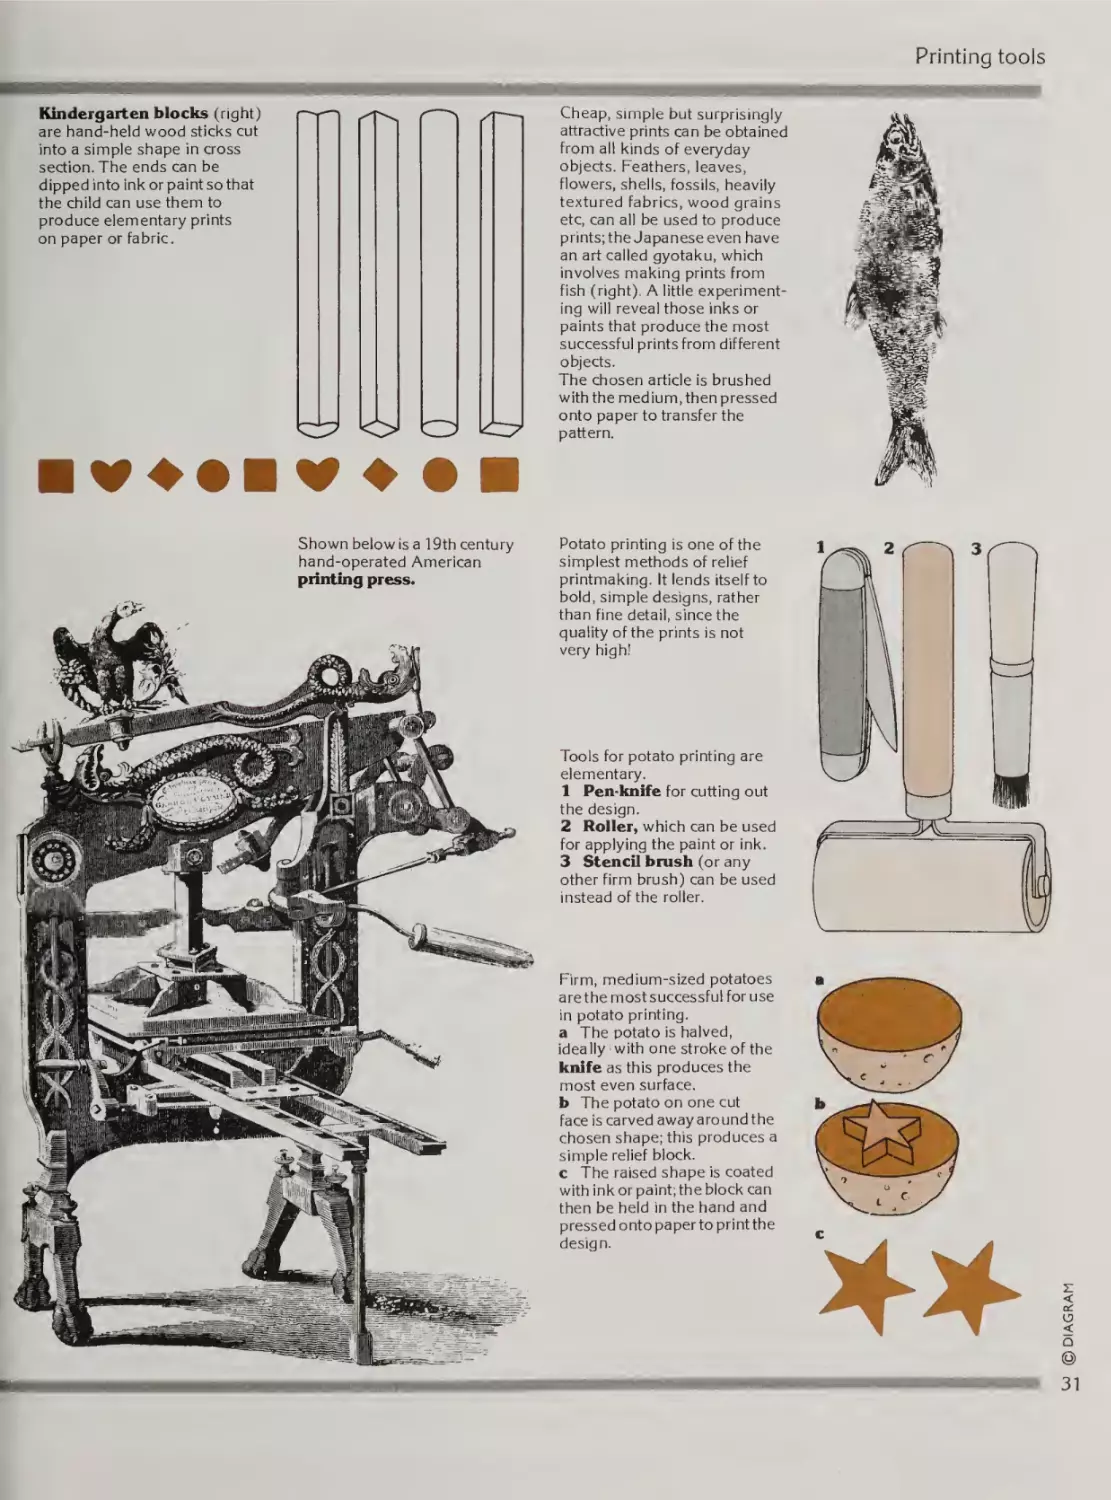
are hand-held wood sticks cut
into a simple shape in cross
section. The ends can be
dipped into ink or paint so that
the child can use them to
produce elementary prints
on paper or fabric.
■
V♦ • ■
Shown below is a 19th century
hand-operated American
printing press.
Cheap, simple but surprisingly
attractive prints can be obtained
from all kinds of everyday
objects. Feathers, leaves,
flowers, shells, fossils, heavily
textured fabrics, wood grains
etc, can all be used to produce
prints; the Japanese even have
an art called gyotaku, which
involves making prints from
fish (right). A little experiment¬
ing will reveal those inks or
paints that produce the most
successful prints from different
objects.
The chosen article is brushed
with the medium, then pressed
onto paper to transfer the
pattern.
Potato printing is one of the
simplest methods of relief
printmaking. It lends itself to
bold, simple designs, rather
than fine detail, since the
quality of the prints is not
very high!
Tools for potato printing are
elementary.
1 Pen-knife for cutting out
the design,
2 Roller, which can be used
for applying the paint or ink.
3 Stencil brush (or any
other firm brush) can be used
instead of the roller.
Firm, medium-sized potatoes
are the most successful for use
in potato printing,
a The potato is halved,
ideally ‘with one stroke of the
knife as this produces the
most even surface,
b The potato on one cut
face is carved away around the
chosen shape; this produces a
simple relief block,
c The raised shape Is coated
with ink or paint; the block can
then be held In the hand and
pressed onto paper to print the
design.
DIAGRAM
Kindergarten blocks (right)
31
Linocuts axid wood engraving
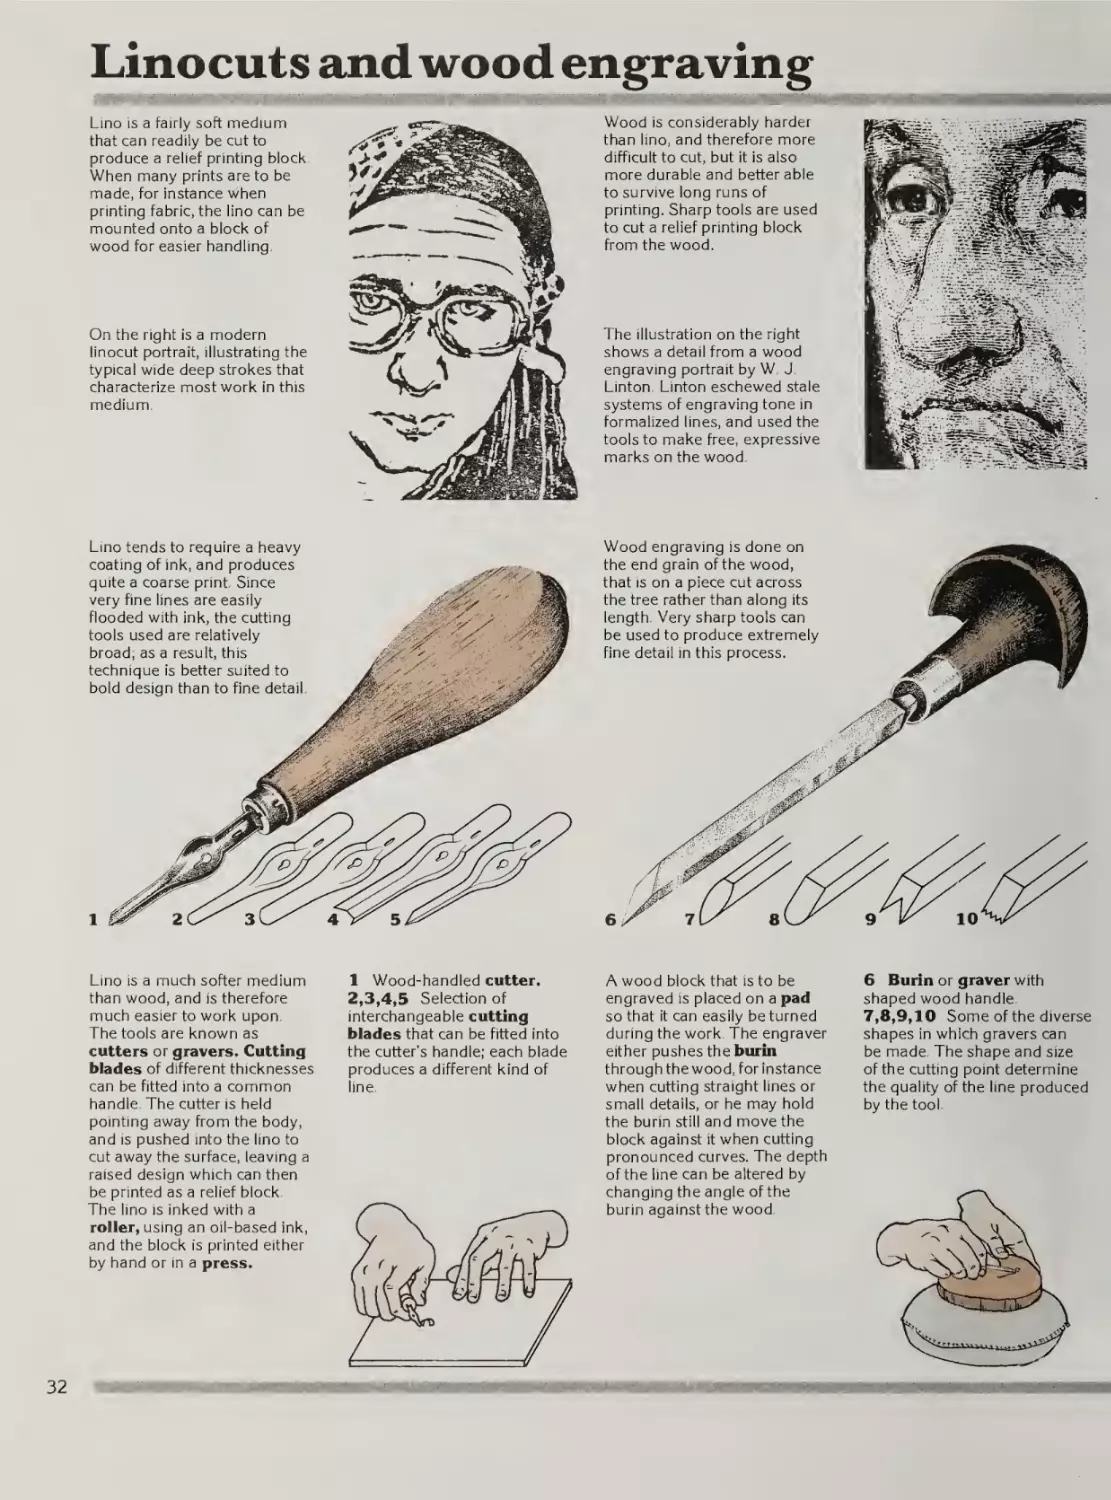
Lino is a fairly soft medium
that can readily be cut to
produce a relief printing block.
When many prints are to be
made, for instance when
printing fabric, the lino can be
mounted onto a block of
wood for easier handling.
Wood is considerably harder
than lino, and therefore more
difficult to cut, but it is also
more durable and better able
to survive long runs of
printing. Sharp tools are used
to cut a relief printing block
from the wood.
On the right is a modern
linocut portrait, illustrating the
typical wide deep strokes that
characterize most work in this
medium.
The illustration on the right
shows a detail from a wood
engraving portrait by W. J.
Linton. Linton eschewed stale
systems of engraving tone in
formalized lines, and used the
tools to make free, expressive
marks on the wood.
Lino tends to require a heavy
coating of ink, and produces
quite a coarse print. Since
very fine lines are easily
flooded with ink, the cutting
tools used are relatively
broad; as a result, this
technique is better suited to
bold design than to fine detail.
Wood engraving is done on
the end grain of the wood,
that is on a piece cut across
the tree rather than along its
length. Very sharp tools can
be used to produce extremely
fine detail in this process.
Lino is a much softer medium
than wood, and is therefore
much easier to work upon.
The tools are known as
cutters or gravers. Cutting
blades of different thicknesses
can be fitted into a common
handle. The cutter is held
pointing away from the body,
and is pushed into the lino to
cut away the surface, leaving a
raised design which can then
be printed as a relief block.
The lino is inked with a
roller, using an oil-based ink,
and the block is printed either
by hand or in a press.
1 Wood-handled cutter.
2,3,4,5 Selection of
interchangeable cutting
blades that can be fitted into
the cutter's handle; each blade
produces a different kind of
line.
A wood block that is to be
engraved is placed on a pad
so that it can easily be turned
during the work. The engraver
either pushes the burin
through the wood, for instance
when cutting straight lines or
small details, or he may hold
the burin still and move the
block against it when cutting
pronounced curves. The depth
of the line can be altered by
changing the angle of the
burin against the wood.
6 Burin or graver with
shaped wood handle.
7,8,9,10 Some of the diverse
shapes in which gravers can
be made. The shape and size
of the cutting point determine
the quality of the line produced
by the tool.
Woodcuts
Printing tools
ZZZIIIZZZIZZI
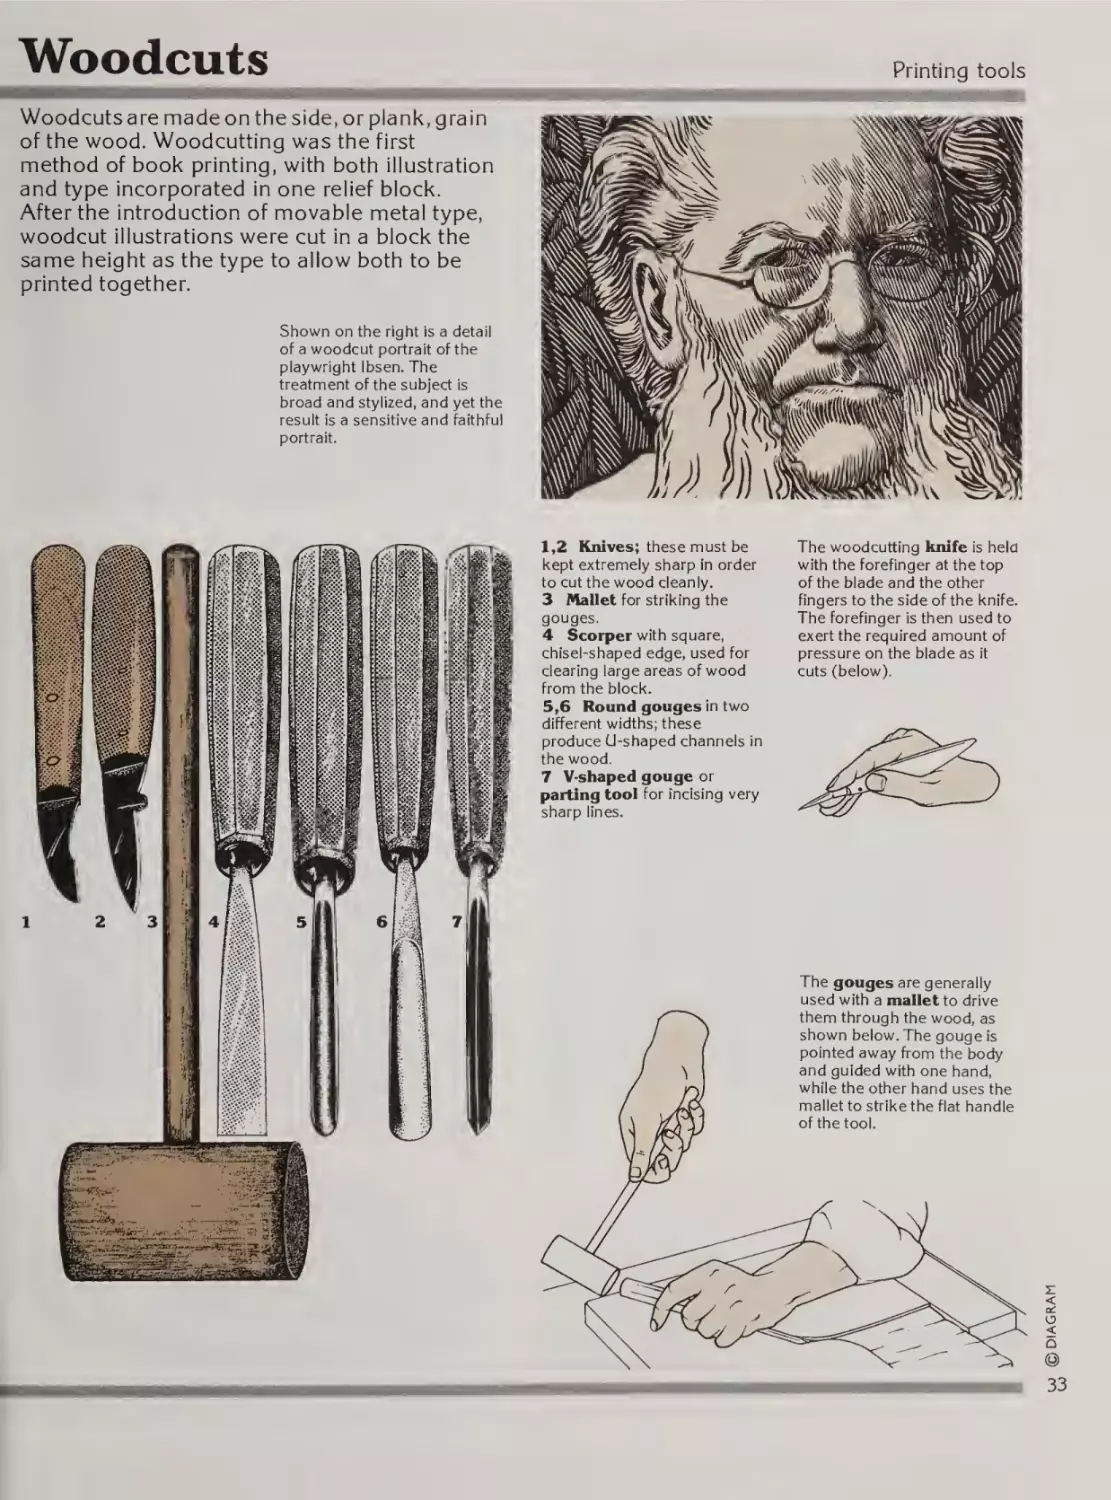
Woodcuts are made on the side, or plank, grain
of the wood. Woodcutting was the first
method of book printing, with both illustration
and type incorporated in one relief block.
After the introduction of movable metal type,
woodcut illustrations were cut in a block the
same height as the type to allow both to be
printed together.
Shown on the right is a detail
of a woodcut portrait of the
playwright Ibsen. The
treatment of the subject Is
broad and stylized, and yet the
result Is a sensitive and faithful
portrait.
1,2 Knives; these must be
kept extremely sharp in order
to cut the wood cleanly.
3 Mallet for striking the
gouges.
4 Scorper with square,
chisel-shaped edge, used for
clearing large areas of wood
from the block.
5,6 Round gouges In two
different widths; these
produce (J-shaped channels In
the wood.
7 V-shaped gouge or
parting tool for Incising very
sharp lines.
The woodcutting knife Is held
with the forefinger at the top
of the blade and the other
fingers to the side of the knife.
The forefinger is then used to
exert the required amount of
pressure on the blade as It
cuts (below).
DIAGRAM
The gouges are generally
used with a mallet to drive
•' I-.'It '--.i'.'.; •
33
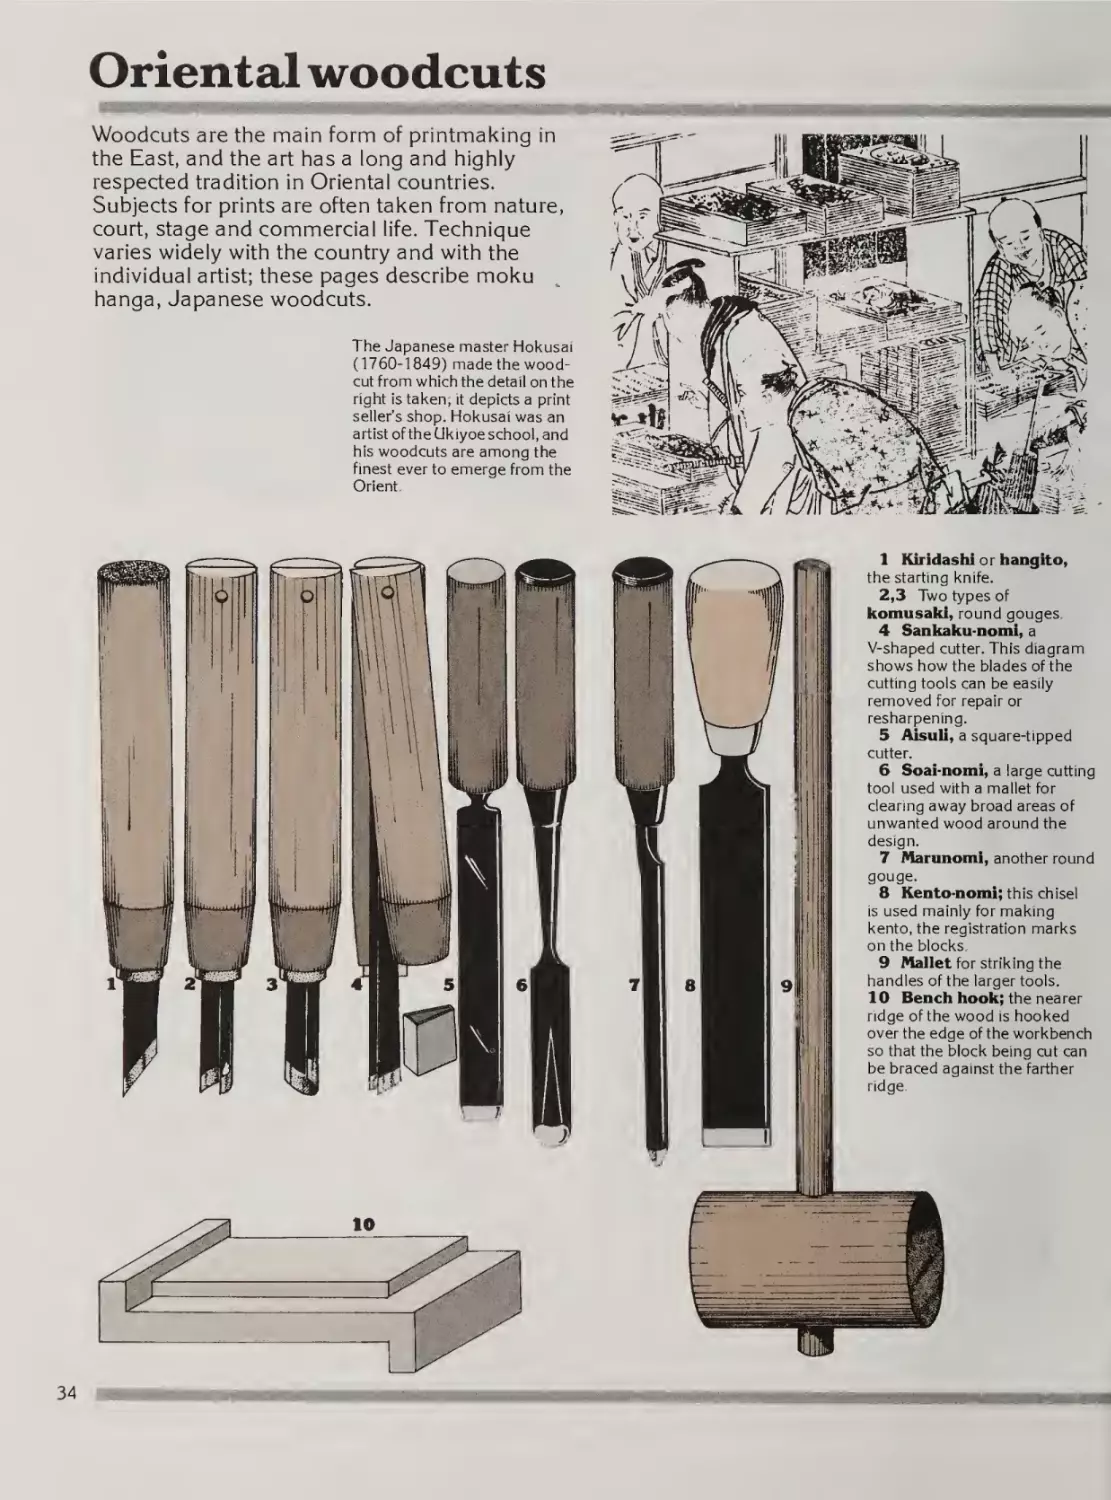
Oriental woodcuts
Woodcuts are the main form of printmaking in
the East, and the art has a long and highly
respected tradition in Oriental countries.
Subjects for prints are often taken from nature,
court, stage and commercial life. Technique
varies widely with the country and with the
individual artist; these pages describe moku
hanga, Japanese woodcuts.
The Japanese master Hokusai
(1760-1849) made the woodcut from which the detail on the
right is taken; it depicts a print
seller’s shop. Hokusai was an
artist of the (Jkiyoe school, and
his woodcuts are among the
finest ever to emerge from the
Orient.
1 Kiridashi or hangito,
the starting knife.
2,3 Two types of
komusaki, round gouges.
4 Sankaku-nomi, a
V-shaped cutter. This diagram
shows how the blades of the
cutting tools can be easily
removed for repair or
resharpening.
5 Aisuli, a square-tipped
cutter.
6 Soai-nomi, a large cutting
tool used with a mallet for
clearing away broad areas of
unwanted wood around the
design.
7 Marunomi, another round
gouge.
8 Kento-nomi; this chisel
is used mainly for making
kento, the registration marks
on the blocks.
9 Mallet for striking the
handles of the larger tools.
10 Bench hook; the nearer
ridge of the wood is hooked
over the edge of the workbench
so that the block being cut can
be braced against the farther
ridge.
34
Printing tools
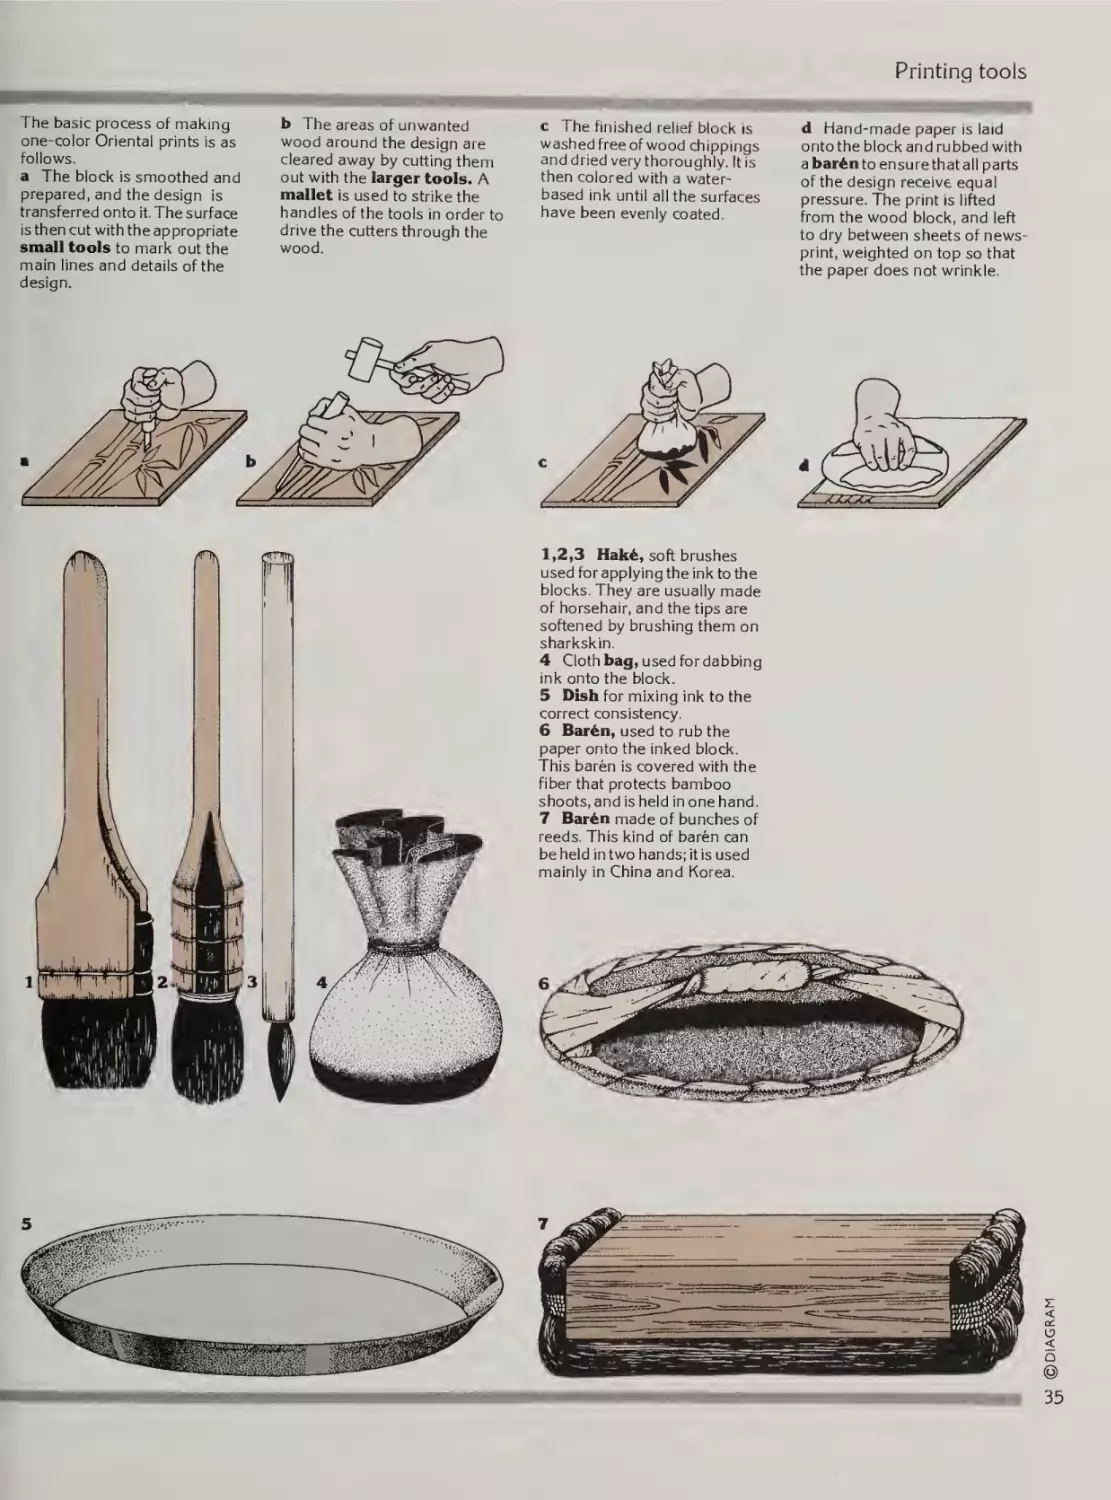
-----b The areas of unwanted
c The finished relief block is
wood around the design are
cleared away by cutting them
out with the larger tools. A
mallet is used to strike the
handles of the tools in order to
drive the cutters through the
wood.
washed free of wood chippings
anddriedverythoroughly. It is
then colored with a waterbased ink until all the surfaces
have been evenly coated.
d Hand-made paper is laid
onto the block and rubbed with
abarinto ensure that all parts
of the design receive equal
pressure. The print is lifted
from the wood block, and left
to dry between sheets of news¬
print, weighted on top so that
the paper does not wrinkle.
1,2,3 Hak6, soft brushes
used for applying the ink to the
blocks. They are usually made
of horsehair, and the tips are
softened by brushing them on
sharkskin.
4 Cloth bag, used for dabbing
ink onto the block.
5 Dish for mixing ink to the
correct consistency.
6 Bar^n, used to rub the
paper onto the inked block.
This baren is covered with the
fiber that protects bamboo
shoots, and is held in one hand,
7 Bar6n made of bunches of
reeds. This kind of baren can
be held in two hands; it is used
mainly in China and Korea.
DIAGRAM
The basic process of making
one-color Oriental prints is as
follows.
a The block is smoothed and
prepared, and the design is
transferred onto it. The surface
is then cut with the appropriate
small tools to mark out the
main lines and details of the
design.
Printing type
CTT"-:
:.■ r
.. :
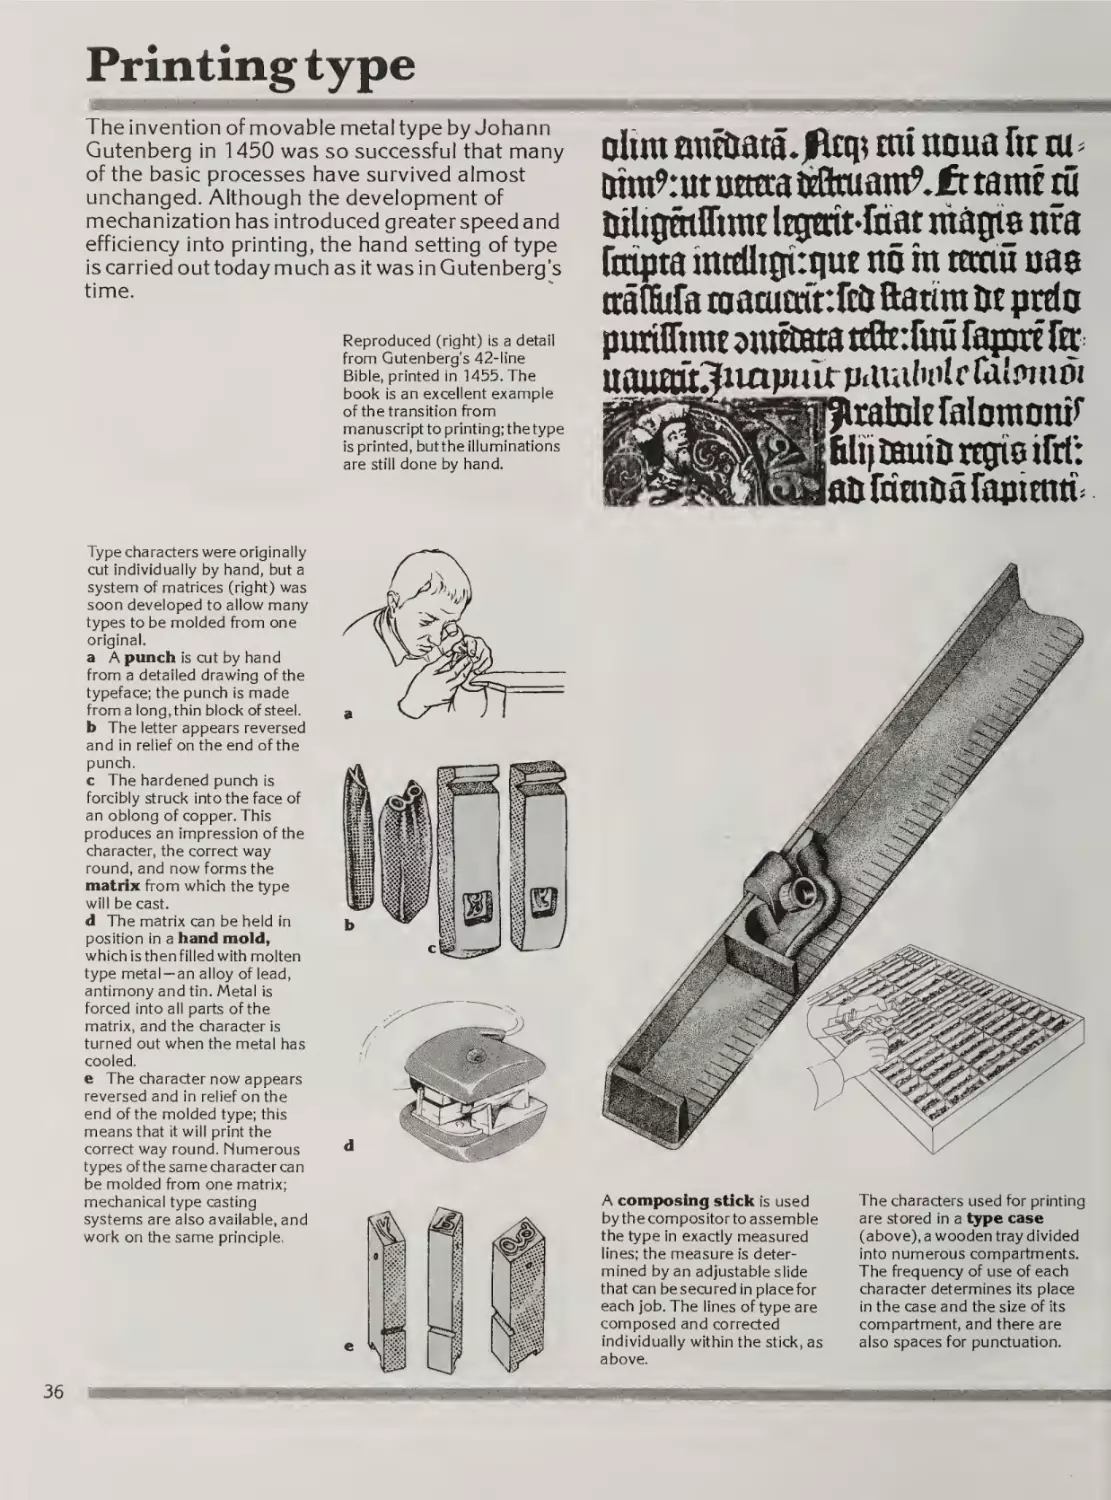
The invention of movable metal type by Johann
Gutenberg in 1450 was so successful that many
of the basic processes have survived almost
unchanged. Although the development of
mechanization has introduced greater speed and
efficiency into printing, the hand setting of type
is carried out today much as it was in Gutenberg’s
time.
Reproduced (right) is a detail
from Gutenberg's 42-line
Bible, printed in 1455. The
book is an excellent example
of the transition from
manuscript to printing; the type
is printed, butthe illuminations
are still done by hand.
Type characters were originally
cut individually by hand, but a
system of matrices (right) was
soon developed to allow many
types to be molded from one
original.
a A punch is cut by hand
from a detailed drawing of the
typeface; the punch is made
from a long, thin block of steel,
b The letter appears reversed
and in relief on the end of the
punch.
c The hardened punch is
forcibly struck into the face of
an oblong of copper. This
produces an impression of the
character, the correct way
round, and now forms the
matrix from which the type
will be cast.
d The matrix can be held in
position in a hand mold,
which is then filled with molten
type metal—an alloy of lead,
antimony and tin. Metal is
forced into all parts of the
matrix, and the character is
turned out when the metal has
cooled.
e The character now appears
reversed and in relief on the
end of the molded type; this
means that it will print the
correct way round. Numerous
types of the same character can
be molded from one matrix;
mechanical type casting
systems are also available, and
work on the same principle.
•^rxr
olim
mi ooua fit oi ^
inra9:utoaa:ai)®tuam9.£ttain£ rii
ailigmfftjnt Itgoit-inat ntagia nfa
ft^ta mtditgitque no in toxin nae
traiMa toatumnfcii ftattnt Ot prdo
punHiint dinllBta ttQt:&ni fapnx fo
^raboltralotnonir
bliflBuiOitgioirtl':
att&imoafaiiitnn>
A composing stick is used
by the compositor to assemble
the type in exactly measured
lines; the measure is deter¬
mined by an adjustable slide
that can be secured in place for
each job. The lines of type are
composed and corrected
individually within the stick, as
above.
The characters used for printing
are stored in a t3rpe case
(above), a wooden tray divided
into numerous compartments.
The frequency of use of each
character determines its place
in the case and the size of its
compartment, and there are
also spaces for punctuation.
Printing tools
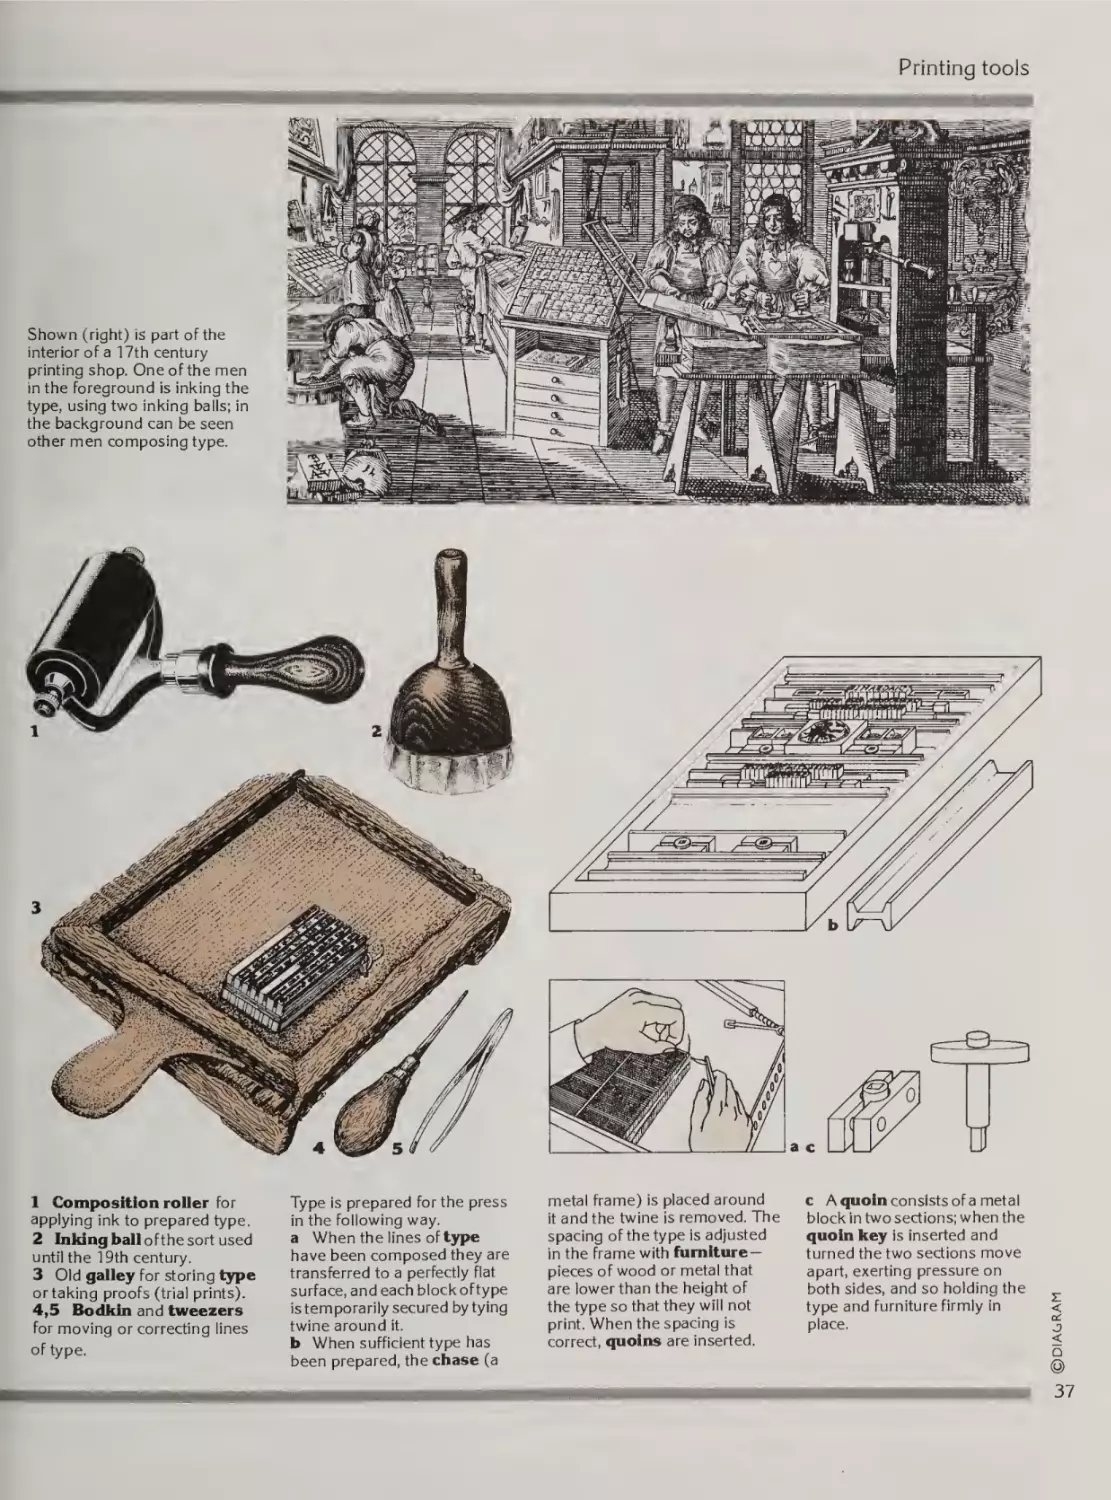
Shown (right) is part of the
interior of a 17th century
printing shop. One of the men
in the foreground is inking the
type, using two inking balls; in
the background can be seen
other men composing type.
2 Inking ball ofthe sort used
until the 19th century.
3 Old galley for storing type
or taking proofs (trial prints).
4,5 Bodkin and tweezers
for moving or correcting lines
of type.
Type is prepared for the press
in the following way.
a When the lines of t3rpe
have been composed they are
transferred to a perfectly flat
surface, and each block oftype
is temporarily secured by tying
twine around it.
b When sufficient type has
been prepared, the chase (a
metal frame) is placed around
it and the twine is removed. The
spacing of the type is adjusted
in the frame with furniturepieces of wood or metal that
are lower than the height of
the type so that they will not
print. When the spacing is
correct, quoins are inserted.
c Aquolnconsists of a metal
block in two sections; when the
quoin key is inserted and
turned the two sections move
apart, exerting pressure on
both sides, and so holding the
type and furniture firmly in
place.
DIAGRAM
1 Composition roller for
applying ink to prepared type.
@
1
37
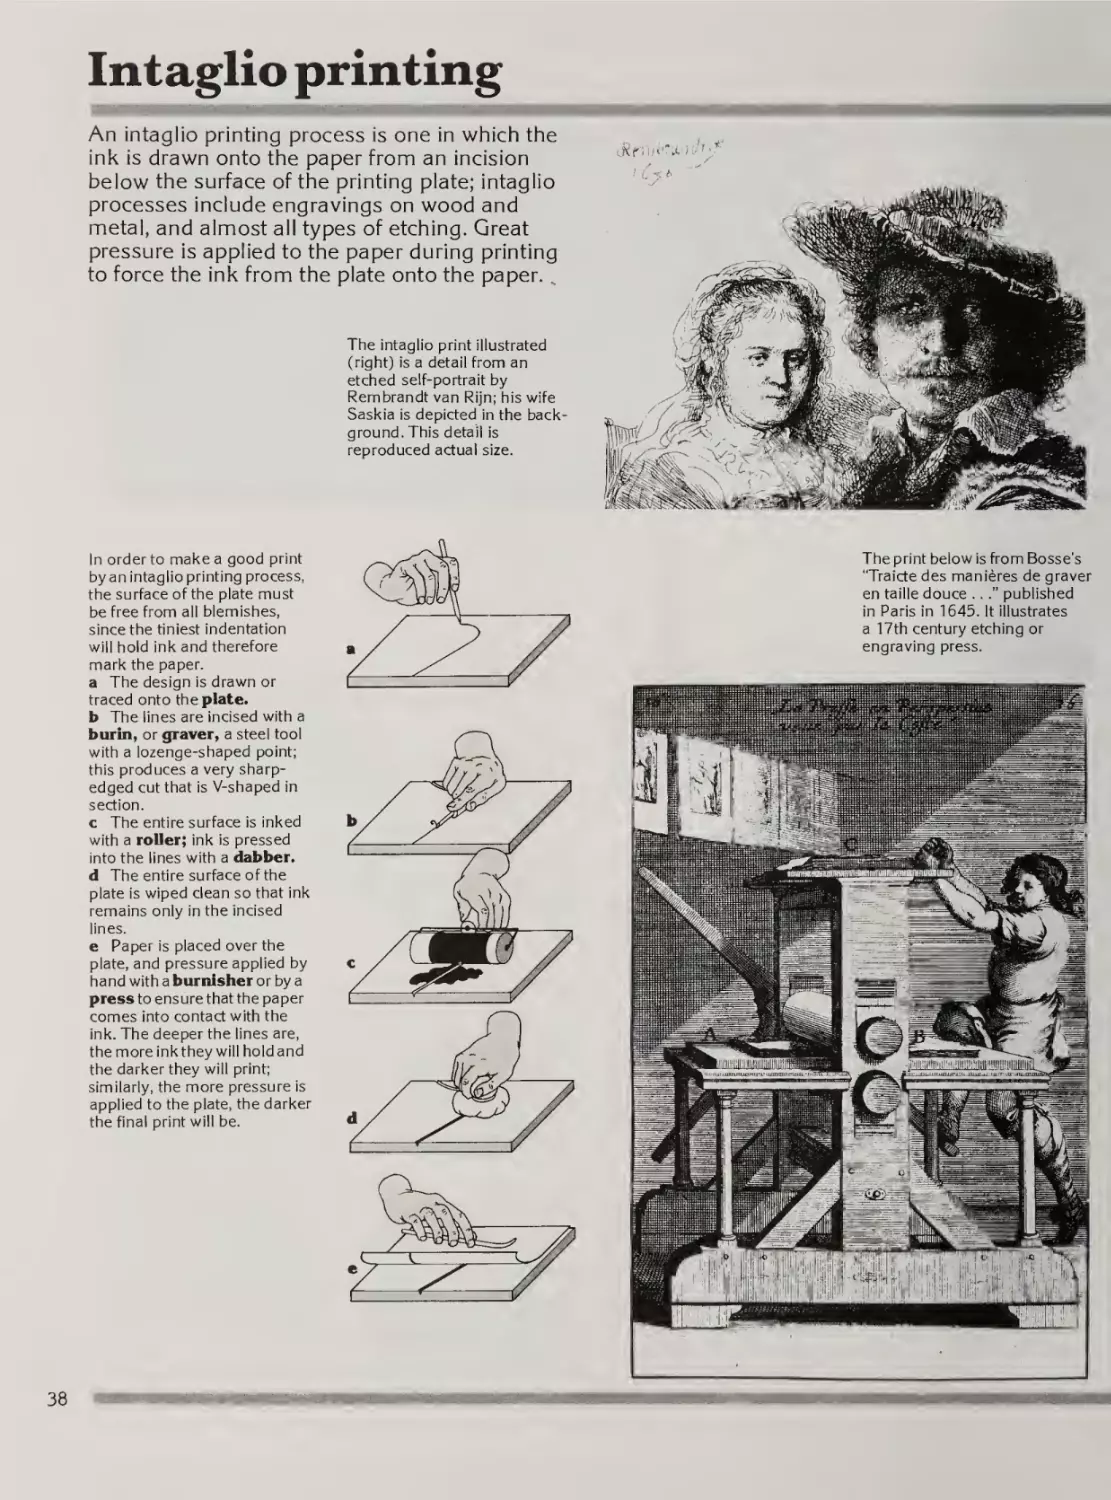
Intaglio printing
An intaglio printing process is one in which the
ink is drawn onto the paper from an incision
below the surface of the printing plate; intaglio
processes include engravings on wood and
metal, and almost all types of etching. Great
pressure is applied to the paper during printing
to force the ink from the plate onto the paper.,
^
6 11
The intaglio print illustrated
(right) Is a detail from an
etched self-portrait by
Rembrandt van Rijn; his wife
Saskia is depicted in the back¬
ground. This detail is
reproduced actual size.
In order to make a good print
by an intaglio printing process,
the surface of the plate must
be free from all blemishes,
since the tiniest indentation
will hold ink and therefore
mark the paper,
a The design is drawn or
traced onto the plate,
b The lines are incised with a
burin, or graver, a steel tool
with a lozenge-shaped point;
this produces a very sharpedged cut that is V-shaped in
section.
c The entire surface is inked
with a roller; ink is pressed
into the lines with a dabber.
d The entire surface of the
plate is wiped clean so that ink
remains only in the incised
lines.
e Paper is piaced over the
plate, and pressure applied by
hand with a burnisher or by a
press to ensure that the paper
comes into contact with the
ink. The deeper the lines are,
the more ink they will hold and
the darker they will print;
similarly, the more pressure is
applied to the plate, the darker
the final print will be.
38
The print below is from Bosse's
"Traicte des manieres de graver
en taille douce ...” published
in Paris in 1645. It illustrates
a 17th century etching or
engraving press.
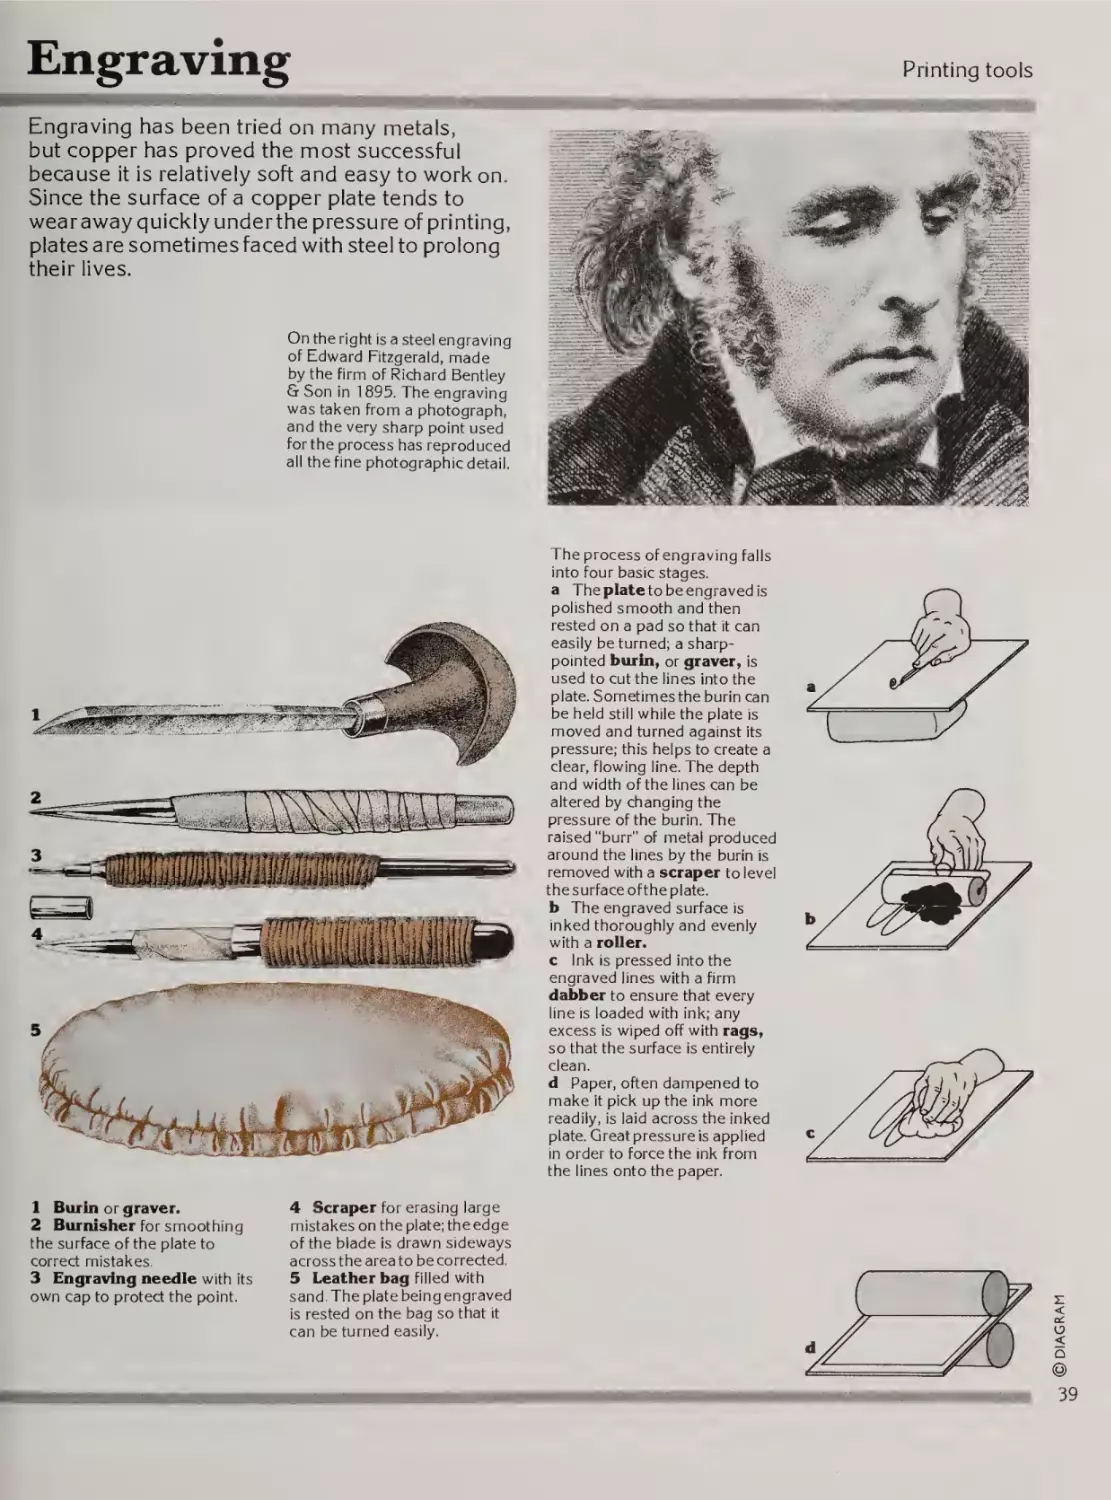
Engraving
Printing tools
Engraving has been tried on many metals,
but copper has proved the most successful
because it is relatively soft and easy to work on.
Since the surface of a copper plate tends to
wear away quickly under the pressure of printing,
plates are sometimes faced with steel to prolong
their lives.
On the right is a steel engraving
of Edward Fitzgerald, made
by the firm of Richard Bentley
& Son In 1895. The engraving
was taken from a photograph,
and the very sharp point used
for the process has reproduced
all the fine photographic detail.
The process of engraving falls
Into four basic stages,
a The plate to be engraved is
polished smooth and then
rested on a pad so that it can
easily be turned; a sharppointed burin, or graver, is
used to cut the lines into the
plate. Sometimes the burin can
be held still while the plate is
moved and turned against its
pressure; this helps to create a
clear, flowing line. The depth
and width of the lines can be
altered by changing the
pressure of the burin. The
raised "burr" of metal produced
around the lines by the burin is
removed with a scraper to level
the surface of the plate,
b The engraved surface is
inked thoroughly and evenly
with a roller,
c Ink is pressed into the
engraved lines with a firm
dabber to ensure that every
line is loaded with Ink; any
excess Is wiped off with rags,
so that the surface is entirely
clean.
d Paper, often dampened to
make It pick up the ink more
readily, is laid across the inked
plate. Great pressure is applied
in order to force the ink from
the lines onto the paper.
the surface of the plate to
correct mistakes.
3 Engraving needle with its
own cap to protect the point.
4 Scraper for erasing large
mistakes on the plate; the edge
of the blade is drawn sideways
across the area to be corrected.
5 Leather bag filled with
sand. The plate being engraved
is rested on the bag so that it
can be turned easily.
DIAGRAM
1 Burin or graver.
2 Burnisher for smoothing
39
Etching
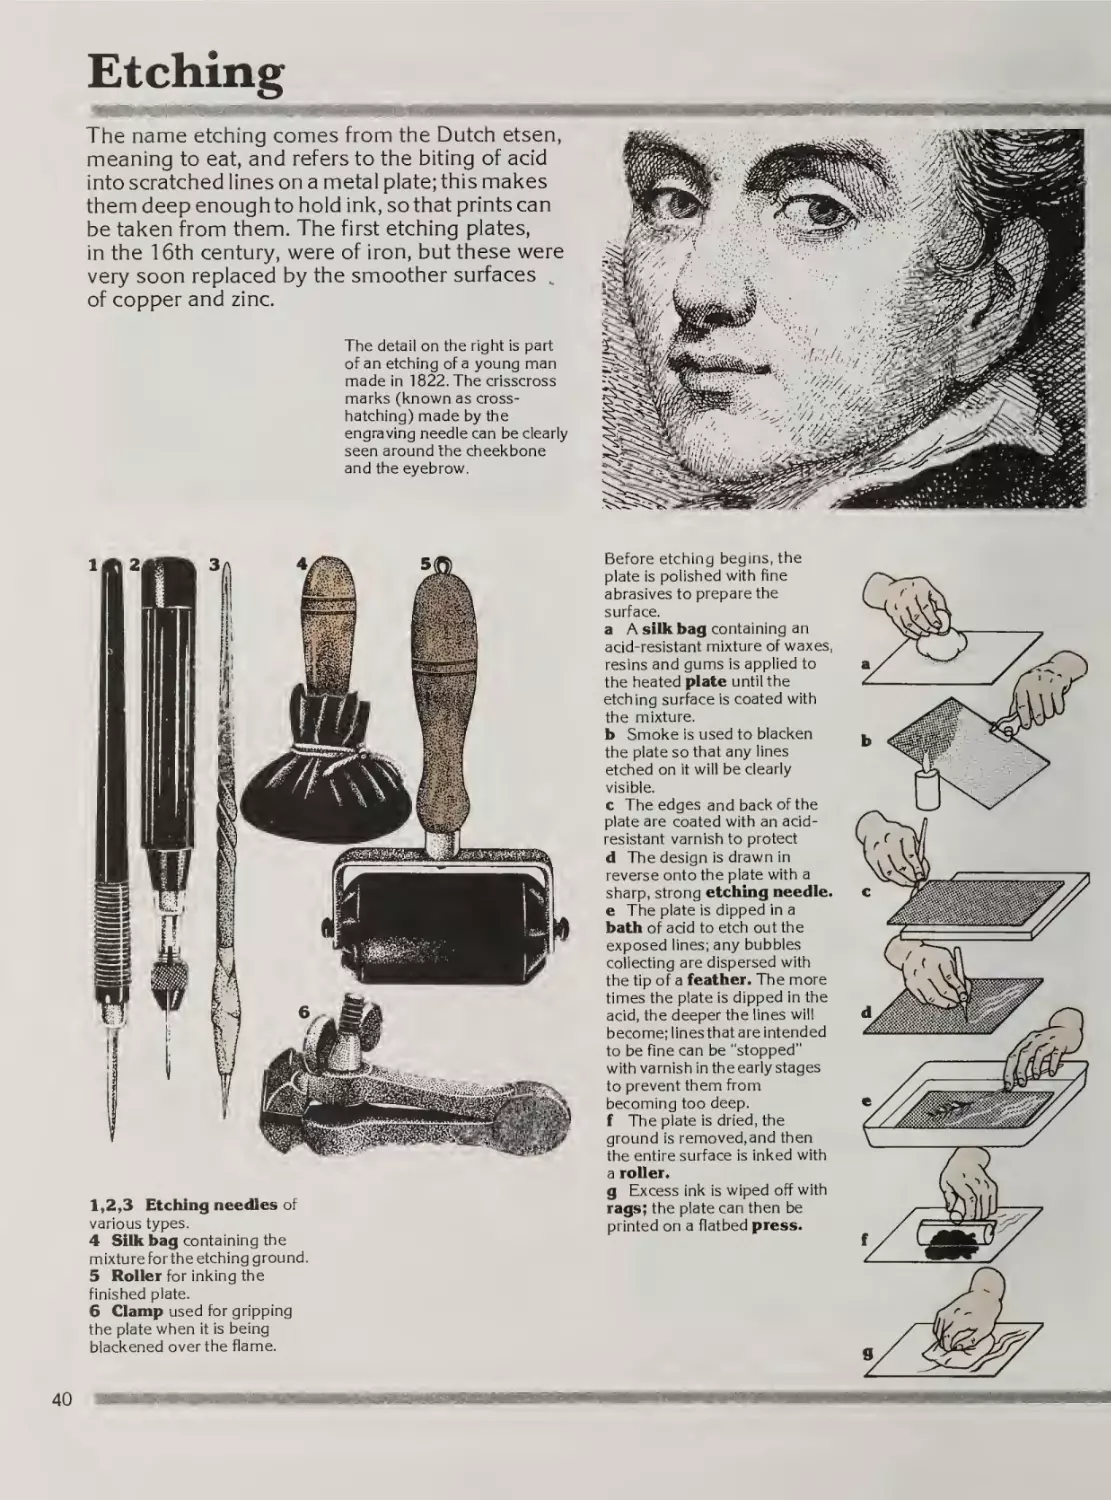
The name etching comes from the Dutch etsen,
meaning to eat, and refers to the biting of acid
into scratched lines on a metal plate; this makes
them deep enough to hold ink, so that prints can
be taken from them. The first etching plates,
in the 16th century, were of iron, but these were
very soon replaced by the smoother surfaces ^
of copper and zinc.
The detail on the right is part
of an etching of a young man
made in 1822. The crisscross
marks (known as crosshatching) made by the
engraving needle can be clearly
seen around the cheekbone
and the eyebrow.
1,2,3 Etching needles of
various types.
4 Silk bag containing the
mixture for the etching ground.
5 Roller for inking the
finished plate.
6 Clamp used for gripping
the plate when it is being
blackened over the flame.
40
Before etching begins, the
plate is polished with fine
abrasives to prepare the
surface.
a A silk bag containing an
acid-resistant mixture of waxes,
resins and gums is applied to
the heated plate until the
etching surface is coated with
the mixture.
b Smoke is used to blacken
the plate so that any lines
etched on it will be clearly
visible.
c The edges and back of the
plate are coated with an acidresistant varnish to protect
d The design is drawn in
reverse onto the plate with a
sharp, strong etching needle,
e The plate is dipped in a
batb of acid to etch out the
exposed lines; any bubbles
collecting are dispersed with
the tip of a featber. The more
times the plate is dipped in the
acid, the deeper the lines will
become; lines that are intended
to be fine can be “stopped”
with varnish in the early stages
to prevent them from
becoming too deep,
f The plate is dried, the
ground is removed,and then
the entire surface is inked with
a roller.
g Excess ink is wiped off with
rags; the plate can then be
printed on a flatbed press.
Printing tools
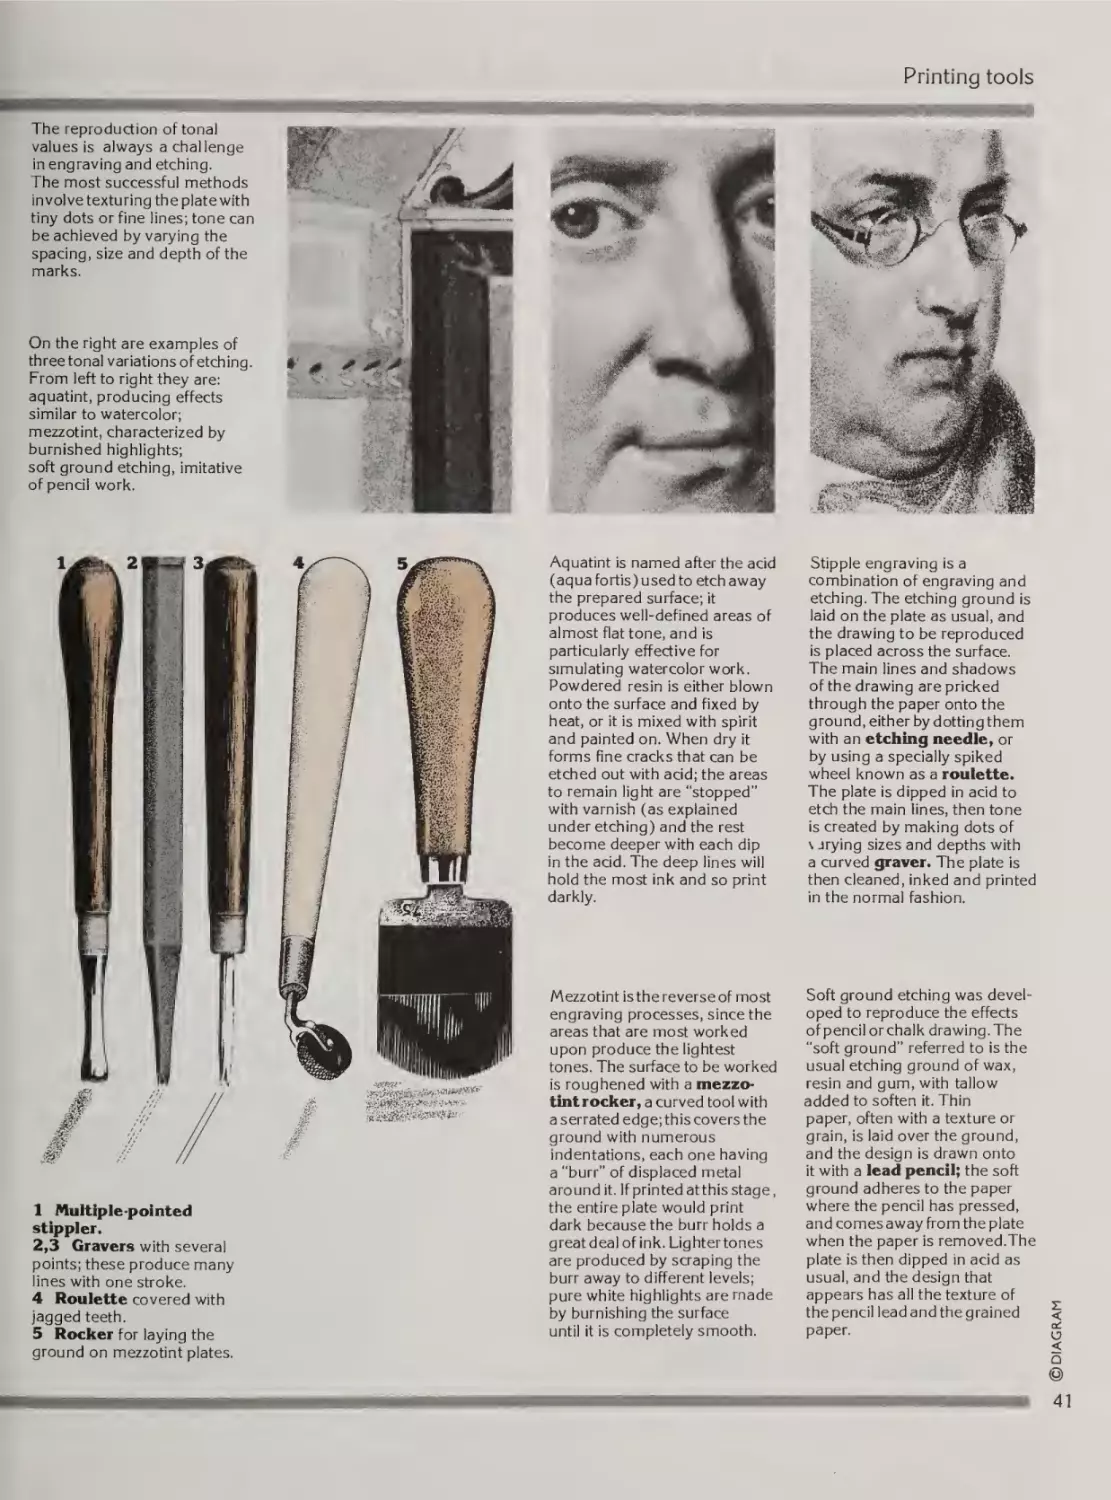
minnaii.-■"The reproduction of tonal
values is always a challenge
in engraving and etching.
The most successful methods
involve texturing the plate with
tiny dots or fine lines; tone can
be achieved by varying the
spacing, size and depth of the
marks.
1 Multiple-pointed
stippler.
2,3 Gravers with several
points; these produce many
lines with one stroke.
4 Roulette covered with
jagged teeth.
5 Rocker for laying the
ground on mezzotint plates.
Aquatint is named after the acid
(aqua fortis) used to etch away
the prepared surface; it
produces well-defined areas of
almost flat tone, and is
particularly effective for
simulating watercolor work.
Powdered resin is either blown
onto the surface and fixed by
heat, or it is mixed with spirit
and painted on. When dry it
forms fine cracks that can be
etched out with acid; the areas
to remain light are "stopped”
with varnish (as explained
under etching) and the rest
become deeper with each dip
in the acid. The deep lines will
hold the most ink and so print
darkly.
Stipple engraving is a
combination of engraving and
etching. The etching ground is
laid on the plate as usual, and
the drawing to be reproduced
is placed across the surface.
The main lines and shadows
of the drawing are pricked
through the paper onto the
ground, either by dotting them
with an etching needle, or
by using a specially spiked
wheel known as a roulette.
The plate is dipped in acid to
etch the main lines, then tone
is created by making dots of
\ Jrying sizes and depths with
a curved graver. The plate is
then cleaned, inked and printed
in the normal fashion.
Mezzotint is the reverse of most
engraving processes, since the
areas that are most worked
upon produce the lightest
tones. The surface to be worked
is roughened with a mezzo¬
tint rocker, a curved tool with
a serrated edge; this covers the
ground with numerous
indentations, each one having
a "burr” of displaced metal
around it. If printed atthis stage,
the entire plate would print
dark because the burr holds a
great deal of ink. Lighter tones
are produced by scraping the
burr away to different levels;
pure white highlights are made
by burnishing the surface
until it is completely smooth.
Soft ground etching was devel¬
oped to reproduce the effects
of pencil or chalk drawing. The
"soft ground" referred to is the
usual etching ground of wax,
resin and gum, with tallow
added to soften it. Thin
paper, often with a texture or
grain, is laid over the ground,
and the design is drawn onto
it with a lead pencil; the soft
ground adheres to the paper
where the pencil has pressed,
and comes away from the plate
when the paper is removed.The
plate is then dipped in acid as
usual, and the design that
appears has all the texture of
the pencil lead and the grained
paper.
DIAGRAM
On the right are examples of
three tonal variations of etching.
From left to right they are;
aquatint, producing effects
similar to watercolor;
mezzotint, characterized by
burnished highlights;
soft ground etching, imitative
of pencil work.
©
■
.HI..
.
41
Inking and correcting intaglio plates
The inking and correcting of intaglio plates are
specialized processes that require their own
particular tools. Because the impression from an
intaglio plate is taken from ink in grooves below
the surface, the inking process has to be very
precise, and any mistakes in the engraving must
be totally erased and the plate restored to a
completely level surface.
Inldngtools are shown in the
The most common correcting
tools are shown (below).
4 Scraper with a triangular
cross-section.
5 Burnisher.
6 Calipers used for locating
the position of a mistake on the
reverse side of the plate.
7 Correcting hammer.
j
illustration (right).
1 Gelatin roller.
2 Dabber made from rolled
canvas.
3 Spatula for mixing the ink
before it is applied to the plate.
The procedure for inking an
intaglio plate is shown in the
sequence (right),
a The intaglio plate is
warmed slightly by holding it
over a heated box. This is done
so that the ink will flow more
readily into the lines,
b The ink is applied to the
plate, usually with a roller, and
then rubbed into the lines with
a dabber.
c Excess ink is wiped off the
plate with rags, and then with
the palm of the hand, leaving
ink only in the lines,
d The plate is then warmed
again, and printed in a press.
Mistakes on engraved plates
are corrected in the following
way.
a The error is removed by
paring down the surface of the
plate with a three-sided
scraper.
b The surface of the plate is
then smoothed again by
rubbing it with a burnisher,
c One foot of a pair of
calipers is placed on the error
so that the other foot will locate
the position of the error on the
reverse side of the plate,
d The surface isthen restored
to flatness by hammering the
plate from the reverse side
over an anvil.
Marbling
Printing tools
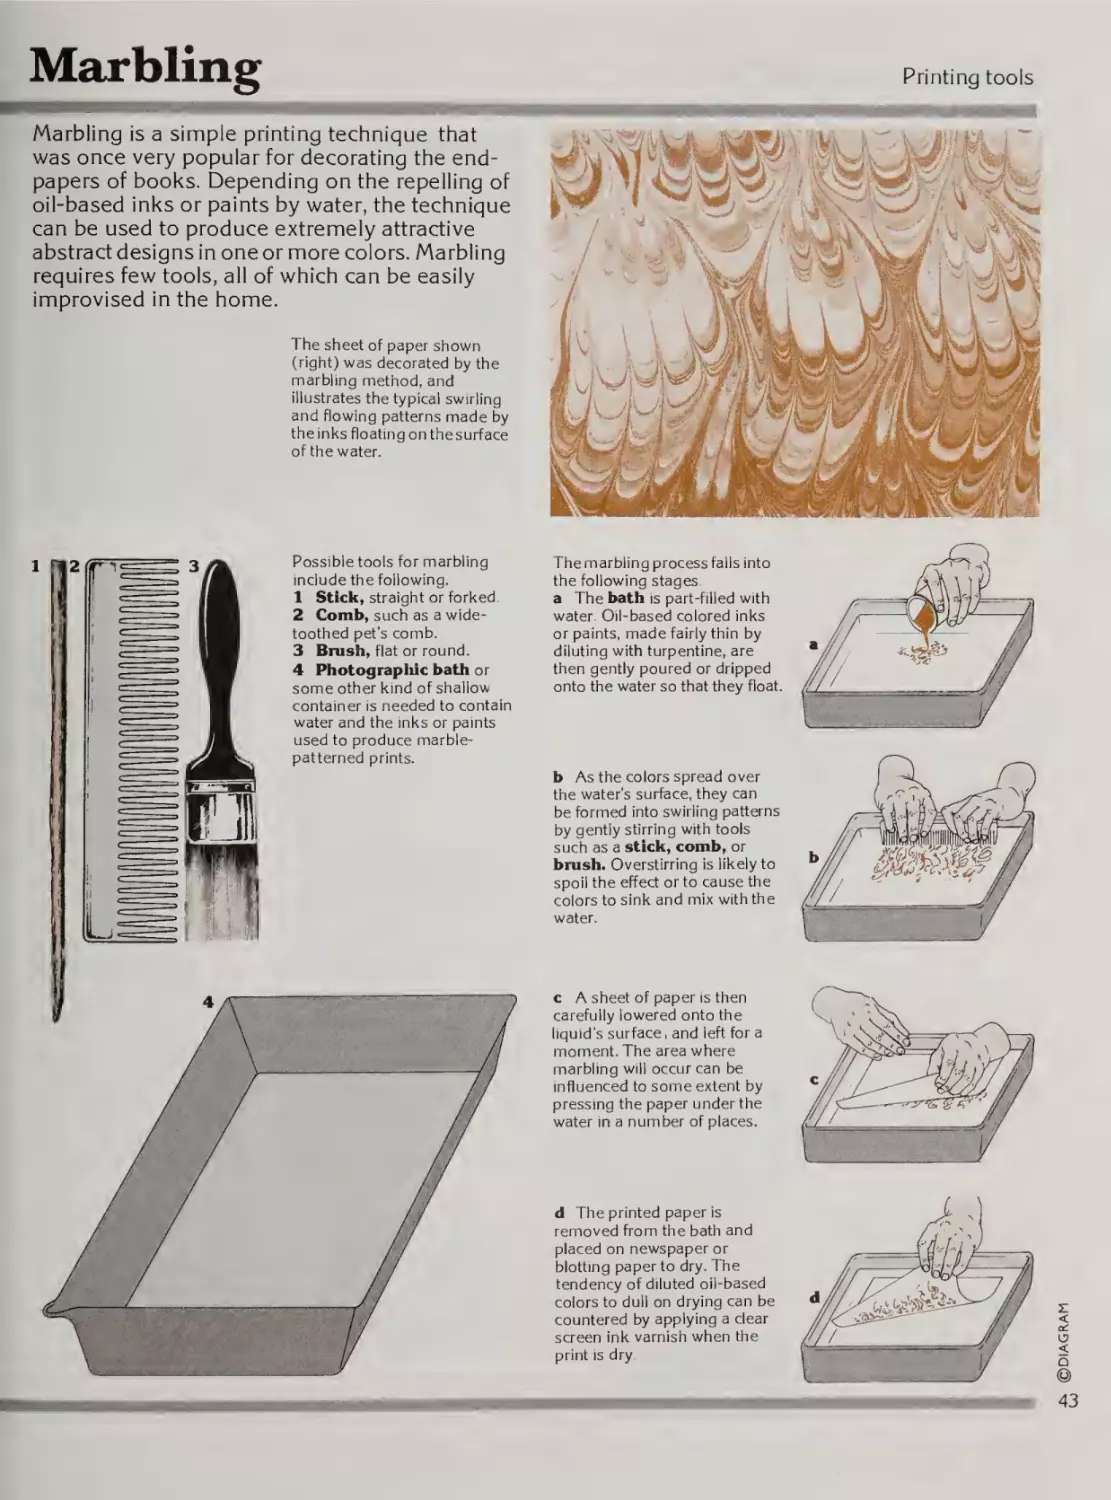
Marbling is a simple printing technique that
was once very popular for decorating the end¬
papers of books. Depending on the repelling of
oil-based inks or paints by water, the technique
can be used to produce extremely attractive
abstract designs in one or more colors. Marbling
requires few tools, all of which can be easily
improvised in the home.
mmm,.
The sheet of paper shown
(right) was decorated by the
marbling method, and
illustrates the typical swirling
and flowing patterns made by
the inks floating on the surface
of the water.
Possible tools for marbling
include the following.
1 Stick, straight or forked.
2 Comb, such as a wide¬
toothed pet's comb.
3 Brash, flat or round.
4 Photograpliic bath or
some other kind of shallow
container is needed to contain
water and the inks or paints
used to produce marblepatterned prints.
The marbling process falls into
the following stages,
a The bath is part-filled with
water. Oil-based colored inks
or paints, made fairly thin by
diluting with turpentine, are
then gently poured or dripped
onto the water so that they float.
b As the colors spread over
the water’s surface, they can
be formed into swirling patterns
by gently stirring with tools
such as a stick, comb, or
brash. Overstirring is likely to
spoil the effect or to cause the
colors to sink and mix with the
water.
c A sheet of paper is then
carefully lowered onto the
liquid's surface , and left for a
moment. The area where
marbling will occur can be
influenced to some extent by
pressing the paper under the
water in a number of places.
d The printed paper is
.
,
,
.«
DIAGRAM
removed from the bath and
placed on newspaper or
blotting paper to dry. The
tendency of diluted oil-based
colors to dull on drying can be
countered by applying a clear
screen ink varnish when the
print is dry.
ifi'nfT’V " ' t'
43
Lithography
Lithography is a printing process invented in
Munich in the 1790s by Alois Senefelder. A
greasy drawing on a special stone slab or metal
plate attracts printing ink, while the remainder
of the surface repels ink if wetted with water.
The process has great potential for artists since
it allows a whole range of tonal va lues as well as
lines of any thickness.
The lithograph on the right
was made by Franz Hanfstaengl
in 1834; it depicts Alois
Senefelder, the inventor of
lithography. The technique
became very popular in the
early 19th century for
reproducing portraits and for
printing music.
44
A lithographic stone is
prepared with these tools.
1 Levigator, an iron disk
with a handle and holes in the
center (see below for method
of use).
2 Muller, a glass or steel tool
used with pumice for finer
grinding.
The lithographer draws the
image to be printed onto a
prepared litho stone or onto
a commercially available metal
litho plate, usually made of
zinc or aluminum. A stone
gives a better print, but plates
are bought ready for use and
are easily portable.
A strong abrasive such as
silicon carbide sand is applied
to the wetted stone. The
lithographer then holds the
levigator by the handle and
rotates it rapidly over the
stone's surface (see right).
More sand can be applied
through the holes in the
levigator.
The drawing is made on the
dry stone or plate, using a
special greasy ink or a greasy
C
litho crayon or pencil.
Printing ink adheres to the
greasy areas, making them
appear on the print; non-greasy
areas will be white on the print.
3 Razor blade for scratching
and correcting.
4 Lithographic crayon.
5 Crayon holder.
6 Lithographic pencil with
greasy "lead.”
7 Brush for applying tusche
(greasy litho ink).
8 Pen for applying tusche.
9,10 Engra^ng tools.
Printing tools
Illustrated (right) are stages
in making a litho print,
a The stone is prepared,
b The drawing is made with
a greasy litho crayon,
c Talcum is dusted over,
d A brush is used to apply
gum etch, which is gently hosed
off some hours later,
e A nitric acid solution is
applied, and washed off after
a few seconds. This process
is repeated, and then more gum
etch applied.
f The greasy drawing is
washed out with turpentine,
g The stone is blackened with
asphaltum, to make the design
reappear, and then washed,
h The stone is inked,
i Paper is laid on and the
stone printed in a press.
5 Scraping tool may be
used to clean a leather roller.
Made of metal, the scraping
tool is shaped to fit over the
roller. The lithographer draws
it toward him over the roller
as shown below. Alternatively,
he may use the back of a
knife.
A hand press such as the
French star press (above) is
used for high-quality art prints.
As shown below, a leathercovered scraper applies
pressure from above as the
stone, with the paper on it, is
drawn through the press on
the movable bed.
iDIAGRAM
1 Brush with wide, flat head
may be used to apply etch
(gum arabic, water, and nitric
acid). The etch makes the
greased areas receptive to the
printing ink and helps to keep
ink off the rest.
2 Flag dryer makes gum
arabic dry more quickly.
3 Roller is used to apply
printing ink to the stone or
plate. The example shown is
made of wood covered with
felt and calfskin. Rubber rollers
are also used.
4 Leather handle grips are
put onto the roller to make
rolling easier.
Silkscreen
Silkscreening was first done by the Chinese,
using a paper stencil attached to a loose mesh
of very fine silk threads; for modern use, the
screen has been refined to a fine, evenly woven
mesh of silk or synthetic fiber. Ink is spread
across a stenciled screen, and only passes
through the areas of the mesh that are not
blocked by the stencil.
The detail on the right is
from a silkscreened Indian
poster for birth control. The
free, loosely defined areas of
flat tone are a characteristic
feature of this technique, but
the fine screening of the
writing demonstrates the
accuracy that is also possible.
Stencils can be applied to the
screen in many different ways;
some of the basic methods are
described here.
a) A stencil is cut from paper
or card and placed against the
screen during printing.
b) A liquid blocking-out
medium is painted onto the
screen to cover the areas that
are not to be printed; this dries
into a solid stencil that is
incorporated into the mesh of
the screen and cannot be
displaced.
c) A stencil film is cut, and
applied to the screen by heat;
this stencil also is firmly fixed.
d) Greasy lithographic
crayons or liquid wax can be
used to produce a stencil with
soft outlines.
e) The stencil is transferred to
the screen by photography.
The image is exposed onto soft
gelatin painted onto the mesh;
this hardens the areas exposed
to light. The remaining soft
gelatin is washed away, leaving
a stencil on the screen.
1 Lithographic crayon; this
is greasy, and produces a softedged mark on the screen.
2 Scissors.
3 Razor biade.
4 Paintbrush for applying
liquid blocking-out medium.
46
S
5 Scaipel.
6 Craft knife.
7 Spreader for coating the
screen with gelatin, blocking
medium etc.
8 Stencii brush with short,
firm bristles.
9,10 Cutter and marker for
use with wax stencils; these
tools can be used to scrape
away the unwanted areas of
wax.
Printing tools
3
The basic stages of silkscreen
printing are as follows,
a The image is applied to the
screen by any of the stenciling
methods.
b The paper to be printed is
placed on a flat surface and the
screen is locked into place
above it. Ink is spread across
the mesh with a squeegee;
this ensures an even deposit
of ink over the entire print,
c The screen is lifted, and the
print is removed and allowed
to dry.
TT
The frame for screen printing,
illustrated above, is generally
made from four battens of
wood fixed together rigidly.
The frame is then covered with
stretched muslin or nylon —or
any fabric with a very fine
thread and open weave—
which forms the screen.
DIAGRAM
1 Squeegee, used to spread
the ink across the screen in an
even film.
2 Spray can; the ink or paint
may be sprayed through the
stencil for particular effects.
]
47
Photography 1
.*'
—
....
^—■ ■•¥ ■■:•'•—■—
■ »
The camera has been described as the marriage
between art and science—success in
photography depends on a combination of
technical advances and the skill and instinct of
the user. Photography consists of recording the
pattern of light in the scene photographed onto
a sensitive film so that it can later be faithfully .
reproduced.
The photograph reproduced
(right) is demonstrating the
process of taking a picture with
a single lens reflex camera. The
subject is steadying the
camera while adjusting the
focus dial before taking the
photograph.
The chart below Illustrates the
development of the camera
from the ancient camera
obscura to the sophisticated
and specialized cameras of
today. The camera obscura,
on which the photographic
camera is based, was known
to Aristotle; If an Image in a
strong light is placed in front
11820
48
[40
of a darkened box with a
pinhole in one wall, the rays of
light will shine through the
pinhole and project the Image,
upside down and laterally
reversed, onto the rear wall of
the box. It was not until 1824
that It was discovered, by
Nicephore Niepce, that if the
wall was replaced by a light-
[60
[80
sensitive plate the image
could be made semi¬
permanent. His associate
Daguerre discovered how to
produce positive images, and
William Henry Fox Talbot
worked on producing a latent
Image for later development.
From this Idea of negative/
positive photography the
11900
[^
l40
modern cameras evolved; film
is exposed in the camera and
later developed to form a
negative. The positive print is
then processed and printed.
160
11980
Printing tools
The characteristics common to
all cameras are illustrated
(right).
1 Lens focuses the image
and refracts the rays of light
so that the image emerges
upside down and laterally
reversed on the film.
2 Diaphragm controls the
amount of light reaching the
film.
3 Shutter controls exposure
time; the shutter illustrated
slides up, butthe design varies
with camera type.
4 Film, light-sensitive so that
the image appears with dark
and light tones reversed.
Black and white film records
the various levels of intensity
in the light reflected off a
subject. The film comprises a
light-sensitive emulsion thinly
coated on a flexible plastic
base. At the moment of
exposure, the silver halides
suspended in this emulsion
begin to blacken under the
action of light, forming metallic
silver. This “latent” image is
invisible until development
begins. The developer
amplifies the effect of the
light, producing a dense black
in the most brightly lit areas
of the subject. Halides exposed
to the shadow areas of the
subject are not activated, and
are subsequently rendered
colorless by the fixer.
5 Black and white cylinder
to be photographed.
6 Lens focusing and inverting
the image.
7 Black and white film.
8 Black and white
negative, with the light and
dark tones reversed.
□ n □ □ n □ n
□ □□□□□□
Color photography is more
complex than black and white.
The lens projects the inverted
rays of light onto color negative
film. The film is made up of
three different color-sensitive
emulsions on a plastic base,
each of which reacts to and
halts the progress of light of one
color but allows the others to
pass through. Just as black and
white film reverses black to
white and vice versa, color
emulsions reverse each color
to its complementary.
9 Colored cylinder.
10 Lens.
11 Blue-sensitive emulsion
12 Green-sensitive
emulsion (producing
complementary magenta).
13 Red-sensitive emulsion
(producing complementary
cyan).
14 Color negative.
(producing complementary
yellow).
DIAGRAM
in black and white photography
the exposed film is taken from
the camera and processed to
obtain a negative image of the
subject. Light subject areas
will tend toward black on the
negative, and dark areas will
record as clear film. In the
enlarger, light is projected
through the negative onto
light-sensitive paper. This
paper is similar to film in its
reaction to light. Dark parts of
the negative will not allow
light to strike the paper, so it
remains white after it is
developed. Clear negative areas
let the light pass through onto
the paper, eventually
producing a dark image. The
result is a black and white
positive image of the original
subject.
Two types of film are used in
color photography. Negative
film is used in the same way
as black and white film, except
that colors as well as tones are
reversed. So a blue subject
will appear yellow, and a
green subject magenta. This
negative is enlarged onto a
color printing paper which has
the same characteristics—
changing yellowback to blue,
and so on.
Color transparency film is a
similar material, but undergoes
a totally different development
process. A blue subject, for
example, records directly as
blue on the transparency. This
original piece of film from the
camera is then mounted and
viewed by means of a hand
viewer or a slide projector.
Photography 2
Camera accessories are extra
pieces of equipment that are
added to the camera or used
with it for specific effects.
1 Lens cap used to protect
the lens from dirt and abrasion.
2
3
4
5
6
7
8
9
10
11
12
13
14
15
Standard lens.
Wide-angle lens.
Fish-eye lens.
Telephoto lens.
Zoom lens.
Lens hood.
Lens brush.
Filters of various kinds.
Light meter.
Light-diffusing dome.
Electronic flash gun.
Flash cube.
Cable release.
Tripod.
Processing equipment is
used for converting the film
into developed negatives or
transparencies.
16 Spiral insert for the
developing tank.
17
18
19
20
21
22
23
Developing tank.
Developing timer.
Measuring cylinder.
Film washing hose.
Glass stirring rod.
Bottle for chemicals.
Clips for holding the film
while it is drying.
24 Funnel to aid in pouring
the chemicals.
25 Heated drying cabinet.
Printing ecpiipment Is used
to convert negatives into
positive images.
26 Print enlarger.
2 7 Negative carrier fits i nto
the enlarger lens.
28 Masking frame used to
determine the shape of the final
image.
29 Dodger, a tool for
masking a small area.
30 Safelight, a dim lightthat
will not fog the paper.
31
32
33
34
35
36
Scissors.
Tongs.
Thermometer.
Measuring cylinder.
Automatic timer.
T^ays for chemicals and
water.
37 Print washer.
38 Print dryer.
50
Printing tools
.
■'
!
~
Taking pictures with any
camera involves these four
steps.
a The camera is loaded with
the film or plate that will receive
the initial image.
Film is processed by placing it
in a developer, a stop bath
and a fixer.
a The film is removed from
the camera and rolled onto
the spiral of the developing
tank. This must be done in
total darkness, otherwise the
film will be spoiled.
The image is printed by
exposing it onto light-sensitive
paper.
a Light is shone through the
negative and onto the paper.
A safelight provides working
illumination that will not affect
the printing paper.
b The correct lens for the
c A light meter is used to
d The camera is focused, that
proposed shot is attached to
the camera. Specialized lenses
can be obtained for virtually
any requirement, such as taking
photographs under water, or
through a microscope.
determine the length of time
that the film will be exposed
and the aperture to which the
lens should be set.
is, it is adjusted so that the lens
and film are the correct distance
apart for the subject being taken.
The camera is steadied, either
by hand or on a tripod, and
the shutter is released to expose
the image onto the film for the
required time.
b The spiral is placed in the
developing tank (containing
c The film is thoroughly
d The strips of film are
attached to clips so that they
developer) and agitated so
that all parts receive equal
amounts of the chemical. This
process is repeated with a
chemical that stops the action
of the developer, and finally
with a fixer.
b The paper is placed first in
a developer tray, then when
fully developed, rinsed in
clean water.
washed in dean running water
to rid it of all traces of the fixer.
c The image is made
permanent by using a fixing
chemical.
can be handled easily, and are
hung up to dry, ideally in a
purpose-built drying cabinet.
d The print is then washed
thoroughly in running water to
clear the surface of all trace of
fixer. When the washiing is
complete the prints are dried;
if a special print dryer is used
it will ensure that the prints
emerge flat.
Ui ©DIAGRAM
te.
Making books
The first books made from individual leaves
were those developed by the Romans, consisting
of wax tablets joined together at the spine. The
advent of parchment in the third century BC
led to the development of more portable leaved
books, although many works were still written
in scroll form on papyrus. Since those times,
books with individual leaves have been made
from strips of bamboo, palm leaves, wood,
ivory and metal, and bound together with thongs
of leather or plant sinew, or pierced and fitted
with metal hinges.
The modern book is made of sheets of paper
folded into leaves and fixed together at the
spine, where the folds meet. Tools for making
such books, by hand, from the manufacture of
the paper itself to the decoration of the binding,
are described and illustrated in this chapter.
Although all these processes have been
automated over the last two centuries, nothing
can compare with a book that has been made
from high-quality paper and bound and
decorated by a craftsman-bookbinder.
This print of a bookbinding
workshop comes from Diderot's
"Encyclopedia of Industries.” In
France in the 18th century, the
binding was not included in
the price of a book, and so the
purchaser had to enlist the
services of a binder.
52
m:
53
Papermaking
Paper is reputed to have been invented in China
in 105AD. Knowledge of papermaking techniques
gradually spread westward, reaching Europe
only in the 12th century. Today, most paper is
machine-made in factories, but traditional
methods of breaking down materials into pulp
and then reconstituting them into paper can be
easily adapted for use at home.
This Japanese woodcut shows
various stages in traditional
Oriental papermaking—
materials are being soaked in
a basket in the river, beaten
to a pulp with; sticks, and
dried in molds to form paper.
The craft of paper making
reached Japan from China
early in the seventh century.
Today, the Japanese still use
traditional processes to produce
a great variety of high-quality
papers. Examples of Japanese
papermaldng tools are shown
left.
1 Mold for making fine tissue
paper, usually from mulberry
bark. This modern mold has a
soft wood frame, copper hinges,
and woven silk over a bamboo
cover.
2,3 Wood block and small
knife used to split inner bark
from coarse outer bark.
4 Paper-cutting knife.
5 Mallet for beating bark.
6 Brush used for smoothing
moist pulp in the molds.
The basic procedures for
making hand-made paper are
quite simple to master. A
paper’s character depends on
the materials used and on the
smoothness of the pulp,
a A knife is used to cut plant
stalks into short lengths. Paper
or fabric should be torn into
squares.
54
b Stalks or fabric are put into
a galvanized bucket and
covered with water. Wearing
rubber gloves, the papermaker carefully adds caustic
soda. When the soda has dis¬
solved, he heats the bucket on
a stove, stirring until the liquid
boils, and lets it simmer 2-3
hours.
c After allowing the bucket's
contents to cool slightly, the
papermaker, again wearing
rubber gloves, carefully strains
the liquid from the fibers. The
pulp isthen thoroughly washed
under a tap, first in a sieve
and then in a square of closely
woven fabric.
d The pulp is now pounded,
either with a pestle and
mortar, as shown below, or
with a meat tenderizer.
Alternatively, an electric
blender may be used with
extra water. If he wishes, the
papermaker can next change
the paper's color by adding
various dyes.
Tools for making books
lowered into the mixture and
a layer of pulp collected on the
fabric mesh. As the mold is
lifted out, it is gently moved
from side to side to obtain an
even fiber distribution.
Other tools for home paper¬
making are shown here.
1,2 Knife and scissors to
cut the old paper, cloth, or
vegetable matter from which
the paper is to be made.
3 Wooden spoon for stirring
the fibers while they are being
softened in a solution of caustic
soda.
4 Sieve for straining liquid
from the fibers.
5,6 Neat tenderizer and
pestle and mortar for
pounding. The smoothness
of the pulp determines the
character of the paper.
7 Iron may be used to smooth
paper before sizing.
8 Electric blender, an
alternative modern tool for
obtaining a smooth pulp.
f
g The mold is placed on one
end to allow the paper to dry,
either in the sun on a warm,
breezy day, or near a radiator
or stove. When the paper is
dry it is remove d from the mold,
placed between blotting
paper, and pressed between
two boards for 24 hours.
If the papermaker is satis¬
fied with the texture, thickness
and evenness of the pulp in the
mold, he then tips the mold
slightly so that surplus water
drains off at one corner, as
shown below. If he is not
satisfied, he tries another dip
from the vat.
h For a smoother surface the
paper can be pressed with an
electric iron. To make the
paper suitable for use with
water-based inks or paints, size
(culinary gelatin) can be applied
with a brush. The paper is
then placed between blotting
paper and hung to dry.
DIAGRAM
e The pulp is next added to
water in a vat—perhaps a
plastic tray. The mold is then
The papermaker's most vital
tool ishismold. Asimple
home-made mold is shown
below. The wood frame is fixed
with waterproof adhesive and
brass screws. A closely woven,
man-made fabric is stretched
over the frame and held with
stapies.
@
55
Bookbinding 1
The binding of folded sheets of vellum into
book form dates from the 4th century. Wood
boards were used to keep the vellum flat and
so the early volumes were heavy and
cumbersome, but the introduction of printing
on paper meant that books became lighter and
more convenient in format, allowing the binder
to develop the more delicate side of his craft.
The craft of bookbinding is
illustrated in the woodcut on
the right, made in 1568 by
dost Amman for Hans Sachs’
“Standebuch,” or "Book of
Trades.’’ Sachs saw
bookbinding as one of the
noblest of the manual trades,
ranking it with goldsmithing.
1 Steel rule.
2 Pencil for marking the
boards and leather.
3 Shears or scissors.
4 Calipers or dividers used
to equalize measurements on
the book and the cover.
5 Bone folder; this
produces a smoother fold than
folders made of other
materials, and will not mark
the paper or the leather.
6 T-square used to ensure
that the lines of the book are
accurate.
7 Awl, needed for punching
holes in the cover boards.
8 Needles used for stitching
the sections to the cords or
tapes.
Tools for making books
paper. This is then formed
into concertina folds and sewn
at the spine, leaving the outer
edges of the “pages” still in
folds.
e Stitched full binding with
raised bands; the folded
sections of the book are
stitched to cords, which then
form the raised bands on the
spine.
f Half-binding; the spine and
corners are covered with a
second material, either leather
or cloth. (Quarter-bound
books have only the spine
reinforced.)
g Perfect binding, often used
for paperbacks. The pages are
held together at the spine by
glue only; there is no stitching.
1 Tenon saw used for
cutting the stitch marks into
the folded sections.
2 Backing hammer; the
spine of the book is beaten
with the hammer to make it
assume its characteristic curved
shape.
3,4 Cutting knives for
use on leather and paper.
5,6 Paring knives used
to thin the edges of the leather
before it is folded over the
cover. The knife with the
bound handle was made from
a sharpened saw blade.
7,8 Brushes for damping
and pasting the leather, and
for applying glue to the spine.
DIAGRAM
Many styles of bookbinding
have evolved to cater for
specific binding needs; some
of the main types of binding
are shown here (left),
a Ring binding, generally used
to bind single sheets that
cannot easily be sewn. Single
metal or plastic rings are
inserted through punched
holes.
b Spiral binding is similar to
ring binding, but the metal is
in a spiral.
c Stab-sewing, also used
mainly for binding single
sheets; a row of stitches is
made through the sheets from
front to back.
d Stitched Japanese waterfall;
these books are printed on
one side of a long sheet of
57
Bookbinding by hand has developed into a
highly skilled craft. Various machines have been
devised to aid the craftsman, but the actual
handiwork on the book, such as stitching,
backing and gilding, is still done entirely by
hand in order to maintain the high quality of the
work.
The illustration reproduced
on the right is of a craftsmanbookbinder in his workshop.
The nipping press in which he
is flattening a book is exactly
the same in principle as those
in use today.
The stages shown here are the
basic steps in producing a full
leather binding,
a The folded sections of the
book are placed in the correct
order and “knocked up" against
a flat surface so that their backs
are level. The sections are put
into a nipping press to flatten
them, and then into a iajring
press; cuts are then made
across the folds with a tenon
sawto produce stitching holes,
b The sections are placed
against vertical cords strung
from a sewing frame, and
stitched firmly through the saw
marks onto the cords. When
the sewing is completed the
cords are cut from the frame,
and the book is pressed again
to make it compact,
c The spine is lightly glued to
hold the sections in place, then
the raw edges of the pages are
trimmed either with a piow
or with a guiliotine.
d The book’s spine is rounded
by hammering it on a flat
surface, and then placed in the
laying press; the spine is
“backed" with a backing
hammer.
58
e The boards for the covers
are cut to size, and the loose
cords from the spine are laced
through the boards and ham¬
mered flat. A hollow spine is
attached to the backs of the
sections.
f The leather is cut to the
right size, and the edges are
pared or thinned with a sharp,
flatparing knife; this ensures
that they will fold over neatly
and easily.
g The leather is damped to
soften it and then pasted all
over to make it adhere to the
book. Thecornersaretrimmed
and the leather is folded over
the spine and boards,
h The endpapers of the first
and last sections are stuck
down to the insides of the
boards to neaten the appear¬
ance of the binding. The leather
is washed with damp cotton to
remove any excess paste; it is
then polished with a poiishing
iron if a smooth finish is
required.
i The binding can then be
decorated in various ways,
such as tooling, embossing etc.
Tools for making books
1 Card cutter is used to trim
the book's cover boards to the
correct size. The blade handle
is raised, the card is placed so
that the line to be cut coincides
with the edge of the block, and
the blade is brought down so
that it slices away the unwanted
card.
2 Ghie kettle is used with
scotch or animal glue. The
inner (removable) pot holds
the glue, while the outer layer
holds hot water.
3 Polishing iron is heated
and rubbed over the binding to
smooth the leather.
4 Nipping press is a small,
5 Knocking-down iron is a
powerful press used to keep
the book flat and compact
during binding. The book is
screwed tightly into the press
for short periods in order to
expel any air that might be
trapped between the pages.
heavy metal block used for
ensuring that all parts of the
book align correctly. The grip
of the iron can be clamped into
a press so thatthe edges of the
book can be knocked firmly
against the flat surface.
6 Plow is a tool for trimming
the pages of books. The book
is clamped into the vise, and a
very sharp blade is run along
the length of several pages at
a time. The blade is then
screwed in slightly further, and
.the process is repeated until
all the pages are cut.
7 Sewing frame used for
stitching the book sections
together. Tapes or cords are
strung vertically across the
frame; the backs of the sections
are laid against the cords and
sewn firmly to them and to
each other. The tapes can then
be cut away from the frame.
DIAGRAM
JL
@
59
Gilding
Gilding has been used to great effect in the
decoration of leather bookbindings, manuscripts
of vellum or parchment, and a variety
of other objects such as clocks and picture
frames. Gold leaf is made to adhere to a surface
by stamping with heated tools, or by burnishing.
Each of these basic processes is briefly
described here along with its tools.
Gold tooling on the jackets
and spines of books has for
hundreds of years been a
popular way of decorating and
enriching leather bindings.The
book shown (left) was made
for King Henry VIII of England,
and was blind tooled.
Gold leaf for gilding is obtained
in small books, as shown (left).
Books usually contain 25 very
thin, square sheets of beaten
23Vi karat gold.
Common leaf, made from
various alloys, and silver leaf
are also available.
Several items are common to
each gilding process.
1 Gilder’s cushion with wood
base and suede-covered pad.
The gilder lays gold leaf
on the cushion ready for used.
This example has a parchment
shield to protectthe gold from
drafts.
2 Gilder’s knife used for
cutting gold leaf.
3 Gilder’s tip is a thin, flat
brush used to pick up the gold.
The gilder draws the tip through
his hair to make the gold
adhere to it.
4 Latex eraser, very soft for
removing excess gold.
Heat is used to apply gold leaf
in the following way.
a With a brush or piece of
cotton, a special adhesive
called glair is applied over the
entire area to be gold tooled,
b Appropriate finishing tools
are heated (see below),
c Petroleum jelly is applied
thinly over the glair,
d A gilder’s tip is used to
position the gold leaf, which is
then pressed flat,
e Ffaiishing toois are cooled
to the correct temperature by
pressing them onto damp
cotton. They are then used to
stamp outthe required design,
since heat makes the gold leaf
adhere to the glair,
f Excess gold is removed.
Finishing tools used when
applying gold leaf by heat
include those shown (left).
5 Fillet for plain lines.
6 Roll for patterned lines.
7 Farthing wheel for curves.
8 Gouge for curved lines.
9 Center tool for a motif.
10 Letter tool, also called a
handle tool or hand tool.
11 Pallet for adding rules.
12 ^ring typeholder to
take letters for words.
13 Gilder’s stove, heated
electrically, with notches to
hold the tool handles.
60
Tools for making books
Gold was frequently used to
decorate the inside of books
as well as the outside,
particularly in manuscript
illumination. The detail (left)
is an illuminated and gilded
capital L from a decorated
manuscript.
The applications of gilding
can be extended for use on
carvings and statues such as
the one shown (right). The
statue is of a seated Indra, and
dates from the 13th century;
the gilding gives the whole
statue an air of opulence.
Examples of tools used for
burnishing gold leaf are
illustrated (left and below).
1 Quill pen with long slit for
applying glair.
2 Breathing tube.
3 Agate burnisher, also
known simply as an agate.
Different styles of head are
available.
4 Erasing knife.
5 Feather.
6 Bone folder, useful for
preliminary burnishing.
7 Awl with fine point.
Stages in the application of
gold leaf by burnishing are
illustrated (right),
a Working on a hard, flat
burnishing slab, the gilder
first dusts the surface to be
gilded with pounce, a fine
powder for removing grease or
moisture. A feather may be
used to dust off the pounce.
The gilder then uses a quill
pen to mark out the required
design in glair, a substance to
which the gold will adhere. Any
bubbles in the glair are pricked
out at once with a fine-pointed
awL
b When the glair is dry, the
gilder picks up a piece of gold
leaf with a gilder’s t4>. He then
makes the glair tacky by
breathing on it through a
breathing tube,
iDIAGRAM
I'
c The gold leaf is laid onto
the tacky glair, and then
covered with two sheets of
paper. The gilder then uses an
agate buri^her to rub over
the area to be gilded,
d The covering sheets are
removed, and the work
examined. An erasing knife
is used to correct mistakes.
61
4 Painting
Paint is a combination of dry pigment, a
binder and a liquid medium. The resultant
mixture determines, to some extent, the nature
of the tools of the painter. The most common
type of tool used by the painter is the brush,
which is sufficiently absorbent to hold the liquid
paint. The brush also has the capability, because
of the flexible nature of the bristles, of being
used in a variety of strokes so that the
appearance on the receiving surface can be
varied and regulated.
The precise qualities of the brushes chosen
depend on the characteristics of the paint itself.
Oil paints are sometimes used thickly, requiring
strong bristle brushes for their application. At
other times thin, translucent layers are applied,
requiring soft, absorbent hair brushes, similar
to those used in watercolor painting where the
medium is water and the paint is applied in thin
washes.
The nature of some paints, or of the ground to
which they are applied, requires more specialized
tools for their application. Fresco calls for
large quantities of paint to be applied rapidly
to the wet plaster ground, and so some fresco
“brushes” consist of pieces of sponge tied onto
handles. Encaustic, a technique popular in
Roman times, involved painting melted colored
waxes onto a panel and then “burning in” with a
heated metal rod. In this century a technique
has been developed for spraying pressurized
paint through a nozzle, known as an airbrush, to
produce very thin coatings of paint and even
gradations of color. As further new paints and
new painting methods are evolved, they will
inevitably be followed by new tools for the
painter.
The painting reproduced here
is a self-portrait by Rembrandt
van Rijn; the painter's brushes
and palette can be clearly seen.
One of Rembrandt's favorite
subjects was himself with his
painting tools, and he painted
many variations on the theme.
62
Watercolor
Water-based paints include the opaque gouache
and polymer paints, but the term watercolor is
used primarily for the technique of painting in
pure, transparent washes. Watercolor paper is
prepared by soaking it in water and then drying
it taped onto a board; the paper itself creates
the white ground, and diluted pigments are
painted onto it.
The detail (right) is from "The
Ghost of Samuel Appearing
to Saul,” a watercolor by
William Blake (1757-1827).
The head is that of the Witch
of Endor, who has called up
Samuel’s spirit; Blake's sensitive
use of the watercolor captures
her horror. Illustrated (left) are
Egyptian brushes and a palette.
Watercolor brushes and
accessories have been
developing and refining since
the 18th century, when
watercolors first became
popular in their own right
rather than as preliminary
sketches for oil paintings.
Brushes now come in a wide
variety of lengths, textures
and thicknesses; each type of
brush serves a different
purpose.
1 Palette is a porcelain, glass
or plastic surface, made either
flat or with reservoirs, used for
diluting the watercolors to the
required strengths. The
pigment, in block or paste
form, is mixed with water by
the artist.
2,3,4 Sable brushes are of
a very high quality, and the
hairs are very fine. Those with
long hairs or heads hold a lot
of paint and can be used for
large areas; short-headed
brushes can be used for small
areas and fine detail.
5,6 Ox hair brushes have
long heads to increase their
paint carrying capacity.
7 Hog hairbrush has a long
flat head and a square tip.
8 Large flat is a brush used
for color washing large areas.
9 Mahlstick is used to hold
the painter’s hand steady, it is
a light wooden rod, often with
a leather covered Dali at one
end.
64
'i-'f
Illustrated below is the
method of using a mahlstick
or rest stick (see left). The
stick is held in the palette hand
of the artist, and he uses it to
steady his painting arm as he
works.
Fresco painting
Fresco painting on plaster began over three
thousand years ago; it reached its peak ot
popularity in the Italian renaissance, but is still
used by some artists today. A cartoon, or sketch,
is drawn first and its lines perforated; the plaster
ground can then be marked through the holes.
Wet plaster is laid on the area to be painted,
so that the paints will combine with the plaster.
On the right is a fresco of the
head of a saint by Domenico
Veneziano; frescoes were
frequently of religious subjects.
The slightly luminous quality
of the face is produced as
much by the plaster ground as
by the fresco paint itself.
Shown (left) are an Egyptian
pestle and mortar.
1 Hawk, a hand held palette.
2 Scratch comb, drawn
over the first rough surface.
3,4 Trowels used for
mortar and plaster.
5 Float for smoothing the
various wall coatings.
6 Wetting brush for
damping the coatings.
7 Snapline and plumb
used to transfer straight lines
to the plaster.
8,9 Pouncing wheel and
perforating point for piercing
the cartoon.
10 Pouncing bag full of
charcoal powder. The bag is
rubbed againstthe holes in the
cartoon and marks the plaster
underneath.
11 Mortar and pestle used
for grinding colors.
12 Muller and slab, also
used for color grinding.
13,14 Spatula and palette
knife for mixing pigments.
15 Broad, flat sable brush.
16 Italian-style fresco
brush.
17 Swedish-style fresco
brush.
18 Fitch brush, with deeply
chiseled tip.
19 Square tipped brush.
20 Square pointed rigger
brush.
21 Liner brush for painting
fine contours.
22 Split tipped brush.
23 Sponge tipped brush.
a
Painting tools
Oil painting
Oil painting was first used extensively by the
van Eyck brothers in the 15th century. The
transiucence of egg tempera had proved
unsatisfactory for rendering the soft, deep
shadows of the newly popular realism in art,
and painters experimented first with oil glazes
over tempera and then with mixing the
pigments themselves into the oil.
This self-portrait in oils (right)
was painted by Velazquez in
1656. The artist has used the
versatility of the oil paint to
the full, laying it on thickly in
the highlights and blending it
delicately in the shadows.
1 Easel for holding the
canvas while it is painted.
2 Canvas pliers for
stretching the canvas.
3 Canvas scraper for
scraping impurities from the
surface of the canvas.
4 Palette on which the
paints are mixed, with
dippers, small paint pots.
The method of using canvas
pliers is illustrated on the left.
The canvas is gripped firmly by
the jaws of the pliers so that it
can be pulled very tightly
across the frame, and it is then
secured with thumbtacks or
nails.
66
[
Painting tools
IllMil iiiWj I ii in>iiwii_iiiiiTi]iiimj 11 l■n^ll^l _i iiiTiiiiiij^ iririP' i n
Illustrated on the left are some
of the many styles of palette
knife available for use with oils.
The artist uses a palette knife
for blending two or more colors
on his palette, and for applying
the paint to his canvas if he
wantsa particularlythick block
ofcolor. If he wishestoalterthe
consistency of his paint, he can
use a palette knife to mix it
with oiljthemostcommonoils
in use are poppy, walnut and
linseed.
Brushes for oil painting must
keep their shapes well so that
they produce consistent
strokes, and they invariably
have very long handles in order
to allow the maximum freedom
of manipulation. For thicker
paints, hog hair brushes are
used becauseoftheirfirmness,
while sable brushes are more
absorbent and are better for
thinner paint. Fan brushes are
used to blend one area of paint
into another on the canvas.
1
2
3
4
Round hog hair brush.
Flat hog hair brush.
Hog hair filbert.
Hog hair brush with the
bristles turning inward.
iDIAGRAM
5 Round sable brush.
6 Flat sable brush.
7 Sable filbert.
8 Pointed sable rigger.
9 Square pointed sable
rigger.
10 Fan brush.
67
Signwriting
Signwriting originated in the distinguishing
symbols displayed by shopkeepers over their
premises; such symbols are known to have
existed in ancient Egyptian, Greek and Roman
civilizations. Gradually, wording that identified
the proprietor or the trade began to be
incorporated into the pictorial signs, and
signwriting as we know it was developed.
The painting reproduced
(right) shows the painting of
an inn sign to celebrate the
Duke of Wellington's birthday
The sign is being painted in
public as part of the birthday
festivities.
1 Wooden quill-holder;
quills of different lengths can
be fitted onto the end.
2 GUiill filled with sable hair.
3 Hog hair brush with
square end.
4 Sable pencil, a brush
with a long, thin head of sable
hair. The brush can be used for
outlines and detailed work.
5 Hog hair brush, fanning
out to a square end.
A bridge is used to keep the
working hand at a distance
fromthe wet, newly painted
surface. The bridge is usually
made of wood, and the feet are
cushioned to protect the sign
from damage; the artist rests
his hand and arm on the flat
top of the bridge (below).
6 Square-pointed rigger,
7 Square-ended brush
with nylon bristles.
8 Vhrnishing brush with
hog hair bristles, used for
varnishing the finished sign.
9 Dippers, small wide pots
that: hold paint or thinning
medium.
10 Bridge used to keep the
artist's hand away from the
work.
11 Snap lines wound onto a
reel. These lines can be used to
produce temporary straight
guidelines.
11
68
A snap line or chalk line
consists of a length of twine
rubbed with colored chalk.
The line is secured tautly across
the work and then lifted away
in the center; when it is released
it snaps smartly onto the work
and deposits the chalk in a
straight line (below).
Airbrushing
Painting tools
Airbrushing is a technique that can be used to
achieve great delicacy and accuracy in detailed
tonal work. Color is propelled onto the paper in
a fine spray by compressed air; a skilled air¬
brush artist can control the flow with great
precision, blending and graduating tone very
smoothly or applying a flat tone.
The example ofthe airbrushing
technique shown (right)
illustrates the gradual shading
that can be obtained with this
method of painting. Strong
shadows and bright highlights
can be produced by careful
use of the brush.
The airbrush is held at the
angle shown below, so that
the ink will flow easily; this
position also allows the wrist
to move freely. The air hose is
wound around the wrist to
keep it clear of the paper and
the brush.
Before the airbrush is used,
the color is diluted to the
required strength, and the
reservoir ofthe airbrush is
filled with the solution. The
strength of color used may be
changed as work progresses
if a wide variety of tone is
required, or several different
colors may be used,
a The drawing to be airbrushed is covered with a self adhesive clear film (or ordinary
clear film attached with
transparent glue or gum),
b The areas to be colored
first are cut out with a scalpel
or frisket knife,
c The airbrush fills in the
exposed areas, while the
operator controls the density
of the color with the trigger on
the top of the brush,
d The colored areas are
covered with film again, and
further areas are removed,
e The procedure continues
until all the detail is complete.
The airbrush is powered by
compressed air, which is
supplied either by an electric
compressor (right) or by a
carbon dioxide cylinder.
The usual working pressure for
the brush is around 251b( 11 kg).
©DIAGRAM
Miniatures
Miniatures are tiny paintings, often portraits
designed to fit inside lockets. They are usually
not more than 6 inches in diameter, and can
be very much smaller, down to the size of a
pin-head. The greatest Western miniaturists
worked in England in the 16th and 17th
centuries, and were headed by the master
miniaturist Nicholas Hilliard.
The miniature reproduced
(right) is a portrait of Sir
Francis Drake, painted in 1581
by Nicholas Hilliard. The
painting itself is only 1!4
inches in diameter, which
means that the brushstrokes
on the ruff and the lace are
minute.
1 Pencil used to make the
original drawing.
2 Stylus for tracing the
drawing onto the ground.
3 Sable brush size 000.
4 Thumbtacks for holding
the paper over the ground.
5 Wns; when ivory is used as
a ground, pins are used to hold
the Ivory leaf still.
6 Chamois used to clean
grease from the grounds.
7 Pounce bag.
8 Paste brush; paste is
used to secure parchment and
vellum grounds.
9 Palette knife for mixing
the pigments.
10 Feather used to dust off
the pounce.
11 Oyster shell, a smooth
shell used as a palette.
12 Glass sleib and grinder
used for blending the pigments
into the liquid medium.
15 Magnifying glass on a
flexible stem to leave both
hands free.
13 Miniature palette.
14 Hand-held magnifier,
used when painting very fine
detail.
HHIIIITT
70
Tempera
Painting tools
Tempera is a water based paint that is mixed
with a binder of egg yolk and then blended with
distilled water. Tempera is generally painted on
a surface of white gesso which, combined with
the translucent appearance of the paint, gives
the final painting an almost luminous quality;
this was used to great effect in the many
tempera paintings of Botticelli.
The tempera painting on the
right is a portrait of Lionello
d'Este, painted in 1447 by
Giovanni da Oriolo. The
translucent quality of the
medium can be seen
particularly in the delicate
tones of the face.
6 Gesso brush.
7 Dropper, used to add
water to the egg binder.
8 Palette knife used when
mixing binder and pigments.
9 Egg separator; only the
yolk is used in the binder.
10 Tea strainer used to
strain the paints.
11 Sharp knife.
The ground for tempera is
often a wood panel; this is
smoothed with a rasp and with
sandpaper, and then coated
with gesso. Gesso is a mixture
of size—a kind of gelatin glue—
and whiting, and it gives a
smooth surface ideal for
receiving paint.
The binder is made by isolating
the yolk of the egg, and then
slitting it with a sharp knife
so that its contents can be
mixed with water and with the
pigments. The paint is then
strained, and is ready for use.
DIAGRAM
1 Rasp used for preparing the
wood grounds.
2 Sandpaper, also used to
smooth the grounds.
3 Size brush; size is the
preliminary adhesive and
sealant.
4,5 Glass rod and
thermometer used when
preparing size.
Stenciling
Stenciling is a method of transferring a design
by painting through shapes cut in a thin sheet
of metal, paper or a similar material. Stencils
can be used for tiny designs, such as initials or
small flower motifs, orfor giant designs suitable
for decorating an entire room.
The sprays of bamboo shown
(right) were made by painting
through a stencil cut from
heavy paper. The repeat
pattern was made by moving
the stencil farther along the
paper and repeating the
process.
Stencils may be bought readycut in many shapes, sizes and
designs.
7 Pattern stencils made in
waxed paper.
8 Alphabet stencils made
from thin metal.
1 Pencil for marking out the
design.
2 Sharp knife used for cutting
out complicated parts of the
design.
3 Scissors.
4 Bone folder used to crease
the paper when cutting a repeat
pattern.
72
5 Stencil brush for stippling
the paint through the cut design.
6 Sponge; this can be used to
dab paint through the stencil.
The technique for making and
using a paper stencil is illustrated
in the sequence (right),
a The chosen design is marked
out onto the paper with clear
lines.
b The design is then cut out of
the paper, using scissors or a
sharp knife; this leaves a paper
stencil ready for use.
c The stencil is placed flat on
the surface to be decorated, and
the paint is applied over the top.
The paint transfers onto the
underneath surface only where
there are holes in the stencil.
i
Tole painting and rosemaling are allied crafts
which both involve painting bright, attractive
designs, often floral in inspiration, onto a plaincolored background. The two crafts are products
of a number of influences; they have a
Scandinavian character, and also show an
affinity to traditional English barge-painting.
Illustrated (right) are examples
of rosemaling and tole painting
The tin coffee jug has been
decorated with rosemaling
designs, and the wooden
eggcup has tole flowers
painted on the outside.
The three main stages in tole
painting are illustrated (right),
a The wood to be decorated is
rubbed with wire wool to
smooth it. The background color
is then painted over the entire
surface.
b Thetoledesignsarebrushed
on with sable brushes; ideally
the artist should have a separate
brush for each color, so thatthe
clarity of the tones will not be
dulled.
c When the paint is dry, the
wood is varnished to give it a
glossy appearance.
Tole painting tools are shown
11 Brush basin used for
above.
cleaning brushes.
5,6,7,8 Sable brushes in
various sizes.
9 Palette knife for blending
the paints.
12 Covered palette; this
preventsthe paints from drying
up during the work.
13 Brush quiver,
^
10 Varnish brush; the wood
<
used for tole painting is often
varnished to protectthepainting.
O
cC
<
Q
@
73
5 Pictures without paint
Pictures without paint can be made from paper,
card, string, metal offcuts, natural objects—in
fact, from any solid material. Many types of
picture can be made from paper used in various
ways. It can be cut into two-dimensional shapes,
as in papercuts; this has for centuries been an
honored craft in Oriental countries. Paper can
also be shaped or folded into three dimensions,
as with paper sculpture and origami, or it can be
treated with a solid pigment as with brass
rubbing and scratchboard.
Natural objects such as flowers and shells can
be used to make pictures by arranging them
decoratively on colored grounds. This was a
traditional pastime at the turn of the century,
and the survival of many examples proves the
durability of such creations if they are carried
out carefully.
Synthetic materials in bright colors, shiny
finishes or unusual textures that are found in
stores or as part of everyday objects can be the
inspiration for modernistic collages. With a little
planning and an element of artistic flair, the
ordinary objects of today may become the art
of tomorrow.
The print reproduced here
shows a shadow artist at work
producing a silhouette. The
silhouette machine, as it is
described, is a chair with one
arm built up to form a screen.
The paper is inserted into the
screen, and the candle-light
projects the model's profile.
iCCO/W7lc7^£<iJL/^(7Uj£^£<f‘
^^J^ct.
caracT^e.
’c:^i^<rrois a. la, <Ly^^(5>Z4<3Zif 'le celle la/ne penrarirLc. ll y Irouf ’e 'c)e la. Ionic cfarixT
lexZLtccnip
^Incpc, '9c la, clarlc Darur Lm zDeec, tC Ic Izunl ak les canceuair aoec ifaciltie , tin. copril^rt
iridiL.ri/'ieuJC ,7?zais aia., n,'est pozni^orrunje par lutc imac^inaltan, bicn. ifiire^ tC pu nc o'-' attacoc.
^aere a, unc, exac/i/aPc scrupulciue On, ne relroiu,’c. pami 9ans la ccpi'e ie caraclcrc ae^atcte' pc 'annoncc
I’Or^iTLal, aiais Lc nc^a^^nc ^arix la,^waMe,—il y arprimcplus- 9c clincjj'e .
Collage
Collage is the process of building a picture by
securing solid materials onto a support. Paper,
metal, wood, glass and plastic can all be used in
collage. Natural objects such as seeds, pine
cones, branches, leaves and grasses can be
incorporated into attractive designs, and even
substances such as sand, ash and powder paint
can be used effectively.
The collage illustrated (right)
was made of old tickets from
a variety of sources. Stamped,
printed or patterned papers
and cards such as these make
ideal materials for collage.
1 Craftknife used for cutting
paper and plastic.
2 TWeezers for picking up
small objects.
3 Roller used to apply
adhesive.
4 Sieve; powder paint or sand
can be shaken onto the collage
through this.
76
C
5 Tin snips; these are sharp
cutters used for snipping pieces
of sheet metal.
6 Pliers, used to cut, bend
and form lengths of wire and
sheets of metal or plastic.
7 Sponge for spreading paint
or adhesive.
The precise technique of
building a collage depends on
the materials being used, but
the basic process is generally
the same. The background or
support for the collage is
chosen, and covered with glue
to make the materials adhere.
The materials are selected,
shaped if necessary, and
pressed onto the background
in layers. More adhesive is
applied to subsequent layers
as necessary. If paper is used,
it may be torn, cut, burned,
wrinkled or shredded to vary
the texture.
[
Decoupage
Picture-making tools
The name decoupage comes from the French,
meaning “applied cutouts.” The craft began in
the West in the 18th century, inspired by Oriental
lacquer work, and was a very popular recreation
in the following century. Cutouts are glued to a
hard surface, usually wood, then varnished and
polished to create a shiny, durable surface.
The box shown in this photo¬
graph has been decorated by
the technique of decoupage.
The cutouts were applied to a
prepared wood box, glued in
place, andthen varnished over
to produce a smooth finish.
I
1 Razor blade can be used
to trim a picture when it over¬
laps an edge, or to produce an
accurate match if part is to
appear on a box lid.
2 Scissors are used for
cutting out the pictures.
3 Sandpaper for smoothing
the coats of varnish.
4 Wire wool is used to buff
the wax in the final polishing.
5 Scalpel; this is very useful
for cutting the fine details of
delicate pictures.
6,7 Brushes are the best
tools for applying varnish.
DIAGRAM
The first stage of decoupage is
choosing an item to decorate;
this is rubbed down with sand¬
paper, painted with the
background color, then sanded
again. The cutouts are glued in
placetoform a pleasing design,
then up to ten coats of varnish
are brushed over the entire
surface, allowing each coat to
dry and then sanding it before
the next is applied. The whole
object can then be "antiqued"
with a brown stain if desired to
simulate aging; finally the
surface is waxed and buffed
with wire wool to complete
the glossy finish.
@
Flower pressing
Flower pressing is a craft that became very
popular in the 19th century, when the teaching
of botany in schools stimulated an interest in
collecting and preserving flora. Although some
flowers fade when they are pressed, others keep
their full colors. Leaves and ferns can also be
pressed with great success.
The decorative effects that can
be achieved by pressing and
arranging flowers may be seen
in the pressed flower picture
shown (right). The flowers
have been placed so that they
form an attractive arrangement
on the background.
A flower press, such as the
one above, can be built by sand¬
wiching sheets of firm card and
blotting paper between two
layers of ply. Pressure is applied
by tightening the wing nuts.
Alternatively, a heavy book,
or a scrapbook under weights,
may be used.
1 Secateurs, used to cut
flower stems cleanly.
2 Putty rubber, an eraser
that can be shaped into points
for cleaning small areas of the
mount between individual
flowers.
3 Toothpicks used for
applying the adhesive.
4 Wood rule.
Flowers and foliage must be
dry and undamaged before
they are pressed,
a The freshly cut flowers are
smoothed out and put between
sheets of blotting paper.
The flowers should not over¬
lap, otherwise they leave marks
on each other.
b The sheets of blotting paper
are placed between sheets of
card and positioned in the
press. The press is screwed
down, or, if a book is used, the
weights are placed on top of it.
The flowers are pressed for at
least six weeks; once they are
dry and flat, they can be
assembled into pictures and
designs.
T"»
Picture-making tools
'/'*
Eggshells, nut shells and seashells may all be used as
materials for pictures and
abstract designs. All the shells
produce intriguing textures,
and the surfaces may be
painted or varnished for even
more variety. Pasta shapes can
be used in the same way.
Shown here are an eggshell
mosaic (right) and a seashell
mosaic (far right). The seashells have been selected and
arranged according to their
natural tones; the eggshells
have been colored and cmshed,
and then arranged in a pattern
on the paper.
8
1 Rolling pin for crushing
shells.
2 Plastic bag holds the
crushed shells.
3 Gum spreader.
4 Nutcrackers.
5 IWeezers; these are used
for picking up tiny shells.
6,7 Orange stick and
cocktail stick for adhesive.
8 Darning needle used to
pierce shells for threading.
9,10 Pins and paperclip
for securing the work.
11 Fuse wire used in making
seashell flowers.
12 Cotton; this is soaked in
glue and used as a base for
seashell flowers.
Egg shells are very fragile, and
so require gentle handling to
avoid spoiling them,
a The shells are placed in a
plastic bag and gently CTushed;
a squeeze of the hand or a
light touch with a rolling pin
is generally sufficient pressure,
b Glue is spread over the
chosen backing material. The
pieces of shell are lifted one at
a time and placed into position
on the backing. The shells may
have been colored or varnished
beforehand, or the entire
surface can be varnished when
complete.
DIAGRAM
\
Shellwork
19
Papercuts
Papercuts may take many forms, from the child’s
string of paper dolls to the intricate beauty of the
traditional Oriental designs. The papercuts may
be made from a single sheet of paper, or cut
from several and joined or superimposed; which¬
ever method is used, careful choice of paperand
skilful cutting can make a pleasing work of art.
This traditional Chinese papercut is a fish shape called Fu
Kuei Yu Yu, and is a charm
meant to ensure that the
recipient would have abundant
wealth.
rr
7
w
as
i
Fasteners of various sorts are
used to secure the paper while
it is being worked.
5 Paper clip.
6 Brad.
7 Thumbtack.
8 Dressmaker’s pin.
9 Staple gun.
10 Glue stick.
1 Lino knife with a very
sharp blade.
2 Pinking shears for making
jagged cuts.
3 Awl made from a darning
needle held in a cork.
4 Bodkin used for piercing
heavy papers.
80
Other tools that are illustrated
elsewhere inthe bookare used
for drafting and designing—
for instance, pencils, pens,
crayons, rulers, set squares,
and compasses.
A simple papercut is made in
the following way.
a The design is drawn out
ontothechosen sheetorsheets
of paper. The pieces to be cut
away are clearly marked,
b Using a sharp knife or a
pair of scissors, the unwanted
portions are cut away from the
sheet, leaving a design made
from a continuous piece of
paper.
Symmetrical patterns and
doilies can be made by folding
the paper several times before
it is cut.
Silhouettes
Picture-making tools
A silhouette is a picture made by reproducing in
one color, usually black, the outline of the model.
The traditional subjectfor a silhouette is a profile
likeness, although in the 19th century the
clothing was often included so that the artist’s
skill could be shown in depicting the frills
and flounces of contemporary fashion.
The silhouette shown (right)
is a portrait of a young boy
made in cut paper. The artist
was one of the many seaside
artists who plied their trade
in the coastal resorts 20 or 30
years ago.
The tools required for
silhouettes are very simple; it
is the skill of the artist that
makes the silhouette
successful.
Small scissors.
Pencil.
Plastic eraser.
Pantograph.
Adjustable lamp.
The first method of producing
a silhouette is shown (right),
a The model is placed so that
the artist receives an exact
profile. A strong light is shone
behind the model so that the
profile is thrown into relief,
b The artist then cuts the
shape of the profile out of a
sheet of paper, using sharp
scissors so that every detail
can be accurately reproduced.
A second method of making a
silhouette is shown in the
sequence (right),
a The model is placed in front
of a screen, and a lamp is shone
so that the model's profile falls
clearly on the screen. The artist
then traces around the outline
of the profile.
b This outline can then be
reduced in scale with a panto¬
graph; the tracing point is run
along the outline, and causes
the marking pointto produce a
smaller version on a piece of
paper or card.
•DIAGRAM
1
2
3
4
5
b
@
81
Scratchboard and sgraffito
Scratchboard (scraperboard) was a very popular
medium for the artwork that accompanied 1950s
advertising. Although now largely superseded
as a commercial technique, especially since the
advent of cheap color reproduction, it remains
a popular craft for the individual artist. Using
only very simple tools, it is possible to produce
a wide range of effects.
Examples of scratchboard
(right) and sgraffito (far right)
are illustrated here. The
scratchboard shows clearly the
strong contrast achieved with
this method, while the sgraffito
uses several different papers
of varying tones and
intensities.
1 Pointed blade for cutting
very fine lines.
2 Rounded blade gives a
wider and deeper line.
3 Curved pointed blade
set in a holder; this blade can
lay bare broad areas.
4 Multiliner produces many
parallel lines with each stroke.
To make scratchboard the artist
coats specially surfaced board
with ink, generally using black
ink for the greatest contrast
in tone. When the ink is dry it
can be scraped away with
sharp tools to give effects
varying from fine lines to broad
plain areas.
Sgraffito work takes two forms.
One form uses the same
method and materials as for
scratchboard. However, when
the ink is scraped away a multi¬
colored background is revealed
rather than a white one.
The other type of sgraffito work,
shown here, involves cutting
through layers of paper.
The tools for this method are
as follows.
5 Clip used to hold the pieces
of paper together.
6 Scissors with curved blades
used for cutting.
Four or five sheets of exact
size paper are clippedtogether.
The pieces of paper should
vary in color and texture. The
scissors are then used to cut
through the different layers
in order to reveal the paper
below through the cut shapes.
82
E
w
Paper sculpture and origami
Picture-making tools
!
I
I
I
Paper sculpture consists of cutting out paper
shapes and scoring them to give a threedimensional appearance. Origami is the ancient
Oriental technique in which solid forms are built
up simply by folding sheets of paper. White
i paper is often used for both these crafts, in order
to give a strong light/shadow contrast to the
finished form.
j
!
The pig shown right has been
made in the ancient Japanese
technique of origami. Two
square sheets of paper were
shaped into a threedimensional form by a series of
complex folds.
I
'
I
!i
The underside ofthe flat paper
shapes is scored by running the
blunt biade or knitting
needie along the chosen line.
The scoring of the paper
produces two facets that slope
in opposite directions, and so
catch the light.
5,6 Bone foiders are used
to make the required creases in
origami paper. The sheet of
paper is repeatedly folded in
a variety of directions, so that
gradually a solid form is built
up with the folded paper planes.
DIAGRAM
I
1 Blunt pen-knife, used for
scoring lines on the paper
shapes.
2 Paper punch, used to
make holes for decoration or
fastening.
3 Knitting needie can also
be used for scoring.
4 Scissors for cutting out
the shapes.
arrsT-'s:
The art of brass rubbing began as a method of
reproducing ancient church memorial brasses,
but any well-defined raised or engraved surface
can also produce interesting results. Attractive
rubbings can be obtained from gravestones,
coal-hole covers, metal name plates, tooled
bookbindings, and even coins and medals. ,
The brass rubbing shown on
the right was made from a
brass of Sir Thomas Walsch
and his wife. The brass is in
Wanlip, Leicestershire,
England, and was made in
1393; the two figures are in
the traditional pose of effigies,
with their hands in the position
of prayer.
1,2 Cobbler’s wax or
heelball; these sticks of waxy
material produce the best
rubbings. They can be obtained
in several colors, and also In
gold, silver and bronze finishes.
3 Weight to hold the paper
in place while the wax is being
rubbed on.
4 Soft wide brush used to
clean the surface of the brass
before the rubbing begins.
Permission must always be
asked for a rubbing to betaken ,
in case the brass is old and
valuable, and might be
damaged.
a The brass is brushed dean,
and the paper is secured over
the surface with weights,
b The heelball is rubbed
firmly over the surface of the
paper, rubbing in one
direction only for neatness.
84
j Nails and string pictures
.-...
Picture-making tools
-
mails and string can be combined on a board
iito make interesting and delicate patterns. The
: shapes used as outlines are usually geometrical,
i so that the positions of the nails can be gauged
accurately. String, colored thread, woolen yarn
and metallic thread can be used to provide a
variety of effects against different colored
i backboards.
i
J
I'
The nail and string picture
reproduced here is a detail of
a red and silver abstract based
on the patterns made by sails
in a harbor. The nail and string
technique can be used to
build up layered pictures or
even three-dimensional
sculptures.
li
f
1
j
i
!i
1 Hammer used for knocking
the nails into the board.
2 Compasses, useful for
drawing accurate circles and
circle sectors.
3 Needle tool, made from a
darning needle stuck in dowel.
! This tool is used to prick outthe
preliminary nail holes.
4 Nail guide; the nail is
slipped into the slot and hit
home. When the guide is
removed, it leaves the nail
at a predetermined height.
5 Fisher; this tool also
ensures that all the nails are
pushed in to the same height.
6 Thimble.
DIAGRAM
Accuracy is the key to making
successful and evenly surfaced
nail and string pictures,
a The design outiines are
drawn onto the chosen backing
board, and nails are driven in
at regular intervals along these
outlines.
b The chosen string or thread
is secured invisibly to the
starting nail. It is then wound
to and fro across the design,
taking a turn around each nail
in sequence, before being
secured neatly to the final nail.
@
]
85
6 Clay and pottery
Clay requires three basic processes to turn it
into permanent, waterproof objects. The first
is that of shaping, performed when the clay is
softand malleableand has a high water content;
its plasticity at this stage enables it to retain
almost any shape and texture. The second
process is that of firing—driving off the water
chemically combined with the clay so that the
object is made permanently hard. The third
process, which waterproofs the clay, is glazing,
which involves fusing a layer of glass onto the
clay surface. All the tools of the potter relate to
one or several of these processes.
Shaped and baked clay has a long and involved
history, dating from 9000 years ago, yet in all
cultures that have developed pottery the basic
procedures are the same and so are the
principles of the tools used. Primitive tribes use
shaped sticks and textured tools to form and
pattern the clay, just as the sophisticated
commercial potter does. The nature of the kiln
differs throughout the world, from the bonfire
of African tribes to the modern gas or electric
kiln, but the method of stacking and slowly
firing the clay is universal. Despite the
chemically controlled content of glaze used in
modern times, the potter uses pouring, brushing
and dipping tools to apply it just as his ancestors
did. The basic nature of pottery tools for each
of the various processes will not change because
the basic nature of clay remains the same.
1 ■ iJ
\ ■
mm
The pot shown here is an Attic
red-figure vase in the beilcrater style, and was decorated
by the Komaris painter c. 430425 BC. The pot shows a
potter’s studio of the time; the
figure on the left is painting a
color decoration on a pot.
86
87
Clay preparation
Pottery is the art of shaping and molding pliable
clays, and then firing them ina kilnto renderthe
created shapes firm and stable. Clay in its original
state is suspended in water; firing drives off the
water that is chemically combined with the
constituent materials, and fuses them together.
Glazes are often added to make the ware
waterproof.
This illustration is from
Diderot's “Encyclopedia of
Industries,” published in the
18th century, and shows a
man at work preparing clay
for making crucibles. He is
mixing the new constituents
with broken biscuit-fired pots
to give the new mixture added
strength.
Pottery has been an instrinsic
part of most civilizations for
so long that archeologists
have been ableto learn a great
deal about the lifestyles and
technology of past cultures
through pottery relics. Clay
has been used in the past to
fashion everything from waterpots to images of gods. Each
civilization has had its own
local clays, its own methods of
shaping and firingtheclay,and
its own uses for the finished
pots, and this variation has
meant that the modern potter
has a rich heritage of design
and technique to inspire him.
88
Illustrated (below) are some
traditional Chinese tools for
shaping soft clay.
1,2 Clay-beating hammers
used for building up large clay
vessels without the use of a
potter’s wheel.
3,4,5 Hammer-stamps;
the face of each stamp bears
a relief carving, and the stamps
are used for decorating the
surfaces of clay pots.
Before clay can be used for
successful pottery, it must be
thoroughly prepared. Wedging
is the term used to describe
the process of expelling the
air from the day and ensuring
that the clay body is thoroughly
mixed.
a The ball of clay is cut in half
with a wire.
b The hemispheres of clay are
placed on top of one another
with the cut sides of both pieces
facing up; this ensures that the
center of the original ball of clay
is exposed to the kneading
action.
c The two bits of clay are
thoroughly kneaded into one
another sothat any hard lumps
will be broken down, and all
air bubbles will be expelled,
d The clay is reformed into a
ball.
e The process is repeated, as
many as twenty times, until the
clay is thoroughly mixed and
smooth.
Clay and pottery tools
a Coiling is one of the simplest
b Slab ware is made from
c Thrown pottery is a term
d Molded ware is pottery that
methods of producing clay
pots. Cylindrical strips of clay
are formed from the clay body,
and then coiled on top of one
another on a solid base; the
final coiled texture can either
be left as it is or smoothed off.
slabs of clay that have been
rolled out to an even thickness
and cut into flat shapes. The
slabs are formed into pots by
sealing the joins with wet clay,
or by pinching the slabs
together at the corners where
they join.
describing ware that is formed
on a flat, rotating wheel. The
clay is placed on the center of
the wheel, and as itrevolvesthe
clay is molded by hand pressure
or with tools. The circular
motion ensures that all sides
of the pot are even.
has been formed by pressing
the clay against, or into, some
kind of mold. Simple shapes
can be formed by pressing the
clay by hand against a shallow
plate or basket; industrial molds
shape the clay on both the
inside and the outside.
Clays used by the potter are
usually clay bodies—
compounds of various clays
and other constituents. Primary
clays are decomposed volcanic
rocks found on their original
sites; they are therefore fairly
pure. Secondary clays contain
traces of other matter such as
iron. Each clay has its own
firing temperature and gives
particular qualities to the
finished article, so the potter
mixes the clays in appropriate
proportions in orderto produce
ware with specific qualities.
To the basic clays he may add
various constituents to alter or
improve the thermal
expansion, plasticity, fusion or
color of the clay body so that
he can determine the character
of the finished product. Clay
shrinks as it dries, but the
shrinkage can be predicted
and controlled by careful
selection of the constituents.
1 Test sieve used to regulate
the composition of clay slips.
2 Sieve.
3 Stiff brush for working the
clay through the sieve.
4
5
6
7
Smali brush.
Potter’s knife.
Fettling knife.
Clay harp, used for cutting
even slabs of clay.
8 Clay wire.
9 Twisted clay wire forthick
DIAGRAM
or coarse clay.
Working with soft clay 1
Soft clay is very pliable, and can readily be
shaped and modeled by pressing, cutting, and
carving. The clay can of course be modeled with
the hands, but the many different tools that are
available produce cleaner lines, smoother
finishes, and more accurate marks on the clay
than can generally be achieved with hand
shaping.
The head shown (right) was
formed from soft clay that was
worked in a variety of ways
to achieve the desired effects.
The clay was kneaded, rolled,
stretched, and also impressed
with tools to form the features.
1,2 Bamboo tools, useful
for cutting, trimming and
decorating clay.
3,4 Boxwood ribs; these are
used for forming thrown ware
into accurate shapes and dimen¬
sions. The ribs are held against
the day shape as it rotates on
the wheel.
5,6 Rubber kidneys.
90
7,8 Calipers used for
checking the dimensions of day
articles. The arms of the calipers
are on a pivot so that they can
be extended and used for both
internal and external measure¬
ments of hollow articles.
9 Template for shaping the
sides of thrown pots to a given
contour.
Clay and pottery tools
1 Piercer with a semicircular
cutting blade. This tool can be
used for pierced work, or for
cutting accurate holes for
spouts etc.
b Caiipers can be extended
so that the points curve out¬
ward. In this way they can be
used to take accurate
measurements of the internal
dimensions of the pot.
2 Needle tool; used mainly
for trimming the rims of thrown
ware, but can also be used as a
stiletto for pierced work.
c A template is held against
the outside of a thrown pot. As
the wheel turns the pot, the
template molds the outside
surface of the article to a
uniform shape.
d Turning tools are sharpbladed tools that are used to
shape a thrown pot as it is
being turned on the wheel. As
the tool is held against the pot,
it incises the clay.
3 Stem tool with a variety
4 Ibrningtool with a
of heads. The tool is held
against pottery thrown on the
wheel; each shape of head will
make a distinctive line or curve
in the clay.
variety of heads. These tools
are used mainly for shaping
rims and bases on thrown ware.
iDIAGRAM
A shaping rib is held
against the inside of a thrown
3ot. As the wheel turns the
3ot, the rib molds the inside of
:he pot to a uniform curve.
1
Working with soft clay 2
The plastic nature of soft unfired clay means
that clay shapes need not be sculpted from a
solid lump, but can be built up from many
separate pieces of clay. When making a figure
or a coiled pot, pieces of clay can be joined by
smoothing and molding them together, or by
smearing wet clay onto the join; either method
produces a firm bond.
The terracotta figures
illustrated (right) are from the
sanctuary of Ayia Irini, Cyprus.
The figures, which portray a
wide variety of men, beasts
and gods, were made in the
7th or 6th century BC.
1,2,3,4,5 Boxwood tools
in many shapes and sizes.
These tools serve a variety of
purposes; the larger tools can
be used for forming large pieces
of modeling, while the smaller
tools are used for detailed work
on sculpture and decorative
ware. The tools with serrated
or pointed edges can be used
for producing textures and
patterned finishes on a wide
variety of clay work.
6,7,8,9,10 Mfire ended
tools used for carving clay and
for hollowing out pieces of
sculpture before firing. The
tools can also be used on
the surfaces of clay sculpture.
The effect that each tool
produces depends on the
shape of its head.
The smooth-wire heads are
suitable for soft clay, while the
twisted-wire heads are useful
for thicker or coarser-textured
clay.
Clay and pottery tools
"
Coiled work is perhaps the
simplest way of forming pots,
although very attractive and
decorative results can be
achieved with variations of the
basic method.
a Accurate cylinders of clay
are cut from a block with a
coUer, rolled by hand or
extruded.
1,2,3,4,5 Ribbon tools in
various shapes and sizes. The
heads are formed fromthin, flat
strips of steel that make the
tools both sharp and strong.
They are used for all kinds of
cutting, slicing and sculpting
work.
b A base is formed by coiling
c Other cylinders of clay are
d The pot is built into the
one of the lengths around itself
on a flat surface. The day is
pressed together in each part
of the spiral to ensure that the
base is firm and solid.
coiled on top of one another
around the edge of the base.
As the end of one length is
reached, another length is
molded onto it and the coiling
continues.
desired shape, and the end of
the final coil is smoothed into
a rim. The ribbed sides of the
pot can be smoothed out, or left
in their attractive pattern.
6 Coiler, for making the
7,8 Loop tools; these tools
cut out different shapes of clay
depending on the formation of
the head of the tool. They can
also be used for carving feet or
decorative lines into thrown
pots.
accurate cylinders of clay
needed for coiled work. As the
coiler is drawn through a lump
of clay, it cuts out a length of
clay that is always of an even
circumference.
DIAGRAM
Illlll"
93
Thro wn pottery
Thrown pottery is the name used for pieces that
have been shaped on a rotating wheel in order
to give them an even, circular form. As the art
of pottery has developed, the potter’s wheel
has become more sophisticated, but primitive
tribes still form pieces on the same kinds of
simple rotating surfaces that their ancestors
used many centuries ago.
The illustration included
(right) is from dost Amman's
"Standebuch" or “Book of
Trades,” and depicts a potter
throwing a pot. The potter is
turning the wheel by moving
its support with his feet.
1 Throwing stick used for
shaping narrow necks and
curves on thrown pieces.
2 Sponge holder; the long
handle enables the sponge to
be used for mopping out the
insides of tall or fragile pieces,
3 “Elephant ear’’ sponge
for smoothing the surfaces of
thrown pots.
4 Mandrel; this is used in the
formation of hollow spouts for
teapots etc.
5 Plaster batt, a porous
surface on which the pot can
be dried without adhering.
6 Pot lift for removing the
pot from the wheel.
7 Electric wheel, controlled
by either hand or foot pressure.
The potter sits in front of the
tray, and can control and vary
the speed of the wheel by using
the foot pedal or by moving the
handle atthe side of the wheel.
The advantage of the footoperated control is that it
leaves both the potter’s hands
entirely free for shaping the
clay.
t
j
Clay and pottery tools
Rotating wheels have been
used for many years as a
method of producing accurate
circular pots.
a The simplest method of
rotating the pot involves placing
it on a small flat surface that
can be lifted and moved round
as required.
b The addition of a spindle
and flywheel makes the work
of turning even easier. The
potter can simply spin the
wheel with his hand to rotate
it, without having to lift the
surface bodily.
c A treadle can be fixed to
the spindle so that the potter
can rotate the wheel with his
foot, by a simple rocking
motion. This leaves both his
hands free to control and shape
the clay.
d The incorporation of electric
power in moving the spindle
means that the potter has even
finer control over his wheel.
Subtle changes in foot pressure
will produce the exact speed
required for every stage of
the work.
Articles such as teapots, cups,
casseroles etc. can still be
thrown on a wheel despite their
irregular shapes. The basic
body ofthe piece is thrown,
andthen handles, lips, lids and
spouts are molded separately
and attached to the body,
a Circular lids can be thrown
on a wheel in the ordinary way;
they can be made the right
way up and then hollowed
out, or they can be thrown
upside down.
b Handles can be formed in
several different ways. The
traditional tapered shape is
made by drawing out a large
piece of clay into a curve, and
cutting it at appropriate points.
Other kinds of handles can be
made from coiled or molded
clay.
c,d Spouts can be formed on
a mandrel. A clay slab is cut
to the right size, and molded
and sealed around the mandrel;
the cone of clay is removed
and cut to the required angle.
Holes are cut in the clay body,
and the spout is fixed to the
perimeter.
e The separate pieces are
molded onto the body, and
sealed using wet clay.
The basic principles of pot
throwing apply to all kinds of
I pieces produced on the wheel,
although of course the final
size and shape of the pottery
will depend on the potter's
I choice.
i 1 The clay is formed into a
ball and held abovethewheel,
and then thrown onto the
wheel as near the center as
possible. The wheel is then
turned while the clay is
manipulated into the exact
center and formed into a cone.
2 As the wheel is turned, the
potter’s thumbs are pressed
into the middle ofthe clay; this
begins to form a rudimentary
hollow shape,
3 The potter uses his hands
and various tools to press
againstthesidesofthepot. He
can increase the height of the
pot, and shape the sides to the
required contour.
4 The inside of the pot is
smoothed in the same way as
the outside—by the pressure
and movement ofthe potter’s
hands and tools.
5 When the pot is the right
shape and size, the potter cuts
it free by drawing a wire
between the pot and the wheel.
The pot is then removed and
allowed to dry before it is fired.
DIAGRAM
i
5
Slab-formed pottery
Slab-molded pots are items that are formed from
flat slabs of clay. The slabs are rolled out and cut
into appropriate shapes, and then built into a
structure by joining the pieces firmly at the
edges. Curved forms can be made by bending
the slabs, and the surfaces of slab work can be
textured and decorated for added variety.
The picture (right) shows a
clay structure made by the slab
method of building up pottery.
The rectangular shape of the
house lends itself well to this
technique, and even the tiles
could be cut from clay slabs.
The principle of slab ware is
very simple, and the slabs can
be cut and formed into a wide
variety of shapes,
a The clay is rolled out to an
even thickness on a specially
formed board. The runners at
the sides of the board ensure
that the pressure of the rolling
pin is evenly distributed across
the clay.
b The slabs are cut into the
shapes required, using a sharp
knife in order to obtain clean,
accurate edges.
c When they are dry enough to
be handled without damage,
the slabs are joined at the
corners or overlaps. Wet clay
can be used to seal the joins,
or the two pieces can be firmly
pinched together. Crosshatching with a sharp tool
and the addition of water make
the joints neat,
d The joining process is
continued with all the slabs to
produce the final shape.
1 Modeling board with wood
runners at the sides. As the
clay is rolled, the runners
govern the thickness of the
slab.
2 Rolling pin used for rolling
out the clay,
3 Knife for cutting the slabs
into the required shapes.
Molded pottery
Clay and pottery tools
Complete clay shapes can be molded whole in
several different ways. In slip-casting, the object
may be shaped on all surfaces; with press
molding, the mold shapes only one surface while
the pressure applied shapes the other. Molds can
be bought ready-made, or they can be made
from existing objects or from a master shaped
by the potter.
The photograph reproduced
here showsthe modeling room
at a large Scottish pottery. The
worker in the foreground is
about to fill a plaster slip¬
casting mold with liquid clay
in order to cast a pot.
Shown above are two types of
Ij press mold.
I 1 Hump mold; the clay is
pressed over this mold to form
a hollow vessel,
i 2 Hollow mold; the clay is
i pressed into this mold and the
I inside of the vessel is flattened
by hand with a sponge or
I rubber kidney.
A plaster mold can be made in
the following way.
a The shape is surrounded
by a watertight barrier,
b The liquid plaster is poured
around the shape,
c When the plaster has set,
the completed mold is removed
and dried.
Slip casting involves pouring
slip (liquid clay) into a porous
hollow mold. The water in the
slip drains away, leaving a firm
clay shape inside the mold,
a Slip is poured into a twopiece mold through channels
in the top; an escape hole for
air allows the slip to reach all
parts of the mold by preventing
air locks.
b When the water has soaked
away from the slip into the
porous mold, both halves of the
mold are removed. Any seam
lines, or marks made by the
slip channels, are smoothed off;
the clay shape Is lifted off the
mold, dried, decorated, and
fired.
DIAGRAM
In press molding, slabs of clay
are pressed against a pre¬
formed shape, usually of
plasteror clay.
a If a hollow mold is used,
the slab of clay is pressed firmly
into the hollow of the mold.
If a hump mold is used, the
slab of clay is pressed firmly
over the mold,
b When the clay has dried
sufficiently it can be lifted
away from the mold; it is then
dried completely and decorated
and fired as required.
Raku pottery
Raku is a rapidly fired pottery that developed in
Japan. The ware gains its characteristic
appearance from the greatly sought-after
accidental effects that result from the rapid
firing and cooling. Raku bowls are often used in
the Japanese tea ceremony, as these accidental
effects provide excellent subjects for the
contemplation that is central to the ceremony.
The raku bowl illustrated
(right) was made in the early
17th century by the raku
craftsman Donyu. The bowl is
for use in the tea ceremony,
and is called Tamamushi—
translated as "a beetle with
burnished wings.”
The elementary steps toward
producing raku pottery are
described here, and pictured
in the diagrams (right),
a The pottery is formed into
the chosen shapes and given
a preliminary firing; it is then
covered with glaze,
b By means of the longhandled raku tongs, the pots
are placed into a pre-heated
kiln and become shinyjthe
pottery is then removed from
the kiln.
c The hot pots are shut into
an airtight container of com
bustible materials, in order to
produce the characteristic raku
finish.
d Using the tongs, the pots
are then plunged into cold
water so that they cool very
quickly.
1,2 Raku tongs with jaws
at different angles. The tongs
are used for lifting the ware
into and out of the kiln, and
for holding the pots while they
are placed in combustible
materials and quenched in
water.
Additional equipment
Clay and pottery tools
.
General accessories useful to
1 the potter include protective
i clothing, and equipment for
storing and measuring the raw
materials.
j
I
1 Storage bin.
, 2 Balance scales.
3,4 Storage canisters.
' 5 Asbestos gauntlet, used
for protecting the hand against
heat.
6 Rubber gloves for
protecting the hands from
contamination.
7 Protective goggles for use
when dealing with chemicals
or high temperatures.
8 Dust mask.
Additional tools for the potter
: include many items for handling
and preparing the days and
glazes.
9 Ladle, for measuring out
rough quantities of liquid.
10 l\ib; this can be used for
mixing slip or glaze.
11 Adjustable modeling
stand with free-spinning
turntable.
12 Tongs.
13 Funnel for transferring
liquids from one container to
i another.
. 14 Bucket, used for storage
I or mixing glazes, plaster etc.
|: 15 Electric mixer; the
! motor-driven blades are on a
j shaft that fits into the tub and
hooks over the top.
> 16 Electric vibrator sieve
DIAGRAM
used to refine large quantities
of slip or glaze.
! 17 Blungerforthethorough
' mixing of slips or glazes. The
blunger is filled with water, and
then the dry materials are
added to the water.
18 PugmlU, a machine used
to recondition waste day.
@
99
Relief decoration
Much of the decorative quality of pottery can
come from marks, patterns and textures made
in the clay itself; that is, from some kind of relief
decoration. Virtually anything can be used to
mark clay, from fingernails to fabric, and every
object or tool used will leave its own distinctive
mark.
Shown (right) is a detail from
an 18th century oviform
earthenware jug. The jug was
made bythefirm ofWedgwood
at the Etruria pottery works,
and is ornamented with
cameo leaves in a decoration
known as amorini black.
1,2,3,4,5 Steel forming
tools with a variety of heads.
7,8 Roulette with various
heads. Each head carries
Some of the heads have coarse
or fine teeth, others have
smooth edges, and some of the
tools have heads that are at
an angle to the body. The
curved shapes of many of the
tools make them particularly
useful for reaching into crevices
and curves of clay models and
sculptures.
6 Steel scraper or palette
with a serrated edge. Steel
scrapers come in various
shapes and sizes, and can be
used to texture large areas of
clay.
a different pattern; as the wheel
is rolled across the work, the
design is impressed into the
clay.
9,10 Plaster stamps made
in several different patterns.
Plaster powder is mixed with
water and then poured into
a mold; when the plaster
has set it is removed from the
mold and carved into the
required shape to make a
relief stamp. The stamp isthen
used to mark the clay, and if
a repeat pattern is wanted the
same stamp can be used
several times.
Clay and pottery tools
Relief decoration may also be
achieved by applying separate
pieces of clay to the pot or
other article. Several tools can
be useful for shaping clay to be
used in applied decoration.
1 Extruding tool with
several heads; the clay is forced
through the head and emerges
in a regular shape.
2 Cutter; these shaped
blades are used in the same
way as cookie cutters.
3 Tea strainer for producing
clay strands.
4 Paddle used to beat clay
additions into the surface of the
article being decorated; this
produces an interesting ripple
effect.
Some of the tools that can be
used to produce relief decor¬
ation on pottery are shown at
the right. The lines of pattern
on the pot below illustrate
the characteristic marks made
by each of the tools.
5
6
7
8
9
Piercer.
Clay plane,
Bamboo tool.
Blunt tool handle.
Ruler, used for making
straight marks on the clay.
10 Needle tool, used to
produce stippled designs and
to make fine lines.
11 Quill for producing a
scratchy line.
12
13
14
15
Loioptool.
Sgrafflto loop.
Sgraffito tool
Texture brush with
stainless steel bristles.
©DIAGRAM
Surface decoration
The surface of pottery can be decorated by
means of colored or textured glazes. Powdered
glaze is mixed with waterand applied to the clay;
when it is fired the glaze melts, producing a
waterproof layer of glass on the surface of the
pottery. Glazes can be applied to entire pots, or
put onto the surface of the clay in patterns.
The photograph (right) was
taken in a Danish porcelain
factory and shows an artist
hand-painting the porcelain
with colored glaze. When the
decoration is complete, the
piece will be re-fired to make
the decoration permanent.
1 Flat glazer; this brush is
soft and broad so that it leaves
no brush marks in the glaze.
2 Glaze mop, a brush that
holds a good deal of glaze so
that it can be floated onto the
pottery.
3 Ladle used for pouring
glaze over articles.
4 Tongs for gripping ware
while it is being dipped.
5 Plate dipper, a contraption
that fits onto the fingertips and
holds a plate lightly so that it
can be glazed without finger¬
marks.
6 Spray gun used to apply
an even coat of glaze.
102
Qlaze can be applied to pottery
in many ways. One of the most
straightforward methods is
that of dipping the vessel into
a container full of glaze, and a
similar technique involves
pouring the glaze overthe clay
piece. Both these techniques
can be used for glazing
portions of pots, by regulating
the parts that come in contact
with the glaze. Glaze may also
be sprayed onto the ware, for
instance through a blowpipe
or by means of a spray gun,
and it can be brushed onto the
ware with various types of
soft brush. A sliptrailer can
be used to apply thin lines of
glaze, and of course once the
glaze has been applied to the
ware it can be patterned by
swirling it, brushing on further
colors, scratching through one
layer of glaze to reach another,
and many similar techniques.
Clay and pottery tools
Various brushes and other
pieces of equipment may be
used to apply color to the
pottery. Some of these brushes
are shown on the right, and
the pot below illustrates the
characteristic mark made by
each tool.
The wet glaze ingredients are
ground,mixed and sieved.
1 Test sieve.
2 Lawn brush for use with
the test sieve.
3 Spatula.
4 Pestle and mortar.
5 Muller and glass slab.
6 Round sable brush.
7 Script brush.
8 Short one-stroke brush.
9 Flat duster.
10,11 Japemese brushes.
12 Sword liner.
13 Cut liner.
14 Fan brush.
15 Sllptraiier, a rubber
bottle with a narrow spout,
used for trailing lines of slip or
glaze In patterns.
16 Feather, used to draw
one glaze into another in a
decorative pattern.
DIAGRAM
Glazes are usually prepared
from dry ingredients that are
then mixed with water to form
a suspension. Glaze is made
up mainly of alumina, silica
and flux; silica is the glass¬
forming ingredient, but on its
own it will not melt below
1750°C; the other substances
are added to melt the silica at
lower temperatures. Thermal
expansion and body fit have
to be considered when
glazing; if the thermal
expansion of the clay is vastly
different from that of the
glaze, the body fit will be
impaired and the glaze will
become damaged on cooling.
Firing clay
The first kilns were simply holes in the ground
packed with unfired pots; bonfires were built over
the top, and the heat hardened the pots. The
modern kiln has been refined to such an extent
that the heat can be regulated exactly, allowing
the potter precise control over the character of
the finished ware.
The illustration on the right
shows workers loading a
biscuit kiln. Biscuit firing is the
first firing of unglazed pottery;
this is the firing that drives off
the water that is chemically
combined with the clay.
Clay pots that are left to dry
without artificial heat are weak
and permeable. Although the
clay appears to be quite dry, it
still contains a considerable
amount of water, and will
become soft and plastic if
moistened. In orderto driveoff
the water that is chemically
combined with the clay, it must
be heated strongly. When this
is done the clay’s structure
is irreversibly changed; it
becomes hard, and will no
longer mix with water. If a glaze
is added, the pottery can be
made totally waterproof.
Pyrometric cones and bars
(a) are a cheap method of
monitoring the temperature
of the kiln. The cones or bars
are manufactured so that they
will bend at a specific
temperature, and are used
in a group of three different
grades.
The first sags at a temperature
below the optimum, and
warns that the required heat is
near; the second will be chosen
to sag at the optimum heat,
and the third will sag at a heat
above the optimum. The kiln
is turned off when the second
cone’s tip has bent down to
the same level as its base (b).
1 Electric kiln of a typical
design. Because the heat comes
from elements, and therefore
no solid fuel is burned, the kiln
does not need a chimney,
although it has a vent hole for
the escape of the fumes and
water given off during firing,
and to speed up the cooling.
Specialized devices can be
fitted to the kiln, such as an
automatic pyrometer that will
switch the kiln off when it has
reached the required
temperature.
As man's understanding of
the process of firing has
increased, so kiln design has
been modified to give him
more control over the firing,
a African bonfire kiln, the
simplest method of firing. The
fire literally roasts the pots.
b Mexican cross-kiln,
c Japanese climbing kiln
d Modern kiln; this one is
built into a bank. The fire
is built at the foot of the bank
and the unfired pottery is
stacked into a central chamber.
The heat is drawn up the
channeltothe ventilation hole,
and fires the pottery as it
passes through.
consisting of several
chambers. The heat from the
fire passes through the first
chamber and into the second,
where it ignites extra wood to
boost its heat level. This
happens in each chamber
until the last, which contains
ware for biscuit firing.
built of insulating brick.
Modern kilns are usually fired
by gas or electricity, but some
people still prefer to use the
traditional kilns that burn
wood.
Kiln furniture is the term
3 High stilt with nichrome
used to describe the accessories
used in the kiln when stacking
and firing the pottery.
1 Stilt, used for keeping
pieces of ware separate from
one another.
2 Spur, used in the same way
as a stilt.
wire points.
4 l<^ltiple stilt.
5 Shelf prop with rim; the
rim enables several props to be
built up firmly to the required
height.
6 Saddle, an elongated stilt.
7 Barstilt with steel points.
8 Pyramid stilt.
9 Bead tree; the wires hold
the beads and keep them
separate.
10 Shelf support.
11 Rubbing brick with
handle, used for cleaning kiln
furniture.
12 Rubbing blocks; these
are made of alumina, and are
used to rub scars off fired
pottery.
13 Sorting chisel for
cleaning the plaster batts used
as shelves.
14 TUe crank, a structure for
holding tiles during firing.
DIAGRAM
Clay and pottery tools
@
7 Modeled and cast sculpture
The tools described in this chapter are those for
modeling and casting sculpture. The principle
of both modeling and casting is that the artist
starts off with a soft material which is shaped
and then allowed to harden in its new form.
In the case of modeling, the material is malleable
and plastic, and because it takes the impression
of any tool brought into contact with its surface,
the artist can work and shape the material into
the form and texture that he wishes. The
sculpture is then hardened by firing, or by
allowing it to dry naturally in the air.
Casting begins with a liquid, which is given shape
by pouring it into a mold; it takes its shape and
texture from the shape and texture of the inside
of the mold. The hardening of most cast materials
is a chemical process that takes place over
several hours or several days. The tools for
cast sculpture are mainly for mixing or melting
the liquids, for making the molds, or for refining
and polishing the surface of the finished cast.
The evolution of casting spans many centuries—
the Greeks, the Romans and the Ancient
Egyptiansall knewthe skills for casting metal —
and yet with the development of colored and
transparent resins and other synthetic liquids,
casting has become one of the most popular
techniques for contemporary sculpture.
The medal shown in this
photograph depicts Duval
Janvier, a master medalist, at
work striking a medal. This
medal itself is the work of
Alexandre Charpentier (18561909), a French craftsman
who made many of these
mementoes.
]
107
Building an armature
Sculpture on a large scale frequently involves
building an armature, a kind of skeleton for the
finished sculpture. An armature can be built
from any firm material, such as wood, metal,
wire or bricks; the main requirement is that it
should support the weight of the sculpting
medium that will be applied to it.
The armature illustrated (right)
is a diagram from Diderot's
industrial encyclopedia printed
in the 18th century. This giant
armature is showing the
amount of support that is
necessary for large sculptures.
An armature Is necessary
Inside a sizeable sculpture
because It prevents the large
amount of sculpting medium
from collapsing under its own
weight. The most efficient
armatures have the same basic
shape as the projected form;
for instance, an armature
for a full figure would have
extensions for the limbs and
head as well as the structure
for supporting the torso.
The armature is built up by
cutting, bending and joining
the materials until a firm
structure of the correct shape
and size is reached.
A simple armature for a head
and shoulders sculpture can be
built up in sections in this way.
a A strong piece of wood or
metal is chosen for the main
element of the armature and is
attached firmly to a base.
108
C
1 Hacksaw for cutting wood
and metal.
2 Spirit levei used to check
the accuracy of horizontal
surfaces.
3 Hammer used for driving
in clouts and nails.
4 Screwdriver, for use when
the pieces are screwed
together.
5 Wirecutters for trimming
chicken wire etc.
6 Vise; when piping or strong
wire needs to be bent it can be
gripped at one end in the vise
to provide good leverage.
7 Gloves should be worn to
protect the hands from splinters
and sharp wire.
b Wire, strips of metal, pieces
of wood or any other appro¬
priate materials are joined to
the main column and molded
or positioned to provide
supportfortheskull partofthe
projected sculpture. Lateral
pieces are joined on further
down to supportthe shoulders.
Clay, terracotta, plaster
Modeling and casting tools
Soft clay and terracotta are very
popular as media for sculpture,
since they remain plastic and
workable for a considerable
time if they are handled care¬
fully. All the tools mentioned
in the section on working in
soft clay can be used for soft
clay sculpture, and the clay can
be fired in the usual way.
A clay (or terracotta) sculpture
on an armature is modeled in
the following stages,
a Anarmaturesuitableforthe
size, shape and material of the
sculpture is made. Particular
care must be taken that no
dimension is too big.
1
i
!
Sculpting with plaster is a very
specialized process because of
the quick-drying nature of the
medium. Also, plaster does not
really pass through a plastic
stage when it can be modeled
in the same way as clay; instead
it begins as a liquid that slowly
thickens and hardens until
it is solid. Thick plaster can be
applied to an armature with a
spatula, or strips of lint or
coarse burlap may be dipped
into liquid plaster and used to
build up the form by binding
them around the armature.
b The clay is rolled into rough
sausage-shapes, and these
shapes are pressed onto the
armature to build upthe model
in the correct proportions. As
the work progresses the blobs
of clay should be smaller, and
more and more accurate in
their shaping and placing.
Dry, powdered plaster
(dehydrated gypsum) is mixed
carefully with water; this brings
about a chemical reaction as
the two elements combine and
then harden,
a Powdered plaster is
sprinkled into a container of
water until small piles of plaster
just break the surface of the
water.
b The two constituents are
left to stand.
c The sculptor puts one hand
under the water and mixes the
plaster thoroughly but gently,
so that no air bubbles are
trapped in the liquid.
c The planes and surfaces of
the clay are worked and
smoothed, with the hands or
with tools, until the artist is
satisfied with their appearance.
The sculpture is finished by
adding any detail or specific
texture that is required.
a
1 Spoon for measuring out
dry plaster.
:
I
I
7,8 Plastic mixing bowls.
9 Plastic bucket.
10 Armature support; th Is
can be used to hold the
armature in the correct position
while it is being worked on.
11 Modeling stand.
DIAGRAM
|i
2 Ladle for handling the
liquid plaster.
3 Scoop used for shoveling
dry plaster.
4 Spatula, used for
applying liquid plaster to the
armature.
5 Scales; the dry plaster is
weighed out on these.
6 Plastic storage bin for
plaster powder.
109
Shaping plaster 1
Once plaster has set, it can be
cut, carved, filed, scraped and
sanded in the same way as a
soft stone, so very sharp steel
tools can be used to great
effect to refine the surface.
Plaster can also be modeled
directly by soaking strips of
coarse cloth in plaster and
then wrapping them round an
armature.
2 Hacksaw for cutting
armature materials.
3,4 Gouges used for shaping
the set plaster.
The following tools are used
for shaping wet plaster.
The following tools are used
for shaping dry plaster.
5,6,7 Plaster-forming
tools, made of steel to ensure
12,13,14,15,16,17 Steel
rifflers, tools with serrated
that they leave a clean
impression on the plaster.
18,19 Chisel-ended tools.
8,9 Spatula-ended steel
tools.
10 Plaster knife.
11 Broad-bladed scraper.
no
1 Shears used for cutting
cloth strips.
edges.
Modeling and casting tools
j
E
I
j
1
Plaster does not remain in a
workable plastic state for more
than a short time during the
setting process, so it is neces¬
sary to build up the medium
layer by layer.
a An armature is buiit of
metal, wood, polystyrene or
other suitable materials.
b Strips of burlap or scrim are
c Dollops of semi-solid plaster
d When the plaster has set,
dipped into liquid plaster and
wrapped around the armature.
These strips form the core of
the sculpture and provide a
textured surface that aids the
adhesion of the subsequent
plaster layers.
are applied to the core with a
spatula, and smoothed into
place to produce the approxi¬
mate shape of the intended
sculpture.
the surface is filed, sculpted
and shaped to the required
form and finish.
5
1,2,3 Assorted tools for
shaping plaster.
4,5,6 Gouge-ended tools.
7 Steel hook.
Ill
Shaping plaster 2
Plaster is a popular material for taking casts,
since it is easy to prepare, dries quickly, and
accurately reproduces fine detail from the molds
in which it is cast. Because plaster is cast cold,
many kinds of plastics and synthetics may be
used as mold materials without the danger of
melting that exists when hot liquids are used.
The shaped plaster shown
(right) is a detail of a ceiling
frieze from Brockhall, England.
Decorative plaster work of this
kind was molded into
numerous shapes, the most
popular subjects being flower
and plant motifs and
geometrical designs.
1 Soft brush for applying
gelatin layers.
2 Spatula used to apply
plaster over a gelatin mold.
3 Key knife; when used to
cut a mold in two, the tool cuts
an interlocking key that is used
to reassemble it precisely.
] ]2
Synthetic molds for casting
b The synthetic mold material
c When the mold material has
plaster can be made around
almost any small, solid object,
a The original is placed in a
suitable container, such as a
can or a cup.
is poured carefully around the
original until the container is
full.
set, the container is removed
and the mold is cut around with
a key knife to release the
original. This leaves a two-part
mold that can be accurately
reassembled and used for
several plaster castings.
A mold for making a casting
of a face can be taken from
life in the following way.
a The subject’s face is painted
with a gelatinous mold material;
care should be taken that the
subject can breathe properly,
by inserting straws or pipes
into the nostrils.
b When the gelatin layer has
c When fully dry, the mold is
set, it is covered with a plaster
layer to strengthen the mold.
removed from the subject’s
face, and can be used for
casting in the usual way.
a
m
Casting plaster from clay
Modeling and casting tools
Casting from a clay original is
one method of producing a
detailed and accurate plaster
cast. The clay model is
coated with a plaster mold,
then the clay is removed and
the mold is filled with plaster.
The disadvantage of the
process is that the mold can
only be used once, since it is
destroyed when releasing the
final model. If reasonable care
is taken when building the
mold, however, this is a very
reliable method of producing
a well-finished plaster model.
6
r~^7
1,2,3 T-scfuare, spirit
level and pencil may be
used to measure and mark
the shim line in the mold.
4 Shears for cutting shim.
5 Calipers, used to take
measurements before and
after the mold is applied, to
ensure that it is even.
6 Rubber mallet; tapping
the mold releases the cast.
7 Cross pein hammer,
used like the mallet.
8,9 Rubber scrapers for
removing excess plaster.
10 Rubber tubing; the mold
is tightly bound with this.
11 Pliers for tightening wire
binding on the mold.
12 Sponge for applying
water and liquid soap.
13 Dusting brush.
14,15 Chisel and mallet
for chipping away the mold.
b When the plaster has set,
the two-part mold is broken
open and the model discarded.
The mold is dampened,
and rinsed with liquid soap; the
soap acts as a parting agent.
The two halves of the mold are
then sealed together.
c The mold is bound very
tightly with wire and rubber
tubing, to ensure that the two
halves will not move. Liquid
plaster is poured into the cavity;
the parting agent prevents it
from sticking to the plaster of
the mold.
d When the cast plaster has
set, the mold is tapped with a
hammer or mallet to help
release the casting. The plaster
of the mold is then carefully
chipped away, bit by bit, to
reveal the cast model. \
DIAGRAM
Casting from a clay original
involves first of all making a
plaster mold around the clay,
a A wall of brass shim is built
into the clay model; this will
serve to divide the mold into
two parts. Plaster is applied to
cover the model.
113
Papier-mache
Papier-mache literally means “chewed paper;”
it is a fine paper pulp that can be cast and
modeled into surprisingly strong structures.
Newsprint or other unglazed papers are the
best materials for papier-mache, since they are
very absorbent and can easily be pulped. The
surface of dry papier-mache objects can be
painted and varnished.
The papier-mache tray shown
(right) was made in the 19th
century by the firm of Jennings
and Bettridge. The tray
demonstrates the exotic
shapes in which papier-mache
can be molded, which could
npt then be produced in any
other suitable material.
1 Saucepan in which the cut
paper is boiled.
2 Colander for straining the
pulp.
3 Scissors used to shred the
paper so that it will pulp more
easily.
4 Wooden stick or spurtle
for stirring the pulp while It Is
boiling.
5,6 Paste brush and paste
bowl; the pulp is mixed with
paste to make it bond more
strongly.
7,8 Paint brushes for
decorating the finished papiermache.
Papier-mache is made from
paper that has been boiled in
order to break down the
fibers.
a The paper is shredded,
either with scissors or by
tearing, and boiled in a
saucepan of water until soft.
114
b The resultant pulp is
strained through a colander, in
order to remove any lumps
and to ensure that the papiermache is of an even
consistency.
c
The strained pulp is mixed
with a water-based paste. This
acts as a binding agent to hold
the paper fibers together.
d The pulp can now be cast in
molds, or applied in layers to
a base to build up a threedimensional form. If the
mixture is left to dry slightly, it
can be modeled by hand or
with tools.
j| Candlemaking
Modeling and casting tools
The craft of candlemaking began with the
manufacture of ordinary domestic candles,
and has developed into a decorative sculpture
process in its own right. Liquid candle wax
can be colored, perfumed, and whipped to
make it frothy; when set it can be carved
and sculpted like clay, or painted with
colored or metallic waxes.
The engraving of a tallowchandler or candlemaker right
comes from "The Book of
English Trades," published in
1839. The workman is
dipping a rack of wicks
repeatedly into a vat of wax to
coat them thoroughly and build
up finished candles.
1 Scales for weighing wax.
2 Measuring spoons, used
when dye is added.
3 Thermometer for testing
the wax temperature.
4 Funnel helps to avoid spills
when filling molds.
5 Pitcher used to pour
melted wax.
6 Sieve for straining dirty
wax.
7 Knitting needle can be
used to suspend the wick over
a candle mold.
8 Knife for carving candles.
9 Deep vat for use when
making dipped candles.
10 Long shallow vat; wicks
are drawn through wax in the
vat in order to make thin
tapers.
m
needle or stick across the
top of the mold,
b The wax is melted to the
correct temperature, perfume
or color is added, and the wax
is poured into the mold
around the wick. When the
wax has set, the newly formed
candle is turned out and
decorated.
(DIAGRAM
Candles can be molded in
many different containers;
cups, vases and tin cans may
be used, or molds can be
purchased in many shapes,
a The watertight mold is lined
with a coating of silicone to
prevent the candle wax from
sticking. The wick is
suspended from a knitting
Modeling wax for casting metal
The lost wax process is a method used for
making accurate and predictable metal casts. A
positive form is modeled in wax, and a negative
mold is made around the wax shape. The wax
is then melted so that it runs out of the mold,
and the cavity left is filled with molten metal;
when cool, the metal is an exact replica of the
wax model.
Auguste Rodin's sculpture
"Despair" (right) was cast in
bronze from a thin wax layer
molded to reproduce the
details of the original model.
A bronze sculpture of this size
hastobecastin a hollow shell,
otherwise it would be both too
heavy and too expensive.
Wax for modeling comes in
different forms to suit the
needs and preferences of
the sculptor. Slabs or bricks of
wax may be sculpted while
firm, warmed and then modeled,
or melted totally and cast Into
molds. Sheet wax may be cut
and "soldered," or pressed into
a mold to form a thin coating.
Tools for modeling wax are
usually made of steel so that
they can be warmed, and also
so that they will make a firm
impression on the wax.
1 Modeling tools, illustrating
some of the shaped heads that
are available on these
implements.
2 Steel dentist’s probes;
these make excellent tools for
modeling wax.
In order to melt wax for casting,
the sculptor may use an electric
melting pot (left). When the
wax simply needs to be pliable,
an alcohol lamp such as the
one below is used to warm the
modeling tools; in this way
the heat is transferred to the
wax.
I
F oundry tools
Modeling and casting tools
To ensure that the metal for the
■ cast will fill all the fine details
of the mold, it has to be heated
• so that it will become molten.
The melting and casting of the
metal is done in a foundry.
Because considerable heat is
required to melt the metal, the
foundry uses specialized equip¬
ment to cope with the handling
and safety problems that arise.
The metal is heated in a
crucible, impurities are
removed as they rise to the
. surface of the molten metal,
and then the liquid is slowly
and carefully poured into the
mold and allowed to cool.
1 IWo-man shank, used to
carry a large crucible. The
handle allows the crucible to
be tipped in order to pour out
the hot metal.
2 Pickout tongs for
removing the top of the crucible
and adding fresh ingots.
3 One-man shank for
carrying a small crucible.
4 Lifting tongs used to lift
the crucible from the fire.
5 Skimmer, a tool for
removing impurities from the
surface of the molten metal.
6 Crucible.
7 Ingot mold; spare metal
I
Protective clothing is
necessary for foundry work, in
case the molten metal spills or
splashes over the workmen.
Sand casting involves pressing
a model Into a sand-packed
mold and filling the impression
with molten metal.
8
9
10
11
12
13
14
15
16
Goggles.
Asbestos mitts.
Leather apron.
Protective boots.
Knife.
Retouching tools.
Pliers.
Sieve.
IVvo-part mold.
DIAGRAM
can be poured into ingot molds
and recycled.
117
Metal casting
Casting from a solid wax model
is perhaps the most straight¬
forward way of using wax in
metal casting.
a The wax is shaped (cast,
sculpted, modeled etc.) into
the form that the finished
casting will take.
b Wax runners are attached to
c The model is placed in a
the model, and a wax funnel is
applied to the top. The funnel
is for the entry of the molten
metal; the runners are for the
release of the hot wax, and also
they allow air to escape during
casting.
container and surrounded with
the mold medium. When the
mold has set, the wax is melted
so that it runs out and leaves a
hollow in the mold.
d Molten metal is poured into
the funnel and fills up all the
cavities left by the wax. When
the metal has set, the mold
is broken open and the metal
shape removed; unwanted
metal is filed off, and the
casting is chased and polished.
'
i|
|
;
’
li
A thin shell of metal can be
cast over a core of another
substance by using a thin layer
of wax inside the mold,
a A model of the intended
casting is made in clay, plaster
etc, and a negative mold is
made of this model.
The basic principle of sand
casting is shown above, very
much simplified. Sand casting
can be a very dangerous
process, and should always be
done under supervision and
with the proper safety
precautions.
a Both halves of a two-piece
mold are packed with sand.
118
b The inside of the mold is
coated with a thin layer of wax.
When the wax is cool, the
central cavity is filled with a
core of solid material, and the
outside mold is removed.
c Runners are attached to
the wax as described for solid
wax casting. Long nails are
driven through the wax and
the core, and the mold medium
is built up around this structure.
d The wax is melted out of the
structure, leaving the core sup¬
ported in the mold by means
of the nails. The thin space left
by the wax can now be filled
with the molten metal; when
the mold is broken off, the gaps
in the casting formed by the
nails are plugged with metal.
b A master model of the
c Runners are cut into the
d The cavities in the sand are
finished casting is pressed into
the sand in one half of the
mold. The model is removed,
leaving a clear impression in
the sand, and is pressed into
the other half of the mold.
sand surrounding the
impressions,andthetwo halves
of the mold are joined very
precisely.
filled with molten metal. When
the metal has cooled, the
mold is removed and the
casting is cleaned.
Metal finishing
Modeling and casting tools
liWhen the casting emerges
! .from the mold, it is covered
^ [with traces of the mold medium
.land is dull and lifeless in color;
j also, metal casts of the runners
I are still attached to it. The
i 'unners are removed, and
} !;the casting is cleaned with wire
tf^ool or a wire brush. Holes
; !5n the casting are enlarged with
; ila drill and then plugged with
. 'metal, and the surface is■ (retouched by filing or graving;
I lithe entire casting is then chased
. ito refine the surface. Finally it
’i^s immersed in an acid bath to
; jcomplete the cleaning process.
10 Cold chisel, used for
removing the metal runners
from the tasting.
11 Mallet for driving the
chisel.
> 12,13,14,15,16
[■ Chasing tools with various
I shapes of head. These tools
■I can be made by the sculptor
to suit his own needs.
17,18,19 Matting tools;
these give a light texture to the
surface of the metal.
20 Punch with a small head,
used to chase details that are
inaccessible tothe largertools.
21 Chasing hammer used
directly on the surface of the
casting.
iDIAGRAM
i
I'
;
1
(
@
119
Polystyrene
Polystyrene is a versatile medium that can be
molded, cut, carved, rasped, fused and colored.
Expanded polystyrene blocks or sheets are
excellent for ephemeral sculpture. Exact forms
can be molded by expanding polystyrene
granules in a shaped container; the granules
expand when they are heated.
The photograph (right) shows
a polystyrene mold being
prepared for a concrete
sculpture. The mold has been
shaped from polystyrene
blocks and assembled in a
wooden frame; the concrete
will be poured into the mold,
and the polystyrene destroyed
when the concrete has set.
Because polystyrene is so light,
it is very useful as a core for
large-scale sculpture in heavier
materials such as plaster,
concrete and resin. The form
is roughed out in polystyrene
blocks, and then the final
material is applied to the
surface.
A face mask such as the one
on the left should be worn
when working with polystyrene,
to avoid inhaling the toxic
fumes given off when the
material melts.
Polystyrene can also be used
as an original for metal casting.
The form is sculpted in poly¬
styrene foam, and then coated
to provide a firm surface; it is
then surrounded with mold
material, and burned out when
the mold Is dry.
o o o
o o o
o o o
o o o
o o o
o o o
o o o
o o o
o o o
1 Hot-wire cutter; this is the
most efficient tool for making
clean cuts in the polystyrene
foam.
2 Soldering iron for cutting
channels in the polystyrene.
3 Heated metal spatuia.
4 Cheese grater used for
filing the foam.
120
5,6 Rasps.
7 Pencil knife; knives used
for cutting polystyrene must be
extremely sharp, otherwise
they simply crush the foam
rather than cutting it.
8 Craft knife.
jFiberglass
Modeling and casting tools
Fiberglass sculpture is generally a mixture of
polyester resin and shredded glass fibers. The
resin is the translucent material that picks up
i the mold details and gives the sculpture its
[ smooth surface; this is then backed up with
llfiberglass and more resin, and produces a thin,
Ihollow shell that has a great deal of tensile
strength.
Shown in the photograph
(right)is a fiberglass and resin
mural. The resin was cast onto
sheets of glass to ensure a flat
surface, and then fiberglass
matting and aluminum section
dividers were laid into the
resin.
Molds made of plaster are
often used for fiberglass
sculpture, since they can be
chipped off when the forming
is complete.
A layer of resin mixed with a
catalyst and an accelerator is
painted onto the inside of the
mold; this is known as the gel
coat.
Since toxic fumes are given
off by the resin mixture, a
fume mask should be worn
throughout the mixing and
application. Fiberglass is then
stippled onto the gel coat,
using a brush or a finned
roller in order to produce a
firm bond.
Further resin mixture is
stippled onto the fiberglass,
and this completes the hollow
sculpture. This technique is
used for large sculptures
because of the high strength
to weight ratio of the
materials; large, strong hollow
shells can be formed.
When the resin has cured
fully, the mold is removed and
the sculpture is trimmed with
snips or shears and then
filed and polished. Proper
safety clothing, consisting of
protective overalls and a
dust mask, is worn to protect
the sculptor from the fine
glass particles producedi.
I
i
!■
4 Scissors.
5 Rasp.
6 Spatula.
7 Snips used for trimming
the sculpture.
DIAGRAM
I the fiberglass.
121
Resin and acrylic
Acrylics and other synthetic materials are
becoming increasingly popular as sculpture
media. The transparency or translucency of
some of the synthetics enableis sculptors to
experiment with new visual effects in a way
that was previously possible only with glass.
Acrylic resins can also be cast, and will
reproduce minute detail very accurately.
The photograph (right) shows
acrylic furniture and wall
panels by Michael Haynes. All
the items shown are made
from clear and colored acrylic
sheet, and show the variety of
forms that the material can be
made to assume.
1 Cardboard chute used
for transferring materials.
2 Spirit level.
3 Matchstick for applying
small amounts of resin.
4 TWeezers are useful for
positioning tiny objects to be
cast in resin.
5 Spatula.
6 Dropper bottle.
7 Glass mixing rod; the
shape prevents the formation
of air bubbles in the resin.
8 Measuring cylinder.
9 Paintbrush for coating
molds.
10 Calibrated measuring
cup.
11 Panel pin.
12 Mixing container.
13 Silicon carbide paper
used for polishing.
Resins are prepared and cast
in the following way.
a The required amounts of
resin and hardener are
measured out and mixed in a
tall container to help prevent
the formation of air bubbles
that would spoil the appearance
of the cast.
122
b When the two materials are
thoroughly mixed, the liquid
is poured into a mold that has
been coated with a release
agent to prevent the resin from
sticking. The mixture must be
poured slowly and evenly to
avoid trapping air.
c The level of the mold is
checked with a spirit level to
ensure that the casting will be
even. The liquid is leftto "cure"
and harden; any air bubbles
that form in this time are
pricked with a panel pin.
d When the resin is thoroughly
cured, the cast is released from
the mold and polished with
various grades of silicon
carbide paper and abrasive
creams until it achieves
a glossy, transparent sheen.
Modeling and casting tools
1 Circular template used
when marking sheet acrylic.
2
3
4
5
6
NuKi-shape template.
Protractor.
Set square.
Ruler.
Felt pen with water-
based ink; marks made by this
pen wash away when no longer
needed.
7 Wire cutters for cutting
joining rivets.
8 Craft knife.
9 Ovengloves, used when
softening acrylic in a domestic
oven.
10 Hacksaw used for cutting
acrylic sheets.
11 Jeweler’s saw for more
delicate cutting.
12 Drill for making rivet
holes.
13
14
15
16
Rivet hammer.
File for shaping the acrylic.
Needle file.
Wire brush for cleaning
the surfaces before glueing.
17 Syringe used to inject
adhesive between pieces of
acrylic.
18 Orange stick used to
apply adhesive to small areas.
19 Bench pin.
The technique for making
sculpture from laminated
acrylic sheets is shown above,
a The chosen pieces of acrylic
are bonded by spreading each
piece with adhesive and
sandwiching the layers
together.
b When the laminated layers
are firmly bonded, the shape
required is marked with a felt
pen, using a template if
necessary for an accurate
outline.
c The shape is cut from the
layers with a saw; all excess
acrylic is cut away, and the felt
pen marks are washed off the
acrylic shape.
d The final object is filed to
the exact form required, and
then polished with a variety of
abrasive cloths. Abrasive
creams such as metal polishes
can be used to achieve a high
luster.
^
<
o
<
Q
@
123
8 Carved sculpture
Virtually the only principle that can be applied
to all sculpture is that it is essentially threedimensional, either in the round or in high or low
relief. With carved sculpture, the artist begins
with a solid block of the carving medium, and
carves away the unwanted portions in order
to leave a pleasing or beautiful form. With all
carved sculpture, the reasoning behind the tools'
and their uses is the same whatever the material:
strong, large tools are used to remove the large
portions of unwanted material, and then
progressively finer tools are used as the surface
is refined. All the tools are either sharp them¬
selves, such as the chisels used on stone and
the knives used for chip carving, or are abrasive
in some way, such as the woodcarving files and
the abrasive-smeared wheels of the jade-carver.
Until the 20th century, it was generally accepted
in the Western world that sculpture should be
representational, but the recent movements
in sculpture have taken the art form to previously
inconceivable limits. Sculpture can now be
vigorously stylized, totally abstract, or even
kinetic. The sculptor Henry Moore has described
the feeling of freedom that came overhim when
he first made a hole entirely through one of his
sculptures, and this new sense of freedom of
expression in sculpture is one of this century’s
most significant contributions to the arts.
This stone relief comes from
the bell tower of Santa Maria
del Fiore, Florence, and depicts
a stonecarver at work, Flis
tools—hammers, chisels and
pliers—can be seen lying
beside his work.
124
S tonec£irving 1
Stonecarving is the process of removing
unwanted pieces from a block of stone until a
sculpted form or finished design remains.
Michelangelo considered that his task was to
release the latent form trapped in each block of
stone that he worked on, and any stonecarver’s
success depends on an ability to visualize the
ultimate result of his work.
The print (right) of a stonecarver illustrates work in a
statuary's shop. The sculptor
is carving ornamental statues
and busts of ancient and
famous figures.
Stone is divided into three
categories, depending on the
way in which each type of rock
was formed in the earth’s crust.
Igneous rocks include such
types as granite and basalt;
limestone and sandstone are
sedimentary rocks, and metamorphic rocks are those such
as marble and alabaster. Stone
varies from extremely soft to
extremely hard, and the
appropriate tools for a carving
depend on the nature of the
chosen stone. Many stones will
take a high polish when the
carving is complete, but others
remain permanently matt and
porous.
Some of the basic tools used
for shaping and cutting stone
have changed very little from
those used in antiquity. The
illustrations (left) show some
ancient Egypt! n stone¬
working tools.
1 Plumb line.
2 Wood mallet.
3 Wedge used for
maneuvering stone blocks.
4 Wood roller.
5 Mason’s bow saw.
6 Cradle for moving large
blocks of stone.
126
Because stone is generally a
dense substance, blocks of
stone tend to be very heavy in
proportion to their volume.
This presents many difficulties
for those lifting and working
the stone, and has led to the
design of specialized handling
equipment.
1 Block, a pulley used when
lifting heavy stones.
2 Lewis, a device that is
locked into a hole in the stone
and provides a loop for lifting.
3 Crowbar used to apply
leverage to a block.
4 Sling for carrying the block.
5 Steel rollers aid the
movement of the stone.
6 Samson, a small wheeled
trolley.
7 Banker, a low, strong table
that supports the block being
carved.
8 Spider and tumtabie, a
heavy-duty rotating surface
resting on steel bearings.
.V
m
These stages are the main
steps that are followed by
the sculptor when producing a
stonecarving.
a A boulder is split, usually
with wedges, to provide a
stone of the right shape and
size for the sculpture.
b Rough outlines of the
d The surfaces of the
e Rasps and files are used
sculpture are drawn on all
faces of the block,
c The large unwanted areas
of stone are stunned off the
block, using a point driven
with a mallet or a club
hammer. Pieces can be struck
away with an adz ora bush
sculpture are defined
with chisels; these chip away
flakes of the stone. The chisels
are also usually struck with
mallets to drive the tips
through the stone with the
correct force and direction.
to smooth away the marks left
by the chisels, and to give a
preliminary shine to the stone.
The final polishing can be done
with abrasive papers or pastes,
and soft cloth Is used for the
buffing.
hammer.
2 3
4
5
6
1 Rip saw can be used for
cutting through soft blocks.
2 Plumb line for testing
vertical surfaces.
3 Spirit level for gauging
horizontal surfaces.
4 Straight-edge, used to
ensure even cutting lines.
5 Blocks ofwood; these can
be slipped under the block of
stone to provide gaps for
inserting rollers.
6 Wedge and feather
inserts, driven into the block
to split off a specific section.
The steel feathers protect the
stone’s edges.
7 Wedges; these stronger
wedges are used on their own
for splitting.
8 Power drill, useful for
making exact indentations.
The bottom of the stone should
be leveled so that it will stand
firmly.
a An accurate horizontal is
marked at the bottom of one
edge of the block, and the
stone is chipped into along this
line. A straight-edge is placed
in the groove, and the process
is repeated on the opposite
side until the two straight¬
edges are level,
b The stone on the other two
sides is chipped away level
with the corners,
c The island of stone in the
center is gradually worked off
in strips, the level being
checked constantly.
If a stone has to be split, the
insertion of wedges can
usually guarantee that it splits
along an accurate line,
a The sculptor marks out on
all sides of the block a groove
where the boulder needs to be
split.
b Wedges, or wedges and
feathers, are driven lightly
into the stone at intervals
around the line, ideally on all
sides of the block,
c The wedges are carefully
and systematically tapped with
a mallet, one by one, until the
two areas of stone are forced
apart.
DIAGRAM
1
127
Stonecarving 2
Picks are used to clear quickly
large areas of unwanted stone
from a block. The pick is driven
against the surface of the stone
and its force is conveyed
laterally, causing flaking of the
outside layers of the stone.
The pick must not be used too
forcefully or at too severe an
angle, otherwise it may damage
the crystalline structure of the
stone further inside the rock;
for this reason, the angle of
the pick against the block is
modified as the clearing of the
surface nears completion.
1 Bush hammer, a flatended tool used like a pick.
The many facets on the ends
diffuse the force of the blow
horizontally.
2 Double four-pointed
pick.
3 Double-ended pick; each
point has four facets.
Chisels come in all shapes and
1 Pitcher, with blunt square
6 Gouge, a chisel with a
sizes, to suit every need of the
stonecarver. The length and
thickness of the handle, the
shape and width ofthetip, and
the angle and sharpness of the
bevel, all depend on the job for
which the particular chisel is
intended.
end.
curved blade.
2 Punch used for making
7 Fishtail chisel.
8 Bolster; this is a sharp
indentations.
3 Point for finer indentations.
4 Claw;theedgeofthechisel
is marked with blunt serrations.
5 Claw bit and holder; the
claw bit can be interchanged
with others of different patterns.
version of the pitcher, and can
be used for splittihg small
areas of stone.
9 Bullnose chisel.
10 Bullnose claw chisel.
11,12,13 Miniature
chisels for use on small pieces
or for working very fine detail.
Tools for carved sculpture
V.?,"!..-
Illustrated (above) are
sharpening stones suitable
for use with stonecarving tools.
The lower stone is in a holder
so that it can be steadied while
the tools are being sharpened.
Oil is often used as a lubricant
while sharpening.
>;jf
Kt
Safety equipment is worn to
The drawing (above) shows
the technique for sharpening
tools on the stones. The tool
is held at an angle that
corresponds exactly to the
angle of the bevel required on
the blade, and the tool is
moved to and fro across the
surface at this angle.
protect the carver from stone
dust and from sharp flakes of
stone.
1 Face mask in the form of
an elongated visor.
2 Goggles.
3 Dust mask with spare
filters.
4 Protective gloves.
Hammers and mallets are
used to drive the chisels into
1 Steel hammer.
2 Iron lump hammer; this
the stone. If the head of the
chisel is flat, then a hammer is
used; if it is rounded, a mallet
is used. Both hammers and
mallets can be made in various
different woods and metals.
gives a duller blow than the
steel hammer.
3 Wood mallet made of
beech or lignum vitae for
durability.
4 Dummy, a small mallet
with a head of malleable iron.
The angle at which the chisel
is held against the stone
changes as the work
progresses.
a When large pieces of stone
are being removed from the
block the chisel is held virtually
at right angles to the stone; the
blow chips out a sizeable
portion of stone and leaves a
very uneven surface,
b The mason’s stroke is used
to define the planes of the
sculpture more specifically; the
chisel is held at a less
pronounced angle to the stone,
c When fine finishing is
needed, the chisel is held near
the horizontal, in the carver's
stroke.
DIAGRAM
The chisel must be held firmly
so that the carver can strike it
squarely with the mallet, and
also so that he can predict its
mark upon the stone. Three
firm ways of gripping the chisel
are shown (right),
a With all fingers curled round
onesideofthe chisel body and
the thumb round the other,
b With the thumb wedged
behind the head of the chisel,
c Withthelittlefingerwedged
behind the chisel body.
129
Stonecarving 3
Power tools of many kinds
are available to the stonecarver.
The tool heads usually have
the same shapes and functions
as their manual equivalents—
the main difference is that they
are driven by air or electricity
rather than by the musclepower of the carver. Power
tools are expensive and noisy,
and they produce fast-flying
chips and a great deal of stone
dust, but they save time and
energy and enable the carving
to progress rapidly. Extra safety
precautions should be taken
when using power tools.
Filing can be used on both soft
and hard stone to produce
smooth curves and planes on
the sculpture, either as a finish
in themselves or as a final
smoothing preparatory to
polishing.
130
[
Heads available for a
pneumatic tool include
the following.
1
2
3
4
5
6
7
Chisel.
Bush chisel.
Claw.
Ripper.
Frosting head.
DriU.
Rottuy rasp.
12
13
14
15
16
17
18
Stone rasp.
Rasp rifflers.
File rifflers.
Needle rifflers.
Needle files.
Cock’s comb.
Drag.
8 Pneumatic tool with air
hose and socket for the heads.
9 Pump for pneumatictool.
10 Heads for electric
tools.
11 Electrically-powered
tool body.
10
11
Finishing stone
Tools for carved sculpture
Bi '
I
!
The photograph reproduced
(right) shows a statue of
Queen Hortense, by an Italian
sculptor of the early 19th
century. The statue illustrates
very well the high polish that
can be achieved on stone
sculpture.
The basic steps needed to finish
stone to a high polish are
illustrated (right),
a The surfaces of the stone
are smoothed with a chisel or
bullnosed claw in order to
remove the deepest marks
made by the carving tools,
b The surface is made still
more even by working it with a
file or riffler; the finer the
grade of file that is used, the
smoother the surface will be.
c The stone is then buffed
and rubbed with abrasive
blocks and compounds
so that even the faint marks
left by the files are smoothed
out. As polishing progresses,
finer and finer grades of
abrasive are used until the
surface of the stone is glassy
smooth.
d An extra gloss can be given
to the stone by rubbing it with
a soft cloth smeared with
transparent oil.
1 Chisel used for the final
smoothing cuts.
2 Bullnose claw used for
smoothing hollows.
3 File; this performs the
preliminary refining.
4 Riffler refines the surface
further.
5,6 Carborundum and
pumice blocks for polishing.
7 Garnet paper, an
abrasive paper made of
crushed precious stones.
8 Wet-or-dry sanding
paper.
9 Emery cloth.
10 Polishing oil.
11 Soft cloth for applying
the oil.
DIAGRAM
j
The finish left on a stone sculpture depends
partly on the stone used: a soft stone, for
instance, can be smoothed but not polished.
Other factors are the tools used and the artist’s
preference. Sometimes a sculptor chooses to
leave his tool marks evident, as in many of
Rodin’s works, whereas those of Michelangelo
were often highly polished.
131
Wood sculpture 1
Wood has been used as a medium for sculpture
by people of virtually every culture for over
5000 years. Wood is readily obtainable and
easily worked with sharp tools, and its fibrous
nature means that raised parts can be deeply
undercut without any danger that they will
break off, as often happens with stone, clay and
plaster.
The wood relief reproduced
(right) shows a monk at work
carving a choir stall, and itself
was originally part of a choir
stall. The monk's tools can be
seen hanging on the wall of
his workshop.
Wood is classified into two
types: hardwood and softwood.
Hardwood comes from trees
with broad, flat leaves, such as
chestnut and oak; softwood
comes from trees with narrow
resinous leaves, such as pine.
Hardwood is usually closegrained and more difficult to
work, but it ismore durable
than softwood and takes a
higher polish. Wood used for
sculpture must be seasoned by
consistent exposure to air
before use—seasoning makes
the moisture in the wood
evaporate, and so reduces
the risk of the final sculpture
cracking, warping orshrinking.
A tree grows a new ring of
wood every year, and each ring
consists of many fibers that run
vertically up and down the
trunk. This fiber structure forms
the grain, and the appearance
of a piece of wood varies
depending whether it is cut
along or across the grain.
WfJ- ^
mWm
hS'WmM
lliijR
’\
■ ' '1
wPflPVllF^
,,
SR
Illustrated (left) is a selection
of old woodworking tools.
1,2 North American broad
axes.
3 Egyptian handsaw.
4 Keyhole saw.
5,6 Hand-forged gouges.
7 Small gouge.
8 Rasp.
132
Tools for carved sculpture
Sculpting in wood consists of
carving out the planes of the
final shape with more and more
precision until they have the
required shape and finish,
a The uncarved block of wood
is marked on all sides with
rough outlines of the finished
shape.
b The main unwanted portions
c The form of the sculpture is
d If a well-smoothed surface
of the wood are removed in
large chunks with a saw or an
adz; the block takes on the
rough proportions of the final
sculpture.
more clearly defined by
chipping or shaving portions
of wood away with chisels.
Gouges are used for cutting
holes and indentations in the
block where necessary.
is required, the sculpture is
refined still further by rubbing
files of different grades over
the wood. The surface can
then be polished to produce a
sheen.
While the wood is sculpted,
the block must be kept
stable so that the tools can be
guided against its surface. This
is done with various kinds of
gripping mechanisms which
are locked round the block.
1 Vise with two jaws for
clamping the wood.
2 Clamp for holding small
pieces against a bench.
3 Carver’s bench screw; a
block is screwed to the carving,
then the block can be held firm
in a vise.
4 Chops with cork-lined jaws
for fragile pieces.
5 Workbench with bench
stops and built-in vises.
6 Sandbag used to stabilize
awkward shapes.
J—/
A f
i-J
7 Panel saw.
8 Ryoba saw with two
working edges.
9 Hikhnawashi saw, similar
to a keyhole saw and
useful for cutting holes
through the wood.
10 Drawknife; the knife is
held with both hands and the
length of the blade is pushed
or pulled across the work.
11 Adz, an extremely sharp
tool used with a chopping
motion.
DIAGRAM
i—/
The initial removal of large
areas of unwanted wood is
achieved with razor-sharp
cutting, shaving, slicing and
chopping tools such as those
shown above.
Wood sculpture 2
Mallets are wooden hammers
used for driving chisels
through the wood when
carving. Asthey are made of
wood, mallets are unlikely to
splinter or split the chisel
handles as a metal hammer
might do. Mallet weights vary
from very light (such as those
of beechwood) to very heavy
(such as lignum vitae). As the
work progresses, and more
delicate chisels are chosen for
the carving, a lighter mallet is
used for striking the chisels so
that they will not cut into the
wood too deeply.
The mallet is held in the
carver’s stronger hand so that
he controls the blow accurately;
the chisel is held in the other
hand and is struck with the
mallet (above). Both hands
should be behind the point of
the chisel at all times.
A
Chisels and gouges are used
for the majority of the carving
work in wood sculpture; they
can be guided by hand, or
struck with a hammer or a
mallet. The shape and size of
the blade determine the
character of the mark made on
the wood.
134
1 Straight chisel.
2 Skew chisel or corner
chisel; the end of the blade is
cut across at an angle.
3 Short bent chisel.
4 Spade.
5 Gouge, a chisel with a blade
that is curved in section.
6 Fluter, a gouge with a
deep channel.
7 Veiner, a very narrow
gouge.
12 Short bent parting
tool.
13 Long bent parting tool.
14 Fishtail tool; the large
8,9 Long bent gouges.
10 Macaroni tool, a chisel
blade spreads from the neck
into a flat triangular shape.
with three straight edges.
11 Parting tool, a chisel
with a V-shaped section.
Tools for carved sculpture
Woodcarving tools must be
kept extremely sharp at all
stages of the work. A properly
sharpened blade is more
efficient and also safer,
since its path through the wood
is more predictable and it is
less likely to slip and damage
the carver or the carving.
1 Rectangular washita stone
for sharpening chisels and any
other tools with straight blades.
2 Gouge slip, a curved stone
used for sharpening both
gouges with the bevel on the
inside (in-cannel) and those
with the bevel on the outside
(out-cannel).
3,4 Sharpening point and
triangle; these shaped and
tapered stones are useful for
sharpening tools with complex
cutting surfaces.
5 Tool honer used to sharpen
a variety of carving tools.
6 Strop, a wooden block
covered in leather, for
producing a really sharp finish
on blades.
The surface of the slip stone is
oiled, and then the tool to be
sharpened is moved over its
surface, held at the exact angle
of the desired bevel. A curved
gouge (above) is moved in a
figure of eight, to ensure that
all parts of the bevel are
sharpened equally.
Files, rasps and scrapers
are all used to abrade and
refine the surface of the wood
once it has been carved or
sculpted to the required shape.
All the tools come In grades
varying from coarse to fine; the
coarse grades are used on the
surface first, and then the finer
grades produce an even
smoother finish.
1 Coarse flat file; the
blade is made of steel and
shaped into many small gouge¬
like cutters that pare off the
unwanted material as the file
moves over the surface.
2 Coarse round file.
3 Cabinet rasp.
4 Round rasp.
5,6,7,8 Riffler rasps In a
variety of shapes. These slim
rifflers are useful for reaching
into awkward corners and
curves.
9,10,11,12 Riffler files.
13 Rasp brush for cleaning
IDIAGRAM
the teeth of rasps and files
when they become clogged
with sawdust.
14 Curved rasp; this can be
fitted round the hand and used
for smoothing curves that are
difficultto reach with a straight
rasp.
15 Cabinet scraper for
paring down large flat surfaces.
Chip carving and finishing wood
: ...
Chip carving is a wood¬
carving method that involves
shaving the wood away in
layers to produce an incised
pattern. The tools used for
chip carving are small, very
sharp knives with specially
shaped blades.
The technique of chip carving
is illustrated in the photograph
(right). The sharp contrast
between the two sides of each
incision is typical of this kind
of carving.
136
Chip carving designs are
usually based on geometric
patterns which have to be
drafted and carved with
extreme precision. The design
is traced onto the wood and
then each facet is carefully
chiseled out of the wood piece
by piece. Because the work is
so precise, the knives for
carving need to be kept very
sharp so that there is no
danger of them slipping and
spoiling the symmetry of the
design.
1 Detail knife.
2 Swedish knife.
3 Broad-bladed knife.
4 Whittiing knife.
5 Hooked knife.
6 Carver’s hook.
7 Flat-biaded knife.
8,9 Detail knives.
If wood is left untreated it is
very susceptible to heat, cold
and damp. These adverse
conditions can cause the
wood to crack, flake, lose its
color, and in extreme cases
even to rot, so wood is usually
protected by staining, sealing
or polishing the surface in
some way. Sanding smooths
the surface, shellac and some
oils and varnishes seal it, and
waxes and polishes buff the
surface to a shiny finish.
10,11 Soft brushes used
for applying stains.
12 Spirit iamp; this is used
to warm polishing oils.
Warming them helps the oil to
spread evenly over the wood,
and also enables it to
penetrate the wood surface
more efficiently.
13 Sandpaper for smoothing
the surface of the wood.
14 Linen rags used to apply
and buff the wax finishes.
15 Tacky cloth; this cloth
has a slightly sticky finish, and
is used to remove dust and
particles of sawdust from the
wood.
When doing chip carving, the
knife must always be held so
that both hands are behind
the blade (right). The thumb
of the working hand may be
rested on the wood for
support, but it too should be
out of the cutting line.
Ivory carving
Ivory is the base of one of the
oldest drawings in existence—
a prehistoric picture of a
mammoth, scratched onto a
tusk. True ivory comes from
the elephant, but the teeth and
tusks of seals, whales and
hippopotami have all been
used as substitutes.
Tools for carved sculpture
These tools are ordinary
Western tools that can be used
for ivory carving.
1 Needle flies; small,
delicate files in assorted
shapes for filing the ivory.
2 Coping saw used to cut
fine pieces of ivory.
3 Bow saw, for slightly more
robust cuts.
The ivory carving on the right
comes from an eleventhcentury casket, and is a selfportrait by the ivory craftsman
Engelramnus. He has
depicted himself preparing an
ivory tablet held by his son
Redolfus.
8
9
10
11
12
13
14
15
File.
Hathouri, a hammer.
Groover.
Flat rasp.
Chhuri, a finishing knife.
Randa, a stippler.
Barma, a drill.
Drill-bow.
DIAGRAM
Hindus have developed a
whole range of delicate tools
especially for carving ivory.
4 Ari, a saw.
5 Kenchi, a pliers-like tool
for cutting ivory into strips.
6 ChhuH, a paring knife.
7 Birka, a chisel.
Jade carving
Jade is one of the hardest stones used as a
carving medium. No metal blade or file will cut
jade, and so carving is accomplished by driving
abrasive sands through the stone with various
tools. Abrasives can be made of emery and
carborundum, or crushed precious stones such
as quartz, garnet and ruby. An ornate carving
may take decades to complete.
The illustration of a jadeworker shown on the right
contains many of the traditional
tools illustrated on this page.
The treadle wheel, bamboo
eyeshield and metal carving
head can be clearly seen.
1 La ssu tzu, a saw made
from a steel blade strung
across a piece of bamboo.
2 Iron pestle and mortar
used to crush the materials
for the abrasives.
3,4 Sieves for grading the
abrasive sands.
5 Oyster shell used to mix
and sift the sands.
138
6 Ladle; the sands are mixed
with water and poured
continually onto the work.
7,8,9 Brush, stick ink and
inkstone; ink is mixed on the
stone and brushed onto the
rough jade to outline the
projected design.
Most of the tools used for
grinding the abrasive through
the jade are steel heads fixed
to a treadle-driven wheel.
The operator uses the treadles
to spin the wheel as fast or as
slowly as the work requires.
a Wood bearing used to
support the wheel shafts.
b
c
d
e
Carving head,
Belt driving the shaft,
Bamboo eye-shield,
IVeadles.
Tools for carved sculpture
A jade carving is designed by
an experienced jade-worker,
who studies the rough piece
and decides upon the shape
that will best enhance thejade’s
pattern and contours,
a The jade boulder is sawn
into pieces of a manageable
size.
b When the design has been
c The jade is carved with the
d When the form is complete,
chosen, its rough outlines are
inked onto the piece of jade.
As the work progresses, the
master designer constantly
studies the stone, and re-draws
the outlines if the jade seems
to require an alteration.
abrasive sands, using the
steel heads on the treadle
wheel. Bamboo drills with
diamond tips are also used to
carve out portions of the
pattern.
the jade is buffed and polished
using wood, leather and
carborundum heads on the
wheel.
3
1 Wan kung chU; this saw
has a single wire across the
bamboo, and is used for cutting
away unwanted jade from the
design.
2 Chat’o, large cutting disk.
3,4 Kuo t’o, small cutting
disks.
5,6 Ya t’o, small grinding
tools.
7 Mo t’o, large grinding
wheel.
8,9,10 Wa-tzu, gouges used
for hollowing out jade bottles
and pots.
11
iz
ctrr
the drill heads.
15
(C<
16
12 Bamboo drill with a sliver
of diamond set intothe wire tip.
13 La tsuan, a large tubular
drill.
14,15,16,17 Chuangting,
drill heads.
18 Bead polisher; two
pieces of cut bamboo are
rubbed around the sphere of
jade.
19 Polishing wheel made
of carborundum and shellac.
20 Wooden wheel covered
with leather for polishing.
21 Wan-tzu, a curved
polishing wheel.
wvaDviai
139
9 Cabinetmaking
Cabinetmaking is the specialized craft that grew
out of the trade of joinery. In the late 17th
century, exotic and expensive woods began to
supersede the commoner woods as materials
for the furniture of the rich. Since the patrons
were paying out a great deal of money for the
materials, they insisted that the very finest items
of furniture were produced for their outlay.
Consequently, the craft of cabinetmaking, or
the manufacture of fine furniture, was born.
The woodworking skills used in cabinetmaking
are of great precision, since a beautiful feature
is made not only of the decoration but of the
joints themselves, the grain of the wood, and
the design of the entire piece of furniture.
Accuracy in the execution of the design is of
paramount importance, and so the tools for
cabinetmaking are of the highest quality and
made to the most stringent specifications. Most
of the tools are developments of those used in
the carpentry and joinery trades, adapted to
cabinetmaking by making them more
sophisticated and often smaller; all blades are
sharpened to a razor-like finish. When a piece
of furniture has been made by a cabinetmaker,
whether it is a 17th century walnut bookcase
ora modern Scandinavian pine table, a functional
form has been made into a work of art.
The picture reproduced here
is Sir John Millais' painting of
Christ in the carpenter’s shop.
Although it was painted in the
19th century, all the tools
illustrated are known to have
existed in Christ's time.
Vi.
140
141
Preliminary cutting
Felled wood must first be cut into manageable
pieces so that it can be seasoned, sold, and
easily measured for the cabinetmaker’s
requirements. Since green wood in particular
tends to make tools stick as they cut, tools for
preliminary cutting need to be both sharp and
sturdy and so are usually made out of heavy-,
duty iron or steel.
The Japanese print illustrated
(right) depicts a craftsman
trueing up a log from a felled
tree. Two types of ax are
shown in the print.
The woodcutting tools
shown above are all American
tools from the 19th or early
20th centuries.
6 Hudson Bay ax, a longhandled lightweight ax.
1 Ax.
2 Maul or beetle, a hickory
sharpen the blade of the ax.
mallet with iron rings.
3 Wedge used for splitting
timber.
4,5 Froe club and froe; the
froe was driven into timber and
pounded with the club to split
off wood shingles.
142
7 Kent ax.
8 Sandstone ring used to
9
10
11
12
Hatchet.
Broad hatchet.
Japanese hatchet.
Kent hewing ax, used for
the rough shaping of wood.
Cabinetmaking tools
An adz is used to hollow out
timber rou|[hly (above). The
adz is moved in a swinging
motion through the wood,
carving away more wood on
each curving stroke.
The method of using a froe is
illustrated (above). The left
hand holds the froe so that the
blade lies along the line to be
split, and then the back of the
blade is struck with a froe
club to drive it into the wood.
Wood is split easily with a
splitting wedge and mallet,
as shown (above). The wedge is
driven lightly into the line to be
split, and then struck firmly
with the mallet. As the wood
begins to split, the wedge is
moved farther along and the
blow repeated.
1 One-man crosscut saw.
2 Shipbuilder’s adz with a
lip on the blade.
3 Socket slick, a broad
chisel for leveling hewn
surfaces.
4 Woodchopper’s maul
used for splitting wood.
5 Bark spud, a tool for
trimming away bark.
6 Dead-blow mallet; the
hollow head Is filled with lead
shot so that there is no rebound
to the blow.
7 Bucking wedge; the
wedge is driven into the wood
with a mallet.
8 Splitting wedge.
9 Froe used for slicing
straight-grained woods.
iDIAGRAM
A one-man cross cut saw is
shown in use (above). The
hand holding the main grip of
the saw pushes it through the
wood; the other hand, on the
grip of the blade, pulls it back
in a return stroke.
@
143
Cutting to shape
Saws are the tools most often used to cut the
wood to the precise shape and size required for
cabinetmaking. Saws are large blades with teeth
on the cutting edges; these teeth are set (turned
to the sides), and enable the blade to cut cleanly
and efficiently through thick wood. Saws vary in
size from the giant one-man crosscut saw (see
p. 143) to the tiny saw knives shown here.
The illustration (right) is a
wood engraving by Thomas
Bewick. It shows the inside of
a cabinetmaker’s workshop;
the master craftsman and his
assistants are working at a
variety of tasks, with their tools
strewn around them.
The handsaw was a prime
tool of pre-mechanical cabinetmaking, and various types
were evolved, such as the
ripsaw, crosscut saw and
panel saw, to meet different
needs of the cabinetmaker.
144
1 Handsaw.
2 Bowsaw; the wire at the
top is twisted to tighten the
blade.
3
4
5
6
Flooring saw.
Back saw.
Bead saw.
Blitz-back saw.
Japanese saws were
developed for the specialized
woodwork done by the
Japanese, but they are also
useful in ordinary
cabinetmaking.
7 Hanamaru saw.
8 Azebiki saw.
9 Dozuki saw.
Cabinetmaking tools
Saw accessories are used for
sharpening and setting the saw
teeth, and as aids to cutting.
1 Saw set for a handsaw.
4
5
6
7
2 Saw setting hammer
check the set of the teeth.
8 Taper jig, used as a guide
when sawing diagonal lines.
used for bending the teeth.
3 Saw setting plate, used
as an anvil for the setting
hammer.
Deep-throated fretsaw.
Coping saw.
Piercing saw.
Keyhole saw.
Saw knife.
Dovetail saw.
Feather-edge saw file.
Adjustable knife with
serrated edge.
9 Sawing jig.
18 Push stick; this is used
for pushing small pieces of
wood while they are sawn.
19
20
21
22
23
Bench brush.
Portable circular saw.
Hole saw.
Jigsaw.
IVeadle fretsaw.
DIAGRAM
10
11
12
13
14
15
16
17
Saw sharpener.
Saw set.
Saw jointer.
Radius gauge, used to
@
145
Measuring and marking
mm ...
Cabinetmaking is a very precise craft, and the
cuts and joints made in the wood need to be
extremely accurate to ensure that they marry
correctly. Exactitude in the measuring and
marking out of lines is therefore essential, and
the cabinetmaker has at his disposal many
instruments for measuring lines, angles, slopes,
depths and rebates.
In the illustration (right) a
Japanese craftsman is
checking the level of a plank.
In his right hand he holds a
square, used to check right
angles, and with his left hand
he is holding the log so that
he can see whether the
surface Is level.
1
1 Folding rule.
2 Locking ruie; the steel
tape can be locked into position.
3 Extending ruie.
4 Dovetaii tempiate, used
to mark out joint angles.
5 Template former, used to
duplicate complex contours.
146
6 Musical instrument
calipers for measuring wood
depths accurately.
7 Spirit level.
8 Water level.
9 Outside caliper.
10 Inside caliper.
11 Double caliper.
12 Vernier caliper.
I
i
I
I
«
I
Cabinetmaking tools
The following muking tools
are used in cabinetmaking.
1
2
3
4
5
Pencil.
Striking knife,
Marking knife.
Scratch awl.
Contour scriber; the plain
point is run along the contour,
and the scribing point
reproduces the contour in a
marked line.
6 Marking gauge.
7 liraniniel heads.
1
9 Flexible curve.
10 Architect’s sc2ile.
11 Miter square used in
marking 45° angles.
12 TVy square for checking
right angles.
13 Sliding bevel.
14 Multipurpose scpiare.
15 Stainless steel
protractor.
16 Angle divider.
17 Loose-leg wing divider.
DIAGRAM
8 Adjustable ruler for
drawing curves.
Holding and clamping
Holding tools and implements are used in
cabinetmaking for various puposes. Some tools
are designed to hold the wood in place while it
is being cut or marked, others to secure two
pieces while they are being glued or jointed
together. All of them work on the principle of
applying pressure around the wood so that it
cannot move out of position.
The rocking chair illustrated
(right) is made in walnut
wood, and,the rods of wood
have been bent by holding
them in steam and then
forcing them into shape on a
pegboard. The steam softens
the wood so that it does not
split during the process.
lO
11
1 Bench vise.
2 Universal vise with a
swivel.
3 Multipurpose vise.
4 Clamp heads that can be
fixed up individually.
5 Cam clamp.
6 Holdfast, a lever-like
clamp used to hold work to
the bench top.
148
7 Rexiclamp, a belt clamp
used particularly for circular
assemblies of wood.
8 Web clamp and corner
pieces. The joints of large
items are glued and assembled,
the protective corner pieces
positioned, and the web
tightened around the whole
assembly.
9 Auxiliary vise.
10 Clamp pad, used over
clamp jaws to protect delicate
woods.
11 Pinch dog, used to hold
flush joints during glueing. The
harder the dog is driven into
the joint, the firmer the bond
will be.
Cabinetmaking tools
..—
1,2 C-clamps.
3 Two-way edging ciamp,
used when pressure is required
from the side as well as the top.
4 Deep-throated ciamp.
5 Miniature ciamp used for
fine work.
6 Handscrew, also used for
fine work.
----
«»■--
-
a.
.
.^4
-Bt.-
\
.-1
A bending iron (right) is an
electric tool used for shaping
curved pieces of wood. The
gauge controls the amount of
heat received by the wood,
which can be held over the
cylinder by the metal rings.
7 Violin-maker’s clamp.
8 Deep engagement
clamp.
9 Spring clamp, a pincerlike tool.
10 Multispring clamp.
11 Universal damp.
DIAGRAM
A pegboard, such as the one
illustrated below, is used to
bend the pieces of wood used
for curved chairbacks. The
wood is softened in steam and
then levered against the pegs;
as it bends, more pegs are
inserted to keep the wood in
shape.
@
mu
149
Specialized cutting
Cabinetmaking frequently calls for the cutting of
complicated or difficult recesses, such as
moldings, keyholes and joints, which can pose
problems for the craftsman. The specialized
cutting tools of the trade have been evolved to
make these awkward cuts easier; many of the
tools have shaped blades that cut out exactly the
recess required.
This Genoese mandolin was
made in about 1700, and has
a wood body. The rose, which
is the decorated centerpiece,
was made by cutting out tiny
sections of the wood to leave a
pierced-work design.
1 Firmer chisel.
2 Socket chisel with steel
3 Socketchisel with leather
9 Paring chisel.
10 Bent paring chisel.
11 Swan-necked chisel.
12,13 Bruzzes, chisels with
handle-end.
angled blades.
4
5
6
7
8
14,15 Drawer-lock chisels.
handle-end.
Socket corner chisel.
Heavy-duty chisel.
Bench chisel.
Deep-mortise chisel.
Butt chisel.
Cabinetmaking tools
4 Hooker, a sharp tool for
cleaning out incised corners.
5,6 Hinge chisels used to
cut the channels for hinge
fittings.
7 Violin-maker’s gouge.
8 Groove cutter.
9 Puifling cutter.
10 Inspection mirror used
for examining cuts that are
outside the line of vision.
11 Plow plane; this tool is
used to cut slits in the sides of
wood.
3 Router heads in a selection
shown also in profile. The
blade, when held sideways
into the wood, cuts a slit.
2 Power router; this tool is
fitted with a head and is moved
across the surface that is to be
routed.
of shapes. Some of the heads
are for cutting recesses, while
others are for shaping moldings.
12 Mortise chisel.
13 Tenon cutter.
14 Rotary cutter; this tool
The illustration (above) shows
a rotary cutter attached to a
drill. The shank is fixed into
the chuck of the drill, and the
cutter acts as the drill head.
cuts grooves in wood.
15,16,17 Alternative heads
for the rotary cutter.
18 Dovetail template, used
to mark out dovetail joints.
©DIAGRAM
' •..wzje^rwzrfsvn
1 Dado blade for a drill,
Shaving and planing
Drawknives, spokeshaves and planes are used to
pare down wood surfaces until they are even and
regular. This process is not limited to flat
surfaces; both concave and convex surfaces are
catered for, and special blades have been
produced to cut chamfers, cylinders and
moldings. Miniature tools are manufactured for
small or complex surfaces.
The chairs illustrated on the
right come from the Harrod’s
catalog of 1895. The traditional
shapes of the chair backs
have ail been formed from
single pieces of wood by the
use of drawknives and shaves.
1 American-pattern
drawknife.
2 English-pattern
drawknife.
3 German-pattem
drawknife.
4 French-pattern
drawknife.
152
5 Chamfer guide; this
drawknife has two blades that
can be adjusted for cuts of
various angles.
6 Scorp, a tool for roughing
out hollow shapes.
7 Inshave, a blade used for
concave surfaces.
8 Flat spokeshave.
9 Adjustable-throat
spokeshave for fine paring.
10 Chamfer spokeshave.
11 Shaver, a paring tool.
12,13 Ship scrapers.
l!
A shaving horse, such as the
one shown (right), is often
used by cabinetmakers and
other woodworkers when
paring or shaving. The work is
held by the movable bar; the
craftsman sits astride the
bench, and can shave the work
with long, unrestricted strokes.
E.
5
/
[
1
2
3
4
5
6
7
8
9
Hollowing plane.
Palm plane.
Rebate plane.
Rail plane.
Finger plane.
Thumb plane.
Chisel plane.
Smoothing plane.
Jointer plane for large
areas and edge joints.
10
11
12
13
14
Block plane.
Molding plane.
Curved plane.
Router plane.
Compass plane with a
flexible sole for either concave
or convex cuts.
15 Adjustable rounder
plane for cylinders.
16 Rounder plane.
v_y'
16
cn=:
DIAGRAM
&
Cabinetmaking tools
153
Scraping and filing
Scraping and filing are methods of refining the
surface of the wood in cabinetmaking so that it
is both level and smooth. Files and rasps abrade
the wood, leveling down uneven patches, while
scrapers actually shave away minute slivers of
the wood so that the surface is plane. Files and
rasps are useful particularly in irregularly
shaped areas.
The French commode table
illustrated (right) was made
by Thomas Chippendale, and
shows the use of many
precision tools. Drawers are
very difficult items to make, as
all the surfaces must be cut
and then planed exactly so that
they run smoothly and fit
perfectly.
4
6
7
8
9
10
1 Scraping plane.
2 IWo-handed scraping
plane.
3 Cabinet scraper in
spokeshave style.
4 Shavehook.
5 Alternative heads for
the shavehook.
6 Burnisher for scrapers,
used to produce the cutting
hook on the blades.
7 Four-bladed scraper.
8 Box scraper used for the
rough leveling of flat wood.
9 Wheel burnisher for
scrapers.
10 Scraper jointer.
11,12,13,14 Cabinet
scrapers in various shapes
for smoothing flat and curved
surfaces.
154
.
.-..
.
.
Cabinetmaking tools
These files are the modern
equivalent of dreadnought
files; they have small cutting
blades that vigorously abrade
the surface of the wood.
1
2
3
4
abrasive file blade.
10
11
12
13
Tapered file.
Cabinet rasps.
Cabinet files.
Stickleback rasp, a
coarse rasp for smoothing
keyholes and other crevices.
drill.
6 Rotary rasp heads, also
used with a drill or motor tool,
Plane-style file.
Box-style file.
Flat file.
Round file.
14 Rifflers, files with curved
heads.
15
16
17
18
19
20
Bentriffler.
Needle rasps.
Needle files.
Mousetail file.
Microfile.
FUe card and brush,
used for cleaning sawdust from
the teeth of files.
DIAGRAM
7 liingsten carbide rasp.
8 liingsten carbide file.
9 Saw frame, for an
5 Flat rasp head to fit onto a
Drilling and piercing
The term drilling can encompass many
processes in cabinetmaking, from the making of
tiny channels for minute screws to the cutting
out of large holes to hold chair rungs or other
cylindrical inserts. Drills work with a combination
of circular motion and pressure to drive the tool
through the wood.
The Chinese bowdrill shown
in the photograph (right) is a
modern version of the
traditional bowdrill that has
been used in many countries
for centuriles. As the bow is
moved from side to side, the
drill bit turns rapidly.
1 HanddriU.
2 Breast drill; the cup atthe
top of the drill is braced against
the user’s chest for extra
pressure.
3 Brace or hand brace.
4 Comer brace, designed
for use in awkward corners.
5 Reciprocating drill.
6 Push drill.
156
7 Gimlet drill, a small
hand-driven drill bit.
8 Pin vise, used for
gripping small drill bits and
driven by a twirling action of
the fingers.
9 Flexibie shaft for an
electric drill.
10 Electric driU.
Cabinetmaking tools
ff.", •
1 Screw pitch gauge, used
to check the pitch on screw
threads.
2 Combination gauge for
measuring thread width and
pitch, and shaft dimensions.
3 Precision drill guide,
used for drilling to a precise
depth.
I
i
4 Ship auger, a heavy-duty
driiiing bit.
5 Twist driU bit.
6 Power-bore bit.
7,8 Countersinking bits,
used for making the recesses
to take screw heads.
9 Flat bit.
10 Circle cutter.
11 Brad point drill.
12,13 Power-bore bits.
14 Tapered bit.
15 Expansion bit.
16 Miniature drill bits.
17 Nultispur bit.
18 Centering bit.
19 Countersink.
20 Spade bit.
21 Screw starter.
22 Bradawl.
23 Gimlet.
24 Automatic center
punch.
25 Japanese gimlet.
26 Auger bit file.
27 Auger bit stone.
28 Drill-sharpening jig.
DIAGRAM
I
157
Securing
Joints in cabinetmaking are secured in four
basic ways; by glueing, by screwing, by nailing,
or by cutting interlocking joints. Frequently two
(or more) ofthese techniques are used together
for extra strength. Nails and screws, if used, are
hidden by using them inside the article or by
sinking the heads and plugging the holes with
matching wood.
The armchair shown (right)
was made in 1917 in the
Cubist style. It appears as
though all the pieces of wood
are simply rested together, but
in fact they are joined with
hidden dowel joints. Chairs
have to be secured very firmly,
as they take strain in all
directions.
1 Heavy-duty screwdriver.
2 Cabinetmaker’s
screwdriver.
3 London-pattem
screwdriver.
4 Ratchet screwdriver.
5 Spirai ratchet
screwdriver.
6 Paurailei-tipped
screwdriver.
158
7 Recessed-head
screwdriver.
8 Midget screwdriver.
9 Wedge screwdriver.
10 Brad pusher.
11 Naii sets, a series of tools
for recessing the heads of nails.
12 Giue injector.
13 Glue brush.
SlSii
Four methods of securing
joints are shown in the
illustrations (above),
a A screwdriver is used to
drive a screw into a pre-drilled
hole. Screws can be obtained
in all sizes for different tasks.
b Joints may be glued
c Joints may also be secured
d Fancy joints are the most
together. The glue is generally
warmed to make it penetrate
into the wood efficiently, and
then brushed on with a glue
brush. When the glue is tacky
the pieces of wood are clamped
together to dry.
with nails or panel pins. The
nail is struck into the joint with
a hanuner; clamps are often
employed to hold the two
pieces of wood together so
that they will not move out of
alignment when the nail is
struck.
attractive and perhaps the
most secure way of joining
pieces of wood. Male and
female parts of the join are cut
so that they marry exactly when
the pieces are assembled.
1 Steel claw hammer,
2 Pincers for removing old
or crooked nails.
I
j
3 Warrington-pattem
hammer.
4 Pin hammer for striking
I
small nails or brads.
I
5 Cross pein hammer.
'DIAGRAM
j
I
j
Cabinetmaking tools
@
,j.
... ai-
3
159
Sanding, finishing, polishing
Wood is given its final smoothness by sanding
and polishing the surface. Sanding consists of
rubbing the wood with abrasives such as sand
and emery; these abrasives are usually
incorporated into a paper or pad so that they
can be applied easily. The surfaces are
finished by applying polish, wax, shellac or
other varnishes.
This art nouveau table was
made in 1902, and possesses
the sinuous curves that were so
popular with this genre. The
mahogany pieces have been
sanded and polished to such a
high gloss that they shine as
much as the gilt bronze
fittings.
1 Sanding block in a convex
shape.
2 Grit Sander; this tool takes
a belt of abrasive material.
3 Electric file or belt
Sander, used when large
areas need to be smoothed.
4 Finishing sander.
160
5 Flat sanding plane.
6 Convex sanding plane.
7 Half-round sanding
plane.
8,9,10,11,12 Contour
Sanders or sanding slips,
shaped so that they can be
used to smooth complex
moldings.
Cabinetmaking tools
]
pAi
1 Shaped sender, used for
sanding in awkward corners
and joints.
2 Alternative heads for the
shaped sander.
3 Line stripper; this wheel
can be used to paint lines of
color onto the wood before it
is varnished.
4 Burn-in knife for applying
shellac to blemishes or as a
decoration.
5 Electric burn-in knife.
9
C
(^==3 10
6, 7 Flexible sanding
wheels used on a drill or on a
15 Varnish brushes.
16 Respirator, worn for
fixed motor.
protection against dust
particles.
17 Airbrush used for
applying stains.
18 Air gun for spraying
varnish.
8 Drum senders for use
with an electric drill.
9 Drum sanding head.
10 Abrasive rod.
11 Wre brushes.
12 Metal burrs and
abrasive heads.
13 Holder for abrasive
19 Spray gun.
disks.
:5
14 Sanding and poiishing
disks.
3
©DIAGRAM
161
Picture framing
Frames for pictures can be made from many
materials, including plastic, metal, papiermache and fabric, but the traditional material
for classic-style frames is wood. The frame is
generally made in four straight pieces, with the
corners mitered (cut at a 45° angle) so that
they join exactly.
N'crnCTi
The picture frame illustrated
(right) is one designed by
Chippendale, and is typical of
the elaborate designs of his
time. Around the frame,
presumably intended for a
seascape, are details
representjing various nautical
subjects.
1 Miter template used'when
marking exact angles in the
wood.
2 Miter vise.
3 Corner clamp used to
hold the corner while it is
being glued.
4 Combined square and
miter.
5 Auxiliary vise, a tool for
clamping frames as they are
secured.
6 Miter guUIotine; the
slicing action of this tool cuts
exact miters.
7 Mat cutter.
8 Framing band and
clamps; a clamp is placed on
each corner, and the band is
tightened around the frame
until the glue has set.
Cabinetmaking tools
is cut into the correct lengths
for the four sides of the frame,
and then an exact 45° miter is
cut on each end of the
molding pieces.
1 Molding scraper; this
tool has a contoured blade so
that it can reach into molding
crevices.
2 Tack hammer.
3 Square-headed hammer,
useful for striking in the panel
pins that secure the
backboard.
c The frame corners are
joined with glue andtwith
small nails, and clamped while
they are drying so that they do
not slip out of alignment.
d The picture is assembled in
the frame. Glass, if used, is
positioned first, followed by
the mat, the picture, a
protective piece of paper, and
then a piece of thin board. The
board is held in place by panel
pins struck into the frame
parallel with the board.
4 Screwdriver.
5 Nail set, a punch used to
8 Pincers for positioning
drive nail heads into the wood
so that they can be concealed
with a plug of wood or plastic
wood.
9 Spring miter clamps;
6 Brad driver.
7 Brad squeezer, used to
spring clamps.
the clamps are squeezed into
the mitered corners with the
pincers, and take the place of
glue and nails.
ease brads into the wood.
©DIAGRAM
b The chosen frame molding
S;
The method of making a
simple picture frame is
illustrated (below),
a A mat is made for the
picture by cutting a piece of
mounting card to the correct
size for the proposed frame,
and then cutting out an
opening for the picture.
Gesso
Gesso is a medium made basically from a
mixture of whiting and animal glue. It produces
a very smooth finish that is used as a base coat
under oil paintings. Gesso can also be
supplemented and thickened with shredded
cotton to form a paste that can be modeled and
shaped; thick gesso has been used extensively
in the past for ornamental frames.
The elaborate mirror frames
illustrated on the right were
designed by Thomas
Chippendale, and come from
his ‘Gentleman and
Cabinetmaker’s Director.” The
frame's have been built up with
layers of thickened gesso.
1 Saucepan for melting the
mixture.
2 Glass stirring rod.
3 Sharp knife used for
shredding cotton.
4 Straining bowl, with a
cover of fine muslin.
5 Pestle and mortar.
The procedure for making and
using gesso is illustrated in
the sequence (above),
a Water is added to the glue,
and the mixture is boiled in a
saucepan until the glue has
dissolved and become clear
and tacky.
b The lumps of whiting are
ground to a fine powder with a
pestle and mortar, and then
mixed with the animal glue.
c The mixture is strained
through a muslin screen to
d For a thick gesso, cotton is
shredded with a sharp knife
remove any lumps that would
spoil the final smoothness of
the gesso.
and added to the mixture.
Cabinetmaking tools
1 Sandpaper used to
smooth the wood bases.
: 2 Carbon paper.
: 3 Soft rag for removing
sawdust and dirt from the
wood before the gesso is
liapplied.
I 4 Bristle brush used for
applying a base ground of
gesso.
5 Smooth-ended stylus.
6 Palette knife; this can
be used to apply large
quantities of gesso.
7
8
I 9
jlO
■
Soft brushes.
Qay-modellng tools.
Bamboo tool.
Dental probes used to
|model the gesso.
f
g The gesso is warmed
h When fully dry, the gesso
stylus.
slightly to soften it, and then
applied to the wood with soft
brushes in the pattern areas.
It can then be modeled and
shaped with a variety of tools,
and built up in layers to form a
raised design.
can be sanded to make it
smoother, and can also be
painted with water-based
paints and then varnished.
The design to be interpreted
in gesso is transferred to the
wood by tracing over carbon
paper with a smooth-ended
DIAGRAM
The wood surface that is to
eceive the gesso is prepared
)y smoothing it with
tandpaper so that the gesso
vill "take" evenly.
5
“rrrrrTD
165
Wood decoration
The nature of wood makes it a very suitable
surface for decorating in a wide variety of
methods. It will take a high polish, which is
useful in such techniques as high-relief carving;
it is easily cut, which has enabled craftsmen to
develop such methods as marquetry and inlay.
Pieces of wood can be bonded together by
laminating them, and because wood is porous
it takes stains and colors readily.
The tools for decorating wood are many and
various, but a large number of them are cutting
implements of one sort or another, since most
of the decorative techniques require some
cutting of the wood. Carving and gunstock
checkering are done with very sharp blades
in shapes suitable to the work, while marquetry
requires precision cutting of the pieces that are
to be fitted together like a jigsaw puzzle. Wood¬
turning uses strong, sharp tools for shaving
away the unwanted wood as the piece is turned
on the lathe, and even Philippino bamboo
decoration requires special knives to cut the
bamboo to size.
The particular appeal of a piece of wood, well
decorated and finished, cannot be imitated by
any other substance, and very few materials
are so satisfying for the craftsman to work
upon. It seems, therefore, that no matter how
convenient the mass-produced plastic and
metal finishes on some articles may be, they
can never have the same charm or even opulence
as wood that has been lovingly designed and
crafted.
The marquetry picture
reproduced here depicts a
marquetry worker at his trade.
He is using a long-handled
knife for cutting out the
veneers; the knife rests
against his shoulder for extra
leverage.
166
167
Carving
Woodcarving is a craft that has been developed
by virtually every nation, as a simple means of
decorating this very common material. Wood¬
carving can be done on all scales; the carving
may be as large as a totem pole or as small as
the tiniest piece of doll house furniture, and
each size of carving has its appropriate tools.
Shown in the photograph
(right) are two carved figures
that have been shaped out of
wood and then stained with
coior. The particular carving
technique used has made a
design feature of the parallel
cuts made by the chisels.
Illustrated (below) are some
traditional Sumatran
woodcarving tools.
1,2 Chisels.
3 Mallet, worn almost hollow
from constant blows to the
ends of the chisels.
Many of the tools for wood¬
carving are variations on basic
chisels and gouges; a fuller
range of these tools is
illustrated in the wood
sculpture section.
4 Chisel.
5 Gouge.
6,7 Sloyd knives.
8 Carver’s hook.
9 Hobby knife.
10 Carving knife with a
laminated steel blade.
1
Tools for wood decoration
3 Rotary tool driven by
electricity, fitted with a flexible
shaft.
4 Heads for the rotary tool;
these take the form of rasps
and burrs.
the detail knife.
7 Whittling knife.
8 Alternative blades for
the whittling knife.
9 Miniature carving tool.
10 Alternative blades for
the miniature tool.
11 Carving knife with its
own protective cap.
12 Carving plane.
13,14 Heavy-duty
scrapers.
15 Incising head.
16 Sharpening tool
embedded with slivers of
diamond.
17
18
19
20
21
Straight rasp.
FQe.
Bent riffler.
Riffler.
Needle flle.
DIAGRAM
1 Woodcarver’s punch; the
punch is struck into the wood
with a mallet, and stamps a
pattern.
2 Alternative designs in
which the punches can be
obtained.
169
Woodtuming 1
Woodturning is a method of producing wood
shapes that are perfectly circular in cross
section. This is achieved by placing the wood in
a lathe, which is then turned at a high speed;
the sharp turning tools are held against the
wood as it rotates, and so cut an even incision
all the way around.
The wood engraving
reproduced here was made by
the English artist Thomas
Bewick, and depicts a wood
turner at his lathe. His tools
are behind him, on the window
ledge, and in the rack on the
wall.
1 Bow-driven lathe; the
bow is moved up and down
(or back and forth if held
horizontal) and spins the lathe.
2 lYeadle-driven lathe; this
works on the same principle
as the bow lathe, but the cord
is driven by a foot treadle so
that both hands are free for
the work.
Centers of various designs are
used to hold the wood securely
in the lathe.
3
4
5
6
7
8
Dead center.
Revolving center.
Cup or ring center.
IWo-pronged center.
Four-pronged center.
Modem lathe powered by
electricity.
Tools for wood decoration
1,2 Miniature turning
tools, only 7 inches in length.
These tools are available in all
the customary tool shapes,
scaled down for miniature
work.
3 Miniature lathe.
4 Safety goggles give
protection from flying slivers
of wood.
5 Dust mask should be
worn when working with
wood that gives off powdery
sawdust.
l\iming tools are strong-
bladed chisels that carve into
the wood as they are held
against it.
6 Parting tool, used for
making the first incisions into
the wood.
DIAGRAM
7 Chisel tool.
8 Skew right chisel.
9 Skew left chisel.
10 Roughing gouge.
11 Spindle gouge.
12 Deep gouge.
13 Scraper.
14 Round scraper.
15,16 Side-cutting tools.
171
Woodturning 2
A strop, illustrated (left), is
used for the final honing of
the newly sharpened tools.
The strop is used as shown
below; the tool is run across
the leather strip so that its
bevel is at the same angle as
the leather.
Oiistones and slipstones,
such as those illustrated
below, are used to keep the
turning tools razor-sharp so
that they cut efficiently and
safely when held against the
wood. Some of the stones are
shaped linto curves so that
the gouges can be sharpened
easily.
Other woodturning
accessories are shown (below),
1 Sizing attachment used
when forming columns of a
specific diameter. When the
correct dimension is reached,
the attachment drops over the
column and fits exactly.
172
2 Vernier caliper used
when making exactly fitting
lids and stoppers for turned
articles.
3 Interned dial caliper.
4 Dividers.
5,6 Center finders, used to
locate the exact center of
wood cylinders.
7 Extendable steel rule.
Laminating
Tools for wood decoration
Laminating is the technique of sandwiching
layers of different woods together so that they
produce a stratified effect on the sides intended
to be seen. Laminated wood can be cut and
shaped once the layers have bonded fully. It
can also be fixed into a lathe and turned in the
same way as any other wood.
Shown in the photograph on the
right is a chair made using
laminated wood. The frame was
formed by sandwiching
together layers of wood of
various colors, and then
bending the frame to shape it
to the required contours.
Steel ruler.
Set squeue.
360° protractor.
Niter block, used to cut
exact angles in wood to be
joined.
5 Marking gauge.
6 Boit attachment, used
for clamping pieces of wood
while they are being glued.
7,8 Dowel cutters.
9 Plug cutter.
10 Dowel centers.
11 Doweling jig.
12 Jigsaw.
13 Smoothing plane.
DIAGRAM
1
2
3
4
173
Marquetry and veneering
Marquetry and veneering are related crafts that
both use very thin slices of wood, known as
veneers. Veneering involves applying or inlaying
veneer of one color; in marquetry, veneers of
different colors, shades and patterns are laid
out to form a picture. The grain of a veneer
reflects the tree that it was taken from and the
way in which it was cut.
This example of marquetry
(right) is a tabletop worked in
a variety of woods of different
tone and grain. The tabletop
was made in the mid ] 8th
century, and is attributed to
the craftsman Oeben.
1 M-section rule; pressure
can be applied to prevent the
veneer from slipping during
the cut.
2 Marking gauge.
3 Compound marking
gauge, with four limbs that
can be set individually.
4 Protractor.
5 T-square.
174
6 Cutting gauge.
7 Inlay cutter; this tool
can be used to cut many shapes
in the veneers.
8 Mortise gauge.
9 Edge cutter fortrimming
veneered edges.
10 Strip cutter used to
make strips of veneer.
Tools for wood decoration
by foot so that both hands are
free to move the veneer in
relation to the blade.
2 Fretsaw cutting table, a
multiple bench pin with slots
of several sizes for use when
sawing veneers.
6,7 Veneer saws in two
11 Veneer punch, an
traditional patterns. The curved
blades help to prevent the
veneers from slipping or
tearing as they are cut.
irregularly shaped punch used
when replacing damaged
veneer. The wood surrounding
the blemish is cut with the
punch and removed, and then
the punch is used to cut a
replacement piece that will fit
exactly.
8 Marquetry knife.
9 Razor blade.
10 Fretwork drill used to
make holes for the fretsaw.
3 Toothing plane, a plane
with a serrated blade used to
score marquetry grounds so
that the glue will hold.
4 Router plane, used to cut
out inlay recesses.
5 Comer trimmer used to
even up perpendicular
veneered surfaces.
12 Veneer knife.
13 TWeezers used for
positioning tiny pieces.
14 Veneer roller used for
smoothing veneered surfaces.
15 Veneer hammer, used
not for striking but for applying
pressure to the veneer after it
has been glued into position.
16 Veneer pins used to hold
the veneers in place while
they are secured. The tiny
points will not damage or mark
the veneers.
17 Trimming chisel used to
trim veneered edges.
DIAGRAM
1 Marquetry cutter’s
donkey, a frame saw powered
@
175
Gunstock checkering
The shotgun illustrated (below)
is an American example,
and shows the traditional
checkering on the stock. The
diamond shapes of the
checkering are arranged to fall
along the stock, so that they
do not cut across the grain
unnecessarily.
Qunstock checkering is a craft that grew out of
a necessary task—that of providing a secure
handgrip on gunstocks. In order to break the
smooth surface of the stock, the wood is
covered in the region of the grip with hundreds
of tiny, even, crisscross lines, placed so that
they form lozenges across the wood.
1 Rasp for preliminary
preparation of the wood.
2 FUe.
3 Chisel used for shaping
uneven parts of the stock.
4 Heavy-duty scraper.
5 Soft brush for staining
and varnishing.
6 Swab for applying
varnish.
7 Sandpaper.
8 French polish rubber.
9 Wool pad used for
buffing.
10 Soft cloth.
11 Wire wool used for
rubbing down coats of varnish.
12 Itipoli wax for polishing.
Checkering tools may be made
at home by the craftsman; the
following sequence shows the
procedure for making a twoline spacing tool,
a The end of a steel rod is
heated and then hammered
so that it is square in section.
b The tool handle is cranked
c The sides of the tool are
d Tiny teeth are cut into the
slightly to give it an angle, and
then a square-bottomed
groove is cut in the underside
of the tool with a hacksaw.
cut away at an angle so that
each side of the tool is slanted
to the same degree.
sloping side of each blade,
using a very small triangular
file. The teeth should be
evenly spaced so that they will
cut through the wood cleanly.
Tools for wood decoration
m.
1 Plastic ruler; the
flexibility of the plastic enables
it to be bent slightly to conform
to the shape of the stock.
2 Hard pencil.
3 Scalpel.
4 Diannond template,
used to ensure that the two
rows of lines are at the correct
angle to one another.
9 V-grooving tool.
10 Spacer for square-topped
checkering.
11 Spacer for diamondtopped checkering.
12 Concave border tool
used for making the final
border around the checkered
area.
13 Convex border tool.
The checkering patterns are
made in the following way.
a The diamond template is
laid aiong two sides of the
area to be checkered, and two
adjoining sides are marked
with a needle or a sharp
pencil.
b These lines are extended to
c Each of the lines is
d The border of the pattern,
the limit of the design, and
then they are marked into the
wood with the appropriate
spacing tool. The spacing
tool is then used to mark all
the crisscross lines parallel
with the first two guide lines.
deepened and regulated with
a grooving tool; the shape
of the final checkers will
depend on the shape of the
grooving tool used.
where all the grooves have
terminated, is neatened and
shaped with a border tool;
this may have either a
concave or a convex section.
The design is then polished
and waxed.
iDIAGRAM
5 Needle.
6 Bent needle file.
7 Narrow grooving tool.
8 Electric checkering
head.
177
Philippino bamboo decoration
Bamboo is a ubiquitous plant in many tropical
countries, and is used for numerous ethnic arts
and crafts. The natives of the Philippine Islands
have developed their own attractive method of
decorating bamboo wood; the technique
involves attaching colored paper to the wood,
and then boiling the bamboo to transfer the
color to the wood.
The containers illustrated
(right) have been decorated
with the traditional Philippino
technique. Each line of pattern
has been produced on the
bamboo wood by dyed paper
cutouts or colored twine.
1 Small knife for cutting
manila paper for the stencils.
2 Bark-trimming knife.
3 Curved knife used to slice
the bamboo into sections.
4 Loguitip, a sandpaperlike leaf that is used for
smoothing the bamboo.
5 Small basin for dissolving
the dyes.
6 Betel nuts; these are used
for polishing the wood.
7 Large basin carved out of
wood.
The bamboo decoration is
carried out as follows,
a A length of bamboo is
trimmed of protruding bark,
and then cut into long sections,
b The section is sanded with
the abrasive loguitip leaf,
c Geometric shapes are cut
out of dyed paper, and these are
pasted onto the bamboo. Dyed
twine is also wrapped around
the cylinder.
d The tube is wrapped tightly
In banana leaves and secured
with twine, and then the entire
object is boiled for several
minutes; the heat causes the
dye to transfer from the
paper to the wood,
e The twine, leaves and paper
are removed from the bamboo,
and when the wood is dry it is
polished with the meat from
betel nuts.
178
Pyrography
Tools for wood decoration
Pyrography, or pokerwork, is the art of
decorative wood-burning. The name pokerwork
comes from the first tool used for burning
designs into wood—that is, an ordinary domestic
hearth poker, which was heated in the open
fire. Pyrographers today can use home-made
patterned tools, or special electric pokers.
The panel illustrated (right) Isa
picture executed in pyrography
by Ralph Marshall. The panel
is dated 1834, and was copied
from a painting by Henry
Morland; the rich effects of
light and shade are typical of
pyrography at the height of its
popularity.
4 Alternative heads for the
home-made poker.
5 Electric poker and stand;
the tip is heated by an electric
current.
6 Aiternative heads for the
electric poker.
The principle of pyrography is
the same whether a poker,
home-made or electric
tools are used,
a The tool is allowed to heat
until its tip glows red hot.
b It is then held against the
wood, and the pattern on the
end of the head will burn itself
into the wood’s surface. The
heads with plain ends can be
drawn across the wood to
scribe various lines.
DIAGRAM
1 Clamp used to hold the
work while it is being
decorated.
2 Bunsen burner for heating
home-made tools.
3 Home-made poker; the
head has been patterned with
a file, and inserted into a wood
handle.
179
11 Working with glass
Glass is a unique material, quite unlike any other
medium used in the arts and crafts. When it is
heated it becomes molten, but rather than being
a liquid like molten metal, it is then viscous
and malleable rather like plastic. When cool,
glass solidifies into an extremely brittle solid
which can not readily be carved or filed. It is
one of the few craft materials that is generally
transparent or translucent, and perhaps this
characteristic above all has resulted in its wide¬
spread use for objects that combine beauty
and utility.
The tools for working with glass can be divided
into two kinds: those for shaping hot, molten
glass, and those for working with cool, solid
glass. Molten glass can be bent, stretched,
molded, stamped, colored and blown, and tools
have evolved to aid in all these actions. Solid
glass can be cut, chipped, faceted, engraved
and etched, and once again glassworking has
its own tools for each process.
Apart from the advent of mechanization, the
tools for glassworking have differed very
little since the invention of each technique;
depictions of 15th century glassbiowers show
them using blowpipes and pontils identical to
those in use today. The main areas where glass¬
working is changing is in the development of
new techniques. Modern materials can be used
with glass, such as the concrete in which dallede-verre is set and the epoxy putty or resin
used for mock stained glass and applique
glass. The art nouveau and art deco movements
in particular did much to develop new and
beautiful methods of decorating glass.
The print reproduced here
illustrates glassbiowers from
Diderot’s “Encyclopedia of
Industries." The pictures show
the progress of a blown goblet
from the attaching of the foot
to its annealing in a slowly
cooling oven.
F:j.
181
Glassblowing
Glassblowing was invented by the Syrians in the
first century BC; they discovered that if molten
glass was gathered on the end of a hollow rod,
air could be blown down the rod to create a
hollow vessel from the glass. The first blown
glass was formed by blowing it into molds, but
craftsmen later developed the technique of
glassblowing without molds.
The photograph (right)
illustrates one stage in the
process of blowing a glass
bowl. The vessel has been
shaped and the bubble cut
open at the mouth, and the
rim of the bowl is being opened
out with tongs.
Glass is formed mainly of
silica, and the source of silica
that is generally used is sand.
The properties of the glass
formed depend on the type of
sand used, the additional
materials used as fluxes, color¬
ants and catalysts, and the
method and speed of fusing
the ingredients. The various
materials are shoveled into a
crucible, which is then placed
in a furnace and fired; the heat
causes the materials to melt
and fuse into a viscous liquid,
which when cooled forms brittle
glass.
1
2
3
4
5
Blowing iron.
Pontil or punty.
Gathering iron.
Angled blowing iron.
Jacks, used for shaping
the necks and feet of blown
vessels.
6 Tweezers are used for
nipping in the molten glass.
7,8 Paddle and wooden
block, used to regulate the
shapes of blown items.
9 Marver, a steel table for
rolling the "gather" of molten
glass.
10 Bucket used for cooling
tools.
11 Glassblower’s bench;
the blowpipes can be laid
across the flat arms.
182
1
I ■
QIassworking tools
Glass for glassblowing is melted
in a furnace; in large
establishments the furnace
runs continuously so that
molten glass is always available.
1 Glassmelting fiirnace.
2 Annealing oven; the
temperature of the oven is
reduced slowly so that the
glass does not develop flaws.
3 Pipe stand, used when
heating the pipes at the
furnace mouth.
4 Glory hole; if the glass
loses any of its malleability
during blowing, it is softened
by holding it in this small
furnace.
5,6 Glass shears; glass can
be easily cut with these thick,
strong blades.
7 Calipers used for checking
measurements.
8 Asbestos mitt, used for
protection from the heat.
9 Protective glove.
The basic stages of glassblowing are shown above.
a A “gather” of molten glass
' is taken up on the blowing
■■ ironandrolledonthemarver
.'. to ensure that it is even. This
'i also slightly cools the outside
! layer so that the blowing will
not burst it.
b A bubble of air is blown
down the iron into the molten
glass. This bubble is then
increased by blowing until the
glass is the desired shape, size
and thickness.
c The pontil is attached to
the tip of the glass, and the
bubble is severed from the
blowing iron by cutting it with
shears or snips, or by
dribbling a little water around
the neck to cool the glass and
then striking it firmly.
d The hollow vessel is then
shaped as required. Extra
molten glass for handles or feet
is applied with the gathering
iron. If at any stage the glass
begins to lose its malleability
it is returned briefly to the
furnace to soften it slightly.
DIAGRAM
I
;)
@
183
Patterned glass
184
c The chosen design is drawn
onto the glass with a wax
pencil or a diamond-point
engraver.
d Theglassaroundthedesign
b Several indentations are
c The ends of the indentations
d The cylinder is then heated
made in the end of the cylinder;
the bigger the bubble that is
required, the deeper the
indentation must be.
are sealed with molten glass.
This traps air in the glass,
forming bubbles in the cylinder.
to make it pliable. It can now
be pulled out to a narrow rod
suitable for a stem, and twisted
so that the elongated air
bubbles form spirals.
b Each end of the bundle of
c Rods made in this way are
d Ifapaperweightorasimllar
canes Is fitted into a special
cup. The glass is then heated
and the cups are drawn apart
so that they stretch the bundle
of canes until it is narrow and
long.
then sliced across, producing
patterned disks. Several disks
are packed together in a
mold, and the spaces between
the disks are filled with clear
molten glass.
object is being made, a thick
dome of clear glass is dolloped
onto the millefiori; this dome
acts as a magnifier so that the
minute detail of the colored
“flowers" can be seen.
Cameo glass, such as the
famous Portland Vase, is made
from two different colors of
molten glass.
a A vessel is formed (in this
case, blown) from glass of one
color; this will be the inner
surface of the final vessel.
b When this vessel is slightly
Air twists, which are often seen
in the stems of wine glasses,
are formed in the following
way.
a A short, thick cylinder of
glass is formed by taking a
"gather" of glass and rolling it
evenly on a marver.
Millefiori means “thousand
flowers,” and is a method of
glassworking that results in
many tiny flower shapes
packed together,
a Tfiin canes of colored glass
are bundled together around a
colored core, and are heated
until they have fused.
cooler, it is dipped into a
container of molten glass of a
different color so that it receives
a coating of the second color.
The vessel is now formed of
two layers of glass.
is cut away until the underneath
layer of glass is reached. This
leaves a relief design in one
color of glass on a background
of a different color.
I
I Flameworking
Off
—■ -■■■
Glassworking tools
■;
.. .
"
:
r
’
;
Flameworking is the manipulation of glass rods
that have been heated to make them pliable,
Flameworking was originally known as
lampworking, and was used to form microscope
lenses over a type of small oil lamp. The glass
i rods used for flameworking are traditionally
clear, although colored rods can easily be
: obtained.
The small glass animal photo¬
graphed here is typical of the
kind of glass produced by
flameworking. The animal
has been formed from a solid
lump of glass that has been
softened by heating and then
pulled into shape.
1 IMncers used to bend the
li
1
glass.
i
i
i
I
3
4
5
6
7
2 Triangular file for scoring
the glass along break lines.
Glass cutter,
Forceps,
Protective goggles.
Hand torch.
Blow torch on stand.
8 Aimealing tin full of
heat-retaining material.
9 Carbon paddle for
shaping the glass.
10 Cvbon block.
11 Asbestos board used to
protect the working surface
from heat.
The method for flameworking
is illustrated above,
a The chosen rod is heated in
the flame of a torch so that it
can be manipulated. The glass
is shaped into the required
form by bending and pulling
the molten rod.
b The finished form is then
placed in an annealing tin;
this allows the glass to cool
very slowly, so preventing it
from developing stress marks
as it cools.
DIAGRAM
li
185
Etching and engraving glass
Etching and engraving are two methods of
decorating glass by removing minute amounts
of glass from the surface of the object. In the
etching process this is done by painting
controlled amounts of weak acid onto the areas
to be patterned; engraving consists of scraping
or cutting away the surface so that a pattern
appears.
Illustrated on the right is a
wheel-engraved glass goblet.
The bowl shown on the left is
an example of glass etching,
reproduced from the 1895
Harrod's catalog.
1 Brush used for painting on
the acid.
2 Craft knife, used to cut
away the pattern if a stencil is
made of plastic film.
3 Razor blade.
4 Stylus.
5,6 Scrapers.
Hydrofluoric acid used on its
own will produce a clear etch,
which is a completely smooth
indentation on the glass. If the
acid is mixed with a bifluoride,
such as ammonium bifluoride,
the etch will have a frosted,
slightly rough, appearance.
Most acids will not attack glass,
so glass etching is a relatively
modern technique made
possible by the discovery of
the properties of hydrofluoric
acid. A 50% solution of this
acid is sufficient to etch glass
very quickly; 10% will yield a
light etch.
smooth etch
glass
resist
The principle of etching glass
is shown in the two steps
above.
a The parts of the glass that
are not to be etched are painted
with shellac, wax, or a similar
acid-resistant substance.
Alternatively, a resist stencil
can be applied.
186
b When the resist has set, acid
is painted over the glass and
eats into the parts not covered
with the resist. When the glass
is etched to the required depth,
the acid is rinsed off in water
and the resist is removed with a
solvent.
Glassworking tools
o
The glass engraver’s wheel
(above) is a high-speed drill to
which various sharp cutting
heads can be fixed. Rather than
moving the wheel over the
glass, the engraver moves the
glass relative to the wheel,
which requires a great deal of
accuracy and skill.
5 Wax pencil for marking
patterns on the glass.
6 Haurd pencil.
7,8 Powered engraver
and alternative head.
9 Tungsten carbide pen.
10 Diamond-point
engraver.
11 Calipers for checking
1 Cutting heads for the
engraving wheel; the side of
the head performs the cutting.
2,3,4 Lead, cork and cloth
wheels used for polishing highrelief engraving. The wheels are
smeared with rouge to polish
the glass.
Wheel engraving is done in the
following way.
a The design is drawn in detail
onto a sheet of thick paper, the
same size as it will appear on
the glass. The main outlines of
the design are then drawn onto
the glass with a wax pencil.
b The engraver moves the
glass over the wheel so that
The method of engraving by
hand is shown in the
illustrations below,
a The design is marked onto
the glass with a wax pencii,
or a white ground is painted on
and the design marked with a
b With a tungsten carbide
pen, a diamond-point
engraver, or a powered
engraver, the artist follows the
the design is cut into the glass.
Different effects are achieved
by varying the angle of the
glass against the wheel, and
also the pressure with which it
is applied, or by using a
selection of cutting heads.
measurements.
lines of the design. The pattern
can be made up of incised lines,
or of many tiny dots.
DIAGRAM
hard pencil.
a
b
@
187
Stained glass 1
m\
Leaded stained glass has for centuries been
associated with grand architecture, especially
with ecclesiastical buildings. Stained glass
panels are now found in all manner of buildings,
and, because of the influence of Louis Comfort
Tiffany, as three-dimensional objects ranging
from lampshades to room dividers.
The stained glass panel shown
(right) depicts a medieval
pedlar with his wares strapped
to his back. The panel has been
made from relatively few
pieces of glass, and these have
been painted to provide the
extra detail required.
1 Soft pencil for designing
and tracing the pattern to be
cut.
2 Soft wax pencil used for
writing on the glass.
3 Steel rule used for
marking straight lines.
4 Carbon paper is useful for
marking dark glass forcutting.
5 Pouncebag; white pounce
is shaken over the carbon line
to make it show up on the dark
glass.
6 Double-bladed cutter for
template cutting. The gap
between the blades equals the
width of the lead strips that will
hold the glass.
188
7 Glass cutter with a steel
wheel. The cutter is used to
score the glass before breaking,
and to nibble off surplus glass.
8 Tapper used to tap the
underside of the scorellne so
that the glass will break cleanly.
9 Glass or plate pliers can
be used to break small pieces
of glass along the scorelines.
10 Grozing pliers remove
uneven pieces of glass from
the cut shape.
11 Circle cutter scores
perfect circles on the glass.
12 Light box used as an aid
to accuracy during the
assembly of the glass.
'ij
;
,
i
|
I
>
i
■
I
'■
l
Glassworking tools
.
:
..
Glass for leaded panels may be
■prepared as follows,
a A full-size copy of the
■design is traced onto paper
or cloth. This copy can then be
used as a guide to mark the
'pattern lines onto a large sheet
jof plain glass that will act as a
(temporary base for the panel.
b The original design is cut
c The pieces of colored glass
into separate pieces, and each
piece is used as a template. The
template is laid over glass of
the appropriate color, and
scored round with a cutter;
this scoreline is tapped and the
excess glass is broken off.
are placed in position on the
clear glass with wax, so that
the entire panel can be held to
the light for inspection. Paint,
a type of vitreous enamel, is
applied in the areas that
require extra detail or special
effects.
j Brushes of many sorts are
; used to apply paint to the
■ glass before the piece is fired
:to make the paint permanent.
1 Stippling brush used to
: dab color onto the glass to
(produce gradations of tone.
8 Mottling brush used to
apply matt color to large areas.
9 Badger brush, an
excellent matting brush.
2 Large stippling brush.
3,4,5 Wooden stick,
needle point and quill are
12 Mixing tray for paints.
13 Glass bell preserves the
all used to vary and refine the
I surface of the paint after it has
been applied to the glass.
16 Broad hog brush for
laying color washes and
3 painting bold strokes.
' 7 Broad soft brush ideal
' for delicate strokes and for
,1 working with oil-based enamel
i paints.
.
'
~
I
d The pieces of colored glass
are placed on racks in a kiln;
they are then fired at a
moderate heat until the paint
is bonded onto the glass
permanently. When the glass
pieces have cooled they are
ready to be glazed.
10 Firing kiln.
11 Kiln fork for placing the
glass in the kiln.
moisture content of paints and
stains.
189
©DIAGRAM
Steiined glass 2
Glazing is the process of placing
the glass pieces in their correct
positions and fixing them with
lead edgings.Thestripsof lead
are known as cames or leads,
a In order to remove any
kinks and to strengthen the
lead the cames are gently
pulled through a lead vise.
b Woodbattens are nailed to
the worksurface at right angles
to each other; these will then
serve as guides for two sides
ofthepanel.Two edgingcames
are put in place and a lathekin
is used to open up the leaves
of the leads.
c The first piece of glass is
fitted into the corner. It is
knocked home with a
stopping knife. A piece of lead
came Is placed around the
glass, cut off at the correct
angle, and pushed firmly
againstthe glass with the knife.
d Once a glass shape and a
;
came have been fitted together,
farrier’s nails are used to
ensurethatthey are heldfirmly '
in place. All the glass pieces
andtheleadsareassembled in
'
this way, and when they are all
in place the final outside cames
are fitted.
i
The tools on the left are used
for assembling the glass and
the lead cames prior to
soldering.
1 Cutting knife for leads.
2 Improvised iead cutter
made from a putty knife.
Stopping knife with a
leadweighted handle that can
be used to knock glass firmly
Into the leads.
4 Lathekin used to open
the leads and smooth them
over curved edges of glass.
5 Pliers are used to pull the
lead through the lead vise.
6 Pincers used for
removing supporting nails after
the glazing has taken place.
7 Farrier’s nails hold the
glass and leads in position
during soldering.
8 Hammer.
9 Lead vise used to stretch
the lead cames before glazing.
10 Mitering vise used for
cutting multiples of leads
consistently and evenly.
190
1
I
Glassworking tools
ISoldering joins the lead cames
ijjtogether so that the glass is
:dheld securely.
'la The panel is scrubbed with
Va wire brush to clean it ready
,,::for soldering. Flux is then
5]painted onto the lead joins to
tjsncourage the solder to "take”
;!on the metal.
b Using a heated soldering
iron each joint is soldered. The
solder stick is held against the
joint so that it will flow exactly
where it is needed as soon as
it becomes molten. When the
solder has set, the two pieces
of lead are permanently joined.
c The panel is turned over and
d The panel is weather¬
all the joints are soldered on
the reverse side to provide
added strength. Any joints that
need resoldering once the
solder is dry are first cleaned
with a flat file.
proofed if it is to be used in the
outside wall of a building. This
is done by painting the joints
with cement putty and pressing
the cames down to firm them.
Excess putty is cleaned away
with a pointed stick.
<[ Shown on the right are tools
it used for soldering a stained
i glass panel.
j| 1 Wire brush used to clean
j the panel before it is soldered.
I 2 Stiff-bristled brush for
^ painting flux onto the joints to
be soldered.
3 Flat file used to correct a
t poor solder. The surface of the
i lead is filed down so that a new
I solder can be made.
j 4 Pointed stick; any excess
bl putty is removed with this.
(5 Scrub brush used to
distribute cement putty evenly
ii over the panel.
I 6 Electric soldering iron
j with a stand; the hot iron can
'DIAGRAM
be placed on the stand for
safety when it is not being held.
191
Copper foil and glass
The use of copper foil in place of lead for
stained glasswork has many advantages. Copper
is a more versatile medium than lead as it can
be wrapped around a wider variety of objects; it
is also much lighter than lead and can be used
for smaller, neater joins. Copper foil can be used
to “lead” shell and stone slices.
This decorative butterfly (right)
was made in stained glass
using the copper foil method
of leading. Each piece of glass
has been cut to shape and
wrapped In copper foil strips,
and the pieces have then been
soldered together.
In addition to the usual tools
for stained glass, the copper
foil technique makes use of
the following tools.
1 Scissors to cut the copper
foil tape.
2 Small brush for applying
flux to the panel.
3 Small nails are used during
the assembly of the panel to
hold the glass pieces firmly in
place during soldering.
4 A ruler jig is used to
produce consistent angles if
geometric glass shapes are
required.
192
C
A copper foil panel can be
made as follows,
a A full size drawing of the
proposed design is made on
paper; there is no need to allow
space for the leads, as the
copper takes up very little
room. The drawing is then cut
up for use as templates,
b The pieces of glass are cut
to fit the design by scoring
around the templates with a
cutter and then breaking off
the excess glass,
c The edges of each piece of
glass are wrapped in copper
foil tape so that every section
of glass is surrounded by a strip
of copper. The glass sections
are then fitted together in their
respective places,
d The copper strips are
soldered together wherever
they touch. Unlike lead cames,
which are soldered only at the
vertices, the copper has to be
soldered along every part of
the “leadline." The panel Is
then turned over and soldered
on the back.
I
Epoxy putty and glass
Glassworking tools
n
Epoxy resin putty can be used to achieve an
effect very similar to that of leaded stained glass.
Black epoxy resin putty acts as the leads when
placed on a base sheet of plain glass, and the
areas between the “leads” can then be stained
with transparent color. Epoxy resin can also be
used to bind together freehand shapes cut from
glass sheets.
Shown on the right is a modern
example of epoxy putty used to
imitate the lead lines on stained
glass. The spaces between the
lines of epoxy putty have been
painted to give the effect of
different colors of glass.
These tools are for making
stained glass panels using
epoxy resin.
1 Damp rubber roller used
to press the putty onto the
glass.
2 Selection of fine brushes
for the application of paint or
enamel to the glass.
3 Wire wool used to tidy up
the edges of the dried lines of
putty.
4 Soft rag moistened with
methylated spirit or ether
alcohol for cleaning the glass.
5 Board to act as a base for
the glass panel during
assembly.
Epoxy resin putty is used here
in place of lead,
a An exact size sheet of glass
is laid over the cartoon, and the
shapes cut freehand from this
sheet. The putty is rolled into
lengths and sandwiched
between the shapes to force it
onto both surfaces,
b A damp roller is used to
press the putty firmly to the
assembled glass. When hard
the putty is rubbed with wire
wool to neaten the edges. The
panel is then cleaned with a
rag dampened with methylated
spirit. Color—French enamels
or acrylic paint—is applied.
A variation of this method,
glass applique, involves fixing
the pieces to plate glass with
epoxy resin.
DIAGRAM
A stained glass panel involving
no cutting can be made in the
following way.
a An exact size glass sheet is
laid over the cartoon. Strips of
epoxy putty are rolled out and
laid on the glass to follow the
leadlines. The strips are then
flattened with a damp roller,
b Once the putty is hard
the panel is reversed and
cleaned with a rag dampiened
with methylated spirit.
The shapes are then painted
so that the color overlaps the
"lead” slightly. When the paint
is dry, strips of putty are applied
to the colored side to "lead" it.
m
Dalle-de-verre
Dalle-de-verre is a French name meaning “flag¬
stone of glass;” it was the French who in the
1930s invented and perfected the methods used
for working with dalle-de-verre, or slab glass as
it is often called. Dalle-de-verre is usually set
in concrete, although epoxy resins are becoming
more popular as they are more weather-resistant.
Illustrated (right) is a dalle-deverre panel made from slabs
of glass set in concrete. The
panel makes a design feature
of the strong vertical lines
produced by the supporting
bars.
I
1 Steel-wfaeel glass cutter.!
2,3,4 DaUe-de-verre
hammers for chipping,
'
A basic slab glass cutting bench
is set up in the manner shown
on the right. The anvil is
positioned over a movable
waste bin, and duckboards
are placed in front of the bin
for the craftsman to stand on
while working.
194
cutting and faceting the
glass pieces.
5 Steel anvil over which
scribed dalles can be broken.
The glass can also be faceted
by chipping itagainstthe anvil.
6 Iron L-angle is fastened
to the front edge of the cutting ,
table, and glass scored with a '
straight line can be broken
over it.
7,8 Goggles and gloves
should be worn for protection
from flying splinters of glass. ;
Glassworking tools
A dalle-de-verre panel is
■ made in the stages illustrated
(below).
I a A full-size drawing of the
1 design is made, and the slabs
. of glass, or dalles, are cut to
) size to correspond to sections
1 of the drawing.
b The faces and edges of the
c The dalles are positioned
d The surface of the concrete
dalles are chipped and faceted
by striking them with
hammers on a steel anvil.
This roughening causes them
to reflect more light than if
they were left flat.
on a piece of greased paper
marked with the design, and
surrounded by battens. The
spaces around the dalles are
filled with concrete or epoxy
resin until the level is flush with
that of the glass.
or resin is smoothed over with
flat tools such as a scraper or
a plasterer’s trowel. When
the panel is fully dry, the paper
can be peeled off the back and
the battens removed.
3
Iii
1 Rubber roller used for
applying grease to the slabs
and the backing paper before
casting.
2 Scissors for cutting the
templates.
3 Brush for filling in narrow
crevices before casting.
A tip tcible (left) provides
support and ease of movement
when casting a large panel, and
a vibrator table (above) is
useful to aid the dispersal of air
bubbles from the casting mix.
Brick trowel.
Scraper.
Plasterer’s trowel.
Knife for patching up
cavities in cast concrete.
8 Wire brush used to clean
the glass before and after the
casting.
9 Rubber gloves, used to
protect the hands from concrete
or resin.
IDIAGRAM
4
5
6
7
@
195
■|
p;
Vitreous and ceramic mosaic
-
- -1?-.i:,Wtlilifl'iUfTaM'Wr"i"rilVilfIITi id' I ' iii - ■'!"illiflirfili f IiTi 'i'-' '■|’■^('
Mosaics have been made through the ages from
virtually every solid material, ranging from gold
and precious stones through to eggshells and
pasta. The famous mosaics of the Byzantine era,
however, were made almost exclusively of glass,
ceramic and stone. The fragments used may be
arranged into a plane surface, or set at angles
so that they deflect the light.
Reproduced (right) is a detail
from a floor mosaic in a Sabian
cave at Edessa, Greece. The
full mosaic, which was made
in AD 227-8, depicts the hero
Orpheus charming the animals
with his lute.
1 Mosaic hammer.
2 Glass cutter with a steel
wheel.
3 Mosaic nippers.
4 Tllecutters, with aspring
for extra power.
5 Tweezers used for picking
up small pieces of mosaic.
6 Hardie, a small steel anvil
used for breaking tesserae.
The piece is held over the
hardie, and struck with the
mosaic hammer.
The illustration (right) shows
some of the ways in which
standard tesserae can be
divided to produce mosaic
pieces of various shapes and
sizes. The cuts are made with
the nippers, holding them at
the edge of the tile and
squeezing firmly.
196
Glassworking tools
,
j
I
i b When each section has been
I done in this way, the groups
of tesserae are assembled on
the prepared ground and the
paper is peeled off.
The double reverse method,
shown right, allows the artist
to assemble the mosaic in
sections but does not restrict
the design to having a totally
flat surface in the way that the
indirect method does,
a The tesserae are grouped in
clay, face up as they will appear
in the final mosaic. They are
then covered with muslin that
has been soaked in glue,
b When the glue Is dry, the
tesserae are lifted out of the
clay inonepiece, heldtogether
by the muslin. They can then
be assembled on the prepared
ground.
1 Rolling pin for making
flat clay tesserae.
2 Fettiing knife for trimming
the day.
3 Tesserae cutter; the clay
is cut and then fired as for
pottery.
4 Tile cutter, illustrating
some of the different shapes
in which cutters can be
obtained.
5 Serrated spreader used
topreparetheground in which
the tesserae are set.
6 Clay board; the battens at
the sides ensure that the clay
is rolled evenly.
7 Automatic clay roller,
with an adjustment for different
thicknesses.
The pieces for mosaic need not
be regular shapes; mosaics
can be made from smooth
pebbles of different colors, or
from pieces of metal that have
been cut to shape and arranged
on a ground.
'DIAGRAM
j
;
Much mosaic is set directly into
itsground, or holding medium,
but various methods have been
developed so that the mosaic
can be assembled in sections
first. The indirect method,
shown right, is one of these,
a An outline of part of the
mosaic, reversed, is drawn
onto craft paper and coated
with gum arabic solution. The
tesserae are arranged face
down on the paper,
@
197
Enameling
cz:z:::z::zr__
.
.
. ..
'
'-
. . .
Enamels are vitreous glazes that can be fused
onto a metal surface to produce a durable
decoration. The enamel is applied by placing it
in position on the metal and then firing it in a
small kiln to fuse the glass. Most enamel work
uses colored glazes, although the technique
known as grisaille uses monochrome enamels,
usually gray with white highlights.
The example of enameling
shown on the right is known
as the Dunstable Swan, and
is in the British Museum,
London, The swan is just over
an inch high, and dates from
the 15th century; it was
intended to be worn as a piece
of jewelry.
1 Porcelain pestle and
mortar.
2 Sandbag.
3 Sieve.
4 Agate pestle and mortar.
5 Glass muller and slab.
6 Strainer.
7 Stiff brush.
8 Funnel.
9 Nailbrush.
Enameling is a craft that
requires careful preparation of
the materials to guarantee
good results.
a The enamel chunks are
placed in a porcelain mortar,
and broken up by striking the
pestie with a mallet. A sand¬
bag underneath cushions the
blows.
10 Wire wool.
11 Paintbrush.
12 Wire tray with foil dishes
for drying enamels.
13,14 Dropper bottle and
spray bottle for distilled
water,
15 Mixing paiettes.
16 Wide-necked jar for
storage.
b The enamel pieces are
transferred to an agate pestle
and mortar, and covered with
distilled water. The grinding
of the enamel continues under
the water, which is changed at
intervals so that the enamel
is being ground and washed
simultaneously.
c After the enamel has been
dried, it is pushed with a stiff
brush through progressively
finer sieve meshes, so that
it is separated into grades.
Each grade is labeled and
stored separately.
d The metal that is to be
enameled is cleaned thoroughly,
usually by pickling it in acid
and then scrubbing it clean
with a nylon brush or wire
wool. This ensures that the
enamel adheres evenly to the
metal surface.
Glassworking tools
l!R?T
[The following tools can be
1 used when applying enamels.
I 1 Enameling stands in a
variety of shapes.
'
15 Kiln rack supports the
work during firing.
1 16,17
Spurs in two designs.
Pieces that are enameled on
all sides can be rested on these
during firing so thatthe enamel
■ is touched at as few points as
possible.
delicate enamel work.
13 Large swirler.
14 Metal chute used to
scatter enamel.
19 Enameling tongs used
to position pieces and racks
inside the kiln.
20 Enameling fork for
removing fired pieces.
21 Enameling kiln.
18 Carborundum stones.
e Enamel is then applied to
the surface that is to be decor¬
ated. The enamel powder may
be dusted onto the surface, or
it can be mixed with water or
glue and applied with a brush
or spray.
f
The metal piece, with its
coating of enamel, is placed
In a kiln and fired for a period
appropriate to the particular
metal and enamel. The firing
melts the glass in the enamel,
and fuses it onto the metal.
g While the enamel is still
h When the enameled piece
molten in the kiln, patterns can
be introduced by swirlingdrawing a pointed tool
through several colors of
enamel in succession so that
streaks of color are produced.
has cooled after firing, the
stains produced on the metal
by the heat are cleaned away
by pickling or by rubbing with
carborundum stones. This
leaves the metal smooth and
polished.
DIAGRAM
;
2 Spray enamel gun.
3 Blorwpipe spray.
4 Enameling brushes.
5 Needle tool.
6 Sgraffito tool.
7 Swirler.
8 QuiU.
9 Tiny spatula.
10,11,12 Shaped tools for
@
199
Foil and thread enamels
Specialized enameling techniques can add
interest to the design of an enameled object
and enhance its appearance. Gold or silver foil
placed behind transparent enamel increases the
brilliance of the color, and if the foil is also
stamped the light is pleasingly diffracted.
Enamel threads melt into attractive shapes .
when fired.
Illustrated (right) is an
enameled medallion of the
Holy Family, made by the
Limoges school in the early
16th century. The enamel has
been applied over foil to give
the highlights a slightly
luminous appearance.
1 Stamp made from pins
stuck into a cork.
2,3,4 Stamps of various
designs used to texture the
foils.
5 Needle tool used to cut
shapes from the foil.
6 Fiberglass brush for
pressing the foil in place.
7 Agate burnisher.
Enameling over foil creates
a peculiarly luminescent effect,
a The chosen foil is cut to
shape, and may be stamped
with a pattern or an overall
texture. It is positioned on the
surface to be enameled, and
burnished into place.
b The coating of enamel is
painted or sprayed evenly over
the foil, and then the entire
piece is fired in the usual way.
This method is effective only
with transparent or translucent
enamels, since opaque enamels
do not allow any light to
penetrate.
Enamel threads are made by
drawing out hot enamel and
allowing it to cool in thin
lengths.
a The enamel is placed in a
crucible and heated in a kiln
until molten. The crucible is
then removed from the kiln
before the enamel cools.
b The crucible is gripped
firmly in tongs, and a steel
rod is dipped into the molten
enamel. The rod is then pulled
away to draw out a thread of
enamel, which quickly cools
in the air and can be broken
into shorter lengths for storage.
Cloisonne and champleve
Glassworking tools
11
) Cloisonne and champleve are two ways of
, applying enamel in well defined areas. If two
colors of enamel are placed side by side without
a barrier they will mingle on firing; cloisonne
overcomes this difficulty by creating barriers of
metal between the areas of enamel, and
champleve places the enamels in depressions
. cut into the metal’s surface.
,-
.—
"
.
The mask of Tutankhamen
illustrated (right) shows
examples of both cloisonne
and champleve work. The
headdress is fused glass set
in recesses in the manner of
champleve, and the bottom of
the necklace is decorated with
cloisonne blossoms.
Cloisonne tools are
Champlev4 tools are shown
5 illustrated (right).
in the illustrations (right).
1 Needle-nosed pliers
4 Gravers of various
! used for bending and shaping
\ the cloisons.
2 Tweezers for positioning
the metal cloisons on the
' background.
3 Paintbrush; this can be
used to fill the cloisons with
tj enamel.
designs, used for cutting the
recesses for the enamels.
5 Justifier, a tool with a flat
head used for leveling the
bottoms of the recesses.
1
Cloisonne consists of making
: fences (cloisons) to enclose
: ' the enamels.
a A strip of metal the correct
length Is bent to shape
, and the ends are soldered to
.' form a cloison. Each cloison is
si then soldered onto the base.
'i
b Each cloison is filled with
an enamel, and when all the
cloisons have been filled the
object is fired. After cooling,
the surface of the piece is
smoothed and polished so
that every cloison stands at
the same height.
Champleve is another way of
ensuring that areas of enamel
are kept separate,
a Depressions of the required
shapes and sizes are cut with
various sharp tools into the
metal ground, leaving raised
portions of metal to act as
barriers.
b The enamel is then placed
In the depressions, and fired
and polished in the usual way.
The effect can be similar to
that of cloisonne, but champ¬
leve can be used to apply
small areas of enamel onto
large pieces of metal that are
to remain uncovered by
enamel.
iDIAGRAM
■'
12 Fine metalwork
Before the second century BC, all decorative
metalwork was executed with hammers. The
beating process spread the metal to the right
thickness and area, and also shaped and
contoured it if it was hammered on one side
only. Large statues could be built up by riveting
several of these hammered pieces together, or
by securing them onto a wood core. Even when
the lost wax process was evolved as a method
of forming metal sections, the malleability of
metal meant that hammering remained, and still
remains, a very easy and effective way of shaping
metal. Many of the metalworker’s tools,
therefore, are hammers, mallets and stakes of
different types.
Hammering took on various refinements as the
centuries passed; repousse, chasing and
stamping are all developments of the beating
technique, and require their own versions of the
hammering tools and punches. The invention
of other processes made the metalworker’s
repertoire still greater; soldering, plating,
inlaying and engraving all brought their
appropriate tools.
The technological age has also made its
contributions to metalwork. Mallets can be
made of acrylic to reduce unwanted marks on
the metal, electrically driven wheels speed up
polishing processes, and tools can be machineformed rather than laboriously hand-shaped.
New processes, such as electroforming and the
use of unusual alloys, are now earning their own
places in the long tradition of craftsmanship
in metal.
k
.
The print reproduced here
depicts a goldsmith’s
workshop in the reign of
Charles II, and comes from “A
New Touchstone for Gold and
Silver Wares,” published in
London in 1679. The
craftsmen’s tools can be seen
hanging over the melting
furnace.
202
••
.
203
Precious metals
-7r7T~":'rrr':7r?gsr~'-'~^
The metals used in jewelry are generally chosen
for their beauty, and so the precious metals —
gold, silver and platinum —have always been in
demand for the jeweler’s work. Copper and
also bronze (an alloy of copper and tin) have
been used quite extensively, but both tend to
oxidize and form an unsightly tarnish unless^
they are protected.
The nose ornament (right)
is made from a cut and
hammered sheet of pure gold,
and is in the early Calima style
of the Colombian goldsmiths.
The ornament is in the Museum
of Mankind, England, and
formed part of the “Gold of El
Dorado" exhibition.
Before the discovery of precious
metals, shells, bones, ivory
and pieces of bark and seeds
were used as body decoration
by primitive man. When gold,
silver and precious stones were
discovered, the ornaments
became more elaborate and
more intricate. Speciaiized
tools were developed, and the
basic form of these tools
remains unchanged in their
modern counterparts. All the
tools below are from Ancient
Egypt-
1
2
3
4
Jeweler’s anvU.
Goldsmith’s hammer.
Jeweler’s hammer.
Pincers.
Gold is one of the most
beautiful of all metals, and its
rarity has made it highly
sought after through the ages.
Gold does not tarnish or
corrode, and although it is
soft, strength is added by
alloying it with other metals,
such as silver or copper.
Silver possesses a desirable
combination of brilliance and
malleability, and is a popular
metal for jewelry work. Silver
is more readily available than
gold and is therefore not so
expensive.
Platinum is a name meaning
"little silver," and its properties
of brilliance, malleability and
ability to take a high polish
strongly resemble those of
silver. Platinum is usually
alloyed with small amounts of
iridium when used for jewelry.
Copper is a warm-colored
ductile metal, and although it
is not particularly hard its
durability can be increased by
cold-working the metal. As
early as 3500BC copper was
being intentionally alloyed
with tin to produce bronze for
tools and decorative work.
The jeweler’s bench (below)
is a piece of equipment that
has remained virtually
unchanged for decades. The
bench has a semicircular
section cut from it, and a
sheepskin is strung under the
gap to catch gold filings and
dropped stones or tools. Most
of the work is done over this
skin, usually using the bench
pin. The craftsman’s stool is
traditionally made from the
semicircular section cut from
the bench. Raised sides around
the tray part preventtoolsfrom
rolling off the bench.
The jeweler's V-clamp
(below) is a fork of wood that
is fixed firmly to the bench. The
work can be braced against
the V-shape and hammered,
cut, sawn and polished. The
clamps come in a variety of sizes,
and some have a small anvil
fixed to the top.
Metalworking tools
If*-.
1 Screw clamp.
2 Pin vise, a smaller kind of
screw clamp.
3 Slide pincers; a sliding
band holds the jaws together
when necessary.
The tools on the right are used
to assess the length of metal
needed when making rings.
4 Ring gauge; this is a series
of ring blanks in regularly
progressing sizes.
5 Ring stick or mandrel, a
graduated stick for checking
ring sizes.
Snips are versatile cutting
tools used for small pieces of
thin metal where a saw is too
cumbersome.
9 Compound action
snips, a particularly strong
12 Shaping snips with
curved jaws.
13 Jeweler’s snips, sturdy
sharp snips that will cut through
a considerable thickness of
metal.
cutting tool.
10 Plate snips, useful for
cutting sheet metal.
11 Tinner’s snips.
DIAGRAM
I' Marking tools are used to
trace out the cutting lines onto
the metal.
6 Scriber, a needle-pointed
■■ marking tool.
7 Dividers; these are used
; to scribe circles and parallel
lines.
8 Aluminum pencil, a
sharpened rod of hard metal.
Clamps and vises are used
to hold the metal in place as
it is worked.
Hammering and beating
The more ductile a metal is, the more easily it
can be hammered and beaten to alter its shape,
size or texture. Gold is the most ductile of all
metals; one troy ounce can be beaten out to an
area of 300 square feet. The tools used for
hammering and beating vary according to the
metal used, the object’s shape, and the amount
of pressure required.
The print reproduced (right)
depicts the inside of an
armorer’s workshop, and
illustrates many of the tools
used in metalwork. The
hammers and stakes being
used in the print are very
similar to those used by
metalworkers today.
1
2
3
4
Metal hammer.
Creasing hammer.
Border hammer.
Horn tip hammer, made
from the end of a bullock's
horn weighted with lead.
5 Blocking hammer.
6 Planishing hammer.
7 Acrylic hammer that will
not mark the metal.
8 Rawhide maliet, made
from coiled treated cattle hide.
9 Plastic maiiet.
10 Round-faced boxwood
maiiet.
11 Raising mallet, used
particularly when forming
hollow shapes.
Metalworking tools
Hammering is done against
smoothly shaped surfaces.
1 Ttee trunk, an excellent
natural anvil.
2 Netal bench block.
3 Bench anvil with shaped
ends.
4 Ring mandrei, a tapered
5 Bracelet mandrel.
6,7,8 Wooden formers,
carved blocks used as shaped
anvils.
9 Annealing tongs; if the
metal is too hard to beat, it is
softened (annealed) by the
controlled use of heat.
stick for shaping rings, in a
10,11,12,13,14,15,16
Large stakes in a variety of
18,19,20,21,22,23 SmaU
stakes for producing specific
shapes. The stake is held firm
is a vise, and the metal is
beaten over the shaped ends.
17 Snarling iron for hollow
shapes; one end is hooked
over the rim and the other is
struck sideways.
shapes in the metal. These also
are held firmly in a vise while
being used.
iDIAGRAM
mandrel holder.
Sawing, piercing, filing
The silver necklace shown in
the photograph (below) is a
daisy chain made the same
size as real daisy blossoms.
The silver was shaped by
sawing and filing flat plates of
silver until they achieved the
correct shapes and contours.
Sawing, drilling, punching and filing are all ways
of rendering pieces of metal the correct shape
for the work in hand. Pierced work is a method
of decoration that involves cutting shaped holes
out of flat metal in order to leave a latticework;
this lattice can then be shaped, underlaid,
enameled, or incorporated into a larger design.
i
Fine-bladed saws are used in
jewelry work to make intricate
perpendicular cuts in sheet
metal.
1 Hacksaw.
2 Piercing saw, a jeweler’s
saw with a very fine, sharp
blade.
3 Two spare blades for the
piercing saw.
208
4 Center punch, a pointed
5 Hand drill.
6 Spare bits for the hand
7 End cutters, a pair of
sharp clippers with straight
jaws.
8 Netal punch for cutting
out small holes in sheet metal,
drill.
9 TWo-hole metal punch.
punch used to make a
preliminary mark for drilling.
j
Metalworking tools
b A hole big enough to take
the blade of the piercing saw
is drilled through the metal
within the outline of the
prospective hole.
1
2
3
4
Hand file.
Half-round file.
Knife-cut file.
Needle files in various
shapes.
5 Handle for needle files.
6 File brush, a wire brush
used to clean debris from the
files.
c The saw blade is threaded
through,iteeth downward, and
attached to the saw frame. The
outline of the pierced work
can now be traced with the saw
cut; this process is repeated
with every part of the metal
to be pierced.
d When the pierced work is
completed, the sawn edges are
filed and polished to smooth
and finish them.
7 Wbe wool; this is used
to clean and polish the metal's
surface.
8,9,10 Emery sticks,
made by glueing emery paper
onto wooden rods.
11 Emery burnisber for refining
the surface of the metal.
DIAGRAM
Pierced work involves drilling
holes in the metal so that the
saw blade can be threaded
through.
a A center punch is used
to mark a small impression
on the metal so that the drill
bit will not slip, and a drop of
oil is added for lubrication.
209
I
Bending and stretching 1
Wiredrawing is the process of stretching a length
of metal into a rod of a specific diameter and
cross-section. The cross-section may be round,
rectangular, triangular, half-round, or even more
fancy depending on the shape of the hole
through which the wire is drawn. Once the wires
are formed they can be twisted, rolled, and bent
into complex shapes.
This photograph of a Maltese
silverworker shows the
extremely delicate nature of
filigree work. The tiny silver
wires are laid out in shapes on
the worktable, and the
craftsman is carefully arranging
them into a design.
1,2 Measuring gauges with
graduated openings, marked
with wire sizes. The wire is laid
in the opening to determine
its thickness.
3 Micrometer, another
instrument for gauging the
thickness of wire. The measure¬
ments are marked on the
handle of the screw.
A drawbench, shown below,
is used for drawing long or
tough lengths of wire. The
drawpiate (see right) is held
in a vise at one end of the
bench; the wire is threaded
through the plate and gripped
in jaws attached to a belt, and
the belt is winched by the
210
4,5 Drawpiates with holes
of various sizes and shapes.
The wire is pulled through a
selected hole to shape it to a
particular size.
6 Draw swage; this tool
makes use of complicated
moldings in order to produce
fancy wires.
7 Joint tool is especially
useful for closing and
smoothing the joints in chenier
(metal tubing).
8 Drawtongs are the strong
pliers used to grip the wire as
it is pulled through the
drawpiate.
Metalworking tools
1 Wire-former, a hand-held
tool for bending wire.
2,3 Wire-bending jigs; the
wire is wrapped firmly round
the posts on the jig in order to
shape it.
4 Haif-round former for
making chenier (tubing). The
semicircular channels are of
different sizes.
5 Jeweier’s roil used to
flatten wire and tubing.
6 Beating block for
triangular wire. This block is
made from part of an old rail¬
road track; a V-shaped channel
has been cut to hold the wire
so that the third side of the
triangle can be flattened.
i
:
,
i
'
O O O O
c
Wire can be evenly twisted,
either in single or multiple
strands, in the following way.
a One end of the wire is
clamped firmly in a bench
vise. The other end is fixed
equally firmly into the chuck
of a hand drill,
b The handle of the drill is
slowly turned, so causing the
wire to twist. The operator can
control the action so that the
wire is loosely or tightly twisted.
Since this process produces
extreme tension in the wire,
the metal is kept well annealed.
DIAGRAM
;
:
Filigree is a technique that
involves forming patterns from
bent and twisted wire, either
on a background or as a
latticework.
a The pattern to be interpreted
in filigree work is drawn onto
a piece of paper, and wires of
the chosen type are twisted
and coiled into flat shapes that
correspond to the design,
b When all the parts of the
design have been laid out in
wire, the sections of wire are
carefully soldered together at
the points where they touch.
Chenier is the name given to
decorative wire tubing; the
process of making chenier is
similar to that of wiredrawing,
though slightly more
complicated.
a A strip is cut out of metal
plate, and one end is tapered
siightiy so that it will slip easily
into the drawplate.
b The strip of metal is placed
over a half-round former,
and a metal or wood rod is
hammered over the top to
force the metal into the
channel.
c The curved shape is put
through an appropriate hole in
a drawplate, and is pulled
through the plate with tongs.
This forms it virtually into a
circle.
d The tube is then drawn
through a joint tool, with the
seam toward the top. The
screw of the joint tool firms
and smooths the join in the
chenier, and the tube is now
truly circular.
@
211
Bending and stretching 2
Malleable metal can be not only hammered but
also bent into decorative shapes. When wires are
cut into even lengths and bent into loops they can
be linked together in various combinations to
form chains; pliers, fluting jigs and folding devices
can be used to produce creases and undulations
in the metals.
The chains shown in the
reproduction (right) are watch
chains that were advertised in
a Sears Roebuck catalog
at the turn of the century.
Wrist watches were virtually
unkown at this time, so every
owner of a watch required a
watch chain.
Chainmaking is a precise
process, and care is needed to
ensure that all the links are of
even thickness and size,
a Wire of the required
thickness is drawn through a
drawplate, as described on
the previous page,
b The wire is wound in a spiral
around a former; the shape
ofthe former will determinethe
shape of the links,
c The spiral of metal is sawn
through on one side; this
produces numerous pieces of
curved wire that are all the
same length and curved to the
same shape.
d The pieces of wire can then
be interlocked. The two ends
of each link are aligned and
pinched together firmly with
pliers so that they will not
come apart, andlthen soldered.
1 Link former made from a
piece of spiral dowel.
2 Knitting needles placed
together to make a former for
oval links.
3 Link former made from a
length of steel rod.
4 Flat-nosed pliers, useful
for gripping wire.
5 Link-opening pliers; the
action of the handles and jaws
forces the links open.
6 Round-nosed pliers.
7 Chain-nosed pliers.
8 Loop-closing pliers with
horizontal faces on the jaws.
Metalworking tools
A fluting jig consists of a pair
of stakes over which the metal
is hooked (right and below).
When the metal is pulled
downward, its rim assumes a
ripple where it is bent by the
A flatfomier, shown below,
bends flat strips of metal into
curved shapes. The metal strip
is inserted into the device and
the handle pulls the protruding
part of the strip into a curve.
jig-
1 Bow-closing pliers.
2 Parallel-motion pliers;
all parts of the jaw exert equal
pressure.
3 Hollow-nosed pliers.
4 Ring-bending pliers.
5 Combination or halfround pliers — one jaw is flat
and the other rounded.
6 Needle-nosed pliers.
7 Ring-holding pliers.
8 Tweezers for picking up
tiny links.
9 Universal holder, a
10 Folding iron; the sheet
of metal is placed in the slit
and can be bent over the tool.
11 Scorer for marking fold
lines on sheet metal.
DIAGRAM
four-jawed gripper.
213
Raised surfacework
Raised surfacework on precious metals covers a
wide variety of techniques; repousse, foil tooling,
doming and graining are all methods of
producing raised or embossed designs
on the metal. Major cultures through history
have used one or several of these methods for
decorating their jewelry, armor and other metal
artefacts.
The gold mask illustrated
(right) was discovered in the
1870s by the archeologist
Heinrich Schliemann, at
the Mycenaean hilltop citadel
in Greece. Schliemann thought
that he had found the mask of
Agamemnon, but in fact the
mask is several centuries
earlier, c. 1600-1450 BC.
1 Pitch bowl and leather
collar; the pitch is used as a
4 Repousse punches; these
are struck with hanuners so
soft working surface for
repousse.
that they mark the metal.
5 Chasing punches, also
hammered into the metal.
2 Fine-pointed punch for
transferring the pattern to the
metal.
3 Repousse stylus, a too I fo r
tracing round the preliminary
outlines.
6 Woodencreaser,atoolfor
producing striated textures.
Hanuners are used to hit the
punches so that they strike the
metal cleanly and forcefully.
7 Chasing hanuner.
8 Claw hammer.
9 Raising hanuner.
10 Mallet.
I
il
1
i!
^of metal (see textured surface; work) or by using tools such
as those shown on the right.
1 Counterpunch for making
graining tools; the punch is
struck over the counterpunch
|until the head is sufficiently
hollowed.
2 Single graining tool, a
jpunch with a hollow end. This
(punch is struck on the right
side of the metal and forms
small bead shapes.
13 Multiple graining tool.
Roulette graining tool.
8 Doming punches.
9 Cutter; domes can be cut
out to form hemispheres.
10 Textured block for
tooling foil.
11 Pointed tools for use
with the textured block.
12 Patterned tooling block.
13 Tools for use with the
patterned block.
14 Fluting block.
15 Fluting punch.
Repousse is a French word
meaning "pushed back,” and
the process involves pressing
or striking the reverse surface
of the metal so that a design
appears on the front,
a The design is drawn out on
a piece of thin paper the same
size as the metal,
b The metal is placed on a
pitch bowl and warmed
slightly. The warming makes
the metal adhere to the pitch
so that it will not move during
the work, and also it makes the
metal a little more malleable,
c The paper carrying the
design is placed on top of the
metal, and the lines of the
design are traced with a
stylus.
d The paper is removed and
the design is pressed into the
metal, using repouss6
punches and chasing
punches. When the design
has been made on the metal it
is removed from the pitch
bowl, and the front of the
design is neatened by leveling
the areas between the raised
parts of the pattern. It is then
returned to the pitch bowl face
down, and the final touching
up of the design is done with
the punches.
r\J ©DIAGRAM
5 Wood dapping block, an
anvil with hollows for
; depressing the metal.
6 Dapping punches; each
punch fits a particular hollow
i in the block.
7 Steel doming block.
Textured surfacework
The surface of metal can be textured by cutting
or scoring it with sharp tools, by stamping it
with patterned punches, by etching it with acid,
and by applying extra pieces of metal to vary its
appearance. Variations in texture produce
pleasing subtleties of light reflection and
diffraction.
The example of textured
surfacework (right) is a helmet
from the Iraq Museum. The
helmet has been decorated by
chiseling and incising the
surface in regular lines to give
the appearance of a human
head, complete with ears and
hair.
7 Scorper, a very sharp tool
with a blade made of
tempered steel.
8 A variety of blades that
can be fitted into the scorper
handle. Each blade is used to
produce a particular line or
mark.
A wiggle engraver is gripped
firmly in the hand and moved
from side to side through the
metal (above left). This makes
a Wiggly line. Chasing
punches (above) are struck
into the metal with a hammer
so that their pattern is
transferred to the metal
surface.
216
C
and can be used to guide the
stroke (above). Variations in
line can be achieved by altering
the pressure on the tool, or by
changing the angle of the tool
against the metal.
Metalworking tools
Graduated sieves (left) are
Etching with acid can be used
to vary the texture of metal
surfaces. The parts of the metal
that are not to be textured are
painted with stopping-out
varnish, which is resistant to
the acid, and the metal is
immersed in an acid bath. The
exposed parts will be eaten
away slightly, leaving a
mark in the metal. When the
metal has been etched to the
required depth, it is removed
from the acid bath and rinsed.
The varnish is then cleaned
away from the untouched parts
of the metal.
used to grade the metal beads
used In the graining process,
stages of which are shown
here (right).
a Tiny squares of metal are
cut from a strip and laid on a
charcoal block; they are then
painted with flux,
b A torch is applied to the
squares so that they melt into
spheres.
c After grading, the metal
beads are fluxed again and
soldered onto the required
ground.
1 Graver used for metal
engraving.
Z Various blades for use as
gravers, all formed from steel
and sharpened so that they
will cut through the metal
without difficulty.
3 Namekuri tagane, an
outlinetool for Japanese inlay.
4 Kiri tagane, used to chisel
A graver can be used to cut
long, flowing lines on the metal,
or short marks for a rougher
texture. As with the scorpers,
the line can be varied by
altering hand pressure or the
angle of the tool.
A specialized Oriental method
of inlay (above) involves cutting
a shape from a thick sheet of
metal and laying it into a thin
chiseled recess. This results in
a heavily textured final surface.
A vibro-engraver (above)
can be used with various
patterns of head to produce
lines of varying quality. The
head vibrates so that it cuts
into the metal; the operator
guides the tool so that it
produces lines or areas of
texture.
DIAGRAM
out the recess cut by the
namekuri tagane.
5 Vibro-engraver, an
electrically powered engraving
tool.
Soldering
Soldering is the most efficient method of
permanently joining two pieces of metal. The
edges to be joined are butted up close to one
another, and small pieces of solder (a slightly
softer compound of the metal) are placed along
the join. The metal is heated, and once the
solder has melted and run into the join, themetals become one cohesive mass.
Brooches, scarf pins and
similar objects, such as the
examples illustrated (right),
usually involve soldering when
the pin is attached. Gold in
particular is too soft to make
successful pins, and so a pin
of a harder metal has to be
attached by soldering.
1 Jeweler’s blowtorch with
8 Soldering bit, a device for
inlets for air and gas.
guiding the molten solder into
the join.
9 Mouth blowpipe made of
brass, used to introduce an
airflow to the work.
2 Acetylene torch.
3,4 Blowtorches.
5 French - pattern
blowtorch.
6 Electric soldering iron.
7 Soldering hon to be
heated in a gas flame.
10 Spirit iamp can be used
to evaporate water from borax
flux.
11 Oil lamp, another torch
device.
12 Rubber bulb for sucking
up excess solder.
i
Metalworking tools
Flux, usually borax, Is used to
remove Impurities from the
solder so that it will flow readily
into the join.
4 Slate mixing paiette.
5 Borax cone and unglazed
earthenware mixing palette.
6 Mixing brush.
7 Syringe full of solder and
flux mixture.
Solder snips.
Soldering tweezers,
Soldering clamp,
Soldering tongs.
Poker used to guide the
solder into the join.
, 13 Beunboo tongs for
' removing pieces from the acid
cleaning-bath.
14 Charcoai block; this can
be used as a soldering base for
small pieces.
15 Coiled asbestos base.
16 Carbon mandrel for
soldering rings.
17,18 Third-hands, tools
that grip work while it is being
soldered.
On the right is shown the
basic technique of soldering,
a The two pieces of metal to
be joined are placed in
position, and painted with flux
so that the solder will flow
cleanly and freely,
b Tiny pieces of solder are
applied to the join, and the
whole piece is heated. The
metal has to be heated most
at the part of the join furthest
from the solder until the
solder runs and seals the join.
©DIAGRAM
' 8
9
i 10
i 11
12
3
219
Preparation for casting
The technique for casting precious metal has
been known for centuries; the ancient Egyptians
were skilled jewelry casters, and in South
America it was a cast gold statuette that finally
confirmed the legend of El Dorado. Casting from
a model reproduces intricate detail or complex
forms that could never be made by cutting or
beating.
The salt cellar illustrated (right)
was cast in gold by Benvenuto
Cellini; he made it in the 16th
century for Francis I, King of
France. Salt was so precious a
commodity that elaborate
containers were made for it,
and placed in front of the host
at meals.
1 Electric wax pot used to
meltthe wax and keep itwarm
and molten.
2 Porcelain ladle; the
porcelain retains the heat so
that the wax does not solidify.
3 Burner for warming tools.
4 Wax-melting burner.
5 Wax extruder, a gun that
forms pellets or wires of wax
in various diameters.
6 Wax press, a syringe used
with different nozzles to
produce wax in wires or fancy
shapes.
220
*
7 Wax pen with a well for
the molten wax.
8 Wax syringe.
9 Dropper for molten wax.
10 Needle tool.
|
11,12 Reservoir tools of |
various designs. These tools
i
have shaped heads that are
used to mold or extrude the
1
wax, and the reservoir in each |
head holds a supply of warm
wax.
13 Spirit lamp for warming
tools and softening wax.
14 Stepped mandrel used
as a base for building wax ring
forms.
Metalworking tools
a
b A stepped mandrel is
used as a base on which to
build the ring. The use of the
mandrel ensures that the ring
will be even in diameter and of
a predictable size.
c The modeled ring form is
removed from the mandrel
when it has solidified. Any
further modeling is done with
warmed tools, and then the
entire surface can be smoothed
by dipping the form quickly
into acetone.
d Sprues of wax wire are
applied by “soldering” the two
•pieces of wax together with
warm tools. The sprues will
form channels in the mold
material, and when the wax
has been melted out these
channels will be used to carry
hot metal and to release
trapped air.
b
c
d
Modeling tools are usually
made of steel so that they
conduct heat. The tools are
warmed so that they make the
wax pliable as they touch it.
1 Wax file.
2,3|4 Wax-modeling tools.
5 Various heads that can be
found on modeling tools.
6 Glass slab used as a
building base for modeling
larger forms.
diagram
i The basic method of modeling
i a wax ring form is illustrated
' in the following sequence.
I a A sufficient quantity of wax
for the model is melted slowly
sothat it does not burn or boil.
I Boiling introduces unwanted
i bubbles into the wax.
Casting
7-
.:-
-.■:..:....... .-aal
The principle of casting is that a positive model
is used to make a negative mold; a metal
positive cast in this mold will reproduce the
original model in every detail. As well as wax,
most combustible natural materials such as
pinecones, leaves and flowers, insects and some
shells can be used as the original model.
The photograph (right)
illustrates an Ashanti brass
weight in the form of a lion.
The weight was formed by the
lost wax casting process, and
was cast in a hollow shell.
1 Investment scoop; the
investment is the material from
which the mold is made.
2 Measuring cylinder used
to determine the volume of
metal needed to complete a
casting. The cylinder is partly
filled with water; the model is
placed in it, and the exact rise
in the water level is noted. The
model is removed, and metal
pieces areaddedto the cylinder
until the water again reaches
the higher level.
3 Investment proportioner
gauges the proportion of
powder to water for the
investment mix.
222
4 Rubber bowl for mixing
the investment.
5 Investment blender; this
machine can be used to mix
very smooth blends of
investment.
6 Casting flask with a fitted
sprue base.
7 Flask vibrator used to
eliminate air bubbles from the
mold.
8 Vacuum extractor; when
the wax has been melted from
the mold, an extractor is used
to create a vacuum so that the
metal will flow readily into the
cavity.
I
Metalworking tools
K simple casting can be done
using a cuttlefish as the mold.
The process requires only basic
tools, such as a small saw and
sharp knives,
a The cuttlefish is cut in half
with a smeill saw, and the two
faces are sanded smooth,
b The shape to be cast is cut
into the two halves of the mold,
ensuring that all the lines marry
when the halves are joined.
The two pieces are bound
together strongly with wi^e,
andean then be used asa mold
and cast with molten metal.
Investing is the process of
creating a mold around the
original model,(right).
a The investment powder is
mixed with waterto thecorrect
creamy consistency,
b The model to be invested is
attached via a wax cone to a
sprue base; a flask is fitted
to the base and filled with
investment mix.
i
Casting is the process of filling
the cavity in the mold with
molten metal to produce a
finished piece.
c The metal that is to be cast
is melted in a crucible until
it is red hot. Any impurities are
removed from the surface of
the molten metal so that they
will not marrthe casting,
d The metal is poured into the
cavity in the mold, and allowed
to set.
e When the metal is cool, the
mold is broken and chipped
away from the casting. The
sprues that carried the molten
metal to the casting are snipped
off with sprue cutters,
f The casting is placed in an
acid bath and scrubbed with
wire brushes to clean away
all traces of the mold material.
When the casting is properly
clean it can be buffed and
polished in the ways suitable
to the metal.
DIAGRAM
1 Crucible used for melting
ithe metal for casting.
>2 Long-handled crucible.
3 Sprue cutter, used for
(dipping off the excess sprues
of metal after the mold has
been removed.
@
223
Inlay
m
Inlay is the process of forming a depression in
one metal and filling this with another metal
or an alloy, usually of a different color. The
depressions to be filled can be formed by
casting them in the metal, by etching them away
with acid, by cutting them away with sharp tools,
or by compressing the metal with punches and
dies.
The gunstock decoration
shown in the photograph
(below) is a superb example of
metal inlay. The gun was
decorated in gold by Ken
Hunt, and the inlay has been
carved in some parts and
engraved in others.
Metal inlay is designed to
produce a decorative contrast
between the colors of the
ground metal and the inlay
metal. Consequently dark
metals such as bronze and
some copper can be effectively
inlaid with gold, silver and
brass, while paler metals such
as gold and silver might be
inlaid with niello or oxidized
copper for contrast. The
technique known as parquetry
involves inlaying shapes of
various metals in a close-fitting
"patchwork" design.
Damascene inlay is done by
hammering the inlay metal
into gouged recesses,
a The pattern to be
damascened is drawn out onto
the metal, and a sharp graver
or scorper is used to cut away
the metal in the pattern areas.
At the edges of each incision
the craftsman undercuts the
ground metal slightly to
provide purchase for the inlay
metal.
b The inlay metal is placed in
the recesses and hammered
into the grooves so that it
spreads into the undercuts and
is secured. The entire surface
is then smoothed and
polished.
224
C
1 Piercing saw for cutting
sheet metal.
2 HanddriU.
3 Hammer used to beat
parquetry metal into place.
4 Graver or scorper.
5 Agate pestle for grinding
niello alloy.
6 File used to reduce gold
to powder. The powder is
mixed with mercury for inlaying,
after which the mercury is
evaporated.
7 Narrow punch.
8 Hammer.
9 Burnisher used to
smooth the inlaid surface.
10 Niello spatula.
11 Pestle and mortar for
mixing gold and mercury.
12 Pair of clams can be
used to hold the work.
Japanese stratified alloys
r::::
Japanese stratified metalwork is made from
many thin sheets of metal laminated together
and then cut and beaten to expose the various
layers. The metals used are generally gold,
silver and copper, pure and in alloys, and the
original sheets need to be very thin so that the
maximum variation of color can be achieved
in the laminated block.
-—■..
..
Metalworking tools
■w
The blades shown (right) are
from traditional Japanese
swords, and illustrate the
principle of stratification. The
patterns along the cutting
edges were produced by the
skilful forging of different
metals to give strength to the
blade; each pattern identifies
the sword’s craftsman.
J C,
The block of combined metals
is carved and hammered in
various ways to expose the
layers of different-colored
metals within. The illustration
below shows some of the
decorative effects that can be
achieved with this method.
USmmmm'
1 Paintbrush used for
applying the borax flux to the
metal sheets.
2 Leather sandbag on which
the work is rested.
3 Blowtorch used for the
soldering process.
4 Various drill bits for
marking the laminated block.
5 Punches for distorting the
metal surface.
6 Files used to flatten the
distorted surfaces.
7 Scorper; holes and
channels can be dug in the
block to expose the layers.
8 Rolling mill used to flatten
the original sheets of metal.
The principle of the stratified
alloys is very simple but
produces a rich and attractive
effect.
a The chosen sheets of metal
are rolled in a mill so that each
sheet is of an even thickness
throughout. The sheets
are then soldered together in
a random order so that there
is as much variation as possible
within the block,
b When the block is complete,
the surface is drilled, gouged
and channeled to reveal the
strata. In some places the metal
is punched or hammered into
domes which are then filed
down to show further metal
layers.
DIAGRAM
6
3
225
Amerindianj eweiry
Jewelry made from silver and set with turquoise
has been made by various North American
Indian tribes, particularly the Navajo, for the
last hundred years. Characteristic designs have
evolved which the Indians have made peculiarly
their own, and Indian craftsmen have developed
esoteric methods and tools for working their
designs on the silver.
The first Indian silversmiths
used tools that were far more
basic than today’s more
sophisticated equipment.
Shown below are the tools
used for soldering a century
ago.
1 Bellows.
2 Tongs.
3 Charcoal bowl.
The belt shown in the photo¬
graph (below) is made in a
typical Amerindian pattern.
Each section of the belt has
been individually cut, stamped
and patterned with embossing
dies.
4
5
6
7
Small saw.
Solder snips.
Paring knife cut short.
Wad cutter used for cutting
flat disks from sheet silver.
8 Snips with outward-curved
ends to prevent the points from
puckering the silver as they
cut.
Jigs are used to bend the silver
into the required shape.
9 Jig for sheet metal. The
flat piece of metal is placed in
the slit and bent over the
curved wood.
10 Wire jig; the wire is held
round the nail so that leverage
can be applied.
226
E
Metalworking tools
-1
During the first half-century
of North American Indian
silversmithing, the only source
of silver was coinage. This was
melted down with a proportion
of cartridge brass and cast in
small bars, or ingots, in a mold.
1 Ingot mold.
-* —I. -
—-—.
□
i*;.
Carved stone molds are used
to cast pieces of ornate jewelry.
2 Two-part mold; the design
is carved into one piece, then
the halves are joined and the
cavity filled with molten metal.
3,4,5 Knives used to carve
the designs into the mold.
i
a
J
3 V
1
a
/5
6 Round-faced mallet
made of wood.
7 Lead block used as an
anvil when hammering shallow
disks.
8,9 Cone anvil and cone
punch used primarily in button
making. A flat disk is placed
on the anvil and struck with the
punch to shape it into a cone.
10,11 Fluting anvil and
fluting punch.
12,13 Female and male
embossing punches. The
female punch Is stamped onto
the front ofthesilverto outline
the shape to be embossed, and
then the shape is raised by
stamping it from the back with
the male punch.
14 Flat anvil.
15 Flat-faced dies used to
stamp relief designs.
16,17 Wooden anvil and
smooth punch used for
rounding disks.
18,19 Bead anvil and oval
bead punch.
20,21 Round bead anvils
and their appropriate punches.
22 Scalloping punches.
23 Detail punches.
diagram
7
Finishing and polishing
Finishing and polishing are the final stages in
working with precious metals, and are the
stages that are most often skimped or deemed
unnecessary. However, a flawless finish on a
piece of metalwork can only be an asset to its
appearance, as it sets off the beauty of the metal
and demonstrates the skill of the craftsman.
The 17th century silver items'
shown here form a set of
writing accessories. They
comprise; tray, inkpot,
sandbox, and a bell for
summoning the servant to
post the letter. The items are
made in English silver, and
are finished to a high polish.
All marks from casting,
enameling and soldering, and
all surface flaws, must be
removed from the metal before
it can be successfully polished.
1 Wire brush for cleaning
the metal.
2,3,4 Wire brush attach¬
ments for a pendant drill.
5 Fiberglass brush.
6 Pickling tongs; pickling
is effective in removing firescale, the black marks that
develop after firing.
7 Stiff nylon brush.
8 Washout brush, a small
scrubbing brush used to clean
the metal.
9 Sawdust shaker and air¬
tight container, used to dry
hot, pickled metal.
228
10 Scraper for removing
surface flaws or roughness.
11 Hollow-ended punch;
this is used to smooth the
surface of metal beads.
12 Water-of-Ayr stone, a
polishing medium used forthe
first refining of the surface.
13 Emery stick; the emery
is rubbed over the surface of
the metal to give it a rough
polish.
14 Felt stick further
polishes the surface.
15 Leather stick for the
final buffing.
Metalworking tools
with various cleaning and
polishing attachments. Tripoli,
a polishing compound, is used
on some of the attachments,
and jeweler’s rouge (a finer
grade polish) on others.
1
2
3
4
Bristle brush.
Muslin buff for tripoli.
Cotton buff for rouge.
Poly-mop, a soft
polishing mop.
5 Wooden lap, a smooth
wooden polishing wheel.
6 Knife-edge lap, also of
wood, for polishing crevices.
7
8
9
10
SpUtbuff.
Taper buff.
Felt ring buffs.
Emery shells; these are
cones for polishing the insides
of rings.
11 Hard felt buff.
12 TVlpoli block.
13 Abrasive tripoli block.
14 Jeweler’s red rouge.
15 Golden rouge block.
16 Chamois polishing
cloth.
Very little polishing medium is
required on the buffs; the
work is done by the fast
movement of the buff against
the metal.
a The chosen buff is attached
to the spindle and set in
motion, and the block of
tripoU or rouge is held gently
against the buff so that only a
very light coating is transferred,
b The piece to be polished is
held against the buff, at such
an anglethatthe moving wheel
cannot “grab” the piece out of
the operator’s hands. It is
advisable to wear goggles to
protect the eyes from dust and
fragments.
17,18,19 Wooden lath,
quill, and sliver of tortoise¬
shell, all used for applying
,ouge into corners or other
awkward places.
20 Linenthread;thiscan be
charged with rouge and
threaded through small
openings in pierced work.
21 Agate burnisher for
final smoothing.
22 Steel burnisher.
23 Hallmark punch.
24 Curved hallmark punch
used to mark the insides of
rings.
25,26 Finger cots used to
protect polished jewelry from
finger marks.
DIAGRAM
A double-spindle polisher,
illustrated below, can be used
@
13 Lapidary and beadmaking
Lapidary work is the cutting and shaping of
precious and semiprecious stones for jewelry.
Beads are also included here as they are similar
to stones in their relationship to jewelry; both are
used to provide pattern and decoration in
transparent, translucent or opaque color as a
contrast to the metals generally used as
backgrounds.
The factor that determines the nature of many
of the tools for lapidary work is the hardness
of many of the most popular stones. Diamond,
emerald, sapphire and ruby are all very hard
stones, amethyst, malachite, tiger eye and agate
rather softer, but all of them have to be ground
against very hard or abrasive surfaces.
Carborundum and emery are used for the softer
stones; diamond itself, in the form of abrasive
grits, is used for the harder stones. Consequently
many lapidary tools are merely vehicles for the
various abrasives.
The cutting of facets in stones, which is
performed to make them reflect extra light,
is an important but relatively recent aspect of
lapidary work. Before the great popularity of
faceted stones in the 15th and 16th centuries,
stones were frequently shaped and polished
into domed forms, called cabochons. Jewelry
and lapidary work have always provided
chances for designers and craftsmen to show
their skill and originality, and today is no
exception. After the ornate creations of the
19th century, which reached their climax in the
works of Carl Faberge, this century has seen a
movement toward stark simplicity and beauty
of design, characterized particularly by the
modern design influence of the Scandinavian
countries.Traditional skills are being transformed;
such techniques as faceting are not outmoded,
but are applied with originality and flair to such
tasks as cutting reflective surfaces on metal or
resin blocks, and to shaping asymmetrical
stones.
This photograph shows the
workshop of Carl Faberge
(1846-1920). Faberge
specialized in the creation of
fantastic objets dart from
combinations of precious
metals, gems, and
semiprecious stones such as
jade, malachite and lapis lazuli.
230
231
Rock hunting
Finding and recognizing the rough stones that
will be attractive or valuable when cut and
polished requires experience, and the use of a
variety of tools for testing the stone’s properties.
Stones can be identified by color, hardness,
specific gravity, facet angle and light diffraction;
careful examination is necessary for these to be
firmly established.
The illustration on the right
comes from a book called
"Familiar Lessons on
Mineralogy and Geology etc.”
published in London in 1821.
Rock collecting is described in
the book as one of the most
agreeable pastimes of those
visiting coastal resorts.
Rock-hunting tools are used
1 Rock hammer for breaking
to dig out rough stones, and to
help the collector make
preliminary examinations
so that he can decide whether
their characteristics are
promising.
up small boulders.
2 Chipping hammer.
3 Rock pick used to chip
away at boulders.
4 Hoe pick.
5 Gad-pry bar used for
loosening ore or rock.
6 Gem scoop used to scrape
rubble out of crevices.
232
7 Splitting chisel, a tool
used to break up rocks into
manageable pieces.
8 Wedging chisel with a
pointed tip.
9 Narrow chisel used for
probing rock pockets.
10 Lightweight ultraviolet
lamp used for gem
identification.
Classifying gemstones
Lapidary tools
1 Eye loupe .
2 Linen tester, a small
magnifying glass.
3 niuminated coddington;
this magnifying lens has a
small beamoflight that passes
through the lens and onto
the stone.
4 Dichroscope, a device
for carrying out detailed
examinations of a stone's
structure. The stone is held by
the attachment in front of
the lens.
5 Focusing magniflers,
worn on a headband as
goggles.
device so that the stone will
not slip while it is being
examined.
7 Gem holder with claws
that grip the stone firmly.
8 Contact goniometer, a
tool that is used for measuring
the facet angle of a crystalline
stone.
9 Emerald Alter; this glass
distinguishes emeralds from
the numerous other green
stones.
10 Hardness tester used
for grading stones.
11 Clea^ng blade, a sharp
steel bar used to split stones
so that their facet angles can
be measured.
Mohs'scale of hardness isused
to grade gemstones, based on
the principle that a harder stone
will mark a softer one. Talc, the
softest stone, is grade 1;
diamond, the hardest, is grade
10. The grades of some other
stones are listed (right).
Diamond
Sapphire
Ruby
Topaz
Chryso beryl
Emerald
Aquamarine
Beryl
Zircon
Tourmaline
Agate
Amethyst
Carnelian
Chalcedony
Onyx
Tiger eye
Garnet
Jade
Haematite
Opal
Moonstone
Lapis lazuli
Turquoise
Obsidian
Malachite
Coral
Jet
Pearl
Amber
10
9
9
8-9
8'/2
8
71^
7'A
7V2
7-7'/2
7
7
7
7
7
7
6'/2-7’/2
6'/2-7
6'/2
6
6
6
6
5
4-5
3'/2
3'/2
3’/2
2-2'/2
iDIAGRAM
6 Tweezers with a locking
@
233
Cutting and shaping
Most precious and semiprecious stones are
harder than steel, and so cannot be cut with steel
tools no matter how sharp the blade may be.
Abrasive grits have to be used to make the actual
fissure in the stone, and the various blades are
used only as a means of driving these grits
through the stone; diamond chips can be
incorporated into many blades.
The slab of semiprecious stone
shown in the photograph on
the right has been cut with a
slab saw to give it a flat surface.
The stone will be cut into
further slices so that sections
for cutting and shaping can
easily be taken.
4 Adjustable rectangle
template used as a pattern.
5,6,7 Templates In fancy
shapes; these are traced onto
the stone as cutting guides.
8 Tlingsten carbide pencil
for marking stones.
9 Aluminum pencil.
;iS;
*
—T-TTt
ill
FT^C
8
234
Lapidary tools
2 Stone holder, also used
with adhesive.
3 Angle plate to which the
stone can be attached.
1 Holding stick; the stone is
4 Rock gripper with screw
attached to the stick with
adhesive while it is being cut.
grips for very irregular rocks.
5 Rock gripper with an
adjustable bar that fastens
down over the rock.
Once the stone has been cut
roughly to shape it is then
shaped more accurately to
precise dimensions.
6 Pump drill for drilling
stones by hand.
7 DriU fixed into a stand for
safety and accuracy.
8 Diamond core drill; the
cut disk can be removed
through the side hole.
9 A selection of diamond
drill heads, all used for
various drilling and shaping
operations on the stones.
10 Core-cab, a head for
removing large disks from the
stone.
13,14 Wheel-dressing
tools, diamond abrasive tools
11 Steel drill head.
12 Hollow steel drill head.
used to remove accumulated
stone dust from the abrasive
wheels so that the wheels
remain efficient.
15 Combination abrasive
unit, holding wheels of differ¬
ent grit grades. The stone is
shaped on the roughest grade
first, and then the shape is
refined on the smoother grades.
This abrasive unit has a saw
attachment at the side.
16 Slitter, a sharp lathe
head used for small cuts.
17,18,19,20,21 Engraving
and carving heads that fit
onto a iathe.
■DIAGRAM
When irregularly shaped stones
are cut into slabs, it is useful to
have holders that will grip them
firmly as they are sawn.
F ace ting and polishing
The beauty of precious and semiprecious stones
is enhanced when they are polished to a high
gloss, and some of the transparent stones can
be given more “fire,” or reflected light, by
faceting. Faceting is the process of cutting
regular planes on the stone in a predetermined
pattern that is related to the stone’s crystalline
structure.
Shown (right) is St Edward’s
crown, part of the Crown
Jewels of the British monarchy.
The crown contains
approxiimately 440 precious
and semiprecious stones, set in
gold with silver decoration.
The first precious stones used
for decorating jewelry were
not faceted atall, but smoothed
and rounded into the cabochon
style; a cabochon is a stone
with a flat back and a domed
face. It was discovered,
however, that some stones
reflected more light ifthey were
cut into facets, and so the face
was cut into regular planes as
in the rose cut. The backs of
these early cut stones were still
flat, but through experiment
lapidaries learned to shape the
bottom of the stone into a point
(known as a pavilion) that
further increased the gem’s
"fire.”
The cuts illustrated (right) are
shown from the top and from
the side.
a Cabochon cut, with a flat
back and a domed face,
b Baguette cut; this cut is
particularly suitable for
emeralds and sapphires. A
true baguette cut has the
same cuts on the back as on
the face.
c Rose cut, a cut that was
particularly popular for early
faceted stones,
d Trap cut; the face is similar
to a baguette, but the back is
cut into a pointed pavilion,
e Antique cushion, a fancy
cut for rectangular stones,
f Brilliant cut, often used for
modern diamonds,
g Fancy cut used for a pearshaped stone.
236
Gauges are used to take
4 Micrometer, an adjustable
accurate measurements of
stones and settings atall stages
of the work.
tool that is closed around the
stone and allows the size to be
read from a graduated scale.
5 Contact gauge used in
diamond polishing.
6 Angle gauge for
measuring the angle of the
table (top) of a faceted stone.
1 Stone-size gauge.
2 Spring gauge.
3 Stone-size gauge; this
version can be folded away.
Lapidary tools
1,2,3,4 Diamond files used
9 Wooden polishing
wheel, made on a lathe so
for shaping and polishing.
5 Silicon carbide abrasive
board.
6 Silicon carbide sander.
7 Glass slab used for
that the circumference is true,
10 IXimbler, often used to
polish baroque (irregularly
shaped) gemstones.
11 Vibrating lap; this
polisher vibrates gently,
abrading and polishing the
stones on its surface.
hand-polishing stones.
8 Scored perspex slab,
used with grits for hand
polishing.
i
12
13
14
15
Hardwood dopstick.
Steel dopstick.
Suction dopstick.
Cone-ended dopstick
used for faceted stones.
16 Lap stick used in the
faceting head.
17 Dopping wax.
18 Heated palette used to
22 Hand-held faceting
head; the stone is dopped to
melt dopping wax.
the end and the tool is adjusted
to the correct angle against
the lap.
23 Hand rest for use with
hand-held faceting tools.
19 Knocldng-off block,
against which the dopstick is
struck to remove the stone.
20 Wood knocldng-off
stick.
21 Syringe full of diamond
24 Jambpeg used as an
elementary faceting head; each
hole is at a set height and
angle, and the lap stick is
placed in the appropriate holes.
25 Mechanical faceting
head.
26 Faceting unit with lap
plate and adjustable head.
recharging compound for laps.
DIAGRAM
During polishing, the stone is
secured with wax to a
dopstick to provide a grip.
]
237
Mounting and setting
The settings used for mounting gemstones
perform the functional service of holding the
stones in place and of protecting them against
unexpected blows that might otherwise dislodge
them. Some settings are designed to be as
unobtrusive as possible, but others are
developed so that they become design
elements in their own right.
The head shown (right) is a
detail of the statue of Saint Foy,
in the treasury of the French
cathedral of Conques. The
statue was made in the 10th or
11th century, and the settings
of the precious and semi¬
precious stones are typical of
that period.
The styles in which gemstones
have been mounted and set in
the past have been determined
by a number of factors. Fashion
has played an important part;
for instance, the widespread
use of faceted stones in
Elizabethan times led to the
development of inconspicuous
settings such as the claw
setting , in which the minimum
surface area of the stone is
covered by the metal. The
development of more complex
techniques has also affected
style; for example, pearls were
generally set in the Middle
Ages by driving a rivet right
through the pearl, but as this
spoiled the appearance of the
stone a method was developed
for fixing pearls invisibly.
Shown (right) are some of the
variations in setting and
mounting styles,
a Bezel setting,
b Claw setting,
c Riveting,
d Graining,
e Flush setting,
f Invisible setting for pearls.
g,h Two modern settings for
gemstones that have been cut
into unusual shapes.
238
1 Bezel mandrel; these are
available in various shapes.
2,3 Bezel punch and bezel
block.
4 Bullsticker for creating
textures under transparent
stones.
5 Closing tool, a coneended tool that pushes prongs
firmly over stones.
Lapidary tools
b The bezel is formed from a
c After being checked for
d The stone is dropped into
strip of metal that is soldered
into a ring. The required
tapered shape is imparted to
it by hammering it on a bezel
mandrel or by punching it in
a bezel block.
size around the stone, the
bezel is joined to the metal
base by soldering it all around
the circumference. A pin is
soldered to the back at this
stage.
the middle of the bezel, and a
bezel pusher is used to
smooth the metal rim down
over the stone, so holding it
firmly in place.
5 Prong lifter, a tool for
altering the positions of prongs
without damaging them.
6 Prong-bending pliers for
closing prong fixtures.
7 Prong pusher.
8 Burnisher, a steel or agate
smoothing tool.
DIAGRAM
A bezel setting for a single
stone brooch is formed in the
following way.
a The shape of the stone is
marked with a scriber on the
metal that is to take the
setting; the metal is cut along
this line.
@
239
Beadmaking
Beads are small objects that have been pierced
for stringing together. They are usually used for
necklaces and other decorative purposes,
although in ancient times particular beads were
often endowed with mystical and magical
properties, and so had to be designed and
shaped to set formulae handed down through
the ages.
The beaded basket shown
(right) was made by threading
glass beads onto fibers taken
from pineapple leaves, and
then weaving the threads
together. The beads, in several
different colors, have been
arranged so that they form a
regular pattern.
The earliest beads ever worn
were probably plant seeds;
shells and fossils were used
later, and so were the teeth of
animals and humans, with
holes drilled through them for
stringing. By the Neolithic
period beads were being
made from bone and pebbles.
The Egyptians were the first to
make beads from faience, the
forerunner of glass, and they
also made very beautiful
beads from precious stones
such as lapis lazuli, carnelian,
turquoise and amethyst. Many
civilizations learned to make
beads from gold and silver,
and eventually from glass and
crystal also.
Illustrated (right) are some of
the many kinds of beads that
have been worn at different
times through history,
a Plant seeds,
b Shells.
c Teeth; these examples are
the eyeteeth from several
wildcats.
d Bone, in this case the
vertebrae of a snake,
e Roots and tree bark,
f Carved wood,
g Gnglazed clay,
h Pearls,
i Gold disks,
j Coral,
k Glass shapes.
240
Beads made from rolled paper
can be easily decorated and
are surprisingly durable. Shown
(right) are some of the paper
strips that can be used,
showing also the shape of the
resulting bead. The strip of
paper is coated with paste, and
then rolled evenly over a rod
or a pencil (right) until the
end of the strip is reached. The
bead is slipped off the rod,
allowed to dry, and then
decorated with paints and
varnish.
Wood beads can be made quite
simply from small twigs,
particularly those with
interesting bark,
a The twigs are notched all
round at regular intervals,
using a sharp knife such as a
whittling knife,
b The twig is sliced through
at every notch, so that single
bead shapes are formed.
The center of each one is
pierced with an awl or a
bodkin so that the beads can
be strung.
_
(
(*)
__/tvtx
C3
3 C®(0
Beadmaking tools
1
/A^ y^iryvvvvvTrp-
1 Bead stringing board
4 Bead tree used when
with graduated channels. The
beads are laid in order in a
channel so that they can be
picked up in the correct
sequence.
2 Bow drill for drilling beads
by hand.
firing clay beads; each bead is
placed on a separate piece of
wire.
5 Bead wheel used for
painting stripes on beads; the
bead is placed on the shaft,
which is then turned with the
handle (right) while the stripe
is painted.
3 Electric drill and stand.
9
= ■'
6 Asbestos gloves, used
for protection when making
glass beads.
Glass beads may be made from
an elongated section of blown
glass.
a A “gather” of molten glass
Is taken from the furnace on
the end of a blowpipe, and a
bubble of air is blown Into the
gather.
b This section of hollow glass
is then pulled out Into a thin
length, and cut into pieces with
glass shears so that beads
are formed with holes already
in their centers.
Another way of forming glass
beads is shown on the right,
a Long cames, or sticks, of
glass are assembled around
a metal rod and heated until
they fuse.
b When the glass Is cool, the
metal rod Is withdrawn and
the tube of glass that remains
Is cut Into sections with a file
to form individual beads.
7 Glass shears.
8 IWeezers for pulling
DIAGRAM
molten glass into shape.
9 Metal rod used for
forming glass beads.
10 Blowpipe for molten
glass.
IMiMWtrtlB
r'T Ptol'
7*/« Y
241
i4 Thread preparation
This chapter illustrates and describes the tools
involved in preparing natural fibers for use in
textiles, and also those tools used in coloring
and dyeing fibers; dyeing can take place before
or after the threads have been woven. Natural
fibers of many kinds can be used in textiles; the
fibers may come from animals, as with the
various types of wool, or they may originate
from plants, such as the fibers of hemp, cotton
and mulberry.
The tools used for the preparation vary with the
size and nature of the fibers. With wool, the
material is prepared by combing the fleece
across toothed cards to remove the tangles,
and then spinning it into regular threads;
cotton, by contrast, has to be beaten on a net in
order to clean the dirt from the fibers and to
make them even and fluffy before it is spun.
Spinning is the means of converting a bundle
of separate fibers into a continuous thread that
can be used for weaving, knitting or knotting,
and different ages and different regions of the
world have evolved their own methods, varying
from the simple hand-held spindle of many
tribes to the electrically powered spinning
wheel. The fibers can be dyed to any color of
the rainbow once they have been prepared, and
although many chemical dyes have recently been
developed, none are quite as subtle or as
beautiful as those produced by the various
plantstuffs that have been known and used for
centuries.
The print reproduced here
illustrates the thread
preparation stage in the 18th
century Irish linen industry.
The linen fibers are being
spun into thread by the
woman on the left, while the
woman on the right makes
ready the thread for weaving.
242
r
i
243
Preparing natural fibers
Natural fibers suitable for processing into
textiles can be harvested from a surprising
variety of flora and fauna. Wool can be obtained
not only from sheep, but from goats, llamas and
even angora rabbits. In the plant kingdom, fibers
are derived from the cotton seed, hemp and
flax stems, and the bark of the paper mulberry.
The illustration (right) shows
a pastoral scene, with
peasants in the foreground
preparing flax. The flax has
been retted (partially rotted)
in water so that the softened
fibers can be twisted into
thread.
The bark of the paper
mulberry tree is used for
making fabrics in many Pacific
islands. The bark is stripped,
and then flattened and textured
with patterned beaters.
1,2,3,4,5,6,7 Beetles or
beaters used to flatten the
bark fibers.
Hemp and flax fibers are
processed in similar ways. The
fibers are cleaned, stranded,
beaten, and then prepared for
spinning.
8 Rippler; the fibers are
drawn through this to clean
them of bark and dirt.
9 Nailbedused to separate
the fibers into strands.
10 Scutcher for beating the
fibers.
11 Bar with textured surface;
hanks of fiber are drawn
through the hole and around
the bar to remove unwanted
plant tissue.
Tools for thread preparation
Illustrated (right) are three of
the plants that yield natural
fibers suitable for conversion
into textiles,
a Hemp,
b Flax,
c Cotton.
Wool needs to be carded before
it can be spun. The carding
regulates the strands of wool
and combs out the tangles
that have formed in the fleece.
1 Cards are made of wood
and covered with wire combing
teeth.
2 WUlow beater.
3 Hammock suitable for
willowing cotton.
b The second card is stroked
across the first until all the
wool has been transferred to
the second card. This procedure
is repeated five or six times
until the wool is well combed
and forms a roll, called a
rollag, on the card.
Natural fibers are felted and
scoured by immersing them in
very hot water and scrubbing
them vigorously. This cleans
and softens the fibers and
helps them to form into even
strands.
4 Rubber gloves.
5 Bowl.
6 Jug.
DIAGRAM
Carding is done with lumps of
wool from the sheared fleece,
a A rough hank of wool is
placed on one of the cards
and teased out to cover the
full area of the teeth.
Cotton is prepared by placing
the balls of fiber in a string
hammock and beating them
with willow rods until they are
soft and even.
]
245
Dyeing
Dyeing natural fibers is a rewarding task, since
they readily absorb all kinds of organic dyes
that can be gathered and prepared from
plantstuffs. The plantstuffs are chopped small,
and then boiled to extract the pigment. The
fibers to be dyed are added to the solution with
a mordant that makes the dye “take,” and the
ingredients are boiled.
Illustrated (right) are
examples of tiedyeing and of
batik. The tie-dyed fabric
exhibits the characteristic
radiating effect, and the batik
shows the crackle effect that
appears on the fabric as a
result of the tiny cracks that
appear in the wax.
1 Pestle and mortar for
crushing dyestuffs.
2 Scales used to weigh
ingredients.
3 Hatchet for chopping
dyestuffs.
4 Thermometer.
5 Glass stirring rod.
6 Mixing spoon for the
dyes.
7 Tongs used to lift the
fibers in and out of the vats.
8 Wooden fork for stirring
the fibers.
9 Measuring spoons for
dyes and mordants.
10 Strainer for removing
unwanted plant material.
11 Dyeing vat.
12,13 Bucket and bowl
for mixing and dyeing.
246
Substance
part used
color
Prickly pear
Madder
Onion
Qoldenrod
Bracken
Indigo
Elder
Logwood
Birch
Walnut
fruit
root
skins
flower
fern tips
leaves
berries
wood
bark
hulls
pink
red
orange
yellow
pale green
blue
lilac
purple-gray
light brown
dark brown
Tools for thread preparation
Tie dyeing is a patternproducing dyeing process that
involves binding portions of
the fabric tightly with string or
by other means so that the dye
cannot reach them.
1 Pin used to hold the fabric
in place while it is being tied.
2 Needle and thread; the
thread can either be stitched
into the fabric or wound around
it.
3 Clothes pin can be used
instead of thread to hold the
fabric.
The pattern produced by tie
dyeing will depend on whether
the fabric is folded, gathered,
crumpled or simply tied
randomly.
a The fabric is tied tightly in
the chosen design; the thread
must be extremely tight so that
no dye can creep under it.
b The fabric is dyed in the
normal way. The dye will color
all those parts of the fabric
that are not protected by the
string. When the dye is dry the
strings are removed, and the
fabric is pressed to remove all
folds and creases.
In batik dyeing, resistance to
the dye is provided by a wax
coat.
4 Funnel for applying hot
wax to large areas.
5 Wax crayon; this can be
used to produce a blurry
pattern on the fabric.
6 Ijanting, a tool for
applying hot wax in fine
patterns. A metal reservoir
holds the melted wax.
Batik can be used to produce
intricate patterns, provided that
the wax is kept liquid so that it
can be drawn onto the fabric
accurately.
a The wax is melted, and
applied to the areas of the
fabric that are not intended to
take the dye. The wax is left to
harden, and then the fabric is
dyed in a low-temperature
solution.
b When the dye has taken,
the fabric is washed in very hot
water to remove the wax. The
clean fabric is dried, and the
process is repeated with any
other colors required.
7,8,9 Skewer, needle
tool and nail; these can be
used to trail hot wax across
the fabric.
10 Double boiler for melting
wax safely.
11 Alcobol lamp; this can
be used to keep the wax in the
tjanting molten.
12 Electric weix palette.
Spinning
Spinning is the technique of twisting fibers so
that they cling together and form a continuous
yarn. This can be done on a hand spindle,
which is basically a weighted rod, or on a
spinning wheel, which speeds up the process
considerably. Flax is generally wound onto a
distaff before it is spun, as this helps to prevent
the long fibers from tangling.
The photograph on the right
was taken in Ireland at the
turn of the century, and shows
a woman spinning thread on a
type of spinning wheel known
as a castle wheel.
1 Wood spindle with a
cross onto which the yarn is
wound.
6 Bronze Age pottery
spindle.
7 Bone spindle from the
2
3
4
5
8 New Mexican cup
spindle.
9 Chinese spindle made
Chinese wire spindle.
Navajo spindle.
Andean spindle.
Egyptian spindle,
Bronze Age.
c. 1500BC.
from metal in a section of bone.
Shown (left) is the method of
using a spindle with a dowel
cross.
a A "leader” of ready-spun
yarn is attached to the spindle
and to the roll of unspun wool,
b The spindle is spun with one
hand, while the other hand
slowly feeds out wool.
c When the spindle reaches the
floor, the yarn is wound onto
one hand and then onto the
spindle.
d When the spindle is full of
yarn, the dowels that form the
cross are pulled out and the ball
of yarn is slipped over the end
of the spindle.
Tools for thread preparation
• -V.
r--.,---,; -
•->::■ ^V
-r—r-r-r
• ::.\ :i-• ~ .-=■
1 Distaff used for holding
;
i
I
'
I
prepared fibers. The fibers are
carefully arranged on the
distaff so that they require the
minimum of manual
regulation during spinning.
2 Andean distaff.
3 Hedgehog or flyer, with
;
i
hooks used to feed the yarn
onto the bobbin. As one part
of the bobbin is filled, the yarn
is looped over another hook
to fill the next part of the
bobbin.
4 Electric spinner.
I
the yarn bobbin. The wheel is
operated by a treadle at the
bottom.
6 Cotton-spinning wheel
from China; this wheel has
three spindles.
7 Rimless driving wheel;
the driving belt that turns the
spindle is carried on a
network of cords connecting
the spokes.
8 Hemp-spinning wheel.
iDIAGRAM
5 Spinning wheel with a
hedgehog or flyer for feeding
249
15 Weaving
Weaving involves forming a web or a cloth by
interworking two sets of fibers. The warp, which
goes from top to bottom on a vertical loom or
front to back on a table-top loom, is set up first,
and then interwoven with the weft or woof,
which goes from side to side. Some areas of
weaving, such as basketwork, use adaptations
of this basic principle, such as having a warp of
radiating fibers that are woven with a weft in a
circular fashion, beginning from the center and
working outward.
The principle behind weaving in any fiber is
surprisingly consistent; the basic over/under or
tabby weave is found all over the world, in
fabric, baskets, chair seats and matting in every
fiber from cotton to coconut. Variation is
brought into each craft by altering the basic
weave, and by introducing extra colors or
threads of a different thickness.
The tools of the weaver include those needed
for making ready the fibers to be woven—
knives and bark-strippers for basket canes and
the implements used for warping thread come
into this category. The weaving tools themselves
range from the four-stick “loom” of the
American Indians to the many shedded floor
looms of the cloth weaver. The history of craft
weaving has included such landmarks as the
development of the heddle system, the setting
up of the Gobelins tapestry works in the 15th
century, and in our own century the
development of new weaving techniques such
as three-dimensional “soft sculpture” weaving
and sprang.
This tapestry is the central
panel from the "Life of Christ”
tapestry in Rheims Cathedral,
and depicts the Virgin Mary
weaving a strip of braid
decorated with floral designs.
250
Weaving 1
The successful weaving of fabric depends a
good deal on the way in which the yarn and the
loom are prepared. The warp yarn is made
ready for the loom by winding it into skeins and
attaching it carefully to the loom at even
intervals; various tools exist to assist in this
process, and also to help the weaver to produce
an even weave on the loom.
The wood engraving
reproduced here was made by
the English artist Thomas
Bewick, and depicts a weaver
at his loom. His spare bobbins
are in the basket on the floor.
In sophisticated looms the
over/under sequence of the
weft is controlled by some
kind of “shed" arrangement.
For example, the even warp
threads are lifted above the
odd threads for the shuttle to
pass in one direction, and then
lowered for it to pass back, as
shown in the diagrams (above).
Illustrated (right) are examples
of ancient and ethnic looms
and weaving accessories.
1 Egyptian warp-spadng bar.
2 Egyptian weft beater.
3 Egyptian shuttle with the
thread still in place.
4 Horizontal ground loom.
5 Bow loom strung over a
pliable branch.
6 Warp-weighted loom; the
warp threads are kept taut by
stone weights.
7 Quill loom; the weft used
in this loom incorporates colored
porcupine quills.
8 Backstrap loom, a kind of
loom still used in many
countries. The weaver leans
back to tauten the warp
threads.
Weaving tools
-.i—.Til
1 Weaving tablets, used for
making a strip of decorative
fabric. The tablets are pierced
with five holes and strung with
yarn; the different sheds are
made by turning the cards
forward and back, and the
shuttle is inserted after each
turn.
2 Chinese ribbon loom used
for weaving narrow strips of
silk ribbon.
3 Inkle loom; this loom can
be used for weaving long
strips of braid.
T.'.T.
The technique of finger
weaving, used for making
braids with diagonal or
chevron patterns, is illustrated
(right). This particular
sequence is for making a
diagonal stripe,
a The chosen colors of yarn
are cut into long threads,
roughly twice the length of the
band required,
b Each thread is doubled,
and attached with a loop knot
to a pencil or a weaving
stick. All the threads of each
color should be knotted side
by side.
c The outside thread on the
left is taken under the second
thread, over the third, and so
on alternately to the last
thread.
d The thread that is now on
the extreme left is woven in
turn under and over the
threads to its right,
e This sequence is continued,
always using the thread on the
extreme left, until the strip is
as long as required,
f The end of the braid is
neatened by sewing up the
yarn ends with the final weft
thread.
4 Warping frame used for
preparing the warp threads for
the loom. The way in which
the threads are wound on the
frame ensures that they can
be transferred to the loom in
the correct order and with the
minimum of tangles.
5 Niddy-noddy used for
preparing skeins of wool.
6 Swift; this implement
expands to hold skeins of
different lengths.
7 Spool rack used for
feeding out the yarn.
8 Warping mill, a frame
used for preparing very long
warp threads.
Weaving 2
254
1 Frame loom, a simple
loom for weaving rectangles
of fabric. The warp is made by
winding the yarn to and fro
across nails hammered Into
the frame, and weaving
sticks are used to form sheds.
2 Table loom fitted with
rollers so that considerable
lengths of fabric may be woven.
1
3 Rigid heddie; the heddie
6 Shaft sticks; these are
8,9 Reed hooks used for
is the device used to separate
the threads used for the
different sheds.
4 Wire heddles; each thread
has its own heddie wire in this
arrangement.
5 Raddle used for spacing
the warp threads correctly.
inserted into the warp threads
as they are prepared for the
loom, and keep the different
sheds separate while the loom
Is being threaded.
catching the yarn through the
heddles.
10 Threading hook, also
used for threading the heddles.
7 Shed stick.
Weaving tools
The tools shown on the right
are used particularly for
tapestry weaving.
1 “Butterfly” of yarn; when
many colors are being used
for the tapestry, small lengths
can be formed into butterflies
to keep them tangle-free.
2,3,4 Bobbins, designed to
hang down the back of the
tapestry during work.
5 Beater used to beat down
the weft.
6 Tapestry needles used
for sewing in the loose ends
and joining pieces woven in
different colors.
8 Stick shuttle.
9 Boat shuttle; this shuttle
carries a bobbin of yarn
inside the frame.
10 Bobbin winder, used
for producing bobbins that are
evenly covered with yarn. A
strip of brown paper, wound
on first, secures the yarn end.
11 Beater in the shape of a
comb.
12 Stick beater.
13 Brush for raising the nap
on woven fabric.
14 Fulling shears used for
trimming the nap.
15 Needles, one ordinary
length and one extra long, for
weaving in yarn ends.
DIAGRAM
7 Shuttle; this is the
simplest form of shuttle, with
the yarn simply wound around
the center.
255
Rugmaking
Rugs can be made using many common
techniques, such as weaving, rushwork and
knotting, but the particular method known as
hooking is almost exclusive to rugmaking. A
backing canvas with a very open weave is used
as the rug base, and short pieces of yarn or
strips of fabric are knotted into this canvas in
such a way that the ends stick up in tufts to
form the rug’s pile.
Illustrated (right) is a
traditional Persian carpet; the
geometric and floral elements
are typical of Persian rug
design. The technique of
rugmaking can also be
adapted for designs that
include large, bold or abstract
elements.
1 Indelible marker used for
drawing designs onto the
backing fabric.
2 Feibric slitter, with circu lar
blades driven by a handle.
3 Thumbtack used to hold
paper secure when designing.
4 Carpet tack for mounting
canvas onto a frame.
256
5 Large needle used for
joining and finishing canvas.
6 Lacing sets used to hold
the backing securely.
7 Craftknife used for cutting
canvas to size.
8 Pile gauge; the strands
are looped around the gauge
so that they are all the same
height.
9 Spiral holder for strips of
fabric or for strands of yarn.
10 Rug hook for looped
rugs.
11,12 Latch hooks for
knotted rugs; these hooks
take the yarn through the
canvas and bring it back to
the surface.
Weaving tools
Rug frames are used to keep
the canvas taut during
hooking. The frames shown
(above) are hand-held.
1 Spiked frame; the rug is
pressed into position over the
spikes, and can be tightened
by turning a handle.
The frames illustrated (right)
are floor-standing models that
leave both hands free for the
work.
3 Square frame with a
spiral holder for the working
strands.
4 Circular frame.
'DIAGRAM
2 Circular frame.
@
257
Rushwork
Rushwork articles are made with dried grasses
that are interwoven in the same way as the rods
for basketry. Rushwork tends to be softer than
basketry, as the fibers are not so stiff, and it has
a smoother finish. Also described here are
corn dollies, the traditional fertility symbols
made for many centuries in rural England.
Shown on the right is a table
mat woven from rushes. Two
different weaving methods
have been used to produce
two effects in the mat; the
center has been woven with a
simple tabby weave, and the
outside border has been made
with paired rushes twisted
between the main stakes.
A rush is tested for strength
before it is used; any weak
rush is removed by pulling the
thin end gently but firmly. The
rushes are then wiped with a
damp cloth to clean them and
to remove the air and water
from inside the stems.
1 Secateurs used for cutting
the rushes.
2 Mallet used for beating
and softening.
3 Measuring tape.
4 Craft knife used for
trimming.
5 Wet cloth for damping the
rushes.
258
6 Funnel; this is used as a
gauge for making bundles of
rushes of even thickness.
7 Packing stick.
8 Fid, a long tapering cone
used for stretching holes in
the rushwork.
9 Wriq>ped bricdr used to
hold down partly woven
sections of the work.
Weaving tools
1 Rush threader.
2 Bent wire used for pulling
rushes through narrow gaps
in the work.
3 Packing needle used for
fine finishing work.
4 Lacing awd.
5 Sailoi's palm, a thimble
palm used with the awl and
needle.
6 Corkmat and glass-headed
pins used to keep the work in
place during weaving.
The sequence (right) shows
the method of forming a
horseshoe-shaped corn dolly,
a A number of hollow straws,
such as those from wheat, rye
or maize, are prepared by
cutting the ears off with sharp
scissors.
h Several of these straws are
made into a core by forming
them into a bundle and binding
the bundle with wire,
c Five long straws are
attached to the end of the
bundle; these are the straws
that will form the traditional
corn dolly weave,
d The straws are woven
around the core by placing
one straw over its neighbor;
the second straw is bent over
the first, and twisted round to
lie over the third straw. This
weave continues until the core
has been covered,
e The ends of the straws are
neatened off by tucking them
under one another,
f The dolly is bent into the
shape of a horseshoe,
decorated with a spray of oats,
and tied with a ribbon.
iDIAGRAM
The procedure for making a
round rush mat is shown in
the illustrations (right),
a Long, straight rushes are
chosen for the main stakes of
the mat; they should be
considerably longer than the
width of the mat in order to
allow for a border,
h The stakes are woven into
a simple tabby (over/under)
check to form the central
motif of the mat.
c The weaving around the
central motif is done with a
paired rush. A rush is bent at a
point slightly removed from
the center, and then looped
over one of the main stakes,
d The rush is woven around
the central stakes, twisting it
between the stakes to form a
weave on both sides of the
mat simultaneously,
e A new rush is joined as the
first one comes to an end, and
the process is repeated around
the mat.
f To make a border, the rush
threader is inserted into the
weave and used to pull down
the end of each stake around
the edge of the mat.
259
Basketry
Basketry is a craft with a history spanning
thousands of years, yet the basic methods of
stripping, preparing and interweaving the
willows have changed very little in that time.
Several tools have evolved to speed up various
processes, such as the cleaves for splitting
willows into even strands, but most tools are
still made according to traditional patterns.
Shown on the right is an
example of basketry. The
weaves used in basketry can be
simple, as in this example, or
they may be complex and
executed with fibers of several
colors, as in many of the articles
produced by Oriental
basketmakers.
4 Willowbrake, a tool used
for stripping and peeling the
withies.
5 Three-way cleave used
for slicing withies into three
even parts.
6 Four-way cleave.
7 Shop knife used for
pointing the withies so that
they can be inserted easily
into the work.
8 Picking knife used for
trimming the finished basket,
9 Shears for cutting and
trimming stout withies.
The illustration (left) shows
the method of using a willowbrake. The withy is inserted
into the brake and pulled
through; this loosens the bark.
It is then pulled through In the
opposite direction to clear
away the loosened bark.
Shown (below) are two types
of shave; these work as small
planes for cutting strips of
willow. A small blade is
inserted into a slot in the
shave, and adjusted to the
required position; the blade is
then fixed in place with a
small screw.
The method of using a shave
is illustrated (below). The
shave Is clamped in a vise,
and a willow strand is pulled
through the stock and across
the blade; this converts the
strand into flat strips suitable
for binding finished baskets.
1 Kinking tongs, used for
4 Sponge for damping the
bending the ends of rods so
that they can be finished off
neatly.
2 Commander, an iron bar
used for straightening canes
and rods.
3 Grease horn, used when
lubricating the bodkins.
withies to soften them.
9 Lacing awl used to carry
withies through the weave.
10 Tapestry needle for use
with split binding.
11 Btoards clamped together
so that they can be used to
grip flat pieces of basketry.
5 Solid bodkin.
6 Hollow bodkin; this
makes an opening in the
weave, and the withy is inserted
through it.
7,8 Rapping iron and beater,
used for tapping down rows of
weave.
IDIAGRAM
Weaving tools
Canework
Cane has for many years been a popular
material for making furniture, usually by
splitting the canes and then weaving them into
patterns that are both decorative and strong.
The cane most commonly used is rattan, a
climbing palm that has very tough stems; even
when the cane is split into thin slices the
material has a great deal of strength.
Illustrated (right) are two
examples of cane seating. The
cane strips have been
interwoven in various
directions, and each cane is
individually secured in the
chair frame by taking it down
through a small hole and
wedging it tightly.
1 Scissors used for cutting
4 Knitting needle used for
5 Caning pegs used for
the cane.
clearing old cane from the
holes around chair seats etc.
securing the cane during
weaving.
2 Craft knife for notching
and splitting the cane.
3 Spline chisel used for
removing old cane strips from
furniture that is to be
renovated.
262
6
7
8
9
Pinhanuner.
Fine bodkin.
Basketmaker’s bodkin.
Side cutters used for
cleanly nipping off the ends of
canes.
Spalework
Weaving tools
Spalework and white oak basketry are similar
techniques used for making simple and strong
baskets from wide strips of straight-grained
wood. Whereas the strips used for canework
are often rounded on one side, because they are
half-sections of small stems, the strips used in
spalework are slices taken down large branches,
and so are flat on both sides.
Illustrated (right) is a garden
basket from a shopping
catalog issued earlier this
century. The basket, or trug, is
made in a traditional style
from strips of straight-grained
wood.
3 Small froe.
4 Shave horse used when
shaving off the strips for
spalework.
5 Mallet used for striking
the froe.
6 Drawknife; this can be
used for planing off strips over
the shave horse.
7 Sharp knife for white oak
basketry; this is used for
splitting the wood.
8 Scalehoard plane used to
make long, flat shavings.
DIAGRAM
1 Cleaving adz used for
splitting the wood.
2 Free, also used for
splitting.
I
Knitting and knotting
The word knitting is derived from the AngloSaxon word cnyttan, which means “to weave
threads by hand,” and this is exactly what the
knitter or knotter does. Each of the techniques
described in this chapter consists of making
knots or loops in the thread used until a firm
fabric or decorative filament is produced.
The tools of the knitter and knotter are very
straightforward. They generally consist eithec
of tools for looping one thread through another,
such as knitting needles and crochet hooks, or
for holding the working thread, such as tatting
shuttles, netting shuttles and lace bobbins. The
threads for techniques such as macrame and
bobbin lace are knotted and twisted by hand
rather than with tools.
Perhaps because the knotting crafts are especi¬
ally delicate, and also because they were often
popular with the leisured classes, the tools
designed for these crafts have always been
delicate and beautiful. Crochet hooks have been
fashioned from silver, ebony, mother of pearl;
tatting shuttles have been made in filigree silver,
enamel and ivory. Although the modern versions
of the tools may not be so beautiful, they are
nevertheless easily available and very durable,
and the shapes themselves remain as elegant
as ever. The knitting and knotting techniques,
rather than dying out in the wake of machinemade lace, are being used as media for designs
of great originality and abstract beauty by the
textile artists of today.
Shown on the right is a
painting called “The Visit of
the Angels,” painted c. 1390
by a painter known as the
Master Bertram. The early
date of the painting illustrates
the early evolution of such
complex techniques as knitting
with several needles.
264
A
riii^ ■'
■-■^ V^(^'.‘S!W8?5^
265
Knitting needles and accessories
Knitting is a thread-knotting process usually
carried out on two straight needles, with the
addition of extra needles for special purposes.
The date and area of the origination of knitting
are impossible to establish, but certainly the
craft was well established in European
countries in medieval times.
The example of knitting (right)
shows various different stitch
combinations. The patterns in
this piece were all formed
from the basic plain and purl
stitches combined with slipped
stitches.
Knitting needles have been
made of many substances
through the years, such as
bone, wood, tortoiseshell and
amber, but most ordinary
needles nowadays are made
from metal or plastic.
1 Large needles for
producing large stitches in
fancy knitting; these examples
are made of wood.
2 Metal knitting needles.
3 Circular needle, used for
knitting a seamless tube such
as a sweater.
4 Plastic needles.
5 Cable needles; these
needles are pointed at both
ends so that stitches can be
slipped on and off each end.
6 Needle gauge, used to
check the sizes of knitting
needles. The American
numbering system is shown in
brown, and the English
(metric) system in black.
Knitting and knotting tools
;
I
j
,
The basic plain knitting stitch,
described here for righthanded knitters, is shown in
the sequence (right),
a The right needle is slipped
into the first stitch on the left
needle.
b The working end of the
yarn is wound around the tip
of the right needle, which is
then drawn back through the
stitch, carrying the loop of
yarn with it.
c The old stitch is slipped
over the tip of the left needle,
leaving a new stitch on the
right needle.
Four cable needles are used
to form seamless tubes of
knitting, as shown (right). The
stitches are divided into three
groups, and each group
threaded onto one cable
needle; the spare needle is
used to knit the new stitches
onto each section.
A circular needle can also
be used to knit up garment
necks and other types of
seamless knitting (right). All
the stitches are threaded onto
the needle, and the knitter
moves the stitches around the
circle as they are worked with
the two needle ends.
1 Knitting needle holder
made from carved wood.
2 Novelty knitting needle
1
rsr—
case.
3 Row counter; the small
dial is turned at the end of
every row of stitches, so that
an accurate record can be
kept of completed rows.
4 Needle tip used to
protect the needle point.
5 Point protector made
from a cork.
6 Measuring tape.
7 Yarn holder.
8 Stitch holder used to
hold stitches while they are not
being worked.
9,10 Special-purpose
needles.
11 Ring markers used to
mark off sections of the
knitting.
12 Scissors.
13 Crochet hook used for
making chain stitches when
required.
14 Darning needle used
for sewing up knitted
garments.
c©
z
<
a:
o
14
<
Q
@
Frame knitting
Frame knitting is used for making seamless,
hollow tubes of knitting, either in the form of
thin cording, or as shaped pieces for stockings
and similar articles. The yarn is looped around
a number of raised points, and then a new row
of stitches is formed by hooking the previous
stitches over the yarn.
The print on the right shows a
Japanese woman making a
cord by knotting it over a
circular frame. The frame
ensures that the spools of
thread remain in the correct
order as they are braided.
1 Amerindian knitting
frame made from four sticks;
the yarn is looped over each
stick in turn.
2 Ebony and ivory frame.
3 Ivory frame.
4 Wood ring used for frame
knitting.
5 Hoilow cork with metal
pegs.
6 Thread spool converted
to a knitting frame.
7 Crochet hook used for
looping the stitches over each
other.
The principle of frame knitting
is shown in the sequence
(above).
a The preliminary stitches
are formed on the pegs by
taking a loop of yarn around
each peg.
b The yarn is then taken
round the outside of the first
peg, and the loop already on
the peg is hooked over the
new yarn. This process is
repeated with each peg in the
circle, and then continued for
as many rounds of the pegs as
required.
Beadwork
Knitting and knotting tools
Beadwork is thread work that incorporates
beads into the stitching. This can be done by
threading the beads onto yarn that is then
knitted up in the usual manner or looped over
shaped formers; alternatively, the beads may
be strung on thread that is then used as the
weft thread on a bead loom.
1 Pierced purse mold for a
beaded purse. The band for
the purse top is made by
stitching it through the pierced
holes, and the body of the
purse is then looped around
the mold.
2 Purse mold for a long
beaded purse.
3 Purse mold for beadwork
made using the frame knitting
technique.
4 Cable needles for knitting
up circular shapes.
5 Bead needles; these are
long and fine so that several
beads may be threaded on
them.
1
The example of beadwork
shown (below) is a quirt, or
horsewhip. The thong is made
from braided animal hide, and
the loop is made from fabric
with beadwork incorporated
into the decoration.
5
6 Bead loom.
b The weft is laid under the
warp so that one bead appears
in each gap in the warp. The
weft needle is then returned
over the top of the warp
threads, and threaded through
each bead in turn so that they
are secured in place.
DIAGRAM
Bead weaving is done in the
following way.
a The bead loom is threaded
with warp threads to the
desired width, and sufficient
beads to decorate one width
are threaded onto the weft.
The end of the weft is attached
to a bead needle.
@
Knitting machines
Knitting machines have been developed to
duplicate mechanically the stitches made when
hand knitting, only to do so considerably faster.
The handpiece of the machine is moved back
and forth across the stitching area, and it
performs the stitches dictated by punched cards
that have been previously fed into the machine.
Illustrated (right) is a pair of
gloves made on a knitting
machine. The machine was
programmed with one stitch
for the basic knit of the
gloves, and with another for
the fancy border around the
wrist bands.
The illustration (below) shows
a typical modern knitting
machine.
1 Yam tensioner.
2 Punched card.
3 Handpiece.
4 Completed knitting
emerging from the machine.
5 Spools of yarn.
Knitting and knotting tools
;
I
I
I
!'
j:
j
'
I
.
.
.—
I
I
J
Illustrated (far right) are several
styles of needle pusher.
These are the parts of the
machine that determine
changes in the basic stitching
scheme of the knitted fabric
being worked.
Various accessories are used
with the knitting machine.
1 Work hook.
2 Latchet tool
3 Transfer tool.
4 Seven-needle transfer
tool.
5 Spare needle.
6 Bar pusher.
]
J.
U
U
U
Lr“U
LT^J
LT^J
U
L
U
U
Lr^U
U
L
U
U
U
U
U
U
U
7 Weights, used to ensure
that stitch tension is equal
throughout the piece.
8 Hachine brush.
9 Card clamps.
10 Card guide pin.
11 Card punch.
iDIAGRAM
-
A yarn iwinder, illustrated
(right), is used to prevent knots
and tangles from impeding
the machine’s progress. The
yarn is wound onto the winder
from the purchased skein, and
passes through an eye which
halts the yarn at knots so that
they can be untangled.
271
Bobbin lace
Bobbin lace is formed by twisting many tiny
threads in a predetermined pattern so that they
form a piece of flat lace. The name comes from
the numerous bobbins on which the threads
are wound to keep them tidy and to provide
tension on the work; complex patterns can
require hundreds, or even thousands, of
individual threads.
The photograph (right) shows
a piece of traditional bobbin
lace being made. The paper is
pricked out and marked with
pins, and the threads are
being twisted and knotted in
the required sequences.
1 Stiletto, in the shape of
a fish, used for pricking out
the lace pattern.
2 Pins with decorative
beads; the pins are used as
guides, and the thread is
twisted around them.
3,4 Glass-headed pins
from Venice.
5 Plain wood bobbins.
6 Pricking template used
as a pattern.
7 Spring; this is attached
to the front of the working
pillow and keeps the bobbins
in the right order.
8 Bobbin winder.
9 Lace board, a small
board onto which the finished
lace is wound.
10 Lace measure an ancient
tool used by laceworkers to
measure a day’s work.
272
Knitting and knotting tools
1 Olivewood bobbin from
France.
2 Boxwood window
bobbin.
3 Boxwood bobbin.
4 English ivory bobbin.
5 Named ivory bobbin;
these were often given as love
tokens.
6 Painted bobbin from
Russia.
7 Bamboo bobbin from
India.
8 English bobbin with
pewter washers.
9 Brass bobbin.
10 Barrel bobbin from
Austria; the barrel keeps the
thread clean.
11 Lace pillow with a wheel
at the back so that the finished
lace can be wound into a bag
to keep it clean.
12 Circular lace pillow
that rotates to allow easy
access to all parts of the work.
13 Lacemaker’s lamp; the
sphere in the center held
a floating wick.
14 Lace pillow shaped like
a muff.
15 Lace pillow and
adjustable stand.
16 Diffusers; these globes
DIAGRAM
diffused the light from a lamp so
that all parts of the work were
lit evenly.
mmm
273
Crochet
Crochet is a method of knotting a thread by
drawing it into a chain by means of a hook. The
basic stitches can be combined into sequences
to produce many variations of pattern and
texture; crochet can be as delicate as fine lace, or
as chunky as macrame; the technique is
adaptable to threads of any thickness.
The example of crochet work
shown (right) illustrates the
way in which large, flat areas
can be built up by a spiral of
crochet stitches. Each stitch is
hooked into a loop made by a
stitch in the preceding row of
the spiral.
The size of the stitches made
in crochet is determined by
the diameter of the crochet
hook that is used.
1 Crochet hooks in
graduated sizes. Modern
hooks are usually molded
from metal.
274
2
3
4
5
Hardwood hook.
Rosewood hook.
Kelp hook.
Multiple crochet hook
with heads of different sizes.
6 Sheath for the multiple
tool. When in position, the
sheath allows only the chosen
hook to protrude.
All crochet stitches are
variations on the basic chain
stitch shown (right),
a A small slip-knot is made
in the end of the thread to be
crocheted, and a hook of
suitable size is inserted into
this loop.
h The loop is pulledtight over
the hook, then the hook is
brought down to pick up
another portion of the working
thread. The hook is turned
slightly so that it grips the
thread securely,
c The new loop is drawn
through the original loop,
which passes over the tip of
the hook to form the first
stitch of a chain. This is
repeated as many times as
required.
d The chain that has been
formed now acts as the base
for further rows of stitches;
each new stitch is looped
through one of the stitches in
the previous row.
Hairpin crochet, lucet work
Knitting and knotting tools
iK--
Hairpin crochet and lucet work are variations of
the chainmaking principle of crochet. Hairpin
crochet gains its name from the curved pin upon
which it is produced; it is a technique that yields
a long web of fine lace. Lucets are used to
produce single chains of thread which can then
be couched or crocheted in their turn.
The lace illustrated on the right
was made by linking lengths
of hairpin crochet with ordinary
crochet stitches. The hairpin
crochet exhibits the
characteristic feathery
appearance.
Steel pin used for wide
hairpin crochet.
2 Mn with adjustable slider.
3 Wood pin with slots in
various places so that different
widths of lace can be crocheted.
Lucets are small harp-shaped
tools used for making chains;
the thread is looped around
the two horns, and then
hooked over subsequent loops
to form a chain.
4 Ivory lucet.
5 Wood lucet.
Hairpin crochet consists of a
series of loops secured in the
center.
a The thread is wound around
one bar of the pin, and a small
crochet hook is used to take
up a stitch and pull it through
the stitch that is already on the
hook.
b The thread is then wound
around the other bar of the pin,
and again a stitch is picked up
when the thread returns to the
center. Completed stitches can
be gently slipped off the
rounded end of the pin to make
room for further work.
'DIAGRAM
1
Macr ame, tatting, netting, knotting
Macrame, netting and tatting are three ways of
forming decorative knots in thread in order to
produce lacy patterns. All three types of
knotting can be done with any thickness of
thread, although traditionally tatting is very
delicate while macrame is particularly associated
with coarse jute and hemp threads.
The lacy panel Illustrated
(right) is made from
embroidered netting. A regular
mesh is netted first, and this
can then be decorated with
embroidery, needleweaving
and other techniques.
Illustrated (left) is an example
of macrame. The technique
was originally a Turkish craft
used for making decorative
fringes on shawls and veils,
but it has now developed into
a craft in its own right.
1,2 Bone bobbins for
macrame threads.
3 Glass-headed pins for
pinning out macrame.
4 T-pins.
5 Knotting shuttle made of
ivory.
6 Scissors.
7 Crochet hook used for
finishing macrame and
knotting.
8 Needle with a large eye
so that it can take coarse
threads.
9,10 Two types of macramfe
board.
Macrame is generally worked
from a series of parallel threads,
a The macrame threads are
cut into even lengths, and these
are knotted in a row along the
top of a macram6 board.
276
b The threads are then used
in pairs and groups to form a
wide variety of decorative
knots; the threads may be
braided or twisted, and wood
beads are often threaded over
the working threads so that
they appear in the pattern.
Knitting and knotting tools
1 Tatting shuttle, showing
the way that the thread is
wound over the central core.
2 Tatting shuttle.
3 Rubber band, used to
secure balls of wool so that they
can be used as makeshift
shuttles.
4 Fancy shuttle made of
wood.
5 Shuttle for loosely spun
wools such as mohair.
6 Tatting hook on a chain
so that it could be hung from
the waist.
7 Large netting needle
suitable for hammocks.
8
9
10
11
12
13
Large netting gauge.
Netting shuttle.
Steel netting needle.
Case for netting tools.
Gauges for fine netting.
Netting needles carved
from tortoiseshell.
14 Single-ended netting
needle.
15 Netting needle made of
tortoiseshell.
16 Netting box containing
netting tools and a stand
for securing the work.
b A gauge is placed under
the first row of knots, so that
the next row wiil be even. The
second row is made by
threading the needle through
a loop and over the gauge,
and then knotting it at the top
of the gauge.
iDIAGRAM
The technique of netting with
a large thread is shown in the
sequence (above),
a The thread is wound onto a
netting needle, and a series
of loops is made by knotting
the thread loosely round a
stick or dowel.
277
Needlework
In the late Stone Age, the people living in
Northern Europe wore clothes made from
several pieces of hide sewn together in a
primitive manner by threading thongs through
punched holes. In Southern Europe the
discovery of contemporary bone needles
suggests that woven fabrics were already being
stitched together, since bone would have been
too weak to pierce leather. The art of sewing
fabric, therefore, dates back many thousands
of years.
Needles and other sewing tools have changed
remarkably little in appearance since ancient
times. The iron needles used by the Egyptians
and introduced to Europe in the Middle Ages
were exactly the same in principle as their bone
forerunners, and shears were used for cutting
out fabric in the late 19th century just as they
were in Roman times. The Inventions of the
sewing machine in 1830 and the band-knife
cutting machine in 1860 were the first major
changes in sewing tools since the Stone Age.
The Introduction of electrically powered tools
for domestic use has been the major contribution
this century to the history of sewing tools.
Electric irons are now used instead of flat¬
irons for pressing tailored work; sewing machines
and even scissors can be driven by electricity.
Perhaps even more important, however, has
been the revival of Interest awakened by the
various arts and crafts movements at the turn
of the century in the rich heritage of needlework
techniques and tools that exists throughout
the world.
This photograph was taken at
the turn of the century in a
London school. The girls in
the picture are being taught
needlework, and the boards at
the front of the class display
stitching samples.
278
279
Measuring, marking, cutting
Dressmaking requires very accurate measuring
and cutting of the pieces of fabric to ensure
the success of the final garment. Seams must
be even, hems level, curves smooth and cuts
clean so that the pattern pieces will fit
together correctly when they are stitched.
Clearly marked cutting guides and sharp
scissors help the dressrnaker at every stage.
This photograph, taken at
dressmaking class in 1915,
shows a girl cutting out major
pattern pieces from fabric laid
on a large table.
1
1 Measuring stick.
2 Tape measure.
3 Skirt marker used to
ensure that hems are even.
4 Sewing gauge with
adjustable slider.
5 Scalloping template.
6 Curve square used for
measuring curves.
280
7
8
9
10
Chalk marker.
Tailor tacker.
Tailor’s chalk.
Chalk holder with an
edge for sharpening the
chalk piece.
11 Dressmaker’s pencil
with chalk at one end and
a stiff chalk-erasing brush
at the other.
12, 13 Tracing wheels, one
smooth and one serrated.
These are used to transfer
pattern markings to the
fabric.
Needleworking tools
5
Dressmaker’s shears;
the handles are bent upward so
that the blades can lie flat
when cutting out fabric.
6 Hairdresser’s or lingerie
scissors used for cutting
fine fabrics.
7 Trimming scissors.
1 Cutting-out knife from
Ancient Egypt.
2 Iron shears.
3 Iron scissors from the
1st century AD.
4 Steel scissors inlaid with
gold, from 18th century
France.
8 Pinking shears with
blades that cut a series of
small zigzags to prevent
fraying.
10 Electric scissors.
11 Embroidery scissors
with short, pointed blades.
9 Buttonhole scissors;
the special design of these
scissors means that
buttonhole slits can be cut
without damaging the
surrounding fabric.
iDIAGRAM
Scissors are sophisticated
cutting implements formed by
two cutting blades joined at a
fulcrum. When the handles
are brought together, the
blades meet in a cutting action.
The first implement used for
cutting textiles was simply a
shaped knife-blade. The
advantage of two blades for
accuracy was soon realized,
and at first these were formed
rather like sheep shears from
a single piece of sprung metal.
These developed into the twobladed scissor design that is
still used today.
281
Needles, pins, tailoring aids
Needles and pins have been used since the
Stone Age. The first simple needles were carved
from slivers of bone and used to carry thonging
through holes punched in animal hides. As
man’s domestic skills evolved, needles were
made finer and sharper so that they could
themselves pierce holes for the thread.
Shown (right) is a pack of
needles offered for sale in the
1895 Harrod’s catalog. The
needles are all sharps, one of
the most popular all-purpose
needles.
13 14
1 Bone needle with an eye
and notches for carrying the
thread. This needle is from
Ancient Egypt and is about
5000 years old.
2 Bone needle from the
Early Iron Age.
3 Bronze needle from
Egypt.
4,5 Bronze needles from
Ancient Rome. One needle has
multiple eyes so that the thread
can be secured against slipping.
6 Sharp, a needle used for
hand-sewing.
21
15
16
17
18
23
7 Between or quilting
nee die.
8 Straw, a tacking needle.
9 Bail-point needle used
with knits.
10 Self-threading needle;
the thread is drawn into the
eye through a slot.
11 Embroidery needie.
12 Chenille used for yarn
embroidery.
13 Bead needle used to
apply beads and spangles.
14 Tapestry needle.
15,16,17 Darners.
18 Glover, a small needle
with a triangular point.
19 Saihnaker; this needle
also has a triangular tip.
20 Curved needle.
Various accessories are
used with needles.
21
22
23
24
25
26
27
28
Needle threader.
Thimble.
Thread waxer.
Awl.
Pointer and creaser.
Bodkin.
Loop turner.
Seam ripper.
Meedleworking tools
i
j
j
j
I
j
j
I
I'
Sewing 2dds are used by the
dressmaker to help shape and
form the garments.
1 Iron.
2 Press mitt for shaping
small curved seams.
3 Tailor’s ham for pressing
shaped areas.
4 Seam roll, a cylindrical pad
on which seams can be pressed
|i open.
■ 5 Tailor’s board.
6 Sleeve board, a small
;
j
1
i
ironing board used for pressing
sleeves.
7 Needle board, a block
with steel needles covering the
surface. TTiis is used for
pressing fabrics with a thick
pile.
20
The first pins used in antiquity
were those that could be
found ready-made—fish bones
and thorns. Through the ages,
pins have been carved from
bone and wood, and fashioned
from gold, silver, ivory and
bronze.
8 Roman bronze pin.
9 Egyptian bronze pin.
10 Iron pin, forerunner of
the safety pin. The point could
be bent back and secured
behind the ring.
Modem pins, like modern
Sewing accessories are
needles, are generally made of
steel, although there are several
designs of pinto choose from.
Pins are no longer a luxury,
since they can be made very
cheaply with specialized
machinery.
15 Flat pin, a steel pin with
a flat head.
16 Dressmaker’s pin, a
long fine pin that will not mark
delicate fabric.
designed to make the seam¬
stress’s task easier and more
pleasant.
20 Darning egg, a smooth
shape over which fabric is
stretched for repair.
21 Hand cooler, made of
natural stone or of porcelain
and used to cool the sewer’s
hands.
22 Darning mushroom, a
wood shape used in the same
way as the darning egg.
23 Tailor’s dummy, a lifesized form on which garments
can be fitted and tailored.
protector.
17 Glass-headed pin.
18 T-pin.
19 Pincushion with a
separate emery bag for
13 Glass-headed pin from
cleaning rusty pins.
11 Bone pin.
12 Bronze pin with a point
Venice.
14 Pin-poppet, a type of
pincushion with a lid.
m
22
23
DIAGRAM
!
283
Sewing accessories
The many small and delicate implements used
in sewing have lent themselves over the years to
dainty ornament, so that the tools have become
objects of craftsmanship, beauty or elegance.
Tools for the rich were often ornamented with
gold, silver, ivory, ebony, pearl and carved
wood, and sets of matching implements were
often manufactured as gifts.
The sewing kit (right) was
advertised in the 1895 Harrod's
catalog. The kit contains
spools of thread, silks,
buttons, needles, pins, tapes
and thimbles.
Shown here are some
historical examples of sewing
accessories.
1 Anglo-Saxon bronze
sewing box.
2 Pinball of knitted silk.
The five following implements
were all made to swing from a
common head that was
attached to the waist and
known as a chatelaine.
3
4
5
6
Yard meeisure.
Needle case.
Folding scissors.
Pincushion made from
two layers of metal with a
fabric padding.
7 Thimble holder.
8 Etui, an ornamental case
for sewing tools.
9 Emery cushion used for
cleaning rust from pins and
needles.
10 Pin-poppet, a lidded
pincushion.
11 TortoisesheU needle
box.
12 Powder sprinkler made
from a carved peach stone.
13 Yard mesisure, with wax
at the bottom for waxing
thread.
284
Needleworking tools
2 Thread-winding clamp.
3 Hemming bird; the fabric
was clamped in the bird's
beak so that it could be
stretched taut for hemming.
4 Embroidery frame with
clamp; the frame can be
screwed to the table, leaving
both hands free for the work.
5 Teimbour hook made of
ivory. Tambour work was
stitched in a chain of thread,
made by hooking it through
the fabric.
6 Stiletto with pearl
handle.
7 Mellore, a steel point for
use in gold work.
8 Broche for laying gold
thread.
9,10 Thread winders.
11 Silk winder in a barrel
to protect it from dirt.
12 Slate frame, a rectangular
embroidery frame.
13 Tamlmur frame.
14 Oval embroidery frame.
15 Circular embroidery
frame.
16 Embroidery frame on a
stand so that it can be tilted
to any angle.
DIAGRAM
!
The tools shown on the right
were clamped onto tabletops
during use.
1 Sewing clamp made of
bone and ivory; clamps were
used to hold work at one end
so that it could be stretched.
This clamp has a pincushion
on the top.
285
Sewing machines
Sewing machines are mechanical aids, powered
either manually or by electricity, that perform
the work of stitching fabrics. Modern machines
have two threads, one above and one under¬
neath the fabric; the upper thread is taken down
through the fabric by the needle, and winds
around the lower, or bobbin, thread to form
a stitch.
The photograph (right) w^s
taken in 1905, and shows a
girl using a treadle sewing
machine. As the treadle is
rocked back and forth, it
drives the belt that moves the
needle up and down.
The ancestor of the modern
sewing machine is a design
patented in 1790by an English
cabinetmaker, Thomas Saint.
This machine was for chainstitching leather with a single
thread, but Saint never actually
built his machine, and the first
person to construct a sewing
machine was a French tailor,
Thimonnier. Even he did not
really win acclaim, since his
first production machines were
destroyed by jealous tailors;
when he finally managed to
gain a patent for his invention,
other practical sewing machines
were already being marketed.
Needles fit into the needle
clamp and carry the upper
thread through the fabric.
1 Sharp-pointed needle.
2 Ball-pointed needle for
knits.
3 Wedge-pointed needle
for leather and vinyl.
4 IWin needle.
5 l^eble needle.
The machine parts shown in
the illustration on the right are
common to most modern
sewing machines,
a Take-up lever to carry the
slack thread when the needle
is lifted.
b Needle clamp,
c Feed; this moves the
material along during stitching.
d Needle.
e Tension regulator for the
top thread.
f Stitch-length regulator,
g Thread spool,
h Bobbin tension-spring
used when thread is wound
onto a new bobbin.
Bobbins are the small spools
that carry the bottom thread
underneath the fabric.
6 Bobbin case.
7 Metal bobbin.
8 Plastic bobbin.
The two basic stitching feet
are the straight-stitching foot
and the swing needle; most
stitch variations use these feet.
9 Straight-stitching foot.
10 Swing needle used for
zigzag stitches.
Needle plates are supplied
to fit the two basic stitching
feet.
11 Straight-stitching
plate.
12 Swing-needle plate.
Needleworking tools
5 Embroidery foot has a
groove cut out of the bottom
so that thick blocks of solid
embroidery can pass under¬
neath it without jamming.
6 Overedge foot is used for
binding stitches on the edge of
fabric.
11,12 Chainstitch
attachments adapt the
sewing machine so that the top
thread only is required for
stitching, and produce a
continuous chain of stitches.
2 Quilter guide bar is an
adjustable extension to the
machine foot. It is fixed to a
set width, and can be moved
along a guide line to produce
even quilting channels.
7 Narrow hemmer turns in
a small fold of fabric which is
then stitched by the machine
as usual.
3 Blind hemming guide
4 Seam gauge is adjusted to
holds the fabric piece and the
folded hem in correct relation
to each other while they are
being stitched.
a specific distance from the
needle. The fabric is butted up
against the gauge to ensure
that the stitching line is parallel
to the fabric edge.
8 Cording foot allows for
10 Buttonhole foot is
made of transparent plastic so
that the operator can gauge
the exact place to begin and
end the line of stitching.
cord to be fed steadily into the
foot and then makes zigzag
stitches to secure it.
9 Zipper foot is a narrow
foot that can be fitted to either
side of the needle. Its narrow¬
ness prevents it from catching
on the thick bulk of the zipper.
13,14 Stitching cams are
guides that program the
machine to produce stitches
in predetermined patterns.
Fancy designs and stitch
combinations of many different
kinds can be built into the
cams.
DIAGRAM
1 Roller foot is used when
stitching two fabrics of different
weight. The roller ensures that
■the top fabric feeds through
the machine at the same rate
as the bottom one.
287
Decorative fabric work
.^
Patchwork began as a way of reusing fabric
scraps, quilting as a means of combining layers
of fabric for warmth, but both soon developed
into decorative arts with their own carefully
planned designs. Applique has a long tradition
of decorative use in Palestine and among
American Indians; fabric collage is a more
modern, abstract type of applique.
Shown (right) is a portion^of
patchwork skirt made from
silk fabrics in different
patterns and plain colors. The
sections have been cut from
diamond shaped templates
and stitched together in a
zigzag design.
The tools on the right are
common to patchwork,
quilting, applique and fabric
collage, since all four tech¬
niques require the marking
of the design, the cutting of
the fabric, and some sewing.
1
2
3
4
5
6
7
8
9
10
11
12
Pencil.
Steel rule.
Compasses.
Protractor.
French curve.
Scalpel.
Scissors.
Pins.
Pincushion.
Needles.
Thimble.
Seam ripper.
Templates are cutting guides
for papers and fabric pieces.
13 Templates of the most
popular patchwork shapes.
14 Suffolk puff, a circle of
gathered fabric.
15 Cathedral window, an
elaborately folded design.
16 Log cabin, a design
made from fabric strips.
Patchwork consists of making
a mosaic of fabric pieces joined
with stitching.
a A piece of fabric is cut to
the chosen shape. The edges
are folded over a piece of paper
slightly smaller than the fabric,
and the two are lightly basted
together.
b Two patches are joined by
placing the fabric sides together
and oversewing one straight
edge. When every side of any
fabric shape has been stitched
to another shape, the tacking
threads can be taken out and
the paper removed.
Needleworking tools
Illustrated on the right are
examples of quilting, applique
and fabric collage. The
quilting is a piece of traditional
white work, with curved
shapes outlined in tiny
quilting stitches. The applique
is a complex shape cut from
one fabric and used to provide
a decorative border on a fabric
of a different color, and the
fabric collage illustrates the
more unconventional and
freer approach characteristic
of this craft.
1 Small cfuOting frame; the
fabric is basted to the woven
strips on the front and back
rods, and the rods are turned
to tauten the fabric.
2 Spue rods in pairs, used to
adapt the frame for longer
pieces of fabric
9
-
^
'-7^
—
-
=^
—
Applique means "applied," and
the word describes the
technique of applying small
pieces of fabric to a larger
background.
a The shape of the piece to be
applied is cut out in fabric, and
the edges are turned in and
basted down to stop them
fraying.
b The fabric shape is piaced
on the background and
secured with stitching around
the edges. This is repeated with
each shape to be appiied, and
further shapes can be appliqued
to these in turn.
-
-
9
°
-=-=-
Fabric coiiage is an extension
of appiique, but it is more
concerned with color and
texture than with well-defined
shapes.
a The pieces of fabric to be
used for the collage are chosen,
and either cut or torn to the
required size.
b The fabrics are attached to
a background, using stitching,
giue or any other means to hold
them securely. The fabrics
may be folded, wrinkled,
slashed or frayed in order to
vary their textures, and they
may be used with threads,
beads, and pieces of wood,
glass, plastic or metal.
DIAGRAM
Q-
Quilting is the technique of
making decorative stitched
designs on a padded fabric
ground.
a The padding material is
stretched across a frame. The
chosen background fabric is
marked with the design to be
quilted, and placed on top of
the padding.
b The two layers are joined
with small stitches, aiong the
lines of the design. The
stitching may be in the same
color as the fabric, or chosen
to contrast with it.
289
Metal thread embroidery
Metal thread embroidery has a long tradition of
use for ecclesiastical and royal vestments,
because of the richness of the materials used.
Gold and silver is spun, woven or plaited into
threads or stretched into wires, and these are
used for the embroidery; extra care is required
because of the delicacy of the threads, which
are easily broken or tarnished.
The picture (right) is a detail
from a painting of Queen
Elizabeth I, and shows elaborate
embroidery in gold and silver
threads. Many of Elizabeth’s
dresses were encrusted with
this kind of embroidery, often
with the addition of precious
stones.
Parfilage.’or drizzling, was the
craze among court ladies in the
18th century for unraveling
and selling the gold from ornate
embroideries.
1,2 Paifilage tools.
3 Scissors for clipping away
surrounding threads.
4 Case for parfilage tools.
5,6,7 Needles in various
shapes and sizes for the
different types of thread.
8,9 Two thimbles used to
protect the middle finger on
each hand.
10 Mellore, a pointed tool
used for laying gold thread.
11 Stiletto used for making
the holes for the metal thread
to pass through.
12 Embroidery scissors.
13 Embroidery frame used
to keep the fabric taut so that
the metal will not buckle or
twist.
rSeedleworking tools
1 Thread elopers; these
tiny clippers can be held in the
hand while sewing, so that they
are always handy when
required.
2 Burling irons, pointed
tweezers for lifting burls.
3 Thread bobbin.
4 Lead weight.
b The metal thread is cut to
the approximate length
required, and holes are made
with a stiletto at each end of
the pencil line to be couched.
The metal thread is laid along
the line, and inserted gently
into the holes at each end so
that it is secured.
5 Measuring tape.
6 Small ruler.
7 Soft pencil for marking
out the fabric.
8 Eraser.
9 Thumb tack for securing
the fabric while working.
c The thread can be kept in
place with a lead block so
that it does not roll out of line,
and a blending or contrasting
thread is used to stitch through
the fabric and over the metal
thread, so that the thick thread
is caught down onto the fabric.
d Burls, small twists of gold
or silver, can be incorporated
into the work by threading
them onto the needle. Burling
irons are used to pick up the
burls so that their luster is not
lost by handling them.
I n order to protect the gold and
silver threads from the air,
which would cause them to
tarnish, they are wrapped in
black tissue paper and
stored in airtight tins. The
threads are handled as little as
possible, as they are so fragile.
DIAGRAM
Metal thread is often couched
onto the fabric so that it will
not become worn by passing
through the fabric too
frequently.
a The fabric to be couched is
marked out with the design,
using a soft pencil so that
the marks can later be erased.
291
Millinery
The making and finishing of hats has
traditionally been divided into two crafts:
hatting and millinery. Hatting is the craft of
making men’s hats, often including felting and
scalding; millinery involves making, but more
particularly decorating, women’s hats, and
tends to be a more gentle, ornamental craft.
The hats illustrated (right)
were advertised in a shopping
catalog at the turn of the
century, and illustrate some of
the styles of headgear that
were popular at that time.
Milliner’s tools include the
4 Embroidery scissors for
following.
cutting fabric and decorations.
1 Measuring tape.
2 Sharp scissors for cutting
5
6
7
8
card templates.
3 Wirecutters; wire is used
to give shape and body to the
hats.
Hand mirror.
Dressmaker’s pin.
Glass-headed pin.
Straw needie, a long,
strong needle suitable for
millinery.
9 Thimble.
10 Thumbtack, used for
holding fabric temporarily in
place.
Needleworking tools
Hatter’s tools are illustrated
(right).
1 Bow used for fluffing up
fibers for felting.
2 Club used for planking, a
beating to which the felt fibers
are subjected after boiling and
felting.
3 Runner-down used to
smooth the hat over the block.
4 ToUiker used to flatten the
hat brim.
5 Paddle with wires, used to
raise a nap on the felt.
6 Hat iron.
7 Hat block.
8 Bell-crowned hat block.
10 Headband.
11 Brim roll made of fabric
stuffed with sawdust.
12 Brim block, used with
the brim roll for shaping hat
brims.
13 Canvas dolly, a life-size
head dummy.
17 Iron used for pressing
fabric before it is shaped.
14 Dome block.
15 Hat stretcher; the
screw mechanism forces the
two halves apart.
16 Kettle; steam is used to'
soften fabrics so that they can
be shaped.
iDIAGRAM
Additional milliner’s tools
are illustrated (below).
9 Spiral used for taking
accurate head measurements.
293
Upholstery
Upholstery is the craft of attaching soft
furnishing materials to the wooden frames of
furniture, particularly chairs, sofas and foot¬
stools. Upholstery is a unique combination of
skills,as the upholsterer ideally requires a
knowledge of basic woodwork as well as an
understanding of needlework and pattern¬
cutting.
This print from Diderot's
"Encyclopedia of Industries”
illustrates an upholsterer at
work in the 18th century. The
furnishings he is working
on are typical of the lavish
styles current in France at that
time.
Upholstery makes use of
many specialized tools, but
other tools that are used for
various crafts are also useful
for upholstery, for instance
pencils, rulers and other
measuring equipment, pincers,
chi els, pliers and screwdrivers.
294
1 Ripping chisei, with an
angled blade for reaching into
awkward corners.
2
3
4
5
Tack lifter.
Staple extractor.
Bevel rule.
Sash cramp, a holding
device.
6 Nailet, used for driving
the chisels.
7 Hat rasp.
8 Pincers with corrugated
jaws; these are used to grip
webbing and to stretch fabric.
9 Web strainer, used for
stretching the webbing across
chair seats.
Needleworking tools
lyestles are used to rest the
furniture on so that the
required part of the frame is
accessible. Trestles of various
styles are illustrated (below and
right); the double trestle (far
right) is used to elevate entire
pieces of furniture.
1 Bradawl, used for making
screw holes in the wood.
6 lyimming knife.
7 Upholsterer’s skewer;
2 Tack hammer.
3 Stud template, used to
these skewers are used to hold
fabric and webbing in place
while they are being measured
and fitted.
8 Regulator, a long needle
used to even out upholstery
padding.
guide the positioning of studs
so that they are evenly spaced.
4 Cabriole hammer, a
small-headed hammer for
studs.
9 Mattress needle.
10 Spear-pointed needle.
11 Spring needle, a curved
needle used for attaching
upholstery springs.
12 Half-circular needle.
13 Brace and bit used to
make holes for buttoning.
DIAGRAM
5 Upholstery studs.
295
18 Leatherwork
Leather clothing was probably first used by
man in the Ice Age to protect his body and feet
from the cold. Before the invention of metal
tools, animal skins were scraped with sharp
flints and stones. Later, man also learned the
art of rubbing the hides with animal fats and
oils in order to soften them. More sophisticated
leather clothes and shoes, sometimes with
stitching to hold them together, can be seenJn
contemporary depictions from the ancient world,
and leather has been used for many centuries
for making harnesses and saddles.
Leather, even when treated to clean and soften
the hides, is a very tough material, and so the
tools for working it need to be very sharp and
strong and often require a certain amount of
pressure in their use. Stitching leather presents
particular problems, since the holes cannot be
made with an ordinary needle in the way that
fabric can be stitched. The stitch holes in leather
are either made beforehand with special punches,
or very strong needles are used and forced
through the leather by applying pressure to
their ends.
The revival of interest in leatherworking has led
to the updating and development of the
traditional tools, which have been improved
by combining traditional styles with modern
methods of shaping and tempering the metal.
Today, tools are available in such a wide range
of styles that every possible requirement for
shaping or decorating leather is catered for.
The painting reproduced here
is from the tomb of Tekhmire
at Thebes, and shows leather
craftsmen at work. Although
the painting was executed
over three thousand years
ago, the tools are very similar
to their modern counterparts.
296
Preparing and cutting
The leatherworker was once a key figure in
every village; he had the specialized task of
turning raw skins and hides into essential
commodities—shoes, saddles, belts, bags and
aprons. Tanning and curing processes are now
largely chemical, but the craft of working with
leather to produce attractive goods happily still
survives.
The leather cutout shown
(right) is the silhouette of an
elk, and was made in the fifth
century BC. The figure was
found in the frozen tombs of
Siberia; the ice had preserved
the leather perfectly.
Leather needs to be tanned
and cured in order to keep it
soft and pliable. The hides are
first soaked and scraped to
remove the hair, fat, and any
traces of flesh; they are then
steeped in tannin, a chemical
obtained from tree bark. The
bark is stripped in the spring
and ground up finely, then
made up into the infusion used
for soaking the hides. The
hides remain in the tanning
vats for anything up to a year,
then the leather is washed,
dried, and beaten thoroughly
to make it soft and compact.
1 Fleshing knife for cleaning
the raw hides. The tool is held
in both hands and drawn down
the flesh side of the hide over
a curved surface.
2 Dehairing knife, used on
the reverse of the hide.
3 Spud, a sharp tool for
stripping the tanbark from the
trees.
4 Skiver; this tool is for
splitting hides and skins so that
they can be handled easily.
5 Pin, a tool for removing the
yellowish “bloom” from the
grain side of the sheepskin
and goatskin.
6 Slicker, used for
burnishing the surface of skins.
Knives for leather vary widely
in the shape and style of the
blade. Each knife produces a
particular stroke, and is adapted
to meet specific leather-cutting
requirements.
7 Hawkbill knife.
8 Curved clicker.
9 Gauge knife used for
making cuts of an exact depth.
298
10 Sloyd knife.
11 Shoemaker’s or
cobbler’s knife.
12 Round knife.
13 Single-head saddler’s
knife.
Leatherworking tools
j
Leather-splitter (above) is
used to split leather to a
uniform thickness. The blades
are adjustable to produce
differing thicknesses of leather.
As the leather is pulled through
the blades, a piece is pared
away from the top.
6 Steel ruler.
7 Leather shears with one
straight-ended bladeto ensure
an accurate cut.
12 Skife; the hole in the tool
is fitted with a razor blade, and
pares an accurate width of
leather from a cut edge.
13 Cutting dividers; one
edge is sharpened to a cutting
blade so that the tool can be
used to cut circles.
8 French-pattern paring
knife used to thin the edges
of leather pieces.
9 Swedish-pattern paring
knife.
10 Skiving knife.
11 Bevel point skiver.
■■
^ ■::, •-"nr—-3r
14 Strap cutter, a tool used
for cutting a strip of leather to a
uniform width. The gauge of
the blade is set and fixed, and
when the tool is run down the
side of a straight piece of
leather it makes a parallel cut
further in.
15 Home-made paring
knife is made from a spokeshave blade set in a wooden
handle; this tool is used for
paring down large areas of
leather.
DIAGRAi-l
I
Cutting accessories enable
the leatherworker to make
accurate and safe cuts in the
leather.
1 Steel square used when
cutting right angles.
2 Cutting board made of
nylon and rubber.
3 Zinc templates, used as
guides when cutting curves or
complex shapes.
4 Clamp for holding the
leather while it is being pared.
5 Safety ruler, with a guard
to protect the fingers against
accidental slipping of the knife.
299
Leather decoration 1
Leathercarving is a craft that has become very
popular in recent years. The leather for carving
needs to be fairly thick, so that the knives will
not cut right through it and so that there is some
scope for modeling. All the tools used must be
kept very sharp, otherwise they will not leave a
clean impression on the surface.
The shield shown (right) is of
cut and embossed leather, and
was made in Italy in the 16th
century. The technique used
is that known as "cuir-bouilli,”
in which the leather is first
boiled to soften it before being
shaped.
I
1 Dracer, a metal point used
for transferring patterns or
shapes onto the leather.
2 Incising knife with
beveled blade.
3 Swivei knife with inter¬
changeable blades; this is a
very versatile leathercarving
tool.
300
4 Siwivei knife sharpener;
6 Leathercarving knife
the knife is screwed into the
holder, which keeps it at the
correct angle while it is run
across the sharpening stone.
5 Razor blade for delicate
cutting work.
with interchangeable blades.
The different blades are used
for cutting a variety of different
strokes into the leather.
7,8,9,10,11,12 Modeling
tools forged from stainless
steel. These tools are used for
pressing down and shaping
outlines when carving patterns
into leather; each head
produces a particular mark on
the leather surface.
I!
Leatherworking tools
The leather-stripper shown
(right) is a labor-saving device
for producing thonging and
fringing. The tool is fitted with
several evenly spaced blades,
and as the piece of leather is
pulled through the blades it is
cut into parallel strips of an
even width.
1 Double-ended racer.
2 Screw or adjustable racer;
the straight edge can be used
mm.
as a guide at the side of the
leather piece so that the iine
cut by the racer head will be
parallel to the edge of the
leather.
3 Compass racer, used for
cutting grooves in the shape
of a circle.
4 Gouge used for cutting
channels in leather, either for
decoration or as an aid to
folding.
5 A<yustabie gouge; this
tool is capable of gouging
grooves of various depths. The
groove depth is altered by
turning the guide ring on the
handle.
6 Edge beveler or edge
shave for rounding off and
smoothing cut edges of
leather.
7 Edge cutter, used to
ensure that borders are cut
accurately.
'DIAGRAM
Racers or races are cutting
tools with horseshoe-shaped
cross-sections; the outside of
the curve is sharpened so that
it cuts a groove in the leather
as the tool moves across the
surface.
A turntable, such as the one
above, is a valuable accessory
when leathercarving. The
leather piece is placed on the
top, and the turntable can be
spun to present a new part of
the work to the carving tool, so
that the leather need not be
picked up.
@
301
Leather decoration 2
Punches are metal (or hard plastic) tools that
are driven into the leather and leave either a cut
or an indented shape when they are removed.
Hammers and mallets are generally used with
the punches in order to provide the necessary
driving force. Punches may be used decoratively,
or to produce holes for stitching, thonging, or
fastenings.
The example of punched and
stamped leatherwork illustrated
(right) is a chair seat made
from treated cowhide. The
background of the pattern has
been stamped all over with a
repeat pattern to produce a
regular texture.
1 Fid a«vl used for enlarging
punch holes.
2 Spacemaker; this tool
makes indentations which are
then pricked through with an
awl.
3 Drive or wad punch for
cutting small circular holes.
4 Bag or crew punch,
used to cut elongated holes in
the leather.
5 Strapendpunch;thistool
is used to shape the tongues
of belts or the end of straps,
and saves the trouble of cutting
an accurate curve by hand.
6 Stitching punch or
pricking iron with eight
9 Diamond-point thonging
chisel; this chisel produces
points, for making evenly
spaced stitching holes.
7 Thonging chisel, a punch
used for making lacing slits in
leather.
slanted holes.
8 Nuitiple-point thonging
chisel, for making several
slits simultaneously.
302
10 Revolving punch with
six different-sized heads; each
head punches a hole of a
specific diameter. The
punching is accomplished by
squeezing the handles of the
tool together.
Leatherworking tools
Stamp punches are used to
7 Pyroelectric pen for
impress decorative designs
onto the leather surface.
burning patterns into the
leather.
8 Rubber board for use
with stamps and punches; the
rubber protects the tool heads
from damage.
10 Eyelet pliers for setting
metal eyelets into the leather.
11 Grommet setter.
12 Eyelet setter.
13 Anvil for use with eyelet
and grommet setters.
14 Multiple anvil for setters
of different sizes.
4 Alphabet stamp.
5 Stippler.
6 Embossing wheel.
9 Wooden end-grain
block can be used instead of
Hammers and mallets are
20 Rawtdde hammer.
21 Rawhide maul,
used to strike punches, eyelet
setters etc.
15 Rubber mallet.
16 Rawhide mallet.
17 Magnetic hammer sto ps
metal fittings moving while
they are being struck.
18 Shoemaker’s hammer.
19 Riveting hammer.
a rubber board.
iDIAGRAM
1,2,3 Pattern stamps;
these stamps may be bought
ready-made, or may be created
by the craftsman.
303
Shaping, sewing, finishing
Leather can be shaped, stitched, glued, colored
and dressed in an almost infinite variety of ways.
Shaping can be achieved by folding, by
hammering over a former, or by stitching
several pieces of leather together. Dye can be
applied to an entire article, or may be painted
on in patterns, and smooth leather can be
polished or waxed.
The print on the right illustrates
some leather gloves that were
made and sold at the turn of
the century. Gloves are articles
that are often made in fine
leatherwork, and they present
many challenges to the
leatherworker because they
require small, strong seams
and very accurate shaping.
1 Bone folder used for
making folds in leather.
2 Creaser for producing
firm, neat creases.
3 Double creaser with
adjusting screw so that the
width between the creases
can be altered.
4 Horseshoe-shaped former
for making jewel-cases etc.
304
5 Bracelet ^nder used in
shaping bracdets; the leather
is hammered over the curved
shape.
6 Curved sewing awl.
7 Harness awl, an awl
with a chuck and wrench for
fitting alternative heads.
8 Awl wrench.
9 Stitching awl used for
placing stitch holes.
10 Curved leather needle.
11 Harness needle with
blunt end.
12 Glover’s needle.
13 Collar awl.
14 Lacing needle.
Leatherworking tools
1 Last has multiple heads
and is particularly useful for
clinching nails in leather
footwear.
2 Anvil is used as a base for
hammering and shaping, and
as a hard surface for eyelet
and grommet setting.
Leather articles can be easily
colored and dyed.
3 Wool dauber, a piece of
sheepskin used for applying
dye.
4 Hole dauber with pointed
end for coloring the insides of
punched holes.
8 Lacing pliers, used to
grip lacing so that it can be
pulled tight.
9 Open-ended thimble
with large indentations to take
the thick needle heads.
10 Lacing pony; this tool
holds pieces of leather while
they are being stitched
together.
11 Thimble palm used for
pushing needles through the
leather.
12 Wool for applying dyes,
waxes and other dressings.
13 Shine brush for
polishing up glossy finishes.
14 Edge slicker, used to
smooth leather edges; the
slicker is run down the cut
surface.
15 Sole scraper, a tool for
roughening leather surfaces
(such as the soles of shoes)
before they are cemented.
DIAGRAM
5,6 Dye brushes.
7 Glue brush.
305
Saddlery and hamessmaking
Saddlery and harnessmaking are both very
ancient crafts. The Romans used wheeled
vehicles drawn by harnessed horses, and the
Byzantines developed the saddle in the fourth
century. Leather has almost always been used
as the basic material, and distinctive tools have
been devised to meet the specific requirements
of the two crafts.
The print reproduced (right)
depicts the inside of a
saddler’s workshop, and
illustrates many of the tools
used in the craft. The saddle
tree being used in the print
is very similar to those used by
saddlers today.
' ,t
The saddler and harnessmaker,
in addition to their specialized
tools, also need many of the
general leatherworking tools
that have been illustrated on
the previous pages—such
tools as a paring knife, round
knife, cutting gauge, edge
trimmer, hole punches, pattern
punches, racers, creasers,
pricking iron, beveler, cutting
board, hammers, and an anvil.
All the various tools for cutting
and shaping straps are mainly
useful to the harnessmaker,
and the many stitching
tools will be required by the
saddler and harnessmaker
alike.
306
C—.
1 Washer cutter, a compass¬
like mechanism for cutting
circles of leather.
2 Hand knife used for cutting
and splicing.
3 Saddler’s spokeshave fo r
splitting and trimming the
leather.
4 Plow or plow gauge,
a tool for cutting straps and
belts evenly by ensuring that
the cut edges are parallel.
5 Cutting pliers.
Leatherworking tools
A saddle tree, shown above,
is used as a shape guide and
as a core for the finished saddle.
The tree is covered with
webbing and serge, and the
pads of leather for the various
parts of the saddle are stuffed
and stitched onto the base as
required.
3 Sewing awl.
4 Harness needles.
5 Hand iron, a kind of
heavy-duty thimble palm, used
for driving the sturdy harness
needles through the leather.
The pointed end has a hole
drilled to take the eye of the
needle; this is used to apply
pressure if there is not enough
space available to use the
broad part of the iron.
6 Clamp or pair of clams;
the jaws hold the work while
it is being stitched, and the
clamp itself is gripped between
the saddler’s knees to hold it
firm.
7 Nail claw is used to pull
out the nails that temporarily
hold the work together during
the assembly and stitching.
8 Saddler’s hammer.
9 Seat iron used for
stuffing saddle pieces.
10 Collar rod, also used for
stuffing.
IDIAGRAM
1 Checker, a small double
creaser with parallel edges.
2 Seat awl used to regulate
the stuffing in collars and
saddles.
1 Loop stick, used to form
the leather hoops that hold
straps in place.
2 Straining fork for
stretching webbing or wet
leather.
3 Rubber, a piece of hard
wood or glass used for
smoothing down leather or
stitching.
□
307
Bibliography
General
Amman, Jost The Book Of Trades Dover
Diderot, D Encyclopedia of Tk'ades and Industry Dover
Egbert, Virginia W The Medieval Artist at Work Princeton University Press
Feller and Tourret L’OutQ Editeur
Flinders Petrie, W M Tools and Weapons Aris and Phillips
Griswold, R and K The New Handicraft Processes and Projects Van Nostrand Reinhold
Hickman, B Japanese Crafts, Materials and Their Applications Fine Books Oriental
Hommel, R P China at Work Doylestown Bucks Co
Reader's Digest Things To Make And Do
Salaman, R A Dictionary of Tools George Allen and Unwin
Writing euid drawing •
Fairbank, Alfred A Handwriting Manual Faber
Johnson, E Writing andJiluminating Pitman
Osley, A S Calligraphy and Paiaeography Faber
Quick, John Artists’ and Illustrators’ Encyclopedia McGraw Hill
Whalley, Joyce I Writing Implements and Accessories David and Charles
Yee, Chiang Chinese CaUigraphy Harvard University Press
Printing
Caza, M Siik Screen Van Nostrand
Chamberlain, W Etching and Engraving Thames and Hudson
Irving, W M How Prints Look Beacon
Moore, K H How To Make Japanese Woodblock Prints Acropolis Books
Ross and Ronald The Complete Printmaker Free Press
Making books
Johnson, E Writing and liluminating Pitman
Lewis, A W Basic Bookbinding Dover
Middleton, Bernard The Restoration of Leather Bindings American Library Association
Painting
Hayes, Colin Painting and Drawing Techniques and Materials Phaidon
Sutherland, W G Modem Signwriting Sutherland
Pictures without paint
Hickman, Peggy Siihouettes, A Living Art David and Charles
Harbin, R Secrets of Origami Octopus
Hulbert, Anne Victorian Arts Revived Batsford
Portchmouth, John All Kinds of Papercrafts Studio Vista
Clay and pottery
McKenzie, Compton The House of Coalport 1750-1950 Collins
Warring, Ron The Amateur Potter Pan Craft Books
Modeled and cast sculpture
Collins, Paul Introducing Candlemaldng Batsford
Dawson, R Starting with Sculpture Studio Vista
Farnworth, Warren Creative Work With Plaster Batsford
Hauser, Christian Art Foundry Van Nostrand Reinhold
Carved sculpture
Dawson, R Practical Carving Studio Vista
Eliscu, Frank Slate and Soft Stone Sculpture Pitman
Meilach, Dona Contemporary Stone Sculpture George Allen and Unwin
Rich, Jack C The Materials and Methods of Sculpture Oxford University Press
310
|i Cabinetmaldng
i
t
'
[i
i
Ij
Blandford, Percy Country Craft Topis David and Charles
Mercer, H C Ancient Carpenters’ Tools Horizon
Taubes, Frederic Better Frames For Your Pictures Thames and Hudson
Wood decoration
Child, P The Craftsman Woodturner Bell
Lincoln, W A The Art and Practice of Marquetry Thames and Hudson
Working with glass
Bernstein, Jack W Stained Glasscraft Collier Macmillan
Clarke and Feher The Technique of Enameliing Batsford
Haswell, J M Mosaic Thames and Hudson
Heddle, G M Manual on Etching and Engraving Glass Tiranti
Reyntiens, Patrick The Technique of Stained Glass Batsford
Savage, G Glass and Glassware Octopus
Fine metalwork
Branson, Oscar T Indiem Jewelry Making
Choate, Sharr Creative Casting George Allen and Unwin
Untracht, Oppi Metal Techniques for Craftsmen Hale
Lapidary and beadmaking
Gemcr aft Magazine
Preparing thread
Brown, Rachel The Weaving, Spinning and Dyeing Book Routledge and Kegan Paul
Leadbeater, E Handspiiming Studio Vista
Weaving
i
;
Coffinet and Pianzola Tapestry Bonvent
Ling Roth, H Studies in Primitive Looms County Borough of Halifax
Tovey, John The Technique of Weaving Batsford
Wright, D Complete Book of Baskets and Basketry David and Charles
Knitting and knotting
McDonald, Joanna Kidtting Burke's Pastime Series
Nottingham, P Techniques of Bobbin Lacemaking Batsford
Wright, Doreen Bobbin Lacemaking Bell
I
■r
Needlework
Gostelow, Mary Embroidery Marshall Cavendish
Groves, Sylvia The History of Needlework Tools and Accessories David and Charles
Reader's Digest Complete Guide to Sewing
Whiting, Gertrude Old Time Tools and Toys of Needlework Dover
Leatherwork
Attwater, W A Leathercraft Batsford
Leathercrafters Supply Co Publications
Stohiman, Al How To Carve Leather Craftool
311
Bibliography
General
Amman, Jost The Book Of Tkades Dover
Diderot, D Encyclopedia of Trades and Industry Dover
Egbert, Virginia W The Medieval Artist at Work Princeton University Press
Feller and Tourret L’Outil Editeur
Flinders Petrie, W M Tools and Weapons Aris and Phillips
Griswold, R and K The New Handicraft Processes and Projects Van Nostrand Reinhold
Hickman, B Japanese Crafts, Materials and Their Applications Fine Books Oriental
Hommel, R P China at Work Doylestown Bucks Co
Reader’s Digest Things To Make And Do
Salaman, R A Dictionary of Tools George Allen and Unwin
Writing and drawing •
Falrbank, Alfred A Handwriting Manual Faber
Johnson, E Writing andJUumlnating Pitman
Osley, A S Calligraphy and Palaeography Faber
Quick, John Artists’ and Illustrators’ Encyclopedia McGraw Hill
Whalley, Joyce 1 Writing Implements and Accessories David and Charles
Yee, Chiang Chinese CaUigraphy Harvard University Press
Printing
Caza, M Silk Screen Van Nostrand
Chamberlain, W Etching and Engraving Thames and Hudson
Irving, W M How Prints Look Beacon
Moore, K H How To Make Japanese Woodblock Prints Acropolis Books
Ross and Ronald The Complete Printmaker Free Press
Making books
Johnson, E Writing and Illuminating Pitman
Lewis, A W Basic Bookbinding Dover
Middleton, Bernard The Restoration of Leather Bindings American Library Association
Painting
Hayes, Colin Painting and Drawing Techniques and Materials Phaidon
Sutherland, W G Modem Signwriting Sutherland
Pictures without paint
Hickman, Peggy Silhouettes, A Living Art David and Charles
Harbin, R Secrets of Origami Octopus
Hulbert, Anne Wctorian Arts Revived Batsford
Portchmouth, John All Kinds of Papercrafls Studio Vista
Clay and pottery
McKenzie, Compton The House of Coalport 1750-1950 Collins
Warring, Ron The Amateur Potter Pan Craft Books
Modeled and cast sculpture
Collins, Paul Introducing Cimdlemaldng Batsford
Dawson, R Starting with Sculpture Studio Vista
Farnworth, Warren Creative Work With Plaster Batsford
Hauser, Christian Art Foundry Van Nostrand Reinhold
Carved sculpture
Dawson, R Practical Carving Studio Vista
Eliscu, Frank Slate and Soft Stone Sculpture Pitman
Meilach, Dona Contemporary Stone Sculpture George Allen and (Jnwin
Rich, Jack C The Materials and Methods of Sculpture Oxford University Press
310
Cabinetmaking
Blandford, Perq^ Country Craft Topis David and Charles
Mercer, H C Ancient Carpenters’ Toois Horizon
Taubes, Frederic Better Frames For Your Pictures Thames and Hudson
Wood decoration
Child, P The Craftsman Woodturner Bell
Lincoln, W A The Art and Practice of Marquetry Thames and Hudson
Working with giass
Bernstein, Jack W Stained Giasscraft Collier Macmillan
Clarke and Feher The Technique of Enameliing Batsford
Haswell, J M Mosaic Thames and Hudson
Heddle, G M Manual on Etching and Engraving Glass Tiranti
Reyntiens, Patrick The Technique of Stained Glass Batsford
Savage, G Glass and Glassware Octopus
Fine metalwork
Branson, Oscar T Indiem Jewelry Making
Choate, Sharr Creative Casting George Allen and Unwin
Untracht, Oppi Metal Techniques for Craftsmen Hale
Lapidary and beadmaking
Gemcraft Magazine
Preparing thread
Brown, Rachel The Weaving, Spinning and Dyeing Book Routledge and Kegan Paul
Leadbeater, E Handspinning Studio Vista
Weaving
Coffinet and Pianzola Tapestry Bonvent
Ling Roth, H Studies in Primitive Looms County Borough of Halifax
Tovey, John The Technique of Weaving Batsford
Wright, D Complete Book of Baskets and Basketry David and Charles
Knitting and knotting
McDonald, Joanna Knitting Burke’s Pastime Series
Nottingham, P Techniques of Bobbin Lacemaking Batsford
Wright, Doreen Bobbin Lacemaking Bell
Needlework
Gostelow, Mary Embroidery Marshall Cavendish
Groves, Sylvia The History of Needlework Tools and Accessories David and Charles
Reader’s Digest Complete Guide to Sewing
Whiting, Gertrude Old Time Tools and Toys of Needlework Dover
Leatherwork
Attwater, W A Leathercraft Batsford
Leathercrafters Supply Co Publications
Stohiman, Al How To Carve Leather Craftool
Acknowledgements
Abrasive Tools Ltd
Akron Tool Supply Co
Allcraft, Enamelaire Ltd
Amalgamated Tool Distributors Ltd
American Handicrafts
H W Anger and Son Ltd
Arnold and Walker
Claudius Ash, Sons and Co Ltd
E P Barrus Ltd
Benson Industries Ltd
The British Museum
British Oxygen Co
Brookstone Co Inc
Buck and Ryan Ltd
Burgon and Ball Ltd
CeKa Works Ltd
Cole Ceramic Laboratories
Albert Constantine and Son Inc
Charles Cooper (Hatton Garden) Ltd
Coronet Trading Co
Covington Engineering Corporation
Crafts Advisory Council
Crystalite Corporation
Deancraft Ceramic Supplies
Dryad
Ebersole Lapidary Supply Co
Emmerich (Berlon) Ltd
Entwistle, Thorpe and Co Ltd
Ferro (Great Britain) Ltd
Furnival Steel Co Ltd
Gemcraft Magazine
Gem Instruments Corporation
Gilman’s Lapidary Equipment
GKN Fastener and Hardware Distributors Ltd
Greenham Tool Co Ltd
Beno J Gundlach Ltd
Hall and Ryan Ltd
L G Harris and Co Ltd
Hartley Reece and Co
James Hetley and Co Ltd
Highland Park Manufacturing
Hunter Penrose Ltd
George Ibberson
The Jacobs Manufacturing Co Ltd
C I Jenkinson and Son Ltd
Johnson Alridge Ltd
Johnson Matthey
A J Jubb Ltd
Keuffel and Esser Co
Kingsley North Inc
Knitmaster
312
C B Latham (Colours) Ltd
T N Lawrence and Son Ltd
Leathercrafters
Leather Journal
Lortone Fine Lapidary Equipment
A D McBurney
W J Meddings (Sales) Ltd
Minnesota Woodworkers Supply Co
Monument Tools Ltd
Nasco Arts and Crafts
Parry and Son (Tools) Ltd
Peugeot Outillage
George Pike Ltd
Podmore and Sons Ltd
Protofram Ltd
Proto Tool Division (International)
J W Ratcliffe and Sons (Engineers) Ltd
Rathbone Chesterman Ltd
Raytech Industries Ltd
Record Ridgway Tools Ltd
Tyrone R Roberts
George Rowney and Co Ltd
Russel Bookcrafts
The Salmon and Trout Association
Sandvik UK Ltd
Sculpture Associates Ltd
Sculpture House
Selectasine Silk Screens Ltd
The Shelburne Museum
Skilcrafts Division
Smith Francis Tools Ltd
Spear and Jackson (Tools) Ltd
SRS Diamond Tools Ltd
Stanley Tools Ltd
J Stead and Co Ltd
Swest Inc
Sykes-Pickavant Ltd
Tandy Leather Co
Taylor and Co Tools Ltd
Henry Taylor (Tools) Ltd
Taymar Ltd
Alec Tiranti Ltd
S Tyzack and Son Ltd (London)
University College, London
Vaughans (Hope Works) Ltd
The Vernon Park Museum, Stockport
The Victoria and Albert Museum
Westwood Ceramic Supply Co
Winsor and Newton Ltd
Woodcraft Supply Corporation
Index
:
;
I
.'i
i ‘
rf
'
"
,i,
■
|i
||
i
ij
i
[
j
;
j
'
A
Abrasives, gemcutting 234-235
jade 124, 138-139
stonecarving 127
Acid, etching 40-41, 45, 217
glass etching 186-187
metal finishing 119
Acrylic sculpture 122-123
Adz 127, 133, 143
cleaving 263
Agate burnisher 61, 200, 229
Air twists, glass 184
Airbrush 62, 69, 161
Airbrushing 62, 69
Aluminum pencil 234
Amerindian jewelry 226-227
Annealing oven 183
Annealing tin 185
Annealing tongs 207
Antique cushion cut 236
Anvil 194-195, 305
bead 227
bench 207
cone 227
fluting 227
jeweler's 204
Applique, fabric 288-289
Applique, glass 180, 193
Aquatint 41
Armature 108-111
Awl 17, 56, 61, 80, 240, 304
collar 304
fid 302
lacing 261
scratch 147
Ax 142
B
Back saw 144
Backing hammer 58
Badger brush 189
Bag punch 302
Bagging hook 260
Baguette cut 236
Bail-point needle 282
Ball-point pen 18-19
Bamboo decoration 178
Bamboo tools 90, 165
Banker 126
Basketry 250, 260-261
Batik 246-247
Bead anvil 227
Bead loom 269
Bead needle 269, 282
Bead saw 144
K''-
■
■
Bead stringing board 241
Bead tree 105, 241
Bead wheel 241
Beadmaking 240-241
Beads 230, 240-241
Beam compass 25
Beater, weaving 255
Beating block, metalwork 211
Bench anvil 207, 227
Bench chisel 150
Bench hook 34
Bending iron 149
Beveler, edge 301
Bezel setting 238
tools 238-239
Billhook 260
Bindings, book 57
Biro, L.J. 18
Biscuit firing 104
Bits, drill 157,208-209,225
Black and white photography 49
Blades, scratchboard 82
Blind hemming guide 287
Blitz-back saw 144
Blocking hammer 206
Blocks, beating 211
bench 207
hat 293
graining 215
printing 30, 32-35
Blotting paper,
flower pressing 78
papermaking 55
Blowtorch 185, 217-219, 225
Blowing iron 180, 182-183
Blowpipe, glass 241
soldering 218
Blunger 99
Bobbin, lace 273
macrame 276
sewing machine 286
weaving 255
Bobbin lace 264, 272-273
Bodkin, basketmaker's 261-262
dressmaking 282
Bone folder 56, 61,72, 83,304
Bookbinding 52-53, 56-59
Borax 218-219, 255
Border hammer 206
Border tool 177
Bow, hatter's 293
Bowsaw 126, 137-139, 144
Bowdrill 156, 241
Boxwood tools 92
Brace, cabinetmaking 156
Bracelet bender 304
Bracelet mandrel 207
Brad driver 163
Brad pusher 158
Brad squeezer 163
Bradawl 157, 295
Brass rubbing 74, 84
Breathing tube, gilding 61
Bridge, signwriting 68
Brilliant cut 236
Brim block 293
Brim roll 293
Broche 285
Brush, badger 189
fitch 65
fresco 65
|-i o
A
hog hair 64, 67,68, 189
ox hair 64
painting 62, 64-65, 67-73
rigger 65, 67, 68
sable 64-65, 67, 68, 70,
73, 103
stencil 31, 46, 72
stippling 189
Sumi 10
writing 26
see also 43-45, 54, 57, 84,
89, 101-103, 114, 121-123,
136, 165, 176, 186, 192-193,
200-201,228,271,305
Buff, precious metal 229
Bullnose chisel 128
Bullstlcker 238
Burin 32,38, 39,119
Burling iron 291
Burn-in knife 161
Burnisher, agate 61,200, 229,
239
emery 209
steel 224
see also 30, 38-39, 42
Burnishing, gold leaf 60-61
Bush hammer 127-128
Butt chisel 151
Button making 227
Buttonhole foot 287
c
Cabinetmaking 140-165
Cable needle 266-267, 269
Cabochon cut 230, 236
Calipers, double 146
inside 146
outside 146
vernier 146, 172
see also 12, 42, 56, 90-91,
113, 183, 187
Calligrapher's seal 27
Calligraphy, Oriental 26-27
Western 17
Cameo glass 184
Camera 48-49
accessories 50-51
Camera obscura 48
Carnes, glazing 190, 192
Cams, stitching 287
Candlemaking 115
Cane, weaving 262
Canvas, painting 66-67
Canvas pliers 66
Canvas scraper 66
Carborundum 131, 138-139, 230
stone 199
Card, knitting machine 270
Card, wool 245
Card cutter 59
Carved sculpture 124-139
Carver's hook 136
Carving, chip 136
ivory 137
jade 138-139
stone 126-131
wood 132-136
Cast, plaster 112-113
Cast sculpture 106-107,
112-113, 116-118
Casting flask 220-223
Casting, precious metal
220-223
Cathedral window patchwork 288
Center, lathe 170
Center finder 172
Center punch 208-209
Ceramic mosaic 196-197
Chain, crochet 274
Chainmaking 212-213
Chainstitch 283
Chalk, dressmaker's 280
see also 16, 20-21, 73
Champleve 201
Charcoal 20-21
Chase, type 37
Chasing hammer 119
Chasing punch 214-216
Chatelaine 284
Checker, saddlery 307
Checkering head 177
Chenier 211
Chenille needle 282
Chip carving 124, 136
Chipping hammer 232
Chisel, bench 150
bullnose 128
butt 150
cold 119
drawer lock 150
firmer 150
fishtail 128
hinge 151
.:7::c:L:r:
i
313
Index
Chisels cont.
mortise 150
Oriental 34
paring 150
ripping 294
skew 135
socket 150
spline 262
splitting 232
swan-necked 150
thonging 302
trimming 175
wedging 232
see also 12, 113, 127,
129-131, 134, 168, 171,
176
Circular needle 266-267
Clamp, cabinetmaking 148-149
jeweler’s 204-205
leatherworking 299
picture framing 162-163
pokerwork 179
saddlery 307
sewing 285
soldering 219
Claw setting 238
Clay, plaster casting 113
working with 86-105
Clay harp 89
Clay sculpture 109
Clay tablets 13
Clay-beating hammer 88
Cleave, willow 260
Cleaving blade 233
Cloisonne 201
Closing tool 238
Club hammer 127
Club, hatter’s 293
Cobbler’s wax 84
Coddington, illuminated 233
Coiler, pottery 93
Coiling, clay 89, 93
Cold chisel 119
Collage 74, 76, 289
Collar awl 304
Collar rod 307
Color photography 49
Commander 261
Compass 25, 81,85
Composing stick 36
Concrete sculpture 126
Cone anvil 227
Conte crayon 21
Contour scriber 147
Coping saw 137, 145
Copper 39-40, 204, 224-225
Copper foil and glass 192
Cording foot 287
Cords, bookbinding 56-59
314
Corn dolly 258-259
Core cab 235
Cotton 242, 244-245, 249
Counterpunch 215
Countersinking bit 157
Cover, book 56-60
Craft knife 46, 58, 76, 120,
186,256,258,262
Crayon 21,44-45, 46, 80
Creaser, leather 304
Creasing hammer 207
Crochet 267, 274
Crochet, hairpin 275
Crochet hook 264, 267-268,
274, 276
Cross pein hammer 113
Crosscut saw 143-144
Crucible, casting 117, 223
enameling 200
glass making 182
soldering 219
Curing leather 298
Cutter, edge 174, 301
glass 185, 188-189, 192,
194, 196
groove 151
inlay 174
lino 32
purfling 151
rotary 151
strip 174
tenon 151
tesserae 197
tile 197
wad 226
washer 306
see also 34-35, 46, 101,
215
Cutting heads, glass engraving
186
Cutting pliers 306
1 j
Dabber 35, 38, 39, 42
Daguerreotype 48
Dalle-de-verre 194-195
Damascene inlay 224
Dapping block 215
Dapping punch 215
Darning egg 283
Darning mushroom 283
Darning needle 267, 282
Dauber 305
Dead-blow mallet 143
Decoupage 77
Dehairing knife 298
Detail knife 136, 169
Developer 49-51
Developing equipment.
photographic 50-51
Diamond 230, 233
Diamond drill 235
Diamond file 237
Diamond-point engraver 184,
187
Diaphragm, camera 49
Dichroscope 233
Distaff 249
Dividers 23, 56, 147, 172,
205, 299
Dolly, canvas 293
Dolly, corn 258-259
Doming block 215
Doming punch 215
Dopstick 237
Dotting wheel 25
Dovetail joint 151
Dovetail template 146
Dovetail saw 145
Dowel cutter 173
Drafting table 22
Draw swage 210
Drawbench 210
Drawer lock chisel 150
Drawknife 133, 152, 263
Drawplate 210-212
Drawtongs 210-211
Dressmaking 280-281
Drill, bow 157, 241
diamond 235
electric 156, 161,241
hand 156,208-209,211,
225
jade 138-139
Drum Sander 161
Durnmy 129
Dummy, tailor’s 283
Dyeing, fabric 242, 246-247
rr
Easel 66
Edge cutter 174, 301
Edge slicker 305
Egyptian writing 11, 12, 14
Embossing wheel 303
Embroidery 284-285,
290-291
Embroidery foot 287
Embroidery frame 285, 290
Embroidery needle 282
Emerald filter 233
Emery 228, 230
Emulsion, photographic 41
Enameling 198-201
foil and thread 200
Engineer’s pencil 20
Engraver, wiggle 216
Engraving, glass 186-187
metal 28, 38-39
wood 32,38
Engraving needle 39
Enlarger 49-50
Epoxy putty 193
Etch 45
Etching, glass 186-187
metal 38, 40-41,217
Extruding tool, clay 101
Eye loupe 233
Eyelet pliers 303
Eyelet setter 303
In
Faberge.Carl 230-231
Fabric collage 289
Fabric slitter 256
Faceting 230, 232-233, 236237
head 237
Fancy cut 236
Farrier’s nails 190
Feet, sewing machine 286287
Felt stick 228
Felting 245
Felt-tip pen 18-19
Fettling knife 89, 197
Fiberglass sculpture 121
Fid awl 302
Filbert brush 67, 71
File, diamond 237
needle 130, 137, 169, 209
riffler 135
saw 145
wax 221
see also 123, 133, 169,
176, 191,209,224,225,
241
Filigree 211
Film, photographic 49-51
Filter, photographic 50
Finishing, cast metal 119
leather 304-305
precious metal 228-229
stone 131
wood 136, 160-161
Finishing tools, cast metal 119
fine metal 228-229
gilder’s 60-61
leather 304-305
Firing, clay 86, 88, 95, 97,
98, 104-105
Firmer chisel 151
Fishtail chisel 128
Fitch brush 65
Fixer, photographic 51
Flag dryer 45
Flask vibrator 222
Flatformer 213
Flax 244, 248
Fleshing knife 298
Flexiclamp 148
Float, fresco 65
Flooring saw 144
Flower pressing 78
Flush setting 238
Fluting anvil 227
Fluting block 215
Fluting jig 213
Fluting punch 215
Flux 191, 192, 217-219
Flyer, weaving 249
Foil enamel 200
Folder, bone 56, 61,72, 83,
304
Folding iron 213
Forming tools, clay 100
Former, chain 212-213
Chenier 211
leather 304
metal 207
Foundry 117
Fountain pen 16-19
Fox Talbot, William Henry 48
Frame, embroidery 285, 290
quilting 289
rug 257
silkscreen 47
tambour 285
Frame knitting 268
Frame loom 254
Framing, pictures 162-165
French curve 23
Fresco 62, 65
Fretsaw 145
Fretsaw cutting table 175
Frisket knife 69
Froe 142-143, 263
Fulling shears 255
Furnace, glassblowing 182-183
Furniture, kiln 105
type 37
G
Gad pry bar 232
Galley, type 37
Gauge, marking 147, 173,
174
measuring 210
pile 256
ring 205
screw pitch 157
stone 236
Gelatin 46, 112
Gem scoop 232
Gesso 71, 164-165
Gilder’s cushion 60
Gilder’s knife 60
Gilder’s tip 60-61
Gilding 60-61
Gimlet 157
Glair 60-61
Glass, cameo 184
collage 76
Glass applique 193
Glass cutter 185, 188, 192,
194, 196
Glass engraver’s wheel 187
Glass engraving 186-187
Glass etching 186-187
Glass pliers 188
Glass shears 183, 241
Glassblower’s bench 182
Glassblowing 182-183
Glazing clay 86, 88, 102-104
Glory hole 183
Glover’s needle 282, 304
Gold 204, 224, 225
Gold leaf 60-61
Goldsmith’s hammer 204
Goniometer 233
Gouache 64
Gouge, Japanese 34
roughing 171
round 33
spindle 171
V-shaped 33
see also 119, 133-134,
168-169,301
Graining 214
Graining setting 238
Graphite pencil 21
Graver, champleve 201
engraving 32, 38, 39
metal 119, 217, 224
Stone Age 12
Grommet setter 303
Groove cutter 151
Grooving tool 177
Grozing pliers 188
Guillotine, bookbinding 58-59
miter 162
Gunstock checkering 176-177
Gutenberg, Johann 36
Gyotaku 31
H
Hacksaw 108, 110, 119, 123,
176,208
Hairpin crochet 275
Hake brushes 35
Half-moon knife 14
Half-set compass 25
Hallmark punch 229
Hammer, backing 57
blocking 206
border 206
bush 127-128
cabriole 295
chasing 119, 214
chipping 232
clay-beating 88
club 127
correcting 42
creasing 206
cross pein 113, 159
dalle-de-verre 194-195
goldsmith’s 204
inlay 224
jeweler’s 204
mosaic 196
pin 159, 262
planishing 206
raising 214
riveting 303
rock 232
shoemaker’s 303
square-headed 163
tack 163, 295
Warrington-pattern 159
see also 12,85, 108, 129,
134, 190
Hammer-stamps 88
Hammock, cotton preparation
245
Hand drill 208-209, 211, 224
Hand iron 317
Hardener, acrylic 122
Hardie 196
Hardness tester, stones 233
Harness needle 304, 307
Harnessmaking 306-307
Hawk, fresco 65
Hawkblll knife 298
Heddles 250, 254
Hedgehog, spinning 249
Heelball 84
Hemp 242, 244, 276
Hindu ivory tools 137
Hinge chisel 151
Hog hair brush 64, 67, 68,
189
Hook, crochet 264, 267, 268,
274-275, 276
rug 256
weaving 254
willow 260
Hot-wire cutter 120
I
Incising knife 300
Ingot mold 227
Ink, engraving 38, 39, 42
lithography 44-45
Oriental 26-27, 35
printing 30-32, 37
silkscreen 46-47
writing 14-19
Inking ball 37
Inkle loom 253
Inkstlck 27, 138
Inkstone 27, 138
Inkwell 14-15
Inlay 224
Inlay cutter 174
Intaglio printing 38
Investment, casting 222
Invisible setting 238
Iron, electric 55, 283, 293
hat 293
knocking-down 59
polishing 58-59
Ivory carving 137
J
Jack, glassblowing 182
Jade 138-139, 233
Jade carving 124, 138-139
Jambpeg 237
Japanese papermaking 54
Japanese stratified alloys 225
Japanese writing 11
Jeweler’s anvil 204
Jeweler’s bench 204
Jeweler’s hammer 204
Jeweler’s rouge 229
Jeweler’s saw 123
Jewelry 204-205, 208,211,
212-214,218,226-227,
230, 236, 238-239
Jig, fluting 213
wirebending 211, 226
315
Index
Joint tool 210-211
Joints, cabinetmaking 151,
158-159
K
Key knife 112
Keyhole saw 133, 145
Kidney, rubber 90, 97
Kiln, enameling 199, 200
pottery 86, 88, 98, 104105
stained glass 189
Kinking tongs 261
Knife, bamboo 178
carving 168-169
craft 46, 76, 120, 123,
186,256,258,262
dehairing 298
detail 136, 169
fettling 89
fleshing 298
frisket 69
gilder’s 60-61
hawkbill 298
half-moon 14
hand 306
hobby 168
incising 300
key 112
leathercarving 300
lino 80
marking 147
palette 65, 67, 70, 71,73,
165
paring 57, 298
pencil 23, 121
plaster 110
potter's 89
round 298
saddler’s 298
saw 145
shoemaker’s 298
skiving 299
sloyd 168, 298
stopping 190, 195
striking 147
Swedish 136
swivel 300
whittling 136, 169, 240
willow 260
see also 33, 54-55, 71,
72, 96, 115, 117
Knitting 242, 264, 266-268
machine 270-271
needles 264, 266-267
Knocking-down iron 59
Knotting 242, 264
316
L
Lace, bobbin 264, 272-273
Lace pillow 273
Lacemaker’s lamp 273
Lacing awl 261
Lacing needle 304
Lacing pliers 304
Lacing pony 304
Lacing sets 256
Laminating wood 173
Lap, vibrating 237
Lap stick 237
Lapidary work 230-239
Last 305
Latch hook 256
Lathe, gemcutting 235
woodturning 170-171
Lathekin 190
Laying press, bookbinding 58
Leads, glazing 190, 192
Leather, bookbinding 58-60
Leather splitter 299
Leather stick 228
Leather stripper 301
Leathercarving 300-301
Leathercarving knife 300
Leatherworking 296-307
Lenses, photographic 49-51
Levigator 44
Lewis 126
Light box 22, 188
Light meter 50-51
Line stripper 161
Linen tester 233
Link former 212
Lino cutter 32
Lino knife 80
Linocuts 32
Lithographer's pencil 20, 4445
Lithographic crayon 44-45, 46
Lithography 44-45
Log cabin patchwork 288
Loom, bead 269
weaving 250, 252, 254
Loop stick 307
Loop tools, pottery 93
Lost wax process 116-118,
220-223
M
Macrame 264, 276
Macrame board 276
Magnifier 70, 213, 233
Mahlstick 64
Mallet, dead blow 143
Japanese 34-35
raising 206, 214
rawhide 303
round-faced 227
rubber 303
wood 129
see also 33,54, 113, 119,
127, 134, 168, 198
Mandrel, bezel 238-239
bracelet 207
carbon 219
ring 205, 207
spout 94-95
stepped 221
Marbling 28, 43
Marking gauge 147, 173, 174
Marking knife 147
Marking tools, dressmaking
280
Marquetry 174-175
Marquetry cutter’s donkey
175
Marquetry knife 175
Marver 182-184
Matrix, type 36
Matting tools 119
Measuring tools, cabinet¬
making 146
dressmaking 280
Mellore 285, 290
Metal, precious 202-229
Metal plates, printing 28,
36-42, 44
Metal punch 208
Metal sculpture 116-119
Metal thread embroidery 290
Mezzotint 41
Micrometer 210, 236
Millefiori 184
Millinery 292-293
Miniatures 70
Miter block 173
Miter square 147
Miter template 162-163
Modeling tools, leathercarving
300
Mohs’ scale 233
Mold, acrylic sculpture 122
Amerindian jewelry 227
candlemaking 115
casting metal 116-117,223
Molds cont.
casting plaster 112-113
fiberglass 121
millefiori 184
papermaking 54-55
pottery 96
purse 269
solder 219
type 36
Molded ware 89, 97
Mortise chisel 151
Mosaics 79, 196-197
Mounting, gemstones 238
Mulberry, paper 242
Muller and slab 65, 198
N
Nail bed 244
Nail claw 307
Nails and string pictures 85
Needle board 283
Needle file 137, 169, 177, 209
Needle plate 286
Needle pusher 271
Needle tool, enameling 199,
200
pottery 91, 101
Needles, bead 269, 282
bookbinding 56, 58-59
cable 266-267, 269
circular 266-267
darning 267, 282
embroidery 282, 290
knitting 264-267
leatherwork 304
netting 277
rugmaking 255, 256-257
sewing machine 286
tapestry 255, 261, 282
upholstery 295
weaving 255
Needlework 278-295
Negative, photographic 48,
49-51
Netting 276-277
Netting shuttle 264, 277
Nib, pen 15, 17, 19
Niddy-noddy 253
Niello 224
Niepce, Nicephore 48
Nippers, mosaic 196
Nipping press, bookbinding
58-59
Nooker151
o
Oil painting 62, 66
Oilstone 23, 172
Oriental crafts, calligraphy
26-27
jade carving 138-139
woodcarving 34-35
see also 80, 83
Origami 83
Overedge foot 287
P
Paddle, flameworking 185
glassblowing 182
hatter’s 293
Painting 62-73
Palette 14, 64, 65, 66,70, 73,
198
Palette knife 65, 67, 70, 71,
73
Panel saw 133, 144
Pantograph 22, 81
Paper, bookbinding 52, 56-57
Paper beads 240
Paper mulberry 244
Paper sculpture 83
Paperback books 57
Papercraft 74, 76, 80
Papercuts 80
Papermaking 54-55
Papier-mache 114
Parallel rule 23
Parfilage 290
Paring chisel 150
Paring knife 57, 299
Parquetry 224
Parting tool 171
Pastels 20-21
Patchwork 288
Pavilion, gemcutting 236
Pegboard 149
Pen, bail-point 18-19
felt-tip 18-19
fountain 16-19
quill 14-17, 51
reed 10, 14
ruling 24-25
steel 14, 16-17
technical drawing 18-19
Pencil, aluminum 234
charcoal 21
engineer's 20
graphite 21
lithographer's 20, 44
tungsten carbide 234
Pencils cont.
wax 187-188
see also 41, 56,70, 72, 81,
113
Pencil knife 120
Penholders 16-17
Pen-knife 15, 17, 21,31, 83
Pestle and mortar 54-55, 65,
138, 164, 198,224, 246
Philippino bamboo work 178
Photography 28, 46, 48-51
Pick 128
Picture framing 162-163
gesso 164-165
Piercing saw 145, 208-209,
224
Pile gauge 256
Pin, hairpin crochet 275
Pin, leatherwork 298
Pin hammer 159, 262
Pin vise 205
Pincers 185, 190, 294
Pinking shears 80, 281
Pins, dressmaking 283
Pitch bowl 214-215
Plain knitting 267
Planes, laminating 173
sanding 160
scaleboard 263
veneering 174-175
woodcarving 169
Planishing hammer 206
Plaster sculpture 109-113
Plaster-forming tools 110-111
Plastic 76, 112
Platinum 204
Pliers, canvas 66
chainmaking 212-213
cutting 306
glass 188, 201
grozing 188
Plow 58-59, 306
Pokerwork 179
Polisher, double-spindle 229
Polishing, jade 139
precious metal 228-229
stone 131
wood 136
Polishing iron 58-59
Polymer paints 64
Polystyrene 111, 120
Pontil 180, 182-183
Positive photograph 48, 50
Pot lift 94
Potato printing 31
Potter's knife 89
Potter's wheel 88-89, 94-95
Pottery 86-105
Pounce 14-15, 61, 65, 70
Power router 151
Power tools 130
Press, flower 78
laying 58
lithography 45
nipping 58-59
printing 30-31
Press mitt 283
Press molding 97
Printing 28-49
Printing press 36-37
Prong pusher 239
Proportional dividers 23
Protective equipment,
fiberglass 121
glassworking 161, 171
metalworking 108, 117,
229
polystyrene 120
soldering 218
stonecarving 129
woodworking 161, 171
Protractor 23, 147, 173, 174
Pugmill 99
Pulp, paper 54-55, 114
Punch, chasing 214-216
graining 215
hallmark 229
jewelry 225, 227, 228
leather 301-302
metal 208
printing 36
repousse 214-215
revolving 302
Punch centers 208
Punch needles 257
Purfling cutter 151
Purse mold 269
Pyrography 179
Q
Quill 101, 189, 199
Quill pen 14-17, 61
Quilter guide bar 287
Quilting 289
Quilting frame 289
Quilting needle 282
Quoin 37
R
Racer, leathercarving 301
Raddle 254
Raising hammer 214
Raising mallet 206
Raku pottery 98
Rapping iron 261
Rasp, cabinet 135
open 111
riffler 111, 135, 137
stone 130
see also 71, 120-121,
169, 176,294
Rattan 262
Reed pen 10, 14
Regulator 295
Relief block 30-35
Relief decoration, pottery
100-101
Relief printing 30-35
Repousse 214
Resin 106, 120, 122-123
Revolving punch 302
Ribbon loom 253
Ribbon tools, pottery 93
Riffler, file 130
needle 130
rasp 130
see also 110-111, 169
Rigger brush 65, 67, 68
Ring gauge 205
Ring mandrel 205
Ripping chisel 294
Rippler 244
Ripsaw 127, 144
Riveting hammer 303
Rivet setting for gems 238
Rock hammer 232
Rock hunting 232
Rock pick 232
Rocker, mezzotint 41
Rollag 245, 249
Roller, collage 76
fiberglass 121
glasswork 193, 195, 197
printing 30-32, 37, 38-42,
45
Roller foot 287
Rolling mill 225
Rose cut 236
Rosemaling 73
Rotary cutter 151
Rotary tool 169
Roughing gouge 33
Roulette, clay 100
etching 41
Round gouge 33
Index
Round knife 298
Round-faced mallet 227
Router 151
Rug hook 256
Rugmaking 256-257
Ruler jig 192
Ruling pen 24-25
Ryoba saw 133
s
Sable brush 64-65, 67, 68, 70,
73, 103
Saddle tree 307
Saddler's knife 298
Saddlery 306-307
Sailmaker's needle 282
Samson 126
Sand casting 117-118
Sander, cabinetmaking 160161
Sanding block 23
Sanding slip 160
Sanding wood 160-161
Sash cramp 294
Saw, back 144
bead 144
blitz-back 144
bow 126, 137, 138-139,
144
coping 137
crosscut 143, 144
dovetail 145
flooring 144
fretsaw 145
Japanese 144
keyhole 133, 145
panel 133, 144
piercing 145, 208-209,
224
rip 127, 144
ryoba 133
slab 234
tenon 57-58
veneer 175
wire 234
see also 137, 223
Saw accessories 145
Saw file 145
Scaleboard plane 263
Scalpel 23, 46, 69, 77
Scissors, decoupage77
glass 192, 195
knitting 267
knotting 276
making books 56, 57
needlework 281, 284, 288,
290, 292
318
Scissors cont.
origami 83
painting 72
printing 46
sculpture 114, 121
sgraffito 82
silhouettes 81
weaving 262
Scorer, leather 213
Scorp 152
Scorper 33, 216, 224, 225
Scraper, canvas 66
engraving 39, 42
glass engraving 186-187
precious metal 228
woodworking 135, 169,
171, 176
Scratch awl 147
Scratchboard 82
Screw pitch gauge 157
Screwdriver 158-159, 163
Scriber24, 147, 204, 239
Scutcher 244
Seam guide 287
Seam roil 283
Seat iron 307
Secateurs 78
Set square 23, 80, 123,
Setter, eyelet 303
grommet 303
Settings, gemstones 238
Sewing accessories 284-285
Sewing frame, bookbinding
58-59
Sewing machine 278, 286287
Sgraffito 82
tools 101, 199
Shaping rib, clay 90-91
Sharp, needle 282
Sharpening stones 129, 135,
172
Shave, willow 261
Shave horse 263
Shears, fulling 255
glass 183
willow 260
Shed, weaving 252-253, 254
Sheiiwork 79
Shoemaker's hammer 303
Shoemaker's knife 298
Shutter, camera 49, 51
Shuttle, macrame276
netting 264
tatting 264
weaving 252, 255
Signwriting 68
Silhouettes 75, 81
Silicon carbide paper 122-123
Silkscreen printing 28, 46-47
Silver 204, 224-227
Skew chisel 135
Skife 299
Skimmer 117
Skiver 298-299
Slab glass 194-195
Slab saw 234
Slab ware 89, 96
Sleeve board 283
Slicker 298
Slip casting 97
Slipstone 172
Sliptrailer 102-103
Sloyd knife 168, 298
Snake curve 23
Snapline 65, 68
Snarling iron 207
Snips, jeweler's 205
silver 226
solder 219
see also 76, 121
Socket chisel 150
Socket slick 143
Soft ground etching 41
Solder 191-192, 201, 218-219,
226
Soldering 212, 217,218-219,
239
Soldering iron 120, 191,
218-219
Sole scraper 305
Spacemaker 302
Spalework 263
Spider 126
Spindle 242, 248
Spindle gouge 171
Spine, book 52, 57-59
Spinning 242, 248-249
Spinning wheel 242, 248-249
Spline chisel 262
Splitting chisel 232
Spokeshave 152, 306
Sponge, pottery 94, 97
Springbow compass 25
Spud, bark 143, 298
Square-headed hammer 163
Stained glass 188-191
Stamps, clay 88, 100
enamel 200
leather 303
Steel pen 14, 16-17
Stencil, silkscreen 28, 46-47
stenciling 72
Stencil brush 31, 46, 72
Stepped mandrel 220-221
Stiletto 285, 290
Stipple engraving 41
Stippler 303
Stippling brush 189
Stitching punch 302
Stone, carborundum 199
lithography 44-45
writing 12-13
Stonecarving 126-130
Stones, sharpening 135, 172
Stop bath, photographic 51
Straining fork 307
Strap cutter 299
Strap end punch 302
Straw, needle 282, 292
Striking knife 147
String, nails and string
pictures 85
Strip cutter 174
Stylus 10, 13, 15, 17,70, 165,
186-187,214-215
Sumi brush 11
Swedish knife 136
Swivel knife 300
Swift 253
T
T-pins 276, 283
T-square 23, 56, 113, 174
Table loom 254
Tack hammer 163, 295
Tailor tacker 280
Tailor’s board 283
Tailor's dummy 283
Tailor’s ham 283
Tanning leather 298
Tapestry needle 255, 261,282
Tatting 276-277
Tatting shuttle 264, 277
Technical drawing 22-25
pens 18-19
Technical illustration 11
Tempera 71
Template, bobbin lace 272
diamond 177
dovetail 146
gemcutting 234
leatherwork 299
miter 162
patchwork 288
pottery 90-91
scalloping 280
stud 295
technical drawing 22, 24
Tenon cutter 151
Tenon saw 57-58
Terracotta sculpture 109
Tesserae 196-197
Thonging chisel 302
Throwing stick 94
Thrown pottery 89, 94-95
Tie dyeing 246-247
; Tiffany, Louis Comfort 188
Tile cutter 197
Tinsnips 76
I Tip table 195
Tjanting 247
Tole painting 73
Tolliker 293
Tou brush 26
Tracer, leather 300
Tracing wheel, dressmaking
280
Trammel heads 147
■ Trap cut 236
Trestles 295
Trimming chisel 175
Tripoli wax 176, 229
Try square 147
Tumbler, stone 237
Tungsten carbide pen 187
pencil 234
Turning tools, clay 91
wood 170-171
Tusche 44
Tweezers, glassblowing 182
see also 76,79
i Type 28, 36-37
j Typeface 36
a
'
Ultraviolet lamp 232
Upholsterer’s skewer 295
Upholstery 294-295
V
V-clamp 204
V-shaped gouge 33
Veneer knife 175
Veneer punch 175
Veneer saw 175
Veneering 174-175
Vise, miter 162, 190
pin 205
see also 108, 133, 148,
207
Vitreous mosaic 196
w
Wad cutter 226
Wad punch 302
Warp 250, 252, 253
Warping frame 253
Warping mill 253
Warrington-pattern hammer
159
Washer cutter 306
Water-of-Ayr stone 228
Watercolor painting 64
Wax, batik 247
candle 115
casting 116-118, 220-221
crayons 20-21, 247
etching 40-41
silkscreen 46
Wax file 221
Wax pencil 184, 186, 188
Weaving 250-253
Weaving stick 253, 254
Weaving tablet 253
Web strainer 294
Wedge, stone 126-127
woodcutting 142-143
Wedging chisel 232
Wedging clay 88
Weft 250, 252-253
Wheel, jade carving 124,
138-139
pottery 94-95
Whittling knife 136, 169, 240
Wiggle engraver 210
Willow beater 245
Willow knife 260
Willowbrake 260-261
Wire, clay 88
Wire-ended tools, clay 92
Wire saw 234
Wiredrawing 210
Wood engraving 32, 38
Wood sculpture 132-136
Woodcarver’s punch 169
Woodchopper's maul 143
Woodcuts 28, 33
Oriental 34-35
Woodcutting 142
Woodturning 170-172
Woodworking 140-163, 166-179
Wool 242, 244-245
Writing 10-27
Writing brushes 26-27
Y
Yarn tensioner 270
z
Zipper foot 287
319
Picture Credits
Page
11 Osterreichische Akademieder Wissenschaften,
20
63
64
70
167
Osterreichisches Museum
fur Angewandte Kunst
Vienna
174
Rijksmuseum, Amsterdam
National Gallery, London
Greater London Council,
179
Pinto Collection, Birming¬
ham Museum
Trustees of The Iveagh
182
Glass Manufacturers’
Bequest, Kenwood
Tate Gallery, London
186
Federation
Glass Manufacturers’
National Portrait Gallery,
London
198
Trustees of the British
Museum
200
Museo Poldi Pezzoli, Milan
204
Trustees of the British
Museum
210
Anne Bolt
Iraq Museum
71
National Gallery, London
73
American Museum of
Bath
75
86
Mansell Collection
Ashmolean Museum,
Oxford
92
98
Department of Antiquities,
Nicosia
Seattle Art Museum
Federation
216
222
Trustees of the British
Museum
224
226
Ken Hunt
Oscar T Branson
228
Victoria and Albert
100
Victoria and Albert Mu¬
seum, London
102
Royal Copenhagen Porce¬
lain Manufactory
230
Wartski, London
106
Trustees of the British
236
Crown Commissioners,
Tower of London
112
Museum
Country Life
238
Archives Photographi-
116
The Rodin Museum, Paris
ques, Caisse Nationale
120
121
Fred Millet
Fred Millet
des Monuments
Historiques
122
ICI Plastics Division
124
Giraudon
243
244
131
Editions E de Boccard
248
132
Niedersachsisches Landesmuseum, Hannover
137
National Hermitage
140
160
Mansell Collection
Mansell Collection
Ulster Folk and Transport
Museum
250
Mansell Collection
265
272
Hamburger Kunsthalle
British Tourist Authority
School of Oriental and
African Studies, University
279
Greater London Council
280
Greater London Council
of London
Tate Gallery
286
297
Greater London Council
Uni dai Verlag
Union Centrale des Arts
Decoratifs
298
Trustees of the British
Museum, Leningrad
138
Museum, London
Museum
:,'5:;(}’v:"''*|;^|
■A
V^4.‘4,
■.'.'
©.-,-.
' ' '.
*
^
'
<
■«
,.
,■■■■
'
'
■ lllis
'
.
'
.
''
’■ ' >
v!
-
fc.
''
■
4-
-,
,■
. • t>t, ).
i¥i '
f:
W
s.i«
"^,7'
** '
■
.. r
‘.^
4
'•
4.
;,' Jrti: .
<(^,
v I.’ •*i'.
j';1- V
' f
■
-
W®7‘
' 7 ■ k
.'
i'^^VSn ''■
1 «'J
THE DIAGE^M x|iiWP is a London-based team
f^^.searchers,
writers, editors,
and artists.
Their previous bdoks include
Weapons, Comparisons, Rules of the
Game, Man’s Bod};, Woman’s Bod};,
and Musical Instruments of the World.
In preparing Handtools of Arts and
Crafts, they have had the cooperation
of museums, libraries, tool manufac¬
turers, craft organizations and individ¬
ual artists from around the world.
Jacket design by Lfiw'y& f/M/driipm
.
/
St. Mariif’,% Press
175 FtMt Avenue
Nevy SoftV:, ''A'i. 10010
Pifeteiid fe'iihe U.S.A.
Handtools of Arts and Crafts illustrates the evolution,
function and method of use of more than 2,000 implements
employed in over 150 specialized activities, including:
• calligraphy
• bookbinding
• tolcf painting
• cabinetmaking
• veneering'
• enameling
• weaving
• upholstering
• engraving
• silkscreening
• decoupage
• carving
• pyrography
• metalworking
• knitting
• needleworking
• printing
• airbrushing
• origami
• woodturning
• glassblowing
• spinning
• macrame
• leatherworking
ISBN 0-312-3Sflb0-l
|
|
■'-=t