/

Tags: weapons military affairs
Year: 1943

Text
Р-14/Р-17
ENFIELD RIFLE
★ RESTRICTED
ORDNANCE FIELD SERVICE
BASE SHOP DATA
U. S. RHIe, Cal. .30, M1917
ROCK BLAND ARSENAL-FEB.. IMS
★ RESTRICTED 9 wu
ftnfawnc« Held Sarrica Вам Shop DaU
и. 1 Rifle, CaL JO, «1917
ИП.ЙГ Wl
Liat Of Шотами
Qmernl IbfoimtioQ
• CaororoUn Uet Of Tool tewtafi
LAJkJSb
АммЫ^- ----• — - -a
•UmbUIm-------------------1
m.)
• LUt Of Contents t Issue of February 19АЭ
★ RESTRICTED
ORDNANCE FIELD SERVICE
BASE SHOP DATA
U. S. Rifle, Cal. .30, M1917
ROCK ISLAM) ARSENAL • FEB.. IM3
Assembly
111 I
2
ли -:
гго9кд
total arms
mi
tMStT-GtL.jO
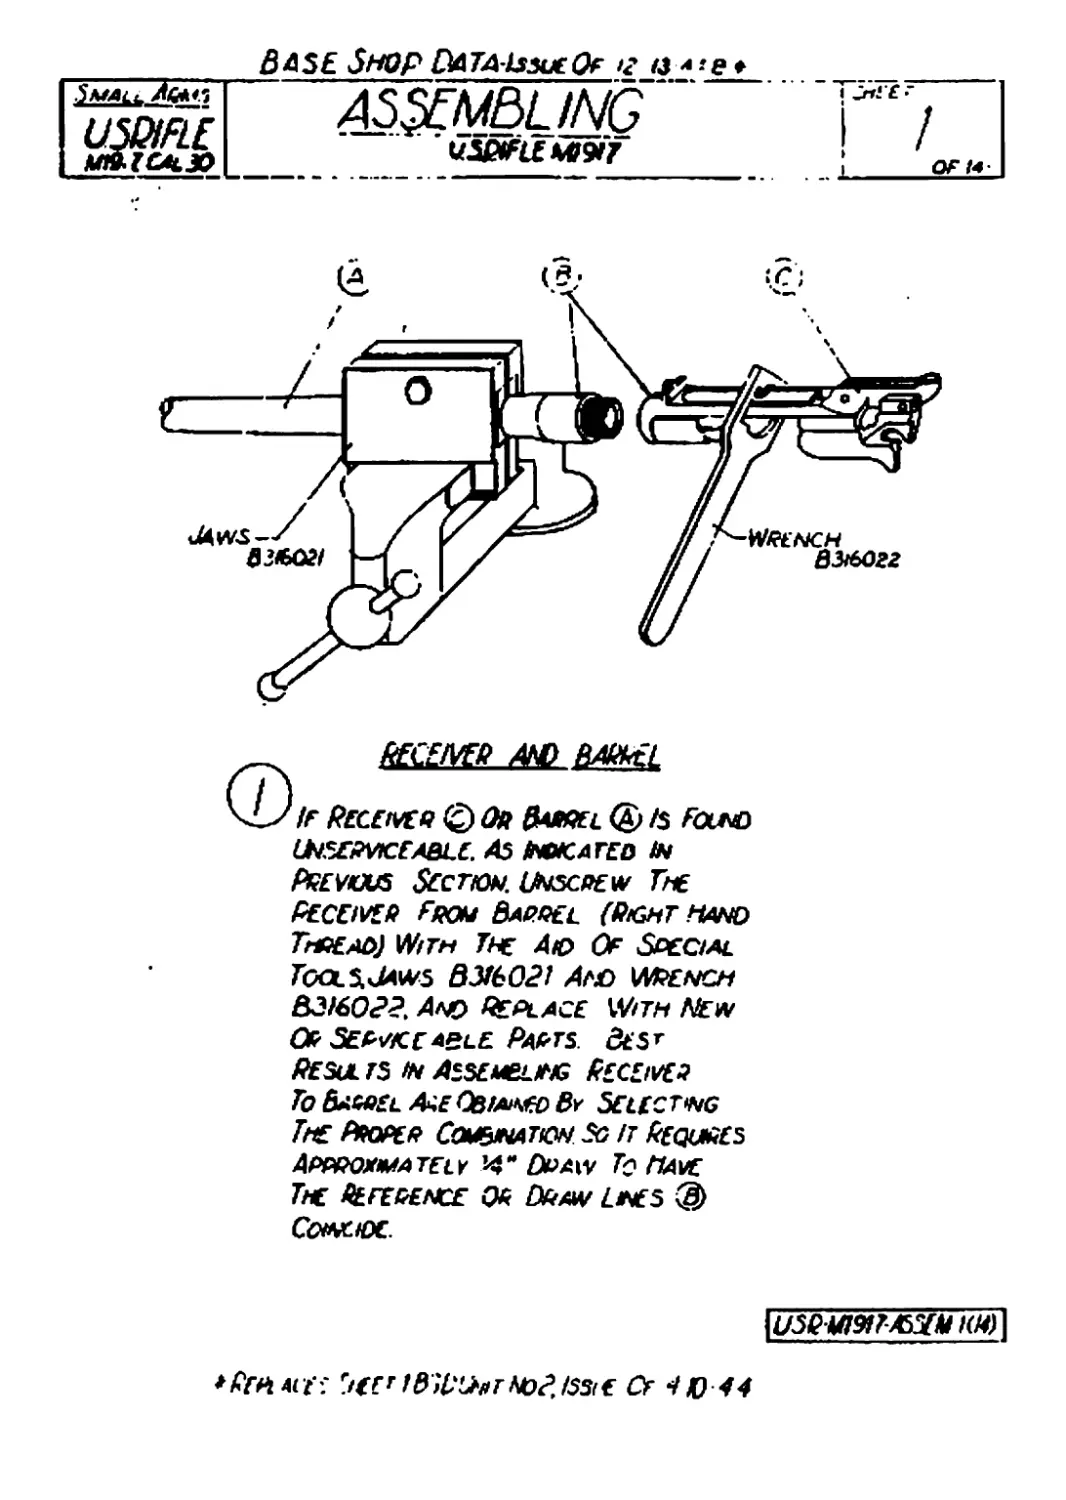
Base Shop Data -t^suc Or м&г
ASXMBUNG
US Wit М19У
Pc M
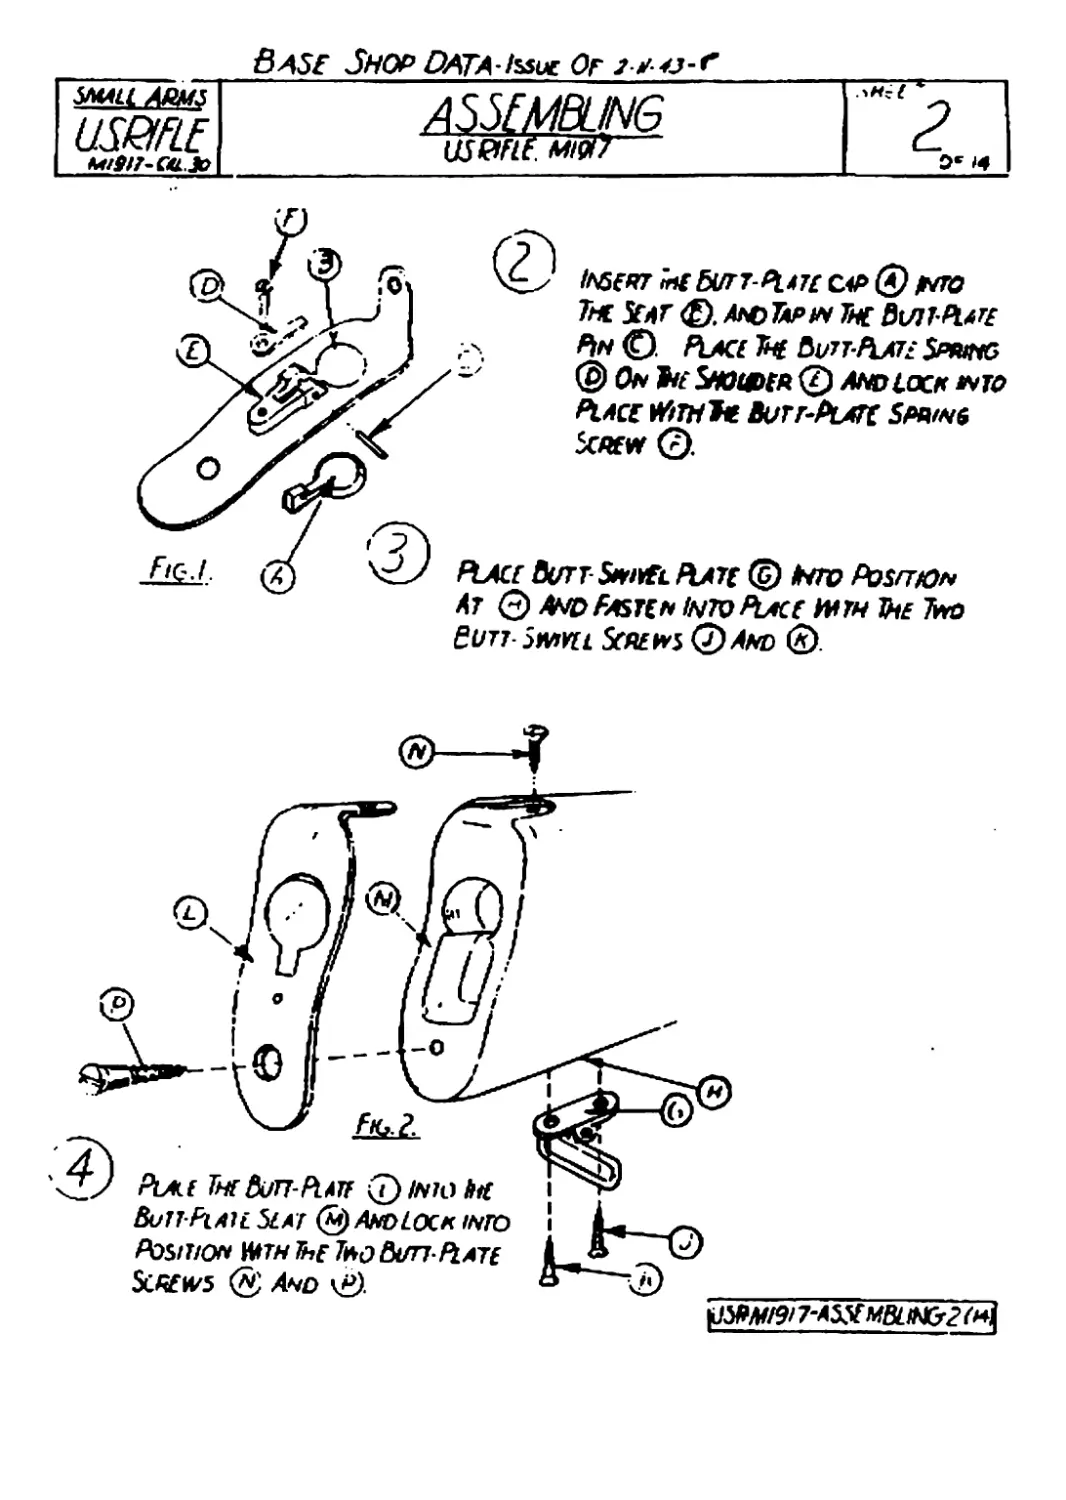
INSERT Mt ЪиП-PltU C4₽ 0 INTO
1нс 5f*r <®. AndTapm The &vii-Put£
PtN © PLACE Hi 5u7T-PlA7£ SflfUNG
© On Hte Swtfifp © and lock into
Place WimJt Burr-Pmrc Spwvt
Screw 0.
f\Acc Outt Snivel Hatc © Into Ро$пю*
Ar 0 And Fasten IntoPlacc Hath Ihe Two
SUTi imvu Screws ©And (*)
Base Shop Data-issue Or mu-e
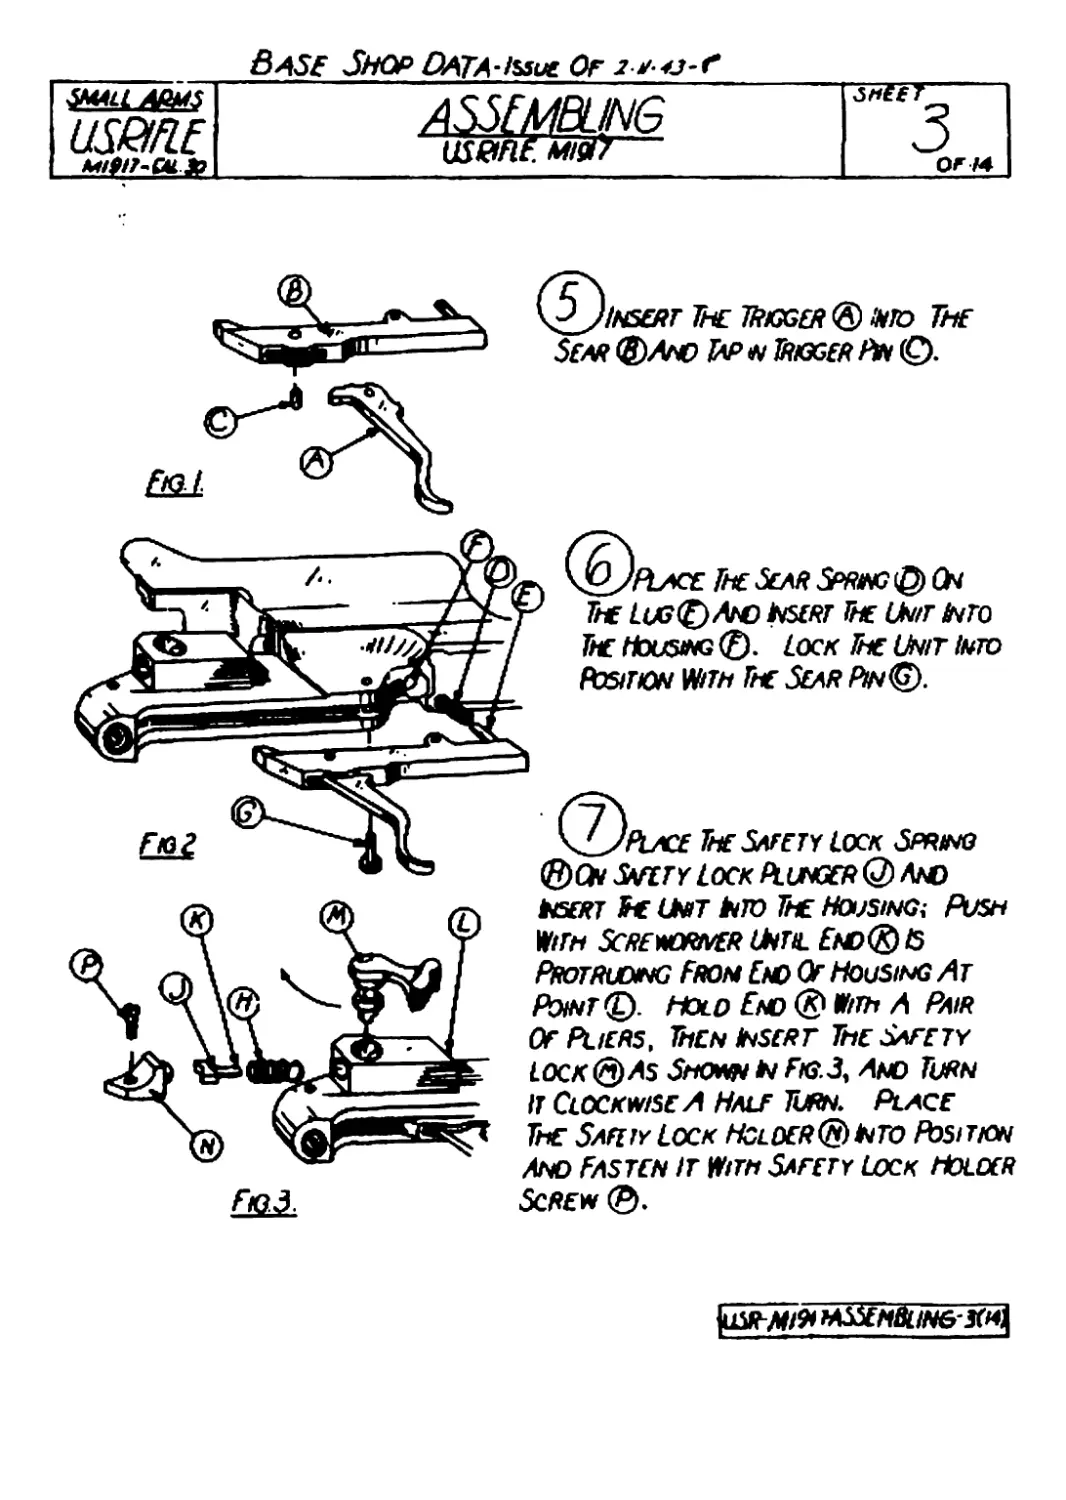
D_JInsert The Digger® mo The
Sear ®Лло Tap n Digger Pm ©.
The LugQAno Insert The Unit Into
The Housing © Lock The Unit Into
Position With The Sear Pin©.
x/yflMCf The Safety Lock Spring
©On Safety Lock Plunger Q) Лао
Fie.3.
usert Fe unit toro The Housing4 Push
With Screwdriver until End® IS
Protruding From End Of Housing At
Point©. Hold End ® Hith A Pair
Of Pliers, Then insert The Safety
lock @л$ Show in Fig.3, And Turn
it Clockwise A Hale Turn. Place
The 5afeiy Lock Holder® into Position
And Fasten it With Safety Lock Holder
Screw
МЖМВИИбХЦ
Bas? Shop Data tssue Of w-h-
Base Shop Data-issue
(/3)
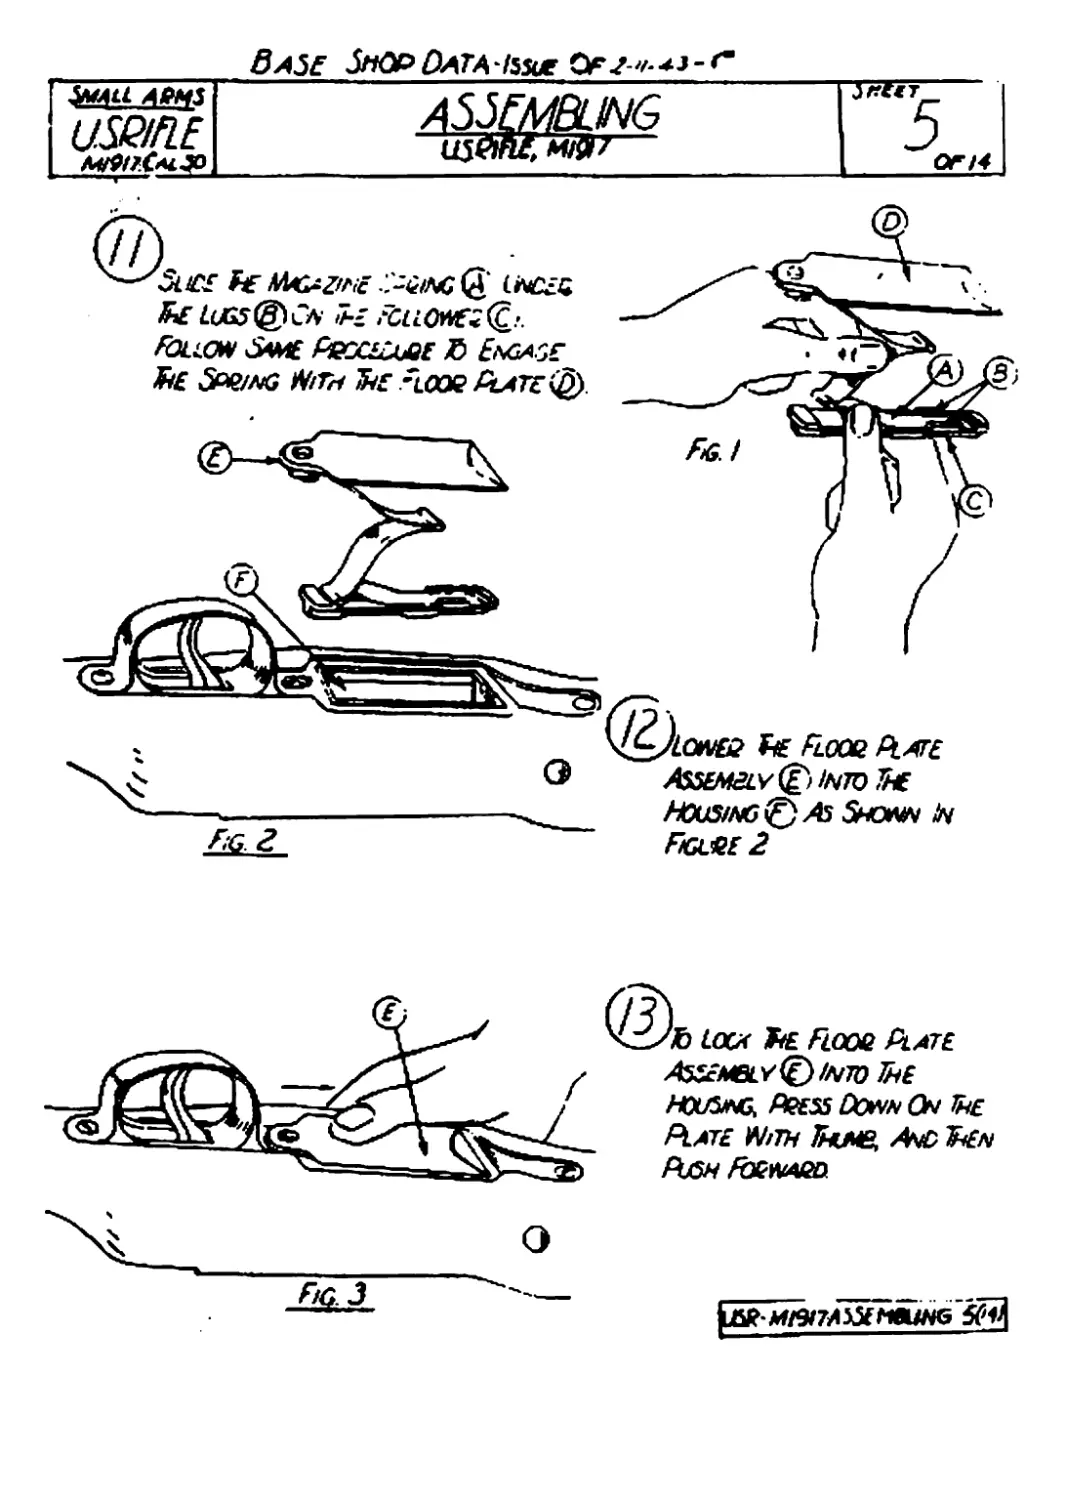
vLZbloot Же Floqq Plate
Assembly®/ню The
hqusac, Pqess Down On Ihe
Plate With ^lmb, At^> JiEn
Psn Pxwaod
FiG.3
|U» M/»7H3JffOW6
Вазе Shop Data -issue Or -л^з-г-
Лчми ACH5 USffflf MfftCAJO ASSEMBLING Uitoftr. Hl9f7 3fi№^~ ' 6 ort^
Fisa
©
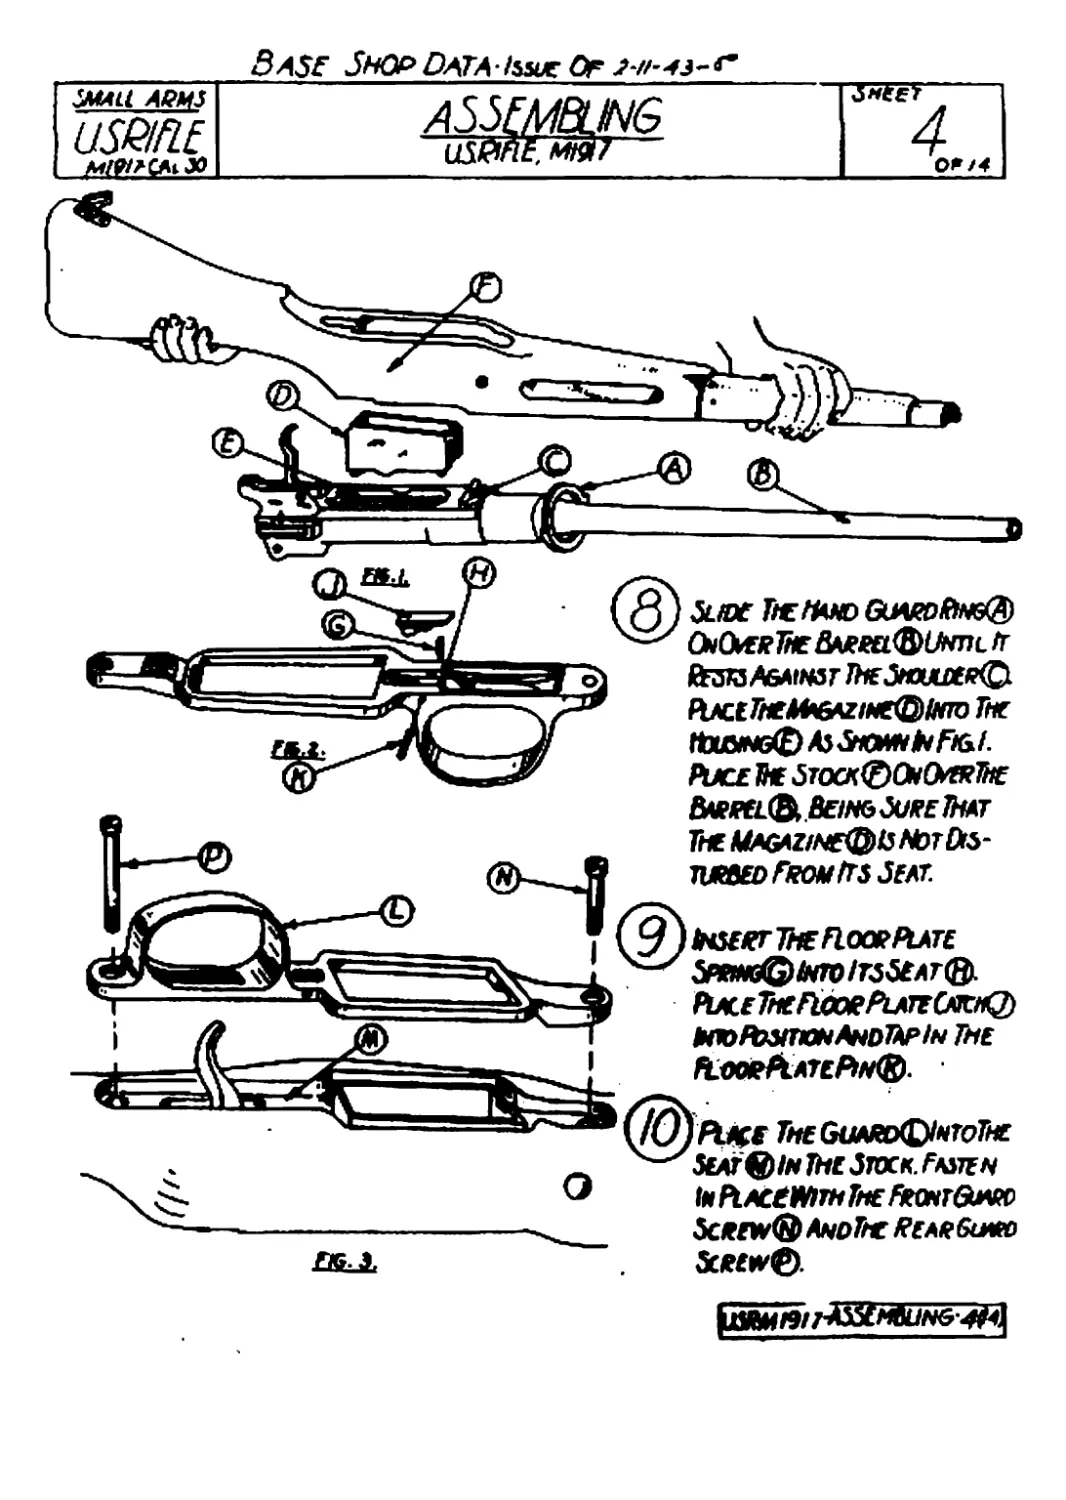
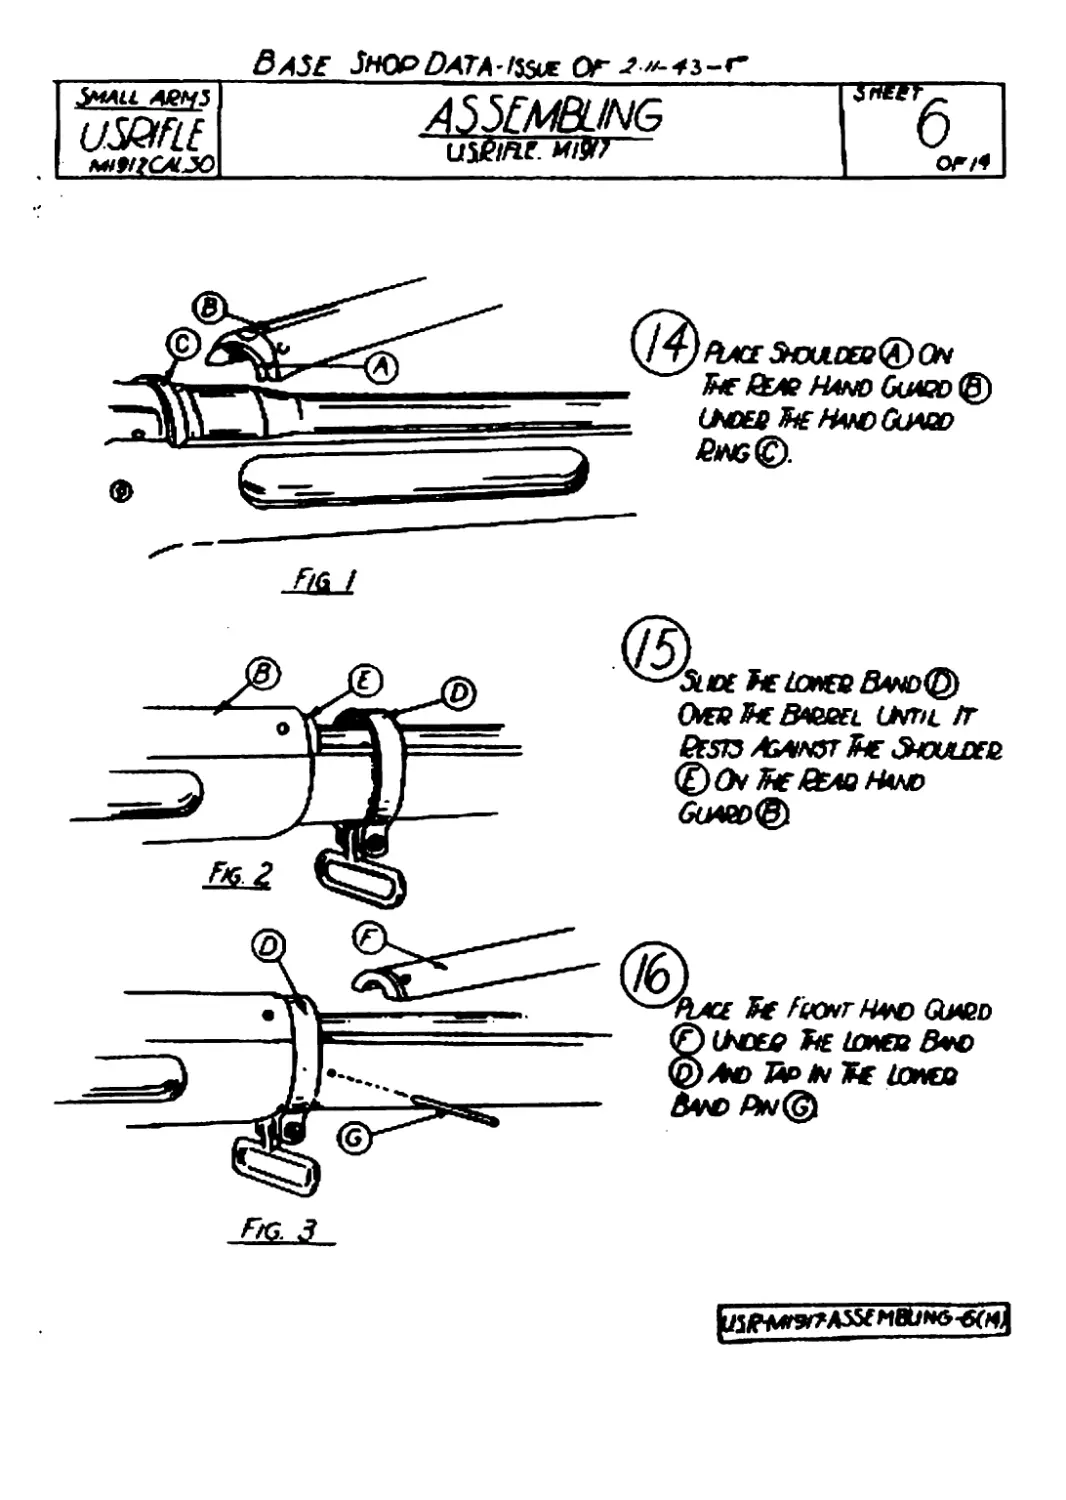
ЛГ iONEQ BAND®
OifBBcBieea. until it
Qrsa Against Jhe SkOUUXR
(E)(h JneQeaqHwd
GuawQ
Fig. 3
|U5fAffW7A55fMaUw&-6(^
Зазе Shop Data-issue or ы-4з
jwerr
US&FLB, MfW
MAU ARMS
usanf
• , MWWHSO
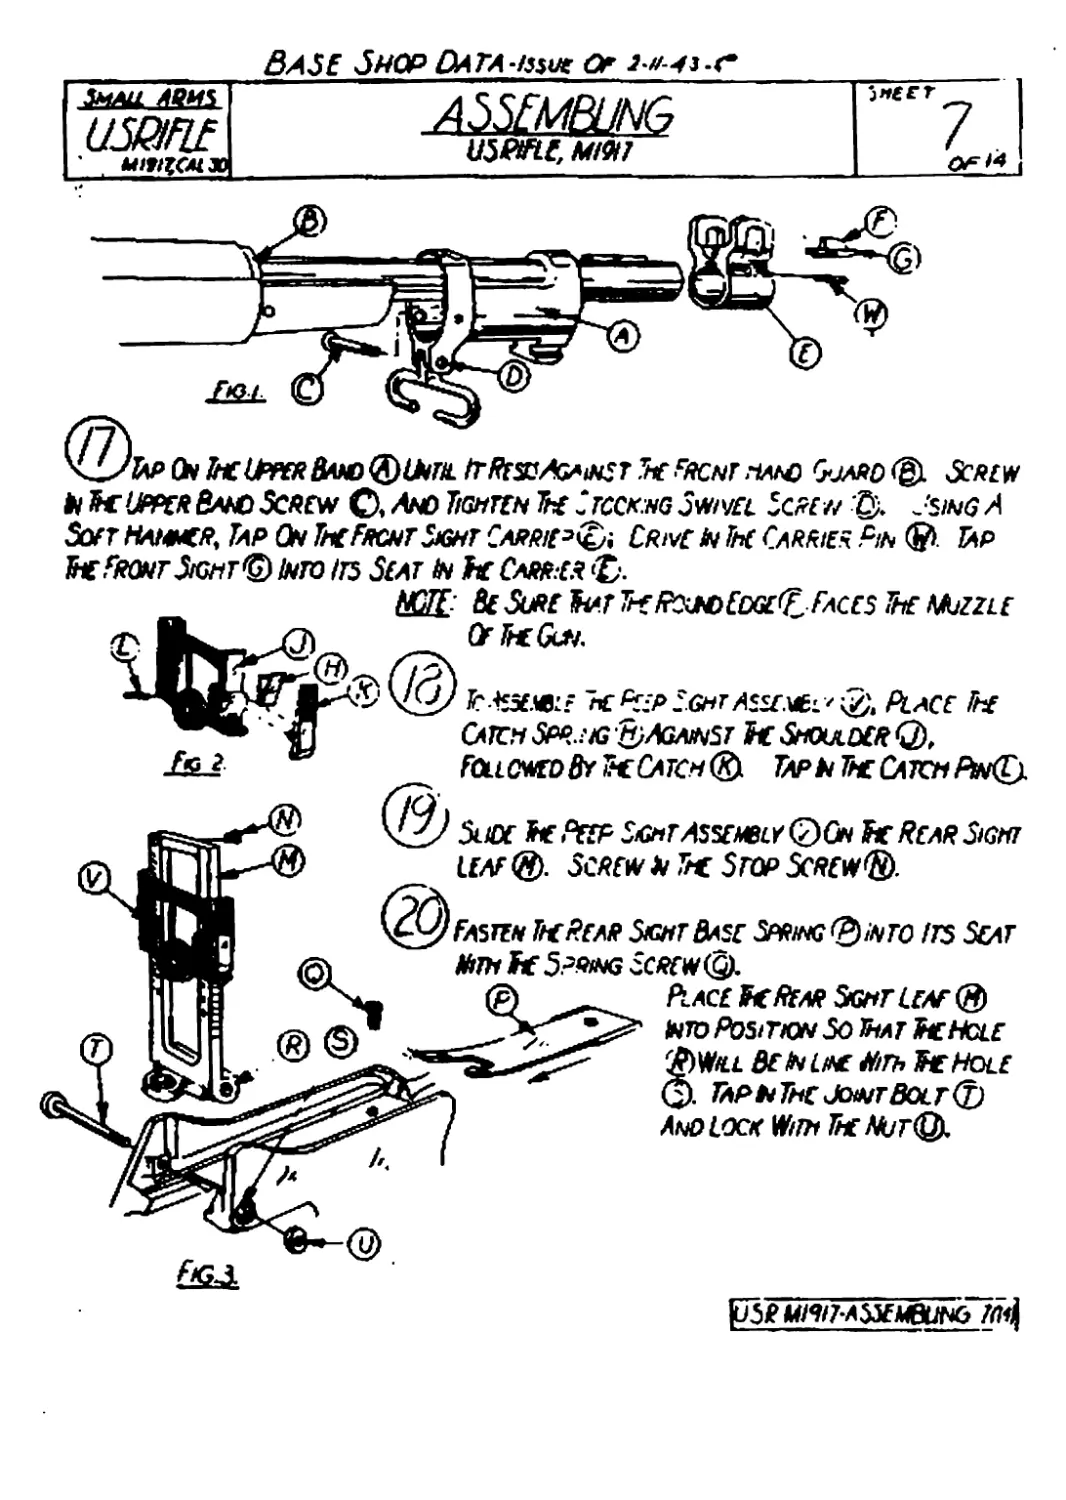
ItReSIAgaiNET The FRCNT HAt<C GuaRD®. SCREW
A Band Screw 0, And Tighten Stocking Jwm 'crew jsing A
Soft Hammer, Tap On The Frcnt Sight САтнг>&. Crive in Jhe Carrier Pin ®>. Tap
Ье Front Sight© Into its Seat а» Лг Carper ©.
NCR. Be Sure H&r TheТгомЕехе^ Faces The nozzle
Of The Gun.
It ASSEMBLE nC^PJ<^M«SZ-.UEL '0, Аясг ThE
СлКН 5fX>.?IG ®AGAINST IhE SHOULDER Q),
Followed 8rfc Catch ® Тары The Catch Р»КГ).
Slide The Peep Sight assembly QOn ft Rear Sight
leaf (g). Screw n ft Stop Screw®.
(£&) Fasten Ik Rear Sight Base Spring® into Its Seat
Him if Spring Screw©.
Place VfREAR SghtLeaf ®
Into Position So That The Hole
®Will Be In Line Mn> SieHole
0. TaphTHCJcwrBolt<l)
Ano Lock With The Nut®.
ff>R UIW-AXEMBUNb M<i
Base Shop Оата-ьм of
fat
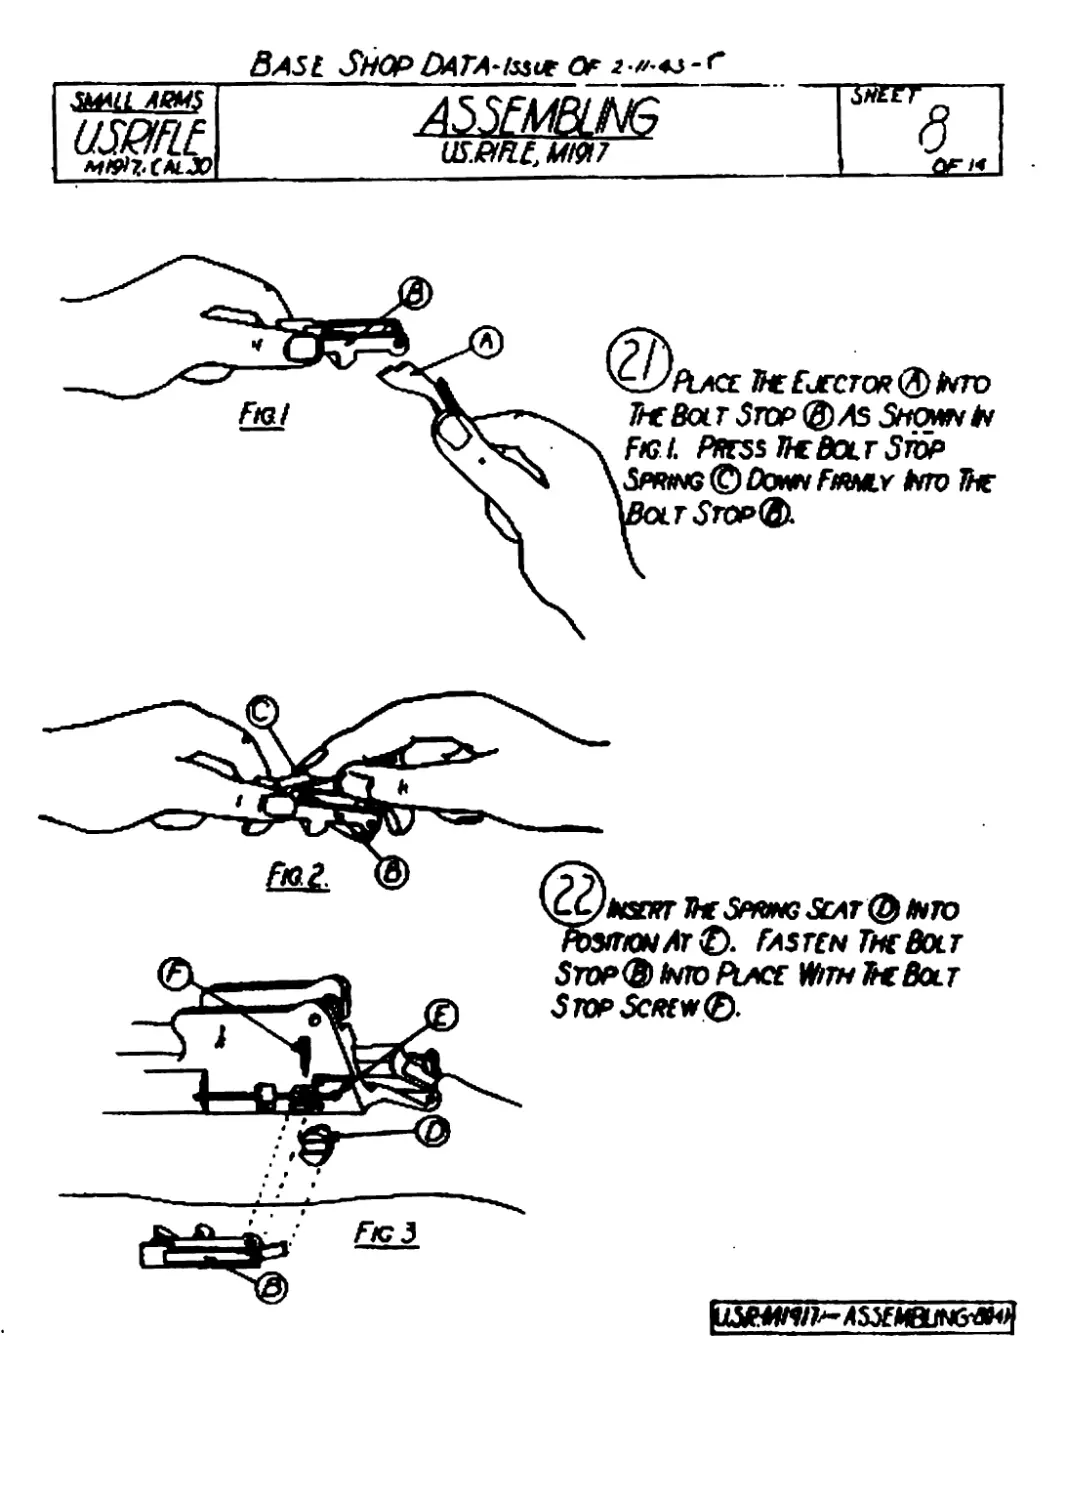
zL/Лао: fit Cjector® Into
fit Bolt Згор @ As Show to
Figi. Press fit Bolt Stop
ЗяимвфЛт*Firmly torn fc
rSropQ).
^^tHSOT IhfSPIWK &at ^ /ню
чонЛгф. Fasten ThcBolt
Stop® Into Place lt»w ft*Bolt
Stop Screw®.
|изйИ1ю^лтвим>*«4
SHOP DATA-wut Of 4 **
ISfFr
noLwaia
I/21H
SMALL AQMS
USQ/FLE
£>
pW/Q/7 A*yA<BWG J ‘ |
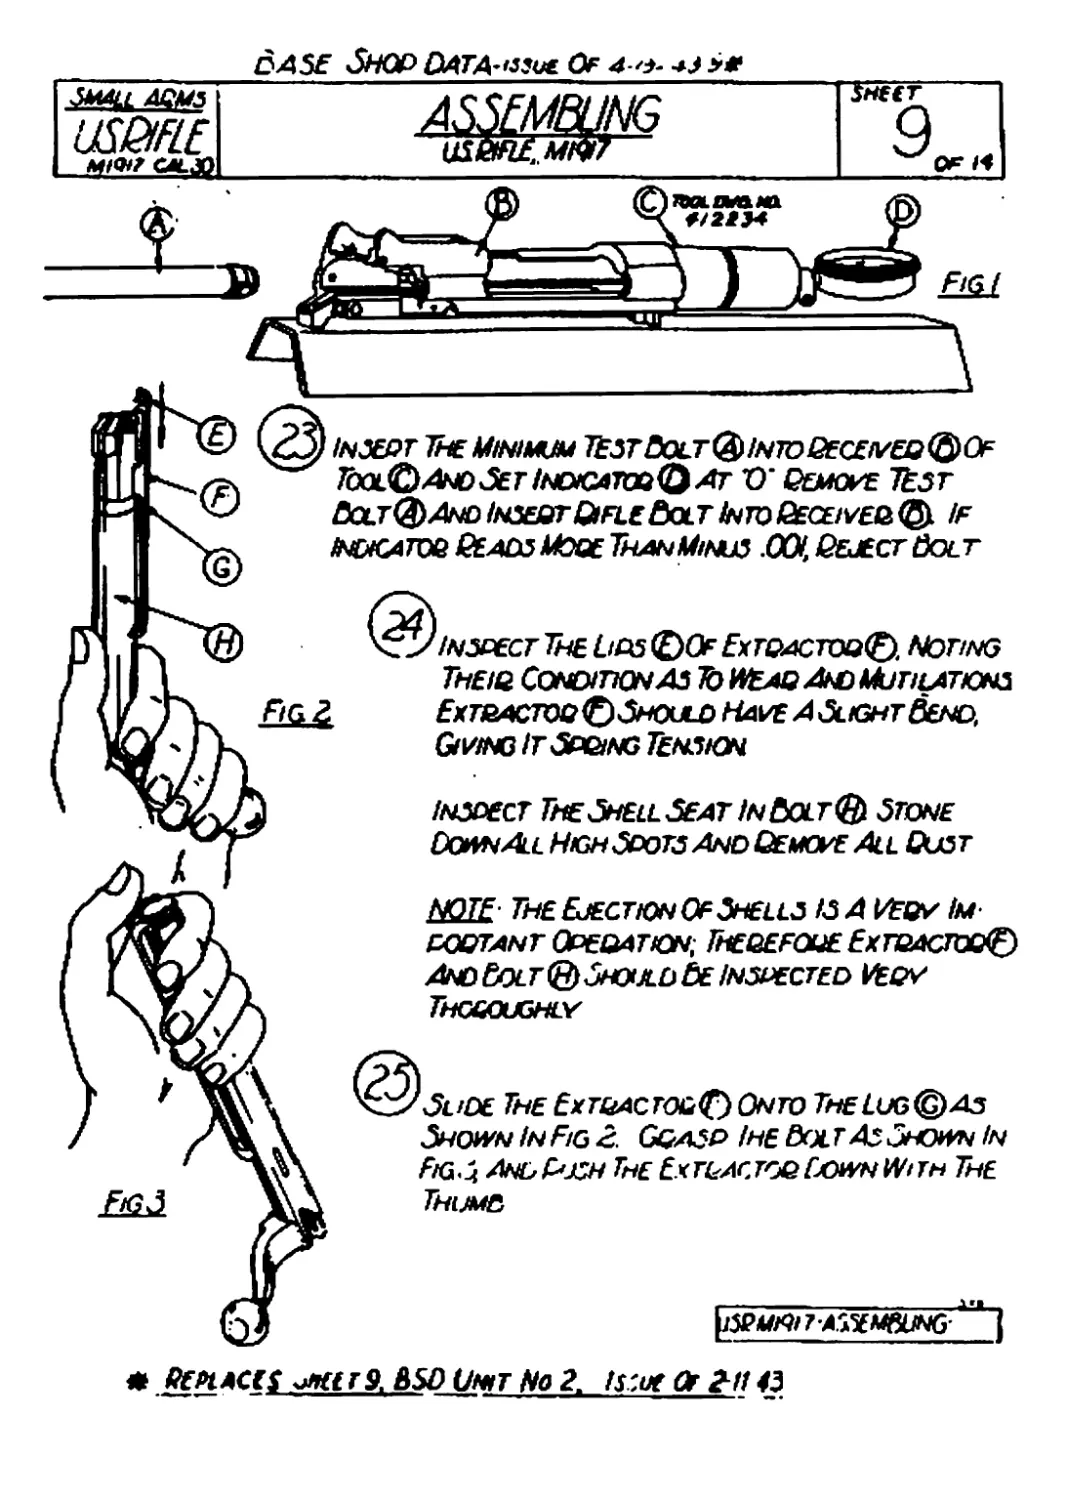
inspect The Shell Seat In Bolt® Stone
DohnAll High Spots And Genome All Oust
NOTE The Ejection Of Shells AS A VEqy Im
dqqtant Operation, Theqefoue Ехтраооо©
And Bolt® Should 6e Inspected Mepy
Thoroughly
Slide The Extractor© Onto The Lug© аз
Shown In Fig 2. Grasp I he Bol t As Shown In
FiG.i And Push The Ex tractor [jown With The
Thumq
Inspect The Ups ©Of Extqactoq© Noting
Theiq Condition As 10 WEaq And Mutilations
ExtractoqQShould Have A Slight Bend.
Giving ItSp&ng Tension
* HehacES ^ат9, BSD Unit Ho 2. issue Or ^1143
insept The Minimum testDqlt^intdOeceiveq^Of
Kxm.©AndSetIndigatdq©at O' Qemove TEst
Bolt<3>And InseotQifleBolt IntoQeceiveq© If
скатов Qeads Moot Than Minus .001, Qeject Bolt
Base Shop data-Essik o- г-zA-^j-r*’
Small U5H/ELE UI9/7O.X ASSEMBLING USRlfLE MI9I7 SHE IT /0 CH/f
The Spring @ On The
Striker Followed By The
Sleeve ©. Cocking Piece
Assembled In Toudwing Opera?ion.
Grasp The Sleeve © Ллю Pm l Down,
AsInFig.2. Pl ace TNe Cocking
Piece © Over The End Of The
Striker <B) Лз Shown, AndTurn
Fig i
Cl ockw/se.
ji»Nl9(?-AS^NBLHG -O(H)I
Ё>АЗ£ Shop Data ixsic Ck тл«г nв•
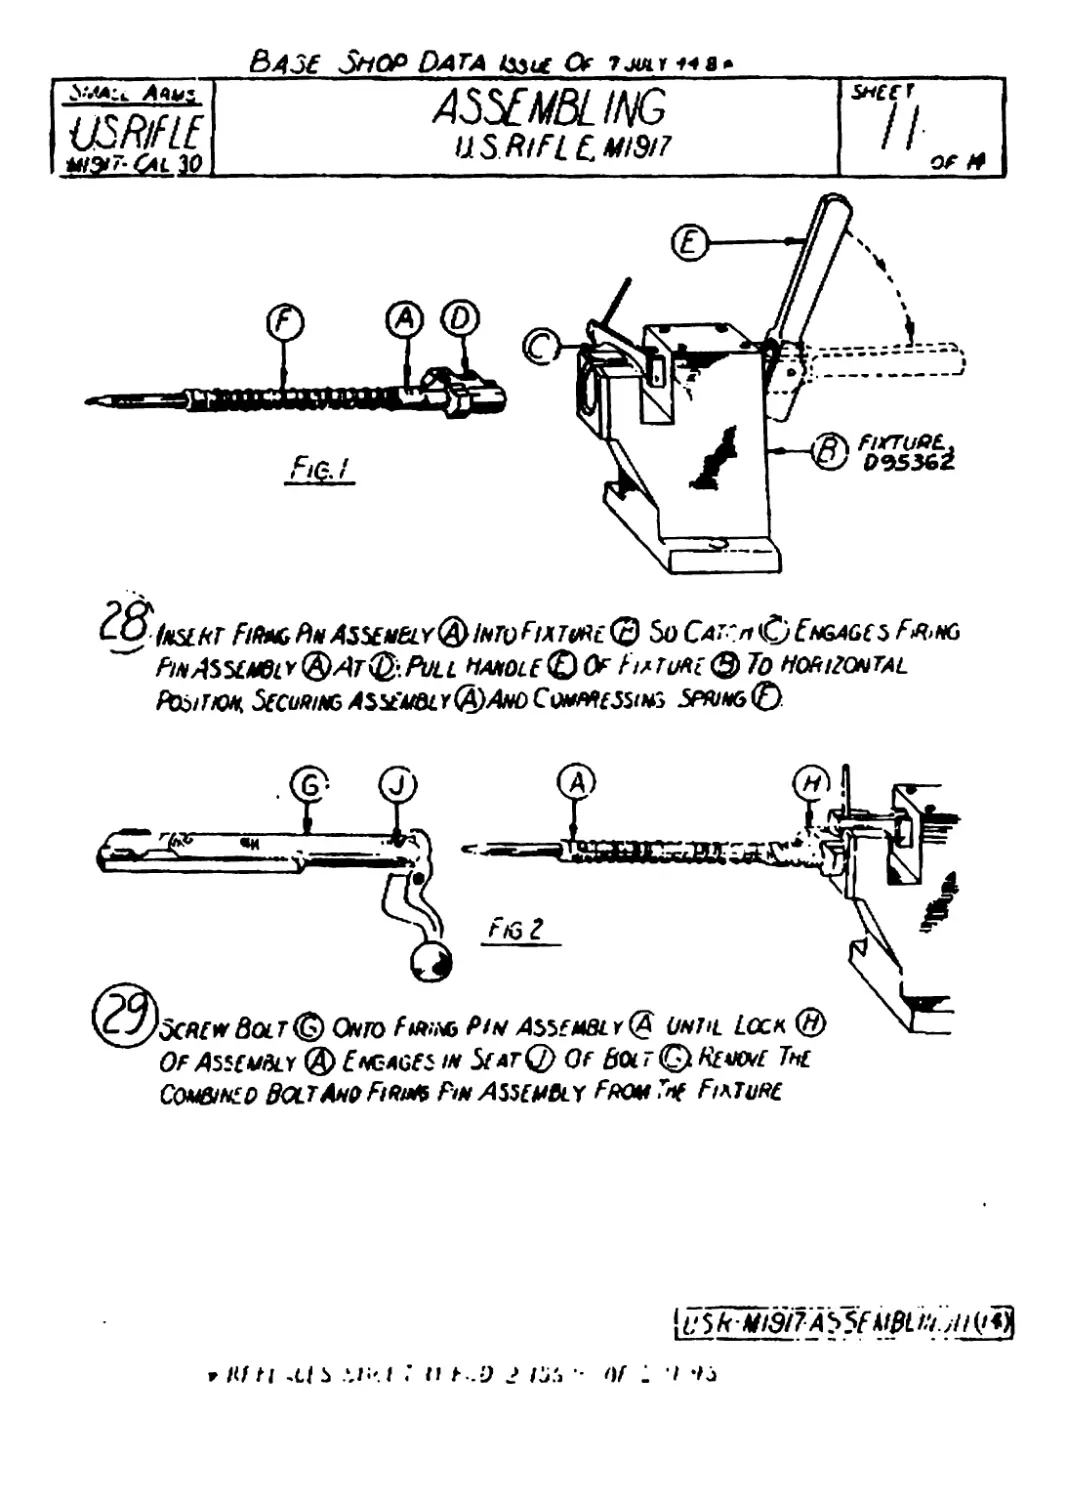
У*л»и A^z A5XMBL ING IlSRlFLCMISl! SH£€T /1 OF ft
йж£ tUQlT-CAL 30
F/faCfaA55£KeLY®/N7VFMTitft(c) So CAT'rt£)EntaAQ£5 FA.NG
~~^ PinАЬЪ£мб1У®Ат(&.Pull Handle (£) Of Fiftuae <Q To horizontal
ftfiiTiON, SECURING АЖЪ&Л@А*ОСоыМ£&1*й 5fWN6<E).
vbzbsz
^^)зся(* 8olt© Onto Тыыл Рты Аж holt (A until Lock ®
Of Assevoly ® £NCAGFi in StntQ) Of boiт © Rl«n£ Tut
COMBINLO BOLTAn» filta* PiNAiSOHBLY PMnTnf FtKTuft.
\u$k Mi'9l7^<FUBU:ijiii!^
г нт ti ~tf ь ли-1: ti t-.o > rss - <u i •/ -tj
Ё>А$Е Shop Data ~цзис Of /г • и <м з •
small arms
USMfLE
MStr-Cu.So
ASSEMBLING
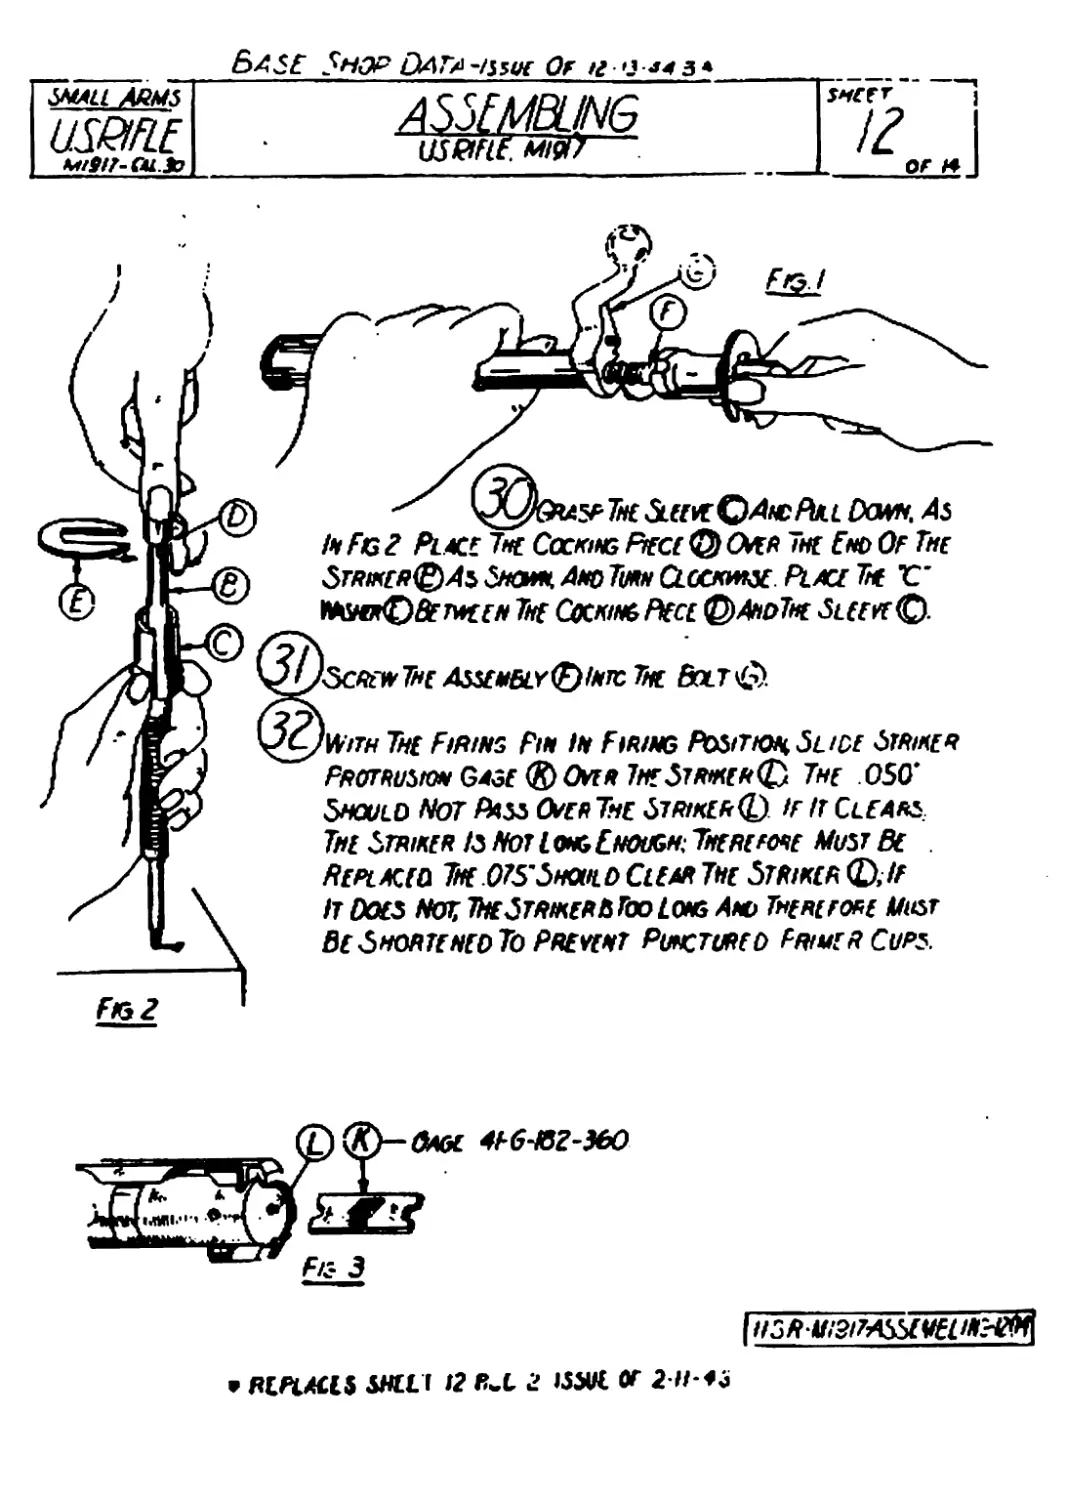
US Pl f I F. М!9>
।
In Fg 2 Place The Cocking Piece О Ося The Eno Of The
Striker® As Suam Aho Turn Clockhtse. Place The Г*
тает®Between The Cocking Rece ®And7he Sleeve®.
’JScrewThe Assengly®Injc The Bolt&.
И77я 7Ztf Firing Pin in Firing Position Slide Striker
Protrusion Gage® Over The Striker® The OSO'
Should Not Aw Over The Striker® >f it Clears,
The Striker Is Not Long Enough; There tore Must Be
Replaced The 0?S'Should Clear The Striker ®,lf
It Does Nor, ItaStriker6 Too Long And There горе Must
Be Shortened To Prevent Punctured FriuerCups.
• RtflXlS SHEW 12 fiwl. 2 «Ж Of 2 H N3
| IISRUISlTASbEVEliK-^
Base Shop Data -zjjut ос 2 j - r
Ш/fLf
AS3EMBLNG
US&FLE. MI97
ЗЯГЕГ----
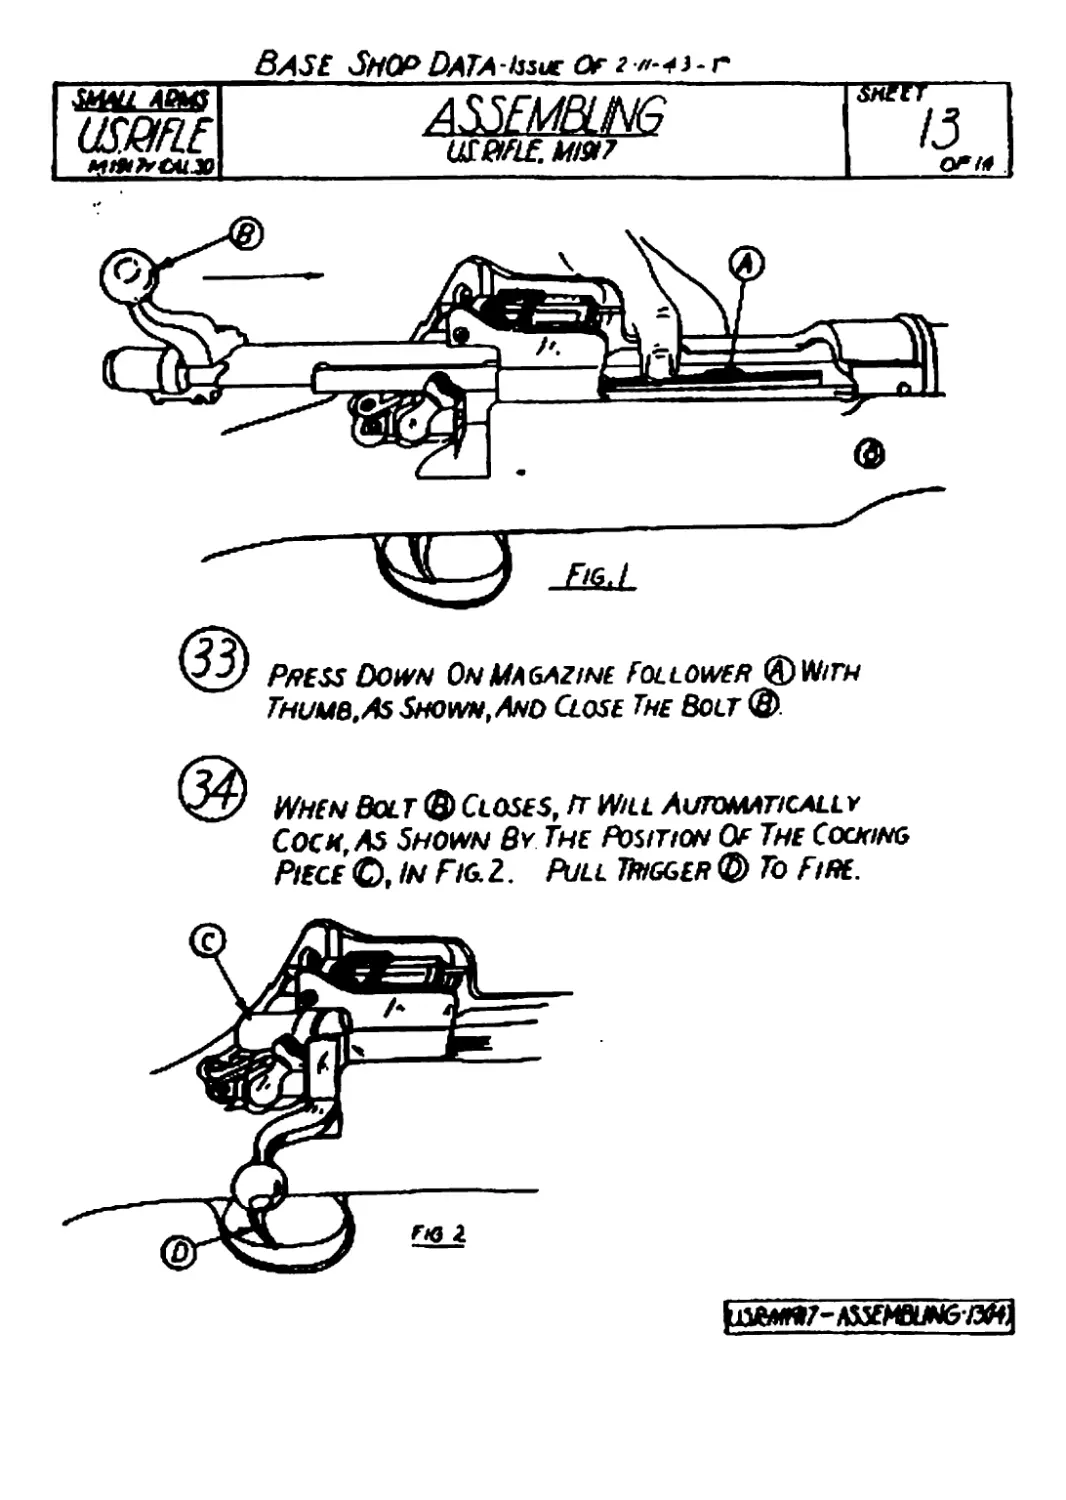
/J
OP
Press Down On Magazine Follower <8)With
Thumb.As Shown,Ano Close The Bolt <&>.
When Bolt ® Closes, ft Will Automatically
Coch, As Shown By The Position Oe The Cocking
Piece ©, In Fig. 2. Pull Trigger © To Fine.
Base Shop Pat a-issue ot 6*
sneer
/HbtMBLmG
RE2KKKBKJE1
г*лг*г
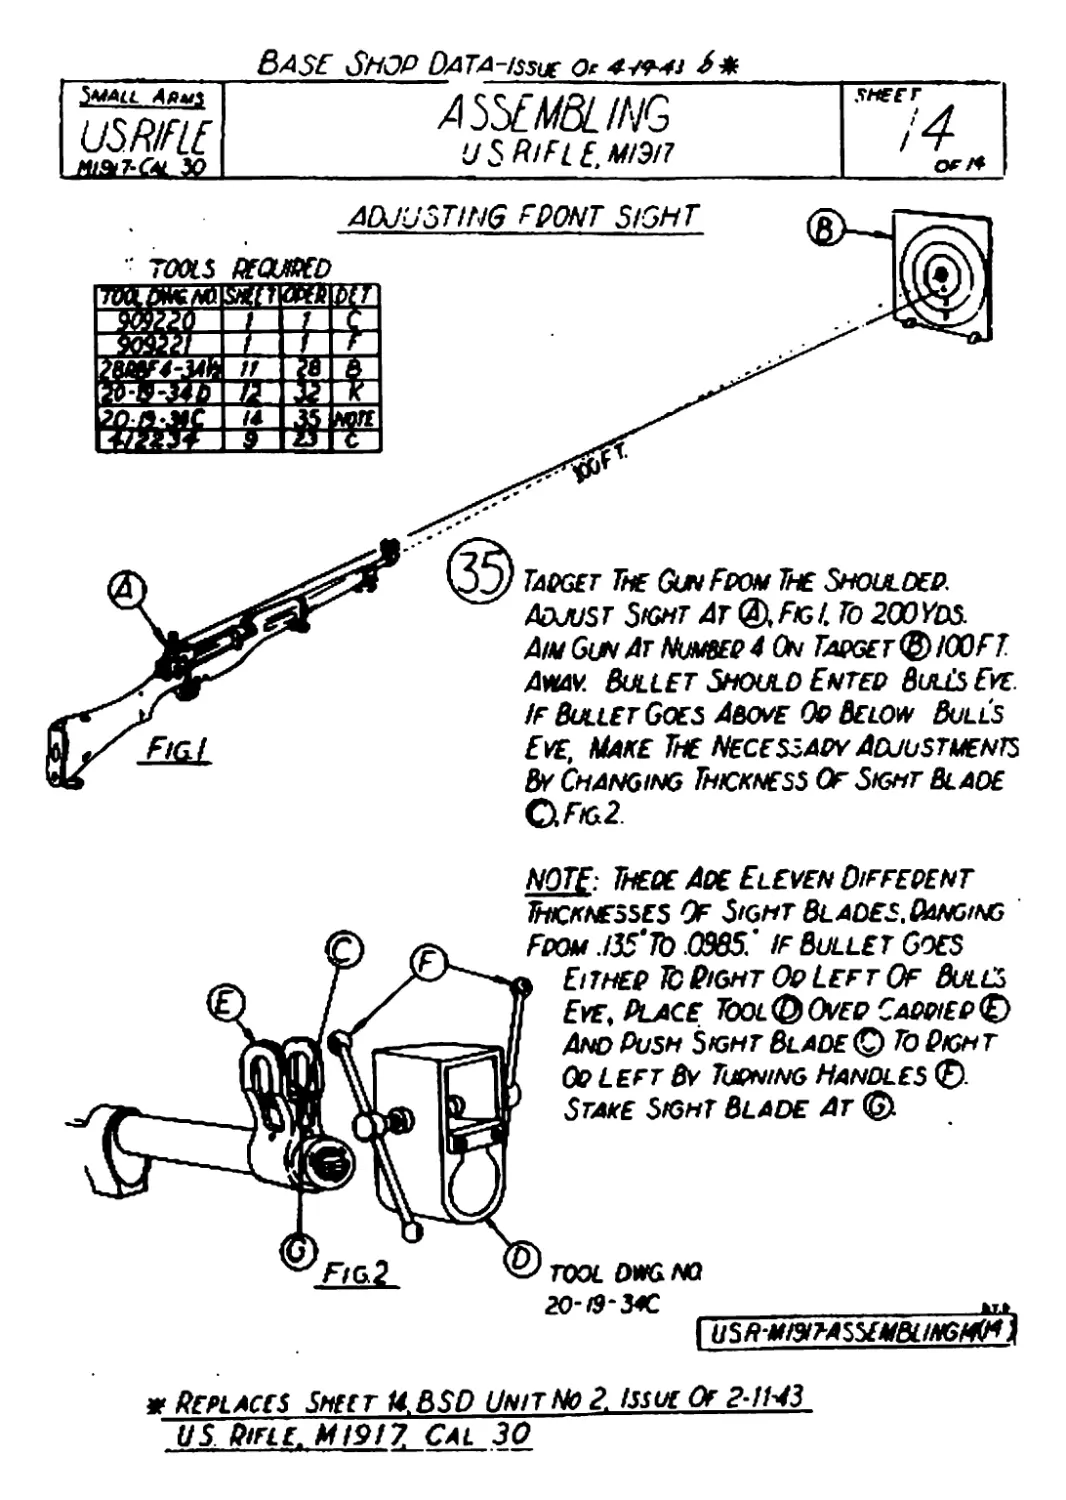
ADJUSTING "PONT SIGHT
' TOOLS XCUXD
Small Afi^s
USRIFLE
Н1Л7-СН. SO
Target The Gun From The Shoulder
Adjust Sight At®, Figi. To 200Yds.
Aw Gun Ar Number 4 On Target QlOOFT.
Away. Bullet Should Enter Bul£s Eye.
If Bullet Goes Above Op Below Bulls
Eve, Make The Necessary Adjustments
By Changing Thickness Of Sight Blade
Q.Fig2
NOTE: Thex Ax Eleven Different
Thicknesses Of Sight Blades,Ranging
From .I35'1b .0985.’ if Bullet Goes
Either ft Bight Op Left Of Bules
Eve, Place TGolQiOvep Cappiep<E)
Ano Push Sight Blade © To Bight
Op Left By Turning Handles (£).
Stake Sight Blade At ©
Fig!
TOOL DWG NO
| USR MIST-ASSEMBLWGI^i
ж Replaces Sheet U.BSD Unit No 2. issue Of 2-!H3
US Rifle. M1917, Cal 30
★ RESTRICTED
ORDNANCE HELD SERVICE
BASE SHOP DATA
U. S. Rifle, Cal. .30, M1917
ROCK ISLAND ARSENAL - FEB.. 1S43
Dismantling
Base Shop Олгд-^ие
zzia^ jUMny-Ai to DISMANTLING USRflE M9t inter o*» 13
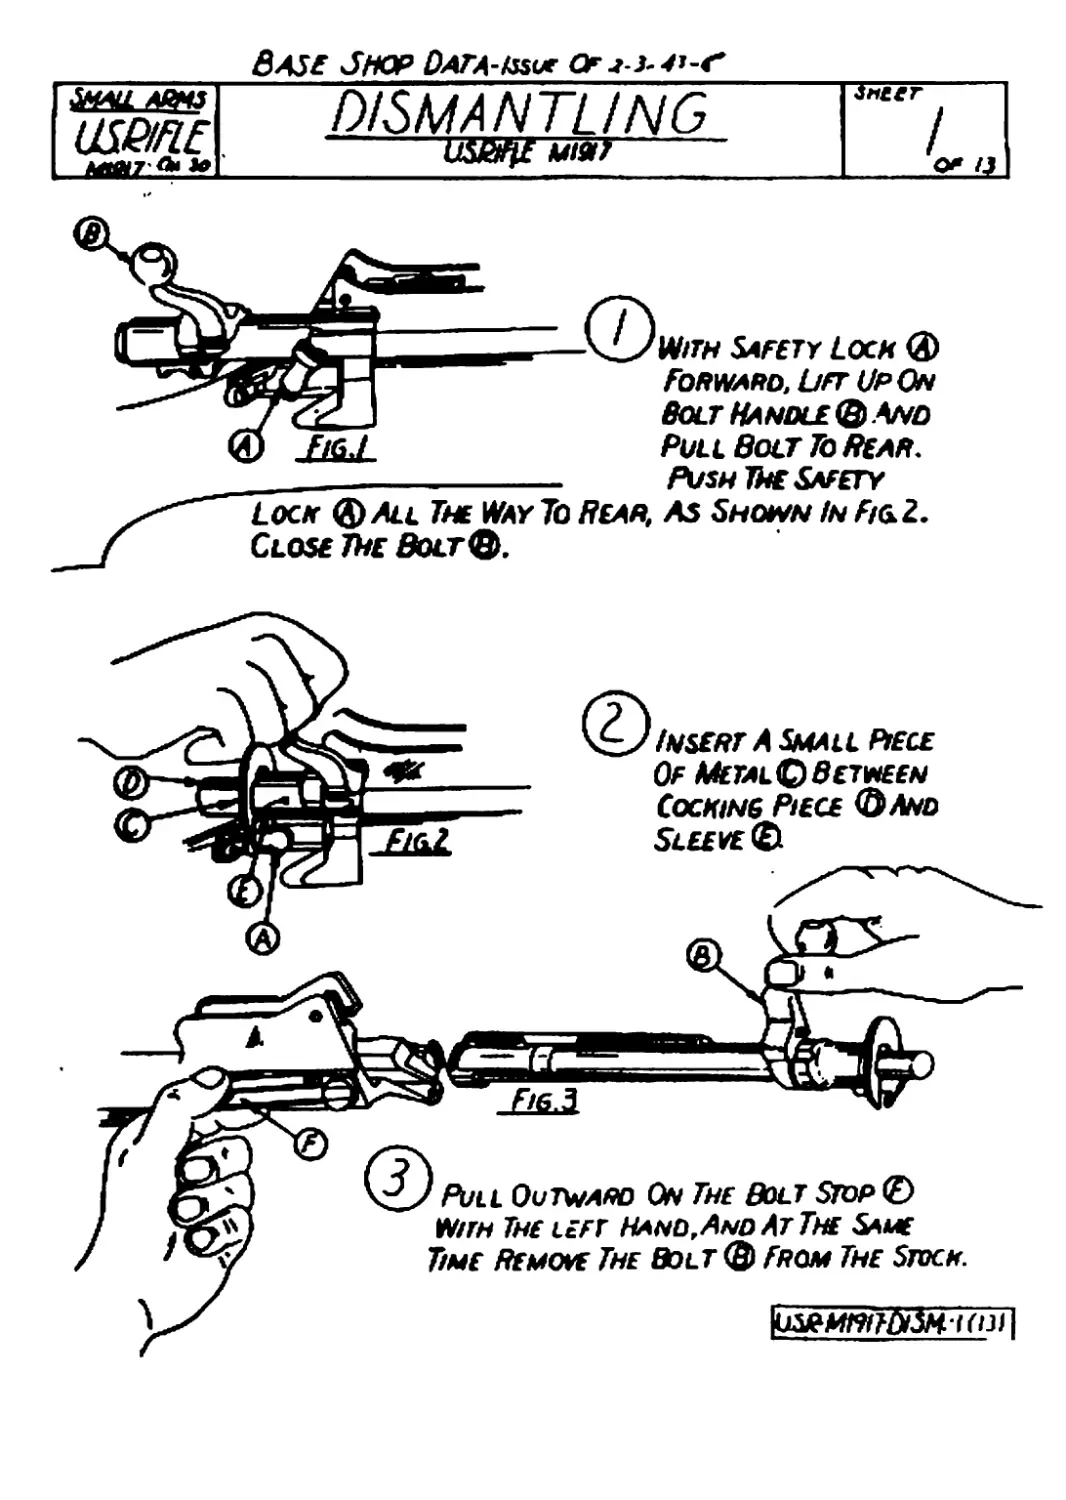
With Safety Loch (3)
Forward, Lift Up On
Bolt Handle^ And
Pull Bolt To Re ah.
Push IHe Safety
Lock <&All The Way To Reap, as Shown In Fio.2.
Close THe Bolt®.
Base Shop Data-ixm or ?-з-43-Г
DISMANTLING
US0HE МГЛГ7
УнГГТ-----
2
OF<3
1 Small ASPS
t.US&ftf
NGj
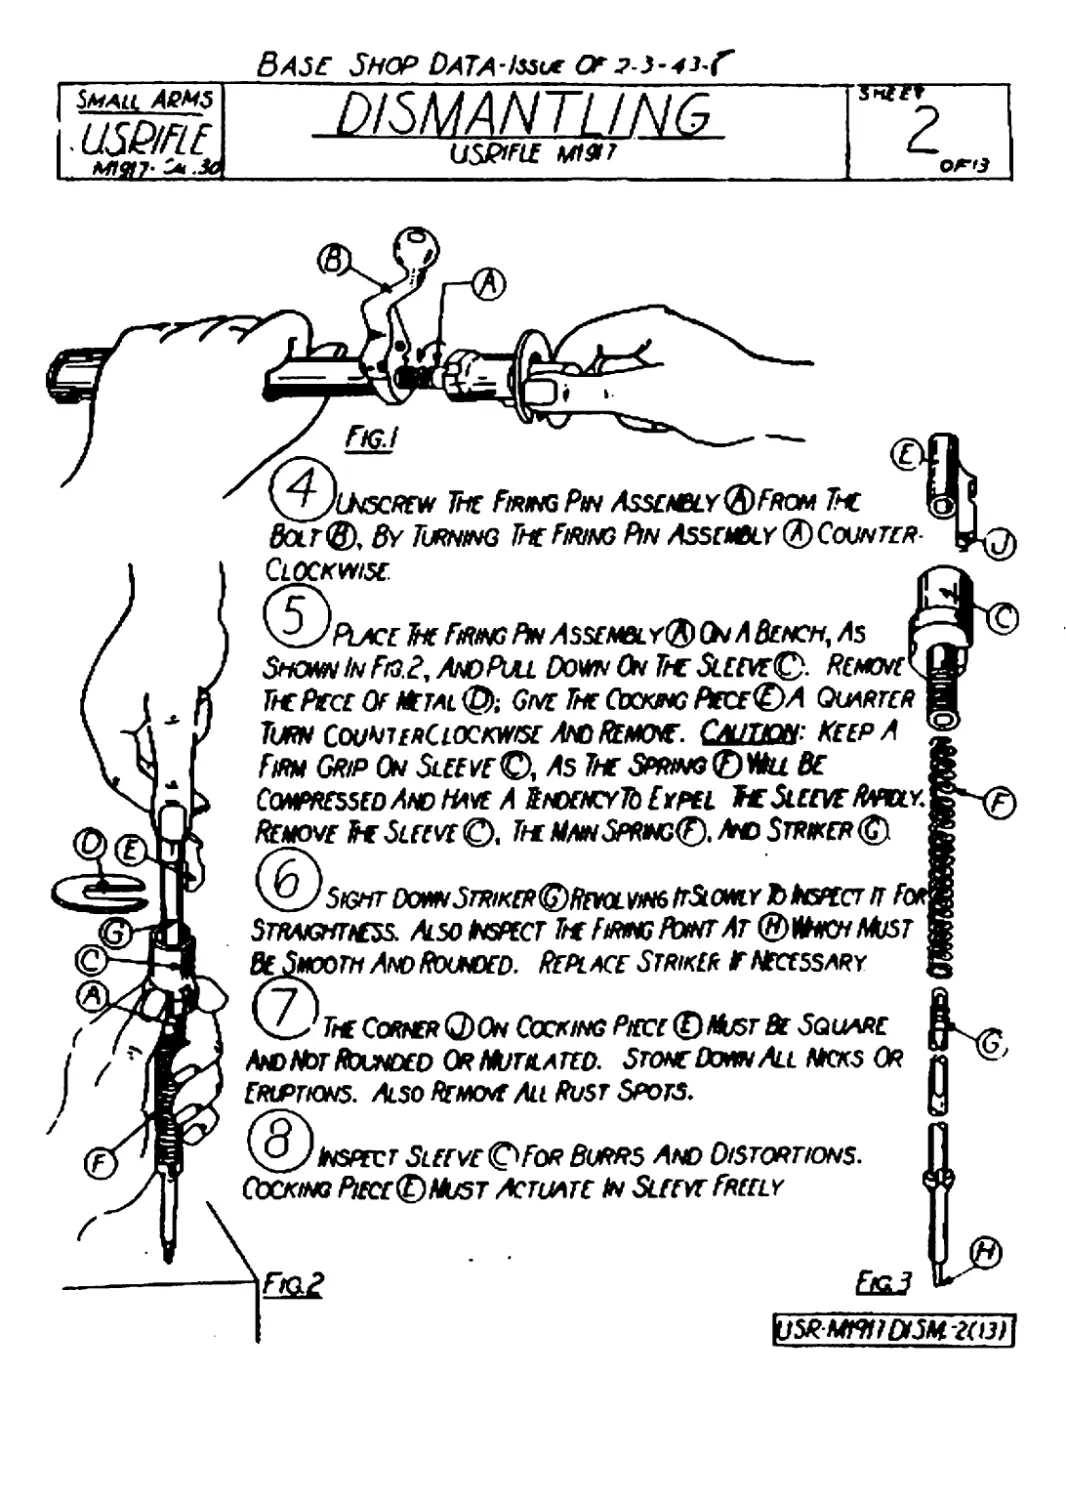
Cocking Piece® Must Actuate In Sleeve Freely
Bolt®, By Turning The Tiring Pin Assembly (^Counter-
Clockwise.
^^Place ft Firing Pin Assembly® QvABench, As
Shown In Тю.Р, AndPull Down On Ttt SleeveQ. Remoye
ТлРесе Of Metal <Q>-, Che The Cocking ВесефА Quarter
Turn counterclockwise And Remove. Слзткж: keep a
Firm Grip On Sleeve®, As The Spring®^ Be
Compressed And Haye A SnoencyRi [ypel He Sleeve Mroly.
Remove ft Sleeve ©, Tit NainSpring(F). And Striker ©i
\i> Sight down5triker®Revolwn6 ItSiowiy Ысрест п Л
STfWGuncss. Also Inspect Tie Firing Pont At @Hhw Must
fit Smooth And Pounded. Replace Striker r necessary
The Corner Q)On Cocking Piece ®Musr Be Square
AndNot Bounded Or Mutilated. Stone Dunn All nkks Or
Eruptions. Also Remcne Au Rust Spots.
|U5gWW7CyJ«?(O7f
Bah Shop Data-umcp
DISMANTLING
USPfTtf M97
or 13
ItSR-MIRllPlSl
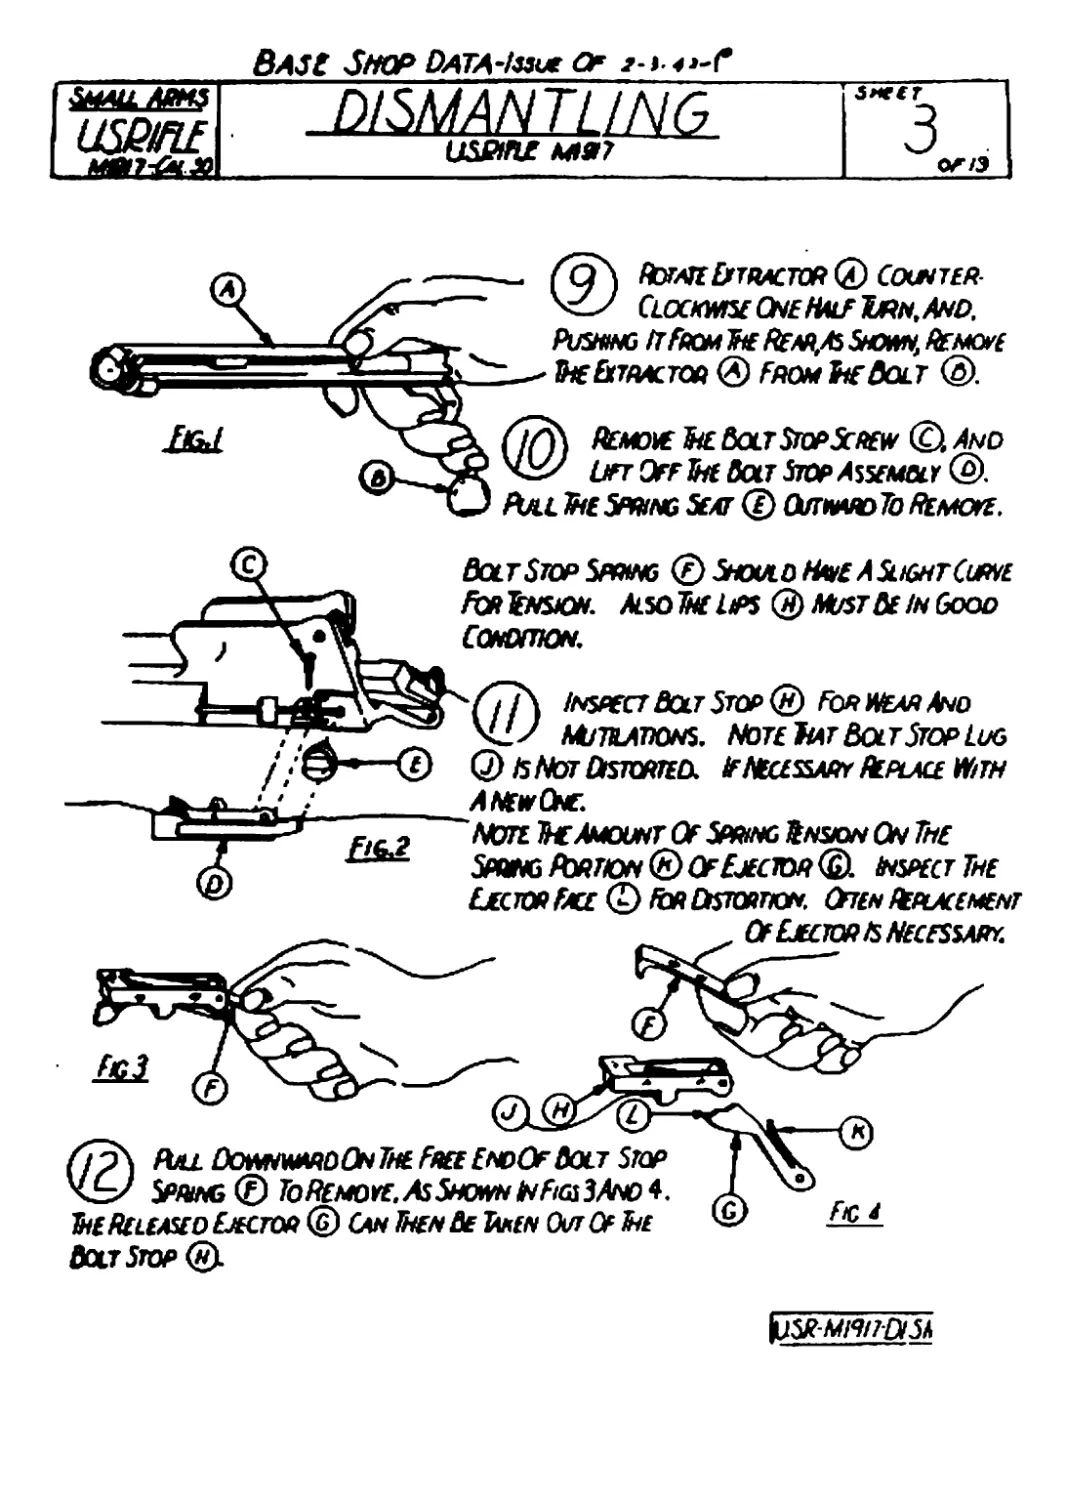
(Q\ f&ATEEXTRACTOR ® COlHTER-
CLOCKWISE ONE HALF TURN, AND.
Pushing It From The Rear,As Shown, Remove
Ite&TMCToa ® From he Holt ®.
Remo* hE Bolt SiopScrew® And
ЧЬУ Un OFFfat Bolt Stop Assembly®.
Bal The Spring Seat ф ОитчмоТоРЕмо*.
Bolt Stop Spthng ® Should Hve A Slight Curve
For iNSiON. Also The ups® Must Be in Good
CONDmON.
(7i\ Inspect Bolt Stop® ForiMearAno
Щу MUTUAOOns. NoteIiat Bolt Stop Lug
Q) is Not Distorted. If Necessary Replace №tn
A nek One.
Note Jhr Amount Of Spring ^nsion On The
SpmngPmtion® Of Factor®, inspect The
Factor Face ®1ЬрОктойтюн. Oten ^placement
Of Factor is Necessary.
®ЯЛ£ DOWNWARDOnThEFREEENDOfBOLT SHOP
SPRING © ToREMQVE.AsSHONNiNFtGi3ANOR.
The Released Factor © Gw Then & Then Our&fof
Base Shop data-iswe cf nu-t
Small ARMS
use/ru
DISMANTLING
USPiFLE Ml 917
smer
Е1Ы.
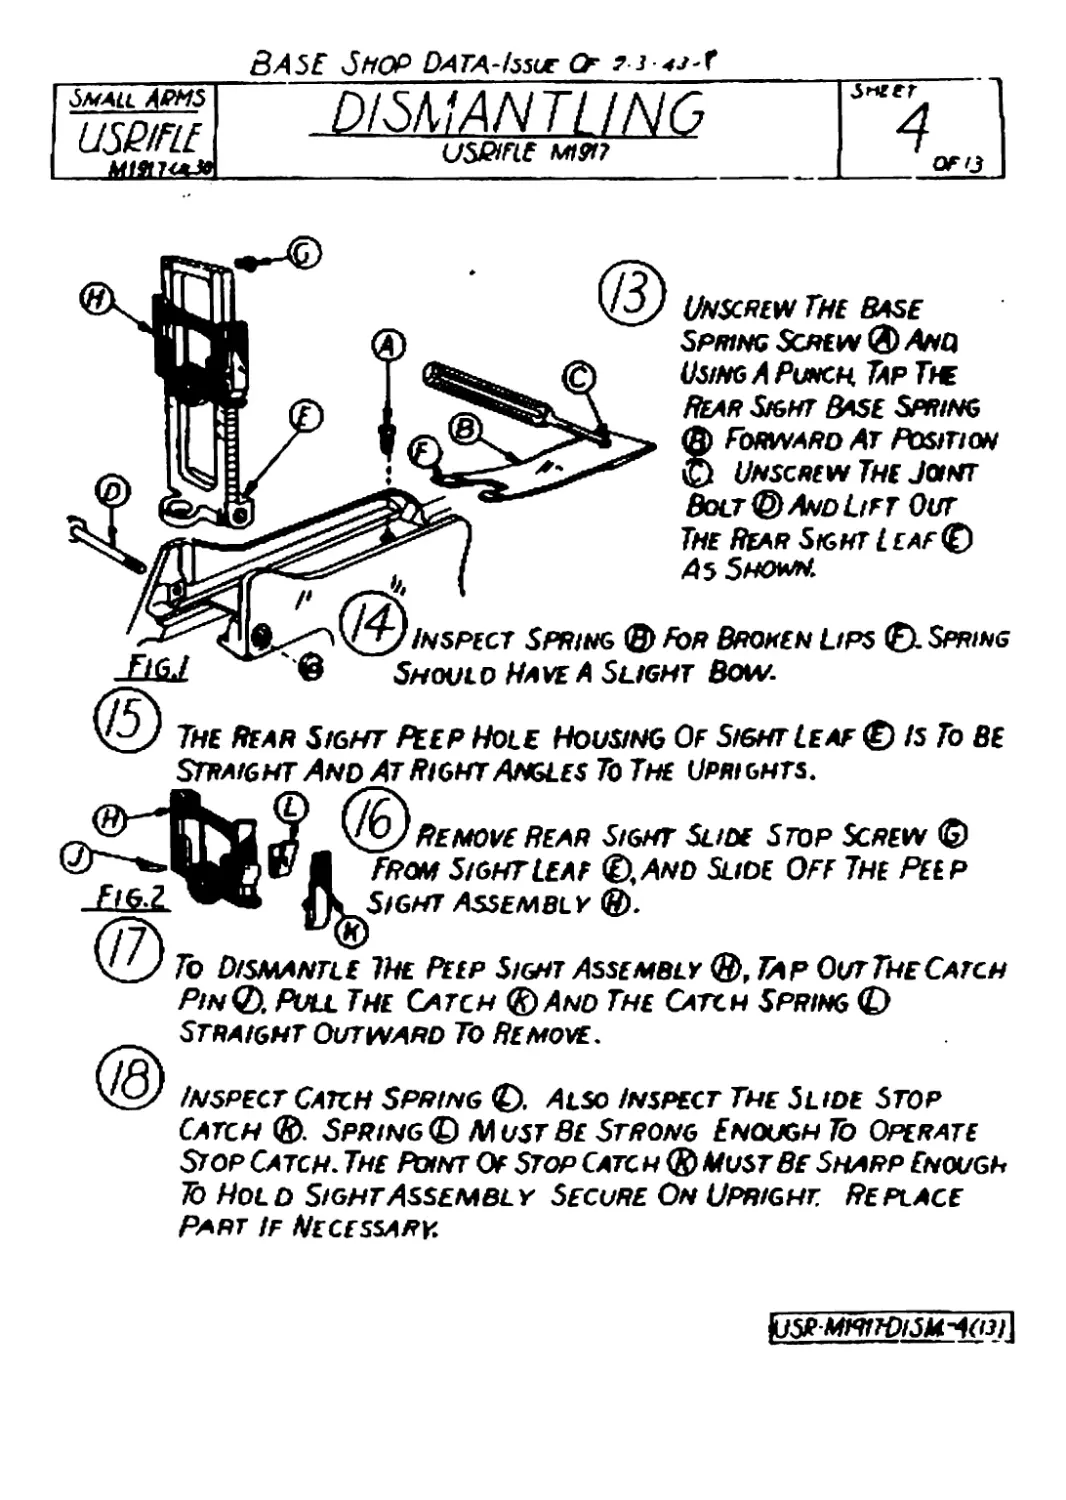
Spring Screw ® And
Using A Punch, Tap De
Rear Sight Base Spring
© Forward At Position
© Unscrew The Joint
Bolt ©And Lift Out
The Rear Sight L eaf©
As Shown.
Inspect Spring © For Broken Lips ©- Spring
® Should Have A Slight Bow.
The Rear Sight Peep Hole Housing Of Sight Leaf © is To be
Straight And At Right Angles To The Upri ghts.
Remove Rear Sight Slide Stop Screw ©
From SightLeaf <D,and Slide Off The Peep
Sight Assembly <8).
IHe Peep Sight Assembly <B),Tap Out The Catch
PinQ). Pull The Catch ©And The Catch Spring <D
Straight Outward To Remove.
Inspect Catch Spring ©. Also Inspect The Slide Stop
Catch ®. Spring © Must Be Strong Enough To Operate
Stop Catch. The Point Of Stop Catc h © Must Be Sharp Enough
To Hold Sight Assembly Secure On Upright. Replace
Part if Necessary.
LU5HM1RfH)l5M-A(D)\
Shop Data-ьи* о
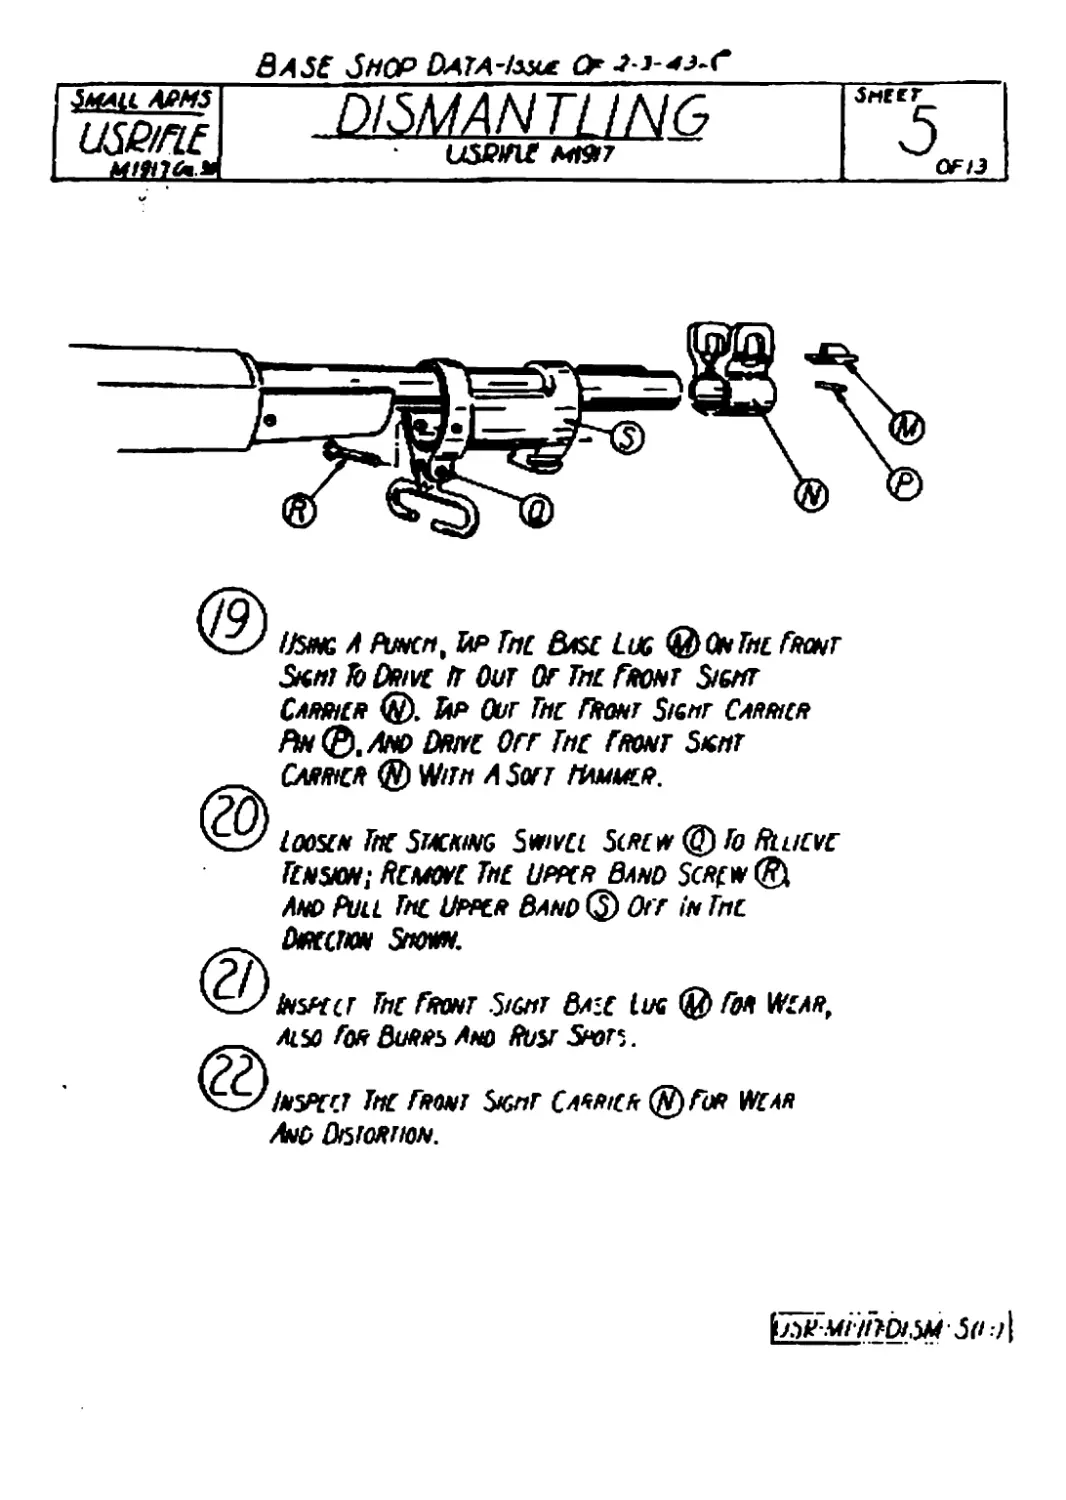
Using A Punch, Up Tnc &$[ Lug (Q)OnThl fMNT
Sum fb Dfuvc ir Out Or Тис Гноит Sight
Camhcr ©. йя Our The тент Sight Camicr
RnQ.ANO DttHC Orr Th£ ГНОНГ SKHT
Cmikh ® With A Soft Наммся.
Loosen Tnc Stacking Smvet Smew @ To Rtueve
ItNSION; RCMWC TtlC UPPCR BAND Scfi[w ©
And Puu Thc l/pnit Band © Ot r In Tnc
л О*аши SnomiN.
(?h
LnsH(J FhcГноит Sight Basc lusty)Гон Wcah,
л aso Гон Bmps And Huy 5ч»п.
(2)
't-х Fkpcct Тис Fmnt Sight Слпгнск (£)Г<* Игля
Ano Оыотшон.
h.^~W/7/>D/.W\5^ .71
вЛ Sf Shop DATA-Issue Or s-J-iJ-f
SMAIL ARMS U№ftf .DISMANTLING USPtFlE Mt9t7 Snerr 6 0Ff3
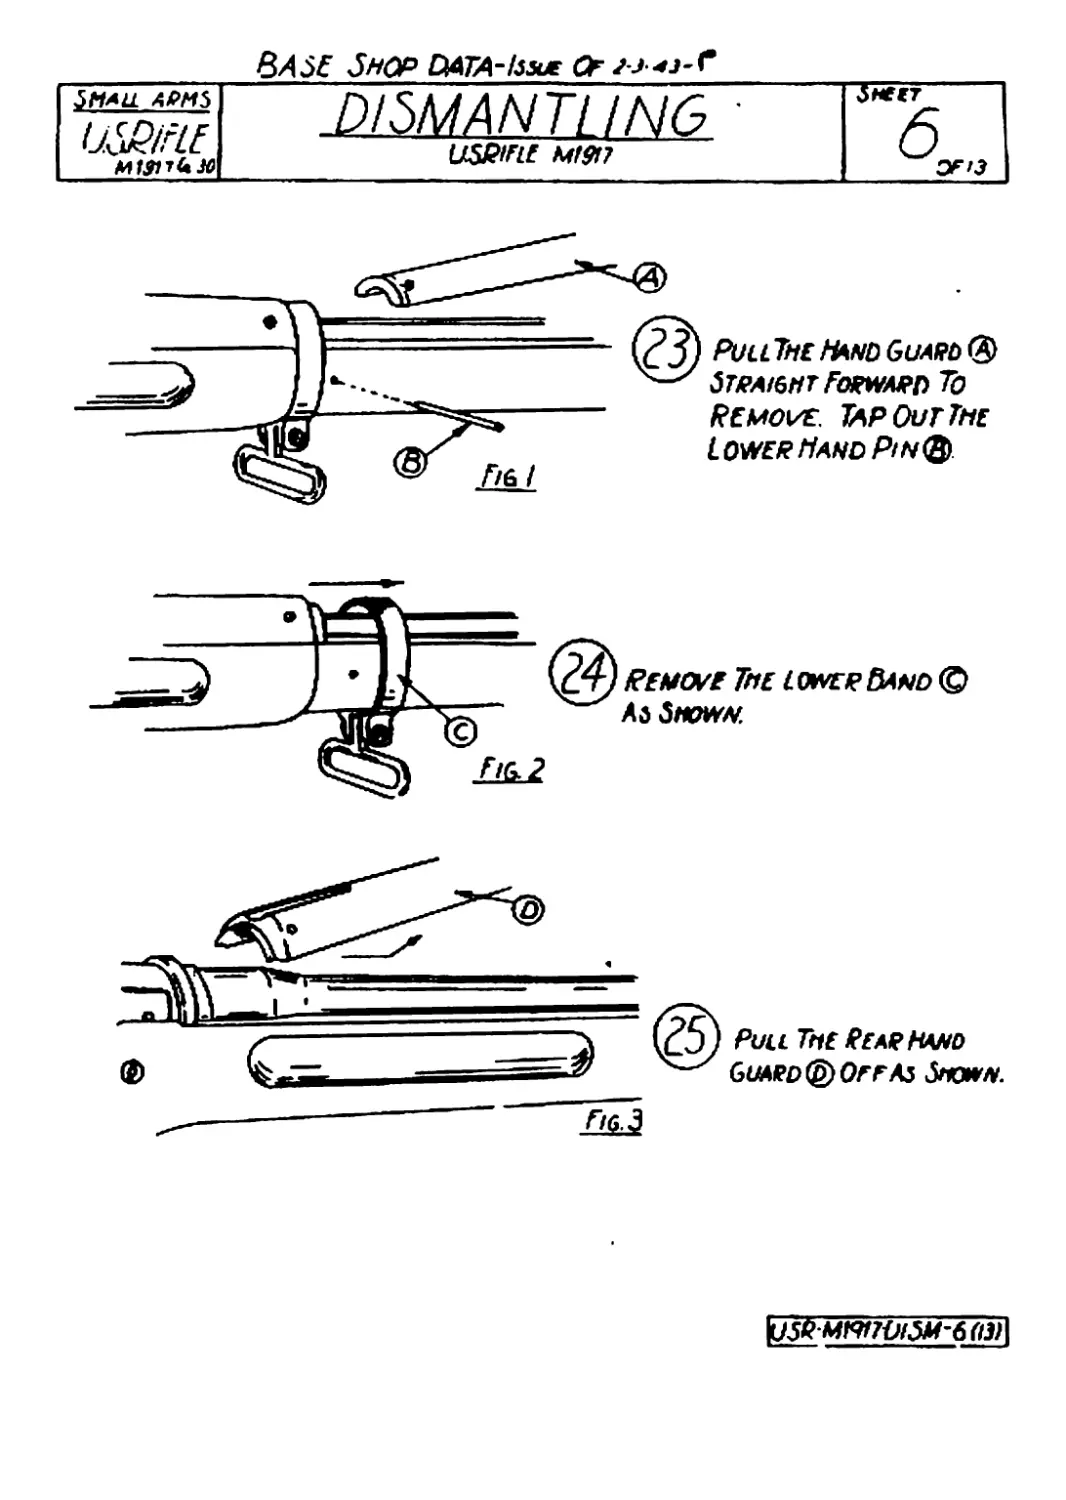
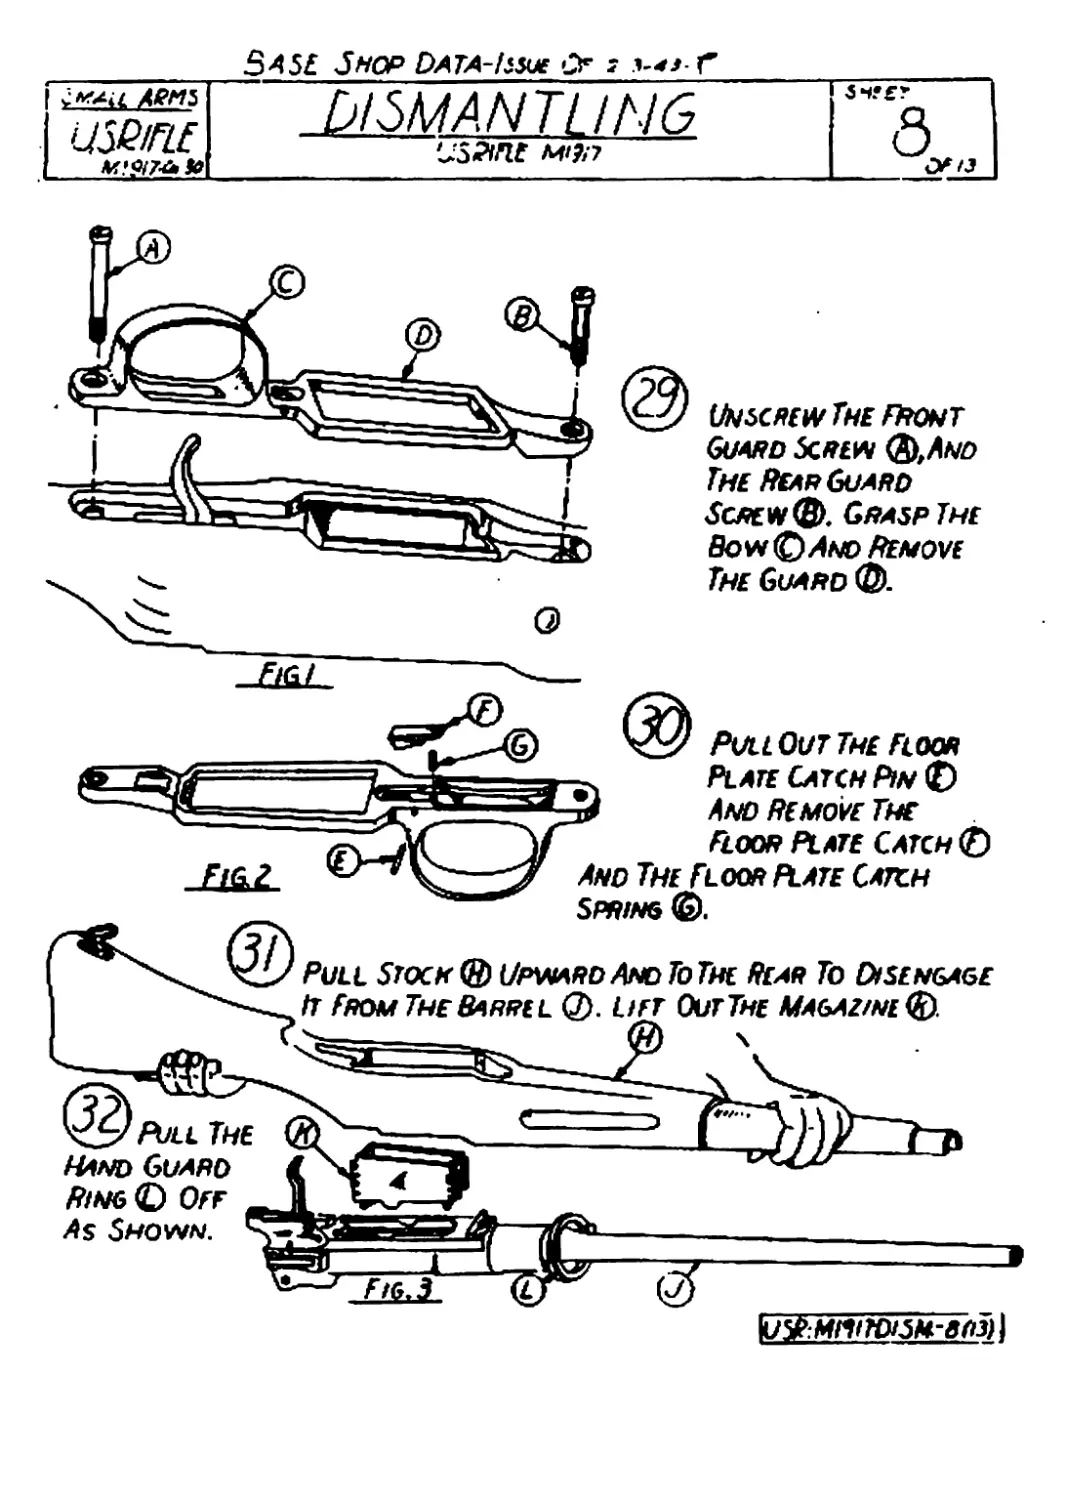
PuuThe Hand Guam ®
S7JMi6tfT fatwAvn To
Remove. Tap Out The
Iower Hand Pin®
Влзг 5ЛОР Олгд-liwe Of С
О
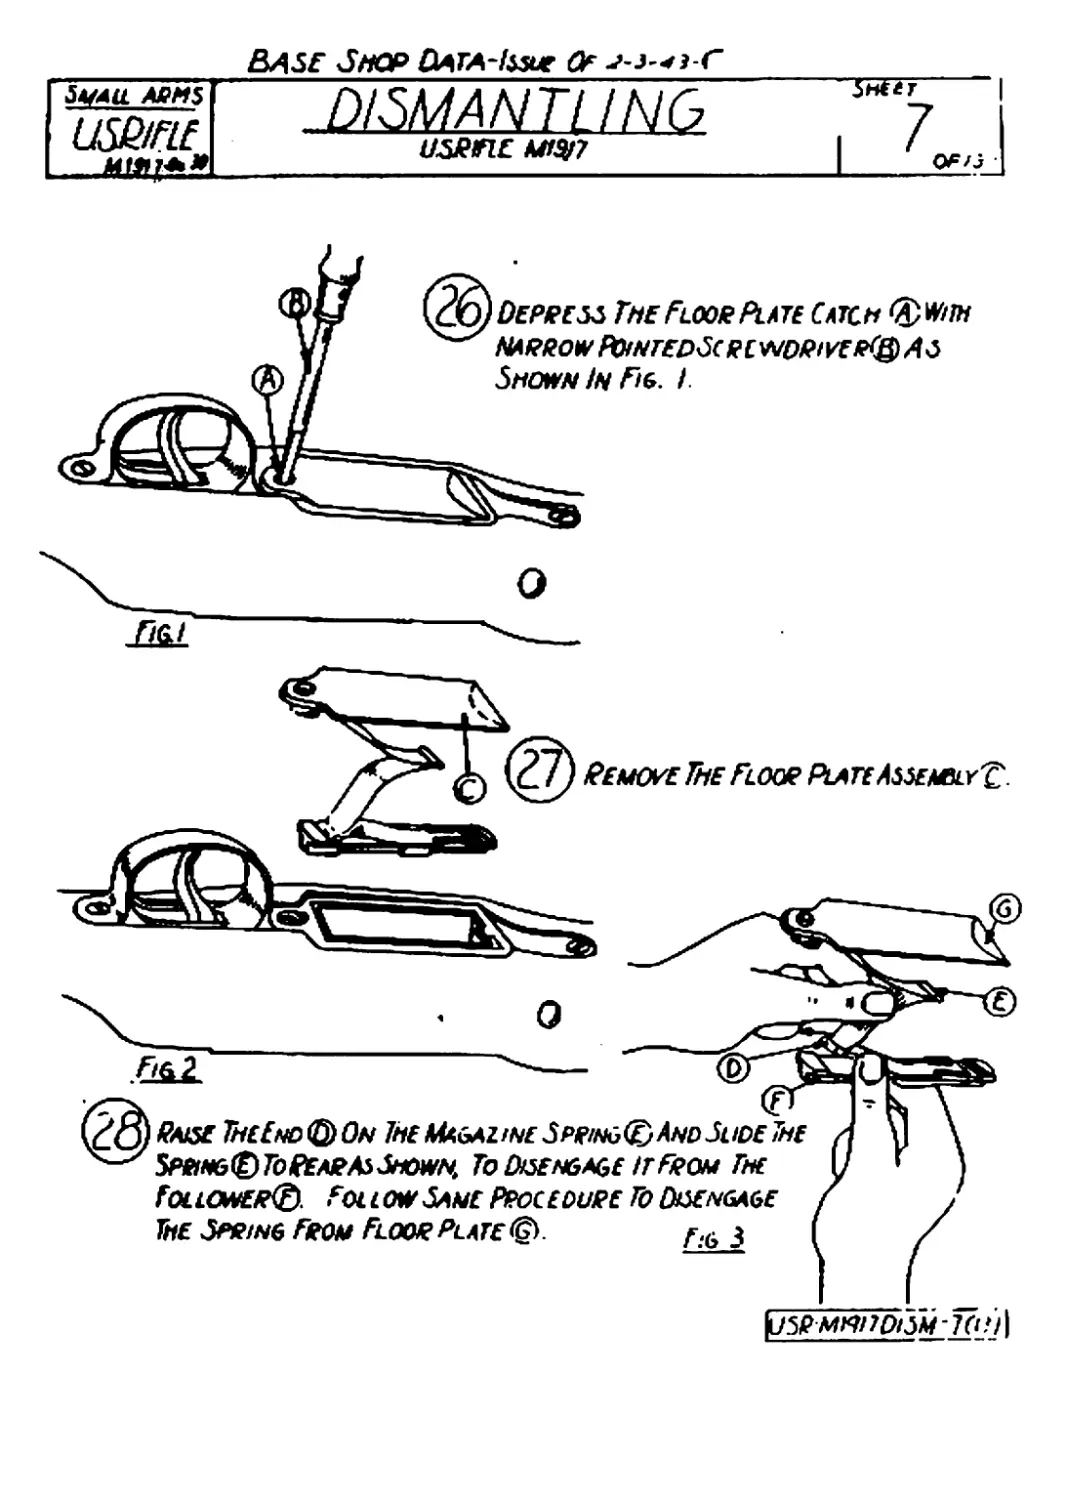
(2b) Depress The Floor Plate Catch Qwhh
NARROW POINTEDSCRL'A/DRIVE R^AS
Shown !n Fig. I
Р£ал?иг Лг Flow Plate Assembly®
УЯРМППРГЗМТО!) |
Raise TheEho®On Ihe Magazine Spring® And Slide The
5PHN6®ToREMEAsShOWN, TO DISENGAGE IT FROM ГнЕ
fOLLOHER®. Follow Sane Procedure Го [^engage
The Spring From Floor Plate®.
5^5f 5HOP DATA-liWe '> : Г
Жи ЛЕМ!
LM/FLC
DISMANTLING
'J52Wlf M/?;7
(A/sc/ww The front
Guard Scriw (&And
The Rearguard
Screw®. Grasp The
Bow® And Remove
The Guard ®.
^.MrtiTDiSH^i) |
Base Shopdata-issueof ? an .
USB/flE
MtWeA.30
ASSEMBLING
usewf, mfh7
D
GOGMf-^KejO'IS
'<NaOti -4t-O-N»^OQ
Select A Bimo. And Poceiven As$emoly,©Fig I In
Much The Headsimcc. Is Gorpect In Accordance Mth
Operation 41 Of Dismantling. InsertGoGape ©
(4l~6-ax)-75)iN Cnamer. Dot r© Should Close. Insert
NoGqOwGE 4F6200-KX>. DOLT SHOULD NOTQOX.
F&Z
F/gS
Inspect The L/cg ©Of Extq^toq© Noting
THeiq Condition As lb Wear AM) Mutilations
Extractoq©Shouu) Have ASught Bend.
Giving It Spring Tension
Inspect TheShellSeat InBolt© Stone
Down All High Spots And Qemove All Oust
NOTE The Ejection Of Shells ISA VEor Im
POGTANT OPEOAHON, ThEQEFQQE EXTQACTOQ©
And Bqlt® Should Be Inspected Перу
Thoroughly
Slide The Extoactoo© Onto The Lug ©as
Shown In Fig 2. GqaspTheBoltAsShownIn
Fig J And Push The Extqactoq Down With The
Thumb
|u3P*<W7-X3afA<fltjW6-A“ I
* Replaces Sheet Я BSD Unit no. 2. Issue of 4 » as
USPifle. М1ЭГ7. Cal, SO
ВД5£ SHOP DATA-ls$u£ Of
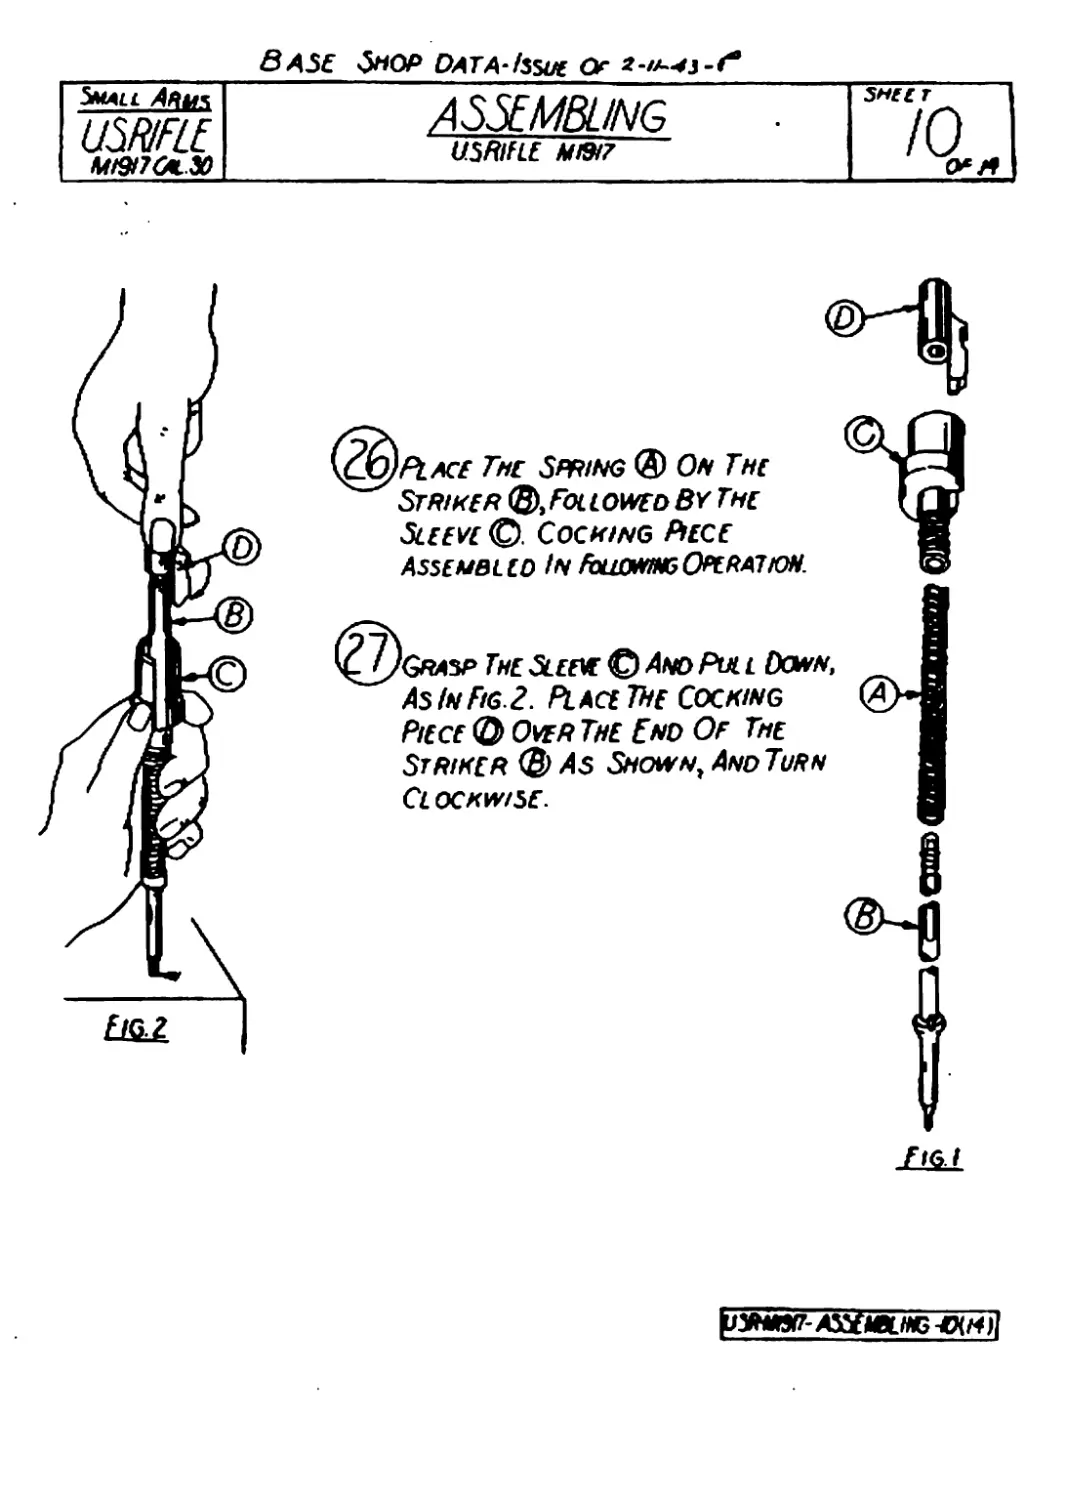
Small Анмч USR1FLE Atl9l7GtL.3O ASSEMBLING USRIFU Midi? Sneer IO„
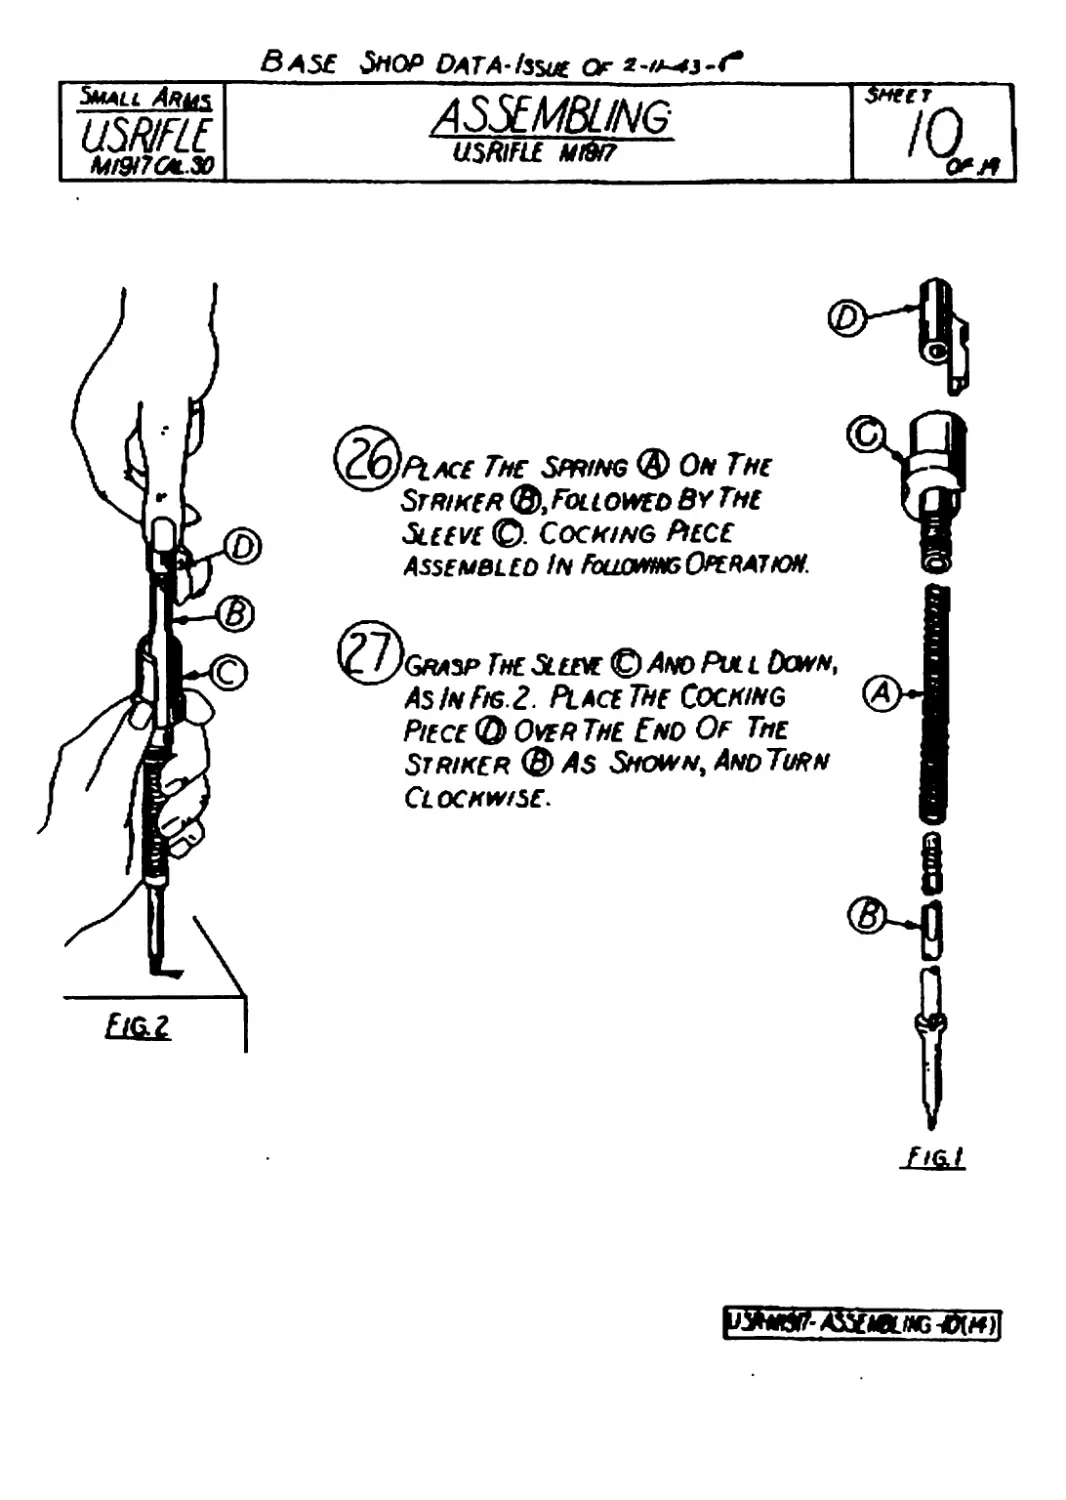
(^£))pLACE The Spring <3> 0* The
Striker <&,Followed By The
Sleeve ©. Cocking Piece
Assembled In ЕоиошвОкААТЮН.
(£7)&изр Гне Sleek © And Pul l Down,
AsInFig.Z. Place The Cocking
Piece © Over The End Of The
Striker © As Shown, And Turn
Clockwise.
ZaH
№tt№- Aj&iOJK -0(M)|
EASE Shop Cata-Iswe Of H i3 44 в
Small АРМЕ:
DISMANTLING
USMFLEMW7
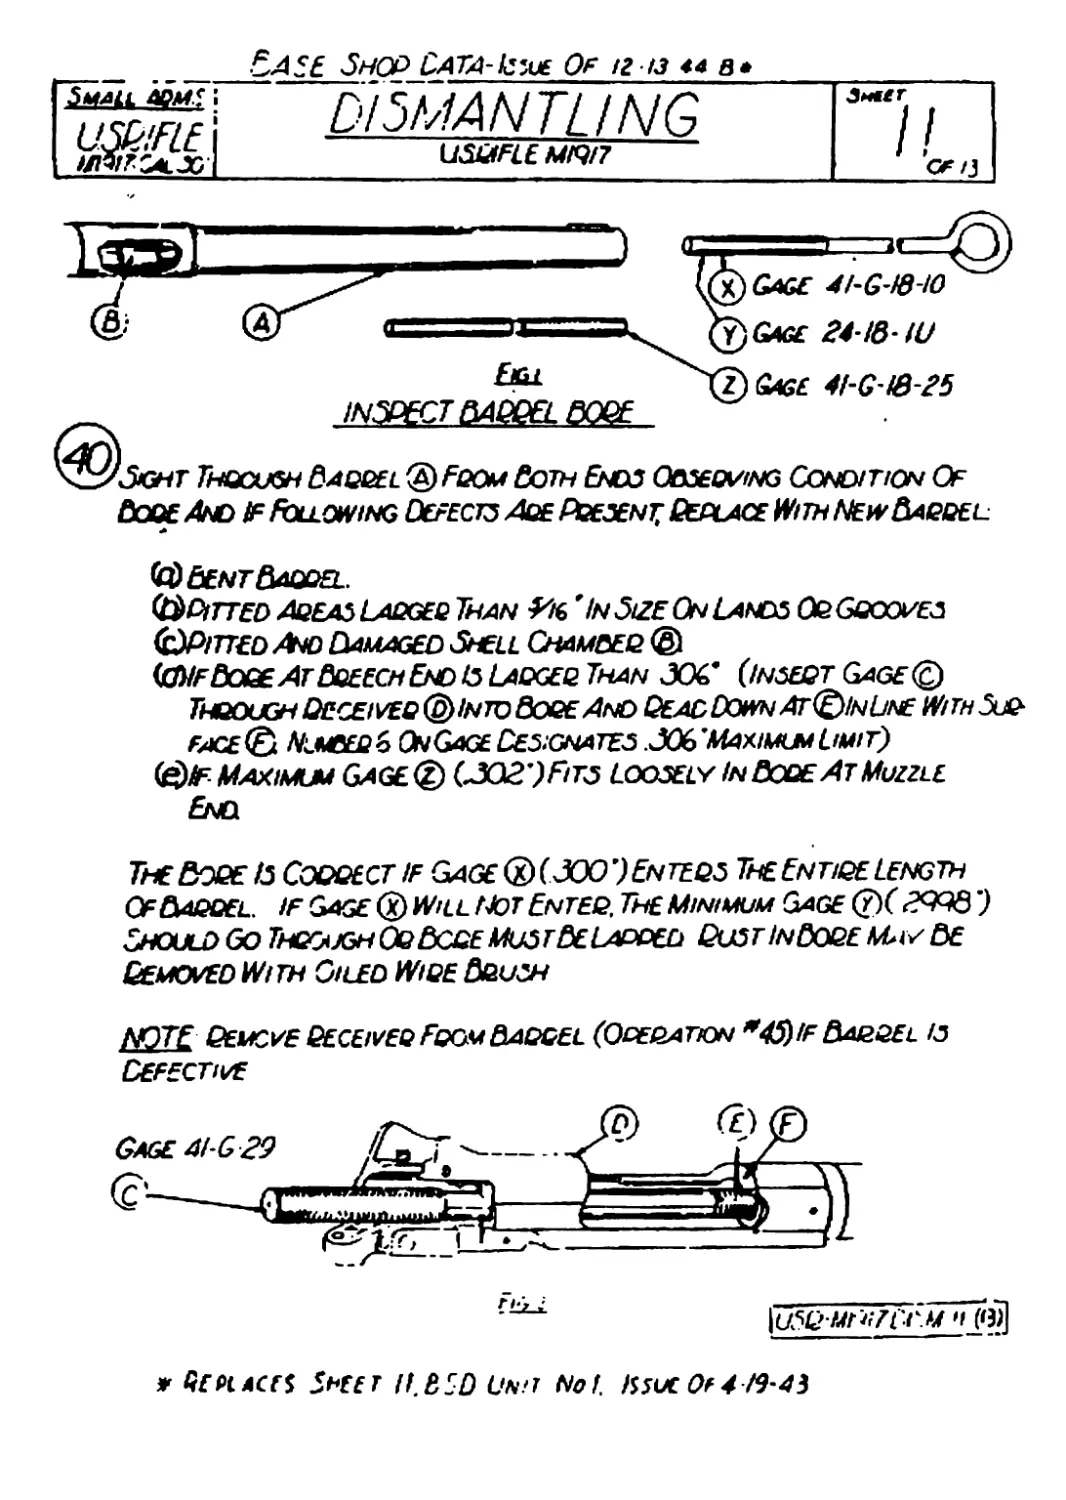
INSPECT BAQQEL BOQE
3GHT ThQOUGH BAQQEL @FOOM BOTH ENDS OOXQWNG CONDITION OF
Bode And f Following Defects Aqe Pqesent; Peplace With New Baqqel
Bent Baqqel.
(^Pitted AqeasLaqgeq Than Vk> *In Size On Lands OgGcoo^es
(^Pitted And Damaged Stell Chambeq ®
<£NfBOQEAtBQEEChEnDIS LAQGEQ THAN JOC (iNSEQT GaGE©
ThgoughOecei^Q^IntoBogeAnD QeadDownAt(^)InUne With Suq-
face<& NimbepS OnGage Designates SOG'Max-imumLimit)
®If Maximum Gage(^)CSO2')Fit3 Loosely In Bode At Muzzle
End
The&xe is Coqqect if Gage ® (JOO’)Enteqs TheEntiqelength
OfBapqel. if Gage ® Will Not Enteq, The Minimum Gage (y)( ')
Should Go ThqoughOqBcqeMustBeLapded OustinBoqeMayBe
Gemoued With Oiled Wide Bqush
NOTE Qemgve QeceiveqFqgmBaqqel (Ooeqatton *4$IfBaqqel is
Defective
» He pi acts Sheet H.bsD Unh NoL Ksuc0t4 19-аз
В Д5£ Shod Data-IsshlOf т ми ♦« в *
A&M5 извне U19irc«.X> DISMANTLING uS&FLt MI9I7 SH£€T /г <У~'з
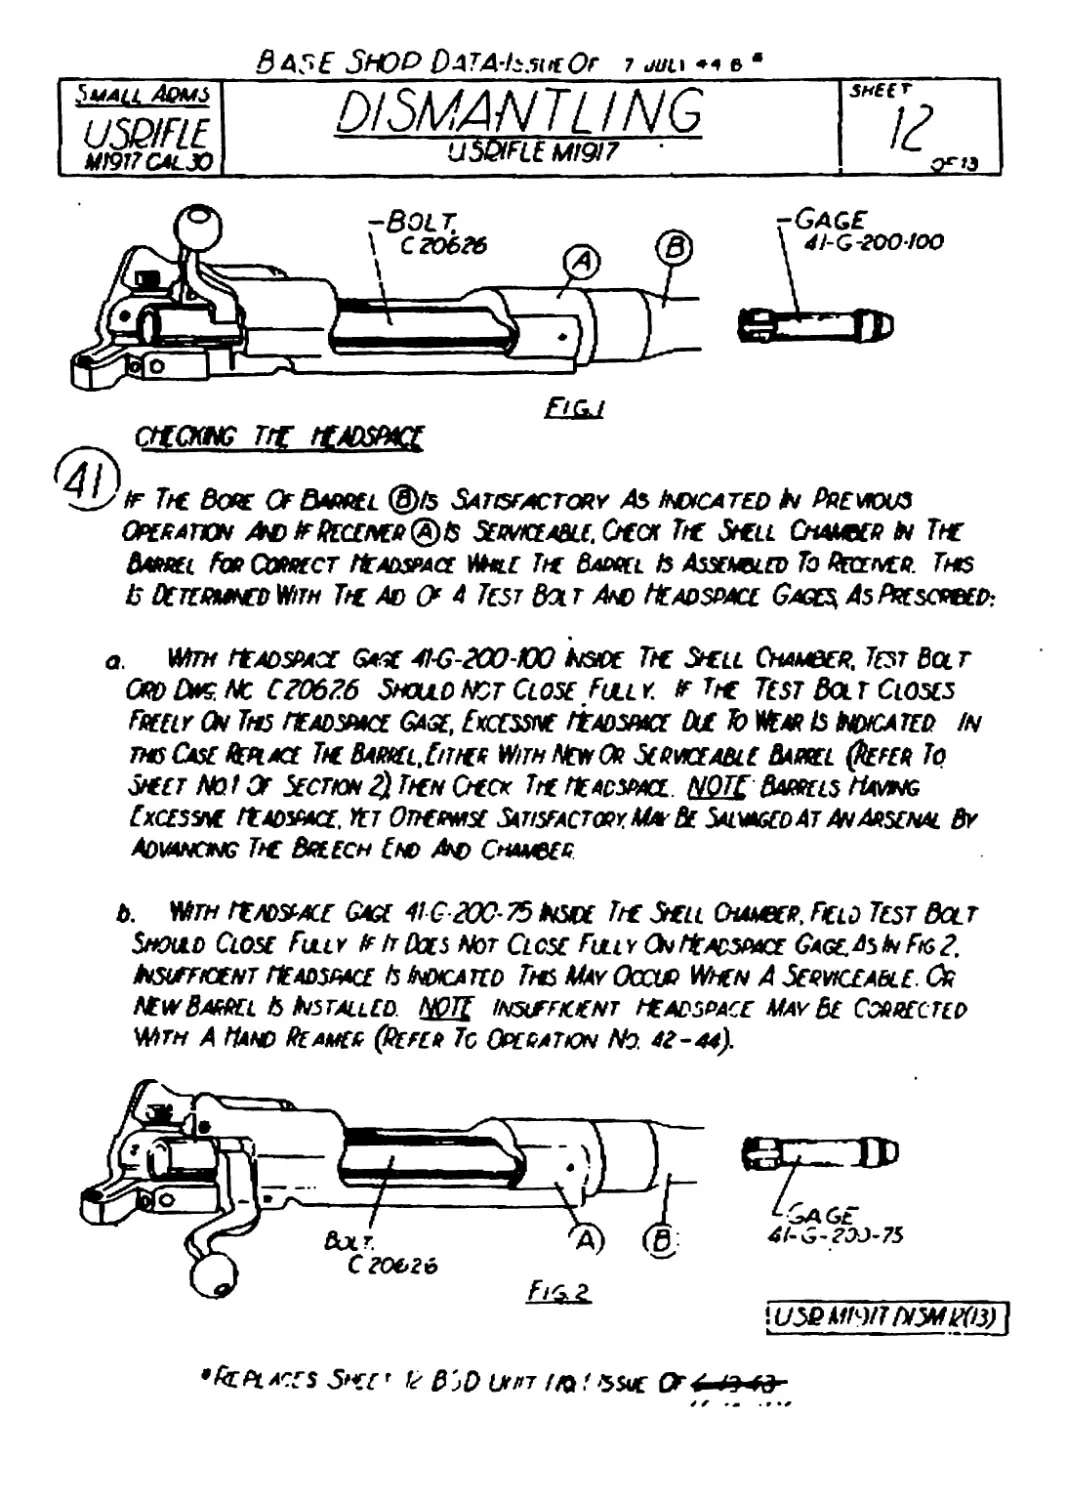
_ (ЖМИ? Г/С FfAOSfACT
(AlJ
t*i/ If Tn. Bore OfBnirel @is Satisfactory As indicated bi Previous
Operahon and if Receiver® is Замсиаи. Скся Tit Shell Chamber In The
Barrel For Correct Headspace Mtar Tn Barrel Is Assembled To Receiver. Ths
b Determned With Tie Ad O' a Test Bolt And Headspace Gages AsPrescrbed:
a. WITH HEADSPACE Gtft AI-G-ХО-ЮО Л«Г Tl€ SHELL CHAMBER. TEST BCL T
Ord Due. Nc CZ06Z6 should not Close Full y. if t# Test Bol t Closes
Freely On Ths headspace Gage, Excessive itADswx Due to №? is hd/ca ted in
das Case &hace Tie Barrel. fn/ER WwNehOr Servkiabie Barrel Qeter Tq
&EET No t Or Section Tien Oecx Tie headspace. NOTt Barrels Hamng
CxCESMVE rtADVACE, YtT OUERVASE SATISFACTORY. М» Bt SALVAGED AT An ARSENAL By
Advancing Tie Breech End Am Chamber
b. Wth rtADSMCE Gage 1? G £00-75 Mde Tie Stell chamber, Feld Test Bol т
Snoiad Close Fully RtrOocs Not Close Fully OnHeadsimce Gage.AsInFi6Z
Nsuffkent headspace b Endica ted Ths May Occur When A Serviceaeile. Or
new Barrel b Installed. NOU insuffeent headspace May Be Corrected
Wth A Hand Reamer (Refer Tc Operation No. re-44).
'faflLACrS 5»<r' Я BjD UtPT flQ ! ISSUE QFi
4l-G-FO)-75
iuseubVTTRSMROs) i
Base Shop Data issue Of 7 jult hb *
DISMANTLING
USRlFLE ШЭИ
Small Аёмх U6P/FIE Mtd(7-CN.JD DISMANTLING USRlFLE MI9I7 Sheet IJ Or
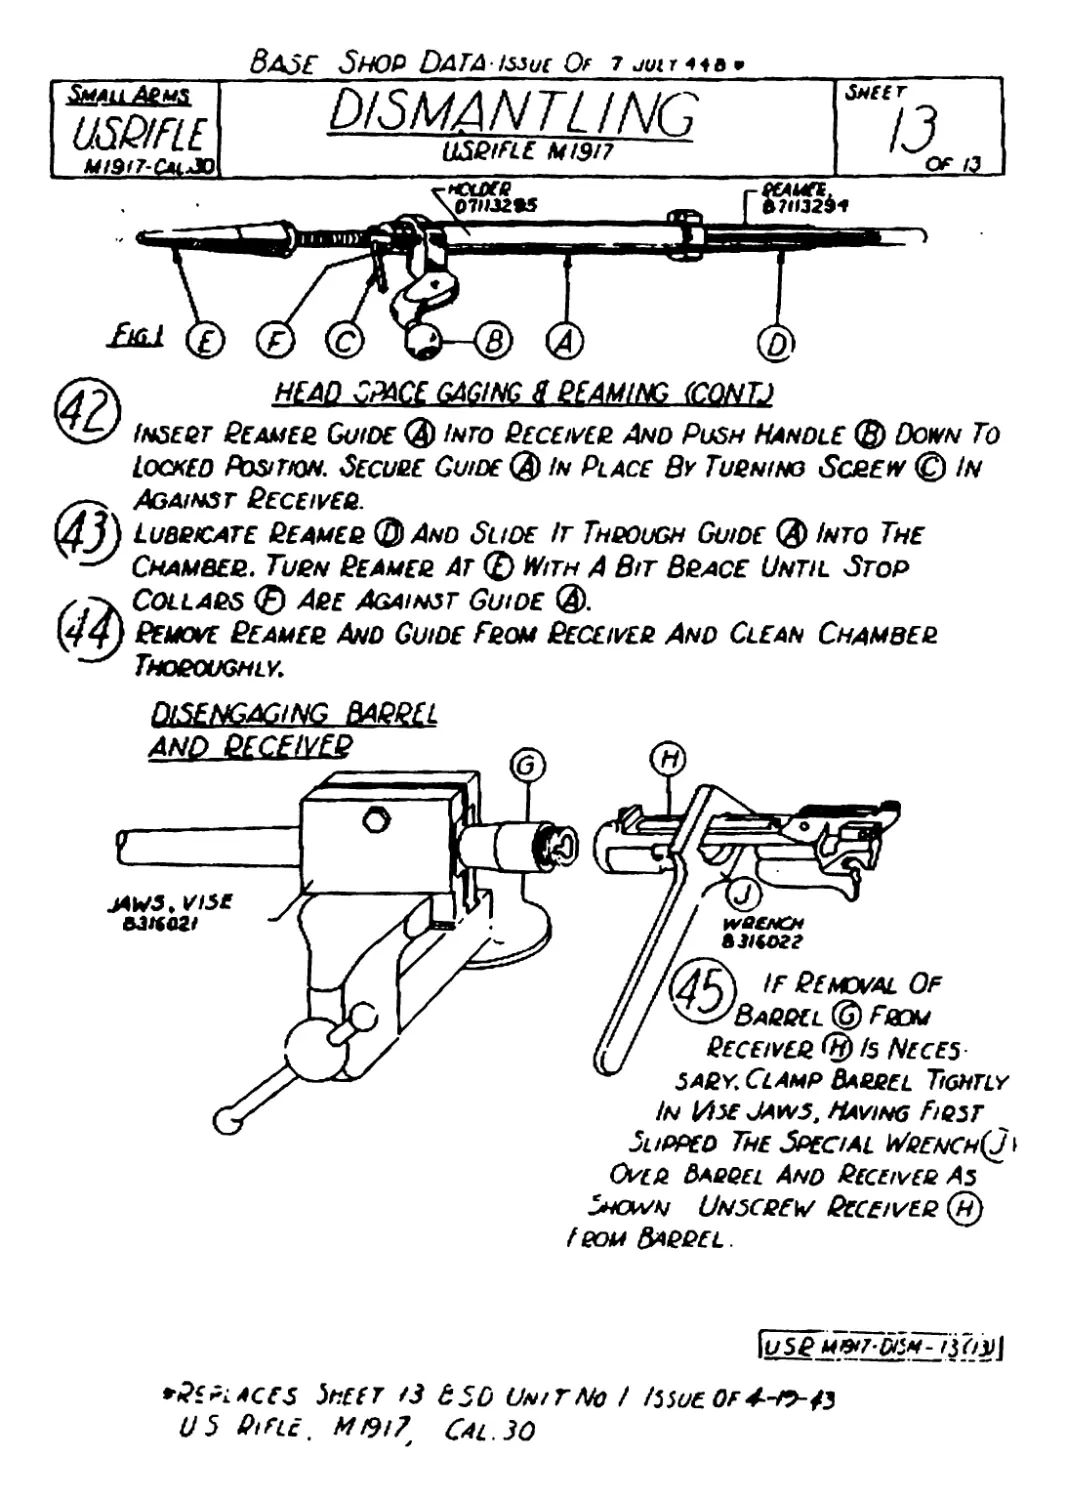
H£A£L3*&£№NG. ШАМЖ ..(CQNTJ.
't-у Insert Beamer Guide (3> into Beceiver And Push Handle ® Down To
Locked Position. Secure Guide (3) in Place By Turning Screw © №
@)
<$)
Against Beceiver.
Lubricate Beamed (fy And Slide It Through Guide © Into The
Chamber. Turn Beamer at © With A Bit Brace Until Stop
Collars © 4w Against Guide ®.
Behove Beamer And Guide From Beceiver And Clean Chamber
Thoroughly.
disengaging babbll
In Их Jaws, Having First
Slipped The Special Wrench(J\
Over Barrel And Beceiver As
Shown Unscrew Beceiver (h)
I еом Barrel .
It/Sg MDtT'&SM- ijoul
places Sheet /3 bSD Unit No I issue of A-rs-ts
US PiFLe. мы 7 Cal. 30