/


Text
ENCYCLOPEDIA
OF RAWHIDE
AND LEATHER
BRAIDING
BRUCE GRANT
Bruce Grant showing a braided quirt (in right hand) and twist-braid reata,
braided rawhide reins, braided rawhide headstall, and braided chin strap (in left
hand) at the Miracle of Books Fair m Chicago. The articles in the author s left
hand are held together by braided rawhide hobbles. Photo. Chicago Tribune.
ENCYCLOPEDIA
OF RAWHIDE
AND LEATHER
BRAIDING
BRUCE GRANT
CMrt CORNELL MARITIME PRESS
VjigZ Centreville, Maryland
A Partial List of Other Books by Bruce Grant
THE ADVENTURES OF ROBIN HOOD
AMERICAN INDIANS: YESTERDAY AND TODAY
BOY SCOUT ENCYCLOPEDIA
MY COWBOY BOOK
COWBOY ENCYCLOPEDIA
CYCLONE
DAVY CROCKETT, AMERICAN HERO
EAGLE OF THE SEA
FAMOUS AMERICAN TRAILS
FIGHT FOR A CITY
FIRE FIGHTERS
HOW TO MAKE COWBOY HORSE GEAR
MY INDIAN BOOK
ISAAC HULL, CAPTAIN OF OLD IRONSIDES
KNOW YOUR CAR AND HOW TO DRIVE
LEATHER BRAIDING
LEOPARD HORSE CANYON: THE STORY OF THE LOST APPALOOSAS
LONGHORN: A STORY OF THE CHISHOLM TRAIL
NORTHWEST CAMPAIGN. THE GEORGE ROGERS CLARK EXPEDITION
PANCHO: A DOG OF THE PLAINS
PONY EXPRESS
RIDE, GAUCHO
SIX GUN A STORY OF THE TEXAS RANGERS
THE STAR-SPANGLED ROOSTER
THOMAS TRUXTUN, CAPTAIN OF THE CONSTELLATION
TONG WAR! A HISTORY OF THE CHINESE TONGS IN AMERICA
(With Eng Ying Gong)
A TRIP IN SPACE
WARPATH: A STORY OF THE PLAINS INDIANS
ZACHARY, THE GOVERNOR’S PIG
CONTENTS
Foreword xvii
The Romance of Leather Braiding xix
Rawhiding in the Old West xxv
Making and Working Rawhide; Leather-braiding Tools
Making and Working Rawhide—PL 1 1
Cutting Rawhide in the Argentine—Pl. 2 13
Leather-braiding Tools—Pl. 3 20
Thong Cutting—Pl. 4 22
Twist Braids
Twist Braids—Pl. 5 26
Round Braid of Two Thongs or Trick Twist—Pl.5 26
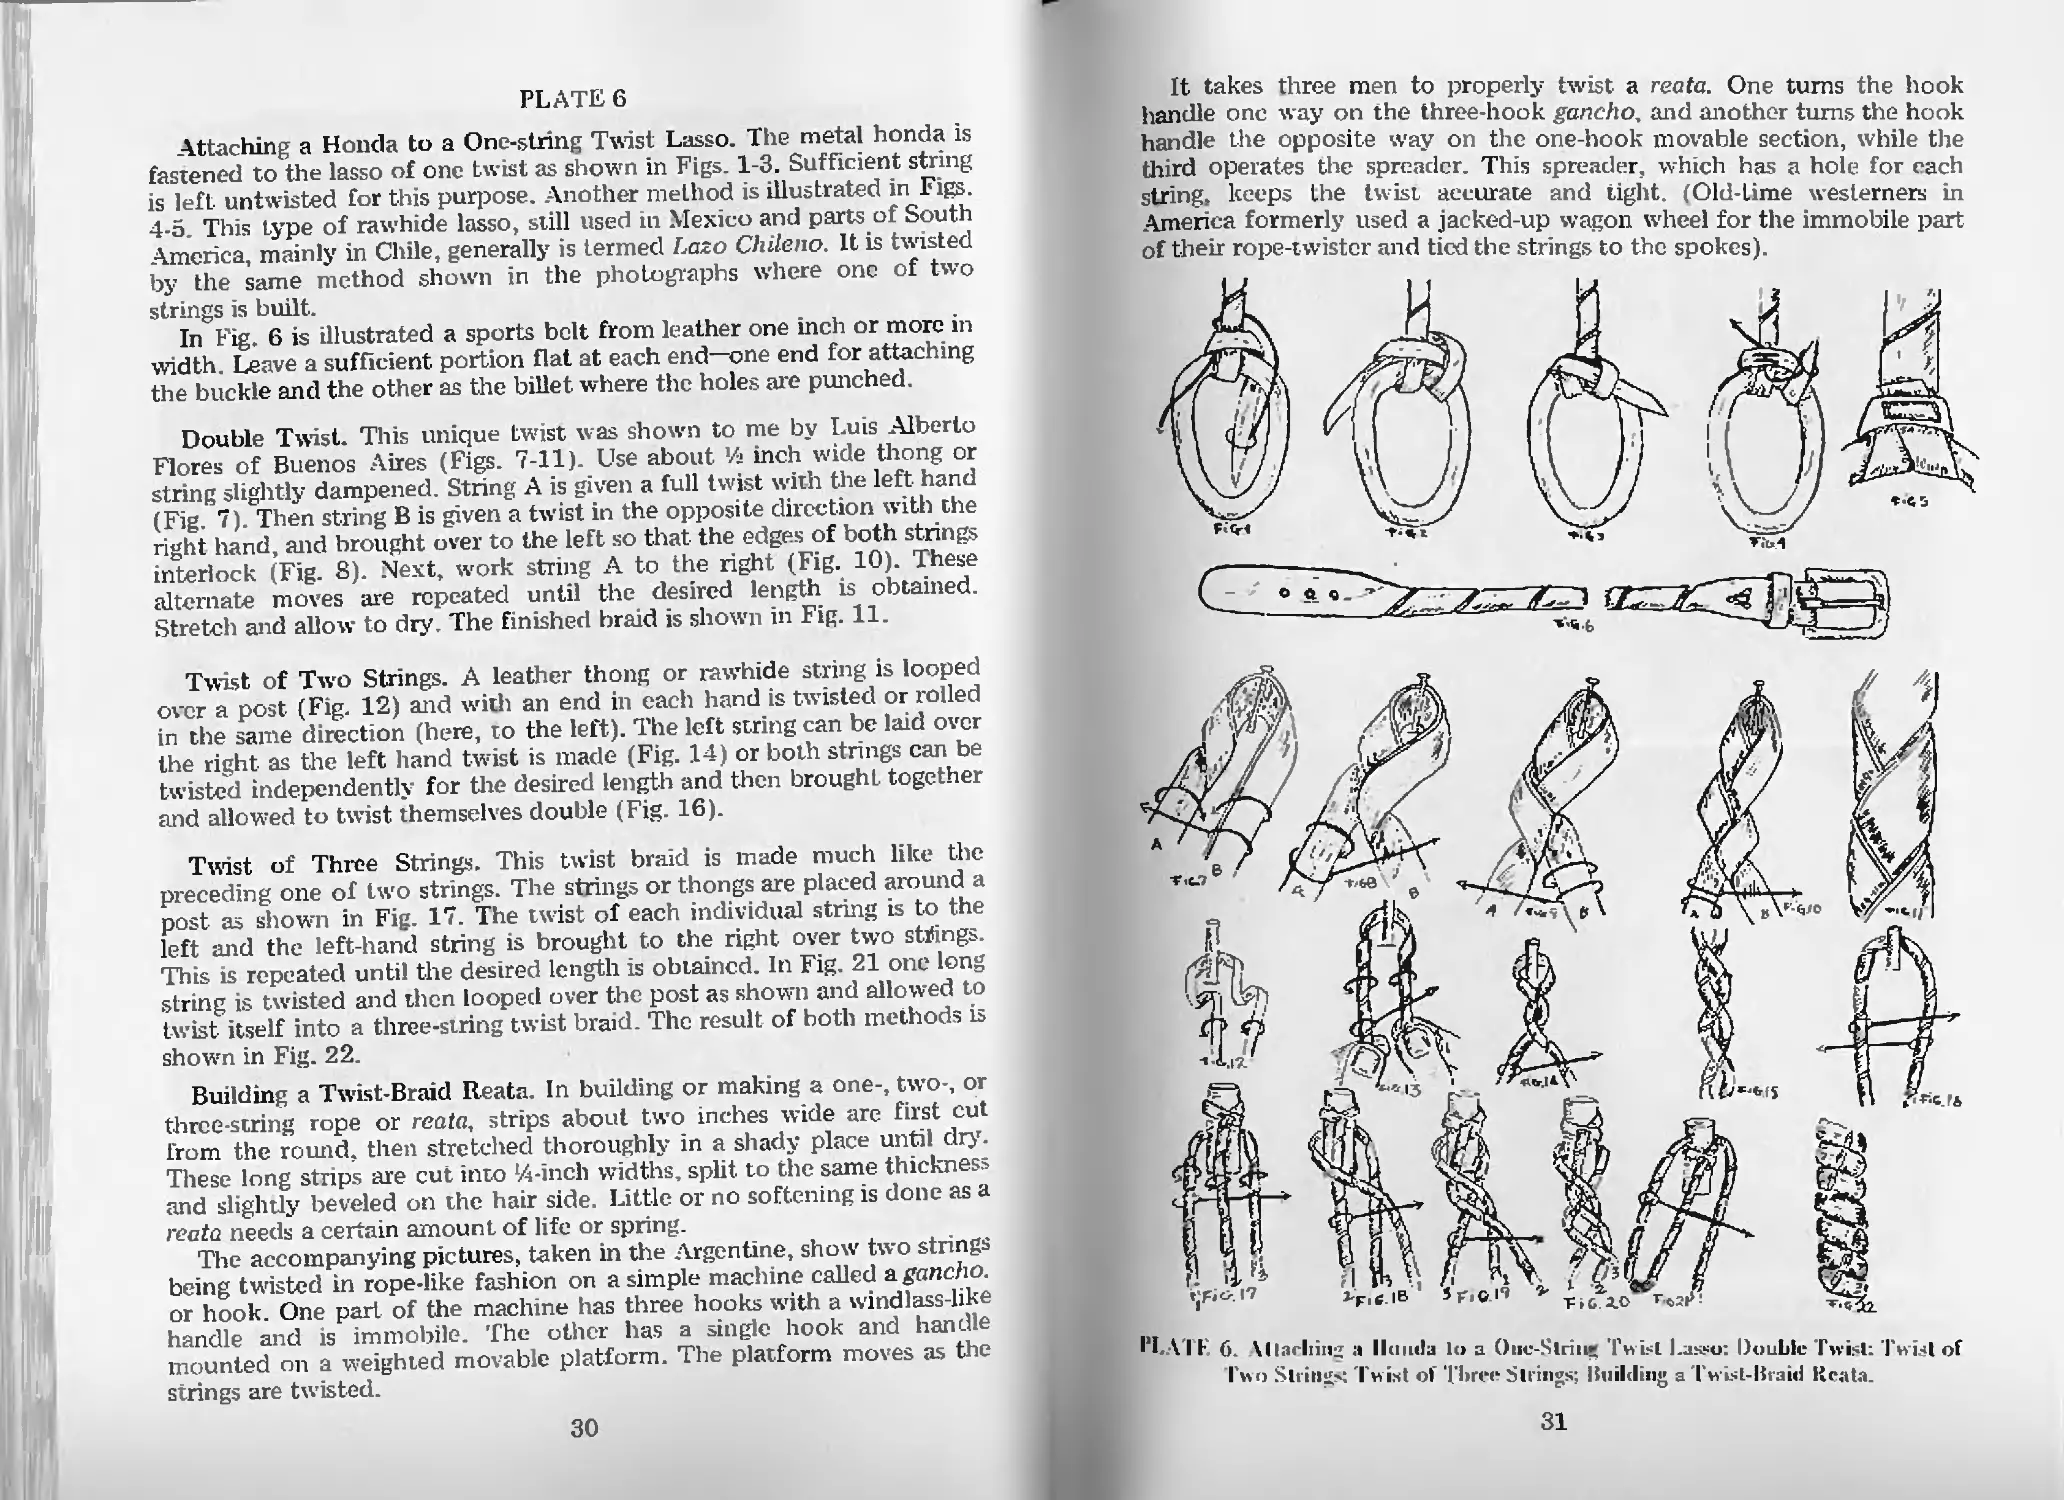
Attaching a Honda to a One-string Twist Lasso—Pl. 6 30
Double Twist-Pl. 6 30
Twist of Two Strings—Pl. 6 30
Twist of Three Strings—Pl. 6 30
Building a Twist-Braid Reata—Pl. 6 30
Simulated Four-String Round Braid—Pl. 7 34
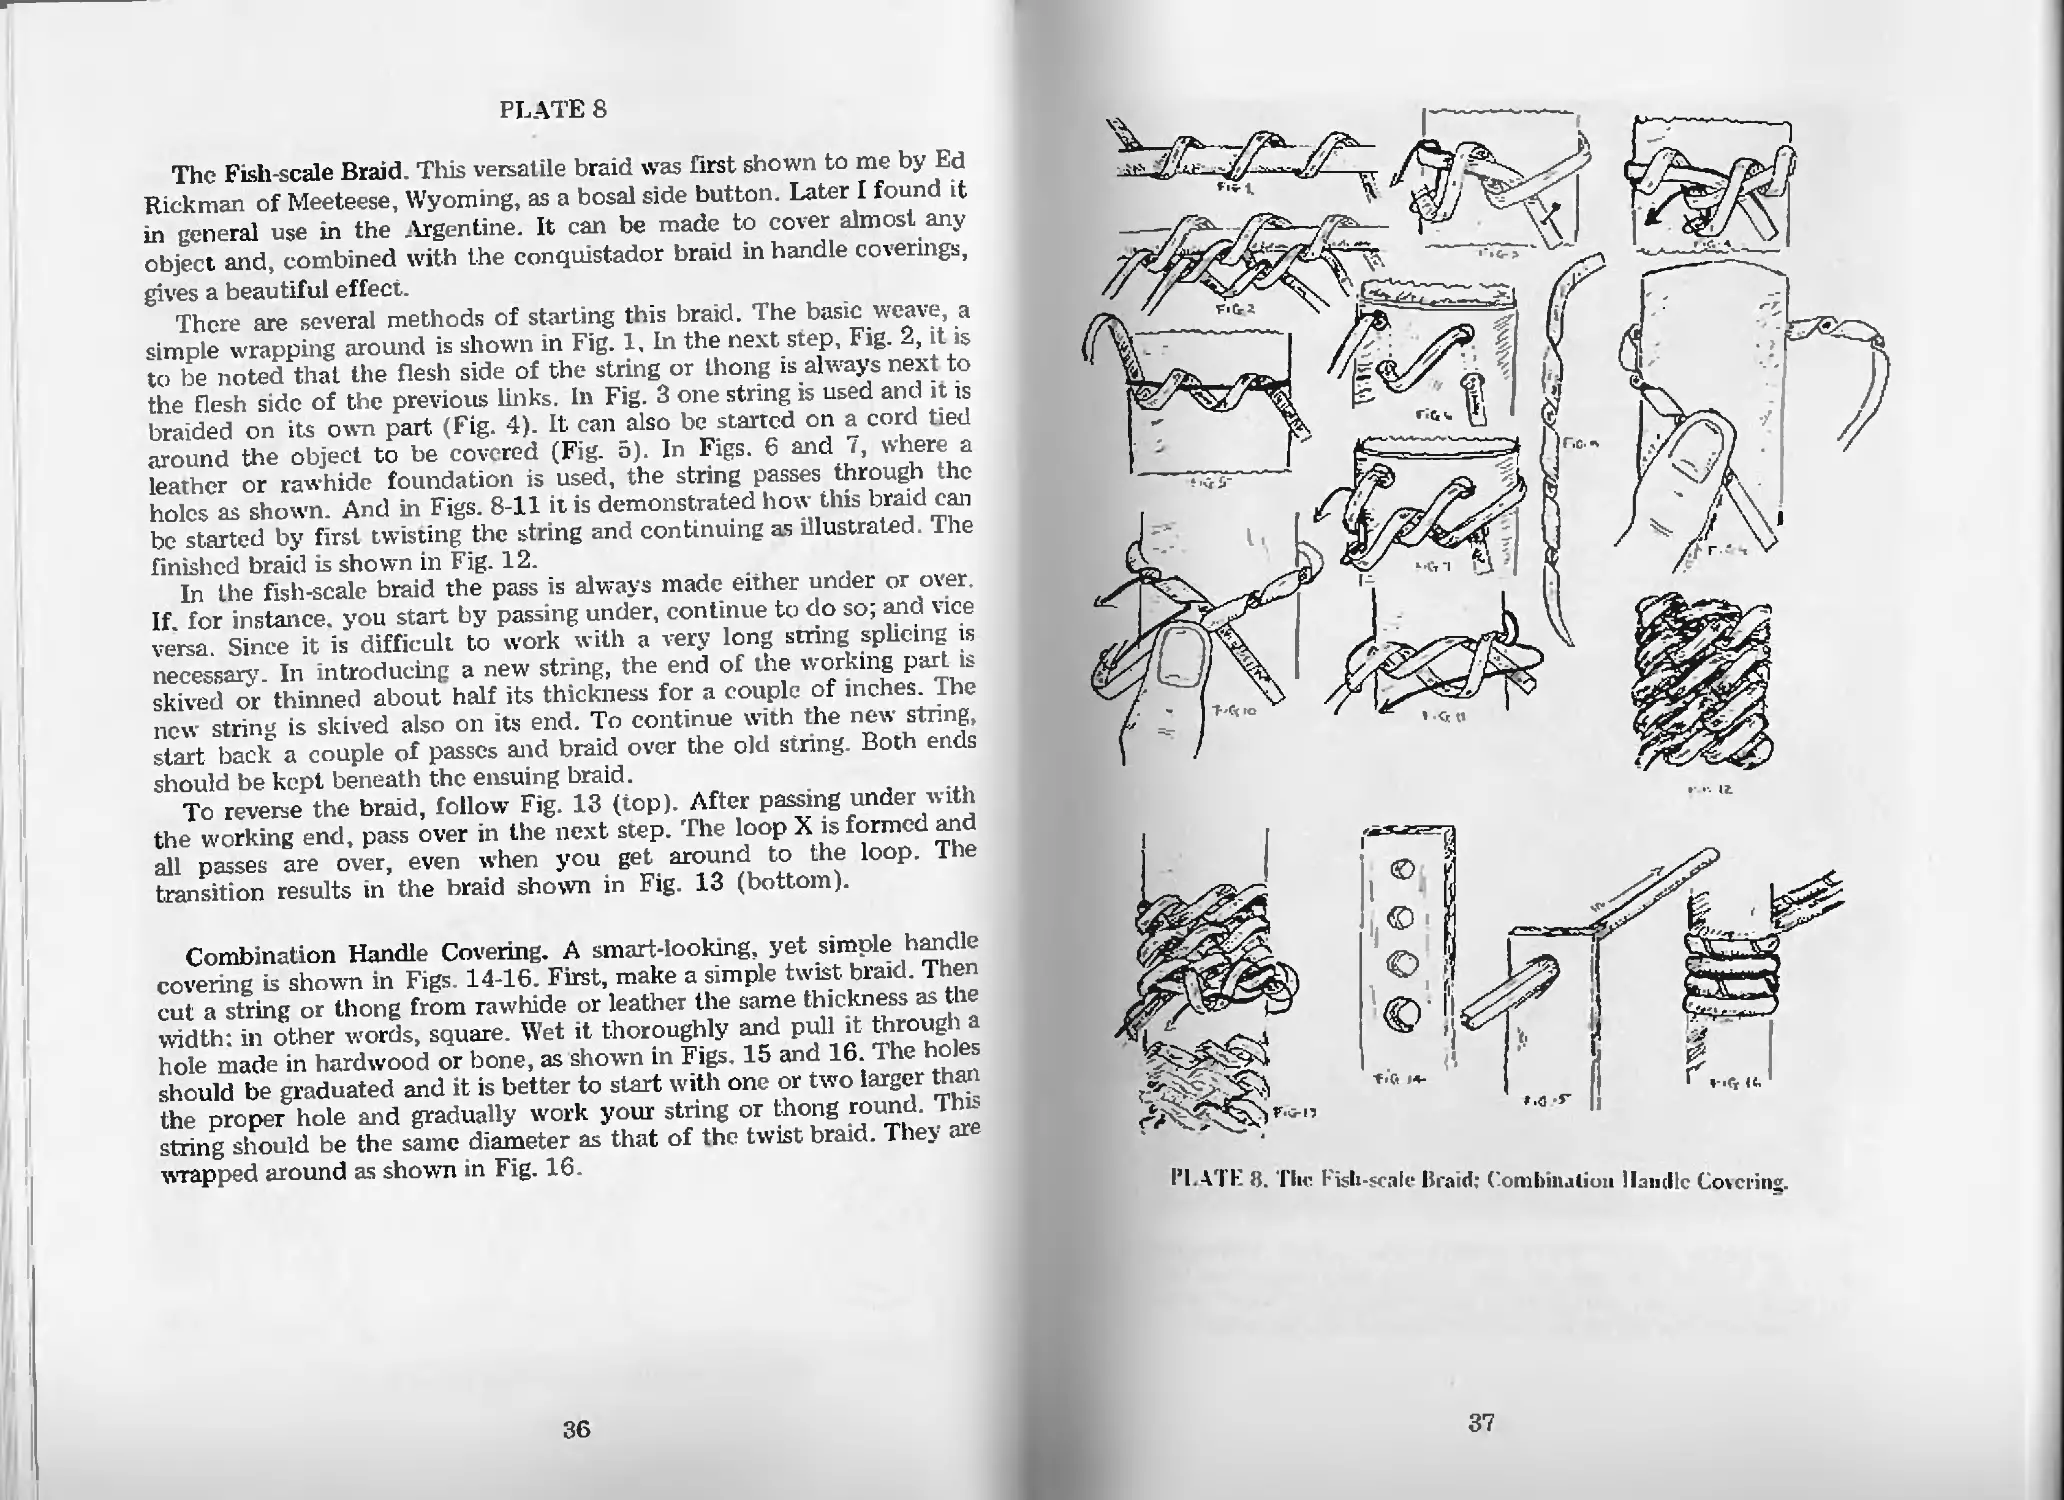
The Fish-scale Braid—Pl. 8 36
Combination Handle Covering—Pl. 8 36
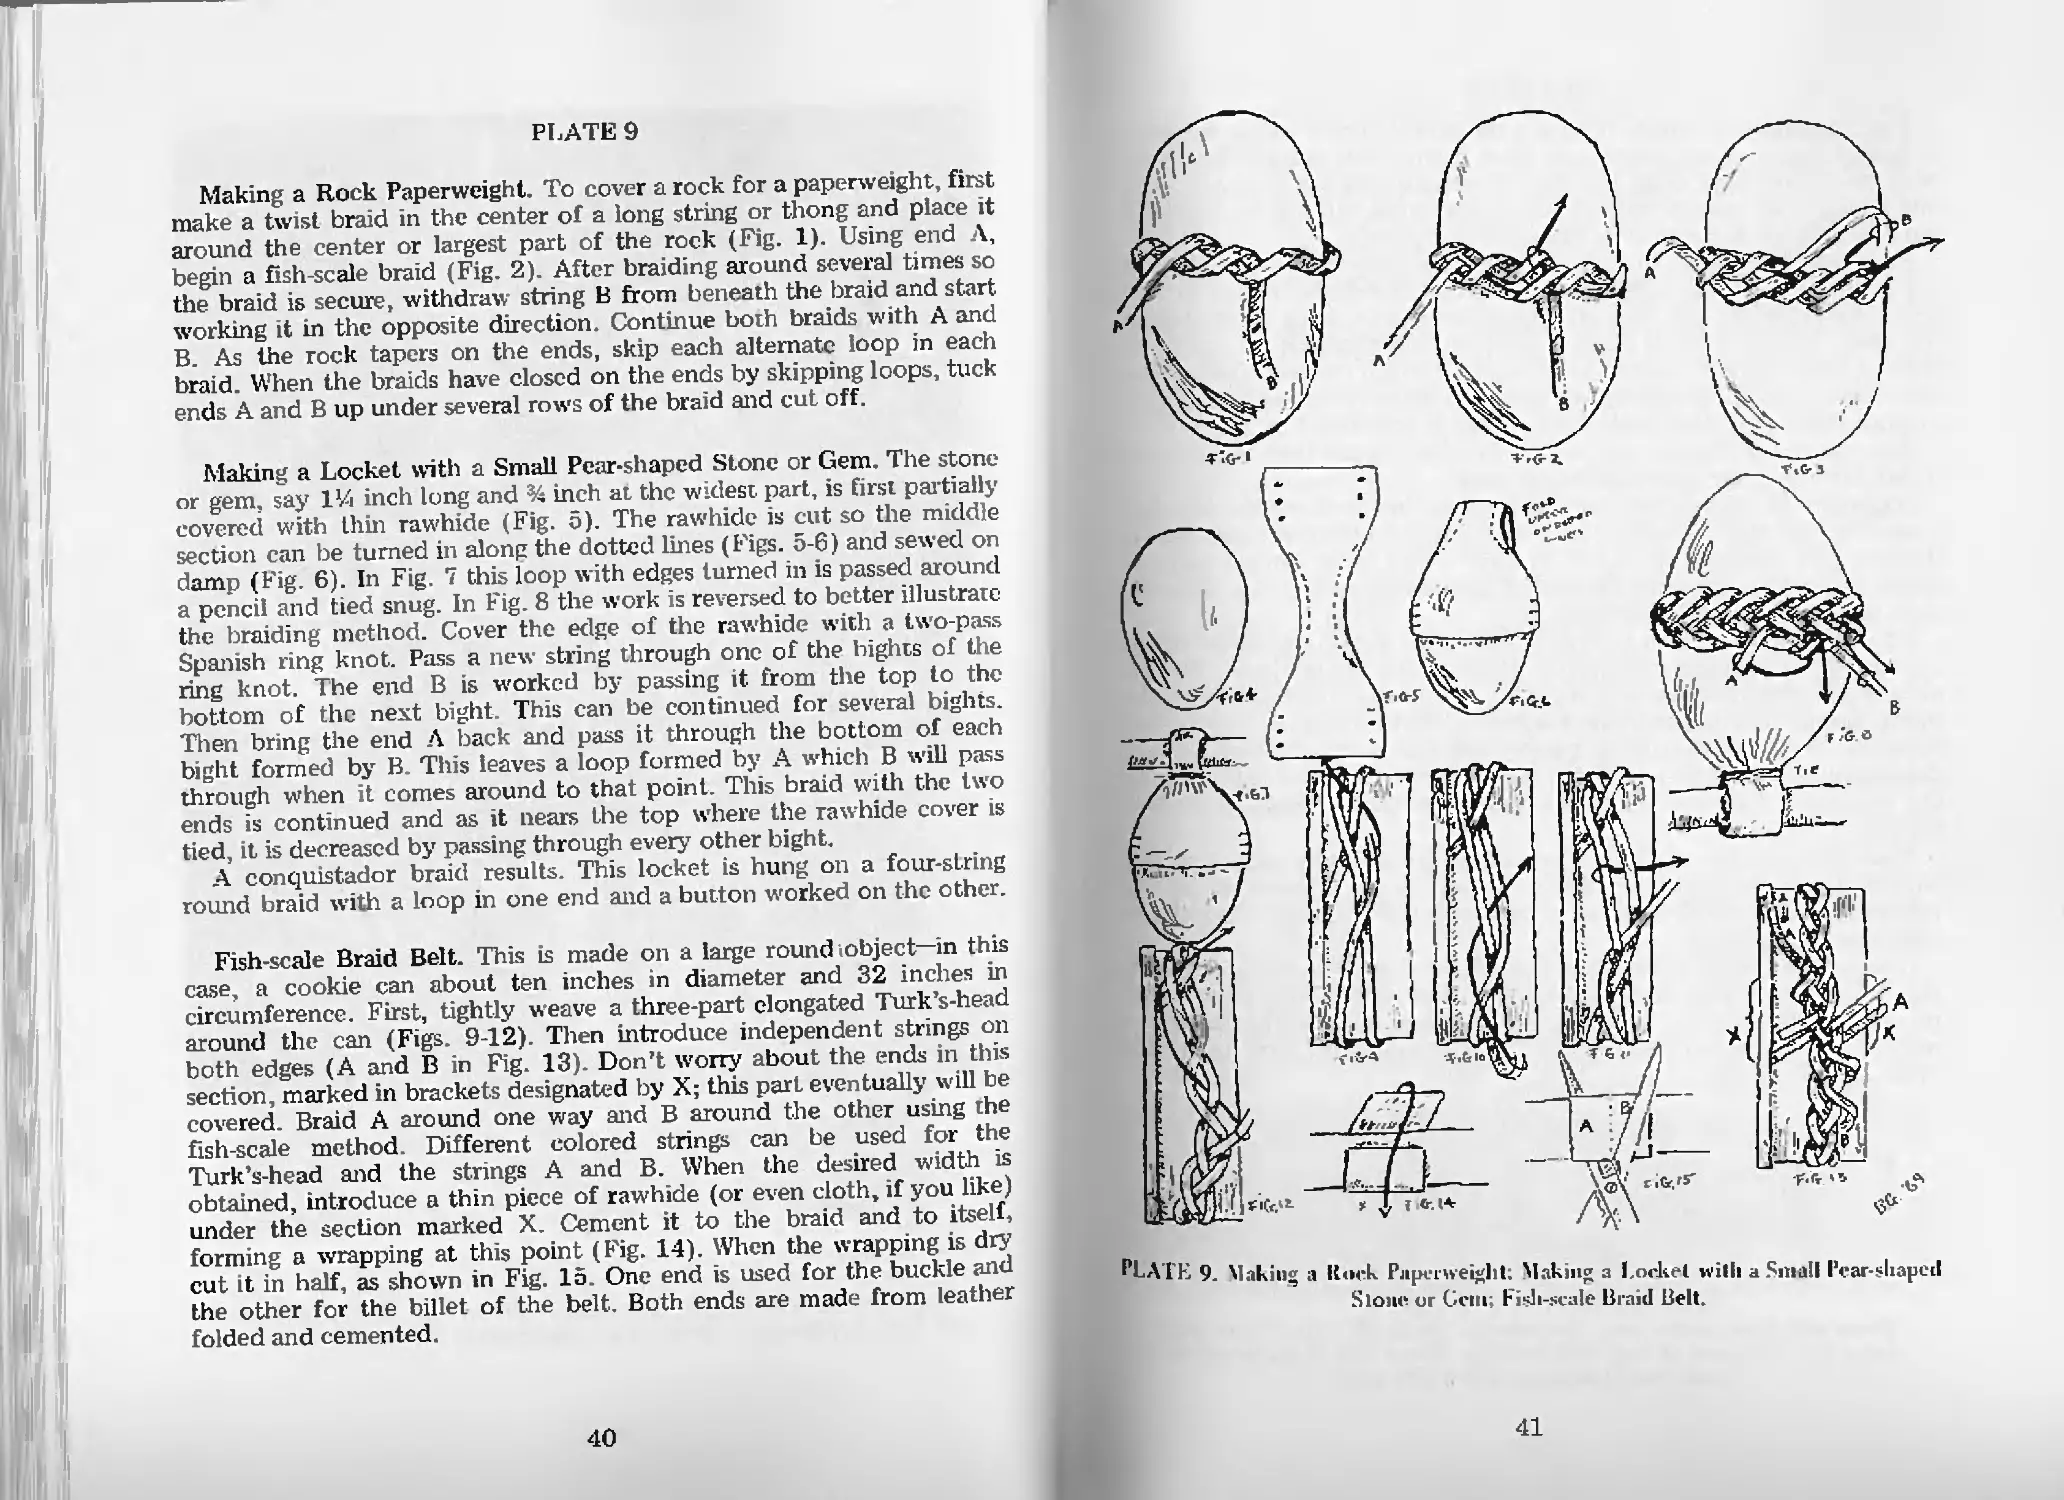
Making a Rock Paperweight—Pl. 9 40
Making a Locket with a Small Pear-shaped
Stone or Gem—Pl. 9 40
Fish-scale Braid Belt—Pl. 9 40
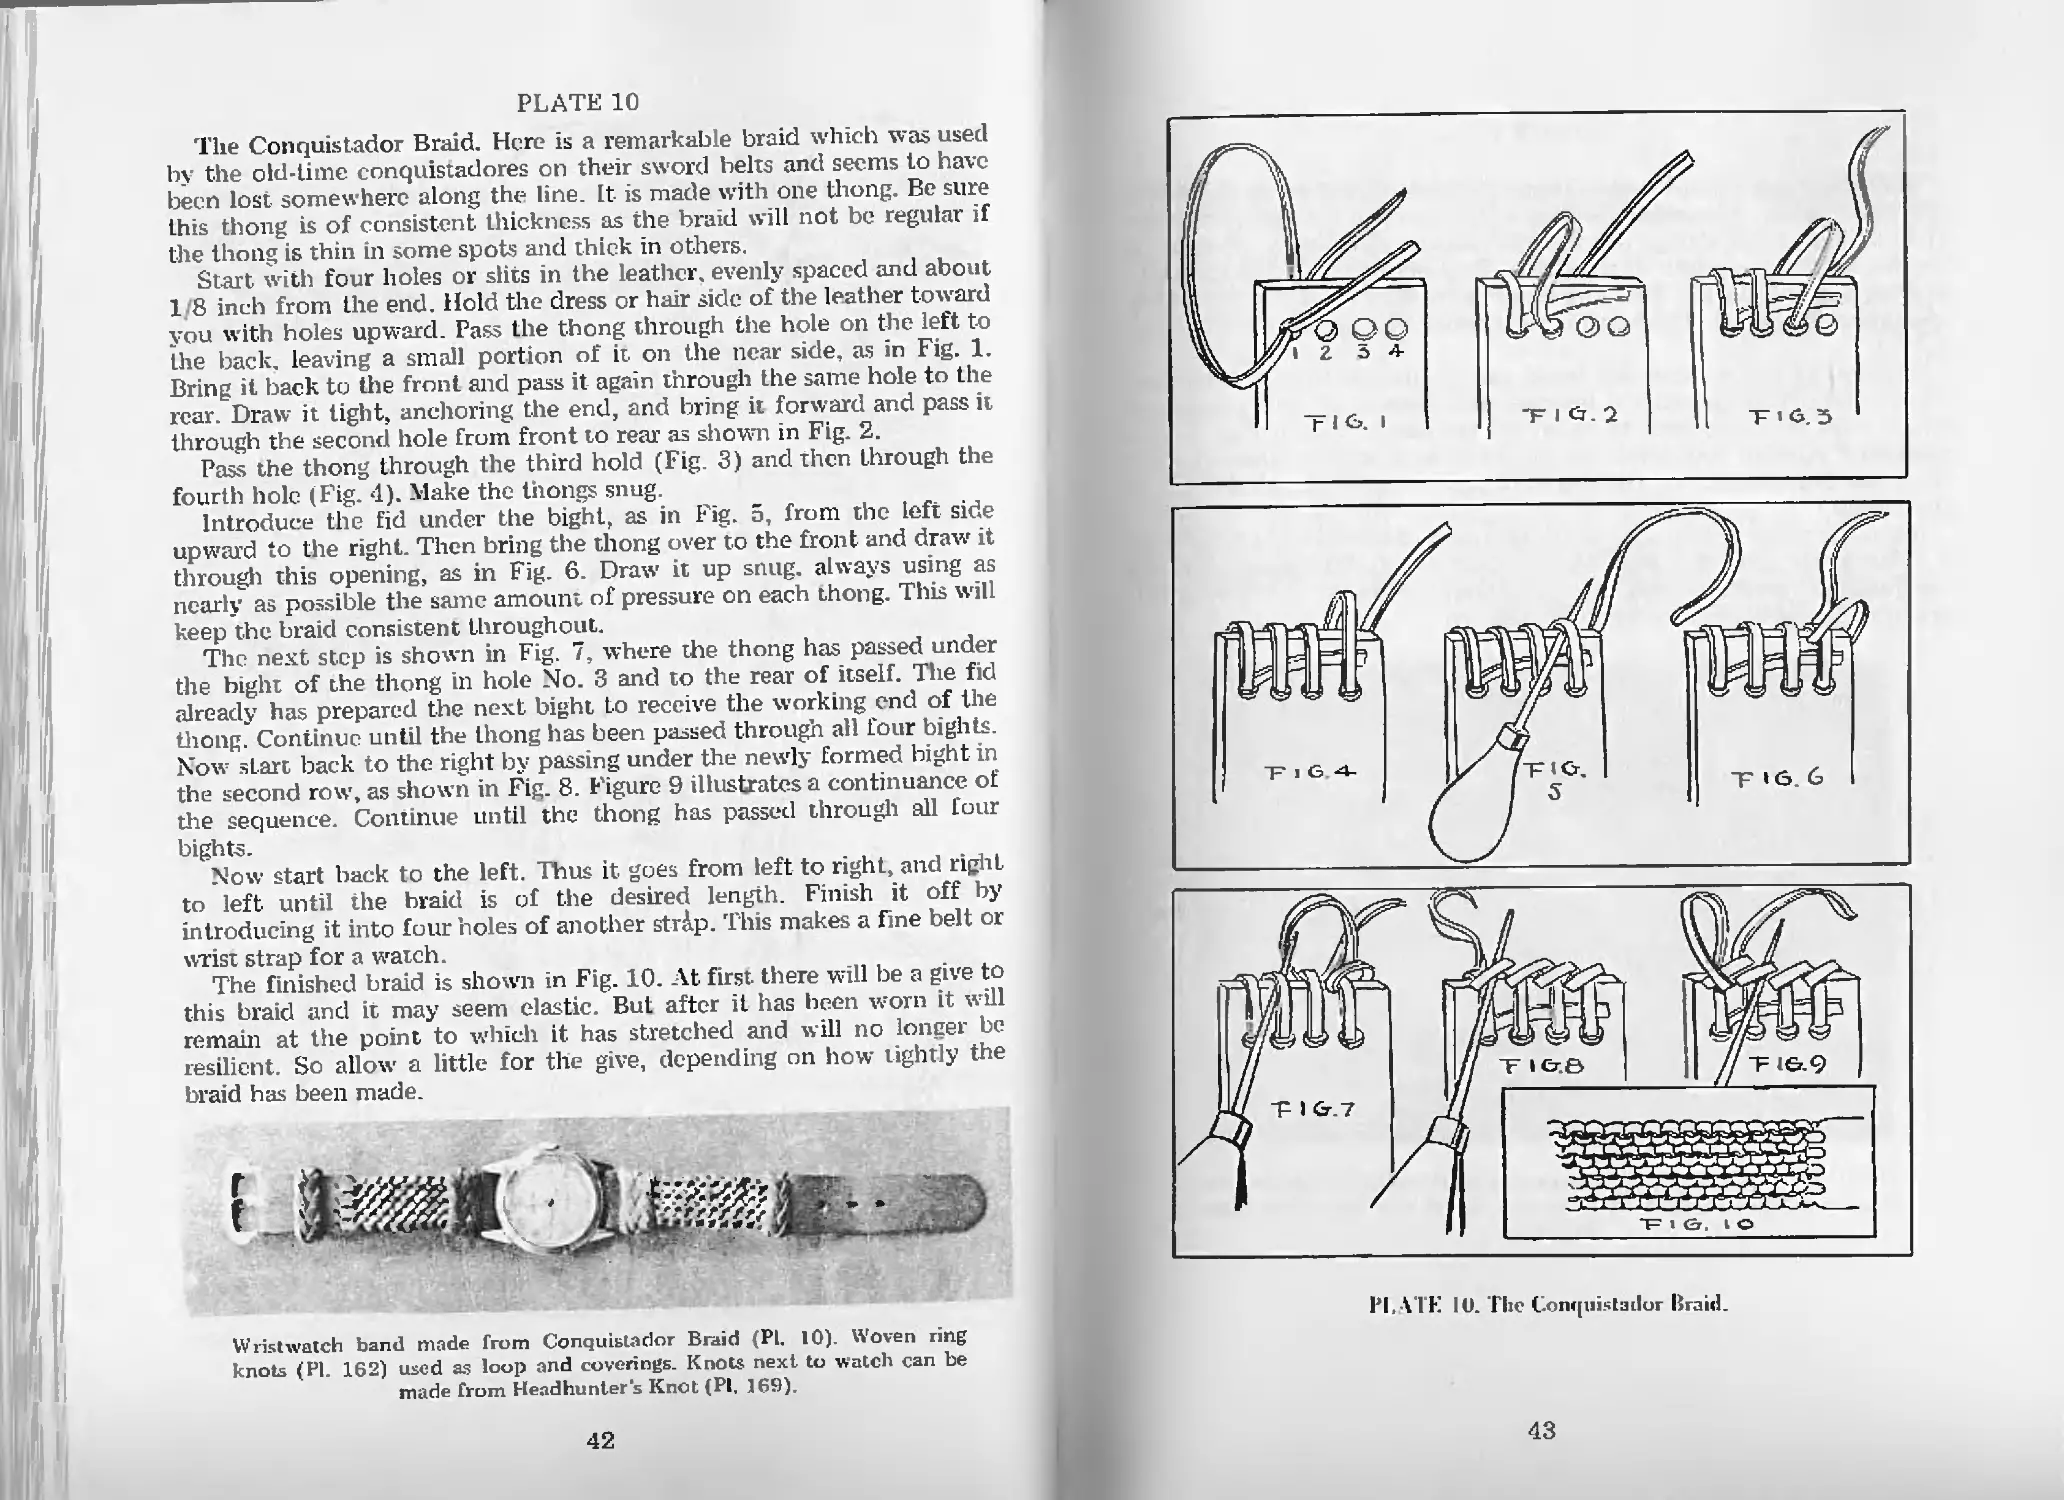
ГЬе Conquistador Braid—Pl. 10 42
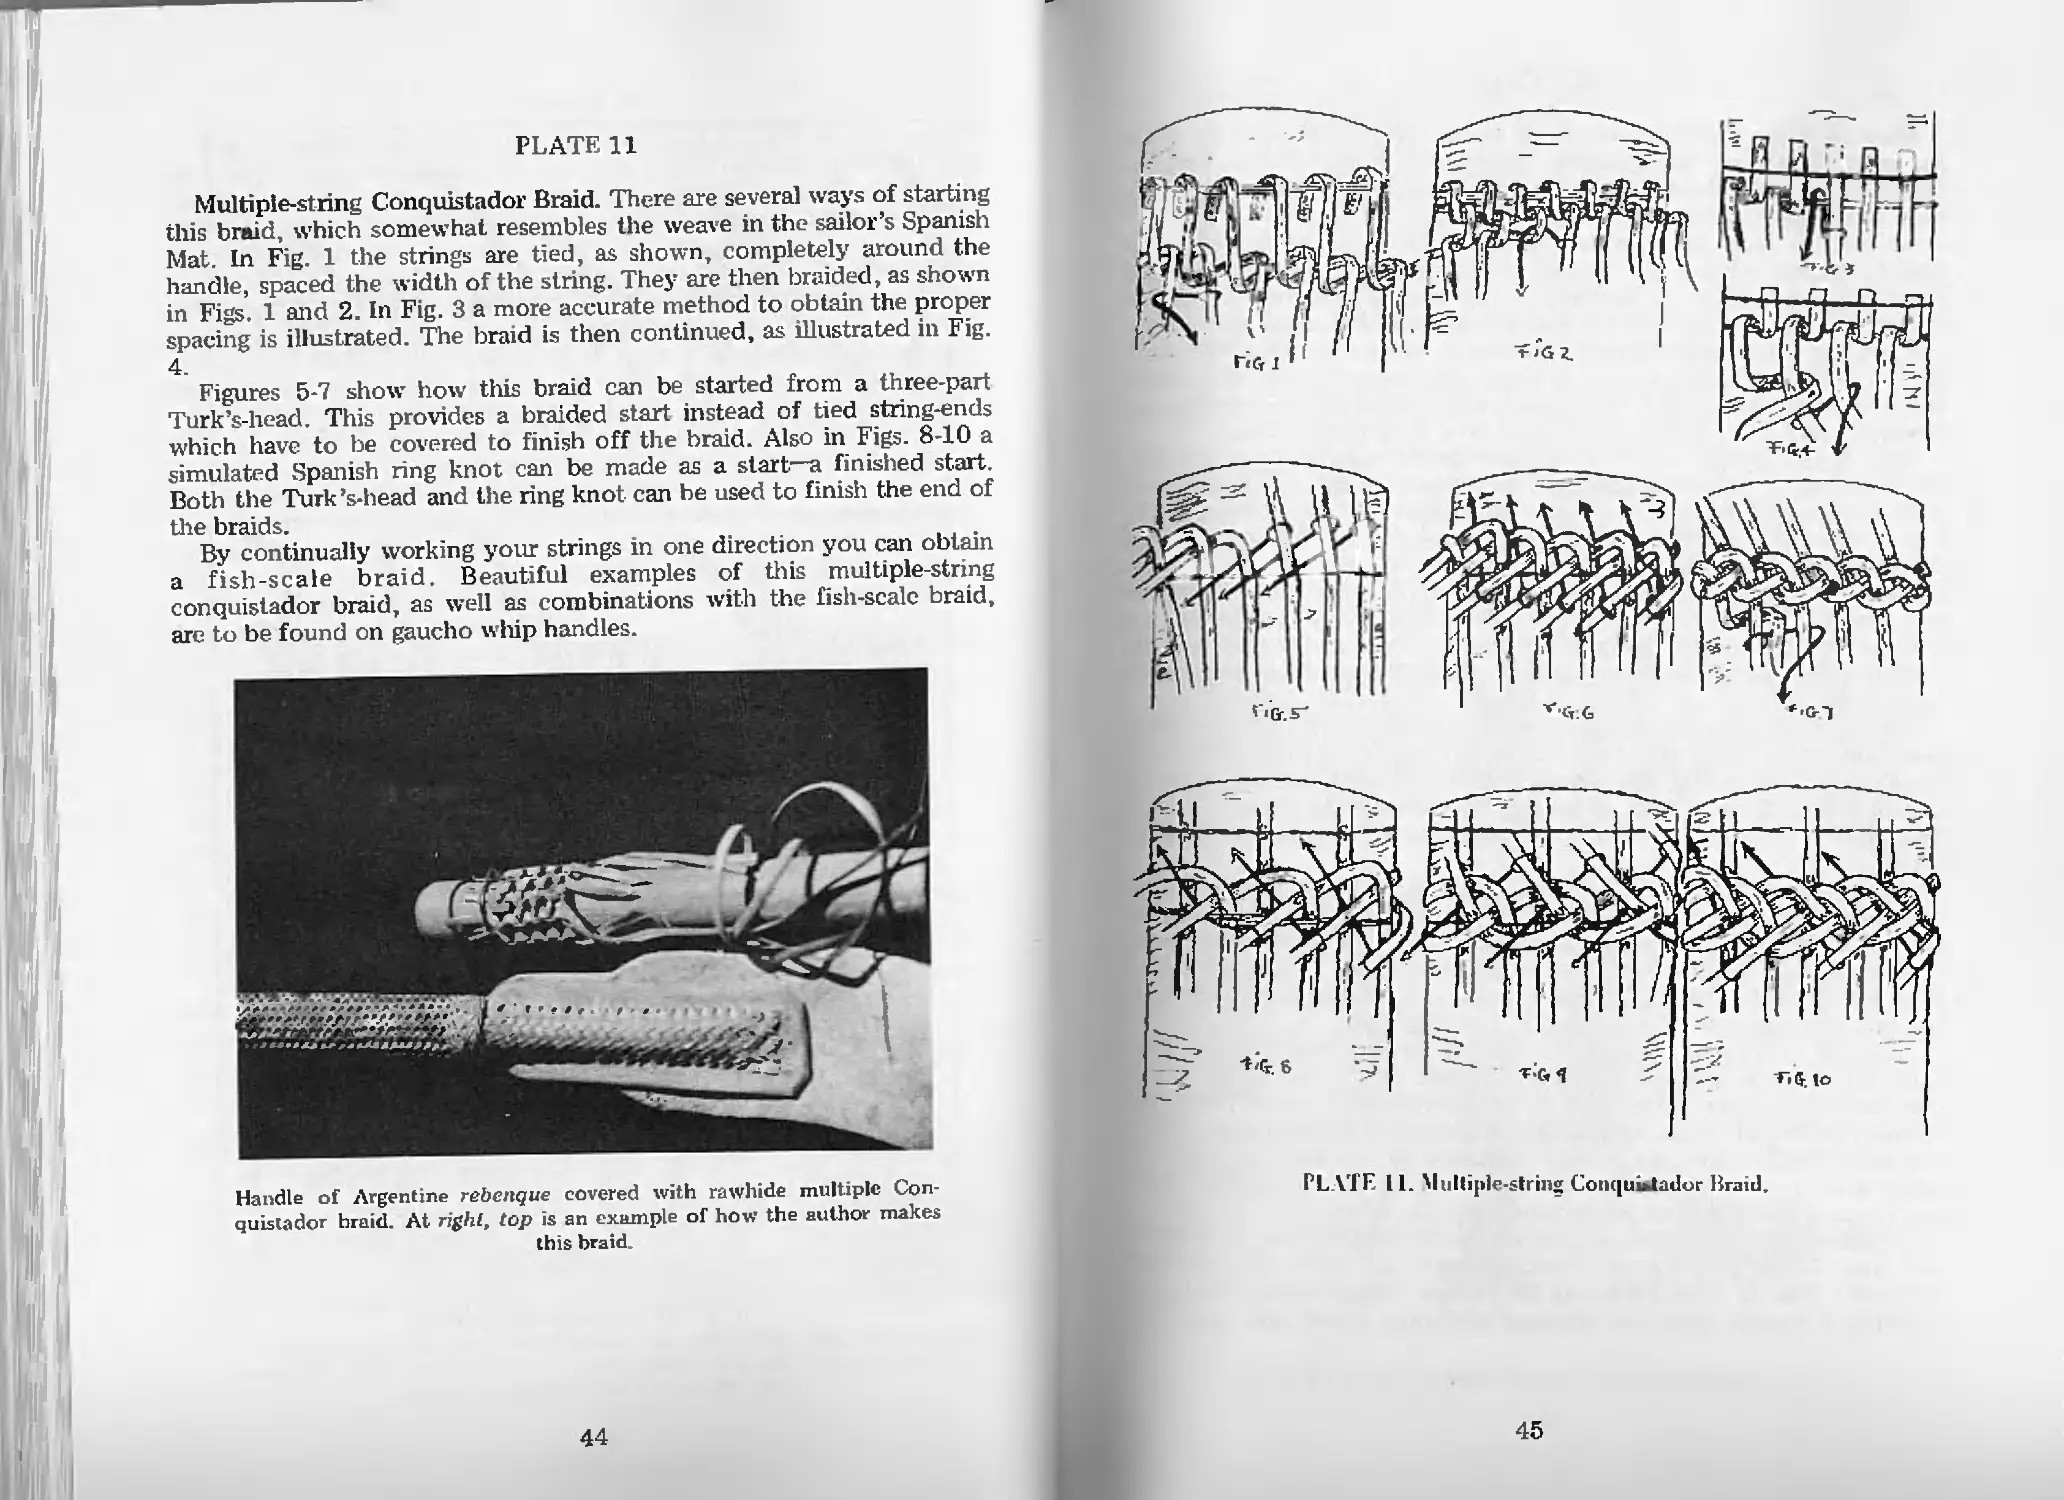
Multiple-string Conquistador Braid—Pl. 11 44
How to Make Braided Twist-Loop Reins—Pl. 12 46
vii
Slit Braids
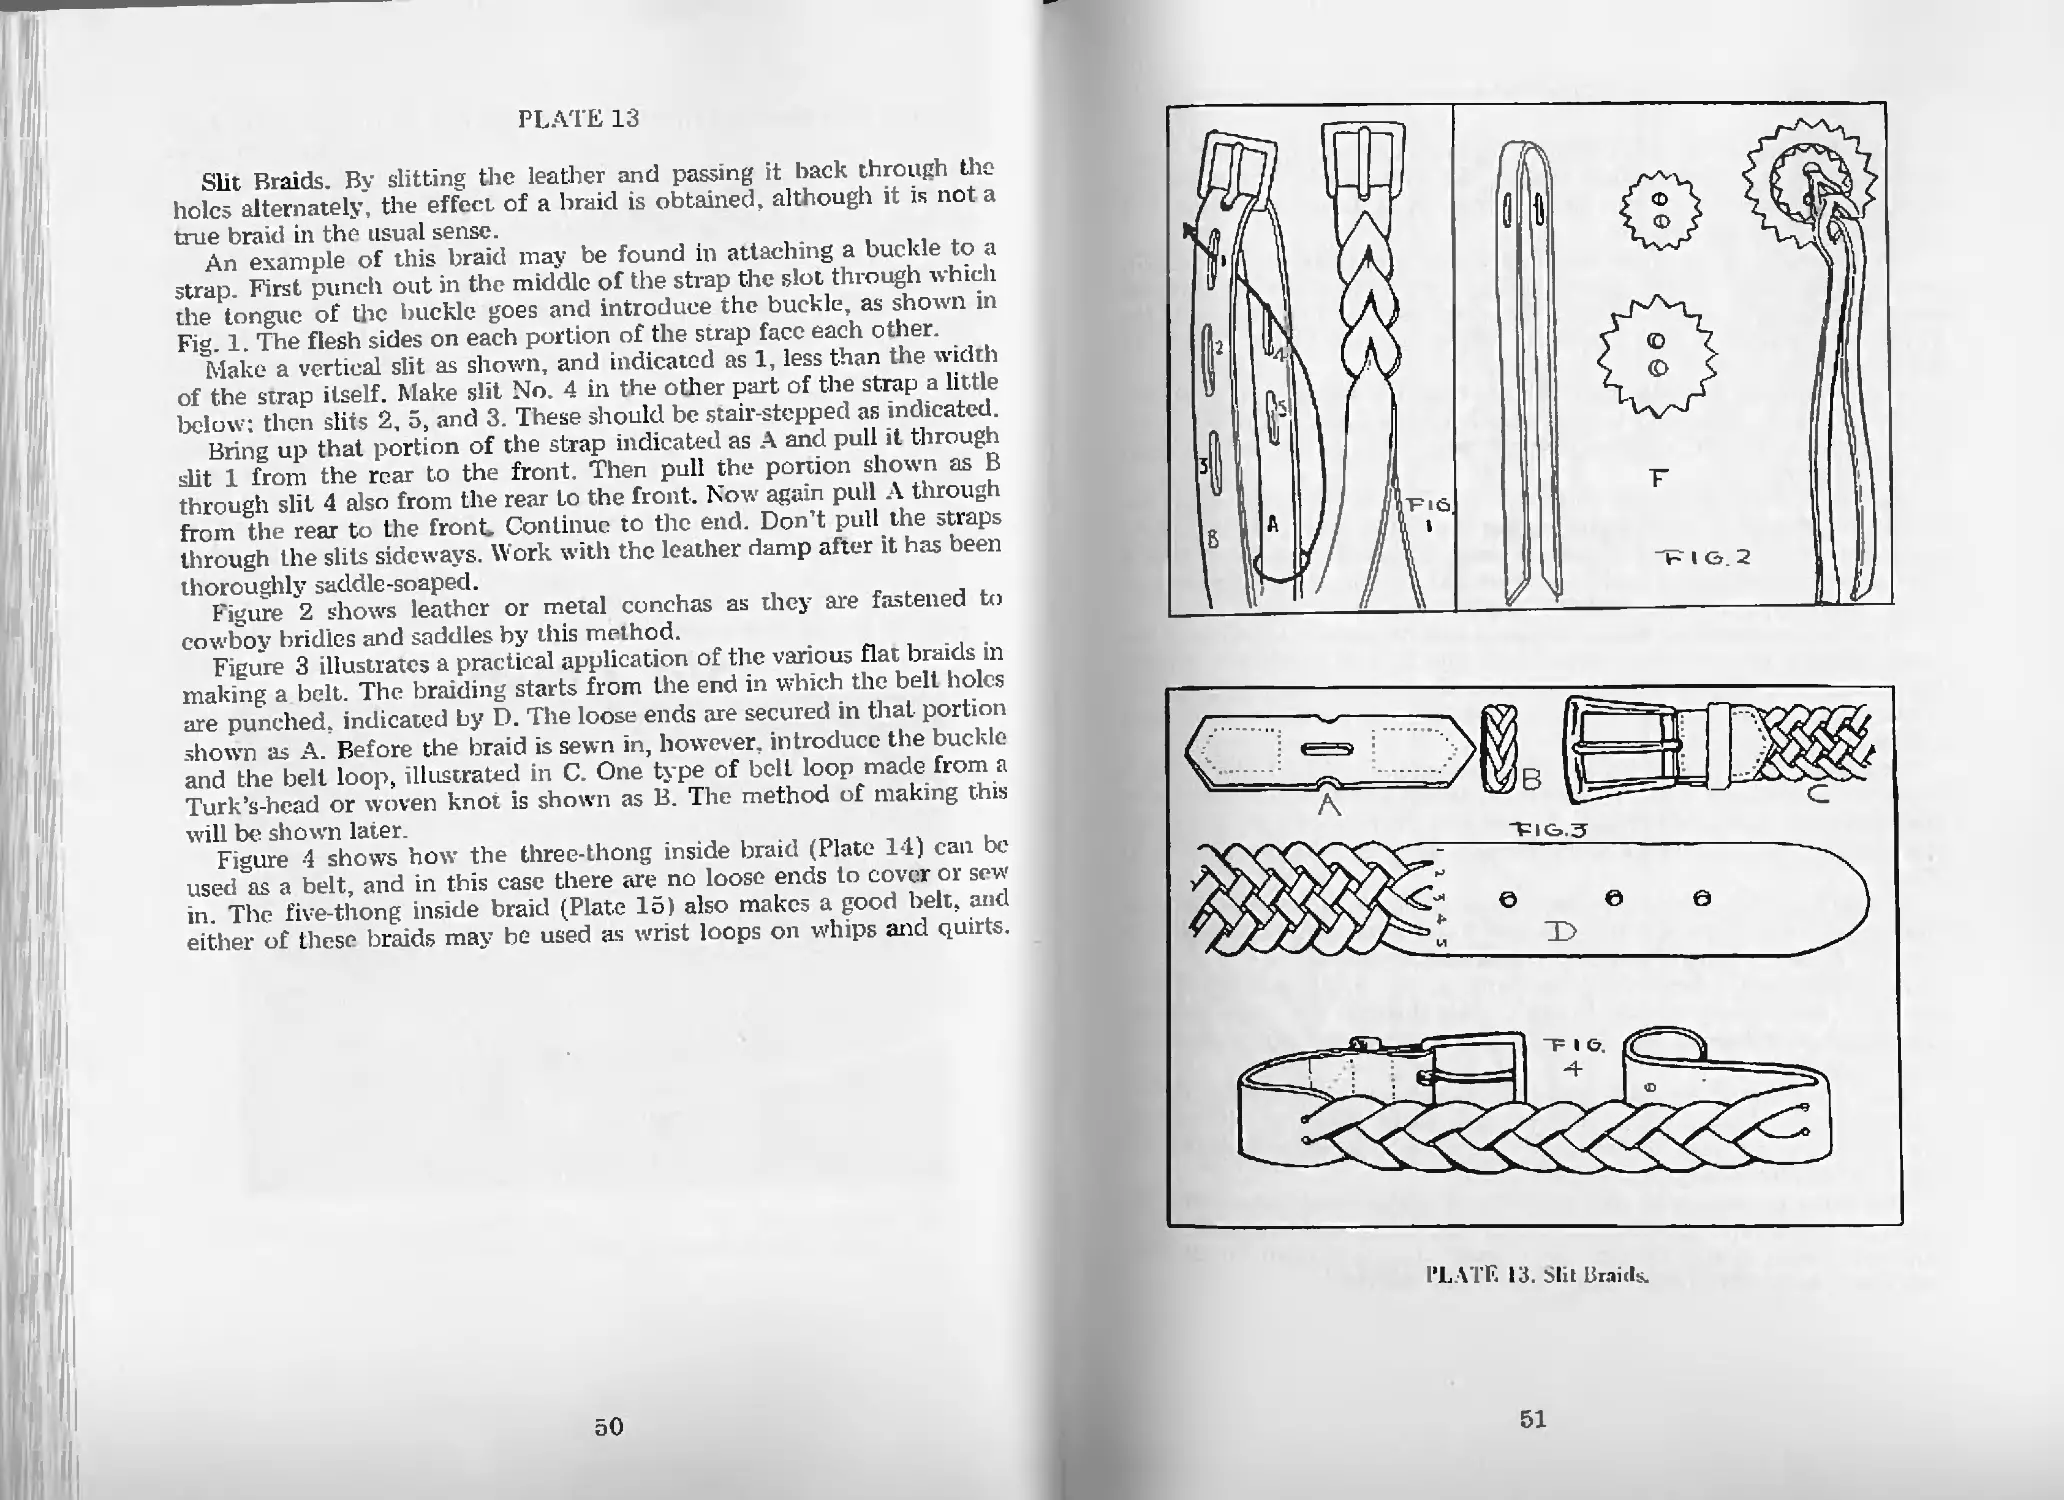
Slit Braids—Pl. 13 50
Three-Part Inside or Trick Braid—Pl. 14 52
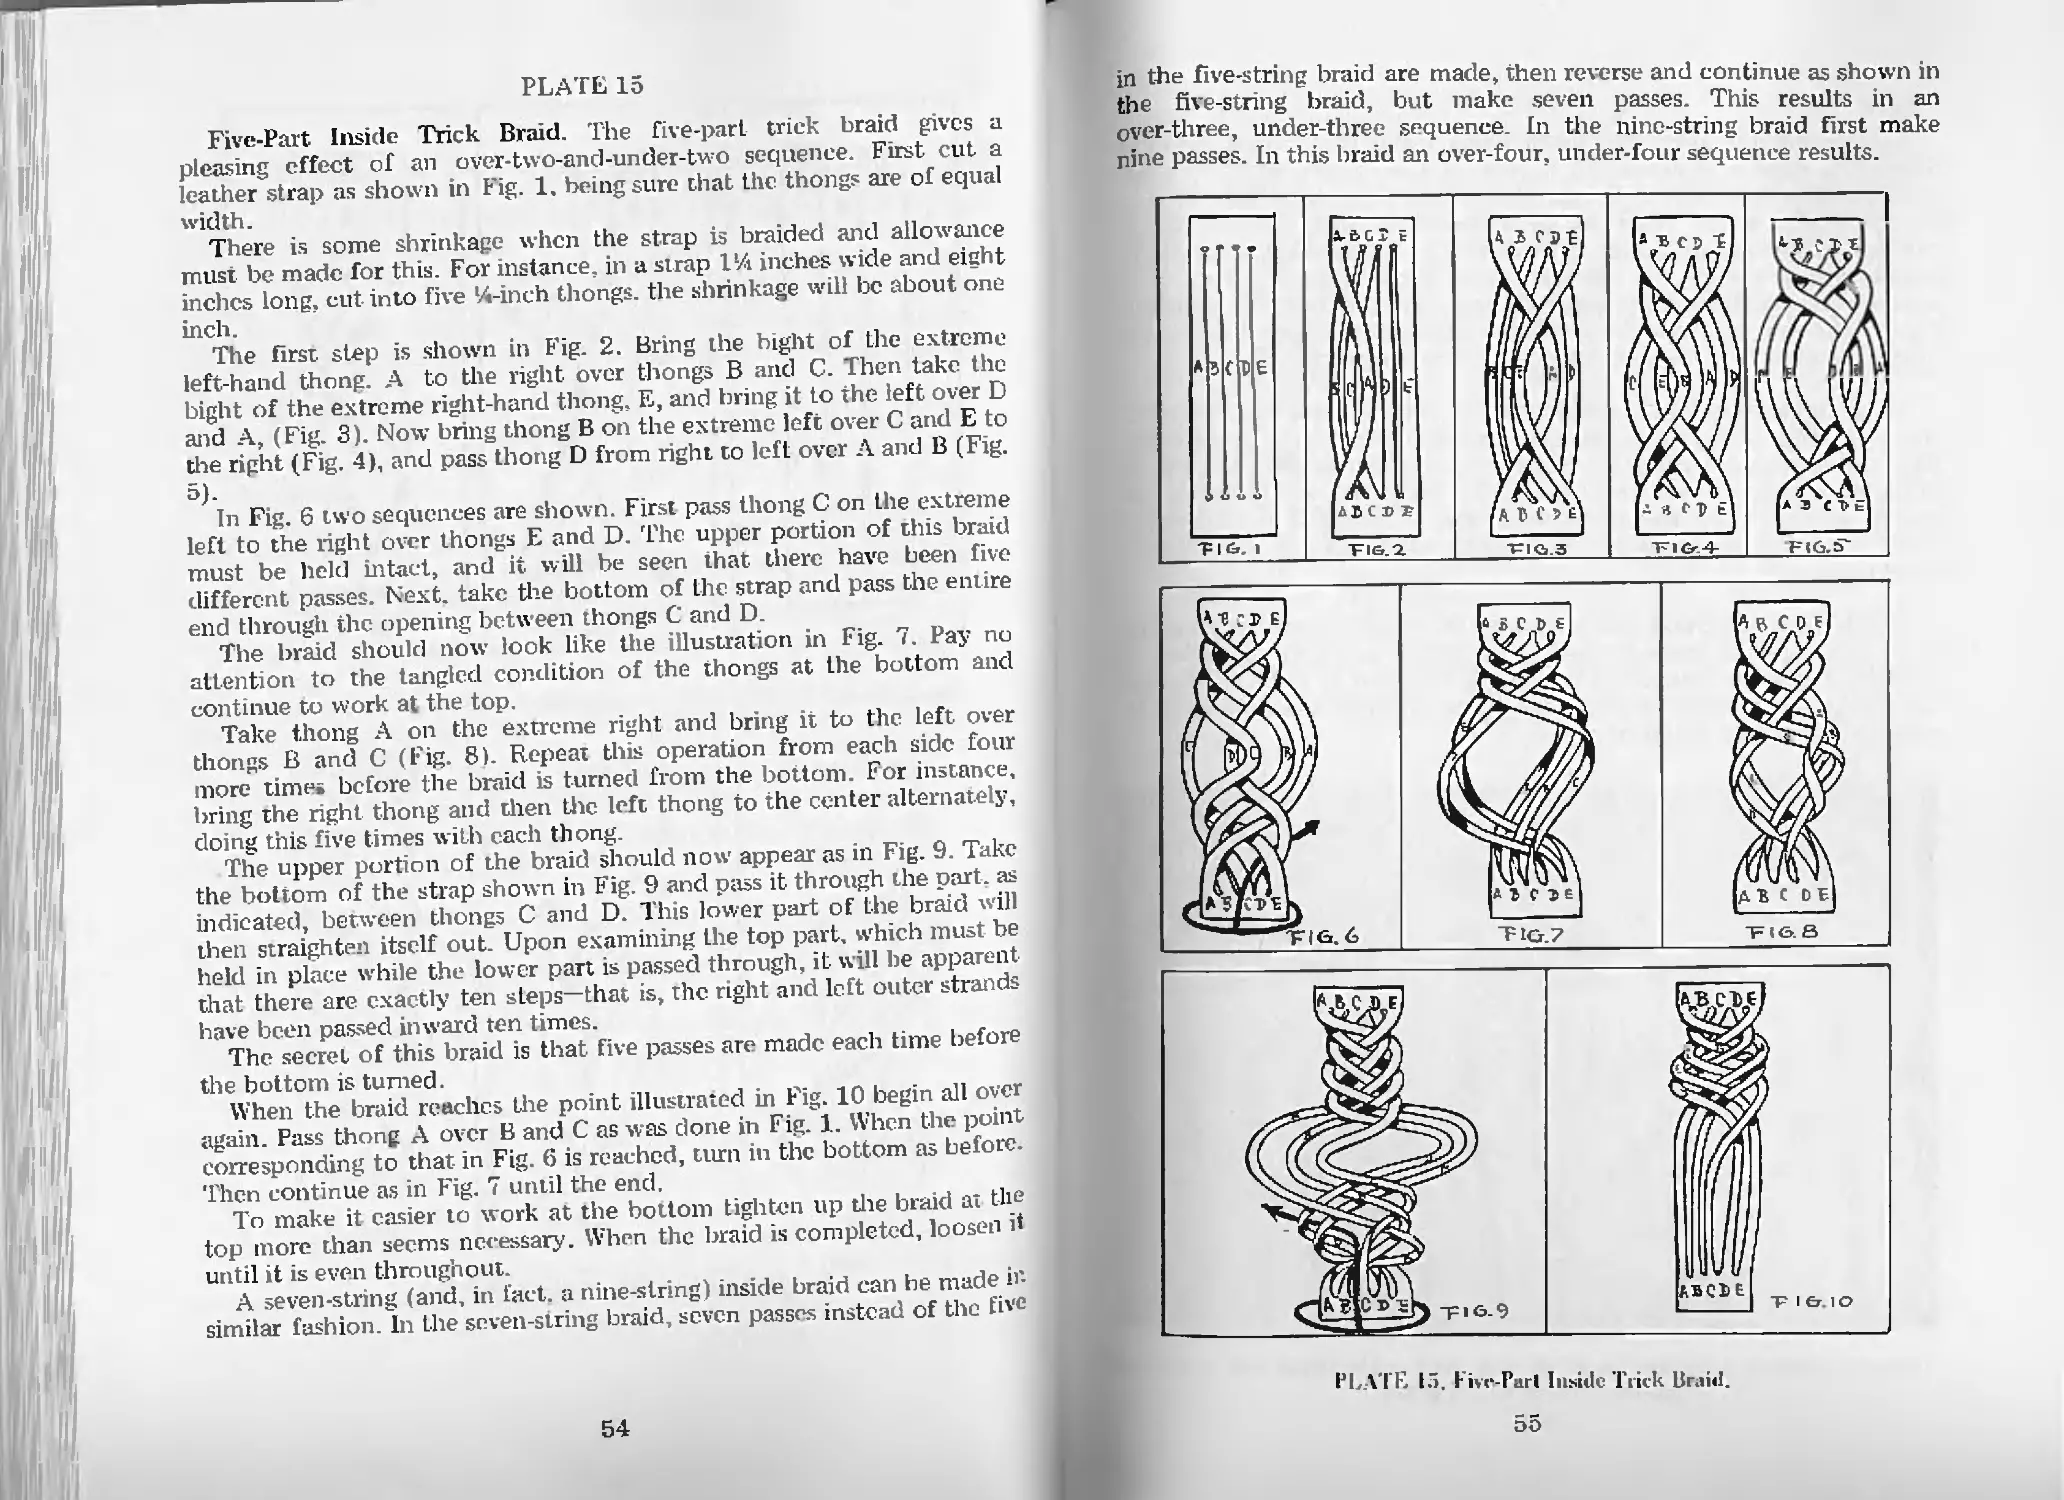
Five-Part Inside Trick Braid—Pl. 15 54
Interweaving the Three-Part Inside Braid—PI. 16 56
A Simulated Four-Part Inside Braid—Pl. 16 56
Six-String Inside Braid—Pl. 16 56
Interweaving the Slit Braid—Pl. 17 60
Heart-Shaped Headstall Front Piece—Pl. 17 60
Four-String Slit Braid—Pl. 17 60
Curlicues or Monitos—Pl. 17 60
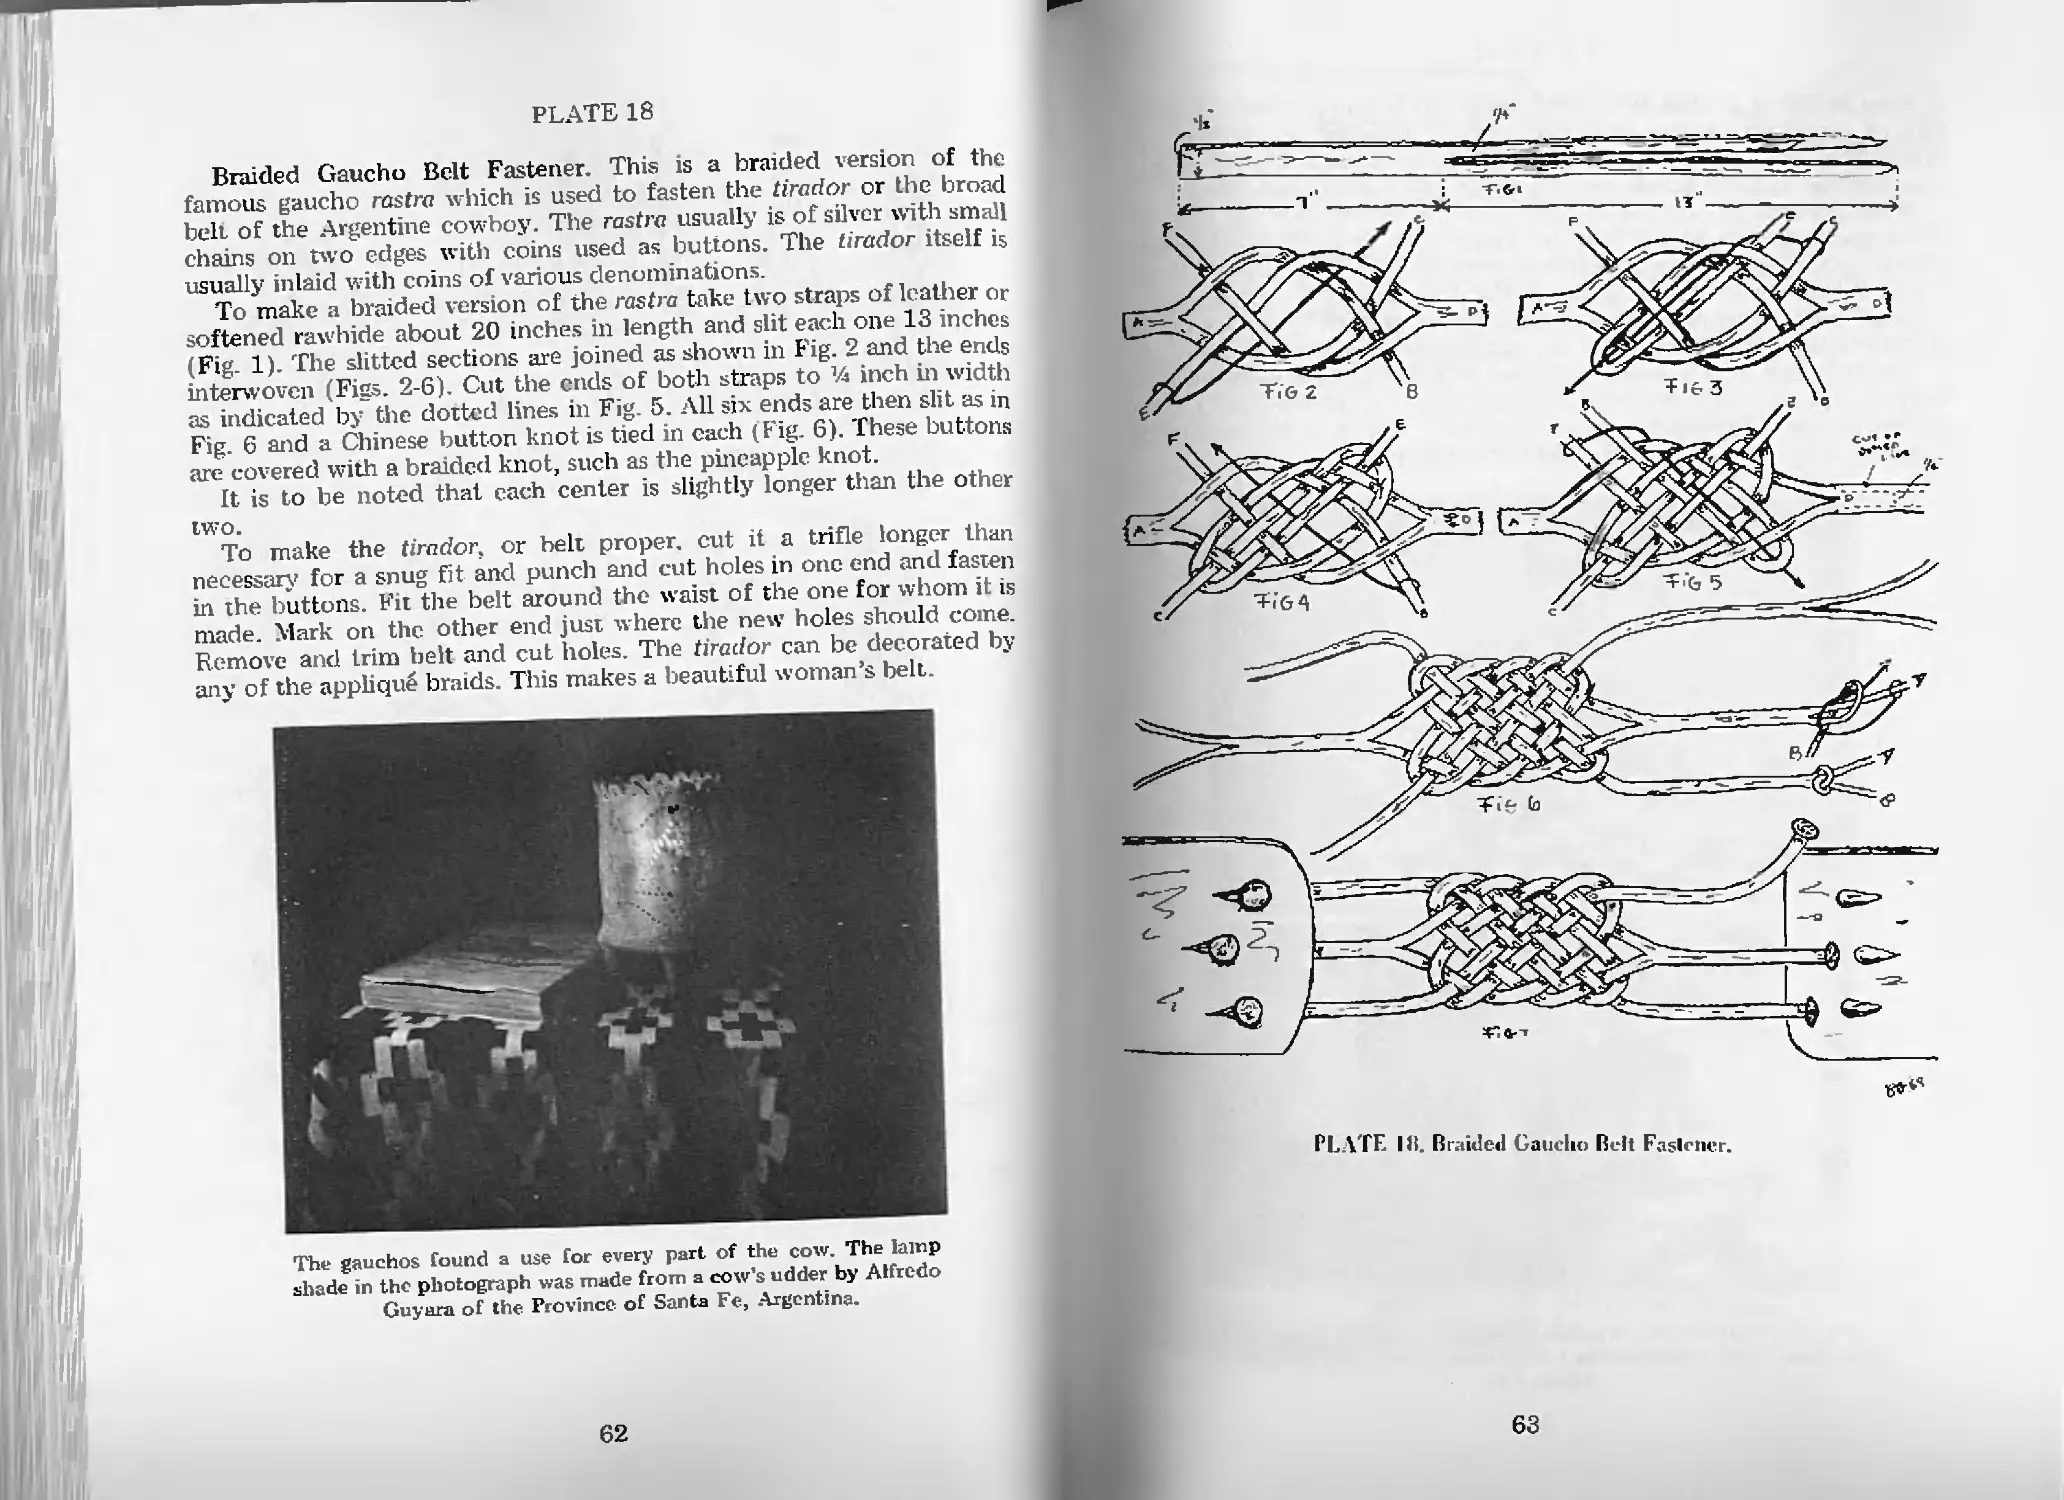
Braided Gaucho Belt Fastener—Pl. 18 62
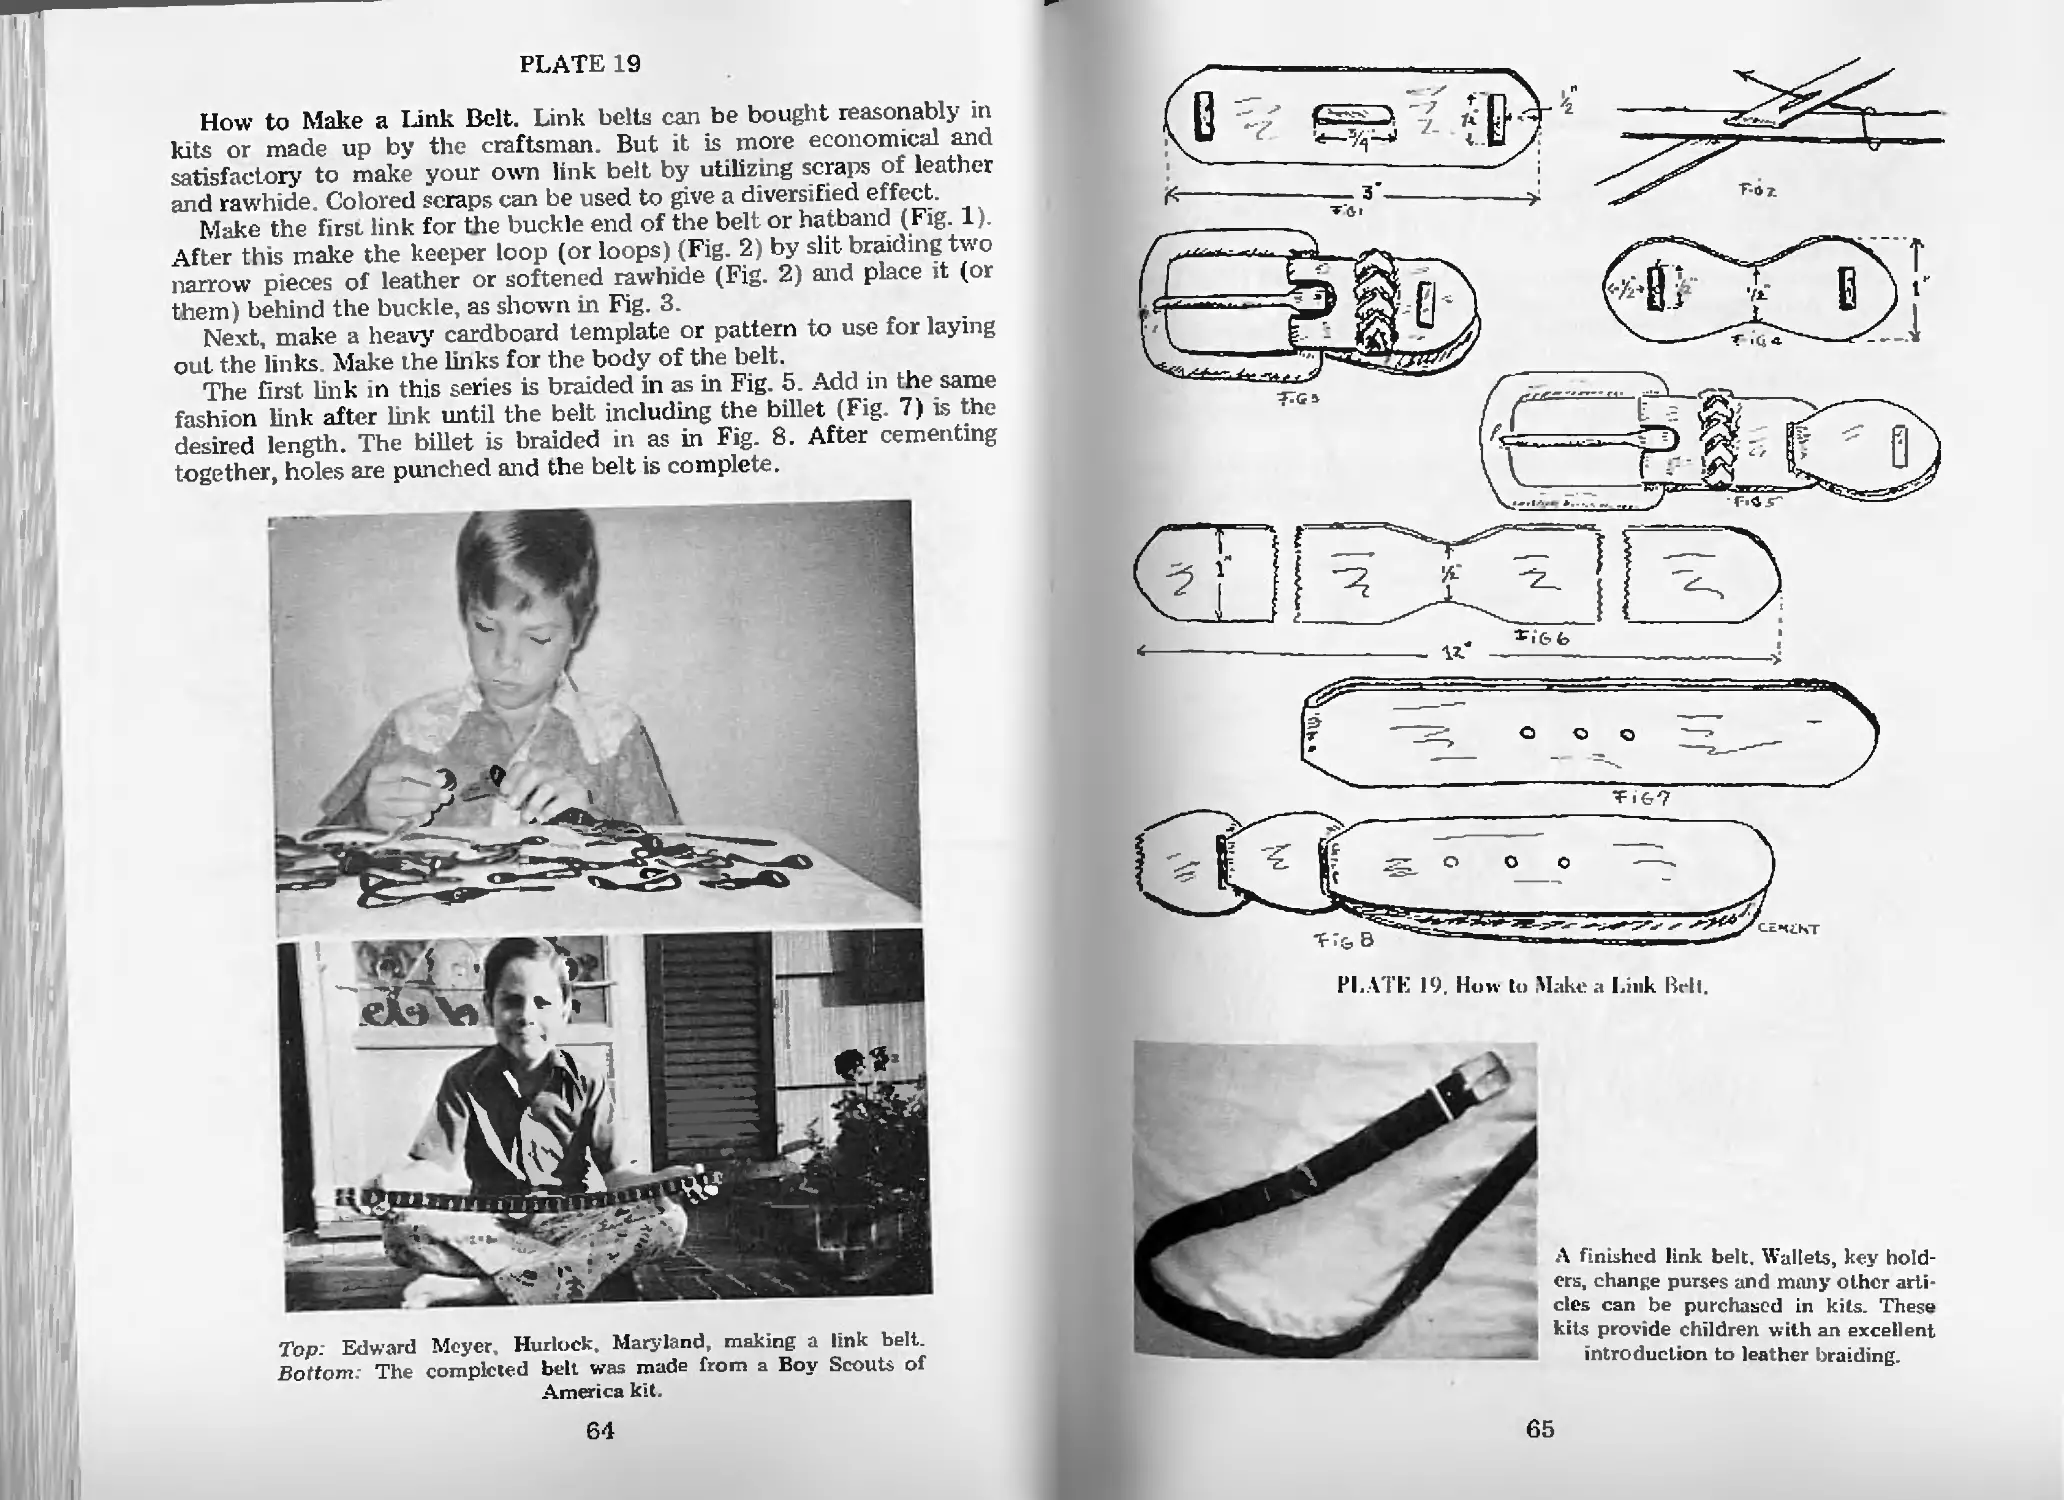
How to Make a Link Belt—Pl. 19 64
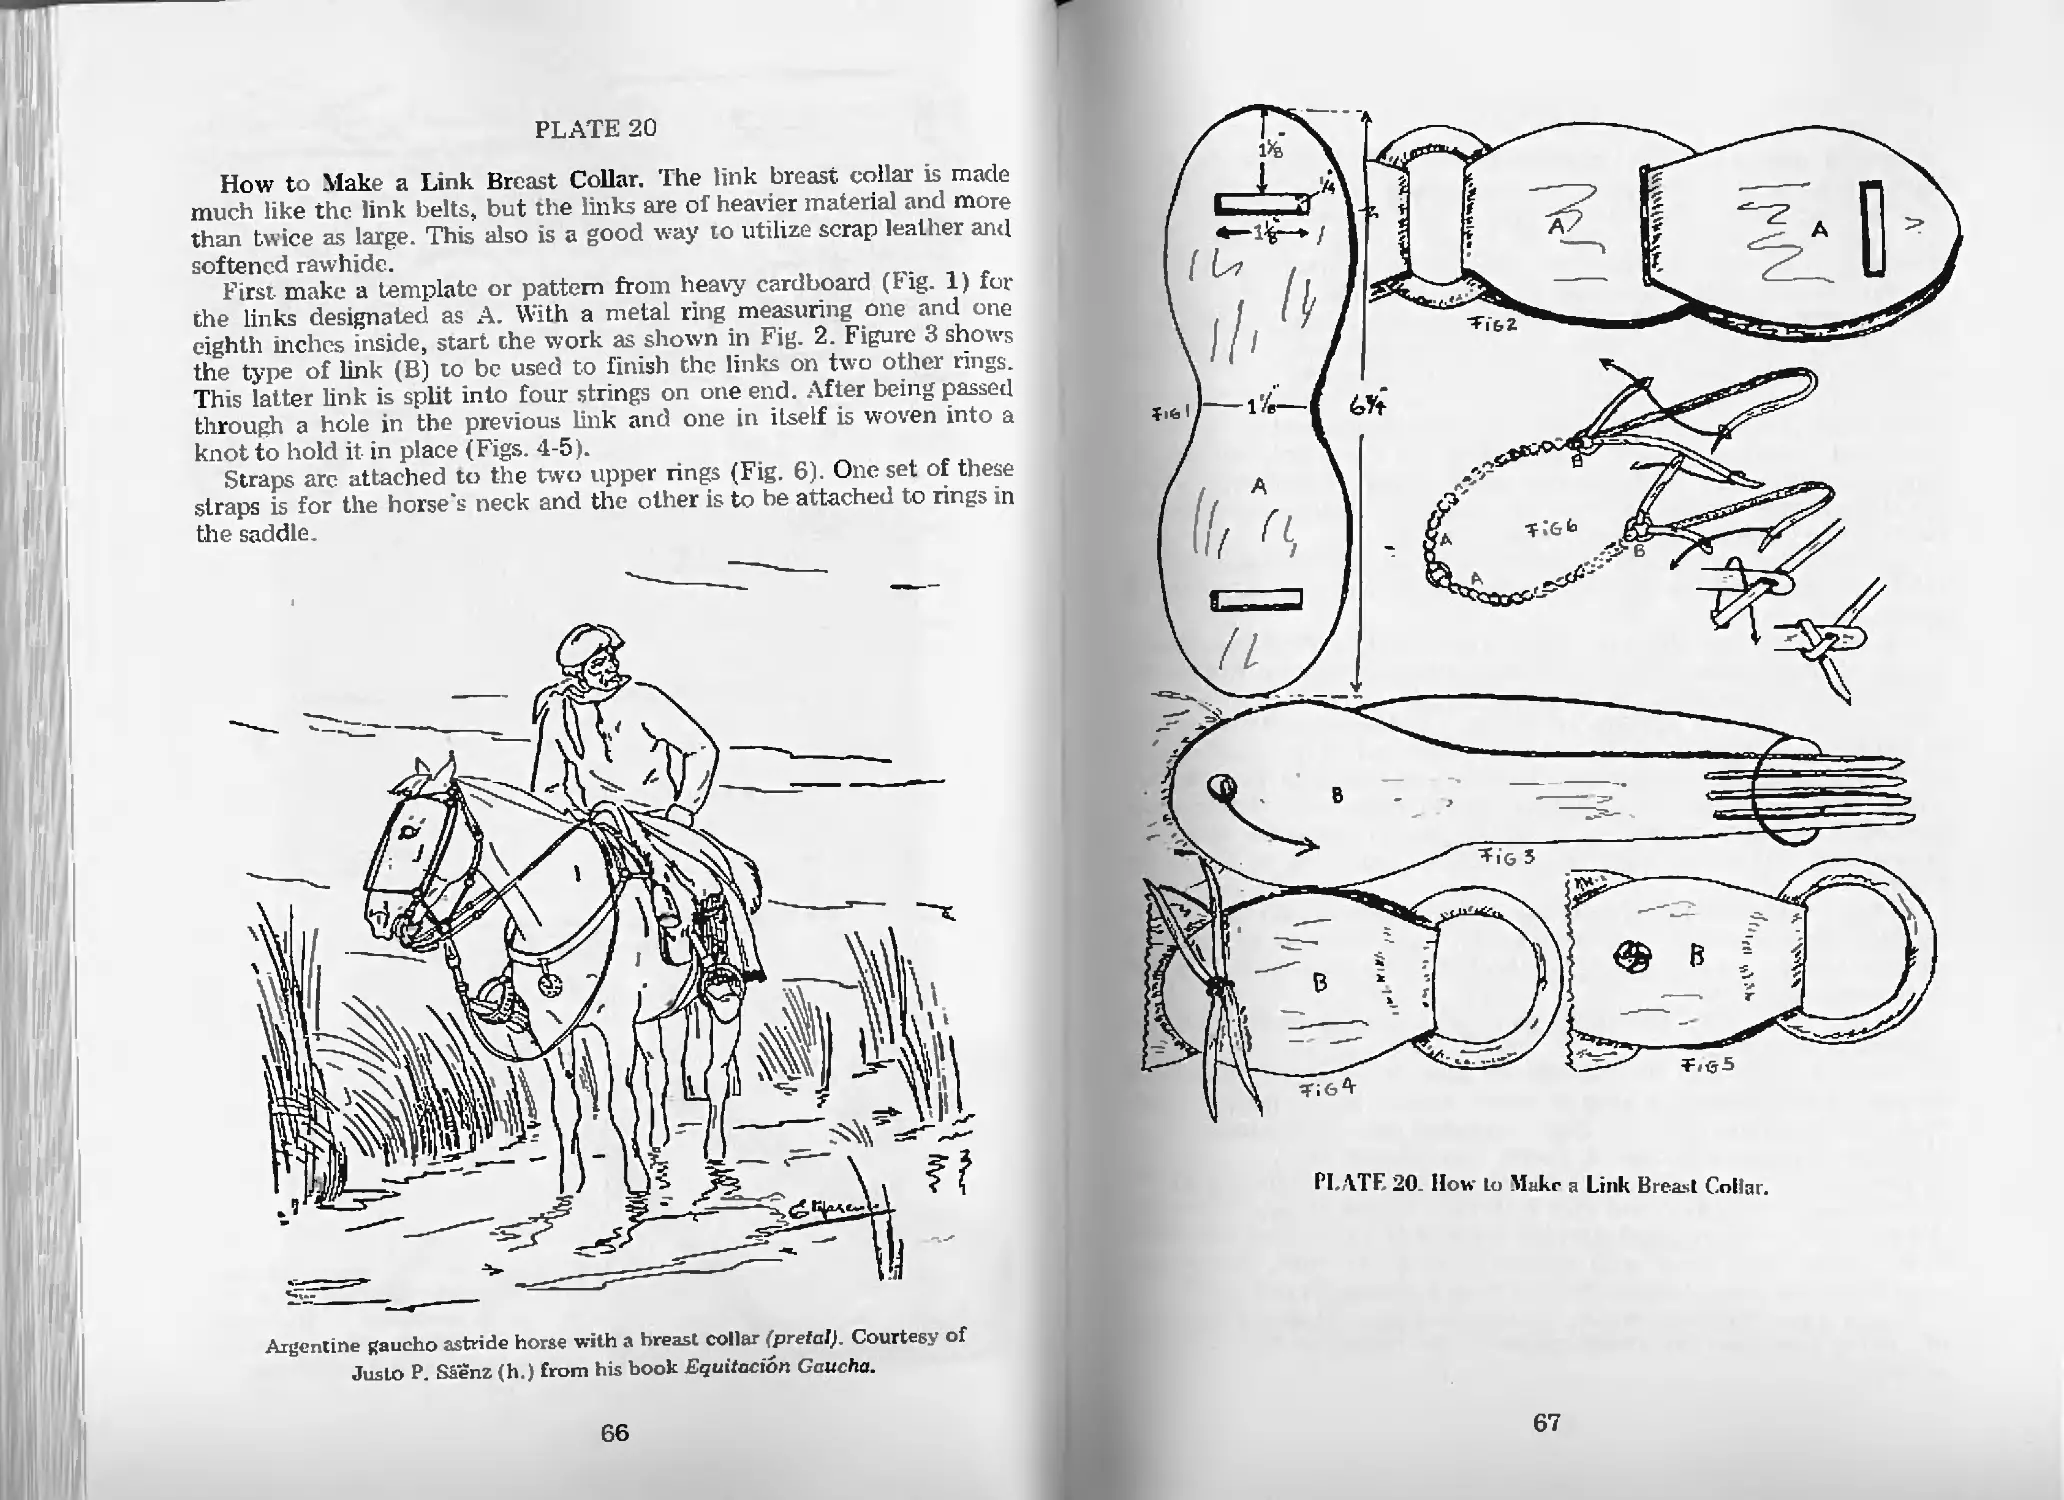
How to Make a Link Breast Collar—Pl. 20 66
How to Make a Slit-Braid Hackamore Headstall—Pl. 21 68
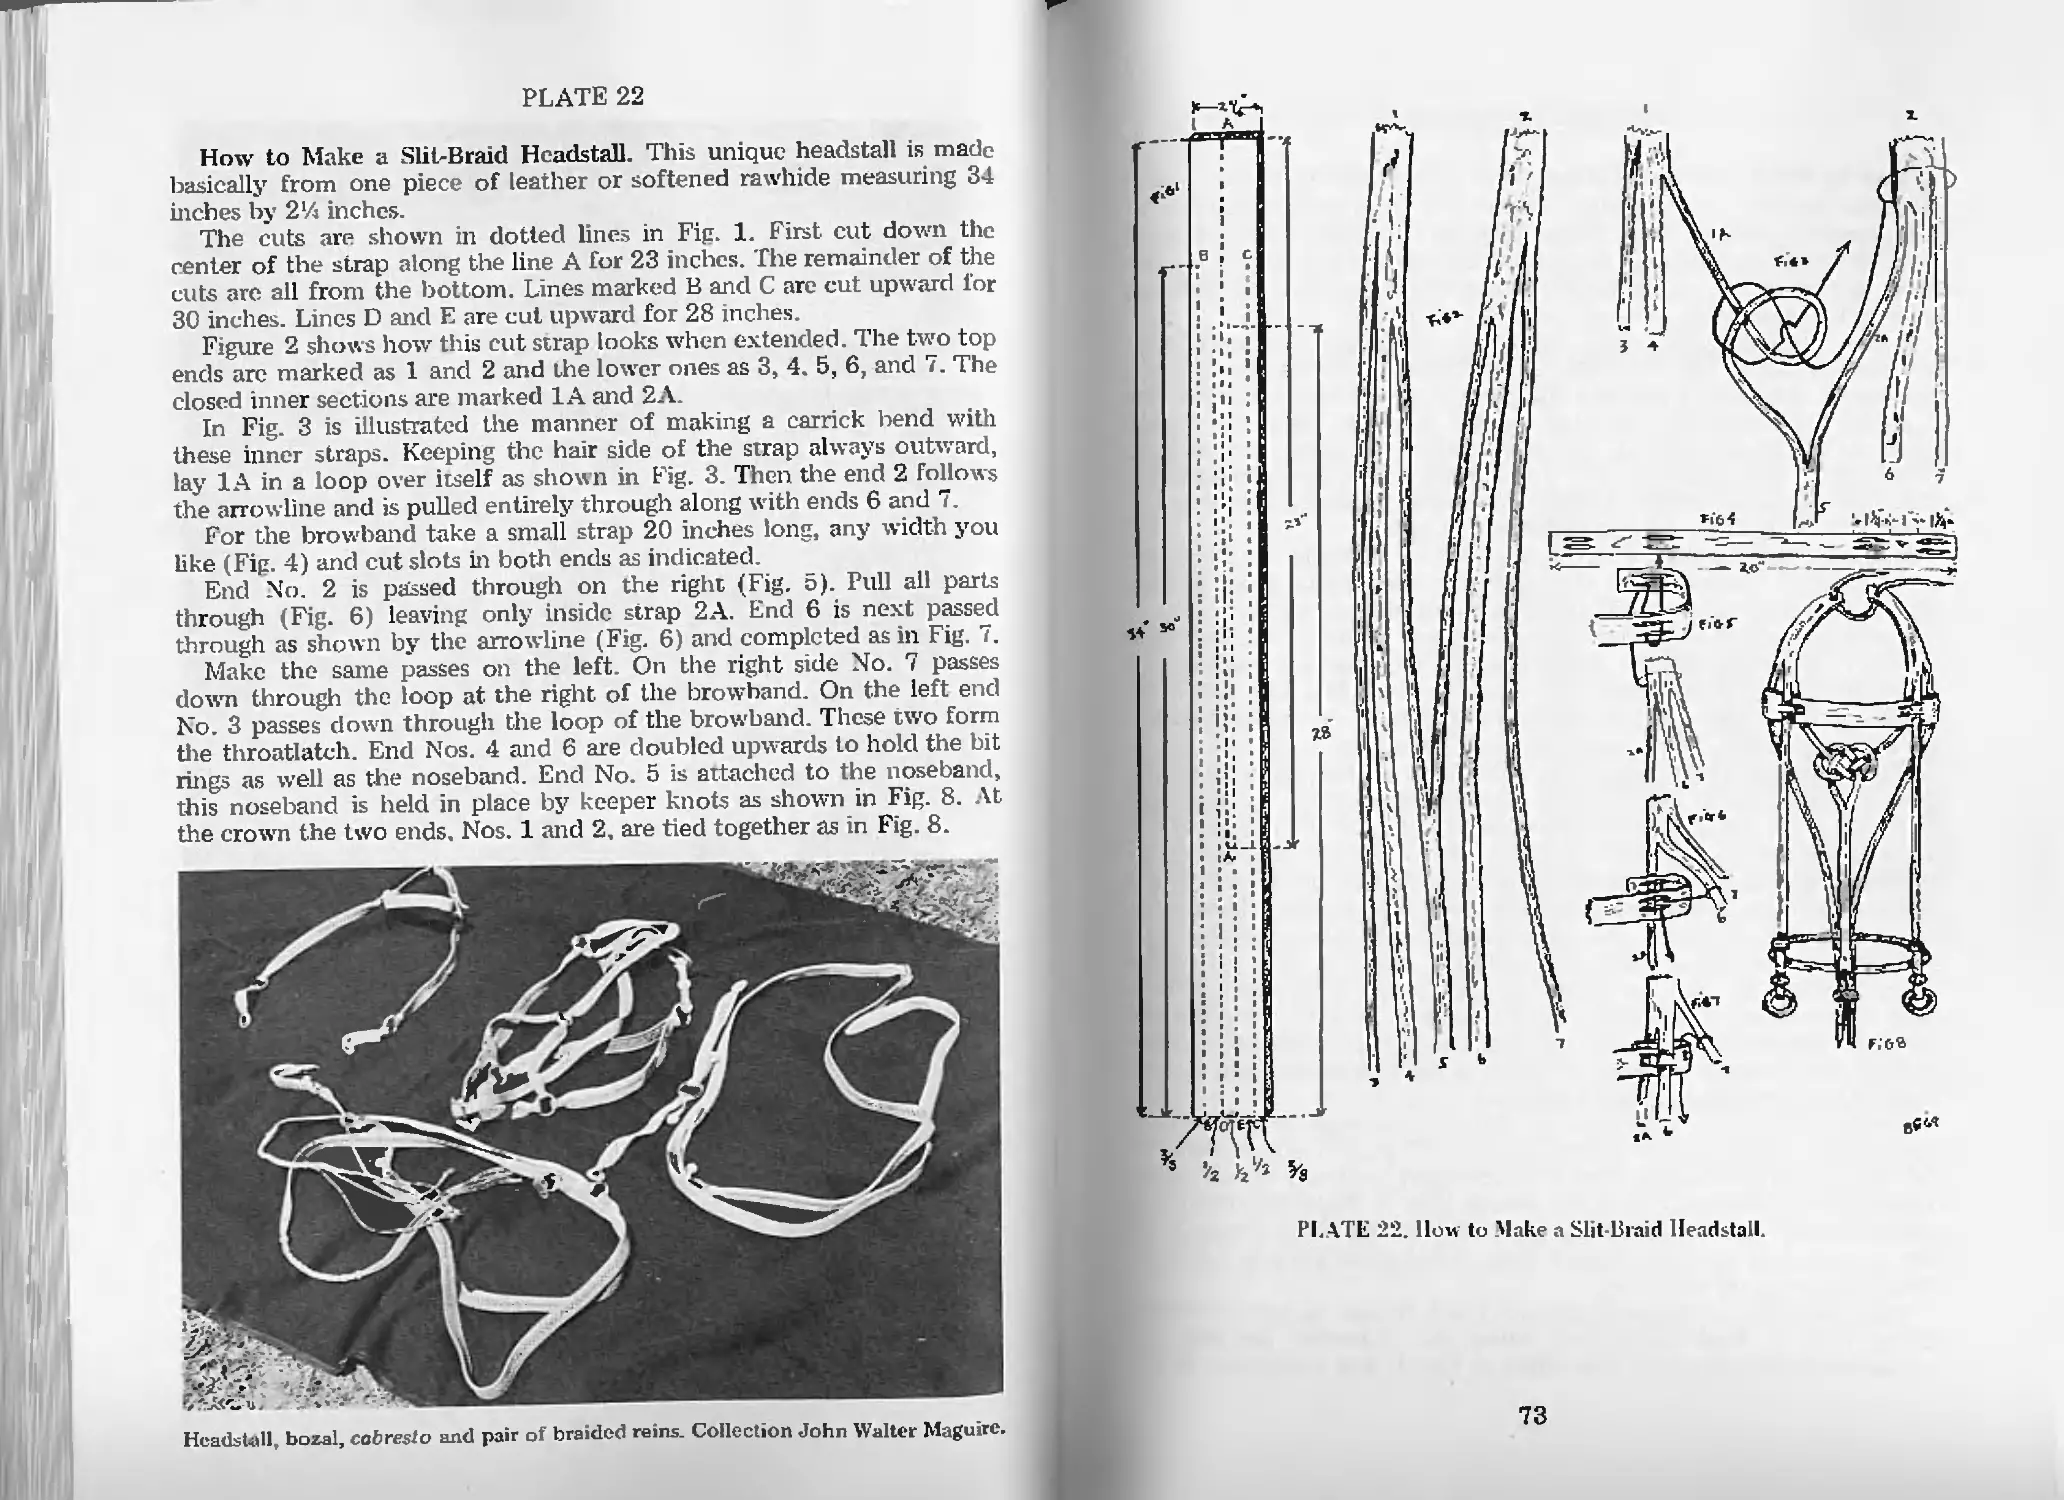
How to Make a Slit-Braid Headstall—Pl. 22 72
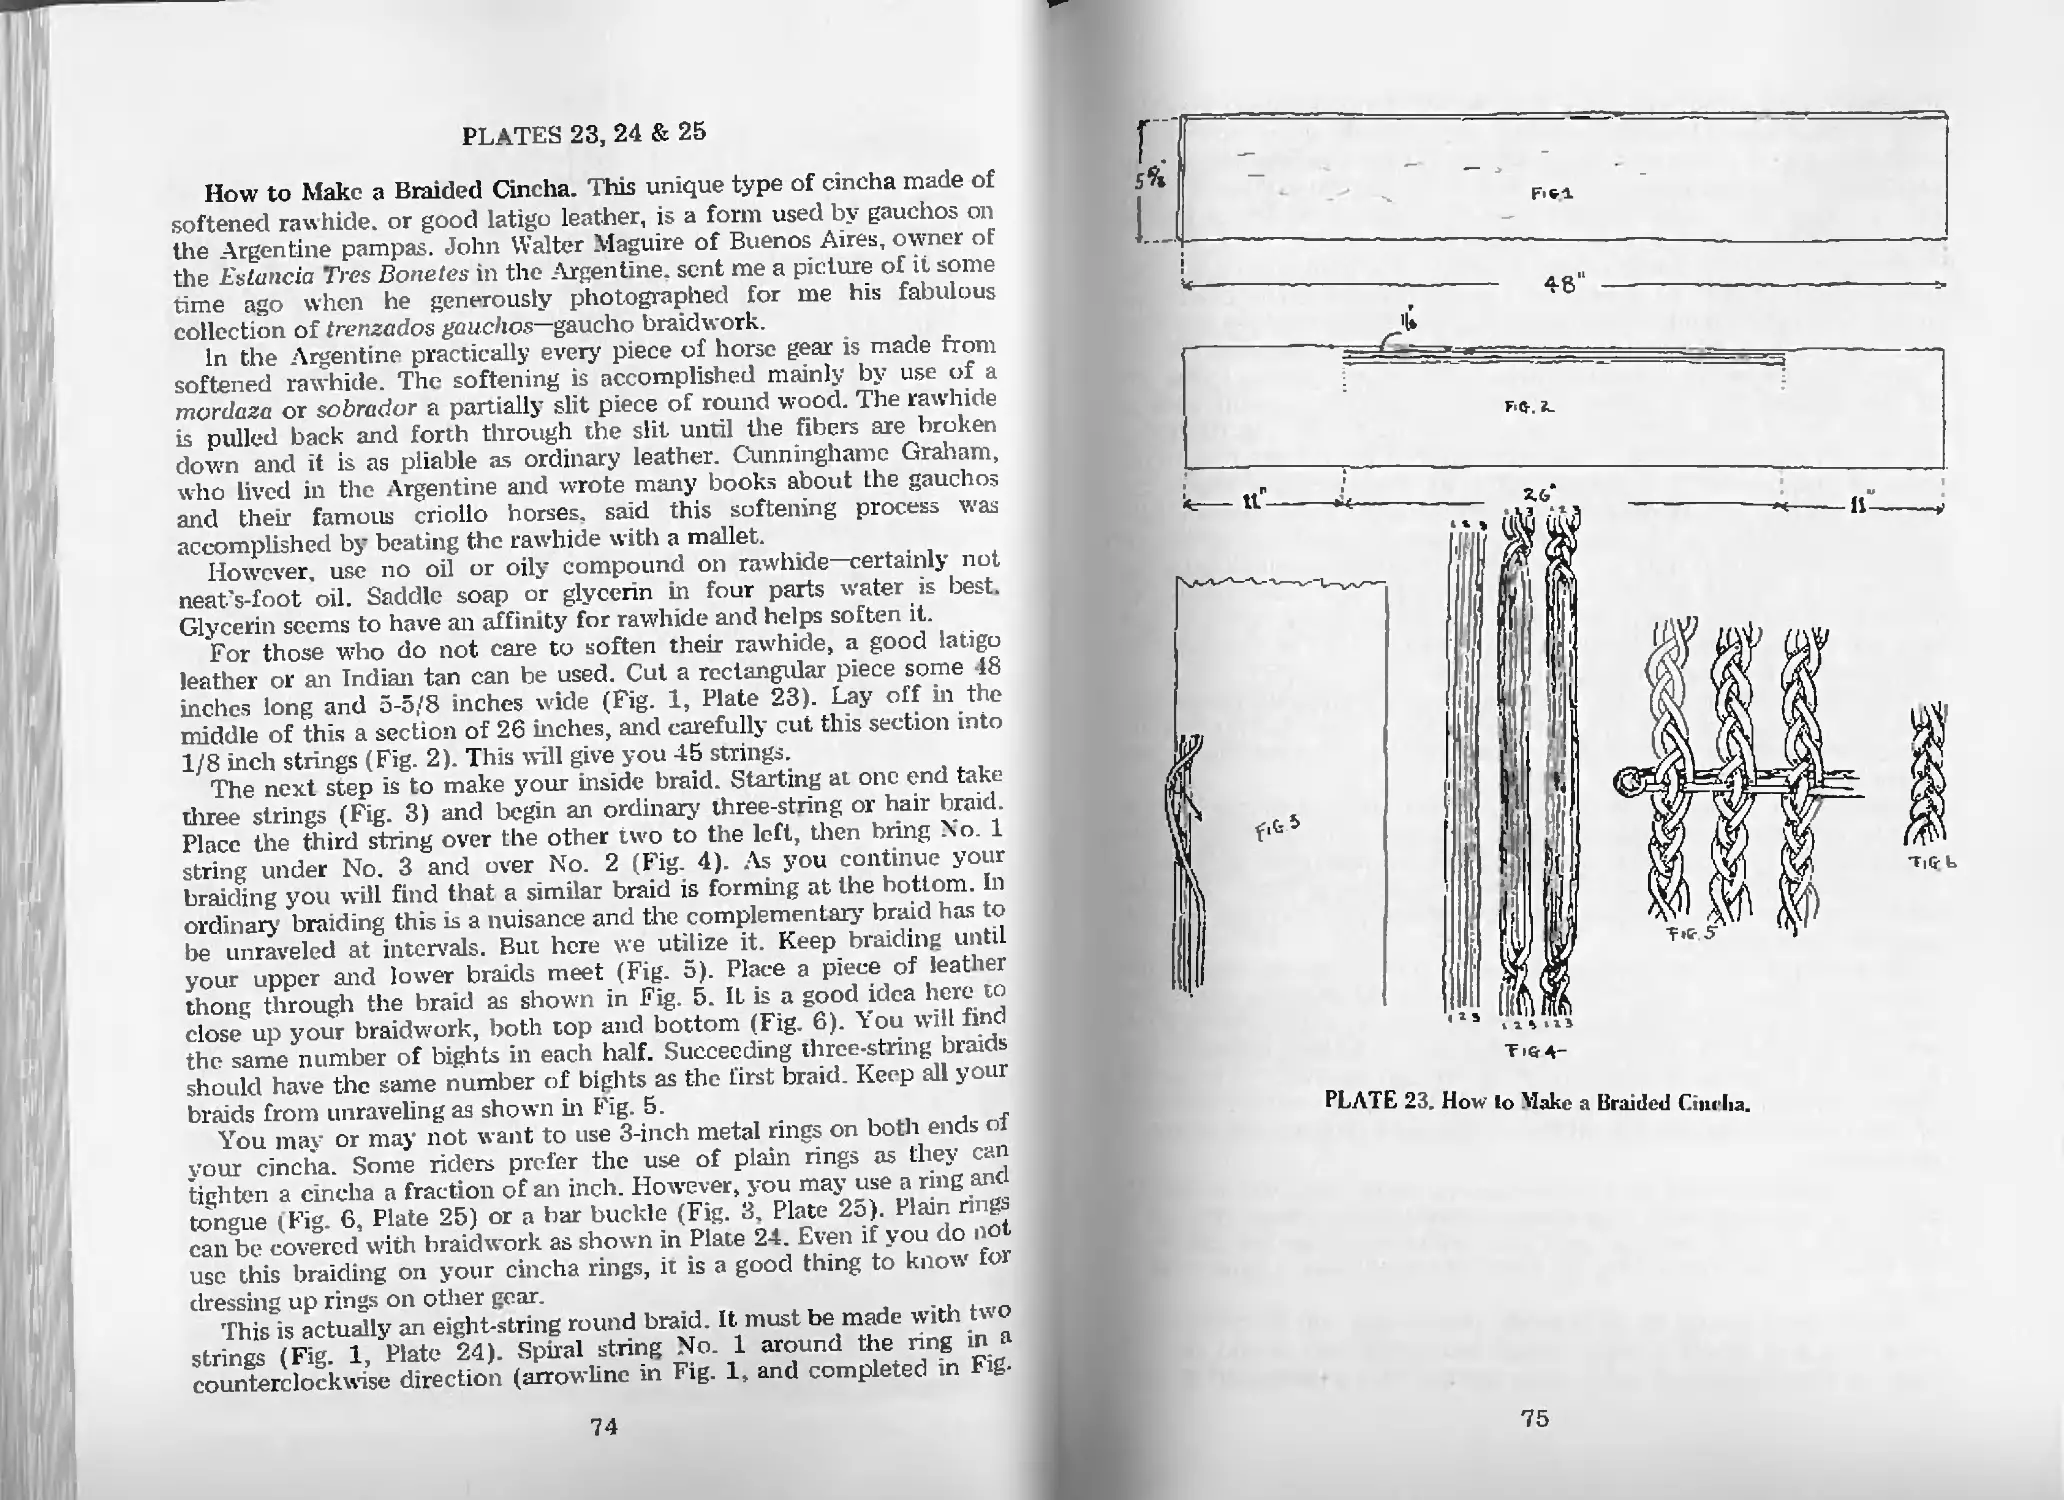
How to Make a Braided Cincha—Pl. 23 74
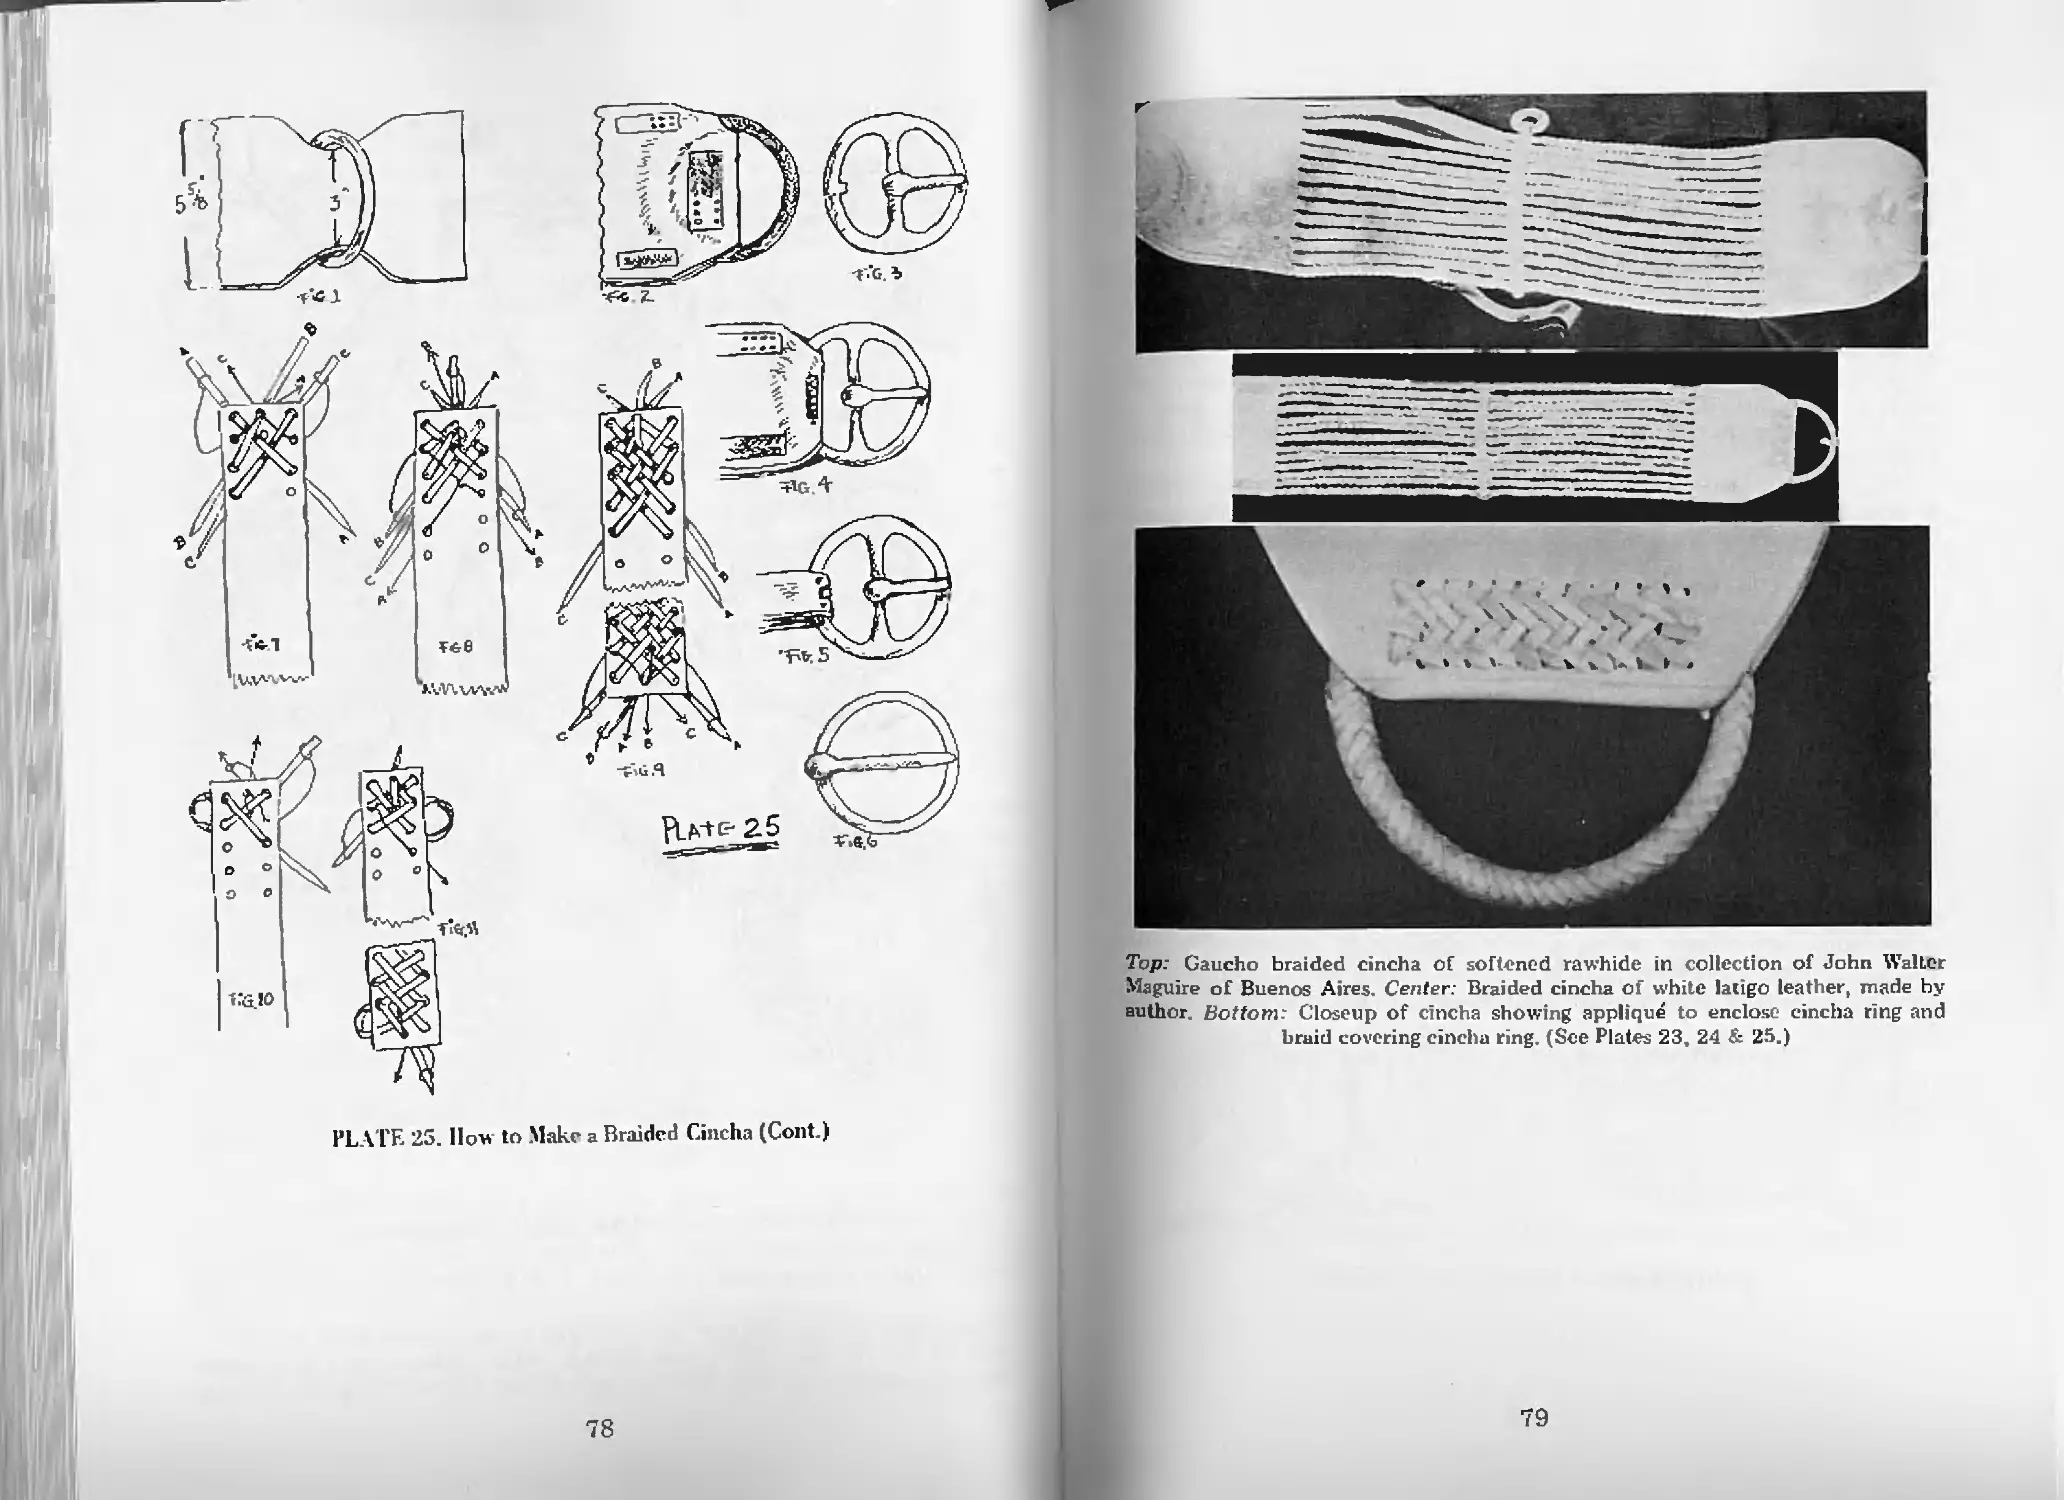
How to Make a Braided Cincha (Cont.)—Pl. 24 77
How to Make a Braided Cincha (Cont.)—Pl. 25 78
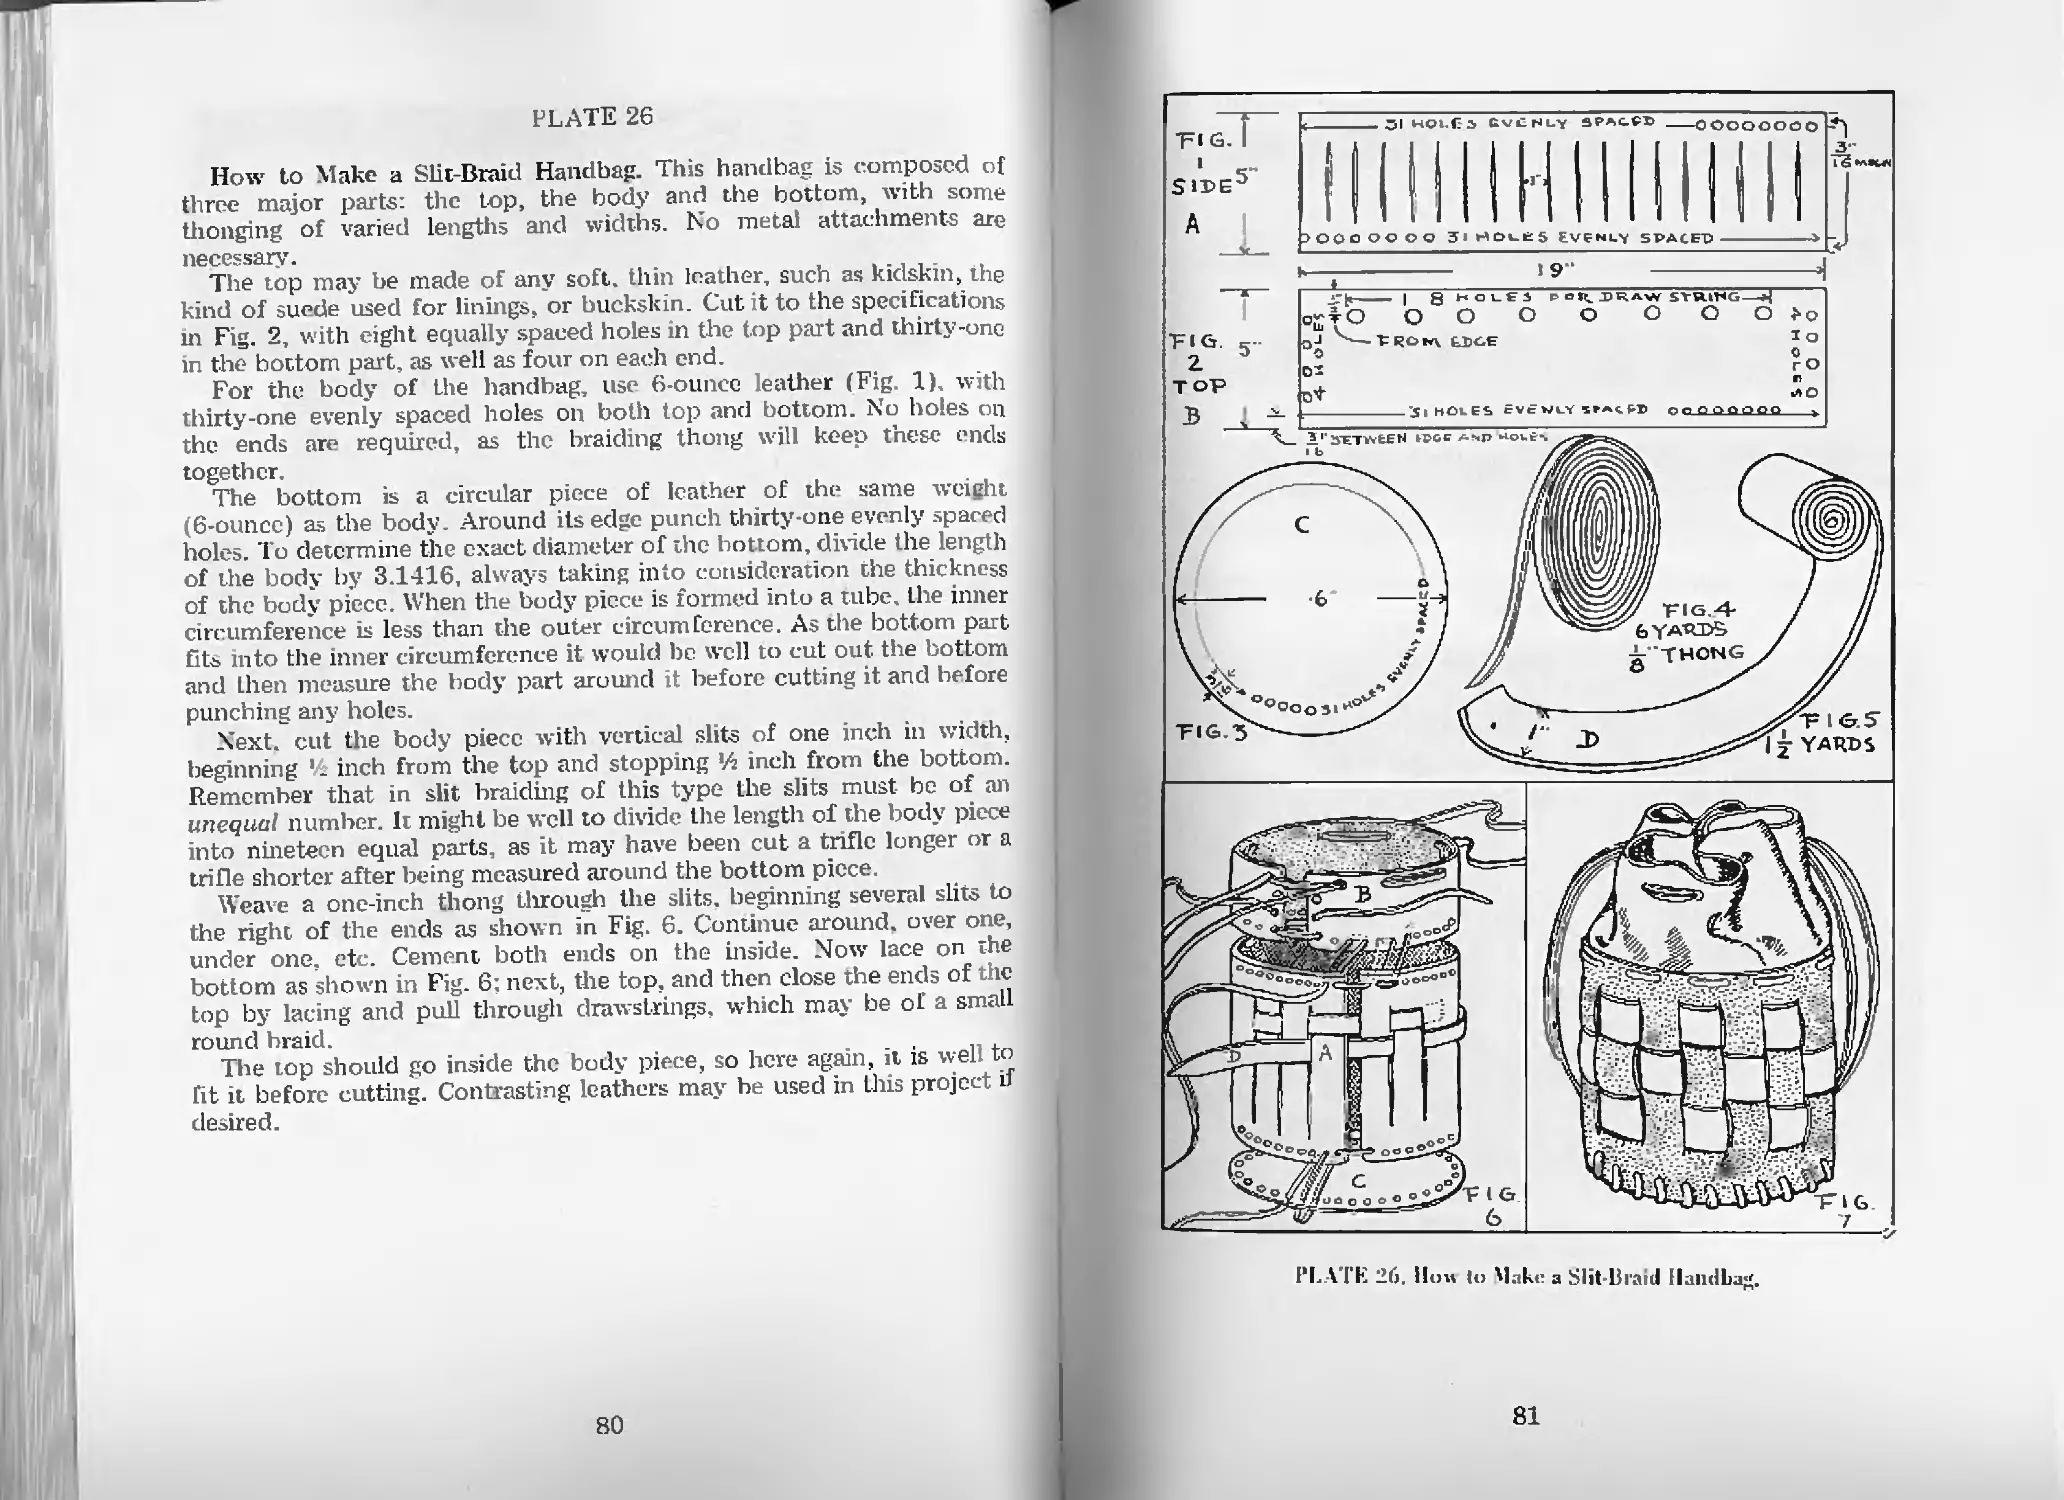
How to Make a Slit-Braid Handbag—Pl. 26 80
Flat Braids
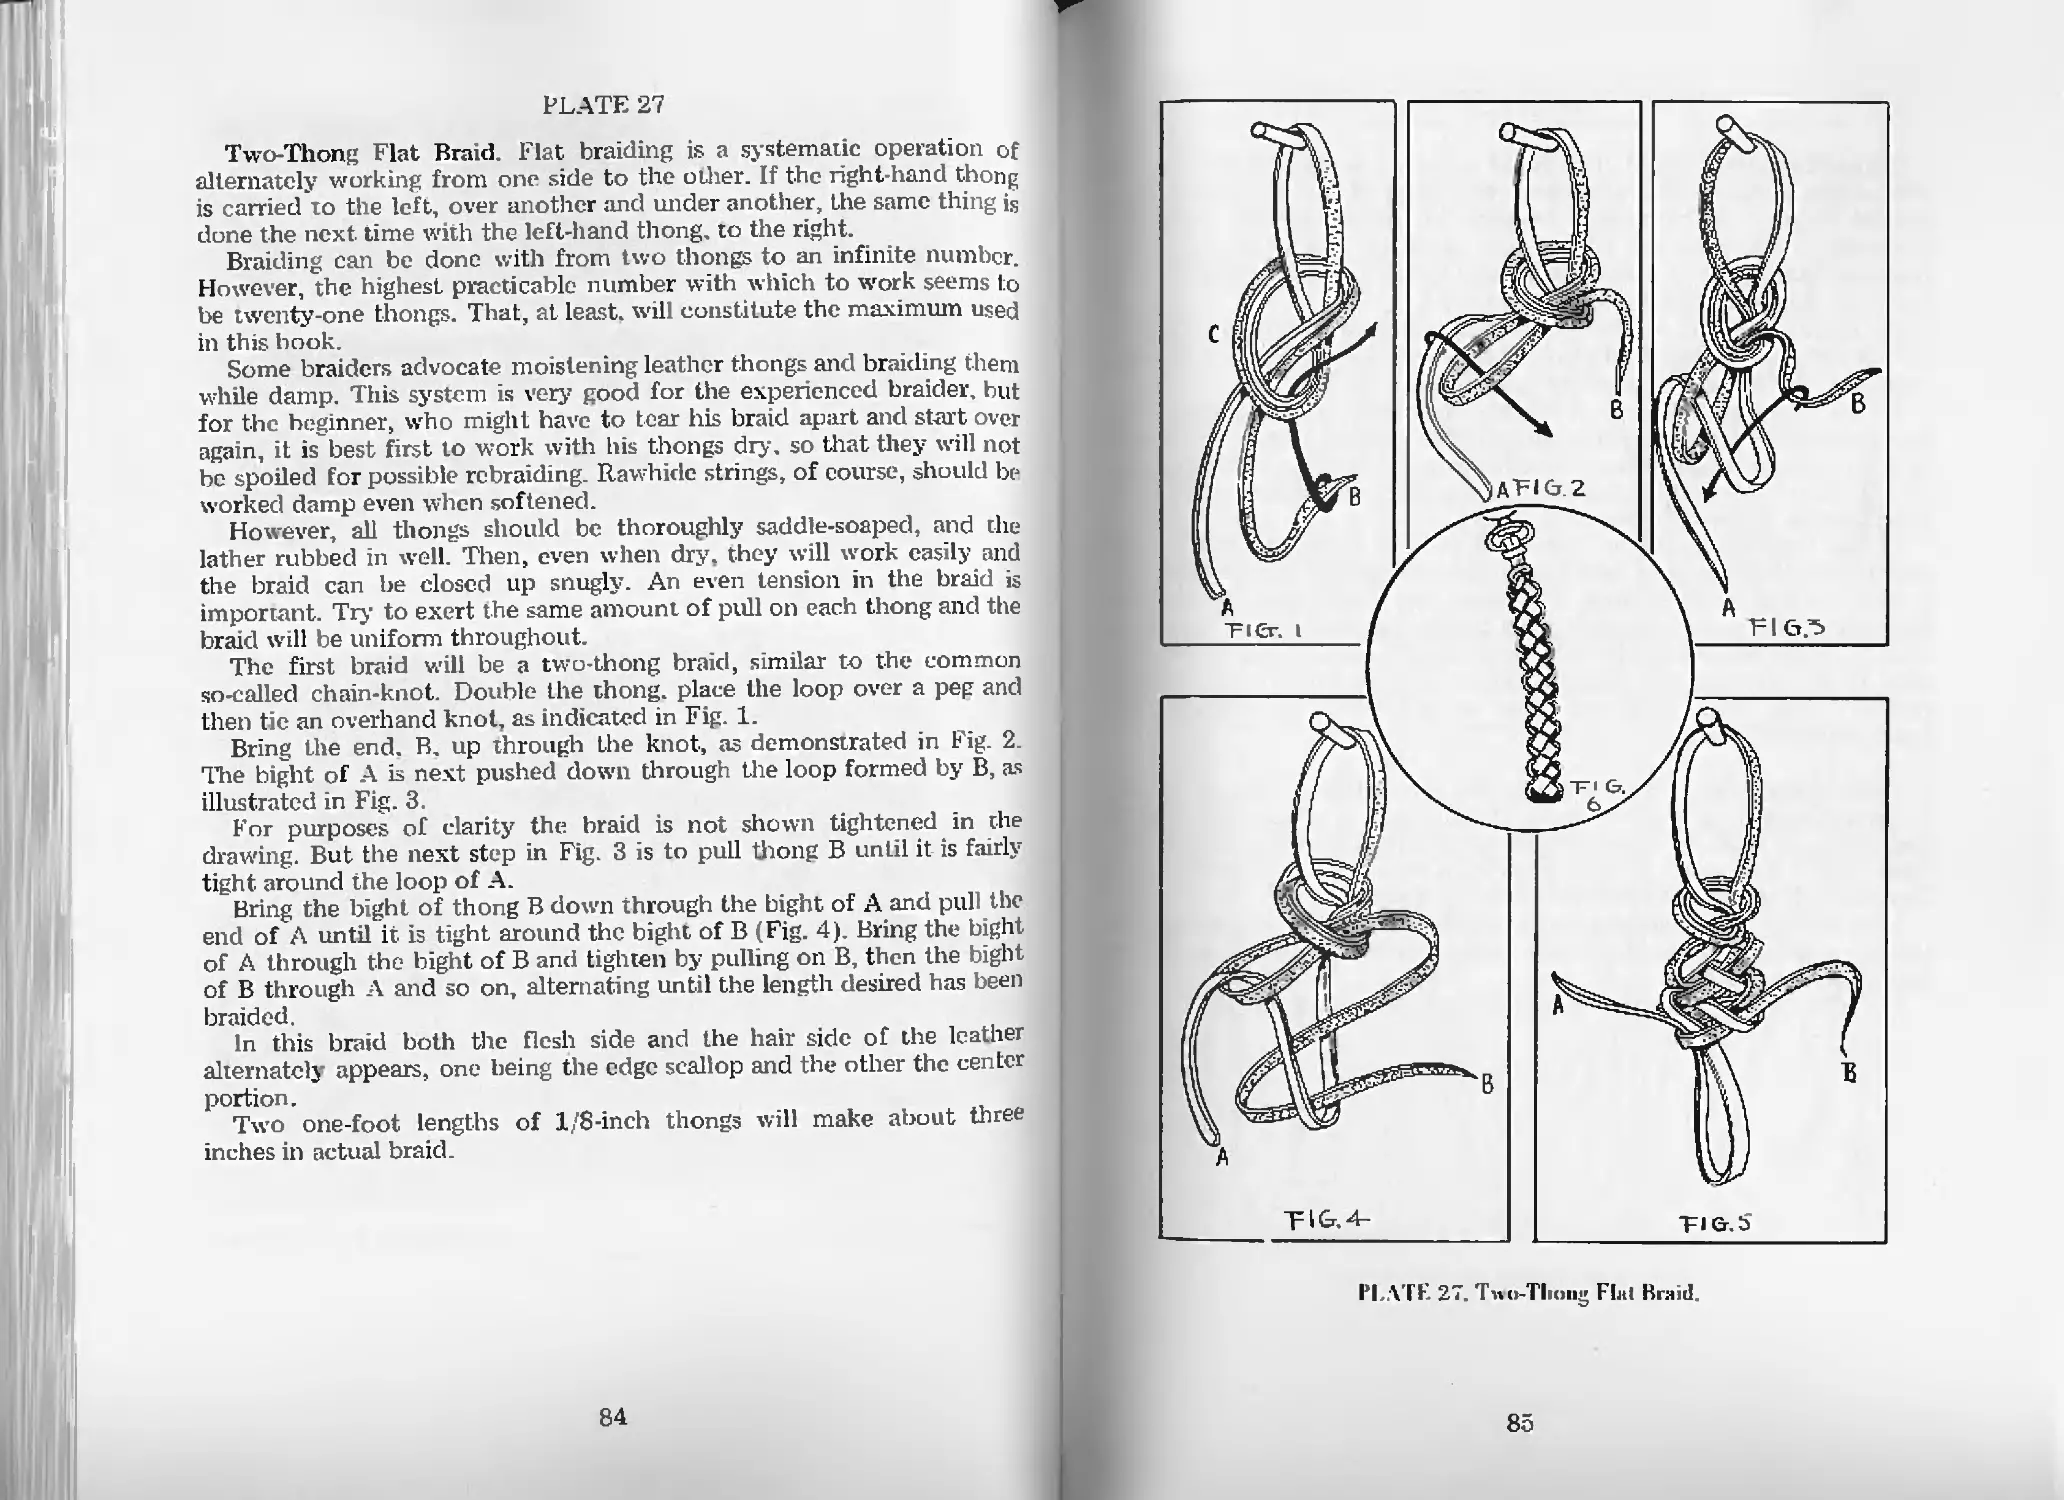
Two-Thong Flat Braid—Pl. 27 84
Three-Thong Hair Braid—Pl. 28 86
Four-Thong Braid—Pl. 28 86
Five-Thong Braids—Pl. 29 88
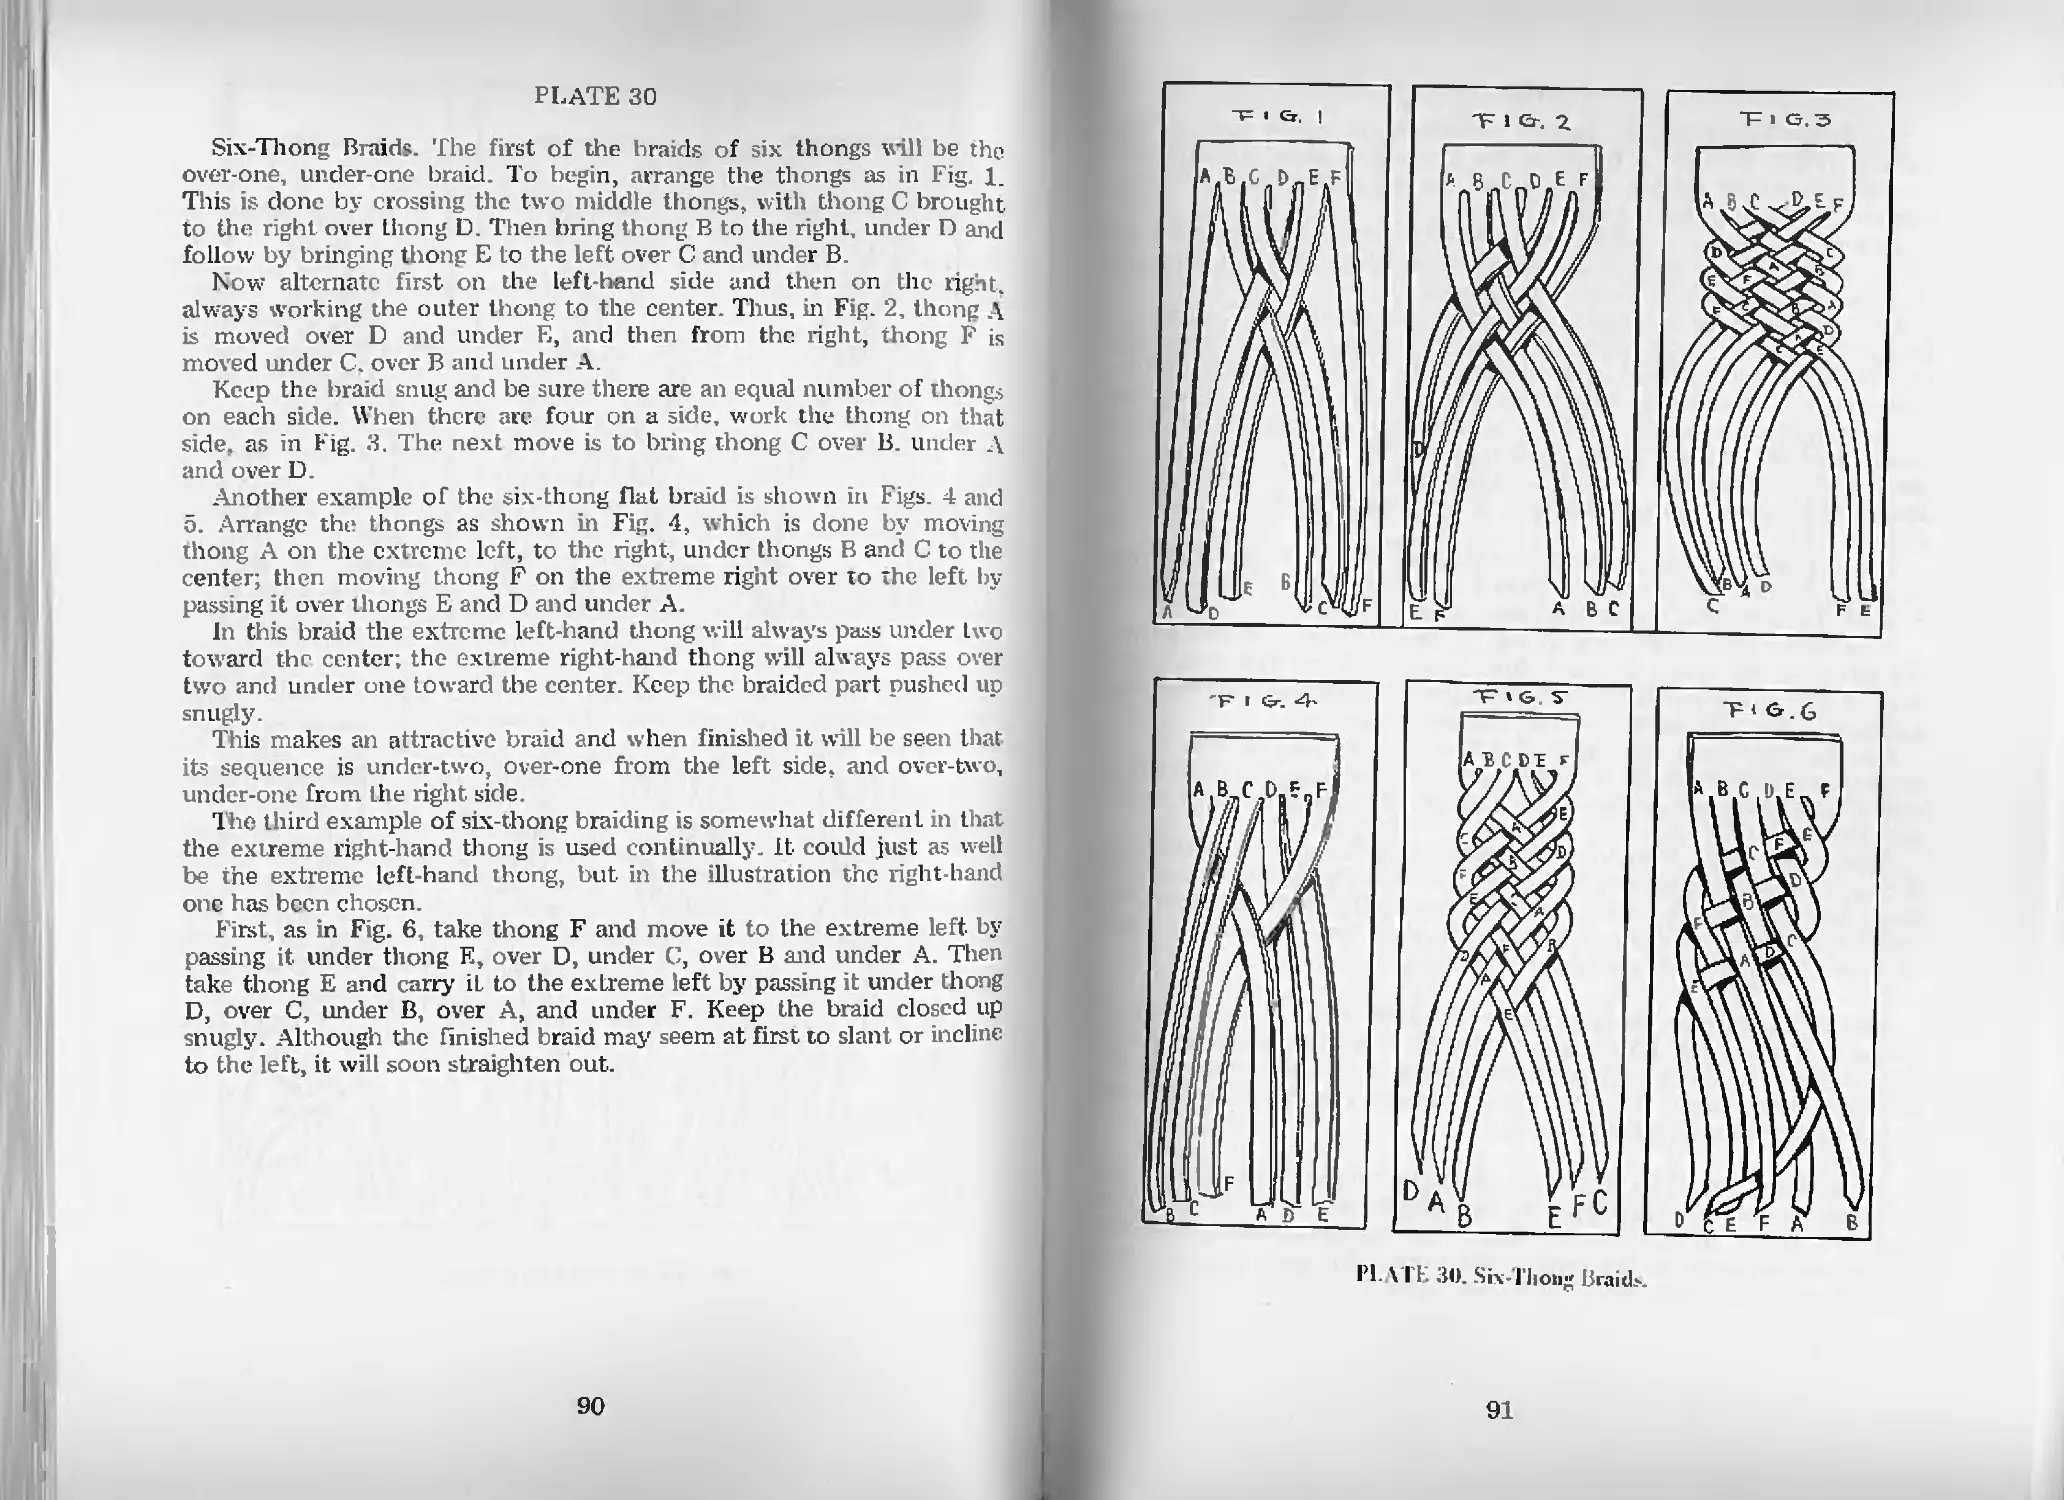
Six-Thong Braids—Pl. 30 90
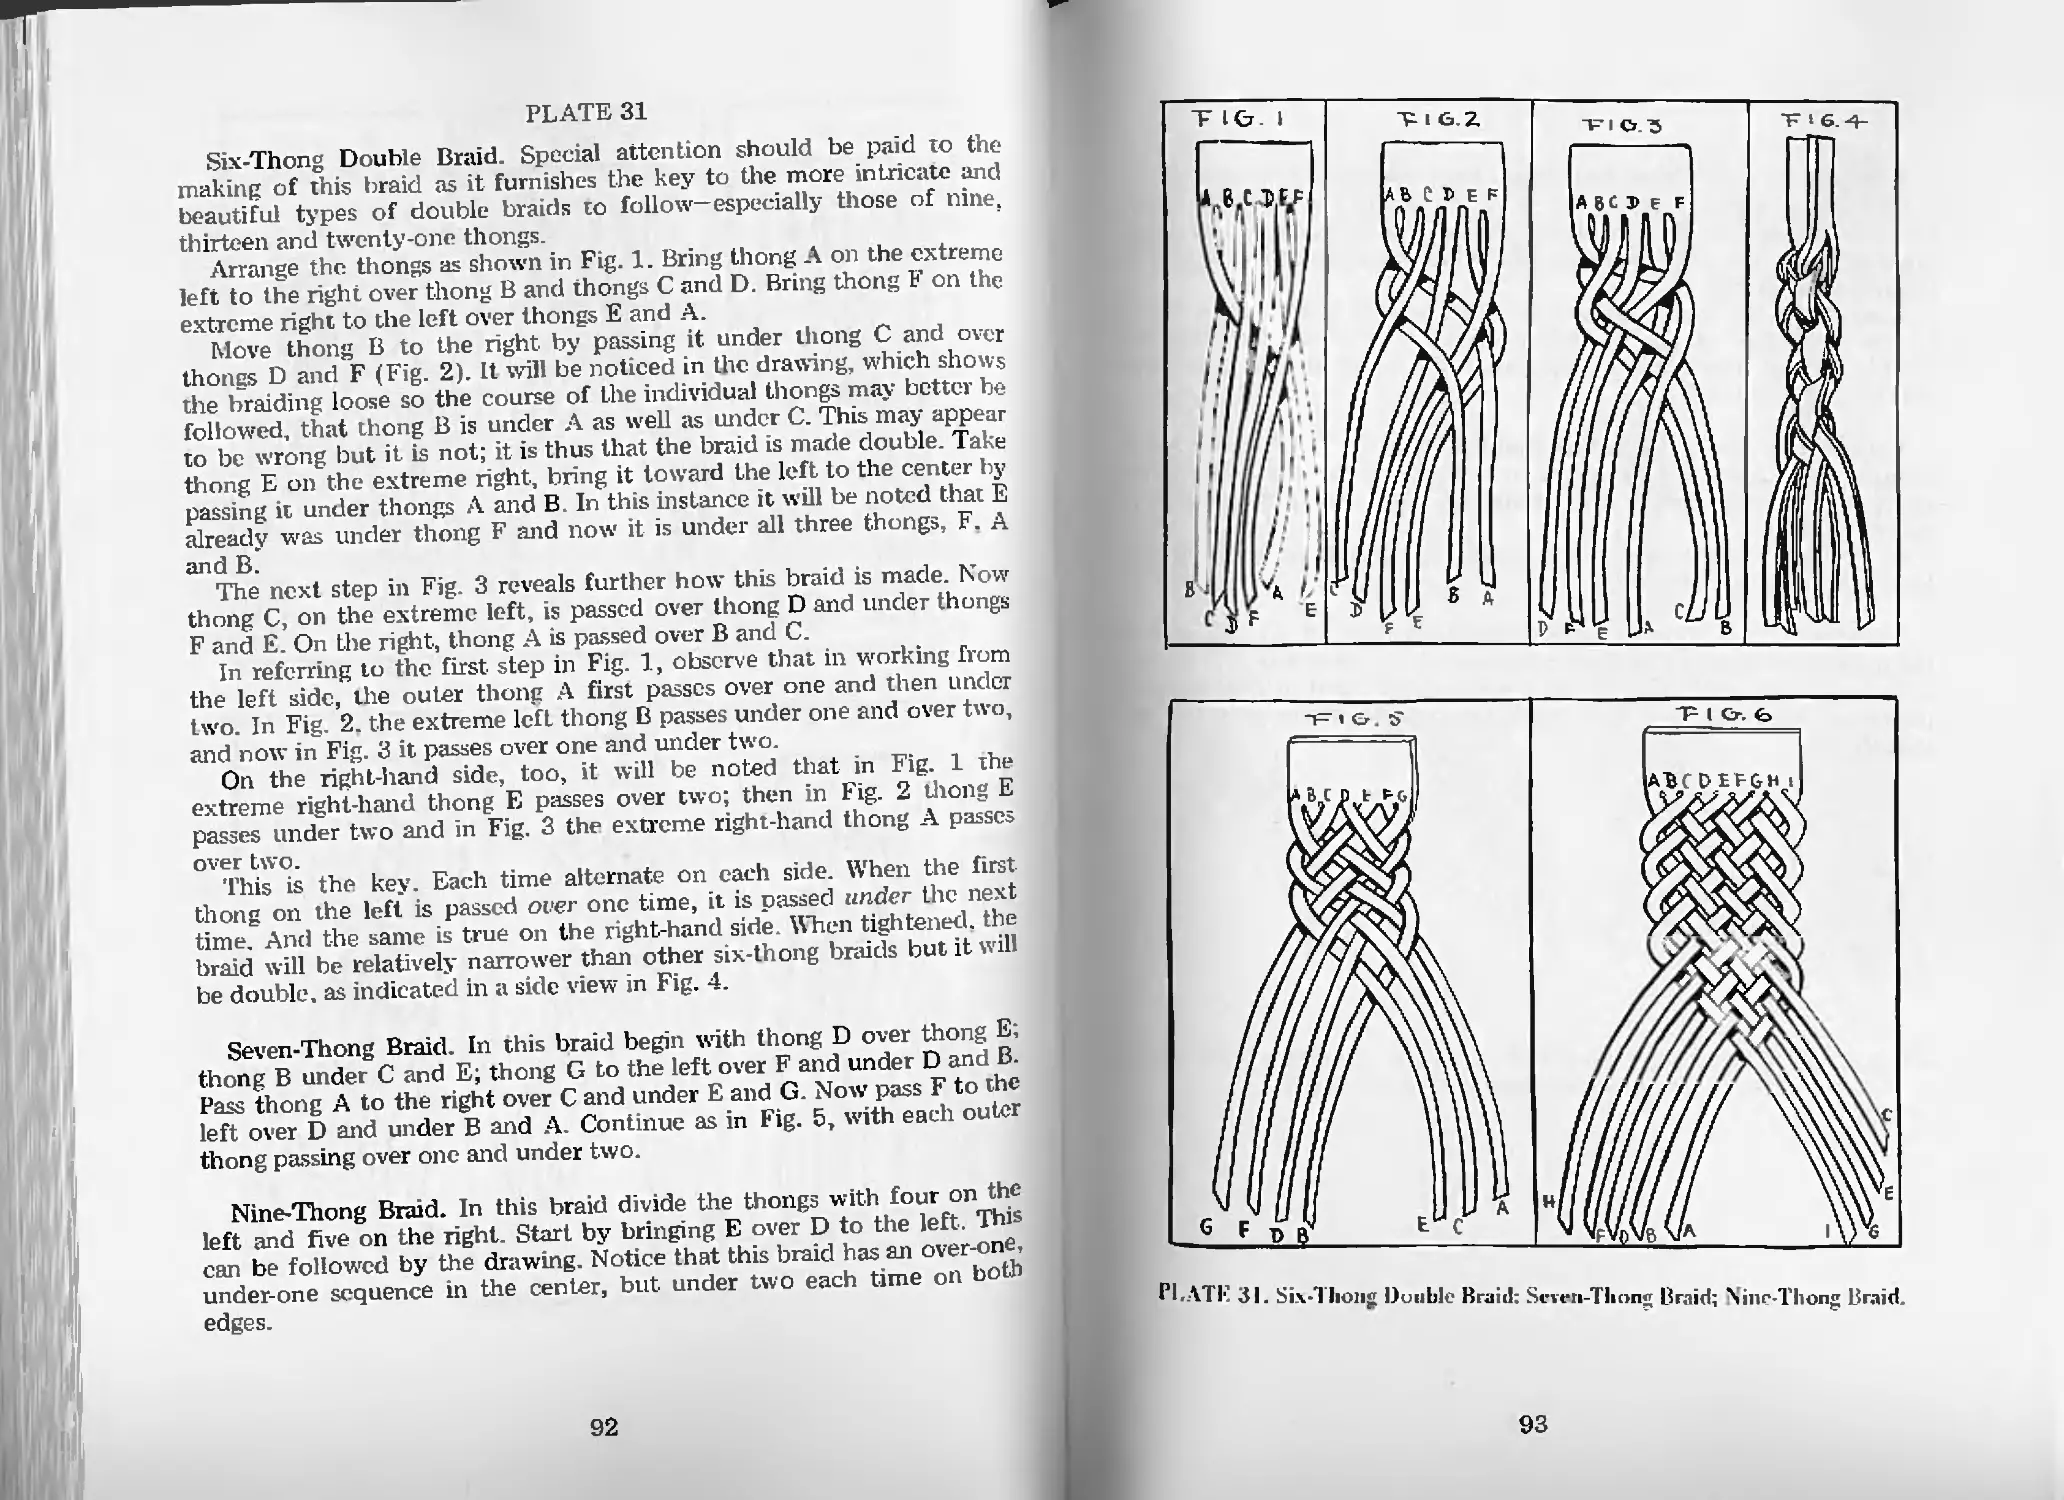
Six-Thong Double Braid—Pl. 31 92
Seven-Thong Braid—Pl 31 92
Xine-Thong Braid—Pl. 31 92
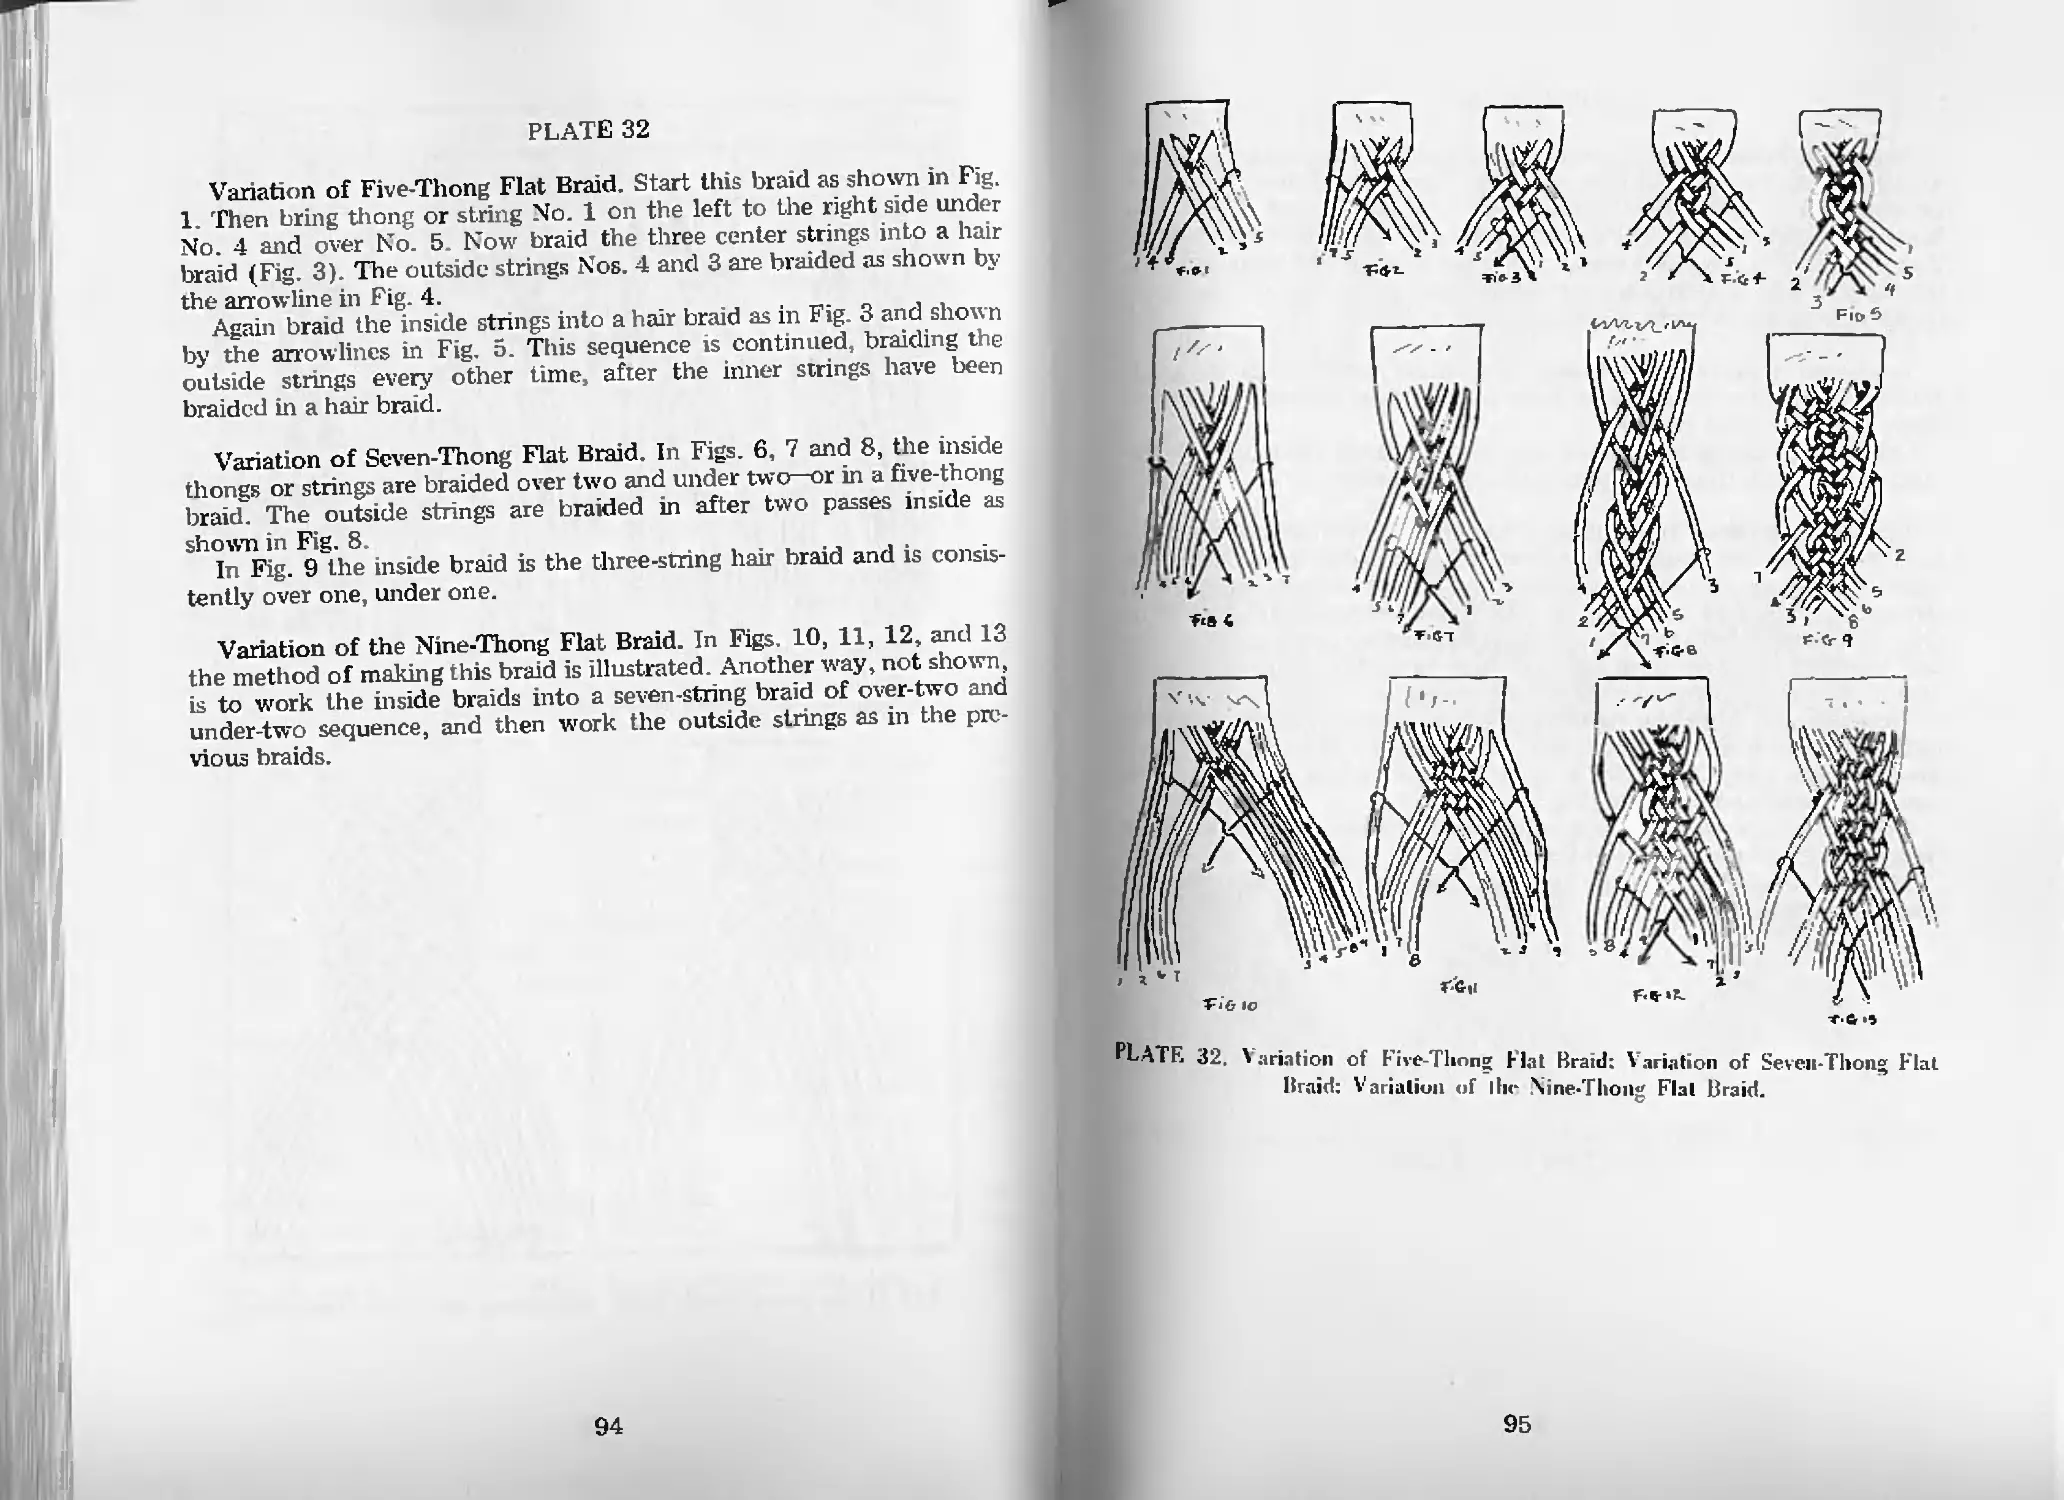
Variation of Five-Thong Flat Braid—Pi. 32 94
Variation of Seven-Thong Flat Braid—Pl. 32 94
Variation of Nine-Thong Flat Braid—Pl. 32 94
Lazy-Man Braid of Six Thongs—Pl. 33 96
Lazy-Man Braid of Eight Thongs—Pl. 33 96
Lazy-Man Braid of Ten Thongs—Pl. 33 96
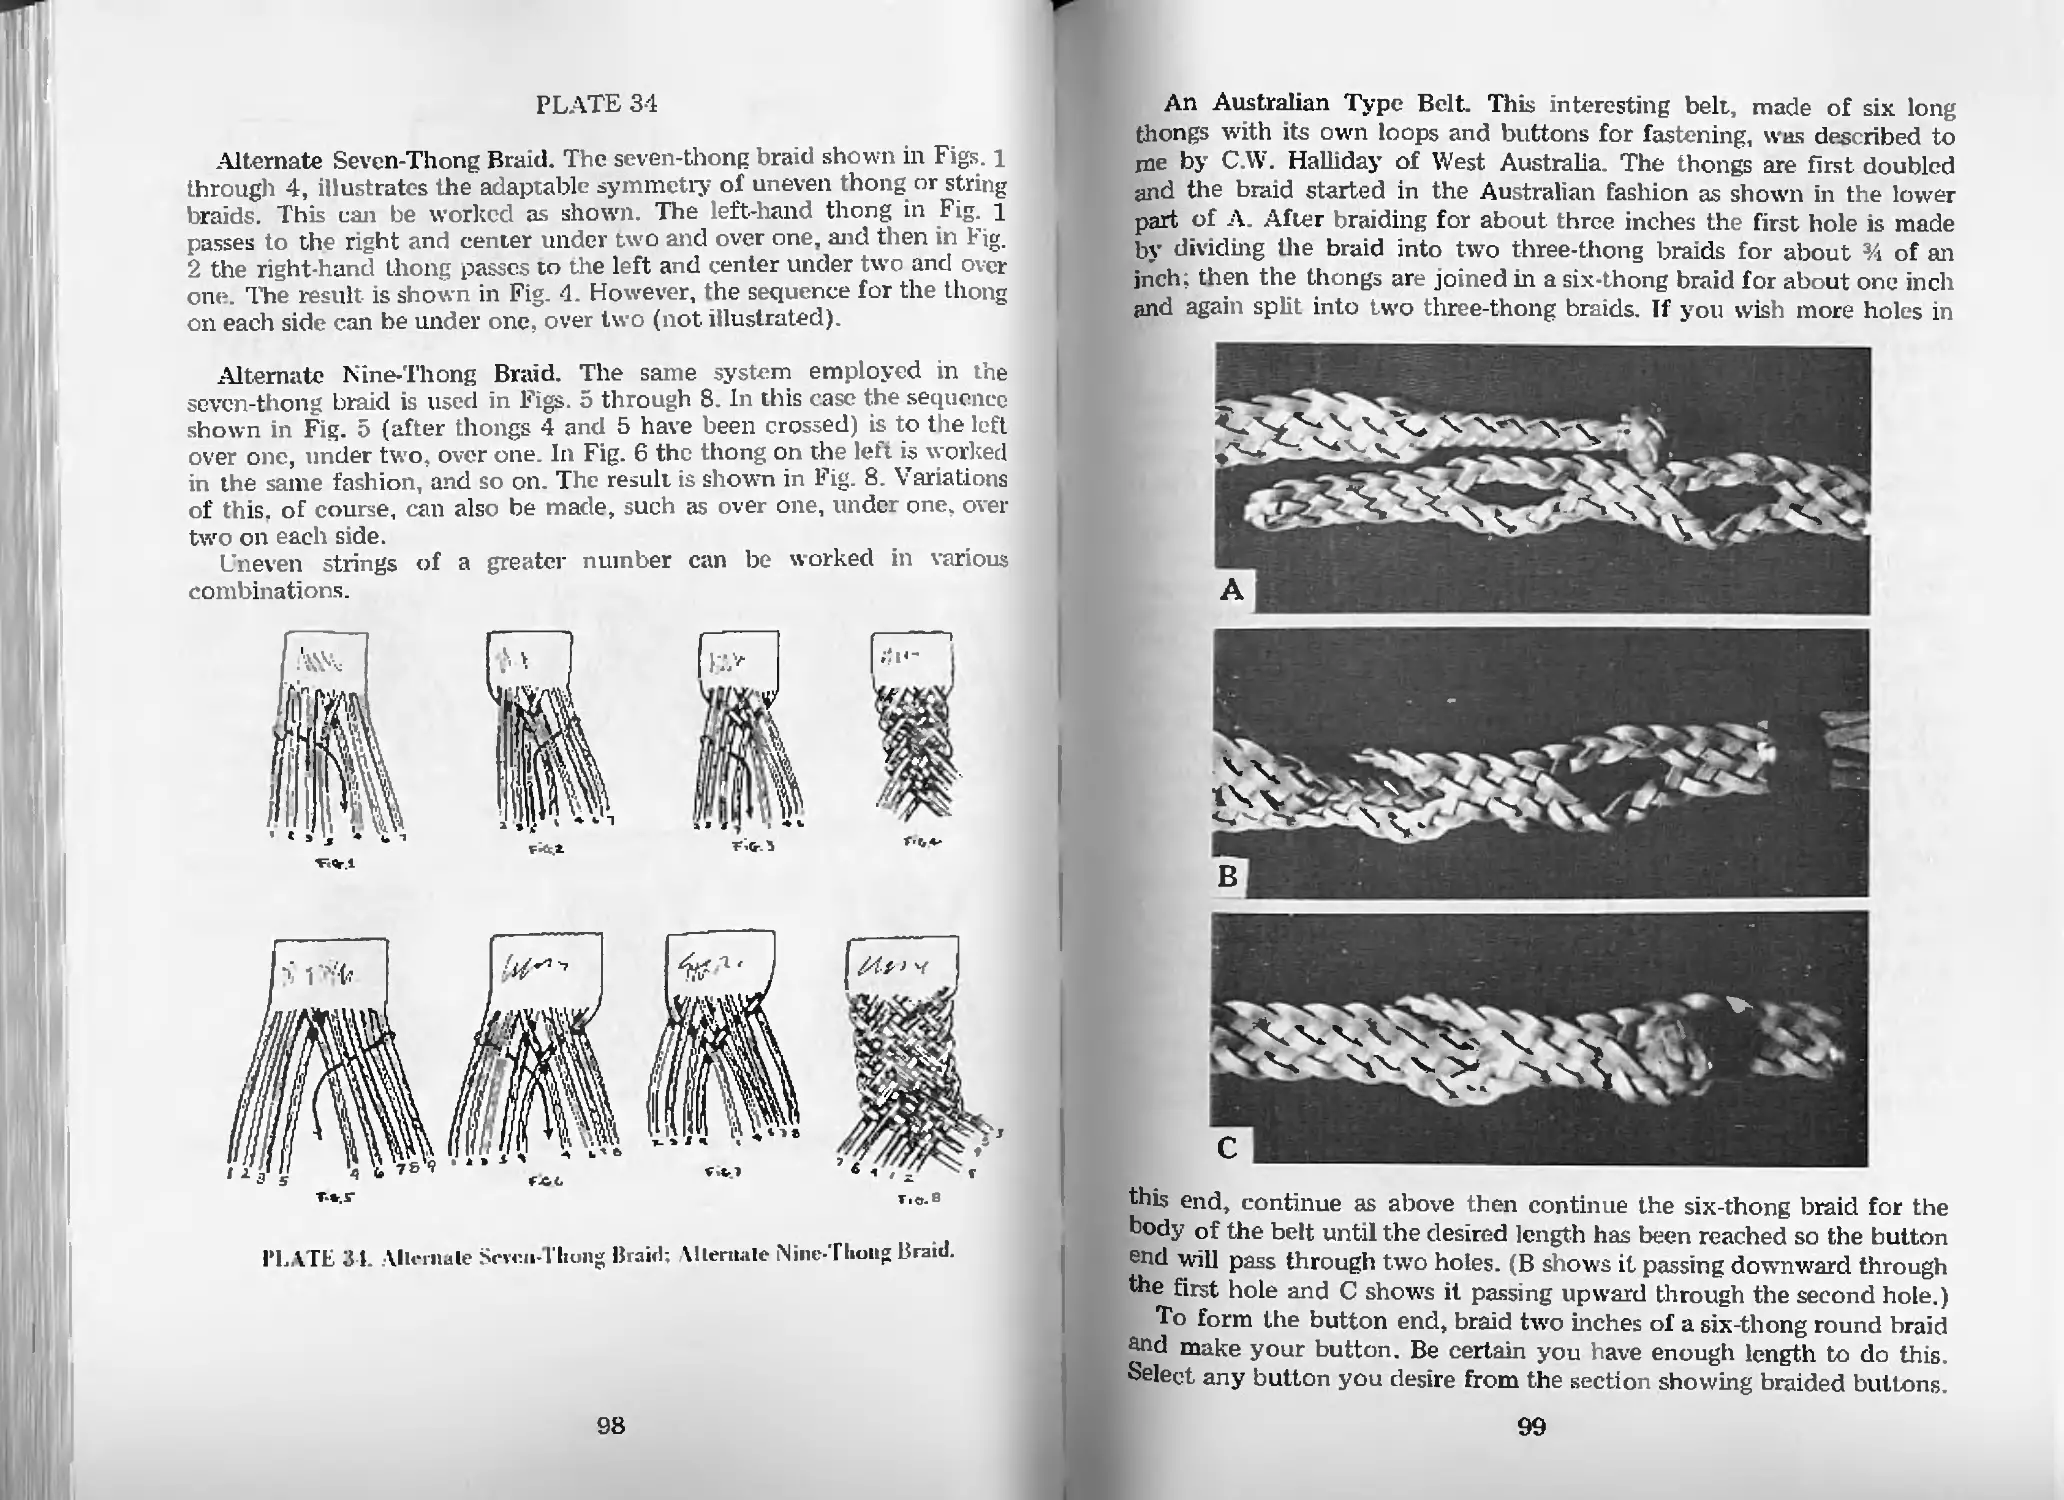
Alternate Seven-Thong Braid—Pl. 34 98
vui
Flat Braids (cont.)
Alternate Nine-Thong Braid—Pl. 34 98
How to Make an Australian Type Belt—Pl. 35 100
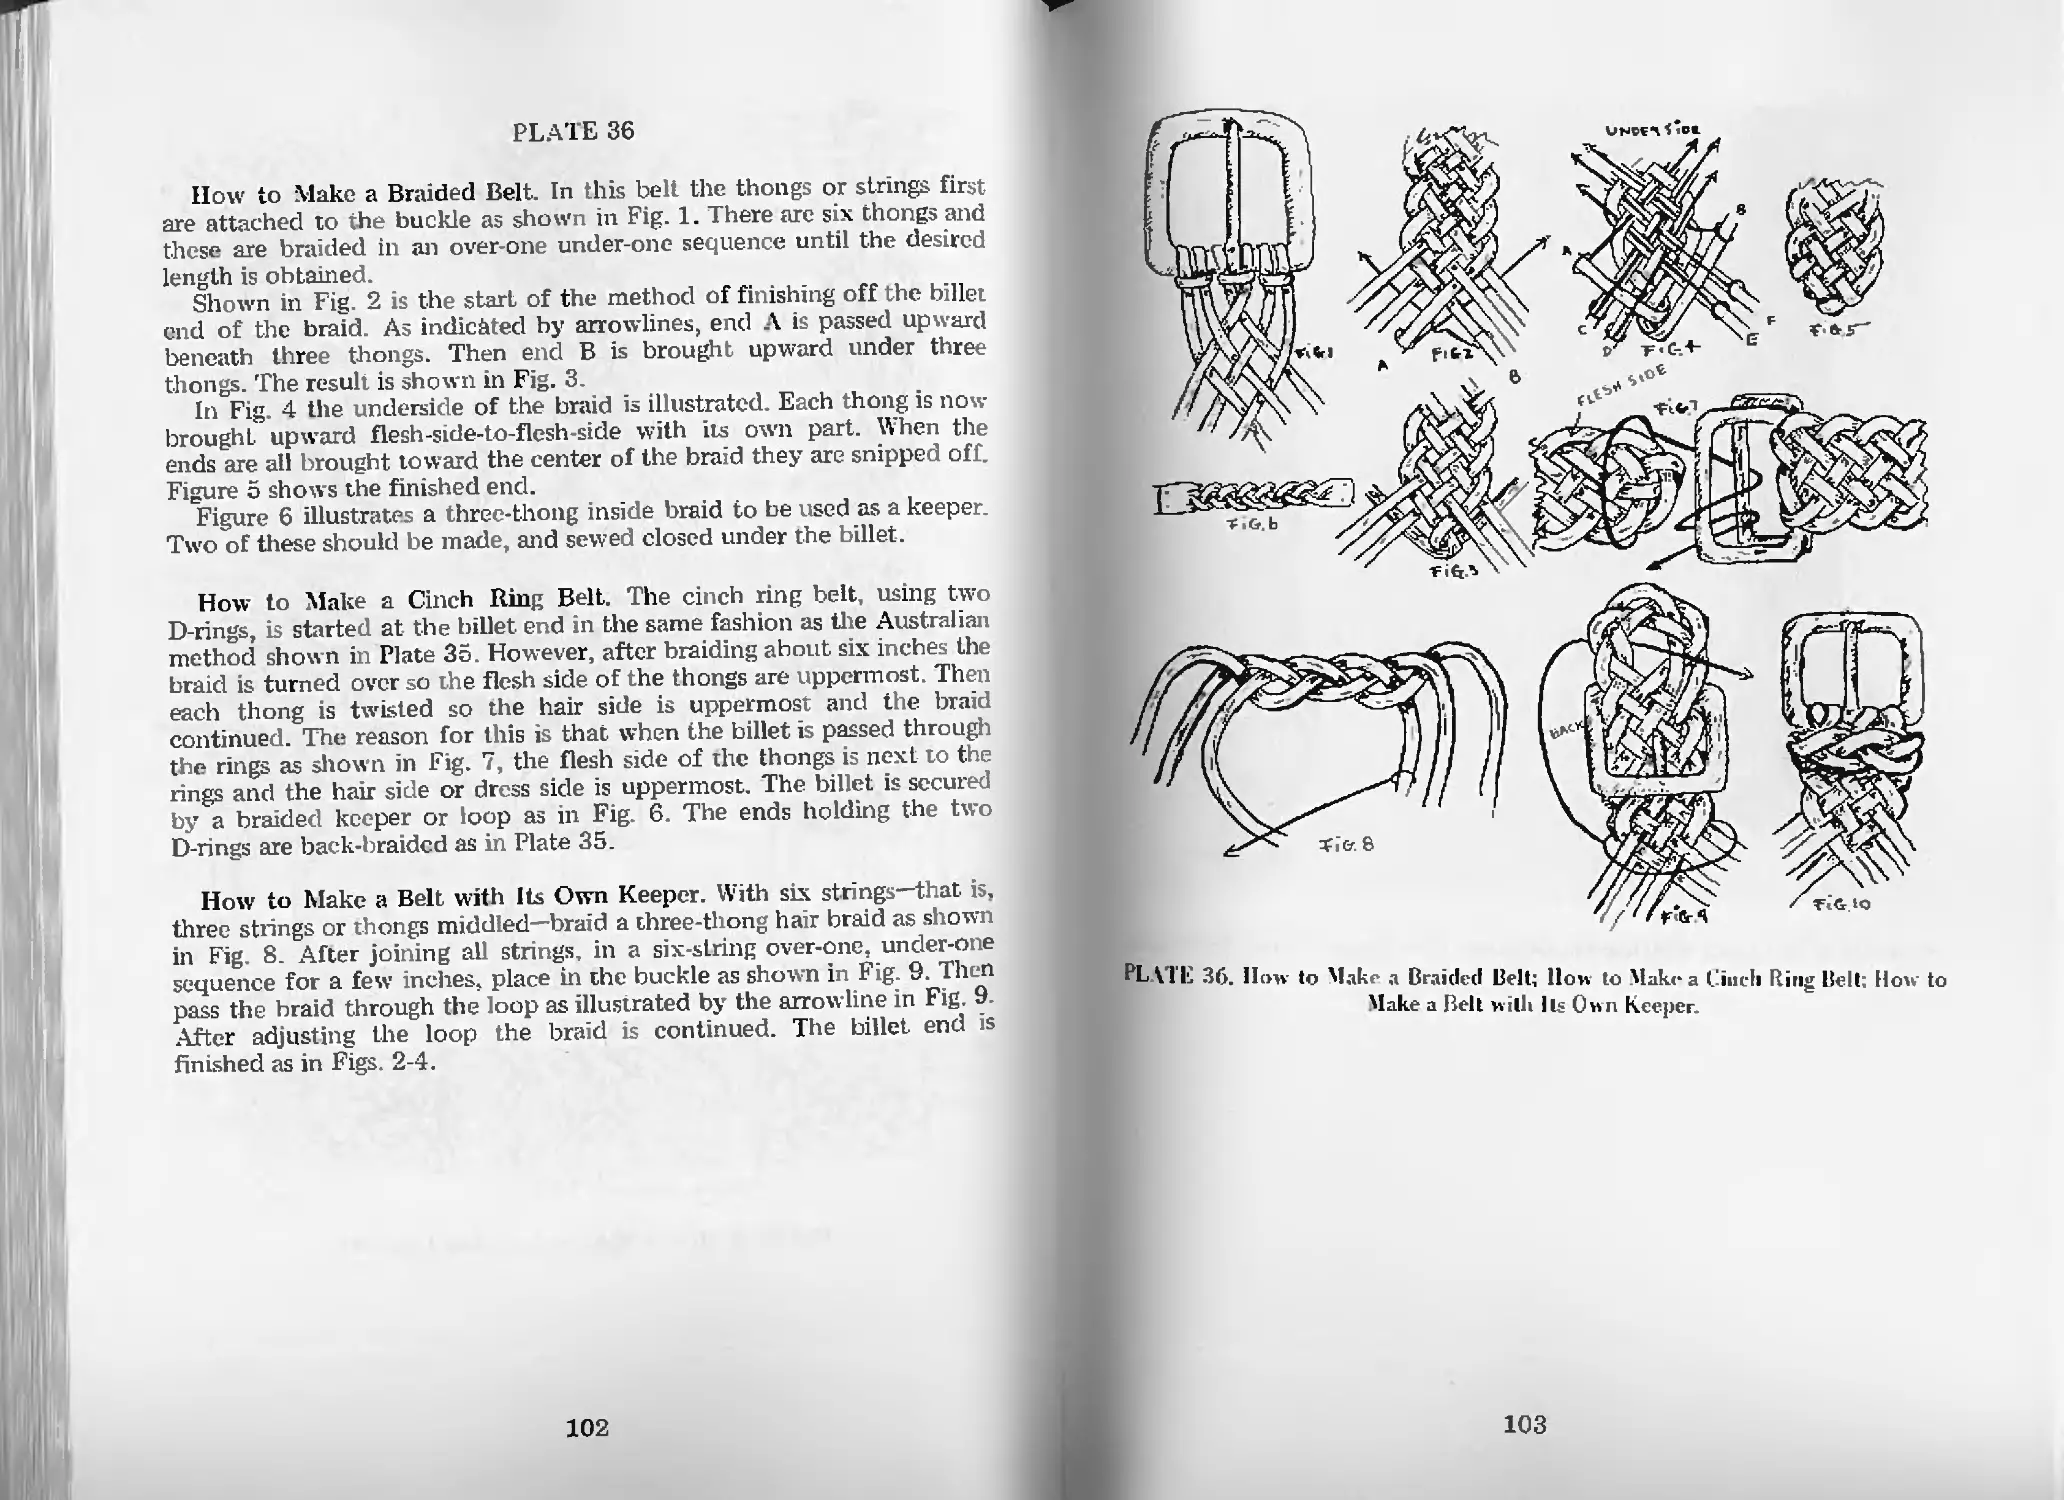
How to Make a Braided Belt—Pl. 36 102
How to make a Cinch Ring Belt—PL 36 102
How to Make a Belt with Its Own Keeper—PL 36 102
Round Braids
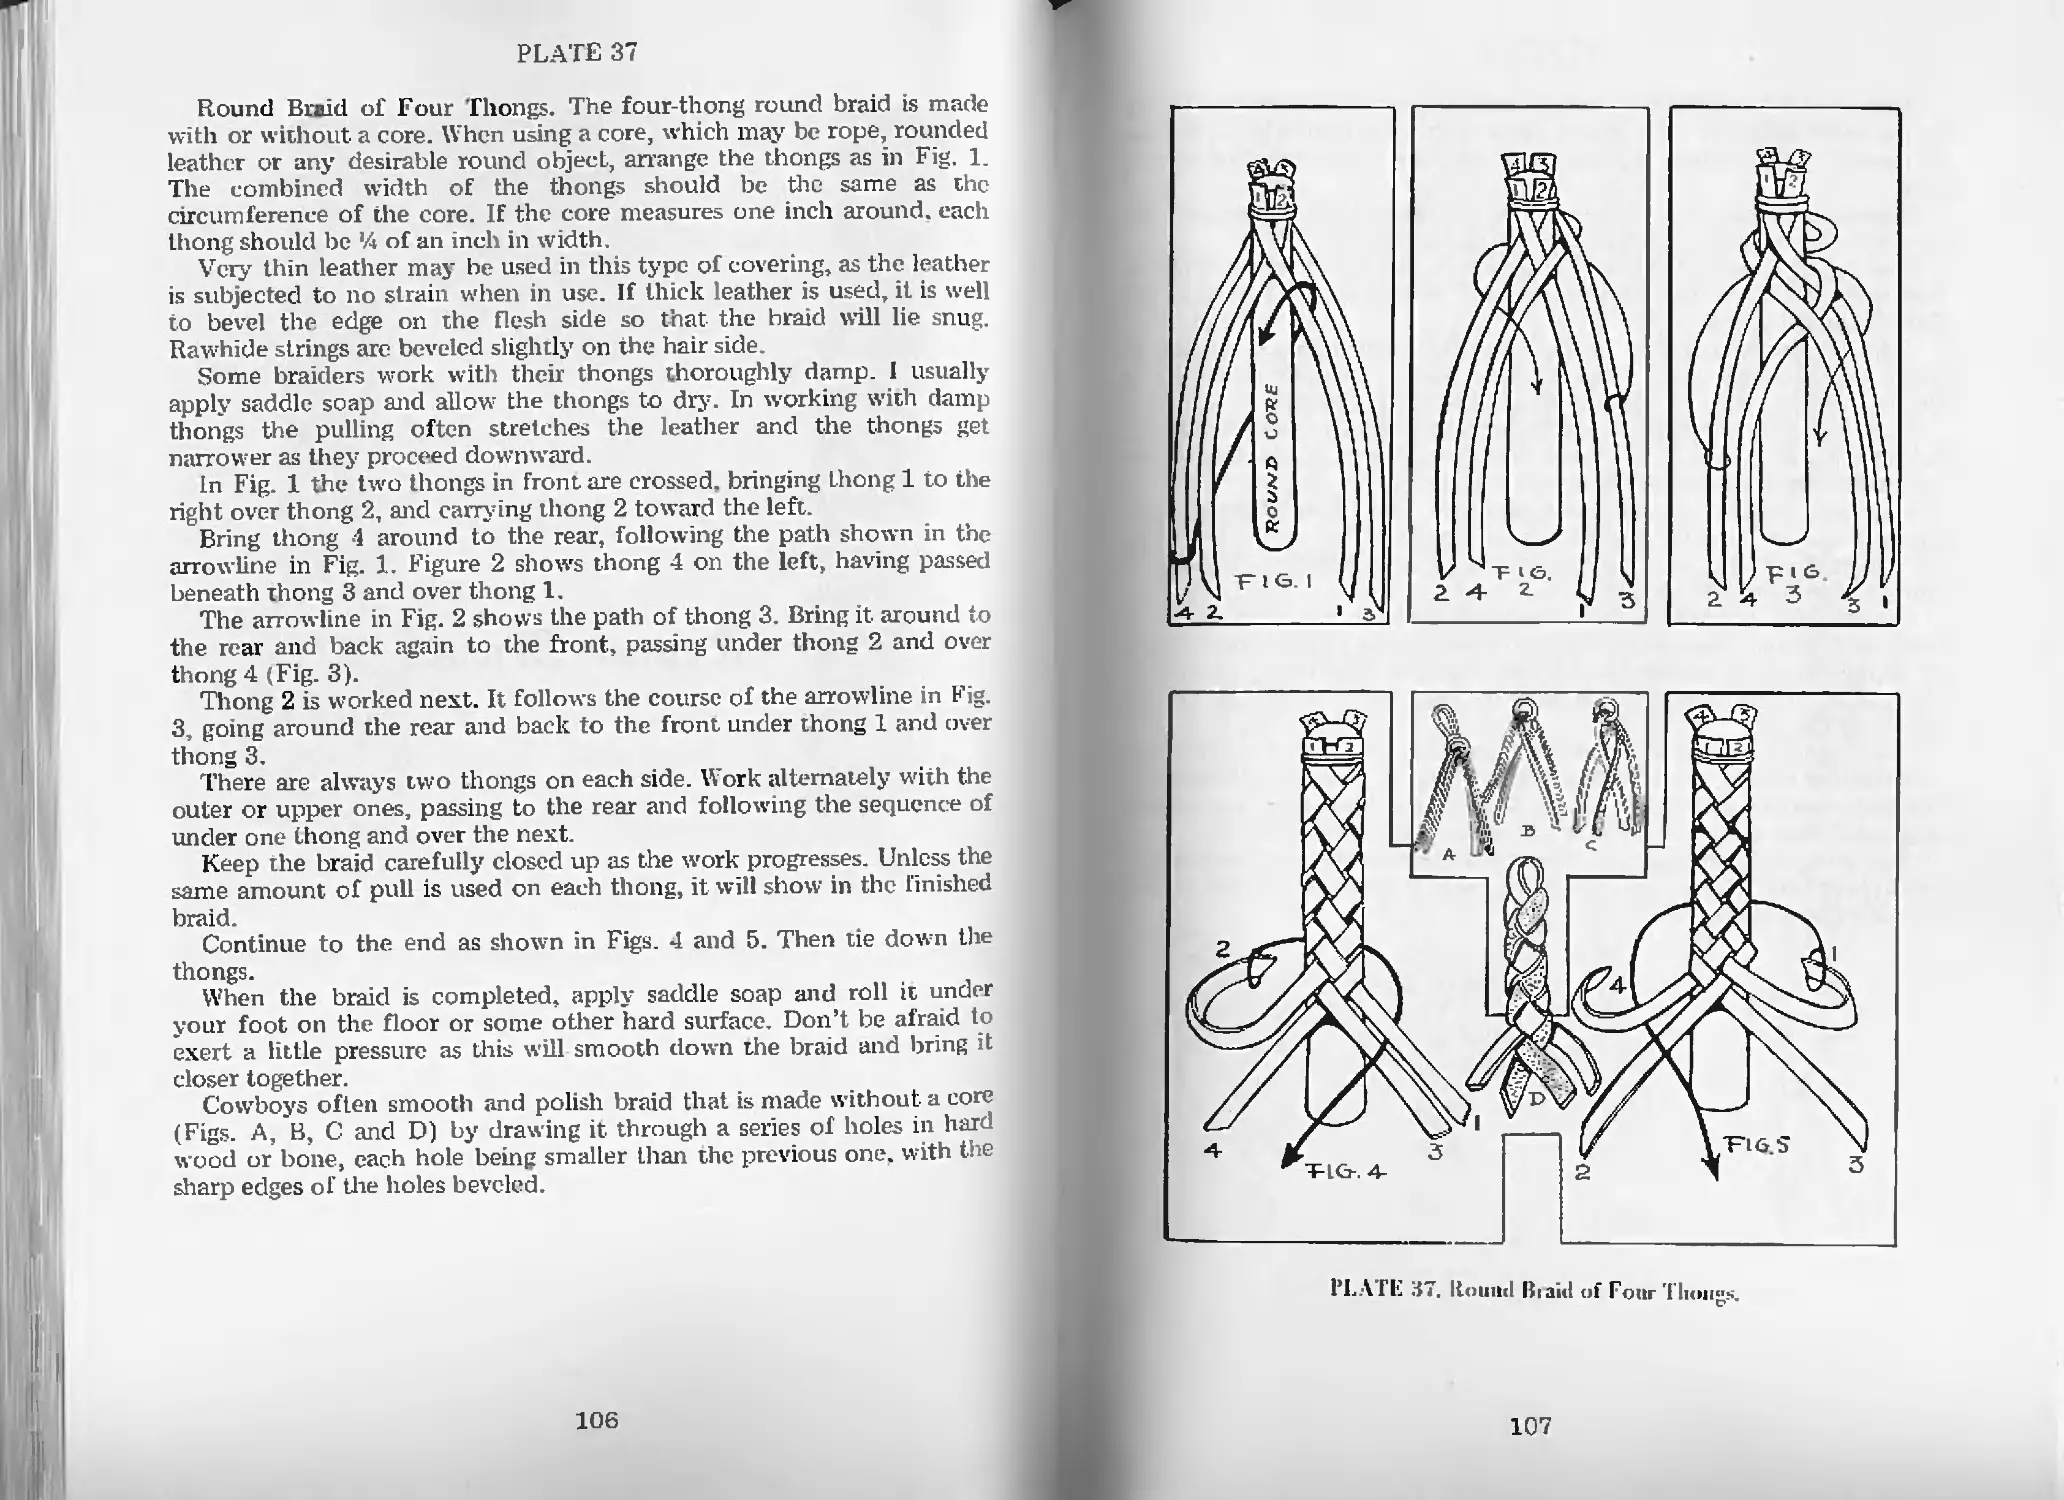
Round Braid of Four Thongs—PL 37 106
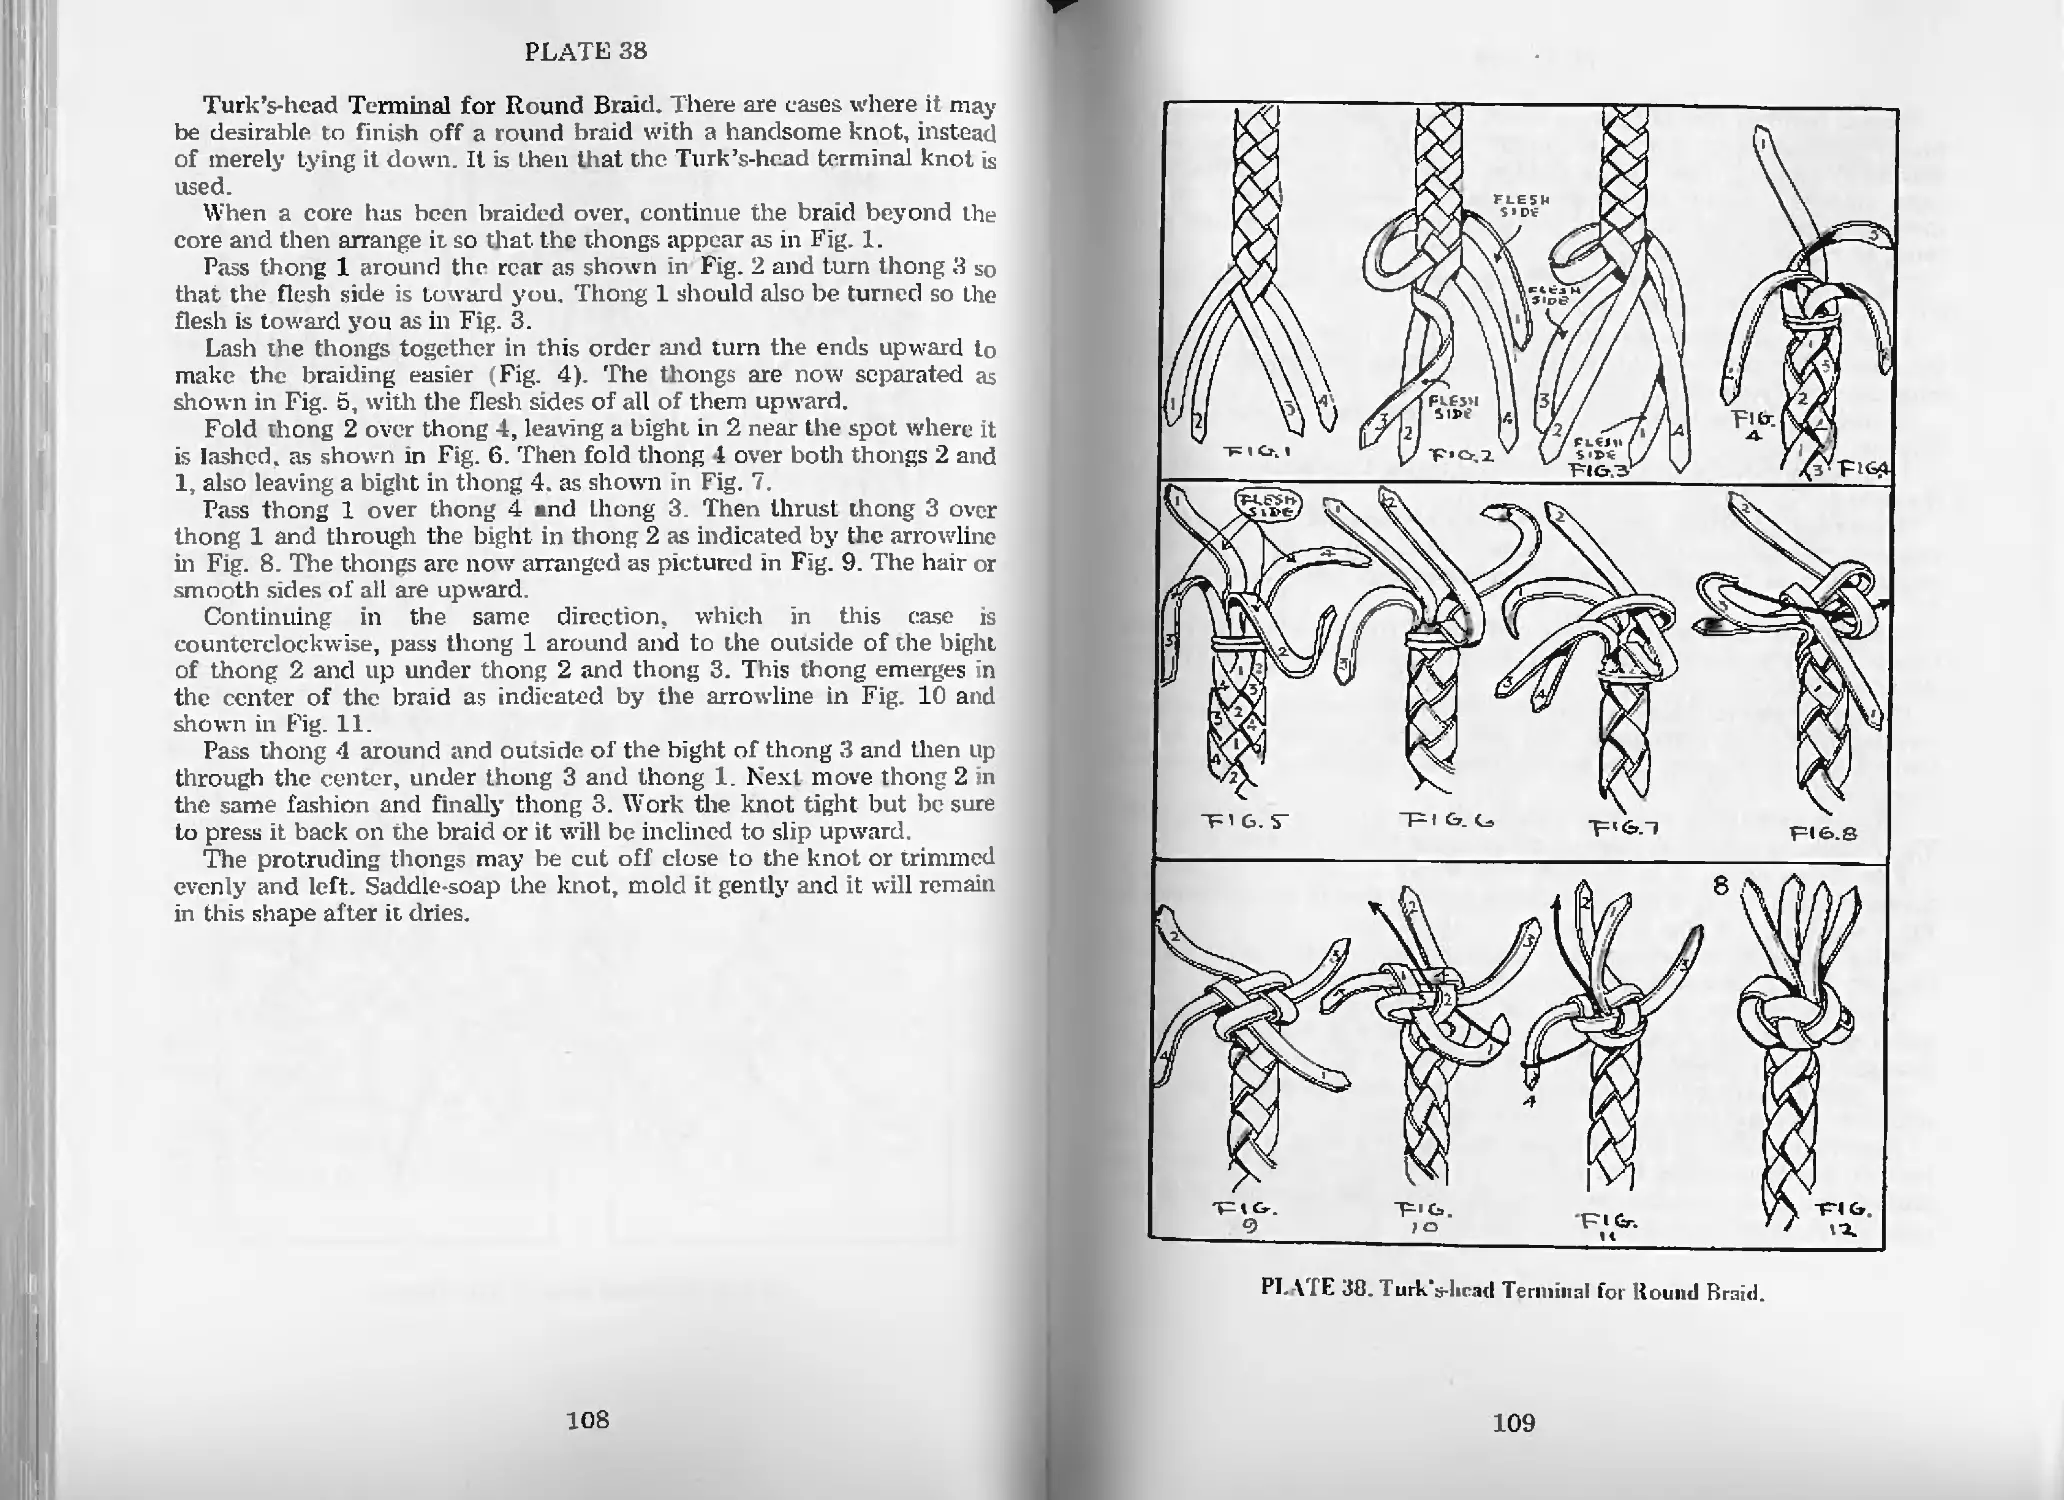
Turk’s-head Terminal for Round Braid—Pl. 38 108
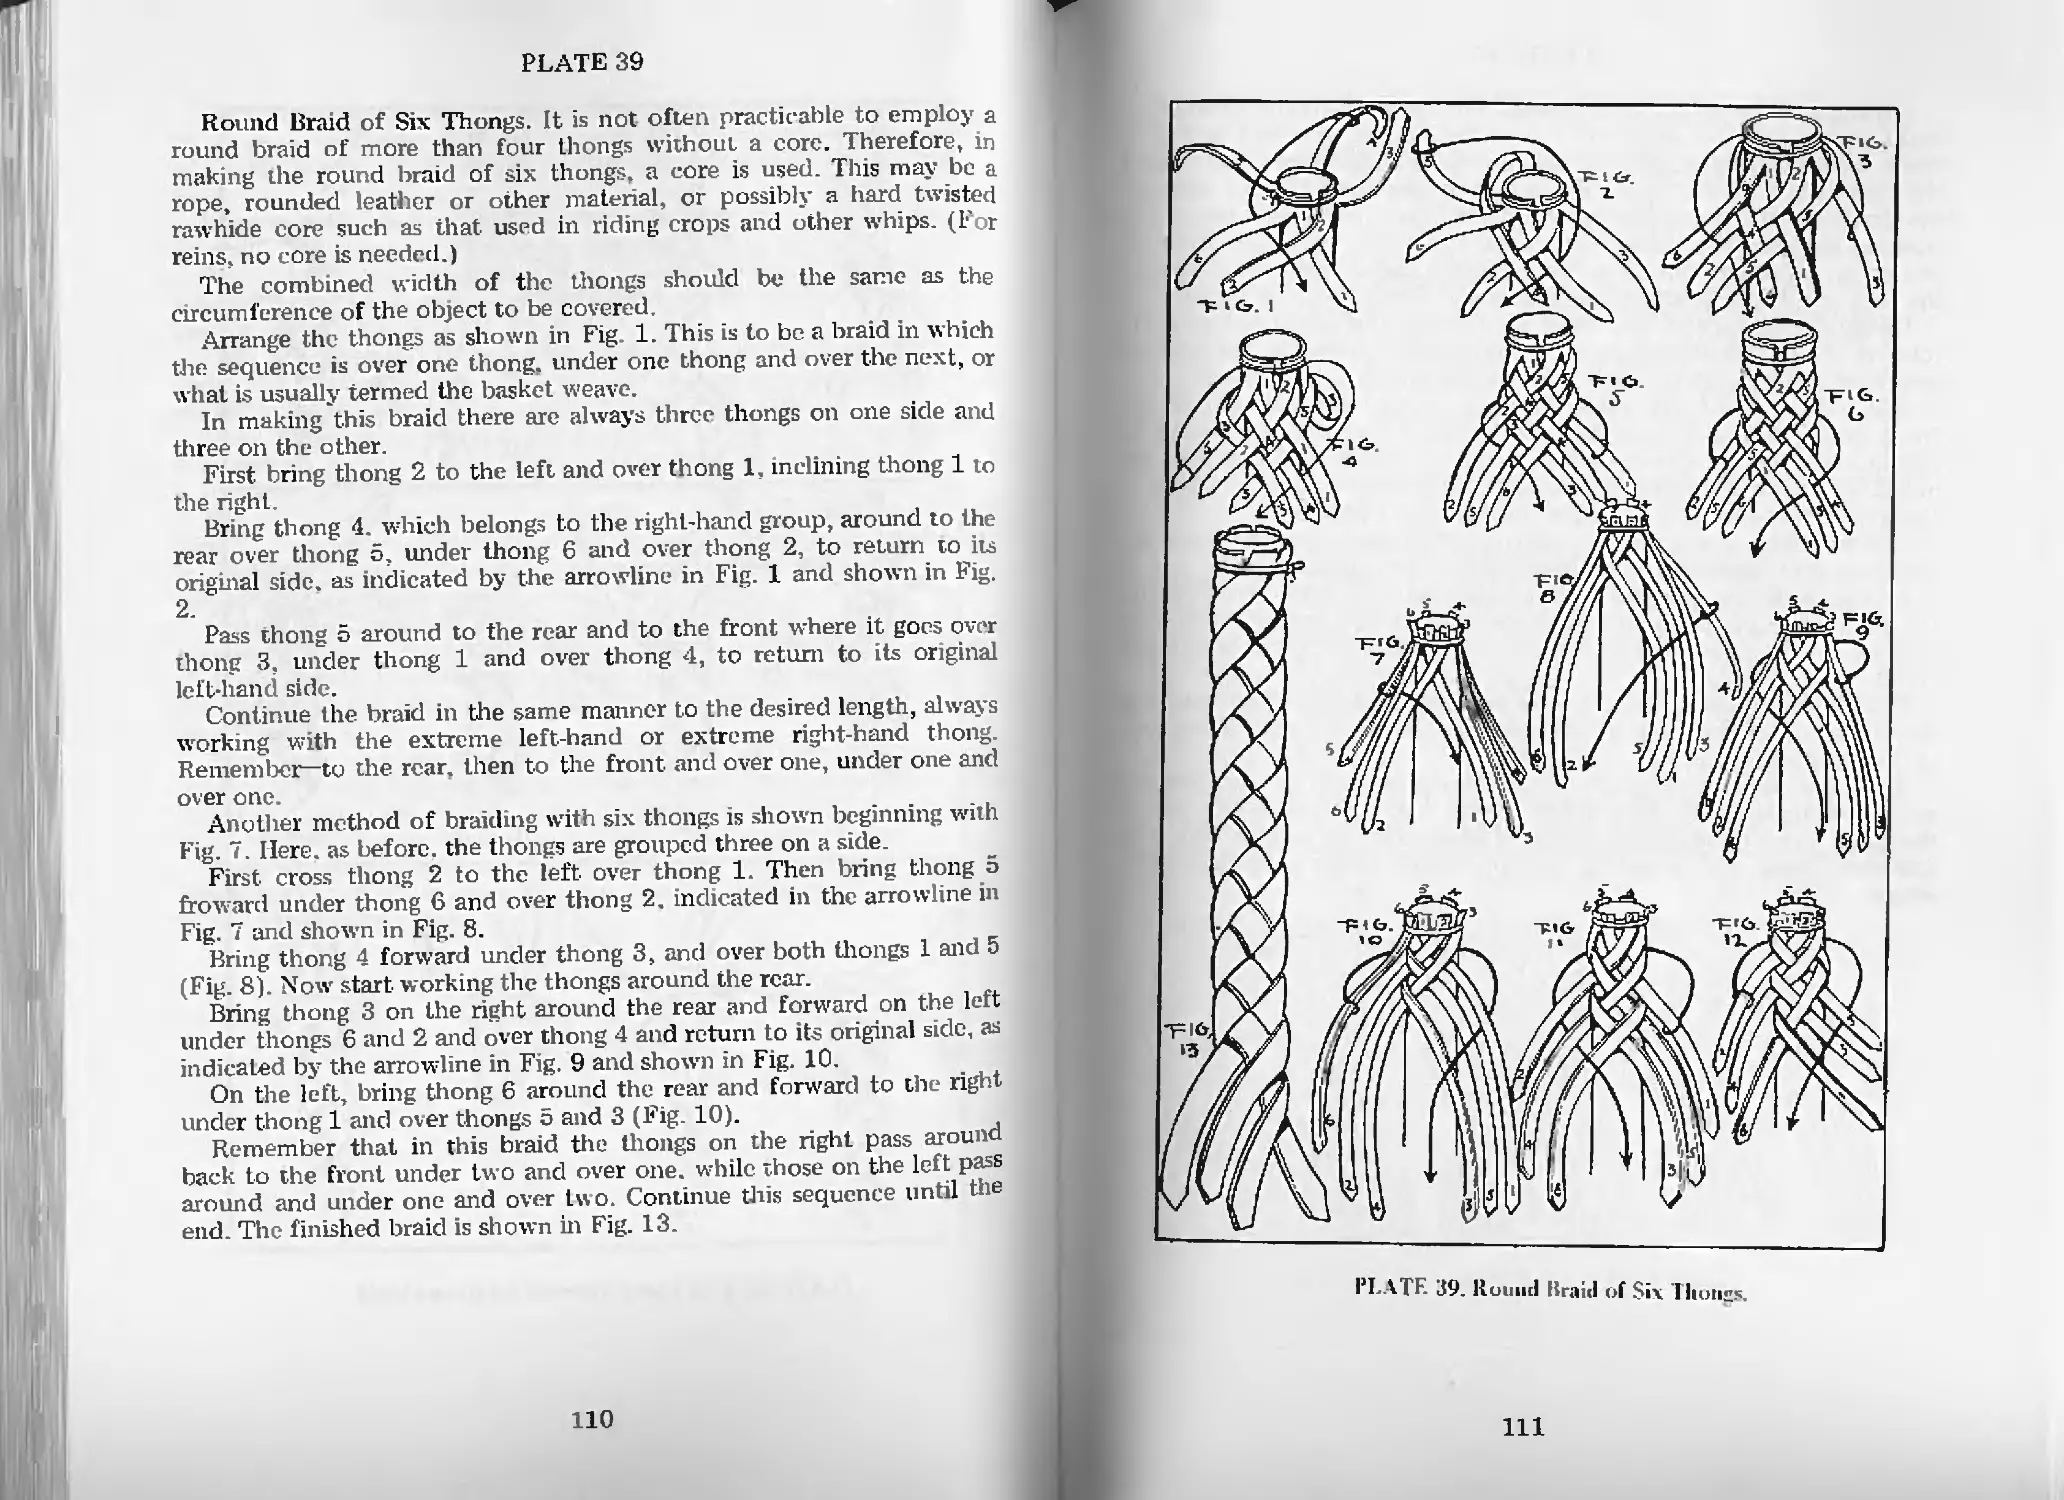
Round Braid of Six Thongs—Pl. 39 110
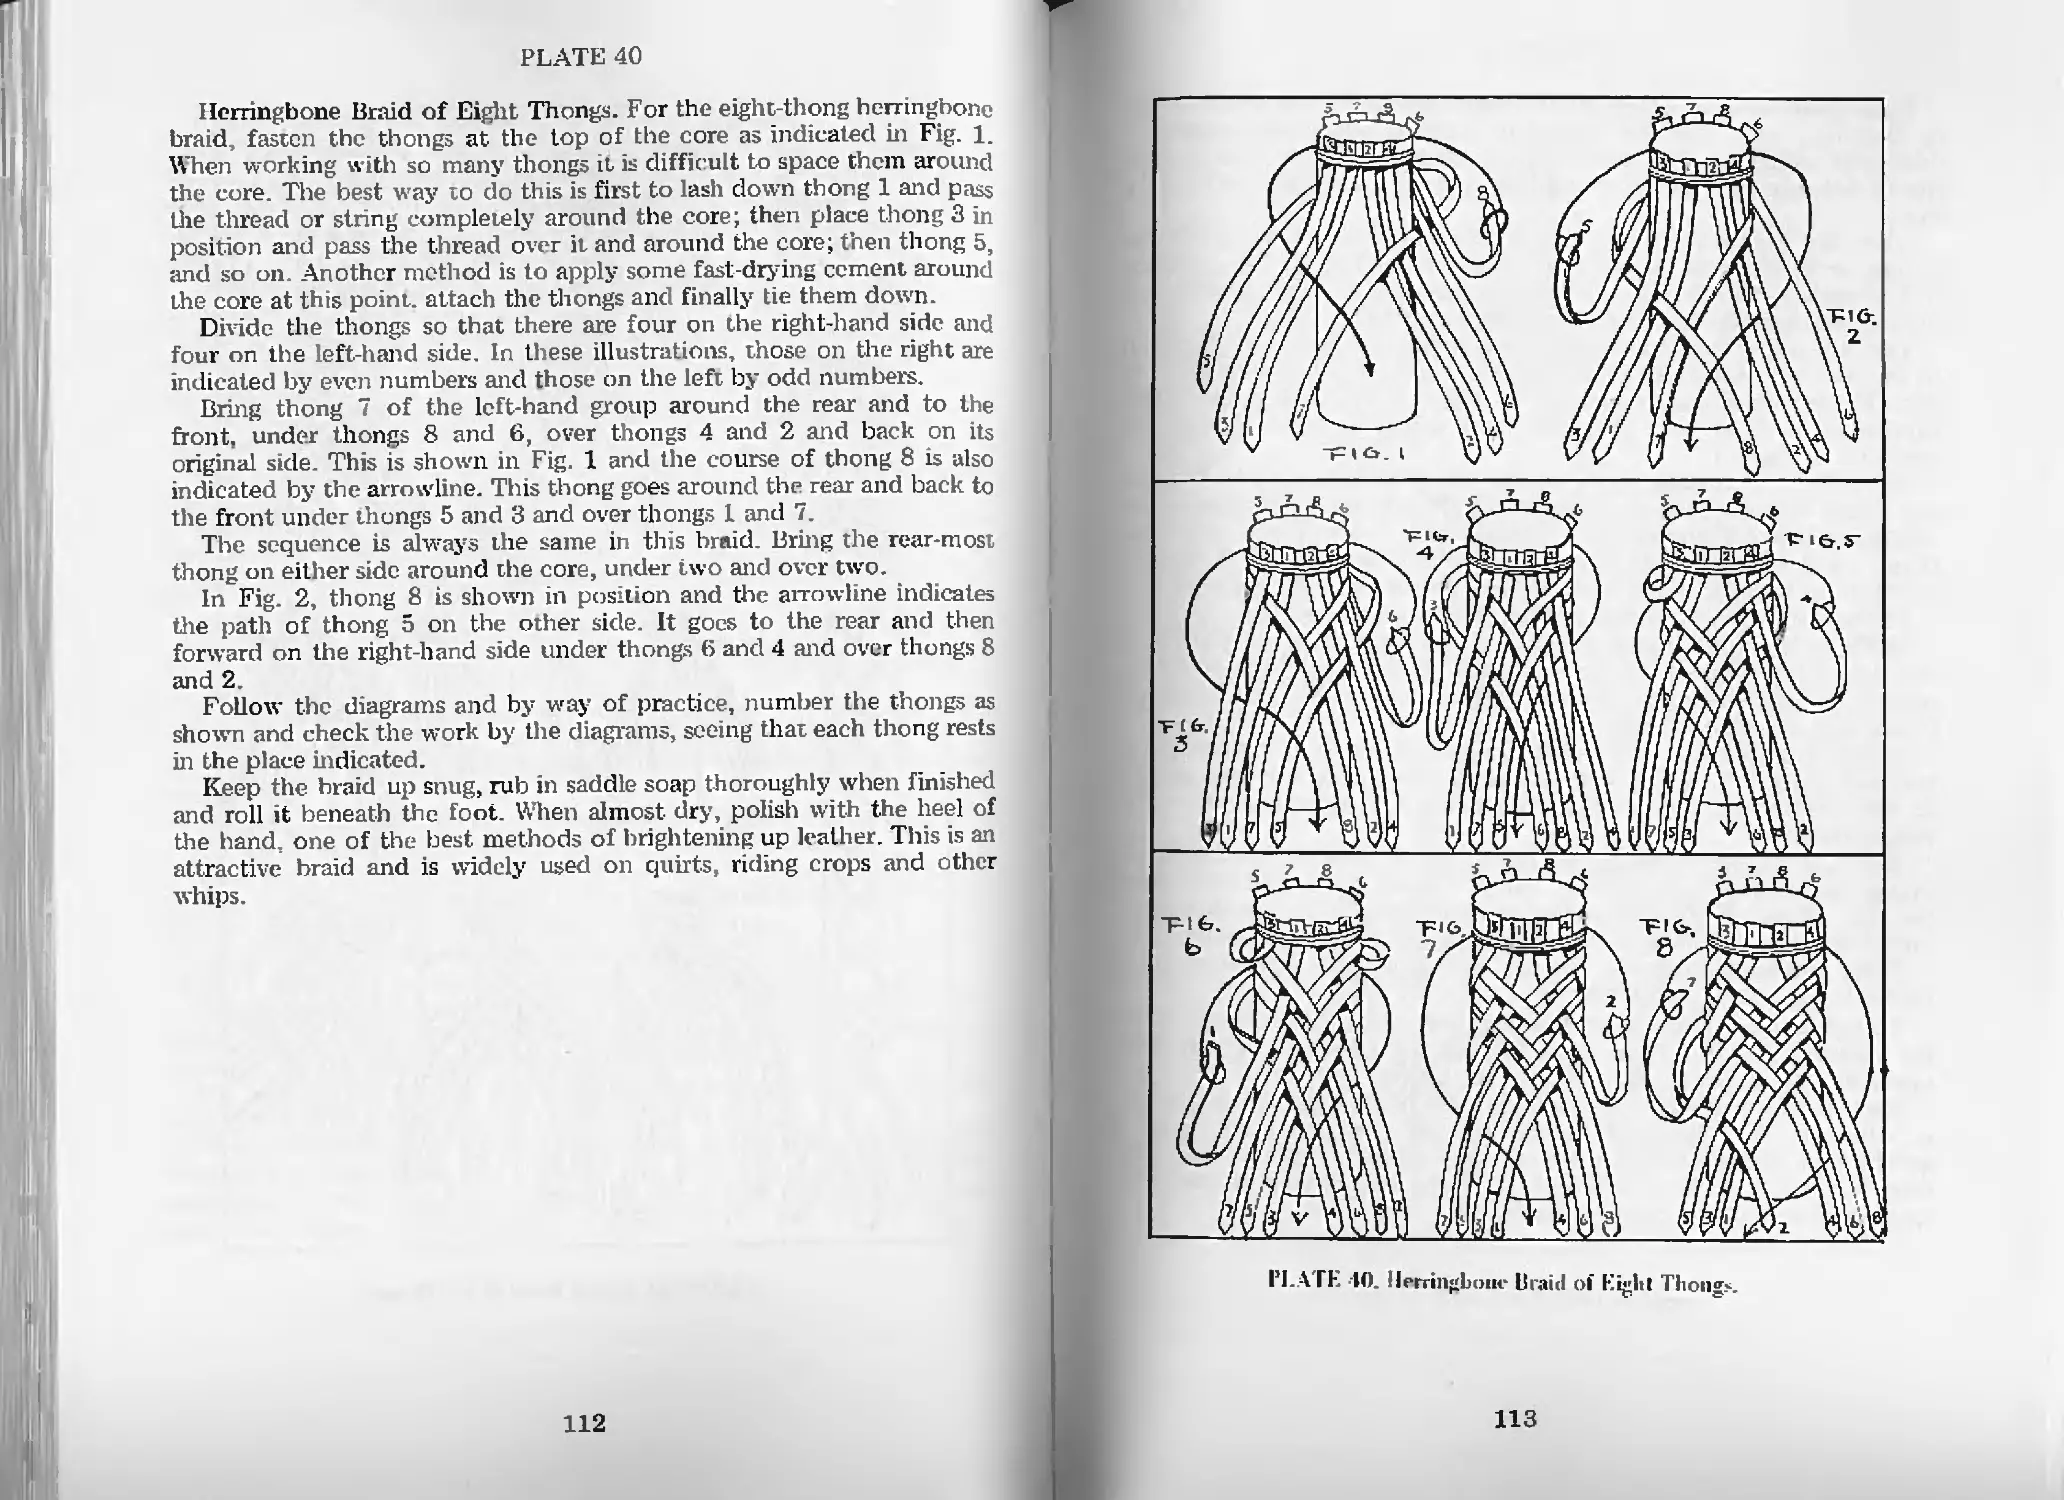
Herringbone Braid of Eight Thongs—PL 40 112
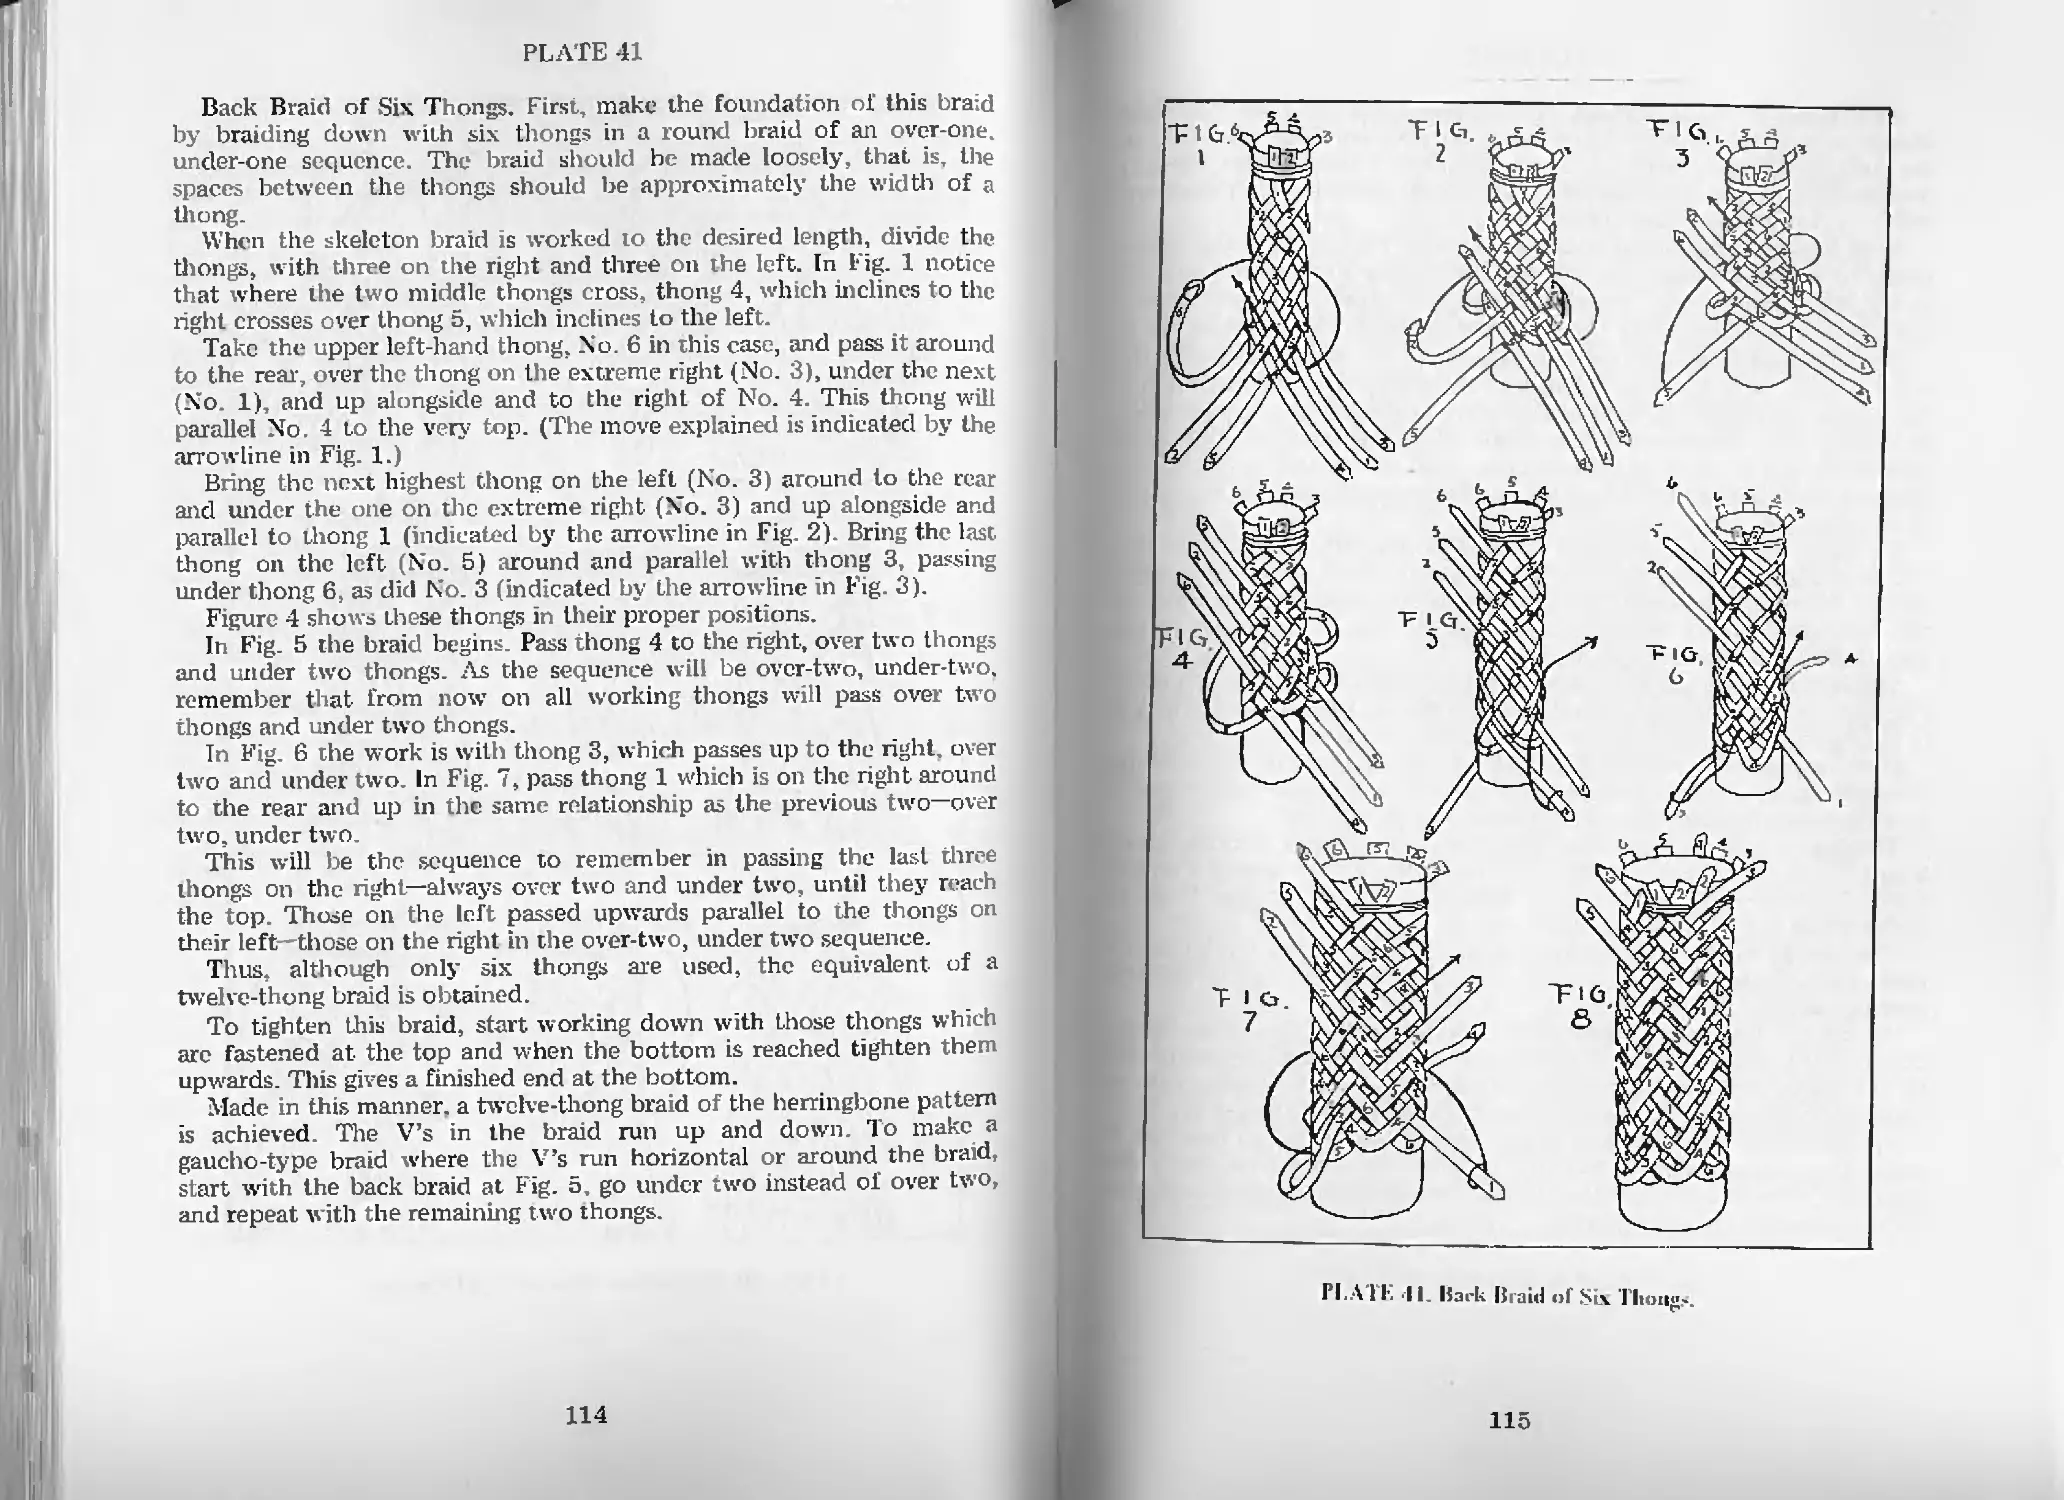
Back Braid of Six Thongs—PL 41 114
Back Braid of Eight Thongs—PL 42 116
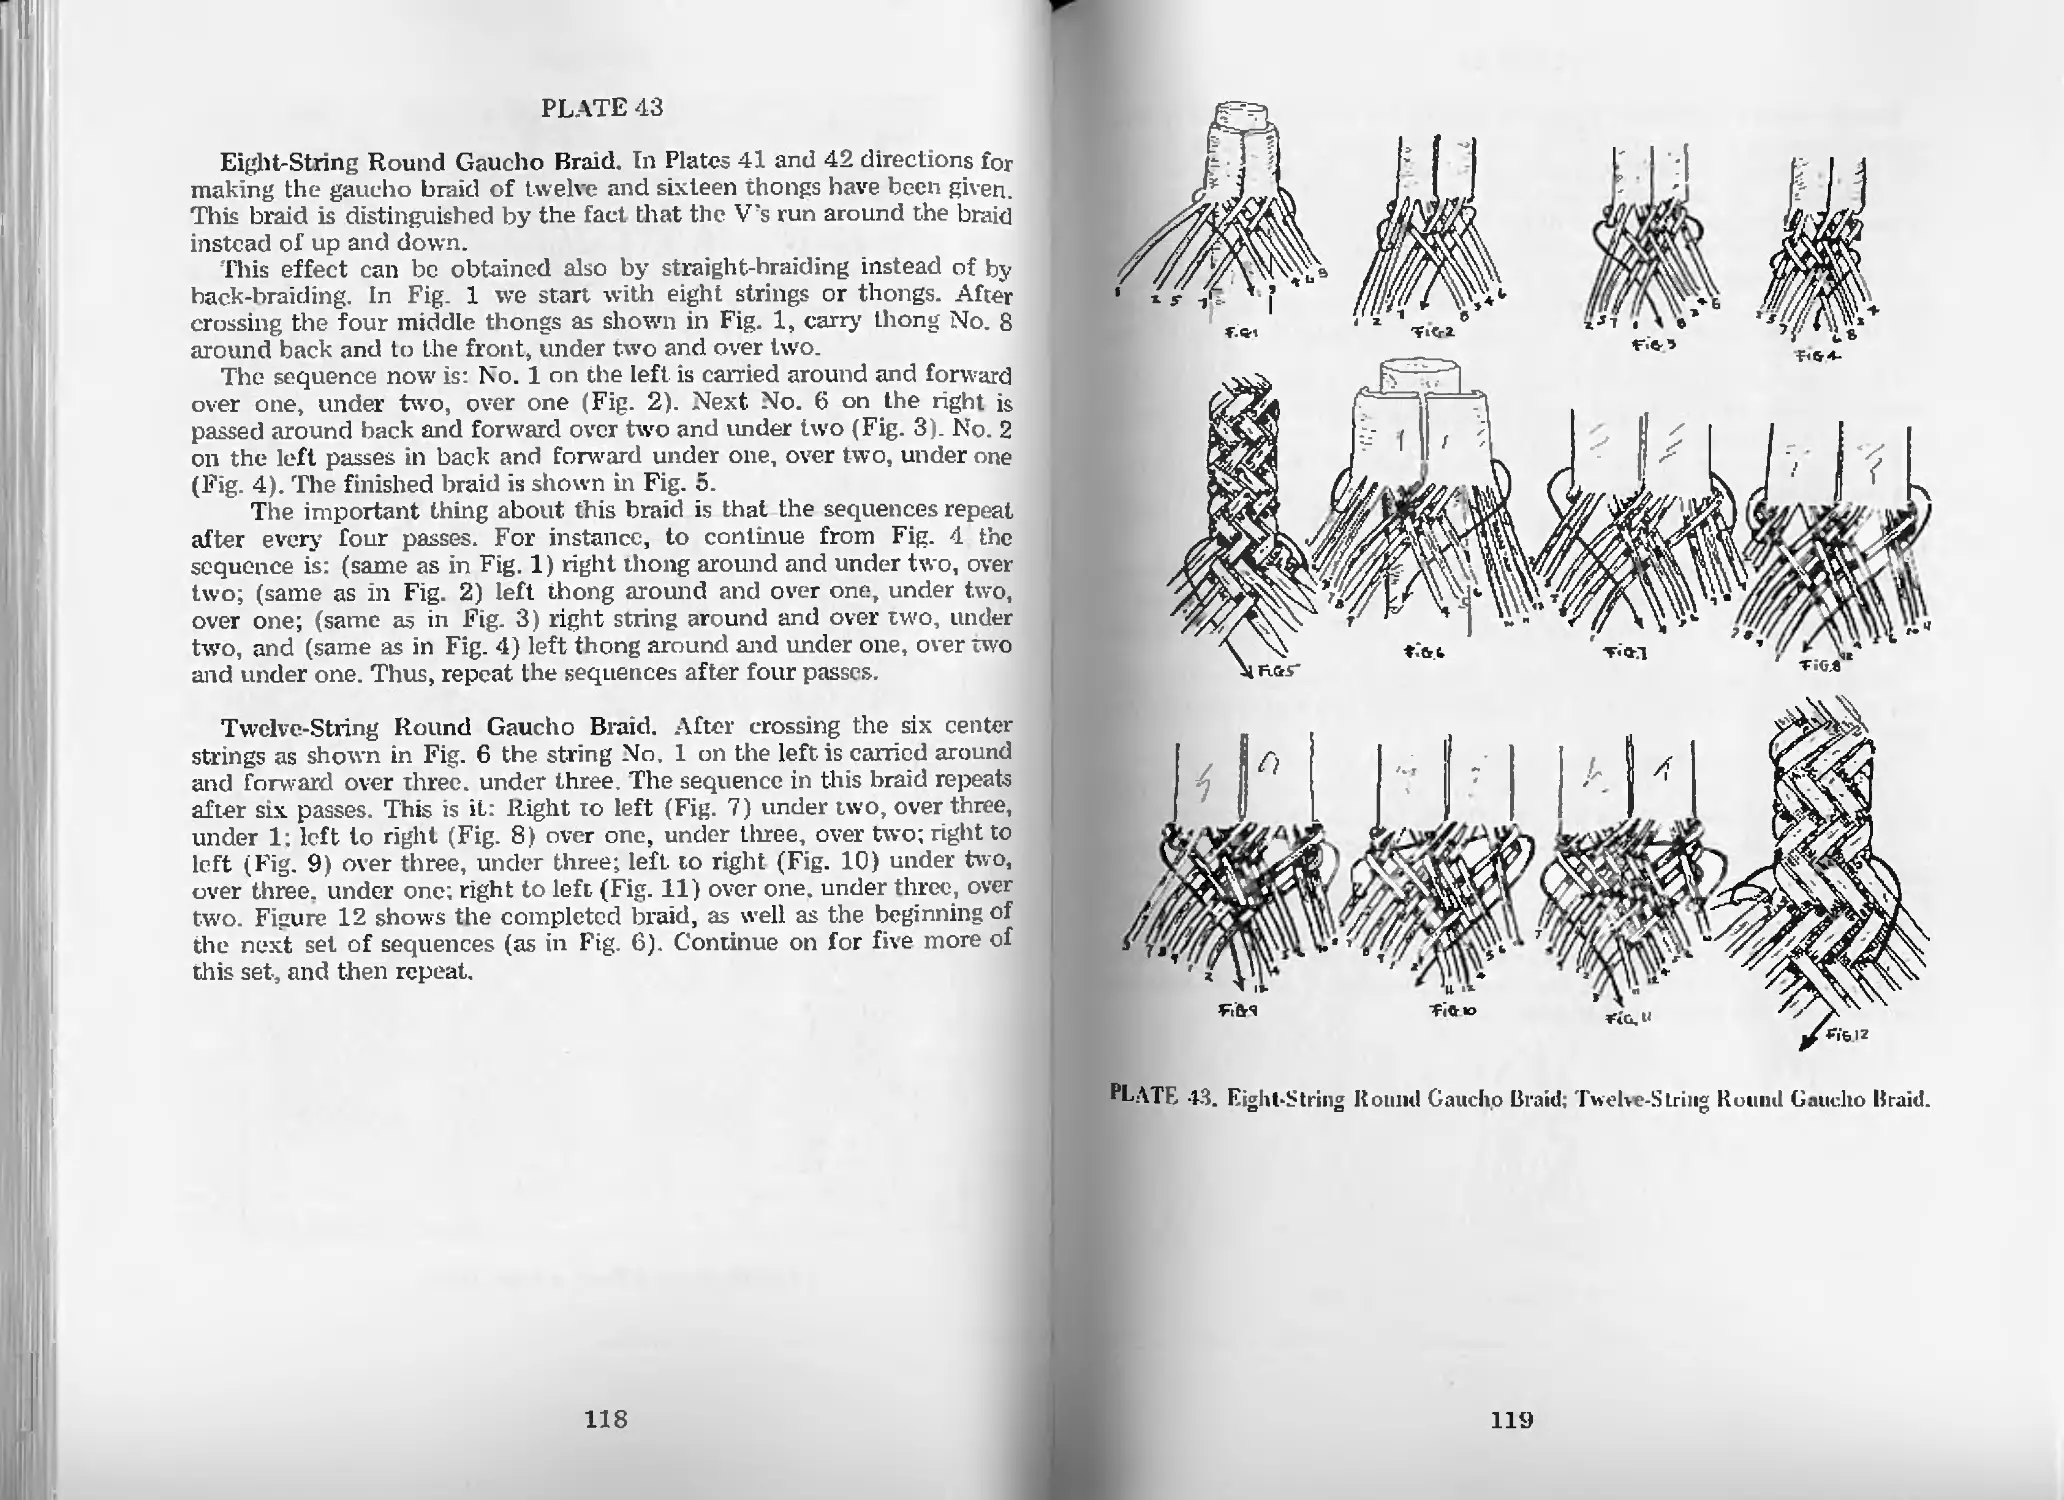
Eight-String Round Gaucho Braid—Pl. 43 118
Twelve-String Round Gaucho Braid—Pl. 43 118
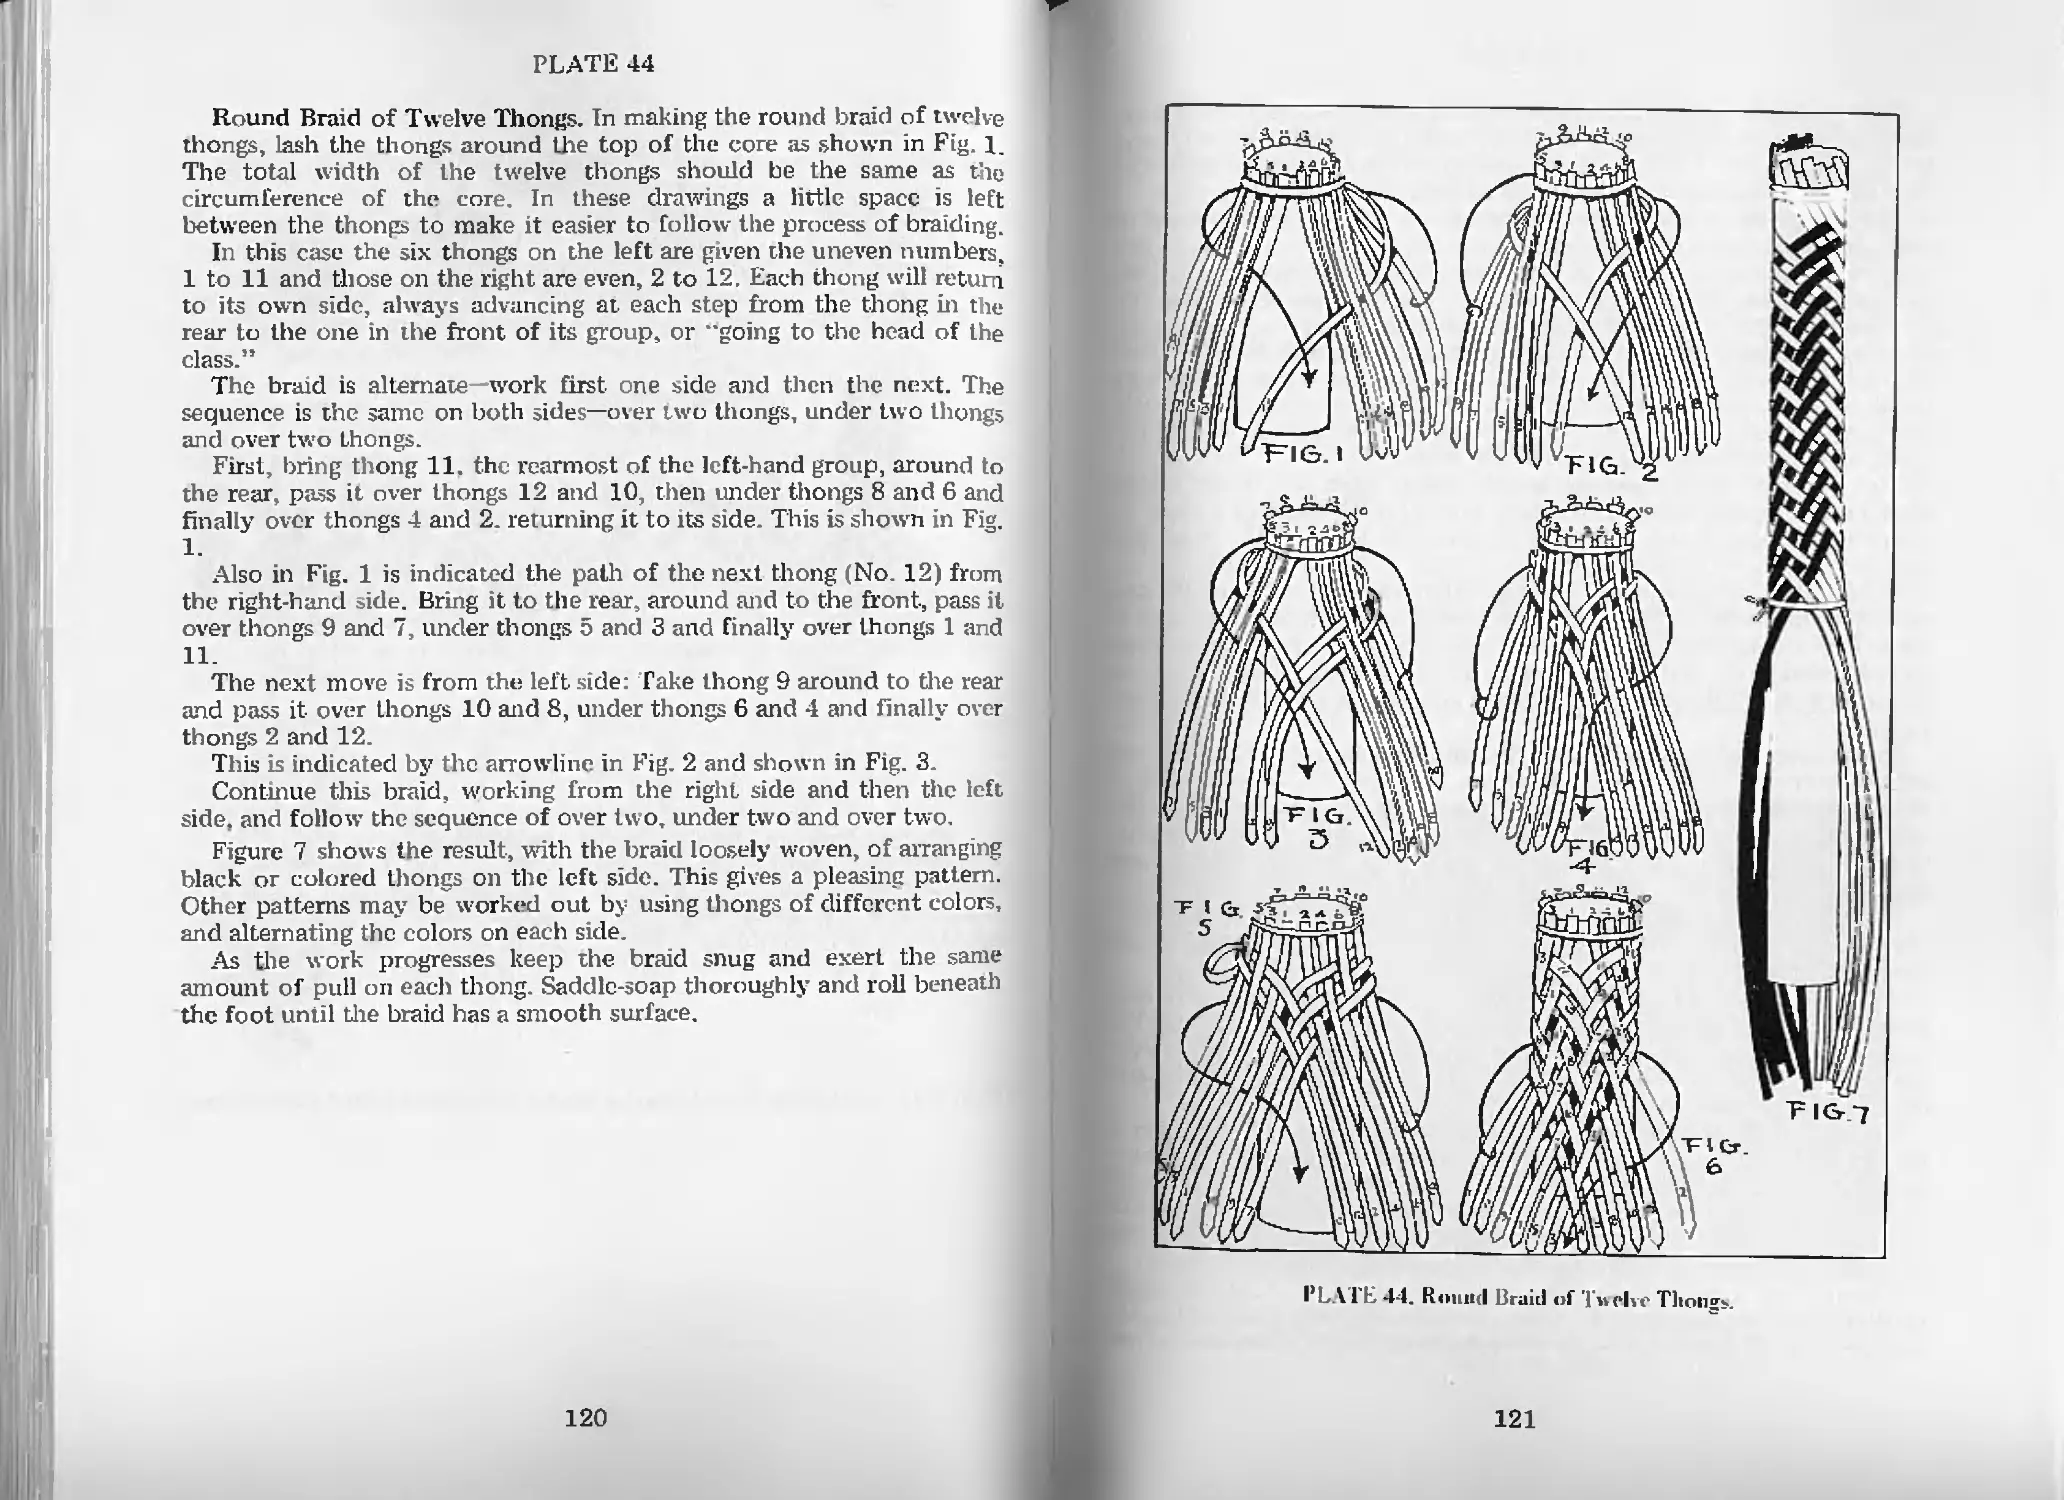
Round Braid of Twelve Thongs—PL 44 120
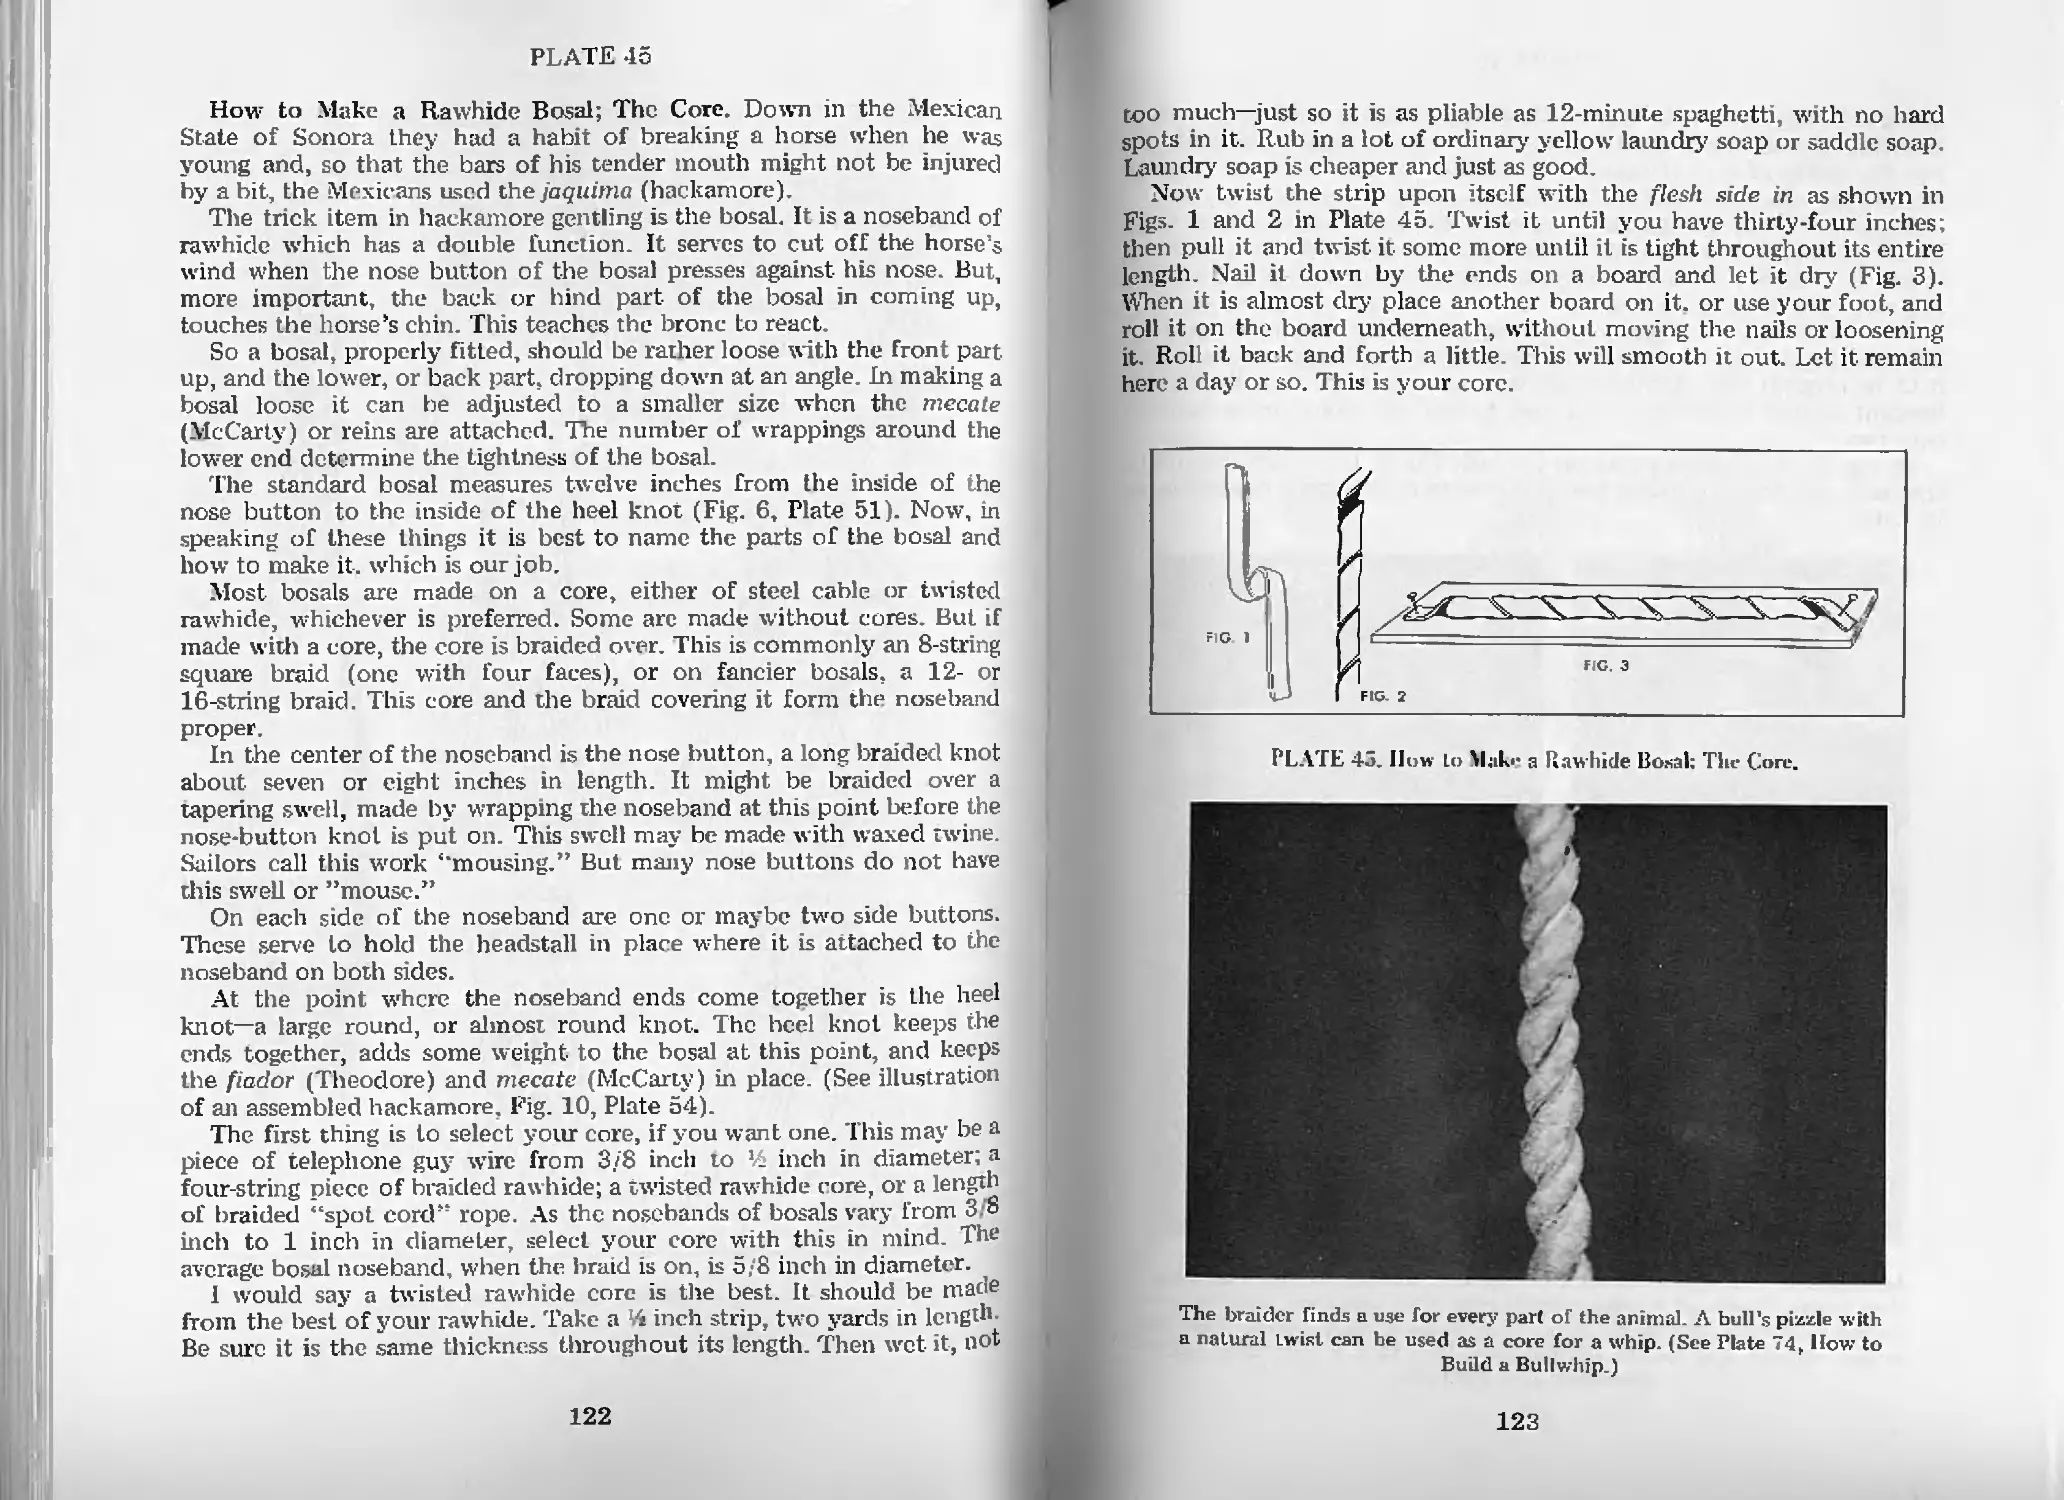
How to Make a Rawhide Bosal; The Core—Pl. 45 122
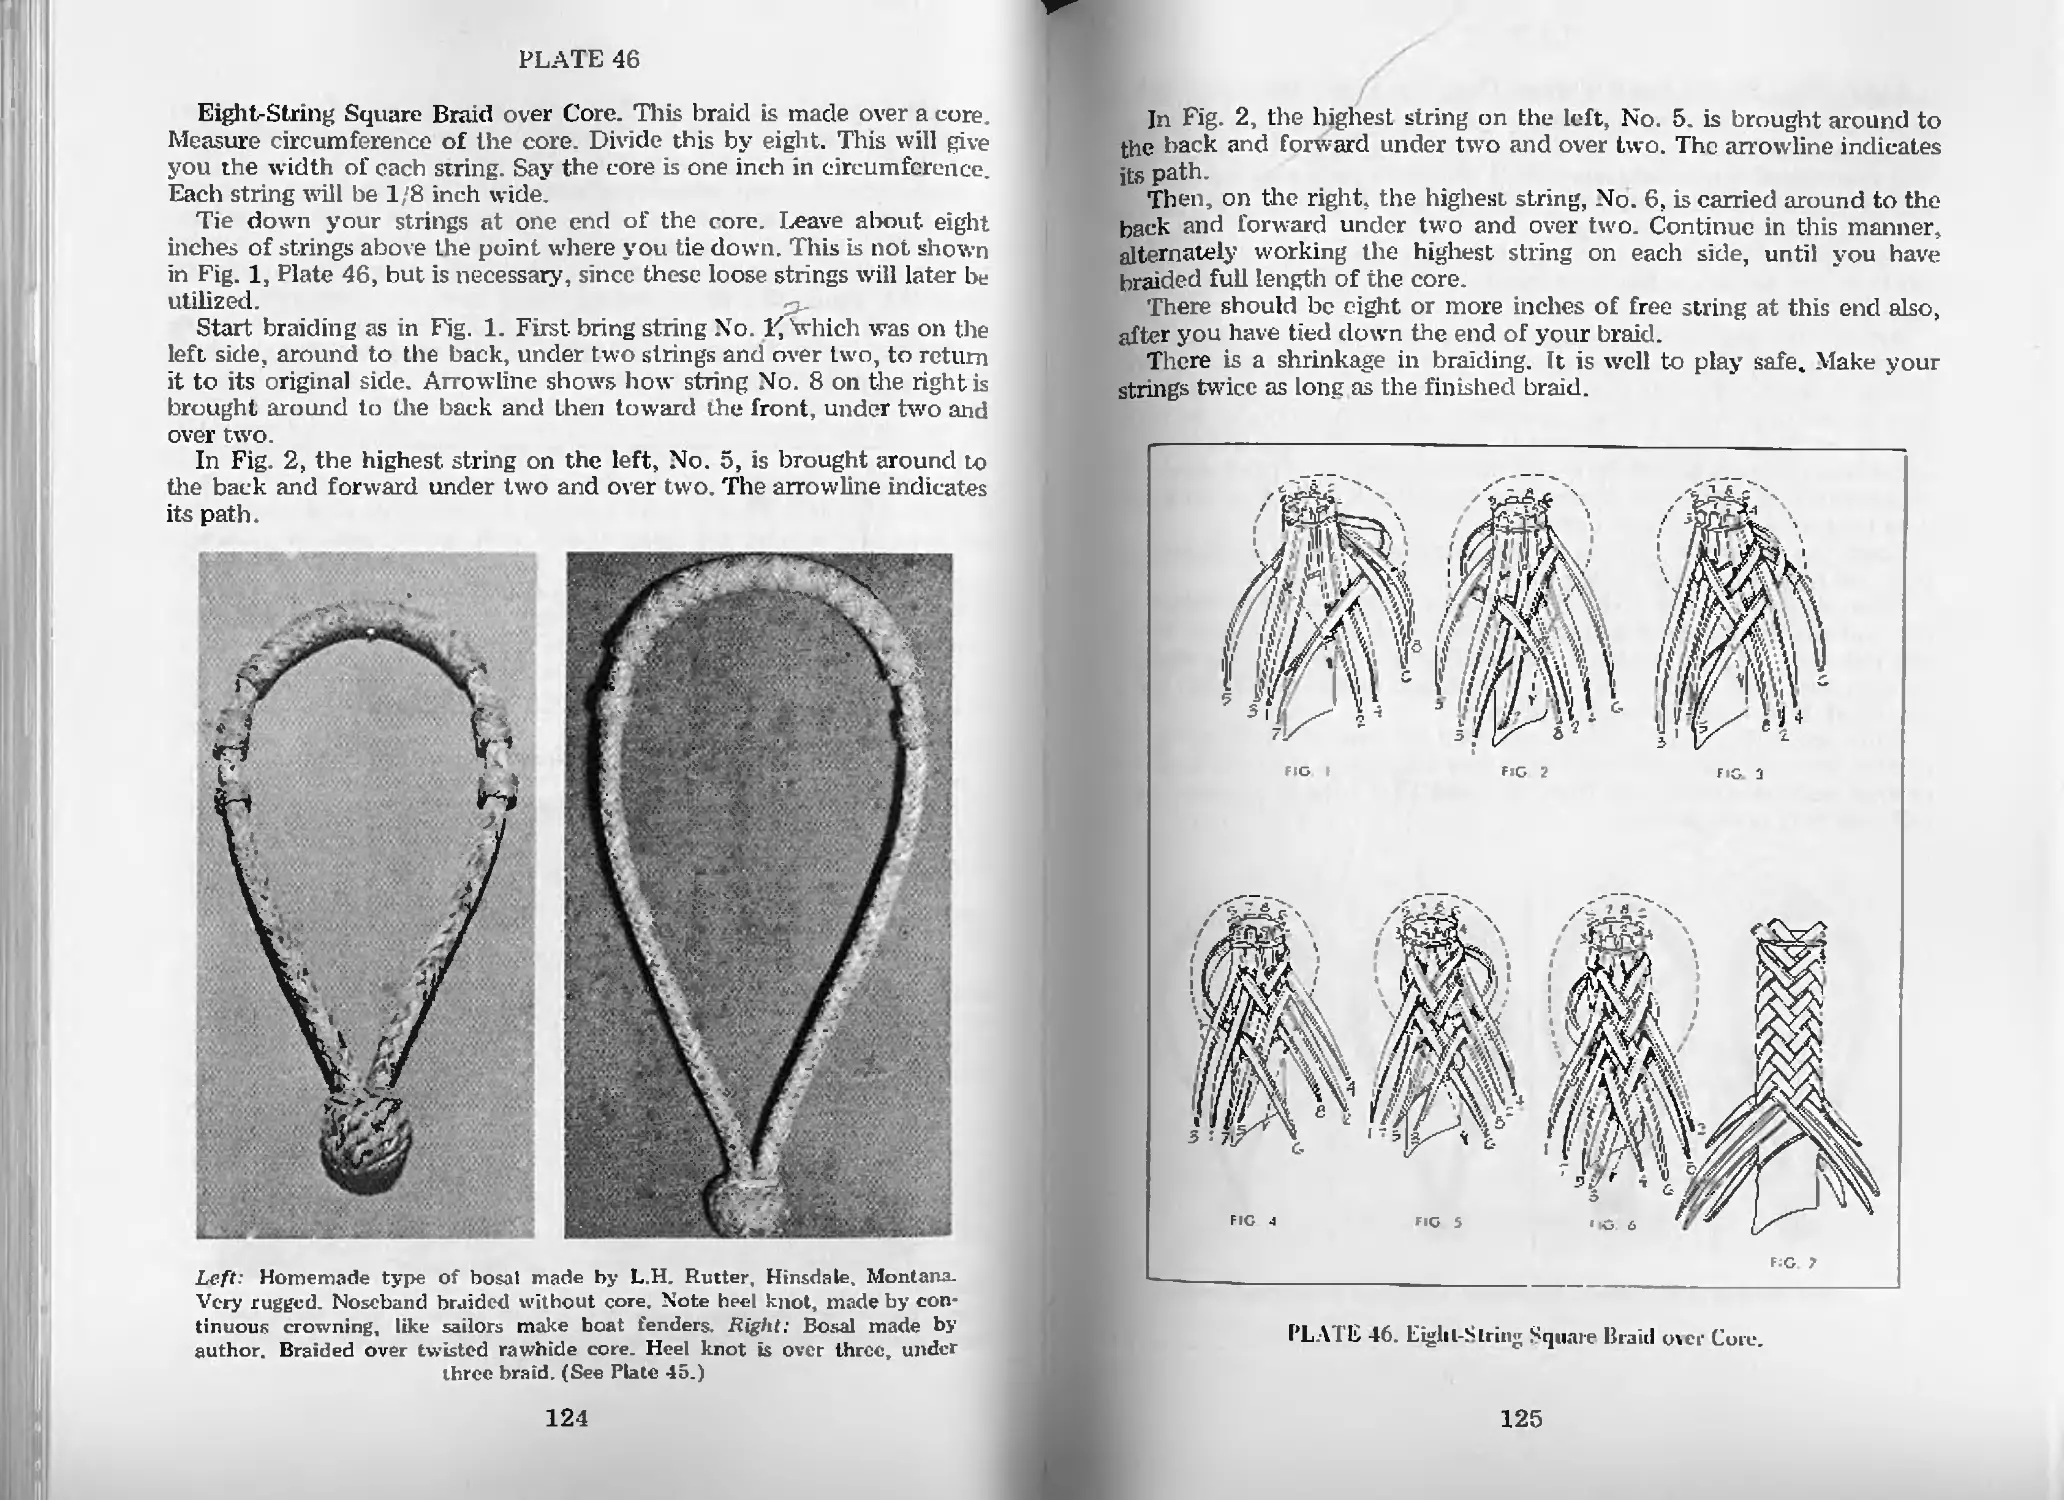
Eight-String Square Braid over Core—PL 46 124
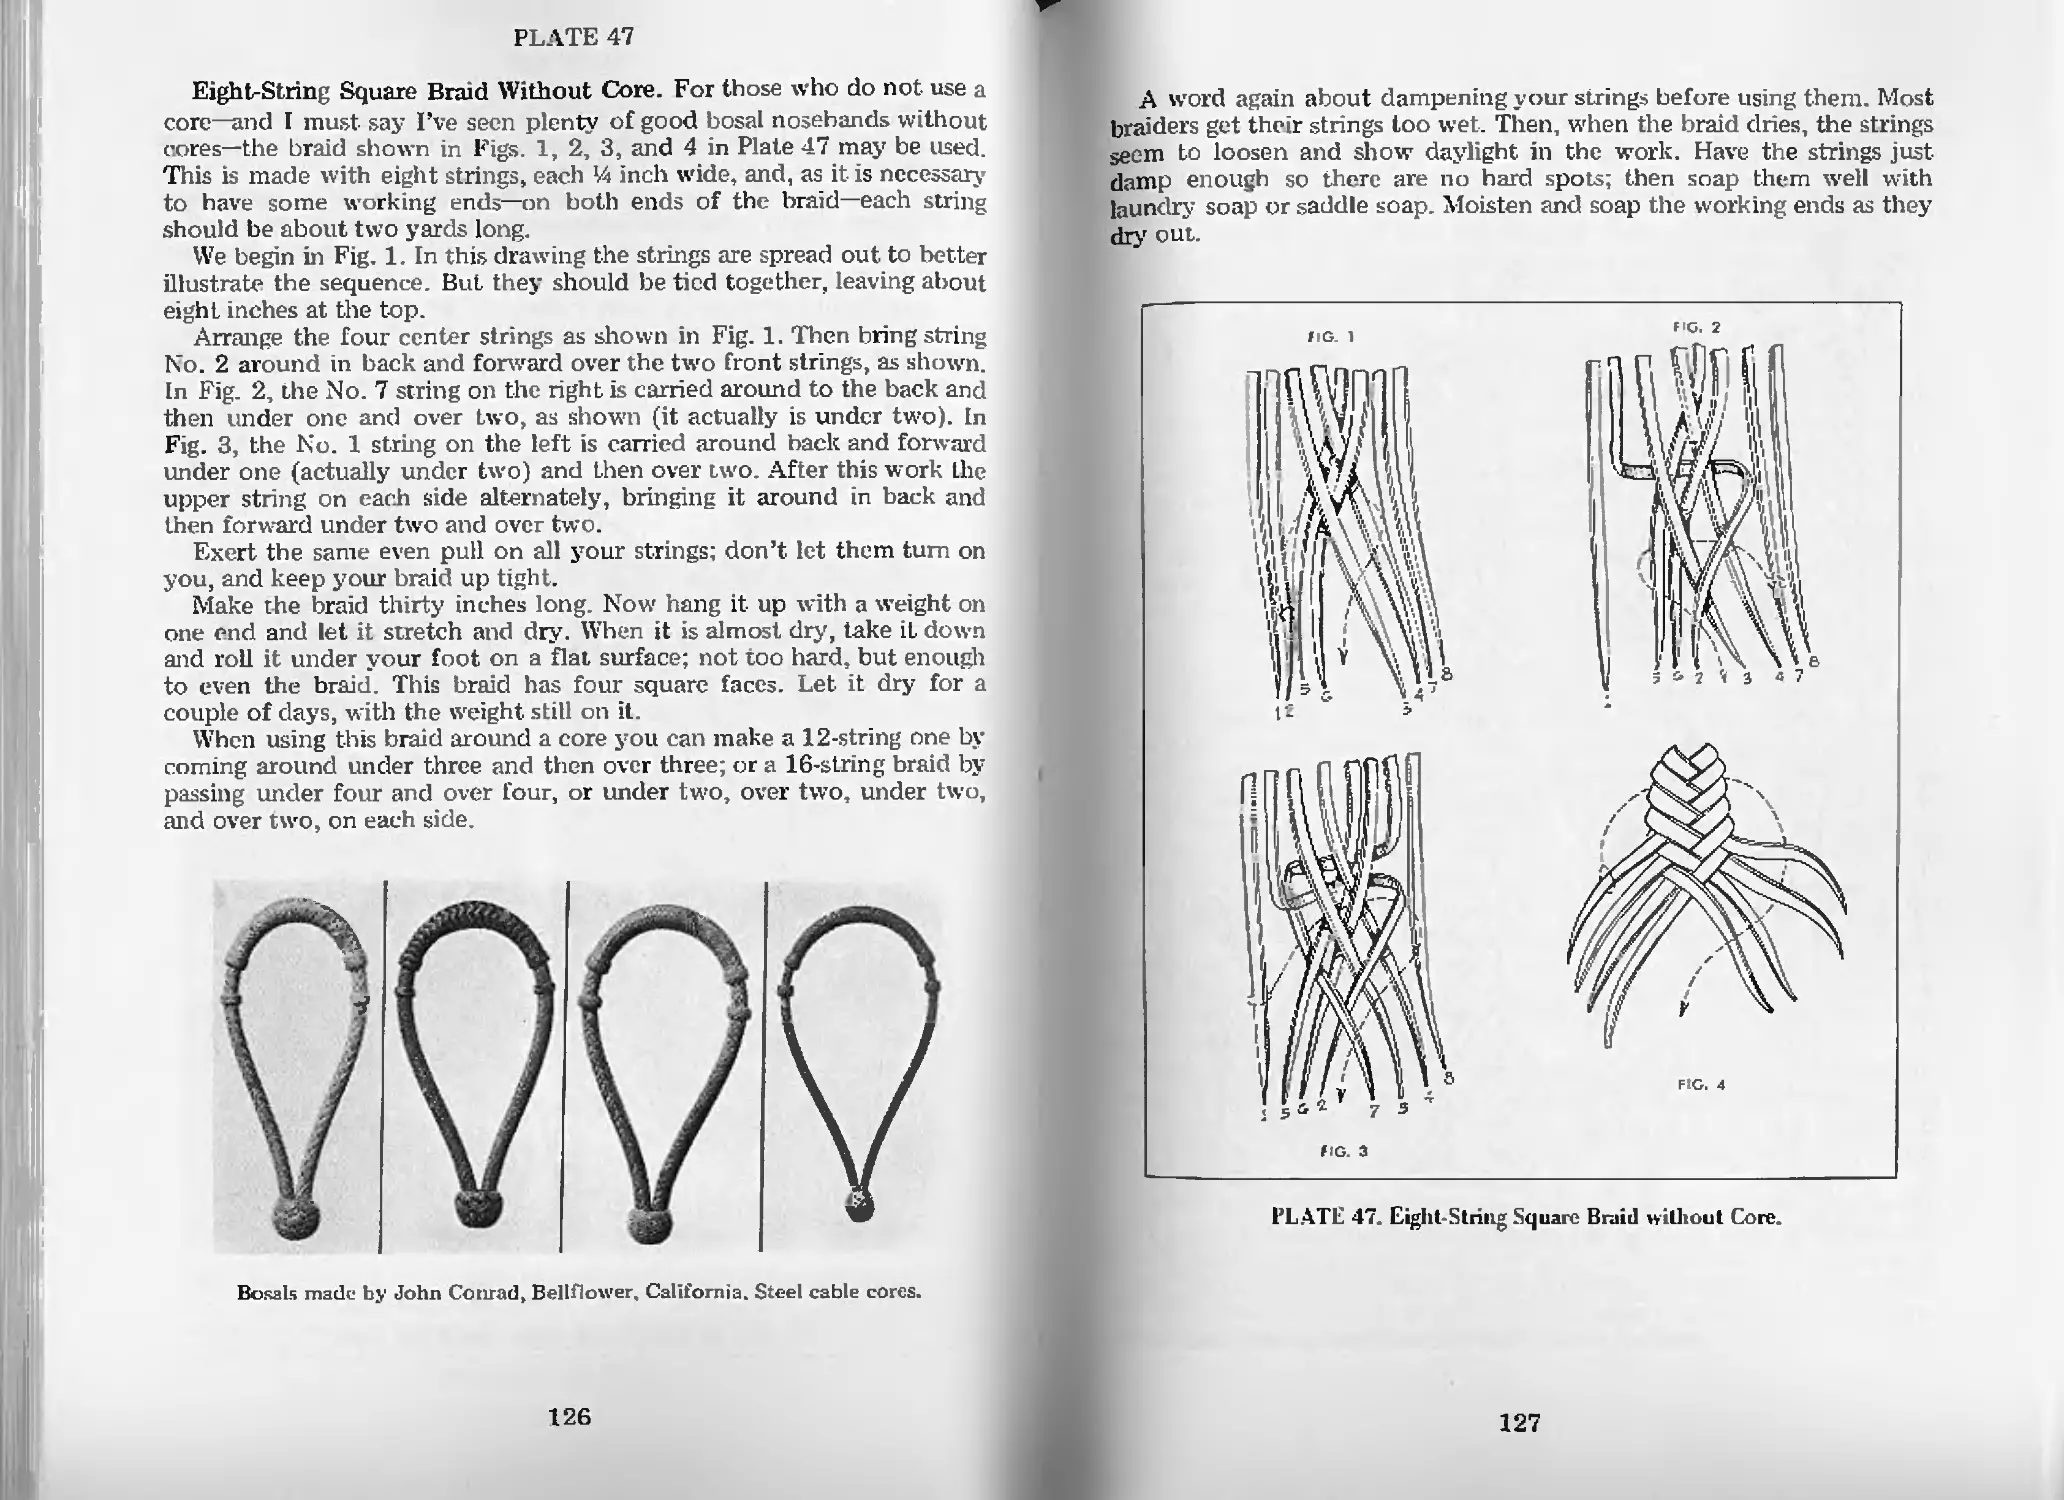
Eight-String Square Braid Without Core—PL 47 126
The Nose Button—PL 48 128
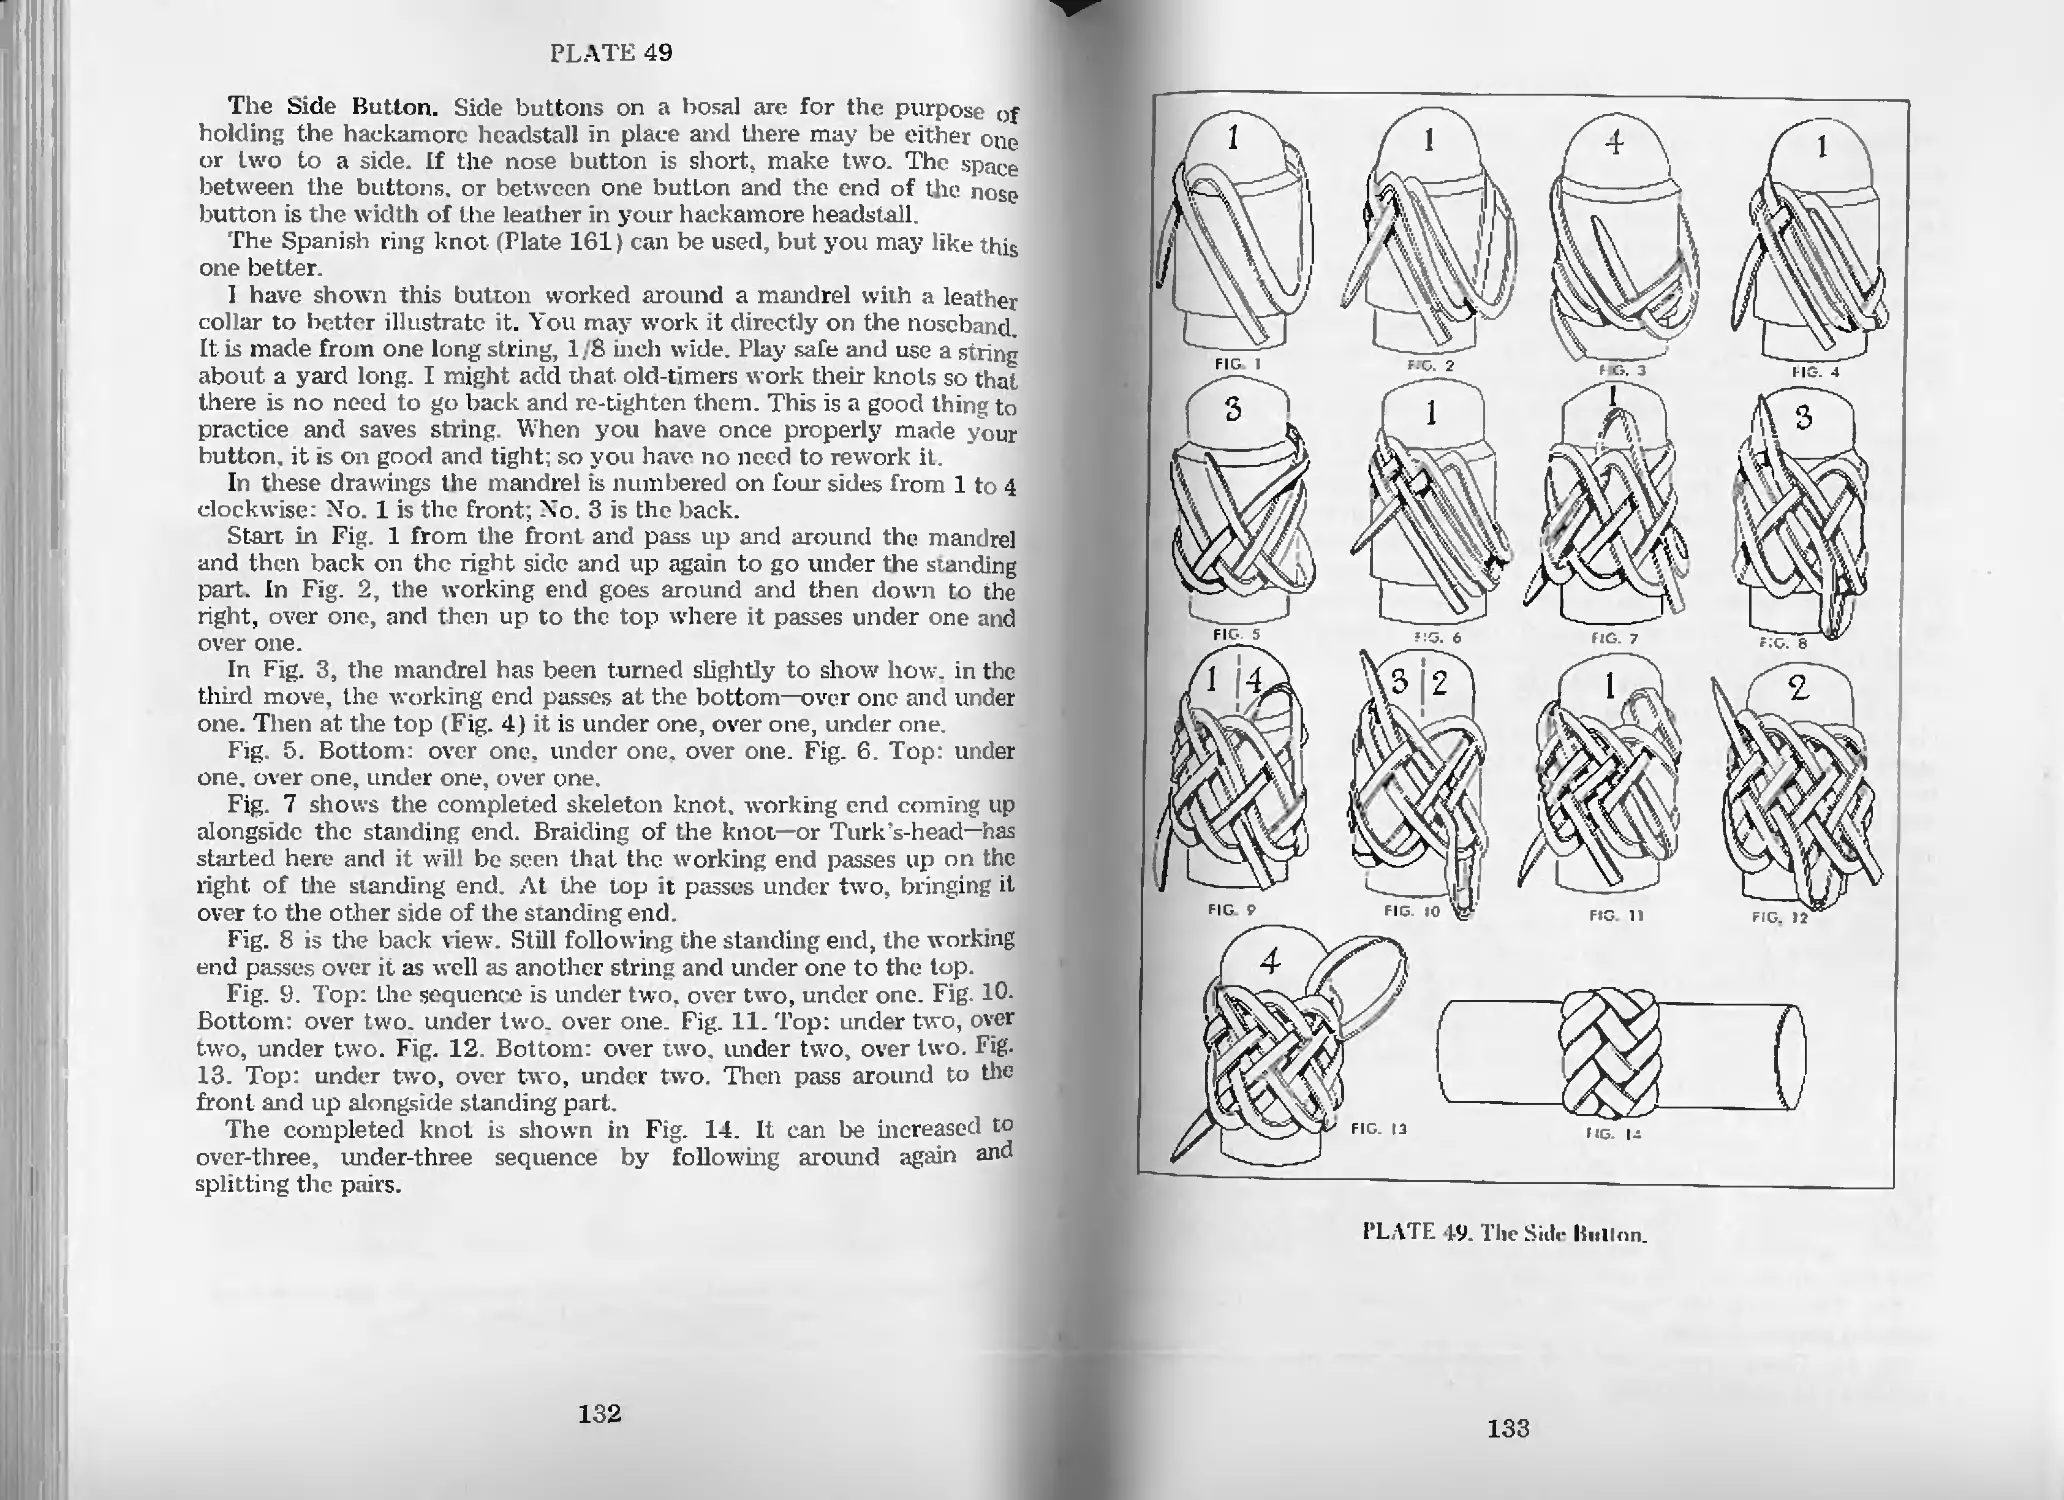
The Side Button—Pl 49 132
The Heel Knot—PL 50 134
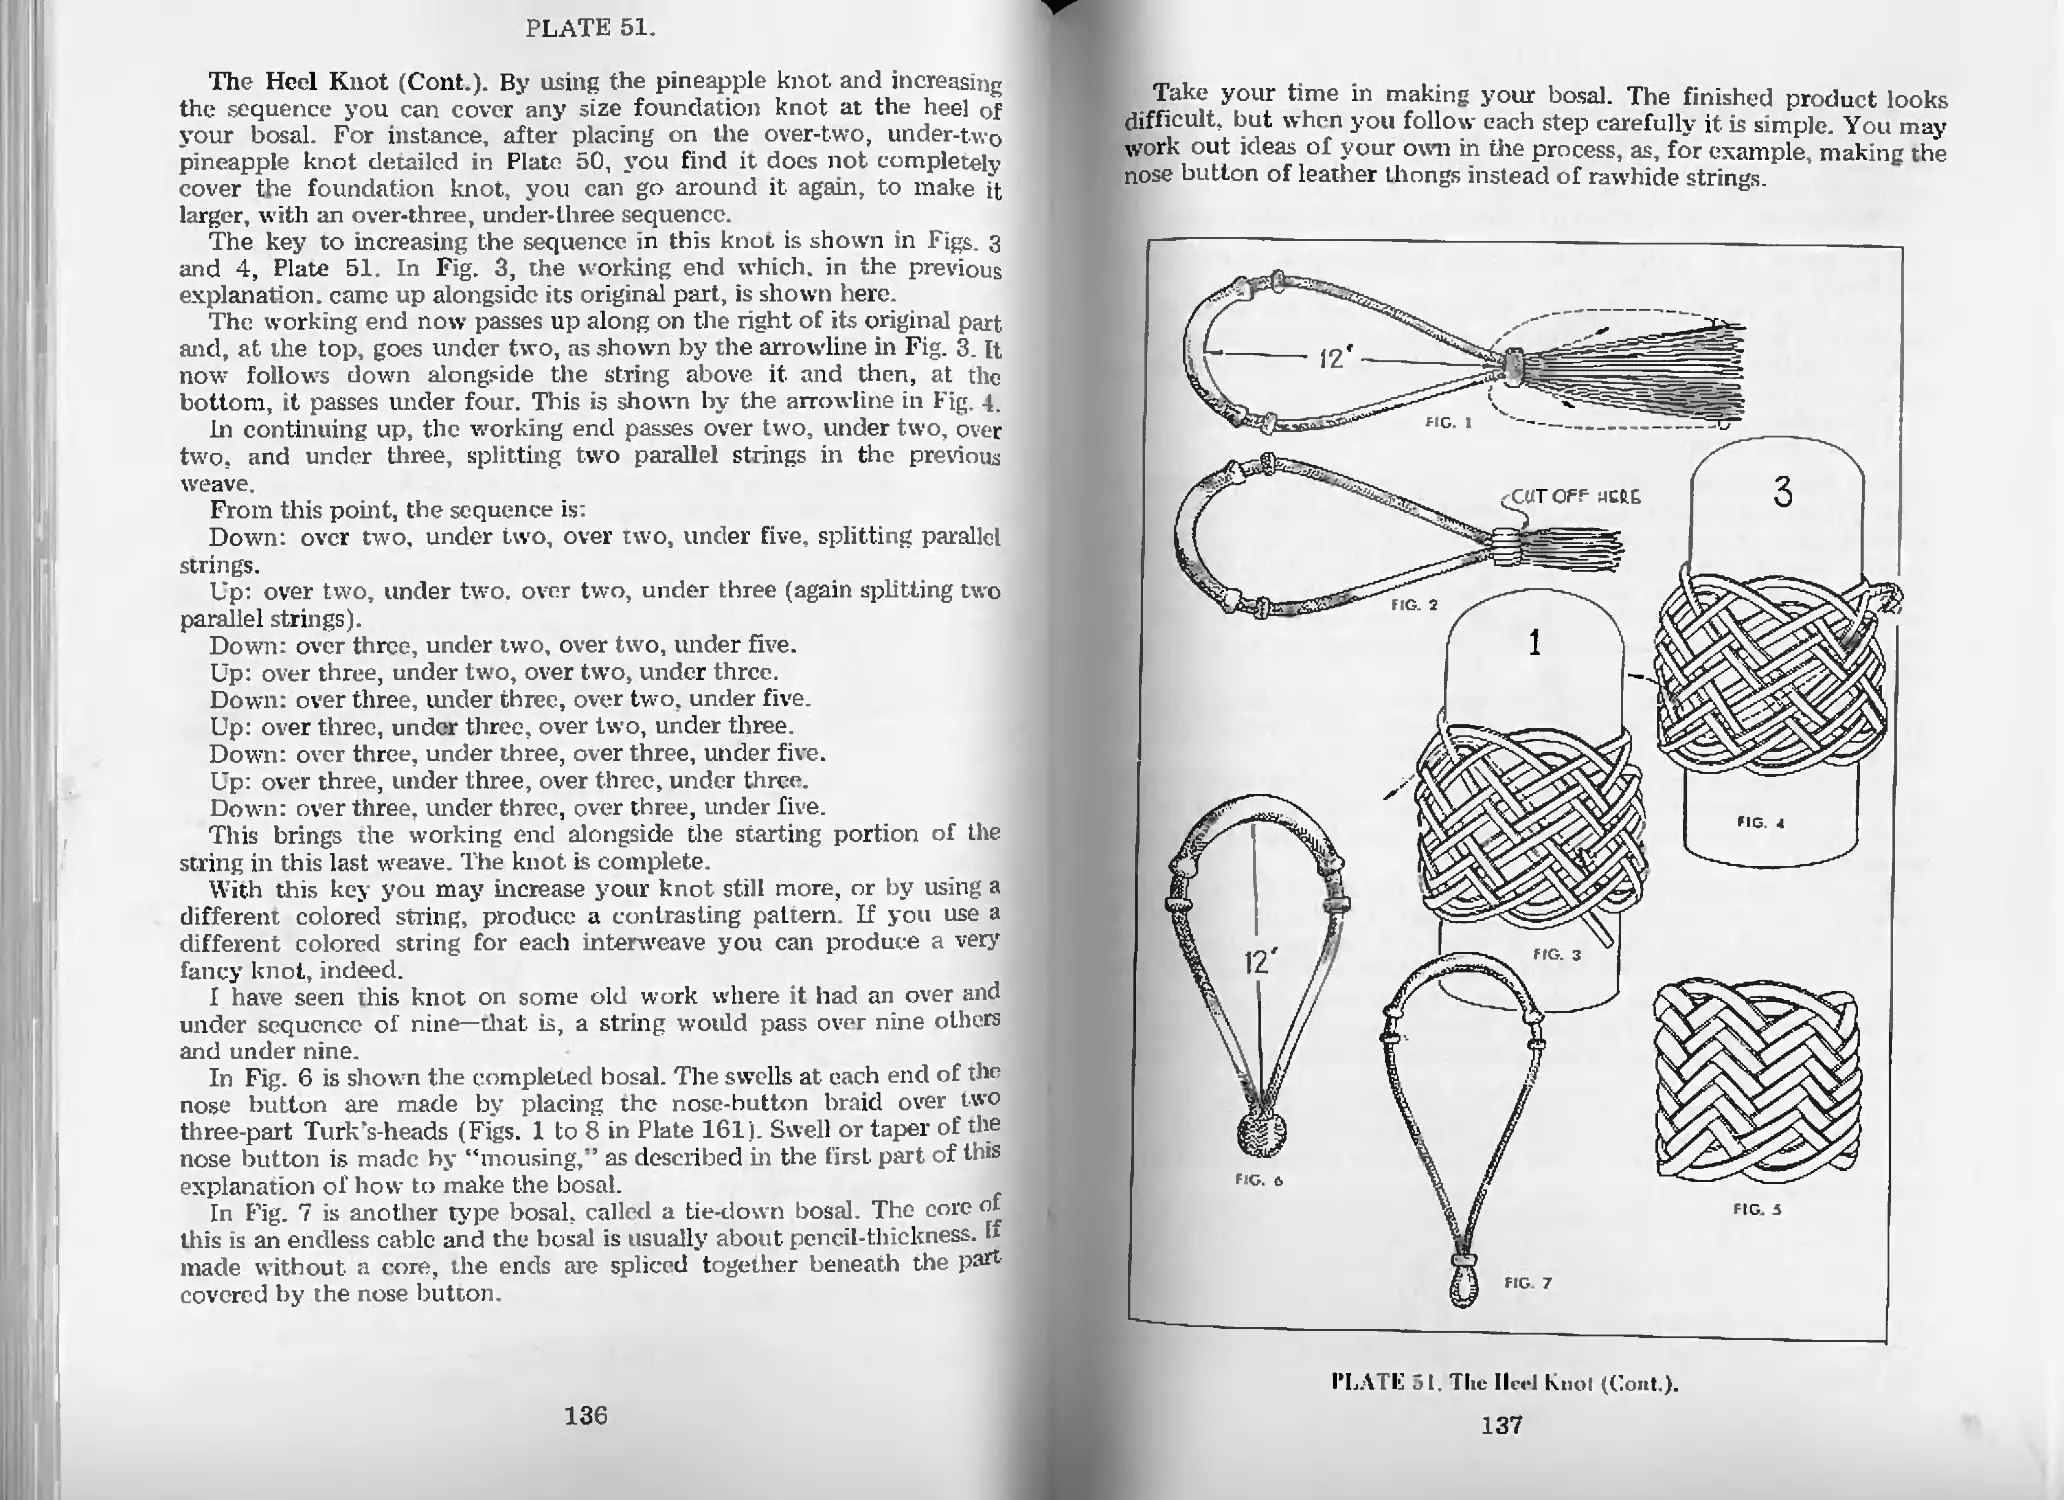
The Heel Knot (Cont.)—PL 51 136
How to Make a Braided Hackamore Headstall—PL 52 138
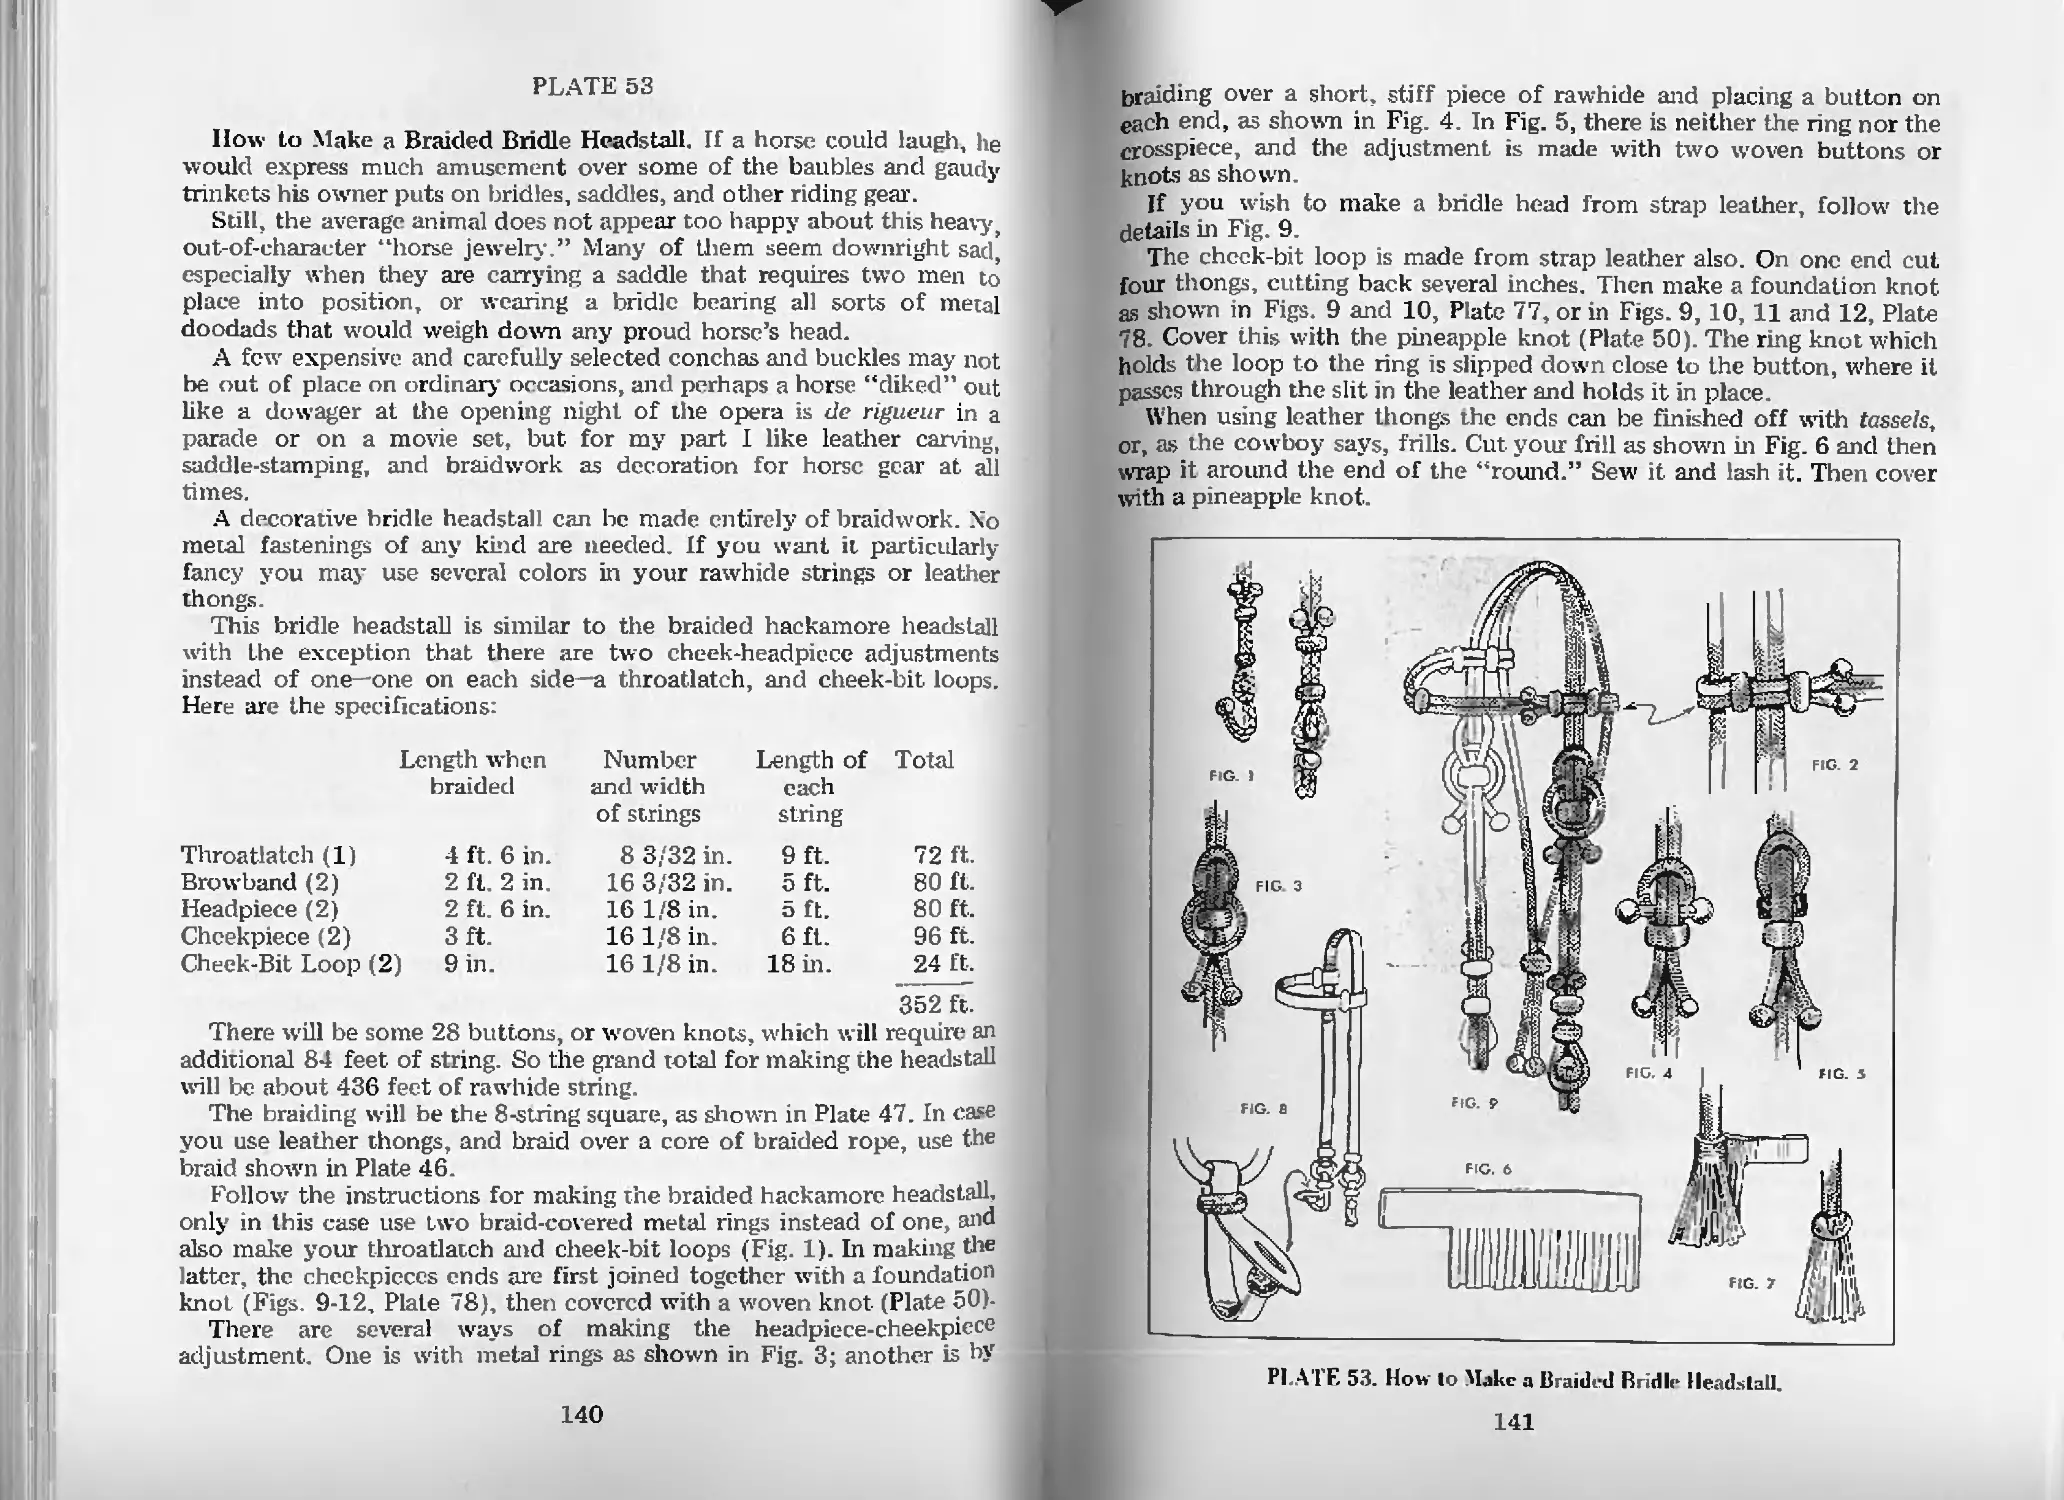
How to Make a Braided Bridle Headstall—Pl. 53 140
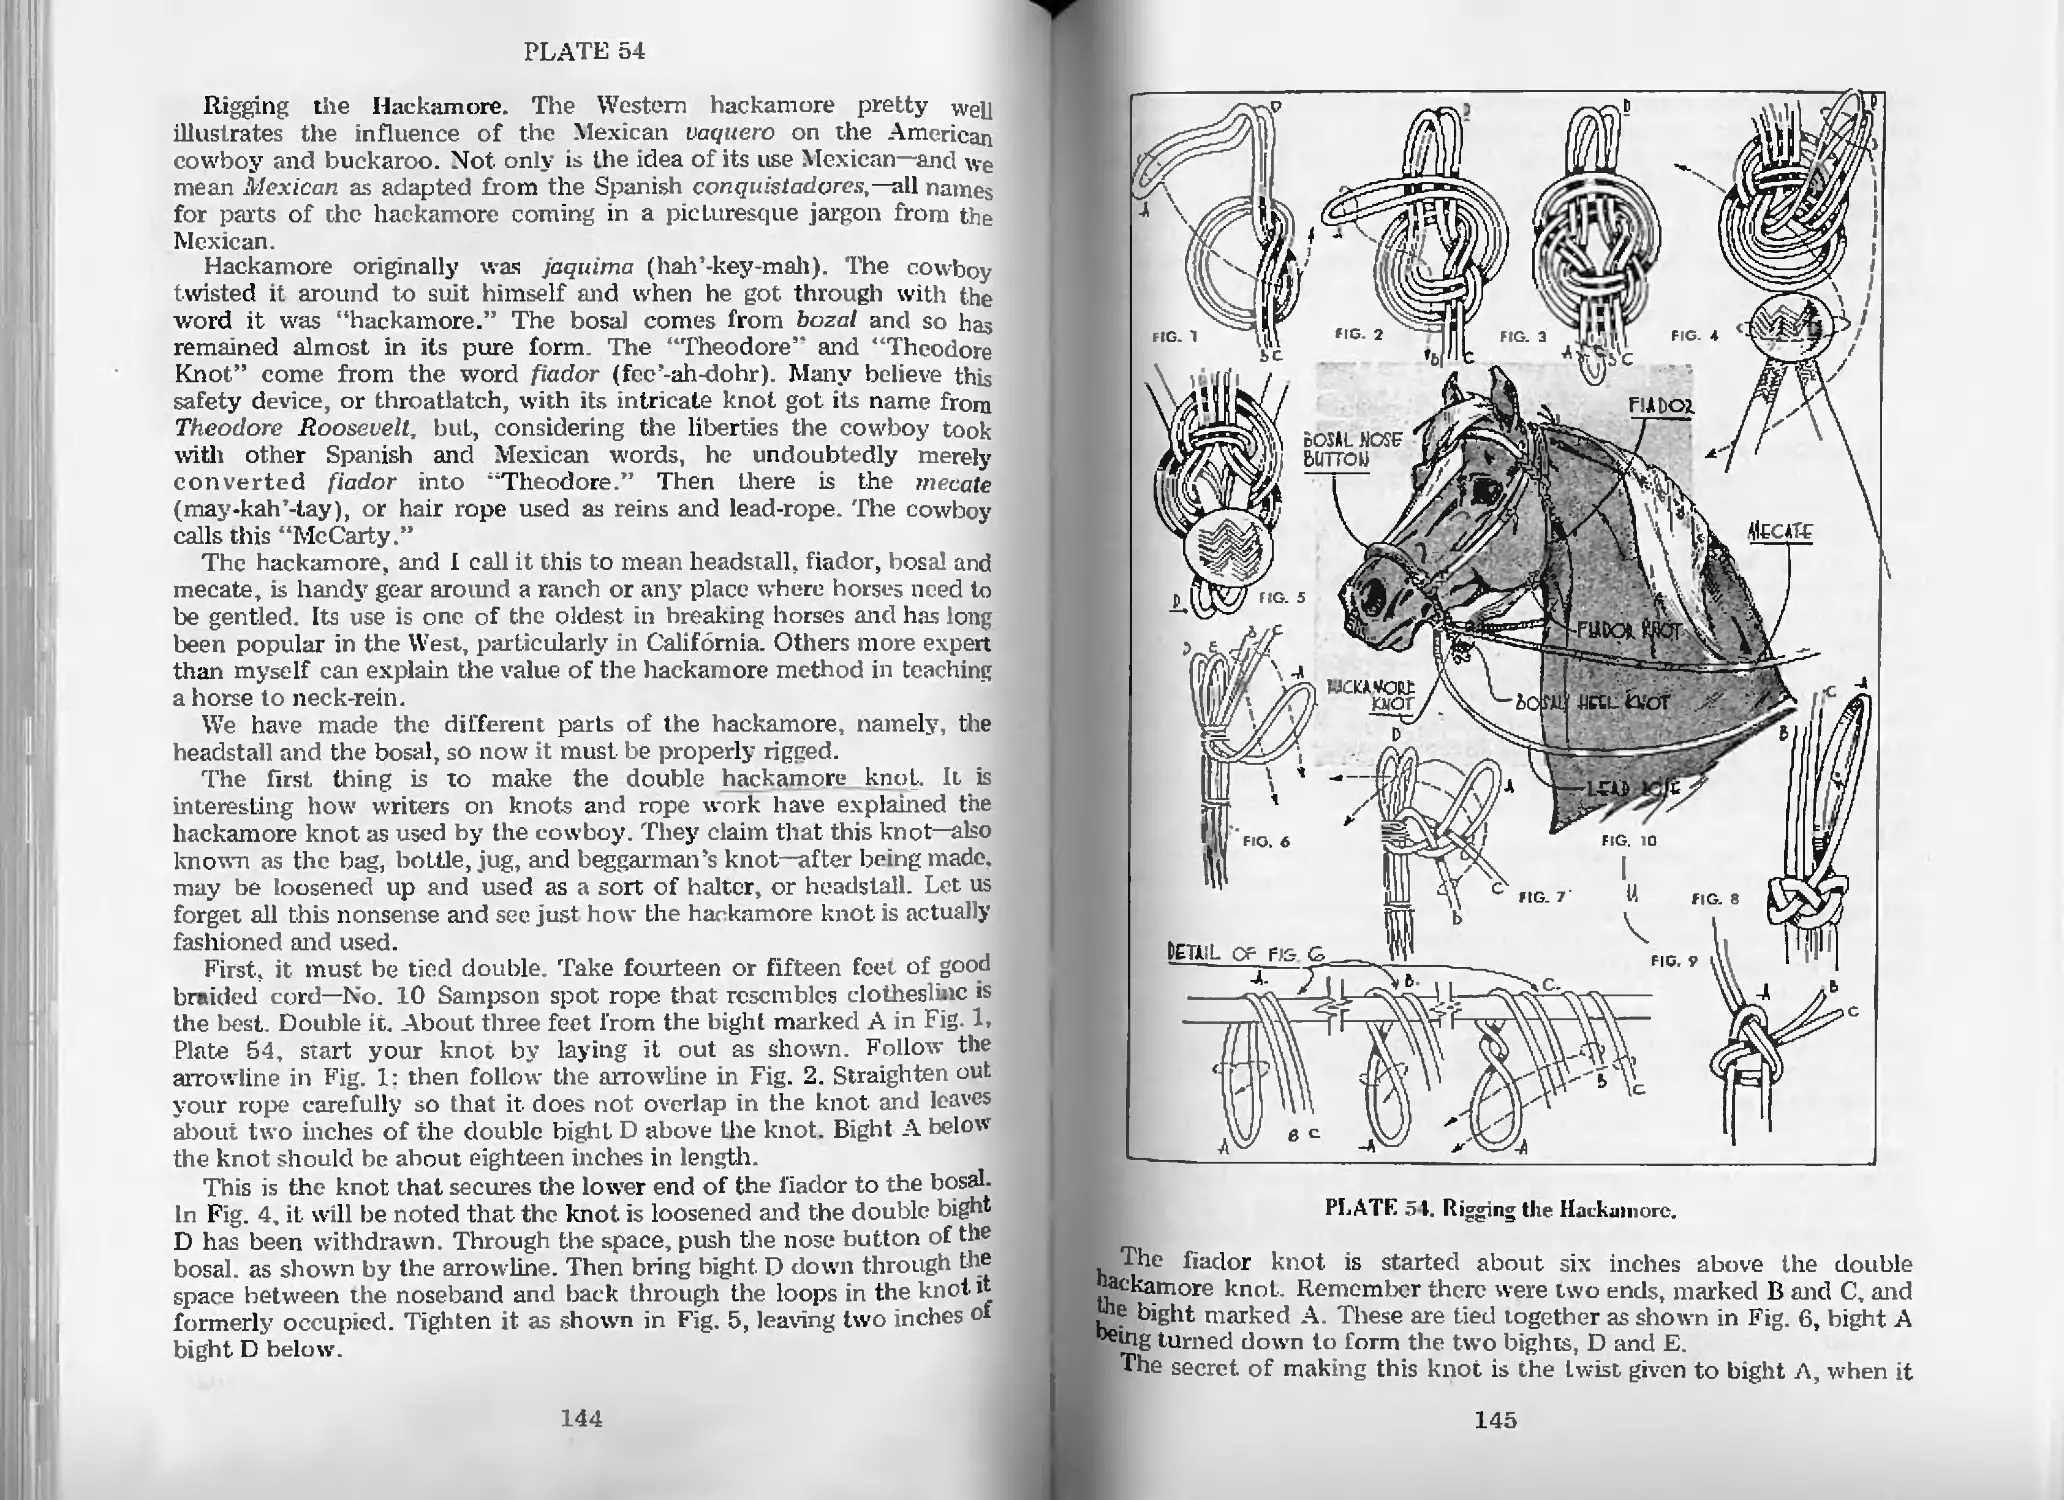
Rigging the Hackamore—Pl. 54 144
That “Ole” Fiador Knot-Pl. 55 146
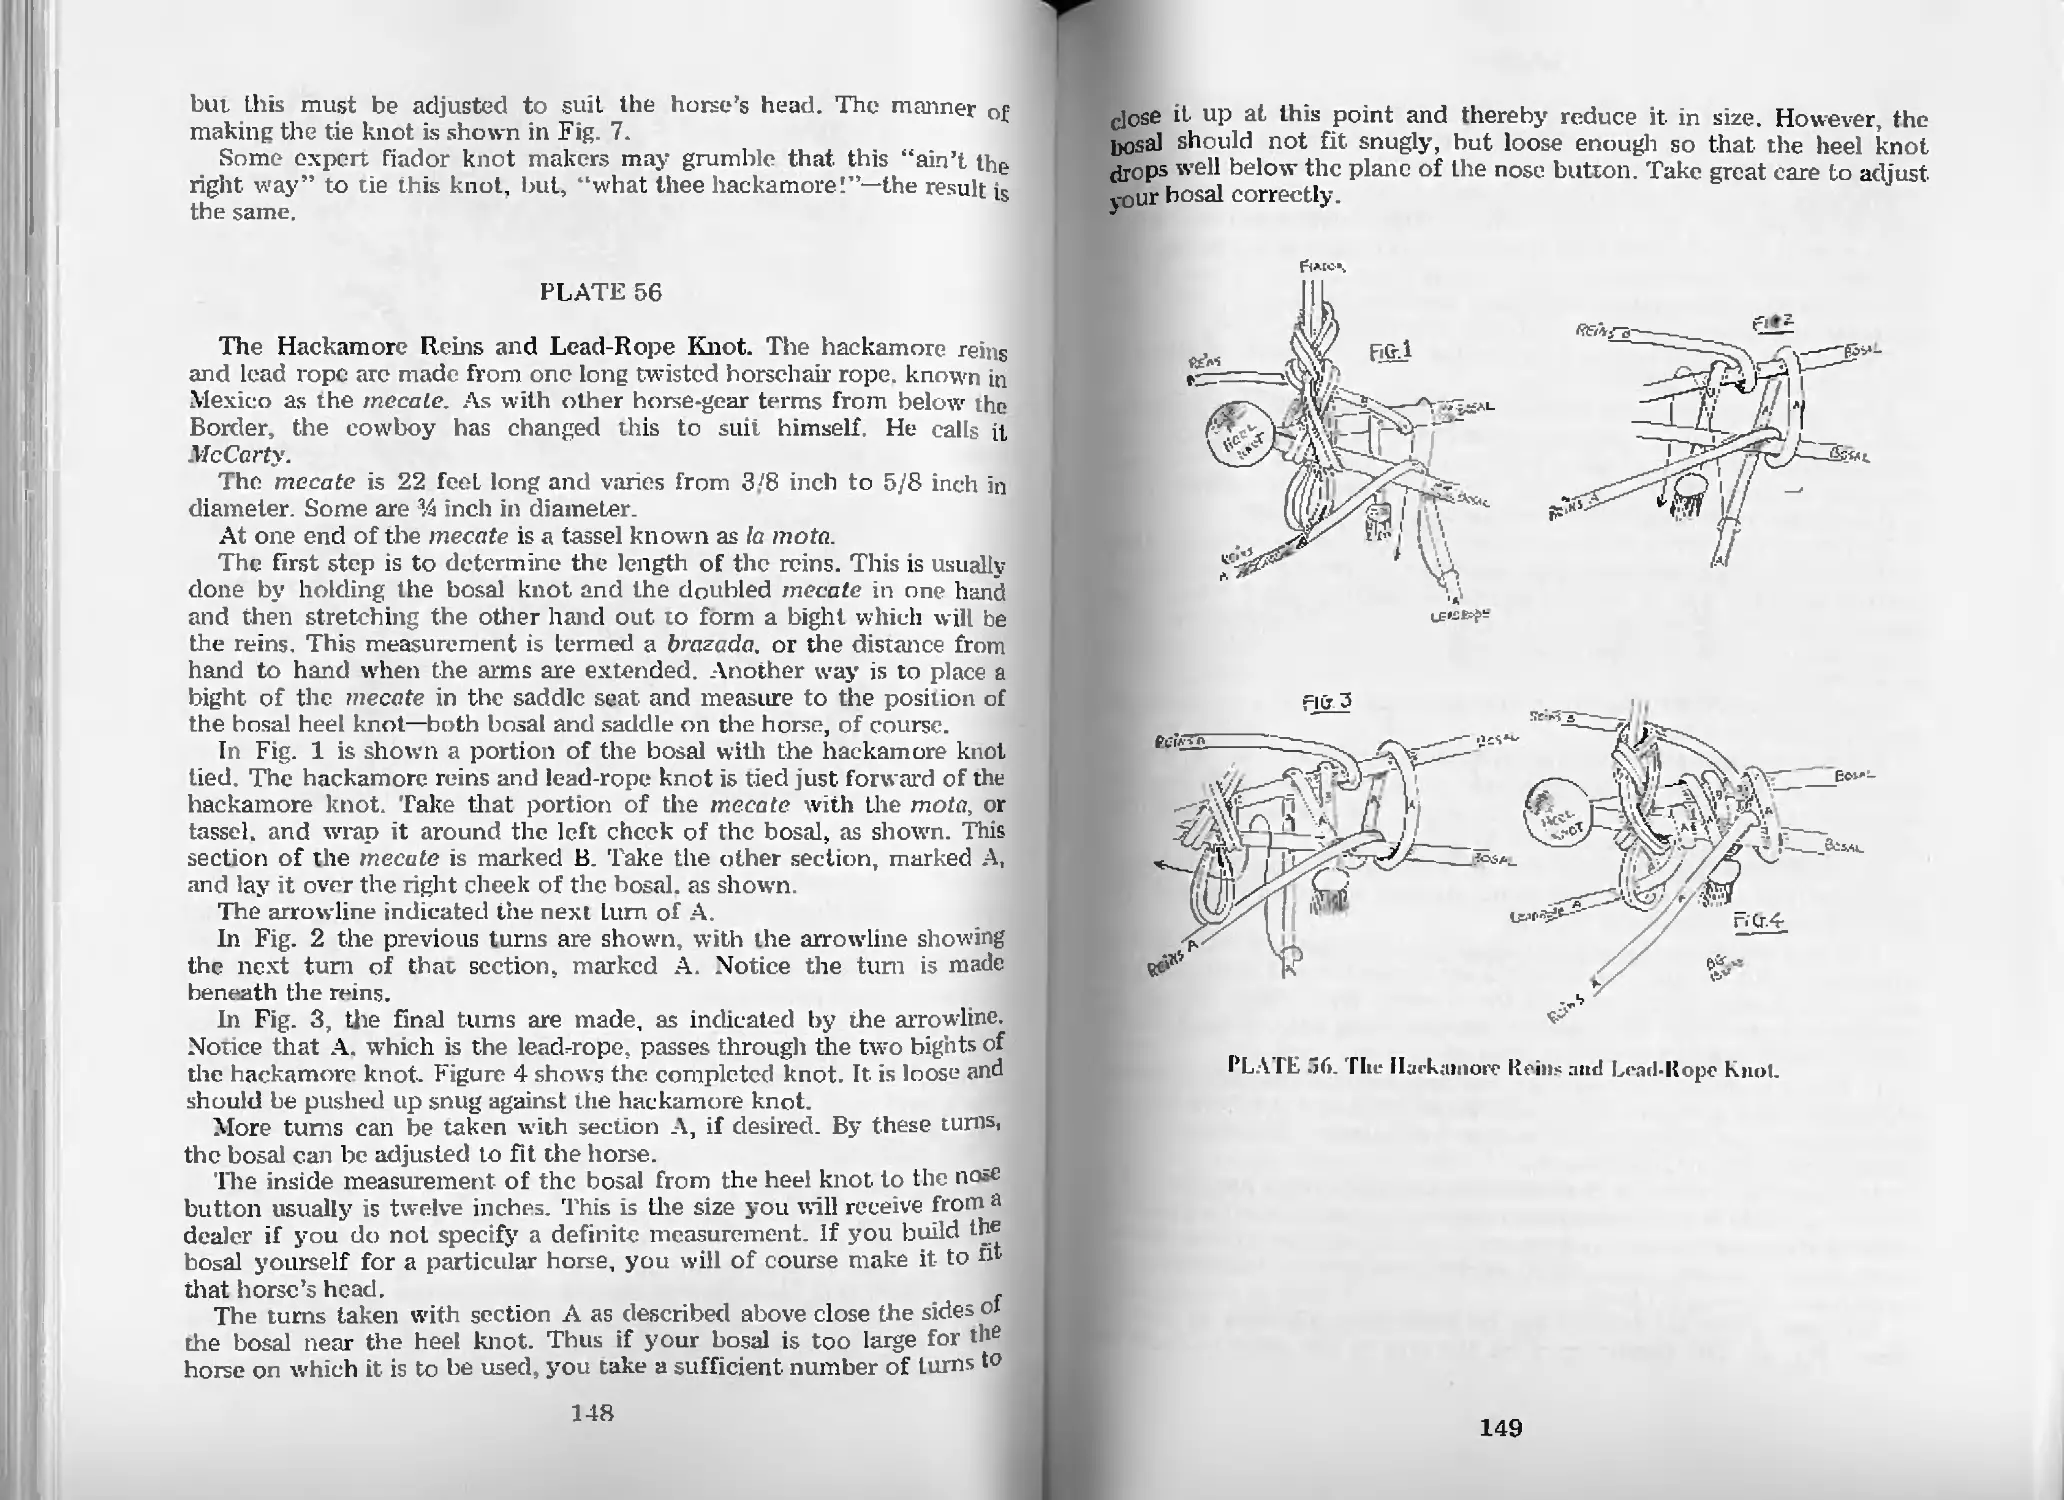
The Hackamore Reins and Lead-Rope Knot—PL 56 148
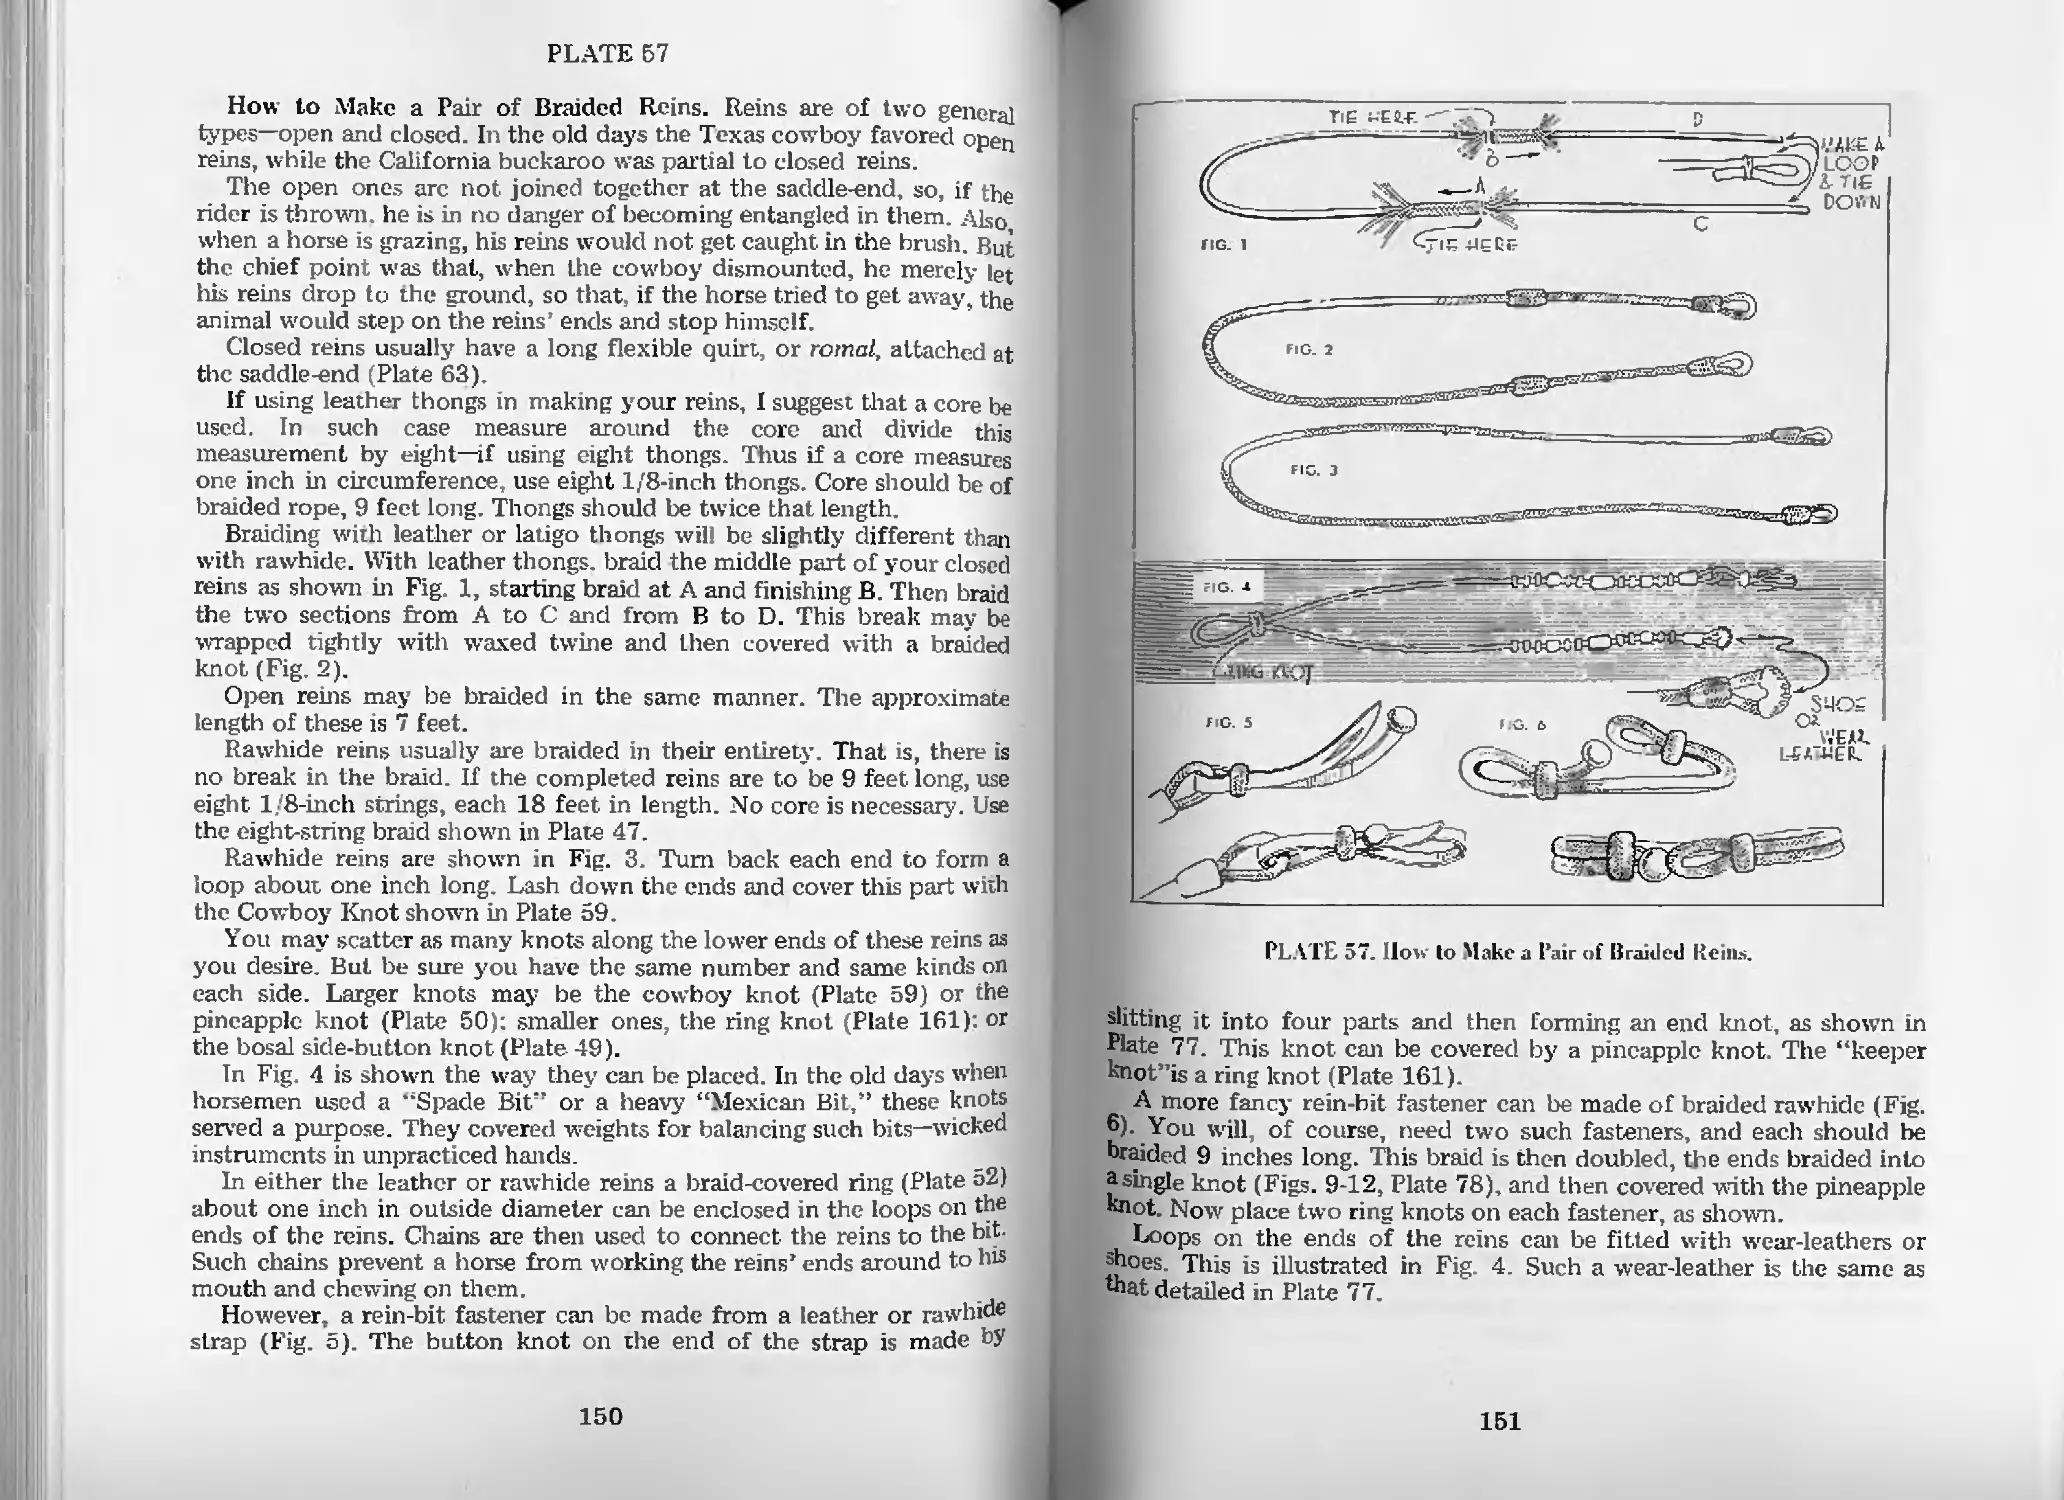
How to Make a Pair of Braided Reins—PL 57 150
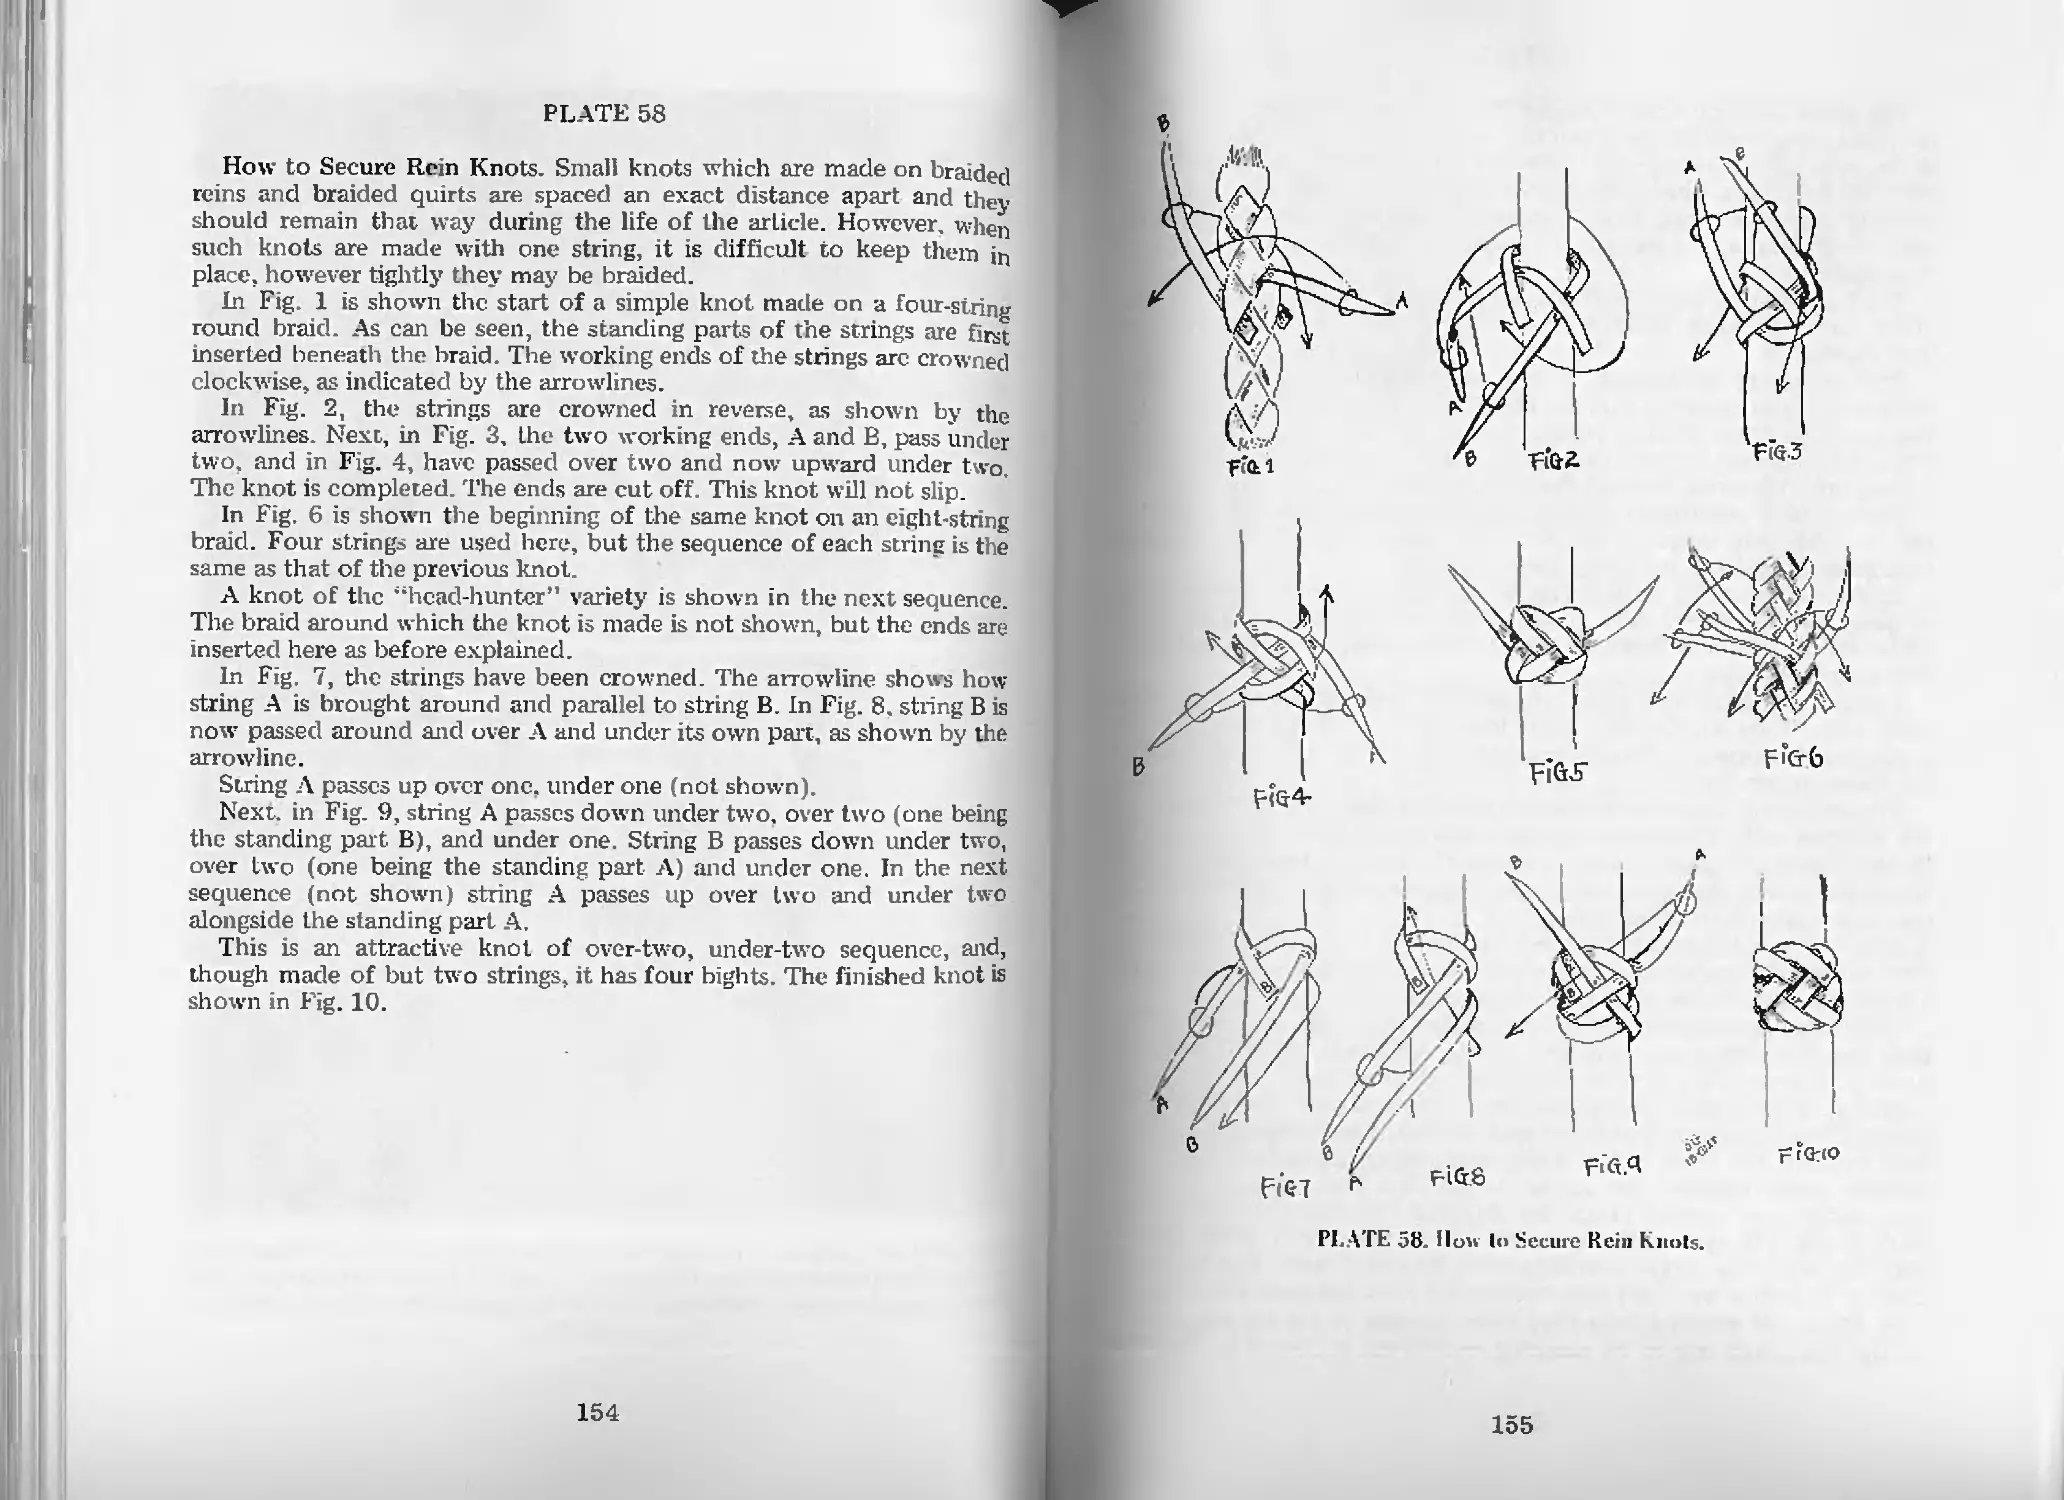
How to Secure Rein Knots—PL 58 154
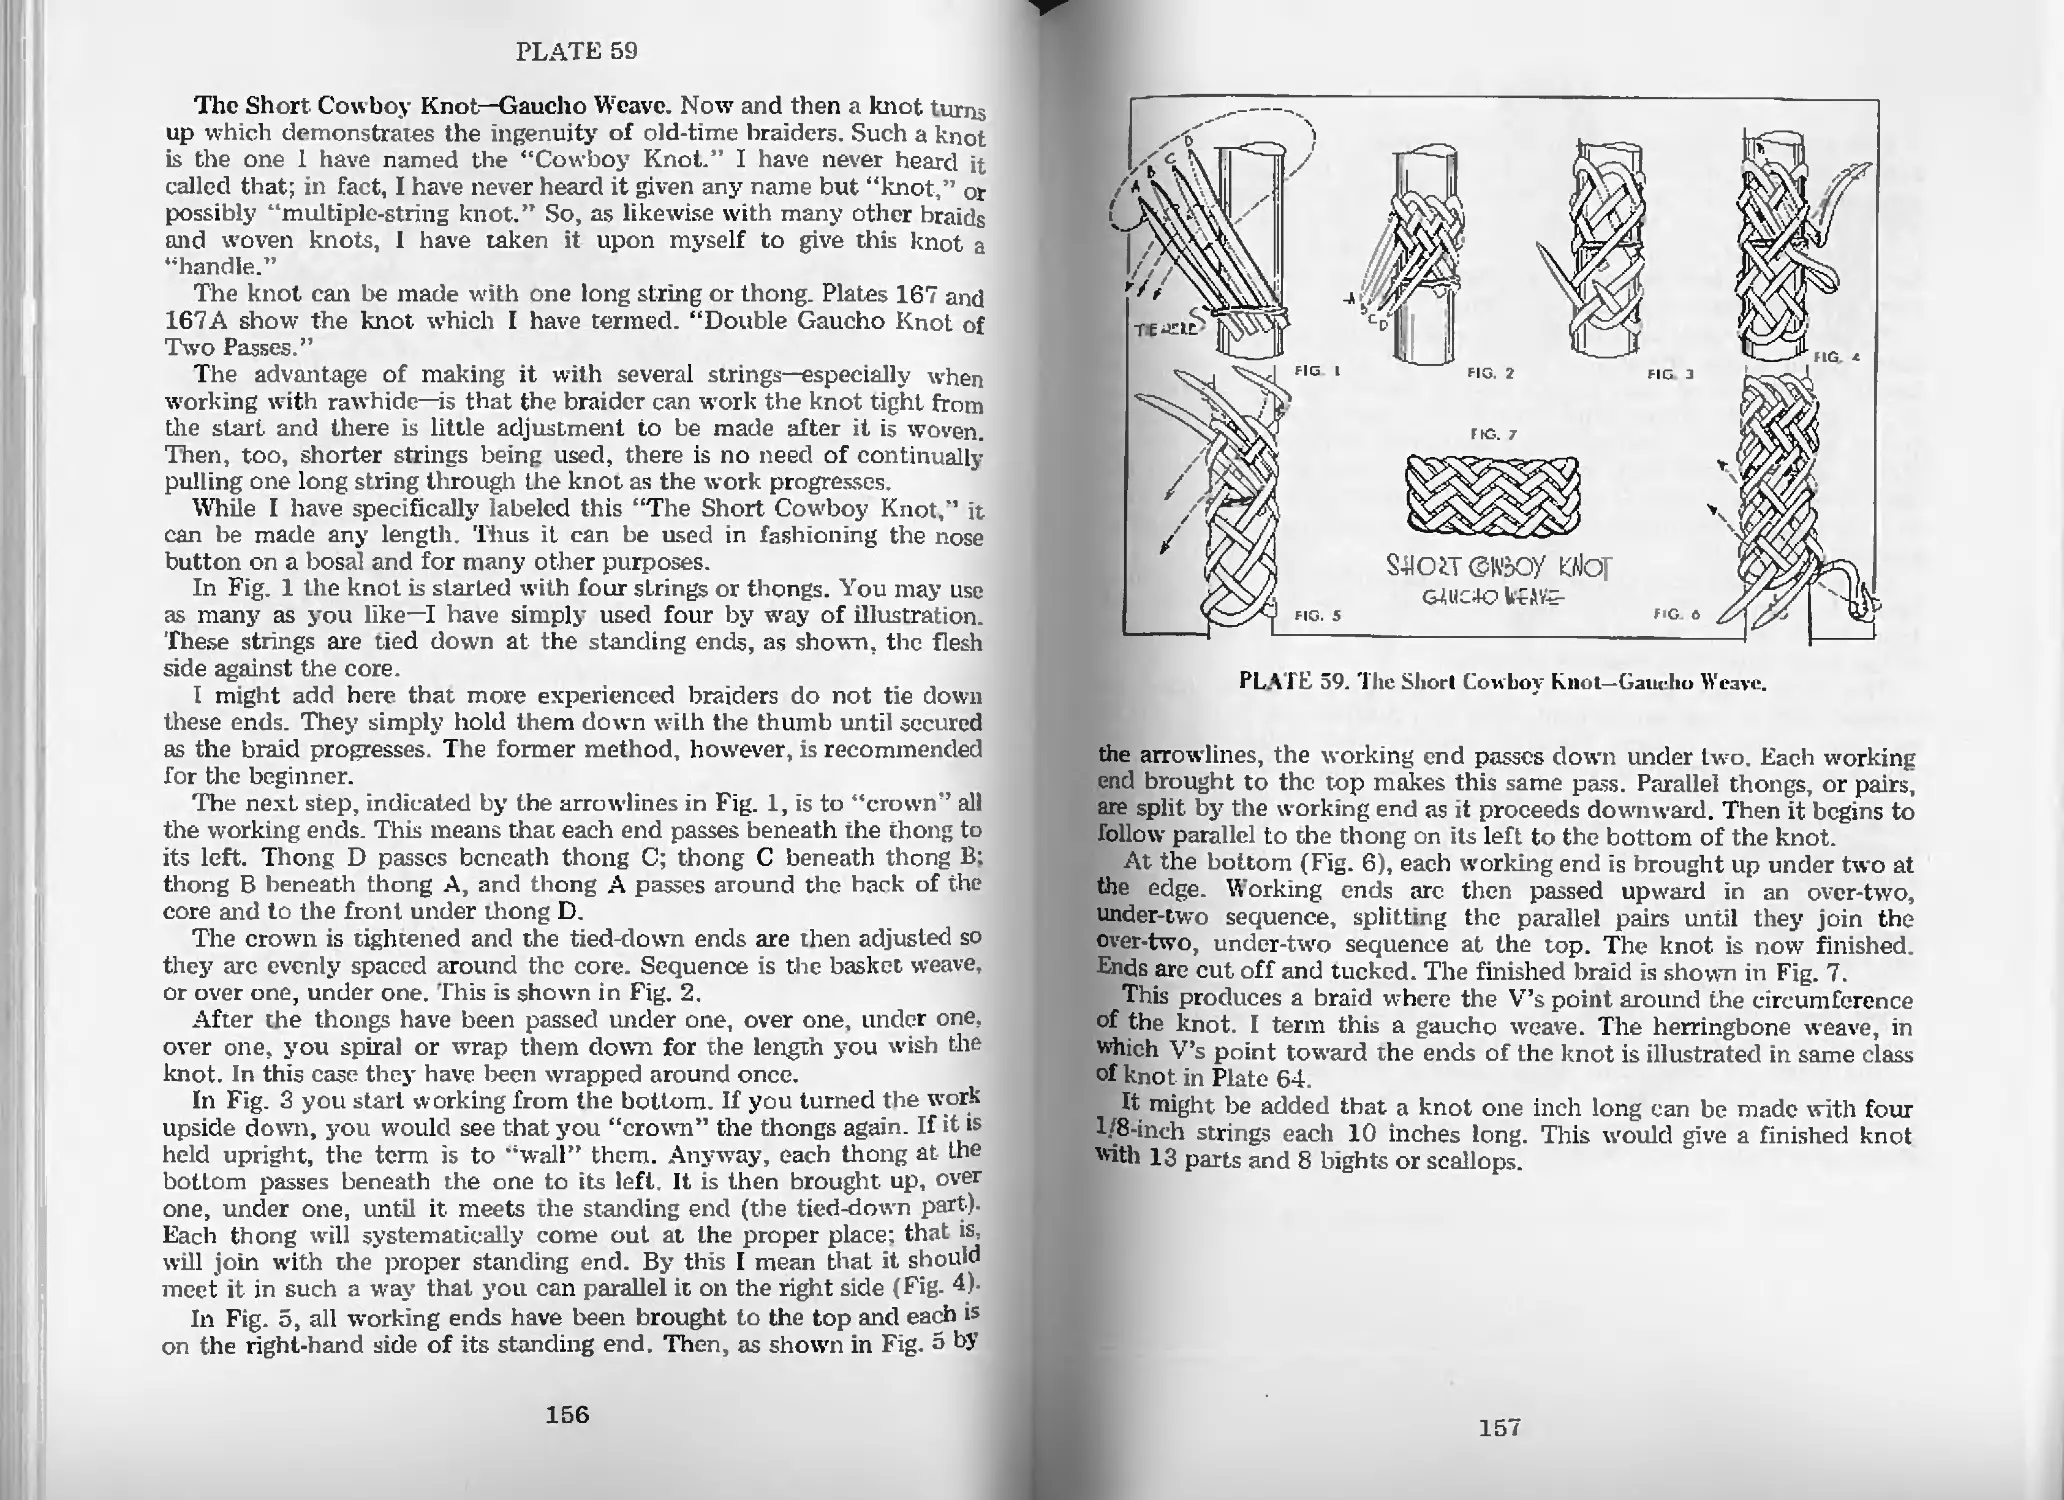
The Short Cowboy Knot—Gaucho Weave—PL 59 156
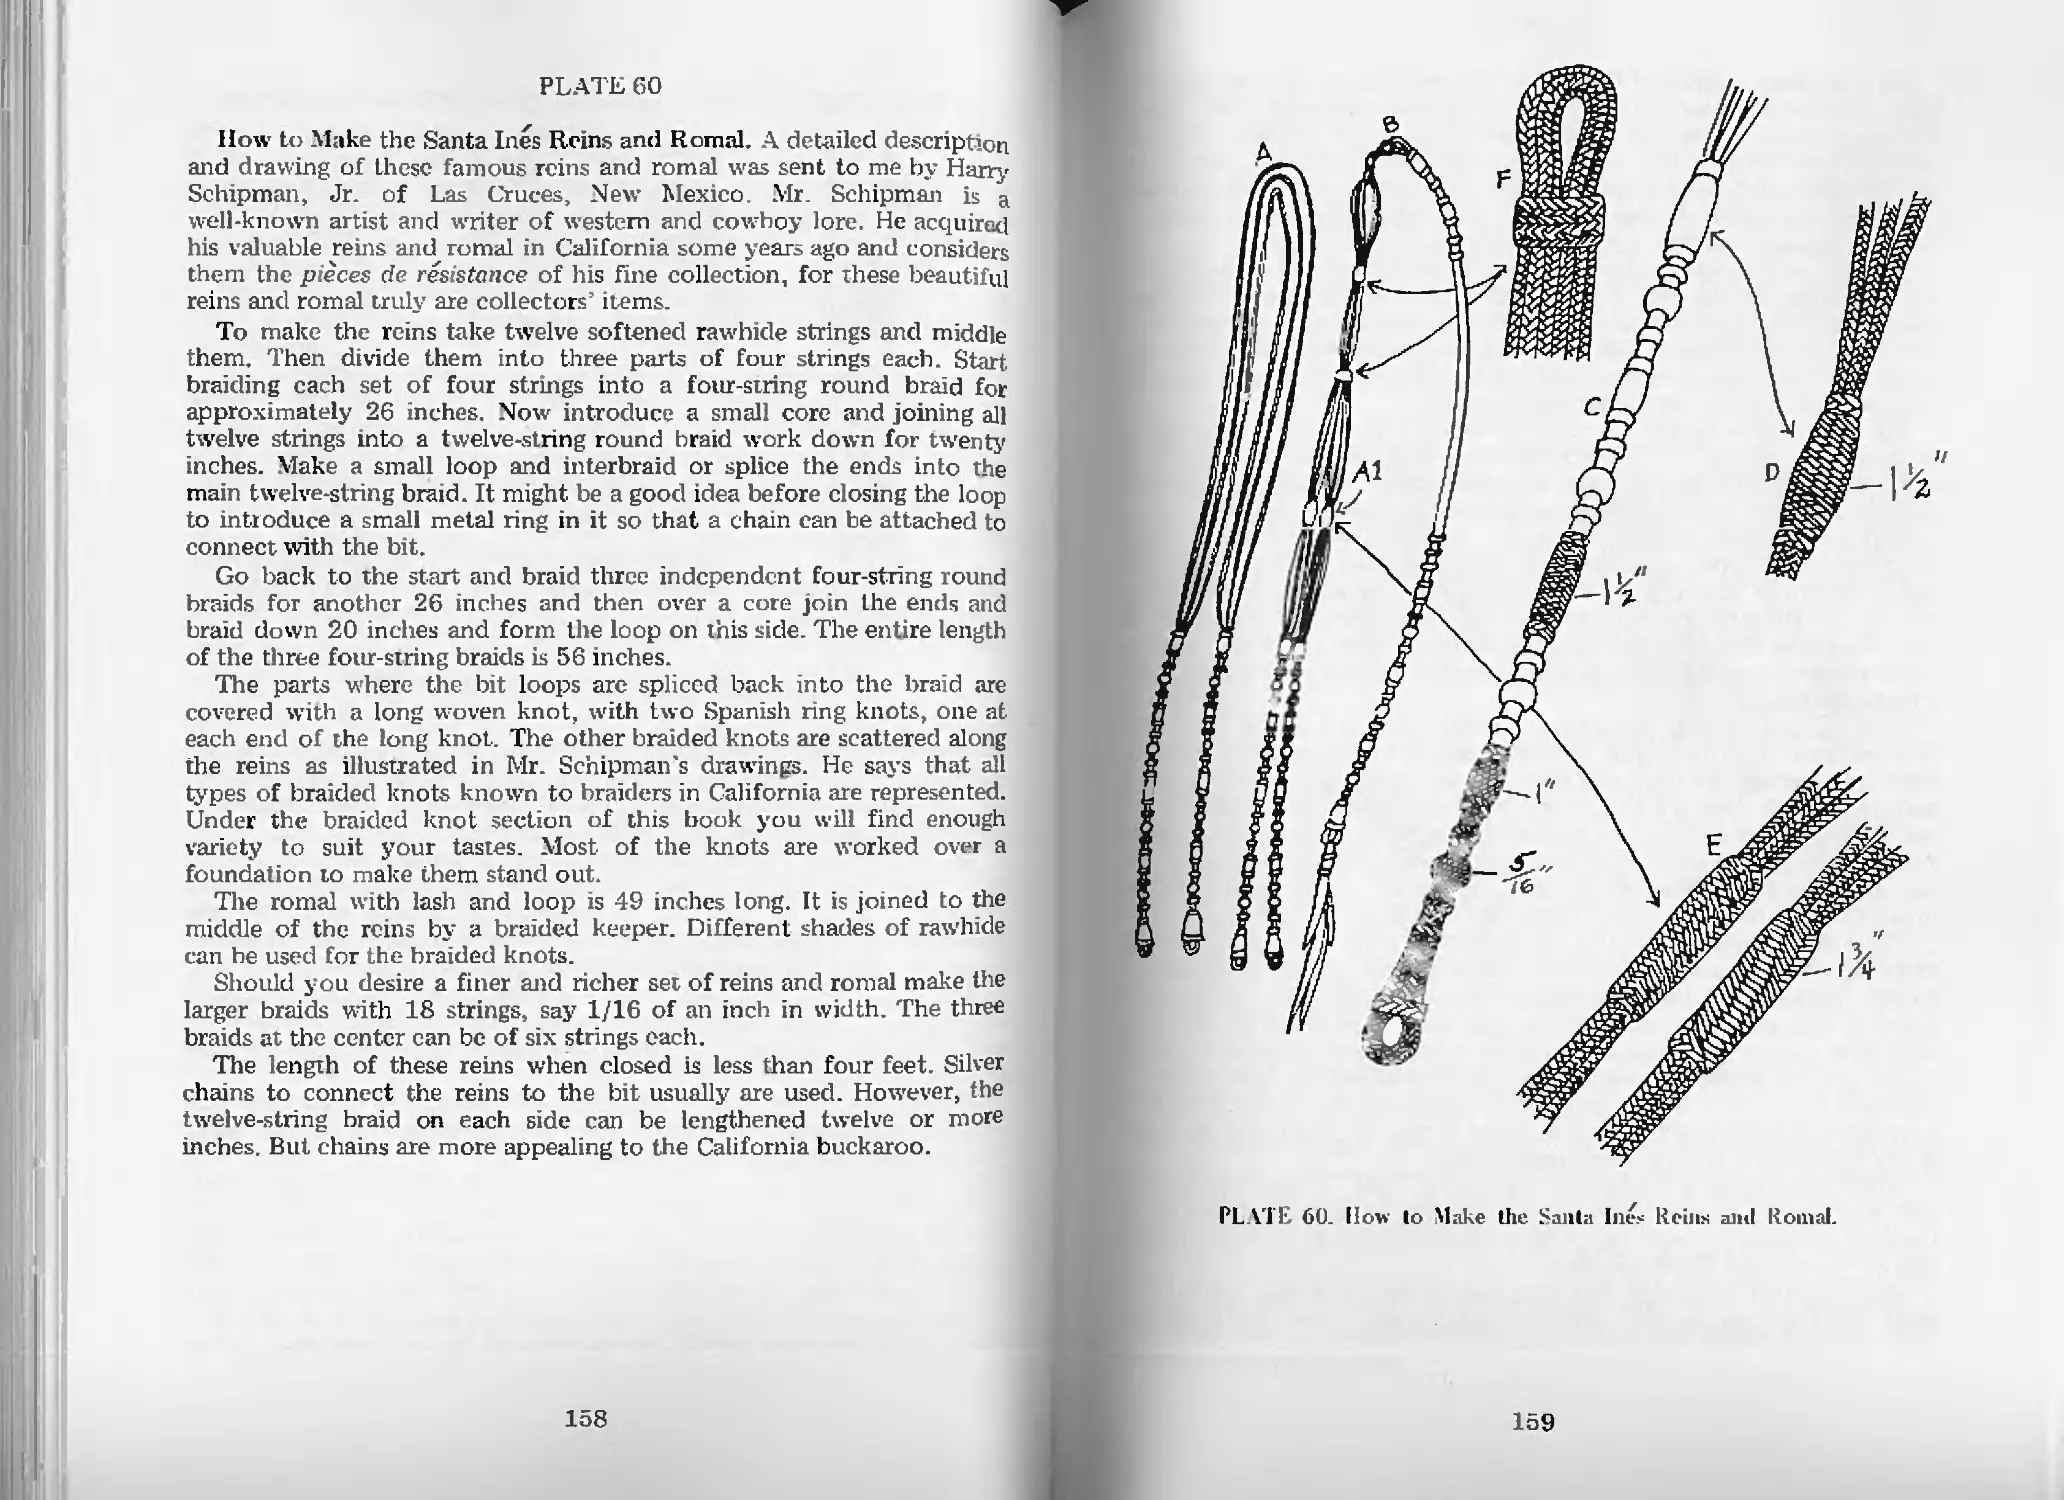
How to Make the Santa files Reins and Romal—PL 60 158
How to Make a Braided Ear-Head—PL 61 160
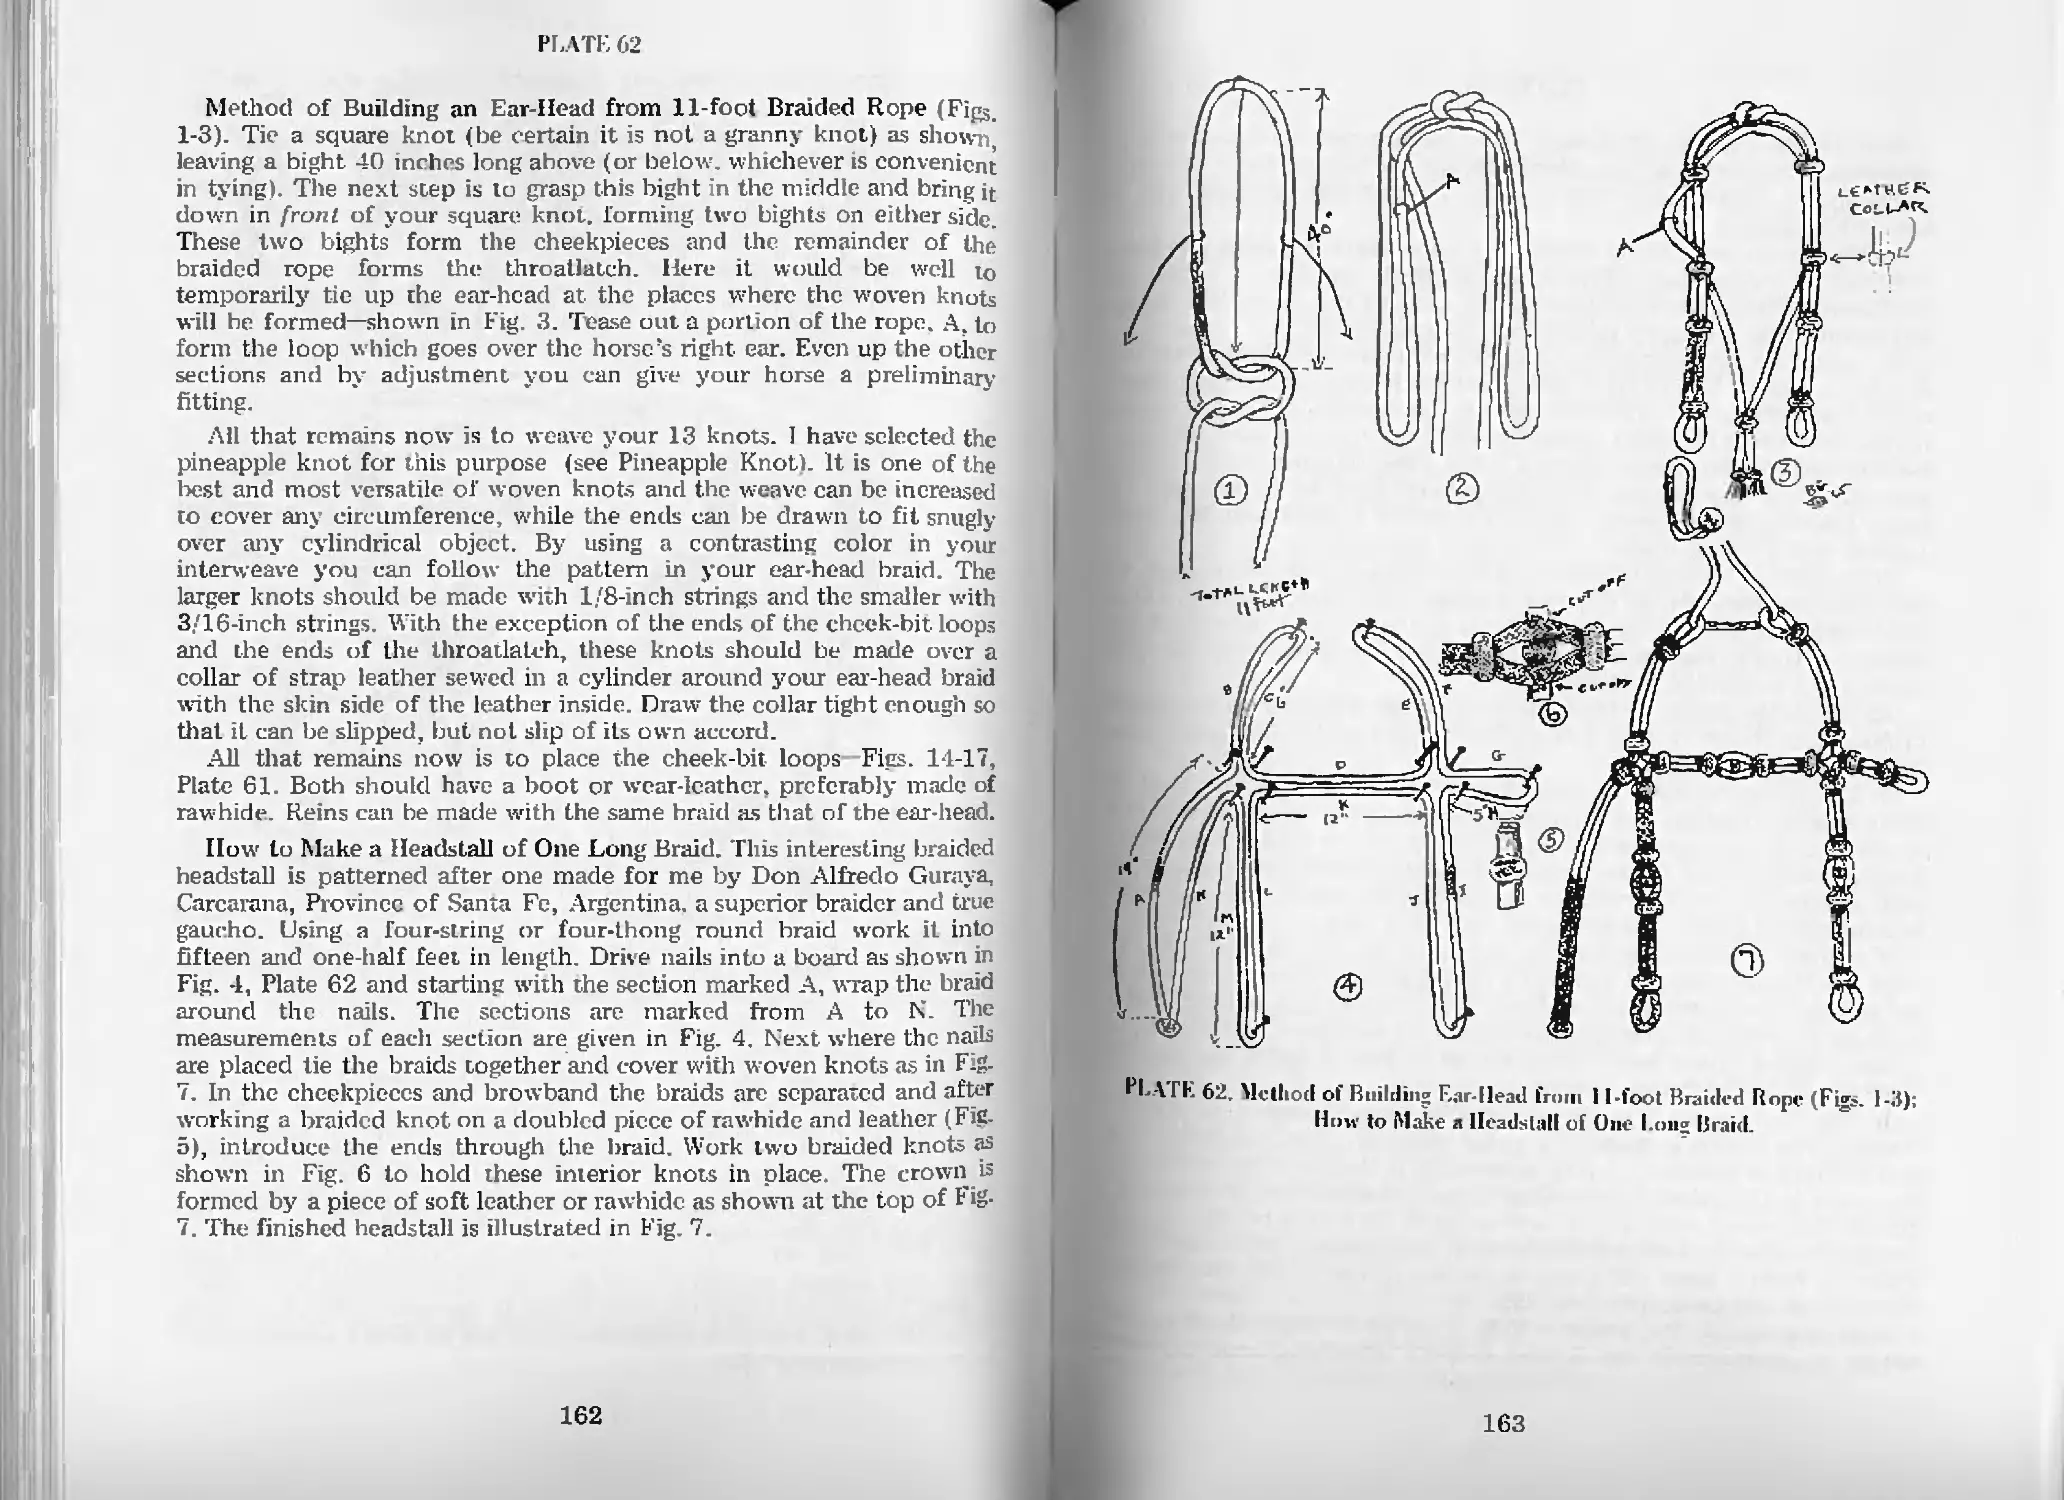
Method of Building an Ear-Head from
11-Foot Braided Rope—PL 62 162
How to Make a Headstall of One Braid—PL 62 162
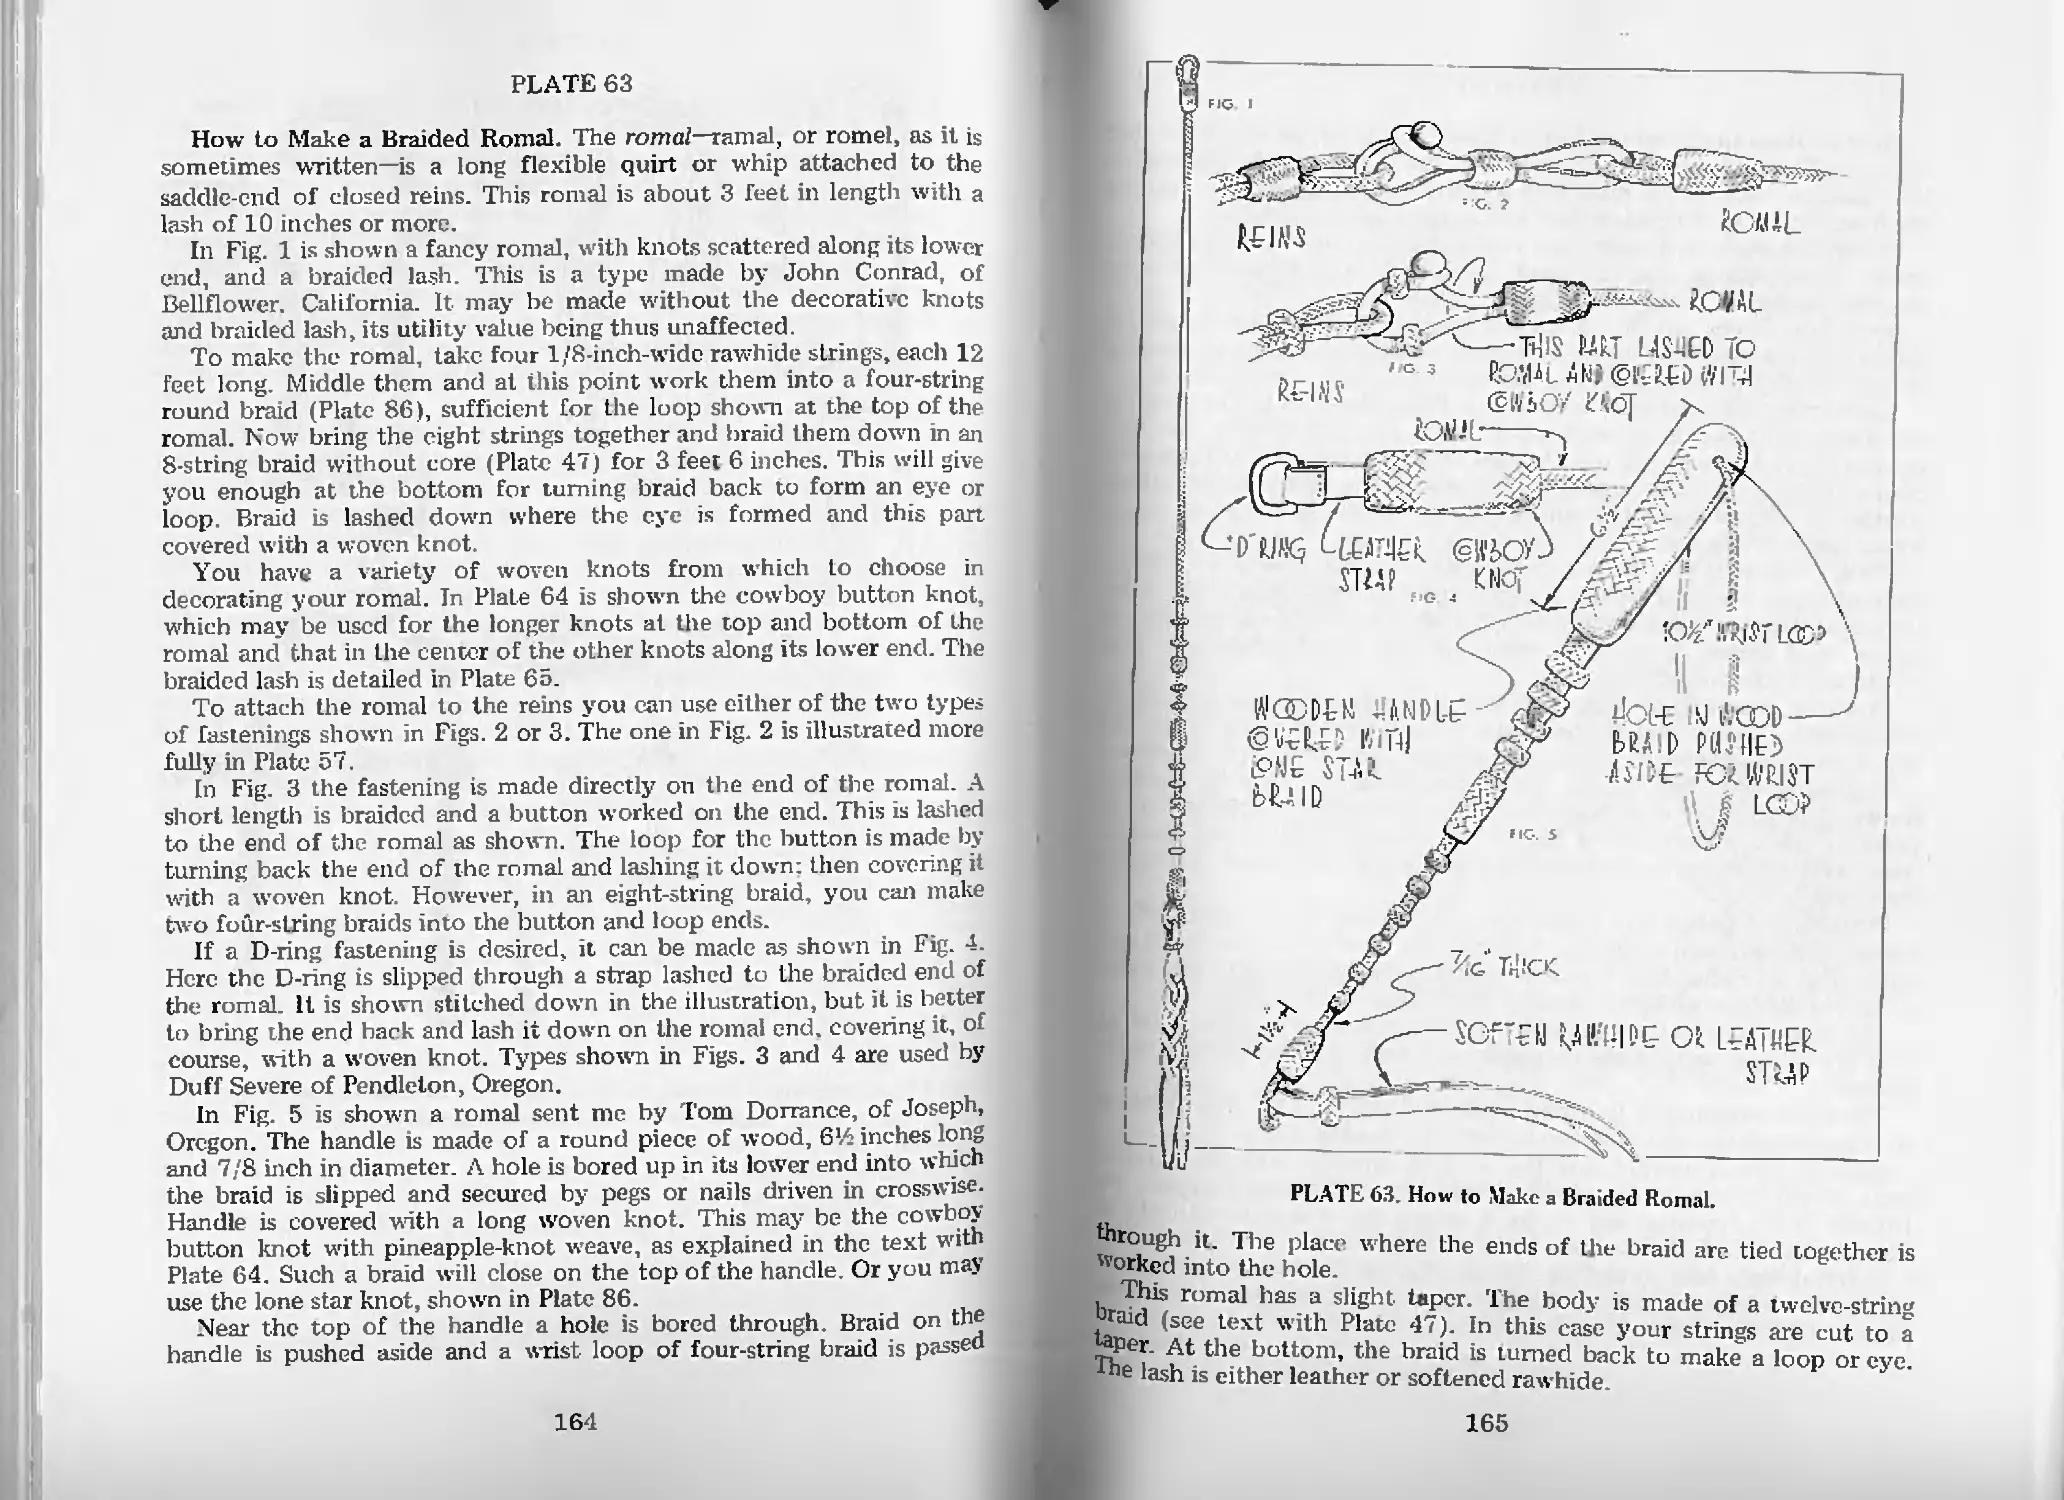
How to Make a Braided Romal—PL 63 164
ix
1
Round Braids (cont.)
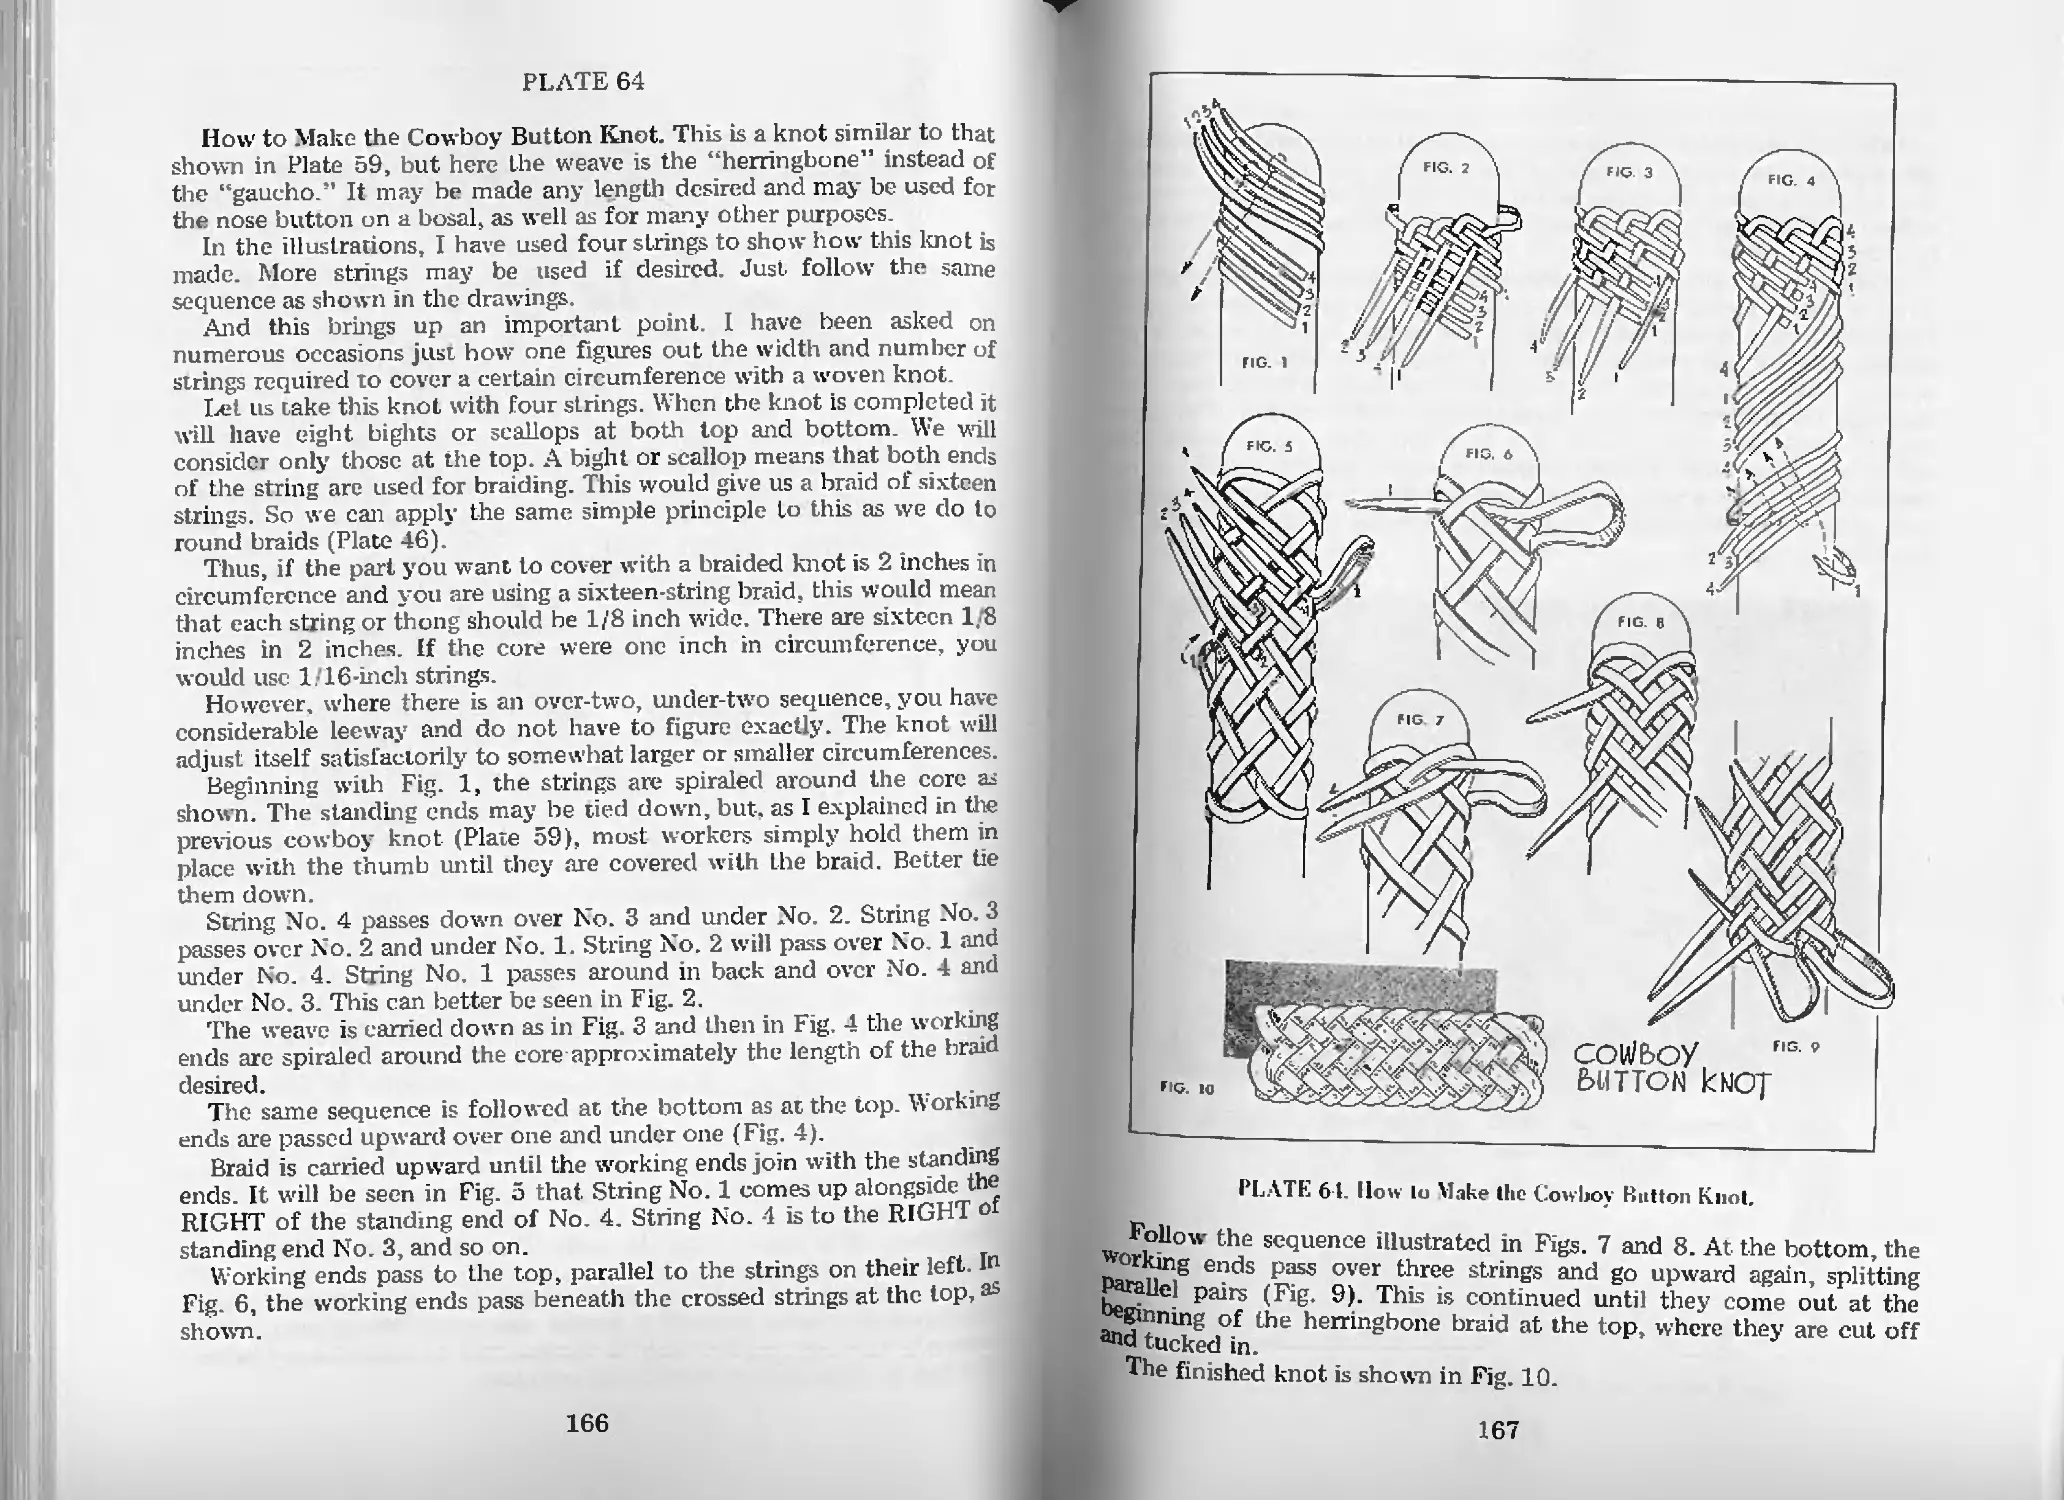
How to Make the Cowboy Button Knot—Pl. 64 166
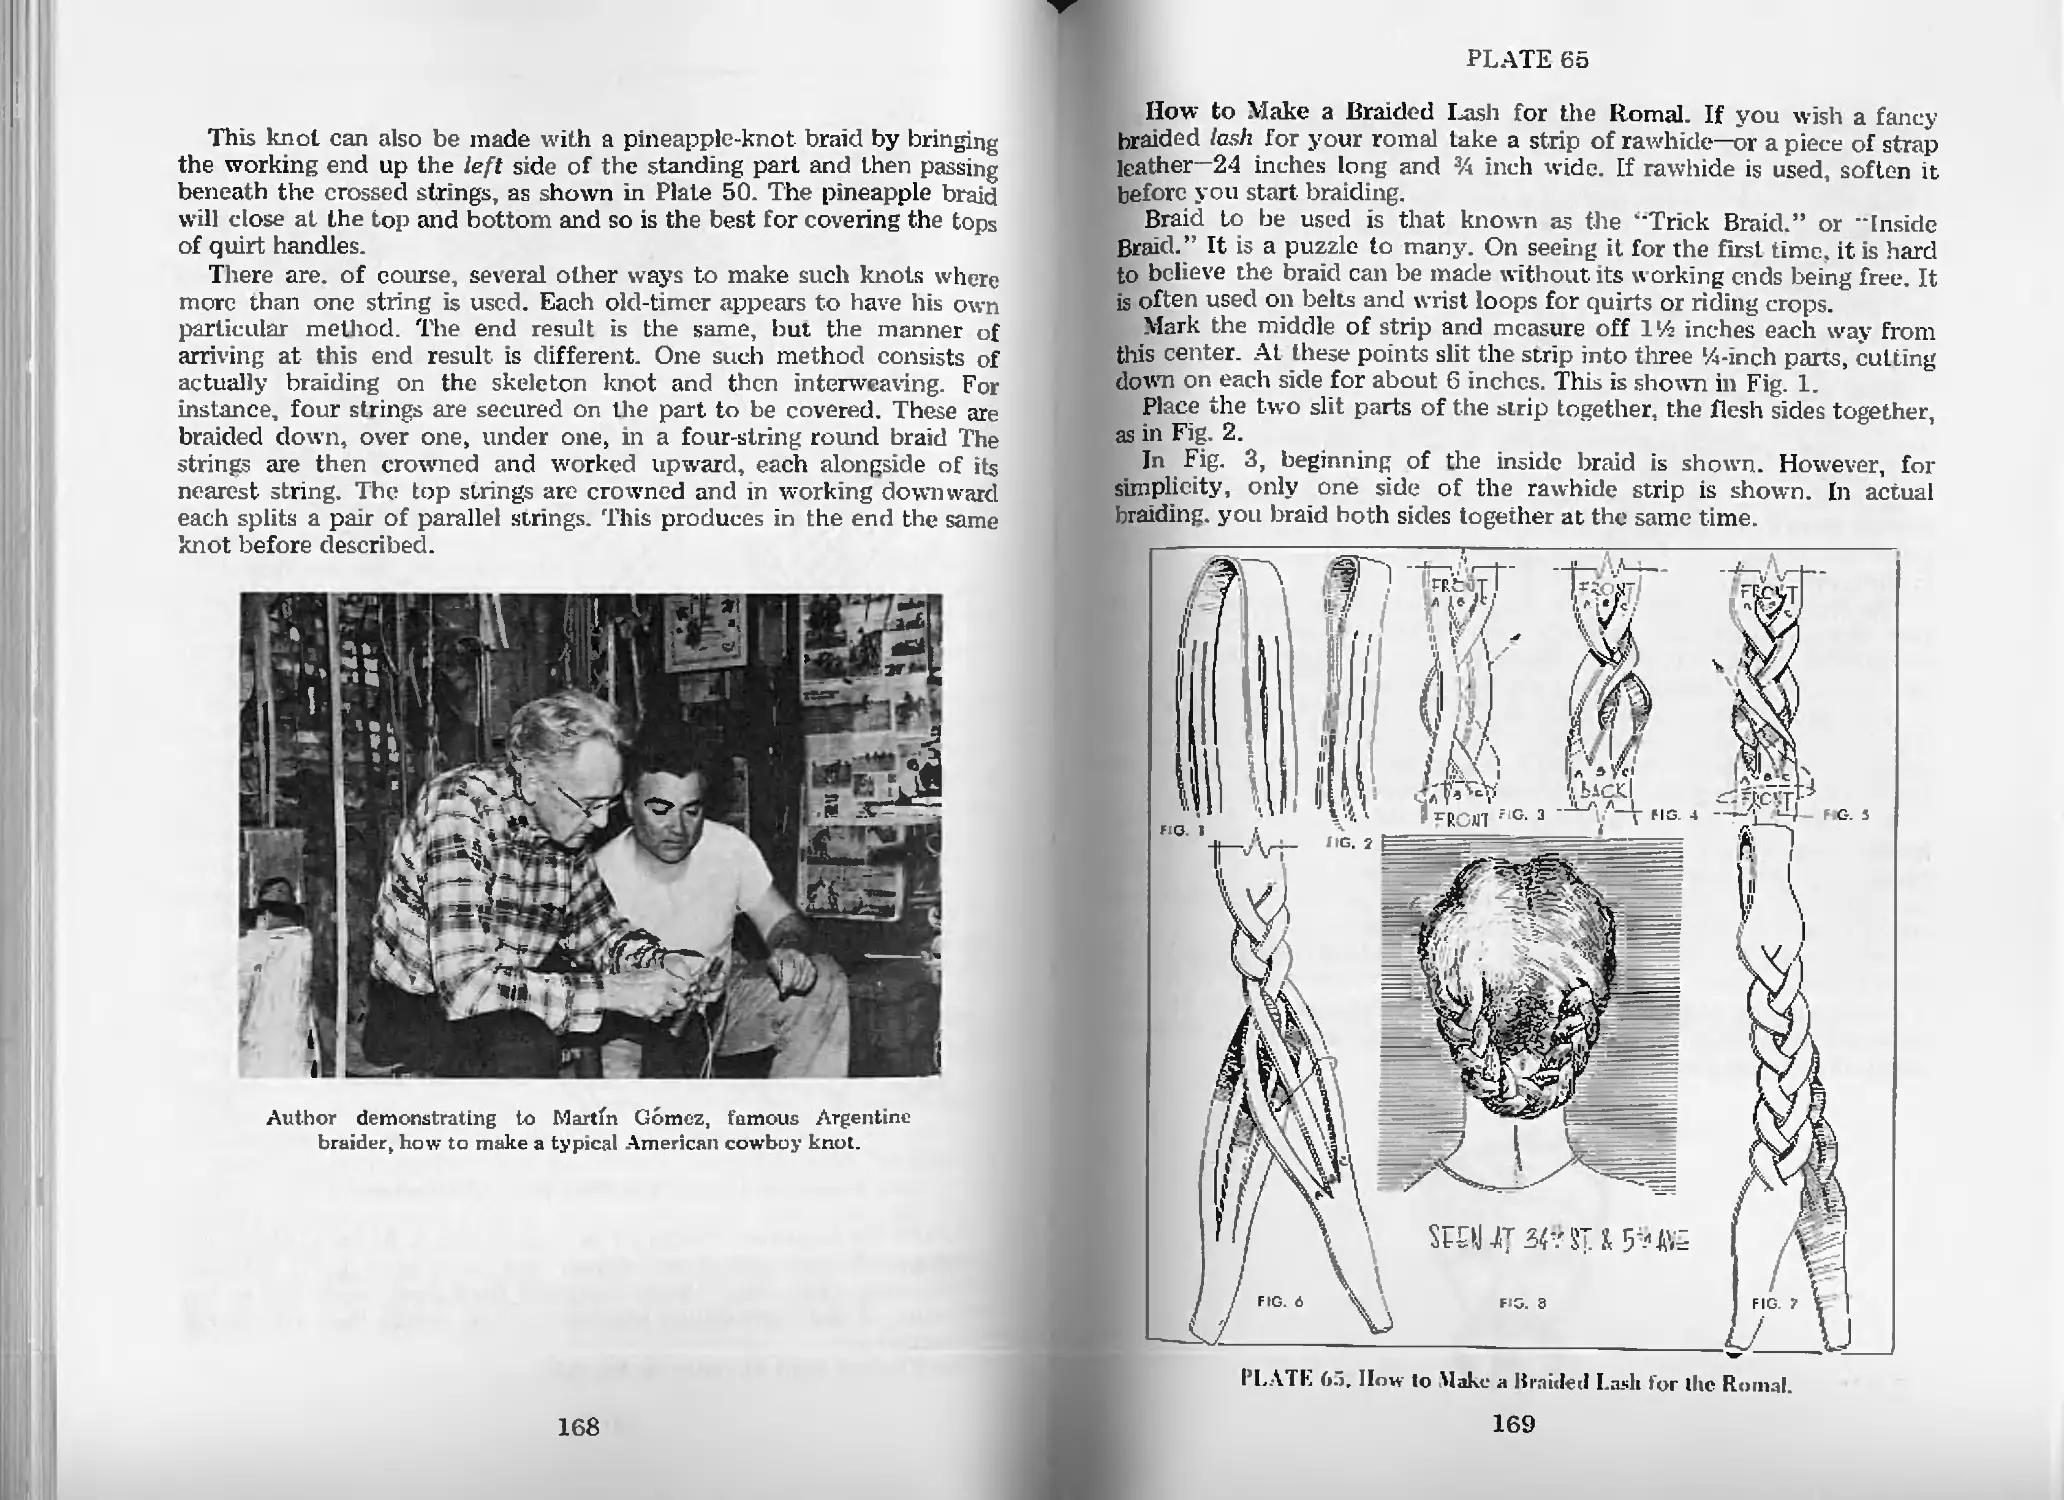
How to Make a Braided Lash for the Romal—Pl. 65 169
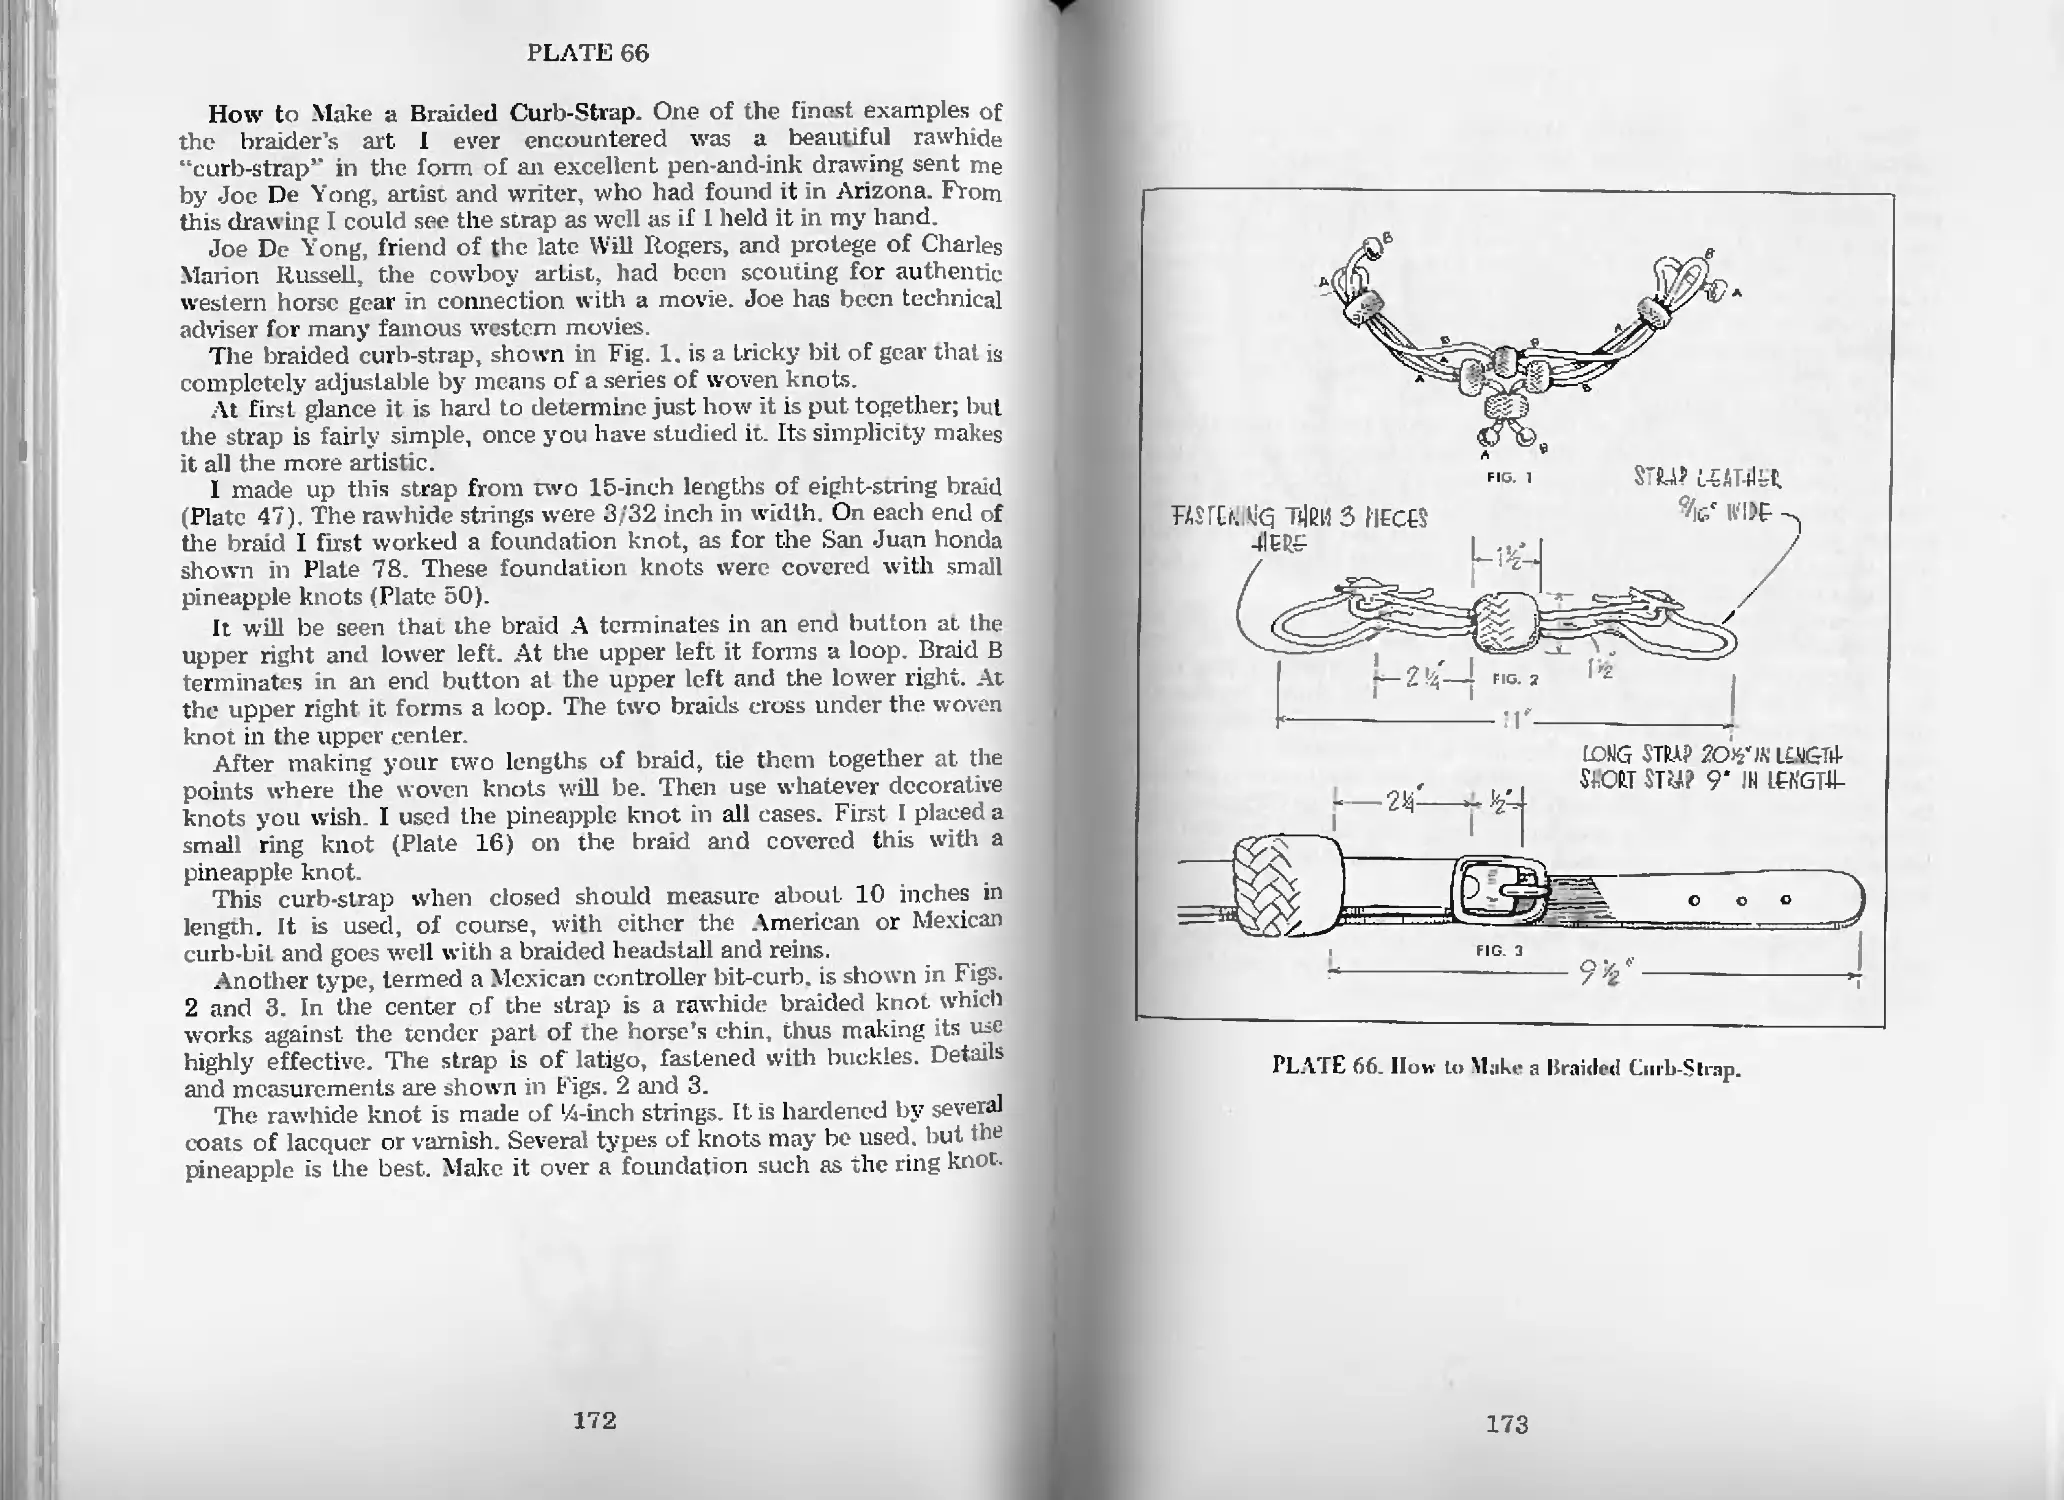
How to Make a Braided Curb-Strap—Pl. 66 172
How to Make a Running Martingale—Pl. 67 174
How to Make a Standing Martingale—Pl. 67 174
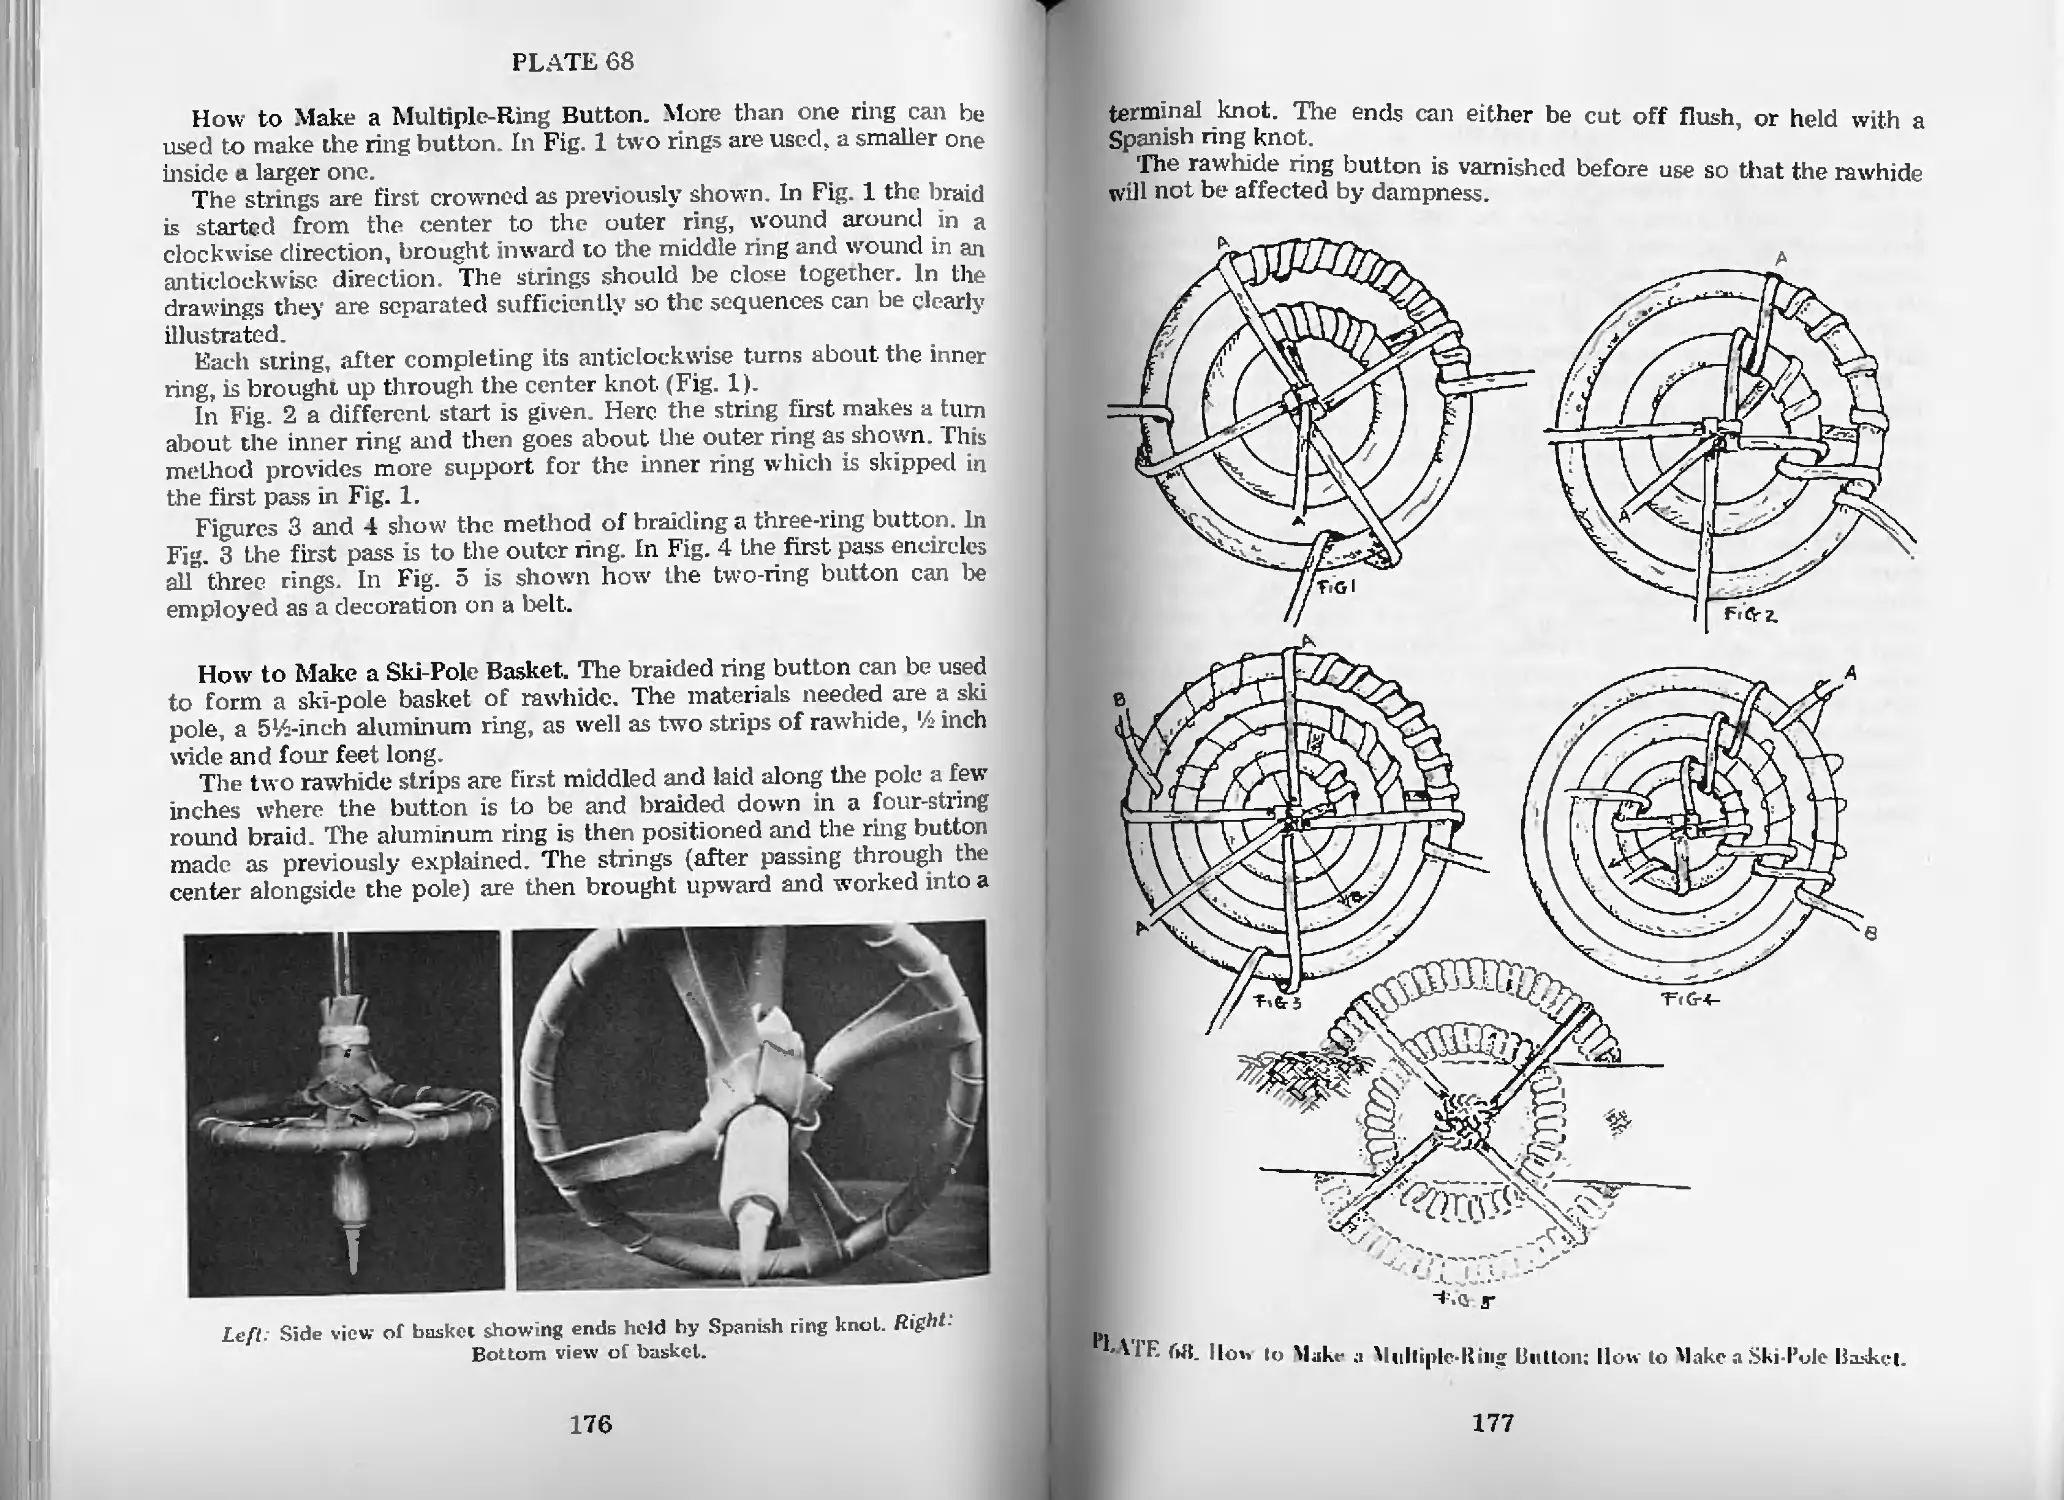
How to Make a Multiple-Ring Button—Pl. 68 176
How to Make a Ski-Pole Basket—Pl. 68 176
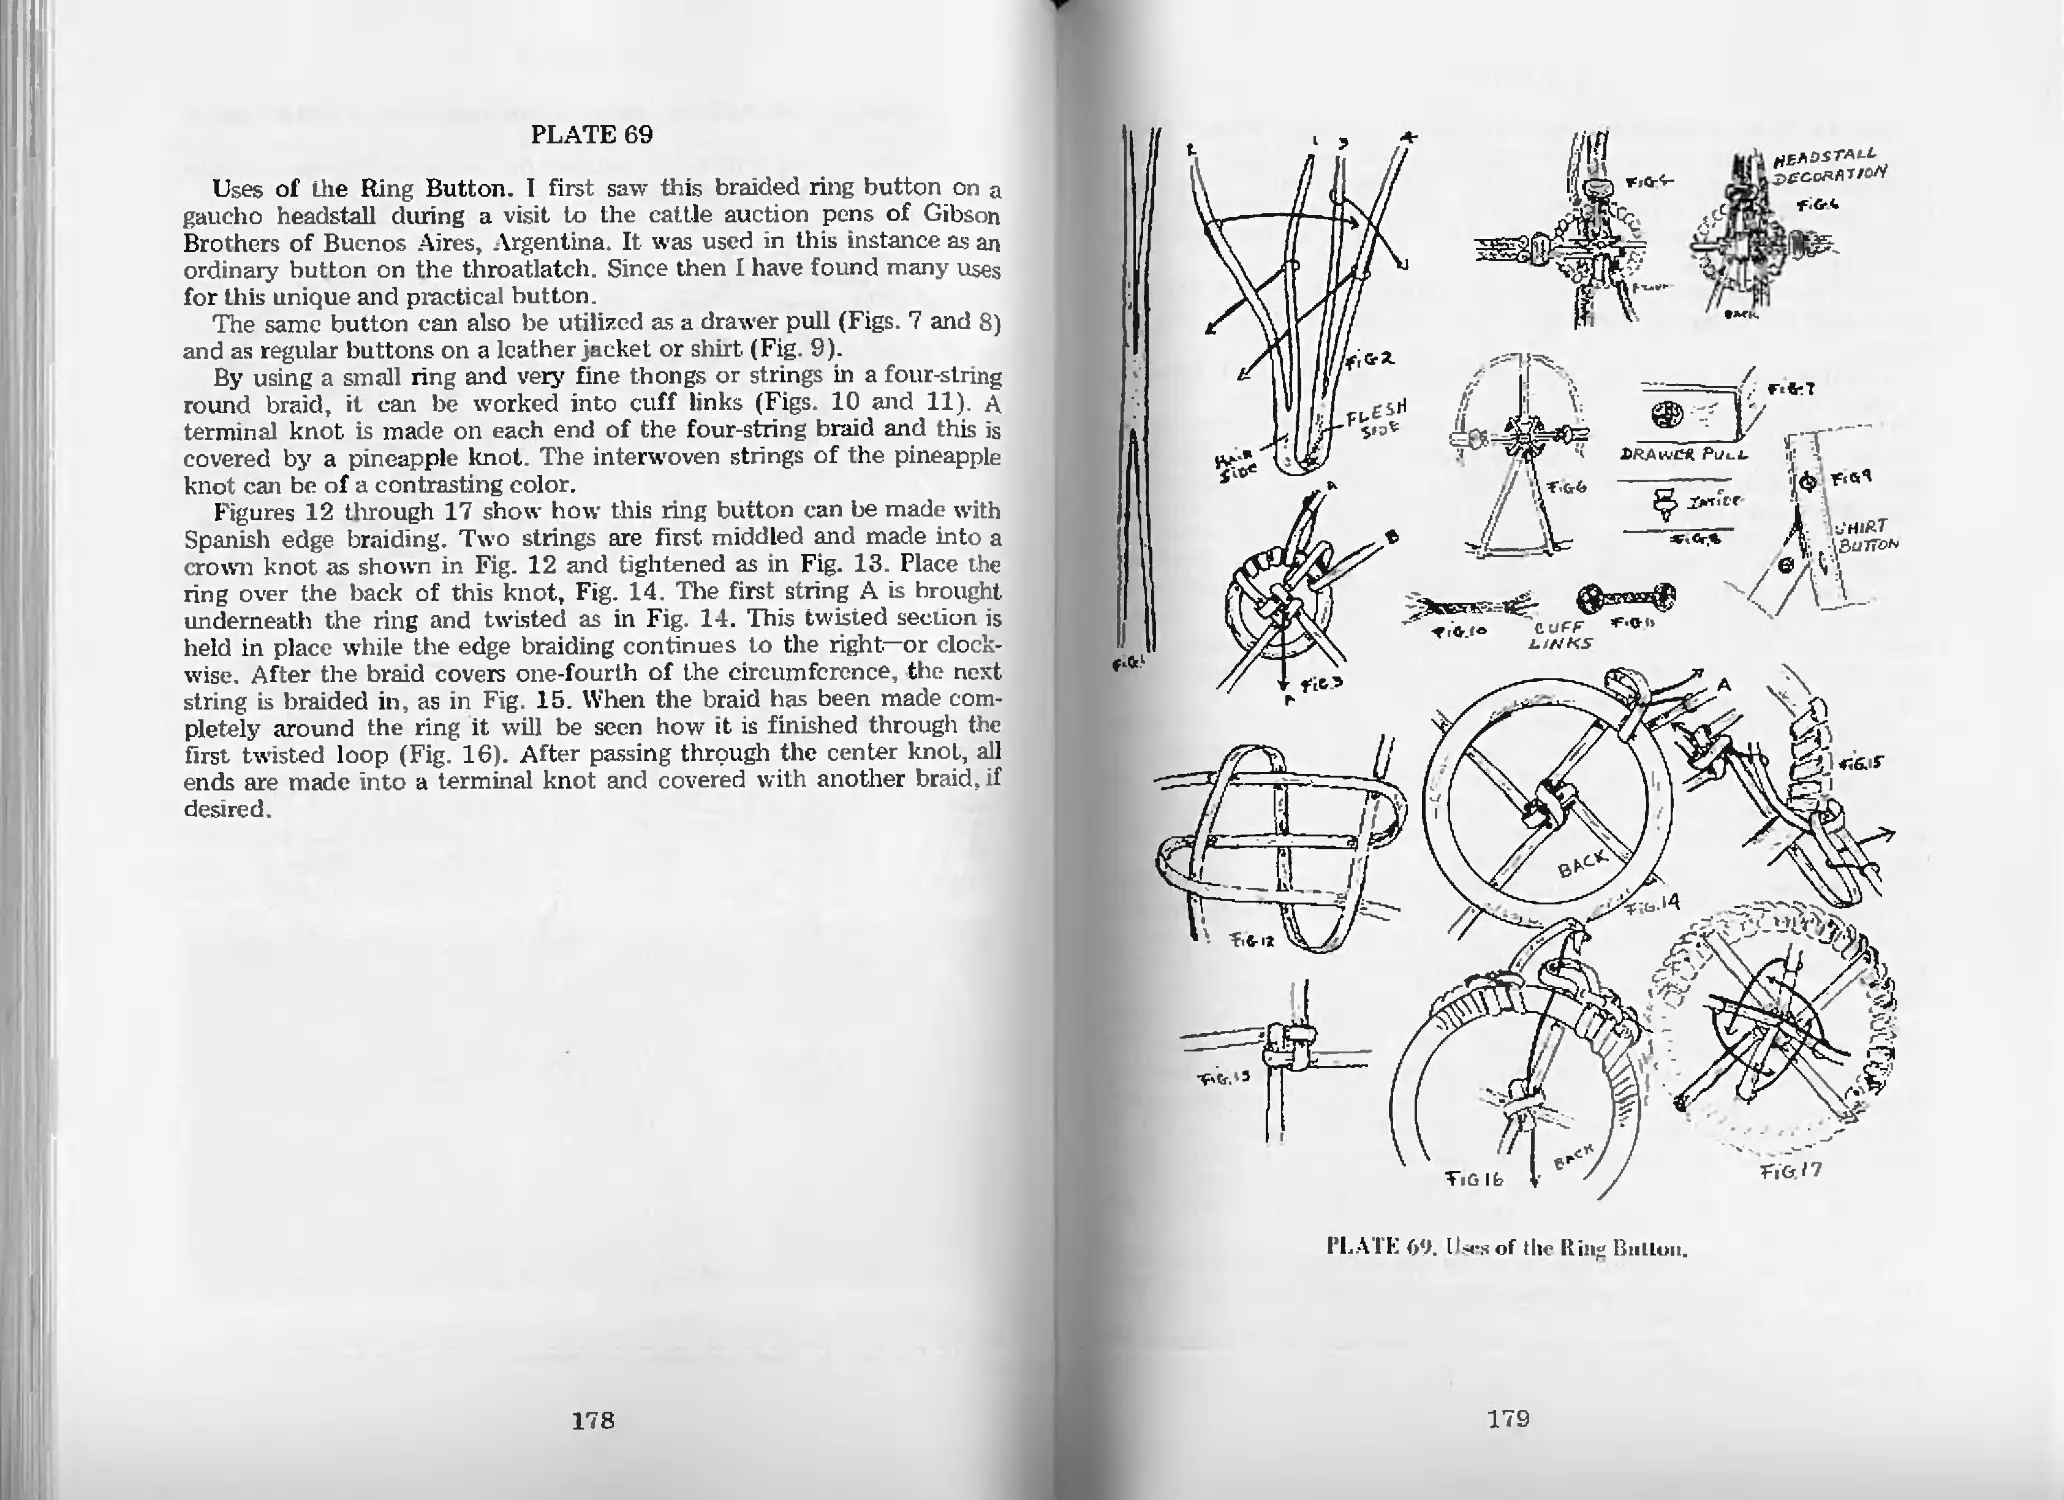
Uses of the Ring Button—Pl. 69 178
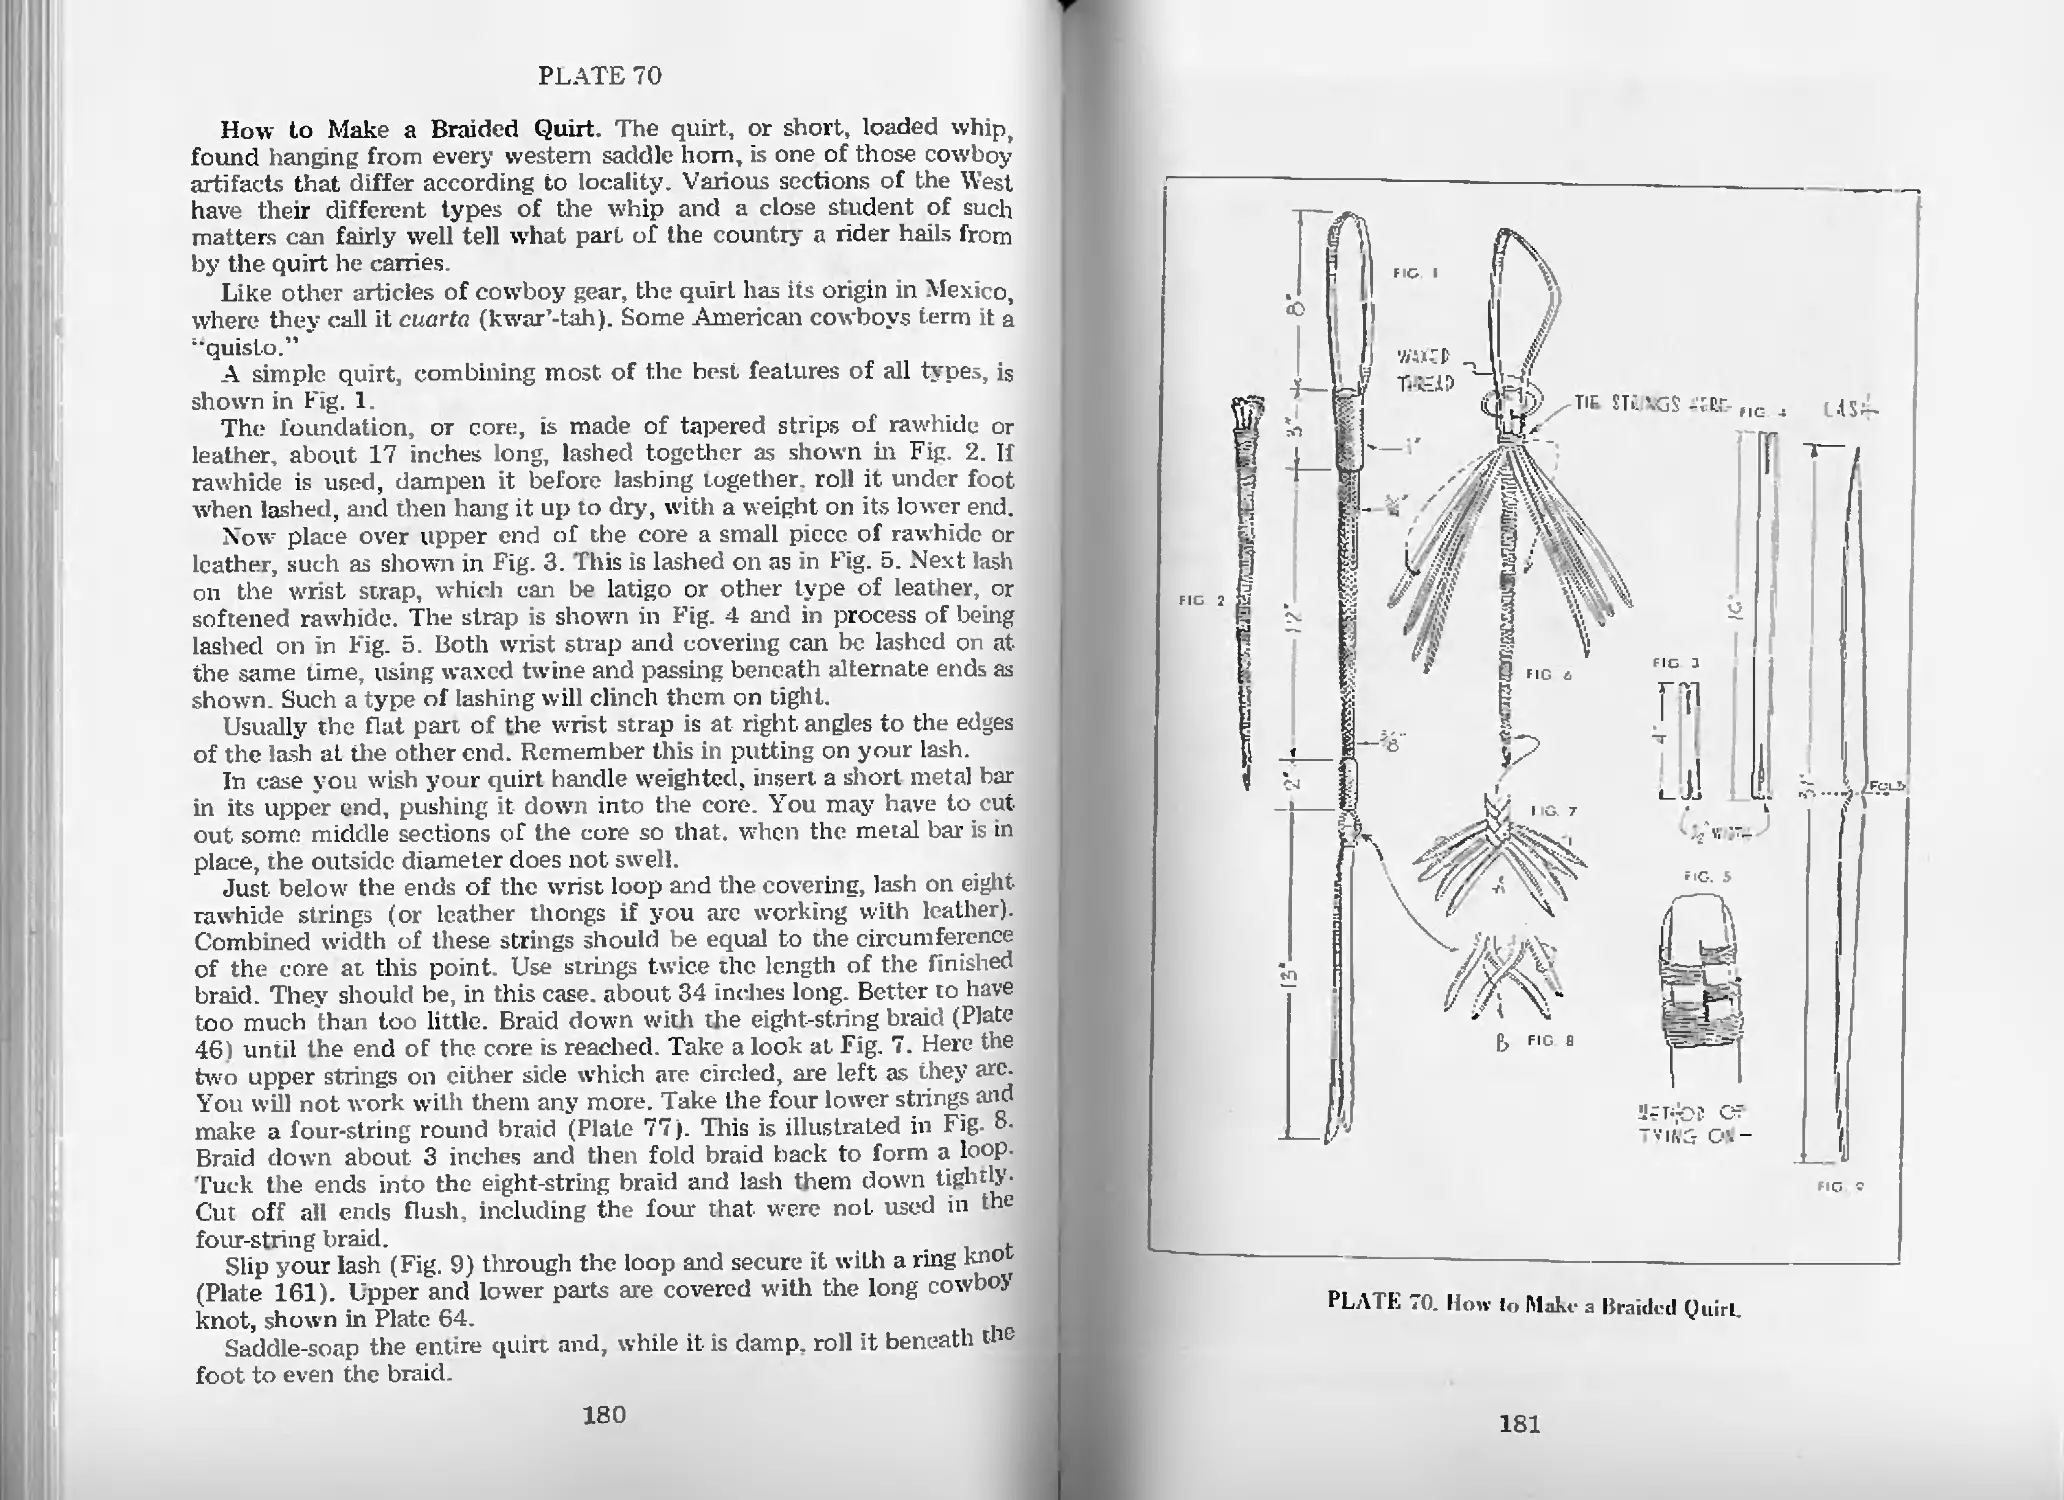
How to Make a Braided Quirt—Pl. 70 180
Another Braided Quirt—Pl. 71 184
How to Make a Mexican Quirt—Pl. 72 186
How to Make a Mexican Quirt (Cont.)—Pl. 73 188
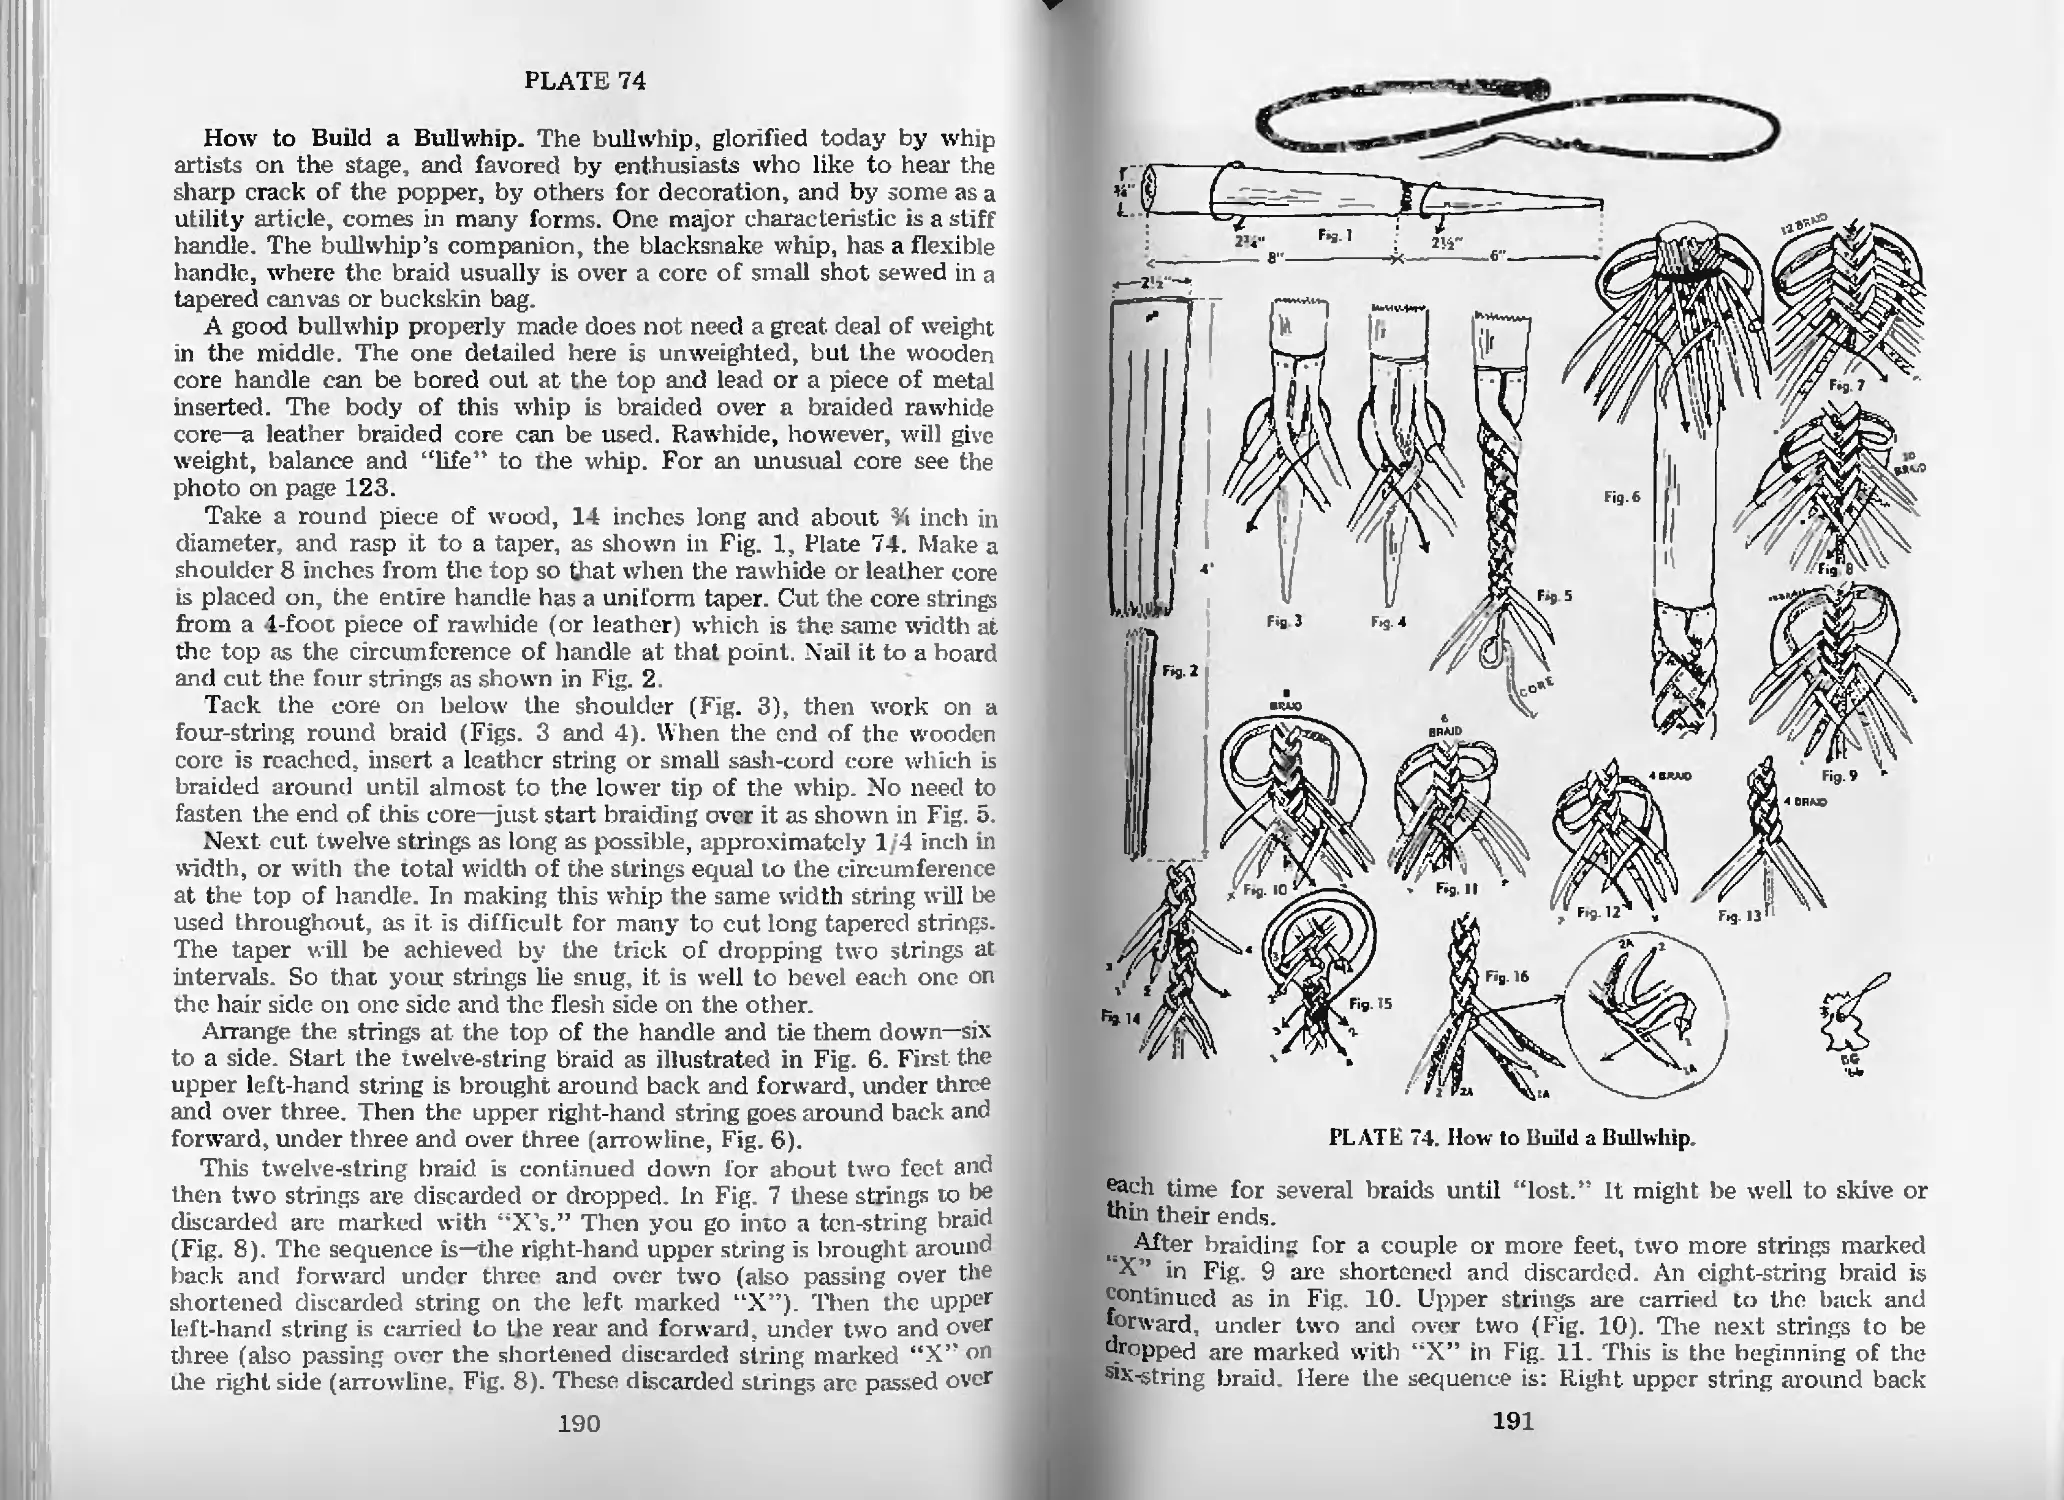
How to Build a Bullwhip—PL 74 190
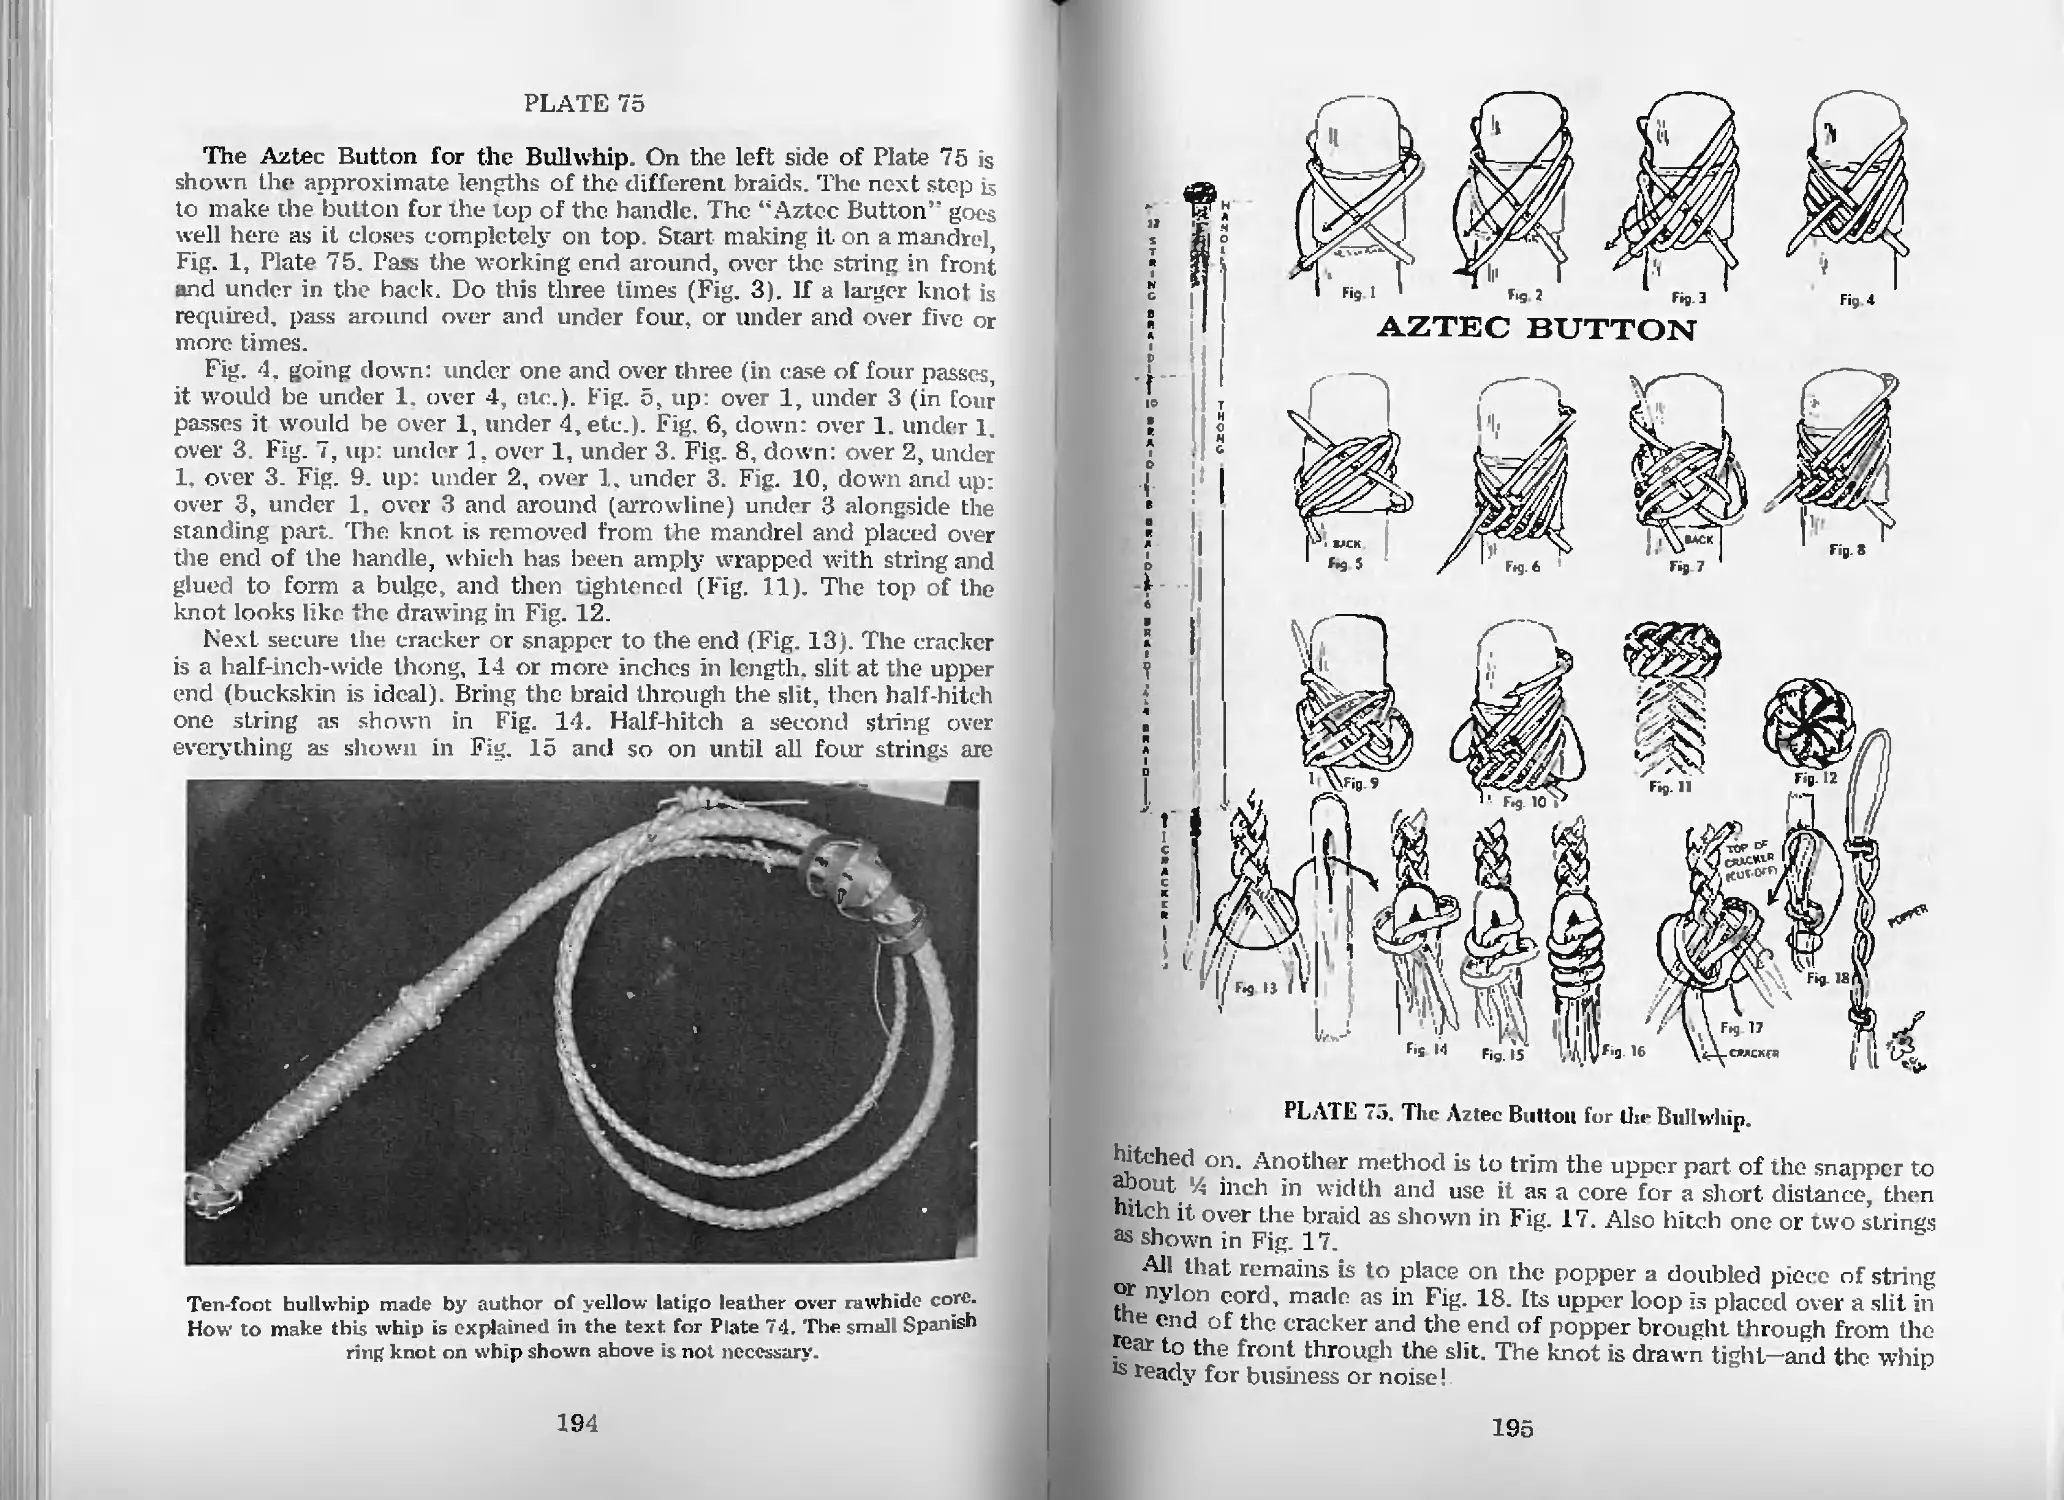
The Aztec Button for the Bullwhip—Pl. 75 194
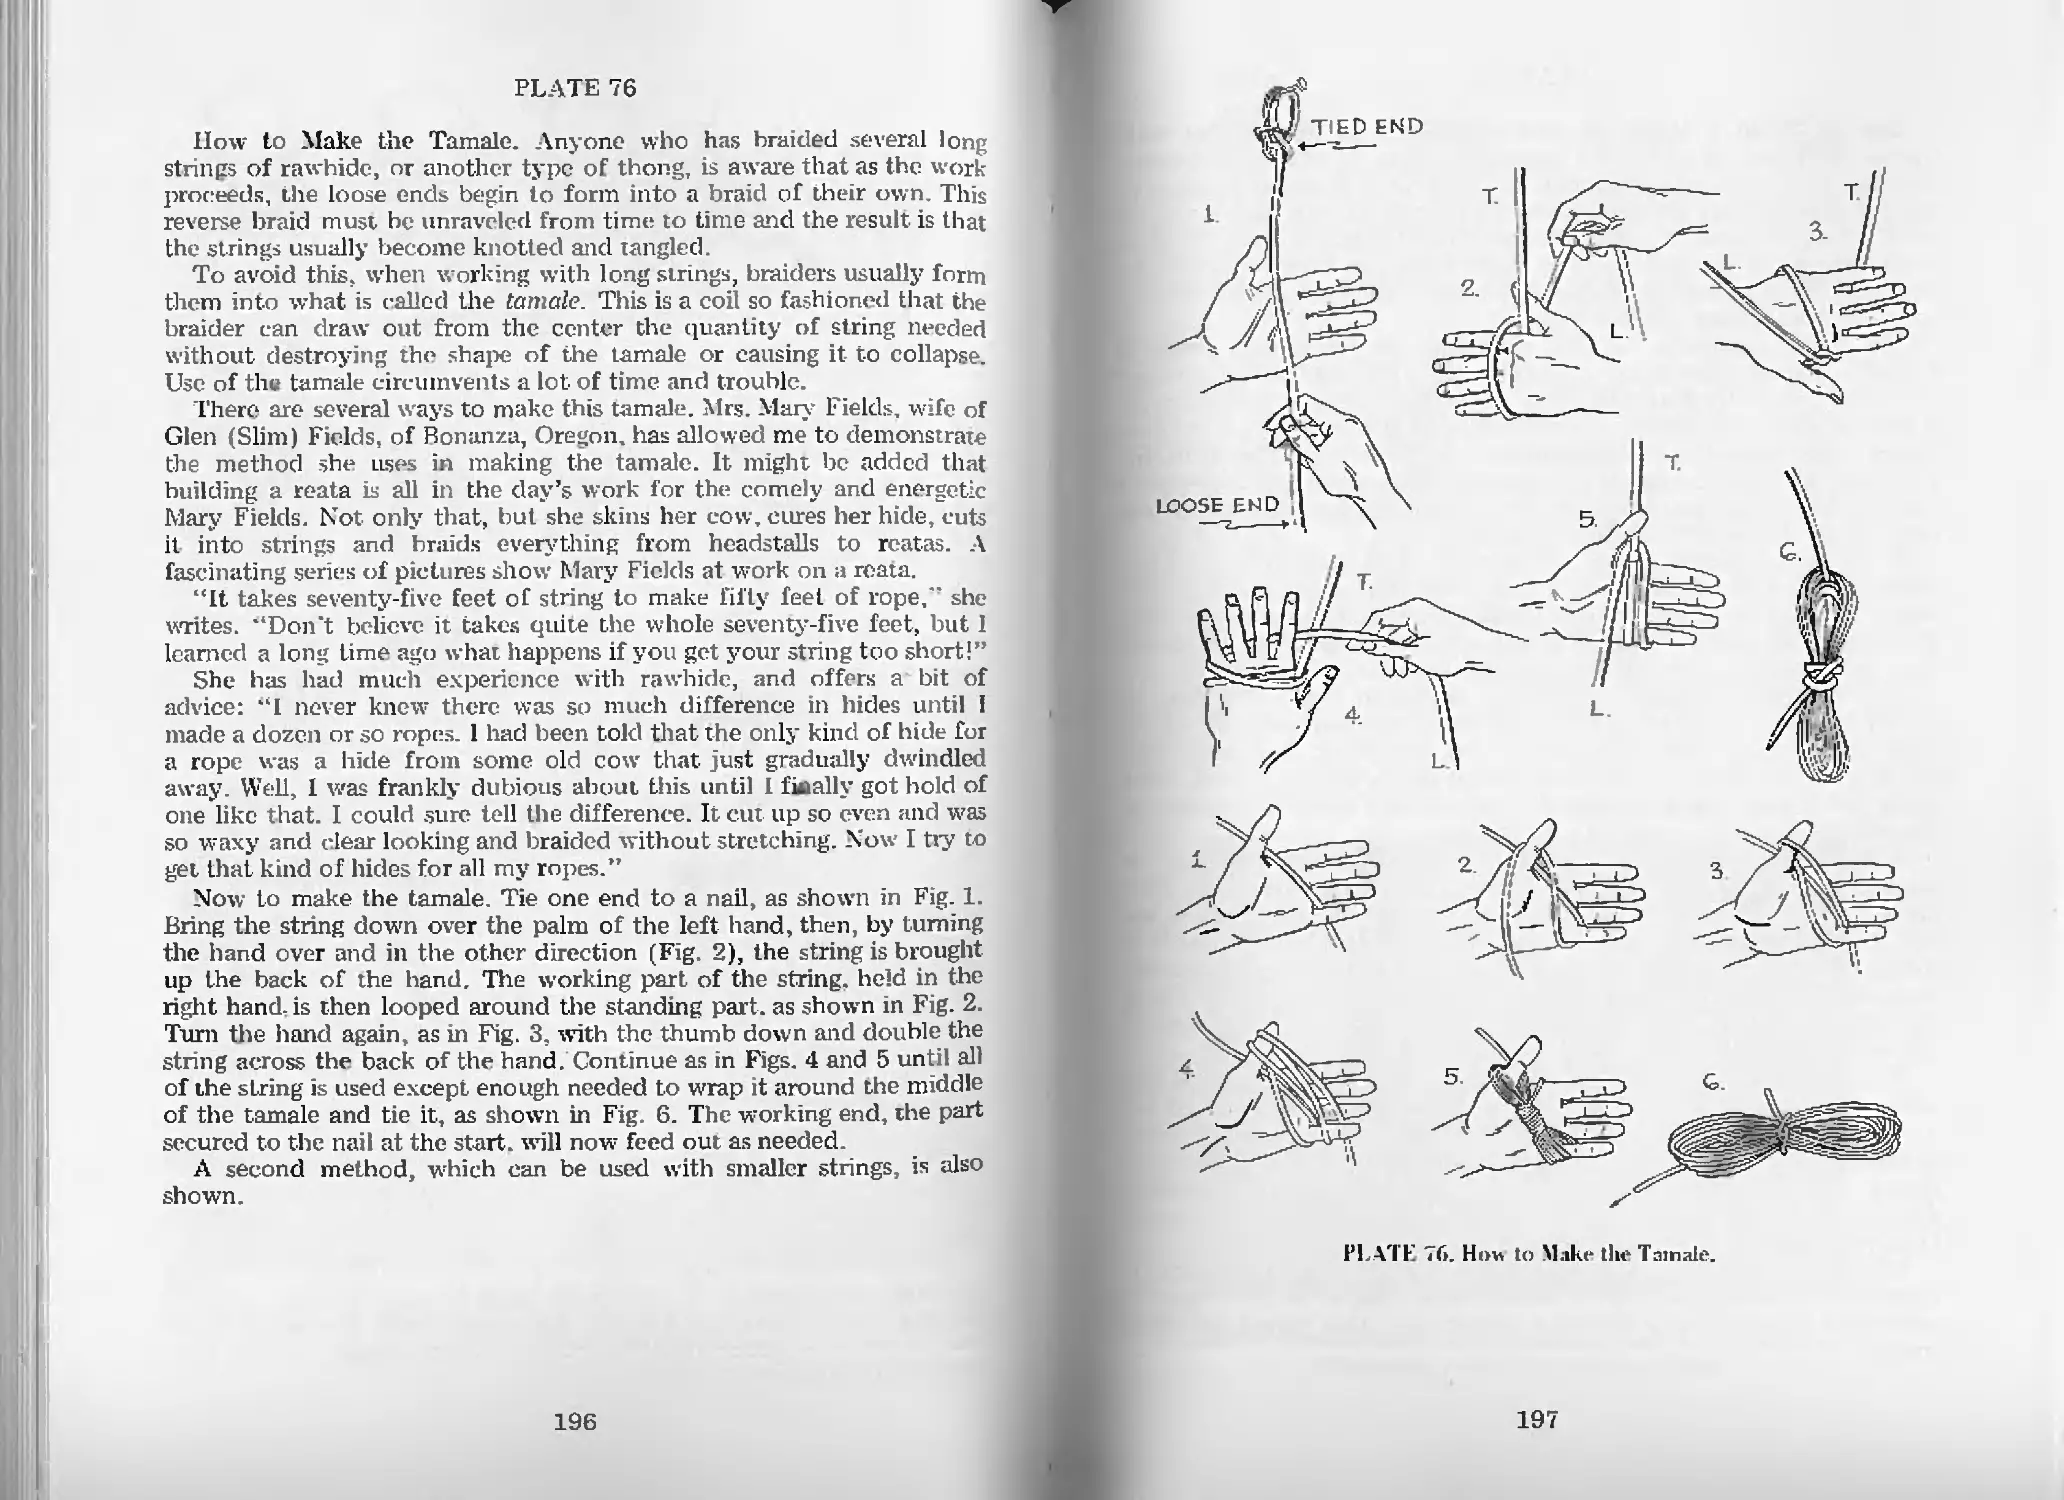
How to Make the Tamale—Pl. 76 196
How to Build a Reata or Rawhide Rope—Pl. 77 198
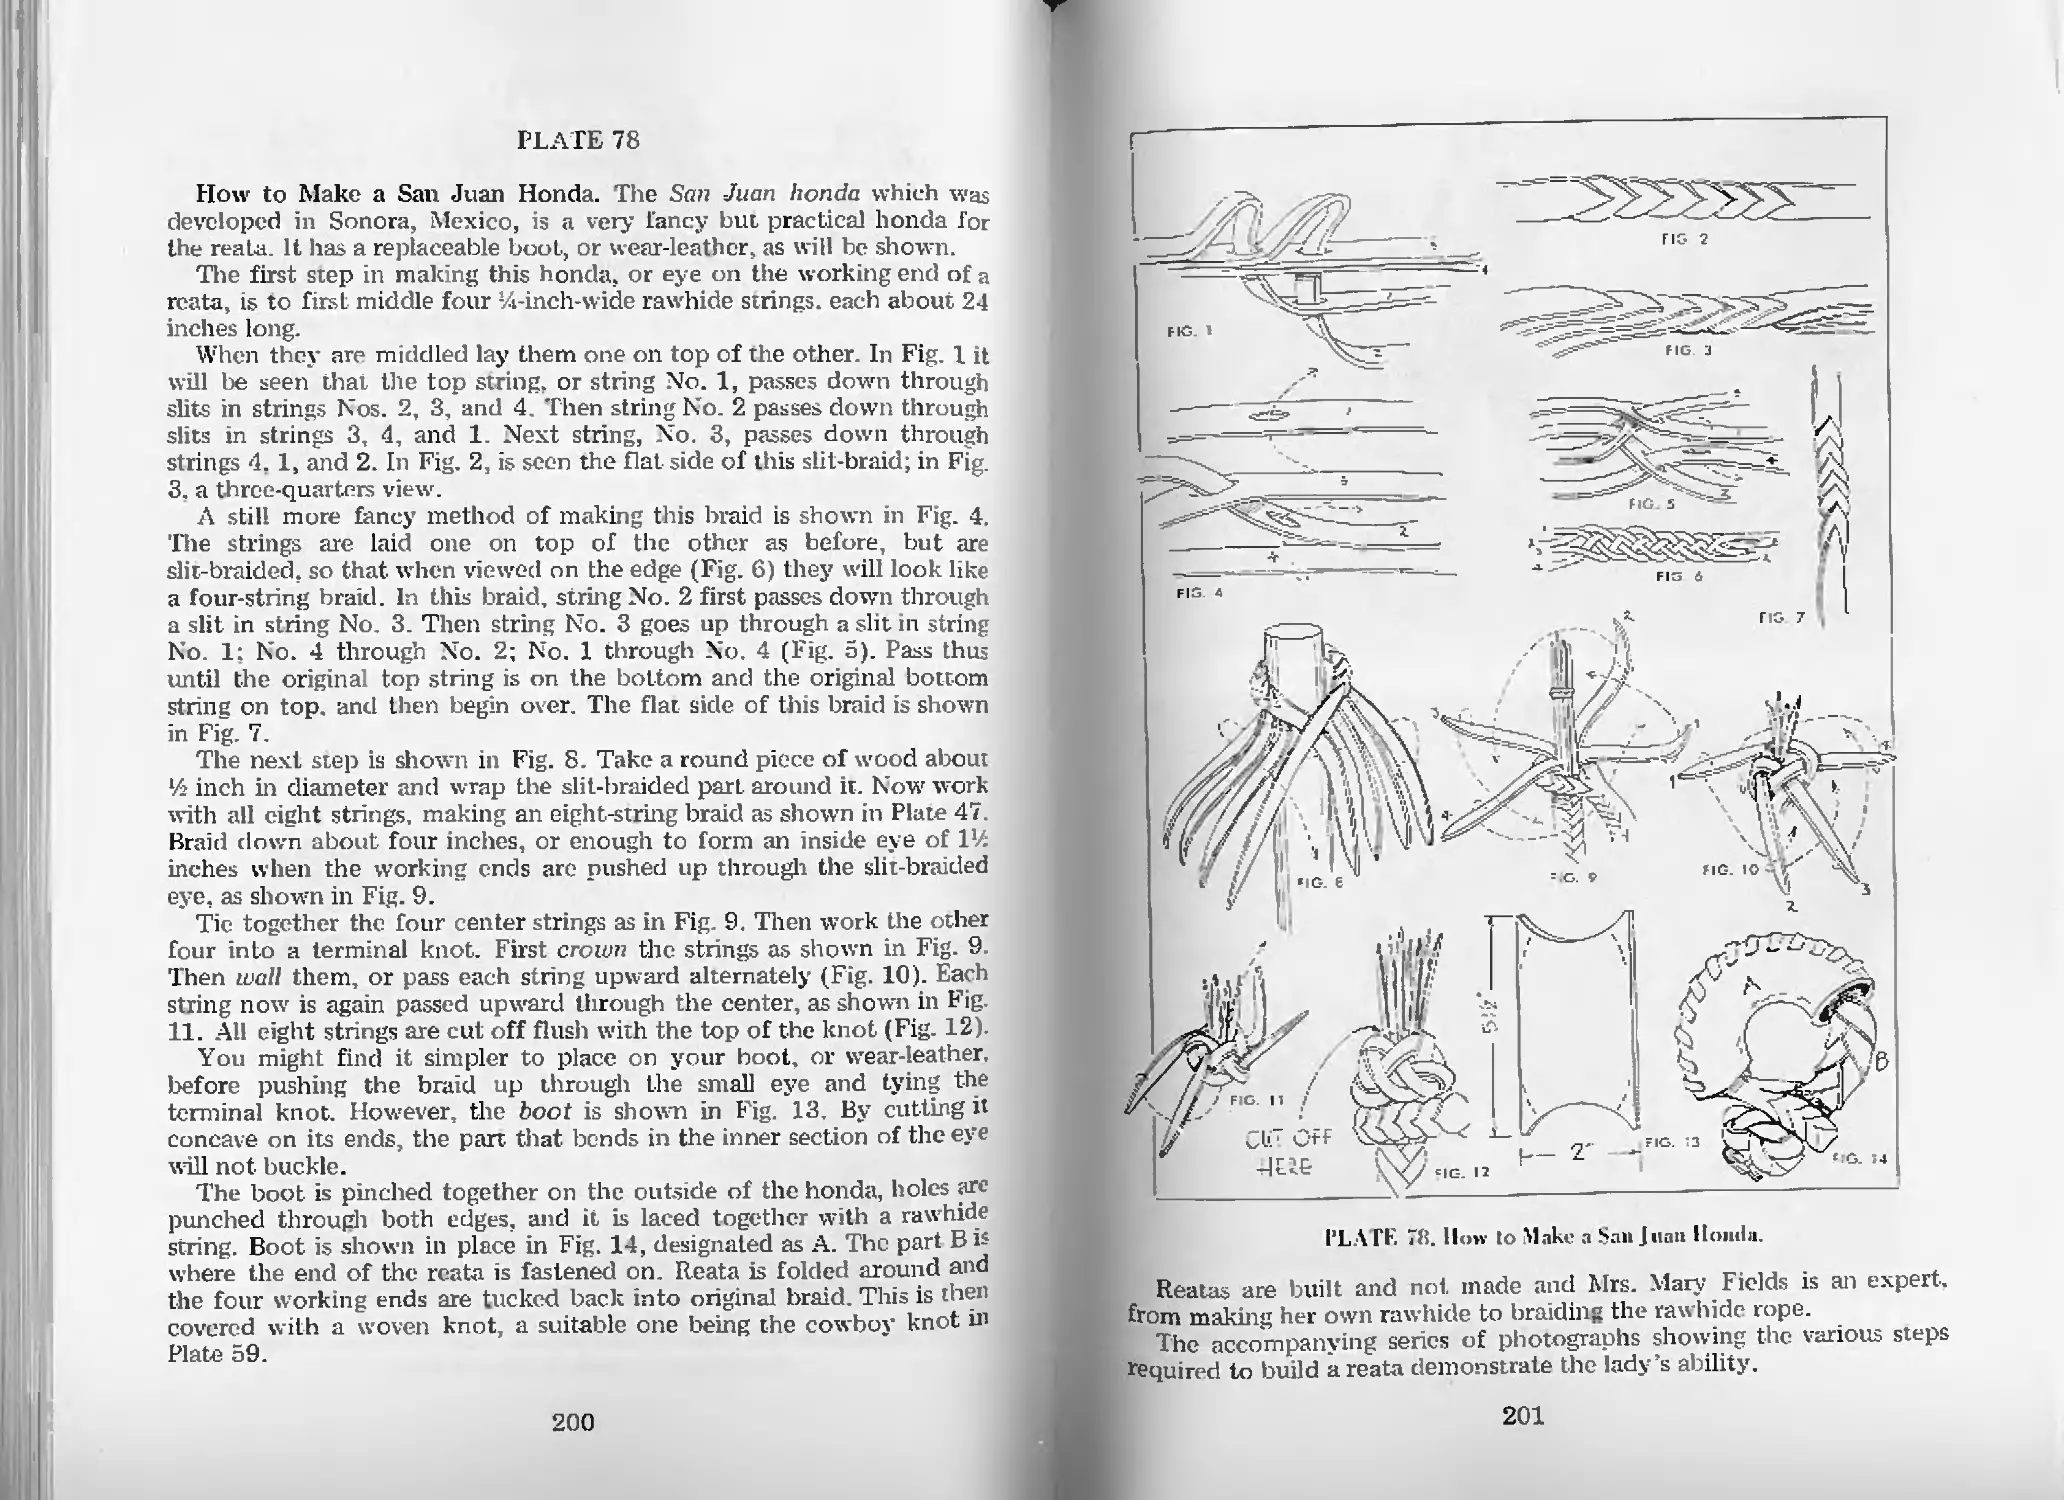
How to Make a San Juan Honda—Pl. 78 200
How to Tie the Reata to the Honda—Pl. 79 206
The Saddle-Horn Tie Knot—Pl. 80 208
How to Make a Mexican Swivel Honda—Pl. 81 210
How to Make a Mexican Swivel Honda (Cont.)—Pl. 82 212
How to Make a Second Type of
Mexican Swivel Honda—Pl. 83 214
How to Make a Third Type of
Mexican Swivel Honda—Pl. 84 216
How to Make a Braided Riding Crop—Pl. 85 218
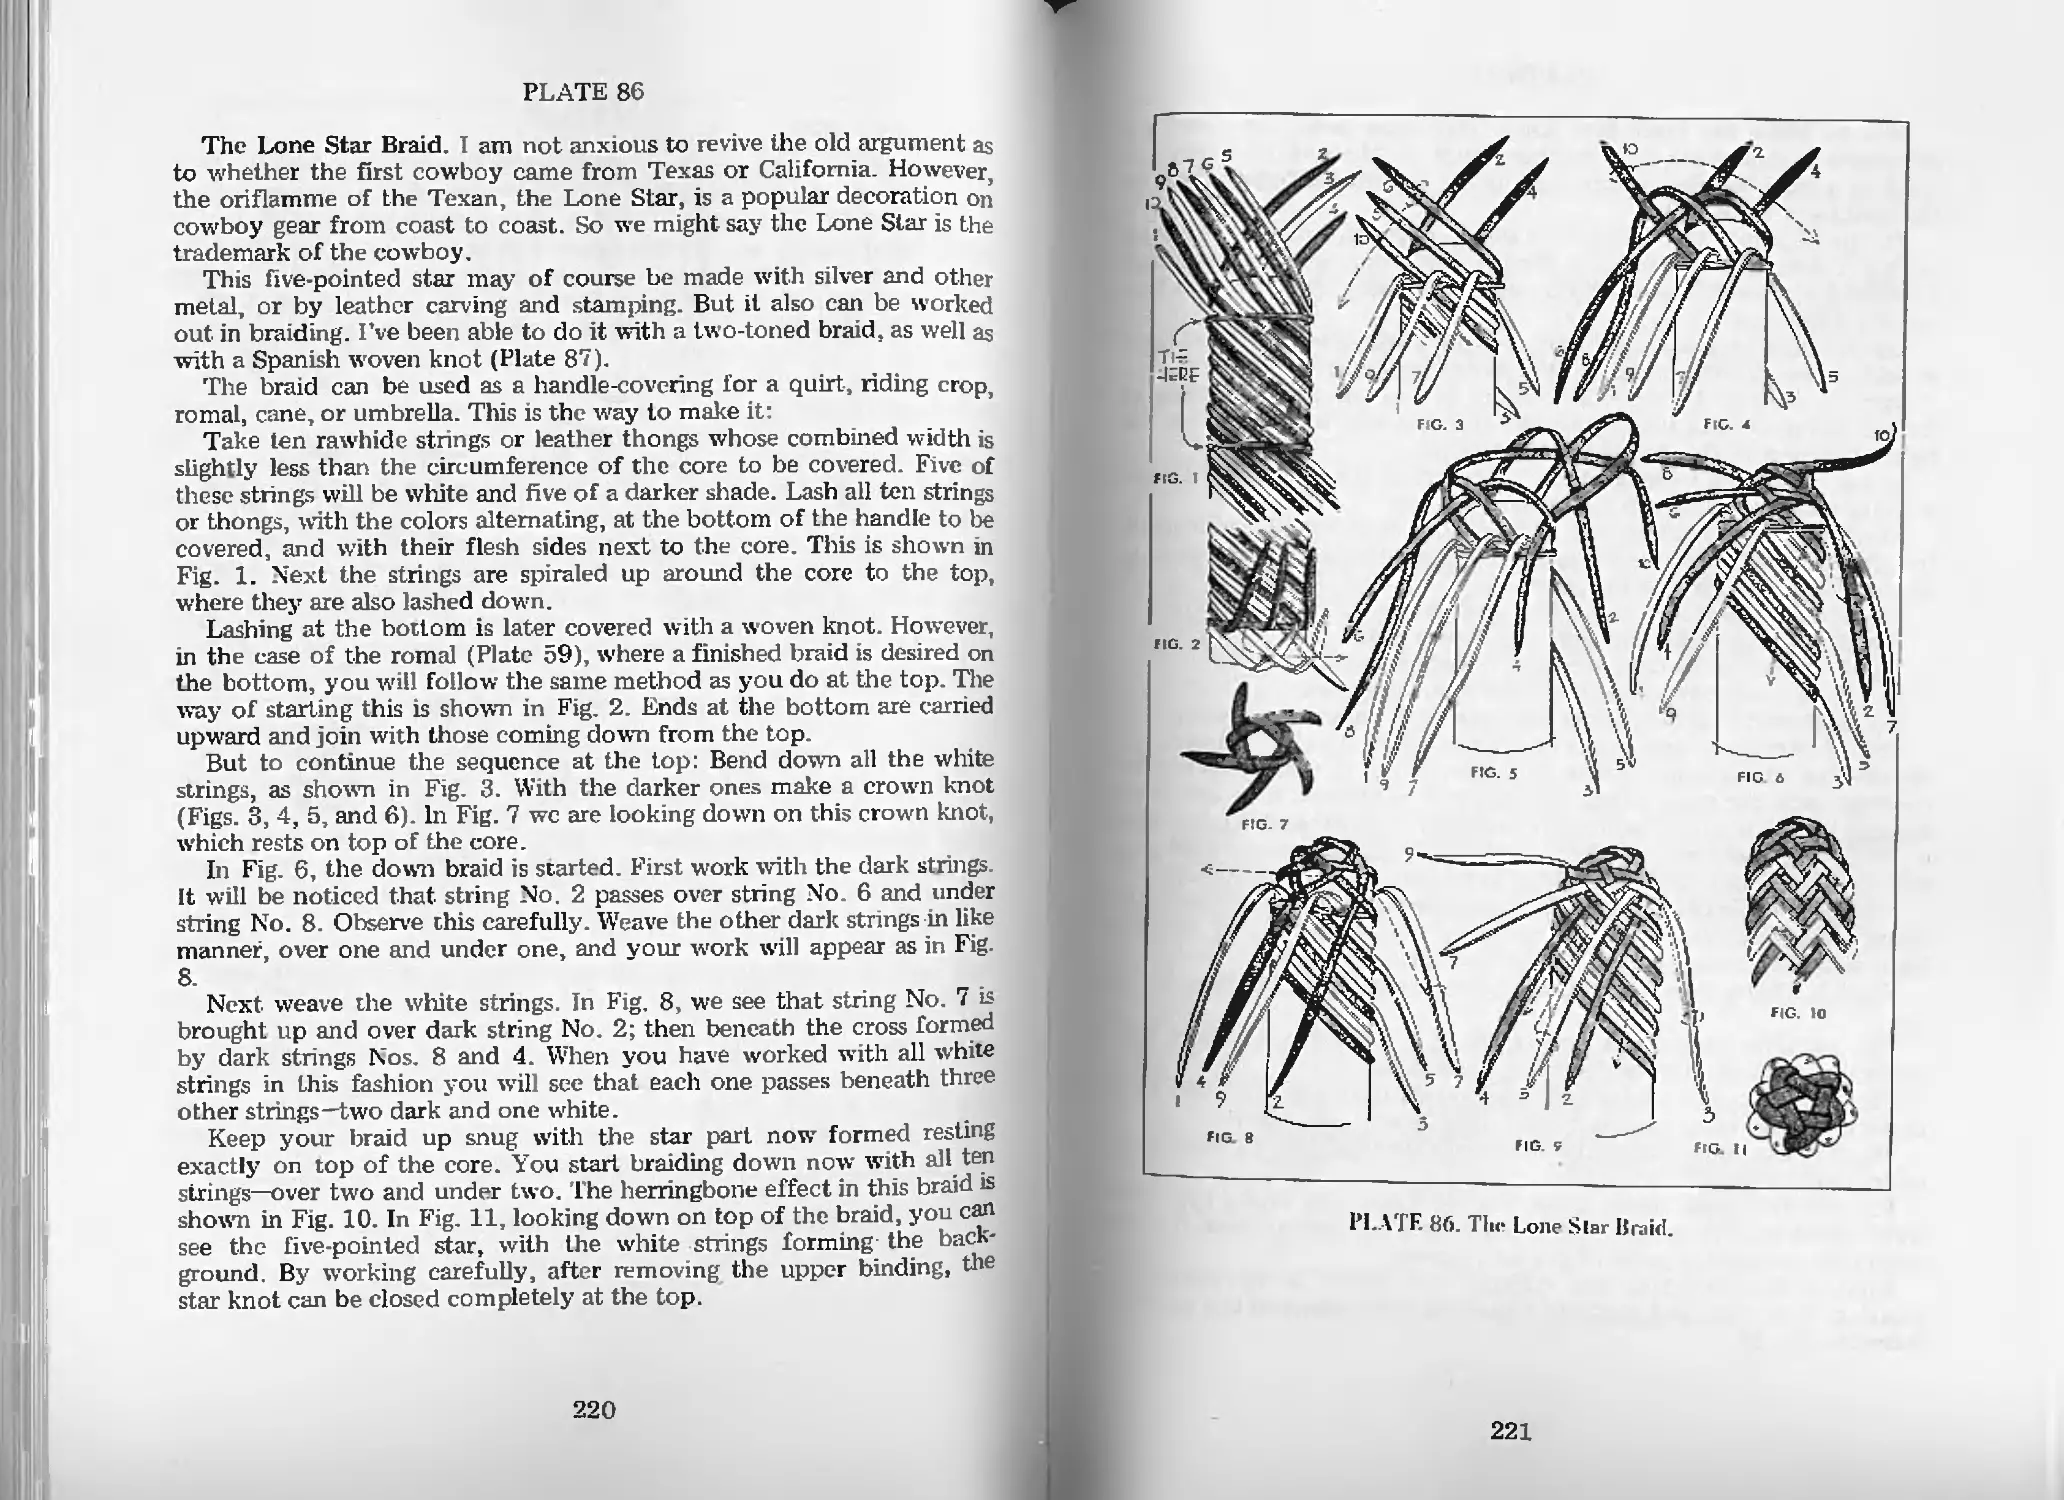
The Lone Star Braid—Pl. 86 220
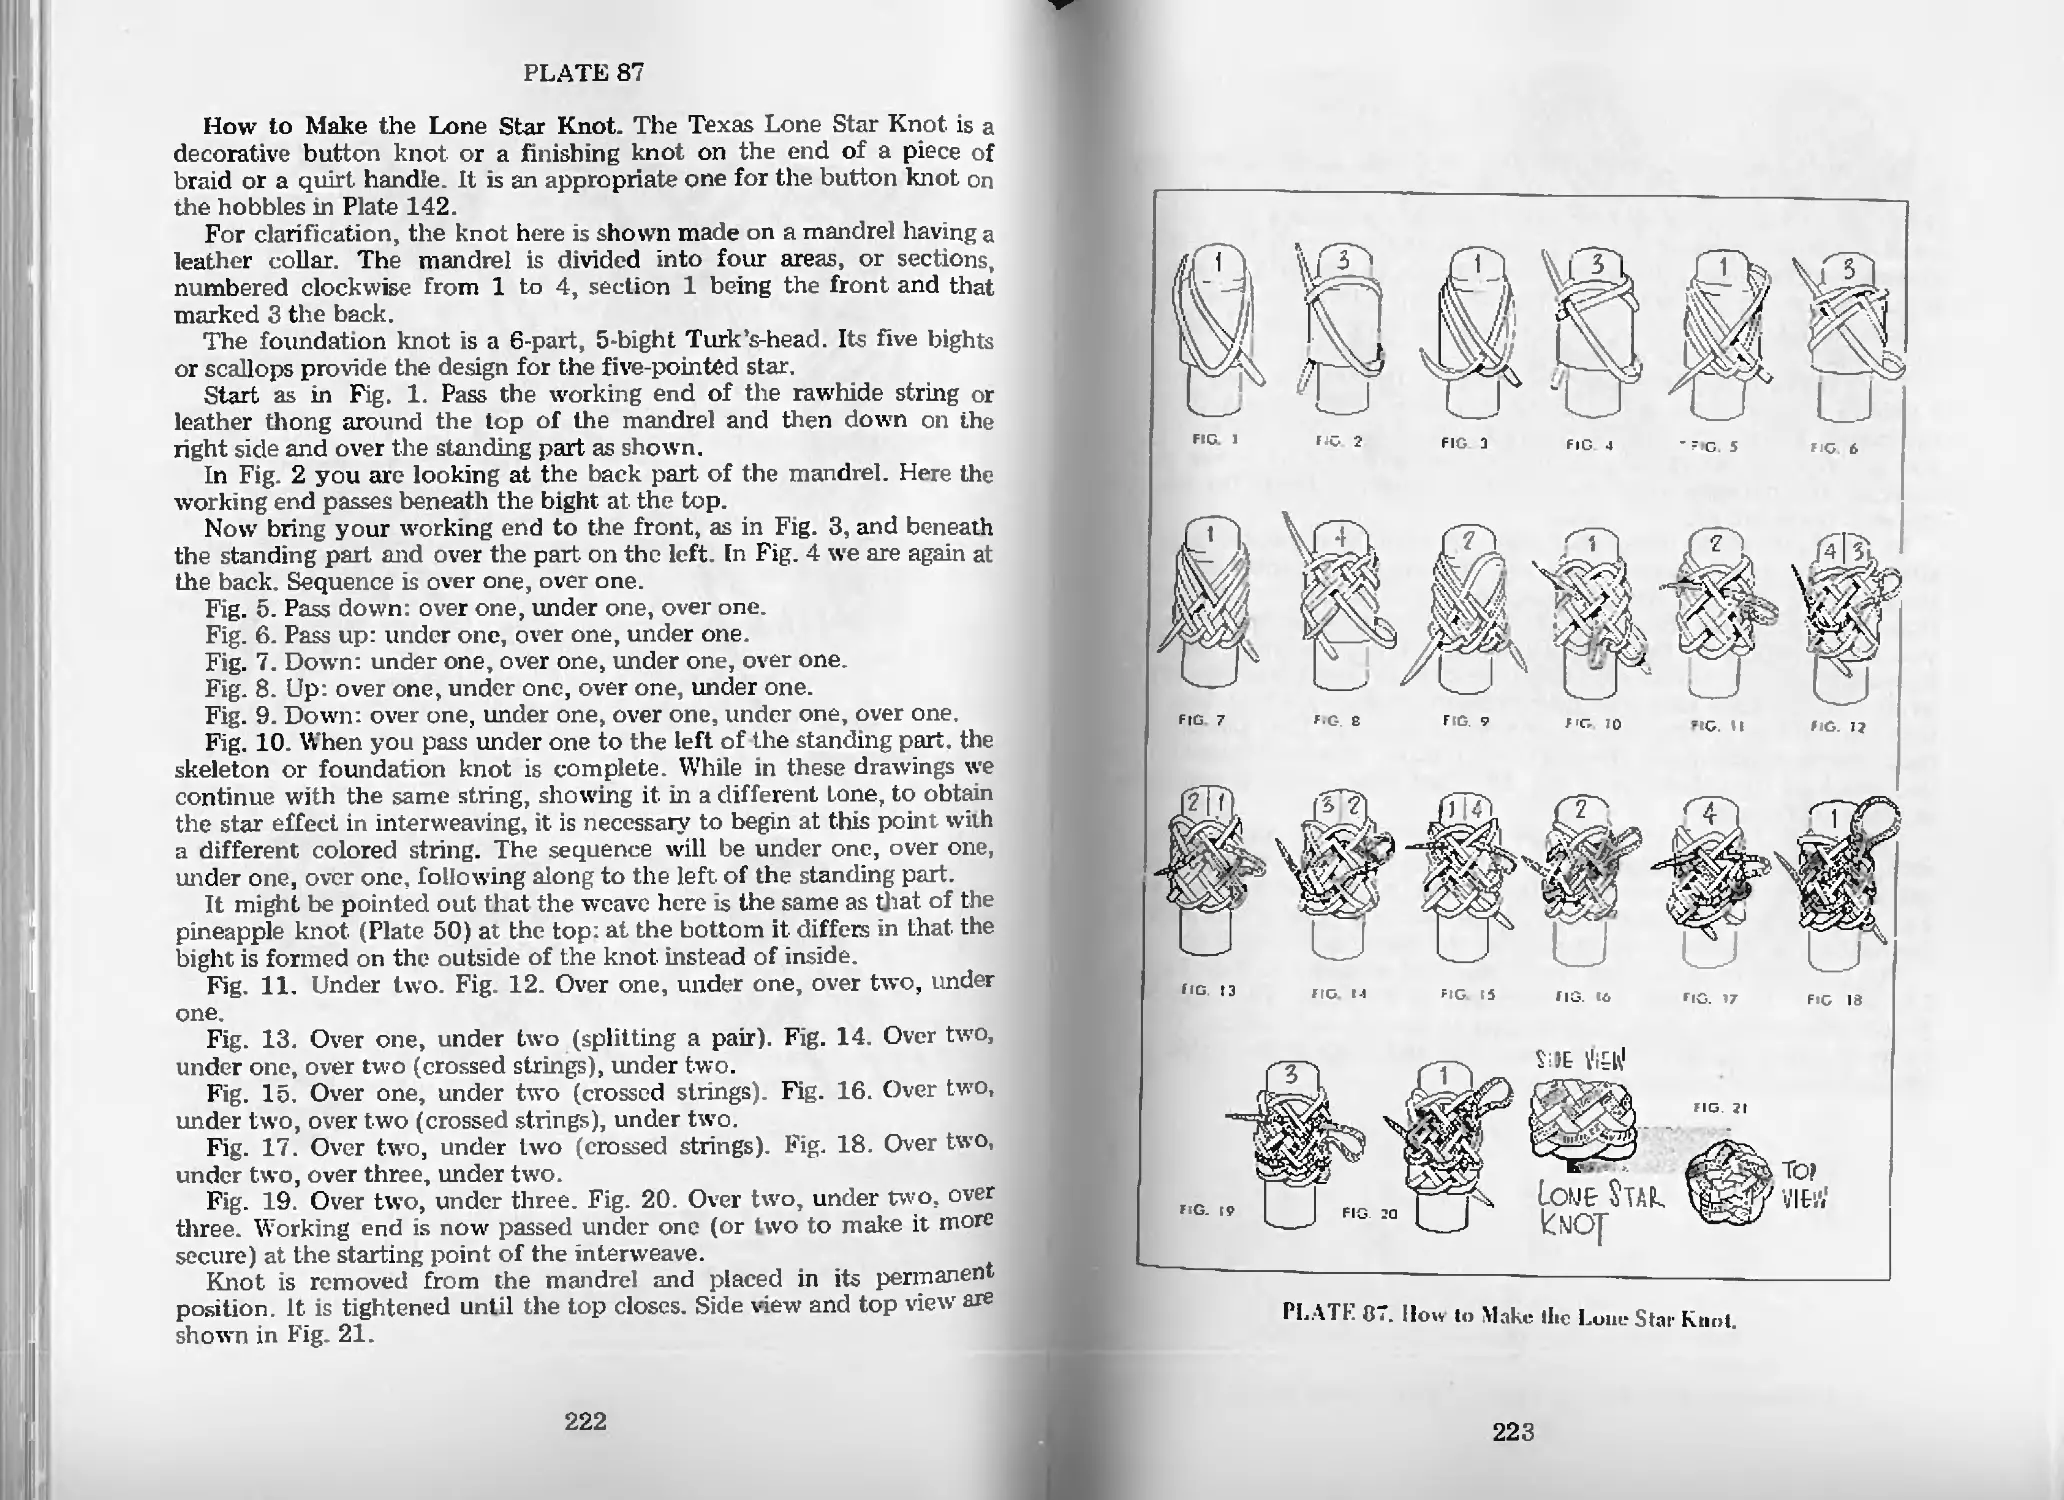
How to Make the Lone Star Knot—Pl. 87 222
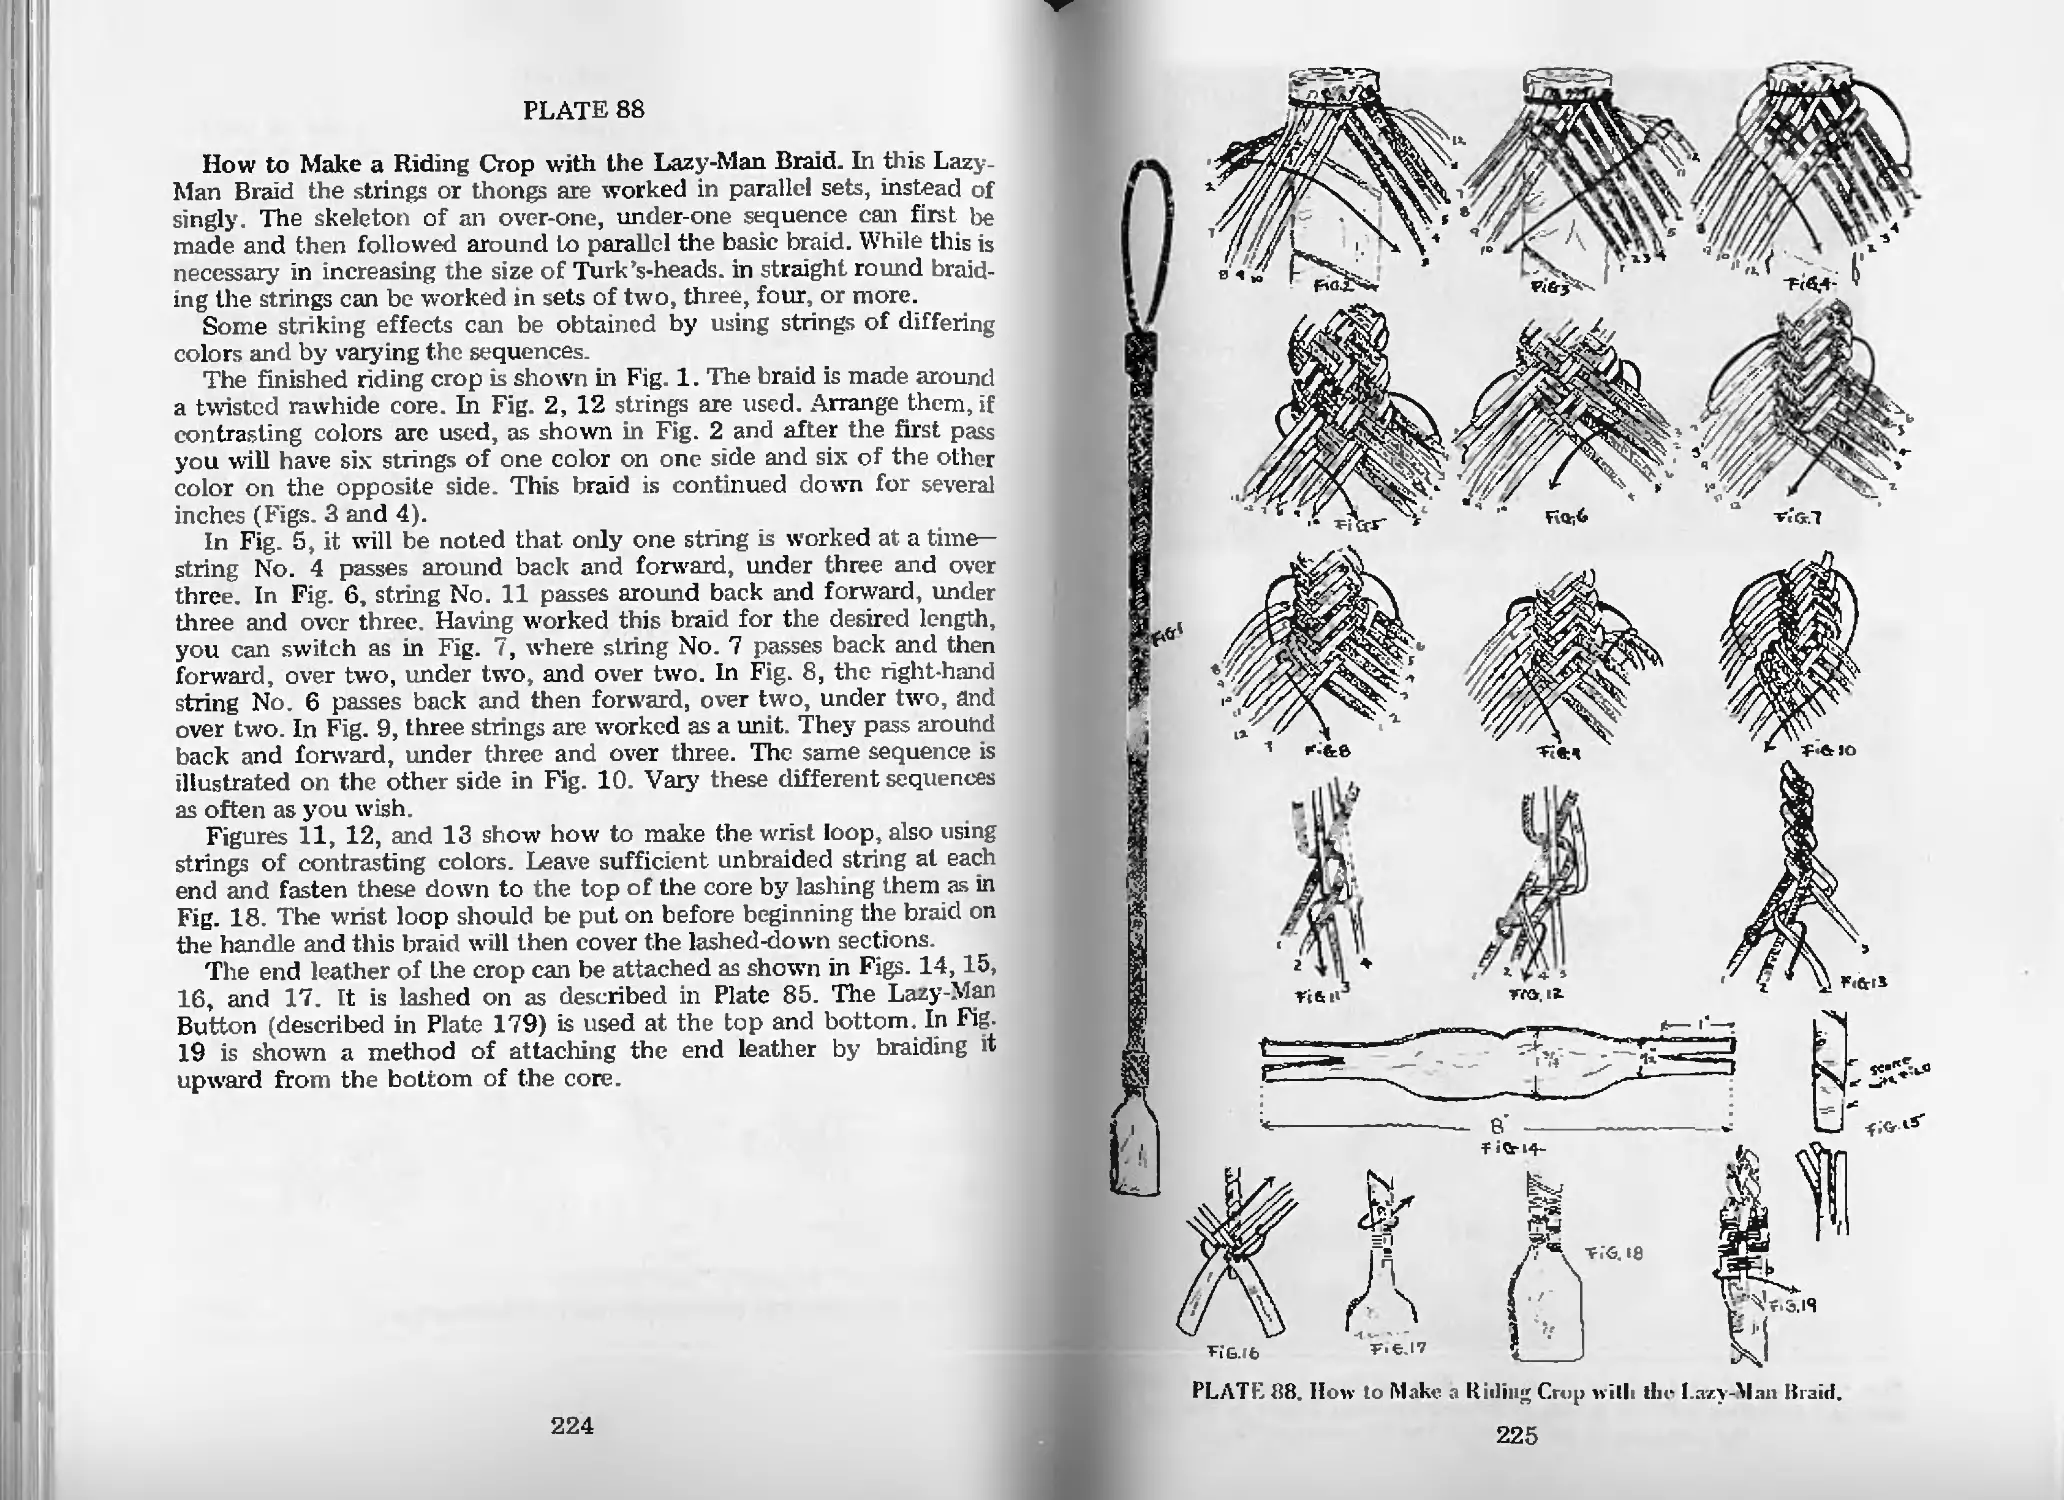
How to Make a Riding Crop with the
Lazy-Man Braid—Pl. 88 224
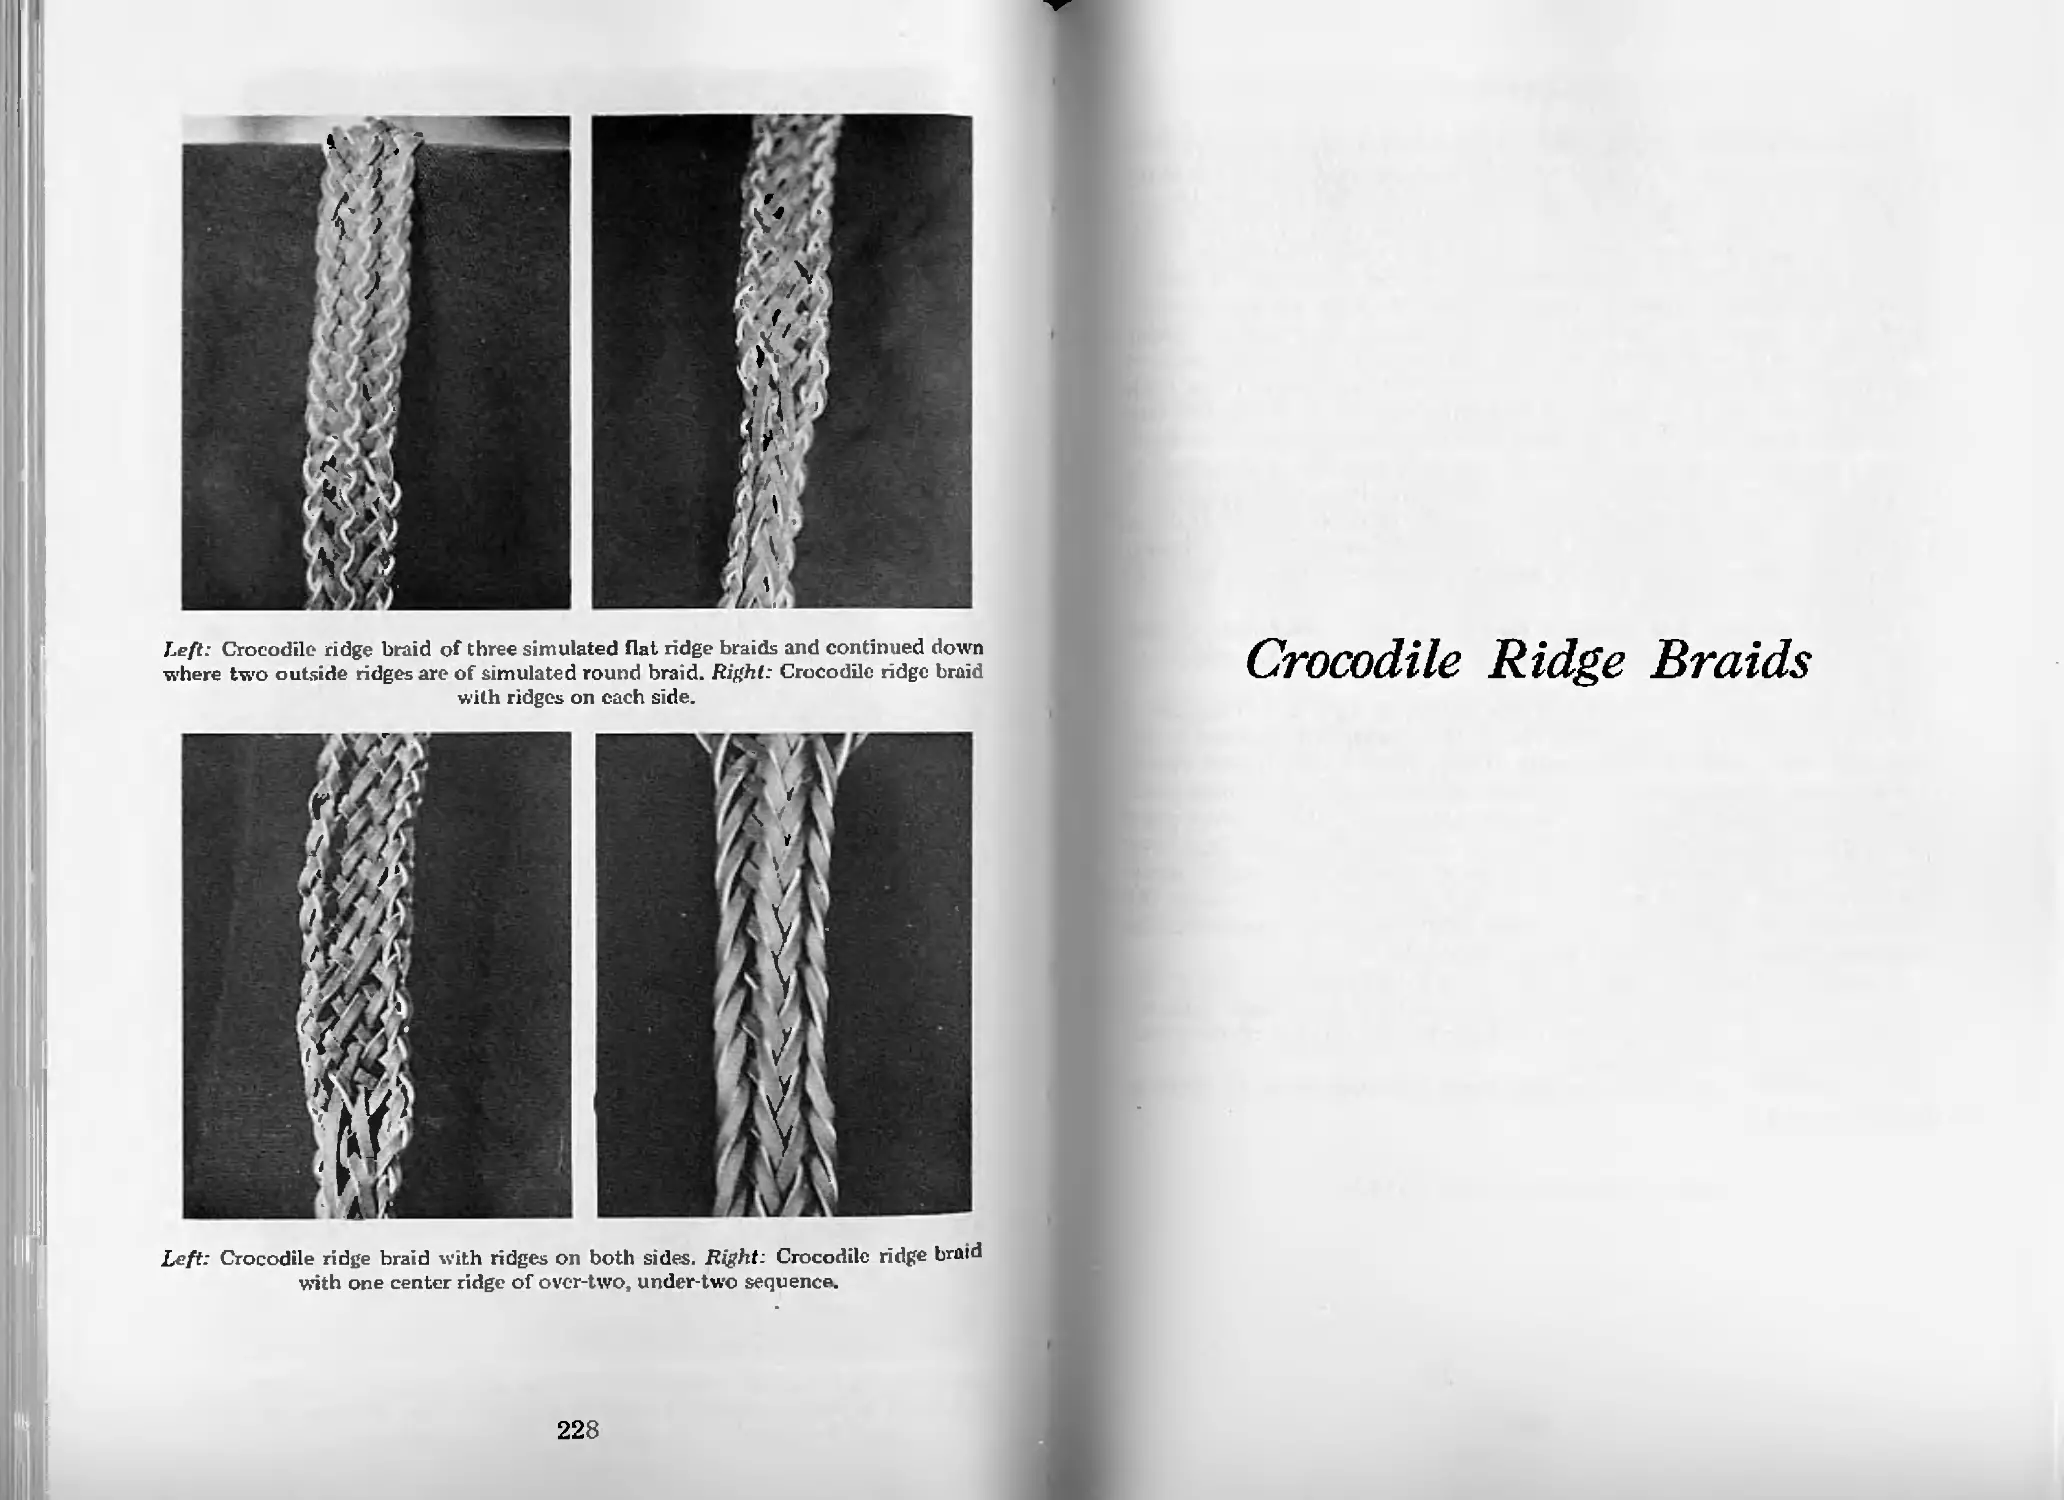
Crocodile Ridge Braids
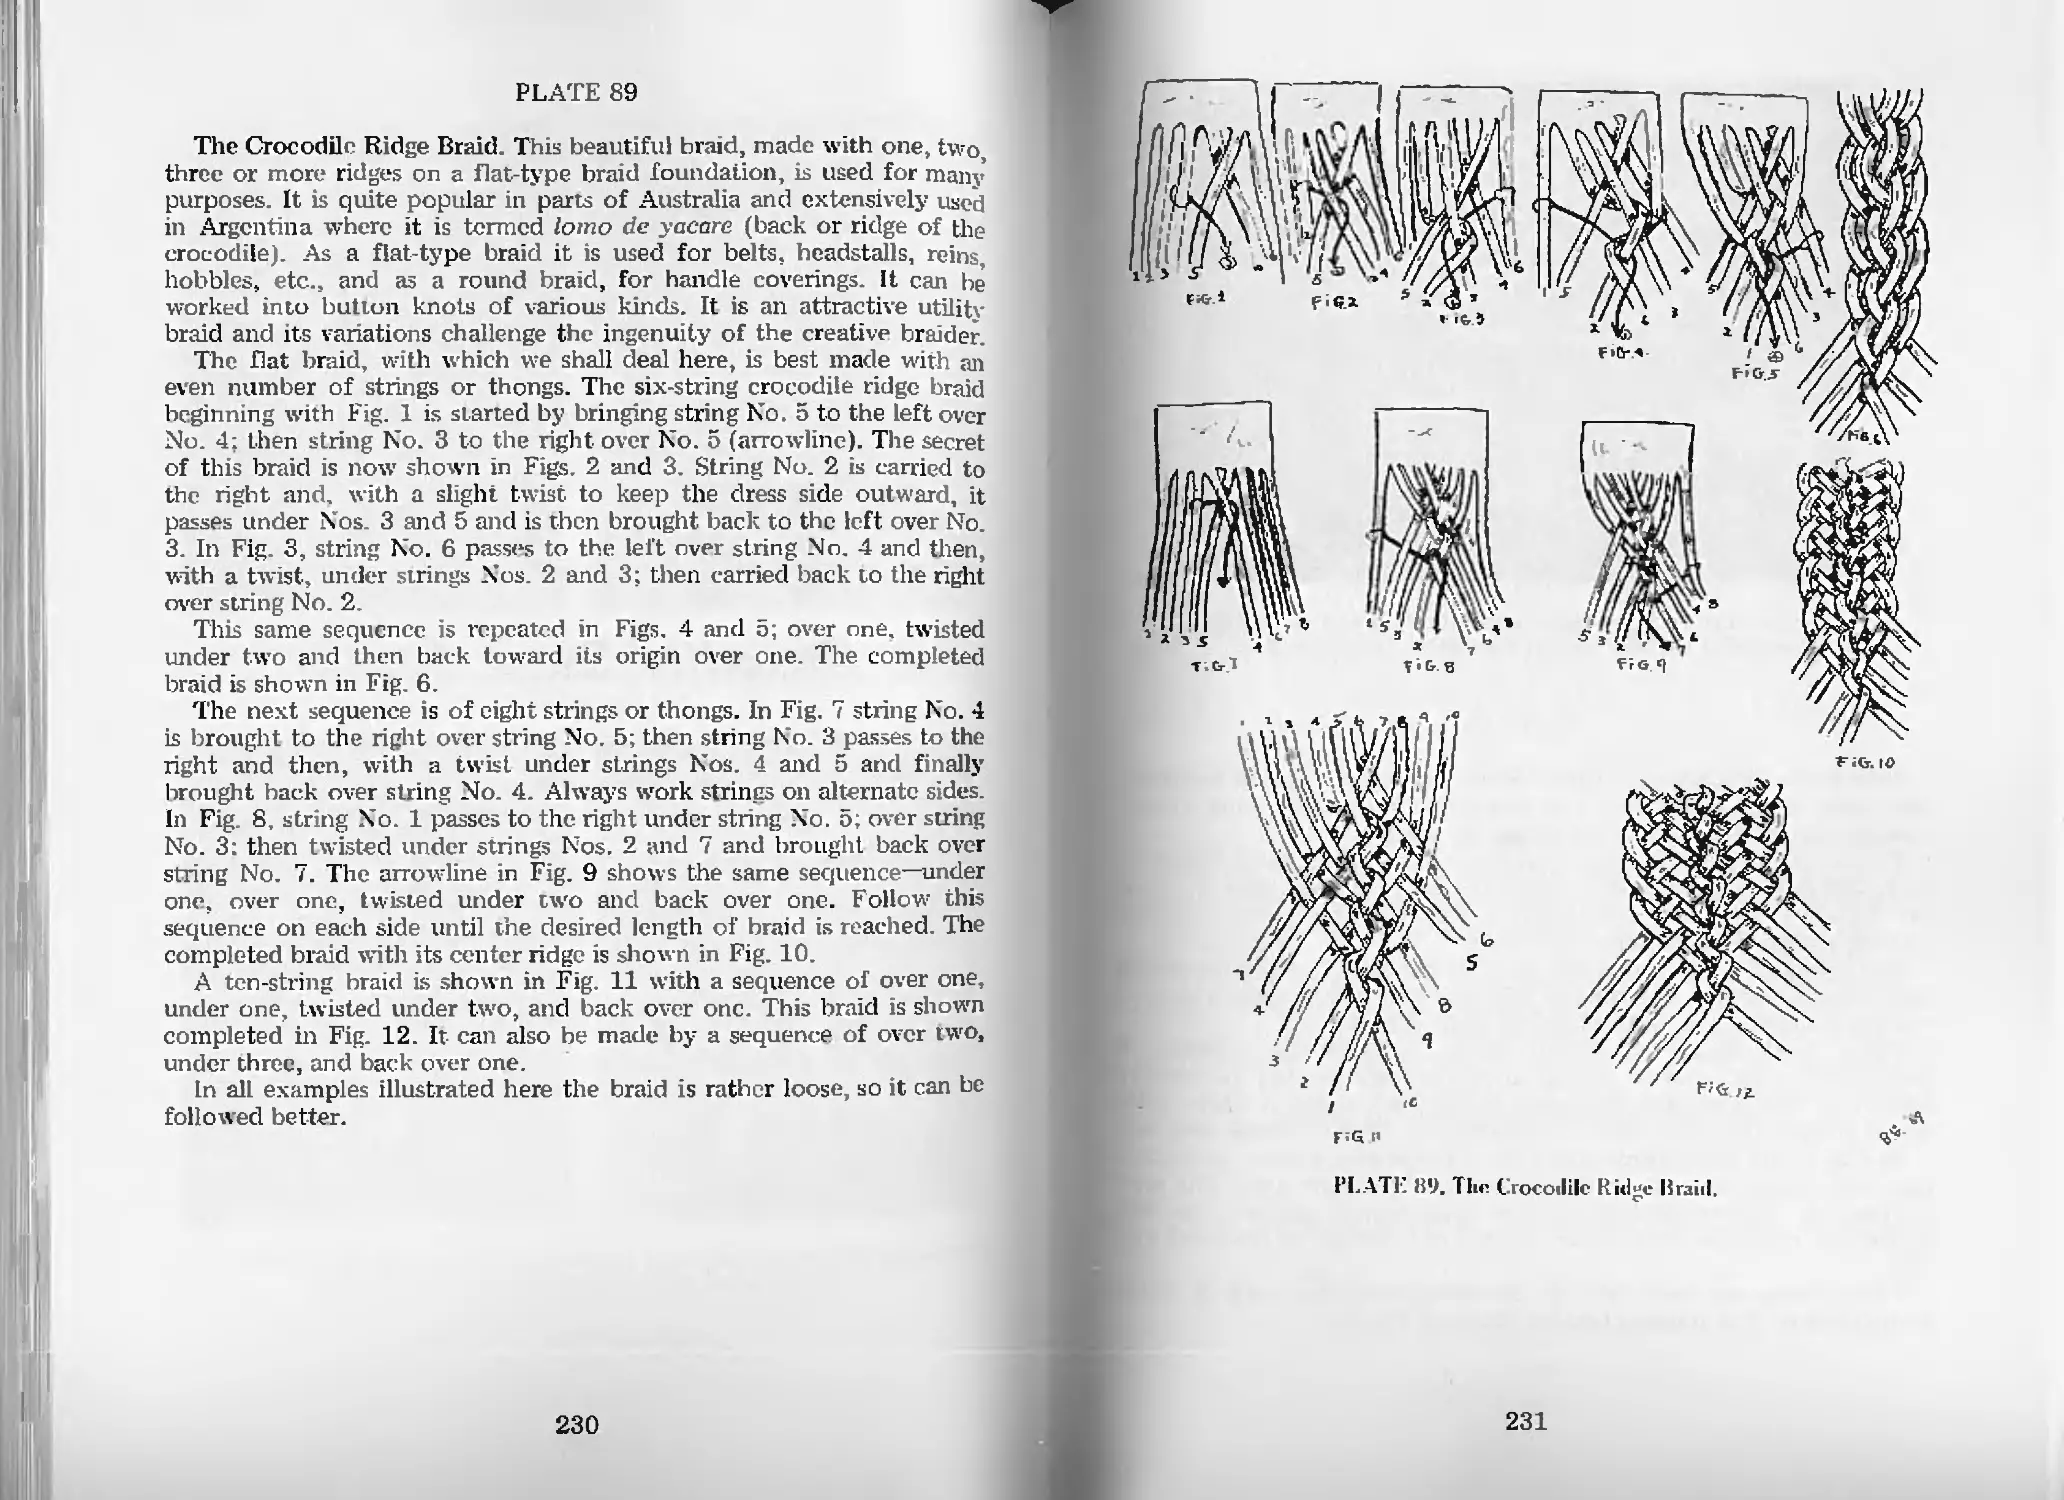
The Crocodile Ridge Braid—Pl. 89 230
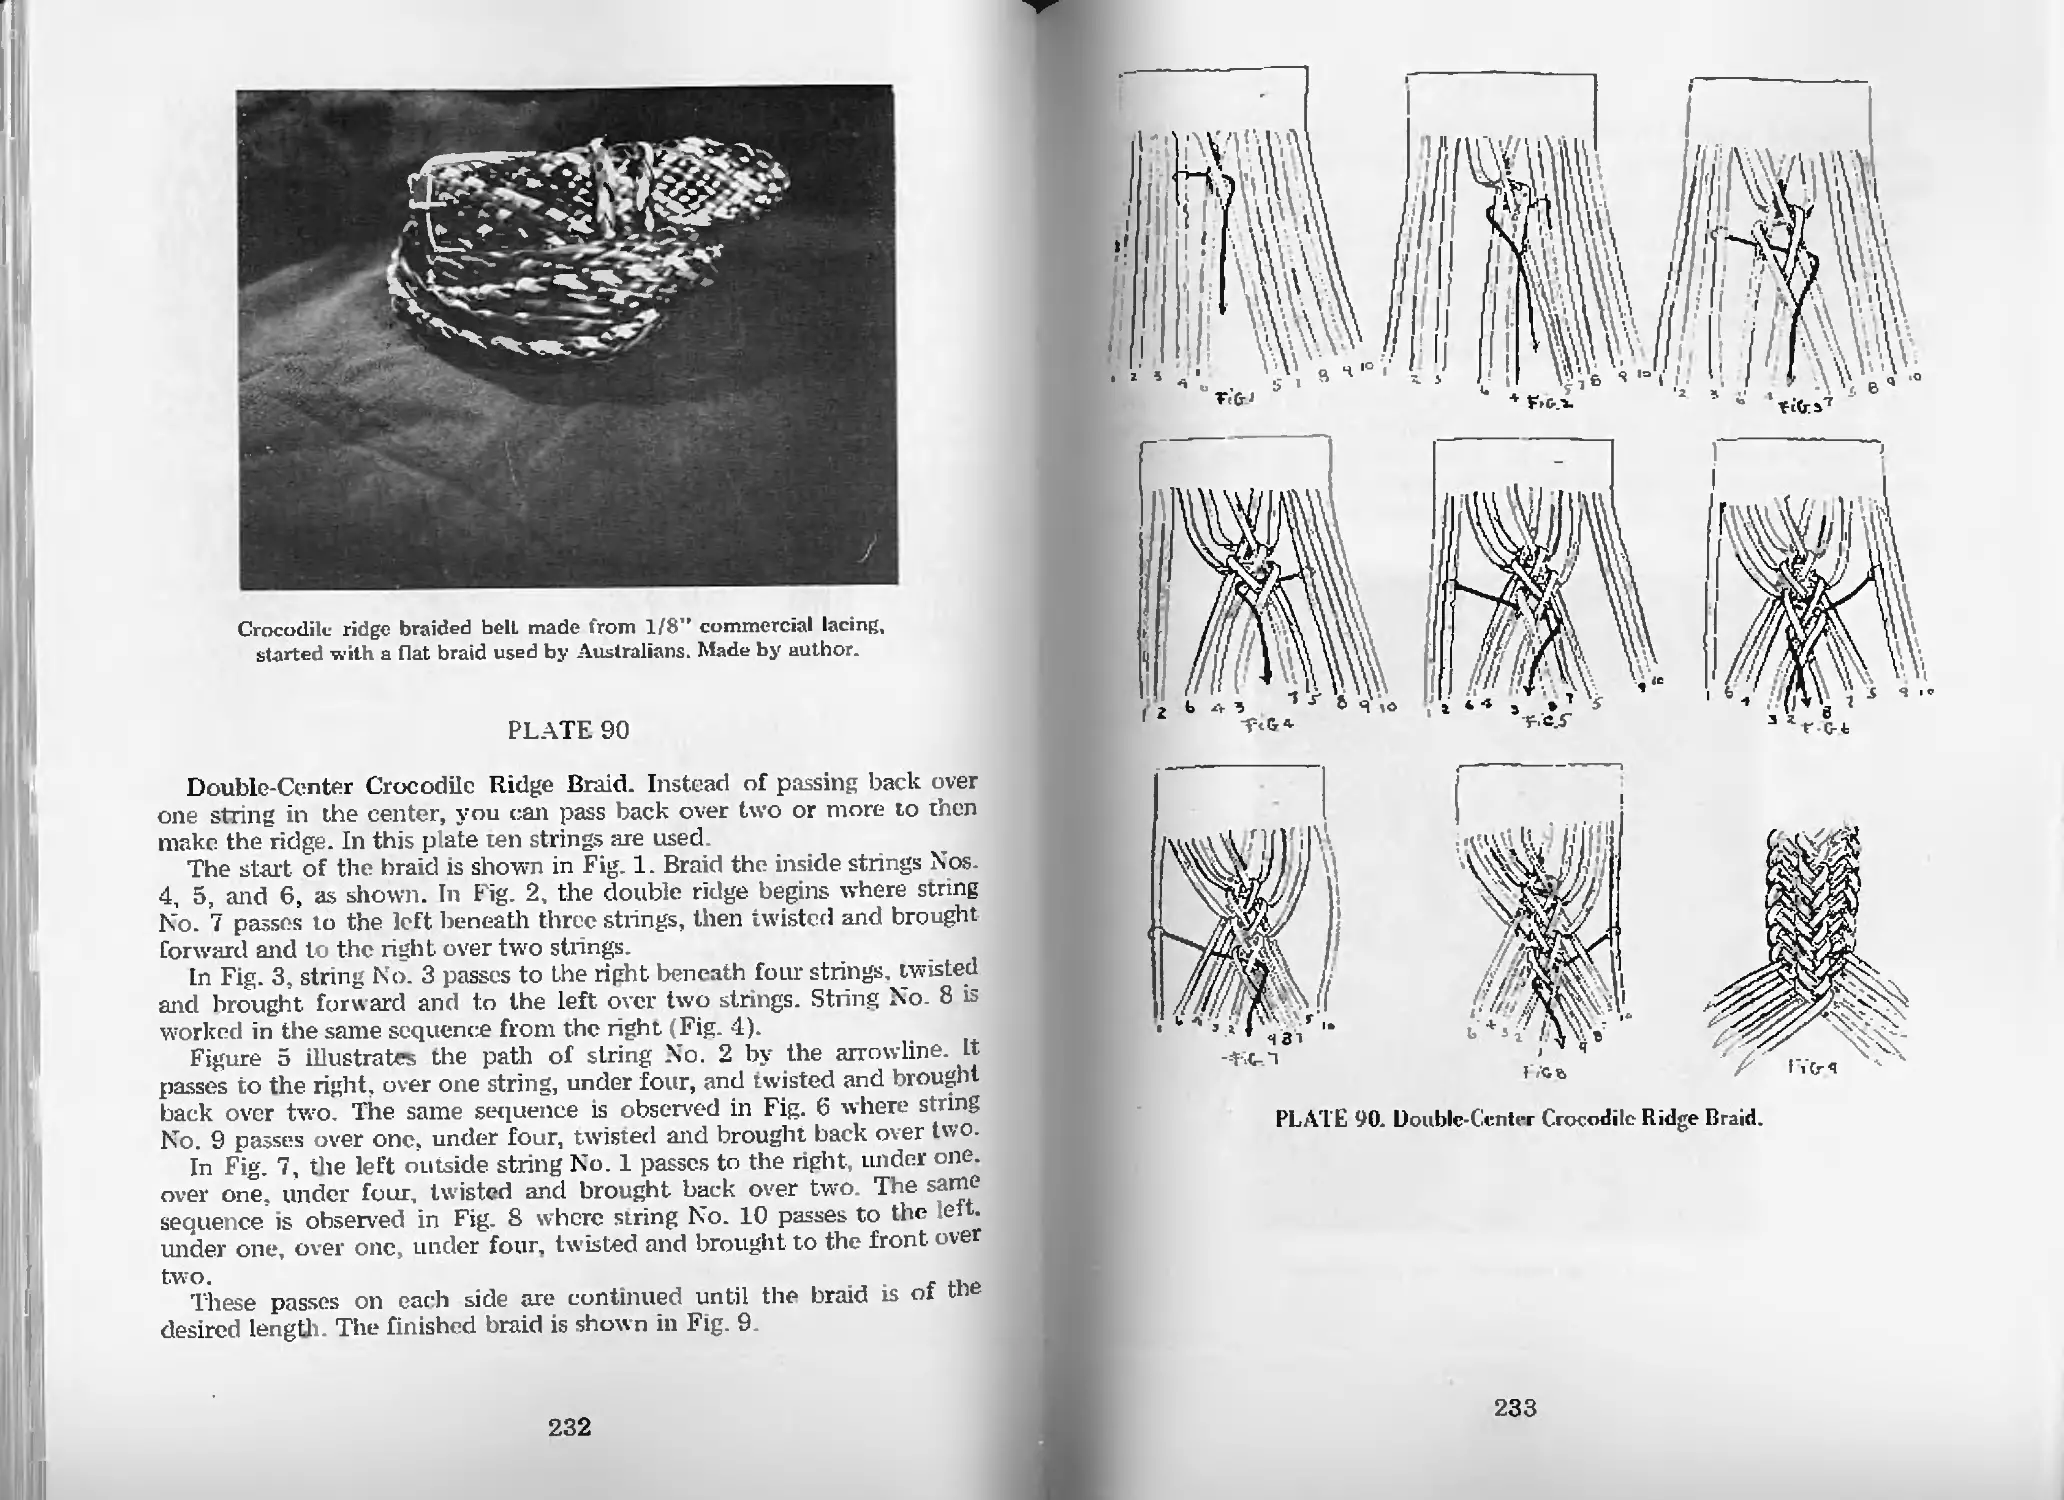
Double-Center Crocodile Ridge Braid—Pl. 90 232
Half-Round Center Crocodile Ridge Braid—Pl. 91 234
Crocodile Ridge Braids (cont.)
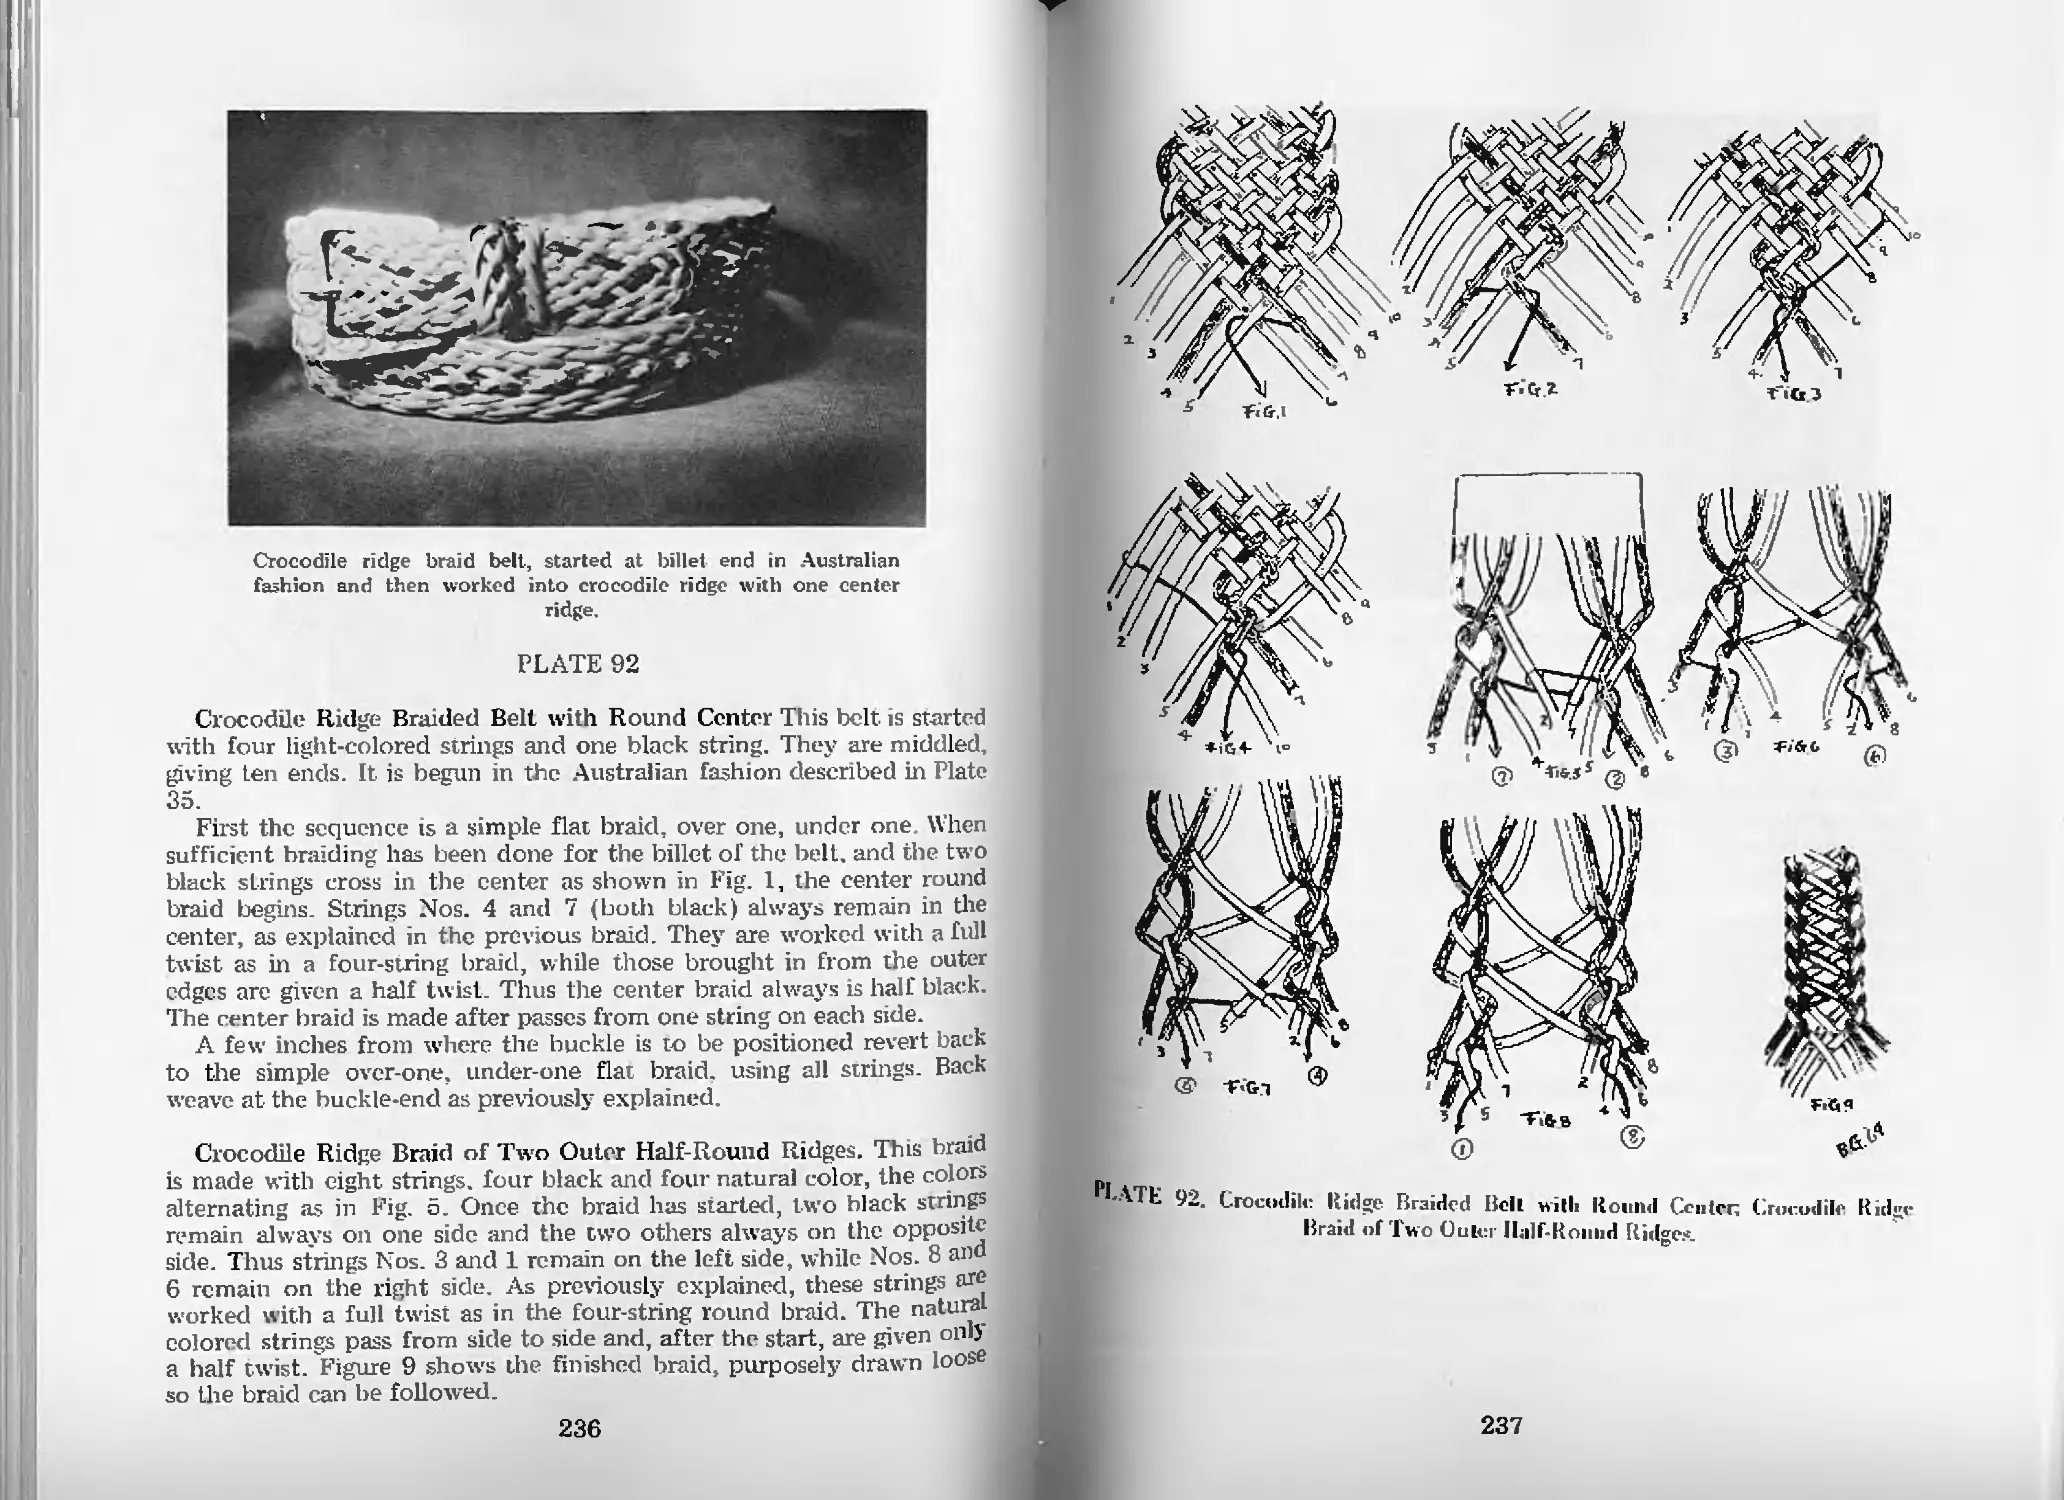
Crocodile Ridge Braided Belt with Round Center—Pl. 92 236
Crocodile Ridge Braid of Two Outer
Half-Round Ridges—Pl. 92 236
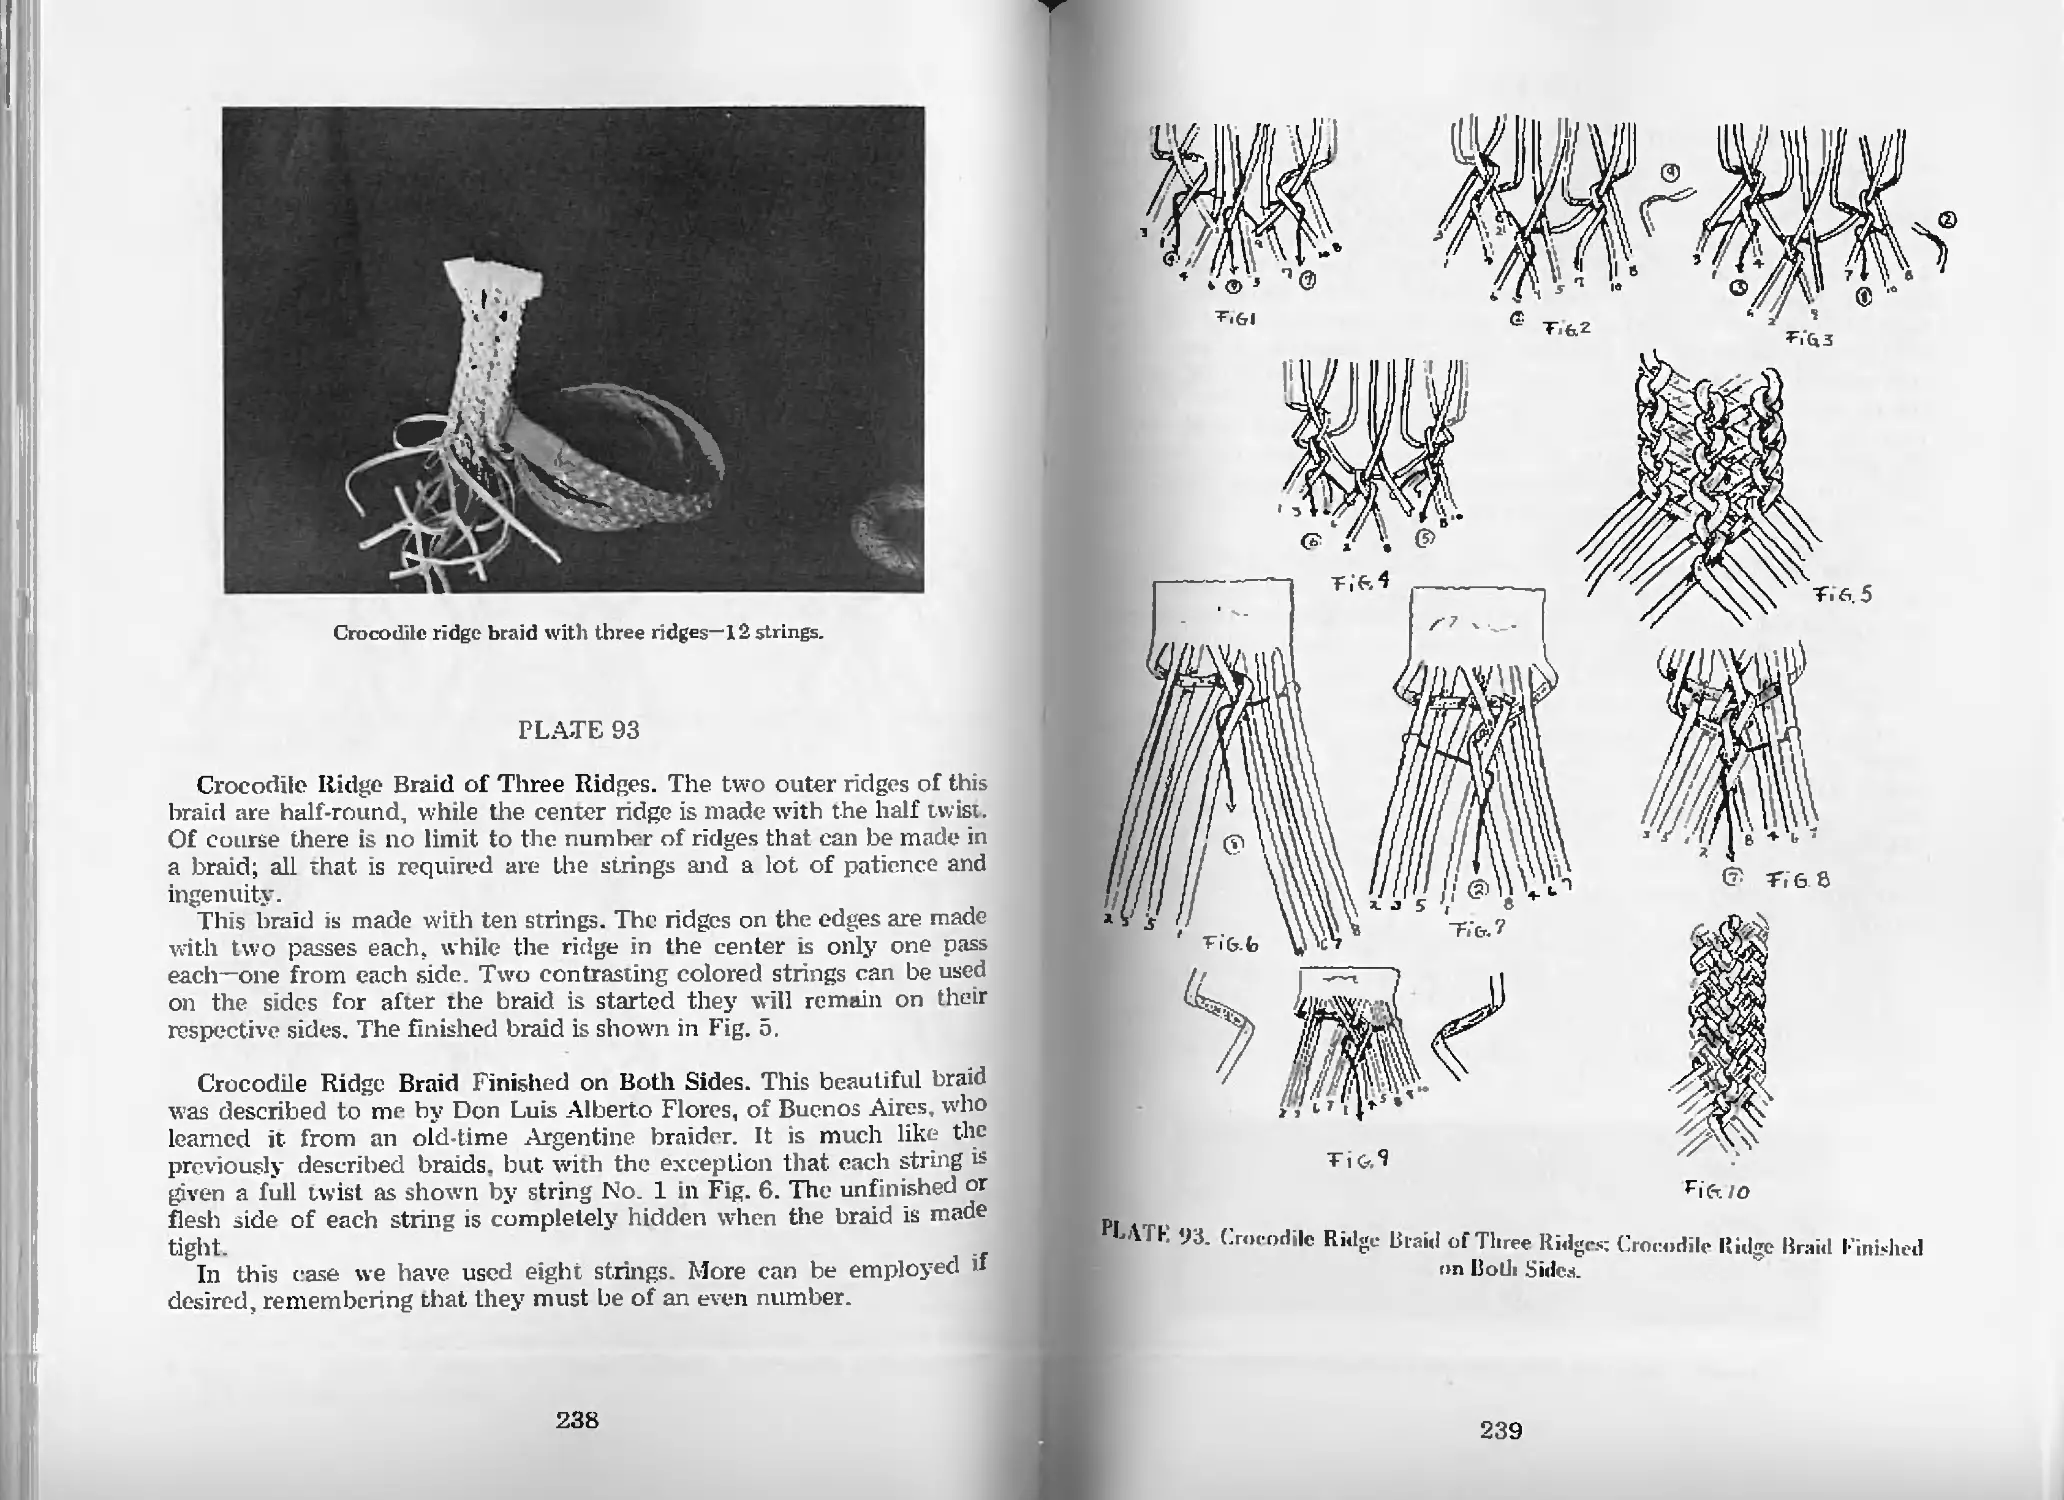
Crocodile Ridge Braid of Three Ridges—Pl. 93 238
Crocodile Ridge Braid Finished on Both Sides—PL 93 238
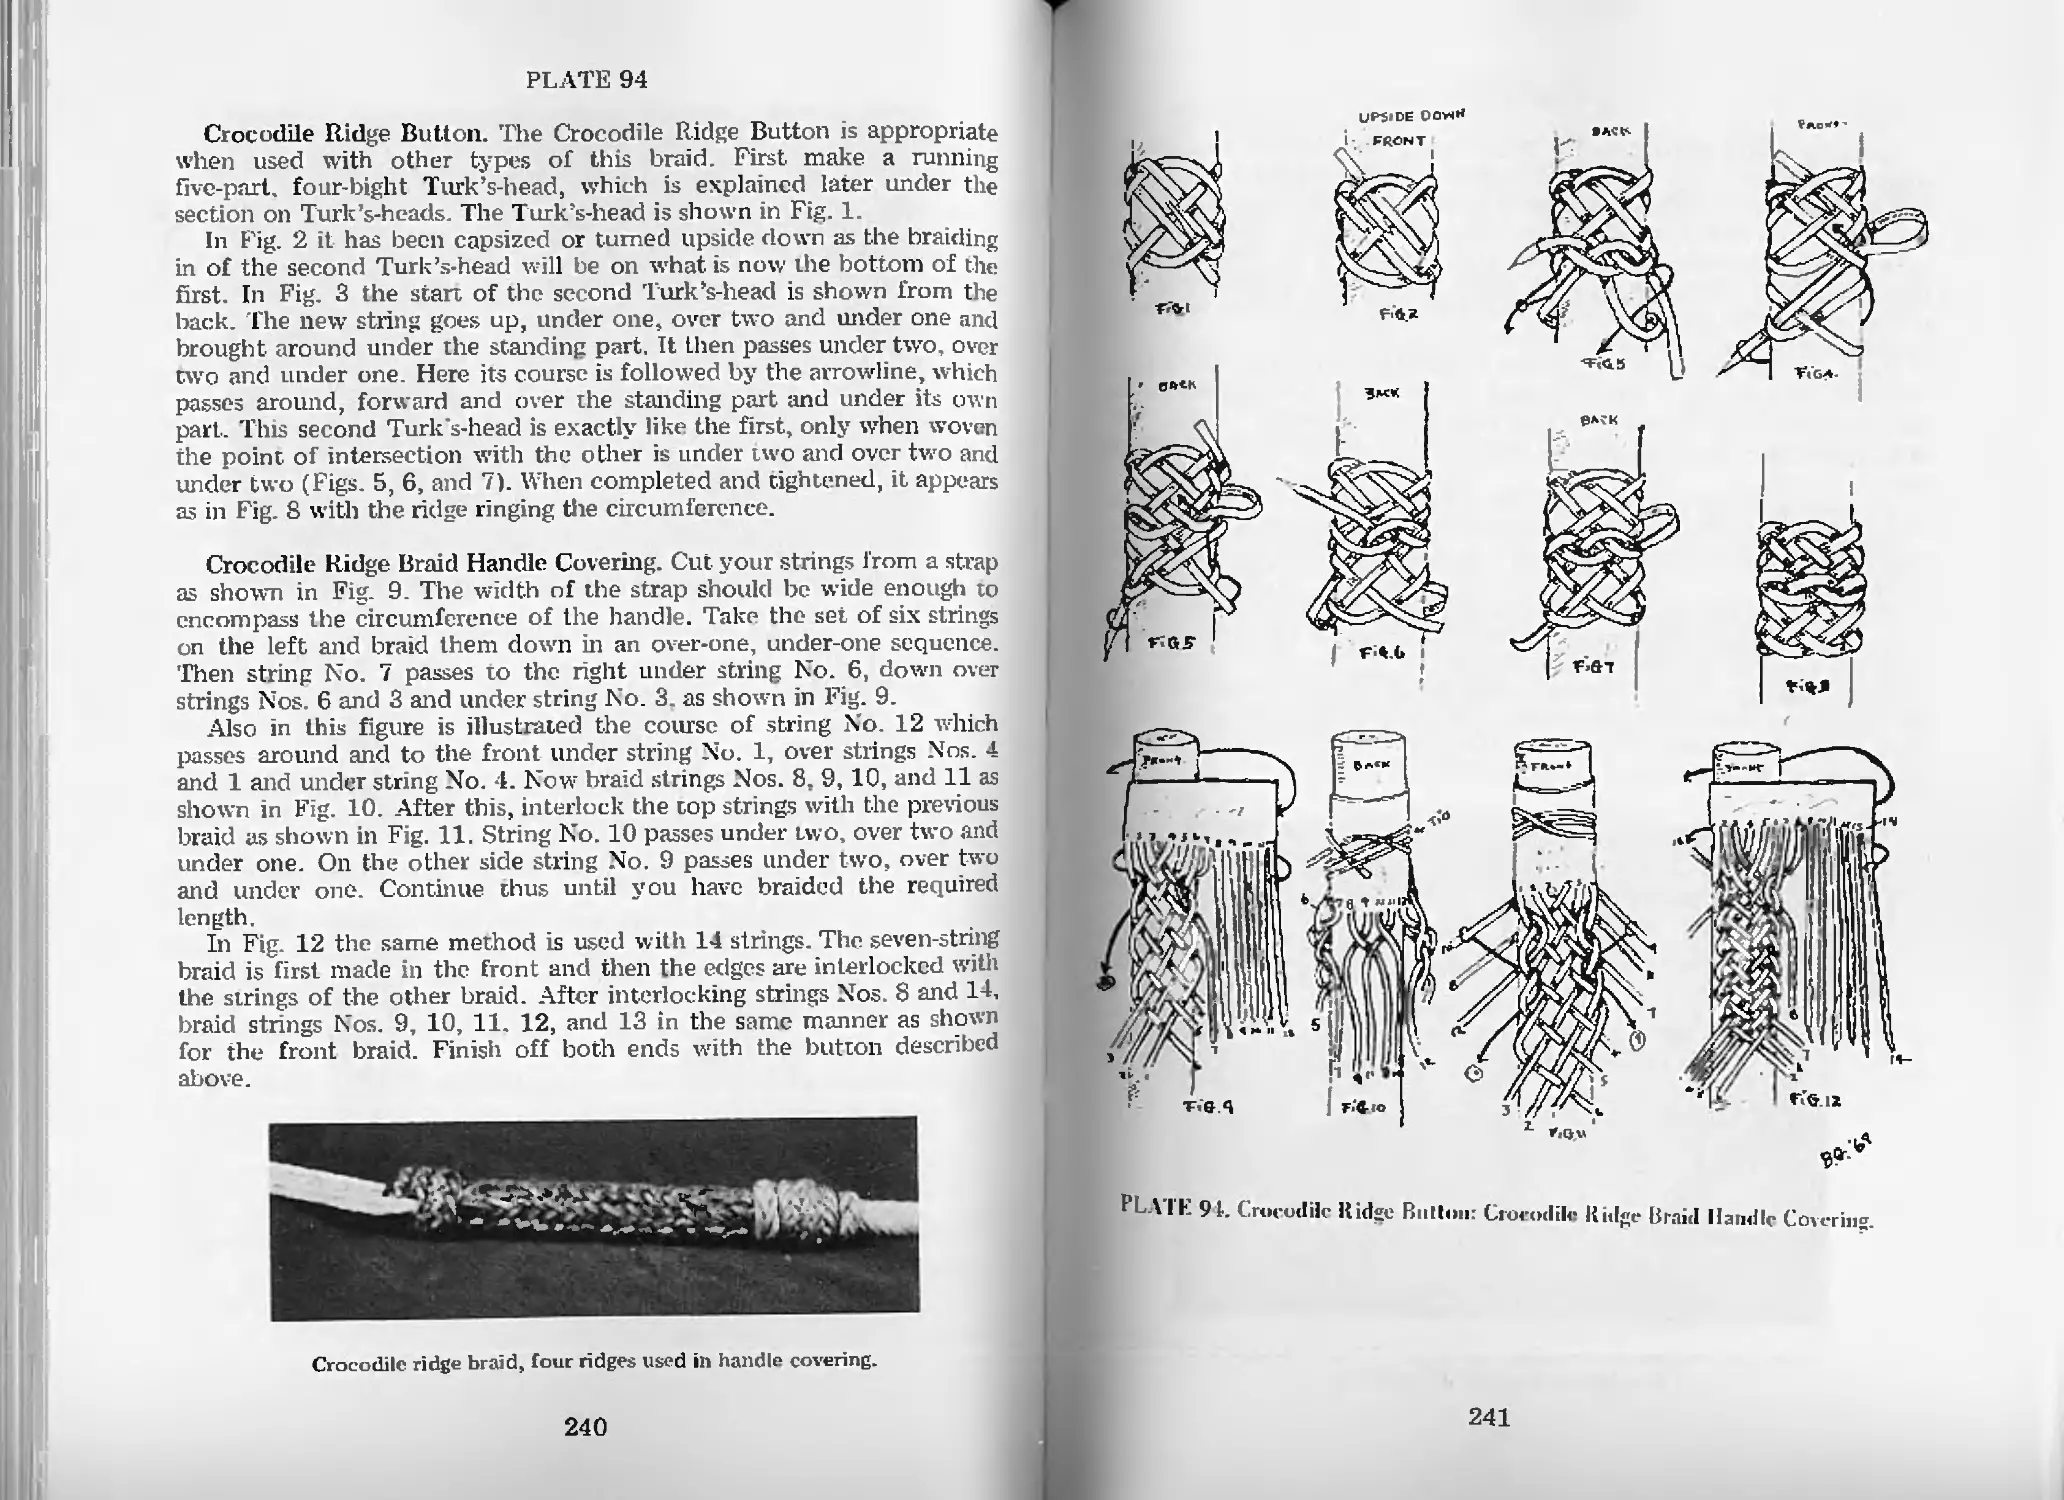
Crocodile Ridge Button—Pl. 94 240
Crocodile Ridge Braid Handle Covering—Pl. 94 240
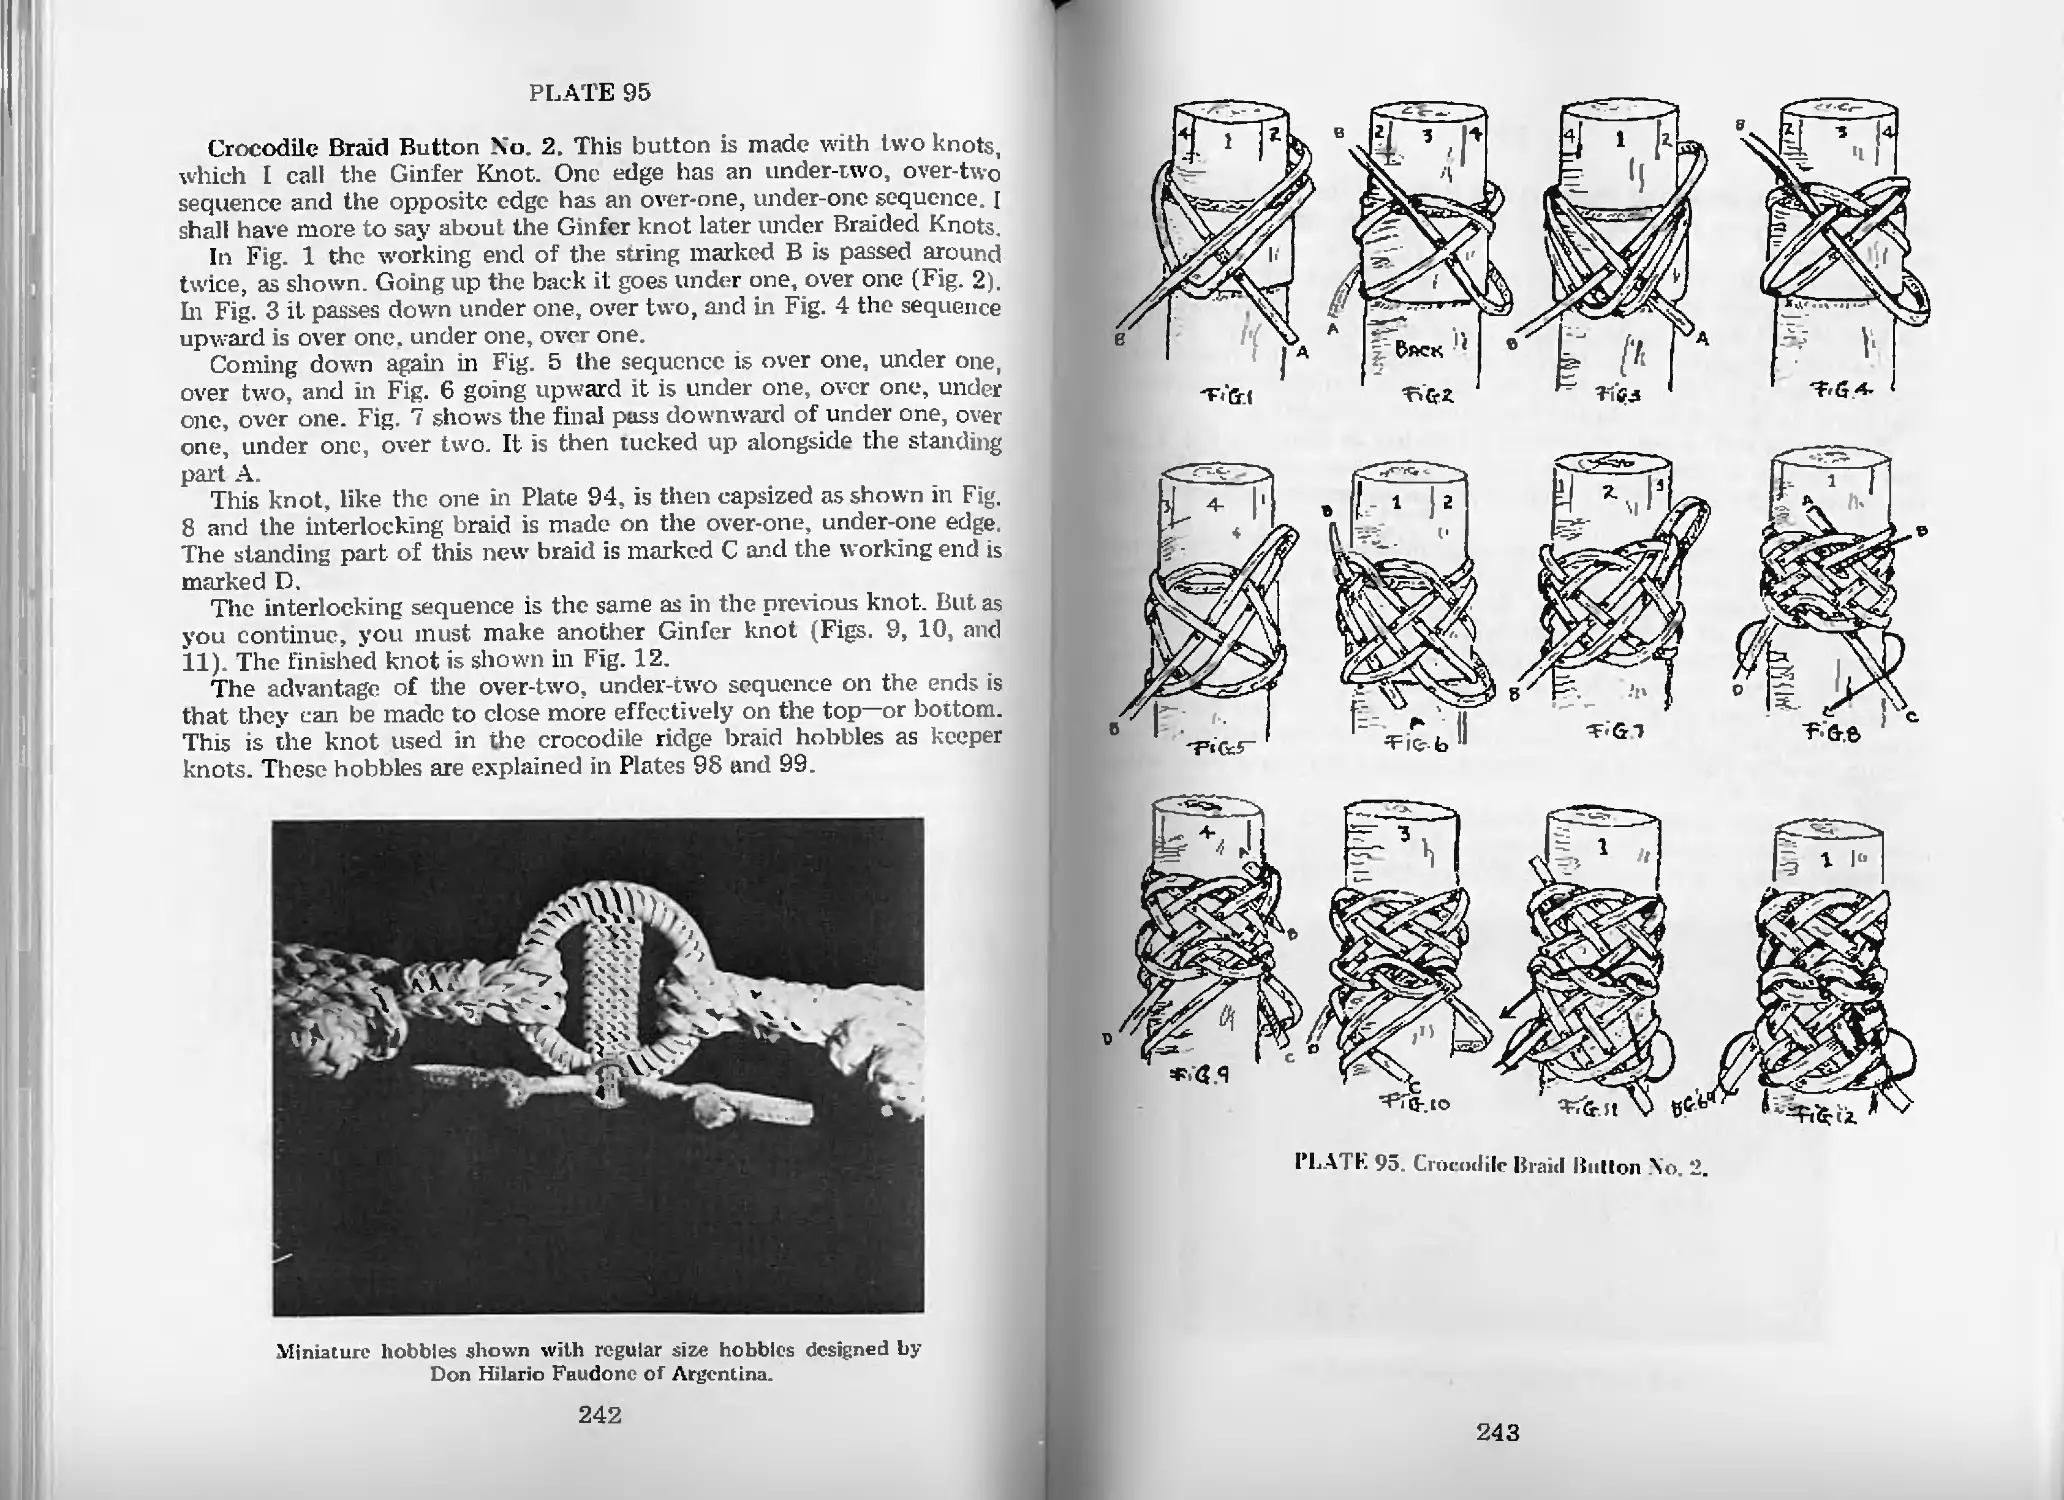
Crocodile Braid Button No. 2—Pl. 95 242
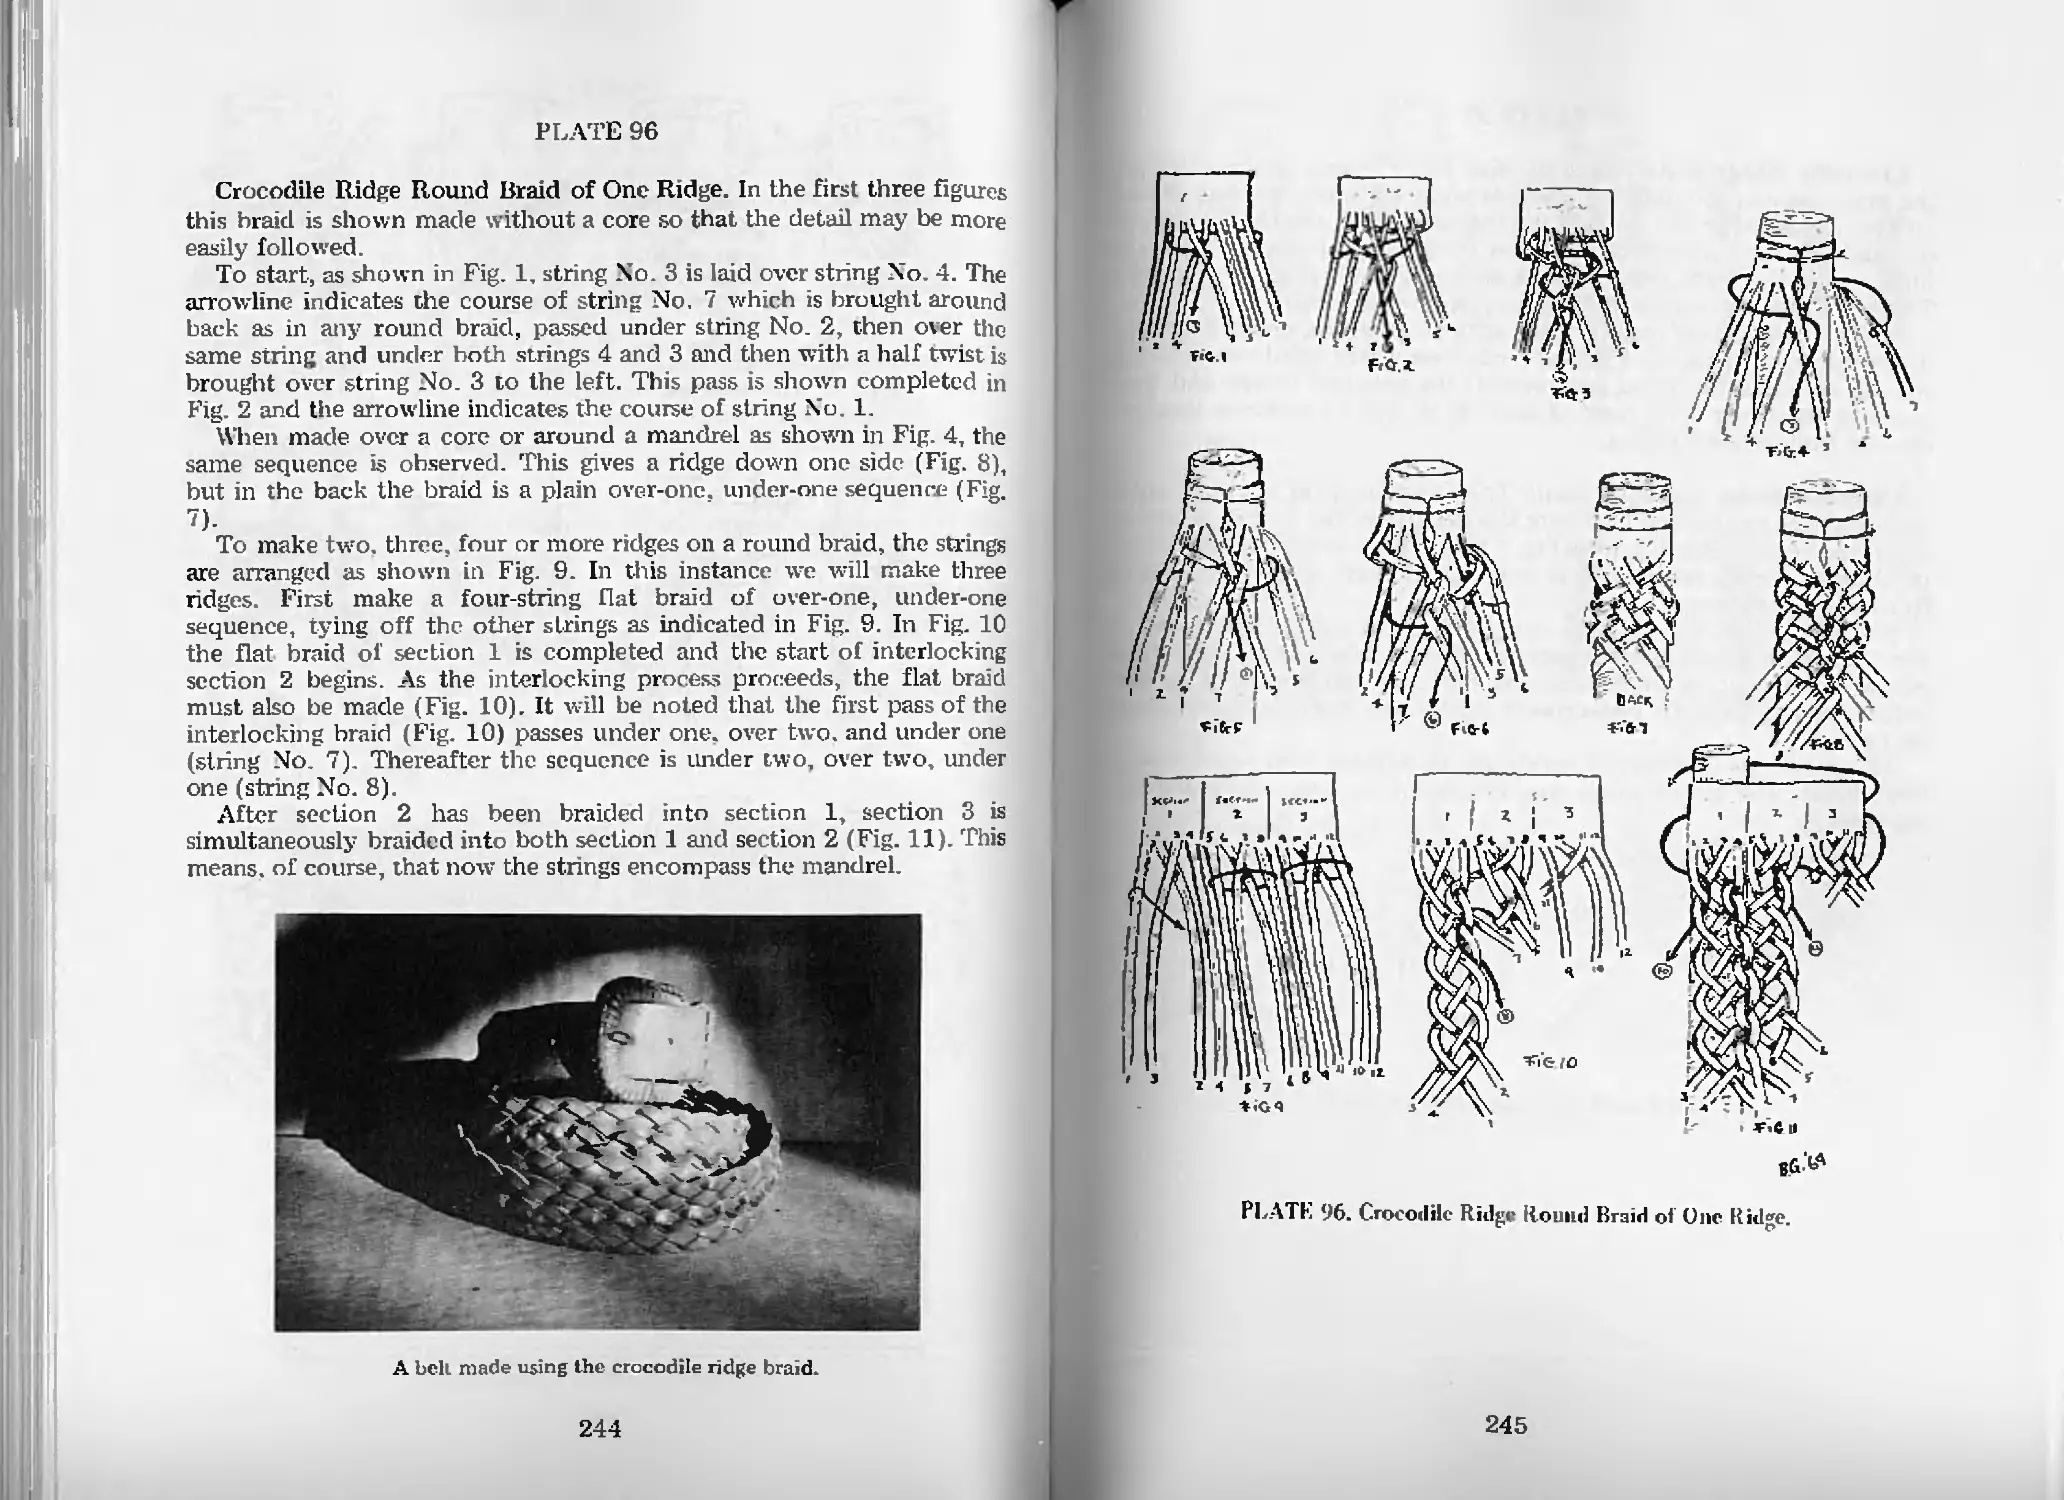
Crocodile Ridge Round Braid of One Ridge—Pl. 96 244
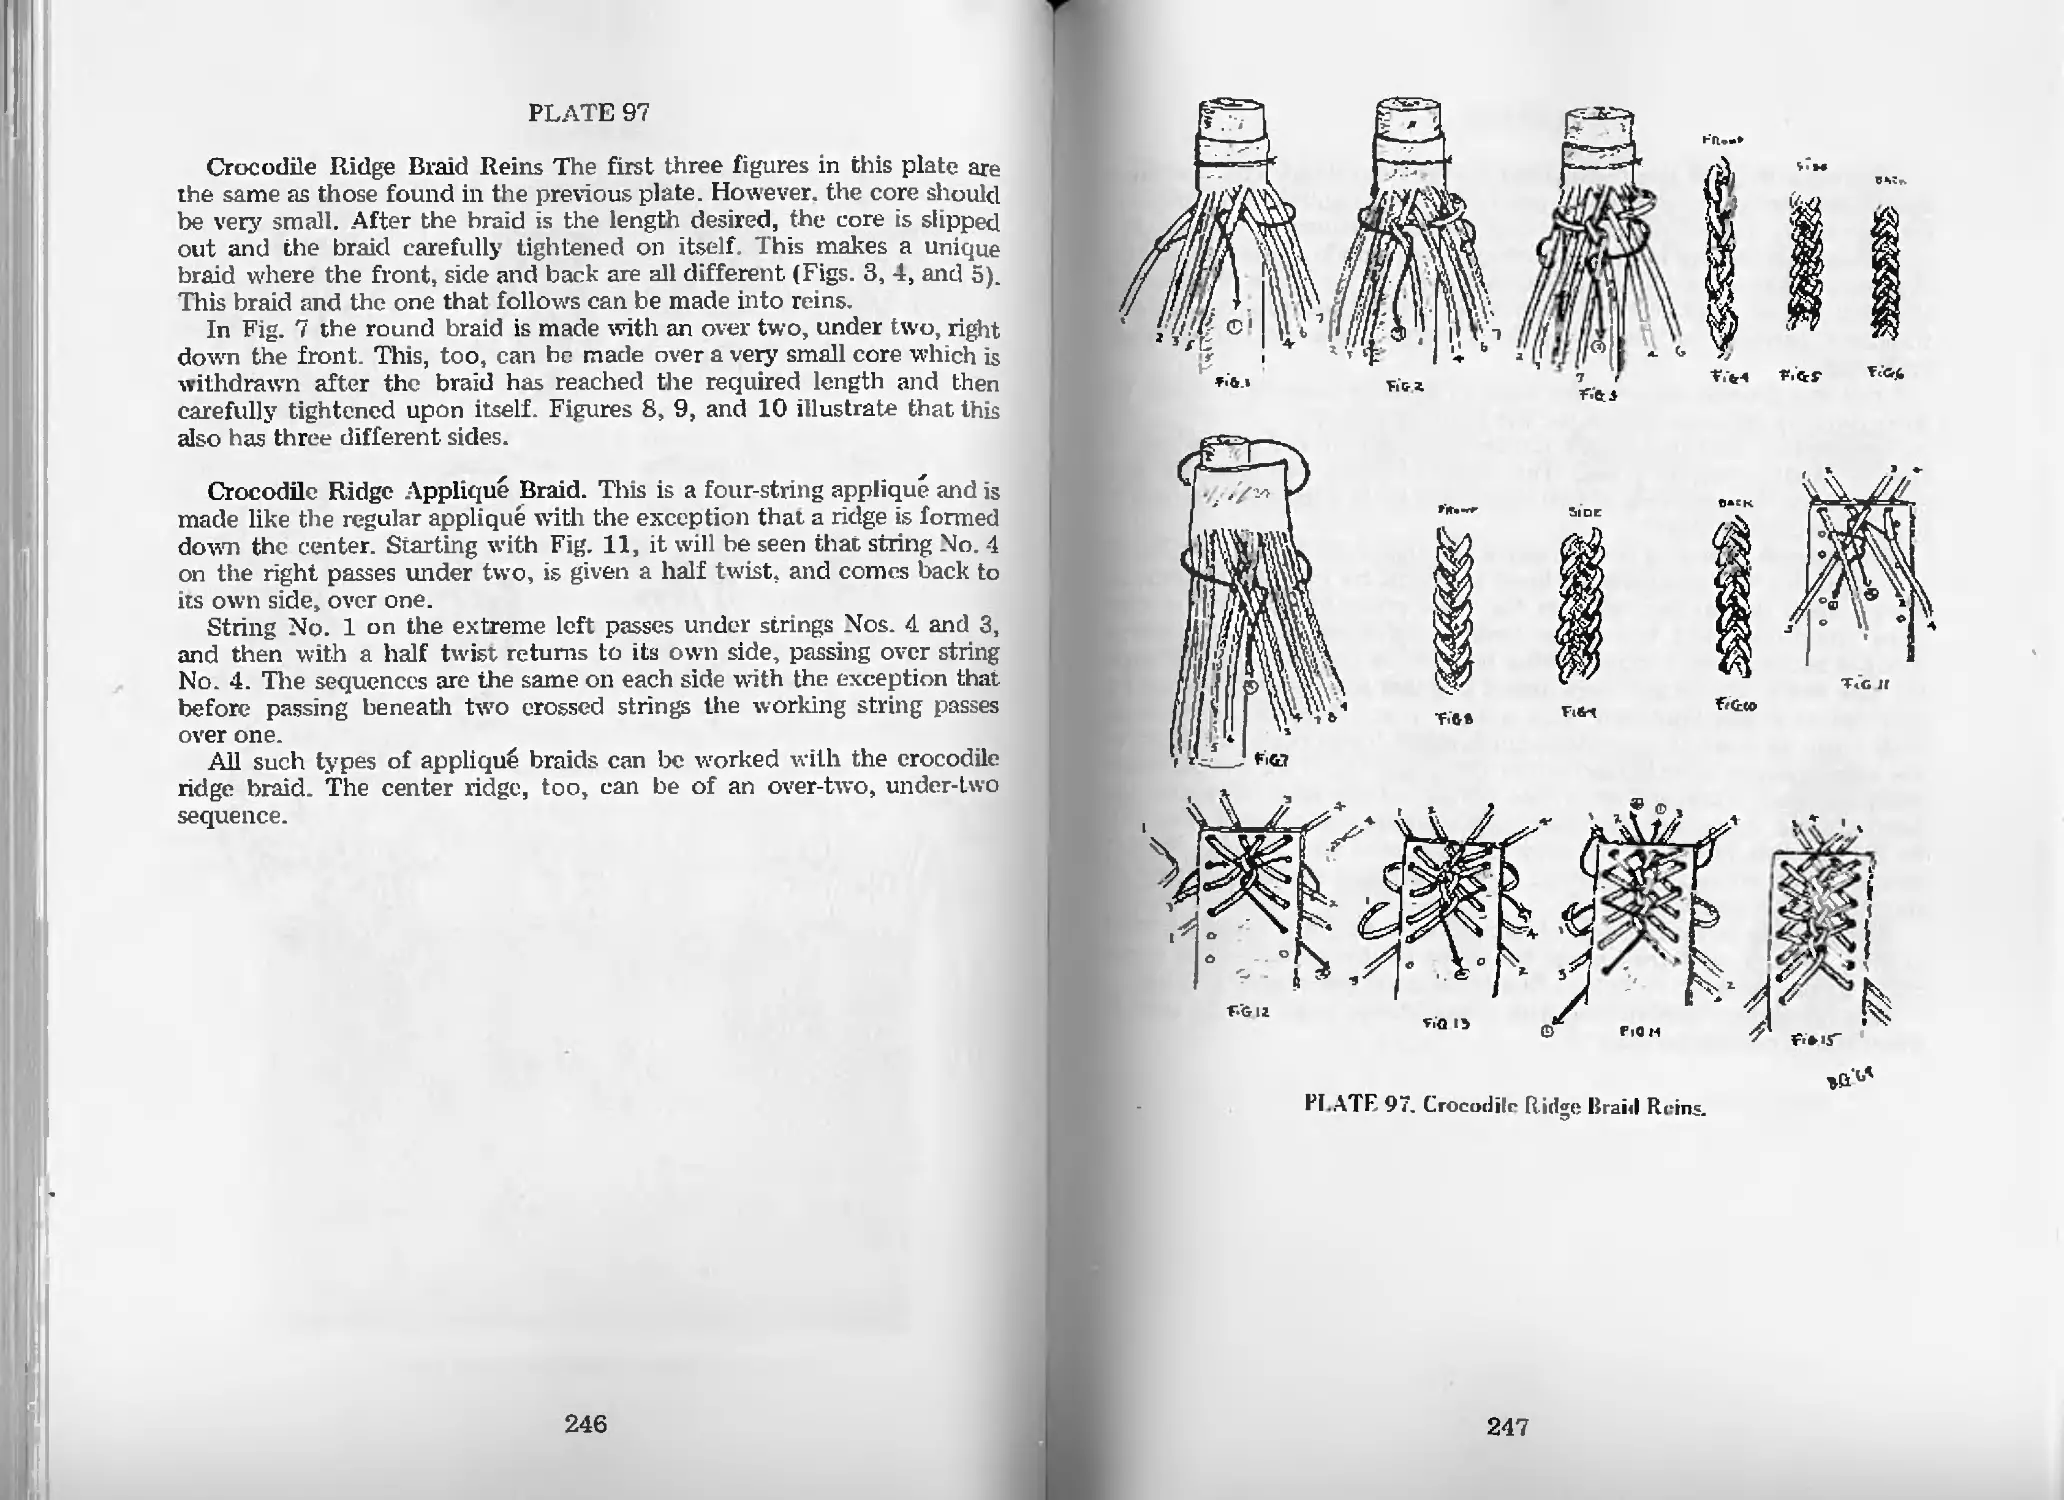
Crocodile Ridge Braid Reins—Pl. 97 246
Crocodile Ridge Applique Braid—Pl. 97 246
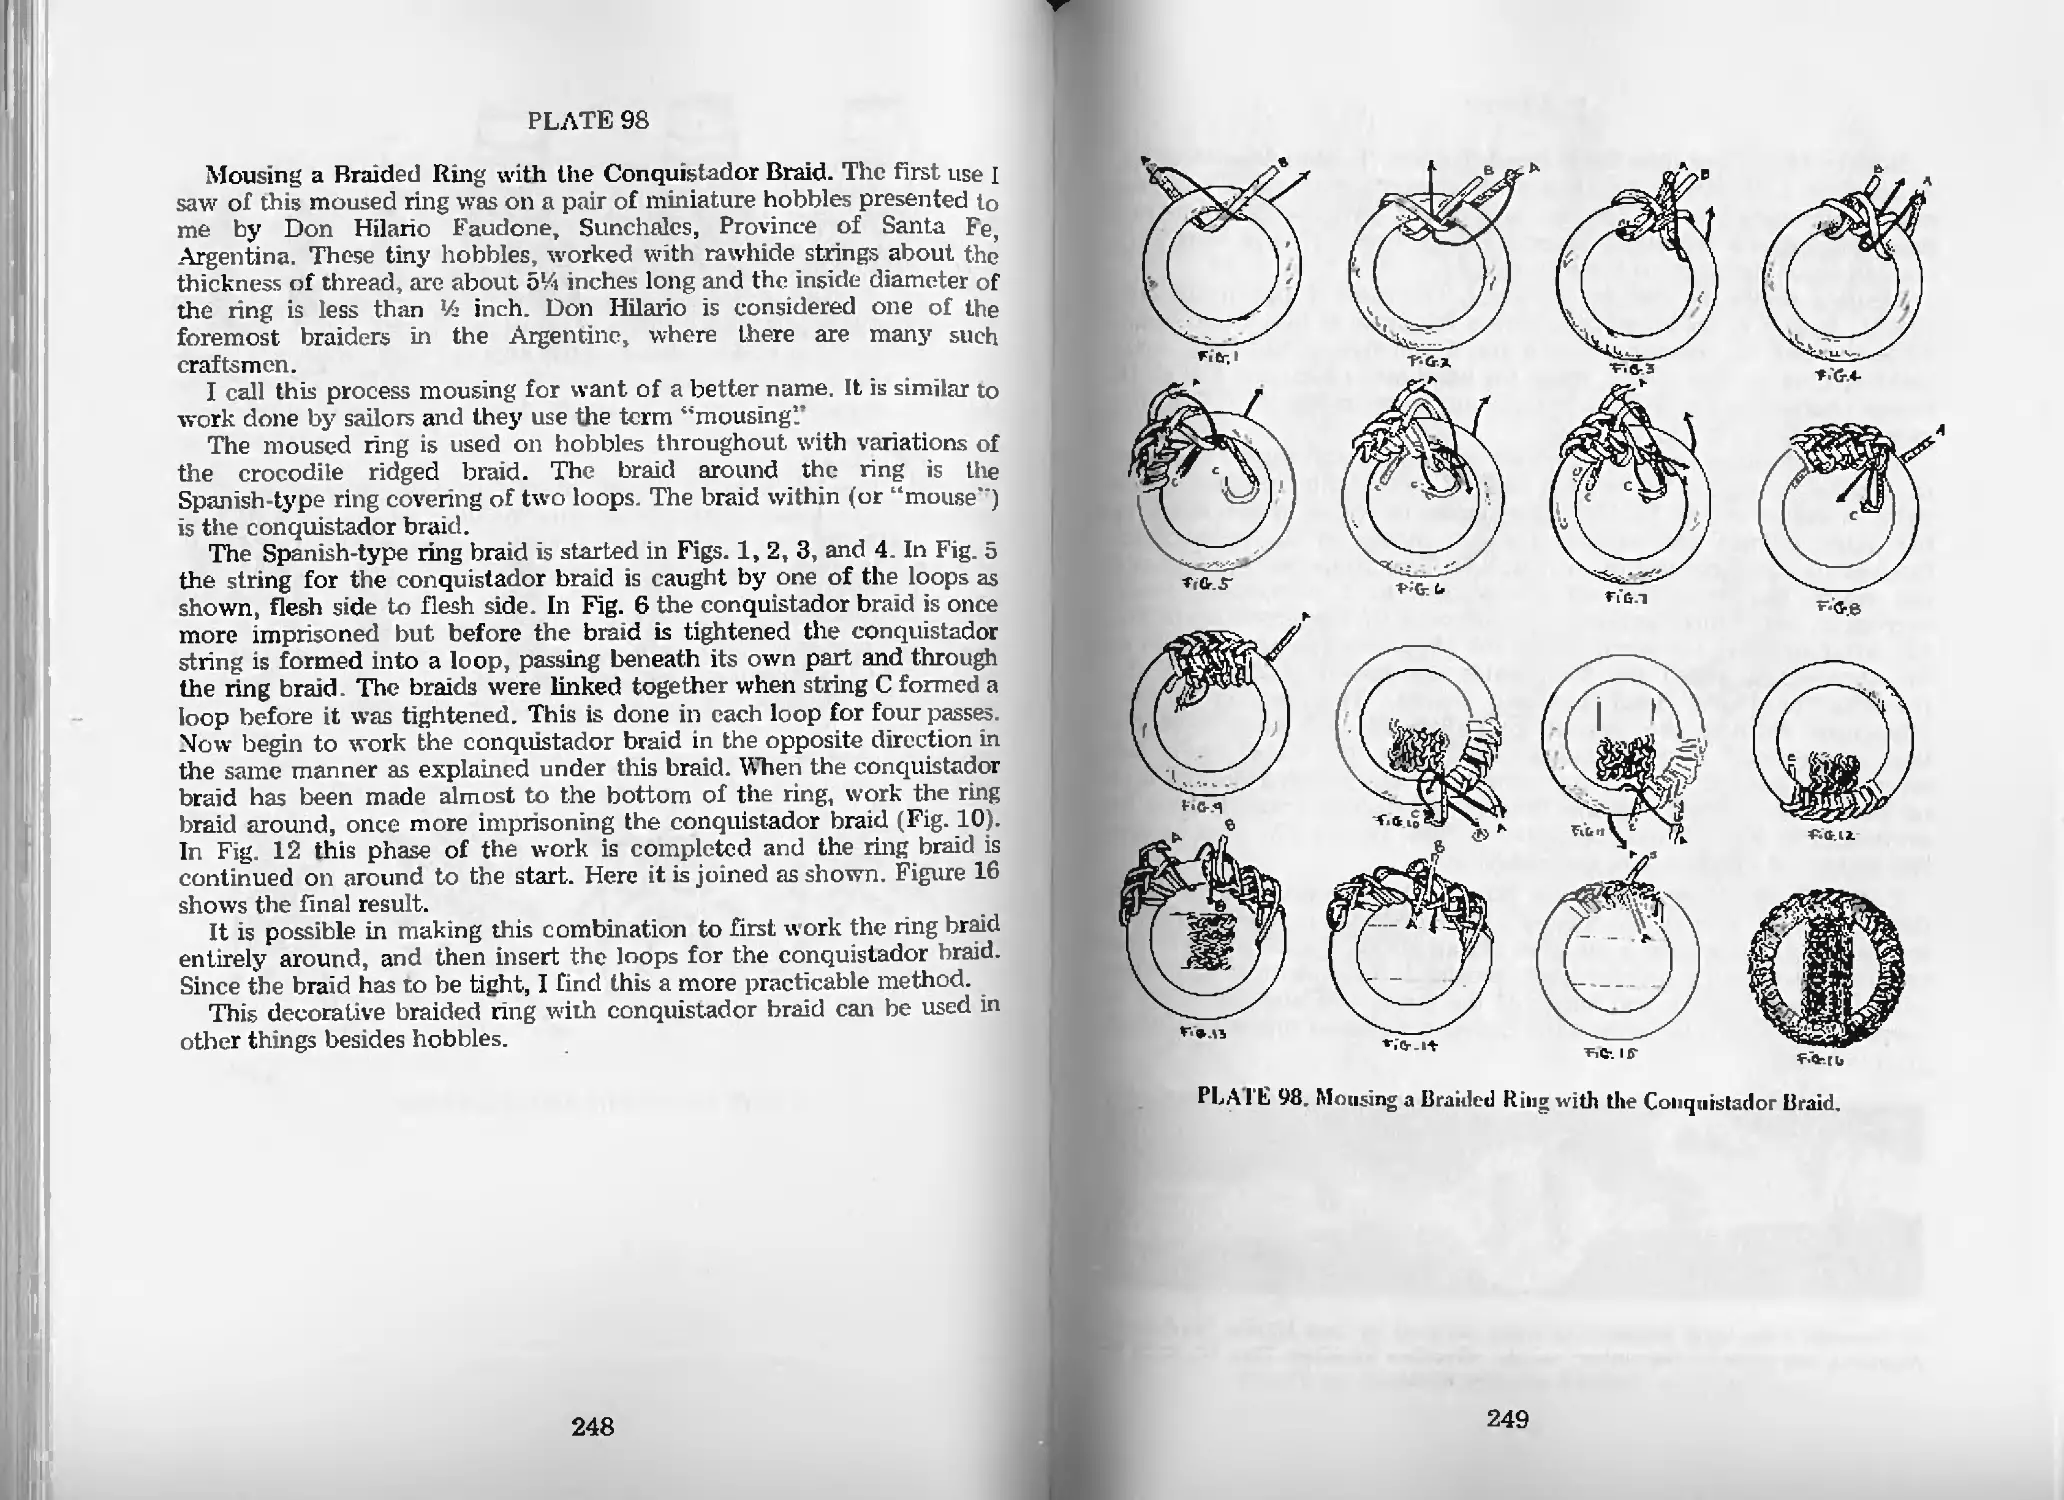
Mousing a Braided Ring with the Conquistador Braid—Pl. 98 248
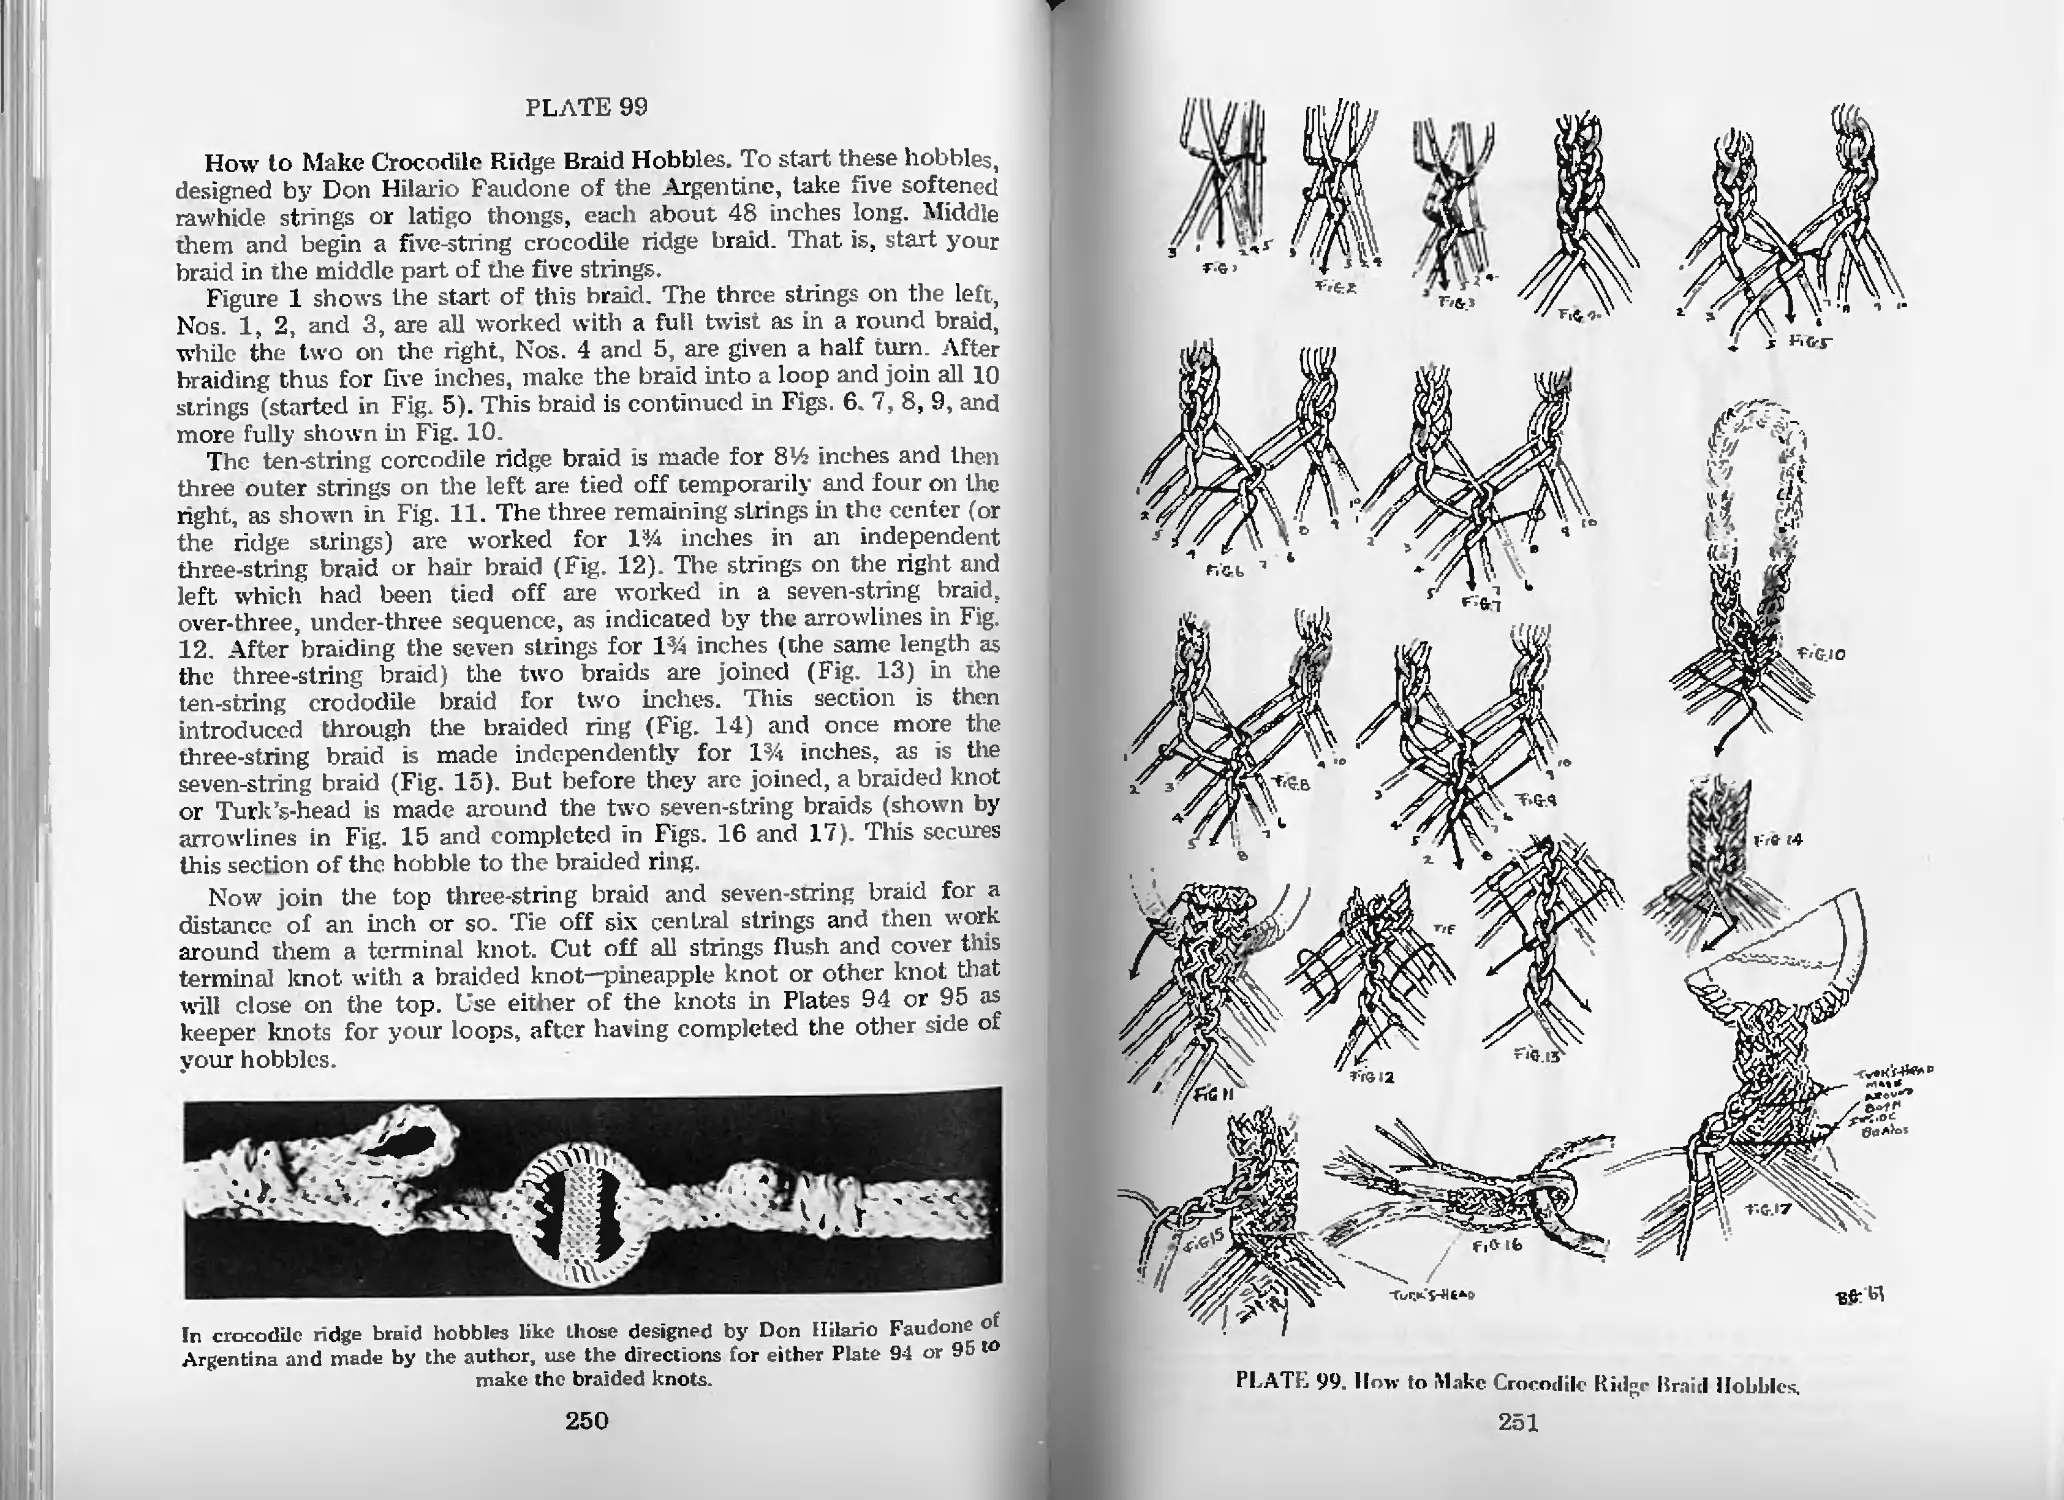
How to Make Crocodile Ridge Braid Hobbles—Pl 99 250
Square, Rectangular, Spiral, Twist Spiral,
Oval and Triangular Braids
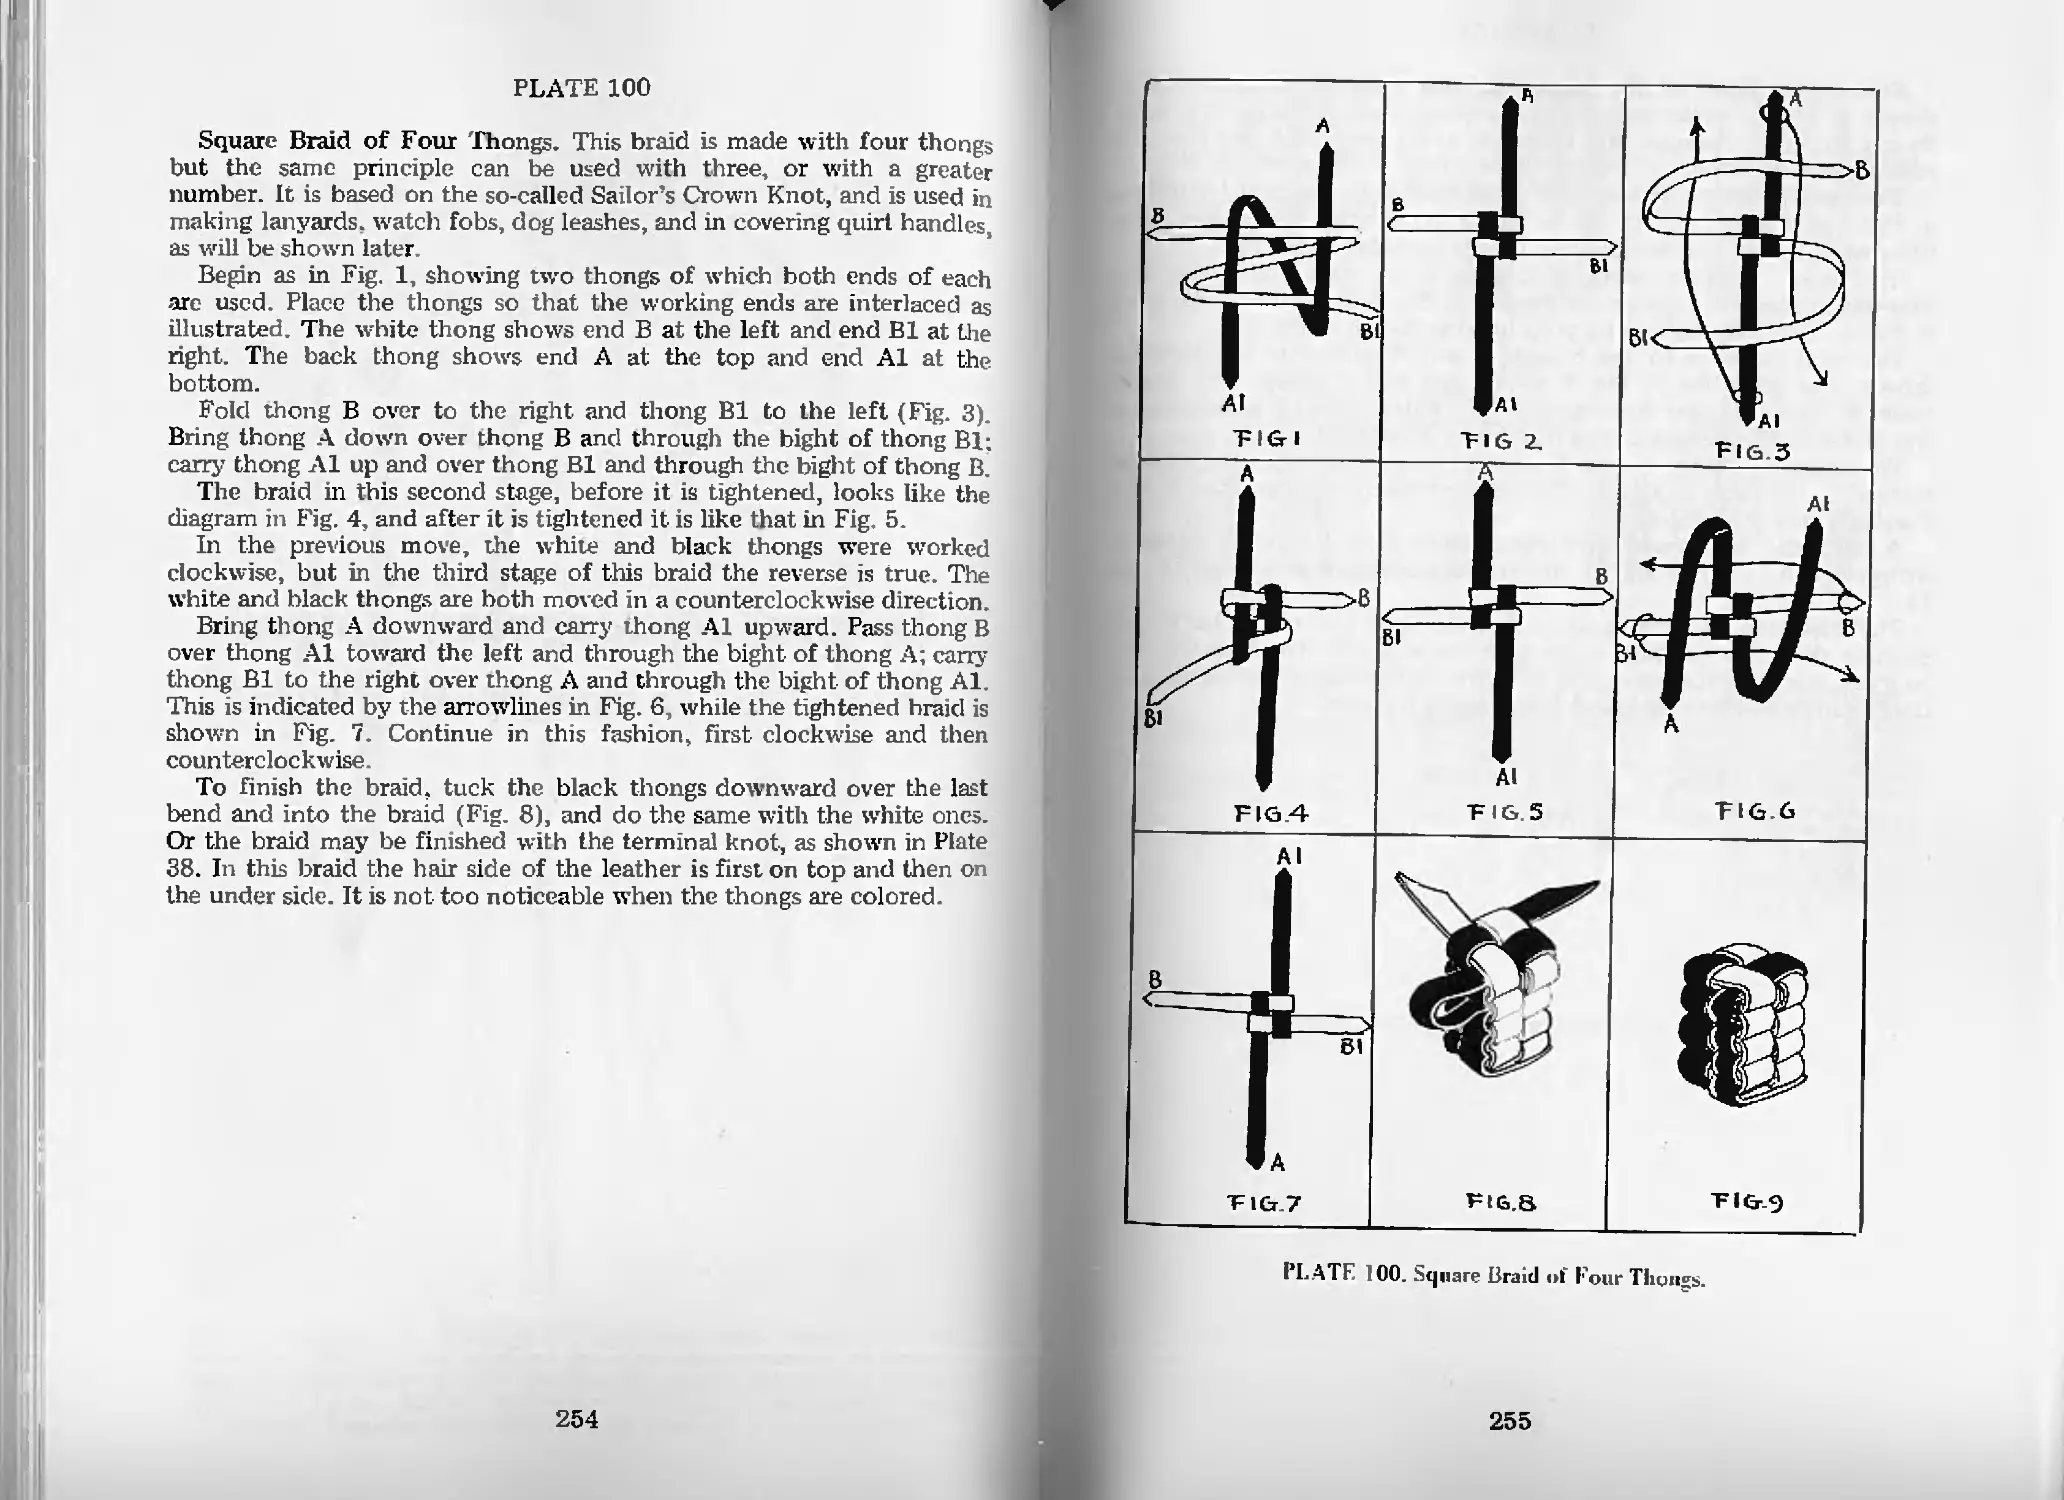
Square Braid of Four Thongs—Pl. 100 254
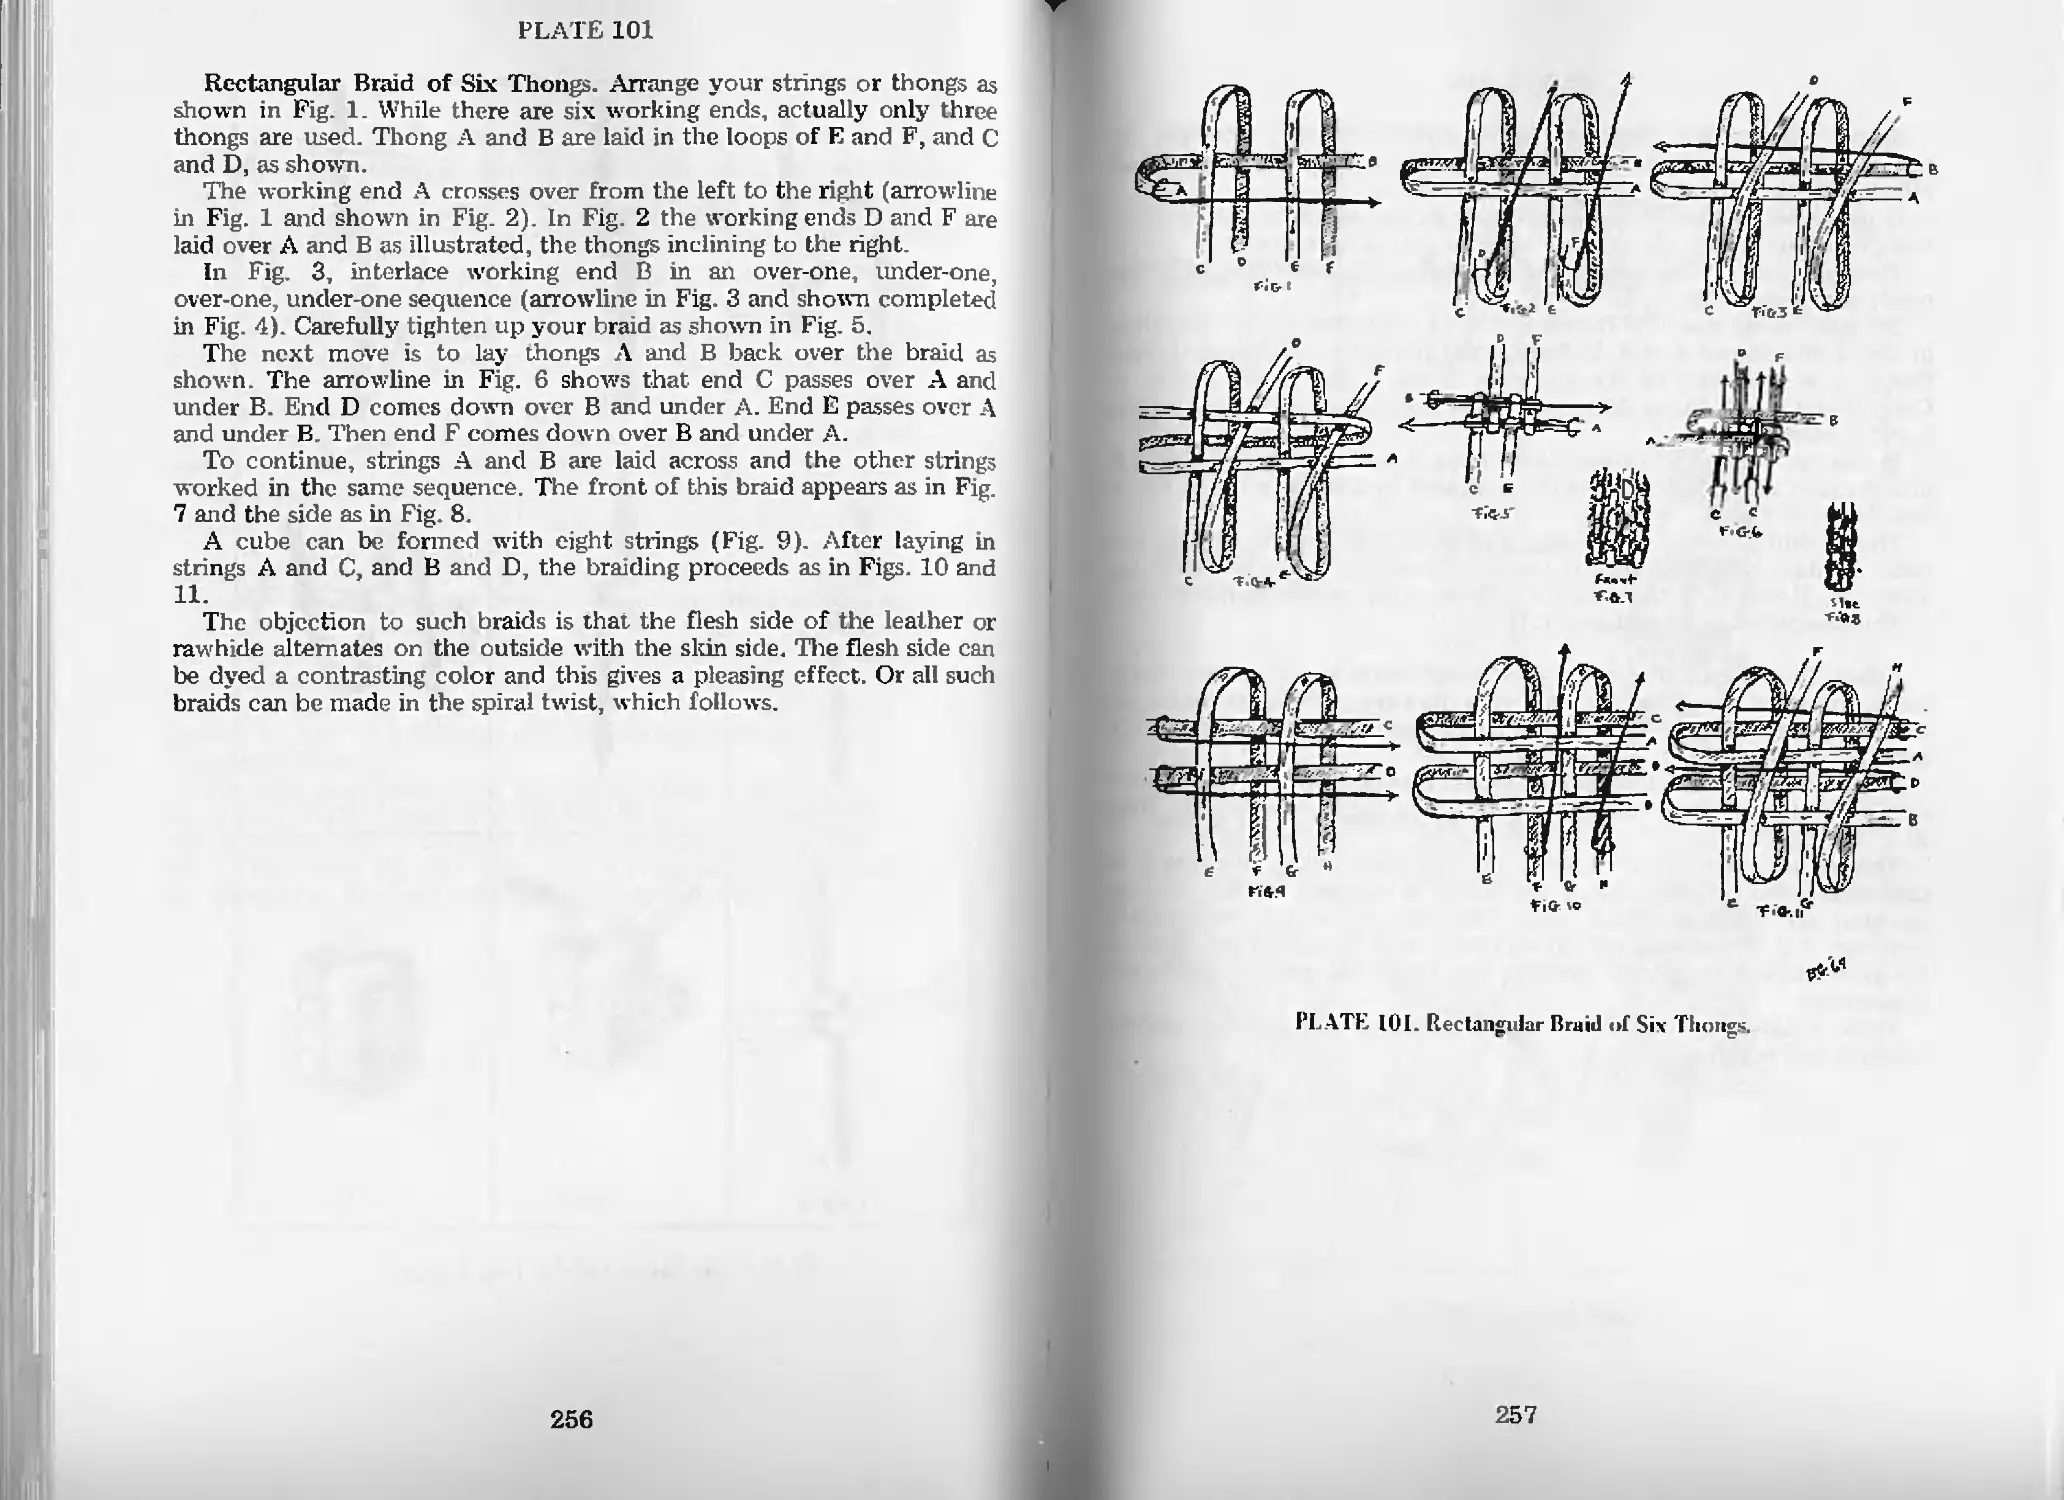
Rectangular Braid of Six Thongs—Pl. 101 256
Spiral Braid—Pl. 102 258
Spiral Twist Braid—Pl 102 258
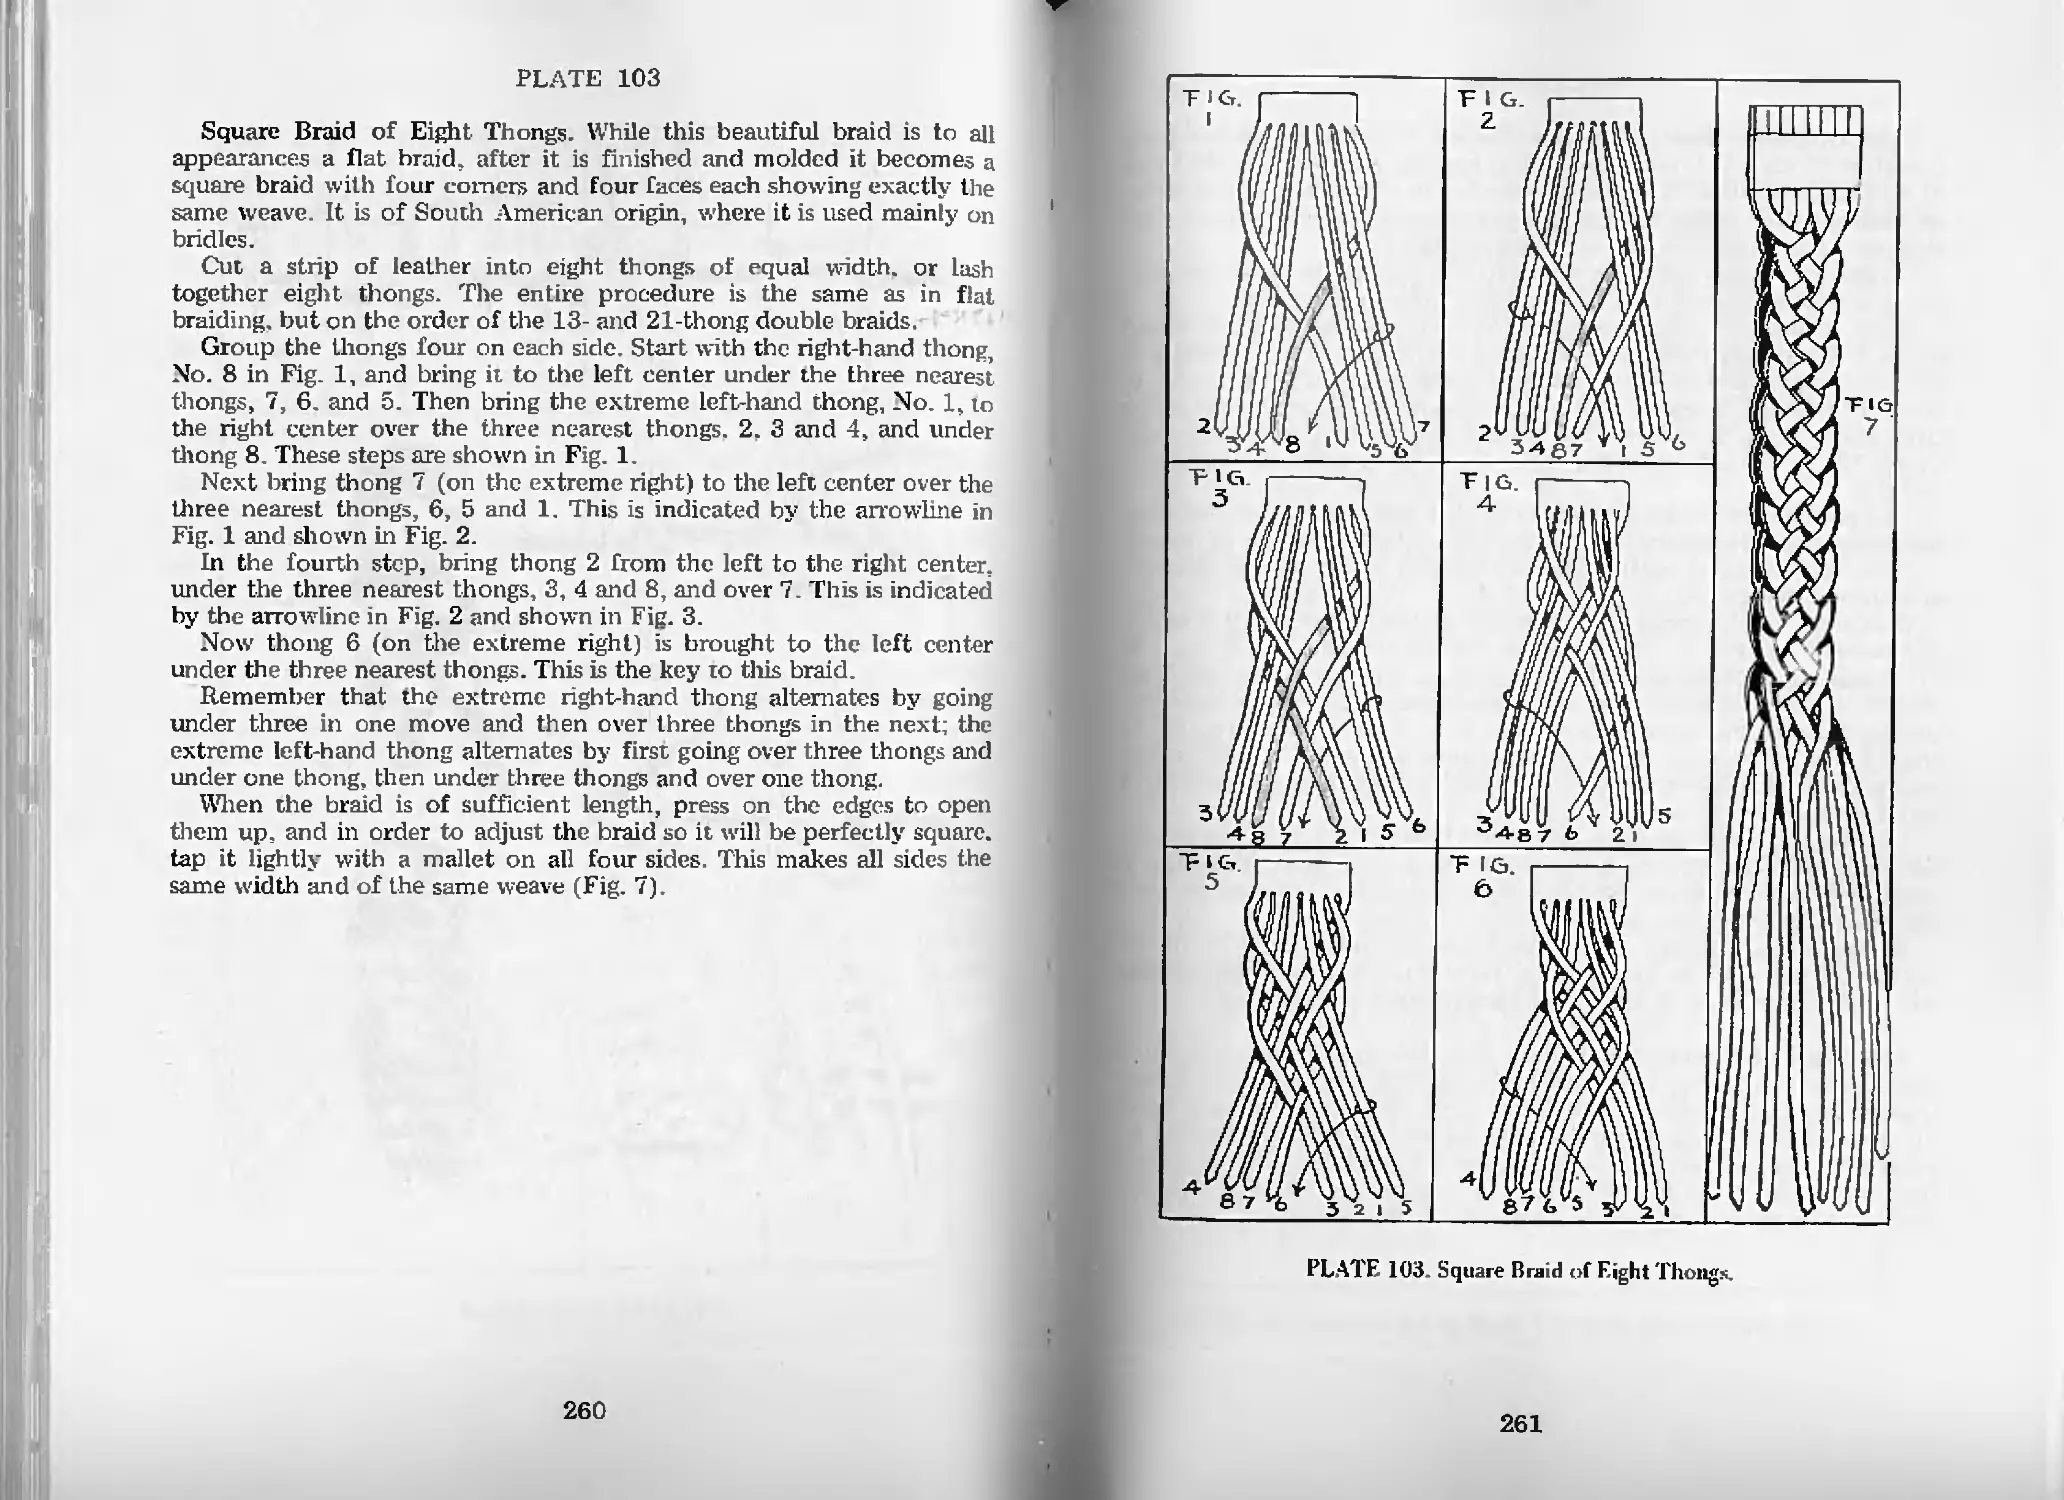
Square Braid of Eight Thongs—Pl. 103 260
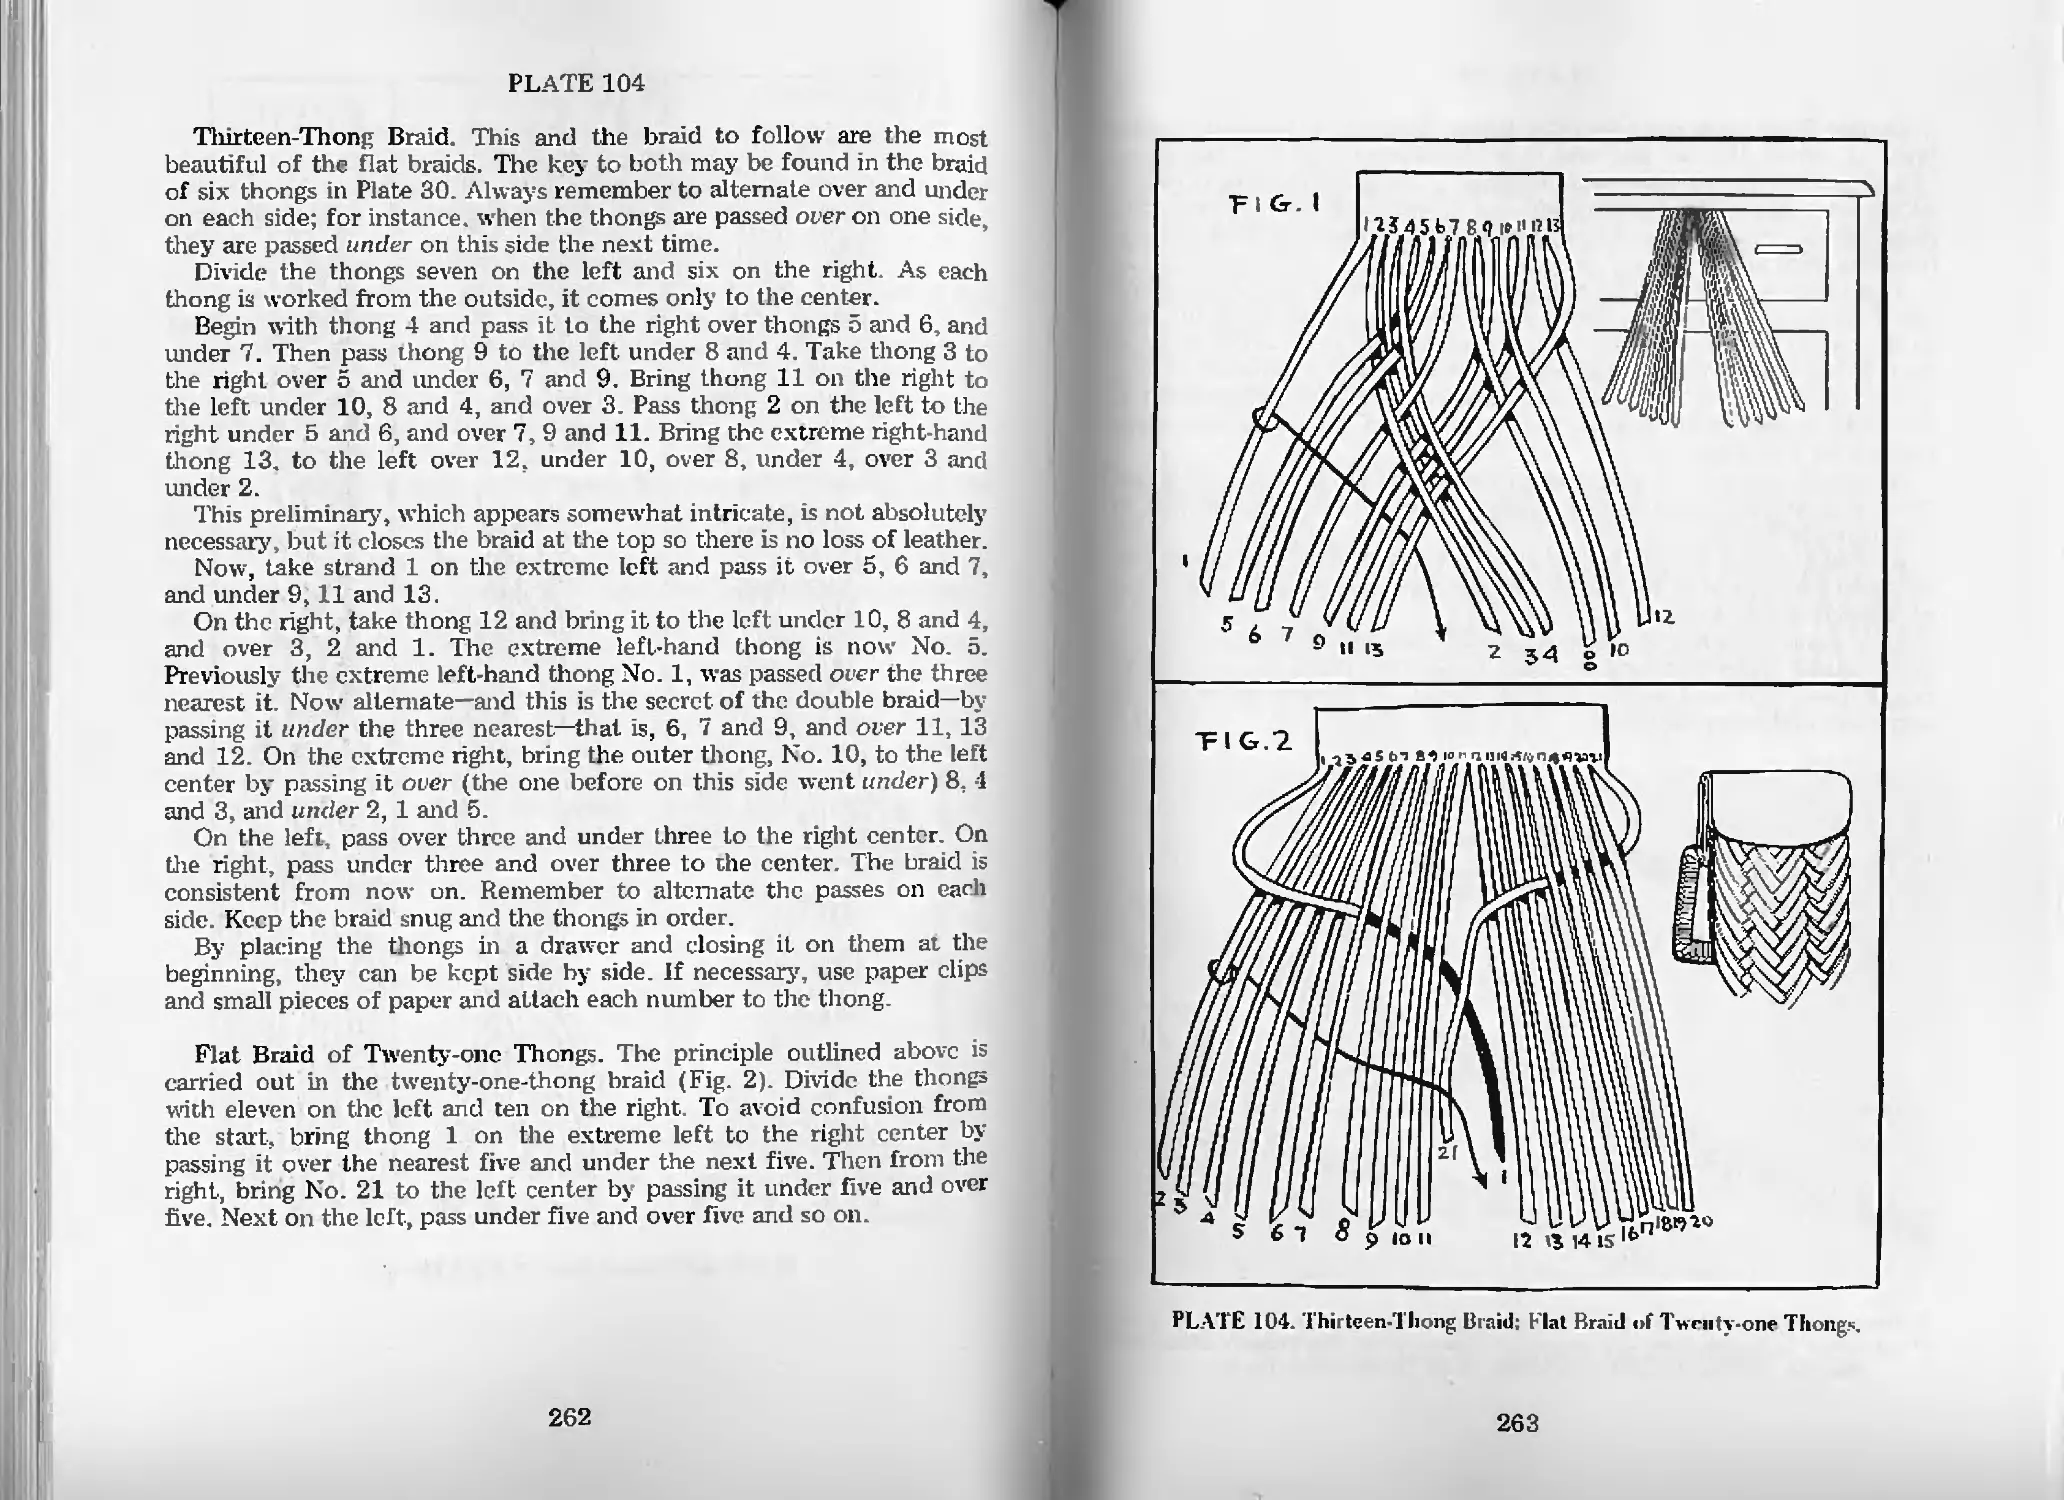
Thirteen-Thong Braid—Pl. 104 262
Flat Braid of Twenty-one Thongs—Pl. 104 262
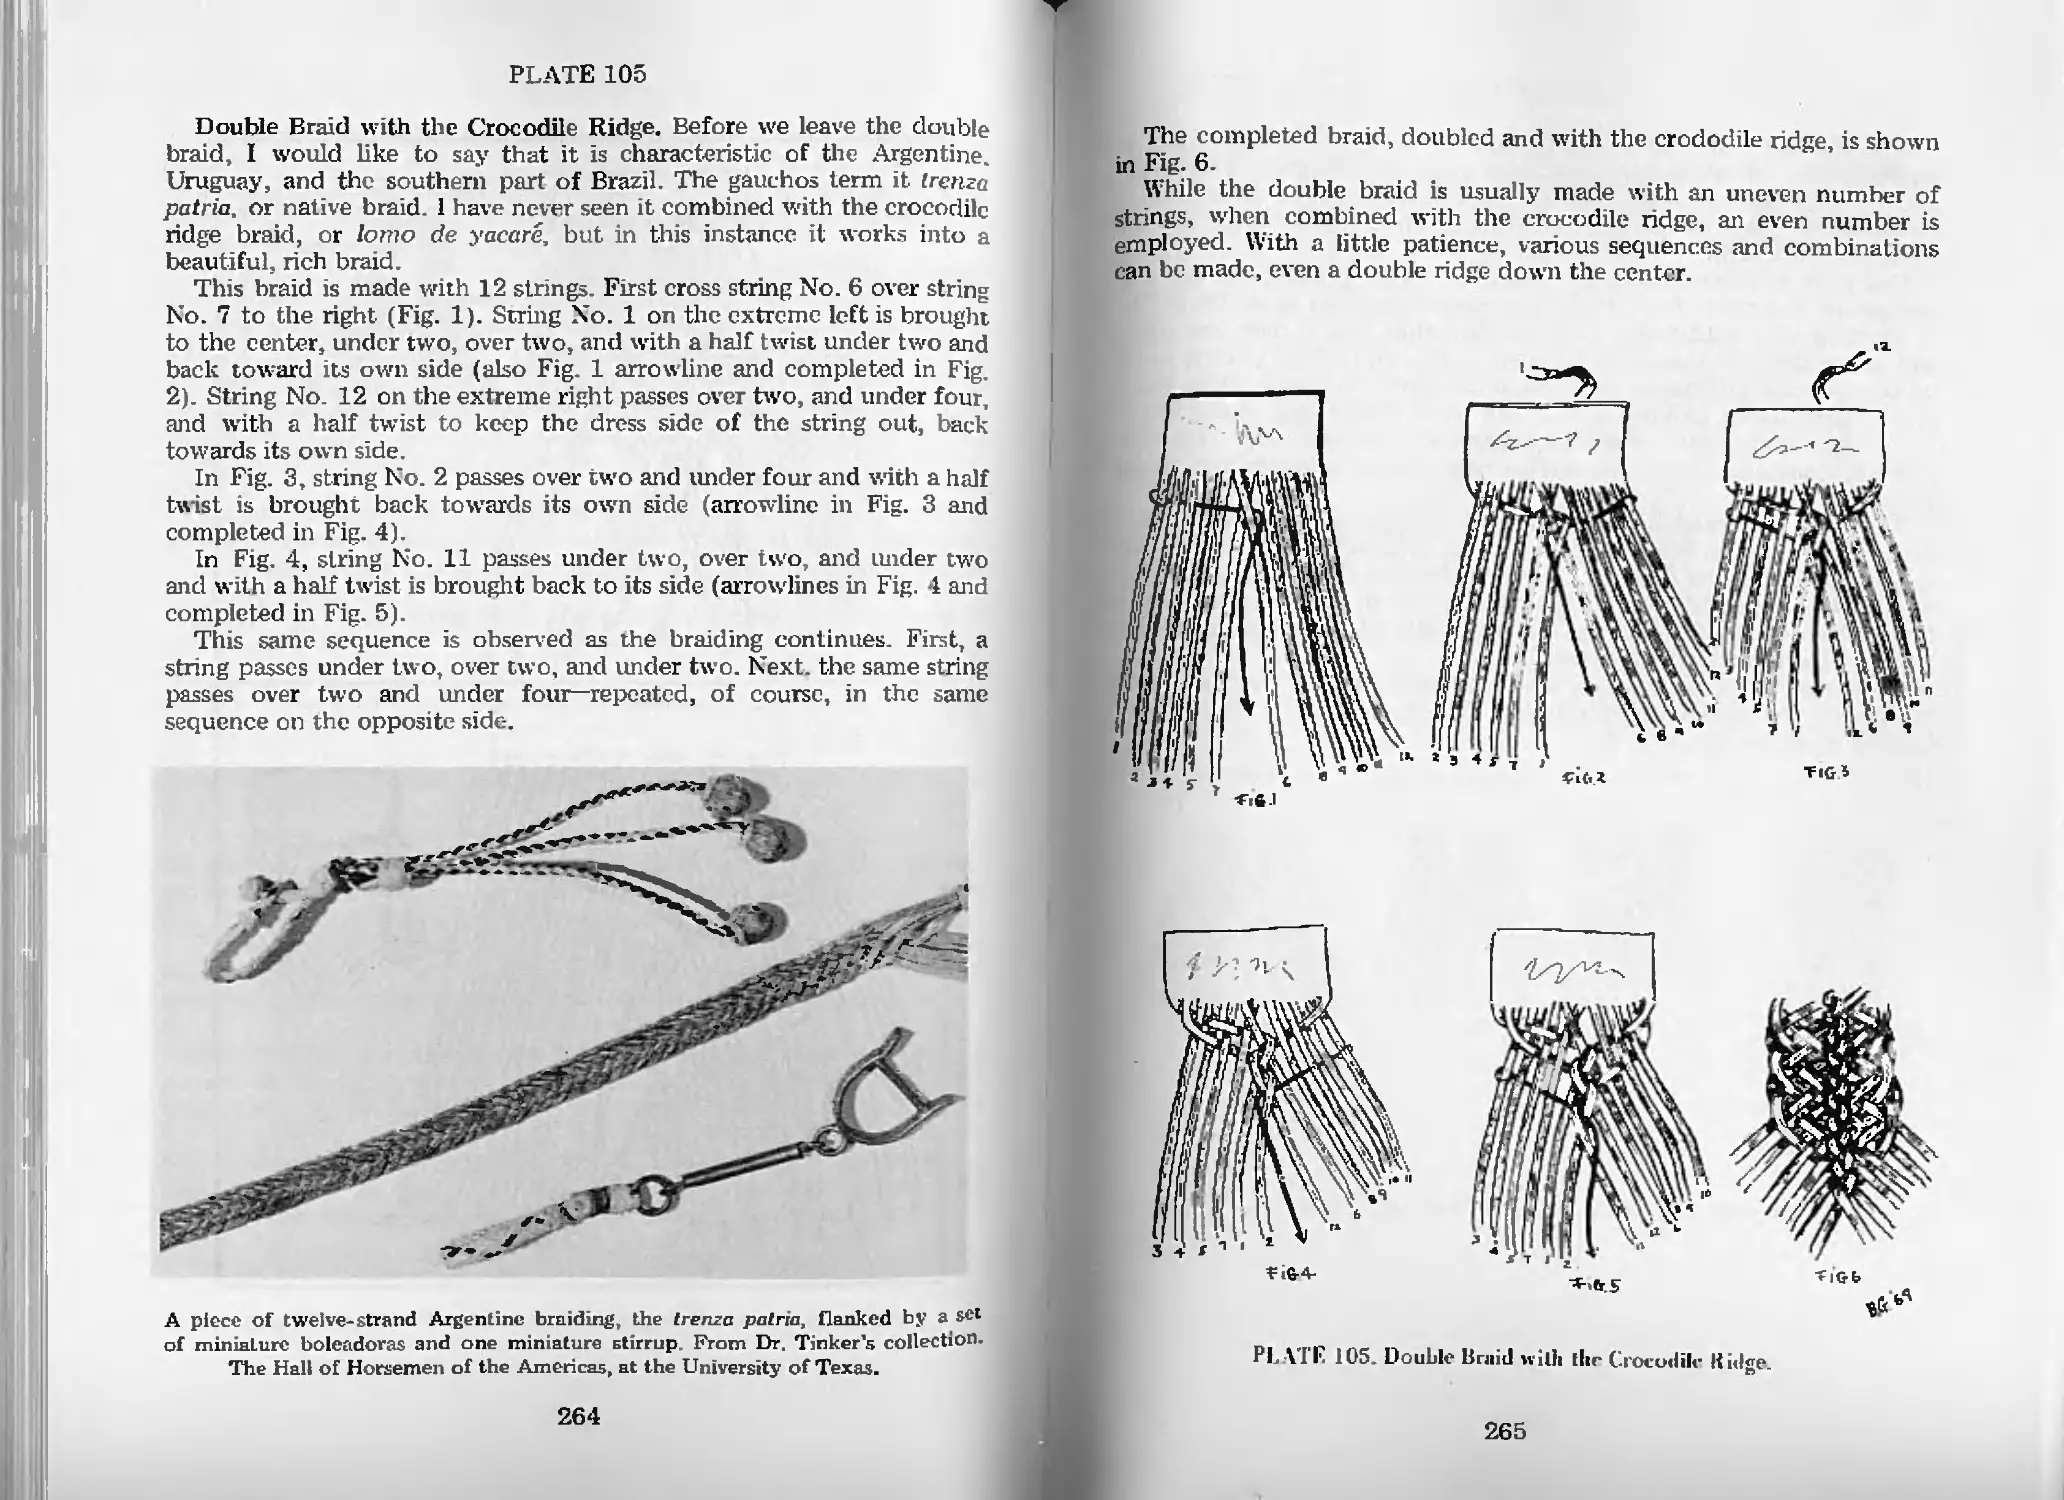
Double Braid with the Crocodile Ridge—Pl 105 264
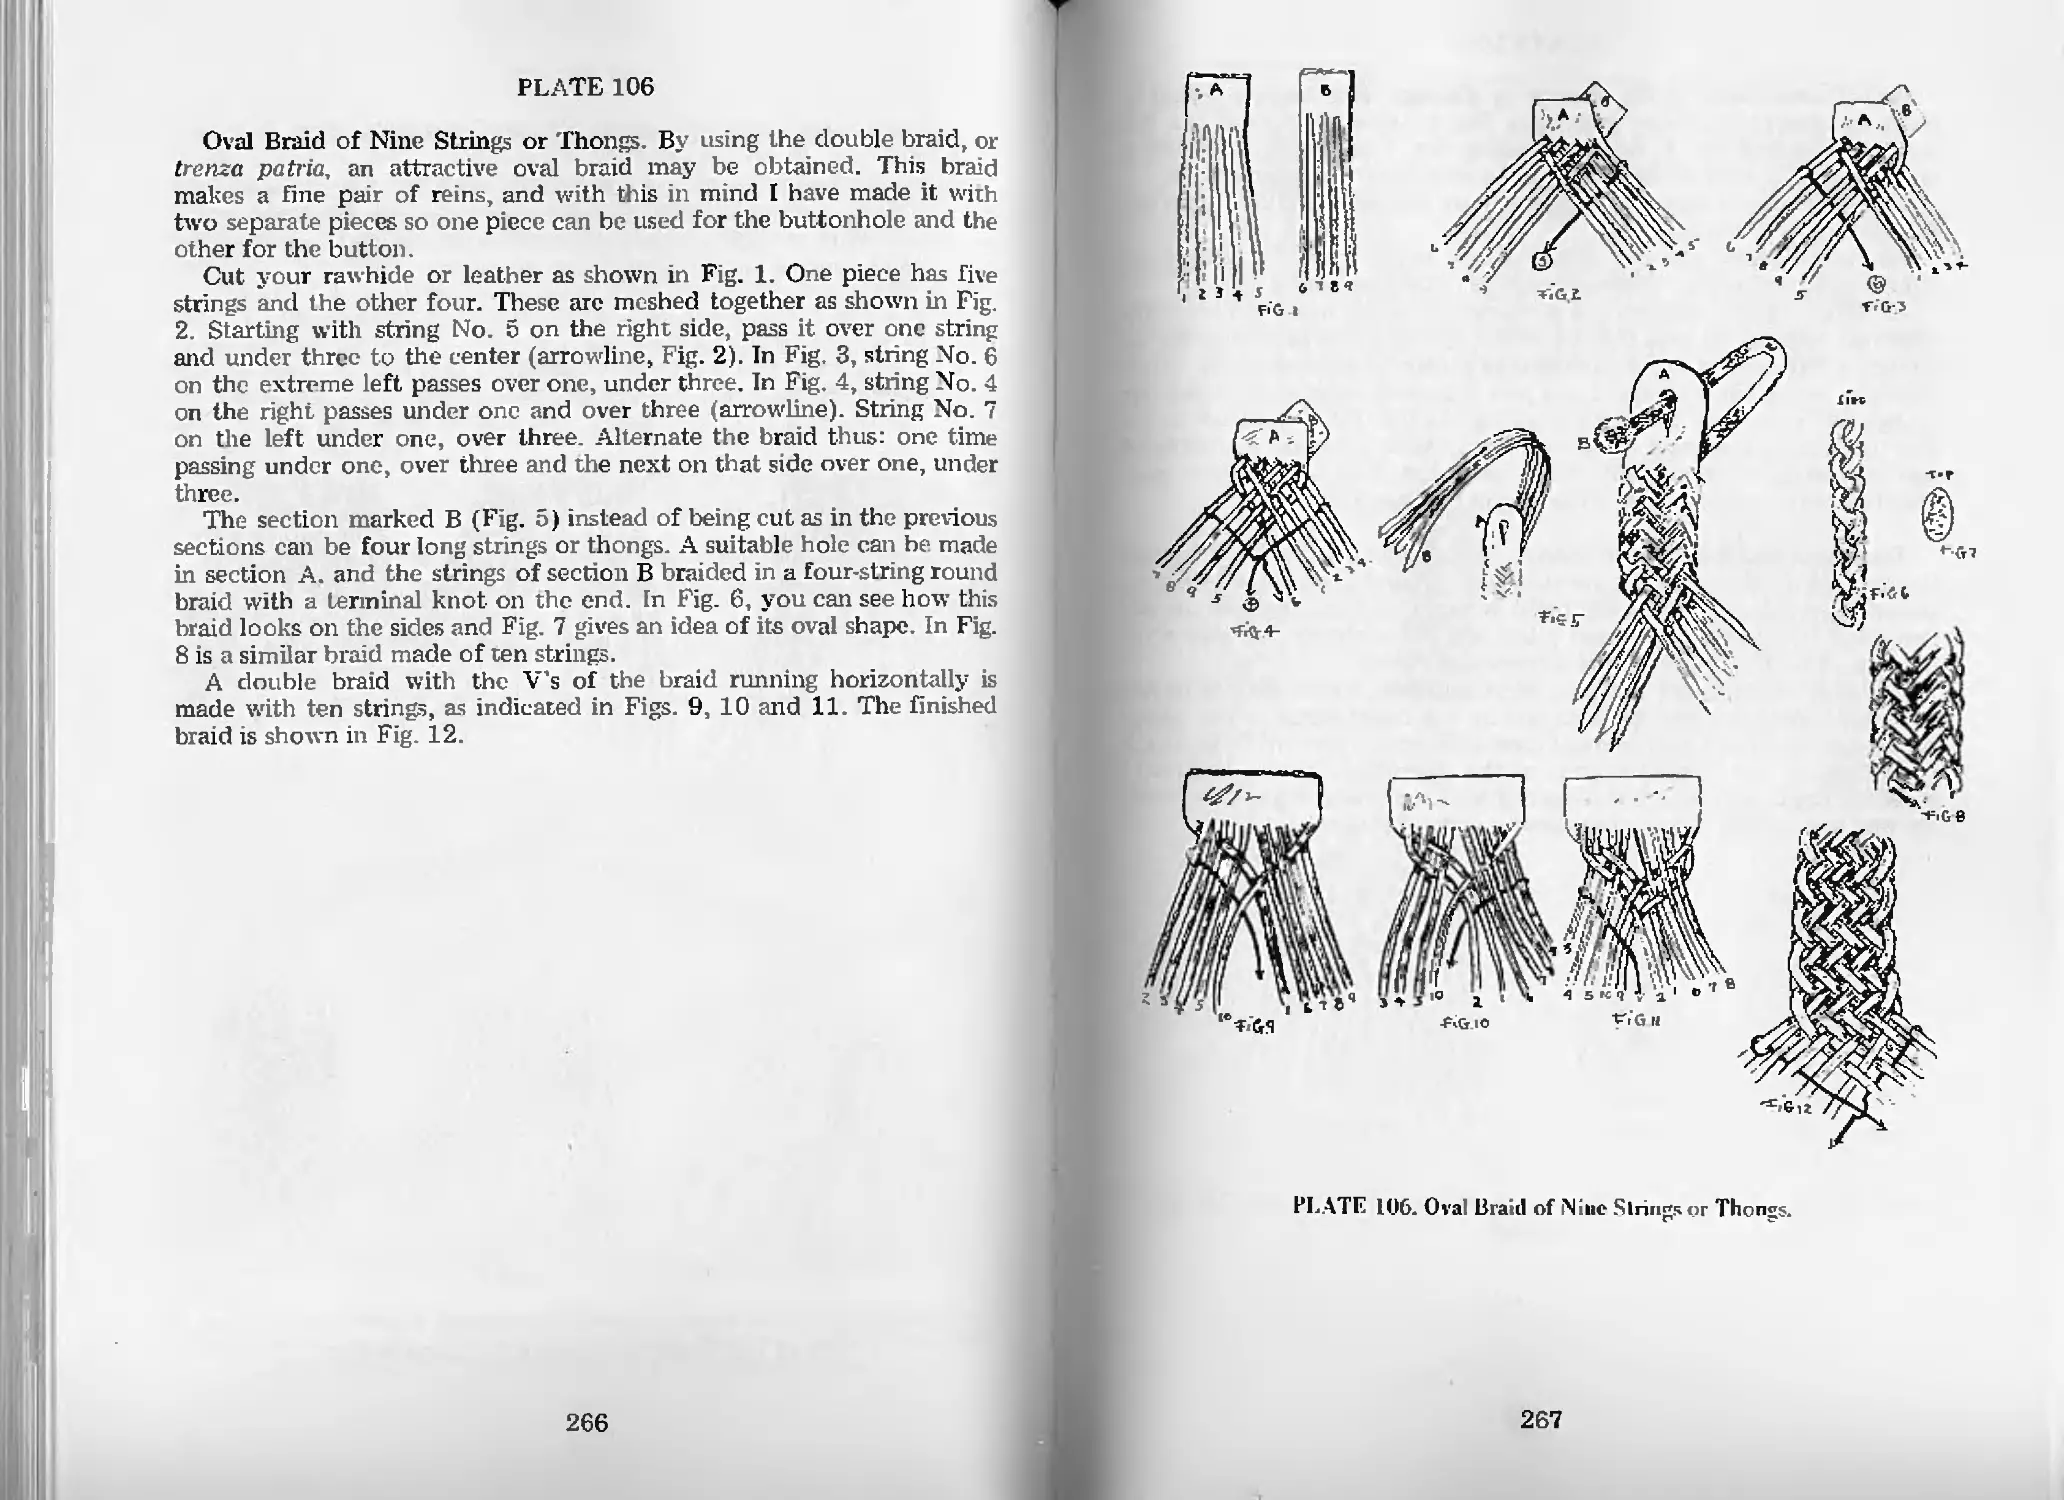
Oval Braid of Nine Strings or Thongs—Pl. 106 266
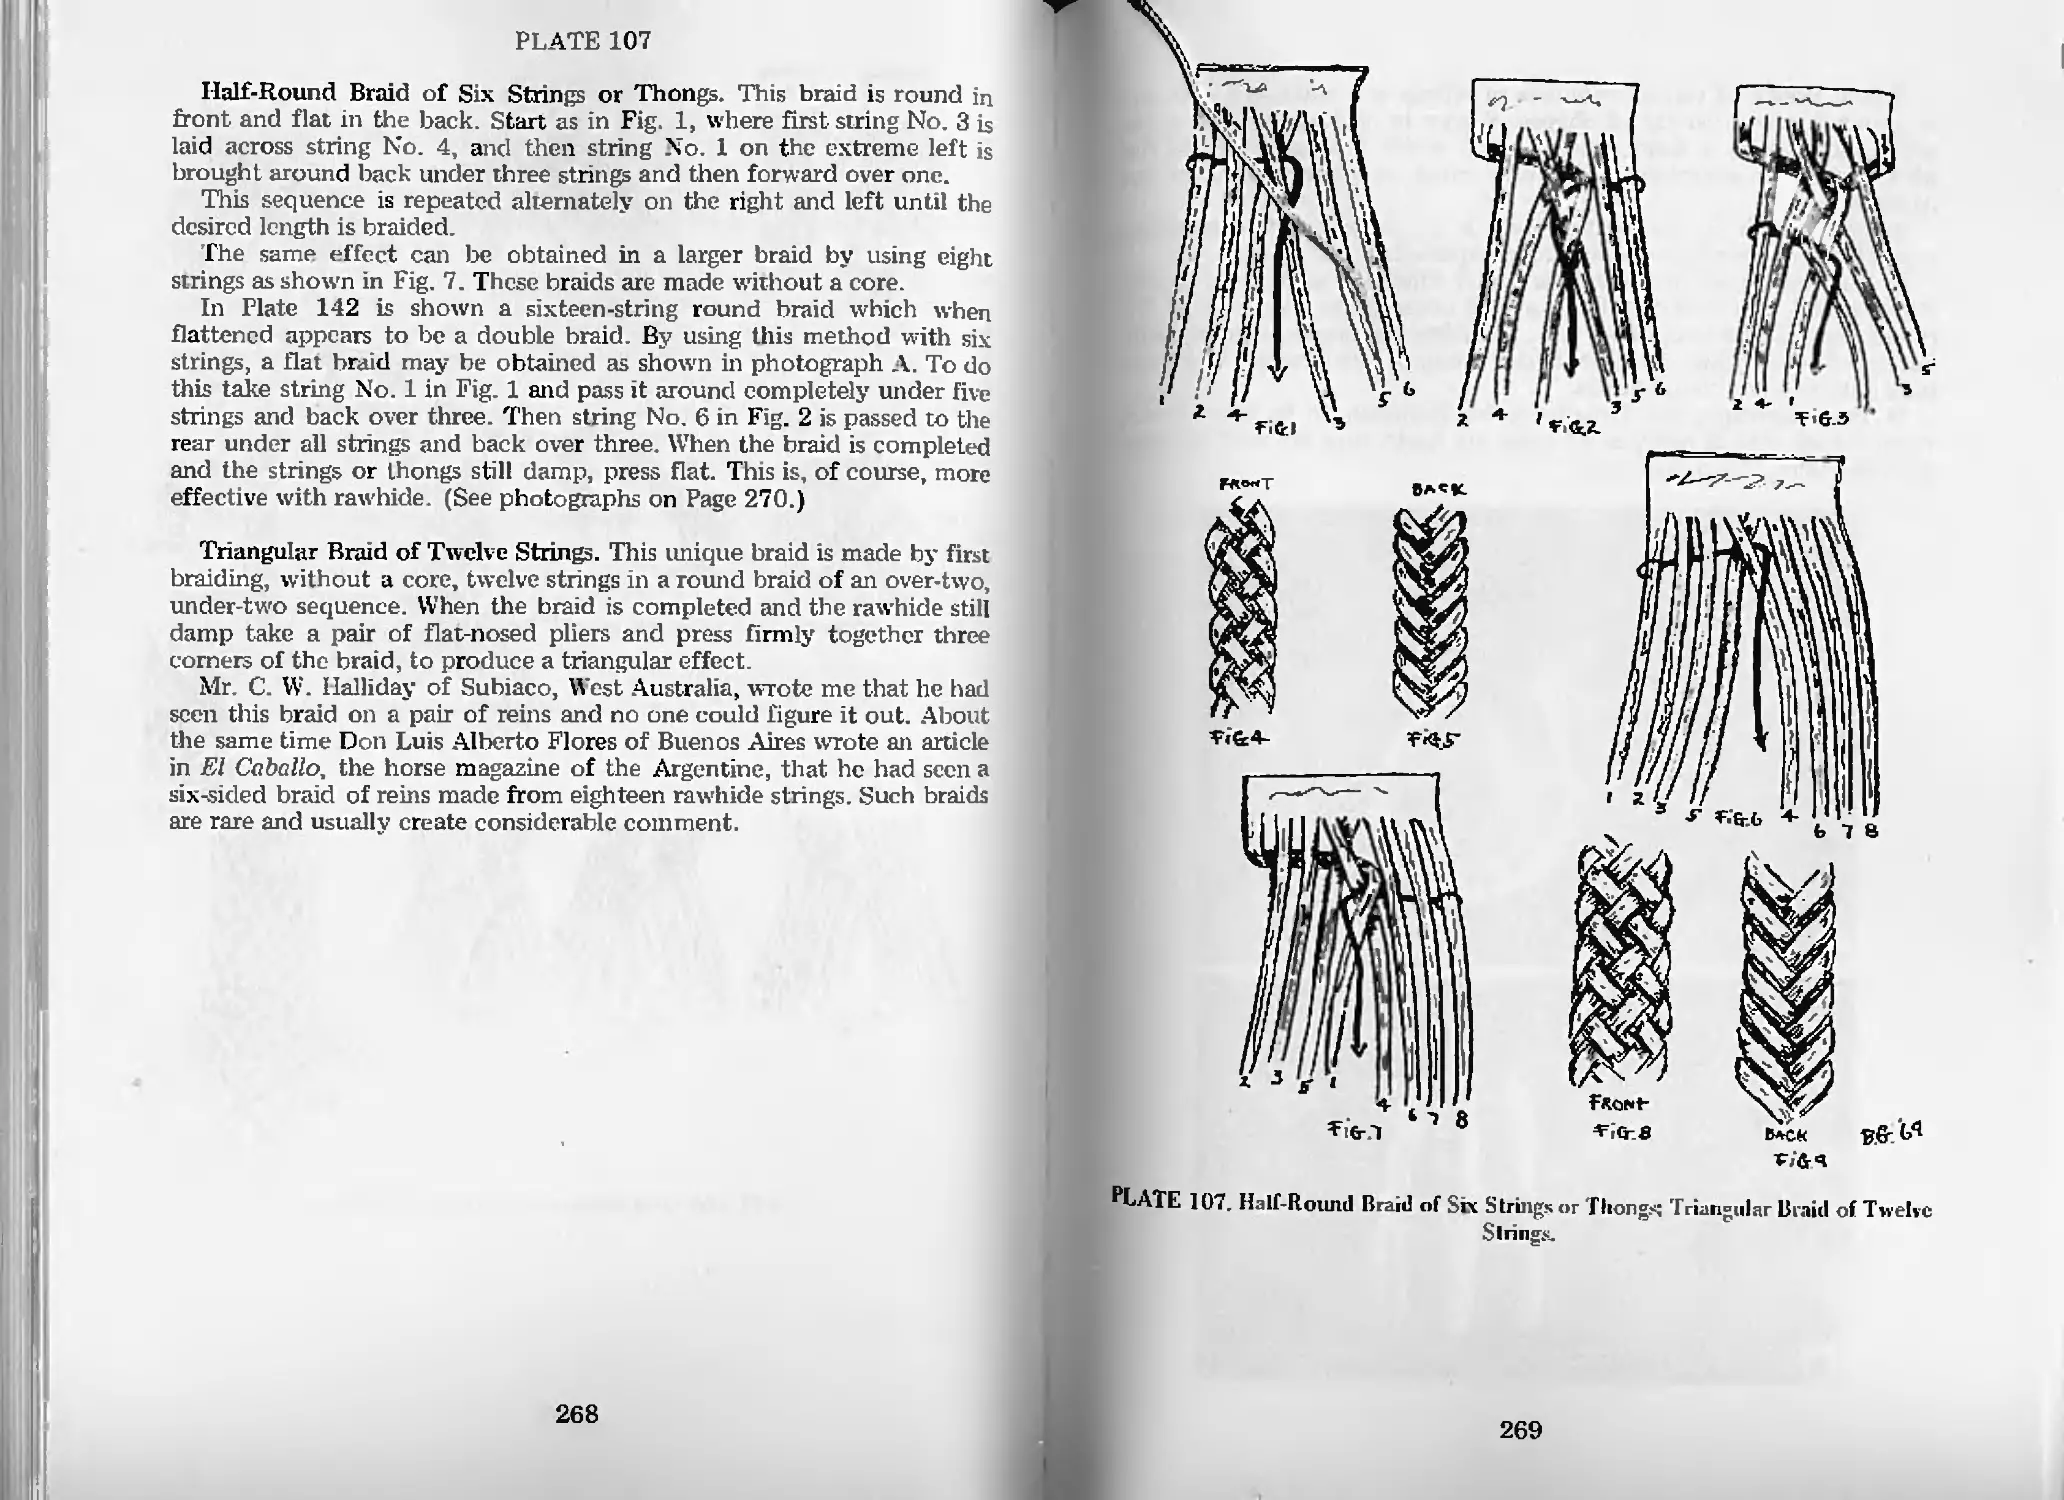
Half-Round Braid of Six Strings or Thongs—Pl. 107 268
Triangular Braid of Twelve Strings—Pl. 107 268
Buttons
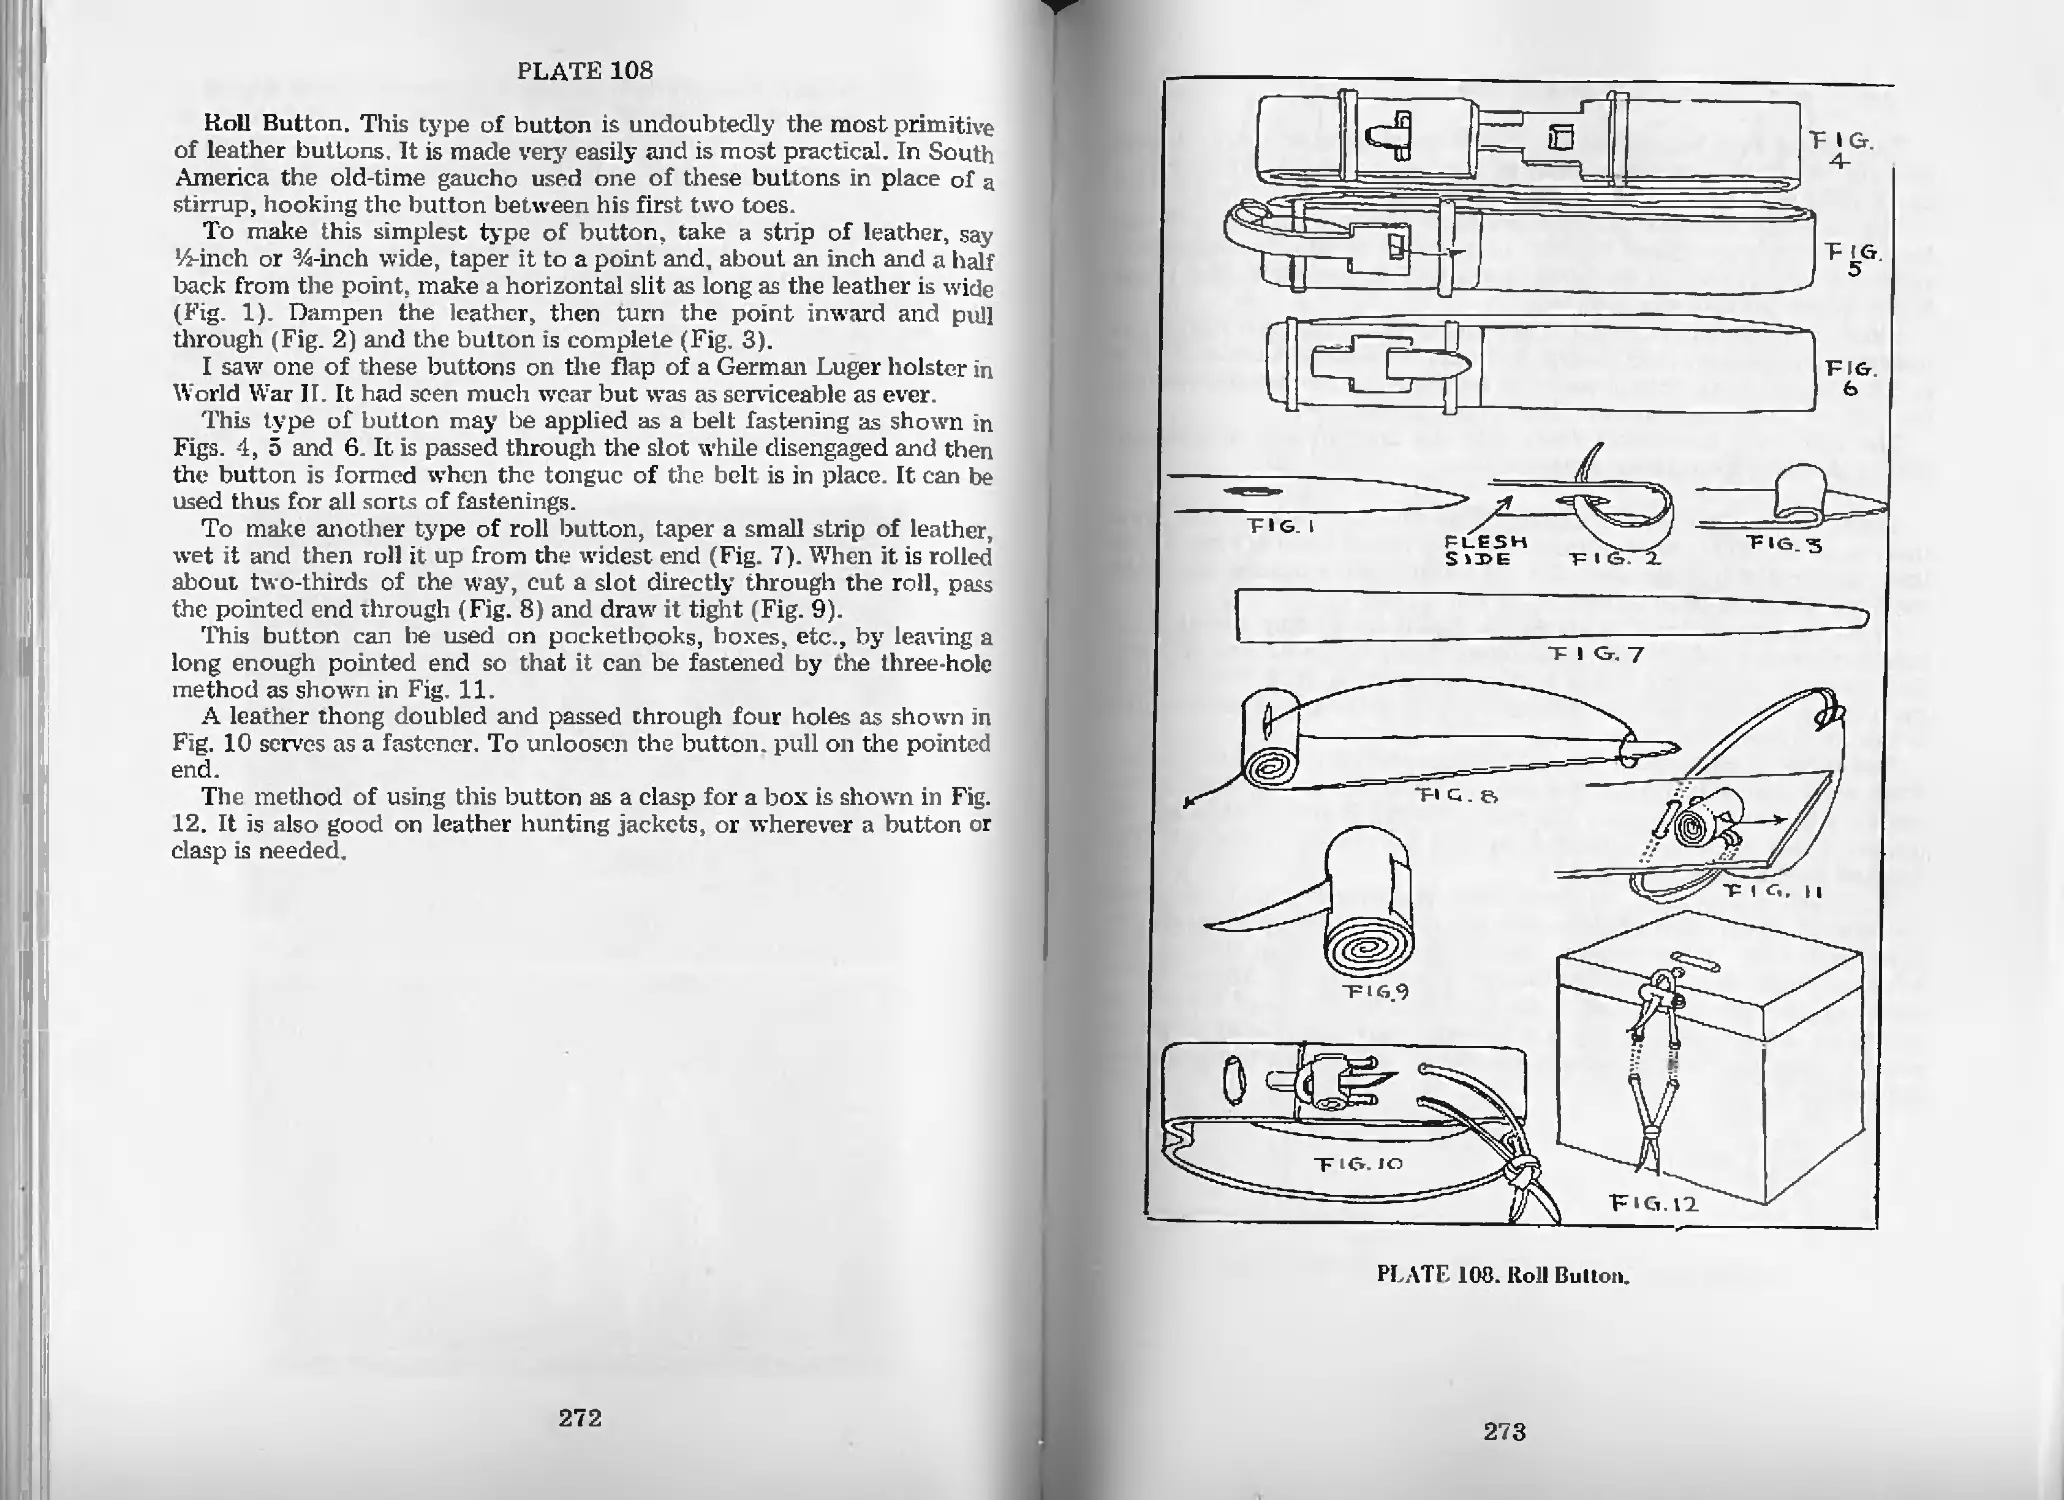
Roll Button—Pl. 108 272
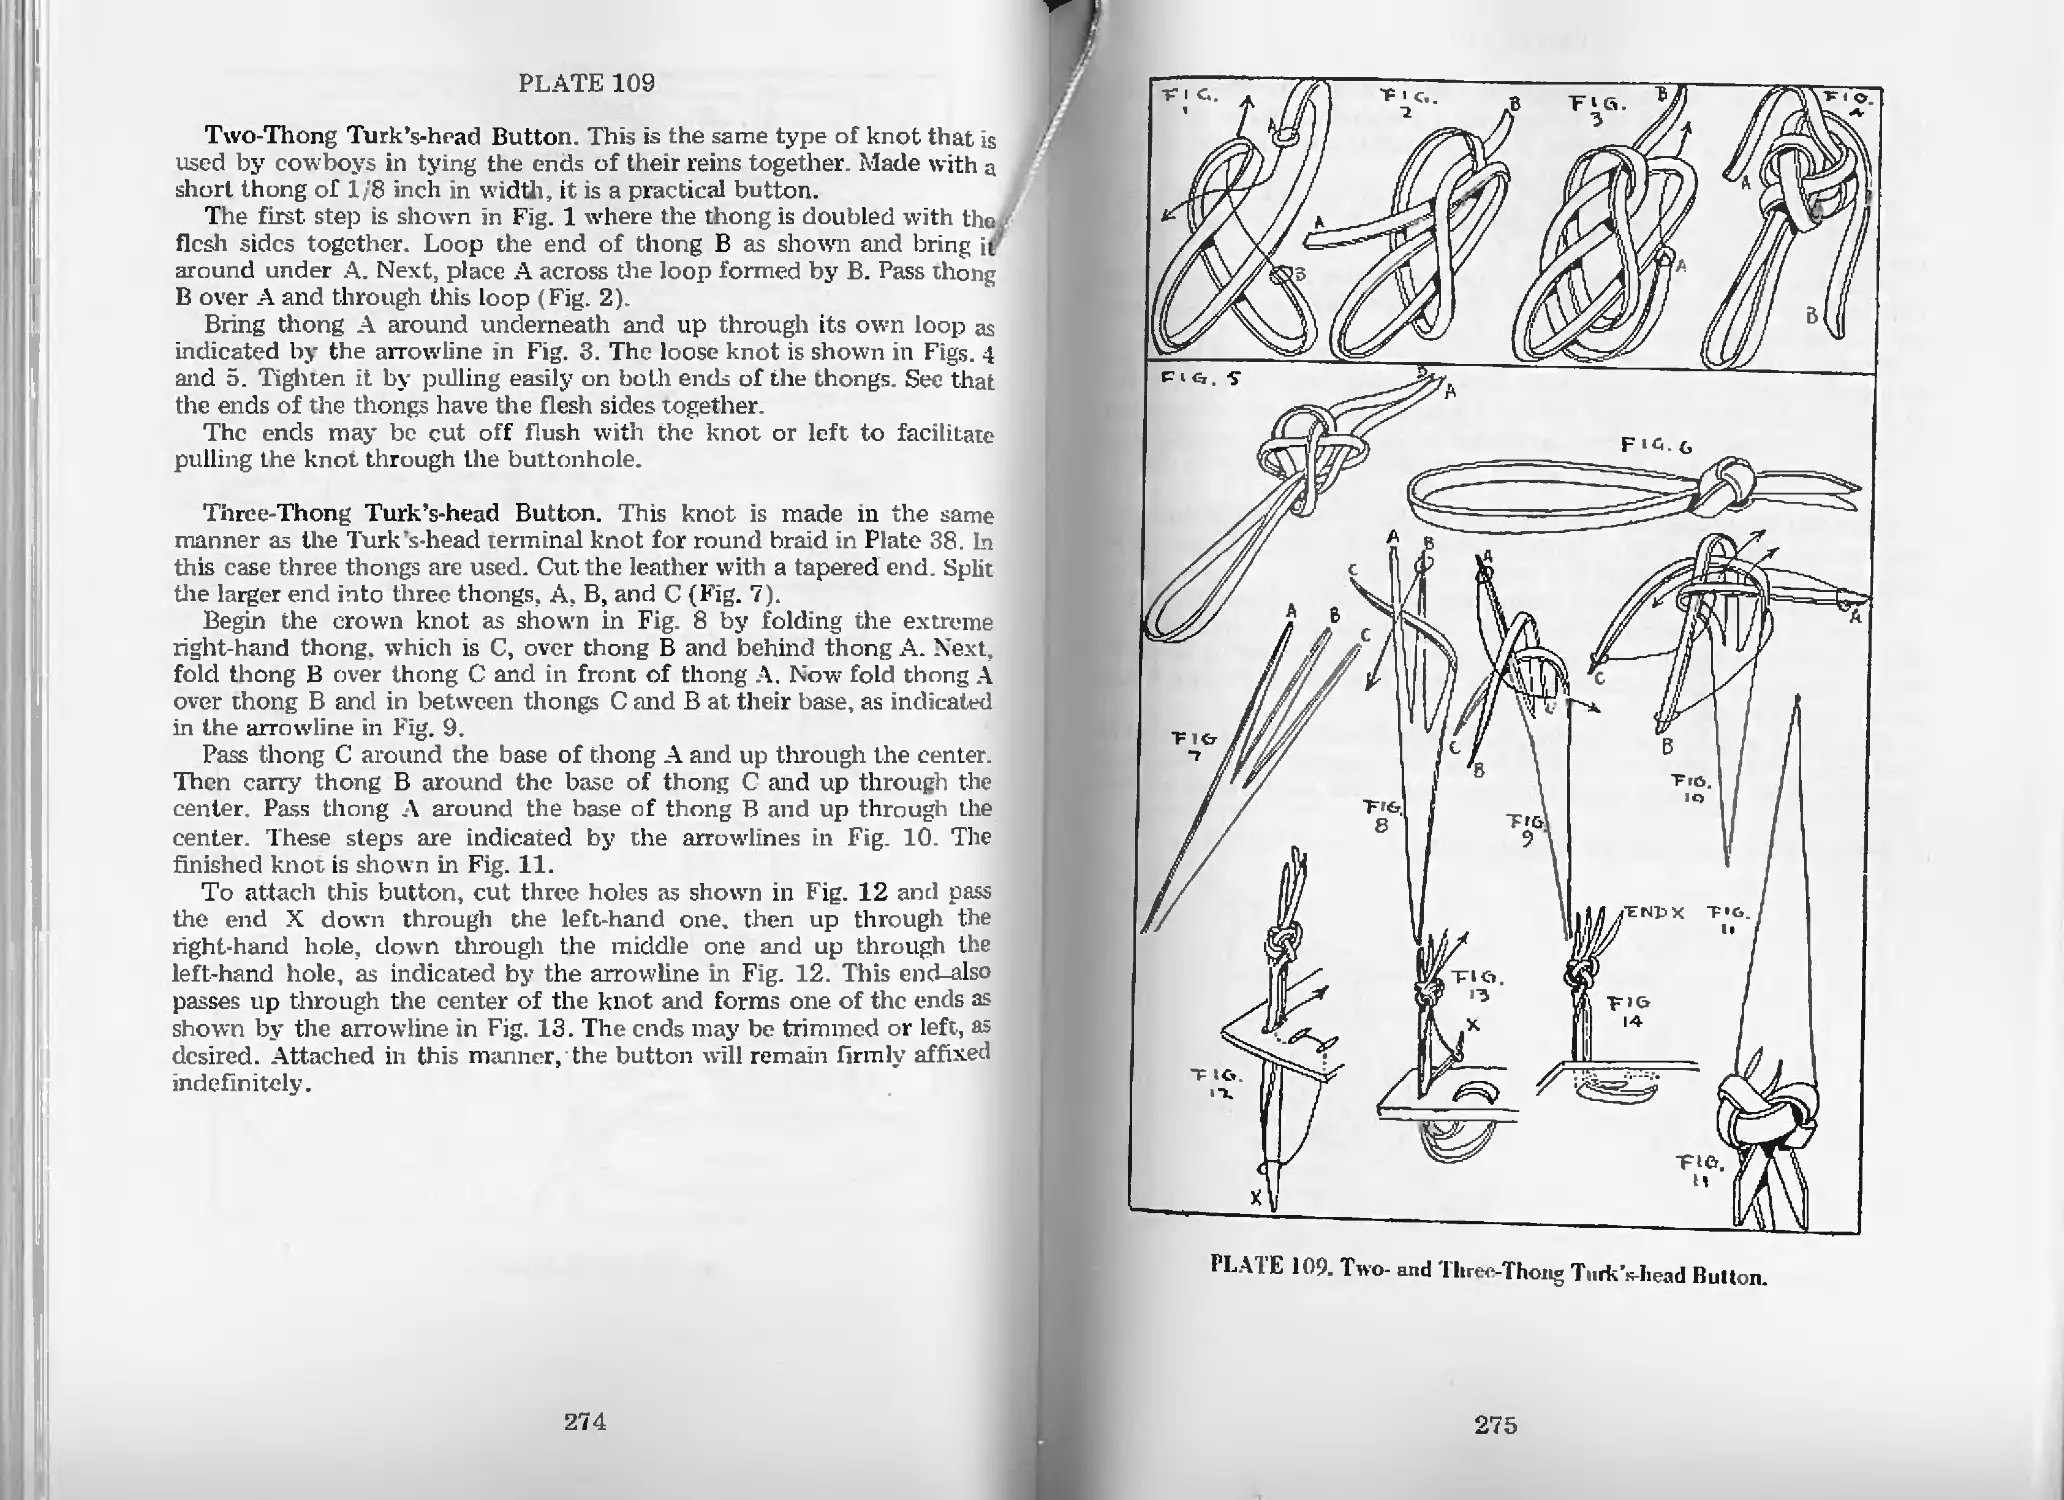
Two-Thong Turk’s-head Button—Pl. 109 274
Three-Thong Turk’s-head Button—Pl. 109 274
Chinese Button Knot—Pl. 110 276
Diamond Button Knot-Pl. 110 276
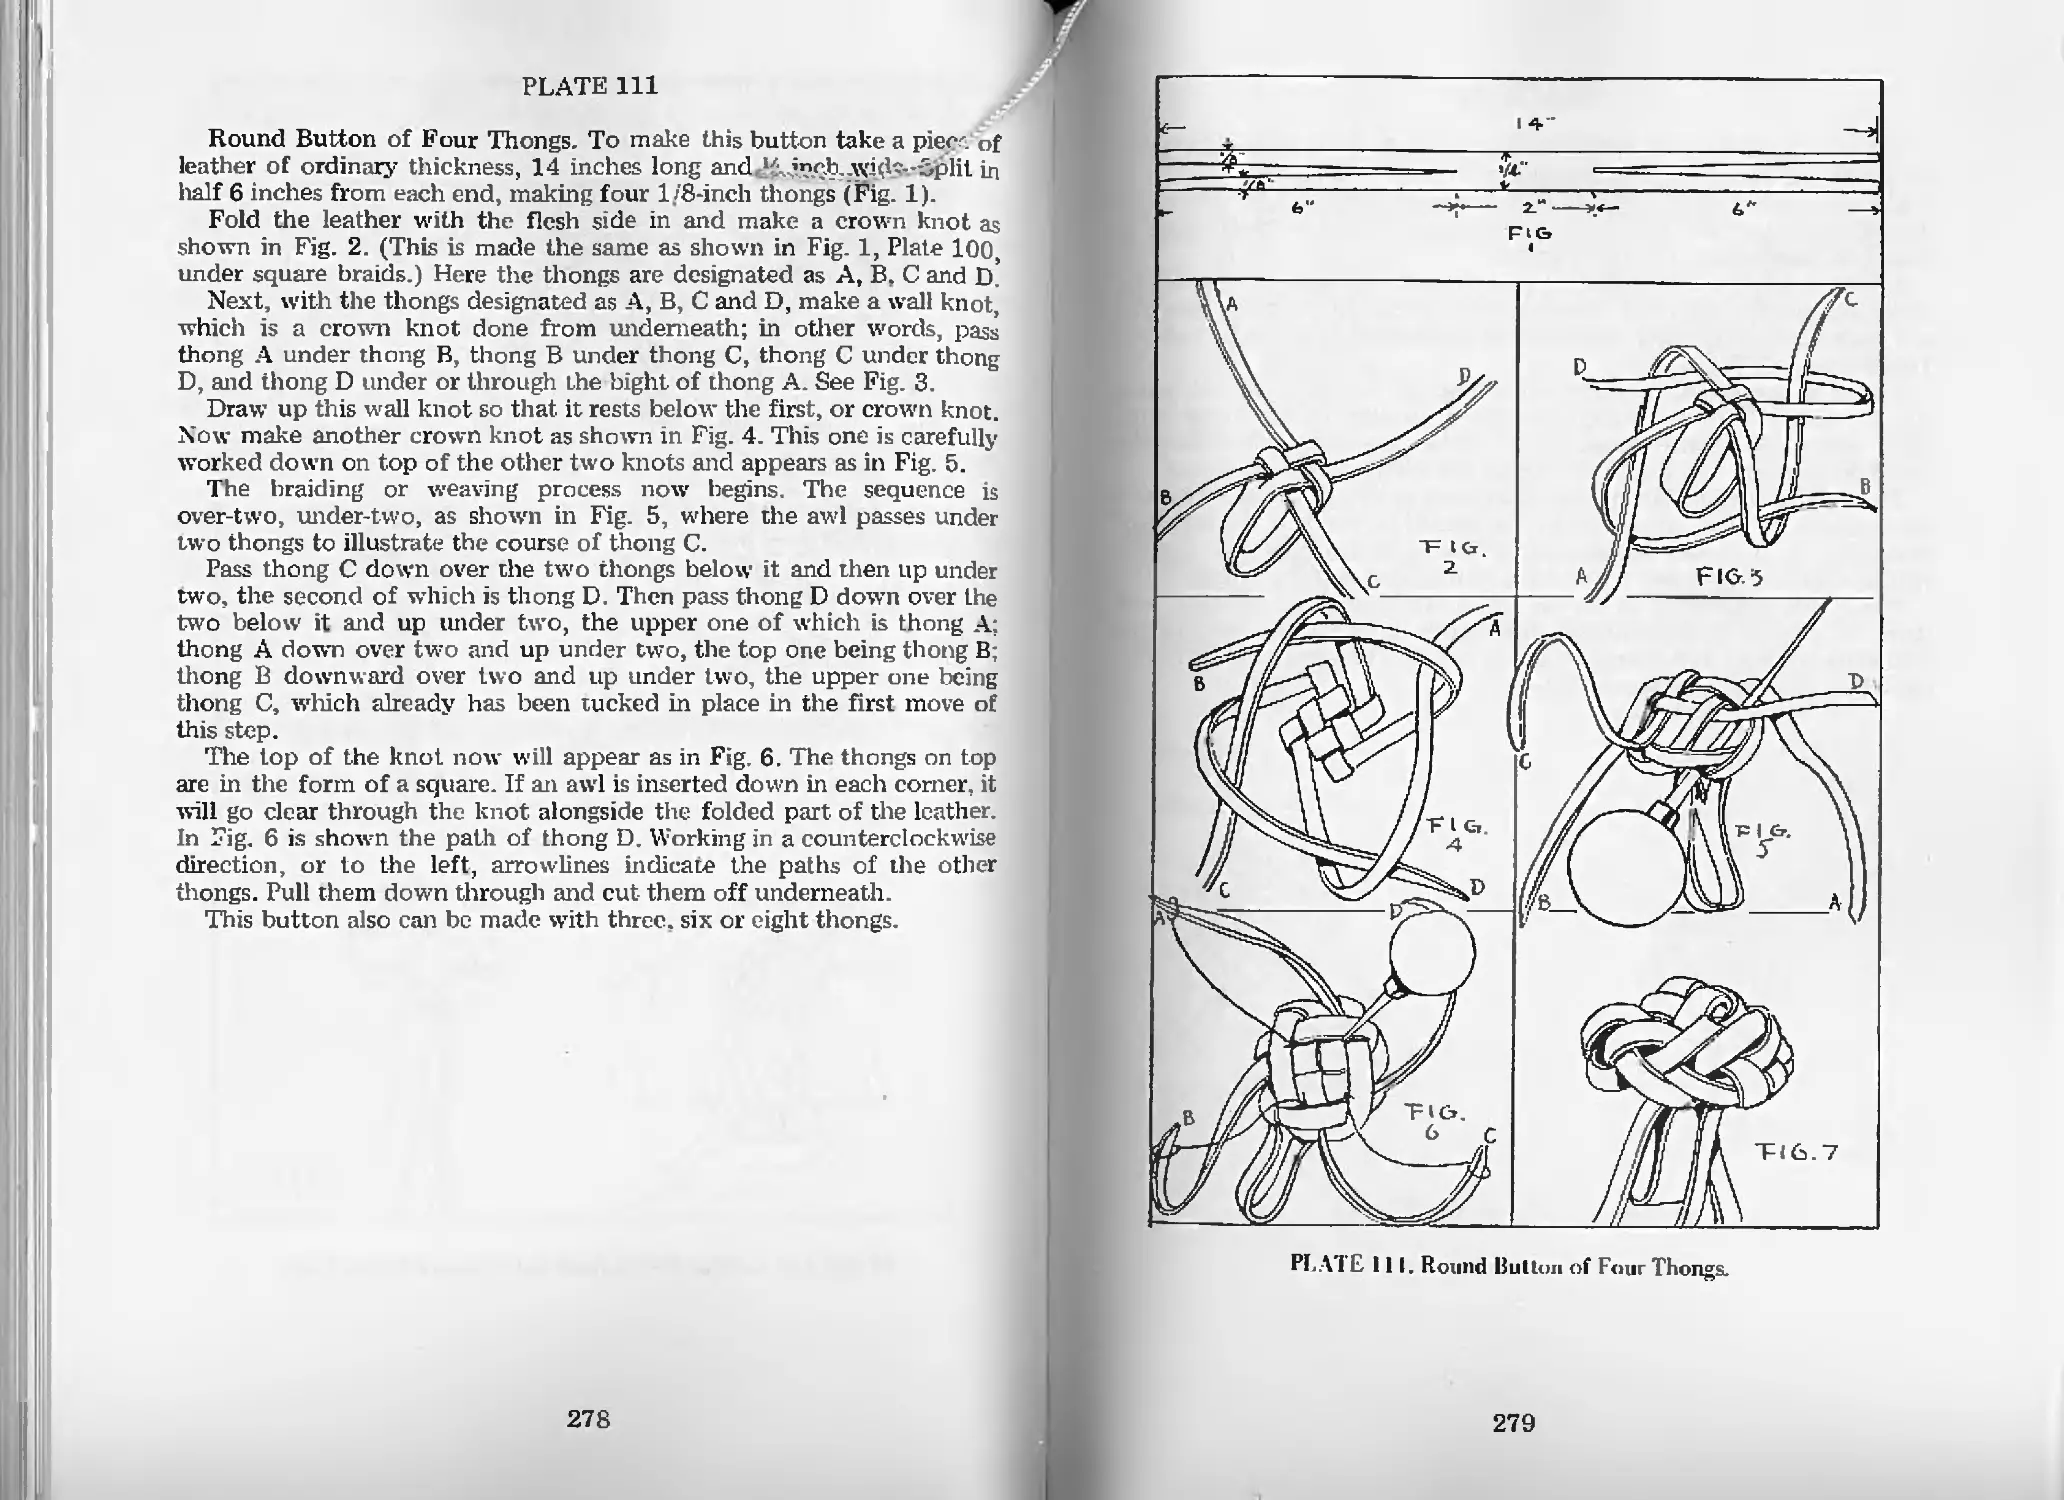
Round Button of Four Thongs—Pl. Ill 278
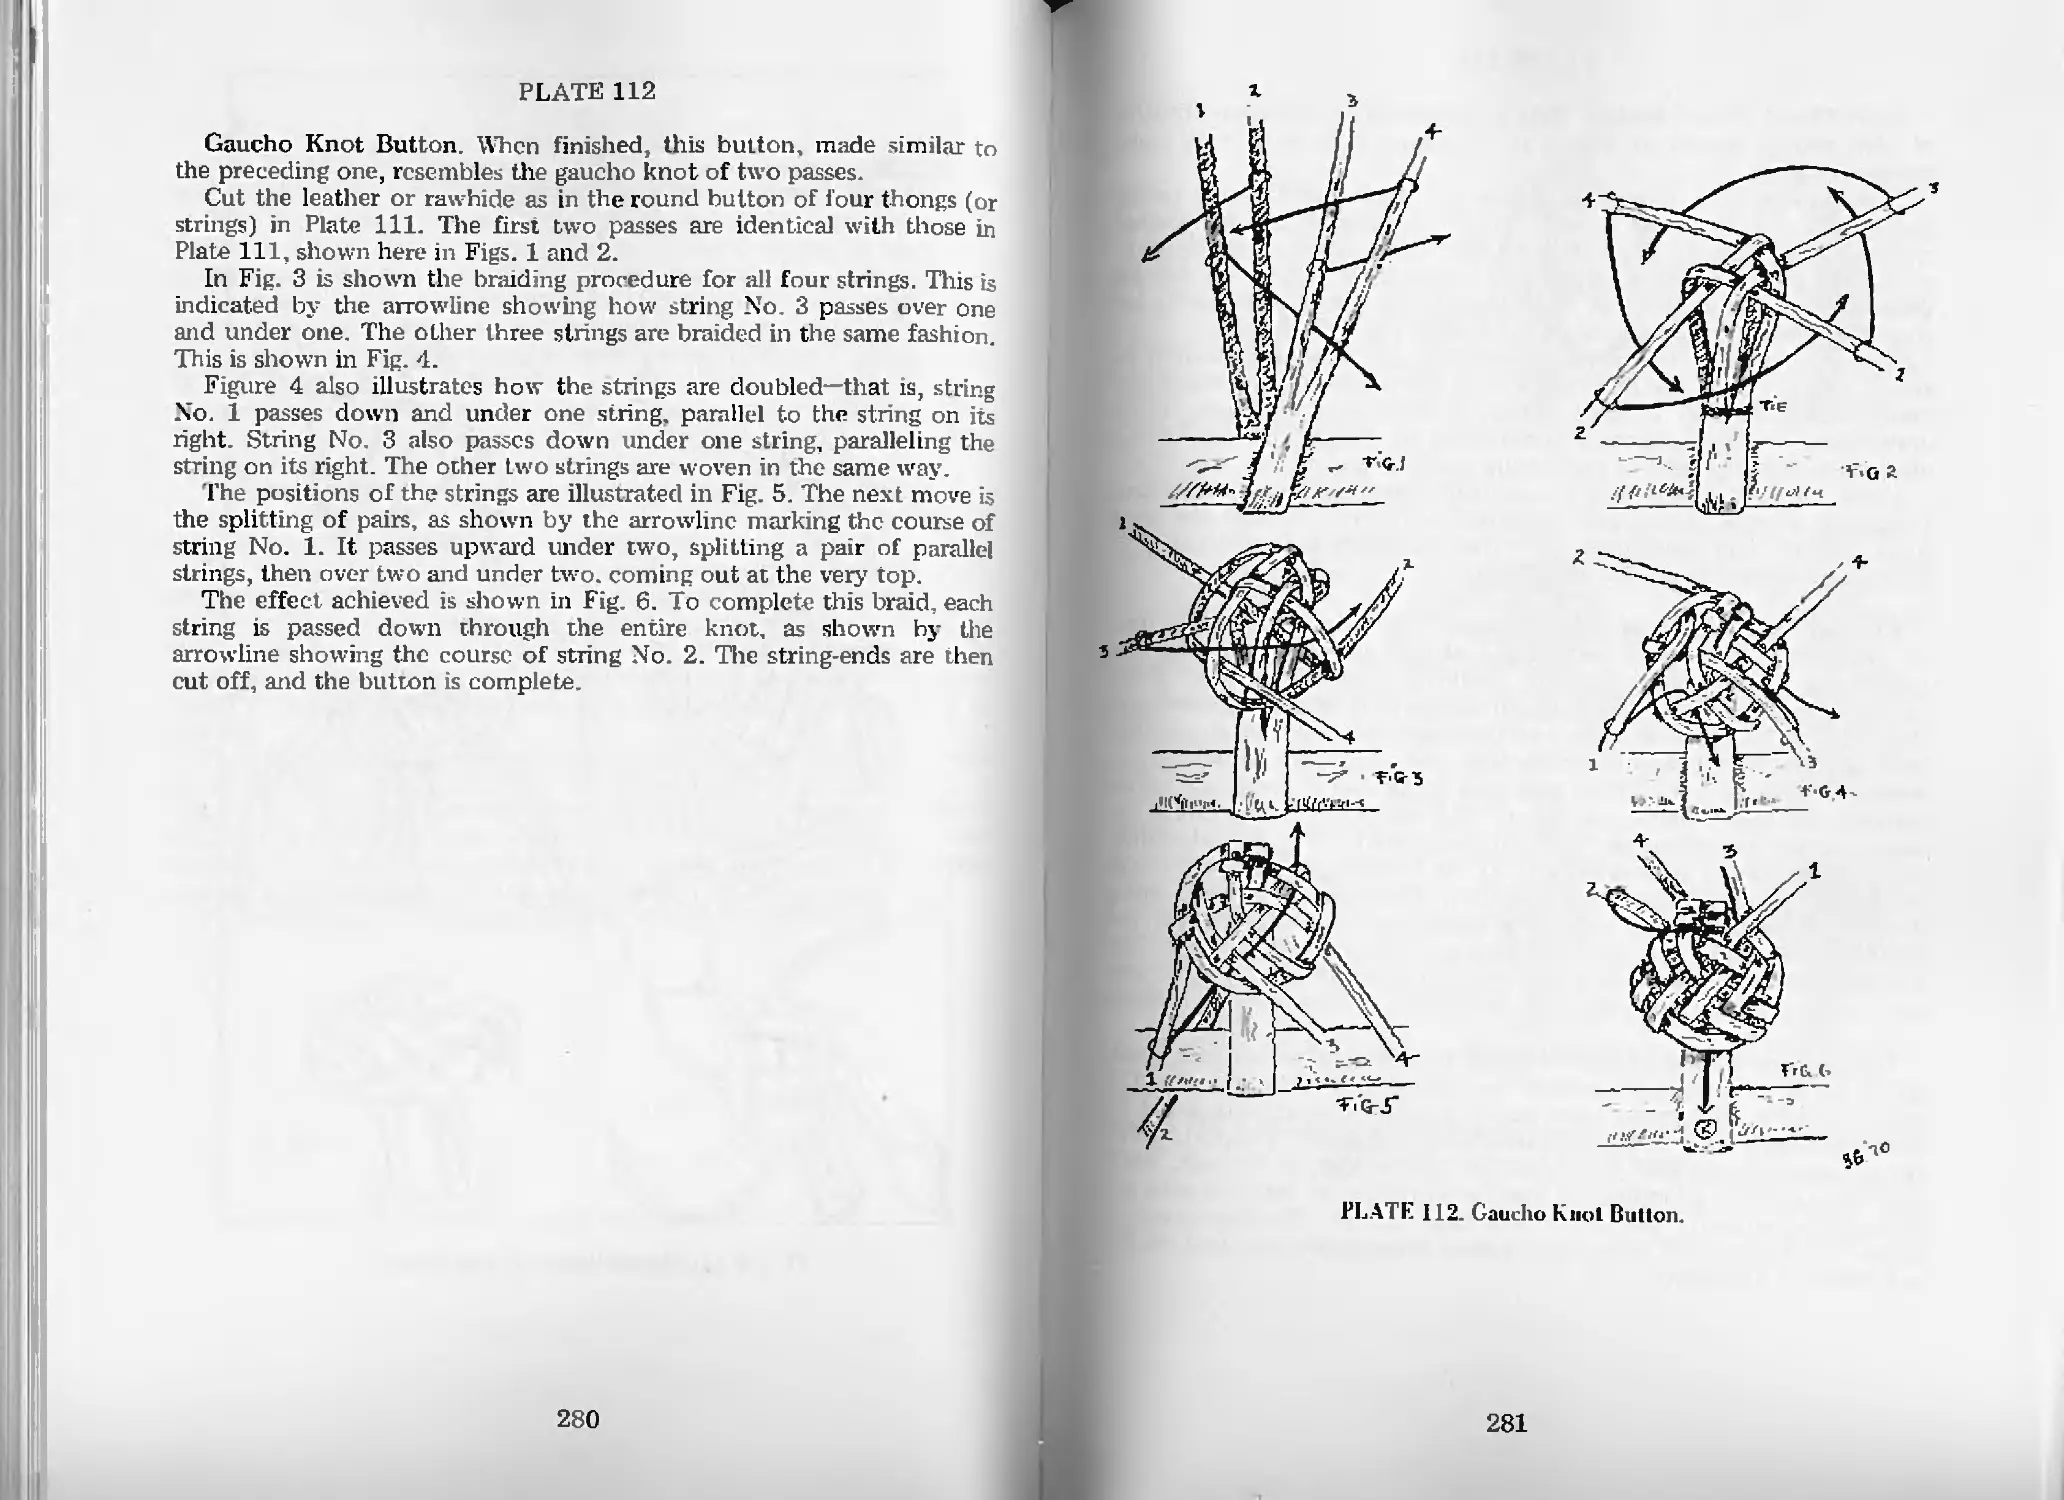
Gaucho Knot Button-Pl. 112 280
xi
Buttons (cont.)
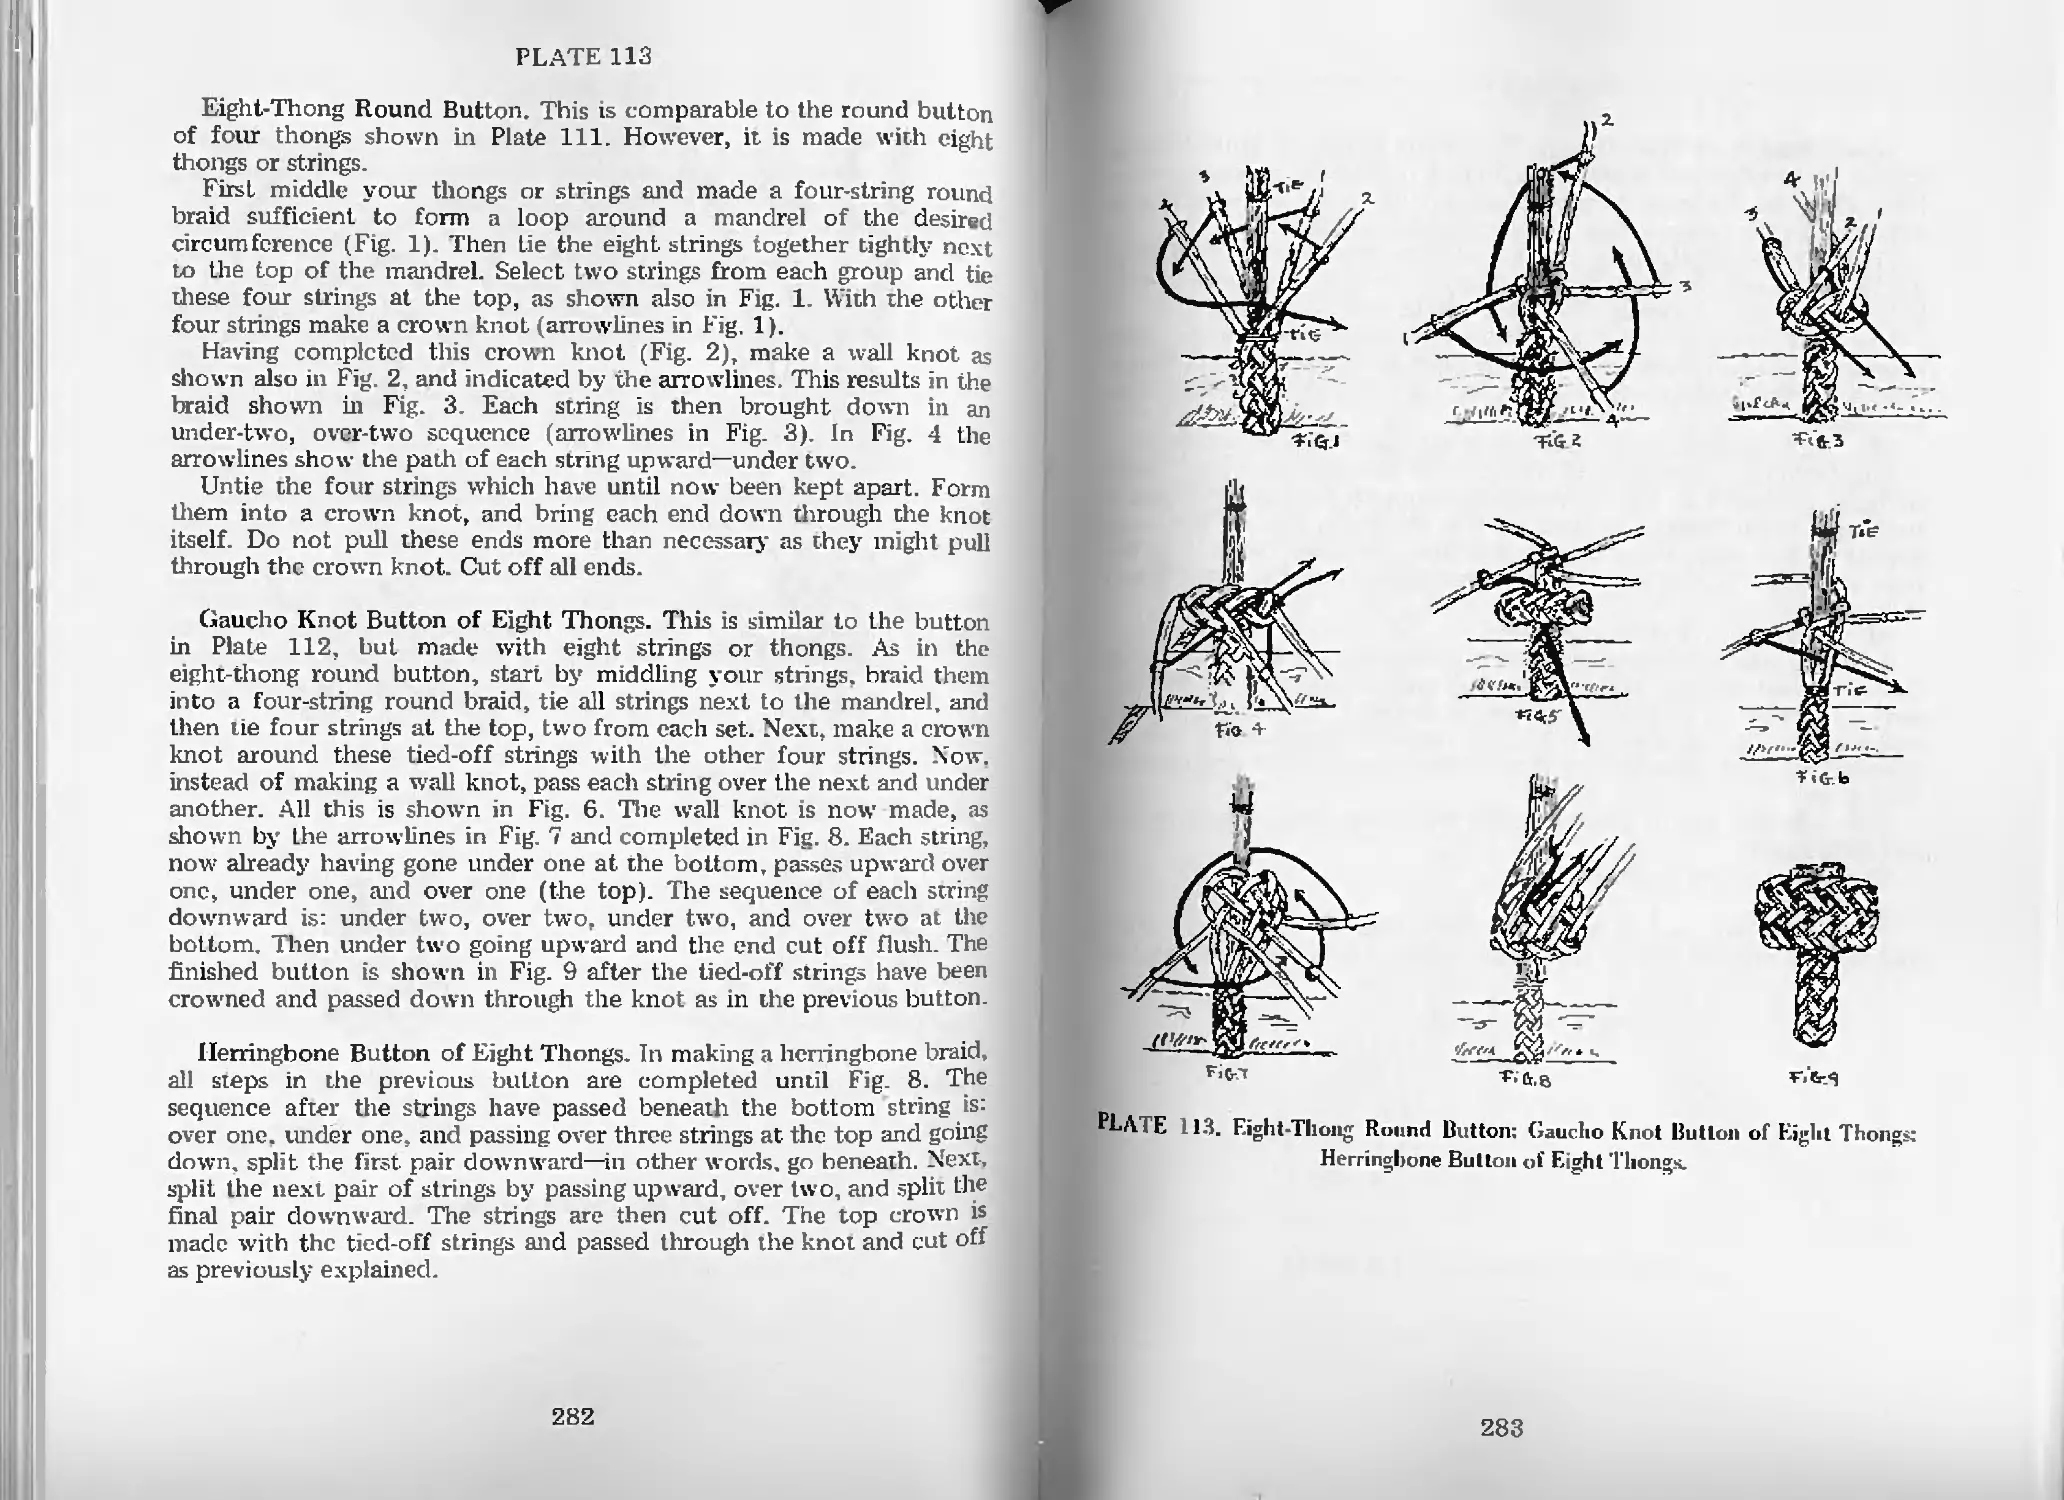
Eight-Thong Round Button—Pl. 113 282
Gaucho Knot Button of Eight Thongs—Pl. 113 282
Herringbone Button of Eight Thongs—Pl 113 282
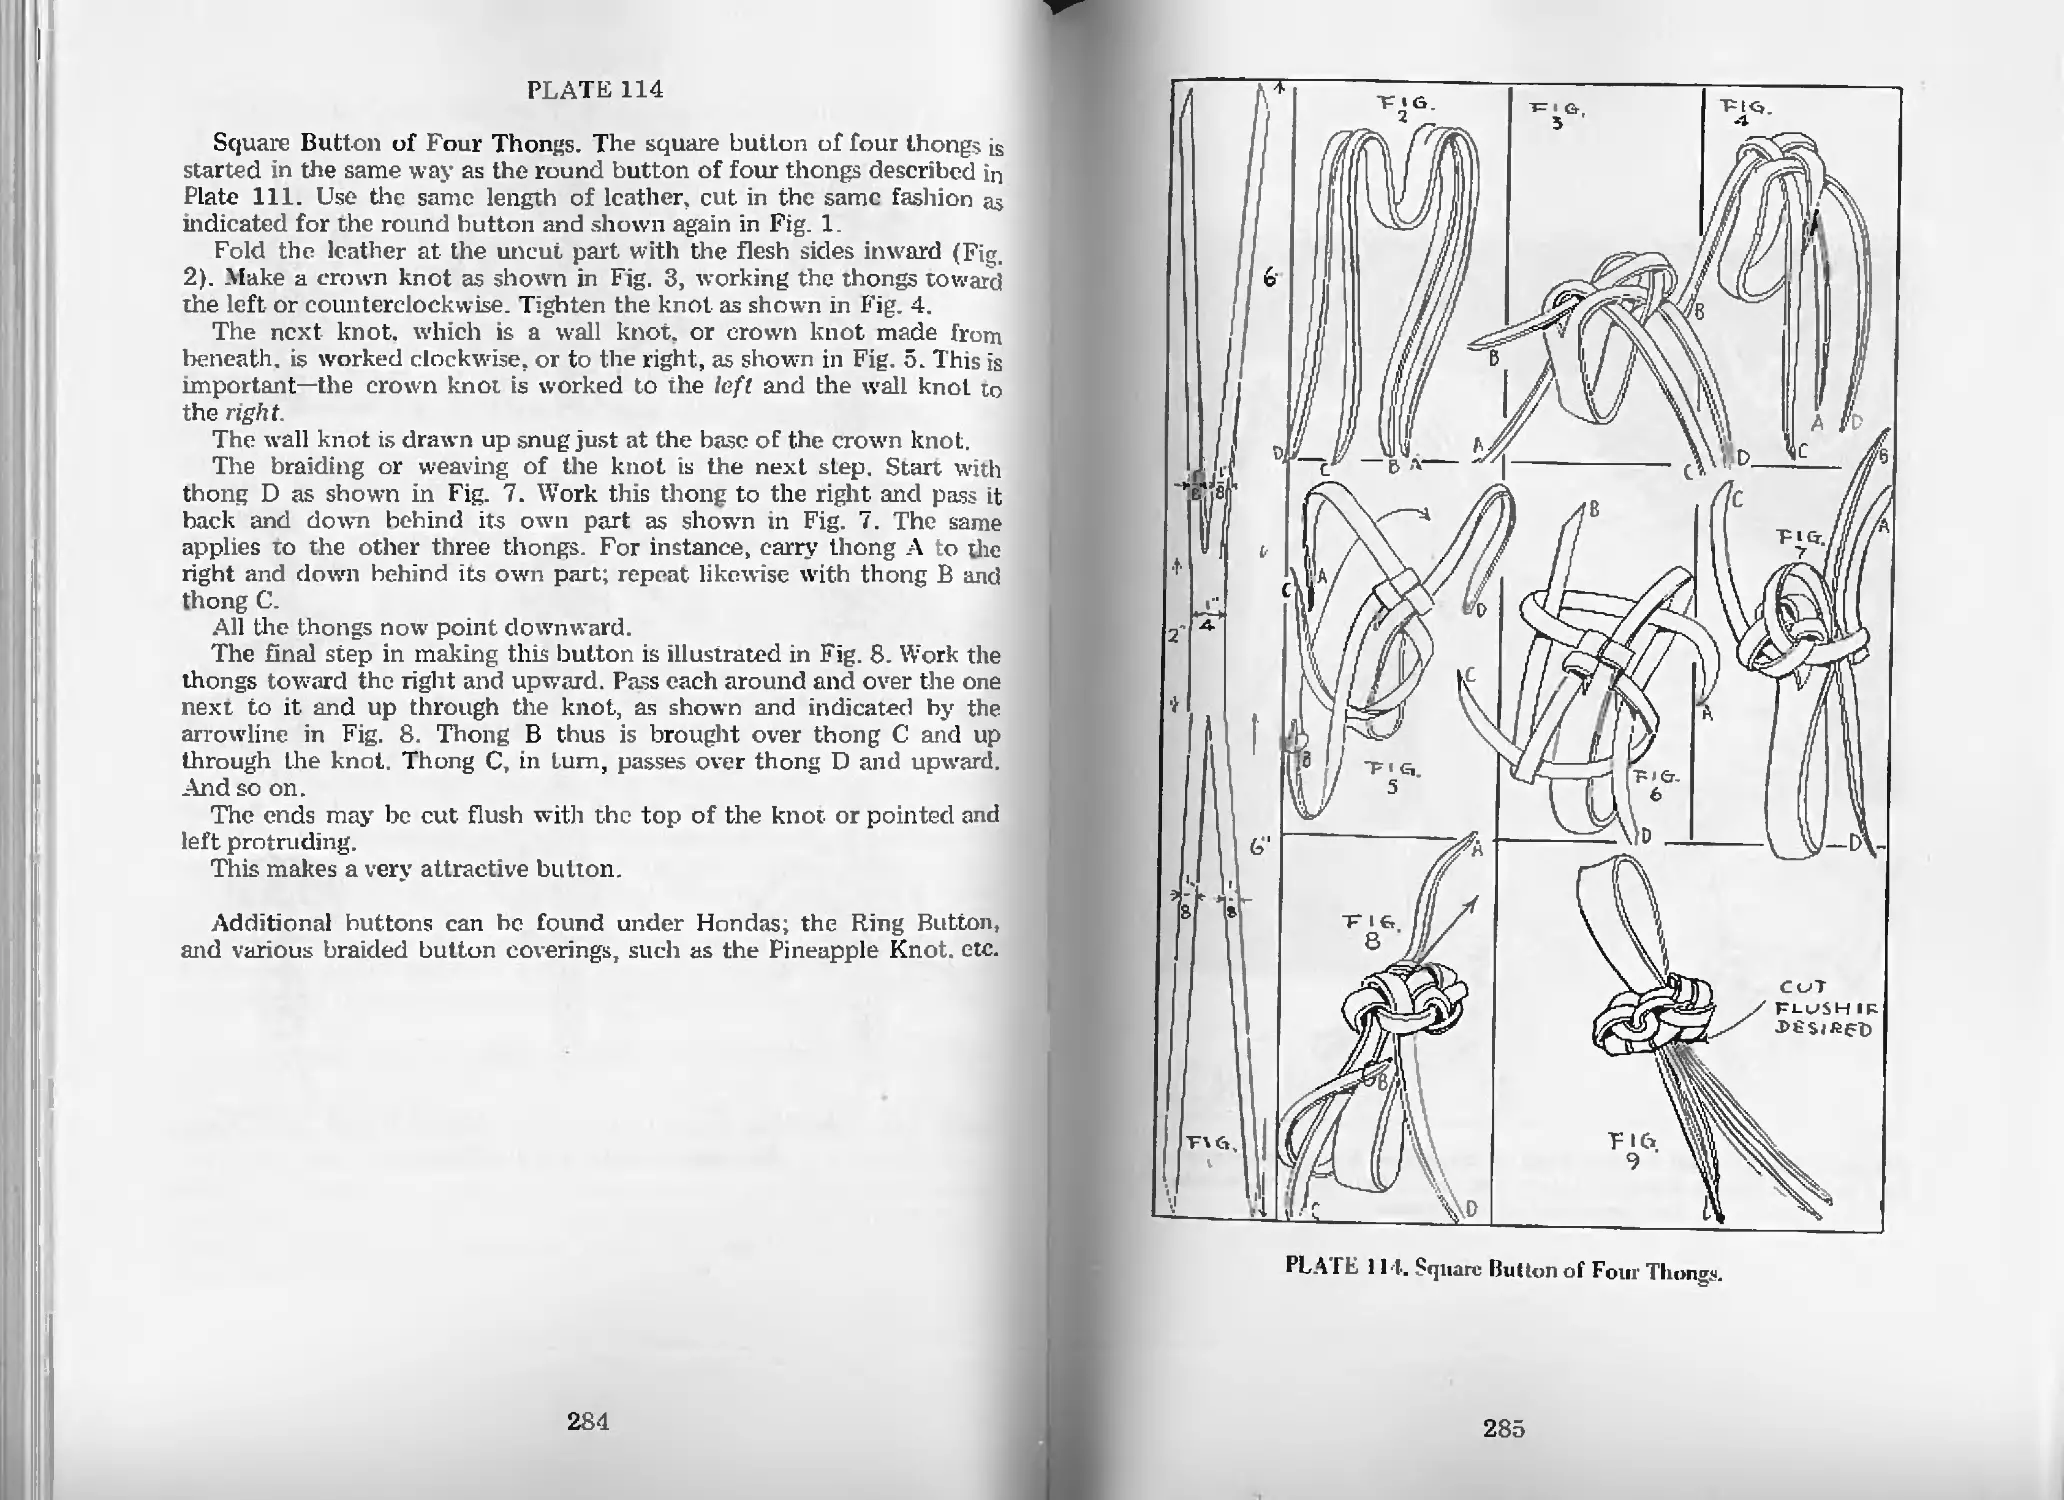
Square Button of Four Thongs—Pl. 114 284
Edge-Braiding
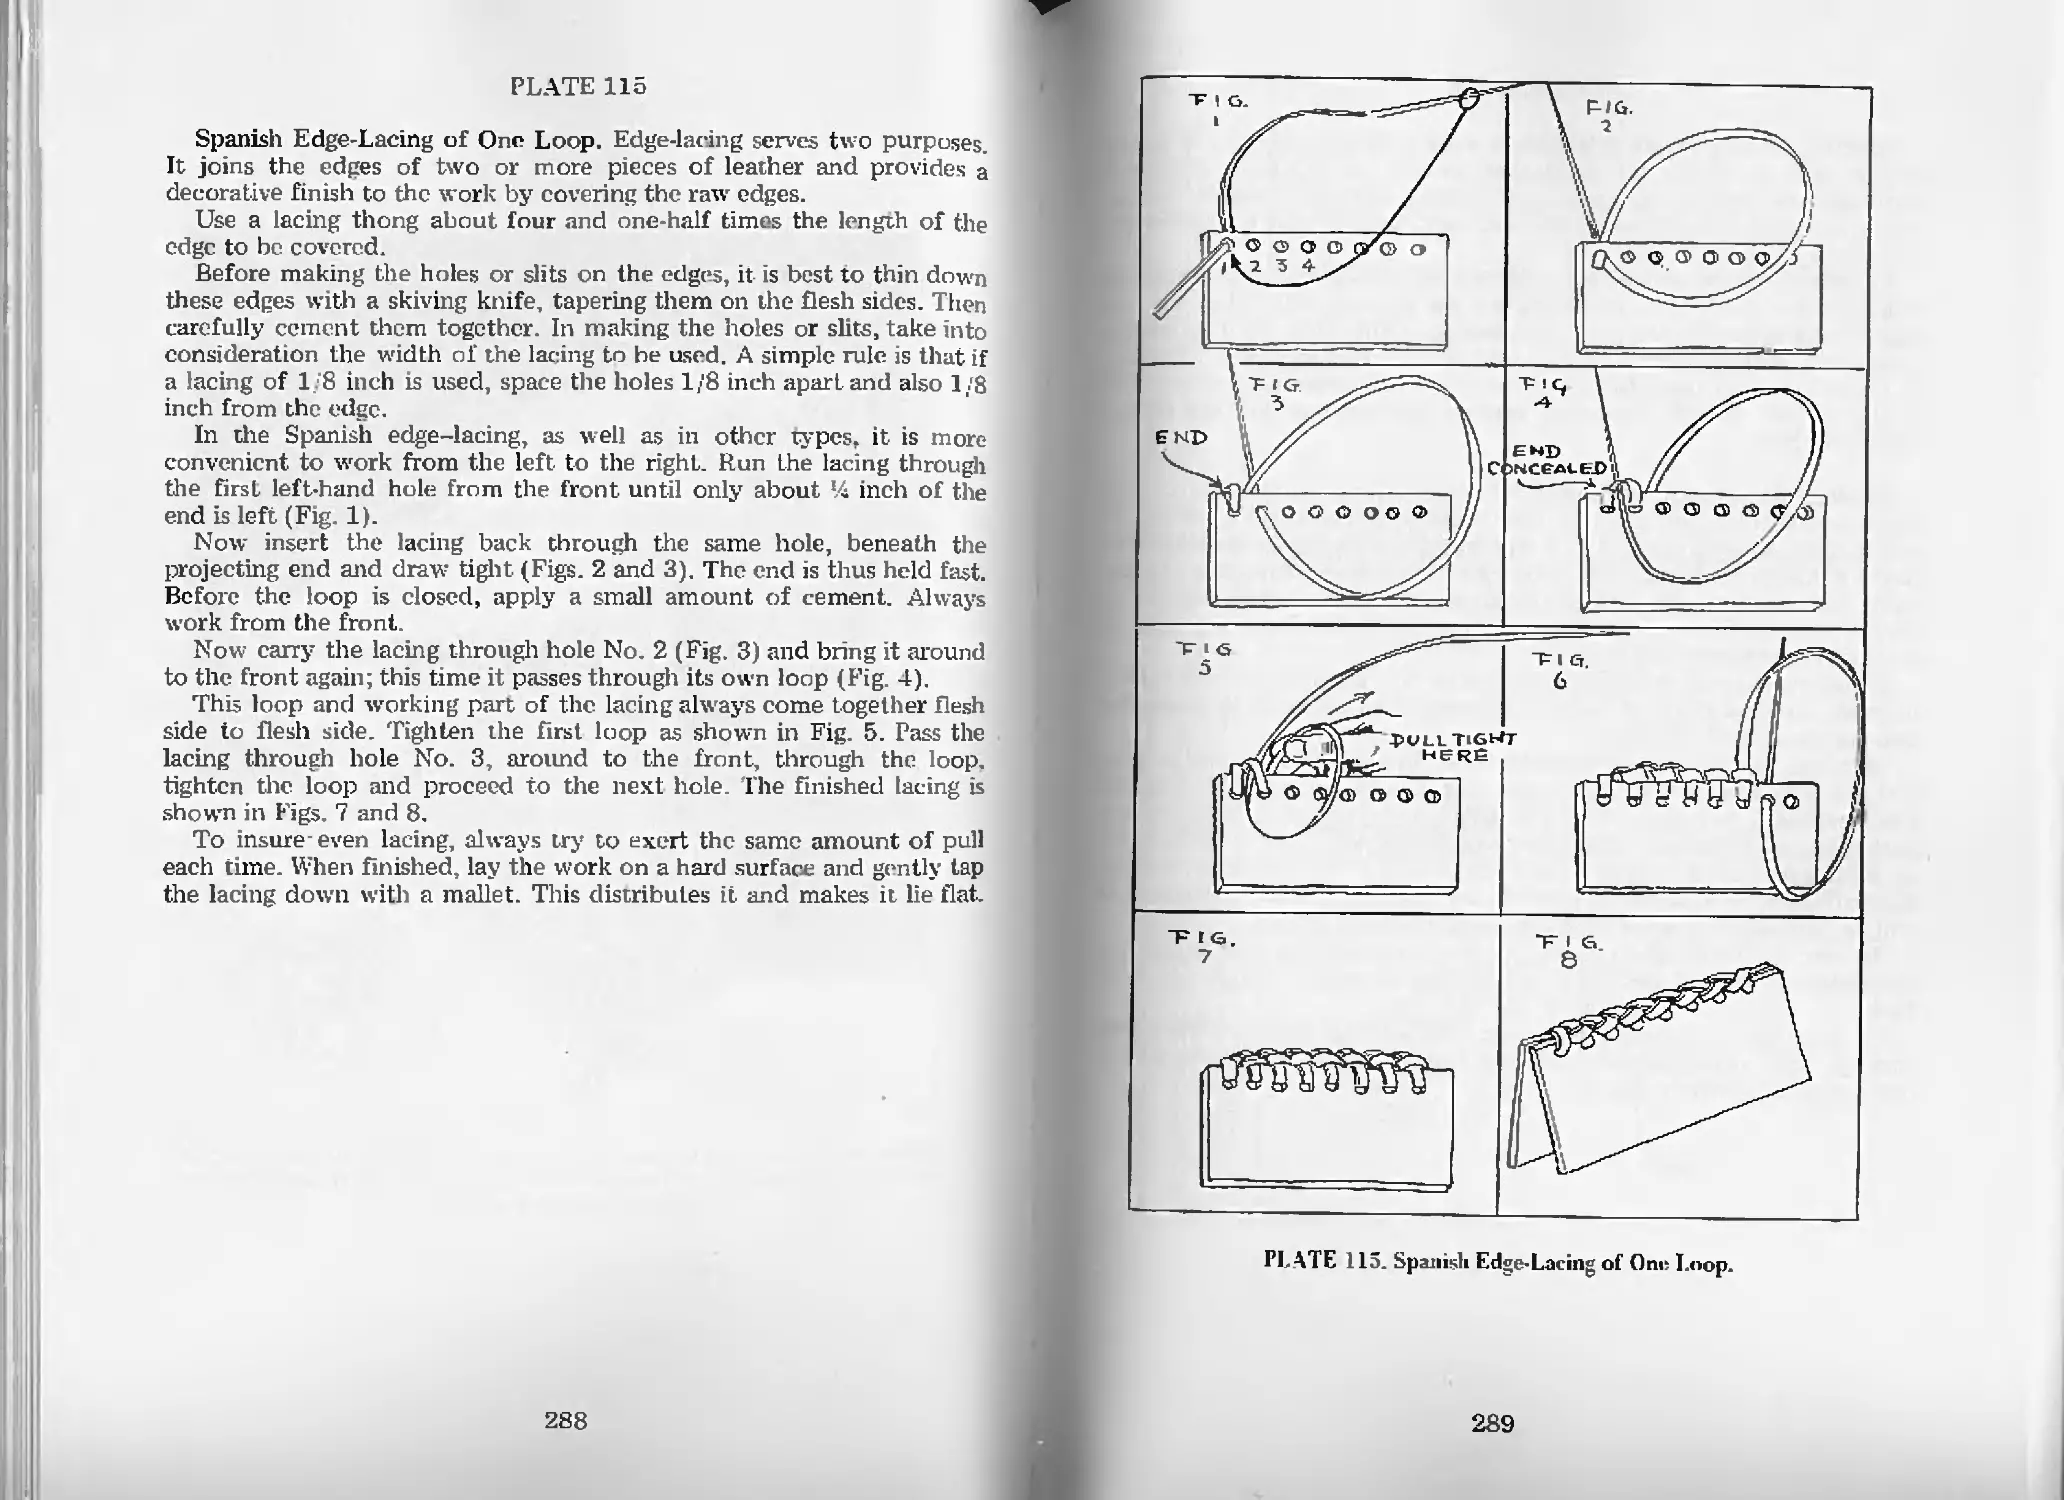
Spanish Edge-Lacing of One Loop—Pl. 115 288
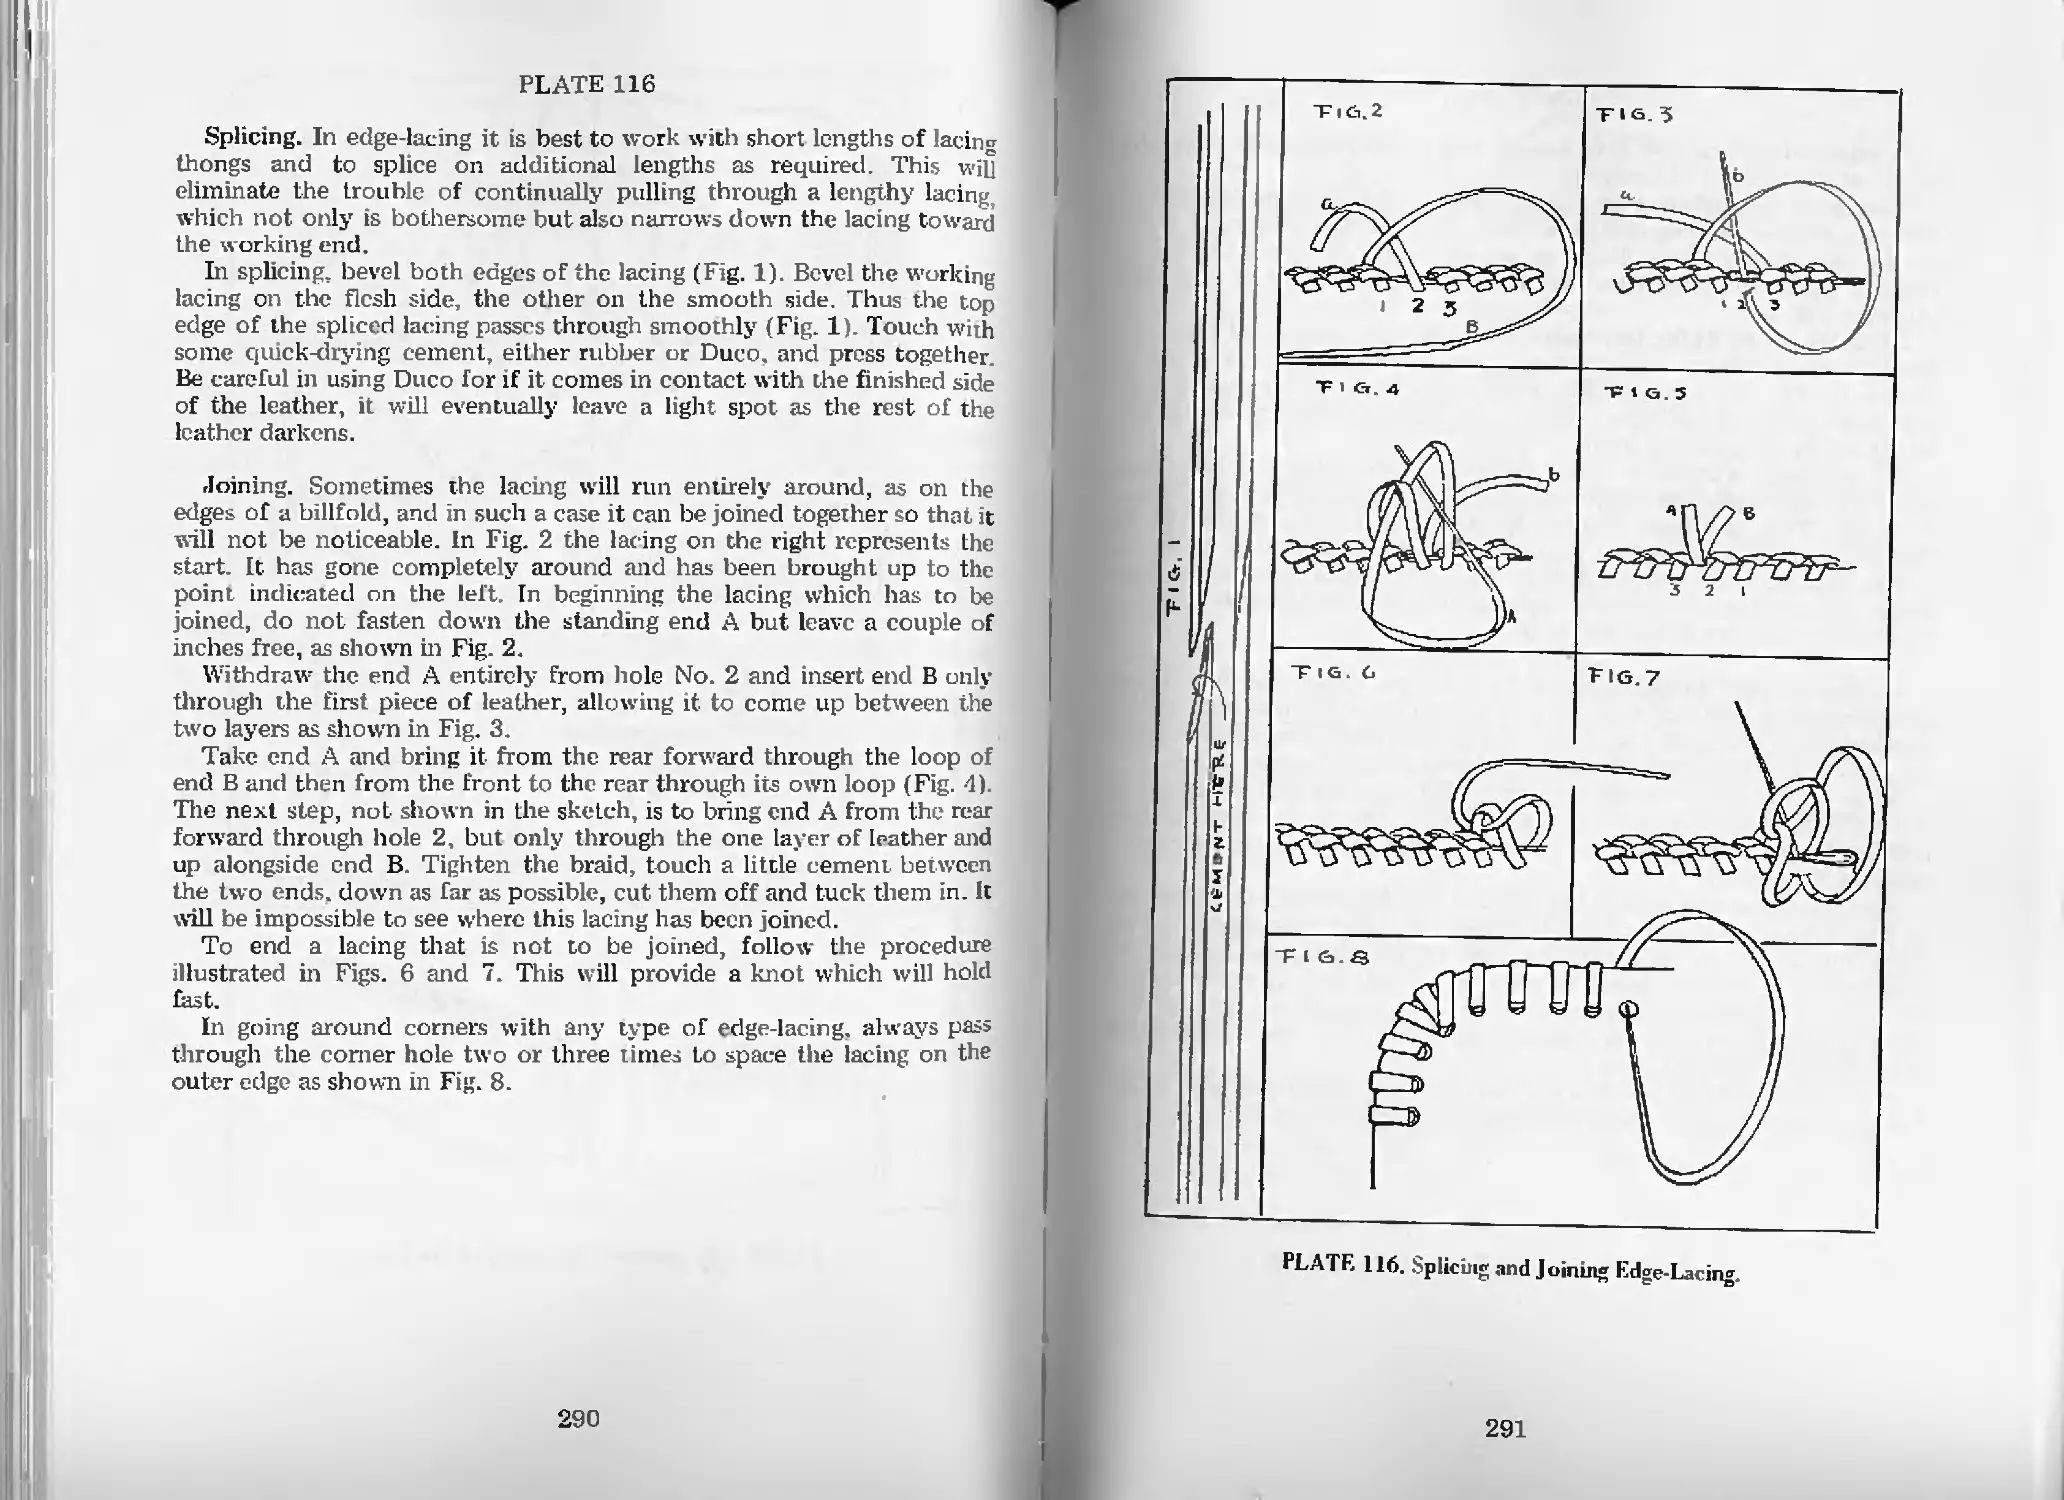
Splicing-Pl. 116 290
Joining—Pl. 116 290
Spanish Edge-Lacing of Two Loops—Pl. 117 292
Joining Spanish Edge-Lacing of Two Loops—Pl. 117 292
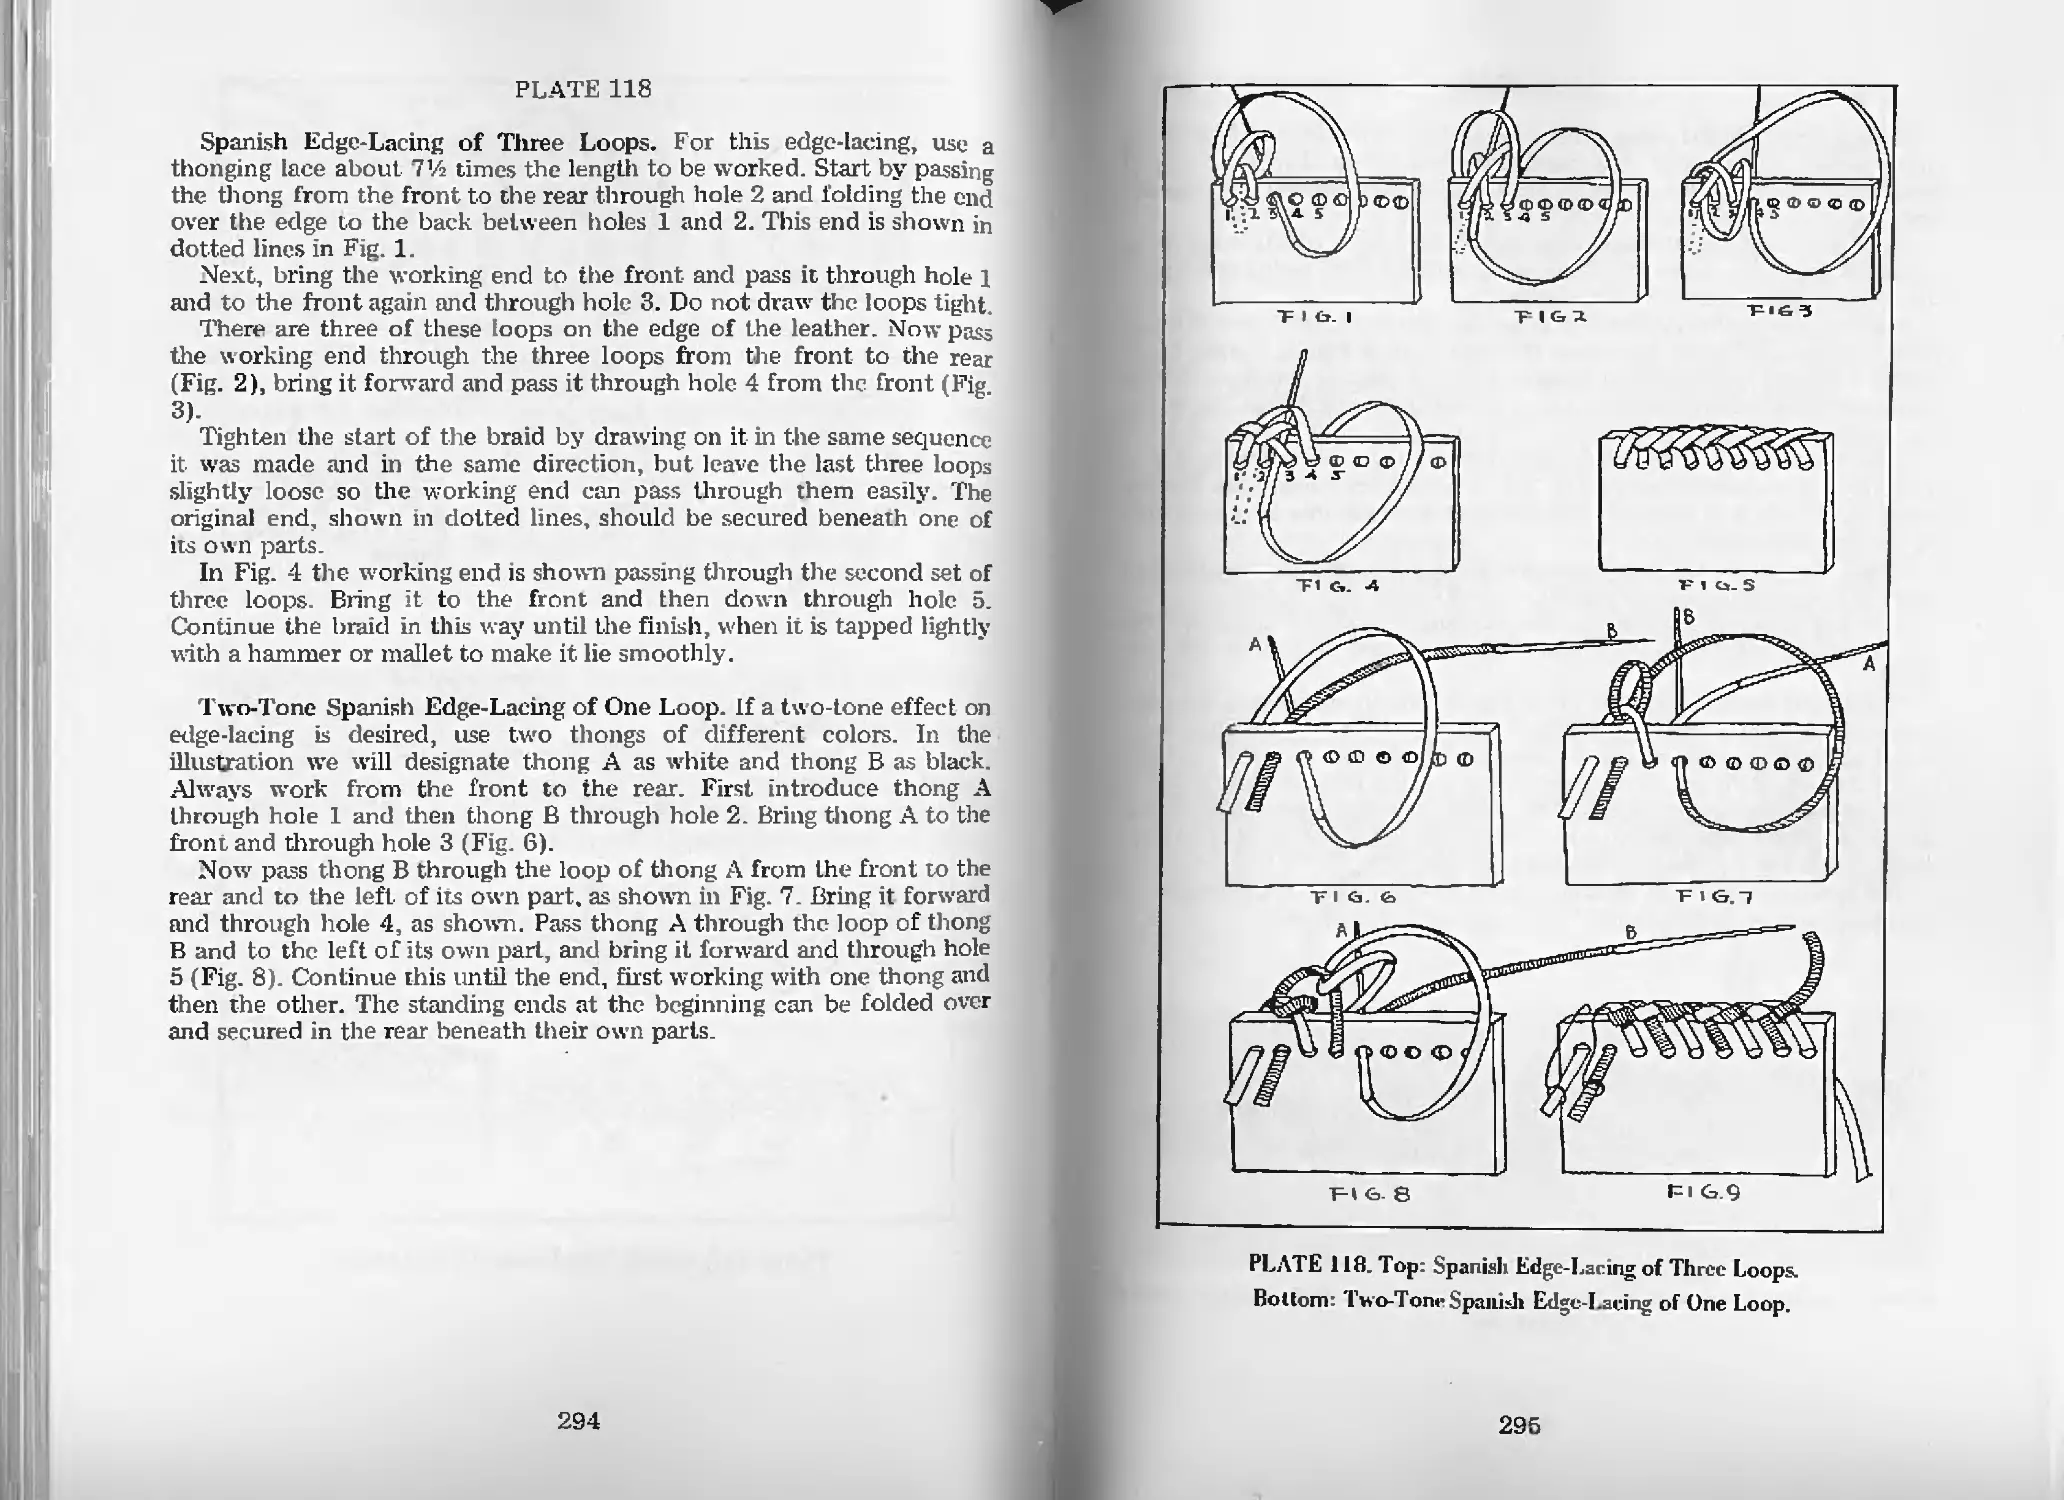
Spanish Edge-Lacing of Three Loops—Pl. 118 294
Two-Tone Spanish Edge-Lacing of One Loop—Pl. 118 294
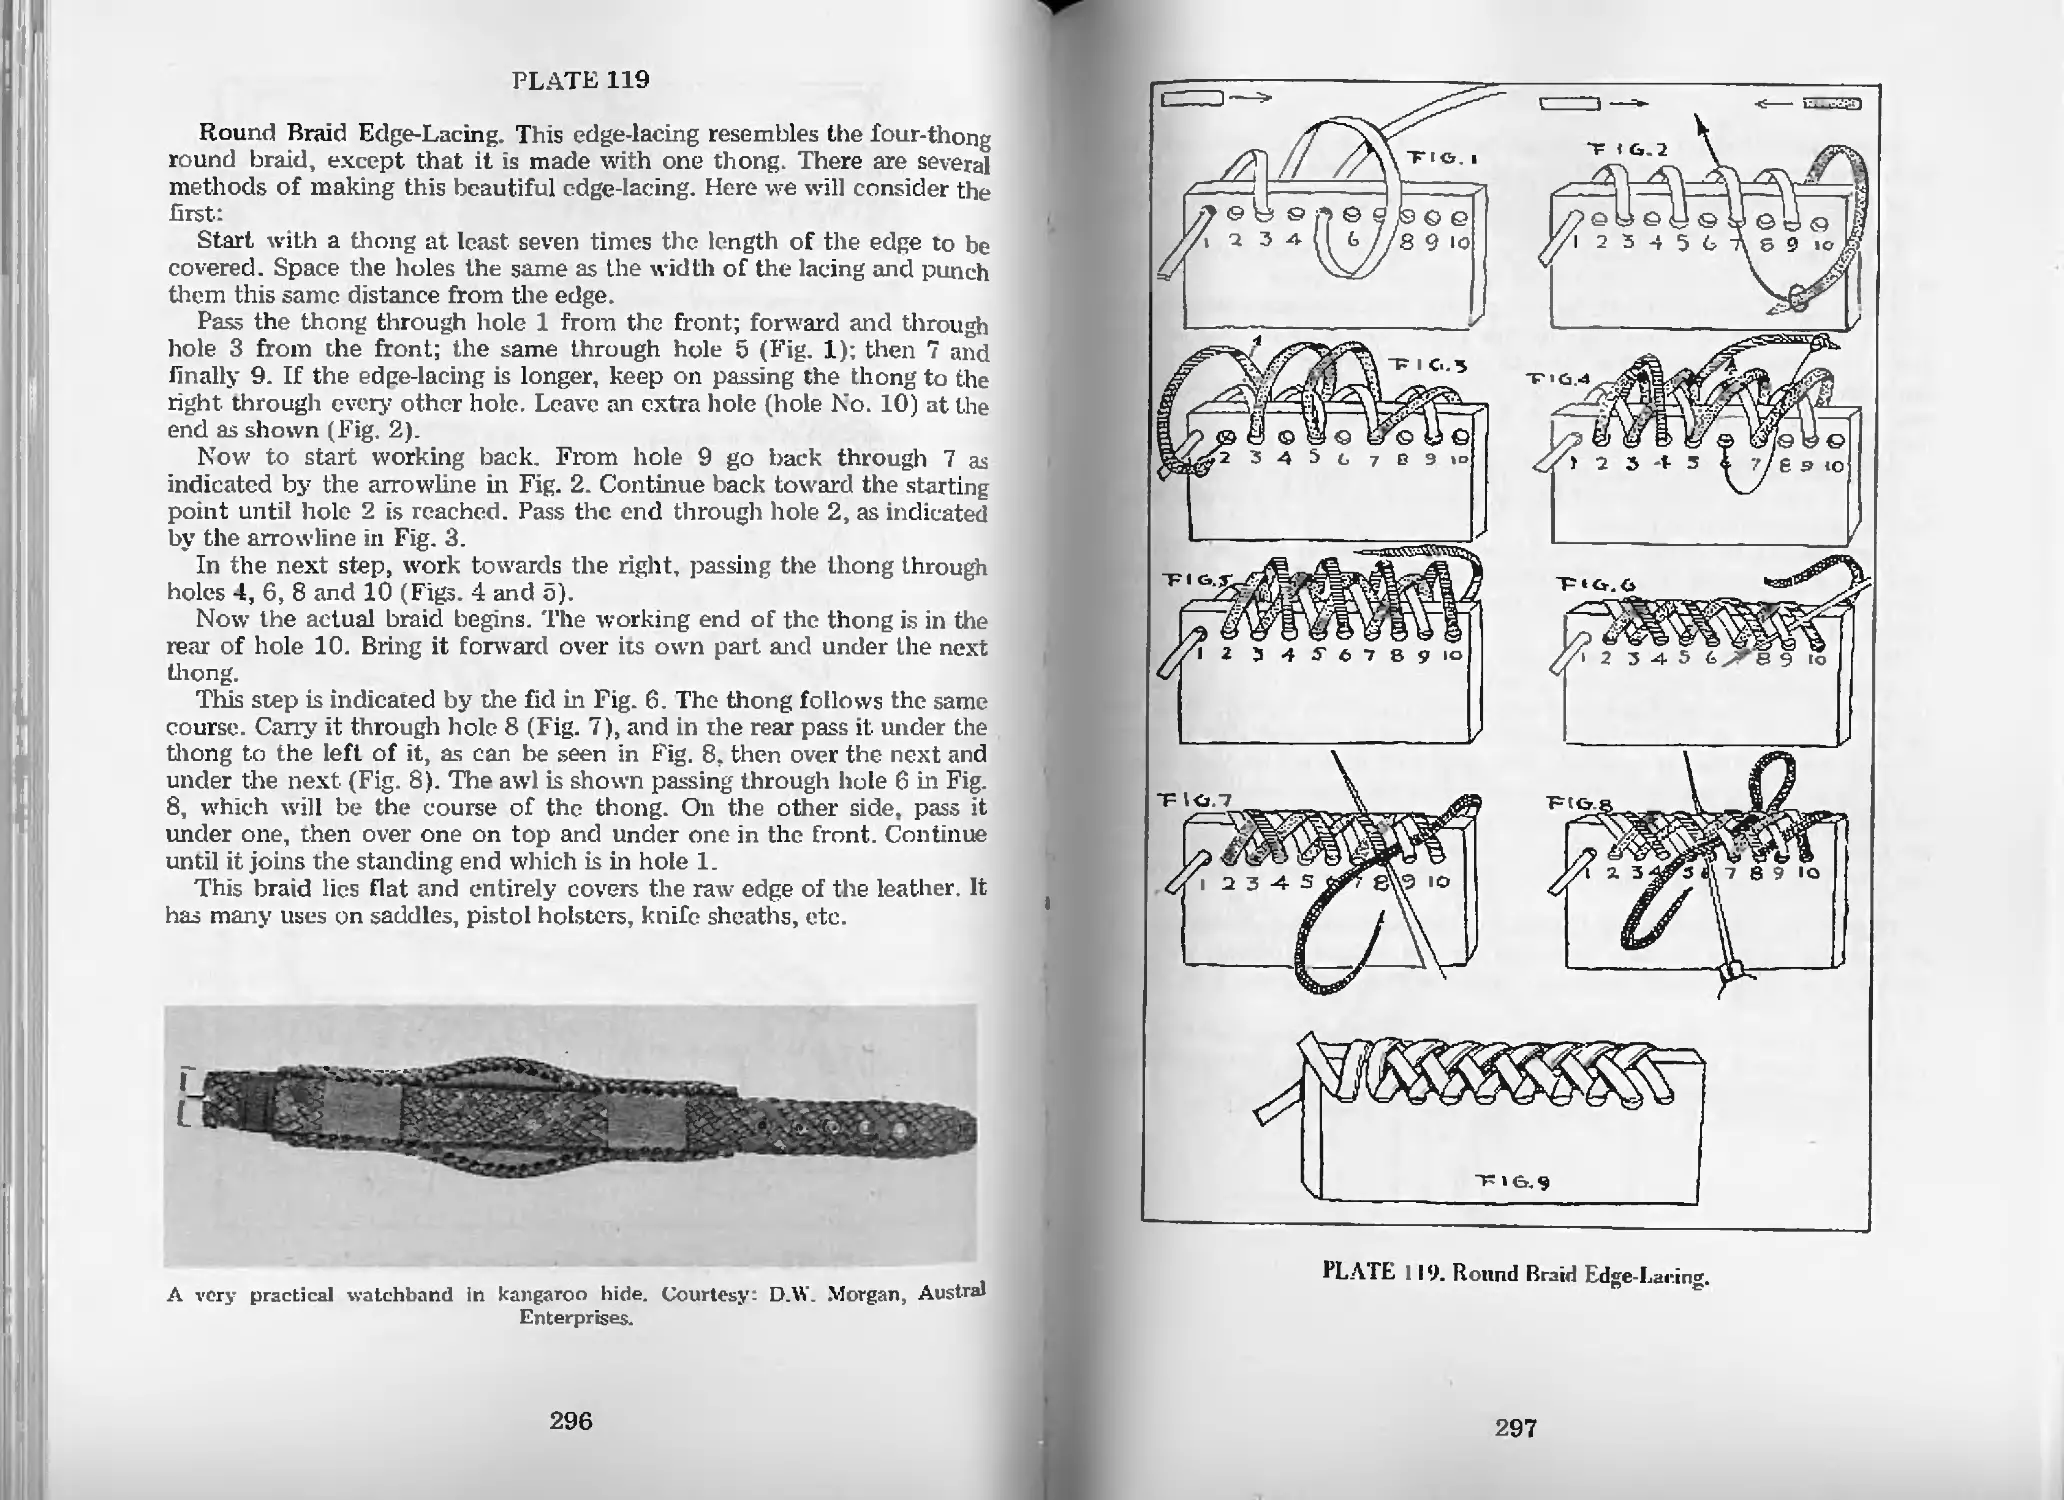
Round Braid Edge-Lacing—Pl. 119 296
Round Braid Edgc-Lacing (Second Method)—Pl. 120 298
Round Braid Edge-Lacing (Third Method)—Pl. 120 298
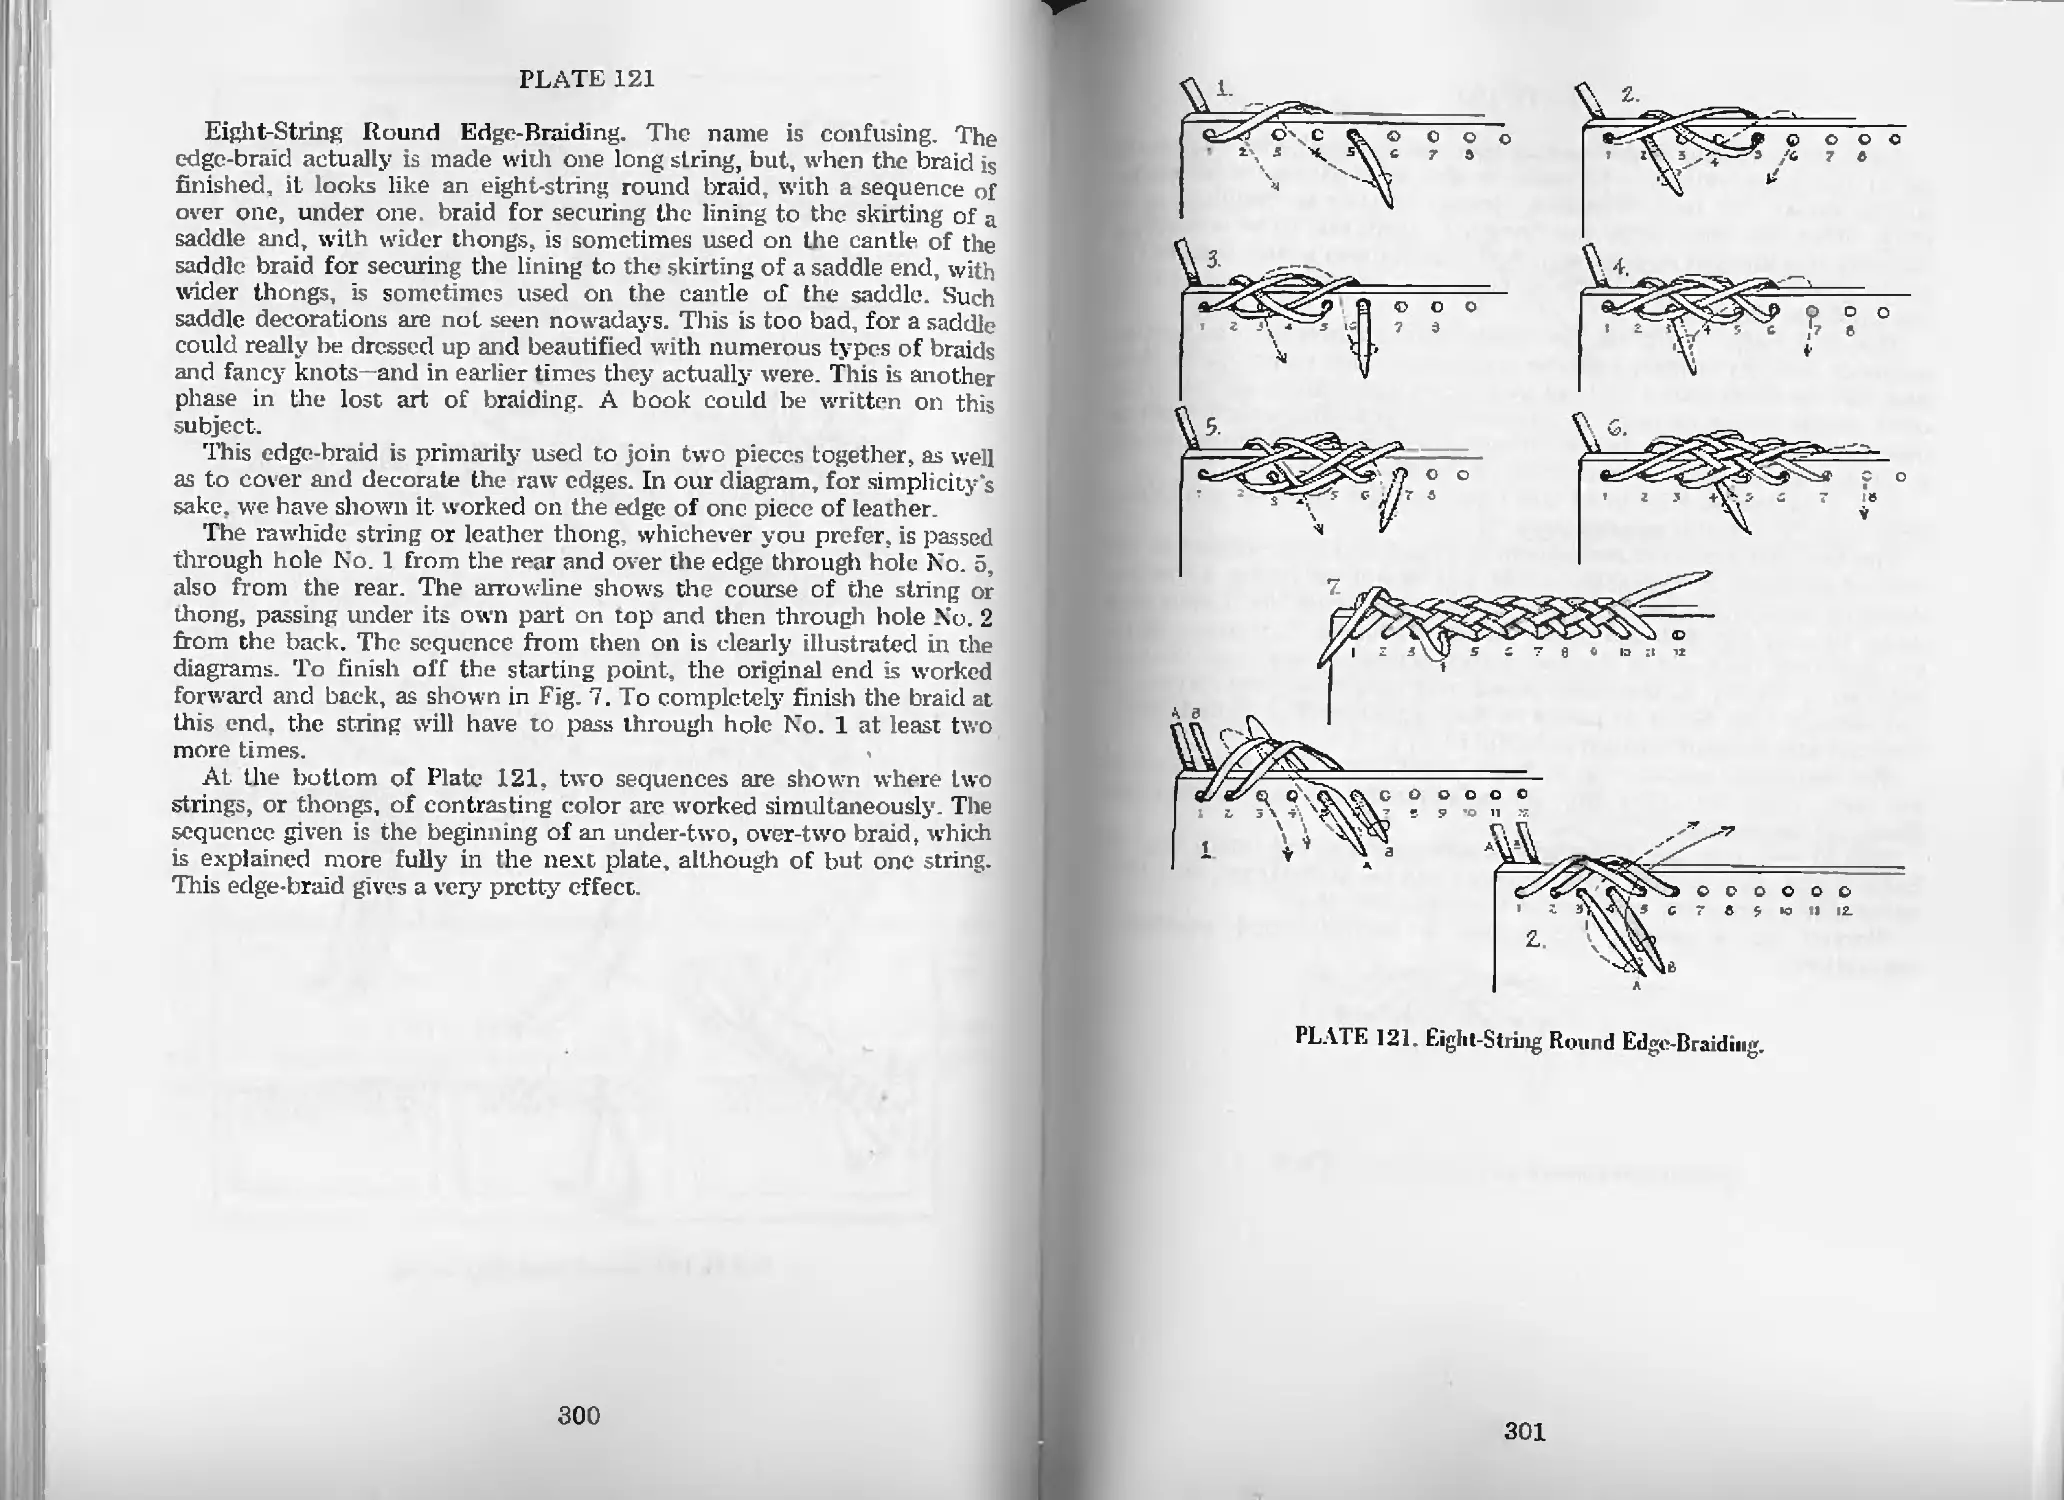
Eight-String Round Edge-Braiding—Pl. 121 300
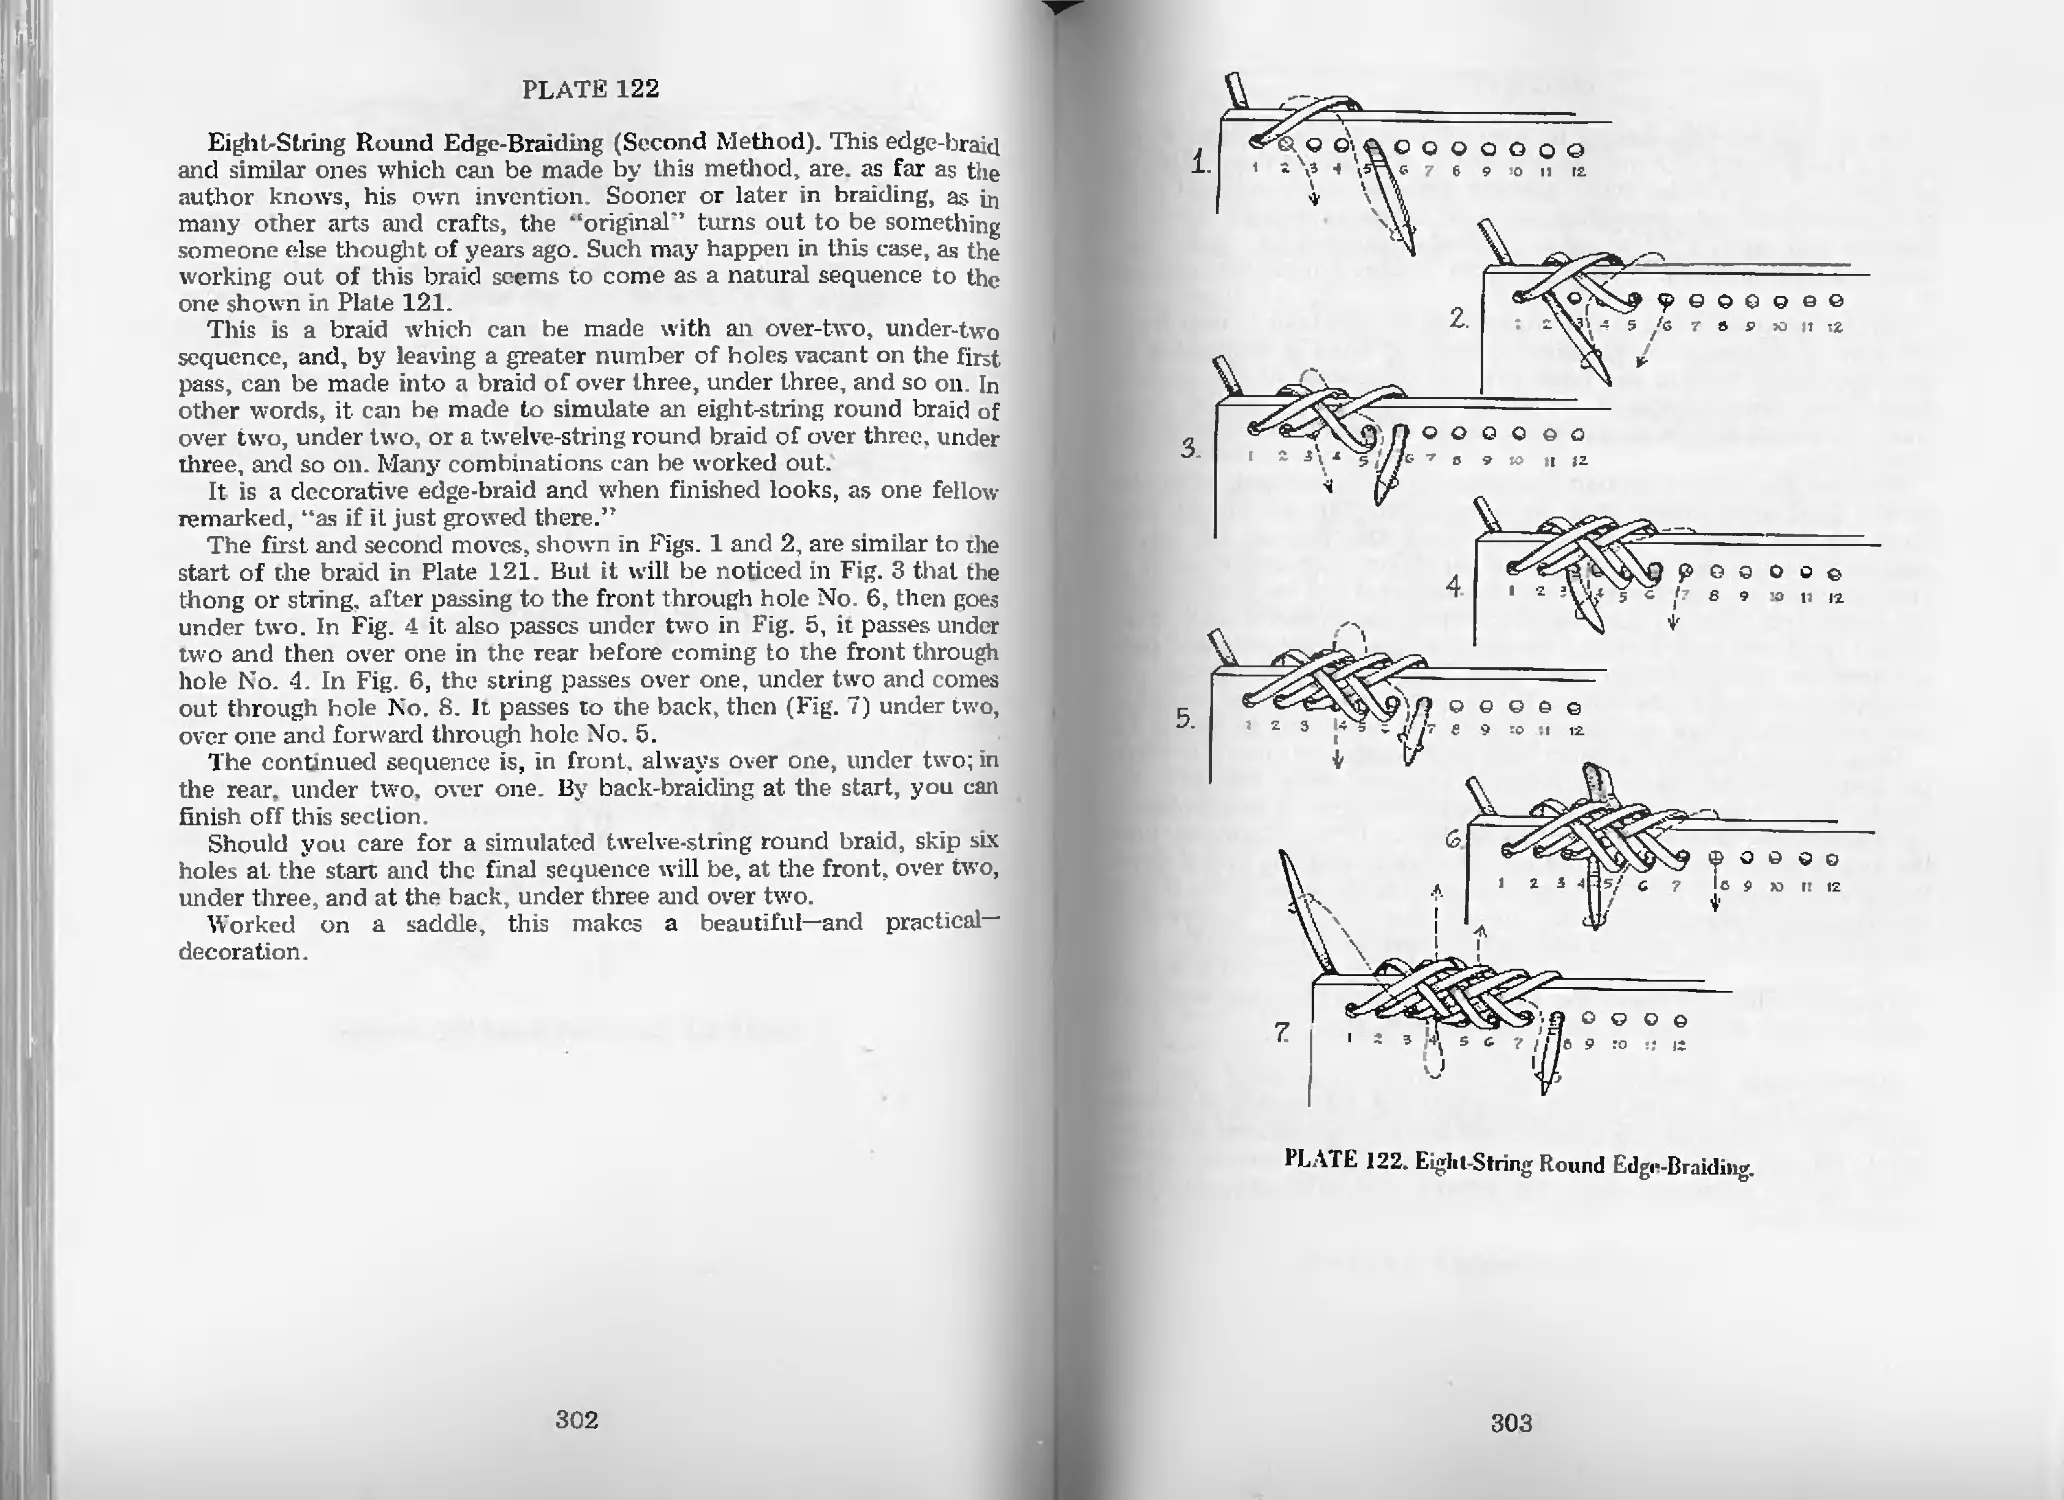
Eight-String Round Edge-Braiding (Second Method)—Pl. 122 302
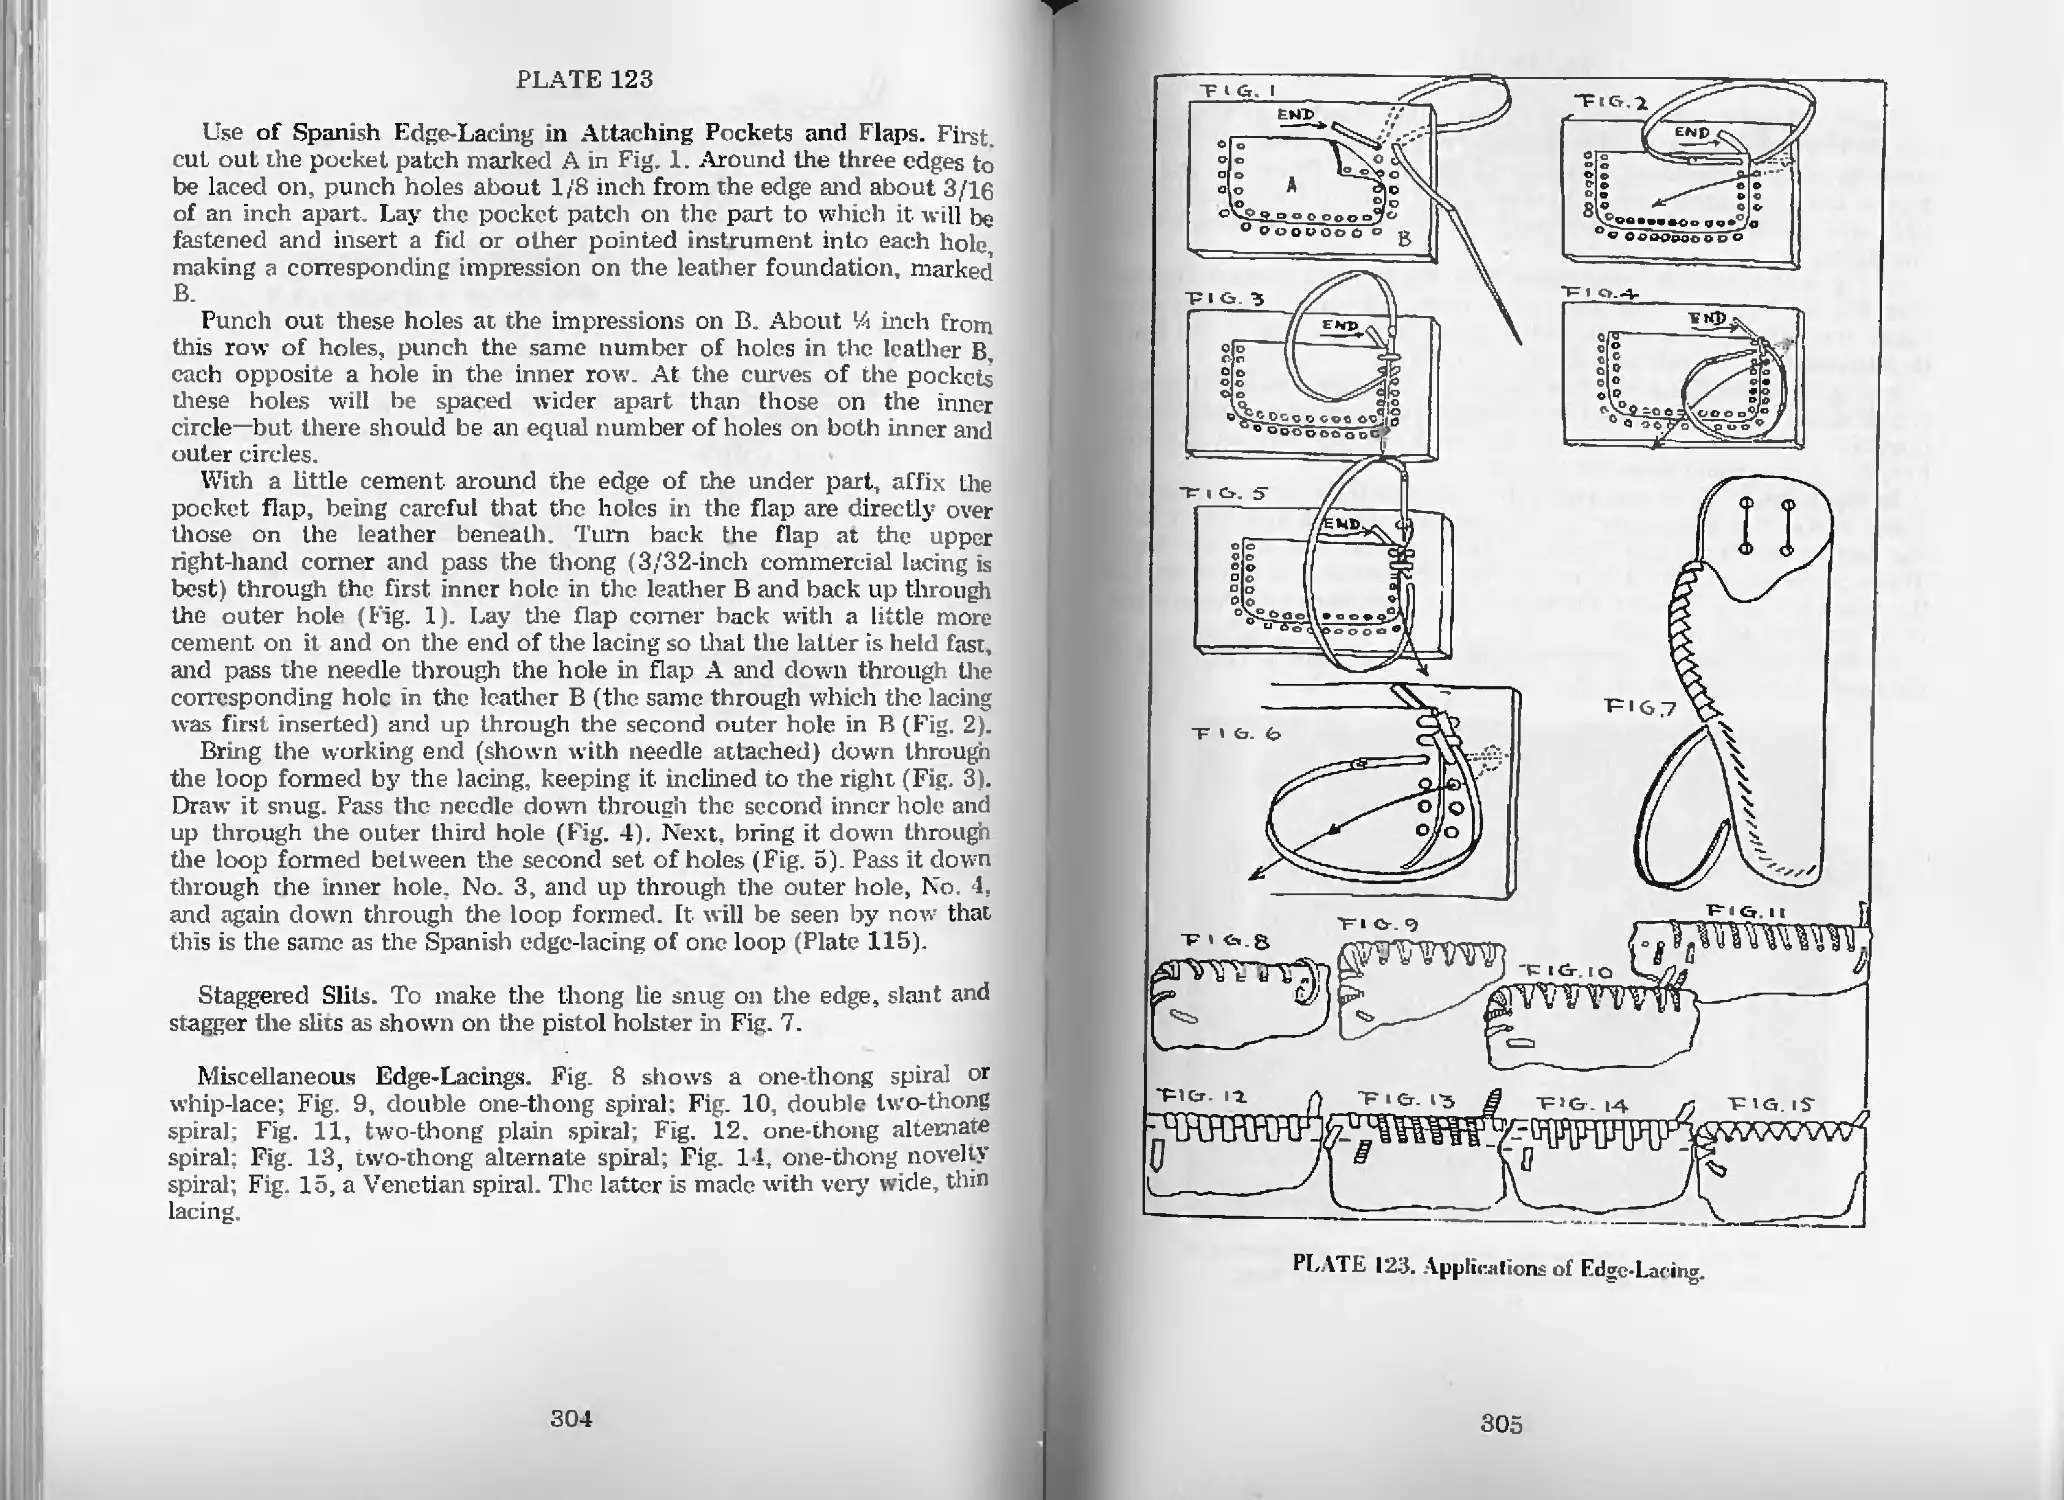
Use of Spanish Edgc-Lacing in Attaching
Pockets and Flaps—Pl. 123 304
Staggered Slits—Pl. 123 304
Miscellaneous Edge-Lacings—Pl. 123 304
Gaucho Edge-Braiding of One String—Pl. 124 306
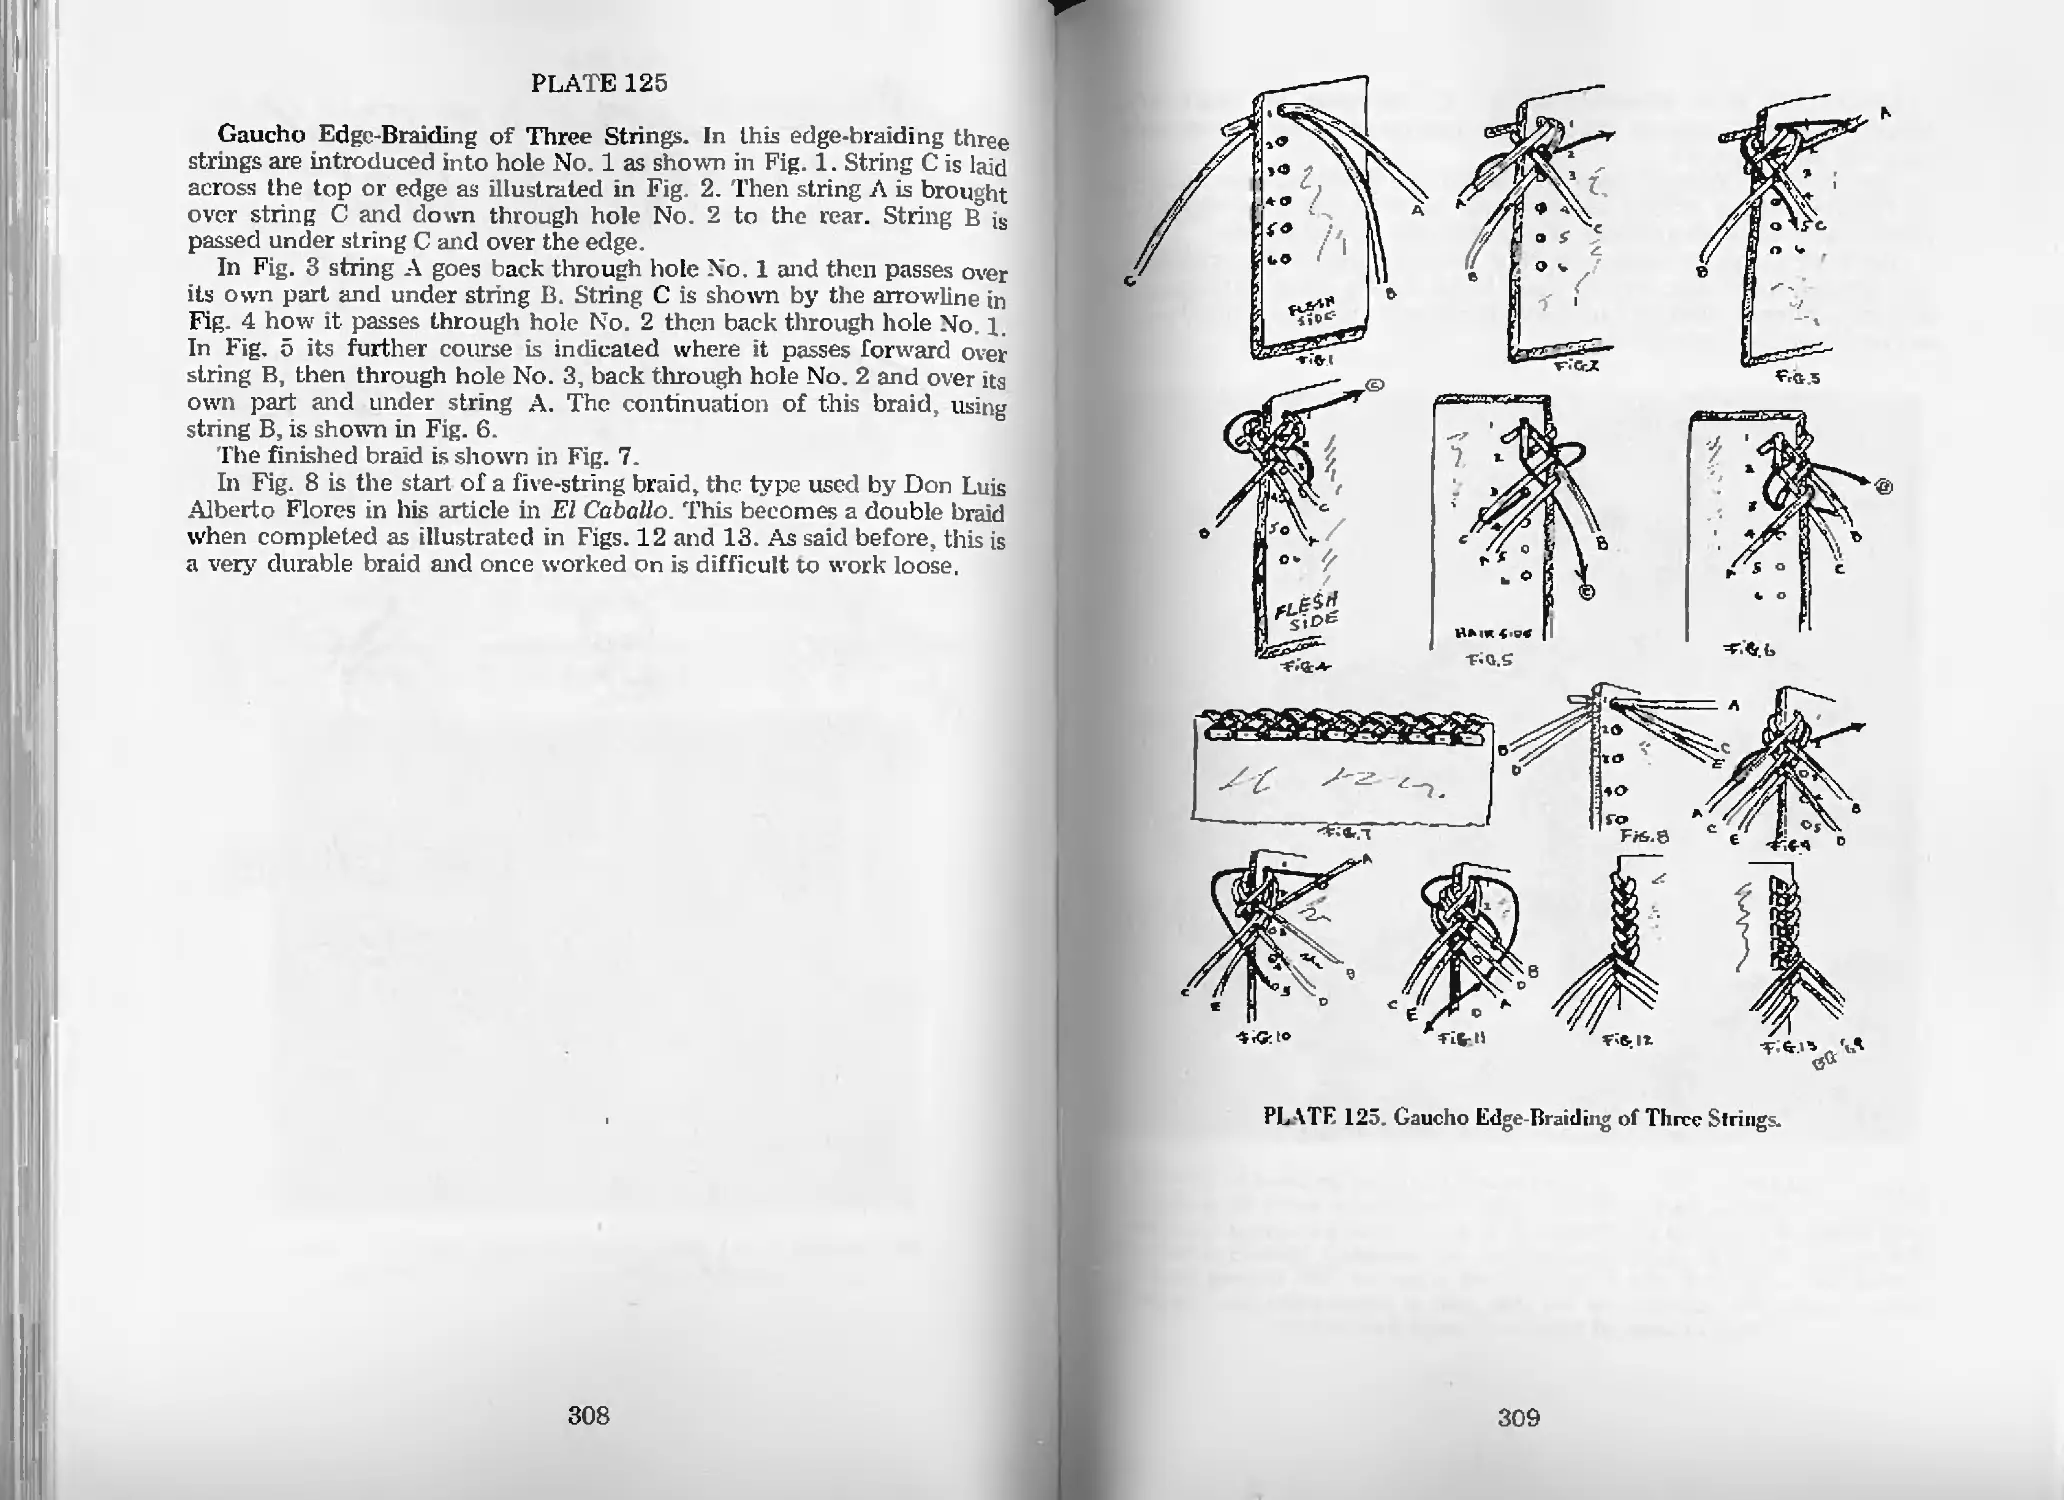
Gaucho Edge-Braiding of Three Strings—Pl. 125 308
Buckle and Ring Coverings
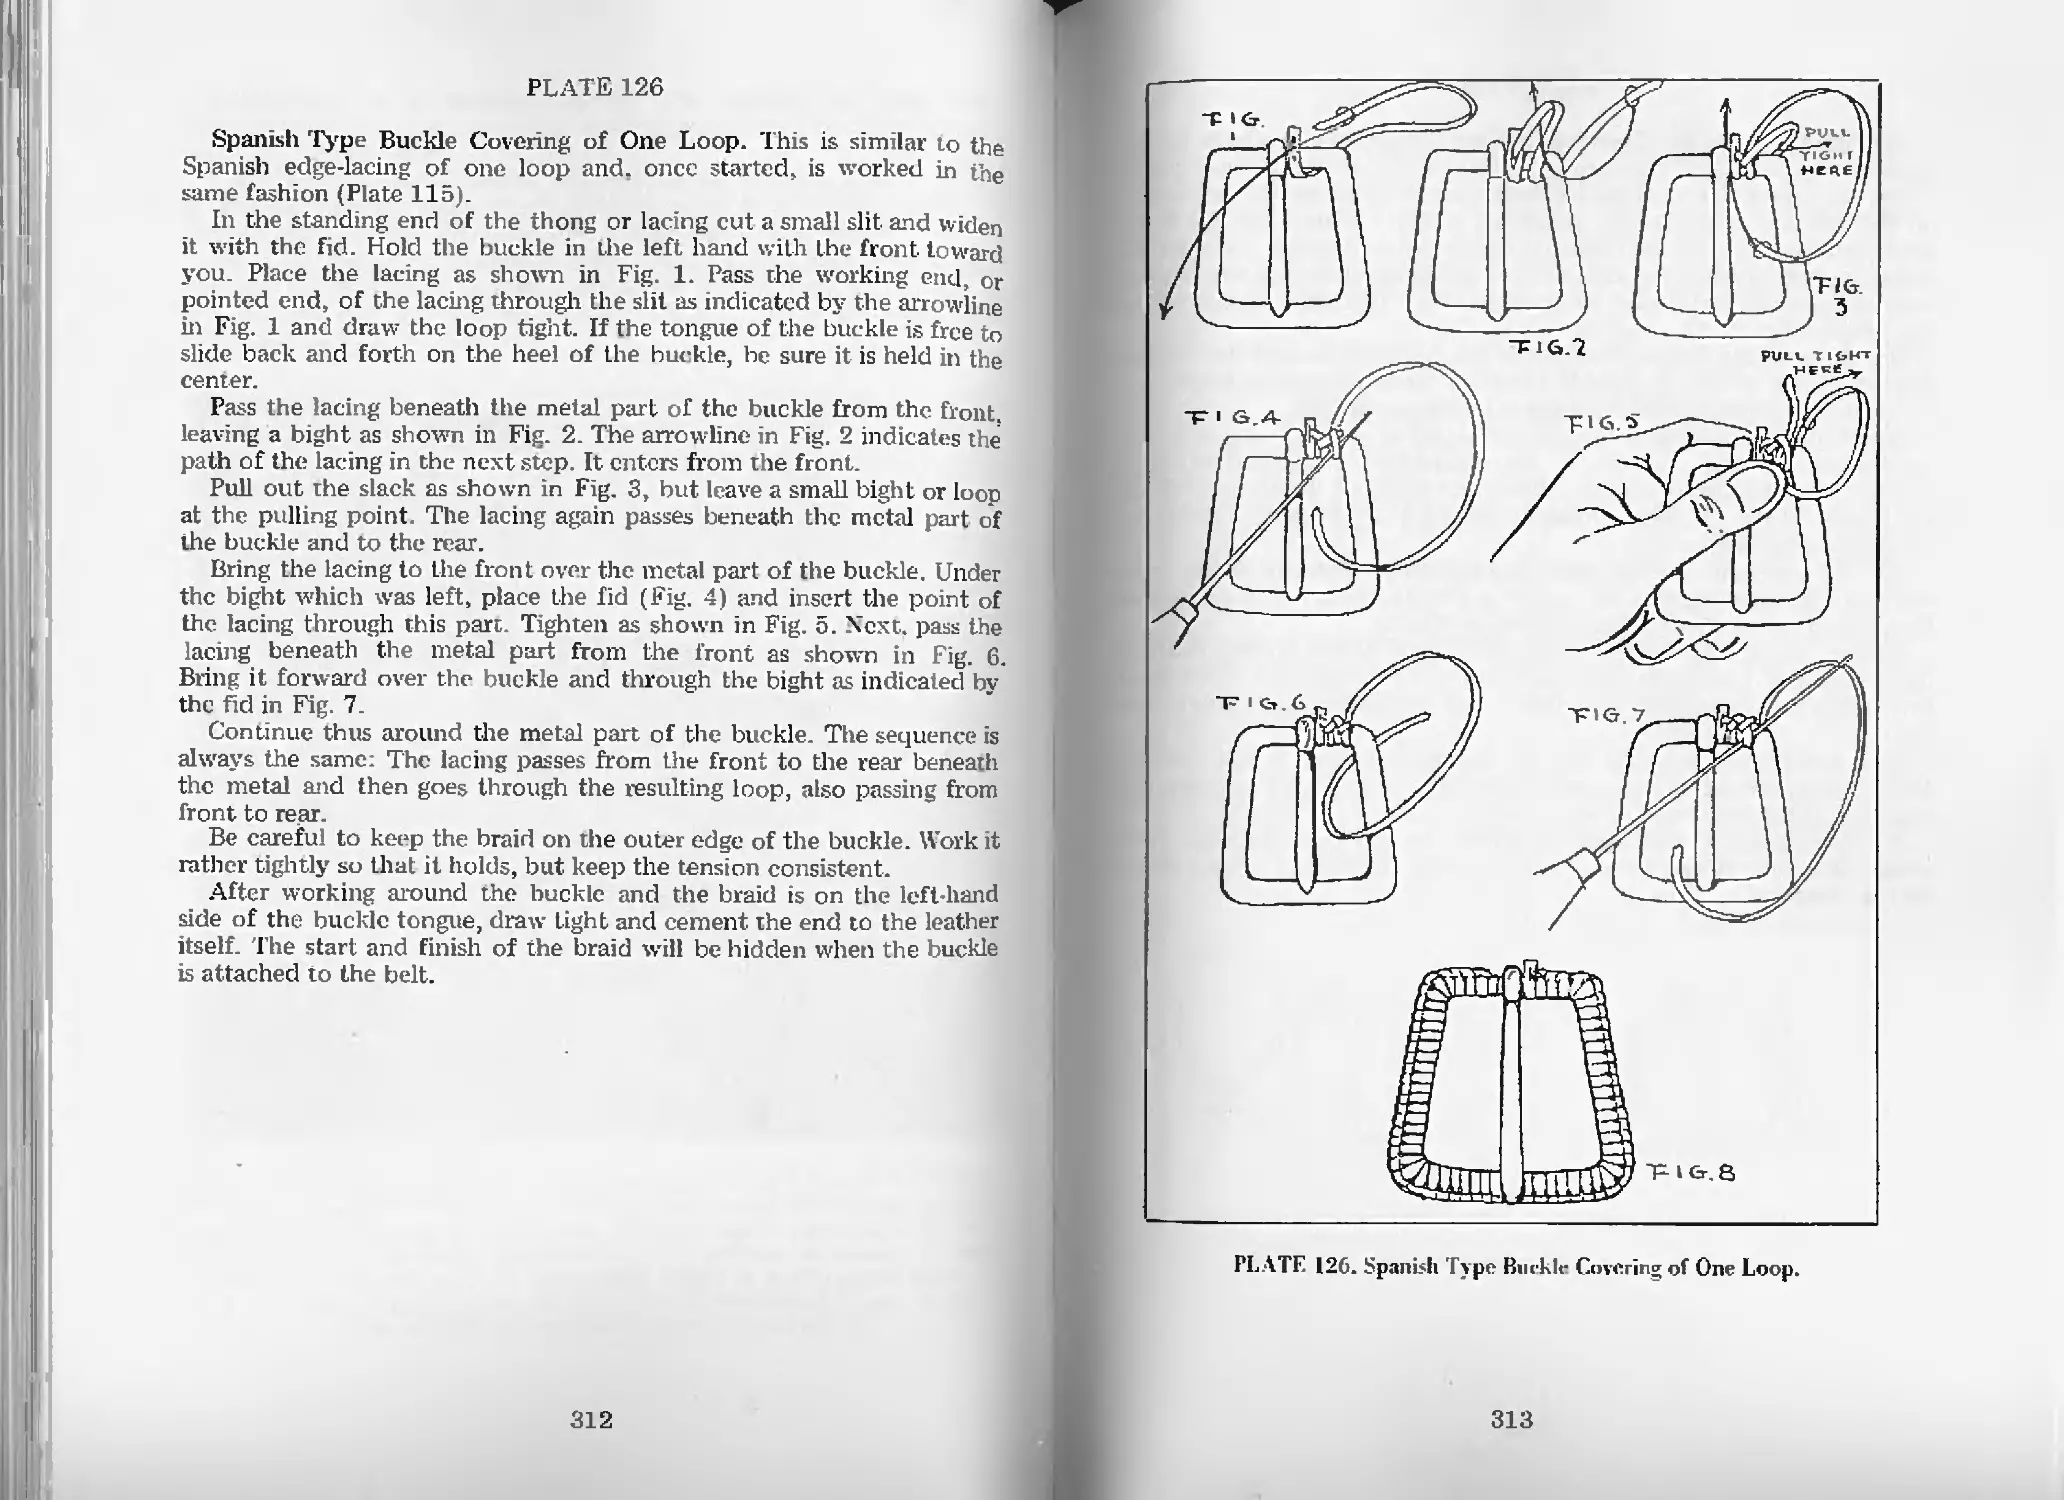
Spanish Type Buckle Covering of One Loop—Pl. 126 312
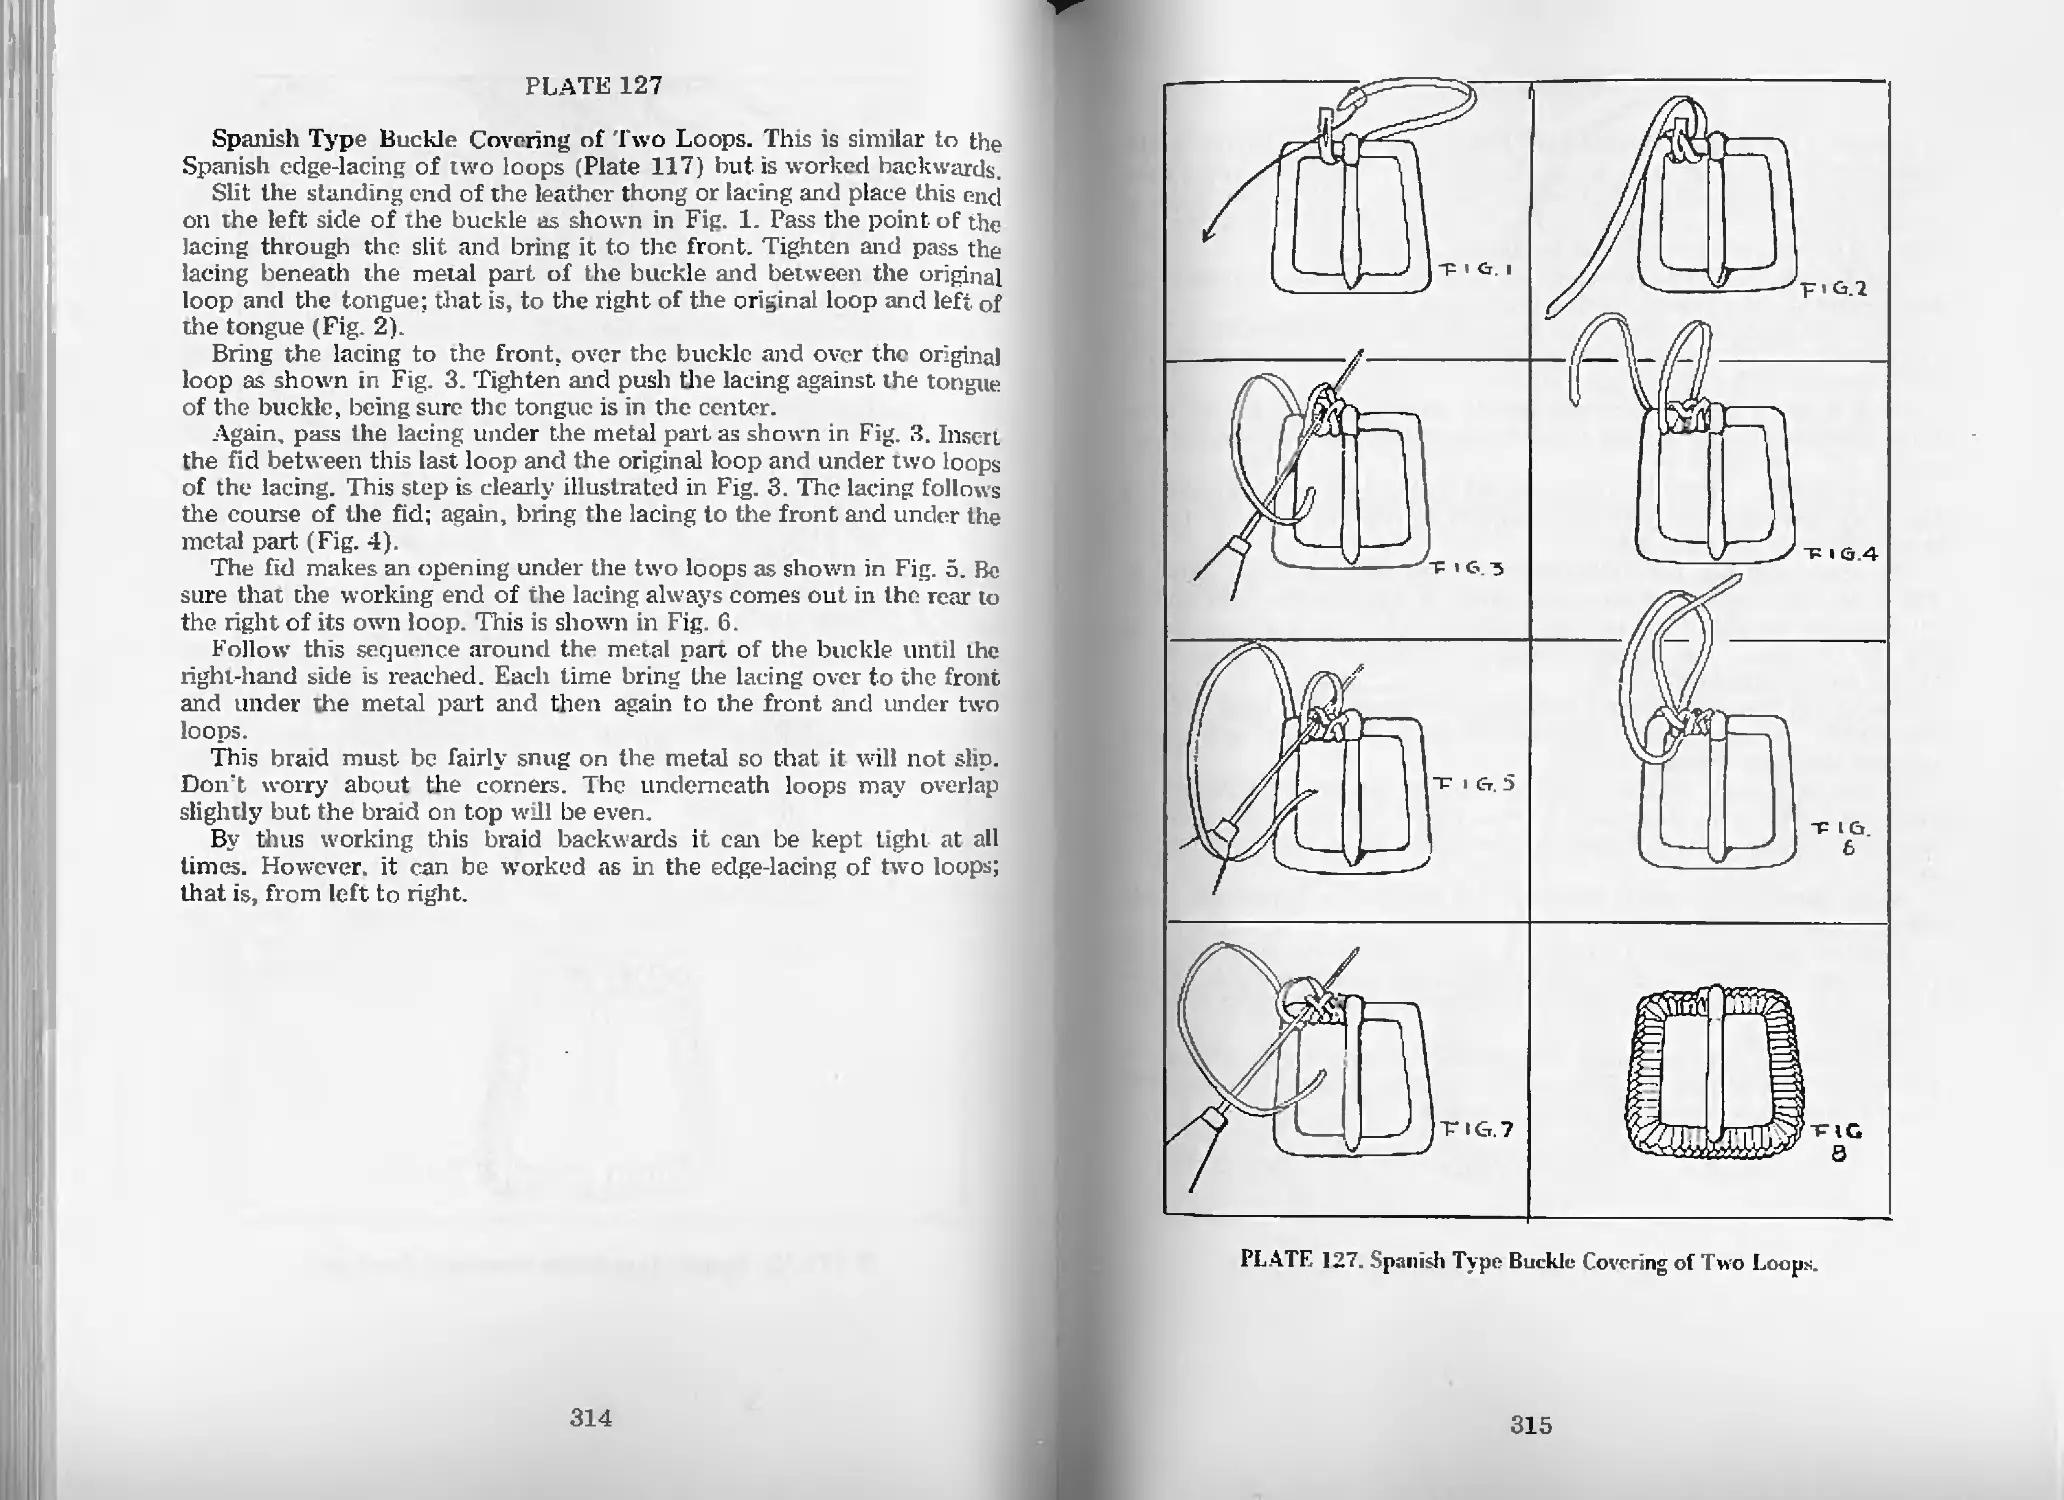
Spanish Type Buckle Covering of Two Loops—Pl. 127 314
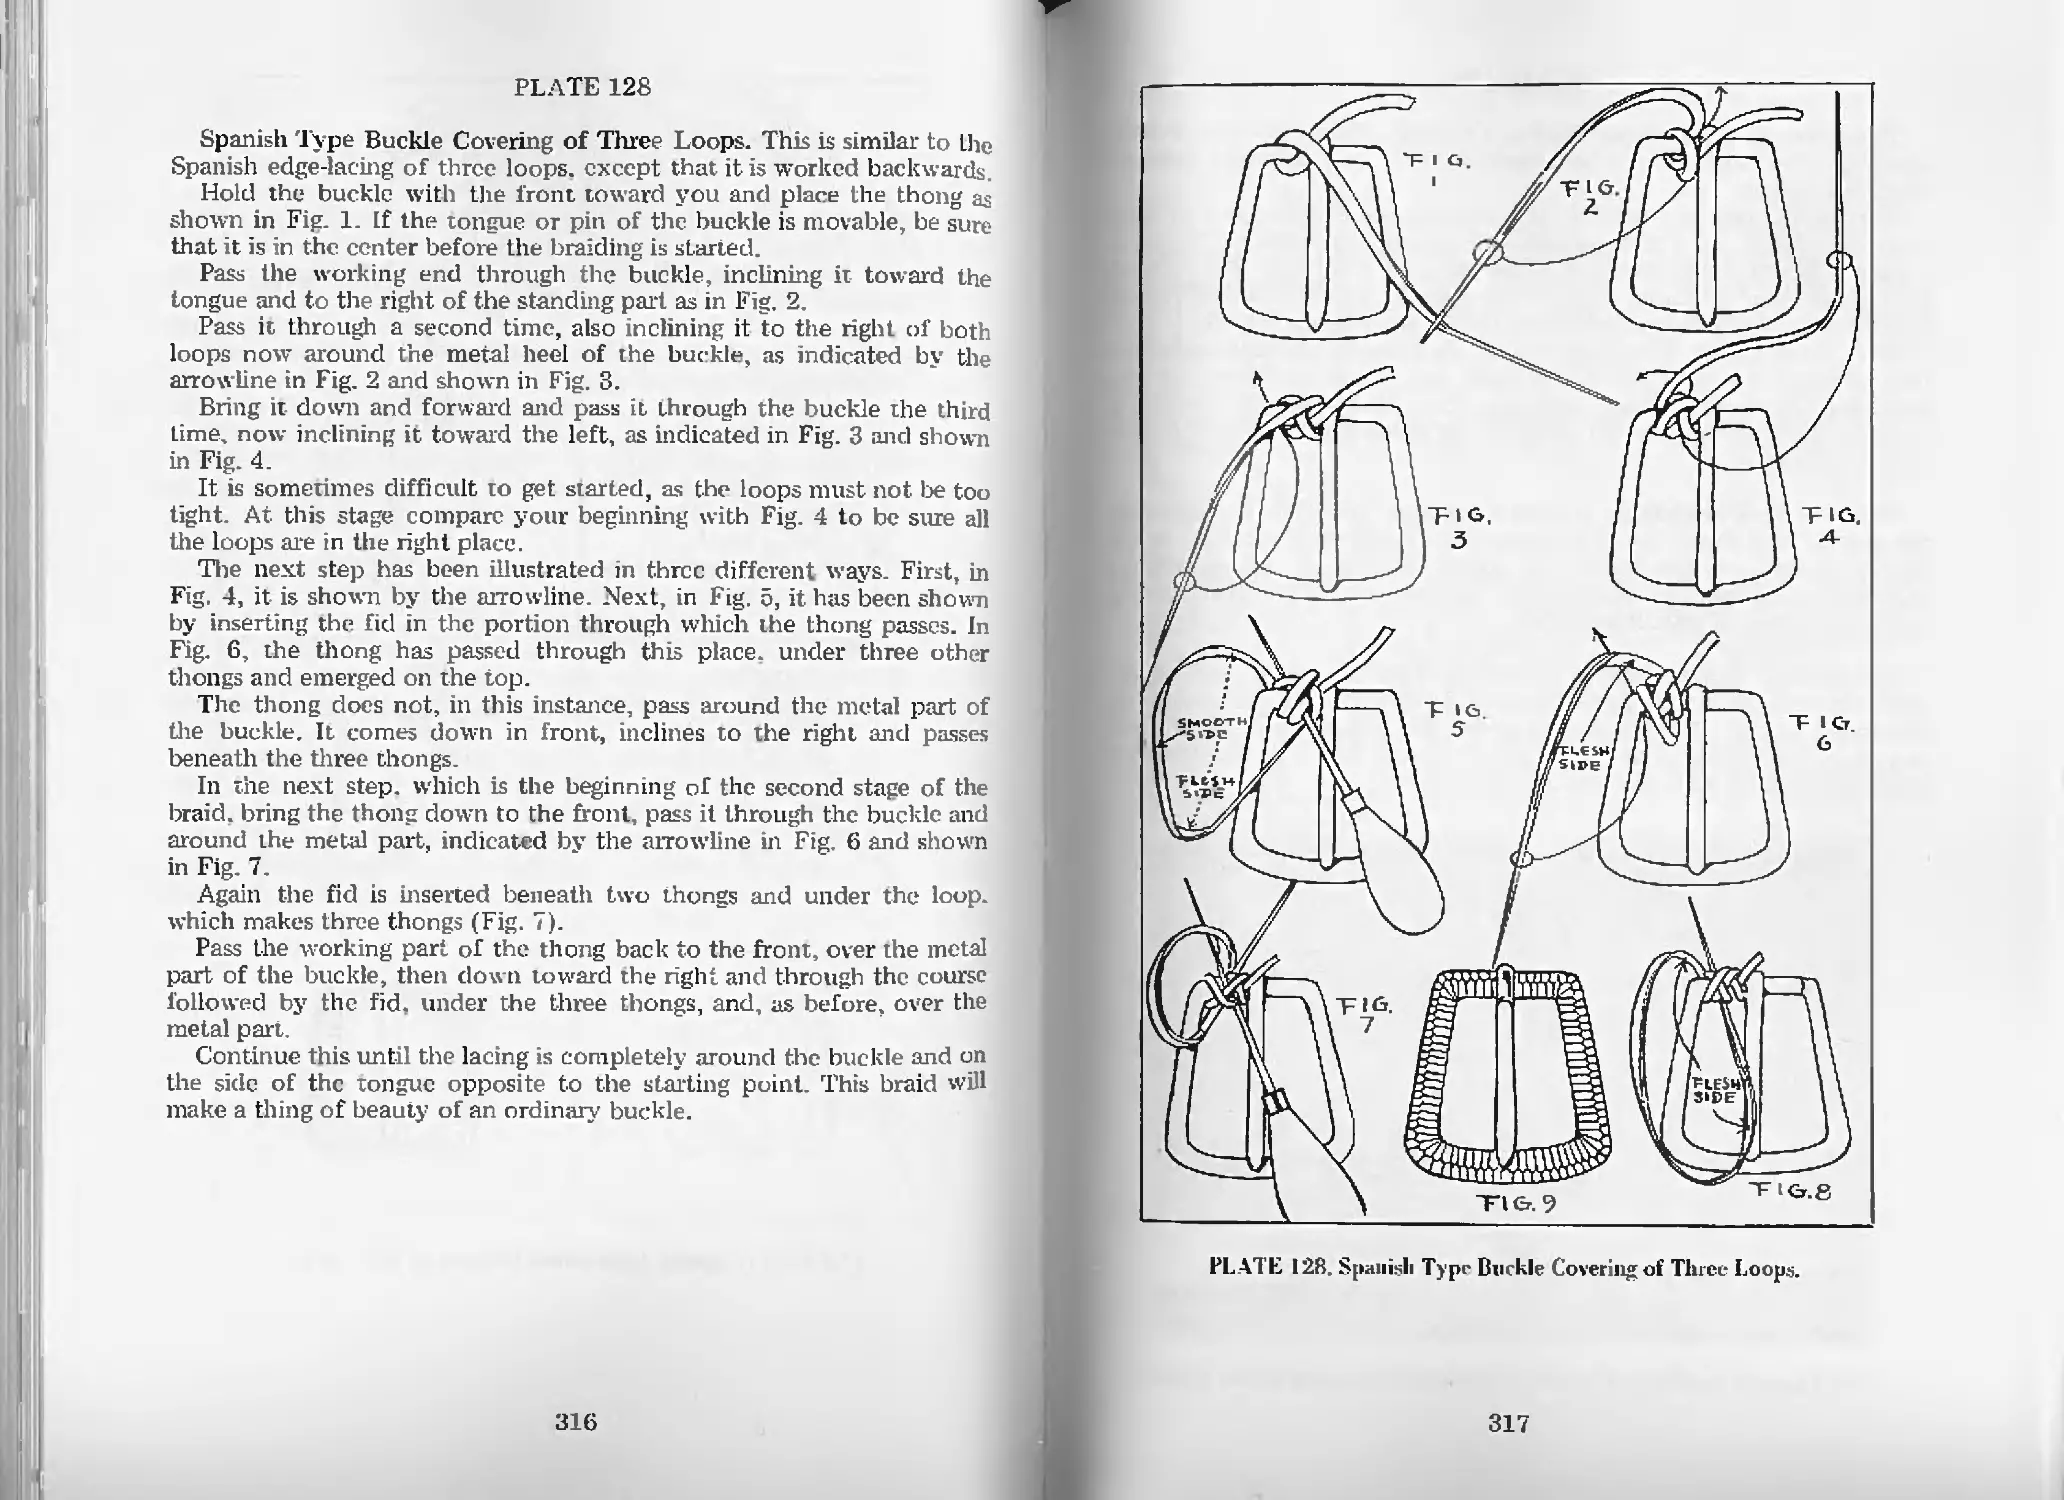
Spanish Type Buckle Covering of Three Loops—Pl. 128 316
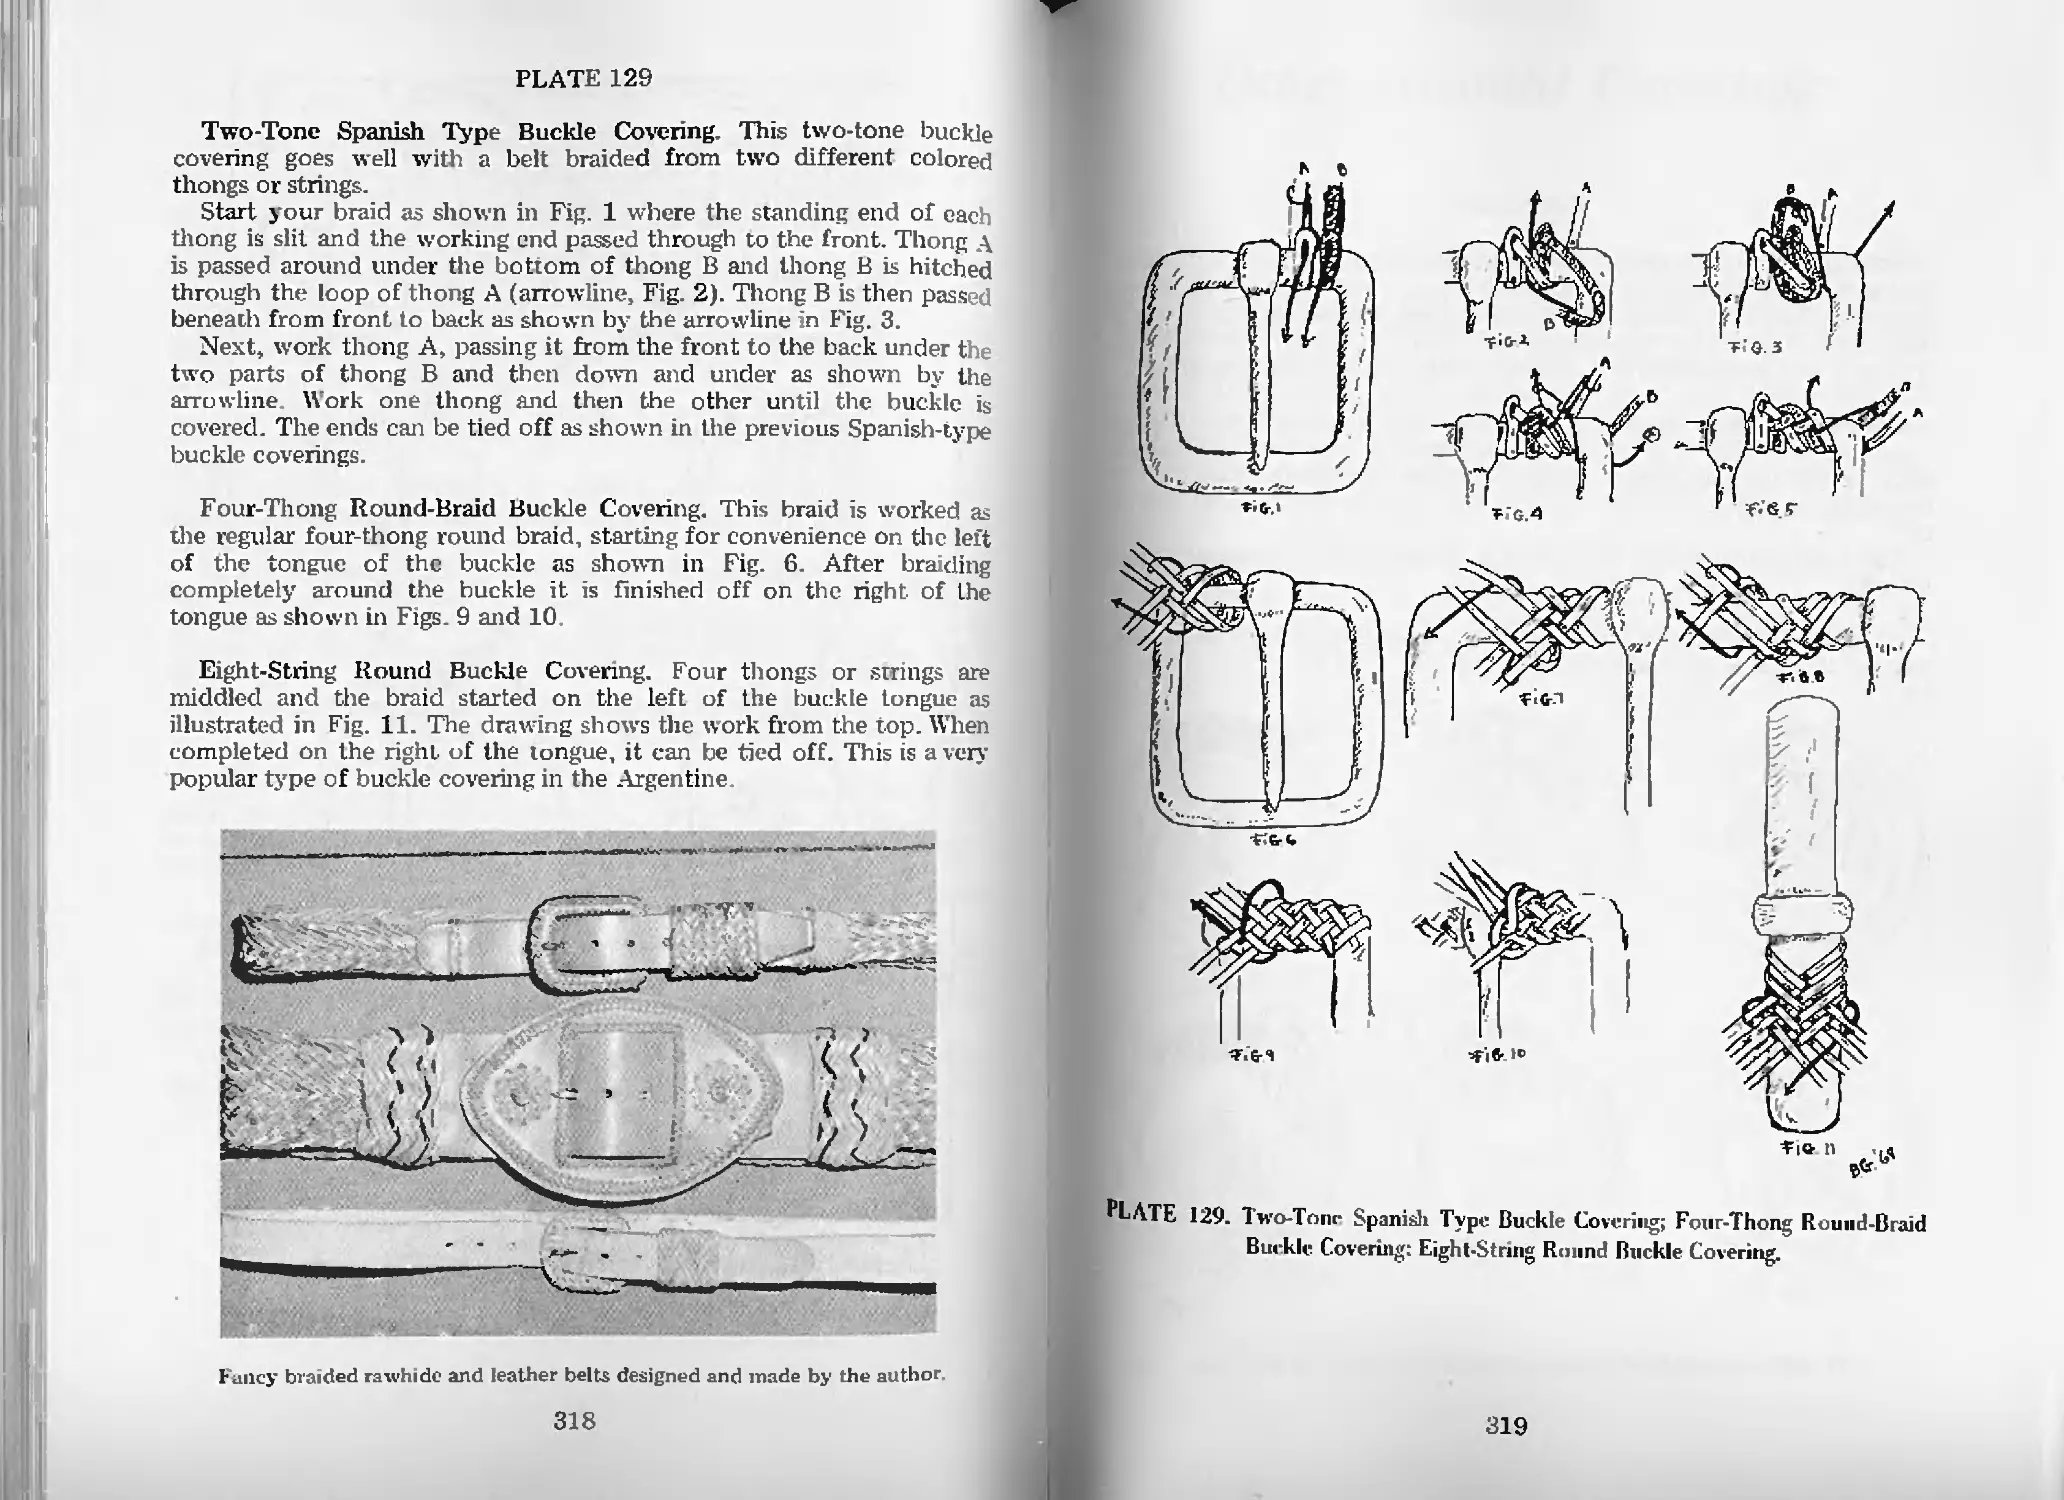
Two-Tone Spanish Type Buckle Covering—Pl 129 318
F ur-Thong Round—Braid Buckle Covering—Pl. 129 318
EighLStnng Round Buckle Covering—Pl. 129 318
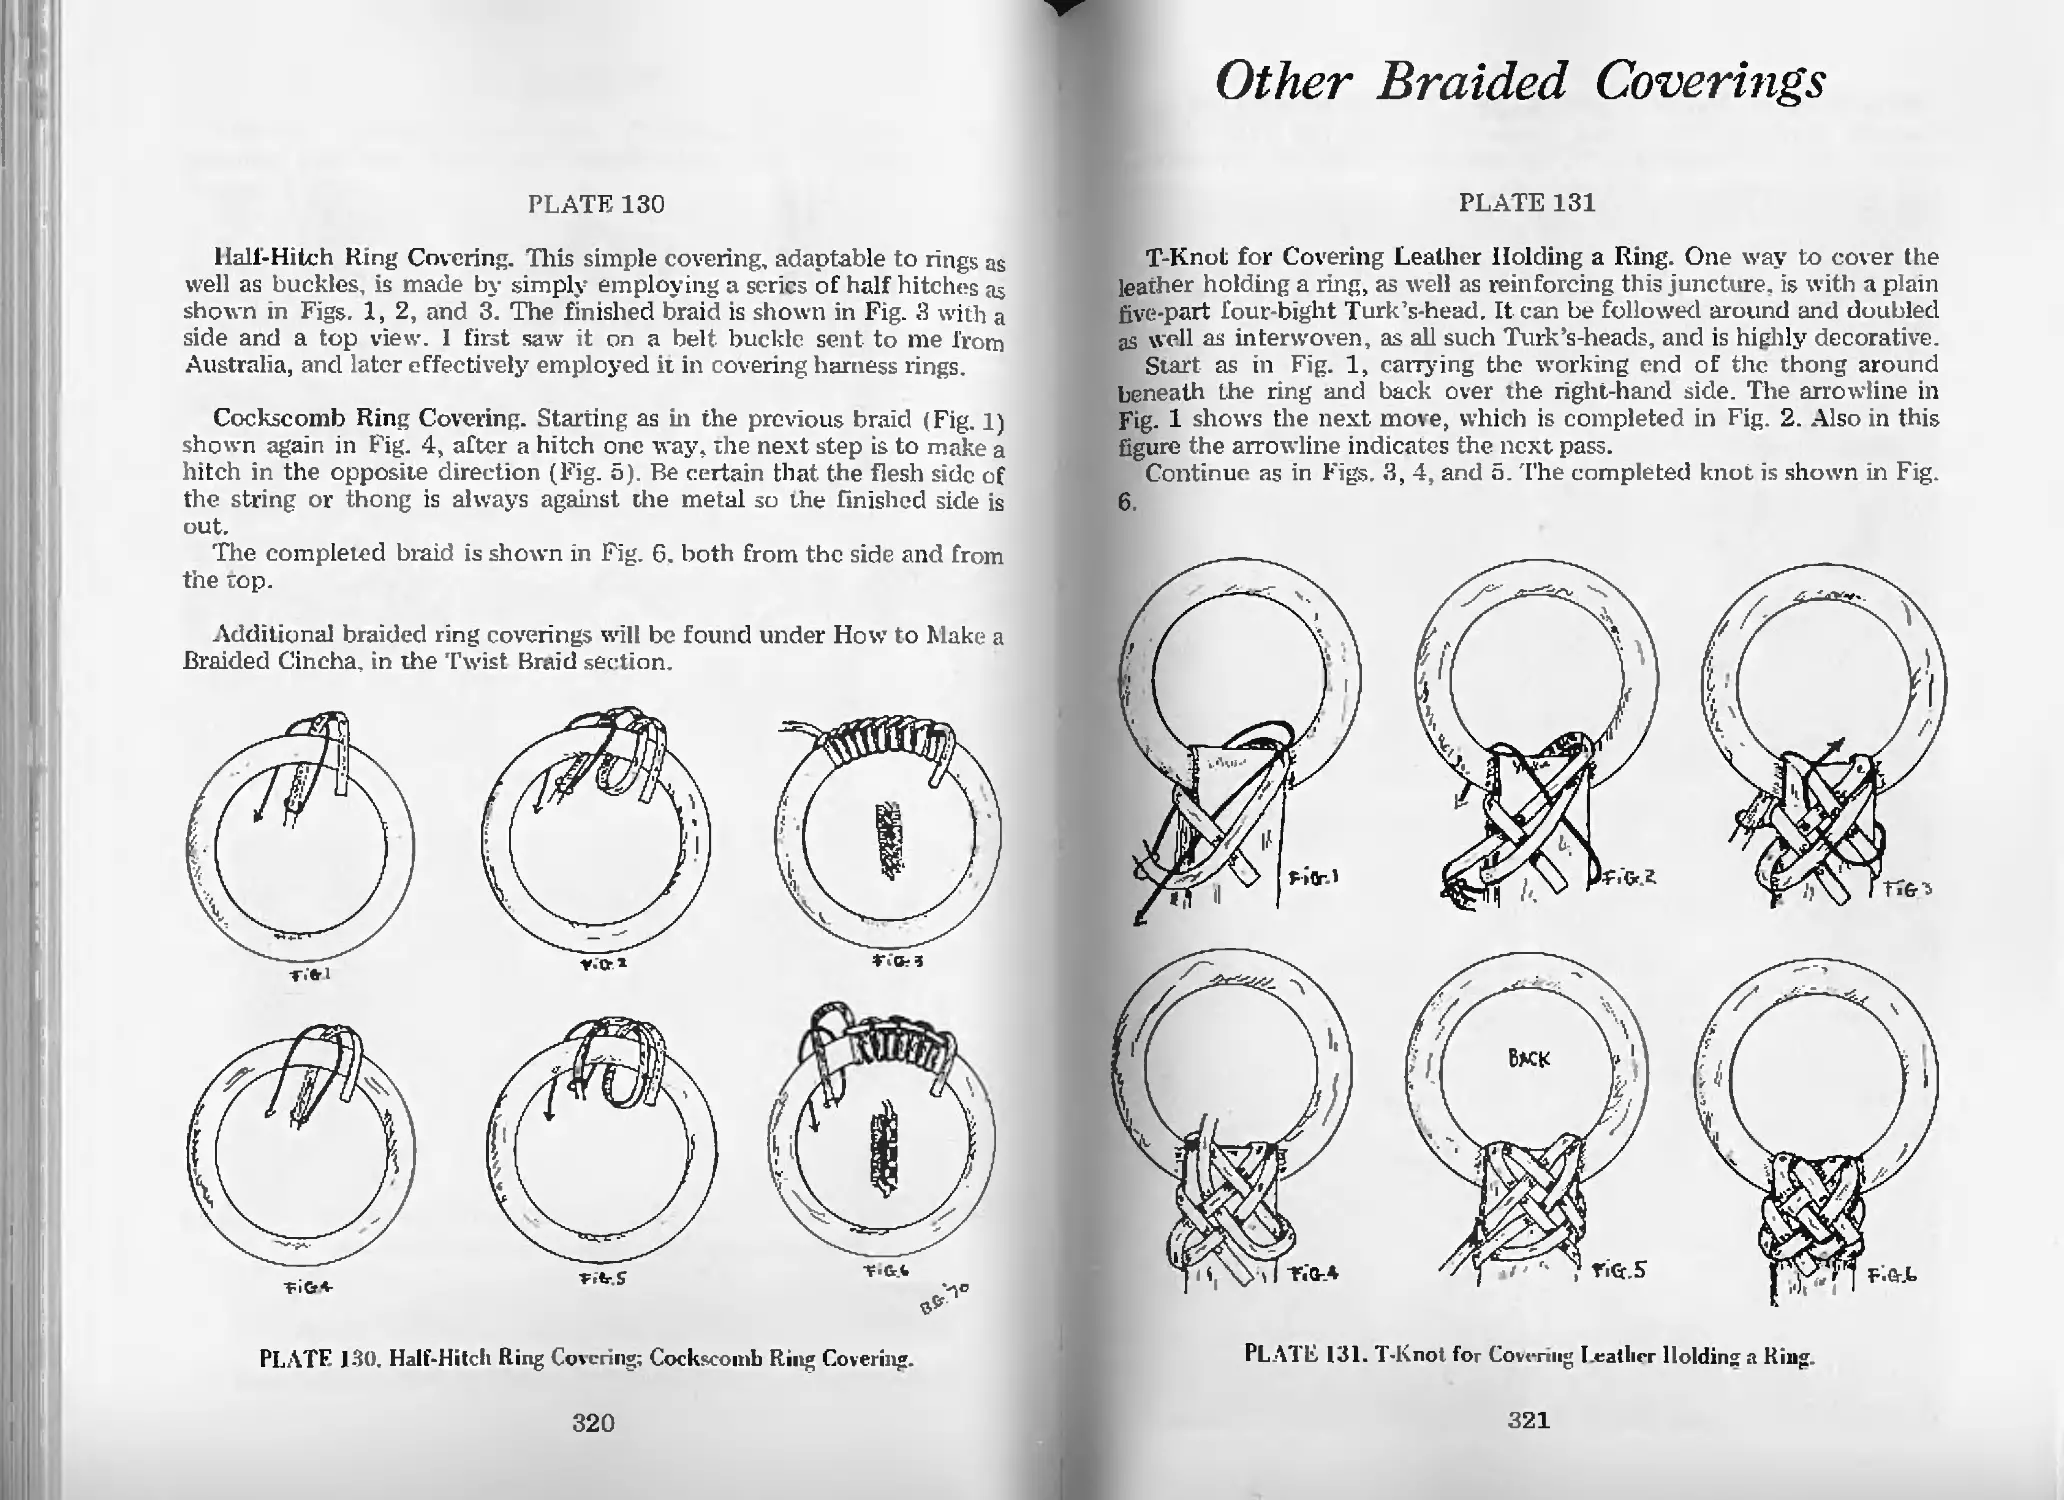
Half-Hitch Ring Covering—Pl. 130 320
Cockscomb Ring Covering—Pl. 130 320
xii
Other Braided Cox erings
Т-Knot for Covering Leather Holding a Ring—Pl. 131 321
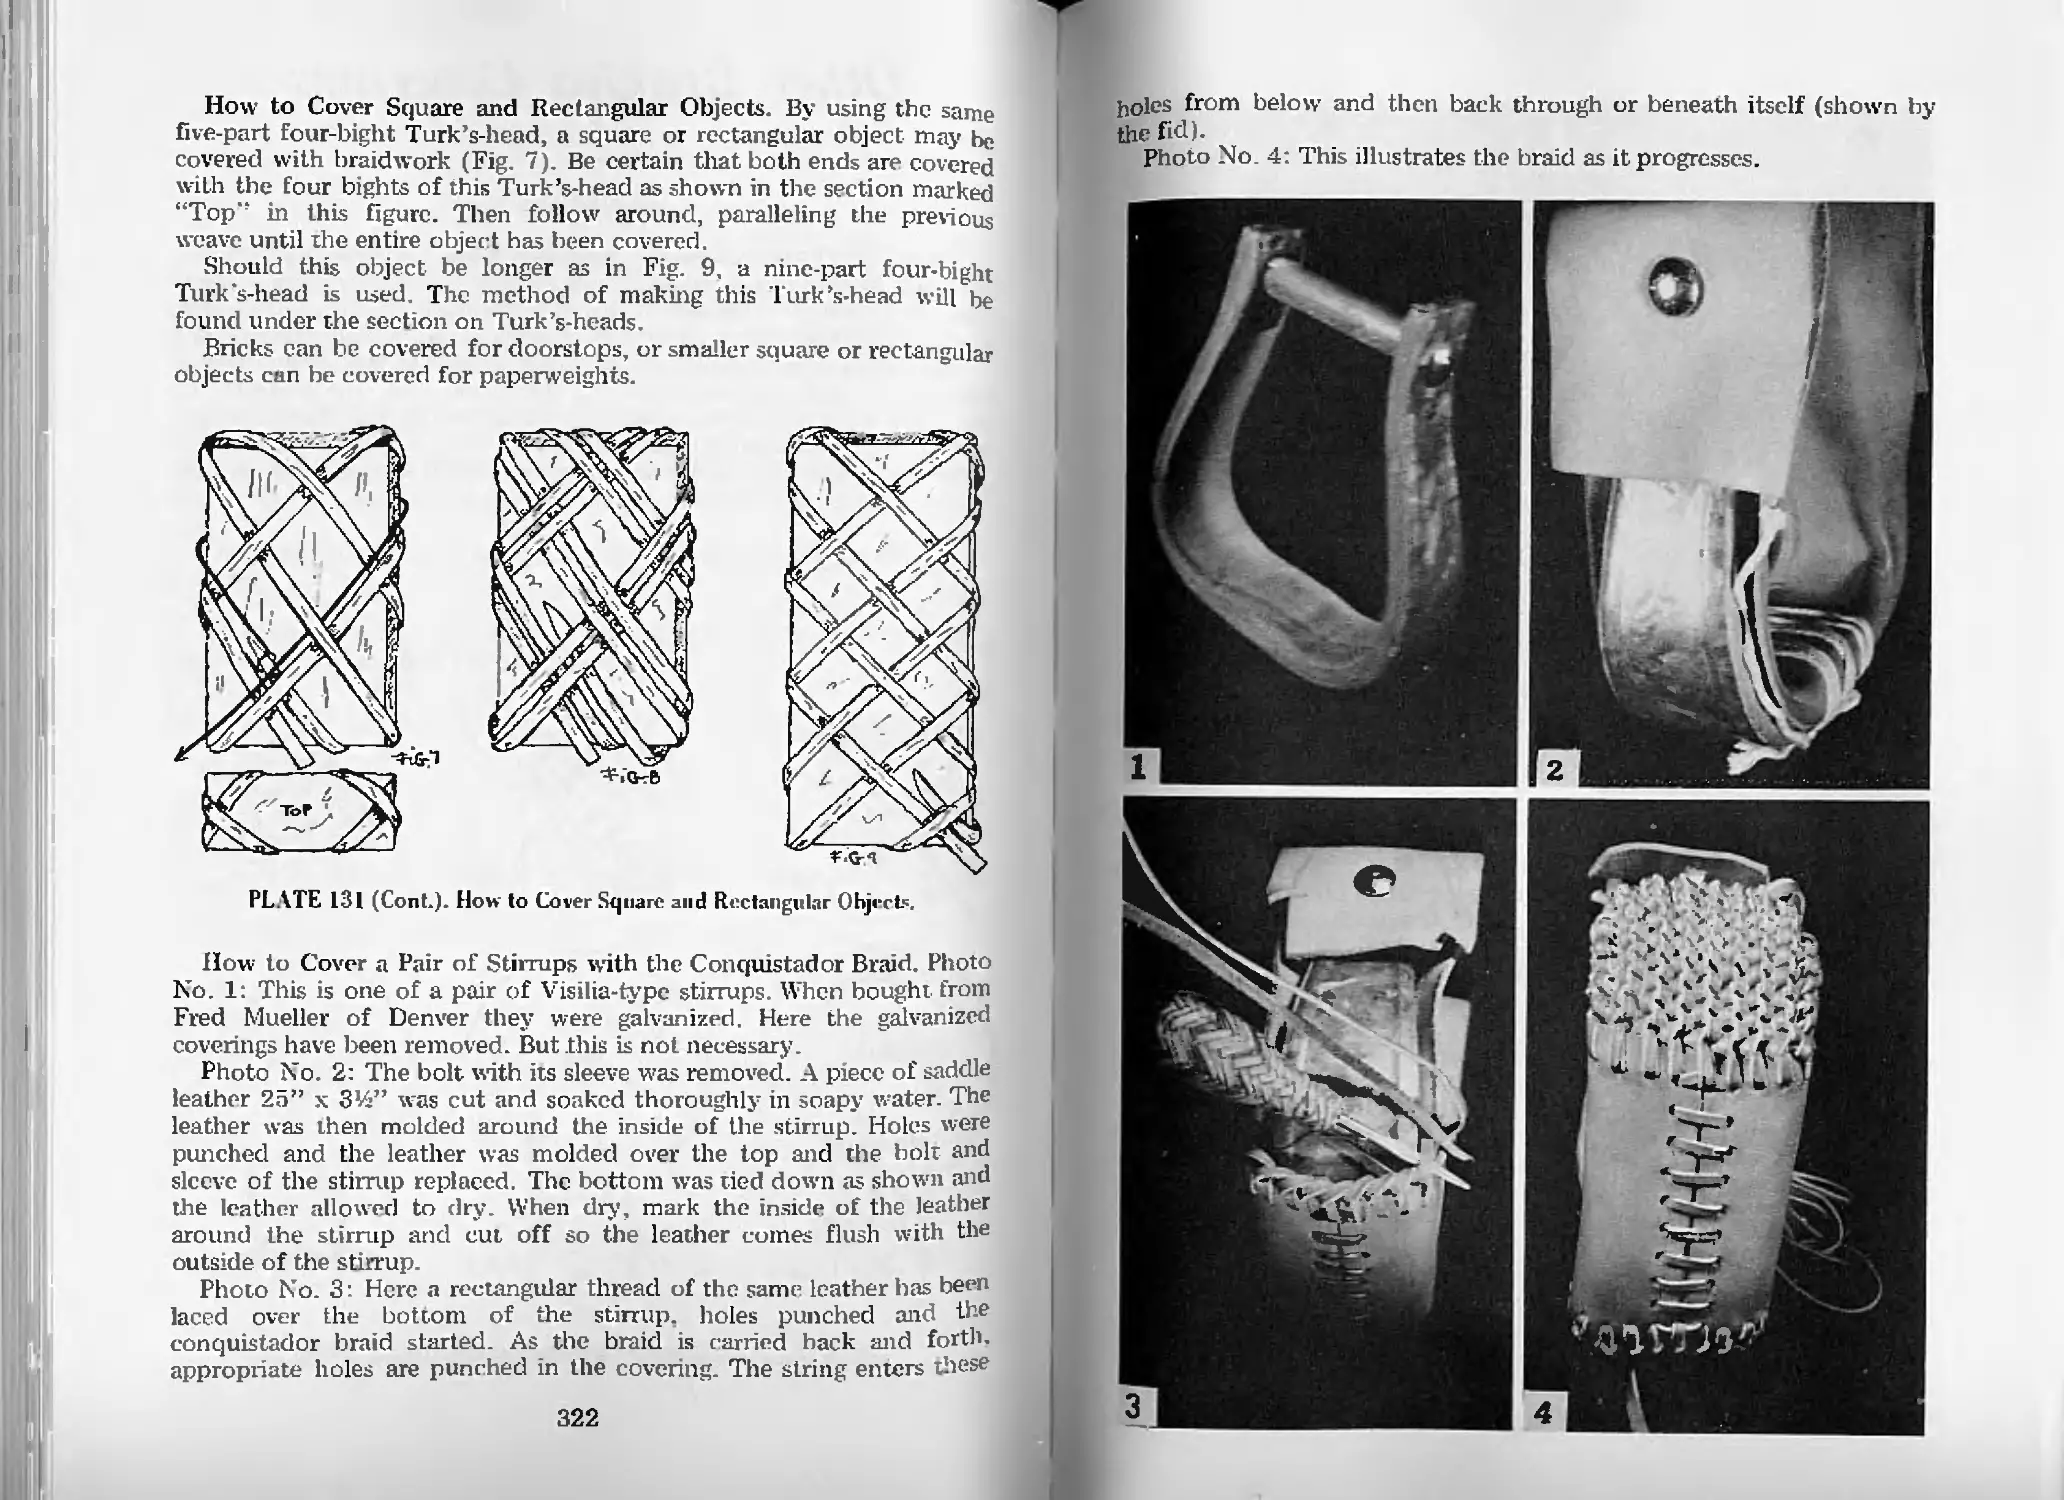
How to Cover Square and Rectangular Objects—Pl. 131 322
How to Cover a Pair of Stirrups with the
Conquistador Braid 322
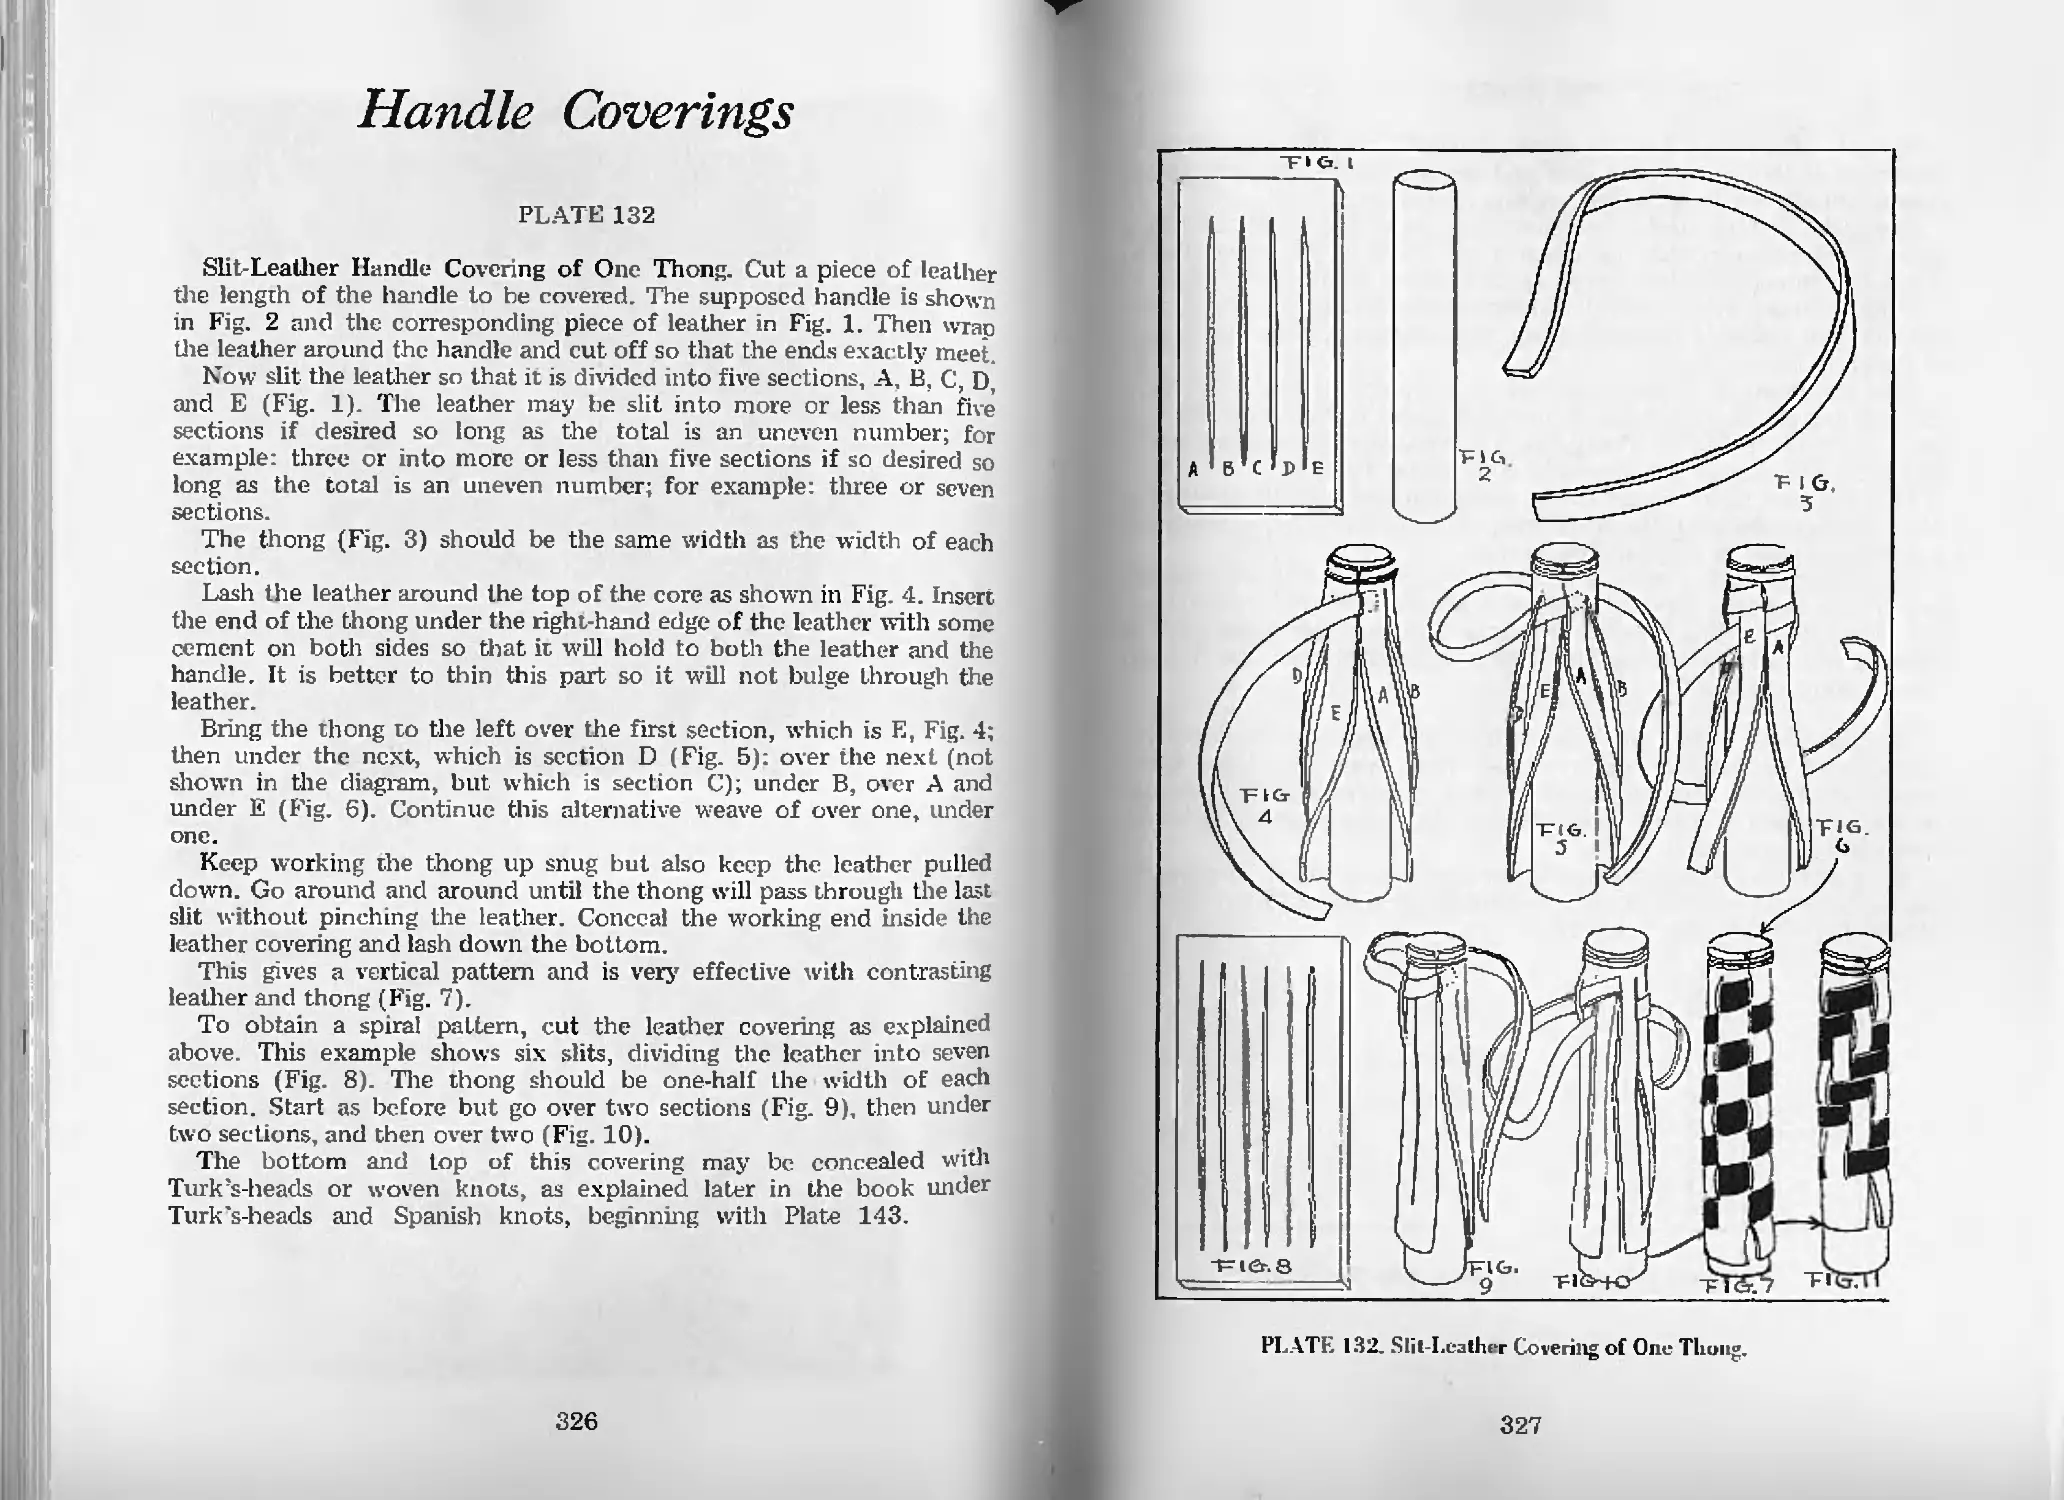
Slit—Leather Handle Covering of One Thong—Pl. 132 326
Spanish Hitching?—1Pl 133 328
Zig-Zag Braid—Pl. 133 328
Handle Coverings
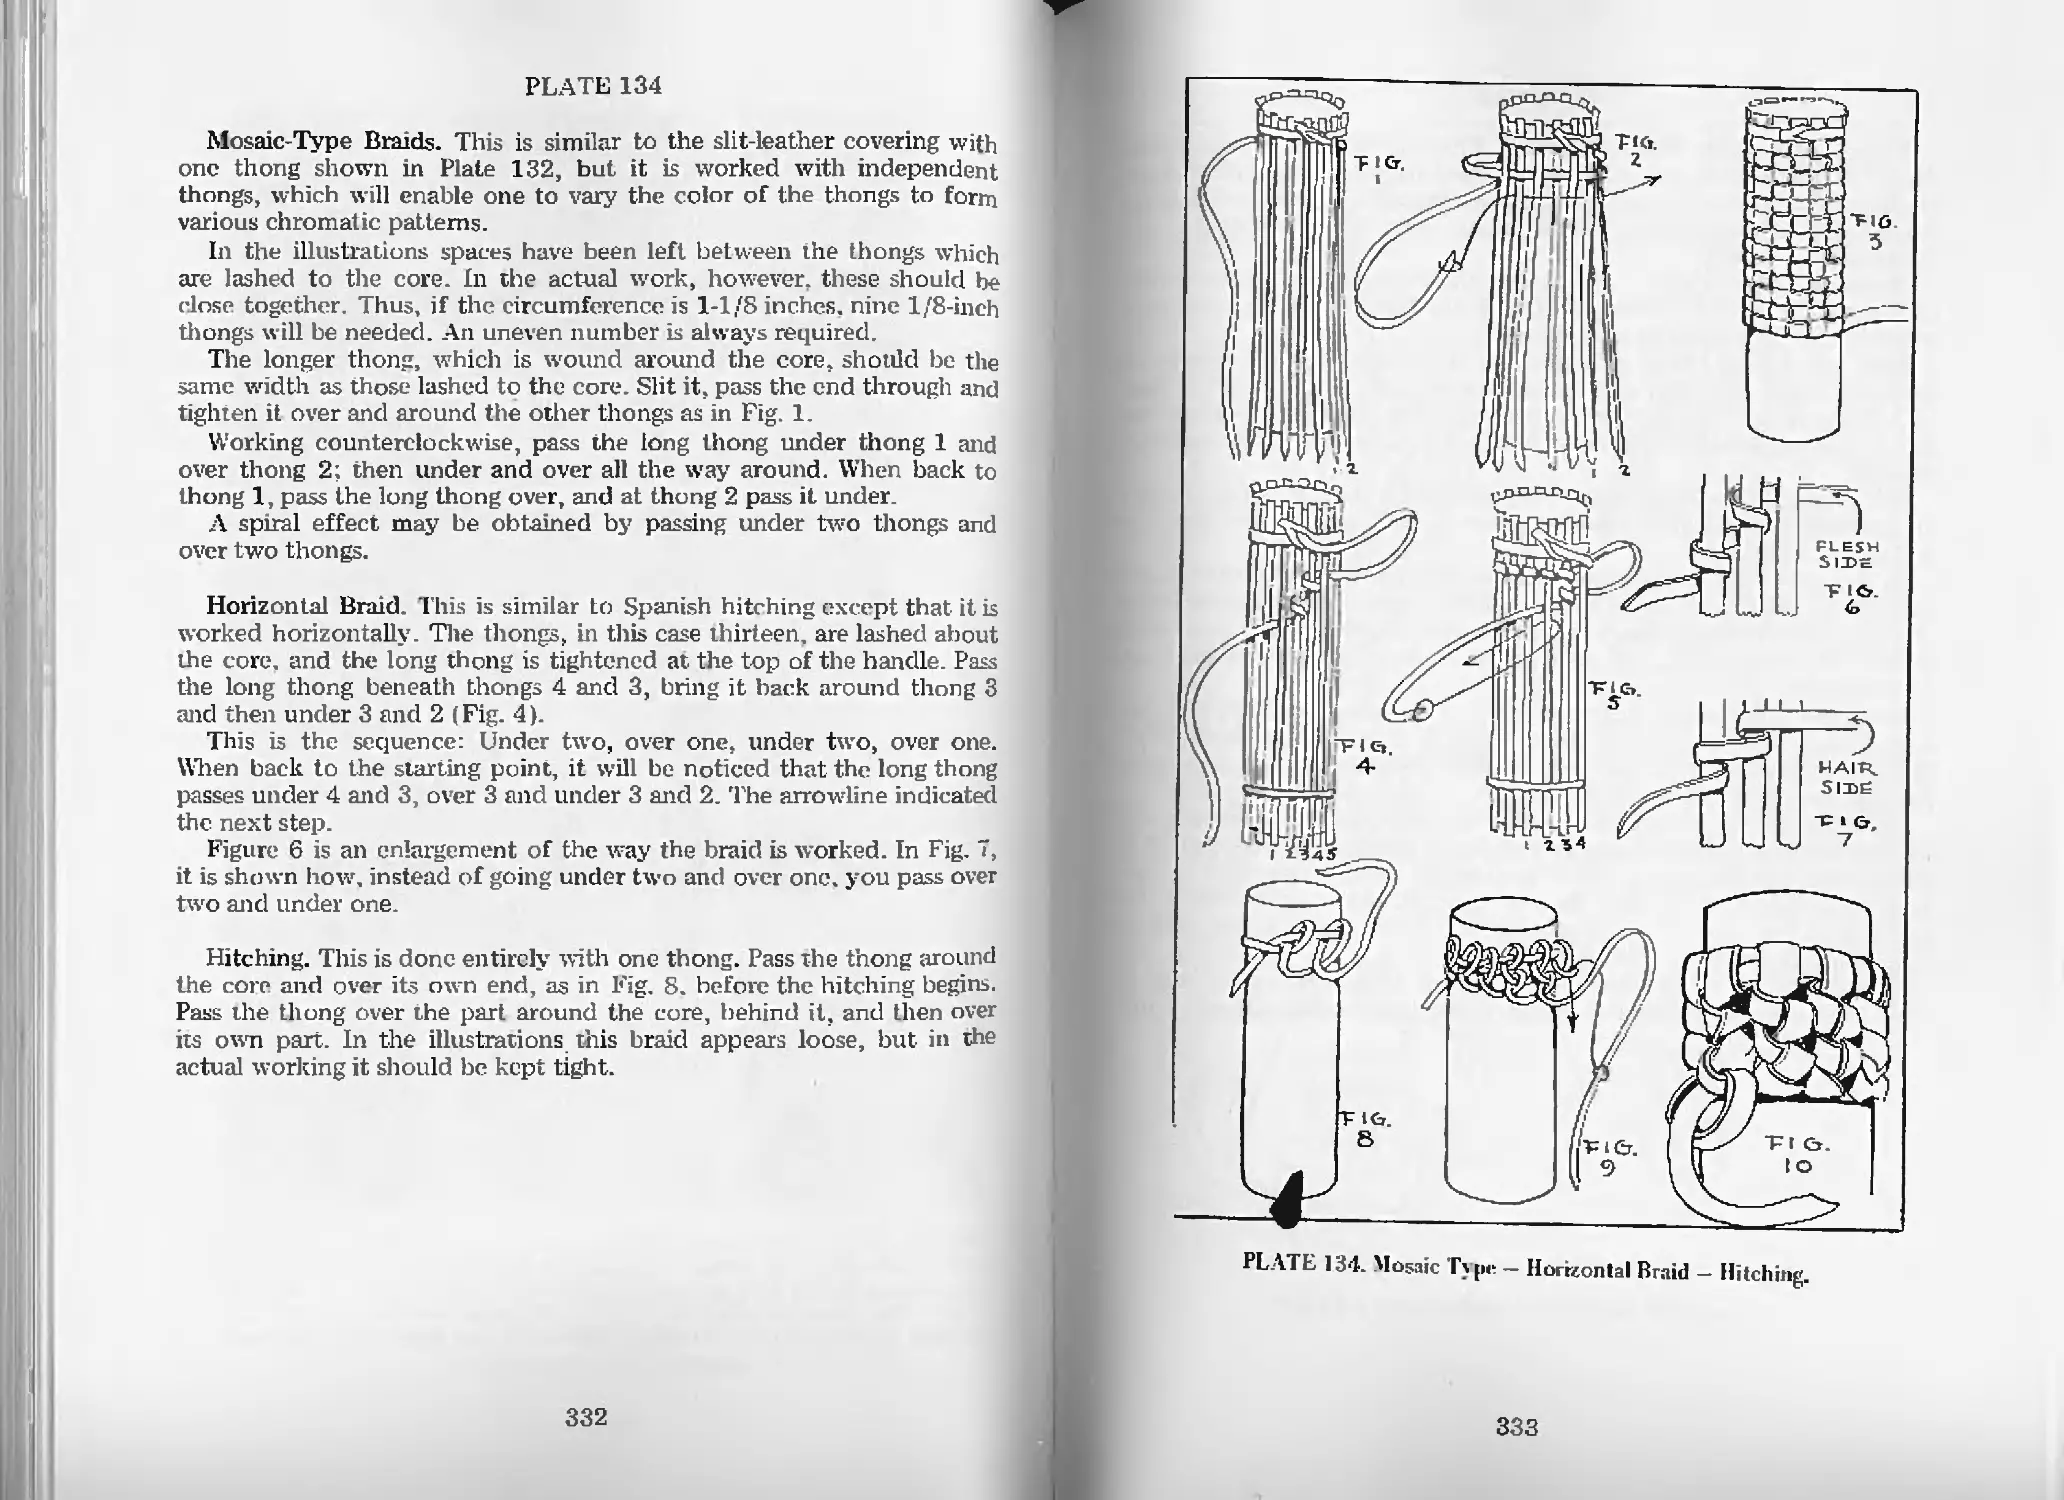
Mosaic-Type Braids—Pl. 134 332
Horizontal Braid—Pl 134 332
Hitching—Pl. 134 332
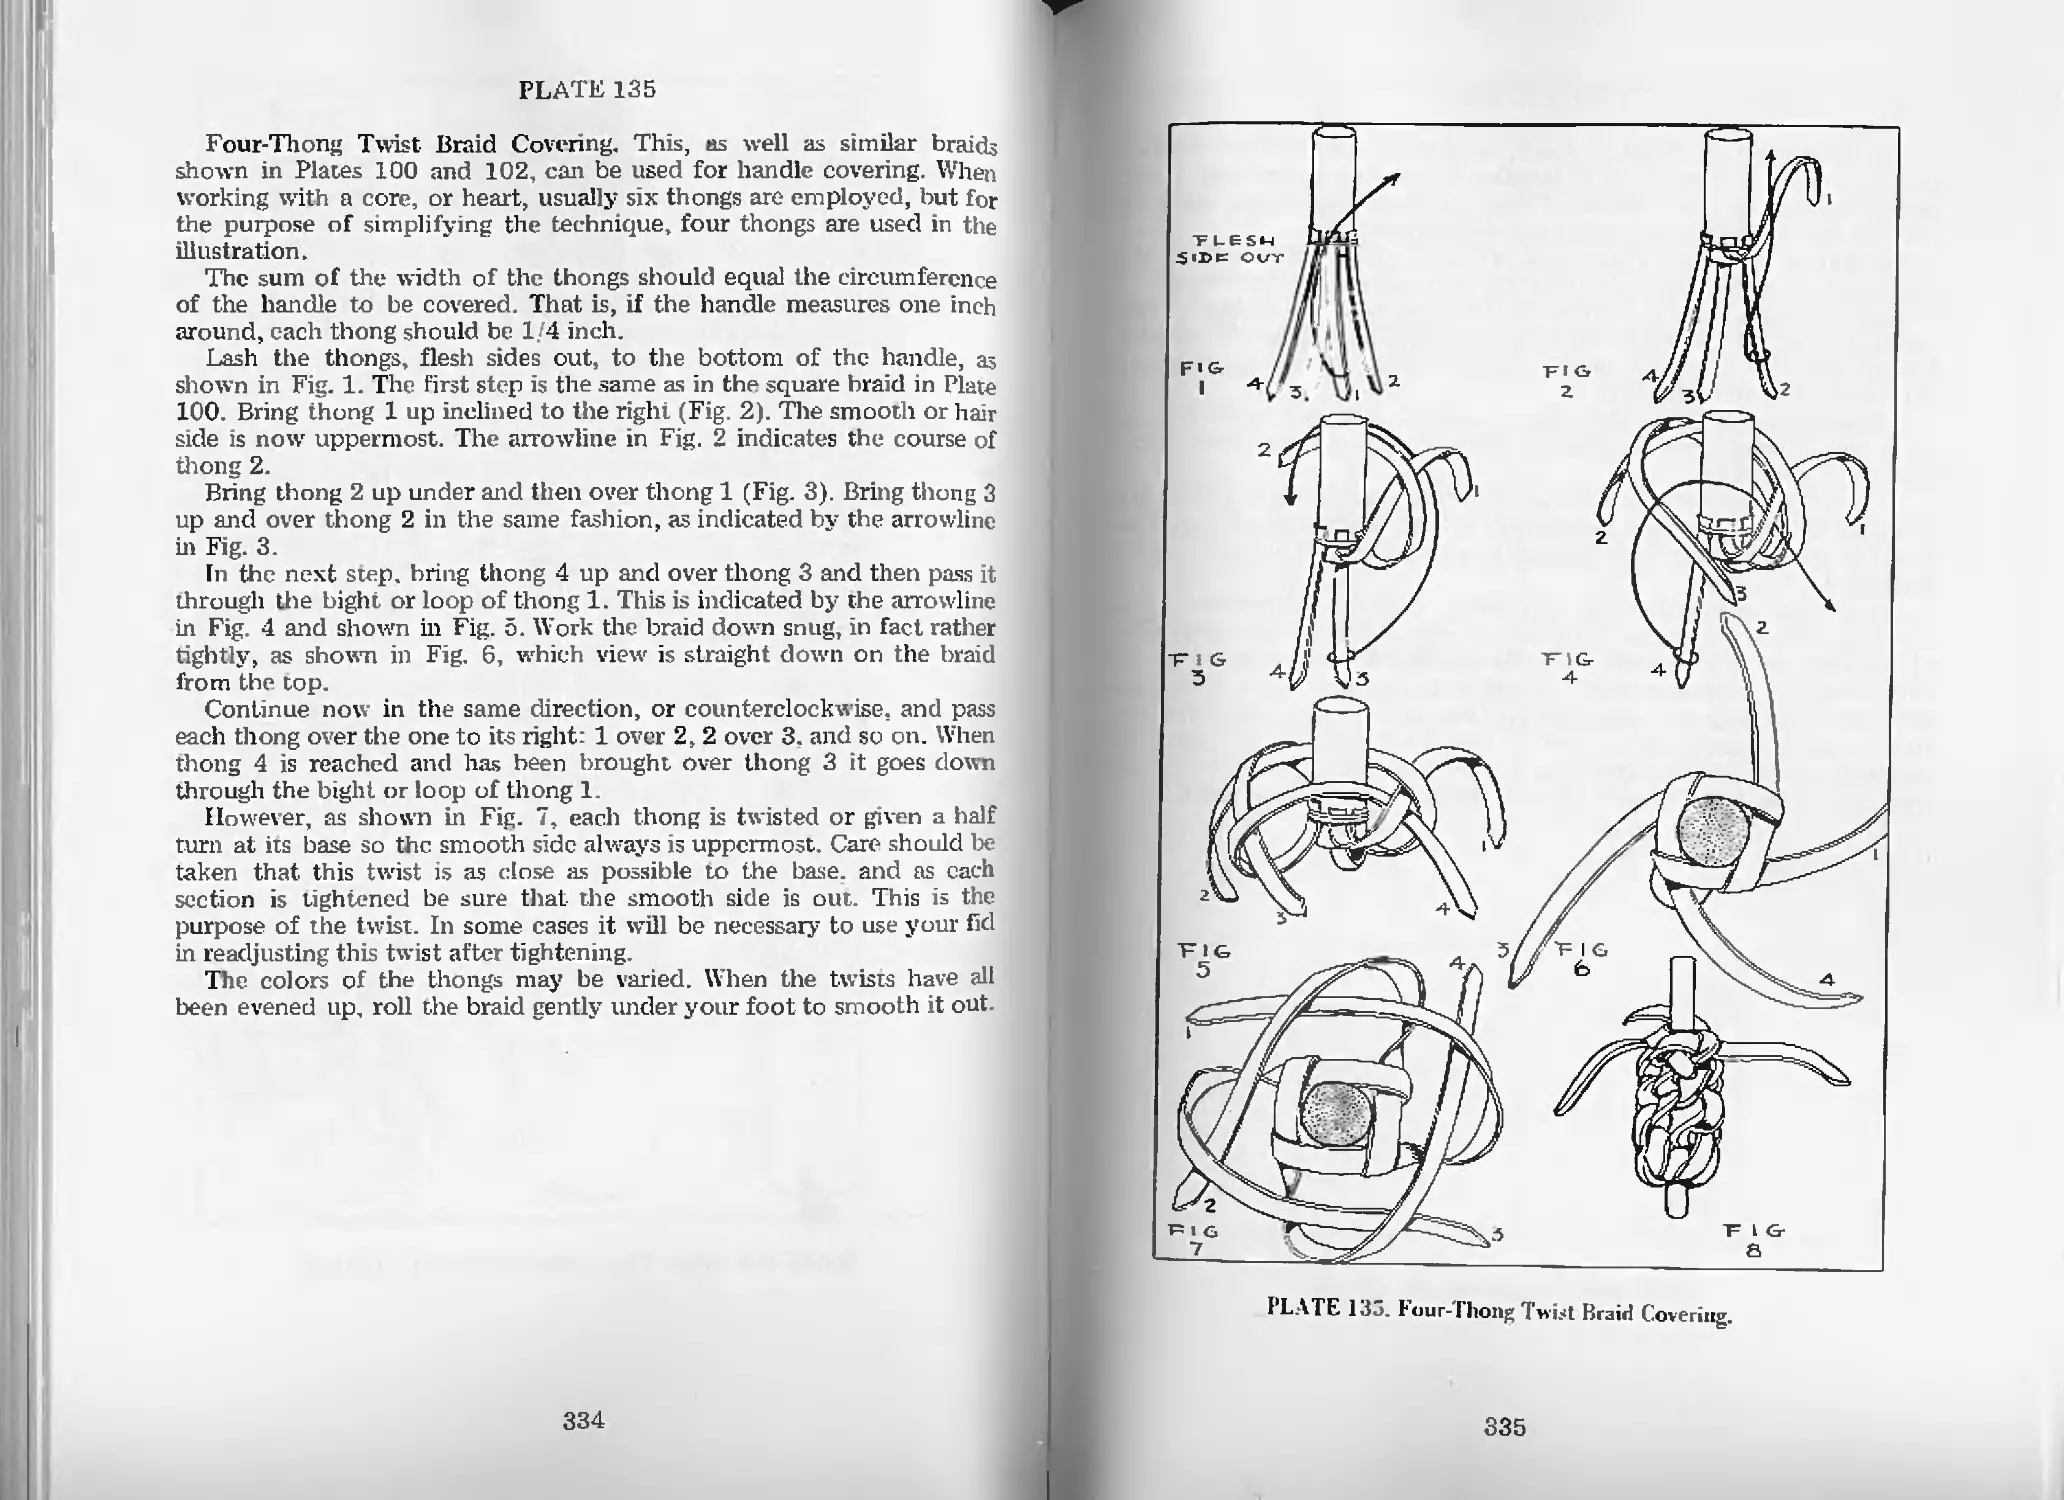
Four-Thong Twist Braid Covering—Pl, 135 334
Six-Thong Multiple Braid—Pl. 136 336
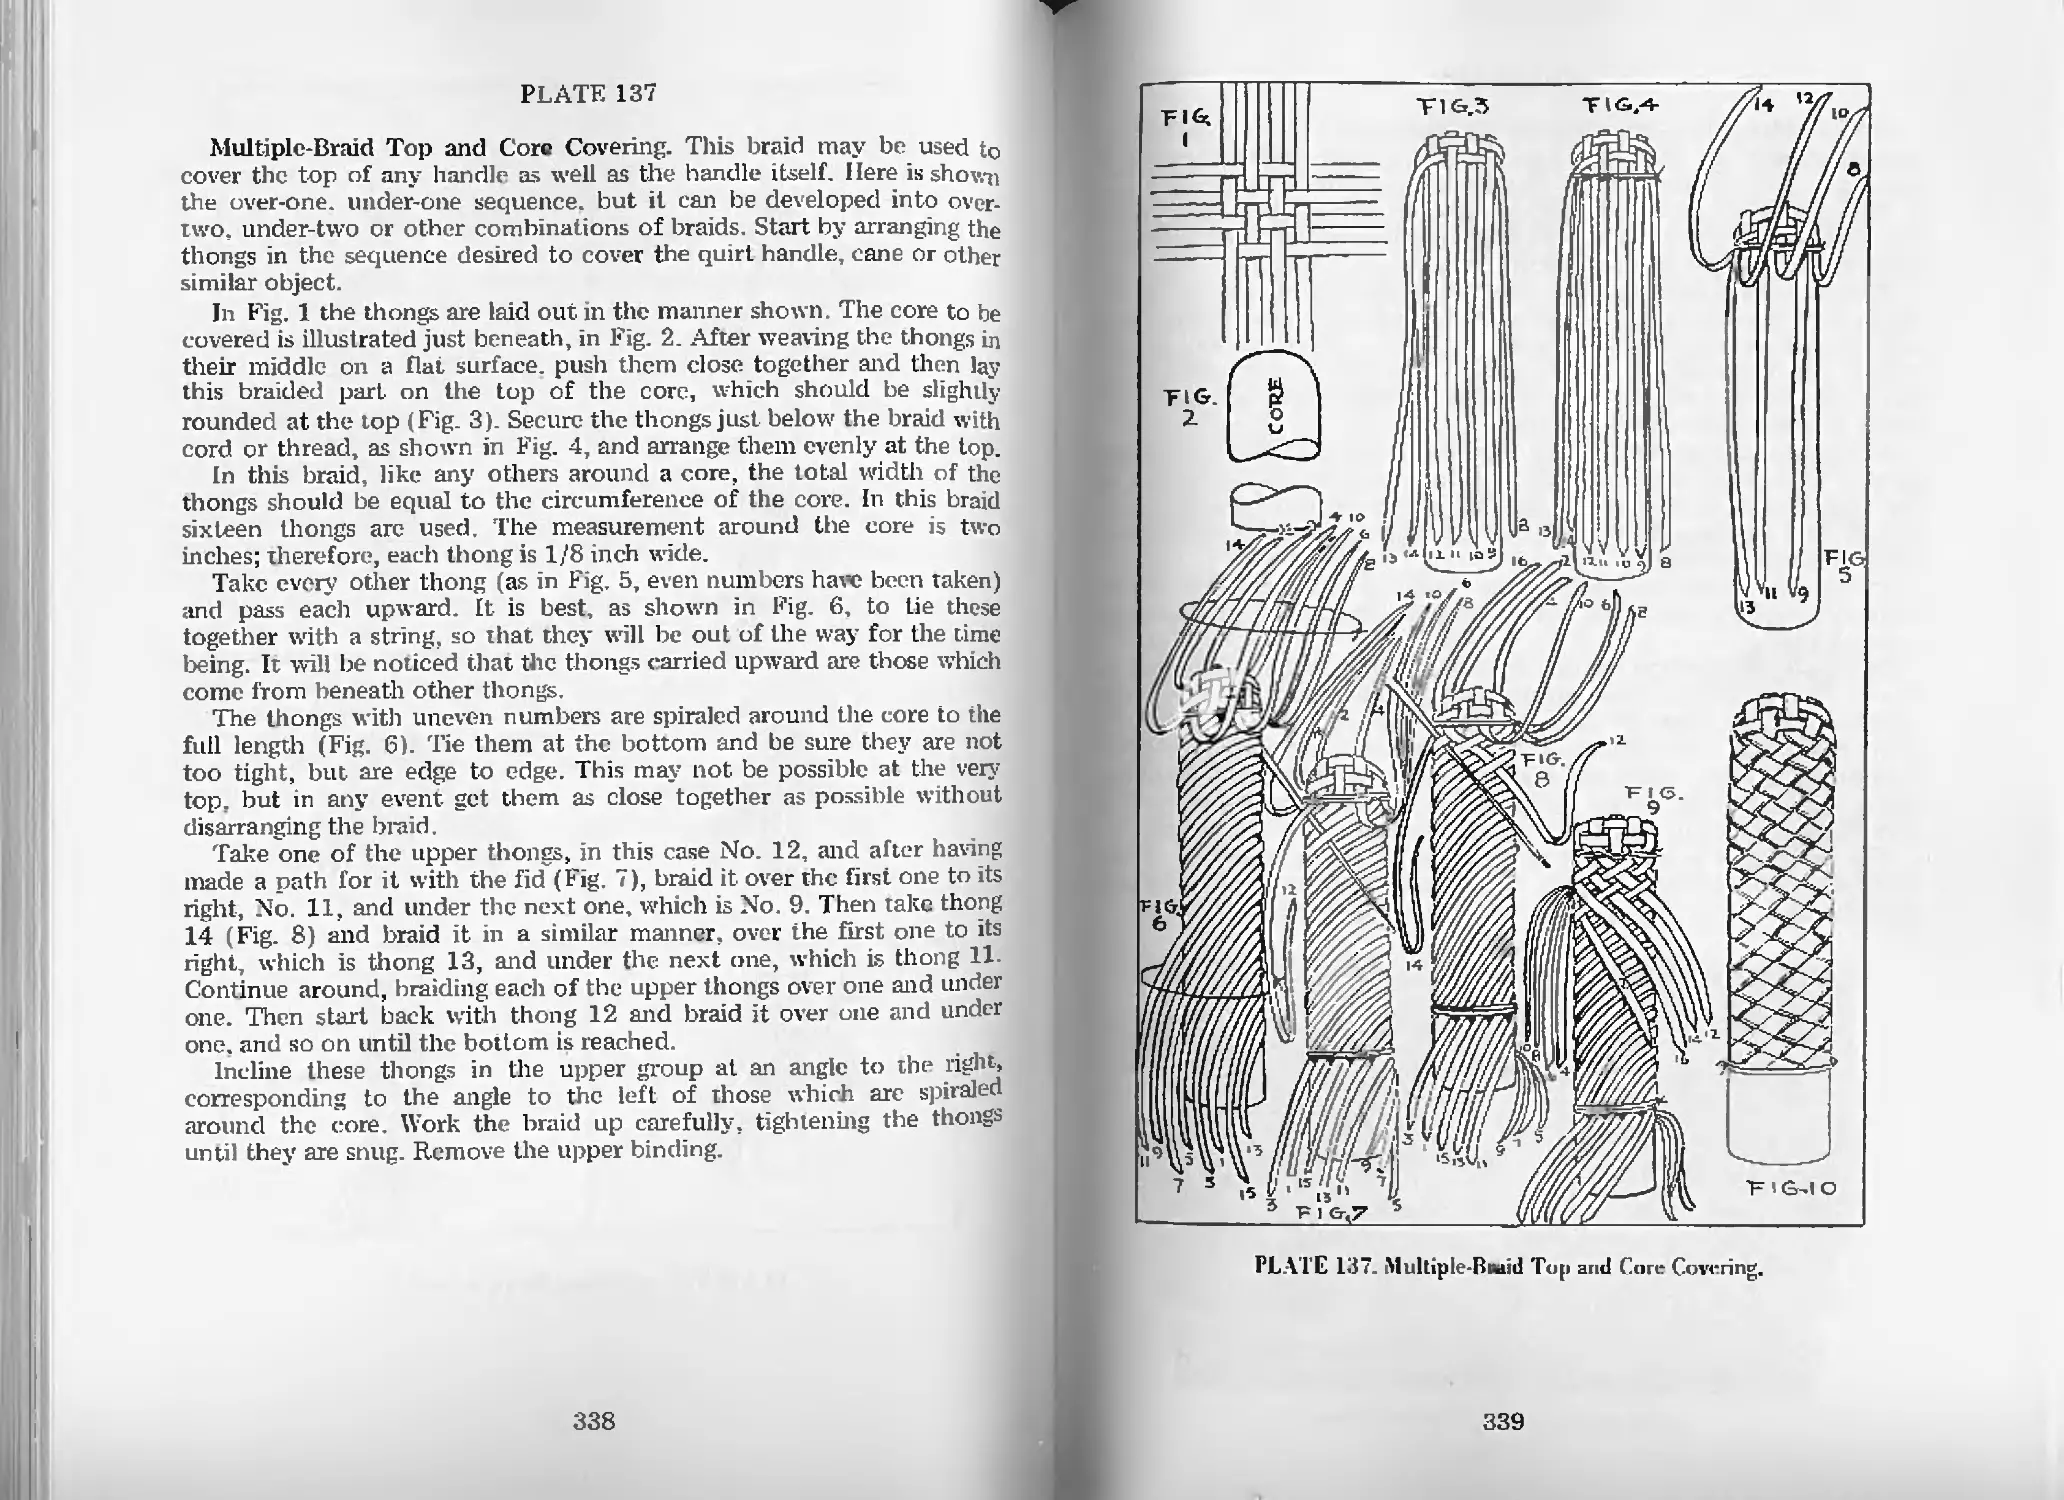
Multiple-Braid Top and Core Covering—Pl. 137 338
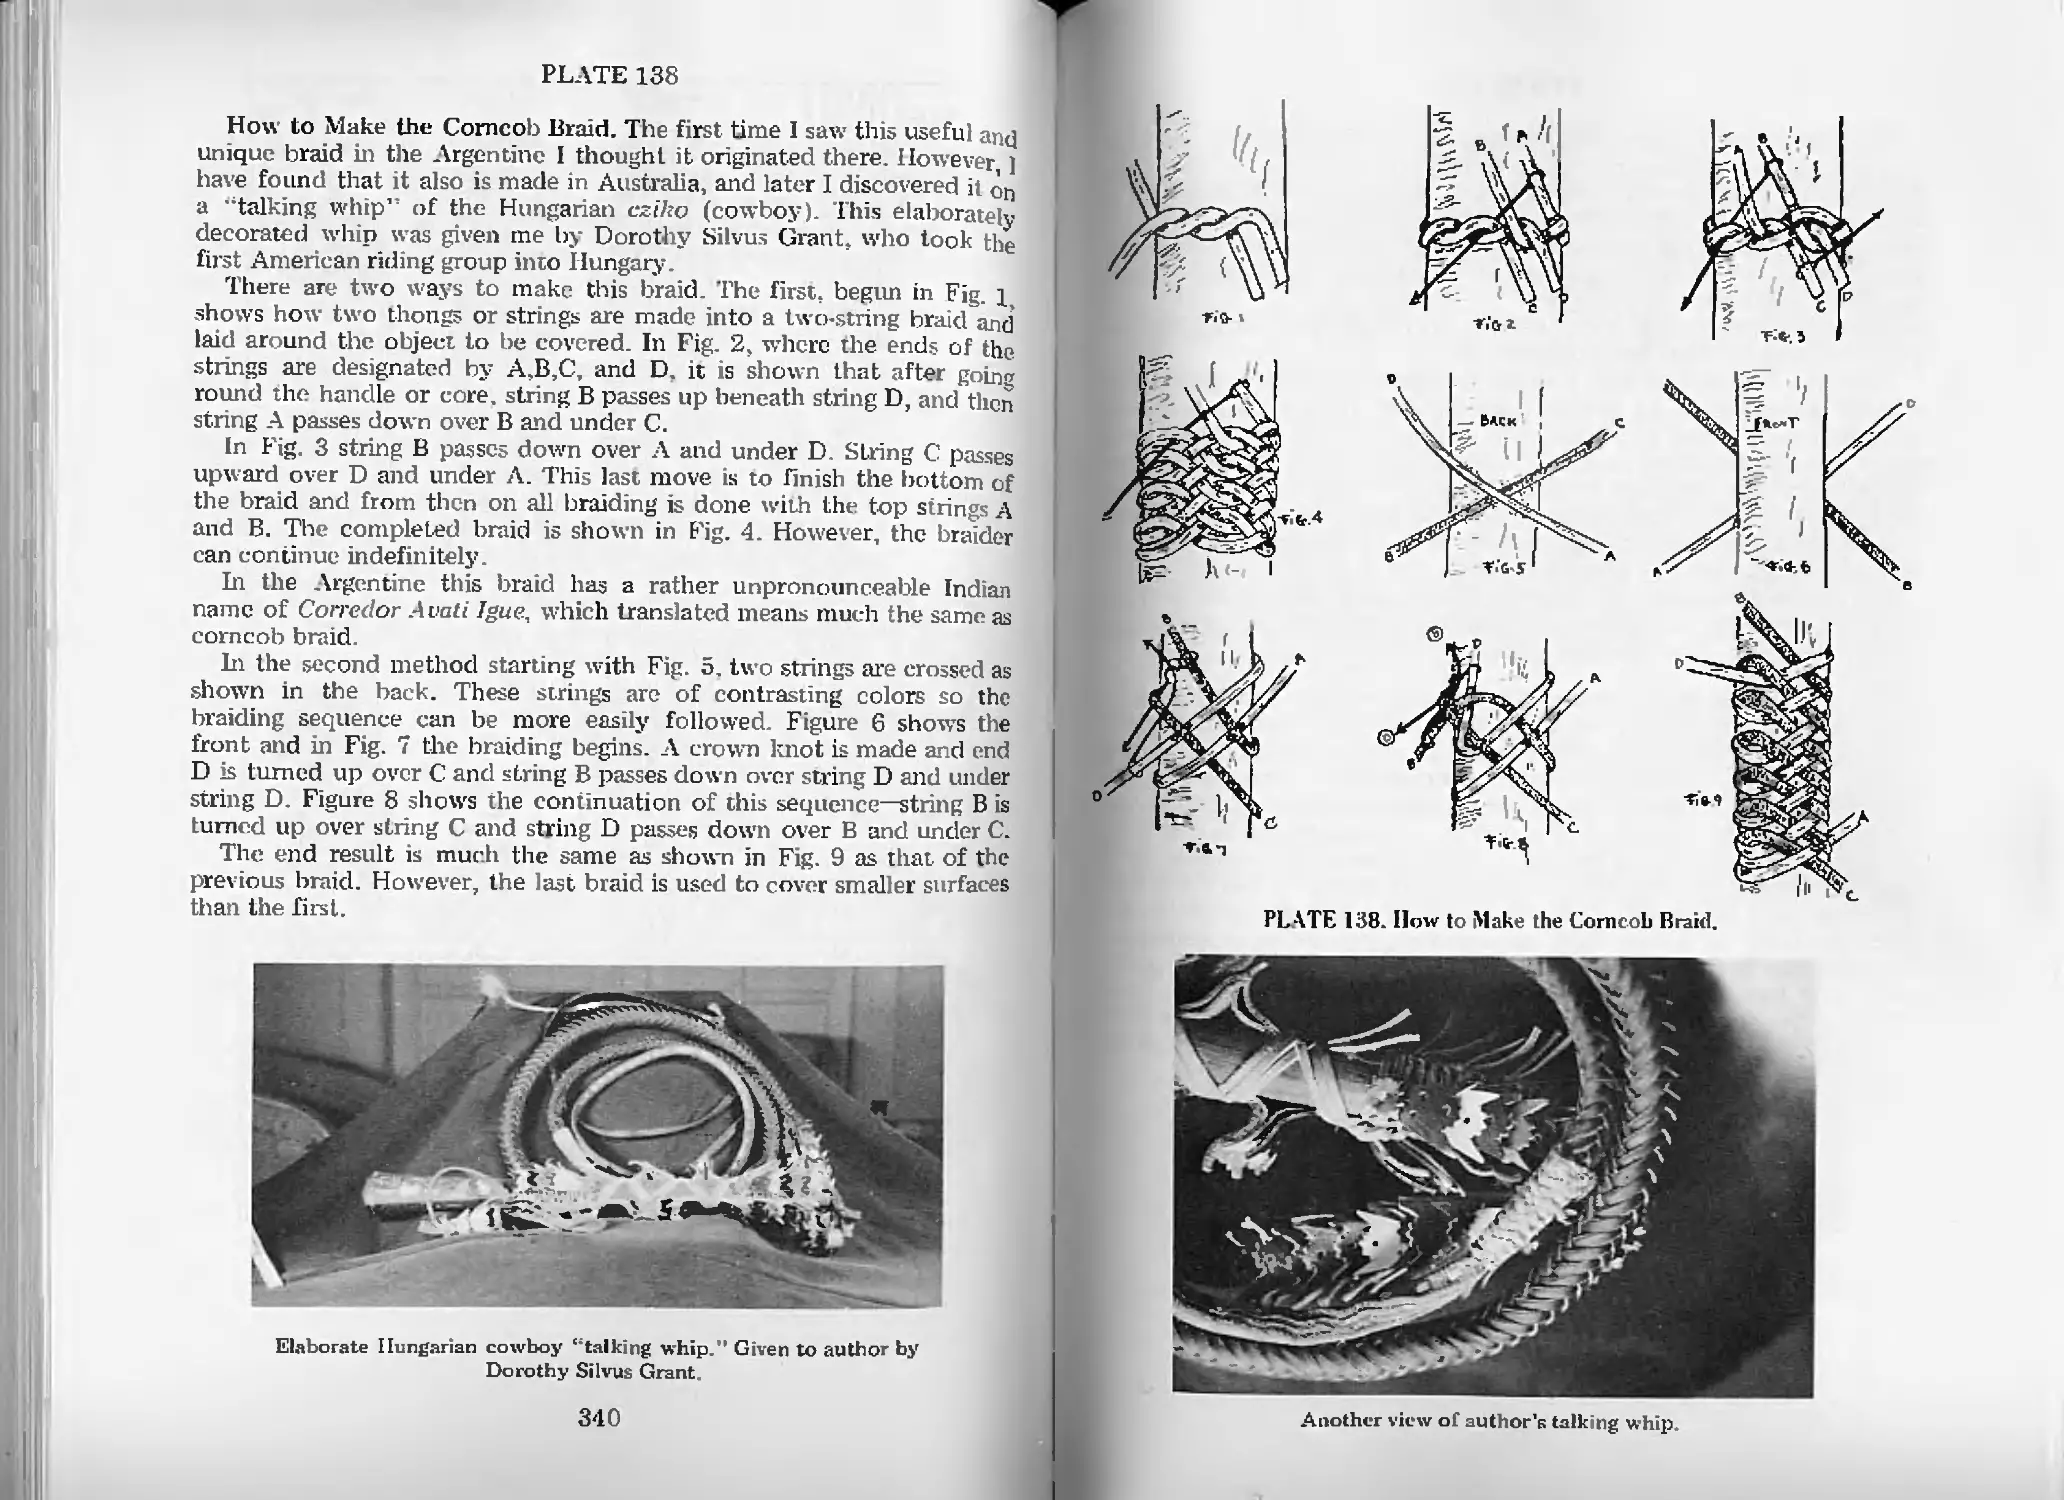
How to Make the Corncob Braid—Pl. 138 340
The Corredor Cordohes—Pl. 139 342
Fid Work-Pl. 139 342
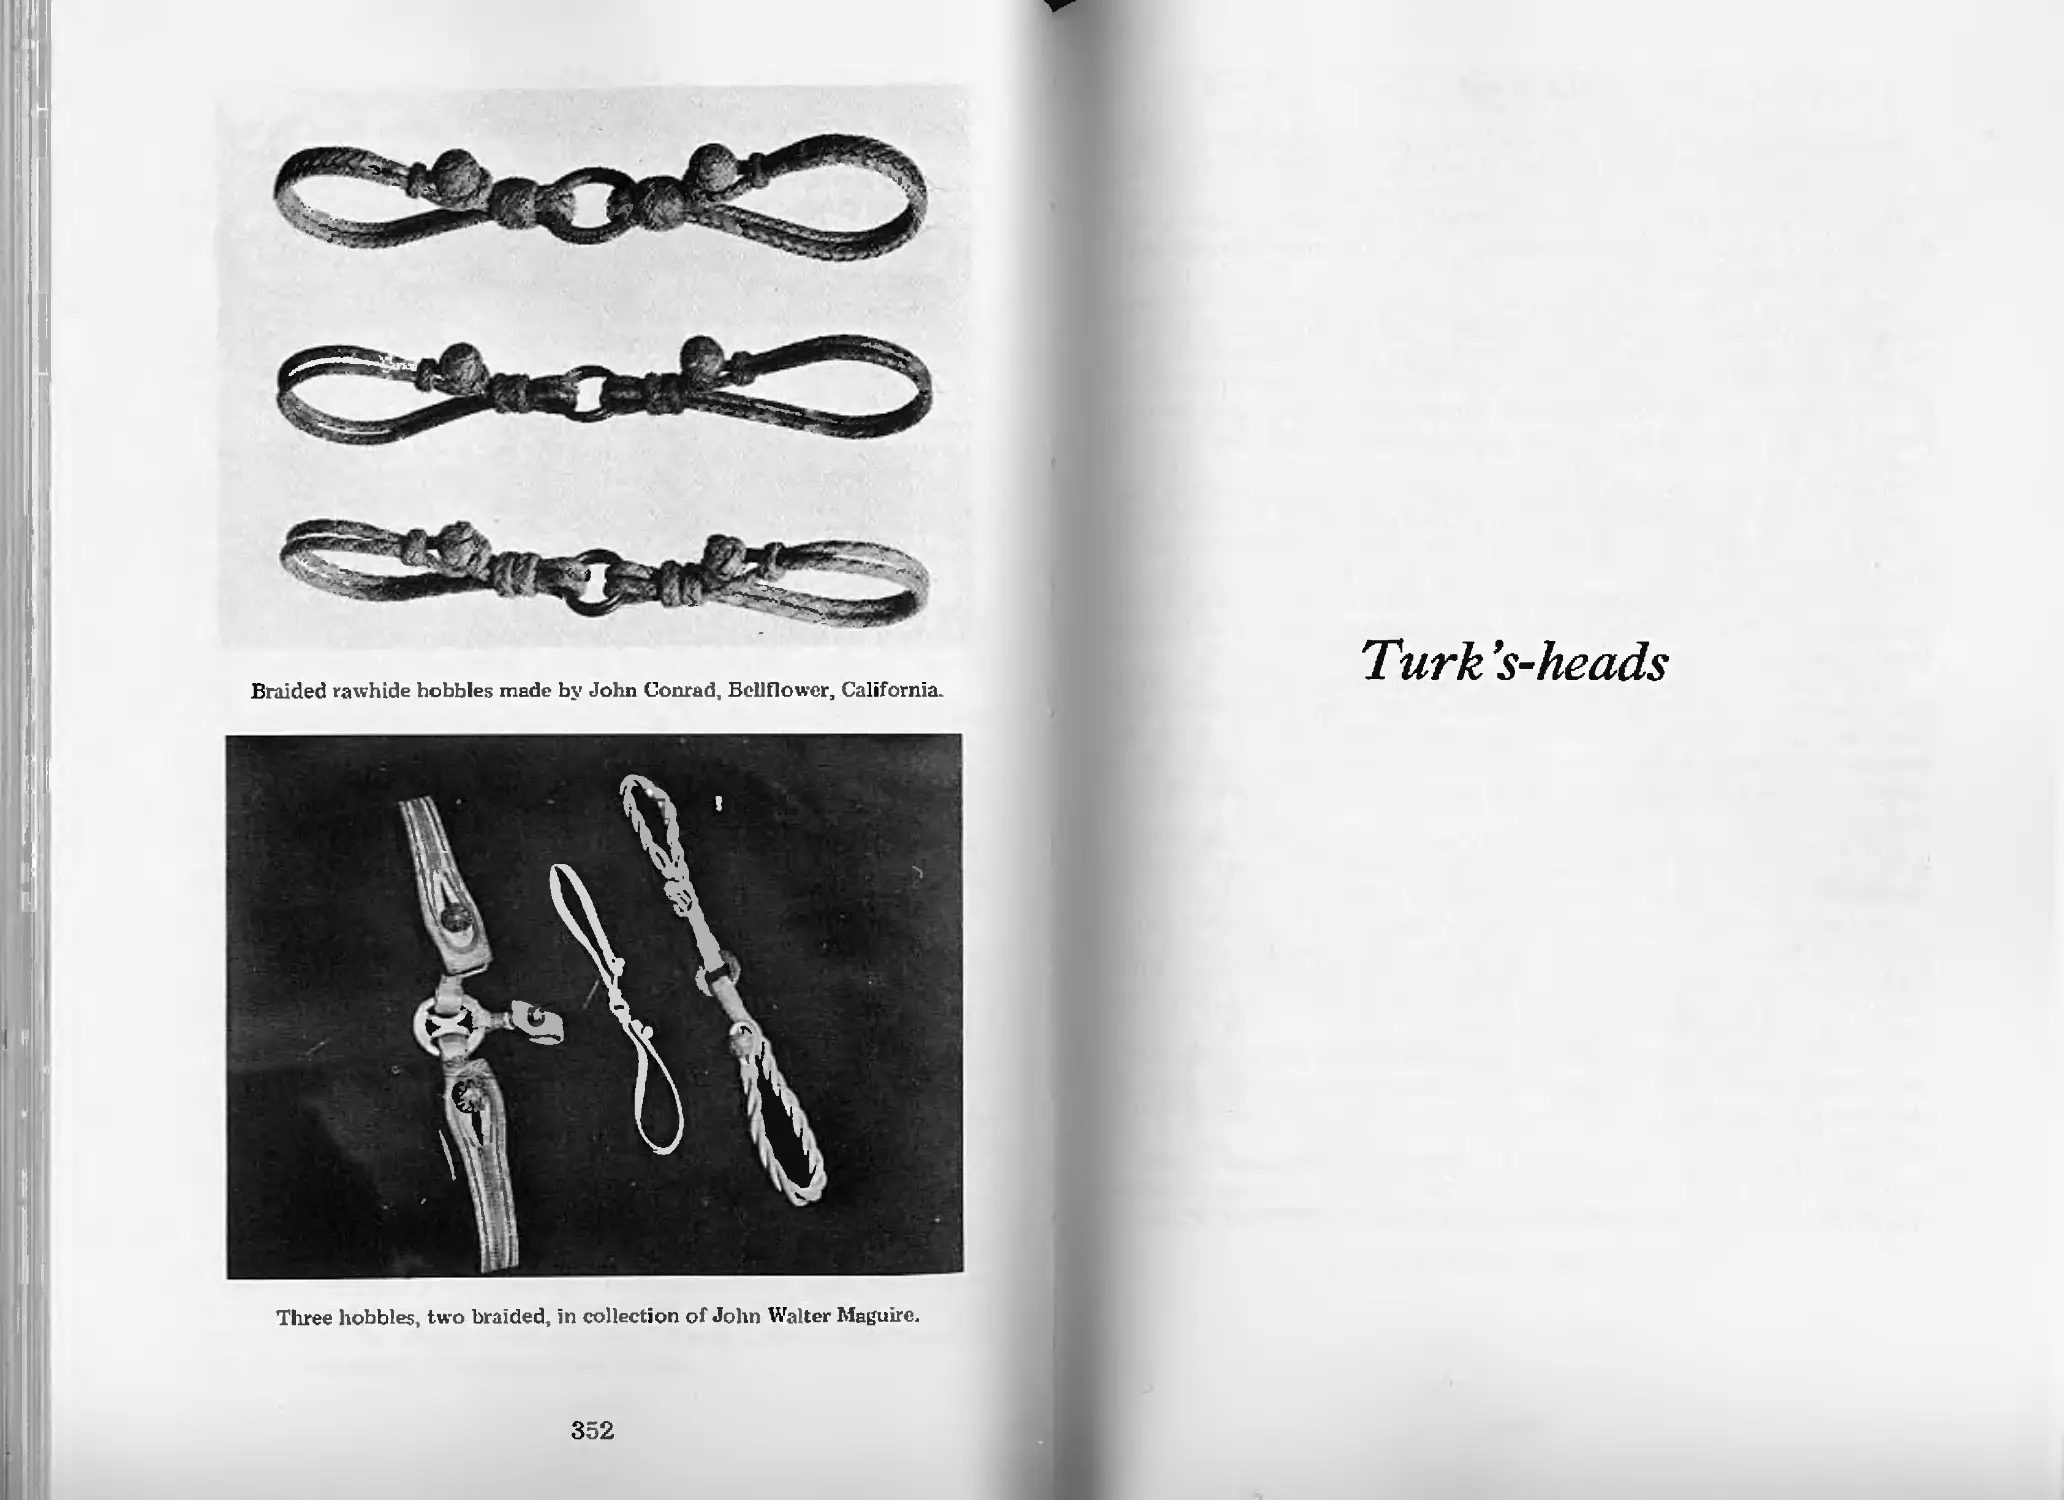
I lobbies
How to Make Simple Types of Hobbles—Pl. 140 346
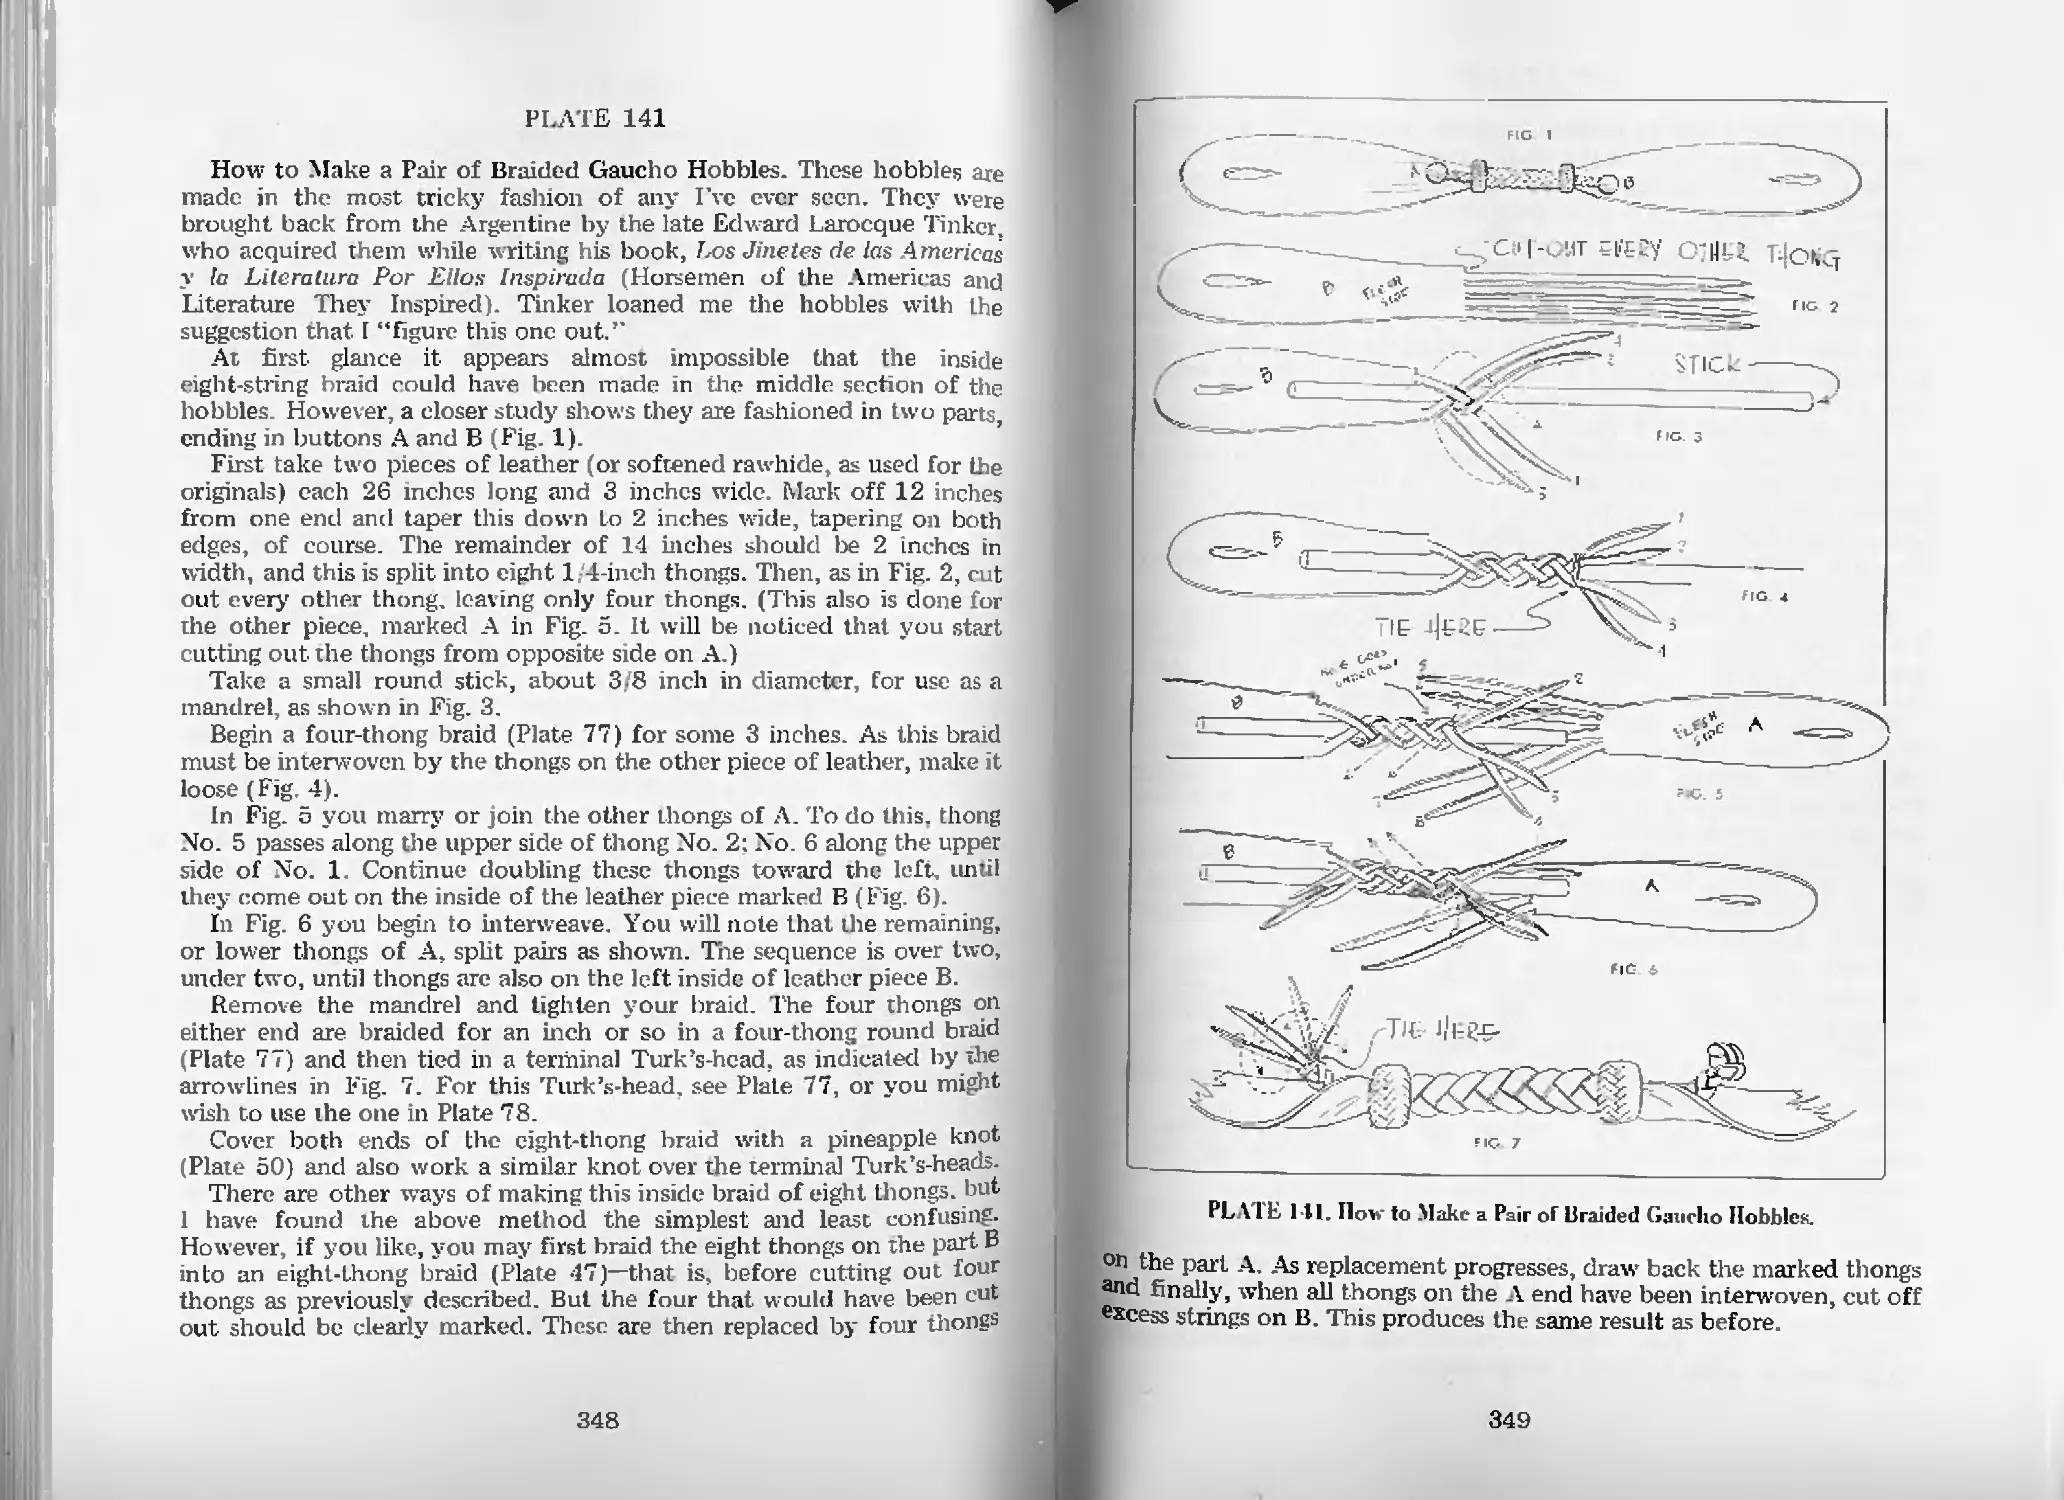
How to Make a Pair of Braided Gaucho Hobbles—Pl. 141 348
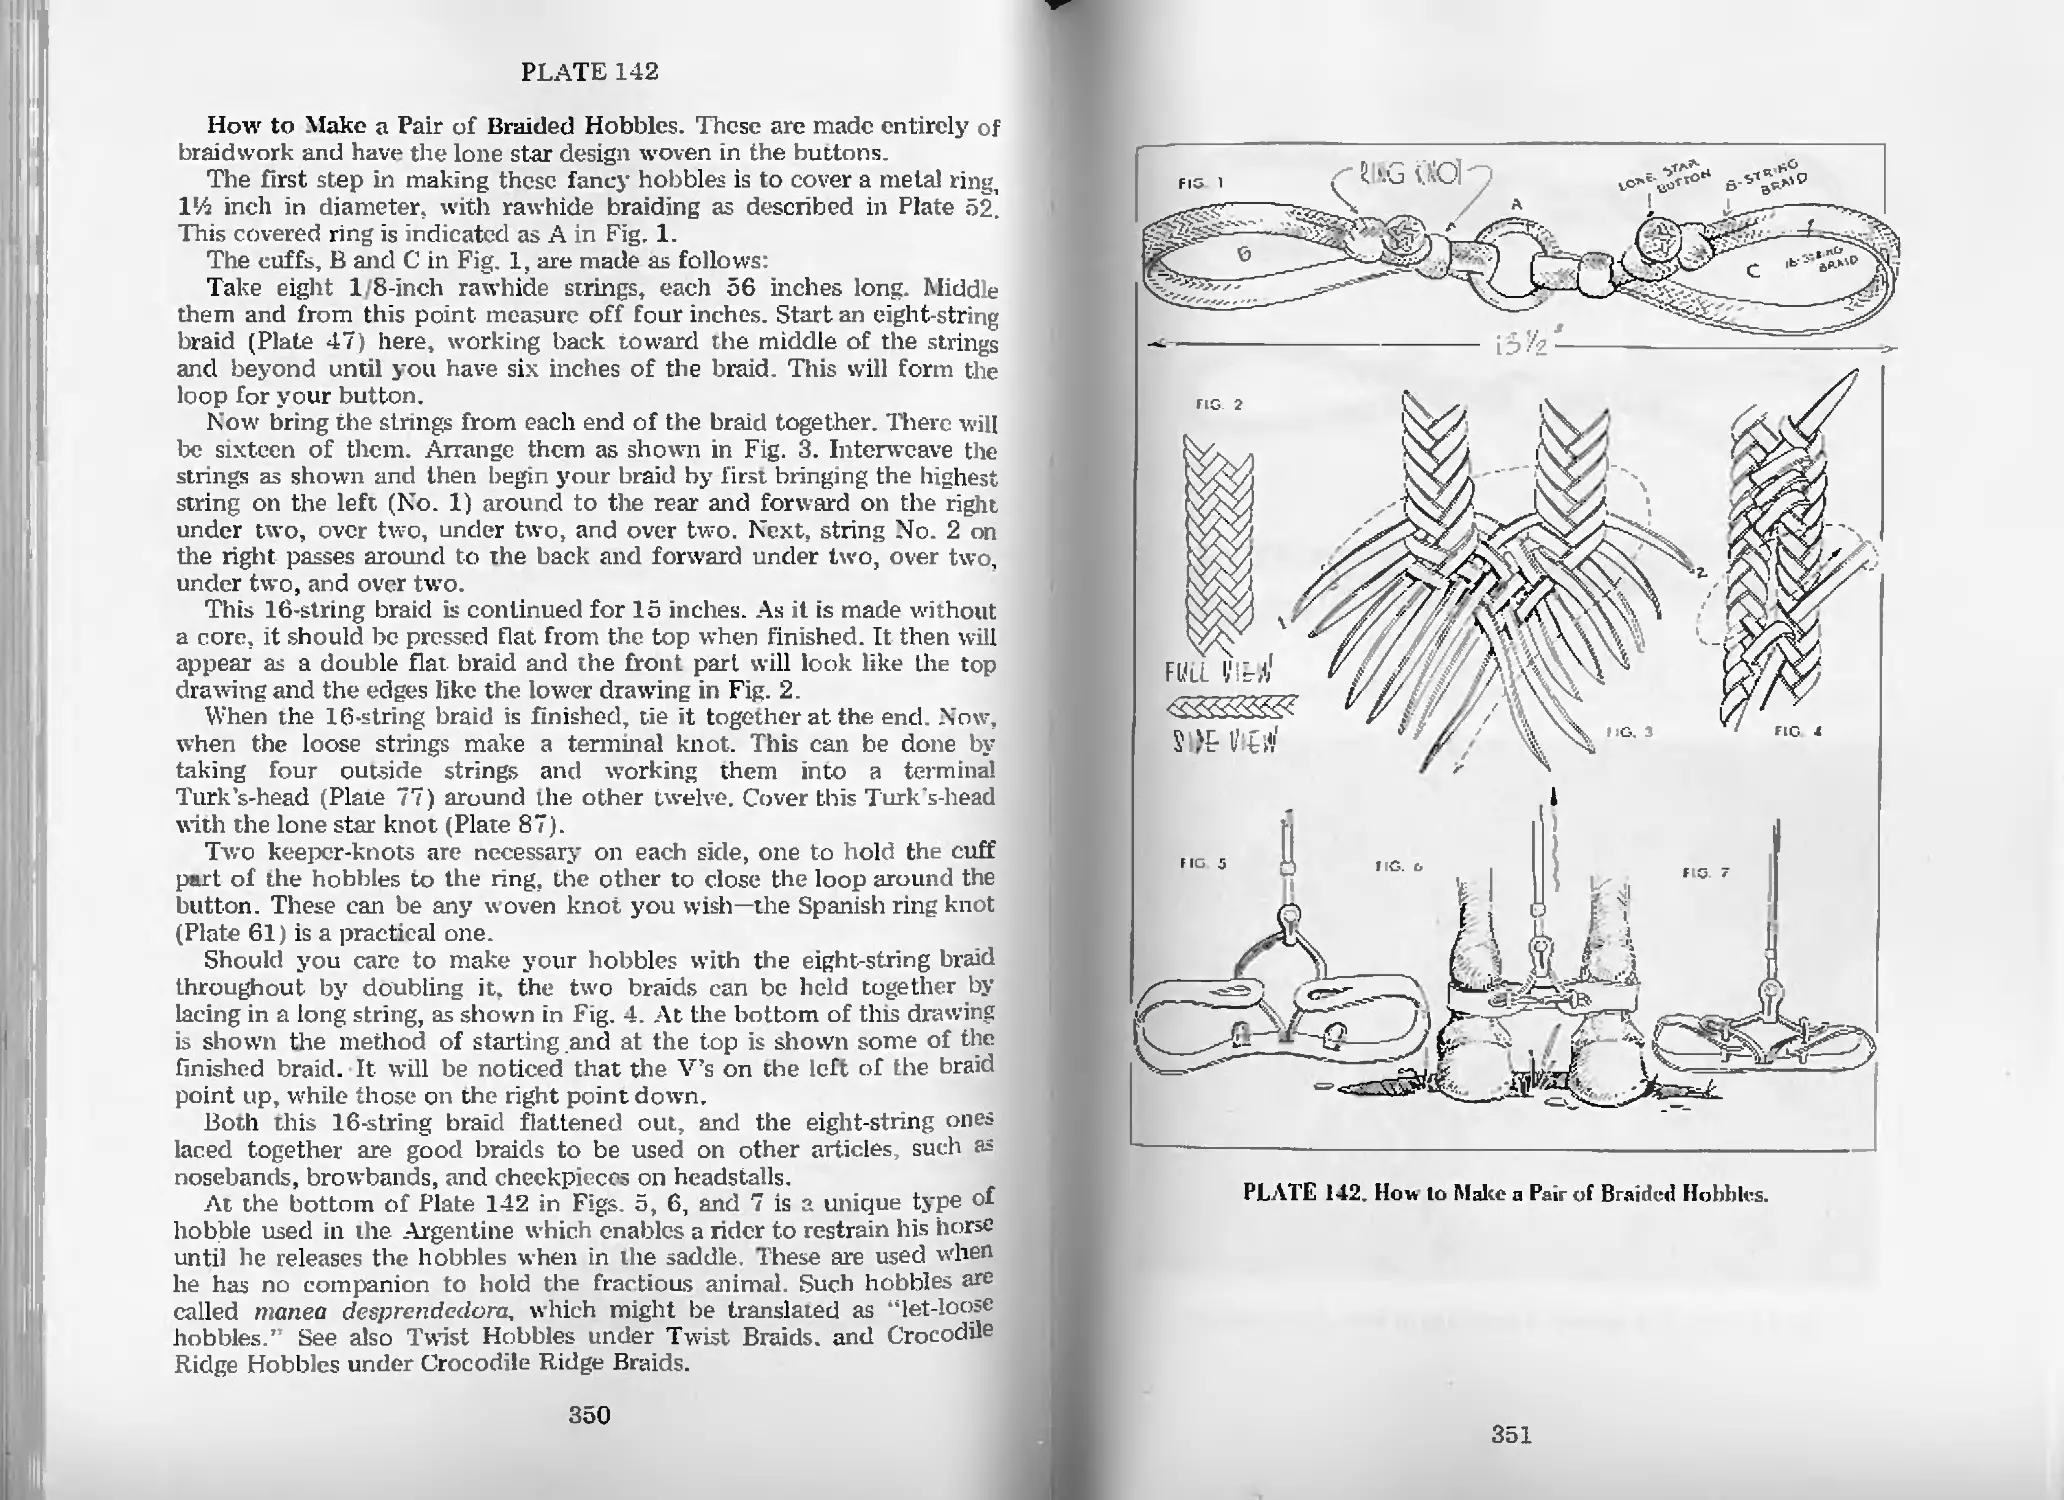
How to Make a Pair of Braided Hobbles—Pl. 142 350
Turk’s-heads
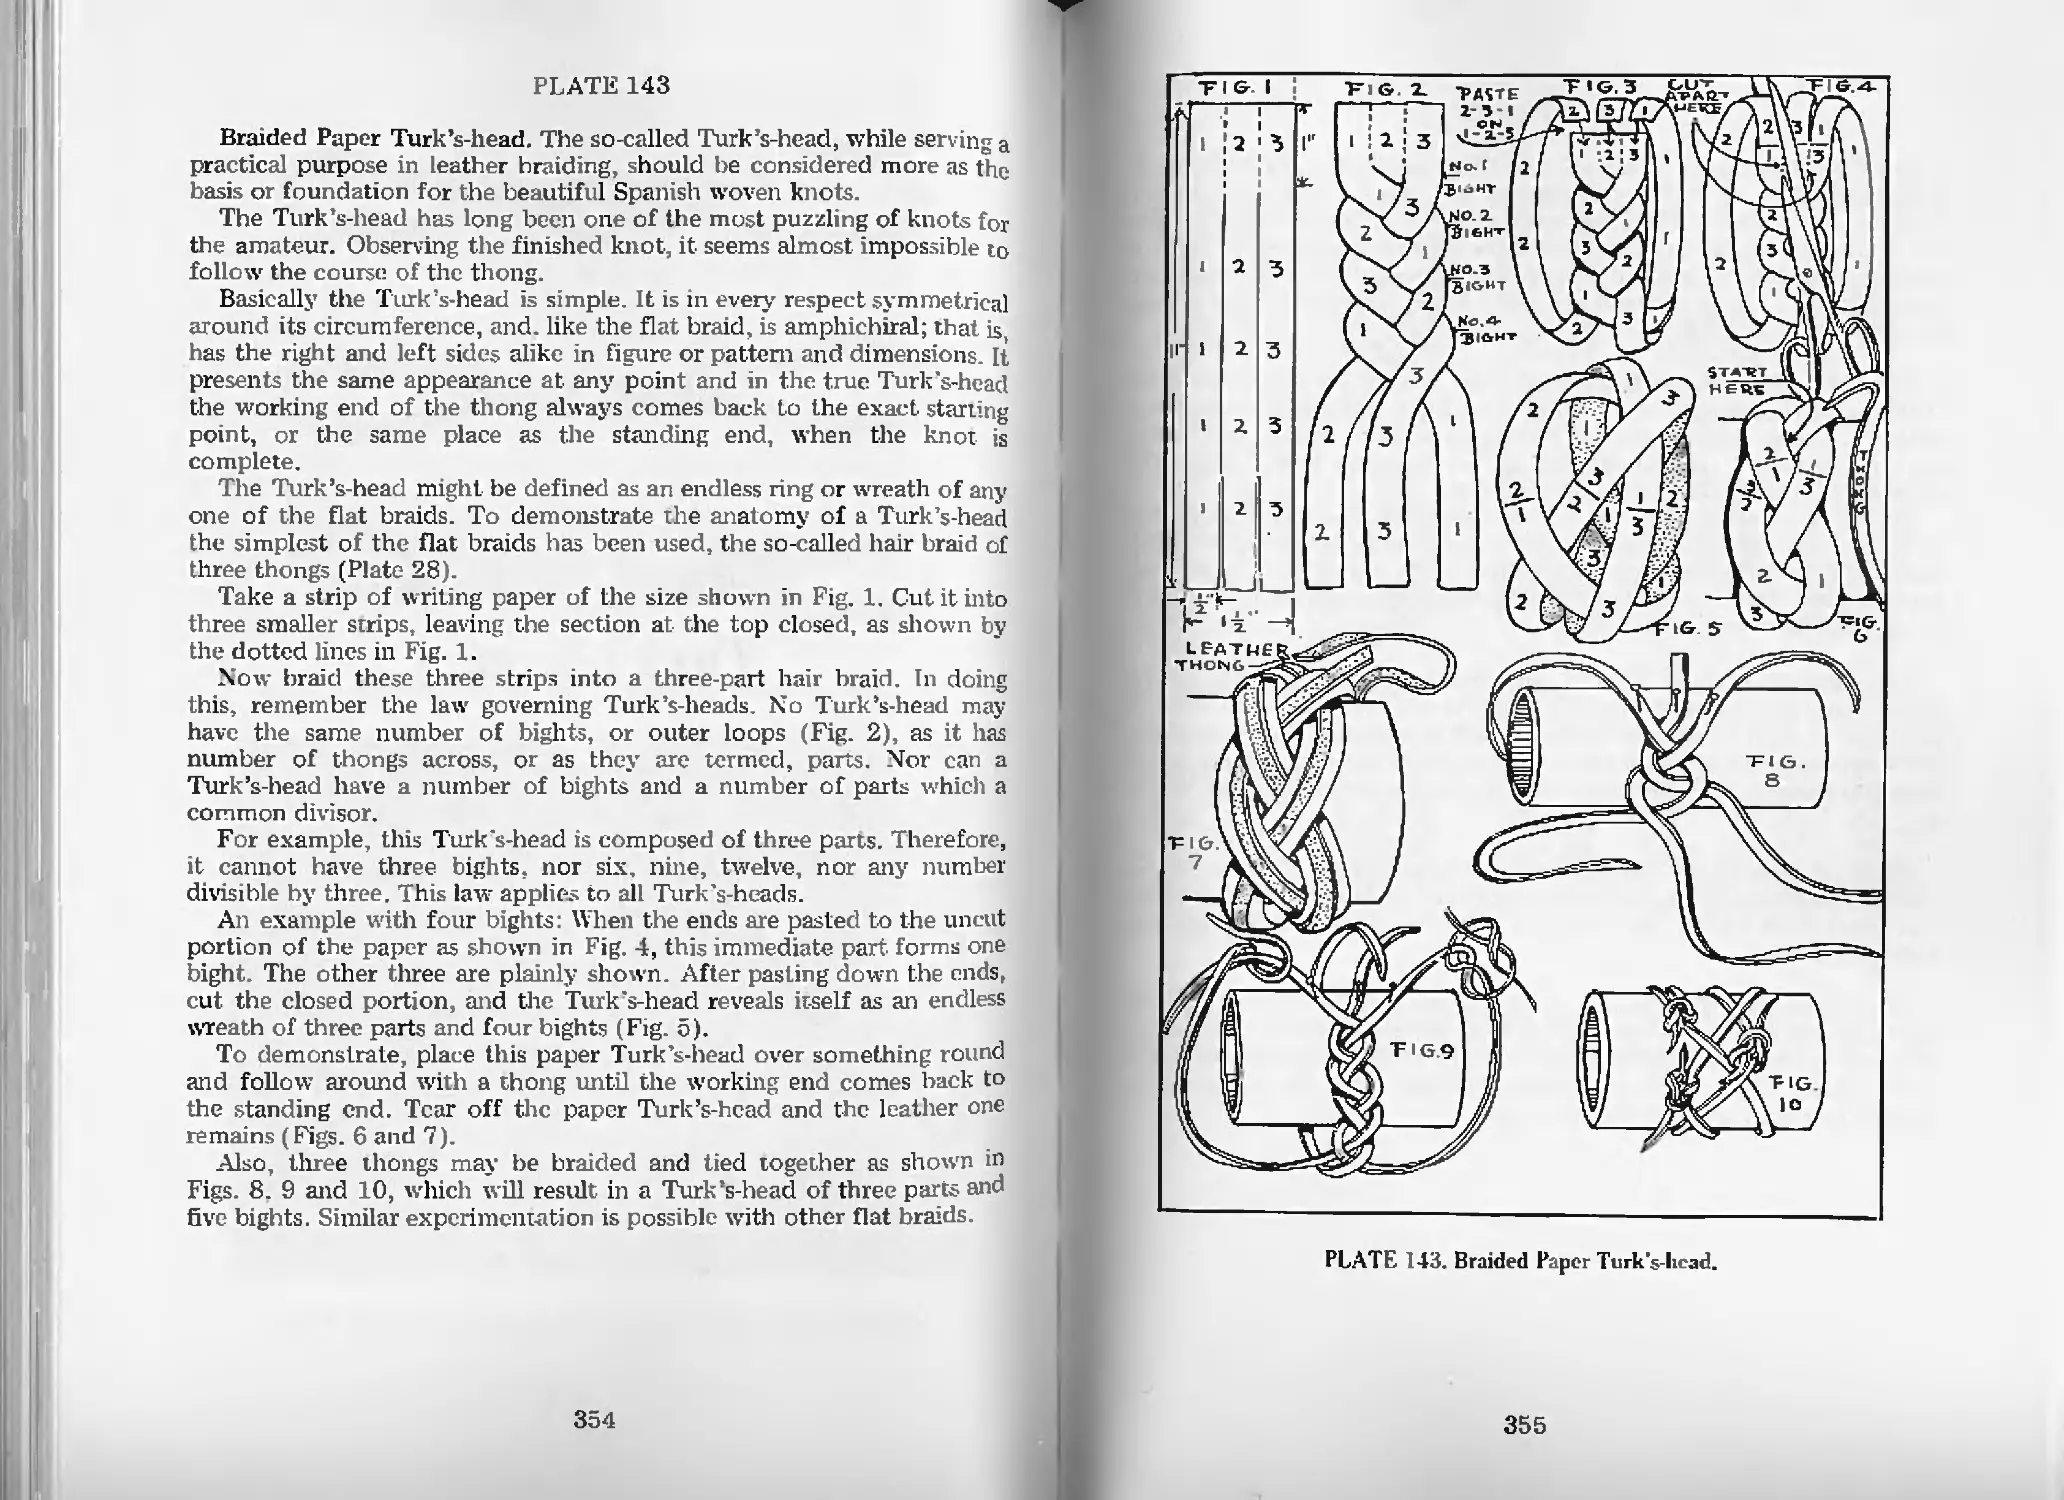
Braided Paper Turk’s-head—Pl. 143 354
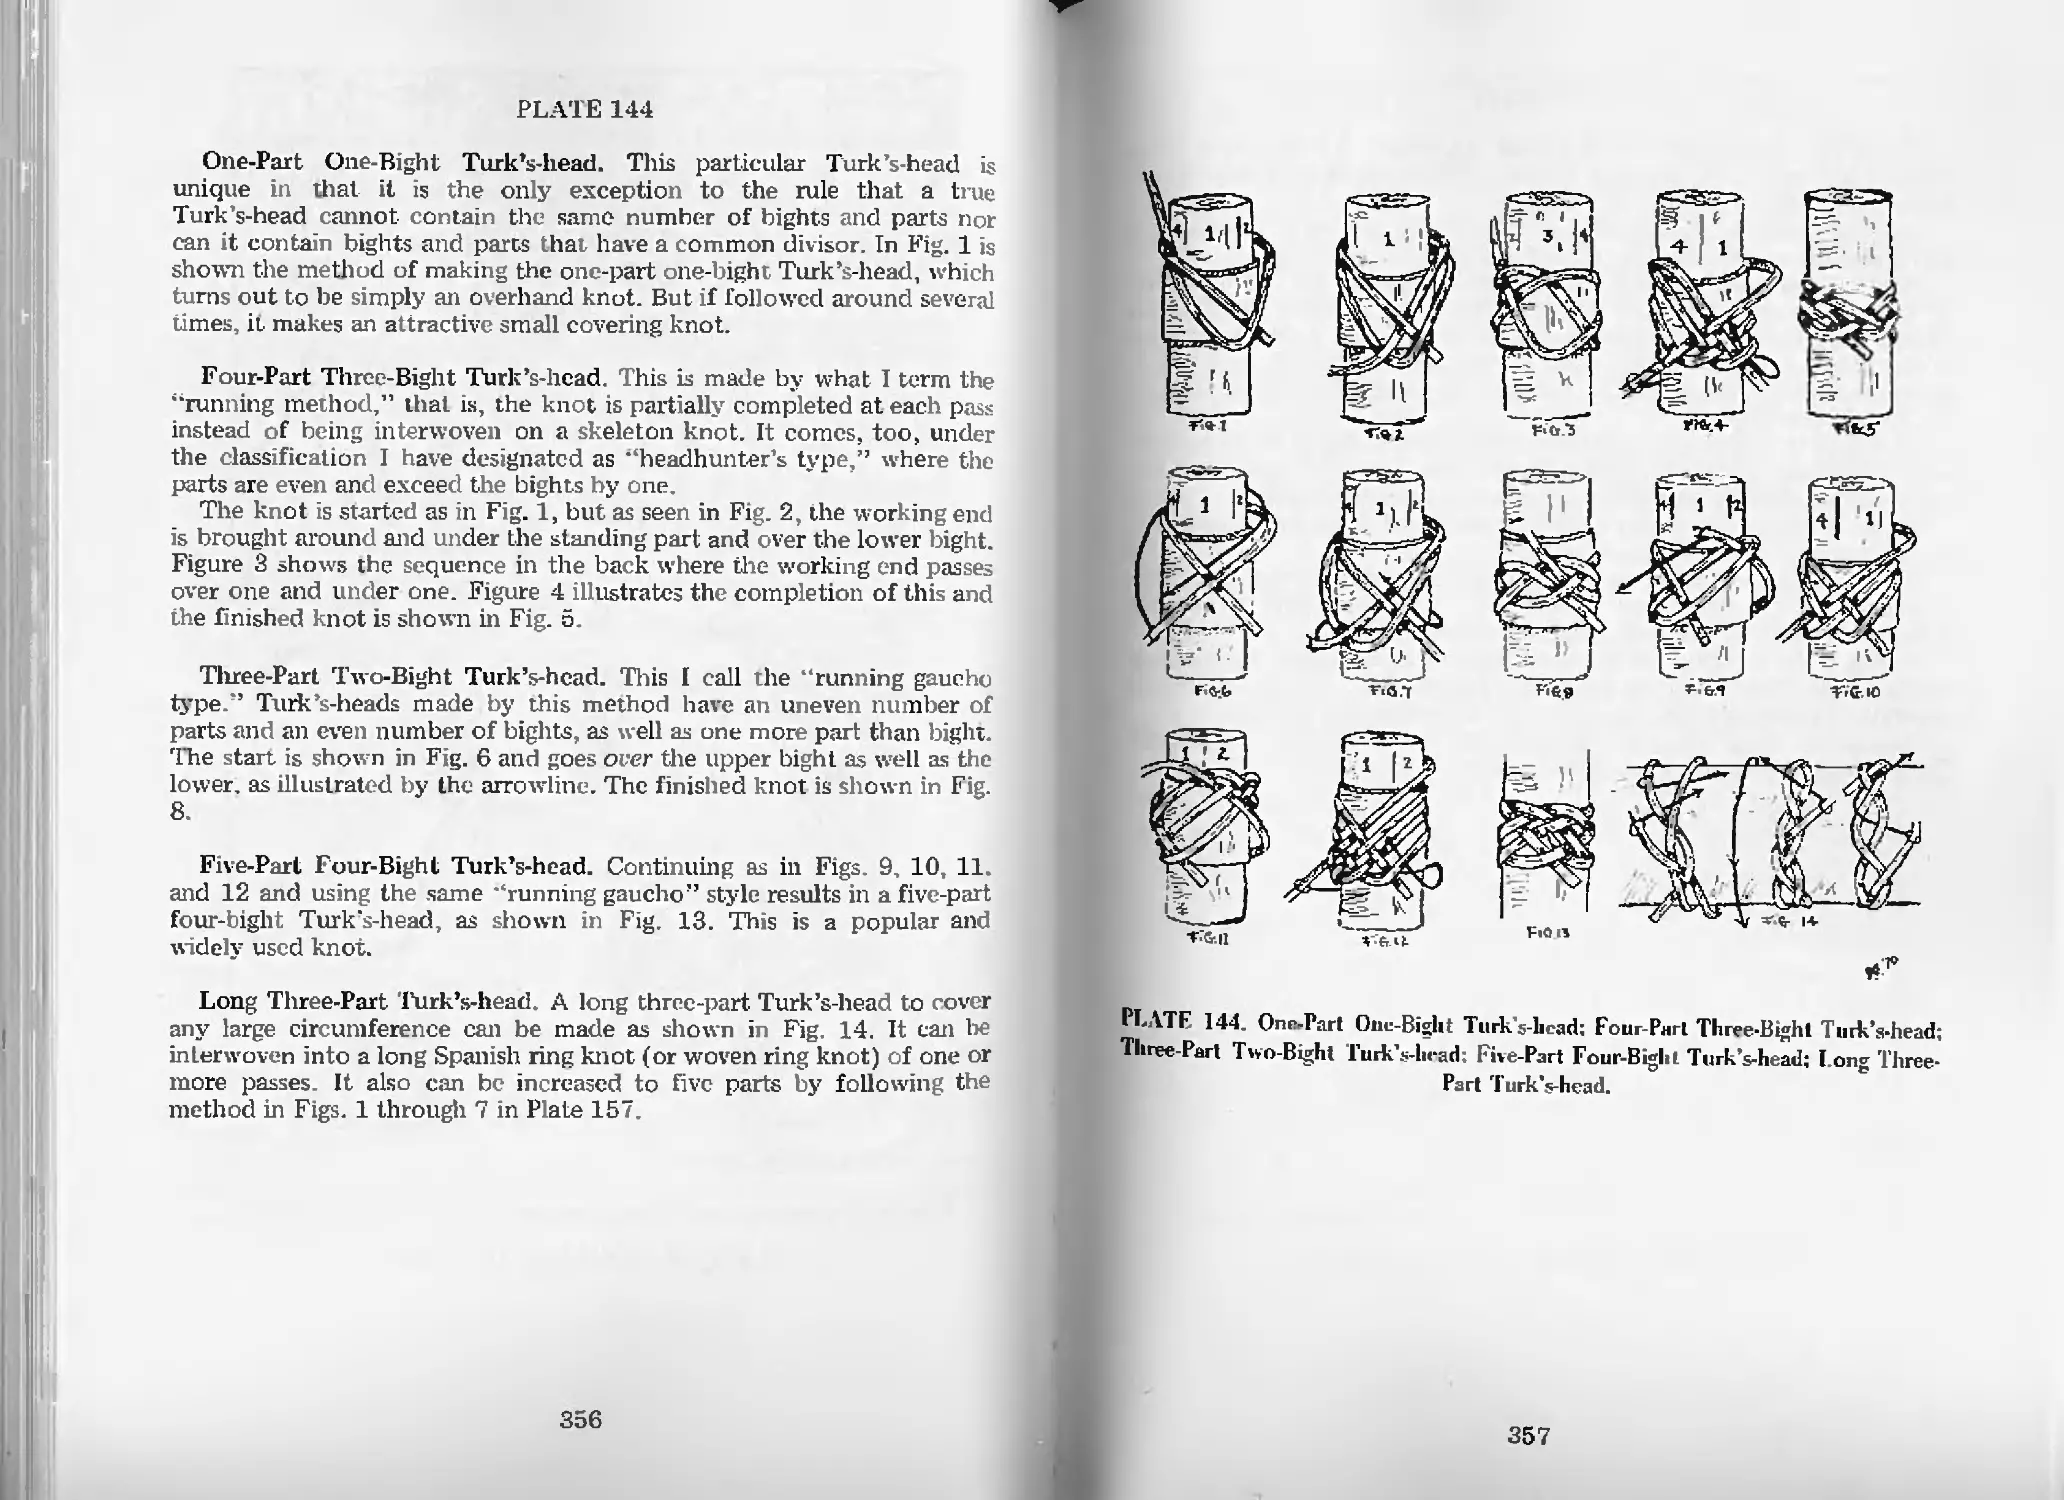
One-Part One-Bight Turk’s-head—Pl. 144 356
Four-Part Three-Bight Turk’s-head—Pl. 144 356
Three-Part Two-Bight Turk’s-head—Pl. 144 356
Five-Part Four-Bight Turk’s-head-Pl. 144 356
Long Three-Part Turk’s-head—Pl. 144 356
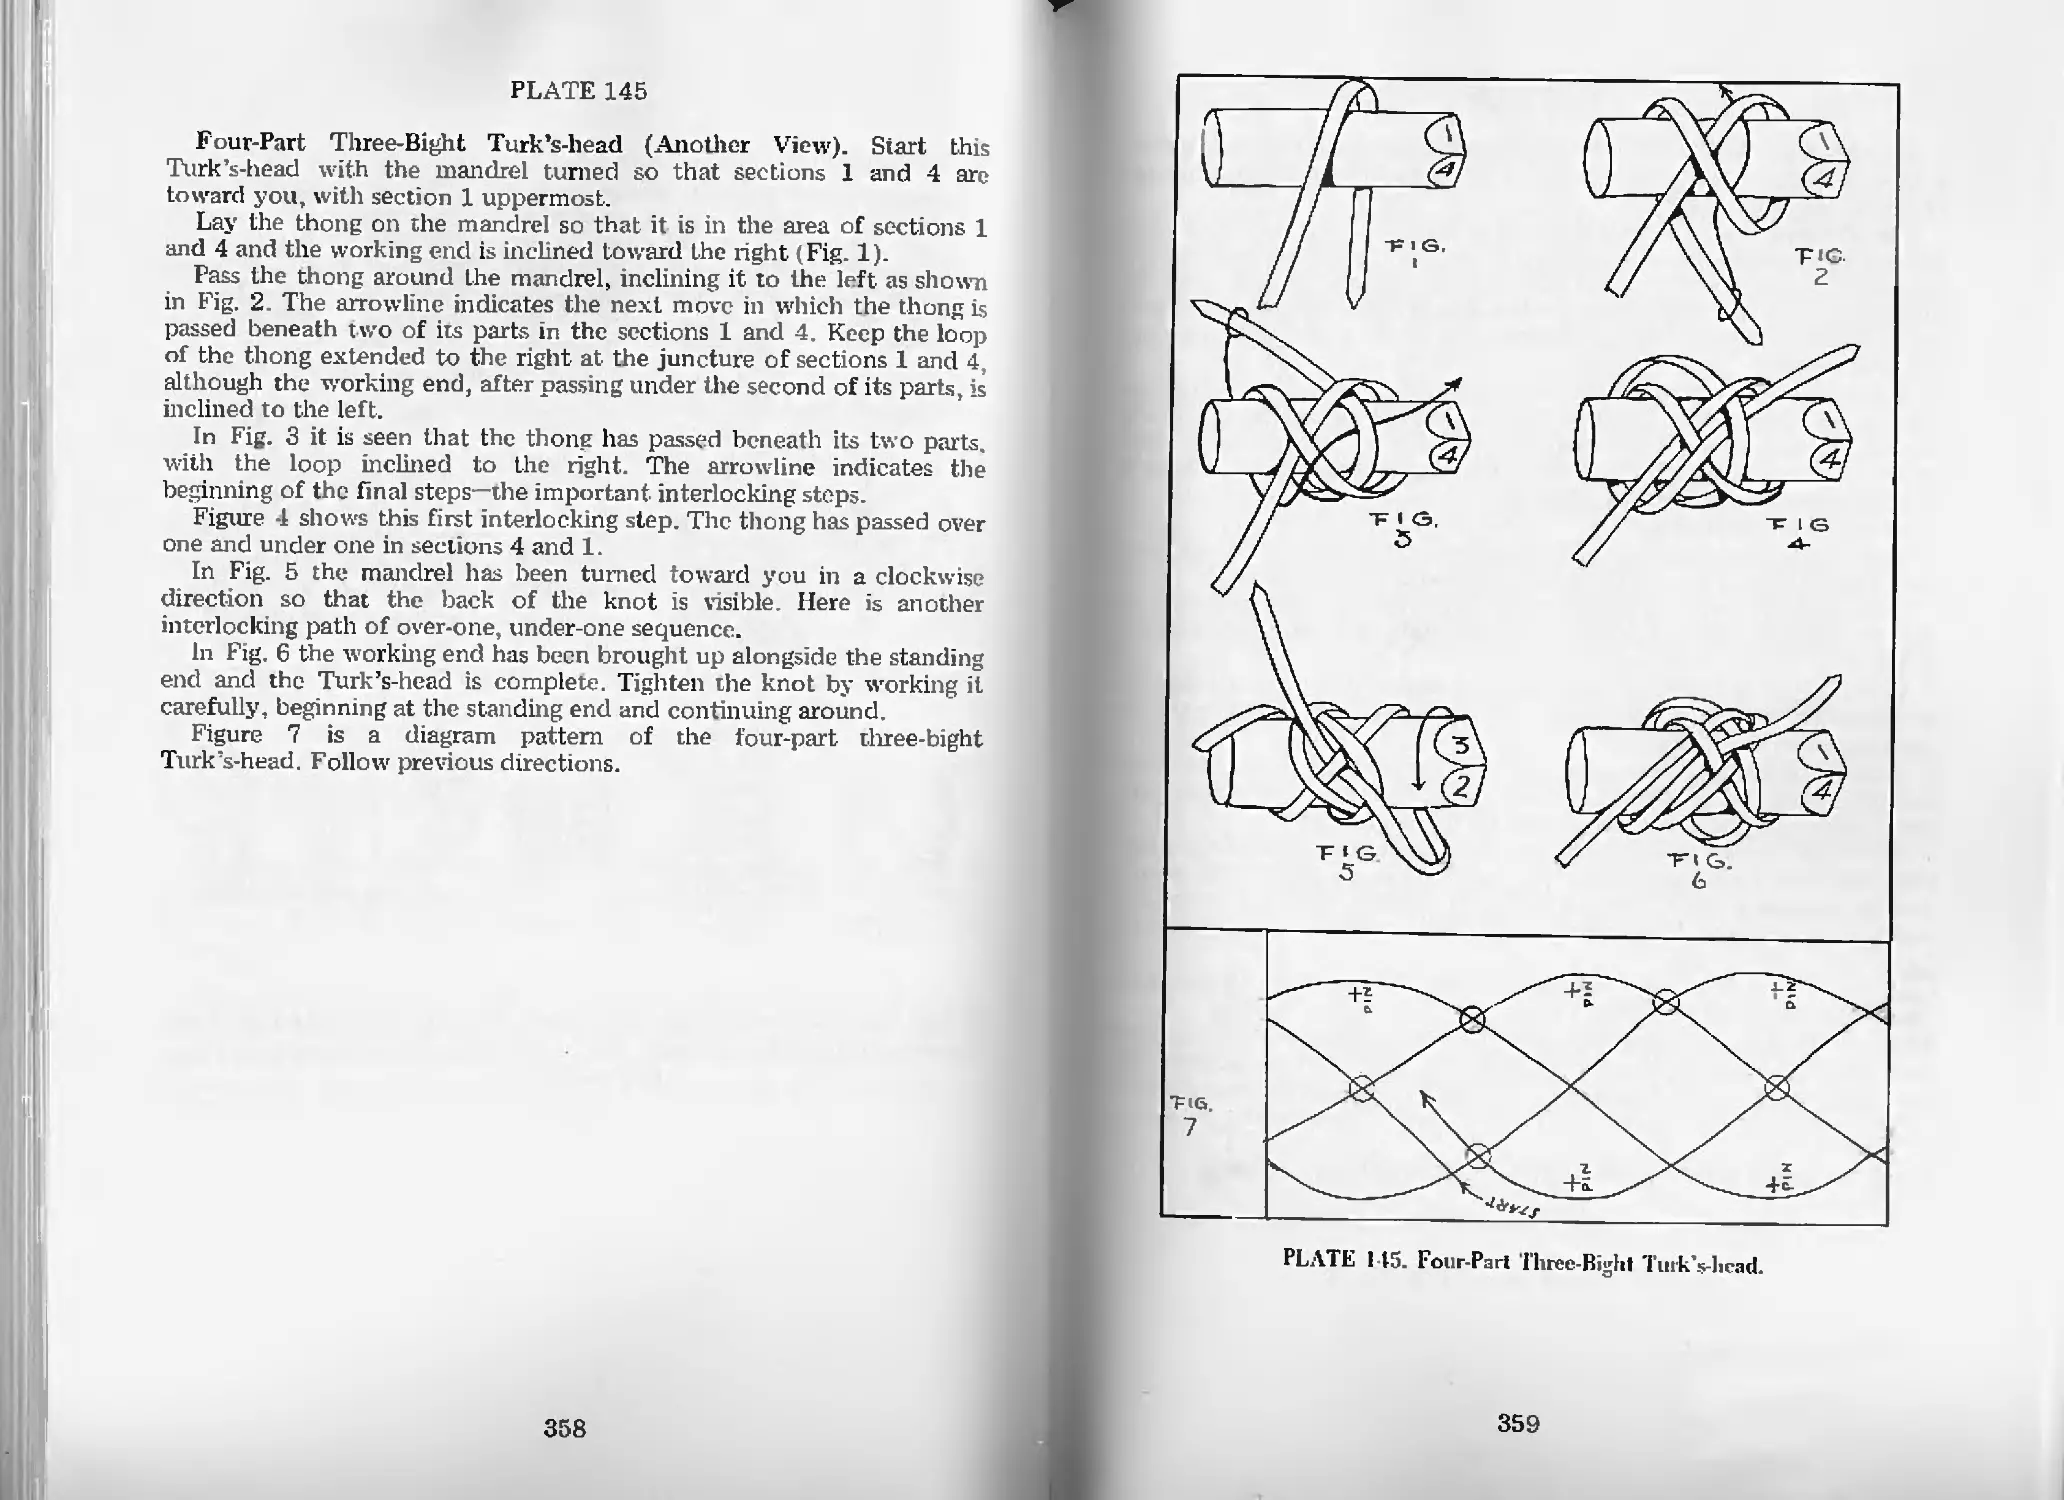
Four-Part Three-Bight Turk’s-head (Another View)—Pl. 145 358
Gaucho Knot of One Pass—Pl. 147 360
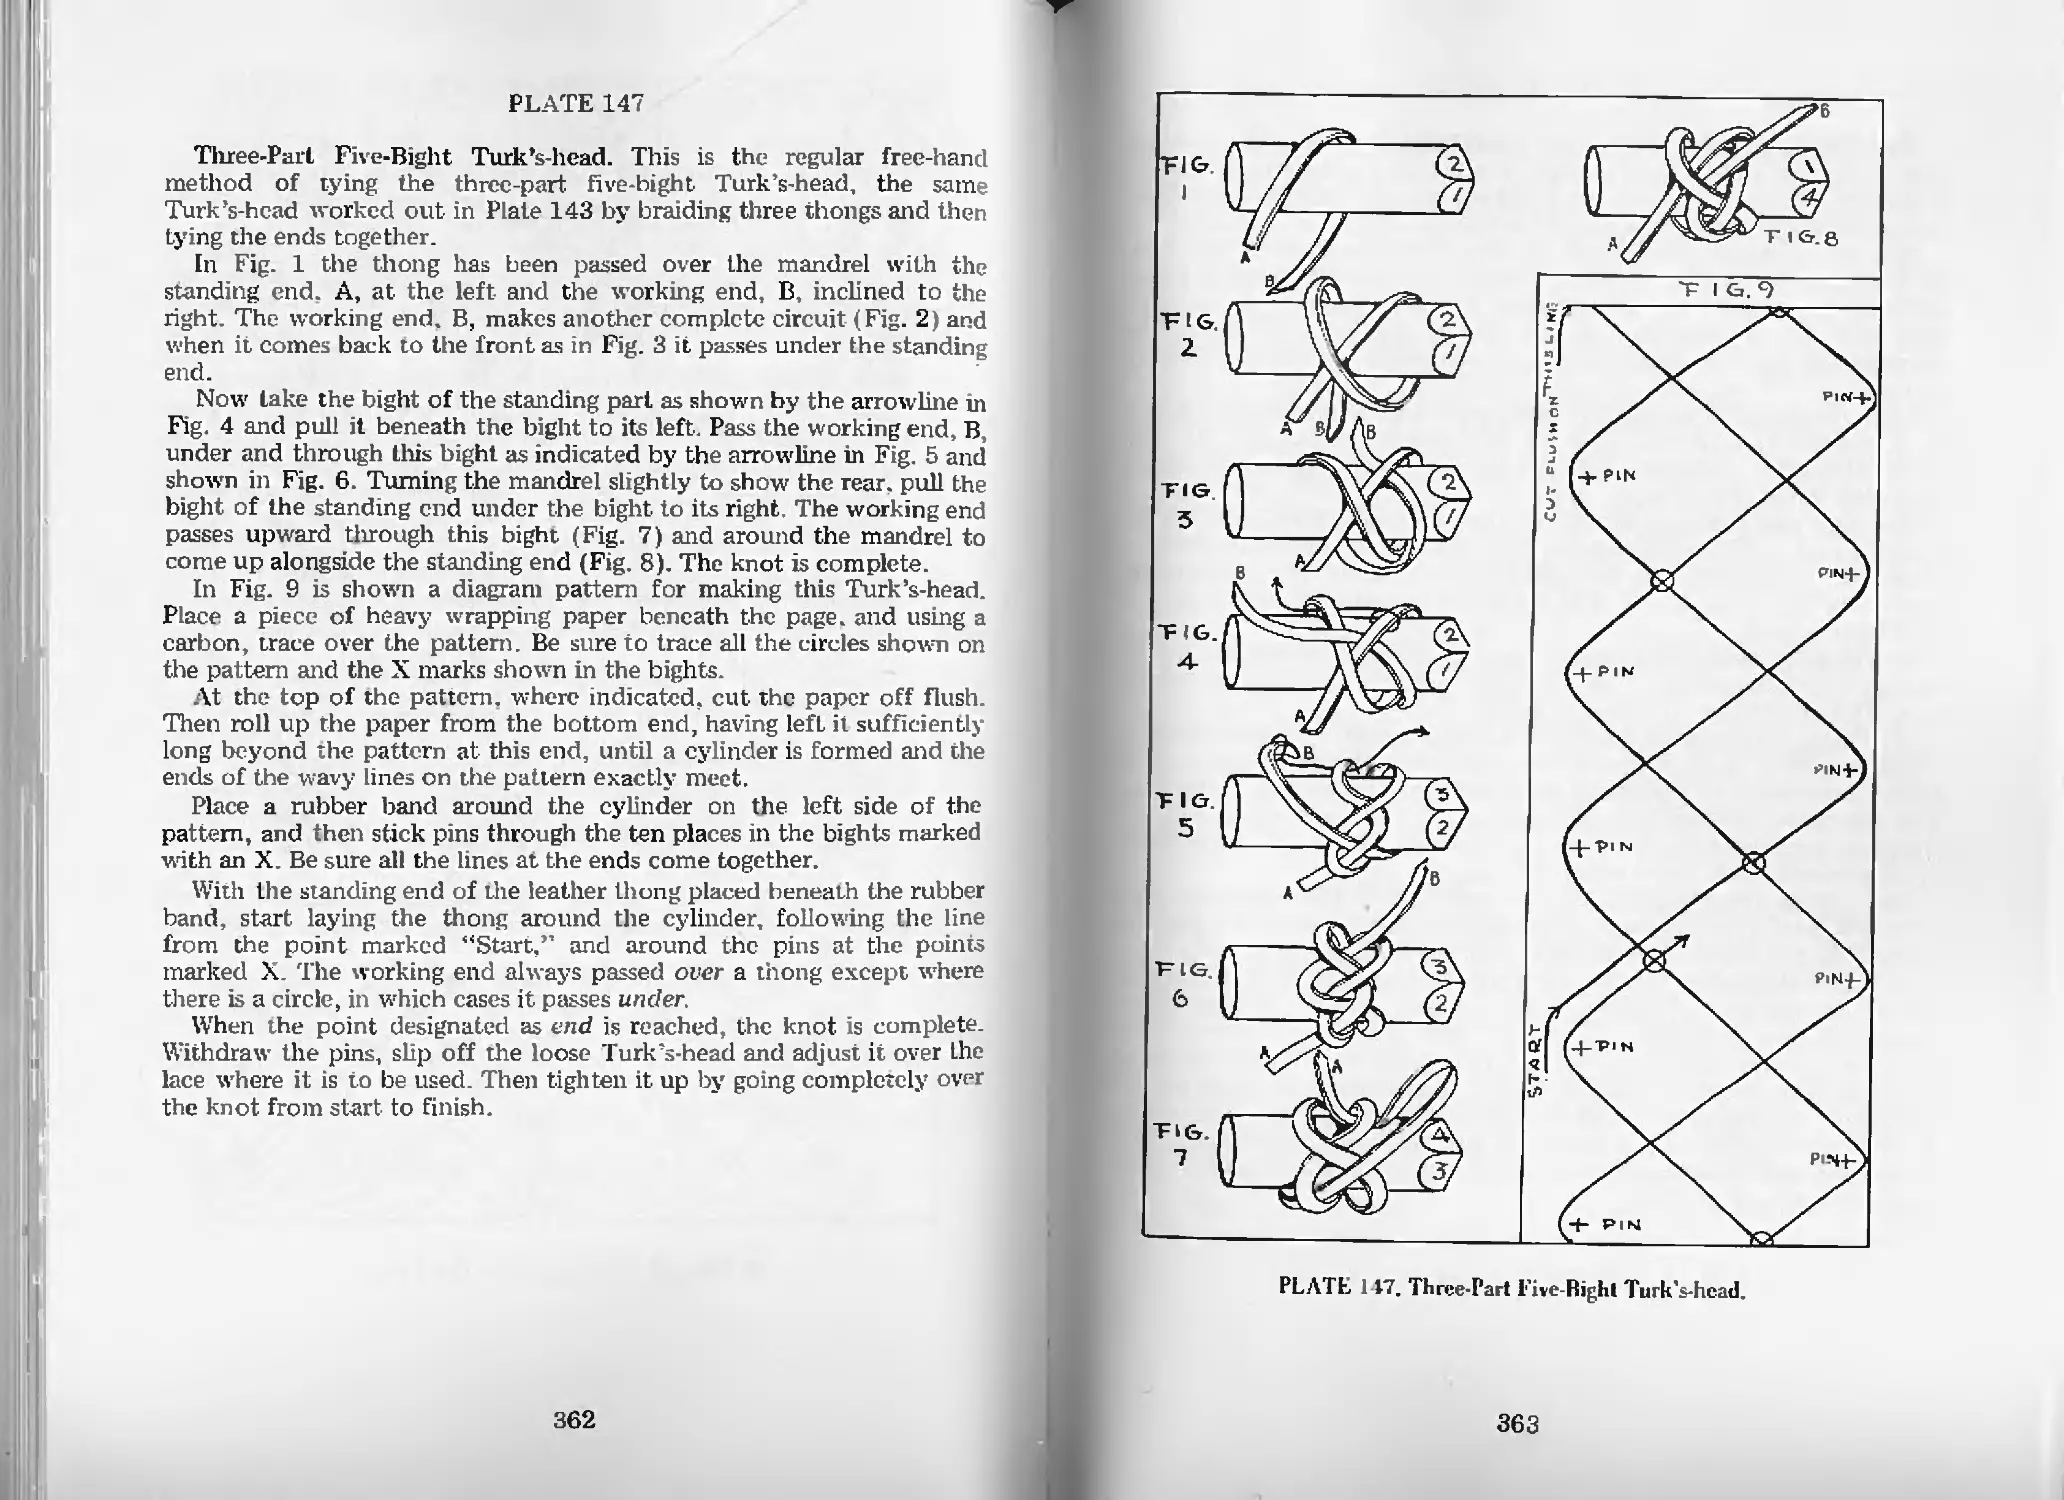
Three-Part Five-Bight Turk’s-hcad-Pl. 147 362
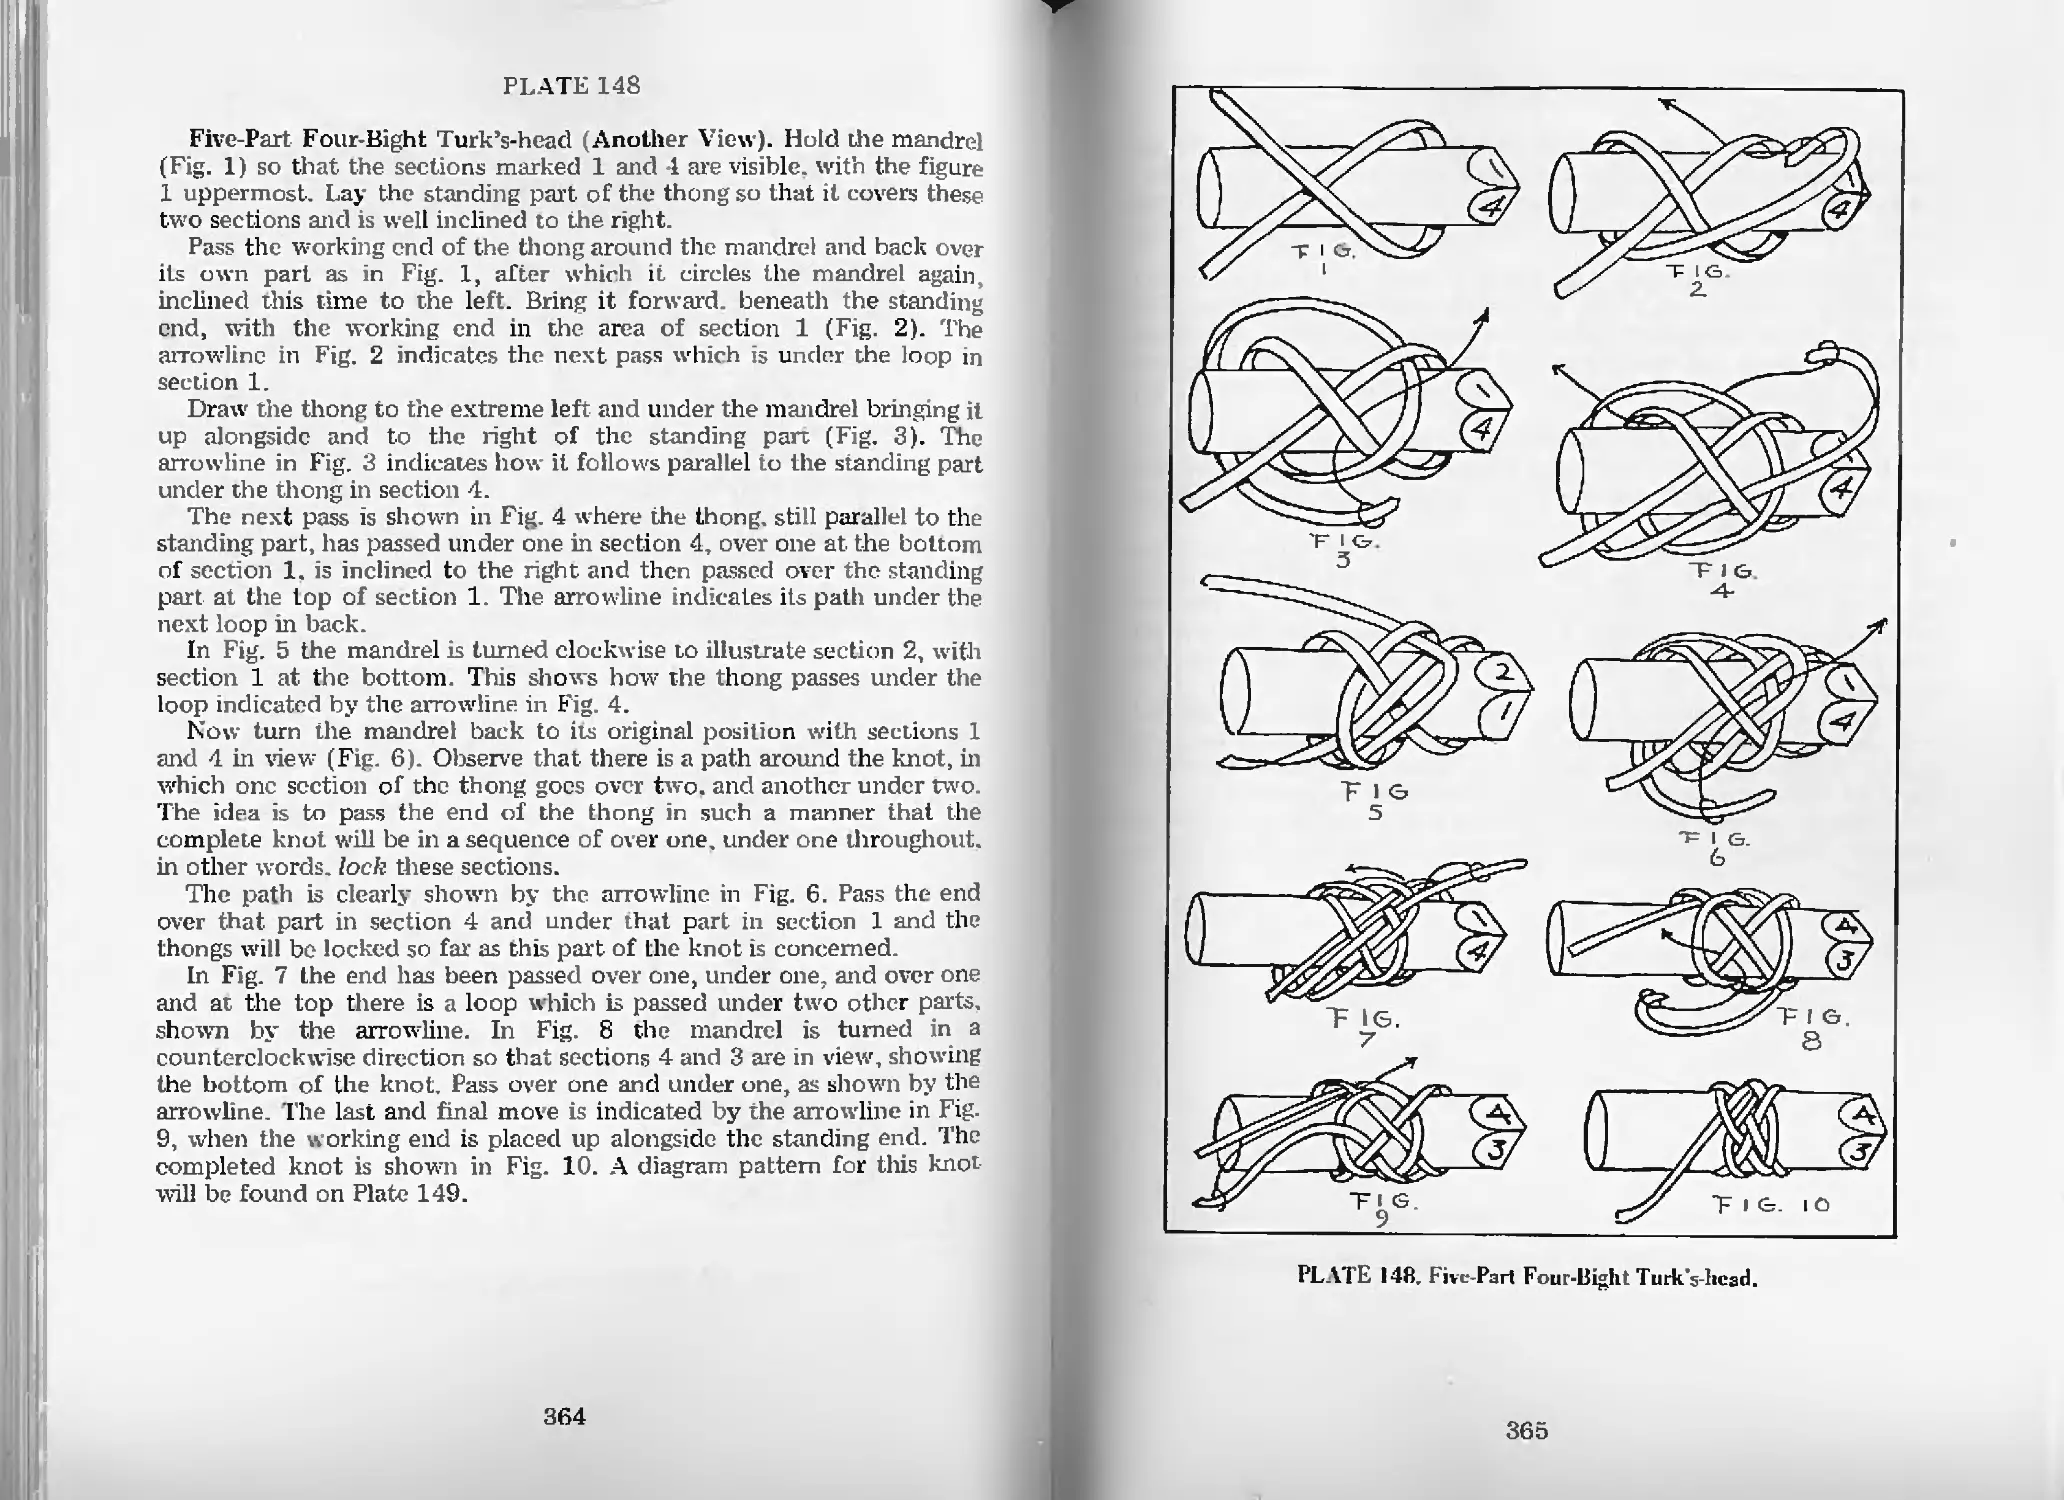
Five-Part Four-Bight Turk’s-head (Another View)—Pl. 148 364
xiii
Turk’s-heads (cont.)
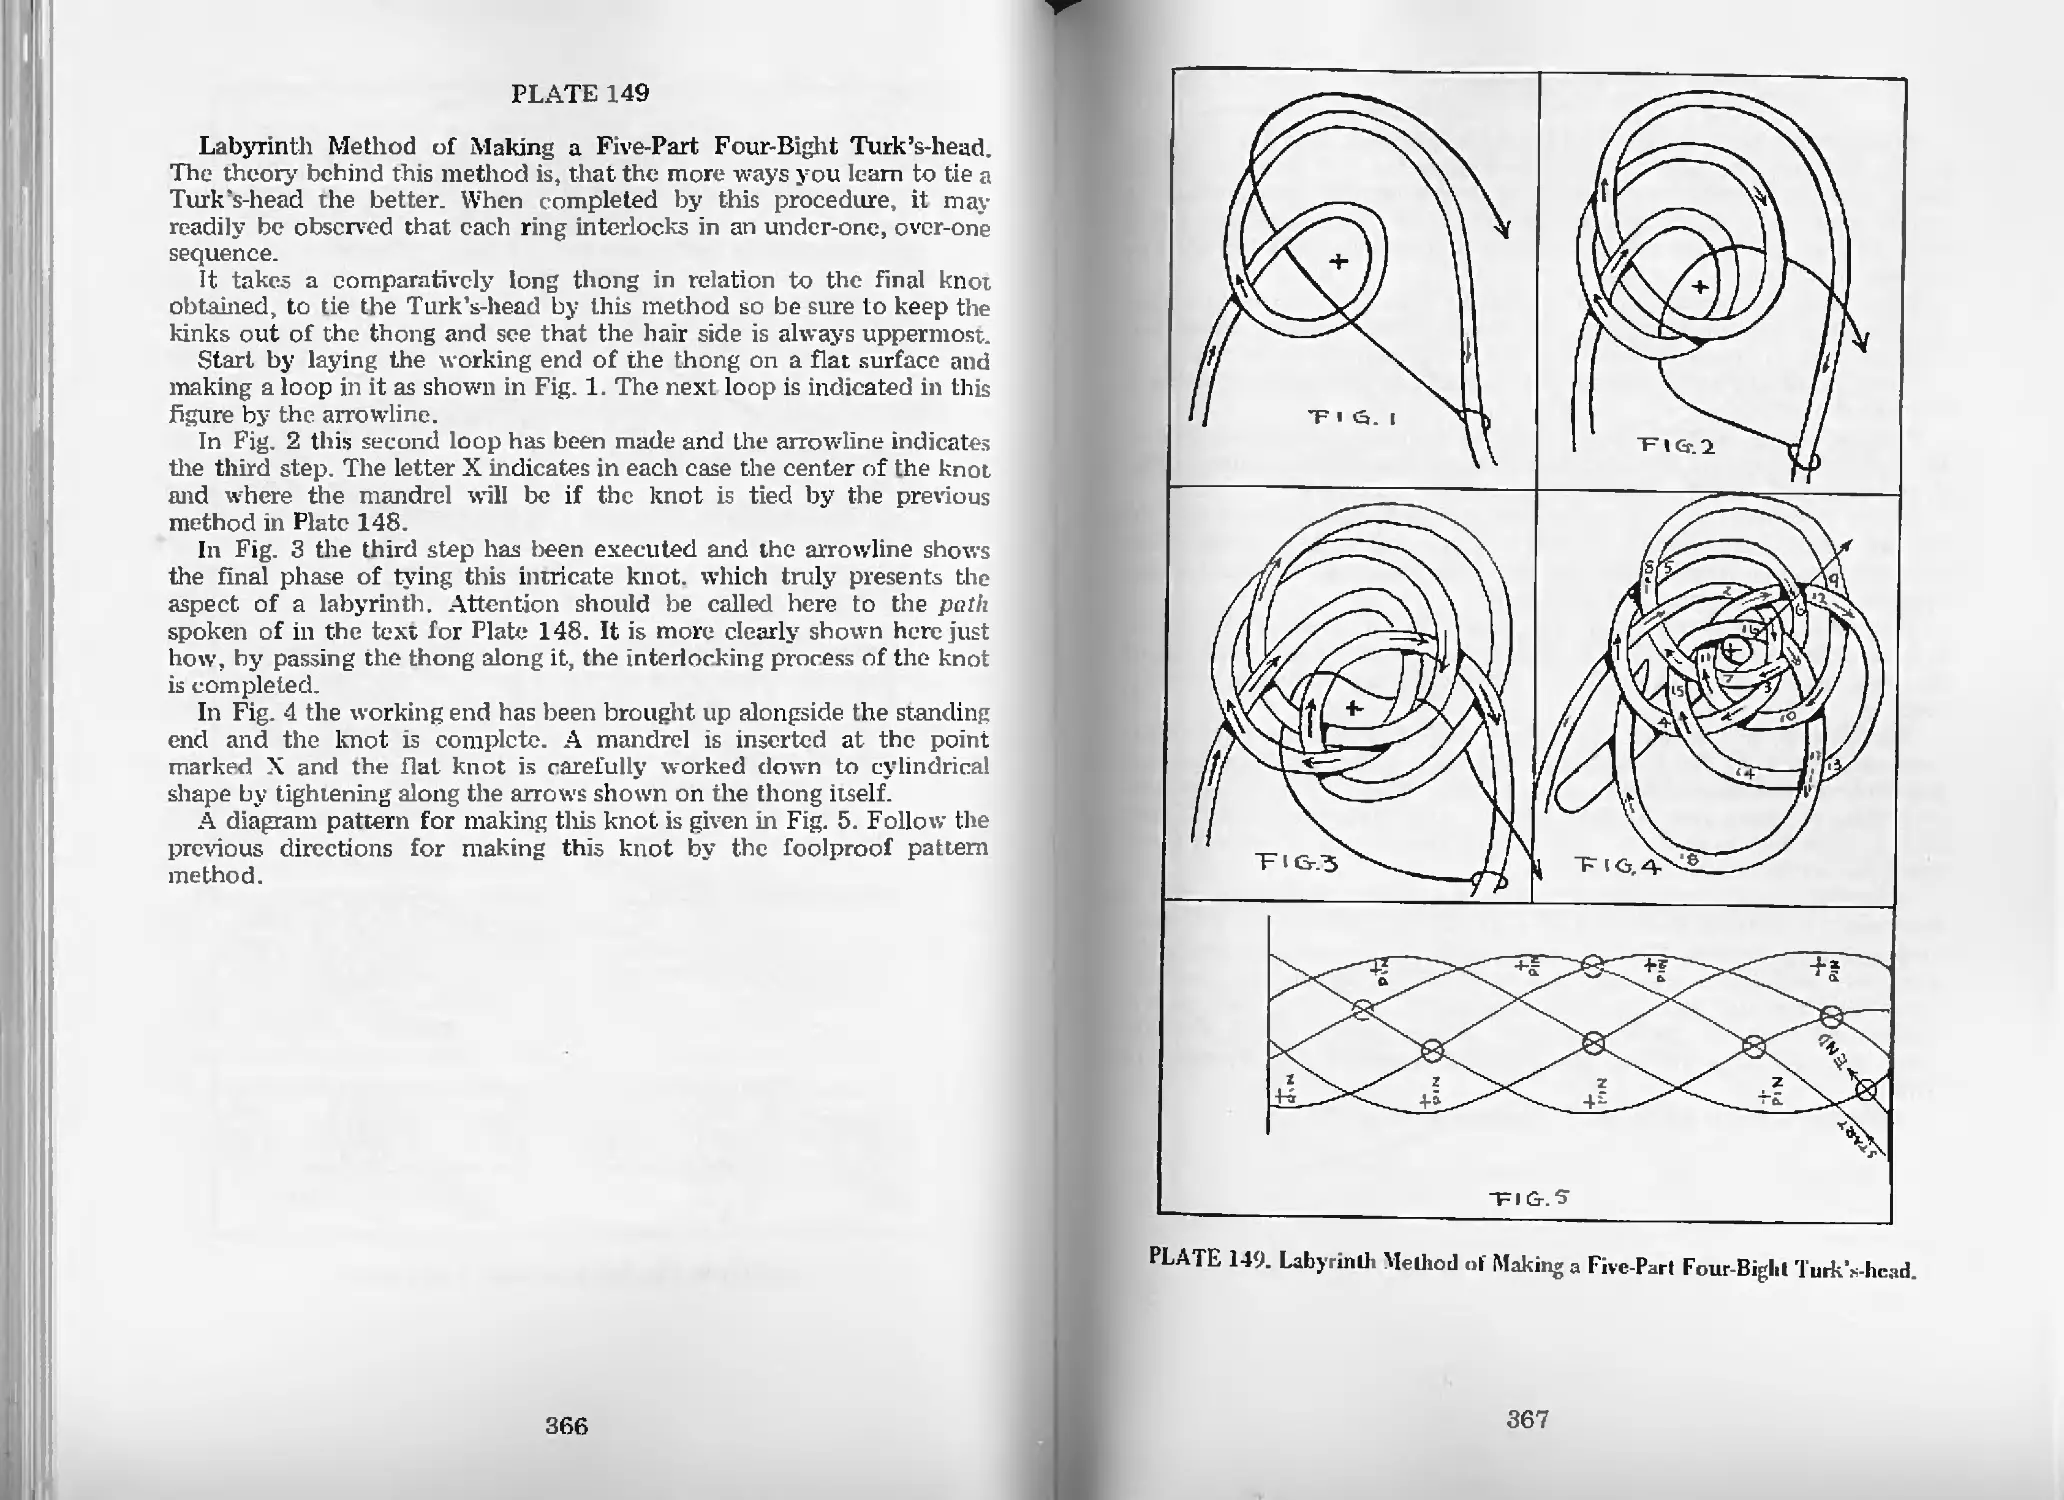
Labyrinth Method of Making a Five-Part
Four-Bight Turk’s-head—Pl. 149 366
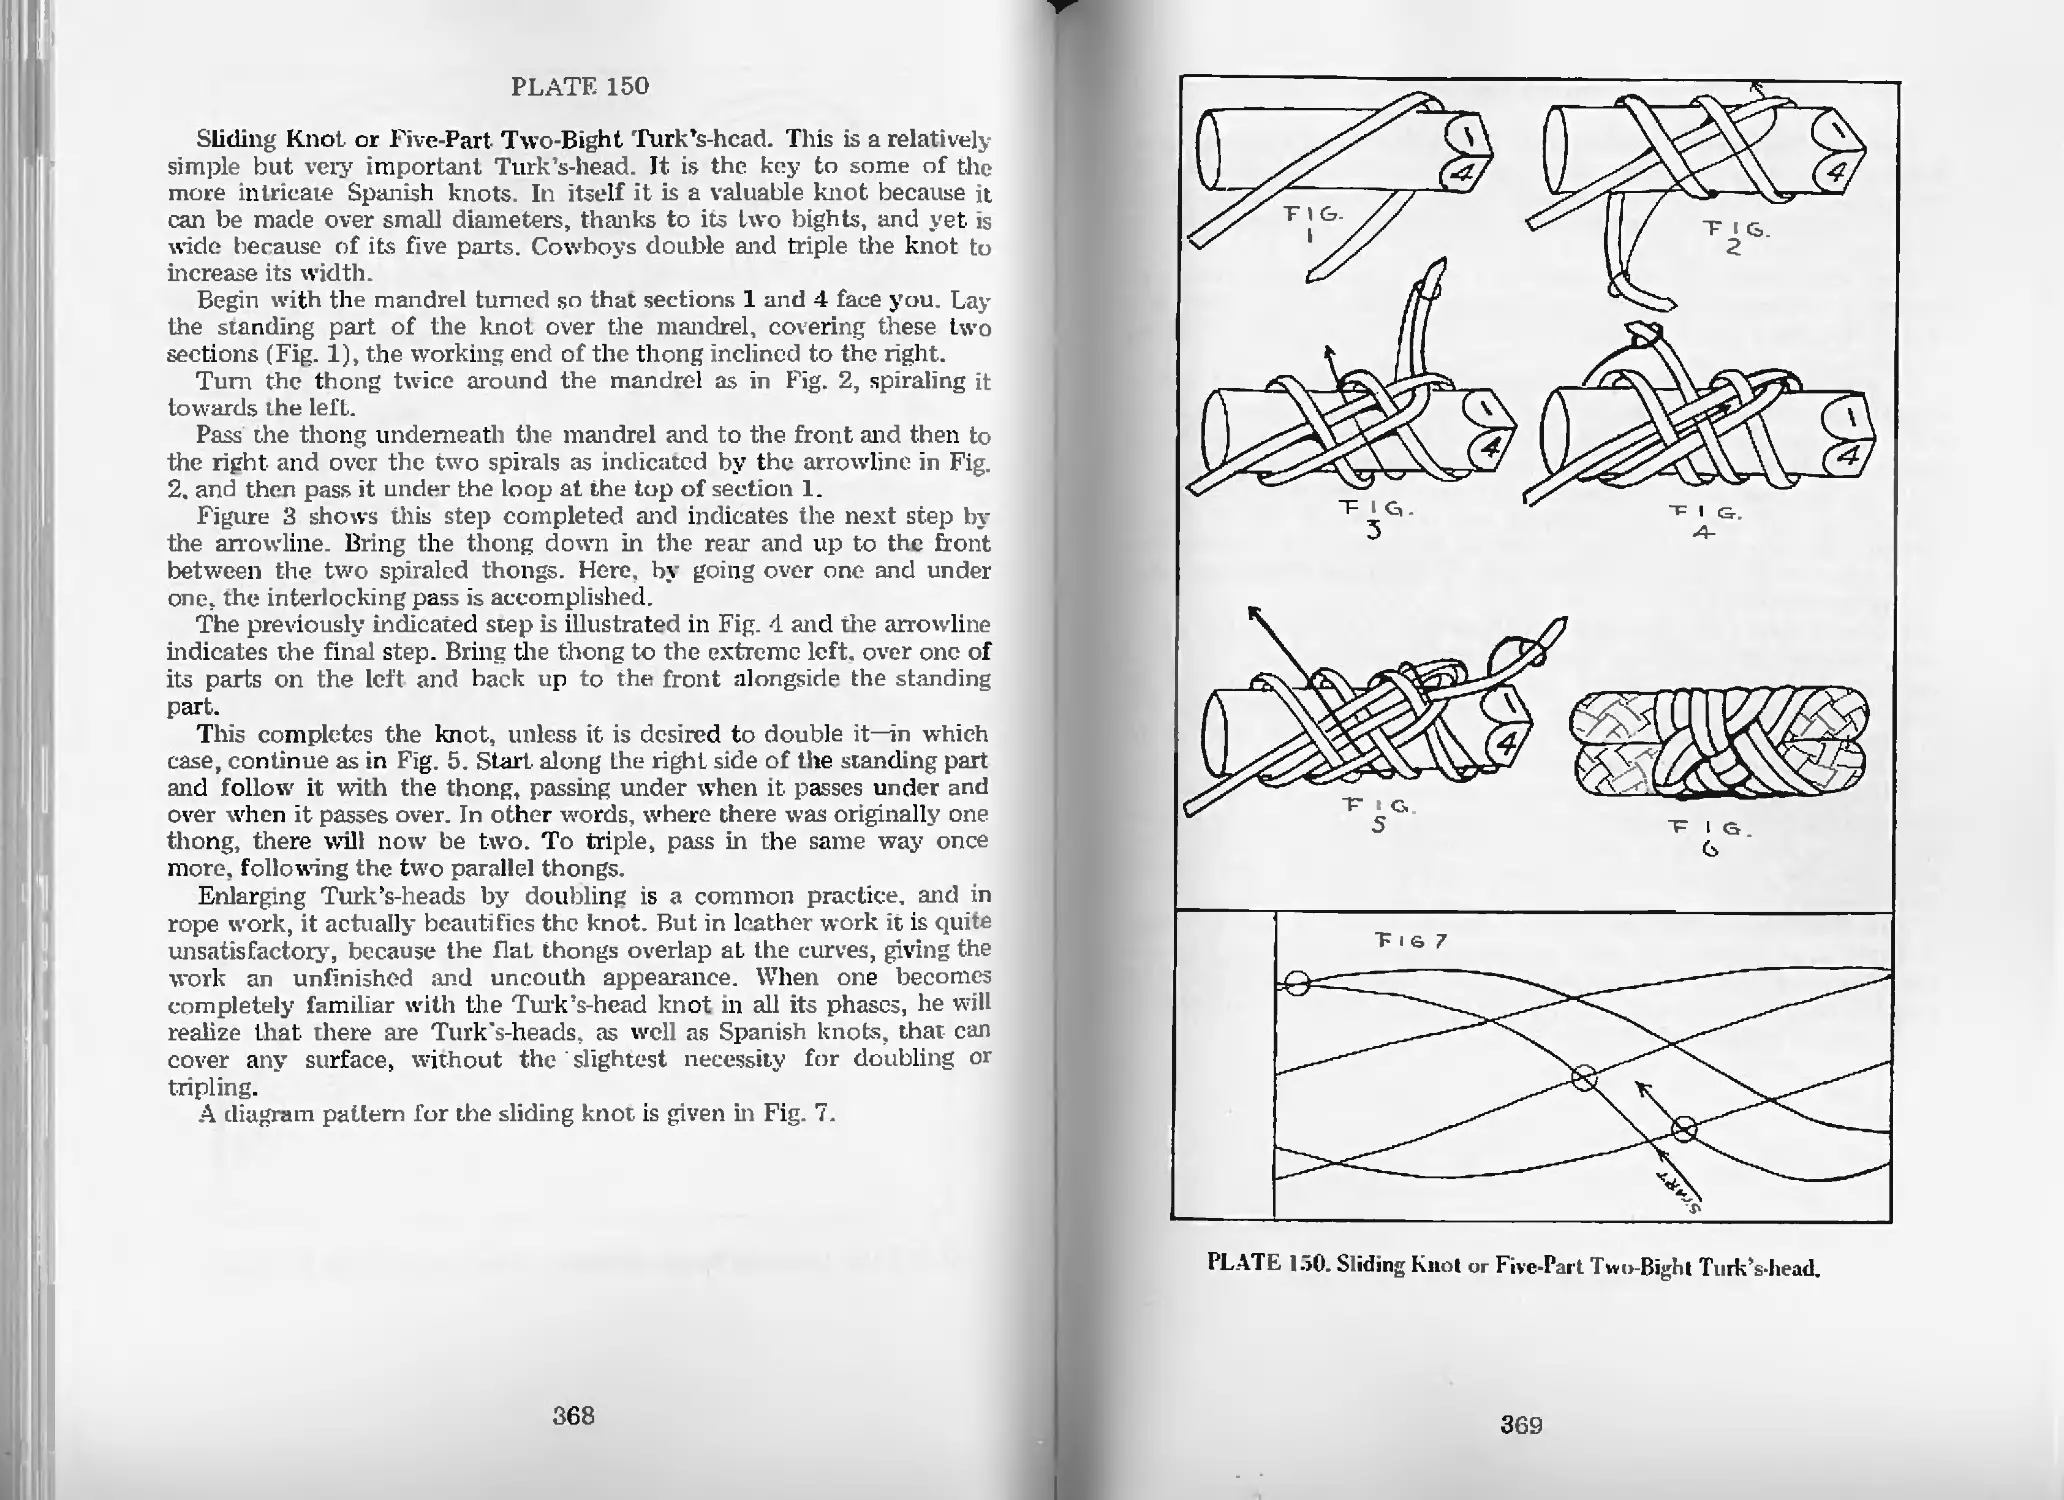
Sliding Knot or Five-Part Two-Bight Turk’s-head—Pl. 150 368
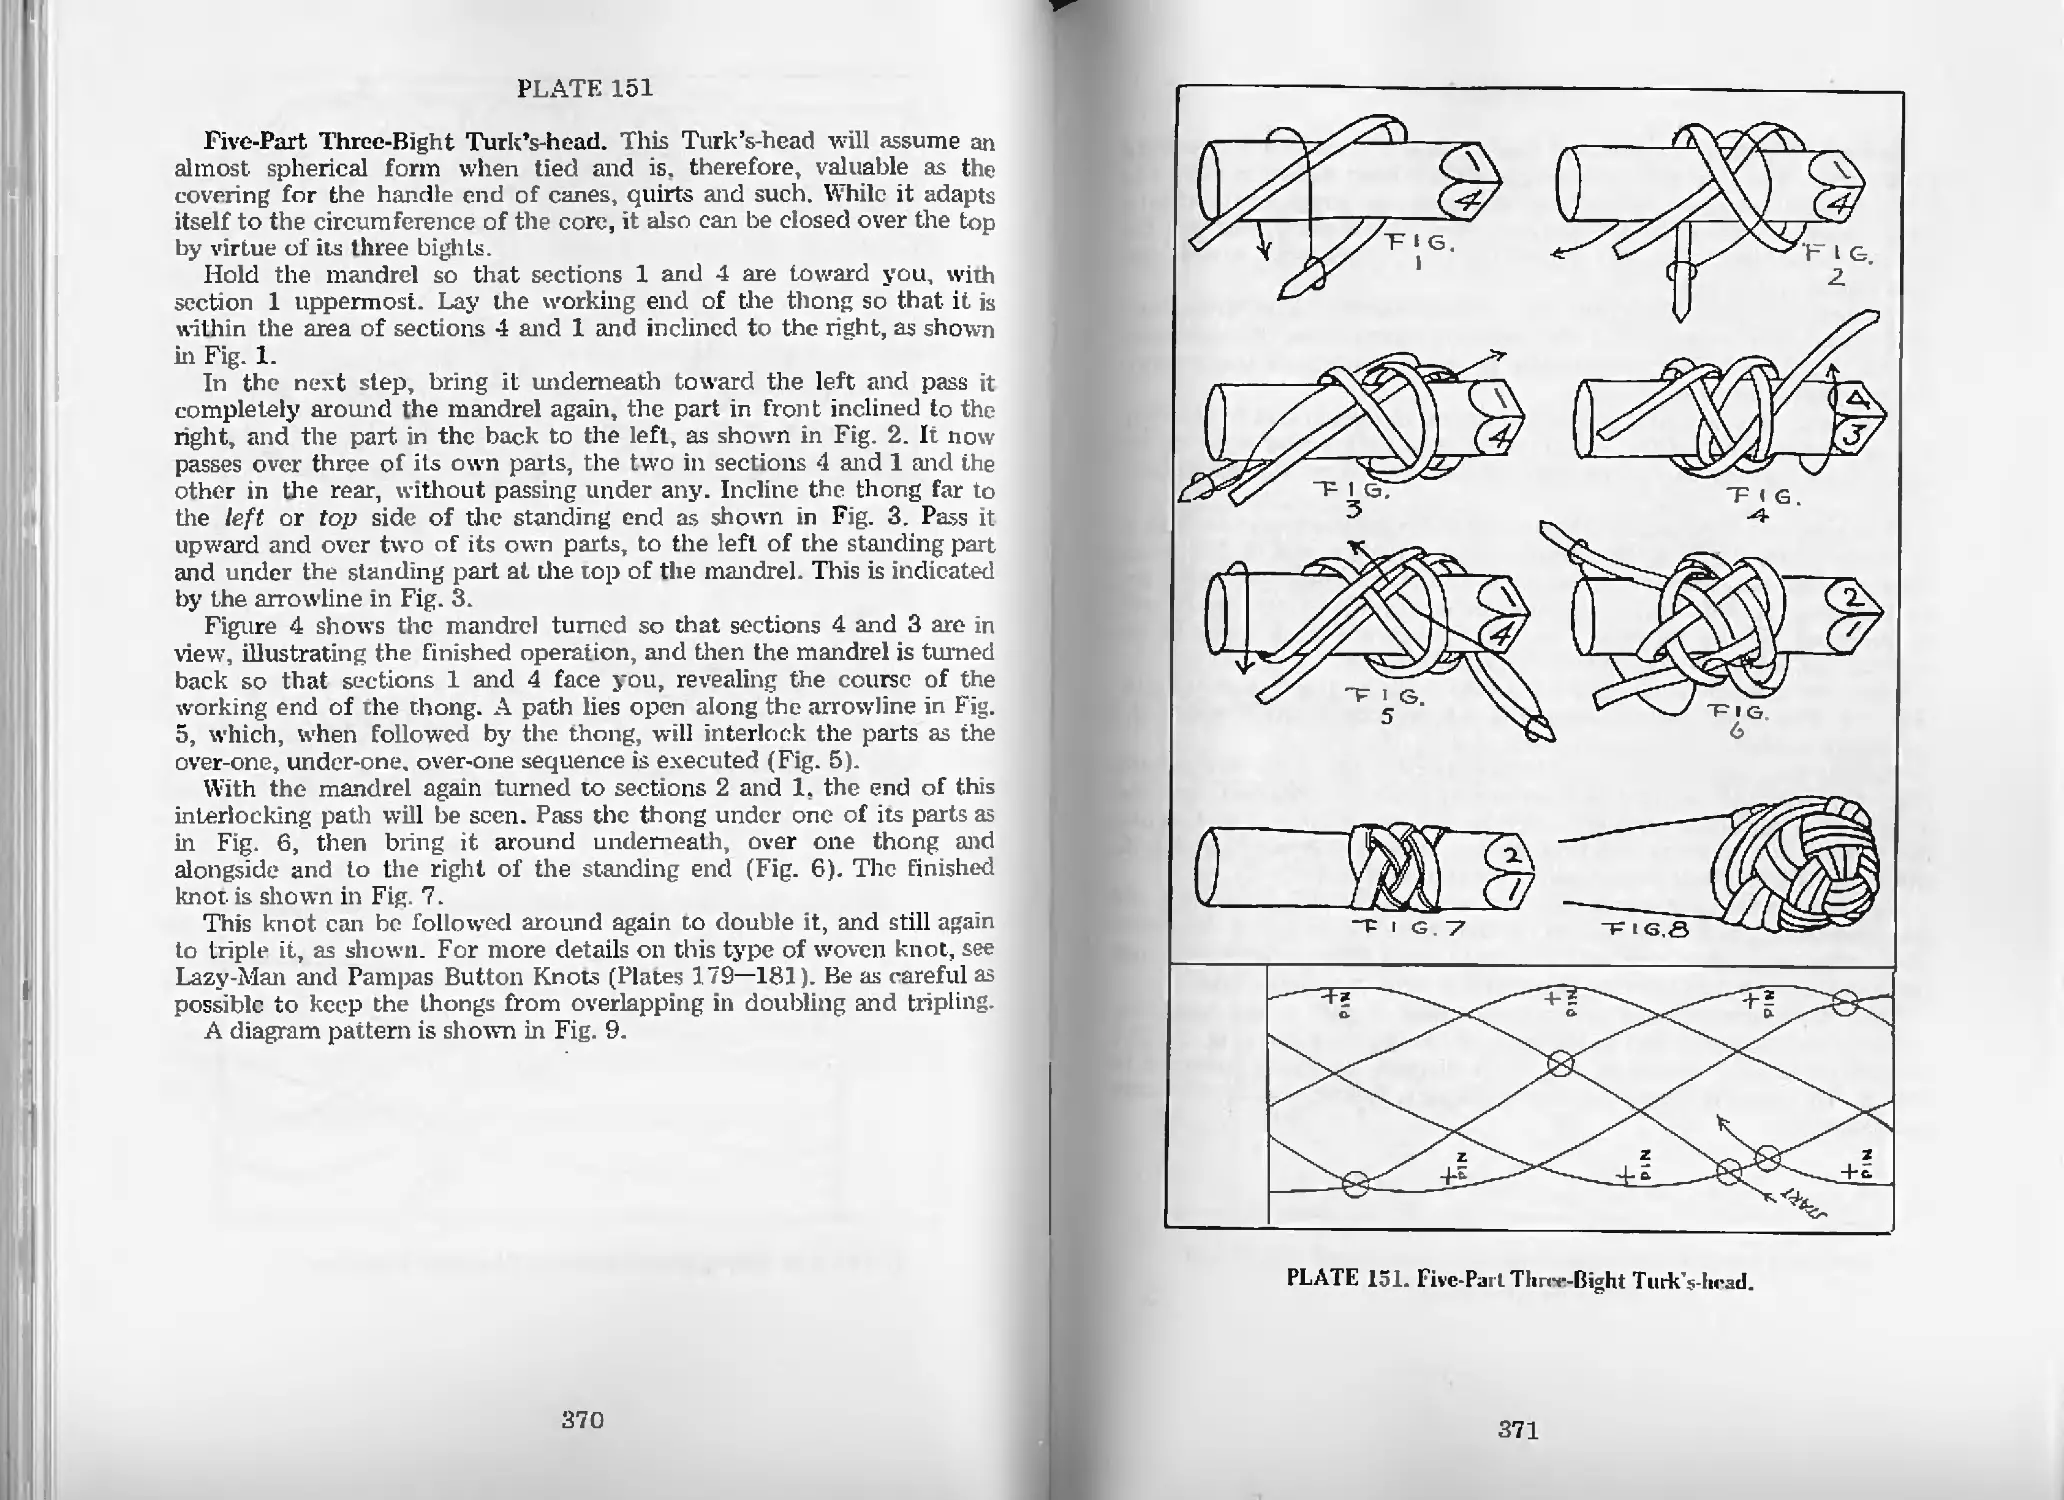
Five-Part Three-Bight Turk’s-head—Pl. 151 370
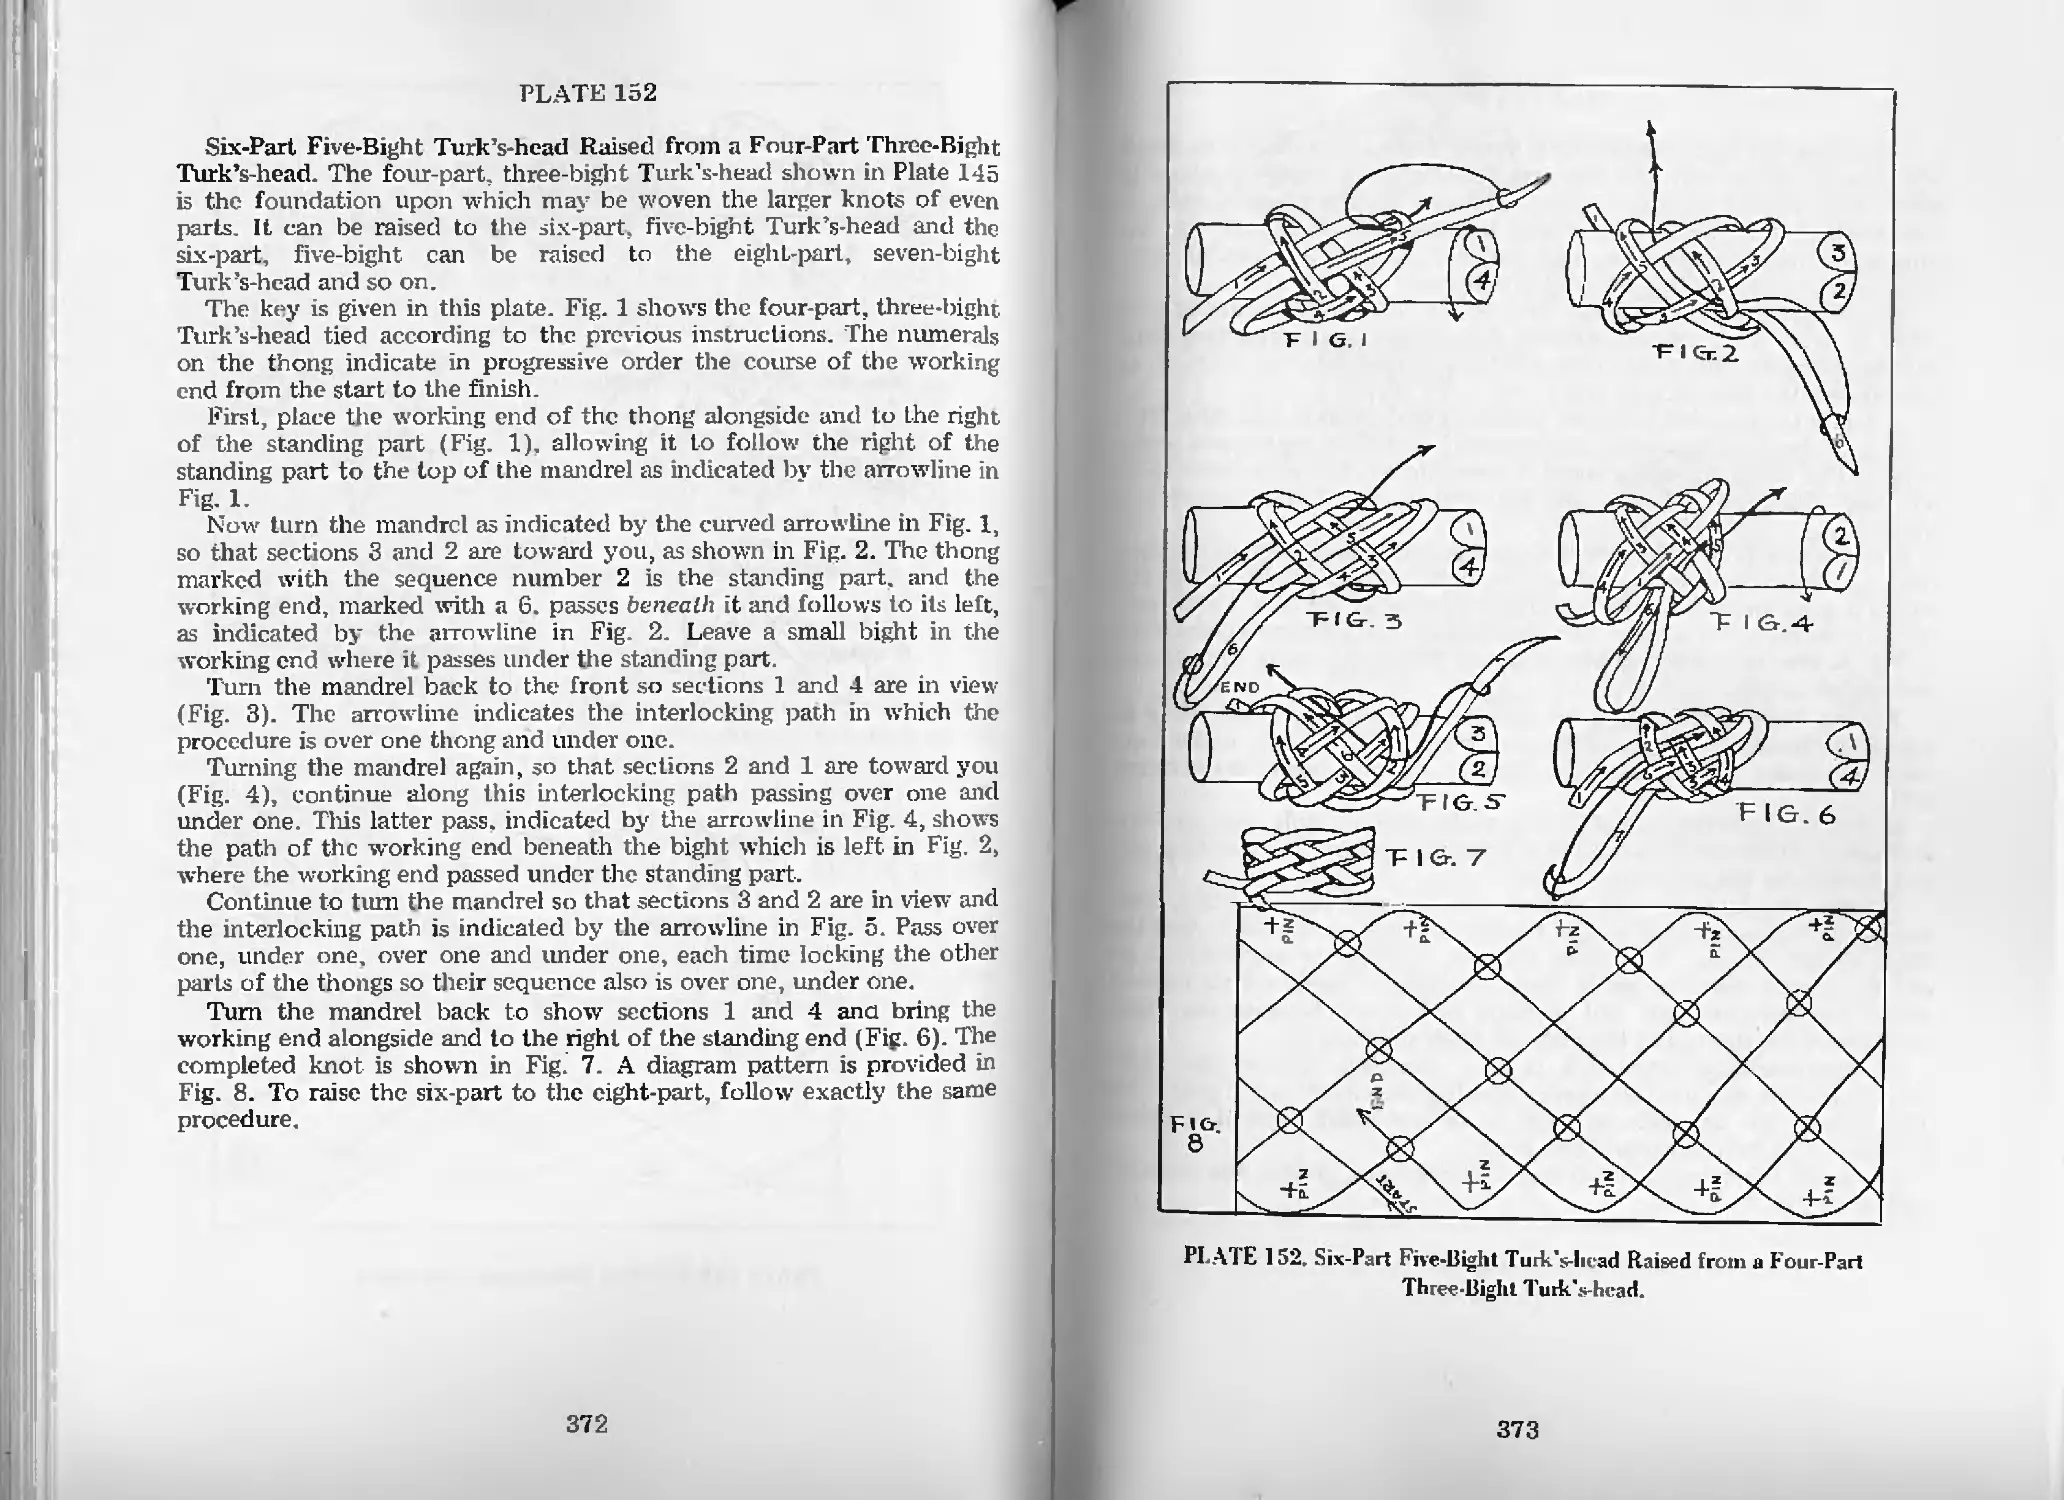
Six-Part Five-Bight Turk’s-head Raised from
a Four-Part Three-Bight Turk’s-head—Pl. 152 372
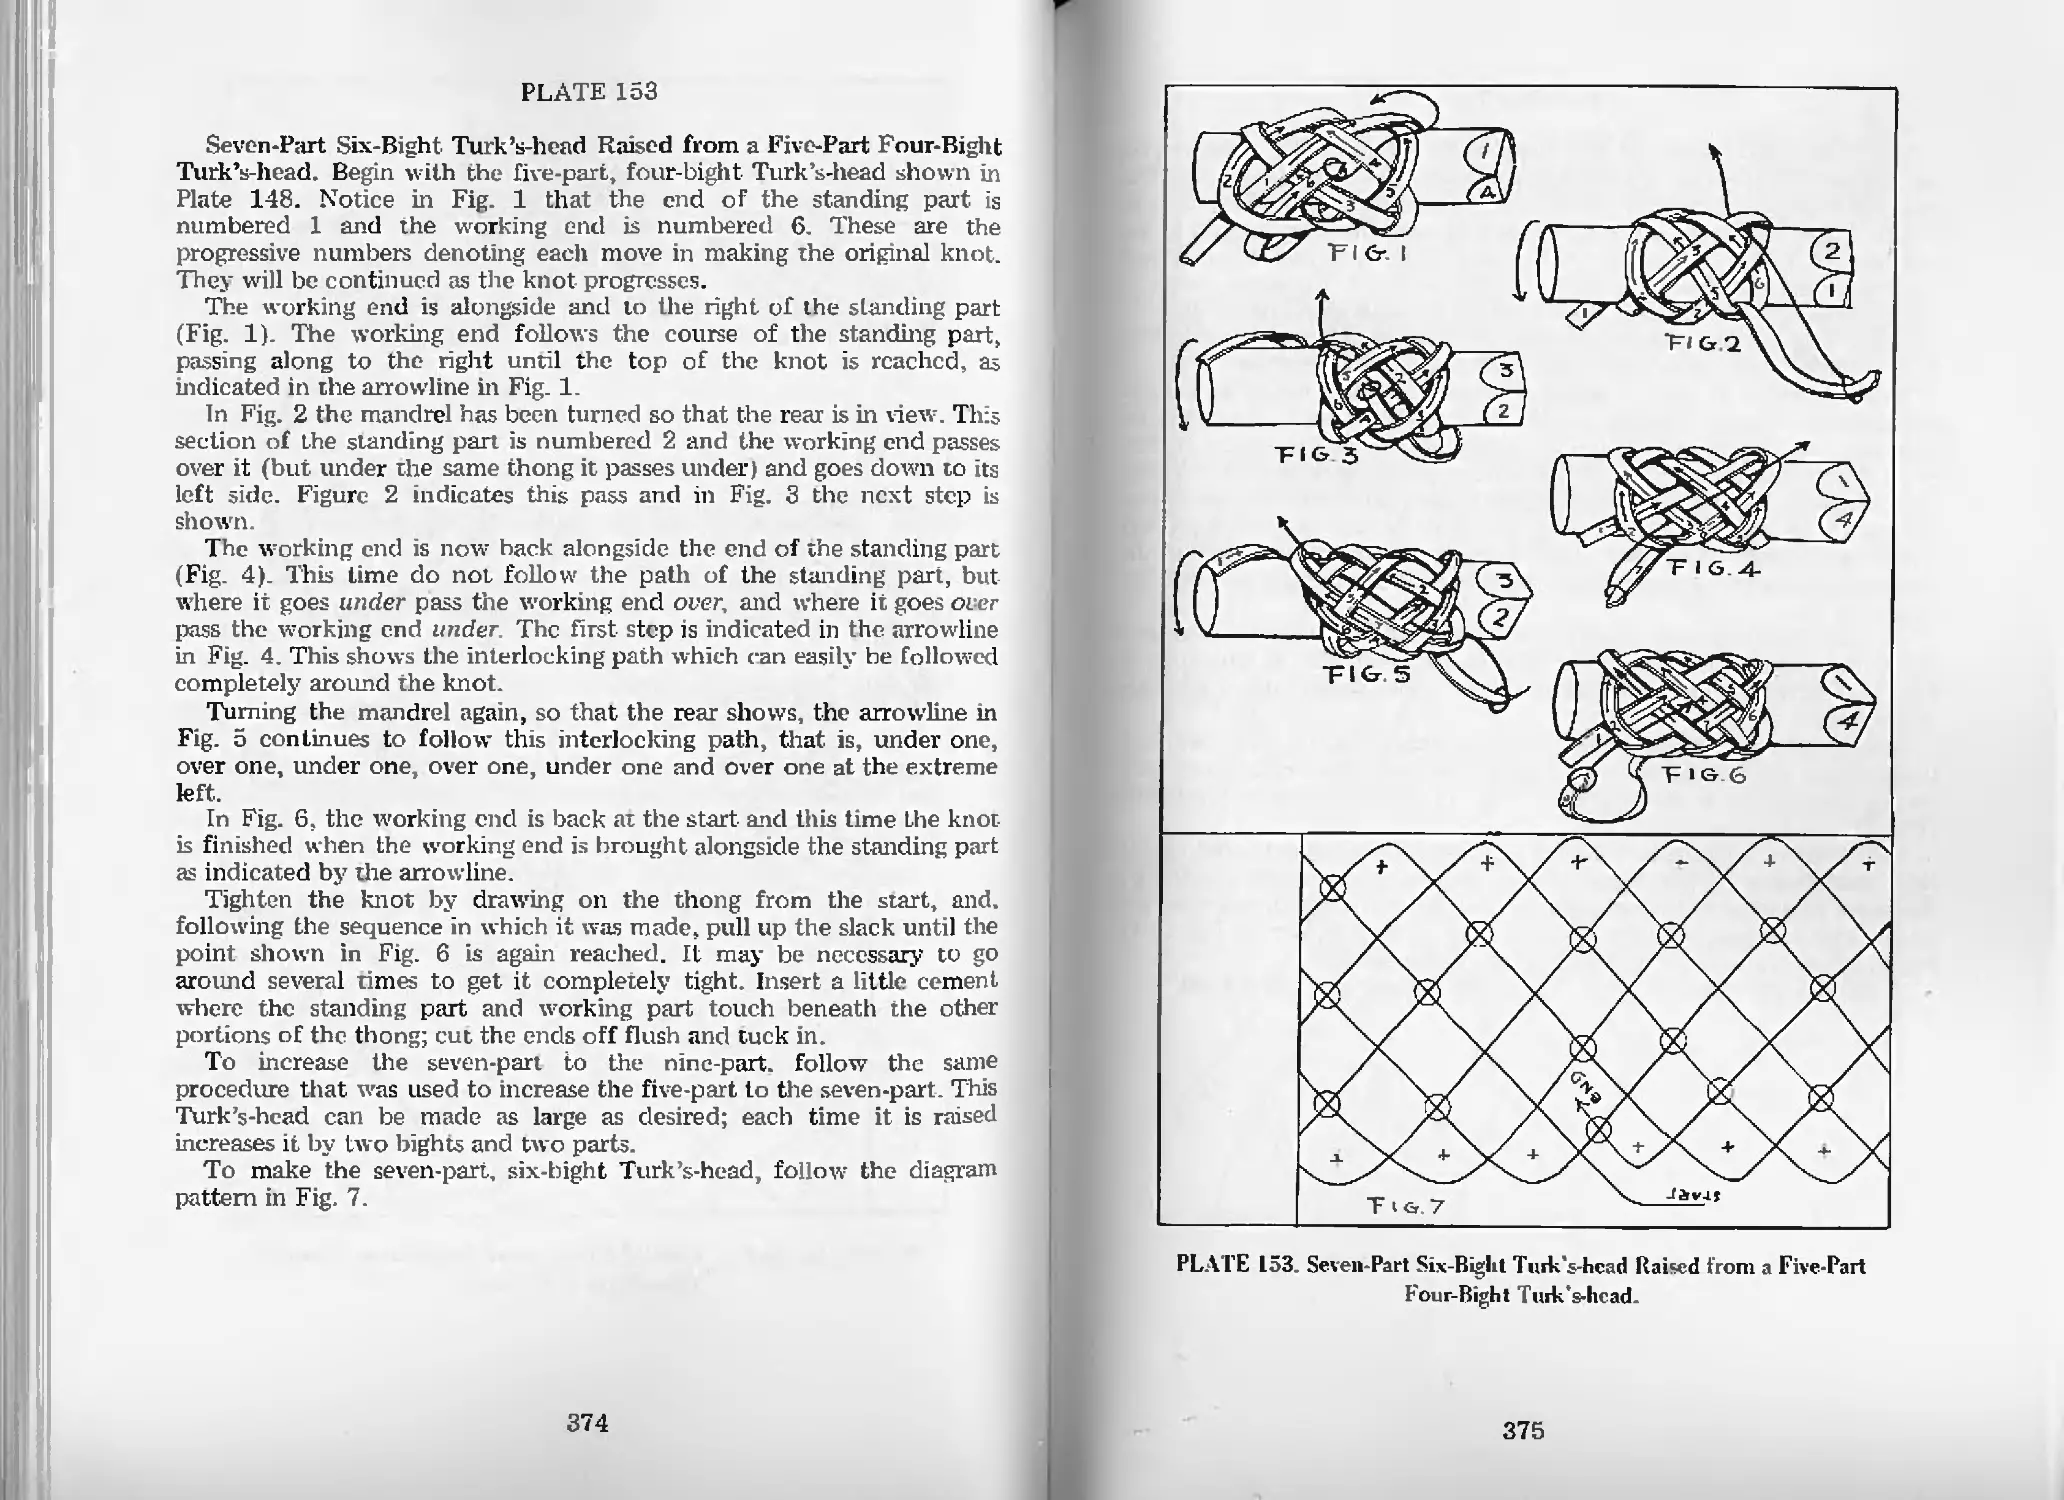
Seven-Part Six-Bight Turk’s-head Raised from a Five-Part
Four-Bight Turk’s-head—Pl. 153 374
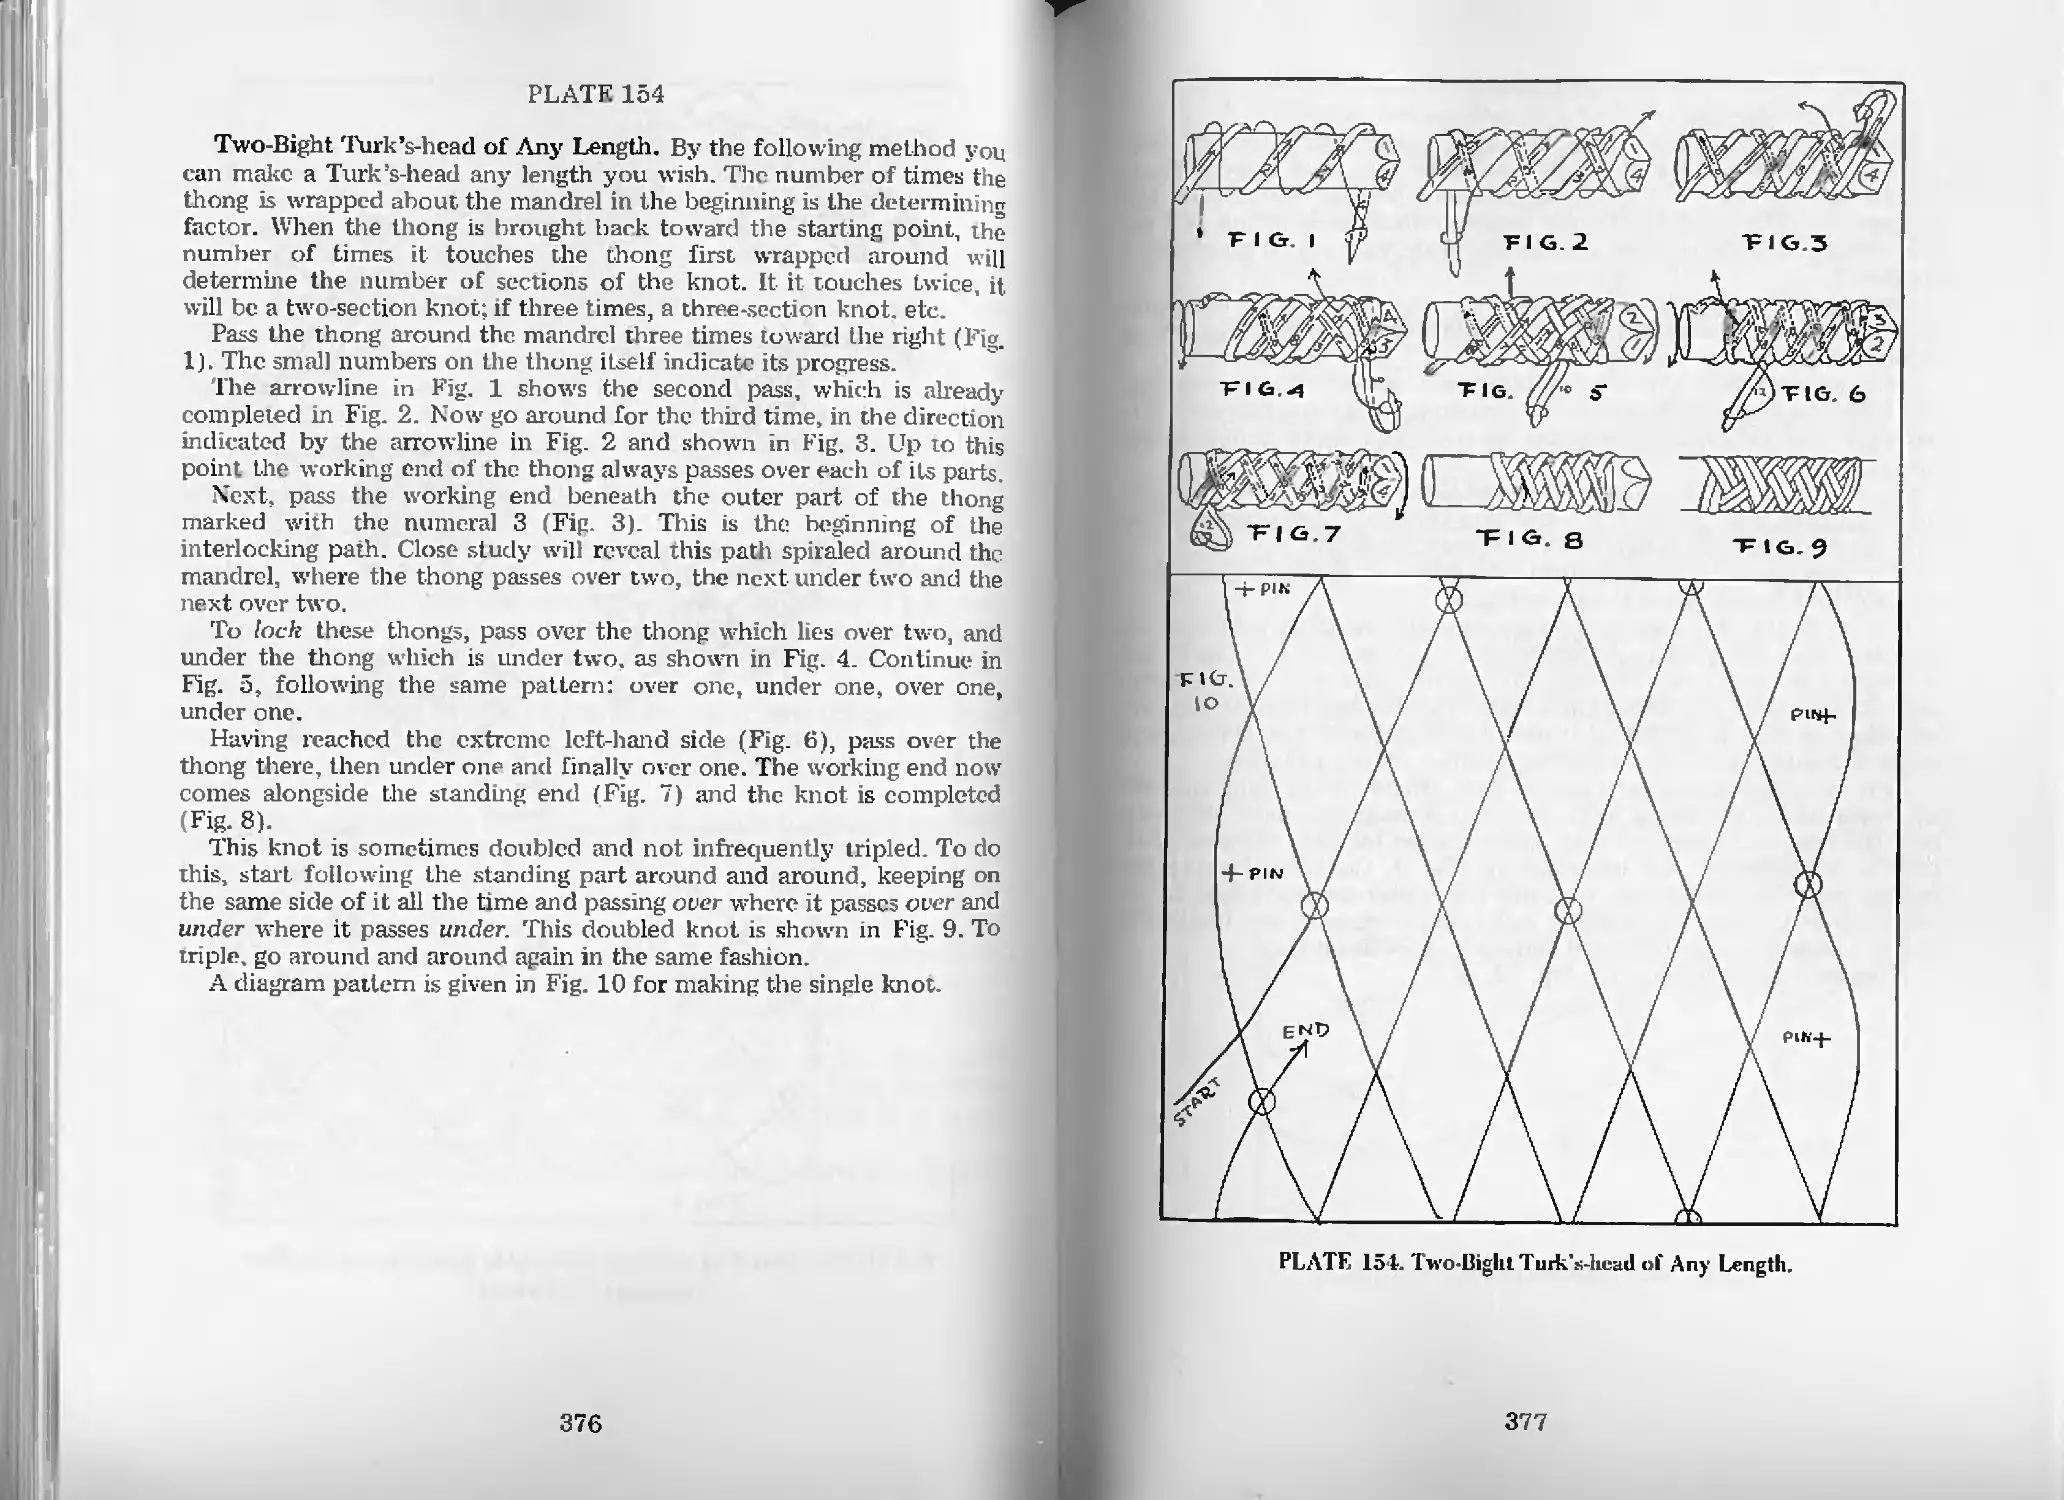
Two-Bight Turk’s-head of Any Length—Pl. 154 376
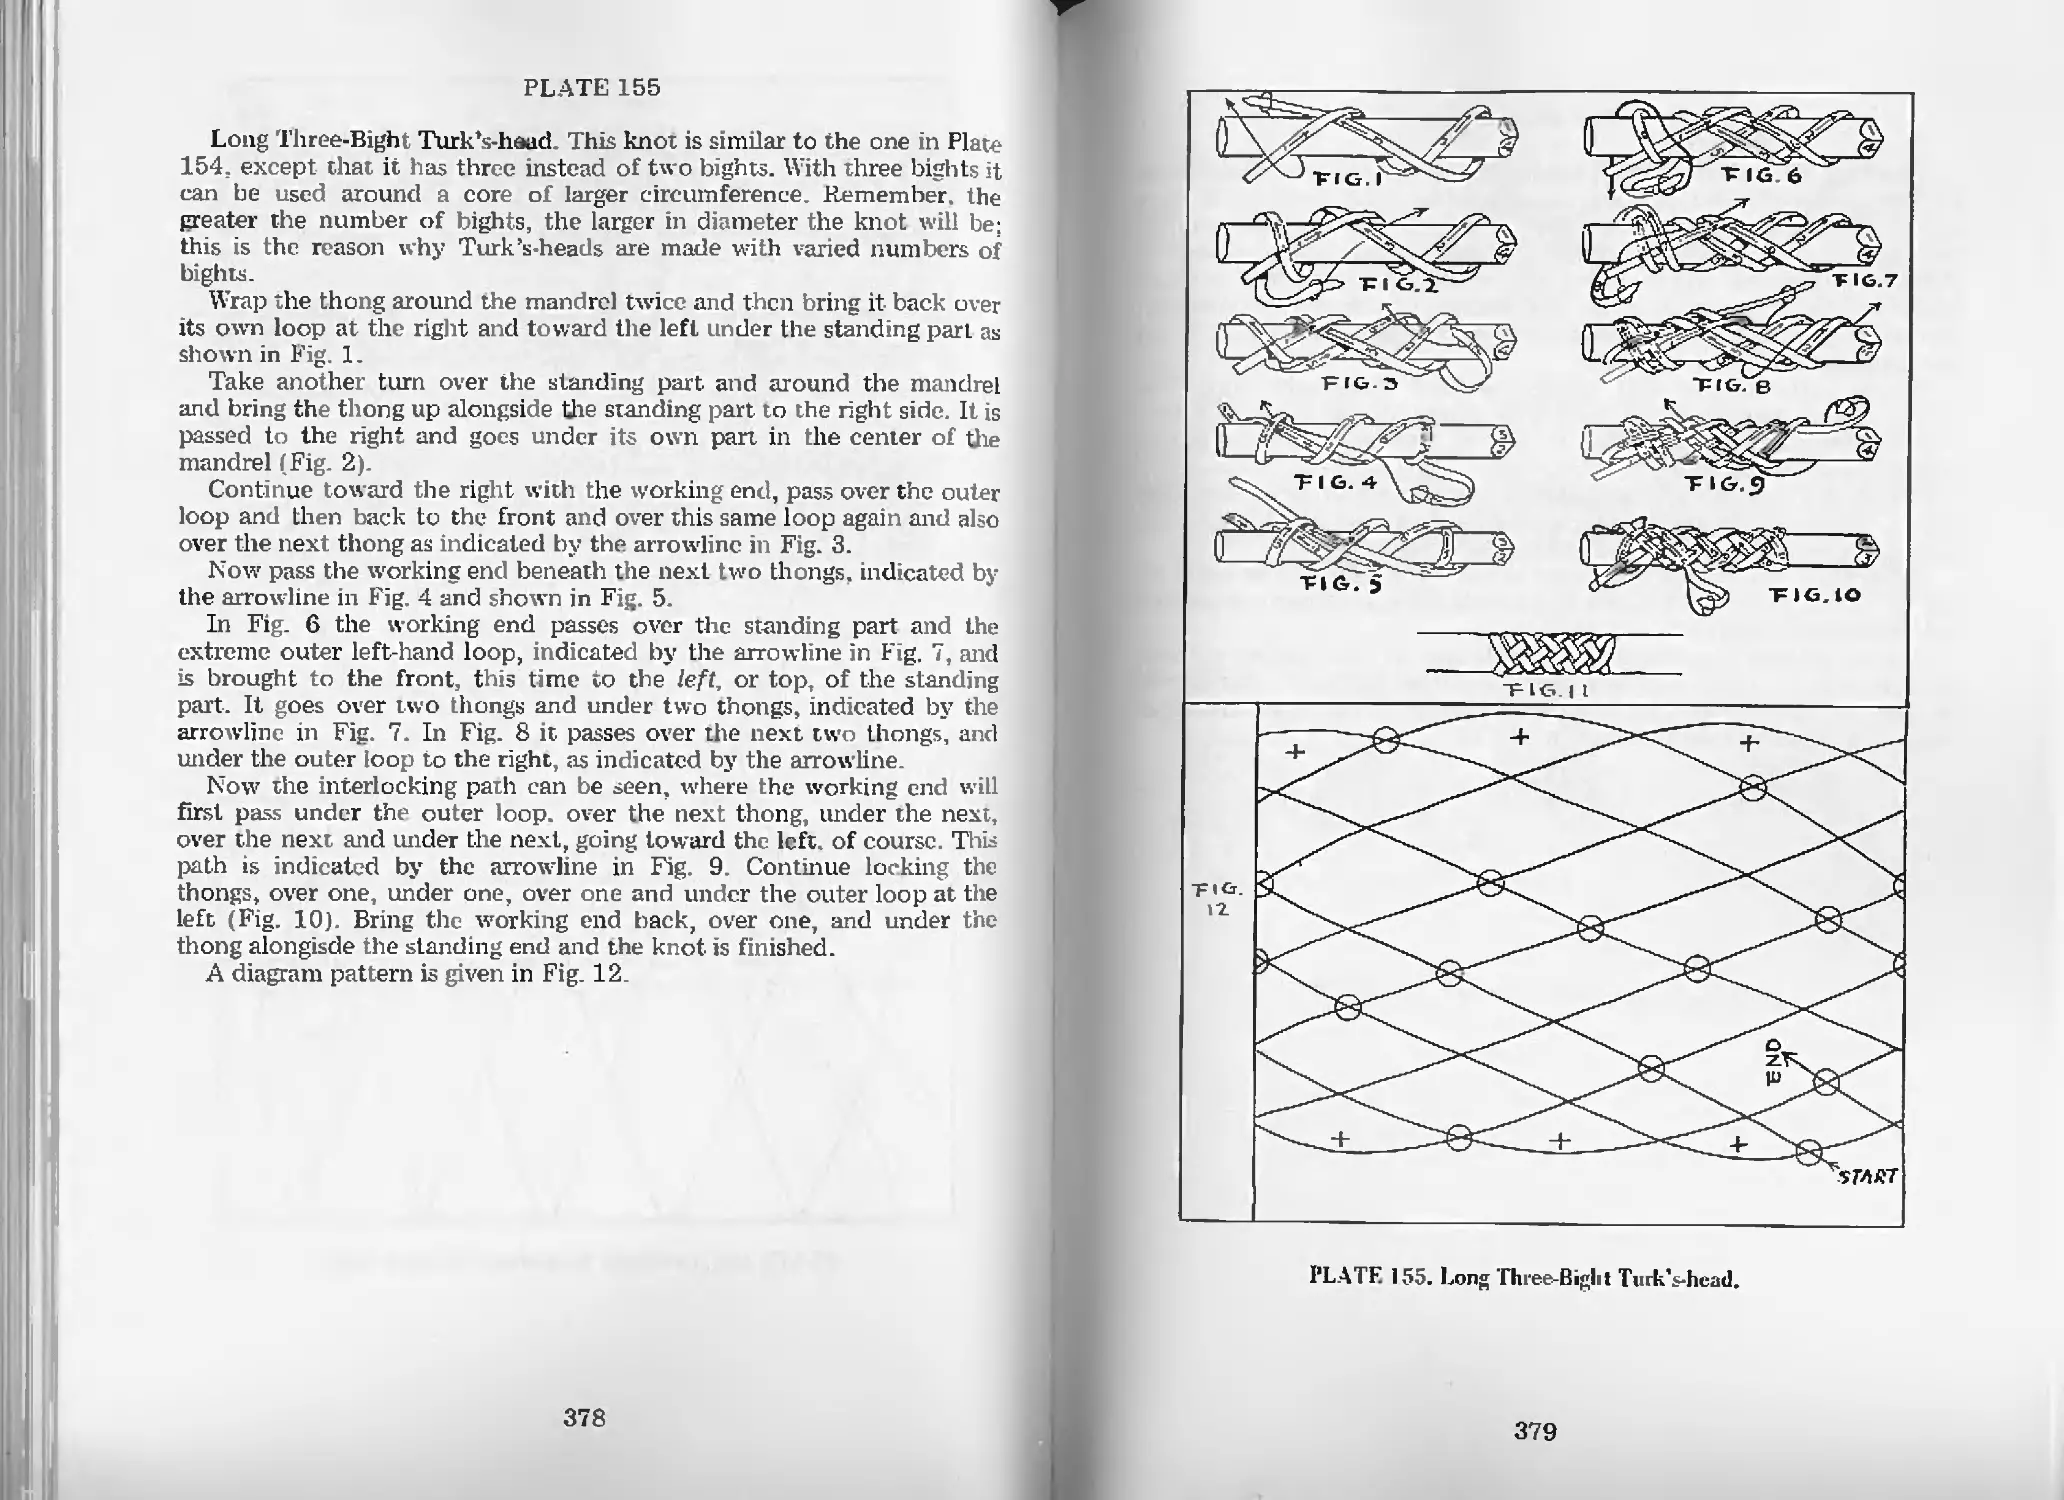
Long Thrcc-Bight Turk’s-head—Pl. 155 378
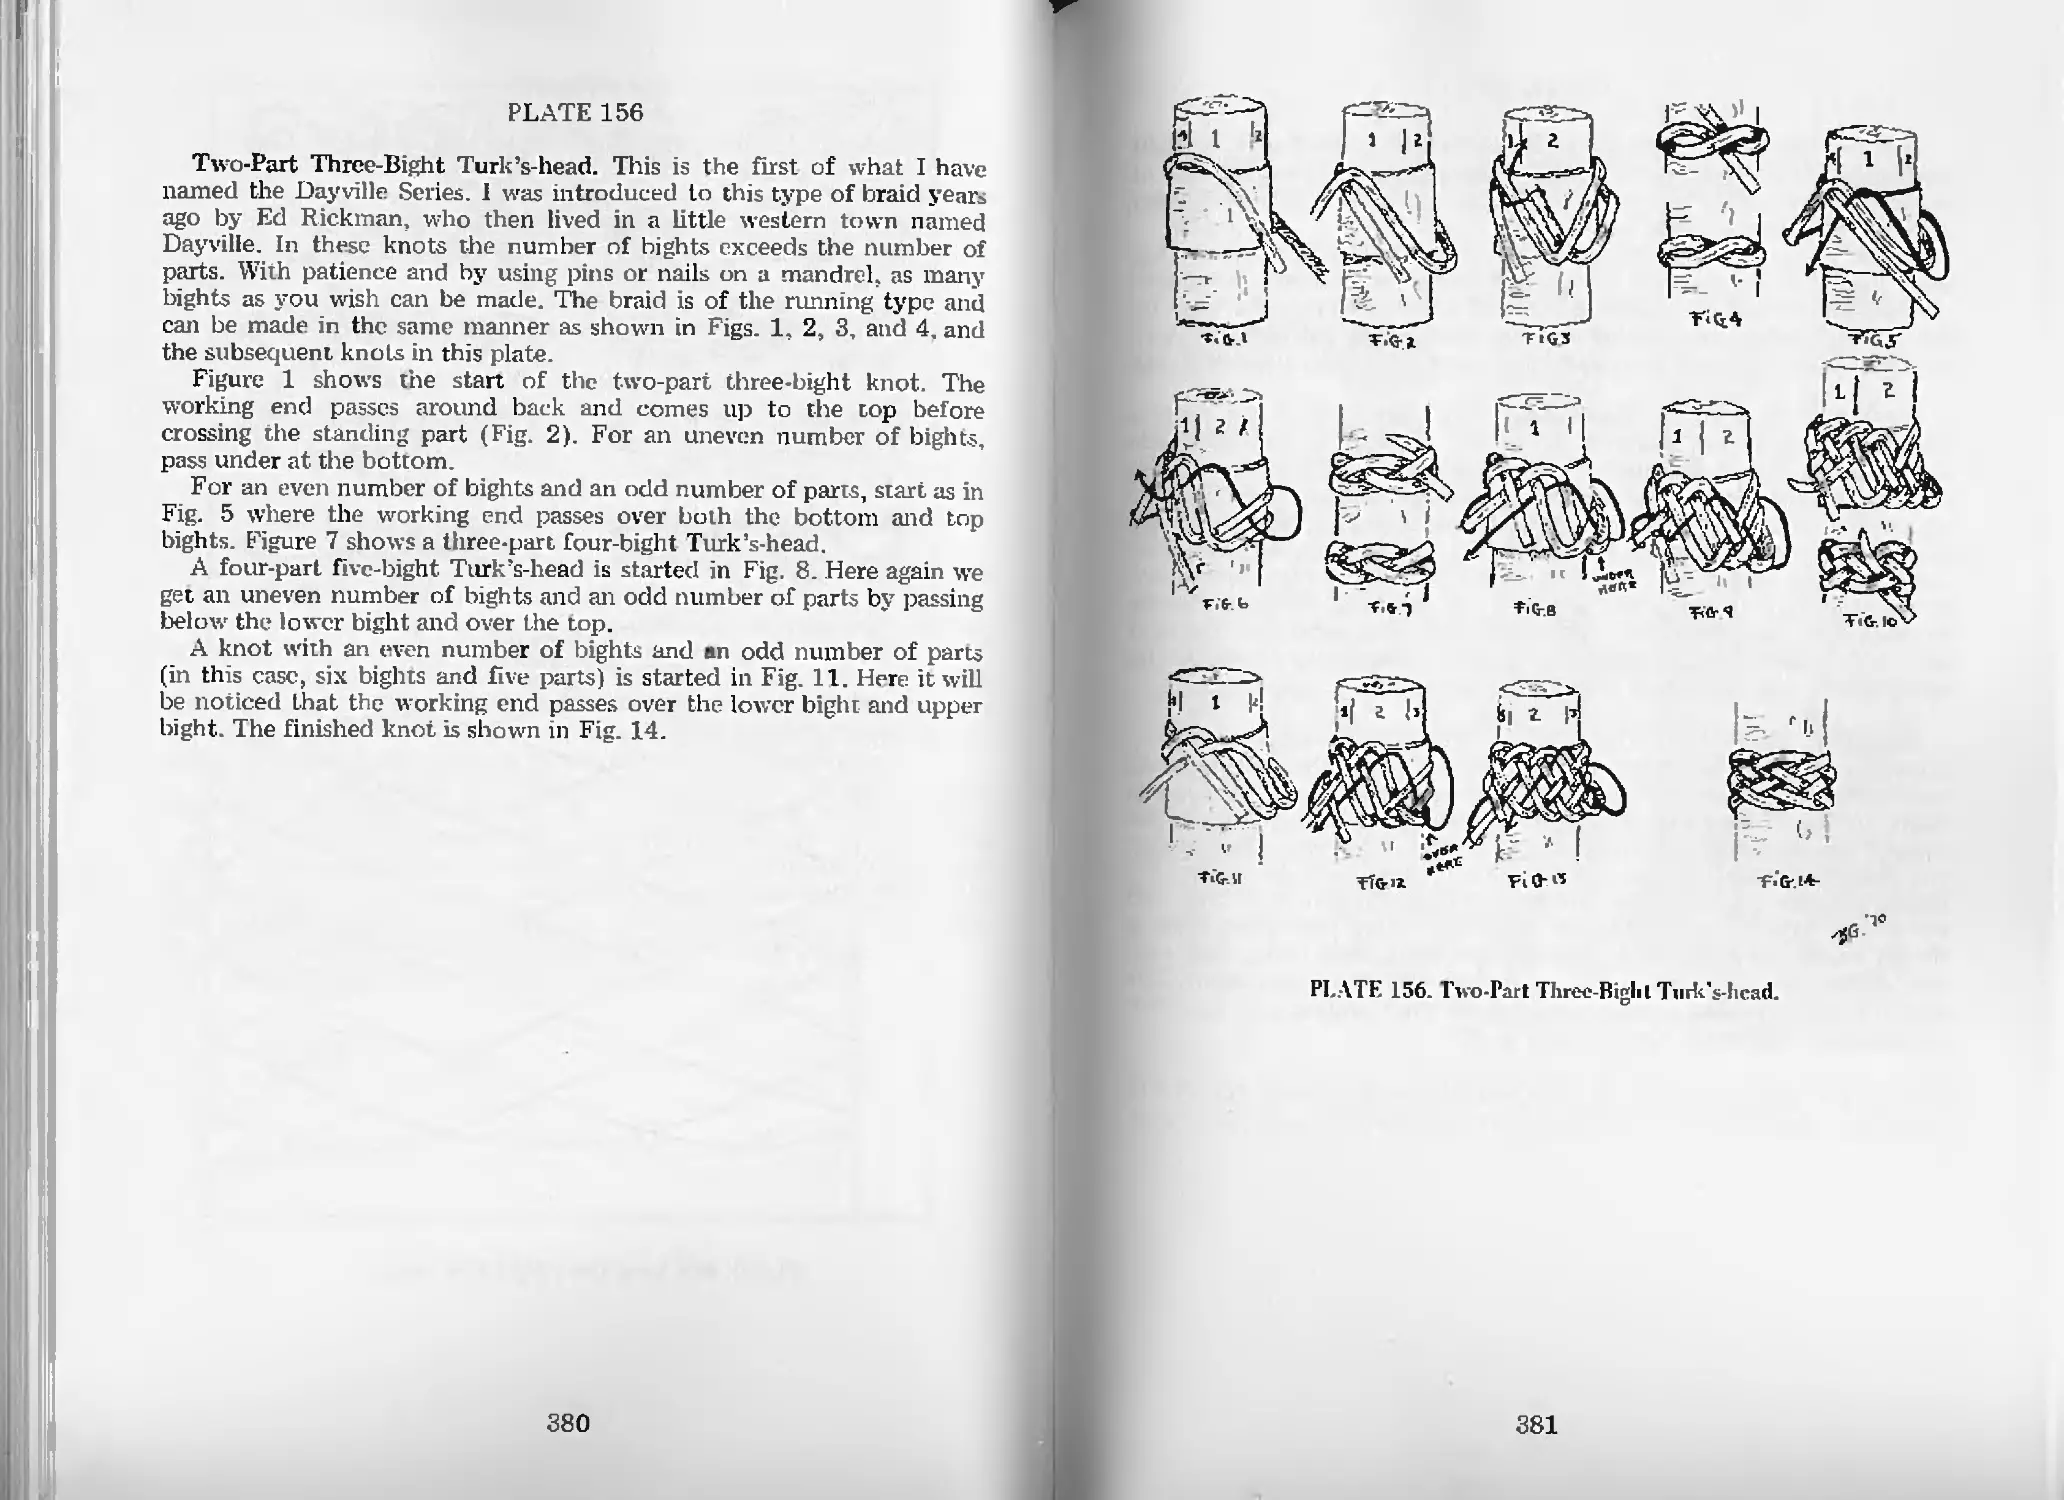
Two-Part Three-Bight Turk’s-head—Pl. 156 380
Five-Part Nine-Bight Turk’s-head Raised from a Three-Part.
Five-Bight Turk’s-head—Pl. 157 382
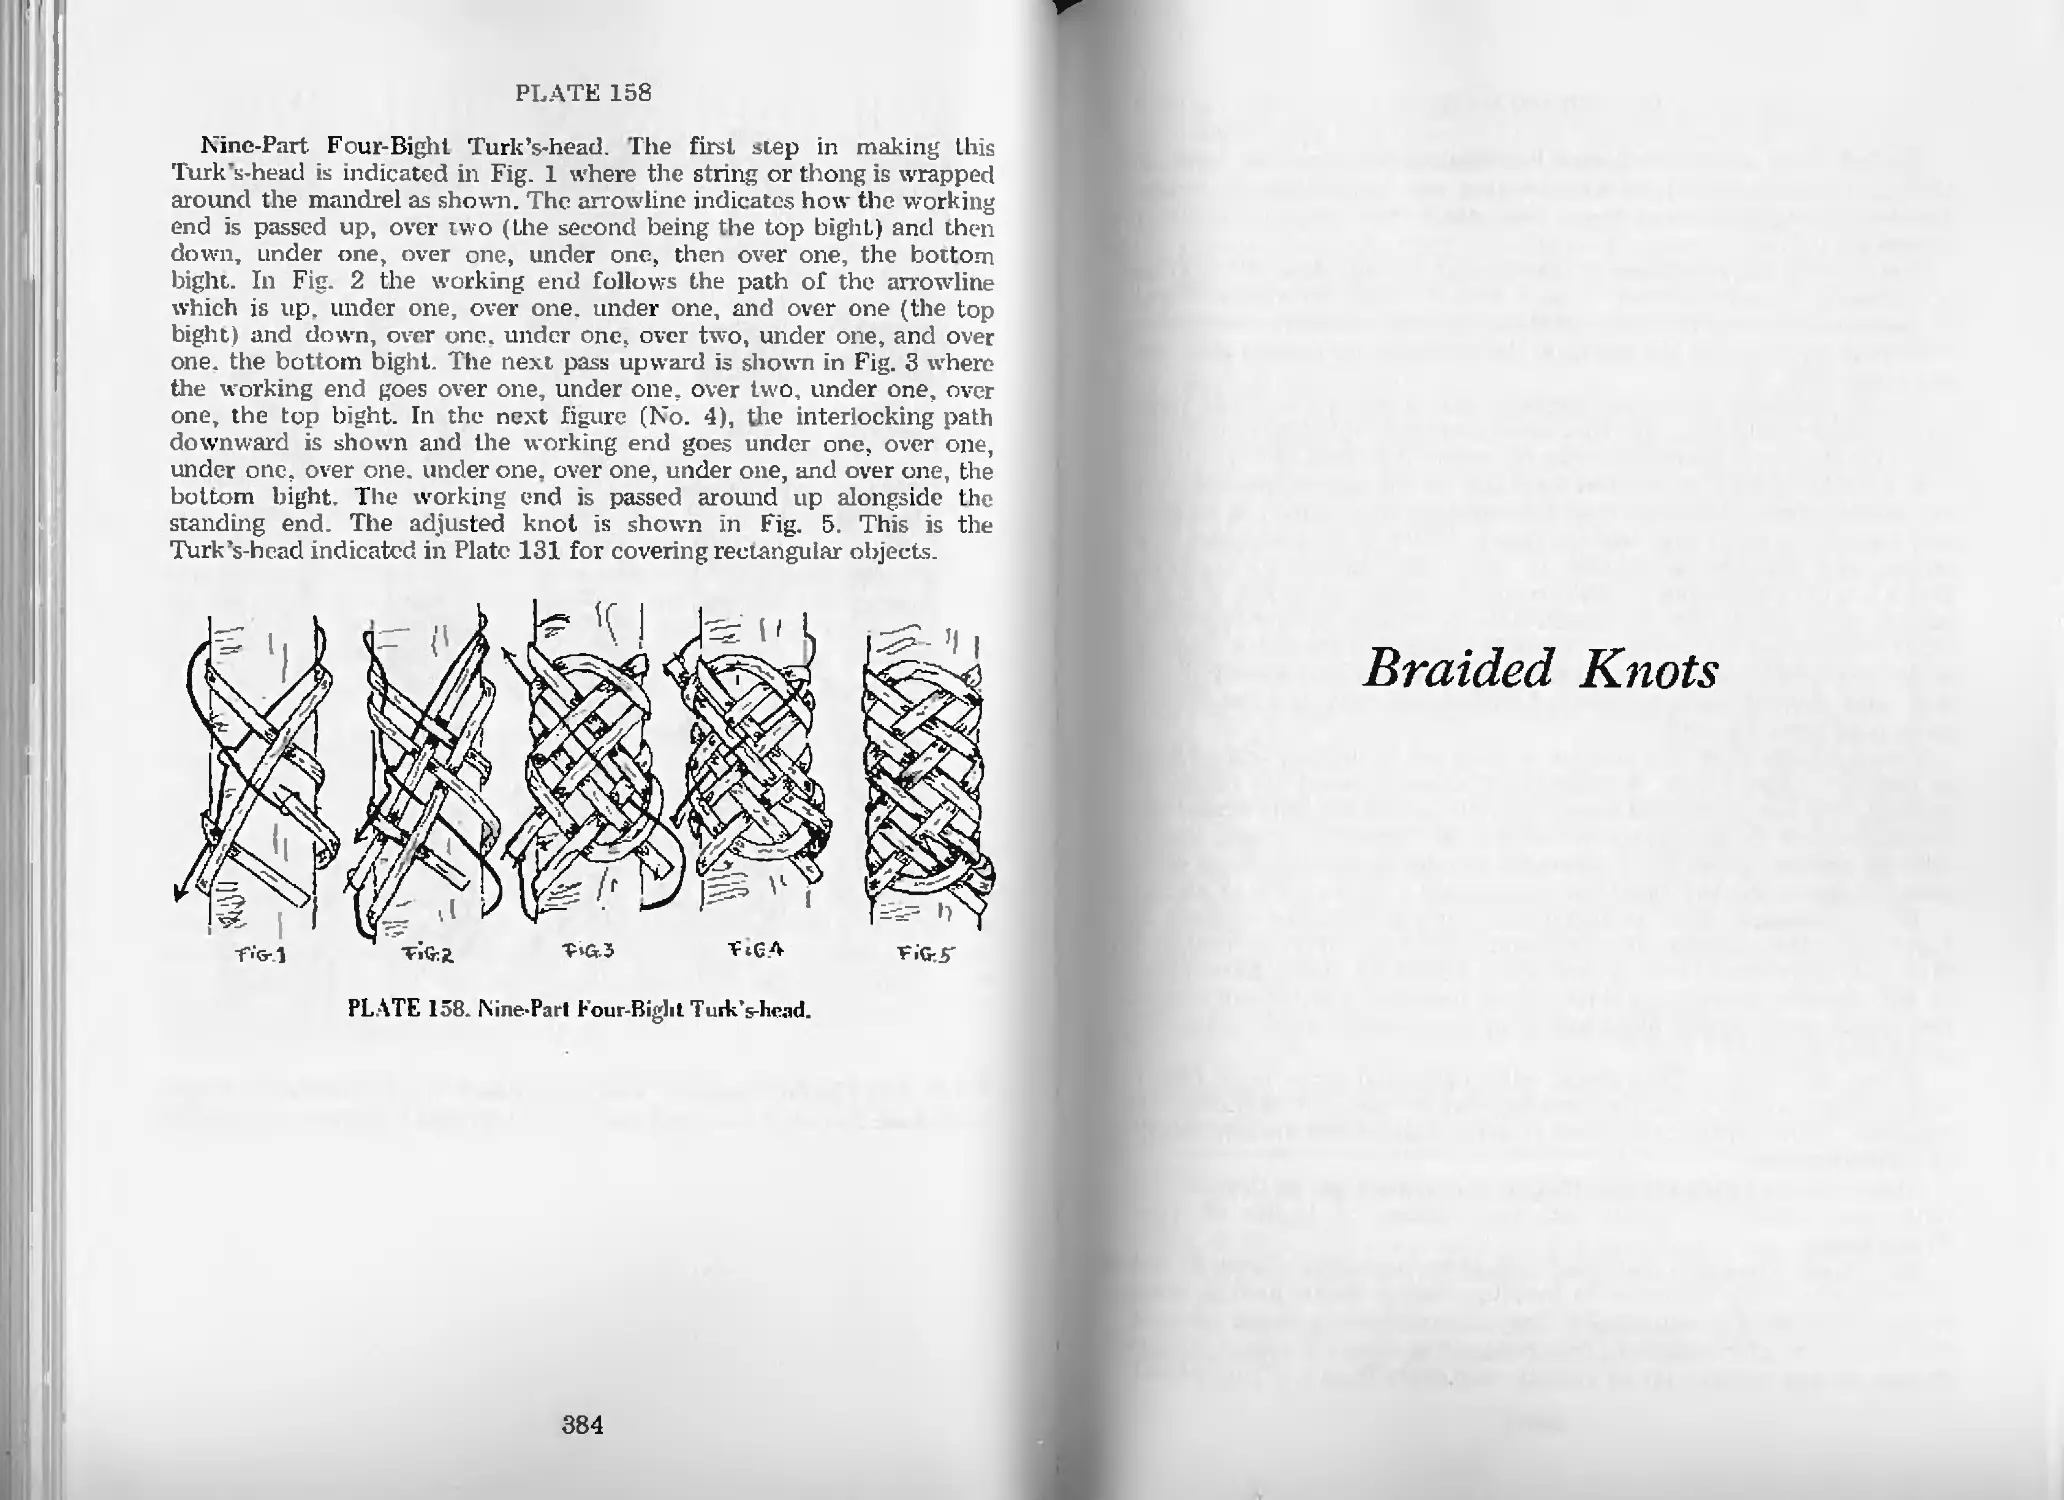
Nine-Part Four-Bight Turk’s-head—Pl. 158 384
Braided Knots
Braided Knot with Turk’s-head Foundation—Pl. 159 386
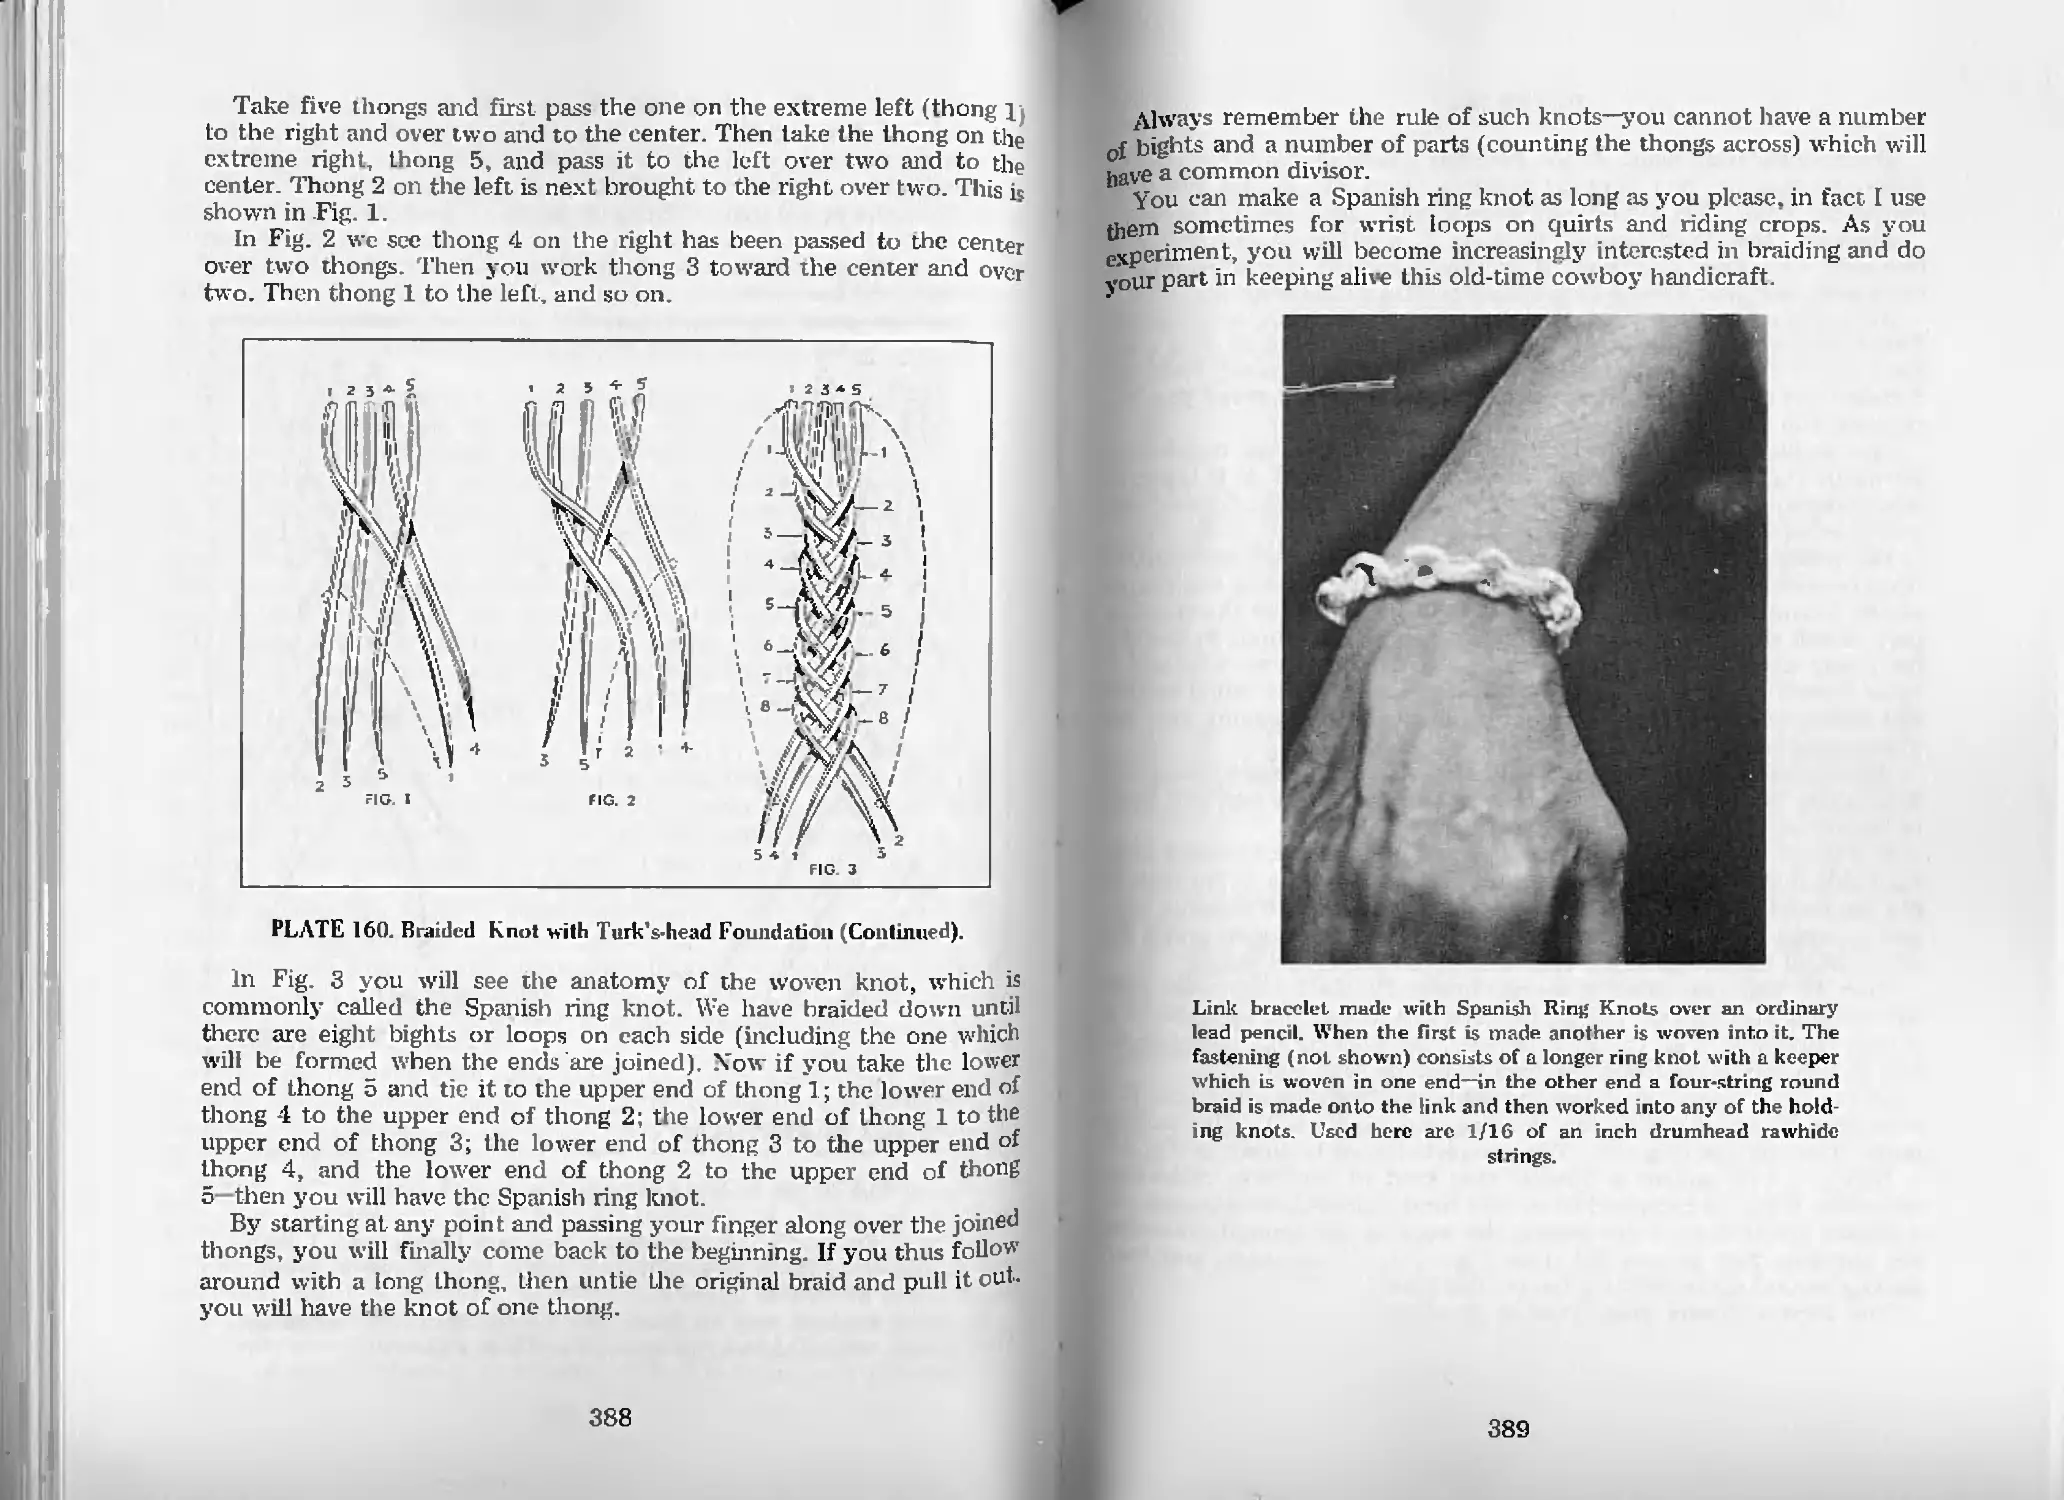
Braided Knot with Turk’s-head Foundation (cont.)—Pl. 160 388
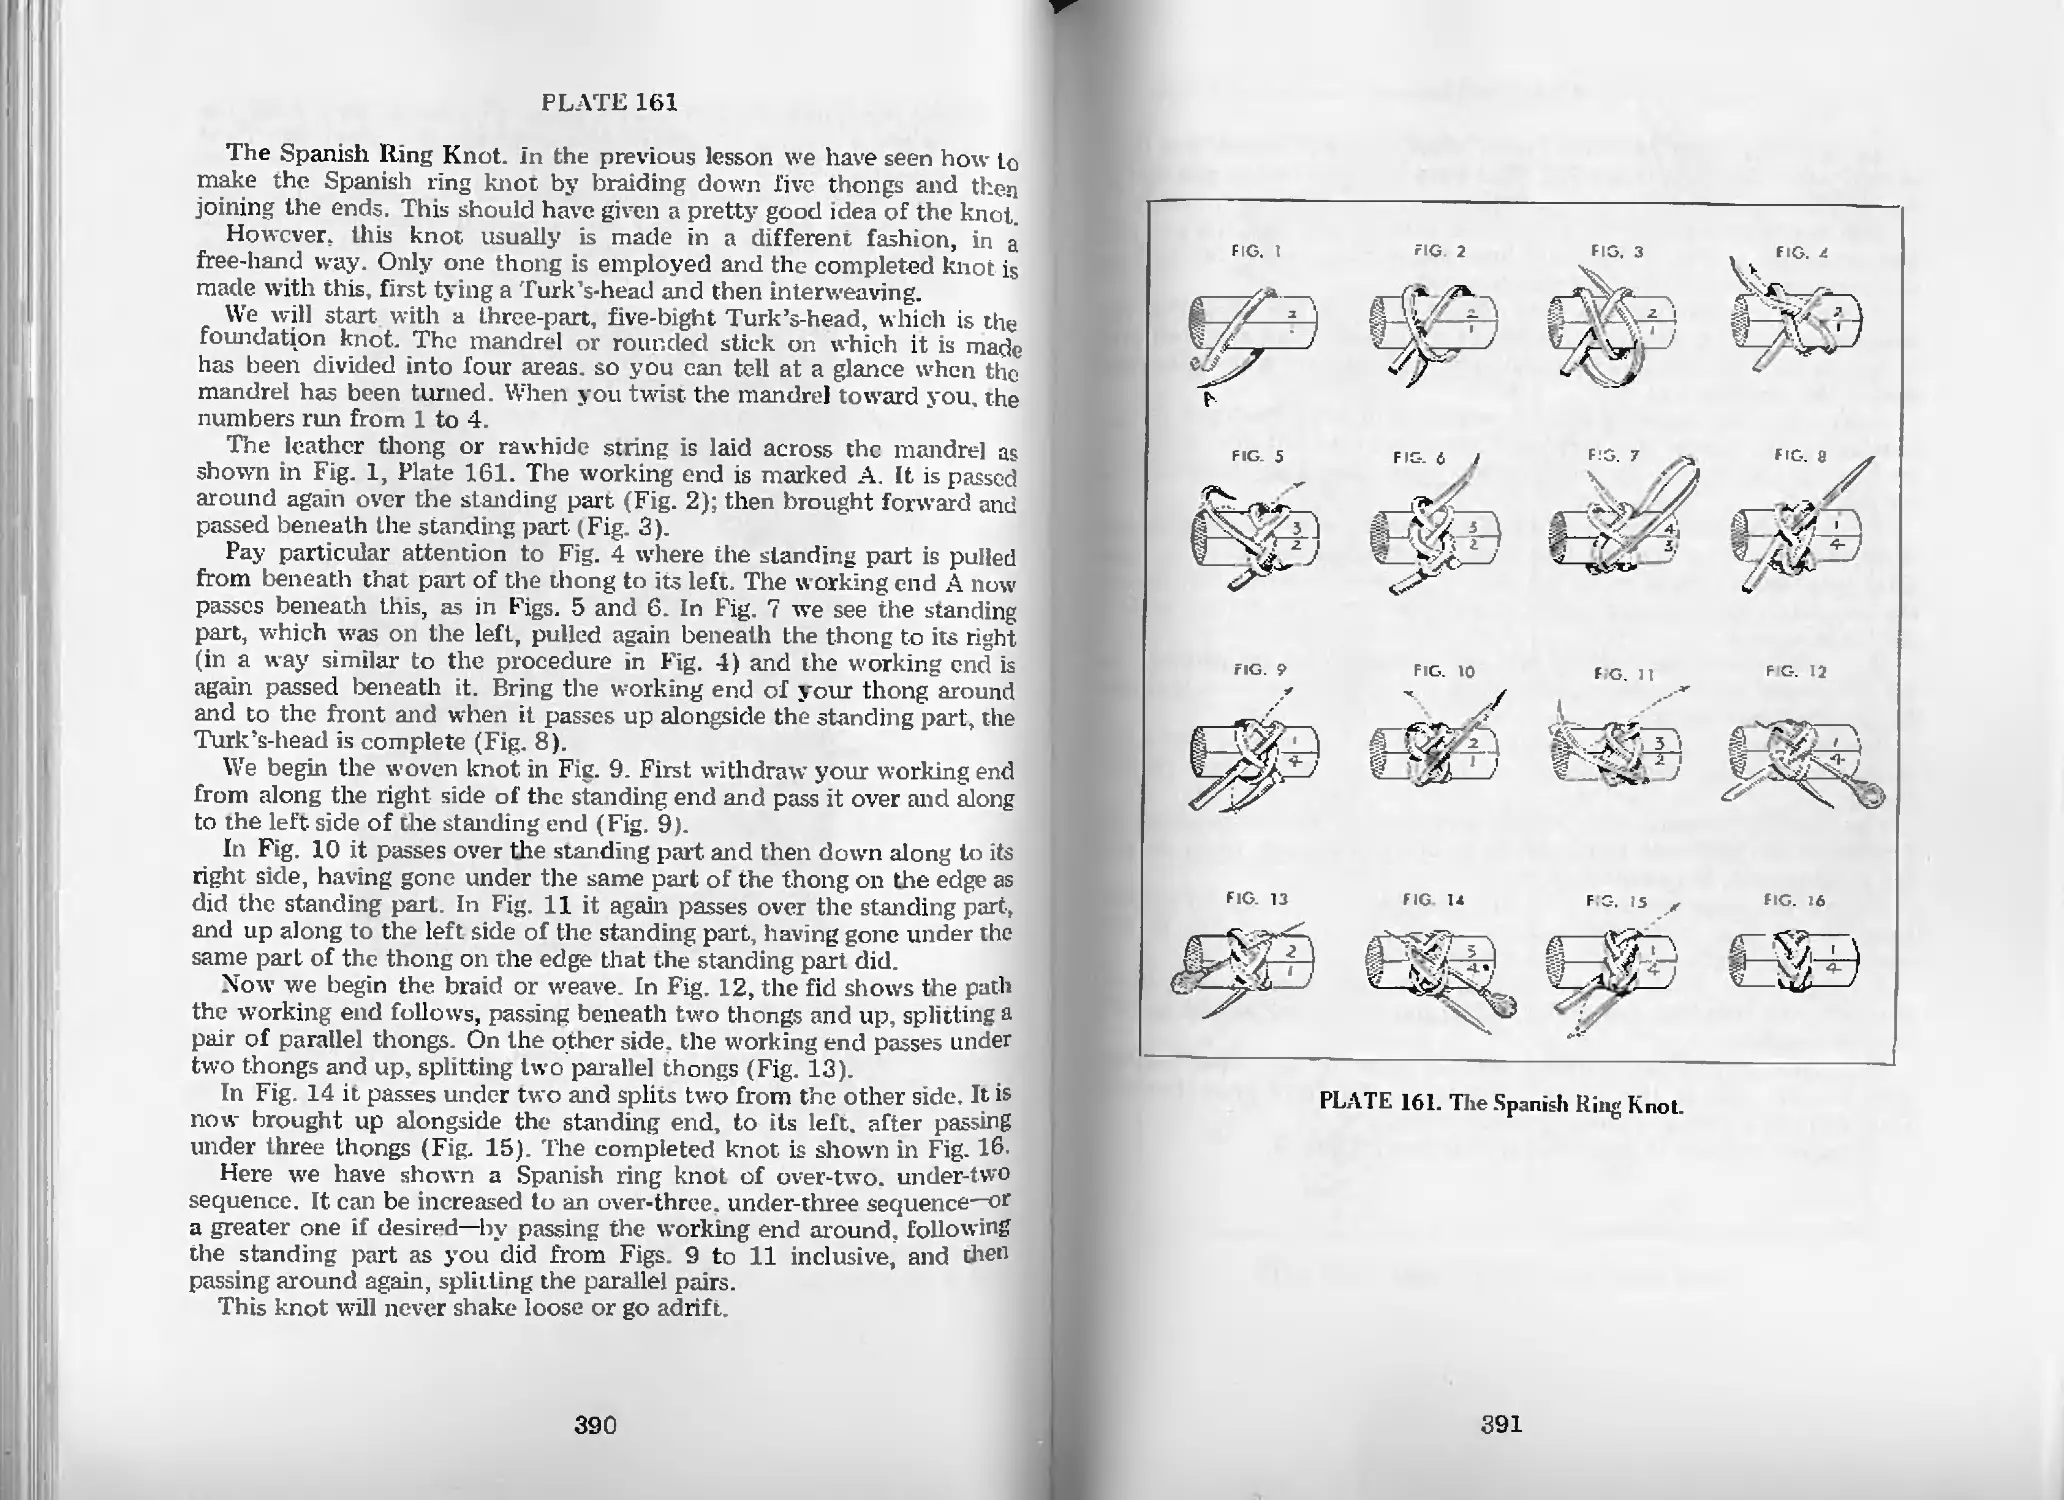
The Spanish Ring Knot—Pl. 161 390
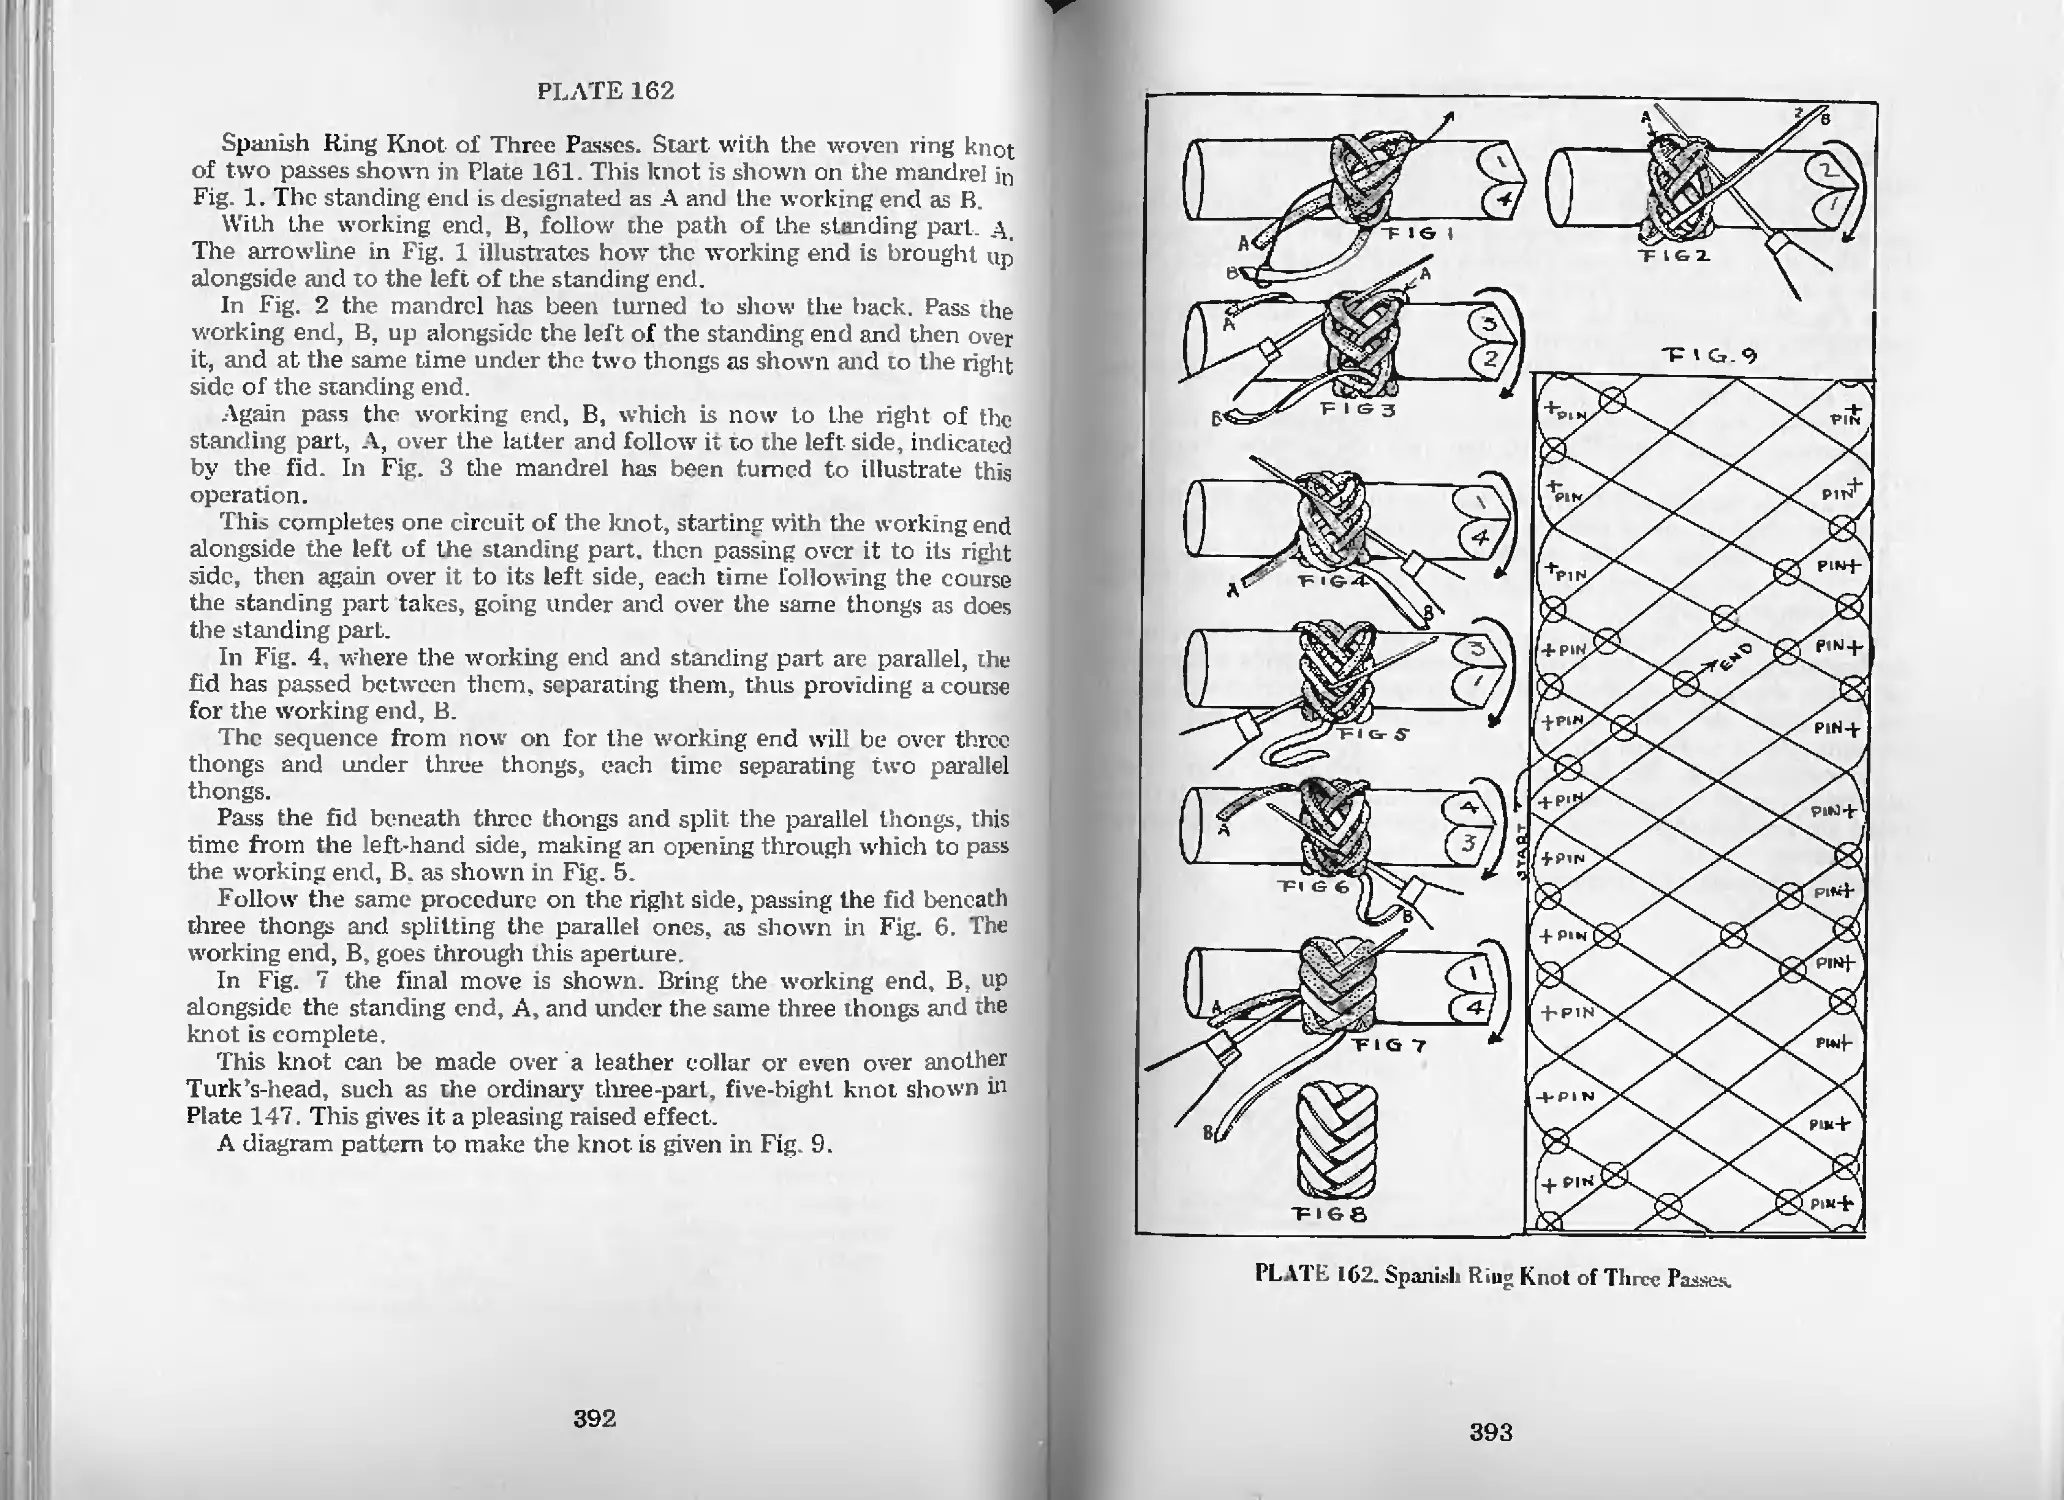
Spanish Ring Knot of Three Passes—Pl. 162 392
Ring Knot of Four Passes—Pl. 163 394
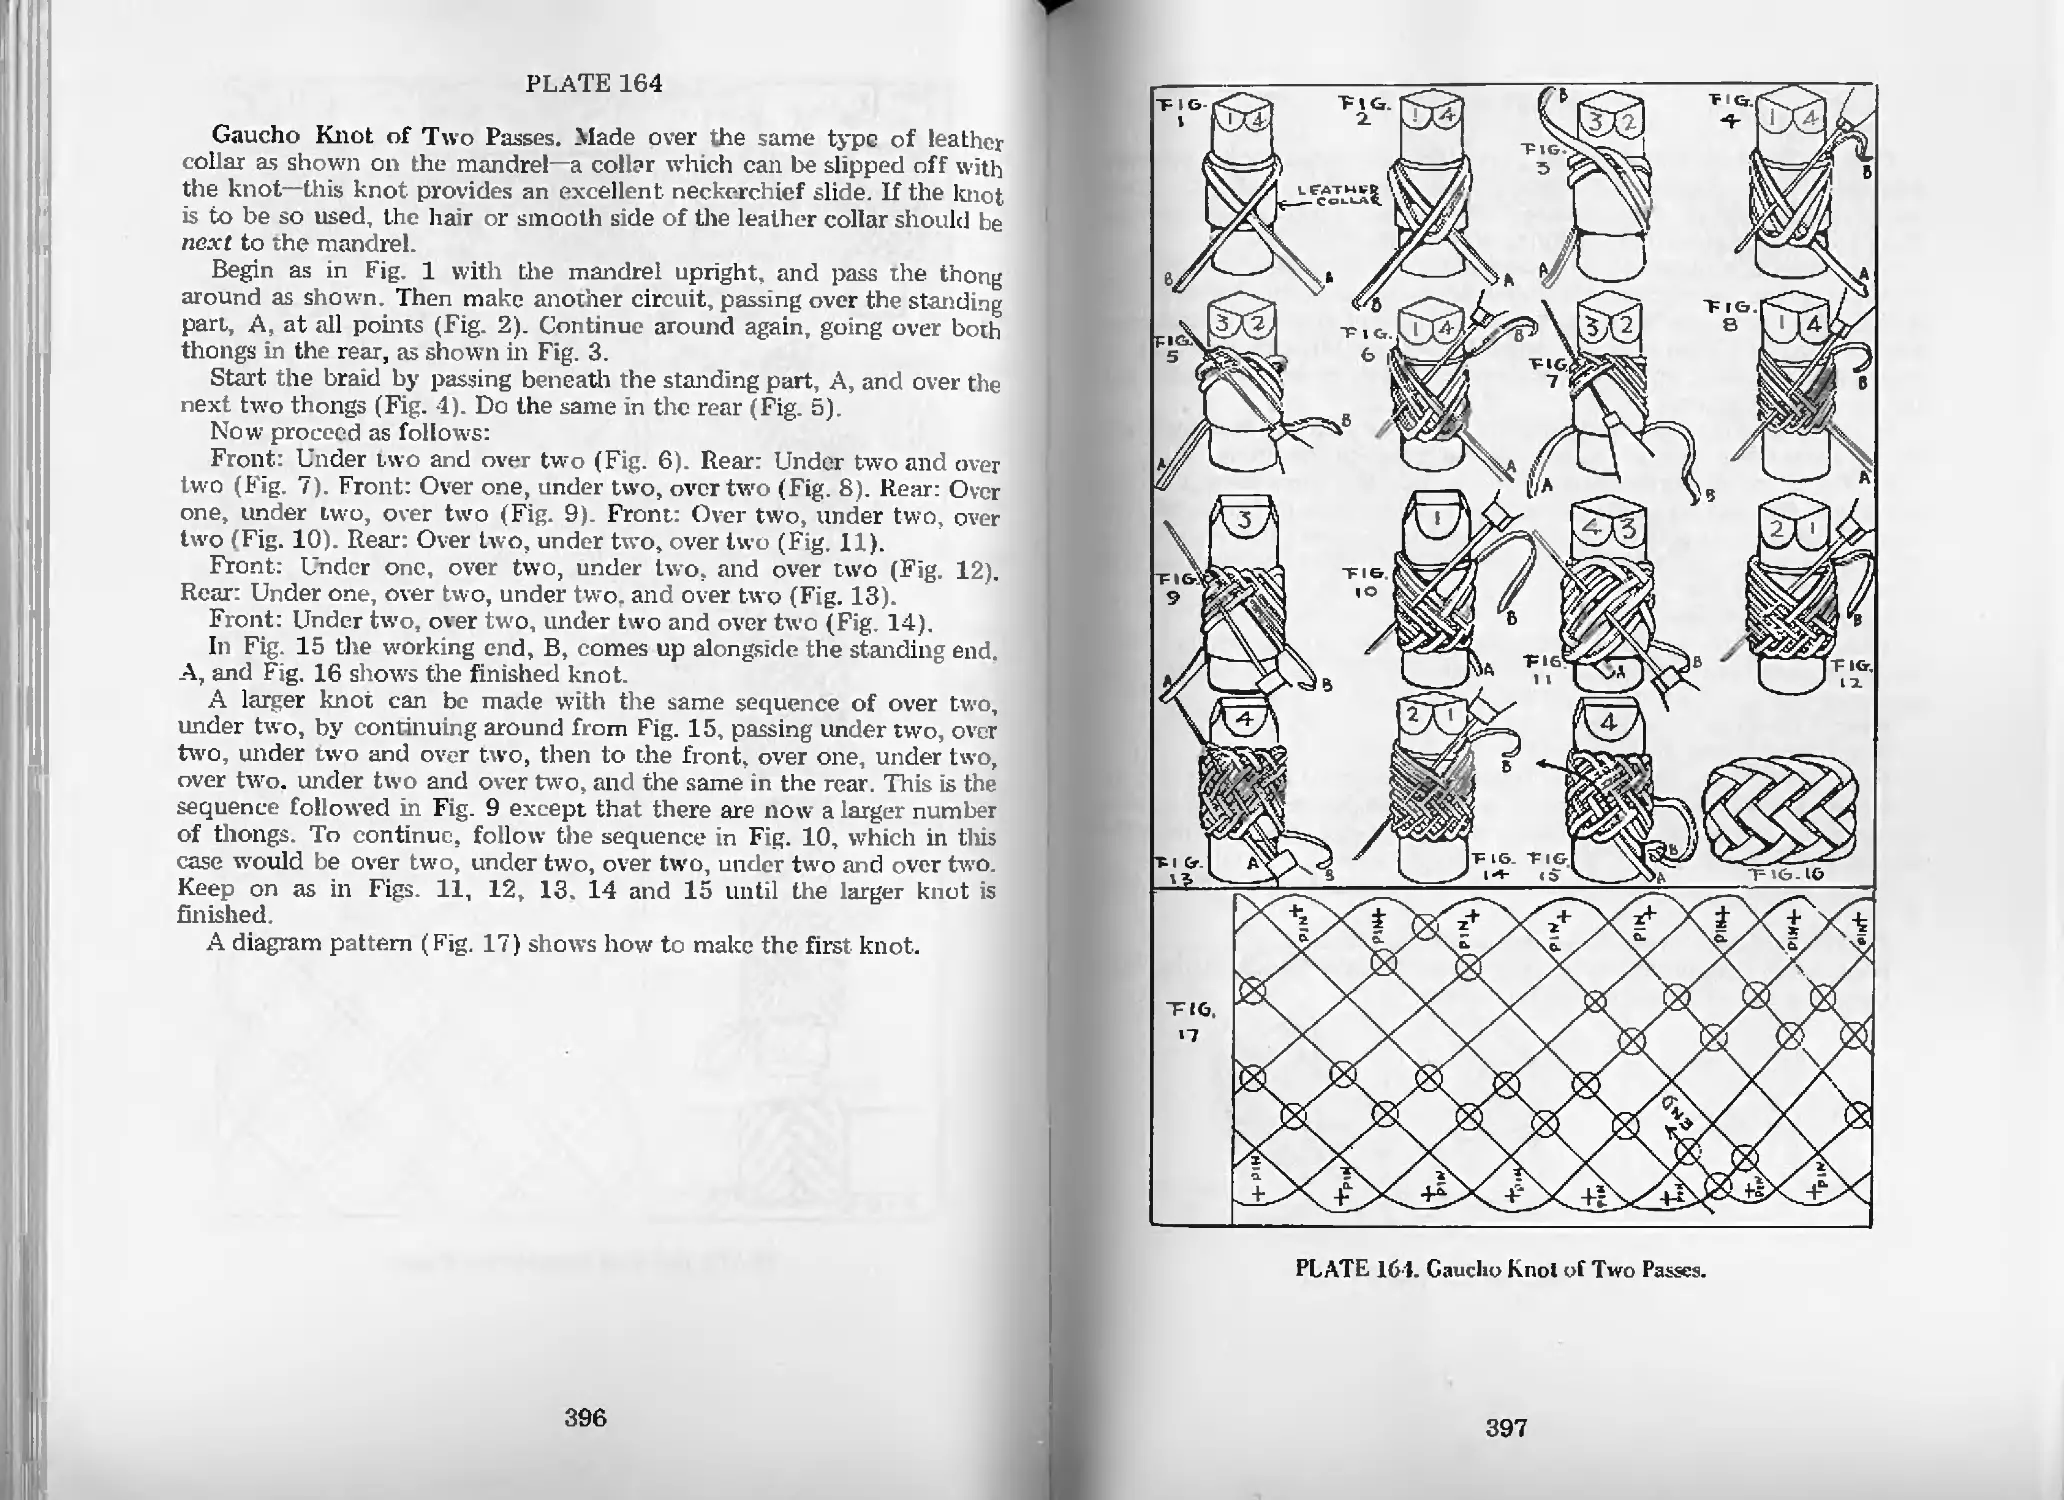
Gaucho Knot of Two Passes—Pl. 164 396
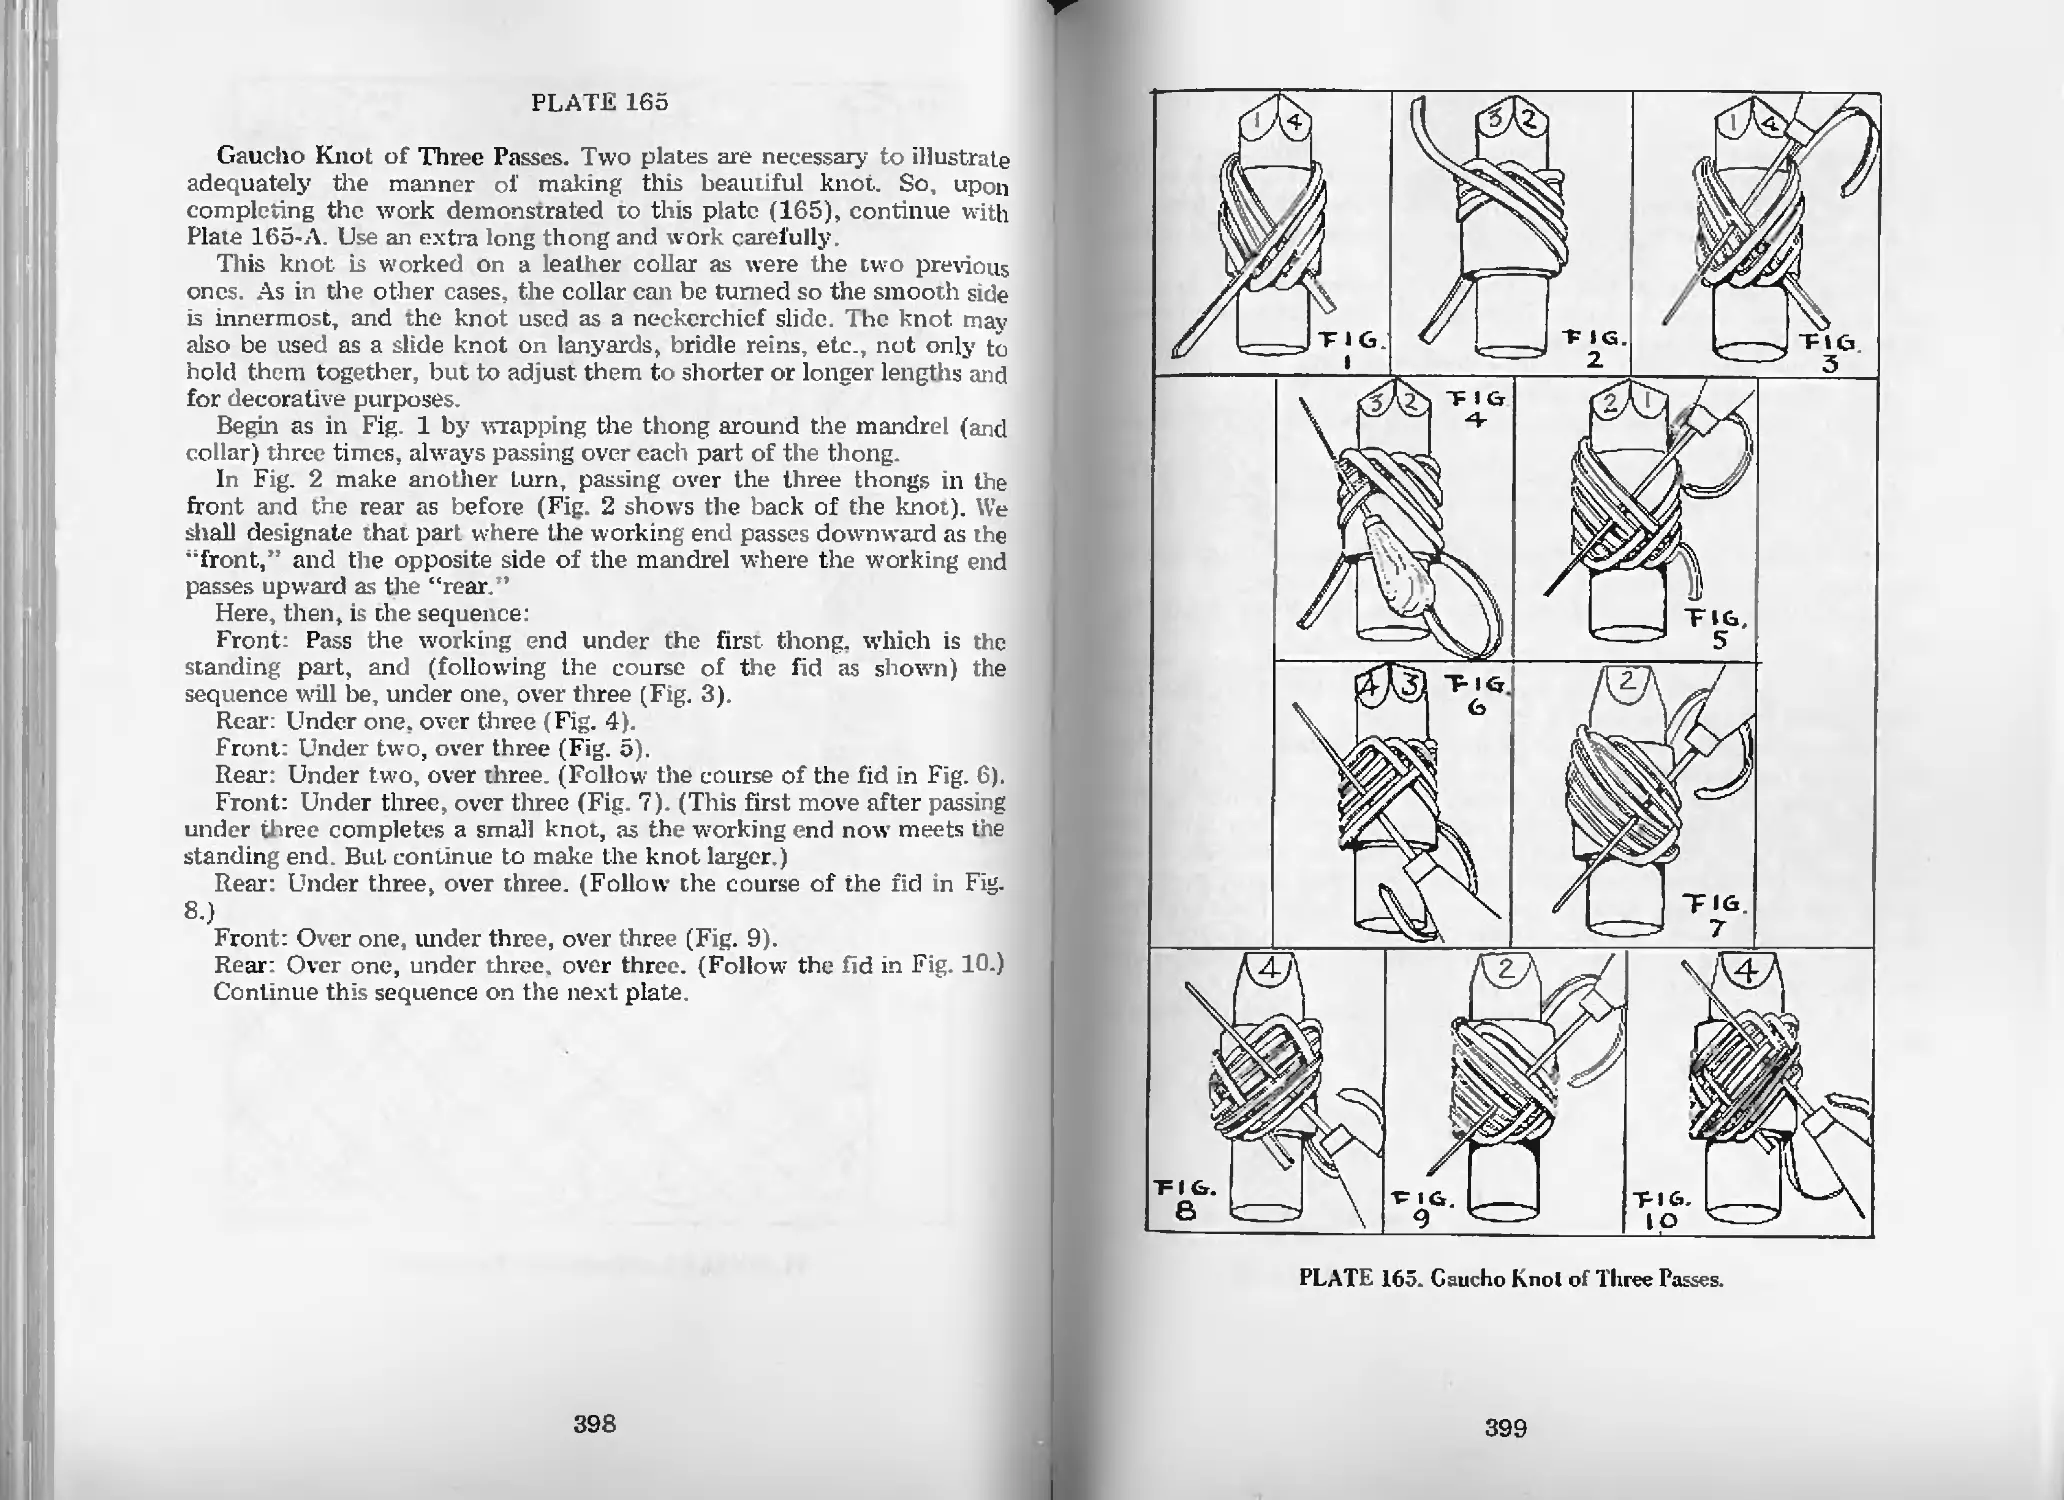
Gaucho Knot of Three Passes—Pl. 165 398
Gaucho Knot of Three Passes (Cont.)—Pl. 165 400
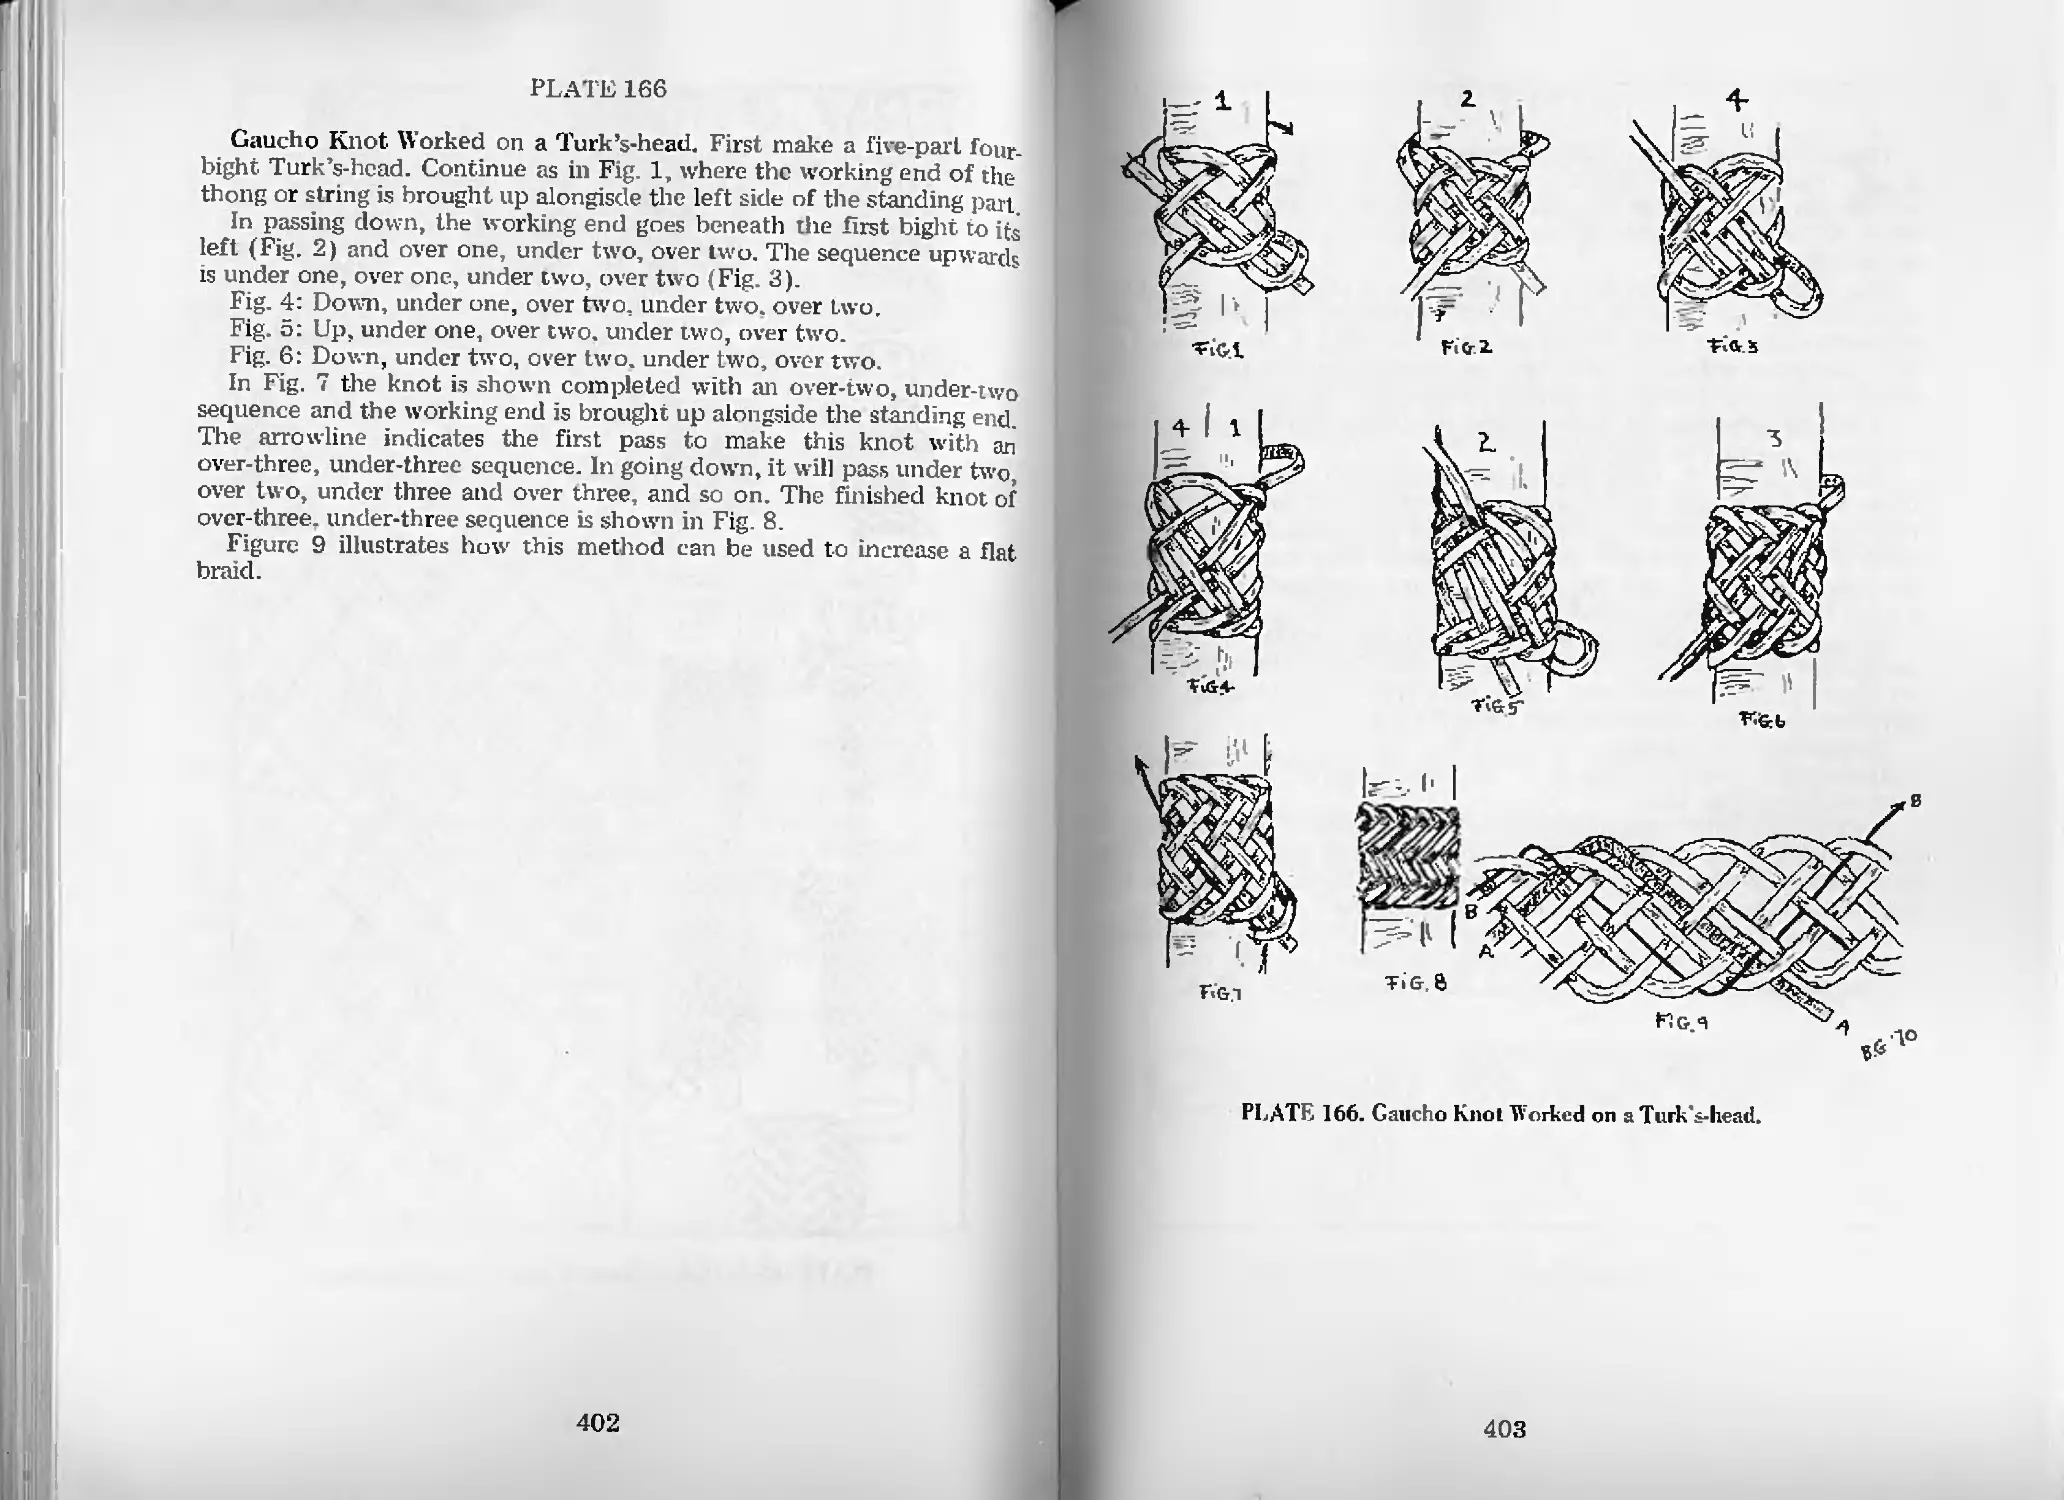
Gaucho Knot Worked on a Turk’s-head—Pl. 166 402
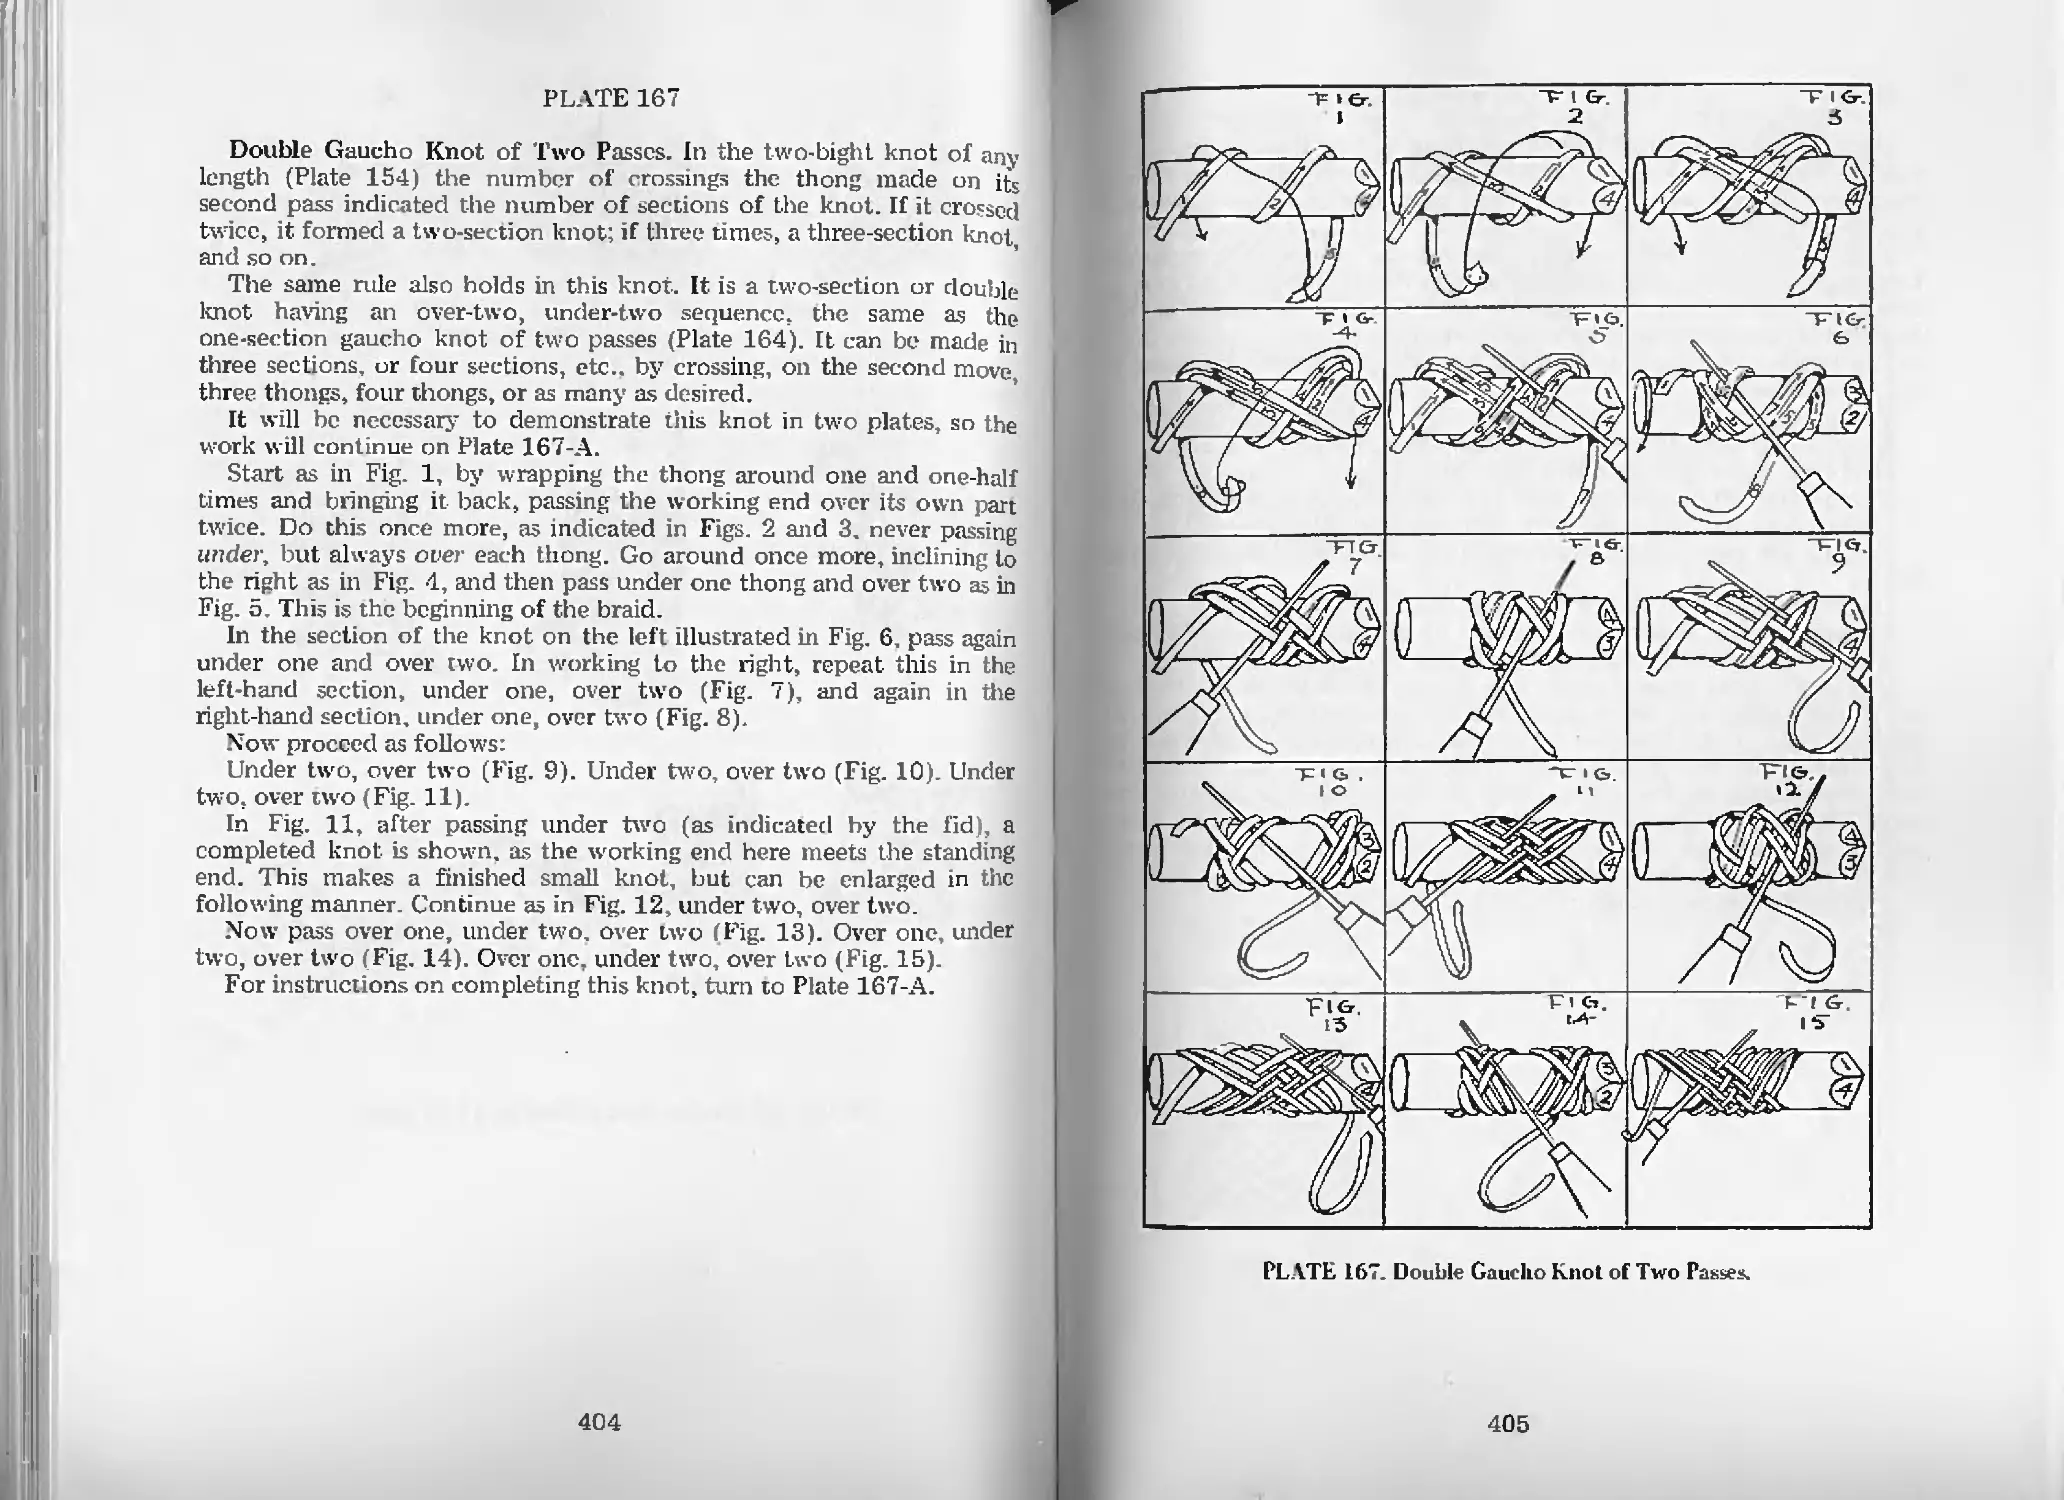
Double Gaucho Knot of Two Passes—Pl. 167 401
Double Gaucho Knot of Two Passes (Cont.)—Pl. 167A 406
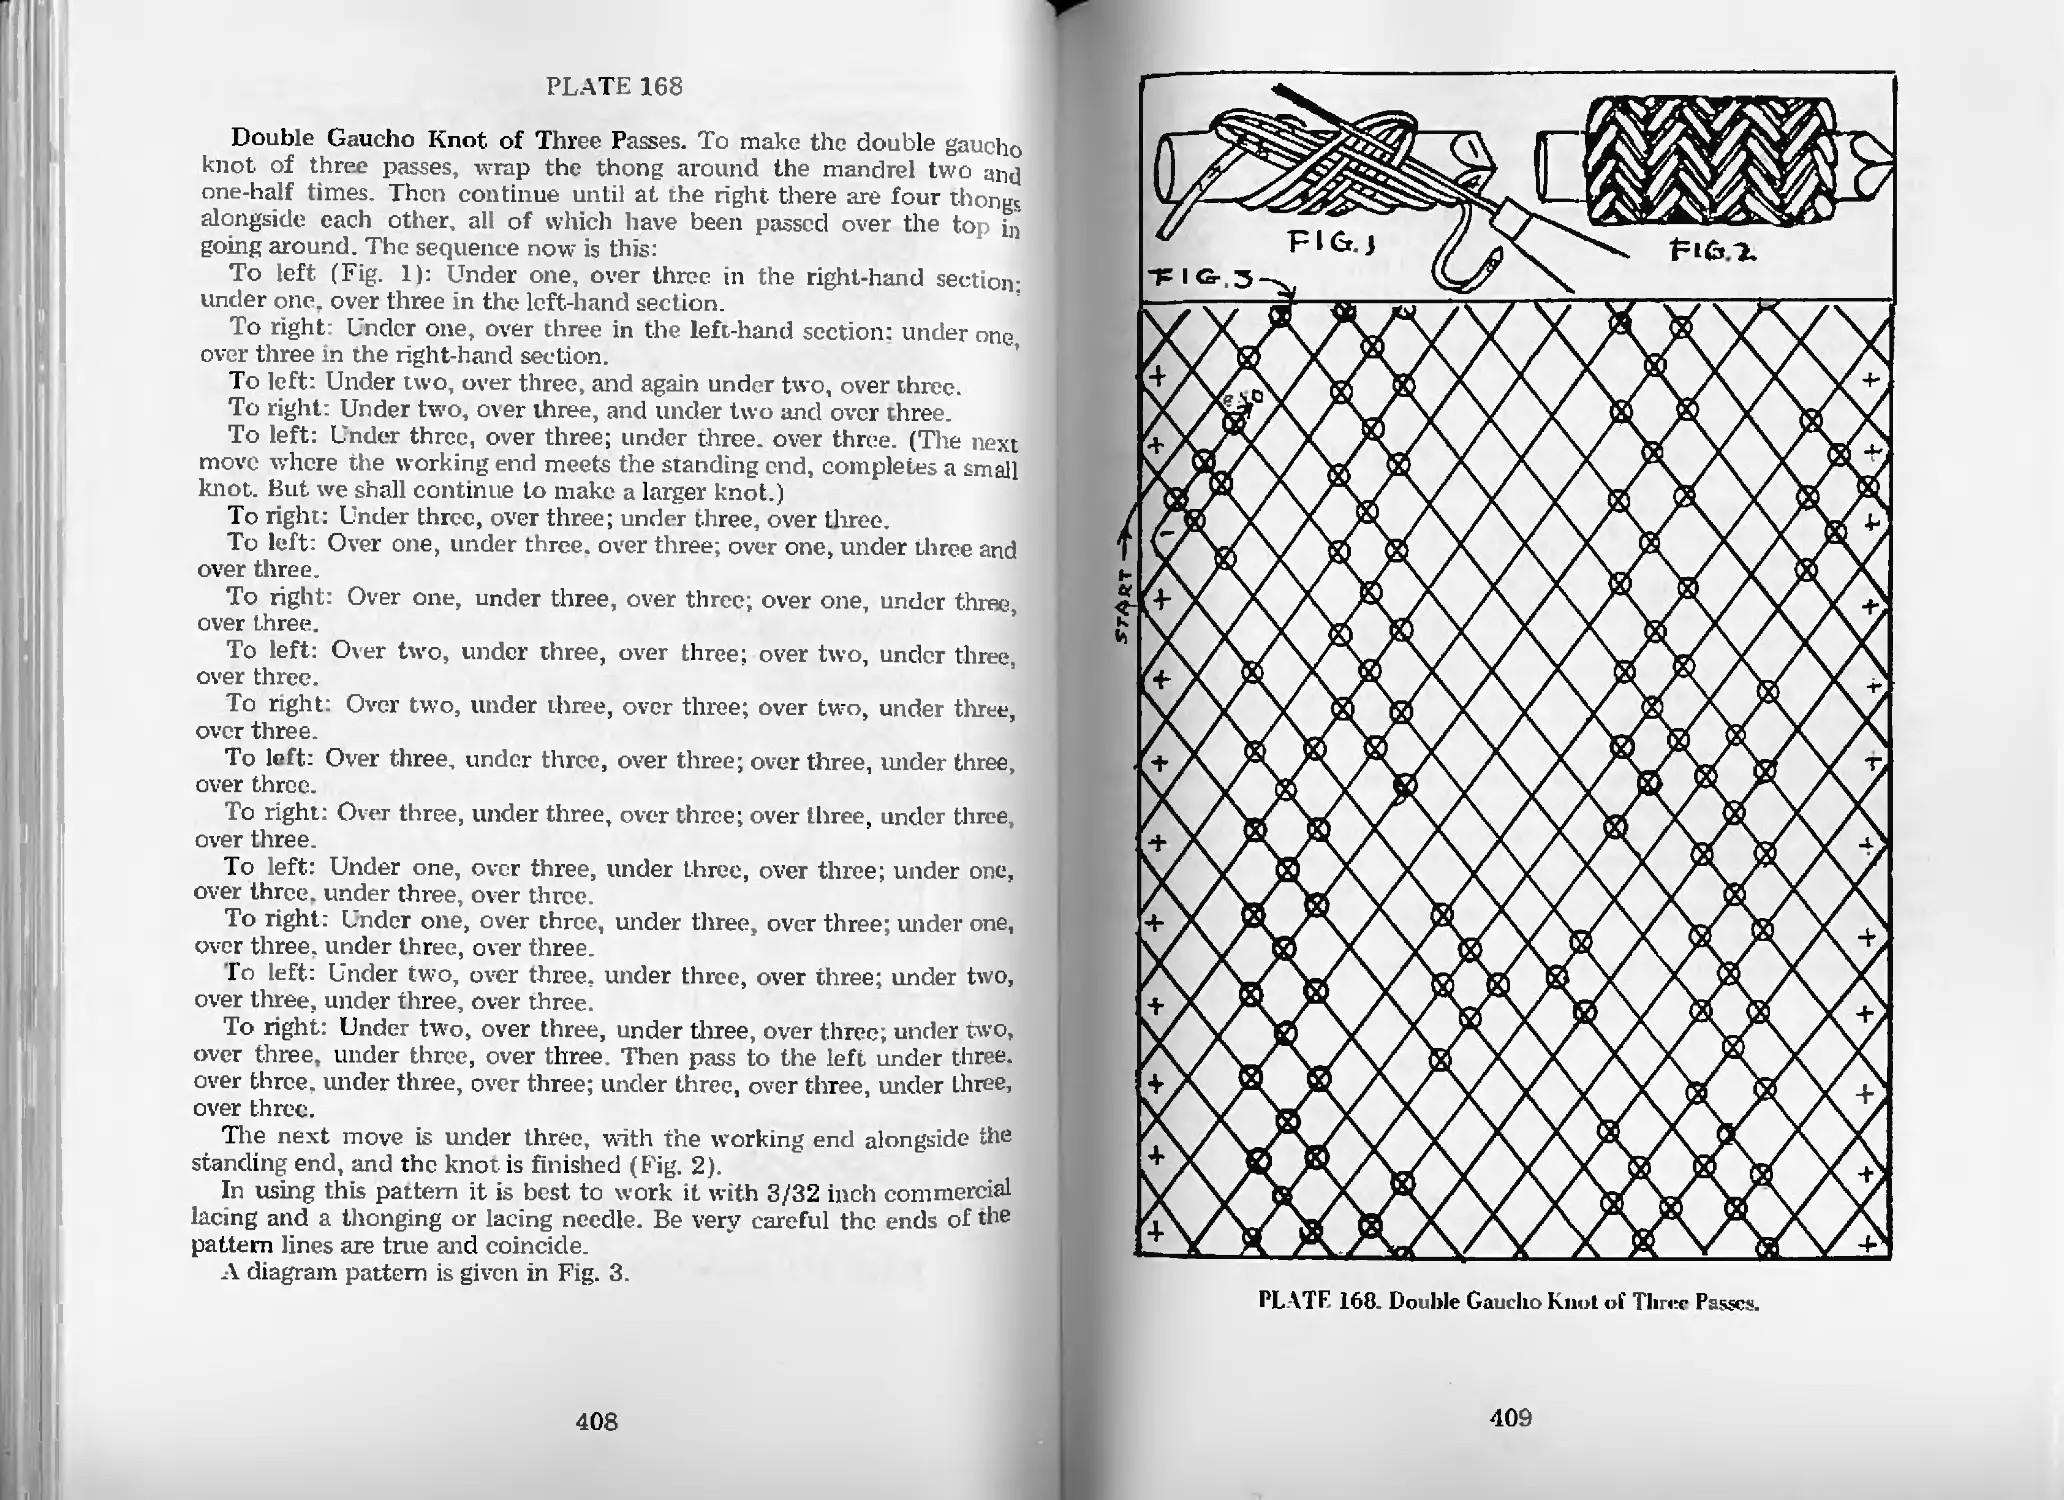
Double Gaucho Knot of Three Passes—Pl. 168 408
Headhunter’s Knot of Two Passes—Pl. 169 410
Headhunter’s Knot of Three Passes—Pl. 170 412
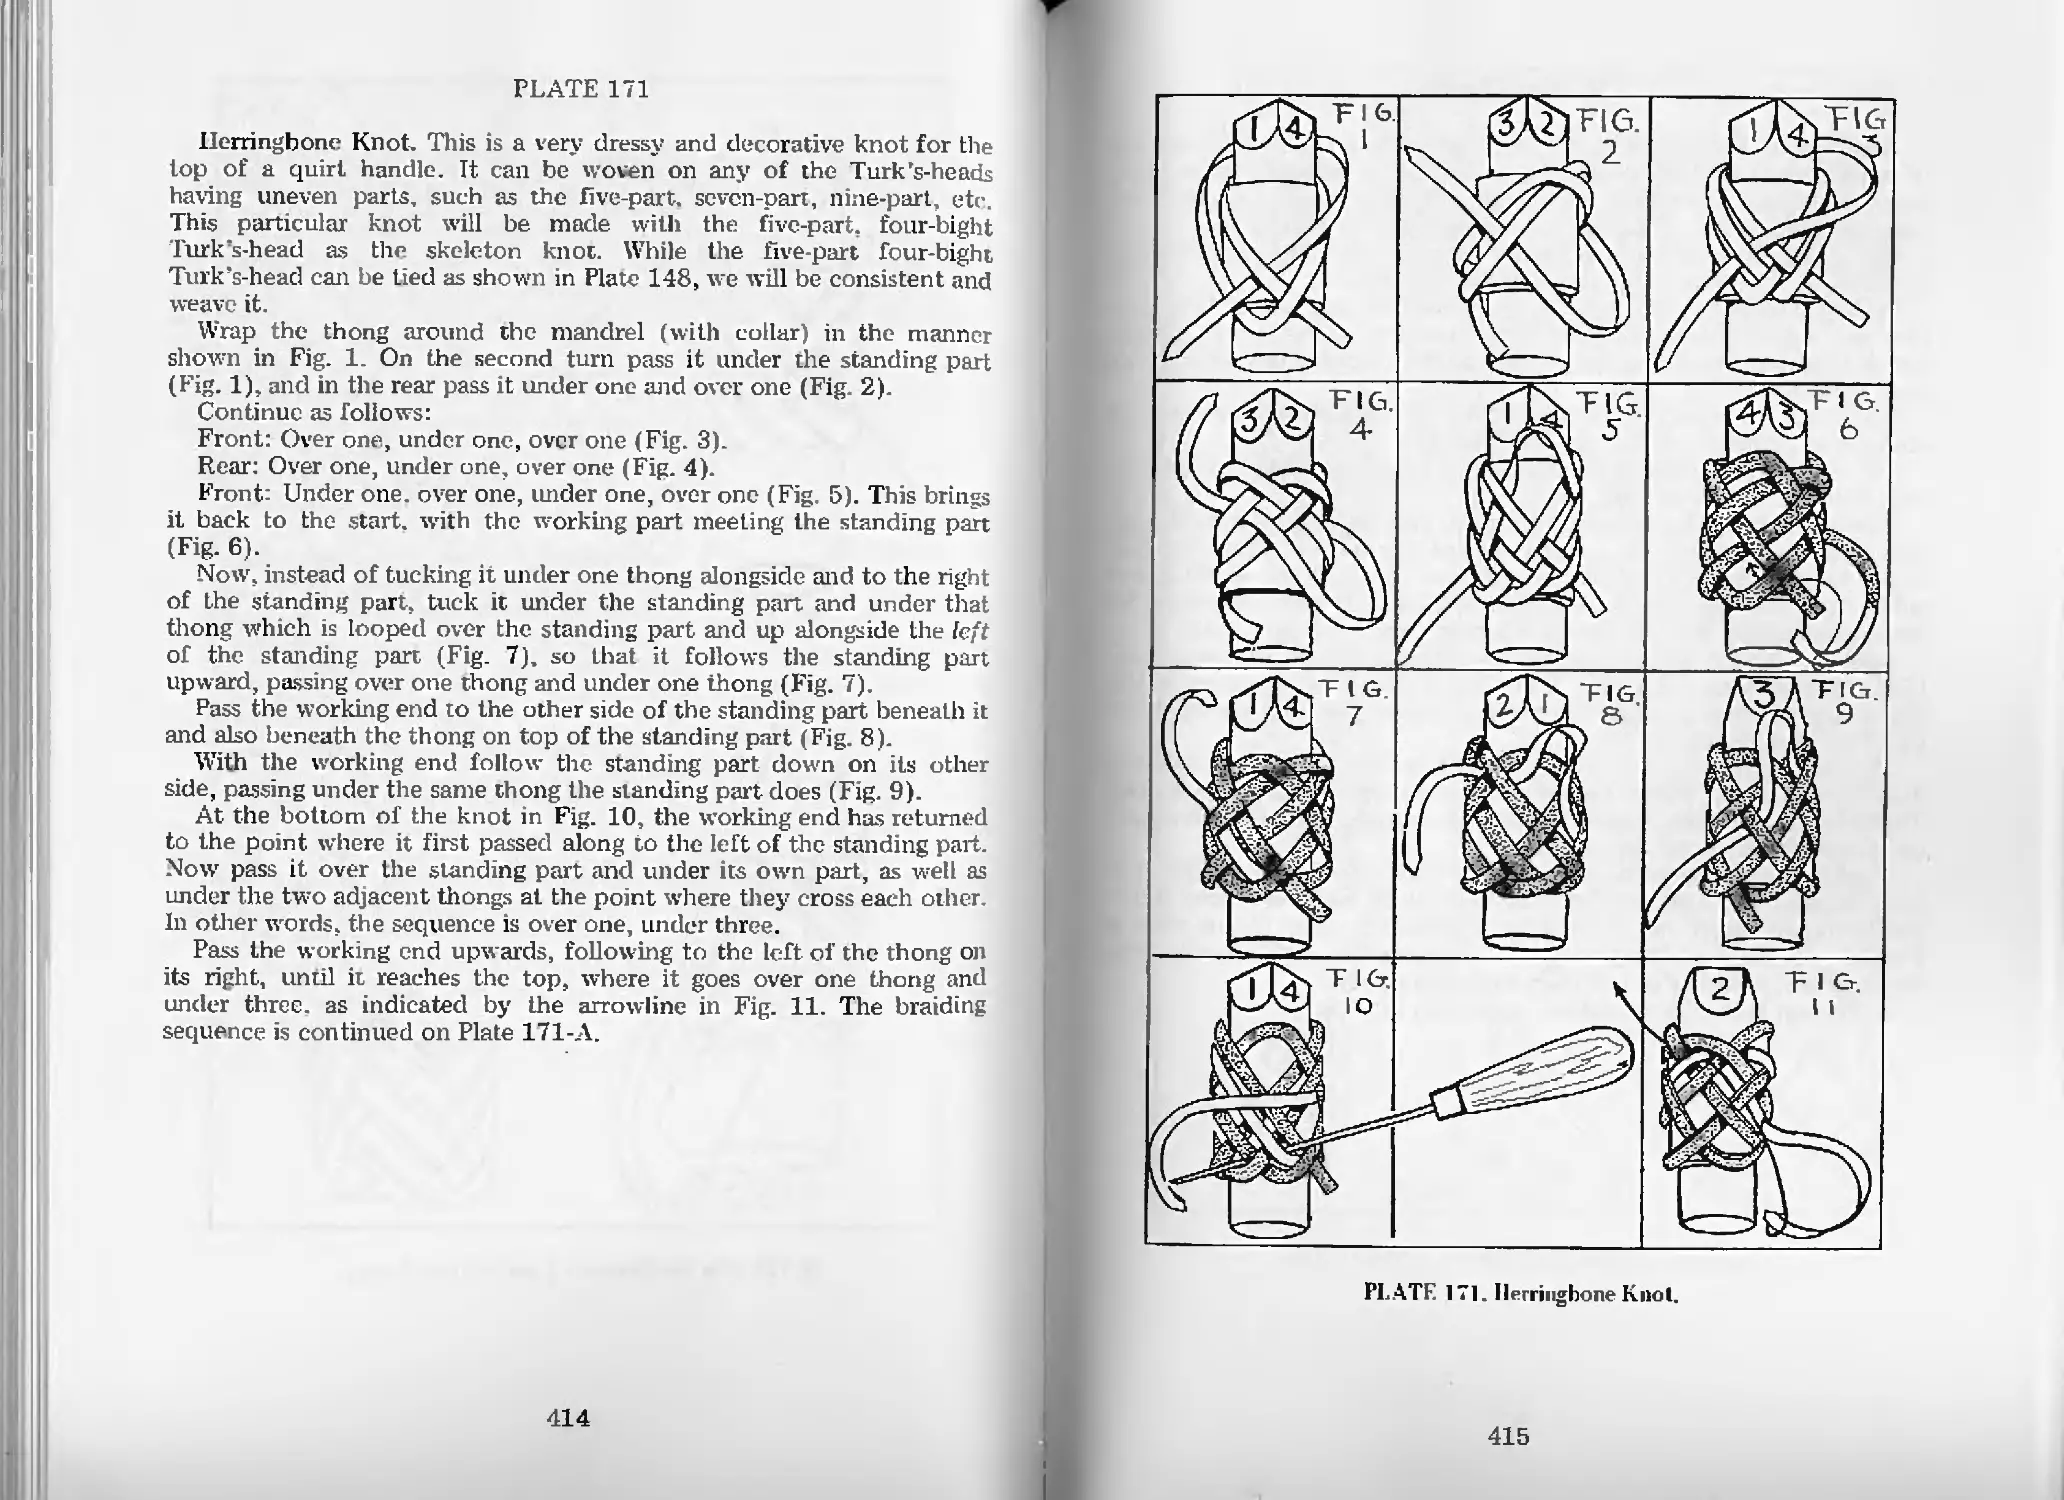
Herringbone Knot—Pl. 171 414
Herringbone Knot (Cont.)—Pl. 171A 416
The Bruce Knot—Pl. 172 418
The Catharine Knot—Pl 172 418
Pineapple or Gaucho Button Knot—Pl. 173 420
Pineapple or Gaucho Button Knot (Cont.)—Pl. 173A 422
xiv
Braided Knots (cont.)
The Flores Button Knot—Pl. 174 424
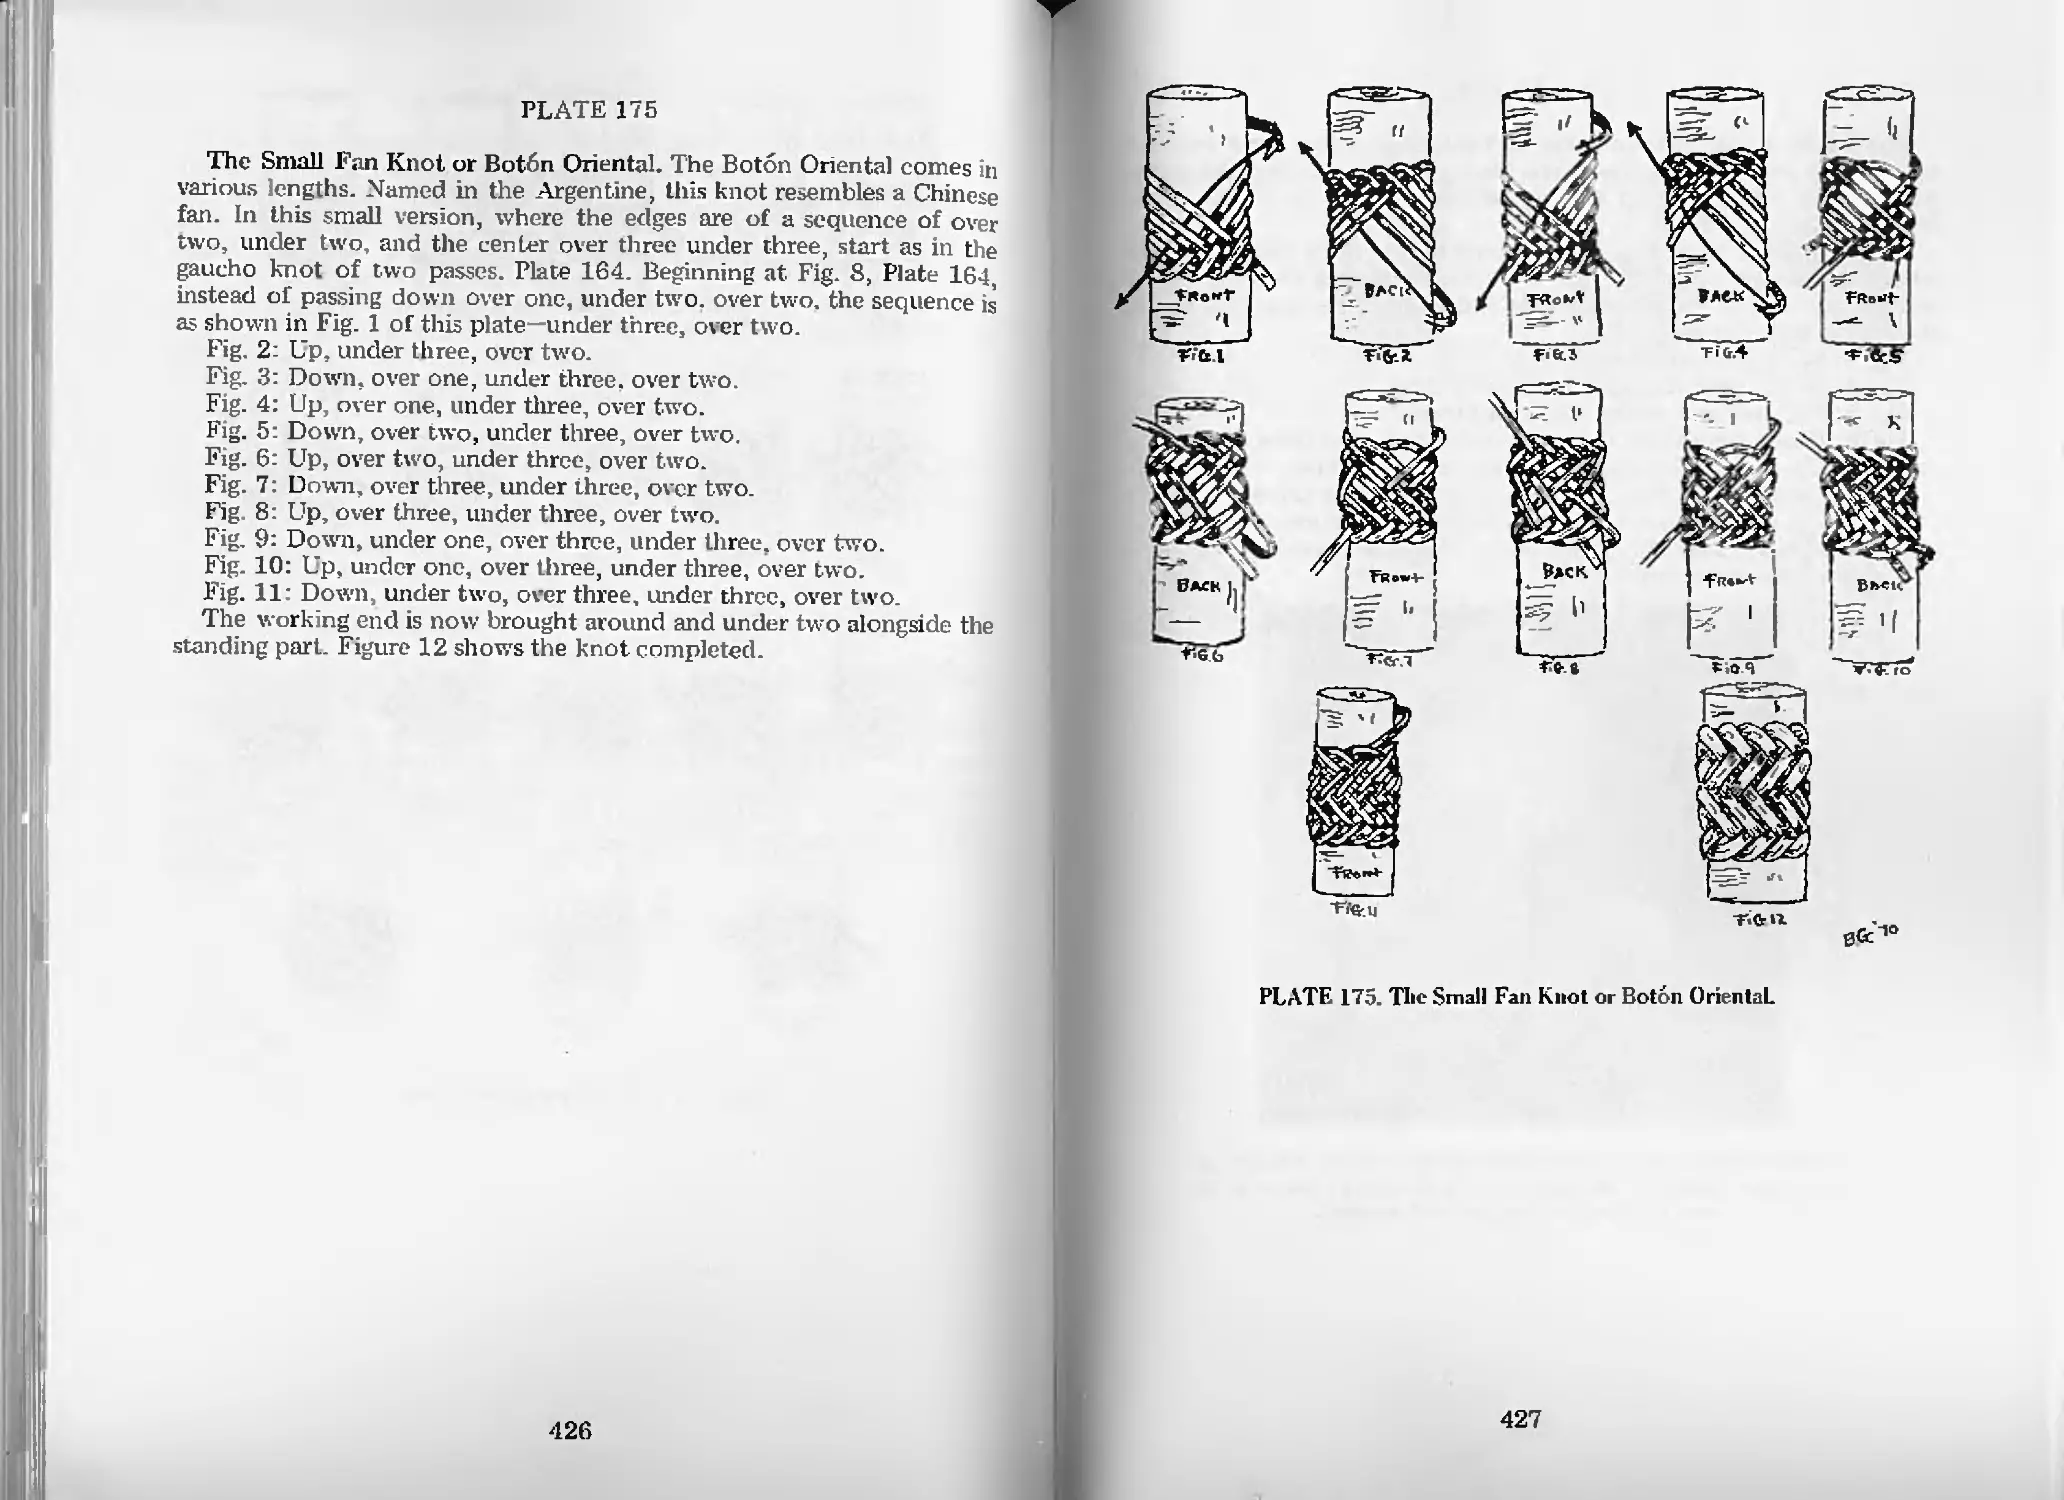
The Small Fan Knot or Boton Oriental—Pl. 175 426
The Ginfer Knot—Pl 176 428
Three-Section Fan Knot or Boton Oriental—Pl. 177 430
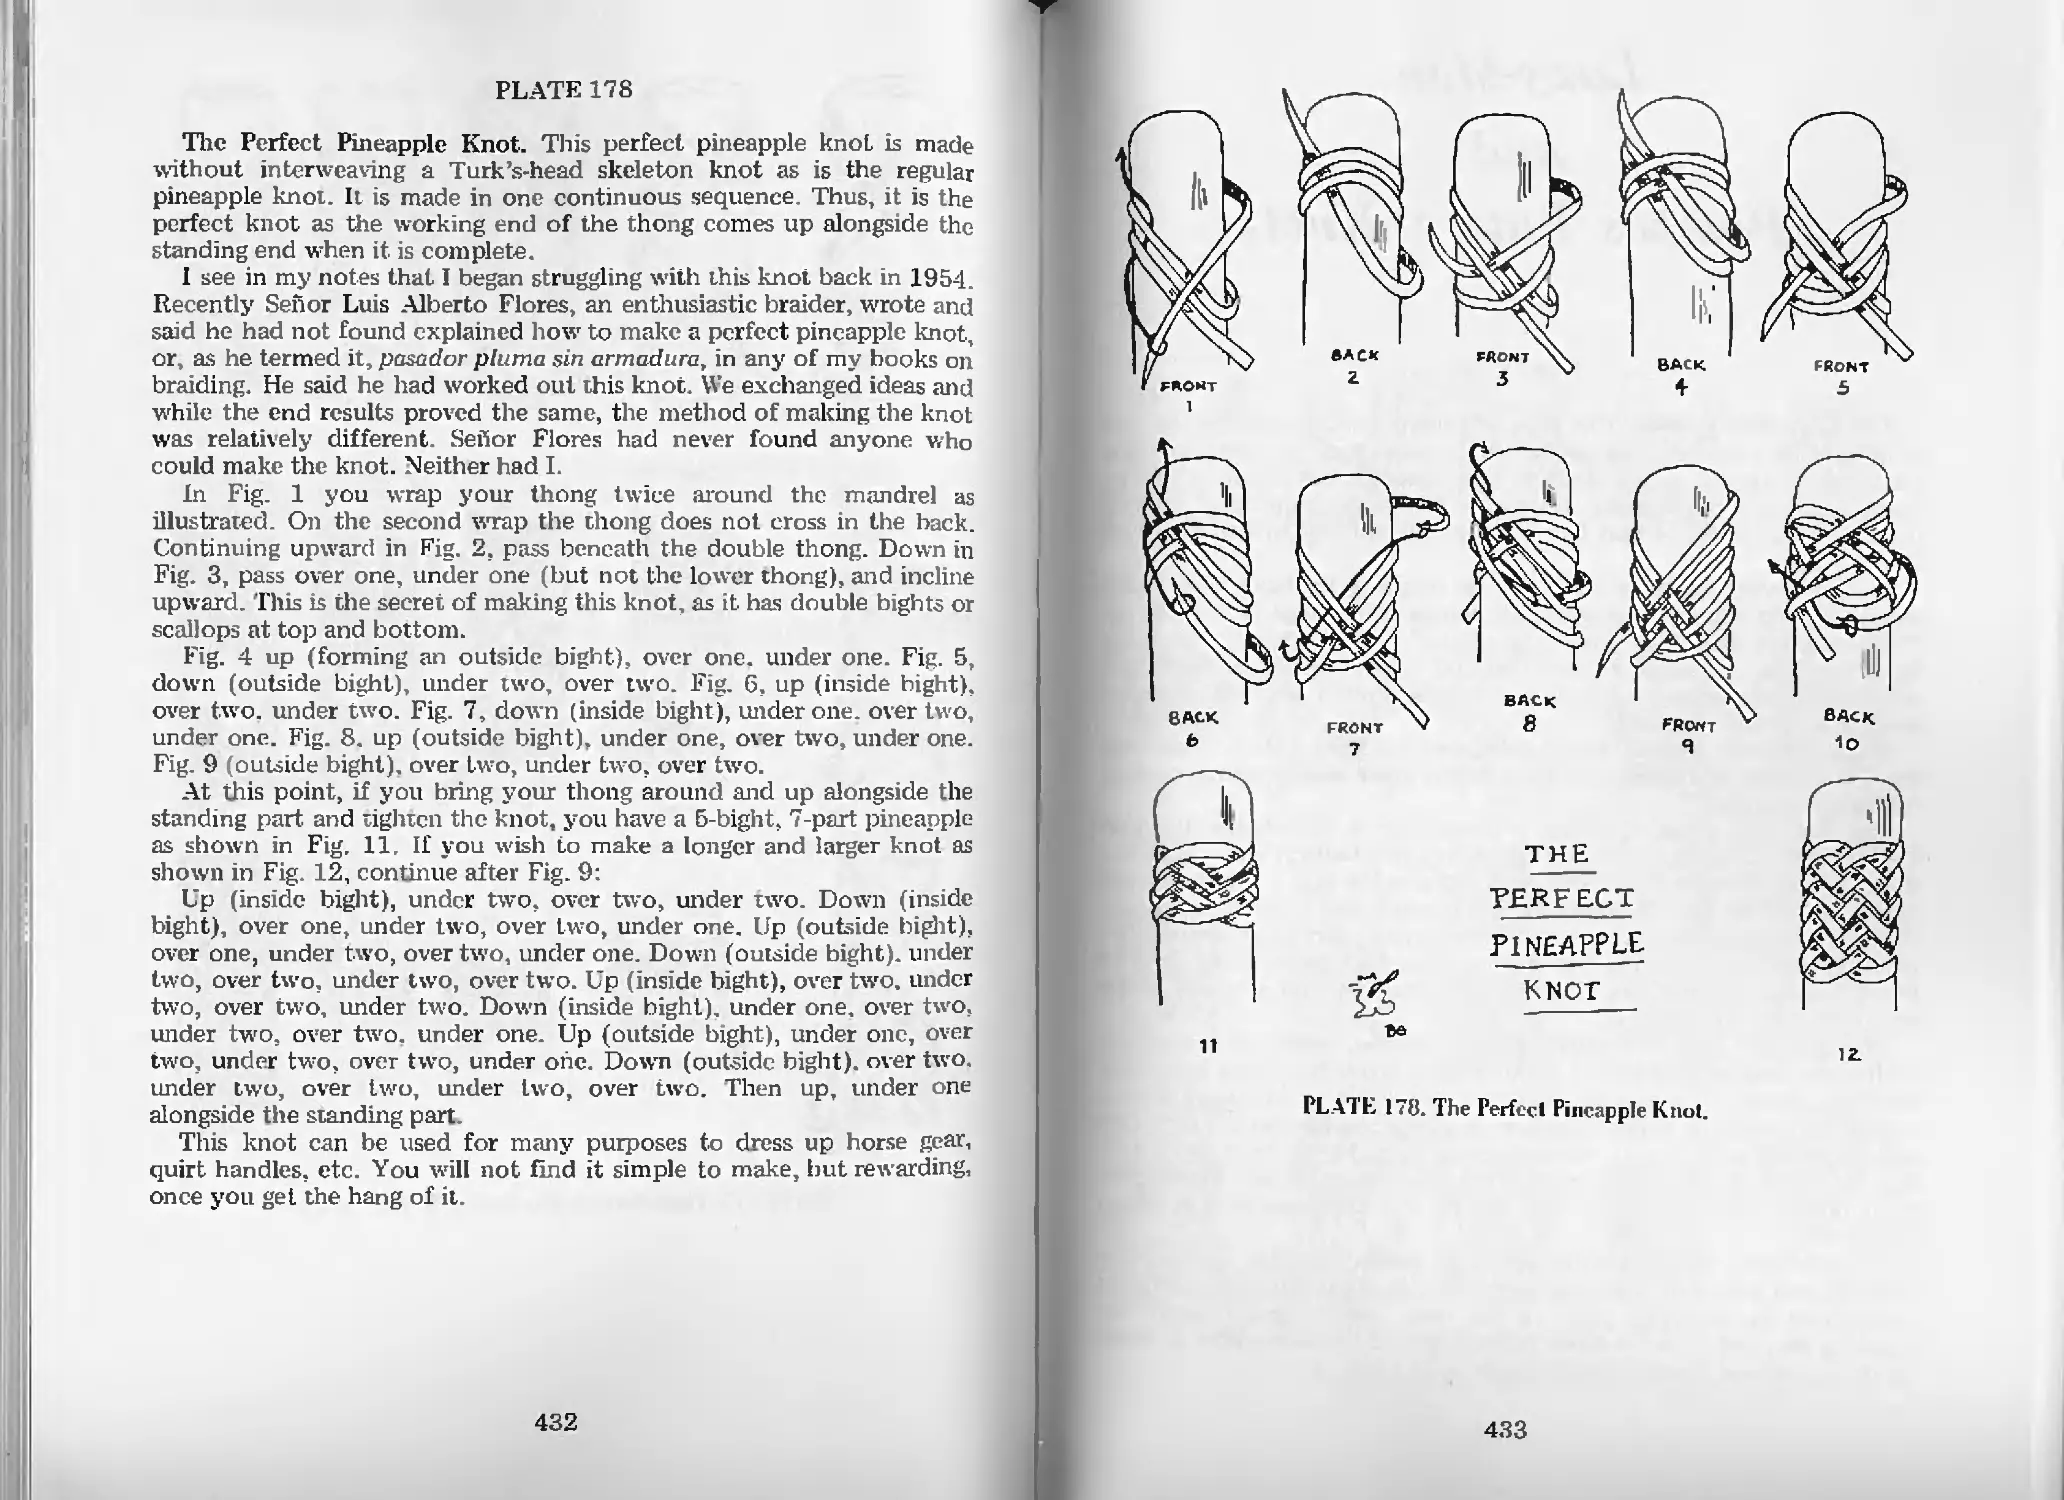
The Perfect Pineapple Knot—Pl. 178 432
LazvMan Button and Pampas Button Knots
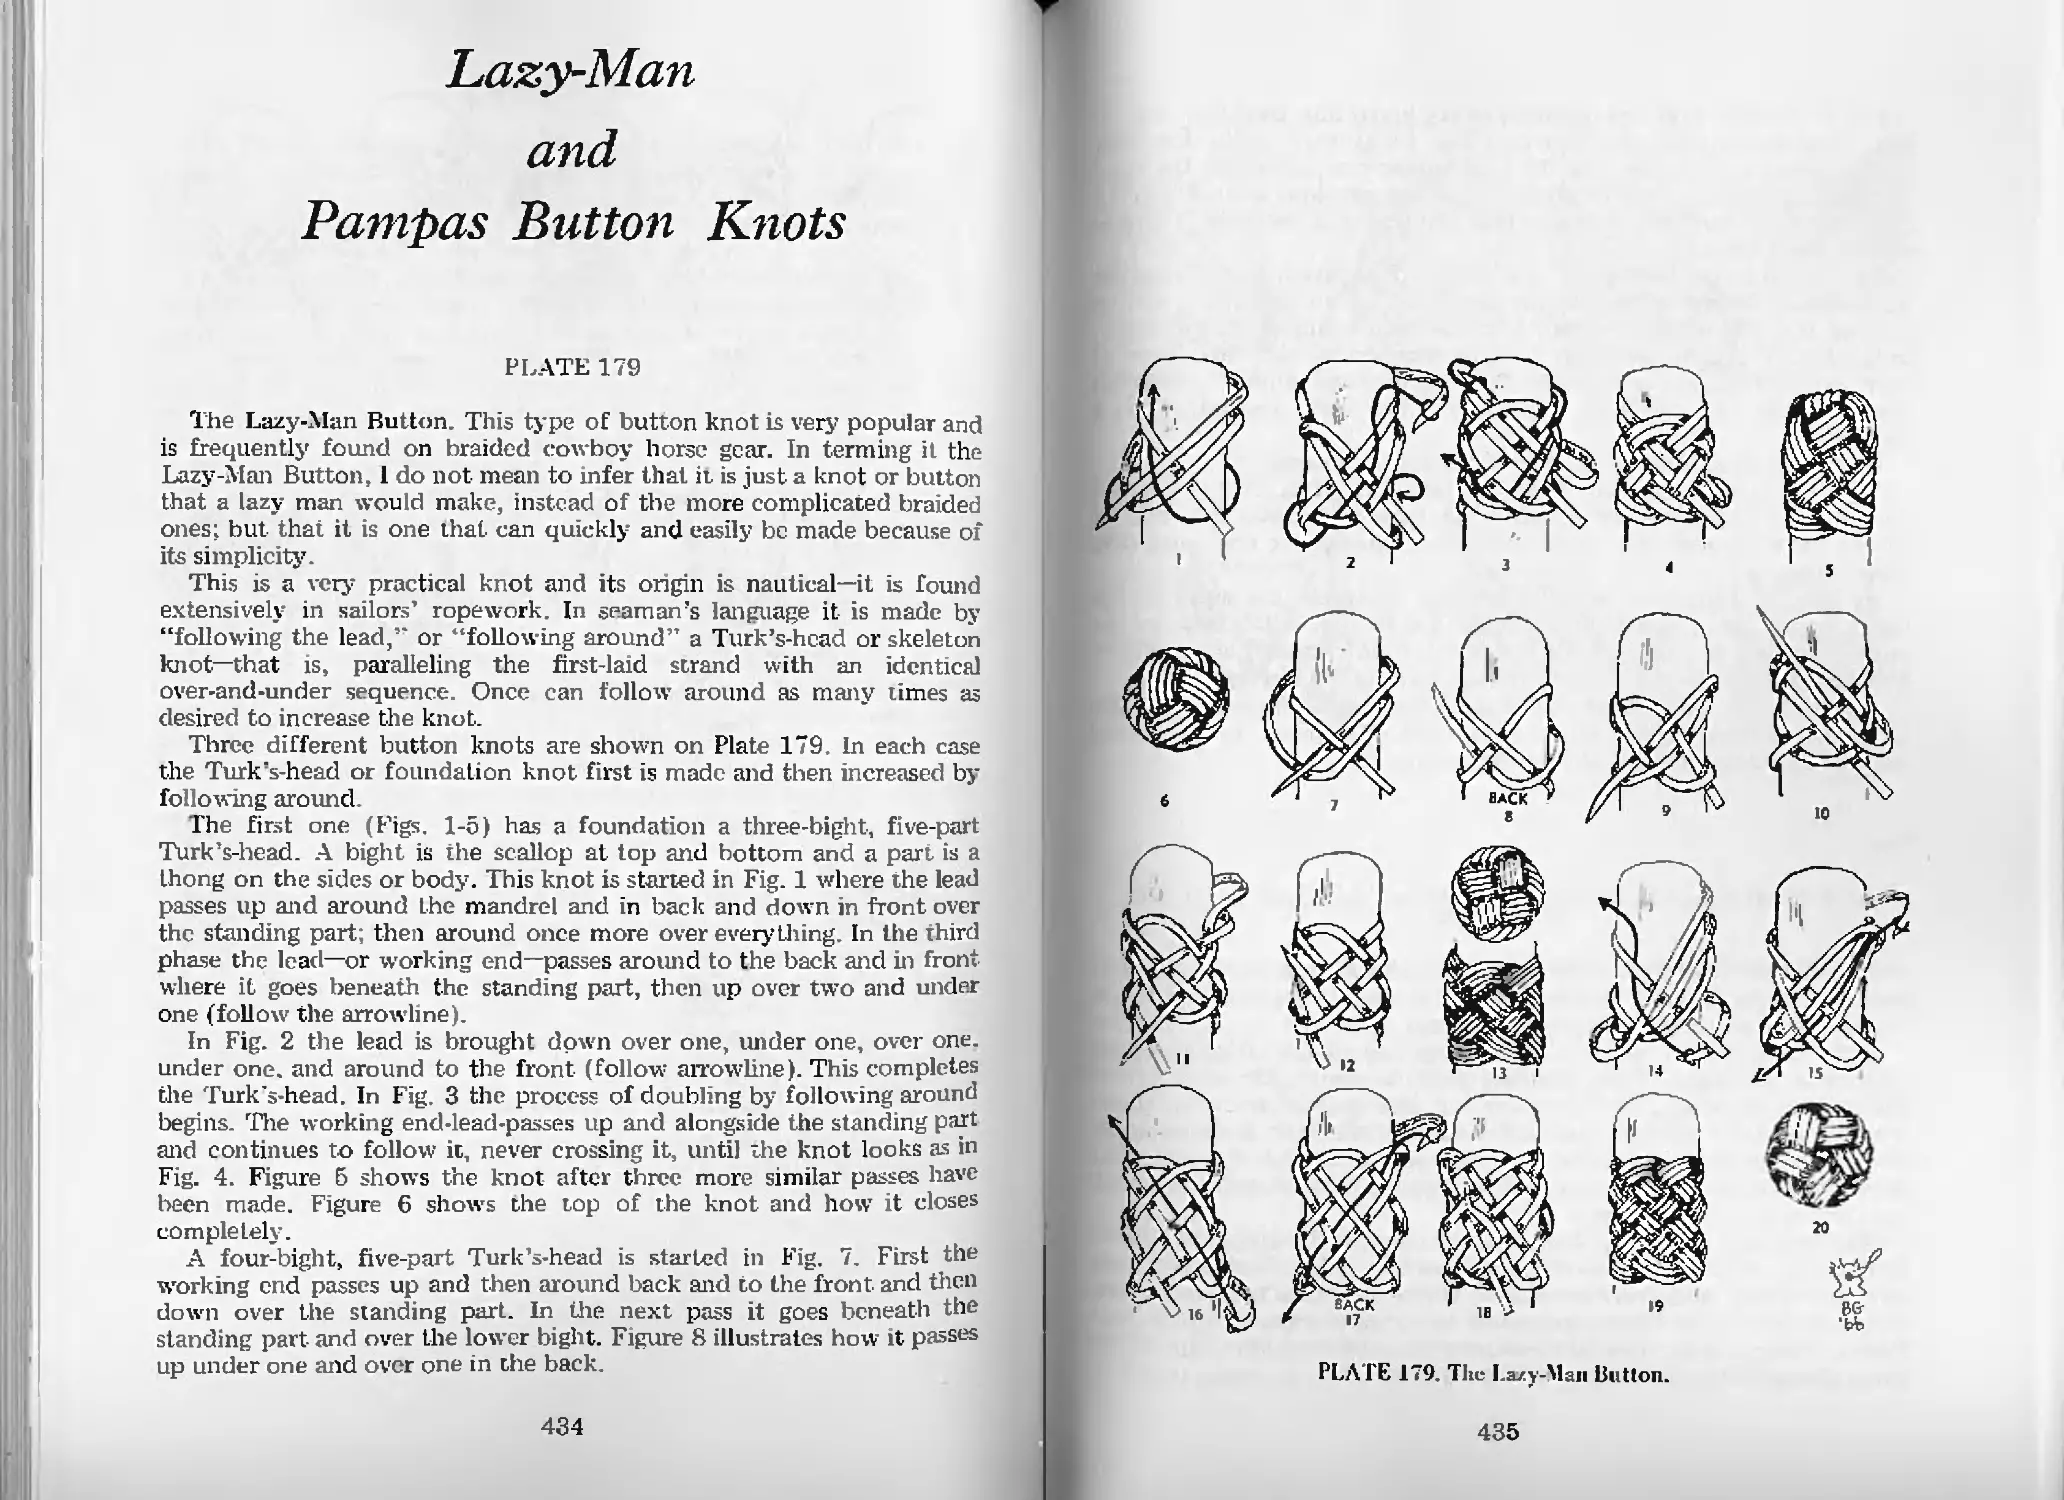
The Lazy-Man Button—Pl. 179 434
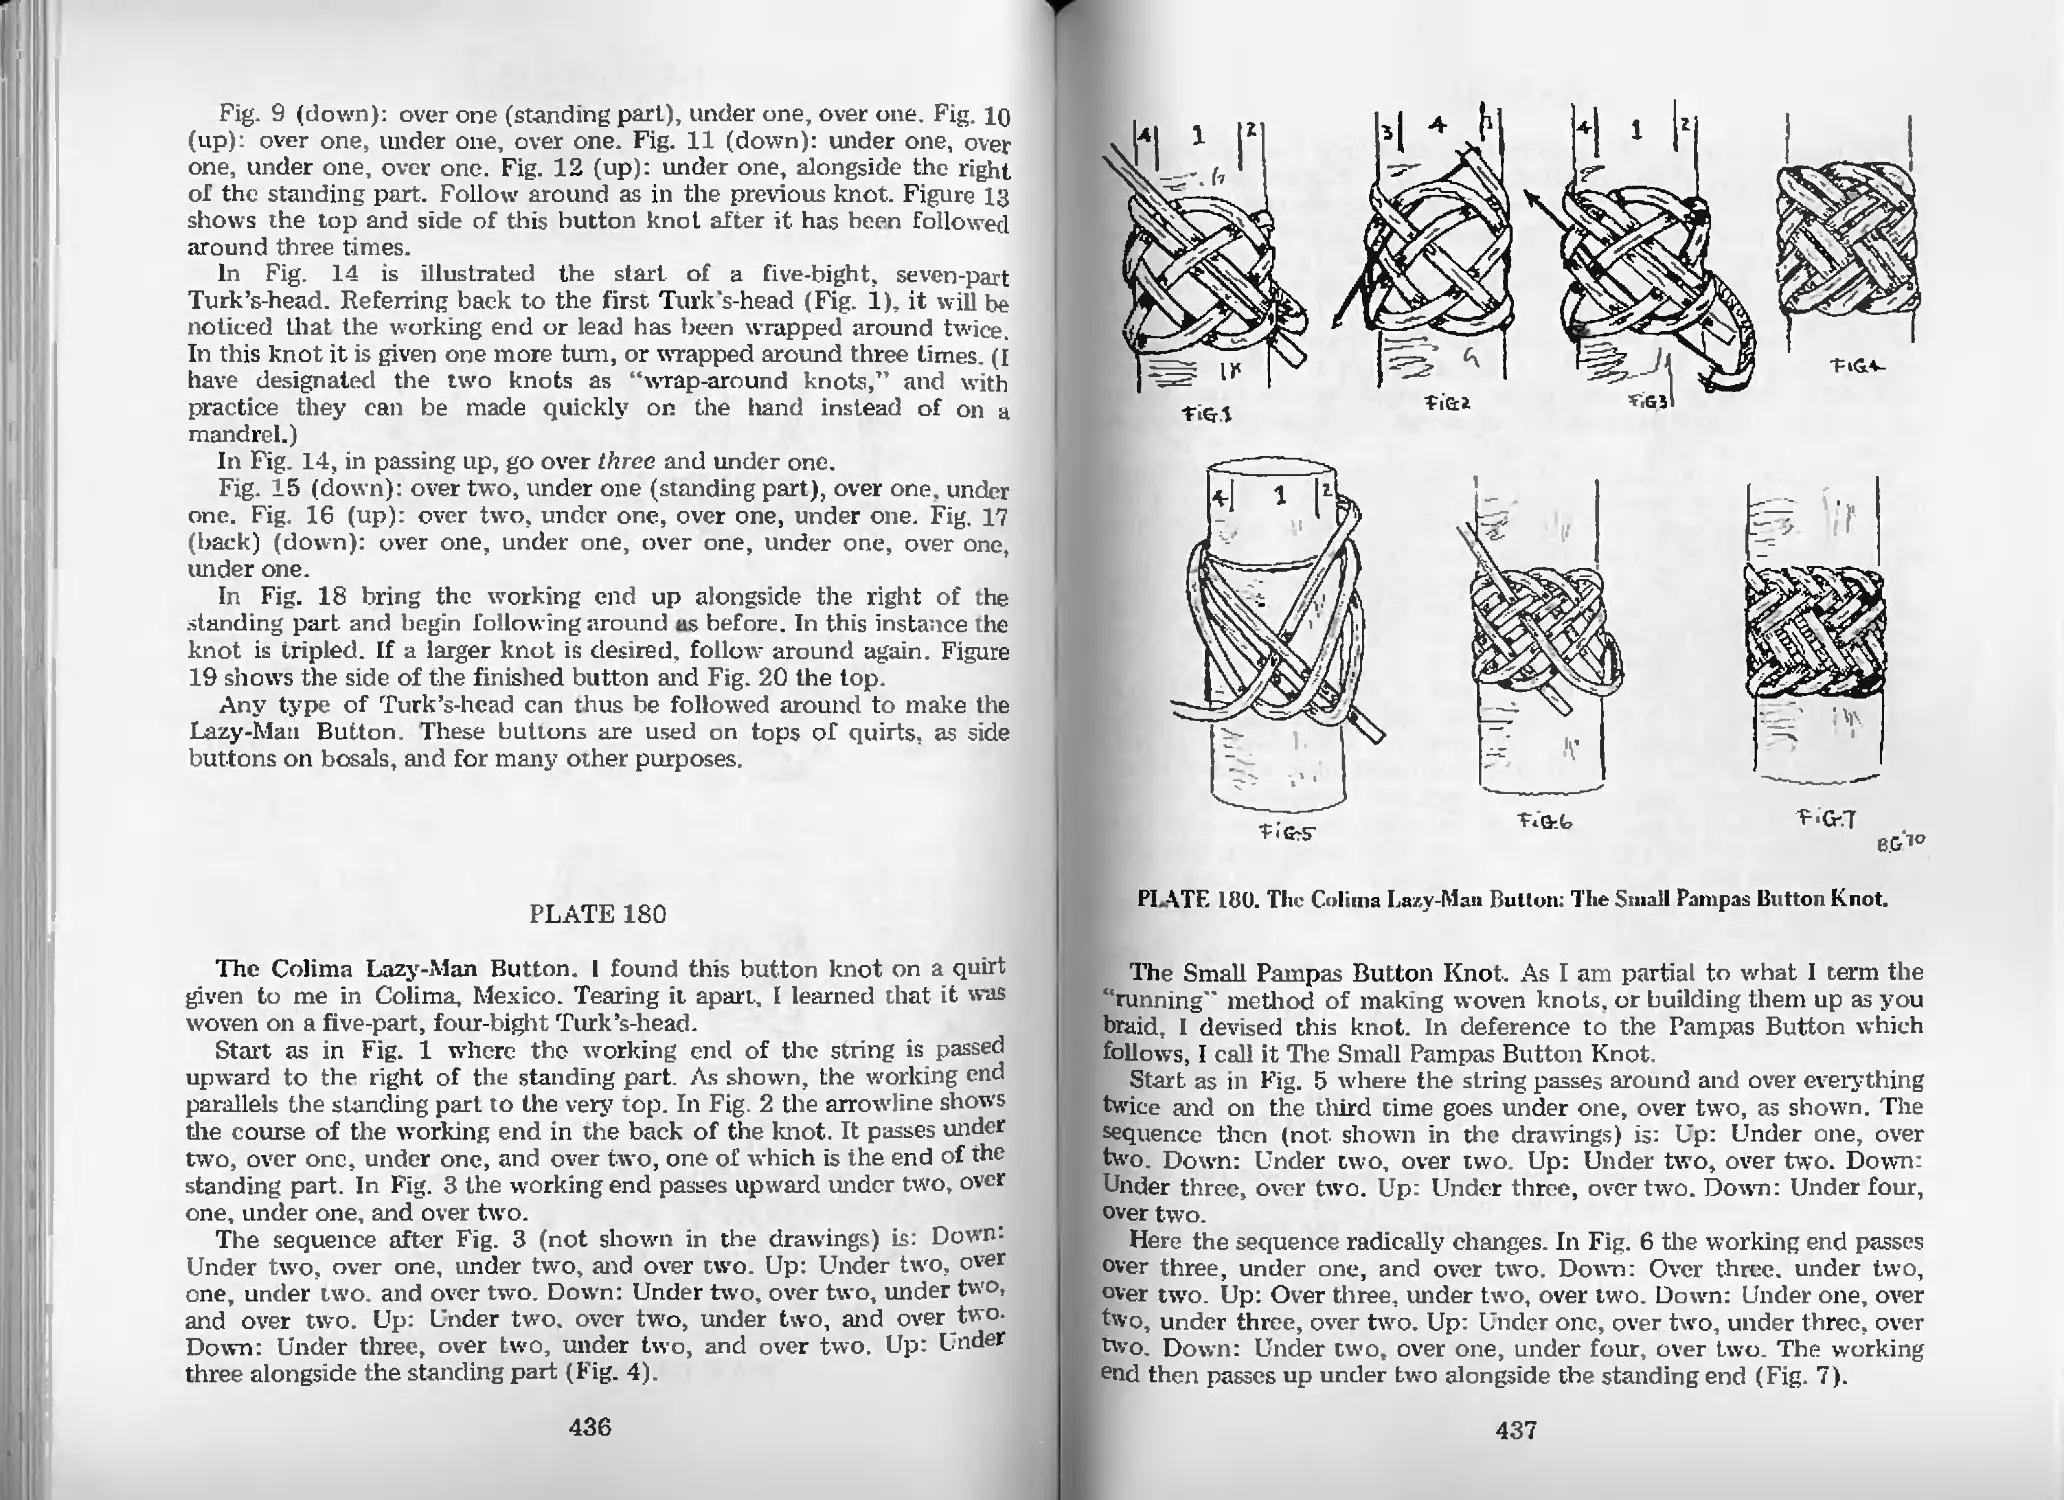
The Colima Lazy-Man Button—Pl. 180 436
The Small Pampas Button Knot—Pl. 180 437
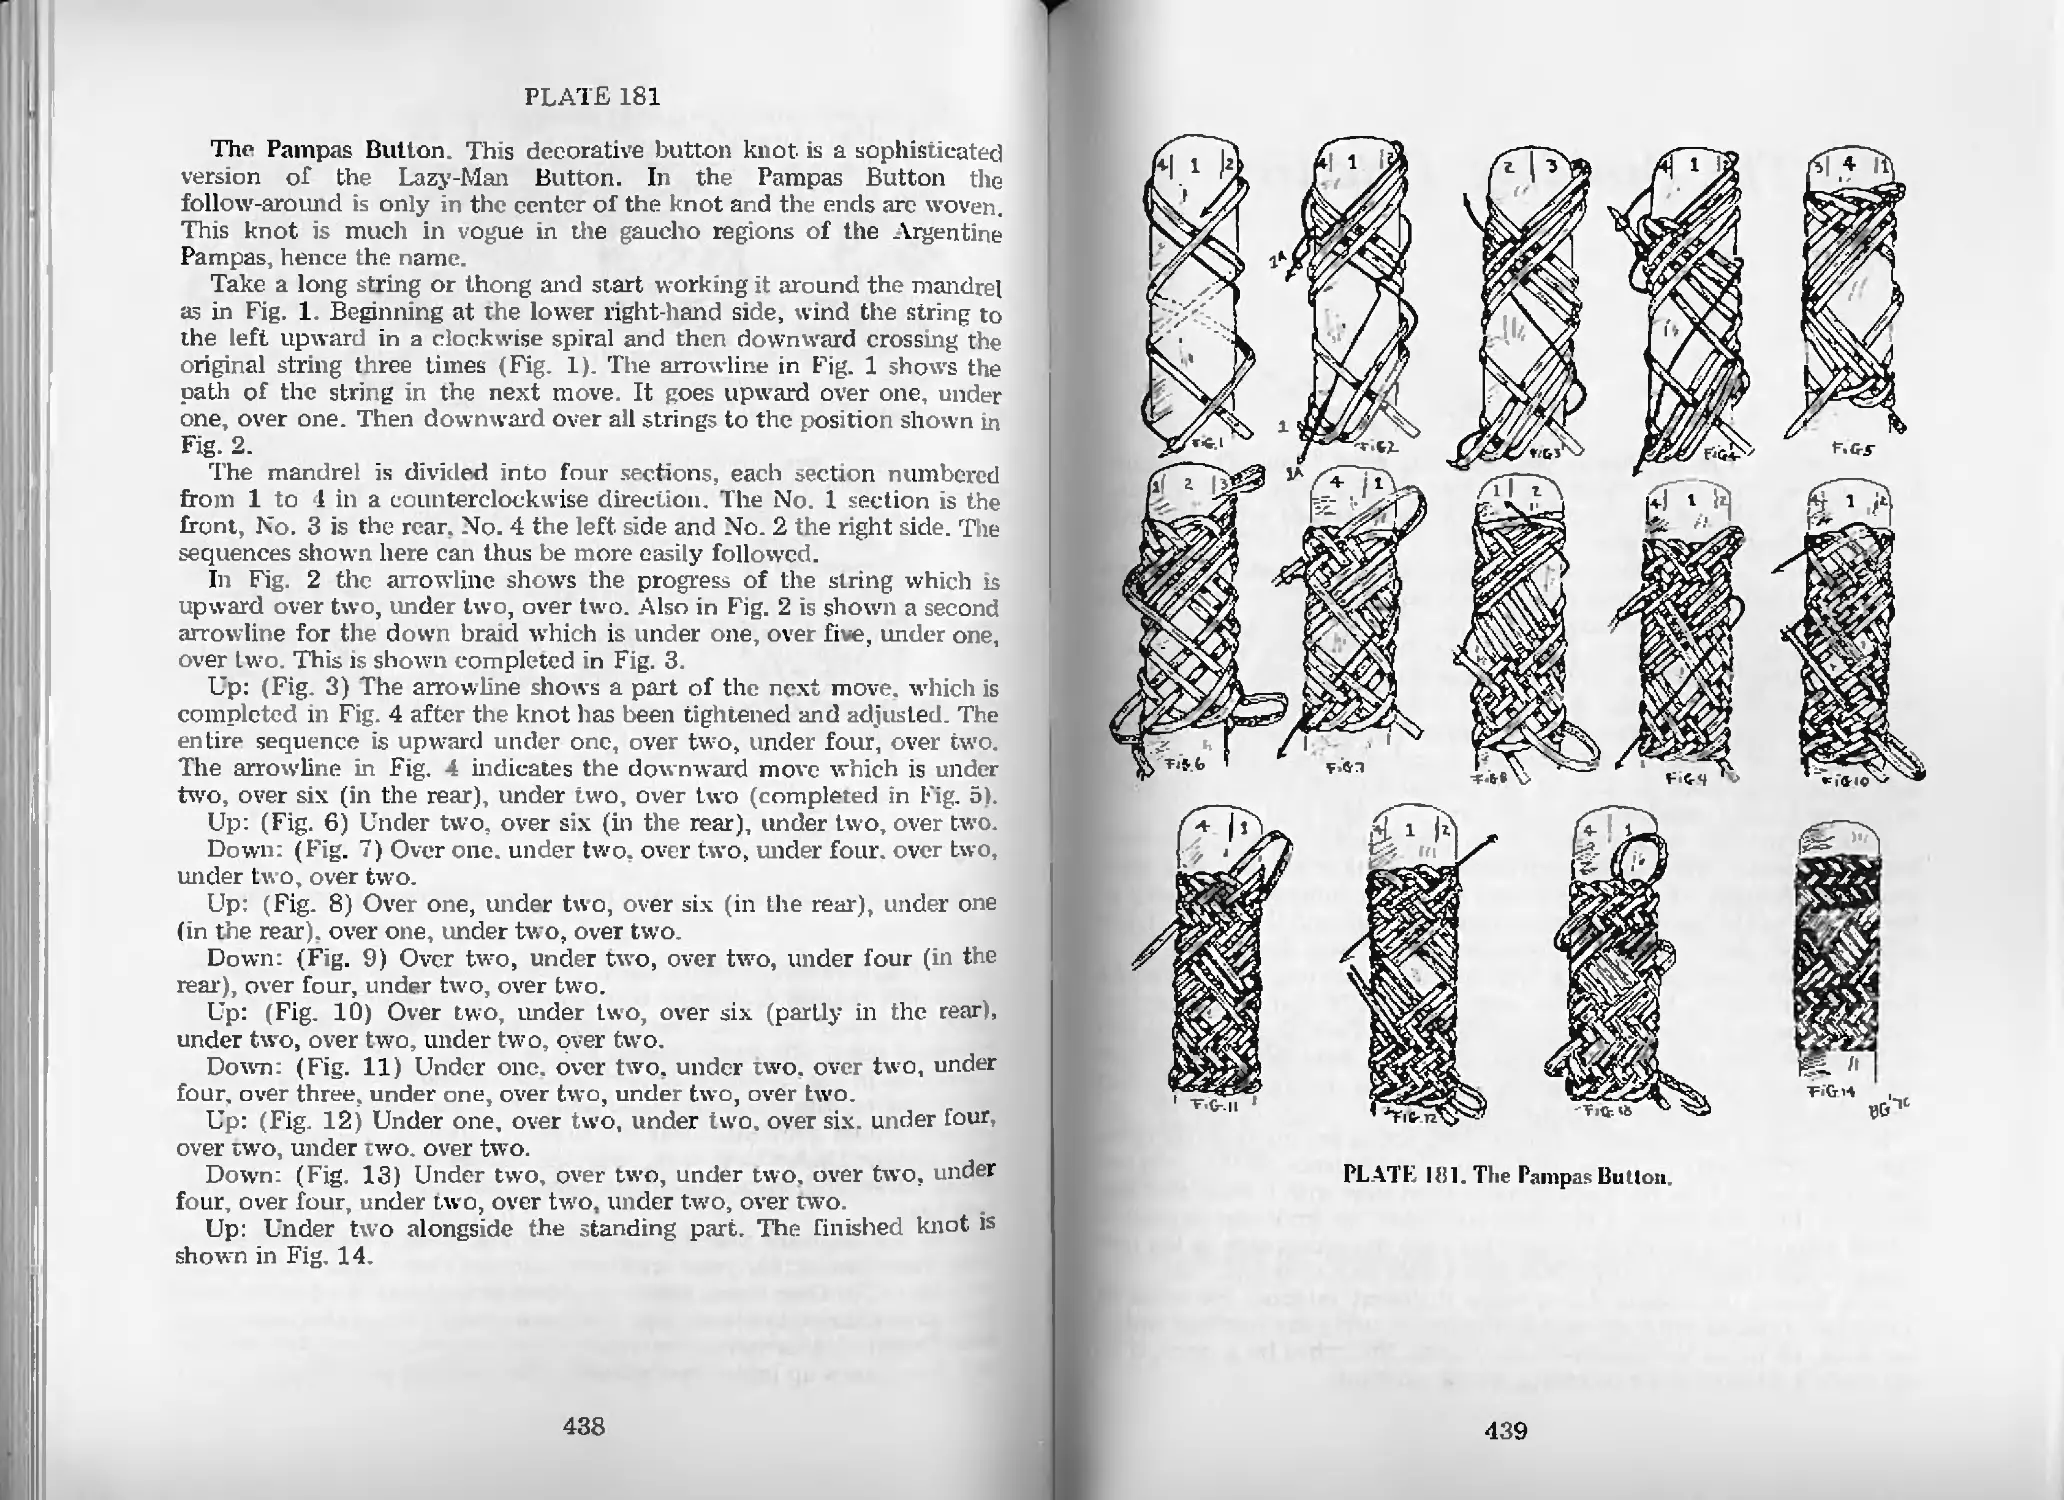
The Pampas Button—Pl. 181 438
The Braiding Detective
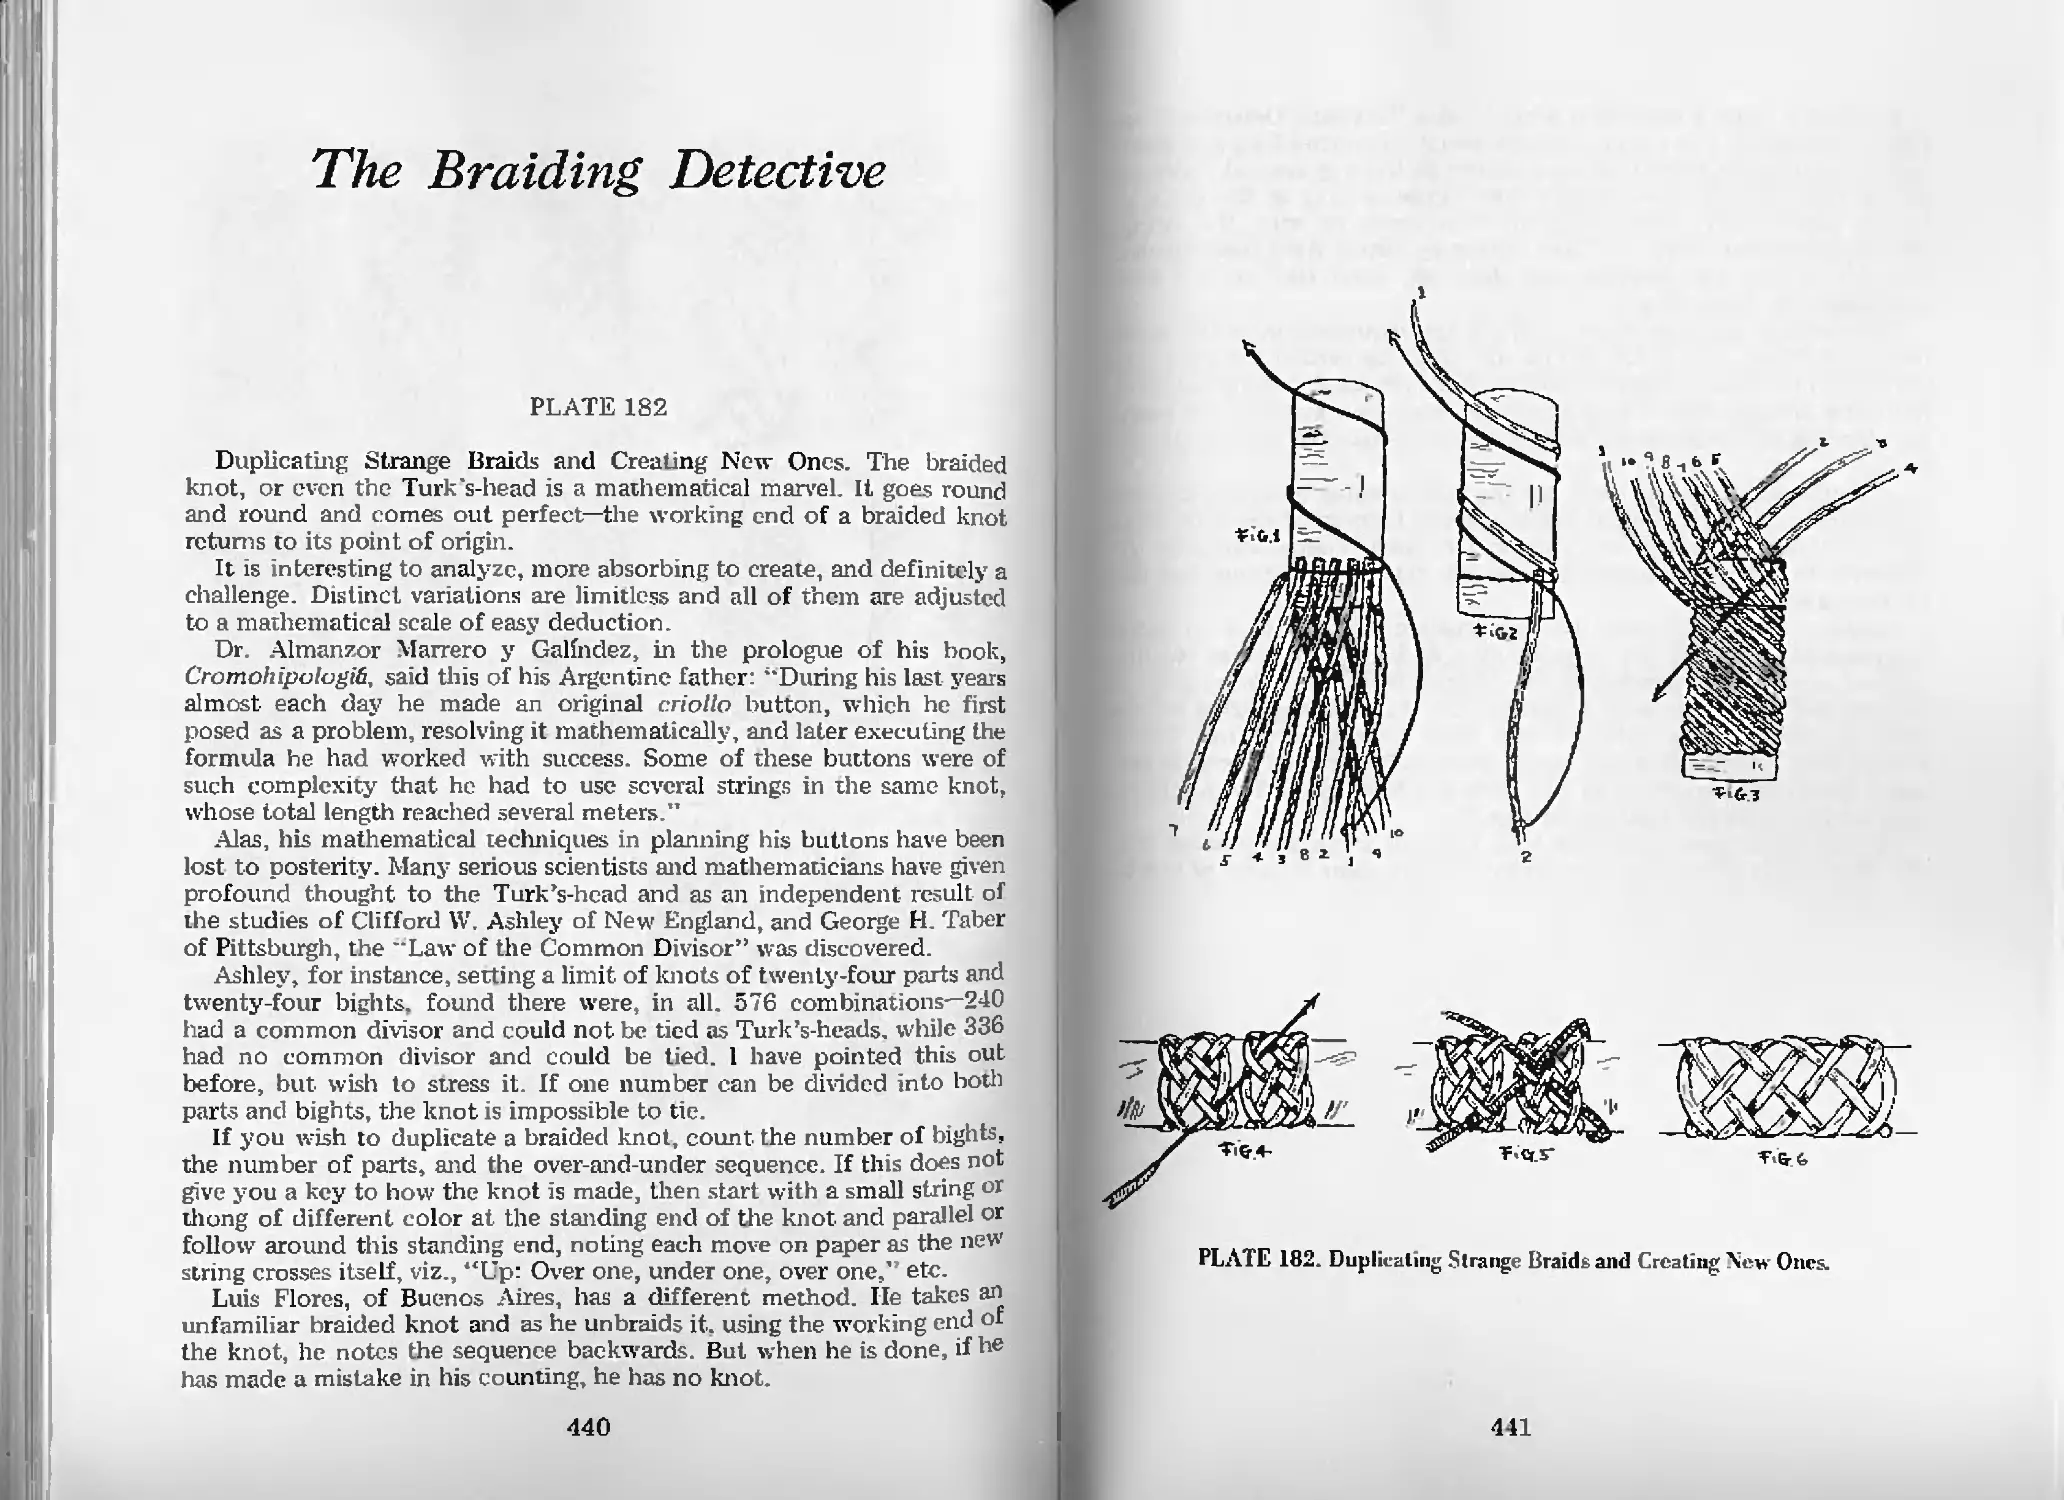
Duplicating Strange Braids and Creating New Ones—Pl. 182 440
Braided Appliques
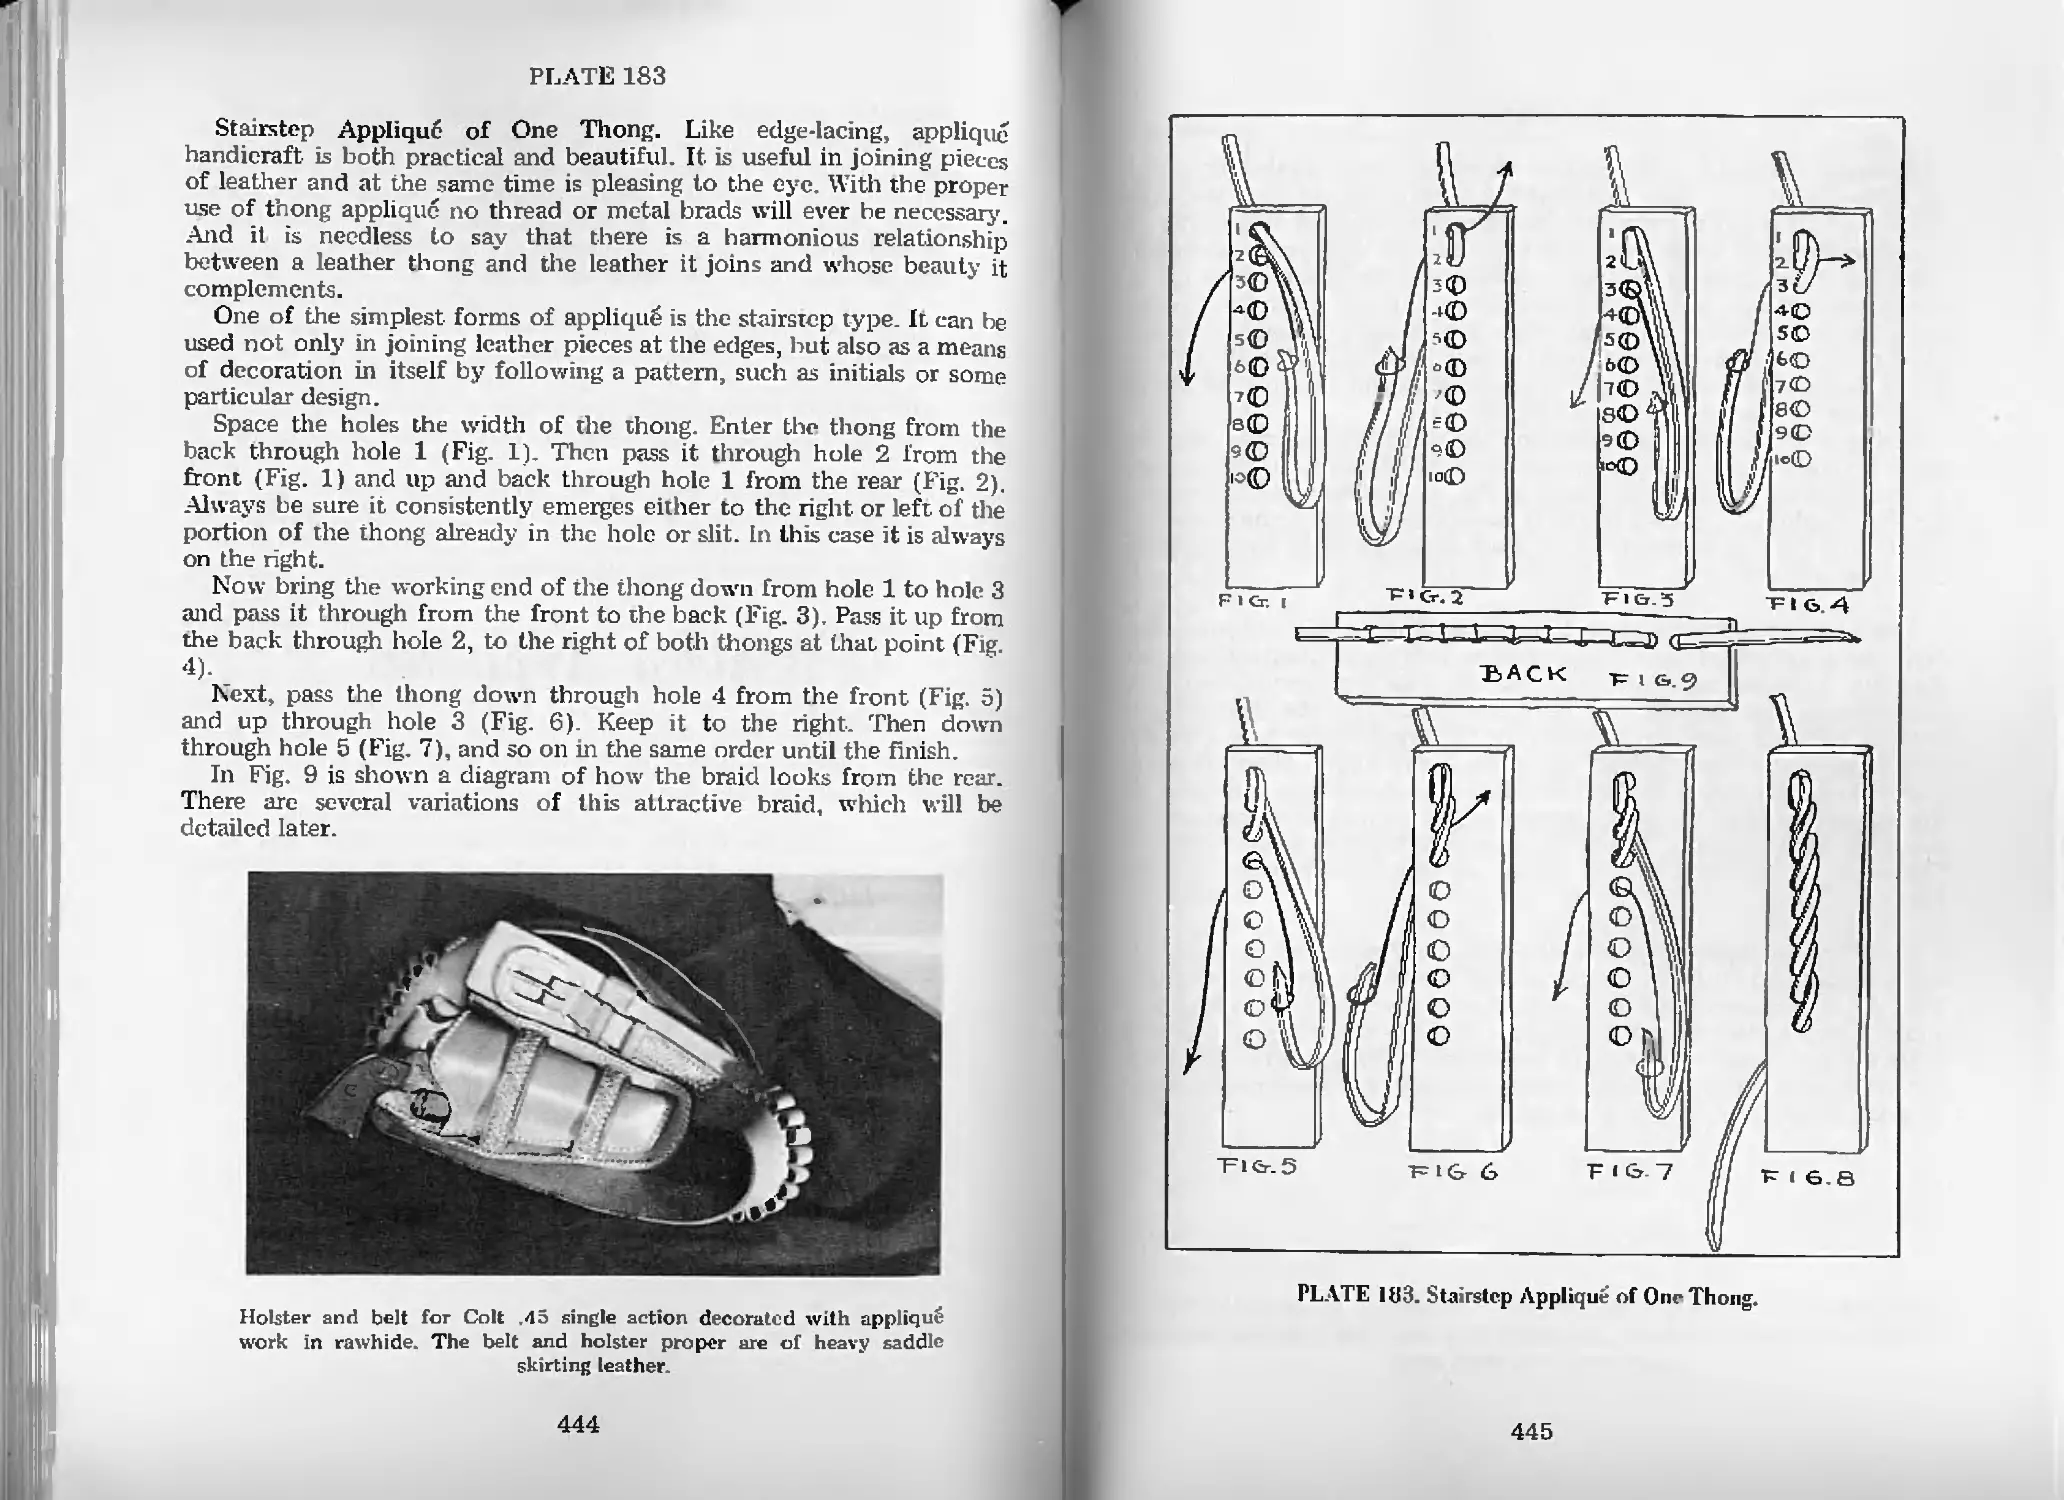
Stairstep Applique of One Thong—Pl. 183 444
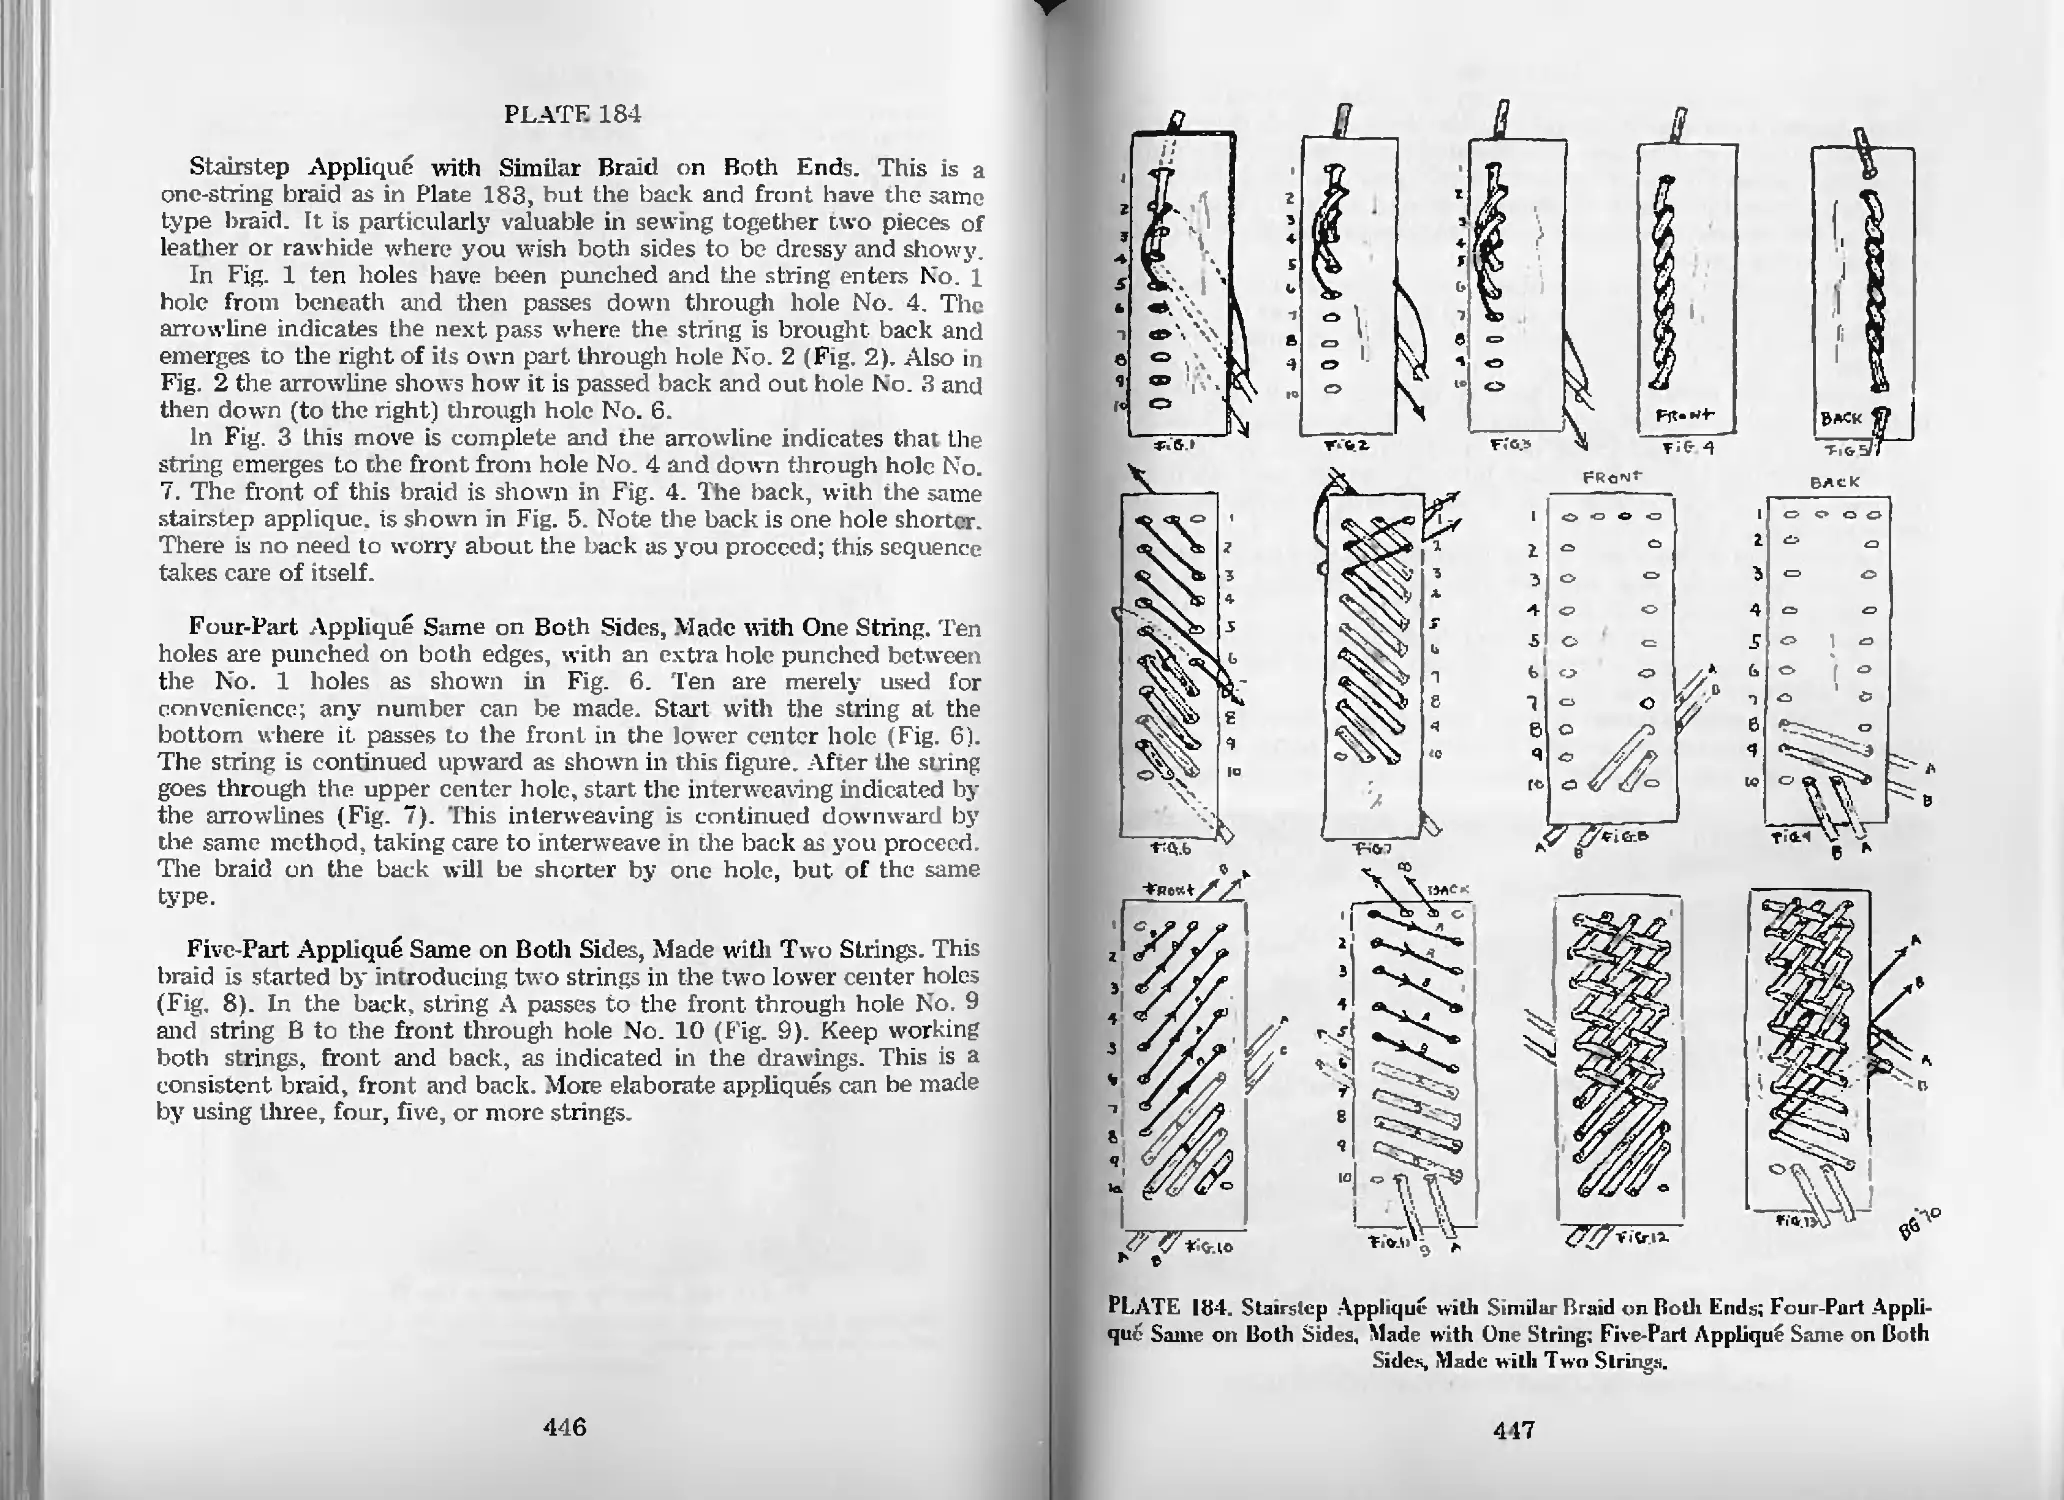
Stairstep Applique with Simjlar Braid
on Both Ends—Pl. 184 446
Four-Part Applique Same on Both Sides,
Made with One String—Pl. 184 446
Five-Part Applique Same on Both Sides,
Made with Two Strings—Pl. 184 446
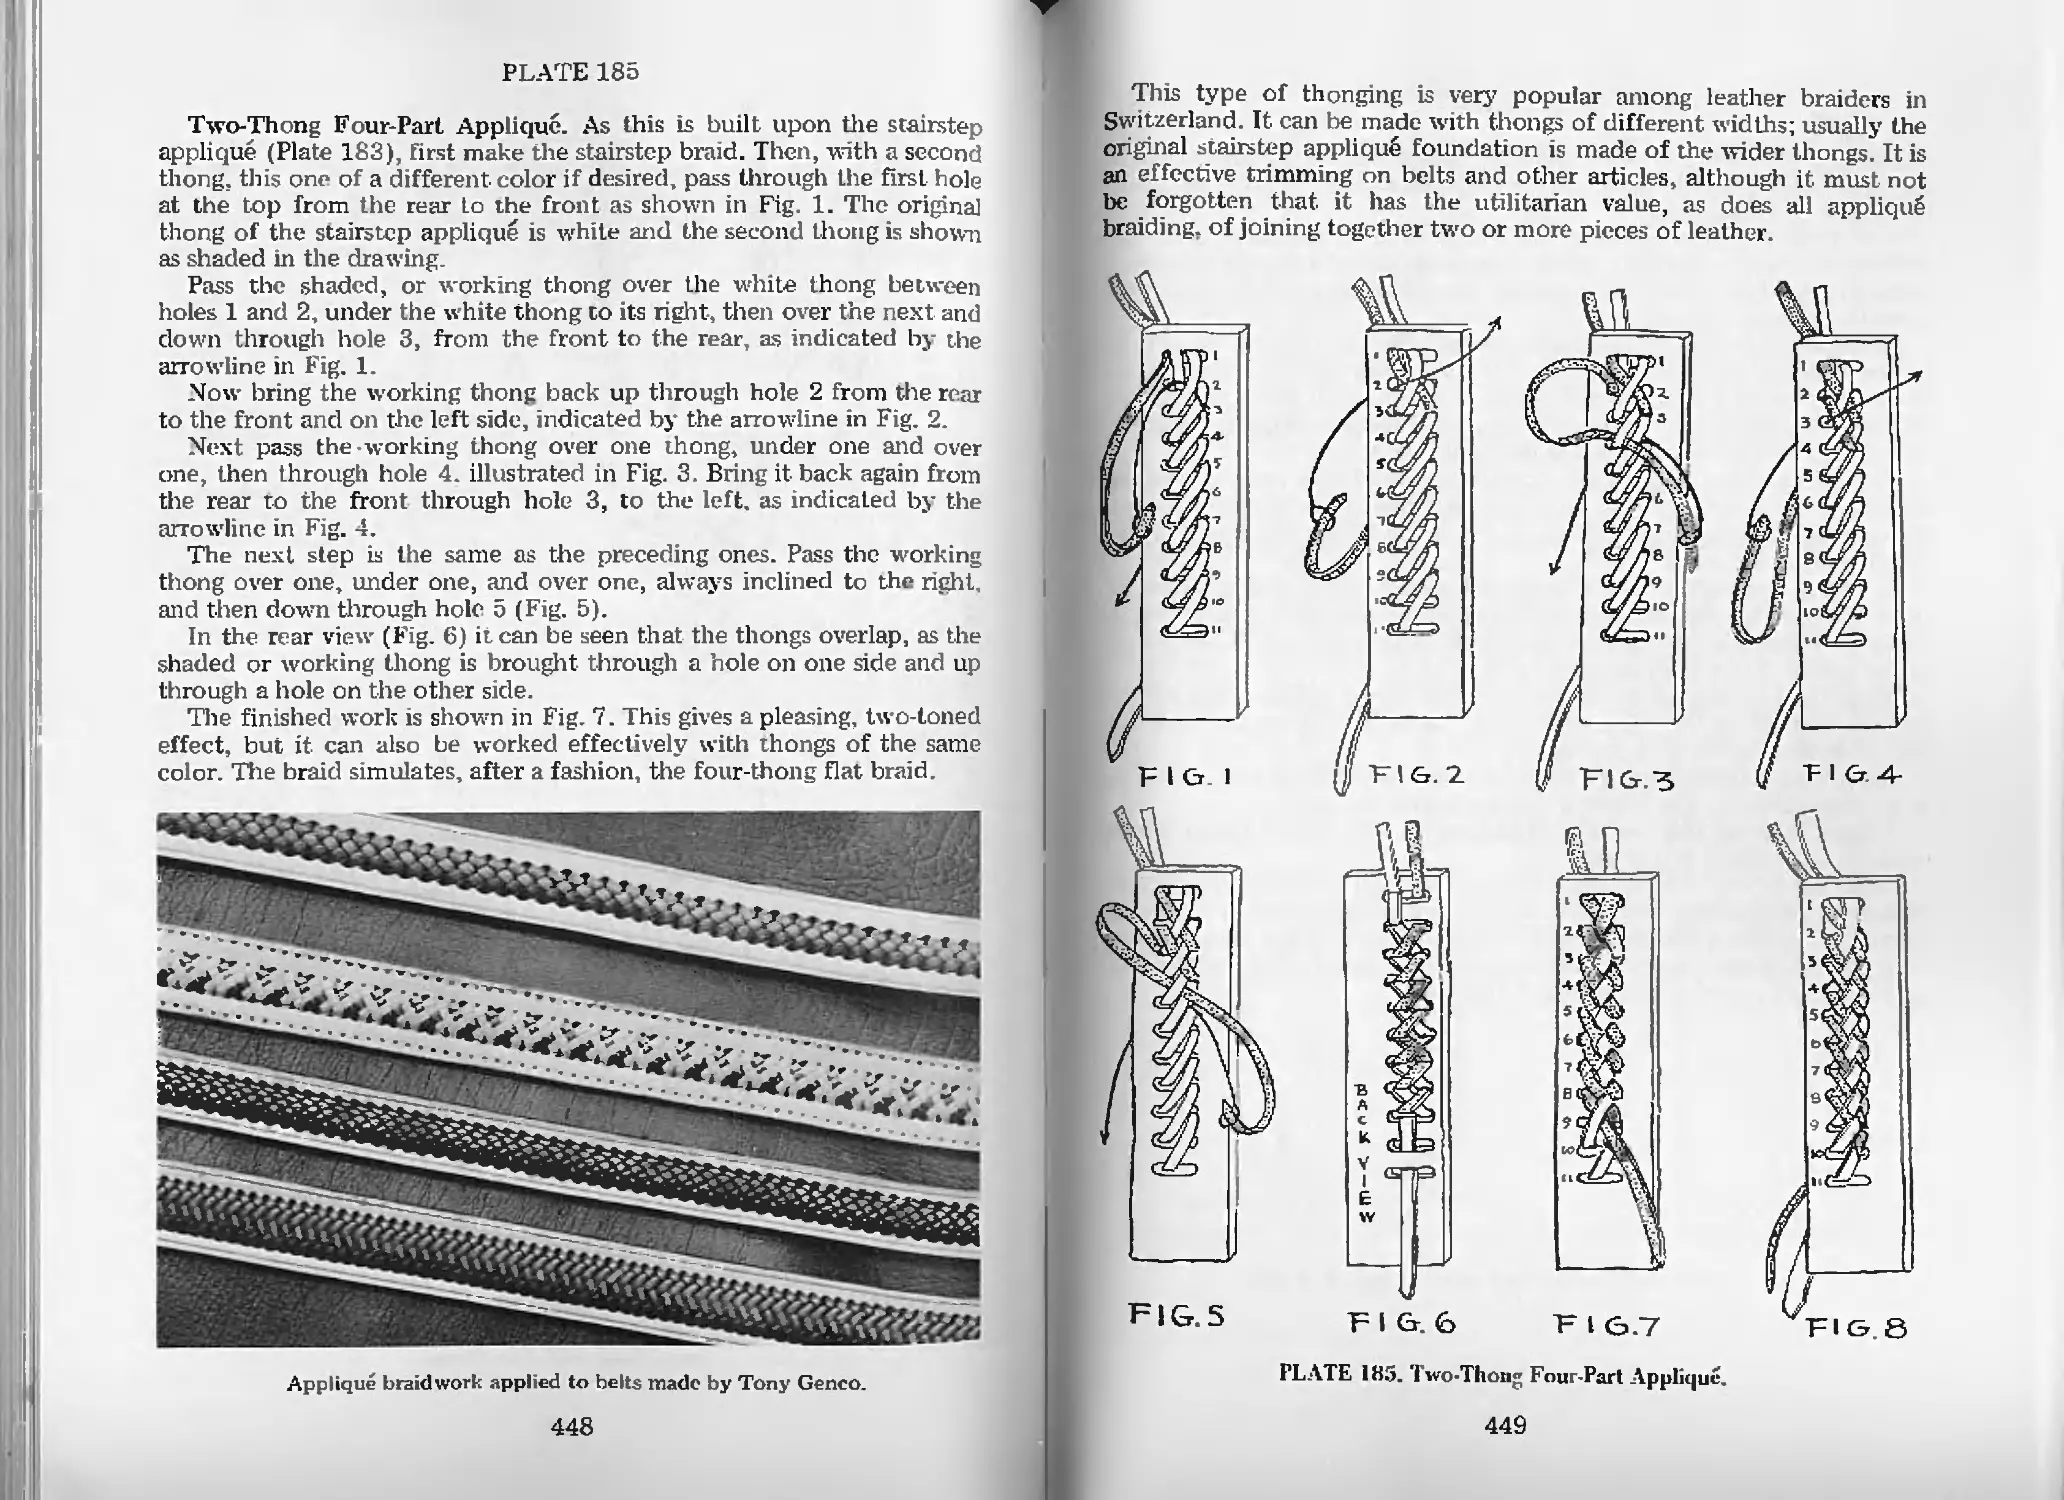
Two-Thong Four-Part Applique—Pl. 185 448
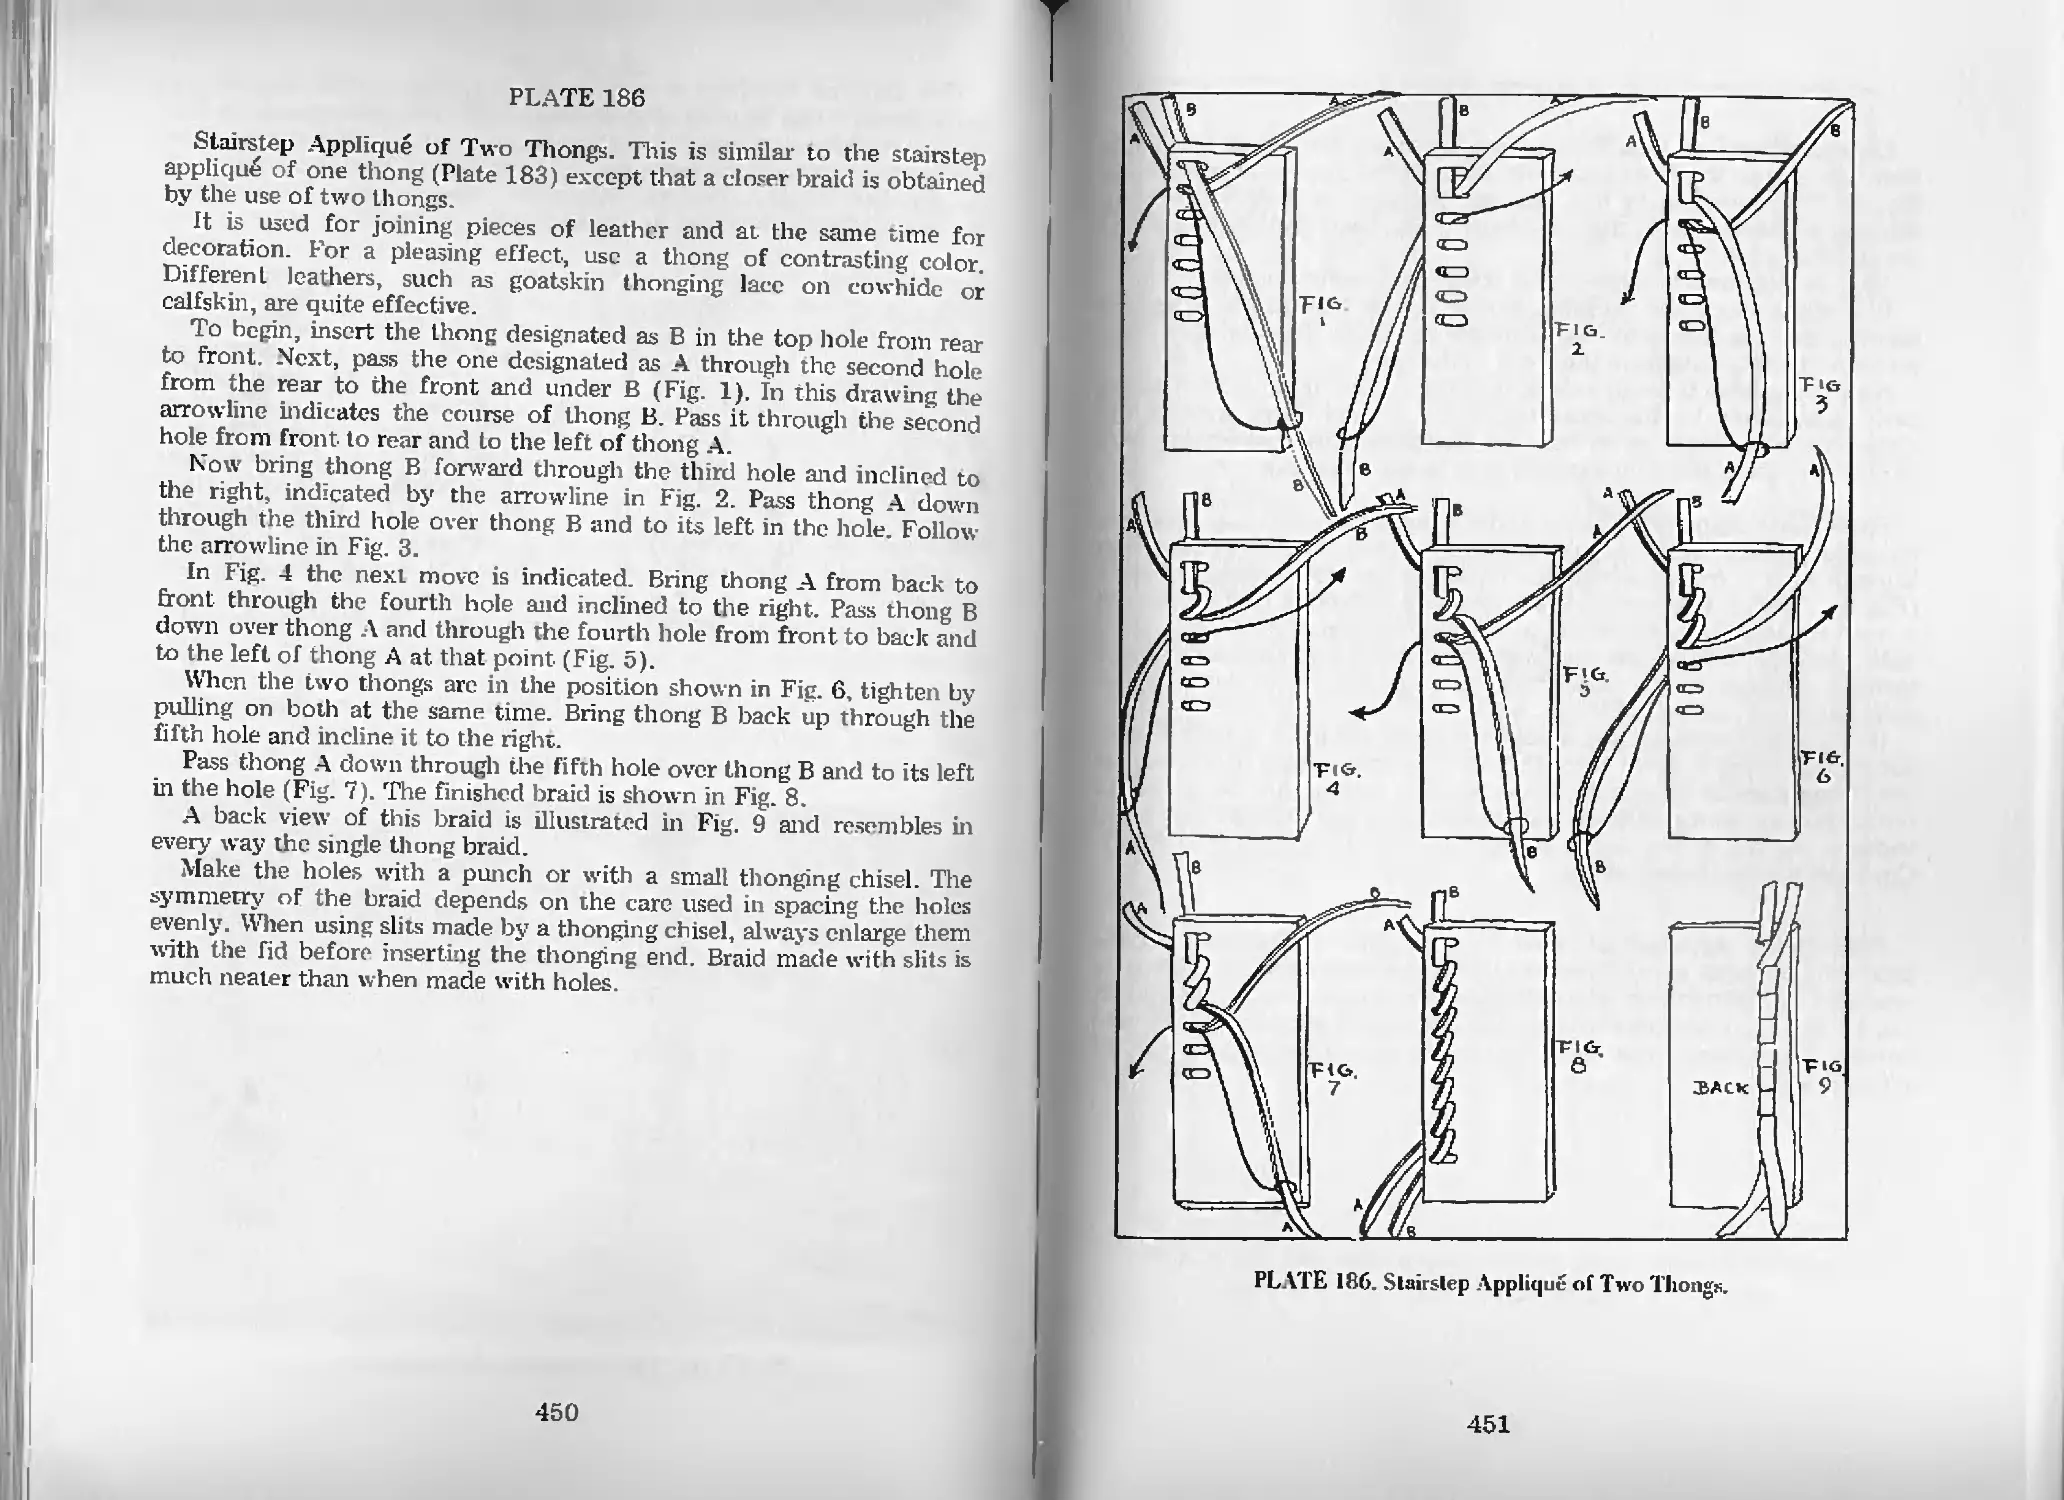
Stairstep Applique of Two Thongs—Pl. 186 450
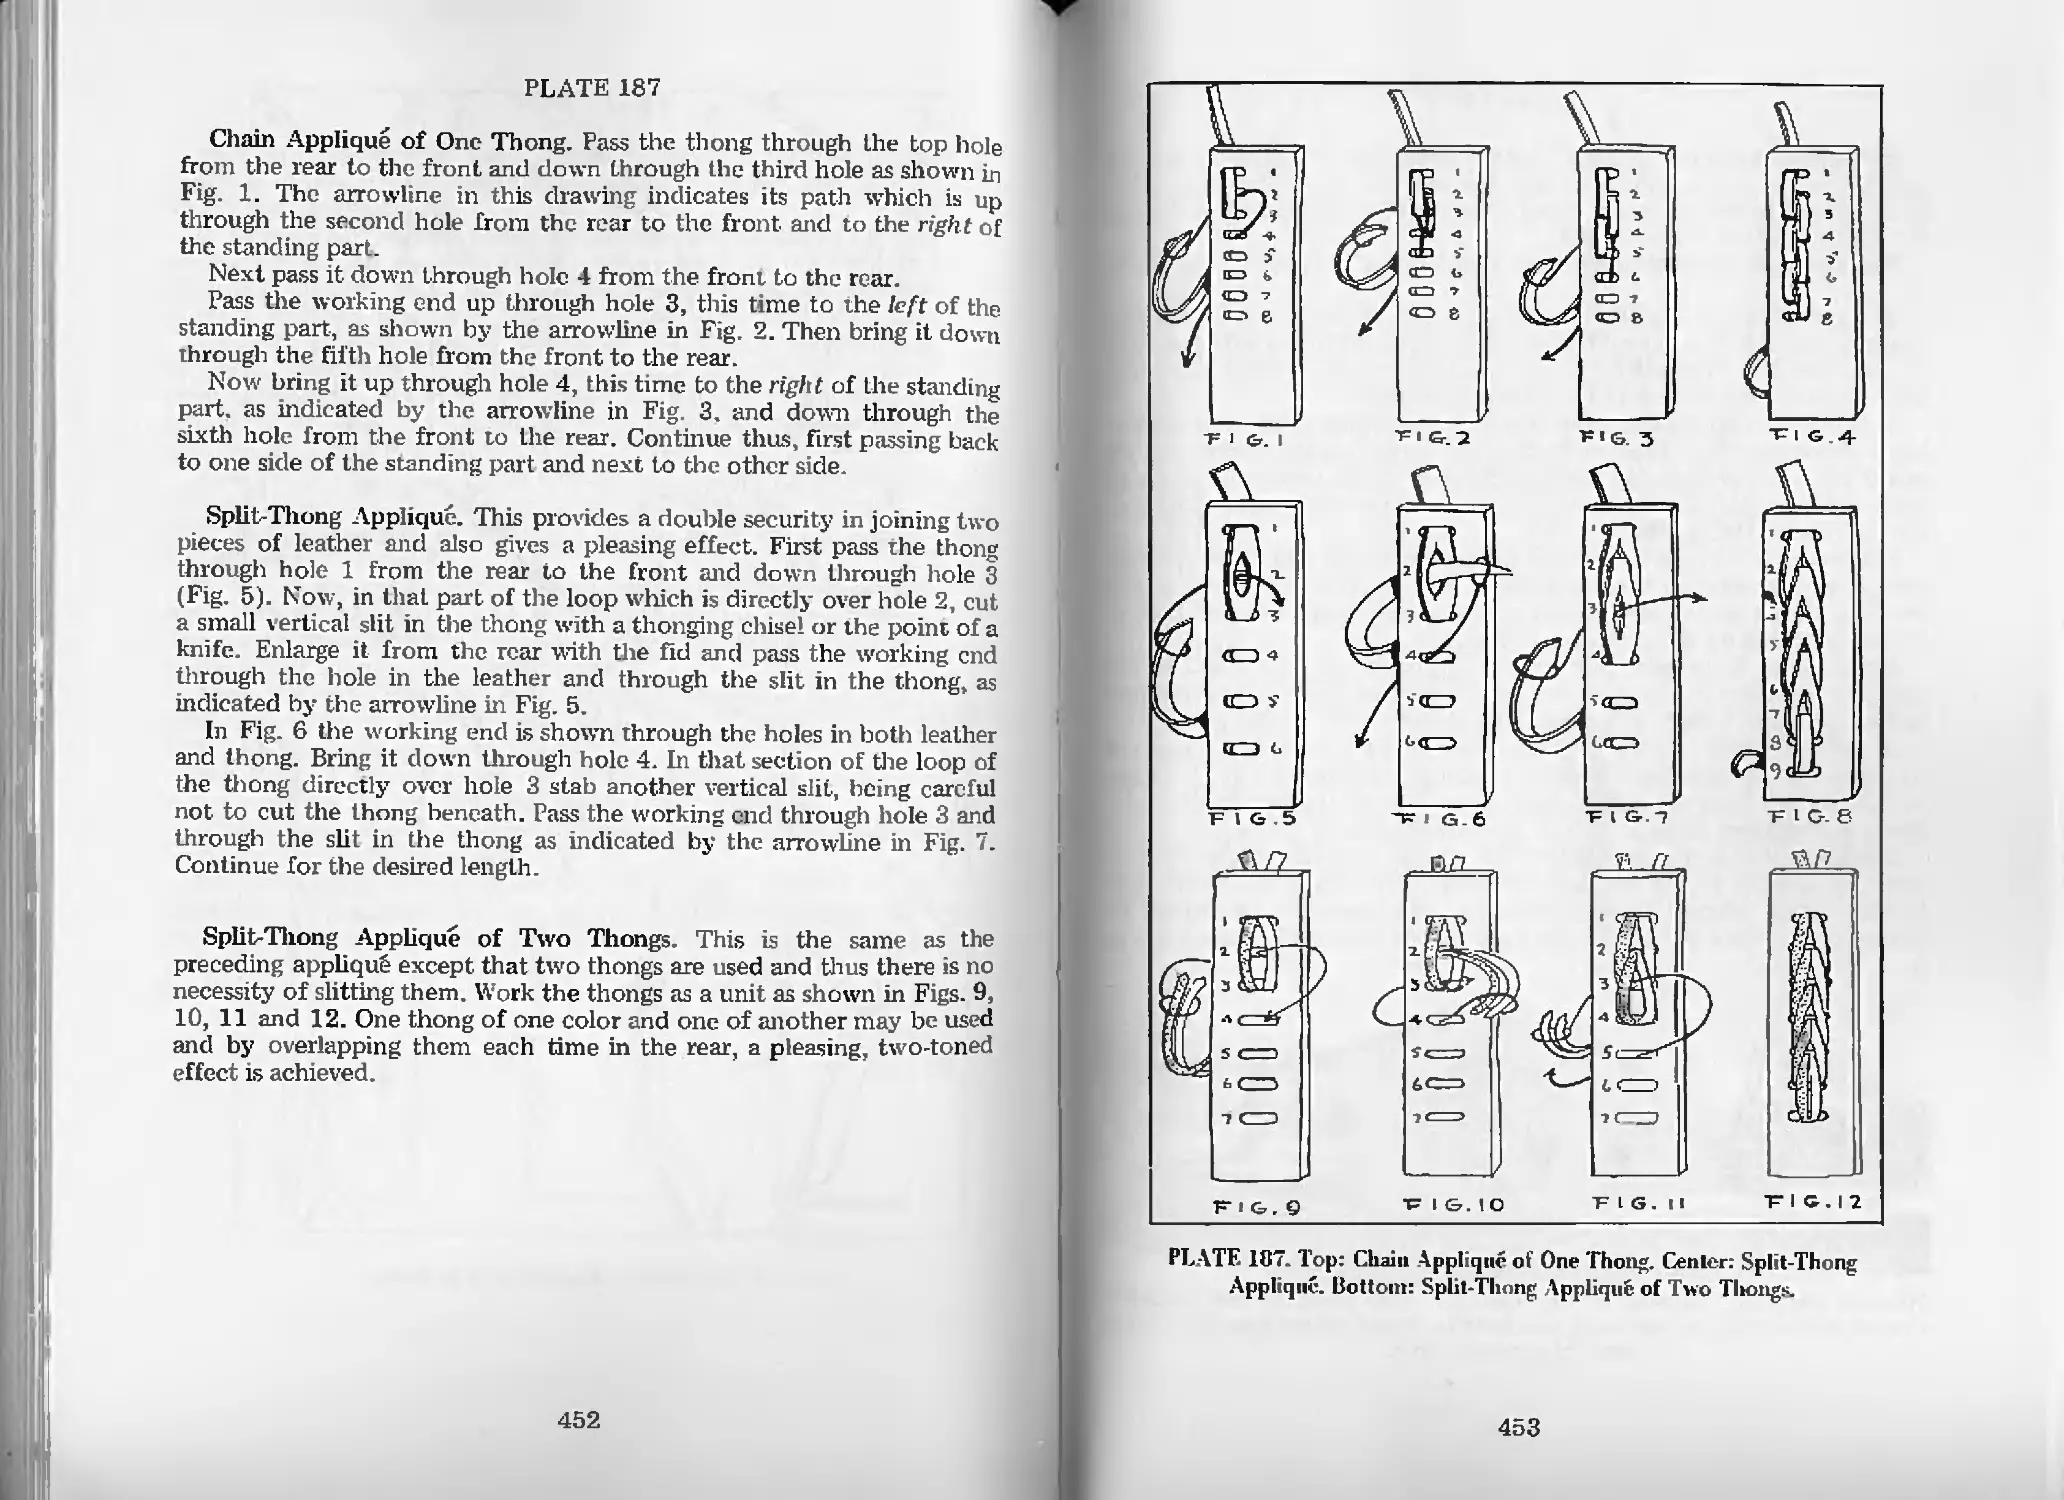
Chain Applique of One Thong—Pl. 187 452
Split-Thong Applique—Pl. 187 452
Split-Thong Applique of Two Thongs—Pl. 187 452
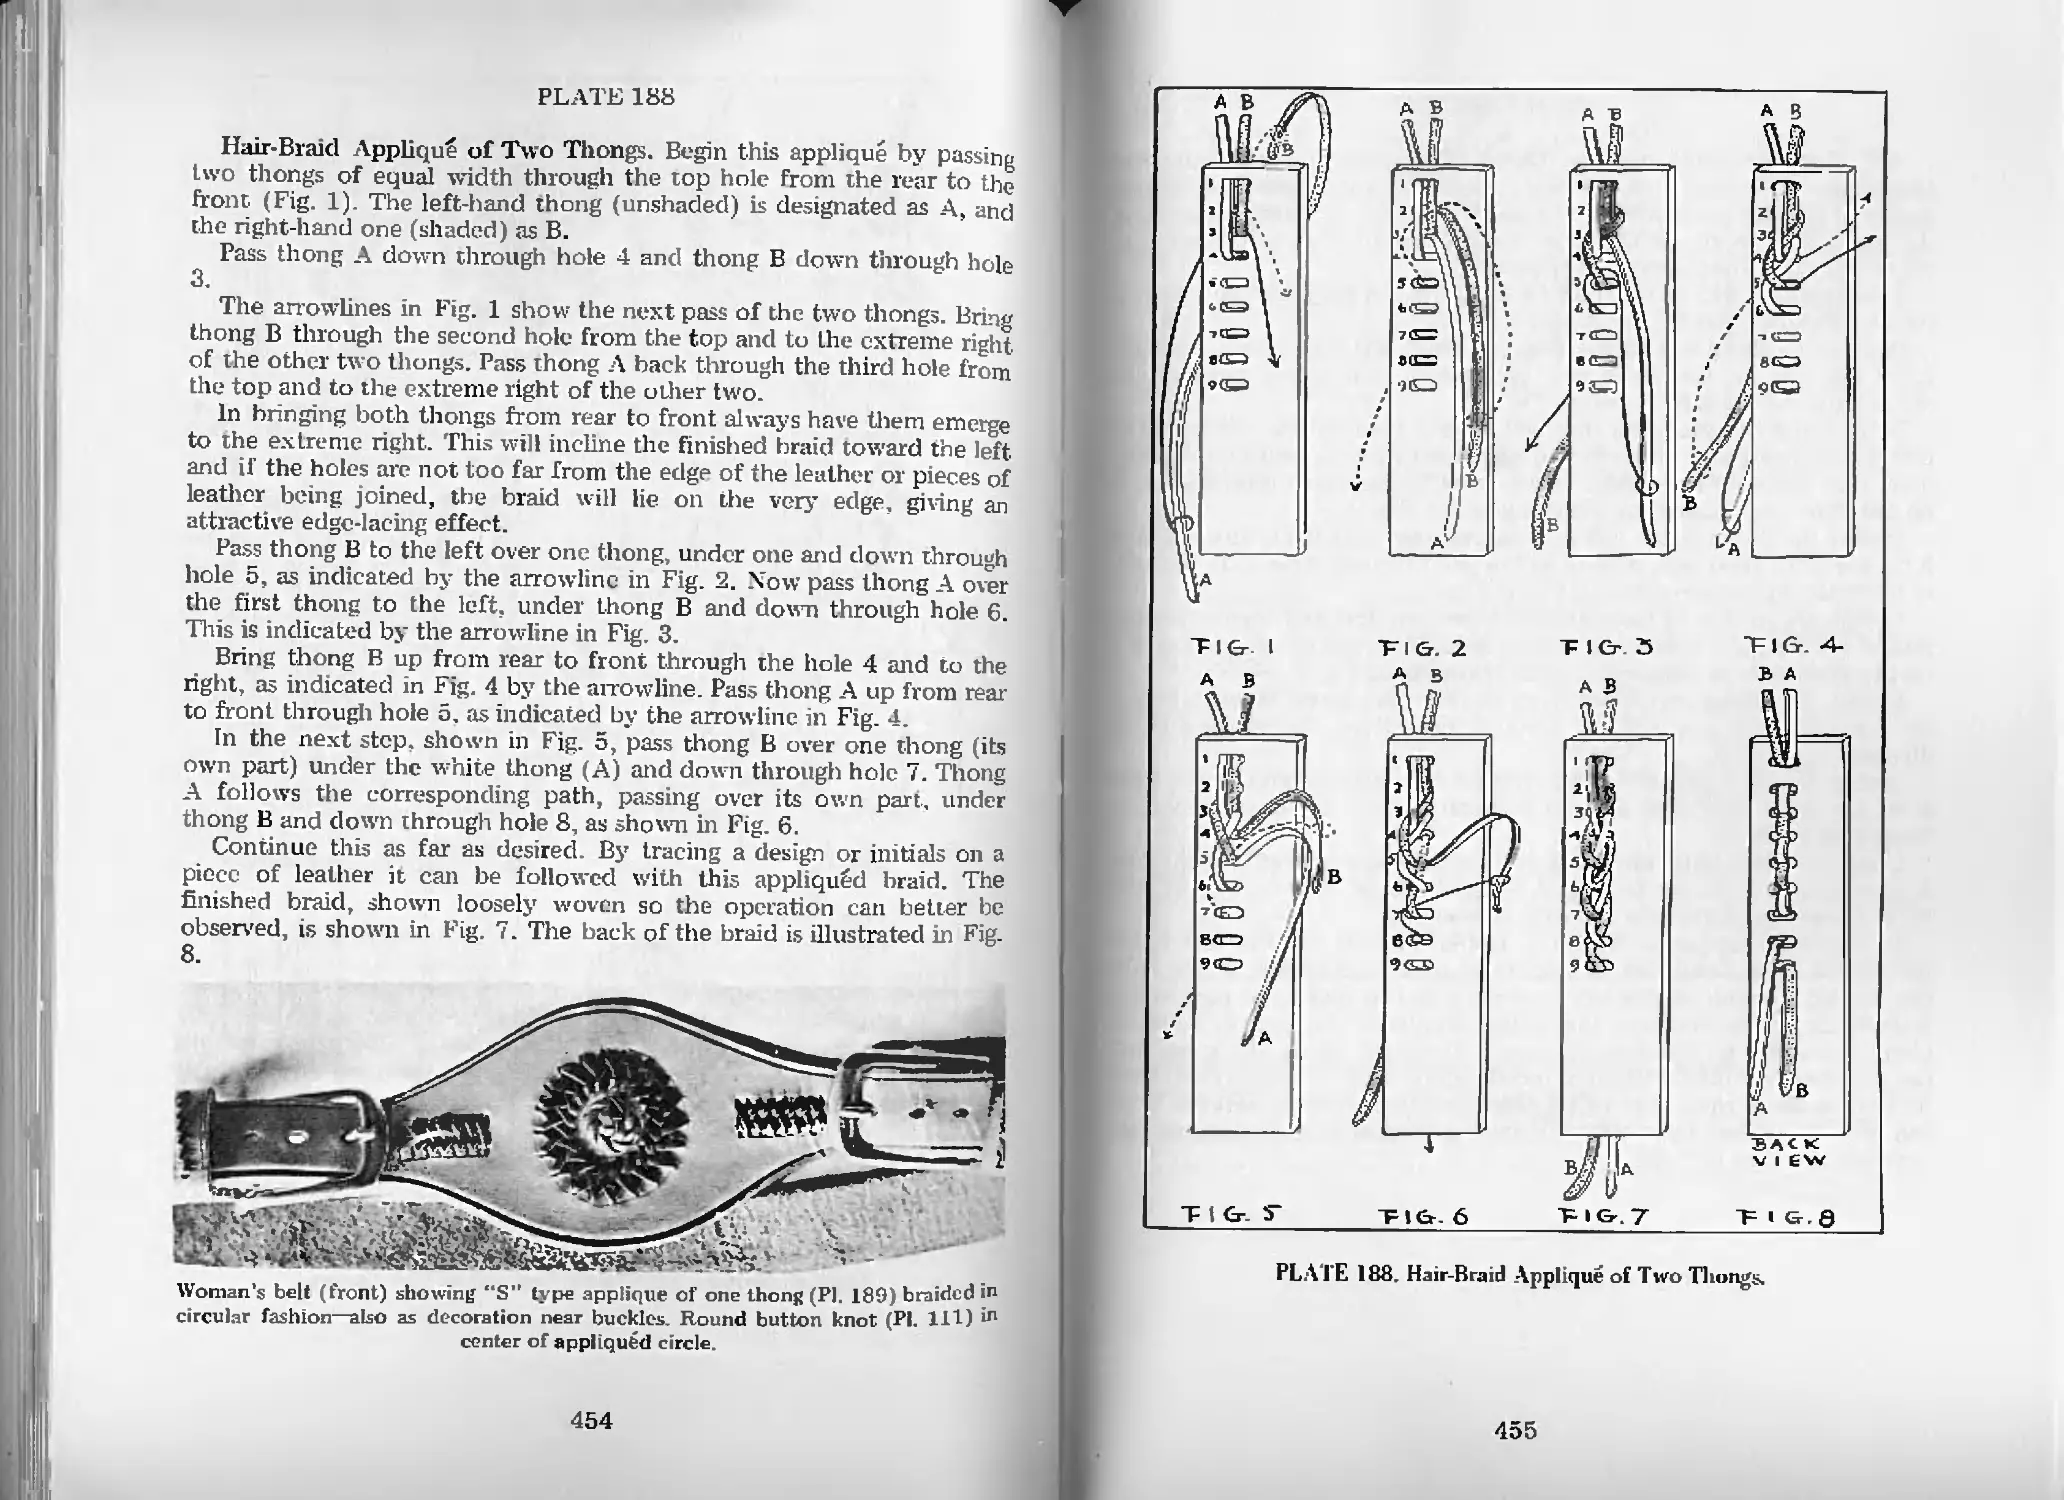
Hair-Braid Applique of Two Thongs—Pl. 188 454
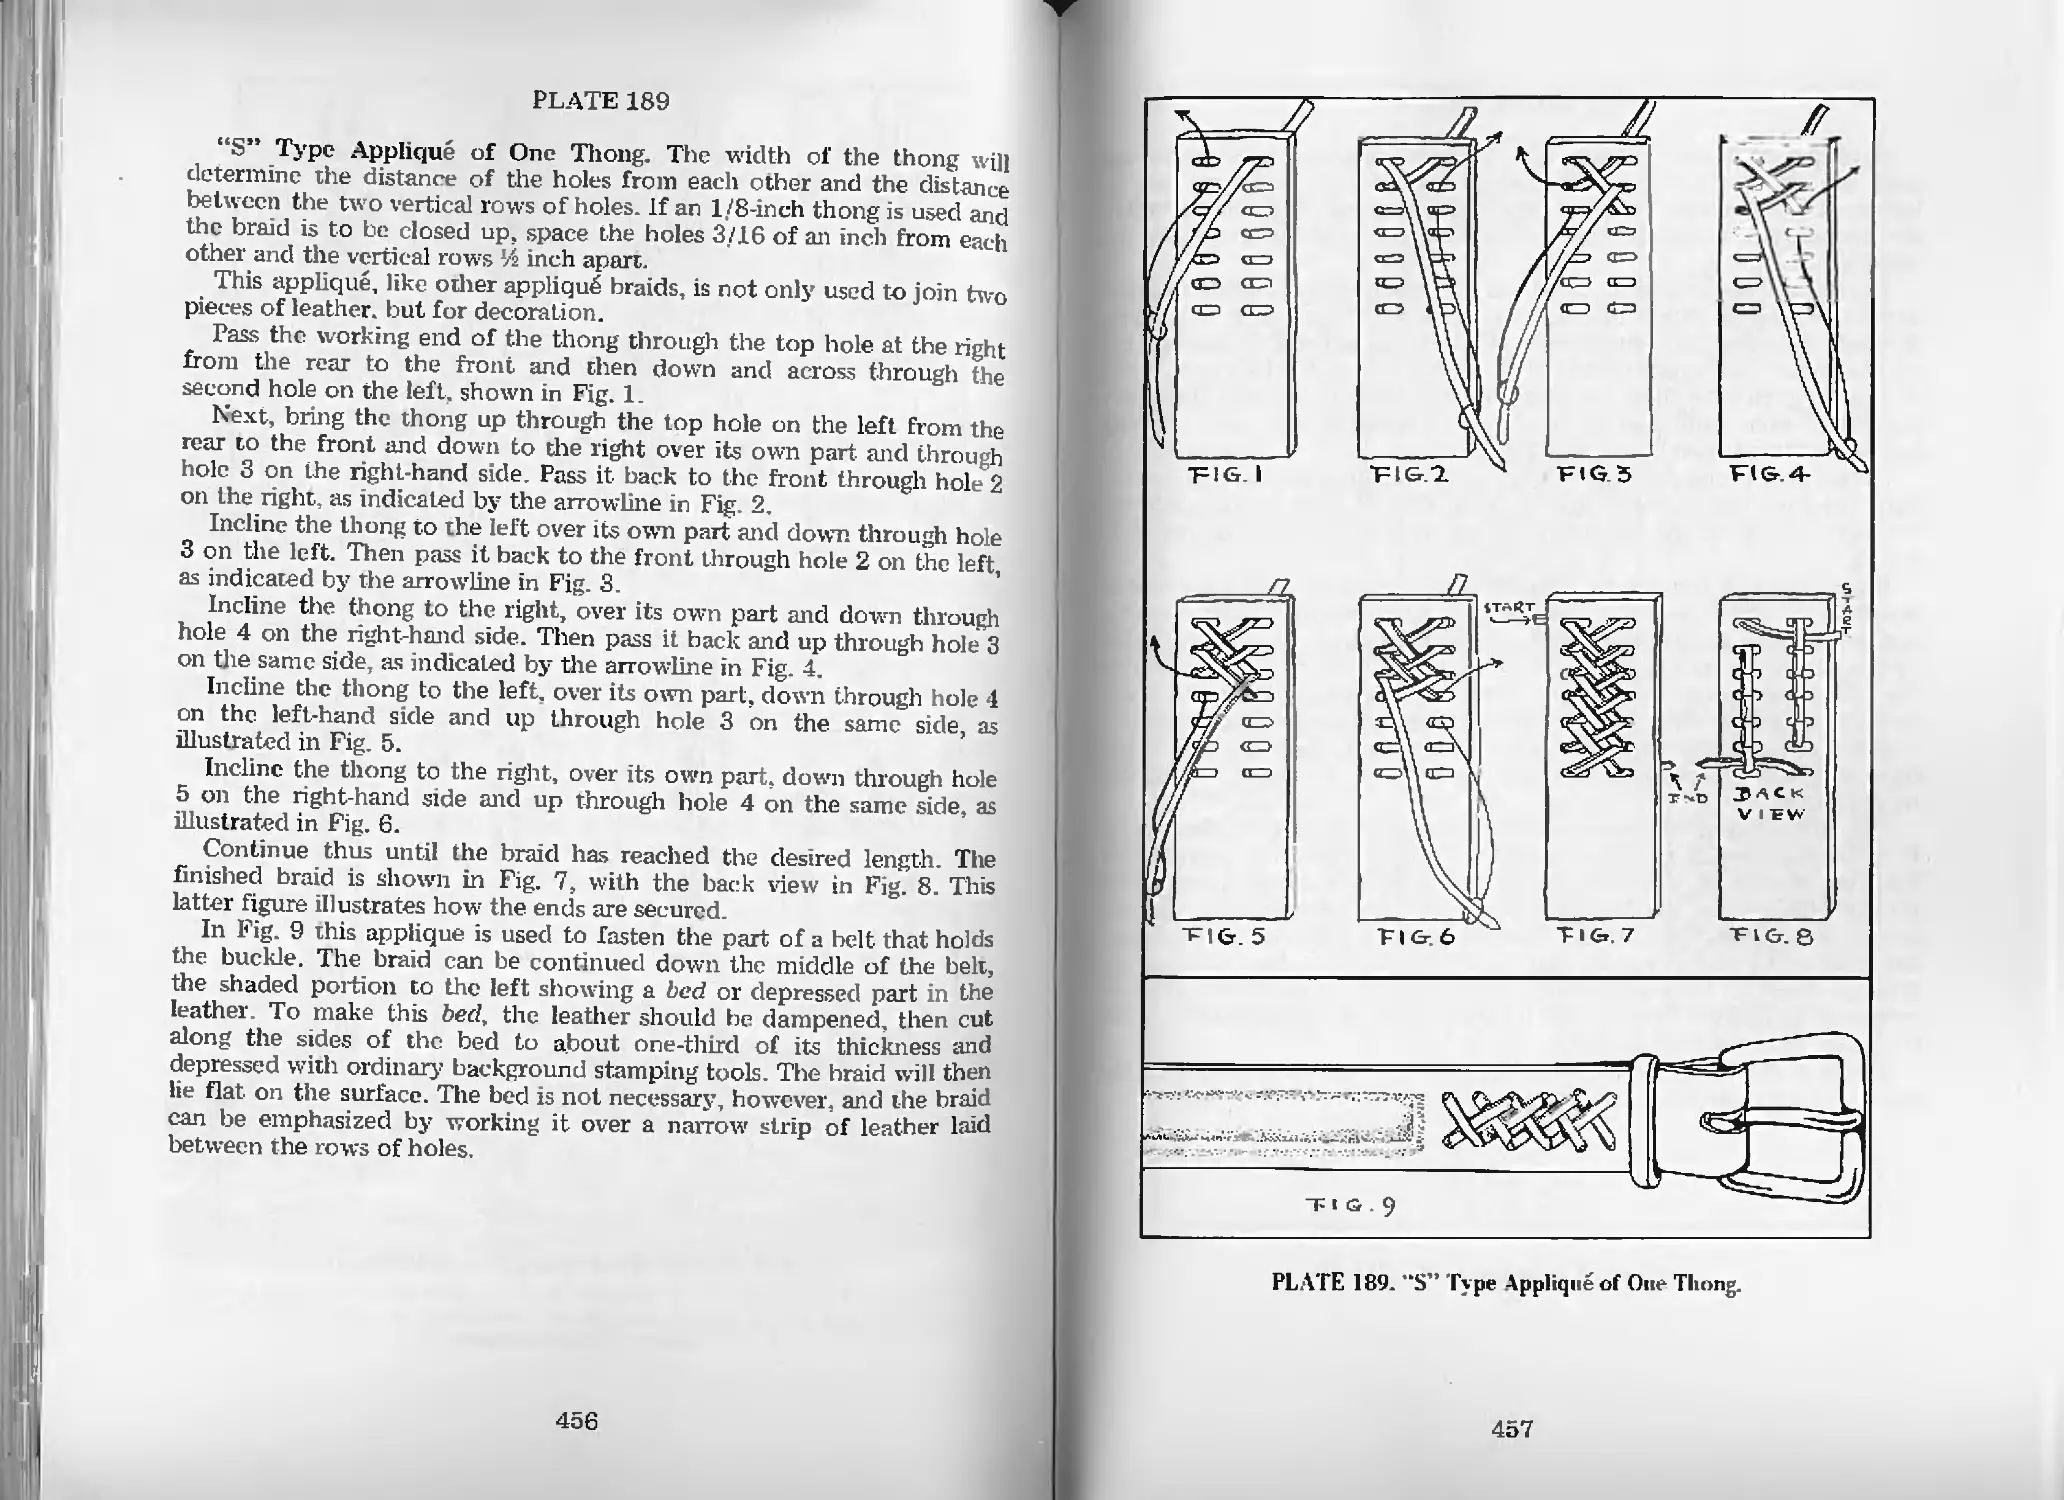
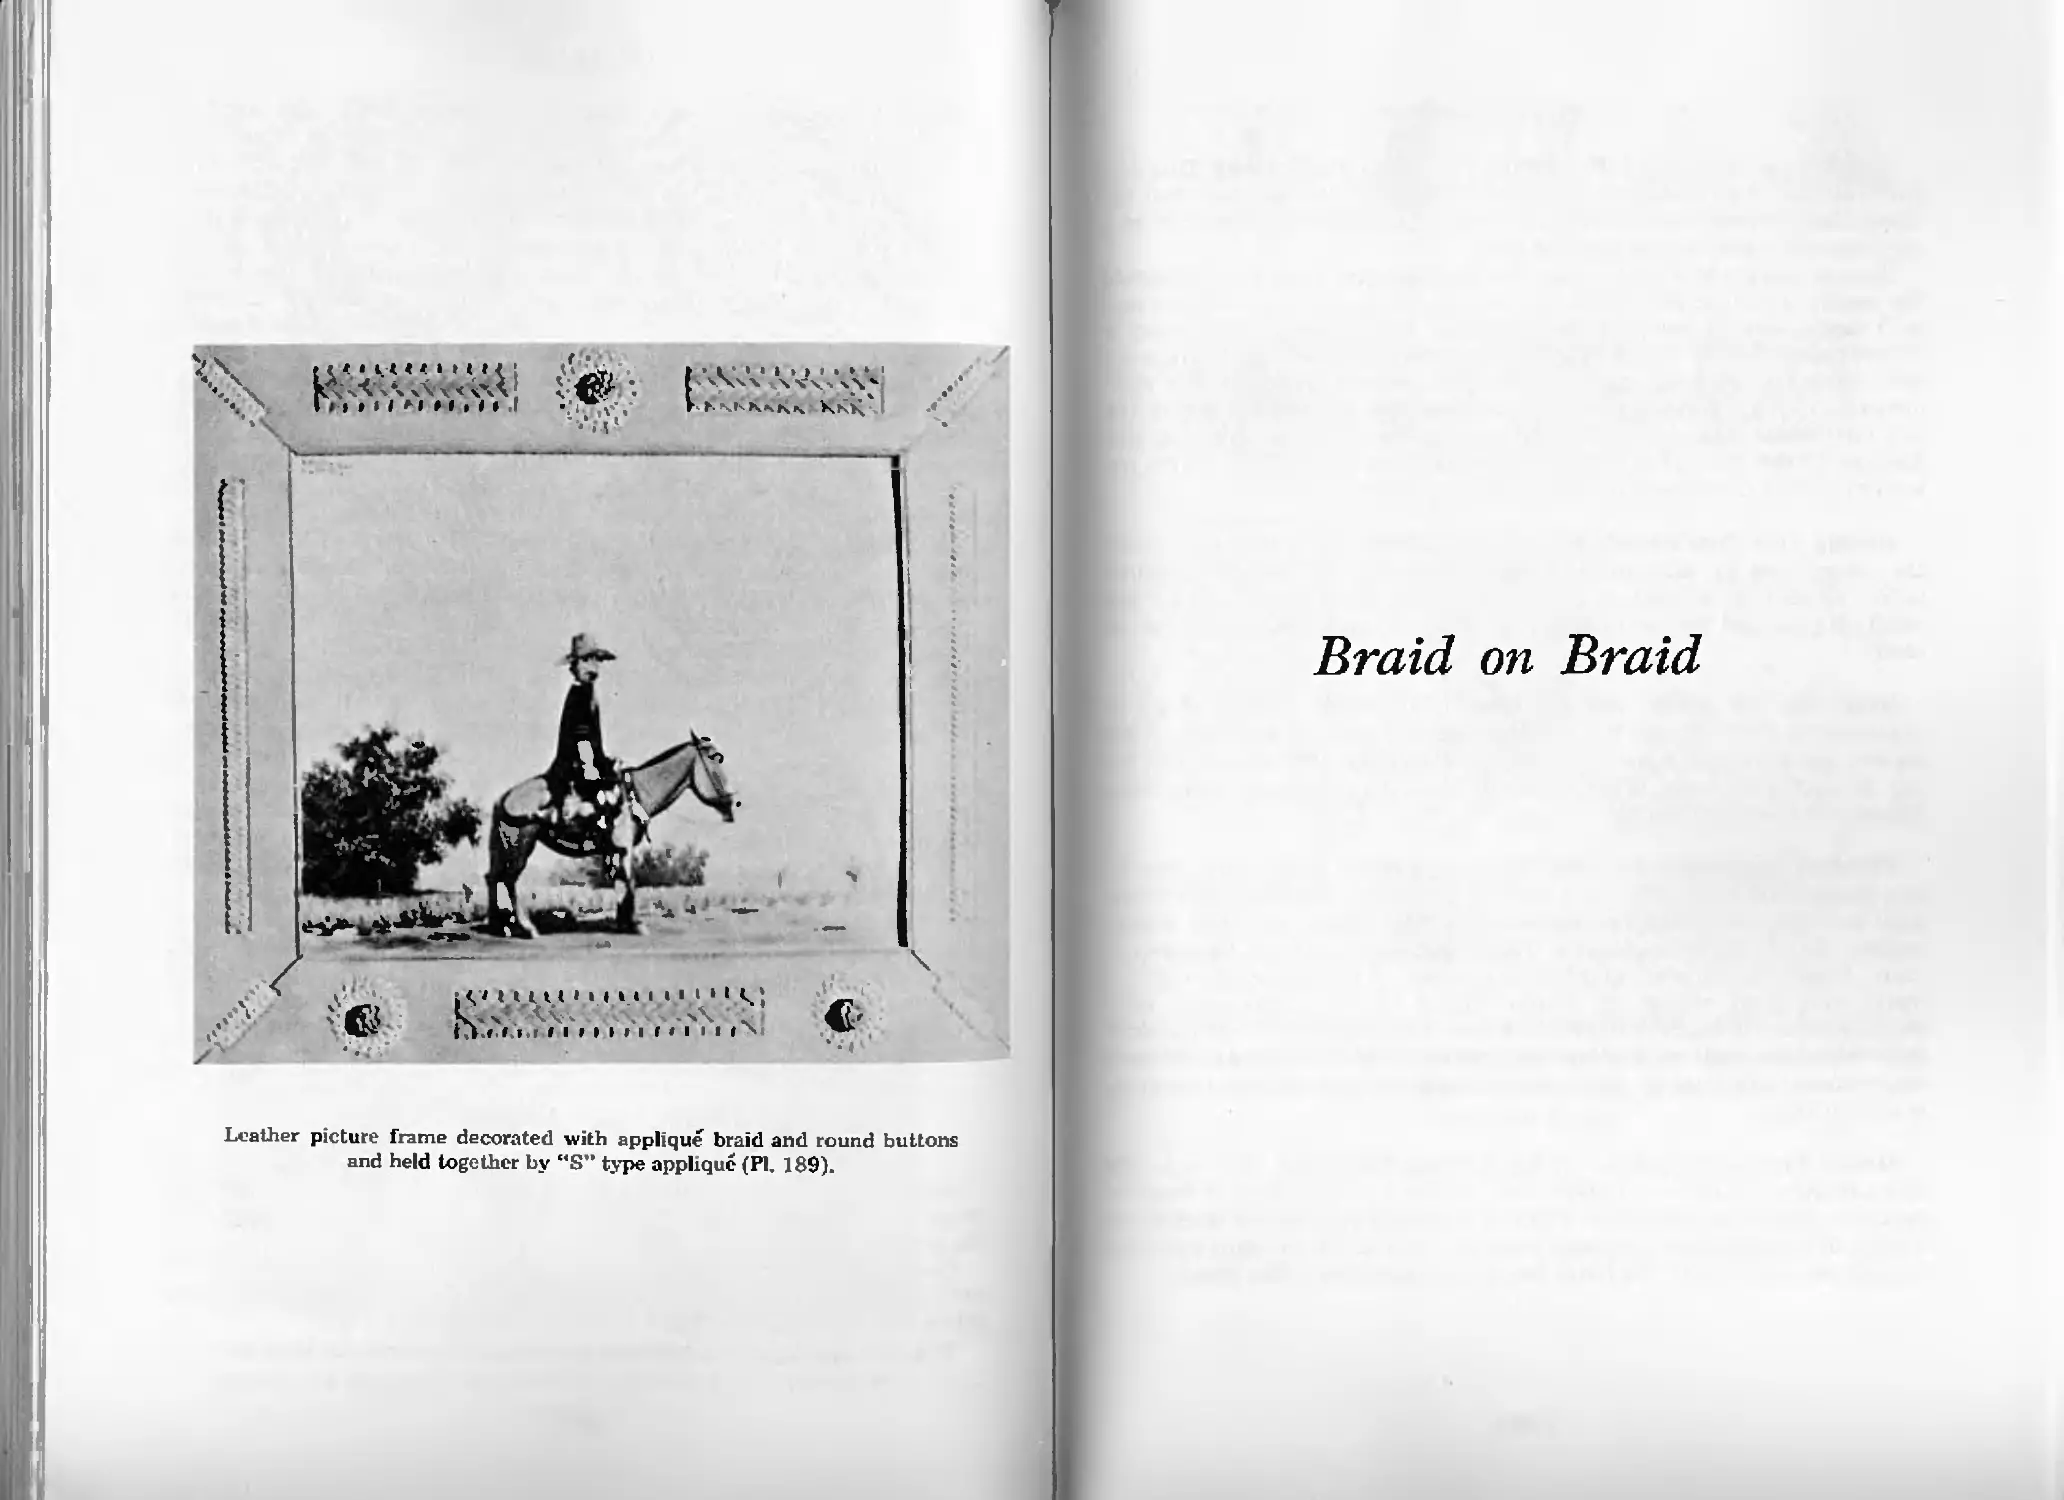
“S” Type Applique of One Thong—Pl. 189 456
Applique of Three Thongs—Pl. 190 458
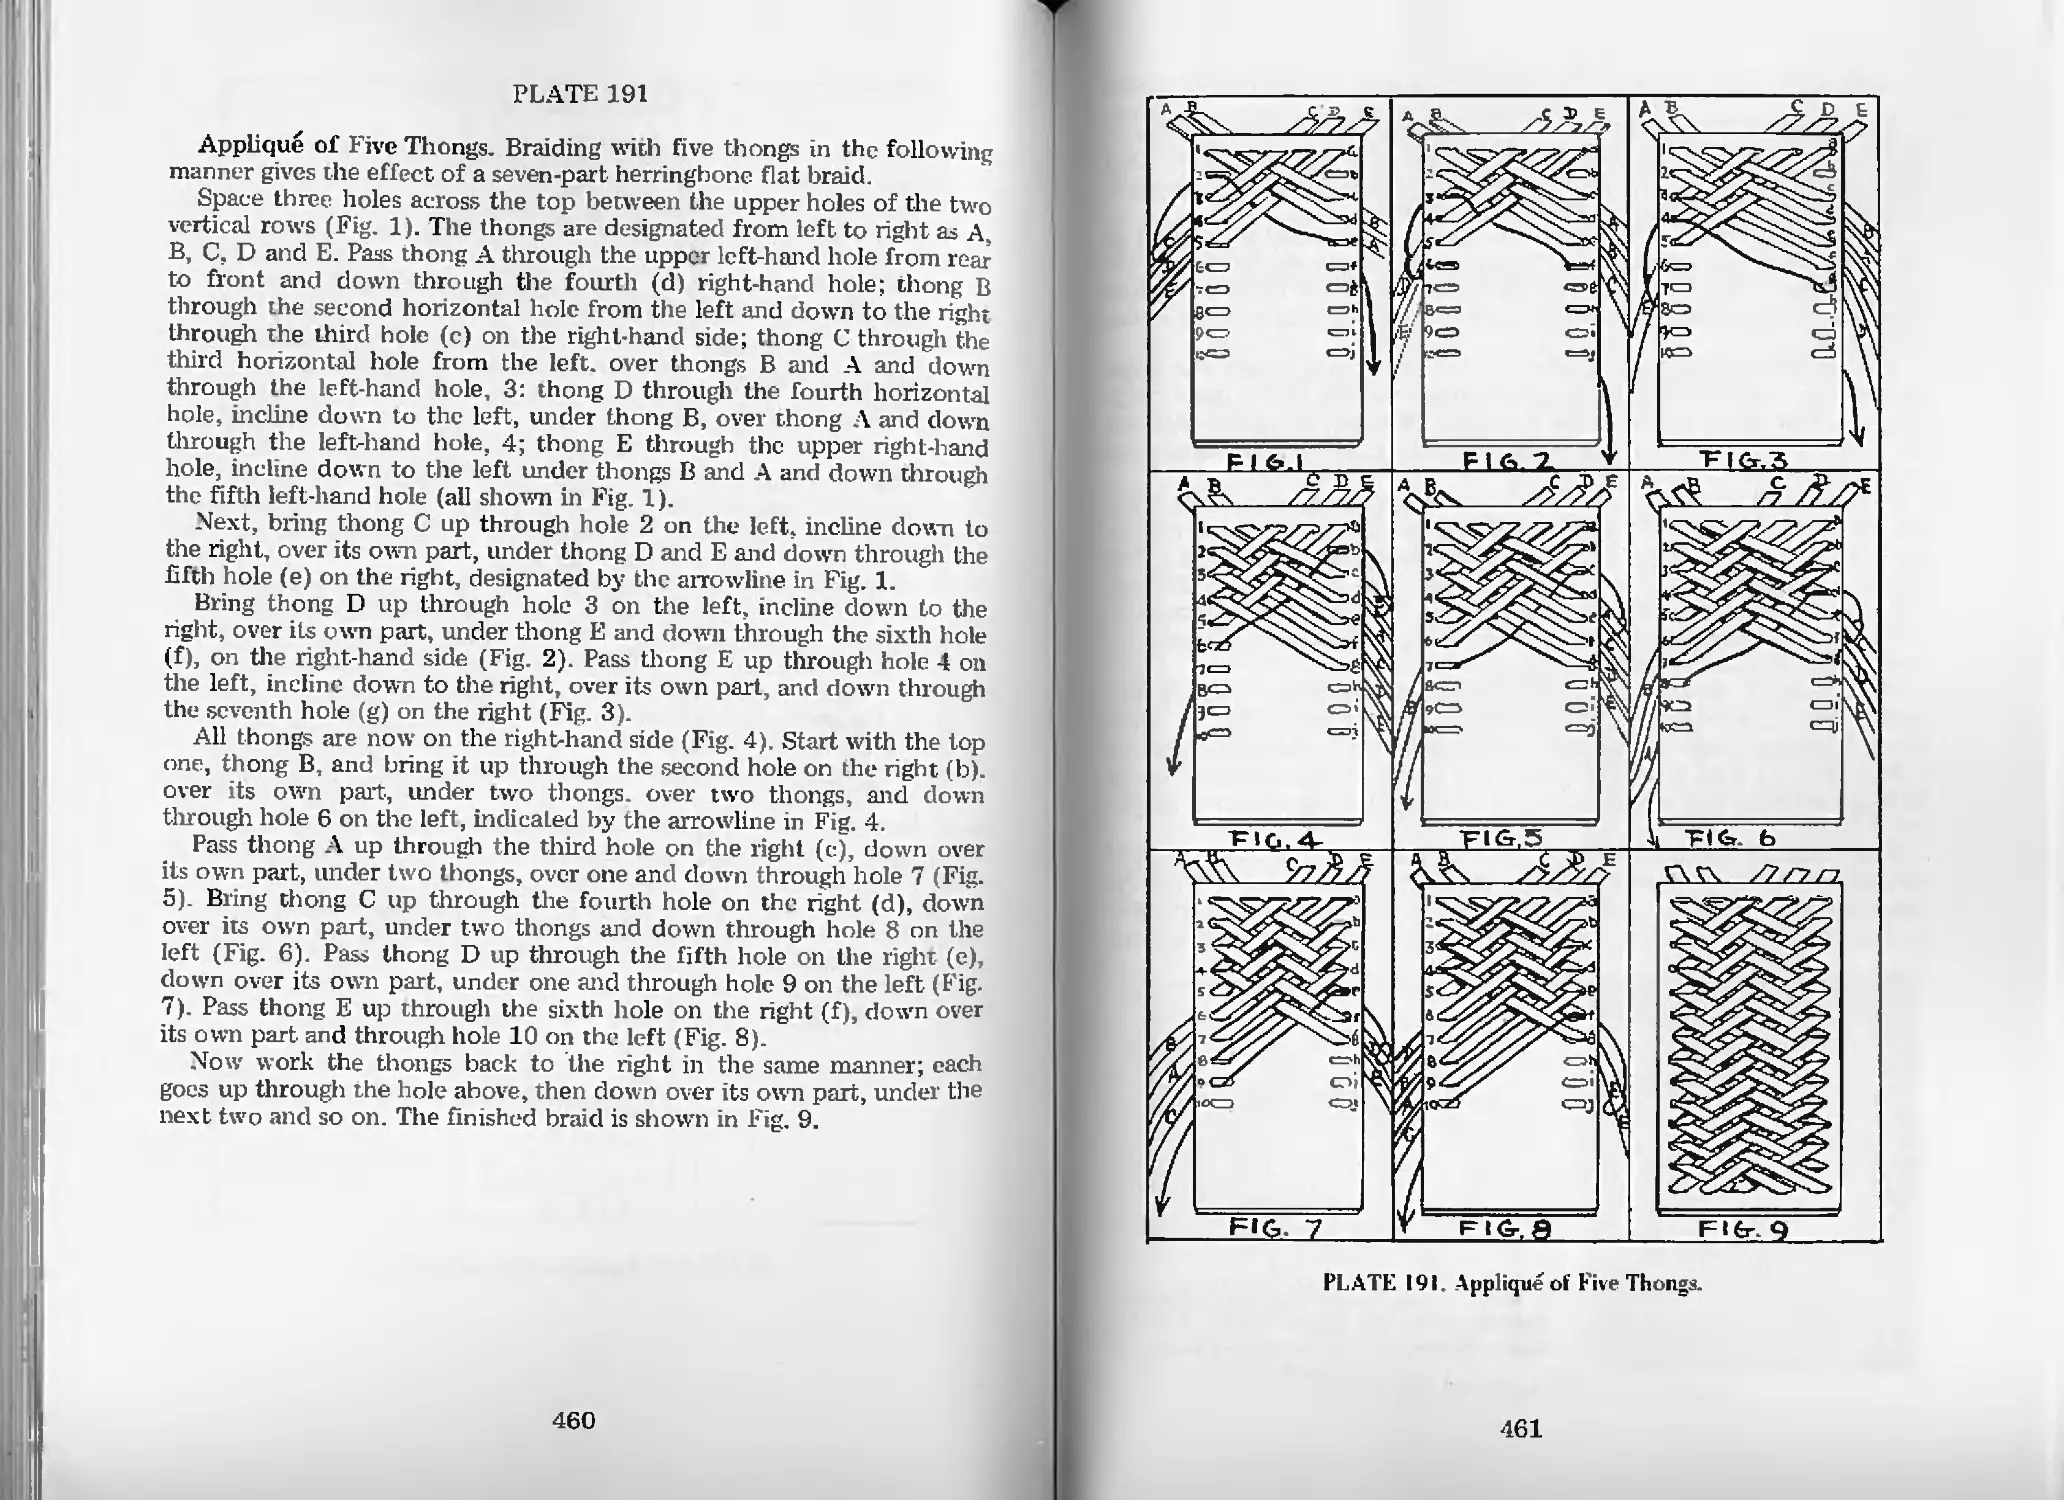
Applique of Five Thongs—Pl. 191 460
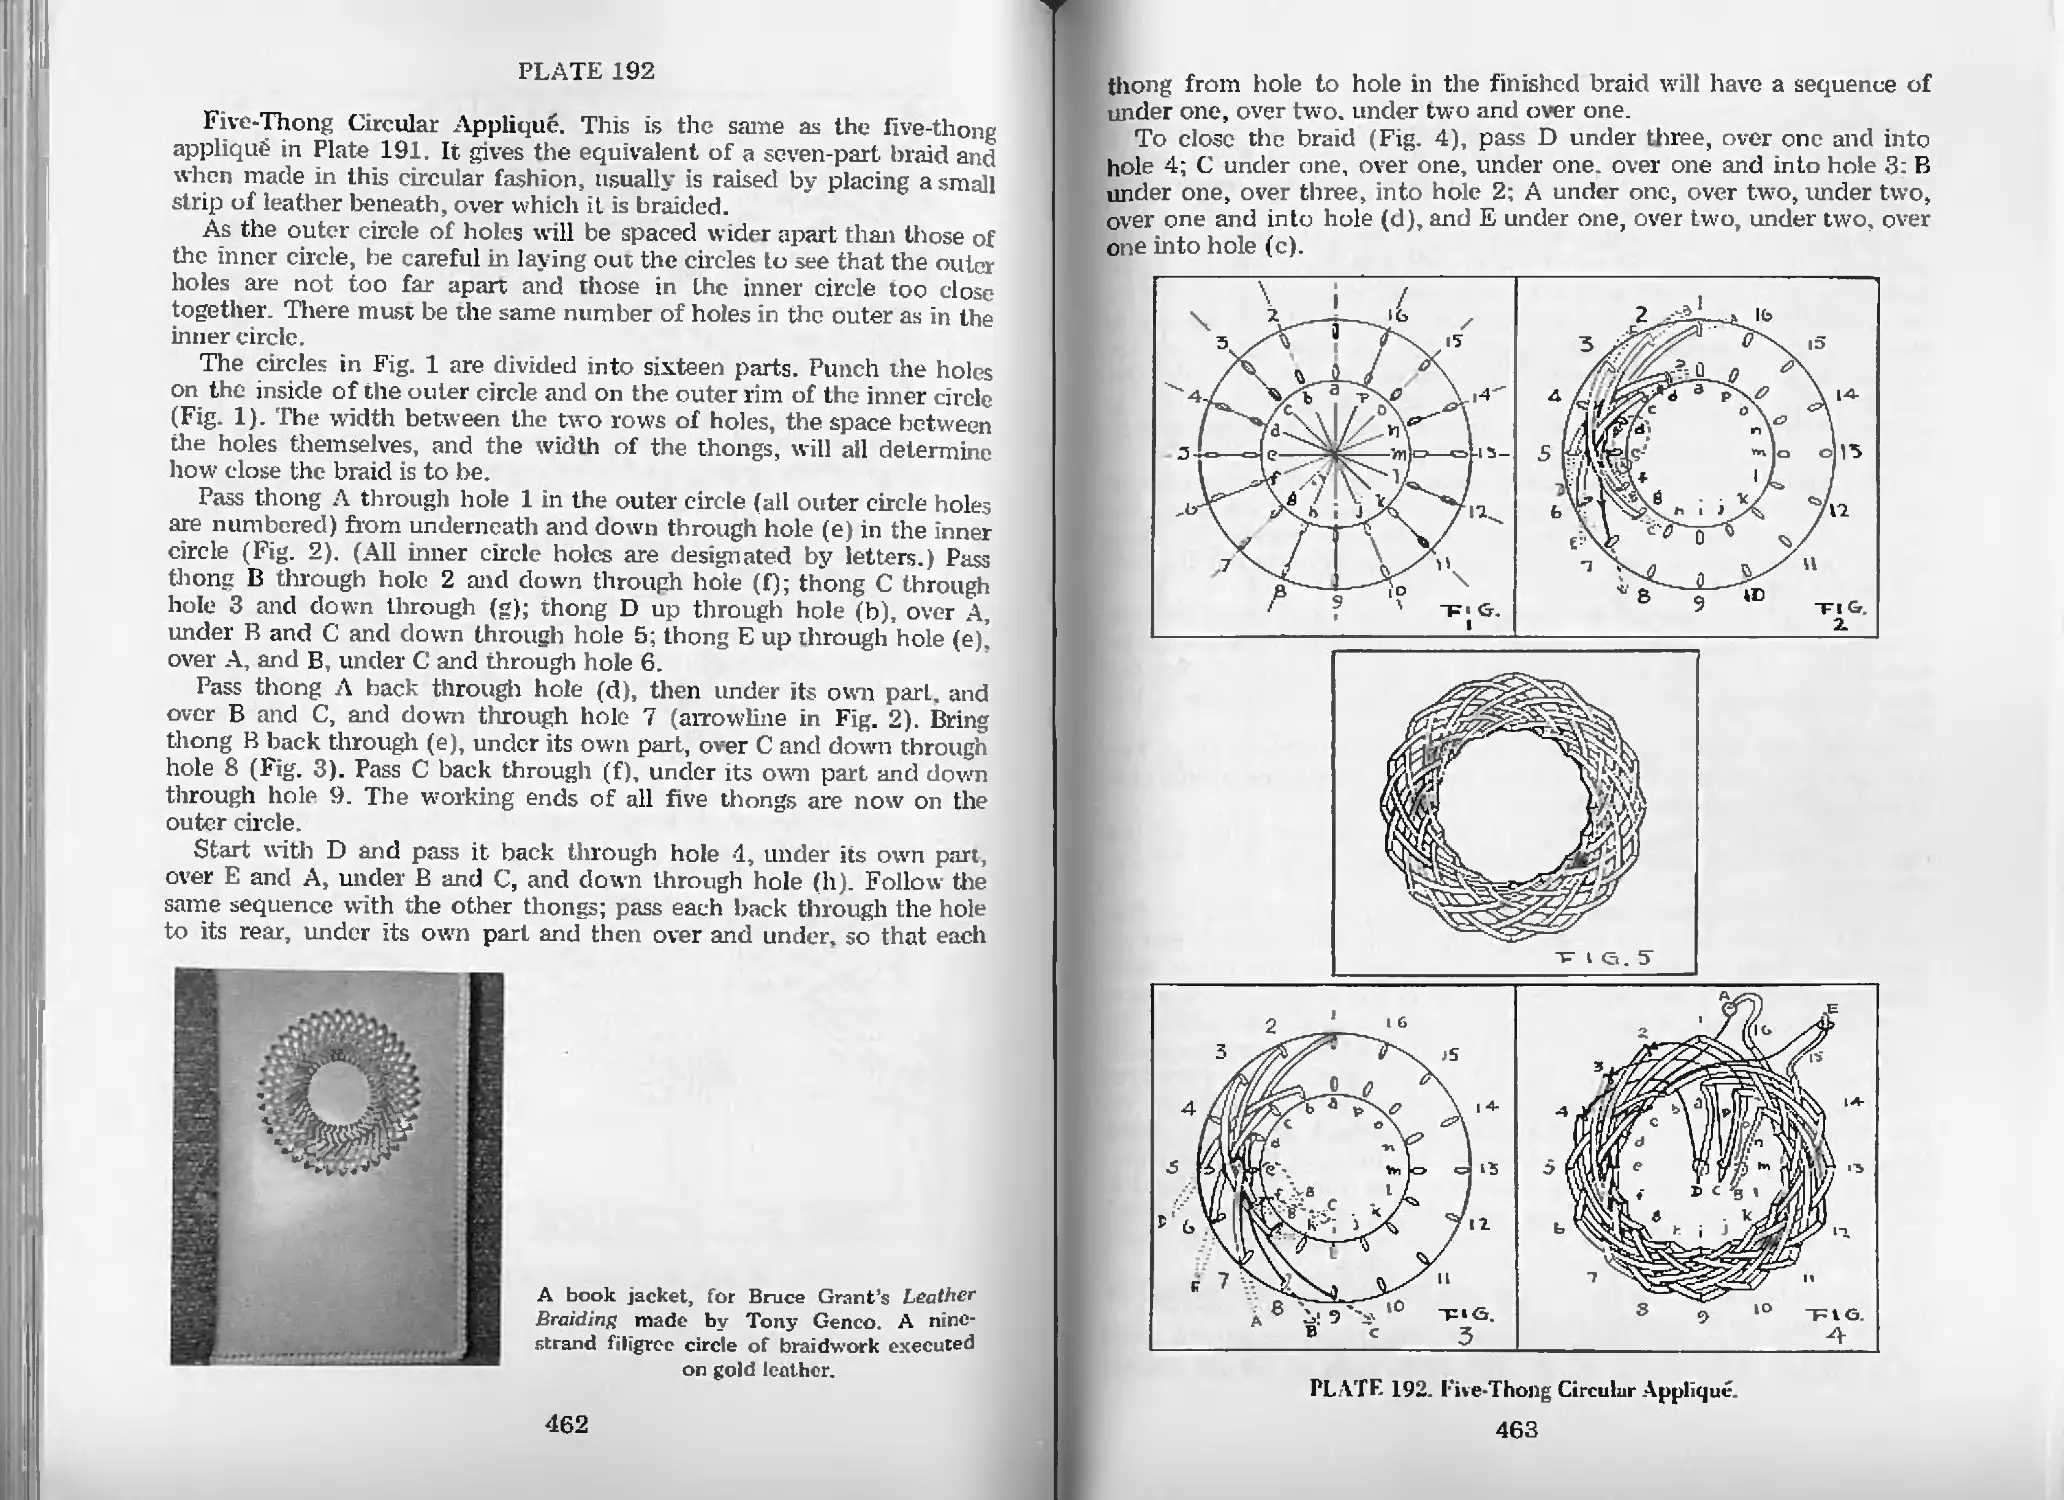
Five-Thong Circular Applique—Pl. 192 462
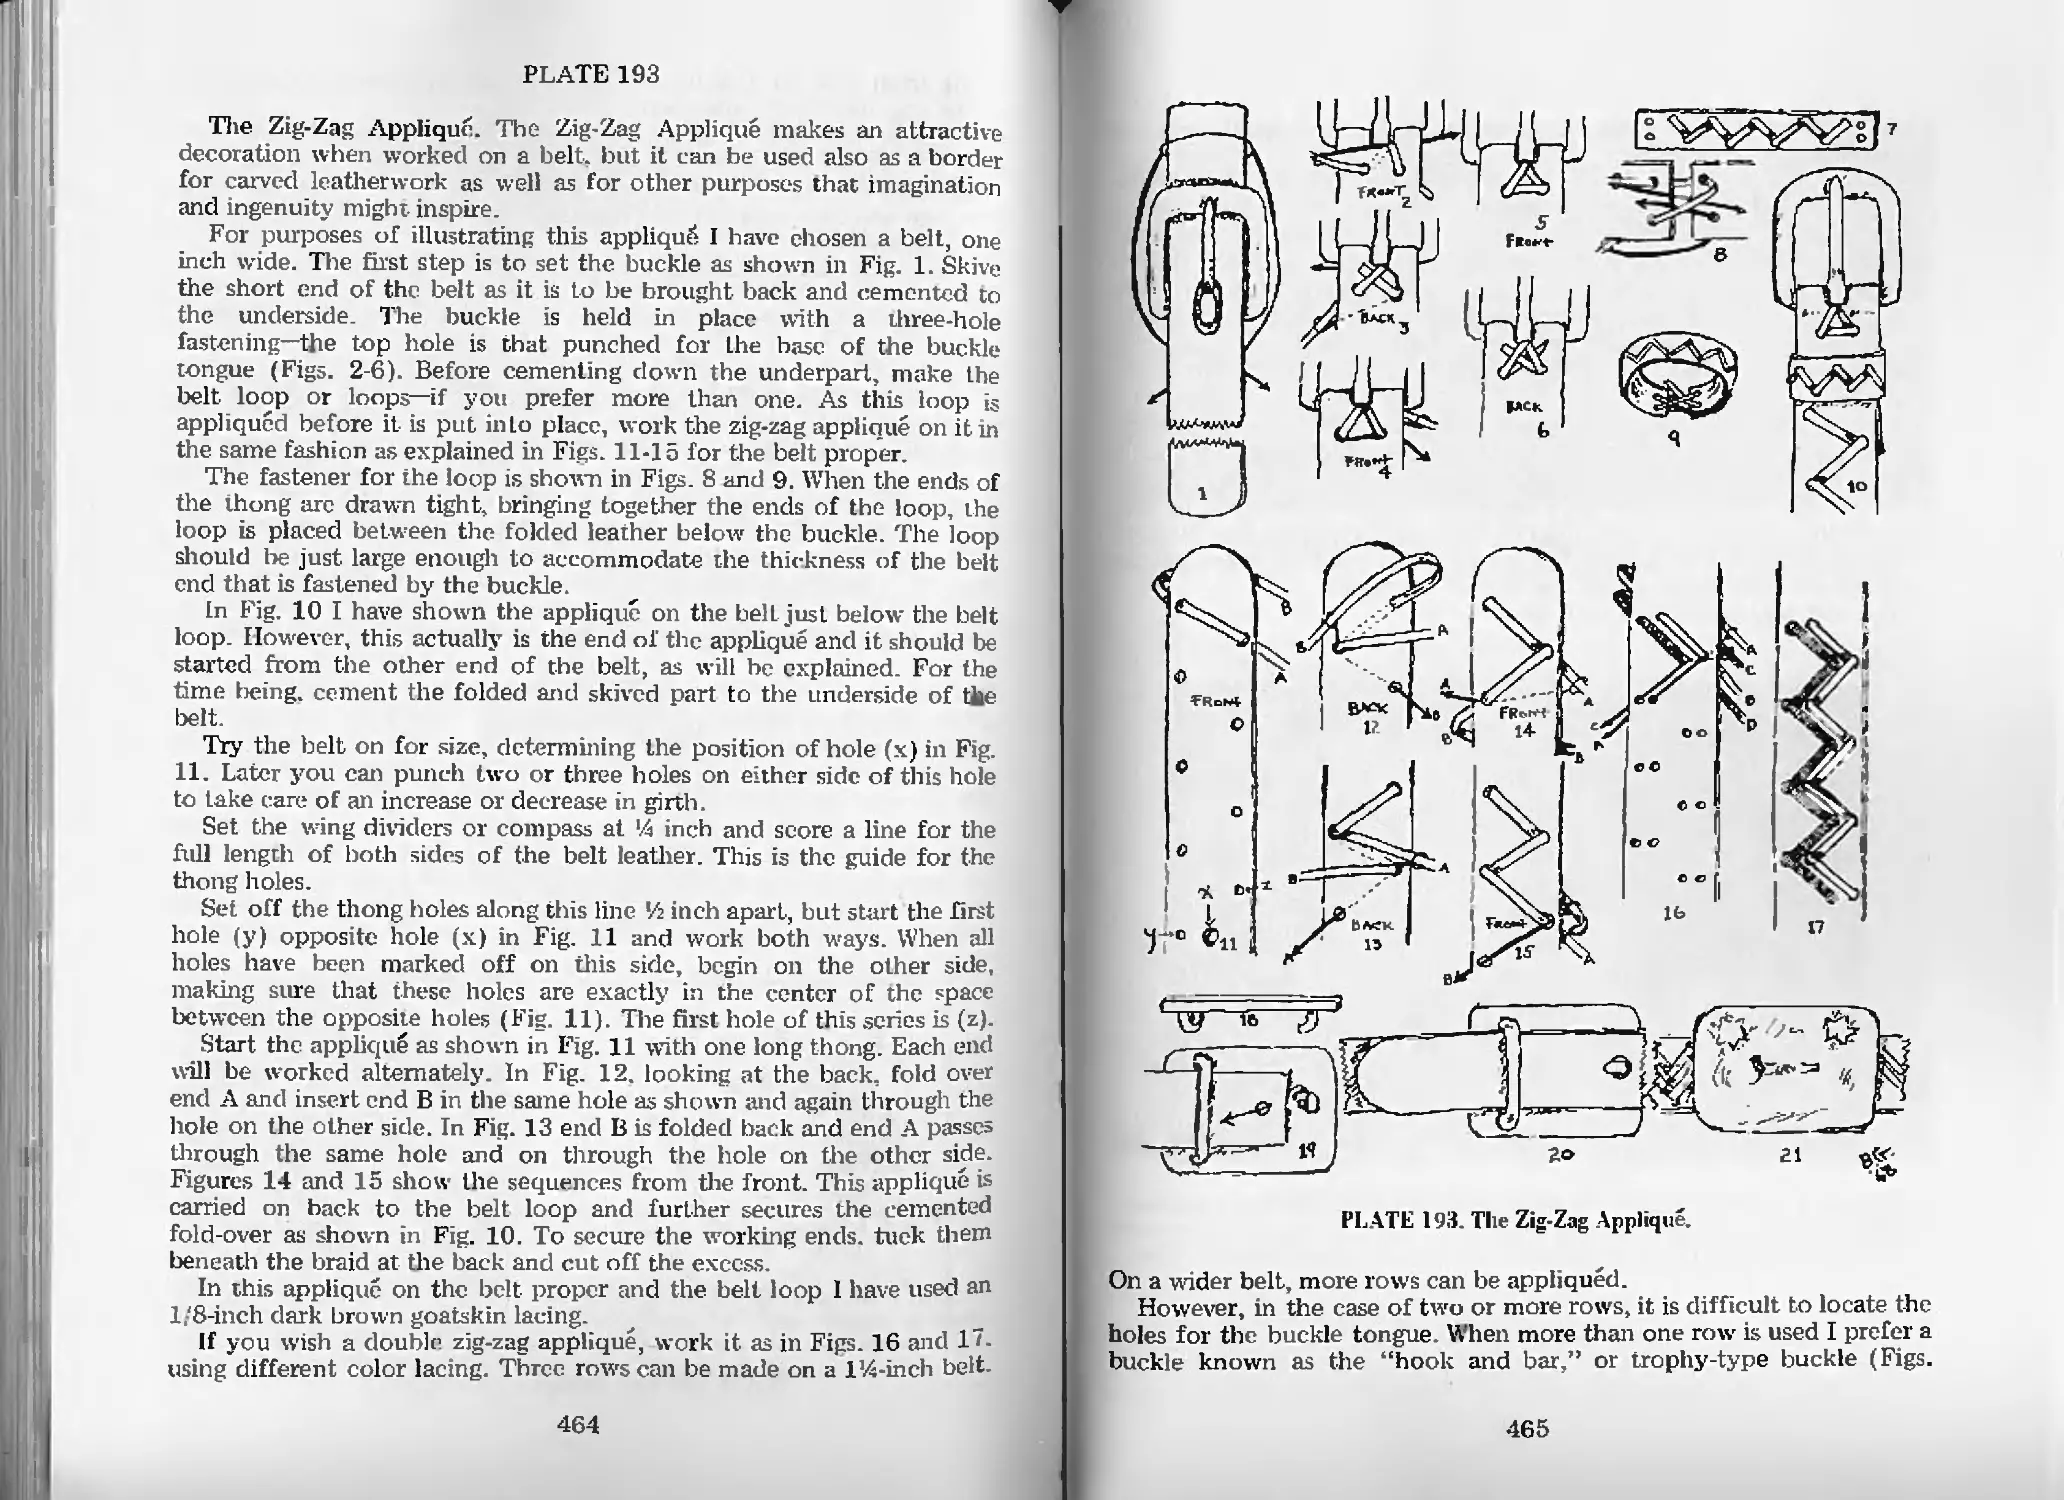
The Zig-Zag Applique—Pl. 193 464
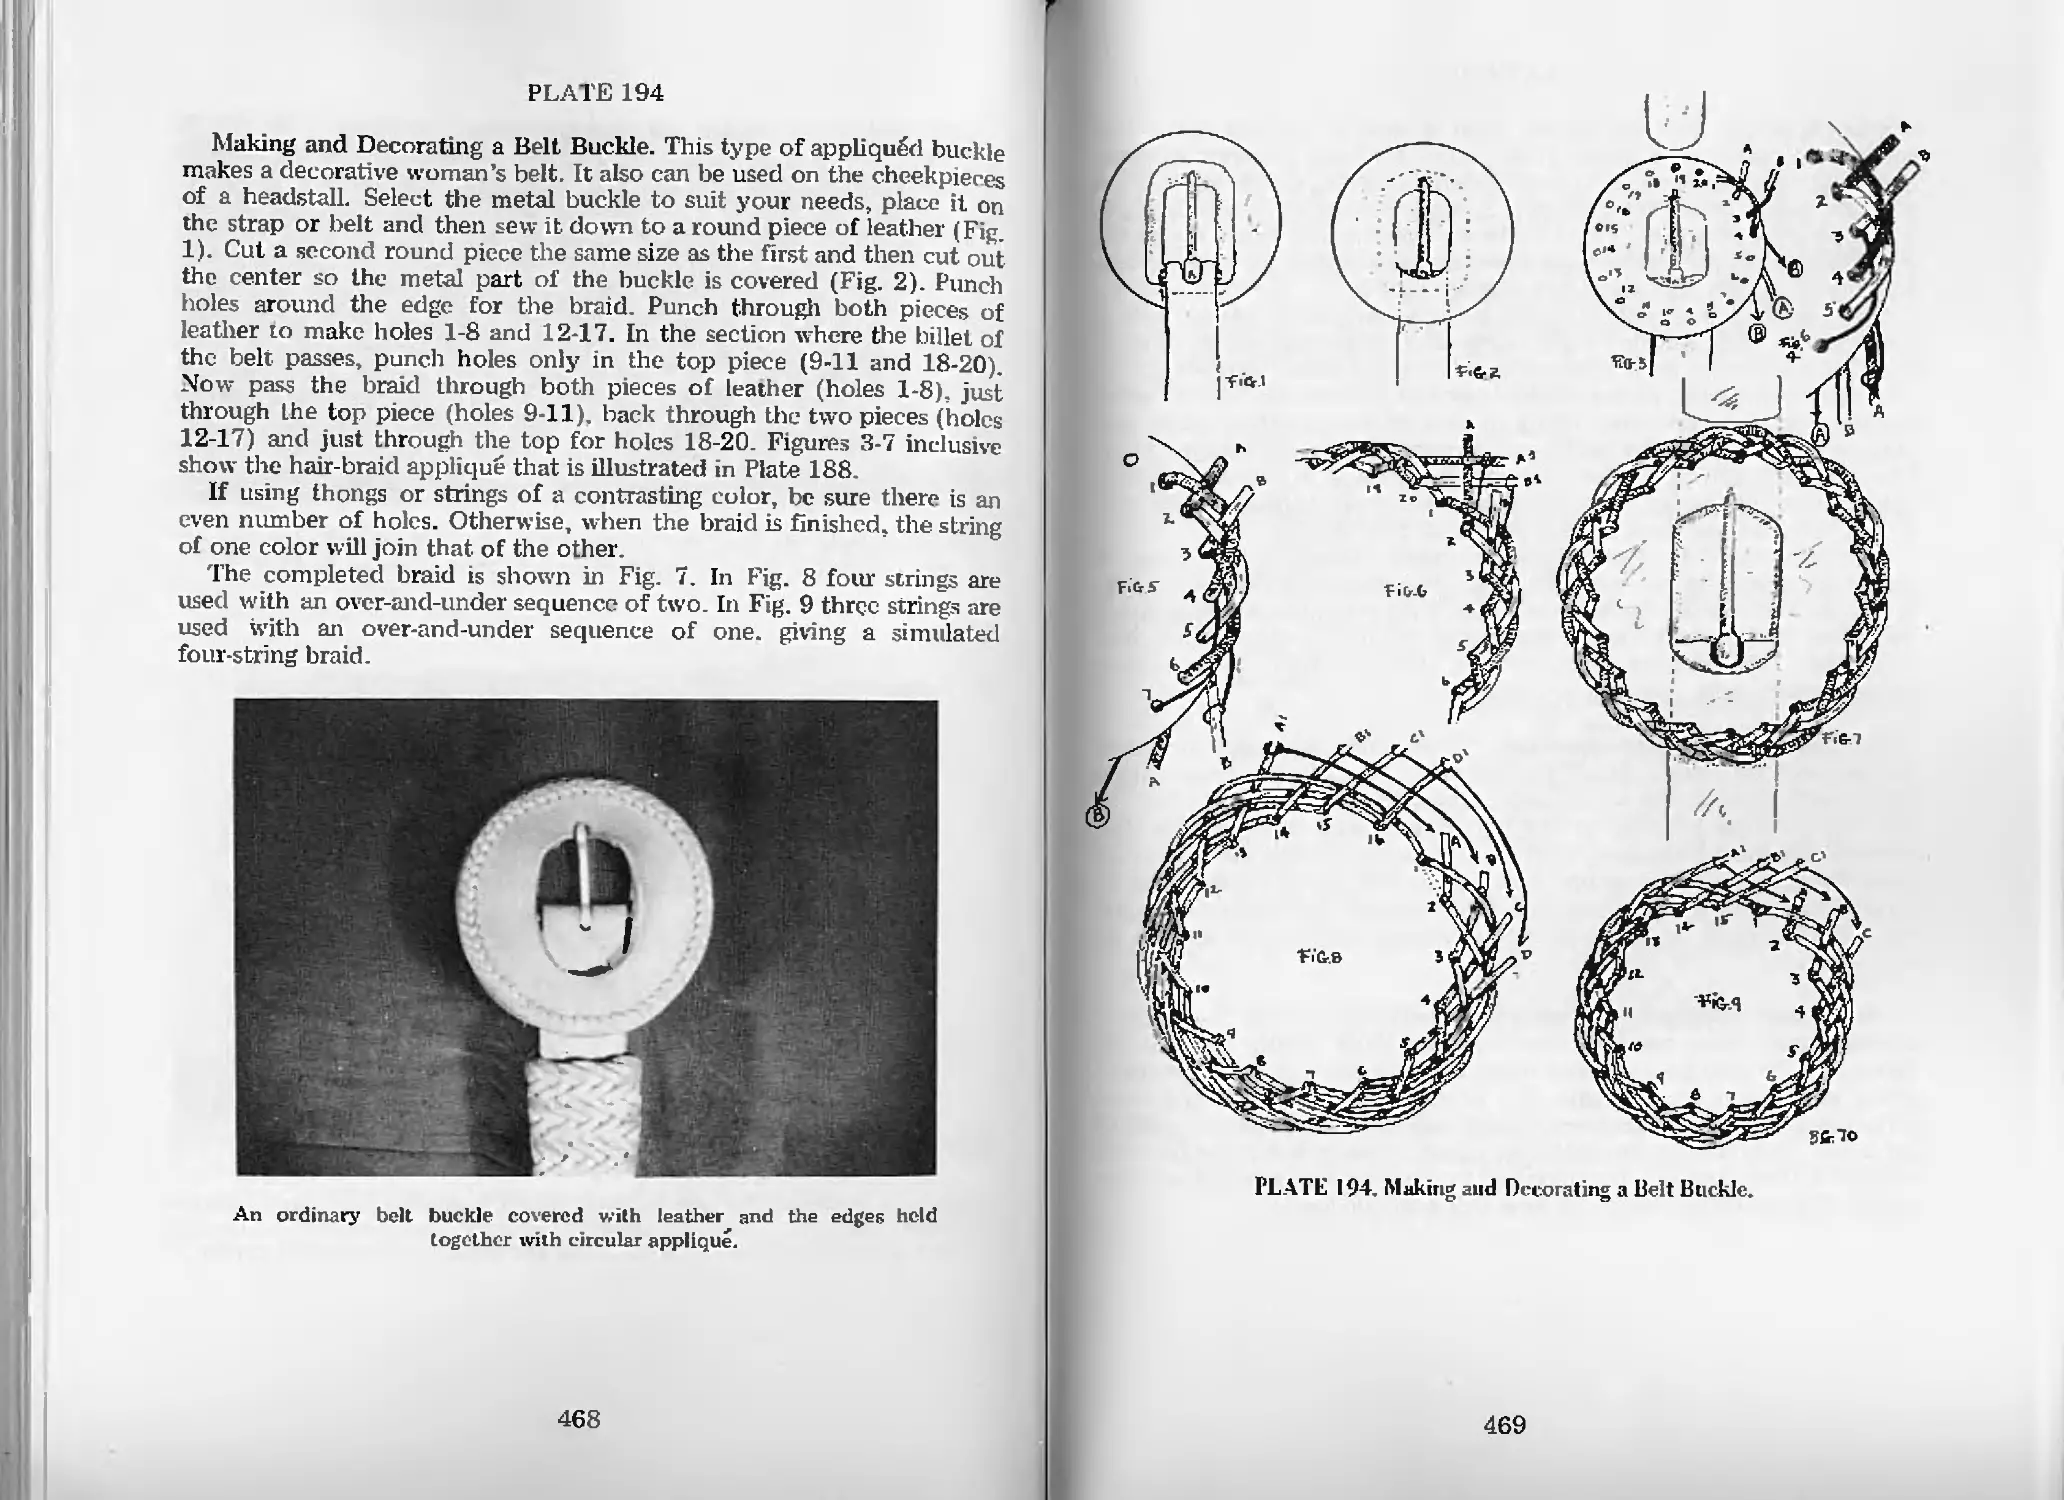
Making and Decorating a Belt Buckle—Pl. 194 468
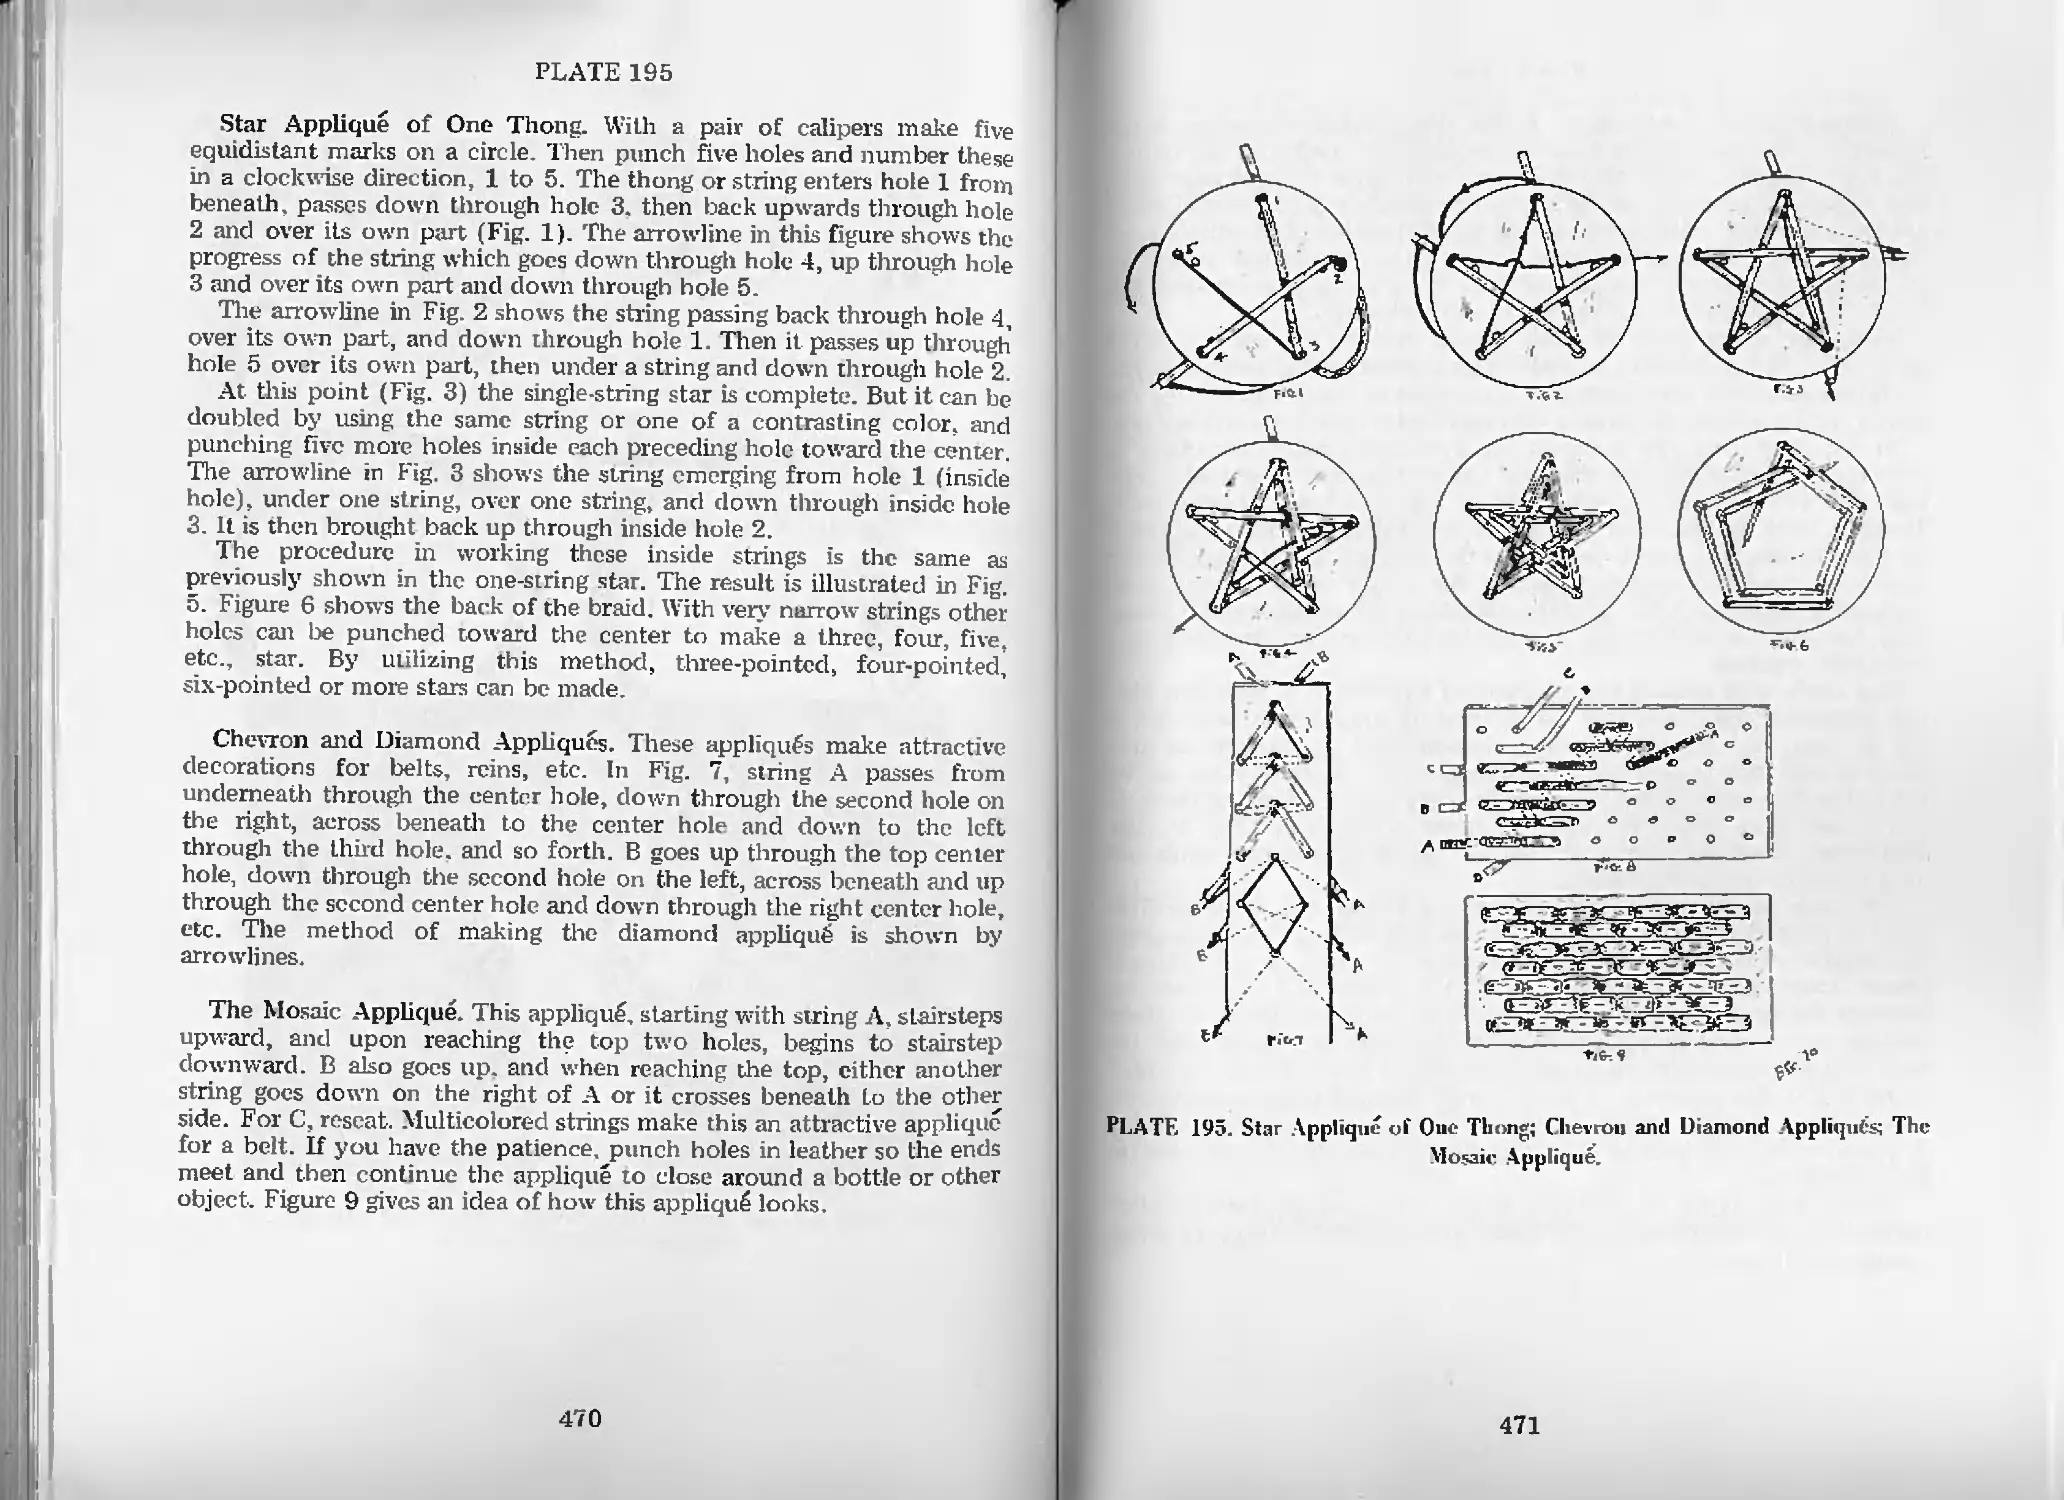
Star Applique of One Thong—Pl. 195 470
xv
Braided Appliques (cont.)
Chevron and Diamond Appliques—Pl. 195 470
The Mosaic Applique—Pl. 195 470
Saddle Decoration—Applique Braids—Pl. 196 472
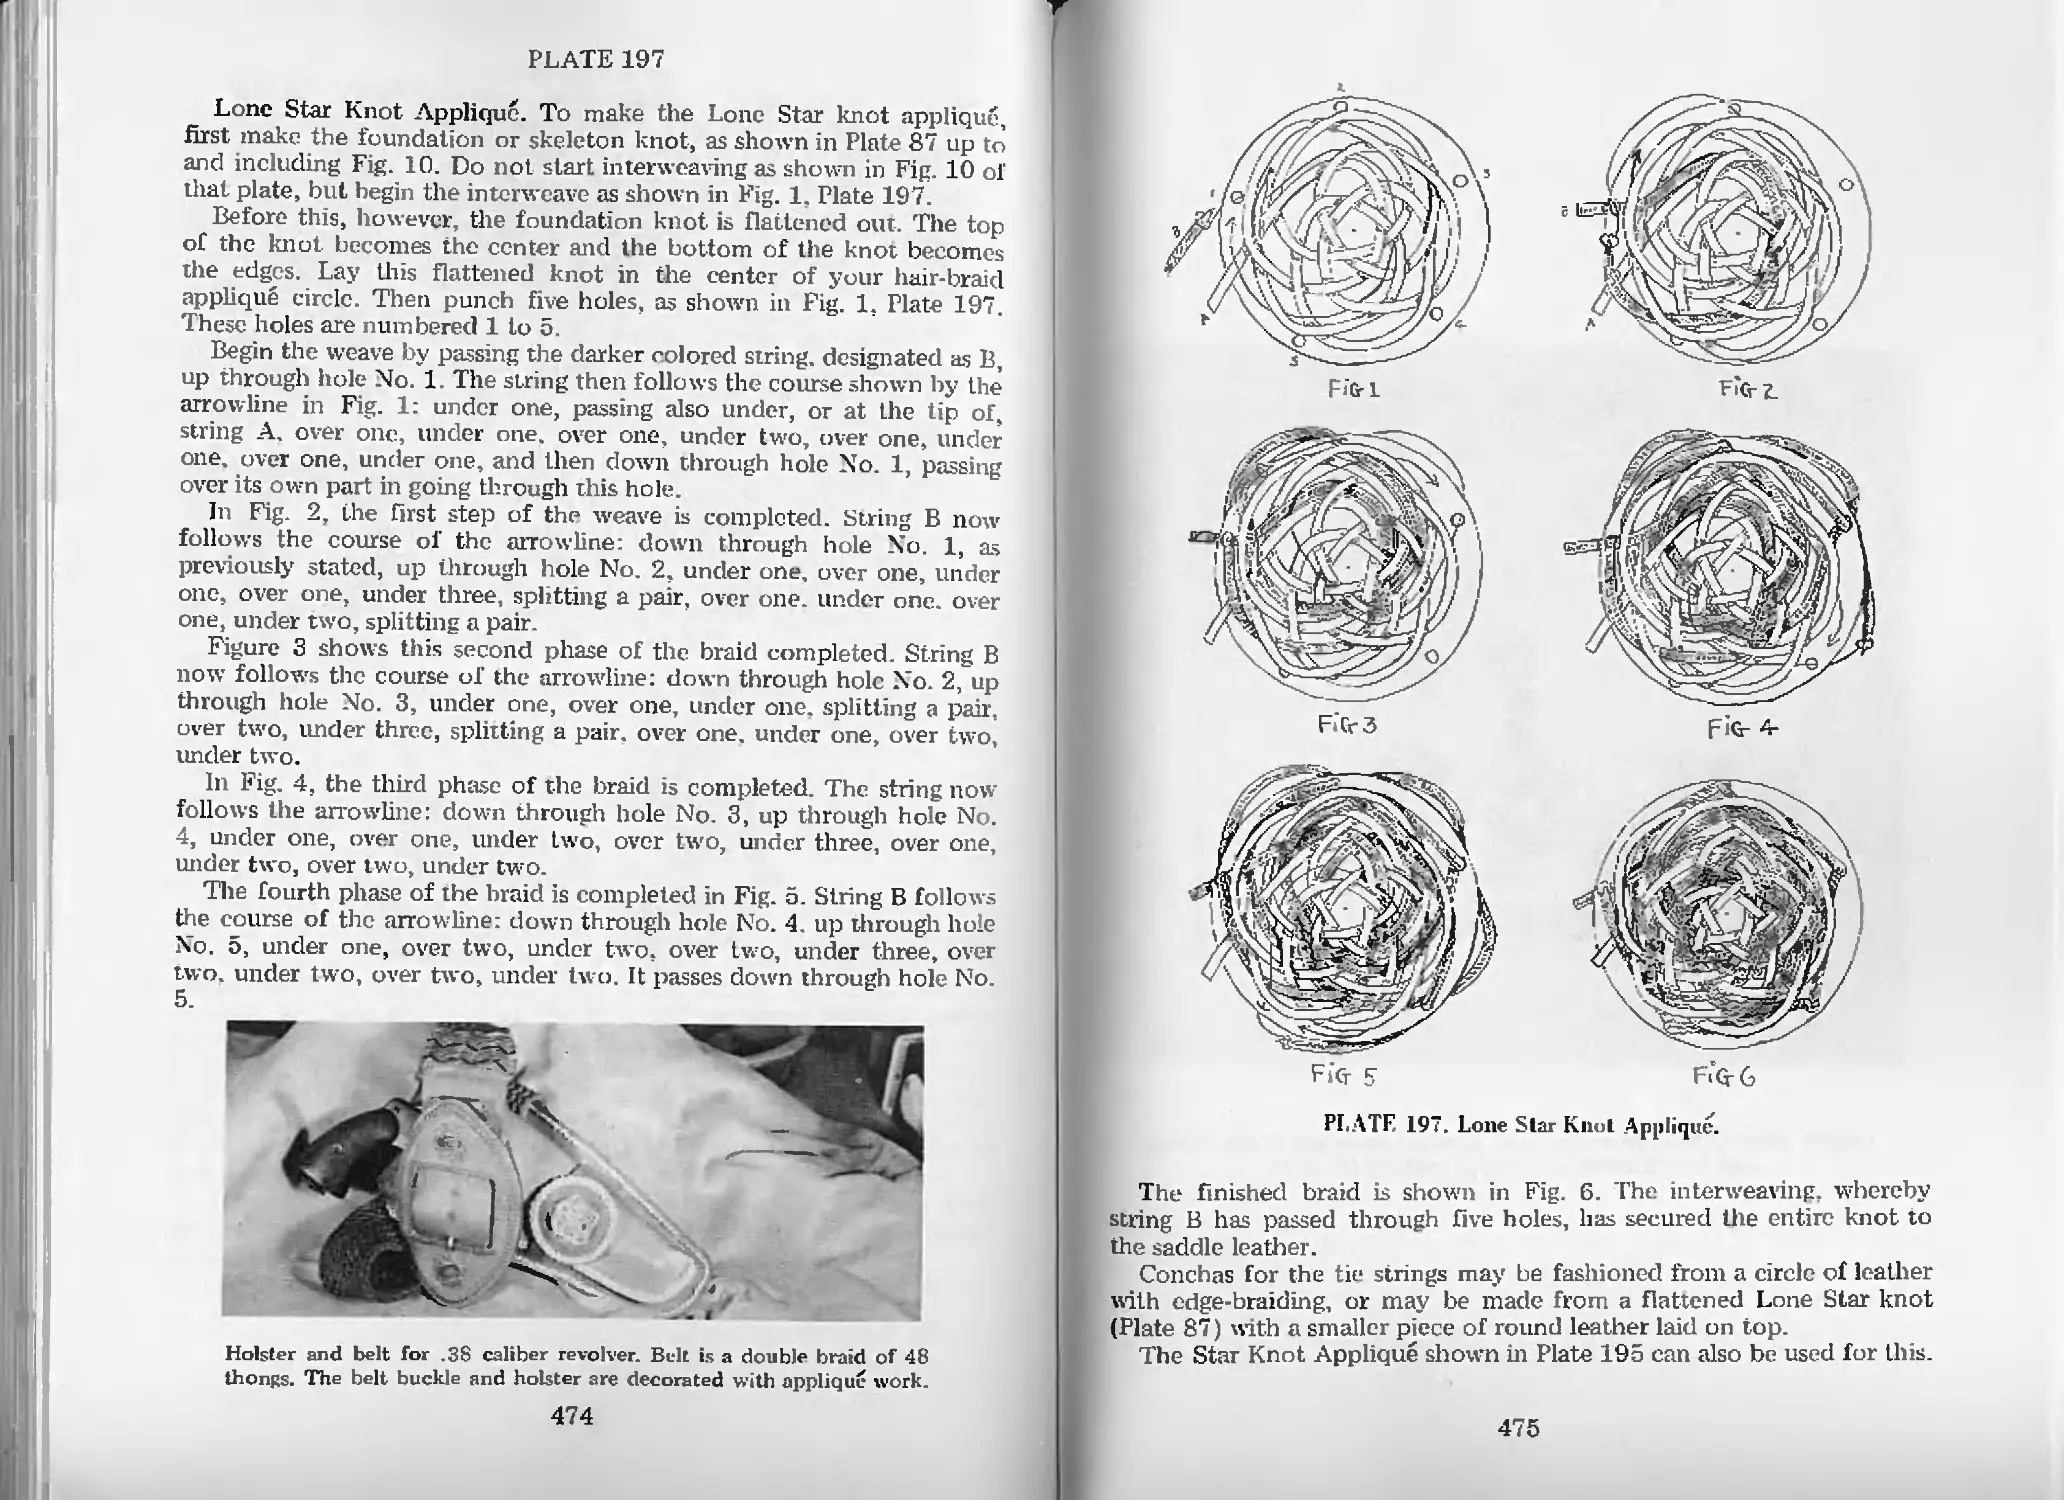
Lone Star Knot Applique—Pl. 197 474
Braid on Braid
Mosaic Type Braid on a Three-Part,
Five-Bight Turk’s-head—Pl. 198 478
Joining Two Turk’s-heads with the “S” Braid—Pl. 198 478
Braid on the Aztec Button Knot—Pl. 198 478
Five-Part Applique on a Nine-Part,
Eight-Bight Knot-Pl. 198 478
Mosaic Type Applique on an Eight-String
Flat Braid-Pl. 198 478
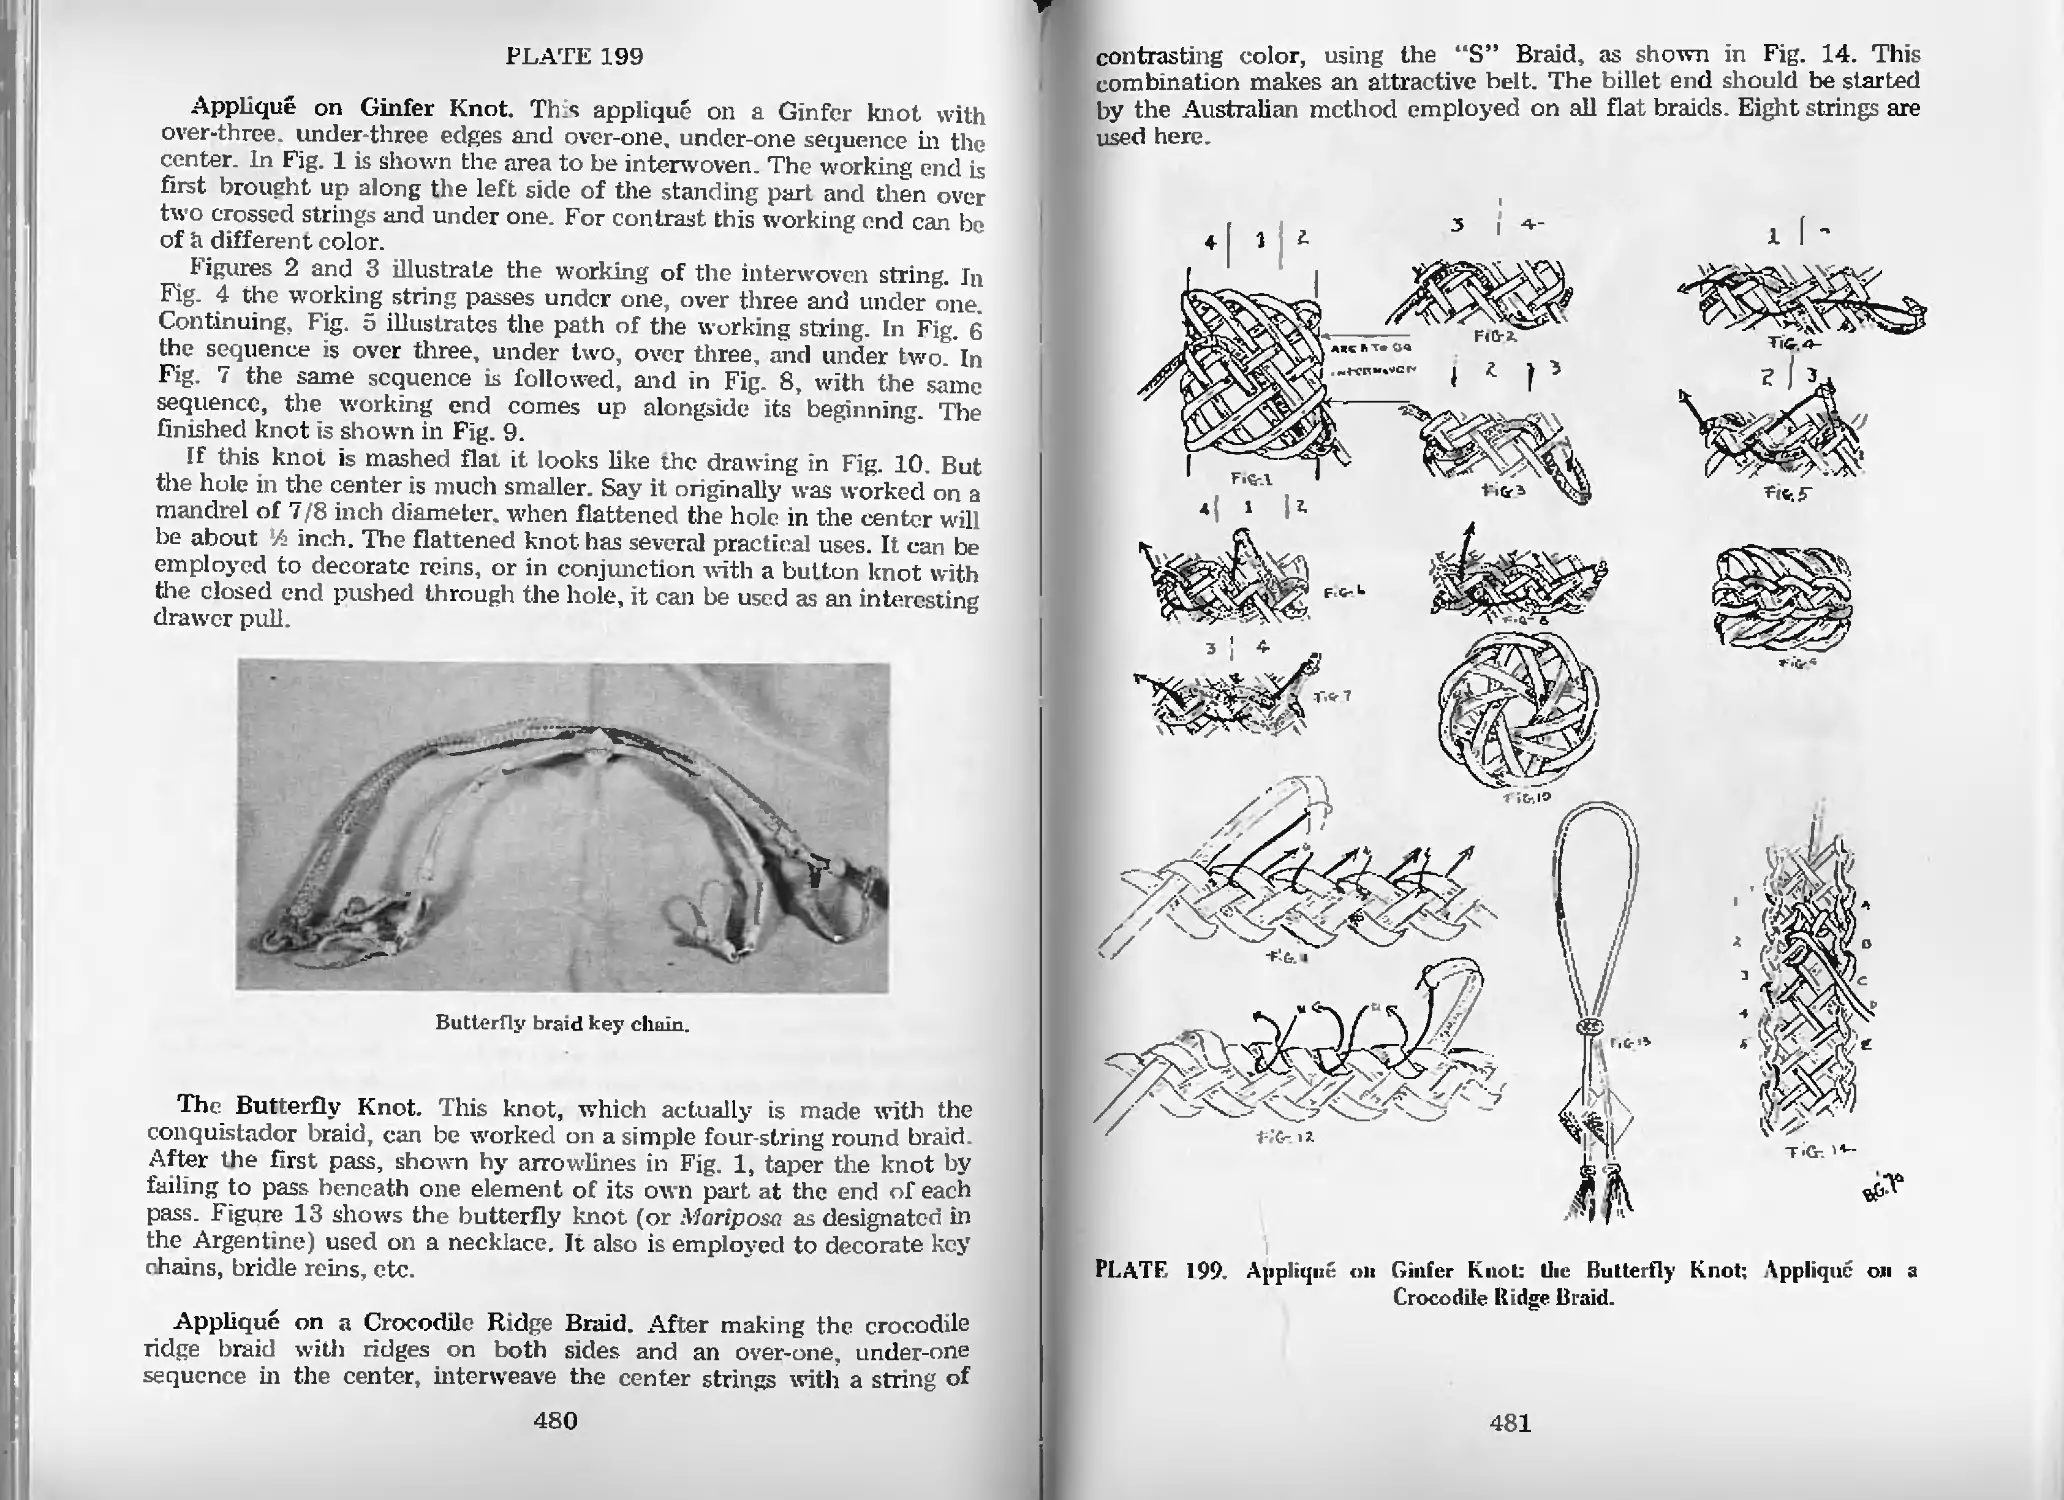
Applique on Ginfer Knot—Pl. 199 480
The Butterfly Knot—Pl. 199 480
Applique on a Crocodile Ridge Braid—Pl. 199 480
Additional Projects and Examples
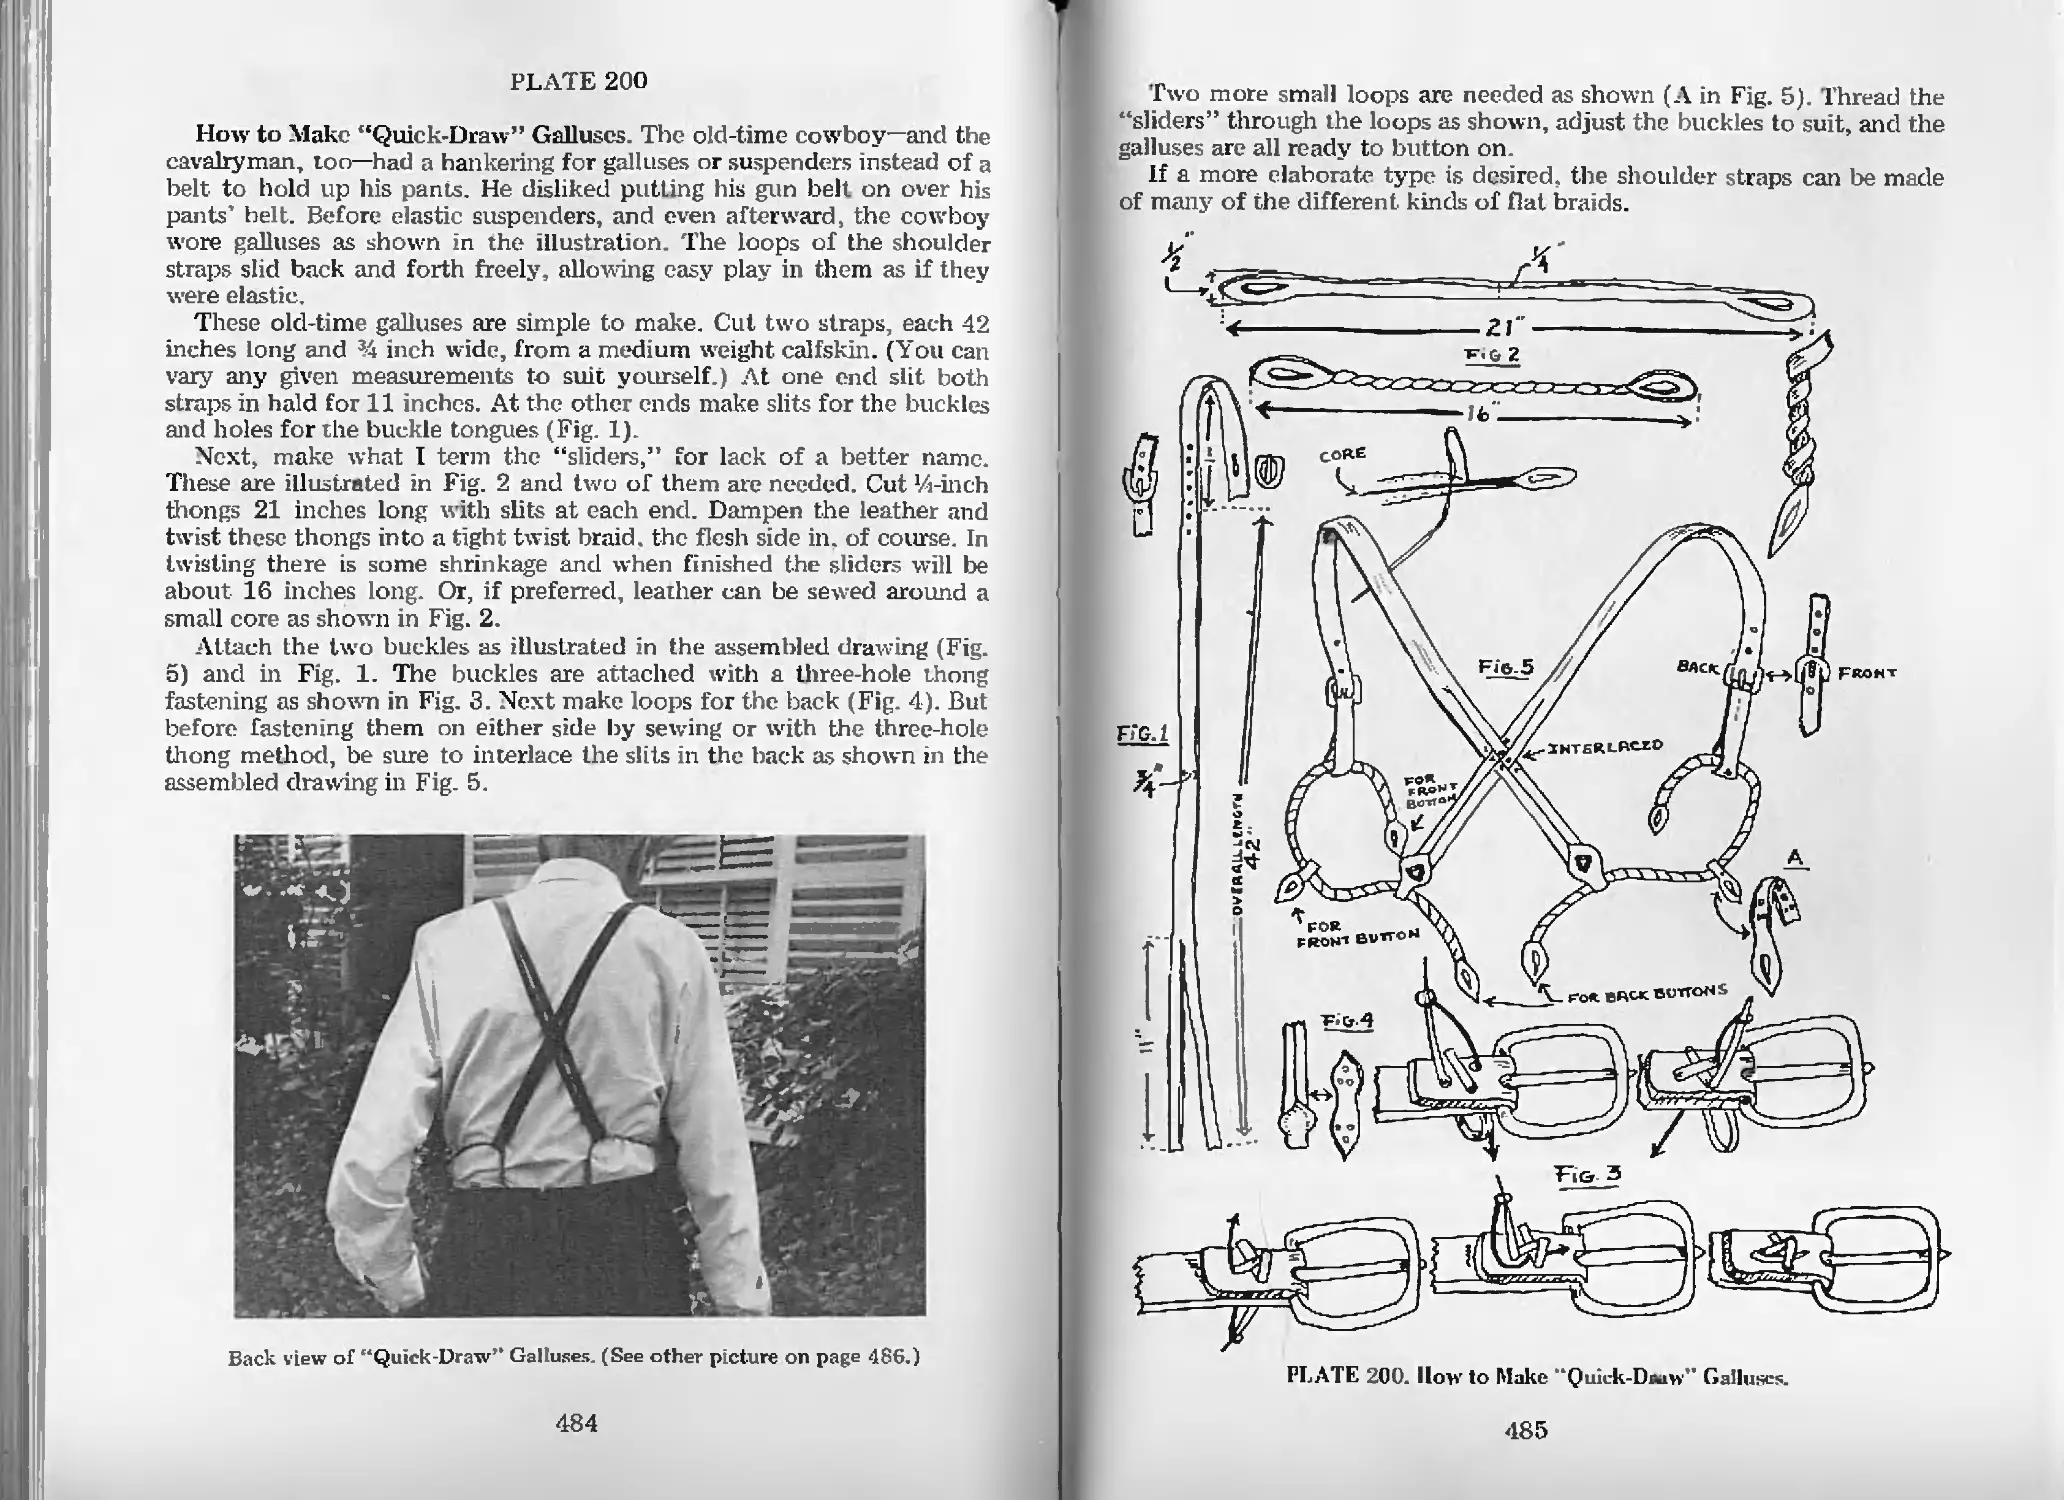
How to Make “Quick-Draw” Galluses—Pl. 200 484
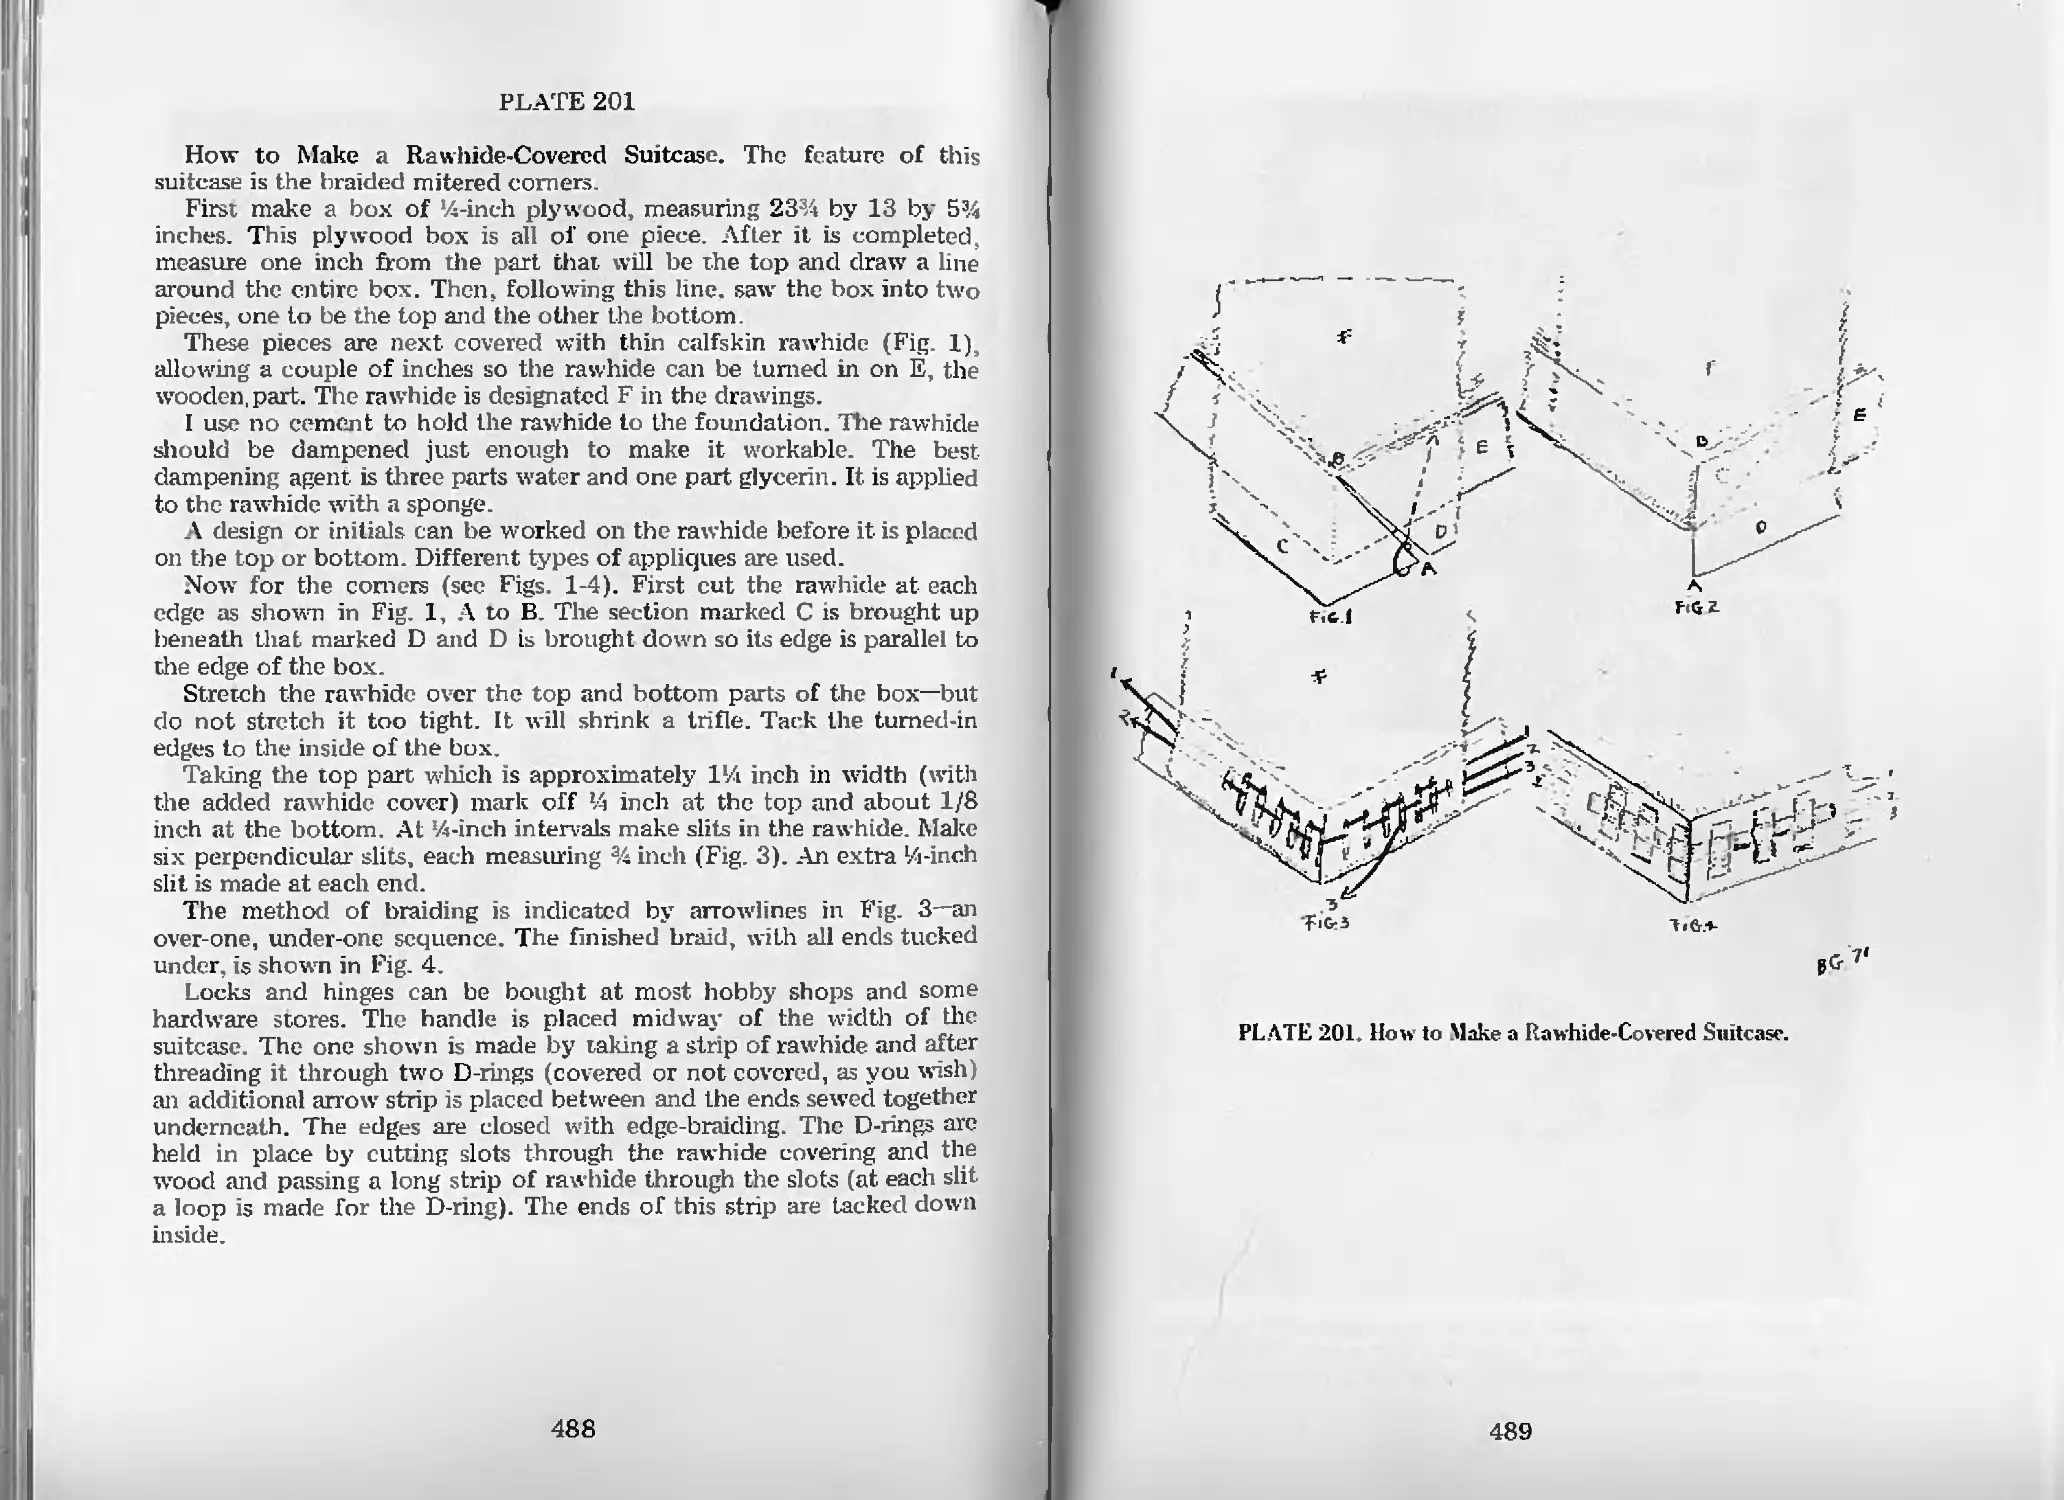
How to Make a Rawhide-Covered Suitcase—Pl. 201 488
Making a Woven Rawhide Chair Seat—Pl. 202 492
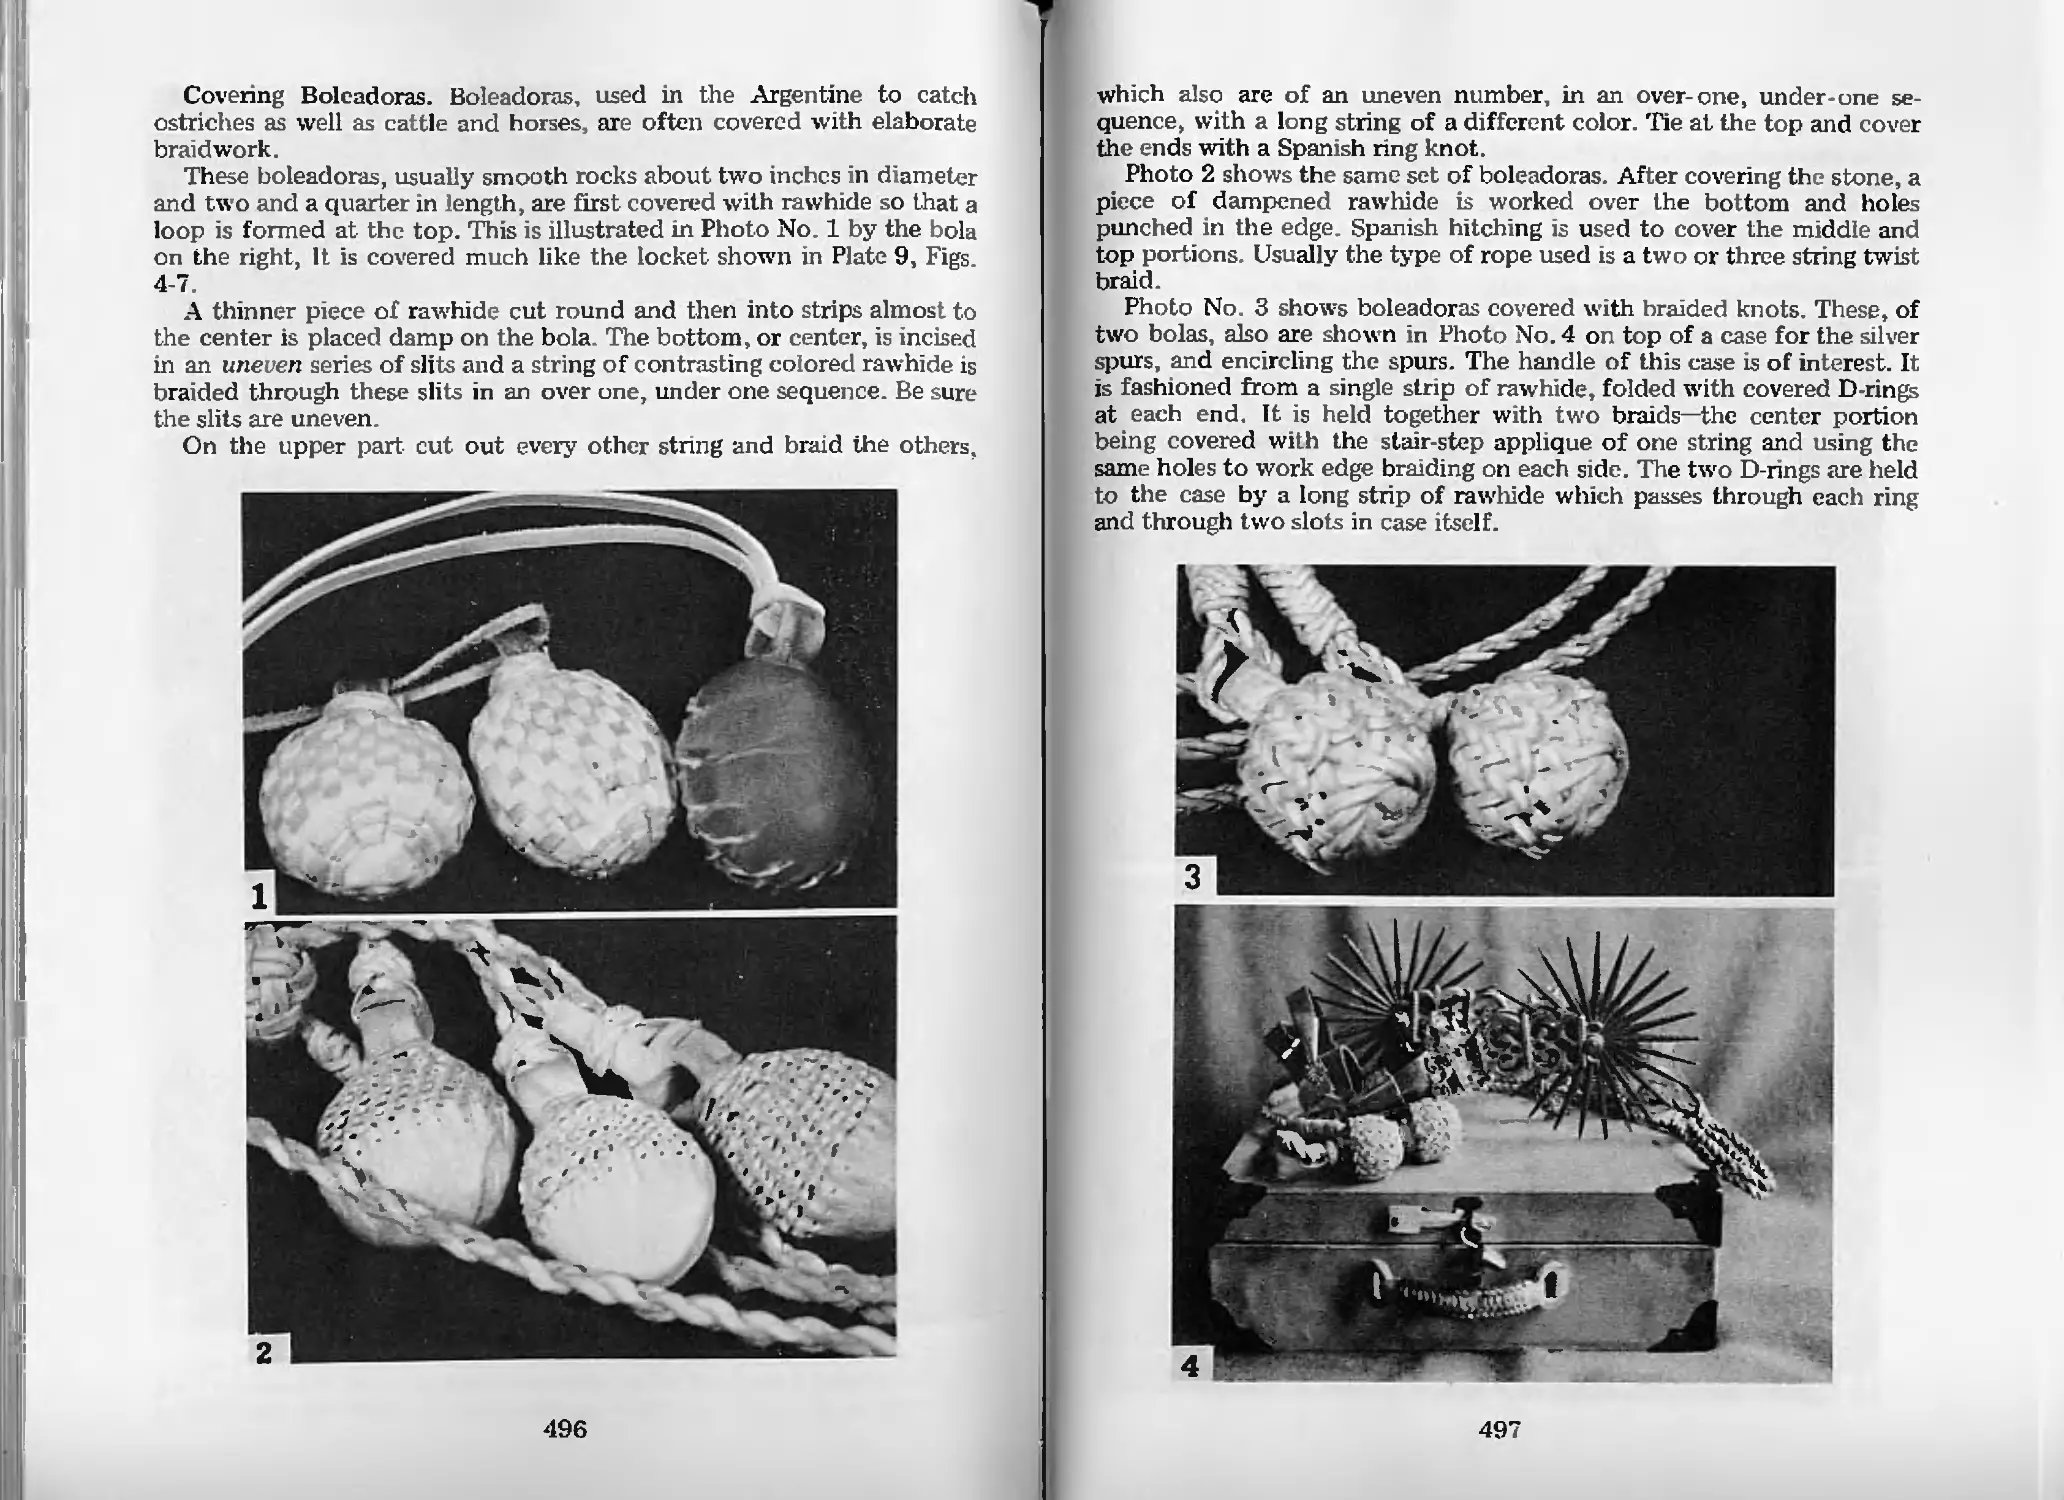
Covering Boleadoras 496
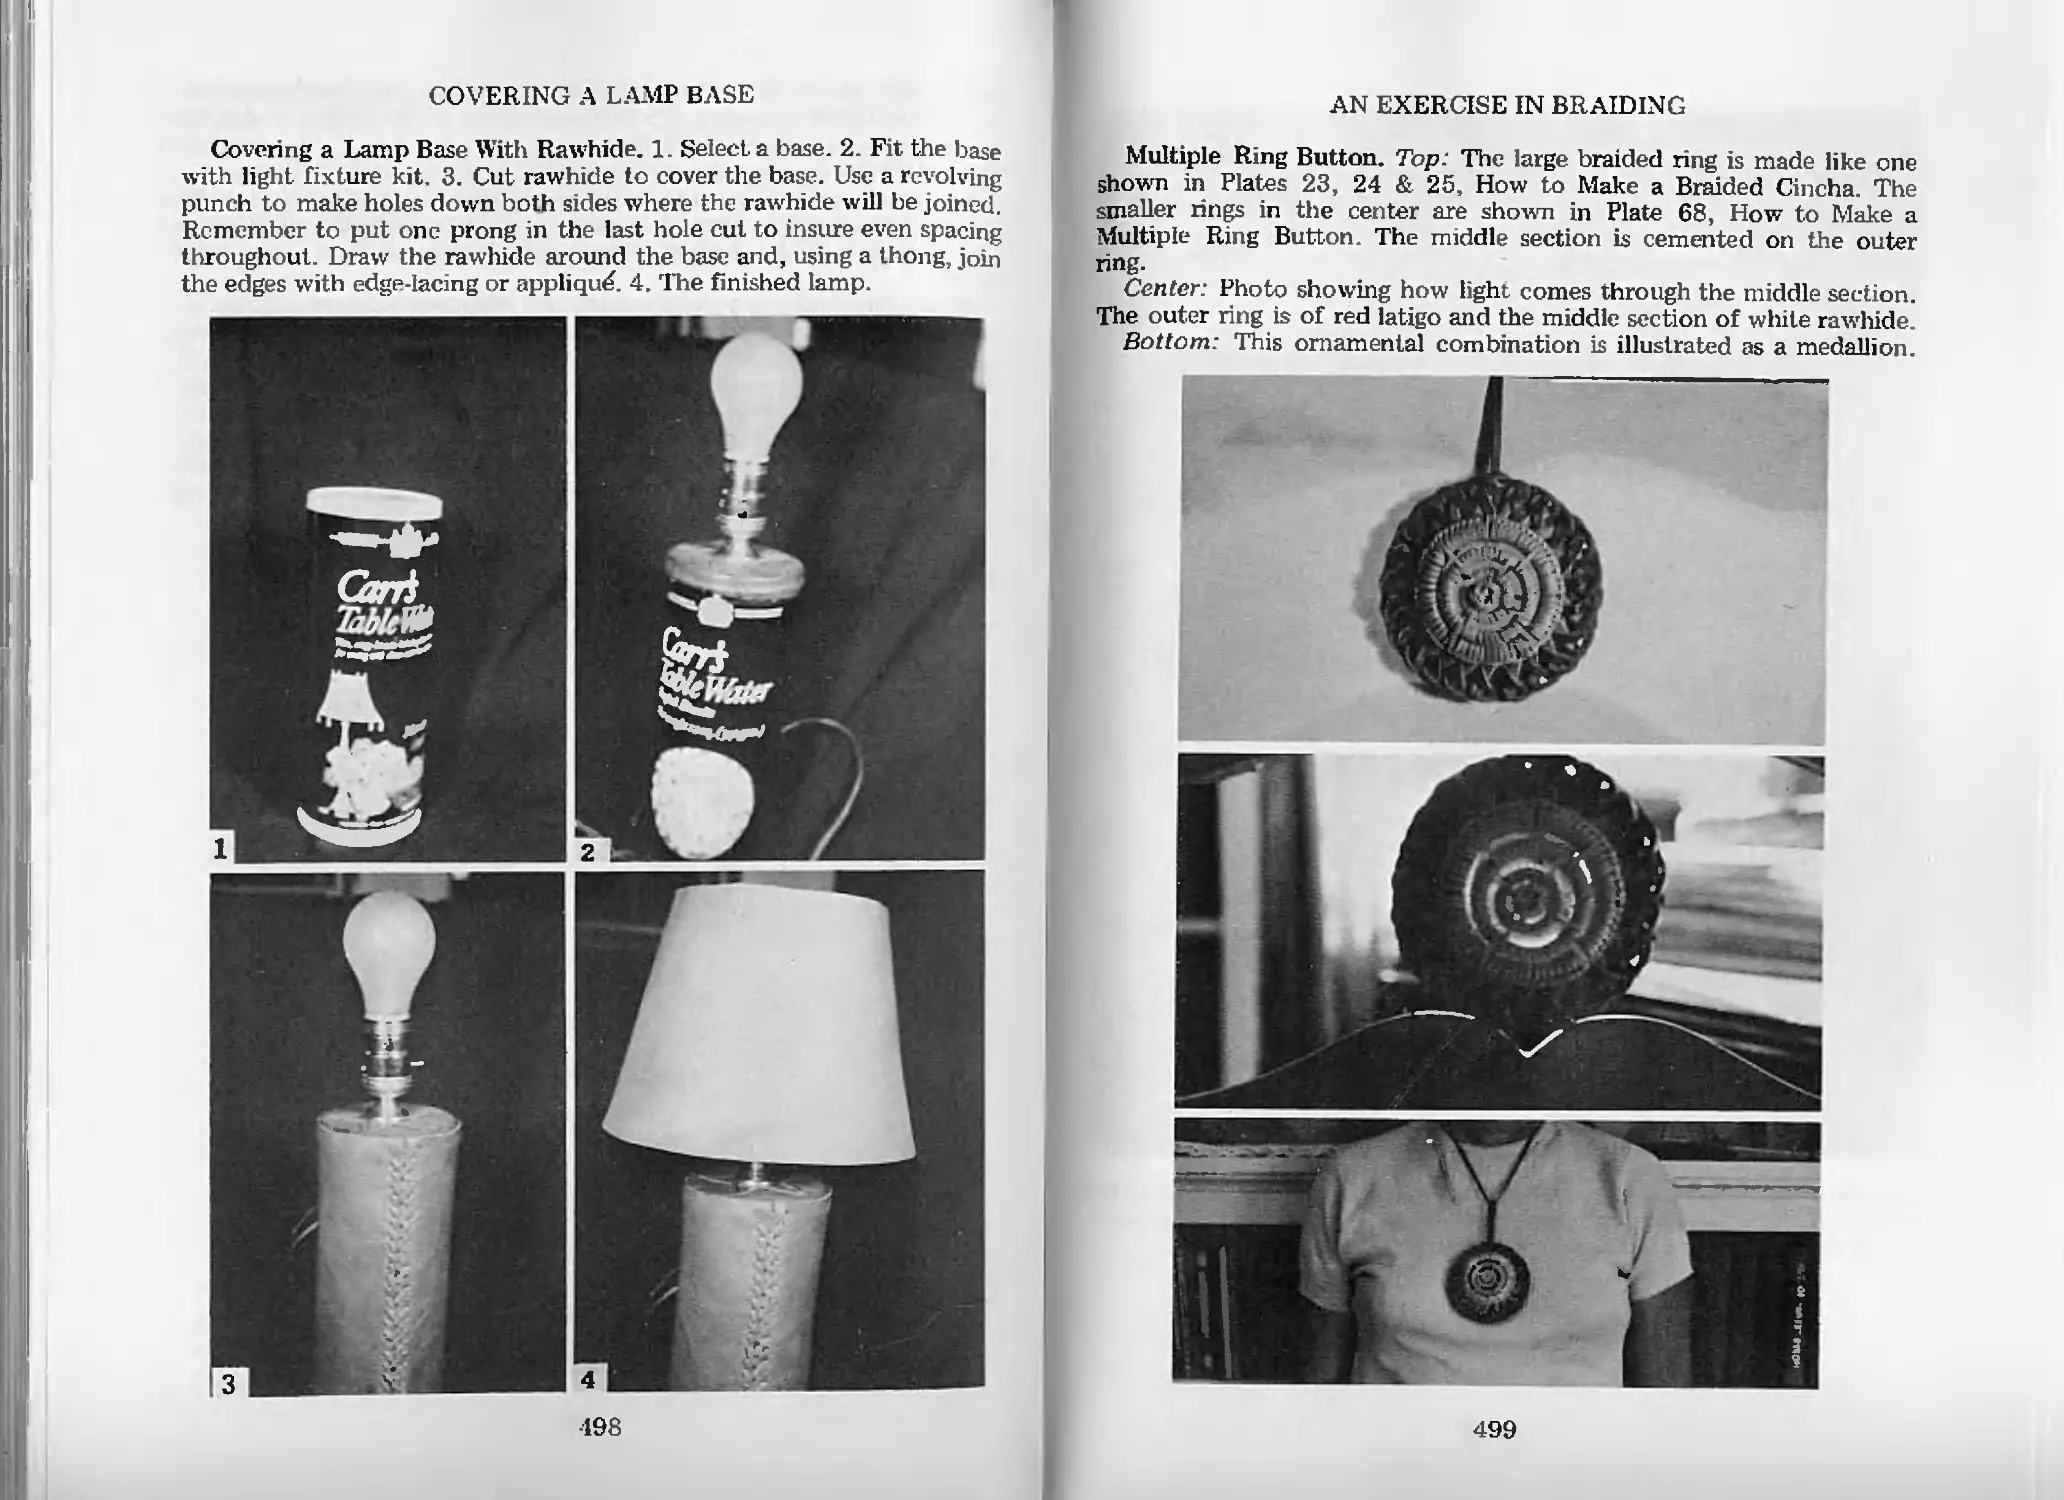
Covering a Lamp Base 498
An Exercise in Braiding 499
A Curiosity in Braiding 508
Twisted Hobbles 509
Glossary 513
Rawhide and Leather Braiders’ Bibliography 521
Sources of Rawhide and Leather Supplies 523
Index 525
xvi
FOREWORD
This book comes as the result of almost a lifetime of work. It comes,
too, as the inevitable consequence of two prior books, as well as
numerous magazine articles on braiding, and from the encouragement
of friends and fellow craftsmen in this country and many parts of the
world.
Since the two books, Leather Braiding and How to Make Cowboy
Horse Gear, became widely circulated among rawhide and leather
braiders, I have exchanged letters and information with braiding
enthusiasts and professionals in many sections of the globe. I also have
made two trips to the Argentine, where I had worked years ago as a
newspaper man; six or more to Mexico; and traveled about America’s
West.
I first became interested in braiding as a youngster in Texas. Years
later, when I returned a trifle shaken from France where I was a war
correspondent in World War II, I Look up the craft with renewed
interest and as a form of therapy. It was then that I realized there was
hardly anything written in English on the subject—no definitive book,
certainly—and so I wrote my first article, “The Vanishing Craft of
Braiding,” for the Western Horseman magazine. The response to this, as
I explain later, was most encouraging.
The late Felix M. Cornell, of the Cornell Maritime Press, became
interested, and the two above-mentioned books resulted. These are now
incorporated in this volume, with a wealth of new material I have
collected since their publication.
There are so many people I want to thank for their help and
encouragement, that it would take many pages to list them all. Many
will be given due credit in various sections of this book. However, I
wish to rhank especially:
A.G. Belcher, editor, The Craftsman, Fort Worth, Texas; Romeo Del
Castillo, late secretary of the National Association of Charros, Mexico
City; Hilario Faudone, Argentina; Luis Alberto Flores, author of El
Guasquero (The Rawhide Worker), and writer of gaucho braiding for El
Caballo magazine, Buenos Aires; Martin Gomez, Argentina; Richard
Grimier, Guatemala; Alfredo Guraya, Argentina; C.W. Halliday, West
Australia; Roy Harmon, Las Cruces, New Mexico; John Walter Maguire,
Argentina; David Morgan, Austral Enterprises, Seattle, Washington;
James Morrison, New Zealand; Francis Ian Maclean, Queensland,
Australia; Justo P. Saenz (h), writer and horse breeder, Argentina;
Henry Schipman, Jr., writer and artist, Las Cruces, New Mexico; Dick
Spencer III. publisher, Chuck King, editor, and Barbara Emerson,
editorial secretary of the Western Horseman, Colorado Springs,
Colorado, and R.M. Williams, author of The Bushman’s Handcrafts,
Australia.
xvii
i
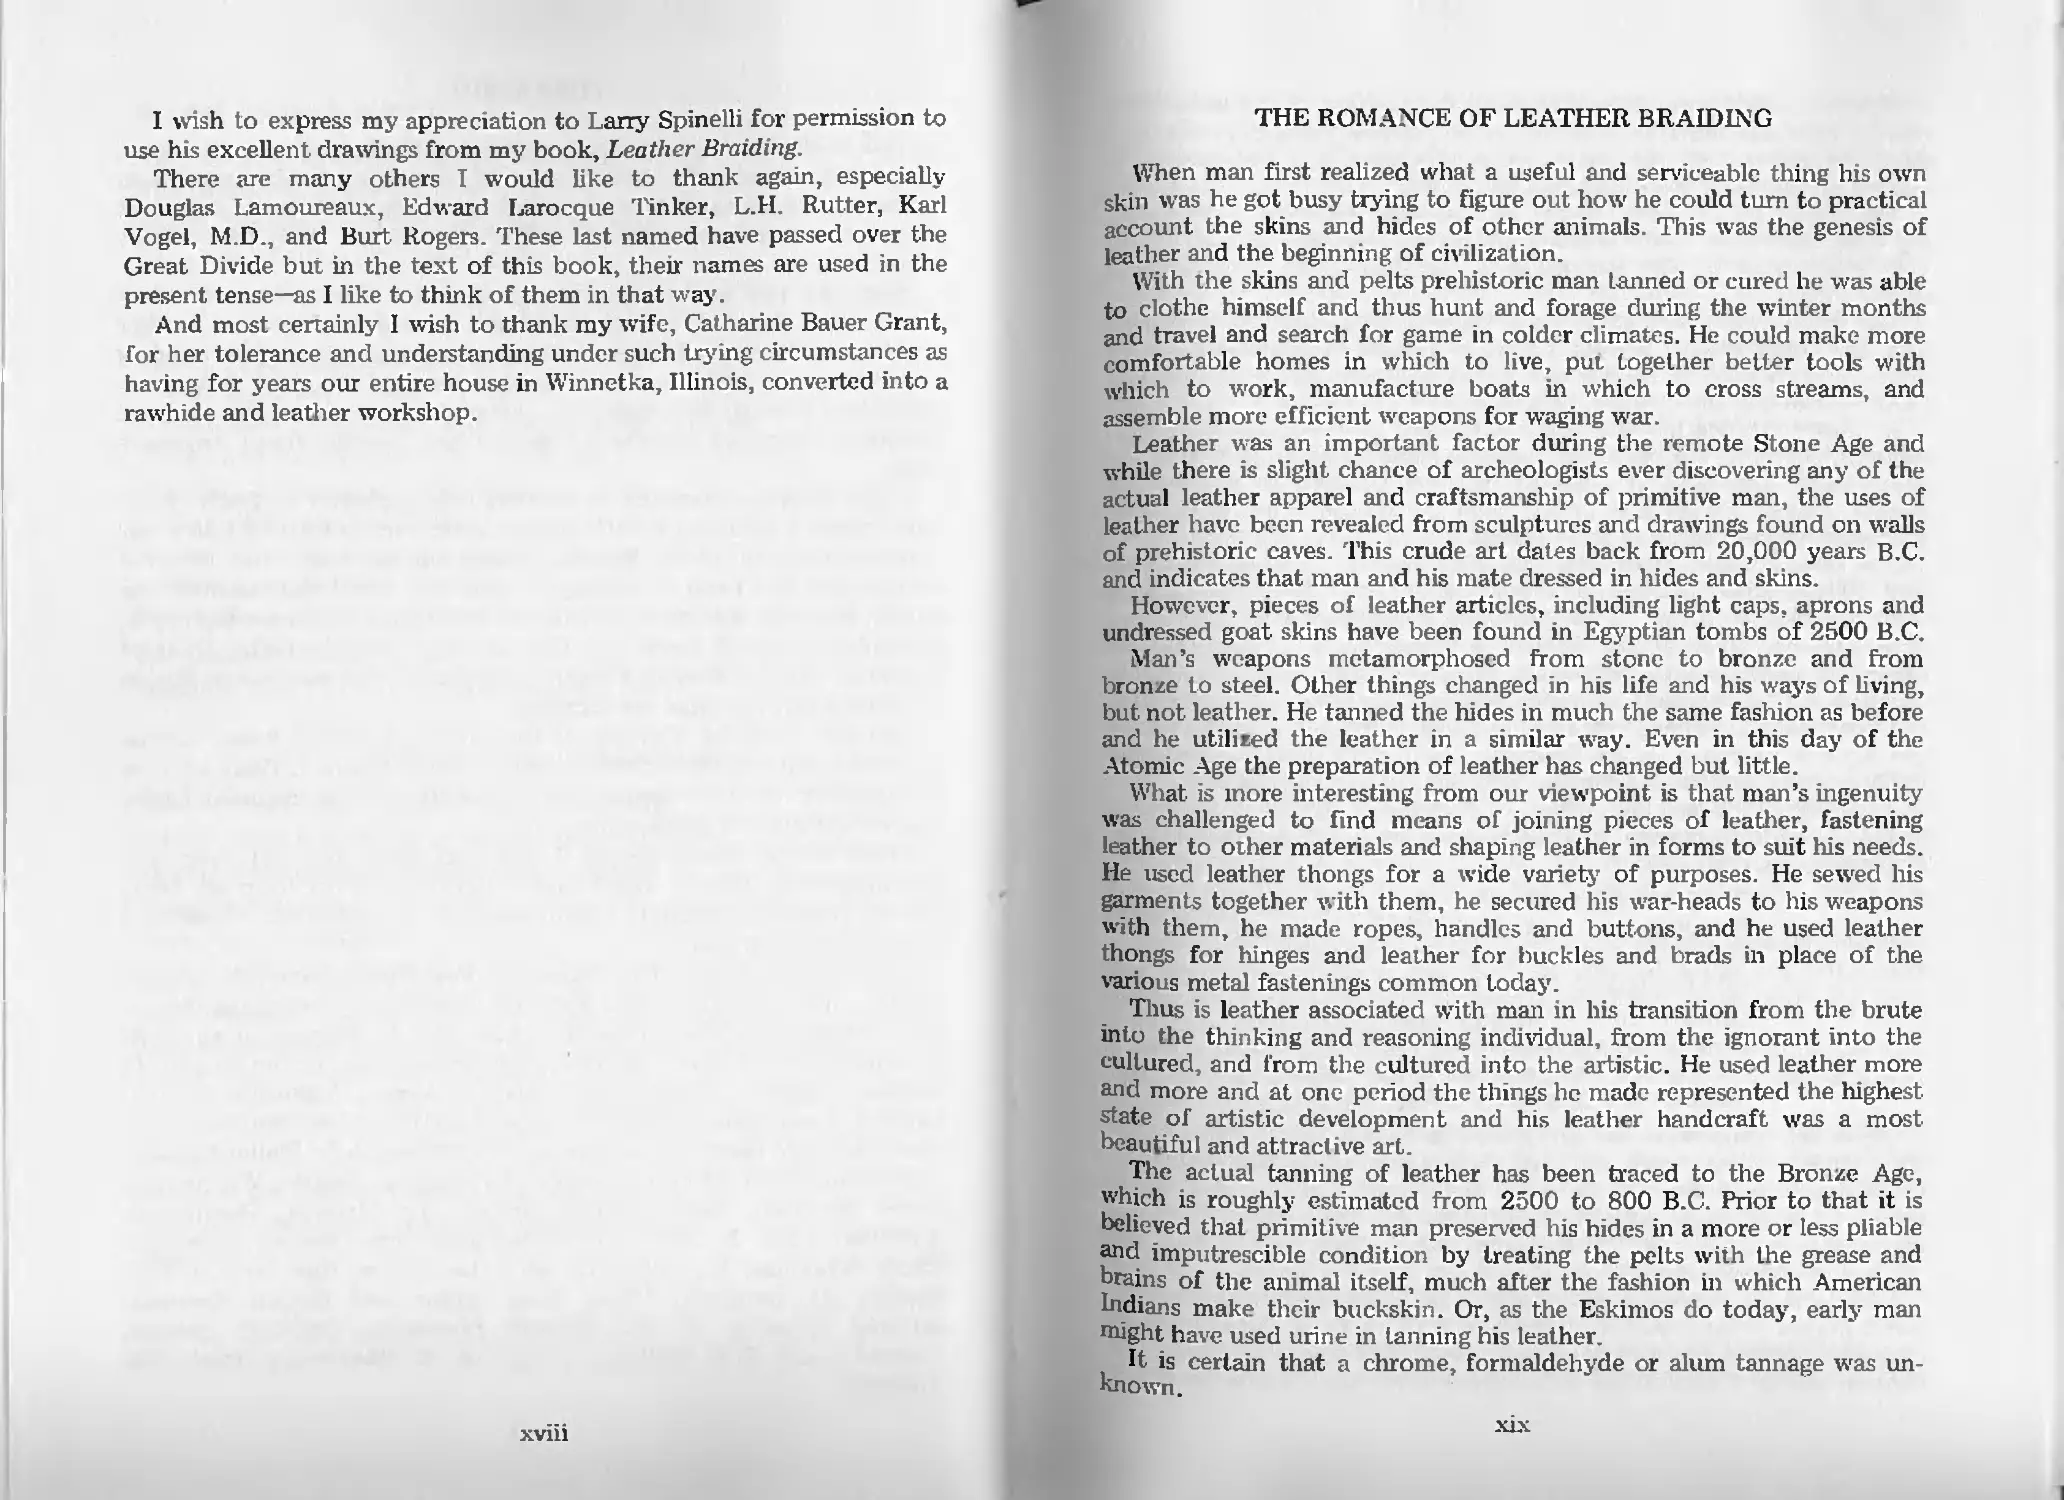
I wish to express my appreciation to Larry Spinelli for permission to
use his excellent drawings from my book, Leather Braiding.
There are many others I would like to thank again, especially
Douglas Lamoureaux, Edward Larocque Tinker, L.H. Rutter, Karl
Vogel, M.D., and Burt Rogers. These last named have passed over the
Great Divide but in the text of this book, their names are used in the
present tense—as I like to think of them in that way.
And most certainly I wish to thank my wife, Catharine Bauer Grant,
for her tolerance and understanding under such trj mg circumstances as
having for years our entire house in Winnetka, Illinois, converted into a
rawhide and leather workshop.
xviii
THE ROMANCE OF LEATHER BRAIDING
When man first realized what a useful and serviceable thing his own
skin was he got busy trying to figure out how he could turn to practical
account the skins and hides of other animals. This was the genesis of
leather and the beginning of civilization.
With the skins and pelts prehistoric man tanned or cured he was able
to clothe himself and thus hunt and forage during the winter months
and travel and search for game in colder climates. He could make more
comfortable homes in which to live, put together better tools with
which to work, manufacture boats in which to cross streams, and
assemble more efficient weapons for waging war.
Leather was an important factor during the remote Stone Age and
while there is slight chance of archeologists ever discovering any of the
actual leather apparel and craftsmanship of primitive man, the uses of
leather have been revealed from sculptures and drawings found on walls
of prehistoric caves. This crude art dates back from 20,000 years B.C.
and indicates that man and his mate dressed in Irides and skins.
However, pieces of leather articles, including light caps, aprons and
undressed goat skins have been found in Egyptian tombs of 2500 B.C.
Man’s weapons metamorphosed from stone to bronze and from
bronze to steel. Other things changed in his life and his ways of living,
but not leather. He tanned the hides in much the same fashion as before
and he utilized the leather in a similar way. Even in this day of the
Atomic Age the preparation of leather has changed but little.
What is more interesting from our viewpoint is that man’s ingenuity
was challenged to find means of joining pieces of leather, fastening
leather to other materials and shaping leather in forms to suit his needs.
He used leather thongs for a wide variety of purposes. He sewed his
garments together with them, he secured his war-heads to his weapons
with them, he made ropes, handles and buttons, and he used leather
thongs for hinges and leather for buckles and brads in place of the
various metal fastenings common today.
Thus is leather associated with man in his transition from the brute
into the thinking and reasoning individual, from the ignorant into the
cultured, and from the cultured into the artistic. He used leather more
and more and at one period the things he made represented the highest
state of artistic development and his leather handcraft was a most
beautiful and attractive art.
The actual tanning of leather has been traced to the Bronze Age,
which is roughly estimated from 2500 to 800 B.C. Prior to that it is
believed that primitive man preserved his hides in a more or less pliable
and imputrescible condition by treating the pelts with the grease and
brains of the animal itself, much after the fashion in which American
Indians make their buckskin. Or, as the Eskimos do today, early man
nnght have used urine in tanning his leather.
It is certain that a chrome, formaldehyde or alum tannage was un-
known.
However, during the Bronze Age the fleshy sides of the hides were
rubbed with salt and alum, stored in cool placefor a few days and then
stretched and pulled. The fatty sides were scraped and limestone sand
rubbed in. The skins were stretched and dried.
This method came down to the Romans who perfected it in produc-
ing their fine leather known as aluta. This soft leather was said to have
even been used by the Roman ladies for fashioning their “beauty
spots.”
The Greeks, also, were adept in the tanning and utilization of leather.
The first Greek leather worker is cited as Tychios of Boetia, a native of
Hyle. He is credited by Homer with having made the shield of Ajax, and
Pliny termed him the inventor of tanning.
In those days leather and skins were used for beds, blankets, rugs,
curtains, coverings for chairs and couches, and for shoes as well as for
many other purposes. A deerskin bed was believed to protect the
sleeper against snakes and priests slept on special skins when they
wished to invoke oracles in their dreams.
The Bible contains frequent mention of leather. In Genesis 3:21 we
find: “Unto Adam also and to his wife did the Lord God make coats of
skins, and clothed them.’’ It also tells that Moses dyed rams’ skins.
In Butler’s Lives of the Saints he writes of St. Crispin and St.
Crispinian working with their hands at night making shoes. St. Crispin
today is the patron saint of the shoemakers, and this honorable trade
can boast such American examples as Noah Worcester, D.D., known as
the Apostle of Peace; Roger Sherman, the patriot; Henry Wilson, the
Natik Cobbler, and John Greenleaf Whittier, the Quaker Poet.
Hans Sachs, the shoemaker poet of Nuremberg, known as the Night-
ingale of the Reformation, in 1568 wrote a verse in which he told how
he prepared his own leather :
“I dry the skins out in the air
Removing first each clinging hair.
Then in the Escher stream I dash them
And thoroughly from dirt I wash them.
Cow-skin and calf in tan I keep,
Long months in bark-soaked water steep
Then with a brush of hair I scrape them
And on the selling counter drape them. ”
There are many wise and pithy sayings having to do with leather.
One proverb has it, “Men cut large thongs from other men’s leather.”
Unemotional men are said to have “thick hides,” or they are “thick-
skinned,” while those with stubborn ideas are “hide-bound.” We still
use such expressions as “I’ll tan your hide,” “He’s a skinflint,” and
“Give him a leather medal.”
Carlyle in his Sartor Resarlus comes to the conclusion that the old-
world grazier became sick of lugging his slow ox about the country till
he got it bartered for corn or oil, and would take a piece of leather and
thereon stamp or scratch the mere figure of an ox, or pecus. He would
1
put this in his pocket and call it pecunia, or money Here is the deriva-
tion of our word pecuniary, and even today in modem slang we speak
of a dollar bill as a “skin.” We “skin” a man in a trade and when we do
him out of something illegally it is by use of the “skin-game.”
Ancient history is replete with references to leather and leather
work. Unbelievable as it might seem there were even leather cannon!
These guns, in calibers from 1-pounders to 4-pounders, consisting of a
copper tube covered with several layers of mastic and wrapped with
rope or twine on top of which was put a coat of plaster, were finally
covered with leather. They were used as early as 1349 by the Venetians.
There were, of course, leather cups, leather bottles, leather chests
and many other utility articles of leather. There is a complete literature
on leather bookbinding and ancient leathercraft. Leather was in wide
use—and even today there is hardly a person who does not have some
form of leather about him—shoes, hatbands, pocketbooks, billfolds and
such.
The most important of the historical notices on leather—from our
viewpoint—has to do with the ancient Phoenicians. These people
invaded North Africa probably in or around the year 1600 B.C. and
transmitted their leathercraft to the Moors.
The Moors at the beginning of the Eighth Century crossed the Straits
of Gibraltar and penetrated Spain. Here they inaugurated a brilliant
civilization. In Cordova, the capital, the leather industry gave origin to
several trades, one of which was harness-making. What leathers arc more
famous than Cordovan, Spanish and Morocco!
The guaclamacileros of Spain could not be surpassed for their wonder
creations of figured leather, for unlike the heavily lacquered and
painted leathers of today these Spanish artists always subordinated
their decorations to the leather itself. The leather never lost character.
This art originated in the city of Ghadamcs in the Sahara, where the
ghadamesian leather came from.
From the Ninth to the 18th centuries Europe had been reconquered
and the Arabs expelled. But they left behind them not only their
leather art, which included elaborate braiding and thong work, but their
techniques for executing these things.
So in 1520 when Hernando Cortes introduced the first horses into
America, he brought, too, men well versed in the understanding and
teaching of leatherwork and the art of braiding.
It is not difficult from that point to trace the introduction of fancy
braidwork into the United States. The Mexican vaqueros who rode the
dusty trails of the plains and brought up their cattle from below the
Rio Grande and those of the pre-gold rush cattle drives of California
during the last century were expert trenzadores, or braiders. They were
masters of leather braiding and leather decoration. Some were charros
to whom the horse and Iris decoration or equipage was tire primary
object of life.
These Mexicans inspired our own cowboys to take pride in their gear
end in those times a braided bridle with fancy woven knots scattered
xxi
along the reins was a beautiful thing to behold—not to speak of the
hatbands, belts, pistol holsters, saddles, quirts and other gear and
appurtenances.
The Spanish craft of leather braiding and decoration spread, too. It
would be interesting to an anthropologist or archeologist to trace, for
example, the Spanish woven knot, built upon the sailor’s well-known
Turk’s-head knot. 1 have seen woven finger rings of split bamboo made
by the Igorotes of the Philippines which are exactly like those knots on
Spanish and Arabian whip and knife handles.
The Argentine gaucho makes the same type of woven knot as does
the native Indian of Mexico. Tire entire course of Spanish civilization
could well be traced through this intricate and decorative knot.
The term “lost art” might be applied to leather braiding. However, it
is a loose and generic term used in connection with most handcraft
today. The greater part of our handcraft should be designated as a
developed art. We continually see where improvements have been made
in ancient workmanship by the use of modem scientific methods and
by machine operation and cultivated design.
Just as the development of the bow and arrow in archery makes
these modem implements far superior to those of the ancients, especi-
ally the savages, so are textile weaving and many other arts and crafts as
far advanced.
It might be better to say that leather braiding is an almost forgotten
and liighly neglected art. It is not necessary now to join things with
leather thongs. Sewing with thread and fastening with metal brads are
the methods used. The attractive and sometimes unique means of using
leather buttons and other leather fastenings has been supplanted by all
manner of metal devices.
In this book the broad term of “braiding” is used throughout much
after the manner in which it is used by the Spanish trenzador and the
craftsmen of Mexico and Latin America in general. Actually braiding
means to weave together, to plait, and usually is associated with the
so-called flat braid, or the three-thong “hair braid,” or the simple braids
used in making belts.
For our purpose it will mean the weaving of leather knots, the
making of buttons, the working of edge lacing on leather articles, the
covering of belt buckles, the appliqued work on leather which was
introduced to the American public for the first time in my Leather
Braiding, and the beautiful one-thong weave which the Spanish conquis-
tadores used on their sword belts, as well as many variations of the
commonly known round and flat braids.
Leather braidwork has many forms and many applications. You
don’t make things just to look at and admire, but to use. Y'ou combine
beauty with utility. This work can be used in making handles for suit-
cases, briefcases and other leather articles. It adapts itself to use on and
is associated with plain or carved or tooled leather work, supplementing
and complementing such examples of craftsmanship.
It can be used in covering the handles of canes, umbrellas and tools.
xxii
It is, of course, employed in the making of quirts, riding crops, belts
and wristwatch straps, dog collars and leashes, hackamores, bridles and
reins, leather buttons, buckle coverings and for many, many other prac-
tical things.
The rewards of a small amount of work are ample and highly gratify-
ing. There is another thing that should not be overlooked: the practic-
ability of this handcraft for those persons who are convalescing or who
are partially disabled or have some permanent injury which confine
them to their beds or wheelchairs. The few tools necessary, the small
amount of space in which the work can be done and the cleanliness
with which it can be executed, make it uniquely adaptable in such
cases. Its value in occupational and recreational therapy cannot be
ignored.
While this book is primarily for those interested m leathercraft, the
methods of braiding in nearly all cases are applicable to strands of many
other materials—silk, cotton, plastic, rawhide, catgut or horsehair.
Especial care has been exercised in giving detailed step-by-step in-
struction methods, both in diagrams and text. It has been presumed
that the reader knows nothing of braidwork and wants each move
carefully explained.
Many photographs have been included in this book. Some accom-
pany plate instructions and depict step-by-step methods; others show
finished articles. Braiding can be considered a universal language and I
have included photographs of braidwork from many countries. It is
hoped that the excellent examples of leathercraft articles will prove to
be an incentive to the reader.
In the years of my study of this subject—in Europe, South America
and among Mexicans, Basque sheep herders, cowboys and others—I
have picked up many things of value. I have worked out many types of
braidwork, which have suggested themselves from the basic principles
commonly in practice. Possibly they are not new but many are now
shown in print for the first time.
As to Turk’s-heads and woven knots the methods employed in illus-
trating them and how to make them are at least an innovation. By the
use of diagram patterns any type of Turk’s-head or woven knot, no
matter how complicated, can be made by a method which is foolproof.
As a native of Texas, it is sincerely hoped these efforts will arouse
interest in a craft which is identified with the tradition of our plains-
men and of our West and Southwest. There are very few museum
collections in this country' of cowrboy handcraft—of braided bridles,
hackamores, quirts (cuartas), or reatas, nor even of stamped and carved
leatherwork! It is a definite part of our folklore and has a positive
archeological and anthropological value.
Fifty years from now many museums will be digging around franti-
cally in an endeavor to assemble a representative collection of the hand-
craft of the cowboy. But it will have vanished.
xxiii
RAWHIDING IN THE OLD WEST
Historians of the Old West have dug deep in their search for story
material on that period in American history usually termed our true
national tradition. In some instances they have not dug deeply enough
One thing they usually fail to turn up, or take for granted or com-
pletely ignore, is Rawhide.
So many things have been given credit for winning the West, what-
ever the phrase actually means, that one hesitates to bring forth
another. Yet it seems no more than justified, considering the years it
has been disregarded, to say that rawhide should take its place in the
front rank in the battle that converted the West into a wilderness of
steel, concrete, and vapor lanes; main streets and motels, gas stations,
hot-dog stands, and billboards.
Anyway, rawhide is itself a tradition—not merely a word. It em-
bodies the story of the Old West from the brushpopper to the cow-
puncher, from cowhunts to roundups, from the open plains to fenced-
in ranches, from the chaparral country clear up that course of an
empire, the Texas Trail. The story is tied together in tough and lasting
rawhide.
Certainly the writers have sifted every aspect, artifact, hombre, and
animal of the Old West in trying to tie together their stories. The Colt
revolver, the Winchester carbine, the Stetson hat, the western saddle,
the Bowie knife, the prairie schooner, the mustang, the maverick, the
barbed wire-These and many other things have their places in how the
“west was won.” Rawhide is seldom mentioned—it is often erroneously
termed “leather.”
As “Indian Iron,” the Mormons employed it to lash together the
beams of their first temple at Salt Lake City. As “Mexican Iron,” or
cuero crudo the southwestern cowboys used it for making quirts, head-
stalls, reatas, bosals, and reins—and softened it into latigos, or saddle
tie-strings, and belts. Nothing has been found better suited to cover a
saddle tree.
The Apaches shod their horses with rawhide shoes. Indians used
rawhide for many things, including drum heads, bow strings, and thongs
to bind on their arrows and lance heads. They converted deerskin raw-
hide into the softest buckskin
When an iron band broke on the wheel of an old-time prairie
schooner, it might be replaced with a rawhide rim. Pioneers used it for
gate and door hinges and after treating it with linseed oil employed it
for semitransparent window panes.
The fur-trappers, or “mountain men,” made moccasins from the
smoke-impregnated, and thus unshrinkable, rawhide coverings of their
winter lodges.
They say Texas was bound together with rawhide. Texans were
known to northern cowboys as “rawhides,” because of their custom of
repairing everything with this material—from bridles to wagon tongues.
A “rawhide” was an affectionate name for an old-timer.
xxv
“Rawhiding” in cowboy lingo meant Lo torture or abuse, or to verb-
ally “ride.” It also meant to thrash. It meant as well to work rawhide.
Rawhide lumber was cottonwood slabs. There were even “rawhide”
ponies.
One of the most unpleasant deaths consisted of being sewed up in a
green rawhide skin—one just off the animal—and left in the sun. As the
rawhide shrank, in this savage version of the “Iron Maiden,” the victim
gradually was squeezed to death.
This marvelous power of constriction of green rawhide made it unus-
ually efficacious in lashing together corral posts, ranch furniture, as well
as other articles where nails usually were employed. The “jewel box” of
the chuck wagon contained an assortment of rawhide strings and pieces
for repairs. Slung beneath the wagon itself was the “cooney,” a rawhide
apron for carrying fuel—usually buffalo or cow chips.
Literature on the subject of rawhide-making is scarce. Most that has
been written on this subject is superficial and takes too much for
granted. One might conjecture that the apparent basic simplicity of the
process needs no explanation. Rawhide just makes itself. The cowboy
or Indian skinned his animal, stretched the hide, and then scraped off
or shaved off the hair. There was little else to it, except cutting it into
strings or appropriate pieces.
Rawhide braiding is another thing. It is here that rawhide work
graduates from a mere handcraft to an art. In this area, indeed, there is
a downright scarcity of instructive literature. It is practically non-
existent. It was to correct this deficiency, as well as to justify in my
own fashion my western heritage, that I set about writing books on the
subject of rawhide and leather braiding.
My first effort was a story' in the Western Horseman magazine for
December, 1949, called “The Vanishing Craft of Braiding.” The re-
sponse to this was surprising and gratifying. Old-time braiders and many
interested in braiding wrote me letters.
I found it heartening to realize that 1 had not started too late. Nor
had I started too early. There were still a few old-time braiders around,
a very few. In former days such men were highly secretive, close-
mouthed and uncommunicative when it came to their craft. The braid-
ing art was something to be passed on from father to son. A particular
woven knot, for instance, was almost the trademark of a braider. He let
no one in on the secret of how he made this knot.
Thus I was extremely fortunate in my timing. The rawhide braider,
like many who work with their hands, could no longer make a living.
His son was not interested in learning this esoteric craft. Everyone now
calculated work on a so-much-per-hour basis. When a piece of his wrork
was on view, the rawhide braider—as well as other handcrafters—was
invariably asked the annoying question: “How long did it take you?” It
might be like asking a doctor, after an intricate operation: “How long
did that take you?” Thinking back over his years in school, internship,
etc., he could justifiably say, “Twenty years.” The old rawhide braider
xxvi
could possibly reply, “That thar piece o’ work jest took me seventy-odd
y’ars.”
.Anyway, now he could not make a living from his work and his son
was more interested in going to the city and becoming an engineer, so
the old rawhide braider was no longer reluctant to explain some of the
secrets of his craft. In fact, many I found were most anxious to have
this craft preserved in writing.
One man I know seeks out these old-timers and sits at their knee, like
the youth of Athens in the presence of Socrates. He once wrote me that
he had found Pinkie Bethel high up in the Sierras—a fellow who had
been working rawhide for fifty years—and came upon him when he was
actually at work braiding.
“I suddenly realized,” wrote my friend, Ernie Ladouceur, of Madera,
California, “that I had never before seen one of these old-timers actu-
ally braiding rawhide. I had seen much of Pinkie’s stuff and much of
the fancy work of others, but this was the first time I had ever seen one
of these expert braiders busy at his craft.”
Strangely enough,while Ernie Ladouceur had expected a rebuff, he
had found Pinkie Bethel most cooperative in explaining what he was
doing.
John Conrad of San Ysidro, California, one of the finest of the
professional rawhide braiders, wrote me:
“To most people the word ‘rawhide’ carries little significance, but to
many old-timers like myself, it brings back fond memories of an era in
life which will never be forgotten.
“Back in the late Nineties I was a member of a family who had
pioneered far from the railhead, out on the California prairies. By our
own resourcefulness and the assistance of friendly Indians, we managed
to overcome most of our difficulties, and I remember with much grati-
tude the Indian brave who gave me my first lessons in bronco-busting
and cow-punching.
“Living several hundred miles from any place where there were
saddleshops 1 early learned the virtues of rawhide, which I was able to
produce in a crude manner. We used it as riding equipment, to string up
our bunks, and make the bedrolls more comfortable, also for chair seats
and backs, and to lash together rails and posts, because we had no nails.
“From the beginning I have always had a sentimental regard for
rawhide, which I feel played as big a part in our pioneer existence as
gunpowder. In later years my hobby has been designing and making
rawhide articles, still very usable, but considerably more artistic, than
those made fifty years ago.”
In obtaining a fuller picture of the Old West it is well to widen the
scope of research to include the use of rawhide and it is even better to
preserve the art of rawhide braiding. This Moorish craft came over with
the Spanish conquerors and a knowledge of it would be of great value
to anthropologists and to archaeologists. Where you find rawhide braid-
ing you can be certain the Spanish were there m the early days
xxvii
There are still rawhide braiders around and they are increasing all the
time. Recently Jerry Eastman of the Four Lazy F Ranch, Jackson Hole,
Wyoming, wrote me: “I have been working with rawhide for several
years now and each year the demand for braided items gets greater. The
people in my area seem to be becoming more aware of the beauty as
well as the durability of braided rawhide work as well as not minding
the price I’m asking for custom work.”
xxviii
Making and Working Rawhide
Leather-braiding Tools
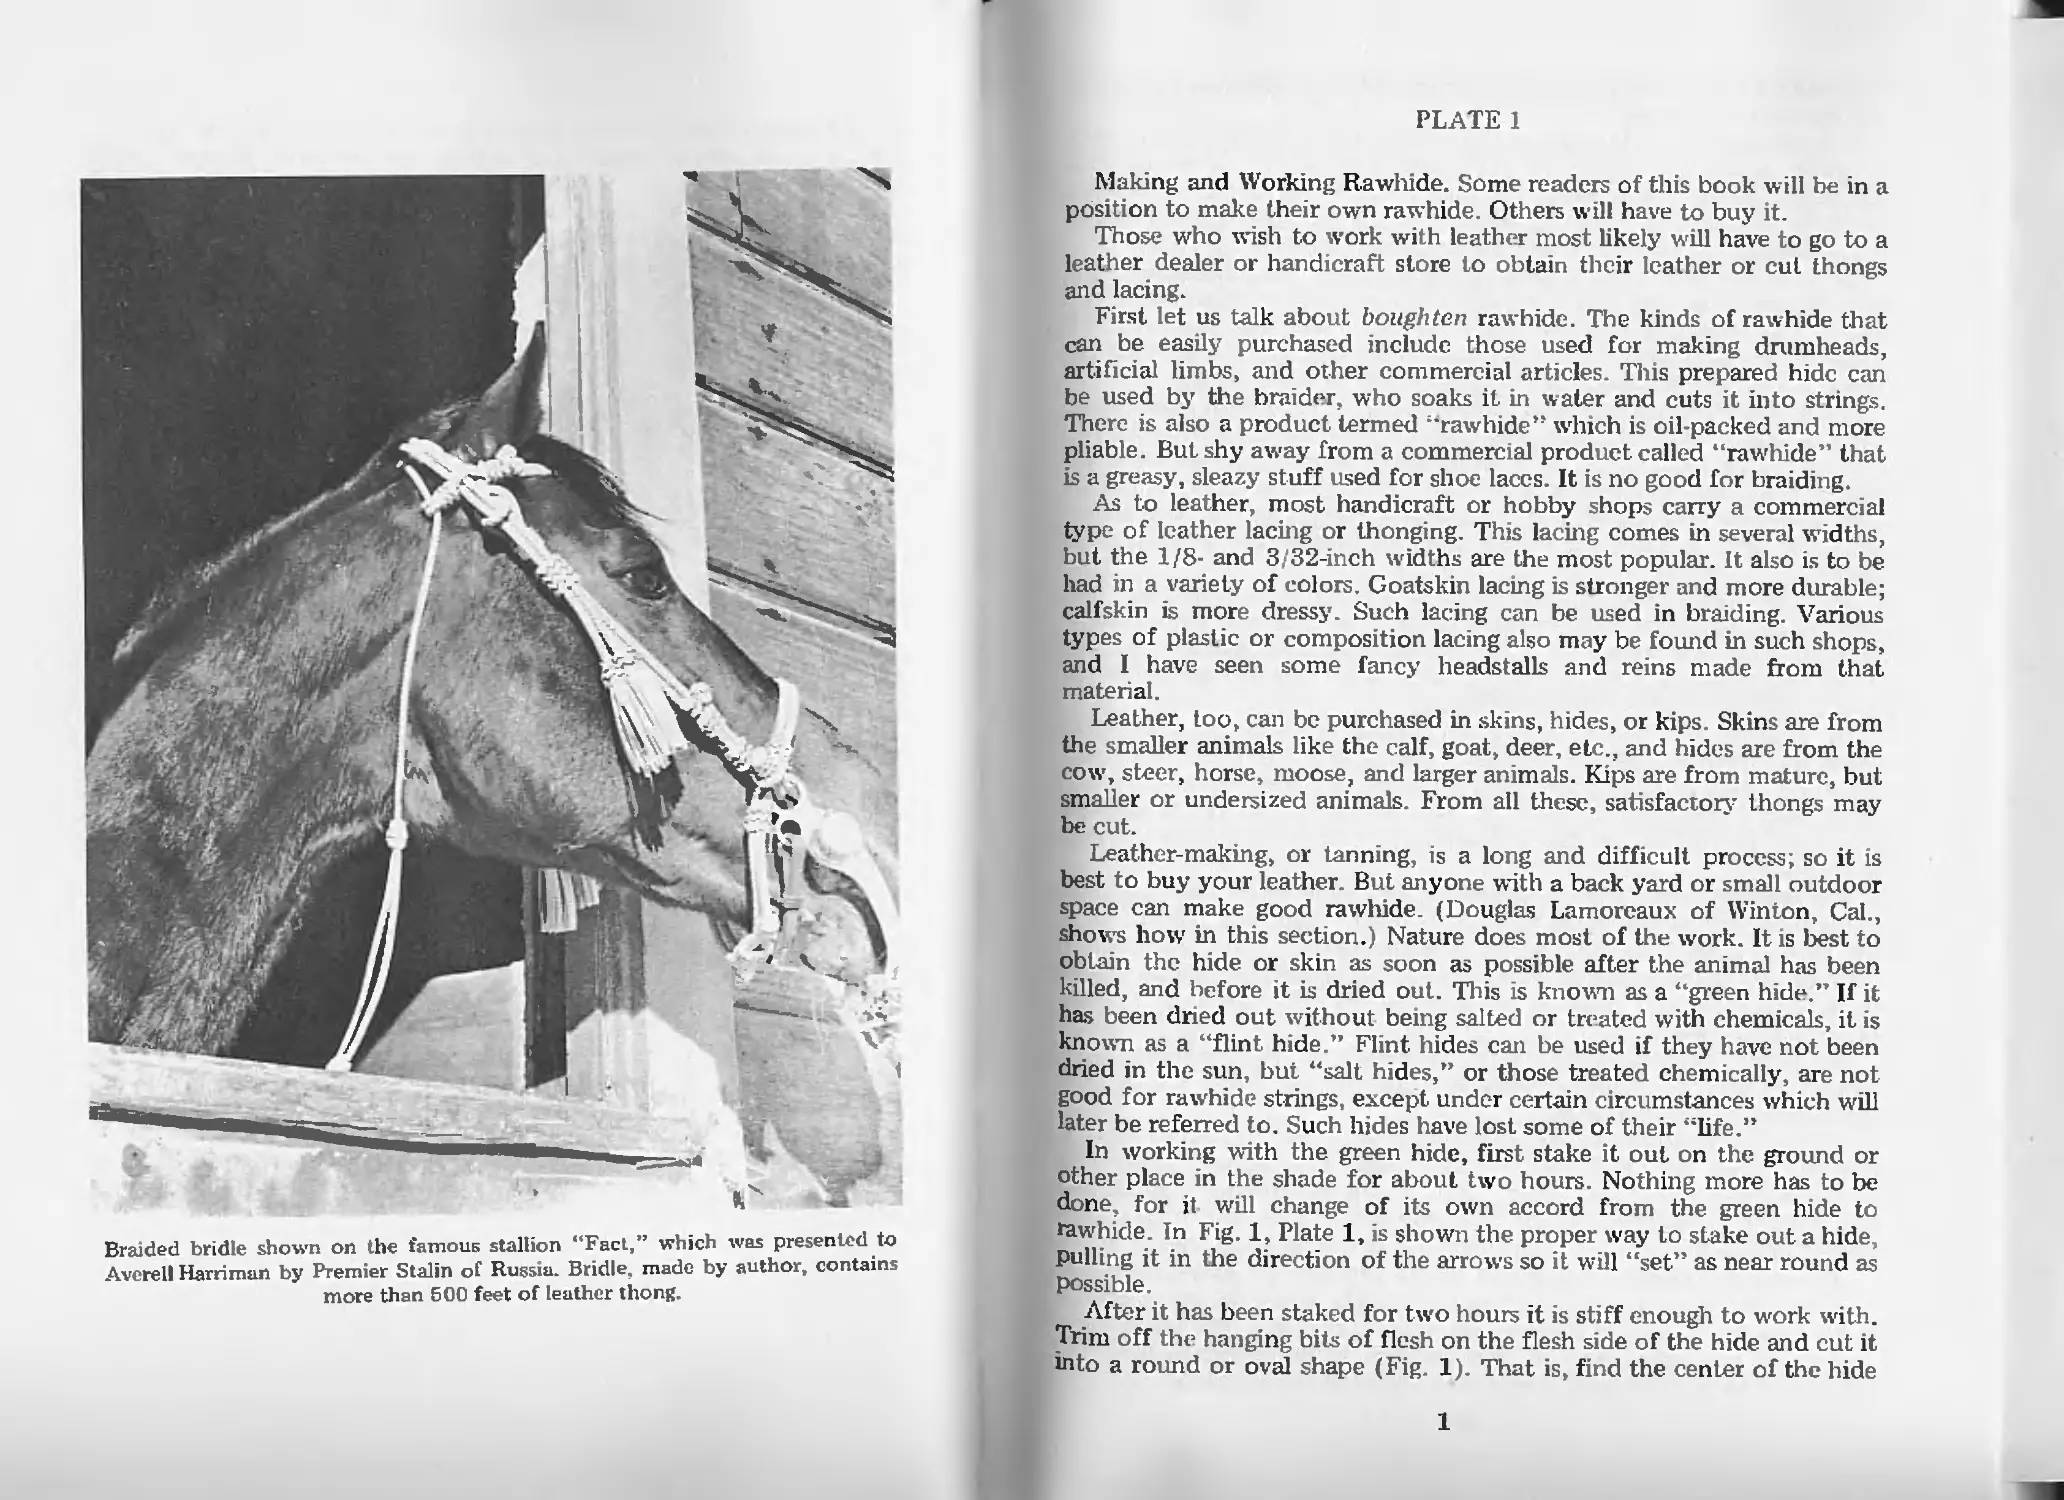
Braided bridle shown on the famous stallion "Fact,” which was presented to
Averell Harriman by Premier Stalin of Russia. Bridle, made by author, contains
more than 500 feet of leather thong.
PLATE 1
Making and Working Rawhide. Some readers of this book will be in a
position to make their own rawhide. Others will have to buy it.
Those who wish to work with leather most likely will have to go to a
leather dealer or handicraft store to obtain their leather or cut thongs
and lacing.
First let us talk about boughten rawhide. The kinds of rawhide that
can be easily purchased include those used for making drumheads,
artificial limbs, and other commercial articles. This prepared hide can
be used by the braider, who soaks it in water and cuts it into strings.
There is also a product termed "rawhide” which is oil-packed and more
pliable. But shy away from a commercial product called “rawhide” that
is a greasy, sleazy stuff used for shoe laces. It is no good for braiding.
As to leather, most handicraft or hobby shops carry a commercial
type of leather lacing or thonging. This lacing comes in several widths,
but the 1/8- and 3/32-inch widths are the most popular. It also is to be
had in a variety of colors. Goatskin lacing is stronger and more durable;
calfskin is more dressy. Such lacing can be used in braiding. Various
types of plastic or composition lacing also may be found m such shops,
and I have seen some fancy headstalls and reins made from that
material.
Leather, too, can be purchased in skins, hides, or kips. Skins are from
the smaller animals like the calf, goat, deer, etc., and hides are from the
cow, steer, horse, moose, and larger animals. Kips are from mature, but
smaller or undersized animals From all these, satisfactory thongs may
be cut.
Leather-making, or tanning, is a long and difficult process; so it is
best to buy your leather. But anyone with a back yard or small outdoor
space can make good rawhide. (Douglas Lamoreaux of Winton, Cal.,
shows how in this section.) Nature does most of the work. It is best to
obtain the hide or skin as soon as possible after the animal has been
killed, and before it is dried out. This is known as a ‘ green hide.” If it
has been dr d out without being salted or treated with chemicals, it is
known as a “flint hide.” Flint hides can be used if they have not been
dried in the sun, but “salt hides,” or those treated chemically, are not
good for rawhide strings, except under certain circumstances which will
later be referred to. Such hides have lost some of their “life.”
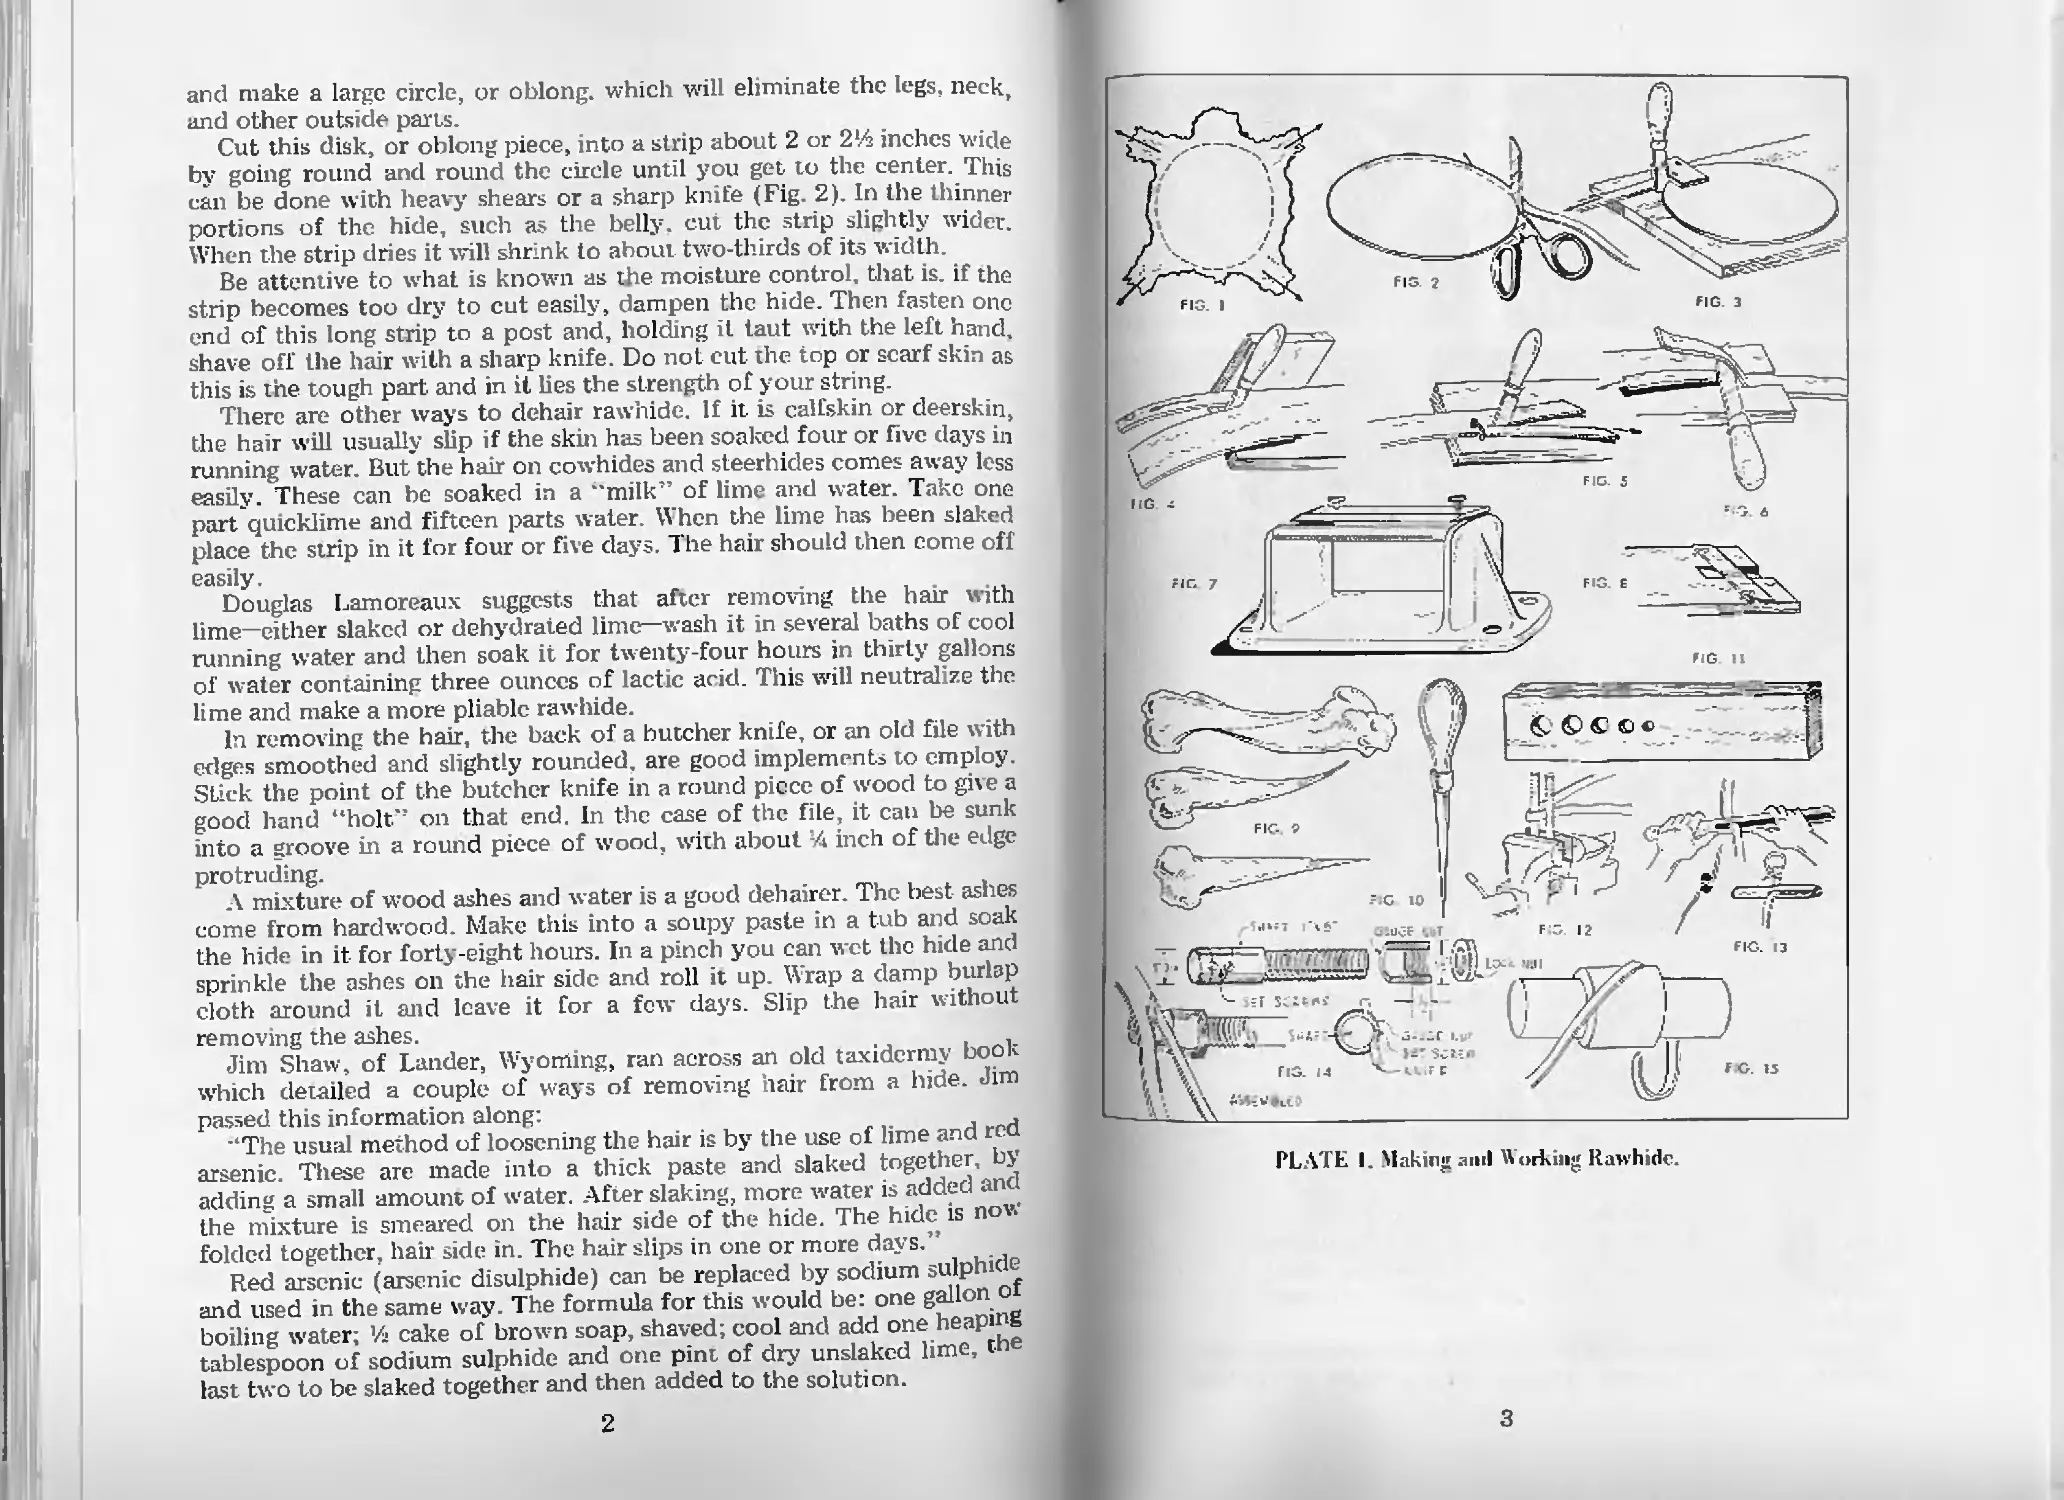
In working with the green hide, first stake it out on the ground or
other place in the shade for about two hours. Nothing more has to be
done, for it will change of its own accord from the green hide to
tawhide. In Fig. 1, Plate 1, is shown the proper way to stake out a hide,
pulling it in the direction of the arrows so it will “set” as near round as
possible.
After it has been staked for two hours it is stiff enough to work with.
Trim off the hanging bits of flesh on the flesh side of the hide and cut it
into a round or oval shape (Fig. 1). That is, find the center of the hide
1
and make a large circle, or oblong, which will eliminate the legs, neck,
and other outside parts.
Cut this disk, or oblong piece, into a strip about 2 or 2’/з inches wide
by going round and round the circle until you get to the center. This
can be done with heavy shears or a sharp knife (Fig. 2). In the thinner
portions of the hide, such as the belly, cut the strip slightly wider.
When the strip dries it will shrink to about two-thirds of its width.
Be attentive to what is known as the moisture control, that is. if the
strip becomes too dry to cut easily, dampen the hide. Then fasten one
end of this long strip to a post and, holding it taut with the left hand,
shave off the hair with a sharp knife. Do not cut the top or scarf skin as
this is the tough part and in it lies the strength of your string.
There are other ways to dehair rawhide. If it is calfskin or deerskin,
the hair will usually slip if the skin has been soaked four or five days in
running water. But the hair on cowhides and steerhides comes away less
easily. These can be soaked in a "milk” of lime and water. Take one
part quicklime and fifteen parts water. When the lime has been slaked
place the strip in it for four or five days. The hair should then come off
easily.
Douglas Lamoreaux suggests that after removing the hair with
lime—either slaked or dehydrated lime—wash it in several baths of cool
running water and then soak it for twenty-four hours in thirty gallons
of water containing three ounces of lactic acid. This will neutralize the
lime and make a more pliable rawhide.
In removing the hair, the back of a butcher knife, or an old file with
edges smoothed and slightly rounded, are good implements to employ.
Stick the point of the butcher knife in a round piece of wood to give a
good hand “holt” on that end. In the case of the file, it can be sunk
into a groove in a round piece of wood, writh about SA inch of the edge
protruding.
A mixture of wood ashes and water is a good dehairer. The best ashes
come from hardwood. Make this into a soupy paste in a tub and soak
the hide in it for forty-eight hours. In a pinch you can wet the hide and
sprinkle the ashes on the hair side and roll it up. Wrap a damp burlap
cloth around it and leave it for a few days. Slip the hair without
removing the ashes.
Jim Shaw, of Lander, Wyoming, ran across an old taxidermy book
which detailed a couple of ways of removing hair from a hide. Jim
passed this information along:
“The usual method of loosening the hair is by the use of lime and red
arsenic. These are made into a thick paste and slaked together, by
adding a small amount of water. After slaking, more water is added and
the mixture is smeared on the hair side of the hide. The hide is now
folded together, hair side in. The hair slips in one or more days.”
Red arsenic (arsenic disulphide) can be replaced by sodium sulphide
and used in the same way. The formula for this would be: one gallon оf
boiling water; ’/a cake of brown soap, shaved; cool and add one heaping
tablespoon of sodium sulphide and one pint of dry unslaked lime, the
last two to be slaked together and then added to the solution.
2
PLATE I. Making ami Working Rawhide.
3
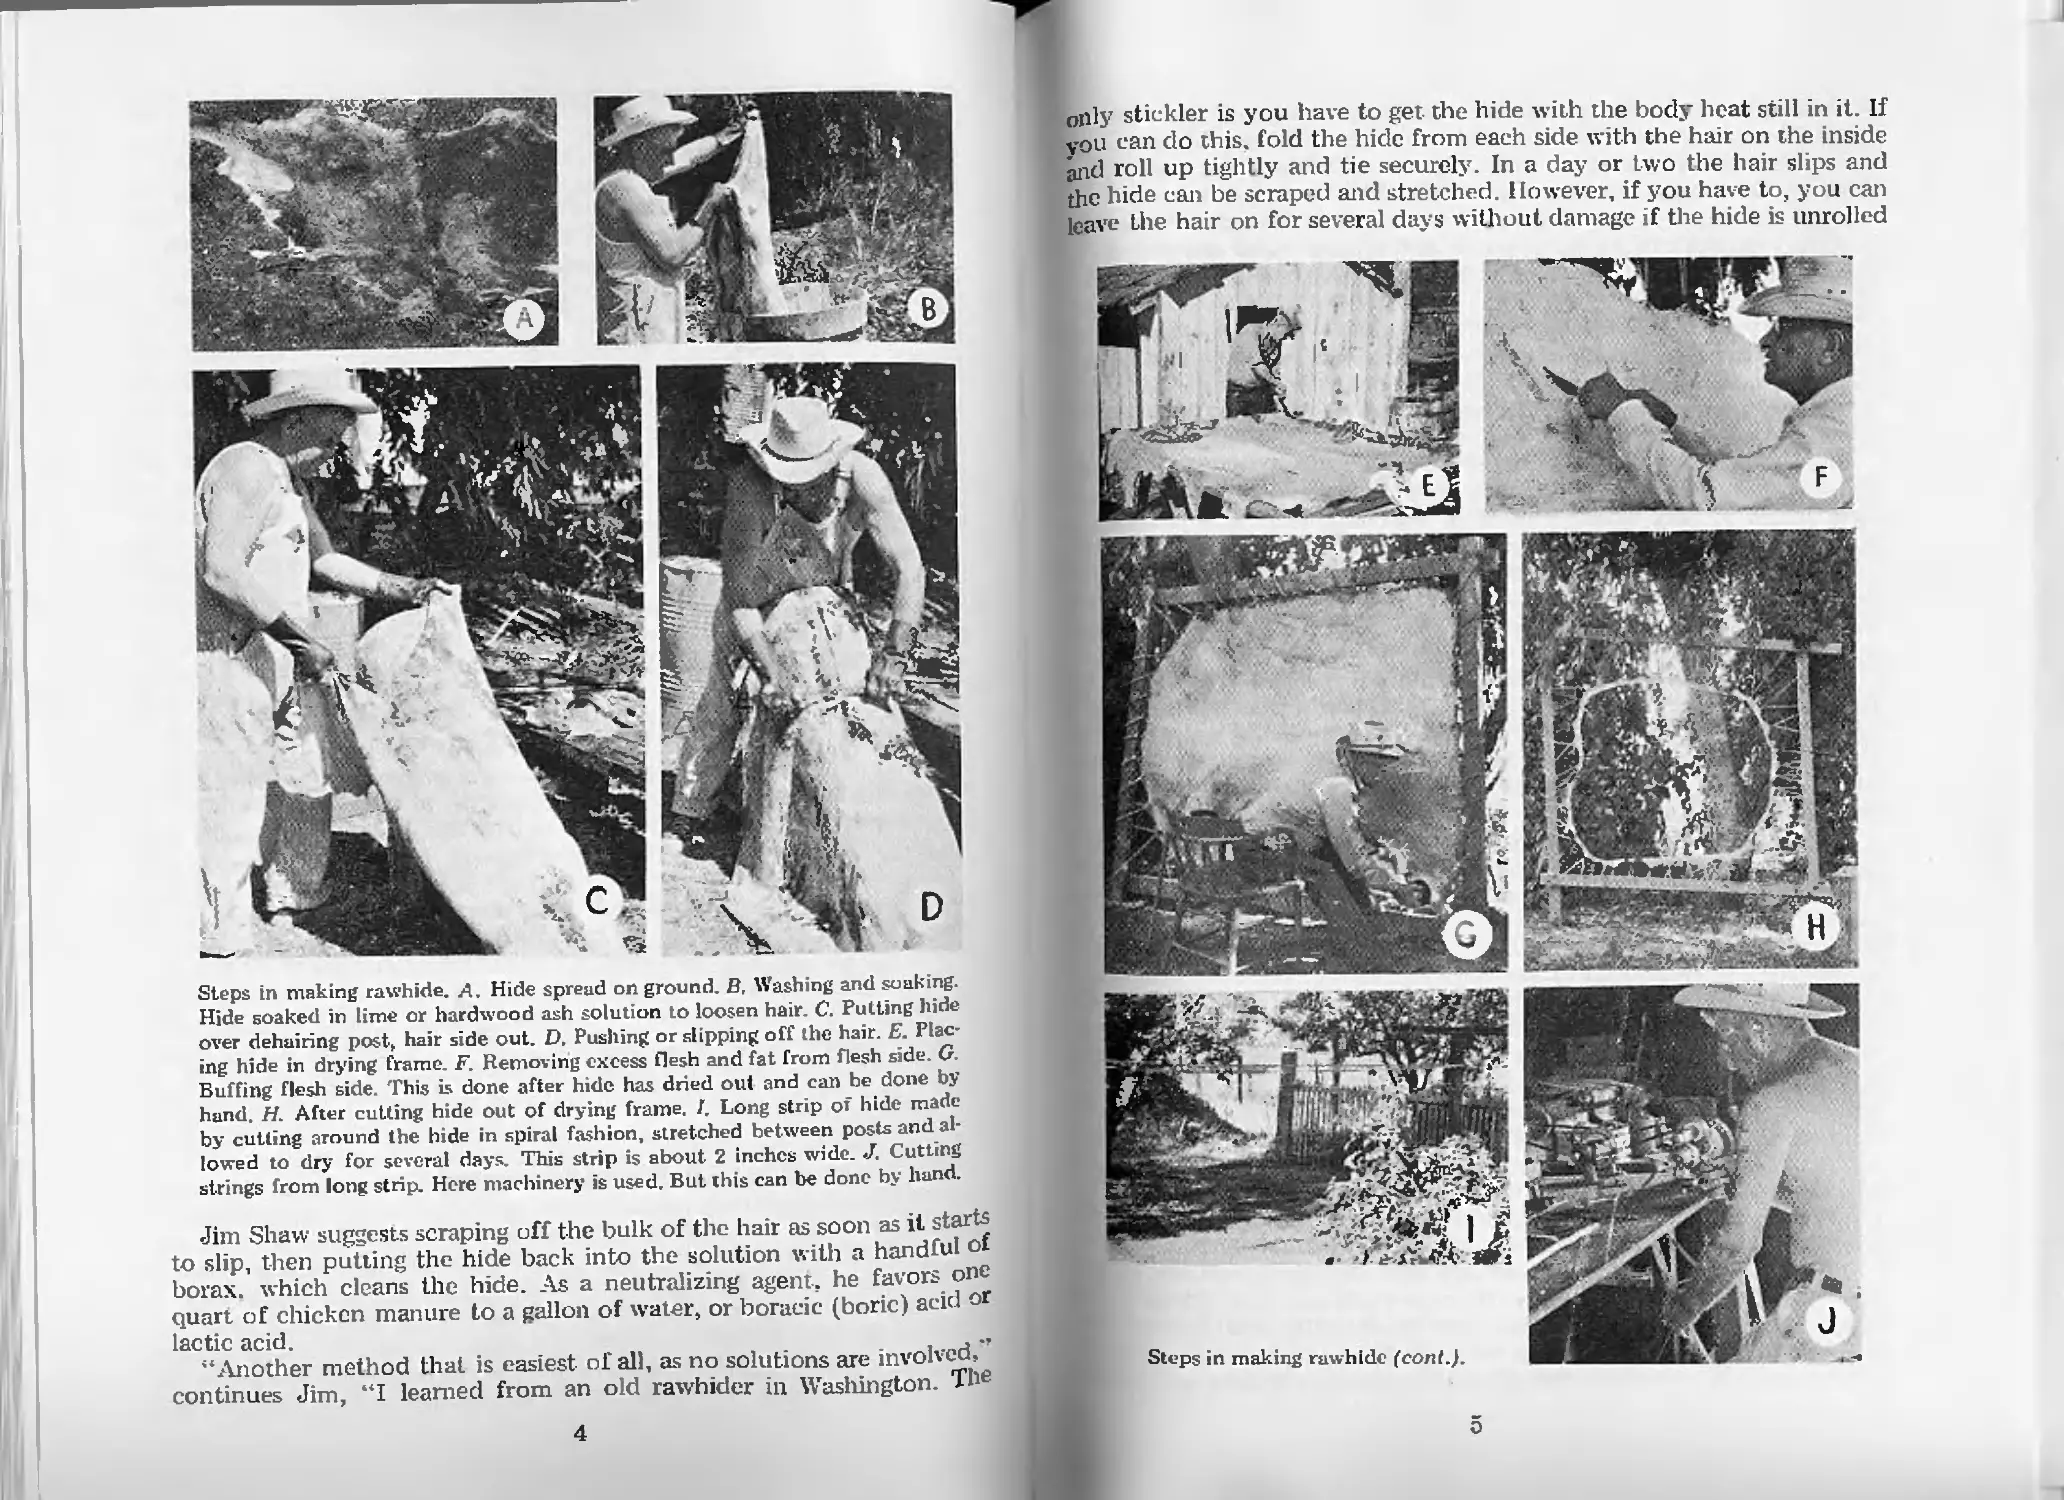
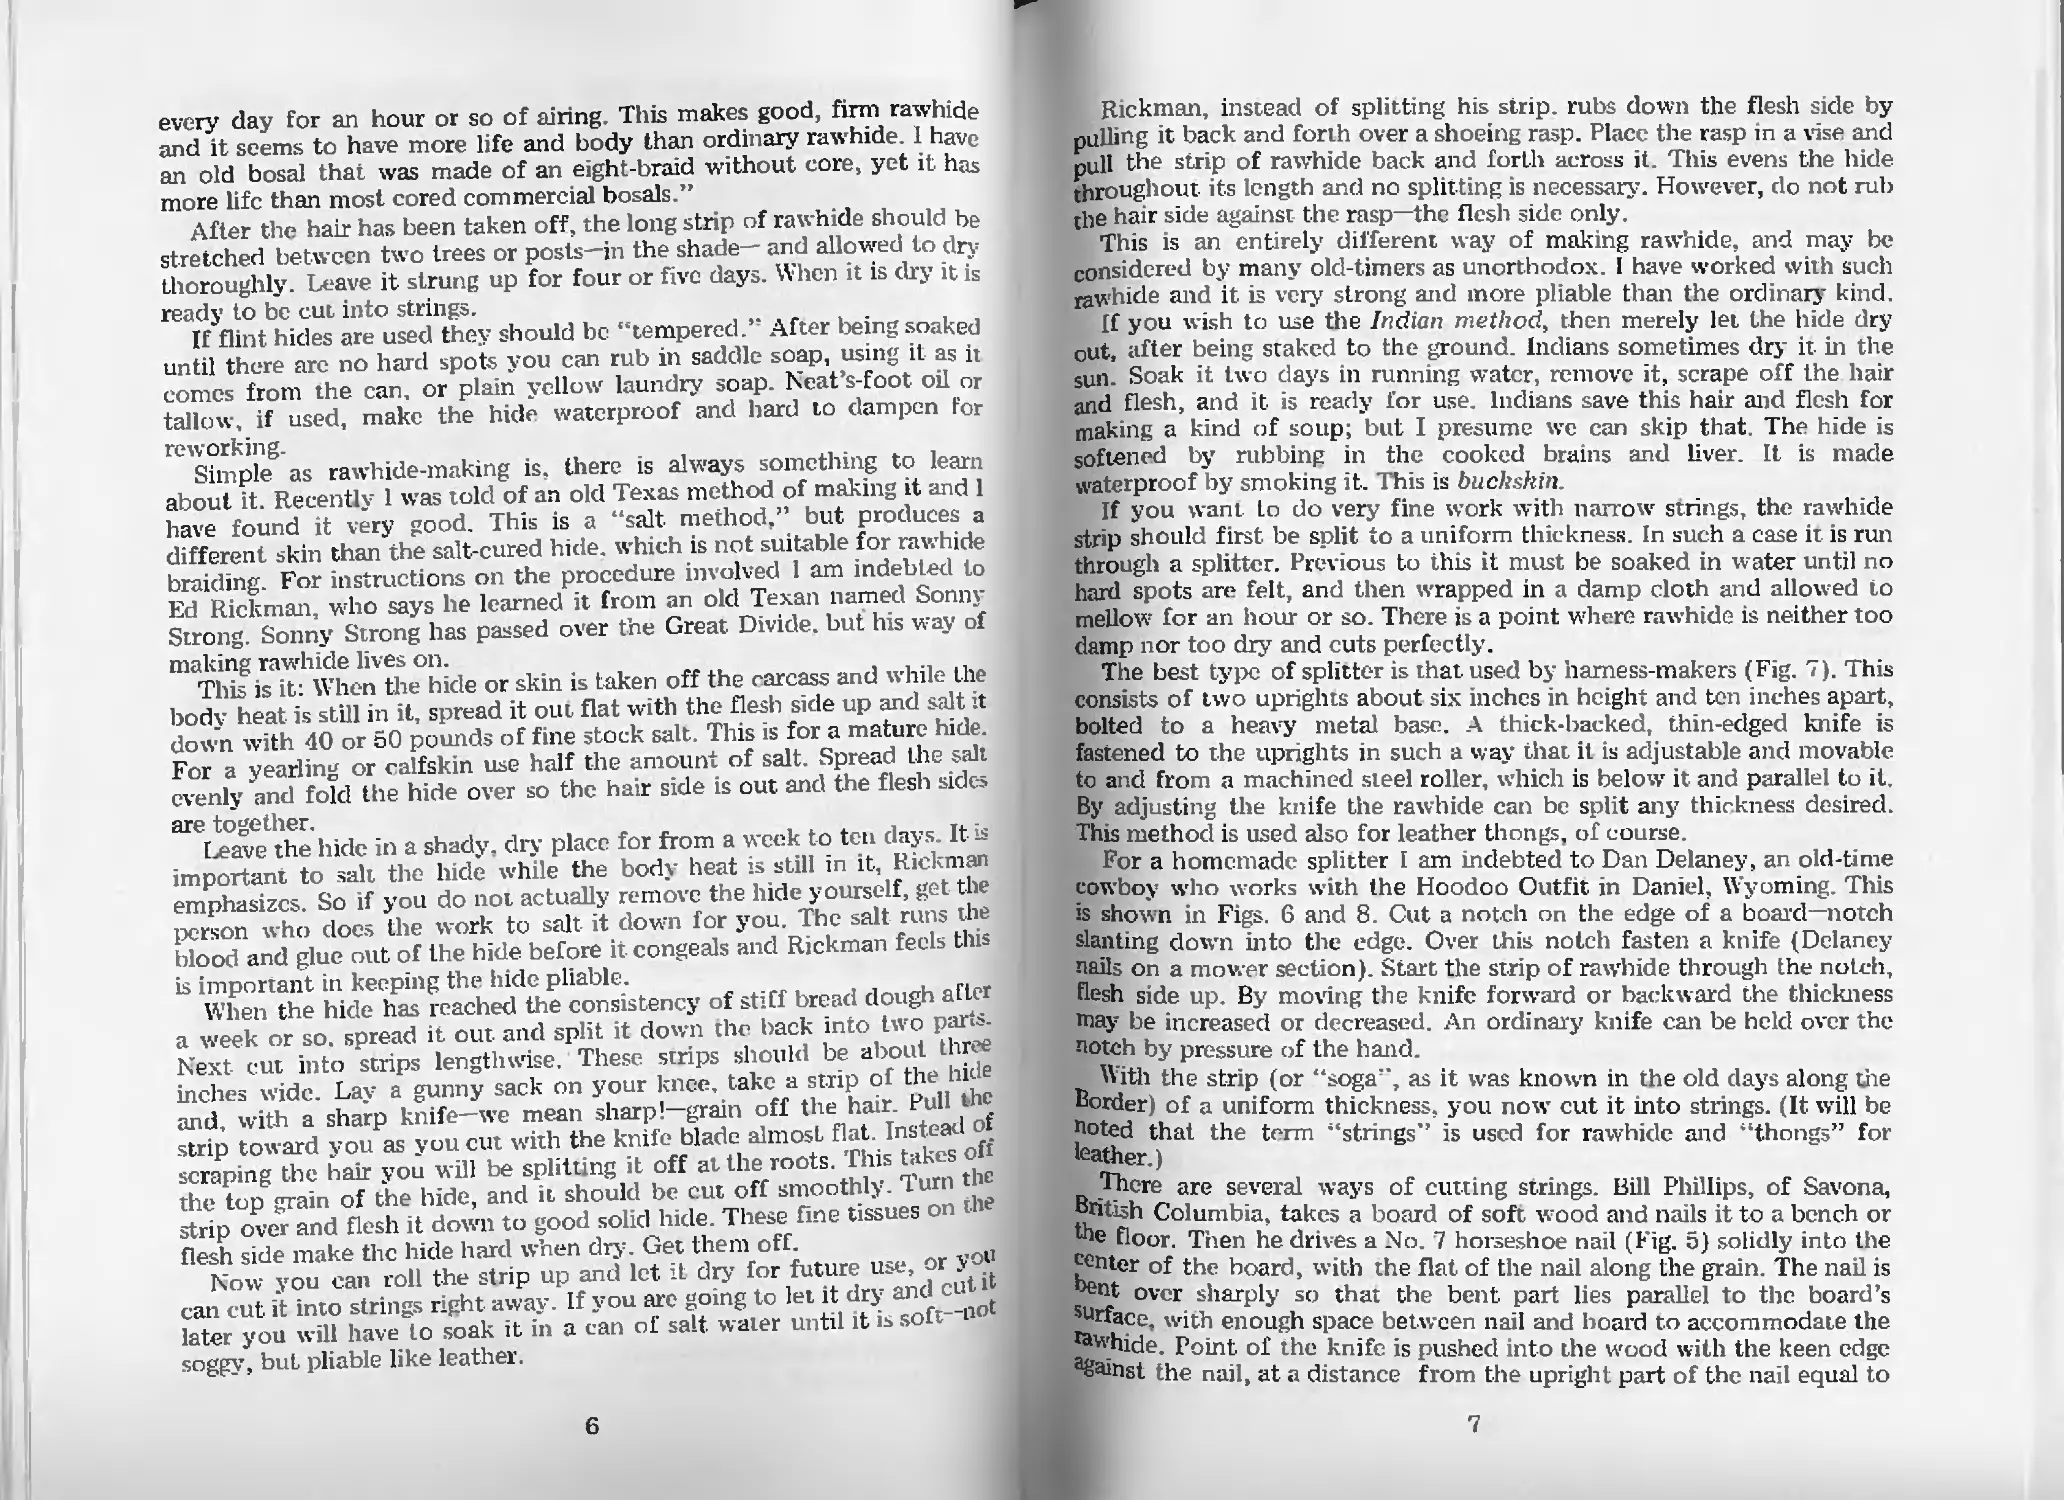
Steps tn making rawhide. A. Hide spread on ground. B, Washing and soaking.
Hide soaked in lime or hardwood ash solution to loosen hair. C. Putting hide
over dehairing post, hair side out. D. Pushing or slipping off the hair. E. Plac-
ing hide in drying frame. F. Removing excess flesh and fat from flesh side. G.
Buffing flesh side. This is done after hide has dried out and can be done by
hand. H. After cutting hide out of drying frame. I. Long strip of hide made
by cutting around the hide in spiral fashion, stretched between posts and al-
lowed to dry for several days. This strip is about 2 inches wide. J. Cutting
strings from long strip. Here machinery is used. But this can be done by hand.
Jim Shaw suggests scraping off the bulk of the hair as soon as it starts
to slip, then putting the hide back into the solution with a handful of
borax, which cleans the hide. As a neutralizing agent, he favors one
quart of chicken manure to a gallon of water, or boracic (boric) acid or
lactic acid.
“Another method that is easiest of all, as no solutions are involved,
continues Jim, “I learned from an old rawhider in Washington. The
4
only stickler is you have to get the hide with the body heat still in it. If
vou can do this, fold the hide from each side with the hair on the inside
Jmd roll up tightly and tie securely. In a day or two the hair slips and
the hide can be scraped and stretched However, if you have to, you can
leave the hair on for several days without damage if the hide is unrolled
5
every day for an hour or so of airing. This makes good, firm rawhide
and it seems to have more life and body than ordinary rawhide. 1 have
an old bosal that was made of an eight-braid without core, yet it has
more life than most cored commercial bosals.”
After the hair has been taken off, the long strip of rawhide should be
stretched between two trees or posts—in the shade— and allowed to dry
thoroughly. Leave it strung up for four or five days. When it is dry it is
ready to be cut into strings.
If flint hides are used they should be "tempered.” After being soaked
until there arc no hard spots you can rub in saddle soap, using it as it
comes from the can, or plain yellow laundry soap. Neat’s-foot oil or
tallow, if used, make the hide waterproof and hard to dampen for
reworking.
Simple as rawhide-making is. there is always something to learn
about it. Recently 1 was told of an old Texas method of making it and 1
have found it very good. This is a “salt method,” but produces a
different skin than the salt-cured hide, which is not suitable for rawhide
braiding. For instructions on the procedure involved 1 am indebted to
Ed Rickman, who says he learned it from an old Texan named Sonny
Strong. Sonny Strong has passed over the Great Divide, but his way of
making rawhide lives on.
This is it: When the hide or skin is taken off the carcass and while the
body heat is still in it, spread it out flat with the flesh side up and salt it
down with 40 or 50 pounds of fine stock salt. This is for a mature hide.
For a yearling or calfskin use half the amount of salt. Spread the salt
evenly and fold the hide over so the hair side is out and the flesh sides
are together.
I^eave the hide in a shady, dry place for from a week to ten days. It is
important to salt the hide while the body heat is still in it, Rickman
emphasizes. So if you do not actually remove the hide yourself, get the
person who does the work to salt it down for you. The salt runs the
blood and glue out of the hide before it congeals and Rickman feels this
is important in keeping the hide pliable.
When the hide has reached the consistency of stiff bread dough after
a week or so. spread it out and split it down the back into two parts.
Next cut into strips lengthwise. These strips should be about three
inches wide. Lay a gunny sack on your knee, take a strip of the hide
and, with a sharp knife—we mean sharp’—grain off the hair. Full the
strip toward you as you cut with the knife blade almost flat. Instead ot
scraping the hair you will be splitting it off al the roots. This takes oft
the top grain of the hide, and it should be cut off smoothly. Turn the
strip over and flesh it down to good solid hide. These fine tissues on the
flesh side make the hide hard when dry. Get them off.
Now you can roll the strip up and let it dry for future use, or У 1
can cut it into strings right away. If you arc going to let it dry and cut i
later you will have to soak it in a can of salt water until it is soft—П
soggy, but pliable like leather.
6
Rickman, instead of splitting his strip, rubs down the flesh side by
pulling it back and forth over a shoeing rasp. Place the rasp in a vise and
pull the strip of rawhide back and forth across it. This evens the hide
throughout its length and no splitting is necessary. However, do not rub
the hair side against the rasp—the flesh side only.
This is an entirely different way of making rawhide, and may be
considered by many old-timers as unorthodox. I have worked with such
rawhide and it is very strong and more pliable than the ordinary kind.
If you wish to use the Indian method, then merely let the hide dry
out, after being staked to the ground. Indians sometimes dry it in the
sun. Soak it two days in running water, remove it, scrape off the hair
and flesh, and it. is ready for use. Indians save this hair and flesh for
making a kind of soup; but I presume we can skip that. The hide is
softened by rubbing in the cooked brains and liver. It is made
waterproof by smoking it. This is buckskin.
If you want Lo do very fine work with narrow strings, the rawhide
strip should first be split to a uniform thickness. In such a case it is run
through a splitter. Previous to this it must be soaked in water until no
hard spots are felt, and then wrapped in a damp cloth and allowed to
mellow for an hour or so. There is a point where rawhide is neither too
damp nor too dry and cuts perfectly.
Tiie best type of splitter is that used by harness-makers (Fig. 7). This
consists of two uprights about six inches in height and ten inches apart,
bolted to a heavy metal base. A thick-backed, thin-edged knife is
fastened to the uprights in such a way that it is adjustable and movable
to and from a machined steel roller, which is below it and parallel to it.
By adjusting the knife the rawhide can be split any thickness desired.
This method is used also for leather thongs, of course.
For a homemade splitter I am indebted to Dan Delaney, an old-time
cowboy who works with the Hoodoo Outfit in Daniel, Wyoming. This
is shown in Figs. 6 and 8. Cut a notch on the edge of a board—notch
slanting down into the edge. Over this notch fasten a knife (Delaney
nails on a mower section). Start the strip of rawhide through the notch,
flesh side up. By moving the knife forward or backward the thickness
may be increased or decreased. An ordinary knife can be held over the
notch by pressure of the hand.
With the strip (or “soga", as it was known in the old clays along the
Border) of a uniform thickness, you now cut it into strings. (It will be
noted that the term '“strings” is used for rawhide and “thongs” for
leather.)
There are several ways of cutting strings. Bill Phillips, of Savona,
British Columbia, takes a board of soft wood and nails it to a bench or
me floor. Then he drives a No. 7 horseshoe nail (Fig. 5) solidly into the
^nter of the board, with the flat of the nail along the grain. The nail is
oent over sharply so that the bent part lies parallel to the board’s
Unace, with enough space between nail and hoard to accommodate the
y'hide. Point of the knife is pushed into the wood with the keen edge
“gainst the nail, at a distance from the upright part of the nail equal to
desired width of the string. The blade may be set at an angle to bevel
the strings as they are cut. This bevel would thus run on the hair side of
one edge of the string and on the flesh side of the other. The knife may
be moved to make wider or narrower strings.
Also is shown a cutter designed by Doug Lamoreaux which may be
clamped in a vise (Fig 14). It has two slits for placing the blade to cut a
beveled edge or a vertical edge. Doug estimates that this gadget can be
made for approximately five dollars.
As to beveling rawhide strings and leather thongs, the rawhide
usually is beveled on the hair side and the leather on the flesh side. The
reason for beveling the rawhide on the hair side is that otherwise the
sharp edges curl upward in drying. Beveling prevents this and gives a
smooth finish to the braid. A thick thong of leather beveled on the
flesh side allows it to lie snug. In some wide thongs, the bevel is on the
hair side on one edge and the flesh side on the other. These edges
overlap on the alternate thongs.
In Fig. 3 is shown a cutter where the string or thong is made from a
small round or disc of leather or rawhide. In such a case, an 1 ,'8-inch
thong or string a yard long can be cut from a disc two inches in
diameter; a three-inch disc yields two yards, and a four-inch disc tliree
and one-half yards, and so on. In Fig. 4 is another type of homemade
cutter for cutting thongs or strings from long strips of leather or
rawhide.
Old-time quirt and whip-makers sometimes use a sharp knife with the
thumb as a guide in cutting strings and thongs freehand. In this manner
they can taper the string or thong by moving the thumb toward the
knife. This requires considerable practice.
If rawhide strings are to be softened they should be placed while
damp in warm melted tallow or neat’s-foot oil. They are then pulled
back and forth against a round piece of wood held in a vise. Keep oiling
them and working them around the wood as they dry cut.
I have found a good way to soften strings, or even sogas, is to clamp
two sections of a broom handle in a vise, about 'A inch apart (Fig. 12).
Place the string or strip of rawhide around these as shown in the
diagram and seesaw back and forth, keeping the string or strip well
saddle-soaped I am partial to saddle soap instead of tallow or
neat’s-foot oil, as I think the tallow and oil tend to deteriorate the
rawhide, especially if it is left in the sun. Instead of saddle soap, good
old yellow laundry soap may be used and is just as effective.
In braiding rawhide it will sometimes be found that, when the
finished braid dries, the strings have narrowed and daylight can be seen
through them. This means they have been improperly tempered or have
been worked while too wet. Rawhide workers dampen their strings
until they are just workable. Then they rub soap in them. If the string
has little of the natural oil left in it the rawhider retempers it. To
retemper strings, rub them well with saddle soap (or tallow or
neat’s-foot oil) and wrap them while damp in a piece of damp burlap
and allow them to remain for forty-eight hours. If you use soap you can
8
redampen these strings, while if you temper them with neat’s-foot oil or
tallow, once they dry out it is difficult to restore them to that pliable
condition required for good work. So don’t spare the soap.
You won't need many tools for braiding. A good, sharp knife is
essential. Most important is a fid, or an instrument which tapers to a
thin, rounded point—not a sharp one (Fig. 10).
Fids can be made from bone. In fact, several of your tools may be
made from bone—soup bones, or those from the Sunday roast. With a
hacksaw and file you can shape a piece of bone nicely. Polish it. with
steel wool and then some fine abrasive, such as pumice or rotten stone.
I turned out a very fine fid from the leg bone of a sheep. (Cattle
men, please forget your prejudices for a moment.) This bone had a
slight curve to it and I took advantage of this curve in fashioning my
fid. This is shown in the accompanying illustration (Fig. 9).
Another practical gadget can be made from a piece of thick bone, or
hardwood. This is a gauge for round braid (Fig. 11). A half dozen holes
are drilled through the bone or wood with machine drills—say, starting
with a 5/8, graduating down to a 1/16-inch hole. Bevel or smooth edges
of die holes on both sides.
A round braid after being rolled under foot, is first drawn through
the hole which is closest to its diameter. Then it is drawn through the
next smaller hole; then the next smaller one. This evens up the braid
and polishes it, and makes it of a consistent diameter throughout.
Several mandrels of various diameters are handy gadgets. They arc
used in making Turk’s-heads and braided knots. One is shown in Fig.
15. This is a piece of broom handle with a leather or rawhide collar.
The collar is to keep the knot from slipping while being braided. A face
may be cut or filed on each of the four sides and these faces numbered
in a clockwise direction from 1 to 4 (Plate 3. Fig. 12). This will help in
the instructions which follow on braided knots.
Additional Notes on Making and Working Rawhide. In Queensland,
Australia, they still use some old-time methods in making rawhide.
Francis Ian Maclean, of Cunnamulla, writes:
‘'Peg out the hide while the animal body heat is still in it. The hide is
stretched drum-tight on the ground with wooden pegs through small
slits in the hide and made so it finishes in a circle, or as near as possible.
Salt and ashes are laid on liberally to the extent of 10 to 12 pounds to a
two-year-old steer hide, and allowed to remain for a few days. Leave
the tail of the beast on the hide. The reason for leaving the tail on the
hide is that the old drovers and bullock teamsters would tie the hide
flesh down behind their wagons and drag it for miles. This method
cleansed the fat and other tissues from the hide and helped to ‘break” it.
f the hide was not wanted for several days salt and fat was rubbed in
after the dust was shaken off. Such a hide would keep for a long time if
tolled up and left in the shade. This makes terrific rawhide.”
He says sometimes bran was used instead of ashes and this imparted a
yellow color to the hide. For small skins, like those of rabbits, he
spread a paste of baking soda on the flesh side, repeating this for a
9
couple of days. Then he softened the skin by kneading with his hands,
or pulling back and forth around a rough piece of hardwood. This gave
it a soft and pliable finish.
“I have also seen.” he further writes, “a bullock hide placed in a calf
yard where four or five calves were locked up. Every night for about a
month this hide was turned and believe me it was the best rawhide for
ropes and hobbles I ever saw. The urine and dung made a super job.”
Milton F. Farley, an old-time buckaroo of Crawfordsville, Oregon,
wrote me recently that, after years of trying to find some easy and
satisfactory method of thinning and evening rawhide strings, he had
learned from an old fellow how to skive them by a very simple and
homey way.
“Now, here's what I want you to do.” he wrote. “Go to a hardware
store and tell the salesman you want a good joiner’s plane. When you
get it in your hands it explains itself. You turn the screw behind the bit
clockwise io close the gap behind the bit. When you turn the screw
anticlockwise it opens the gap. If the strings are one inch or smaller I
hold the plane in my left hand, pull the string with m\ right. When the
strings are wider, I fasten the plane in a vise. Darn it, Bruce, it’s so
simple it’s silly!”
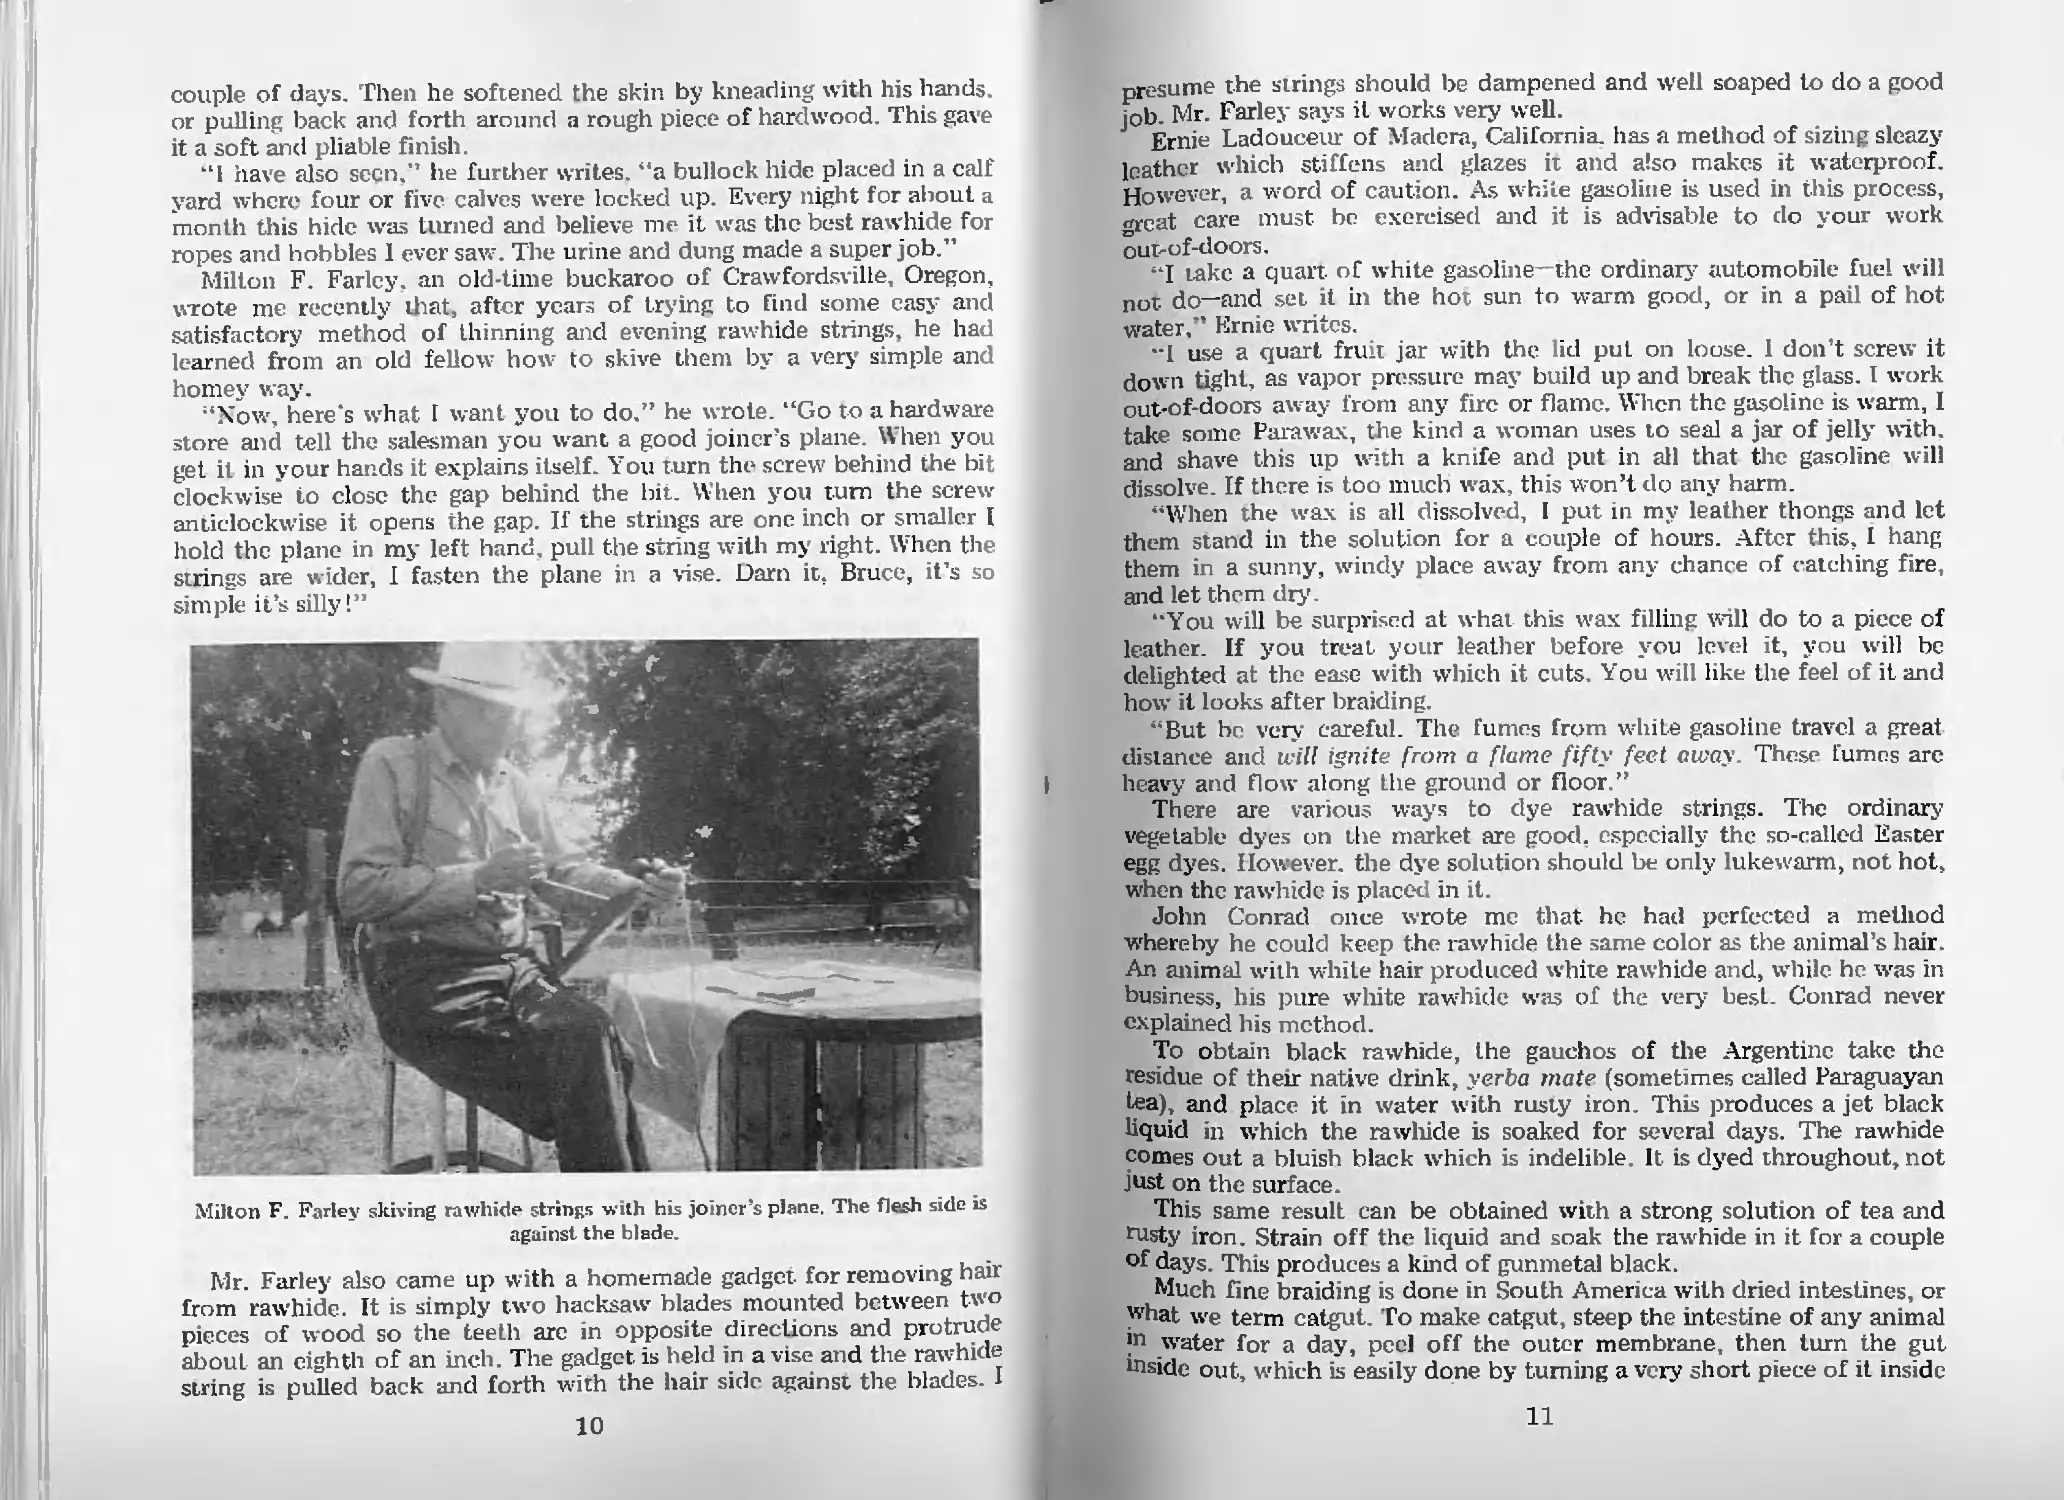
Milton F. Farley skiving rawhide strings with his joiner’s plane. The flesh side is
against the blade.
Mr. Farley also came up with a homemade gadget for removing hair
from rawhide. It is simply two hacksaw blades mounted between two
pieces of wood so the teeth arc in opposite directions and protrude
about an eighth of an inch. The gadget is held in a vise and the rawhide
siring is pulled back and forth with the hair side against the blades. I
10
presume the strings should be dampened and well soaped to do a good
job. Mr. Farley says it works very well.
Ernie Ladouceur of Madera, California, has a method of sizing sleazy
leather which stiffens and glazes it and also makes it waterproof.
However, a word of caution. As white gasoline is used in this process,
<rrcat care must be exercised and it is advisable to do your work
out-of-doors.
“I Lake a quart of white gasoline—the ordinary automobile fuel will
not- do—and set it in the hot sun to warm good, or in a pail of hot
water,” Ernie writes.
"1 use a quart fruit jar with the lid put on loose. 1 don’t screw it
down tight, as vapor pressure may build up and break the glass. I work
out-of-doors away from any fire or flame. When the gasoline is warm, I
take some Parawax, the kind a woman uses to seal a jar of jelly with,
and shave this up with a knife and put in all that the gasoline will
dissolve. If there is too much wax, this won’t do any harm.
“When the wax is all dissolved, I put in my leather thongs and let
them stand in the solution for a couple of hours. After this, 1 hang
them in a sunny, windy place away from any chance of catching fire,
and let them dry'.
“You will be surprised at what this wax filling will do to a piece of
leather. If you treat your leather before you level it, you will be
delighted at the ease with which it cuts. You will like the feel of it and
how it looks after braiding.
“But be very careful. The fumes from white gasoline travel a great
distance and will ignite from a flame fifty feet away These fumes are
heavy and flow along the ground or floor.”
There are various ways to dye rawhide strings. The ordinary
vegetable dyes on Lhe market are good, especially the so-called Easter
egg dyes. However, the dye solution should be only lukewarm, not hot,
when the rawhide is placed in it.
John Conrad once wrote me that he had perfected a method
whereby he could keep the rawhide he same color as the animal’s hair
An animal with white hair produced white rawhide and, while he was in
business, his pure white rawhide was of the very- best. Conrad never
explained his method.
To obtain black rawhide, the gauchos of the Argentine take the
residue of their native drink, yerba mate (sometimes called Paraguayan
tea), and place it in water with rusty iron. This produces a jet black
liquid in which the rawhide is soaked for several days. The rawhide
comes out a bluish black which is indelible. It is dyed throughout, not
just on the surface.
This same result can be obtained with a strong solution of tea and
rusty iron. Strain off the liquid and soak the rawhide in it for a couple
of days. This produces a kind of gunmetal black.
Much fine braiding is done in South America with dried intestines, or
what we term catgut. To make catgut, steep the intestine of any animal
*n water for a day, peel off the outer membrane then turn the gut
inside out, which is easily done by turning a very short piece of it inside
11
out, just as you would turn up the cuff of your sleeve; then, catching
hold of the turned-up cuff, dip the whole in a bucket, and scoop up a
little water between the cuff and the rest of the gut. The weight of
this water will do what is wanted. It will bear down an additional
length of the previously turned gut. and thus, by a few successive
dippings, the entire length of any amount of intestine, however narrow
it may be, can be turned inside out in a minute or two. Having turned
the intestine inside out, scrape off the whole of its inner soft par ts and
that which remains is a fine transparent tube. This, being twisted and
stretched to dry, forms catgut.
A fine sewing thread can be made from the outer membrane of
intestines. Steep the intestines of any animal in water for a day. Then
peel off the outer membrane, which will come off in long strips. These
should be twisted between the hands, and hung out to dry’. This thread
is excellent for sewing rawhide together or for any other purpose.
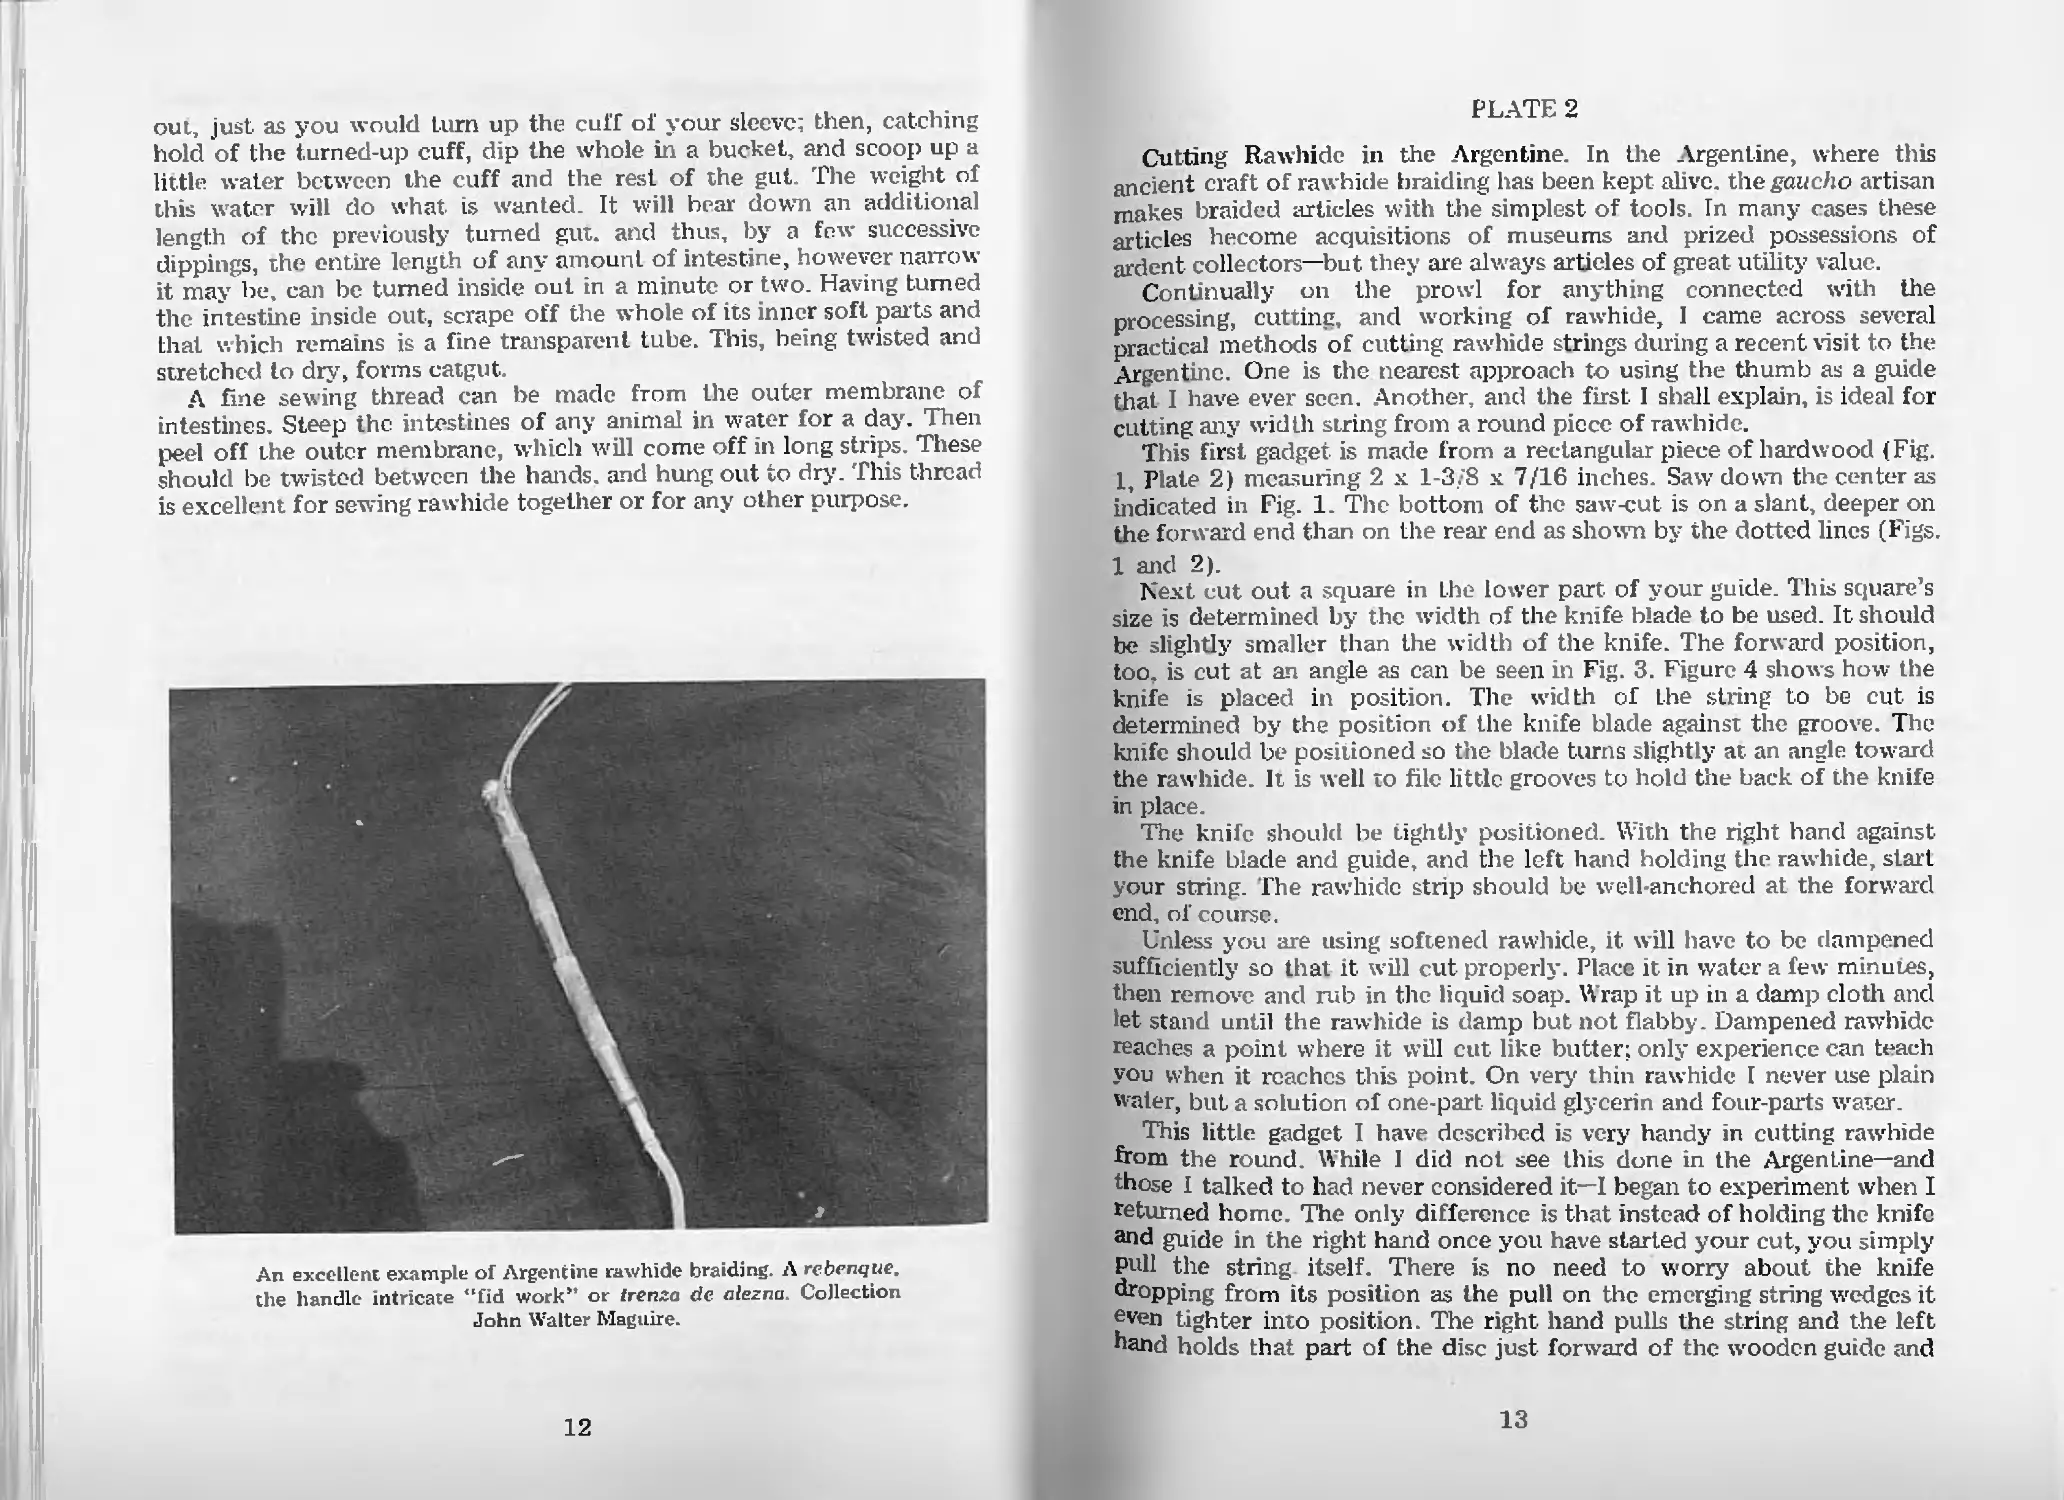
An excellent example of Argentine rawhide braiding. Л rebenque,
the handle intricate “fid work*’ or trenza de alezna. Collection
John Walter Maguire.
12
PLATE 2
Cutting Rawhide in the Argentine. In the Argentine, where this
ancient craft of rawhide braiding has been kept alive, the gaucho artisan
makes braided articles with the simplest of tools. In many cases these
articles become acquisitions of museums and prized possessions of
ardent collectors—but they are always articles of great- utility value.
Continually on the prowl for anything connected with the
processing, cutting and working of rawhide, I came across several
practical methods of cutting rawhide strings during a recent visit to the
Argentine. One is the nearest approach to using the thumb as a guide
that I have ever seen. Another, and the first 1 shall explain, is ideal for
cutting any width string from a round piece of rawhide.
This first gadget is made from a rectangular piece of hardwood (Fig.
1, Plate 2) measuring 2x1 3/8 x 7/16 inches. Saw down the center as
indicated in Fig. 1. The bottom of the saw-cut is on a slant, deeper on
the forward end than on the rear end as shown by the dotted lines (Figs.
1 and 2).
Next cut out a square in the lower part of your guide. This square’s
size is determined by the width of the knife blade to be used. It should
be slightly smaller than the width of the knife. The forward position,
too. is cut at an angle as can be seen in Fig. 3. Figure 4 shows how the
knife is placed in position. The width of the string to be cut is
determined by the position of the knife blade against the groove. The
knife should be positioned so the blade turns slightly at an angle toward
the rawhide. It is well to file little grooves to hold the back of the knife
in place.
The knife should be tightly positioned. With the right hand against
the knife blade and guide, and the left hand holding the rawhide, star!
your string. The rawhide strip should be well-anchored at the forward
end, of course.
Unless you are using softened rawhide, it will have to be dampened
sufficiently so that it will cut properly. Place it in water a few minutes,
then remove and rub in the liquid soap. Wrap it up in a damp cloth and
let stand until the rawhide is damp but not flabby. Dampened rawhide
reaches a point where it will cut like butter; only experience can teach
you when it reaches this point. On very' thin rawhide I never use plain
water, but a solution of one-part liquid glycerin and four-parts water.
This little gadget I have described is very handy in cutting rawhide
from the round While I did not see this done in the Argentine—and
those I talked to had never considered it—I began to experiment when I
returned home. The only' difference is that instead of holding the knife
and guide in the right hand once you have started your cut, you simply
Pull the string itself. There is no need to worry about the knife
°r pping from its position as the pull on the emerging string wedges it
even tighter into position. The right hand pulls the string and the left
hand holds that part of the disc just forward of the wooden guide and
13
PLATE 2. (lulling liawliidc in the Argentine.
the knife. The disc or round of rawhide should be nailed in the center
to the edge of a table or other flat surface so that it can turn freely
(Fig. 6).
It is astonishing how long a string one can obtain from a disc or
round of rawhide cut in this fashion: possibly as much as 100 feet of
1/16-inch of string from a round 12 or 13 inches in diameter. But one
word of caution in cutting from the round: the disc must come from a
section of the hide or skin that is consistently the same thickness. If
part of the disc is from the belly, this portion of the string will come
out thinner than the rest.
In making the simpler form of guide to cut strings (Fig. 7), cut a
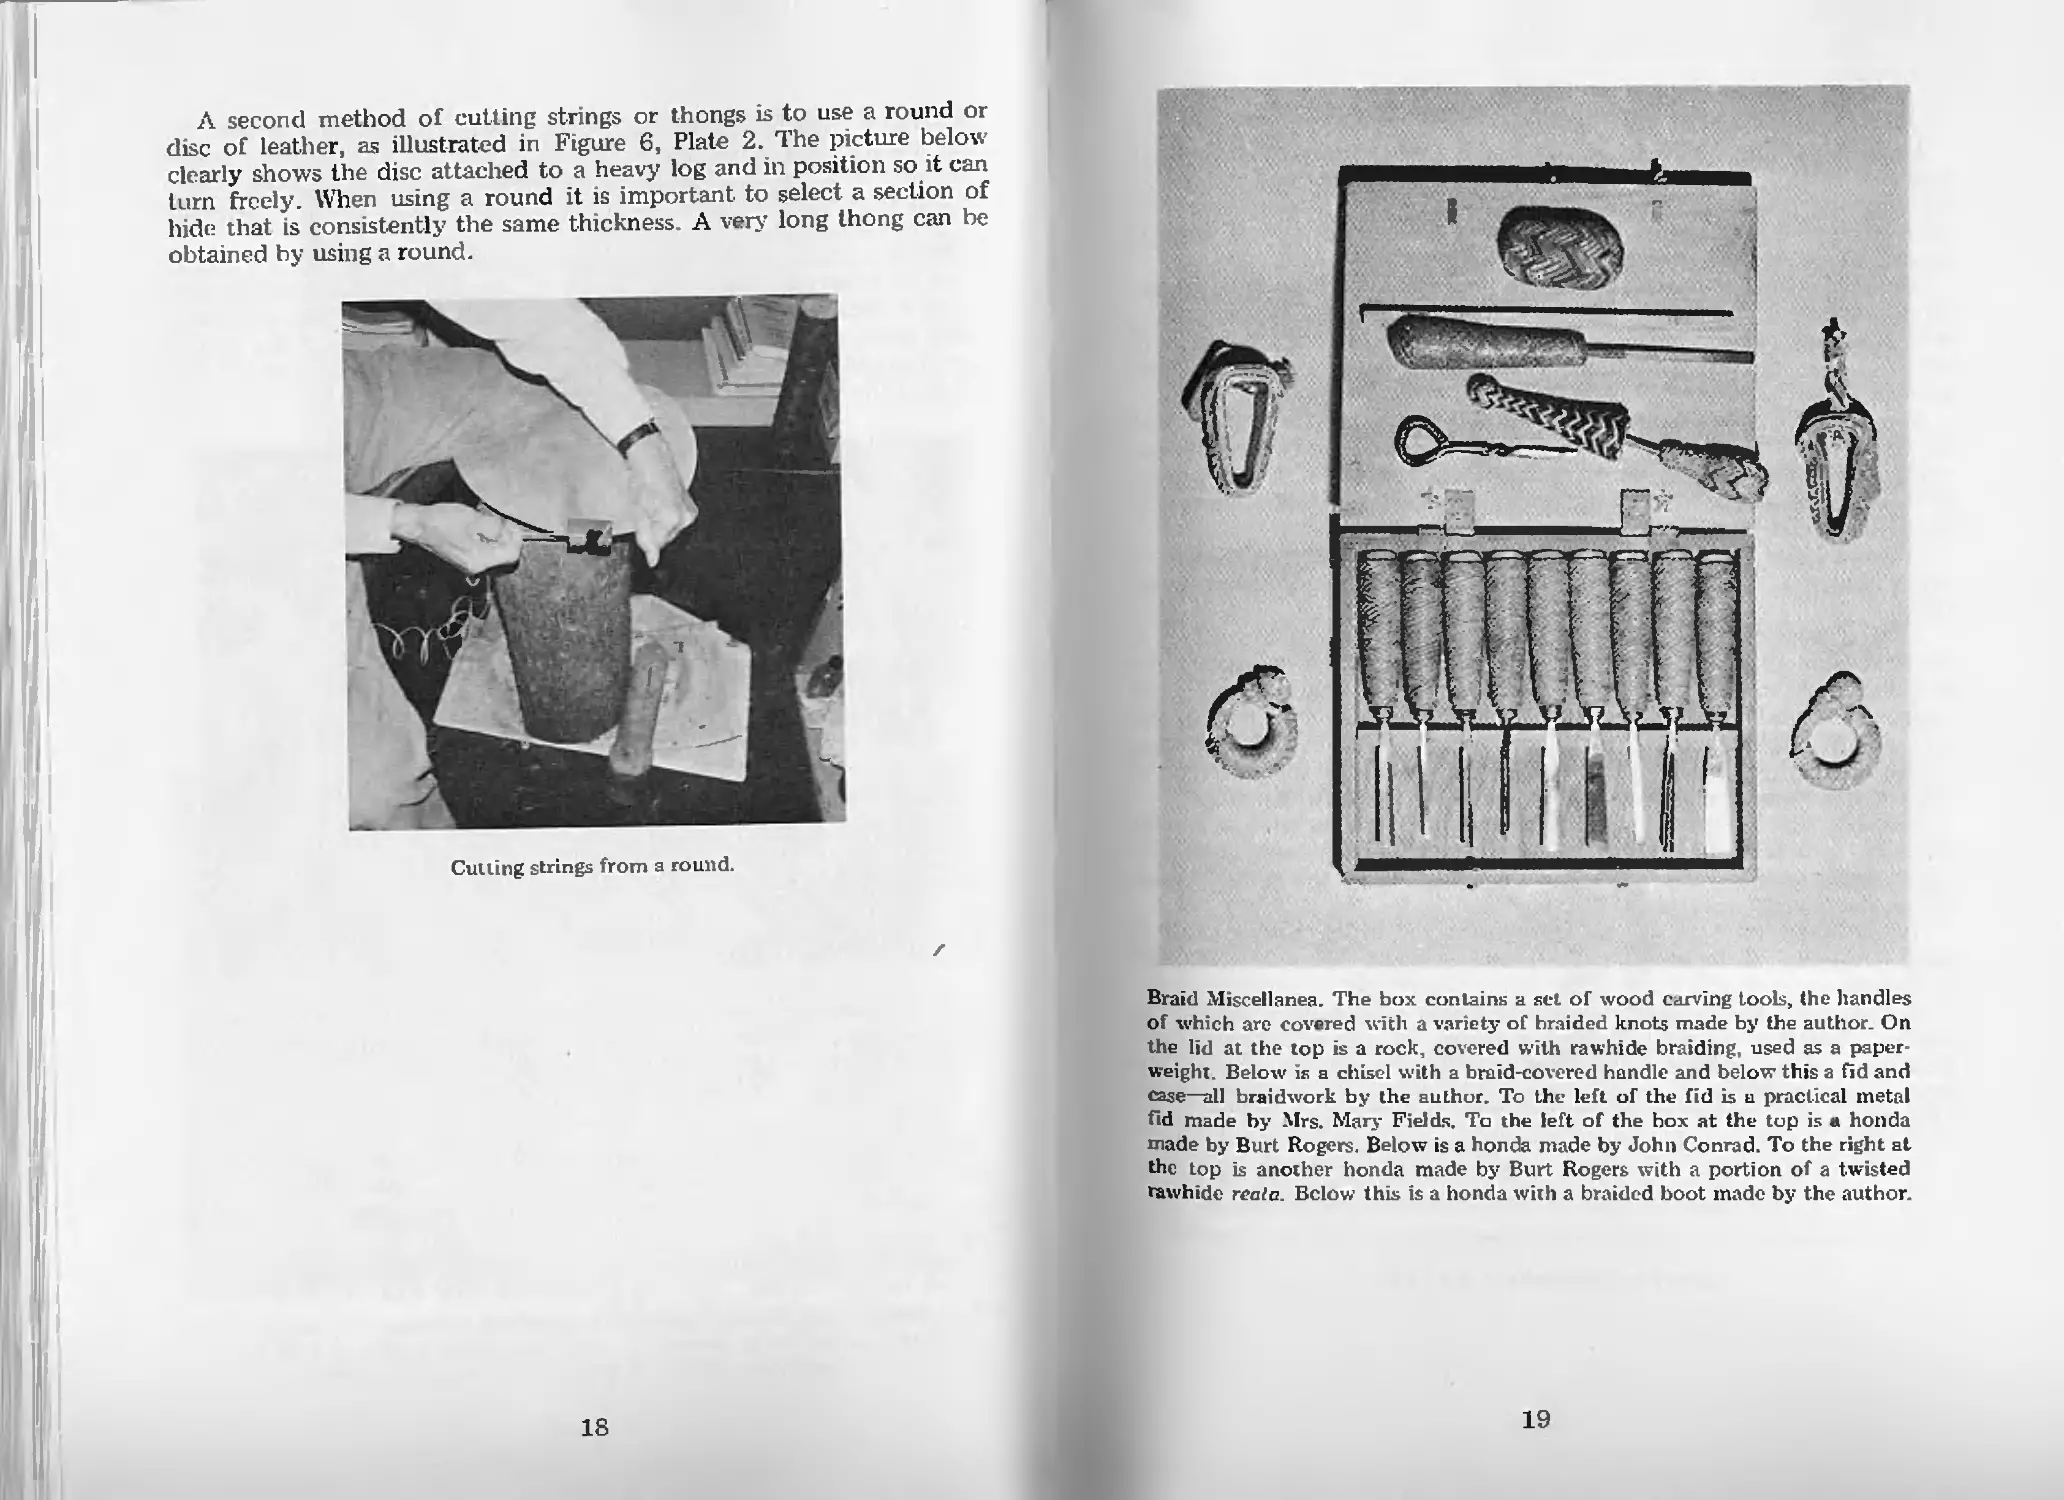
rectangular piece of heavy rawhide and fold it hair side in. Place
between the folded parts (damp, of course) a piece of cardboard
wrapped in cellophane or waxed paper so it won’t stick, weight it
down, and allow it to dry for several days. I might explain that folding
with the hair side in is practical, as rawhide curls on the hair side when
dry. It will'curl out of shape anyway if left around, so when not using
it, place the cardboard between the folds and keep a weight on it.
Figure 8 shows the position of the knife blade against the groove to
determine the width of string to be cut. Push the blade edge into the
rawhide slightly, so it will not slip out of position. Figure 9 shows the
way to use this guide. The upper part, of the rawhide strap is anchored
securely.
The gaucho method of “knocking off” the sharp edges of rawhide
strings is shown in Fig. 10. With a sharp knife and a piece of cardboard
on your knee, this is not difficult. The thumb of the hand holding the
knife holds the string closely against the knife blade, and the rawhide
string is pulled forward as illustrated.
Martin Gomez, of the Argentine, whose work is in museums and in
the hands of collectors, demonstrated for me his method of softening
rawhide. The finest rawhide is made from the skins of colts. The skin is
staked out in the shade for a couple of hours, then fleshed, and the hair
removed—either with a sharp knife or by soaking for a day or two in a
solution of quicklime (sometimes in a solution of sodium sulphide), and
finally given an alum bath. The method of staking out determines the
ultimate use of the skin. If it is to be cut in the round (that is spiraled
into one long strap or soga), it is staked out to be formed as nearly
round as possible. If for broad straps or lonjas it is staked so the pull is
from head to tail.
Dehaired, fleshed, and cut into strips (the belly section is the best for
very fine strings), the rawhide is then softened. This is done in two
stages. First the strip is rolled in a long spiral, with the hair side in, then
dampened and rubbed liberally with yellow laundry’ soap, and beaten
with a wooden mallet until the fibers are broken down.
Next, one end is fastened to a post and the strap is pulled many
times through a mordaza. This is a cylinder of wood with a groove cut
in it for two-thirds of its length. By turning the mordaza upward on one
Pull and downward on the next to offer as much resistance as possible.
15
Martin Gomez demonstrating two steps in softening rawhide. Top Rolled strip
is beaten with a wooden mallet until fibers are broken down. Bottom' Strap is
pulled through a mordasa until it is as soft as leather.
16
the strap is worked until it is soft as leather. While tallow is used on
such raw hide, it is the tallow which comes from fat around the animal’s
heart and liver. Ordinary tallow rots rawhide in time, the gauchos say.
No salt is used on the skin as this causes the rawhide “to cry” or sweat
in damp weather.
Gomez cuts his strings with a sharp knife, using his thumb as a guide.
When he cuts hair-like strings, they curl in the air as he proceeds, and
are of a consistent width for their entire length. Sometimes he uses a
heavy piece of doubled rawhide with a square cut out of the folded
part. Into this square goes the knife, its cutting edge adjusted for the
width of the strings to be cut.
After the rawhide is softened it is ready to be cut into thongs. Martin Gomez
demonstrating one method of cutting thongs. This step requires a sharp knife.
Using his thumb as a guide he can cut strings that are hair-like in width and
consistent for their entire length.
The edges of the strings are next beveled on the skin side by placing a
knife, at an angle, on a card or piece of rawhide. This is placed on the
knee, and the string is pulled against the knife’s edge. The thumb acts as
a guide.
Sogas, or wide strings cut from the round, mainly arc used for
making twisted lariats. The soga is softened only with the mordaza, as
a laze needs a certain amount of life or spring.
17
Л second method of cutting strings or thongs is to use a round or
disc of leather, as illustrated in Figure 6, Plate 2. The picture below
clearly shows the disc attached to a heavy log and in position so it can
turn freely. When using a round it is important to select a section of
hide that is consistently the same thickness. A very long thong can be
obtained by using a round.
Culling strings from a round.
18
Braid Miscellanea. The box contains a sei of wood carving took, the handles
of which are covered with a variety of braided knots made by the author. On
the lid at the top is a rock, covered with rawhide braiding used as a paper-
weight. Below is a chisel with a braid-covered handle and below this a fid and
сазе—all braidwork by the author. To the left of the fid is a practical metal
fid made by Mrs. Mary Fields, To the left of the box at the top is a honda
made by Burt Rogers. Below is a honda made by John Conrad. To the right at
the top is another honda made by Burt Rogers with a portion of a twisted
rawhide reala. Below this is a honda with a braided boot made by the author.
19
PLATE 3
Leather-braiding Tools. Tn leather braiding and thong work the best
tool is the hand. Just as other tools must be sharpened and well cared
for, so must this most valued tool: the sharpening in this instance is its
development and training, which involves a certain mental process
leading to the coordination of eye and hand.
The actual tools themselves are mere projections of the hands. To use
tools properly one must become so familiar with them, with their feel,
with their application and their purpose that it is possible to use them
with the same dexterity as the hand. Most tools can do more harm than
good in unpracticed hands.
Some people have a natural bom deftness and knack for braiding and
thong work; others acquire it only through careful and conscientious
study and application—by hard and faithful practice. Yet, taken step by
step, and each step carefully and accurately performed, it is, as is any
handicraft, relatively simple.
A good knife is important, It may be a pocketknife or the type of
knife known as the skiving knife (Fig. 1). Keep the knife sharp at all
times.
Figures 2 and 3 show thonging chisels for cutting slits in leather. A
lacing needle (Fig. 5), purposely shown over-sized, is necessary for
working with small thongs. The revolving punch with tubes (Fig. 4)
which cuts holes of six different diameters, is an essential p;irt of the
equipment. A drive punch (Fig. 6), which may be had in different sizes,
is also a necessary tool, in order to make holes several inches from the
edge of the leather, which cannot be made with a revolving punch.
The fid. with a tapering metal part and blunt on the end, is a most
valuable tool (Fig. 7). The space marker is a convenience, especially
when lacing leather parts together, as it evenly marks the holes through
which the thongs must pass (Fig 8).
To cut belts or wide thongs from skins and hides, a draw gauge is
used (Fig. 9). A mallet (Fig. 10) and dividers (Fig. 11) arc also
necessary.
For making Turk’s-heads or woven knots of leather a mandrel is
needed. This can be made with six inches of common broomstick.
Cement a collar of leather near one end, file the other down on four
sides and number these surfaces from 1 to 4 in a clockwise direction
(Fig. 12).
20
PLATE 3. Leather-braiding Tools.
21
PLATE 4
Thong Cutting. Some braiders prefer to cut their own thongs. These
should be taken from that portion of the skin or hide that presents the
least spongy appearance. Lay the leather on a hard cutting board and
with a straightedge or ruler and a sharp knife cut the thongs, always
cutting across the grain in the wood so the knife cannot follow this
grain.
Scraps of leather may be cut into discs from four to eight inches in
diameter. With a pair of shears, cut around the circumference the width
of the thong desired (Fig. 1). After the thong is cut, its spiral shape can
be straightened out by stretching it on the convex or inner side of the
curve.
Some whipmakers cut their thongs freehand with a sharp knife, using
the thumb as a gauge (Figs. 2 and 3). A more practical way is to use a
thong cutter constructed as in Fig. 5. Other homemade thong cutters
are shown in Figs. 6 and 7.
In cutting thongs it is important that the leather disc have a perfectly
even circumference; also that the disc is laid out in the manner shown
in Fig. 4, so that a leader is first cut. Make the circle segment for the
leader by placing the point of the compass a fraction of an inch above
the center of the first circle. Start the leader with a knife or shears.
In cutting a thong, either with a thong cutter or a draw gauge (Fig.
9), pull only on the thong itself.
The other illustrations show the uses of a few of the tools already
mentioned. Dividers can be used to score a margin on the leather edge
(Fig. 8), or to step off spaces (Fig. 10). Fig. 11 shows the use of the
four-pronged thonging chisel. Always put one prong in the last hole cut,
thus insuring even spacing throughout. Figures 12 and 13 show the use
of the space maker and the revolving punch
/
22
Plate i. Thong Cutiing.
23
Two Indian bows with twisted rawhide bow strings. The one on the
right is a Pampas Indian bow and the one on the left an Apache bow.
The universality of the bow with twisted strings is a puzzle to
archaeologists.
The universal twist braid employed in another practical way. The twist
braid is clearly shown in this camel saddle from Arabia.
24
Twist Braids
PLATE 5
Twist Braids. Twist braiding probably is the oldest form of this craft.
No doubt the intertwining of vines about trees and other plants, and
often about themsehes, inspired ancient man to simulate this braid in
making his rope and string from tree fibers, grasses and other suitable
materials. Later he used rawhide and found it practical as the torsion in
the twisted string created a friction acting against itself to make it
considerably' stronger than an untwisted string.
Strings on primitive man’s bows usually were of a single twisted
strand of rawhide. Bows and arrows were used throughout the world, so
this weapon can be considered a link between the cultures of ancient
races. This belief is strengthened by the fact that twisted rawhide was
used almost universally to brace ancient bows.
The simplest form of the twist braid is that of one leather thong or
rawhide string (Fig. 1). Take a thong or string of uniform thickness and
wet it thoroughly. If leather, it should not be too wet, but allowed to
dry' until the natural color almost reappears; if rawhide, just damp
enough to be workable.
Do not actually twist the leather but roll it upon itself, the flesh side
in (Fig. 1). Keep rolling it until it is a hollow tube and then begin
gradually to stretch it until the tube narrows and the leather comes
together at the spiral lines. While it is still damp, holding the two ends
so that the roll does not uncurl, roll it beneath your foot or upon some
hard surface with a piece of wood.
The t wo ends should then be clamped or nailed down to a board and
the leather allowed to dry' completely. It will retain its twist or roll. The
ends may be left Hat and attached to boxes for handles, or as shown in
Fig. 2, inserted in holes and nailed or fastened inside.
Rawhide twisted in this fashion is used for a variety of
purposes—cores for bosals, whips and riding crops. In utilizing such a
core for riding crops it is made with a taper. The twist braid first is
made from a heavy7 hide*—bull hide or water buffalo hide. When dry it is
sanded down to the proper taper. A taper also can be achieved by
cutting the string from the back area down to the belly' part, for the
tape in a twist braid depends upon the thickness of the leather or
rawhide and not the width.
Round Braid of Two Thongs or Trick Twist. This may not be new
but 1 worked it out in the following manner: Slit the leather down the
center, leaving the two ends closed as in Fig. 3. Dampen the leather,
and then, with the hair side towaid you, bring one end through to the
front, as shown in Fig. 4. Continue pulling the bottom end through
from real- to front until the braid is tight and then pull straight.
This braid can be made into a belt, or, by using a small piece of
leather, into a wristwatch band, as shown in Fig. 7.
Don’t forget to provide for the usual shrinkage—about inch in a
wristwatch strap.
26
PL А ГЕ 5. Twist Braids.
27
Twist braid belt of one thong with woven knot for keeper loop.
(See Plate 5, Twist Braids.)
Interesting parts of an old braided headstall, sent to the author by L.H.
Rutter, Hinsdale, Montana. The keeper above has a loop made with an
8-string braid and then woven into a 16-string braid without core. The
16-string flattens out. This braid is illustrated under braided hobbles.
28
Twist braids can be used in various ways. Top: An excellent example of the tops in
rawhide braiding. The handle of this Argentine rebenque (whip) is covered with
mondongnillo braid of 48 fine strings. The various twist braids are used to form the
intricate pattern. The rebenque belongs to Daniel Ber'tich of the Argentine and was
Photographed by Luis Alberto Flores of Buenos Aires. Bottom: A twist braid belt,
the thongs are stretched to show the twist in each individual string.
29
PLATE 6
Attaching a Honda to a One-string Twist Lasso. The metal honda is
fastened to the lasso of one twist as shown in Figs. 1-3. Sufficient string
is left untwisted for this purpose. Another method is illustrated in Figs.
4-5. This type of rawhide lasso, still used in Mexico and parts of South
America, mainly in Chile, generally is termed Lazo Chileno. It is twisted
by the same method shown in the photographs where one of two
strings is built.
In Fig. 6 is illustrated a sports belt from leather one inch or more in
width. Leave a sufficient portion flat at each end—one end for attaching
the buckle and the other as tire billet, where the holes are punched.
Double Twist. This unique twist was shown to me by Luis Alberto
Flores of Buenos Aires (Figs. 7-11). Use about */a inch wide thong or
string slightly dampened. String A is given a full twist with the left hand
(Fig. 7). Then string В is given a twist in the opposite direction with rhe
right hand, and brought over to the left so that the edges of both strings
interlock (Fig. 8). Next, work string A to the right (Fig. 10). These
alternate moves are repeated until the desired length is obtained.
Stretch and allow to dry. The finished braid is shown in Fig. 11.
Twist of Two Strings. A leather thong or rawhide string is looped
over a post (Fig. 12) and with an end in each hand is twisted or rolled
in the same direction (here, to the left). The left string can be laid over
the right as the left hand twist is made (Fig. 14) or both strings can be
twisted independently for the desired length and then brought together
and allowed to twist themselves double (Fig. 16).
Twist of Three Strings. This twist braid is made much like the
preceding one of two strings. The strings or thongs are placed around a
post as shown in Fig. 17. The twist of each individual string is to the
left and the left-hand string is brought to the right over two strings.
This is repeated until the desired length is obtained. In Fig. 21 one long
string is twisted and then looped over the post as shown and allowed to
twist itself into a three-string twist braid. The result of both methods is
shown in Fig. 22.
Building a Twist-Braid Reata. In building or making a one-, two-, or
three-string rope or reata, strips about two inches wide are first cut
from the round, then stretched thoroughly in a shady place until dry.
These long strips are cut into W-inch widths, split to the same thickness
and slightly beveled on the hair side. Little or no softening is done as a
reata needs a certain amount of life or spring.
The accompanying pictures, taken in the Argentine, show two strings
being twisted in rope-like fashion on a simple machine called agancho.
or hook. One part of the machine has three hooks with a windlass-like
handle and is immobile. The other has a single hook and handle
mounted on a weighted movable platform. The platform moves as the
strings are twisted.
30
It takes three men to properly twist a reata. One turns the hook
handle one way on the three-hook gancho, and another turns the hook
handle the opposite way on the one-hook movable section, while the
third operates the spreader. This spreader, which has a hole for each
string, keeps the twist accurate and tight. (Old-time westerners in
America formerly used a jacked-up wagon wheel for the immobile part
of their rope-twister and tied the strings to the spokes).
II VI f 6. \ I ladling a Ikiuda 1<> a One-String Twist Lasso: Double Twist: Twist of
Two Strings: Twist of Three Strings; Building a Twist-Braid Reata.
31
A: Unmovable pan of machinery for twisting a reala B- Attaching rawhide
strings to the movable pan of machinery. C: Beginning the twist from the
movable part—one man is turning the handle and the other is using a spreader to
keep the twist accurate and tight.
32
Reata strings are created first with a paste made from the contents of
the animal’s paunch mixed with chopped liver. Afterward, tallow from
the fat around the heart and liver is rubbed in to keep the reata in good
shape. Dry saddle soap rubbed in as a paste is excellent.
33
PLATE 7
Simulated Four-String Round Braid. This ingenious twist braid is
employed to join two or more rings, using only one long rawhide string
or leather thong. It can be made any desired length.
Begin as shown in Fig. 1 by looping the string or thong through the
top ring, which is held by a nail or post. With the left hand holding the
lower ring and two ends of the string, twist to the left until the doubled
string forms a twist braid as shown in Fig. 3. String В is passed over
string Л at the bottom and wound round the basic twist, as indicated
by the arrowlines in Figs. 3 and 4.
String B. the working end, is next passed under A at the top
(arrowline in Fig. 4) through the ring and then down. It is braided in a
sequence of over one, under one, and then over 2, under one at the
bottom (Fig. 5). Tf properly spaced, the path will now be clear for the
upward and final pass which will be over one, under one to the top
(Fig. 6). The finished braid resembles a four-string round braid,
although it actually consists of five strings.
If you wish to join three rings, the same method is used with the
result shown in Fig. 7.
The two-ring braid usually is employed on fancy hackamorcs to
replace the fiador. It also may be used as a suitcase handle.
The versatile Fish-scale Braid can be used in a variety of ways. Shown here are three
articles covered with thus braid. Left to right; a bottle, a cigarette lighter and a rock
paperweight. The directions for making the Fish-scale Braid are given in Plate 8.
34
PLATE 7. Sintulaled Four-String Round Braid.
35
PLATE 8
The Fish-scale Braid. This versatile braid was first shown to me by Ed
Rickman of Meeteese, Wyoming, as a bosal side button. Later I found it
in general use in the Argentine. It can be made to cover almost any
object and, combined with the conquistador braid in handle coverings,
gives a beautiful effect.
There are several methods of starting this braid. The basic weave, a
simple wrapping around is shown m Fig. 1, In the next step, Fig. 2, it is
to be noted that the flesh side of the string or thong is always next to
the flesh side of the previous links. In Fig. 3 one string is used and it is
braided on its own part (Fig. 4). It can also be started on a cord tied
around the object to be covered (Fig. 5). In Figs. 6 and 7, where a
leather or rawhide foundation is used, the string passes through the
holes as shown. And in Figs. 8-11 it is demonstrated how this braid can
be started by first twisting the string and continuing as illustrated. The
finished braid is shown in Fig. 12.
In the fish-scale braid the pass is always made either under or over.
If. for instance, you start by passing under, continue to do so; and vice
versa. Since it is difficult to work with a very long string splicing is
necessary. In introducing a new string, the end of the working part is
skived or thinned about half its thickness for a couple of inches. The
new string is skived also on its end. To continue with the new string,
start back a couple of passes and braid over the old string. Both ends
should be kept beneath the ensuing braid.
To reverse the braid, follow Fig. 13 (top). After passing under with
the working end, pass over in the next step. The loop X is formed and
all passes are over, even when you get around to the loop. The
transition results in the braid shown in Fig. 13 (bottom).
Combination Handle Covering. A smart-looking, yet simple handle
covering is shown in Figs. 14-16. First, make a simple twist braid. Then
cut a string or thong from rawhide or leather the same thickness as the
width: in other words, square. Wet it thoroughly and pull it through a
hole made in hardwood or bone, as shown in Figs. 15 and 16. The holes
should be graduated and it is better to start with one or two larger than
the proper hole and gradually work your string or thong round. This
string should be the same diameter as that of the twist braid. They are
wrapped around as shown in Fig. 16
36
» •- «.
1’1. ATE 8. The Fish-scale Braid; Combination Handle Coverin'.
37
What the author calls the “Fish-scale Braid” is shown here. This twisted
braid can be used for many purposes. Top: A belt. Center: Belt with
the braid pulled open. Bottom: Stone paperweights and a bottle are just
two examples of articles that can be covered with this braid.
38
T'op, left: The locket with the single stone is made by partially covering a small
black stone with a pineapple knot. The locket with three stones uses the Spanish
ring knot to link the stones together. The rings, with stone settings, are made
like the Gaucho button knot around a mandrel the size of the finger. After the
first part of the braid is made, the stone is set inside the top braid and the braid
u tightened about it. Top, right: Glasses case made with an elongated Turk’s-
head interwoven with lacing. Bottom, left: Mexican coin locket; one Spanish
nnK knot encircles the coin and a smaller one, made as a link, accommodates the
neck rope. Bottom, right: Covered rock paperweights of interwoven braid.
39
PLATE 9
Making a Rock Paperweight. To cover a rock for a paperweight, first
make a twist braid in the center of a long string or thong and place it
around the center or largest part of the rock (Fig. 1). Using end Л,
begin a fish-scale braid (Fig. 2). After braiding around several times so
the braid is secure, withdraw string В from beneath the braid and start
working it in the opposite direction. Continue both braids with A and
B. As the rock tapers on the ends, skip each alternate loop in each
braid. When the braids have closed on the ends by skipping loops, tuck
ends A and В up under several rows of the braid and cut off.
Making a Locket with a Small Pear-shaped Stone or Gem. The stone
or gem, say 114 inch long and % inch at the widest part, is first partially
covered with thin rawhide (Fig. 5). The rawhide is cut so the middle
section can be turned in along the dotted lines (Figs. 5-6) and sewed on
damp (Fig. 6). In Fig. 7 this loop with edges turned in is passed around
a pencil and tied snug. In Fig. 8 the work is reversed to better illustrate
the braiding method. Cover the edge of the rawhide with a two-pass
Spanish ring knot. Pass a new string through one of the bights of the
ring knot. The end В is worked by passing it from the top to the
bottom of the next bight. This can be continued for several bights.
Then bring the end A back and pass it through the bottom of each
bight formed by B. This leaves a loop formed by A which В will pass
through when it comes around to that point. This braid with the two
ends is continued and as it nears the top where the rawhide cover is
tied, it is decreased by passing through every other bight.
A conquistador braid results. This locket is hung on a four-string
round braid with a loop in one end and a button worked on the other.
Fish-scale Braid Belt. This is made on a large round iobject—in this
case, a cookie can about ten inches in diameter and 32 inches in
circumference. First, tightly weave a three-part elongated Turk’s-head
around the can (Figs. 9-12). Then introduce independent strings on
both edges (A and В in Fig. 13). Don’t worry about the ends in this
section, marked in brackets designated by X; this part eventually will be
covered. Braid A around one way and В around the other using the
fish-scale method. Different colored strings can be used for the
Turk’s-head and the strings A and B. When the desired width is
obtained, introduce a thin piece of rawhide (or even cloth, if you like)
under the section marked X. Cement it to the braid and to itself,
forming a wrapping at this point (Fig. 14). When the wrapping is dry
cut it in half, as shown in Fig. 15. One end is used for the buckle and
the other for the billet of the belt. Both ends are made from leather
folded and cemented.
40
FLAIL 9. Making a Kock Paperweight. Making a Locket with a Small Pear-sliaped
Slone or Gcnr Fish-scale Braid Belt.
41
PLATE 10
The Conquistador Braid. Here is a remarkable braid which was used
by the old-time conquistadores on their sword belts and seems to have
been lost somewhere along the line. It is made with one thong. Be sure
this thong is of consistent thickness as the braid will not be regular if
the thong is thin in some spots and thick in others.
Start with four holes or slits in the leather, evenly spaced and about
1 8 inch from the end. Hold the dress or hair side of the leather toward
you with holes upward. Pass the thong through the hole on the left to
the back, leaving a small portion of it on the near side, as in Fig. 1.
Bring it back to the front and pass it again through the same hole to the
rear. Draw it tight, anchoring the end, and bring it forward and pass it
through the second hole from front to real’ as shown in Fig. 2.
Pass the thong through the third hold (Fig. 3) and then through the
fourth hole (Fig. 4). Make the thongs snug.
Introduce the fid under the bight, as in Fig. 5, from the left side
upward to the right. Then bring the thong over to the front and draw it
through this opening, as in Fig. 6. Draw it up snug, always using as
nearly as possible the same amount of pressure on each thong. This will
keep the braid consistent throughout.
The next step is shown in Fig. 7, where the thong has passed under
the bight of the thong in hole No. 3 and to the rear of itself. The fid
already has prepared the next bight to receive the working end of the
thong. Continue until the thong has been passed through all four bights.
Now start back to the right by passing under the newly formed bight in
the second row, as shown in Fig. 8. Figure 9 illustrates a continuance of
the sequence. Continue until the thong has passed through all four
bights.
Now start back to the left. Thus it goes from left to right, and right
to left until the braid is of the desired length. Finish it off by
introducing it into four holes of another strip. This makes a fine belt or
wrist strap for a watch.
The finished braid is shown in Fig. 10. At first, there will be a give to
this braid and it may seem elastic. But after it has been worn it will
remain at the point to which it has stretched and will no longer be
resilient. So allow a little for the give, depending on how tightly the
braid has been made.
Wristwatch band made from Conquistador Braid (PI. 10). Woven ring
knots (Pl. 162) used as loop and coverings. Knots next to watch can be
made from Headhunters Knot (Pl, 169).
42
PL ATE 10. The Conrpiiststlor Braid.
43
PLATE 11
Multiple-string Conquistador Braid. There are several ways of starting
this braid, which somewhat resembles the weave in the sailor’s Spanish
Mat. In Fig. 1 the strings are tied, as shown, completely around the
handle, spaced the width of the string. They are then braided, as shown
in Figs. 1 and 2. In Fig. 3 a more accurate method to obtain the proper
spacing is illustrated. The braid is then continued, as illustrated in Fig.
4.
Figures 5-7 show how this braid can be started from a three-part
Turk’s-head. This provides a braided start instead of tied string-ends
which have to be covered to finish off the braid. Also in Figs. 8-10 a
simulated Spanish ring knot can be made as a start—a finished start.
Both the Turk ’s-head and the ring knot can be used to finish the end of
the braids.
By continually working your strings in one direction you can obtain
a fish-scale braid. Beautiful examples of this multiple-string
conquistador braid, as well as combinations with the fish-scale braid,
are to be found on gaucho whip handles.
Handle of Argentine rebcnque covered with rawhide multiple Con-
quistador braid. At right, top is an example of how the author makes
this braid.
44
PL Vf F 11. Multiple-string ConquUiador Braid.
45
PLATE 12
How to Make Braided Twist-Loop Reins. Twist-loop reins are quite
common in ordinary strap leather. They are attractive and practical for
they do away with buckles and give a double thickness of leather in the
loop, thereby minimizing wear at the bit ring.
As long as they are popular and not difficult, to make with strap
leather, I have worked out a method whereby they can be fashioned
from braided rawhide. I hesitate to say that my method or idea is
unique, but I can truthfully say that J have never seen reins of this sort.
First, for those who do not know how to make such reins with strap
leather, I shall explain how this is done. The same method of twisting
the leather loops is used with the braided ones, so by showing the
former, I shall make it easier to explain how the latter is done.
Take a 7-foot-long, ’/’-inch-wide strap and, 2V4 inches from one end,
slit the strap in the center for 2V4 inches (Fig. 1). Fold over the slit part
with the dressed side of the leather uppermost and the portion at the
top of the slit toward you. With a fid or piece of wood or metal, twist
the left loop clockwise one-half turn (follow arrowlines in Fig. 2). Do
the same with slit loop on the right (Fig. 3). Pass the long end of the
rein through the bit ring and then through the two twisted loops. It is
well to have the leather damp. Work the knot tight and the job is done.
This same idea can be emoloved with three or four slits in the leather
(Figs. 6-9).
For rawhide reins, take three 1/S-inch strings about 20 feet each. It is
best that these strings first be softened by dampening them, rubbing in
liquid soap and pulling them back and forth (flesh side in) around a
square piece of wood held in a vise. Work them until almost dry and
feel to sec if there arc any hard spots. If so, resoap them and work some
more.
Drive three nails in a board or at the edge of a tabic (Fig. 10). Double
the strings and place the loops over the nails and work down 2 inches in
an over-one, under-one 6-string braid (Fig. 12). Then with three strings
from each side, braid down two 3-sLring braids for two more inches
(Fig. 13). Join the strings, starting as in Fig. 13, and resume the 6-strmg
flat braid for a couple of additional inches (Fig. 14).
Now, as illustrated in Fig. 14, begin a 6-string round braid. First
carry' string A on the left and then forward on the right, then under
one, over two. Then take string В on the right and around back and
forward on the left under two, over one. Continue this sequence, taking
the top string on the left around back and to the right and forward
under one. over two, and then the top string on the right around back
and forward to the left under two and over one.
If you wish 6-foot reins, continue this braid to the last two inches
and then finish with a round braid of over one, under one sequence
(Fig. 15). This is done by taking the highest string on cither side and
carrying it around back and forward over one, under one, over one.
46
PLATE 12. flow Io Make Braided Twist-Loop Reins.
47
Work alternate strings and then tie the end of the braid with a piece of
twine (Fig, 16).
To permanently secure the braid, take three thin, smaller rawhide
strings and introduce them into the original braid, as shown in Fig. 16.
Figure 17 shows these newly introduced strings from the top and Fig.
18 shows how they are braided.
This backbraiding is done by following on top of each original string,
over and under. Cut the ends flush (Fig. 19) and remove the twine tied
around the top of the braid. The interwoven strings will keep the braid
intact and will not cause too large a swell so these ends can pass easily
through the loops.
Next, double over the two 3-string loop braids (Fig. 20), twist, each
one-half turn as with the strap leather loops in Figs. 2 and 3. Run the
ends of the reins through the bit ring and then through the braided
loops (Fig. 21). The final result is shown in Fig. 22.
The twist loops should be damp so they can be gently molded. Allow
to dry. It may be necessary to dampen them again should you want to
remove the reins from the bit rings.
Such reins are attractive and in harmony with braided headstalls. The
reins can be left open or the ends held together with any of the woven
button knots.
Luis Alberto Flores used a twist braid to cover the handle of the
Argentinc-type knife. The sheath was made by the author.
48
Slit Braids
PLATE 13
Slit Braids. By slitting the leather and passing it back through the
holes alternately, the effect of a braid is obtained, although it is not a
true braid in the usual sense.
An example of this braid may be found in attaching a buckle to a
strap. First punch out in the middle of the strap the slot through which
the tongue of the buckle goes and introduce the buckle, as shown in
Fig. 1. The flesh sides on each portion of the strap face each other.
Make a vertical slit as shown, and indicated as 1, less than the width
of the strap itself. Make slit No. 4 in the other part of the strap a little
below: then slits 2, 5, and 3. These should be stair-stepped as indicated.
Bring up that portion of the strap indicated as A and pull it through
slit 1 from the rear to the front. Then pull the portion shown as В
through slit 4 also from the rear to the front. Now again pull A through
from the rear to the front» Continue to the end. Don’t pull the straps
through the slits sideways. Work with the leather damp after it has been
thoroughly saddle-soaped.
Figure 2 shows leather or metal conchas as they are fastened to
cowboy bridles and saddles by this method.
Figure 3 illustrates a practical application of the various flat braids in
making a belt. The braiding starts from the end in which the belt holes
are punched, indicated by D. The loose ends are secured in that portion
shown as A. Before the braid is sewn in, however, introduce the buckle
and the belt loop, illustrated in C. One type of belt loop made from a
Turk’s-head or woven knot is shown as B. The method of making this
will be shown later.
Figure 4 shows how the three-thong inside braid (Plate 14) can be
used as a belt, and in this case there are no loose ends to cover or sew
in. The five-thong inside braid (Plate 15) also makes a good belt, and
either of these braids may be used as wrist loops on whips and quirts.
50
PLATE 13. Slit Braids.
51
PLATE 14
Three-Part Inside or Trick Braid. This is an ordinary threc-part "hair
braid’’ but it is worked inside: that is. the ends of the thongs are not
free and are split from one single strap. It is tricky to make and
mystifying to the uninitiated.
Lay the strap out in three equal parts and split it the desired length,
leaving both ends closed, remembering that there is some shrinkage
when the braid is complete, and the strap used in making a belt, for
instance, should be nearly one-third longer than the desired length of
the belt.
At the ends of the slits punch holes with the smallest tube on the
revolving punch. This is to keep the leather from splitting further. Now
dampen the leather by saddle-soaping it thoroughly as it is well to braid
it while damp.
The first two steps are indicated in Fig. 2. Starting with the
right-hand thong, C. place its bight over the center thong, B, then place
the bight of the left-hand thong. A, over C. It will be noticed that a
reverse or compensating braid is formed at the bottom. This bottom
braid must be raveled out, while the top part remains intact.
To make the bottom braid disappear pass the entire bottom of the
strap through the opening indicated in Fig. 2. This twists and tangles
the thongs as in Fig. 3. The back part or flesh side of the strap will be
forward and this should be twisted from left to right until the front side
is foremost as in Fig. 4.
Meantime, as shown in Fig. 4, the braiding is continued and thong В
is placed over thong A and thong C over thong B. The entire bottom of
the scrap now is passed through the opening shown in Fig. 4. and when
straightened out, the whole work assumes an orderly appearance as in
Fig. 5.
In this braid the moves have been made as simple as possible. That is,
the bottom end is passed through the braid after each two moves. .A
“move” is the crossing of a thong over or under another.
In continuing the braid from its status in Fig. 5, place thong C over
thong B, then thong A over thong C. Pass through the corresponding
opening as was done in Fig. 2. Continue, or repeat, the moves shown in
Figs. 3 and 4.
This braid should be made very tight at the top, so that when within
a couple of inches of the bottom the braid becomes difficult to
continue, the tightness in the upper part can be worked out and the
braid distributed evenly throughout.
This braid is popular in making belts. It is also used for camera and
shoulder bag straps, handles for quirts and crops and for bridle reins
and wristwatch straps. Be sure the original strap is a third longer than
necessary, to absorb the shrinkage when it is braided.
52
PLATE I I Three-Part Inside or Trick Braid.
53
PLATE 15
Five-Part Inside Trick Braid. The five-part trick braid gives a
pleasing effect of an over-two-and-under-two sequence. First cut a
leather strap as shown in Fig. 1, being sure that the thongs are of equal
width.
There is some shrinkage when the strap is braided and allowance
must be made for this. For instance, in a strap 114 inches wide and eight
inches long, cut into five %-inch thongs, the shrinkage will be about one
inch.
The first step is shown in Fig. 2. Bring the bight of the extreme
left-hand thong. A to the right over thongs В and C. Then take the
bight of the extreme right-hand thong, E, and bring it to the left over D
and A, (Fig. 3). Now bring thong В on the extreme left over C and E to
the right (Fig. 4), and pass thong D from right to left over A and В (Fig.
5).
In Fig. 6 two sequences are shown. First pass thong C on the extreme
left to the right over thongs E and D. The upper portion of this braid
must be held intact, and it will be seen that there have been five
different passes. Next, take the bottom of the strap and pass the entire
end through the opening between thongs C and D.
The braid should now look like the illustration in Fig. 7. Pay no
attention to the tangled condition of the thongs at the bottom and
continue to work at the top.
Take thong A on the extreme right and bring it to the left over
thongs В and C (Fig. 8). Repeat this operation from each side four
more time» before the braid is turned from the bottom. For instance,
bring the right thong and then the left thong to the center alternately,
doing this five times with each thong.
The upper portion of the braid should now appear as in Fig. 9. Take
the bottom of the strap shown in Fig. 9 and pass it through the part, as
indicated, between thongs C and D. This lower part of the braid will
then straighten itself out. Upon examining the top part, which must be
held in place while the lower part is passed through, it will be apparent
that there are exactly ten steps—that is, the right and left outer strands
have been passed inward ten times.
The secret of this braid is that five passes are made each time before
the bottom is turned.
When the braid reaches tire point illustrated in Fig. 10 begin all over
again. Pass thong A over В and C as was done in Fig. 1, When the point
corresponding to that in Fig. 6 is reached, turn in the bottom as before.
Then continue as in Fig. 7 until the end.
To make it easier to work at the bottom tighten up the braid at the
top more than seems necessary. When the braid is completed, loosen it
until it is even throughout.
A seven-string (and, in fact, a nine-string) inside braid can be made h-
similar fashion. In the seven-siring braid, seven passes instead of the five
54
in the five-string braid are made, then reverse and continue as shown in
the five-string braid, but make seven passes. This results in an
over-three, under-three sequence. In the nine-string braid first make
nine passes. In this braid an over-four, under-four sequence results.
Pl,.VI E 15. live-Parl Inside Trick Braid.
55
PLATE 16
Interweaving the Three-Part Inside Braid. Inside trick braids, even the
three-part, have a tendency to narrow in the braided section, while
remaining the full width in the uncut portions. This can be overcome in
the three-part inside braid by interweaving it with two additional
independent strings or thongs. First, as in Fig. 1, introduce string A and
interweave as shown by the arrowline. Next (Fig. 2) string В is
interwoven as indicated by the arrowline. The final result is shown in
Fig. 3. The ends can be tucked under and cemented or sewed down. An
over-two. under-two five-part braid is the final outcome.
Л Simulated Four-Part Inside Braid. This interweave is valuable when
two separate sets of strings are to be joined in four-string inside braid.
First the two upper strings are laid over and under as shown in Fig. 4.
String A is placed over two and under two, etc., according to the
length, as shown by the arrowline in Fig. 4. String В is interwoven
under one, over one, as shown by the arrowline in Fig. 5. The result is
shown in Fig. 6.
Six-String Inside Braid (not shown in the plate). A regular six-string
inside braid can be made by cutting six strings in a strip of leather or
rawhide. The same method of braiding is followed as in Plate 13, only
the strings are worked in pairs. The same principle can be applied to
nine strings worked in sets of three.
Closeup photo of a braided cincha showing braid and applique used to bold fol*'
together. (Plates 23, 24 & 25.)
56
PLATE 16. Interweaving the Three-Part Inside Braid; Л Simulated Four-Part Inside
Braid; Six-String Inside Braid (not shown in the plate}.
57
Black leather reinsand romal made by Ernie Ladouceur of Maderaj California.
White rawhide headstall made by author. Buttons are interwoven with a
darker shade of rawhide
58
Top: A braided bosal of five rawhide strings. Bottom (I. to r.): Headstall, reins,
breast plate, and bosal all of braided rawhide with gold ornaments. Collection of
John Walter Maguire, Buenos Aires, Argentina.
o9
PLATE 17
Interweaving the Slit Braid. The simple slit braid shown in Fig. 1,
Plate 13, can be decorated by interweaving a smaller string as shown in
Fig. 1, Plate 17. An interwoven string of a different color will give a
pleasing effect.
Heart-Shaped Headstall Front Piece. A single strip of leather or
rawhide, thoroughly dampened, can be worked into various designs by
this method. The heart-shaped style is the most popular. Three slits are
made through the edges as shown in Fig. 2. and numbered 1, 2, and 3.
First, end A is passed through slit No. 1 (Fig. 3). Then end В is passed
through slits Nos. 2 and 3 (Fig. 4). The braid is carefull} adjusted and
then lapped with a mallet to finish it. The two top ends are fastened to
the browband and the three bottom ends to the noseband.
Four-String Slit Braid. Using two strings of one color and two of
another, an attractive slit braid can be made as shown in Figs. 5 and 6.
It appears rather complicated but after the start it is quite simple. Other
slit braids for ends of reins, reatas, hondas, etc., are to be found under
these subjects.
Curlicues or Moiiitos. This type of slit braiding offers many
interesting possibilities. It is found in profusion in the Province of
Buenos Aires, Argentina, and possibly, as the native gauchos claim, it
originated there. It is used for headstalls, reins, etc., and is more
decorative than useful. The first method is illustrated in Figs. 7-11. The
leather (Fig. 2) by slit braiding two narrow pieces of leather or softened
rawhide (Fig. 2) and place it (or them) behind the Argentine name
monitos is translated as “little Lufts" or crests, from the word mono
which means the tuft or crest on a bird’s head. Curlicue is my own
interpretation. In the second method the leather or rawhide is doubled
so the hair side is out on both sides (Fig. 12). It is slit through the
doubled section (Fig. 13). After the ends are pulled through tightly,
they appear as in Fig. 14. Tap the slit sections with a mallet to adjust.
60
•’LVIT I". Interweaving the Slit Braid: Heart-Shaped Headstall Front Piece-
Four-String Slit Braid: Curlicues or Monitos.
61
PLATE 18
Braided Gaucho Belt Fastener. This is a braided version of the
famous gaucho rastra which is used to fasten the tirador or the broad
belt, of the Argentine cowboy. The rastra usually is of silver with small
chains on two edges with coins used as buttons. The tirador itself is
usually inlaid with coins of various denominations.
To make a braided version of the rastra take two straps of leather or
softened rawhide about 20 inches in length and slit each one 13 inches
(Fig. 1). The slitted sections are joined as shown in Fig. 2 and the ends
interwoven (Figs. 2-6). Cut the ends of both straps to Vs inch in width
as indicated by the dotted lines in Fig. 5. All six ends are then slit as in
Fig. 6 and a Chinese button knot is tied in each (Fig. 6). These buttons
are covered with a braided knot, such as the pineapple knot.
It is to be noted that each center is slightly longer than the other
two.
To make the tirador, or belt proper, cut it a trifle longer than
necessary for a snug fit and punch and cut holes in one end and fasten
in the buttons. Fit the belt around the waist of the one for whom it is
made. Mark on the other end just where the new holes should come.
Remove and trim belt and cut holes. The tirador can be decorated by
any of the applique braids. This makes a beautiful woman’s belt.
The gauchos found a use for every part of the cow. The lamp
shade in the photograph was made from a cow’s udder by Alfredo
Guyara of the Province of Santa Fe, Argentina.
62
69^
PLATE 111. Braided Gaucho Belt Fastener.
63
PLATE 19
How to Make a lank Belt. Link belts can be bought reasonably in
kits or made up by the craftsman. But it is more economical and
satisfactory to make your own link belt by utilizing scraps of leather
and rawhide. Colored scraps can be used to give a diversified effect.
Make the first link for the buckle end of the belt or hatband (Fig. 1).
After this make the keeper loop (or loops) (Fig. 2) by slit braiding two
narrow pieces of leather or softened rawhide (Fig. 2) and place it (or
them) behind the buckle, as shown m Fig. 3.
Next, make a heavy cardboard template or pattern to use for laying
out the links. Make the links for the body of the belt.
The first link in this series is braided in as in Fig. 5. Add in the same
fashion link after link until the belt including the billet (Fig. 7) is the
desired length. The billet is braided in as in Fig. 8. After cementing
together, holes are punched and the belt is complete.
Top: Edward Meyer, Hurlock. Maryland, making a link belt.
Bottom The completed belt was made from a Boy Scouts of
America kit.
64
BLATE 19. How to Make a Link Bell.
A finished link belt. Wallets, key hold-
ers, change purses and many other arti-
cles can be purchased in kits. These
kits provide children with an excellent
introduction to leather braiding.
65
PLATE 20
How to Make a Link Breast Collar. The link breast collar is macle
much like the link belts, but the links are of heavier material and more
than twice as large. This also is a good way to utilize scrap leather and
softened rawhide.
First make a template or pattern from heavy cardboard (Fig. 1) for
the links designated as A. With a metal ring measuring one and one
eighth inches inside, start the work as shown in Fig. 2. Figure 3 shows
the type of link (B) to be used to finish the links on two other rings.
This latter link is split into four strings on one end. After being passed
through a hole in the previous link and one in itself is woven into a
knot to hold it in place (Figs. 4-5).
Straps arc attached to the two upper rings (Fig. 6). One set of these
straps is for the horse's neck and the other is to be attached to rings in
the saddle.
Argentine gaucho astride horse with a breast collar (pretai). Courtesy of
Juslo P. Saenz (h.) from his book Equitation Gaucha.
66
PLATE 20 How to Make a Link Breast Collar.
67
PLATE 21
How to Make a Slit-Braid Hackamore Headstall. With a knife, some
leather, and a little patience, you may make yourself a handsome
slit-braid hackamore headstall in a few hours. If you are an expert, you
can make it in much less time. No metal parts are necessary, and
personally, I like this. By using the proper type of braidwork a fellow
can do without, metal fastenings, buckles, snaps, etc., on any type of
horse gear. The gear will be easily adjustable and much more handsome,
to my way of thinking. Then there is the satisfaction of making
something in which you need to employ a little ingenuity.
To make your headstall, good strap leather is all right, but what is
called latigo is better. Real latigo is a vegetable-tanned leather which has
been well oiled; but you may use some chrome-tanned latigo.
Sometimes you may corral enough good pieces of leather in these
so-called repair bundles offered by mail order houses and western
outfitters to make yourself a very smart headstall.
You will need four pieces of leather, one-half inch wide and not too
thick. One piece will be 18 inches long, another 34 inches, and two 16
inches long.
First take the 34 inch piece, which will form the offside chcckpiece,
as well as the headband and part of the nearside cheekpiece. Soak it for
a few minutes in water so that it is wet through.
Take a look at Fig. 1, Plate 21. Place the leather around offside part,
of the bosal. between the side-button and the end of the nose-button;
or, if your bosal has a couple of side-buttons on each side, place leather
around the part of the bosal between the two buttons. In this drawing,
part of the strap is marked A. The other part. B, should be about six
inches long. In B, cut a slit lengthwise and about the width of the
leather.
In Fig. 1 the arrowline shows how A passes through slit in B. Pull it
up tight. Now cut a slit in A as shown in Fig. 2 and pass the end of В
through this slit. In Fig. 3, A passes through B. Figure 4 shows this part
of the work completed.
Do the same with the short piece—the one 18 inches long—on
nearside of the bosal.
Next wc will make the browband. Start as in Fig. 5, passing В
through A, but leaving a loop of about % inch in the leather. Your
fiador, or throatlatch (Fig. 10. Plate 54) passes through this loop.
In Fig. 6, A passes through B, shown completed in Fig. 7.
The next step is to attach the browband to the cheekpiecc (Fig. 8).
Here В passes through A and then A through B, and, finally, В through
A again. The work will look like the drawing in Fig. 9. You may make
it all a little more fancy with additional slit-braid work, but be sure
your straps are longer because there is some shrinkage in this braid.
Attach your browband on the other side. Figure 10 shows two ways
of joining these two browband pieces in the center so that they are
adjustable.
68
i’l. \TE 21. How to Make a Slit-Braid Hackamore Headstall.
69
In this type of slit-braiding the flesh aide shows in alternate braids.
To obtain a more finished braid where only the hail- or dress side is out,
make your cheekpieces as in Fig. 11. Here two pieces of leather are
joined together with a 3-hole fastening. In Fig. 12, it will be shown that
A passes through two thicknesses of leather and secures the other end
of the splice.
If you observe Fig. 13 at the drawing marked A. you will see how to
obtain a similar finished braid on the browband. The loop is formed by
holding the leather together with a Turk’s-head or Spanish ring knot
(Plate 161). Then, behind the cheekpiece, the leather is given a twist so
the hair side will be out in both pieces.
The completed headstall is shown in Fig. 13. A slit is made in the end
of the long cheekpiece and the shorter one passes through it to form
the knot you see there. This makes the headstall adjustable. If you are a
gadget man you may use a buckle here.
Fancy braided headstall made by John Conrad, Bellflower, California.
70
Pour examples of cinchas from the John W. Maguire collection. A A cincha of
colt’s skin beautifully worked, В Intricate-braided cincha which also illustrates
b°w an appiiqu/ braid can be used on the folded end where the ring is enclosed. C:
This cincha presents something of a puzzle as to the method used to make it but is
explained in How to Make a Braided Cincha. D: Another example of trenzados
gauchos, gaucho braid work.
71
PLATE 22
How to Make a Slit-Braid Headstall. This unique headstall is made
basically from one piece of leather or softened rawhide measuring 34
inches by 2'A inches.
The cuts are shown in dotted hues in Fig. 1. First, cut down the
center of the strap along the line A for 23 inches. The remainder of the
cuts are ail from the bottom. Lines marked В and C are cut upward for
30 inches. Lincs D and E are cut upward for 28 inches.
Figure 2 shows how this cut strap looks when extended. The two top
ends arc marked as 1 and 2 and ihe lower ones as 3, 4. 5, 6, and 7. The
closed inner sections are marked 1A and 2A.
In Fig. 3 is illustrated the manner of making a carrick bend with
these inner straps. Keeping the hair side of the strap always outward,
lay 1A in a loop over itself as shown in Fig. 3. Then the end 2 follows
the arrowline and is pulled entirely through along with ends 6 and 7.
For the browband take a small strap 20 inches long, any width you
like (Fig. 4) and cut slots in both ends as indicated.
End No. 2 is passed through on the right (Fig. 5). Pull all parts
through (Fig. 6) leaving only inside strap 2A. End 6 is next passed
through as shown by the arrowline (Fig. 6) and completed as in Fig. 7.
Make the same passes on the left On the right side No. 1 passes
down through the loop at the right of the browband. On the left end
No. 3 passes down through the loop of the browband. These two form
the throatlatch. End Nos. 4 and 6 are doubled upwards to hold the bit
rings as well as the noseband. End No. 5 is attached to the noseband,
this noseband is held in place by keeper knots as shown in Fig. 8. At
the crown the two ends. Nos. 1 and 2, are tied together as in Fig. 8.
Headstall, bozal, cab rest о and pair of braided reins. Collection John Walter Maguire.
PLATE 22. llow to Make a Slit-Braid Headstall.
73
PLATES 23, 24 & 25
How to Make a Braided Cincha. This unique type of cincha made of
softened rawhide, or good latigo leather, is a form used by gauchos on
the Argentine pampas. John Walter Maguire of Buenos Aires, owner of
the Estancia Tres Bonetes in the Argentine, sent me a picture of it some
time ago when he generously photographed for me his fabulous
collection of trenzados gauchos—gaucho braidwork.
In the Argentine practically every' piece of horse gear is made from
softened rawhide. The softening is accomplished mainly by use of a
mordaza or sobrador a partially slit piece of round wood. The rawhide
is pulled back and forth through the slit until the fibers are broken
down and it is as pliable as ordinary leather. Cunninghame Graham,
who lived in the Argentine and wrote many books about the gauchos
and their famous criollo horses, said this softening process was
accomplished by beating the rawhide with a mallet.
However, use no oil or oily compound on rawhide—certainly not
neat's-foot oil. Saddle soap or glycerin in four parts water is best.
Glycerin seems to have an affinity' for rawhide and helps soften it.
For those who do not care to soften their rawhide, a good latigo
leather or an Indian tan can be used. Cut a rectangular piece some 18
inches long and 5-5/8 inches wide (Fig. 1, Plate 23). Lay off in the
middle of this a section of 26 inches, and carefully cut this section into
1/8 inch strings (Fig. 2). This will give you 45 strings.
The next step is to make your inside braid. Starting at one end take
three strings (Fig. 3) and begin an ordinary' three-string or hair braid.
Place the third string over the other two to the left, then bring No. 1
string under No. 3 and over No. 2 (Fig. 4). As you continue your
braiding you will find that a similar braid is forming at the bottom. In
ordinary braiding this is a nuisance and the complementary braid has to
be unraveled at intervals. But here we utilize it. Keep braiding until
your upper and lower braids meet (Fig. 5). Place a piece of leather
thong through the braid as shown in Fig. 5. It is a good idea here to
close up your braidwork, both top and bottom (Fig. 6). You will find
the same number of bights in each half. Succeeding three-string braids
should have the same number of bights as the first braid. Keep all your
braids from unraveling as shown in Fig. 5.
You may or may not want to use 3-inch metal rings on both ends of
your cincha. Some riders prefer the use of plain rings as they can
tighten a cincha a fraction of an inch. However, you may use a ring and
tongue (Fig. 6, Plate 25) or a bar buckle (Fig. 3. Plate 25). Plain rings
can be covered with braidwork as shown in Plate 24. Even if you do not
use this braiding on your cincha rings, it is a good thing to know' for
dressing up rings on other gear.
This is actually an eight-string round braid. It must be made with two
strings (Fig. 1, Plate 24). Spiral string No. 1 around the ring in a
counterclockwise direction (arrowline in Fig. 1, and completed in Fig-
74
PLATE 23. How to Make a Braided Cincha.
75
2). Next, passing over string No. 1 all the way around, spiral string No.
2 in a clockwise direction, crossing No. 1 both above and below
(arrowline Fig. 2 and completed in Fig. 3). On the second spiral we will
number these strings respectively 3 and 4—3 being the continuation of
No. 1 and 4 the continuation of No. 2. One set of strings will be
odd-numbered and the other even-numbered.
String No. 3 (the continuation of No. 1) is wound around, passing
over string No. 2 (Fig. 4). String No. 4 is now spiraled around, over one,
under one, interlocking all sections (Fig. 5). This completes the first
phase and gives us a four-string round Turk’s-head over the ring.
Next take string No. 5 (continuation of No. 3) and passing to the left
of the original No. 1 string, follow it completely around until it
becomes No. 3 and continue following as siring No. 7 (Fig. 6). String
No. 6 (continuation of No. 4) is now spiralled around the ring twice,
splitting strings Nos. 1-5 and 3-7 (Fig. 6). The arrowline shows the
splitting process, also as shown in the portion of the siring marked “X.”
(This is merely shown for demonstration purposes, and this portion of
the string does not belong in your braid.) The braid is complete in Fig.
7. Figure 8 on the left shows the braid you have just completed.
However, if the splitting of pairs is done as shown to the right in Fig. 8
you will obtain a gaucho braid. In one case the "Vis’' in the braid run
lengthwise; in the other, crosswise.
Plate 25 illustrates the method of enclosing the cincha rings. A plain
ring is shown in Figs. 1 & 2, and a bar-buckle in Figs. 3. 4 & 5. When
using a ring with a tongue (Fig. 6) a hole must be cut in the folded part
of the cincha for the tongue.
Between the folded end and the part where the ring is enclosed it is
well to hold the leather together with an appliqud braid (Fig. 2). The
pull is then on the part held together rather than the inside of the fold.
A satisfactory applique of three-strings is shown in Figs. 7-9. Holes
are punched through both parts of the leather inside the ring, and the
appliqu^ made as shown.
An applique to hold together the edges is more simple, made from
one string (Figs. 10 & 11). This also can be used in holding in the
bar-buckle (Fig. 4). On this latter ring there usually is a tit or protection
which it is well to enclose in a separate piece of leather, shown in Fig.
5. This will keep the tit from punching through the braid. In enclosing
the ring with Longue, use the applique in two sections—one on each side
of the tongue. Be certain the slit for the tongue is long enough to give it
proper play.
If this cincha is used on a center fire rig saddle using one cincha or
girth—the rider may wish to employ a breast collar, or more properly a
martingale. In such case the small strap which separates the middle of
the braids in the cincha (Fig. 5, Plate 23) must have a small ring as
shown.
Should your cincha be of rawhide, periodically rub in saddle soap,
using it as you would a salve. LaLigo and Indian tan should be kept
clean by frequent use of saddle soap applied with a dampened sponge
76
PL AT. E 24. How to Make a Braided Cincha (ConL)
77
PLATE 25. По* to Make a Braided Cincha (Cont.)
78
Top: Gaucho braided cincha of softened rawhide in collection of John Walter
Maguire of Buenos Aires Center: Braided cincha of white latigo leather, made by
author. Bottom: Closeup of cincha showing applique to enclose cincha ring and
braid covering cincha ring. (See Plates 23, 24 & 25.)
79
PLATE 26
How to Make a Slit-Braid Handbag. This handbag is composed of
three major parts: the top, the bod.y and the bottom, with some
thonging of varied lengths and widths. No metal attachments are
necessary.
The top may be made of any soft, thin leather, such as kidskin, the
kind of suede used for linings, or buckskin. Cut it to the specifications
in Fig. 2, with eight equally spaced holes in the top part and thirty-one
in the bottom part, as well as four on each end.
For the body of the handbag, use 6-ounce leather (Fig. 1), with
thirty-one evenly spaced holes on both top and bottom. No boles on
the ends are required, as the braiding thong will keep these ends
together.
The bottom is a circular piece of leather of the same weight
(6-ounce) as the body. Around its edge punch thirty-one evenly spaced
holes. To determine the exact diameter of the bottom, divide the length
of the body by 3.1416, always taking into consideration the thickness
of the body piece. When the body piece is formed into a tube, the inner
circumference is less than the outer circumference. As the bottom part
fit* into the inner circumference it would be well to cut out the bottom
and then measure the body part around it before cutting it and before
punching any holes.
Next, cut the body piece with vertical slits of one inch in width,
beginning 'A inch from the top and stopping 'A inch from the bottom.
Remember that in slit braiding of this type the slits must be of an
unequal number. It might be well to divide the length of the body piece
into nineteen equal parts, as it may have been cut a tnflc longer or a
trifle shorter after being measured around the bottom piece.
Weave a one-inch thong through the slits, beginning several slits to
the right of the ends as shown in Fig. 6. Continue around, over one,
under one, etc. Cement both ends on the inside. Now lace on the
bottom as shown in Fig. 6; next, the top, and then close the ends of the
top by lacing and pull through draw-strings, which may be of a small
round braid.
The top should go inside the body piece, so here again, it is well to
fit it before cutting. Contrasting leathers may he used in this project if
desired.
80
PLATE 26. Нои to Make a Slit Braid Handbag.
81
Four belts made by using a flat braid. D.W. Morgan, Austral Enterprises, Seattle,
Washington.
Hatband of flat braid showing two-tone work. D.W. Morgan, Austral Enterprises,
Seattle, Washington.
82
Flat Braids
PLATE 27
Two-Thong Flat Braid Flat braiding is a systematic operation of
alternately working from one side to the other. If the right-hand thong
is carried to the left, over another and under another, the same thing is
done the next time with the left-hand thong, to the right.
Braiding can be done with from two thongs to an infinite number.
However, the highest practicable number with which to work seems to
be twenty-one thongs. That, at least, will constitute the maximum used
in this book.
Some braiders advocate moistening leather thongs and braiding them
while damp. This system is very good for the experienced braider, but
for the beginner, who might have to tear his braid apart and start over
again, it is best first to work with his thongs dry. so that they will not
be spoiled for possible rebraiding. Rawhide strings, of course, should be
worked damp even when softened.
However, all thongs should be thoroughly saddle-soaped, and the
lather rubbed in well. Then, even when dry, they will work easily and
the braid can be closed up snugly. An even tension in the braid is
important. Try to exert the same amount of pull on each thong and the
braid will be uniform throughout.
The first braid will be a two-thong braid, similar to the common
so-called chain-knot. Double the thong, place the loop over a peg and
then tic an overhand knot, as indicated in Fig. 1.
Bring the end. R. up through the knot, as demonstrated in Fig. 2
The bight of A is next pushed down through the loop formed by B, as
illustrated in Fig. 3.
For purposes of clarity the braid is not shown tightened in the
chawing. But the next step in Fig. 3 is to pull thong В until it is fairly
tight around the loop of A.
Bring the bight of thong В down through the bight of A and pull the
end of A until it is tight around the bight of В (Fig. 4). Bring the bight
of A through the bight of В and tighten by pulling on B, then the bight
of В through A and so on, alternating until the length desired has been
braided.
In this braid both the flesh side and the hair side of the leather
alternately appears, one being the edge scallop and the other the center
portion.
Two one-foot lengths of 1/S-inch thongs will make about three
inches in actual braid.
84
PLATE 27. Two-Tliong Flat Braid.
85
PLATE 28
Three-Thong Hair Braid. This braid is known as the hair braid and is
one of the simplest, and most commonly used of the flat braids. As a
general rule it is dismissed, because of its simplicity, with the
assumption that everyone knows how to do it This is not true, and
from our standpoint, it is most important that it be done correctly, as it
is the key to more complicated flat braids.
As in the majority of flat braids, the extreme right and left-hand
thongs are worked alternately toward the center. They follow a definite
sequence, in this case, of over-one, under-one.
In all braiding there is a length shrinkage which varies from
approximately one-half to one-quarter of the original length. In the case
of a three-strand braid, three 1/8-inch thongs of one foot each shrink to
ten inches of braid. Figuring on a one-quarter shrinkage would be a
good average. Be sure the braiding is snug.
In the beginning, take the extreme left-hand thong, A (Fig. 1), and
pass it over thong B; then take the extreme right-hand thong C and pass
it over A (Fig. 2). Now bring В to the right, over C (Fig. 3). Bring A
from the right toward the left over В (Fig 4). In the next step, pass
thong C from the left to the right over thong A; then thong В from the
right to the left and over thong C. The thongs are now in their original
position, thus completing one phase of the braid. To continue the
braid, repeat as before.
Four-Thong Braid. First cross the two center thongs (Fig. 5), C over
B. Bring thong D to the. left under В and thong A to the right over C
and under D (Fig. 6). Now bring В to the left under A, and C to the
right, over D and under B. Next bring A to the left under C and bring D
from the left to the right over В and under A (Fig. 7).
It is best in the beginning to place on the ends of the thongs the
letters corresponding to those used here, as indicated in Fig. 5. Follow
instructions carefully.
Shrinkage is approximately7 one-fourth of the original length.
86
TlGr. I “FIG. 1 FIG 5 FlG.-V
PLATE 28. Three-Thong Hair Braid.
87
PLATE 29
Five-Thong Braids. To make the five-thong braid in Figs. 1. 2 and 3,
first arrange the thongs as in Fig. 1. Now bring thong C, on the left, to
the center over thongs D and E as in Fig. 2. Next bring thong B, on the
extreme right, to the center over thongs A and C. Continue braiding
first with the outer left thong and then the outer right one. In each
instance they pass over two thongs. This makes an attractive
herringbone braid.
Next we come to the braid shown in Figs. 4 and 5. The first step is to
arrange the thongs as shown in Fig. 4. Start working with thong В on
the extreme left and pass it to the center over thong E; then bring
thong D on the extreme right to the left toward the center, over thong
C, under thong A and over B, as illustrated in Fig. 5. In the next step
bring thong E in Fig. о to the center by passing it over thong D and
under thong C. Continue this braid by working alternately from left to
right and right to left. This is an over-one, under-one sequence, so one
thong is never passed over or under more than once.
Figures 6 and 7 show another variation of the give-thong flat braid.
In this case it will be noticed that the center thong. C, becomes a sort
of core and runs straight down the center of the braid.
The first step is to arrange the thongs as shown in Fig. 6. It will be
noticed that thongs A and E, the two outer thongs, always pass under
thong C, but alternate in passing over and under each other. In the case
of thongs F and D, they always pass over thong C and alternate in
passing over and under each other.
Starting with Fig. 6, take thong D in the right hand and pass it
beneath thong A and over thong C. Take thong В on the left and pass it
toward the right under thong E and over thong D, at the juncture of D
and C. Thong В thus passes over both D and C. Now on the right, thong
A is brought to the left over thong В and under thong C. From the left,
thong E is brought to the right over thong D and under thong A, at the
junction of A and C. Thus E passes under both A and C.
This offers a fine opportunity to use thongs of different colons, or at
least to make thong C different from the others.
88
I’lATI'. 29. Five-Thong Braids.
89
PLATE 30
Six-Thong Braids. The first of the braids of six thongs will be the
over-one, under-one braid. To begin, arrange the thongs as in Fig. 1.
This is done by crossing the two middle thongs, with thong C brought,
to the. right over thong D. Then bring thong В to the right, under D and
follow by bringing thong E to the left over C and under B.
Now alternate first on the left-hand side and then on the right,
always working the outer thong to the center. Thus, in Fig. 2, thong A
is moved over D and under E, and then from the right, thong F is
moved under C. over В and under A.
Keep the braid snug and be sure there are an equal number of thongs
on each side. When there are four on a side, work the thong on that
side, as in Fig. 3. The next move is to bring thong C over B. under Д
and over D.
Another example of the six-thong flat braid is shown in Figs. 4 and
5. Arrange the thongs as shown in Fig. 4, which is done by moving
thong A on the extreme left, to the right, under thongs В and C to the
center; then moving thong F on the extreme right over to the left by-
passing it over thongs E and D and under A.
In this braid the extreme left-hand thong will always pass under two
toward the center; the extreme right-hand thong will always pass over
two and under one toward the center. Keep the braided part pushed up
snugly.
This makes an attractive braid and when finished it will be seen that
its sequence is under-two, over-one from the left side, and over-two,
under-one from the right side.
Ihe third example of six-thong braiding is somewhat different in that
the extreme right-hand thong is used continually, it could just as well
be the extreme left-hand thong, but in the illustration the right-hand
one has been chosen.
First, as in Fig. 6, take thong F and move it to the extreme left by
passing it under thong E, over D, under C, over В and under .A. Then
take thong E and carry it to the extreme left by passing it under thong
D, over C, under B, over A, and under F. Keep the braid closed up
snugly. .Although the finished braid may seem at first to slant or incline
to the left, it will soon straighten out.
90
Pl. \ТЕ 30. Six-Thong braid.*-.
91
PLATE 31
Six-Thong Double Braid. Special attention should be paid to the
making of this braid as it furnishes the key to the more intricate and
beautiful types of double braids to follow—especially those of nine,
thirteen and twenty-one thongs.
Arrange the thongs as shown in Fig. 1. Bring thong A on the extreme
left to the right over thong В and thongs C and D. Bring thong F on the
extreme right to the left over thongs E and A.
Move thong В to the right by passing it under thong C and over
thongs D and F (Fig. 2). It will be noticed in the drawing, which shows
the braiding loose so the course of the individual thongs may better be
followed, that thong В is under A as well as under C. This may appear
to be wrong but it is not; it is thus that the braid is made double. Take
thong E on the extreme right, bring it toward the left to the center by
passing it under thongs A and В In this instance it will be noted that E
already was under thong F and now it is under all three thongs, F. A
and B.
The next step in Fig. 3 reveals further how this braid is made. Now
thong C, on the extreme left, is passed over thong D and under thongs
F and E. On the right, thong A is passed over В and C.
In referring to the first step in Fig. 1, observe that in working from
the left side, the outer thong A first passes over one and then under
two. In Fig. 2. the extreme left thong В passes under one and over two,
and now in Fig. 3 it passes over one and under two.
On the right-hand side, too, it will be noted that in Fig. 1 the
extreme right-hand thong E passes over two; then in Fig. 2 thong E
passes under two and in Fig. 3 the extreme right-hand thong A passes
over two.
This is the key. Each time alternate on each side. When the first
thong on the left is passed over one time, it is passed under the next
time. And the same is true on the right-hand side. When tightened, the
braid will be relatively narrower than other six-thong braids but it will
be double, as indicated in a side view in Fig. 4.
Seven-Thong Braid. In this braid begin with thong D over thong E;
thong В under C and E; thong G to the left over F and under D and B.
Pass thong A to the right over C and under E and G. Now pass F to the
left over D and under В and A. Continue as in Fig. 5, with each outer
thong passing over one and under two.
Nine-Thong Braid. In this braid divide the thongs with four on the
left and five on the right. Start by bringing E over D to the left. This
can be followed by the drawing. Notice that this braid has an over-one,
under-one sequence in the center, but under two each time on both
edges.
92
PLATk 31. Six-1 hong Double Braid; Scvcn-Tliong Braid; Nine-Thong Braid.
93
PLATE 32
Variation of Five-Thong Flat Braid. Start this braid as shown in Fig.
1. Then bring thong or string No. 1 on the left to the right side under
No. 4 and over No. 5. Now braid the three center strings into a hair
braid (Fig. 3). The outside strings Nos. 4 and 3 are braided as shown by
the arrowline in Fig. 4.
Again braid the inside strings into a hair braid as in Fig. 3 and shown
by the arrowlines in Fig, 5. This sequence is continued, braiding the
outside strings every other time, after the inner strings have been
braided in a hair braid.
Variation of Seven-Thong Flat Braid. In Figs. 6, 7 and 8, the inside
thongs or strings are braided over two and under two—or in a five-thong
braid. The outside strings are braided in after two passes inside as
shown in Fig. 8
In Fig. 9 the inside braid is the three-string hair braid and is consis-
tently over one, under one.
Variation of the Nine-Thong Flat Braid. In Figs. 10, 11, 12, and 13
the method of making this braid is illustrated. Another way, not shown,
is to work the inside braids into a seven-string braid of over-two and
under-two sequence, and then work the outside strings as in the pre-
vious braids.
t-a •»
PLATE 32. Variation of Five-Tl.ong Flat Braid: Variation of Seve.i-Tl.ong Flat
liraid; Variation of ih<- Nine-Thong Flat Braid.
94
95
PLATE 33
Lazy-Man Braid of Six Thongs. In this braid double thongs or strings
are worked in the same fashion as single thongs in the three-thong hair
braid shown in Plate 28. Thongs L and 2, 3 and 4. and 5 and 6 are
braided as a single unit. In Fig 2 this method is illustrated where 1 and
2 are first laid to the right over 3 and 4 and 5 and 6 and brought to the
left over 1 and 2 (arrowline). Proceed then as in Fig. 3. The upper
double thongs are brought to the center each time.
Lazy-Man Braid of Eight Thongs. This braid is worked as the single
four-thong braid also shown in Plate 28, but pairs are used instead of
single thongs (Figs. 4 and 5).
Other single-thong flat braids may also be made with pairs in this
fashion, also with three strings as a unit, or even more.
Lazy-Man Braid of Ten Thongs. This braid is over one, under one on
each edge with the double thongs or strings crossing in the center. It
might be called a semi-lazy-man braid. After first crossing the pairs of
strings in the center as in Fig. 6, the upper left-hand thong or string
(No. 1) is carried to the right and center by passing over one, under two
and over two. Working from the same side, string No. 2 is carried to the
center over one, under one. and over two (Fig. 7)
Working now from the right-hand side, string No. 10 passes to the
left and center over one, under two, and over two (Fig. 8). Then from
the same side carry string No 9 to the left and center by passing over
one, under one, and over two (Fig. 9).
Two strings arc worked from each side in the same fashion until the
desired length of the braid is obtained (Fig. 11).
Many combinations can be used in this lazy-man braid. Do not
hesitate to experiment.
96
Pl ATE 33. Lazy Al ait Braid of Sis Thongs Lazy Man Braid of Eight Thongs; Lazy-
Man Braid of Ten Thongs.
97
PLATE 34
Alternate Seven-Thong Braid. The seven-thong braid shown in Figs. 1
through 4, illustrates the adaptable symmetry of uneven thong or string
braids. This can be worked as shown The left-hand thong in Fig. 1
passes to the right and center under two and over one, and then in Fig.
2 the right-hand thong passes to the left and center under two and over
one. The result is shown in Fig. 4. However, the sequence for the thong
on each side can be under one, over tw о (not. illustrated)
Alternate Nine-Thong Braid. The same system employed in the
seven-thong braid is used in Figs. 5 through 8. In this case the sequence
shown in Fig. 5 (after thongs 4 and 5 have been crossed) is to the left
over one, under two, over one In Fig. 6 the thong on the left is worked
in the same fashion, and so on. The result is shown in Fig. 8. Variations
of this, of course, can also be made, such as over one, under one. over
two on each side.
Uneven strings of a greater number can be worked in various
combinations.
T.O.S
PLATE 31. \llerilale Seven-Thong Braid- Mleniale Nine-Thong Braid.
98
An Australian Type Belt. This interesting belt, made of six long
thongs with its own loops and buttons for fastening, was described to
me by C.W. Halliday of West Australia. The thongs are first doubled
and the braid started in the Australian fashion as shown in the lower
part of Л. After braiding for about three inches the first hole is made
by dividing the braid into two three-thong braids for about % of an
inch; then the thongs are joined in a six thong braid for about one inch
and again split into two three-thong braids. If you wish more holes in
this end, continue as above then continue the six-thong braid for the
body of the belt until the desired length has been reached so the button
end will pass through two holes. (B shows it passing downward through
the first hole and C shows it passing upward through the second hole.)
To form the button end, braid two inches of a six-thong round braid
and make your button. Be certain you have enough length to do this
Select any button you desire from the section showing braided buttons.
99
PLATE 35
How to Make an Australian Type Belt. In Australian braiding all Hat
braids are started as shown in Figs. 1 and 2. The thong A-В is middled
and given a twist in the center, as shown in Fig. 1. This twist is to keep
the hair or dress side up in both thongs. Then thong F-D is introduced
as shown. Next thong E-C is placed in as indicated. The end D is
brought down in an over-one, under-one sequence. The end F is woven
downward under one, over one, and under one (thong D, Fig. 1).
Thong end C is next brought down over thong end В and under F
(Fig. 2). Thong end E on the left is woven downward under thong end
A, over thong end D and under thong end C. Also in Fig. 2, indicated
by arrowlines, the regular six-thong braid begins—over one. under one
on the right, and under one. over one, and under one on the left. This is
continued until the desired length of the belt is obtained.
In Fig. 3 the braid is introduced through the buckle as shown,
entering from the top (the back of the buckle is illustrated here). In
Fig. 4 the braid is secured to the buckle by back braiding. Each thong is
passed back, following its own part, as shown. This back braiding can
be continued to the center of the six-braid and each end cut off flush.
Then two braided keeper knots can be made behind the buckle.
However, in Fig. 6 1 have made these keeper knots from the ends of
the braid itself. In the lower three thongs. A, B, and D, two are on the
left side and one is on the right side. В and D are crossed as shown with
the hair side out and A passes over B, under D, back over В and under
D. At the top two strings are on the right-hand side, E and F, and one,
C, is on the left-hand side. C passes over E, under F, and back over E.
All this is shown in Fig. 6.
Taking the lower strings once more, the body of D is pulled beneath
D to form a loop, as shown by the arrowline, and then A passes over В
and under D. At the top, the body of F is drawn beneath F to form a
loop and C passes beneath F and over E. This is continued until a tight
three-thong hair braid is formed. Before tightening and tucking the ends
beneath the braid, the billet should be slipped through these keepers to
see that sufficient room is allowed for it. The finished belt is shown in
Fig. 8. This belt is made with six strings, but more even-numbered
thongs may be used Australian belts usually are from 12 to 16 thongs.
100
PLATE 35. How lo Make an Australian Type Bell.
101
PLATE 36
How to Make a Braided Belt. In this belt the thongs or strings first
are attached to the buckle as shown in Fig. 1. There are six thongs and
these are braided in an over one under-one sequence until the desired
length is obtained.
Shown in Fig 2 is the start of the method of finishing off the billet
end of the braid. As indicated by arrowlines, end A is passed upward
beneath three thongs. Then end В is brought upward under three
thongs. The result is shown in Fig. 3.
In Fig. 4 the underside of the braid is illustrated. Each thong is now-
brought upward flesh-side-to-flesh-side with its own part. When the
ends are all brought toward the center of the braid they are snipped off.
Figure 5 shows the finished end.
Figure 6 illustrates a three-thong inside braid to be used as a keeper.
Two of these should be made, and sewed closed under the billet.
How to Make a Cinch Ring Belt. The cinch ring belt, using two
D-rings, is started at the biDet end in the same fashion as the Australian
method show n in Plate 35. However, after braiding about six inches the
braid is turned over so the flesh side of the thongs are uppermost. Then
each thong is twisted so the hair side is uppermost and the braid
continued. The reason for this is that when the billet is passed through
the rings as shown in Fig. 7, the flesh side of the thongs is next to the
rings and the hair side or dress side is uppermost. The billet is secured
by a braided keeper or loop as in Fig. 6 The ends holding the two
D-nngs are back-braidcd as in Plate 35.
How to Make a Belt with Its Own Keeper. With six strings—that is,
three strings or thongs middled—braid a three-thong hair braid as shown
in Fig. 8. After joining all strings, in a six-string over-one, under-one
sequence for a few inches, place in the buckle as shown in Fig. 9. Then
pass the braid through the loop as illustrated by the arrowline in Fig. 9.
After adjusting the loop the braid is continued. The billet end is
finished as in Figs. 2-4.
PL \ 1L 36. How to Make a Braided Belt; How to Make a Cinch Ring Belt; How to
Make a Belt with Ils Own Keeper.
102
103
Л closeup of two fancy whip handles. Courtesy: D.W. Morgan, Austral Enterprises.
104
Round Braids
PLATE 37
Round Breid of Four Thongs. The four-thong round braid is made
with or without a core. When using a core, which may be rope, rounded
leather or any desirable round object, arrange the thongs as in Fig, 1.
The combined width of the thongs should be the same as the
circumference of the core. If the core measures one inch around, each
thong should be '/» of an inch in width.
Very thin leather may he used in this type of covering, as the leather
is subjected to no strain when in use. If thick leather is used, it is well
to bevel the edge on the flesh side so that the braid will lie snug.
Rawhide strings arc beveled slightly on the hair side.
Some braiders work with their thongs thoroughly damp. 1 usually
apply saddle soap and allow the thongs to dry. In working with damp
thongs the pulling often stretches the leather and the thongs get
narrower as they proceed downward.
In Fig. 1 the two thongs in front are crossed, bringing thong 1 to the
right over thong 2, and carrying thong 2 toward the left.
Bring thong 4 around to the rear, following the path shown in the
arrowline in Fig. 1. Figure 2 shows thong 4 on the left, having passed
beneath thong 3 and over thong 1.
The arrowline in Fig. 2 shows the path of thong 3. Bring it around to
the rear and back again to the front, passing under thong 2 and over
thong 4 (Fig. 3).
Thong 2 is worked next. It follows the course of the arrowline in Fig.
3, going around the rear and back to the front under thong 1 and over
thong 3.
There are always two thongs on each side. Work alternately with the
outer or upper ones, passing to the rear and following the sequence of
under one thong and over the next.
Keep the braid carefully closed up as the work progresses. Unless the
same amount of pull is used on each thong, it will show in the finished
braid.
Continue to the end as shown in Figs. 4 and 5. Then tie down the
thongs.
When the braid is completed, apply saddle soap and roll it under
your foot on the floor or some other hard surface. Don’t be afraid to
exert a little pressure as this will smooth down the braid and bring it
closer together.
Cowboys often smooth and polish braid that is made without a core
(Figs. А, В, C and D) by drawing it through a series of holes in hard
w ood or bone, each hole being smaller than the previous one. with the
sharp edges of the holes beveled.
106
I’LAI к 37. Bound Bi aid of Four
о
107
PLATE 38
Turk’s-head Terminal for Round Braid. There are eases where it may
be desirable to finish off a round braid with a handsome knot, instead
of merely tying it down. It is Lhen that the Turk’s-head terminal knot is
used.
When a core has been braided over, continue the braid beyond the
core and then arrange it so that the thongs appear as in Fig. 1.
Pass thong 1 around the rear as shown in Fig. 2 and turn thong 3 so
that the flesh side is toward you. Thong 1 should also be turned so the
flesh is toward you as in Fig. 3.
Lash the thongs together in this order and turn the ends upward to
make the braiding easier Fig. 4). The thongs are now separated as
shown in Fig. 5, with the flesh sides of all of them upward.
Fold thong 2 over thong 4, leaving a bight in 2 near the spot where it
is lashed, as shown in Fig. 6. Then fold thong 4 over both thongs 2 and
1, also leaving a bight in thong 4. as shown in Fig. 7.
Pass thong 1 over thong 4 and thong 3. Then thrust thong 3 over
thong 1 and through the bight in thong 2 as indicated by the arrowline
in Fig. 8. The thongs are now arranged as pictured in Fig. 9. The hair or
smooth sides of all are upward.
Continuing in the same direction, which in this case is
counterclockwise, pass thong 1 around and to the outside of the bight
of thong 2 and up under thong 2 and thong 3. This thong emerges in
the center of the braid as indicated by the arrowline in Fig. 10 and
shown in Fig. 11.
Pass thong 4 around and outside, of the bight of thong 3 and then up
through the center, under thong 3 and thong 1. Next move thong 2 in
the same fashion and finally thong 3. Work the knot tight but be sure
to press it back on the braid or it will be inclined to slip upward.
The protruding thongs may be cut off close to the knot or trimmed
evenly and left. Saddle soap the knot, mold it gently and it will remain
in this shape after it dries.
108
PL ATE 38. Turk’s-head Terminal for Round Braid.
109
PLATE 39
Round Braid of Six Thongs. It is not often practicable to employ a
round braid of more than four thongs without a core. Therefore, in
making the round braid of six thongs, a core is used. This may be a
rope, rounded leather or other material, or possibly a hard twisted
rawhide core such as that used in riding crops and other whips. (For
reins, no core is needed.)
The combined width of the thongs should be the same as the
circumference of the object to be covered.
Arrange the thongs as shown in Fig 1. This is to be a braid in which
the sequence is over one thong, under one thong and over the next, or
what is usually termed the basket weave.
In making this braid there are always three thongs on one side and
three on the other.
First bring thong 2 to the left and over thong 1, inclining thong 1 to
the right.
Bring thong 4. which belongs to the right-hand group, around to the
rear over thong 5, under thong 6 and over thong 2, to return to its
original side, as indicated by the arrowline in Fig. 1 and shown in Fig.
2.
Pass thong 5 around to the rear and to the front where it goes over
thong 3, under thong 1 and over thong 4, to return to its original
left-hand side.
Continue the braid in the same manner to the desired length, always
working with the extreme left-hand or extreme right-hand thong.
Remember—to the rear, then to the front and over one, under one and
over one.
Another method of braiding with six thongs is shown beginning with
Fig. 7. Here, as before, the thongs are grouped three on a side.
First cross thong 2 to the left over thong 1. Then bring thong 5
froward under thong 6 and over thong 2. indicated in the arrowline in
Fig. 7 and shown in Fig. 8.
Bring thong 4 forward under thong 3, and over both thongs 1 and 5
(Fig. 8). Now start working the thongs around the rear.
Bring thong 3 on the right around the rear and forward on the left
under thongs 6 and 2 and over thong 4 and return to its original side, as
indicated by the arrowline in Fig. 9 and shown in Fig. 10.
On the left, bring thong 6 around the rear and forward to the right
under thong 1 and over thongs 5 and 3 (Fig. 10).
Remember that in this braid the thongs on the right pass around
back to the front under two and over one. while those on the left pass
around and under one and over two. Continue tliis sequence until the
end. The finished braid is shown in Fig. 13.
110
PLATE 39. Round Braid of Six Tlionss,
111
PLATE 40
Herringbone Braid of Eight Thongs. For the eight-thong herringbone
braid, fasten the thongs at the top of the core as indicated in Fig. 1.
When working with so many thongs it is difficult to space them around
the core. The best way to do this is first to lash down thong 1 and pass
tire thread or string completely around the core; then place thong 3 in
position and pass the thread over it and around the core; then thong 5,
and so on. Another method is to apply some fast-drying cement around
the core at this point, attach the thongs and finally tie them down.
Divide the thongs so that there are four on the right-hand side and
four on the left-hand side. In these illustrations, those on the right are
indicated by even numbers and those on the left by odd numbers.
Bring thong 7 of the left-hand group around the rear and to the
front, under thongs 8 and 6, over thongs 4 and 2 and back on its
original side This is shown in Fig. 1 and the course of thong 8 is also
indicated by the arrowline. This thong goes around the rear and back to
the front under thongs 5 and 3 and over thongs 1 and 7.
The sequence is always the same in this braid. Bring the rear-most
thong on either side around the core, under two and over two.
In Fig. 2, thong 8 is shown in position and the arrowhne indicates
the path of thong 5 on the other side. It goes to the rear and then
forward on the right-hand side under thongs 6 and 4 and over thongs 8
and 2
Follow the diagrams and by way of practice, number the thongs as
shown and check the work by the diagrams, seeing that each thong rests
in the place indicated.
Keep the braid up snug, rub in saddle soap thoroughly when finished
and roll it beneath the foot. When almost dry, polish with the heel of
the hand, one of the best methods of brightening up leather. This is an
attractive braid and is widely used on quirts, riding crops and other
whips.
112
1’1- ^ ГЬ 40. Herringbone Braid of Eight Thongs.
113
PLATE 41
Back Braid of Six Thongs. First, make the foundation of this braid
by braiding down with six thongs in a round braid of an over-one.
under-one sequence. The braid should be made loosely, that is, the
spaces between the thongs should be approximately the width of a
thong.
When the skeleton braid is worked to the desired length, divide the
thongs, with three on the right and three on the left. In Fig. 1 notice
that where the two middle thongs cross, thong 4, which inclines to the
right crosses over thong 5, which inclines to the left.
Take the upper left-hand thong, No. 6 in this case, and pass it around
to the rear, over the thong on the extreme right (No. 3), under the next
(No. 1), and up alongside and to the right of No. 4 This thong will
parallel No. 4 to the very top. (The move explained is indicated by the
arrowline in Fig. 1.)
Bring the next highest thong on the left (No. 3) around to the rear
and under the one on the extreme right (No. 3) and up alongside and
parallel to thong 1 (indicated by the arrowline in Fig. 2). Bring the last
thong on the left (No. 5) around and parallel with thong 3, passing
under thong 6, as did No. 3 (indicated by the arrowline in Fig. 3).
Figure 4 shows these thongs in their proper positions.
In Fig. 5 the braid begins. Pass thong 4 to the right, over two thongs
and under two thongs. As the sequence will be over-two, under-two.
remember that from now on all working thongs will pass over two
thongs and under two thongs.
In Fig. 6 the work is with thong 3, which passes up to the right, over
two and under two In Fig. 7, pass thong 1 which is on the right around
to the rear and up in the same relationship as the previous two—over
two, under two.
This will be the sequence to remember in passing the last three
thongs on the right—always over two and under two, until they reach
the top. Those on the left passed upwards parallel to the thongs on
their left—those on the right in the over-two, under two sequence.
Thus, although only six thongs are used, the equivalent of a
twelve-thong braid is obtained.
To tighten tills braid, start working down with those thongs which
arc fastened at the top and when the bottom is reached tighten them
upwards. This gives a finished end at the bottom.
Made in this manner, a twelve-thong braid of the herringbone pattern
is achieved. The V’s in the braid run up and down. To make a
gaucho-type braid where the V’s run horizontal or around the braid,
start with the back braid at Fig. 5. go under two instead oi over two,
and repeat with the remaining two thongs.
114
PLATE •11. Bark Braid of Six Thong,'.
115
PLATE 42
Back Braid of Eight Thongs. By braiding down the core with eight
thongs in a basket weave—over-one, under-one sequence—and then at
the bottom braiding back up in an over-two, under-two sequence, a
sixteen-thong braid is obtained. The bottom presents a finished end
which does not have to be covered
Start by arranging the thongs as shown in Fig. 1. Begin the basket
weave by crossing thong 1 to the right over thong 2 and incline thong 2
to the left. Bring thong 7 around to the rear, under 8, over 6, under 4
and over 1, as indicated by the arrowline in Fig. 1 and shown in Fig 2.
From the right-hand group of thongs, take No. 8 and bring it to the
rear under 5, over 3, under 2 and over 7, indicated by the arrowline in
Fig. 2 and shown in Fig. 3. Continue braiding down, first from one side
and Lhen the other, until the w’ork has progressed to the point
illustrated in Fig. 5, or in other words, until the desired length of the
finished braid is reached. Leave a space between thongs just the width
of a thong.
To begin the back braid, take thong 5 on the left, pass it to the rear
and then forward under 6. over 4, under 7 and then up along the right
side of thong 8, following exactly the same course as thong 8. which in
the first step would bring it under No. 2. This is indicated in the
arrowline in Fig. 5 and shown in Fig. 6.
The other thongs on the left are braided accordingly as shown up to
Fig. 9. Now, to begin the second phase of the back braid, bring thong 8
to the right, over 5 and 1, under 3 and 4, and over 2 and 6.
Note that the diagrams in Figs. 10, 11 and 12 show all the braiding
crowded to the front. This is done merely to illustrate the work in
greater detail; actually, the core is turned as you proceed.
Thong 1 is worked next (Fig. 10). Pass it over thongs 3 and 4, under
2 and 6 and over 7 and 8 (Fig. 11). Pass thong 4 over thongs 2 and 6,
under 7 and 8 and over 1 and 4. Pass thong 6 over thongs 2 and 8,
under 5 and 1, over 3 and 4, and so on.
The thongs working up toward the left, follow exactly the thongs to
their left; those inclining up to the right maintain an individual
over-two-under-two sequence.
To tighten this braid, begin at the top where the thongs are lashed
down. Work down one set at a time—that is. those slanting downward
to the right, and follow them back to the top. Then tighten those
inclining to the left, all the way to the bottom and back to the Lop.
To make this into a gaucho braid, start at Fig. 9 and go past No. 8
under two instead of over two and continue the same over-and-under
sequence. The remaining three thongs are also first passed over two
instead of under two, and so on.
116
1’1. \ IP 42. Hack Braid of Eight Thong.».
117
PLATE 43
Eight-String Round Gaucho Braid. In Plates 41 and 42 directions for
making the gaucho braid of twelve and sixteen thongs have been given.
This braid is distinguished by the fact that the V's run around the braid
instead of up and down.
This effect can be obtained also by straight-braiding instead of by
back-braiding. In Fig. 1 we start with eight strings or thongs. After
crossing the four middle thongs as shown in Fig. 1, carry thong No. 8
around back and to the front, under two and over two.
The sequence now is No. 1 on the left is carried around and forward
over one, under two, over one (Fig. 2). Next No. 6 on the right is
passed around back and forward over two and under two (Fig. 3). No. 2
on the left passes in back and forward under one, over two, under one
(Fig. 4). The finished braid is shown in Fig. 5.
The important thing about this braid is that the sequences repeat
after every four passes. For instance, to continue from Fig. 4 the
sequence is: (same as in Fig. 1) right thong around and under two, over
two; (same as in Fig. 2) left thong around and over one, under two,
over one; (same as in Fig. 3) right string around and over two, under
two, and (same as in Fig. 4) left thong around and under one, over two
and under one. Thus, repeat the sequences after four passes.
Twelve-String Round Gaucho Braid. After crossing the six center
strings as shown in Fig. 6 the string No. 1 on the left is carried around
and forward over three, under three. The sequence in this braid repeats
after six passes. This is it Right to left (Fig. 7) under two, over three,
under 1. left to right (Fig. 8) over one, under tliree, over two; right to
left (Fig. 9) over three, under three; left to right (Fig. 10) under two,
over three, under one; right to left (Fig. 11) over one. under three, over
two. Figure 12 shows the completed braid, as well as the beginning of
the next set of sequences (as in Fig. 6). Continue on for five more of
this set, and then repeat.
118
PLATE 43. Eight-String Round Gaucho Braid; Twelve-String Round Gaucho Braid.
119
PLATE 44
Round Braid of Twelve Thongs. In making the round braid of twelve
thongs, lash the thongs around the top of the core as shown in Fig. 1.
The total width of the twelve thongs should be the same as the
circumference of the core. In these drawings a little space is left
between the thongs to make it easier to follow the process of braiding.
In this case the six thongs on the left are given the uneven numbers.
1 to 11 and those on the right are even, 2 to 12. Each thong will return
to its own side, always advancing at each step from the thong in the
rear to the one in the front of its group, or "going to the head of the
class.”
The braid is alternate—work first one side and then the next. The
sequence is the same on both sides—over iwo thongs, under two thongs
and over two Lhongs.
First, bring thong 11. the rearmost of the left-hand group, around to
the rear, pass it over thongs 12 and 10, then under thongs 8 and 6 and
finally over thongs 4 and 2. returning it to its side. This is shown in Fig.
1.
Also in Fig. 1 is indicated the path of the next thong (No. 12) from
the right-hand side. Bring it to the rear, around and to the front, pass it
over thongs 9 and 7, under thongs 5 and 3 and finally over thongs 1 and
11.
The next move is from the left side: Take thong 9 around to the rear
and pass it over thongs 10 and 8, under thongs 6 and 4 and finally over
thongs 2 and 12.
This is indicated by the arrowline in Fig. 2 and shown in Fig. 3.
Continue this braid, working from the right side and then the left
side, and follow the sequence of over two, under two and over two.
Figure 7 shows the result, with the braid loosely woven, of arranging
black or colored thongs on the left side. This gives a pleasing pattern.
Other patterns may be worked out by using thongs of different colors,
and alternating the colors on each side.
As the work progresses keep the braid snug and exert the same
amount of pull on each thong. Saddle-soap thoroughly and roll beneath
the foot until the braid has a smooth surface.
120
PLATE 44. Round Braid of Twelve Thongs.
121
PLATE 45
How to Make a Rawhide Bosal; The Core. Down in the Mexican
State of Sonora they had a habit of breaking a horse when he was
young and, so that the bars of his tender mouth might not be injured
by a bit, the Mexicans used the jaquima (hackamore).
The trick item in hackamore gentling is the bosal. It is a noseband of
rawhide which has a double function It serves to cut off the horse’s
wind when the nose button of the bosal presses against his nose. But,
more important, the back or hind part of the bosal in coming up,
touches the horse’s chin. This teaches the bronc to react.
So a bosal, properly fitted, should be rather loose with the front part,
up, and the lower, or back part, dropping down at an angle. In making a
bosal loose it can be adjusted to a smaller size when the mecate
(McCarty) or reins are attached. The number of wrappings around the
lower end determine the tightness of the bosal.
The standard bosal measures twelve inches from the inside of the
nose button to the inside of the heel knot (Fig. 6, Plate 51). Now, in
speaking of these things it is best to name the parts of the bosal and
how to make it . which is our job.
Most bosals are made on a core, either of steel cable or twisted
rawhide, whichever is preferred. Some are made without cores. But if
made with a core, the core is braided over. This is commonly an 8-string
square braid (one with four faces), or on fancier bosals. a 12- or
16-string braid. This core and the braid covering it form the noseband
proper.
In the center of the noseband is the nose button, a long braided knot
about, seven or eight inches in length. It might be braided over a
tapering swell, made by wrapping the noseband at this point before the
nose-button knot is put on. This swell may be made with waxed twine.
Sailors call this work ‘ mousing.” But many nose buttons do not have
this swell or ’’mouse.”
On each side of the noseband are one or maybe two side buttons.
These serve to hold the headstall in place where it is attached to the
noseband on both sides.
At the point where the noseband ends come together is the heel
knot—a large round, or almost round knot. The heel knot keeps the
ends together, adds some weight to the bosal at this point, and keeps
the flador (Theodore) and mecate (McCarty) in place. (See illustration
of an assembled hackamore. Fig. 10, Plate 54).
The first thing is to select your core, if you want one. This may be a
piece of telephone guy wire from 3/8 inch to 14 inch in diameter; a
four-string piece of braided rawhide; a twisted rawhide core, or a length
of braided “spot cord” rope. As the nosebands of bosals vary from 3/8
inch to 1 inch in diameter, select your core with this in mind. The
average bosal noseband when the hratd is on, is 5/8 inch in diameter.
1 would say a twisted rawhide core is the best. It should be made
from the best of your rawhide. Take a Vt inch strip, two yards in length.
Be sure it is the same thickness throughout its length. Then wet it, not
122
too much—just so it is as pliable as 12-minute spaghetti, with no hard
spots in it. Rub in a lot of ordinary yellow laundry soap or saddle soap
Laundry soap is cheaper and just as good.
Now twist the strip upon itself with the flesh side in as shown in
Figs. 1 and 2 m Plate 45. Twist it until you have thirty-four inches;
then pull it and twist it some more until it is tight throughout its entire
length. Nail it down by the ends on a board and let it dry’ (Fig. 3).
When it is almost dry’ place another board on it. or use your foot, and
roll it on the board underneath, without moving the nails or loosening
it. Roll it back and forth a little. This will smooth it out. Let it remain
here a day or so. This is your core.
PLATE 45. How lo Mak» a Rawhide Bosal; The Core.
The braider finds a use for every part of the animal. A hull’s pizzle with
a natural twist can be used as a core for a whip (See Plate 74, How to
Build a Bullwhip.)
123
PLATE 46
Eight-String Square Braid over Core. This braid is made over a core.
Measure circumference of the core. Divide this by eight. This will give
you the width of each string. Say the core is one inch in circumference.
Each string will be 1/8 inch wide.
Tie down your strings at one end of the core. Leave about eight
inches of strings above the point where you tie down. This is not shown
in Fig. 1, Plate 46, but is necessary, since these loose strings will later be
utilized.
Start braiding as in Fig. 1. First bring string No. X’which was on the
left side, around to the back, under two strings and over two, to return
it to its original side. Arrowline shows how string No. 8 on the right is
brought around to Lhe back and then toward the front, under two and
over two.
In Fig. 2, the highest string on the left, No. 5, is brought around to
tire back and forward under two and over two. The arrowline indicates
its path.
Left: Homemade type of bosal made by L.H. Rutter, Hinsdale Montana.
Very rugged. Noseband braided without core. Note heel knot, made by con-
tinuous crowning, like sailors make boat fenders. Right: Bosal made by
author. Braided over twisted rawhide core. Heel knot is over three, under
three braid. (See Blate 45.)
124
In Fig. 2, the highest string on the left, No. 5. is brought around to
the back and forward under two and over two. The arrowline indicates
its path.
Then, on the right, the highest string, No. 6, is carried around to the
back and forward under two and over two. Continue in this manner,
alternately working the highest string on each side, until you have
braided full length of the core.
There should be eight or more inches of free string at this end also,
after you have tied down the end of your braid.
There is a shrinkage in braiding. It is well to play safe. Make your
stnngs twice as long as the finished braid.
PLATE 46. Eiglll-Slring Square Braid o»cr Core.
125
PLATE 47
EighLString Square Braid Without Core. For those who do not- use a
core—and I must say I’ve seen plenty of good bosal nosehands without
cores—the braid shown in Figs. 1, 2, 3, and 4 in Plate 47 may be used.
This is made with eight strings, each W inch wide, and, as it is necessary
to have some working ends—on both ends of the braid—each string
should be about two yards long.
We begin in Fig. 1. In this drawing the strings are spread out to better
illustrate the sequence. But they should be tied together, leaving about
eight inches at the top.
Arrange the four center strings as shown in Fig. 1. Then bring string
No. 2 around in back and forward over the two front strings, as shown.
In Fig. 2, the No. 7 string on the right is carried around to the back and
then under one and over two, as shown (it actually is under two). In
Fig. 3, the No. 1 string on the left is carried around back and forward
under one (actually under two) and then over two. After this work the
upper string on each side alternately, bringing it around in back and
then forward under two and over two.
Exert the same even pull on all your strings; don’t let them tum on
you, and keep your braid up tight.
Make the braid thirty inches long. Now hang it up with a weight on
one end and let it stretch and dry. When it is almost dry, take it down
and roll it under your foot on a flat surface; not too hard, but enough
to even the braid. This braid has four square faces. Let it dry for a
couple of days, with the weight still on it
When using this braid around a core you can make a 12-string one by
coming around under three and then over three; or a 16-string braid by
passing under four and over four, or under two, over two, under two,
and over two, on each side.
Bosals made by John Conrad, Bellflower. California. Steel cable cores.
A word again about dampening your strings before using them. Most
braiders get their strings too wet. Then, when the braid dries, the strings
seem to loosen and show daylight in the work. Have the strings just-
damp enough so there are no hard spots; then soap them well with
laundry soap or saddle soap. Moisten and soap the working ends as they
dry' out.
fIG. з
PLATE 47. Eight String Square Braid without Core.
126
127
1’1 \ТГ IB The Button
128
PLATE 48
The Nose Button. There st ill are some old-time raw hide-braiders
around. I have located possibly a score or more of them who are busily
making fancy quirts, bosals, rcatas, headstalls and other articles of horse
gear. In almost all cases they are "‘retired” cowboys or buckaroos.
It would not be far-fetched to say that these fellows are the very last
of the Old West, survivors of former days, still doing things as they were
done in the long ago.
These old-timers have many ingenious tricks in making braided
knots. Take the long nose-button knot for a bosal, for instance. There
are several ways to make the nose-button knot. One is with a long string
of rawhide The knot is so long, however, that it becomes awkward in
working with a lengthy string. Л simpler way is with a multiple-string
knot, or one which is made by several strings. This is a variation of what
1 have called the Cowboy Knot later in this book.
Take a look at Fig 1, Plate 48 You place from three to six strings on
the middle part of the noseband and tie them down the length the
finished button is to be—say eight inches. (Three strings are shown in
these drawings for simplicity: you might use more.) Make each string
about a yard long. The way to determine the width of the string is to:
measure the circumference of the noseband. Say it is one and one-half
inches around. In this knot three strings are going to pass back and
forth, until they form six bights on each. If you were braiding down,
one bight would mean two strings, because you use both ends. So with
six bights you are actually using twelve strings. With twelve 1/8-inch
thongs you can cover a circumference of one and one-half inches. So
three strings of 1/8 meh will cover this noseband In other words, figure
the number of bights or scallops on a woven knot and double it to
obtain the actual number of strings you will use.
In winding your strings around the noseband, as shown in Fig. 1, the
dress of hair side of the strings is out. In Fig. 3 start your braid. On the
left-hand side bring each working end over one string and under one as
shown. On the right-hand side bring each string under one and over one.
These working ends spiral back at right angles to those they pass over
and under.
Keep passing over one and under one until the strings from each side
meet. You will notice in Fig. 4 that string No 1 on the left meets string
No. 1 on the right. After the ends of the strings have come together in
this fashion, keep working towards the opposite ends, this time
doubling the strings.
When you reach the stage shown m Fig. 5, bring back the ends on the
left under two and oier two. splitting the doubled pairs as shown. On
the right, the ends come back over two and under two. When the ends
meet, as in Fig. 6, cut them off and tuck them in the braid. Don’t have
all pairs of ends coming together in the same part of the knot. Scatter
or stagger them so that the finished knot is uniform.
129
This gives you what 1 call a Gaucho Braid. The Vs in the braid run
around the knot. In the next braid (Fig. 7), which I call the
Herringbone Braid, the V’s run, or point, the length of the knot.
To make the herringbone braid, start back at Fig. 5, but pass the
working ends as shown in Fig. 7. This time the ends on the left go over
two and under two. Those on the right go under two and over two.
Finished knot is shown in Fig, 8.
You may combine these two braids on your nose button, making it
more fancy. On each end make two tucks w th the gaucho braid, and
finish the inside with the herringbone braid. Where the two braids join
there will be an alternating over-one, under-one sequence, but as this is
regular it does not detract from the knot. This makes an attractive
button—“very cowboy.”
A beautiful bosal of colt’s rawhide. Mr. Maguire’s cattle brand is on the silver
center. The braid is called trenza pampa. Collection John W. Maguire.
130
Kackaniore from the Ed ard Larocque Tinker collection, The Hall of the Horse
men of the Americas, The University of Texas.
131
PLATE 49
The Side Button. Side buttons on a bosal are for the purpose of
holding the hackamore headstall in place and there may be either one
or two to a side. If the nose button is short, make two. The space
between the buttons, or between one button and the end of the nose
button is the width of the leather in your hackamore headstall.
The Spanish ring knot (Plate 161) can be used, but you may like this
one better.
I have shown this button worked around a mandrel with a leather
collar to better illustrate it. You may work it directly on the noseband.
It is made from one long string, 1/8 inch wide. Play safe and use a string
about a yard long. I might add that old-timers work their knots so that
there is no need to go back and re-tighten them. This is a good thing to
practice and saves string When you have once properly made your
button, it is on good and tight; so you have no need to rework it.
In these drawings the mandrel is numbered on four sides from 1 to 4
clockwise: No. 1 is the front; No 3 is the back.
St-art in Fig. 1 from the front and pass up and around the mandrel
and then back on the right side and up again to go under the standing
part. In Fig. 2, the working end goes around and then down to the
right, over one, and then up to the top where it passes under one and
over one.
In Fig. 3, the mandrel has been turned slightly to show how. in the
third move, the working end passes at the bottom^over one and under
one. Then at the top (Fig. 4) it is under one, over one, under one.
Fig. 5. Bottom: over one. under one. over one. Fig. 6. Top: under
one, over one, under one, over one.
Fig. 7 shows the completed skeleton knot, working end coming up
alongside the standing end. Braiding of the knot—or Turk’s-head—has
started here and it will be seen that the working end passes up on the
right of the standing end. At the top it passes under two, bringing it
over to the other side of the standing end.
Fig. 8 is the back view Still following the standing end, the working
end passes over it as well as another string and under one to the top
Fig. 9. Top: the sequence is under two, over two, under one. Fig. 10.
Bottom: over two. under two. over one. Fig. 11. Top: under two, over
two, under two. Fig. 12 Bottom over two. under two, over two. Fig.
13. Top: under two, over two, under two. Then pass around to the
front and up alongside standing part.
The completed knot is shown in Fig. 14. It can be increased to
over-three, under-three sequence by following around again and
splitting the pairs.
132
PLATE 49. The Side Bulkin.
133
PLATE 50
The Heel Knot. The final knot on the bosal is the heel knot. Bui first
the ends of the bosal must be joined together so that the inside
measurement, from the inside of nose button to the point where ends
are joined, is approximately twelve inches. You may wTant your bosal
longer or shorter—but average size is twelve inches.
In joining the ends together you make a foundation knot. There are
several ways to make this knot. The ends can first be tied and then
secured with the knot shown in Figs. 9,10, and 11 of Plate 77. You can
use four or six strings, making sure that a half of them comes from each
of the ends. This forms a foundation knot.
However, one of the best ways of securing the ends and making your
foundation knot is shown in Figs. 1 and 2 of Plate 51. Ends arc brought
together and tied. Then, at the point where they are tied you make a
Spanish ring knot (Plate 161) or a side-button knot (Plate 49.) Make
either of these knots with W-inch-wide string but not too tight.
You will recall that, when you braided the noseband, you left eight
inches of loose strings on each end. Moisten these strings. Each string is
then brought back and through the ring knot or side-button knot, as
shown in Fig. 1. There arc sixteen strings in all and all are passed back
and through the knot and pulled tight. Arrange them in regular order;
then cui them off flush with the knot.
Best covering I know for this foundation knot is one I call the
Pineapple Knot. It is one of the most practical knots in braiding. As the
bights or scallops on each edge are staggered toward the center, the
knot closes on the end when tightened and, in fact, will close on both
ends and completely encompass a spherical object. The pineapple knot
can be interwoven to make it larger, yet its outside bights remain the
same in number, enabling it to close over the 1 ead of a quirt, bottom of
a heel knot, or other round or semi-round object. It is the King of
Braided Knots, and you will find many uses for it. The Argentine
gauchos use it to cover buttons and call it the button knot
Take a look at Plate 50. We start out by making a four-bight,
five-part Turk’s-head, which is completed at Fig. 7. This is then raised
to a six-bight, seven-part Turk’s-head and is completed at Fig. 11. (In
case you wish a larger Turk’s-head, use the same key in raising it to an
eight-bight, nine-part Turk’s-head.)
In Fig. 11 we start braiding or interwearing. (Drawings show this
knot made on a mandrel, but you can make it directly on the heel-knot
foundation of your bosal.) The working end passes along to the right or
the standing part, as shown by the arrowline; and then over to the 1еД
under two strings at the point where they cross. In Fig. 12, passing
down, the working end follows the string on its left. The sequence is
over one, under one, over one, under two.
Fig. 13. Going up: over one, under one, over one, under three,
splitting parallel strings.
Fig. 14. Going down: over one, under one, over one, under three
(splitting two parallel strings).
134
Fig. 15. Up: over one (not seen in the drawing), under one, over one,
under three.
Fig. 16. Down: over two, under one, over one, under three.
Fig- 17- Up: over two. under one, oxer one, under three.
Fig. 18. Down: over two, under two, oxer one, under three.
Fig. 19. Up: over two, under two, over one, under three.
Fig- 20. Down: over two. under two, over two, under three.
Fig. 21. Up: over two, under two, oxer two, under three.
Fig. 22. Down: over two; under txxo, over two, under three, which
brings the working end up alongside its original starting part. The
finished knot is shown in Fig. 23, not tightened.
This knot can be made with 1/8-inch strings. If it does not
completely cover the foundation knot you will have to enlarge your
Turk’s-head, or. better yet, you can enlarge the knot by intenvcaving in
an over-three, under-three sequence. See Plate 51.
FIG. 2 FIG. 3 FlG. A FIG 5 FIG й FIG. 7
FIG 8
FIG. 1
fIG, p fsq. ю H 12
FIG. 13 FlG. 14 ИЗ. 15
FlG FIG. 17 FIG 18
FIG. 19 FIG 20 FIG 21 FIG. 22
PLATE 50. Tlie Heel Knot.
FIG. 23
135
PLATE 51
The Heel Knot (Cont.). By using the pineapple knot and increasing
the sequence you can cover any size foundation knot at the heel of
your bosal. For instance, after placing on the over-two, under-tv,o
pineapple knot detailed in Plate 50, you find it does not completely
cover the foundation knot, you can go around it again, to make it
larger, with an over-three, under-three sequence.
The key to increasing the sequence in this knot is shown in Figs. 3
and 4, Plate 51. In Fig. 3, the working end which, in the previous
explanation, came up alongside its original part, is shown here.
The working end now passes up along on the right of its original part
and, at the top, goes under two, as shown by the arrowline in Fig. 3. It
now7 follow-s down alongside the string above it and then, at the
bottom, it passes under four. This is shown by the arrowline in Fig. 4.
In continuing up, the wrorking end passes over two, under two, over
two, and under three, splitting two parallel strings in the previous
w'eave.
From this point, the sequence is:
Down: over two. under two, over two, under five, splitting parallel
strings.
Up: over two, under two, over two, under three (again splitting two
parallel strings).
Down: over three, under two, over two, under five.
Up: over three, under two, over two, under three.
Down: over three, under three, over two. under five.
Up: over three, under three, over two, under three.
Down: over three, under three, over three, under five.
Up: over three, under three, over three, under three.
Down: over three, under three, over three, under five.
This brings the working end alongside the starting portion of the
string in this last weave. The knot is complete.
With this key you may increase your knot still more, or by using a
different colored string, produce a contrasting pattern. If you use a
different colored string for each interweave you can produce a very
fancy knot, indeed.
I have seen this knot on some old work where it had an over and
under sequence of nine—that is, a string would pass over nine others
and under nine.
In Fig. 6 is shown the completed bosal. The swells at each end of the
nose button are made by placing the nose-button braid over two
three-part Turk's-heads (Figs. 1 to 8 in Plate 161). Swell or taper of the
nose button is made by “mousing/’ as described in the first part of this
explanation of how to make the bosal.
In Fig. 7 is another type bosal, called a tie-down bosal. The core of
this is an endless cable and the bosal is usually about pencil-thickness. h
made without a core, the ends are spliced together beneath the part
covered by the nose button.
136
Take your time in making your bosal. The finished product looks
difficult, but when you follow each step carefully it is simple. You may
work out ideas of your own in the process, as, for example, making the
nose button of leather thongs instead of rawhide strings.
PLATE 51. The Heel Knot (Cont.).
137
PLATE 52
How to Make a Braided Hackamore Headstall. A fancy headstall can
be made entirely of braid. By the use of woven knots it is made
adjustable to fit any horse’s head. Such a headstall is used with a
pencil-width bosal.
This headstall (Fig. 14, Plate 52) consists of the following parts:
One metal ring 1-3/8 inches outside measurement, covered with
braid work (marked A in Fig. 14).
Two long braided “rounds” 40 inches each for the offside
cheekpiece, headpiece, and part of the nearside cheekpiece, (B).
One braided “round” 24 inches for the lower part of nearside
cheekpieee, (C).
Two braided “rounds” 24 inches each for the browband, (D).
Woven knots of various sizes.
This headstall can be made with a four-string braid, illustrated in
Plate 77, with or without a core. If used with a core, this core should be
braided cord. The eight-string braid shown in Plate 46 can be used over
a core. Measure circumference of the core and then divide this by the
number of strings to be used in your braid. The result will give you the
width of each string. For example, if the core is an inch in
circumference and you use eight strings, each string will be 1/8 inch in
width.
When latigo or leather thongs are used it is best to employ a core. If
you use rawhide strings, no core will be necessary and the best braid for
this purpose is shown in Plate 47—the eight-string braid.
With or without the core, make your thongs or strings about double
the length of finished braid to take care of shrinkage, and leave enough
unbraided on each end to tie a foundation knot for your covering or
woven knot.
We will start with the metal ring. In Fig. 1 is shown the first step in
covering this with a Spanish type edge-braid of two loops. The end В
should be about two inches long. Working end A is passed through the
ring as shown, and then brought forward over В and through the ring
once more. In Fig. 2, the working end A is brought, back and passed
beneath the crossed strings X. and between the strings and the outer
rim of the ring. The working end in this instance does not pass through
the ring.
In Fig. 3, the working end passes through the ring and, in Fig. 4. is
brought back once more beneath the crossed strings—but not through
the ring. Braid is continued in this manner until it covers the ring and is
near the starting point.
To join the braid after it has been made around the ring, look at Fie-
о. Standing end В has been pulled out as shown. Working end A passes
through the ring and up in back through the same loop which contains
B. The working end A next passes underneath two crossed strings ana
then down through the loop containing B, through which A previously
passed. Now draw your braid tight and cut off ends A and В flush with
the braid.
138
PLATE 52. I low to Make a Braided Ilackainore Headstall.
In our drawings the braid is shown very loose, so that details can be
more easily followed. The covered ring is shown in Fig. 7.
In Fig. 12 is shown how the ends are tied for the foundation knot.
Four strings are used for this purpose. Details of this knot are shown in
Figs. 9 and 10, Plate 77, or you may use the knot shown in Figs. 9, 10,
11, and 12 in Plate 78. Cut your ends off flush with the top of the
knot.
The woven knot which covers this foundation knot is the pineapple
biot, shown in Plate 50. The pineapple knot is used also in the other
woven knots shown on the finished headstall However, the Spanish
ring knot (Plate 161) is best for the smaller knots on the browband and
those fastening the checkpieces to the bosal.
The knot at the point of adjustment on the nearside cheekpiccc
should be smaller than the inside of the metal ring.
139
PLATE 53
How to Make a Braided Bridle Headstall. If a horse could laugh, he
would express much amusement over some of the baubles and gaudy
trinkets his owner puts on bridles, saddles, and other riding gear.
Still, the average animal does not appear too happy about this heavy,
out-of-character “horse jewelry.” Many of them seem downright sad,
especially when they are carrying a saddle that requires two men to
place into position, or wearing a bridle bearing all sorts of metal
doodads that would we gh down any proud horse’s head.
A few expensive and carefully selected conchas and buckles may not
be out of place on ordinary occasions, and perhaps a horse “diked” out
like a dowager at the opening night of the opera is de rigueur in a
parade or on a movie set, but for my part I like leather carving,
saddle-stamping, and braidwork as decoration for horse gear at all
times.
A decorative bridle headstall can be made entirely of braidvvork. Xo
metal fastenings of any kind are needed. If you want it particularly
fancy you may use several colors in your rawhide strings or leather
thongs.
This bridle headstall is similar to the braided hackamore headstall
with the exception that there are two cheek-headpiece adjustments
instead of one—one on each side—a throatlatch, and cheek-bit loops.
Here are the specifications-
Length when braided Number and width of strings Length of each string Total
Throatlatch (1) 4 ft. 6 in. 8 3/32 in. 9 ft. 72 ft.
Browband (2) 2 ft. 2 in. 16 3/32 in. 5 ft. 80 ft.
Headpiece (2) 2 ft. 6 in. 16 1/8 in. 5 ft. 80 ft.
Cheekpiece (2) 3 ft. 16 1/8 in. 6 ft. 96 ft.
Cheek-Bit Loop (2) 9 in. 16 1/8 in. 18 in. 24 ft.
352 ft.
There will be some 28 buttons, or woven knots, which will require an
additional 84 feet of string. So the grand total for making the headstall
will be about 436 feet of rawhide string.
The braiding will be the 8-string square, as shown in Plate 47. In case
you use leather thongs, and braid over a core of braided rope, use the
braid shown in Plate 46
Follow the instructions for making the braided hackamore headstall,
only in this case use two braid-covered metal rings instead of one, and
also make your throatlatch and cheek-bit loops (Fig. 1). In making tire
latter, the cheekpieccs ends are first joined together with a foundation
knot (Figs. 9-12, Plate 78), then covered with a woven knot (Plate 50)-
There are several ways of making the headpiece-cheekpiccc
adjustment. One is with metal rings as shown in Fig. 3; another is by
140
braiding over a short, stiff piece of rawhide and placing a button on
each end, as shown in Fig. 4. In Fig. 5, there is neither the ring nor the
crosspiece, and the adjustment is made with two woven buttons or
knots as shown.
If you wish to make a bridle head from strap leather, follow the
details in Fig. 9.
The check-bit loop is made from strap leather also. On one end cut
four thongs, cutting back several inches. Then make a foundation knot
as shown in Figs. 9 and 10, Plate 77, or in Figs. 9, 10,11 and 12, Plate
78. Cover this with the pineapple knot (Plate 50). The ring knot which
holds the loop to the ring is slipped down close to the button, where it
passes through the slit in the leather and holds it in place.
When using leather thongs the ends can be finished off with tassels,
or, as the cowboy says, frills. Cut your frill as shown in Fig. 6 and then
wrap it around the end of the “round.” Sew it and lash it. Then cover
with a pineapple knot.
PLATE 53. How to Make a Braided Bridle Headstall.
141
Top, left: Braided rawhide headstall, reins and chin strap made by the author.
Bottom, left: Fancy headstall used in the Argentine. Right: Black leather braided
headstall made by Burl Rogers, Spearfish, South Dakota. The headstall has white
horsehair tassels.
142
Completely rigged hackamore made by Duff Severe, Pendleton, Oregon,
Braided headstall, pencil type bosal.
143
PLATE 54
Rigging the Hackamore. The Western hackamore pretty well
illustrates the influence of the Mexican vaquero on the American
cowboy and buckaroo. Not only is the idea of its use Mexican—and we
mean Mexican as adapted from the Spanish conquistadyres,—all names
for parts of the hackamore coming in a picturesque jargon from the
Mexican.
Hackamore originally was jaquima (hah’-key-mah). The cowboy
twisted it around to suit himself and when he got through with the
word it was “hackamore.” The bosal comes from bozal and so has
remained almost in its pure form. The “Theodore” and “Theodore
Knot” come from the word fiador (fcc’-ah-dohr). Many believe this
safety device, or throatlatch, with its intricate knot got its name from
Theodore Roosevelt, but, considering the liberties the cowboy took
with other Spanish and Mexican words, he undoubtedly merely
converted fiador into “Theodore.” Then there is the tnecate
(may-kah’-tay), or hair rope used as reins and lead-rope. The cowboy
calls this “McCarty.”
The hackamore, and I call it this to mean headstall, fiador, bosal and
mecate, is handy gear around a ranch or any place where horses need to
be gentled. Its use is one of the oldest in breaking horses and has long
been popular in the West, particularly in California. Others more expert
than myself can explain the value of the hackamore method in teaching
a horse to neck-rein.
We have made the different parts of the hackamore, namely, the
headstall and the bosal, so now it must be properly rigged.
The first thing is to make the double hackamore knot. Il is
interesting how writers on knots and rope work have explained the
hackamore knot as used by the cowboy. They claim that this knot—also
known as the bag, bottle, jug, and beggarman’s knot—after being made,
may be loosened up and used as a sort of halter, or headstall. Let us
forget all this nonsense and see just how the hackamore knot is actually
fashioned and used.
First, it must be tied double Take fourteen or fifteen feet of nood
braided cord—No. 10 Sampson spot rope that resembles clothesline is
the best. Double it. About three feet from the bight marked A in Fig 1,
Plate 54, start your knot by laying it out as shown. Follow the
arrowline in Fig. 1: then follow the arrowline in Fig. 2. Straighten out
your rope carefully so that it does not overlap in the knot and leaves
about two inches of the double bight D above the knot. Bight A below
the knot should be about eighteen inches in length.
This is the knot that secures the lower end of the fiador to the bosal.
In Fig. 4, it will be noted that the knot is loosened and the double bight
D has been withdrawn. Through the space, push the nose button of the
bosal. as shown by the arrowline. Then bring bight D down through the
space between the noseband and back through the loops in the knot it
formerly occupied. Tighten it as shown in Fig. 5, leaving two inches of
bight D below.
144
PLATE 54. Rigging the Hackamore.
The fiador knot is started about six inches above the double
“^’kamore knot. Remember there were two ends, marked В and C, and
e bight marked A. These are tied together as shown in Fig. 6, bight A
turned down to form the two bights, D and E.
The secret of making this knot is the twist given to bight A, when it
145
is brought forward beneath the part where it is lied. To better illustrate
this I have shown the steps in this twist in Figs. 11,12, and 13. Be sure
to arrange the rope in this fashion in tying the knot according to the
diagrams in Figs. 6 and 7.
Bight A should be about 4 inches long when the knot is completed
(Fig. 8). In tightening the knot after Fig. 7, seize the ends В and C and
the bight A, remove the tie-string, and work the knot until it looks as in
Fig. 8. Its position on the fiador is seen in Fig. 10. In Fig. 9 is the
simple knot used to fasten the ends of the fiador.
PLATE 55
That “Ole” Fiador Knot. The fiador is the toughest of all horse gear
knots to tie. Лапу letters have come from readers who say they have
found it impossible to tie the fiador.
Possibly more cuss words have been wasted on this “ole’’ fiador knot
than on all the one-cow stampeding Brahmas, balky jackasses and
ornery bronco gizzard-poppers and gut-twisters put together.
The fiador, or Theodore, can almost be labeled “the knot that
nobody can tie.” Of course, there still are" some old-timers who can
whip up this knot, and some have their own private way of doing it.
But even these fellows are becoming fewer, and that is too bad, because
the fiador is the one typically horseman’s knot. Most all other knots
can be traced to sailors and sailing ships—but not the fiador. It came
hundreds of years ago from the Argentine Pampas and up through
Mexico and into the Southwest—and it came on horses and not on
ships.
Today, a very small percentage of the horsemen who use the
hackamore with the fiador tic this classic knot themselves—either it
comes with the rig when they buy ii, or they purcl ase it from a saddle
shop or mail-order house with the knot already tied. Should these riders
transfer the fiador from the hackamore to another, they are careful not
to upset or capsize the knot.
So, for those who want to tie the fiador to use it. or those who
simply want to learn to make it for the satisfaction of helping to keep
alive a part of the Old West, we believe a simple, foolproof way has
been worked out.
In showing how the fiador is made, we have also described again the
making of the two other knots that go with it the hackamore knot,
which secures the heel knot of the bosal, and the sheet bend or tie
knot, bj' which the fiador is adjusted and fastened. By doing all the
knots together, their relationship to each other can be illustrated more
clearly.
The hackamore knot should be made first. Take 15 feet of sash °r“
and middle it, forming the loop or bight A in Fig. 1. With 3 feet of the
doubled cord—from В to A in Fig. 1—start the knot as shown, working
146
PL MT. 55. That "Ole" Fiador Knot.
with the loop A. In Fig. 2 the final pass is made as indicated by the
arrowline. The double bight C at the bottom should be about 2 inches.
The bight A should extend above the knot about 13 inches, as this wil
be a part of the fiador knot.
Now, take a board and hammer and six nails (Fig. 3). The distance
between the bottom nail and the top nail should be about 1 foot, and
between those on the right and those on the left, about ’Л foot. You
don’t have to be too exact about placing the nails, as they are merely to
hold the rope turns apart.
Secure loops C of the hackamore knot over the lower nail. Then,
forking with loop A as shown in Fig. 3, pass it around the nails, as
®°wn, being careful about crossing the strands, and finally loop it over
Jbe top nail. Next, work the two ends marked В as shown in Fig. 4.
yornplete the knot as shown in Fig. 5. Take the loop A and the ends В
f one hand and the loops C in the other and remove the rope from the
na>ls and draw the hands apart, ghtening the knot. With a little
c°axing, the fiador knot will emerge as shown in Fig. 6.
i The fiador knot should be about 6 inches above the hackamore knot,
147
but this must be adjusted to suit the horse’s head. The manner of
making the tie knot is shown in Fig. 7.
Some expert fiador knot makers may grumble that, this “ain’t the
right way” to tie this knot, but, “what thee hackamore!”—the result is
the same.
PLATE 56
The Hackamore Reins and Lead-Rope Knot. The hackamore reins
and lead rope arc made from one long twisted horsehair rope, known in
Mexico as the mecate. As with other horse-gear terms from below the
Border, the cowboy has changed this to suit himself. He calls it
McCarty.
The mecate is 22 feet long and varies from 3/8 inch to 5/8 inch in
diameter. Some are % inch in diameter.
At one end of the mecate is a tassel known as la mota.
The first step is to determine the length of the reins. This is usually
done by holding the bosal knot and the doubled mecate in one hand
and then stretching the other hand out to form a bight which will be
the reins. This measurement is termed a brazada. or the distance from
hand to hand when the arms are extended. Another way is to place a
bight of the mecate in the saddle seat and measure to the position of
the bosal heel knot—both bosal and saddle on the horse, of course.
In Fig. 1 is shown a portion of the bosal with the hackamore knot
tied. The hackamore reins and lead-rope knot is tied just forward of the
hackamore knot. Take that portion of the mecate with the mota, or
tassel, and wrap it around the left check of the bosal, as shown. This
section of the mecate is marked B. 'lake the other section, marked A,
and lay it over the right cheek of the bosal. as shown.
The arrowline indicated the next Lum of A.
In Fig. 2 the previous turns are shown, with the arrowline showing
the next turn of that section, marked A. Notice the turn is made
beneath the reins.
In Fig. 3, the final turns are made, as indicated by the arrowline.
Notice that A. which is the lead^rope, passes through the two bights of
the hackamore knot. Figure 4 shows the completed knot. It is loose and
should be pushed up snug against the hackamore knot.
More turns can be taken with section A, if desired. By these turns,
the bosal can be adjusted to fit the horse.
The inside measurement of the bosal from the heel knot to the nose
button usually is twelve inches. This is the size you will receive from a
dealer if you do not specify a definite measurement. If you build the
bosal yourself for a particular horse, you will of course make it- to nt
that horse’s head.
The turns taken with section A as described above close the sides oi
the bosal near the heel knot. Thus if your bosal is too large for the
horse on which it is to be used, you take a sufficient number of turns t°
148
close it up at this point and thereby reduce it in size. However, the
jjosal should not fit snugly, but loose enough so that the heel knot
tirops well below the plane of the nose button. Take great care to adjust
vour bosal correctly.
PLATE 56. The Hurkaniore Reins and Lead-Норе Knot.
149
PLATE 67
How to Make a Pair of Braided Reins. Reins are of two general
types—open and closed. In the old days the Texas cowboy favored open
reins, while the California buckaroo was partial to closed reins.
The open ones arc not. joined together at the saddle-end, so, if the
rider is thrown, he is in no danger of becoming entangled in them. A]sO
when a horse is grazing, his reins would not get caught in the brush. But
the chief point was that, when the cowboy dismounted, he merely let
his reins drop to the ground, so that, if the horse tried to get away, the
animal would step on the reins’ ends and stop himself.
Closed reins usually have a long flexible quirt, or romal, attached at
the saddle-end (Plate 63).
If using leather thongs in making your reins, I suggest that a core be
used. In such case measure around the core and divide this
measurement by eight—if using eight thongs. Thus if a core measures
one inch in circumference, use eight 1/8-inch thongs. Core should be of
braided rope, 9 feet long. Thongs should be twice that length.
Braiding with leather or latigo thongs will be slightly different than
with rawhide. With leather thongs, braid the middle part of your closed
reins as shown in Fig. 1, starting braid at A and finishing B. Then braid
the two sections from A to C and from В to D. This break may be
wrapped tightly with waxed twine and then covered with a braided
knot (Fig. 2).
Open reins may be braided in the same manner. The approximate
length of these is 7 feet.
Rawhide reins usually are braided in their entirety. That is, there is
no break in the braid. If the completed reins are to be 9 feet long, use
eight 1/8-inch strings, each 18 feet in length. No core is necessary. Use
the eight-string braid shown in Plate 47.
Rawhide reins are shown in Fig. 3. Turn back each end to form a
loop about one inch long. Lash down the ends and cover this part with
the Cowboy Knot shown in Plate 59.
You may scatter as many knots along the lower ends of these reins as
you desire. But be sure you have the same number and same kinds on
each side. Larger knots may be the cowboy knot (Plate 59) or the
pineapple knot (Plate 50): smaller ones, the ring knot (Plate 161): or
the bosal side-button knot (Plate 49).
In Fig 4 is shown the way they can be placed. In the old days when
horsemen used a "Spade Bit" or a heavy “Mexican Bit," these knots
served a purpose. They covered weights for balancing such bits—wicked
instruments in unpracticed hands.
In either the leather or rawhide rems a braid-covered ring (Plate 52)
about one meh in outside diameter can be enclosed in the loops on the
ends of the reins. Chains are then used to connect the reins to the bit.
Such chains prevent a horse from working the reins’ ends around to his
mouth and chewing on them.
However, a rein-bit fastener can be made from a leather or rawhide
strap (Fig. 5). The button knot on the end of the strap is made by
150
PLATE 57. How to Make a Pair of Braided Reins.
slitting it into four parts and then forming an encl knot, as shown in
Plate 77. This knot can be covered by a pineapple knot The “keeper
knot ’is a ring knot (Plate 161).
A more fancy rein-bit fastener can be made of braided rawhide (Fig.
6). You will, of course, need two such fasteners, and each should be
braided 9 inches long. This braid is then doubled, the ends braided into
^single knot (Figs. 9-12, Plate 78), and then covered with the pineapple
knot. Now place two ring knots on each fastener, as shown.
Loops on the ends of the reins can be fitted with wear-leathers or
shoes. This is illustrated in Fig. 4. Such a wear-leather is the same as
‘hat detailed in Plate 77.
151
Tap: Reins made of 65 strings of colt’s skin. They were presented to Maguire as a
wedding present in 1940 by a famous collector, A. Barreto Pottom: Three fiadores
(collars) and one headstall (center) of braided rawhide. Collection of John "
Maguire.
152
Top: Braided rawhide reins with silver ornaments. Bottom: Pair of reins of 75
stings with silver ornaments; made in 1845 for Colonel Martin Santa Coloma of the
Rosas Army, Argentina. Collection of John Walter Maguire, Buenos Aires, Argentina.
153
PLATE 58
How to Secure Rem Knots. Small knots which are made on braided
reins and braided quirts are spaced an exact distance apart and they
should remain that way during the life of the article. However, when
such knots are made with one string, it is difficult to keep them in
place, however tightly they may be braided.
In Fig. 1 is shown the start of a simple knot made on a four-string
round braid. As can be seen, the standing parts of the strings are first
inserted beneath the braid. The working ends of the strings arc crowned
clockwise, as indicated by the arrowlines.
In Fig. 2, the strings are crowned in reverse, as shown by the
arrowlines. Next, in Tig. 3, the tw'o working ends, A and B, pass under
two. and in Fig. 4, have passed over two and now upward under two.
The knot is completed. The ends are cut off. This knot will not slip.
In Fig. 6 is shown the beginning of the same knot on an eight-string
braid. Four strings are used here, but the sequence of each string is the
same as that of the previous knot.
A knot of the “head-hunter” variety is shown in the next sequence.
The braid around which the knot is made is not shown, but the ends are
inserted here as before explained.
In Fig. 7, the strings have been crowned. The arrowline shows how
string A is brought around and parallel to string B. In Fig. 8. string В is
now passed around and over A and under its own part, as shown by the
arrowline.
Siring A passes up over one, under one (not shown).
Next, in Fig. 9, string A passes down under two, over two (one being
the standing part B), and under one. String В passes down under two,
over two (one being the standing part A) and under one. In the next
sequence (not shown) string A passes up over two and under two
alongside the standing part A.
This is an attractive knot of over-two, under-two sequence, and,
though made of but two strings, it has four bights. The finished knot is
shown in Fig. 10.
154
PLATE 58. flow l<> Secure Rein Knots.
155
PLATE 59
The Short Cowboy Knot—Gaucho Weave. Now' and then a knot turns
up which demonstrates the ingenuity of old-time braiders. Such a knot
is the one 1 have named the “Cowboy Knot.” I have never heard it
called that; in fact, I have never heard it given any name but “knot,” or
possibly “multiple-string knot.” So, as likewise with many other braids
and w’oven knots, 1 have taken it upon myself to give this knot a
“handle.”
The knot can be made with one long string or thong. Plates 167 and
167A show the knot which I have termed. “Double Gaucho Knot of
Two Passes.”
The advantage of making it with several strings—especially when
working with rawhide—is that the braider can work the knot tight from
the start and there is little adjustment to be made after it is woven.
Then, too, shorter strings being used, there is no need of continually
pulling one long string through the knot as the work progresses.
While I have specifically labeled this “The Short Cowboy Knot,” it
can be made any length. Thus it can be used in fashioning the nose
button on a bosal and for many other purposes.
In Fig. 1 the knot is started with four strings or thongs. You may use
as many as you like—I have simply used four by way of illustration.
These strings are tied down at the standing ends, as shown, the flesh
side against the core.
I might add here that more experienced braiders do not tie down
these ends. They simply hold them down with the thumb until secured
as the braid progresses. The former method, however, is recommended
for the beginner.
The next step, indicated by the arrowlines in Fig. 1, is to “crown” all
the working ends. This means that each end passes beneath the thong to
its left. Thong D passes beneath thong C; thong C beneath thong B;
thong В beneath thong A, and thong A passes around the back of the
core and to the front under thong D.
The crown is tightened and the tied-down ends are then adjuster! so
they arc evenly spaced around the core. Sequence is the basket weave,
or over one, under one. This is shown in Fig. 2.
After the thongs have been passed under one, over one, under one,
over one, you spiral or wrap them down for the length you wish the
knot. In this case they have been wrapped around once.
In Fig. 3 you start working from the bottom. If you turned the work
upside down, you would see that you “crown” the thongs again. If it is
held upright, the term is to “wall” them. Anyway, each thong at the
bottom passes beneath the one to its left. It is then brought up, over
one, under one, until it meets the standing end (the tied-down part).
Each thong will systematically come out at the proper place: that is,
will join with the proper standing end. By this I mean that it should
meet it in such a way that you can parallel it on the right side (Fig. 41-
In Fig. 5, all working ends have been brought to the top and each is
on the right-hand side of its standing end. Then, as shown in Fig. 5 by
156
PLATE 59. The Short Cowboy Knot—Gaucho Weave.
the arrowlines, the working end passes down under two. Each working
end brought to the top makes this same pass. Parallel thongs, or pairs,
are split by the working end as it proceeds downward. Then it begins to
follow parallel to the thong on its left to the bottom of the knot.
At the bottom (Fig. 6), each working end is brought up under two at
the edge. Working ends arc then passed upward in an over-two,
under-two sequence, splitting the parallel pairs until they join the
over-two, under-two sequence at the top. The knot is now finished.
Ends are cut off and tucked. The finished braid is shown in Fig. 7.
This produces a braid where the V’s point around the circumference
of the knot. I term this a gaucho weave. The herringbone weave, in
which V’s point toward the ends of the knot is illustrated in same class
of knot in Plate 64.
It might be added that a knot one inch long can be made with four
1/8-inch strings each 10 inches long. This would give a finished knot
with 13 parts and 8 bights or scallops.
157
PLATE 60
How to Make the Santa Lies Reins and Romal. A detailed description
and drawing of these famous reins and romal was sent to me by Harry
Schipman, Jr. of Las Cruces, New Mexico. Mr. Schipman is a
well-known artist and writer of western and cowhoy lore. He acquired
his valuable reins and romal in California some years ago and considers
them the pieces de resistance of his fine collection, for these beautiful
reins and romal truly are collectors’ items.
To make the reins take twelve softened rawhide strings and middle
them. Then divide them into three parts of four strings each. Start
braiding each set of four strings into a four-siring round braid for
approximately 26 inches. Now introduce a small core and joining all
twelve strings into a twelve-string round braid work down for twenty
inches. Make a small loop and interbraid or splice the ends into the
main twelve-string braid. It might be a good idea before closing the loop
to introduce a small metal ring in it so that a chain can be attached to
connect with the bit.
Go back to the start and braid three independent four-string round
braids for another 26 inches and then over a core join the ends and
braid down 20 inches and form the loop on this side. The entire length
of the three four-string braids is 56 inches.
The parts where the bit loops are spliced back into the braid are
covered with a long woven knot, with two Spanish ring knots, one at
each end of the long knot. The other braided knots are scattered along
the reins as illustrated in Mr. Schipmai's drawings. He says that all
types of braided knots known to braiders in California are represented.
Under the braided knot section of this book you will find enough
variety to suit your tastes. Most of the knots are worked over a
foundation to make them stand out.
The romal with lash and loop is 49 inches long. It is joined to the
middle of the reins by a braided keeper. Different shades of rawhide
can be used for the braided knots.
Should you desire a finer and richer set of reins and romal make the
larger braids with 18 strings, say 1/16 of an inch in width. The three
braids at the center can be of six strings each.
The length of these reins when closed is less than four feet. Silver
chains to connect the reins to the bit usually are used. However, the
twrelve-string braid on each side can be lengthened twelve or more
inches. But chains are more appealing to the California buckaroo.
158
159
PLATE 61
How to Make a Braided Ear-Head. The ear-head or ear-headstall is a
light, serviceable headstall and has long been popular with riders.
Ear-heads come in several types, some with a split in the headpiece
which allows the headstall to go over both cars of the horse, some with
throatlatches, but usually with one slit on the right side for the horse’s
ear. Most are made of strap leather. Few attempts have been made to
braid an ear-head—in fact, I personally have never seen one.
The ear-head presented here is braided throughout and adjustable by-
woven knots to fit any horse’s head. The entire head, with the
exception of the two check-bit loops to hold the bit rings, is made from
one long braided piece. The braid on the ear-head proper and the
loops, as well as the weave of the knots, is planned so that a pleasing
contrast in design can be obtained throughout.
The first step is to select a core over which the braid will be made. If
thin calfskin strings (or thongs) are used, the core can be of braided
sashcord 3/16 inch in diameter. If thicker latigo leather is employed,
the core should be smaller. Deep-sea fish line is ideal.
This core should measure 11 feet in length. Over it we will use a
six-string round braid. Six 1/8-inch strings are tied to the core at one
end as shown in Fig. 1. Plate 61. The uneven numbers given the strings
arc on the left and the even ones on the right. The left strings are all
one color—the three on the right are another color. Black and natural
color are good combinations. So-called Indian tan and yellow latigo give
a pleasing effect.
In tying your strings (or thongs) sec that string No. 5 on the left is
tied over No. 6 on the right. The braid begins by bringing No. 2 on the
right side around the back and then forward under strings Nos. 1 and 3
and over No. 5 (Fig 1). Next carry No. 1 around back to the right and
under No. 4 and over Nos. 6 and 2. This is the sequence of the braid
throughout. Strings on the left are carried around back and then under
one and over two. Those on the right are carried around back and then
under two and over one. The completed braid is shown in Fig. 7.
There is a shrinkage of at least a third in your strings in braiding.
Braid to cover a core 11 feet long would require strings of 16 feet in
length. Splicing of the strings may be necessary. This is done by
beveling one string on the hair side and the added string on the flesh
side. The strings are cemented together with a good adhesive. I find a
casein glue very good for this purpose. One under the trade name of
‘‘Elmer’s Glue" will cement latigo. The bevels on the strings should be
long and the spliced part should be made so that in continuing the braid
it will fall beneath one or more other strings.
When your braid is complete, a tassel of “frill” is fastened to each
end. Cut your leather as shown in Fig. 8, then wrap around the end of
the braid and sew on securely. A woven button knot to be detailed later
will be placed over this sewn part.
The cheek-bit loop—you will need two—is shown in Figs. 14-15. The
same braid as that on the ear-head proper is made over the same size
160
Pl.ЛТК 61. Нои to Макс a Braided Ear-Head
core. The core in this instance should be 13]/s inches in length. In tying
your strings to one end of the core, leave at least five inches above and
41 finishing the braid, leave another five inches at the end. The braided
section is then tied together as shown in Fig. 11, forming a bight of
some 51/; inches, with your unbraided strings above the tic. Select two
from each braided portion and tie these in the foundation knot shown
111 Figs. 11-13. The remaining eight strings in the center are cut off flush
above the knot. Over this foundation knot will be woven a button knot
to be demonstrated later.
161
PLATE 62
Method of Building an Ear-Head from 11-foot Braided Rope (Figs.
1-3). Tie a square knot (be certain it is not a granny knot) as shown,
leaving a bight 40 inches long ahove (or below, whichever is convenient
in tying). The next step is to grasp this bight in the rrnddle and bring it
down in front of your square knot, forming two bights on either side.
These two bights form the cheekpieces and the remainder of the
braided rope forms the throatlatch. Here it would be well ю
temporarily tie up the ear-head at the places where the woven knots
will he formed—shown in Fig. 3. Tease out a portion of the rope. A. to
form the loop which goes over the horse's right ear. Even up the other
sections and by adjustment you can give your horse a preliminary
fitting.
All that remains now is to weave your 13 knots. I have selected the
pineapple knot for this purpose (see Pineapple Knot). It is one of the
best and most versatile of woven knots and the weave can be increased
to cover any circumference, while the ends can be drawn to fit snugly
over any cylindrical object. By using a contrasting color in your
interweave you can follow the pattern in your ear-head braid. The
larger knots should be made with 1/8-inch strings and the smaller with
3/16-inch strings. With the exception of the ends of the cheek-bit loops
and the ends of the throatlatch, these knots should be made over a
collar of strap leather sewed in a cylinder around your ear-head braid
with the skin side of the leather inside. Draw the collar tight enough so
that it can be slipped, but not slip of its own accord.
All that remains now is to place the cheek-bit loops Figs. 14-17,
Plate 61. Both should have a boot or wear-leather, preferably made of
rawhide. Reins can be made with the same hraid as that of the ear-head.
How to Make a Headstall of One Long Braid. This interesting braided
headstall is patterned after one made for me by Don Alfredo Guraya,
Carcarana, Province of Santa Fe, Argentina a superior braider and true
gaucho. Using a four-string or four-thong round hraid work it into
fifteen and one-half feet in length. Drive nails into a board as shown in
Fig. 4, Plate 62 and starting with the section marked A, wrap the braid
around the nails. The sections are marked from A to N. The
measurements of each section are given in Fig. 4, Next where the nails
are placed tie the braids together and cover with woven knots as in Fig-
7. In the cheekpieccs and browband the braids arc scpara*cd and after
working a braided knot on a doubled piece of rawhide and leather (Fig-
51, introduce the ends through the braid. Work two braided knots as
shown in Fig. 6 to hold these interior knots in place. The crown is
formed by a piece of soft leather or rawhide as shown at the top of I1 ig-
7. The finished headstall is illustrated in Fig. 7.
162
--JK
И-АГк 62. Method of Building Ear-Head from 11-foot Braided Rope (Figs. 1-3);
How to Make л Head-dall of One l.on» Braid.
163
PLATE 63
How to Make a Braided Romal. The romal—ramal, or romel, as it is
sometimes written—is a long flexible quirt or whip attached to the
saddle-end of closed reins. This romal is about 3 feet in length with a
lash of 10 inches or more.
In Fig. 1 is shown a fancy romal, with knots scattered along its lower
end, and a braided lash. This is a type made by John Conrad, of
Bellflower. California. It may be made without the decorative knots
and braided lash, its utility value being thus unaffected.
To make the romal, take four 1/8-inch-wide rawhide strings, each 12
feet long. Middle them and at this point work them into a four-string
round braid (Plate 86), sufficient for the loop shown at the top of the
romal. Now bring the eight strings together and braid them down in an
8-string braid without core (Plate 47) for 3 feet 6 inches. This will give
you enough at the bottom for turning braid back to form an eye or
loop. Braid is lashed down where the eye is formed and this part
covered with a woven knot.
You have a variety of woven knots from which to choose in
decorating your romal. In Plate 64 is shown the cowboy button knot,
which may be used for the longer knots at the top and bottom of the
romal and that in the center of the other knots along its lower end. The
braided lash is detailed in Plate 65.
To attach the romal to the reins you can use either of the two types
of fastenings shown in Figs. 2 or 3. The one in Fig. 2 is illustrated more
fully in Plate 57.
In Fig. 3 the fastening is made directly on the end of the romal. A
short length is braided and a button worked on the end. This is lashed
to the end of the romal as shown. The loop for the button is made by
turning back the end of the romal and lashing it down: then covering it
with a woven knot. However, in an eight-string braid, you can make
two four-string braids into the button and loop ends.
If a D-ring fastening is desired, it can be made as shown in Fig. 4.
Here the D-ring is slipped through a strap lashed to the braided end of
the romal. It is shown stitched down in the illustration, but it is better
to bring the end hack and lash it down on the romal end, covering it, of
course, with a woven knot. Types shown in Figs. 3 and 4 are used by
Duff Severe of Pendleton, Oregon.
In Fig. 5 is shown a romal sent me by Tom Dorrance, of Joseph,
Oregon. The handle is made of a round piece of wood, 6V6 inches long
and 7/8 inch in diameter. A hole is bored up in its lower end into which
the braid is slipped and secured by pegs or nails driven in crosswise.
Handle is covered with a long woven knot. This may be the cowboy
button knot with pineapple-knot weave, as explained in the text with
Plate 64. Such a braid will close on the top of the handle. Or you may
use the lone star knot, shown in Plate 86.
Near the top of the handle a hole is bored through. Braid on the
handle is pushed aside and a wrist loop of four-string braid is passed
164
PLATE 63. How to Make a Braided Romal.
through it. The place where the ends of the braid are tied together is
Worked into the hole.
This romal has a slight taper. The body is made of a twelve-string
raid (see text with Plate 47). In this case your strings are cut to a
¥Ф<?г. At the bottom, the braid is turned back to make a loop or eye.
^he lash is either leather or softened rawhide.
165
I
PLATE 64
How to Make the Cowboy Button Knot. This is a knot similar to that
shown in Plate 59, but here the weave is the “herringbone” instead of
the “gaucho.” It may be made any length desired and may be used for
the nose button on a bosal, as well as for many other purposes.
In the illustrations, I have used four strings to show how this knot is
made. More strings may be used if desired. Just follow the same
sequence as shown in the drawings.
And this brings up an important point. I have been asked on
numerous occasions just how one figures out the width and number of
strings required to cover a certain circumference with a woven knot.
1x4 us take this knot with four strings. When the knot is completed it
will have eight bights or scallops at both top and bottom. We will
consider only those at the top. A bight or scallop means that both ends
of the string are used for braiding. This would give us a braid of sixteen
strings. So we can apply the same simple principle to this as we do to
round braids (Plate 46)
Thus, if the part you want to cover with a braided knot is 2 inches in
circumference and you are using a sixteen-string braid, this would mean
that each string or thong should he 1/8 inch wide. There are sixteen 1.8
inches in 2 inches. If the core were one inch in circumference, you
would use 1/16-inch strings
However, where there is an over-two, under-two sequence, you have
considerable leeway and do not have to figure exactly. The knot will
adjust itself satisfactorily to somewhat larger or smaller circumferences.
Beginning with Fig. 1, the strings are spiraled around the core as
shown. The standing ends may be tied down, but. as I explained in the
previous cowboy knot (Plate 59), most workers simply hold them in
place with the thumb until they are covered with the braid. Better tie
them down.
String No. 4 passes down over No. 3 and under No. 2. String No. 3
passes over No. 2 and under No. 1. String No. 2 will pass over No. 1 and
under No. 4. String No. 1 passes around in back and over No. 4 and
under No. 3. This can better be seen in Fig. 2.
The weave is carried down as in Fig 3 and then in Fig 4 the working
ends are spiraled around the core approximately the length of the braid
desired.
The same sequence is followed at the bottom as at the top. Working
ends are passed upward over one and under one (Fig. 4).
Braid is carried upward until the working ends join with the standing
ends. It will be seen in Fig. 5 that String No. 1 comes up alongside the
RIGHT' of the standing end of No. 4. String No. 4 is to the RIGHT of
standing end No. 3, and so on.
Working ends pass to the top, parallel to the strings on their left. In
Fig. 6, the working ends pass beneath the crossed strings at the top,35
shown.
166
PLATE 61. How lo Make the Cowboy Button Knot.
Follow the sequence illustrated in Figs. 7 and 8. At the bottom, the
en^s P1155 over three strings and go upward again, splitting
(Fig. 9). This is continued until they come out at the
the herringbone braid at the top, where they are cut off
The finished knot is shown in Fig. 10.
pairs
beginning of
tucked ir
167
PLATE 65
This knot can also be made with a pineapple-knot braid by bringing
the working end up the left side of the standing part and then passing
beneath the crossed strings, as shown in Plate 50. The pineapple braid
will close al the top and bottom and so is the best for covering the tops
of quirt handles.
There are. of course, several other ways to make such knots where
more than one string is used. Each old-timer appears to have his own
particular method. The end result is the same, but the manner of
arriving at this end result is different. One such method consists of
actually braiding on the skeleton knot and then interweaving. For
instance, four strings are secured on the part to be covered. These are
braided down, over one, under one, in a four-string round braid The
strings are then crowned and worked upward, each alongside of its
nearest string. The top strings are crowned and in working downward
each splits a pair of parallel strings. This produces in the end the same
knot before described.
Author demonstrating to Martin Gomez, famous Argentine
braider, how to make a typical American cowboy knot.
How to Make a Braided Lash for the Romal. If you wish a fancy
braided lash for your romal take a strip of rawhide—or a piece of strap
leather—24 inches long and % inch wide. If rawhide is used, soften it
before you start braiding.
Braid to be used is that known as the -Trick Braid.” or "Inside
Braid.” It is a puzzle to many. On seeing it for the first time, it is hard
to believe the braid can be made without its working ends being free. It
is often used on belts and wrist loops for quirts or riding crops.
Mark the middle of strip and measure off 1Й inches each way from
this center. At these points slit the strip into three W-inch parts, cutting
down on each side for about 6 inches. This is shown in Fig. 1.
Place the two slit parts of the strip together, the flesh sides together,
as in Fig. 2.
In Fig. 3, beginning of the inside braid is shown. However, for
simplicity, only one side of the rawhide strip is shown. In actual
braiding, you braid both sides together at the same time.
1 LATh 65. How to Make a Braided I ash for the Romal.
168
169
Starting with the right-hand thong (or thongs, as you will be braiding
two at once) marked C, place its bight over the center thong (B) then
bring the bight of the left-hand thong (A) over C. It will he noticed that
a reverse or compensating braid is formed at the bottom. This bottom
braid must be raveled out, while the top part is to remain as it is.
To make this bottom braid disappear, pass the entire bottom end of
the strip through the opening indicated in Big. 2. This will twist and
tangle the thongs as shown in Fig. 4, but do not mind this. Back part of
the strip will be forward and should now be twisted from left to right
until the front side is foremost (Fig. 5).
After this twist, be sure that thong В is over thong A, and thong C
over thong B, as shown in Fig. 5. Now pass the lower end up and
through the opening, as shown in Fig. 5. Braid will appear as in Fig. 6.
Both parts are shown here braided together.
From this point you start braiding each strip independently. First
step is shown by the arrowline in Fig. 6. Refer back to Fig. 3 and
continue through Fig. 5 Turn the work over and braid the other strip
in the same fashion.
The finished lash is shown in Fig. 7. The ends are tapered and top
part of the lash also is tapered. In working this through the loop in the
end of the romal, you either make your loop after braiding on your
lash, or slip it in position through the loop before you start braiding.
You will notice, in looking at the romal in Plate 63, that a
Turk’s-head or ring knot is worked over the upper end of the lash to
make it fit snug on the loop. This is mainly for decoration, however, as
the douhle braid in your lash will hold it on the romal loop.
In Plate 65, Fig. 8 is shown a curious example of feminine
hairdressing. I have been able to work out many types of intricate
braids, but must admit that for once I am stumped. I cannot figure this
one out—but, of course, there are a lot of things about women’s gear
which have always been a puzzle to the male species.
After seeing the picture of the girl whose hair was done in back with
a trick inside braid, C. W. Halliday, of West Australia, wrote me that as
a young man he had seen an old Afghan of Afghanistan with his chin
whiskers and mustache braided together in a similar fashion. He sent a
rough sketch (see drawing below).
170
Braided rawhide curb strap made by author from design sent, by
Joe De Yong, Hollywood. California, (See Plate 66).
171
PLATE 66
How to Make a Braided Curb-Strap One of the finest examples of
the braider’s art I ever encountered was a beautiful rawhide
“curb-strap” in the form of an excellent pen-and-ink drawing sent me
by Joe De Yong, artist and writer, who had found it in Arizona. From
this drawing I could see the strap as well as if 1 held it in my hand.
Joe De Yong, friend of the late Will Rogers, and protege of Charles
Manon Russell, the cowboy artist, had been scouting for authentic
western horse gear in connection with a movie. Joe has been technical
adviser for many famous western movies
The braided curb-strap, shown in Fig. 1. is a tricky bit of gear that is
completely adjustable by means of a series of woven knots.
At first glance it is hard to determine just how' it is put together; but
the strap is fairly simple, once you have studied it. Its simplicity makes
it all the more artistic.
I made up this strap from two 15-inch lengths of eight-string braid
(Plate 47). The rawhide strings were 3/32 inch in width. On each end of
the braid I first worked a foundation knot, as for the San Juan honda
shown in Plate 78 These foundation knots were covered with small
pineapple knots (Plate 50).
It will be seen that the braid A terminates in an end button at the
upper right and lower left. At the upper left it forms a loop. Braid В
terminates in an end button at the upper left and the low'er right. At
the upper right it forms a loop. The two braids cross under the woven
knot in the upper center.
After making your two lengths of braid, tie them together at the
points where the woven knots will be. Then use whatever decorative
knots you wish. I used the pineapple knot in all cases. First I placed a
small ring knot (Plate 16) on the braid and covered this with a
pineapple knot.
This curb-strap when closed should measure about 10 inches in
length. It is used, of course, with either the \merican or Mexican
curb-bit and goes well with a braided headstall and reins.
Another type, termed a Mexican controller bit-curb, is shown in Figs.
2 and 3. In the center of the strap is a rawhide braided knot which
works against the tender part of the horse’s chin, thus making its use
highly effective. The strap is of latigo, fastened with buckles. Details
and measurements are shown in Figs. 2 and 3.
The rawhide knot is made of W-inch strings. It is hardened by several
coats of lacquer or varnish. Several types of knots may be used, but the
pineapple is the best. Make it over a foundation such as the ring knot.
172
LONG STU? 20^IN UJOk
«ГОНТ SW? 9* IN LCKGT4I-
PLATE 66. How to Milke a Braided Curb-Strap.
173
PLATE 67
How to Make a Running Martingale. There are two types of
martingales—the running and the standing. Here we deal with the
running martingale which consists primarily of three pieces: the reins
piece which has two rings through which the reins pass; the neckpiece,
the belly piece. A braid-covered ring holds all the other pieces together.
Tliis is made as in Figs. 1-3. Take an iron ring with an inside diameter of
two inches, and after crowning two pieces of leather or softened
rawhide thong or string as in Fig. 1, place the ring in the position
indicated in Fig. 2 and begin wrapping the ends as shown. After each
end is wrapped around the ring it is brought up through the center knot
and braided into a terminal knot. Fig. 3.
Start independent braids of four-string round on two rings ahout l!/2
inch inside diameter (Fig. 4). After braiding each down thirteen inches
join the braids into an eight-string flat braid (Fig. 5). Braid for six more
inches, then divide the braid into two four-string flat braids for about
an inch, join again and bring the loose ends over and around the braided
ring, through the braided slot and tie in a terminal knot, Figs. 5, 6, and
7. This completes the reins piece.
The neckpiece or neck strap is in two sections. First middle your
strings and braid a four-string round braid into a loop, join the braids
into an eight-string flat and braid for 18 inches and fasten to the ring as
in Fig. 7. The other section with the adjustable knots is started as
eight-string round braid for several inches and then woven into an
eight-string flat braid for 39 inches and also fastened to the ring. The
belly piece attaches to the girth or cincha of the saddle and is started at
the loop end. using adjustable knots that can be lengthened or
shortened. Terminal knots may be covered with fancier braided knots
and sliding knots can be Spanish ring knots or other braided knots over
a collar.
How to Make a Standing Martingale. This is made in the same
manner as the preceding one, except instead of a rein piece there is a
piece of about 23 inches that leads to the noseband.
174
PLATE 67. How to Make a liunning Martingale.
175
PLATE 68
How to Make a Multiple-Ring Button. More than one ring can be
used to make the ring button. In Fig. 1 two rings are used, a smaller one
inside a larger one.
The strings are first crowned as previously shown. In Fig. 1 the braid
is started from the center to the outer ring, wound around in a
clockwise direction, brought inward to the middle ring and wound in an
anticlockwise direction. The strings should be close together. In the
drawings they are separated sufficiently so the sequences can be clearly
illustrated.
Each siring, after completing its anticlockwise turns about the inner
ring, is brought up through the center knot (Fig. 1).
In Fig. 2 a different start is given. Here the string first makes a turn
about the inner ring and then goes about the outer ring as shown. This
method provides more support for the inner ring which is skipped in
the first pass in Fig. 1.
Figures 3 and 4 show the method of braiding a three-ring button. In
Fig. 3 the first pass is to the outer ring. In Fig. 4 the first pass encircles
all three rings. In Fig. 5 is shown how the two-ring button can be
employed as a decoration on a belt.
How to Make a Ski-Pole Basket. The braided ring button can be used
to form a ski-pole basket of rawhide. The materials needed are a ski
pole, a 516-inch aluminum ring, as well as two strips of rawhide, '/> inch
wide and four feet long.
The two rawhide strips are first middled and laid along the pole a few
inches where the button is to be and braided down in a four-string
round braid. The aluminum ring is then positioned and the ring button
made as previously explained. The strings (after passing through the
center alongside the pole) are then brought upward and worked into a
Left. Side view of basket showing ends held by Spanish ring knot. Right:
Bottom view of basket.
176
terminal knot. The ends can either be cut off flush, or held with a
Spanish ring knot.
The rawhide ring button is varnished before use so that the rawhide
will not be affected by dampness.
P'AIF. 6H. How l<> Make a Multiple-Ring Button: How to Make a Ski Pole Basket.
177
PLATE 69
Uses of the Ring Button. I first saw this braided ring button on a
gaucho headstall during a visit to the cattle auction pens of Gibson
Brothers of Buenos Aires, Argentina. It was used in this instance as an
ordinary button on the throatlatch. Since then I have found many uses
for this unique and practical button.
The same button can also be utilized as a drawer pull (Figs. 7 and S)
and as regular buttons on a leather jacket or shirt. (Fig. 9).
By using a small ring and very' fine thongs or strings in a four-stnng
round braid, it can be worked into cuff links (Figs. 10 and 11). Д
terminal knot is made on each end of the four-string braid and this is
covered by a pineapple knot. The interwoven strings of the pineapple
knot can be of a contrasting color.
Figures 12 through 17 show how this ring button can be made with
Spanish edge braiding. Two strings are first middled and made into a
crown knot as shown in Fig. 12 and tightened as in Fig. 13. Place the
ring over the back of this knot, Fig. 14. The first string A is brought
underneath the ring and twisted as in Fig. 14. This twisted section is
held in place while the edge braiding continues to the right—or clock-
wise. After the braid covers one-fourth of the circumference, the next
string is braided in, as in Fig 15. When the braid has been made com-
pletely around the ring it will be seen how it is finished through the
first twisted loop (Fig. 16). After passing through the center knot, all
ends are made into a terminal knot and covered with another braid, if
desired.
178
PLATE 69. Uses of tiie Ring Button.
179
PLATE 70
How to Make a Braided Quirt. The quirt, or short, loaded whip,
found hanging from every western saddle horn, is one of those cowboy
artifacts that differ according to locality. Various sections of the West
have their different types of the whip and a close student of such
matters can fairly well tell what part of the country a rider hails from
by the quirt he carries.
Like other articles of cowboy gear, the quirt has its origin in Mexico,
where they call it cuarta (kwar’-tah). Some American cowboys term it a
"quisto.”
A simple quirt, combining most of the best features of all types, is
shown in Fig. 1.
The foundation, or core, is made of tapered strips of rawhide or
leather, about 17 inches long, lashed together as shown in Fig. 2. If
rawhide is used, dampen it before lashing together, roll it under foot
when lashed, and then hang it up to dry, with a weight on its lower end.
Now place over upper end of the core a small piece of raw hide or
leather, such as shown in Fig. 3. This is lashed on as in Fig. 5. Next lash
on the wrist strap, which can be latigo or other type of leather, or
softened rawhide. The strap is shown in Fig. 4 and in process of being
lashed on in Fig. 5. Both wrist strap and covering can Ire lashed on at
the same time, using waxed twine and passing beneath alternate ends as
shown. Such a type of lashing will clinch them on tight.
Usually the flat part of the wrist strap is at right, angles to the edges
of the lash at the other end. Remember this in putting on your lash.
In case you wish your quirt handle weighted, insert a short metal bar
in its upper end, pushing it down into the core. You may have to cut
out some middle sections of the core so that, when the metal bar is in
place, the outside diameter does not swell.
Just below the ends of the wrist loop and the covering, lash on eight-
rawhide strings (or leather thongs if you are working with leather).
Combined width of these strings should be equal to the circumference
of the core at this point. Use strings twice the length of the finished
braid. They should be, in this case, about 34 inches long. Better to have
too much than too little. Braid down with the eight-string braid (Plate
46) until the end of the core is reached. Take a look at Fig. 7. Here the
two upper strings on either side which are circled, are left as they arc.
You will not work with them any more. Take the four lower strings and
make a four-string round braid (Plate 77). This is illustrated in Fig. 8.
Braid down about 3 inches and then fold braid back to form a loop.
Гиск the ends into the eight-string braid and lash them down tightly-
Cut off all ends flush, including the four that were not used in he
four-string braid.
Slip your lash (Fig. 9) through the loop and secure it with a ring knot
(Plate 161). Upper and lower parts are covered with the long cowboy
knot, shown in Plate 64.
Saddle-soap the entire quirt and, while it is damp, roll it beneath the
foot to even the braid.
180
PLATE 70. How io Make a Braided Quirt.
181
Braided quirt from the Texas-Mexico border, owned by author. Knot on
the handle is same type of braid as shown on Arabian knife and Argentine
rebenque.
Quirt made by author with an Argentine rebenque motif.
182
Jesse Wilkinson of Paso Robles, California, standing beside an ex-
hibit of some of his beautiful braidwork. Jesse is among the last of
the great braiders. He was 72 when this picture was taken and had
been doing rawhide braiding for some sixty years. “I can still do it
fairly well,” he writes modestly. Photograph by Stevens Studios,
Paso Robles.
183
PLATE 71
Anotner Braided Quirt. The first step is to make the core or filler of
the quirt. Take a piece of leather, preferably 8-ounce leather, which is
about 1/16 inch in thickness, and cut it as shown in Fig. 1.
Dampen the leather thoroughly and nail Lhe narrow end to a piece of
board as shown in Fig. 2. Roll or twist it in a clockwise direction, so
that the flesh side is innermost (Fig. 3). This type of twist braid is
demonstrated in Plate 5.
When Lhe core has been twisted tightly, stretch it and then nail the
wide end to the board and leave it to dry (Fig. 4)
Next, make the wrist strap by braiding together three 1 8-ineh
thongs (Figs. 6 and 7). Braid tightly, using the method illustrated in
Plate 28. Cut the lash, also of 8-ounce leather, with a horizontal slit in
the center (Fig. 10).
The core should be completely dry before covering. Cut off the parts
through which the nails have been driven. Insert a spike nail in the top
(Fig. 5) to stiffen the handle part. Cover this nail top with a small strip
of leather, bringing the ends down on the handle, and lash them there.
Next, attach the wrist strap, lashing it to the sides of the top of the
handle between the ends of the strips which covered the head of the
spike nail. Directly below the ends of the wrist strap, lash the six
1/8-incn thongs which will be braided over the entire core (Fig. 8).
The braid for the quirt is the six-thong back braid shown in Plate 41.
Carry the braid just a trifle beyond the end of the core at the bottom
before starting to braid it back. When the braid is back at the top, lash
it down and continue wrapping the twine around the ends of the braid
as well as around the ends of the wrist strap, until a bulge is formed for
the knob of Lhe handle.
Cover this bulge with a Turk’s-head made with Ц-inch thonging, a
pattern for which is given in Fig. 12. Insert a sheet of carbon paper
underneath this pattern and over a piece of heavy brown paper. Trace
the pattern, transferring it to the brown paper. Cut flush at the
right-hand side and then roll up the paper so the lines on both ends
come together. Place pins in the loops marked with an X. Lay the
standing end of the thong at the point marked starting point, and hold
it there with a light rubber band. Then follow the lines around with the
working end, always passing over each intersection of thongs except
those marked with a circle in which case pass under.
Remove the Turk’s-head from the pattern by withdrawing the pins,
and tighten it over the knob on the handle. Dampen the lash, insert the
end of the quirt through the slit and then pass the ends down through
the center of the braid (Fig. 9) and pull tight.
184
PL \TE 71. \itollier Braided Qnirl.
185
PLATE 72
How to Make a Mexican Quirt. This quirt, or cuarto, is characteristic
of the type made in the Colima district of Mexico. The finished quirt is
shown in Fig. 1 and has an overall length including wrist loop and lash
of 35 inches.
The core of the handle which measures 11 inches is made from
dampened rawhide scraps, tapered and lashed together in a bundle and
hung up to dry with a weight on the bottom end. Insert a small round
stick through the top as shown in Fig. 2. This is for the wrist loop hole.
Four types of rawhide quirts.
Cut a rawhide strip as shown in Fig. 3 leaving the center portion
uncut and with seven strings on each end, both sets about 18 inches
each. The dotted line on the uncut portion indicates where the rawhide
will be folded inward to form the loop for the lash.
Braiding is started from the bottom (Fig. 4). Place another round
stick oxer the bottom of the core as in Fig. 5. The beginning of the
fourteen-string braid is illustrated in Fig. 5 and continued in Figs. 6, 7,
and 8. The sequence on each side is over two, under three, and over two
on each pass.
Continue this round braid to the very’ top of the core, tie down with
waxed thread or wire, and cut the ends off flush.
186
Pl.Л 1 h 72. How to 'lake a Mexican Quirt.
187
PLATE 73
How to Make a Mexican Quirt (Cont.). The tricky and unique part of
this quirt is the handle braid. Take two pieces of thin rawhide and cut
each into eight strings 1/8 inch wide. Leave about an inch or more at
one end of each piece. Mesh the two pieces, flesh side to flesh side (Fig.
1). Place the meshed strings over the head of the quirt core (Fig. 2).
Mold the rawhide down and start the braid as in Fig. 2. After braiding
this one section as shown in Fig. 3, braid the strings opposite in the
same fashion. Keep your braid tight.
Tie off strings Nos. 5, 6, 7, and 8 on the left and Nos. 9,10, 11, and
12 on the right. Begin the next step by braiding the strings shown in
Fig. 5 in an under-two, over-two sequence. Arrowlines in Figs. 4 and 5
show the course of string No. 13. Figure 6 shows string No. 13 in place
and the arrowline indicates where string No. 4 goes. After eight passes,
turn the core around and braid those strings which had been tied off.
Keep working the braid, section by section, down for about four inches
(Fig. 7).
This handle braid covers not only the uncut ends at the top but also
is made over the body braid The ends of the handle braid can be
formed into a Spanish ring knot of two or three passes (Plate 161) or
tied down and covered with a woven knot.
Next take two one-inch-wide pieces of rawhide, each piece 36 inches
long, and cut as shown in Fig. 8. The three-inch uncut end is rolled
inward as you make your four-string round braid. Worked damp it will
retain its shape when dry. Braid this lash for about 18 inches in a
four-string round braid and then change for several inches to a
four-string flat braid. The two flat braids are joined or spliced as shown
in Fig. 12. This lash is passed through the quirt loop, middled, and the
two braided parts are held together with a woven knot as shown in Fig.
1, Plate 72.
Perfection in rawhide braiding. A Mexican quirt owned by the author
braided with 1/32-inch rawhide strings. The black interweaving is done
with black horsehair.
188
PLATE 73. How to .Make a Mexican Quirt (Cont.).
189
PLATE 74
How to Build a Bullwhip. The bullwhip, glorified today by whip
artists on the stage, and favored by enthusiasts who like to hear the
sharp crack of the popper, by others for decoration, and by some as a
utility article, comes in many forms. One major characteristic is a stiff
handle. The bullwhip’s companion, the blacksnake whip, has a flexible
handle, where the braid usually is over a core of small shot sewed in a
tapered canvas or buckskin bag.
A good bullwhip properly made does not need a great deal of weight
in the middle. The one detailed here is unweighted, but the wooden
core handle can be bored out at the top and lead or a piece of metal
inserted. The body of this whip is braided over a braided rawhide
core—a leather braided core can be used. Rawhide, however, will give
weight, balance and “life” to the whip. For an unusual core see the
photo on page 123.
Take a round piece of wood, 14 inches long and about % inch in
diameter, and rasp it to a taper, as shown in Fig. 1, Plate 74. Make a
shoulder 8 inches from the top so that when the rawhide or leather core
is placed on, the entire handle has a uniform taper. Cut the core strings
from a 4-foot piece of rawhide (or leather) which is the same width at
the top as the circumference of handle at that point. Nail it to a hoard
and cut the four strings as shown in Fig. 2.
Tack the core on below the shoulder (Fig. 3), then work on a
four-string round braid (Figs. 3 and 4). When the end of the wooden
core is reached, insert a leather string or small sash-cord core which is
braided around until almost to the lower tip of the whip. No need to
fasten the end of this core—just start braiding over it as shown in Fig. 5.
Next cut. twelve strings as long as possible, approximately 1/4 inch in
width, or with the total width of the strings equal to the circumference
at the top of handle. In making this whip the same width string will be
used throughout, as it is difficult for many to cut long tapered strings.
The taper will be achieved by the trick of dropping two strings at
intervals. So that your strings lie snug, it is well to bevel each one on
the hair side on one side and the flesh side on the other.
Arrange the strings at the top of the handle and tie them down—six
to a side. Start the twelve-string braid as illustrated in Fig. 6. First the
upper left-hand string is brought around back and forward, under three
and over three. Then the upper right-hand string goes around back and
forward, under three and over three (arrowline, Fig. 6).
This twelve-string braid is continued down for about two feet and
then two strings are discarded or dropped. In Fig. 7 these strings to be
discarded are marked with “X’s.” Then you go into a ten-string braid
(Fig. 8). The sequence is—the right-hand upper string is brought around
back and forward under three and over two (also passing over the
shortened discarded string on the left marked “X”). Then the upper
left-hand string is carried to the rear and forward, under two and over
three (also passing over the shortened discarded string marked “X” on
tire right side (arrowline. Fig. 8). These discarded strings are passed over
190
PLATE 74. How to Build a Bullwhip.
Wch time for several braids until “lost." It might be well to skive or
thin their ends.
After braiding for a couple or more feet, two more strings marked
X" in Fig. 9 are shortened and discarded. An eight-string braid is
continued as in Fig. 10. Upper strings are carried to the back and
forward, under two and over two (Fig. 10). The next strings to be
dropped are marked with “X” in Fig. 11. This is the beginning of the
s,x-string braid. Here the sequence is: Right upper string around back
191
and forward, under two and over one (covering, of course, the
discarded string). Left upper string around back and forward, under one
and over two (covering also the discarded string). The final four-string
braid starts in Fig. 12 where the two strings to be dropped are marked
“X." The sequence from then on is upper strings on each side are
carried alternately around back and under one and over one (Figs. 12
and 13).
Ten-foot bullwhip with weighted revolving handle, made by J.M. Bucheimer Co.
In Figs. 14 through 16 is shown the method of splicing the braid, if
necessary. First make a four-string braid around the core and push it up
snug under the original hraid. Continue the original braid down,
weaving it into the lower braid as shown in Figs. 14 and 15. The strings
of the original braid are on top of those of the other. To keep from
having too much swell here, it would be well to thin or skive the ends
of the strings of the original hraid. In Fig. 16, after working down three
or four inches, the ends of the original braid are passed through slits in
the lower strings and “lost” beneath as the lowrer braid is continued.
Slit each lower string at a point where it will be covered by a string.
192
Top: Twelve-foot bullwhip, Australian type, of braided Kangaroo skin, courtesy
D.W. Morgan, Austral Enterprises. Bottom: Eight-foot bullwhip made up
from a kit sold by the Tandy Leather Company.
193
PLATE 75
The Aztec Button for the Bullwhip. On the left side of Plate 75 is
shown the approximate lengths of the different braids. The next step is
to make the button for the lop of the handle. The “Aztec Button’" goes
well here as it closes completely on top. Start making it on a mandrel,
Fig. 1, Plate 75. Pass the working end around, over the string in front
and under in the hack. Do this three times (Fig. 3). If a larger knot is
required, pass around over and under four, or under and over five or
more times.
Fig. 4. going clown: under one and over three (in case of four passes,
it would be under 1. over 4, etc.). Fig. 5, up: over 1, under 3 (in four
passes it would be over 1, under 4,etc.). Fig. 6, down: over 1. under 1.
over 3. Fig. 7, up: under 1, over 1, under 3. Fig. 8, down: over 2, under
1. over 3. Fig. 9. up under 2, over 1. under 3. Fig. 10, down and up:
over 3, under 1. over 3 and around (arrowline) under 3 alongside the
standing part. The knot is removed from the mandrel and placed over
the end of the handle, w hich has been amply wrapped with string and
glued to form a bulge, and then tightened (Fig. 11). The top of the
knot looks like the drawing in Fig. 12.
Next secure the cracker or snapper to the end (Fig. 13). The cracker
is a half-inch-wide thong, 14 or more inches in length, slit at the upper
end (buckskin is ideal). Bring the braid through the slit, then half-hitch
one string as shown in Fig. 14. Half-hitch a second string over
everything as shown in Fig. 15 and so on until all four strings are
Ten-foot bullwhip made by author of yellow latigo leather over rawhide core.
How to make this whip is explained in the text for Plate 74. The small Spanish
ring knot on whip shown above is not necessary.
194
PLATE 75. The Aztec Button for the Bullwhip.
hitched on. Another method is to trim the upper part of the snapper to
about lA inch in width and use it as a core for a short distance, then
hitch it over the braid as shown in Fig. 17. Also hitch one or two strings
as shown in Fig. 17.
All that remains is to place on the popper a doubled piece of string
or nylon cord, macle as in Fig. 18. Its upper loop is placed over a slit in
the end of the cracker and the end of popper brought through from the
fear to the front through the slit. The knot is drawn tight—and the whip
15 ready for business or noise!
195
PLATE 76
How to Make the Tamale. Anyone who has braided several long
strings of rawhide, or another type of thong, is aware that as the work-
proceeds, the loose ends begin to form into a braid of their own. This
reverse braid must he unraveled from time to time and the result is that
the strings usually become knotted and tangled.
To avoid this, when working with long strings, braiders usually form
them into what is called the tamale. This is a coil so fashioned that the
braider can draw out from the center the quantity of string needed
without destroying the shape of the tamale or causing it- to collapse.
Use of the tamale circumvents a lot of time and trouble.
There are several ways to make this tamale. Mrs. Mary- Fields, wife of
Glen (Slim) Fields, of Bonanza, Oregon has allowed me to demonstrate
the method she uses in making the tamale. It might be added that
building a reata is all in the day’s work for the comely and energetic
Mary Fields. Not only that, but she skins her cow, cures her hide, cuts
it into strings and braids everything from headstalls to reatas. A
fascinating series of pictures show Mary Fields at work on a reata.
“It takes seventy-five feet of string to make fifty feet of rope," she
writes. “Don't believe it takes quite the whole seventy-five feet, but 1
learned a long time ago what happens if you get your string too short!”
She has had much experience with rawhide, and offers a bit of
advice: “I not er knew there was so much difference in hides until I
made a dozen or so ropes. 1 had been told that the only kind of hide for
a rope was a hide from some old cow that just gradually dwindled
away Well, 1 was frankly dubious about this until I fatally got hold of
one like that. I could sure tell the difference. It cut up so even and was
so waxy and dear looking and braided without stretching. Now I try to
get that kind of hides for all my ropes.”
Now to make the tamale. Tie one end to a nail, as shown in Fig. 1.
Bring the string down over the palm of the left hand, then, by turning
the hand over and in the other direction (Fig. 2), the string is brought
up the back of the hand. The working part of the string, held in the
right hand, is then looped around the standing part, as show-n in Fig. 2.
Turn the hand again, as in Fig. 3, with the thumb down and double the
string across the back of the hand. Continue as in Figs. 4 and 5 until all
of the string is used except enough needed to wrap it around the middle
of the tamale and tie it, as shown in Fig. 6. The working end, the part
secured to the nail at the start, will now feed out as needed.
A second method, which can be used with smaller strings, is also
shown.
196
Pl ATE 76. How to Make the Tamale.
197
PLATE 77
How to Build a Reata or Rawhide Rope. In Mexico the raata
(ray-ah’-tah) may be of sisal or maguey fiber, or of twisted or braided
rawhide. But, in the western section of the United States, reala means a
braided rawhide rope as distinguished from a fiber rope, It is from “la
reata” that the cowboy obtained his word “lariart.” Some Mexican
slang concerning the reata is to be heard along the Border, too. To be
muy reata is to be valiant, and when a man is called uno bueno reata, it
means he is a gay dog with the ladies.
The reata—sometimes written riata—can be made with either a
four-string or an eight-string braid (Plate 46). The eight-string is fancier
and considered muy brava, but it is less satisfactory- as a working rope.
It is more for show. Reatas are from 40 to 85 feet in length, some even
longer. They come in several diameters. The 3/8-inch is called light; the
7/16-inch is termed medium; the 'A-inch is heavy; and the 9/16-inch is
extra heavy’. These diameters are determined by the diameter of the
core and thickness of the rawhide strings.
In Fig. 1 we start braiding a four-string reata over a core which is
either a long raw hide string or a sash cord. Remember that the total
width of the four strings should equal the circumference of the core.
The strings should be one-half longer than the finished length of the
reata—needless to say, of the best quality rawhide.
Lash the strings around the core as shown in Fig. 1. To start, as
shown in Fig. 2, pass string No. 1 around to the rear and back to the
front on the right, under string No. 4 and over No. 2. In Fig. 3, string
No. 4 is carried around to the rear and to the front on the left, under
string No. 3 and over string No. 1. Continue this braiding sequence to
the end, keeping your braid snug and tight.
In Fig. 5 is shown one method of finishing off the “bitter end,” or
the end opposite the honda. The braid is arranged as shown and a slit is
made in strings Nos. 4 and 2. No. 1 passes through the slit in No. 4, and
No. 3 through the slit in No. 2 (Fig. 6). Then two slits are made in
strings Nos. 1 and 4 (Fig. 7). Strings Nos. 2 and 3 are passed through
these slits, as shown by the arrowline in Fig. 7 and completed in Fig. 8.
Or, after the step in Fig. 6, strings Nos. 1 and 4 and strings Nos. 3 and 2
can be slit-braided by themselves (see Plate 21).
A simple honda can be made by taking a strip of rawhide -И inch
wide and rolling it together, so that it has an inside diameter of two
inches (Fig. 9). After shaping it, punch a hole in the bottom, the hole
to be the diameter of the reata braid. Pass end of the reata through as
shown in Fig. 9. The four loose ends now are tied in a terminal
Turk’s-head, as shown in Figs. 9 and 10. The loose ends arc cut off
flush w’ith the top of the knot (Fig. 11).
The reata should be wrell saddle-soaped and rolled under foot, or
between two heavy boards. Some use melted tallow. It is softened by
working it back and forth around a smooth post. Don’t spare the elbow
grease.
PL A I E 77. How to Build a Reata or Raiviitde Hop*.
Rawhide twisted lariat or, more properly, reata. In the center are
three types of rawhide hondas for lariats
198
199
PLATE 78
How to Make a San Juan Honda. The San Juan honda which was
developed in Sonora, Mexico, is a very fancy but practical honda for
the reata. It has a replaceable boot., or wear-leather, as will be shown.
The first step in making this honda, or eye on the working end of a
reata, is to first middle four 54-inch-wide rawhide strings, each about 2-1
inches long.
When they are middled lay them one on top of the other. In Fig. 1 it
will be seen that the top string, or string No. 1, passes down through
slits in strings Nos. 2, 3, and 4. Then string No. 2 passes down through
slits in strings 3, 4, and 1. Next string, No. 3, passes down through
strings 4. 1, and 2. In Fig. 2, is seen the flat side of this slit-braid; in Fig.
3, a three-quarters view.
A still more fancy method of making this braid is shown in Fig. 4.
The strings are laid one on top of the other as before, but are
slit-braided, so that when viewed on the edge (Fig. 6) they will look like
a four-string braid. In this braid, string No. 2 first passes down through
a slit in string No. 3. Then string No. 3 goes up through a slit in string
No. 1: No. 4 through No. 2; No. 1 through No. 4 (Fig. a). Pass thus
until the original top string is on the bottom and the original bottom
string on top. and then begin over. The flat side of this braid is shown
in Fig. 7
The next step is shown in Fig. 8. Take a round piece of wood about
inch in diameter and wrap the slit-braided part around it. Now work
with all eight strings, making an eight-string braid as shown in Plate 47.
Braid down about four inches, or enough to form an inside eye of l’Z
inches when the working ends are pushed up through the slit-braided
eye, as shown in Fig. 9.
Tic together the four center strings as in Fig. 9. Then work the other
four into a terminal knot. First crown the strings as shown in Fig. 9
Then wall them, or pass each string upward alternately (Fig. 10). Each
string now is again passed upward through the center, as shown in Fig.
11. All eight strings are cut off flush with the top of the knot (Fig. 12).
You might find it simpler to place on your boot, or wear-leather,
before pushing the braid up through the small eye and tying the
terminal knot. However, the boot is shown in Fig. 13, By cutting it
concave on its ends, the part that bonds in the inner section of the eye
will not buckle.
The boot is pinched together on the outside of the honda, holes are
punched through both edges, and it is laced together with a rawhide
string. Boot is shown in place in Fig. 14, designated as A. The part ВЙ
where the end of the reata is fastened on. Reata is folded around and
the four working ends are tucked back into original braid. This is then
covered with a woven knot, a suitable one being the cowboy knot in
Plate 59.
200
PLATE 7ti. How to Make a San Juan Honda.
Reatas are built and not made and Mrs. Mary Fields is an expert,
from making her own rawhide to braiding the rawhide rope.
The accompanying series of photographs showing the various steps
required to build a reata demonstrate the lady’s ability.
201
Top: Shaving off the hair. Bottom. Cutting string with a draw gauge.
202
Top: Fleshing—splitting the rawhide string. Bottom: Making a tamale
203
I.eft: Braiding—the fingers are cut out of the gloves. Pight: Pulling over the peg.
204
Top: Br aking in the reata by pulling it through holes in a post. Bottom:
Shaping the honda over a stick.
205
PLATE 79
How to Tic the Reata to the Honda. In Plate 79 is shown one of the
methods of securing the reata to the honda. The fastening knot is
actually a five-part four-bight Turk’s-head, but made with four strings.
The same method can be used in making a longer Turk’s-head but the
five-part Turk’s-head is sufficient.
Leave about 8 inches of the reata unbraided. Place it on the honda,
as shown in Fig. 1, so that two strings come up on one side and two on
the other.
The strings arc now crowned about three-quarters of an inch up from
the honda. Crowning means that string A is laid over string В in a
counterclockwise direction; string В then is laid over string C; string C is
laid over string D, and string D is passed through the bight made in
string A.
The result is shown in Fig. 2. Also, in this diagram it will be seen that
the arrowline indicates that string A passes over one string (C) and then
under string D. In a similar manner, string В passes over string D and
under string A. String C passes over string A and under string B. String
D passes over string В and under string C.
This sequence is shown in Fig. 3. Now each string passes over one
and then completely under the knot to come out at the top. The ends,
shown in Fig. 4, may he cut off. or they may be spliced back mto the
honda for several inches to give the knot more strength.
By referring to the short cowboy knot (Plate 59) and the cowboy
button knot (Plate 64), other and fancier sequences can be worked out.
PLA E 79. How to Tic the Reata to the Honda.
A Brazilian reata In the Tinker collection at The Hall of the Horsemen of the
Americas, University of Texas.
206
Braided rawhide reata or lariat, with San Juan honda, made by John
Conrad, Bellflower, California.
207
PLATE 80
The Saddle-Horn Tie Knot. There is a difference in using the rawhide
rope, or reata, and the hempen rope. The California buckaroos, who are
partial to the rawhide rope, are known as “dally men.” The term
“dally” comes from the Mexican dar la tuelta, “to give a turn.” In
other words, the dally men turn the bitter end—or end opposite the
loop—in a counterclockwise direction several times around the horn of
the saddle after throwing the rope. The rawhide rope user “dallies” his
rope because a rawhide rope cannot stand the sudden strain when the
cow is “busted” on the other end, and by “dallying,” the rope is
allowed to give or slip a trifle.
The Texan and those of his school who use the hempen or fiber rope
makes the rope fast around the saddle horn and so is termed a
“tie-man.” Rodeo cowboys are "tie-men,” too.
There are various ways of tying a rope to the saddle horn, but Roy
Harmon, of Las Cruces, picked up a practical knot for “tying” at the
Socorro Rodeo and has passed it along to the author. Roy says this
knot was shown him by a rodeo cowboy. Bill Rush, of Lovington. New
Mexico.
“The knot is primanlv used by rodeo cowboys to fix their rope to
the saddle horn in such a manner that it can be easily removed,"
explains Roy. “It’s really a slip knot. The ordinary knot used by
cattlemen and working cowboys is tied in the end of the rope and, after
heavy stock have been roped and dragged, the knot often tightens so
that it is hard to untie. But with this one, the rope can just be slipped
off the horn.”
To make this knot, take a string or thong of rawhide or latigo,
whichever is preferred, about 3/8 meh wide and 24 inches long
In Fig. 1 is shown the lariat in position to receive the knot. The
working area is indicated by the C. Commence the braid as shown,
bringing the end of the string marked В around to the front, and then
the one marked A around and over B.
In Fig. 2, the string-end A has passed over the string-end В three
times in the front and twice in the rear (Fig. 3).
It will be noticed in Fig. 3 that when the string-end A is brought to
the rear, it is then crossed under В Now spiral A upward, crossing it
over all sections of the string, as indicated by the arrowline.
This latter step is shown in Fig. 4. xAlso. the arrowline in Fig. 4
indicates how В passes beneath its own part. The arrowline in Fig. a
indicates how В is worked upward, interlocking the braid.
The finished braid is shown in Fig. 6. The saddle-horn knot is shown
in place in Fig. 7.
This knot can be made any length and can be used for bosal nose
buttons and other coverings. It may, of course, be interwoven with the
gaucho or herringbone braid.
208
PLATE 80. T he Saddle-Horn Tic Knot.
209
PLATE 81
How to Make a Mexican Swivel Honda. Some time ago Art Reuter,
of Norco, California, wrote me the following letter:
“Where can I find out how to braid a rawhide honda? You show the
folded type in your book but I would like to know how to make the
other. I have a real use for this as 1 rope steers and use a nylon rope and
I think you will agree with me it’s virtually impossible to Lie a honda
straight up in one of these ropes. This braided one, of course, swivels
and really does the trick. I saw one that was made in Mexico, but did
not sec it long enough to figure out how it was made.’"
Mr. Reuter enclosed a sketch showing how the honda looked. I sent
him my ideas on how this honda was made. However, the complete
details of how it is built are as follows:
First take four W-inch-wide rawhide strings each a little more than a
foot in length. Middle them and braid a four string round braid about
five inches long (Figs. 1 and 2). Next take a round piece of wood
slightly larger than the diameter of the rope to he used with the honda,
bend the four-string round braid oi er the top as in Fig. 3. It is a good
idea to mark in ink on the ends of the strings the numbers as shown in
Fig. 3.
The ends of the strings are then braided into an eight-string round
braid around tire mandrel or piece of wood, arranging them first as
shown in Fig. 3. String No. 2 on the right is carried around to the rear
and then forward under strings 1 and 3 and over 5 and 7. In Fig. 4
string No. 1 on the eft is carried around back and forward under strings
4 and 6 and over 8 and 2. The braid is continued in Figs, a and 6.
The next step (Fig. 7) shows strings 7, 3, 4 and 8 turned upward and
secured so they will remain out of the way for the time being. Then
begin a four-string round braid with strings 5,1, 6 and 2 (Fig. 8). Start
with string No. 6 on the right. Carry it around to the back, then
forward on the left side under string No. a and over string No. 1. This
four-string braid is continued in Figs. 9 and 10. In Fig. 11 string No. 1
is brought around from the left side to the rear and up on die right
directly under string No. 6, up over string No. 5 and alongside and to
the right- of string No. 2. This is the beginning of the back-braid.
S ring No. 5 (Fig. 12) also on the left is passed around back and
brought forward on the right and up alongside string No. 6. In so doing
it passes under its own part. Working with the two strings on the right,
Nos. 2 and 6, first pass No. 2 upward, over two and under one, as
shown by the arrowline in Fig. 13. String No. 6 passes around back and
up, over two and under two, as shown by the arrowline in Fig. 13.
Strings Nos. 1, 5, 2 and 6 in back-braiding will, by a sequence of over
and under two, meet the ends of strings which have previously’ been
turned upward and tied out of the way. In other words, by continuing
the back-braid, string No. 1 will meet string No. 8; string No. 2 will
210
PLATE 81. How lo Make a Mexican Swivel Honda.
meet string No. 7; string No. 5 will meet string No. 4 and string No. 6
will meet string No. 3 (Fig. 14).
The meeting points should be scattered and the ends of the strings
cut off and tucked under the cross strings The completed honda is
shown in Fig. 15.
211
PLATE 82
How to Make a Mexican Swivel Honda (Cont.). The terminal knot
should be made by first pushing the rope end up through the round
braid of the honda to allow sufficient length for tying the knot (Fig.
A). Starting with end No. 1. lay it to the left over No. 2; No. 2 passes
over No. 1 and No. 3; No. 3 over No. 2 and No. 4; No. 4 over No. 3 and
No. 1 (Fig. B). Next, end No. 3 passes around No. 1 and up in the
center under No. 1 and No. 4; No. 4 around No. 2 and up under No. 2
and No. 1; continue this sequence as shown in Fig. C. Tighten your
knot as shown in Fig. D and cut the top ends off flush.
This sequence is for a four-strand rope. If more strands arc in the
rope, follow the same instructions as for the four-strand.
It is well to add a wear-leather to the loop part of the honda whether
the rope is of rawhide or of fiber. Cut your rawhide or leather piece as
shown in Fig. E. Make it slightly wider than the circumference of lhe
honda loop braid. Then sew it on as shown in Figs. E and F.
Another way to make this swivel honda is shown on Plate 82, Figs.
G-J, with the completed honda in Fig. M. Middle four strings and braid
down as in Fig. G. Join the ends and make an eight-string braid as
illustrated in the same figure. All strings are next back-braided and
brought up beneath the loop and cut off flush. This gives a
sixtccn-string round braid for the swivel part.
In Figs. K-M is another type of wear-leather 1 learned from an old
braider in Colima, Mexico. It is simple and can easily be replaced when
necessary.
Author (left) with an old braider from Colima, Mexico. In
seven trips to Mexico, he was one of few old-time braiders
the author was able to locate.
212
TERMINAL KNOT \ WEAR LEATHER
V
PLATE 82. How to Make a Mexican Swivel Honda (Cont.).
213
PLATE 83
How to Make a Second Type of Mexican Swivel Honda. This
interesting and decorative honda was explained to me by Ed Rickman
Meeteetse. Wyoming. Ed discovered it, badly chewed up by pack rats,
among some old gear owned by his father. With the aid of his wife,
Mary Jane, a competent artist, Ed sent me some drawings and details.
Take a strip of rawhide measuring 30 inches by three inches and cut
as shown in Fig. 1. With the hair side toward you bring the end, where
five strings have been cut, over through the rectangular hole, as shown
by the arrowline in Fig. 1. Wien this move has been completed as
shown in Fig. 2, the dress or hair side of the rawhide is on the inside. In
Fig. 3 dotted lines show how the rawhide is folded at the edges and a
five-string, over-two, under-two flat braid is started.
In Fig. 4 the fold over and the braid have been completed around the
honda. Three of the strings have been brought through the three small
holes around the center hole. The fourth string is brought through the
beginning of the braid and the fifth string is tucked under and cut off.
A round stick slightly larger than the rawhide rope to be used is
inserted in the center hole, through the braid beneath and pressed down
to the bottom inside of the honda. A four-string round braid is made
around the top of the stick for a couple of inches—more or less,
according to taste—and then back-braided from the top down and the
strings cut off flush.
While the honda is damp, it can be molded over a shaped stick and
allowed to dry. The reata is then introduced from the top and the
holding knot, made as previously explained.
Three types of rawhide hondas. Left: San Juan honda (Plate 78);
Middle Mexican Swivel honda (Plate Rd)-, Right: Mexican Swivel
honda (Plates 81 and 82).
214
PLATE 83 How to Make a Second Type of Mexican Swivel Honda.
215
PLATE 84
How to Make a Third Type of Mexican Swivel Honda. Some years
ago the late Burt Rogers of Spearfish, South Dakota, one of the great
rawhide braiders, sent me one of these hondas. Later he also sent the
metal ring bolt and hook for molding it. Burt said that while the honda
was of the Mexican type, he had learned how to make it from an old
Indian.
There is a certain similarity in this honda and the one of Ed
Rickman. Rickman’s type also can be molded in the shape of this
honda by using the metal ring bolt and hook used for this one.
Cut your rawhide, which measures 26 inches by 2-7/8 inches, as
shown in Fig. 1. The sides A and В are then folded inward so that the
holes come together. Then, as in Fig. 2, the long end with the cut
strings is folded over as shown in Fig. 3. Hold this together with a fid as
illustrated. In Fig. 4 the five-string flat braid is s arted. To keep this
braid in its proper position on the outside of the honda, the first layer
of rawhide is cut as shown in Fig. 5, and the braid passes through this
slit (Fig. 6). Tw’o or more slits around the outside of the honda can be
made.
In Fig. 7 the braid has passed entirely around, and the ends are
drawn through the holes indicated in Fig. 3. A terminal knot is made to
fasten the braid in place.
The gadget for shaping the honda is detailed in Fig. 9. This consists
of a ring bolt, a couple of nuts and washers and leather pads. The
finished honda is shown from the side and front in Figs. 8 and 10,
respectively. In Fig. 11 the method of shaping and drying it with the
ring bolt and hook is illustrated. Let it dry for several days and it will
always hold its shape.
Left: Implements for shaping honda, made for Lhe author by the late Burt
Rogers. Right. Shaping and drj mg honda.
216
Other fancier braids and knots can be employed on this honda. On
one which Burt Rogers sent me, the strings were twisted instead of
braided
PLATE 84. How to Make a Third Type of Mexican Swhel Honda.
217
PLATE 85
How to Make a Braided Riding Crop. A riding crop usually is made
over a twisted rawhide core. This core is 23 inches long and tapers from
Уг inch in diameter at the handle end to 14 inch at the other end (Fig.
1). Such cores are commercially made and may be bought from whip-
makers, rawhide manufacturers, and some handicraft supply stores.
The core, however, may be of rattan or elm root, or a tough flexible
switch from the quince tree. Prize crops are made from the bull’s pizzle
sanded down
The first step is to lash on the wrist strap. This may be made from a
flat braid or merely a strap 5/8 inch wide. It can be tied on at the top
of the handle, as shown in Fig. 5, or five or six inches down on the side
of the core, as illustrated in Fig. 6. Best method of lashing on the strap
is shown in Figs. 2 and 3. Split the strap on each end: then alternately
pass the turns of waxed twine over one part and then the other, as
shown in Fig. 3. The loop should be about 6 inches when on the crop.
Other end of the core is fitted with a short leather piece fastened on
in the same manner (Fig. 4). The shape of this end leather can be as you
wish, either like that shown in Fig. 4, or those shown in Figs. 7 and 8.
If the wrist loop is at the end of the handle, you can start your braid
at the very top and carry' it down to the smaller end, using the eight-
thong braid shown in Plate 46, or the 12-thong as detailbd in the text
accompanying Plate 47.
If the handle end is to be braided differently from the body, there
are several types of braid to select from. One of these is shown in Figs.
9,11, 12 and 13. This is made with a strip of leather six inches long and
wide enough to encompass the core at this point. Slit the leather four
times, as shown in Fig. 9, so that you have five strips of the same width.
Lash it on at the top (Fig. 11) and with a different colored thong pass
around over one, under one, spiraling down as illustrated in Figs. 12
and 13.
Same effect can be achieved with thongs, as illustrated in Figs. 14.
15, and 16. Figures 17 and 18 show a method of making a handle-
covering with Spanish hitching.
After the handle part is braided, the remainder of the core is covered
with a braid as described. Woven knots are used to cover all places
where braids join or where ends are lashed down (Figs 5, 6, and 8).
Where the wrist strap is used on the side (Fig. 6), an attractive braid for
the handle is shown in the next plate, 86.
218
I’LAl E 85. Нои lo Make a Braided Riding (лор.
219
PLATE 86
The Lone Star Braid. I am not anxious to revive the old argument as
to whether the first cowboy came from Texas or California. However,
the oriflamme of the Texan, the Lone Star, is a popular decoration on
cowboy gear from coast to coast. So we might say the Lone Star is the
trademark of the cowboy.
This five-pointed star may of course be made with silver and other
metal, or by leather carving and stamping. But it also can be worked
out. in braiding. I’ve been able to do it with a two-toned braid, as well as
with a Spanish woven knot (Plate 87).
The braid can be used as a handle-covering for a quirt, riding crop,
romal, cane, or umbrella. This is the way to make it:
Take ten rawhide strings or leather thongs whose combined width is
slightly less than the circumference of the core to be covered. Five of
these strings will be white and five of a darker shade. Lash all ten strings
or thongs, with the colors alternating, at the bottom of the handle to lie
covered, and with their flesh sides next to the core. This is shown in
Fig. 1. Next the strings are spiraled up around the core to the top,
where they are also lashed down.
Lashing at the bottom is later covered with a woven knot. However,
m the case of the romal (Plate 59), w'here a finished braid is desired on
the bottom, you will follow the same method as you do at the top. The
way of starting this is shown in Fig. 2. Ends at the bottom are carried
upward and join with those coming down from the top
But to continue the sequence at the top: Bend down all the white
strings, as shown in Fig. 3. With the darker ones make a crown knot
(Figs. 3, 4, 5, and 6). In Fig. 7 wc are looking down on this crown knot,
which rests on top of the core.
In Fig. 6, the down braid is started. First work with the dark strings.
It will be noticed that string No, 2 passes over string No. 6 and under
string No. 8. Observe this carefully. Weave the other dark strings in like
manner, over one and under one, and vour work will appear as in Fig.
8.
Next weave the white strings. In Fig, 8, we see that string No. 7 is
brought up and over dark string No. 2; then beneath the cross formed
by dark strings Nos. 8 and 4. When you have worked with all white
strings in this fashion you will see that each one passes beneath three
other strings—two dark and one white.
Keep your braid up snug with the star part now formed resting
exactly on top of the core. You start braiding down now with all ten
strings—over two and under two. The herringbone effect in this braid is
shown in Fig. 10. In Fig. 11, looking down on top of the braid, you can
see the five-pointed star, with the white strings forming the back-
ground By working carefully, after removing the upper binding, the
star knot can be closed completely at the top.
220
l’I-Л ГЕ 86. Tlie Lone Star Braid.
221
PLATE 87
How to Make the Lone Star Knot. The Texas Lone Star Knot is a
decorative button knot or a finishing knot on the end of a piece of
braid or a quirt handle. It is an appropriate one for the button knot on
the hobbles in Plate 142
For clarification, the knot here is shown made on a mandrel having a
leather collar. The mandrel is divided into four areas, or sections,
numbered clockwise from 1 to 4, section 1 being the front and that
marked 3 the back.
The foundation knot is a 6-part, 5-bight Turk’s-head. Its five bights
or scallops provide the design for the five-pointed star.
Start as in Fig. 1. Pass the working end of the rawhide string or
leather thong around the top of the mandrel and then down on the
right side and over the standing part as shown.
In Fig. 2 you are looking at the back part of the mandrel. Here the
working end passes beneath the bight at the top.
Now bring your working end to the front, as in Fig. 3, and beneath
the standing part and over the part on the left. In Fig. 4 we are again at
the back. Sequence is over one, over one.
Fig. 5. Pass down over one, under one, over one.
Fig. 6. Pass up: under one, over one, under one.
Fig. 7. Down: under one, over one, under one, over one.
Fig. 8. Up: over one, under one, over one, under one.
Fig. 9. Down: over one, under one, over one, under one, over one.
Fig. 10. When you pass under one to the left of the standing part, the
skeleton or foundation knot is complete. While in these drawings we
continue with the same string, showing it in a different Lone, to obtain
the star effect in interweaving, it is necessary to begin at this point with
a different colored string. The sequence will be under one, over one,
under one, over one, following along to the left of the standing part.
It might be pointed out that the weave here is the same as that of the
pineapple knot (Plate 50) at the top: at the bottom it differs in that the
bight is formed on the outside of the knot instead of inside.
Fig. 11. Under two. Fig. 12. Over one, under one, over two, under
one.
Fig. 13. Over one, under two (splitting a pair). Fig. 14 Over two,
under one, over two (crossed strings), under two.
Fig. 15. Over one, under two (crossed strings). Fig. 16. Over two,
under two, over two (crossed strings), under two.
Fig. 17. Over two, under two (crossed strings). Fig. 18. Over two,
under two, over three, under two.
Fig. 19. Over two, under three. Fig. 20. Over two, under two, over
three. Working end is now passed under one (or two to make it more
secure) at the starting point of the interweave.
Knot is removed from the mandrel and placed m its permanent
position. It is tightened until the top closes. Side new and top view are
shown in Fig. 21.
222
FIG. 1 ОС 2 FIG 3 FlG 4 "<C. 5 FlG 6
FIG 7 F.G, 6 FIG. 9 F'C. 10 FIG. II FlG. 7?
FIG 13 HQ 14 FIG IS FlG. 16 FiO. 17 FlG 18
PLATE 87. Hou to Make the Lone Star Knot.
223
PLATE 88
How to Make a Riding Crop with the Lazy-Man Braid. In this Lazy-
Man Braid the strings or thongs are worked in parallel sets, instead of
singly. The skeleton of an over-one, under-one sequence can first be
made and then followed around Lo parallel the basic braid. While this is
necessary in increasing the size of Turk’s-heads. in straight round braid-
ing the strings can be worked in sets of two, three, four, or more.
Some striking effects can be obtained by using strings of differing
colors and by varying the sequences.
The finished riding crop is shown in Fig. 1. The braid is made around
a twisted rawhide core. In Fig. 2, 12 strings are used. Arrange them, if
contrasting colors are used, as shown in Fig. 2 and after the first pass
you will have six strings of one color on one side and six of the other
color on the opposite side. This braid is continued down for several
inches (Figs. 3 and 4).
In Fig 5, it will be noted that only one string is worked at a time-
string No. 4 passes around back and forward, under three and over
three. In Fig. 6, string No. 11 passes around back and forward, under
three and over three. Having worked this braid for the desired length,
you can switch as in Fig. 7, where string No. 7 passes back and then
forward, over two, under twTo, and over two. In Fig. 8, the right-hand
string No. 6 passes back and then forward, over two, under two, and
over two. In Fig. 9, three strings are worked as a unit. They pass arouhd
back and forward, under three and over three. The same sequence is
illustrated on the other side in Fig. 10. Vary these different sequences
as often as you wish
Figures 11, 12, and 13 show how to make the wrist loop, also using
strings of contrasting colors. Leave sufficient unbraided string at each
end and fasten these down to the top of the core by lashing them as in
Fig. 18 The wnst loop should be put on before beginning the braid on
the handle and this braid will then cover the lashed-down sections.
The end leather of the crop can be attached as shown in Figs. 14,15,
16, and 17. It is lashed on as described in Plate 85. The Lazy-Man
Button (described in Plate 179) is used at the top and bottom. In Fig.
19 is shown a method of attaching the end leather by braiding it
upward from the bottom of the core.
224
PLATE 88 How to Make a Riding Crop willi the I.аул-Man Braid.
225
Argentine rebenque or heavy quirt.
Top: The hutt of an Argentine stock-whip. Bottom: Hanging from this breast-
plate is a medallion with the initials of Edward Larocque Tinker, in The Hall о
the Horsemen of the Americas, The University of Texas.
Collection of riding crops owned by author.
227
Left: Crocodile ridge braid of three simulated flat ridge braids and continued down
where two outside ridges are of simulated round braid. Right: Crocodile ridge braid
with ridges on each side.
Left: Crocodile ridge braid with ridges on both sides. Right: Crocodile ridge braid
with one center ridge of over-two, under-two sequence.
228
Crocodile Ridge Braids
PLATE 89
The Crocodile Ridge Braid. This beautiful braid, made with one, two,
three or more ridges on a flat-type braid foundation, is used for many
purposes. It is quite popular in parts of Australia and extensively used
in .Argentina where it is termed lomo de yacare (back or ridge of the
crocodile). As a flat-type braid it is used for belts, headstalls, reins,
hobbles, etc., and as a round braid, for handle coverings. It can be
worked into button knots of various kinds. It is an attractive utility
braid and its variations challenge the ingenuity of the creative braider.
The flat braid, with which we shall deal here, is best made with an
even number of strings or thongs. The six-string crocodile ridge braid
beginning with Fig. 1 is started by bringing string No. 5 to the left over
No. 4; then string No. 3 to the right over No. 5 (arrowline). The secret
of this braid is now shown in Figs. 2 and 3. String No. 2 is carried to
the right and, with a slight twist to keep the dress side outward, it
passes under Nos. 3 and 5 and is then brought back to the left over No.
3. In Fig. 3, string No. 6 passes to the left over string No. 4 and then,
with a twist, under strings Nos. 2 and 3; then carried back to the right
over string No. 2.
This same sequence is repeated in Figs. 4 and 5; over one, twisted
under two and then back toward its origin over one. The comp eted
braid is shown in Fig. 6.
The next sequence is of eight strings or thongs. In Fig. 7 string No. 4
is brought to the right over string No. 5; then string No. 3 passes to the
right and then, with a twist under strings Nos. 4 and 5 and finally
brought back over string No. 4. Always work strings on alternate sides.
In Fig. 8, string No. 1 passes to the right under string No. 5; over string
No. 3: then twisted under strings Nos. 2 and 7 and brought back over
string No. 7. The arrowline in Fig. 9 shows the same sequence—under
one, over one, twisted under two and back over one. Follow this
sequence on each side until the desired length of braid is reached. The
completed braid with its center ridge is shown in Fig. 10.
A ten-string braid is shown in Fig. 11 with a sequence of over one,
under one, twisted under two, and back over one. This braid is shown
completed in Fig. 12. It can also be made by a sequence of over two,
under three, and back over one.
In all examples illustrated here the braid is rather loose, so it can be
followed better.
230
T't. в
PLATE 89. The Crocodile Ridge Braid.
231
Crocodile ridge braided belt made from 1/8” commercial lacing,
started with a flat braid used by Australians. Made by author.
PLATE 90
Double-Center Crocodile Ridge Braid. Instead of passing back over
one string in the center, you can pass back over two or more to then
make the ridge. In this plate ten strings are used
The start of the braid is shown in Fig. 1. Braid the inside strings Nos.
4, 5, and 6, as shown. In E ig. 2, the double ridge begins where string
No. 7 passes to the left beneath three strings, then twisted and brought
forward and to the right over two strings.
tn Fig. 3, string No. 3 passes to the right beneath four strings, twisted
and brought forward and to the left over two strings. String No. 8 is
worked in the same sequence from the right (Fig. 4).
Figure 5 illustrates the path of string No. 2 by the arrowline. It
passes to the right, over one string, under four, and twisted and brought
back over two. The same sequence is observed in Fig. 6 where string
No. 9 passes over one, under four, twisted and brought back over two.
In Fig. 7, the left outside string No. 1 passes to the right, under one.
over one, under four, twisted and brought back over two. The same
sequence is observed in Fig. 8 where string No. 10 passes to the eft.
under one, over one, under four, twisted and brought to the front over
two.
These passes on each side are continued until the braid is of the
desired length The finished braid is show n in Fig. 9
232
PLATE 90. Double-Center Crocodile Ridge Braid.
233
PLATE 91
Half-Round Center Crocodile Ridge Braid. In this braid the center
ridge gives the impression of being the same as a four-string round
braid.
Start the braid with eight strings as in Fig. 1. It will be noted that
string No. 6 is given a full twist as in the regular four-string round braid,
and that string No. 3 also is given a full twist (Fig. 2).
In Fig. 2, string No. 7 is brought to the left (arrowline), over one.
under wo, twisted a half tum and then back to the right, over one. In
Fig. 3, string No. 2 passes to the right (arrowline), over one. under two,
twisted and back over one.
In this braid strings Nos. 3 and 6 always n main in the center and
never pass to the edges. They are always braided in the same manner as
in a regular four-string round braid. After one pass by each of these
strings the outer strings are braided in as explained.
Studying this carefully will prove a valuable key to other crocodile
ridge braids to follow.
Crocodile ridge braid with one center ridge.
PLATE 91. Halt-Round enter Crocodile Ridge Braid.
234
235
Crocodile ridge braid belt, started at billet end in Australian
fashion and then worked into crocodile ridge with one center
ridge.
PLATE 92
Crocodile Ridge Braided Belt with Round Center This belt is started
with four light-colored strings and one black string. They are middled,
giving ten ends. It is begun in the Australian fashion described in Plate
35.
First the sequence is a simple flat braid, over one, under one. When
sufficient braiding has been done for the billet of the belt. and the two
black strings cross in the center as shown in Fig. 1, the center round
braid begins. Strings Nos. 4 and 7 (both black) always remain in the
center, as explained in the previous braid. They are worked with a full
twist as in a four-string braid, while those brought in from the outer
edges are given a half twist. Thus the center braid always is half black.
The center braid is made after passes from one string on each side.
A few inches from where the buckle is to be positioned revert back
to the simple over-one, under-one flat braid, using all strings. Back
weave at the buckle-end as previously explained.
Crocodile Ridge Braid of Two Outer Half-Round Ridges. This braid
is made with eight strings, four black and four natural color, the colors
alternating as in Fig. 5. Once the braid has started, two black strings
remain always on one side and the tw’o others always on the opposite
side. Thus strings Nos. 3 and 1 remain on the left side, while Nos. 8 and
6 remain on the right side. As previously explained, these strings are
worked with a full twist as in the four-string round braid. The natural
colored strings pass from side to side and, after the start, are given onb
a half twist. Figure 9 shows the finished braid, purposely drawn loose
so the braid can be followed.
236
I-ЛТЕ 92. Crocodile Ridge Braided Bell with Round Center Crocodile Rid„e
Braid of Two Outer Half-Round Ridges.
237
Crocodile ridge braid with three ridges—12 strings.
PLATE 93
Crocodile Ridge Braid of Three Ridges. The two outer ridges of this
braid are half-round, while the center ridge is made with the half twist.
Of course there is no limit to the number of ridges that can be made in
a braid; all that is required are the airings and a lot of patience and
ingenuity.
This braid is made with ten strings. The ridges on the edges are made
with two passes each, while the ridge in the center is only one pass
each—one from each side. Two contrasting colored strings can be used
on the sides for after the braid is started they will remain on their
respective sides. The finished braid is shown in Fig. 5.
Crocodile Ridge Braid Finished on Both Sides. This beautiful braid
was described to me by Don Luis Alberto Flores, of Buenos Aires, who
learned it from an old-time Argentine braider. It is much like the
previously described braids, but with the exception that each string is
given a full twist as shown by string No 1 in Fig. 6. The unfinished or
flesh side of each string is completely hidden when the braid is made
tight.
In this case we have used eight strings. More can be employed u
desired, remembering that they must be of an even number.
io
Crocodile Ridge Braid I’ini.died
E 93 Crocodile Ridge Braid of Three Ridge
on Both Sides.
238
239
PLATE 94
Crocodile Ridge Button. The Crocodile Ridge Button is appropriate
when used with other types of this braid. First make a running
five-part, four-bight Turk’s-head, which is explained later under the
section on Turk’s-heads The Turk’s-head is shown in Fig. 1.
In Fig. 2 it has been capsized or turned upside down as the braiding
in of the second Turk’s-head will be on what is now the bottom of the
first. In Fig. 3 the start of the second Turk’s-head is shown from the
back. The new string goes up, under one, over two and under one and
brought around under the standing part. It then passes under two, over
two and under one. Here its course is followed by the arrowline, which
passes around, forward and over the standing part and under its own
part. This second Turk's-head is exactly like the first, only when woven
the point of intersection with the other is under two and over two and
under two (Figs. 5, 6, and 7). When completed and tightened, it appears
as in Fig. 8 with the ridge ringing the circumference.
Crocodile Ridge Braid Handle Covering. Cut your strings from a strap
as shown in Fig. 9. The width of the strap should be wide enough to
encompass the circumference of the handle. Take the set of six strings
on the left and braid them down in an over-one, under-one sequence.
Then string No. 7 passes to the right under string No. 6, down over
strings Nos. 6 and 3 and under string No. 3. as shown in Fig. 9.
Also in this figure is illustrated the course of string No. 12 which
passes around and to the front under string No. 1, over strings Nos. 4
and 1 and under string No. 4. Now braid strings Nos. 8, 9, 10, and 11 as
shown in Fig. 10. After this, interlock the cop strings with the previous
braid as shown in Fig. 11. String No. 10 passes under two, over two and
under one. On the other side string No. 9 passes under two, over two
and under one. Continue thus until you have braided the required
length.
In Fig. 12 the same method is used with 14 strings. The seven-string
braid is first made in the front and then the edges are interlocked with
the strings of the other braid. After interlocking strings Nos. 8 and 14,
braid strings Nos. 9, 10, 11. 12, and 13 in the same manner as shown
for the front braid. Finish off both ends with the button described
above.
Crocodile ridge braid, four ridges used in handle covering.
240
I* VI E 91. Crocodile Ridge Button: Crocodile Ridge Braid Handle Covering.
241
PLATE 95
Crocodile Braid Button No. 2. This button is made with two knots,
which I call the Ginfer Knot. One edge has an under-two, over-two
sequence and the opposite edge has an over-one, under-one sequence. I
shall have more to say about the Ginfer knot later under Braided Knots.
In Fig. 1 the working end of the string marked В is passed around
twice, as shown. Going up the back it goes under one, over one (Fig. 2).
In Fig. 3 it passes down under one, over two, and in Fig. 4 the sequence
upward is over one. under one, over one.
Coming down again in Fig. 5 the sequence is over one, under one,
over two, and in Fig. 6 going upward it is under one, over one, under
one, over one. Fig. 7 shows the final pass downward of under one, over
one, under one, over two. It is then tucked up alongside the standing
part A.
This knot, like the one in Plate 94, is then capsized as shown in Fig,
8 and the interlocking braid is made on the over-one, under-one edge
The standing part of this new braid is marked C and the working end is
marked D.
The interlocking sequence is the same as in the previous knot. But as
you continue, you must make another Ginfer knot (Figs. 9, 10, and
11) The finished knot is shown in Fig. 12.
The advantage of the over-two, under-two sequence on the ends is
that they can be made to close more effectively on the top—or bottom.
This is the knot used in the crocodile ridge braid hobbles as keeper
knots. These hobbles are explained in Plates 98 and 99.
Miniature hobbles shown with regular size hobbles designed by
Don Hitario Faudone of Argentina.
242
I’LATk 95. Crocodile Braid Button No. 2.
243
PLATE 96
Crocodile Ridge Round Braid of One Ridge. In the first three figures
this braid is shown made without a core so that the detail may be more
easily followed.
To start, as shown in Fig. 1, string No. 3 is laid over string No. 4. The
arrowline indicates the course of string No. 7 which is brought around
back as in any round braid, passed under string No. 2, then oxer the
same string and under both strings 4 and 3 and then with a half twist is
brought over string No. 3 to the left. This pass is shown completed in
Fig. 2 and the arrowline indicates the course of string No. 1.
When made over a core or around a mandrel as shown in Fig. 4, the
same sequence is observed. This gives a ridge down one side (Fig. 8),
but in the back the braid is a plain over-one. under-one sequence (Fig.
7).
To make two. three, four or more ridges on a round braid, the strings
are arranged as shown in Fig. 9 In this instance we will make three
ridges. First make a four-string flat braid of over-one, under-one
sequence, tying off the other strings as indicated in Fig. 9. In Fig. 10
the flat braid of section 1 is completed and the start of interlocking
section 2 begins. As the interlocking process proceeds, the flat braid
must also be made (Fig. 10). It will be noted that the first pass of the
interlocking braid (Fig. 10) passes under one. over two. and under one
(string No. 7). Thereafter the sequence is under two, over two, under
one (string No. 8).
After section 2 has been braided into section 1, section 3 is
simultaneously braided into both section 1 and section 2 (Fig. 11). This
means, of course, that now the strings encompass the mandrel.
A bell made using the crocodile ridge braid.
244
fG*»'
PLATE 96. Crocodile Ridge Round Braid of One Ridge.
245
PLATE 97
Crocodile Ridge Braid Reins The first three figures in this plate are
the same as those found in the previous plate. However, the core should
be very small. After the braid is the length desired, the core is slipped
out and the braid carefully tightened on itself. This makes a unique
braid where the front, side and back are all different (Figs. 3, 4, and 5).
This braid and the one that follows can be made into reins.
In Fig. 7 the round braid is made with an over two, under two, right
down the front. This, too, can he made over a very small core which is
withdrawn after the braid has reached the required length and then
carefully tightened upon itself. Figures 8, 9, and 10 illustrate that this
also has three different sides.
Crocodile Ridge \pphque Braid. This is a four-stnng applique and is
made like the regular applique with the exception that a ridge is formed
down the center. Starting with Fig. 11, it will be seen that string No. 4
on the right passes under two, is given a half twist, and comes back to
its own side, over one.
String No. 1 on the extreme left passes under strings Nos. 4 and 3,
and then with a half twist returns to its own side, passing over string
No. 4. The sequences are the same on each side with the exception that
before passing beneath two crossed strings the working string passes
over one.
All such types of applique braids can be worked with the crocodile
ridge braid. The center ridge, too, can be of an over-two, under-two
sequence.
246
fit»
ЭЙ45
PLATE 97. Crocodile Ridge Braid Reins.
247
PLATE 98
Mousing a Braided Ring with the Conquistador Braid. The first use I
saw of this moused ring was on a pair of miniature hobbles presented to
me by Don Hilano Faudone, Sunchales, Province of Santa Fe,
Argentina. These tiny hobbles, worked with rawhide strings about the
thickness of thread, are about 5l/i inches long and the inside diameter of
the ring is less than 16 inch. Don Hilario is considered one of the
foremost braiders in the Argentine, where there are many such
craftsmen.
I call this process mousing for want of a better name. It is similar to
work done by sailors and they use the term “mousing?
The moused ring is used on hobbles throughout with variations of
the crocodile ridged braid. The braid around the ring is the
Spanish type ring covering of two loops The braid within (or “mouse")
is the conquistador braid.
The Spanish-type ring braid is started in Figs. 1, 2, 3, and 4. In Fig. 5
the string for the conquistador braid is caught by one of the loops as
shown, flesh side to flesh side. In Fig. 6 the conquistador braid is once
more imprisoned but before the braid is tightened the conquistador
string is formed into a loop, passing beneath its own part and through
the ring braid. The braids were linked together when string C formed a
loop before it was tightened. This is done in each loop for four passes.
Now begin to work the conquistador braid in the opposite direction in
the same manner as explained under this braid. When the conquistador
braid has been made almost to the bottom of the ring, work the ring
braid around, once more imprisoning the conquistador braid (Fig. 10).
In Fig 12 this phase of the work is completed and the ring braid is
continued on around to the start. Here it is joined as shown. Figure 16
shows the final result.
It is possible in making this combination to first work the ring braid
entirely around, and then insert the loops for the conquistador braid.
Since the braid has to be tight, I find this a more practicable method.
This decorative braided ring with conquistador braid can be used in
other things besides hobbles.
248
PLATE 98. Mousing a Braided Ring with the Conquistador Braid.
249
PLATE 99
How to Make Crocodile Ridge Braid Hobbles. To start these hobbles,
designed by Don Hilario Faudone of the Argentine, take five softened
rawhide strings or latigo thongs, each about 48 inches long. Middle
them and begin a five-string crocodile ridge braid. That is, start your
braid in the middle part of the five strings.
Figure 1 shows the start of this braid. The three strings on the left,
Nos. 1, 2, and 3, are all worked with a full twist as in a round braid,
while the two on the right, Nos. 4 and 5, are given a half turn After
braiding thus for five inches, make the braid into a loop and join all 10
strings (started in Fig. 5). This braid is continued in Figs. 6. 7, 8, 9, and
more fully shown in Fig. 10
The ten-string corcodile ridge braid is made for 84: inches and then
three outer strings on the left are tied off temporarily and four on the
right, as shown in Fig. 11. The three remaining strings in the center (or
the ridge strings) are worked for 1% inches in an independent
three-string braid or hair braid (Fig. 12). The strings on the right and
left which had been tied off are worked in a seven-string braid,
over-three, under-three sequence, as indicated by the arrowlines in Fig.
12. After braiding the seven strings for 134 inches (the same length as
the three-string braid) the two braids are joined (Fig. 13) in the
ten-string crododile braid for two inches. This section is then
introduced through the braided ring (Fig. 14) and once more the
three-string braid is made independently for 1% inches, as is the
seven-string braid (Fig. 15). But before they are joined, a braided knot
or Turk’s-head is made around the two seven-string braids (shown by
arrowlines in Fig. 15 and completed in Figs. 16 and 17). This secures
this section of the hobble to the braided ring.
Now join the top three-string braid and seven-string braid for a
distance of an inch or so. Tie off six central strings and then work
around them a terminal knot. Cut off all strings flush and cover this
terminal knot with a braided knot—pineapple knot or other knot that
will close on the top Use either of the knots in Plates 94 or 95 as
keeper knots for your loops, after having completed the other side of
your hobbles.
In crocodile ndge braid hobbles like those designed by Don Hilario Faudon of
Argentina and made by the author, use the directions for either Plate 94 or 9 to
make the braided knots.
250
PLATE 99. How to Make Crocodile Ridgr Braid Hobbles.
251
Quirts and whips in the author’s collection. Left to right: Paraguayan arrea-
dor (cattle whip—the long one which circles the sides and tops of the others);
California quirt (made by Ernie Ladouceur); Mexican quirt; South Dakota
quirt (made by Burt Rogers); Texas quirt; New Mexico quirt (made by Roy
Harmon); Argentine quirt; California quirt (made by Ernie Ladouceur).
Square, Rectangular, Spiral,
Oval and Triangular Braids
PLATE 100
Square Braid of Four Thongs. This braid is made with four thongs
but the same principle can be used with three, or with a greater
number. It is based on the so-called Sailor’s Crown Knot, and is used in
making lanyards, watch fobs, dog leashes, and in covering quirt handles,
as will be shown later.
Begin as in Fig. 1, showing tw-o thongs of which both ends of each
are used. Place the thongs so that the working ends are interlaced as
illustrated. The white thong shows end В at the left and end Bl at the
right. The back thong shows end A at the top and end Al at the
bottom.
Fold thong В over to the right and thong Bl to the left (Fig. 3).
Bring thong A down over thong В and through the bight of thong Bl;
carry thong Al up and over thong Bl and through the bight of thong B.
The braid in this second stage, before it is tightened, looks like the
diagram in Fig. 4, and after it is tightened it is like that in Fig. 5.
In the previous move, tire white and black thongs were worked
clockwise, but in the third stage of this braid the reverse is true. The
white and black thongs are both moved in a counterclockwise direction.
Bring thong A downward and carry thong Al upward. Pass thong В
over thong Al toward the left and through the bight of thong A; carry-
thong Bl to the right over thong A and through the bight of thong Al.
This is indicated by the arrowlines in Fig. 6, while the tightened braid is
shown in Fig. 7. Continue in this fashion, first clockwise and then
counterclockwise
To finish the braid, tuck the black thongs downward over the last
bend and into the braid (Fig. 8), and do the same with the white ones.
Or the braid may be finished with the terminal knot, as shown in Plate
38. In this braid the hair side of the leather is first on top and then on
the under side. It is not too noticeable when the thongs are colored.
254
TIGI
TIG.3
TIG 2.
TIGS
TIG 6
ZD
Bl
TIG 7
Tlb.S
TIG-9
PL ATE 100. Square Braid of Four Thongs.
255
PLATE 101
Rectangular Braid of Six Thongs. Arrange your strings or thongs as
shown in Fig. 1. While there are six working ends, actually only three
thongs are used. Thong A and В are laid in the loops of E and F, and C
and D, as shown.
The working end A crosses over from the left to the right (arrowline
in Fig. 1 and shown in Fig. 2). In Fig. 2 the working ends D and F are
laid over A and В as illustrated, the thongs inclining to the right.
In Fig. 3, interlace working end В in an over-one, under-one,
over-one, under-one sequence (arrowline in Fig. 3 and shown completed
in Fig. 4). Carefully tighten up your braid as shown in Fig. 5.
The next move is to lay thongs A and В back over the braid as
shown. The arrowline in Fig. 6 shows that end C passes over A and
under B. End D comes down over В and under A. End E passes over A
and under B. Then end F comes down over В and under A.
To continue, strings A and В are laid across and the other strings
worked in the same sequence. The front of this braid appears as in Fig.
7 and the side as in Fig. 8.
A cube can be formed with eight strings (Fig. 9). After laying in
strings A and C, and В and D, the braiding proceeds as in Figs. 10 and
11.
The objection to such braids is that the flesh side of the leather or
rawhide alternates on the outside with the skin side. The flesh side can
be dyed a contrasting color and this gives a pleasing effect. Or all such
braids can be made in the spiral twist, which follows.
256
PL ATE 101. Rectangular Braid of Six Thongs,
257
PLATE 102
Spiral Braid. This braid is also worked on the principle of
superimposed crown knots. While the previous braid gives a vertical
effect in the pattern, this one gives a spiral effect.
It may be worked with six thongs, over a core, as will be shown later,
but when four thongs are used, no heart or core is necessary.
The first step is the same as for the square braid in Plate 100. The
result is shown in Fig. 1.
Take thong Bl and fold it over thong Al, indicated by the arrowline
in Fig. 1 and shown in Fig. 2. Next, fold thong Al over thong Bl and
thong B, as indicated by the arrowline in Fig. 2 and shown in Fig. 3.
Carry thong В over thong Al and thong A, indicated and shown in Figs.
3 and 4, respectively.
In the last step of this stage take thong and pass it over thong В
and through the bight of thong Bl, indicated by the arrowline in Fig. 4
and shown in Fig. 5.
The second phase, starting with Fig. 6, is executed in exactly the
same fashion. Note the work moves continually in a counterclockwise
direction. However, if the start is clockwise, keep on working that way.
The completed braid is shown in Fig. 7.
Spiral Twist Braid. The spiral twist braid starts exactly7 as the spiral
braid, shown in Fig. 1. hi the next step, however, where Bl crosses to
the right over Al, give the thong a half twist so that the smooth side
remains uppermost (Fig. 8).
Bring thong Al over thongs Bl and В and twist it so that the smooth
side is up and the flesh side is in contact with the thongs beneath (Fig.
9).
The same twist is given each thong. Thus, when the braid is
completed, the smooth side of the thong is exposed. In the diagram
showing the finished braid (Fig. 12), the twists are emphasized;
however, if it is worked carefully and each twist brought down close to
the point where the thong emerges, the braid will present a finished
appearance.
These braids may be used to make attractive and durable leashes,
lanyards and bathrobe belts.
258
PLATE 102. Spiral Braid.
259
PLATE 103
Square Braid of E gilt Thongs. While this beautiful braid is to all
appearances a flat braid, after it is finished and molded it becomes a
square braid with four comers and four faces each showing exactly the
same weave. It is of South American origin, where it is used mainly on
bridles.
Cut a strip of leather into eight thongs of equal width. or lash
together eight thongs. The entire procedure is the same as in flat
braiding, but on the order of the 13- and 21-thong double braids.
Group the thongs four on each side. Start with the right-hand thong,
No. 8 in Fig. 1, and bring it to the left center under the three nearest
thongs, 7, 6. and 5. Then bring the extreme left-hand thong, No. 1, ю
the right center over the three nearest thongs. 2, 3 and 4, and under
thong 8. These steps are shown in Fig. 1.
Next bring thong 7 (on the extreme right) to the left center over the
three nearest thongs, 6, 5 and 1. This is indicated by the arrowline in
Fig. 1 and shown in Fig. 2.
In the fourth step, bring thong 2 from the left to the right center,
under the three nearest thongs, 3, 4 and 8, and over 7. This is indicated
by the arrowline in Fig. 2 and shown in Fig. 3.
Now thong 6 (on the extreme right) is brought to the left center
under the three nearest thongs. This is the key to this braid.
Remember that the extreme right-hand thong alternates by going
under three in one move and then over three thongs in the next; the
extreme left-hand thong alternates by first going over three thongs and
under one thong, then under three thongs and over one thong.
When the braid is of sufficient length, press on the edges to open
them up, and in order to adjust the braid so it will be perfectly square,
tap it lightly with a mallet on all four sides. This makes all sides the
same width and of the same weave (Fig. 7).
260
PLATE 103 Square Braid of Eight Thongs.
261
PLATE 104
Thirteen-Thong Braid. This and the braid to follow are the most
beautiful of the flat braids. The key to both may be found in the braid
of six thongs in Plate 30. Always remember to alternate over and under
on each side; for instance, when the thongs are passed over on one side,
they are passed under on this side the next time.
Divide the thongs seven on the left and six on the right As each
thong is worked from the outside, it comes only to the center.
Begin with thong 4 and pass it to the right over thongs 5 and 6, and
under 7. Then pass thong 9 to the left under 8 and 4. Take thong 3 to
the right over 5 and under 6, 7 and 9. Bring thong 11 on the right to
the left under 10, 8 and 4, and over 3. Pass thong 2 on the left to the
right under 5 and 6, and over 7, 9 and 11. Bring the extreme right-hand
thong 13. to the left over 12, under 10, over 8, under 4, over 3 and
under 2.
This preliminary, which appears somewhat intricate, is not absolutely
necessary but it closes the braid at the top so there is no loss of leather.
Now, take strand 1 on the extreme left and pass it over 5, 6 and 7,
and under 9, 11 and 13.
On the right, take thong 12 and bring it to the left under 10, 8 and 4,
and over 3, 2 and 1. The extreme left-hand thong is now No. 5.
Previously the extreme left-hand thong No. 1, was passed over the three
nearest it. Now alternate—and this is the secret of the double braid—by
passing it under the three nearest—that is, 6, 7 and 9, and over 11,13
and 12. On the extreme right, bring the outer thong, No. 10, to the left
center by passing it over (the one before on this side went under) 8, 4
and 3, and under 2, 1 and 5.
On the left, pass over three and under three to the right center. On
the right, pass under three and over three to the center. The braid is
consistent from now on. Remember to alternate the passes on each
side. Keep the braid snug and the thongs in order.
By placing the thongs in a drawer and closing it on them at the
beginning, they can be kept side by side. If necessary, use paper clips
and small pieces of paper and attach each number to the thong.
Flat Braid of Twenty-one Thongs. The principle outlined above is
carried out in the twenty-one-thong braid (Fig. 2). Divide the thongs
with eleven on the left and ten on the right. To avoid confusion from
the start, bring thong 1 on the extreme left to the right center by
passing it over the nearest five and under the next five. Then from the
right, bring No. 21 to the left center by passing it under five and over
five. Next on the left, pass under five and over five and so on.
262
PLATE 104 Thirteen-! hong Braid: Elat Braid of T wen tv-one Thongs
263
PLATE 105
Double Eraid with the Crocodile Ridge. Before we leave the double
braid, I would like to say that it is characteristic of the Argentine.
Uruguay and the southern part of Brazil. The gauchos term it trema
patria, or native braid. 1 have never seen it combined with the crocodile
ridge braid, or tomo de yaeare, but in this instance it works into a
beautiful, rich braid.
This braid is made with 12 strings. First cross string No. 6 over string
No. 7 to the right (Fig. 1). String No. 1 on the extreme left is brought
to the center, under two, over two, and with a half twist under two and
back toward its own side (also Fig. 1 arrowline and completed in Fig
2). String No. 12 on the extreme right passes over two, and under four,
and with a half twist to keep the dress side of the string out, back
towards its own side.
In Fig. 3, string No. 2 passes over two and under four and with a half
twist is brought back towards its own side (arrowline in Fig. 3 and
completed in Fig. 4).
In Fig. 4, string No. 11 passes under two, over two, and under two
and with a half twist is brought back to its side (arrowlines in Fig. 4 and
completed in Fig. 5).
This same sequence is observed as the braiding continues. First, a
string passes under two over two, and under two. Next, the same string
passes over two and under four—repeated, of course, in the same
sequence on the opposite side.
A piece of twelve-strand Argentine braiding, the trenza patria, flanked by a set
of miniature boleadoras and one miniature stirrup. From Dr. Tinker's collection.
The Hall of Horsemen of the Americas, at the University of Texas.
264
The completed braid, doubled and with the crododile ridge, is shown
in Fig. 6.
While the double braid is usually made with an uneven number of
strings, when combined with the crocodile ridge, an even number is
employed. With a little patience, various sequences and combinations
can be made, even a double ridge down the center.
Tifr4-
PLATE 105. Double Braid with the Crocodile Ridge.
265
PLATE 106
Oval Braid of Nine Strings or Thongs. By using the double braid, or
trenza patria, an attractive oval braid may be obtained. This braid
makes a fine pair of reins, and with this in mind I have made it with
two separate pieces so one piece can be used for the buttonhole and the
other for the button.
Cut your rawhide or leather as shown in Fig. 1. One piece has five
strings and the other four. These arc meshed together as shown in Fig.
2. Starting with string No. 5 on the right side, pass it over one string
and under three to the center (arrowline, Fig. 2). In Fig. 3, string No. 6
on the extreme left passes over one, under three. In Fig. 4, string No. 4
on the right passes under one and over three (arrowline). String No. 7
on the left under one, over three. Alternate the braid thus: one time
passing under one, over three and the next on that side over one, under
three.
The section marked В (Fig. 5) instead of being cut as in the previous
sections can be four long strings or thongs. A suitable hole can be made
in section A. and the strings of section В braided in a four-string round
braid with a terminal knot on the end. In Fig. 6, you can see how this
braid looks on the sides and Fig. 7 gives an idea of its oval shape. In Fig.
8 is a similar braid made of ten strings.
A double braid with the V’s of the braid running horizontally is
made with ten strings, as indicated in Figs 9, 10 and 11. The finished
braid is shown in Fig. 12.
266
PL ATE 106. Oval Braid of Niue Strings or Thongs.
267
PLATE 107
Half-Round Braid of Six Strings or Thongs. This braid is round in
front and flat in the back. Start as in Fig. 1, where first siring No. 3 is
laid across string No. 4, and then string No. 1 on the extreme left is
brought around back under three strings and then forward over one.
This sequence is repeated alternately on the right and left until the
desired length is braided.
The same effect can be obtained in a larger braid by using eight
strings as shown in Fig. 7. These braids are made without a core.
In Plate 142 is shown a sixteen-string round braid which when
flattened appears to be a double braid. By using this method with six
strings, a flat braid may be obtained as shown in photograph A. To do
this take string No. 1 in Fig. 1 and pass it around completely under five
strings and back over three. Then string No. 6 in Fig. 2 is passed to the
rear under all strings and back over three. When the braid is completed
and the strings or thongs still damp, press flat. This is, of course, more
effective with rawhide. (See photographs on Page 270.)
Triangular Braid of Twelve Strings. This unique braid is made by first
braiding, without a core, twelve strings in a round braid of an over-two,
under-two sequence. When the braid is completed and the rawhide still
damp take a pair of flat-nosed pliers and press firmly together three
corners of the braid, to produce a triangular effect.
Mr. C. W. Halliday of Subiaco, West Australia, wrote me that he had
seen this braid on a pair of reins and no one could figure it out. About
the same time Don Luis Alberto Flores of Buenos Aires wrote an article
in El Caballo, the horse magazine of the Argentine, that he had seen a
six-sided braid of reins made from eighteen rawhide strings. Such braids
are rare and usually create considerable comment.
268
PLATE 107. Half-Round Braid of Six Strings or Thongs Triangular Braid of Twelve
Strings.
269
Round braids of various numbers of strings and without a core can
be molded into a variety of shapes. Shown in photograph A is a dog
collar made from a sixteen-string braid which has been pressed flat
while damp. It resembles the double braid or trenza patria of the
Argentine.
In photograph B, the center braid is a mashed-together six-string
round braid of over-three, under-three sequence.
In В (1. and r.) are two triangular braids which are made from twelve-
string round braids—without a core, of course. The sequence of the
round braid is over two, under two. The edges are pressed together with
flat-nosed pliers while the rawhide still is damp. Few braiders know this
trick with rawhide round braids.
In the Argentine, the Providence of Tucuman to be more exact,
where braids with as many as six edges are made, they are used for reins
and designated “Tucuman reins.”
270
Buttons
PLATE 108
Roll Button. This type of button is undoubtedly the most primitive
of leather buttons. It is made very easily and is most practical. In South
America the old-time gaucho used one of these buttons in place of a
stirrup, hooking the button between his first two toes.
To make this simplest type of button, take a strip of leather, say
!4-inch or %-inch wide, taper it to a point and, about an inch and a half
back from the point, make a horizontal slit as long as the leather is wide
(Fig. 1). Dampen the leather, then turn the point inward and pull
through (Fig. 2) and the button is complete (Fig. 3).
I saw one of these buttons on the flap of a German Luger holster in
World War II. It had seen much wear but was as serviceable as ever
This type of button may be applied as a belt fastening as shown in
Figs. 4, 5 and 6 It is passed through the slot while disengaged and then
the button is formed when the tongue of the belt is in place. It can be
used thus for all sorts of fastenings.
To make another type of roll button, taper a small strip of leather,
wet it and then roll it up from the widest end (Fig. 7). When it is rolled
about two-thirds of the way, cut a slot directly through the roll, pass
the pointed end through (Fig. 8) and draw it tight (Fig. 9).
This button can be used on pocketbooks, boxes, etc,, by leaving a
long enough pointed end so that it can be fastened by the three-hole
method as shown in Fig 11
A leather thong doubled and passed through four holes as shown in
Fig. 10 serves as a fastener. To unloosen the button, pull on the pointed
end.
The method of using this button as a clasp for a box is shown in Fig.
12. It is also good on leather hunting jackets, or wherever a button or
clasp is needed.
PLATE 108. Roll Button.
272
273
PLATE 109
Two-Thong Turk’s-head Button. This is the same type of knot that is
used by cowboys in tying the ends of their reins together. Made with a
short thong of 1/8 inch in width, it is a practical button.
The first step is shown in Fig. 1 where the thong is doubled with the
flesh sides together. Loop the end of thong В as shown and bring it
around under A. Next, place A across the loop formed by B. Pass thong
В over A and through this loop (Fig. 2).
Bring thong A around underneath and up through its own loop as
indicated by the arrowline in Fig. 3. The loose knot is shown in Figs. 4
and 5. Tighten it by pulling easily on both ends of the thongs. See that
the ends of the thongs have the flesh sides together.
The ends may be cut off flush with the knot or left to facilitate
pulling the knot through the buttonhole.
Three-Thong Turk’s-head Button. This knot is made m the same
manner as the Turk’s-head terminal knot for round braid in Plate 38. In
this case three thongs are used. Cut the leather with a tapered end. Split
the larger end into three thongs. A, B, and C (Fig. 7).
Begin the crown knot as shown in Fig. 8 by folding the extreme
right-hand thong, which is C, over thong В and behind thong A. Next,
fold thong В over thong C and in front of thong A. Now fold thong A
over thong В and in between thongs C and В at their base, as indicated
in the arrowline in Fig. 9.
Pass thong C around the base of thong A and up through the center.
Then carry thong В around the base of thong C and up through the
center. Pass thong A around the base of thong В and up through the
center. These steps are indicated by the arrowlines in Fig. 10. The
finished knot is shown in Fig. 11.
To attach this button, cut three holes as shown in Fig. 12 and pass
the end X down through the left-hand one. then up through the
right-hand hole, down through the middle one and up through the
left-hand hole, as indicated by the arrowline in Fig. 12. This end-also
passes up through the center of the knot and forms one of the ends as
shown by the arrowline in Fig. 13. The ends may be trimmed or left, as
desired. Attached in this manner, the button will remain firmly affixed
indefinitely.
274
PLATE 109. Two- and Three-Thong Turk’s-head Button.
275
PLATE 110
Chinese Button Knot. The basis of this knot is that which sailors
term a carrick bend. Lay the thong over a mandrel as shown in Fig. j
or around the hand. Twist thong В (on the right) into a loop as shown
in Fig. 2 with the bight over thong A.
Bring thong A under thong В and in an over-one, under-one
sequence, as indicated by the arrowline in Fig. 2. Figure 3 shows the
completed carrick bend.
Bring the end of thong В up through the center on its own side as
indicated bj’ the arrowline in Fig. 3. Thong A follows a similar course
on its own side, as shown by the arrowline.
Remove the loose knot from the mandrel, or the hand, and bring the
two ends together, with their flesh sides touching. Begin to tighten the
knot carefully, first taking up the bight which originally was around the
mandrel. The knot now appears as shown in Fig. 4. Tighten it gradually,
always holding the two ends together until finished, as shown in Fig. 5,
Diamond Button Knot. The diamond button knot starts in the same
way as the Chinese button—with a carrick bend. The difference is in
bringing up the ends through the center of the knot.
In the case of the diamond button knot, instead of passing thong A
up through the center on its own side, bring it around as indicated by
the arrowline in Fig. 6 and up on the side of thong B, passing under B.
Carry thong В around to the side of thong A, pass it under thong A and
up through the center.
The bight around the mandrel is the top of the button. Keep the
flesh sides of the ends together and work out the slack until the knot
becomes tight. This is a more attractive knot than the Chinese button
knot.
Both can be made with a 1/8-inch thong, or wider if desired.
276
PLAIE 110, Chinese Button Knot and Diamond Button Knot
277
PLATE 111
Round Button of Four Thongs. To make this button take a piec' of
leather of ordinary thickness, 14 inches long and \vid---3plit in
half 6 inches from each end, making four 1/8-inch thongs (Fig. 1).
Fold the leather with the flesh side in and make a crown knot as
shown in Fig. 2. (This is made the same as shown in Fig. 1, Plate 100,
under square braids.) Here the thongs are designated as А, В, C and D.
Next, with the thongs designated as А, В, C and D, make a wall knot,
which is a crown knot done from underneath; in other words, pass
thong A under thong B, thong В under thong C, thong C under thong
D, and thong D under or through Lhe bight of thong A. See Fig. 3.
Draw up this wall knot so that it rests below the first, or crown knot.
Now make another crown knot as shown in Fig. 4 This one is carefully
worked down on top of the other two knots and appears as in Fig. 5.
The braiding or weaving process now begins. The sequence is
over-two, under-two, as shown in Fig. 5, where the awl passes under
two thongs to illustrate the course of thong C.
Pass thong C down over the two thongs below it and then up under
two, the second of which is thong D. Then pass thong D down over the
two below it and up under two, the upper one of which is thong A;
thong A down over two and up under two, the top one being thong B;
thong В downward over two and up under two, the upper one being
thong C, which already has been tucked in place in the first move of
this step.
The top of the knot now will appear as in Fig. 6. The thongs on top
are in the form of a square. If an awl is inserted down in each corner, it
will go clear through the knot alongside the folded part of the leather.
In Fig. 6 is shown the path of thong D. Working in a counterclockwise
direction, or to the left, arrowlines indicate the paths of the other
thongs. Pull them down through and cut them off underneath.
This button also can be made with three, six or eight thongs.
278
PI. VIE 111. Round Button of Four Thongs.
279
PLATE 112
Gaucho Knot Button. When finished, this button, made similar to
the preceding one, resembles the gaucho knot of two passes.
Cut the leather or rawhide as in the round button of four thongs (or
strings) in Plate 111. The first two passes are identical with those in
Plate 111, shown here in Figs. 1 and 2.
In Fig. 3 is shown the braiding procedure for all four strings. This is
indicated by the arrowline showing how string No. 3 passes over one
and under one. The other three strings are braided in the same fashion.
This is shown in Fig. 4.
Figure 4 also illustrates how the strings are doubled—that is, string
No. 1 passes down and under one string parallel to the string on its
right. String No. 3 also passes down under one string, paralleling the
string on its right. The other two strings are woven in the same way.
The positions of the strings are illustrated in Fig. 5. The next move is
the splitting of pairs, as shown by the arrowlinc marking the course of
string No. 1. It passes upward under two, splitting a pair of parallel
strings, then over two and under two. coming out at the very top.
The effect achieved is shown in Fig. 6. To complete this braid, each
string is passed down through the entire knot, as shown by the
arrowline showing the course of string No. 2. The string-ends are then
cut off, and the button is complete.
280
PLATE 112. Gaucho Knot Button.
281
PLATE 113
Eight-Thong Round Button. This is comparable to the round button
of four thongs shown in Plate 111. However, it is made with eight
thongs or strings.
First middle your thongs or strings and made a four-string round
braid sufficient to form a loop around a mandrel of the desired
circumference (Fig. 1). 'then Lie the eight strings together tightly next
to the top of the mandrel. Select two strings from each group and tie
these four strings at the top, as shown also in Fig. 1. With the other
four strings make a crown knot (arrowlines in Fig. 1).
Haring completed this crown knot (Fig. 2), make a wall knot as
shown also in Fig. 2, and indicated by the arrowlines. This results in the
braid shown in Fig. 3. Each string is then brought down in an
under-two, over-two sequence (arrowlines in Fig. 3). In Fig. 4 the
arrowlines show the path of each string upward—under two.
Untie the four strings which have until now been kept apart. Form
them into a crown knot, and bring each end down through the knot
itself. Do not pull these ends more than necessary as they might pull
through the crown knot. Cut off all ends.
Gaucho Knot Button of Eight Thongs. This is similar to the button
in Plate 112, but made with eight strings or thongs. As in the
eight-thong round button, start by middling your strings, braid them
into a four-string round braid, tie all strings next to the mandrel, and
then tie four strings at the top, two from each set. Next, make a crown
knot around these tied-off strings with the other four strings. Now.
instead of making a wall knot, pass each string over the next and under
another. All this is showm in Fig. 6. The wall knot is now made, as
shown by the arrowlines in Fig. 7 and completed in Fig 8. Each string,
now already having gone under one at the bottom, passes upward over
one, under one, and over one (the top). The sequence of each string
downward is: under two, over two, under two, and over two at the
bottom. Then under two going upward and the end cut off flush. The
finished button is shown in Fig. 9 after the tied-off strings have been
crowned and passed down through the knot as in the previous button.
Herringbone Button of Eight Thongs. In making a herringbone braid,
all steps in the previous button are completed until Fig. 8. The
sequence after the strings have passed beneath the bottom string is:
over one, under one, and passing over three strings at the top and going
down, split the first pair downward—in other words, go beneath. Next,
split the next pair of strings by passing upward, over two, and split the
final pair downward. The strings are then cut off. The top crown is
made with the tied-off strings and passed through the knot and cut off
as previously explained.
282
TlG*
PLATE 113. Eight-Thong Round Button: Gaucho Knot Button of Eight Thongs:
Herringbone Button of Eight Thongs.
283
PLATE 114
Square Button of Four Thongs. The square button of four thongs is
started in the same way as the round button of four thongs described in
Plate 111. Use the same length of leather, cut in the same fashion as
indicated for the round button and shown again in Fig. 1.
Fold the leather at the uncut part with the flesh sides inward (Fig.
2). Make a crown knot as shown in Fig. 3, working the thongs toward
the left or counterclockwise. Tighten the knot as shown in Fig. 4.
The next knot, which is a wall knot, or crown knot made from
beneath. is worked clockwise, or to the right, as shown in Fig. 5. This is
important—the crown knot is worked to the left and the wall knot to
the right.
The wall knot is drawn up snug just at the base of the crown knot.
The braiding or weaving of the knot is the next step. Start with
thong D as shown in Fig. 7. Work this thong to the right and pass it
back and down behind its own part as shown in Fig. 7. The same
applies to the other three thongs. For instance, carry thong A to the
right and down behind its own part; repeat likewise with thong В and
thong C.
All the thongs now point downward.
The final step in making this button is illustrated in Fig. 8. Work the
thongs toward the right and upward. Pass each around and over the one
next to it and up through the knot, as shown and indicated by the
arrowline in Fig. 8. Thong В thus is brought over thong C and up
through the knot. Thong C, in Lum, passes over thong D and upward.
And so on.
The ends may be cut flush with the top of the knot or pointed and
left protruding.
This makes a very attractive button.
Additional buttons can be found under Hondas; the Ring Button,
and various braided button coverings, such as the Pineapple Knot. etc.
284
PLATE 114. Square Button of Four Thongs.
285
Edge Braiding
Alamar, a Spanish word meaning gimp, or decoration, is a name given to this
knot or weave by the Spanish Caballero who used it to “dike” out his caballo
for parades and slate functions.
PLATE 115
Spanish Edge-Lacing of One Loop, Edge-lacing serves two purposes.
It joins the edges of two or more pieces of leather and provides a
decorative finish to the work by covering the raw edges.
Use a lacing thong about four and one-half times the length of the
edge to be covered.
Before making the holes or slits on the edges, it is best to thin down
these edges with a skiving knife, tapering them on the flesh sides. Then
carefully cement them together. In making the holes or slits, take into
consideration the width of the lacing to be used. A simple rule is that if
a lacing of 1 8 inch is used, space the holes 1/8 inch apart and also 1/8
inch from the edge.
In the Spanish edge-lacing, as well as in other types, it is more
convenient to work from the left to the right. Run the lacing through
the first left-hand hole from the front until only about 14 inch of the
end is left (Fig. 1).
Now insert the lacing back through the same hole, beneath the
projecting end and draw tight (Figs. 2 and 3). The end is thus held fast.
Before the loop is closed, apply a small amount of cement. Always
work from the front.
Now carry the lacing through hole No. 2 (Fig. 3) and bring it around
to the front again; this time it passes through its own loop (Fig 4).
This loop and working part of the lacing always come together flesh
side to flesh side. Tighten the first loop as shown in Fig 5. Pass the
lacing through hole No. 3, around to the front, through the loop,
tighten the loop and proceed to the next hole. The finished lacing is
shown in Figs. 7 and 8.
To insure-even lacing, always try to exert the same amount of pull
each time. When finished, lay the work on a hard surface and gently tap
the lacing down with a mallet. This distributes it and makes it lie flat.
288
PL ATE 115. Spanish Edge-Lacing of One Loop.
289
PLATE 116
Splicing. In edge-lacing it is best to work with short lengths of lacing
thongs and to splice on additional lengths as required. This will
eliminate the trouble of continually pulling through a lengthy lacing
which not only is bothersome but also narrows down the lacing toward
the working end.
In splicing, bevel both edges of the lacing (Fig. 1). Bevel the working
lacing on the flesh side, the other on the smooth side. Thus the top
edge of the spliced lacing passes through smoothly (Fig. 1). Touch with
some quick41rying cement, either rubber or Duco. and press together.
Be careful in using Duco for if it comes in contact with the finished side
of the leather, it will eventually leave a light spot as the rest of the
leather darkens.
Joining. Sometimes the lacing will run entirely around, as on the
edges of a billfold, and in such a case it can be joined together so that it
will not be noticeable. In Fig. 2 the lacing on the right represents the
start. It has gone completely around and has been brought up to the
point indicated on the left. In beginning the lacing which has to be
joined, do not fasten down the standing end A but leave a couple of
inches free, as shown in Fig. 2.
Withdraw the end A entirely from hole No. 2 and insert end В only
through the first piece of leather, allowing it to come up between the
two layers as shown in Fig. 3.
Take end A and bring it from the rear forward through the loop of
end В and then from the front to the rear through its own loop (Fig. 4).
The next step, not shown in the sketch, is to bring end A from the rear
forward through hole 2, but only through the one layer of leather and
up alongside end B. Tighten the braid, touch a little cement between
the two ends, down as far as possible, cut them off and tuck them in. It
will be impossible to see where this lacing has been joined.
To end a lacing that is not to be joined, follow the procedure
illustrated in Figs. 6 and 7 This will provide a knot which will hold
fast.
In going around corners with any type of edge-lacing, always pass
through the corner hole two or three times to space the lacing on the
outer edge as shown in Fig. 8.
290
PLATE 116. Splicing and Joining Edge-Lacing.
291
PLATE 117
Spanish Edge-Lacing of Two Loops. Use a thong about six times the
length of the edge to be covered.
Start with the standing end in the back, held down by the thumb
between ,the first and second hole. Then pass the thong from the front
to the rear through hole No. 1 as shown in Fig. 1. Bring the thong
forward again and pass it through hole No. 2 from front to rear also
shown in Fig. 1.
Bring the thong to the front again, and this time, instead of passing it
through a hole, carry it beneath the two loops formed on the top as
shown in Fig. 2. Tighten the work by pulling at the two points
indicated in Fig. 3. Always try to exert the same tension so that the
lacing will be consistently even.
After passing the thong under the two loops, bring it to the front
again and this time pass it through hole No. 3 as shown in Fig. -1. Bring
it to the front and pass it under the two loops as shown in Fig. 5.
Tighten by pulling upon that portion of the thong indicated in Fig. 5.
The sequence now is through hole No. 4 from front to back and then
under the two loops on the top; tighten (Fig. 6): then through hole No.
5 and under the two loops; and so on.
Joining Spanish Edge-Lacing of Two Loops. Where the edge-lacing
goes completely around as on a wallet or billfold and comes back to the
starting point, finish the work by joining the braid. When this is done
properly it is difficult to tell where the braid ends or begins.
Note in Fig. 7 at the starting point the standing end is shown in
dotted lines. The standing end is withdrawn through the starting hole
and the loops through which it had passed. It is shown protruding from
hole No. 2 in Fig. 8.
The braid has come completely around and the working end is shown
in Fig. 9 just to the left of the starting hole. Pass it through this hole
from the front, up through the loop to the right, and under the
intersection of the two loops to the left, as indicated by the arrowline
in Fig. 10. Then pass it back over its own part, down through the
right-hand loop and into the same hole in which is the standing end
(Fig. 11).
When binding together two pieces of leather, tuck both ends inside
between the two pieces and the braid is complete.
292
PLATE 117. Spanish Edge-Lacing of Two Loops.
293
PLATE 118
Spanish Edge-Lacing of Tliree Loops. For this edge-lacing, use a
thonging lace about 7’Л times the length to be worked. Start by passing
the thong from the front to the rear through hole 2 and folding the end
over the edge to the back between holes 1 and 2. This end is shown in
dotted lines in Fig. 1.
Next, bring the working end to the front and pass it through hole 1
and to the front again and through hole 3. Do not draw the loops tight.
There are three of these loops on the edge of the leather. Now pas*
the working end through the three loops from the front to the rear
(Fig. 2), bring it forward and pass it through hole 4 from the front (Fig
3).
Tighten the start of the braid by drawing on it in the same sequence
it was made and in the same direction, but leave the last three loops
slightly loose so the working end can pass through them easily. The
original end, shown in dotted lines, should be secured beneath one of
its own parts.
In Fig. 4 the working end is shown passing through the second set of
three loops. Bring it to the front and then down through hole 5.
Continue the braid in this way until the finish, when it is tapped lightly
with a hammer or mallet to make it lie smoothly.
Two-Tone Spanish Edge-Lacing of One Loop. If a tw o-tone effect on
edge-lacing is desired, use two thongs of different colors. In the
illustration we will designate thong A as white and thong В as black.
Always work from the front to the rear. First introduce thong A
through hole 1 and then thong В through hole 2. Bring thong A to the
front and through hole 3 (Fig. 6).
Now pass thong В through the loop of thong A from the front to the
rear and to the left of its own part, as shown in Fig. 7. Bring it forward
and through hole 4, as shown. Pass thong A through the loop of thong
В and to the left of its own part and bring it forward and through hole
5 (Fig. 8). Continue this until the end, first working with one thong and
then the other. The standing ends at the beginning can be folded over
and secured in the rear beneath their own parts.
294
PLATE 118. Top: Spanish Edge-Lacing of Three Loops.
Bottom: I’wo-Tone Spanish Edge-Lacing of One Loop.
295
PLATE 119
Round Braid Edge-Lacing. This edge-lacing resembles the four-thong
round braid, except that it is made with one thong. There are several
methods of making this beautiful edge-lacing. Here we will consider the
first:
Start with a thong at least seven times the length of the edge to be
covered. Space the holes the same as the width of the lacing and punch
them this same distance from the edge.
Pass the thong through hole 1 from the front; forward and through
hole 3 from the front; the same through hole 5 (Fig. 1): then 7 and
finally 9. If the edge-lacing is longer, keep on passing the thong to the
right through every other hole. Leave an extra hole (hole No. 10) at the
end as shown (Fig. 2).
Now to start working back. From hole 9 go back through 7 as
indicated by the arrowline in Fig. 2. Continue back toward the starting
point until hole 2 is reached. Pass the end through hole 2, as indicated
by the arrowline in Fig. 3.
In the next step, work towards the right, passing the thong through
holes 4, 6, 8 and 10 (Figs. 4 and o).
Now the actual braid begins. The working end of the thong is in the
rear of hole 10. Bring it forward over its own part and under the next
thong.
This step is indicated by the fid in Fig. 6. The thong follows the same
course. Cany it through hole 8 (Fig. 7), and in the rear pass it. under the
thong to the left of it, as can be seen in Fig. 8. then over the next and
under the next. (Fig. 8). The awl is shown passing through hole 6 in Fig.
8, which will be the course of the thong. On the other side, pass it
under one, then over one on top and under one in the front. Continue
until it joins the standing end which is in hole 1.
This braid lies flat and entirely covers the raw edge of the leather. It
has many uses on saddles, pistol holsters, knife sheaths, etc.
A very practical watchband in kangaroo hide. Courtesy. D.W. Morgan, Austral
Enterprises.
296
PLATE 119. Round Braid Edge-Lacin^.
297
PLATE 120
Round Braid Edge-Lacing (Second Method). Here is another way to
make the four-part round braid edge-lacing of one thong Start as in Fig.
1 by passing the thong through hole 1 from rear to front; then over the
edge to the rear and forward through hole 4.
In the next step, also shown in Fig. 1, bring the working end to the
left and forward through hole 2 from the rear to the front.
In Fig. 2 the working end is shown passing over the edge and through
hole 5 from rear to front. Up to this point the working end of the
thong has been passed over its own parts. However, in Fig. 2 the
arrowline indicates how the working encl in the next move passes to the
rear over its own part and beneath the loop of that part of the thong
over hole 4.
Bring the working end of the thong forward through hole 3 as shown
in Fig. 3. The fid, with its end beneath the thong which emerges from
hole 4, is also shown in Fig. 3.
After passing the working end beneath the thong at hole 4, carry it
over the edge, to the rear, and forward through hole 6 (Fig. 4). Pass it
over its own part and under that part of the thong illustrated by the
course of the fid in Fig. 4.
Next, bring the working end from the rear to the front through hole
4, which is already occupied by a section of the thong (Fig. 5). Pass it
beneath the section of the thong which emerges from hole 5. as shown
by the fid in Fig. 5. Now move the working end to the rear and forward
through hole 7. Pass it over its own part and under a section of the
thong as m Fig. 4, and then through hole 5 to the front—and so on until
the finish. The sequence is always over one, under one. If the original
standing end has been left long it can be worked forward to close up
the braid at the beginning, following the over-one. under-one sequence.
Round Braid Edge-Lacing (Third Method). By using four thongs, all
of different colors, or two of one color and two of another, you can
obtain a multitone braid as shown in the sequences in Figs. 7. 8, 9,10,
11 and 12.
Work with two thongs at a time, lacing the first pair from left to
right to the end and then interweaving the next pair. Remember the
over-one, under-one sequence.
298
PLATE 120. Round Braid Edge-Lacing.
299
PLATE 121
Eight-String Round Edge-Braiding. The name is confusing. The
edge-braid actually is made with one long string, but, when the braid is
finished, it looks like an eight-string round braid with a sequence of
over one, under one. braid for securing the lining to the skirting of a
saddle and, with wider thongs, is sometimes used on the cantie of the
saddle braid for securing the lining to the skirting of a saddle end, with
wider thongs, is sometimes used on the cantie of the saddle. Such
saddle decorations are not seen nowadays. This is too bad, for a saddle
could really be dressed up and beautified with numerous types of braids
and fancy knots—and in earlier times they actually were. This is another
phase in the lost art of braiding. A book could be written on this
subject.
This edge-braid is primarily used to join two pieces together, as well
as to cover and decorate the raw edges. In our diagram, for simplicity s
sake, we have shown it worked on the edge of one piece of leather.
The rawhide string or leather thong, whichever you prefer, is passed
through hole No. 1 from the rear and over the edge through hole No. 5,
also from the rear. The arrowline shows the course of the string or
thong, passing under its own part on top and then through hole No. 2
from the back. The sequence from then on is clearly illustrated in the
diagrams. To finish off the starting point, the original end is worked
forward and back, as shown in Fig. 7. To completely finish the braid at
this end, the string will have to pass through hole No. 1 at least tv. о
more times.
At- the bottom of Plate 121, two sequences are shown where two
strings, or thongs, of contrasting color arc worked simultaneously. The
sequence given is the beginning of an under-two, over-two braid, which
is explained more fully in the next plate, although of but one string.
This edge-braid gives a very pretty effect.
300
PLATE 121. Eight-String Round Edge-Braiding.
301
PLATE 122
Eight-String Round Edge-Braiding (Second Method). This edge-braid
and similar ones which can be made by thia method, are. as far as the
author knows, his own invention. Sooner or later in braiding, as in
many other arts and crafts, the “original"’ turns out to be something
someone else thought of years ago. Such may happen in this case, as the
working out of this braid seems to come as a natural sequence to the
one shown in Plate 121.
This is a braid which can be made with an over-two, under-two
sequence, and, by leaving a greater number of holes vacant on the first
pass, can be made into a braid of over three, under three, and so on In
other words, it can be made to simulate an eight-string round braid of
over two, under two, or a twelve-string round braid of over three, under
three, and so on. Many combinations can be worked out.
It is a decorative edge-braid and when finished looks, as one fellow
remarked, “as if it just growed there.”
The first and second moves, shown in Figs. 1 and 2, are similar to the
start of the braid in Plate 121. But it will be noticed in Fig. 3 that the
thong or string, after passing to the front through hole No. 6, then goes
under two. In Fig. 4 it also passes under two in Fig. 5, it passes under
two and then over one in the rear before coming to the front through
hole No. 4. In Fig. 6, the string passes over one, under two and comes
out through hole No. 8. It passes to the back, then (Fig. 7) under two,
over one and forward through hole No. 5.
The continued sequence is, in front, always over one, under two; in
the rear, under two. over one. By back-braiding at the start, you can
finish off this section.
Should you care for a simulated twelve-string round braid, skip six
holes at the start and the final sequence will be, at the front, over two,
under three, and at the back, under three and over two.
Worked on a saddle, this makes a beautiful—and practical-
decoration.
3 2
PLATE 122. Eight-String Round Edge-Braiding.
303
PLATE 123
Use of Spanish Edge-Lacing in Attaching Pockets and Flaps. First,
cut out the pocket patch marked A in Fig. 1. Around the three edges to
be laced on, punch holes about 1/8 inch from the edge and about 3/16
of an inch apart. Lay the pocket patch on the part to which it will be
fastened and insert a fid or other pointed instrument into each hole
making a corresponding impression on the leather foundation, marked
B.
Punch out these holes at the impressions on B. About И inch from
this row of holes, punch the same number of holes in the leather B,
each opposite a hole in the inner row. At the curves of the pockets
these holes will be spaced wider apart than those on the inner
circle—but there should be an equal number of holes on both inner and
outer circles.
With a little cement around the edge of the under part, affix Lhe
pocket flap, being careful that the holes in the flap are directly over
those on the leather beneath. Turn back the flap at the upper
right-hand corner and pass the thong (3/32-inch commercial lacing is
best) through the first inner hole in the leather В and back up through
the outer hole (Fig. 1). Lay tire flap comer hack with a little more
cement on it and on the end of the lacing so that the latter is held fast,
and pass the needle through the hole in flap A and down through the
corresponding hole in the leather В (the same through which the lacing
was first inserted) and up through the second outer hole in В (Fig. 2).
Bring the working end (shown with needle attached) down through
the loop formed by the lacing, keeping it inclined to the right (Fig. 3).
Draw it snug. Pass the needle down through the second inner hole and
up through the outer third hole (Fig. 4). Next, bring it down through
the loop formed between the second set of holes (Fig. 5). Pass it down
through the inner hole. No. 3, and up through the outer hole, No. 4,
and again down through the loop formed. It will be seen by now that
this is the same as the Spanish edge-lacing of one loop (Plate 115).
Staggered Slits. To make the thong lie snug on the edge, slant and
stagger the slits as shown on the pistol holster in Fig. 7.
Miscellaneous Edge-Lacings. Fig. 8 shows a one-thong spiral or
whip-lace; Fig. 9, double one-thong spiral: Fig. 10, double two-thong
spiral; Fig. 11, two-thong plain spiral; Fig. 12. one-thong alternate
spiral; Fig. 13, two-thong alternate spiral; Fig. 14, one-thong novelty
spiral; Fig. 15, a Venetian spiral. The latter is made with very' wide, thin
lacing.
304
PLATE 123. Applications of Edge-Lacing.
305
PLATE 124
Gaucho Edge-Braiding of One String. This sturdy but decorative
edge-braiding first came to my attention in an article in El Caballo, the
Argentine horse magazine, written by my friend, Don Luis Alberto
Flores. Don Luis presented it, however, in a braid of five strings (Plate
125) and in this account I have sought to simplify it by making it with
one string.
In Fig, 1 the rawhide string passes from the front to the rear- through
hole No. 1, then over the top and through hole No. 2. In this same
figure the working end of the string passes from the rear to the front
through hole No. 1 (indicated by the arrowline).
In Fig. 2 the working end passes over its own part and through hole
No. 2 to the front (shown by the arro vline). Once more it goes through
hole No. 1 from the front to the rear, over the top part and through
hole No. 3 (arrowline shown in Fig. 3).
In Fig. 4 the working end passes from back to front through hole \o.
2 and in Fig. 5 it passes over its own part and through hole No. 3 from
the rear to the front and continues through hole No. 2 to the back.
These moves are indicated by arrowlines. The sequence is continued for
the desired length. Figure 6 shows how this interesting edge-braid looks
from the front and the back.
In Fig. 7 the string is middled and both ends are used as illustrated :n
the remaining figures. Front and back arc shown in Fig. 11.
Some of the many designs and braids that can be employed to
make belts are shown in the author’s collection of belts.
306
T»’G I г
PLATE 124. Gaucho Edge-Braiding of One String.
307
PLATE 125
Gaucho Edge-Braiding of Three Strings. In this edge-braiding three
strings are introduced into hole No. 1 as shown in Fig. 1. String C is laid
across the top or edge as illustrated in Fig. 2. Then string A is brought
over string C and down through hole No. 2 to the rear. String В is
passed under string C and over the edge.
In Fig. 3 stnng A goes back through hole No. 1 and then passes over
its own part and under string B. String C is shown by the arrowline in
Fig. 4 how it passes through hole No. 2 then back through hole No 1.
In Fig. 5 its further course is indicated where it passes forward over
string B, then through hole No. 3, back through hole No. 2 and over its
own part and under string A. The continuation of this braid, using
string B, is shown in Fig. 6.
The finished braid is shown in Fig. 7.
In Fig. 8 is the start of a five-string braid, the type used by Don Luis
Alberto Flores in his article in El Caballo. This becomes a double braid
when completed as illustrated in Figs. 12 and 13. As said before, this is
a very durable braid and once worked on is difficult to work loose,
308
PL ATE 125. Gaucho Edge-Braiding of Three Sfruigs.
309
1
Leathercraft is an excellent hobby. The amateur can begin with
simple braids and projects and as skills develop move on to more com-
plex and difficult work.
The objects to make or cover with leather are limitless. Combinations
of braiding, lacing, edging and appliqu^ work in the wide variety of
leathers and materials available offer a challenge to any braider.
Mr. Tony Genco of Rochester, New York, a skilled leathercraftsman,
has devoted more than twenty years to his hobby. As a participant in
the International Assembly of Leathercraftsmen, he has captured many
salon ribbons in competitions.
Three fine examples of Mr. Genco’s craftsmanship. In his right hand he is holding “
Craftsman’s magazine binder with an original eleven-strand raised circle applique
braid framing a carving by R.J. Hartmann. In his left hand is a personal scrapbook.
This requires 2,900 precision hand-punched nib punchings to execute the half'
hitched lace design and used 82 yards (three colors) of 1/8” Duncan hand cut
lacing. The personal notebook on the table used an eleven-strand raised appliqu®
circle to frame Al Stholman’s cougar head carving.
310
Buckle and Ring Coverings
PLATE 126
Spanish Type Buckle Covering of One Loop. This is similar to the
Spanish edge-lacing of one loop and. once started, is worked in the
same fashion (Plate 115).
In the standing end of the thong or lacing cut a small slit, and widen
it with the fid. Hold the buckle in the left hand with the front, toward
you. Place the lacing as shown in Fig 1. Pass the working end, or
pointed end, of the lacing through the slit as indicated by the arrowline
in Fig. 1 and draw the loop tight. If the tongue of the buckle is free to
slide back and forth on the heel of the buckle, he sure it is held in the
center.
Pass the lacing beneath the metal part of the buckle from the front,
leaving a bight as shown in Fig. 2. The arrowline in Fig. 2 indicates the
path of the lacing in the next step. It enters from the front.
Pull out the slack as shown in Fig. 3, but leave a small bight or loop
at the pulling point. The lacing again passes beneath the metal part of
the buckle and to the rear.
Bring the lacing to the front over the metal part of the buckle. Under
the bight which was left, place the fid (Fig. 4) and insert the point of
the lacing through this part. Tighten as shown in Fig. 5. Next, pass the
lacing beneath the metal part from the front as shown in Fig. 6.
Bring it forward over the buckle and through the bight as indicated by
the fid in Fig. 7
Continue thus around the metal part of the buckle. The sequence is
always the same: The lacing passes from the front to the rear beneath
the metal and then goes through the resulting loop, also passing from
front to rear.
Be careful to keep the braid on the outer edge of the buckle. Work it
rather tightly so that it holds, but keep the tension consistent.
After working around the buckle and the braid is on the left-hand
side of the buckle tongue, draw tight and cement the end to the leather
itself. The start and finish of the braid will be hidden when the buckle
is attached to the belt.
312
PLATF 126. Spanish Type Buckle Covering of One Loop.
313
PLATE 127
Spanish Type Buckle Covering of Two Loops. This is similar to the
Spanish edge-lacing of two loops (Plate 117) but is worked backwards.
Slit the standing end of the leather thong or lacing and place this end
on the left side of the buckle as shown in Fig. 1. Pass the point of the
lacing through the slit and bring it to the front. Tighten and pass the
lacing beneath the metal part of the buckle and between the original
loop and the tongue; that is, to the right of the original loop and left, of
die tongue (Fig. 2).
Bring the lacing to the front, over the buckle and over the original
loop as shown in Fig. 3. Tighten and push the lacing against the tongue
of the buckle, being sure the tongue is in the center.
Again, pass the lacing under the metal part as shown in Fig. 3. Insert
the fid between this last loop and the original loop and under two loops
of the lacing. This step is clearly illustrated in Fig. 3. The lacing follows
the course of the fid; again, bring the lacing to the front and under the
metal part (Fig. 4).
The fid makes an opening under the two loops as shown in Fig. 5. Be
sure that the working end of the lacing always comes out in the rear to
the right of its own loop. This is shown in Fig. 6.
Follow this sequence around the metal pan of the buckle until lhe
right-hand side is reached. Each time bring the lacing over to the front
and under the metal part and then again to the front and under two
loops.
This braid must be fairly snug on the metal so that it will not slip.
Don’t worry about the corners. The underneath loops may overlap
slightly but the braid on top will be even.
By thus working this braid backwards it can be kept tight at all
times. However, it can be worked as in the edge-lacing of two loops;
that is, from left to right.
314
PLATE 127. Spanish Type Buckle Covering of Two Loops.
315
PLATE 128
Spanish Type Buckle Covering of Three Loops. This is similar to the
Spanish edge-lacing of three loops, except that it is worked backwards.
Hold the buckle with the front toward you and place the thong as
shown in Fig. 1. If the tongue or pin of the buckle is movable, be sure
that it is in the center before the braiding is started.
Pass the working end through the buckle, inclining it toward the
tongue and to the right of the standing part as in Fig. 2
Pass it through a second time, also inclining it to the right of both
loops now around the metal heel of the buc kle, as indicated by the
arrowline in Fig. 2 and shown in Fig. 3.
Bring it down and forward and pass it through the buckle the third
time, now inclining it toward the left, as indicated in Fig. 3 and shown
in Fig. 4.
It is sometimes difficult to get started, as the loops must not be too
tight. At this stage compare your beginning with Fig. 4 to be sure all
the loops are in the right place.
The next step has been illustrated in three different ways. First, in
Fig. 4, it is shown by the arrowline. Next, in Fig, 5, it has been shown
by inserting the fid in the portion through which the thong passes. In
Fig. 6, the thong has passed through this place, under three other
thongs and emerged on the top.
The thong does not, in this instance, pass around the metal part of
the buckle. It comes down in front, inclines to the right and passes
beneath the three thongs.
In the next step which is the beginning of the second stage of the
braid, bring the thong down to the front, pass it through the buckle and
around the metal part, indicated by the arrowline in Fig 6 and shown
in Fig. 7.
Again the fid is inserted beneath two thongs and under the loop,
which makes three thongs (Fig. 7).
Pass the working part of the thong back to the front, over the metal
part of the buckle, then down toward the right and through the course
followed by the fid, under the three thongs, and, as before, over the
metal part.
Continue this until the lacing is completely around the buckle and on
the side of the tongue opposite to the starting point. This braid will
make a thing of beauty of an ordinary buckle.
316
PLATE Г28 Spanish Type Buckle Covering of Three Loops.
317
PLATE 129
Two-Tone Spanish Type Buckle Covering. This two-tone buckle
covering goes well with a belt braided from two different colored
thongs or strings.
Start your braid as shown in Fig. 1 where the standing end of each
thong is slit and the working end passed through to the front. Thong д
is passed around under the bottom of thong В and thong В is hitched
through the loop of thong A (arrowline, Fig. 2). Thong В is then passed
beneath from front to back as shown by the arrowline in Fig. 3.
Next, work thong A, passing it from the front to the back under the
two parts of thong В and then down and under as shown by the
arrowline. Work one thong and then the other until the buckle is
covered. The ends can be tied off as shown in the previous Spanish-type
buckle coverings.
Four-Thong Round-Braid Buckle Covering. This braid is worked as
the regular four-thong round braid, starting for convenience on the left
of the tongue of the buckle as shown in Fig. 6. After bra ding
completely around the buckle it is finished off on the right of the
tongue as shown in Figs. 9 and 10
Eight-String Round Buckle Covering. Four thongs or strings are
middled and the braid started on the left of the buckle tongue as
illustrated in Fig. 11. The drawing shows the work from the top. When
completed on the right of the tongue, it can be tied off. This is a very
popular type of buckle covering in the Argentine.
Fancy braided rawhide and leather belts designed and made by the author
318
PLATE I29. Two-Tone Spanish Type Buckle Covering; Four-Thong Round-Braid
Buckle Covering: Eight-Stnng Round Buckle Covering.
319
PLATE 130
Half-Hitch Ring Covering. This simple covering, adaptable to rings as
well as buckles, is made by simply employing a series of half hitches as
shown in Figs. 1, 2, and 3. The finished braid is shown in Fig. 3 with a
side and a top view. I first saw it on a belt buckle sent to me from
Australia, and later effectively employed it in covering harness rings.
Cockscomb Ring Covering. Starting as in the previous braid (Fig. 1)
shown again in Fig. 4, after a hitch one way, the next step is to make a
hitch in the opposite direction (Fig. a). Be certain that the flesh side of
the string or thong is always against the metal so Lhe finished side is
out.
The completed braid is shown in Fig. 6. both from the side and from
the top.
Additional braided ring coverings will be found under How to Make a
Braided Cincha, in the Twist Braid section.
PLATE 130. Half-Hitch Ring Covering; Cockscomb Ring Covering.
320
Other Braided Coverings
PLATE 131
Т-Knot for Covering Leather Holding a Ring. One way to cover the
leather holding a ring, as well as reinforcing this juncture, is with a plain
five-part four-bight Turk’s-head. It can be followed around and doubled
as well as interwoven, as all such Turk’s-heads, and is highly decorative.
Start as in Fig. 1, carrying the working end of the thong around
beneath the ring and back over the right-hand side. The arrowline in
Fig. 1 shows the next move, which is completed in Fig. 2. Also in this
figure the arrowline indicates the next pass.
Continue as in Figs 3, 4, and a. The completed knot is shown in Fig.
6.
PLAT E 131.1-Knot for Cover ng Leather Holding a Ring.
321
How to Cover Square and Rectangular Objects. By using the same
five-part four-bight Turk’s-head, a square or rectangular object may be
covered with braidwork (Fig. 7). Be certain that both ends are covered
with the four bights of this Turk’s-head as shown in the section marked
“Top" in this figure. Then follow around, paralleling the previous
weave until the entire object has been covered.
Should this object be longer as in Fig. 9, a nine-part four-bight
Turk's-head is used. The method of making this Turk’s-head will be
found under the section on Turk’s-heads.
Bricks can be covered for doorstops, or smaller square or rectangular
objects can he covered for paperweights.
PLATE 131 (Cont.). How to Cover Square and Rectangular Objects
How to Cover a Pair of Stirrups with the Conquistador Braid. Photo
No. 1: This is one of a pair of Visilia-type stirrups. When bought from
Fred Mueller of Denver they were galvanized. Here the galvanized
coverings have been removed. But this is not necessary.
Photo No. 2: The bolt with its sleeve was removed. A piece of saddle
leather 25” x З’/j” was cut and soaked thoroughly in soapy water. The
leather was then molded around the inside of the stirrup. Holes were
punched and the leather was molded over the top and the bolt and
sleeve of the stirrup replaced. The bottom was tied down as shown and
the leather allowed to dry. When dry, mark the inside of the leather
around the stirrup and cut off so the leather comes flush with the
outside of the stirrup.
Photo No. 3: Here a rectangular thread of the same leather has been
laced over the bottom of the stirrup, holes punched and the
conquistador braid started. As the braid is carried hack and forth,
appropriate holes are punched in the covering. The string enters these
322
holes from below and then back through or beneath itself (shown by
the fid)-
photo No 4: This illustrates the braid as it progresses.
photo No. 8: This shows the finished braid.
Photo No. 5: At this point, stop the
conquistador braid, remove the bolt and
sleeve, lift the leather and punch five
holes for the lone star applique. When
this is completed, replace the bolt and
sleeve.
Photo No. 6: The conquistador braid
is continued and the string passes
through the flap as well as the braid and
holds both together.
Photo No. 7: The top part or flap is
fastened with the stairstep appliqu6 as
shown. Both inside and outside of this
flap were cut so they could be joined
together thus
Photo No. 9: This is the covered stirrup with a spurred boot in it. At
Ле top the stirrup leather has a silver dollar inserted and ringed with
Ле stairstep applique.
324
325
Handle Coverings
PLATE 132
Slit-Leather Handle Covering of One Thong. Cut a piece of leather
the length of the handle to he covered. The supposed handle is shown
in Fig. 2 and the corresponding piece of leather in Fig. 1. Then wrap
the leather around the handle and cut off so that the ends exactly meet.
Now slit the leather so that it is divided into five sections, А. В, C, D,
and E (Fig. 1). The leather may be slit into more or less than five
sections if desired so long as the total is an uneven number; for
example: three or into more or less than five sections if so desired so
long as the total is an uneven number; for example: three or seven
sections.
The thong (Fig. 3) should be the same width as the width of each
section.
Lash the leather around the top of the core as shown in Fig. 4. Insert
the end of the thong under the right-hand edge of the leather with some
cement on both sides so that it will hold to both the leather and the
handle. It is better to thin this part so it will not bulge through the
leather.
Bring the thong to the left over the first section, which is E, Fig. 4;
then under the next, which is section D (Fig. 5); over the next (not
shown in the diagram, but which is section C); under B, over A and
under E (Fig. 6). Continue this alternative weave of over one, under
one.
Keep working the thong up snug but also keep the leather pulled
down. Go around and around until the thong will pass through the last
slit without pinching the leather. Conceal the working end inside the
leather covering and lash down the bottom.
This gives a vertical pattern and is very effective with contrasting
leather and thong (Fig. 7).
To obtain a spiral pattern, cut the leather covering as explained
above. This example shows six slits, dividing the leather into seven
sections (Fig. 8). Tire thong should be one-half the width of each
section. Start as before but go over two sections (Fig. 9), then under
two sections, and then over two (Fig. 10).
The bottom and top of this covering may be concealed with
Turk’s-heads or woven knots, as explained later in the book under
Turk's-heads and Spanish knots, beginning with Plate 143.
PLATE 132. Slit-Leather Covering of One Thong.
326
327
PLATE 133
Spanish Ilitchings. For the sake of clarity in the illustration a
minimum of thongs has been used and larger spaces left between them
than is actually necessary' in the working of this braid.
Space the thongs around the circumference of the handle so that a
space is left between each one equal to the width of the thong; that is,
if 1/8-inch thongs are used, leave a space between them of 1/8 inch.
Take a longer thong, which is designated as thong X in Fig. 1. Slit
one end and fasten it around the top, thus binding on the other thongs
as shown in Fig. 1.
Pass the thong X around the core in a counterclockwise direction.
Bring thong No. 2 over thong X and then under to the left of its own
part, as shown in Fig. 2. Thong No. 3 is brought over and then under
and to its left. Repeat this operation with thongs 4 and 1.
On each turn of the longer thong, tighten up the braid by pulling the
other thongs, and keep the work snug. As in all braiding, a consistent
pull must be used to keep the braid even.
Continuation of the work is shown in Fig. 3 and in Fig. 4 is a clearer
key to the braiding process. When the handle is completely covered,
lash down the working ends of the thongs. Both top and bottom will be
covered with Turk’s-hcads or Spanish knots, detailed later. The finished
braid is shown in Fig. 5.
Zig-Zag Braid. This braid is worked in the opposite way from the
above braid but on the same principle. First, wrap the longer thong
around the handle from top to bottom in a spiral fashion. It should not
be too Light and it is well to saddle-soap the thong thoroughly before
winding it around the core.
Work down with one thong at a time as shown in Fig. 6. The pattern
can he varied by working the hitch either to the right or to the left. Use
different colored thongs if desired.
32S
PLATE 133. Spanish Hitching and Zig-Zag Braid.
329
Various types of handle coverings for riding crops. Left to right: Multiple
Braid Covering (Pl. 136); half-hitching zig-zag type (Pl. 133); Slit-Leather
covering (Pl. 132). Pineapple-type woven knots at each end of handle-braid
(Pl. 173). Use of twist braid (Pl. 15) in back part of woman’s belt. This is
"wormed” with black lacing. Pineapple knots (PI. 173) and gaucho knot of
three passes (Pl. 165) shown.
330
Braided rawhide breast collars made by John Conrad, Bellflower,
California,
331
PLATE 134
Mosaic-Type Braids. This is similar to the slit-leather covering with
one thong shown in Plate 132, but it is worked with independent
thongs, which will enable one to vary the color of the thongs to form
various chromatic patterns.
In the illustra ons spaces have been left between the thongs which
are lashed to the core. In the actual work, however, these should be
close together. Thus, if the circumference is 1-1/8 inches, nine 1/8-inch
thongs will be needed. An uneven number is always required.
The longer thong, which is wound around the core, should be the
same width as those lashed to the core. Slit it, pass the end through and
tighten it over and around the other thongs as in Fig. 1.
Working counterclockwise, pass the long thong under thong 1 and
over thong 2; then under and over all the way around. When back to
thong 1, pass lhe long thong over, and at thong 2 pass it under.
A spiral effect may be obtained by passing under two thongs and
over two thongs.
Horizontal Braid. This is similar to Spanish hitching except that it is
worked horizontally. The thongs, in this case thirteen, are lashed about
the core, and the long thong is tightened at the top of the handle. Pass
the long thong beneath thongs 4 and 3, bring it back around thong 3
and then under 3 and 2 (Fig. 4).
This is the sequence: Under two, over one, under two, over one.
When back to the starting point, it will be noticed that the long thong
passes under 4 and 3, over 3 and under 3 and 2. The arrowline indicated
the next step.
Figure 6 is an enlargement of the way the braid is worked. In Fig. 7,
it is shown how, instead of going under two and over one. you pass over
two and under one.
Hitching. This is done entirely with one thong. Pass the thong around
the core and over its own end, as in Fig. 8. before the hitching begins.
Pass lhe thong over the part around the core, behind it, and then over
iis own part. In the illustrations this braid appears loose, but in the
actual working it should be kept tight.
332
PLATE 134. Mosaic Type — Horizontal Braid — Hitching.
333
PLATE 135
Four-Thong Twist Braid Covering. This, as well as similar braids
shown in Plates 100 and 102, can be used for handle covering. When
working with a core, or heart, usually six thongs are employed, but for
the purpose of simplifying the technique, four thongs are used in the
illustration.
The sum of the width of the thongs should equal the circumference
of the handle to be covered. That is, if the handle measures one inch
around, each thong should be 1/4 inch.
Lash the thongs, flesh sides out, to the bottom of the handle, as
shown in Fig. 1. The first step is the same as in the square braid in Plate
100. Bring thong 1 up inclined to the right (Fig. 2). The smooth or hair
side is now uppermost. The arrowline in Fig. 2 indicates the course of
thong 2.
Bring thong 2 up under and then over thong 1 (Fig. 3). Bring thong 3
up and over thong 2 in the same fashion, as indicated by the arrowline
in Fig. 3.
In the next step, bring thong 4 up and over thong 3 and then pass it
through the bight or loop of thong 1. This is indicated by the arrowline
in Fig. 4 and shown in Fig. 5. Work the braid down snug, in fact rather
tightly, as shown in Fig. 6, which view is straight down on the braid
from the top.
Continue now in the same direction, or counterclockwise, and pass
each thong over the one to its right: 1 over 2, 2 over 3. and so on. When
thong 4 is reached and has been brought over thong 3 it goes down
through the bight or loop of thong 1.
However, as shown in Fig. 7, each thong is twisted or given a half
turn at its base so the smooth side always is uppermost. Care should lie
taken that this twist is as close as possible to the base, and as each
section is lightened be sure that the smooth side is out. This is the
purpose of the twist. In some cases it will be necessary to use your fid
in readjusting this twist after tightening.
The colors of the thongs may be varied. When the twists have all
been evened up, roll the braid gently under your foot to smooth it out.
334
PLATE 135. Four-Thong Twist Braid Covering.
335
PLATE 136
Six-Thong Multiple Braid. In this type of braid both ends are finished
and need not be covered. IL is popular in covering a core with varied
circumferences as the process of first spiraling the thongs makes it
possible to compensate for bulges and depressions.
Six thongs are used. Their total width should be the same as the
circumference of the core, although this is not absolutely necessary.
Lash the thongs to the bottom of the core, as shown in Fig. 1. with
the flesh sides out. Bring thong 1 up and over the lashing and spiral it
around the core as shown in Fig. 2; then thong 2, keeping it snugly
along the under side of 1 (Fig. 3).
Continue to spiral the other thongs, smooth side out, until they are
all at the top and close together as shown in Fig. 4. Lash them at the
top in this position.
A crown knot is formed with the six thongs as shown in Fig. 5. For
instance, thong 1 is turned downward, behind 2, smooth side out. Pass
thong 6 beneath thong 1; 5 beneath 6; 4 beneath 5: 3 beneath 4; and 2
beneath 3.
Begin the over-and-under sequence, braiding downward at a
corresponding angle of rhe spiral thongs. Pass over one, under one (Fig.
6), or over two. under two (Fig. 7). In fact it can be varied in die
over-and-under sequence to suit, being sure that where one thong goes
over- two and under two, the other five also go over two and under two.
In tlris case the sequence is varied so that it is first under one, over one
and then over two, under two (Fig. 7). The bottom is finished off in the
over-one. under-one sequence (Fig. 8). Tuck the ends out of sight.
336
PLATE 136. Six-Thong Multiple Braid.
337
PLATE 137
Multiple-Braid Top and Core Covering. This braid may be used to
cover the top of any handle as well as the handle itself. Here is shown
the over-one. under-one sequence, but it can be developed into over-
two, under-two or other combinations of braids. Start by arranging the
thongs in the sequence desired to cover the quirt handle, cane or other
similar object.
In Fig. 1 the thongs are laid out in the manner shown The core to be
covered is illustrated just beneath, in Fig. 2. After wearing the thongs in
their middle on a flat surface, push them close together and then Jay
this braided part on the top of the core, which should be slightly
rounded at the top (Fig. 3). Secure the thongs just below the braid with
cord or thread, as shown in Fig. 4, and arrange them evenly at the top.
In this braid, like any others around a core, the total width of the
thongs should be equal to the circumference of the core. In this braid
sixteen thongs arc used. The measurement around the core is two
inches; therefore, each thong is 1/8 inch wide.
Take every other thong (as in Fig, 5, even numbers have been taken)
and pass each upward It is best, as shown in Fig. 6, to tie these
together with a string, so that they will be out of the way for the time
being. It will be noticed that the thongs carried upward are those which
come from beneath other thongs.
The thongs with uneven numbers are spiraled around the core to the
full length (Fig. 6). Tie them at the bottom and be sure they are not
too tight, but are edge to edge. This may not be possible at the very
top, but in any event get them as close together as possible without
disarranging the braid.
Take one of the upper thongs, in this case No. 12, and after haring
made a path for it with the fid (Fig 7), braid it over the first one to its
right, No. 11, and under the next one, which is No. 9. Then take thong
14 (Fig. 8) and braid it in a similar manner, over the first one to its
right, which is thong 13, and under the next one, which is thong 11-
Continue around, braiding each of the upper thongs over one and under
one. Then start back with thong 12 and braid it over one and under
one. and so on until the bottom is reached.
Incline these thongs in the upper group at an angle to the right,
corresponding to the angle to the left of those which are spiraled
around the core. Work the braid up carefully, tightening the thongs
until they' are snug. Remove the upper binding.
PLA1E 131. Multiple-B d Top and Core Covering.
338
339
PLATE 138
Hou to Make the Corncob Braid. The first time I saw this useful and
unique braid in the Argentine I thought it originated there. However ]
have found that it also is made in Australia, and later I discovered it on
a 'Talking whip” of the Hungarian cziko (cowboy). This elaborately
decorated whip was given me by Dorothy Silvus Grant, who took the
first American riding group into Hungary.
There are two ways to make this braid. The first, begun in Fig. i
shows how two thongs or strings are made into a two-string braid and
laid around the object to be covered. In Fig. 2, where the ends of the
strings are designated by A,B,C, and D. it is shown that after goinw
round the handle or core, string В passes up beneath string D, and then
string A passes down over В and under C.
In Fig. 3 string В passes down over A and under D. String C passes
upward over D and under A. This last move is to finish the bottom of
the braid and from then on all braiding is done with the top strings A
and B. The completed braid is shown in Fig. 4. However, the braider
can continue indefinitely.
bi the Argentine this braid has a rather unpronounceable Indian
name of Corrector Auati Igue, which translated means much the same as
corncob braid.
In the second method starting with Fig. 5. two strings are crossed as
shown in the back. These strings are of contrasting colors so the
braiding sequence can be more easily followed. Figure 6 shows the
front and in Fig. 7 the braiding begins. A crown knot is made and end
D is turned up over C and string В passes down over string D and under
string D. Figure 8 shows the continuation of this sequence—string В is
turned up over string C and string D passes down over В and under C.
The end result is much the same as shown in Fig. 9 as that of the
previous braid. However, the last braid is used to cover smaller surfaces
than the first.
Elaborate Hungarian cowboy “talking whip." Given to author by
Dorothy Silvus Grant
340
PLATE 138. How to Make the Corncob Braid.
Another view of author's talking whip.
PLATE 139
The Corredor Cordobes. This binding and attractive braid is native to
Cordoba, an Argentine province, though it is to be found in the
Province of Santa Fe and other sections of the Argentine littoral, it js
described in El Guasquero- Trenzados Criollos, written by Luis Alberto
Flores, who graciously allowed me to detail it. The word corredor i5
freely translated as “running,” and is usually applied to braids where
one string is utilized.
This braid often takes the place of a woven knot or Turk’s-head to
cover the ends of other braid on reins, etc
The start is shown in Fig. 1 where the string first has been wrapped
around the object to be covered, passing over the standing end. The
working end is passed down under all strings and then up over two and
under two. It is worked around in this manner in a clockwise direction
and when it comes to the front again, as in Fig. 3, it passes over two
and under two as before. Then it starts to pass between the previous
loops until it reaches the top when the string is passed under and the
end cut off. The finished braid is shown in Fig. 4.
Another way to make a similar braid is shown in Figs. 5 and 6 where
both ends of the string become working ends. Instead of working
around the braid, make stairsteps up or down.
Fid Work. This type of work is comparable to what is called marline-
spike work in sailor’s rope work. In the Argentine it has been brought
to a high perfection and is termed trenza de alezna, weaving or braiding
with the fid. An endless number of combinations can be achieved In
Fig. 7 is shown a braid of over-two, under-two sequence. Strings are
wound diagonally around the object to be covered and tied at both
ends, where small grooves have been made. Then with a separate string
start braiding down diagonally as shown with string A. The fid is con-
tinuously used, of course, to lift those strings which are passed under.
Here we have, as I have said, an over-two, under-two combination.
However the first pass can be under one, over one; the second, under
two, over two; the third," over three, under three, and so on. After
reaching the center of the braid which may be over four, under four,
you begin decreasing the strings, passed over and under—as, over three,
under three; over two, under two, and so on.
See also Plates 136 and 137.
342
TiG.4
PLATE 1.39. The Corredor Cordobes; Fid Work.
Beautifully braided knife handle and sheath made for the author
by Martin Gomez, one of the best braiders in Argentina. This
type of braiding is known as “fid work.”
343
Hobbles in collection of John Walter Maguire.
Gaucho hobbles (upper) owned by the late Edward Laroequc Tinker. Dupli-
cate (lower) made by author to illustrate the trick method of malting these
hobbles.
344
Hobbles
PLATE 140
How to Make Simple Types of Hobbles. Hobbles come in many
styles. They vary from the simplest form, such as is made from a torn
gunny sack and piece of rope, to the more elaborately braided article.
Attractive and workable hobbles may be fashioned from ordinary
strap leather (or softened rawhide, if you like) of about 1/8 inch in
thickness.
The over-all length of the strap is 29 inches and it is 3 inches wide.
Taper it from each end for 12 inches, so that the center portion is 2
inches wide (Fig. 1). Round off the ends and punch a hole an inch from
each end, in the center of the strap. Make a slit 2-1/2 inches long from
each of these holes toward the center, or middle portion, of the strap.
These slits serve as holes to accommodate the button.
One method of making the button and securing it to the strap is
shown in Fig. 1. This is by a three-hole fastening. Holes are punched as
shown, each set of three holes being about 3 inches from the middle of
the strap. Thus they would be 6 inches apart.
Thread a 1/4-inch thong through the holes as illustrated and then
split the ends. Tie these ends in a terminal Turk’s-head knot, as
explained in Plate 77, or the end knot shown in Plate 78.
In Fig. 2, another method is demonstrated for making the button
and securing it with only one hole punched on each side.
Also, the rolled leather button may be used with three holes, as
shown in Figs. 3,4, and 5.
In Fig. 6 a mcthal ring, 1-1/2 inches inside diameter, is used in the
center of the hobble shown. The ends of the strap are folded over the
ring, secured with a Spanish ring knot (Plate 161). and the ends are slit
and worked into a terminal knot. This terminal knot can be covered
with a woven knot, such as the pineapple (Plate 50).
A slit-braid hobble that I worked out, and which has proved a
practical one, is illustrated in Fig. 7. It is made of two pieces of leather,
each 26 inches long. These are tapered down from 3 inches in width at
the button-end to 1-inch width at 12 inches from that end. (The taper
is not plainly shown in the drawings.)
The two inside ends are joined together by a slit braid. Strap A is
placed over strap В and two slits are made, one in strap A and one in
strap B, as shown in Fig. 8. Slit in В should be 12 inches from the
button-end of the strap. The one in A should be 13 inches from the
button-end.
Strap A is pushed down through В and then В up through A.
indicated by arrowlines in Fig. 8. A final slit is made in B. and A is
pushed up through this (Fig. 9).
The leather should be damp in working this slit braid.
In Fig. 10, it is seen that both the ends A and В have been slit into
four thongs. These thongs are worked into terminal Turk’s-heads and
then covered with a woven knot (pineapple knot, Plate 50), if desired.
346
PLATE 140. Ноъ to Make Simple Types of Hobbles.
347
PLATE 141
How to Make a Pair of Braided Gaucho Hobbles. These hobbles are
made in the most tricky fashion of any I’ve ever seen. They were
brought back from the Argentine by the late Edward Larocque Tinker,
who acquired them while writing his book, Los Jinetes de las Americas
у la Literature Por Elios Inspirada (Horsemen of the Americas and
Literature They Inspired). Tinker loaned me the hobbles with the
suggestion that. I “figure this one out.’’
At first, glance it. appears almost impossible that the inside
eight-string braid could have been made in the middle section of the
hobbles. However, a closer study shows they are fashioned in two parts,
ending in buttons A and В (Fig. 1).
First take two pieces of leather (or softened rawhide, as used for the
originals) each 26 inches long and 3 inches wide. Mark off 12 inches
from one end and taper this down Lo 2 inches wide, tapering on both
edges, of course. The remainder of 14 inches should be 2 inches in
width, and this is split into eight 1/4-inch thongs. Then, as in Fig. 2, cut
out every' other thong, leaxing only four thongs. (This also is done for
the other piece, marked A in Fig. 5. It will be noticed that you start
cutting out. the thongs from opposite side on A.)
Take a small round stick, about 3/8 inch in diameter, for use as a
mandrel, as shown in Fig. 3.
Begin a four-thong braid (Plate 77) for some 3 inches. As this braid
must be interwoven by the thongs on the other piece of leather, make it
loose (Fig. 4).
In Fig. 5 you marry or join the other thongs of A. To do this, thong
No. 5 passes along the upper side of thong No. 2: No. 6 along the upper
side of No. 1. Continue doubling these thongs tow'ard the left, until
they come out on the inside of the leather piece marked В (Fig. 6).
In Fig. 6 you begin to interweave. You will note that the remaining,
or lower thongs of A, split pairs as shown. The sequence is over two,
under two, until thongs are also on the left inside of leather piece B.
Remove the mandrel and tighten your braid. The four thongs on
either end are braided for an inch or so in a four-thong round braid
(Plate 77) and then tied in a terminal Turk’s-head, as indicated by the
arrowlines in Fig. 7. For this Turk’s-head, see Plate 77, or you might
wish to use the one in Plate 78.
Cover both ends of the eight-thong braid with a pineapple knot
(Plate 50) and also work a similar knot over the terminal Turk’s-heads-
There are other ways of making this inside braid of eight thongs, but
1 have found the above method the simplest and least confusing.
However, if you like, you may first braid the eight thongs on the part В
into an eight-thong braid (Plate 47)—that is, before cutting out four
thongs as previously described. But the four that would have been cut
out should be clearly marked. These are then replaced by four thongs
348
FIG 1
PLATE 141. How to Make a Pair of Braided Gaucho Hobbles.
on the part A. As replacement progresses, draw back the marked thongs
and finally, when all thongs on the A end have been interwoven, cut off
excess strings on B. This produces the same result as before.
349
PLATE 142
How to Make a Pair of Braided Hobbles. These are made entirely of
braidwork and have the lone star design woven in the buttons.
The first step in making these fancy hobbles is to cover a metal ring,
1И inch in diameter, with rawhide bra ding as described in Plate 52.
This covered ring is indicated as A in Fig. 1.
The cuffs, В and C in Fig. 1, are made as follows:
Take eight 1/8-inch rawhide strings, each 56 inches long. Middle
them and from this point measure off four inches. Start an eight-string
braid (Plate 47) here, working back toward the middle of the strings
and beyond until you have six inches of the braid This will form the
loop for your button.
Now bring the strings from each end of the braid together. There will
be sixteen of them. Arrange them as shown in Fig. 3. Interweave the
strings as shown and then begin your braid by first bringing the highest
string on the left (N >. 1) around to the rear and forward on the right
under two, over two, under two, and over two. Next, string No. 2 on
the right passes around to the back and forward under two, over two,
under two, and over two.
This 16-string braid is continued for 15 inches. As it is made without
a core, it should be pressed flat from the top when finished. It then will
appear as a double flat braid and the front part will look like Lhe top
drawing and the edges like the lower drawing in Fig. 2.
When the 16-string braid is finished, tie it together at the end. Now,
when the loose strings make a terminal knot. This can be done by
taking four outside strings and working them into a terminal
Turk’s-head (Plate 77) around the other twelve. Cover this Turk’s-head
with the lone star knot (Plate 87).
Two keeper-knots are necessary on each side, one to hold the cuff
part of the hobbles to the ring, the other to close the loop around the
button. These can be any woven knot you wish—the Spanish ring knot
(Plate 61) is a practical one.
Should you care to make your hobbles with the eight-string braid
throughout by doubling it, the two braids can be held together by
lacing in a long string, as shown in Fig. 4. At the bottom of this drawing
is shown the method of starting and at the top is shown some of the
finished braid. It will be noticed that the V’s on the left of the braid
point up, while those on the right point down.
Both this 16-string braid flattened out, and the eight-string ones
laced together are good braids to be used on other articles, such as
nosebands, browbands, and cheekpieces on headstalls.
At the bottom of Plate 142 in Figs. 5, 6, and 7 is a unique type of
hobble used in the Argentine which enables a rider to restrain his horse
until he releases the hobbles when in the saddle. These are used when
he has no companion to hold the fra tious animal. Such hobbles are
called manea desprendedora, which might be translated as “let-loose
hobbles.” See also Twist Hobbles under Twist Braids, and Crocodile
Ridge Hobbles under Crocodile Ridge Braids.
350
PLATE 142 How to Mai e a Pair of Braided Hobbles.
351
Braided rawhide hobbles made by John Conrad, Bellflower, California.
Three hobbles, two braided, in collection of John Walter Maguire.
352
Turk ’s-heads
PLATE 143
Braided Paper Turk’s-head. The so-called Turk’s-head, while serving a
practical purpose in leather braiding, should be considered more as the
basis or foundation for the beautiful Spanish woven knots.
The Turk’s-head has long been one of the most puzzling of knots for
the amateur. Observing the finished knot, it seems almost impossible to
follow the course of the thong.
Basically the Turk’s-head is simple. It is in every respect symmetrical
around its circumference, and. like the flat braid, is amphichiral; that is,
has the right and left sides alike in figure or pattern and dimensions. It
presents the same appearance at any point and in the true Turk's-head
the working end of the thong always comes back to the exact starting
point, or the same place as the standing end, when the knot is
complete.
The Turk’s-head might be defined as an endless ring or wreath of any
one of the flat braids. To demonstrate the anatomy of a Turk’s-head
the simplest of the flat braids has been used, the so-called hair braid of
three thongs (Plate 28).
Take a strip of writing paper of the size shown in Fig. 1. Cut it into
three smaller strips, leaving the section at the top closed, as shown by
the dotted lines in Fig. 1.
Now braid these three strips into a three-part hair braid. In doing
this, remember the law governing Turk’s-heads. No Turk’s-head may
have the same number of bights, or outer loops (Fig. 2), as it has
number of thongs across, or as they are termed, parts. Nor can a
Turk’s-head have a number of bights and a number of parts which a
common divisor.
For example, this Turk's-head is composed of three parts. Therefore,
it cannot have three bights, nor six, nine, twelve, nor any number
divisible by three. This law applies to all Turk’s-heads.
An example with four bights: When the ends are pasted to the uncut
portion of the paper as shown in Fig. 4, this immediate part forms one
bight. The other three are plainly shown. After pasting down the ends,
cut the closed portion, and tire Turk's-head reveals itself as an endless
wreath of three parts and four bights (Fig. 5).
To demonstrate, place this paper Turk’s-head over something round
and follow around with a thong until the working end comes back to
the standing end. Tear off the paper Turk’s-head and the leather one
remains (Figs. 6 and 7).
Also three thongs may be braided and tied together as shown io
Figs. 8. 9 and 10, which will result in a Turk’s-head of three parte and
five bights. Similar experimentation is possible with other flat braids.
354
PLATE 143. Braided Paper Turk's-head.
355
PLATE 144
One-Part One-Bight Turk’s-head. This particular Turk’s-head is
unique in that it is the only exception to the rule that a true
Turk’s-head cannot contain the same number of bights and parts nor
can it contain bights and parts that have a common divisor. In Fig. 1 is
shown the method of making the one-part one-bight Turk’s-head, which
turns out to be simply an overhand knot. But if followed around several
times, it makes an attractive small covering knot.
Four-Part Three-Bight Turk’s-head. This is made by what I term the
“running method,” that is, the knot is partially completed at each pass
instead of being interwoven on a skeleton knot. It comes, too, under
the classification I have designated as “headhunter’s type,” where the
parts are even and exceed the bights by one.
The knot is started as in Fig. 1, but as seen in Fig. 2, the working end
is brought around and under Lhe standing part and over the lower bight.
Figure 3 shows the sequence in the back where the working end passes
over one and under one. Figure 4 illustrates the completion of this and
the finished knot is shown in Fig. 5.
Three-Part Two-Bight Turk’s-head. This I call the “running gaucho
type.” Turk’s-heads made by this method have an uneven number of
parts and an even number of bights, as well as one more part than bight.
The start is shown in Fig. 6 and goes over the upper bight as well as the
lower, as illustrated by the arrowline. The finished knot is shown in Fig.
8.
Five-Part Four-Bight Turk’s-head. Continuing as in Figs. 9 10 11
and 12 and using the same “running gaucho” style results in a five-part
four-bight Turk's-head as shown in Fig. 13. This is a popular and
widely used knot.
Long Three-Part Turk’s-head. A long three-part Turk’s-head to cover
any large circumference can be made as shown in Fig. 14. It can lie
interwoven into a long Spanish ring knot (or woven ring knot) of one or
more passes. It also can be increased to five parts by following the
method in Figs. 1 through 7 in Plate 157.
PkATF 144. One-Part One-Bight Turk's-head; Four-Part Three-Bight Turk’s-head;
Three-Part Two-Bight Turk’s-head; Five-Part Four-Bight Turk’s-head; Long Three-
Part Turk's-head.
356
357
PLATE 145
Four-Part Three-Bight Turk’s-head (Another View). Start this
Turk’s-head with the mandrel turned so that sections 1 and 4 are
toward you, with section 1 uppermost.
Lay the thong on the mandrel so that it is in the area of sections 1
and 4 and the working end is inclined toward the right (Fig. 1).
Pass the thong around the mandrel, inclining it to the left as shown
in Fig. 2 The arrowline indicates the next move in which the thong is
passed beneath two of its parts in the sections 1 and 4. Keep the loop
of the thong extended to the right at the juncture of sections 1 and 4,
although the working end, after passing under the second of its parts, is
inclined to the left.
In Fig. 3 it is seen that the thong has passed beneath its two parts
with the loop inclined to the right The arrowline indicates the
beginning of the final steps—the important interlocking steps.
Figure 4 shows this first interlocking step. The thong has passed over
one and under one in sections 4 and 1.
In Fig. 5 the mandrel has been turned toward you in a clockwise
direction so that the back of the knot is visible. Here is another
interlocking path of over-one, under-one sequence.
In Fig. 6 the working end has been brought up alongside the standing
end and the Turk’s-head is complete. Tighten the knot by working it
carefully, beginning at the standing end and continuing around.
Figure 7 is a diagram pattern of the four-part three-bight
Turk’s-head. Follow previous directions.
358
PLATE 145. Four-Part Three-Bight Turk’s-head.
359
PLATE 146
Gaucho Knot of One Pass. The Gaucho Knot of One Pass is in reality
a nine-part eight-bight Turk’s-head. In this instance it is braided instead
of tied in the usual way.
Use a mandrel with a leather collar as shown in Fig. 1. If this knot
(or the other gaucho knots to follow) is used as a neckerchief slide, turn
the leather collar so the smooth part is on the innter side, and work the
knot over the flesh side. When the knot is finished, slip the knot and
collar off the mandrel and the smooth side of the collar will slide over
the neckerchief.
The mandrel is numbered at the top so as to indicate when it has
been turned (clockwise, in this instance). Start by laying the thong
around the mandrel (and collar) as shown in Fig. 1. Pass the thong again
to the rear and over the loop there bringing it to the front, where it
passes under one and over one (Fig. 2).
Now proceed as follows:
Rear: Under one, over one (Fig. 3). Front: Over one, under one, over
one (Figs. 4 and 5). Rear: Over one, under one, over one (Fig. 6).
Front: Under one, over one, under one. over one (shown by fid in
Fig. 7). Rear: Under one, over one, under one, over one (shown by fid
in Fig. 8).
Front: Over one, under one, over one, under one, over one (shown
by fid in Fig. 9). Rear: Over one, under one, over one, under one, over
one (shown by fid in Fig. 10).
Front: Under one, over one. under one, over one, under one, over
one (shown by fid in Fig. 11). Rear: Under one, over one, under one,
over one, under one, over one (shown by fid in Fig. 12).
Front: Over one, under one, over one, under one, over one, under
one, over one (indicated by fid in Fig. 13). Rear: (The work is now
moving around so the rear and front are practically one.) Over one,
under one, over one, under one, over one, under one, over one (Fig.
14).
Front: Under one, over one, under one, over one, under one. over
one, under one, over one (Fig. 15).
In the next move the working end comes up alongside the standing
part and the knot is completed (Fig. 17). It should be understood,
however, that the working end met the standing end several times
before and at any of these points there would have been a complete
knot.
In Fig. 18 is a diagram pattern for making this knot.
360
PLATE 146. Gaucho Knot of One Pass.
361
PLATE 147
Three-Part Five-Bight Turk’s-head. This is the regular free-hand
method of tying the three-part five-bight Turk’s-head, the same
Turk’s-head worked out in Plate 143 by braiding three thongs and then
tying the ends together.
In Fig. 1 the thong has been passed over the mandrel with the
standing end. A, at the left and the working end, B, inclined to the
right. The working end. B, makes another complete circuit (Fig. 2) and
when it comes back to the front as in Fig. 3 it passes under the standing
end.
Now take the bight of the standing part as shown by the arrowline in
Fig. 4 and pull it beneath the bight to its left. Pass the working end, B,
under and through this bight as indicated by the arrowline in Fig. 5 and
shown in Fig. 6. Turning the mandrel slightly to show the rear, pull the
bight of the standing end under the bight to its right. The working end
passes upward through this bight (Fig. 7) and around the mandrel to
come up alongside the standing end (Fig. 8). The knot is complete.
In Fig. 9 is shown a diagram pattern for making this Turk’s-head.
Place a piece of heavy wrapping paper beneath the page, and using a
carbon, trace over the pattern. Be sure to trace all the circles shown on
the pattern and the X marks shown in the bights.
At the top of the pattern, where indicated, cut the paper off flush.
Then roll up the paper from the bottom end, having left it sufficiently
long beyond the pattern at this end, until a cylinder is formed and the
ends of the wavy lines on the pattern exactly7 meet.
Place a rubber band around the cylinder on the left side of the
pattern, and then stick pins through the ten places in the bights marked
with an X. Be sure all the lines at the ends come together.
With the standing end of the leather thong placed beneath the rubber
band, start laying the thong around the cylinder, following the line
from the point marked “Start,” and around the pins at the points
marked X. The working end always passed over a thong except where
there is a circle, in which cases it passes under.
When the point designated as end is reached, the knot is complete.
Withdraw the pins, slip off the loose Turk’s-head and adjust it over Lhe
lace where it is to be used. Then tighten it up by go ng completely over
the knot from start- to finish.
362
PLATE 147. Three-Part Five-Right Turk's-head.
363
PLATE 148
Five-Part Four-Bight Turk’s-head (Another View). Hold the mandrel
(Fig. 1) so that the sections marked 1 and 4 are visible, with the figure
1 uppermost. Lay the standing part of the thong so that it covers these
two sections and is well inclined to the right.
Pass the working end of the thong around the mandrel and back over
its own part as in Fig. 1, after which it circles the mandrel again
inclined this time to the left. Bring it forward, beneath the standing
end, with the working end in the area of section 1 (Fig. 2). The
arrowlinc in Fig. 2 indicates the next pass which is under the loop in
section 1.
Draw the thong to the extreme left and under the mandrel bringing it
up alongside and to the right of the standing part (Fig. 3). The
arrowline in Fig. 3 indicates how it follows parallel to the standing part
under the thong in section 4.
The next pass is shown in Fig. 4 where the thong, still parallel to the
standing part, has passed under one in section 4, over one at the bottom
of section 1. is inclined to the right and then passed over the standing
part at the top of section 1. The arrowline indicates its path under the
next loop in back.
In Fig. 5 the mandrel is turned clockwise io illustrate section 2, with
section 1 at the bottom. This shows how the thong passes under the
loop indicated by the arrowline in Fig. 4.
Now turn the mandrel back to i s original position with sections 1
and 4 in view (Fig. 6). Observe that there is a path around the knot, in
wrhich one section of the thong goes over two. and another under two.
The idea is to pass the end of the thong in such a manner that the
complete knot will be in a sequence of over one. under one throughout,
in other words, lock these sections.
The path is clearly shown by the arrowline in Fig. 6. Pass the end
over that part in section 4 and under that part in section 1 and the
thongs will be locked so far as this part of the knot is concerned.
In Fig. 7 the end has been passed over one, under one, and over one
and at the top there is a loop which is passed under two other parts,
shown by the arrowline. In Fig. 8 the mandrel is turned in a
counterclockwise direction so that sections 4 and 3 are in view, showing
the bottom of the knot. Pass over one and under one, as shown by the
arrowline. The last and final mo\e is indicated by the arrowline in Fig.
9, when the working end is placed up alongside the standing end. The
completed knot is shown in Fig. 10. A diagram pattern for this knot
will be found on Plate 149.
364
PLATE 148. Five-Part Four-Bight Turk’s-head.
365
PLATE 149
Labyrinth Method of Making a Five-Part Four-Bight Turk’s-head.
The theory behind this method is, that the more ways you leam to tie a
Turk’s-head the better. When completed by this procedure, it may
readily be observed that each ring interlocks in an under-one, over-one
sequence.
It takes a comparatively long thong in relation to the final knot
obtained, to tie the Turk’s-head by this method so be sure to keep the
kinks out of the thong and see that the hair side is always uppermost.
Start by laying the working end of the thong on a flat surface and
making a loop in it as shown in Fig. 1. The next loop is indicated in this
figure by the arrowline.
In Fig. 2 this second loop has been made and the arrowline indicates
tire third step. The letter X indicates in each case the center of the knot
and where the mandrel will be if the knot is tied by the previous
method in Plate 148.
In Fig. 3 the third step has been executed and the arrowline shows
the final phase of tying this intricate knot, which truly presents the
aspect of a labyrinth. Attention should be called here to the path
spoken of in the text for Plate 148. It is more clearly shown here just
how, by passing the thong along it, the interlocking process of the knot
is completed.
In Fig. 4 the working end has been brought up alongside the stan ling
end and the knot is complete. A mandrel is inserted at the point
marker! X and the flat knot is carefully worked down to cylindrical
shape by tightening along the arrows shown on the thong itself.
A diagram pattern for making this knot is given in Fig. 5. Follow the
previous directions for making this knot by the foolproof pattern
method.
366
PLATE 149. Labyrinth Method of Making a Five-Part Four Bight Turk's-head.
367
PLATE 150
Sliding Knot or Five-Part Two-Bight Turk’s-head. This is a relatively
simple but very important Turk’s-head. It is the key to some of the
more intricate Spanish knots. In itself it is a valuable knot because it
can be made over small diameters, thanks to its two bights, and yet is
wide because of its five parts. Cowboys double and triple the knot to
increase its width.
Begin with the mandrel turned so that sections 1 and 4 face you. Lay
the standing part of the knot over the mandrel, covering these two
sections (Fig. 1), the working end of the thong inclined to the right.
Turn the thong twice around the mandrel as in Fig. 2, spiraling it
towards lhe left.
Pass the thong underneath the mandrel and to the front and then to
the right and over the two spirals as indicated by the arrowline in Fig.
2. and then pass it under the loop at the top of section 1.
Figure 3 shows this step completed and indicates the next step by
the snowline. Bring the thong down in the rear and up to the front
between the two spiraled thongs. Here, by going over one and under
one, the interlocking pass is accomplished.
The previously indicated step is illustrated in Fig. 4 and the arrowline
indicates the final step. Bring the thong to the extreme left, over one of
its parts on the left and hack up to the front alongside the standing
part.
This completes the knot, unless it is desired to double it—in which
case, continue as in Fig. 5. Start along Lhe right side of the standing part
and follow it with the thong, passing under when it passes under and
over when it passes over. In other wrords, where there was originally one
thong, there will now be two. To triple, pass in the same way once
more, following the two parallel thongs.
Enlarging Turk’s-heads by doubling is a common practice, and in
rope work, it actually beautifies the knot. But in leather work it is qu ite
unsatisfactory, because the flat thongs overlap at the curves, giving the
work an unfinished and uncouth appearance. When one becomes
completely familiar with the Turk's-head knot in all its phases, he will
realize that, there are Turk’s-heads, as well as Spanish knots, that can
cover any surface, without the slightest necessity for doubling or
tripling.
A diagram pattern for the sliding knot is given in Fig. 7.
368
PLATE 150. Sliding Knot or Five-Part Two-Bight Turk’s-head.
369
PLATE 151
Five-Part Three-Bight Turk’s-head. This Turk’s-head will assume an
almost spherical form when tied and is. therefore, valuable as the
covering for the handle end of canes, quirts and such. While it adapts
itself to the circumference of the core, it also can be closed over the top
by virtue of its three bights.
Hold the mandrel so that sections 1 and 4 are toward you, with
section 1 uppermost. Lay the working end of the thong so that it is
within the area of sections 4 and 1 and inclined to the right, as shown
in Fig. 1.
In the next step, bring it underneath toward the left and pass it
completely around the mandrel again, the part in front inclined to the
right, and the part in the back to the left, as shown in Fig. 2. It now
passes over three of its own parts, the two in sections 4 and 1 and the
other in the rear, without passing under any. Incline the thong far to
the left or top side of the standing end as shown in Fig. 3. Pass it
upward and over two of its own parts, to the left of the standing part
and under the standing part at the top of the mandrel. This is indicated
by the arrowline in Fig. 3.
Figure 4 shows the mandrel turned so that sections 4 and 3 are in
view, illustrating the finished operation, and then the mandrel is turned
back so that sections 1 and 4 face you, revealing the course of the
working end of the thong. A path lies open along the arrowline in Fig.
5, which, when followed by the thong, will interlock the parts as the
over-one, under-one. over-one sequence is executed (Fig. 5).
With the mandrel again turned to sections 2 and 1, the end of this
interlocking path will be seen. Pass the thong under one of its parts as
in Fig. 6, then bring it around underneath, over one thong and
alongside and to the right of the standing end (Fig. 6). The finished
knot is shown in Fig. 7.
This knot can be followed around again to double it, and still again
to triple it, as shown. For more details on this type of woven knot, see
Lazy-Man and Pampas Button Knots (Plates 179—181). Be as careful as
possible to keep the thongs from overlapping in doubling and tripling.
A diagram pattern is shown in Fig. 9.
370
PLATE 151. Five-Part Three-Bight Turk’s-head.
371
PLATE 152
Six-Part Five-Bight Turk’s-head Raised from a Four-Part Three-Bight
Turk’s-head. The four-park three-bight Turk’s-head shown in Plate 145
is the foundation upon which may be woven the larger knots of even
parts. It can be raised to the six-part, five-bight Turk’s-head and the
six-part, five-bight can be raised to the eight-part, seven-bight
Turk’s-head and so on.
The key is given in this plate. Fig. 1 show's the four-part, three-bight
Turk’s-head tied according to the previous instructions. The numerals
on the thong indicate in progressive order the course of the working
end from the start to the finish.
First, place the working end of the thong alongside and to the right
of the standing part (Fig. 1). allowing it to follow the right of the
standing part to the top of the mandrel as indicated by the arrowline in
Fig. 1.
Now turn the mandrel as indicated by the curved arrowline in Fig. 1,
so that sections 3 and 2 are toward you, as shown in Fig. 2. The thong
marked with the sequence number 2 is the standing part, and the
working end, marked with a 6. passes beneath it and follows to its left,
as indicated by the arrowline in Fig. 2. Leave a small bight in the
working end where it passes under the standing part.
Turn the mandrel back to the front so sections 1 and 4 are in view
(Fig. 3). The arrowline indicates the interlocking path in which the
procedure is over one thong and under one.
Turning the mandrel again, so that sections 2 and 1 are toward you
(Fig. 4), continue along this interlocking path passing over one and
under one. This latter pass, indicated by the arrowline in Fig. 4, shows
the path of the working end beneath the bight which is left in Fig. 2,
where the working end passed under the standing part.
Continue to turn the mandrel so that sections 3 and 2 are in view and
the interlocking path is indicated by the arrowline in Fig. 5. Pass over
one, under one over one and under one, each time locking the other
parts of the thongs so their sequence also is over one, under one.
Turn the mandrel back to show sections 1 and 4 and bring the
working end alongside and to the right of the standing end (Fig. 6). The
completed knot is shown in Fig. 7. A diagram pattern is provided in
Fig. 8. To raise the six-part to the eight-part, follow exactly the same
procedure.
372
PLATE 152. Six-Part Five-Bight Turk's-head Raised from a Four-Part
Three-Bight Turk’s-head.
373
PLATE 153
Seven-Part Six-Bight Turk’s-head Raised from a Five-Part Four-Bight
Turk’s-head. Begin with the five-part, four-bight Turk’s-head shown in
Plate 148. Notice in Fig. 1 that the end of the standing part is
numbered 1 and the working end is numbered 6. These are the
progressive numbers denoting each move in making the original knot.
They will be continued as the knot progresses.
The working end is alongside and to the right of the standing part
(Fig. 1). The working end follows the course of the standing part,
passing along to the right until the top of the knot is reached, as
indicated in the arrowline in Fig. 1.
In Fig. 2 the mandrel has been turned so that the rear is in new. This
section of Lhe standing part is numbered 2 and the working end passes
over it (but under the same thong it passes under) and goes down to its
left side. Figure 2 indicates this pass and in Fig. 3 the next step is
shown.
The working end is now hack alongside the end of the standing part
(Fig. 4). This time do not follow the path of the standing part, but
where it goes under pass the working end over, and where it goes oier
pass the working end under. The first step is indicated in the arrowline
in Fig. 4. This shows the interlocking path which can easily he followed
completely around the knot.
Turning the mandrel again, so that the rear shows, the arrowline in
Fig. 5 continues to follow this interlocking path, that is, under one,
over one, under one, over one, under one and over one at the extreme
left.
In Fig. 6, the working end is back at the start and this time Lhe knot
is finished when the working end is brought alongside the standing part
as indicated by the arrowline.
Tighten the knot by drawing on the thong from the start, and.
following the sequence in which it was made, pull up the slack until the
point shown in Fig. 6 is again reached. It may be necessary to go
around several times to get it completely tight. Insert a little cement
where the standing part and working part touch beneath the other
portions of the thong; cut the ends off flush and tuck in.
To increase the seven-part to the nine-part, follow the same
procedure that was used to increase the five-part to the seven-part. This
Turk’s-head can be made as large as desired; each time it is raised
increases it by two bights and tw о parts.
To make the seven-part six-bight Turk’s-head, follow the diagram
pattern in Fig. 7.
374
PLATE 153. Seven-Part Six-Bight Turk's-head Raised from a Five-Part
Four-Bight Turk’s-head.
375
PLATE 154
Two-Bight Turk’s-head of Any Length. By the following method you
can make a Turk’s-head any length you wish. The number of times the
thong is wrapped about, the mandrel in the beginning is the determining
factor. When the thong is brought back toward the starting point, the
number of times it touches the thong first wrapped around w Ц
determine the number of sections of the knot. It it couches twice, it
will be a two-section knot; if three times, a three-section knot. etc.
Pass the thong around the mandrel three times toward the right (Fig.
1). The small numbers on the thong itself indicate its progress.
The arrowline in Fig. 1 shows the second pass, which is already
completed in Fig. 2. Now go around for the third time, in the direction
indicated by the arrowline in Fig. 2 and shown in Fig. 3. Up to this
point the working end of the thong always passes over each of its parts.
Next, pass the working end beneath the outer part of the thong
marked with the numeral 3 (Fig. 3). This is the beginning of the
interlocking path. Close study will reveal this path spiraled around the
mandrel, where the thong passes over two, the next- under two and the
next over two.
To lock these thongs, pass over the thong which lies over two, and
under the thong which is under two. as shown in Fig. 4. Continue in
Fig. 5, following the same pattern: over one, under one, over one,
under one.
Having reached the extreme left-hand side (Fig. 6), pass over the
thong there, then under one and finally over one. The working end now
comes alongside the standing end (Fig. 7) and the knot is completed
(Fig. 8).
This knot is sometimes doubled and not infrequently tripled. To do
this, start following the standing part around and around, keeping on
the same side of it all the time and passing over where it passes over and
under where it passes under. This doubled knot is shown in Fig. 9. To
triple, go around and around again in the same fashion.
A diagram pattern is given in Fig. 10 for making the single knot.
PLATE 154. Two Bight Turk's-liead of Any Length
376
377
PLATE 155
Long Three-Bight Turk’s-haud. This knot is similar to the one in Plate
154, except chat it has three instead of two bights. With three bights it
can be used around a core of larger circumference. Remember, the
greater the number of bights, the larger in diameter the knot will be;
this is the reason why Turk’s-heads are made with varied numbers of
bights.
Wrap the thong around the mandrel twice and then bring it back over
its own loop at the right and toward the left under the standing part as
shown in Fig. 1.
Take another turn over the standing part and around the mandrel
and bring the thong up alongside the standing part to the right side. It is
passed to the right and goes under its own pan in the center of the
mandrel (Fig. 2).
Continue toward the right with the working end, pass over the outer
loop and then back to the front and over this same loop again and also
over the next thong as indicated by the arrowlinc in Fig. 3.
Now pass the working end beneath the next two thongs, indicated by
the arrowline in Fig. 4 and shown in Fig. 5.
In Fig. 6 the working end passes over the standing part and the
extreme outer left-hand loop, indicated by the arrowline in Fig. 7, and
is brought to the front, this time to the left, or top, of the standing
part. It goes over two thongs and under two thongs, indicated by the
arrowline in Fig. 7. In Fig. 8 it passes over the next two thongs, and
under the outer loop to the right, as indicated by the arrowline.
Now the interlocking path can be seen, where the working end will
first pass under the outer loop, over the next thong, under the next,
over the next and under the next, going toward the left of course. This
path is indicated by the arrowline in Fig 9. Continue locking the
thongs, over one, under one, over one and under the outer loop at the
left (Fig. 10). Bring the working end back, over one, and under the
thong alongisde the standing end and the knot is finished.
A diagram pattern is given in Fig. 12.
378
PLATE 155. Long Three-Bight Turk's-head.
379
PLATE 156
Two-Part Three-Bight Turk’s-head. This is the first of what I have
named the Dayville. Series. 1 was introduced to this type of braid years
ago by Ed Rickman, who then lived in a little western town named
Dayville. In these knots the number of bights exceeds the number of
parts. With patience and by using pins or nails on a mandrel, as many
bights as you wish can be made. The braid is of the running type and
can be made in the same manner as shown in Figs. 1, 2, 3, and 4. and
the subsequent knots in this plate.
Figure 1 shows the start of the two-part three-bight knot. The
working end passes around back and comes up to the top before
crossing the standing part (Fig. 2). For an uneven number of bights,
pass under at the bottom.
For an even number of bights and an odd number of parts, start as in
Fig. 5 where the working end passes over both the bottom and top
bights. Figure 7 shows a three-part four-bight Turk’s-head.
A four-part five-bight Turk’s-head is started in Fig. 8. Here again we
get an uneven number of bights and an odd number of parts by passing
below the lower bight and over the top.
A knot with an even number of bights and an odd number of parts
(in this case, six bights and five parts) is started in Fig. 11. Here, it will
be noticed that the working end passes over the lower bight and upper
bight. The finished knot is shown in Fig. 14.
380
'JG
PLATE 156. Two-Part Three-Bight Turk's-head.
381
PLATE 157
Five-Part Nine-Bight Turk’s-head Raised from a Three-Pan Five-Bight
Turk’s-head. This system of raising the three-part Turk’s-head to one of
larger size is valuable, especially when increasing the elongated
Turk’s-head shown in Plate 144.
Figure 1 shows the beginning of this process. The working end has
been shaded so its progress might more easily be followed. Work first
on the right side of the standing part and when passing down, work on
the opposite side. Once around and the interlocking path will easily be
seen and the sequence is then under one, over one. under one. over one.
Seven-Part Four-Bight Turk’s-head. The string or thong first is
wrapped around the mandrel as shown in Fig. 8. including the
arrowline. In Fig. 9 this pass is completed. In Fig. 16 going up, the
sequence is under one, over one, and under one (the top bight). In Fig.
11 passing down, the sequence is under one. over two, under one and
then over the standing part. Going up (Fig. 12), the sequence is under
one, over two, under one, and then over one (the Lop bight not shown
in the drawing). Going down (Fig. 13), the working end passes under
the top bight, then over one, under one, over one, under one, and over
the lower bight. The working end is then brought up alongside the
standing end and the knot is complete (Fig. 11).
Eight-Part Three-Bight Turk’s-head. This Turk’s-head is started as
shown in Fig. 15. The arrowline shows the next step where the working
end is brought around, and up under its own part and then over the top
bight. In Fig. 16 this step is completed and the arrowline indicates the
path of the working end—down, over two and under two. The working
end is now brought aroudn and, as the arrowline indicates in Fig. 17,
passes over the standing end and then up, under two, over two, and
under one at the top. In Fig. 18 the interlocking path downward is
shown where the sequence is over the top bight, then under one, over
one, under one, over one. under one, and over the lower bight. The
working end is passed around up alongside the standing end, the knot
adjusted, and the result is shown m Fig. 20.
382
PLATE 157. Five-Part Nine-Bight Turk’s-head Raised from a Three-Part Five-Bight
Turk’s-head; Seven-Part Four-Bight Turk’s-head: Eight-Part Three-Bight Turk’s-head.
383
PLATE 158
Nine-Part Four-Bight Turk’s-head. The first step in making this
'lurk's-head is indicated in Fig. 1 where the string or thong is wrapped
around the mandrel as shown. The arrowline indicates how the working
end is passed up, over two (Lhe second being the top bight) and then
down, under one, over one, under one, then over one, the bottom
bight. In Fig. 2 the working end follows the path of the arrowline
which is up. under one, over one. under one, and over one (the top
bight) and down, over one. under one, over two, under one, and over
one. the bottom bight. The next pass upward is shown in Fig. 3 where
the working end goes over one, under one, over two, under one, over
one, the top bight. In the next figure (No. 4), the interlocking path
downward is shown and the working end goes under one, over one,
under one, over one. under one, over one, under one, and over one, the
bottom bight. The working end is passed around up alongside the
standing end. The adjusted knot is shown in Fig. 5. This is the
Turk’s-head indicated in Plate 131 for covering rectangular objects.
PLATE 158. Nine-Part Four-Biglit Turk’s-head.
384
Braided Knots
PLATES 159 & 160
Braided Knot with Turk’s-head Foundation. The simplest form of
braiding is the flat braid, or the so-called hair braid of three thongs.
This is working each outer thong alternately over the one nearest it
toward the center.
Such a working procedure is the basis of flat braiding. Work your
outer thongs in rotation—that is. each time bringing the highest thong
on each side toward the center. If it passes over one thong and under
one thong on one side, the thong on the other side also passes over one
and under one.
Bu the hair braid is not as simple as that. It may be made to form
the toughest, of all knots, the Turk’s-head, which is nothing more than a
flat braid made into a wreath or ring by means of a single thong.
The Turk’s-head is a practical knot and an old sailor’s favorite. But
the braider should think of it as a foundation upon which to fashion
the woven knot, or the braided knot. While it is customary for
present-day braiders to double or triple the leather or rawhide
Turk’s-head by following around to make it larger or longer, this is a
sailor’s trick and is not too practicable in leather or rawhide work.
Why? Because leather thongs or rawhide strings will invariably overlap
on the scallops; the round rope will not do this. The Turk’s-head then is
best used without being doubled or tripled, and only as a foundation
knot, or at times by itself.
I must repeat, there is a rule to be observed in making Turk’s-heads
as well as braided knots. A relationship exists between the bights, or
scallops, and the number of thongs directly across the Turk’s-head. By
the number of thongs across—which we call “parts”—is meant that if
you cut straight across the Turk's-head at right angles you would sever
three thongs in the hair braid. So this is called a three-part Turk’s-head.
The relationship between bights and parts is this: The number of
btghts and the number of parts cannot have a common divsor A
three-part Turk’s-head cannot have three bights, six bights, nine bights,
or any number divisible by three. It can have two bights, four bights,
five bights, seven bights, eight bights, or any number which cannot be
divided by three.
If you try to tic a Turk’s-head with bights and parts which have a
common divisor, the ends will come together or meet before the knot is
complete. Turk’s-heads are perfect in every respect and are the delight
of mathematicians.
Always observe then the rule that no one number can be divided into
both the number of parts and the number of bights of your
Turk’s-head.
The simple three-part flat hraid and three-part Turk’s-head do not
constitute anything elaborate in braiding, but to know how to make
them is important as a beginning. They illustrate how you can take any
flat braid—one of four thongs, five thongs (Figs 1 and 2. Plate 159), six
thongs, or any number up to infinity—and make from it a Turk’s-head-
386
Take a look at Fig. 1, Plate 159. Here is a five-thong braid which has
been braided down until there are four bights on each side (including,
of course, the bight which will be formed when the ends are tied
together). To make this into a Turk’s-head you tic the lower part of
thong 3 to the upper part of thong 1; the lower part of thong 1 to the
upper part of thong 2; lower 4 to upper 3; lower 5 to upper .4, and
lower 2 to upper 5. Follow around and you will have a Turk’s-head, of
four bights and five parts.
PLATE 159. Braided Knut with Turk’s-head Foundation.
In Fig. 2. Plate 159, is a three-bight, five-part Turk’s-head. Lower 4 is
tied to upper 1; lower 3 to upper 2; lower 5 to upper 3; lower 2 to
upper 4, and lower 1 to upper 5.
There is another way to braid five thongs and make them into a
^Utk’s-head. This is shown in Figs. 1, 2 and 3 in Plate 160.
387
Take five thongs and first pass the one on the extreme left (thong ij
to the right and over two and to the center. Then take the thong on the
extreme right, thong 5, and pass it to the left over two and to the
center. Thong 2 on the left is next brought to the right over two. This is
shown in Fig. 1.
In Fig. 2 we see thong 4 on the right has been passed to the center
over two thongs. Then you work thong 3 toward the center and over
two. Then thong 1 to the left, and so on.
Always remember the rule of such knots—you cannot have a number
of bights and a number of parts (counting the thongs across) which will
fjave a common divisor.
You can make a Spanish ring knot as long as you please, in fact I use
them sometimes for wrist, loops on quirts and riding crops. As you
experiment, you will become increasingly interested in braiding and do
your part in keeping alive this old-time cowboy handicraft.
Link bracelet made with Spanish Ring Knots over an ordinary
lead репс I. When the first is made another is woven into it. The
fastening (not shown) consists of a longe• ring knot with a keeper
which is woven in one end—in the other end a four-string round
braid is made onto the link and then worked into any of the hold-
ing knots. Used here arc 1/16 of an inch drumhead rawhide
strings.
PLATE 160. Braided Knot with Turk’s-head Foundation (Continued).
In Fig. 3 you will see the anatomy of the woven knot, which is
commonly- called the Spanish ring knot. We have braided down until
there are eight bights or loops on each side (including the one which
will be formed when the ends are joined). Now if you take the lower
end of thong 5 and tie it to the upper end of thong 1; the lower end of
thong 4 to the upper end of thong 2; the lower end of thong 1 to the
upper end of thong 3; the lower end of thong 3 to the upper end of
thong 4, and the lower end of thong 2 to the upper end of thong
5 then you will have the Spanish ring knot.
By starting at any point and passing your finger along over the joined
thongs, you will finally come back to the beginning. If you thus follow
around with a long thong, then untie the original braid and pull it out-
you will have the knot of one thong.
388
389
PLATE 161
The Spanish Ring Knot, in the previous lesson we have seen how to
make the Spanish ring knot by braiding down 1'ive thongs and then
joining the ends. This should have given a pretty good idea of the knot.
However, this knot usually is made in a different fashion, in a
free-hand way. Only one thong is employed and the completed knot is
made with this, first tying a Turk’s-head and then interweaving.
We will start with a three-part, five-bight Turk’s-head, which is the
foundation knot. The mandrel or rounded stick on which it is made
has been divided into four areas, so you can tell at a glance when the
mandrel has been turned. When you twist the mandrel toward you, the
numbers run from 1 to 4
The leather thong or rawhide string is laid across the mandrel as
shown in Fig. 1, Plate 161. The working end is marked A. It is passed
around again over the standing part (Fig. 2); then brought forward and
passed beneath the standing part (Fig. 3).
Pay particular attention to Fig. 4 where the standing part is pulled
from beneath that part of the thong to its left. The w orking end A now
passes beneath this, as in Figs. 5 and 6. In Fig. 7 we see the standing
part, which was on the left, pulled again beneath the thong to its right
(in a way similar to the procedure in Fig. 4) and lhe working end is
again passed beneath it. Bring the working end of your thong around
and to the front and when it passes up alongside the standing part, the
Turk’s-head is complete (Fig. 8).
We begin the woven knot in Fig. 9. First withdraw your working end
from along the right side of the standing end and pass it over and along
to the left side of the standing end (Fig. 9).
In Fig. 10 it passes over the standing part and then down along to its
right side, having gone under the same part of the thong on the edge as
did the standing part. In Fig 11 it again passes over the standing part,
and up along to the left side of the standing part, having gone under the
same part of the thong on the edge that the standing part did.
Now we begin the braid or weave. In Fig. 12, the fid shows the path
the working end follows, passing beneath two thongs and up, splitting a
pair of parallel thongs. On the other side the working end passes under
two thongs and up, splitting two parallel thongs (Fig. 13).
In Fig. 14 it passes under two and splits two from the other side. It is
now brought up alongside the standing end, to its left, after passing
under three thongs (Fig. 15). The completed knot is shown in Fig. 16-
Here we have shown a Spanish ring knot of over-two. under-two
sequence. It can be increased to an over-three, under-three sequence—or
a greater one if desired—by passing the working end around, following
lhe standing part as you did from Figs. 9 to 11 inclusive, and then
passing around again, splitting the parallel pairs.
This knot will never shake loose or go adrift.
390
FlG. 1
FlG. 13
PLATE 161. The Spanish Ring Knot.
391
PLATE 162
Spanish Ring Knot of Three Passes. Start with the woven ring knot
of two passes shown in Plate 161. This knot is shown on the mandrel in
Fig. 1. The standing end is designated as A and the working end as В
With the working end, B, follow the path of the standing part. Д,
The arrowline in Fig. 1 illustrates how the working end is brought up
alongside and to the left of the standing end.
In Fig. 2 the mandrel has been turned io show the hack. Pass the
working end, B, up alongside the left of the standing end and then over
it, and at the same time under the two thongs as shown and to the right
side of the standing end.
Again pass the working end, B, which is now to the right of the
standing part, A, over the latter and follow it to the left side, indicated
by the fid. In Fig. 3 the mandrel has been turned to illustrate this
operation.
This completes one circuit of the knot, starting with the working end
alongside the left of the standing part, then passing over it to its right
side, then agam over it to its left side, each time following the course
the standing part takes, going under and over the same thongs as does
the standing part.
In Fig. 4, where the working end and standing part are parallel, the
fid has passed between them, separating them, thus providing a course
for the working end, B.
The sequence from now on for the working end will be over three
thongs and under three thongs, each time separating two parallel
thongs.
Pass the fid beneath three thongs and split the parallel thongs, this
time from the left-hand side, making an opening through which to pass
the working end, B. as shown in Fig. 5.
Follow the same procedure on the right side, passing the fid beneath
three thongs and splitting the parallel ones, as shown in Fig. 6. The
working end, В goes through this aperture
In Fig. 7 the final move is shown. Bring the working end, B, up
alongside the standing end, A, and under the same three thongs and the
knot is complete.
This knot can be made over a leather collar or even over another
Turk’s-head, such as the ordinary three-part, five-bight knot shown in
Plate 147. This gives it a pleasing raised effect.
A diagram pattern to make the knot is given in Fig. 9.
392
PLATE 162. Spanish Ring Knot of Three Passes.
393
PLATE 1G3
Ring Knot of Four Passes. This attractive knot must be used on a
collar which will keep its outer edges or bights even.
Wrap the thong around the mandrel (with leather collar) four times,
passing over the thongs in both front and rear. Then bring it around a
fifth time as in Fig. 1 and pass the working end beneath the first thong,
which is the standing part. Pass it over the last four.
In Fig. 2 the mandrel has been turned to show the rear Pass the
working end under one thong and over four.
Back to the front again in Fig. 3, pass the working end under two
thongs and over four.
In the rear (Fig 4), make the same pass under two and over four.
Returning to the front (Fig. 5), now pass under three thongs and
over four.
The knot is closing and front and rear are almost one in Fig. 6. Bring
the working end up under three thongs and over four.
Bring We working end to the front and pass it under four thongs
(Fig. 7). It is alongside the standing part in the next move (Fig. 8). The
knot is completed (Fig. 9).
This knot can be made by wrapping the thongs around five times in
the beginning and then the sixth time before the weaving is started. In
such case, always pass over the last five thongs in both front and rear. It
can be made also with an over-six, under-six or an even greater
sequence, but it soon gets out of hand.
As cautioned in the beginning, when used on a quirt, whip,
hackamore, cane or a» a neckerchief slide knot, always work it over a
collar so that the edges will not draw inward beneath the knot when it
is tightened.
Figure 10 provides a diagram pattern for this knot.
394
PLATE 163. Ring Knot of Four Passes.
395
PLATE 164
Gaucho Knot of Two Passes. Made over the same type of leather
collar as shown on the mandrel—a collar which can be slipped off with
the knot—this knot provides an excellent neckerchief slide. If the knot
is to be so used, the hair or smooth side of the leather collar should be
next to the mandrel.
Begin as in Fig. 1 with the mandrel upright, and pass the thong
around as shown. Then make another circuit, passing over the standing
part, A, at all points (Fig. 2). Continue around again, going over both
thongs in the rear, as shown in Fig. 3.
Start the braid by passing beneath the standing part, A, and over the
next two thongs (Fig. 4). Do the same in the rear (Fig. 5).
Now proceed as follows:
Front: Under two and over two (Fig. 6). Rear: Under two and over
two (Fig. 7). Front: Over one, under two, over two (Fig. 8). Rear: Over
one, under two, over two (Fig. 9). Front: Over two, under two, over
two I Fig. 10). Rear Over two, under two, over two (Fig. 11).
Front. Under one, over two, under two, and over two (Fig. 12).
Rear: Under one, over two, under two. and over two (Fig. 13).
Front: Under two, over two, under two and over two (Fig. 14).
In Fig. 15 the working end, B, comes up alongside the standing end.
A, and Fig. 16 shows the finished knot.
A larger knot can be made with the same sequence of over two,
under two, by continuing around from Fig. 15, passing under two, over
two, under two and over two, then to the front, over one, under two,
over two. under two and over two, and the same in the rear. This is the
sequence followed in Fig. 9 except that there are now a larger number
of thongs. To continue, follow the sequence in Fig. 10, which in tliis
case w'ould be over two, under two, over two, under two and over two.
Keep on as in Figs. 11, 12, 13. 14 and 15 until the larger knot is
finished
A diagram pattern (Fig. 17) shows how to make the first knot.
PLATE 164. Gaucho Knot of Two Passes.
396
397
PLATE 165
Gaucho Knot of Three Passes. Two plates are necessary to illustrate
adequately the manner of making this beautiful knot. So, upon
completing the work demons rated to this plate (165), continue with
Plate 165-A. Use an extra long thong and work carefully.
This knot is worked on a leather collar as were the two previous
ones. As in the other cases, the collar can be turned so the smooth side
is innermost, and the knot used as a neckerchief slide. The knot may
also be used as a slide knot on lanyards, bridle reins, etc., not only to
hold them together, but to adjust them to shorter or longer lengths and
for decorative purposes.
Begin as in Fig. 1 by wrapping the thong around the mandrel (and
collar) three times, always passing over each part of the thong.
In Fig. 2 make another turn, passing over the three thongs in the
front and the rear as before (Fig. 2 shows the back of the knot). We
shall designate that part where the working end passes downward as the
"front,” and the opposite side of the mandrel where the working end
passes upward as the “rear.”
Here then, is the sequence:
Front: Pass the working end under the first thong, which is the
standing part, and (following the course of the fid as shown) the
sequence will be, under one, over three (Fig. 3).
Rear: Under one, over three (Fig. 4).
Front: Under two, over three (Fig. 5).
Rear: Under two, over three. (Follow the course of the fid in Fig. 6).
Front: Under three, over three (Fig. 7). (This first move after passing
under three completes a small knot, as the working end now meets the
standing end. But continue to make the knot larger.)
Rear: Under three, over three. (Follow the course of the fid in Fig.
8.)
Front: Over one, under three, over three (Fig. 9).
Rear: Over one, under three, over three. (Follow the fid in Fig. 10.)
Continue this sequence on the next plate.
398
PLATE 165. Gaucho Knol of three Passes.
399
PLATE 165-A
Gaucho Knot of Three Passes (Cont.). To continue from the previous
plate, pass the working end of the thong along the course taken by the
fid in Fig. 11. This sequence is over two, under three and over three.
Rear: Over two. under three, over three (illustrated by the fid in Fm
12).
By now it may be seen that the working end always makes the same
pass in the rear as in the front. However, we shall continue to detail
each move. Back to the sequence:
Front: Over three, under three, over three (Fig. 13).
Rear: Over three, under three, over three (Fig. 14).
Front: Under one, over three, under three, over three. (Follow the
path of the fid in Fig. 15.)
Rear: Under one, over three, under three, over three (fid in Fig. 16).
Front: Under two, over three, under three, over three (shown by fid
in Fig. 17).
Rear: Under two, over three, under three, over three. (Illustrated by
the course of the fid in Fig. 18. The knot is closing up now.)
Front: Under three, over three, under three, over three (fid in Fig.
19)
Rear-front: Bring the working end around and under three, which
places it alongside the standing end and completes the knot (Fig. 20).
The finished knot is shown in Fig. 21.
This knot can be enlarged still further by continuing around. When
the front is reached, again pass over one, under three,
This knot can be enlarged still further by continuing around. When
the front is reached, again pass over one. under three, over three, and
the same applies in the rear. When the point is reached where the pass is
over three, under three, over three, under three, over three, start with
under one, over three, under three, over three, under three'and over
three. Continue until an under-three, over-three, under-three. and
over-three sequence is reached. When the working end comes alongside
the standing end. the knot is completed.
A diagram pattern for making this interesting knot is shown in
Fig. 22.
400
PLATE 165-A. Gaucho Knot of Three Passes (Continued).
401
PLATE 166
Gaucho Knot Worked on a Turk’s-head. First make a five-part four-
bight Turk’s-head. Continue as in Fig. 1, where the working end of the
thong or string is brought up alongisde the left side of the standing part.
In passing down, the working end goes beneath the first bight to its
left (Fig. 2) and over one, under two, over two. The sequence upwards
is under one, over one, under two, over two (Fig 3).
Fig. 4: Down, under one, over two, under two. over Lwo.
Fig. 5: Up, under one, over two. under two, over two.
Fig. 6: Down, under two, over two. under two, over two.
In Fig. 7 the knot is shown completed with an over-two, under-two
sequence and the working end is brought up alongside the standing end.
The arrowline indicates the first pass to make this knot with an
over-three, under-three sequence. In going down, it will pass under two,
over two, under three and over three, and so on. The finished knot of
over-three, under-three sequence is shown in Fig. 8.
Figure 9 illustrates how this method can be used to increase a flat
braid.
402
<0.1
Fi'G.I
PLATE 166. Gaucho Knot Worked on a Turk's-head.
403
PLATE 167
Double Gaucho Knot of Two Passes. In the two-bight knot of any
length (Plate 154) the number of crossings the thong made on its
second pass indicated the number of sections of the knot. If it crossed
twice, it formed a two-section knot; if three times, a three-section knot
and so on.
The same rule also holds in this knot. It is a two-section or double
knot having an over-two, under-two sequence, the same as the
one-section gaucho knot of two passes (Plate 164). It can be made in
three sections, or four sections, etc., by crossing, on the second move,
three thongs, four thongs, or as many as desired.
It will be necessary to demonstrate this knot in two plates, so the
work will continue on Plate 167-A.
Start as in Fig. 1, by wrapping the thong around one and one-half
times and bringing it back, passing the working end over its own part
twice. Do this once more, as indicated in Figs. 2 and 3. never passing
under, but always oner each thong. Go around once more, inclining to
the right as in Fig. 4, and then pass under one thong and over two as in
Fig. 5. This is the beginning of the braid.
In the section of the knot on the left illustrated in Fig. 6, pass again
under one and over two. In working to the right, repeat this in the
left-hand section, under one, over two (Fig. 7), and again in the
right-hand section, under one, over two (Fig. 8).
Now proceed as follows:
Under two, over two (Fig. 9). Under two, over two (Fig. 10). Under
two, over two (Fig. 11).
In Fig. 11, after passing under two (as indicated by the fid), a
completed knot is shown, as the working end here meets the standing
end. This makes a finished small knot, but can be enlarged in the
following manner. Continue as in Fig. 12, under two, over two.
Now pass over one, under two, over two (Fig. 13). Over one, under
two, over two (Fig. 14). Over one, under two, over two (Fig. 15).
For instructions on completing this knot, turn to Plate 167-A.
404
PLATE 167. Double Gaucho Knot of Two Passes.
405
PLATE 167-A
Double Gaucho Knot of Two Passes (Cont.). Take the double gaucho
knot of two passes in Fig. 16 and proceed by passing over one thong,
under two thongs and over two Then pass over two, under two and
over two (Fig. 17).
Next, in the left-hand section, pass over two, wider two and over
two, indicated by the path of the fid in Fig. 18. (It will be noted here in
combining the sequences of Figs. 17 and 18 that in the middle of the
knot the working end actually passes over four thongs. This may look
wrong but it will adjust itself in the over-two, under-two sequence as
the work proceeds.)
Continue as follows:
Back toward the right, over two, under two, over two (Fig. 19).
Over two, under two, over two (Fig. 20).
Toward the left, under one, over two, under two, over two (Fig. 21)
Under one, over two, under two, over two (Fig. 22).
Toward the right, under one, over two, under two, over two (Fig
23).
Under one, over two, under two, over two (Fig. 24).
Toward the left, under two. over two, under two, over two (Fig. 25).
Under two, over two, under two, and over two (Fig. 26).
In Fig. 27, after passing under two thongs, the work comes back to
the starting point and the working end is alongside the standing end. so
the knot is complete. However, as with the other gaucho knots macle by
this braiding process, it may be continued around again and again, each
time terminating at the point where working end and standing end
meet. This will result in a knot with a greater number of bights, which
will fit over a larger circumference and still close up when tightened.
The finished knot is shown in Fig. 28.
Figure 29 provides a diagram pattern for this knot.
406
PLATE 167-A. Double Gaucho Knot of Two Passes (Continued).
407
PLATE 168
Double Gaucho Knot of Three Passes. To make the double gaucho
knot of three passes, wrap the thong around the mandrel two and
one-half times. Then continue until at the right there are four thongs
alongside each other, all of which have been passed over the top jn
going around. The sequence now is this:
To left (Fig. 1): Under one, over three m the right-hand section:
under one. over three in the left-hand section.
To right- Under one, over three in the left-hand section: under one
over three in the right-hand section.
To left: Under two, over three, and again under two, over three.
To right: Under two, oxer three, and under two and over three.
To left: Under three, over three; under three, over three. (The next
move where the working end meets the standing end, completes a small
knot. But we shall continue to make a larger knot.)
To right: Under three, over three; under three, over three.
To left: Over one, under three, over three; over one, under three and
over three.
To right: Over one, under three, over three; over one, under three,
over three.
To left: Oxer two, under three, over three; over txvo, under three,
over three.
To right: Over two, under three, over three; over two, under tliree,
over three.
To left: Over three, under three, over three; over three, wider three,
over three.
To right: Over three, under three, over three; over three, under three,
over three.
To left: Under one, over three, under three, over three; under one,
over three, under three, over three.
To right: Under one, over three, wider three, over three; wider one,
over three, under three, over three.
To left: Under two, over three, under three, over three; under txvo,
over three, under three, over three
To right: Under two, over three, under tliree, over three; under txvo,
over three, under three, over three. Then pass to the left under three,
over three, under three, over three; under three, over three, wider three,
over three.
The next move is under three, with the working end alongside the
standing end, and the knot is finished (Fig. 2).
In using this pattern it is best to work it with 3/32 inch commercial
lacing and a thonging or lacing needle. Be very careful the ends of the
pattern lines are true and coincide.
A diagram pattern is given in Fig. 3.
408
’’’AftT
PLATF 168. Double Gaucho Knot of Three Passes.
409
PLATE 169
Headhunter’s Knot of Two Passes. The man who first introduced the
headhunter’s knot to civilization never told how it was made. As the
story goes, a chieftain of a savage tribe had explained to him how to
hraid the knot and then warned him that he would suffer dire
consequences if he gave away the secret. However, as I have worked it
out myself, I am violating no confidence and fear no savage vengeance.
Start as in Fig. 1 by wrapping the thong around the mandrel (with
leather collar). When the working end reaches the rear (the mandrel has
been turned in Fig. 2 to show this), it passes beneath the thong there
This is the secret of the knot.
Proceed as follows:
Front: Over two (Fig. 3).
Rear: Under two (Fig. 4). (From now on always pass over the last
two in front and under the last two in the rear.)
Front: Under one, over two (Fig 5).
Rear: Over one, under two (Fig. 6).
Front: Under two. over two (Fig. 7).
Rear: Over two, under two (Fig. 8).
Front: Over one, under two, over two (Fig. 9).
Rear. Under one, over two, under two (Fig. 10).
Front: Over two, under two, over two (Fig. 11).
In Fig. 12 the working end comes up under two thongs and alongside
the standing end which, by our mathematical law, completes the knot.
The finished knot is shown in Fig. 13.
If a larger knot is desired, keep passing around, varying the sequence
at the top and bottom each time so that when working from the top
down, the working end always comes out over the last two thongs, and
when working up in the rear, the business end of the thong passes under
the last two. When the working end comes up alongside the standing
end, the knot is finished. This is true we repeat, of all the knots of this
fascinating series.
A diagram pattern for this knot is provided in Fig. 14.
410
PL ATE 169. Headhunter's Knot of Two Pa*ses.
411
PLATE 170
Headhunter’s Knot of Three Passes. As a headhunter’s knot of
over-three, under-three sequence, this may evoke a triple curse from the
chief of the cannibal tribe for revealing the secret. But here goes:
Figure 1 illustrates the same rule that was given in the beginning of
the headhunter's knot of two passes (Plate 169); that is, the working
end passes on top of all the thongs in the front and beneath all the
thongs in the rear. The rear is not shown in Fig. 1 but all the thongs
there go under each other.
Start by passing under one thong and over three (Fig. 1). Then to the
rear (the mandrel has been turned to show) in Fig. 2 and pass over one
and under three. The sequence from now on is:
Front: Under two, over three.
Rear: Over two. under three.
Front: Under three, over three.
Rear: Over three, under three.
Front: Over one, under three, over three.
Rear: Under one, over three, under three.
Front: Over two, under three, over three.
Rear: Under two, over three, under three.
Front: Over three, under three, over hree.
Rear: Under three. The working end is now alongside the standing
end and the knot is finished.
The completed knot is shown in Fig. 3.
If desirable to enlarge the knot, continue from this point with an
under-three, over-three, under-three sequence and when the front is
again reached, pass under one, over three, under three, over three. The
rear this time will be over one, under three, over three, under three.
Keep going in this manner, being sure that in the front the working
end passes over the last three thongs and in the rear it passes under the
last three thongs.
The savage tribes of the Philippines use split bamboo and weave this
knot into finger rings. They also use it to adorn their spears and other
warlike implements.
A diagram pattern for the overThree, under-three headhunter’s knot
is given in Fig. 4.
412
PLATE 170. Headhunter's Knot of Three Passes.
413
PLATE 171
Herringbone1. Knot. This is a very dressy and decorative knot for the
top of a quirt handle. It can be woven on any of the Turk’s-heads
having uneven parts, such as the five-part, seven-part, nine-part, etc.
This particular knot will be made with the five-part, four-bight
Turk's-head as the skeleton knot. While the five-part four-bight
Turk’s-head can be tied as shown in Plate 148, we will be consistent and
weave it.
Wrap the thong around the mandrel (with collar) in the manner
shown in Fig. 1. On the second turn pass it under the standing part
(Fig. 1), and in the rear pass it under one and over one (Fig. 2).
Continue as follows:
Front: Over one, under one, over one (Fig. 3).
Rear: Over one, under one, over one (Fig. 4)
Front: Under one. over one, under one, over one (Fig. 5). This brings
it back to the start, with the working part meeting the standing part
(Fig. 6).
Now, instead of tucking it under one thong alongside and to the right
of the standing part, tuck it under the standing part and under that
thong which is looped over the standing part and up alongside the left
of the standing part (Fig. 7). so that it follows the standing part
upward, passing over one thong and under one thong (Fig. 7).
Pass the working end to the other side of the standing part beneath it
and also beneath the thong on top of the standing part (Fig. 8).
With the working end follow the standing part down on its other
side, passing under the same thong the standing part does (Fig. 9).
At the bottom of the knot in Fig. 10, the working end has returned
to the point where it first passed along to the left of the standing part.
Now pass it over lhe standing part and under its own part, as well as
under the two adjacent thongs at the point where they cross each other.
In other words, the sequence is over one, under three.
Pass the working end upwards, following to the left of the thong on
its right, until it reaches the top, where it goes over one thong and
under three, as indicated by Lhe arrowhne in Fig. 11. The braiding
sequence is continued on Plate 171-A.
414
PLATE 171. Herringbone Knot.
415
PLATE 171-A
Herringbone Knot (Cont.). The last step in Plate 171 reached the top
of the knot and the next pass will split two of the parallel thongs. Bring
the working end down over one, under one, over two and under thre
drawing it out at the bottom to the left as shown in Fig. 12.
Going up. the working end passes over one, under one, over two and
under three, emerging at the top and left (Fig. 13).
Passing downward, the working end goes over one. under two. over
two and under three, emerging at the bottom left (Fig. 14). (Note:
Watch the numbers at the top of the mandrel which show when it has
been turned.)
Going up, the working end passes over one, under two, over two and
under three, emerging at the top left (Fig. 15).
Fig. 16: Going down, the working end passes over two, under two,
over two and under one (Fig. 16).
Figure 17 shows the finish of the knot. Pass under two more thongs,
including the standing part, and the knot is complete. This last pass
could have been included in the previous one and the working end
could have been brought under all three thongs at once. However, for
the sake of clarity in instructions, it is here done the longer way.
Both the shaded thongs and the white thongs in the completed knot
(Fig. 18) represent a five-part, four-bight Turk’s-head. In other words,
this complete knot is simply the result of w eaving or interw eaving these
two Turk’s heads together.
The same type of knot can be made with a seven-part, six-bight
Turk’s-head, which would be the result of interweaving two seven-part
Turk’s-heads together. Also it can be made from the nine-part,
eight-bight Turk's-head and so on.
It might be of interest here to say that Turk’s-heads and woven knots
have engaged the attention of many profound mathematicians and a
ponderous literature has been written on them. They follow rules as
inviolate as those of the planets, and the winding and intricate, even
labyrinthine, twistings can be calculated to a nicety.
A diagram pattern for this knot is given in Fig. 19.
416
PLATE 171-Л Herringbone Knot (Continued).
417
PLATE 172
The Bruce Knot. This knot is a small type of herringbone woven on a
three-part five-bight Turk’s-head. Start as in the Spanish ring knot, Plate
161, up to and including Fig. 8. The working end of the string or thong
is passed up along the right side of the standing part (Fig. 1).
In Fig. 2 the working end passes along parallel with the standing part,
but in Fig. 3 it goes beneath the crossed strings (Fig. 4). It continues to
follow the original string but in Fig. 5 it splits a pair downward and
then in Fig. 6 splits another pair.
In Fig. 7 the sequence is under one. over two, and under three. The
same sequence in Fig. 8 and then the string is brought up alongside the
point where the weave started. The finished knot is shown in Fig, 9.
The Catharine Knot. This herringbone knot is similar to the
preceding one, except it is woven on a three-part, four-bight
Turk’s-head. Also, unlike the above knot which is woven at the top, this
one is woven at both top and bottom.
Start the foundation knot or Turk's-head as in Fig. 10. It is
completed in Fig. 11 and in Fig. 12 the working end is brought up to
the right of the standing part. The working end does not cross the
standing part but follows around above it to the second crossed strings
then passes down over one, under one, over two (one the standing part)
as shown in Fig. 13.
Fig. 14: Up, over one, under one, over two.
Fig. 15: Down, over one, under one, over two.
Fig. 16: Up, over one, under two, over two.
Fig. 17: Down, over two. under two, over two.
Fig. 18: Up, over two, under two, over two.
Fig. 19: Down, under one (not shown in drawing), over two, under
two, over two.
Fig. 20: Up, under one, over two, under two.
The interweaving string can be a contrasting color and both knots
can be made on larger Turk's-head. I believe both types of knots to be
original.
418
PLATE 172. The Bruce Knot; Tin Catharine Knot.
419
PLATE 173
Pineapple or Gaucho Button Knot. Where the herringbone knot
(Plate 171) was an interweave of two Turk’s-heads of the same number
of parts and bights, the pineapple knot is an interweave of two
Turk’s-heads of the same number of bights but different number of
parts.
In this case, the basic or skeleton knot is a seven-part, six-bight
Turk’s-head and the one interwoven is a Turk’s-head of five parts and
six bights. This knot is usually made over a rounded core and can be
used on the heads of canes and quirts. It lias, because of its double row
of staggered bights at each end, the faculty of closing completely over a
round surface.
If tightened around a small spherical core, it makes a beautiful
button. The interweaving thong can be of a different tone or color,
which gives a very unusual pattern.
The knot can be made any size or length; however, it should be made
on a skeleton knot of uneven parts, such as the five-part, seven-part,
nine-part, etc. A longer one can be made by interw eaving the double or
triple section basket-weave Turk’s-head.
In Fig. 1 is shown the start of the basic, or skeleton knot. It
Illustrates a Turk’s-head of five parts and four bights which will be
raised to one of seven parts and six bights Tie the five-part, four-bight
Turk’s-head as shown in Plate 144. Beginning at the front of the knot
(Fig. 1), pass the working end, along parallel to the standing end, on its
right, under one, over one, under one, over one.
At the Lop, working down (Fig. 2) pass over one, under one, over
one, under one and over one (the bottom loop). Tire working end
passing down in this last step was to the left of the standing part.
In Fig. 3, pass upward, again to the right of the standing end, over
one, under one, over one,under one, over one and under one (top loop.)
Follow the interlocking path downward, over one, under one, over one,
under one, over one (Fig. 4).
This portion of the knot is shaded in Fig 5 Begin with the unshaded
part of the working end in Fig. 5, again follow alongside upward to the
right of the standing end, under one, over one, under one, over one, and
then pass toward the left under the two thongs which cross each other.
Fig. 6; Down, over one, under one, over one, and under two (where
the two thongs cross). Fig. 7: Work up, over one, under one, over one
and under three where the working end divides two parallel thongs. Fig.
8: Work down, over one, under one. over one and under three, splitting
a pair.
Fig. 9: (Not. shown clearly in the drawing) work up, over one, under
one, over one and under three (splitting a pair).
The sequence is continued on Plate 173-Л.
420
PLATE 173. Pineapple or Gaucho Button Knot.
421
PLATE 173-A
Pineapple or Gaucho Button Knot (Cont.). The sequence of the
pineapple knot is continued; pass down (Fig. 10) over two (splitting a
pair), under one, over one, and under three, splitting another pair.
Fig. 11: Pass up, over two (dividing a pair), under one, over one and
under three. The last move splits a pair of parallel thongs.
Fig. 12: Pass down, over two (splitting a pair), under two (splitting a
pair), over one and under three. The last move divides another pair
Fig. 13: Proceed upward, over two (dividing a pair), under two
(dividing another pair), over one, under three (splitting a third pair).
Fig. 14: Over two (dividing a pair), under two (dividing another
pair), over two (splitting a third pair) and then under three (dividing a
fourth pair).
Fig. 15: Pass up, over two (dividing a pair), under two (dividing a
second pair), over two (dividing a third pair), and under three (splitting
a fourth pair).
Fig. 16: Pass down, over two (splitting a pair), under two (splitting a
second pair), over two (splitting a third pair), and then under three,
bringing the working end alongside its own original part. The finished
knot is shown in Fig. 17
A diagram pattern is provided in Fig. 18.
422
PLATE 173-Л. Pineapple or Gaucho Button Knot (Continued).
423
PLATE 174
The Flores Button Knot. This beautiful little button knot was shown
to me in November, 1966, in Buenos Aires bj' my amigo, Don Luis
Alberto Flores. It illustrates a unique way to make a herringbone weave
on a five-part, six-bight Turk’s-head —or armadura, as they say in the
Argentine.
First, the Turk’s-head is constructed as shown in Figs. 1-5. In Fig. 5,
note that the working end comes up alongside the right of the standing
end. The weaving begins in Fig. 6 where the working end passes to the
left (arrowline) wider two inside crosses.
Fig. 7: Down, over one, under four (two crosses).
Fig. 8: Up, over one, under five.
Fig. 9: Down, over one, under five.
Fig. 10: Up, over one. under six. (Split pair, one of which is the
standing part.)
Fig. 11: Down, over one, under six.
Fig. 12: Up, over one, under six.
Fig. 13: Down, over two under six.
Fig. 14: Up, over two. under six.
Fig. 15: Down, oxer two, under seven (split two sets of pairs).
Fig. 16: Up, over two, under seven.
Fig. 17: Down, over two, under seven and up alongside the first
string to the right of the standing part.
There are some Turk's-heads where you find it impossible to weave a
herringbone or pineapple braid. This is one of them, when the usual
method is used. When the bights are unequal, say five or seven, and
exceed the parts, the working end is brought up to the left of the
standing end, crossed under two crosses at the top, and one cross at the
bottom.
424
PLATE 174. The Flores Button Knot.
425
PLATE 175
The Small Fan Knot or Bot6n Oriental. The Boton Oriental comes in
various lengths. Named in the Argentine, this knot resembles a Chinese
fan. In this small version, where the edges are of a sequence of over
two, under two, and the center over three under three, start as in the
gaucho knot of two passes. Plate 164. Beginning at Fig. 8, Plate 164,
instead of passing down over one, under two. over two. the sequence is
as shown in Fig. 1 of this plate—under three, over two.
Fig. 2: Up, under three, over two.
Fig. 3: Down, over one, under three, over two.
Fig. 4: Up, over one, under three, over two.
Fig. 5: Down, over two, under three, over two.
Fig. 6: Up, over two, under three, over two.
Fig. 7: Down, over three, under three, over two.
Fig 8: Up, over three, under three, over two.
Fig. 9: Down, under one, over three, under three, over two.
Fig. 10: Up, under one, over three, under three, over two.
Fig. 11: Down, under two, over three, under three, over two.
The working end is now brought around and under two alongside the
standing part. Figure 12 shows the knot completed.
426
FifcS Tift.4
PLATE 175. The Small Fan Knot or Boton OrientaL
427
PLATE 176
The Ginfer Knot. This knot has an over-three, under-three sequence
on the ends and over-one, under-one sequence in the center. This center
part can be interwoven in various patterns, as will be shown in the
section of Braid on Braid.
Start the knot as in Fig. 1 by passing the working end completely
around over everything. Do this three times, passing over everything,
and then in Fig. 2 pass the working end beneath the standing part as
shown, and over three.
Fig. 3: Up, under one, over three
Fig. 4: Down, over one, under one, over three.
Fig. 5: Up, over one. under one. over three.
Fig. 6: Down, under one, over one, under one, over three.
Fig. 7: Up, under one. over one, under one, over three.
Fig. 8: Down, under two, over one, under one, over three.
Fig. 9: Up, under two, over one, under one, over three.
Fig. 10: Down, under three, over one, under one. over three.
Figure 11 shows complete knot.
John Walter MaRu re, affectionately called Don Juan Maguire, in
his private museum in Buenos zVres. He is holding a pair of silver
reins of exquisite pampas workmanship
428
f’fr-4 Flfcio
PLATE 176. The Grnfer Knot.
429
PLATE 177
Three-Section Fan Knot or Boton Oriental. Mario A. Lopez Osomio,
who made a scholarly study of Argentine Braiding for La Comision
National de Cultura of that country and wrote three important books
on rawhide braidng, said of this knot: ‘‘Few times have 1 seen a botfin
so difficult to make.”
The edges are of a sequence of over two, under two, and the center
or “fan” section is over six, under six.
The knot is started as in Fig. 1 where the string or thong is wrapped
around the mandrel as shown. It will be noticed that it goes over all
parts except on the way down it passes beneath the standing part at the
point marked X. The arrowline shows the proeress upward—over one,
under one, over one.
Fig. 2: Down (follow the arrowline), over two, under two, over two.
Fig. 3: Up (arrowline), over two, under two, over two.
Fig. 4: Down, under one, over two, under four (one of these the
standing part), over two.
Fig. 5: Up (arrowline), under one, over two, under four, over two.
Fig. 6: Down, under two, over two, under six, over two.
Fig. 7: Up. under two, over two, under six (the arrowline does not
show the other two this string passes under), over two.
Fig. 8: Down, over one, under two, over three, under four, over one.
under two, over two.
Fig. 9: Up, over one, under two, over three, under four, over one,
under two, over two.
Fig. 10: Down, over two, under two, over four, under four, over two,
under two over two.
Fig. 11: Up, over two, under two. over four, under four, over two,
under two, over two.
Fig. 12: Down, under one, over two, under two, over five, under five,
over two, under two, over two.
Fig. 13: Up, under one, over two, under two, over five, under five,
over two, under two. over two.
Fig. 14: Down, under two, over two, under two. over six, under six,
over two. under two, over two.
The working end is now brought around two, alongside the standing
end. The finished knot is shown in Fig. 15.
430
PLATE 177. Three-Section Fan Knot or Bot6n Oriental.
431
PLATE 178
The Perfect Pineapple Knot. This perfect pineapple knot is made
without interweaving a Turk’s-head skeleton knot as is the regular
pineapple knot. It is made in one continuous sequence. Thus, it is the
perfect knot as the working end of the thong comes up alongside the
standing end when it is complete.
1 see in my notes that I began struggling with this knot back in 1954.
Recently Senor Luis Alberto Flores an enthusiastic braider, wrote and
said he had not found explained how to make a perfect pineapple knot,
or, as he termed it, pasador pluma sin armadura, in any of my books on
braiding. He said he had worked out this knot. We exchanged ideas and
while the end results proved the same, the method of making the knot
was relatively different. Seflor Flores had never found anyone who
could make the knot. Neither had I.
In Fig. 1 you wrap your thong twice around the mandrel as
illustrated. On the second wrap the thong does not cross in the back.
Continuing upward in Fig. 2, pass beneath the double thong. Down in
Fig. 3, pass over one, under one (but not the lower thong), and incline
upward. This is the secret of making this knot, as it has double bights or
scallops at top and bottom.
Fig. 4 up (forming an outside bight), over one. under one. Fig. 5,
down (outside bight), under two, over two. Fig. G, up (inside bight),
over two. under two. Fig. 7, down (inside bight), ui der one. over two,
under one. Fig. 8. up (outside bight), under one, oxer two, under one.
Fig. 9 (oubide bight), over two, under two, oxer twro.
At this point, if you bring your thong around and up alongside the
standing part and tighten the knot, you have a Б-bight, 7-part pineapple
as shown in Fig, 11, If you xvish to make a longer and larger knot as
shoxvn in Fig. 12, continue after Fig. 9:
Up (inside bight), under two, over two, under txvo. Down (inside
bight), over one, under txvo, over two, under one. Up (outside biglrt),
over one, under txvo, over two, under one. Down (outside bight), under
two, over two, under two, over two. Up (inside bight), over txvo, under
two, over txvo, under two. Doxvn (inside bight), under one, over txvo,
under two, over txvo. under one. Up (outside bight), under one, over
two, under two, over two, under one. Doxvn (outside bight), oxer two.
under txvo, over two, under txvo, over txvo. Then up, under one
alongside the standing part.
This knot can be used for many purposes to dress up horse gear,
quirt handles, etc. You will not find it simple to make, but rexvarding,
once you get the hang of it.
432
PLATE 178. The Perfect Pineapple Knot.
433
Lazy-Man
and
Pampas Button Knots
PLATE 179
The Lazy-Man Button. This type of button knot is very popular and
is frequently found on braided cowboy horse gear. In terming it the
Lazy-Man Button, 1 do not mean to infer that it is just a knot or button
that a lazy man would make, instead of the more complicated braided
ones; but. that it is one that can quickly and easily be made because of
its simplicity.
This is a very' practical knot and its origin is nautical—it is found
extensively in sailors’ ropework. In seaman’s language it is made by
“following the lead," or “following around” a Turk’s-head or skeleton
knot—that is, paralleling the first-laid strand with an identical
over-and-under sequence. Once can follow around as many times as
desired to increase the knot.
Three different button knots are shown on Plate 179. In each case
the Turk’s-head or foundation knot first is made and then increased by
following around.
The first one (Figs. 1-5) has a foundation a three-bight, five-part
Turk’s-head. A bight is the scallop at top and bottom and a part is a
thong on the sides or body. This knot is started in Fig. 1 where the lead
passes up and around the mandrel and in back and down in front over
the standing part then around once more over every'tiring. In the third
phase the lead—or working end—passes around to the back and in front
where it goes beneath the standing part, then up over two and under
one (follow the arrowline).
In Fig. 2 the lead is brought down over one, under one, over one.
under one. and around to the front (follow arrowline). This completes
tire Furk's-head. In Fig. 3 the process of doubling by following around
begins. The working end-lead-passes up and alongside the standing part
and continues to follow it, never crossing it, until the knot looks as in
Fig. 4. Figure Б shows the knot after three more similar passes have
been made. Figure 6 shows the top of the knot and how it closes
completely.
A four-bight, five-part Turk’s-head is started in Fig. 7. First the
working end passes up and then around back and to the front and then
down over the standing part. In the next pass it goes beneath the
standing part and over the lower bight. Figure 8 illustrates how it passes
up under one and over one in the back.
434
PLATE 179. The Lazy-Man Button.
435
Fig. 9 (down): over one (standing part), under one, over one. Fig. 1q
(up): over one, under one, over one. Fig. 11 (down): under one, over
one, under one, over one. Fig. 12 (up): under one, alongside the right
of the standing part. Follow around as in the previous knot. Figure 13
shows the top and side of this button knot after it has been followed
around three times.
In Fig. 14 is illustrated the start of a five-bight, seven-part
Turk’s-head. Referring back to the first Turk's-head (Fig. i), it will be
noticed that the working end or lead has been wrapped around twice.
In this knot it is given one more turn, or wrapped around three times. (I
have designated the two knots as “wrap-around knots,” and with
practice they can be made quickly on the hand instead of on a
mandrel.)
In Tig 14, in passing up, go over three and under one.
Fig. 15 (down): over two, under one (standing part), over one. under
one. Fig. 16 (up): over two, under one, over one, under one. Fig. 17
(back) (down): over one, under one, over one, under one, over one,
wider one.
In Fig. 18 bring the working end up alongside the right of the
standing part and begin following around as before. In this instance the
knot is tripled. If a larger knot is desired, follow around again. Figure
19 shows the side of the finished button and Fig. 20 the top.
Any type of Turk’s-head can thus be followed around to make the
Lazy-Man Button These buttons are used on tops of quirts, as side
buttons on bosals, and for many other purposes.
PLATE 180
The Colima Lazy-Man Button. I found this button knot on a quirt
given to me in Colima, Mexico. Tearing it apart, I learned that it was
woven on a five-part, four-bight Turk’s-head.
Start as in Fig. 1 where the working end of the string is passed
upward to the right of the standing part. As shown, the working end
parallels the standing part to the very top. In Fig. 2 the arrowline shows
the course of the working end in the back of the knot. It passes under
two, over one, under one, and over two, one of which is the end of the
standing part. In Fig. 3 the working end passes upward under two, over
one, under one, and over two.
The sequence after Fig. 3 (not shown in the drawings) is: Down:
Under two, over one, under two, and over two. Up: Under two, over
one, under two. and oxer two. Down: Under two, over two, under two,
and over two. Up: Under two. over two, under two, and over two.
Down: Under three, over two, under two, and over two. Up: Under
three alongside the standing part (Fig. 4).
436
PI ATE 180. The Colima Lazy-Man Button: The Small Pampas Button Knot.
The Small Pampas Button Knot. As I am partial to what I term the
“running" method of making woven knots, or building them up as you
braid, I devised this knot. In deference to the Pampas Button which
follows, I call it The Small Pampas Button Knot.
Start as in Fig. 5 where the string passes around and over everything
twice and on the third time goes under one, over two, as shown. The
sequence then (not shown in the drawings) is: Up: Under one, over
two. Down: Under two, over two. Up: Under two, over two. Down:
Under three over two. Up: Under three, over two. Dowrn: Under four,
over two.
Here the sequence radically changes. In Fig. 6 the working end passes
over three, under one, and over two. Down: Over three, under two,
over two. Up: Over three, under two, over two. Down: Under one, over
two, under three, over two. Up: Under one, over two, under three, over
gvo. Down: Under two, over one, under four, over two. The working
end then passes up under two alongside the standing end (Fig. 7).
437
PLATE 181
The Pampas Button. This decorative button knot is a sophisticated
vers on of the Lazy-Man Button. In the Pampas Button the
follow-around is only in the center of the knot and the ends arc woven.
This knot is much in vogue in the gaucho regions of the Argentine
Pampas, hence the name.
Take a long string or thong and start working it around the mandrel
as in Fig. 1. Beginning at the lower right-hand side, wind the string to
the left upward in a clockwise spiral and then downward crossmg the
original string three times (Fig. 1). The arrowline in Fig. 1 shows the
path of the string in the next move. It goes upward over one, under
one, over one. Then downward over all strings to the position shown in
Fig. 2.
The mandrel is divided into four sections, each section numbered
from 1 to 1 in a counterclockwise direction. The No. 1 section is the
front, No. 3 is the rear. No. 4 the left side and No. 2 the right side. The
sequences shown here can thus be more easily followed.
In Fig. 2 the arrowline show's the progress of the string which is
upward over two, under two, over two. Also in Fig. 2 is shown a second
arrowline for the down braid which is under one, over five, under one,
over two. This is shown completed in Fig. 3.
Up: (Fig. 3) The arrow line shows a part of the next move, which is
completed in Fig. 4 after the knot has been tightened and adjusted. The
entire sequence is upward under one, over two, under four, over two.
The arrowline in Fig. 4 indicates the downward move which is under
twro, over six (in the rear), under two, over two (completed in Fig. 5).
Up: (Fig. 6) Under two, over six (in the rear), under two, over two.
Down: (Fig. 7) Over one. under two, over two, under four, over two,
under two, over two.
Up: (Fig. 8) Over one, under two, over six (in the rear), under one
(in the rear), over one, under t\ o, over two.
Down: (Fig. 9) Over two, under tw'o, over two, under four (in the
rear’), over four, under two, over two.
Up: (Fig. 10) Over two, under two, over six (partly in the rear),
under two, over two, under two, over two.
Down: (Fig. 11) Under one. over two, under two. over two, under
four, over three, under one, over two, under two, over two.
Up: (Fig. 12) Under one, over two, under two, over six. under four,
over two, under two. over two.
Down: (Fig. 13) Under two, over two, under two, over two, under
four, over four, under two, over two, under two, over two.
Up: Under two alongside the standing part. The finished knot is
shown in Fig. 14.
438
PLATE 181 The Pampas Button.
439
The Braiding Detective
PLATE 182
Duplicating Strange Braids and Creating New Ones. The braided
knot, or even the Turk’s-head is a mathematical marvel. It goes round
and round and comes out perfect—the working end of a braided knot
returns to its point of origin.
It is interesting to analyze, more absorbing to create, and definitely a
challenge. Distinct variations are limitless and all of them are adjusted
to a mathematical scale of easy deduction.
Dr. Almanzor Marrero у Galfndez, in the prologue of his book,
CromohipologiS, said this of his Argentine father: "During his last years
almost each day he made an original criollo button, which he first
posed as a problem, resolving it mathematically, and later executing the
formula he had worked with success. Some of these buttons were of
such complexity that he had to use several strings in the same knot,
whose total length reached several meters."
Alas, his mathematical techniques in planning his buttons have been
lost to posterity. Many serious scientists and mathematicians have given
profound thought to the Turk’s-head and as an independent result of
the studies of Clifford W, Ashley of New England, and George H. Taber
of Pittsburgh, the "Law of the Common Divisor” was discovered.
Ashley, for instance, setting a limit of knots of twenty-four parts and
twenty-four bights, found there were, in all. 576 combinations—240
had a common divisor and could not be tied as Turk’s-heads. while 336
had no common divisor and could be t ed. 1 have pointed this out
before, but wish to stress it. If one number can be divided into both
parts and bights, the knot is impossible to tie.
If you wish to duplicate a braided knot, count the number of bights,
the number of parts, and the over-and-under sequence. If this does not
give you a key to how the knot is made, then start with a small string or
thong of different color at the standing end of the knot and parallel or
follow' around this standing end, noting each move on paper as the new
siring crosses itself, viz., “Up: Over one, under one, over one,” etc.
Luis Flores, of Buenos Aires, has a different method. He takes an
unfamiliar braided knot and as he unbraids it ising the working end ot
the knot, he notes the sequence backwrards. But when he is done, if he
has made a mistake in his counting he has no knot.
440
1
PLATE 182. Duplicating Strange Braids and Creating New Ones.
441
For many years I have used what I call a “Braiding Detective.’* see
Figs. 1 through 3. Cut a broom handle about five inchej long and about
half an inch from the bottom cut a groove all the way around. Take ten
strings (this number is arbitrary) three times as long as the piece of
broom handle and fasten them on with string or wire, the strings
pointing downward (Fig. 1). Then, string by string, wind them upward
(Fig. 2). If you are going to use them all, wind the ten and then
temporarily tie them (Fig. 3).
These strings are now woven down in any' sequence you wish- under
two, over three, etc. If ten strings are used, be certain the parts and
bights do not have a common divisor. When the knot is complete, start
following around with a long string and when the working end meets
tire standing end, pull out the strings of the “Detective*’ and slip off the
knot.
In duplicating a strange knot, use the same number of strings as there
are bights in the knot. If eight bights, use eight strings; if the knot starts
with air under-two sequence, you do the same. Follow carefully the
sequence to the end and then remove the “Detec five” strings and slip
off your knot.
Another method I have used in creating new knots is to make
independent knots of the same number of bights, using the running
method explained in braided knots. Arrange the knots side by side on
the mandrel (Fig. 4) in such a fashion that the emerging string on one
bight is over and the string on the other goes under. Then follow
around with a long string and finally pull out the original knots. In this
case I have used two knots of five parts and four bights. The result is a
knot of nine parts and four bights (Fig. 6).
By' this means you can create long knots of varying sequences. The
one rule is that all original knots must have the same number of bights.
442
Braided Appliques
PLATE 183
Stairstep Applique of One Thong. Like edge-lacing, applique
handicraft is both practical and beautiful. It is useful in joining pieces
of leather and at the same time is pleasing to the eye. With the proper
use of thong applique no thread or metal brads will ever be necessary'.
And it is needless to say that there is a harmonious relationship
between a leather thong and the leather it joins and whose beauty it
complements.
One of the simplest forms of applique is tire stairstep type. It can be
used not only in joining leather pieces at the edges, but also as a means
of decoration in itself by following a pattern, such as initials or some
particular design.
Space the holes the width of the thong. Enter the thong from the
back through hole 1 (Fig. 1). Then pass it through hole 2 from the
front (Fig. 1) and up and back through hole 1 from the rear (Fig. 2).
Always be sure it consistently emerges either to the right or left of the
portion of the thong already in the hole or slit. In this case it is always
on the right.
Now bring the working end of the thong down from hole 1 to hole 3
and pass it through from the front to the back (Fig. 3). Pass it up from
the back through hole 2, to the right of both thongs at that point (Fig.
4).
Next, pass the thong down through hole 4 from the front (Fig. 5)
and up through hole 3 (Fig. 6) Keep it to the right. Then down
through hole 5 (Fig. 7), and so on in the same order until the finish.
In Fig. 9 is shown a diagram of how the braid looks from the rear.
There are several variations of this attractive braid, which will be
detailed later.
Holster and belt for Colt 45 single action decorated with applique
work in rawhide. The belt and holster proper are of heavy saddle
skirting leather.
444
Tj А с к p i G.g
PLATE 103. Stairstep Applique of Onr Thong.
445
PLATE 184
Stairstep Applique with Similar Braid on Both Ends. This is a
one-string braid as in Plate 183, but the back and front have the same
type braid. It is particularly valuable in sewing together two pieces of
leather or rawhide where you wish both sides to be dressy and showy.
In Fig. 1 ten holes have been punched and the string enters No. 1
hole from beneath and then passes down through hole No. 4. The
arrowline indicates the next pass where the. string is brought back and
emerges to the r ght of its own part through hole No. 2 (Fig. 2). Also m
Fig. 2 the arrowline shows how it is passed jack and out hole No. 3 and
then down (to the right) through hole No. 6.
In Fig. 3 this move is complete and the arrowline indicates that the
string emerges to the front from hole No. 4 and down through hole No.
7. The front of this braid is shown in Fig. 4. The back, with the same
stairstep applique, is shown in Fig. 5. Note the back is one hole shortor.
There is no need to worry about the back as you proceed; this sequence
takes care of itself.
Four-Part Applique Same on Both Sides, Made with One String. Ten
holes are punched on both edges, with an extra hole punched between
the No. 1 holes as shown in Fig. 6. Ten are merely used for
convenience; any number can be made. Start with the string at the
bottom where it passes Lo the front in the lower center hole (Fig. 6).
The string is continued upward as shown in this figure. After the string
goes through the upper center hole, start the interweaving indicated by
the arrowlines (Fig. 7). This interweaving is continued downward by
the same method, taking care to interweave in die back as you proceed.
The braid on the back will be shorter by one hole, but of the same
type.
Five-Part Applique Same on Both Sides, Made with Two Strings. This
braid is started by introducing two strings in the two lower center holes
(Fig. 8). In the back, string A passes to the front through hole No. 9
and string В to the front through hole No. 10 (Fig. 9). Keep working
both strings, front and back, as indicated in the drav ings. This is a
consistent braid, front and back. More elaborate appliques can be made
by using three, four, five, or more strings.
446
PLATE 184. Stairstep Applique with Similar Braid on Both Ends; Four-Part Appli-
quc Same on Both Sides, Made with One String; Five-Part Applique Same on Both
Sides, Made with Two Strings.
447
PLATE 185
Two-Thong Four-Part Applique. As this is built upon the stairstep
applique (Plate 183), first make the stairstep braid. Then, -with a second
thong, this one of a different color if desired, pass through the first hole
at the top from the rear to the front as shown in Fig. 1. The original
thong of the stairstep applique is white and the second thong is shown
as shaded in the drawing.
Pass the shaded, or working thong over the white thong between
holes 1 and 2, under he white thong co its right-, then over the next and
down through hole 3, from the front to the rear, as indicated by the
arrowline in big. 1.
Now bring the working thong back up through hole 2 from the rear
to the front and on the left side, indicated by the arrowline in Fig. 2.
Next pass the-working thong over one thong, under one and over
one, then through hole 4. illustrated in Fig. 3. Bring it back again from
the rear to the front through hole 3, to the left, as indicated by the
arrowlinc in Fig. 4.
The next step is the same as the preceding ones. Pass the working
thong over one, under one, and over one, always inclined to the right,
and then down through hole 5 (Fig. 5).
In the rear view (Fig. 6) it can be seen that the thongs overlap, as the
shaded or working thong is brought through a hole on one side and up
through a hole on the other side.
The finished work is shown in Fig. 7. This gives a pleasing, two-toned
effect, but it can also be worked effectively with thongs of the same
color. The braid simulates, after a fashion, the four-thong flat braid.
Applique braid work applied to belts made by Tony Genco.
448
This type of thonging is very popular among leather braiders in
Switzerland. It can be made with thongs of different widths; usually the
original stairstep applique foundation is made of the wider thongs. It is
an effective trimming on belts and other articles, although it must not
be forgotten that it has the utilitarian value, as does all appliqu6
braiding, of joining together two or more pieces of leather.
PLATE 185. Two-Thong Four-Part Applique.
449
PLATE 186
Stairstep Applique of Two Thongs. This is similar to the stairstep
applique of one thong (Plate 183) except that a closer braid is obtained
by the use of two thongs.
It is used for joining pieces of leather and at the same time for
decoration. For a pleasing effect, use a thong of contrasting color.
Different leathers, such as goatskin thonging lace on cowhide or
calfskin, are quite effective.
To begin, insert the thong designated as В in the top hole from rear
to front. Next, pass the one designated as A through the second hole
from the rear to the front and under В (Fig. 1). In this drawing the
arrowline indicates the course of thong B. Pass it through the second
hole from front to rear and to the left of thong A.
Now bring thong В forward through the third hole and inclined to
the right, indicated by the arrowline in Fig. 2. Pass thong A down
through the third hole over thong В and to its left in the hole. Follow
the arrowline in Fig. 3.
In Fig. 4 the next move is indicated. Bring thong A from back to
front through the fourth hole and inclined to the right. Pass thong В
down over thong A and through the fourth hole from front to back and
to the left of thong A at that point (Fig. 5).
When the two thongs are in the position shown in Fig. 6, tighten by
pulling on both at the same time. Bring thong В back up through the
fifth hole and incline it to the right.
Pass thong A down through the fifth hole over thong В and to its left
in the hole (Fig. 7). The finished braid is shown in Fig. 8.
A back view of this braid is illustrated in Fig. 9 and resembles in
every' way the single thong braid.
Make the holes with a punch or with a small thonging chisel. The
symmetry of the braid depends on the care used in spacing the holes
evenly. When using slits made by a thonging chisel, always enlarge them
with the fid before inserting the thonging end. Braid made with slits is
much neater than when made with holes.
450
PLATE 186. Stairstep Applique of Two Thongs.
451
PLATE 187
Chain Applique of One Thong. Pass the thong through the top hole
from the rear to the front and down through the third hole as shown in
Fig. 1. The arrowline in this drawing indicates its path which is up
through the second hole from the rear to the front and to the right of
the standing part.
Next pass it down through hole 4 from the from to the rear.
Pass tire working end up through hole 3, this time to the left of the
standing part, as shown by the arrowhne in Fig. 2. Then bring it down
through the fifth hole from the front to the rear.
Now bring it up through hole 4, this time to the right of the standing
part, as indicated by the arrowline in Fig. 3. and down through the
sixth hole from the front to the rear. Continue thus, first passing back
to one side of the standing part and next to the other side.
Split-Thong Applique. This provides a double security in joining two
pieces of leather and also gives a pleasing effect. First pass the thong
through hole 1 from the rear to the front and down through hole 3
(Fig. 5). Now, in that part of the loop which is directly over hole 2, cut
a small v ertical slit in the thong with a thonging chisel or the point of a
knife. Enlarge it from the rear with the fid and pass the working end
through the hole in the leather and through the slit in the thong, as
indicated by the arrowline in Fig. 5.
In Fig. 6 the working end is shown through the holes in both leather
and thong. Bring it down through hole 4. In that section of the loop of
the thong directly over hole 3 stab another vertical slit, being careful
not to cut the thong beneath. Pass the working end through hole 3 and
through the slit in the thong as indicated by the arrowline in Fig. 7.
Continue for the desired length.
Split-Thong Applique of Two Thongs This is the same as the
preceding applique except that two thongs are used and thus there is no
necessity of slitting them. Work the thongs as a unit as shown in Figs. 9
10, 11 and 12. One thong of one color and one of another may be used
and by overlapping them each time in the rear, a pleasing, two-toned
effect is achieved.
452
PLATE 187. Top: Chain Applique of One Thong. Center: Split-Thong
Applique. Bottom: Split-Thong Applique of Two Thongs.
453
PLATE 188
Hair-Braid Applique of Two Thongs. Begin this applique by passing
two thongs of equal width through the top hole from the rear to the
front (Fig. 1). The left-hand thong (unshaded) is designated as A, and
the right-hand one (shaded) as B.
Pass thong A down through hole 4 and thong В down through hole
3.
The arrowlines in Fig. 1 show the next pass of the two thongs. Bring
thong В through the second hole from the top and to the extreme right
of the other two thongs. Pass thong A back through the third hole from
the top and to the extreme right of the other two.
In bringing both thongs from rear to front always have them emerge
to the extreme right. This will incline the finished braid toward the left
and if the holes are not too far from the edge of the leather or pieces of
leather being joined, the braid will lie on the very edge, giving an
attractive edge-lacing effect.
Pass thong В to the left over one thong, under one and down through
hole 5, as indicated by the arrowlinc in Fig. 2. Now pass thong A over
the first thong to the left, under thong В and down through hole 6.
Tliis is indicated by the arrowline in Fig. 3.
Bring thong В up from rear to front through the hole 4 and to the
right, as indicated in Fig. 4 by the arrowline. Pass thong A up from rear
to front through hole 5, as indicated by the arrowline in Fig. 4.
In the next step, shown in Fig. 5, pass thong В over one thong (its
own part) under the white thong (A) and down through hole 7. Thong
A follows the corresponding path, passing over its own part, under
thong В and down through hole 8, as shown in Fig. 6.
Continue this as far as desired. By tracing a design or initials on a
piece of leather it can be followed with this appliqued braid. The
finished braid, shown loosely woven so the operation can belter be
observed, is shown in Fig. 7. The back of the braid is illustrated in Fig.
8.
Woman's belt (front) showing “S” type applique of one thong (Pl. 189) braided in
circular fashion—also as decoration near buckles. Round button knot (Pi. lit) m
center of appliqued circle
454
PLATE 188 Hair-Braid Applique of Two Thongs.
455
PLATE 189
“S” Type Applique of One Thong. The width of the thong will
determine the distance of the holes from each other and the distance
between the two vertical rows of holes. If an 1/8-inch thong is used and
the braid is to be closed up. space the holes 3/16 of an inch from each
other and the vertical rows ‘A inch apart.
This applique, like odier appliqu£ braids, is not only used to join two
pieces of leather, but for decoration.
Pass the working end of the thong through the top hole at the right
from the rear to the front and then down and across through the
second hole on the left, shown in Fig. 1.
Next, bring the thong up through the top hole on the left from the
rear to the front and down to die right over its own part and through
hole 3 on the right-hand side. Pass it back to the front through hole 2
on the right, as indicated by the arrowline in Fig. 2.
Incline the thong to the left over its own part and down through hole
3 on the left. Then pass it back to the front through hole 2 on the left,
as indicated by the arrowline in Fig. 3.
Incline the thong to the right, over its own part and down through
hole 4 on the right-hand side. Then pass it back and up through hole 3
on the same side, as indicated by the arrowline in Fig. 4.
Incline the thong to the left, over its own part, down through hole 4
on the left-hand side and up through hole 3 on the same side, as
illustrated in Fig. 5.
Incline the thong to the right, over its own part, down through hole
5 on the right-hand side and up through hole 4 on the same side, as
illustrated in Fig. 6.
Continue thus until the braid has reached the desired length. The
finished braid is shown in Fig. 7, with the back view in Fig. 8. This
latter figure illustrates how the ends are secured.
In Fig. 9 this applique is used to fasten the part of a belt that holds
the buckle. The braid can be continued down the middle of the belt,
the shaded portion co the left showing a bed or depressed part in the
leather. To make this bed, the leather should he dampened, then cut
along the sides of the bed to about one-third of its thickness and
depressed with ordinary background stamping tools. The braid will then
lie flat on the surface. The bed is not necessary, however, and the braid
can be emphasized by working it over a narrow strip of leather laid
between the rows of holes.
456
............„
>1&. 5 FIGr. 6 Fit»./ Fltr. а
PLATE 189. “S” Type Applique of One Thong.
457
PLATE 190
Appliqufc of Three Thongs. This beautiful applique of three thongs
gives the effect of a five-part flat braid. The color of the thongs may be
varied It is, of course, used to fasten together parts of leather as well as
for decoration. Space the rows of vertical holes about five times the
width of the thong.
Thongs are designated from left to right as A, В and C. Pass thong д
from the rear to front through the upper left-hand hole and down
through the third right-hand hole (Fig. 1). Pass thong В through the
middle upper hole from rear to front and down to the left, over thong
A and through hole 3 on the left (Fig. 1); thong C through the upper
right-hand hole from rear to front, under thong A and down through
hole 4 on the left-hand side (Fig. 1).
Now, bring thong A (on the right) up through the second hole on the
right (b) from rear to front, incline down the left, over its own part and
through hole 5 on the left-hand side, as indicated bv the arrowline in
Fig-1-
Bring thong В (on the left) up through hole 2 on that side, incline
down to the right and over its own part, under thong C, over thong A
and down through the fourth hole (d) on the right-hand side (indicated
by the arrowline in Fig. 2). Next, bring thong C up through hole 3 on
the left, incline down to the right, over its own part, under thong A and
down through the fifth hole (e) as indicated hy the arrowline in Fig. 3.
Bring thong A up through hole 4 on the left, incline down to the
right and over its own part and through hole if), the sixth hole on the
right (Fig. 4).
The three thongs are now on the right-hand side (Fig. 5). Pass thong
В up through the third hole (c) on the right, incline down towards the
left, pass it over its own part, under thong C, over thong A and down
through hole 6 on the left. Bring thong C up through hole (d), the
fourth one on the right, incline down toward the left, over its own part,
under thong A and down through hole 7 on the left Pass thong A up
through the fifth hole on the right (e). incline down to the left, over its
own part and down through the left-hand hole, 8. These moves are all
indicated hy arrowlines in Fig. 5.
Figure 6 shows the finished braid, and Fig. 7 shows the back of the
braid and the method of securing the ends.
458
А) Л)
Ba с к view
"F l &. 7
PLATE 190. Applique of Three Thongs.
459
PLATE 191
Applique of Five Thongs. Braiding with five thongs in the following
manner gives the effect of a seven-part herringbone flat braid.
Space three holes across the top between the upper holes of the two
vertical rows (Fig. 1). The thongs are designated from left to right as A
В, C. D and E. Paas thong A through the upper left-hand hole from rear
to front and down through the fourth (d) right-hand hole; thong В
through the second horizontal hole from the left and down to the right
through the third hole (c) on the right-hand side; thong C through the
third horizontal hole from the left, over thongs В and A and down
through the left-hand hole, 3: thong D through the fourth horizontal
hole, incline down to the left, under thong B, over thong A and down
through the left-hand hole, 4; thong E through the upper right-hand
hole, incline down to the left under thongs В and A and down through
the fifth left-hand hole (all shown in Fig. 1).
Next, bring thong C up through hole 2 on the left, incline down to
the right, over its own part, under thong D and E and down through the
fifth hole (e) on the right, designated by the arrowline in Fig. 1.
Bring thong D up through hole 3 on the left, incline down to the
right, over its own part, under thong E and down through the sixth hole
(f), on the right-hand side (Fig 2). Pass thong E up through hole 4 on
the left, incline down to the right, over its own part, and down through
the seventh hole (g) on the right (Fig. 3).
All thongs are now on the right-hand side (Fig. 4). Start with the top
one, thong B, and bring it up through the second hole on the right (b).
over its own part., under two thongs, over two thongs, and down
through hole 6 on the left, indicated by the arrowline in Fig. 4.
Pass thong A up through the third hole on the right (cj, down over
its own part, under two thongs, over one and down through hole 7 (Fig.
5). Bring thong C up through the fourth hole on the right (d), down
over its own part, under two thongs and down through hole 8 on the
left (Fig. 6). Pass thong D up through the fifth hole on the right (e),
down over its own part, under one and through hole 9 on the left (Fig.
7). Pass thong E up through the sixth hole on the right (f), down over
its own part and through hole 10 on the left (Fig. 8).
Now work the thongs back to the right in the same manner; each
goes up through the hole above, then down over its own part, under the
next two and so on. The finished braid is shown in Fig. 9.
460
PLATE 191. Applique of Five Thongs.
461
PLATE 192
Five-Thong Circular Applique. This is the same as the five-thong
applique in Plate 191. It gives the equivalent of a seven-part, braid and
when made in this circular fashion, usually is raised by placing a small
strip of leather beneath, over which it is braided.
As the outer circle of holes will be spaced w ider apart than those of
the inner circle, be careful in laying out the circles to see that the outer
holes are not too far apart and those in the inner circle too close
together. There must be the same number of holes in the outer as in the
inner circle.
The circles in Fig. 1 are divided into sixteen parts. Punch the holes
on the inside of the outer circle and on the outer rim of the inner circle
(Fig. 1). The width between the two rows of holes, the space between
die holes themselves, and the width of the thongs, will all determine
how close the braid is to be.
Pass thong A through hole 1 in the outer circle (all outer circle holes
are numbered) from underneath and down through hole (e) in the inner
circle (Fig. 2). (All inner circle holes are designated by letters.) Pass
thong В through hole 2 and down through hole (f); thong C through
hole 3 and down through (g); thong D up through hole (b), over A,
under В and C and down through hole 5; thong E up through hole (e).
over A, and B, under C and through hole 6.
Pass thong A back through hole (d), then under its own part, and
over В and C, and down through hole 7 (arrowline in Fig. 2). Bring
thong В back through (e), under its own part, over C and down through
hole 8 (Fig. 3). Pass C back through (f), under its owi part and down
through hole 9. The working ends of all five thongs are now on the
outer circle.
Start with D and pass it back through hole 4, under its own part,
over E and A, under В and C, and down through hole (h). Follow tire
same sequence with the other thongs; pass each back through the hole
to its rear, under its own part and then over and under, so that each
A book jacket, for Bruce Grant's Leather
Braiding made by Tony Genco. A nine-
strand filigree circle of braidwork executed
on gold leather.
462
thong from hole to hole in the finished braid will have a sequence of
under one, over two. under two and over one.
To close the braid (Fig. 4), pass D under three, over one and into
hole 4; C under one, over one, under one. over one and into hole 3: В
under one, over three, into hole 2; A under one, over two, under two,
over one and into hole (d), and E under one, over two, under two, over
one into hole (c).
PLATE 192. Five-Thong Circular Applique.
463
PLATE 193
The Zig-Zag Applique. The Zig-Zag Applique makes an attractive
decoration when worked on a belt, but it can be used also as a border
for carved leatherwork as well as for other purposes that imagination
and ingenuity might inspire.
For purposes of illustrating this applique I have chosen a belt, one
inch wide. The first step is to set the buckle as shown in Fig. 1. Skive
the short end of the belt as it is to be brought back and cemented to
the underside. The buckle is held in place with a three-hole
fastening—the top hole is that punched for Lhe base of the buckle
tongue (Figs. 2-6). Before cementing down the underpart, make the
belt, loop or loops—if you prefer more than one. As this loop is
appliqued before it is put into place, work the zig-zag applique on it in
the same fashion as explained in Figs. 11-15 for the belt proper.
The fastener for the loop is shown in Figs. 8 and 9. When the ends of
the thong arc drawn tight, bringing together the ends of the loop, the
loop is placed between the folded leather below the buckle. The loop
should Ire just large enough to accommodate the thickness of the belt
end that is fastened by the buckle.
Ln Fig. 10 I have shown the applique on the belt just below the belt
loop. However, this actually is the end of the applique and it should be
started from the other end of the belt, as will be explained. For the
time being, cement the folded and skived part to the underside of the
belt.
Try the belt on for size, determining the position of hole (x) in Fig.
11. Later you can punch two or three holes on either side of this hole
to take care of an increase or decrease in girth.
Set the wing dividers or compass at *4 inch and score a line for the
full length of both sides of the belt leather. This is the guide for the
thong holes.
Set off the thong holes along this line 'A inch apart, but start the first
hole (y) opposite hole (x) in Fig. 11 and work both ways. When all
holes have been marked off on this side, begin on the other side,
making sure that these holes are exactly in the center of the space
between the opposite holes (Fig. 11). The first hole of this scries is (z).
Start the applique as shown in Fig. 11 with one long thong. Each end
will be worked alternately. In Fig. 12. looking at the back, fold over
end A and insert end В in the same hole as shown and again through the
hole on the other side. In Fig. 13 end В is folded back and end A passe»
through the same hole and on through the hole on toe other side.
Figures 14 and 15 show the sequences from the front. This applique is
carried on back to the belt loop and further secures the cemented
fold-over as shown in Fig. 10. To secure the working ends, tuck them
beneath the braid at the back and cut off the excess.
In this applique on the belt proper and the belt loop 1 have used an
1/8-inch dark brown goatskin lacing.
If you wish a double zig-zag applique, work it as in Figs. 16 and lo-
using different color lacing. Three rows can be made on a 1’4-in ch belt.
464
PLATE 193. The Zig-Zag Applique.
On a wader belt, more rows can be appliqued.
However, in the case of two or more rows, it is difficult to locate the
holes for the buckle tongue. When more than one row is used I prefer a
buckle known as the “hook and bar,” or trophy-type buckle (Figs.
465
18-21). With such the applique can be worked just under the edge of
the buckle on each side.
Usually this buckle is mounted by folding the stationary end of the
belt around the bar and then securing it. However, this usually causes a
bulge in the front and the working end of the belt comes out on top of
the belt. I skive the stationary end on the hair side, punch a hole in it to
accommodate the hook, pass it through the bar and over the hook
(Figs. 19 and 20). A little cement between tire skived leather and the
underside of the buckle will usually hold it in place. The working end
of the belt goes over the hook and through the bar, beneath the
standing part
In such case I use one hole for the fastening, exactly measured. The
working end is thus hidden beneath the other section and the buckle
looks like it “‘jus’ growed on the belt."
If the belt is to be taken up, punch a new hole in the standing end,
cut off the section with the original hole, and re-skive. If it is to be
enlarged, punch a new hole in the working end and then splice out the
applique so it disappears under the edge of the buckle.
The best way is to watch your diet!
Belt decorated by the author with a Zig Zag applique.
466
Three-inch-wide belt decorated in the center with appliqu6 similar to that of
Plate 191 and with a four-Lhong round edge braid on the edges (Pl. 119).
Executive’s briefcase. The case is black leather, medallion type circle applique
braidwork over silver leather; cut medallion underlay. This example of Mr. Genco's
work demonstrates how braidwork, lacing and design complement any project.
467
PLATE 194
Making and Decorating a Belt Buckle. This type of appliqu&l buckle
makes a decorative woman’s belt. It also can be used on the cheekpieces
of a headstall. Select the metal buckle to suit your needs, place it on
the strap or belt and then sew it down to a round piece of leather (Fig.
1). Cut a second round piece the same size as the first and then cut out
the center so the metal part of the buckle is covered (Fig. 2). Punch
holes around the edge for the braid. Punch through both pieces of
leather to make holes 1-8 and 12-17. In the section where the billet of
the belt passes, punch holes only in the top piece (9-11 and 18-20).
Now pass the braid through both pieces of leather (holes 1-8), just
through the top piece (holes 9 11). back through the two pieces (holes
12-17) and just through the top for holes 18-20. Figures 3-7 inclusive
show the hair-braid applique that is illustrated in Plate 188.
If using thongs or strings of a contrasting color, be sure there is an
even number of holes. Otherwise, when the braid is finished, the string
of one color will join that of the other.
The completed braid is shown in Fig. 7. In Fig. 8 four strings are
used with an over-and-under sequence of two. In Fig. 9 three strings are
used with an over-and-under sequence of one. giving a simulated
four-string braid.
An ordinary belt buckle covered with leather and the edges held
together with circular applique.
PL4TE 194. Making and Decorating a Belt Buckle.
468
469
PLATE 195
Star Applique of One Thong. With a pair of calipers make five
equidistant marks on a circle. Then punch five holes and number these
in a clockwise direction, 1 to 5. The thong or string enters hole 1 from
beneath, passes down through hole 3. then back upwards through hole
2 and over its own part (Fig. 1). The arrowline in this figure shows the
progress of the string which goes down through hole 4, up through hole
3 and over its own part and down through hole 5.
The arrowline in Fig. 2 shows the string passing back through hole 4,
over its own part, and down through hole 1 Then it passes up through
hole 5 over its own part, then under a string and down through hole 2.
At this point (Fig. 3) the single-string star is complete. But it can be
doubled by using the same string or one of a contrasting color, and
punching five more holes inside each preceding hole toward the center.
The arrowline in Fig. 3 shows the siring emerging from hole 1 (inside
hole), under one string, over one string, and down through inside hole
3. It is then brought back up through inside hole 2.
The procedure in working these inside strings is the same as
previously shown in the one-string star. The result is illustrated in Fig.
5. Figure 6 shows the back of the braid. With very narrow strings other
holes can be punched toward the center to make a three, four, five,
etc., star. By utilizing this method, three-pointed, four-pointed,
six-pointed or more stars can be made.
Chevron and Diamond Appliques. These appliques make attractive
decorations for belts, reins, etc. In Fig. 7, string A passes from
underneath through the center hole, down through the second hole on
the right, across beneath to the center hole and down to the left
through the third hole, and so forth. В goes up through the top center
hole, down through the second hole on the left, across beneath and up
through the second center hole and down through the right center hole,
etc. The method of making the diamond appliqu£ is shown by
arrowlines.
The Mosaic Applique. This appliqu£, starting with string A, stairsteps
upward, and upon reaching the top two holes, begins to stairstep
downward. В also goes up. and when reaching the top, cither another
string goes down on the right of A or it crosses beneath to the other
side. For C, reseat. Multicolored strings make this an attractive applique
for a belt. If you have the patience, punch holes in leather so the ends
meet and then continue the applique to close around a bottle or other
object. Figure 9 gives an idea of how this appliqufi looks.
470
PLATE 195. Star Applique of Out Tliong; Chevron and Diamond Appliqufs The
Mosaic Applique.
471
PLATE 196
Saddle Decoration—Applique Braids. Fortunately, there are many
horsemen who still consider leather caning and braidwork the richest
and most agreeable form of decoration for all types of horse gear. That
this form of decoration can be applied to saddles is to be seen in many
old-time saddlers’ catalogues, where fancy braid work is emphasized.
Unfortunately, braiding on saddles has been supplanted today by
ornate and heavy metal ornaments. Only fancy carving has survived and
braiding, as a saddle decoration, has become a lost art.
There are many types of braid which may be applied to saddle
decoration. In an endeavor to revive this interesting and beautiful type
of ornamentation, several original braids have been created by the
author, and methods of utilizing standard braids have been worked out.
In Fig. 9 of Plate 196 is shown the sketch of a saddle decorated in
this fashion. This saddle was made by Lee M. Rice and decorated by the
author. The carving is supplemented by different types of braidwork.
The seat, back jockey, skirt and fender are decorated with an applique
of five strings. The swell, seat, back jockey, skirt and fender carry
circles of hair-braid applique, and in the center of each circle is an
appliqued Lone Star knot. Edge-braiding is on the cantie, swell, rigging,
skirt, back jockey and fender. Around the horn and on the stirrups is a
hair-braid applique.
The method of making the applique of five strings is shown in Figs.
1-4, inclusive. The five strings are inserted in holes or slits, as shown in
Fig. 1. Each end on the left side is then brought up through the hole
above it and then passed down, as shown in Fig. 2, to the holes on the
right. The five ends on the right are brought up, each through the hole
above, and then down through the holes on the left (Fig. 3). The
completed braid is shown in Fig. 4, where the corner ends are
interwoven to finish these sections.
The circle of hair-braid applique is shown in Figs. 5-8, inclusive. This
braid is worked with two strings. If strings of a different color are used,
the number of holes must be even, otherwise it doesn’t matter. String В
passes down through the first hole to the fourth and then back up
through the hole above it, on the inside of the circle. String A passes
through the second hole, down through the fifth and up through the
hole above it, also emerging on the inside of the circle (Fig. 5). In Fig. 6
is the key to the sequence to be followed. String В passes over its own
part to the left under siring A and down through the sixth hole. String
A goes over its own pari under string В and down through the seventh
hole and so on.
Many other types of applique braid which can be used in such
decoration arc described in this book. White rawhide strings or latigo
thongs may be used.
472
PLATE 196. Saddle Decoration — Applique Braids.
473
PLATE 197
Lone Star Knot Applique. To make the Lone Star knot applique,
first make the foundation or skeleton knot, as shown in Plate 87 up to
and including Fig. 10. Do not start interweaving as shown in Fig. 10 of
that plate, but begin the interweave as shown in Fig. 1. Plate 197.
Before this, however, the foundation knot is flattened out. The top
of the knot becomes the center and the bottom of the knot becomes
the edges. Lay this flattened knot in the center of your hair-braid
applique circle. Then punch five holes, as shown in Fig. 1. Plate 197.
These holes are numbered 1 to 5.
Begin the weave by passing the darker colored string, designated as B,
up through hole No. 1. The string then follows the course shown by the
arrowline in Fig. 1: under one, passing also under, or at the tip of,
string A. over one, under one. over one, under two, over one, under
one, over one, under one, and then down through hole No. 1, passing
over its own part in going through this hole.
In Fig. 2, the first step of the weave is completed. String В now
follows the course of the arrowline: down through hole No. 1, as
previously stated, up through hole No. 2, under one, over one, under
one, over one, under three, splitting a pair, over one. under one. over
one, under two, splitting a pair.
Figure 3 shows this second phase of the braid completed. String В
now follows the course of the arrowline: down through hole No. 2, up
through hole No. 3, under one, over one, under one. splitting a pair,
over two, under three, splitting a pair, over one, under one, over two,
under two.
In Fig. 4, the third phase of the braid is completed. The string now
follows the arrowline: down through hole No. 3, up through hole No.
4, under one, over one, under two, over two, under three, over one,
under two, over two, under two.
The fourth phase of the braid is completed in Fig. 5. String В follows
the course of the arrowline: down through hole No. 4. up through hole
No. 5, under one, over two, under two, over two, under three, over
two, under two, over two, under two. It passes down through hole No.
5.
Holster and belt for .38 caliber revolver. Bek is a double braid of 48
thongs. The belt buckle and holster are decorated with applique work.
474
PLATE 197. Lone Star Knot Applique.
The finished braid is shown in Fig. 6. The interweaving, whereby
string В has passed through five holes, has secured the entire knot to
the saddle leather.
Conchas for the tie strings may be fashioned from a circle of leather
with edge-braiding, or may be made from a flattened Lone Star knot
(Plate 87) with a smaller piece of round leather laid on top.
The Star Knot Applique shown in Plate 195 can also be used for this.
475
Leather picture frame decorated with applique braid and round buttons
and held together by "S" type applique (PI. 189).
Braid on Braid
PLATE 198
Mosaic Type Braid on a Three-Part, Five-Bight Turk’s-head. This ring
knot can be made not only on the Turk’s-head shown here, but on
larger Turk’s-heads with an over-one, under-one sequence. It results in a
very attractive and unique braided knot.
Start as shown in Fig. 1 where the working end comes up alongside
the standing end on the left side and over the first crossed strings and
back under one of them as illustrated by the arrow line. This step is
shown completed in Fig. 2. Turn the mandrel toward you, in the next
step carry' the working end over the twro crossed strings on the right
(arrowline, Fig. 3) then under one and over the crossed strings on the
left (arrowline, Fig. 4). Continue this sequence until the working end
emerges at the start of the braid. Carefully trim off the end. When the
working end is a contrasting color, it is very effective.
Joining Tw'o Turk’s-heads with the “S” Braid. The two Turk’s-heads
are placed side by side on the mandrel, and the “S" Braid, explained
under Appliques, is used to unite them (Fig. 6). Figure 7 shows this
braid on punched leather or rawhide. Again a contrasting string can be
used.
Braid on the Aztec Button Knot. The Aztec Button Knot is
explained in Plate 75. As the strings cross in a one-one sequence in the
center, the Stairstep Appliqu^, illustrated in Plate 183, is used for the
top or appliqued braid (Figs. 8 and 9). A string in a contrasting color
makes this a beautiful knot.
Five-Part Applique on a Nine-Part, Eight-Bight Knot. Each edge of
this foundation knot (Fig. 10) is of an over-two, under-two sequence,
with an over-one, under-one sequence in the center. It is this center
section that is to be appliqued. This basic knot is of the Ginfer-type
knot. Figure 11 shows a graphic illustration of the applique, which is
made with three strings or thongs. Figure 12 shows the same, only
worked on a nine-part flat braid. Figure 13 illustrates how this knot
looks when finished on the button-type foundation. Each of the three
strings used will join up with another and the ends trimmed. A truly
beautiful knot.
Mosaic Type Applique on an Eight-String Flat Braid. This is a very'
fine example of how an applique can be made on any type of braid of
over-one, under-one sequence. Figure 14 shows this applique worked on
a piece of leather which has been punched. In Fig. 15 the same applique
is made on a flat braid, the holes being the interstices in the braid.
478
PLATE 198. Mosaic Type Braid on a Three-Part, Five-Bight Turk’s-head; Joining
Two Turk’s-heads with the “S” Braid; Braid on the Aztec Button Knot; Five-Part
Applique on a Nine-Part. Eight-Bight Knot: Mosaic Type Appliqu? on an Eight-
String Flat Braid.
479
PLATE 199
Applique on Ginfer Knot. This applique on a Ginfer knot with
over-three, under-three edges and over-one, under-one sequence in the
center. In Fig. 1 is shown the area to be interwoven. The working end is
first brought up along the left side of the standing part and then over
two crossed strings and under one. For contrast this working end can be
of <i different color.
Figures 2 and 3 illustrate the working of the interwoven string. In
Fig. 4 the working string passes under one, over three and under one.
Continuing, Fig. 5 illustrates the path of the working string. In Fig. 6
the sequence is over three, under two, over three, and under two. In
Fig. 7 the same sequence is followed, and in Fig. 8, with the same
sequence, the working end comes up alongside its beginning. The
finished knot is shown in Fig. 9.
If this knot is mashed flat it looks like the drawing in Fig. 10. But
the hole in the center is much smaller. Say it originally was worked on a
mandrel of 7/8 inch diameter, when flattened the hole in the center will
be about ‘A inch. The flattened knot has several practical uses. It can be
employed to decorate reins, or in conjunction with a button knot with
tee closed end pushed through the hole, it can be used as an interesting
drawer pull.
Butterfly braid key chain.
The Butterfly Knot. This knot, which actually is made with the
conquistador braid, can be worked on a simple four-string round braid.
After the first pass, shown hy arrowlines in Fig. 1, taper the knot by
failing to pass beneath one element of its own part at the end of each
pass. Figure 13 shows the butterfly knot (or Mariposa as designated in
the Argentine) used on a necklace. It also is employed to decorate key
chains, bridle reins, etc.
Applique on a Crocodile Ridge Braid. After making the crocodile
ridge braid with ridges on both sides and an over-one, under-one
sequence in the center, interweave the center strings with a string of
480
contrasting color, using the “S” Braid, as shown in Fig. 14. This
combination makes an attractive belt. The billet end should be started
by the Australian method employed on all flat braids. Eight strings are
used here.
PLATE 199. Applique on Ginfer Knot: the Butterfly Knot; Applique on a
Crocodile Ridge Braid.
481
Top: Picture taken in private museum of Gaucho Handcraft at Estancia
El Cinco in the Province of Buenos Aires. (Left to right) Don Luis
Alberto Flores, author and writer for the horse magazine El Caballo;
the author; and Don Osvaldo Monti, owner of the estancia. Bottom:
Another view of Mr. Monti’s museum.
482
Additional Projects and Examples
PLATE 200
How to Make “Quick-Draw” Galluses. The old-time cowboy—and the
cavalryman, too—had a hankering for galluses or suspenders instead of a
belt to hold up his pants. He disliked putting his gun belt on over his
pants’ belt. Before elastic suspenders, and even afterward, the cowboy
wore galluses as shown in the illustration. The loops of the shoulder
straps slid back and forth freely, allowing easy play in them as if they
were elastic.
These old-time galluses are simple to make. Cut two straps, each 42
inches long and % inch wide, from a medium weight calfskin. (You can
vary any given measurements to suit yourself.) At one end slit both
straps in hald for 11 inches. At the other ends make slits for the buckles
and holes for the buckle tongues (Fig. 1).
Next, make what I term the “sliders,” for lack of a better name.
These are illustrated in Fig. 2 and two of them are needed. Cut 'Zi-inch
thongs 21 inches long w ith slits at each end. Dampen the leather and
twist these thongs into a tight twist braid, the flesh side in. of course. In
twisting there is some shrinkage and when finished the sliders will be
about 16 inches long. Or, if preferred, lea her can be sewed around a
small core as shown in Fig. 2.
Attach Lhe two buckles as illustrated in the assembled drawing (Fig.
5) and in Fig. 1. The buckles are attached with a three-hole thong
fastening as shown in Fig. 3. Next make loops for the back (Fig. 4). But
before fastening them on either side by sewing or with the three-hole
thong method, be sure to interlace the slits in the back as shown in the
assembled drawing in Fig. 5.
Back view of “Quick-Draw” Galluses. (See other picture on page 4S6.)
484
Two more small loops are needed as shown (A in Fig, 5). Thread the
“sliders” through the loops as shown, adjust the buckles to suit, and the
galluses are all ready to button on.
If a more elaborate type is desired, the shoulder straps can be made
of many of the different kinds of flat braids.
PLATE 200. How to Make “Quick-Daiw" Galluses.
485
£11111 HU
Top: Side view of “Quick-Draw” Galluses showing how they articulate.
Bottom: Another side view showing how they easily adjust to any
movements.
486
Bell made from a four-thong round braid (without core, 50 feet after braided,
Pl. 37) and then tied in Chinese knots.
487
PLATE 201
How to Make a Rawhide-Covered Suitcase. The feature of this
suitcase is the braided mitered comers.
First make a box of ’Л-inch plywood, measuring 233/i by 13 by 5ЭЛ
inches. This plywood box is all of one piece. After it is completed,
measure one inch from the part that will be the top and draw a line
around the entire box. Then, following this line, saw the box into two
pieces, one to be die top and the other the bottom.
These pieces are next covered with thin calfskin rawhide (Fig. 1)5
allowing a couple of inches so the rawhide can be turned in on E, the
wooden, part. The rawhide is designated F in the drawings.
I use no cement to hold the rawhide to the foundation. The rawhide
should be dampened just enough to make it workable. The best
dampening agent is three parts water and one part glycerin. It is applied
to the rawhide with a sponge.
A design or in tials can be worked on the rawhide before it is placed
on the top or bottom. Different types of appliques are used.
Novr for the comers (see Figs. 1-4). First cut the rawhide at each
edge as shown in Fig. 1, A to B. The section marked C is brought up
beneath that marked D and D is brought down so its edge is parallel to
die edge of the box.
Stretch the rawhide over the top and bottom parts of the box—but
do not stretch it too tight. It will shrink a trifle. Tack the tumed-in
edges to the inside of the box.
Taking the top part which is approximately l’/i inch in width (with
the added raw’hide cover) mark off ’/i inch at the top and about 1/8
inch at the bottom. At ’Л-inch intervals make slits in the rawhide. Make
six perpendicular slits, each measuring 3A inch (Fig. 3). An extra li-inch
slit is made at each end.
The method of braiding is indicated by arrowlines in Fig. 3—an
over-one, under-one sequence. The finished braid, with all ends tucked
under, is shown in Fig. 4.
Locks and hinges can be bought at most hobby shops and some
hardware stores. The handle is placed midway of the width of the
suitcase. The one shown is made by taking a strip of rawhide and after
threading it through two D-rings (covered or not covered, as you wish)
an additional arrow’ strip is placed between and the ends sewed together
underneath. The edges are closed with edge-braiding. The D-rings are
held in place by cutting slots through the rawhide covering and the
w'ood and passing a long strip of rawhide through the slots (at each slit
a loop is made for the D-ring). The ends of this strip are tacked down
inside.
488
PLATE 201. How to Make a Rawhide-Covered Suitcase.
489
Clow up of braided mitered corner.
The author’s initials are worked in the stairstep applique of one string;
the circle employs the hair-braid applique of two strings. The design or
initials are worked on the rawhide before it is put on the case.
490
Top: Front view of the finished rawhide-covered suitcase. Bottom:
View showing lock, handle and the mitered comers.
491
PLATE 202
Making a oven Rawhide Chair Seat. On one of my trips to Mexico I
saw an interesting woven rush chair seat. I took a closeup photo of it
and later duplicated the woven scat with rawhide strings. I used a
sturdy old Elbert Hubbard Roycraft chair with worn-out seat. It proved
a most interesting and rewarding task.
Figure 1 in Plate 202 and Photo A show’ the beginning of this braid
or weave. I used W-inch-wide rawhide strings, cutting them from head
to tail down the center to avoid the belly section which narrows and
stretches w'hen wet.
One end of the string is first tacked securely under on the left side
bar of the frame (Fig. 1). It is then brought up and over the left side
and then across to the right side where it is passed under the side piece
and over its own part. It is next passed under the side piece and worked
toward the left, passing under tire loop as indicated by the arrowline in
Fig. 1. At the left side it passes over the side piece and then makes a
loop over both strings as illustrated in Fig. 2. It is again carried to the
right over the side piece where the same procedure is continued as in
the case of the first pair of strings.
As it is difficult to wrork with a tamale or very long string. I prefer to
use strings of seven or eight feet in length, splicing in a new string when
necessary. This split-braid splice is illustrated in Figs. 3 and 4. Make a
slit about *4—1 inch from the end of the old string and the same from
the new string. If necessary7, cut off the end of the old string before
making the slit so the splice will be underneath the side piece.
I use dampened newspapers in which to keep the strings properly
dampened and tempered. You can keep these dampened strings
overnight in an icebox if you do not finish the braiding in one session.
Photo E shows the design of the Mexican rush chair seat. However, a
plain basket weave of over one, under one can be used, or an over-two,
under-two sequence, as shown in Fig. 5, can be employed.
It might first be well to try out your braiding over an ordinary frame
and by using paper with small squares drawn in, make up your own
sequence, or design. There are many possible designs and one can even
work initials in the center part of the braid, if desired.
When working these dampened rawhide strings, do not pull too t: ght
for the strings will contract when dry7 and could pull the chair frame
apart.
492
PLATE 202. Making a Woven Rawhide Chair Seat.
493
A: The start of the braid, working crosswise on their seal. (Illustrated in Figs. I and
2 in the plate.) B: The cross strings completed; begin the weave or braid from front
to back and vice versa. C: Continuing the weave, D: The braid or weave half
finished.
E The completed braid. (This can also be made in over-one. under-one or over-two,
under-two sequence, or of a design of the braider’s choice.)
495
Covering Boleadoras. Boleadoras, used in the Argentine to catch
ostriches as well as cattle and horses, are often covered with elaborate
braidwork.
These boleadoras, usually smooth rocks about two inches in diameter
and two and a quarter in length are first covered with rawhide so that a
loop is formed at the top. This is illustrated in Photo No. 1 by the bola
on the right, It is covered much like the locket shown in Plate 9, Figs.
4-7.
A thinner piece of rawhide cut round and then into strips almost to
the center is placed damp on the bola. The bottom, or center, is incised
in an uneven series of slits and a string of contrasting colored rawhide is
braided through these slits in an over one, under one sequence. Be sure
the slits are uneven.
On the upper part cut out every other string and braid the others.
496
which also are of an uneven number in an over-one, under-опе se-
quence, with a long string of a different color. Tie at the top and cover
the ends with a Spanish ring knot.
Photo 2 shows the same set of boleadoras. After covering the stone, a
piece of dampened rawhide is worked over the bottom and holes
punched in the edge. Spanish hitching is used to cover the middle and
top portions. Usually the type of rope used is a two or three string twist
braid.
Photo No. 3 shows boleadoras covered with braided knots. These, of
two bolas, also are shown in Photo No. 4 on top of a case for the silver
spurs, and encircling the spurs. The handle of this case is of interest. It
is fashioned from a single strip of rawhide, folded with covered D-rings
at each end. It is held together with two braids—the center portion
being covered with the stair-step applique of one string and using the
same holes to work edge braiding on each side. The two D-nngs are held
to the case by a long strip of rawhide which passes through each ring
and through two slots in case itself.
497
COVERING A LAMP BASE
Covering a Lamp Base With Rawhide. 1. Select a base. 2. Fit the base
with light fixture kit. 3. Cut rawhide to cover the base. Use a revolving
punch to make holes down both sides where the rawhide will be joined.
Remember to put one prong in the last hole cut to insure even spacing
throughout. Draw the rawhide around the base and, using a thong, join
the edges with edge-lacing or appliqu^. 4, The finished lamp.
198
AN EXERCISE IN BRAIDING
Multiple Ring Button. Top: The large braided ring is made like one
shown in Plates 23, 24 & 25, How to Make a Braided Cincha. The
smaller rings in the center are shown in Plate 68, How to Make a
Multiple Ring Button. The middle section is cemented on the outer
ring.
Center: Photo showing how light comes through the middle section.
The outer ring is of red latigo and the middle section of white rawhide.
Bottom: This ornamental combination is illustrated as a medallion.
499
Woman's pocketbook showing use o£ stairstep applique of two thongs (Pl. 186) as
edge-braiding as well as holding parts together.
500
Drumhead type woman’s pocketbook showing carved work set off by 7-thong
circular appliqu^ braid (similar to that of Pl. 192) and with Spanish edge-braiding of
three loops (Pl. IIS). Braid work is in black and pocketbook natural calf.
501
The author made this braided halter shown on a bell mare.
A collar of softened rawhide with bell. It is for the madnna or bell mare
of a string of horses. The collar was made by a master braider, Tomas
Anaacolta, and is in the collection of John Walter Maguire, Buenos
Aires, Argentina.
502
Martin G6mez covered this knife handle with fid work and made
the sheath for the author.
Top: Knife in decorated sheath and an Argentine rebenque
covered with intricate fid work. Bottom Closeup of decorated
sheath. This is the type of sheath used by the South American
gaucho to carry a facon (a large heavy belt knife).
Б03
An ancient Arabian knife and sheath owned by Wright Howes, Chicago,
Illinois. Note the braided knots on sheath and knife handle. Rawhide and
leather braiding originated in Arabia, and was carried into Spain.
An Argentine rebenque, or heavy quirt, owned bj’ Edward Larocquc Tink-
er. Note braided knot on handle end of quirt, similar to that of the
Arabian knife.
504
Comanche sculping knife with rawhide covered handle and
sheath. Braiding can be considered a universal language. Note
braided knots are used on both the Comanche knife and the
Arabian knife.
Braidwork generally served some practical purpose. Shown are
three types of stone weapons that employed rawhide. Left to
right: a rawhide covered rock “head breaker," used by lhe Plains
Indians; Apache tomahawk; grooved stone axe.
505
Covering a Bottle. Leather craftsmen strive to develop the art of
leather work. Projects such as these two shown on this page, by Tony
Genco will keep the art flourishing. Half gallon bottle completely
covered with one piece sunburst-type cut leather brought up from
bottle bottom. One piece lacing woven around bottle up to its neck in
over-two, under sequence (on right).
Intricate Designed Bottle Covering. To proceed from the basics to
complex and original designs is a challenge of braidwork. Bottle covered
with half-hitch design. The design repeats three times around in three
colored lacings. To excute the design 1,000 plus precision punched nib
punchings w’ere made in the leather. Bottom piece molded and joined
to the cylinder design area with a false braid, a weave. Top of the
cylinder piece is finished with a two-color edge lacing. A pineapple
two-two sequence is used for covering beyond the cork area (on left).
506
Rawhide bottles or containers. In Mexico they are used as to-
bacco pouches. The stopper for each bottle is the metal part of a
shotgun shell.
507
1
A CURIOSITY IN BRAIDING
A curiosity in braiding. This is an eight-string round braid worked
into a ring like a Turk’s-head, and done with one long string, according
to the maker, Ernie Ladouceur. He wrote at the time: “All I can
remember was that I took a piece of copper wire and bent it in a circle.
The wire was about 1/8 inch in diameter. I started working over this
wire and when the braid started to get too tight I just pulled out the
wire and continued from there. I haven’t the slightest idea how I did
it.”
However, this braid can be made with two strings, wrapping them in
the same direction, but so as to cross each other, and interweaving
them. The braid is of two cycles, which would make it theoretically
impossible with one string revolving in one cycle. But Ernie apparently
did the impossible, which should confound all mathematicians.
This braid is certainly a challenge to the braider. It is suggested that
tire work first be done over a rope grommet or a metal ring. Spiral one
string or thong around the grommet in a clockwise direction. Then,
going in the same direction, spiral the second string around in a
counterclockwise direction so that it crosses the first string on the
outside and inside of the grommet. Then wrap the first string around,
passing over even-thing. Finally, work with the second string, over one,
under one, interlocking all sections. This gives a four-string round
Turk’s-head.
This can be built into an eight-string by doubling and then splitting
pairs, and after that it can be made into a sixteen-string round
Turk’s-head, and so on ad infinitum. Lf you can make this of raw hide
you can do away with metal rings on your horse gear.
This is more fully illustrated in Plates 23, 24 & 25.
508
TWISTED HOBBLES
The upper, closed pair were made by the author. The lower, open pair
were made by Rudy Mudra, Sheridan, Wyoming. Both are made of
heavy latigo, but can be fashioned from softened rawhide. First take a
strip of latigo or rawhide 56 inches long and 2% inches wide. Wet
thoroughly and then fold in the flesh side on both edges. On one end
fashion a rolled leather button similar to the one in Fig. 3, Plate 140.
Five and one-half inches from the button fold the leather again for 8
inches, leave 9 inches doubled after that and then fold again for 8
inches. Twist your two 1/8-inch folds together and lash with string until
dry. Make a slit in the end opposite from the button. Button the
hobbles and allow them to dry in the shape shown in the upper photo-
graph. Those shown were dried around two soup cans, but they can be
dried around anything approximately 3 inches in diameter. When dry,
remove the string around the twisted parts. These hobbles will then
retain their shape.
The section on hobbles contains directions for making Simple Types
of Hobbles (Plate 140), Braided Gaucho Hobbles (Plate 141), and
Braided Hobbles, (Plate 142). Photographs of various hobbles are also
shown.
509
Margarita de] Castillo (shown here) and Gloria del Castillo are two of the fanciest riders in Mexico City and lead all
the parades for notables, Their father, who died recently, wua Копии» del Custillo, secretary of the Asociaslbn del
Charros in Mexico City. The horse’s gear consists of scarce rawhide and leather braiding.
The author is shown as a young man wearing the hat, buckskin jacket and holding
the braided quirt—all bought with many other articles from Herbert Cody Blake, a
nephew of Buffalo Bill. Blake duplicated Buffalo Bill’s outfit and played the role in
his own Wild West Show.
GLOSSARY
Alforja (al-for'hah )—Wide leather or canvas bag in which a horseman
carries his personal effects on a pack animal.
Aparejo (ah-par-ay 'ho)—Packsaddle.
Applique—A form of braiding which is worked directly up n the
surface of the leather.
Awl—A pointed instrument or tool for piercing small holes in leather.
Used when stitching with waxed thread.
Back—The middle of the hide or skin directly over the backbone. This
section supplies the best thongs.
Back Braid—A braid in which the thongs are first braided loosely in an
over-one, under-one sequence, then crowned and woven back upon
themselves.
Basil—A cheap form of sheepskin.
Basket Weave—Usually where the interwoven thongs are of an over-one,
under-one sequence.
Belly—The sides of a skin or hide A very thin thong can be cut from
this section. However, it must be dampened and stretched before the
thong is cut.
Bevel—To cut or shape to a bevel angle; to slope the edge or surface of a
piece of leather.
Bight—A loop in a thong, as that part of the thong between the working
end and standing end, formed by bringing the working end of the
thong around, near to, or across its own part. Particularly the
“scallops” on the upper and lower edges of a Turk’s-head or woven
knot.
Bit—The metal part of a bridle which goes in the “bit hole” of a horse’s
mouth and to which the reins and headstall are attached.
Bit-Chains—Chains for fastening the reins to the bit. Usually fitted
because of the tendency of some horses to bite the reins They add
weight when certain types of bits (such as the Mexican bit) are used.
Blanket Stitch—A form of lock stitch. Sometimes called buttonhole
stitch in edge-braiding.
Boots—Protective coverings of rawhide or leather in eyes of hondas,
reins, and bit-cheek loops on headstalls to prevent wear on the braid.
Also called wear-leathers.
Bosal (boh-zal)—Noseband of the hackamore, usually made of braided
rawhide. Bosals are made from pencil size to 1 Vi-inch diameter.
Braid—The interlacing or weaving of one thong with itself or several
thongs with each other.
513
Breast Collar—Hamess which passes around the horse’s breast and is
attached to the saddle. Standard length is 32 inches. Some breast
collars have a neckpiece and side straps both of which are adjustable.
When used with a saddle it is more properly termed martingale.
Breeching—A wide strap which passes around a horse’s rump.
Bridle—Head harness consisting of headstall, bit, and reins.
Bucking Strap—A strap placed tightly around a horse’s belly to make
him buck.
Buckskin—A soft, pliable leather of deerskin, formerly tanned by the
American Indians by treating them with brains of the animals and
smoking the skins. Today a chrome process is used and the term
applies to both deer and elk skins.
Buck-Strap—A leather loop attached to the saddle horn to provide a
“hand-holt” when riding a bucking horse.
Bull-Rigging—A broad strap or rope around an animal’s body and to
which are attached “hand-holts” for wild-steer riding in rodeos.
Bullwhip—A whip with a lash from 15 to 25 feet in length, with a short
lead-weighted handle.
Buscadero Belt—A broad belt from which two guns can be hung, one on
each side.
Button—Woven leather or rawhide knot on quirts, bridle reins,
headstalls, and other gear. Interwoven thongs forming a knot, or a
strip of leather rolled into a small cylinder.
Cabestro (cah-bes'tro)—Horsehair tie-rope.
Calfskin—Leather made from the skins of calves. The best and most
attractive thongs are cut from calfskin.
Cantinas—Saddle pockets which slip over the saddle hom.
Cantie—Up-curved back of a saddle.
Catch-Rope—Working rope or lanat
Catgut—A tough cord obtained from the intestines of sheep. Used for
violin strings, tennis rackets, surgical sutures, and for Turk’s-head
decorations on canes and whips. Also for ferrules on the latter.
Chamois—A very soft leather made from sheepskin.
Chaps—Leather leggings with wide flaps for the protection of a
horseman’s legs. From the Mexican chaparejos.
Cinch—A wide strap which goes around a horse’s belly to hold the
saddle on his back. Called cincha in some areas.
Coachwliipping—A braid made around a core in which several thongs
are worked as one unit.
Concha—Silver or metal ornament used on belts, bits, headstalls and
saddles Saddle conchas are usually termed “string conchas” and
come in sets of eight.
514
Core—A hard or pliable center of a whip, quirt or crop, usually of
twisted rawhide or leather, but sometimes of rattan or French
willow. Also a rope center of a braid.
Corona—A fancy saddle pad.
Crown Knot—A knot at the end of a braid where the working ends are
laid over each other so that they interlock and are pointing back
toward the braid.
Cuff—Leather gauntlet for guarding the wrists and protecting the shirt
sleeves.
Curb Strap—Strap which is attached to the bit and passes behind the
horse’s chin.
Danglers—Pear-shaped ornaments of metal which dangle from spurs.
Draw Gauge—A hand tool for cutting thongs or leather straps.
Drover’s Whip—A swivel-handled and shot-loaded whip having a lash
from 8 to 12 feet long.
Duffel Bag—A roll containing blankets and personal effects.
Ear-Head—A simple headstall without noseband, browband, or
throatlatch, and with a loop or loops for one or both of the horse’s
ears.
Edge-Lacing—A type of edge-braiding in which the braid covers the
edge of the leather. While a decoration, it also serves to fasten two or
more pieces of leather together.
False Braid—Braid where leather thongs are pulled alternately through
slits in their own parts. Usually is termed slit-braiding and simulates
actual braiding.
Fiador—Л safety device or tliroatlatch used on the hackamore.
Sometimes called Theodore.
Fiador Knot—An intricate knot used on the fiador.
Fid—Sometimes called belt awl in leather work A long tapering metal
tool with a blunt point used for making an opening between thongs
in braiding, as well as enlarging slits through which thongs are passed.
Flat Braid—Braid in which thongs are worked alternately from each
side.
Flesh Side—The inner or rough side of the leather as opposed to the
smooth or hair side.
Frill- A tassel on a quirt or other gear.
Girth—Same as cinch.
Grain—The smooth natural exterior surface of leather from which the
hair has been removed. Same as hair side or smooth side.
515
Guilloche—A pattern made by interlacing curved lines in which braiding
is simulated; sometimes carved or stamped on leather.
Hackamore—Type of western headstall or bridle without a bit. It
consists of headstall, bosal, mecate, and fiador. Commonly used in
breaking horses and teaching them to neck-rein.
Hair Braid—The simple, three-thong flat braid.
Headstall—Part of a bridle or hackamore that fits over the horse’s head.
It consists of cheekpieces, crownpiece, noseband, browband, and
throatlatch.
Herringbone—A pattern usually of a V-shape formed by thongs when
braided in over-two, under-two sequence or over-three, under-three
sequence.
Hide—A pelt from one of the larger animals; cattlehide, cowhide,
horsehide, etc.
Hide Rope—Rope made from strips of leather cut from green hides and
braided. Formerly used by seamen in rigging.
Hobbles—Cuffs or loops joined together and fastened around an
animal’s forelegs.
Holster—Leather sheath for a pistol or revolver.
Honda—Eye on the working end of a lariat, or reata, through which the
rope passes to form a loop or noose.
Hom—Pommel or knob on the front of a saddle.
Horsehair Rope—A rope of braided horsehair. Best quality is the
“clipped” rope made from a horse’s mane. Wien used on a
hackamore, it is called a mecate, or “McCarty'.”
Horse Jewelry—Various types of metal ornaments used on headstalls,
breast collars, and saddles.
Huaraches—Mexican sandal-like shoes with tops of braided thongs.
Incising—Another name for leather carving. A method of slightly
cutting around the ornament with a knife before sinking the
background.
Inlay—To set braidwork in a leather surface to form a design. The two
surfaces are usually level.
Interlaced—Where laces or thongs cross alternately over and under each
other.
Jingle-Bobs—Another term for danglers.
Kink—Twist in a thong.
Lace—A small, narrow thong. Usually commercially made and beveled;
used mainly for edge-braiding or edge-lacing.
516
Lacing Needle—Flat needle split at one end to receive the thong or
lacing.
Lariat—A throw-rope or cateh-rojie. Usually made of fiber.
Lasso—A modem term for lariat. However, the word is more properly
used as a verb—to lasso.
Latigo—A form of thong of alum-tanned leather; often mistermed
rawhide.
Levis—Blue denim overalls, named for the maker, Levi Strauss.
Lock—Thonging in which each tum secures itself.
Lie—The “settling down’" of a thong in the right position, usually
obtained by tapping it lightly with a mallet.
Maguey (mah-ghay'e)—Four-strand rope, handmade by Mexicans from
the fibers of the aloe plant.
Mandrel—A cylindrical or conical core used in making Turk’s-heads or
woven knots.
Marlinspike—A metal pin tapering to a point used in separating thongs
in braiding. Synonymous with fid.
Martingale—A breast collar used with a saddle.
Mecate A twisted horsehair rope used on the hackamore for reins and
lead-rope. Sometimes called “McCarty.”
Natural—A term applied to unstained or undyed leather.
Neckerchief—Bandanna or handkerchief worn around a man’s neck,
knot to the rear
Neckrope—A rope that encircles a horse’s neck and through which the
lariat passes to keep the horse head-on to a calf or steer after it has
been roped.
Parfleche—Rawhide.
Panng—Thinning dowrn the edge of the leather with a knife.
Piggin’ Strings—Strings used to tie an animal’s feet after he has been
roped and thrown.
Pile—The under or flesh side of leather. Also called the velvet side.
Pinking—Cutting the border of leather in an ornamental pattern of
small scallops with indented edges.
Plait (Plat)—The continued interlacing of several thongs to form a
braided strap. In some sections “plait” means a round braid and
“braid” is used for flat braid.
Poncho—Blanket or oiled cloth with a hole in the middle for the
horseman’s head,
Prong—Tool for punching several slots at equal spacings.
Pulling—A skin is more elastic from side to side than from neck to tail.
51 i
Punch—A tool with a sharpened cylinder or tube which acts upon a soft
metal base for punching holes in leather. There are also independent
punches known as drive punches. The re volring punch has as many as
six different size tubes.
Quirt—A short, loaded whip.
Rawhide—An untanned hide.
Reata—A rope 40 to 85 feet in length made from braided rawhide. The
3/8-inch diameter reata is called “light”; 7/16-inch. “medium”;
’/i-inch, “heavy”; and the 9/16-inch, “extra heavy.” Often misspelled
“riata.”
Reins—Leather or rawhide lines attached to the bit. By these the rider
guides and manages his horse. There are two types of reins, open and
closed.
Rigging—Latigo, cinch, and rigging rings, or gear securing a saddle on a
horse’s back.
Romal—A long flexible quirt or whip attached to closed reins. It
measures about 3 feet with its 1-foot “popper,” or lash. Sometimes
misspelled “ramal.”
Rope—A common term for a lariat. The two general types of ropes are
the hard-twist, made from vegetable fiber, and the reata, of braided
rawhide.
Roping-Rcins—Closed reins used in roping. The standard length is 6
feet.
Rosette—A leather tie ornament used both as a decoration and as a
fastening on saddles and headstalls.
Round Braid—A braid in which alternate thongs are brought around to
the rear instead of straight across as in flat braiding.
Run—The passage of a thong from one hole to another on the front of
the leather, without going over the edge to the back.
Saddle—A leather seat with a high horn and cantie, fastened to a horse’s
back to accommodate the rider. With its rigging, it consists of a tree,
horn, seat, cantie, back jockey, skirt, swell, gullet, front jockey,
fender (rosadero), stirrup-leathers, stirrups, cinch rings, latigo,
conchas and tie-strings.
Saddle Blanket—A blanket or padding between saddle.and horse’s back.
Saddle Leather—A vegetable-tanned cowhide leather, tan or natural
colored.
Saddle Pockets—Leather bags joined together and hung across the
saddle behind the cantie.
Saddle Soap—A special soap used to cleanse and soften leather
518
Saddle Stamp—A metal stamp used to impress various designs on
leather.
Scabbard—Open-mouthed leather sheath for a rifle or carbine.
Skin—The pelt of the smaller animals, such as calf, goat, sheep, etc.
Skirt Ornaments—Silver ornaments for decorating saddle-skirts.
Skiving—Splitting a skin horizontally into several thicknesses. Beveling
an edge by paring.
Slicker—A raincoat made of oiled canvas. Sometimes called a “fish.”
Slot—A long, narrow aperture as distinct from a round punched hole.
Spanish Knot—A woven cylindrical knot of one thong worked with a
Turk’s-head as a skeleton or base.
Spanish Lacing—Edge-braiding or edge-lacing.
Spur-Chains Small chains attached to spurs and passing under the
wearer’s instep. Two or three chains are used.
Spurs—Metal implements attached to the heels of a rider’s boots. They
usually have a wheel or rowel with blunt-end points and may be
hand-forged, plain, silver-inlaid, or silver-mounted, with straight or
curved shanks, of 1/8-. lA-, or Vi-inch metal.
Spur-Straps—Leather straps securing spurs to rider’s boots. Usually
carved or stamped, some are decorated with silver conchas. Some
cowboys wear the buckles inside; others wear them outside.
Square Braid—Braid usually made by the overlapping or crowning of
several thongs.
Stake-Rope—A picket-rope, or rope for tying up a horse.
Standing End—The inactive or secured part of a thong as opposed to
the active or working part.
String—A tie-leather used on saddles. Also a term for a rawhide thong.
Surcingle—Girth or strap passing around the body of an animal.
Taps—Leather covering or shields over the front of stirrups. The word is
from the Mexican tapaderos.
Thong—A narrow strip cut from a hide or skin. Sometimes beveled on
the flesh side.
Thonging Chisel—A small chisel with one or more tines or prongs to cut
slits for thonging.
Thong Wheel—A tool cutting a continuous line of slots for thonging
when rolled under pressure.
Tie-Down Bosal—A pencil bosal with a loop or ring in place of the
heel-knot on other bosals.
Tie-Stnngs—Leather thongs or rawhide strings that pass through leather
rosettes or metal conchas on saddles. Used to tie on blankets and
other articles, as well as to hold parts of the saddle together
519
Trick Braid—An inside braid made with three or more thongs cut in a
strap in such a manner that the ends are joined.
Tube Punch—Same as revolving punch.
Turk’s-head—A braided wreath or ring in which the braid is similar to
that of flat braids but is continuous and made with one thong. A
Turk’s-head cannot have the same number of thongs across its
breadth as bights. The law is that bights and parts must not have a
common divisor or the working end will come back to the standing
end before the knot is complete.
Twist Braid—Braid made with leather turned or twisted upon itself.
War Bridle—Halter used in leading unruly horses; usually a lariat-noose
placed in the horse’s mouth and over his head.
Wear-Leather—Another term for boot; used to protect braid in the eyes
of hondas and reins.
Working End—The end of a thong used in making a braid as
distinguished from standing end.
520
RAWHIDE AND LEATHER BRAIDERS’ BIBLIOGRAPHY
Ashley, Clifford, The Ashley Book of Knots, Garden City, N.Y., 1945.
Ropework and braiding that can be applied to leather and rawhide.
Berruti, Augusto Diego Leon, El Trenzador Sudamericano, Buenos
Aires, 1921. Gaucho rawhide braiding.
Catalogues (Old). Hamley & Company, Victor Mardcn, Visalia Stock
Saddle Company, Walsh-Richardson Company. Pictures of old-time
rawhide braidwork.
Coker, Jim, How to Skin, Make Rawhide, Tan and Braid, Kernville,
Calif., no date. A mimeographed pamphlet by an old-time braider.
Country Hides and Skins, U.S. Department of Agriculture, Farmers’
Bulletin No. 1055, Washington, D.C., revised edition, 1942.
Instructions on how to skin an animal.
Dobie, J. Frank, The Longhorns, Boston, 1941. Romantic aspects of
rawhide, pp. 221-241.
Flores, Luis Alberto, El Guasquero-Trenzados Criollos, Buenos Aires,
1960. Argentine rawhide braiding.
Grant, Bruce, The Cowboy Encyclopedia, Chicago, 1951. Alphabet-
ically arranged text. Rawhide and horse gear.
Grant, Bruce, Leather Braiding, Cambridge, Md., 1950. Leather and
rawhide braiding sequences.
Grant, Bruce, How to Make Cowboy Horse Gear, Cambridge, Md.,
1956. Practical rawhide and leather iraidmg. Contains a section on
How to Make a Western Saddle, by Lee M. Rice.
Graumont, Raoul, and Hensel, John, Encyclopedia of Knots and Fancy
Rope Work, Cambridge, Md., 1958. Much practical knowledge of
ropework and braiding which can be used in leather and rawhide
braiding.
Griswold, Lester, Handicraft, Colorado Springs, Colo., 1951. How to
make rawhide and rawhide handicraft, as well as leather braiding.
Handbook of American Indians North of Mexico, edited by Frederick
Webb Hodge, Bureau of American Ethnology, Bulletin 30, 2 vols.,
Washington, D.C., 1907-1910. Skin and skin dressing, Vol. 2, pp.
592-504.
Indians of the Southeastern United States, John R. Swanton,
Smithsonian Institution, Bui etin 137, Washington, D.C., 1946.
Indian methods of making rawhide, pp. 442-448.
Jaeger, Ellsworth, Wildwood Wisdom, New York, 1945. Indian uses of
rawhide, pp. 26-27.
Lopez Osornio, Mario A., Trenzas Gauchas, Buenos Aires, 1943.
Argentine methods of rawhide braiding.
Mason, Bernard S., Woodcraft, New York, 1939. Indian method of
making rawhide and uses, pp. 394-422.
521
Raine, W. MacLeod, and Barnes, Will C., Cattle, Garden City, N.Y.,
1930. How cowboys utilize rawhide, pp. 309-313.
Rincon Gallardo, D. Carlos, El Charro Mexicano, Mexico City, 1939.
Mexican rawliide horse gear.
Saubidet, Tito, Vocabulario у Refranero Criollo, Buenos Aires, 1945.
Alphabetically arranged text. Gaucho horse gear and the making and
uses of rawhide.
Williams, R.M., The Bushman’s Handcrafts, Prospect, South Australia,
1966. Australian methods of leather and rawhide braiding. Also
Australian tanning methods.
Sometimes a braider will be confronted with measurements in the
metric system:
1 millimeter equals 0.03937 inches
1 centimeter equals 0.3937 inches-
1 decimeter equals 3.937 inches
1 meter equals 39.37 inches or 3.28 feet
1 inch equals 25.4 millimeters
1 inch equals 2.54 centimeters
1 foot equals 0.3048 meters
1 yard equals 0.9144 meters
To convert inches to centimeters, multiply by 10 and divide by 4.
To convert feet into meters, multiply by 61 and divide by 200.
To convert yards into meters, multiply by 9 and divide by 10.
To find feet in a given number of meters, multiply by 200 and divide
by 61.
Old-time crude measurements are to be found in many Latin
American countries, especially Argentina:
Brazada—length of the arms extended.
Cuarta—breadth of the hand at the palm.
Dedo—finger breadth.
Jeme—distance from the end of the thumb to the end of the
forefinger, both extended.
522
SOURCES of rawhide and leather supplies
C. Ralph Dillon
1930 Pine Grove Drive, Mount Shasta, Ca. 96067
Robert J GolkaCo.
400 Warren Avenue, Brockton, Ma. 02401
MacPherson Brothers
730 Polk Street, San Francisco, Ca. 94109
200 S. Los Angeles Street, Los Angeles, Ca. 90053
David Morgan
P.O Box 70190, Seattle, Wa. 98107
(Kangaroo hides & lace)
Oregon Leather Co.
110 N.W 2nd Portland, Or. 97209
810 Gonger Street. Eugene, Or. 97402
Saiz Leathers, Inc.
1040 River Street Santa Cru2 Ca. 95060
Sax Arts & Crafts
P O. Box 2002, Milwaukee, Wi 53201
PO Box 2511, Allentown Pa 18001
Texas Leather Co.
P.O. Box 123, Yoakum, Tx. 77995
(Lace, latigo, strap, skirting, chap leather, rawhide, garment, &
woolskins)
Tandy Leather Co
P.O. Box 2903, Ft. Worth, Tx 76107
R.M. Williams Pty., Ltd.
5 Percy Street, Prospect, South Australia 5082
523
INDEX
Additional Projects and Examples
Curiosity in Braiding, 508
Exercise in Braiding, 499
Covering a Lamp Base, 498
Covering Boleadoras, 496
Covering Bottle, Intriciate Bottle
Covering, Rawhide Bottles. 506-507
How to Make a Rawhide Covered Suit
case, 488
How to Make "Quick Draw'" Galluses,
•184-186
Making a Woven Rawhide Chair Seat,
492-495
Pocketbook,
Drum-head type, 500
Stairstep appliqu^ type. 501
Twisted Hobbles, 509
Alamar Knot, 386
Argentine rebenque, 29. 226, 503
Australian Type Belt, 99-101
Braided Appliques
Chain of One Thong. 452
Chevron. 470
Circular, Five-Thong, 462
Decoration
Belt Buckle, 468
Saddle, 472
Diamond, 470
Five-Part Same on Both Sides, with
Two Strings, 446
Five Thongs, 460
Four-Part Same on Both Sides. 446
Hair-Braid, Two Thongs, 452
Lone Star Knot, 474
Mosaic, 470
Split-Thong, 452
Two Thongs, 452
Stairstep of One Thong, 444
Of Two Thongs, 450
Similar Braid on Both Ends, 4 16
Star of One Thong, 47 0
“S” Type of Ono Thong, 456
Three Thongs, 45S
Two-Thong, Four-Part, 448
Zig-Zag, 464
Braiding Detective, 440
Braided Knots
Boton Oriental, 426
Bruce Knot, 418
Catharine Knot, 418
Double Gaucho, Three Passes, 106
Two Passes, 404, 406
Flores Button, 424
Gaucho Knot, Three Passes, 398, 4 0
Two Passes, 396
Worked on a Turk’s-head, 402
Ginfer Knot, 242, 428
Headhunter’s of Three Passes, 412
Of Two Passes 410
Herringbone, 414, 416
Perfect Pineapple, 432
Pineapple or Gaucho Button, 420, 422
Ring Knot, Four Passes, 394
Small Fan Knot, 426
Spanish Ring Knot, 390
Three Passes, 392
Three-Section Fan Knot, 430
Turk’s-head Foundation, 386, 388
Braid on Braid
Appliqu^ on a Crocodile Ridge Braid,
480
Appliqu^ on Ginfer Knot, 480
Braid on the Aztec Button Knot, 478
Five-Part Appliqu£ on a Nine-Part,
Eight-Bight Knot, 478
Joining Two Turk’s-heads with the
‘S” Braid, 478
Mosaic Type Appliqui on an Eight-
String Flat Braid, 478
Mosaic Type Braid on a Three-Part,
Five-Bight Turk’s-head. 478
The Butterfly Knot, 480
Buckle and Ring Coverings
Cockscomb Ring Covering, 320
Eight String Round Buckle Covering,
318
Four-Thong Round-Braid Buckle
Covering, 318
Half-Hitch Ring Covering, 320
Spanish Type Buckle Covering of One
Loop, 312
525
Buckle and Ring Coverings (coni.)
Spanish Type Buckle Covering of Two
Loops, 314
Spanish Type Buckle Covering of
Three Loops, 316
Two-Tone Spanish Type Buckle Cover-
ing, 318
Buttons
Chinese Button Knot, 276
Diamond Button Knot, 276
Eight Thong Round Button, 282
Gaucho Knot Button, 280
Gaucho Knot Button of Eight Thongs,
282
Herringbone Button of Eight Thongs,
282
Roll Button, 272
Round Button of Four Thongs, 278
Square Button of Four Thongs, 284
Three Thong Turk’s-head, 274
Two Thong Turk's-hcad, 274
Crocodile Ridge Braids
Appliqu^ Braid, 246
Belt with Round Center, 236
Braided Reins. 246
Button, 240
Button No. 2, 242
Crocodile Ridge Braid, 230
Double-Center, 232
Finished on Both Sides, 238
Half-Round Center, 234
Handle Covering, 240
Hobbles. How to Make, 260
Mousing Braided Ring with Conquista-
dor Braid, 218
Round Braid of One Ridge, 244
Three Ridges, 238
Two Outer Half-Round Ridges. 236
Cutting Rawhide in the Argentine, 13
Duplicating Strange Braids, 440
Edge-Braiding
Eight-String Round Edge-Braiding,
300
Eight-String Round Edge-Braiding
Second Method, 302
Gaucho Edge-Braiding of One String,
306
Gaucho Edge-Braiding of Three
Strings, 308
Edge-Braiding (cont.)
Joining, 290
Joining Spanish Edge-Lacing of Two
Loops. 292
Miscellaneous Edge-Lacings, 304
Round Braid Edge-Lacing, 296
Round Braid Edge Lacing, Second
Method, 298
Round Braid Edge-Lacing, Third
Method, 298
Spanish Edge-Lacing of One Loop,
288
Spanish Edge-Lacing of Three Loops,
294
Spanish Edge-Lacing of Two Loops,
292
Splicing, 290
Staggered Slits, 304
Two-Tone Spanish Edge-Lacing of One
Loop,294
Use of Edge-Lacing in Attaching Pock-
ets and Flaps. 304
Flat Braids
Australian Type Belt, 100
Belt with Its Own Keeper, 102
Braided Belt, 102
Cinch Ring Belt, 102
Five-Thong, 88
Five-Thong, Variation of, 94
Four-Thong, 86
Lazy-Man of Eight Thongs, 96
Lazy-Man of Ten Thongs, 96
Lazy-Man of Six Thongs, 96
Nine-Thong, 92
Nine-Thong, Alternate, 98
Nine-Thong, Variation of, 94
Three-Thong Hair Braid, 86
Two-Thong, 84
Seven-Thong, 92
Seven-Thong, Alternate, 98
Seven. Thong, Variation of, 94
Six-Thong, 90
Six-Thong Double, 92
Fid Work, 342-343, 503
Glossary. 513-520
Handle Coverings
Corredor Cordobes, 342
Fid Work, 342
Four Thong Twist Braid Covering, 334
Hitching, 332
526
Handle Coverings (cont.)
Horizontal Braid, 332
How to Make the Corncob Braid, 340
Mosaic-Type Braids, 332
Multiple-Braid Top and Core Covering,
334
Six Thong Multiple Braid, 336
Hobbles
How to Make a Pair of Braided
Gaucho Hobbles, 348
How to Make a Pair of Braided Hob-
bles, 350
How to Make Simple Types of Hob-
bles, 346
Lazy-Man Button and Pampas Button
Knots
Colima Lazy-Man Button, 436
Lazy-Man Button, 434
Pampas Button, 438
Small Pampas Button Knot, 440
Leather-braiding Tools, 20
Making and Working Rawhide, 1
Mousing, 122, 248
Other Braid Coverings
How to Cover a Pair of Stirrups with
the Conquistador Braid, 322
How to Cover Square and Rectangular
Objects, 322
Slit-Leather Handle Covering of One
Thong, 326
Spanish Hitchings, 328
Т-Knot for Covering Leather Holding a
Ring, 321
Zig-Zag Braid, 328
Round Braids
Aztec Button for Bullwhip, 194
Back Braid of Eight Thongs, 116
Back Braid of Six Thongs, 114
Braided Bridle Headstall, 140
Braided Ear-Head, 160
Braided Curb-Strap, 172
Braided Hackamore Headstall, 138
Braided Lash for the Romal, 169
Braided Quirt, 180-184
Braided Reins, 150
Braided Riding Crop, 218
Braided Romal, 164
Building Ear Head from 11-Foot
Braided Rope, 162
Round Braids (cont.)
Bullwhip, How to Build, 190
Cowboy Button Knot, 166
Eight-String Round Gaucho, 118
Eight-String Square over Core, 124
Eight-String Square Without Core, 126
Four Thongs, 106
Hackamore Reins and Lead-Rope
Knot, 148
Headstall of One Braid, 162
Heel Knot, 132-134
Herringbone of Eight Thongs, 112
How to Secure Rem Knots, 154
How to Tie Reata to Honda, 206
Lone Star Braid, 220
Lone Star Knot, 222
Mexican Quirt, 186-188
Mexican Swivel Honda, 210-212
Mexican Swivel Honda, Second Type,
214
Mexican Swivel Honda, Third Type,
216
Multiple-Ring Button, 176
Nose Button, 12S
“Ole'’ Fiador Knot, 146
Rawhide Bosal, The Core, 122
Reata, How to Build, 198
Riding Crop Made With Lazy-Man
Braid 224
Rigging the Hackamore, 144
Running Martingale, 174
Saddle-Horn Tie Knot, 208
San Juan Honda, How to Make, 200
Santa Ines Reins and Romal, 258
Short. Cowboy Knot, Gaucho Weave, 156
Side Button, 132
Six Thongs. 110
Ski-Pole Basket How to Make. 176
Standing Martingale, 174
Tamale, How to Make, 196
Turk’s-head Terminal for Round
Braid, 108
Twelve-String Round Gaucho. 118
Twelve Thongs, 120
Uses of Ring Button, 178
Slit Braids
Braided Gaucho Belt Fastener. 62
Cincha, Braided, 74-78
Curlicues. 60
Five-Part Inside Trick Braid, 54
Four-String, 60
527
Slit Braids (cont.)
Hackamore Headstall, 66, 68
Handbag, 80
Heart-Shaped Headstall Front Piece,
60
Interweaving the Slit Braid, 60
Interweaving lhe Three-Part Inside
Braid 56
Link Belt, 64
Link Breast Collar, 66
Monitos 60
Simulated Four-Part Inside Braid, 56
Slit Braids, 50
Six-String Inside Braid, 56
Slit Braids Three-Part Inside or Trick,
52
Turk’s-heads
Braided Paper, 354
Five-Part Four-Bight, 356, 364
Five-Part Nine-Bight Raised from a
Three-Part Five-Bight, 382
Five-Part Three-Bight, 370
Four-Part Three Bight. 356
Labyrinth Method of Making a Fiva-
Part Four-Bight, 366
Long Three-Bight, 378
Long Three-Part, 356
Nine-Part Four-Bight, 384
One-Part One-Bight, 356
Seven-Part Six-В ght Raised from a
Five-Part Four-Bight, 374
Six-Part Five-Bight Raised from a
Four-Part Three-Bight, 372
Sliding Knot or Five-Part Two-Bight,
368
Three-Part Two-Bight. 356
Two-Bight of Any Length, 376
Two-Part Three-Bight, 380
Square, Rectangular, Spiral, Twist Spiral,
Oval and Triangular Braids
Double Braid with the Crocodile
Ridge, 264
Flat Braid of Twenty-one Thongs, 262
Half-Round Braid of Six Strings or
Thongs, 268
Oval Braid of Nine Strings or Thongs,
266
Rectangular Braid of Six Thongs, 256
Spiral Braid, 258
Spiral Twist Braid, 258
Square Braid of Eight Thongs,260
Square Braid of Four Thongs, 254
Thirteen-Thong Braid, 262
Triangular Braid of Twelve Strings. 268
Twist Braids
Attaching a Honda to a One-String
Twist Lasso, 30
Building Twist-Braid Reata, 30
Combination Handle Covering, 36
Conquistador, 42
Double Twist, 30
Fish-scale Bell, 40
Fish-scale Braid, 36
Making a Locket, 40
Making a Rock Paperweight, 40
Multiple-string Conquistador. 44
Round of Two Thongs, 26
Simulated Four-String Round Braid,
34
Trick Twist, 26
Twist Braids, 26
Twist Loop Reins, 46
Twist of Three Strings, 30
Twist of Two Strings, 30
528
BRUCE GRANT was born in
Texas and came by his interest in leather
braiding as a natural outgrowth of his
association with cowboys on the ranches near
his home. Leather braiding became his major
hobby, and it continued to occupy his spare
time until his death in 1977.
As a newspaperman Grant traveled over
much of the world and never overlooked an
opportunity to uncover examples of leather
braiding. 1 le collected all existing literature on
leather braiding and searched through the
classics for references to this ancient art.
Every new example was duplicated in his
hobby room and cataloged for future reference.
Encyclopedia of Rawhide and Leather Braiding
presents, in one volume, the results of his many
years of interest and experience as a braider and
collector.
CORNELL MARITIME PRESS
Centreville, Maryland 21617
ISBN 0*87033-161-2