/


Tags: weapons military affairs
Year: 2004

Text
OWNER’S MANUAL
FN TPS
TACTICAL POLICE SHOTGUN
PUMP ACTION SHOTGUN
Version 1.0 April 2004
2
Important instructions for:
FN Tactical Police Shotgun
Pump Action Shotgun
For further information contact:
FNH-USA, INC.
P.O. Box 697
McLean, VA 22101
Tel: (703) 288-1292
Fax: (703) 288-1730
Use the space below to record information about your new FN Tactical Police Shotgun:
MODEL: _
FN Tactical Police Shotgun (TPS)
_
SERIAL NUMBER: _________________________________
PURCHASED FROM: _______________________________
DATE OF PURCHASE: ______________________________
This manual is an extremely important part of the shotgun. It should remain with the
shotgun its entire service life. If the shotgun is sold, it should accompany the shotgun to
its new owner.
There are slight variations between special versions or models of the FN Tactical Police
Shotgun (TPS). This manual covers all the common basic operating procedures of all
current models.
PLEASE READ THIS OPERATOR’S MANUAL FULLY BEFORE OPERATING
YOUR SHOTGUN. DOING SO WILL ASSURE ABSOLUTE SAFETY, PROPER
OPERATION, AND PEAK PERFORMANCE OF YOUR NEW FN TPS.
CONTENTS
PAGE
Gun safety warnings........................................................................ 3
General description......................................................................... 6
Terminology and descriptions............................................................. 6
Serial number................................................................................ 6
Ammunition................................................................................... 7
Magazine capacity........................................................................... 7
General Operation / special reminders..................................................... 7
3
Initial cleaning................................................................................ 8
Lubricating the action....................................................................... 8
Operation of the safety..................................................................... 9
Installing Assembly/ Takedown........................................................... 10
Loading Procedures .......................................................................... 12
Unloading Procedures....................................................................... 13
Firing procedures............................................................................ 14
In the case of a misfire...................................................................... 15
Removing the Magazine Spring............................................................ 15
Full Disassembly............................................................................. 17
Sight Adjustments........................................................................... 22
Zeroing ....................................................................................... 23
Cleaning and maintenance suggestions................................................... 25
Ordering parts / service or repair / questions............................................ 27
GUN SAFETY WARNINGS
These warnings apply to military and law enforcement work, general target shooting, and
hunting use.
IT IS ESSENTIAL THAT THESE OPERATING INSTRUCTIONS BE
THOROUGHLY STUDIED BEFORE USING THIS FIREARM TO ASSURE
PROPER AND SAFE GUN HANDLING. FAILURE TO FOLLOW THESE
INSTRUCTIONS OR FAILURE TO OBEY ANY SAFETY WARNING MAY RESULT
IN INJURY TO YOURSELF OR OTHERS, OR CAUSE DAMAGE TO YOUR
SHOTGUN.
As a gun owner / operator, you accept a set of demanding responsibilities. How seriously
you take these responsibilities can be the difference between life and death. There is no
excuse for careless or abusive handling of any firearm. At all times handle your shotgun
and any other firearm with intense respect for its power and potential danger.
PLEASE READ AND UNDERSTAND ALL OF THE CAUTIONS, PROPER
HANDLING PROCEDURES, AND INSTRUCTIONS OUTLINED IN THIS
MANUAL BEFORE USING YOUR SHOTGUN.
FOUR BASIC SAFETY RULES:
1. Treat every weapon as if it were loaded.
2. Never point a weapon at anything you do not intend to shoot.
3. Keep your finger off of the trigger until you intend to fire.
4. Keep the weapon on safe until you are ready to fire.
ADDITIONAL SAFETY PRECAUTIONS;
4
1. Do not carry a loaded firearm with a live round in the chamber while walking,
running, climbing a tree, crossing a fence, or anywhere you might slip or fall,
drop the firearm or otherwise bump or jar the firearm. A firearm that is dropped,
bumped, or jarred with a chambered round might accidentally discharge even with
the safety on, causing serious injury to you or someone else.
For military and law enforcement personnel, refer to your agency’s procedures
on carrying a loaded shotgun.
2. Do not rely on the safety to prevent accidental discharge. Many safeties merely
block the trigger and prevent firing by blocking the trigger. The safety may not
prevent an accidental discharge due to dropping, jarring, or bumping a firearm.
3. Use only ammunition for which the firearm is chambered as indicated on the
barrel, to prevent excessive pressure and possible serious personal injury. Ensure
all ammunition that is used is of good quality and is in good condition before
loading. Ensure all ammunition used meets the Sporting Arms and Ammunition
Manufacturers’ Institute (SAAMI) or NATO specifications.
FN Herstal cannot assume any responsibility for the use of unsafe or improper
arms and ammunition combinations. Please inspect your ammunition before
loading it into your firearm.
4. Incorrectly reloaded ammunition can cause serious injury and damage to the
firearm due to excessive pressure. Reload only after proper instruction and in
strict compliance with instruction and data contained in current reloading
manuals.
5. Never point a firearm at anything you do intend to shoot. Always keep it pointed
in a safe direction in case of an accidental discharge.
6. Always check to ensure the barrel is free of obstructions before loading and using
the firearm. If you experience light recoil or off sound, check the barrel for
obstructions before attempting to fire again.
7. Before firing, clean any grease or oil out of the barrel with a cleaning rod and
patch. Grease or heavy accumulation of oil can cause excessive pressure and
result in serious personal injury.
8. Keep barrel, chamber, and action free of rust. Rust in the barrel and chamber can
cause excessive pressures resulting in serious injury. A rusted, pitted, or eroded
barrel should be replaced.
9. Use hearing protection to prevent ear damage and hearing loss from repeated
exposure to gunfire.
5
10. Always use proper shooting glasses to prevent eye injury from flying particles.
11. Never carry a loaded firearm in a motor vehicle or carry one into a dwelling.
Always carefully unload the firearm before entering a motor vehicle, a dwelling,
or an area such as a camp. Always point the firearm in a safe direction while
loading or unloading to prevent serious injury in case of an accidental discharge.
Never load in a dwelling or in a vehicle.
For military and law enforcement personnel, refer to your agency’s procedures
for carrying a loaded shotgun in a motor vehicle, into a dwelling, or loading
inside vehicles and dwellings.
12. Never shoot at a hard, flat surface or at the surface of water to avoid a ricochet
and possible serious personal injury to yourself or a bystander.
13. Store firearms in a clean dry place out of reach of children and separate from
stored ammunition.
For military and law enforcement personnel, refer to your agency’s procedures
for storing shotguns.
14. Never alter any parts of your firearm. Any alterations or adjustments that may
become necessary to the operating mechanism should be performed by an FN
Herstal armorer, FN certified unit armorer, or returned to an FN Herstal
Recommended Service Center.
15. FN Herstal cannot assume any responsibility for injuries suffered or caused by
unauthorized servicing, alterations, or modifications of FN Herstal firearms.
16. FN Herstal reserves the right to refuse service on firearms that have been altered,
added to or substantially changed. Removal of metal from the barrel, or
modification of the firing mechanism and / or operating parts may lead to FN
Herstal’s refusal of service on such firearms. FN Herstal will charge the owner
for parts and labor to return the firearm to original FN Herstal specifications.
17. Hunting from elevated surfaces such as tree stands is dangerous. Doing so may
increase the risk of handling the firearm. Always make sure that the stand being
used is safe, sturdy, and stable. Always make certain your firearm is unloaded
when it is being taken up and down from the stand. Always make certain that
your firearm is not dropped from the stand or dropped while it is being taken up
or down from the stand.
18. Discharging firearms in poorly ventilated areas, cleaning firearms, or handling
ammunition may result in exposure to lead and other substances known to cause
birth defects, reproductive harm, and other serious physical injury. Have
adequate ventilation at all times. Wash your hands thoroughly after exposure.
6
19. Never drink alcoholic beverages or take any type of drugs before or during the
firing of any firearm. Your vision and judgment could be dangerously impaired,
making your firearms handling unsafe to you and others.
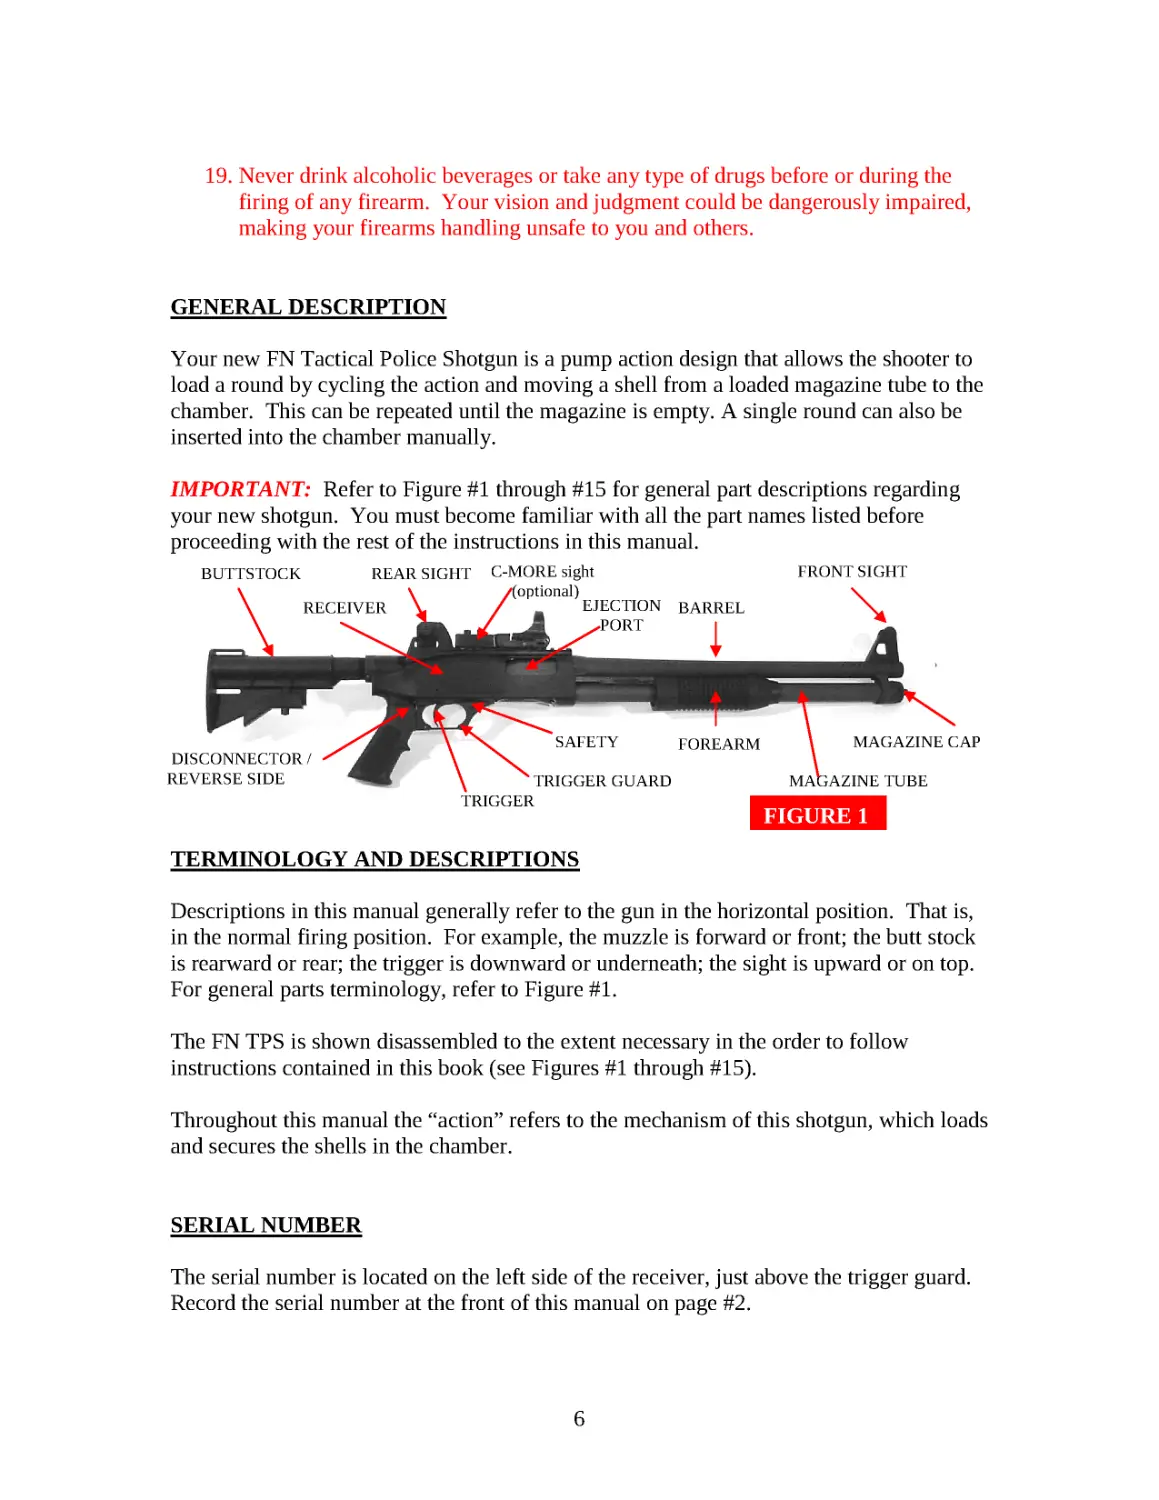
GENERAL DESCRIPTION
Your new FN Tactical Police Shotgun is a pump action design that allows the shooter to
load a round by cycling the action and moving a shell from a loaded magazine tube to the
chamber. This can be repeated until the magazine is empty. A single round can also be
inserted into the chamber manually.
IMPORTANT: Refer to Figure #1 through #15 for general part descriptions regarding
your new shotgun. You must become familiar with all the part names listed before
proceeding with the rest of the instructions in this manual.
TERMINOLOGY AND DESCRIPTIONS
Descriptions in this manual generally refer to the gun in the horizontal position. That is,
in the normal firing position. For example, the muzzle is forward or front; the butt stock
is rearward or rear; the trigger is downward or underneath; the sight is upward or on top.
For general parts terminology, refer to Figure #1.
The FN TPS is shown disassembled to the extent necessary in the order to follow
instructions contained in this book (see Figures #1 through #15).
Throughout this manual the “action” refers to the mechanism of this shotgun, which loads
and secures the shells in the chamber.
SERIAL NUMBER
The serial number is located on the left side of the receiver, just above the trigger guard.
Record the serial number at the front of this manual on page #2.
BUTTSTOCK
RECEIVER
EJECTION
PORT
REAR SIGHT
FRONT SIGHT
DISCONNECTOR /
REVERSE SIDE
SAFETY
TRIGGER GUARD
TRIGGER
FOREARM
MAGAZINE CAP
MAGAZINE TUBE
BARREL
FIGURE 1
C-MORE sight
(optional)
7
AMMUNITION
Your FN TPS is chambered for 12-gauge factory ammunition. All current 12 gauge FN
Shotguns have a 3-inch chamber and are designed to shoot with all factory loads such as
3” Magnum, 2 3⁄4” Magnum, 2 3⁄4” High Velocity, 23⁄4” Field and Target loads. The barrel
and choke system can safely shoot both lead and steel shot, including large-sized
buckshot loads and slugs. Being that the shotgun is a smooth bore weapon, it is
recommended for accuracy sake that you do not fire sabot slugs.
MAKE SURE YOU USE ONLY THE EXACT AMMUNITION / CALIBER AS
LISTED ON THE LEFT SIDE OF THE BARREL.
FNH USA CAN ASSUME NO RESPONSIBILITY FOR INCIDENTS WHICH
OCCUR THROUGH THE USE OF SHELLS OF NON-STANDARD DIMENSION
OR THOSE THAT WHEN SHOT, DEVELOP PRESSURES IN EXCESS OF
INDUSTRY STANDARDS ESTABLISHED BY THE SPORTING ARMS AND
AMMUNITION MANUFACTURERS’ INSTITUTE (SAMMI).
Incorrectly reloaded ammunition can cause serious personal injury and damage to the
firearm due to excessive pressure. Reload only after proper instruction and in strict
compliance with instructions and data contained in current reloading manuals.
DISCHARGING FIREARMS IN POORLY VENTILATED AREAS, CLEANING
FIREARMS, OR HANDLING AMMUNITION MAY RESULT IN EXPOSURE TO
LEAD AND OTHER SUBSTANCES KNOWN TO CAUSE BIRTH DEFECTS,
REPRODUCTIVE HARM, AND OTHER SERIOUS PHYSICAL INJURY. HAVE
ADEQUATE VENTILATION AT ALL TIMES. WASH YOUR HANDS
THOROUGHLY AFTER EXPOSURE.
MAGAZINE CAPACITY
It is extremely important that you know the magazine capacity of your FN TPS. Under
appropriate circumstances – at a range or other suitable shooting location – fill your
magazine to full capacity and make note of the number of shells. Remember, “total”
capacity includes an additional round, which can be loaded manually in the chamber in
addition to a full magazine. Totals may vary from 2 3⁄4” to 3” shells. The FN TPS has
two models totaling 5 shot or 8 shot.
GENERAL OPERATION / SPECIAL REMINDERS
IMPORTANT: ALWAYS KEEP THE MUZZLE POINTED IN A SAFE
DIRECTION.
8
Prior to using live ammunition, familiarize yourself thoroughly with these operating
instructions. Get accustomed to the feel of your new shotgun – know the forces required
to operate the action. Learn how to pull the trigger and, above all, know the location and
operation of the safety. Procedures for disassembly and operation of various components
are outlined in the sections below. Please read and study all instructions thoroughly. In
addition, always remember:
USE THE CORRECT AMMUNTION REFERENCED BY THE INSCRIPTION ON
THE BARREL.
BEFORE LOADING YOUR SHOTGUN BE SURE ALL GREASE AND OIL HAVE
BEEN REMOVED FROM THE BARREL AND CHAMBER, AND THERE ARE NO
OBSTRUCTIONS.
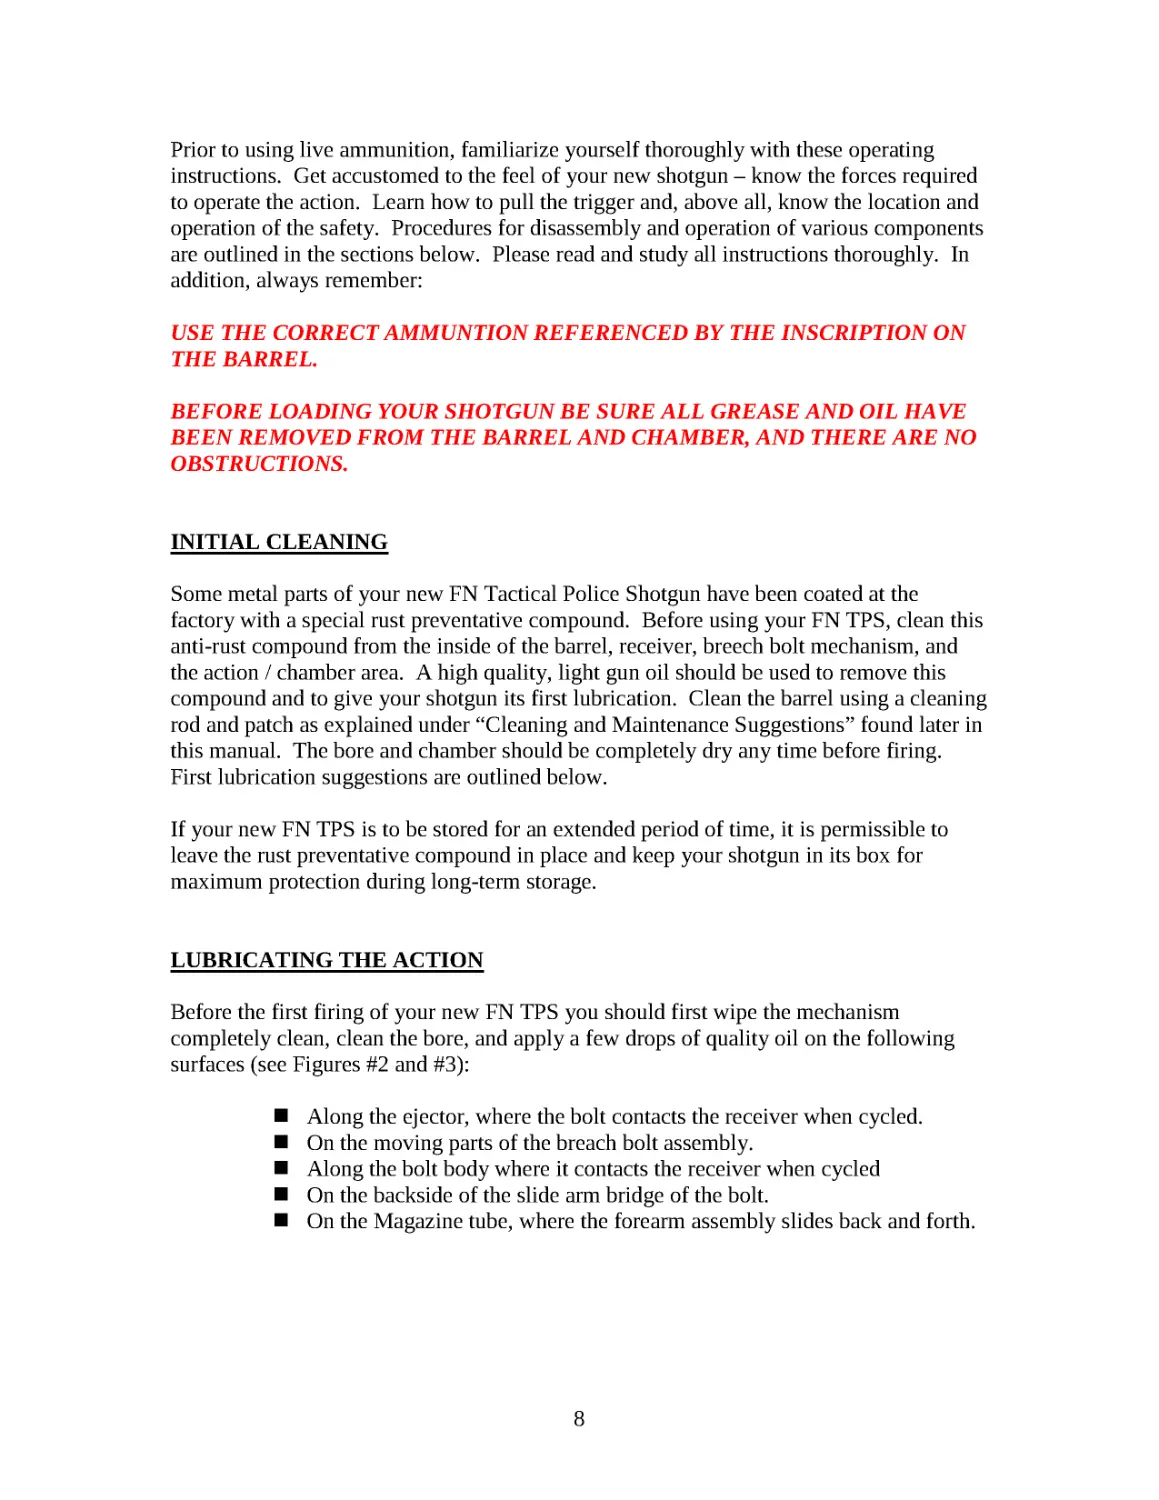
INITIAL CLEANING
Some metal parts of your new FN Tactical Police Shotgun have been coated at the
factory with a special rust preventative compound. Before using your FN TPS, clean this
anti-rust compound from the inside of the barrel, receiver, breech bolt mechanism, and
the action / chamber area. A high quality, light gun oil should be used to remove this
compound and to give your shotgun its first lubrication. Clean the barrel using a cleaning
rod and patch as explained under “Cleaning and Maintenance Suggestions” found later in
this manual. The bore and chamber should be completely dry any time before firing.
First lubrication suggestions are outlined below.
If your new FN TPS is to be stored for an extended period of time, it is permissible to
leave the rust preventative compound in place and keep your shotgun in its box for
maximum protection during long-term storage.
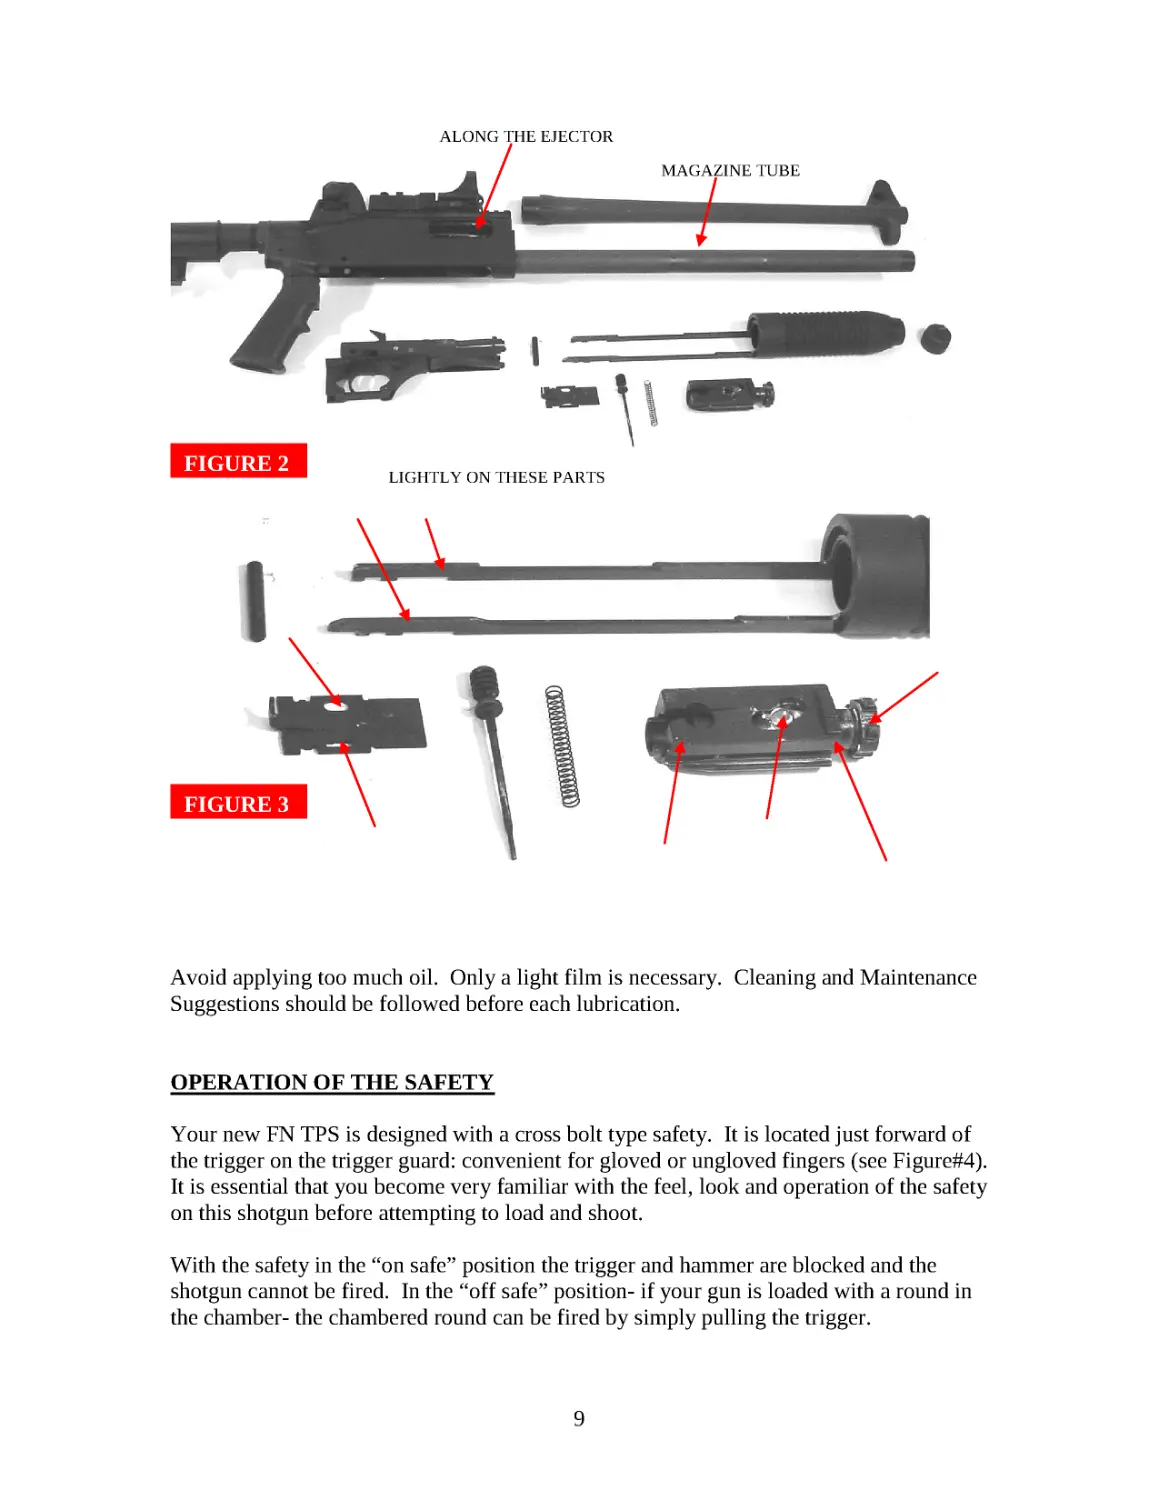
LUBRICATING THE ACTION
Before the first firing of your new FN TPS you should first wipe the mechanism
completely clean, clean the bore, and apply a few drops of quality oil on the following
surfaces (see Figures #2 and #3):
Along the ejector, where the bolt contacts the receiver when cycled.
On the moving parts of the breach bolt assembly.
Along the bolt body where it contacts the receiver when cycled
On the backside of the slide arm bridge of the bolt.
On the Magazine tube, where the forearm assembly slides back and forth.
9
Avoid applying too much oil. Only a light film is necessary. Cleaning and Maintenance
Suggestions should be followed before each lubrication.
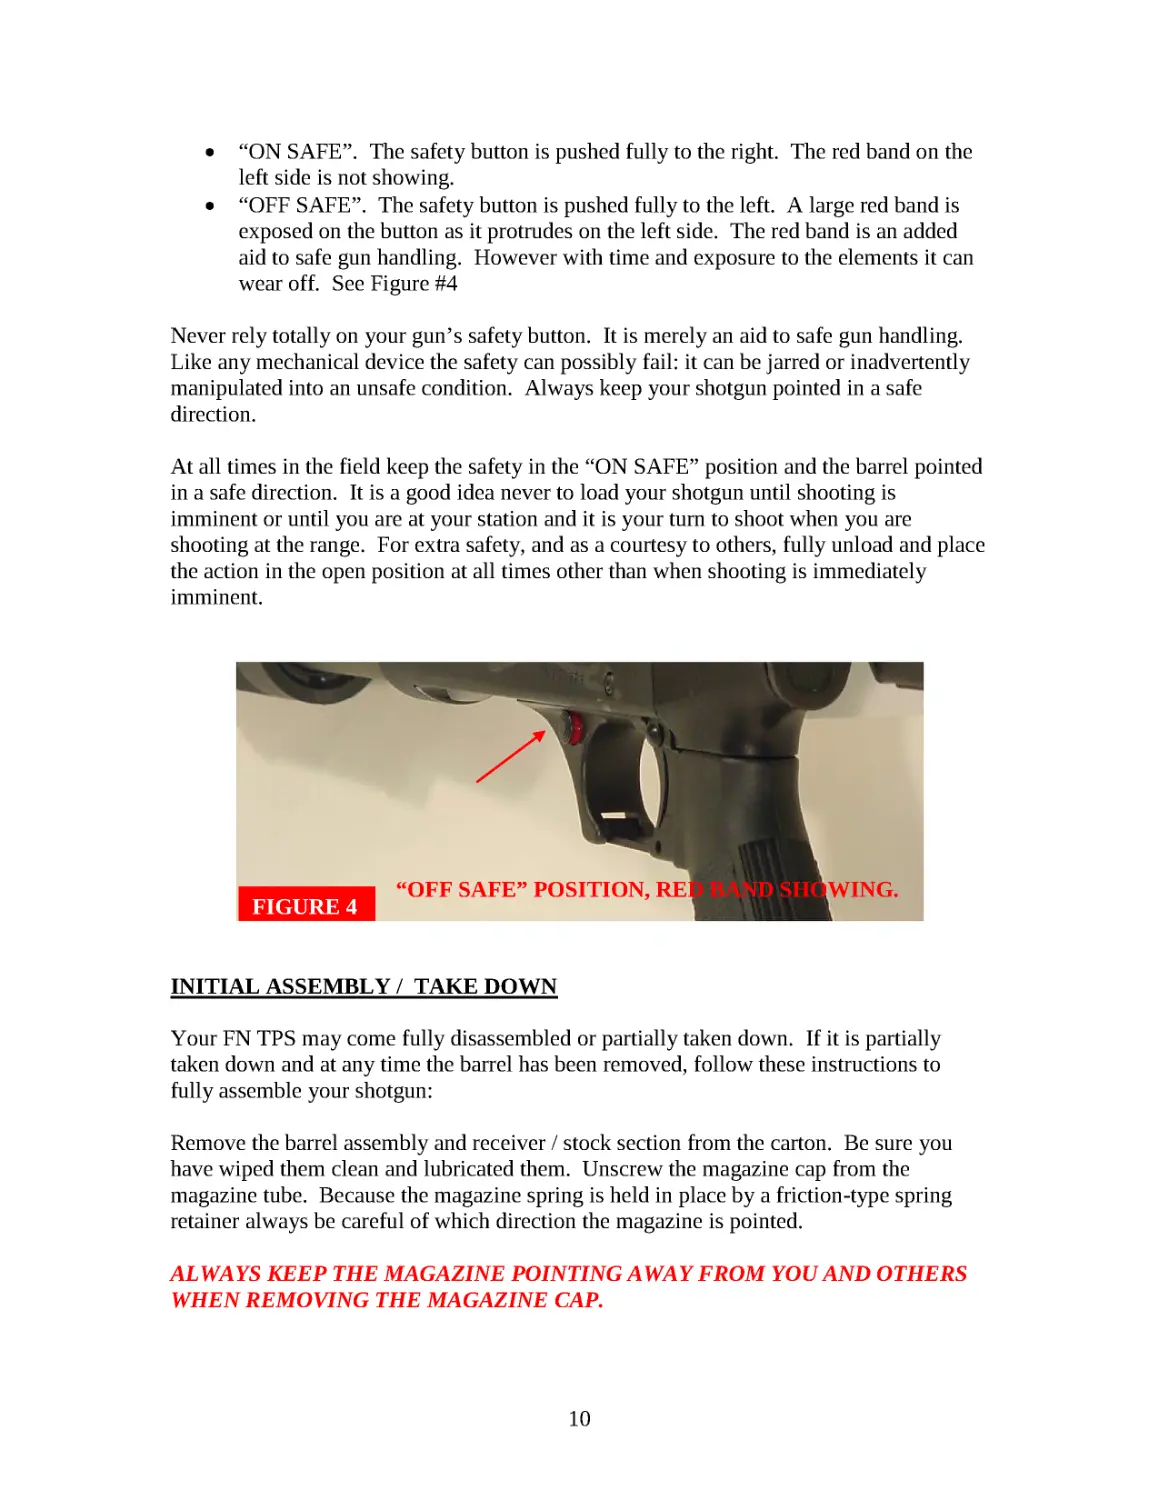
OPERATION OF THE SAFETY
Your new FN TPS is designed with a cross bolt type safety. It is located just forward of
the trigger on the trigger guard: convenient for gloved or ungloved fingers (see Figure#4).
It is essential that you become very familiar with the feel, look and operation of the safety
on this shotgun before attempting to load and shoot.
With the safety in the “on safe” position the trigger and hammer are blocked and the
shotgun cannot be fired. In the “off safe” position- if your gun is loaded with a round in
the chamber- the chambered round can be fired by simply pulling the trigger.
FIGURE 2
FIGURE 3
ALONG THE EJECTOR
MAGAZINE TUBE
LIGHTLY ON THESE PARTS
10
• “ON SAFE”. The safety button is pushed fully to the right. The red band on the
left side is not showing.
• “OFF SAFE”. The safety button is pushed fully to the left. A large red band is
exposed on the button as it protrudes on the left side. The red band is an added
aid to safe gun handling. However with time and exposure to the elements it can
wear off. See Figure #4
Never rely totally on your gun’s safety button. It is merely an aid to safe gun handling.
Like any mechanical device the safety can possibly fail: it can be jarred or inadvertently
manipulated into an unsafe condition. Always keep your shotgun pointed in a safe
direction.
At all times in the field keep the safety in the “ON SAFE” position and the barrel pointed
in a safe direction. It is a good idea never to load your shotgun until shooting is
imminent or until you are at your station and it is your turn to shoot when you are
shooting at the range. For extra safety, and as a courtesy to others, fully unload and place
the action in the open position at all times other than when shooting is immediately
imminent.
INITIAL ASSEMBLY / TAKE DOWN
Your FN TPS may come fully disassembled or partially taken down. If it is partially
taken down and at any time the barrel has been removed, follow these instructions to
fully assemble your shotgun:
Remove the barrel assembly and receiver / stock section from the carton. Be sure you
have wiped them clean and lubricated them. Unscrew the magazine cap from the
magazine tube. Because the magazine spring is held in place by a friction-type spring
retainer always be careful of which direction the magazine is pointed.
ALWAYS KEEP THE MAGAZINE POINTING AWAY FROM YOU AND OTHERS
WHEN REMOVING THE MAGAZINE CAP.
FIGURE 4
“OFF SAFE” POSITION, RED BAND SHOWING.
11
The bolt assembly will be in the closed position (forward) with the trigger assembly
already in place in the receiver. The barrel can be assembled to the action with the action
closed, but it is usually much easier with the action slightly open.
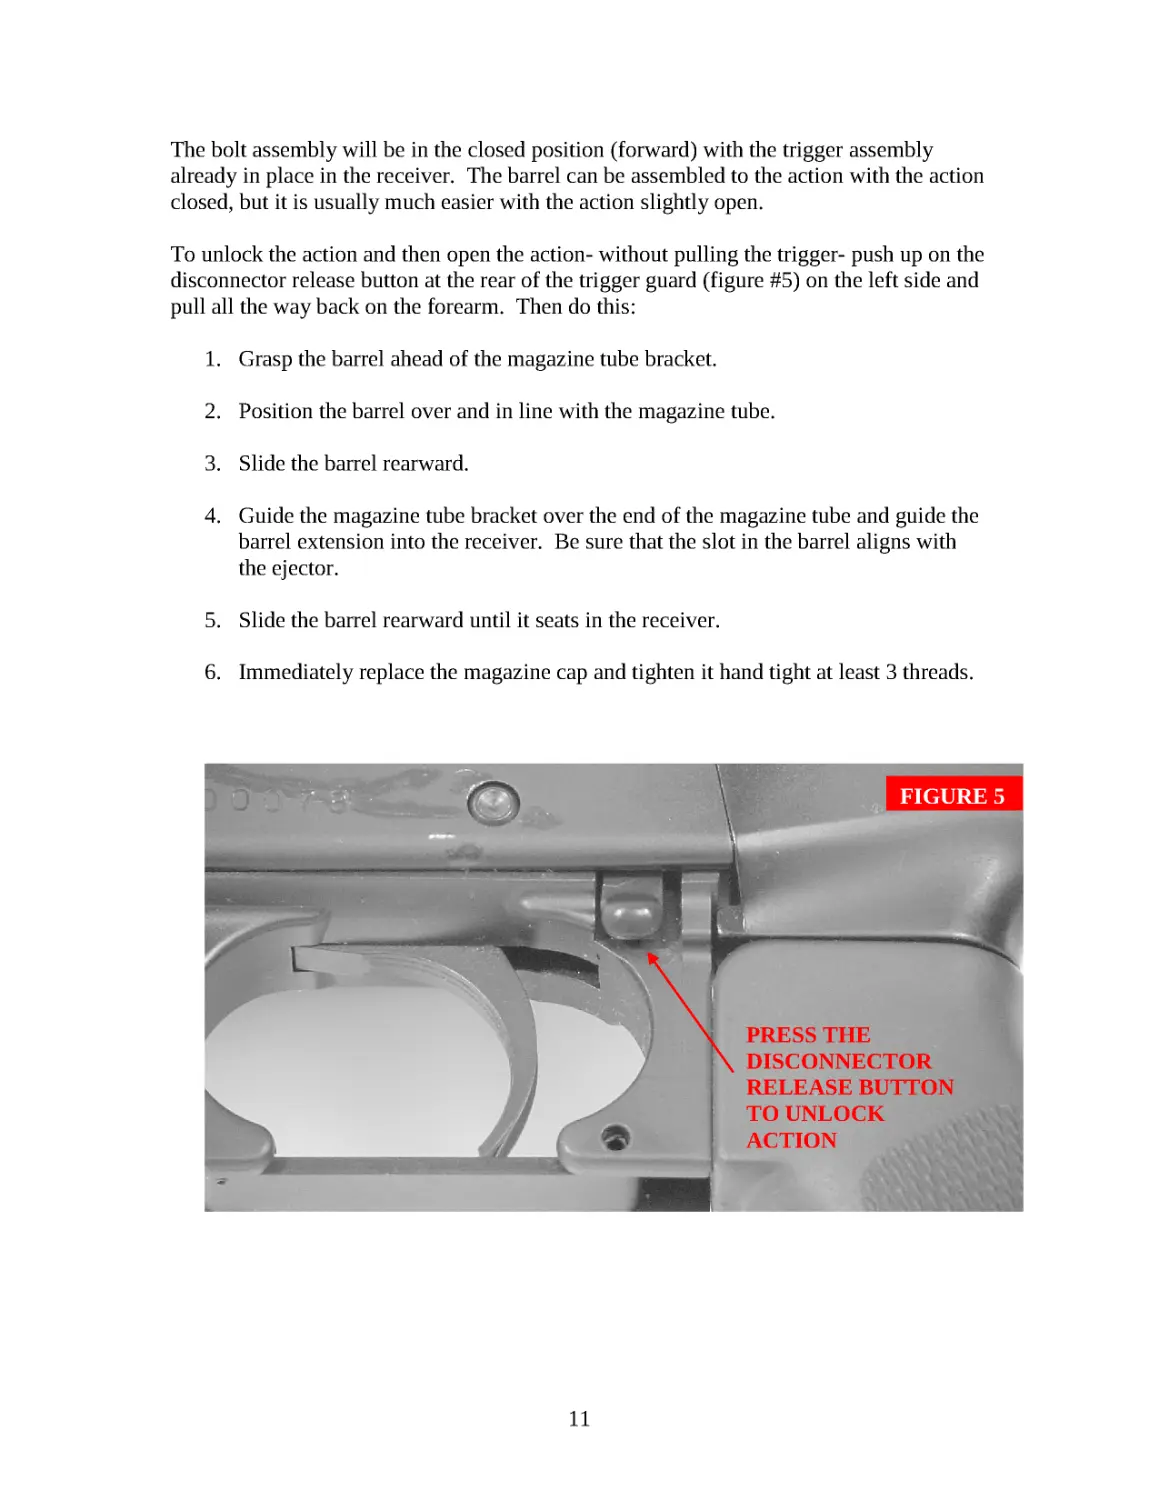
To unlock the action and then open the action- without pulling the trigger- push up on the
disconnector release button at the rear of the trigger guard (figure #5) on the left side and
pull all the way back on the forearm. Then do this:
1. Grasp the barrel ahead of the magazine tube bracket.
2. Position the barrel over and in line with the magazine tube.
3. Slide the barrel rearward.
4. Guide the magazine tube bracket over the end of the magazine tube and guide the
barrel extension into the receiver. Be sure that the slot in the barrel aligns with
the ejector.
5. Slide the barrel rearward until it seats in the receiver.
6. Immediately replace the magazine cap and tighten it hand tight at least 3 threads.
PRESS THE
DISCONNECTOR
RELEASE BUTTON
TO UNLOCK
ACTION
FIGURE 5
12
To return your shotgun to its taken down condition perform the following.
IMPORTANT: BE CERTAIN THERE ARE NO SHELLS IN THE CHAMBER OR
THE MAGAZINE OF THE SHOTGUN.
TAKING DOWN THE BARREL
1. Depress the disconnector release button, found behind the trigger guard on the left
side, to unlock the action without releasing the hammer.
2. Open the action all the way and place the safety in the “ON SAFE” position.
(The red warning band must not be visible.)
3. With the magazine pointed in a safe direction, unscrew and remove the magazine
cap. Be careful, a friction-type retainer retains the magazine spring and magazine
plug.
ALWAYS KEEP THE MAGAZINE POINTING AWAY FROM YOU AND
OTHERS WHEN REMOVING THE MAGAZINE CAP.
4. Carefully disengage the barrel from the receiver while sliding the barrel ring from
the magazine tube. DO NOT USE EXCESSIVE FORCE OR TOOLS.
Immediately replace the magazine cap and hand-tighten at least three threads.
Reassembly of the barrel to the action was explained earlier in this section.
LOADING PROCEDURES
SINGLE SHOT MODE
Use the correct ammunition referenced by the inscription on the left side of the barrel.
Before loading your gun, be sure all grease and oil has been removed from the barrel
and chamber and there are no obstructions.
1. Depress the disconnector release button found behind the trigger guard on the left
side. This unlocks the action without releasing the hammer.
2. Open the action and push the safety in the “ON SAFE” position. The chamber is
now ready to be loaded.
3. To operate your FN Police Shotgun in a single-shot mode a shell can now be
placed directly into the chamber.
IMPORTANT: When the slide is moved forward with a shell placed directly into the
chamber the gun is now ready to fire.
13
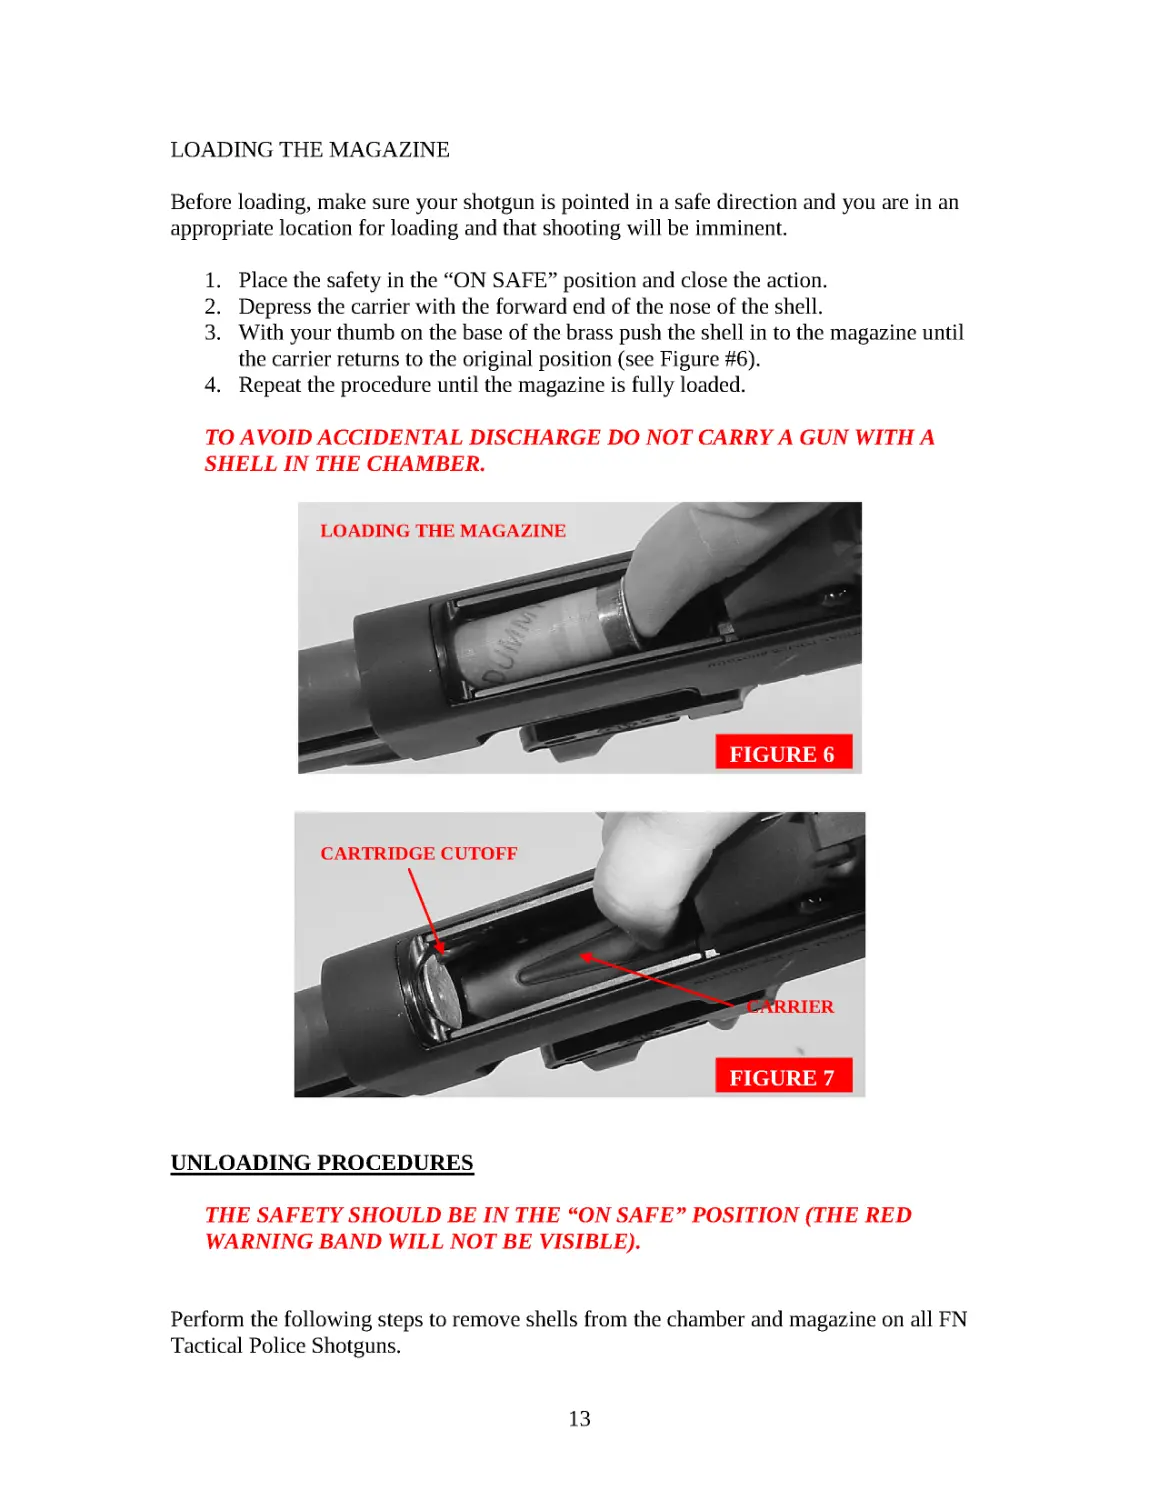
LOADING THE MAGAZINE
Before loading, make sure your shotgun is pointed in a safe direction and you are in an
appropriate location for loading and that shooting will be imminent.
1. Place the safety in the “ON SAFE” position and close the action.
2. Depress the carrier with the forward end of the nose of the shell.
3. With your thumb on the base of the brass push the shell in to the magazine until
the carrier returns to the original position (see Figure #6).
4. Repeat the procedure until the magazine is fully loaded.
TO AVOID ACCIDENTAL DISCHARGE DO NOT CARRY A GUN WITH A
SHELL IN THE CHAMBER.
UNLOADING PROCEDURES
THE SAFETY SHOULD BE IN THE “ON SAFE” POSITION (THE RED
WARNING BAND WILL NOT BE VISIBLE).
Perform the following steps to remove shells from the chamber and magazine on all FN
Tactical Police Shotguns.
FIGURE 6
FIGURE 7
CARTRIDGE CUTOFF
CARRIER
LOADING THE MAGAZINE
14
1. Point the muzzle in a safe direction.
2. Hold the disconnector release button inward to release the slide.
3. Slide the forearm through a complete cycle of the action and repeat the process
until all the shells in the magazine have been transferred to the chamber and then
ejected.
4. When the last shell in the magazine has been cycled through the chamber and out
the ejection port, leave the action open.
5. Using your index finger, feel the entry of the magazine to make sure there are no
longer any shells that have not been fed from the magazine and ejected.
ALTERNATE WAY TO UNLOAD
The shells can also be removed from the magazine by following these steps:
1. PLACE THE SAFETY IN “ON SAFE” POSITION, MAKE SURE THE
ACTION IS CLOSED AND KEEP THE MUZZLE POINTED IN A SAFE
DIRECTION.
2. Turn the gun over so the trigger guard is facing up, then push and hold the carrier
down as far as it will go.
3. The cartridge cutoff is located on the inside-right below the ejection port, (Figure
#5). Depress the front end of the cutoff one time fully into the receiver wall to
release each shell from the magazine.
4. With the magazine emptied and with the safety still in the “ON SAFE” position,
press the disconnector release button and move the forearm all the way rearward
to remove the shell from the chamber.
IMPORTANT: ALWAYS VISUALLY AND PHYSICALLY CHECK AND KNOW
FOR SURE THAT YOUR SHOTGUN IS NOT LOADED. DO THIS BY LOOKING
DIRECTLY INTO THE CHAMBER AND INSERT YOUR FINGER INTO THE
CHAMBER WITH THE BOLT FULLY TO THE REAR.
FIRING PROCEDURES
1. When ready to shoot, and with a loaded shell in the chamber, the safety “ON
SAFE”, and your finger off of the trigger, push the safety to the “OFF SAFE”
15
position (with the red warning band fully visible). Your shotgun is now ready to
fire with a pull of the trigger.
REMEMBER, THE RECOIL FROM A SHOTGUN, ESPECIALLY MAGNUM
LOADS, WILL BE SOMEWHAT HEAVIER THAN MOST OTHER FIREARMS, SO
FIRMLY SHOULDER YOUR SHOTGUN, TAKE AIM, AND – WHEN ON TARGET
–
SQUEEZE THE TRIGGER.
2. Pull the forearm fully rearward until the fired shell is ejected out the ejection port.
3. Push the forearm fully forward, transferring a new shell from the magazine into
the chamber. Your shotgun is again cocked and ready to fire. IMMEDIATELY
PUT THE SAFETY IN THE “ON SAFE” POSITION (WITH THE RED
WARNING RING HIDDEN) UNTIL YOU ARE READY TO FIRE AGAIN.
IN THE CASE OF A MISFIRE
Only rarely will modern factory ammunition experience a misfire. If this ever happens to
you when shooting your FN TPS, please follow these instructions carefully.
CAUTION: IN THE CASE OFA MISFIRE, KEEP THE BARREL POINTED IN A
SAFE DIRECTION, CAREFULLY OPEN THE ACTION WHILE AVOIDING
DIRECT EXPOSURE TO THE BREECH BY YOURSELF AND OTHERS.
REMOVE THE SHELL FROM THE CHAMBER. LEAVE THE ACTION OPEN
AND FULLY UNLOAD YOUR SHOTGUN, REMOVING ALL SHELLS FROM THE
MAGAZINE.
Carefully inspect the ejected shell. If the primer is dented, the shell should be disposed of
in a manner that would prevent accidental injury to you or others. If there is no
indentation, your gun has malfunctioned and should be serviced by a qualified gunsmith,
or by the FN Herstal Service Center as explained under “Service or Repair”, see page 26.
REMOVING THE MAGAZINE SPRING
FN Tactical Police Shotguns are not shipped with an adapter, which limits the magazine
capacity to two shells. If an adapter is needed for legal use, one can be installed.
However, it may be important to remove the magazine spring for cleaning of the
magazine spring and tube.
BE CERTAIN THERE ARE NO SHELLS IN THE MAGAZINE OR CHAMBER.
ALWAYS FULLY UNLOAD YOUR SHOTGUN AND REMOVE THE BARREL
BEFORE REMOVING THE MAGAZINE SPRING. ALWAYS POINT THE END OF
THE MAGAZINE AWAY FROM YOUR FACE AND IN A SAFE DIRECTION.
16
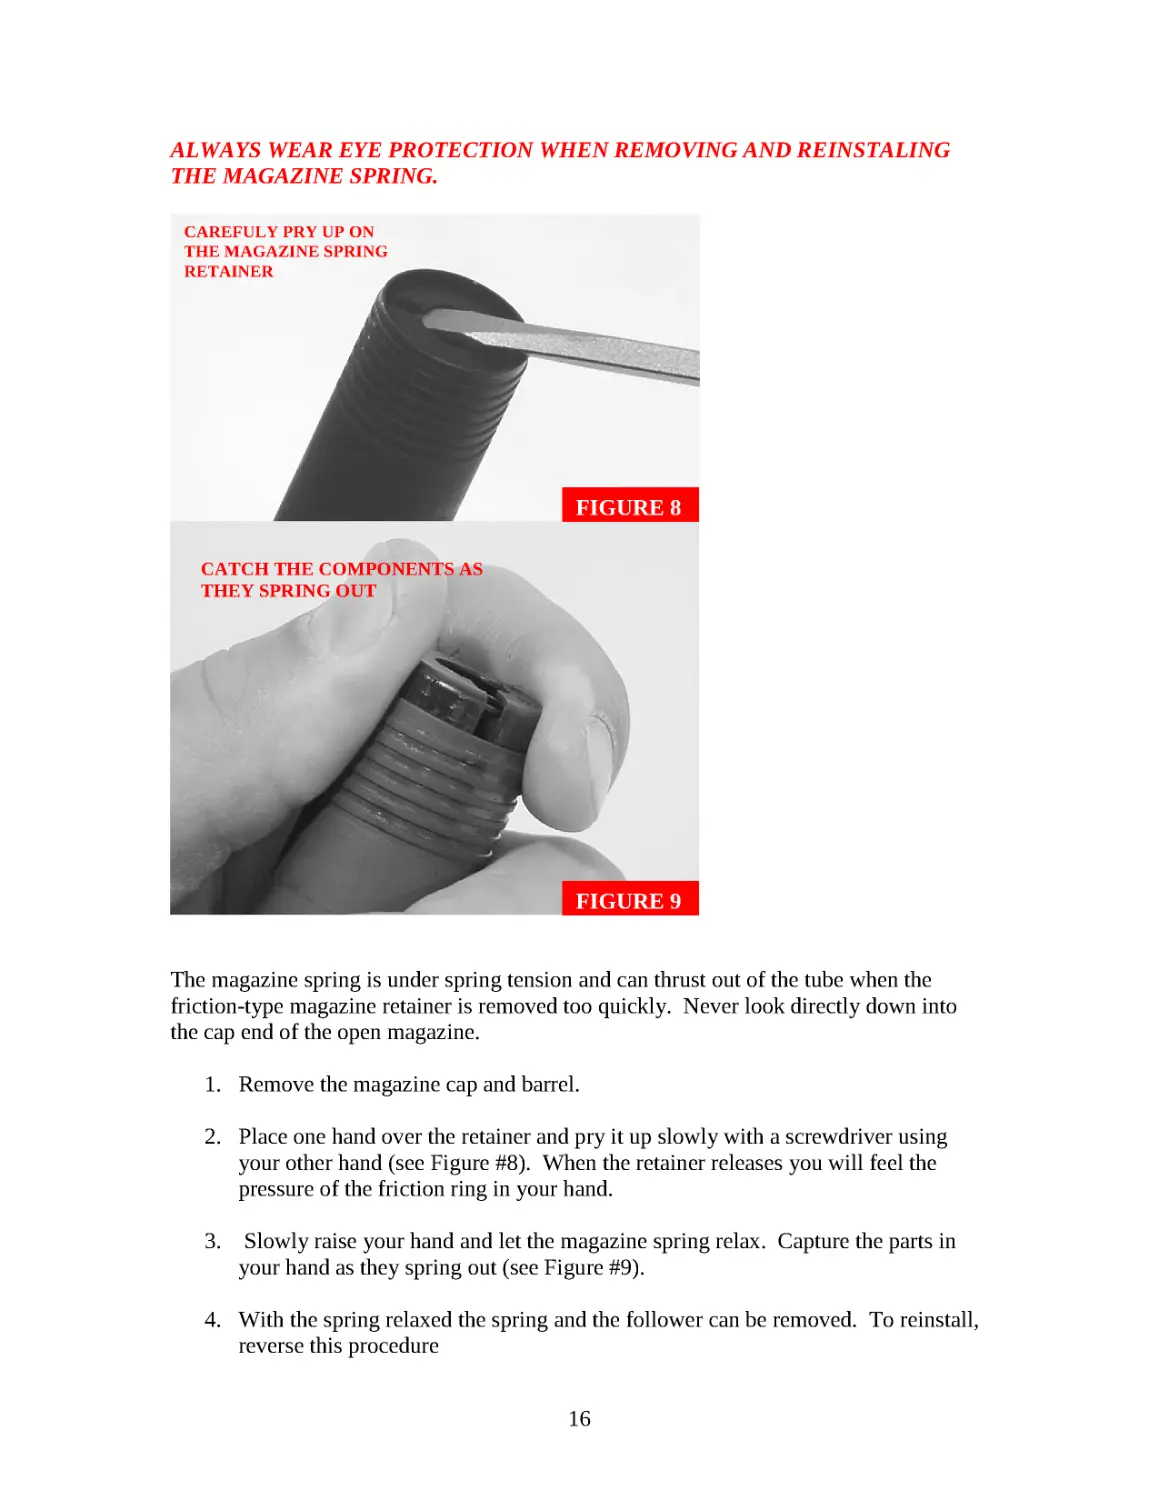
ALWAYS WEAR EYE PROTECTION WHEN REMOVING AND REINSTALING
THE MAGAZINE SPRING.
The magazine spring is under spring tension and can thrust out of the tube when the
friction-type magazine retainer is removed too quickly. Never look directly down into
the cap end of the open magazine.
1. Remove the magazine cap and barrel.
2. Place one hand over the retainer and pry it up slowly with a screwdriver using
your other hand (see Figure #8). When the retainer releases you will feel the
pressure of the friction ring in your hand.
3. Slowly raise your hand and let the magazine spring relax. Capture the parts in
your hand as they spring out (see Figure #9).
4. With the spring relaxed the spring and the follower can be removed. To reinstall,
reverse this procedure
FIGURE 8
FIGURE 9
CAREFULY PRY UP ON
THE MAGAZINE SPRING
RETAINER
CATCH THE COMPONENTS AS
THEY SPRING OUT
17
FULL DISASSEMBLY
One advantage of an FN TPS is the ability to disassemble the action for cleaning. Under
very harsh weather conditions and in dirty environments just knowing that parts are clean
and lightly oiled can add an extra measure of confidence.
Make sure you have a clean place to work and a good place to put the components as they
are disassembled.
Wear eye protection at all times. Never disassemble beyond what is shown in this
manual.
Disassembling the action can be done in the field, but remember, there are small parts
involved, some of which are under spring tension (see Figure #10).
FIRST, BE CERTAIN THERE ARE NO SHELLS IN THE MAGAZINE OR
CHAMBER.
HOW TO TAKE DOWN THE BARREL
1. Open the action and make sure the gun is not loaded.
2. Close the action and place the safety in the “ON SAFE” position.
3. Unscrew and remove the magazine cap. REMEMBER, ALWAYS KEEP THE
END OF THE MAGAZINE POINTED IN A SAFE DIRECTION.
4. Slide the barrel forward withdrawing the barrel from the receiver and disengaging
the barrel bracket from the end of the magazine.
5. Immediately screw the magazine cap back onto the magazine.
HOW TO REMOVE THE TRIGGER GUARD AND GROUP FROM THE RECIEVER
Removing the trigger guard group is another necessary procedure in performing thorough
maintenance of your shotgun. It is easy to do, and removing it allows you to perform
cleaning and maintenance whenever and wherever required. MAKE SURE THE GUN IS
UNLOADED. With both the trigger guard group and the bolt assembly removed, it is
easy to wipe out any debris or moisture that sometimes accumulates in the receiver. The
trigger guard group should be removed before you attempt to remove the bolt assembly.
The action should be cycled by sliding the forearm forward and then rearward. This puts
the hammer in the cocked position. Place the safety in the “ON SAFE” position.
18
1. If the barrel assembly has been removed, always be sure to replace the magazine
cap on the end of the tube to prevent accidental disengagement of the magazine
spring retainer.
2. Place you gun with the trigger guard facing up, on a suitable surface that will
protect the receiver finish and stock.
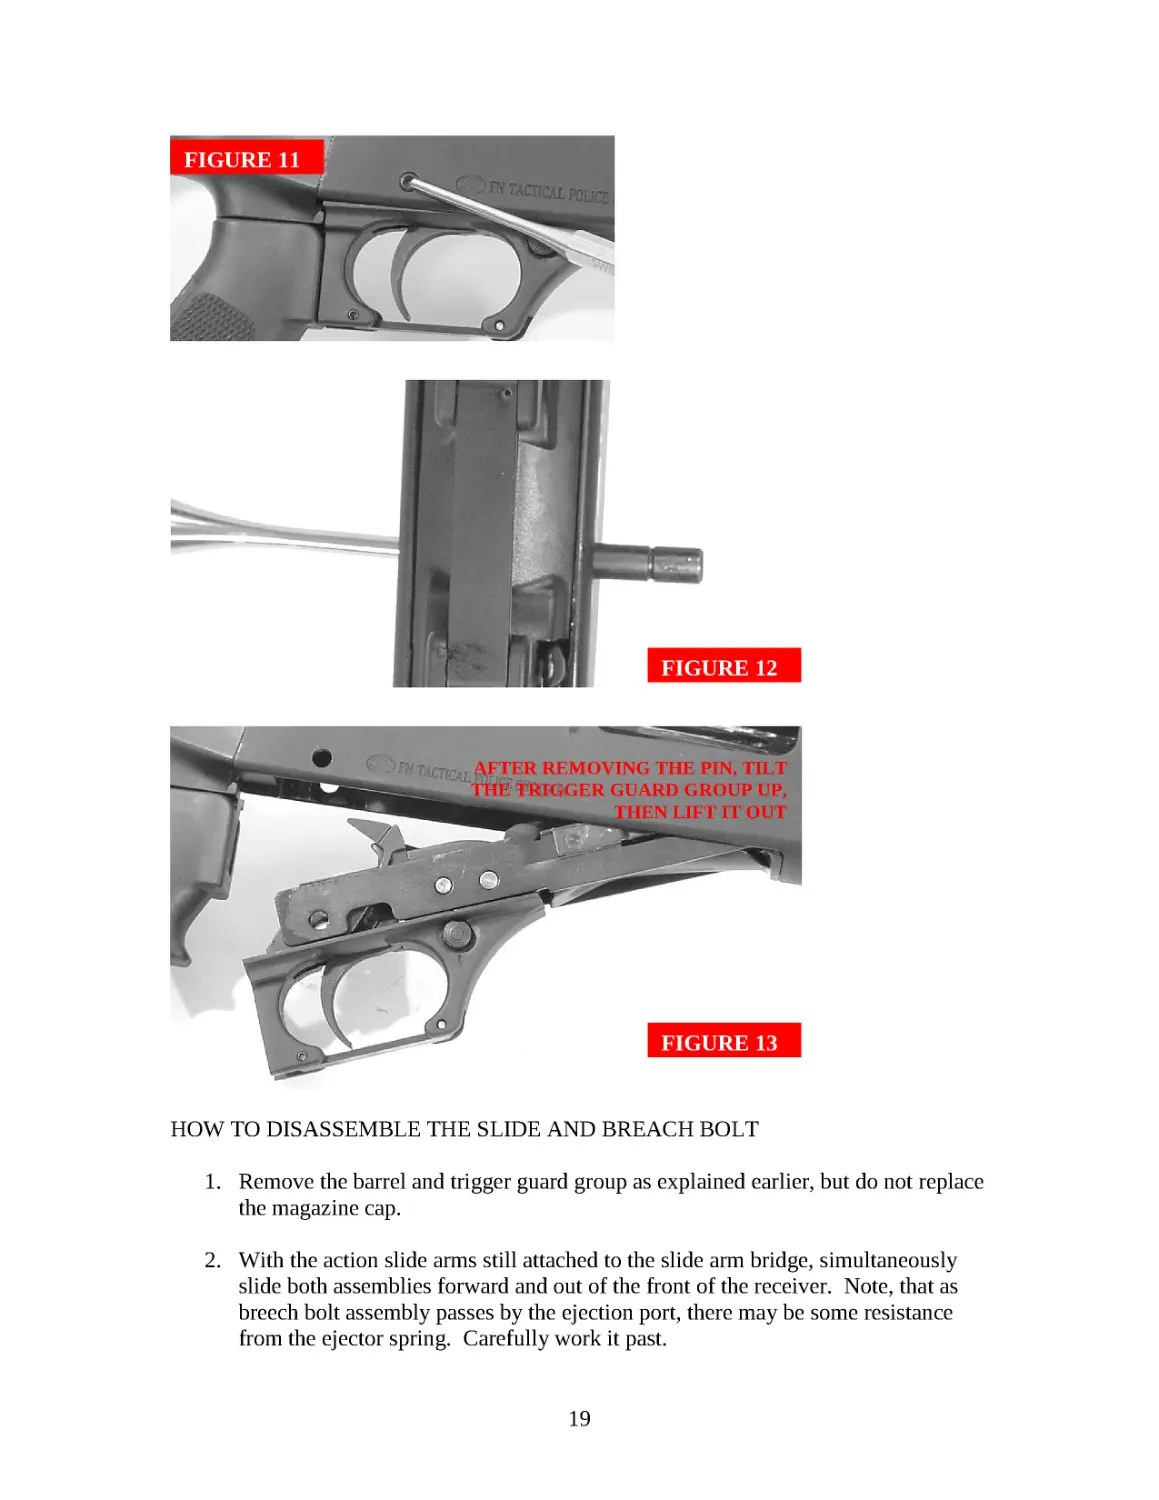
3. Remove the trigger guard pin by pushing it out from the RIGHT side of the
receiver-the side with the ejection port. Any sturdy pushing tool that is smaller in
diameter than the pin, that will not mar the finish, is acceptable. Make sure you
can maintain a good grip on your pushing tool and on the shotgun as you push
(see Figure #11).
4. Push the pin through sufficiently until it can be grasped with your fingers. Pull it
the rest of the way out. If it cannot be removed with fingers, make sure your
pushing tool or punch has a diameter small enough so that it will push the pin
completely through without the tool damaging the hole (see Figure #12).
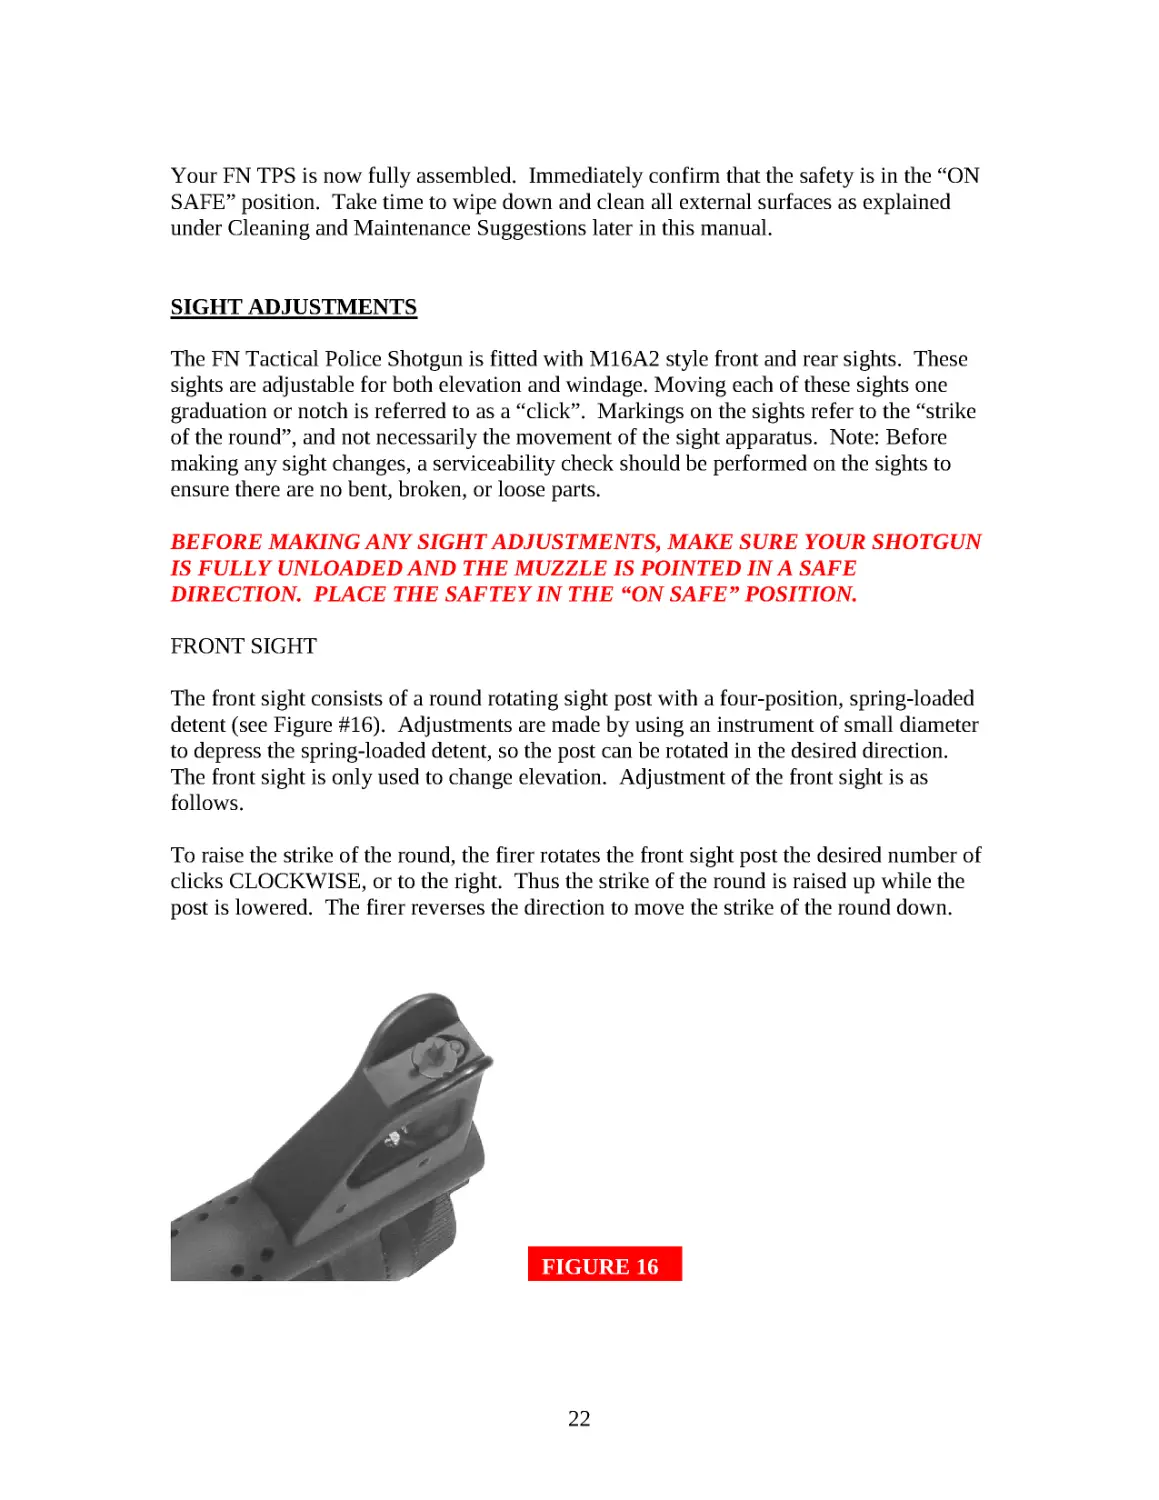
5. With the pin removed, lift the trigger guard group out of the receiver by pulling
down and to the rear (see Figure #13).
FIGURE 10
REAR SIGHT
RECEIVER
BARREL
FOREARM
MAGAZINE FOLLOWER
MAGAZINE CAP
MAGAZINE RETAINER
TRIGGER GUARD GROUP
TRIGGER GUARD PIN
SLIDE ARM BRIDGE
FIRING PIN
FIRING PIN SPRING
BREECH BOLT ASSEMBLY
(BREECH BOLT SLIDE & BREECH BOLT)
BARREL BRACKET
MAGAZINE SPRING
MAGAZINE TUBE
19
HOW TO DISASSEMBLE THE SLIDE AND BREACH BOLT
1. Remove the barrel and trigger guard group as explained earlier, but do not replace
the magazine cap.
2. With the action slide arms still attached to the slide arm bridge, simultaneously
slide both assemblies forward and out of the front of the receiver. Note, that as
breech bolt assembly passes by the ejection port, there may be some resistance
from the ejector spring. Carefully work it past.
FIGURE 11
FIGURE 12
FIGURE 13
AFTER REMOVING THE PIN, TILT
THE TRIGGER GUARD GROUP UP,
THEN LIFT IT OUT
20
HOW TO REMOVE THE FIRING PIN
Begin with the breech bolt assembly removed from the gun.
1. Grasp the breech bolt assembly, bottom side up (flat side), and push the rear of
the firing pin forward with your forefinger. While holding the firing pin in this
position, take your other hand, tilt the front end of the slide arm bridge and move
it slightly forward. Lift up on the slide arm bridge and disengage the curved
tongue on the slide arm bridge from the groove in the firing pin. This will detach
the slide arm bridge from the breech bolt slide.
2. The firing pin is under spring tension and will snap out the rear of the breech bolt
when your forefinger releases it. Control the pin as you remove the firing pin and
spring because they are under tension.
For cleaning purposes no further dismantling is necessary or recommended. Do not
disassemble you FN TPS further than shown in Figure #10. Doing so may void your
warranty. For repairs that require further disassembly contact the FN service Dept.
HOW TO REASSEMBLE THE FIRING PIN, BREECH BOLT AND SLIDE
1. Reinstall the firing pin spring over the firing pin. Either end can go first.
2. Insert the firing pin (with spring) into the rear opening of the bolt slide, pin end
first.
3. To reinstall the bolt assembly on the slide arm bridge, push or compress the “knob
end” of the firing pin sufficiently into the hole in the bolt slide so that the large
space between the grooved “knob” and the flange on the firing pin is centered in
the round hole on the bolt slide.
4. Place the curved tongue, located on the slide arm bridge, into the space between
the knob and flange and slowly release pressure on the end of the firing pin. Let
the flange on the pin pull the tongue toward the rear of the bolt assembly. This
should hold the breech bolt assembly and the slide arm bridge together during
further assembly.
5. With the firing pin and breech bolt now assembled, engage the slide arm bridge
into the matching cuts on the slide arms (see Figure #14)
6. Remove the magazine cap. Hold the slide arms and bolt/slide arm bridge
assemblies together. Start the forearm assembly onto the magazine tube.
7. Carefully guide the slide arms and bolt/slide arm bridge assemblies into the front
of the receiver. As the assemblies enter the receiver, slide them fully rearward
(see Figure #15)
21
HOW TO REINSTALL THE TRIGGER GUARD GROUP
Be careful when reinstalling the trigger group. Never force parts into position. Normally
the bolt assembly, slide arms and barrel should be attached before installing the trigger
guard group. The hammer should be in the cocked position and the safety in the “ON
SAFE” position. Carefully insert the trigger guard group into place. It may be necessary
to slide the forearm into different positions until the trigger guard group fits flush into the
receiver. When it is properly installed it will fit easily and the pin will slide in without
excessive force.
Installing the bolt assembly after the trigger guard group is installed should not be
attempted. Consequently, make sure you have already installed the bolt assembly before
installing the trigger guard group. It is not necessary that the barrel be attached to install
the trigger group. Install the trigger group as follows:
1. Turn your shotgun over with the open bottom of the receiver facing upward.
Hold the trigger guard at an angle to the receiver (about 45°) and then engage the
front tabs on the trigger guard group with the corresponding slots in the magazine
throat at the forward end of the receiver opening as shown earlier in Figure #13.
2. Rotate the trigger guard group towards and into the receiver opening, until it is
parallel with the receiver.
3. Align the trigger guard group with the hole in the receiver and install the trigger
guard pin from the RIGHT side of the receiver (ejection port side) until it is flush
with both sides of the receiver. The pin should pass through easily with little
force. If significant resistance is felt, remove the trigger group and repeat step
one above.
FIGURE 14
FIGURE 15
POSITION THE BOLT ASSEMBLY ON THE SLIDE ARMS
CAREFULLY GUIDE THE BOLT
ASSEMBLY ON THE SLIDE ARMS
INTO THE RECEIVER
22
Your FN TPS is now fully assembled. Immediately confirm that the safety is in the “ON
SAFE” position. Take time to wipe down and clean all external surfaces as explained
under Cleaning and Maintenance Suggestions later in this manual.
SIGHT ADJUSTMENTS
The FN Tactical Police Shotgun is fitted with M16A2 style front and rear sights. These
sights are adjustable for both elevation and windage. Moving each of these sights one
graduation or notch is referred to as a “click”. Markings on the sights refer to the “strike
of the round”, and not necessarily the movement of the sight apparatus. Note: Before
making any sight changes, a serviceability check should be performed on the sights to
ensure there are no bent, broken, or loose parts.
BEFORE MAKING ANY SIGHT ADJUSTMENTS, MAKE SURE YOUR SHOTGUN
IS FULLY UNLOADED AND THE MUZZLE IS POINTED IN A SAFE
DIRECTION. PLACE THE SAFTEY IN THE “ON SAFE” POSITION.
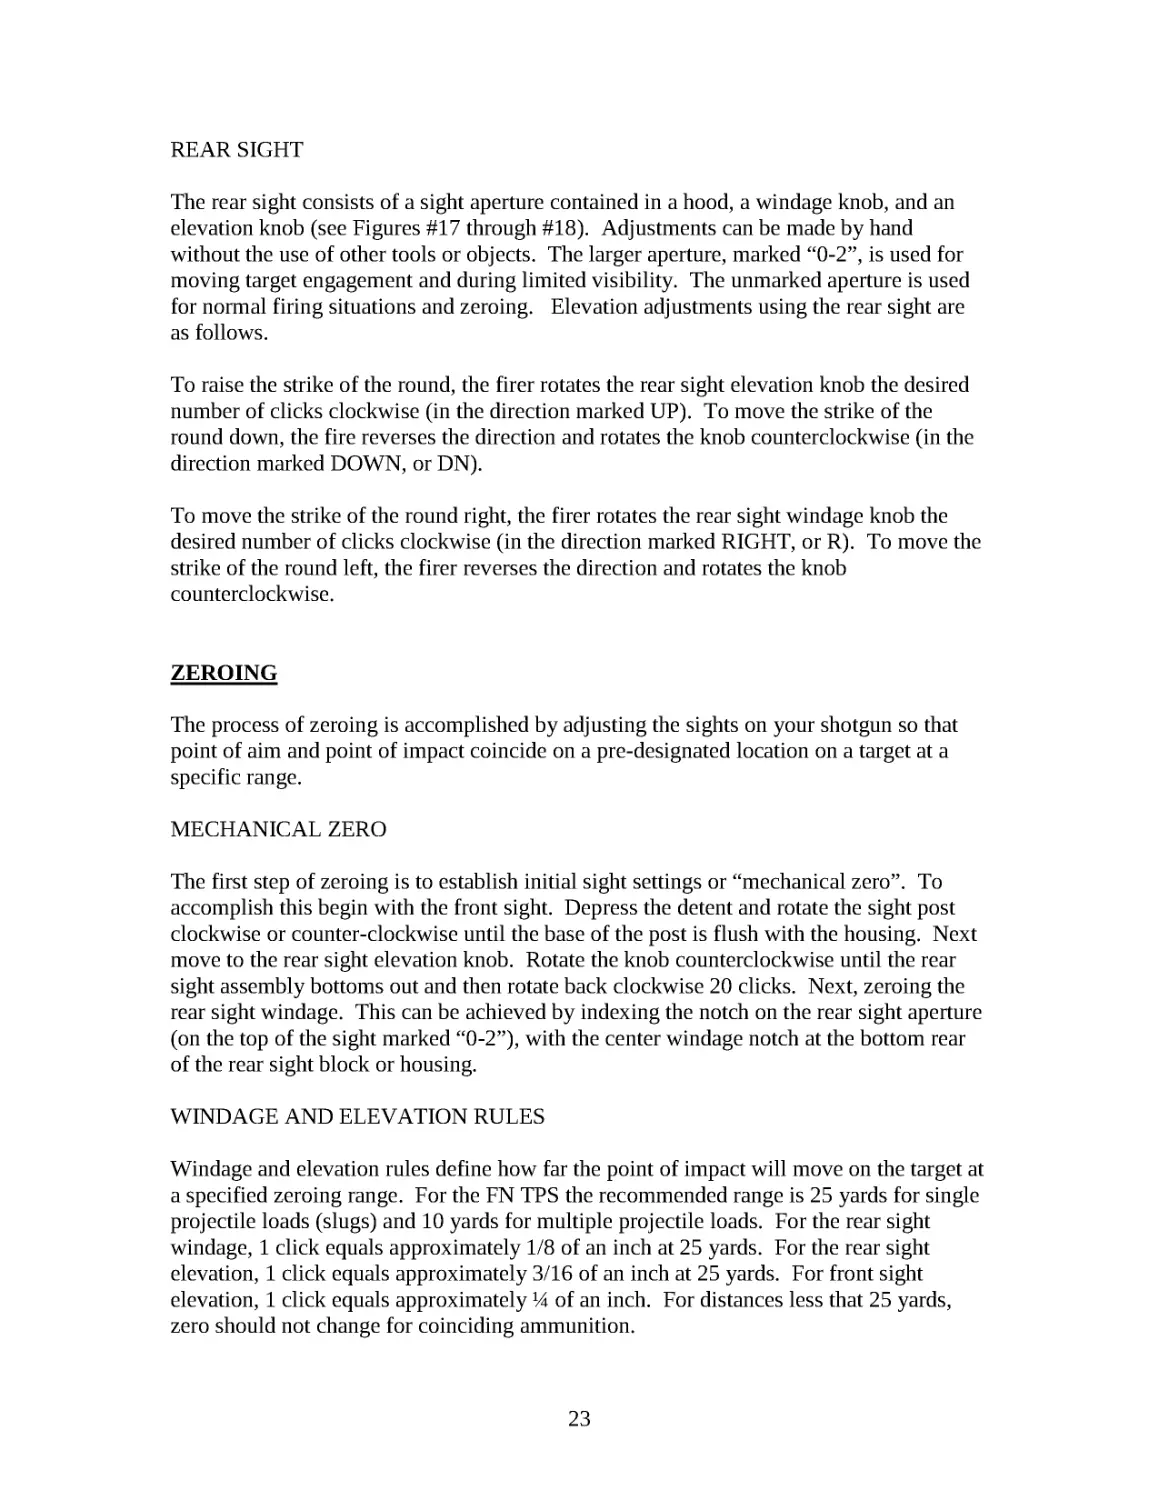
FRONT SIGHT
The front sight consists of a round rotating sight post with a four-position, spring-loaded
detent (see Figure #16). Adjustments are made by using an instrument of small diameter
to depress the spring-loaded detent, so the post can be rotated in the desired direction.
The front sight is only used to change elevation. Adjustment of the front sight is as
follows.
To raise the strike of the round, the firer rotates the front sight post the desired number of
clicks CLOCKWISE, or to the right. Thus the strike of the round is raised up while the
post is lowered. The firer reverses the direction to move the strike of the round down.
FIGURE 16
23
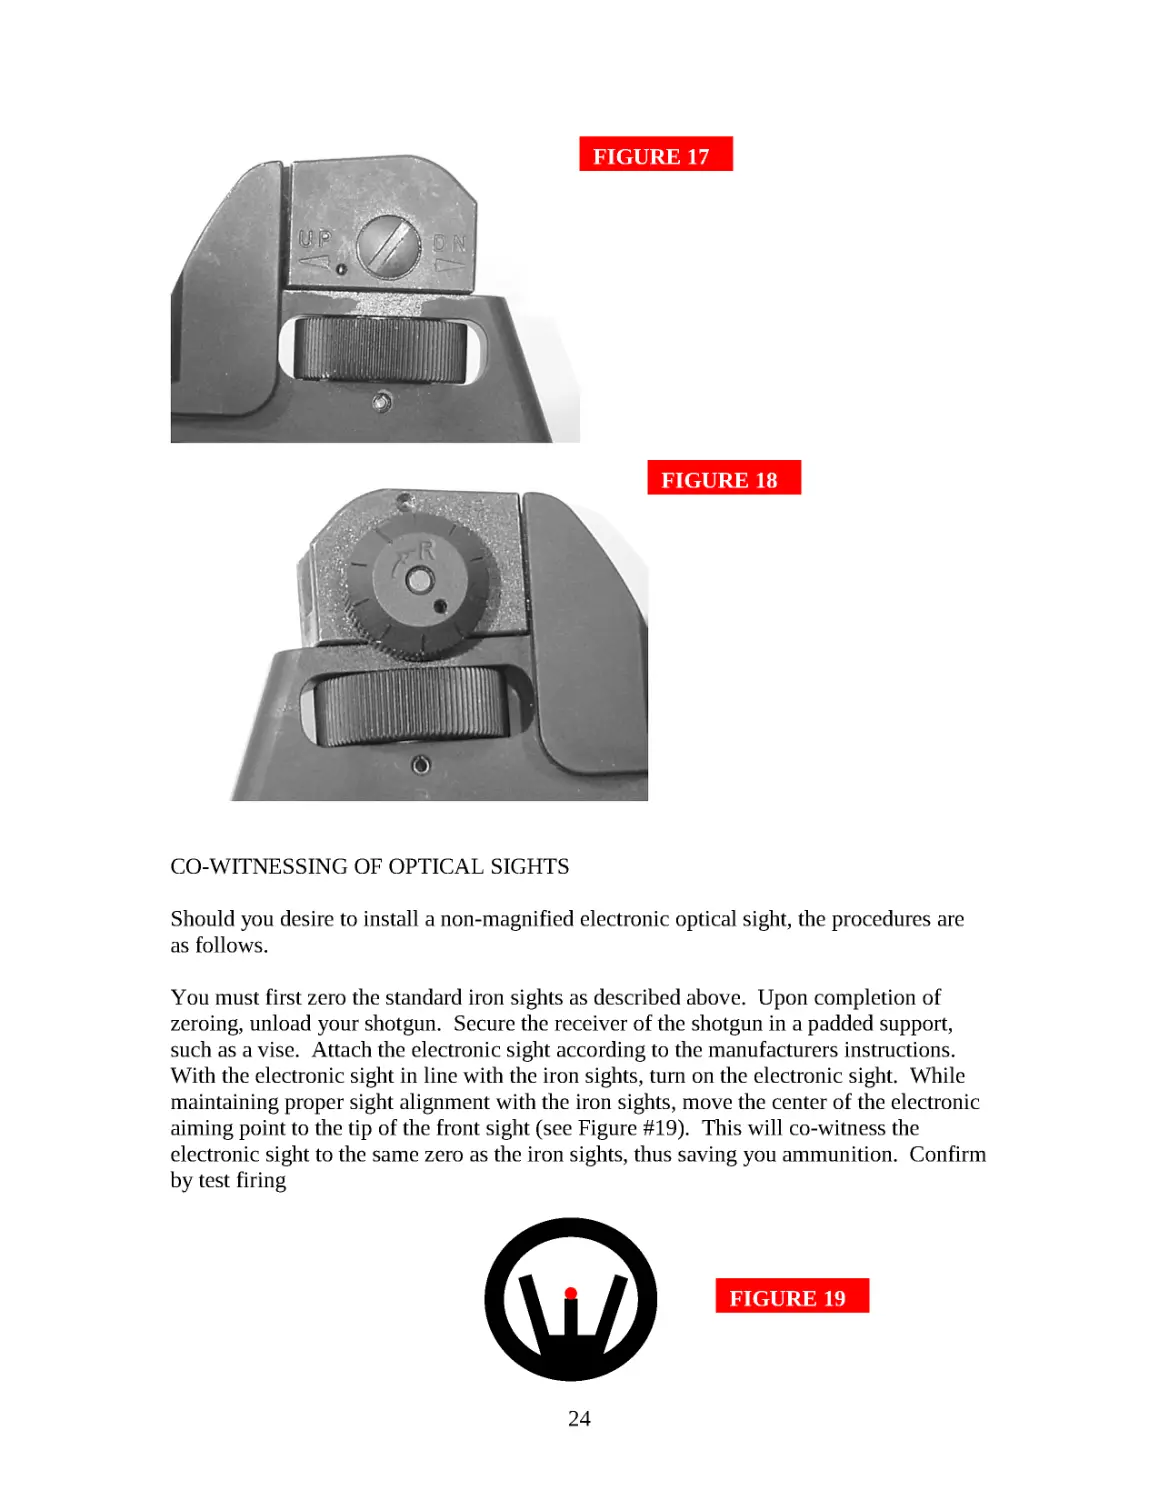
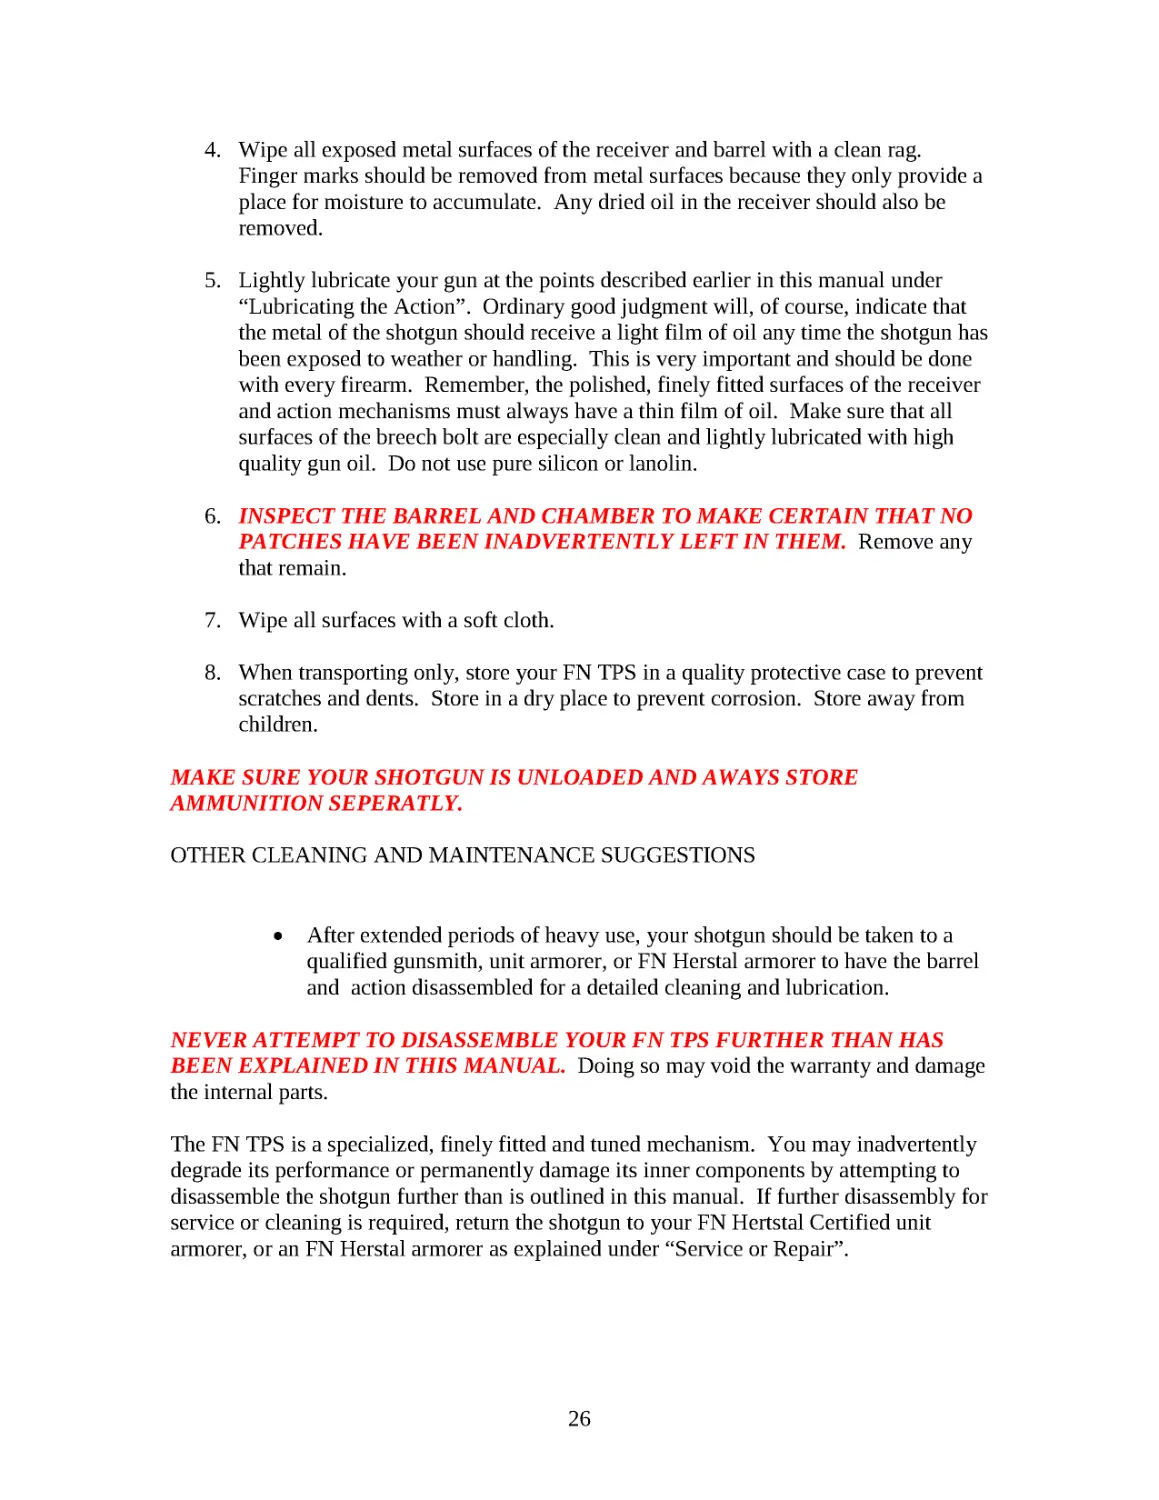
REAR SIGHT
The rear sight consists of a sight aperture contained in a hood, a windage knob, and an
elevation knob (see Figures #17 through #18). Adjustments can be made by hand
without the use of other tools or objects. The larger aperture, marked “0-2”, is used for
moving target engagement and during limited visibility. The unmarked aperture is used
for normal firing situations and zeroing. Elevation adjustments using the rear sight are
as follows.
To raise the strike of the round, the firer rotates the rear sight elevation knob the desired
number of clicks clockwise (in the direction marked UP). To move the strike of the
round down, the fire reverses the direction and rotates the knob counterclockwise (in the
direction marked DOWN, or DN).
To move the strike of the round right, the firer rotates the rear sight windage knob the
desired number of clicks clockwise (in the direction marked RIGHT, or R). To move the
strike of the round left, the firer reverses the direction and rotates the knob
counterclockwise.
ZEROING
The process of zeroing is accomplished by adjusting the sights on your shotgun so that
point of aim and point of impact coincide on a pre-designated location on a target at a
specific range.
MECHANICAL ZERO
The first step of zeroing is to establish initial sight settings or “mechanical zero”. To
accomplish this begin with the front sight. Depress the detent and rotate the sight post
clockwise or counter-clockwise until the base of the post is flush with the housing. Next
move to the rear sight elevation knob. Rotate the knob counterclockwise until the rear
sight assembly bottoms out and then rotate back clockwise 20 clicks. Next, zeroing the
rear sight windage. This can be achieved by indexing the notch on the rear sight aperture
(on the top of the sight marked “0-2”), with the center windage notch at the bottom rear
of the rear sight block or housing.
WINDAGE AND ELEVATION RULES
Windage and elevation rules define how far the point of impact will move on the target at
a specified zeroing range. For the FN TPS the recommended range is 25 yards for single
projectile loads (slugs) and 10 yards for multiple projectile loads. For the rear sight
windage, 1 click equals approximately 1/8 of an inch at 25 yards. For the rear sight
elevation, 1 click equals approximately 3/16 of an inch at 25 yards. For front sight
elevation, 1 click equals approximately 1⁄4 of an inch. For distances less that 25 yards,
zero should not change for coinciding ammunition.
24
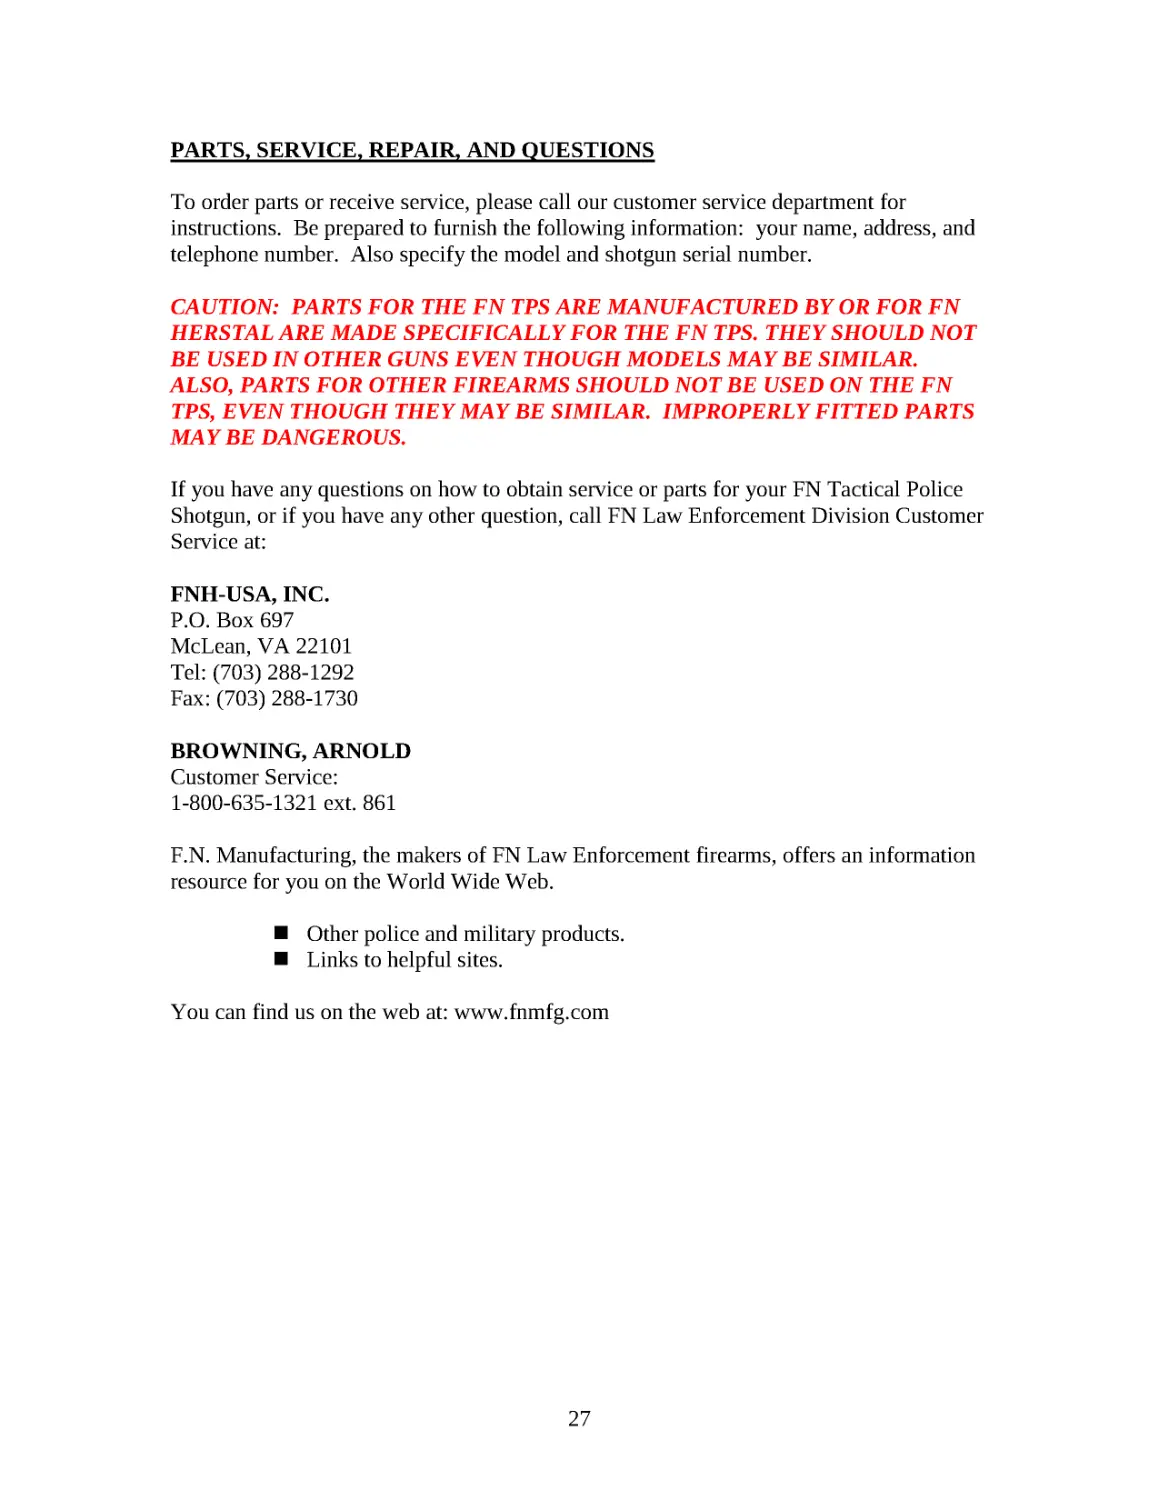
CO-WITNESSING OF OPTICAL SIGHTS
Should you desire to install a non-magnified electronic optical sight, the procedures are
as follows.
You must first zero the standard iron sights as described above. Upon completion of
zeroing, unload your shotgun. Secure the receiver of the shotgun in a padded support,
such as a vise. Attach the electronic sight according to the manufacturers instructions.
With the electronic sight in line with the iron sights, turn on the electronic sight. While
maintaining proper sight alignment with the iron sights, move the center of the electronic
aiming point to the tip of the front sight (see Figure #19). This will co-witness the
electronic sight to the same zero as the iron sights, thus saving you ammunition. Confirm
by test firing
FIGURE 17
FIGURE 18
FIGURE 19
25
CLEANING AND MAINTENANCE SUGGESTIONS
As with any firearm, the FN Tactical Police Shotgun will function better and more
reliably over a longer period of time if it is properly maintained and kept clean.
BEFORE PERFORMING ANY CLEANING PROCEDURES, ALWAYS MAKE
CERTAIN THERE ARE NO SHELLS IN THE CHAMBER, MAGAZINE, OR
ACTION / FEED AREAS.
You should clean your FN TPS after every day of shooting and more often, if it becomes
excessively dirty.
A minimum cleaning requires wiping down the action and lubricating key parts. Most
regular maintenance will also include cleaning the barrel. If you encounter a function
problem (tight action when working the forearm), be sure to give the gun a thorough
cleaning to see if it solves the problem before seeking the services of an FN Herstal
armorer or a gunsmith. To clean your shotgun, follow the general outline below:
CLEANING PROCEDURES
BE CERTAIN YOUR GUN’S CHAMBER AND MAGAZINE ARE UNLOADED.
ALWAYS WEAR RPOTRECTIVE SAFETY GLASSES DURING ALL CLEANING
PROCEDURES. KEEP AMMUNITION AWAY FROM THE CLEANING AREA.
DO NOT TEST THE FUNCITION OF YOUR FIREARM WITH LIVE
AMMUNITION.
Always place the safety in the intermediate “ON SAFE” position before beginning any
cleaning procedure.
1. Use a cleaning rod with a tip and patch suitable for your FN TPS’s bore. Make
sure the patch is large enough for snug fit in the bore. Insert the patch into the
barrel at the receiver end and run it back and forth several times
2. Inspect the chamber and bore for lead, and powder fouling. A normal amount of
powder residue can be expected and is not serious. It can be easily removed using
a patch saturated with solvent. If fouling is heavy, a brass bore brush can be used
in the chamber. Dip or spray the brush with solvent and scrub the chamber and
bore until the fouling is removed. To prevent brass bristles from breaking off, the
brush should be pushed completely through the bore before being withdrawn.
3. After the fouling has been removed the bore should be wiped dry. The last patch
through the bore and in the chamber should be a dry one. If you do not anticipate
shooting your FN TPS for a few days or more, run a patch with a few drops of
high-quality light oil down the bore for protection from rust. Be sure to remove
this oil film from the barrel before firing the next time you shoot.
26
4. Wipe all exposed metal surfaces of the receiver and barrel with a clean rag.
Finger marks should be removed from metal surfaces because they only provide a
place for moisture to accumulate. Any dried oil in the receiver should also be
removed.
5. Lightly lubricate your gun at the points described earlier in this manual under
“Lubricating the Action”. Ordinary good judgment will, of course, indicate that
the metal of the shotgun should receive a light film of oil any time the shotgun has
been exposed to weather or handling. This is very important and should be done
with every firearm. Remember, the polished, finely fitted surfaces of the receiver
and action mechanisms must always have a thin film of oil. Make sure that all
surfaces of the breech bolt are especially clean and lightly lubricated with high
quality gun oil. Do not use pure silicon or lanolin.
6. INSPECT THE BARREL AND CHAMBER TO MAKE CERTAIN THAT NO
PATCHES HAVE BEEN INADVERTENTLY LEFT IN THEM. Remove any
that remain.
7. Wipe all surfaces with a soft cloth.
8. When transporting only, store your FN TPS in a quality protective case to prevent
scratches and dents. Store in a dry place to prevent corrosion. Store away from
children.
MAKE SURE YOUR SHOTGUN IS UNLOADED AND AWAYS STORE
AMMUNITION SEPERATLY.
OTHER CLEANING AND MAINTENANCE SUGGESTIONS
• After extended periods of heavy use, your shotgun should be taken to a
qualified gunsmith, unit armorer, or FN Herstal armorer to have the barrel
and action disassembled for a detailed cleaning and lubrication.
NEVER ATTEMPT TO DISASSEMBLE YOUR FN TPS FURTHER THAN HAS
BEEN EXPLAINED IN THIS MANUAL. Doing so may void the warranty and damage
the internal parts.
The FN TPS is a specialized, finely fitted and tuned mechanism. You may inadvertently
degrade its performance or permanently damage its inner components by attempting to
disassemble the shotgun further than is outlined in this manual. If further disassembly for
service or cleaning is required, return the shotgun to your FN Hertstal Certified unit
armorer, or an FN Herstal armorer as explained under “Service or Repair”.
27
PARTS, SERVICE, REPAIR, AND QUESTIONS
To order parts or receive service, please call our customer service department for
instructions. Be prepared to furnish the following information: your name, address, and
telephone number. Also specify the model and shotgun serial number.
CAUTION: PARTS FOR THE FN TPS ARE MANUFACTURED BY OR FOR FN
HERSTAL ARE MADE SPECIFICALLY FOR THE FN TPS. THEY SHOULD NOT
BE USED IN OTHER GUNS EVEN THOUGH MODELS MAY BE SIMILAR.
ALSO, PARTS FOR OTHER FIREARMS SHOULD NOT BE USED ON THE FN
TPS, EVEN THOUGH THEY MAY BE SIMILAR. IMPROPERLY FITTED PARTS
MAY BE DANGEROUS.
If you have any questions on how to obtain service or parts for your FN Tactical Police
Shotgun, or if you have any other question, call FN Law Enforcement Division Customer
Service at:
FNH-USA, INC.
P.O. Box 697
McLean, VA 22101
Tel: (703) 288-1292
Fax: (703) 288-1730
BROWNING, ARNOLD
Customer Service:
1-800-635-1321 ext. 861
F.N . Manufacturing, the makers of FN Law Enforcement firearms, offers an information
resource for you on the World Wide Web.
Other police and military products.
Links to helpful sites.
You can find us on the web at: www.fnmfg.com