/


Tags: warfare
Year: 1917


Text
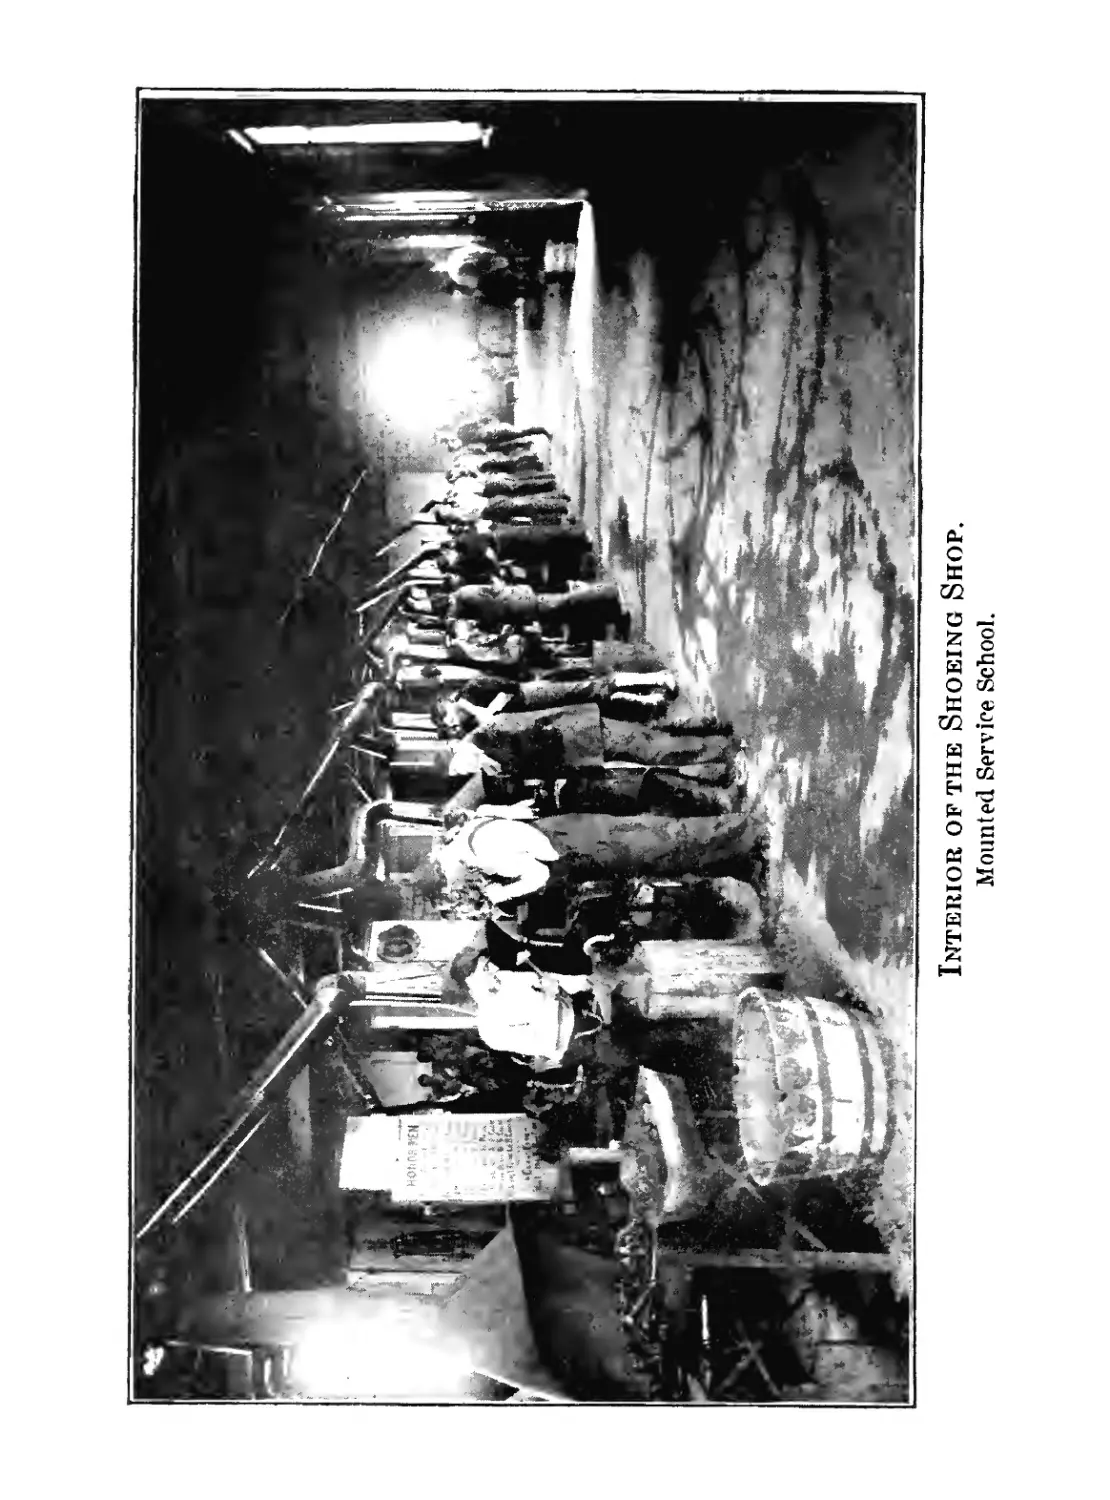
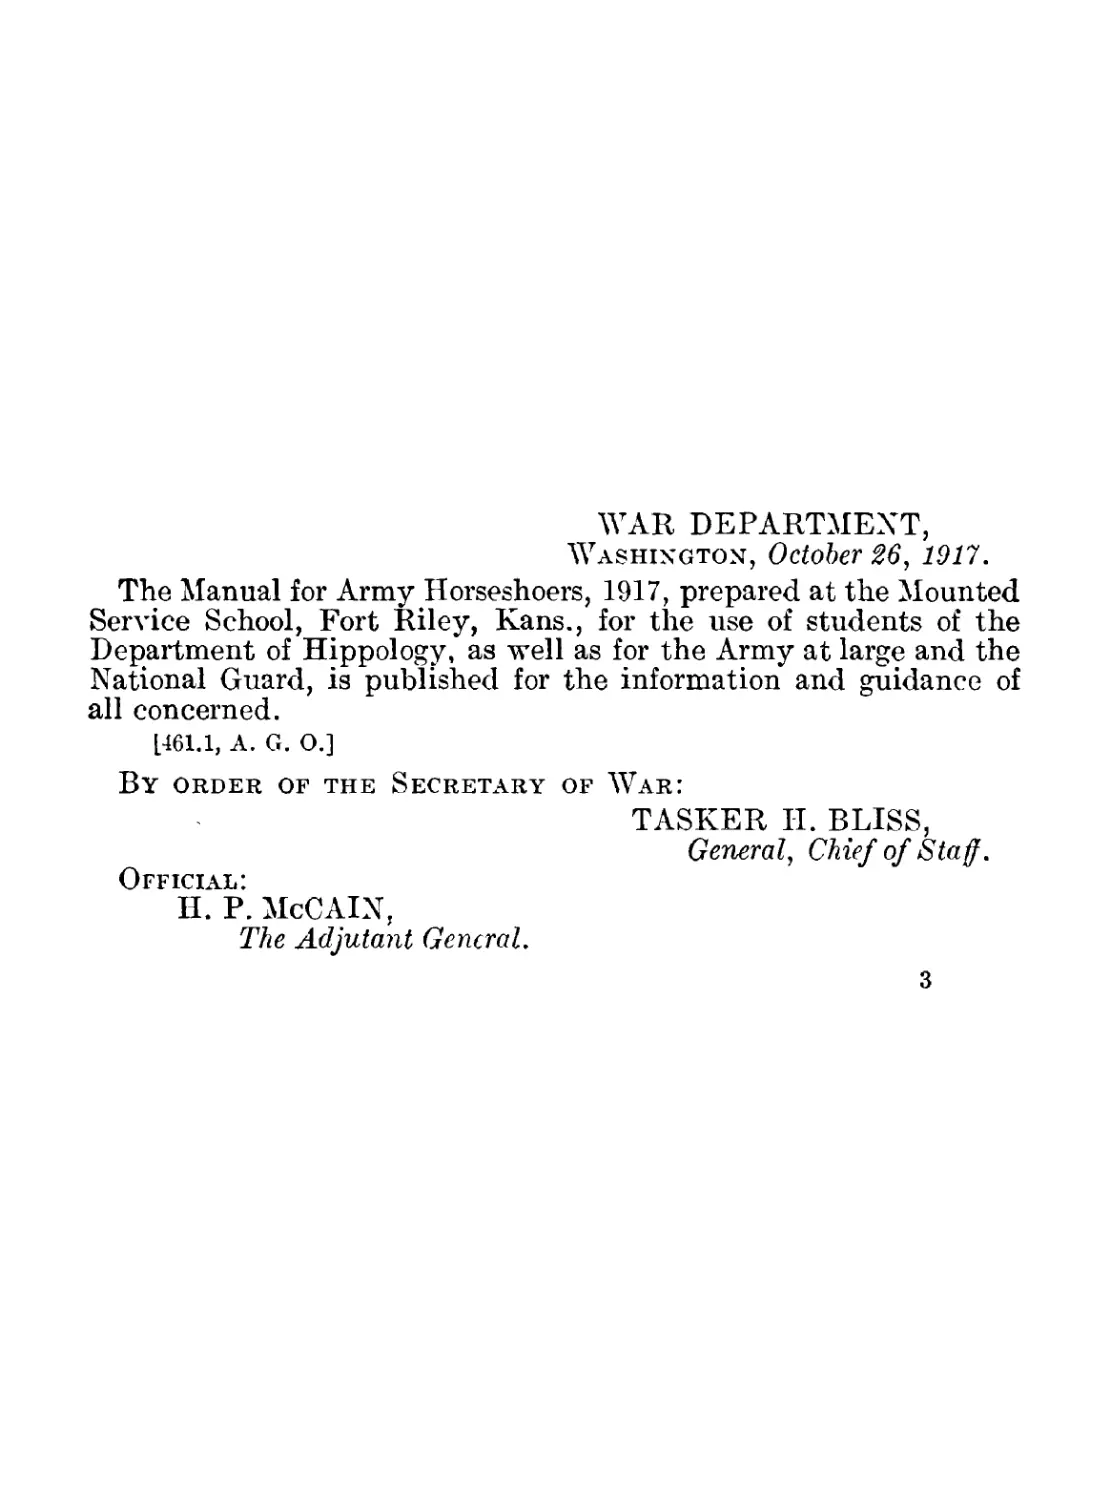
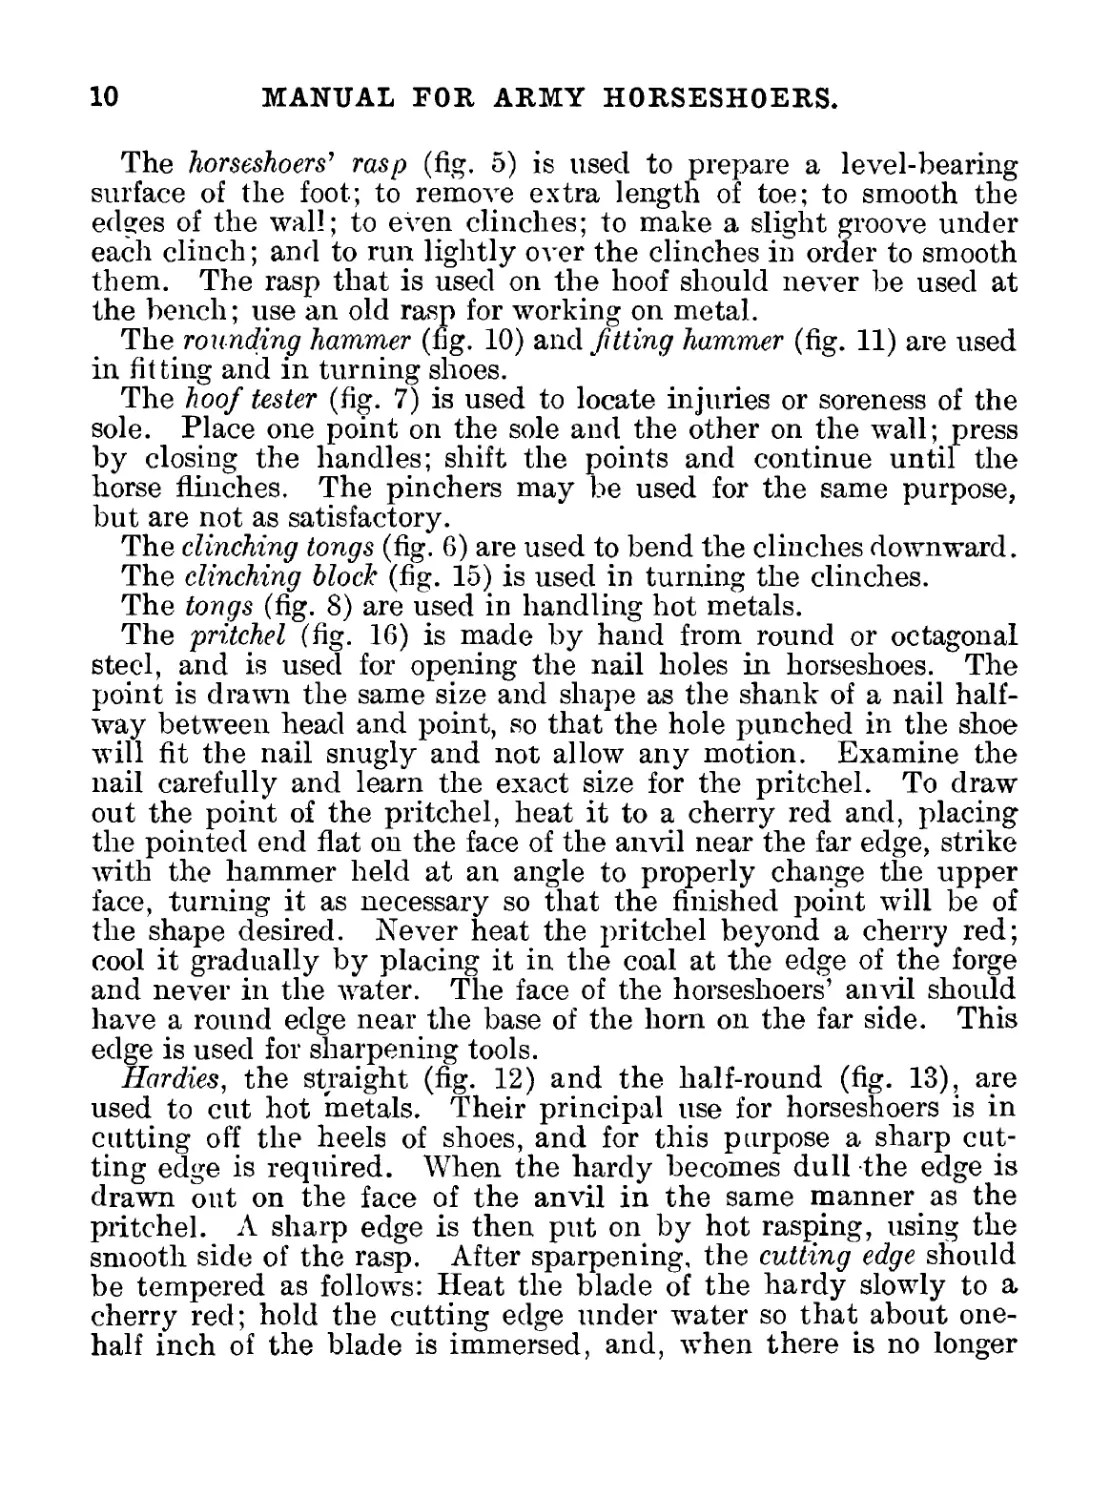
Interior of the Shoeing Shop.
Mounted Service School.
I
MANUAL FOR
ARMY HORSESHOERS
V
1917
PREPARED FOR THE USE OF STUDENTS OF
THE MOUNTED SERVICE SCHOOL
FORT RILEY, KANS.
WASHINGTON
GOVERNMENT PRINTING OFFICE
1917
WAR DEPARTMENT.
Document No. 683.
OFFICE OF THE ADJUTANT GENERAL.
WAR DEPARTMENT,
Washington, October 26, 1917.
The Manual for Army Horseshoers, 1917, prepared at the Mounted
Service School, Fort Riley, Kans., for the use of students of the
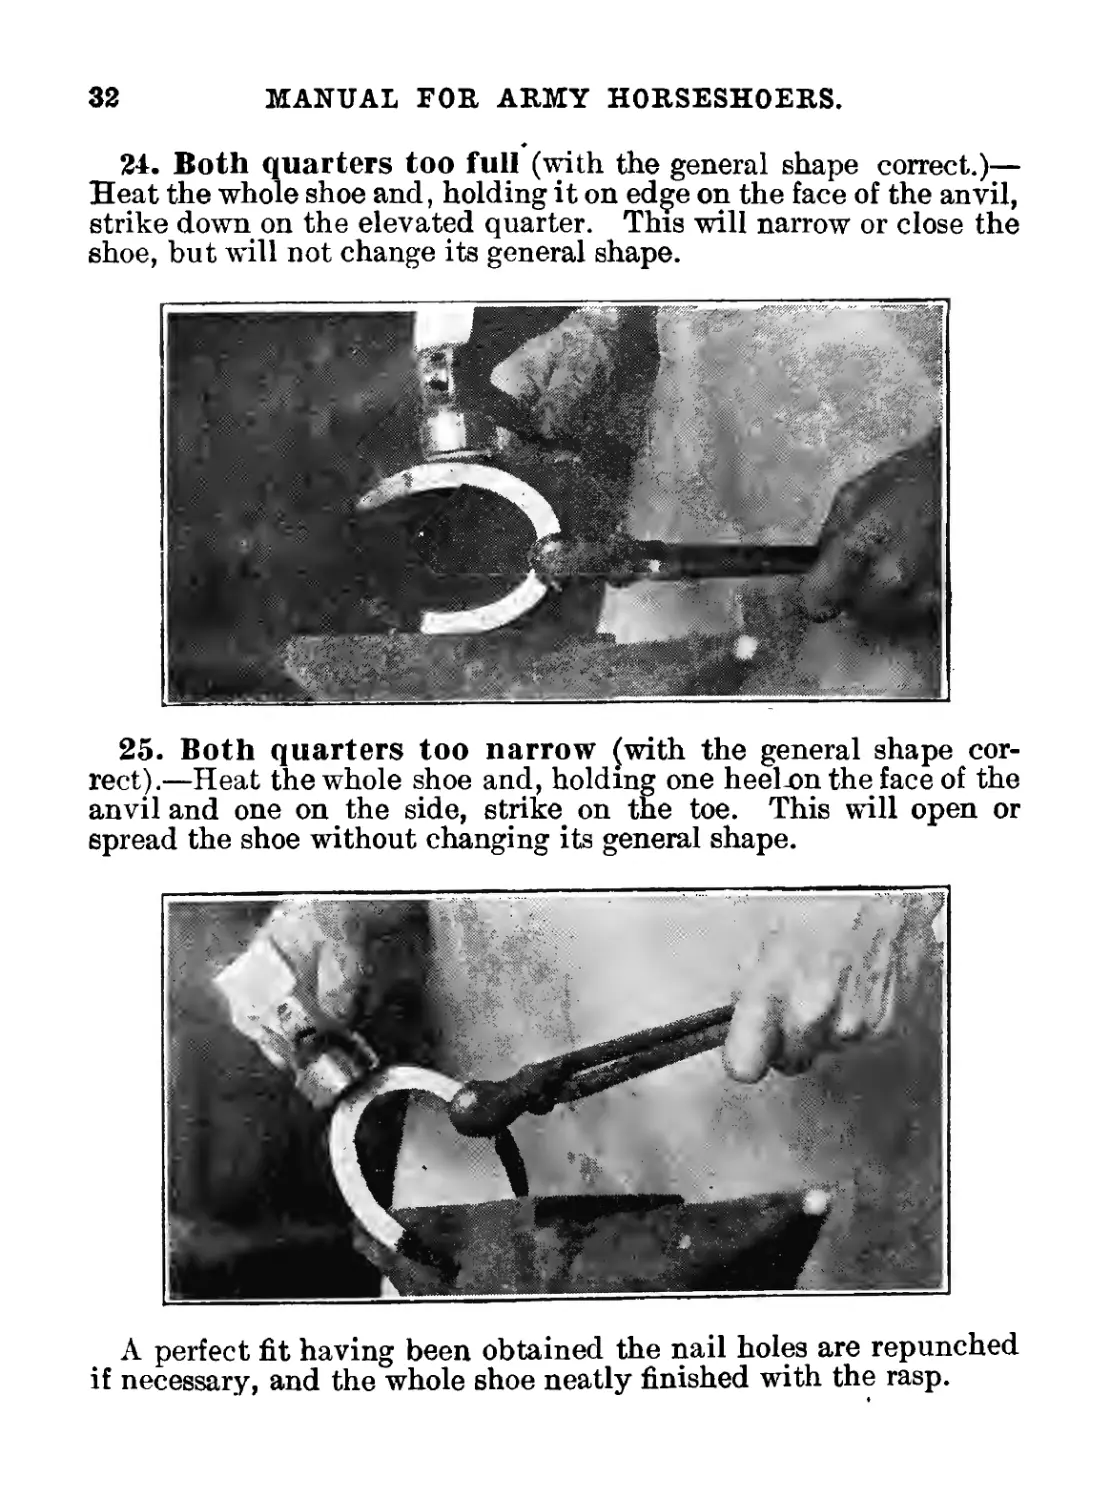
Department of Hippology, as well as for the Army at large and the
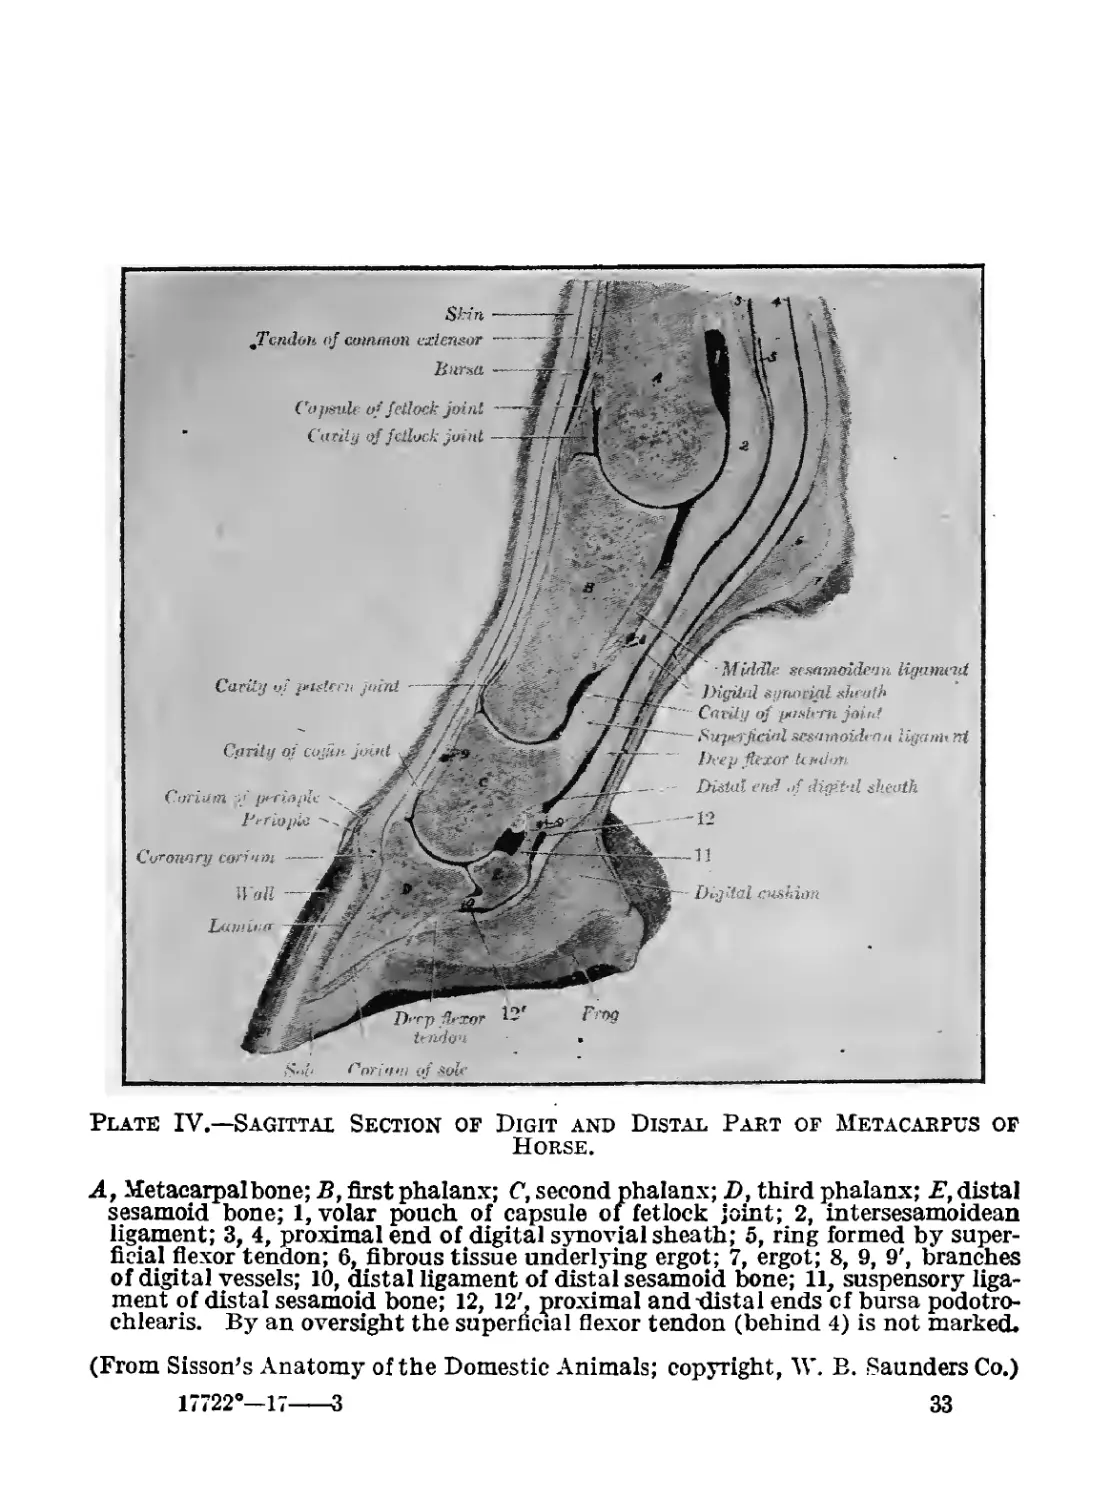
National Guard, is published for the information and guidance of
all concerned.
[461.1, A. G. O.]
By order of the Secretary of War:
TASKER II. BLISS,
General, Chief of Staff.
Official:
H. P. McCAIN,
The Adjutant General.
3
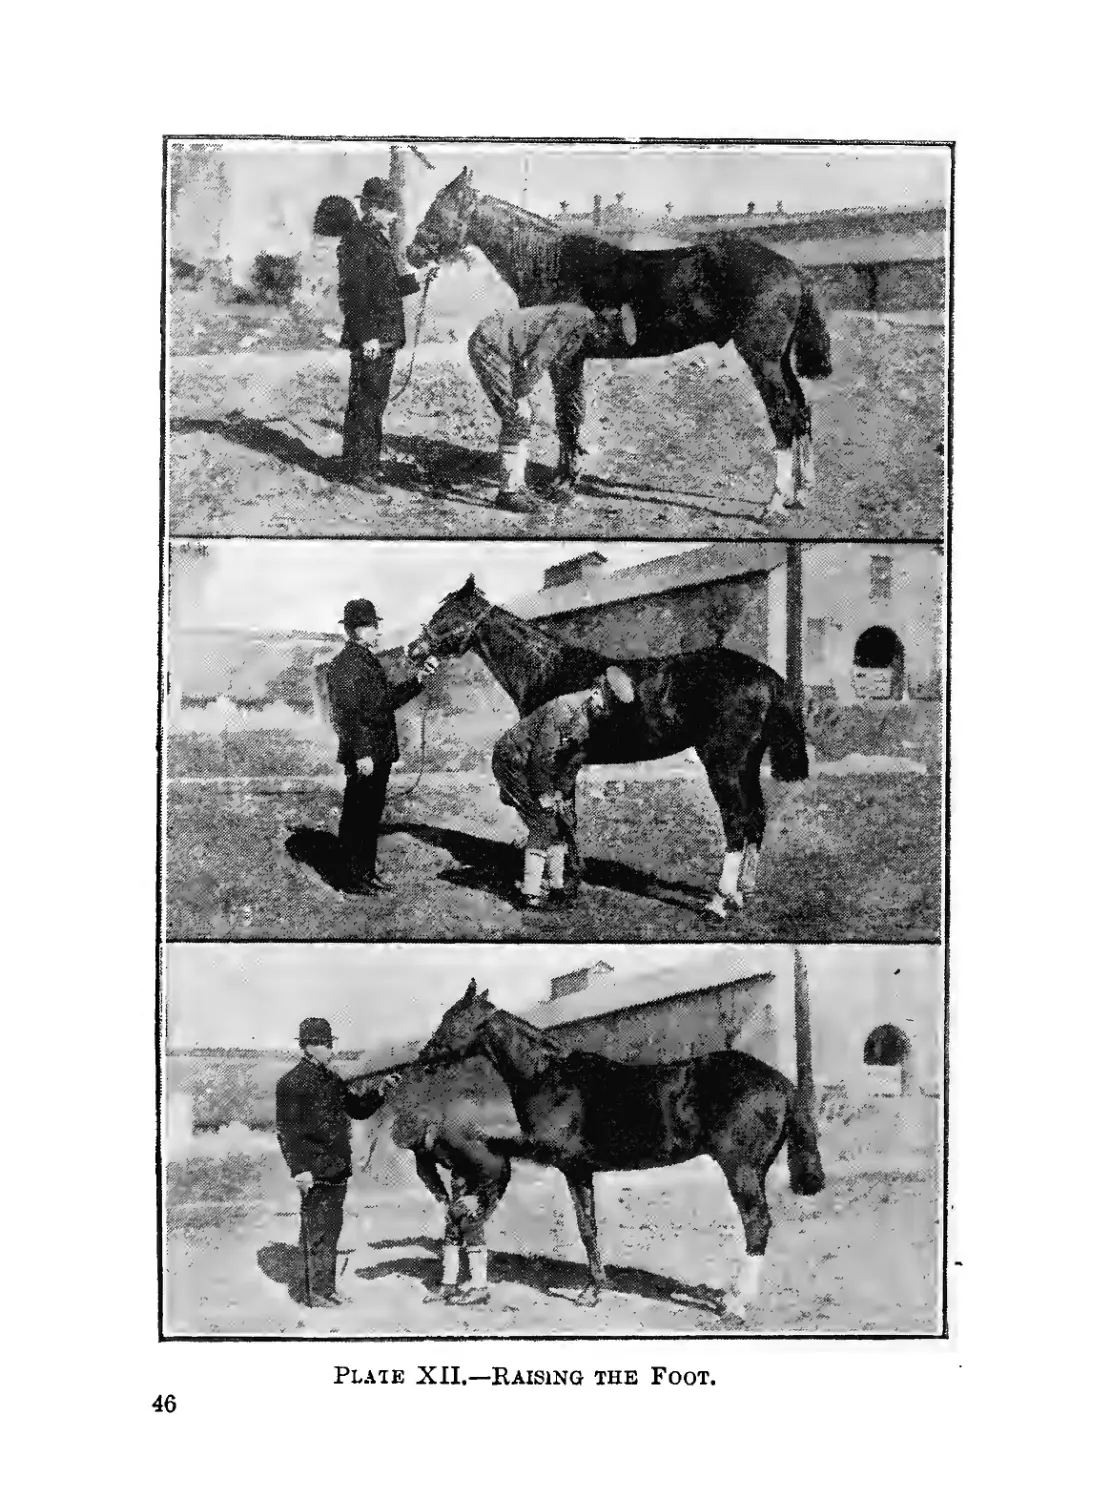
ILLUSTRATIONS.
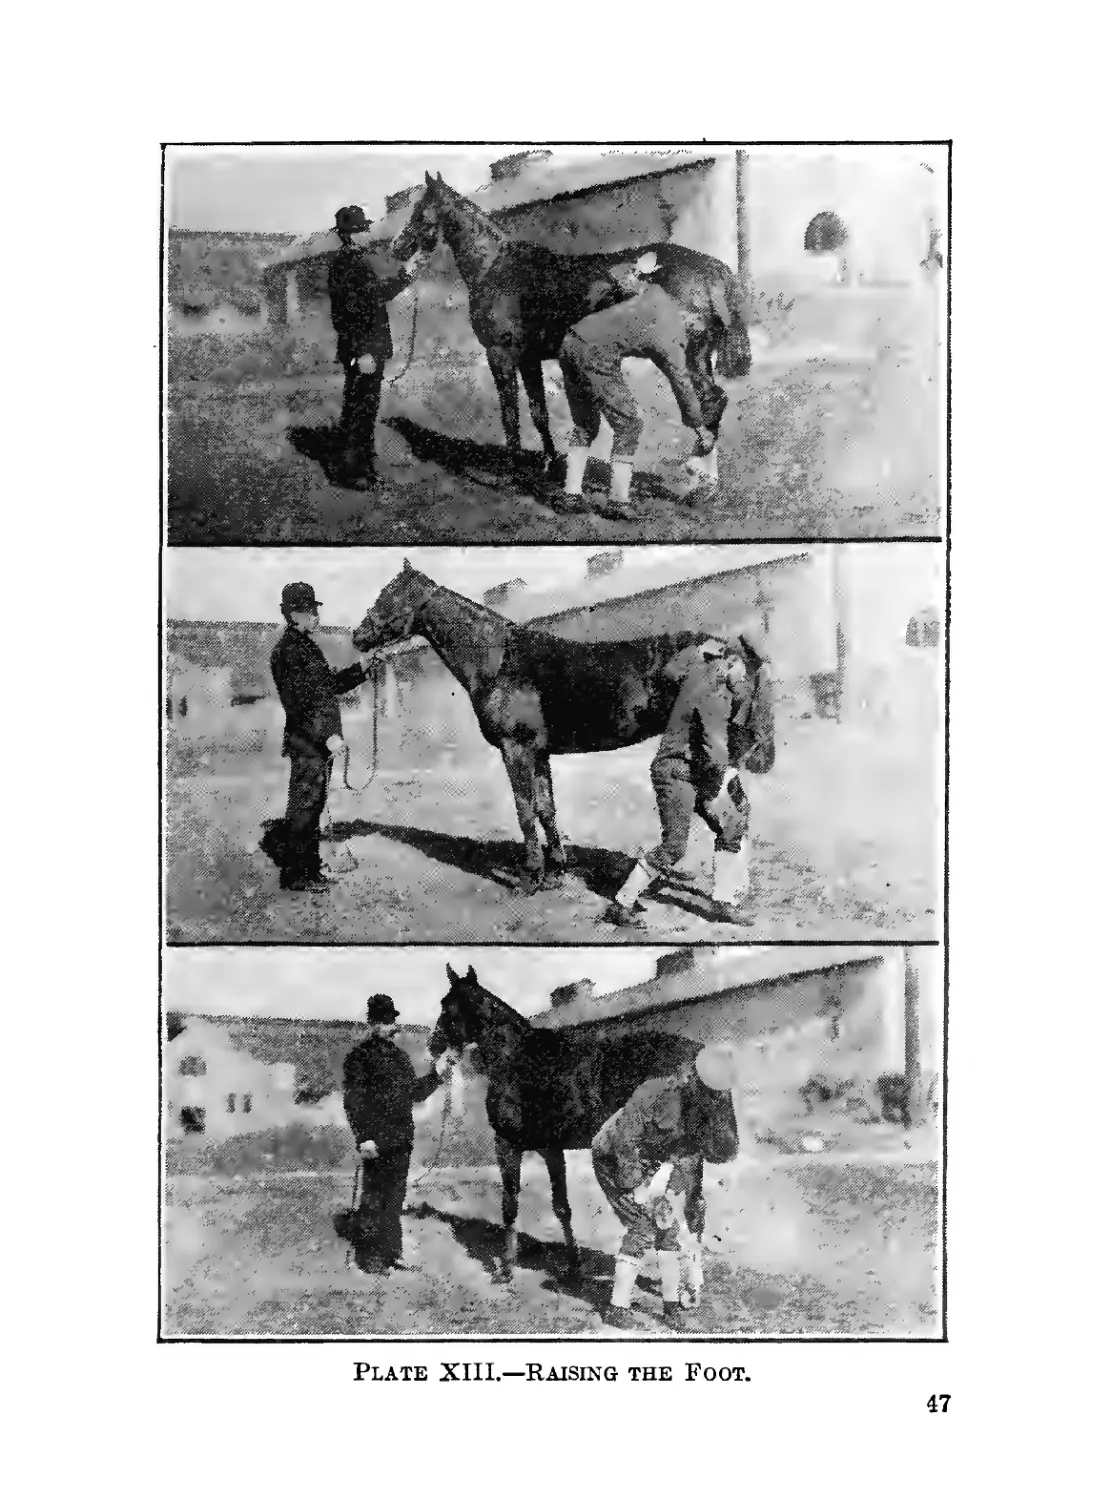
Page.
Interior of the shoeing shop, Mounted Service School. Frontispiece.
Plate I.—Tools......................................... 11
II .—Anvil and tool boxes....................... 13
III .—Section of forge......................... . 14
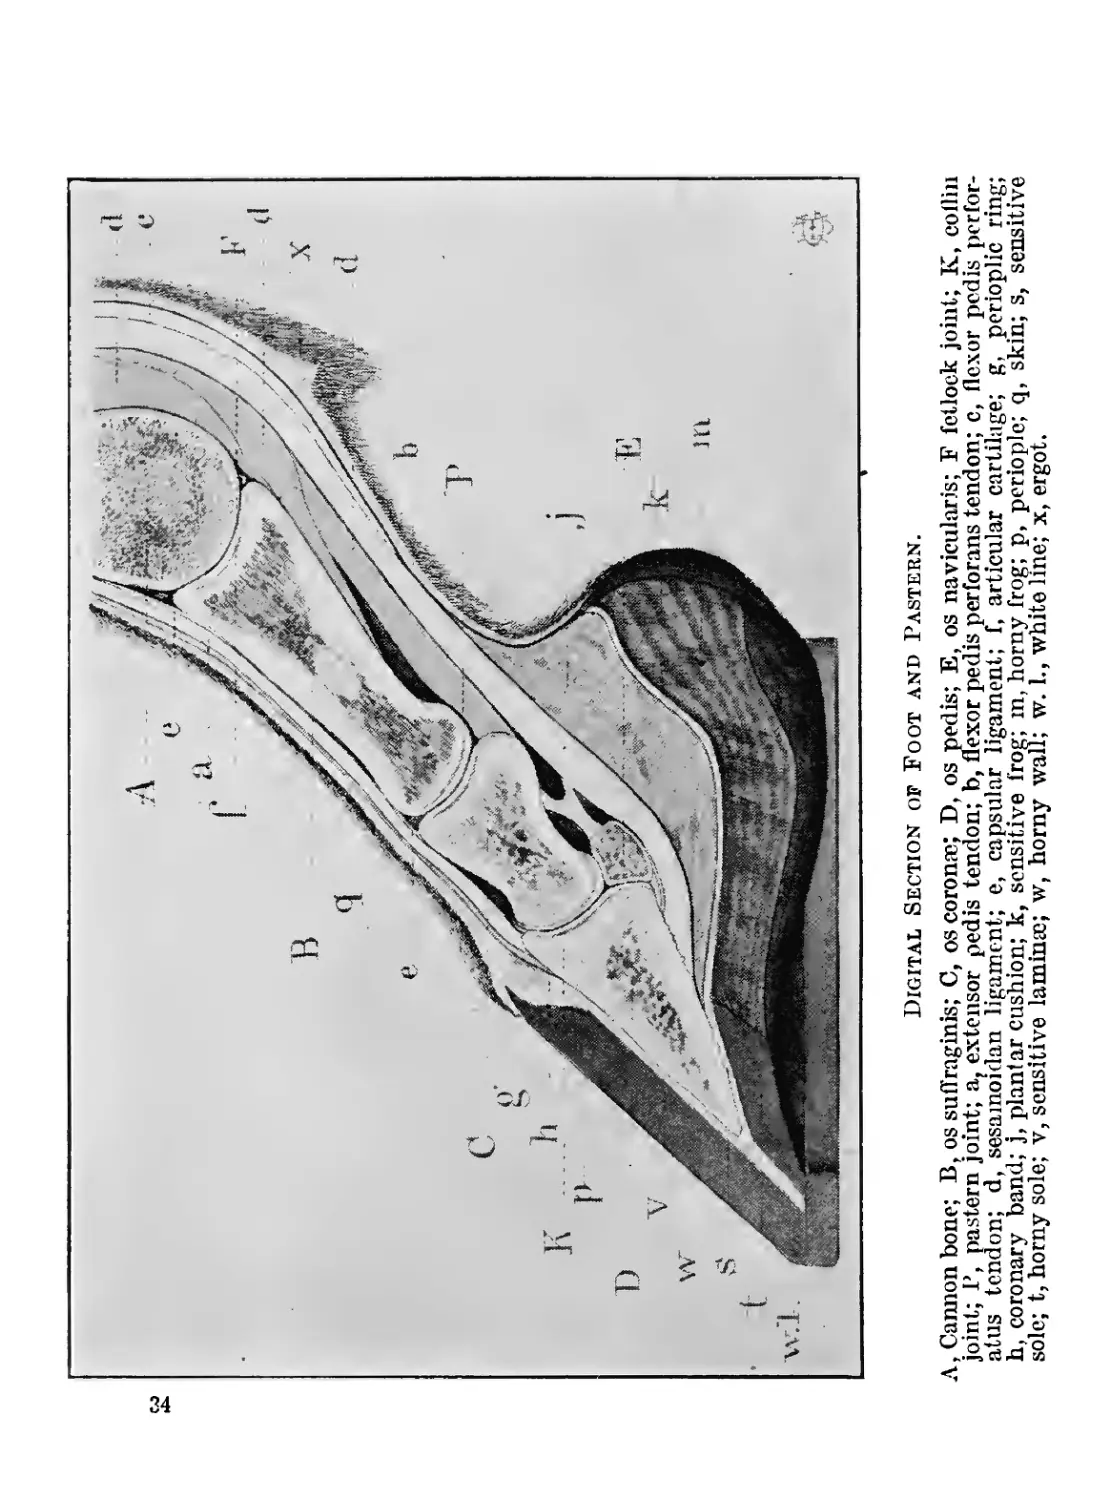
IV .—Sagittal section of digit and distal part of meta-
carpus of horse..................................... 33
V .—Skeleton of digit and distal part of metacarpus of
horse; lateral view................................. 36
VI .—Third phalanx of horse; lateral view.......... 37
VII .—Lateral view of foot of horse after removal of hoof
and part of skin................................... 38
VIII .—Ground surface of foot of horse after removal of
half of hoof to show corium........................... 39
IX .—Digit of horse, showing, surface relations of bones
and joints. The cartilage is largely exposed... 40
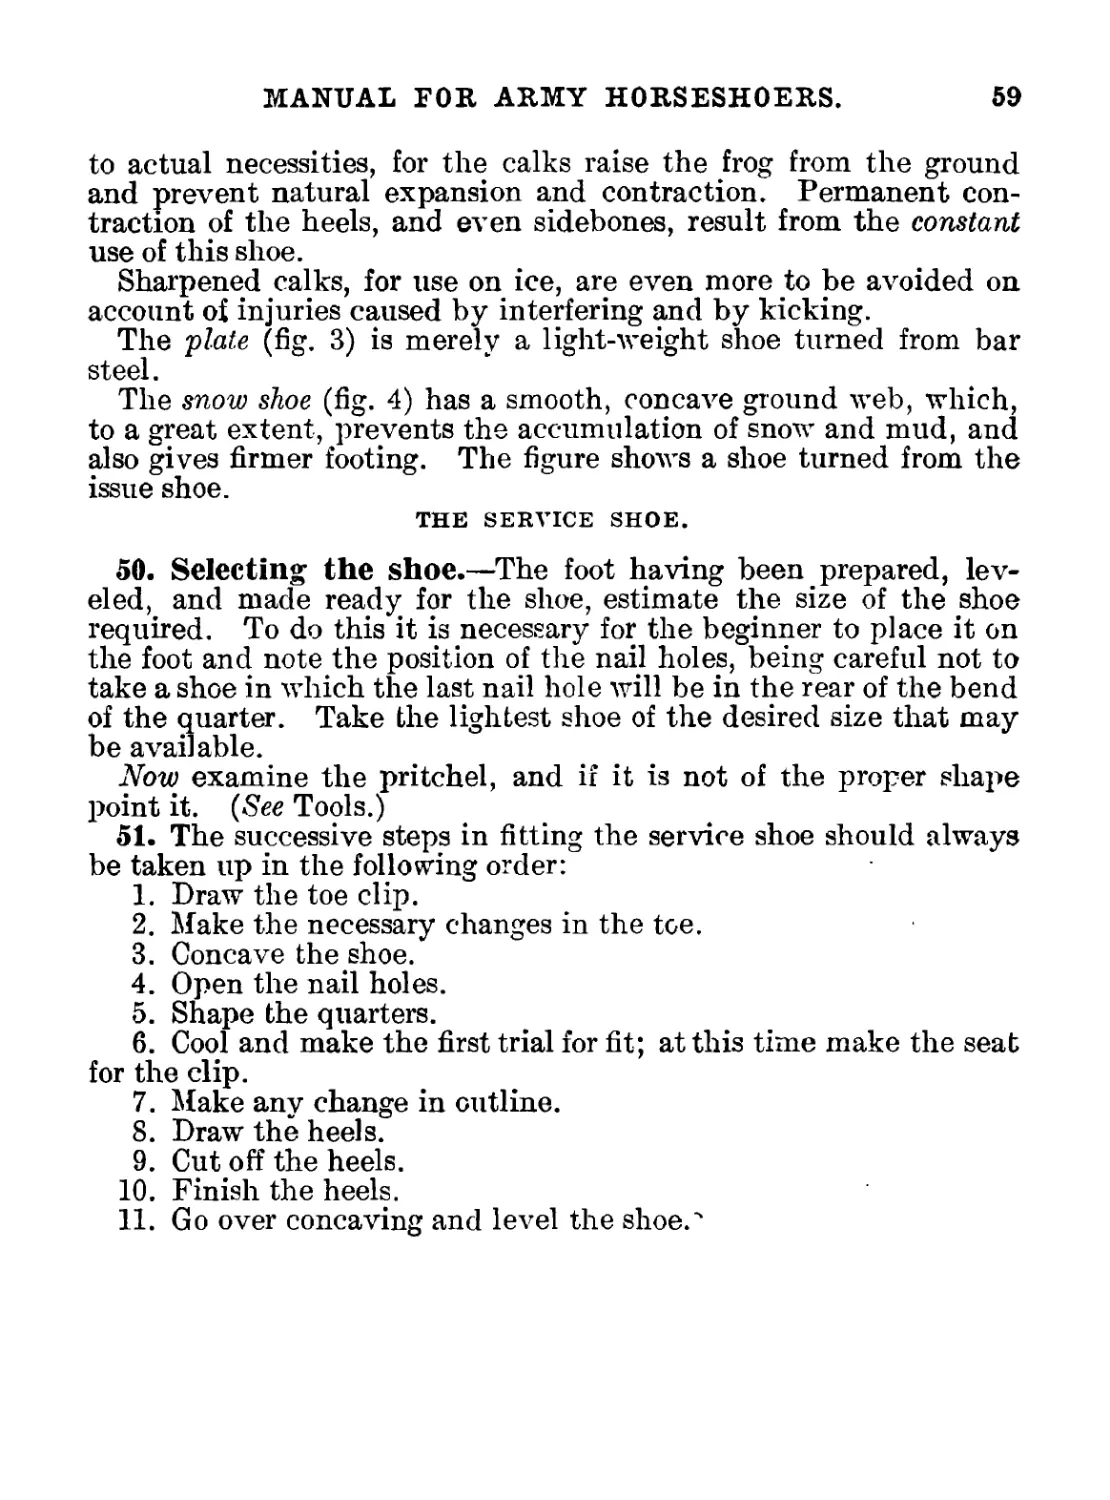
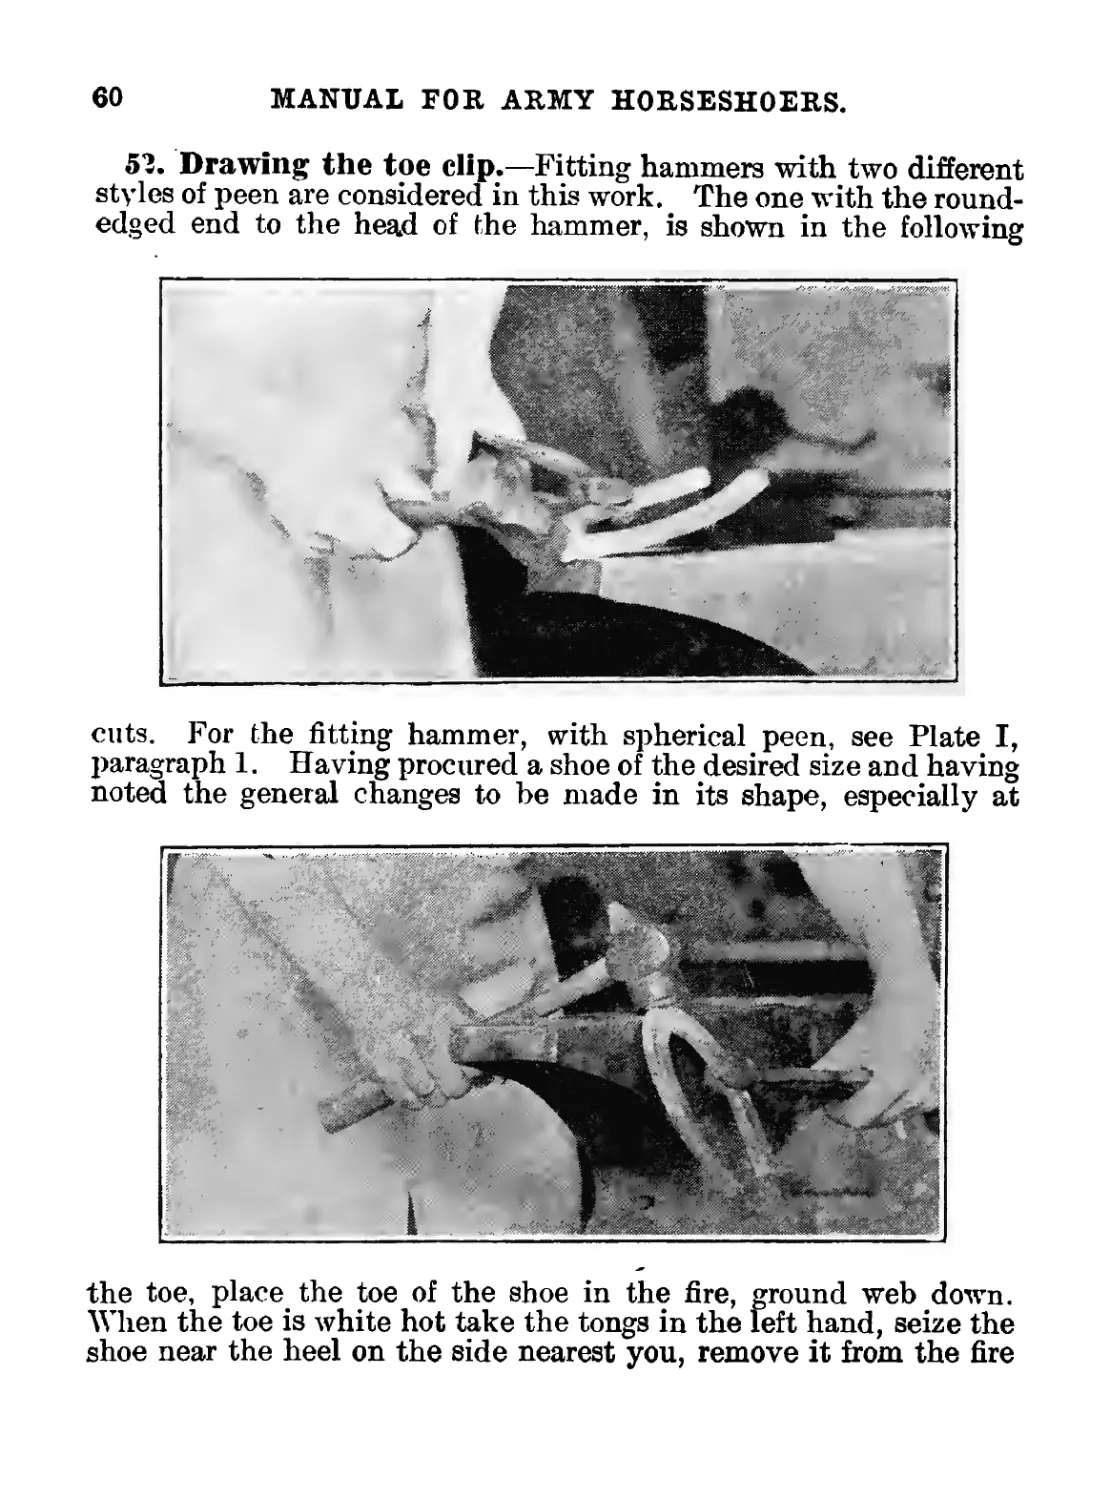
X .—Kight fore hoof of horse; ground surface..... 43
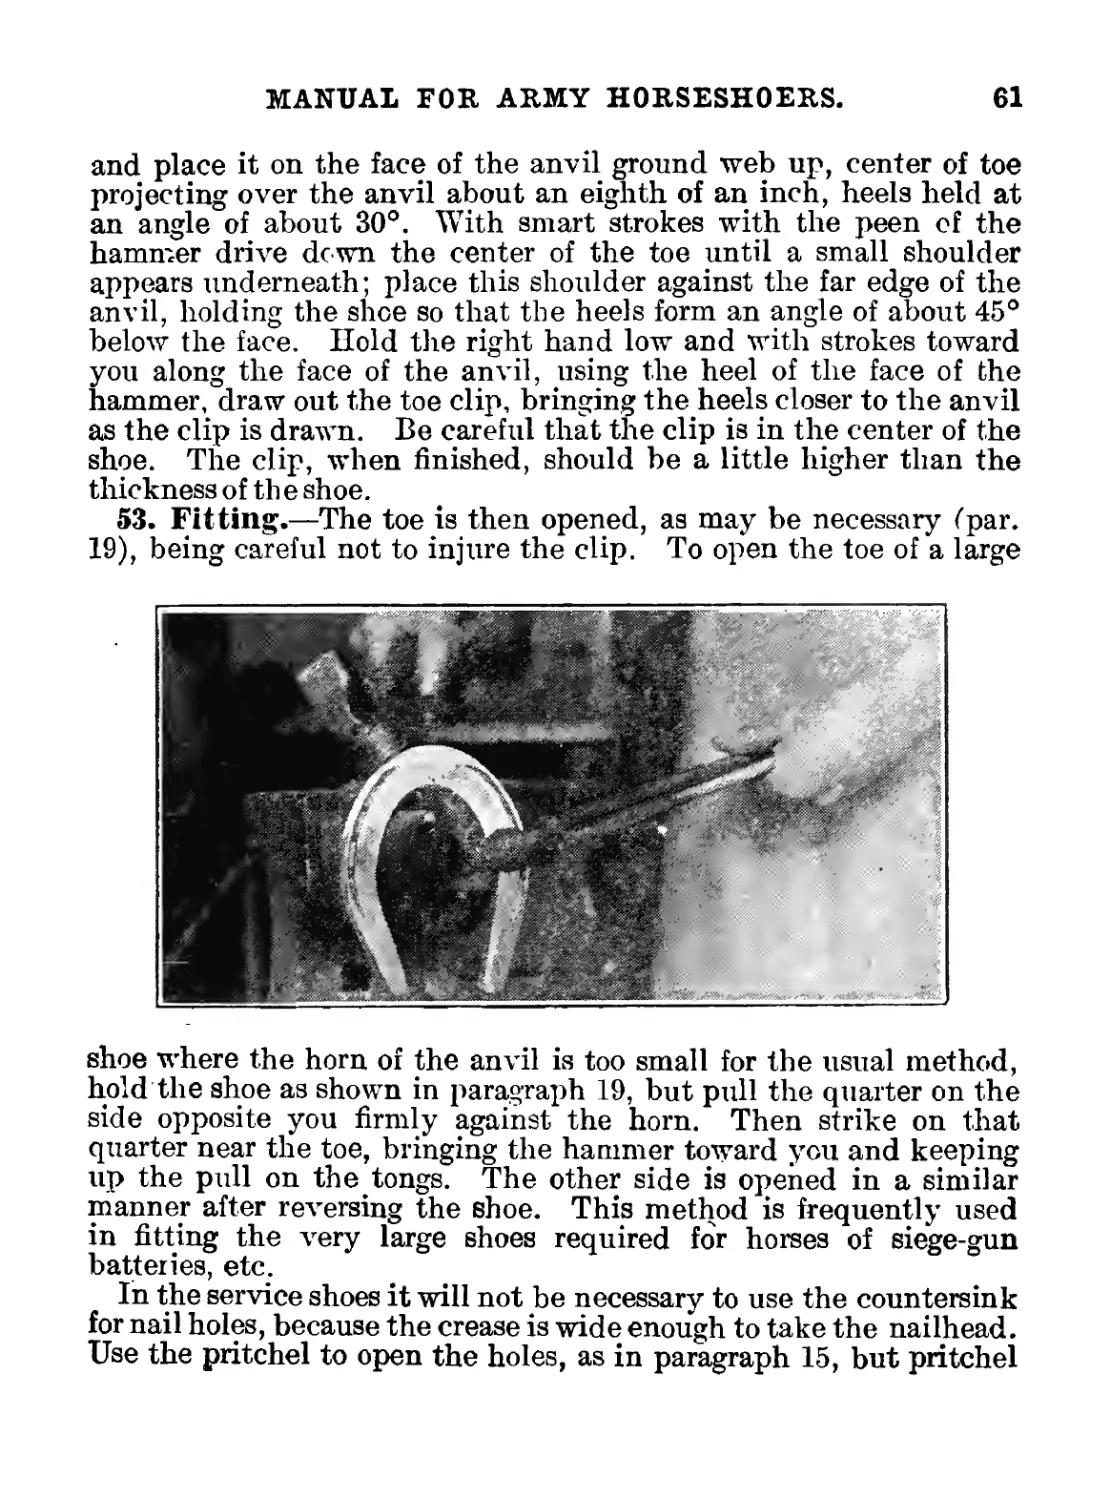
XI .—Foot of the horse............................. 34
XII .— (Raising the foot. Three positions for foot (third
XIII .— I raised for clinching)....................46,47
XIV .—The foot axis and the pastern axis........... 49
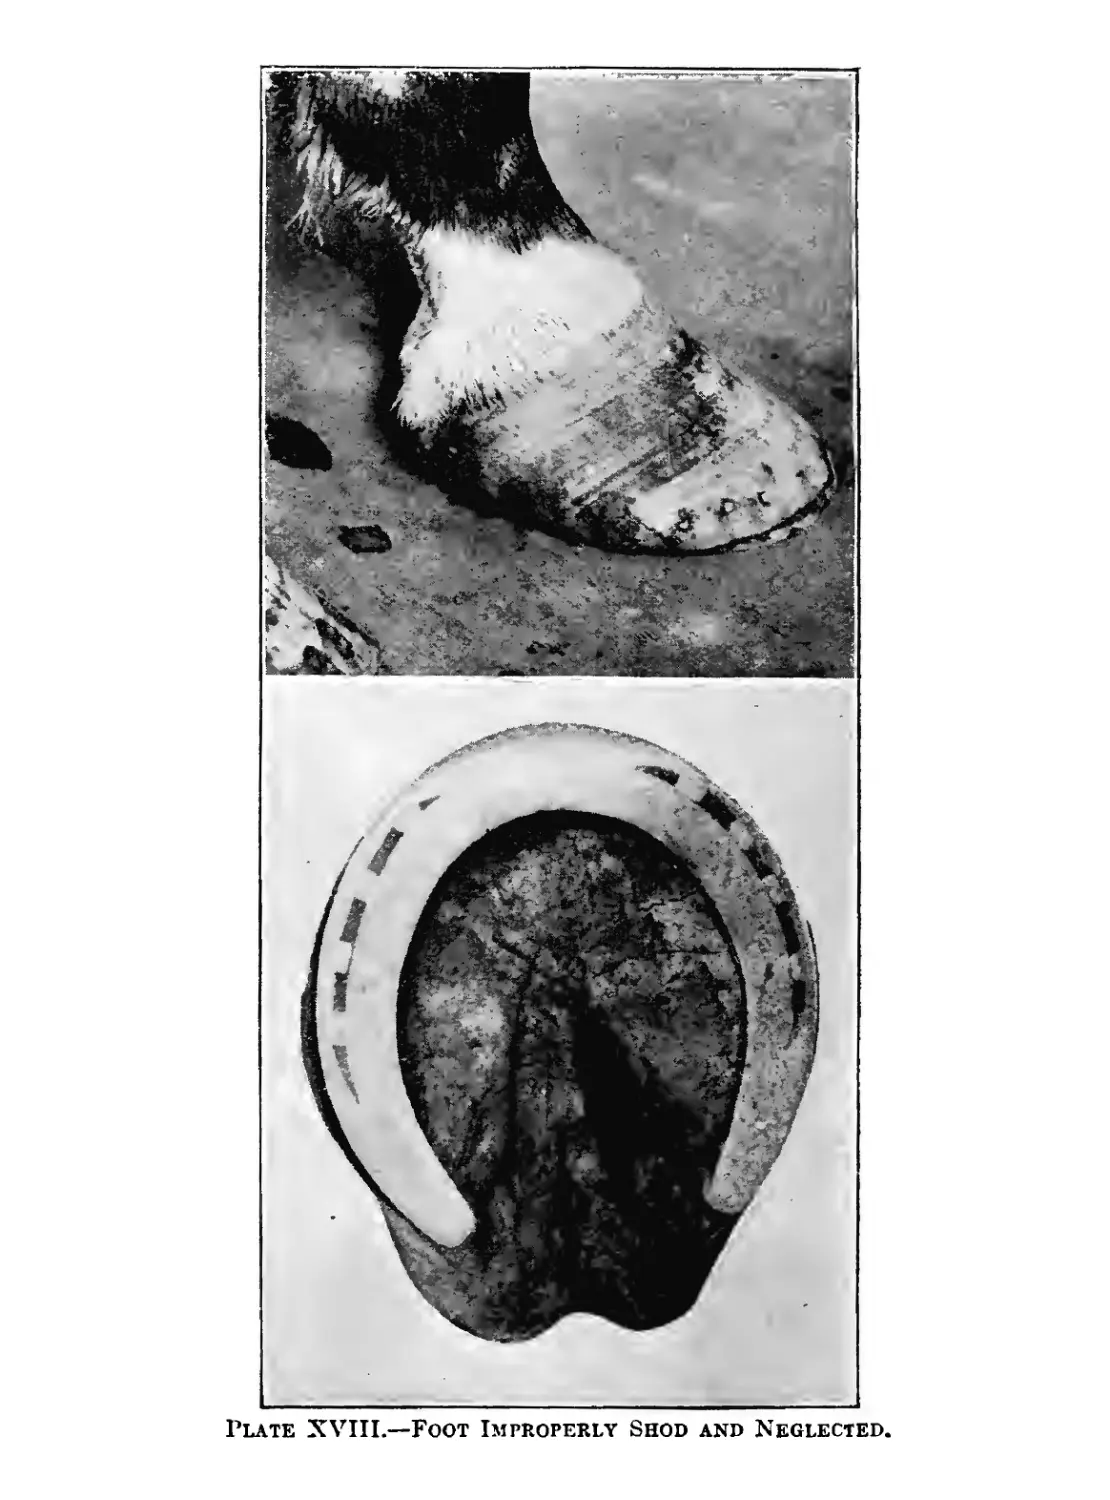
XV .—Level of the foot.......................... 54
XVI .—Preparation of the foot....................... 56
XVII .—Normal shoes............................... 58
XVIII .—Foot improperly shod and neglected............. 68
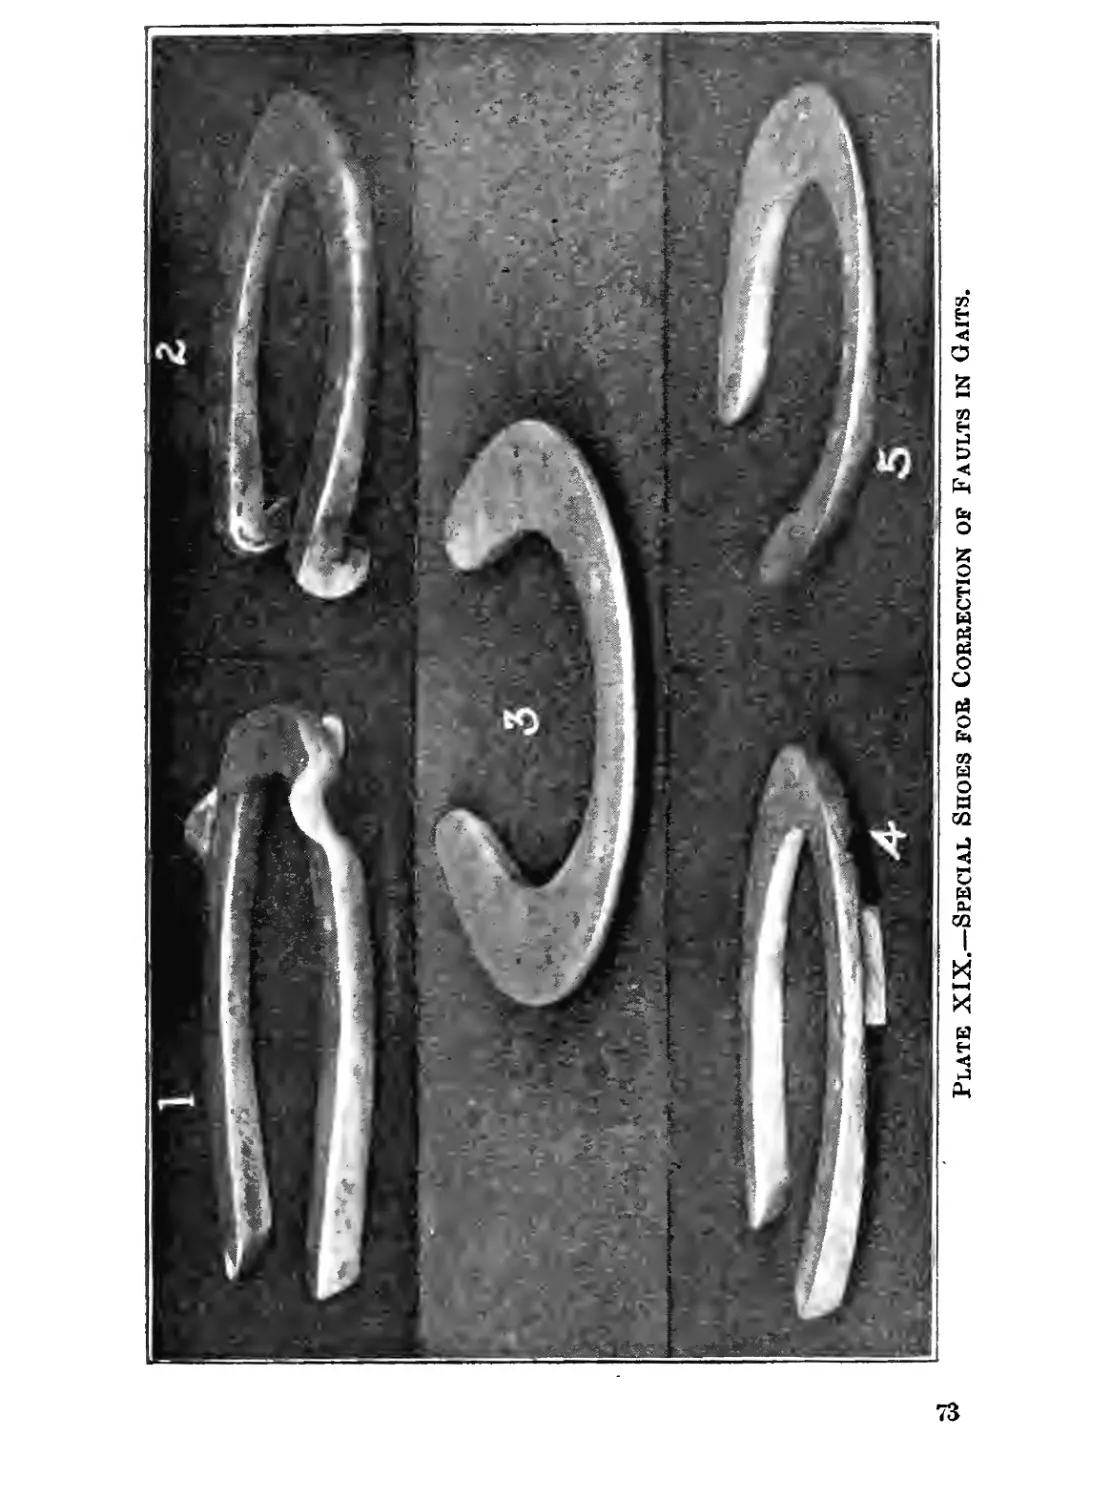
XIX .—Special shoes for correction of faults in gaits. 73
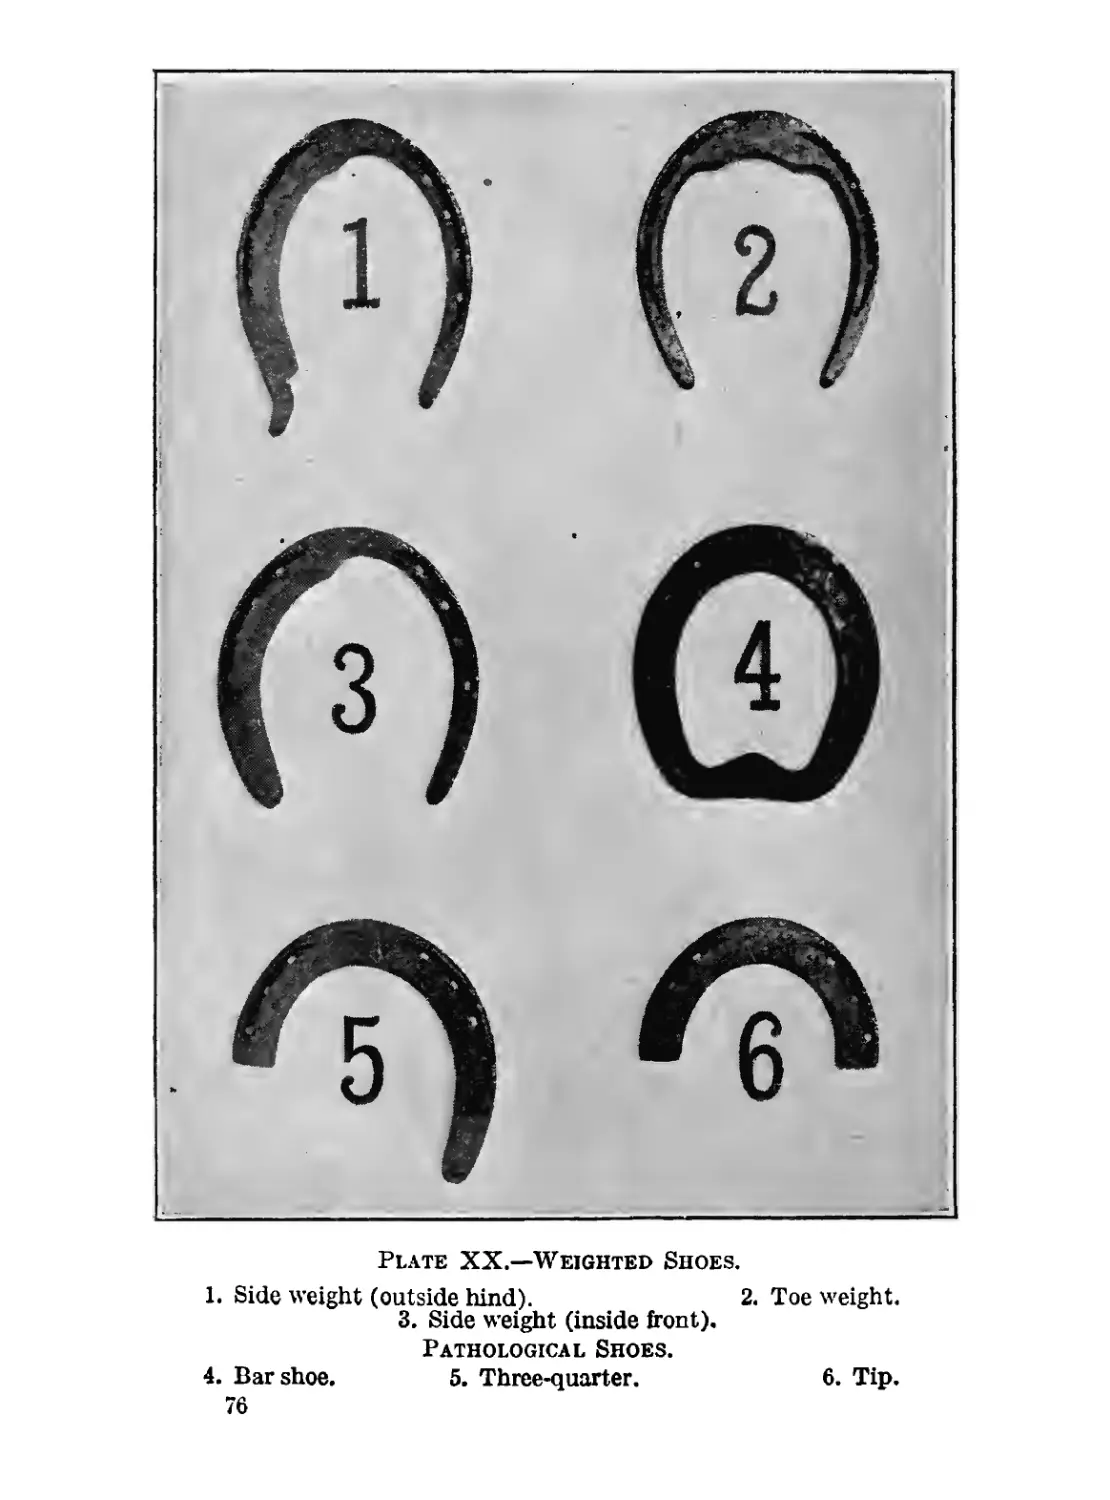
XX .—Weighted shoes................................ 76
Pathological shoes............................. 76
XXI .—Extension toe................................. 77
XXII .—Quarter crack (before and after treatment and
shoeing)............................................. 87
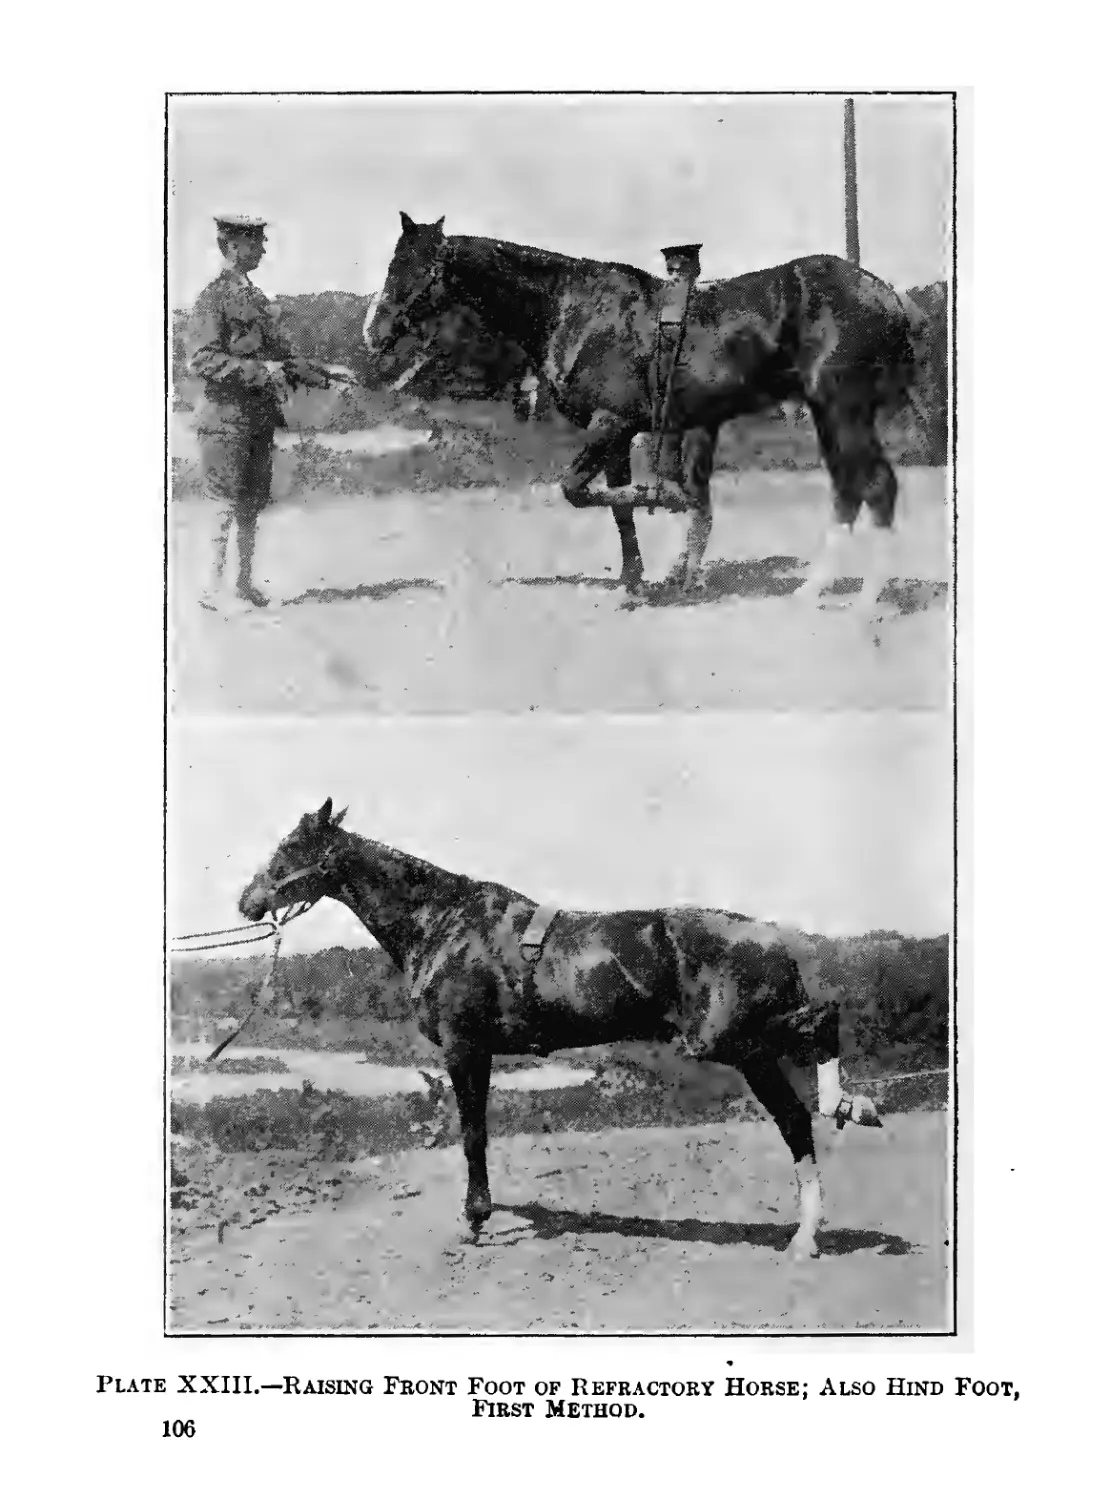
XXIII .—Raising front foot of refractory horse; also hind foot,
first method.......................................... 106
XXIV .—Horse in stocks................................ 108
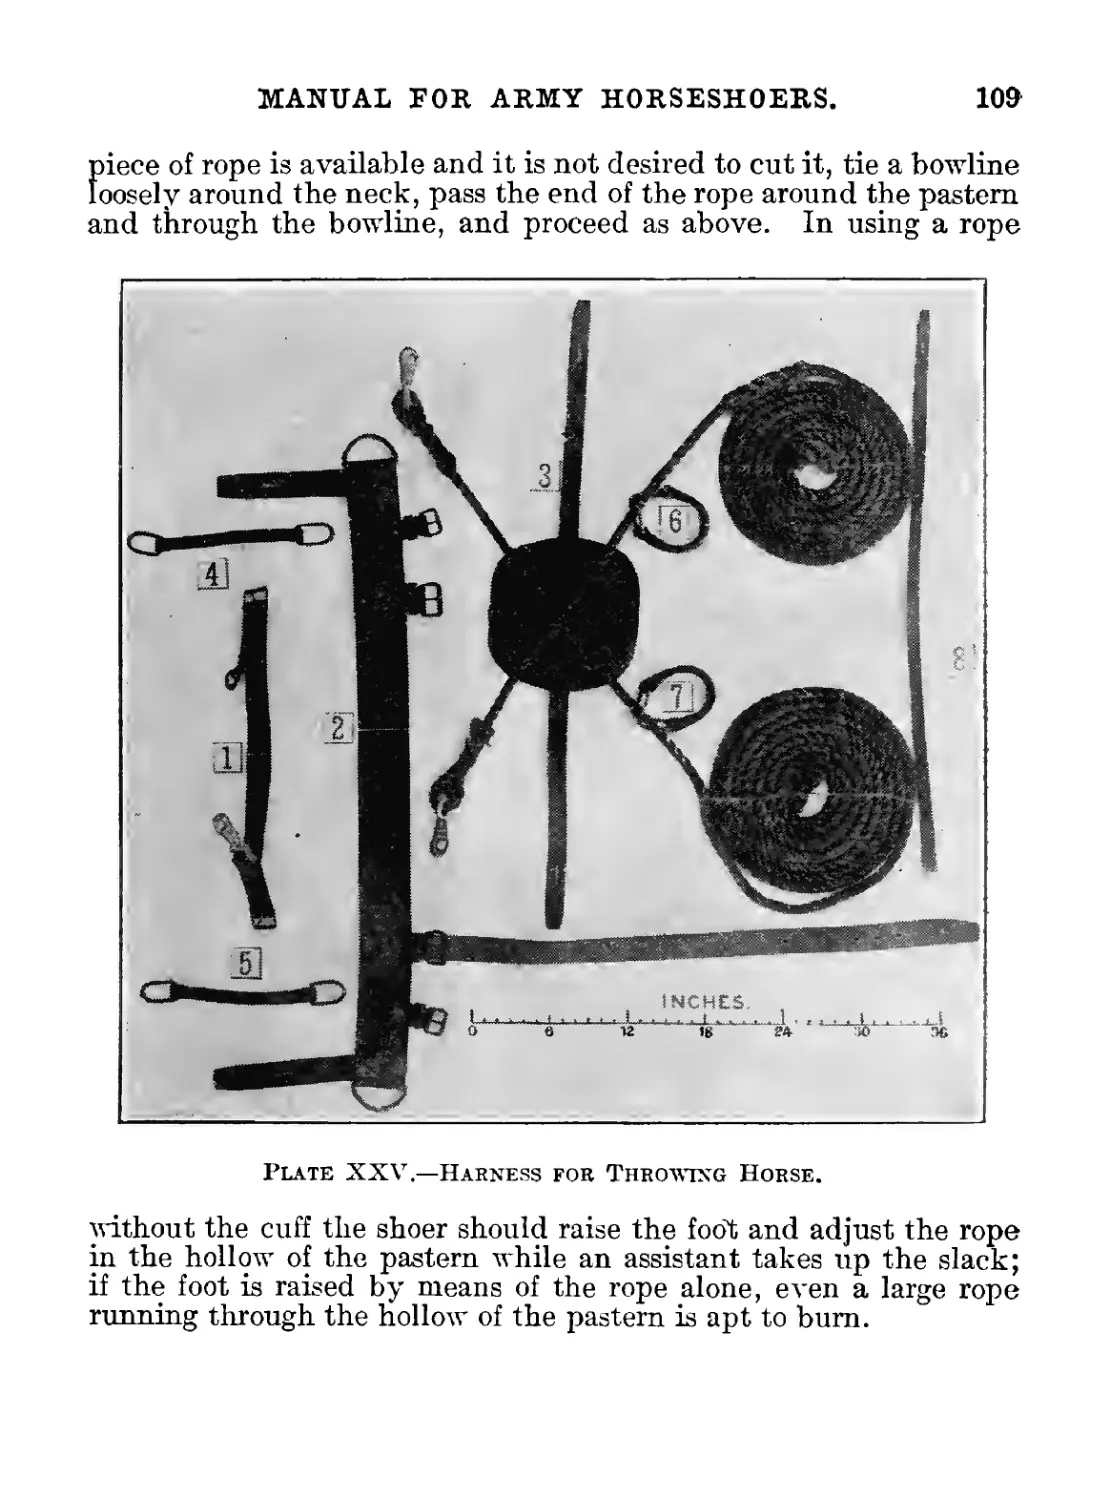
XXV .—Harness for throwing horse.................. 109
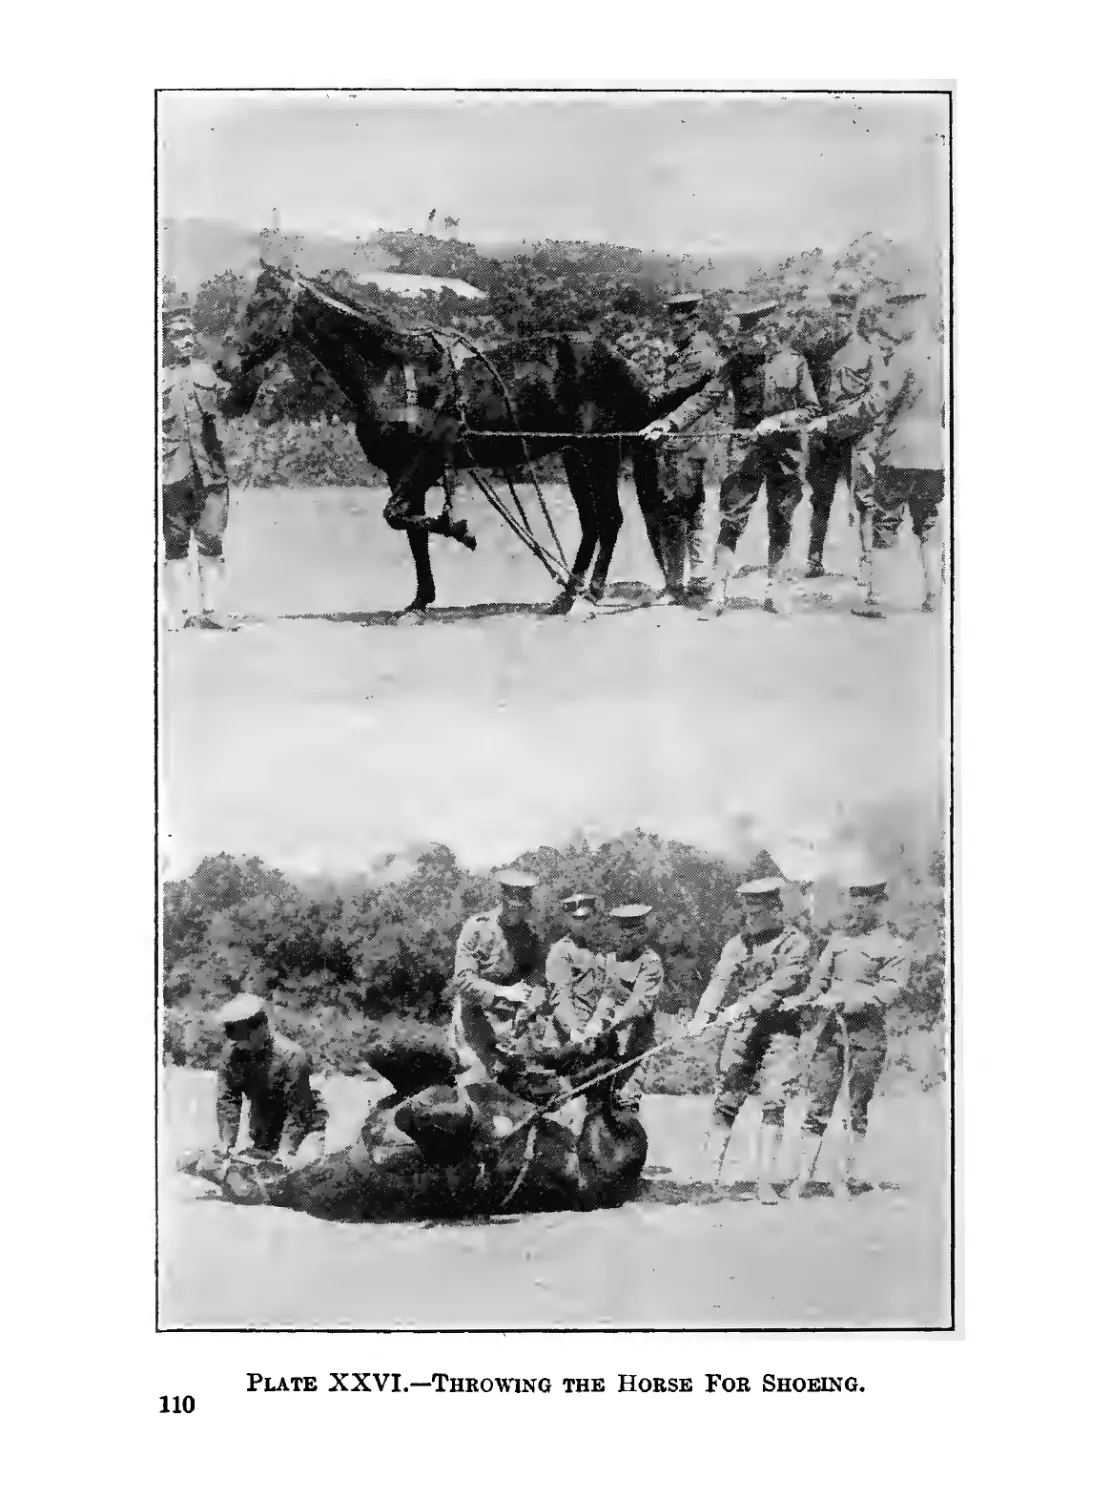
XXVI .—Throwing the horse for shoeing. ............... 110
5
CONTENTS.
Paragraphs.
Chapter I.—Horseshoers’ tools and their uses—The forge... 1-4
II .—The fire—Heats............................ 5-7
III .—Working and shaping iron—The plate shoe.... 8-25
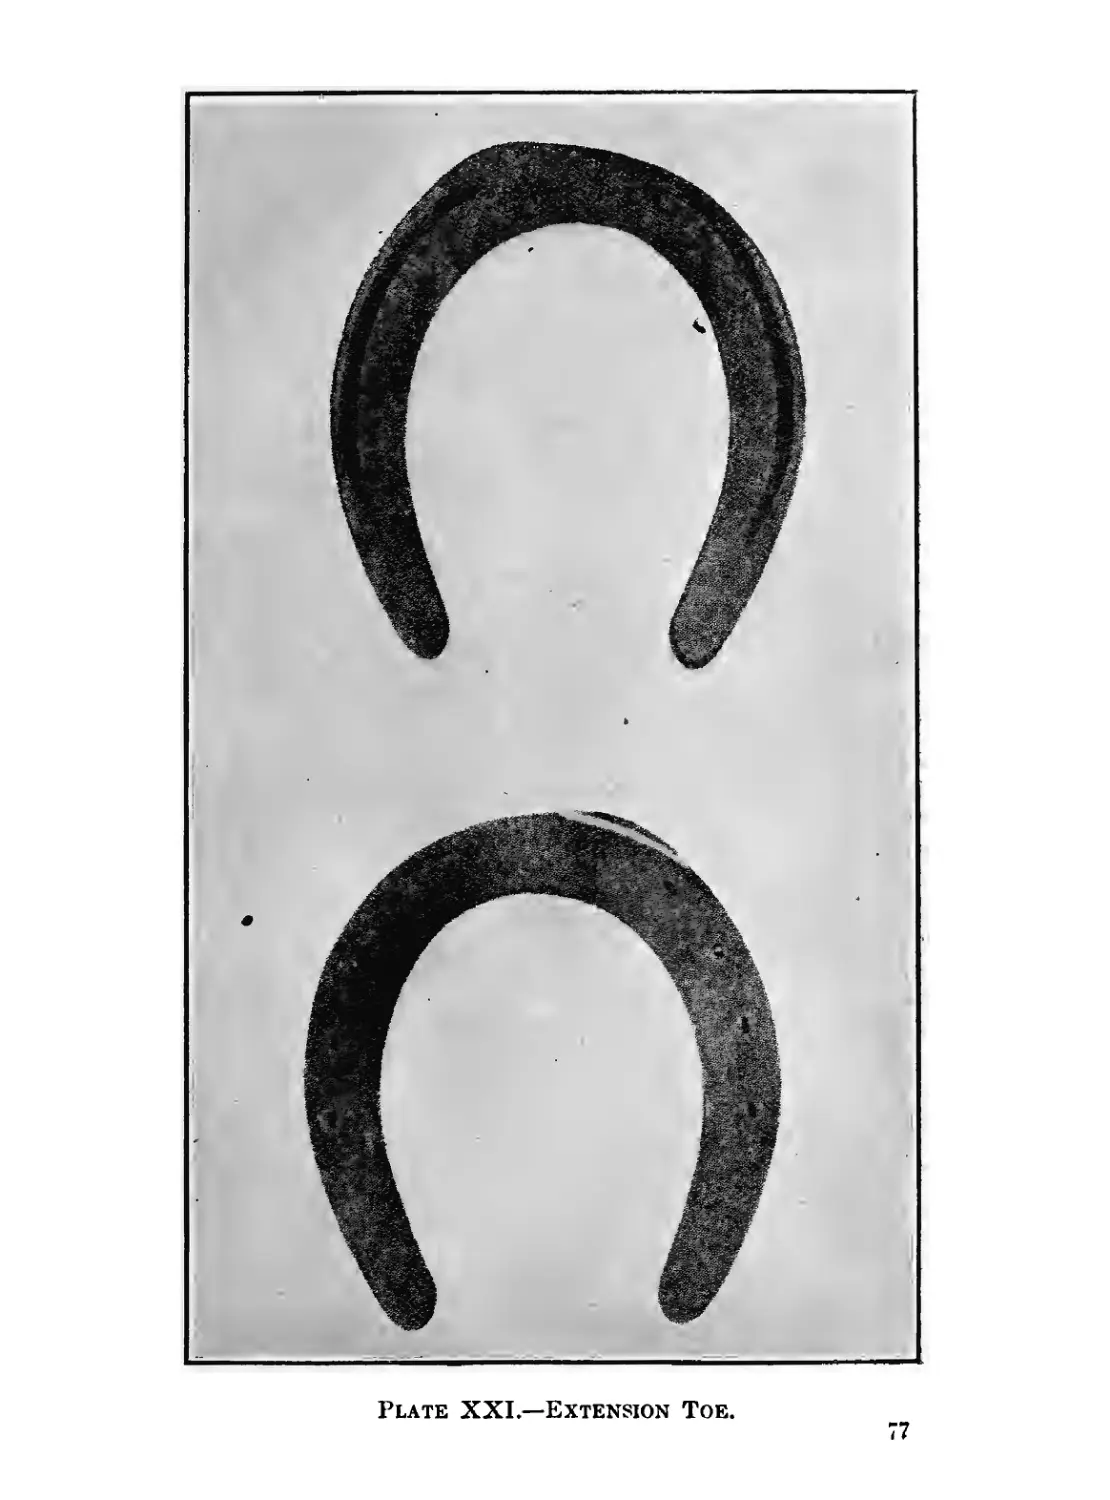
IV .—Anatomy and physiology of the horse’s foot.... 26-34
V .—Normal shoeing........................ 35-57
VI .—Gaits—Shoeing to confirm or alter same—Faults
in gaits—Shoeing to correct same—The mak-
ing of special shoes for gaits................. 58-75
VII .—Diseases—The making of pathological shoes... 76-106
VIII .—Shoeing refractory horses.............. 107-114
7
MANUAL FOR ARMY HORSESHOERS.
CHAPTER I.
HORSESHOERS’ TOOLS AND THEIR USES—THE FORGE.
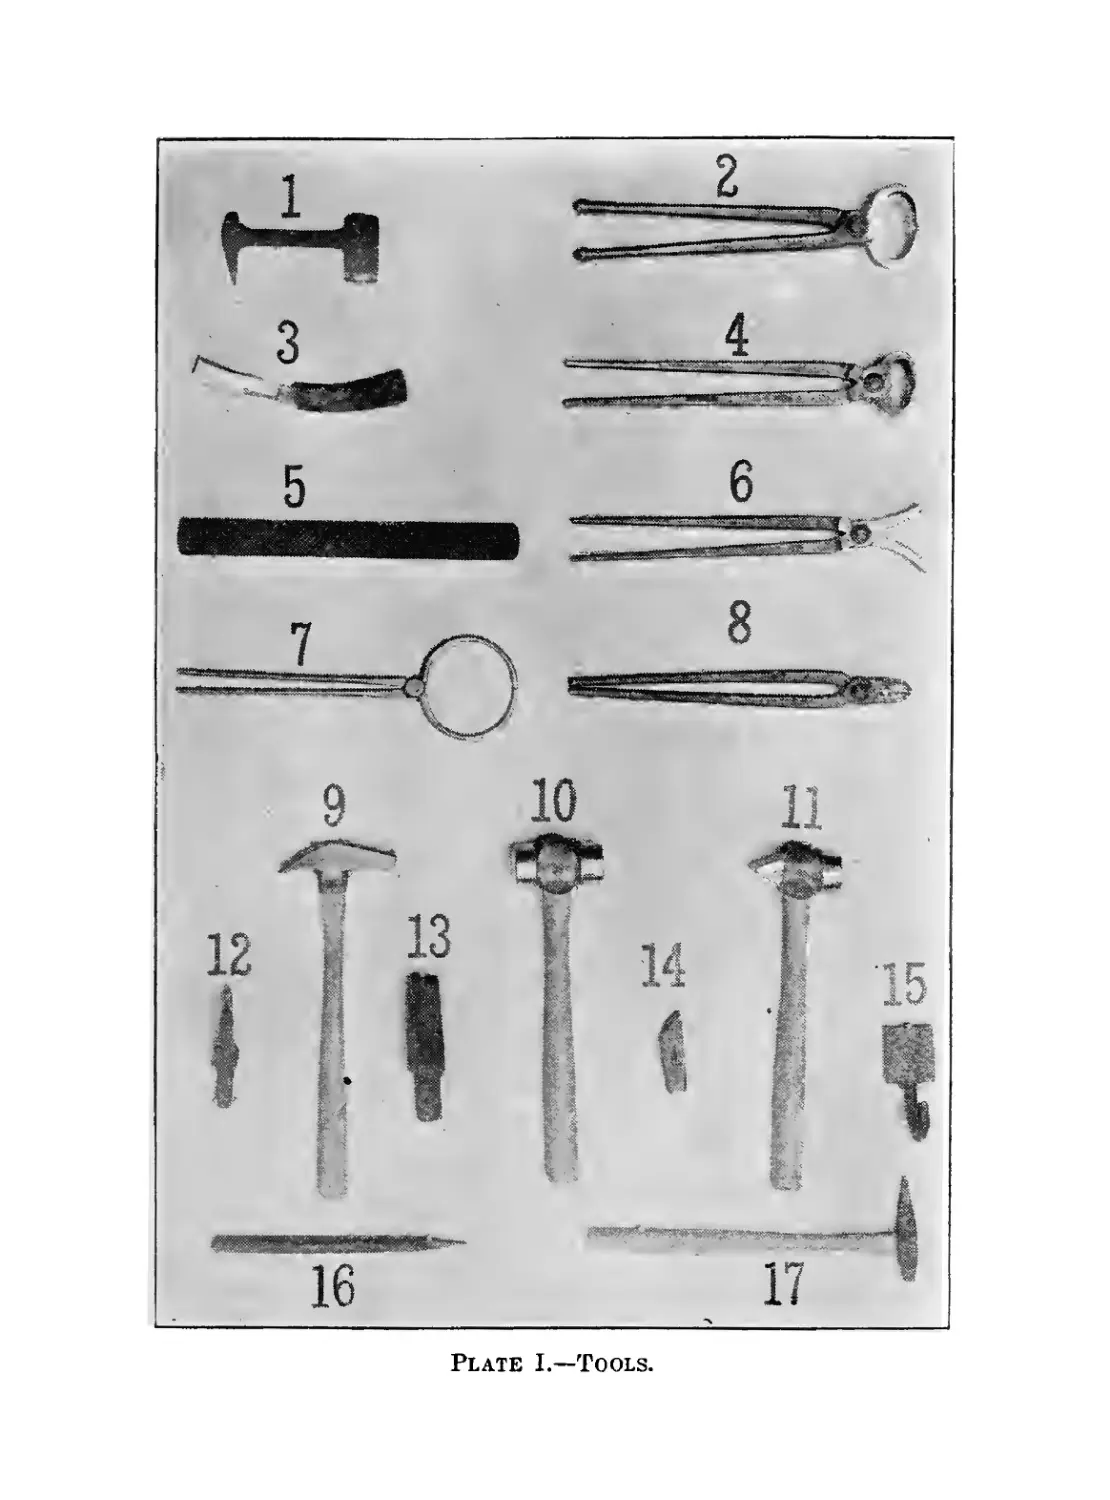
(Plate I.)
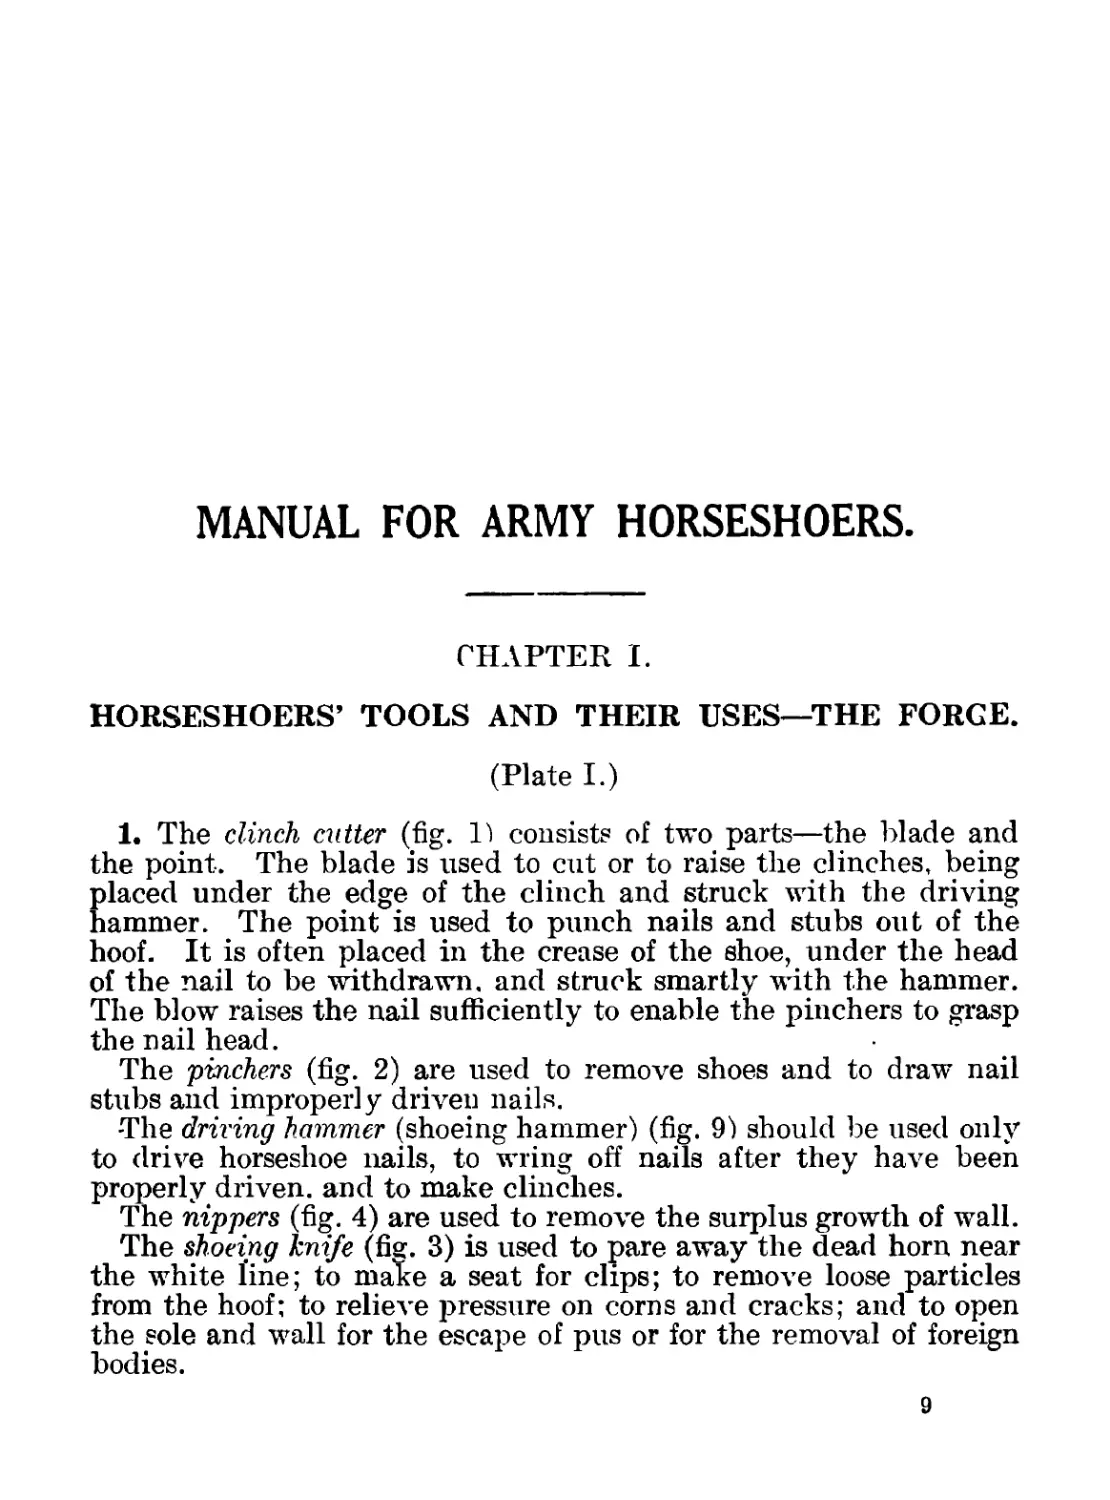
1. The clinch cutter (fig. I') consists of two parts—the blade and
the point. The blade is used to cut or to raise the clinches, being
placed under the edge of the clinch and struck with the driving
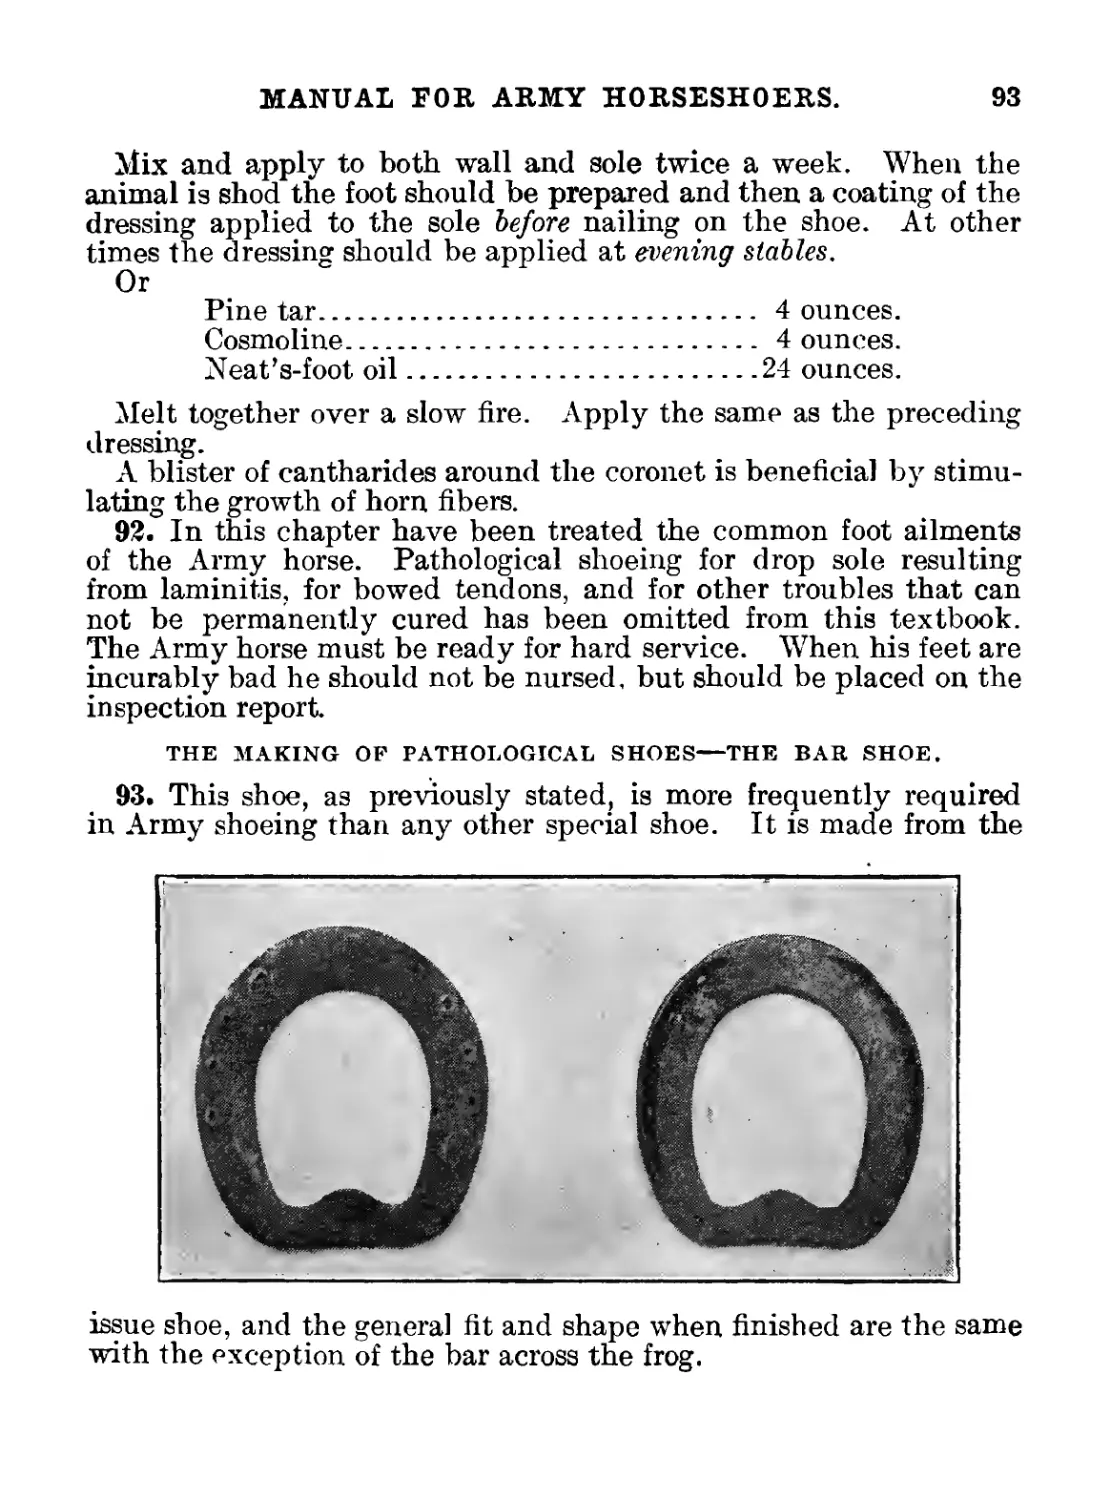
hammer. The point is used to punch nails and stubs out of the
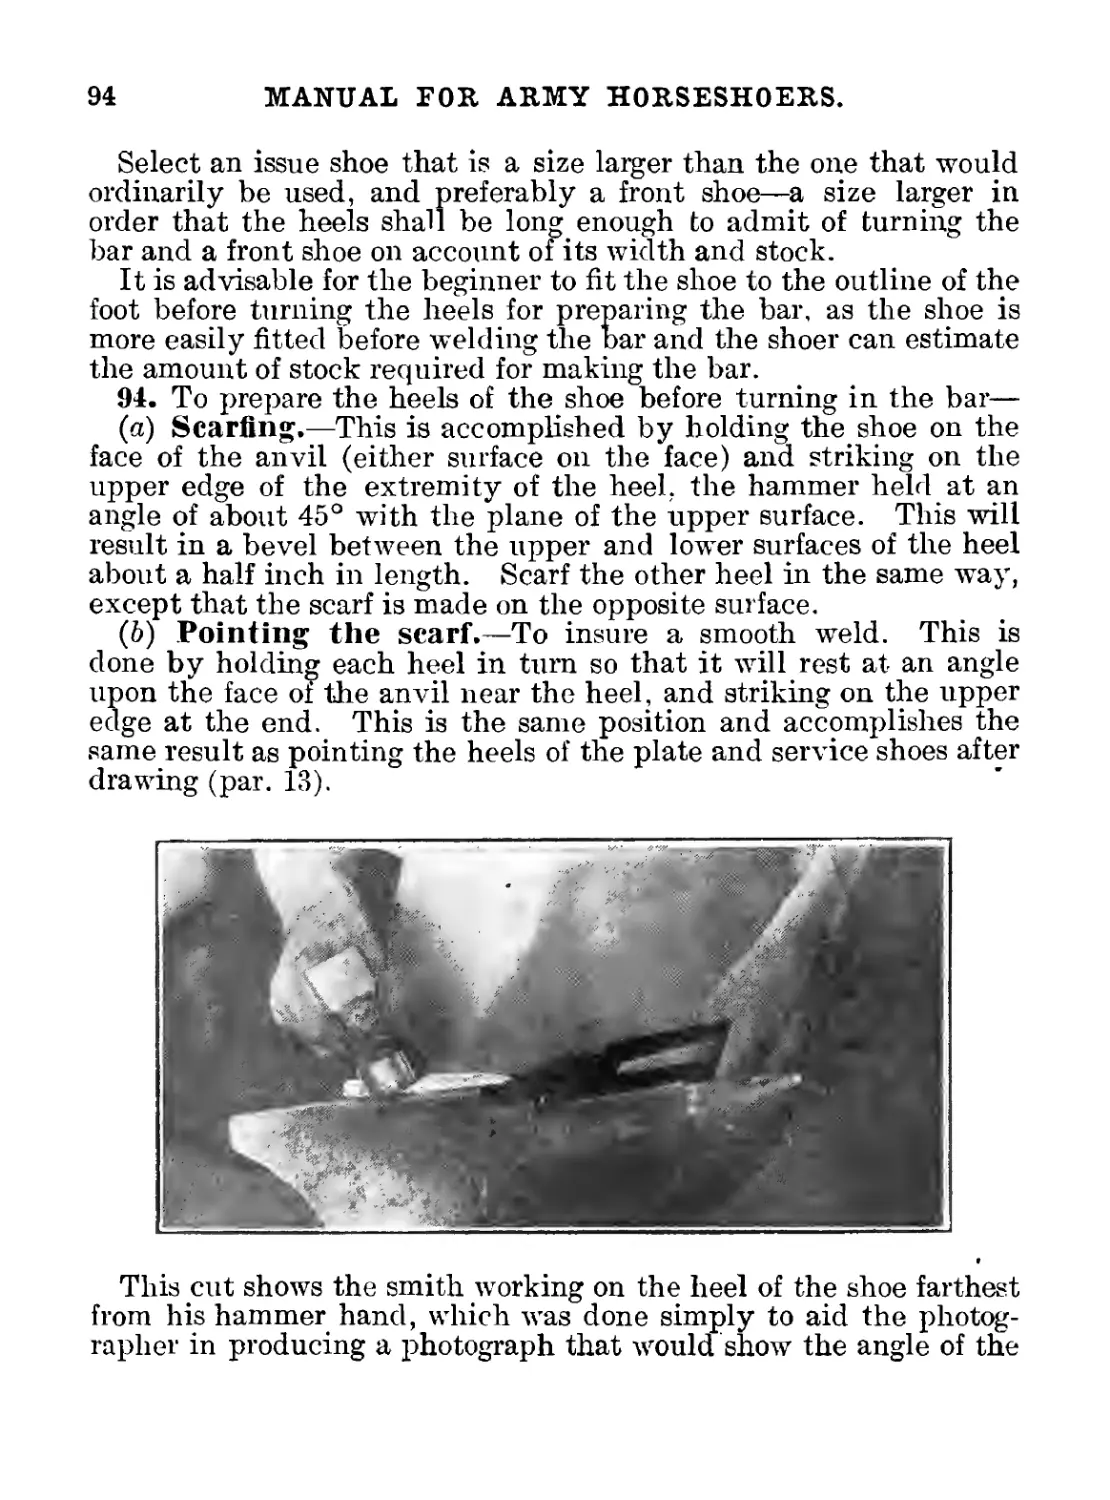
hoof. It is often placed in the crease of the shoe, under the head
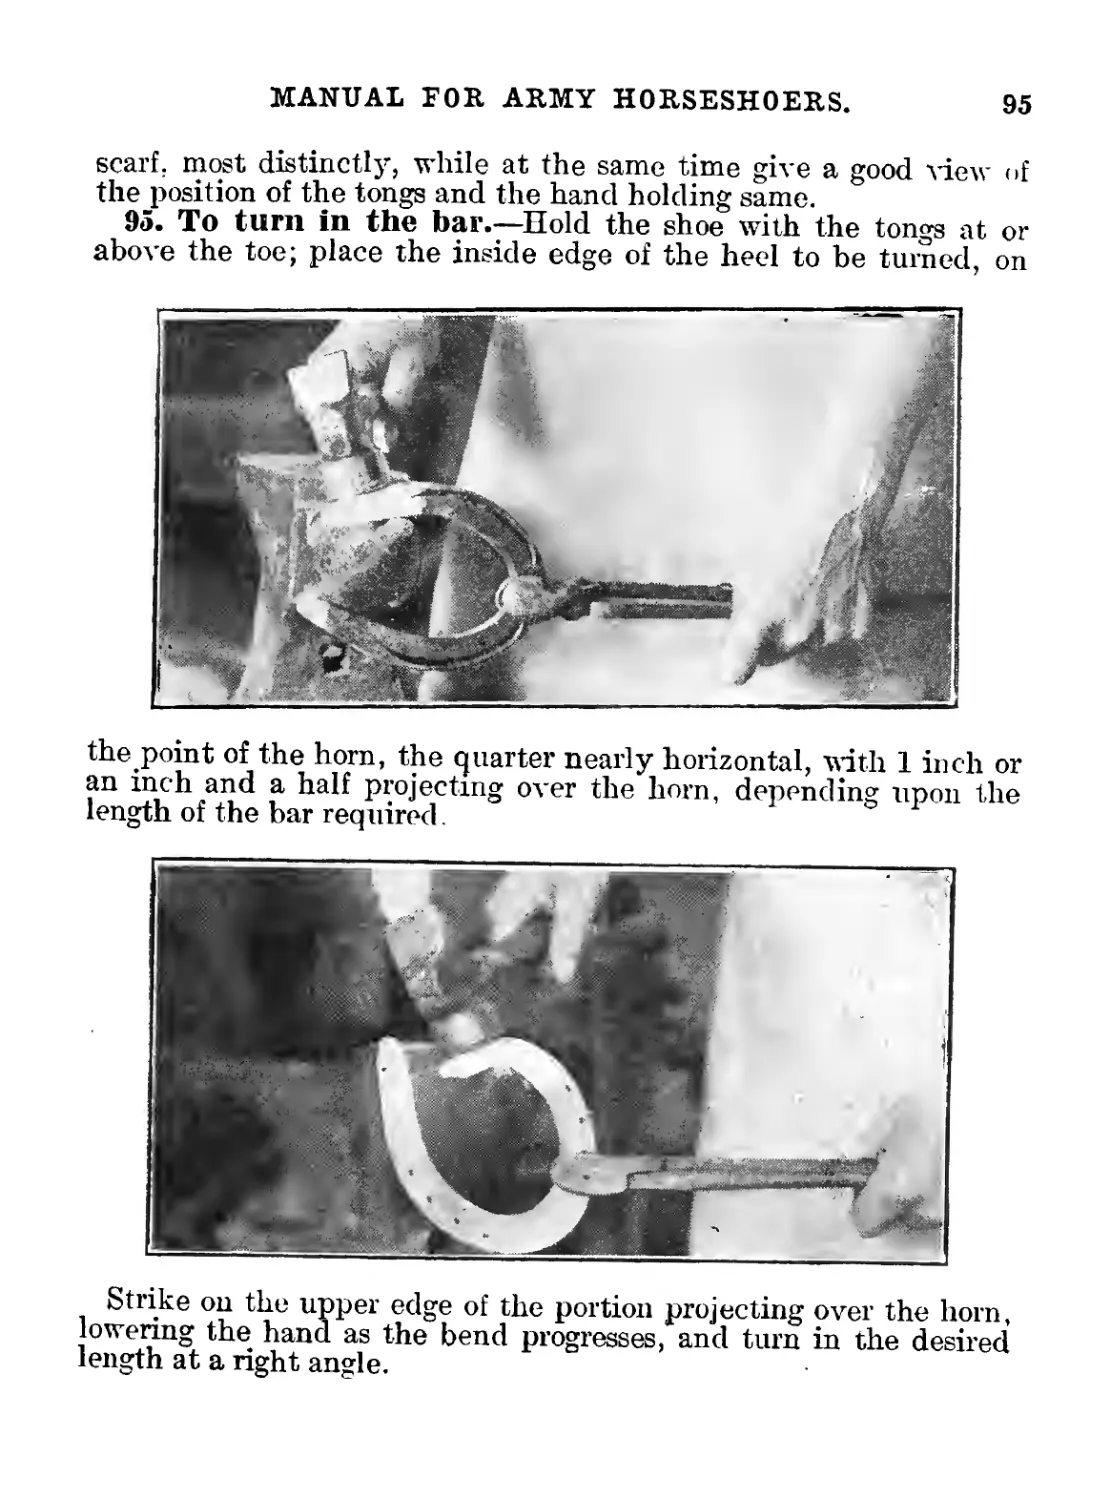
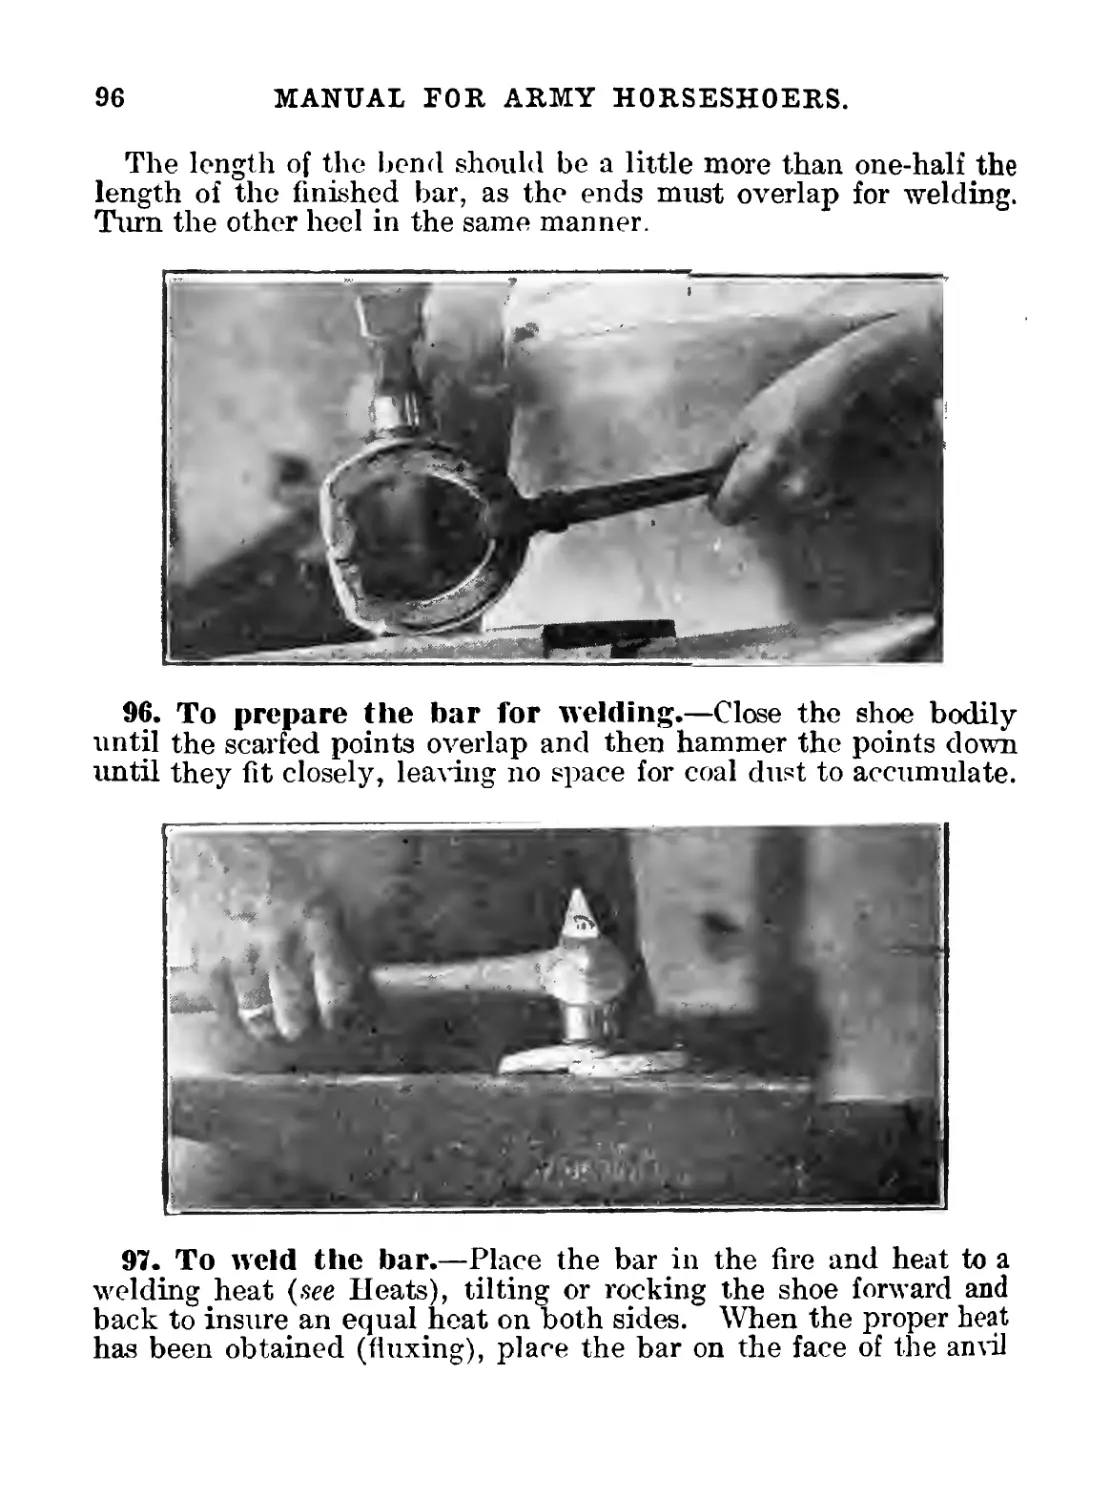
of the nail to be withdrawn, and struck smartly with the hammer.
The blow raises the nail sufficiently to enable the pinchers to grasp
the nail head.
The pinchers (fig. 2) are used to remove shoes and to draw nail
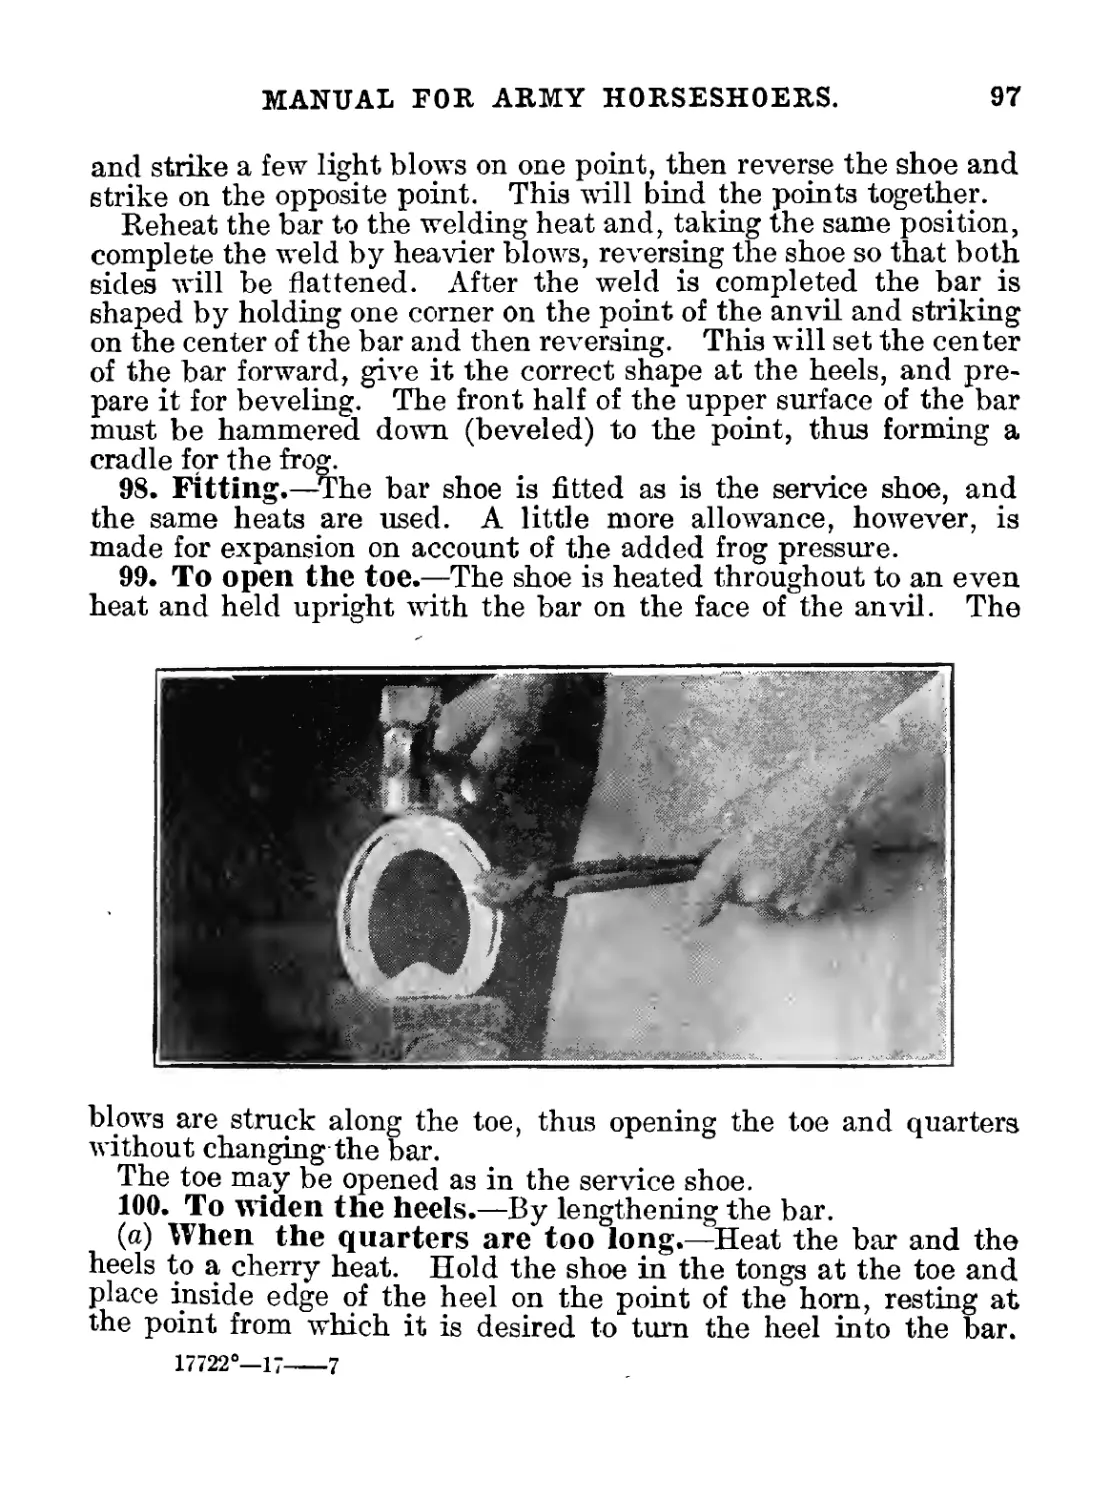
stubs and improperly driven nails.
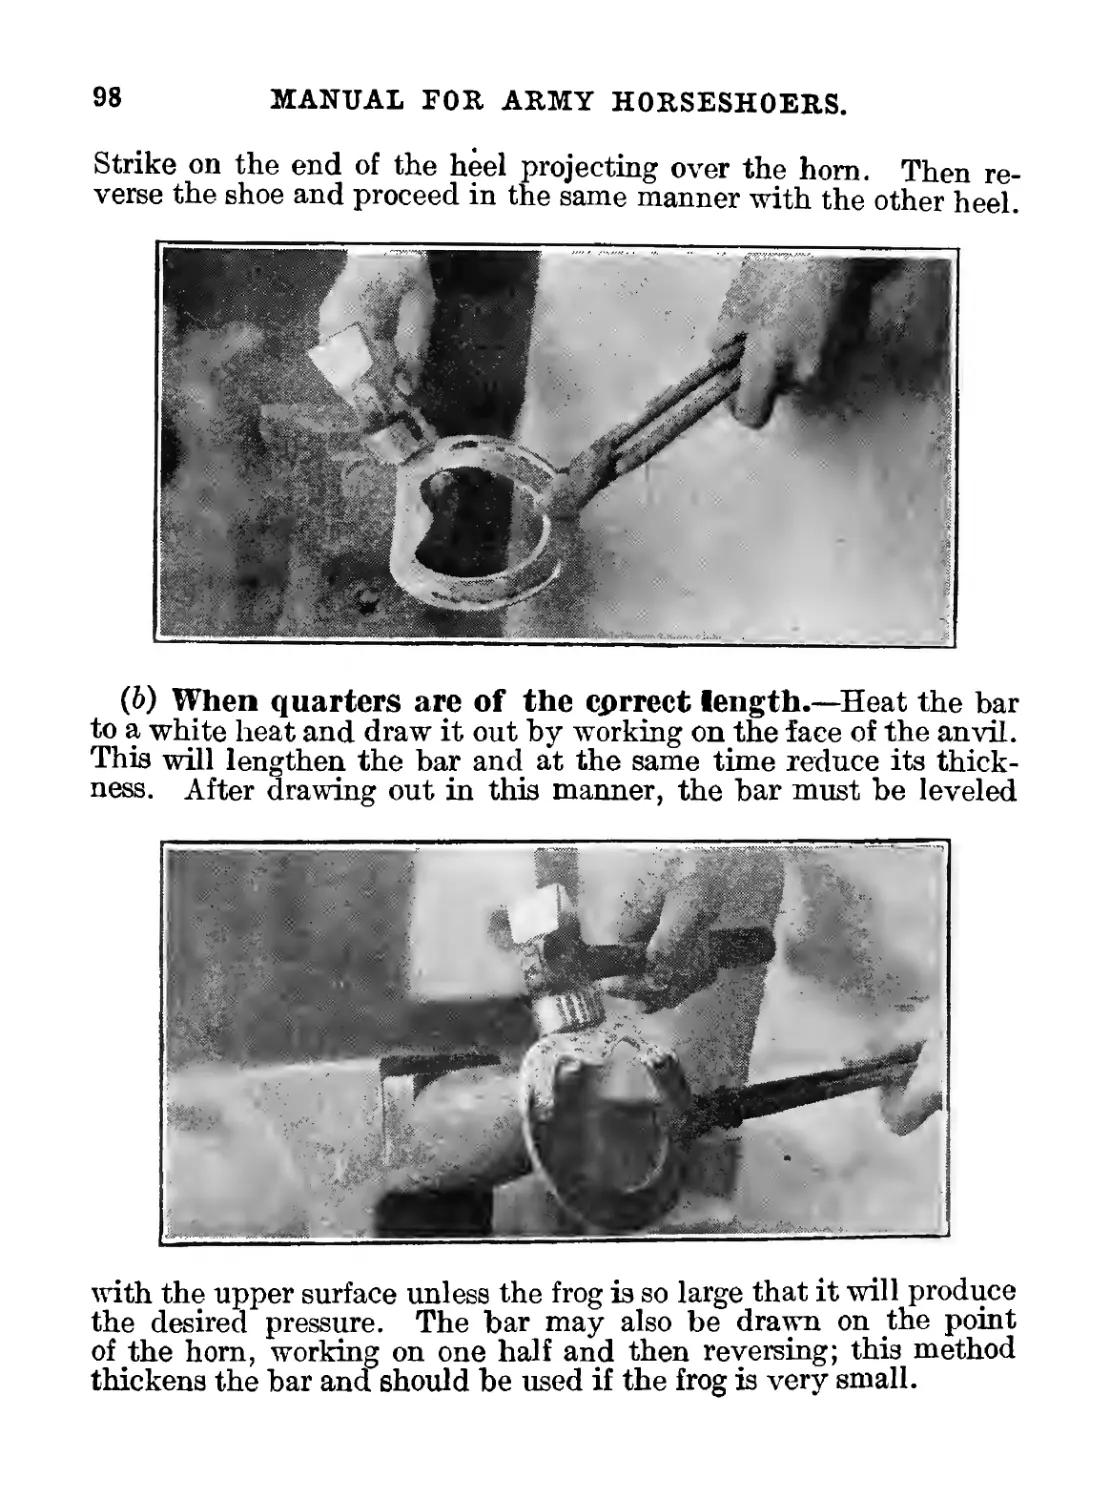
The driving hammer (shoeing hammer) (fig. 9) should be used only
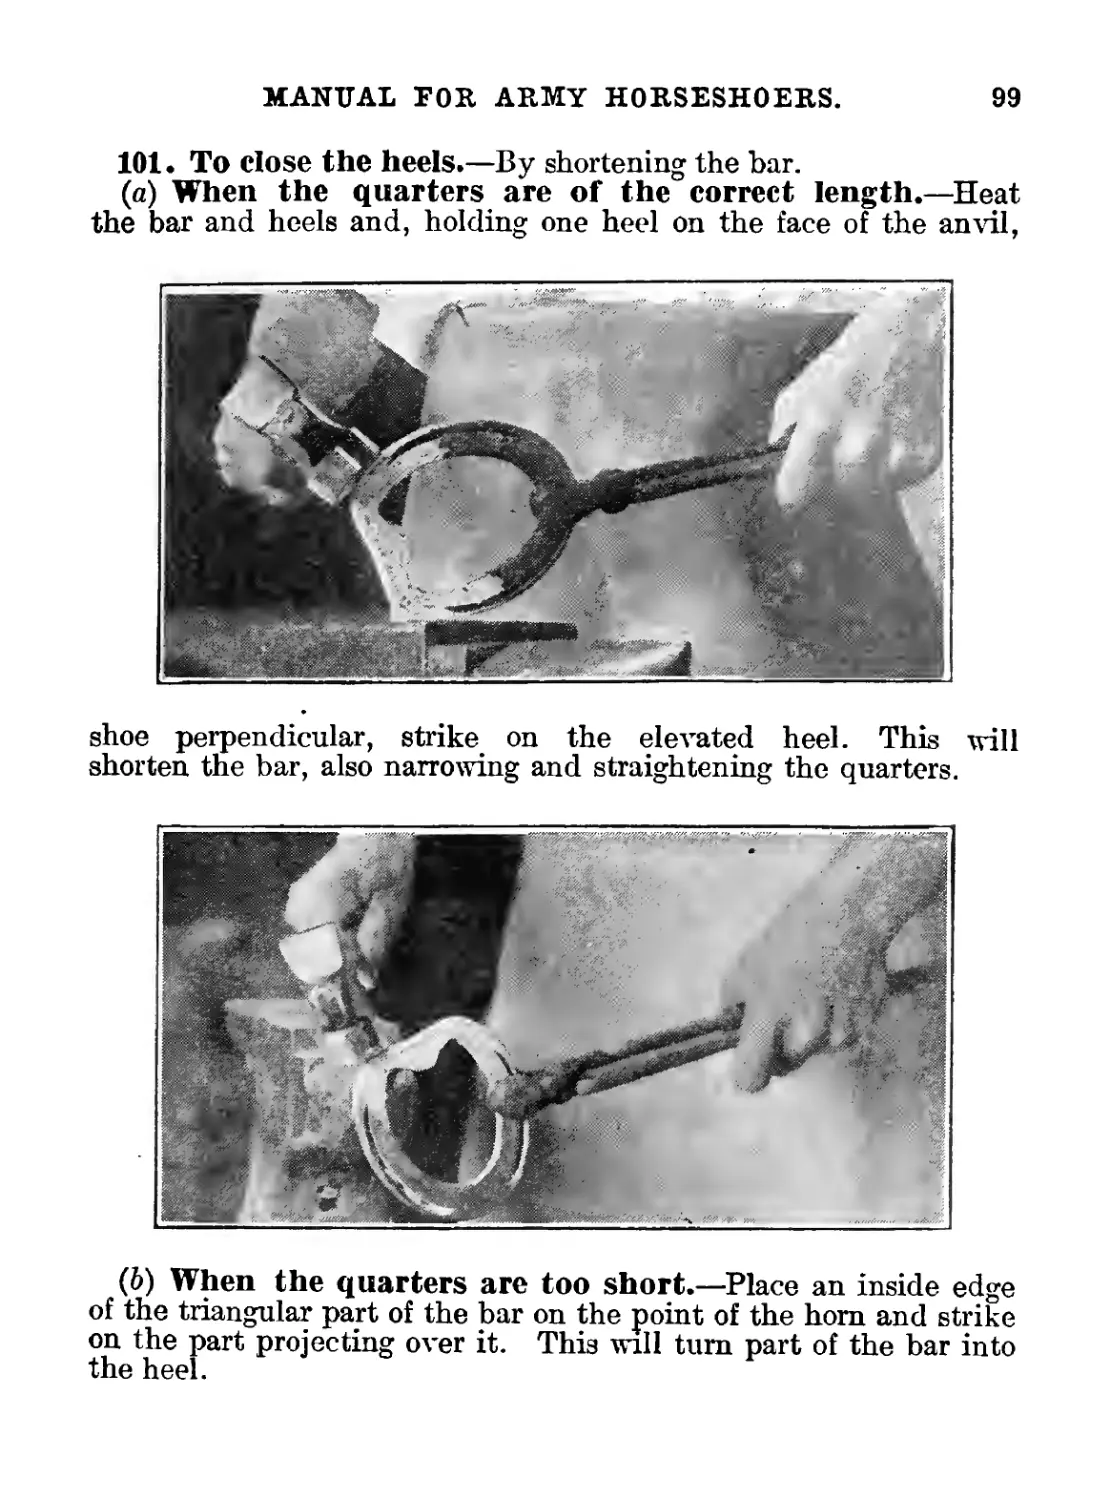
to drive horseshoe nails, to wring off nails after they have been
properly driven, and to make clinches.
The nippers (fig. 4) are used to remove the surplus growth of wall.
The shoeing knife (fig. 3) is used to pare away the dead horn near
the white line; to make a seat for clips; to remove loose particles
from the hoof; to relieve pressure on corns and cracks; and to open
the sole and wall for the escape of pus or for the removal of foreign
bodies.
9
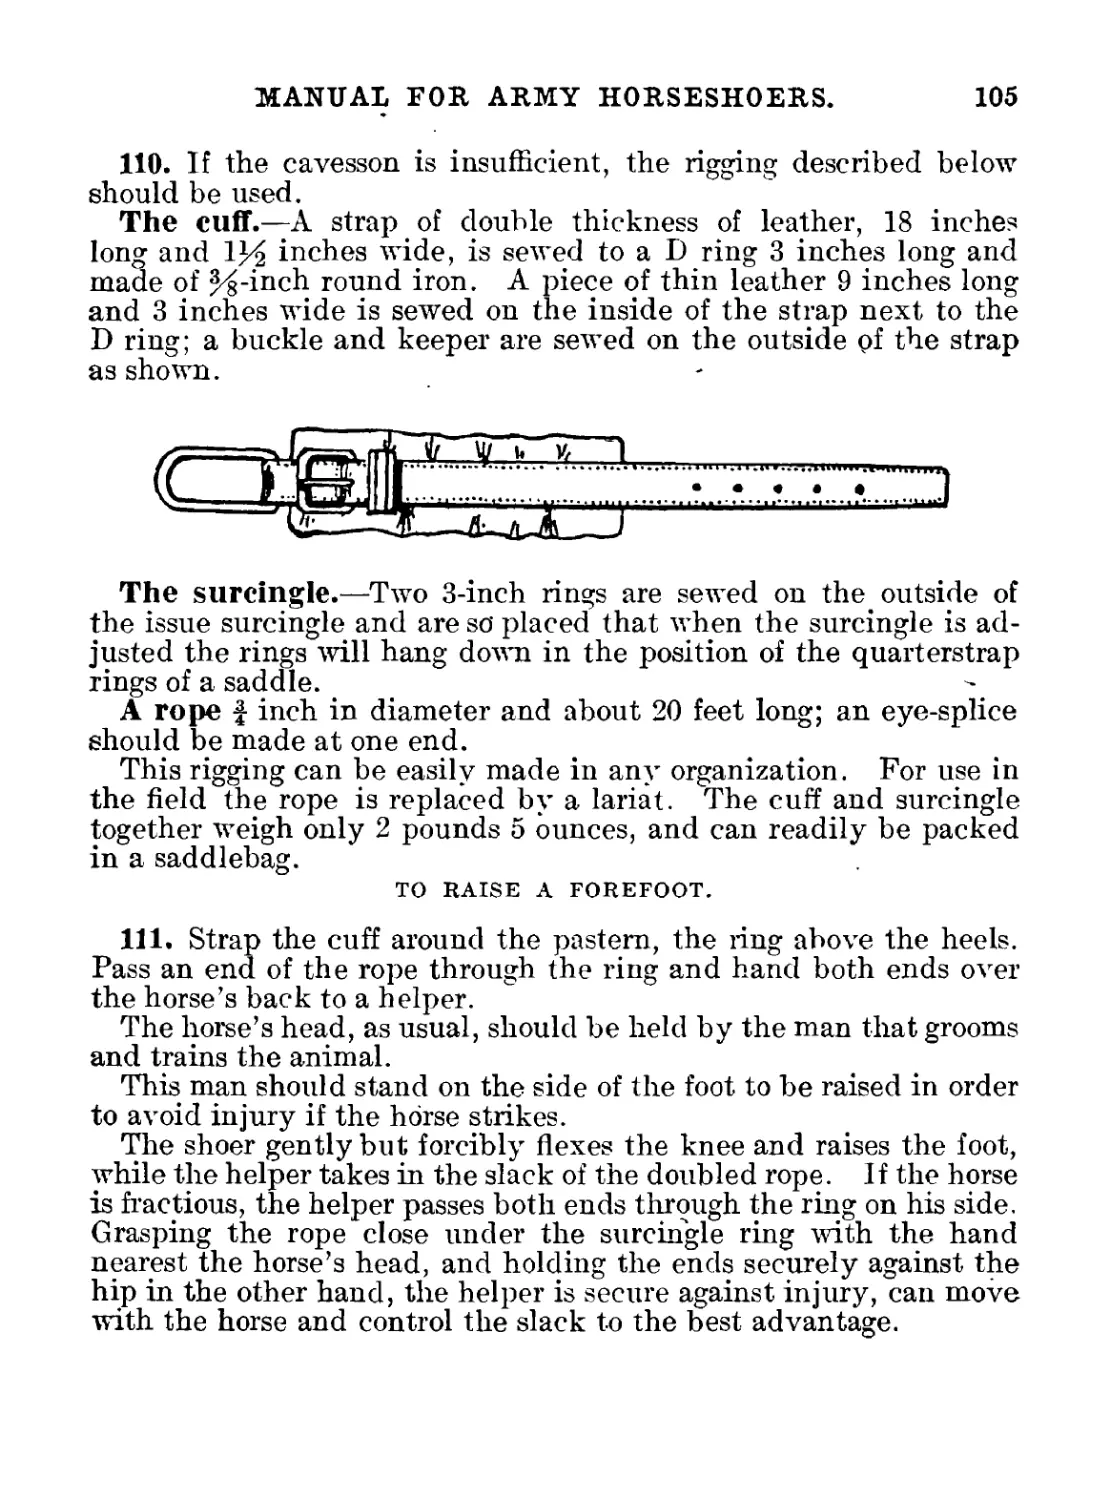
10
MANUAL FOR ARMY HORSESHOERS.
The horseshoers’ rasp (fig. 5) is used to prepare a level-bearing
surface of the foot; to remove extra length of toe; to smooth the
edges of the wall; to even clinches; to make a slight groove under
each clinch; and to run lightly Олег the clinches in order to smooth
them. The rasp that is used on the hoof should never be used at
the bench; use an old rasp for working on metal.
The rounding hammer (fig. 10) and fitting hammer (fig. 11) are used
in fitting and in turning shoes.
The hoof tester (fig. 7) is used to locate injuries or soreness of the
sole. Place one point on the sole and the other on the wall; press
by closing the handles; shift the points and continue until the
horse flinches. The pinchers may be used for the same purpose,
but are not as satisfactory.
The clinching tongs (fig. 6) are used to bend the clinches downward.
The clinching block (fig. 15) is used in turning the clinches.
The tongs (fig. 8) are used in handling hot metals.
The pritchel (fig. 16) is made by hand from round or octagonal
steel, and is used for opening the nail holes in horseshoes. The
point is drawn the same size and shape as the shank of a nail half-
way between head and point, so that the hole punched in the shoe
will fit the nail snugly and not allow any motion. Examine the
nail carefully and learn the exact size for the pritchel. To draw
out the point of the pritchel, heat it to a cherry red and, placing
the pointed end flat on the face of the anvil near the far edge, strike
with the hammer held at an angle to properly change the upper
face, turning it as necessary so that the finished point will be of
the shape desired. Never heat the pritchel beyond a cherry red;
cool it gradually by placing it in the coal at the edge of the forge
and never in the water. The face of the horseshoers’ anvil should
have a round edge near the base of the horn on the far side. This
edge is used for sharpening tools.
Hardies, the straight (fig. 12) and the half-round (fig. 13), are
used to cut hot metals. Their principal use for horseshoers is in
cutting off the heels of shoes, and for this purpose a sharp cut-
ting edge is required. When the hardy becomes dull the edge is
drawn out on the face of the anvil in the same manner as the
pritchel. A sharp edge is then put on by hot rasping, using the
smooth side of the rasp. After sparpening, the cutting edge should
be tempered as follows: Heat the blade of the hardy slowly to a
cherry red; hold the cutting edge under water so that about one-
half inch of the blade is immersed, and, when there is no longer
Plate I.—Tools.
12
MANUAL FOR ARMY HORSESHOERS.
any sizzling, plunge the whole hardy under water and remove it
at once; rub the blade on the floor to remove loose flakes of metal
and to give it a slight polish; now carefully observe the change
in color as the remaining heat in the body extens badck to the
edge; the color will be first straw, then copper, and finally blue;
as "soon as the blue color has reached the cutting edge, place the
whole hardy under water and leave it there until thoroughly cooled.
The creaser (fig. 14) is used to crease the shoes and to repair
damaged creases.
The countersink (fig. 17) is used in hand-made shoes to punch
holes of sufficient size to receive the heads of the nails; these holes
are completed by the use of the pritchel (fig. 16).
Horseshoe nails retain the shoe on the foot. These nails (fur-
nished in several sizes) are machine-made and pointed; they are
slightly concave on one side and flat on the other; there is a short
bevel at the point on the concave side. In driving the nail into
the hoof the flat side is held faced outward.
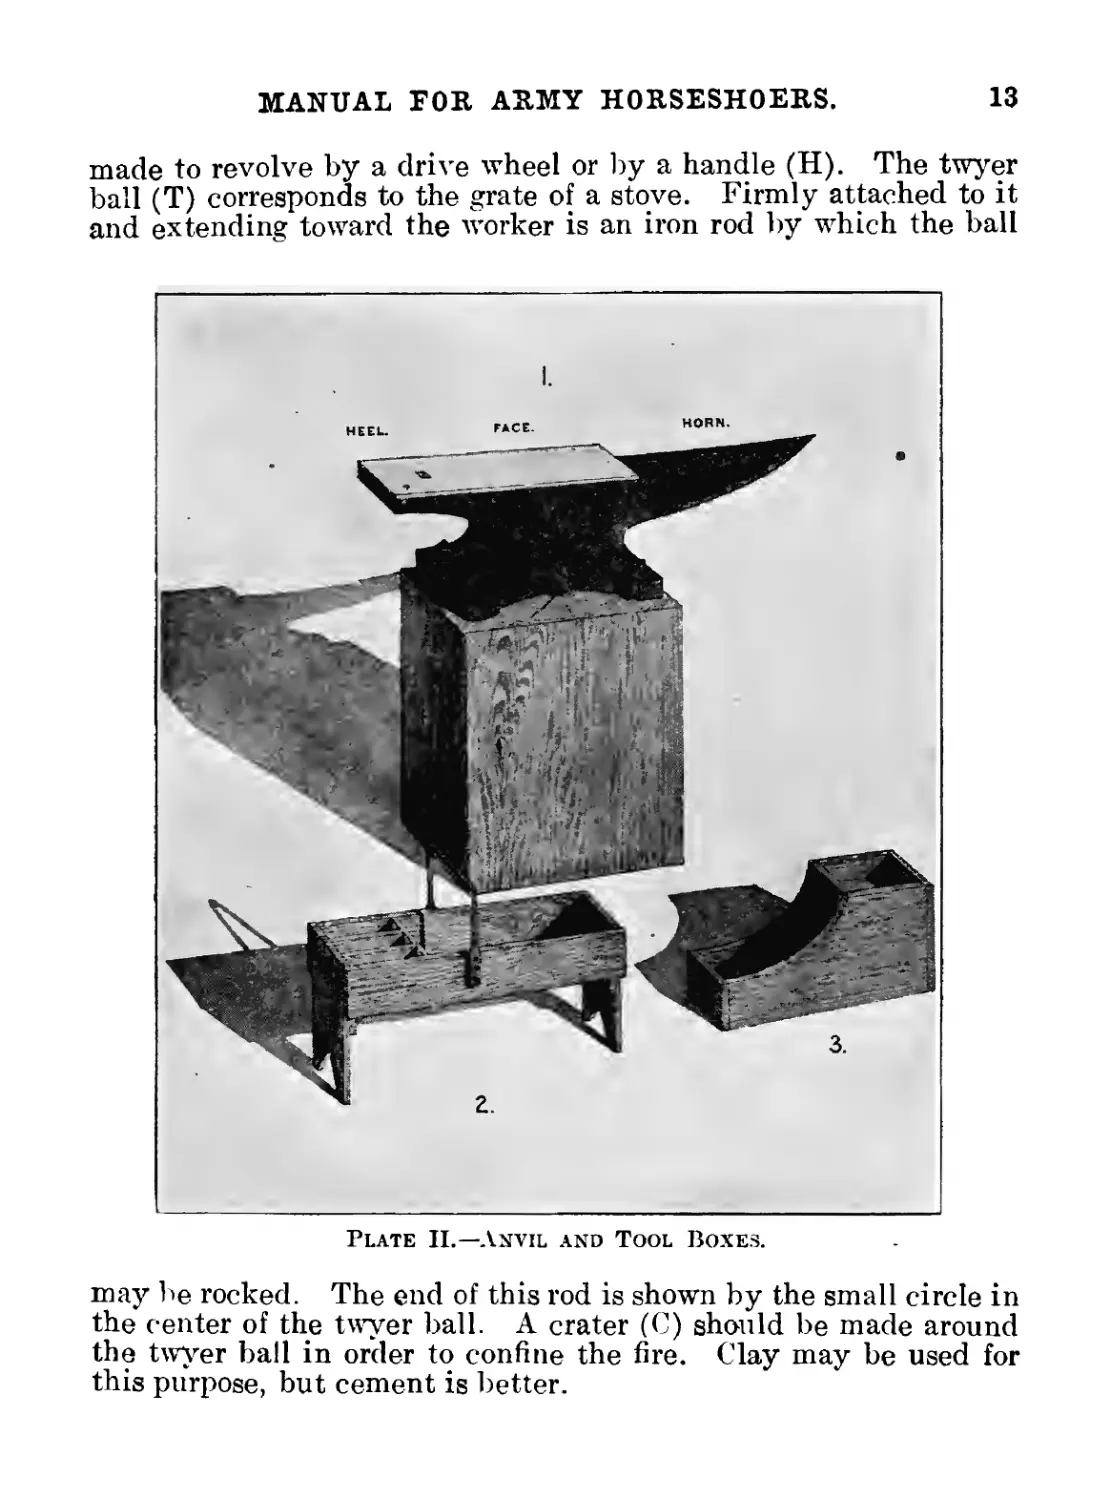
2. The anvil.—The working parts of the anvil (Pl. II, fig. 1) are
the horn, the face, and the heel.
The face, or the upper plane surface, is of steel, and is welded
to the iron body. The anvil is firmly fastened to a wooden block,
whi h is sunk into the ground to a depth that will bring the surface
of the face at a convenient working height above the ground—from
30 te 36 inches.
The horn is used to open and to shape shoes; the face to level
the web and for welding; and the heel to straighten heels of shoes and
to turn calks. Clips are ordinarily drawn on the edge of the face, but
in the anvil shown there is an attachment near the base of the horn
which is used for this purpose. The square hole in the face (hardy
hole) is a socket for hardies; the round hole (pritchel hole) permits
the passage of the pritchel through the nail hole of the shoe.
The flat surface at the base of the horn is relatively soft iron and is
used to rest hot metals on when cutting them with a chisel.
The anvil weighs from 125 to 150 pounds.
Figure 2 shows the tool box issued by the Quartermaster Corps.
Its use is readily understood, and the only instruction required is
that all tools should be placed in the,box, handles out. An objec-
tion to this box is that it is easily tipped over. On this account
many sjhoers prefer the pattern shown in figure 3, although the tools
are not as near to the hand.
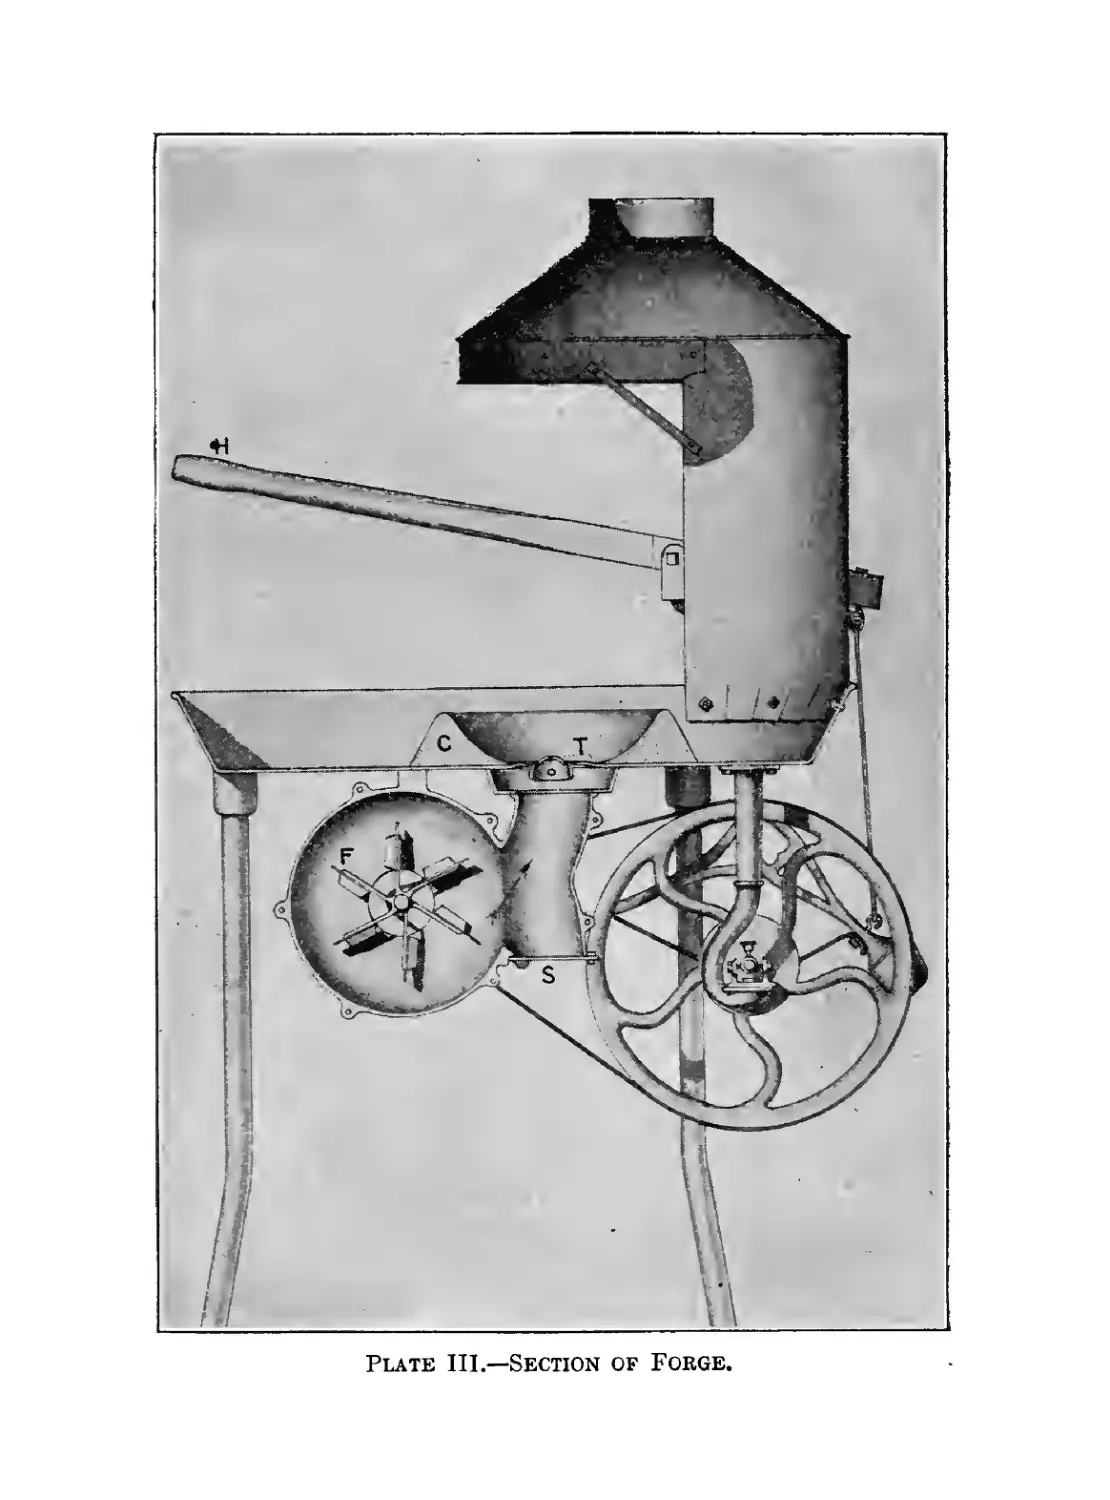
3. Plate III shows a section of a portable forge. In every forge
air is forced through the fire by a bellows or a fan (F); the latter is
MANUAL FOR ARMY HORSESHOERS.
13
made to revolve by a drive wheel or by a handle (H). The twyer
ball (T) corresponds to the grate of a stove. Firmly attached to it
and extending toward the worker is an iron rod by which the ball
Plate II.—Anvil and Tool Boxes.
may be rocked. The end of this rod is shown by the small circle in
the center of the twyer ball. A crater (C) should be made around
the twyer ball in order to confine the fire. Clay may be used for
this purpose, but cement is better.
Plate III.—Section of Forge.
MANUAL FOR ARMY HORSESHOERS.
15
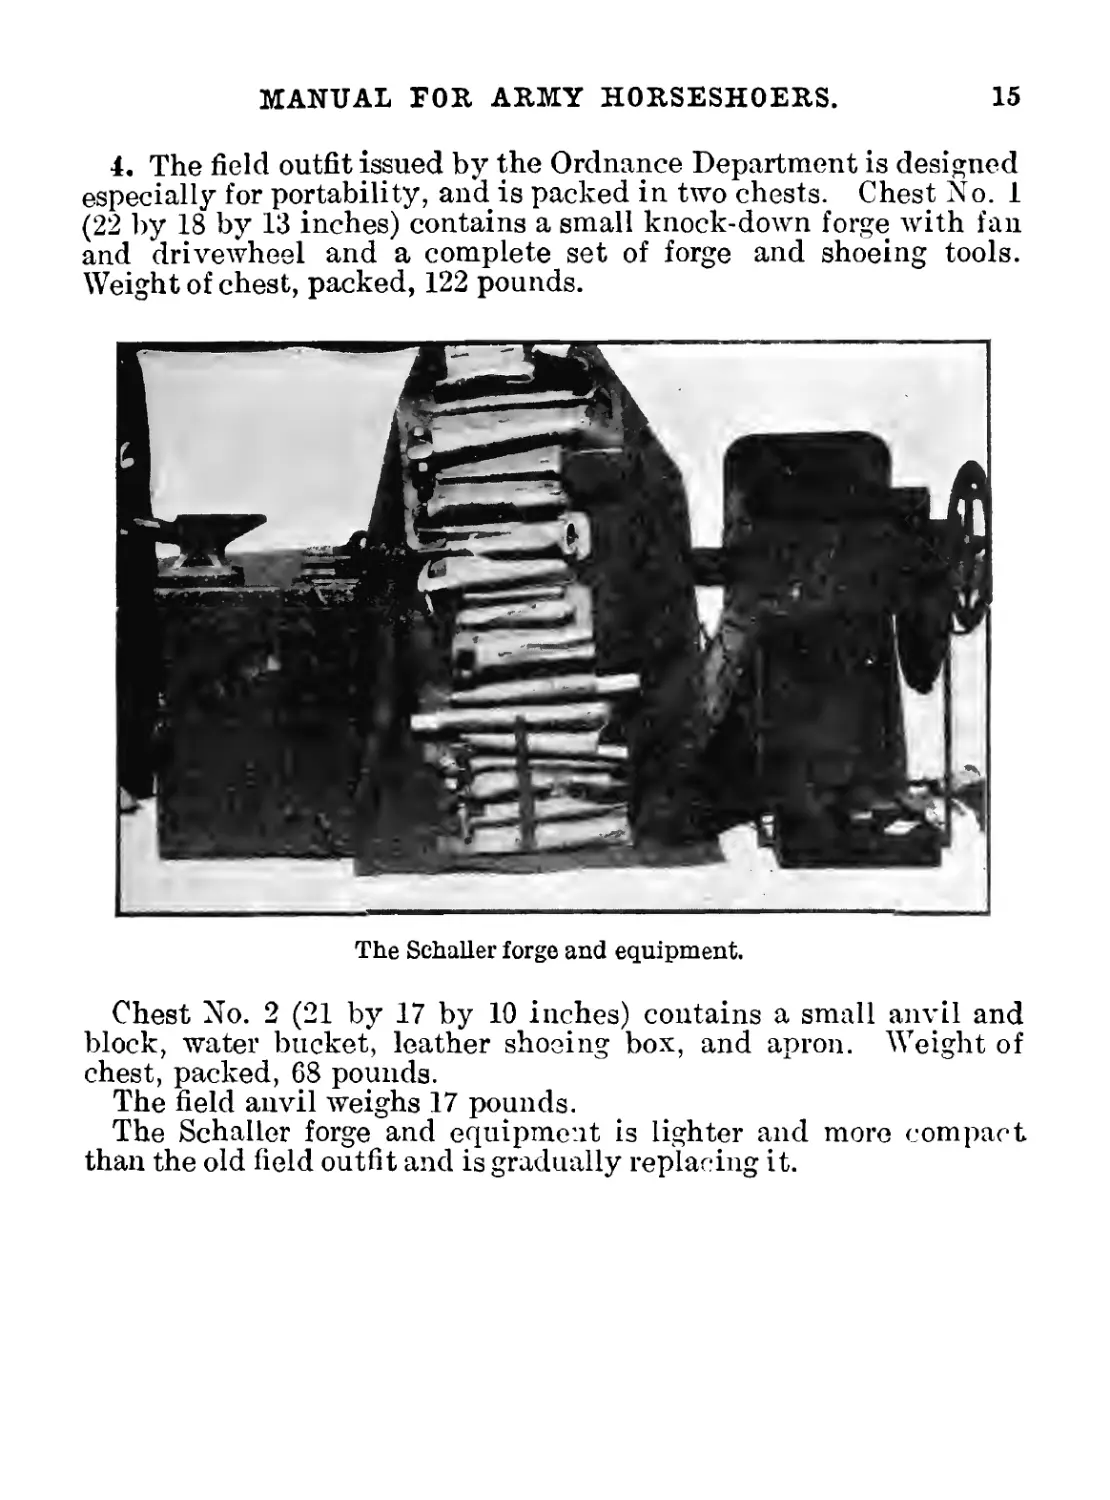
4. The field outfit issued by the Ordnance Department is designed
especially for portability, and is packed in two chests. Chest No. 1
(22 by 18 by 13 inches) contains a small knock-down forge with fan
and drivewheel and a complete set of forge and shoeing tools.
Weight of chest, packed, 122 pounds.
The Schaller forge and equipment.
Chest No. 2 (21 by 17 by 10 inches) contains a small anvil and
block, water bucket, leather shoeing box, and apron. Weight of
chest, packed, 68 pounds.
The field anvil weighs 17 pounds.
The Schaller forge and equipment is lighter and more compact
than the old field outfit and is gradually replacing it.
CHAPTER II.
THE FIRE—HEATS.
THE FIRE.
5. Coal, charcoal, coke, or even wood, may be used as fuel tc
create the necessary heat in the forge.
Before building the fire the crater of the forge must be thor-
oughly cleaned, removing all dirt, ashes, and unconsumed fuel.
The twyer ball should be rocked vigorously, and the slide (S)
opened. A few blasts will aid in removing the accumulated dust.
The ball is often so heated as to fuse, and melted metal and clink-
ers may close the openings around the ball, preventing the passage
of the blast. The obstructions must be removed by the use of
the poker.
Coal is banked around the twyer ball in the form of a crater,
in the center of which dry particles of any inflammable material
are placed and ignited. When these particles are burning, coke
or wet coal (if no coke is available) is gradually placed on the fire
and the fan is revolved slowly, care being taken not to cover so
closely that the flames are smothered.
When the fire is burning brightly, it should be built up around
the edges with wet coal, which will in time become coke. (See
Heats.) This coke is next burned and is replaced by wet coal,
thus keeping up the supply of coke. Green coal is of little use in
heating iron or steel for the reason that it does not give a high
decree of heat, that it sticks to the metal, and that it emits a smoke
which interferes with the work.
A clear fire without smoke is essential for good work, and the
higher degrees of heat can only be obtained from such a fire..
The depth of the fire should be about 9 inches; the metal is then
supported at the place of greatest heat, about 6 inches above the
twyer ball.
16
MANUAL FOR ARMY HORSESHOERS.
17
If the metal is too near the twyer ball the heat is affected by
the cold blast.
To bank a fire, cover thoroughly with the fuel and open the slide
below; this will keep the fire alive for several hours. Whenever
the fire is left for more than a few minutes the slide should be left
open.
CLINKERS.
6. Heated steel or iron gives off particles or scales which remain
in the fire. These melting particles bind together particles of
burned coal, gradually becoming larger and finally forming what
is called a clinker. Clinkers give off but little heat and obstruct
and spoil the fire; they must therefore be removed as fast as they
form. Their presence will be shown by a tendency of the fire to
spread and an unusual throwing out of sparks. If indications of
clinkers appear, open up the fire with a poker, and as soon as the
air touches the clinker it will turn black and become a solid mass
which can be lifted out entire. Trying to drag out the clinker
without opening up the fire only results in breaking up the clinker
and making the fire worse than it was before.
HEATS.
7. There are four degrees of heat that are to be considered by the
horseshoer, and they are generally designated as the black, the
cherry red, the white, and the welding or sparking heat.
The black heat is when the shoe is hot but shows no color, and
is used in making minor changes in shaping, leveling, and in open-
ing nail holes.
The cherry red heat is when the steel or iron shows a bright cherry-
colored glow. It is used in the general shaping of the shoe, in
pointing the pritchel, and in sharpening tools.
The next degree of heat is called the white heat because the steel
or iron then shows almost that color. This heat is used when it
is necessary that the metal should be very pliable and easily
worked, as in drawing toe clips, cutting off the heels, in drawing
the heels of the shoe, in hot rasping, and in turning heel calks.
The welding heat is sometimes called sparking heat for the reason
that the metal then gives off small particles which explode or
spark above the fire. As soon as the sparks appear watch the
17722°—17--2
18 MANUAL FOR ARMY HORSESHOERS.
metal closely, and when the part to be welded has a bubbling
(fluxing) appearance it must be withdrawn from the fire and
worked immediately. The success of a weld depends entirely
upon the proper heat of the parts at the exact moment the weld
is attempted.
A newly made coal fire can be used for ordinary heating, but
for a welding heat coke is required. Coke is ordinary coal from
which the gases have been driven off by gradual heating. It will
be found ready at hand around the edge of the fire. As coke do Co
not smoke, there is no trouble in observing when the metal has
reached exact welding heat.
CHAPTER III.
WORKING AND SHAPING IRON.
THE PLATE SHOE.
8. As a preliminary to instruction in shaping and preparing a
shoe for the foot, it is best for beginners to learn the method of making
and shaping a plate shoe, using an old shoe as a model.
The various parts of a shoe are commonly spoken of as follows:
The toe is that portion between the first nail hole on one side and
the first nail hole on the other side. The quarters are the portions
in which the nail holes are punched. The heels are the remaining
parts of the shoe. A side is one-half of a shoe, and includes one heel,
one quarter, and one-half of the toe.
The plate shoe is made of 1 by | inch steel which is much more
easily worked than the heavier service shoe.
Take a bar of metal about 11 or 12 inches in length.1
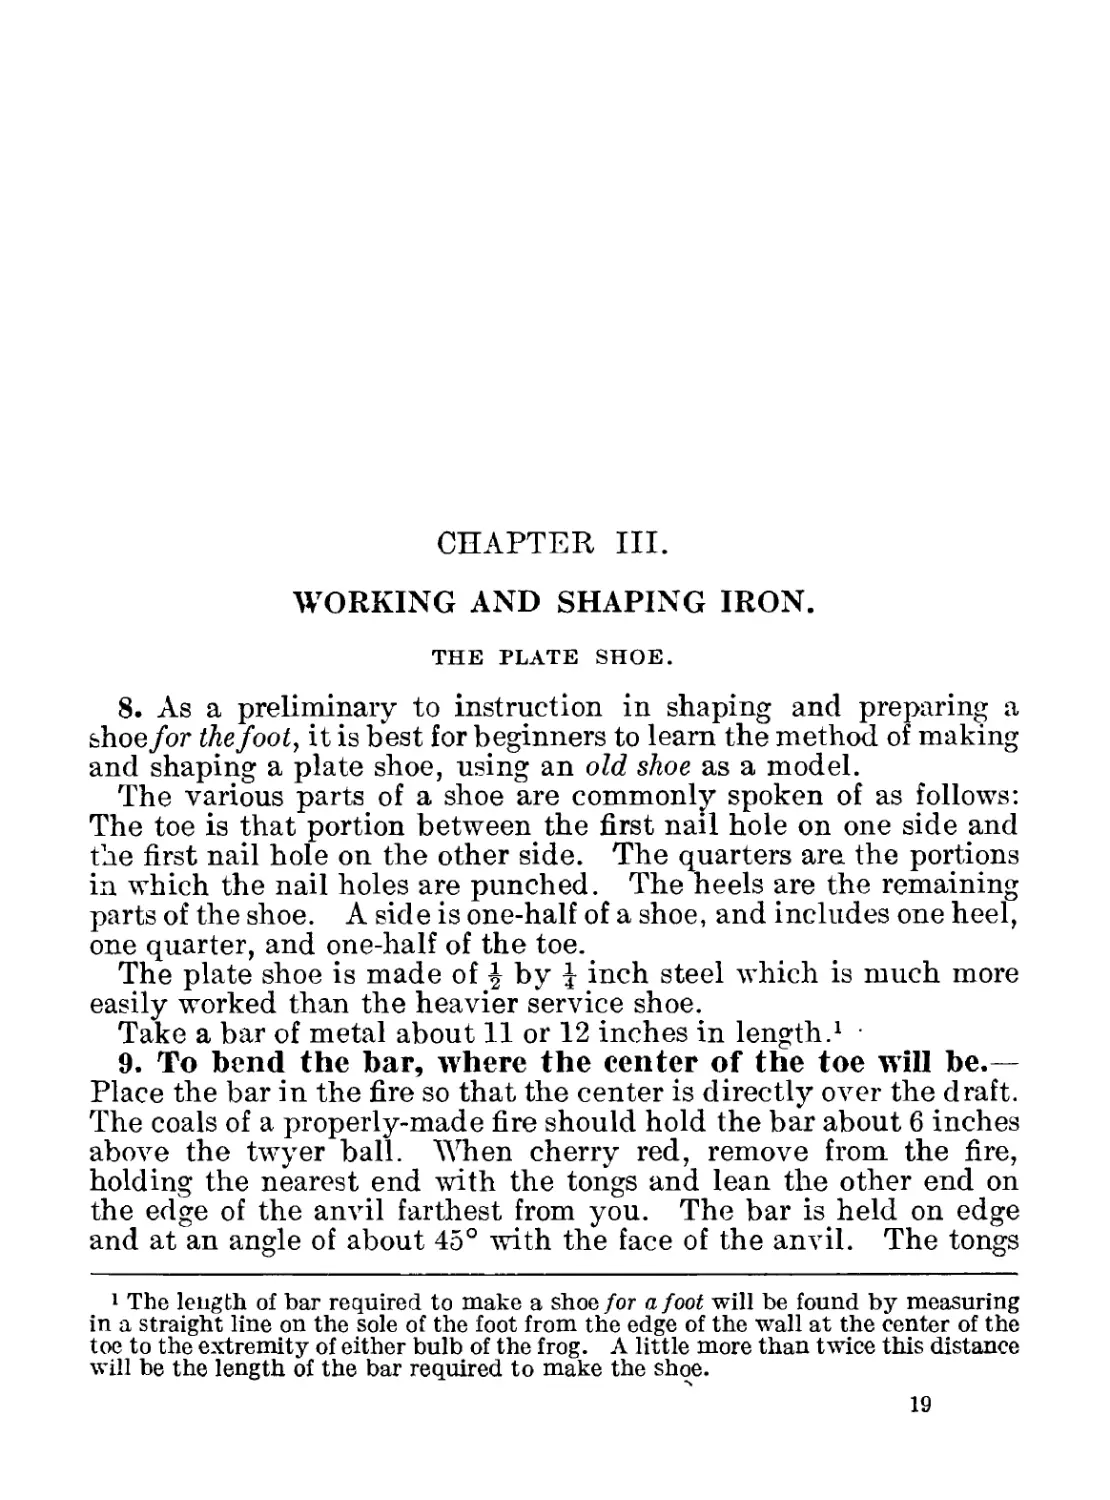
9. To bend the bar, where the center of the toe will be.—
Place the bar in the fire so that the center is directly over the draft.
The coals of a properly-made fire should hold the bar about 6 inches
above the twyer ball. When cherry red, remove from the fire,
holding the nearest end with the tongs and lean the other end on
the edge of the anvil farthest from you. The bar is held on edge
and at an angle of about 45° with the face of the anvil. The tongs
1 The length of bar required to make a shoe for a foot will be found by measuring
in a straight line on the sole of the foot from the edge of the wall at the center of the
toe to the extremity of either bulb of the frog. A little more than twice this distance
will be the length of the bar required to make the shoe.
19
20
MANUAL FOR ARMY HORSESHOERS.
grasp the bar about 2 inches from the end and an equal amount
projects over the edge of the anvil, so that the point struck will be
midway between the points of support.
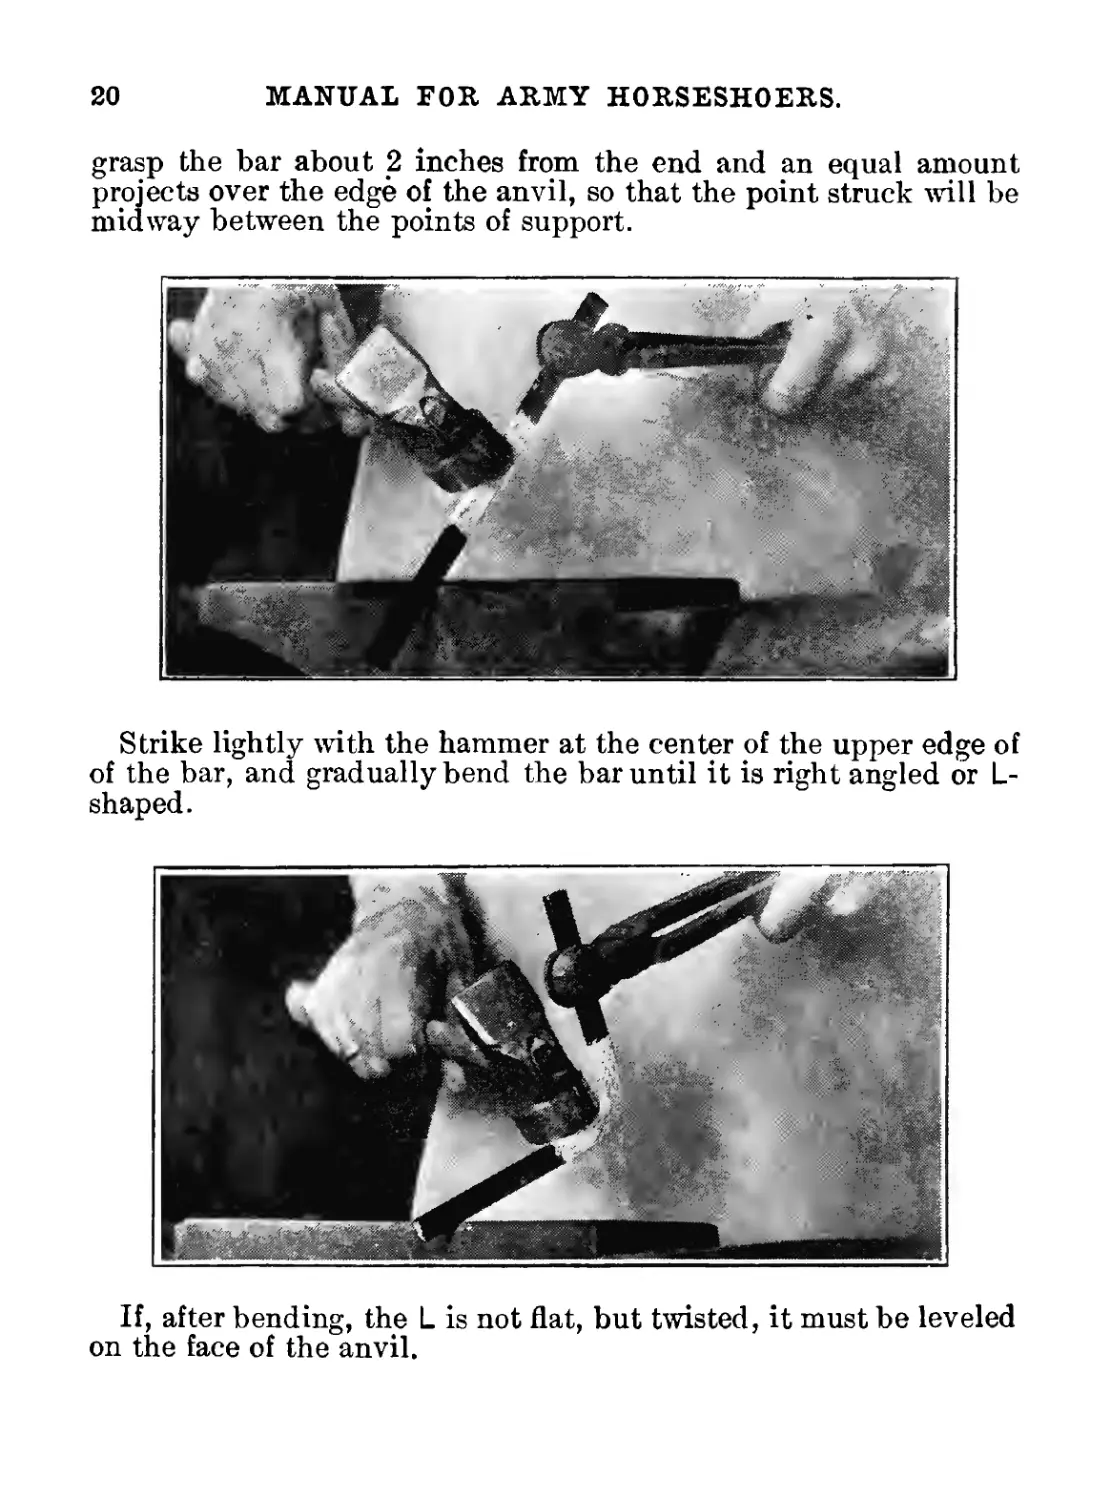
Strike lightly with the hammer at the center of the upper edge of
of the bar, and gradually bend the bar until it is right angled or L-
shaped.
If, after bending, the L is not flat, but twisted, it must be leveled
on the face of the anvil.
MANUAL FOR ARMY HORSESHOERS.
21
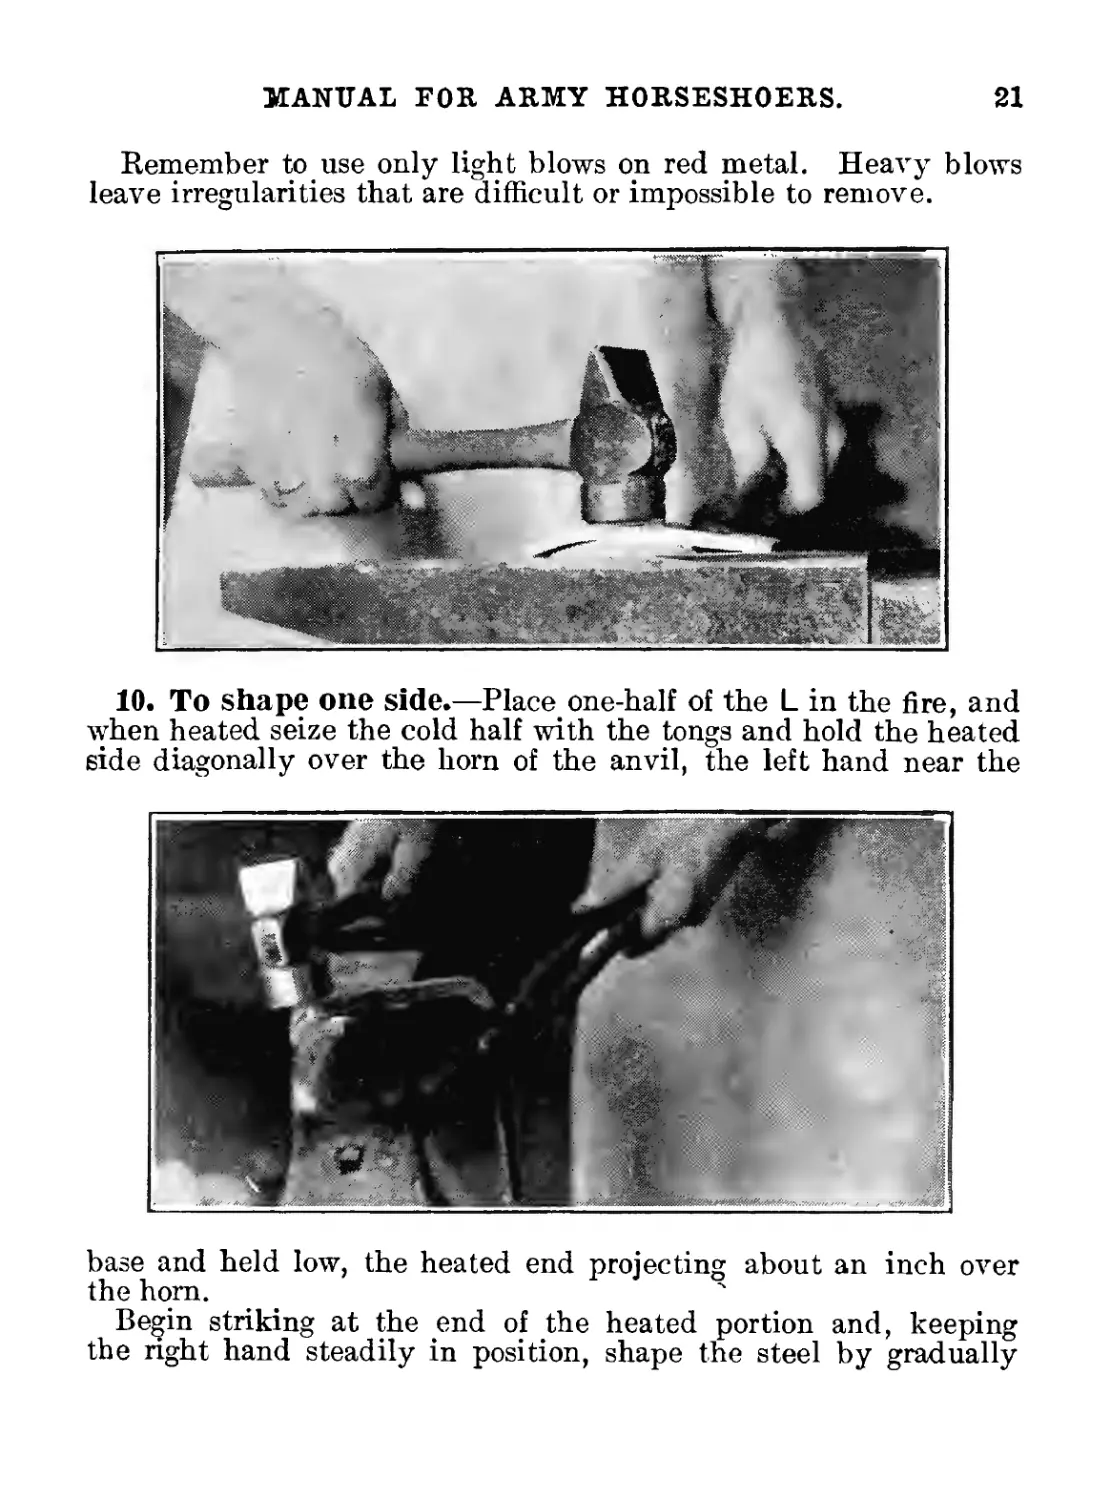
Remember to use only light blows on red metal. Heavy blows
leave irregularities that are difficult or impossible to remove.
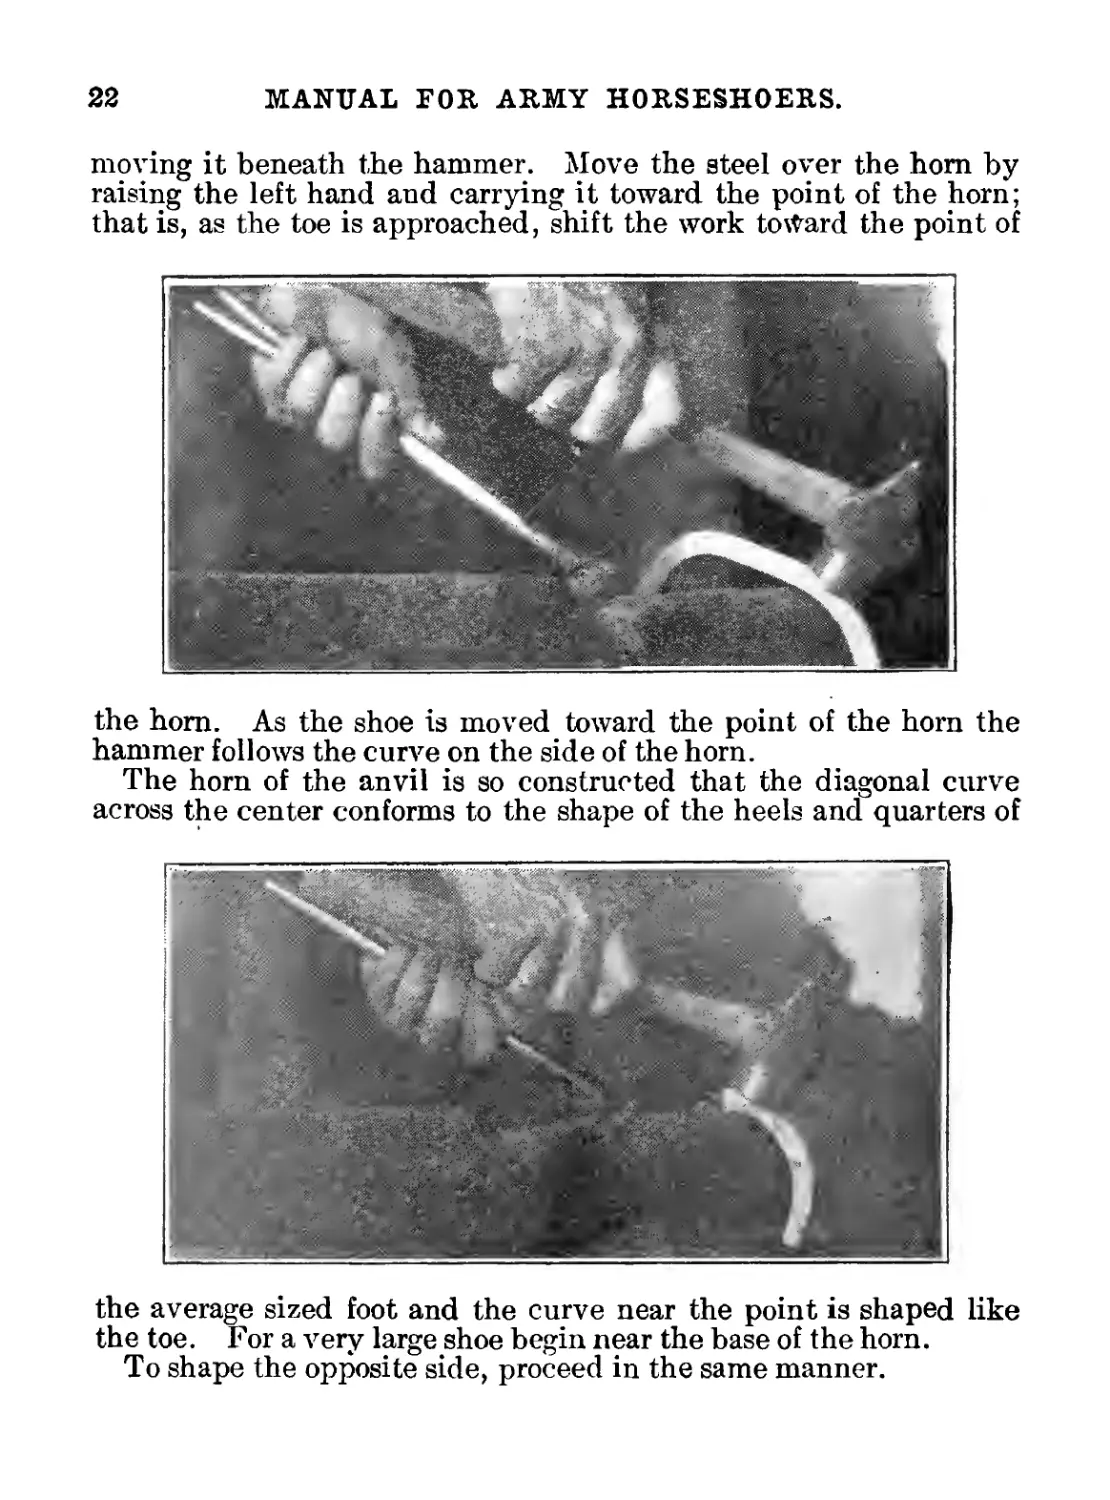
10. To shape one side.—Place one-half of the L in the fire, and
when heated seize the cold half with the tongs and hold the heated
side diagonally over the horn of the anvil, the left hand near the
base and held low, the heated end projecting about an inch over
the horn.
Begin striking at the end of the heated portion and, keeping
the right hand steadily in position, shape the steel by gradually
22
MANUAL FOR ARMY HORSESHOERS.
moving it beneath the hammer. Move the steel over the horn by
raising the left hand and carrying it toward the point of the horn;
that is, as the toe is approached, shift the work toward the point of
the horn. As the shoe is moved toward the point of the horn the
hammer follows the curve on the side of the horn.
The horn of the anvil is so constructed that the diagonal curve
across the center conforms to the shape of the heels and quarters of
the average sized foot and the curve near the point is shaped like
the toe. For a very large shoe begin near the base of the horn.
To shape the opposite side, proceed in the same manner.
MANUAL FOR ARMY HORSESHOERS.
27
fourths through or the shoe will be bulged and ruined. The tool
is held slanted outward to conform to the direction which the nail
should follow and the hole is started a little outside of the center of
the web.
Heat one side and first start the hole nearest the toe. Its proper
position can be learned by examining a sendee shoe of the same
size. The hole at the bend of the quarter is next started, and
finally the hole midway between the two. The plate shoe, on
account of its light weight, requires but six nails, three on each
side.
Heat the other side and proceed as before.
The nail holes must not be placed too far back. A shoe nailed
back of the turn of the quarter will impede the expansion of the
hoof and eventually cause contraction of the heels.
If, in punching the nail holes, bulges appear near them on the
edges of the bar or shoe, they must be removed by working over
the horn. (Same position and means as for drawing heels.)
Punch out the nail holes on the ground surface, holding the
pritchel slanted outward; then punch out the holes on the upper
surface, holding the pritchel slanted inward.
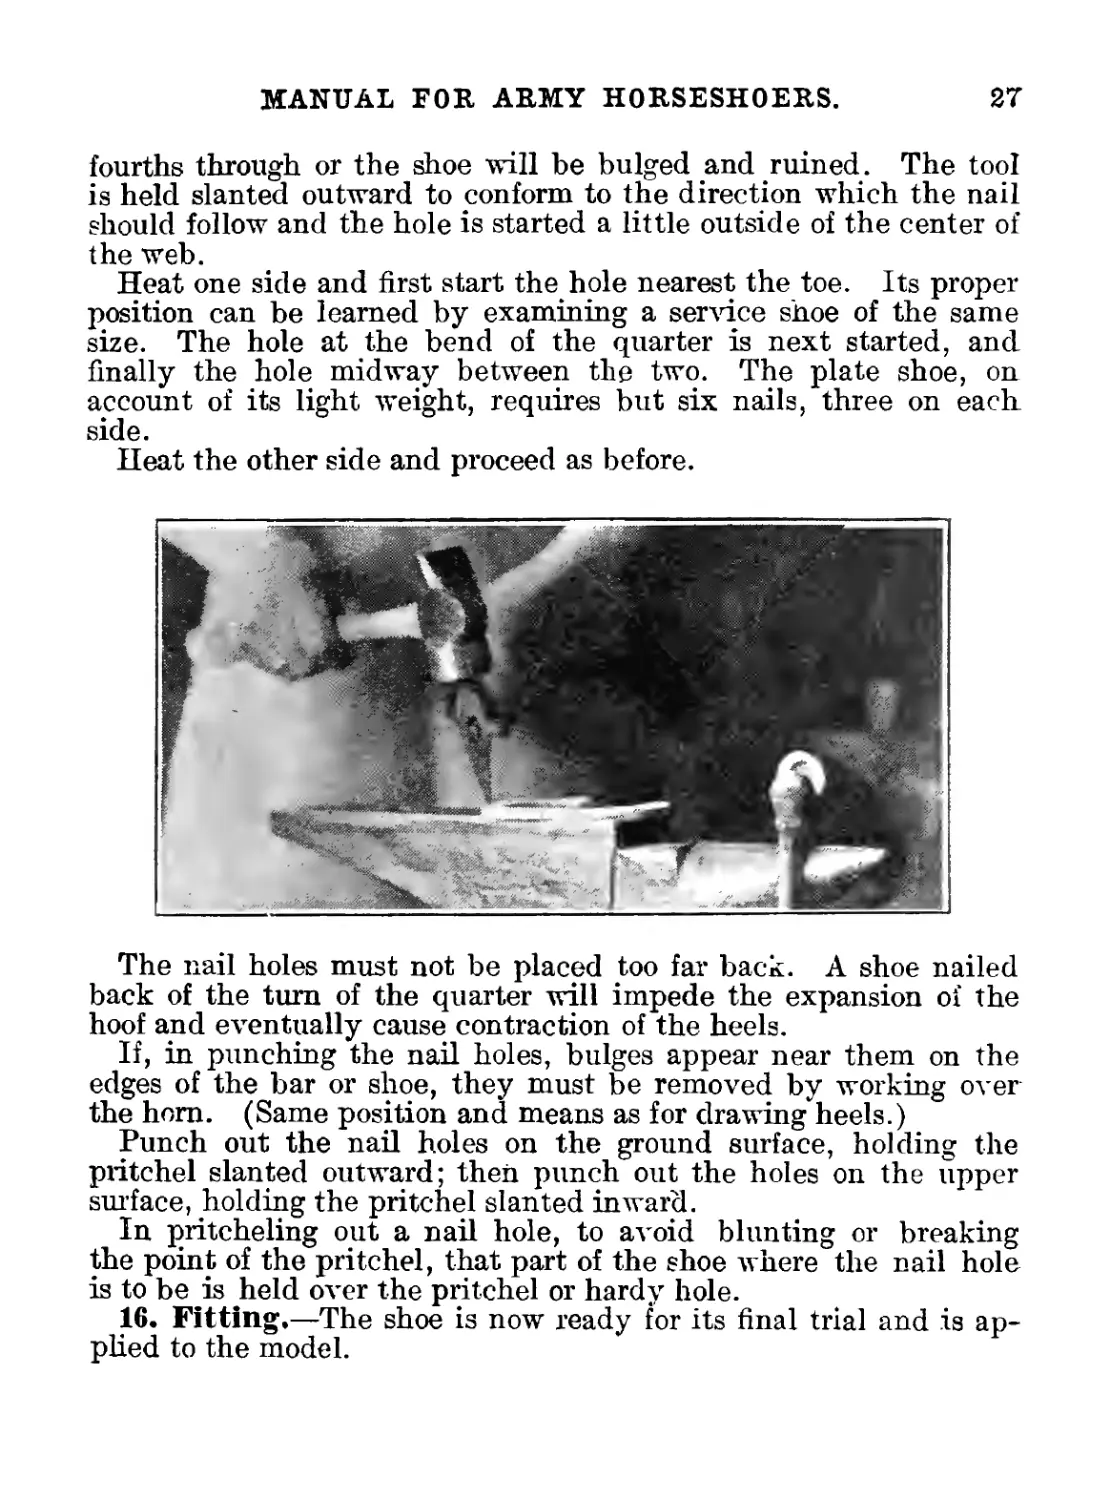
In pritcheling out a nail hole, to avoid blunting or breaking
the point of the pritchel, that part of the shoe where the nail hole
is to be is held over the pritchel or hardv hole.
16. Fitting .—The shoe is now ready for its final trial and is ap-
plied to the model.
28
MANUAL FOB ARMY HORSESHOERS.
If it does not exactly conform to the model, it will have at least
one of the following faults, vhich must be corrected according to
the explanation given in each case.
17. Not level.—To level the shoe, take it with the tongs near the
toe on the far side and examine it by sighting over the upper surface.
If it appears to be crooked, lay it on the face of the anvil in a posi-
tion allowing the highest surface to be struck (par. 9). If, after
remedying this defect, a similar one appears, it must be treated
in the s«,me manner. A crooked shoe will not stay on the foot and
is apt to cause lameness.
29
MANUAL FOR ARMY HORSESHOERS.
/
When leveling the sendee shoe, if it be found necessary to strike
on the ground surface of the shoe, let the blows fall over the crease
in order to avoid spoiling the concave of the upper surface. Special
care, however, must be used to strike a square blow. If the face
of the hammer does not fall evenly, it will dent and close the crease.
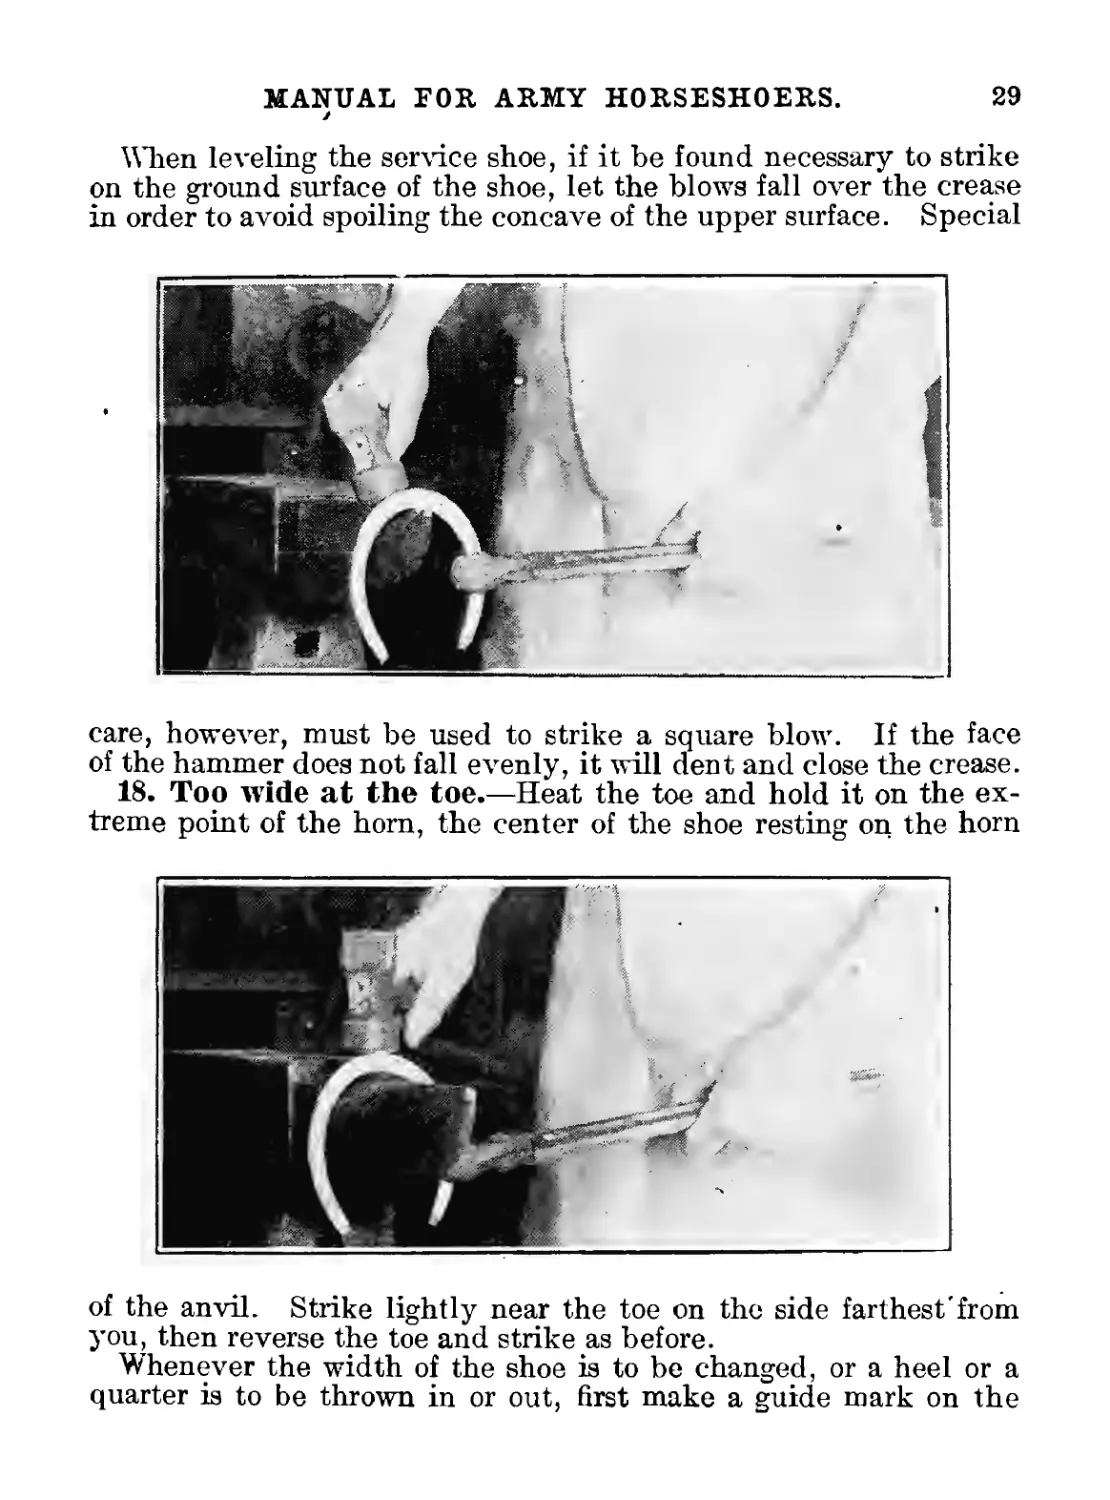
18. Too wide at the toe.—Heat the toe and hold it on the ex-
treme point of the horn, the center of the shoe resting on the horn
of the anvil. Strike lightly near the toe on the side farthest'from
you, then reverse the toe and strike as before.
Whenever the width of the shoe is to be changed, or a heel or a
quarter is to be thrown in or out, first make a guide mark on the
30
MANUAL FOR ARMY HORSESHOERS.
anvil. To do this hold one heel against the edge of the anvil toward
the horn and draw the shoe across the anvil so that the other heel
will make a mark on the face. Repeat this after the change is made
and a comparison of the two marks will show the amount of the
change.
19. Too narrow at the toe.—Heat the toe and hold it on the
horn of the anvil so that there will be a small space between the
shoe and the horn. Strike lightly along the toe, not confining the
blows to any one spot.
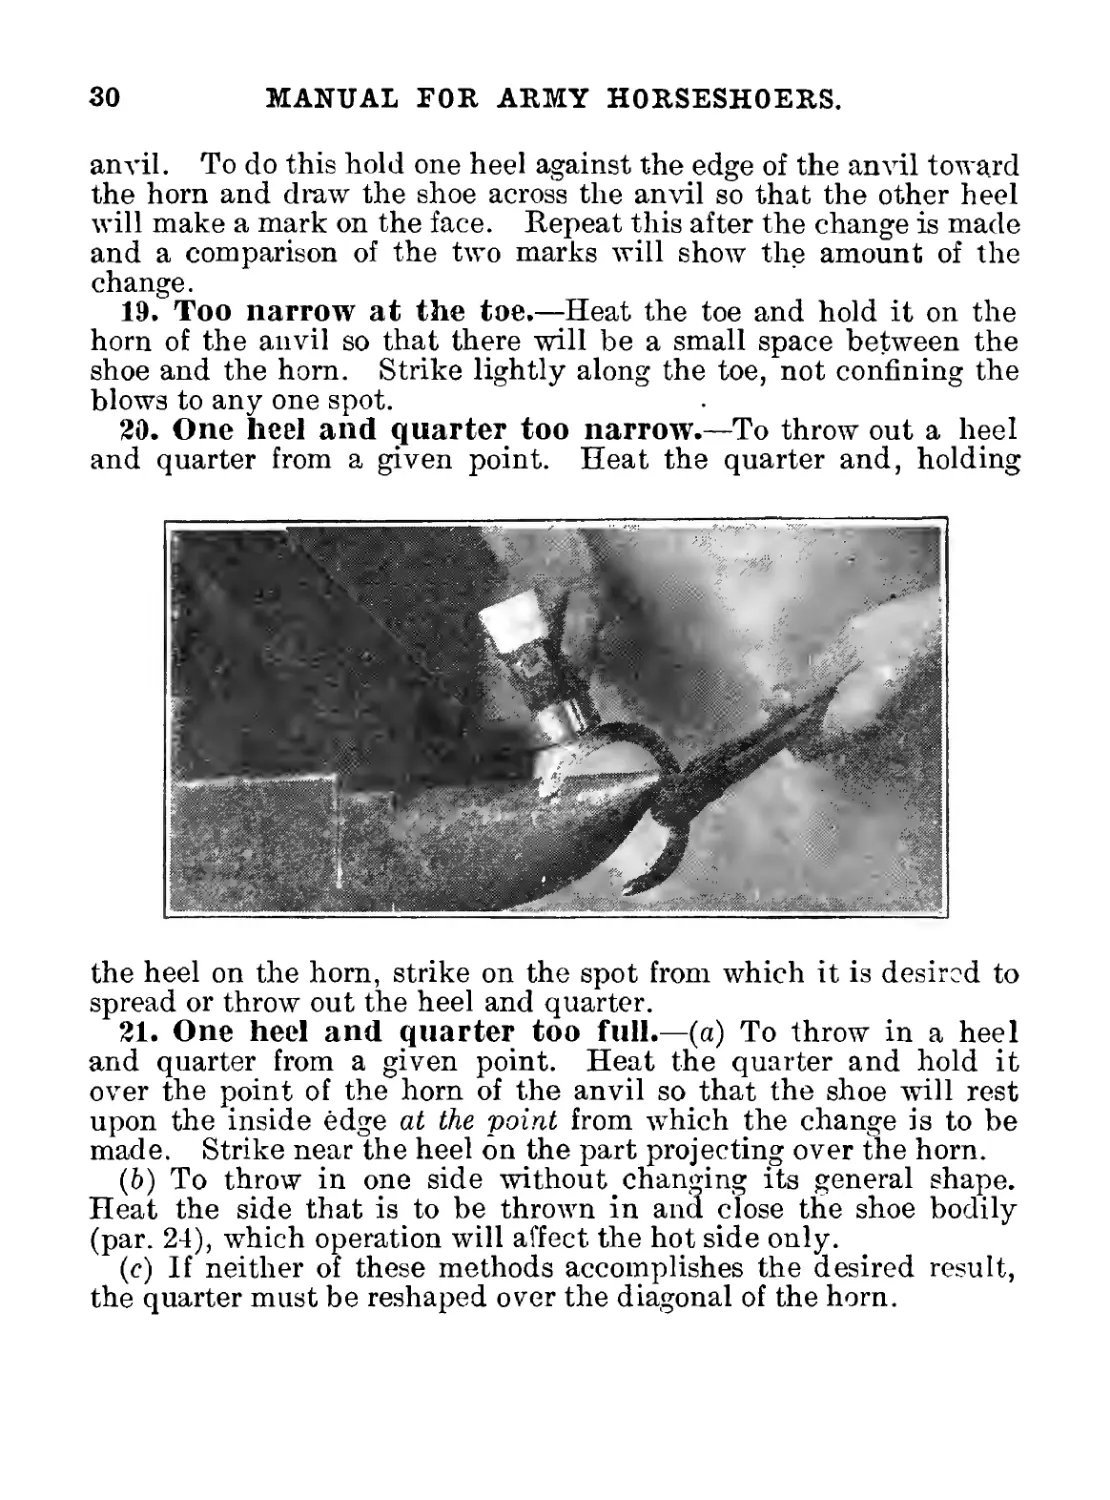
20. One heel and quarter too narrow.—To throw out a heel
and quarter from a given point. Heat the quarter and, holding
the heel on the horn, strike on the spot from which it is desired to
spread or throw out the heel and quarter.
21. One heel and quarter too full.—(a) To throw in a heel
and quarter from a given point. Heat the quarter and hold it
over the point of the horn of the anvil so that the shoe will rest
upon the inside edge at the point from which the change is to be
made. Strike near the heel on the part projecting over the horn.
(6) To throw in one side without changing its general shape.
Heat the side that is to be thrown in and close the shoe bodily
(par. 24), which operation will affect the hot side only.
(c) If neither of these methods accomplishes the desired result,
the quarter must be reshaped over the diagonal of the horn.
MANUAL FOR ARMY HORSESHOERS.
31
22, A bulge in the quarter.—Heat the quarter and hold over
the heel of the anvil. Strike directly over the bulge.
This will remove the bulge, but will also slightly straighten the
quarter, which must later be reshaped.
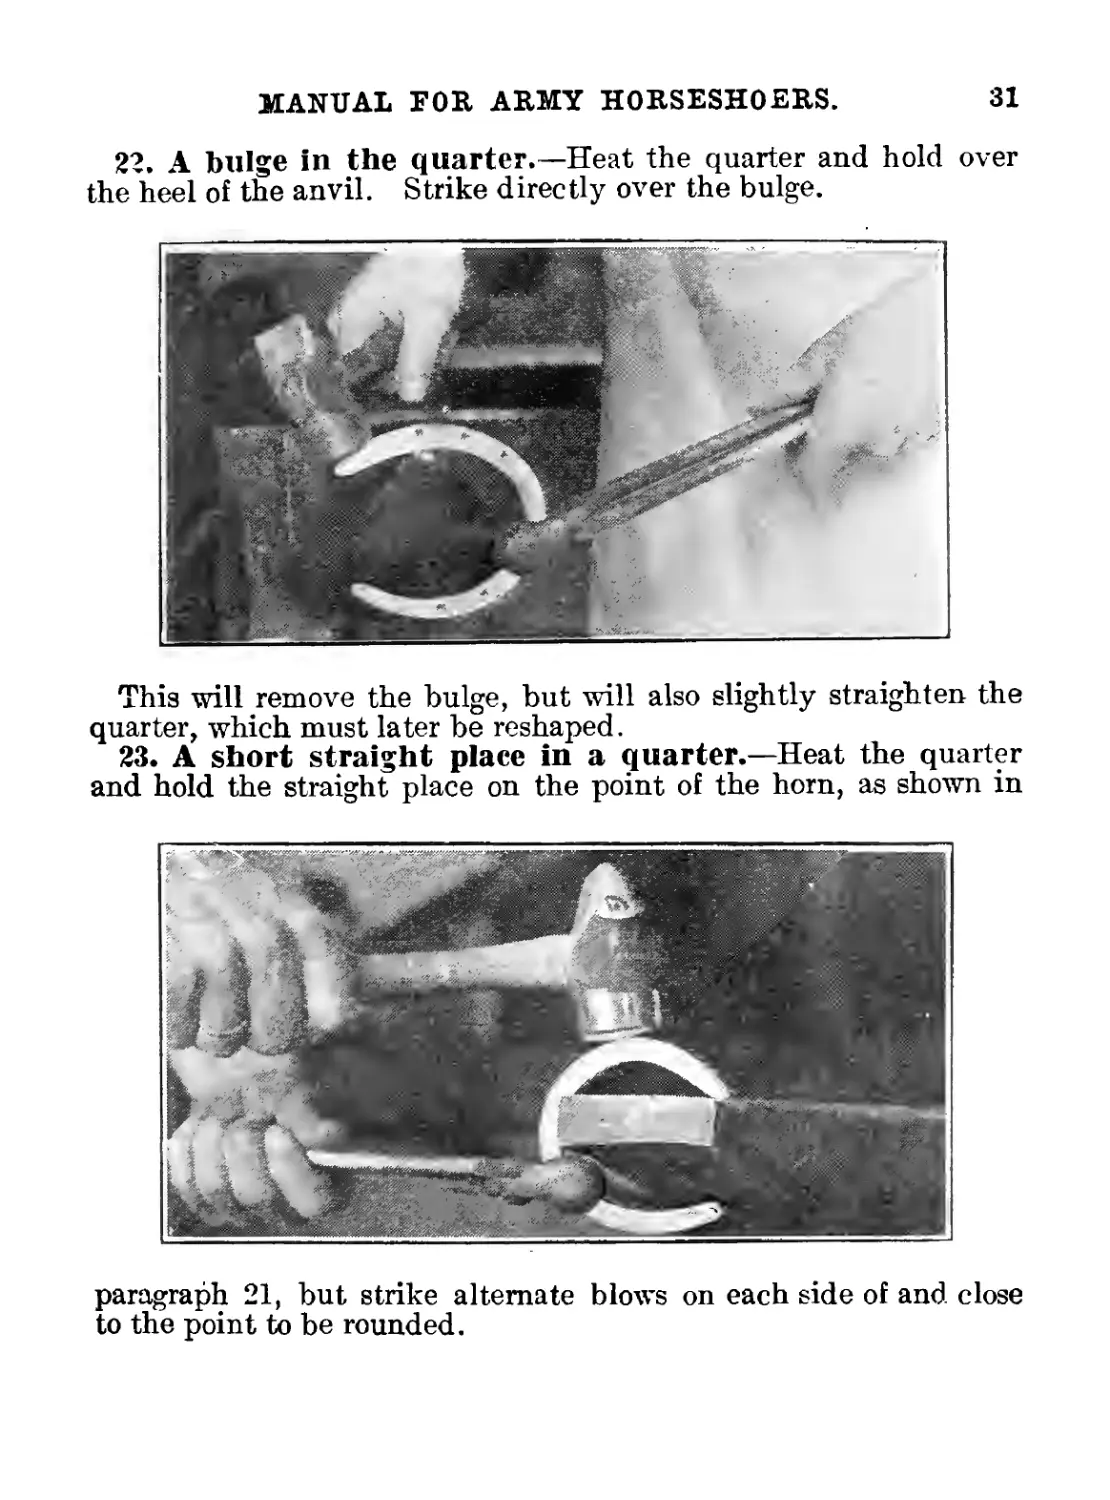
23. A short straight place in a quarter.—Heat the quarter
and hold the straight place on the point of the horn, as shown in
paragraph 21, but strike alternate blows on each side of and close
to the point to be rounded.
32
MANUAL FOR ARMY HORSESHOERS.
24. Both quarters too full (with the general shape correct.)—
Heat the whole shoe and, holding it on edge on the face of the anvil,
strike down on the elevated quarter. This will narrow or close the
shoe, but will not change its general shape.
25. Both quarters too narrow (with the general shape cor-
rect).—Heat the whole shoe and, holding one heel-on the face of the
anvil and one on the side, strike on the toe. This will open or
spread the shoe without changing its general shape.
A perfect fit having been obtained the nail holes are repunched
if necessary, and the whole shoe neatly finished with the rasp.
Plate IV.—Sagittal Section of Digit and Distal Part of Metacarpus of
Horse.
A, Metacarpal bone; B, first phalanx; C, second phalanx; D, third phalanx; E, distal
sesamoid bone; 1, volar pouch of capsule of fetlock Joint; 2, intersesamoidean
ligament; 3, 4, proximal end of digital synovial sheath; 5, ring formed by super-
ficial flexor tendon; 6, fibrous tissue underlying ergot; 7, ergot; 8, 9, 9', branches
of digital vessels; 10, distal ligament of distal sesamoid bone; 11, suspensory liga-
ment of distal sesamoid bone; 12, 12', proximal and-distal ends of bursa podotro-
chlearis. By an oversight the superficial flexor tendon (behind 4) is not marked.
(From Sisson’s Anatomy of the Domestic Animals; copyright, W. B. Saunders Co.)
17722°—17----------3 33
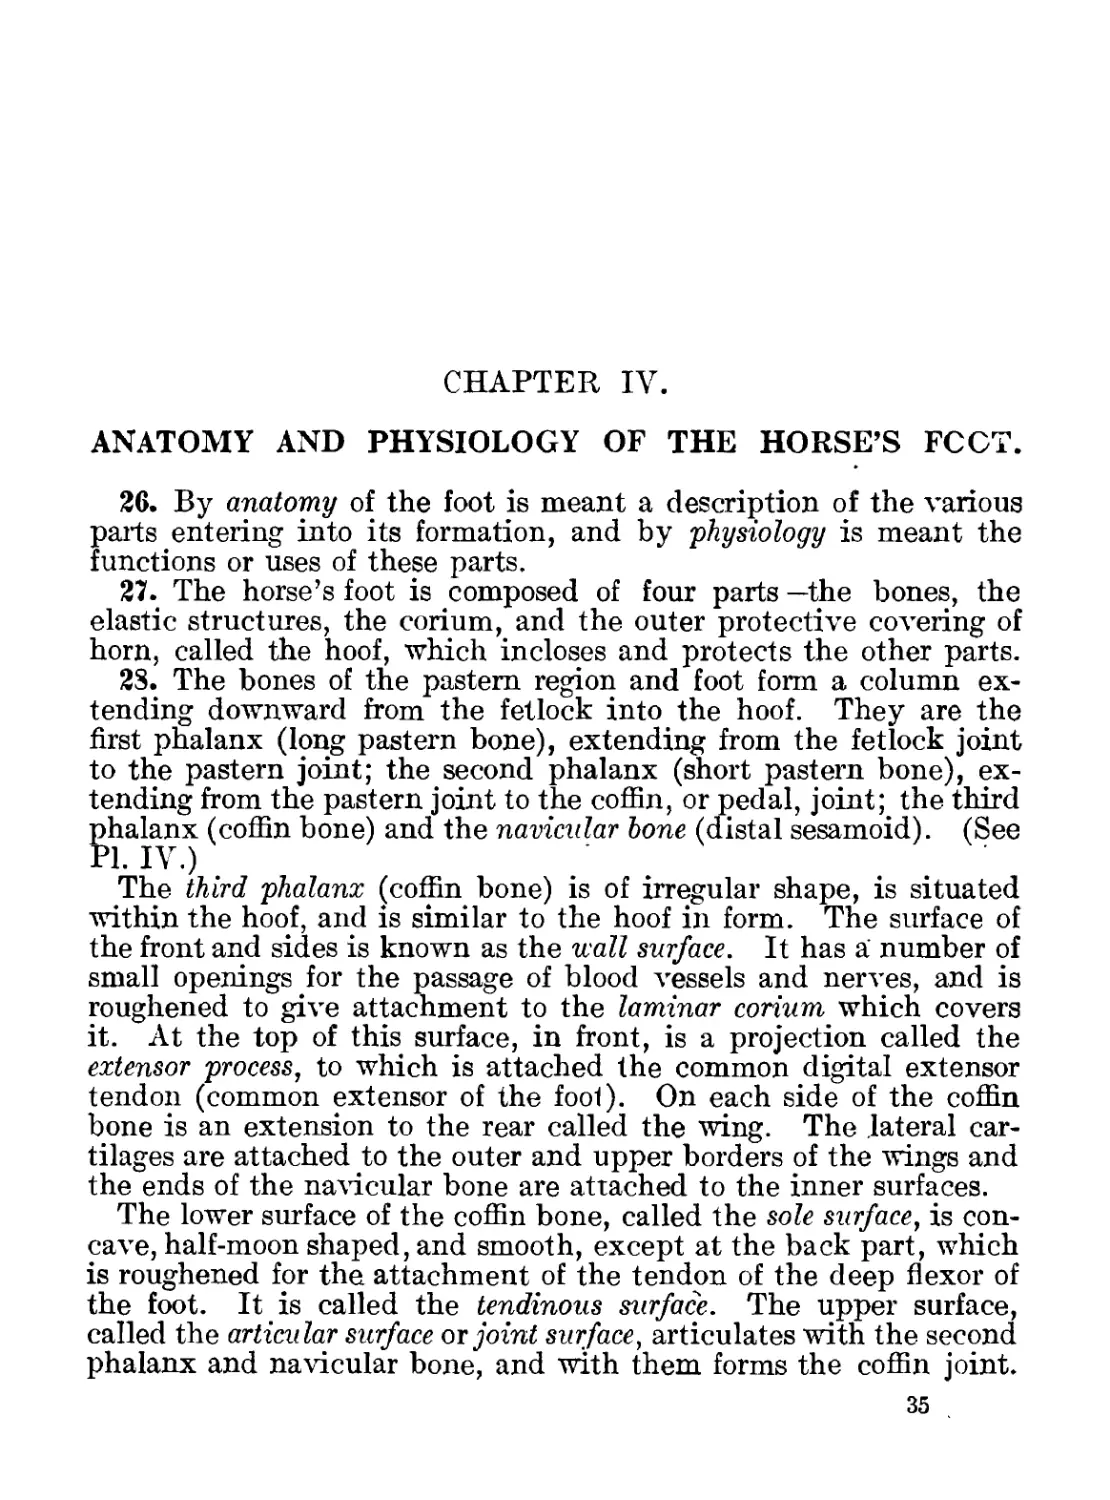
Digital Section of Foot and Pastern.
A, Cannon bone; B, os sufTraginis; C, oscoronae; D, os pedis; E, os navicularis; F fetlock joint; K, collin
joint; P, pastern joint; af extensor pedis tendon; b, flexor pedis perforans tendon; c, flexor pedis pcrfor-
atus tendon; d, sesamoidan ligament; e, capsular ligament; f, articular cartilage; g, perioplic ring;
h, coronary band; j, plantar cushion; k, sensitive frog; m, horny frog; p, periople; q, skin; s, sensitive
sole; t, horny sole; v, sensitive laminae; w, horny wall; w. 1., white line; x, ergot.
CHAPTER IV.
ANATOMY AND PHYSIOLOGY OF THE HORSE’S FOOT.
26. By anatomy of the foot is meant a description of the various
pails entering into its formation, and by physiology is meant the
functions or uses of these parts.
27. The horse’s foot is composed of four parts —the bones, the
elastic structures, the corium, and the outer protective covering of
horn, called the hoof, which incloses and protects the other parts.
28. The bones of the pastern region and foot form a column ex-
tending downward from the fetlock into the hoof. They are the
first phalanx (long pastern bone), extending from the fetlock joint
to the pastern joint; the second phalanx (short pastern bone), ex-
tending from the pastern joint to the coffin, or pedal, joint; the third
phalanx (coffin bone) and the navicular bone (distal sesamoid). (See
Pl. I\ .)
The third phalanx (coffin bone) is of irregular shape, is situated
within the hoof, and is similar to the hoof in form. The surface of
the front and sides is known as the vjqII surface. It has a number of
small openings for the passage of blood vessels and nerves, and is
roughened to give attachment to the laminar corium which covers
it. At the top of this surface, in front, is a projection called the
extensor process, to which is attached the common digital extensor
tendon (common extensor of the fool). On each side of the coffin
bone is an extension to the rear called the wing. The lateral car-
tilages are attached to the outer and upper borders of the wings and
the ends of the navicular bone are attached to the inner surfaces.
The lower surface of the coffin bone, called the sole surface, is con-
cave, half-moon shaped, and smooth, except at the back part, which
is roughened for the attachment of the tendon of the deep flexor of
the foot. It is called the tendinous surface. The upper surface,
called the articular surface or joint surface, articulates with the second
phalanx and navicular bone, and with them forms the coffin joint.
35
36
MANUAL FOR ARMY HORSESHOERS.
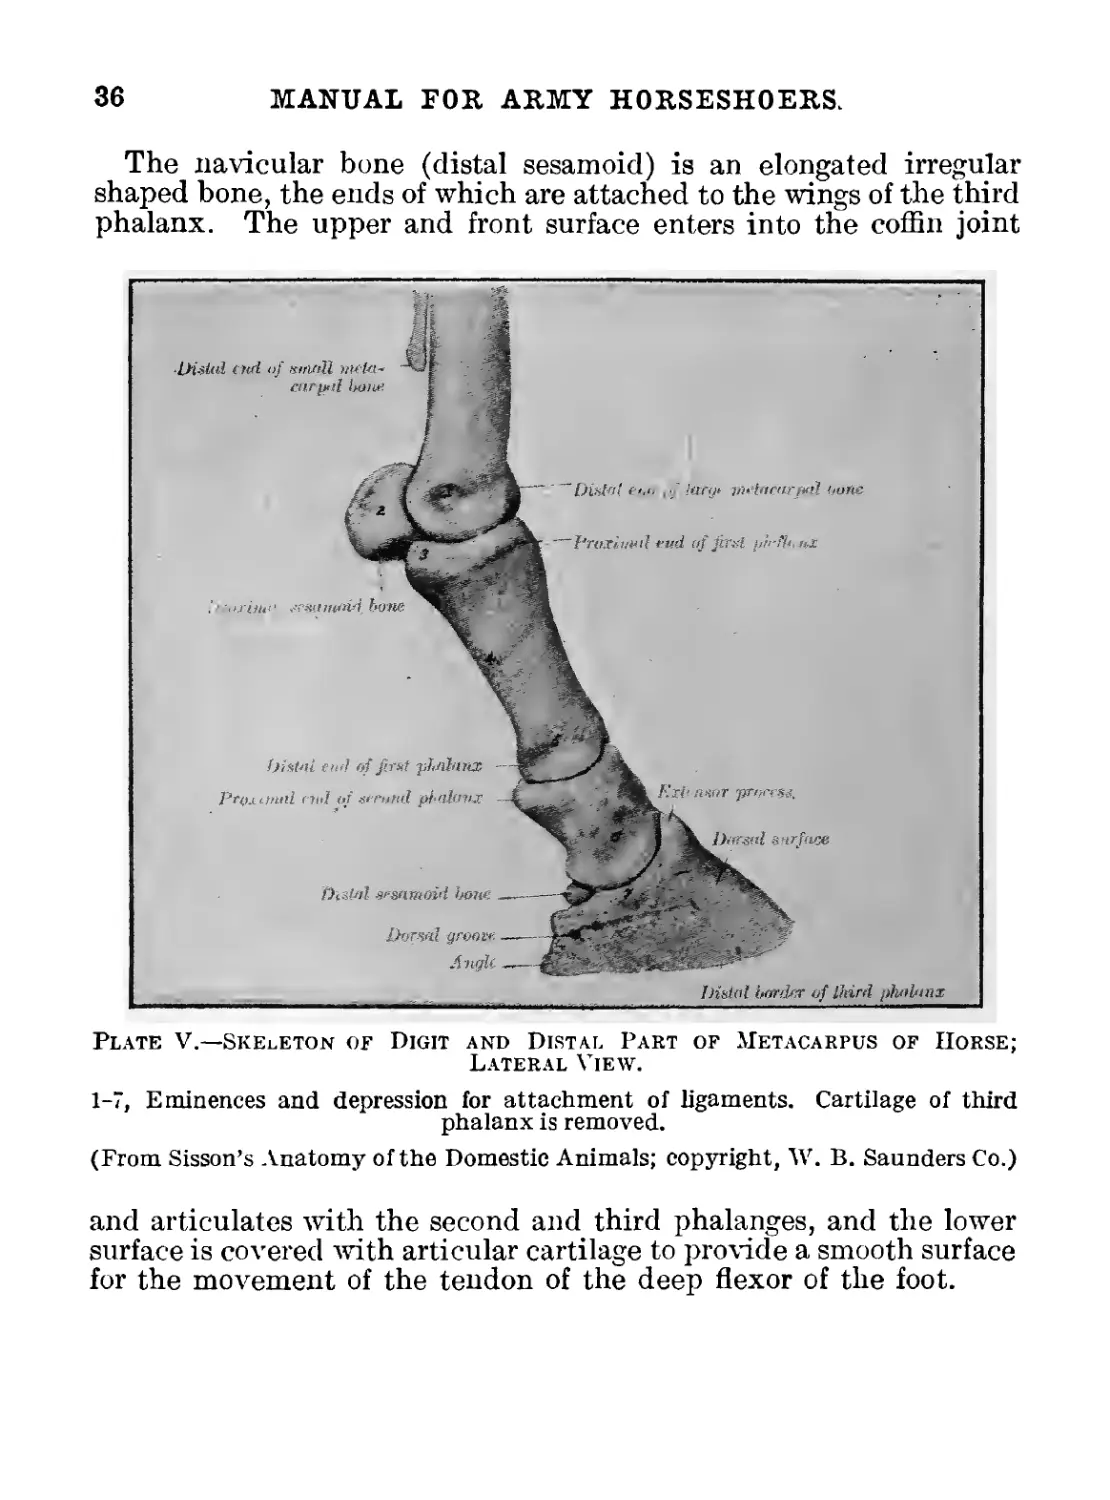
The navicular bone (distal sesamoid) is an elongated irregular
shaped bone, the ends of which are attached to the wings of the third
phalanx. The upper and front surface enters into the coffin joint
Plate V.—Skeleton of Digit and Distal Part of Metacarpus of Horse;
Lateral View.
1-7, Eminences and depression for attachment of ligaments. Cartilage of third
phalanx is removed.
(From Sisson’s Anatomy of the Domestic Animals; copyright, W. B. Saunders Co.)
and articulates with the second and third phalanges, and the lower
surface is covered with articular cartilage to provide a smooth surface
for the movement of the tendon of the deep flexor of the foot.
MANUAL FOR ARMY HORSESHOERS.
37
29. The elastic structures are the cartilages of the third phalanx, also
known as the lateral cartilages and the digital cushion (plantar
cushion, Pls. IV and VI). All parts of the foot, except the bones,
are to a certain extent elastic, but these structures are especially so.
The lateral cartilages are two large elastic plates of cartilage, one
attached to the top of each wing of the third phalanx. They extend
backward and upward so far that their upper borders may be felt
imder the skin above the coronet at the heels.
Plate VI.—Third Phalanx of Horse; Lateral View.
a, b, Anterior and posterior extremities of cartilage.
(From Sisson’s Anatomy of the Domestic Animals; copyright, W. B. Saunders Co.)
The digital cushion (plantar cushion) is a very elastic wedge-shaped
pad, which fills up the space between the lateral cartilages on the
sides, the frog below, and the deep flexor tendon of the foot above.
The point, or front part, of the digital cushion extends forward to
the ridge vhich separates the sole surface from the tendinous surface
of the third phalanx and lies just below the lover end of the deep
flexor tendon. The base, or back part, is covered by the skin above
the heels. If the frog comes in contact with the ground when the
foot is planted, the digital cushion acts as a buffer and prevents jar.
(See Pl. IV.)
38 MANUAL FOR ARMY HORSESHOERS.
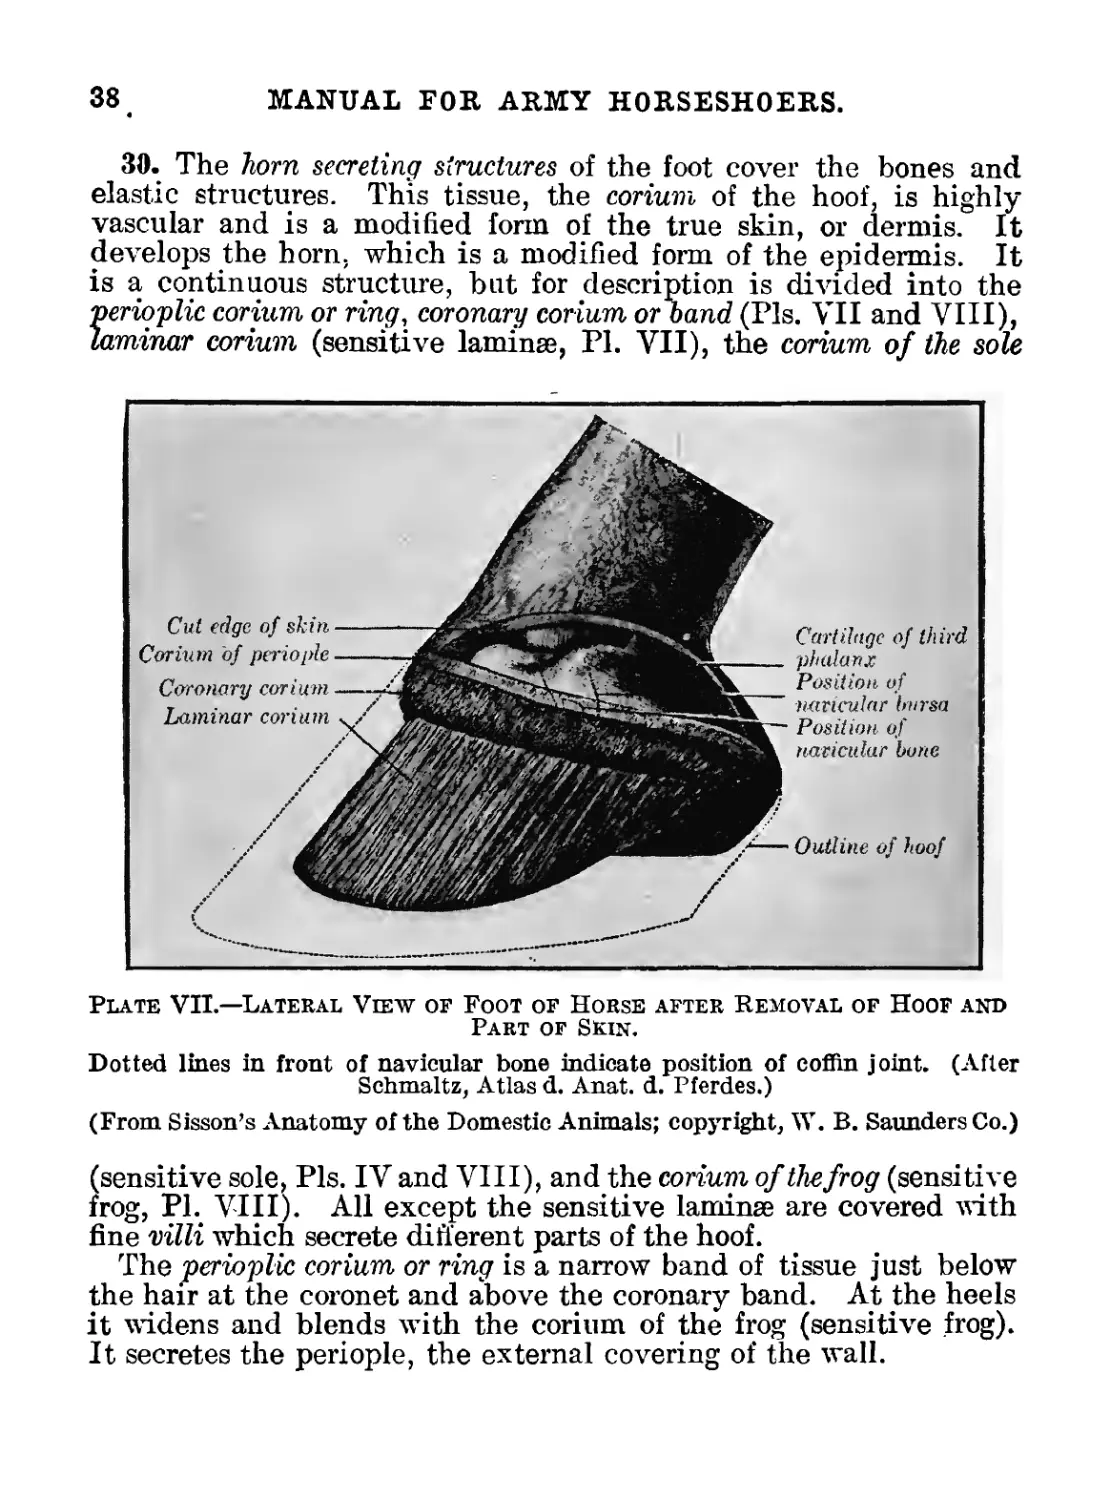
30. The horn secreting structures of the foot cover the bones and
elastic structures. This tissue, the corium of the hoof, is highly
vascular and is a modified form of the true skin, or dermis. It
develops the horn, which is a modified form of the epidermis. It
is a continuous structure, but for description is divided into the
perioplic corium or ring, coronary corium or band (Pls. VII and VIII),
laminar corium (sensitive laminse, Pl. VII), the corium of the sole
Cartilage of third
phalanx
Position of
navicular bursa
Position of
navicular bone
Outline of hoof
Plate VII.—Lateral View of Foot of Horse after Removal of Hoof and
Part of Skin.
Dotted lines in front of navicular bone indicate position of coffin joint. (After
Schmaltz, Atlas d. Anat. d. Pferdes.)
(From Sisson’s Anatomy of the Domestic Animals; copyright, W. B. Saunders Co.)
(sensitive sole, Pls. IV and VIII), and the corium of the frog (sensitive
frog, Pl. VIII). All except the sensitive laminse are covered with
fine villi which secrete different parts of the hoof.
The perioplic corium or ring is a narrow band of tissue just below
the hair at the coronet and above the coronary band. At the heels
it widens and blends with the corium of the frog (sensitive frog).
It secretes the periople, the external covering of the wall.
MANUAL FOR ARMY HORSESHOERS.
39
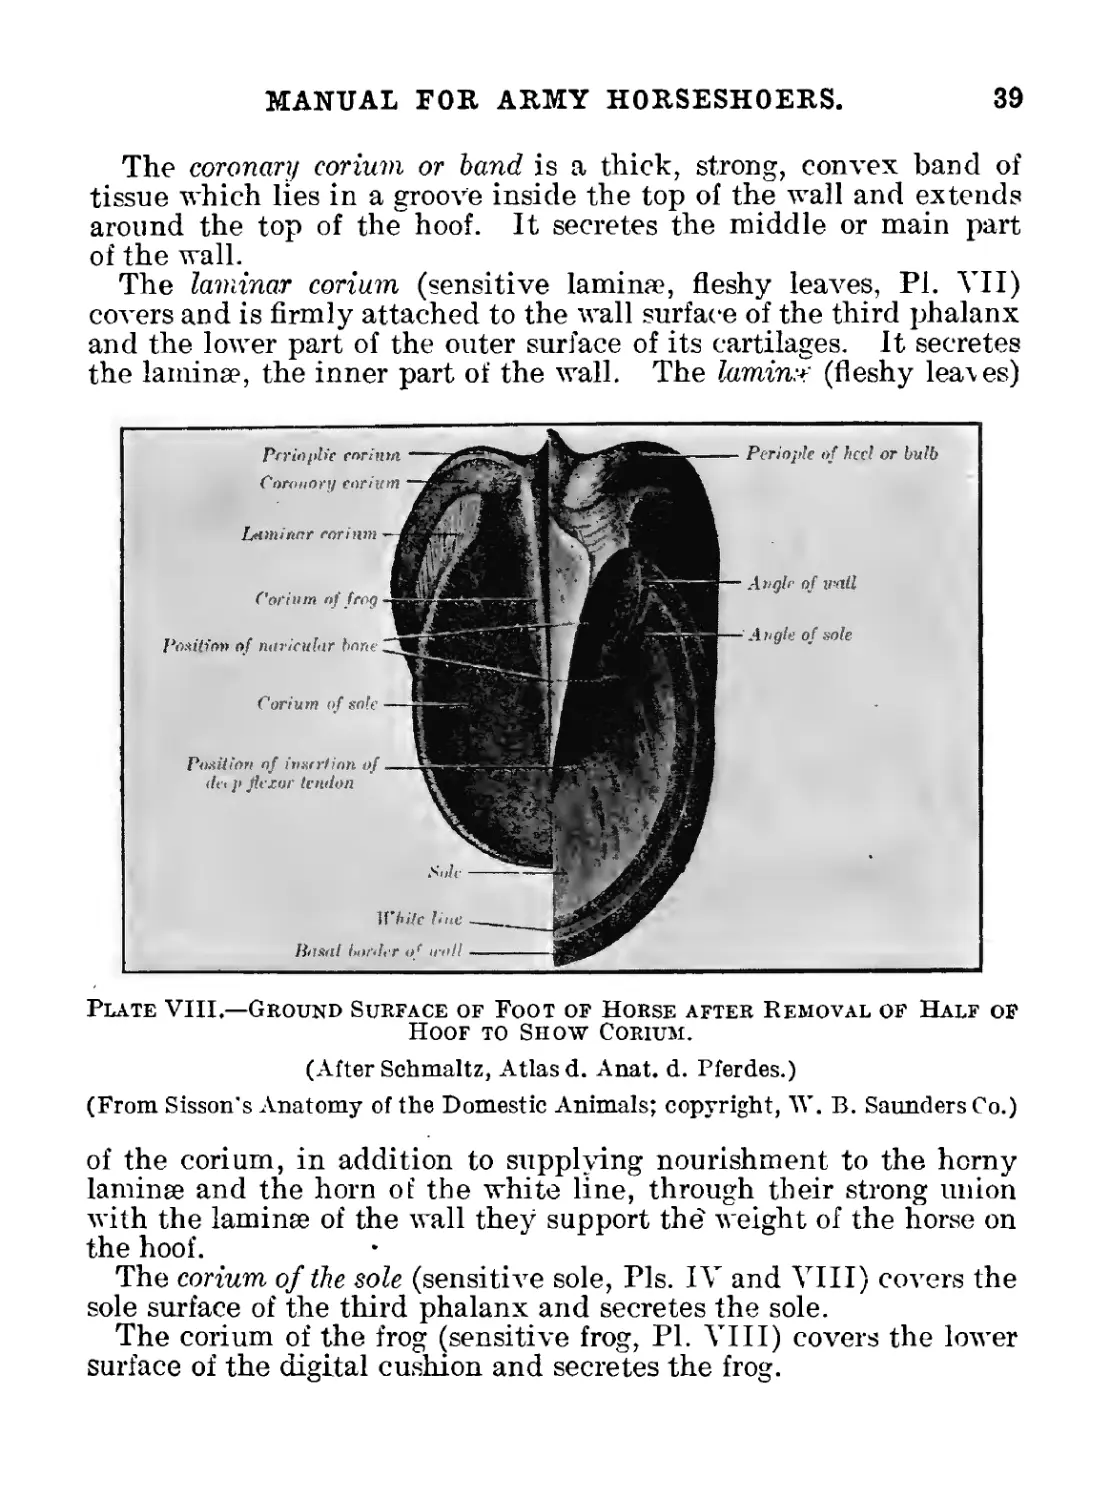
The coronary corium or band is a thick, strong, convex band of
tissue which lies in a groove inside the top of the wall and extends
around the top of the hoof. It secretes the middle or main part
of the wall.
The laminar corium (sensitive lamina?, fleshy leaves, Pl. VII)
covers and is firmly attached to the wall surface of the third phalanx
and the lower part of the outer surface of its cartilages. It secretes
the laminae, the inner part of the wall. The lamin* (fleshy leases)
Plate VIII,—Ground Surface of Foot of Horse after Removal of Half of
Hoof to Show Corium.
(After Schmaltz, Atlas d. Anat. d. Pferdes.)
(From Sisson's Anatomy of the Domestic Animals; copyright, W. B. Saunders Co.)
of the corium, in addition to supplying nourishment to the horny
laminae and the horn of the white line, through their strong union
with the laminae of the wall they support the weight of the horse on
the hoof.
The corium of the sole (sensitive sole, Pls. IV and VIII) covers the
sole surface of the third phalanx and secretes the sole.
The corium of the frog (sensitive frog, Pl. VIII) covers the lower
surface of the digital cushion and secretes the frog.
40
MANUAL FOR ARMY HORSESHOERS.
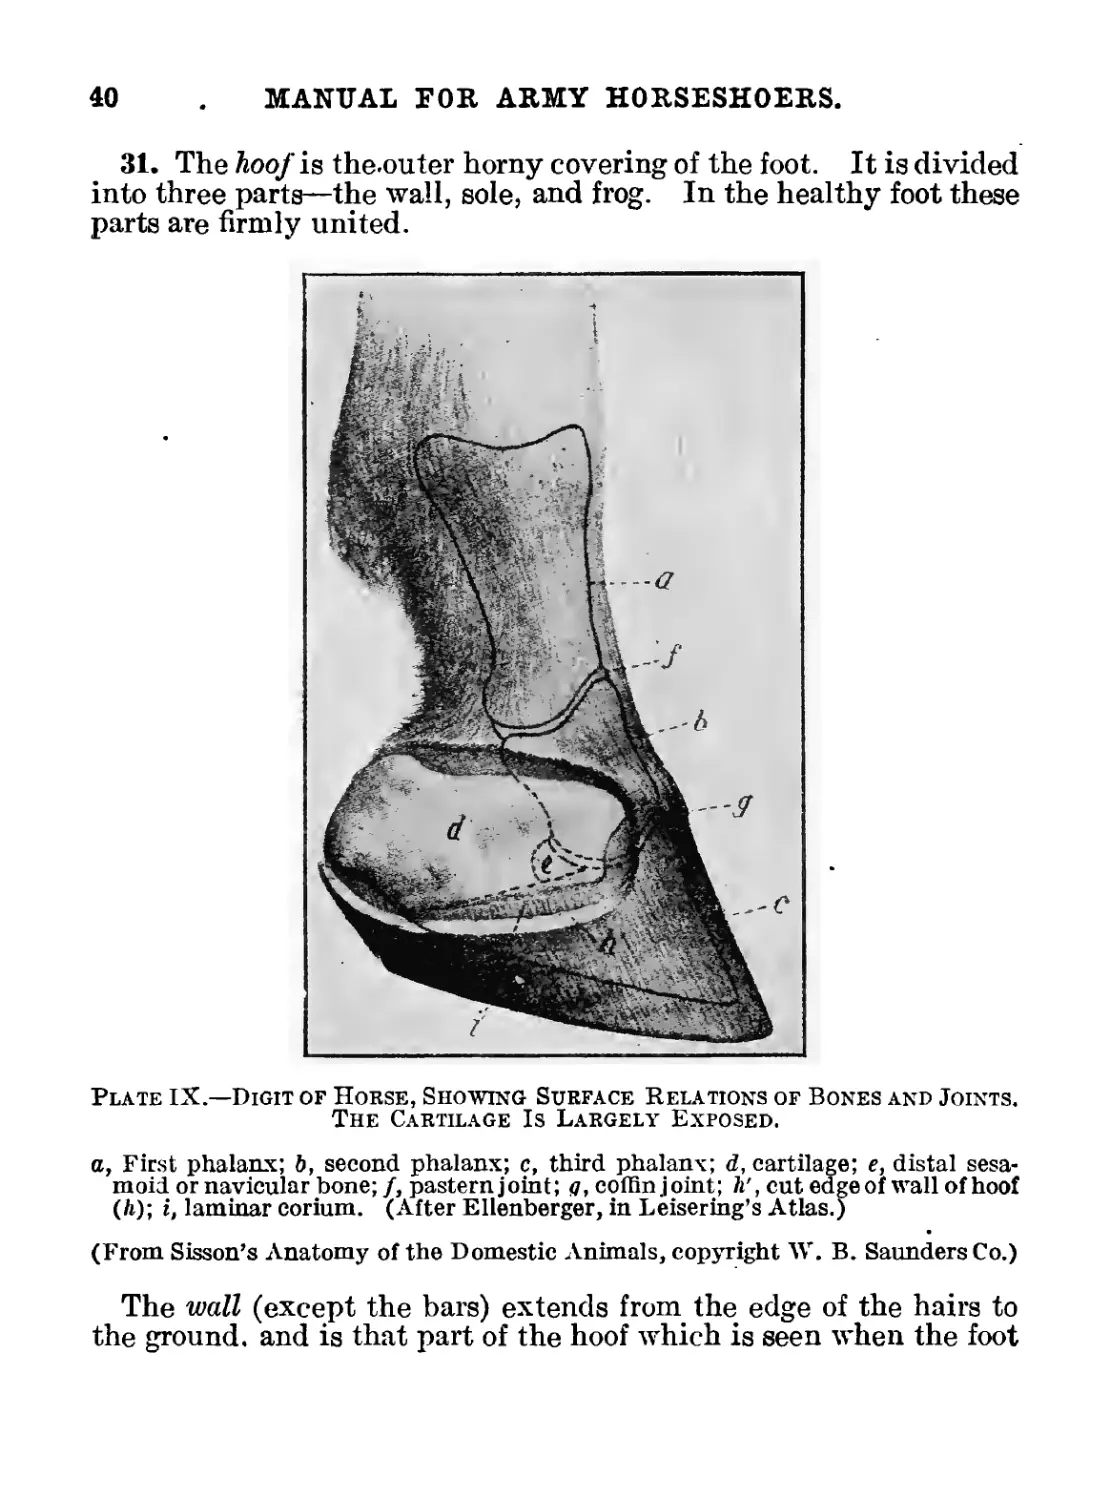
31. The hoof is the.outer horny covering of the foot. It is divided
into three parts—the wall, sole, and frog. In the healthy foot these
parts are firmly united.
Plate IX.—Digit of Horse, Showing Surface Relations of Bones and Joints.
The Cartilage Is Largely Exposed.
a, First phalanx; b, second phalanx; c, third phalanx; d, cartilage; e, distal sesa-
moid or navicular bone; /, pastern joint; <7, coffin joint; h', cut edge of wall of hoof
(й); i, laminar corium. (After Ellenberger, in Leisering’s Atlas.)
(From Sisson’s Anatomy of the Domestic Animals, copyright W. B. Saunders Co.)
The wall (except the bars) extends from the edge of the hairs to
the ground, and is that part of the hoof which is seen when the foot
MANUAL FOB ARMY HORSESHOERS.
41
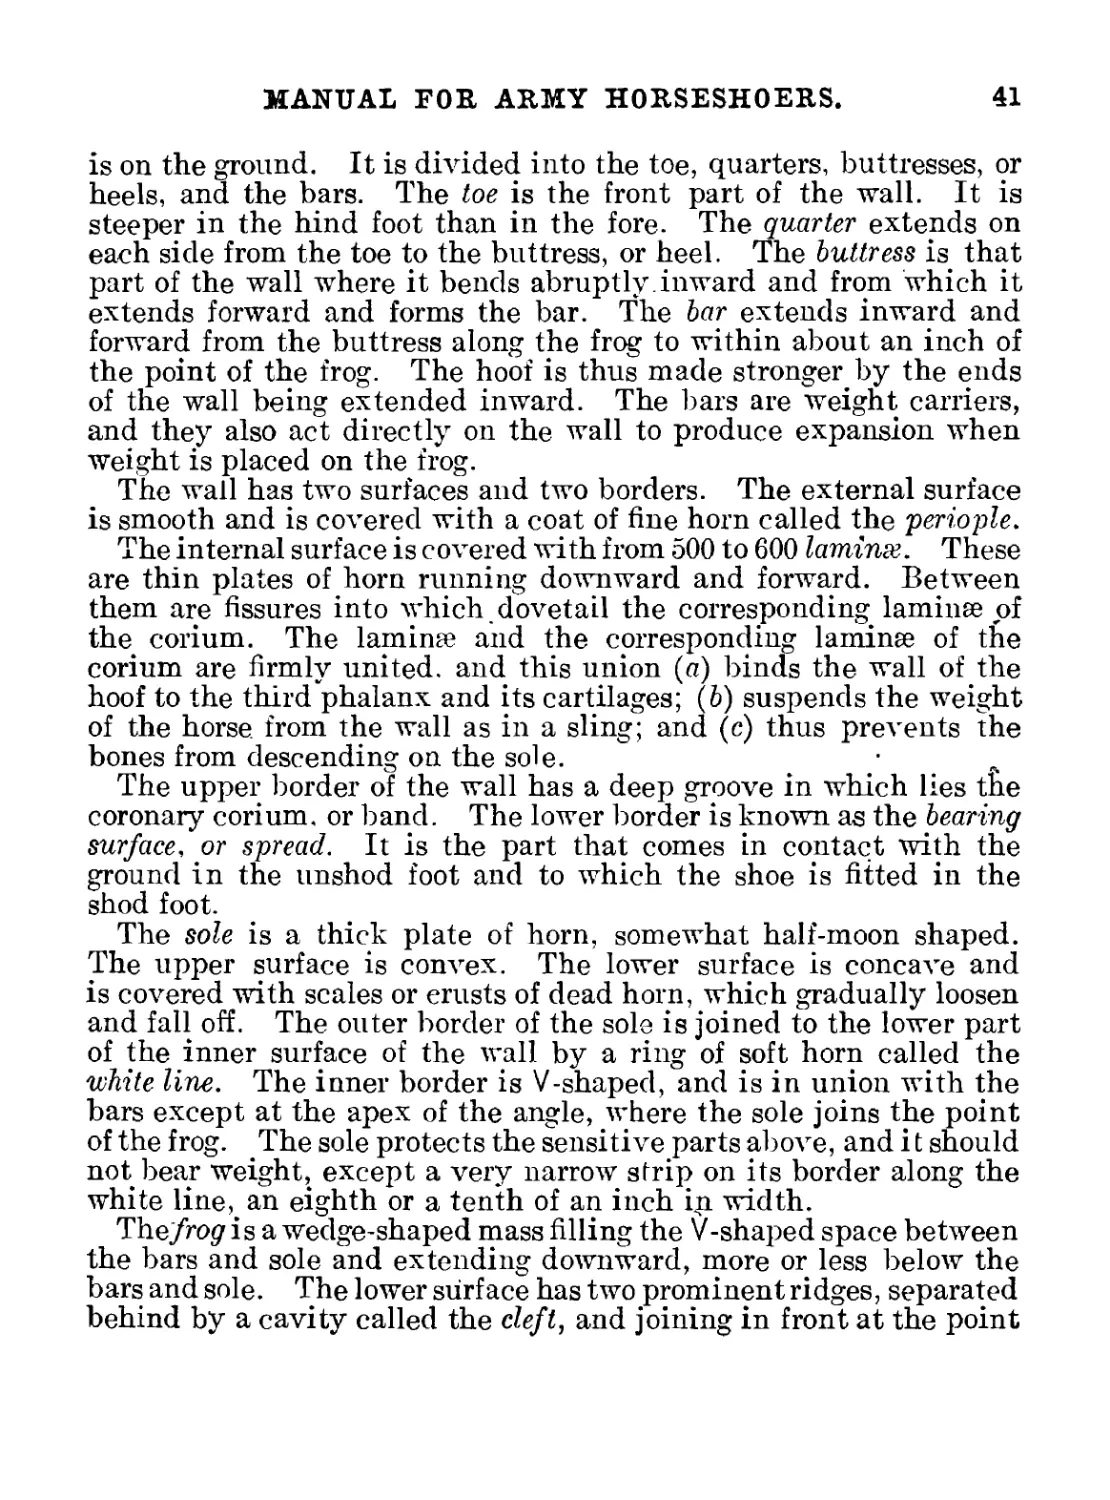
is on the ground. It is divided into the toe, quarters, buttresses, or
heels, and the bars. The toe is the front part of the wall. It is
steeper in the hind foot than in the fore. The quarter extends on
each side from the toe to the buttress, or heel. The buttress is that
part of the wall where it bends abruptly, inward and from which it
extends forward and forms the bar. The bar extends inward and
forward from the buttress along the frog to within about an inch of
the point of the frog. The hoof is thus made stronger by the ends
of the wall being extended inward. The bars are weight carriers,
and they also act directly on the wall to produce expansion when
weight is placed on the frog.
The wall has two surfaces and two borders. The external surface
is smooth and is covered with a coat of fine horn called the periople.
The internal surface is covered with from 500 to 600 laminx. These
are thin plates of horn running downward and forward. Between
them are fissures into which dovetail the corresponding laminee of
the corium. The laminae and the corresponding laminee of the
corium are firmly united, and this union («) binds the wall of the
hoof to the third phalanx and its cartilages; (6) suspends the weight
of the horse, from the wall as in a sling; and (c) thus prevents the
bones from descending on the sole. •
The upper border of the wall has a deep groove in which lies the
coronary corium. or band. The lower border is known as the bearing
surface, or spread. It is the part that comes in contact with the
ground in the unshod foot and to which the shoe is fitted in the
shod foot.
The sole is a thick plate of horn, somewhat half-moon shaped.
The upper surface is convex. The lower surface is concave and
is covered with scales or erusts of dead horn, which gradually loosen
and fall off. The outer border of the sole is joined to the lower part
of the inner surface of the wall by a ring of soft horn called the
'white line. The inner border is V-shaped, and is in union with the
bars except at the apex of the angle, where the sole joins the point
of the frog. The sole protects the sensitive parts above, and i t should
not bear weight, except a very narrow strip on its border along the
white line, an eighth or a tenth of an inch ip width.
The/ro^ is a wedge-shaped mass filling the V-shaped space between
the bars and sole and extending downward, more or less below the
bars and sole. The lower surface has two prominent ridges, separated
behind by a cavity called the cleft, and joining in front at the point
42
MANUAL FOR ARMY HORSESHOERS.
of the frog. These ridges terminate behind in the bulbs of the hoof.
Between the sides of the frog and the bars are two cavities called the
commissures.
The upper surface of the frog is the exact reverse of the lower. It
has in the middle a ridge of horn called the frog stay, which assists
in forming a firm union between the frog and the frog corium.
The function of the frog is to assist the digital cushion in breaking
the jar or concussion, to prevent slipping and to produce expansion
and contraction upon which normal blood circulation in the foot
depends. (See pars. 33 and 34.)
STRUCTURE OF HORN.
32. The horn of the hoof consists of fine fibers, similar to the hair in
structure, held together by a cementing substance, The horn fibers
run downward and forward and are straight in the wall and sole and
wavy in the' frog. The fibers of the frog are finer, softer, and more
elastic than those of the wall and sole.
The wall wears away at the lower border, or, if the animal is shod,
the growth is removed in preparation for shoeing. The sole and frog
scale off when the fibers have reached the proper length; they should
not be cut except when necessary in the treatment of a diseased
condition.
moisture.
33. The wall of the healthy hoof is, by weight, about one-fourth
water, the sole more than one-third, and the frog almost one-half.
This water is supplied by the blood and preserves the horn in a
tough and elastic condition. The periople, which covers the wall,
prevents the evaporation of water, and therefore should never be
rasped. As there is no similar covering for the sole and the frog,
the layers of horn on their exposed surfaces dry out and die. The
dead layers are hard and brittle, and gradually fall or flake off; but,
as they preserve the moisture in the layers of live horn beneath, as
little as possible should be removed in preparing the hoof for
shoeing.
EXPANSION AND CONTRACTION.
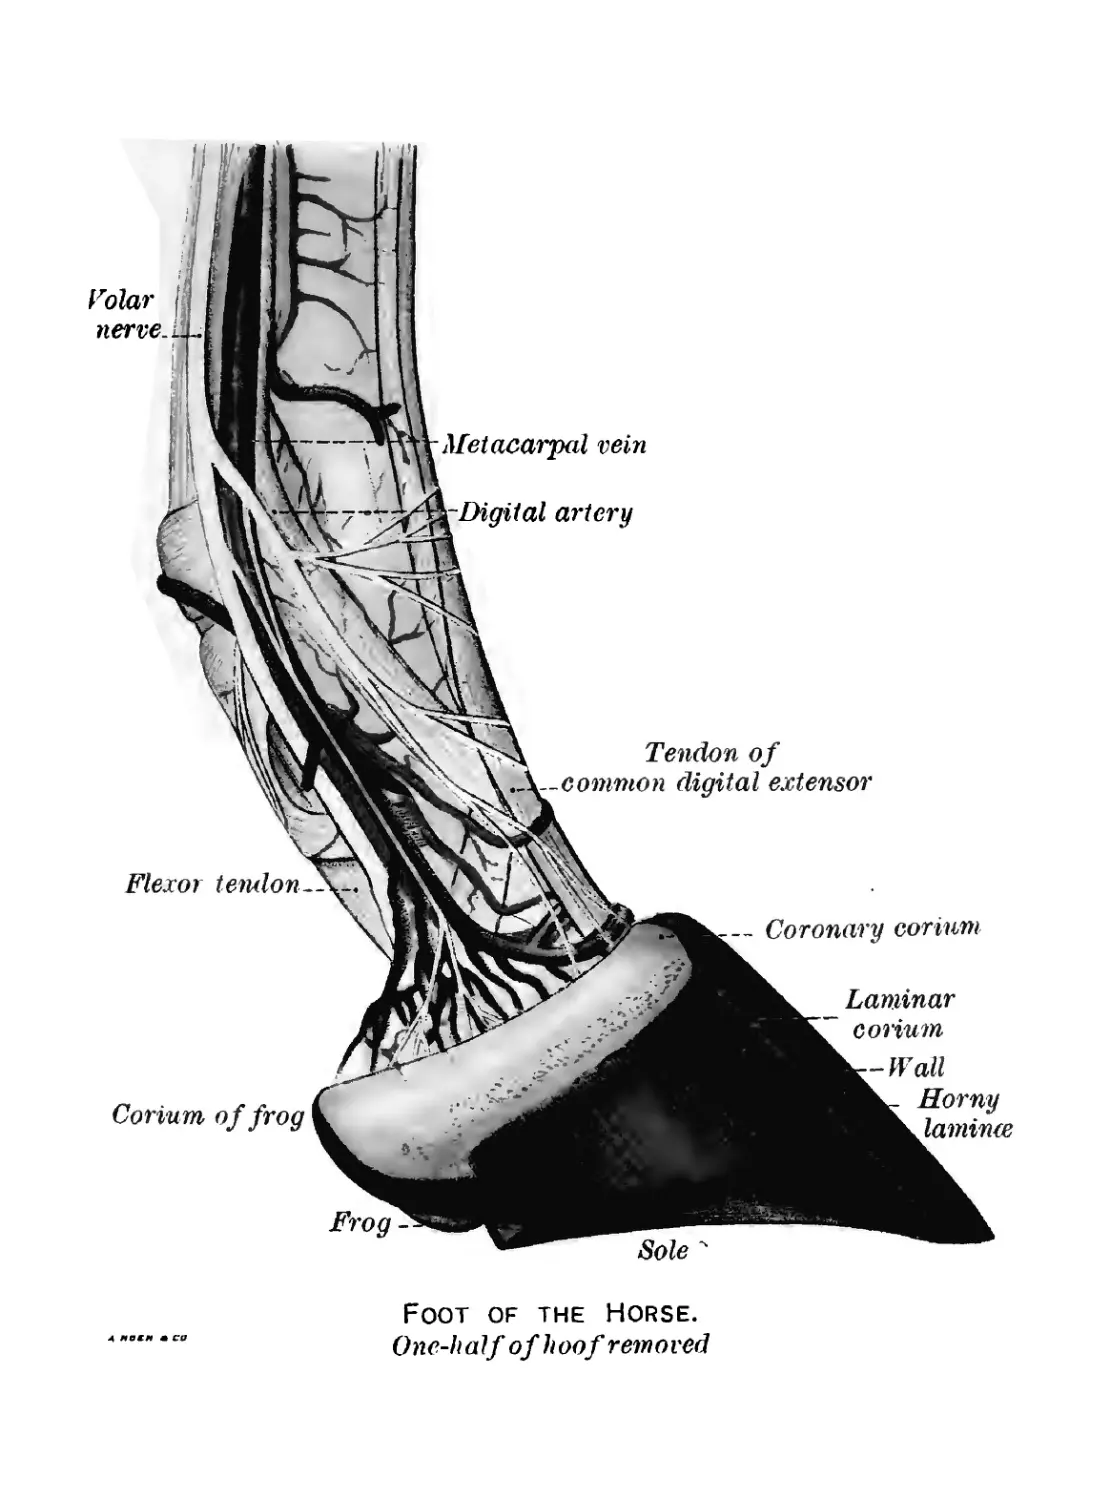
34. When the foot is placed on the ground the frog comes in
contact with the ground and is forced upward, compressing the
digital cushion against the deep flexor tendon and the bony frame-
Plate X.—Right Fore Hoof of Horse; Ground Surface.
1. Basal or ground border of wall; 2, laminae of wall; 3, angle of wall; 4,bar; 5,sole;
5', angle of sole; 6, white line (junction of wall and sole); 7, apex of frog; 8, central
sulcus of frog; 9,9, collateral sulci between frog and bars; 10,10, bulbs of hoof.
(From Sisson’s Anatomy of the Domestic Animals, copyright W. B. Saunders Co.)
43
44 MANUAL FOR ARMY HORSESHOERS.
work above. This compression causes the digital cushion and frog
to spread out to the sides, pressing outward energetically the carti-
lages, the bars, and the walls at the heels and quarters. This is
called expansion. It does not occur in a foot so shod that the frog
can not come in contact with the ground.
When the weight is removed from the foot the digital cushion and
frog return to their normal shape, allowing the cartilages and the
quarters to return to their original positions. This is called contrac-
tion. Upon the alternate displacing and returning of these parts of
the foot, nature relies for necessary beneficial effects.
This expansion and contraction diminish the jar to the foot and
leg. The action is increased as the horse increases his gait. This
action also assists in the circulation of the blood through the foot.
When expansion occurs the blood is forced out of the veins in the
digital cushion up into the pastern region, where the valves prevent
its return to the foot. When contraction occurs and the parts
resume their normal positions fresh blood is drawn from the arteries
for the nourishment of the tissues of the foot. For this reason the
horse should have daily exercise to give the tissues of the foot their
proper nourishment. "When the horse is taken out to work he should
be walked at first to allow the circulation to adjust itself to the
change from rest to work.
Foot of the Horse.
One-half of hoof removed
CHAPTER V.
NORMAL SHOEING.
By normal shoeing is meant the shoeing cf a sound foot of a
horse with proper gaits.
RAISING THE FOOT.
35. In preparing to raise a horse’s foot never approach the animal
suddenly, for he will not only be startled, but a sudden pull at his
foot will probably disturb his balance, and the lifting will be more
difficult for both man and horse.
To raise the forefoot, the shoer stands with his back to the horse’s
head and places his inside hand on the horse’s shoulder. Then,
bending over, he runs his hand gently down the back of the leg
until the fingers, with the thumb on the outside, are just above
the fetlock. The shoer’s shoulder is pressed against the shoulder
of the horse, forcing the weight upon the other fore foot. (Pl. XII,
fig. 1.) A slight grasp of the hand on the tendons is usually suffi-
cient to induce the horse to raise the foot.
The shoer next straddles the horse's leg and holds the foot upon
his knees, standing so that his body is about opposite the horse’s
shoulder, and in close to him, so that the horse's leg is not pulled
outward in a strained position. The shoer’s toes should be turned
in to give strength to the position. (Pl. XII, fig. 2.)
36. Raising the hind foot is performed in two different ways. In
the first method the shoer, standing at the horse’s flank and with
his back to the animal’s head, bends until his shoulder presses the
horse’s thigh, runs his hand gradually down the tendons and grasps
them as in raising the forefoot. In the second method, the one
generally employed, the .shoer stands as in the first method, but
with his outside foot advanced (Pl. XIII, fig? 1); the hand nearest
the horse is placed upon the animal's hip, gently pushing him over
and forcing the weight upon the opposite hind foot; meanwhile
the other hand is run slowly down the back tendons from below
45
Plate XII.—Raising the Foot.
46
Plate XIII.—Raising the Foot.
47
48 MANUAL FOR ARMY HORSESHOERS.
the hock. The leg is grasped under the fetlock and is slightly
raised forward. The shoer now swings his inside leg under the horse’s
leg (Pl. XIII, fig. 2), presses it with his knee and extends it to the
rear to the position shown in Plate XIII, figure 3. Care must be
exercised that the foot is not held too high nor carried too far to the
rear or outward,.for the discomforts of these strained positions will
induce the horse to pull his leg away.
PRELIMINARY EXAMINATIONS.
37. Three careful examinations should be made before old shoes
are removed from the horse:
1. Of the action of the feet when the horse is in motion.
2. Of the shape and position of the feet at rest.
3. Of the evidence of wear on the old shoe.
For the first examination, the horse having free use of his head,
should be led at a walk and at a slow trot upon level ground. Uneven
ground will produce modifications of the natural gait, and a tight
rein or a short hold on the halter shank will also alter the free, natural
motion. The shoer assumes a squatting position and observes the
feet as the horse is led past him, away from him, and toward him.
The manner in which a foot leaves the ground, its path in the air,
and the manner in which it is planted should be closely watched
in order to detect any of the defects of gait which can be remedied
by intelligent shoeing. (See Chapter VI.)
38. For the second examination, the horse should stand at ease
on the floor; the shajoe of each foot and leg should be observed from
the front, from each side, and from the rear, care being exercised that
the leg, at the time, is bearing its proper share of the animal’s weight.
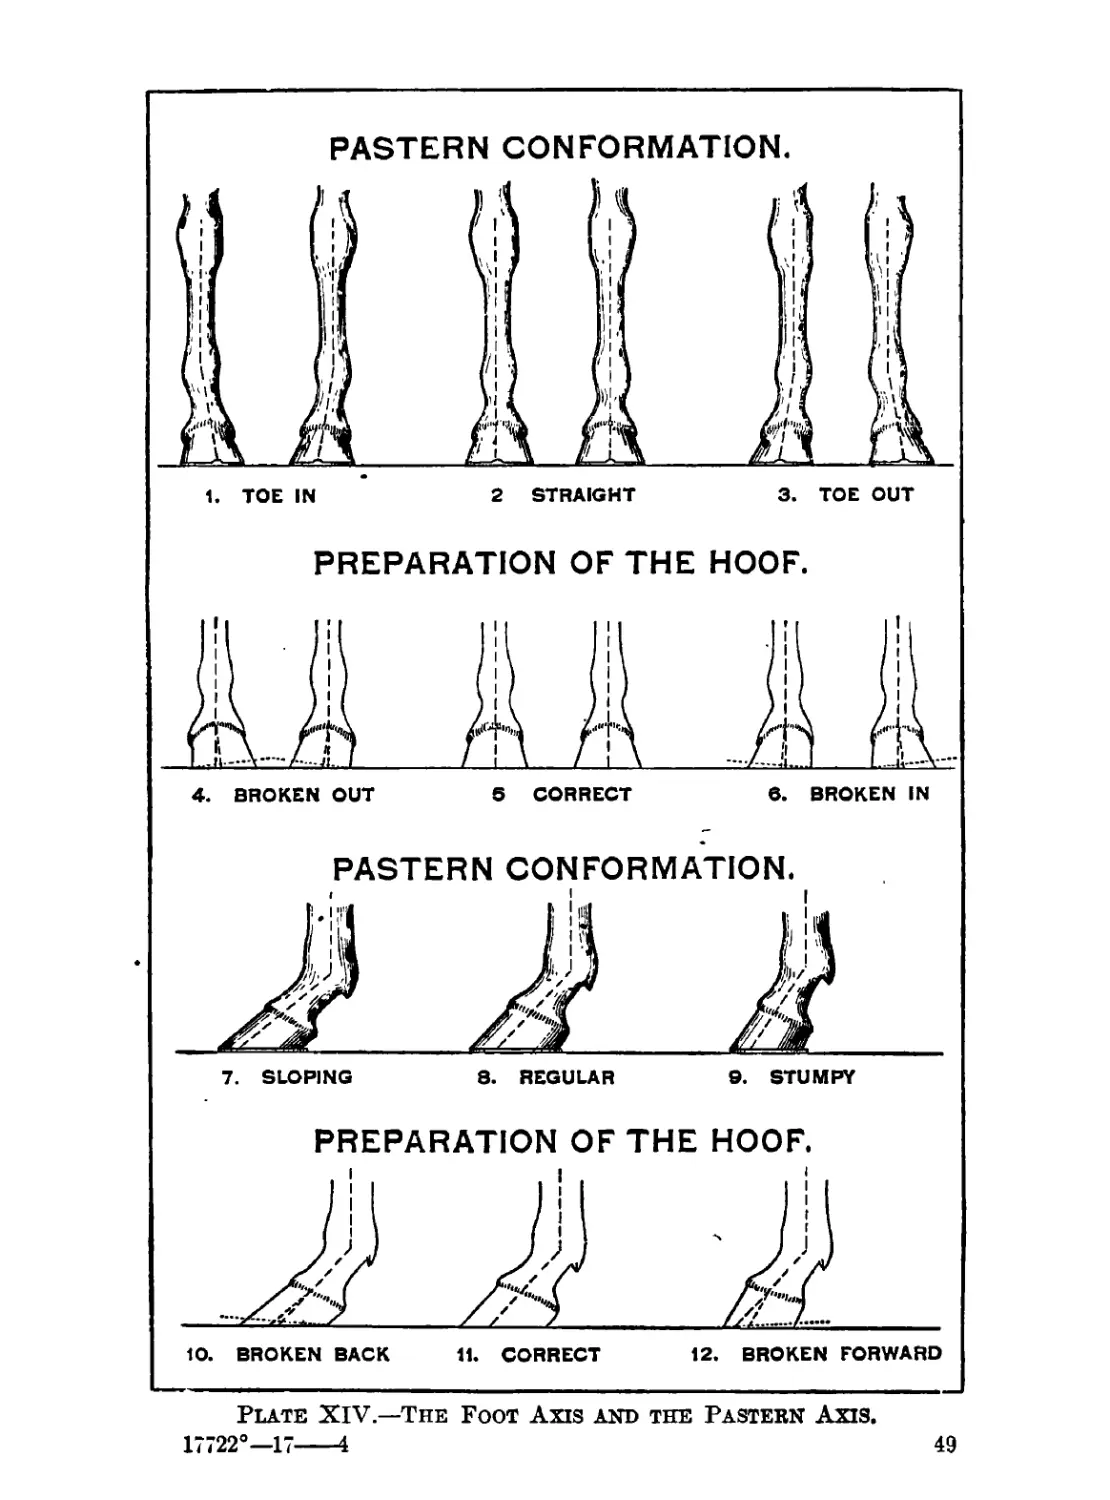
The shoer first studies the natural pastern conformation. Is. the
pastern slanting inward (toe in), is it vertical (straight), or is it
sloping outward (toe out)? (Pl. XIV, figs. 1, 2, and 3.)
Having decided this point, he then studies the position of the
“pastern axis” and the “foot axis.”
As seen from the front we may consider that the “pastern axis”
is the imaginary line exactly splitting the long pastern in two, and
that the “foot axis” is the line exactly splitting the foot in two;
that is, the line from the center of the toe to the center of the coronet.
(The foot axis may be drawn on the hoof wall in chalk.)
PASTERN CONFORMATION.
1. TOE IN 2 STRAIGHT 3. TOE OUT
PREPARATION OF THE HOOF.
4. BROKEN OUT 5 CORRECT 6. BROKEN IN
PASTERN CONFORMATION.
7. SLOPING 8. REGULAR 9. STUMPY
PREPARATION OF THE HOOF.
10. BROKEN BACK 11. CORRECT 12. BROKEN FORWARD
Plate XIV—The Foot Axis and the Pastebn Axis.
49
50
MANUAL FOR ARMY HORSESHOERS.
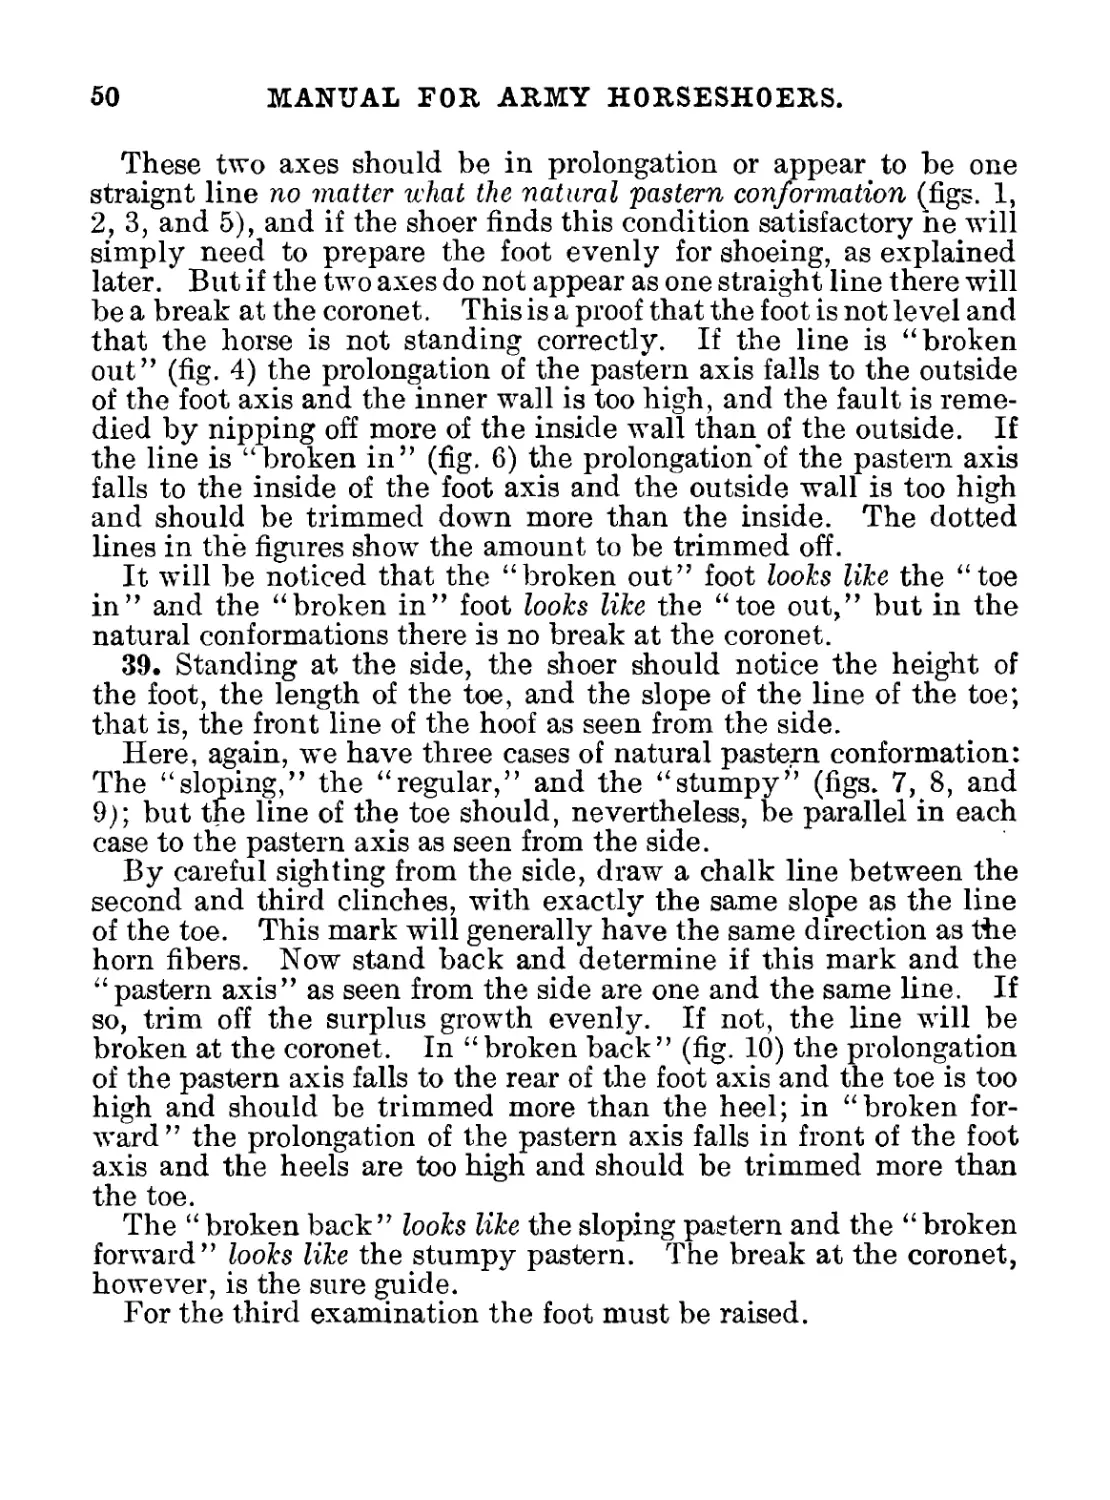
These two axes should be in prolongation or appear to be one
straignt line no matter what the natural pastern conformation (figs. 1,
2,3, and 5), and if the shoer finds this condition satisfactory he will
simply need to prepare the foot evenly for shoeing, as explained
later. But if the two axes do not appear as one straight line there will
be a break at the coronet. This is a proof that the foot is not level and
that the horse is not standing correctly. If the line is “broken
out” (fig. 4) the prolongation of the pastern axis falls to the outside
of the foot axis and the inner wall is too high, and the fault is reme-
died by nipping off more of the inside wall than of the outside. If
the line is “broken in” (fig. 6) the prolongation’of the pastern axis
falls to the inside of the foot axis and the outside wall is too high
and should be trimmed down more than the inside. The dotted
lines in the figures show the amount to be trimmed off.
It will be noticed that the “broken out” foot looks like the “toe
in” and the “broken in” foot looks like the “toe out,” but in the
natural conformations there is no break at the coronet.
39. Standing at the side, the shoer should notice the height of
the foot, the length of the toe, and the slope of the line of the toe;
that is, the front line of the hoof as seen from the side.
Here, again, we have three cases of natural pastern conformation:
The “sloping,” the “regular,” and the “stumpy” (figs. 7, 8, and
9); but the line of the toe should, nevertheless, be parallel in each
case to the pastern axis as seen from the side.
By careful sighting from the side, draw a chalk line between the
second and third clinches, with exactly the same slope as the line
of the toe. This mark will generally have the same direction as the
horn fibers. Now stand back and determine if this mark and the
“pastern axis” as seen from the side are one and the same line. If
so, trim off the surplus growth evenly. If not, the line will be
broken at the coronet. In “broken back” (fig. 10) the prolongation
of the pastern axis falls to the rear of the foot axis and the toe is too
high and should be trimmed more than the heel; in “broken for-
ward” the prolongation of the pastern axis falls in front of the foot
axis and the heels are too high and should be trimmed more than
the toe.
The “broken back” looks like the sloping pastern and the “broken
forward” looks like the stumpy pastern. The break at the coronet,
however, is the sure guide.
For the third examination the foot must be raised.
MANUAL FOR ARMY HORSESHOERS. 51
40. The wear of the old shoe should be carefully noted as a check
on the preceding two examinations. If the shoe has worn evenly,
its position on the foot was undoubtedly correct. If one side of
the shoe shows more wear, (a) that side may have been fitted too
closely; (6) there may be some fault in gait which should have
been noted in the first examination; (c) the foot may not have been
properly leveled in the last shoeing; (rf) the quarters, as frequently
happens, may have grown unevenly since the last shoeing.. Horses
with long, sloping pasterns wear the shoe more at the heel, while those
with short, upright pasterns wear the shoe more at the toe. There
is a slight scuff at the moment of breaking over, which produces a
normal wear at the toe, but overworked horses and those suffering
from disease show more than this normal wear.
REMOVAL OF THE OLD SHOE.
41. The clinches are cut off or straightened with the clinch cutter
and hammer. The sharp edge of the clinch cutter is placed under
the edge of the clinch and struck with the hammer until the clinch
turns up flat against the wall or is broken off. If even one clinch
is left holding it may break off the portion of the wall to which it
is fastened.
Beginning at the heel, each side of the shoe is loosened with
the pincers and, gradually working toward the toe, is separated
from the hoof until all the nails are free except those at the toe.
The shoe is firmly grasped at the toe with the pincers and is pulled
toward the center of the foot. If pried over the toe toward the
outside of the foot, part of the hoof may be broken off. Any stubs
of nails remaining m the foot must be removed.
TO PREPARE THE FOOT.
4?. With the horse standing evenly on its feet, examine the foot
and pastern axes to determine the necessary changes, if any, to
be made besides the removal of the surplus growth of horn. Then
taking the knife in the right hand, back of the hand down, the
blade coming out at the little finger, palm of the left hand supporting
the wall of the hoof and the left thumb on the blade to assist in
cutting and to prevent slipping, pare away the dead horn near
the v:hite line until live horn is reached, being careful not to go
farther back than the last nail hole. This is done to ascertain the
amount of horn that may be removed and to facilitate the use of
52
MANUAL FOR ARMY HORSESHOERS.
the nippers. The knife must never be used on the bars or the
frog. The bars strengthen the hoof and assist in its expansion.
Cutting, therefore, weakens them and prevents them from performing
their function. Never use a knife on the hoof of a horse that has
been running barefoot, nor on flat feet, either natural or diseased.
Ragged parts of the frog may be cut away by careful use of the
nippers.
In removing surplus growth of horn it is safer to lower the toe
first, for, if the heels be lowered and, later, it is found that a cor-
responding amount of horn can not be cut from the toe, it will be
impossible to put the foot at the proper angle without the use of
heel calks or a thickened web at the heels.
Taking the nippers in both hands so that the handles are per-
pendicular to the plane of the bearing surface, begin at the last
nail hole and cut until the white line shows plainly and live horn
has almost been reached; start with a thin cut or bite and gradually
increase the depth of bite to the point of the toe; continue along
the opposite wall to the last nail hole on that side, gradually
diminishing the bite.
43. Heavy horses with wide feet and horses raised on soft, marshy
pastures usually have flat feet. The natural flat foot, although
particularly liable to bruises of the sole, must be classed as a sound
foot and must be distinguished from one that is flat as a result of
disease.
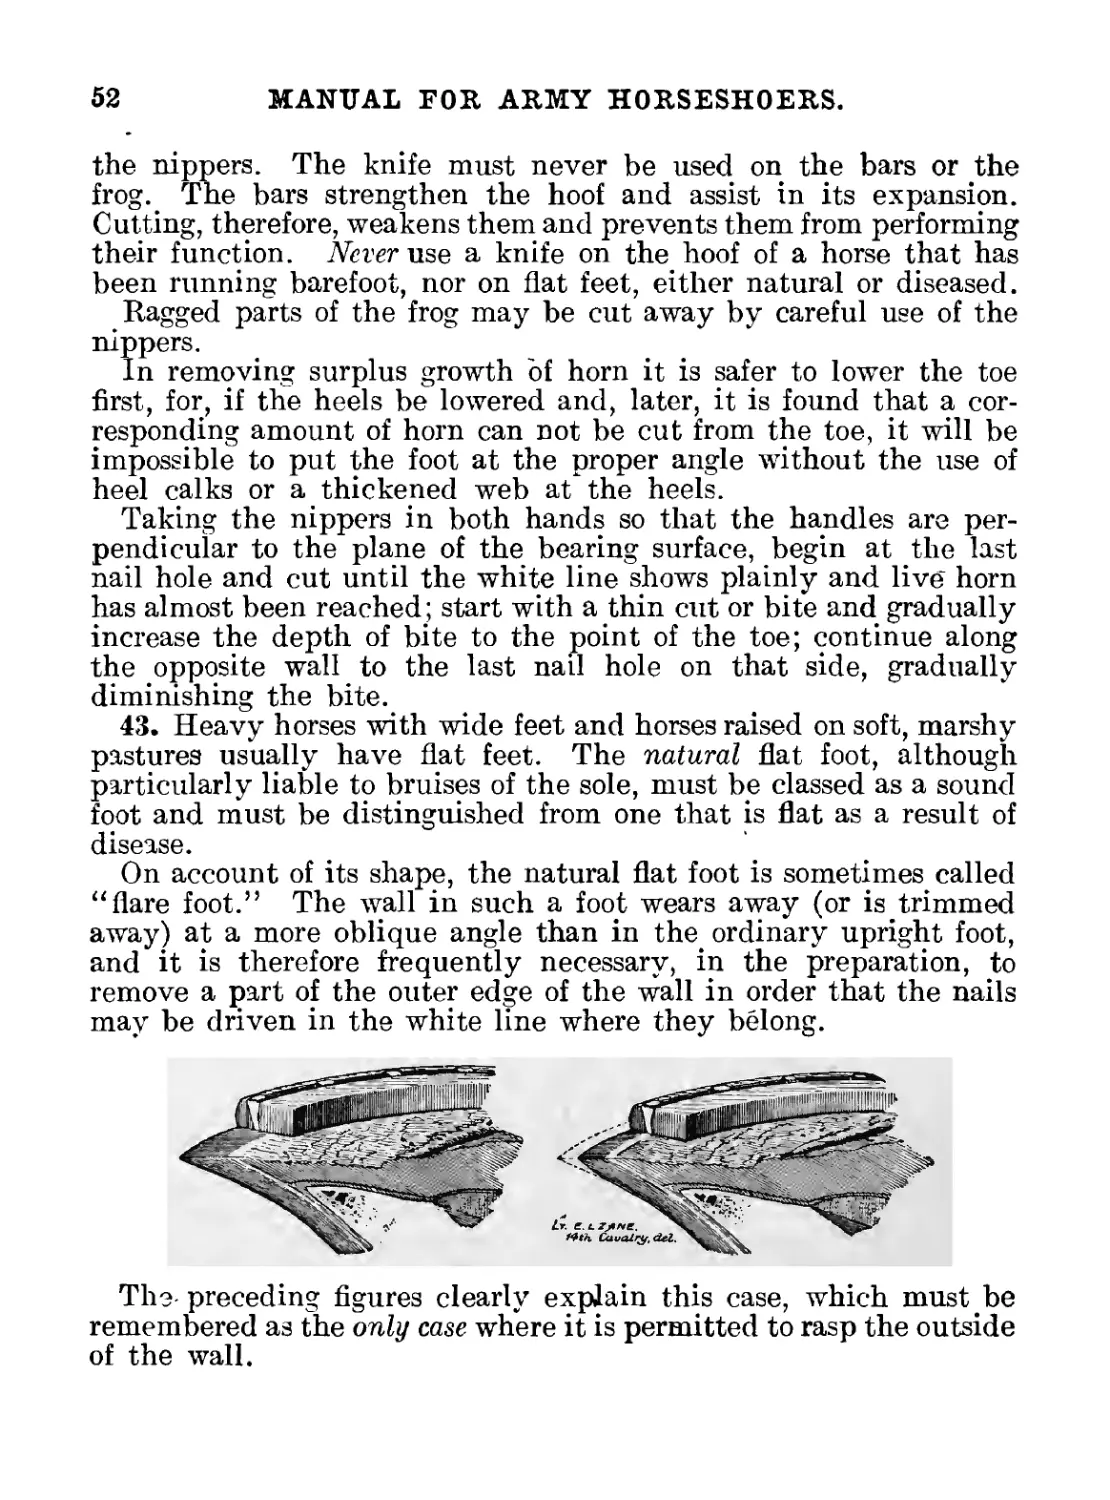
On account of its shape, the natural flat foot is sometimes called
“flare foot.” The Avail in such a foot wears away (or is trimmed
away) at a more oblique angle than in the. ordinary upright foot,
and it is therefore frequently necessary, in the preparation, to
remove a part of the outer edge of the wall in order that the nails
may be driven in the white line where they belong.
The preceding figures clearly explain this case, which must.be
remembered as the only case where it is permitted to rasp the outside
of the wall.
MANUAL FOR ARMY HORSESHOERS.
53
44- In general.—The foot should be prepared so that it will ap-
proximate as nearly as possible to a state of nature, and only such
trimming is allowed as is absolutely necessary for the purpose of
fitting and securing the shoe.
TO LEVEL THE FOOT.
45. Grasp the rasp with the right hand, the left hand near the
far end, left palm resting on the upper surface to act as a guide.
Place the coarse side of the rasp against the ground surface of the
wall on the right half of the foot, ancl with long, even strokes, smooth
off the foot where it has been cut with the nippers. Then work on
the buttress and bring it to the same level as the quarter and toe,
removing such horn as may be necessary and no more. Beginners
usually bear too strongly with the right hand and remove more with
the hind part of the rasp than with the front part. Avoid this fault.
Frequent tests should be made to avoid removing too much of the
horn. For this purpose, take the foot in both hands and press with
the thumbs near the white line; if the sole yields ever so slightly
no more horn should be rasped away or lameness will result. Work
carefully and slowly on the flat foot, which has a thinner sole than
the cup-shaped foot.
For the left half of the foot reverse the hands on the rasp and pro-
ceed as above. This half will be found more difficult at first on
account of the awkward position, and as a result the work will often
be slighted. Experience with beginners shows that the right-
handed man leaves the left half too high four times out of five.
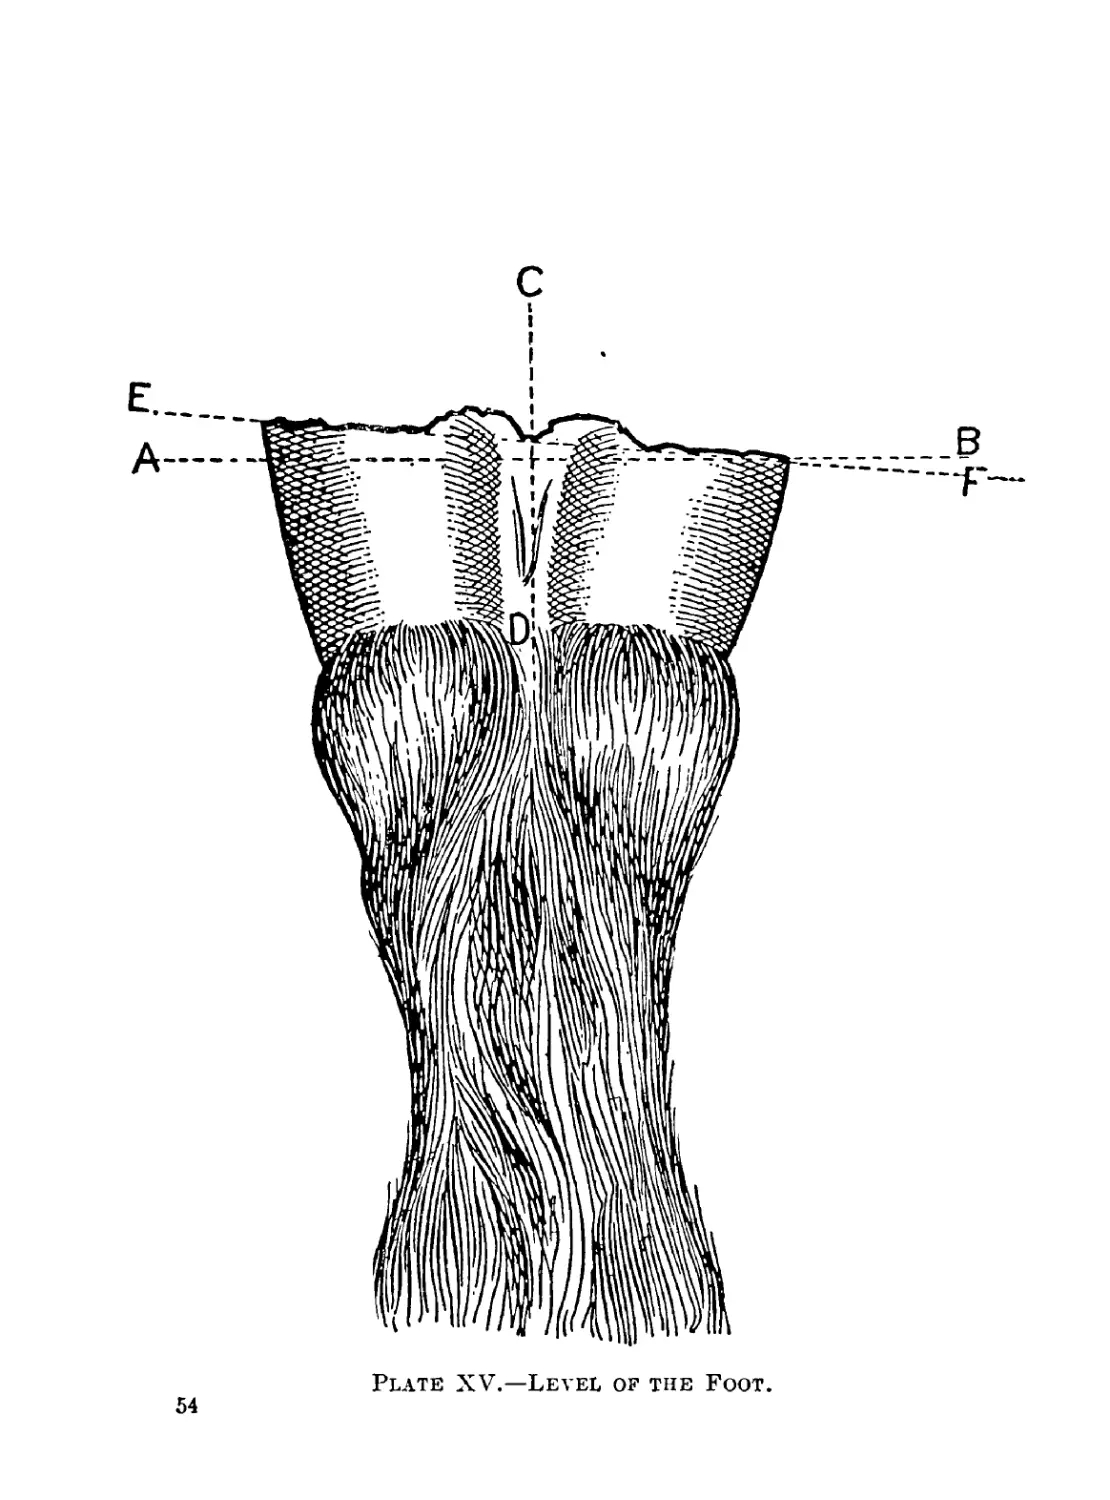
To determine the level of the foot, the shoer raises the foot to a
position for sighting over the bearing or ground surface; let the foot
hang naturally and do not press against it with the thumb, as this
is apt to disturb the pastern and foot axes and make the foot appear
level when it is not; sight over each side separately, from the but-
tress to the toe, and note any irregularities which may appear in
these two surfaces; now continue the plane of the quarter and heel,
on one side across or through the horny frog to the opposite side of
the foot, for the purpose of determining whether or not the two sides
are in the same plane. This may be done with the eye by drawing
an imaginary line, or by placing the smooth surface of the rasp on a
level with the bearing surface of the foot, as indicated by the line
e—f. To determine the level of this plane, draw an imaginary verti-
cal line through the cleft of the frog, as shown by the line c—d. If
с
I
I
I
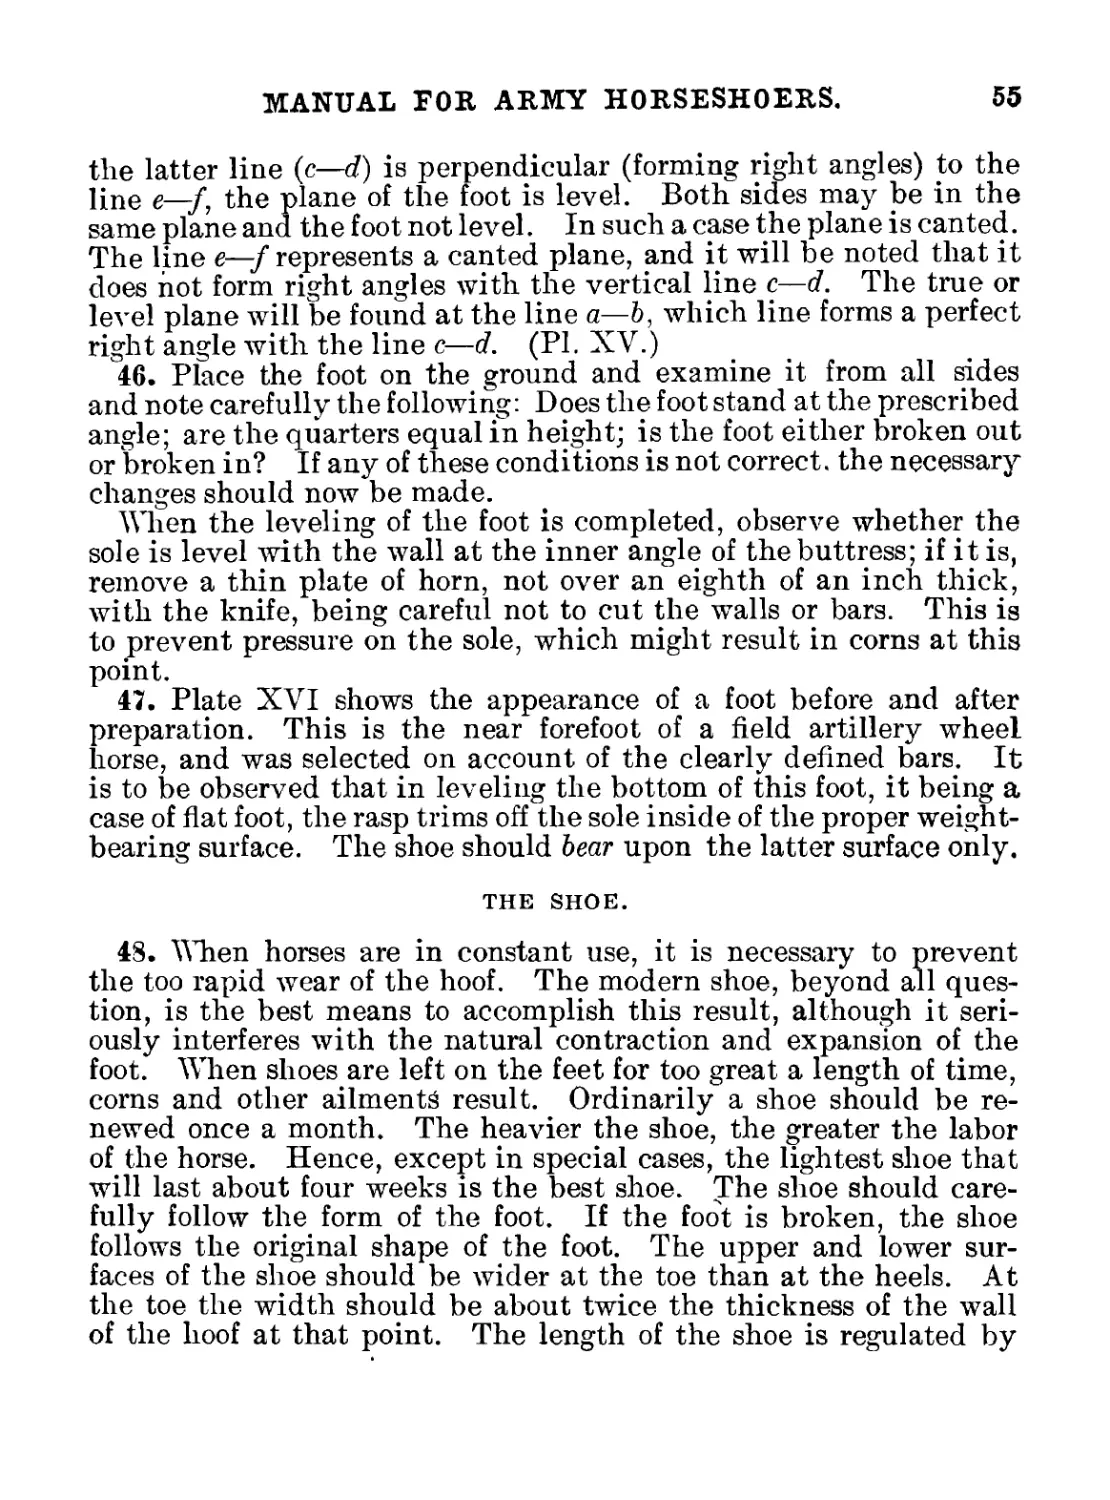
Plate XV.—Level of the Foot.
54
MANUAL FOR ARMY HORSESHOERS.
55
the latter line (c—d) is perpendicular (forming right angles) to the
line e_y, the plane of the foot is level. Both sides may be in the
same plane and the foot not level. In such a case the plane is canted.
The line e—f represents a canted plane, and it will be noted that it
does not form right angles with the vertical line c—d. The true or
level plane will be found at the line a—b, which line forms a perfect
right angle with the line c—d. (PI. XV.)
46. Place the foot on the ground and examine it from all sides
and note carefully the following: Does the foot stand at the prescribed
angle; are the quarters equal in height; is the foot either broken out
or broken in? If any of these conditions is not correct, the necessary
changes should now be made.
When the leveling of the foot is completed, observe whether the
sole is level with the wall at the inner angle of the buttress; if it is,
remove a thin plate of horn, not over an eighth of an inch thick,
with the knife, being careful not to cut the walls or bars. This is
to prevent pressure on the sole, which might result in corns at this
point.
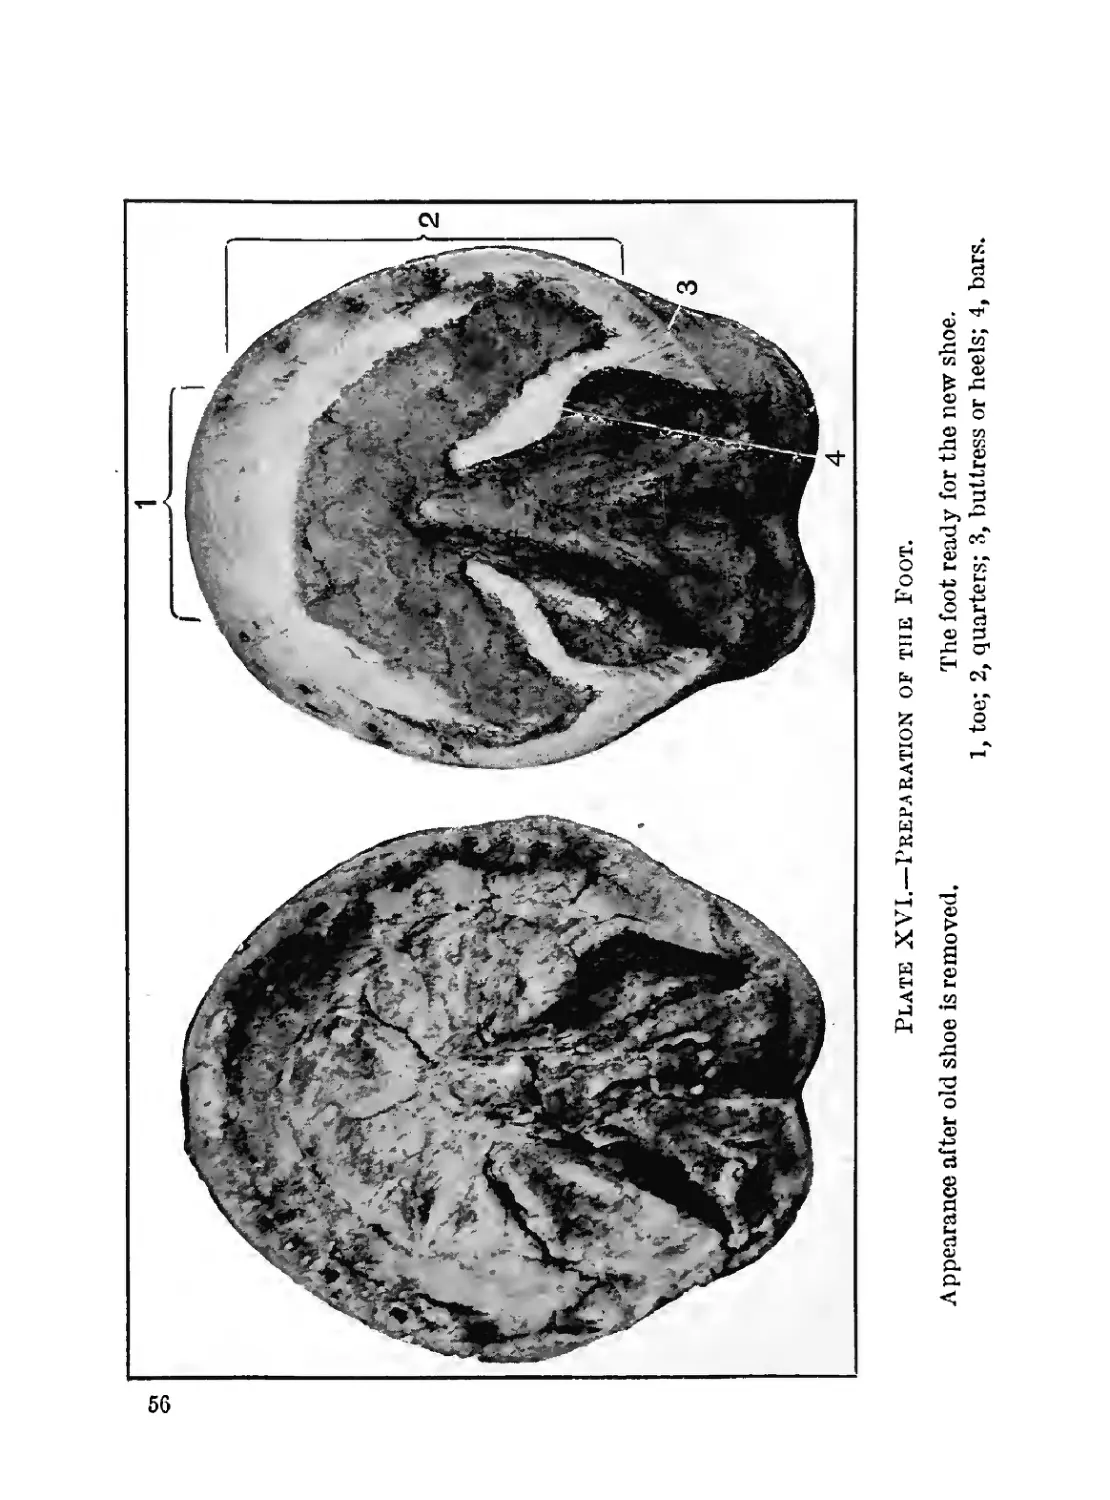
47. Plate XVI shows the appearance of a foot before and after
preparation. This is the near forefoot of a field artillery wheel
horse, and was selected on account of the clearly defined bars. It
is to be observed that in leveling the bottom of this foot, it being a
case of flat foot, the rasp trims off the sole inside of the proper weight-
bearing surface. The shoe should bear upon the latter surface only.
THE SHOE.
48. When horses are in constant use, it is necessary to prevent
the too rapid wear of the hoof. The modern shoe, beyond all ques-
tion, is the best means to accomplish this result, although it seri-
ously interferes with the natural contraction and expansion of the
foot. When shoes are left on the feet for too great a length of time,
corns and other ailments result. Ordinarily a shoe should be re-
newed once a month. The heavier the shoe, the greater the labor
of the horse. Hence, except in special cases, the lightest shoe that
will last about four weeks is the best shoe. The shoe should care-
fully follow the form of the foot. If the foot is broken, the shoe
follows the original shape of the foot. The upper and lower sur-
faces of the shoe should be wider at the toe than at the heels. At
the toe the width should be about twice the thickness of the wall
of the hoof at that point. The length of the shoe is regulated by
Plate XVI,—Preparation of the Foot.
Appearance after old shoe is removed.
The foot ready for the new shoe.
1, toe; 2, quarters; 3, buttress or heels; 4, bars.
MANUAL FOR ARMY HORSESHOERS. 57
the bulb of the frog, and the thickness of metal is made sufficient
to wear about one month.
The ground surface of the shoe should be level. That portion
of the upper surface which presses against the bearing surface of the
foot must be level, smooth, and accurately shaped to support it,
and when the upper shoe surface is wider than the bearing surface
the inner edge must be concaved to avoid excessive sole pressure. This
is one of the most important requisites of correct horseshoeing.
Care must be taken only to concave enough to remove sole pressure.
Do not leave too much space between the shoe and sole, for this
allows small pebbles, grit, and dirt to collect, which allows sole
pressure at small points, which is very harmful. Concussion of the
sole against the inner edge of the upper shoe surface invariably
produces soreness. The outer edge of the upper surface should be
slightly rounded. This adds to the appearance, produces a better
fitting shoe, and to a marked degree prevents cutting if the horse
travels close. The width of the crease of the shoe should be uniform,
and its depth about two-thirds of the thickness of the shoe. The
crease makes the shoe lighter in proportion to its width and is an
aid to prevent slipping. Nail holes should be punched to fall over
the outer edge of the white line.
Clips are semicircular ears drawn upward from the outer edge of
the shoe to prevent its slipping. A clip extends above the upper
surface a distance equal to the thickness of the shoe, or sometimes
farther on hind shoes. When leather is interposed between the shoe
and the bearing surface, the clip must be correspondingly raised.
Toe and side clips assist the nails in holding the shoe in place.
NORMAL SHOES.
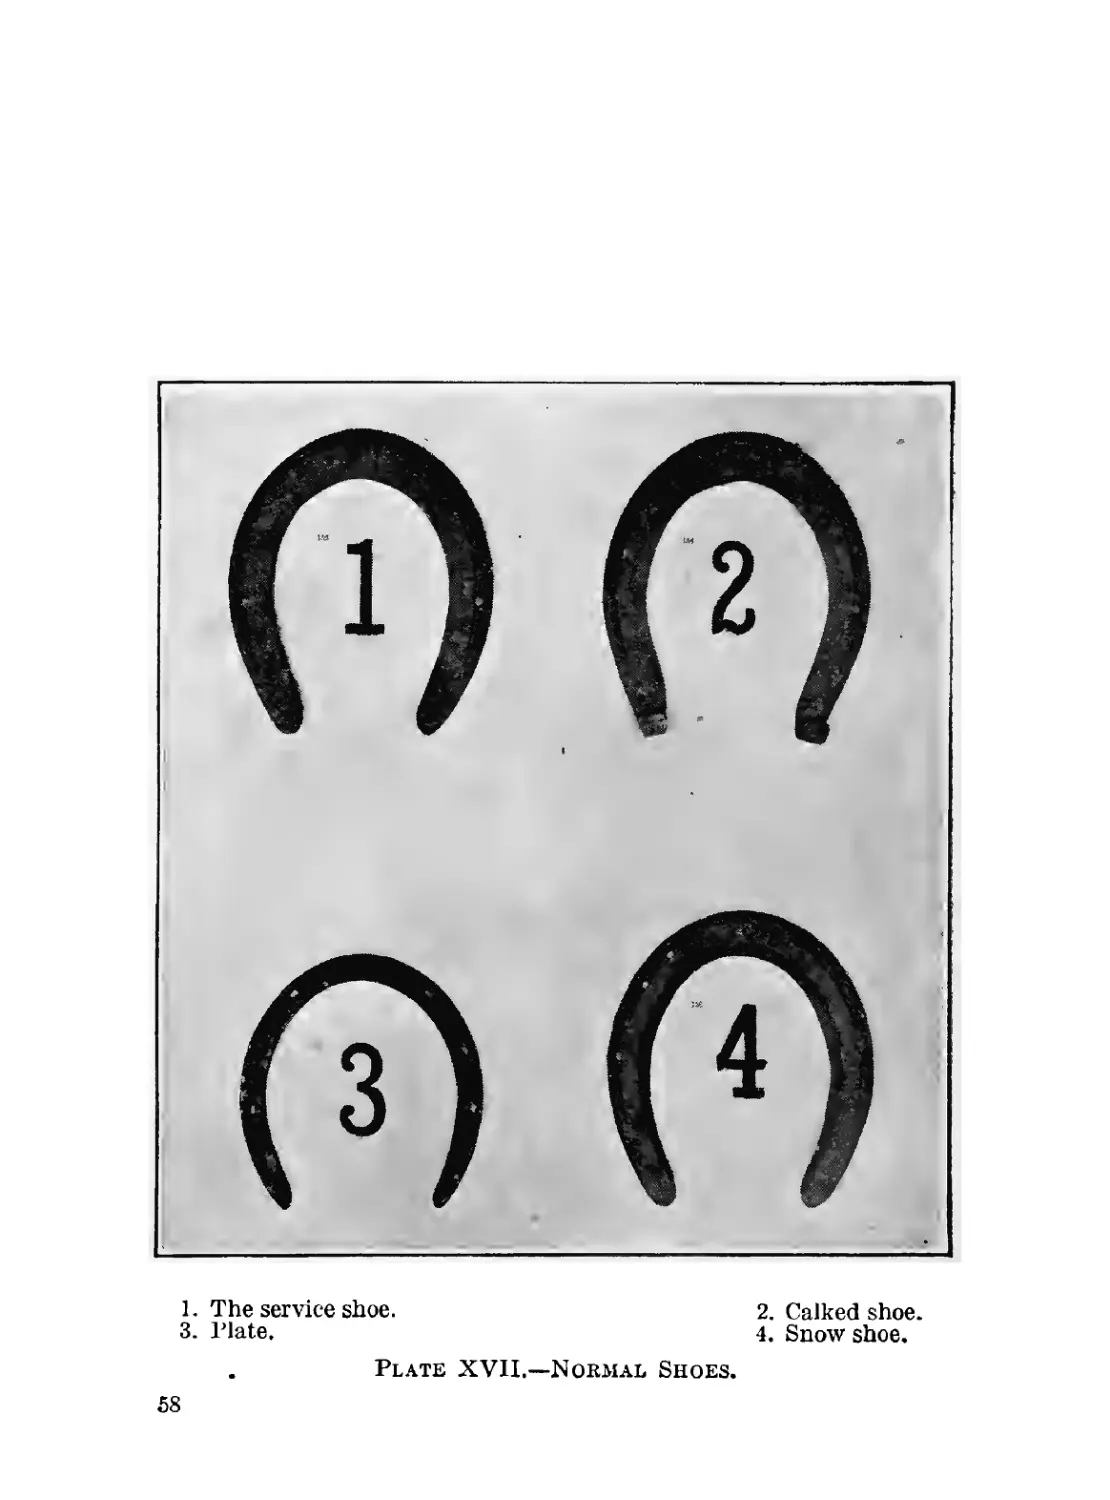
49. By a normal shoe is meant a shoe for a sound foot of a horse
with proper gaits. The service shoe (Pl. XVII, fig. 1) is, of course,
a normal shoe.
In the mounted service four sizes of machine-made shoes are
issued. It will be noted that the heels are much longer than neces-
sary, but they are manufactured in this manner so that the extra
length can be used in turning heel calks or-in making a bar shoe.
It often happens that a larger size is required for the front.than for
the hind foot of the same horse.
Three other shoes belong to this class:
The calked shoe (fig. 2) is used to enable the horse to secure firm
footing on slippery or ice-covered roads. Its use must be confined
1. The service shoe.
3. Plate.
2. Calked shoe.
4. Snow shoe.
Plate XVII.—Normal Shoes.
58
MANUAL FOR ARMY HORSESHOERS.
59
to actual necessities, for the calks raise the frog from the ground
and prevent natural expansion and contraction. Permanent con-
traction of the heels, and even sidebones, result from the constant
use of this shoe.
Sharpened calks, for use on ice, are even more to be avoided on
account of injuries caused by interfering and by kicking.
The plate (fig. 3) is merely a light-weight shoe turned from bar
steel.
The snow shoe (fig. 4) has a smooth, concave ground web, which,
to a great extent, prevents the accumulation of snow and mud, and
also gives firmer footing. The figure shows a shoe turned from the
issue shoe.
THE SERVICE SHOE.
50. Selecting the shoe.—The foot having been prepared, lev-
eled, and made ready for the shoe, estimate the size of the shoe
required. To do this it is necessary for the beginner to place it on
the foot and note the position of the nail holes, being careful not to
take a shoe in which the last nail hole will be in the rear of the bend
of the quarter. Take the lightest shoe of the desired size that may
be available.
Now examine the pritchel, and if it is not of the proper shape
point it. (See Tools.)
51. The successive steps in fitting the service shoe should always
be taken up in the following order:
1. Draw the toe clip.
2. Make the necessary changes in the toe.
3. Concave the shoe.
4. Open the nail holes.
5. Shape the quarters.
6. Cool and make the first trial for fit; at this time make the seat
for the clip.
7. Make any change in outline.
8. Draw the heels.
9. Cut off the heels.
10. Finish the heels.
11. Go over concaving and level the shoe."
60
MANUAL FOR ARMY HORSESHOERS.
52. Drawing the toe clip.—Fitting hammers with two different
styles of peen are considered in this work. The one with the round-
edged end to the head of the hammer, is shown in the following
cuts. For the fitting hammer, with spherical peen, see Plate I,
paragraph 1. Having procured a shoe of the desired size and having
noted the general changes to be made in its shape, especially at
the toe, place the toe of the shoe in the fire, ground web down.
When the toe is white hot take the tongs in the left hand, seize the
shoe near the heel on the side nearest you, remove it from the fire
MANUAL FOR ARMY HORSESHOERS.
61
and place it on the face of the anvil ground web up, center of toe
projecting over the anvil about an eighth of an inch, heels held at
an angle of about 30°. With smart strokes with the peen of the
hammer drive down the center of the toe until a small shoulder
appears underneath; place this shoulder against the far edge of the
anvil, holding the shoe so that the heels form an angle of about 45°
below the face. Hold the right hand low and with strokes toward
you along the face of the anvil, using the heel of the face of the
hammer, draw out the toe clip, bringing the heels closer to the anvil
as the clip is drawn. Be careful that the clip is in the center of the
shoe. The clip, when finished, should be a little higher than the
thickness of th e shoe.
53. Fitting.—The toe is then opened, as may be necessary (par.
19), being careful not to injure the clip. To open the toe of a large
shoe where the horn of the anvil is too small for the usual method,
hold the shoe as shown in paragraph 19, but pull the quarter on the
side opposite you firmly against the horn. Then strike on that
quarter near the toe, bringing the hammer toward you and keeping
up the pull on the tongs. The other side is opened in a similar
manner after reversing the shoe. This method is frequently used
in fitting the very large shoes required for horses of siege-gun
batteries, etc.
In the service shoes it will not be necessary to use the countersink
for nail holes, because the crease is wide enough to take the nailhead.
Use the pritchel to open the holes, as in paragraph 15, but pritchel
62
MANUAL FOR ARMY HORSESHOERS.
the upper surface first in order to give the nail holes the proper slope
and to remove the slight burr left on the machine-punched shoe,
and the lower surface last, so that the hole will be finished in the
shape of the nail. For the first work the shoe may be placed any-
where on the face of the anvil, because the sendee shoe is thick
enough to prevent any chance of spoiling the point of the pritchel;
but for the last work the pritchel or hardy hole must be utilized,
as previously explained. The toe clip generally makes it difficult
or impossible to place the nail hole nearest the toe over the pritchel
or hardy hole. For these nail holes shift the shoe to the nearest end
of the face of the anvil and hold the nail hole slightly outside of
the edge.
It will generally be found that the work up to this stage can be
done with the heat remaining from that required for the toe clip.
Beginners, however, may find it necessary to reheat the shoe in
order to open the toe. In tliis case, place the shoe in the fire with
the clip up, to avoid burning it.
Cool the shoe and apply it to the foot. In order to secure a neat
fit at the toe it is necessary to make a seat for the clip, which other-
wise will stand out its full thickness. Now is the time to prepare
this seat. Place the shoe in position with the clip accurately
centered, and, using the knife, scratch a small mark on the edge of
the wall at each end of the clip. Put the shoe aside and carefully
whittle away the edge of the wall between the two marks. Work
slowly and test frequently by replacing the shoe, so that you will
cut away just what is necessary and no more. {See Seedy toe,
par. 86.)
Now make the first trial of the fit. If the toe is correct, note
where either of the sides needs reshaping. The quarters will usually
be found too full, and if so must be heated and shaped over the horn
by the method explained in the plate shoe, except that the shoe
is slightly turned so that blows will fall on the edge of the upper
surface in order to avoid closing the crease.
The outline of the finished shoe must exactly follow the outer
edge of the hoof to the last nail hole, and gradually widen from that
point so that about an eighth of an inch of the upper surface will
show at the end of the heel. If, however, a foot is found to have a
portion of the wall broken off when the animal is brought to the
shop, the shoe must be fitted so as to follow the original outline of
the wall. Fitting the shoe so that the nail holes will fall on the
outer edge of the white line is a good guide for outline in the case of
MANUAL FOR ARMY HORSESHOERS.
63
a bad break. If the toe has been broken, the shoe is fitted as just
explained, but, of course, there are no nail holes to act as a guide.
The toe clip is omitted and side clips are used if necessary.
The bearing surface of the shoe, upon which rest the wall, the
white line, and not more than an eighth of an inch of the sole, must
be level, fit exactly to the hoof (without any air space), and extend
back even with the bulb of the frog. The part of the upper sm’face
inside of this bearing surface must be concaved (hammered down
while the shoe is hot) in order to avoid any possibility of sole pressure
which would produce lameness. At the heels there should be no
concaving, but the sharp inside edge should be slightly rounded.
(Par. 89.)
The width of the heels of all finished shoes must conform to the
width of the buttress. In shoeing a foot with a very wide buttress
it is often unnecessary to draw the heels at all, but in most cases
they must be drawn as explained in the plate shoe. (Par. 12.)
Remember that the bearing surface of the shoe must cover the buttress
and you then have a guide for the width of the drawn heels.
In the issue shoe, the outer edge is beveled as far back as the end
of the crease, but is square from that point to the end of the heels.
In finishing the shoe, bevel the square part also.
THE CALKED SHOE.
54. The service shoe, as previously explained, is issued with
heels sufficiently long to permit its conversion into a calked shoe.
To turn in a heel calk.—Heat the heel to a white heat. Remove
the shoe from the fire with the tongs holding it near the toe; place the
shoe at any convenient part of the face of the anvil with the ground
surface down, a half to three-quarters of an inch of the heel projecting
over the heel of the anvil. Strike on the part of the heel projecting
over the edge and turn it at a right angle to the shoe. The height of
the heel calk should correspond to that of the toe calk. The calk is
squared by working on the face of the anvil; place one side on the
face and strike on the upper side.
To weld on the toe calk.—The issue toe calk has a sharp nib
or point on that surface which is applied to the ground surface of the
shoe. Heat the toe of the shoe to a white heat and, placing it on the
face of the anvil with the ground surface up, hold the calk with the
tongs across the toe and far enough back so as to allow for turning
the toe clip. Strike a few light blows to drive the nib into the shoe
until the calk and shoe are touching.
64
MANUAL FOR ARMY HORSESHOERS.
Return the shoe to the fire, calk up, and tilt or rock the shoe
forward and back to insure equal heating of both shoe and calk.
When the proper heat—fluxing—(see Heats) has been obtained,
place the shoe on the face of the anvil as before and strike a few light
blows on the calk.
Reheat to the welding heat and place the calk on tl ? face of the
anvil. Strike a few heavier blows on the upper surface of the shoe
directly over the calk.
Fitting.—The calked shoe is fitted in the same manner as the
service shoe, with the exception that the heels are made a little
longer ancT are slightly turned out from the end of the buttress in
order to give a wider support to the foot and to thus prevent as far
as possible the rocking of the shoe. For use on ice the calks are
sharpened, but a horse so shod must never be turned loose with other
horses.
The use of the calk shoe is prohibited except at times when local
conditions make its use absolutely necessary to prevent slipping.
NAIL DRIVING.
55. The nails issued in the mounted service are machine-made,
and the sizes in general use are Nos. 4, 5, 6, and 7. No. 4 nail is
used for plate shoes; No. 5 nail for a No. 1 and 2 shoe; No. 6 nail fora
No. 3 and 4 shoe; No. 7 nail for the large feet of some artillery horses.
One side of the shank of the nail is flat; the other side is concave
and also has a bevel near the point. This bevel, as it enters into the
horn, forces the point of the nail in the direction of the other side
(flat side). Therefore always hold the nail with the flat side toward
the outside edge of the shoe.
By driving nails into the wall of the foot some of the horn tubes
are destroyed, and the higher the nails are driven the greater the
injury to the wall. Nails should, therefore, come out at a height
just sufficient to hold the shoe—not exceeding one inch—and in
order to damage the wall as little as possible, both the size and the
number of the nails should be as small as will accomplish this object.
The outside of the white line is the correct place to start the nails,
and shoes should be fitted with this end in view. Nails thus started
come out evenly on the wall, are low, and at a strong angle.
To the experienced shoer the feel and the sound of the nail and
the amount of force required in driving are important guides.
The nail is held between the thumb and fingers to steady it in
starting, and, if going properly, it imparts to the fingers a character-
MANUAL FOR ARMY HORSESHOERS.
65
istic sensation called the ‘‘feel of the nail.” A nail driven into
healthy horn gives off a distinct sound which the shoer soon learns
to recognize. All nails going properly must be driven with con-
siderable force. A nail driven with slight resistance, i. e., “going
easy,” is either in an old nail hole or serious damage is being done
because the nail is entering the soft sensitive structures of the foot
(pricking).
Nail heads must be sunk in the crease until they are flush with the
ground surface of the shoe. If this is not done, the heads may project
unevenly and throw the foot off the level. They will also wear
quickly and cause a loose shoe.
SECURING THE SHOE.
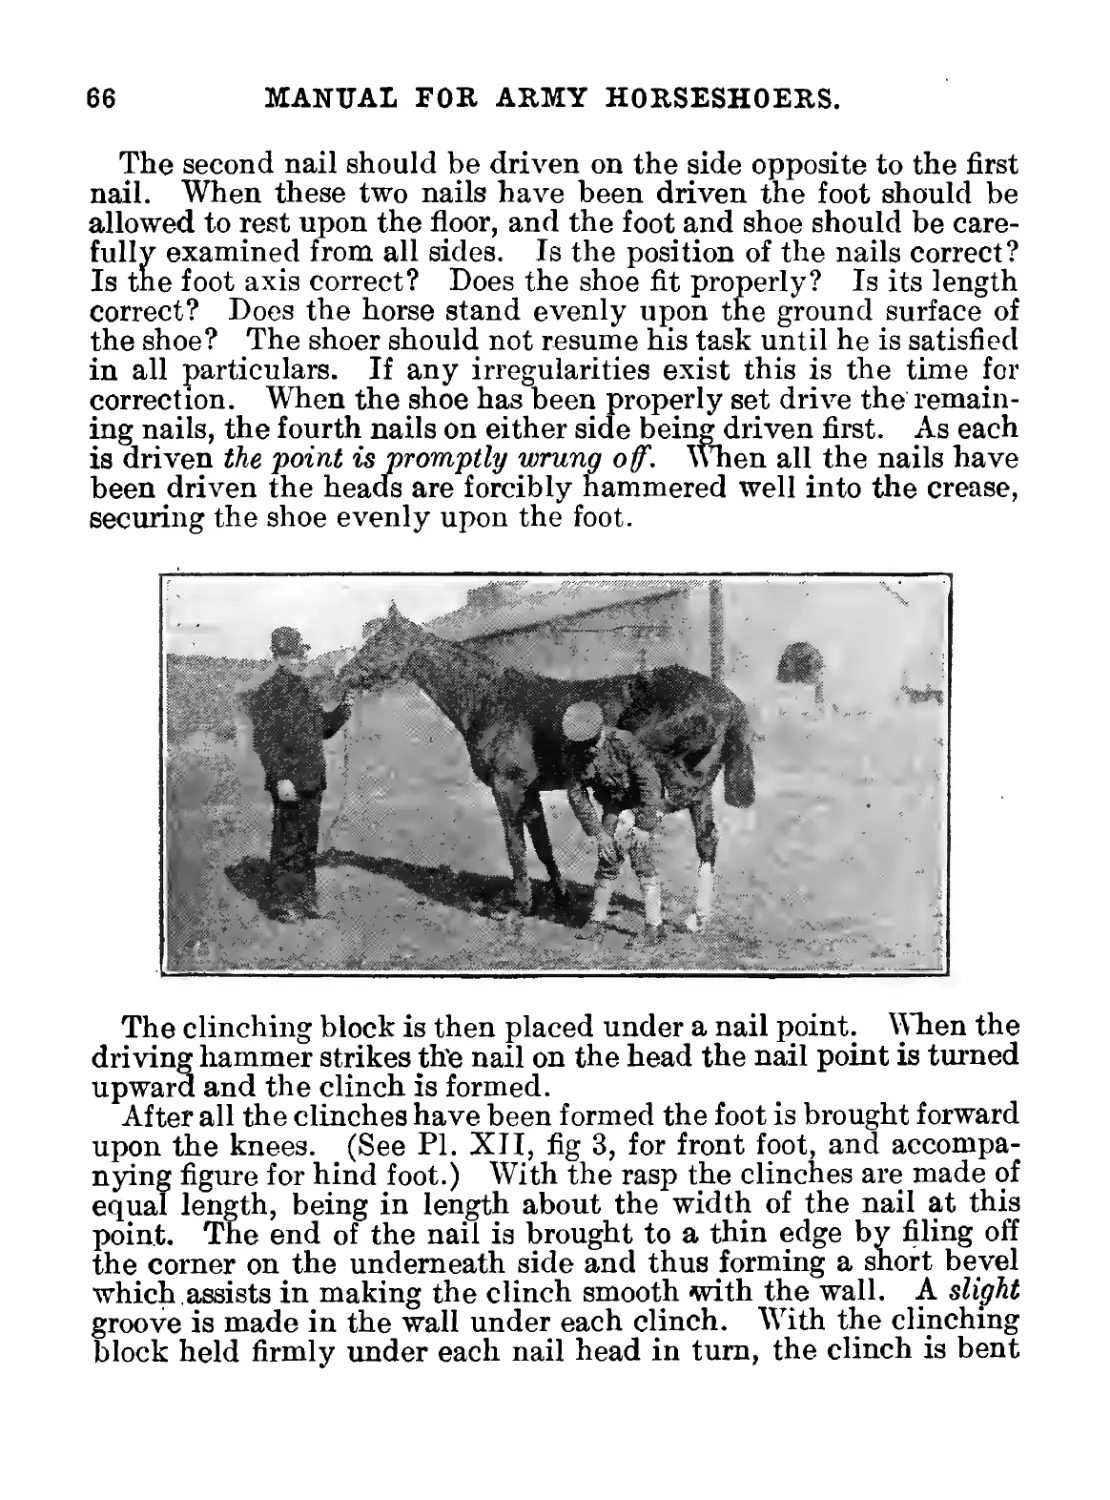
56. The shoe is placed upon the bearing surface of the foot and
held firmly in position with the left hand, back up. A nail is placed
between the thumb and forefinger of the left hand, the fiat side
faced outzcard, and the thumb and the fingers are then extended
along the right side of the shoe until the nail is held squarely in the
center of the most convenient nail hole, usually the third (the third
hole on the left side for a left-handed man); with a toe clip on the
shoe the second nail hole is generally used. The nail head is tapped
lightly with the driving hammer. The nail should be held firmly
to determine the feel, and the thumb and forefinger should not be
removed until the nail, going soundly, needs no further guidance.
The shoe is then grasped more firmly and the nail is driven with
slightly increased force. The fingers, placed on the wall of the foot,
determine the exact location at which the nail emerges.
With the claw of the hammer the point of the nail is then bent
upward until it stands at a right angle to the wall. Next, the head
of the hammer is grasped in the hand and the claw is pushed firmly
downward, clutching the nail point. A half turn downward and a
slight pull wrings the point off close to the wall, leaving enough nail
to form the clinch. In wringing off nails the hammer is held in the
hand nearest the nail point.
As the first nail when driven may cause the shoe to shift, it is
essential to place it exactly in the center of the nail hole. If the
shoe has altered its position on the foot a pressure on the opposite
side of the shoe by the palm of the hand and a few light blows of the
hammer on the lower border of the wall where the first nail is driven
will move the shoe back to place.
17722°—17-5
66
MANUAL FOR ARMY HORSESHOERS.
The second nail should be driven on the side opposite to the first
nail. When these two nails have been driven the foot should be
allowed to rest upon the floor, and the foot and shoe should be care-
fully examined from all sides. Is the position of the nails correct?
Is the foot axis correct? Does the shoe fit properly? Is its length
correct? Does the horse stand evenly upon the ground surface of
the shoe? The shoer should not resume his task until he is satisfied
in all particulars. If any irregularities exist this is the time for
correction. When the shoe has been properly set drive the remain-
ing nails, the fourth nails on either side being driven first. As each
is driven the point is promptly wrung off. When all the nails have
been driven the heads are forcibly hammered well into the crease,
securing the shoe evenly upon the foot.
The clinching block is then placed under a nail point. When the
driving hammer strikes the nail on the head the nail point is turned
upward and the clinch is formed.
After all the clinches have been formed the foot is brought forward
upon the knees. (See Pl. XII, fig 3, for front foot, and accompa-
nying figure for hind foot.) With the rasp the clinches are made of
equal length, being in length about the width of the nail at this
point. The end of the nail is brought to a thin edge by filing off
the corner on the underneath side and thus forming a snort bevel
which ,assists in making the clinch smooth with the wall. A slight
groove is made in the wall under each clinch. With the clinching
block held firmly under each nail head in turn, the clinch is bent
MANUAL FOR ARMY HORSESHOERS. 67
down and hammered in with the driving hammer. It is well to
clinch the inside of the foot first, thus removing danger of the up-
turned clinches tearing the opposite leg. Finally, the smooth side
of the rasp is run lightly over each clinch to take off the rough edges
that would pick up bedding or other material. Much filing of the
clinches weakens them and results in a cast shoe. When finished
the clinch should be a trifle longer than the width of the nail at the
point where it comes out of the wall.
The outside wall of the foot is never rasped (par. 46).
The toe clip should be hammered back against the wall of the
toe after the inside has been clinched on the off feet and the outside
on the near feet. In other words, hammer back the toe clip when
4he right arm is free. »
After the shoeing has been completed the foot is again allowed
to rest upon the ground, and again carefully examined from all
sides.
Plate XVI11 shows .the near forefoot of a newly purchased Cavalry
horse. The shoe, as may be seen, has been on for about three
months, and the foot is broken back. The lack of symmetry at
the heels shows that the shoe was probably not correctly fitted,
and that it certainly was not in proper position when nailed on.
The shoer, having learned to fit normal shoes, is prepared to
take up the study of shoeing to correct faults in gaits and shoeing
as an aid in the treatment of diseased feet.
INSPECTION OF SHOEING
57. The horses shod during the day should be ready for inspec-
tion at afternoon stables, or other convenient time, in the shop or
stable, with their feet cleaned.
The horse should be examined on a level floor, as otherwise it is
impossible to determine whether he is standing correctly or not.
The following examination should be made while the foot is
on the ground:
. (a) Pastern and foot axes.—View the foot from the front and
side to determine whether the axes are correct. (Pl. XIV.)
(5) The fit of the outline of the shoe.—Does it correctly follow the
outline of the wall to the last nail hole, and from there "extend out-
ward, allowing proper space for expansion? (Par. 53.) Note
particularly whether the wall has been rasped to fit the shoe. (Par.
43.)
Plate XVIIL—Foot Improperly Shod and Neglected.
MANUAL FOR ARMY HORSESHOERS.
69
(c) The toe clip.—Is it in the center? Is it of sufficient strength,
height, properly finished and seated? (Pars. 48 and 53.)
(d) The nails.—Are they evenly driven, the proper height and
distance apart? Have any old nail stubs been left in the wall?
(Pars. 55 and 56.)
(e) The clinches.—Are they of proper size? Are they well turned
and set in? Are they smoothed off and not rasped sufficiently
to weaken them? (Par. 56.)
The foot should then be raised and the examination continued
in the following manner:
(a) The shoe.—Is it the proper size and weight? The last nail hole
not farther back than the bend of the quarter? (Par. 50.)
(5) The preparation of the foot.—Has enough horn been removed?
Has too much been removed? (Par. 42.) Is the foot level? (Par.
45.)
(c) Bearing surface of the foot.—Does the shoe rest evenly on the
wall, covering the buttress and showing no air spaces at any point?
(Par. 53.)
(d) Concaving of the shoe.—Is the shoe properly concaved? Xo
sole pressure at any point? (Par.. 53.)
(e) Use of the knife.—Has the knife been used on the bars, sole,
or frog? (Par. 42.)
(/) The nails.—Are they well seated in the crease? Are they the
correct size? Are they all of the same size? (Pars. 55 and 56.)
(g) The heels of the shoe.—Are they the correct width and thick-
ness, properly rounded, without sharp edges or points? Is their
length even with the bulb of the frog? (Pars. 14 and 53.)
In cases where animals have been shod with calk shoes the fol-
lowing should also be noted:
(a) Toe calk.—Is it properly secured and of proper height and
length?
(6) Heel calk.—Are they of the same height as the toe calks?
Are they properly turned and finished?
After becoming accustomed to making the daily inspecticn, the
time necessary should not exceed five minutes for each horse.
CHAPTER VI.
GAITS—SHOEING TO CONFIRM OR ALTER SAME—FAULTS
IN GAITS—SHOEING TO CORRECT SAME—THE MAKING
OF SPECIAL SHOES FOR GAITS.
58, In shoeing horses for the purpose of confirming or altering
gaits, it must be remembered that there are almost as many varia-
tions in gaits as there are horses, and that methods which are suit-
able in one case may be unsatisfactory in another. There are cer-
tain important principles which, properly applied, will be of
material assistance in gaiting the majority of horses. Shoeing alone
will not always accomplish the desired end, but it always helps.
To shoe a horse so that he will be properly balanced and will travel
squarely requires skill, patience, and careful use of special shoes.
Where weight is used, it is always best to start with a small amount
of weight and gradually increase it until the deured result is accom-
plished; otherwise injuries may result from overtaxed, strained, or
ruptured ligaments.
When all four feet have been shod, the animal is taken out and
again examined on level ground at a walk, trot, and gallop.
The horseshoer must bear in mind that seldom will shoeing alone
produce the desired gait or action, but that much depends on proper
riding and on the physical condition of the horse.
In all cases of shoeing to prevent injury to a leg or foot by another,
if, with careful riding, moderate correction methods in shoeing do
not accomplish the desired results, shoe normally and use boots to
protect parts liable to injury.
The use of boots or bandages will render blows of one foot against
another foot or leg painless, give the horse confidence, and if the
blows are mild, with the use of boots they will only slightly affect
his gait.
59. The gaits in the Army are the walk, the trot, and the gallop.
THE WALK.
60. At the walk the horse lifts one foot at a time, in diagonal
sequence, as, left front foot followed by right hind foot, and plants
them in the same order.
70
MANUAL FOR ARMY HORSESHOERS.
71
THE TROT.
61. The trot is a diagonal movement, in which two feet leave
the ground and again strike the ground at the same time, as, the
left front foot and the right hind foot. If the horse shows a tendency
to single foot, the toe-v eight shoe in front (Pl. XX, fig. 2) is often
of benefit. The tee weight increases the length of the stride and
gives a long, reaching swing to the front feet. After the horse trots
steadily the toe weight may be gradually decreased and finally
abandoned.
THE GALLOP.
6?. The gallop is a gait in which the horse springs into the air
from one front foot and has all four feet off the ground at once. The
diagonal hind foot is the first to strike the ground, then the other
hind foot, next the front foot opposite the one from which the spring
was made, and last the foot used for the spring.
Animals that are so frequently used at the gallop as Army horses
should carry as light a shoe as practicable.
THE PACE.
63. The pace is a lateral movement—that is to say, a movement
in which two feet on the same side leave and strike the ground at
the same time. If a horse shows a tendency to pace, it is often of
benefit to shoe the front feet with a medium-weight shoe, well rolled
at the toe, or a roller-motion shoe (Pl. XIX, fig. 3). A confirmed
pacer can very rarely be converted to the trot by shoeing alone, it
being generally necessary to use hobbles, uniting diagonally a front
leg and a hind leg. The pacer should have no place in the service,
but, if present, should be shod with a normal shoe.
THE SINGLE-FOOT.
64. The single-foot is an irregular gait in which the front feet
move in the order of a slow trot and the hind feet at a fast walk.
Each foot strikes the ground singly. The action of the front.feet is
high, and there is a lateral swing to the hind feet.
To convert a single-footer into a trotter, Use heavy toe-weight
shoes in front and ride the horse with a loose rein and an easy bit
up a gentle slope. Just as the horse increases the gait from the
72 MANUAL FOR ARMY HORSESHOERS.
walk, the rider should seize one of his ears. It is found in practice
that this plan distracts his attention and allows the weighted shoes
to produce the effect intended. Whenever the horse returns to the
single-foot, he should be brought down to the walk and started again
with the grasp on the ear. This method may sometimes be found
of use, but, like the pacer, the single-foot horse should have no place
in the service.
65. When a horse has been shod to improve his gait, he should
be ridden with the snaffle bit, which admits of greater freedom of
movement. The reins should be held with a light hand, and the
horse should be forced up against the bit by the use of the legs.
CORRECTING FAULTY ACTION.
66. It is a well-established rule in shoeing that, in order to cor-
rect faults in gaits, the shoer should proceed gradually from one
extreme to the other.
FORGING.
67. Forging, or clicking, is a fault in gait at the trot, the toe of
the hind foot overtaking and striking the bottom of the forefoot.
Causes.—Faulty conformation; horses with short bodies and
relatively long legs; horses with the front or hind feet set too far
under the body. Leg weariness, a condition caused by debility
or overexertion. Improper preparation or shoeing that tends to
slow the action of the front feet, as feet with toe too long or heels too
low; shoes too long or too heavy. Preparation or shoeing that tends
to increase the action of the hind feet, as feet with toes too (Short or
heels too high; shoes with heel calks and no toe calk. Rough ground
and poor horsemanship; the reins held too loosely, the horse not be-
ing kept up to the bit.
Remedies.—To correct this defect by shoeing, the object of the
shoer is to quicken the action of the front feet and to slow the action
of the hind feet.
Three methods for the correction of forging are given. The first
method is a mild corrective treatment, while the third is adopted
only as a last resort.
First or mild method.—For the front feet, lower the toes and leave
the heels a trifle high. The heels of the hind feet should be lowered
and the toes left a trifle long. The front shoes should be light in
weight; the heels of the shoe fitted short so as to just cover the but-
Plate XIX.—Special Shoes for Correction of Faults in Gaits.
74
MANUAL FOB ARMY HORSESHOERS.
tress; the toe of the shoe rolled to its full extent (Pl. XIX, fig. 5),
to increase the rapidity with which the foot breaks over. The hind
shoes should be a trifle heavier than the front shoes, and the heels
left a trifle long. In order to prevent the noise made by the striking
of shoe on shoe, should the feet occasionally meet in action, the hind
shoe should be squared at the toe and fitted so that about three-
quarters of the wall at the toe projects over the shoe.
Second or medium method.—Normal preparation of the feet.
Use a fairly heavy toe-weight shoe (Pl. XX, fig. 2) in front and heavy
side-weight shoes (Pl. XX, fig. 1) on the hind feet, the weight and
trailer being on the outside. The effect of the toe weight is to in-
crease the forward extension of the feet with low action; the side
weight and trailer on the hind feet induce an outward swing of the
foot and leg, thus giving the front feet more time for breaking over
and getting out of the way.
Third or extreme method.—Prepare the feet as explained for the
first method. The front shoe (Pl. XIX, fig. 2) should be light in
weight, fitted short at the heels, and with short-heel calks inclined
well to the front; toe of the shoe thoroughly rolled. The hind shoe
(Pl. XIX, fig. 1) should be heavy in weight, with a small toe calk
set well back from the front edge of the shoe; toe of the shoe squared;
heels long and side clips between the first and second nail holes.
The calks on the front shoe raise the heels, thus diminishing the
distance which they must be lifted by the flexor tendons, and con-
sequently cause more rapid breaking over. The toe calk on the
hind shoe raises the toe, thus increasing the distance the heels
must be lifted by the flexor tendons, and consequently delays the
breaking over of the foot. The long heels also increase the labor
of the tendons by their extra weight. By using this method the
feet are thrown so far out of their natural position that the ligaments
and tendons are apt to be seriously affected in time by the heavy
stiain placed upon them.
stumbling.
6S. The horse stumbles in breaking over, or just after breaking
over, as a result of not raising and carrying a foot high enough to
clear the ground. Horses stumble more frequently with the front
than with the hind feet.
Causes.—Poor conformation; horses with light fore quarters and
heavy hind quarters. Weakness: During convalescence from severe
sickness or as the result of a strain of a leg muscle. Fatigue: Induced
MANUAL FOR ARMY HORSESHOERS.
75
by long marches or by drawing or carrying heavy loads. Improper
preparation: Toe left too long. Improp*er shoeing: Shoes too heavy
or fitted too full at the toe. Laziness, particularly when going down
hill, rough ground, and poor horsemanship.
Remedies.—The bearing surface of the foot must be leveled, the
toe shortened, the shoe made light in weight and thoroughly rolled
at the toe, and the thickness of the heels of the shoe slightly in-
creased. This shoe induces more rapid breaking over. The full
roller-motion shoe (Pl. XIX, fig. 3) is frequently of value in the
prevention of stumbling, because it not only causes a rapid breaking
over o’f the feet but produces higher action.
In cases of stumbling where calks are necessary to prevent slipping,
use heel calks and short quarter calks welded on web of shoe between
first and second nail holes.
INTERFEBING.
69. A horse interferes (strikes') when he is in motion by striking
any part of a limb with the opposite corresponding foot. Since this
fault leaves evidence by rubbing off the hair and even breaking the
skin, it is an easy matter to determine whether one or both feet
need correction.
Causes.—Poor conformation; fatigue; faulty or neglected shoeing.
Horses with good conformation and straight, upright limbs will
not interfere if properly shod. Those that toe out generally strike,
because the clearance space between the limbs is reduced, while
those that toe in usually travel wide: Straight-limbed horses
with narrow chests also have a tendency to interfere. In order
to correct interfering, the shoer should study carefully the shoeing,
the conformation, and the gait of the horse. The first step is to de-
termine the exact part of .the hoof that strikes. This may be readily
learned by chalking the inside of the wall and trotting the animal
slowly. The chalk will be rubbed off from the exact point of con-
tact with the opposite leg.
Inspect the shoeing for projecting clinches or ragged edges of
the hoof, due to neglect. If the shoeing is of recent date, note
if the shoe is too full. Then inspect the f<3ot and see if the inside
is too low or the outside is too high (broken in). This fault bends
the leg inward at the fetlock joint, starts the foot on a curve instead
of a straight path, and thus lessens the clearance space between
the legs.
Plate XX.—Weighted Shoes.
1. Side weight (outside hind). 2. Toe weight.
3. Side weight (inside front).
Pathological Shoes.
4. Bar shoe. 5. Three-quarter. 6. Tip.
76
Plate XXI.—Extension Toe.
77
78
MANUAL FOR ARMY HORSESHOERS.
Remedies.—If the fault is in the shoeing or in the preparation
of the foot, the remedy in either case is apparent. If the horse
continues to interfere after the bearing surface has been leveled
and the foot properly shod, different careful experiments must be
made, because tests show that there is no fixed rule. A shoe that
will be of benefit in one case may be just the reverse in another.
In general, prepare and shoe the foot in such a way that the
breaking over will be at the center of the toe. As much, if not
more, is accomplished by skillful preparation of the feet than by
the use of extraordinary shoes.
If the foot breaks over on the inside of the toe an angular extension
(about | inch: see Pl. XXI) on the inside toe will be beneficial.
When the shoe is in place, the part projecting beyond the wall
should not exceed that outside the white line on shoe in plate.
The extension is made by thinning and widening the wreb of the
shoe at the desired point. Fit the shoe close on outside from center
of toe to quarter, and roll outside toe with the rasp, full on the
inside from toe to second nail hole, and close from there back,
sharp edges on the inside being hot rasped to avoid cutting.
Ordinarily the lightest part of the foot, especially of the front
foot, is lifted first. For this reason a side weight (Pl. XX, fig. 3)
on the inside of the fore foot will often aid in correcting interfering.
As previously stated, this will not always produce the desired
result. On account of differences in pastern action, the result may
even be obtained by just the opposite—the weight on the outside.
The foot may be prepared with the inside high (broken out) in
order to cause the foot to break over the outside the Joe and to
increase the clearance space.
A small side calk may be placed on the inside of the inner half
of the shoe immediately under the part of the hoof that strikes.
The calk should conform to the curve of the shoe. (Pl. XIX, fig. 4.)
The heel of the shoe should be thickened to correspond to the height
of the calk.
It must be understood that improper preparation of the foot and the
use of a side calk are extreme measures. They throw the foot into
an unnatural and strained position, and therefore should not be used
unless this discomfort is to be preferred to severe cutting of the legs.
As the fault of interfering disappears a return to normal conditions
must be accomplished.
MANUAL FOR ARMY HORSESHOERS.
79
If the hind feet strike, the bearing surfaces should be leveled
corrected as in the case of the front feet. A side weight on the out-
side of the shoe (Pl. XX, fig. 1) swings the foot outward sufficiently
to correct the defect in ordinary cases.
THE MAKING OF SPECIAL SHOES FOR GAITS.
70. The roller-motion shoe.—The full roller-motshoe can
be made from heavy bar steel only, and as this is usually not obtain-
able at Army posts the shoe is seldom used. It is made in the same
manner as the plate shoe and the ground surface is then rounded
with the hammer from the last nail hole on one side to the last nail
hole on the other; the outside edge is made very thin and the inside
edge is left unchanged. The shoe is then finished with the rasp.
The service shoe, on account of the crease, can be rounded only
at the toe. The rounded toe, however, will generally be found to
accomplish the result desired.
71. The front forging shoe.—The heel calks of this shoe are
turned as explained for the calked shoe (par. 54) and then bent well
forward. Hold the shoe on the face of the anvil, the tongs grasping
it at the toe, the ground surface up. Strike directly on the calk,
bringing the hammer toward the toe. After bending the calk for-
ward, be careful to level its ground surface so that it will rest evenly
when the shoe is placed on a flat surface.
The toe is rolled as explained for the roller-motion shoe. (Par.
70.)
7?. The hind forging shoe.—This shoe is fitted in the same manner
as the normal shoe, with the following exceptions: The toe is squared
and the heels are cut off so as to be longer than in the normal shoe;
the toe clip is omitted and two side clips are drawn.
73. The toe-weight shoe.—This shoe is made from the issue
front shoe. Heat the shoe to a white heat and with the hammer and
a cold chisel cut a line on each half of the ground surface of the shoe
halfway between the crease and the inside edge. Each line ex-
tends from the heel to a point between the first and second nail
holes, thence is carried obliquely to the inside edge. Begin the
work of cutting, however, near the toe; neverjat the heels. The cut
should begin obliquely because a right-angled cut weakens the shoe
at this place and causes it to break after much wear.
80 MANUAL FOR ARMY HORSESHOERS.
Reheat and cut until the part inside of the lines is entirely re-
moved. The rough edges are finished with the rasp, and the shoe is
fitted in the same manner as a normal shoe.
The cold chisel is tempered as explained for the hardy. (See
Tools.)
74. The side-weight shoe.—This shoe is made from the issue
front shoe. The process is the same as in the toe-weight shoe, except
ihat the weight is removed from one-half only and that the cut
begins at the center of the toe.
In the front shoe the heels are of normal length and finished as in
the service shoe.
The weight may be on the inside or outside of a front shoe. No
fixed rule can be laid down as to which should be used: the conforma-
tion of the horse will decide.
The weight in the hind shoe, however, is always placed on the
outside, and extends back toward the buttress as far as possible
without covering the frog. The outside heel is drawn about three-
quarters of an inch longer than the inside heel, and from the end of the
buttress is turned outward.
This extension is called a trailer and serves to increase the rotary
motion given by the weight.
75. The making of a three-quarter shoe needs no special descrip-
tion. It is simply a plate or service shoe vith one heel cut off at
any des;red point by the use of the hardy.
CHAPTER VII.
DISEASES OF THE FOOT—CAUSES, SYMPTOMS, TREAT-
MENT-PATHOLOGICAL SHOEING—THE MAKING OF
PATHOLOGICAL SHOES.
76. Information in this chapter is for the guidance of the Army
horseshoer in his capacity as an assistant to his veterinarian. No
treatment herein prescribed should. be. attempted except when
directed by the veterinarian or organization commander.
77. Pathological shoeing is shoeing for the relief of diseased feet.
The bar shoe (Pl. XX, fig.. 4). is most commonly used because it
produces frog pressure, which increases blood circulation and thus
assists nature’s method of building up diseased tissue. Removing
pressure means trimming the bearing surface of the foot in such a
way that the shoe can not cause pressure upon diseased parts.
(Pl. XXII.)
THRUSH.
78. Thrush is a diseased condition of the frog, characterized by an
offensive discharge and a maceration, or softening, of the horn.
Causes.—Filth and moisture, particularly when animals stand
in stables saturated with urine. It is both a cause and a result of
contracted feet: A cause, by reducing the size of the frog and les-
sening frog pressure; a result, because the small frog of a badly
contracted foot is poor in quality and has a lessened resistance to
disease.
Symptoms.—At first there is simply an increase of moisture in
the cleft of the frog, accompanied by an offensive odor. As the
maceration proceeds the discharge and odor become more marked,
the cleft deepens, the horn spreads, becomes underrun and loosened,
and the sensitive structures are exposed. Lameness is usually
absent but it may be severe in very badly contracted feet and in
mild cases when the animal is traveling over loose stones.
Treatment.—Dry clean stalls are essential. Pare away all loose
underrun portions of horn, then dry-clean the frog thoroughly
with oakum and paint with strong tincture of iodine; when the
iodine dries cover the frog with a pine tar dressing. The astringent
powders, such as burnt alum, three sulphates (equal parts of sul-
17722°—17-6 81
82 MANUAL FOR ARMY HORSESHOERS.
phate of copper, iron, and zinc), calomel, etc., can also be used. In
badly contracted feet shoeing with bar shoes, leather pads and tar
and oakum is advisable, to restore the frog to a healthy condition.
CANKER.
79. Canker is a chronic disease of the corium of the frog and sole,
characterized by enlargement and a spongy, vascular condition.
Causes.—Eilth and moisture, commonly resulting from neglected
thrush; injuries which expose the soft structures and do not receive
proper treatment and protection.
Symptoms.—The diseased area is covered with a foul, moist,
cheesy material, and the villi are greatly enlarged and softer than
normal. The moisture causes a softening and loosening of the
normal horn at the edges of the diseased area, which thus becomes
larger, until the entire frog, bars, sole, and even the wall may become
diseased and have a general spongy appearance and bleed readily.
Lameness is usually absent.
Treatment.—First pare the foot down thoroughly, removing all
underrun horn, and give it a good cleaning with a strong creolin
solution. The soft, spongy material must then be entirely removed
with the knife or scissors. Bleeding is usually profuse. A pressure
dressing of cotton and oakum can be applied to check the hemor-
rhage, and left in place for a couple of hours. It should then be
removed and the foot wiped dry with cotton and covered with pine
tar, which keeps moisture away and is an antiseptic, protective
dressing; over this a large mass of oakum should be applied and
held firmly in place by a foot bandage. Place the horse in a well
bedded stall, which is to be kept dry and clean. The treatment
should be repeated at intervals of four or five days, keeping the foot
thoroughly trimmed and applying large masses of oakum to produce
much pressure over the diseased area. As the parts become normal
the soft, cheesy material becomes gradually firmer and more flaky,
and the new horn fills in from the edges or from small centers until
the entire area becomes covered with a healthy horny layer. The
following solution may be used:
Formalin............................. 1 part.
50 per cent alcohol.................... 9 parts.
Bichloride of mercury.................. 2 drams.
50 per cent alcohol.................... 5 ounces.
Apply lightly, and when dry apply dressing.
MANUAL FOR ARMY HORSESHOERS. 83
In mild cases the animal may be shod and kept at work, using a bar
shoe and heavy leather pad and packing the foot tightly with tar
and oakum. Mild cases readily yield to treatment, but severe cases
of long standing require a long time to effect a cure.
BRUISES OF THE SOLE—CORNS.
80. These are quite common and usually show reddish areas. /V
com is a bruise in the angle formed by the wall and bar.
Causes.—Stepping on stones and other hard objects; pressure of
shoe on sole, due to lowering the wall too much; shoes too short or
left on too long, in which case the wall overgrows the heels of the
shoe; heels lowered too much; rapid work on hard roads, especially
when the feet are hard and dry, causing a great amount of concussion
and subjecting the foot to injury. In the unshod foot the bar may
curl inward and press upon the sole.
Symptoms.—Lameness may or may not be present. The horn
is discolored, and where bruises and inflammation are severe great
lameness is shown and suppuration may occur. When pus is present
it burrows into the surrounding soft structures, causing a separation
of the horn and making its exit at the heel or around the coronet.
This usually greatly relieves the pain and lameness.
Treatment.—Locate the seat of injury and its probable cause
by removing the shoe, cleaning the foot and thoroughly testing it
with the hoof tester or pincers. Level the foot if uneven, and, if no
lameness is present, reshoe, first removing the pressure over the
diseased area by trimming or lowering the horn; protect and soften
the horn by the use of a leather pad. tar and oakum. If lameness is
present, reduce the inflammation by soaking the foot in cold water or
by poulticing it. This treatment usually gives prompt relief. If
the lameness increases, pus is probably forming and the underrun
horn must be removed, exposing the sensitive structures and pro-
viding for perfect drainage. Antiseptic washings and dressings
should now be used, the diseased parts being kept clean and pro-
tected. A good treatment is carried out as follows: First soak the
foot in a tub or pail of creolin solution for a quarter to half an hour,
then apply cotton saturated with tincture of- iodine and cover with a
foot bandage. Repeat dressing twice daily. When pus formation
ceases and lameness is no longer present, shoe with a bar shoe, after
removing all pressure, and apply a leather pad, tar and oakum.
84
MANUAL FOR ARMY HORSESHOERS.
INJURIES OF CORONET AND HEELS (TREADS).
81. These are caused by the animal overreaching—that is, strik-
ing the heel of the front foot by the toe of the hind foot. Cavalry
horses and lead and swing artillery horses are likely to be stepped
upon by the animals following when the column is brought to a sud-
den stop. They are also caused by the animal resting the heel cf
one foot on the coronet of another, by stepping upon and thus bruising
or wounding the coronet, and by contact with hard or sharp objects.
Symptoms—Lameness is usually present. The skin is lacer-
ated at the heel or coronet and the parts are sensitive. There is
frequently a separation of the hard and soft structures. These
wounds, especially those at the quarter and toe, are usually severe
and badly infected, and hence dangerous because they are so close
to the important underlying structures (joints, tendons, etc.). They
require close attention.
Treatment—Remove all loosened portions of horn and dress as
a wound. Repeat twice daily and protect by foot bandage.
PUNCTURES OF THE FROG AND SOLE—PRICKS IN SHOEING.
82. Causes—Punctures of the frog and sole are caused by the
animal stepping on nails, glass, sharp sticks, etc. Pricks in shoeing
are of two kinds:
(a) From the nails being driven into the soft structures, causing
immediate lameness.
(b) From the nails being driven too close, causing a bulging of the
inner layer of horn and pressure on the soft structures. Lameness
may be in evidence at once, but usually develops slowly and may
not appear for several days.
Symptoms.—Lameness, more or less severe. If the animal has
been recently shod always suspect the nails. Clean the foot thor-
oughly and remove the nails one at a time, examining each nail for
moisture. Test each hole with the hoof tester or pincers; when the
sore spot is pressed the horse will flinch. If the nails are all right
examine the rest of foot thoroughly in the same manner.
Treatment.—Whether an old or recent wound, trim the horn
from about it to establish drainage, clean the wound thoroughly
with a strong antiseptic solution and apply an antiseptic dressing.
This may be applied as a wet pack, that is, cotton saturated with
the antiseptic or a poultice made with a strong antiseptic solution.
If the pus burrows under the wall and escapes at the coronet, the
MANUAL FOR ARMY HORSESHOERS.
85
underrun portion of the wall must be removed to allow perfect
drainage. Repeat drainage twice daily until pus formation and
lameness cease, when the horse can be shod and put to work, pro-
tecting the foot with tar and oakum and a leather pad. • In all punc-
tured wounds of the foot there is danger from infection with, the
germs of tetanus, or lockjaw, which is usually present in the soil.
QUITTOR.
83. A quittor is a diseased condition of the lateral cartilage or
other deep-seated structures of the foot, with the formation of sinuses
(tubes).
Causes.—Suppurating coms, punctures of the sole, frog, or coro-
net, in which the cartilage or other tissues are injured primarily, or
secondarily by the burrowing of pus.
Symptoms.—Swelling of the coronet, with one or more openings
(sinuses), which communicate with the diseased area and discharge
pus. Marked lameness is usally present. Lameness and pus forma-
tion are increased by exercise.
Treatment.—Provide for perfect drainage by removing all
underrun horn, trimming away dead tissues, etc.; treat with anti-
septic foot baths and apply wet antiseptic dressings. The sinuses
may be injected with strong tincture of iodine and a wet pack of
one one-thousandth solution of bichloride of mercury (one tablet to
a quart of water) be applied. Repeat dressing twice daily. Perfect
rest is essential. If this does not effect a cure an operation will be
necessary.
QUARTER AND TOE CRACKS (SAND CRACKS).
84. A quarter crack is a split in the horn of the wall at the quarter,'
a toe crack is a split at the toe. Cracks which affect only the upper
border of the hoof are called coronary cracks; those affecting the lower
border of the hoof are called low cracks, while those extending from
one border to the other are called complete cracks. Horses that have
weak quarters are predisposed to it, also those with brittle horn.
Causes.—Excessive dryness of the hoof, causing brittleness;
lack of frog pressure; contraction; long toes; heavy shoes; large nails
and nails set too far back. Those cracks which start at the bottom,
usually due to shoeing, are of little importance. Those which start
at the coronet are usually troublesome, especially when conformation
and feet are faulty.
86
MANUAL FOR ARMY HORSESHOERS.
Symptoms.—A fissure in the wall at toe or quarter. The fissure
may be shallow and not cause lameness, or it may be a deep one
which extends through the thickness of the wall and, owing to
pinching of the sensitive laminae, causes lameness, frequently with
extensive laceration and hemorrhage.
Treatment.—First remove the shoe and soften the horn and re-
duce the inflammation by cold foot baths or poultices. Then cut
away the hard overlapping edges of the horn to prevent the pinching
of the laminae. Shorten the toe, lower the wall, and trim away the
bearing surface of the wall so that it does not rest on the shoe for half
an inch to an inch on each side of the crack (Pl. XXII). Apply
a bar shoe, providing considerable frog pressure, and keep the foot
soft and elastic by applying tar, oakum and a leather pad. Keep the
wall surface soft, especially over the crack, by daily applications of
pine tar or an oil. Blisters to the coronet are beneficial by stimulating
the growth of horn. A run at grass, barefooted, for two or three
months is decidedly beneficial.
In case of toe crack the operation is the same. In shoeing, the
wall is cut away at the toe to prevent pressure. A bar shoe, rolled
at the toe and with a clip on each side of the crack, is recommended.
The bar shoe serves two purposes:
1. Ordinarily it is not possible to drive the proper number of nails
on the side of the affected quarter, but the bar keeps the shoe in
place on account of the firm nailing on the other side.
2. The bar gives frog pressure and expansion, which are desirable
because quarter cracks usually result from a weak and drawn-in
quarter.
FALSE QUARTER.
85. This term is given to a faulty condition of the hoof in which
the horn is thin and weak, and extends Irom the coronet to the ground
surface oi the wall.
Causes.—Most commonly caused by barbed wire cutting into
and destroying the horn secreting layer of the coronary band.
Symptoms.—The horn of the affected part is usually concave,
rough and scaly in appearance, and is much thinner than the adjacent
healthy parts of the wall. Owing to the weakened condition of the
wall, cracks may appear when the horn becomes hard and dry and
cause lameness.
Treatment.—This is confined to protection of the weakened
area by the use of the bar shoe, removal of pressure, and keeping the
Plate XXII.—Quarter Crack.
Before and after treatment and shoeing.
S7
88
MANUAL FOR ARMY HORSESHOERS.
foot soft and elastic, preferably by the use of tar, oakum, and leather
pad. Should a crack appear and lameness result, treat as directed
under quarter crack.
LAMINITIS.
86. Laminitis, or founder, is an inflammation of the sensitive
laminar corium, usually of the tront feet, and may involve the
adjoining structures. The pain is very acute, because the swollen
laminae lie between two hard surfaces (the coffin bone and the wall)
and are pinched by them. There are three forms: Acute, with pro-
nounced symptoms; subacute, in which the symptoms are mild, and
chronic, resulting from the acute, with structural change of the feet
and chronic lameness.
Causes.—These are many and varied. Concussion, chilling of
the body from standing in a breeze while overheated, (kinking large
amounts of cold water after severe exertion and while in an exhausted
or overheated condition, grains eaten to excess, and improper food-
stuffs such as musty hay and grain, wheat and new oats, green foods
such as alfalfa, clover and com eaten to excess.
Symptoms.—In the acute form all four feet may be affected,
but the disease is usually limited to the front feet. The animal
stands in a fixed position with the front legs advanced, the weight
being carried on the heels; the pain is greatest at the toe because the
laminae are largest and most vascular at that place; the hind legs are
advanced under the body to relieve the forefeet of weight. Occa-
sionally the animal sways backward, elevating the toes to further
relieve them of weight and reduce the pain. He is moved with
difficulty because the movement increases the pressure and pain in
the feet which remain on the ground. The feet are hot, and the ar-
teries of the cannon and pastern have a distinct throb. The animal
groans with pain and sweats profusely. The pulse is full, strong and
rapid, beating 60 to 80 per minute. Constipation or diarrhea may
be present. Temperature 102° to 106°. In some cases the animal
stands persistently; in others he may lie for hours at a time.
Treatment.—Subacute laminitis. This form may be conveniently
treated in the field by standing the animal in a pool of water, prefer-
ably in a running stream, and removing the shoes if the command
is stationary; in garrison by removing the shoes and standing the
animal in a soaking stall, wet clay, or water hole. Feed laxative
diet and give potassium nitrate.
MANUAL FOR ARMY HORSESHOERS.
89
Acute laminitis.—Place the animal in a well bedded box stall; if
in the field, in a soft, grassy, shady spot if possible. If he does not
lie down throw him. This affords great relief by resting the feet
and reduces the pain and inflammation. After once experiencing
the great relief afforded by lying, the animal will then usually lie
of his own accord. Remove the shoes. Give a laxative of 1 or 2
pints raw linseed oil, and give potassium nitrate in 1 to 2 ounce doses
three times a day. Apply cold wet packs to the feet and legs as
high as the knees and keep them wet. Feed laxative diet. As
soon as the pain has diminished moderate exercise is beneficial.
This may be gradually increased as the animal improves. If re-
covery is not marked after five or six days apply a bar shoe with a
wide web, well rolled at the toe and concaved, and then a blister
of cantharides around the coronet; repeat the blister if necessary.
Use no toe clips.
Chronic laminitis is permanent laminitis resulting from one or
more attacks of the acute form of the disease. In the chronic form
there is always inflammation, sometimes more, sometimes less, but
never as severe as in the acute form. Laminitis frequently produces
great stiuctural changes in the feet, due to loosening of the union
between the horny and sensitive laminee, and a rotation backward
of the pedal bone due to increased tension on the flexor tendon.
These changes consist of dropped sole, increased height of the foot
at the quarters and heels, seedy toe, and a chronic type of inflamma-
tion as noted above. When such changes result the usefulness of
the animal is greatly lessened, but by careful shoeing he is able
to do slow work satisfactorily.
In a case of chronic laminitis, pay special care to the concaving
and use a bar shoe rolled both at the toe and at the heel; this is a
modified form of the rocker-motion shoe. This shoe produces a
uniformly smooth breaking over, without much jar.
SEEDY TOE.
87. Seedy toe is a mealy condition of the horn of the wall, most
commonly in the region of the toe.
Causes.—Most commonly the result oL generalized laminitis
with structural changes in "the feet; localized laminitis caused by
nail pricks in shoeing and stepping on sharp objects; injuries to
the wall from blows; pressure from heavy, deep-seated clips; deep
hoof branding with irons insufficiently heated; excessive moisture,
causing disintegration (crumbling) of the horn fibers.
90
MANUAL FOR ARMY HORSESHOERS.
Symptoms.—A soft, flaky condition of the horn, lameness usually
being absent. If there is marked crumbling of the horn with the
formation of a cavity between the horny and sensitive lamin»,
lameness may result from injury to the sensitive structures by dirt,
and infection and pus formation may occur.
Treatment.—Remove the unsound horn, clean the cavity, pro-
tect the foot by means of a leather pad and apply a dressing of tar
and oakum. Use a bar shoe, well rolled at the toe; no nails should
be driven in the diseased part, but, instead, side clips should be
used, care being exercised that they bear only on the healthy horn.
Stimulate the growth of horn by applying a blister of cantharides
or mercury to the coronet.
NAVICULAR DISEASE.
88. Navicular disease is a chronic inflammation at the point where
the tendon of the deep digital flexor passes over the navicular bone.
Causes.—Faulty conformation, in which the limb is placed
under the body and carries excessive weight; faulty conformation
of the feet in which the heels are high and narrow, resulting in ex-
cessive concussion; long toes, in which the strain on the deep flexor
tendon is increased; standing on inclined surfaces, such as stalls
and picket lines with an upward slope, thus increasing the strain.
It invariably affects the front feet because the weight upon them is
greater than on the hind feet.
Symptoms.—Lameness, which is slight at first, but gradually
increases in severity. While traveling, the affected leg takes a
shorter step and the toe strikes the ground before the heel comes
down. In some cases the lameness may disappear for a day or two.
When resting, the animal points the toe, and if lame in both feet
the limbs are advanced and the feet rested alternately. If kept in
a stall with a soft floor a hole is usually dug and the animal stands
with the toes in the hole, the heels resting on the edge. This greatly
relieves the strain on the diseased area. As a result of the constant
standing on the toes the frogs atrophy (waste away) and the heels
contract and the wall at the heels becomes higher than normal.
Pressure over the navicular area with the hoof tester or pincers
causes marked pain. Bar shoes also greatly increase the lameness.
Treatment.—The disease is incurable, and treatment merely
serves to diminish the effects, though in the first stages treatment
may be beneficial. The inflammation should be reduced by means
of cold foot baths and poultices, followed by the application of
MANUAL FOR ARMY HORSESHOERS.
91
blisters around the coronet, after which the animal should be turned
out on soft ground for several months. When necessary to use the
animal the toes should be well shortened and shoes with thickened
heels or heel calks applied. Keep the feet soft by the use of foot
baths, poultices, or the application of a leather pad, tar, and oakum.
SIDEBONES.
89. Sidebone is an ossification (turning into bone) of the lateral
cartilage, frequently resulting from improper leveling of the foot.
Horses with flat feet and weak quarters are predisposed to this
disease.
Causes.—This disease is common in heavy animals working on
hard pavements and is due to concussion; improper preparation of
the foot in shoeing, one side (usually the outside) being left higher
than the other, thus increasing the concussion on the lateral carti-
lage on the high side; injuries to the region of the quarter and heels
by treads, wire cuts, etc.
Symptoms.—A hard unyielding condition of the lateral cartilage,
with or without lameness. The affected side of the foot contracts,
as a result of lack of expansion. Lameness is increased by fast travel
on hard roads and by a hard, dry condition of the hoof.
Treatment.—If lameness is present, first remove the shoe and
level the foot, then reduce the inflamation by cold foot baths and
poultices, followed by the application .of a blister and a rest of four
to six weeks. If lameness persists repeat the blister and rest. In
shoeing an animal afflicted with sidebones level the foot carefully.
If the foot is affected on one side only and contraction has resulted,
the web of the shoe should be widened sufficiently to extend out to
where the normal foot would be. A plain shoe with rolled toe is
recommended. Frog pressure produces soreness and must be carefully
avoided.
CONTRACTED FEET.
90. Contract d feet refers to an unnatural shrinking or narrowing
of the feet at the quarters and heels. It is most frequently seen in
the front feet. The feet of some horses are naturally narrow, resem-
bling in shape the feet of a mule.
Causes.—Lack of frog pressure is always the primary cause;
contributory causes are, lack of exercise and lack of moisture, thrush,
the continued use of heel calks, concaving the bearing surface of
the shoe back to the heels, and opening the heels with the knife.
92
MANUAL FOR ARMY HORSESHOERS.
Symptoms.—The foot, instead of being wide at the quarters
and circular in shape, becomes narrow at the heels, which in very
bad cases may overlap, the frog atrophies and is frequently affected
with thrush. Lameness may be present as a result of the pinching
of the sensitive structures by the walls of the hoof.
Treatment.—Frog pressure is essential. If the feet are ex-
tremely dry and hard they may be softened by standing the animal
in moist clay or in water. If the animal is to be used on soft ground
let him go barefoot, or shoe with the tip (Pl. XX, fig. 6); otherwise
use the bar shoe with leather pad, tar, and oakum, packing the
oakum very tight under the frog.
DRY FEET.
91. This is a troublesome condition, occurring most frequently in
dry weather.
Causes.—The moisture of the foot normally comes from the blood,
and depends largely upon the circulation, and a certain amount of
it comes by absorption from the ground. Shoeing, by raising the
frog from the ground, lessens the circulation and interferes with
absorption of moisture from the ground. Sudden changes in weather,
alternation from wet to dry, and soaking the feet in water cause a
maceration of the perioplic covering and facilitate the evaporation
of moisture from the wall. Working in sandy ground wears away
the periople and facilitates evaporation, and rasping the periople
produces the same condition.
Symptoms.—A hard, dry, and inelastic condition of the horn.
This increases concussion and frequently causes inflammation of the
foot corium and produces lameness.
Treatment.—Soften the feet by poultices or by foot baths and
then apply an oily covering to the wall surface; or pack the cavity
between the branches of the shoe with wet clay two or three times a
week. This is preferable to soaking in water as it supplies moisture
to the foot and does not macerate the periople. Work the animal
on soft ground as much as possible.
An excellent dressing for dry, brittle, or contracted feet is made of
the following:
Creolin......................................... 4 ounces.
Pine tar........................................ 4 ounces.
Raw* linseed oil................................24 ounces.
MANUAL FOR ARMY HORSESHOERS.
93
Mix and apply to both wall and sole twice a week. When the
animal is shod the foot should be prepared and then a coating of the
dressing applied to the sole before nailing on the shoe. At other
times the dressing should be applied at evening stables.
Or
Pine tar............................... 4 ounces.
Cosmoline.............................. 4 ounces.
Neat’s-foot oil........................24 ounces.
Melt together over a slow fire. Apply the same as the preceding
dressing.
A blister of cantharides around the coronet is beneficial by stimu-
lating the growth of horn fibers.
92. In this chapter have been treated the common foot ailments
of the Army horse. Pathological shoeing for drop sole resulting
from laminitis, for bowed tendons, and for other troubles that can
not be permanently cured has been omitted from this textbook.
The Army horse must be ready for hard service. When his feet are
incurably bad he should not be nursed, but should be placed on the
inspection report.
THE MAKING OF PATHOLOGICAL SHOES—THE BAR SHOE.
93. This shoe, as previously stated, is more frequently required
in Army shoeing than any other special shoe. It is made from the
issue shoe, and the general fit and shape when finished are the same
with the exception of the bar across the frog.
94 MANUAL FOR ARMY HORSESHOERS.
Select an issue shoe that is a size larger than the one that would
ordinarily be used, and preferably a front shoe—a size larger in
order that the heels shall be long enough to admit of turning the
bar and a front shoe on account of its width and stock.
It is advisable for the beginner to fit the shoe to the outline of the
foot before turning the heels for preparing the bar, as the shoe is
more easily fitted before welding the bar and the shoer can estimate
the amount of stock required for making the bar.
94. To prepare the heels of the shoe before turning in the bar—
(a) Scarfing.—This is accomplished by holding the. shoe on the
face of the anvil (either surface on the face) and striking on the
upper edge of the extremity of the heel, the hammer held at an
angle of about 45° with the plane of the upper surface. This will
result in a bevel between the upper and lower surfaces of the heel
about a half inch in length. Scarf the other heel in the same way,
except that the scarf is made on the opposite surface.
(6) Pointing the scarf.—To insure a smooth weld. This is
done by holding each heel in turn so that it will rest at an angle
upon the face of the anvil near the heel, and striking on the upper
edge at the end. This is the same position and accomplishes the
same result as pointing the heels of the plate and service shoes after
drawing (par. 13).
This cut shows the smith working on the heel of the shoe farthest
from his hammer hand, which was done simply to aid the photog-
rapher in producing a photograph that would show the angle of the
MANUAL FOR ARMY HORSESHOERS.
95
scarf, most distinctly, while at the same time give a good view of
the position of the tongs and the hand holding same.
95. To turn in the bar.—Hold the shoe with the tongs at or
above the toe; place the inside edge of the heel to be turned, on
the point of the horn, the quarter nearly horizontal, with 1 inch or
an inch and a half projecting over the horn, depending upon the
length of the bar required.
Strike on the upper edge of the portion projecting over the horn,
lowering the hand as the bend progresses, and turn in the desired
length at a right angle.
96
MANUAL FOR ARMY HORSESHOERS.
The length of the bend should be a little more than one-half the
length of the finished bar, as the ends must overlap for welding.
Turn the other heel in the same manner.
96. To prepare the bar for welding.—Close the shoe bodily
until the scarfed points overlap and then hammer the points down
until they fit closely, leaving no space for coal dust to accumulate.
97. To weld the bar.—Place the bar in the fire and heat to a
welding heat (see Heats), tilting or rocking the shoe forward and
back to insure an equal heat on both sides. When the proper heat
has been obtained (fluxing), place the bar on the face of the anvil
MANUAL FOR ARMY HORSESHOERS.
97
and strike a few light blows on one point, then reverse the shoe and
strike on the opposite point. This will bind the points together.
Reheat the bar to the welding heat and, taking the same position,
complete the weld by heavier blows, reversing the shoe so that both
sides will be flattened. After the weld is completed the bar is
shaped by holding one corner on the point of the anvil and striking
on the center of the bar and then reversing. This will set the center
of the bar forward, give it the correct shape at the heels, and pre-
pare it for beveling. The front half of the upper surface of the bar
must be hammered down (beveled) to the point, thus forming a
cradle for the frog.
98. Fitting.—The bar shoe is fitted as is the service shoe, and
the same heats are used. A little more allowance, however, is
made for expansion on account of the added frog pressure.
99. To open the toe.—The shoe is heated throughout to an even
heat and held upright with the bar on the face of the anvil. The
blows are struck along the toe, thus opening the toe and quarters
without changing the bar.
The toe may be opened as in the service shoe.
100. To widen the heels.—By lengthening the bar.
(a) When the quarters are too long.—Heat the bar and the
heels to a cherry heat. Hold the shoe in the tongs at the toe and
place inside edge of the heel on the point of the horn, resting at
the point from which it is desired to turn the heel into the bar.
17722°—17 7
98
MANUAL FOR ARMY HORSESHOERS.
Strike on the end of the heel projecting over the horn. Then re-
verse the shoe and proceed in the same manner with the other heel.
(6) When quarters are of the correct length.—Heat the bar
to a white heat and draw it out by working on the face of the anvil.
This will lengthen the bar and at the same time reduce its thick-
ness. After drawing out in this manner, the bar must be leveled
with the upper surface unless the frog is so large that it will produce
the desired pressure. The bar may also be drawn on the point
of the horn, working on one half and then reversing; this method
thickens the bar and should be used if the frog is very small.
MANUAL FOR ARMY HORSESHOERS.
99
101. To close the heels.—By shortening the bar.
(a) When the quarters are of the correct length.—Heat
the bar and heels and, holding one heel on the face of the anvil,
shoe perpendicular, strike on the elevated heel. This will
shorten the bar, also narrowing and straightening the quarters.
(6) When the quarters are too short.—Place an inside edge
of the triangular part of the bar on the point of the horn and strike
on the part projecting over it. This will turn part of the bar into
the heel.
100
MANUAL FOR ARMY HORSESHOERS.
(c) When the quarters are too long.—Hold the shoe upright,
the center of the bar on the point of the anvil, and strike on the toe.
This will push the bar toward the toe and shorten the shoe, bringing
the heels closer together.
102. To lengthen the quarters without changing the bar.—
Draw out the heels on the horn of the anvil as in the service shoe.
MANUAL FOR ARMY HORSESHOERS.
101
103. When one quarter is longer than the other, to bring
the shoe back to its proper shape. Heat the shoe throughout, and,
holding it upright with the point of the heel of the longer quarter on
the face of the anvil, strike on the upper edge of the shoe directly
over the point resting on the anvil.
104. Thinning the bar is often necessary in the case of a large
frog.. To accomplish this, the bar is welded at about one-half the
required length and then drawn out on the face of the anvil, its
lower surface being leveled with the ground surface of the shoe.
105. In the case of an exceptionally large frog, it is necessary
to curve the bar below the ground surface to allow sufficient room
and to prevent too much pressure. Toe and heel calks must be
used with this shoe to insure a level ground surface.
102 MANUAL FOR ARMY HORSESHOERS.
To curve the bar.—Hold the shoe so that one end of the bar
rests on the edge of the face and the other on the horn of the anvil
and strike on the center of the upper surface.
THE TIP.
106. The use of the tip for contracted heels leaves the foot in
more nearly a state of nature than any other shoe, it is sufficient for
ordinary work, and is easily applied. It should be thin, only thick
enough to hold the nails, and not be. flexible. The best tip can be
made from an old shoe uniformly worn, the quarters being cut off
just in front of the fourth nail hole. Using the rasp acToss the toe,
lower the toe the desired amount as far back as the tip extends.
The heels of the tip should be thinned. If after the tip is secured
in place the walls back of the tip extend below its ground surface,
they can easily be lowered level with the tip by use of rasp.
The tip may be made from bar steel. In such cases two nails on
a side are sufficient, the nail holes being punched to correspond to
the first and third nail holes of a service shoe.
CHAPTER VIII.
SHOEING REFRACTORY HORSES.
107. Most horses that can be classed as refractory in shoeing have
been brought to this condition by improper handling when green
and unaccustomed to the sights and sounds of a shoeing shop.
When a young horse has been assigned to an organization, a com-
mon practice is to send him at once to the shop with instructions
that he be shod by quiet means if possible, but by force if necessary.
No greater evil exists in the mounted service. It is as much
our duty to gradually train a young horse to submit to shoeing
as it is to patiently drill him to surrender to the bit and to work
in the saddle or harness.
Summary methods not only ruin the horse’s disposition, but
subject the shoer to constant danger of injury.
108. Shoeing young horses.—The first step should be. to teach
the young animal that raising his feet will do him no harm, and this
lesson should be given at the first grooming. The method of raising
the forefoot and the hind foot, as explained in this manual, should
be thoroughly understood by all enlisted men and be a part of the
instruction of every recruit.
When the young horse surrenders his foot, lower it again quietly
and pat him; later use the brush on the soles of his feet; next tap
the soles lightly with the currycomb; finally, take the shoer’s posi-
tion and go through the same steps. This complete instruction may
be a matter of a day or of many days, depending upon the animal’s
disposition, but it should not be slighted nor hurried.
In the department of equitation at the Mounted Service School
the following method is used with young horses that are disposed
to kick when their hind legs are first handled. The horse is equipped
with a cavesson, which is held by the animal’s trainer. A surcingle
is placed around the girth. The man that grooms the horse takes
hold of the surcingle with the inside hand, in order to move with
the horse and be secure against injury. With the outside hand he
103
104 MANUAL FOR ARMY HORSESHOERS.
strokes the haunches and legs, gradually working downward. In
the meantime the trainer pats the horse on the neck, but corrects
him sharply with the cavesson whenever he displays temper. This
method is almost invariably successful.
The second step is to let the young horse grow accustomed to the
shop. While the horseshoer is at work on a quiet horse the young
horse should be led into the shop and held by the man who has been
grooming him and raising his feet.
The animal should not be tied, nor should he be held by any other
man than the one he knows and trusts.
When the animal shows neither timidity nor excitement the shoer
begins work on the feet. Frequently the removal of the surplus
growth of horn is all that can be accomplished without excitement
or resistance. At the first sign of either, work for that day should
be abandoned and the horse removed from the shop.
The shock of the hammer is conveyed to the joints of the pastern
bones, and the green horse, startled thereby, will struggle to free his
foot. The shoer can usually handle a forefoot easily unassisted.
If a good helper holds the hind leg in a comfortable position on his
thigh and holds the hoof firmly with both hands, the shoer can work
with more certainty, the shocks of nail driving will be taken up,
to a great extent, in the helper’s wrists and arms, and the horse will
stand quietly.
Patient, quiet work will eventually succeed and thereafter each
shoeing is more easily completed.
109. There are, however, certain highly nervous horses in nearly
every organization that are refractory as a result of previous bad
handling, and in the emergencies of active service there may be
insufficient time to quietly prepare new mounts for shoeing as ex-
plained above.
In these cases some form of restraint is required,.but in each
instance no more force should be employed than is absolutely
necessary—the gentlest method should be tried first.
The cavesson, as a means of correction, will usually make a horse
stand still and is to be preferred to the twitch. The latter, although
effective, is a brutal instrument, and should never be used except
upon an animal otherwise unmanageable; moreover, after repeated
use of the twitch the horse dreads any approach of the hands to
his muzzle, and can be bridled only with the greatest difficulty.
Severe use of the twitch will also permanently disfigure the animal’s
appearance.
MANUAL FOR ARMY HORSESHOERS. 105
110. If the cavesson is insufficient, the rigging described below
should be used.
The cuff.—A strap of double thickness of leather, 18 inches
long and 1J/2 inches wide, is sewed to a D ring 3 inches long and
made of ^-inch round iron. A piece of thin leather 9 inches long
and 3 inches wide is sewed on the inside of the strap next to the
D ring; a buckle and keeper are sewed on the outside of the strap
as shown.
The surcingle.—Two 3-inch rings are sewed on the outside of
the issue surcingle and are so placed that when the surcingle is ad-
justed the rings will hang down in the position of the quarterstrap
rings of a saddle.
A rope f inch in diameter and about 20 feet long; an eye-splice
should be made at one end.
This rigging can be easily made in any organization. For use in
the field the rope is replaced by a lariat. The cuff and surcingle
together weigh only 2 pounds 5 ounces, and can readily be packed
in a saddlebag.
TO RAISE A FOREFOOT.
111. Strap the cuff around the pastern, the ring above the heels.
Pass an end of the rope through the ring and hand both ends over
the horse’s back to a helper.
The horse’s head, as usual, should be held by the man that grooms
and trains the animal.
This man should stand on the side of the foot to be raised in order
to avoid injury if the horse strikes.
The shoer gently but forcibly flexes the knee and raises the foot,
while the helper takes in the slack of the doubled rope. If the horse
is fractious, the helper passes both ends through the ring on his side.
Grasping the rope close under the surcingle ring with the hand
nearest the horse’s head, and holding the ends securely against the
hip in the other hand, the helper is secure against injury, can move
with the horse and control the slack to the best advantage.
Plate XXIII.—Raising Front Foot of Refractory Horse; Also Hind Foot,
First Method.
106
MANUAL FOR ARMY HORSESHOERS.
107
If a helper is not available, the shoer secures one end of the rope
to the D rin» (by the eye or by a knot), passes the other end through
the surcingle ring on his own side and, after raising the foot, ties a
half hitch.
TO RAISE A HIND FOOT.
(First Method.)
112. Strap the cuff around the pastern, the ring above the heels.
Draw the horse’s tail to one side and make a loop in it; fasten one
end of the rope in the loop by a “single sheet bend.” Pass the other
end through the D ring and draw it to the rear, where it is held by
helpers. The horse is tied, but the head is held as usual. When
the shoer raises the foot, the helpers draw in the slack of the rope
and the foot is supported (by the animal himself) in a good position
for work. If he kicks he can do no harm, as his foot must move
along the rope. After one or two such efforts he will ordinarily
stand quiet.
If helpers are not available, the end of the rope may be secured
to a post or tree, but must be fastened in a manner to permit of prompt
release in case of a protracted struggle, during which the horse might
throw himself and be injured.
Mr. Churchill, instructor in shoeing, used this device for 14 years
in civilian practice with unfailing success. (See Plate XVI.)
TO RAISE A HIND FOOT.
(Second Method.)
113. Strap the cuff around the pastern, the ring to . the front.
Put the surcingle around the neck in front of the shoulders, loosely,
so that it will not bind and choke the animal. Make the rope fast
in a ring on the surcingle, pass the free end through the ring on the
cuff and back through the ring on the surcingle, and draw the foot
forward, and upward. This is an inconvenient position of the foot
for an inexperienced workman, but it prevents the animal from
kicking and guards both the animal and the shoer from injury.
With a little care the animal can be quickly and properly shod.
If the rigging is not at hand use a 1-mch or l|-inch rope, preferably
the latter size, as smaller rope is apt to bum the animal. Make a
loose collar with a short piece of rope, pass a loop of a long rope around
the pastern and draw the foot up as described above. If only one
Plate XXIV.—Horse in Stocks.
MANUAL FOR ARMY HORSESHOERS.
109
piece of rope is available and it is not desired to cut it, tie a bowline
loosely around the neck, pass the end of the rope around the pastern
and through the bowline, and proceed as above. In using a rope
Plate XXV,—Harness for Throwing Horse.
without the cuff the shoer should raise the foot and adjust the rope
in the hollow of the pastern while an assistant takes up the slack;
if the foot is raised by means of the rope alone, even a large rope
running through the hollow of the pastern is apt to bum.
Plate XXVI.—Throwing the Horse For Shoeing.
110
MANUAL FOR ARMY HORSESHOERS. Ill
114. When it is found that a horse is so vicious that it is dangerous
to shoe him unless he is rendered helpless, two courses are open.
One is to put him in the stQcks; the other is to throw him and tie
him down.
The latter method is a last resort, to be used only when quieter
methods have been tried and proved unsatisfactory.
The harness used in the farriers’ branch of this school to throw
horses for minor operations has been found to answer the purpose
and does not harm the horse. Throwing and “hog tying” a horse
without other appliances than a rope should be avoided, as this
method usually burns the horse badly and has been known to result
in permanent injury.
The throwing harness (Pl. XXV) consists of:
1. Bellyband with snap hooks for front hobbles.
2. Breast strap with suspending neck strap.
3. Saddle pad with crossed ropes, each 20 feet long.
4 and 5. Front hobbles.
6 and 7. Hind hobbles.
8. Check strap, used to connect the saddle pad with halter crown
strap.
The harness is shown in detail in the illustration. The scale of
inches will enable any good saddler to manufacture it accurately,
and Plate XXVI also shows clearly the manner in which it should
be adjusted and used.
ADDITIONAL COPIES
OF THIS PUBLICATION MAY BE PROCURED FROM
THE SUPERINTENDENT OF DOCUMENTS
GOVERNMENT PRINTING OFFICE
WASHINGTON, D. C.
AT
35 CENTS PER COPY
V