/


Text
17 Lace Knit Accessory Patterns
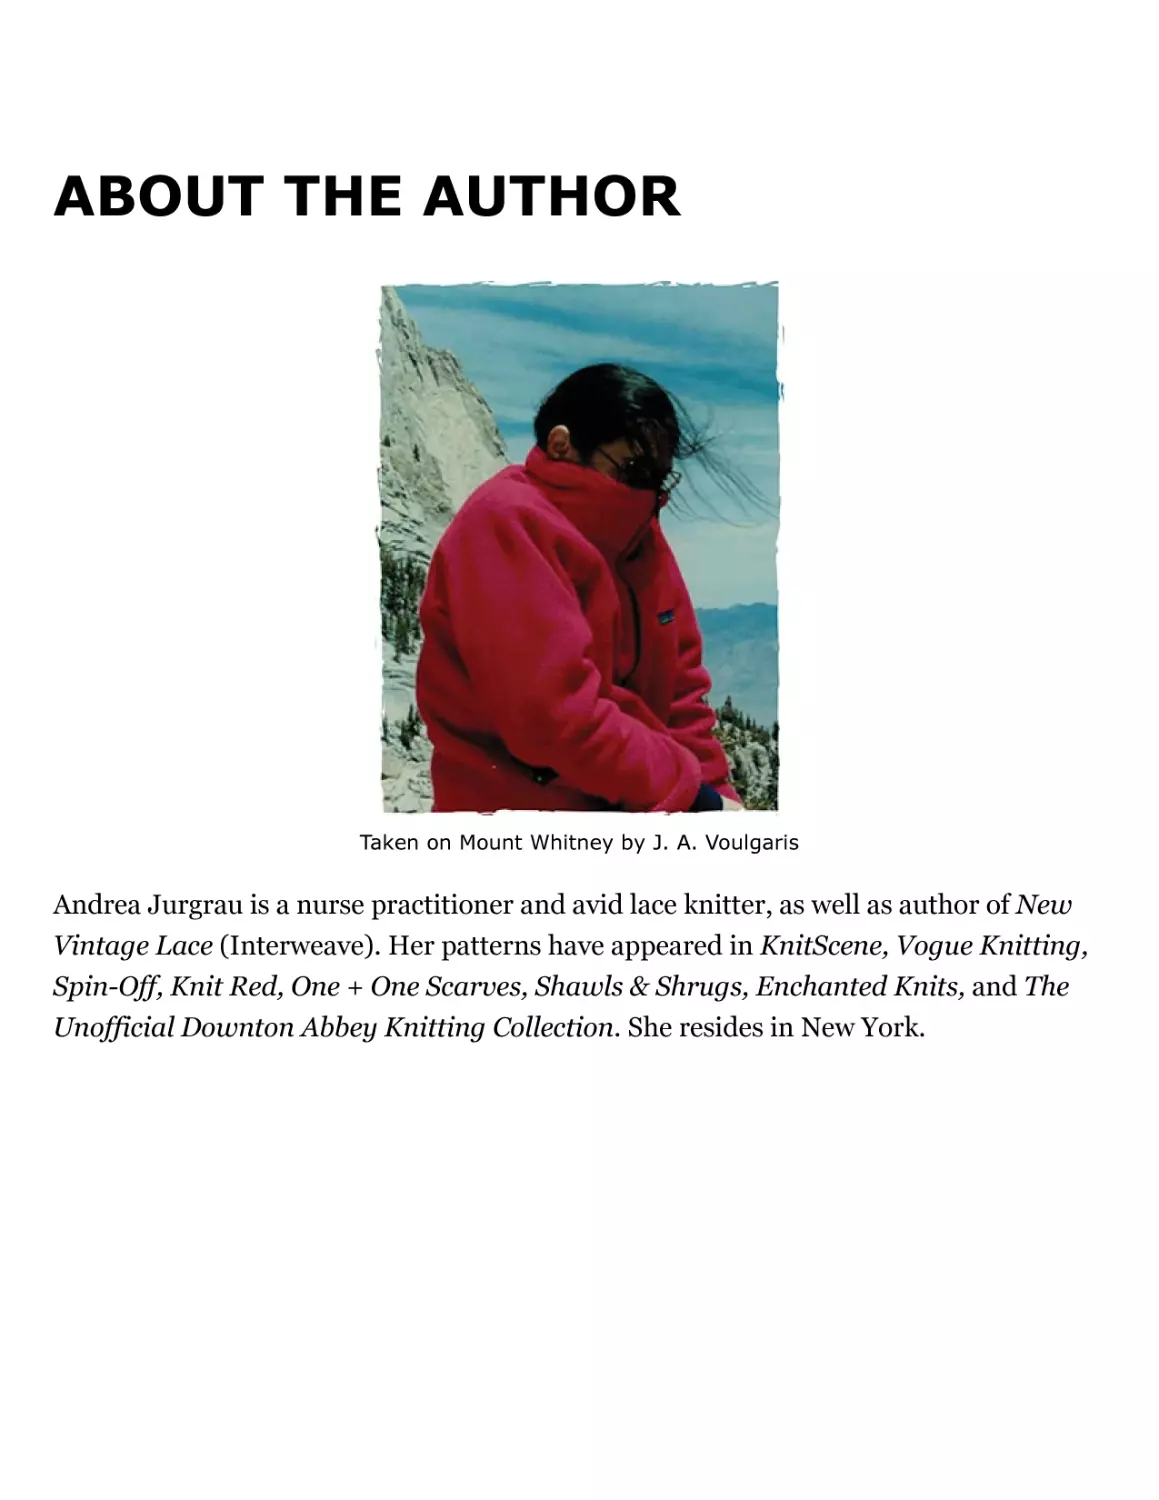
Andrea Jurgrau
DEDICATION
This book is dedicated to the memory of Lucy Voulgaris, my mother-in-law,
who loved hiking and backpacking and shared that love with her children. In
turn, my husband, John, shared that love with me.
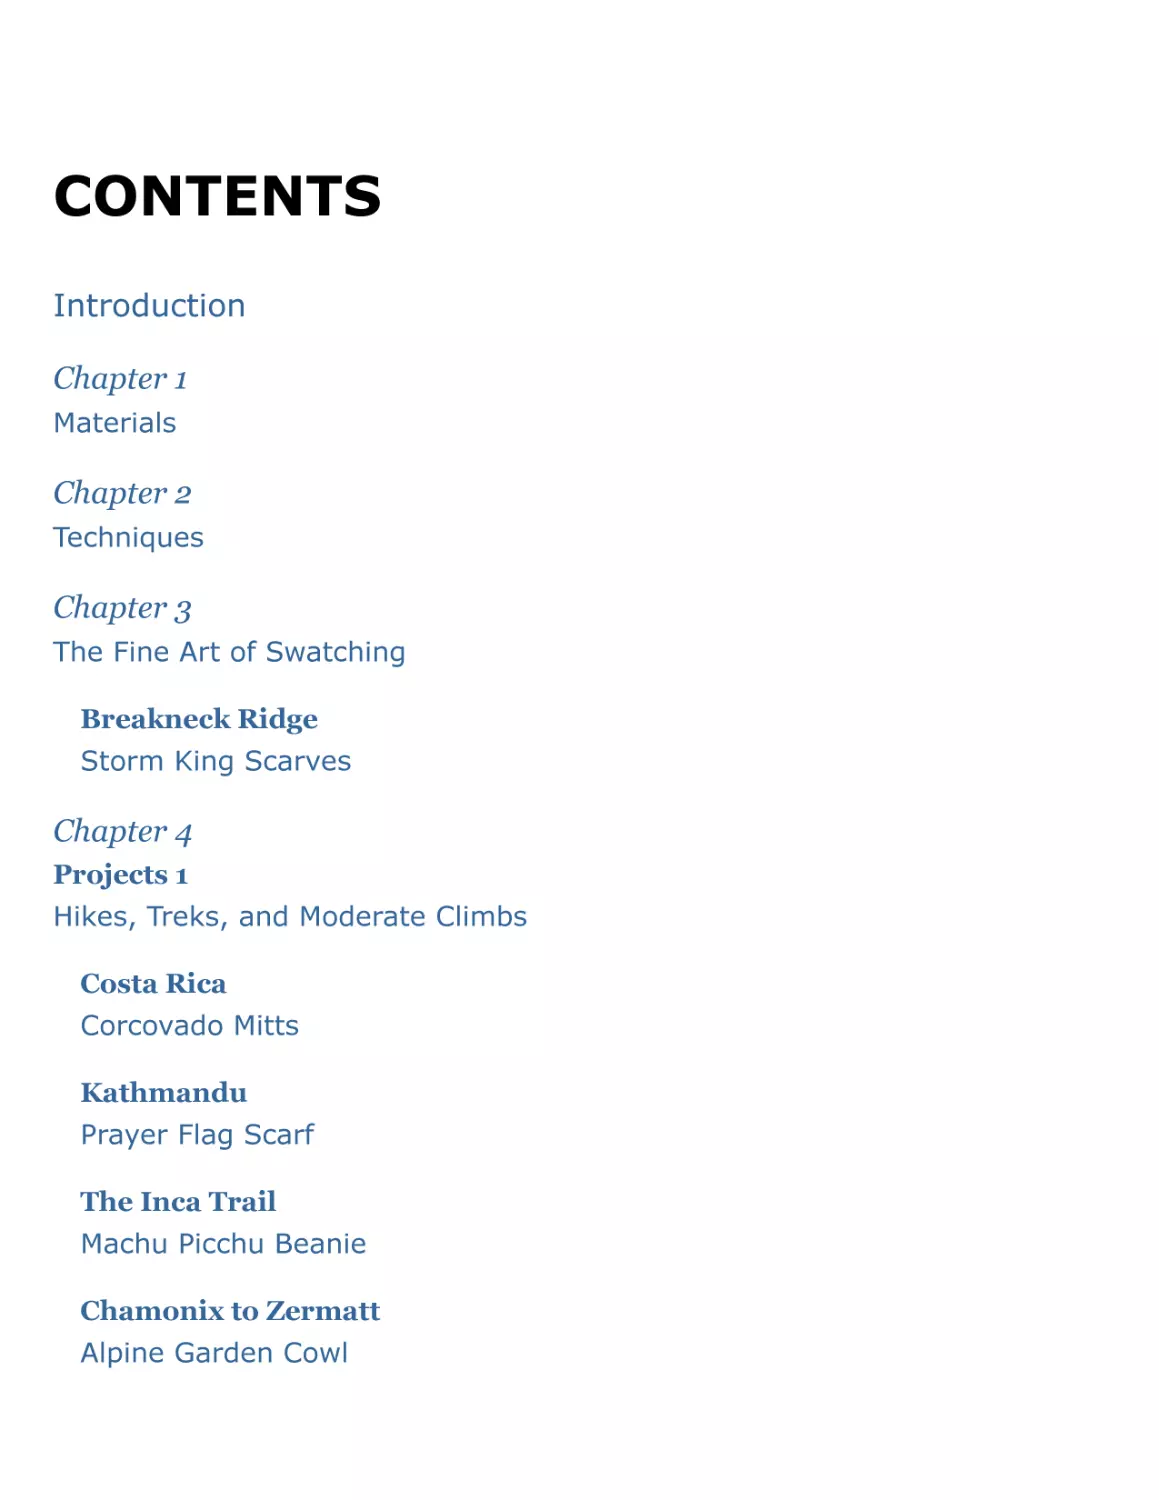
CONTENTS
Introduction
Chapter 1
Materials
Chapter 2
Techniques
Chapter 3
The Fine Art of Swatching
Breakneck Ridge
Storm King Scarves
Chapter 4
Projects 1
Hikes, Treks, and Moderate Climbs
Costa Rica
Corcovado Mitts
Kathmandu
Prayer Flag Scarf
The Inca Trail
Machu Picchu Beanie
Chamonix to Zermatt
Alpine Garden Cowl
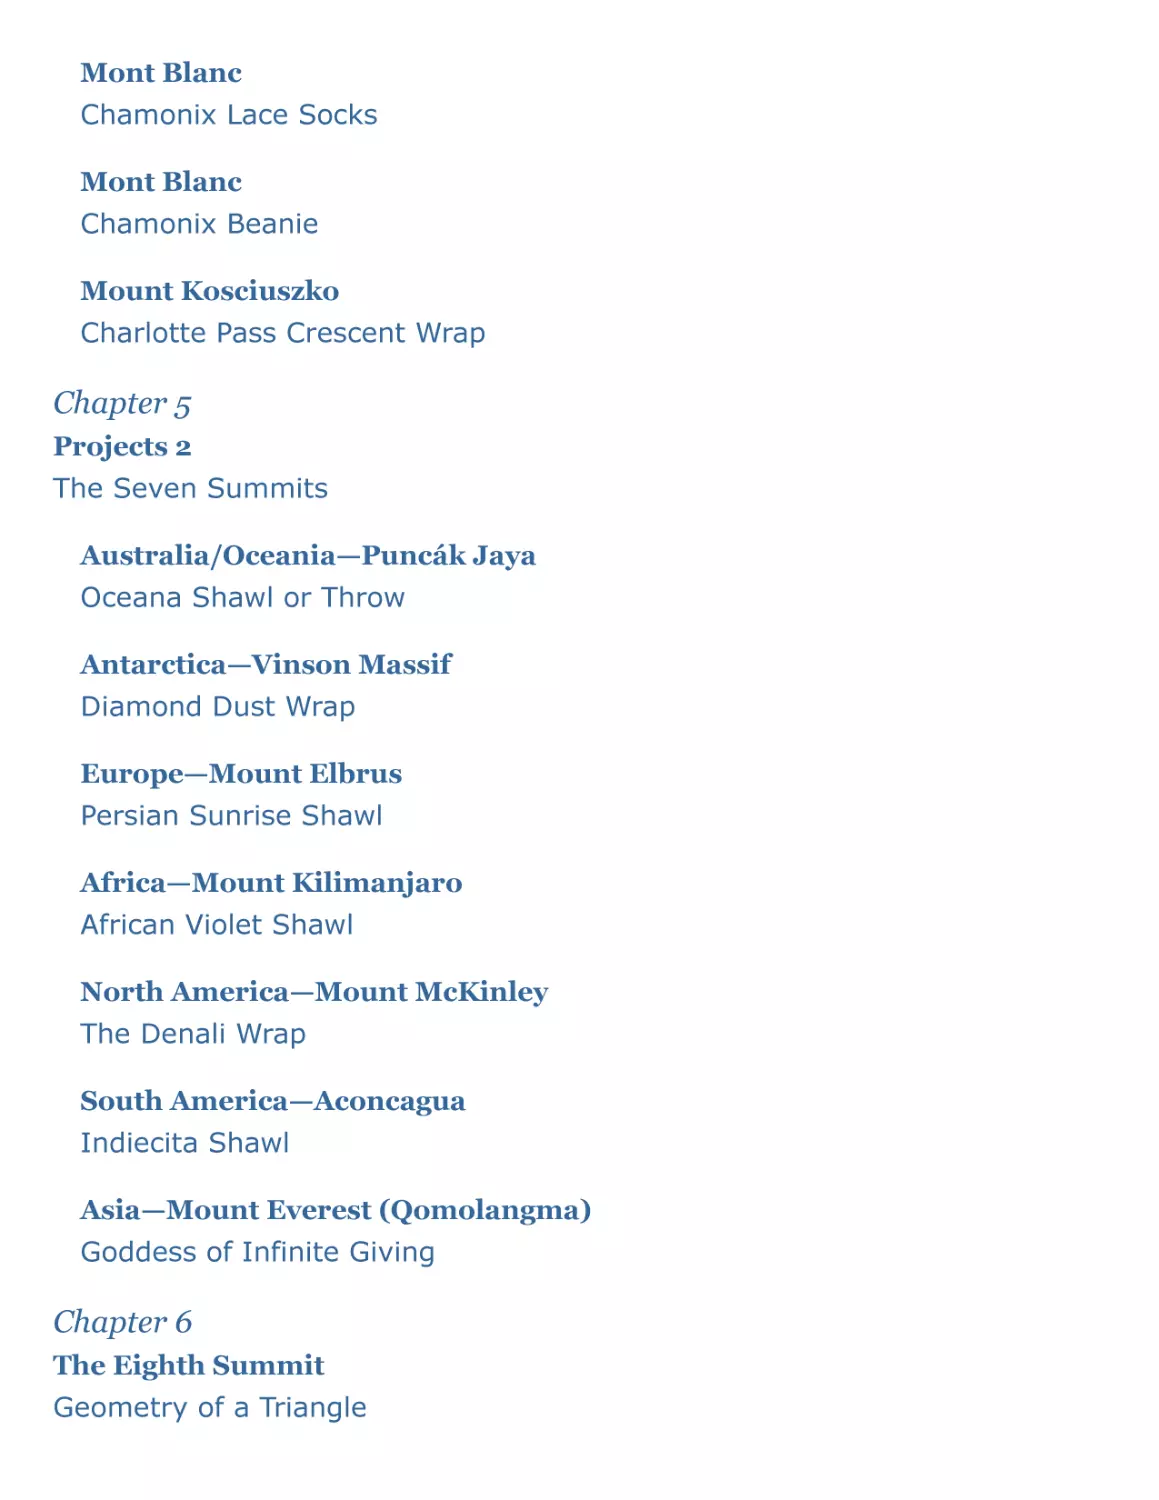
Mont Blanc
Chamonix Lace Socks
Mont Blanc
Chamonix Beanie
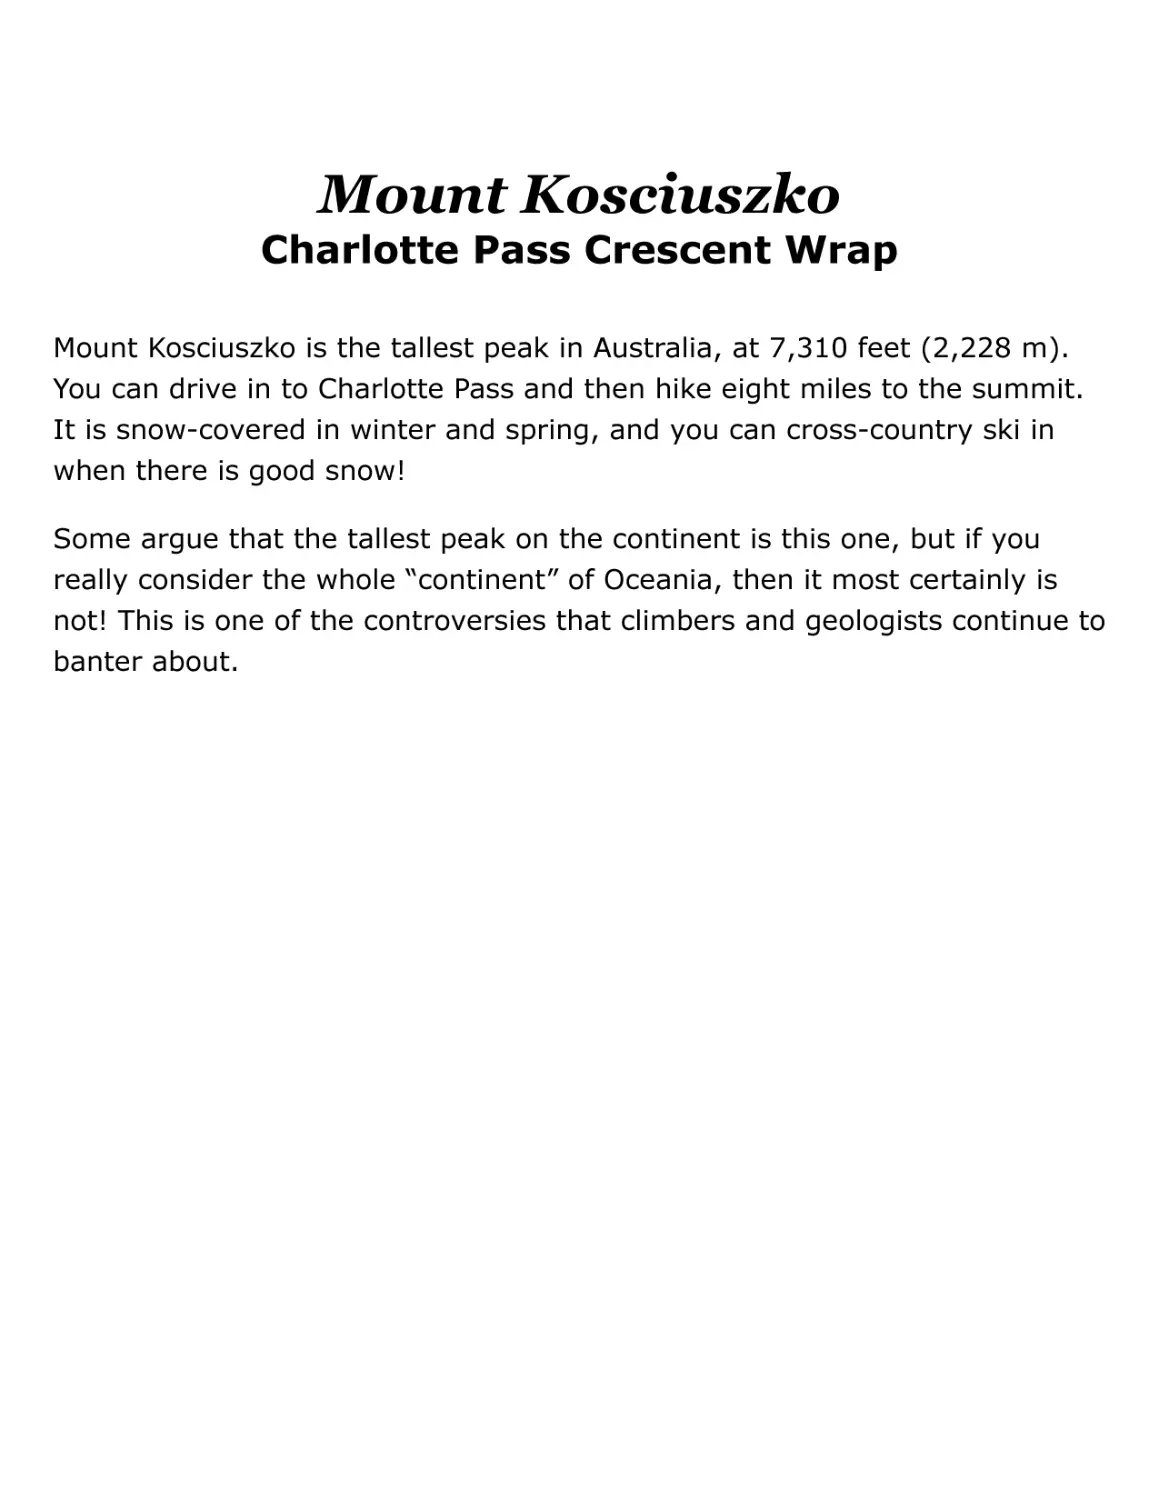
Mount Kosciuszko
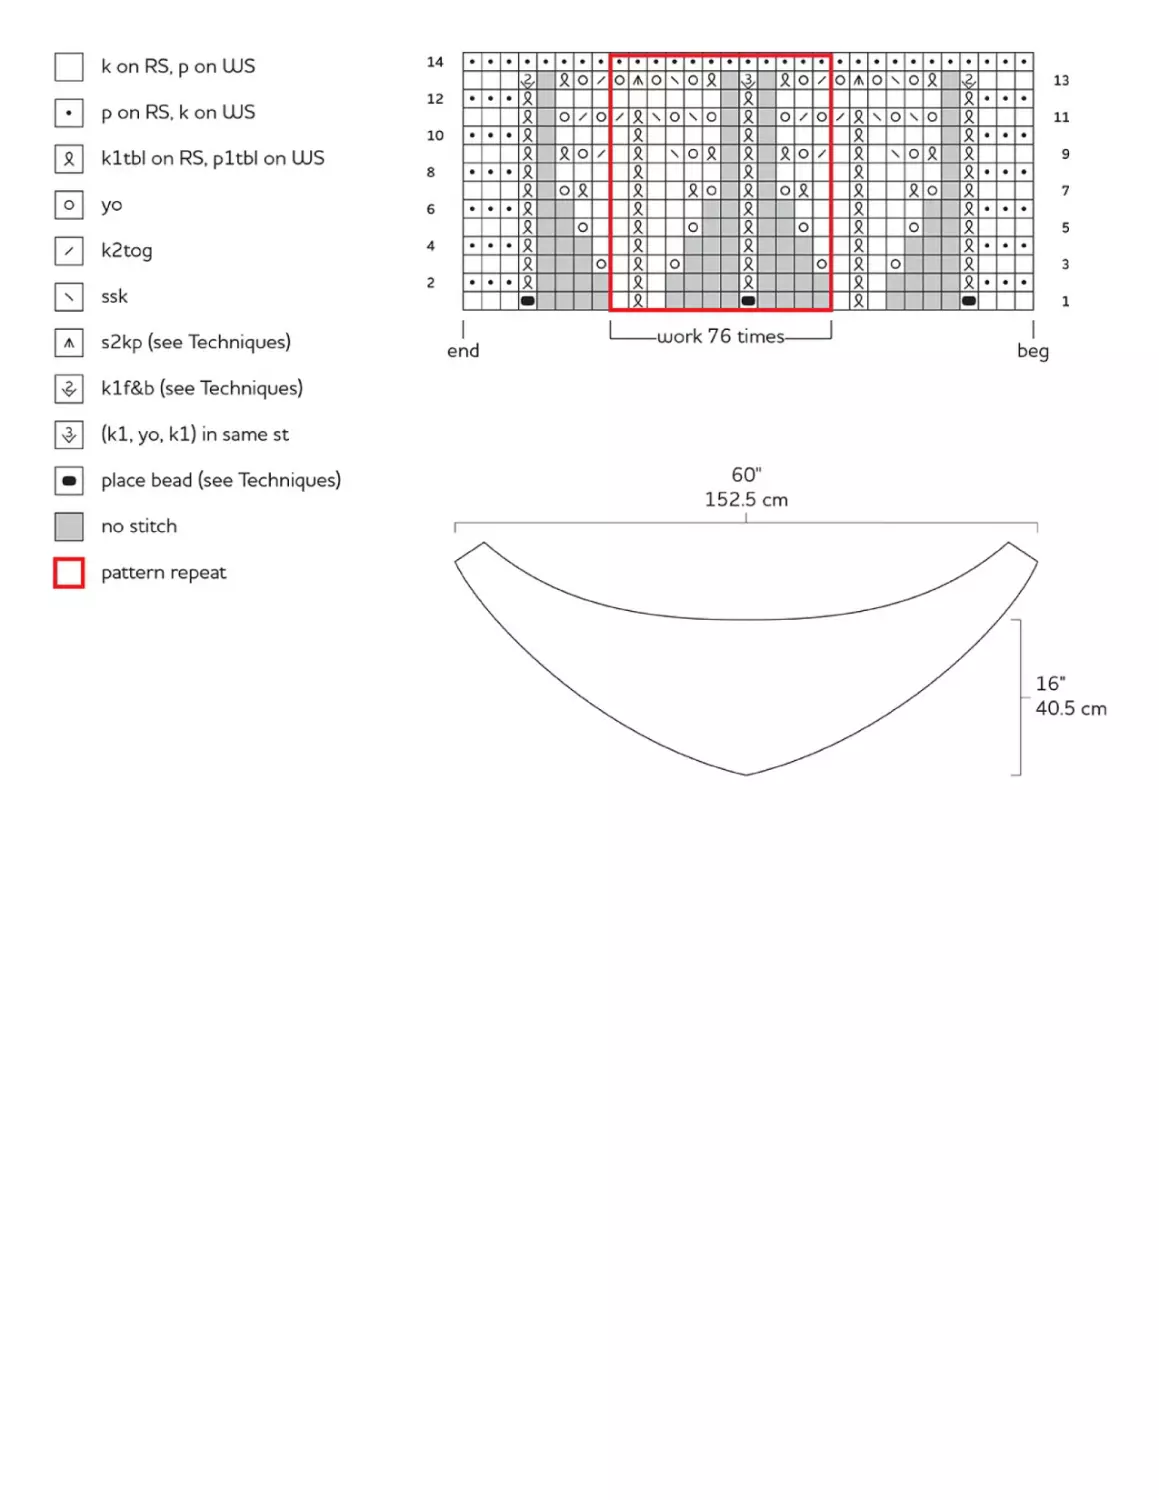
Charlotte Pass Crescent Wrap
Chapter 5
Projects 2
The Seven Summits
Australia/Oceania—Puncák Jaya
Oceana Shawl or Throw
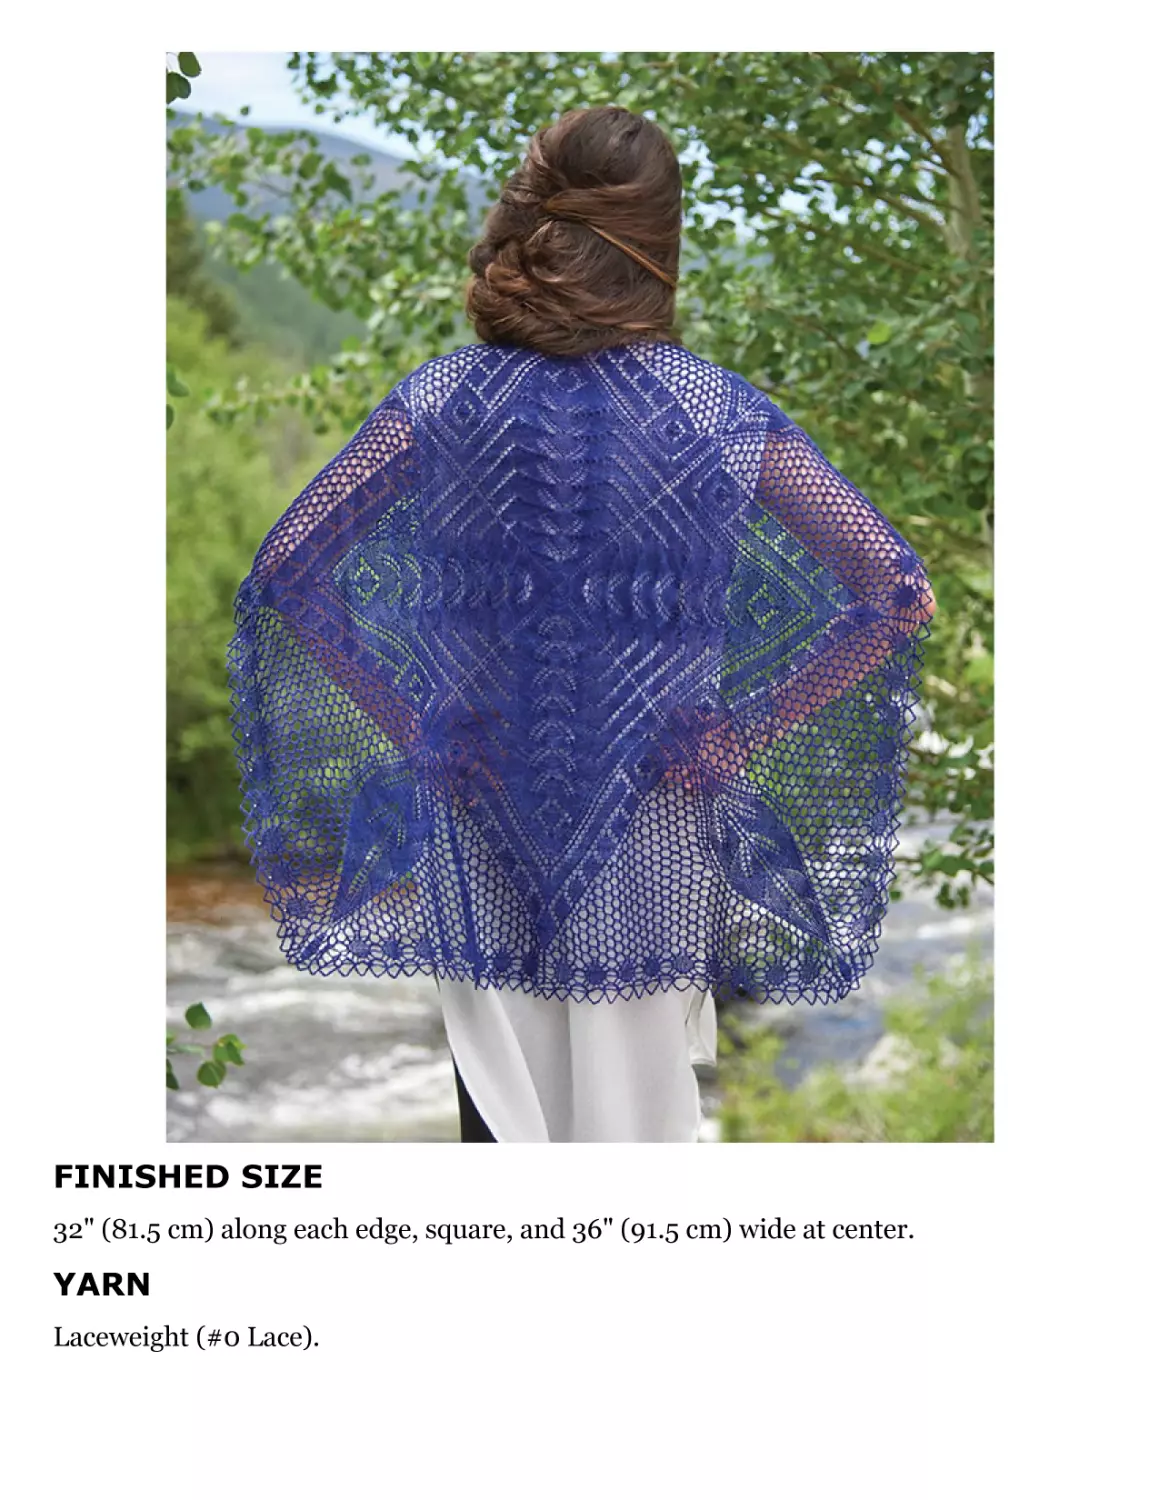
Antarctica—Vinson Massif
Diamond Dust Wrap
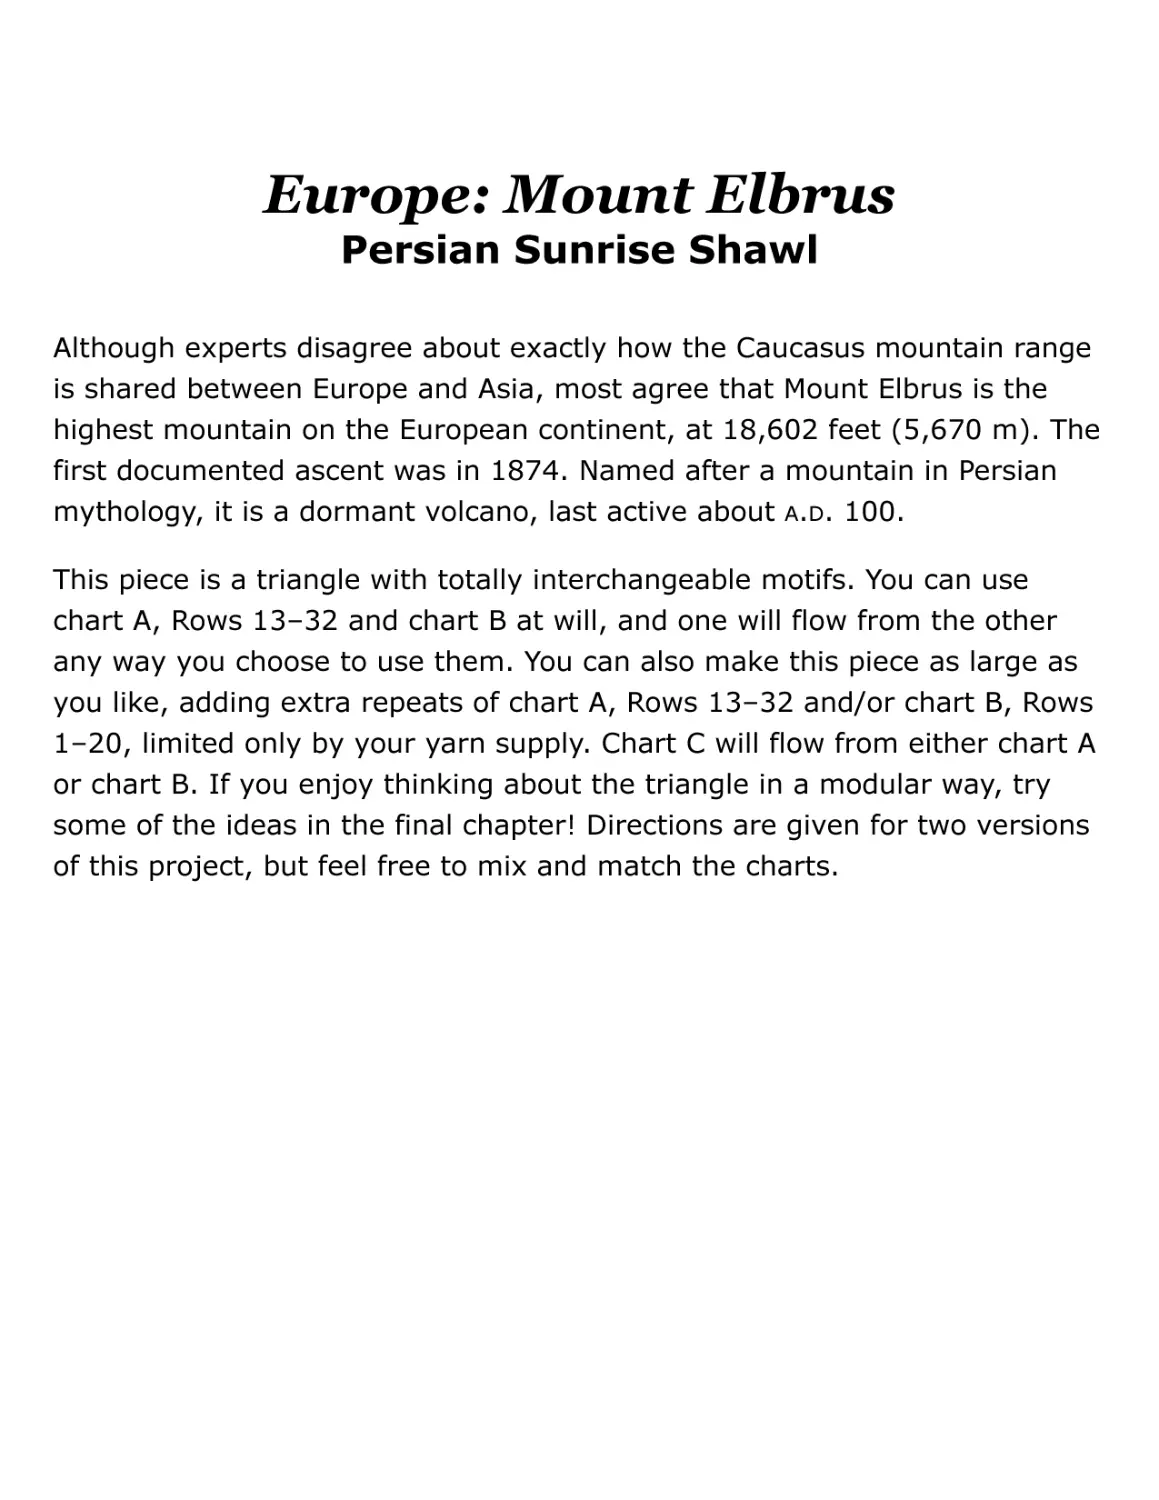
Europe—Mount Elbrus
Persian Sunrise Shawl
Africa—Mount Kilimanjaro
African Violet Shawl
North America—Mount McKinley
The Denali Wrap
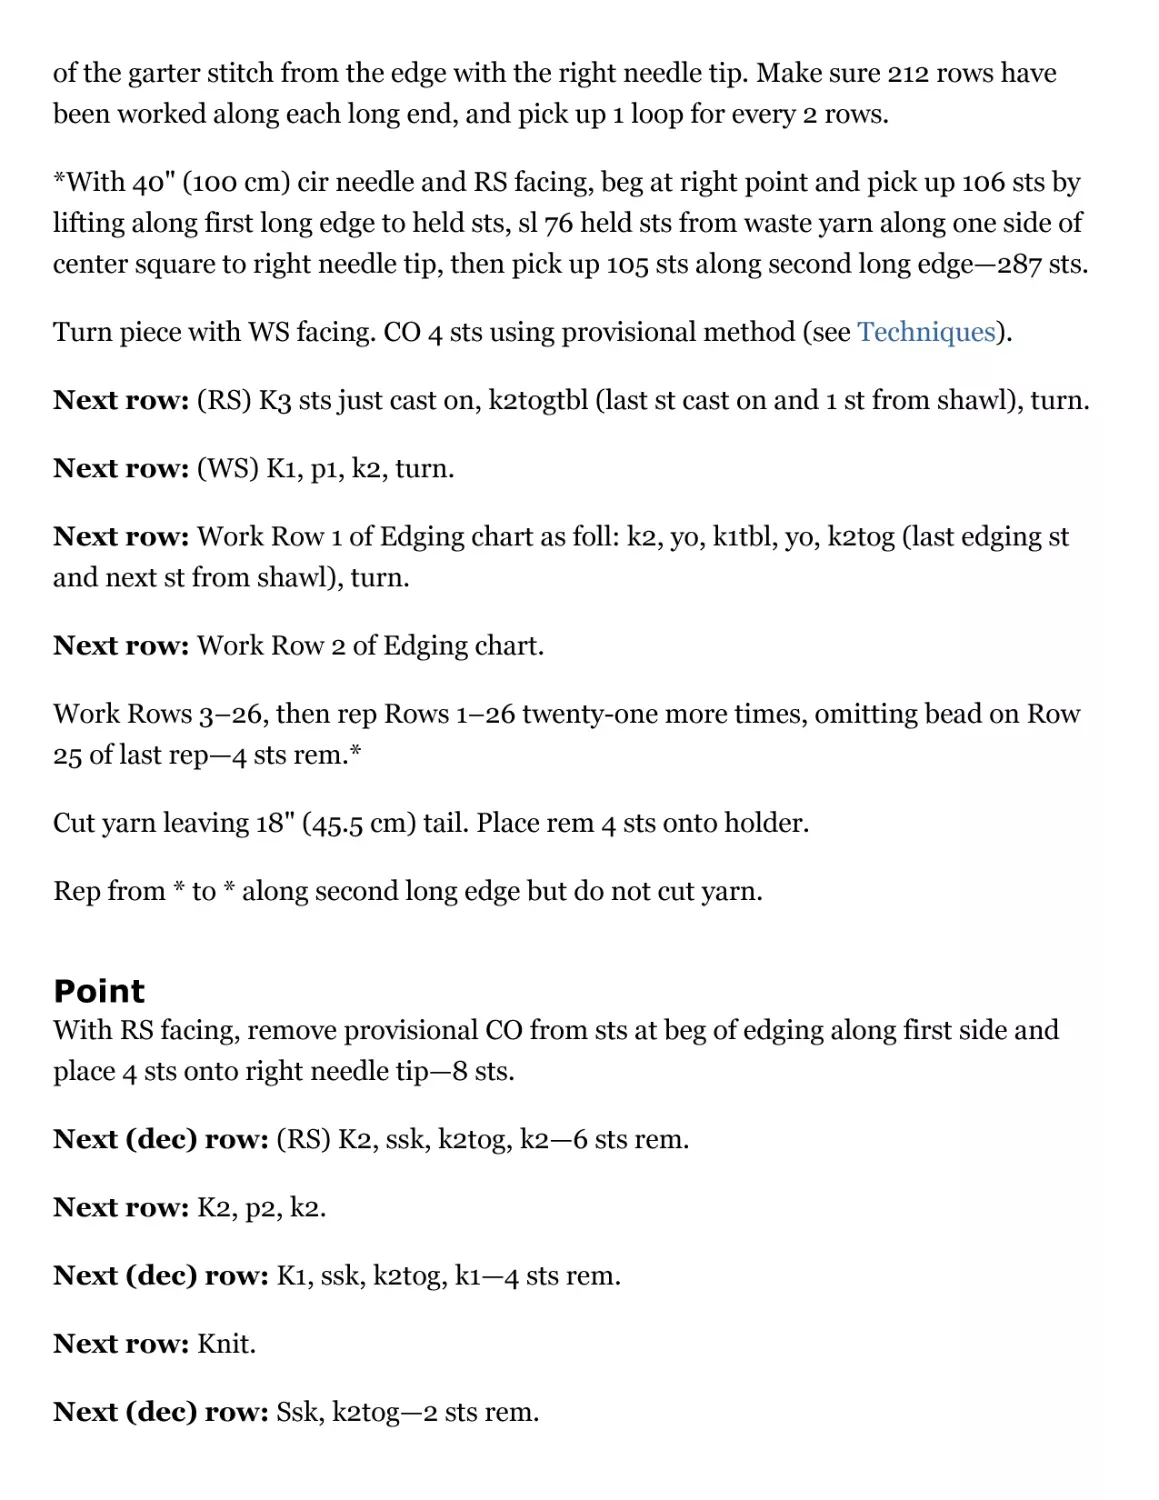
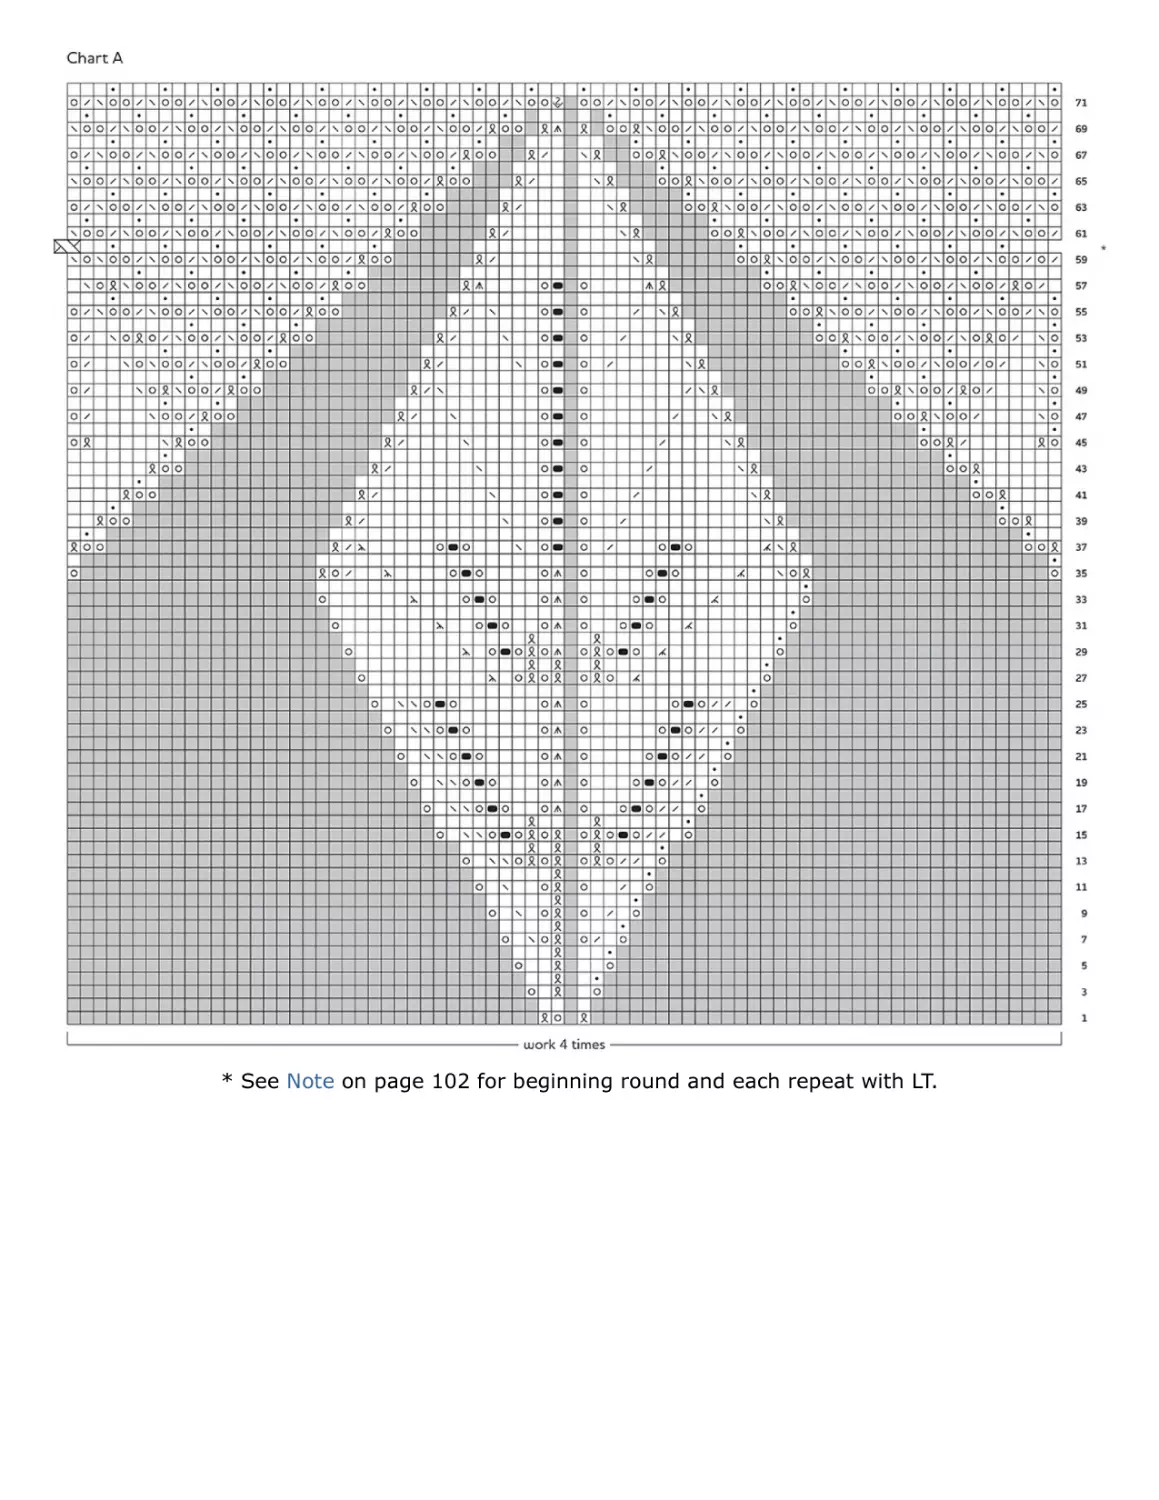
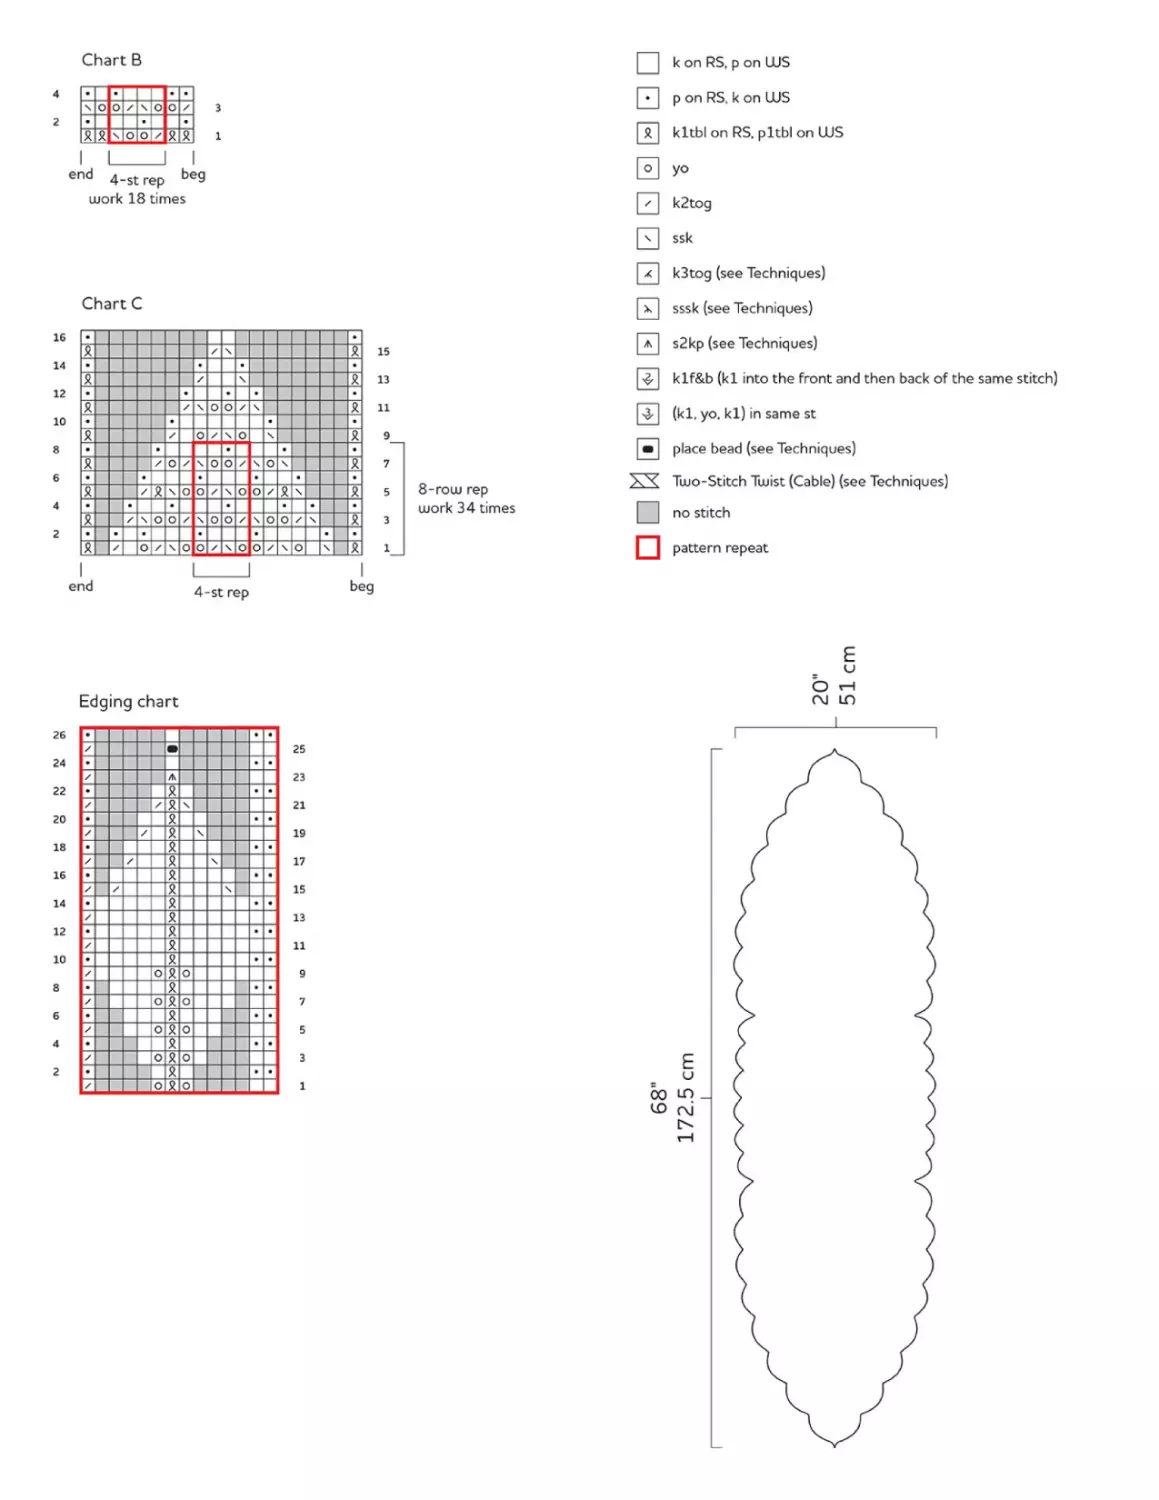
South America—Aconcagua
Indiecita Shawl
Asia—Mount Everest (Qomolangma)
Goddess of Infinite Giving
Chapter 6
The Eighth Summit
Geometry of a Triangle
Franconia Traverse Wrap
A Scalene Triangle
Pacific Crest Shawl
An Equilateral Triangle
Sources for Supplies
INTRODUCTION
The lore of the seven summits calls to every mountaineer. Documented in
the 1988 book of the same name by Richard (Dick) Bass, the seven
summits refer to the tallest mountain on each of the seven continents. Of
course, the list is not without controversy, both nationalistic and political.
I consider myself an armchair mountain climber. I like to hike and climb, but
I am “fair weather.” A hike on a lovely day is just my cup of tea. Put a heavy
pack on my back and with a little sunshine you can drag me up a modest
mountain. Toss in some rain and I am not smiling. Add some snow, ice, and
a bit of high altitude . . . well, let’s just say I can meet you at the bar when
you get back and hear all your war stories!
Summiting a mountain always begins with a few simple steps. And as it is
with climbing, so it is with knitting. Basic knit, purl, and yarnover stitches
can come together to make lace that is simple but elegant; and, for those
seeking further adventures, these very same stitches can unfold into
spectacular designs.
So I think of this book as a knitter’s approach to the seven summits. It is
proverbial mountain climbing for lace knitters who are adventurous;
delighted by the basics, yet yearning for more.
This collection includes seven significant projects, each inspired by one of
the major summits. Throw in a few slightly less complex projects as
homage to the controversial peaks, then add a few treks to train for the big
climbs, and you have a cross-globe mountaineering tour for lace knitters.
I’ll bring the yarn and you bring the ropes. See you in Kathmandu.
All the mountain heights listed were accurate at the time I designed these
pieces, but glaciers melt and shift and earthquakes happen. The earth is
always changing, so consider them approximate!
Chapter 1
MATERIALS
For me, knitting is a process. It’s as much about the
creating as it is about the finished product. With that
in mind, selecting materials isn’t just about the end
result; it’s about the pleasure gotten from the knitting
itself. Along with choosing materials appropriate for
the end product, choose materials that you’ll find
pleasurable to work with. Take care in choosing the
yarn and beads for each project and you’ll find
enjoyment from cast-on to bind-off!
© iStockphoto.com/earleliason
YARN
There are lots of yarns on the market that are ideal for lace knitting. Many are available
from small yarn companies and independent dyers—you’ll find a selection listed in the
Sources for Supplies on page 138. I delight in using unique yarns whenever I can. The
trick in lace knitting is to find the right combination of yarn and pattern. Choosing just
the right yarn for a lace project is a large part of the fun. Lace yarns are available in a
huge range of colors, dye techniques, weights, fiber content, and construction, and
you’ll want to consider all the elements when making a choice. Each characteristic will
contribute to a unique process and end result.
The beauty of knitting lace accessories is that yarn substitutions are relatively easy.
Most yarns of similar weight and fiber content will behave the same as those shown in
the projects. Of course, it’s always a good idea to knit a generous swatch and block it to
make sure that the yarn you’ve chosen will work well with the pattern. Because most of
the projects in this book require less than 800 yards (732 m), they provide the
opportunity for you to experiment with yarn and color choices without too big an
investment in money or time.
COLOR
When choosing a color, consider both the process and the finished object. I always
choose colors that I’ll enjoy working with as well as wearing. In general, light colors are
easier to see as you knit and they show off lace patterns well; solid colors show off lace
patterns better than semisolids and tone-on-tone yarns, but these can produce nice
effects when used judicially.
For the most part, I follow the rule that if the stitch pattern is complicated, the yarn
shouldn’t be. However, if the values or tones of the colors are very close, as in the
handspun version of Indiecita on page 106, variegated yarns can add pleasing visual
dimension. If the colors in the yarn are quite different in tone or the values are very
different, the yarn may dominate to the point of obscuring the lace pattern.
Tone-on-tone colors can work well, as long as the contrast between the shades isn’t
distracting. For the Malabrigo Lace version of Indiecita on page 106, I chose a yarn that
has significant color variation, but all the colors are closely related in tone. Because the
lace motif is bold, it isn’t overpowered by the variegation in the yarn.
Yarns that have long color repeats—the longer the repeat, the better—also can be very
nice, but be sure to knit a swatch to be sure you like the effect. Gradient yarns (those
that progress from one color to another through the entire skein) such as the yarn used
for African Violet on page 92, are lovely for lace, as are long color repeat yarns such as
the yarn used for the Prayer Flag Scarf on page 42.
WEIGHT
Keep in mind that “laceweight” is a rather generic term that encompasses a wide range
of thicknesses. The American Craft Yarn Council (CYC) designates any yarn lighter than
fingering weight to be laceweight, which they designate as “#0 Lace.” This category
includes yarns at 600 yards (549 m)/100 grams to yarns at 1,700 yards (1,554 m)/100
grams and right down to sewing thread. When choosing a laceweight yarn, pay
attention to how many yards are in 100 grams. If you haven’t worked with very fine
yarn before, I suggest you begin with one of the heavier yarns in the category, and
progress from there. See the box below for a general range in yardages for laceweight
yarns.
Typical Yardages for Laceweight Yarns Per 100 Grams
Heavy
600–800 yards (549–732 m)
Average
800–1,100 yards (732–1,006 m)
Fine
1,100–1,700 yards (1,006–1,554 m)
Cobweb
1,700+ yards (1,554+ m)
FIBER CHARACTERISTICS
Laceweight yarns come in a wide range of fiber types. When making a choice, consider
the preferences of both you as the knitter and the eventual wearer. For example, if
you’ll be knitting during warm weather, you might want to consider a cooler fiber, such
as cotton or linen. If, on the other hand, you’ll be knitting during the cold winter
months, you might prefer to work with a warm fiber, such as merino, alpaca, cashmere,
or kid mohair, that will be comfortable in your lap when the temperatures drop.
Memory is the ability of a fiber to spring back to its original shape after being
stretched or blocked. In general, wool has the best memory of all fibers. Cotton and
linen lack memory.
Drape is related to memory, in that fibers without memory often have better drape (or
flow). Fibers with the best drape include cotton, silk, and linen. Silk is often combined
with animal fibers to instill better drape.
Warmth is the ability of a particular fiber to retain heat or insulate. A fluffy yarn (spun
in such a way that air is trapped in it) provides more insulation than a tightly spun yarn
and is therefore warmer. Merino, alpaca, cashmere, and kid mohair are all considered
“warm” fibers. Silk can be both warm and cool.
Coolness is the opposite of warmth. Cooler fibers do not trap air or retain heat and,
therefore, provide less insulation. Cotton, linen, and silk are considered “cool” fibers.
Halo is the fluffiness that some fibers either begin with or develop after blocking. Kid
mohair, which has a very long staple length, has a lovely halo. Alpaca and cashmere
also exhibit a halo, but to a lesser degree. The way a yarn is spun will contribute to the
halo in the finished yarn.
Crispness is related to a lack of elasticity. Crisp yarns tend to provide excellent stitch
definition and are typically cool to the touch. Linen is the classic example of a crisp
yarn.
Softness is related to the diameter of the individual fibers. Fibers that are very fine are
generally softer than coarser fibers. The finest (and softest) animal fibers are qiviut,
cashmere, baby alpaca and other camelids, and very fine wools (usually merino). The
way a yarn is spun can also impact the softness of a particular yarn.
In general, natural fibers, which can be blocked to reveal the full beauty of lace
patterns, are preferable to synthetics, which generally can’t. I’ve used only natural
fibers for the projects in this book, and the blocking directions assume that natural
fibers have been used.
YARN CONSTRUCTION
Most knitters don’t give much, if any, thought to how a yarn is constructed when
selecting yarn for a project. But yarn construction can have a significant effect in the
longevity of the finished piece. For example, a baby blanket will be subjected to a lot of
wear and have to withstand many washings, whereas a wedding shawl will undergo
minimal handling. A yarn with multiple plies will be sturdier and less likely to show
wear than a singles. Fibers with long staple lengths (the length of individual fibers),
such as some wools, silk, and kid mohair, are less likely to pill than those with short
staple length, such as cotton and cashmere. In addition, yarns that are more tightly
spun will be less likely to pill than those that are loosely spun.
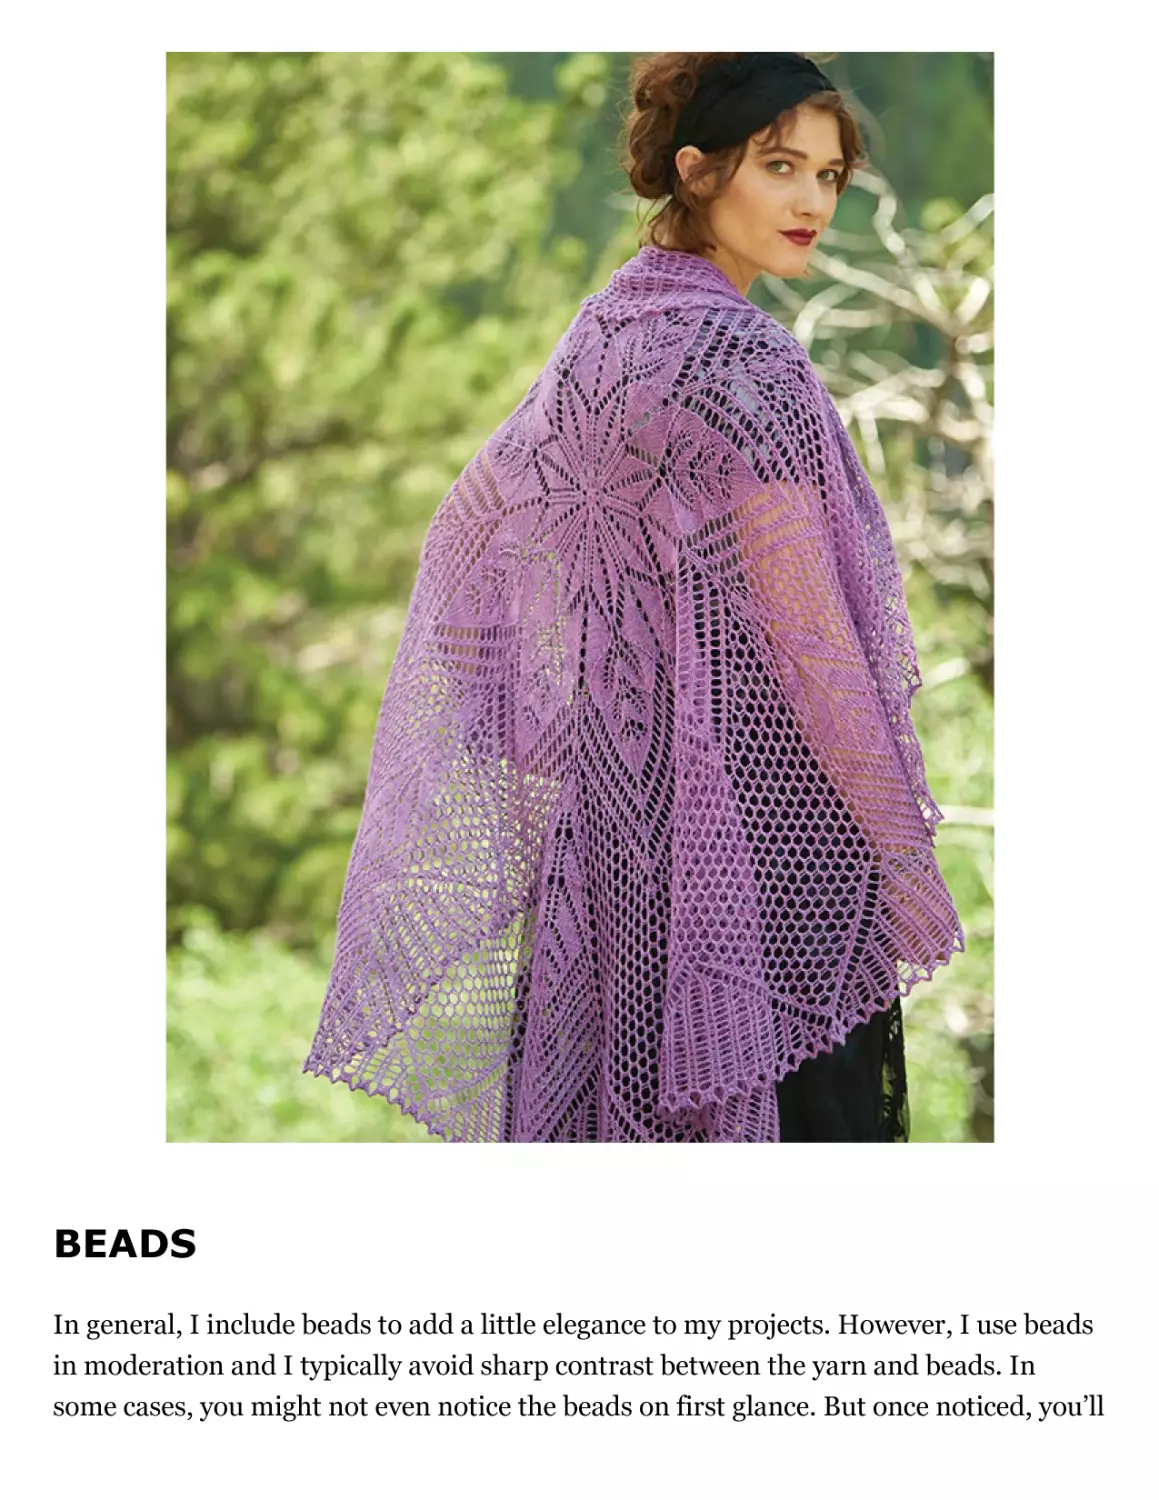
BEADS
In general, I include beads to add a little elegance to my projects. However, I use beads
in moderation and I typically avoid sharp contrast between the yarn and beads. In
some cases, you might not even notice the beads on first glance. But once noticed, you’ll
appreciate the extra je ne sais quoi that they contribute. Beads also add some weight,
which adds to the overall drape. It’s perfectly fine to omit the beads, but before you
decide that they’re not for you, at least give them a try!
Beads come in a myriad of colors and finishes that will match every yarn. Take your
yarn with you when you shop for beads so you’re sure to choose just the right color.
When selecting beads, don’t skimp on quality. Quality beads are more uniform both in
outer circumference and hole size, which tends to be larger—and therefore easier to
work with—than inexpensive beads. Look for beads that have permanent finishes—
beads that are simply dyed can fade or bleed onto the yarn when wet and should be
avoided. If you’re unsure about the colorfastness, use the bead in a knitted swatch, then
wash it. I enjoy using all sorts of beads, but I tend to favor Japanese seed beads for
their uniform quality.
The bead sizes specified for the projects in this book are based on the specified yarn. If
you decide to substitute a different yarn, be sure to check that bead size doesn’t have to
change accordingly. In general, an 8/0 bead works for heavy and average laceweight
yarn; a 10/0 (or even 12/0) works for finer laceweights. If you decide to use a different
size bead, you’ll also need to adjust the number of grams needed—there are fewer 6/0
beads than 8/0 beads in a gram!
Beads come in a variety of shapes—round (called seed beads), square, hexagonal, and
triangular—all of which reflect the light differently. It’s always best to swatch a few
before deciding which is best for your project.
NEEDLES & CROCHET HOOKS
The tools you select are critical to the ease and success of your knitting. There are many
types of needles available, and most knitters have their favorites. But when it comes to
lace knitting, I recommend tapered, pointy tips and, for circular needles, very smooth
joins and flexible, smooth cables.
If your project includes beads, you’ll need a small, steel crochet hook or a beading wire.
Whichever you prefer, the hook or wire must be small enough to fit through your bead,
grab your yarn, and then bring the yarn through the bead easily. You can damage your
yarn if you do not use the correct size hook or bead for the yarn. The best way to be sure
you have the correct hook is to try it with your yarn and bead. Keep in mind that while
hook sizes are inconsistent from manufacturer to manufacturer, the sizes reported in
millimeters are most reliable. I’ve found that a 0.6–0.75 mm steel hook works well for
size 8/0 beads and average laceweight yarn.
BLOCKING WIRES & PINS
I use blocking wires for all my lace pieces. Wires come in lengths ranging from 12"
(30.5 cm) to 60" (152.5 cm) and they can be rigid or flexible. I specify the type I used
for each project. But keep in mind that there’s always more than one way to block
something.
Of the many types of blocking pins, I prefer stainless steel T-pins that don’t run the risk
of developing rust, which can stain yarn. Be sure to use pins with smooth tips. As they
get older, burrs can develop on the tips that can snag the yarn. Such pins should be
replaced.
Blocking mats come in a variety of sizes. I usually use 24" (61 cm) interlocking squares
originally intended as gym flooring.
Chapter 2
TECHNIQUES
The following techniques are essential for the
successful outcome of the projects in this book. The
techniques covered are those I prefer, but
experienced knitters can feel free to modify
techniques according to their own preferences. There
is always more than one path up a mountain!
© iStockphoto.com/Kseniya Ragozina
PLACING BEADS
This method allows precise placement of the bead in an individual stitch and is the
method used for most of the projects in this book. Although it’s easier to put the bead
on the stitch before it is worked, doing so can compromise the tension on that stitch.
Work to the stitch designated for bead placement, work the stitch as specified in the
instructions, slip a bead onto the shaft of a crochet hook, remove the knitted stitch from
the knitting needle by lifting the stitch just worked with the hook (Figure 1). Slide the
bead onto the stitch just worked, return that stitch to the left needle, adjust the tension,
then slip that stitch onto the right knitting needle (Figure 2).
FIGURE 1
FIGURE 2
I-CORD
With a double-pointed needle, cast on the desired number of stitches. *Without turning
the needle, slide the stitches to the other end of the needle, pull the yarn around the
back, and knit the stitches as usual; repeat from * for desired length.
WORKING WITH HAND-DYED YARNS
Because each skein of a hand-dyed yarn is unique, any project that uses more than one
skein runs the risk of having a visible line where you change skeins. This is not a defect
in the yarn, but simply the nature of hand-dyed yarns. You can simply accept that and
embrace the color change. That works sometimes for a piece worked in the round, such
as a square or a circle. And it also can work for a top-down triangle such as the Mount
Elbrus project on page 86. But if you want to avoid a visible color shift, you can simply
“feather” the second skein in, by alternating rows from the first skein and then the
second. I only do this for 5–10 rows when I switch skeins (more if the two skeins are
less alike). You can alternate for the entire project, but that never appeals to me.
BIND-OFFS
Three-Needle Bind-Off
Place stitches to be joined onto two separate needles. Hold them with right sides of
knitting facing together. Insert a third needle into the first stitch on each of the other
two needles and knit them together as one stitch. *Knit next stitch on each needle the
same way. Pass first stitch over second stitch. Repeat from * until one stitch remains on
third needle. Cut yarn and pull tail through last stitch.
A loose bind-off is critical for the proper blocking of lace. The following methods will
provide a sufficiently loose edge. The project instructions will specify which type to
use.
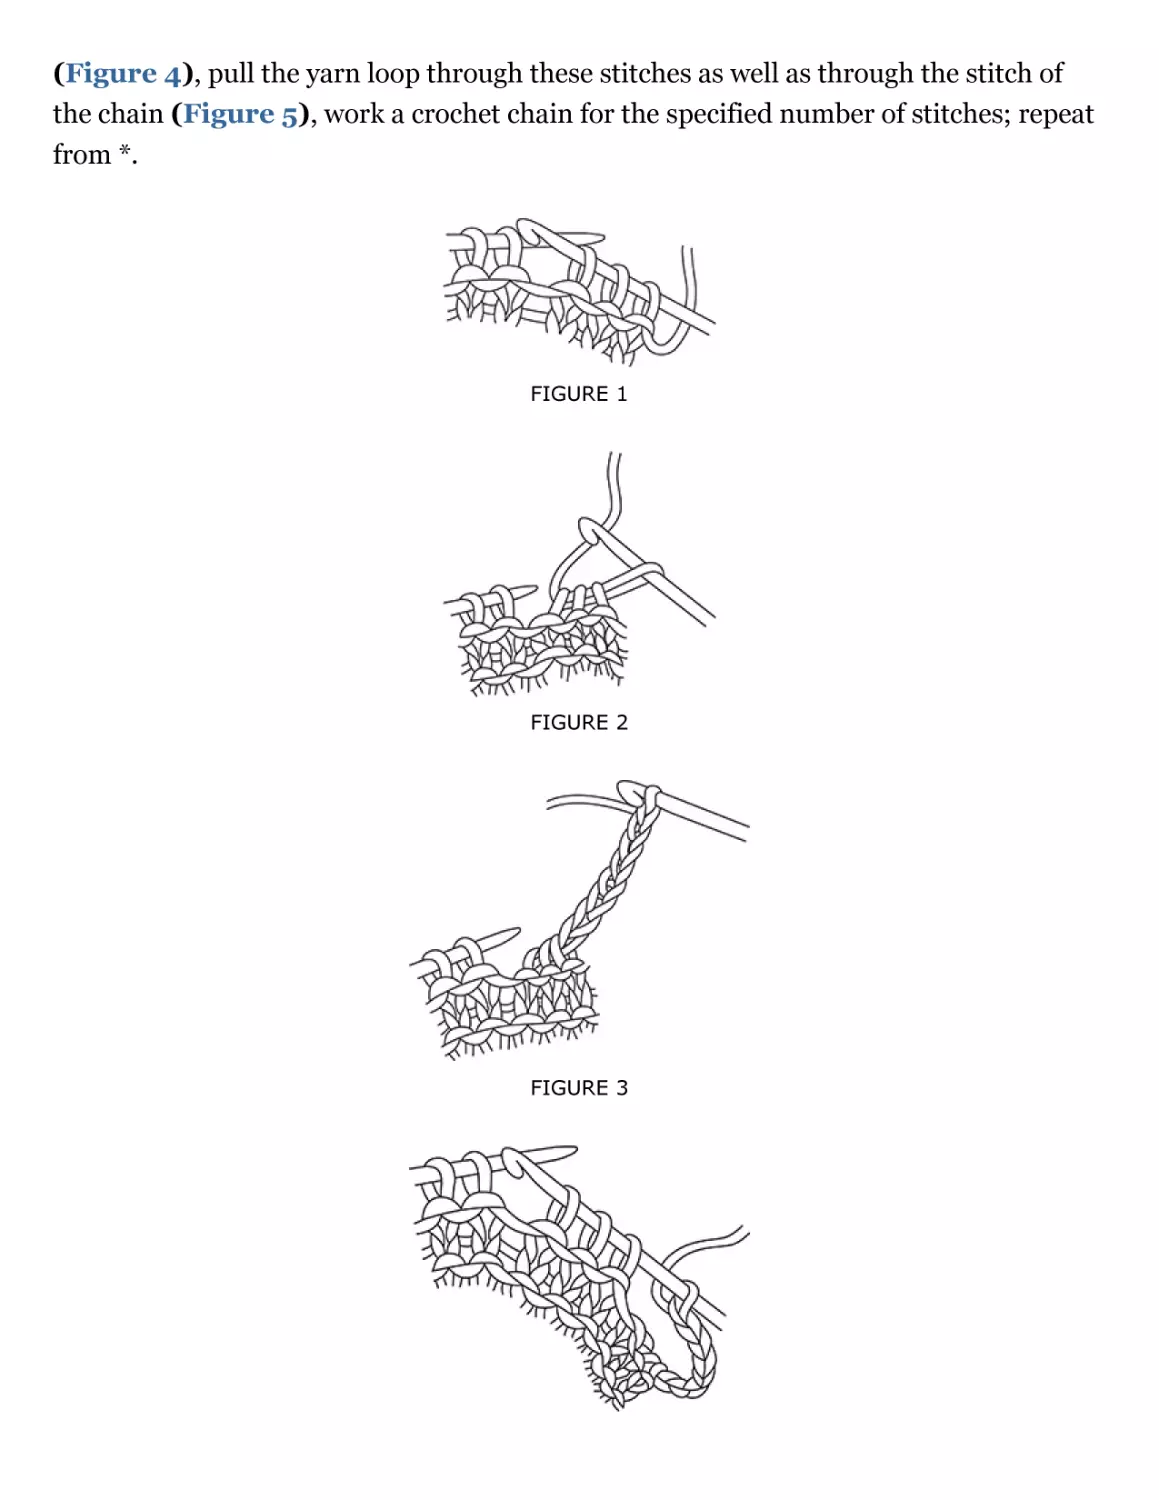
Gathered Crochet Bind-Off
See page 18 for crochet instructions.
Insert hook through the back legs of specified number of stitches (Figure 1; three
stitches shown) to gather them, pull a loop through (Figure 2) so there is one loop
on hook, work a crochet chain the specified length (Figure 3; eight stitches
shown), *insert crochet hook through the back legs of the next group of stitches
(Figure 4), pull the yarn loop through these stitches as well as through the stitch of
the chain (Figure 5), work a crochet chain for the specified number of stitches; repeat
from *.
FIGURE 1
FIGURE 2
FIGURE 3
FIGURE 4
FIGURE 5
If working in rounds, finish by joining the final chain to the base of the first gathered
group, then pull the yarn through the final loop leaving a 9" (23 cm) tail.
If working in rows, finish by pulling the loop through the final group of stitches, then
pull the yarn through the final loop leaving a 9" (23 cm) tail.
Lace Bind-Off
This smooth and stretchy method is ideal for edges that will be stretched during
blocking. Be sure to work loosely but evenly; use a needle one or two sizes larger than
you knit with if desired.
Slip 1 stitch, knit 1 stitch, *insert the left needle tip into the front of both of these
stitches and knit them together through the back legs (Figure 1), return resulting
stitch to the left needle tip; repeat from * until all stitches have been worked and one
stitch remains on right needle. Cut yarn leaving a 5" (12.5 cm) tail, bring tail through
remaining stitch and pull tight to secure.
FIGURE 1
CAST-ONS
Several of the pieces in this book are worked outward from the center and require
Circular cast-ons:
Emily Ocker’s Circular Cast-On
I learned this method from Elizabeth Zimmerman’s Knitter’s Almanac (Dover
Publications, 1981).
Make a simple loop of yarn with the short end hanging down. With a crochet hook,
*draw a loop through the main loop, then draw another loop through this loop. Repeat
from * for each stitch to be cast on. Divide the stitches evenly on four double-pointed
needles.
After several inches of the pattern have been worked, pull on the short end to tighten
the loop and close the circle.
Marianne Kinzel’s Circular Method
This method comes from Marianne Kinzel’s First Book of Modern Lace Knitting
(Dover Publications, 1972). It’s especially good when using fine yarn.
You’ll need a set of five double-pointed needles in the size needed for the specified
gauge and a crochet hook that’s close to the same size as the knitting needles. See page
18 for crochet instructions.
With the crochet hook, make a crochet chain the specified number of stitches long
(Figure 1; eight stitches shown), then use a slip stitch to join the chain into a loop
(Figure 2). Work a single crochet into each of the next three chain stitches (four
stitches on the crochet hook), divide these four stitches evenly on two double-pointed
needles, work a single crochet into each of the next four chain stitches (again four
stitches on crochet hook; Figure 3), then divide these four stitches evenly on two
other double-pointed needles (Figure 4).
FIGURE 1
FIGURE 2
FIGURE 3
FIGURE 4
Many of the pieces in this book begin with a provisional cast-on. This allows for an
elastic edge and seamless pick-up of new stitches:
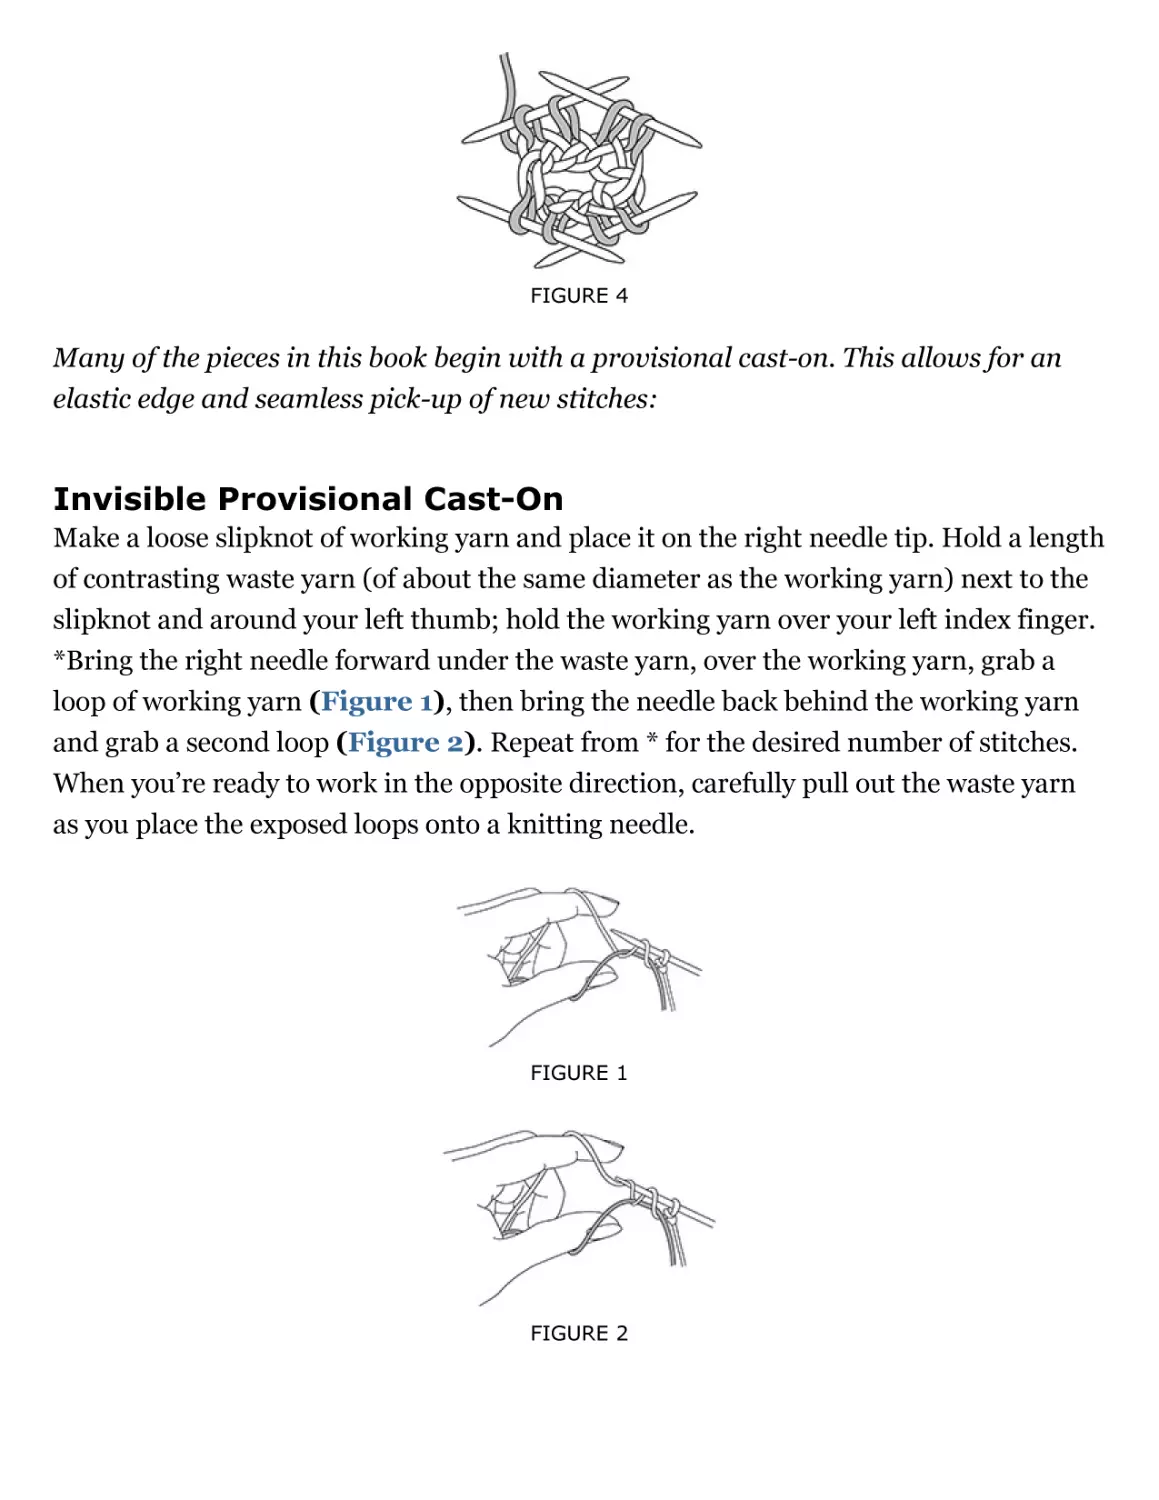
Invisible Provisional Cast-On
Make a loose slipknot of working yarn and place it on the right needle tip. Hold a length
of contrasting waste yarn (of about the same diameter as the working yarn) next to the
slipknot and around your left thumb; hold the working yarn over your left index finger.
*Bring the right needle forward under the waste yarn, over the working yarn, grab a
loop of working yarn (Figure 1), then bring the needle back behind the working yarn
and grab a second loop (Figure 2). Repeat from * for the desired number of stitches.
When you’re ready to work in the opposite direction, carefully pull out the waste yarn
as you place the exposed loops onto a knitting needle.
FIGURE 1
FIGURE 2
Because lace needs blocking to really show its beauty, you need a nice stretchy caston. Stretchy cast-ons:
Knitted Cast-On
Make a slipknot of working yarn and place it on the left needle tip. *Insert the right
needle tip knitwise into the slipknot, wrap the yarn around the needle as if to knit, and
pull the loop through (Figure 1). Keeping the slipknot on the left needle tip, place the
new loop onto the left needle in front of it to form a new stitch (Figure 2). Repeat
from *, always working into the last stitch made (only work into the slipknot for the
first stitch).
FIGURE 1
FIGURE 2
Long-Tail Cast-On
To ensure that this cast-on is suitably stretchy, I work this method over two needles of
the size needed to get gauge.
Leaving a long tail (about 1⁄4" [6 mm] per stitch), make a slipknot and place it on the
right needle tip. Place the thumb and index finger of your left hand between the yarn
ends so that the working yarn is around your thumb. Secure both yarn ends with your
other fingers. Hold your palm upward, making a V of yarn (Figure 1). *Bring the
needle up through the loop around your thumb (Figure 2), catch the first strand
around your index finger, and bring the needle back down through the loop on your
thumb (Figure 3). Drop the loop off your thumb and place your thumb back in the V
configuration while tightening the resulting stitch on the needle (Figure 4). Repeat
from * for the desired number of stitches.
FIGURE 1
FIGURE 2
FIGURE 3
FIGURE 4
BLOCKING
Blocking may be the most critical step in a lace project. Just off the needles, a lace
project can look like a worn-out rag. Only through blocking will its full beauty be
revealed. I always wet-block my lace by soaking it in cool water for at least 30 minutes
(perhaps longer for silk) so that the fibers are thoroughly wet, pressing the project
down into the water a few times as it soaks to ensure uniform water penetration. If
desired, you can add a mild soap to gently wash the piece at this time, but be careful to
rinse it well to remove the soap.
Press out the excess water with your hands and then roll the piece in a thick towel to
remove the extra water. Lay it on a flat padded surface and use wires and T-pins to
block as directed in the pattern. Allow it to air-dry completely before removing the
blocking wires and pins. I generally weave in the loose ends before I block a piece, but I
don’t trim the remaining tails until after it has completely dried.
It’s important to note that the dimensions of the knitting right off the needles will be
considerably smaller than after the piece has been stretched during blocking. It’s
equally important to note that the blocked dimensions are the maximum dimensions
the piece will measure—most will relax a little with handling.
READING CHARTS
If you’re new to reading charts, don’t be intimidated. Charts represent the knitted
fabric in a very logical way. Each symbol is designed to represent how the stitches will
appear (when viewed from the right side) after they’ve been worked. For example, a
right-leaning decrease is represented by a right-leaning symbol on the chart; a
yarnover, which forms an open eyelet, is represented by an open circle on the chart.
Charts will help you learn to read your knitting, and as you get better at reading your
knitting, charts will become easier. As you gain experience with both, you’ll learn to
recognize mistakes and fix them quickly. Start with the simpler projects and practice
comparing what’s on your needles with what’s shown in the chart. The sidebar below
gives general rules for working with charts.
To help keep your place on a chart, it’s a good idea to mark the row being worked. For
charts in which there are no row repeats, my favorite technique is to make a photocopy
of the chart and use a highlighter to color each row as I complete it. Not only does this
mark my place, but it also allows me to compare the row I’m working on with those I’ve
already completed. If the chart involves a series of rows that are repeated (outlined in
red), the highlighter method only works for the first repeat. In these cases, I fix
removable highlighter tape to the row being worked, and I move the tape up the chart
as I progress from row to row. This allows me to start afresh with the first row of each
repeat.
CROCHET
Crochet Chain (ch)
*Yarn over hook and draw through a loop on hook. Repeat from * for the desired
number of stitches.
Single Crochet (sc)
*Insert hook into the next stitch, yarn over hook and draw through a loop, yarn over
hook (Figure 1), and draw it through both loops on hook (Figure 2). Repeat from *
for the desired number of stitches.
FIGURE 1
FIGURE 2
Slip Stitch Crochet (sl st) (B)
*Insert hook into stitch, yarn over hook and draw a loop through both the stitch and
loop already on the hook. Repeat from * for the desired number of stitches.
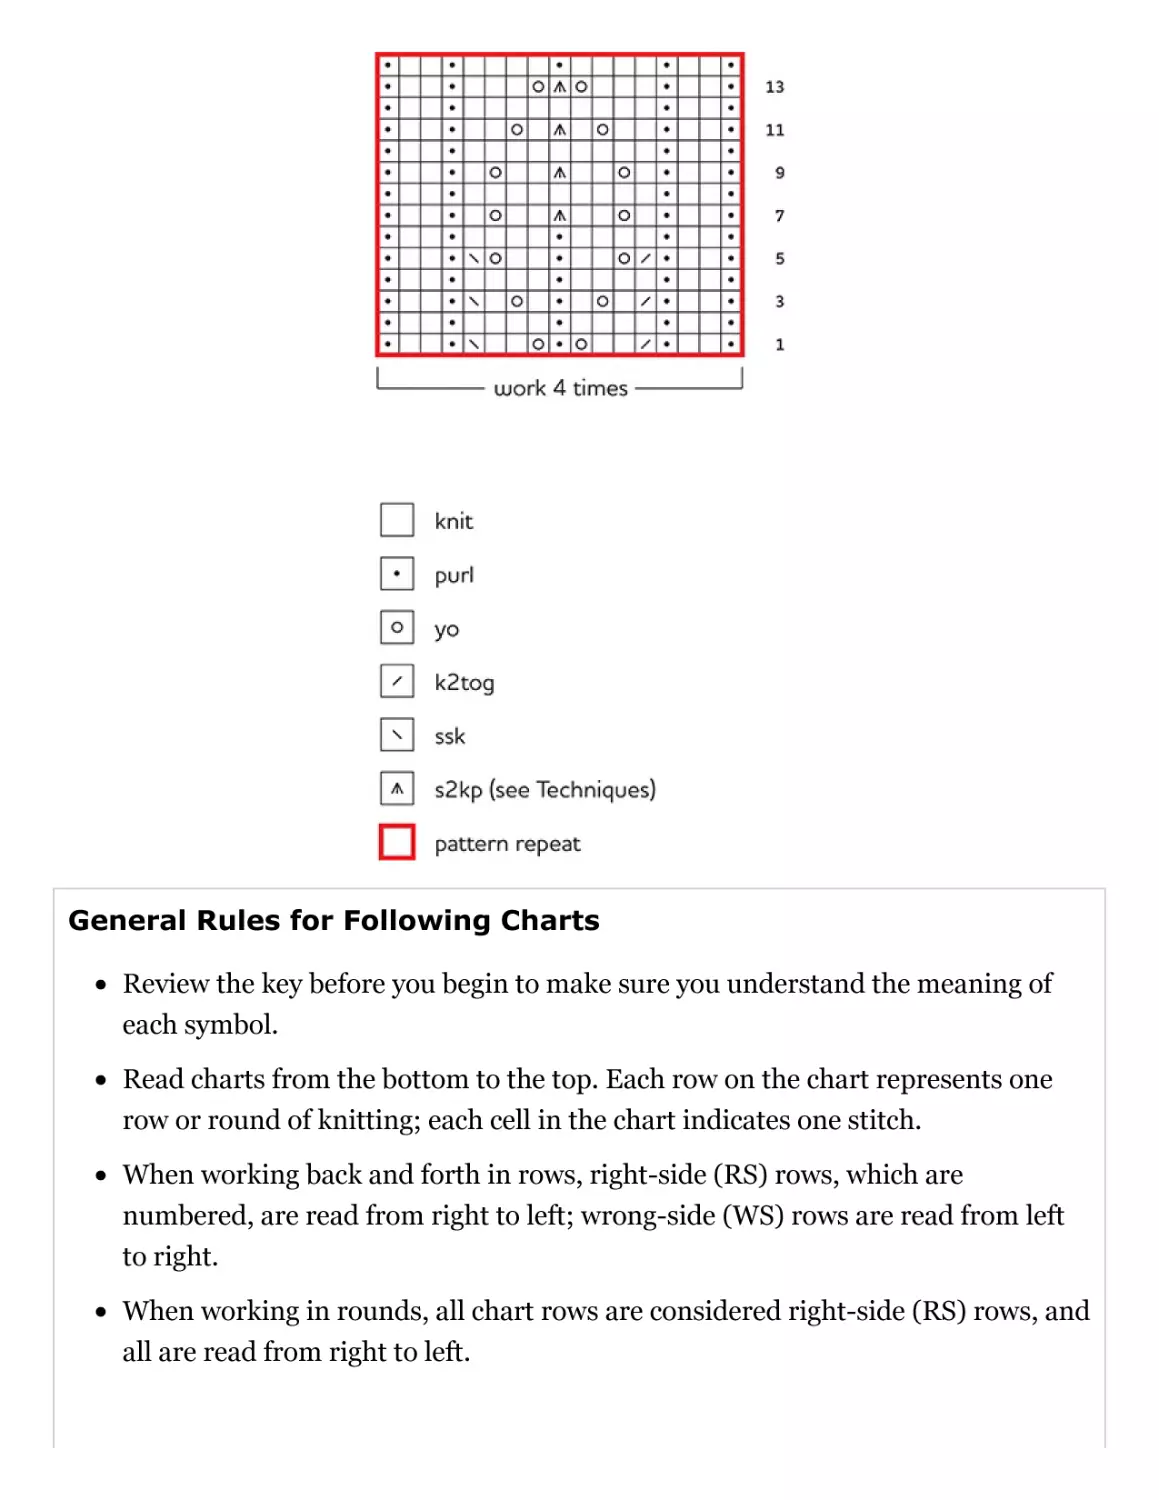
General Rules for Following Charts
Review the key before you begin to make sure you understand the meaning of
each symbol.
Read charts from the bottom to the top. Each row on the chart represents one
row or round of knitting; each cell in the chart indicates one stitch.
When working back and forth in rows, right-side (RS) rows, which are
numbered, are read from right to left; wrong-side (WS) rows are read from left
to right.
When working in rounds, all chart rows are considered right-side (RS) rows, and
all are read from right to left.
Many charts include “no stitch” symbols—gray cells instead of designated stitch
symbols. These “no stitch” symbols are used as placeholders in the chart so that
increases, decreases, and yarnovers align in the chart as they will in your
knitting. When you come to a “no stitch” symbol, simply skip over it and
continue with the next “real” stitch on the chart.
Bold red and blue outlines indicate stitches and rows that are repeated. For
example, when working a right-side row or round, work to the right edge of the
repeat outline, then repeat the stitches within the outline the necessary number
of times, then finish by working the stitches from the left of the outline to the
edge of the chart.
DECREASES
Knit 2 Together (k2tog)
This type of decrease slants to the right—one stitch decreased.
Knit two stitches together as if they were a single stitch.
Slip, Slip, Knit (ssk)
This type of decrease slants to the left.
Slip two stitches individually knitwise (Figure 1), insert the left needle tip into the
front of these two slipped stitches, and use the right needle to knit them together
through their back loops (Figure 2)—one stitch decreased.
FIGURE 1
FIGURE 2
Centered Double Decrease (s2kp)
This type of decrease has a vertical alignment.
Slip two stitches together knitwise (Figure 1), knit the next stitch (Figure 2), then
pass the slipped stitches over the knitted stitch (Figure 3)—two stitches decreased.
FIGURE 1
FIGURE 2
FIGURE 3
Knit 3 Together (k3tog)
This type of decrease slants to the right.
Knit three stitches together as if they were a single stitch—two stitches decreased.
Purl 3 Together (p3tog)
Purl three stitches together as if they were a single stitch.
Slip, Slip, Slip, Knit (sssk)
This type of decrease slants to the left.
Slip three stitches individually knitwise, insert the left needle tip into the fronts of these
three slipped stitches, then use the right needle to knit them together through their
back loops—two stitches decreased.
FIGURE 1
FIGURE 2
INCREASES
Yarnover:
After a Knit and Before a Purl
Beginning with the working yarn in the back of the needles, bring the yarn to the front
of the work between the needles, then over the right needle and again to the front—
wrapping the needle—and ready to purl the next stitch.
After a Purl and Before a Knit
Beginning with the working yarn in front of the needles, bring the yarn over the right
needle to the back, ready to knit the next stitch.
Between Two Knit Stitches
Beginning with the yarn in the back of the needles, bring the yarn to the front of the
work between the needles, then over the right needle to the back, ready to knit the next
stitch.
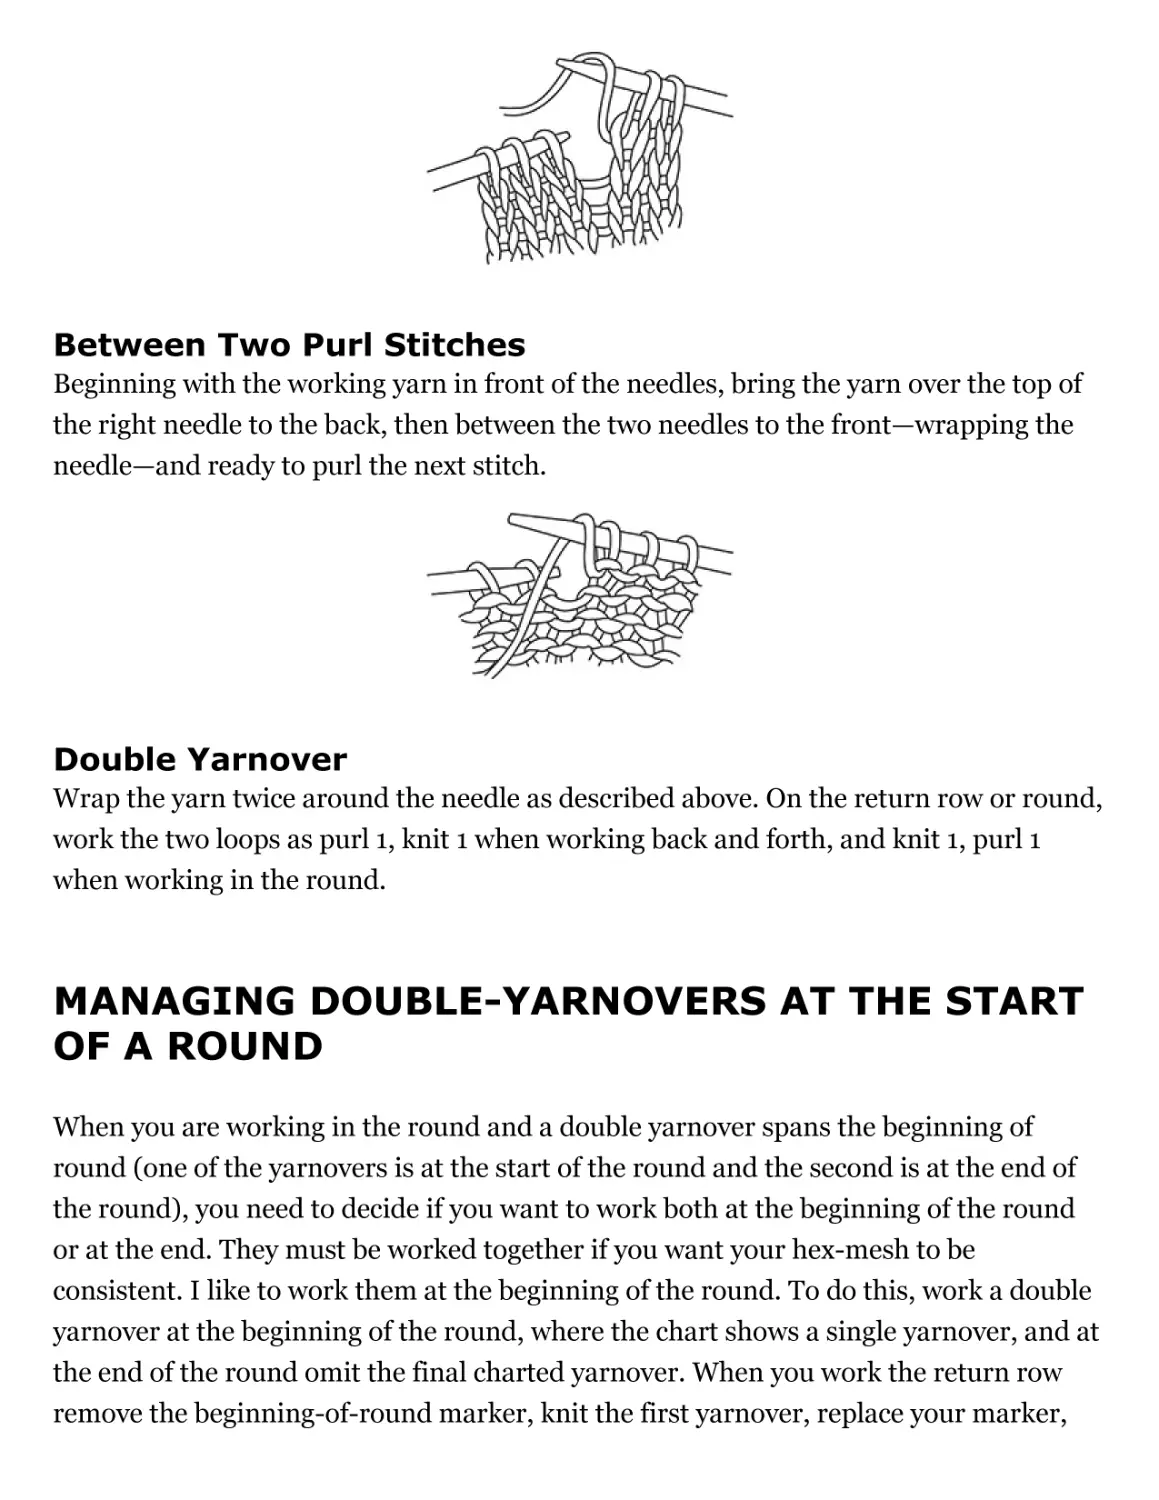
Between Two Purl Stitches
Beginning with the working yarn in front of the needles, bring the yarn over the top of
the right needle to the back, then between the two needles to the front—wrapping the
needle—and ready to purl the next stitch.
Double Yarnover
Wrap the yarn twice around the needle as described above. On the return row or round,
work the two loops as purl 1, knit 1 when working back and forth, and knit 1, purl 1
when working in the round.
MANAGING DOUBLE-YARNOVERS AT THE START
OF A ROUND
When you are working in the round and a double yarnover spans the beginning of
round (one of the yarnovers is at the start of the round and the second is at the end of
the round), you need to decide if you want to work both at the beginning of the round
or at the end. They must be worked together if you want your hex-mesh to be
consistent. I like to work them at the beginning of the round. To do this, work a double
yarnover at the beginning of the round, where the chart shows a single yarnover, and at
the end of the round omit the final charted yarnover. When you work the return row
remove the beginning-of-round marker, knit the first yarnover, replace your marker,
and purl the second yarnover. Your start of round stays the same and your hex-mesh is
uninterrupted and looks great!
If you work one of the yarnovers at the beginning and one at the end, you will have two
yarnovers rather than a double yarnover, so your mesh will be interrupted at the
beginning of round.
Lifted Yarnover (M)
This forms a smaller hole than a regular yarnover.
Use the left needle tip to lift the strand between the needle tips from front to back
(Figure 1), then knit the lifted loop without twisting it—one stitch increased.
FIGURE 1
Making Multiple Stitches (\3/)
There are two ways this is done. In some instances the knitter alternates knitting and
purling into the same stitch the specified number of times. If the number is 3, then knit
1, purl 1, knit 1 into the same stitch. If the number is 4, then knit 1, purl 1, knit 1, purl 1
into the same stitch, and so on. In some instances the knitter alternates knitting and
making a yarnover into the same stitch the specified number of times, always ending
with a knit. Review the chart key, which will give you details for each pattern, before
beginning.
JOINING A NEW BALL OF YARN
When knitting lace, it’s best to join a new ball of yarn as inconspicuously as possible.
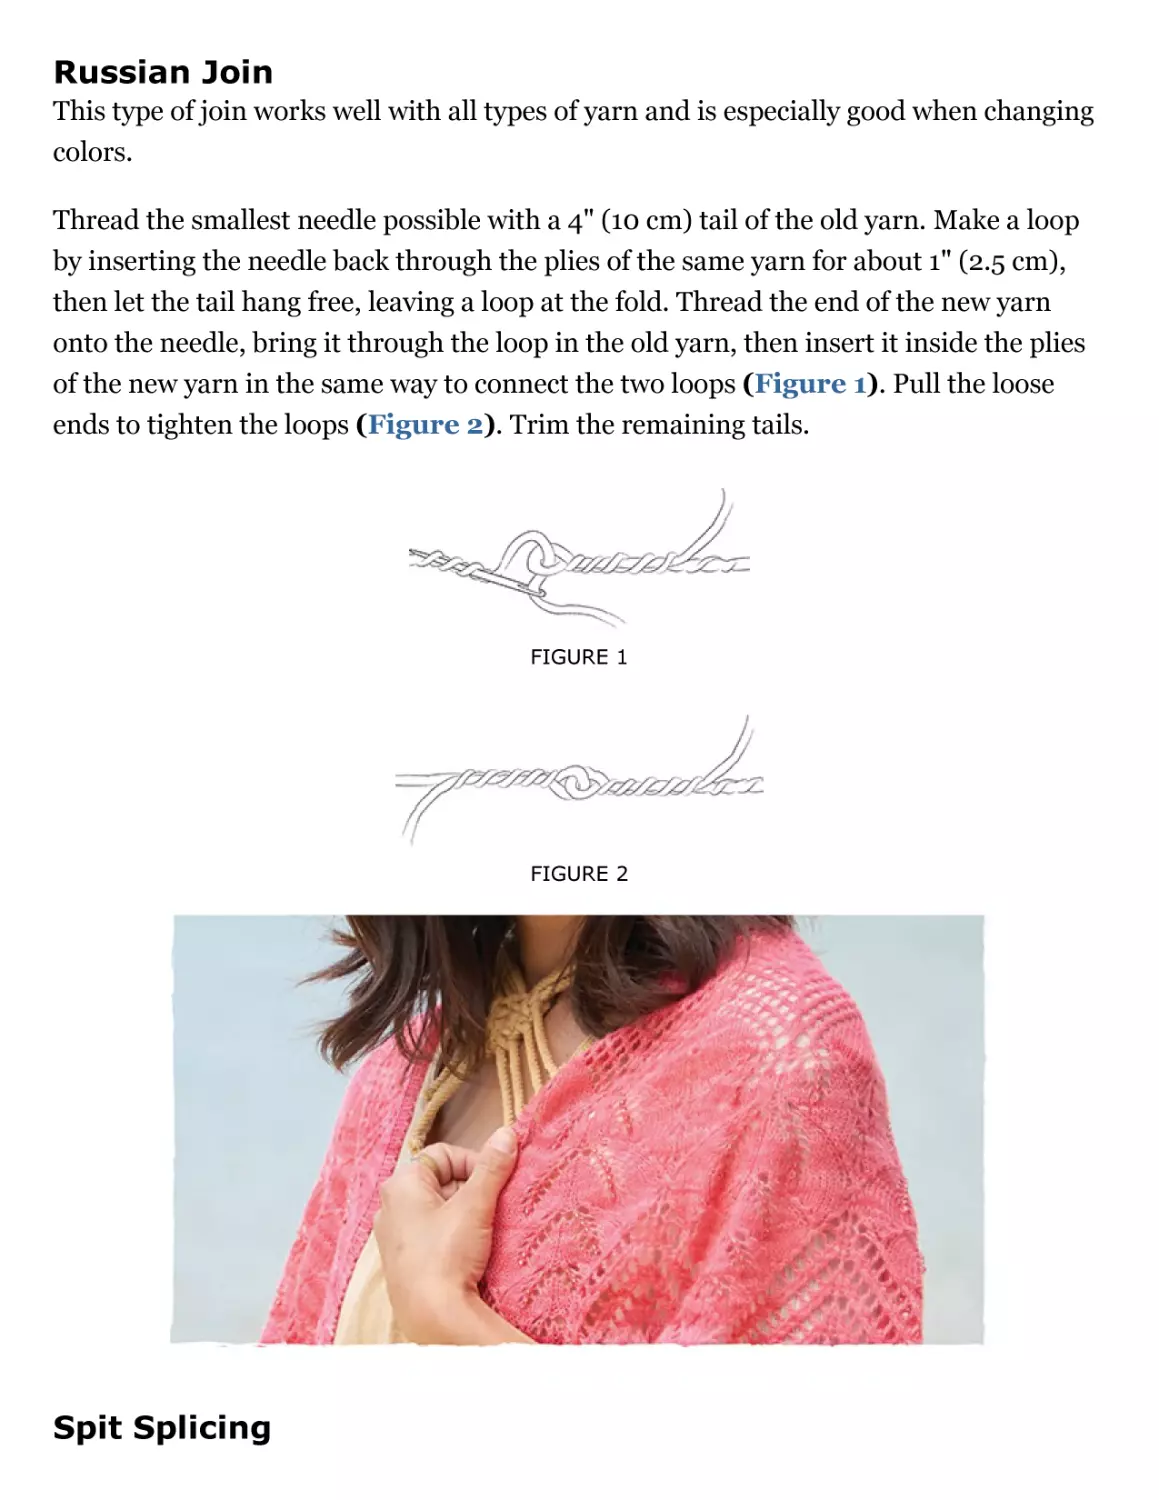
Russian Join
This type of join works well with all types of yarn and is especially good when changing
colors.
Thread the smallest needle possible with a 4" (10 cm) tail of the old yarn. Make a loop
by inserting the needle back through the plies of the same yarn for about 1" (2.5 cm),
then let the tail hang free, leaving a loop at the fold. Thread the end of the new yarn
onto the needle, bring it through the loop in the old yarn, then insert it inside the plies
of the new yarn in the same way to connect the two loops (Figure 1). Pull the loose
ends to tighten the loops (Figure 2). Trim the remaining tails.
FIGURE 1
FIGURE 2
Spit Splicing
This method works only with feltable yarns such as wool and alpaca. It doesn’t work for
superwash wool, cotton, silk, or linen.
Untwist the plies from both the old and new ends of yarn for about 2" (5 cm) (Figure
1), moisten the loose ends with saliva, overlap the loose ends (Figure 2), then rub
them vigorously between your palms (Figure 3). The moisture and friction will cause
the two yarn ends to felt together.
FIGURE 1
FIGURE 2
FIGURE 3
PICK UP STITCHES
Pick Up and Knit
With right side facing and working from right to left, *insert needle tip into the center
of the stitch below the cast-on (or bind-off) edge (Figure 1), wrap yarn around needle,
and pull through a loop (Figure 2). Repeat from * for the desired number of stitches.
FIGURE 1
FIGURE 2
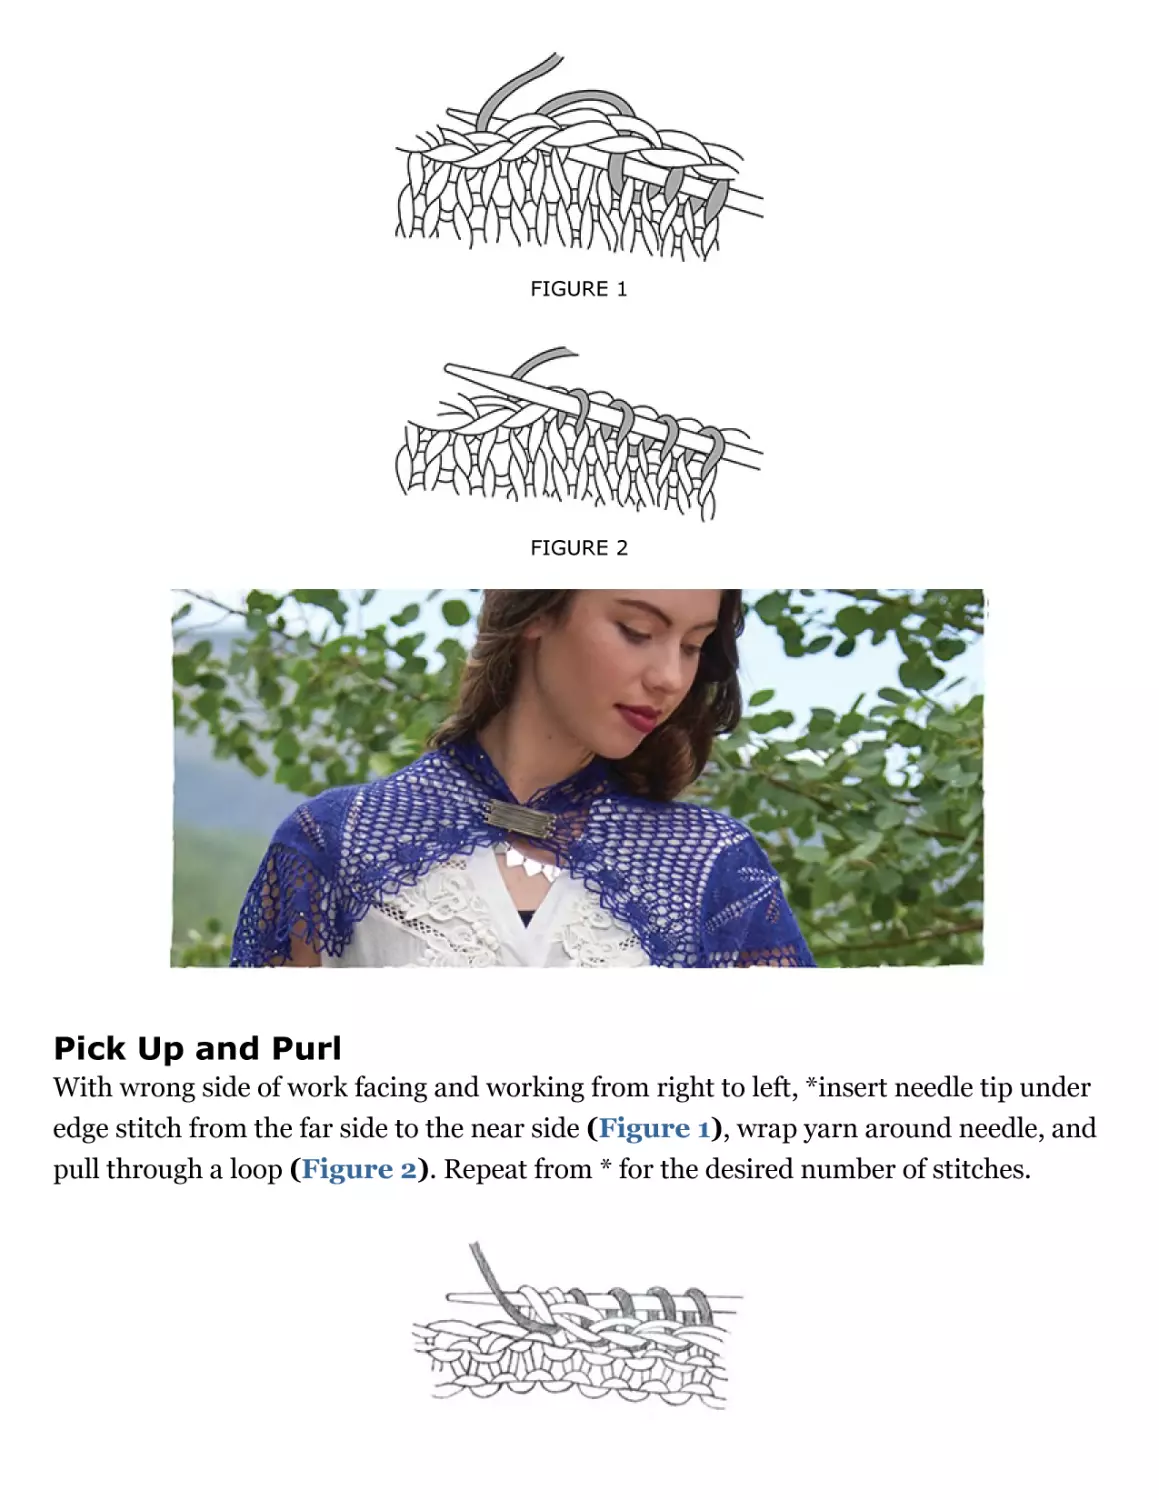
Pick Up and Purl
With wrong side of work facing and working from right to left, *insert needle tip under
edge stitch from the far side to the near side (Figure 1), wrap yarn around needle, and
pull through a loop (Figure 2). Repeat from * for the desired number of stitches.
FIGURE 1
FIGURE 2
SHIFT THE BEGINNING OF A ROUND
Some patterns that are worked in rounds require that the beginning-of-round marker
be shifted to the left or right on specific rounds. The charts for such patterns are clearly
labeled. If the shift is to the left, just work the required number of stitches past the end
of the round, then relocate the marker and resume with the first stitch of the next
round. If the shift is to the right, simply stop working the required number of stitches
before the end of the round, relocate the marker to this position, then continue with the
first stitch of the next round.
STITCH MARKERS
Except to mark the beginning of the round when I’m working in rounds, I rarely use
stitch markers other than for very specific situations. Although some designers
advocate placing a marker at the end of every pattern repeat, I find that they can get in
the way if the pattern repeat straddles a double decrease or the beginning of the round
shifts from one position to another. In addition to the beginning-of-round marker,
every other marker would have to be shifted as well. For example, if the instructions say
to move the beginning of the round one stitch to the left, all the other markers will have
to shift one stitch to the left as well.
When I do use markers, I choose smooth, thin markers that won’t snag delicate yarn or
affect the neighboring stitches. Otherwise, telltale “ladders” may appear in the finished
piece. I also prefer markers that dangle a bit so that they won’t inadvertently slip
through yarnovers. Some of my favorite markers are ones that I’ve made from crochet
cotton. Just cut crochet cotton that’s finer than your working yarn into 3" (7.5 cm)
lengths. Fold the lengths in half, then tie an overhand knot about halfway up the
doubled thread to make a loop that’s about 3⁄4" (2 cm) long with 3⁄4" (2 cm) tails.
I have written the patterns to reflect the method I feel works best for working in the
round: When you work on the double-pointed needles, use the yarn end from your caston to mark the beginning of the round. A locking marker can be used to indicate the
beginning of the round if that is your preferred method. There are drawbacks to this,
such as the locking marker getting in your way when you begin at the center of a lace
piece, the marker getting snagged on your yarn, and the time it takes to unlock and
move the marker as you knit. Where you can choose to place a marker will be indicated
in the pattern.
When working in the round, dealing with stitch markers when the beginning-ofround shifts can be challenging. I find it easier to use only one marker, at the
beginning of round. If you want to use a marker between every chart repeat, I have
two suggestions:
The first is that you use a unique marker for your beginning of round because
that one is critical.
The second is that you treat each marker the same way you treat the beginningof-round marker whenever there is a shift. When a double yarnover or a double
decrease sits at the marker, you will have to “borrow” a stitch from the next
repeat and therefore will have to move the marker one stitch over and return it
to the original spot once you are done.
SEAMS
Overhand Stitch
Bring threaded needle down front to back through fabric on one side of seam, then up
from back to front on other side; repeat from *, striving for even spacing of stitches.
Kitchener Stitch (grafting)
Bring threaded needle through front stitch as if to purl and leave stitch on needle
(Figure 1).
FIGURE 1
Bring threaded needle through back stitch as if to knit and leave stitch on needle
(Figure 2).
FIGURE 2
Bring threaded needle through first front stitch as if to knit and slip this stitch off
needle. Bring threaded needle through next front stitch as if to purl and leave stitch on
needle (Figure 3).
FIGURE 3
Bring threaded needle through first back stitch as if to purl and slip this stitch off
needle. Bring needle through next back stitch as if to knit and leave stitch on needle
(Figure 4).
FIGURE 4
Repeat Steps 3 and 4 until no stitches remain on needles.
STITCHES
In addition to knits and purls, the following stitches are used in many of the projects in
this book.
Twisted Knit (k1tbl)
Insert right needle through the loop on the back of the left needle from front to back
(Figure 1), wrap the yarn around the needle, and pull a loop through while slipping
the stitch off the left needle (Figure 2). This is similar to a regular knit stitch, but is
worked into the back loop of the stitch instead of the front.
FIGURE 1
FIGURE 2
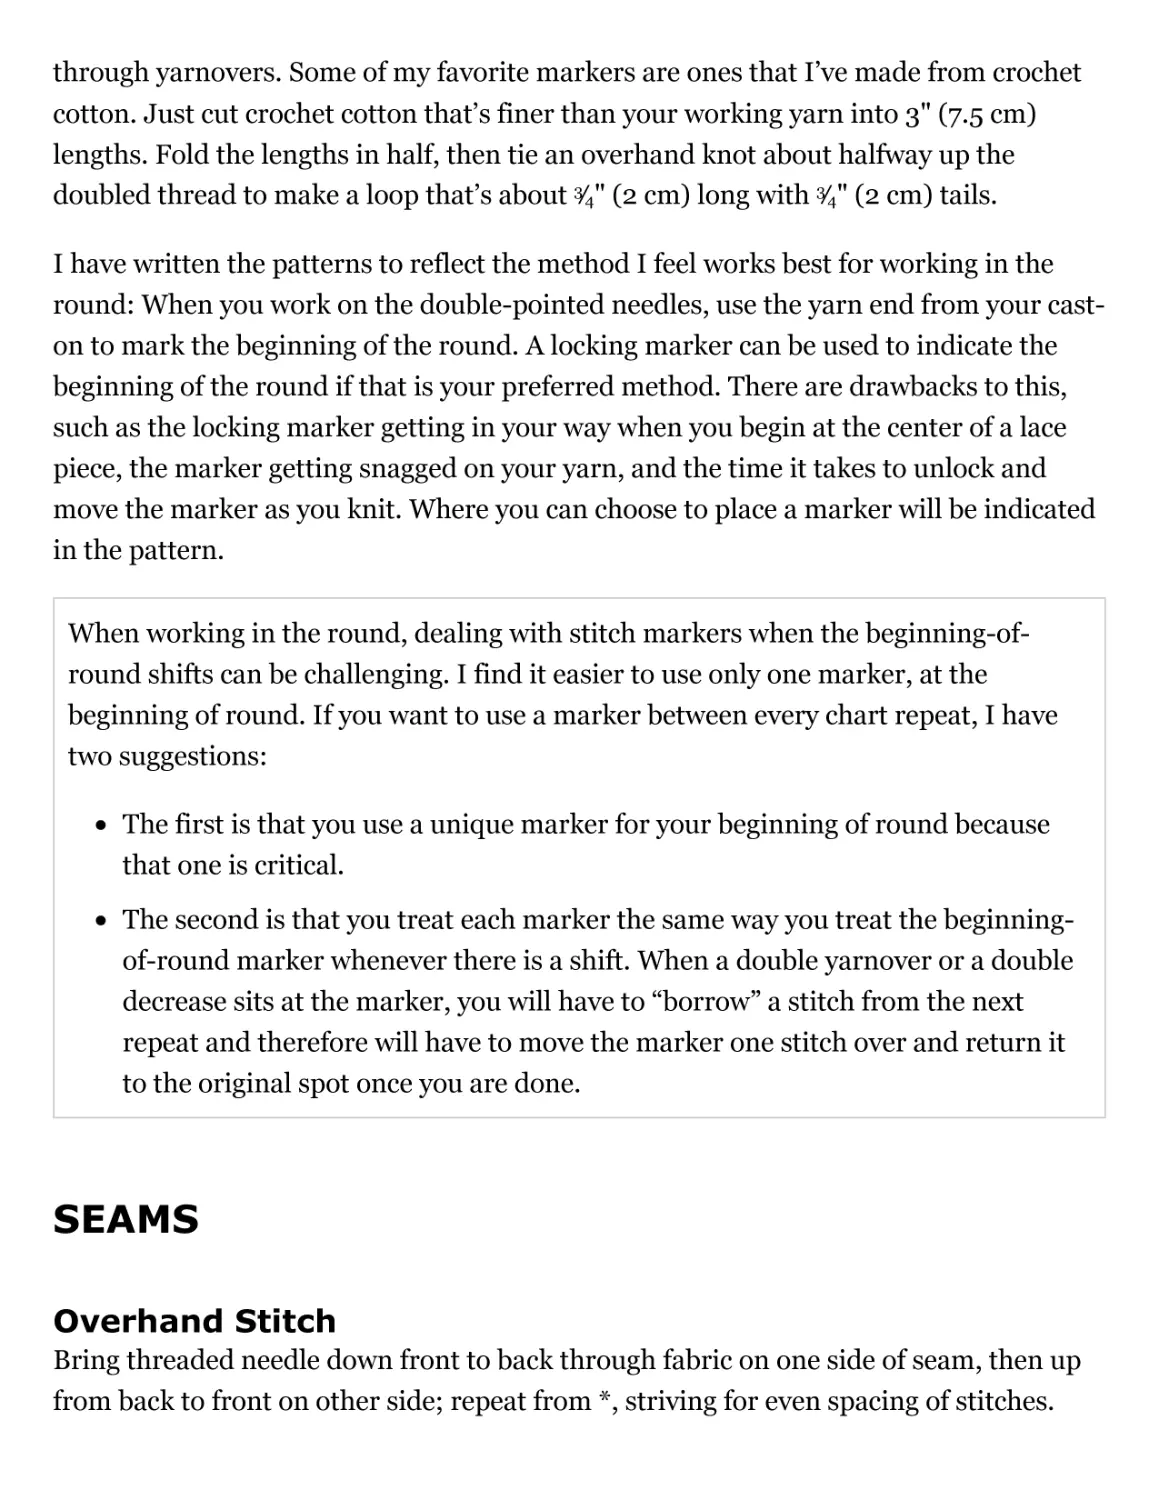
Twisted Purl (p1tbl)
Insert right needle through the loop on the back of the left needle from back to front
(Figure 1), wrap the yarn around the needle, and pull a loop through while slipping
the stitch off the left needle (Figure 2). This is similar to a regular purl stitch, but is
worked into the back loop of the stitch instead of the front.
FIGURE 1
FIGURE 2
SELVEDGE STITCHES
Many knitters like to work a selvedge by slipping the first stitch of every row. However,
I believe that slipped selvedge stitches are less elastic than knitted (or purled) stitches
and can inhibit full blocking of a lace piece. Blocking is critical for all of the projects in
this book and shouldn’t be compromised by tight edges.
SPECIAL STITCHES
Nupps
With the right side of the work facing, work to the desired nupp stitch. Working very
loosely knit into the designated stitch, but leave that stitch on the left needle. *Yarn
over, then knit the stitch again (Figure 1); repeat from * until the desired number of
loops are on the needle (typically 7 or 9), ending by knitting into the stitch again to
secure the last yarnover (Figure 2; 7 nupp loops shown). If working in rows, purl
the 7 or 9 nupp loops together on the following wrong-side row (Figure 3; p7tog
shown). If working in rounds, knit the 7 or 9 nupp loops together on the following
round through their back loops.
FIGURE 1
FIGURE 2
FIGURE 3
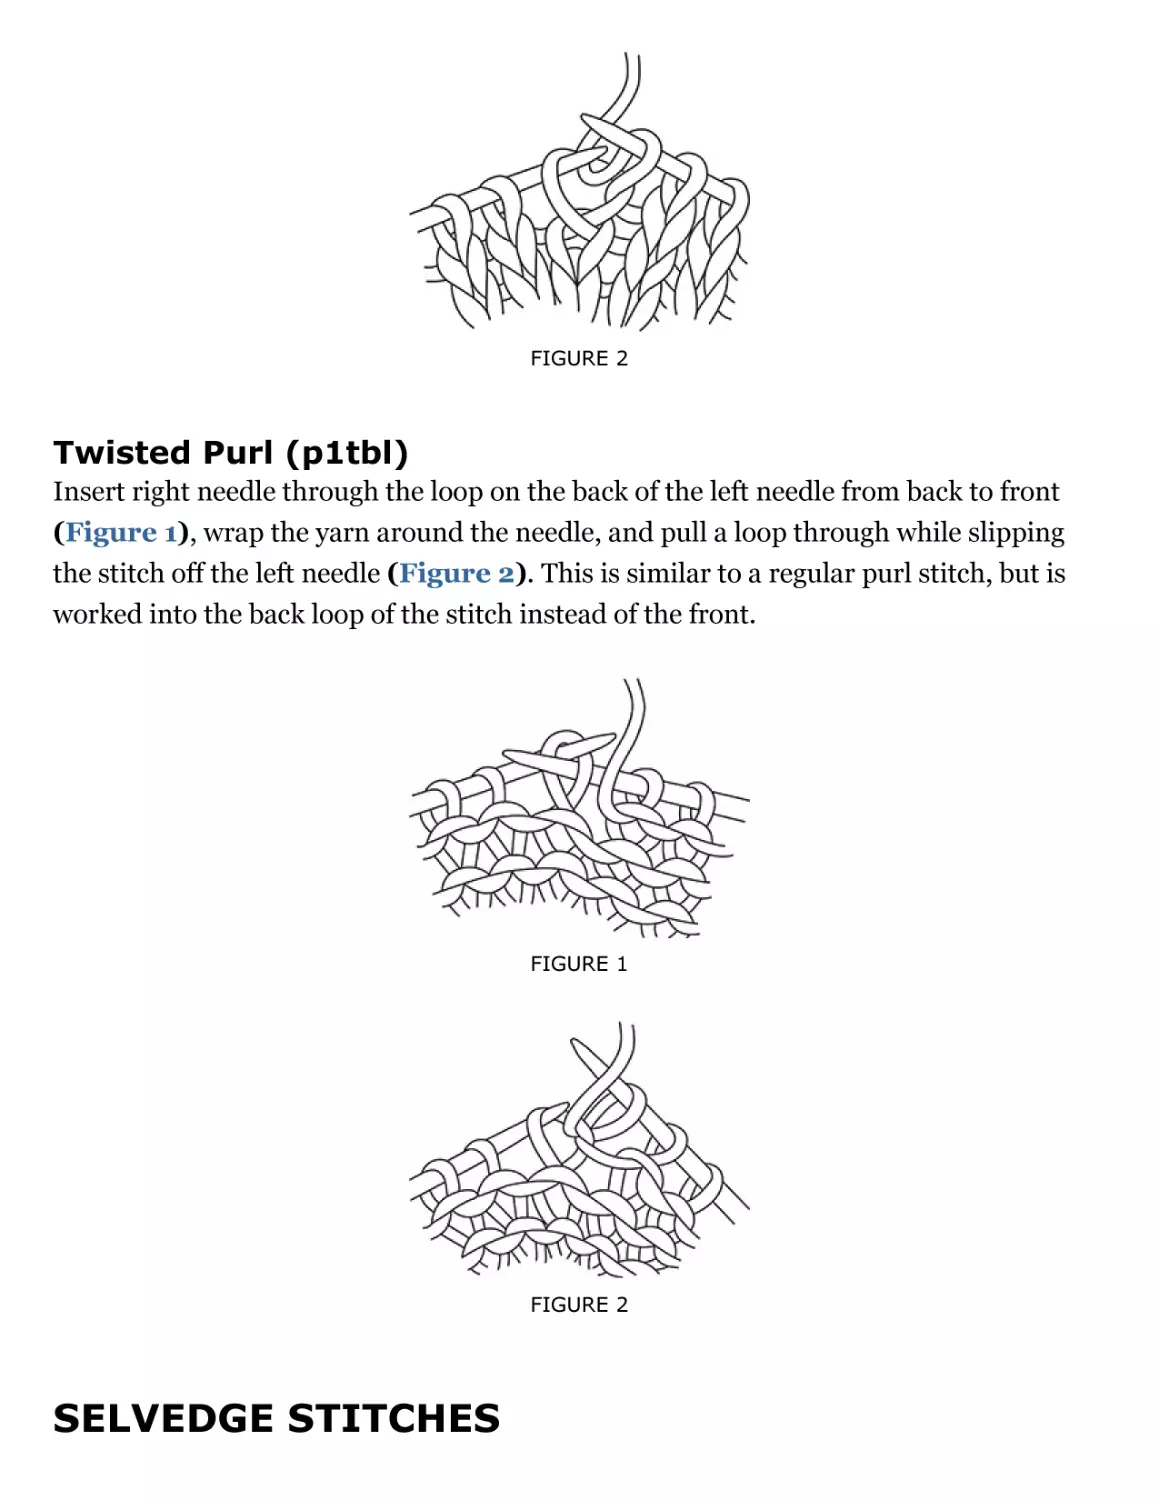
Two-Stitch Twist (cable)
Insert the tip of your right-hand needle between the first and second stitch on the lefthand needle. Knit the second stitch in the usual way (Figure 1). Knit the first stitch
(Figure 2). Slip both stitches off the left-hand needle.
FIGURE 1
FIGURE 2
Chapter 3
THE FINE ART OF SWATCHING
Lace knitters are usually quick to skip swatching,
because most lace accessories are not fit dependent.
In New Vintage Lace (Interweave, 2014) I discuss
several reasons lace knitters should embrace
swatching. For one, we need to see what gauge works
best for the yarn we selected. Another reason is that
we need to see how the yarn works with our lace
patterning. The busier the yarn’s dye job, the more it
can obscure our lace work.
© iStockphoto.com/ilbusca
Finally, getting gauge is important if you want to predict how many yards of yarn you
need. Each project lists a particular yarn, worked at a particular gauge. The yardage
specified is for that yarn over that gauge. When you make a substitution, consider that
your yardage might vary from what is listed! If your project is worked flat, swatch flat.
It your project is worked in the round, swatch in the round. Your gauge might differ.
I love swatching because it gives me the opportunity to try various materials at different
gauges, and it helps me feel confident in my material choices.
Selecting beads for a lace knitting project is as important as selecting your yarn. Beads
come in a myriad of colors and finishes, so the possibilities are almost infinite. When I
choose beads for a project, I consider the size of the beads, the color, the shape, and the
finish.
Bead Size: The larger the numerical designation, the smaller the bead! It is important
to select a bead size that works with your yarn. The beads should fit comfortably on
your yarn, as applied by a crochet hook. If they are too tight, you will struggle with each
bead placement and run the risk of damaging your yarn. If they are too loose, they will
slip out of place and be just too heavy for the yarn, pulling and potentially causing
damage to your yarn. For most laceweight yarns, an 8/0 bead works well. For a heavier
lace or fingering-weight yarn, you might need a 6/0 bead. For cobweb weight try an
11/0. Consider that larger beads weigh more. If you use larger beads on a fine yarn, they
might weigh your fabric down and even damage the yarn.
Seed Bead Sizes
6/0
3.3 mm
8/0
2.5 mm
10/0
2 mm
11/0
1.8 mm
12/0
1.7 mm
15/0
1.3 mm
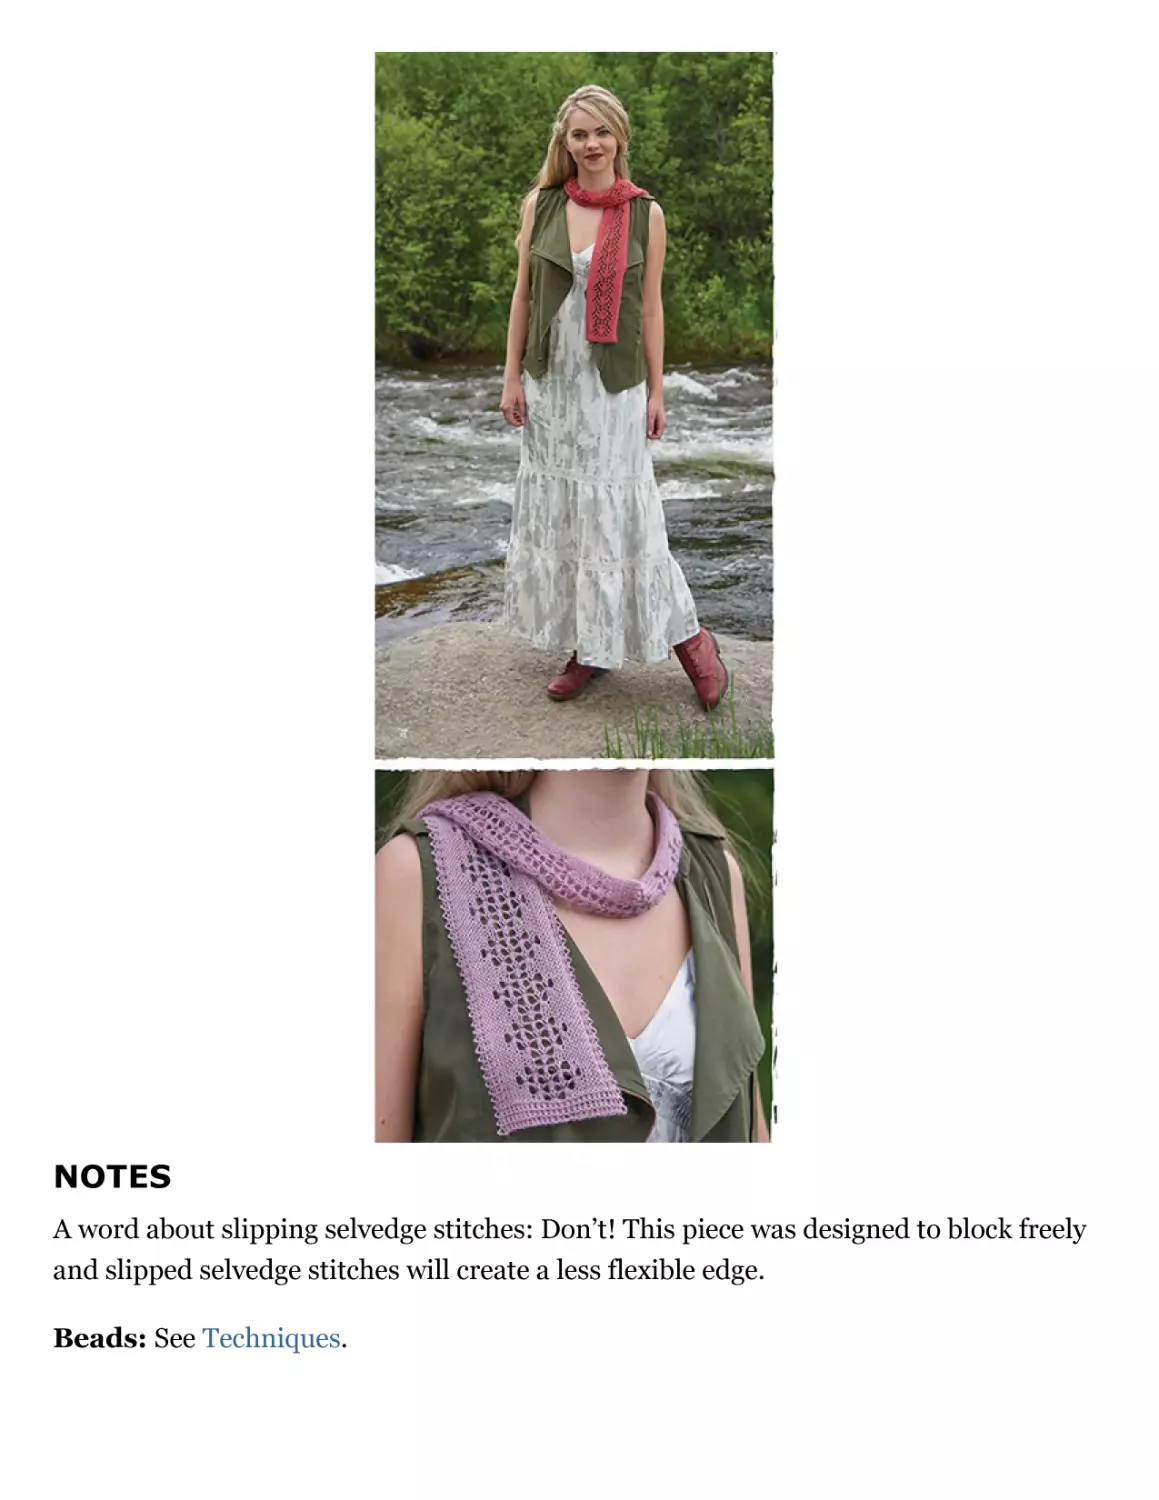
Bead Color: Selecting the perfect bead color for your yarn is one of the most enjoyable
aspects of preparing for a project. I select my yarn first and then take my yarn bead
shopping. I actually bring a crochet hook with me and try the bead options on my yarn
before making a final selection. Check with your bead shop before opening tubes and
trying beads on your yarn, but at my local bead shop they find us amusing! Bead
placements in lace knitting can be used to outline motifs (such as in the coral swatch
and scarf), as elements within a motif (such as a leaf stem as in the yellow swatch and
scarf), or as design elements just about the beads themselves (such as the mauve
swatch and scarf). They can also be used for subtle sparkle and to give your piece a little
extra weight and drape. When using the beads as an outline or element within a lace
motif, consider if you want striking or subtle contrast. I generally choose subtle to
modest contrast, because I find that significant contrast becomes more about the beads
and less about the lace work. When using beads in elements that are about the beads,
contrast works well. If you are using beads for just a little sparkle and weight, avoid
color contrast, but select a bead with sparkle, such as one that has a metallic lining.
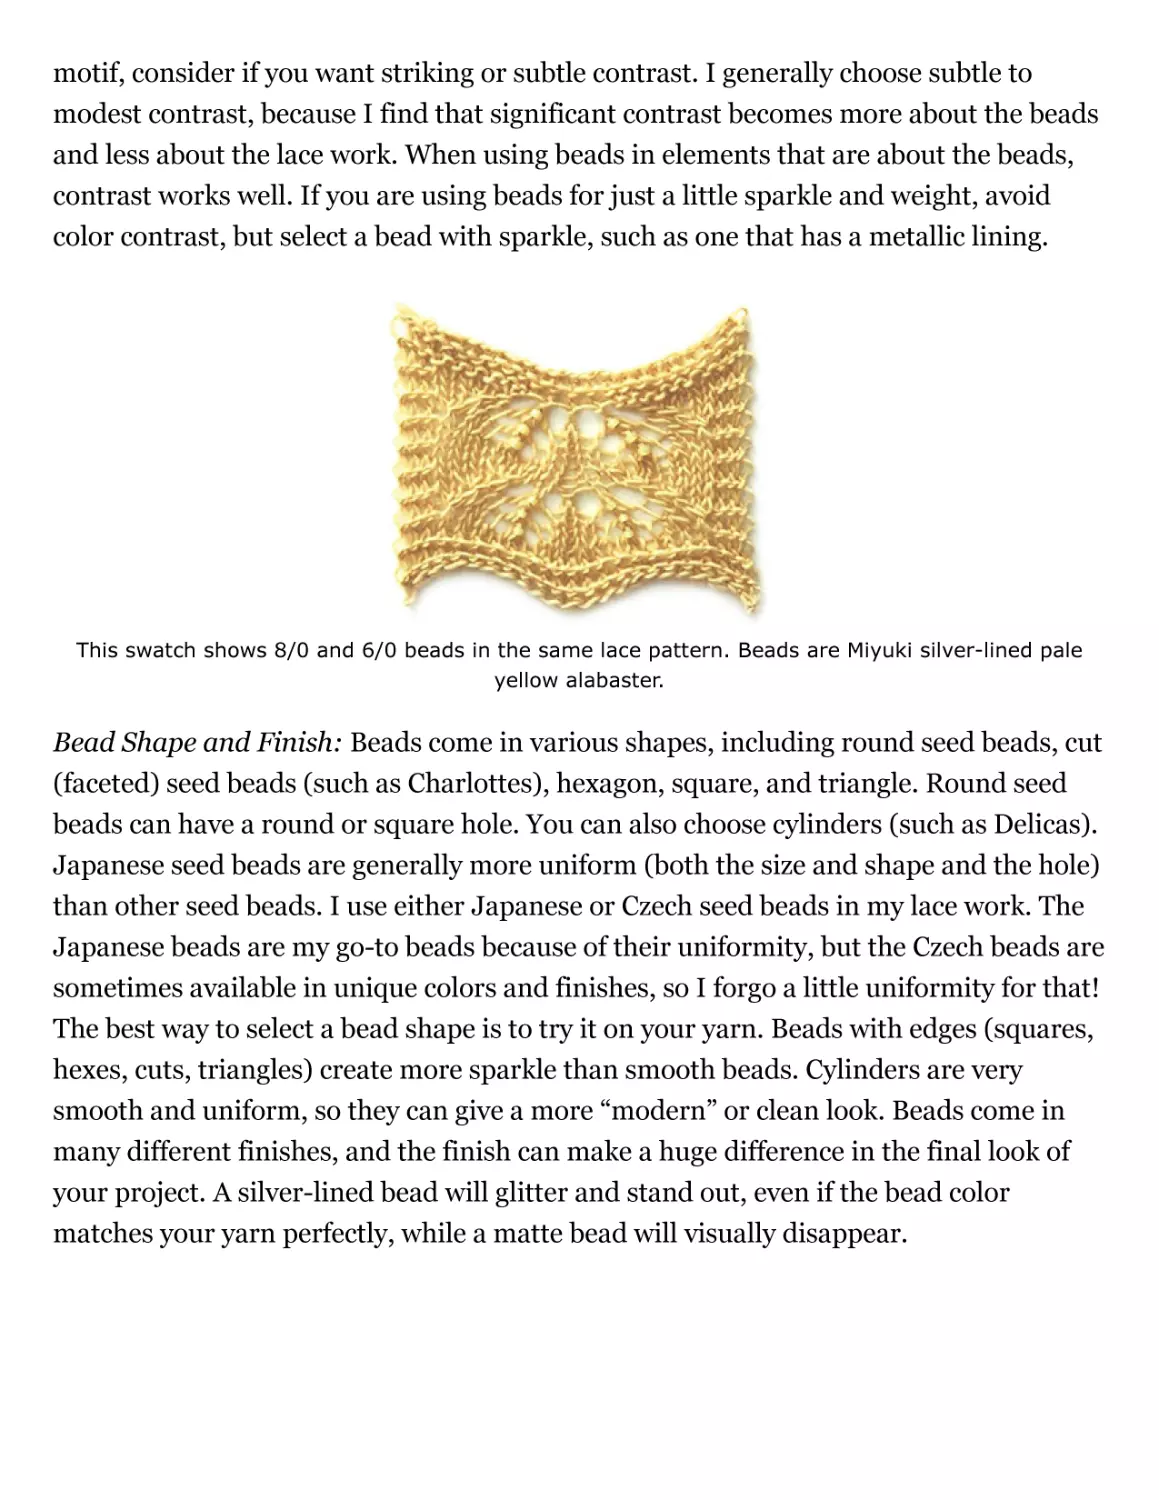
This swatch shows 8/0 and 6/0 beads in the same lace pattern. Beads are Miyuki silver-lined pale
yellow alabaster.
Bead Shape and Finish: Beads come in various shapes, including round seed beads, cut
(faceted) seed beads (such as Charlottes), hexagon, square, and triangle. Round seed
beads can have a round or square hole. You can also choose cylinders (such as Delicas).
Japanese seed beads are generally more uniform (both the size and shape and the hole)
than other seed beads. I use either Japanese or Czech seed beads in my lace work. The
Japanese beads are my go-to beads because of their uniformity, but the Czech beads are
sometimes available in unique colors and finishes, so I forgo a little uniformity for that!
The best way to select a bead shape is to try it on your yarn. Beads with edges (squares,
hexes, cuts, triangles) create more sparkle than smooth beads. Cylinders are very
smooth and uniform, so they can give a more “modern” or clean look. Beads come in
many different finishes, and the finish can make a huge difference in the final look of
your project. A silver-lined bead will glitter and stand out, even if the bead color
matches your yarn perfectly, while a matte bead will visually disappear.
These three swatches show three different lace patterns in three different yarn colors, each using the
same selection of beads in various colors to show off the different effects. (Names of the beads
follow, with “AB” indicating “aurora borealis”): Miyuki silver-lined cobalt blue; Japanese silver-lined
teal AB; Toho purple color-lined fuchsia; Miyuki silver-lined smoky amethyst AB; Miyuki silver-lined
salmon alabaster; Miyuki matte transparent chartreuse AB; Metallic gold round; Miyuki Picasso
canary yellow matte; Toho color-lined metallic antique gold AB; Miyuki silver-lined pale yellow
alabaster
This swatch shows four different bead finishes in the same lace pattern. The names of the beads are:
Czech silver-lined matte root beer; Japanese square-hole silver-lined root beer; Japanese metallic
gold rounds; Toho olive-gold-lined crystal (clear)
If you want to experiment, try this swatch project: Each time you work the row repeat,
try a different bead in the lace motif! A list of different bead finishes can be found on
page 138.
This swatch shows a lace pattern (from left to right): hand-dyed tone-on-tone color, hand-dyed
variegated color, commercially dyed solid color.
Breakneck Ridge
Storm King Scarves
Breakneck Ridge is a 2.8-mile (4.5 km) hike in Hudson Highlands State
Park, New York. Although it is not a long hike, it requires both your hands
and feet to get to the top. Some sections require just a little rock climbing;
wear decent hiking shoes. The vistas are totally worth the effort. There are
amazing views all along the climb, many across the Hudson River, including
a view to Storm King Mountain. Climb early in the morning and enjoy a
picnic breakfast while you watch the hawks soar. Sit and knit a little.
These scarves use repeating lace motifs to illustrate how beads can be used
for differing effects in your lace knitting. They are great for practicing
adding beads and working basic lace techniques, along with gaining comfort
using charts. Feel free to use one type of bead, or try as many as you like
and call it a bead sampler! Use the Beaded Swatch charts for more
diminutive versions of these scarves.
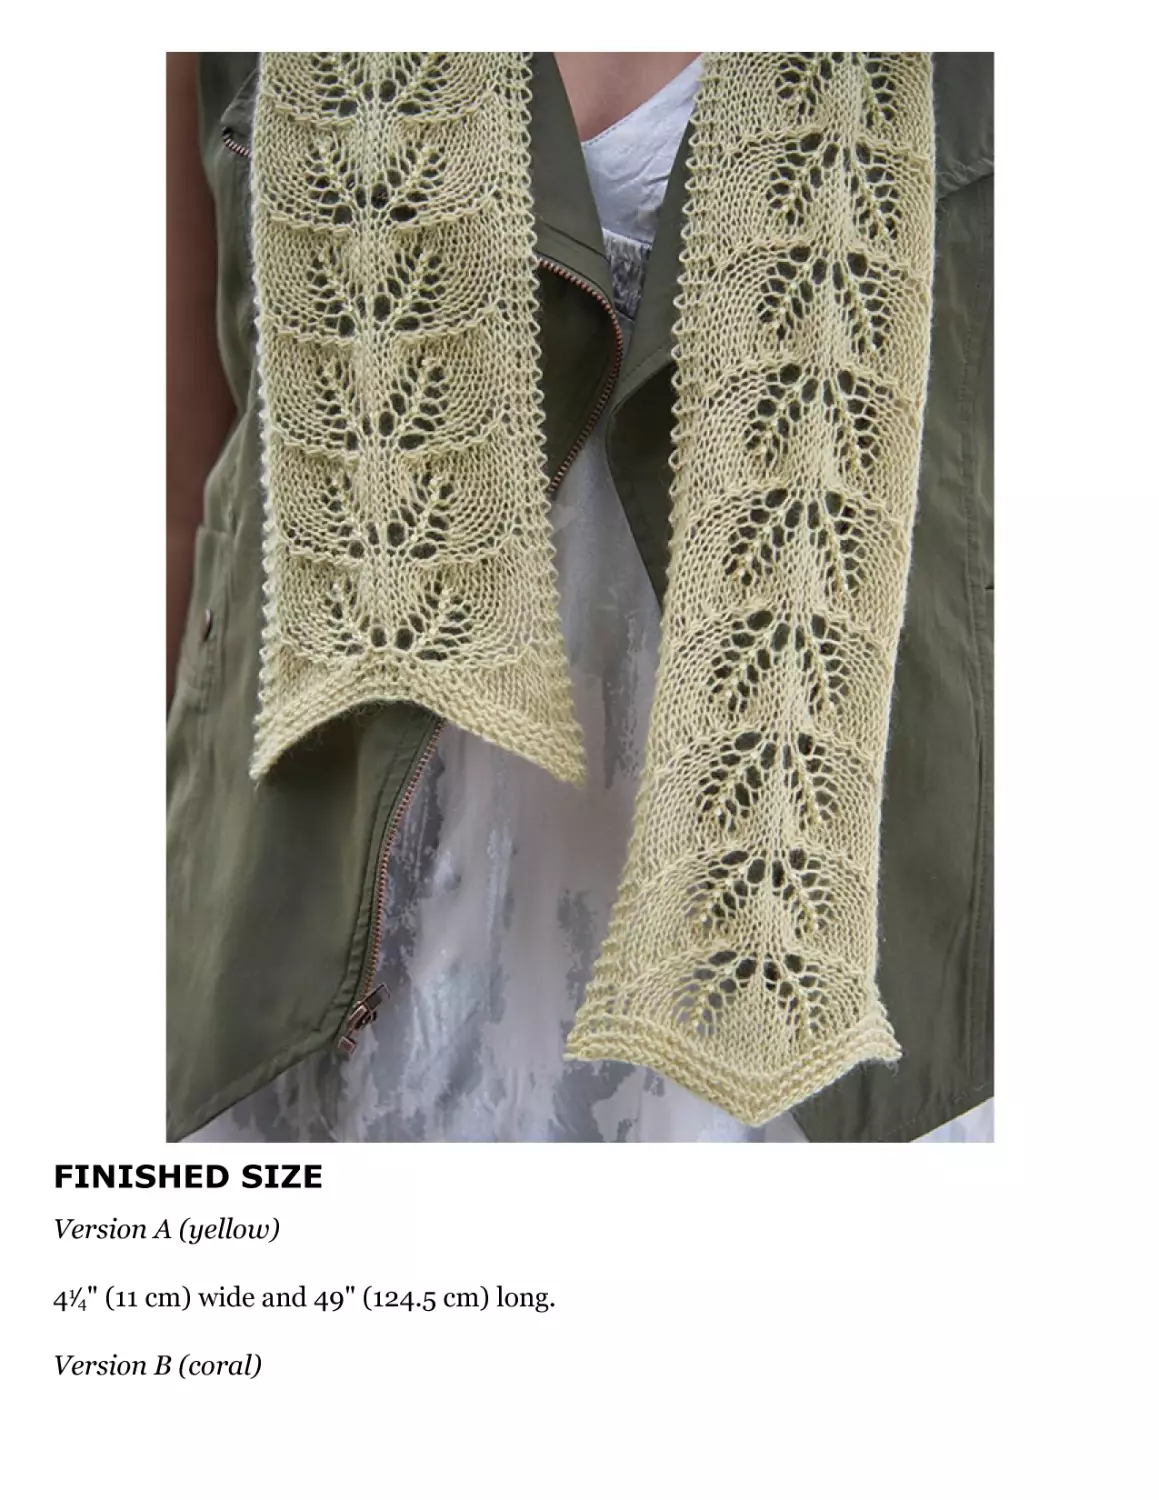
FINISHED SIZE
Version A (yellow)
41⁄4" (11 cm) wide and 49" (124.5 cm) long.
Version B (coral)
41⁄2" (11.5 cm) wide and 49" (124.5 cm) long.
Version C (mauve)
5" (12.5 cm) wide and 471⁄2" (120.5 cm) long.
YARN
Laceweight (#0 Lace).
Shown here: Quince & Co. Piper (50% Texas superfine merino, 50% Texas super kid
mohair; 305 yd [279 m]/50 g): #606 Amarillo (yellow, A), #607 Caracara (orange, B),
and #608 Odessa (mauve, C). 1 skein of each will make a scarf, with enough left for
bead samplers.
NEEDLES
Size U.S. 4 (3.5 mm): straight. Adjust needle size if necessary to obtain the correct
gauge.
NOTIONS
20 g Miyuki 8/0 Japanese seed beads in pale yellow/silver-lined alabaster for Version
A; Miyuki 8/0 Japanese seed beads in salmon/silver-lined alabaster for Version B;
Toho 8/0 Japanese seed beads in purple color-lined fuchsia AB for Version C; size U.S.
14 (0.6 mm) steel crochet hook, or size to fit beads; tapestry needle; stainless T-pins;
blocking mats; 2 long and 2 short blocking wires.
GAUGE
About 24 sts and 30 rows = 4" (10 cm) over St st, blocked and relaxed. Gauge is not
critical to this project, though the size of your scarf and amount of yarn used may be
different from the pattern.
NOTES
A word about slipping selvedge stitches: Don’t! This piece was designed to block freely
and slipped selvedge stitches will create a less flexible edge.
Beads: See Techniques.
The number of stitches cast on are listed for each version in this order: A (B, C). For all
other instructions, the numbers apply to all three versions.
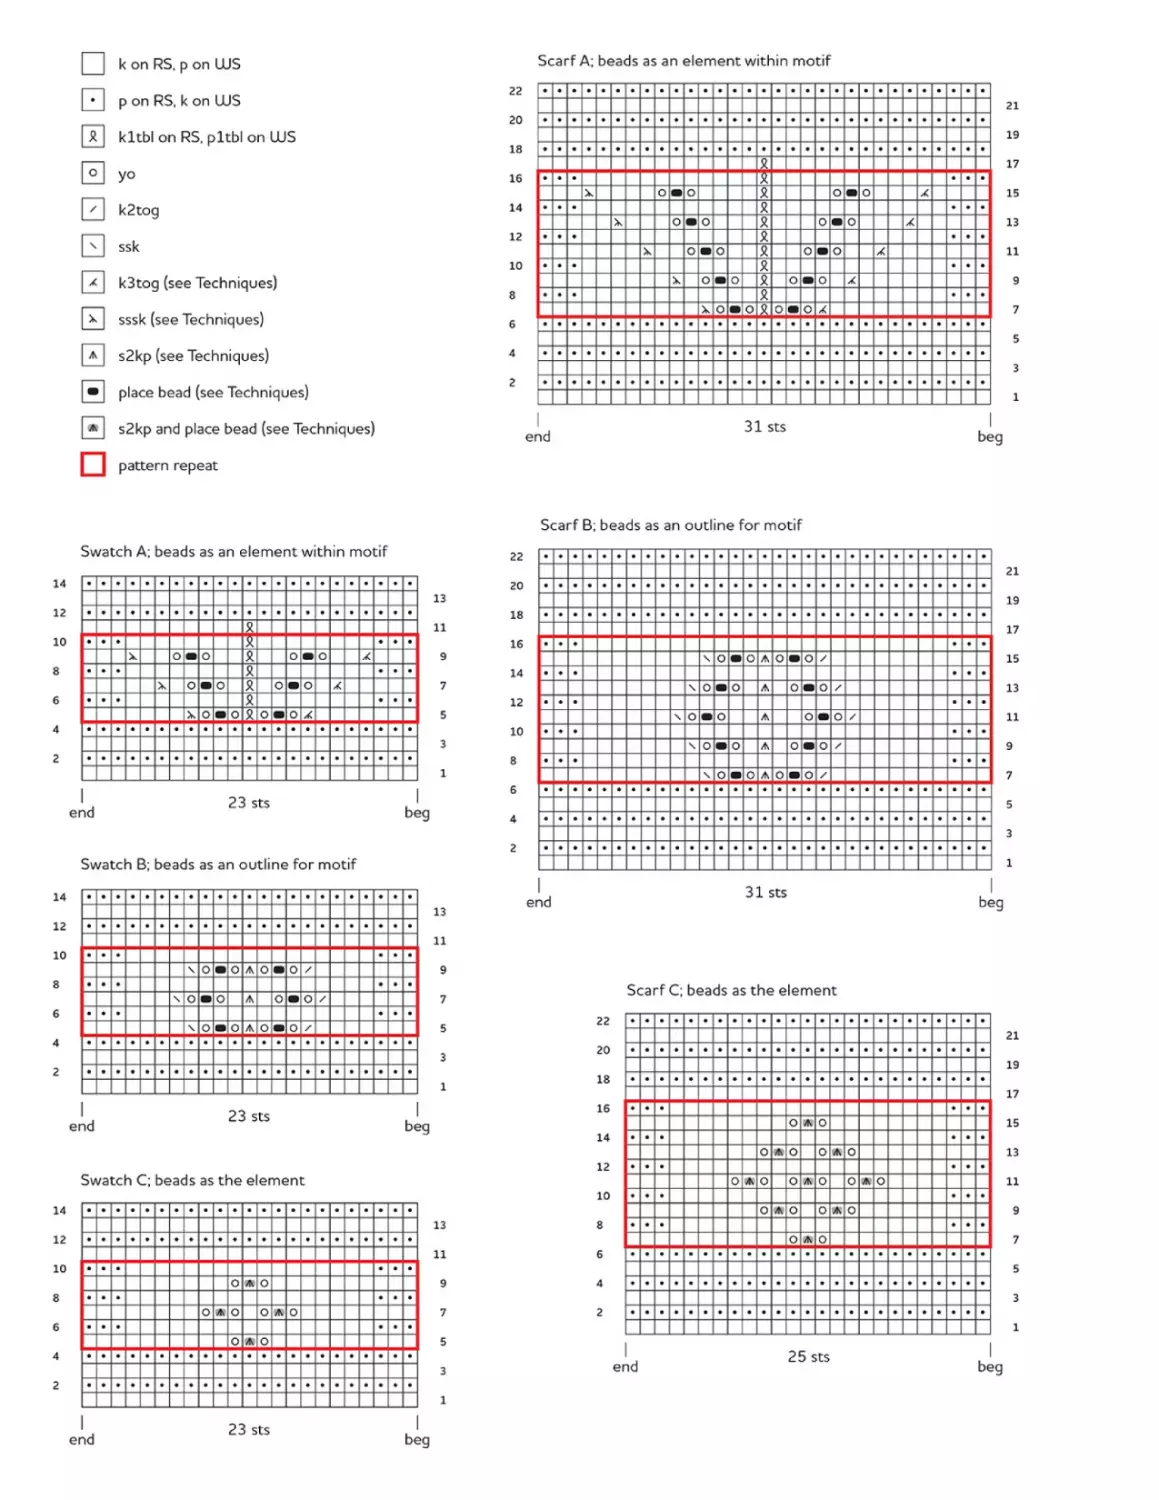
Every row is charted. Charts are worked flat; read all right-side (odd-numbered) rows
from right to left and all wrong-side (even-numbered) rows from left to right.
These scarves look like rags before blocking. There is something about fine mohair and
lace knitting. So as with all lace, plan to block these scarves to really appreciate them.
DIRECTIONS
CO 31 (31, 25) sts using long-tail method (see Techniques).
Beg desired chart and work Rows 1–16 once.
Rep Rows 7–16 twenty-eight more times. Note: For a longer scarf, rep Rows 7–16
additional times.
Work Rows 17–22 once.
BO row: K2, [return 2 sts just worked to left needle tip, k2tog tbl, k1] to last 2 sts, k2,
return 2 sts just worked to left needle tip, k2tog tbl. Cut yarn leaving 9" (23 cm) tail,
pull tail through rem st.
FINISHING
Weave in all ends but do not trim. Soak in cool water until fully saturated (about 30
minutes). Press to remove water, roll piece in a towel, and blot to remove extra water.
Weave a long blocking wire through the vertical strands in garter st along each long
edge of scarf. Note: For Versions B and C you can weave a short wire along each short
edge, and for Version A use T-pins to pull out the pattern’s natural scallop.
Pin wires to 51⁄2 (51⁄2, 5)" (14 [14, 12.5] cm) wide and 52" (132 cm) long. Allow to dry
completely. Scarf will relax to finished measurements after unpinning. Trim ends.
Chapter 4
PROJECTS 1: HIKES, TREKS, AND
MODERATE CLIMBS
There are so many amazing hikes that it was hard to
select a few to highlight. The following projects are
assorted classic treks that mountaineers might “warm
up” on. Think of these knitting projects as “warm-ups”
for the more challenging pieces to come.
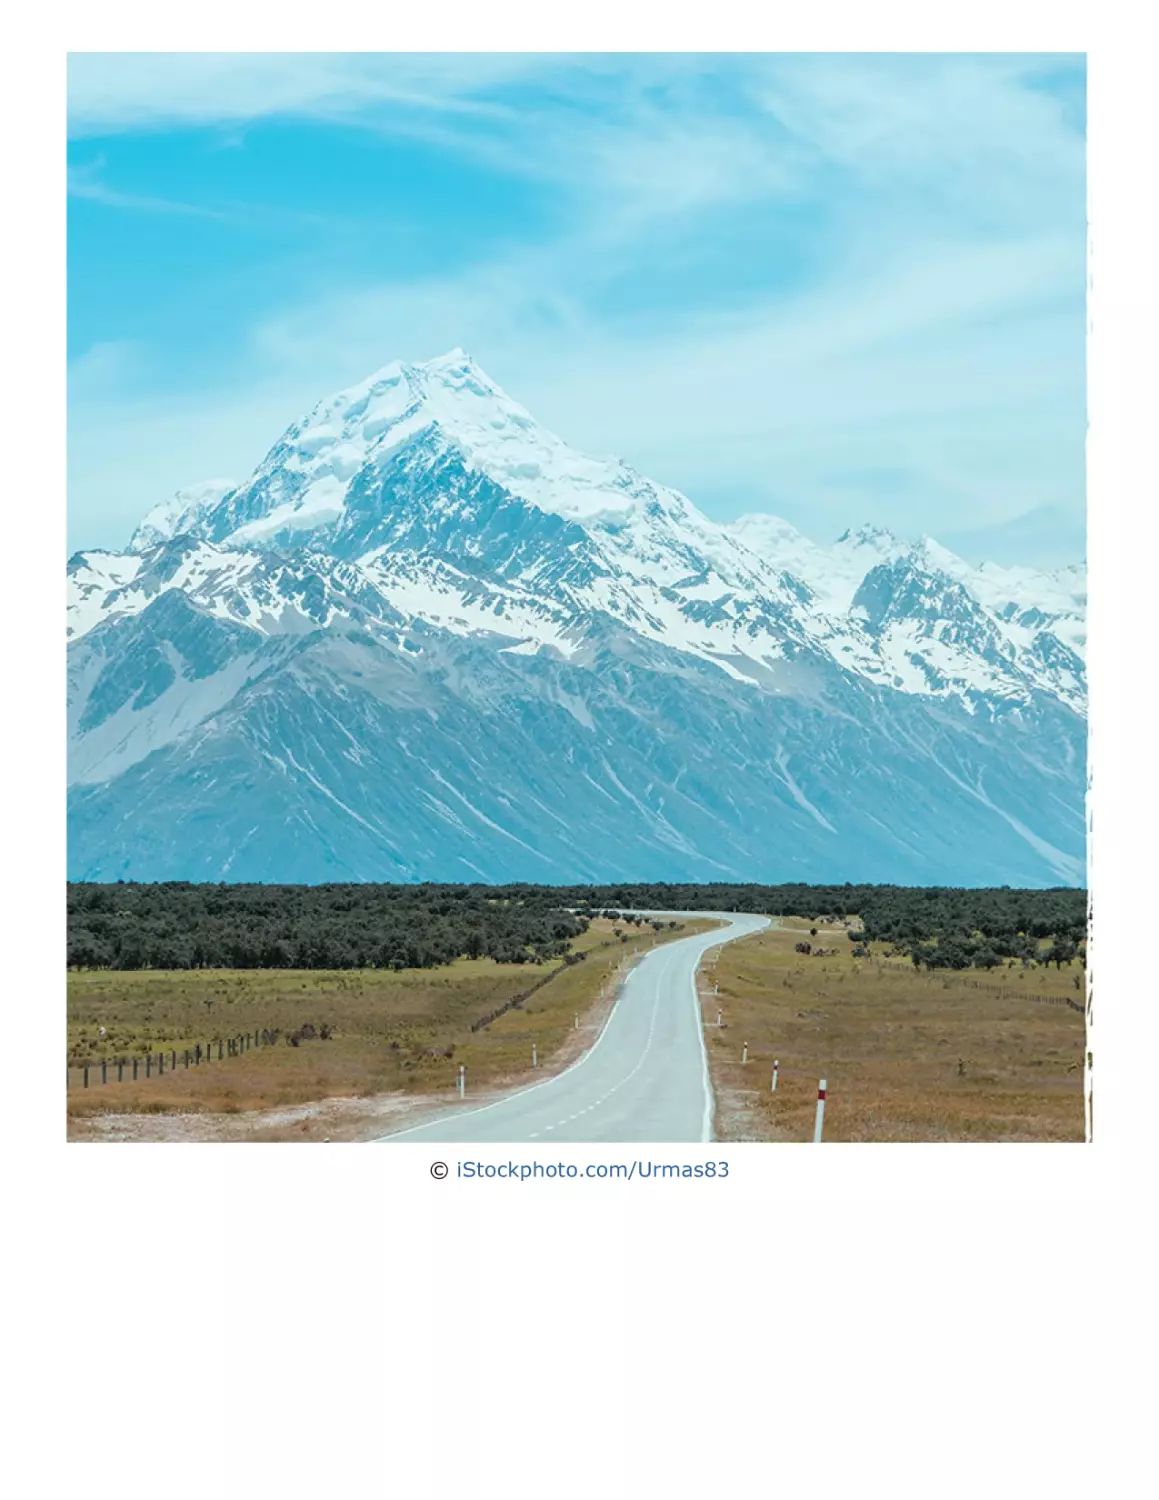
© iStockphoto.com/Urmas83
Costa Rica
Corcovado Mitts
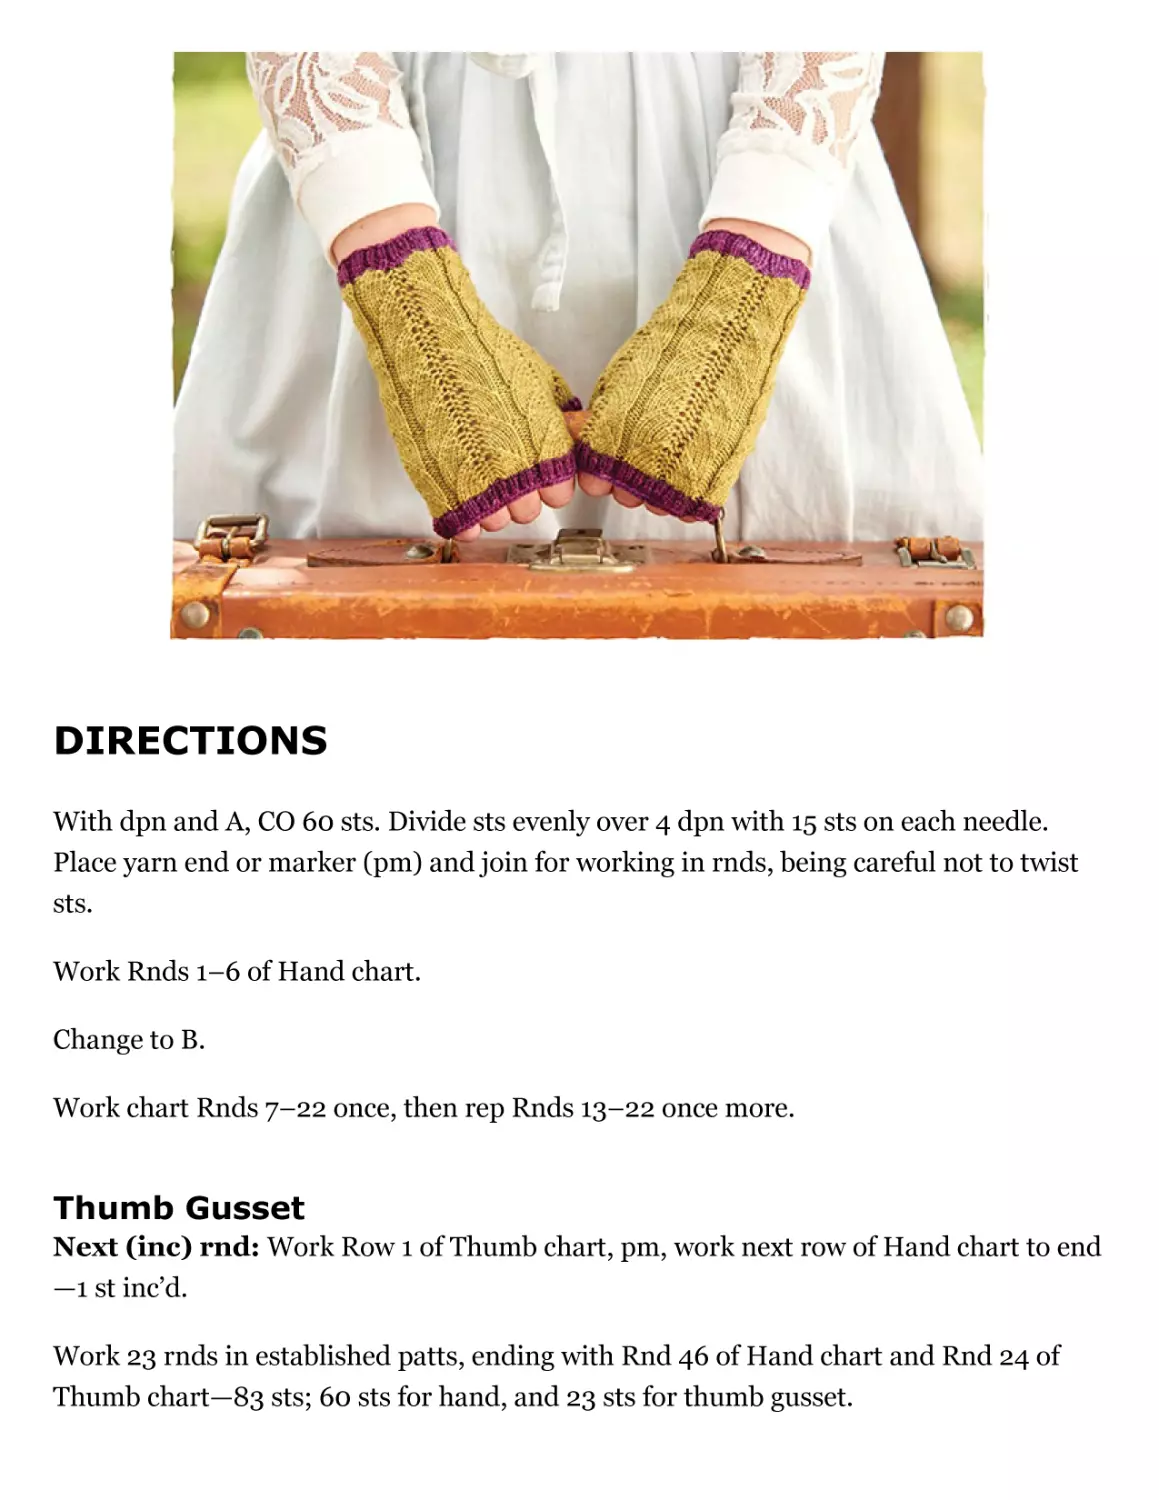
Corcovado National Park is a large area of dense rainforest and is home to
one of Costa Rica’s largest populations of scarlet macaws. It is strenuous
hiking, but the reward is some of Costa Rica’s most beautiful and unspoiled
rainforest.
These mitts use a yarn with lots of memory, so they fit a variety of hand
sizes very well.
FINISHED SIZE
One size fits most women’s hands.
51⁄2" (14 cm) hand circumference and 61⁄2" (16.5 cm) long, relaxed.
YARN
Fingering weight (#1 Super Fine).
Shown here: Alchemy Yarns of Transformation Juniper (100% superfine merino; 232
yd [212 m]/50 g): #78c Pablo’s Solace (purple, A) and #76e Citrine (bright green, B), 1
skein each.
NEEDLES
Size U.S. 1 (2.25 mm): set of 5 double-pointed (dpn). Adjust needle size if necessary to
obtain the correct gauge.
NOTIONS
Locking marker (m) (optional); stitch holder or smooth waste yarn; tapestry needle.
GAUGE
60 sts and 48 rnds = 4" (10 cm) over Hand chart patt, blocked and relaxed.
NOTES
One 15-stitch repeat is worked once on each double-pointed needle in each round.
When changing colors, cut the old color and begin working with the new color leaving a
6" (15 cm) tail for each yarn. At the end, snug things up and weave all ends on the
wrong side.
When you work on the double-pointed needles, use the yarn end from your cast-on to
mark the beginning of the round. A locking marker can also be used if desired.
DIRECTIONS
With dpn and A, CO 60 sts. Divide sts evenly over 4 dpn with 15 sts on each needle.
Place yarn end or marker (pm) and join for working in rnds, being careful not to twist
sts.
Work Rnds 1–6 of Hand chart.
Change to B.
Work chart Rnds 7–22 once, then rep Rnds 13–22 once more.
Thumb Gusset
Next (inc) rnd: Work Row 1 of Thumb chart, pm, work next row of Hand chart to end
—1 st inc’d.
Work 23 rnds in established patts, ending with Rnd 46 of Hand chart and Rnd 24 of
Thumb chart—83 sts; 60 sts for hand, and 23 sts for thumb gusset.
Next rnd: Sl 23 sts for thumb onto holder or smooth waste yarn, removing m if using.
Work next rnd of Hand chart to end, making sure to pull Needles 1 and 4 tog to avoid
leaving a gap at the thumb gusset—60 sts rem.
Work Rnds 48–62 in established patt.
Change to A.
Work Rnds 63–88 in established patt.
BO rnd: K2tog tbl, [return dec st to left needle, k2tog tbl] to end, making sure to not
work too loosely. Cut yarn leaving a 6" (15 cm) tail, pull tail through rem st.
Thumb
Return 23 held thumb sts to 3 dpn.
Next rnd: With B, work Thumb chart Row 25, insert LH needle tip from front to back,
under bar between sts at “crotch” at top of thumb, k1tbl—24 sts. Distribute sts evenly if
necessary with 8 on each dpn. Pm for beg of rnd, if using, and join for working in rnds
Work 1 rnd in established patt.
Change to A.
Work Rnds 27–32 in established patt.
BO same as for hand.
Make second mitt same as first.
FINISHING
Weave in loose ends, making sure to close up any holes, especially at top of thumb, but
do not trim. Soak in cool water until fully saturated (about 30 minutes). Press to
remove water, roll in a towel, and blot to remove extra water. Lay flat to dry. Trim ends.
Kathmandu
Prayer Flag Scarf
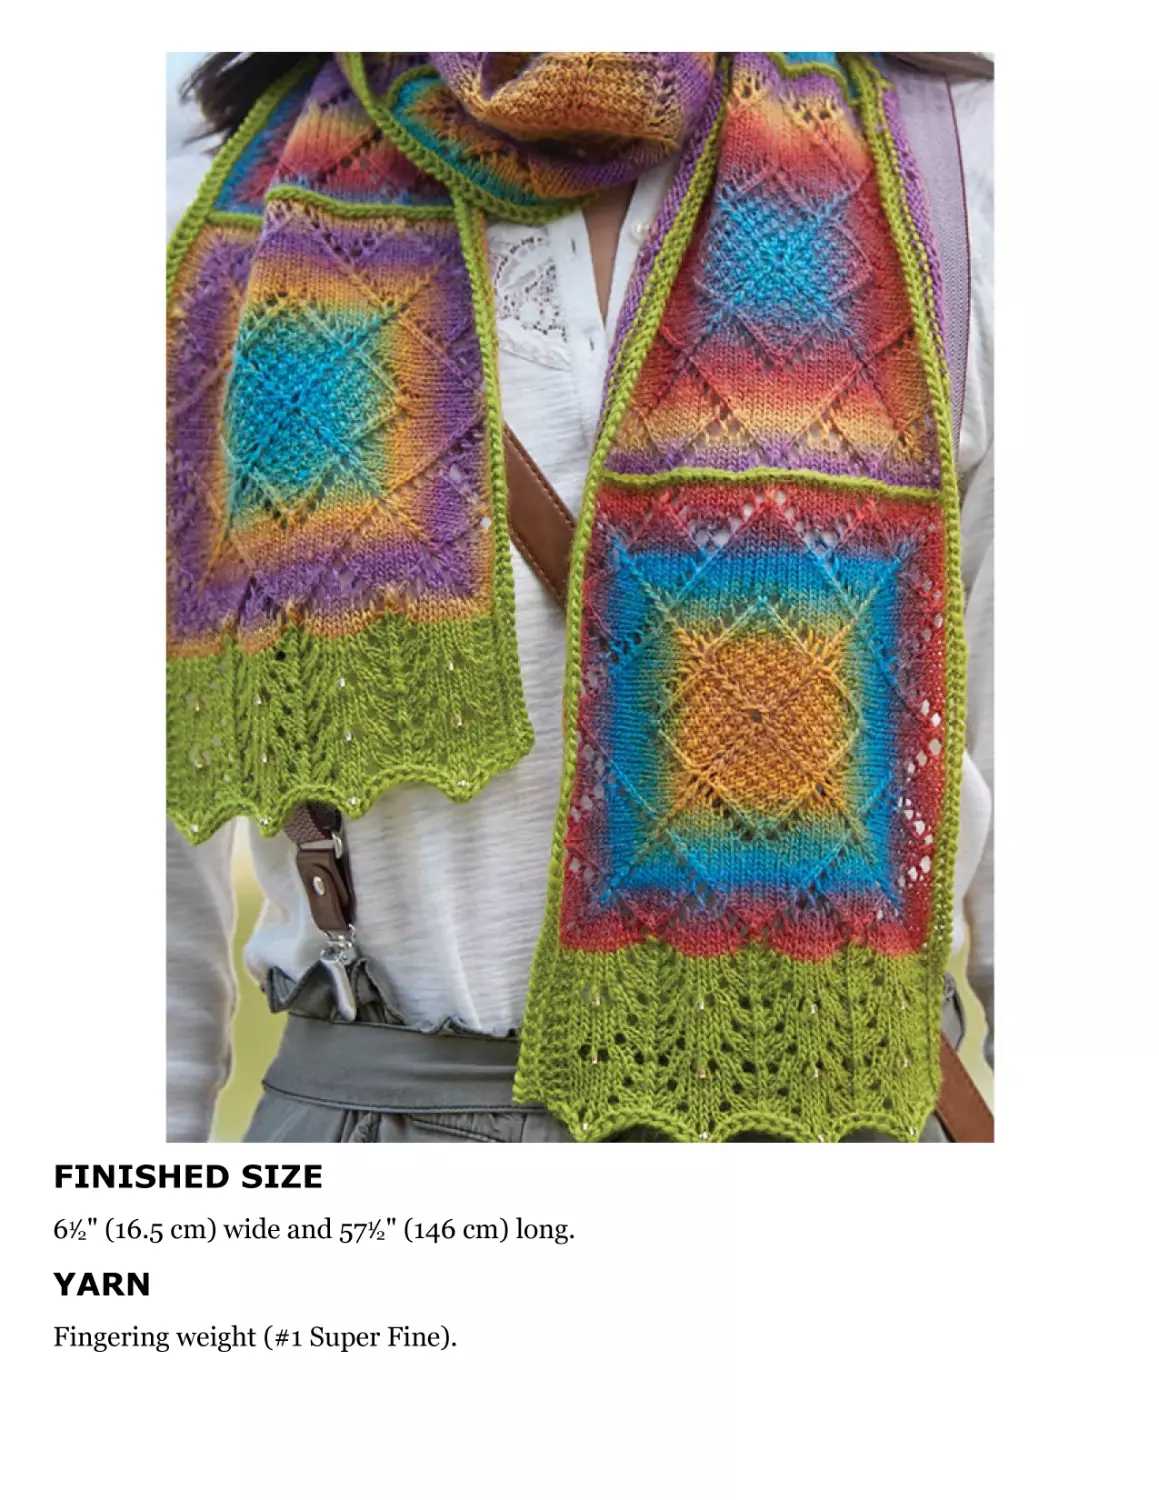
Kathmandu, the capital of Nepal, is the gateway for all travelers to that
country. While hopeful climbers of Mount Everest begin in Kathmandu and
then provision and leave, Kathmandu is a city rich in history and charm,
worthy of exploration.
One of the most famous treks is the hike to Mount Everest’s base camp.
This trip can take from fourteen to twenty-one days and is strenuous and at
high altitude. Inspired by faded but still bright prayer flags on the
mountains, this scarf or wrap is made of modular squares in bright colors.
Each square is worked from the center out on double-pointed needles and
then joined.
This piece can be made wider or longer very easily. It would make a lovely
stole or baby blanket.
FINISHED SIZE
61⁄2" (16.5 cm) wide and 571⁄2" (146 cm) long.
YARN
Fingering weight (#1 Super Fine).
Shown here: Crystal Palace Mini Mochi (80% merino, 20% nylon; 195 yd [178 m]/50
g): #105 Tapestry Rainbow (A), 2 balls; #1110 Lily Pad (B), 1 ball.
See Notes on calculating yarn amounts for making a larger scarf.
NEEDLES
Size U.S. 2 (2.75 mm): set of 5 double-pointed (dpn) and 16" (40 cm) and 32" (80 cm)
circular (cir). Adjust needle size if necessary to obtain the correct gauge.
NOTIONS
Locking marker (m) (optional); smooth waste yarn; 24 size 6/0 Czech seed beads in
gold-lined crystal; size U.S. 16 (0.6 mm) steel crochet hook, or size to fit beads; tapestry
needle; stainless T-pins; blocking mats; 4 short rigid blocking wires for squares; 4 long
(or 2 very long) rigid blocking wires for scarf.
GAUGE
Each square = 61⁄2" (16.5 cm) square, blocked and relaxed.
NOTES
Beads: See Techniques.
When you work on the double-pointed needles, use the yarn end from your cast-on to
mark the beginning of the round. A locking marker can also be used if desired.
Every row is charted. Chart A is worked in the round; read all chart rows from right to
left. Chart B is worked flat; read right-side (odd-numbered) rows from right to left and
wrong-side (even-numbered) rows from left to right.
It is very simple to make this piece larger, in both width and length. One ball of the
specified yarn will make four or five squares. Each square is 61⁄2" (16.5 cm) square,
relaxed after blocking. So you can make the piece longer or wider in 61⁄2" (16.5 cm)
increments. Be sure you get more yarn if you make the piece larger. If you make it
wider, you will have to join the strips lengthwise using three-needle bind-off, and then
work additional repeats of chart B across each edge.
I intentionally made each square different by starting at a different point in the yarn’s
color sequence. To allow for even more options, I wound some of the yarn to reverse
the color sequence.
DIRECTIONS
Square 1
With dpn and A, CO 8 sts using long-tail method (see Techniques). Distribute sts
evenly over 4 dpn, with 2 sts on each needle. Use yarn end or place marker (pm) for beg
of rnd and join for working in rnds, being careful not to twist sts.
Rnd 1: [P1, k1tbl] 4 times.
Next rnd: Work Rnd 1 of chart A 4 times around—8 sts inc’d.
Work Rows 2–36 as est, changing to cir needle when there are too many sts to work
comfortably on dpn—152 sts, with 38 sts in each section.
Cut a piece of waste yarn at least 35" (89 cm) long. Place sts onto waste yarn and knot
ends tog.
Squares 2–8
Make same as for square 1 (see Notes about beginning each square in a different point
in the yarn’s color sequence).
TIPS AND TRICKS
Use yarn tail from the cast-on as your marker while on the double-pointed needles.
FINISHING
Weave in CO tails of squares but do not trim. Soak in cool water until fully saturated
(about 30 minutes). Press to remove water, roll in a towel, and blot to remove extra
water. Slip a rigid blocking wire in each edge of square, and pin out to 7" (18 cm)
square.
Allow to dry completely before removing pins and wires. Squares will relax to finished
measurements after removing pins. Trim ends of CO tails.
Joining Squares
Note: When joining the squares, leave the waste yarn in place until all the squares are
joined and the edging has been worked. Be careful not to split the waste yarn when
returning stitches to the needles.
Return held 39 sts (from one twisted corner st to next twisted corner st) along one side
of first square to one dpn leaving waste yarn in place until the end. Rep with a second
square.
Holding 2 dpn parallel and with WS tog (RS facing out), with B, join squares using
three-needle BO (see Techniques).
*Return held 39 sts along the opposite edge of square 2, from twisted corner st to next
twisted corner st onto dpn as before.
Return held 39 sts along one side of third square to one dpn. Holding 2 dpn parallel
and with WS tog, use B to join squares using three-needle BO.
Rep from * until all squares have been joined.
Lace Edging
Return held 39 sts along opposite end of last square to shorter cir needle. Join B to beg
with a RS row.
Row 1: Beg at right edge of chart B, work 3 sts, work 10-st rep 3 times, then work 6 sts
at left edge of chart.
Work Rows 2–8 of chart as established. Rep Rows 1–8 once more, then work Rows 1–7
once.
Next row: (WS) Knit.
BO row: (RS) K2, [return 2 sts just worked to left needle tip, k2togtbl, k1] to last 2 sts,
k2togtbl. Cut yarn leaving 9" (23 cm) tail, pull tail through rem st.
Work edge along rem short end same as first.
Side Edging
With longer cir needle, with B, and with RS facing, pick up and knit 13 sts in vertical
strands of garter st along side of lace edging, pick up and knit 1 st in twisted corner st,
[knit held 37 sts, pick up and knit 1 st in join between squares] 7 times, knit held 37 sts,
pick up 1 st in twisted corner st, then pick up and knit 13 sts along side of lace edging—
331 sts.
Next row: (WS) Knit.
BO same as for lace edging.
Work edging along rem long side same as first.
Remove all waste yarn carefully.
Weave in all ends, neatening up beg and end of each three-needle BO.
Soak in cool water until fully saturated (about 30 minutes). Press to remove water, roll
in a towel, and blot to remove extra water. Weave one or two long wires along BO edge
of each long edge. Pin wires out to even width. Pin out points along short edges at
beads.
Allow to dry completely before removing pins and wires. Trim ends.
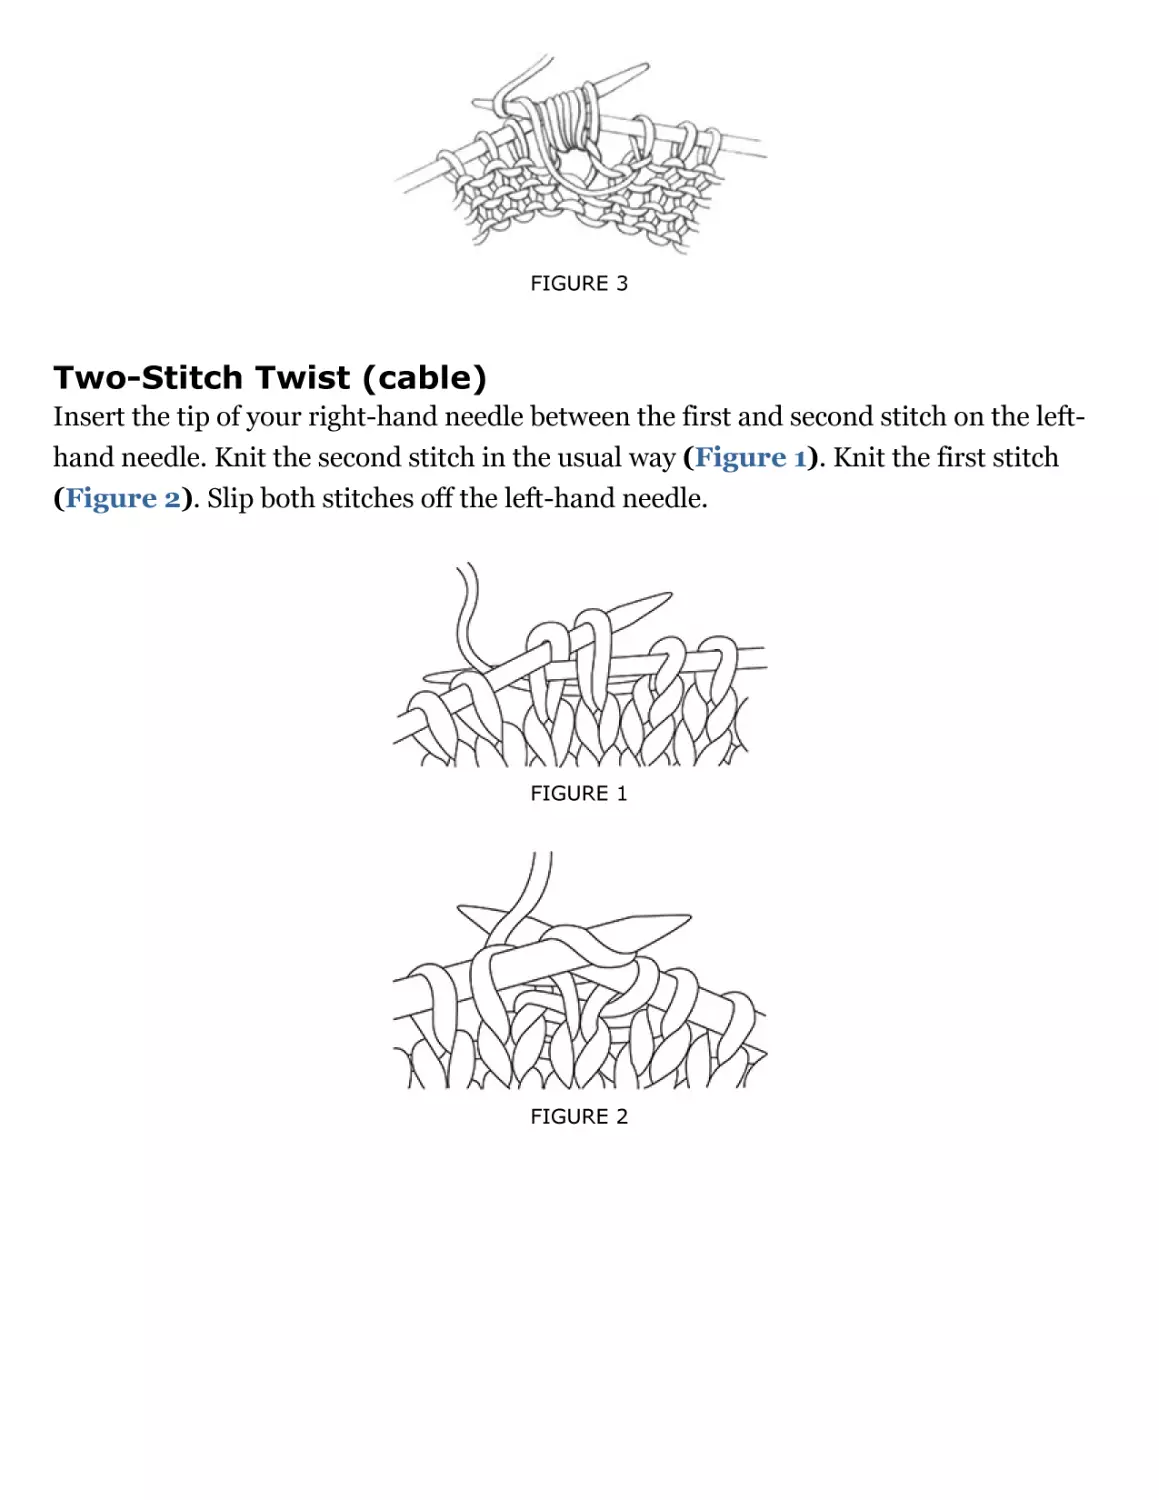
The Inca Trail
Machu Picchu Beanie
The Inca Trail (also known as Camino Inca) is the classic trek to Machu
Picchu. Located in the Andes mountain range, the trail brings you through
several unique environments including cloud forests and alpine tundra. You
pass villages and Incan ruins before arriving at the Sun Gate on Machu
Picchu.
This project uses a center cast-on and double-pointed needles and begins at
the top. It combines a classic take on a feather-and-fan-lace stitch with
contrasting colored purl ridges, plus a double ribbed band to keep your ears
warm. The combination of colors and stitches is both modern and classic at
the same time. The band uses a purl ridge to create a neat fold and is
stitched down on the inside, for a really clean and elastic finish.
FINISHED SIZE
16" (40.5 cm) brim circumference and 83⁄4" (22 cm) tall.
YARN
Fingering weight (#1 Super Fine).
Shown here: Madelinetosh Unicorn Tails (100% superwash merino; 52 yd [47 m]/ 12g):
Silver Fox (A), 2 skeins; Celadon (B), 2 skeins; Charcoal (C), 1 skein.
NEEDLES
Size U.S. 1 (2.25 mm): set of 5 doubled-pointed (dpn), and 16" (40 cm) circular (cir).
Adjust needle size if necessary to obtain the correct gauge.
NOTIONS
Locking marker (m) (optional); waste yarn; tapestry needle.
GAUGE
341⁄2 sts and 42 rnds = 4" (10 cm) over chart B, blocked.
NOTES
A fine yarn alternative is to get a full skein of the Tosh Merino Light and use one color
for the entire piece.
When joining a new color, always bring the new color from under the old color. When
changing colors, cut the old color leaving a 6" (15 cm) tail, and leave a 6" (15 cm) tail
when joining the new color. When working chart B, do not cut color C when changing
colors but carry it up the wrong side of the work, making sure you do not pull it tightly.
Once you weave in the yarn tails, the joins will be invisible.
When you work on the double-pointed needles, use the yarn end from your cast-on to
mark the beginning of the round. A locking marker can also be used if desired.
DIRECTIONS
With dpn and A, CO 8 sts using the long-tail method (see Techniques). Distribute sts
evenly over 4 dpn, with 2 sts on each needle. Use yarn end or place marker (pm) for beg
of rnd, and join for working in rnds, being careful not to twist sts.
Rnd 1: Work Rnd 1 of chart A—8 sts inc’d.
Work Rnds 2–38 in established patt—160 sts. Change to cir needle when there are too
many sts to work comfortably on dpn.
Work Rnds 1–14 of chart B once. Rep Rnds 3–14 three more times. Work Rnds 15–20
once.
Next rnd: P1, *k2, p2; rep from * to last 3 sts, k2, p1.
Rep last rnd 21 more times. Ribbing should measure about 23⁄4" (7 cm).
Next (turning) rnd: Purl.
Cont in ribbing until most of A is used, ending at beg of rnd.
Change to B and work in ribbing until most of yarn is used, ending at beg of rnd.
Change to C and work in ribbing until a total of 21 rnds have been worked after the
turning rnd. Do not cut yarn.
Cut a piece of waste yarn about 24" (61 cm) long. Slip sts kwise onto waste yarn.
Weave in ends and trim ends in ribbing area.
Turn ribbing to inside along turning rnd. Thread rem end of C onto tapestry needle,
sew sts to final chart rnd worked in B, using overhand st (see Techniques) to sew
through the purl bumps on WS, making sure not to pull tightly. Note: Leave waste yarn
in place until seam is complete, then fasten off C and remove waste yarn.
FINISHING
Weave in rem ends but do not trim. Soak in cool water until fully saturated (about 30
minutes). Press to remove water, roll in a towel, and blot to remove extra water. Lay
piece flat and finger block to finished measurements. Allow to dry completely. Trim
ends.
TIPS AND TRICKS
To cast on using double-pointed needles, I like to cast on all the stitches onto one
needle. I then move stitches to another 2 needles. In this case, cast on 8 stitches to
one double-pointed needle. Slip 4 stitches from the right side of the needle to a
second double-pointed needle. Slip 2 stitches from the right side of the second
needle to a third double-pointed needle. Bring the needles away from you and
together to join your work. Then rotate the work toward you so that the join is in
front of you and ready to knit. After working a few rounds, add a fourth doublepointed needle so you are working chart A twice on each of the four needles.
Chamonix to Zermatt
Alpine Garden Cowl
The Haute Route takes you from the Chamonix Valley, France, near Mont
Blanc to Zermatt, Switzerland, and the Matterhorn. During warmer months
you can hike, but during the winter skiing gear is mandatory! It takes about
twelve days on foot and closer to seven on skis, but there are alpine huts
and small inns along the way.
This project is worked in the round using twisted stitches and beads for
texture.
FINISHED SIZE
41" (104 cm) bottom circumference, 16" (40.5 cm) top circumference, and 91⁄2" (24 cm)
long at longest point.
YARN
Laceweight (#0 Lace).
Shown here: Jade Sapphire Silk Cashmere 2-ply (55% silk, 45% Mongolian cashmere;
400 yd [366 m]/55 g): #024 Plum Rose, 1 skein.
NEEDLES
Size U.S. 3 (3.25 mm): 16" (40 cm) circular (cir). Adjust needle size if necessary to
obtain the correct gauge.
NOTIONS
Markers (m); 130 Toho 8/0 Japanese seed beads in purple color-lined Fuchsia AB; size
U.S. 14 (0.6 mm) steel crochet hook, or size to fit beads; tapestry needle; stainless Tpins; blocking mats; mixing bowl with 7" (18 cm) diameter; 1 yd (1 m) cotton tape or
cord.
GAUGE
24 sts = 4" (10 cm) over St st, blocked and relaxed.
NOTES
Beads: See Techniques.
Two-Stitch Twist (Cable): See Techniques
Two-Stitch Twists (cables) are worked on chart B Rnds 5, 9, 13, and 17. To work these
cables, end the previous round one stitch before the end of the round and use that
stitch as the first of the two cable stitches as follows: *Slip 1, remove marker, place
slipped stitch back on left needle tip. Skip first stitch and knit into the back of the
second stitch on the left needle, knit first stitch, then slip both stitches off the needle,
slip the last stitch just worked back to left needle tip, replace marker, slip stitch back to
right needle. If you are using markers, work to 1 stitch before the next marker; repeat
from*, or simply work around as charted, without markers to the last stitch, k1tbl.
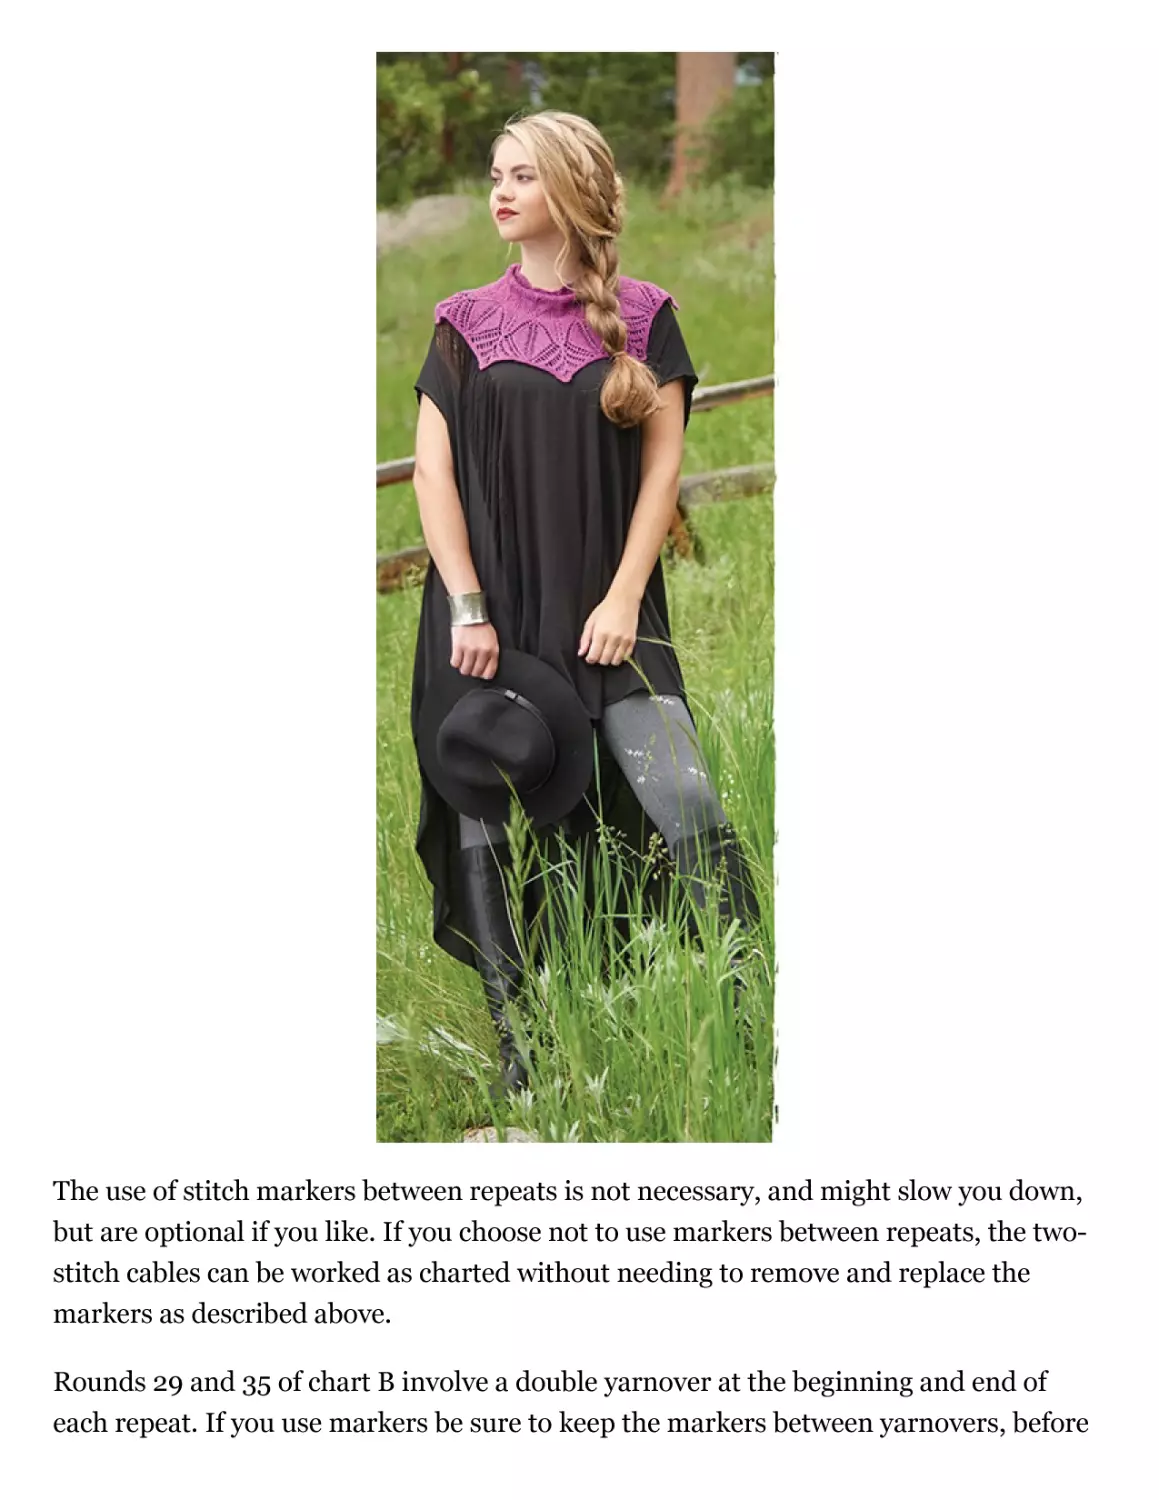
The use of stitch markers between repeats is not necessary, and might slow you down,
but are optional if you like. If you choose not to use markers between repeats, the twostitch cables can be worked as charted without needing to remove and replace the
markers as described above.
Rounds 29 and 35 of chart B involve a double yarnover at the beginning and end of
each repeat. If you use markers be sure to keep the markers between yarnovers, before
slipping the beginning-of-round marker, *yarnover, slip marker, yarnover, work to the
next marker; repeat from * 6 more times, yarnover, slip marker, yarnover, work to the
last stitch, k1.
DIRECTIONS
CO 120 sts using the long-tail method (see Techniques). Place marker (pm) for beg of
rnd, and join for working in rnds, being careful not to twist sts.
Knit 1 rnd.
Purl 1 rnd.
Next rnd: Work 15-st rep of Rnd 1 of chart A 8 times around.
Work Rnds 2–14, then rep Rnds 1–14 twice more.
Next rnd: Work 15-st rep of Rnd 1 of chart B 8 times around—8 sts inc’d.
Work Rnds 2–40 once—280 sts.
BO as foll: K2togtbl, return dec st just worked to left needle tip, k2togtbl, [k1tbl,
return 2 sts just worked to left needle tip, k2togtbl] around. Cut yarn leaving a 6" (15
cm) tail, pull tail through rem st.
FINISHING
Weave in ends but do not trim. Soak in cool water until fully saturated (about 30
minutes). Press to remove water, roll in a towel, and blot to remove extra water.
Block the piece as foll: Place the mixing bowl, upside down, on the blocking mats. Place
the cowl over the top of the bowl with narrow end up. Pin out the points of each chart B
section to create a circle 41" (104 cm) in circumference. Tie the cotton cord around the
piece about 1" (2.5 cm) from the bottom of the mixing bowl, to prevent the neck from
stretching as it blocks. Allow to dry completely. Trim ends.
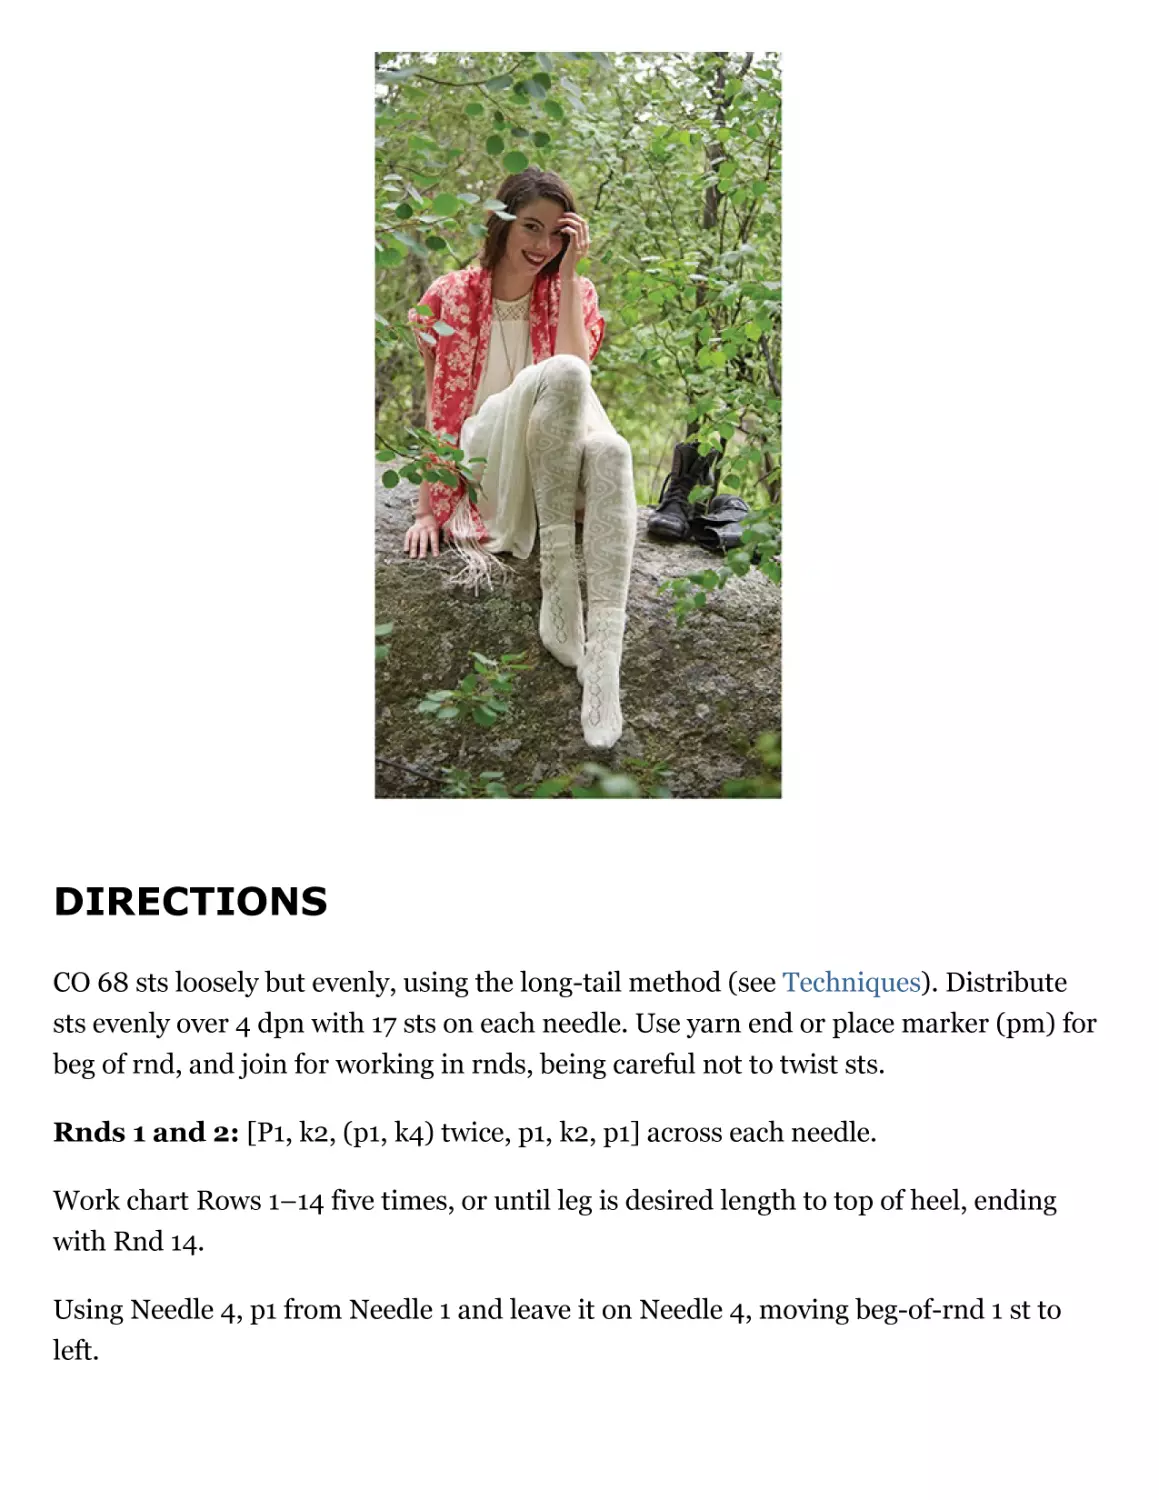
Mont Blanc
Chamonix Lace Socks
Mont Blanc means “white mountain” in French. It is the highest mountain in
the European Union, rising to 15,781 feet (4,810 m) above sea level. The
eleventh-highest mountain in the world, it is known as La Dame Blanche,
which means “the white lady” in French. In 1786, Jacques Balmat and
Michel Paccard made the first documented ascent, and some people
consider this the beginning of “modern” mountaineering. Although Mont
Blanc is the highest mountain within the European Union, it is not the
highest mountain on the continent! But I consider this an honorable
mention.
FINISHED SIZE
61⁄2" (16.5 cm) foot circumference and 7" (18 cm) leg length to bottom of heel.
YARN
Fingering weight (#1 Super Fine).
Shown here: Crystal Palace Panda Silk (52% bamboo, 43% merino, 5% silk; 204 yd [187
m]/50 g): #3204 Natural Ecru, 2 skeins.
NEEDLES
Size U.S. 1 (2.25 mm): set of 5 double-pointed (dpn). Adjust needle size if necessary to
obtain the correct gauge.
NOTIONS
Locking marker (m) (optional); tapestry needle; sock blockers (optional).
GAUGE
37 sts and 52 rnds = 4" (10 cm) over St st, blocked; 42 sts and 52 rnds = 4" (10 cm) over
lace patt, blocked.
STITCH GUIDE
W&t (wrap and turn): On knit side, work to the turning point, slip next stitch
purlwise, bring the yarn to the front, then slip the same stitch back to the left needle,
turn the work around and bring the yarn in position for the next stitch. On the purl
side, work to the turning point, slip the next stitch purlwise to the right needle, bring
the yarn to the back of the work, return the slipped stitch to the left needle, bring the
yarn to the front between the needles and turn the work so that the RS is facing and the
yarn is in position for the next stitch.
NOTES
These socks use classic top-down sock techniques. In place of the more typical heel
stitches, I used Eye of Partridge stitch, which gives the same sturdy fabric but is more
ornamental.
You can easily make these socks longer by adding an extra 16-row repeat of the charted
pattern or just some plain rows before beginning the toe shaping. Get an extra skein for
a woman’s shoe larger than a size U.S. 7.
When you work on the double-pointed needles, use the yarn end from your cast-on to
mark the beginning of the round. A locking marker can also be used if desired.
DIRECTIONS
CO 68 sts loosely but evenly, using the long-tail method (see Techniques). Distribute
sts evenly over 4 dpn with 17 sts on each needle. Use yarn end or place marker (pm) for
beg of rnd, and join for working in rnds, being careful not to twist sts.
Rnds 1 and 2: [P1, k2, (p1, k4) twice, p1, k2, p1] across each needle.
Work chart Rows 1–14 five times, or until leg is desired length to top of heel, ending
with Rnd 14.
Using Needle 4, p1 from Needle 1 and leave it on Needle 4, moving beg-of-rnd 1 st to
left.
Heel Flap (Eye of Partridge)
Row 1: (RS) Using one dpn, *sl 1 pwise wyb, k1; rep from * across Needles 1 and 2 to
last st on Needle 2, sl last st to Needle 3—32 sts on needle for heel. Cont working back
and forth on these sts for heel flap and leave rem 36 sts on Needles 3 and 4 for instep.
Row 2: (WS) Sl 1 kwise wyf, purl to end.
Row 3: S1 pwise wyb, k2, *sl 1 pwise wyb, k1; rep from * to last st, k1.
Row 4: Rep Row 2.
Row 5: *Sl 1 pwise wyb, k1; rep from * to end.
Rep Rows 2–5 six times, then rep Rows 2–4 once more. There should be 16 slipped sts
along each edge of heel flap.
Turn Heel
Row 1: (RS) Sl 1 pwise wyb, k16, k2tog, sl 1, wrap and turn (see Stitch Guide).
Row 2: (WS) P3, p2tog, sl 1, w&t.
Row 3: K4, k2tog, sl 1, w&t.
Row 4: P5, p2tog, sl 1, w&t.
Row 5: K6, k2tog, sl 1, w&t.
Row 6: P7, p2tog, sl 1, w&t.
Row 7: K8, k2tog, sl 1, w&t.
Row 8: P9, p2tog, sl 1, w&t.
Row 9: K10, k2tog, sl 1, w&t.
Row 10: P11, p2tog, sl 1, w&t.
Row 11: K12, k2tog, sl 1, w&t.
Row 12: P13, p2tog, sl 1, w&t.
Row 13: K14, k2tog, sl 1, w&t.
Row 14: P15, p2tog, sl 1, w&t.
Row 15: K17—18 sts rem.
Gusset
With RS facing, Needle 1, pick up and knit 1 st in gap at top of heel flap, then 16 sts
along side of heel flap; Needle 3, p1, work next row of chart as established; Needle 4,
work chart patt as established to last st, p1; with a new dpn, pick up and knit 16 sts
along rem side of heel flap, then 1 st in gap at top of heel flap, k9 from Needle 1—88 sts.
Renumber needles with 26 sts for each on Needles 1 and 4 for heel and gussets, and 18
sts each on Needles 2 and 3 for instep. Pm for beg of rnd and cont working in rnds.
Rnds beg at center under foot.
Rnd 1: Needles 1, knit; Needles 2 and 3, work in established patt; Needle 4, knit.
Rnd 2: Needle 1, knit to last 3 sts, k2tog, k1; Needles 2 and 3, work in established patt;
Needle 4, k1, ssk, knit to end—2 sts dec’d.
Rep last 2 rnds 9 more times, then rep Rnd 1 again—68 sts rem; 16 sts each on Needles
1 and 4, and 18 sts each on Needles 2 and 3.
Move first st on Needle 2 to Needle 1, and last st on Needle 3 to Needle 4—17 sts on
each needle.
Foot
Cont in established patts until foot is 2" (5 cm) shorter than desired length, ending with
Row 15 of chart. If needed, add a few rnds of St st worked over all sts to get correct foot
length.
Toe
Rnd 1: (dec) Needle 1, knit to last 3 sts, k2tog, k1; Needle 2, k1, ssk, knit to end; Needle
3, knit to last 3 sts, k2tog, k1; Needle 4, k1, ssk, knit to end—4 sts dec’d.
Rnd 2: Knit.
Rep Rnds 1 and 2 eight more times—32 sts rem, with 8 sts on each needle.
Rep Rnd 1 six times—8 sts rem, with 2 on each needle.
Cut yarn leaving a 9" (23 cm) tail, thread tail through rem sts twice, pull tight to close
hole, and fasten off on WS. Alternatively, graft rem 8 sts tog using Kitchener st (see
Techniques).
Make second sock same as first.
FINISHING
Weave in ends. Soak in cool water until fully saturated (about 30 minutes). Press to
remove water, roll in a towel, and blot to remove extra water. Lay out to finished
measurements and shape gently. If desired, insert sock blocker into each sock. Allow to
dry completely.
Mont Blanc
Chamonix Beanie
This hat matches the Chamonix Lace Socks. For this piece I replaced the
fine- weight yarn used for the socks with a DK weight yarn in the same fiber
blend. I also replaced the yarnovers used in the sock pattern to M1s, which
have the same look but make a smaller hole. The better to keep your head
warm!
FINISHED SIZE
161⁄2" (42 cm) circumference and 81⁄4" (21 cm) tall.
YARN
DK weight (#3 Light).
Shown here: Crystal Palace Panda Pearl (53% bamboo, 42% merino, 5% silk; 220 yd
[201 m]/100 g): #7204 Natural, 1 skein.
NEEDLES
Size U.S. 4 (3.5 mm): 16" (40 cm) circular (cir), and set of 5 double-pointed (dpn).
Adjust needle size if necessary to obtain the correct gauge.
NOTIONS
Marker (m); locking marker (m) (optional); tapestry needle.
GAUGE
29 sts and 36 sts = 4" (10 cm) over chart patt, blocked.
DIRECTIONS
With cir needle, CO 119 sts loosely but evenly using long-tail method (see Techniques).
Place marker (pm) for beg of rnd, and join for working in rnds, being careful not to
twist sts.
Rnds 1–6: *P1, k2, (p1, k4) twice, p1, k2, p1; rep from * 6 more times around.
Work chart Rows 1–14 three times.
Shape Top
Work chart Rows 15–39—7 sts rem. Change to dpn when there are too few sts to work
comfortably on cir needle, replacing marker with yarn end or locking marker if you
choose.
Work I-cord (see Techniques) over rem 7 sts for 4" (10 cm).
Cut yarn leaving a 9" (23 cm) tail, thread tail through rem sts twice, pull tight to close
hole, then fasten off on WS.
FINISHING
Weave in ends but do not trim. Soak in cool water until fully saturated (about 30
minutes). Press to remove water, roll in a towel, and blot to remove extra water. Lay out
flat to dry, gently patting into shape, and allow to dry completely. Trim ends. Tie I-cord
in an overhand knot.
Mount Kosciuszko
Charlotte Pass Crescent Wrap
Mount Kosciuszko is the tallest peak in Australia, at 7,310 feet (2,228 m).
You can drive in to Charlotte Pass and then hike eight miles to the summit.
It is snow-covered in winter and spring, and you can cross-country ski in
when there is good snow!
Some argue that the tallest peak on the continent is this one, but if you
really consider the whole “continent” of Oceania, then it most certainly is
not! This is one of the controversies that climbers and geologists continue to
banter about.
FINISHED SIZE
52" (132 cm) wide and 121⁄2" (31.5 cm) long at center, blocked and relaxed.
YARN
Light Fingering (#1 Super Fine).
Shown here: The Fibre Company Meadow (40% merino, 25% baby llama, 20% silk, 15%
linen; 549 yd [498 m]/100 g): Pokeweed, 1 skein.
NEEDLES
Size U.S. 4 (3.5 mm): 40" (100 cm) circular (cir). Adjust needle size if necessary to
obtain the correct gauge.
NOTIONS
78 size 6/0 Czech seed beads in crystal bronze-lined AB; size U.S. 14 (0.6 mm) steel
crochet hook, or size to fit beads; markers (optional); tapestry needle; stainless T-pins;
blocking mats; one 60" (152.5 cm) length of blocking wire.
GAUGE
18 sts and 34 rows = 4" (10 cm) over garter st, blocked and relaxed.
NOTES
A word about slipping selvedge stitches: Don’t!
Beads: See Techniques.
For this project I chose to knit into the back loop of my stitches in the garter-stitch
section. Consider this optional, but it adds a little something special to the finished
look.
STITCH GUIDE
Cluster 3: [K3tog, yo, k3tog] in same 3 sts.
DIRECTIONS
CO 237 sts using long-tail method (see Techniques).
Short-row 1: Knit to last 3 sts, working in back of loop of each st if desired (see
Notes), turn.
Short-row 2: Sl 1 pwise wyb, knit to last 3 sts, turn.
Short-row 3: Sl 1 pwise wyb, knit to 3 sts before last turn, turn.
Rep last short-row 75 more times—3 sts rem in work at center of row. Cut yarn leaving
a 9" (23 cm) tail.
Slip sts from right needle tip to left needle tip. Rejoin yarn at edge and knit 1 row over
all sts.
Next row: *Cluster 3 (see Stitch Guide), yo; rep from * to last 3 sts, Cluster 3—315 sts,
with 79 clusters.
Next row: K3, purl to last 3 sts, k3.
Next row: (RS) Working Row 1 of chart, beg at right edge of chart, work 7 sts, 4-st rep
76 times, then 4 sts at left edge of chart.
Next row: (WS) Working Row 2 of chart, beg at left edge of chart, work 4 sts, 4-st rep
76 times, then 7 sts at right edge of chart.
Work Rows 3–14 as established—931 sts.
BO row: K2, return 2 sts just worked to left needle tip, k2togtbl, *k1, return 2 sts just
worked to left needle tip, k2togtbl; rep from *. Cut yarn leaving a 9" (23 cm) tail, pull
tail through rem st.
FINISHING
Weave in ends but do not trim. Soak in cool water until fully saturated (about 30
minutes). Press to remove water, roll in a towel, and blot to remove extra water.
Weave blocking wire through CO edge and pin piece out in a gentle curve to schematic
measurements, pulling each point along bottom edge down firmly. Allow to dry
completely. Wrap will relax to finished measurements after removing pins. Trim ends.
Chapter 5
PROJECTS 2: THE SEVEN
SUMMITS
The seven summits represent the tallest peak on each
of the seven continents. The following projects each
represent a mountain and are presented from lowest
to highest, although the technical challenge of both
the climbs and the knitting are not necessarily based
on the height. Enjoy!
© iStockphoto.com/Torsakarin
Australia/Oceania: Puncák Jaya
Oceania Shawl or Throw
At 16,024 feet (4,884 m), the Carstensz Pyramid is the tallest mountain in
Indonesia and on the Australian “continent” of Oceania. The first
documented summit success was in 1962 by an Austrian expedition.
Although known as the Carstensz Pyramid, possibly as long ago as 1623
when it was first spotted on an unusually clear day, the name was changed
to Puncák Jaya in the latter half of the 1900s. Puncák means “peak” and
Jaya means “glorious.” Carstensz Pyramid is still the name used among
mountain climbers.
FINISHED SIZE
32" (81.5 cm) along each edge, square, and 36" (91.5 cm) wide at center.
YARN
Laceweight (#0 Lace).
Shown here: Tess’ Designer Yarns Superwash Merino Lace (100% superwash merino;
500 yd [457 m]/50 g): Cobalt Blue, 2 skeins.
NEEDLES
Size U.S. 2 (2.75 mm): set of 5 double-pointed (dpn), 24" (60 cm), and 40" (100 cm)
circular (cir). Adjust needle size if necessary to obtain the correct gauge.
NOTIONS
200 size 8/0 Japanese seed beads in opaque cobalt luster; 80 Duracoat 8/0 seed beads
in gold; size U.S. 14 (0.6 mm) steel crochet hook or size to fit beads; size U.S. 0 (1.75
mm) steel crochet hook for crochet bind-off; marker (m); locking markers (m)
(optional); tapestry needle; stainless T-pins; blocking mats; four 60" (152.5 cm) long
lengths of flexible blocking wire.
GAUGE
28 sts = 4" (10 cm) over St st, blocked and relaxed.
NOTES
Beads: See Techniques. Use the gold beads on Round 169 only; use the cobalt beads
on all other rounds.
On odd-numbered rounds, beginning with Round 125, each round/repeat begins and
ends with a double yarnover. See Techniques.
Gathered Crochet Bind-Off: See Techniques
Nupps: See Techniques
When you work on the double-pointed needles, use the yarn end from your cast-on to
mark the beginning of the round. A locking marker can also be used if desired.
DIRECTIONS
With dpn, CO 8 sts using long-tail method (see Techniques). Divide sts evenly over 4
dpn with 2 sts on each needle. Use yarn end or place locking marker (pm) for beg of
rnd, and join for working in rnds, being careful not to twist sts.
Next rnd: [K1tbl] around.
Rnd 1: Work Row 1 of chart A as foll: *[k1tbl, M1] twice, pm; rep from * around—8 sts
inc’d.
Work Rows 2–84 as established—344 sts. Change to short cir needle when there are too
many sts to work comfortably on dpn. Change to long cir needle as number of sts
increases.
Work Rows 85–156 of chart B—624 sts.
Work Rows 157–168 of Border chart—680 sts.
With larger crochet hook, BO as foll: *[Gather 4 sts (see Stitch Guide), ch 7] 9 times,
gather 4, ch 4, gather 2, ch 5, gather 3, ch 5, gather 2, ch 4, [gather 4, ch 7] 20 times,
gather 3, ch 7, [gather 4, ch 7] 10 times; rep from * 3 more times, sl st in first group of
sts at beg of rnd. Cut yarn leaving a 9" (23 cm) tail, pull tail through rem st.
FINISHING
Weave in ends but do not trim. Soak in cool water until fully saturated (about 30
minutes). Press to remove water, roll in a towel, and blot to remove extra water.
Weave one long blocking wire through crochet loops along each edge, pin wires out to
schematic measurements, creating a slightly rounded square. Allow to dry completely
before removing pins and wires. Shawl will relax to finished measurements after
removing pins. Trim ends.
Note: Stitches shaded purple are duplicated for ease of following the two halves of the
chart; work the shaded stitches only once.
Note: Stitches shaded purple are duplicated for ease of following the two halves of the
chart; work the shaded stitches only once.
Antarctica: Vinson Massif
Diamond Dust Wrap
Diamond dust is a ground-level “cloud” composed of crystals of ice. Also
called ice crystals, diamond dust generally forms under clear skies. It is
most commonly seen in Antarctica, and this type of precipitation may
continue for several days without interruption.
A massif is a section of the earth’s crust that is marked by faults. When the
crust moves, a massif retains its internal structure while being moved as a
whole. The term is used to refer to a group of mountains formed in this
way.
Mount Vinson is the highest peak in Antarctica, at 16,050 feet (4,892 m).
The massif is about 750 miles (1,200 km) from the South Pole and is about
13 miles (21 km) long and 8.1 miles (13 km) wide. It was named after Carl
Vinson, a U.S. congressman from Georgia. The Vinson Massif was first seen
in 1958 and first climbed in 1966. As of February 2010, 1,400 climbers have
attempted to reach the top of Mount Vinson.
This piece combines classic hex-mesh and leaves, along with stylized ice
floats and sea creatures. It is a full circle/hexagon with an opening that
wraps around the wearer like a cloak.
FINISHED SIZE
401⁄2" (103 cm) wide and 161⁄2" (42 cm) long at center back, blocked and relaxed.
YARN
Laceweight (#0 lace).
Shown here: Cascade Alpaca Lace (100% baby alpaca; 437 yd [400 m]/ 50 g): #1413
Silver, 2 skeins.
NEEDLES
Size U.S. 2 (2.75 mm): 40" (100 cm) circular (cir). Adjust needle size if necessary to
obtain the correct gauge.
NOTIONS
Smooth waste yarn; 25 g Toho 8/0 Japanese seed beads in silver-lined matte crystal AB
with square holes #TB-F635; size U.S. 14 (0.6 mm) steel crochet hook, or size to fit
beads; size U.S. 0 (1.75 mm) steel crochet hook for bind-off; markers (optional);
tapestry needle; stainless T-pins; blocking mats; four 60" (152.5 cm) lengths of blocking
wire.
GAUGE
32 sts and 28 rows = 4" (10 cm) over St st, blocked and relaxed.
NOTES
Beads: See Techniques.
Gathered Crochet Bind-Off: See Techniques
A word about slipping selvedge stitches: Don’t! This piece was designed to block freely
and slipped selvedge stitches will create a less flexible edge.
DIRECTIONS
With waste yarn, CO 3 sts.
Knit 13 rows.
Next row: K3, do not turn, but rotate piece 90 degrees to right, then pick up and purl
6 sts along left side edge (1 st in each garter ridge). Turn work another 90 degrees right
and pick up and knit 3 sts in provisional CO, removing waste yarn—12 sts. Turn work.
Next row: (RS) Working chart A, beg at right edge of Row 1, k3, (k1tbl, yo) 5 times,
k1tbl, k3—17 sts.
Next row: Beg row 2 at left edge of chart, k3, p1tbl (k1, p1tbl) 5 times, k3.
Work Rows 3–34 of chart A as established—149 sts.
Work Rows 35–68 of chart B—269 sts.
Work Rows 69–78 of chart C—379 sts.
Work Rows 79–90 of chart D—457 sts.
Work Rows 91–112 of chart E—484 sts.
Work Rows 113–138 of chart F—688 sts.
BO row: (RS) Gather 3, ch 7, *[gather 4, ch 7] 6 times, [gather 3, ch 7] 13 times,
[gather 4, ch 7] 14 times; rep from * 4 more times, [gather 4, ch 7] 6 times, [gather 3, ch
7] 13 times, [gather 4, ch 7] 6 times, gather 3, pulling yarn through all loops on hook, ch
1. Cut yarn leaving a 9" (23 cm) tail, pull tail through rem st.
FINISHING
Weave in ends but do not trim. Soak in cool water until fully saturated (about 30
minutes). Press to remove water, roll in a towel, and blot to remove extra water.
Weave one long blocking wire along top edge, and 3 more long blocking wires through
crochet loops along bottom edge. Pin shawl out to schematic measurements. Allow to
dry completely. Shawl will relax to finished measurements after removing pins. Trim
ends.
Note: Stitches shaded purple are duplicated for ease of following the two halves of the
chart; work the shaded stitches only once.
Europe: Mount Elbrus
Persian Sunrise Shawl
Although experts disagree about exactly how the Caucasus mountain range
is shared between Europe and Asia, most agree that Mount Elbrus is the
highest mountain on the European continent, at 18,602 feet (5,670 m). The
first documented ascent was in 1874. Named after a mountain in Persian
mythology, it is a dormant volcano, last active about A.D. 100.
This piece is a triangle with totally interchangeable motifs. You can use
chart A, Rows 13–32 and chart B at will, and one will flow from the other
any way you choose to use them. You can also make this piece as large as
you like, adding extra repeats of chart A, Rows 13–32 and/or chart B, Rows
1–20, limited only by your yarn supply. Chart C will flow from either chart A
or chart B. If you enjoy thinking about the triangle in a modular way, try
some of the ideas in the final chapter! Directions are given for two versions
of this project, but feel free to mix and match the charts.
FINISHED SIZE
561⁄2" (143.5 cm) wide and 27" (68.5 cm) long.
YARN
Laceweight (#0 Lace).
Shown here: SweetGeorgia Merino Silk Lace (50% merino, 50% silk; 765 yd [700
m]/100 g): Saffron (yellow, A) and Dutch (orange, B), 1 skein each.
NEEDLES
Size U.S. 3 (3.25 mm): 40" (100 cm) circular (cir). Adjust needle size if necessary to
obtain the correct gauge.
NOTIONS
Smooth waste yarn; 30 g Miyuki 8/0 Japanese seed beads in gold/galvanized; size U.S.
14 (0.6 mm) steel crochet hook; markers (optional); tapestry needle; stainless T-pins;
blocking mats; one 60" (152.5 cm) length of blocking wire.
GAUGE
20 sts = 4" (10 cm) over St st, blocked and relaxed.
NOTES
Beads: See Techniques.
A word about slipping selvedge stitches: Don’t! This piece was designed to block freely
and slipped selvedge stitches will create a less flexible edge.
Directions are given for Version 1, with Version 2 in parentheses. Version 1 is worked
primarily using chart A with color A (Saffron) with highlights in chart B with color B
(Dutch). Version 2 is worked primarily using chart B with color B (Dutch) with
highlights in chart A with color A (Saffron). The suggested yarn and beads will allow
you to make both versions.
After working chart A (B) Rows 13–32 (1–20) for the first time, each additional time
you repeat these rows, you will be working the 10-st repeat 2 more times in each half of
the shawl.
DIRECTIONS
With color A (B), CO 3 sts using provisional method (see Techniques).
Knit 7 rows.
Next row: K3, do not turn, but rotate piece 90 degrees right, then pick up and purl 3
sts along the left-side edge (1 st in each garter ridge). Turn work another 90 degrees
right and pick up and knit 3 sts in provisional CO, removing waste yarn—9 sts.
Turn work.
Row 1: (RS) Beg at right edge of chart A, work Row 1—4 sts inc’d.
Row 2: (WS) Beg at left edge of chart and work Row 2.
Work Rows 3–12 in established patt—33 sts.
Work Rows 13–32 (1–20) of chart A (B) 3 times—153 sts.
With color A for both versions, work Rows 1–10 (13–32) of chart B (A) once—173 (193)
sts.
Version 1 only:
Change to color B. Work Rows 11–20 of chart B once—193 sts.
Both versions:
Change to A (B). Work Rows 13–32 (1–20) of chart A (B) 3 times—313 sts.
Version 1 only:
Work Rows 1–10 of chart B once—20 sts inc’d.
Change to B. Work Rows 11¬–20 of chart B once—353 sts.
Version 2 only:
Work Rows 13–32 of chart A once—353 sts.
Both versions:
With A (B), work Rows 1–10 of chart C once—441 sts.
With color A (B), work I-cord BO as foll:
Using knitted CO (see Techniques), CO 2 sts and place sts on left needle tip.
Next row: Pull yarn across back of work, k3, sl 3 sts just worked back to left needle tip.
Next row: Pull yarn across back of work, k2, k2tog, sl 3 sts just worked back to left
needle tip.
Rep last 2 rows to last 3 sts.
Next row: K3togtbl. Cut yarn leaving a 9" (23 cm) tail, pull tail through rem st.
FINISHING
Weave in ends but do not trim. Soak in cool water until fully saturated (about 30
minutes). Press to remove water, roll in a towel, and blot to remove extra water.
Weave blocking wire through every vertical strand in garter st along top edge. Pin piece
out to schematic measurements, pinning out each point, from inside the I-cord, so
columns of sts are straight and even. Allow to dry completely. Shawl will relax to
finished measurements after removing pins. Trim ends.
Africa: Mount Kilimanjaro
African Violet Shawl
Mount Kilimanjaro is the highest peak on the African continent. It has three
dormant volcanic cones: Kibo, Mawenzi, and Shira. Located in Tanzania, it
has the distinction of being the highest freestanding mountain in the world.
Kibo is the highest of the peaks, at 19,341 feet (5,895 m) above sea level.
The first documented ascent was in 1889. This project uses typical lace
techniques along with beads and nupps. The patterning is evocative of both
flora and fauna, with leaves, feathers, berries, flowers, and spiderwebs. This
project is for the adventurous lace knitter.
FINISHED SIZE
35" (89 cm) wide and 17" (43 cm) long at center back.
YARN
Laceweight (#0 Lace).
Shown here: Knitwhits Freia Handpaints Ombre Lace (75% wool, 25% nylon; 645 yd
[590 m]/ 75 g): Grapevine, 1 skein.
NEEDLES
Size U.S. 2 (2.75 mm): 40" (100 cm) circular (cir). Adjust needle size if necessary to
obtain the correct gauge.
NOTIONS
Smooth waste yarn; 20 g Toho 8/0 Japanese seed beads in purple-lined rainbow
rosaline #TB928; markers (optional); size U.S. 14 (0.6 mm) crochet hook, or size to fit
beads; size U.S. 0 (1.75 mm) steel crochet hook for bind-off; tapestry needle; stainless
T-pins; blocking mats; one 60" (152.5 cm) length of blocking wire.
GAUGE
24 sts = 4" (10 cm) over St st, blocked and relaxed. Please take time to check gauge so
you do not run short of yarn.
NOTES
Beads: See Techniques.
A word about slipping selvedge stitches: Don’t! This piece was designed to block freely
and slipped selvedge stitches will create a less flexible edge
Gathered Crochet Bind-Off: See Techniques
Nupps: See Techniques
DIRECTIONS
CO 3 sts using provisional method (see Techniques).
Knit 17 rows.
Next row: K3, do not turn, but rotate piece 90 degrees right, then pick up and purl 8 sts
along the side edge (1 st in each garter ridge), turn work another 90 degrees right and
pick up and knit 3 sts in provisional CO, removing waste yarn—14 sts. Turn.
Row 1: (RS) Beg at right edge of chart A, work Row 1—9 sts inc’d.
Row 2: (WS) Beg at left edge of chart A, work Row 2.
Work Rows 3–32 in established patt—141 sts.
Work Rows 33–48 of chart B—271 sts.
Work Rows 49–88 of chart C—409 sts.
Work Rows 89–124 of chart D—573 sts.
BO row: (RS) With larger crochet hook, gather 3, [ch 6, gather 3, pulling yo through
all loops on hook] to end. Cut yarn leaving a 9" (23 cm) tail, pull tail through rem st.
FINISHING
Weave in ends but do not trim. Soak in cool water until fully saturated (about 30
minutes). Press to remove water, roll in a towel, and blot to remove extra water.
Weave blocking wire along garter (top) edge. Pin shawl out to schematic measurements
with one pin in each crochet chain loop. Shawl will relax to finished measurements
after removing pins. Allow to dry completely. Trim ends.
Note: Stitches shaded purple are duplicated for ease of following the two halves of the
chart; work the shaded stitches only once.
North America: Mount McKinley
Denali Stole
Denali means “the high one” in Athabaskan. Previously called Mount
McKinley, the name was officially changed to Denali in 2015. The highest
peak in North America, the summit is 20,237 feet (6,168 m) above sea
level. The first well-documented ascent was in 1913, but the West Buttress
route, which is the most popular one, was first documented in 1951. It can
get extremely cold on top, with temperatures as low as -75°F (-59°C). Add
windchill and it can get as cold as -118°F (-83°C). Bring good winter gear!
This project starts from the center, with large beaded leaf motifs. The hexmesh “wings” are then worked out from opposite sides. Finally, a leaf border
is worked along each long edge and finished at the points.
FINISHED SIZE
18" (45.5 cm) wide and 66" (167.5 cm) long.
YARN
Laceweight (#0 Lace).
Shown here: A Verb for Keeping Warm Reliquary II (80% superfine merino, 20% silk;
875 yd [800 m]/ 100 g): Succulent, 1 skein.
NEEDLES
Size U.S. 1.5 (2.5 mm): set of 5 double-pointed (dpn), 16" (40 cm), 24" (60 cm), 32" (80
cm), and 40" (100 cm) circular (cir). Adjust needle size if necessary to obtain the
correct gauge.
NOTIONS
Smooth waste yarn; 20 g Toho 8/0 Japanese seed beads in olivine/color-lined metallic
antique gold #378b; size U.S. 14 (0.6 mm) steel crochet hook, or size to fit beads;
marker (m); locking markers (m) (optional); point protectors; cable needle (cn)
(optional); small stitch holder; tapestry needle; stainless T-pins; blocking mats; 4 long
very flexible blocking wires.
GAUGE
20 sts = 4" (10 cm) over St st, blocked and relaxed.
NOTES
Beads: See Techniques.
Managing double yarnovers at the start of the round: (on odd-numbered Rounds 3–35,
45–55, 63, 67, and 71). See Techniques.
Dealing with stitch markers when the beginning of the round shifts: I find it easier to
use only one marker for the beginning of round. If you want to use a marker between
every chart repeat, I have two suggestions. First, use a unique marker for your
beginning of round because that one is critical. Second, treat each marker the same way
you treat the beginning-of-round marker (see note above). When a double yarnover or
a double decrease is worked over the marker, you will have to “borrow” a stitch from
the next repeat and therefore will have to move the marker one stitch over and return it
to the original spot once you are done.
All pattern rows are charted. Some portions of the shawl are worked in the round and
others are worked back and forth. When working in the round, read all chart rows from
right to left, and there are no wrong-side rows. When working back and forth, read
right-side chart rows from right to left and wrong-side chart rows from left to right.
A word about slipping selvedge stitches. Don’t! This piece was designed to block freely
and slipped selvedge stitches will create a less flexible edge.
When you work on the double-pointed needles, use the yarn end from your cast-on to
mark the beginning of the round. A locking marker can also be used if desired.
Two-Stitch Twist (Cable): See Techniques
There is a Two-Stitch Twist (Cable) straddling the beginning and end, and between
each chart row repeat of Row 60 as follows: Slip marker at beginning of round. Knit 1.
*Work to 1 stitch before end of chart row repeat, knit second stitch on left needle tip as
shown in Techniques but do not remove from needle, knit first stitch through front
loop, then slip both stitches from left needle. Repeat from * twice more. Work to just
before last stitch of round. Slip that stitch onto right needle tip, remove marker, return
stitch to left needle tip. Work final Two-Stitch Twist. Slip 1 stitch to left needle tip.
Replace beginning-of-round marker to right needle tip. Begin Row 61.
DIRECTIONS
Center Square
With dpn, CO 8 sts using the long-tail method (see Techniques). Distribute sts evenly
over 4 dpn, with 2 sts on each needle. Place marker (pm) for beg of rnd and join for
working in rnds, being careful not to twist sts.
Next rnd: [K1tbl] around.
Next rnd: Working Row 1 of chart A, [k1tbl, yo, k1tbl] 4 times—4 sts inc’d.
Work Rows 2–72 of chart—304 sts. Change to shortest cir needle when there are too
many sts to work comfortably on dpn, then to progressively longer cir needle as the
number of sts increases. (See Notes about working double yarnovers at beginning/end
of rnd and rep).
Cut yarn leaving a 9" (23 cm) tail. Sl 38 sts to RH needle. Place point protector onto
right needle tip.
First Long End
With RS facing, rejoin yarn to left needle tip.
Next row: (RS) With 24" (60 cm) cir needle, work Row 1 of chart B over next 76 sts.
Place second point protector on left needle tip of longer cir needle and leave these rem
228 sts hold.
*Next row: (WS) Work over 76 sts on 24" (60 cm) cir needle only, work Row 2 of
chart B as foll: beg at left edge of chart, work 2 sts before rep, work 4-st rep to last 2 sts,
work 2 sts at right edge of chart after rep.
Work Rows 3 and 4, then rep Rows 1–4 thirty-three more times.
Next (dec) row: (RS) Work Row 1 of chart C as foll: beg at right edge of chart and
work first 7 sts before rep, work 4-st rep to last 8 sts, then work 7 sts at left edge of
chart after rep—2 sts dec’d.
Work Rows 2–8, then rep Rows 1–8 seven more times—12 sts rem.
Work Rows 9–16 once—4 sts rem.
Next (dec) row: (RS) Ssk, k2tog—2 sts rem.
Next row: Knit.
Next (dec) row: K2togtbl. Cut yarn leaving a 9" (23 cm) tail, pull tail through rem st.*
With RS facing, sl 76 sts to waste yarn, next 76 sts to 24" (60 cm) cir needle, then rem
76 sts to waste yarn.
Rejoin yarn to beg with a RS row, and work Row 1 over 76 sts. Rep from * to * for
second long end.
Edging
Note: When picking up stitches along the point edges of the stole, lift the vertical strand
of the garter stitch from the edge with the right needle tip. Make sure 212 rows have
been worked along each long end, and pick up 1 loop for every 2 rows.
*With 40" (100 cm) cir needle and RS facing, beg at right point and pick up 106 sts by
lifting along first long edge to held sts, sl 76 held sts from waste yarn along one side of
center square to right needle tip, then pick up 105 sts along second long edge—287 sts.
Turn piece with WS facing. CO 4 sts using provisional method (see Techniques).
Next row: (RS) K3 sts just cast on, k2togtbl (last st cast on and 1 st from shawl), turn.
Next row: (WS) K1, p1, k2, turn.
Next row: Work Row 1 of Edging chart as foll: k2, yo, k1tbl, yo, k2tog (last edging st
and next st from shawl), turn.
Next row: Work Row 2 of Edging chart.
Work Rows 3–26, then rep Rows 1–26 twenty-one more times, omitting bead on Row
25 of last rep—4 sts rem.*
Cut yarn leaving 18" (45.5 cm) tail. Place rem 4 sts onto holder.
Rep from * to * along second long edge but do not cut yarn.
Point
With RS facing, remove provisional CO from sts at beg of edging along first side and
place 4 sts onto right needle tip—8 sts.
Next (dec) row: (RS) K2, ssk, k2tog, k2—6 sts rem.
Next row: K2, p2, k2.
Next (dec) row: K1, ssk, k2tog, k1—4 sts rem.
Next row: Knit.
Next (dec) row: Ssk, k2tog—2 sts rem.
Next (dec) row: K2tog—1 st rem. Cut yarn leaving 9" (23 cm) tail, pull tail through
rem st.*
Return 4 held sts at rem end to dpn, remove provisional CO from beg of edging along
second side and place 4 sts onto same dpn.
With RS facing, use long tail and work second tip same as first.
FINISHING
Weave in ends but do not trim. Soak in cool water until fully saturated (about 30
minutes). Press to remove water, roll in a towel, and blot to remove extra water.
Weave 2 blocking wires through garter bars along each long edge of piece. Pin out to
schematic measurements, pinning each leaf to form scallops and the point at each end
where wires cross. Allow to dry completely. Stole will relax to finished measurements
after removing pins. Trim ends.
* See Note on page 102 for beginning round and each repeat with LT.
South America : Aconcagua
Indiecita Shawl
Aconcagua, in the Andes mountains of Argentina, is the highest mountain
on the South American continent, at 22,837 feet (6,961 m). The first
recorded ascent was in 1897 by a British expedition. It continues to be a
popular climbing destination, and the youngest person documented to have
reached the summit of Aconcagua was a nine-year-old, in 2013. The oldest
documented climber was an eighty-seven-year-old, in 2007.
This project gives directions for a handspun version and one knit with a
commercially available yarn in the identical fiber. The handspun version
omits the beads, which are used liberally in the commercially available yarn
version! There are two different bind-off options. The “EyeBrow” bind-off
takes longer and uses more yarn, but it is well worth the effort. The
handspun version shows the Gathered Crochet bind-off and the other shows
the “EyeBrow.”
FINISHED SIZE
Handspun version: 401⁄2" (103 cm) wide and 191⁄2" (49.5 cm) deep at center back.
Malabrigo Lace version: 36" (91.5 cm) wide and 171⁄2" (44.5 cm) deep at center back.
SPINNING MATERIALS
Malabrigo Nube (100% merino spinning fiber; 4 oz [113 g]): #NUB416 Indiecita.
0.9 to 1 oz drop spindle; small (sample size) niddy-noddy to skein spindle-spun yarn.
OR
YARN
Laceweight (#0 Lace).
Shown here: Malabrigo Lace (100% baby merino; 470 yd [430 m]/50 g): #LMBB039
Molly, 2 skeins.
NEEDLES
Size U.S. 2 (2.75 mm): 40" (100 cm) circular (cir). Adjust needle size if necessary to
obtain the correct gauge.
NOTIONS
Smooth waste yarn for provisional cast-on; 8/0 Japanese seed beads: 21 beads for
handspun version in Miyuki galvanized silver; 20 g for Malabrigo Lace version in
Matsumo 823 gold-luster transparent pink/cinnamon; size U.S. 14 (0.6 mm) steel
crochet hook, or size to fit beads; size U.S. 0 (1.75 mm) steel crochet hook for crochet
bind-off; markers (optional); tapestry needle; stainless T-pins; blocking mats; three 60"
(152.5 cm) lengths of flexible blocking wire.
GAUGE
20 sts and 32 rows = 4" (10 cm) over St st, blocked and relaxed.
NOTES
Beads: See Techniques.
Gathered Crochet Bind-Off: See Techniques.
A word about slipping selvedge stitches: Don’t! This piece was designed to block freely
and slipped selvedge stitches will create a less flexible edge
DIRECTIONS FOR SPINNING
To prepare the fiber for spinning, unwind the hank of fiber and pull off a long, thin
strip. Attenuate the fiber by gently grabbing sections and pulling it lengthwise, to
loosen the fiber and make your strip as light and thin as practical. Tip: For the first
spindle full, pull off as thin a strip as is comfortable, then for each time after that make
the strip just a little thicker, allowing the colors to form stripes as you knit. Because the
rows get longer as you work, the lengths of colors get longer as you spin using this
method. Spin one entire strip using a lightweight drop spindle.
Andean ply the spindle cop for a balanced laceweight 2-ply.
Wind off your yarn using a sample niddy-noddy, secure the ends, soak it in cool water,
and then dry unweighted.
Repeat for each strip.
Begin knitting using the skeins in the order that you spun them, joining each new skein
as you come to the end of the previous skein. You can spit-splice or just overlap the two
ends for three stitches and then weave them in at the end.
DIRECTIONS FOR KNITTING
CO 3 sts using provisional method (see Techniques).
Knit 11 rows.
Next row: K3, do not turn work, but rotate piece 90 degrees right, then pick up and
purl 5 sts along the left side edge (1 st in each garter ridge), turn the work another 90
degrees right and pick up and knit 3 sts in provisional CO, removing waste yarn—11 sts.
Turn work.
Next (inc) row: K3, [k1f/b] 5 times, k3—16 sts.
Next row: K3, p10, k3.
Next row: (RS) Work Row 1 of chart A as foll: beg at right edge of chart and work 4 sts
before rep, work 2-st rep 10 times, then work 3 sts at left edge of chart after rep—27 sts.
Next row: Work Row 2 of chart, beg at left edge of chart and work 3 sts before rep,
work 2-st rep 10 times, then work 4 sts at right edge of chart after rep.
Work Rows 3–50 of chart A as established—186 sts.
Work Rows 51–82 of chart B—307 sts.
Work Rows 83–110 of chart C—387 sts.
Work Rows 111–140 of chart D—507 sts.
BO using one of the foll options:
Gathered Crochet BO: [Gather 3 sts, ch 6] 2 times, *[gather 4, ch 8] 5 times, gather
5, ch 8, [gather 4, ch 8] 5 times, gather 5, ch 8; rep from * 8 more times, [gather 4, ch 8]
5 times, gather 5, ch 8, [gather 4, ch 8] 4 times, gather 4, ch 6, gather 3, ch 6, gather 3.
Cut yarn leaving a 9" (23 cm) tail, pull tail through rem st.
EyeBrow BO: [K3togtbl, cable CO 6 sts (see Techniques)] 2 times, *[k4togtbl, cable
CO 8] 5 times, k5togtbl, cable CO 8, [k4togtbl, cable CO 8] 5 times, K5togtbl, cable CO
8; rep from * 8 more times, k4togtbl, cable CO 8] 5 times, k5togtbl, cable CO 8,
[k4togtbl, cable CO 8] 4 times, k4togtbl, cable CO 6, k3togtbl, cable CO 6, k3togtbl—
1,091 sts.
Next row: (WS) Knit.
BO row: (RS) [K2togtbl, return st to left needle tip] to last 2 sts, k2togtbl. Cut yarn
leaving a 9" (23 cm) tail, pull tail through rem st.
FINISHING
Weave in ends but do not trim. Soak in cool water until fully saturated (about 30
minutes). Press to remove water, roll in a towel and blot to remove extra water.
Weave one long blocking wire along top edge, and two rem wires through crochet or
“eyebrow” loops along bottom edge. Pin out schematic measures, creating gentle
scallops along bottom edge. Allow to dry completely. Shawl will relax to finished
measurements after removing pins. Trim ends.
Note: Stitches shaded purple are duplicated for ease of following the two halves of the
chart; work the shaded stitches only once.
Asia: Mount Everest (Qomolangma)
Goddess of Infinite Giving
Mount Everest (known as Qomolangma to Tibetans), at 29,029 feet (8,848
m) above sea level, is the highest mountain on the earth. Its massif
includes several peaks above 24,000 feet (7,500 m). Sir Edmund Hillary
and Tenzing Norgay made the first official ascent of Mount Everest in 1953.
It has been climbed many times since then.
Miyolangsangma, the Tibetan Buddhist goddess, lives at the top of
Qomolangma. Known as the goddess of infinite giving, she rides a golden
tiger and hands out jewels (wishes) to those who deserve them. Many
climbers ask for her gifts before beginning their ascent. This piece is a full
circle, a mandala if you will, which represents wholeness.
FINISHED SIZE
56" (142 cm) diameter, relaxed after blocking.
YARN
Laceweight (#0 Lace).
Shown here: Jade Sapphire Khata (50% yak, 50% silk; 700 yd [640 m]/100 g): #K6
Celestial Orchid, 2 skeins.
NEEDLES
Size U.S. 3 (3.25 mm): set of 5 double-pointed (dpn), 16" (40 cm), 24" (60 cm), 32" (80
cm), and 40" (100 cm) circular (cir). Adjust needle size if necessary to obtain the
correct gauge.
NOTIONS
Smooth waste yarn; 20 g Miyuki 8/0 Japanese seed beads in color #319 tran light
sapphire/violet luster; size U.S. 14 (0.6 mm) steel crochet hook, or size to fit beads;
marker (m); locking marker (m) (optional);tapestry needle; stainless T-pins; blocking
mats.
GAUGE
24 sts = 4" (10 cm) over St st, blocked and relaxed.
NOTES
Beads: See Techniques.
Nupps: See Techniques.
Rounds 35, 39, 43, 47, 51, 56, 99, 107, 111, 115, 119, 123, 127, 131, 135, 139, 143, 147, and
188 begin each round/repeat with a double yarnover. See Techniques.
When you work on the double-pointed needles, use the yarn end from your cast-on to
mark the beginning of the round. A locking marker can also be used if desired.
Two-Stitch Twist (Cable): See Techniques
STITCH GUIDE
BO nupp: Insert left needle tip, from front to back under horizontal bar between last
st worked and next st, [(k1, yo) 2 times, k1], return 5 sts just made to left needle tip,
k5tog.
DIRECTIONS
With dpn, CO 8 sts using long-tail method (see Techniques). Use yarn end or place
marker (pm) for beg of rnd and join for working in rnds, being careful not to twist sts.
Next rnd: K1tbl around.
Change to cir needle when there are too many sts to work comfortably on dpn, then to
progressively longer cir needle as number of sts increases.
Work Rows 1–56 of chart A—248 sts.
Work Rows 57–74 of chart B—320 sts.
Work Rows 75–102 of chart C—448 sts.
Work Rows 103–122 of chart D—536 sts.
Work Rows 123–150 of chart E—648 sts.
Work Rows 151–158 of chart F—680 sts.
Work Rows 159–166 of chart G—712 sts.
Work Rows 167–174 of chart H—744 sts.
Work Rows 175–186 of chart I—792 sts.
Work Rows 187–190 of chart J—808 sts.
BO rnd: K2, return 2 sts just worked to LH needle, k2tog, *BO nupp (see Stitch
Guide), return 2 sts to LH needle, k2tog, [k1, return 2 sts to LH needle, k2tog] 4 times;
rep from * 18 more times,
BO nupp, return 2 sts to LH needle, k2tog, [k1, return 2 sts to LH needle, k2tog] 4
times,
**(BO nupp, return 2 sts to LH needle, k2tog, [k1, return 2 sts to LH needle, k2tog] 4
times) 24 times,
BO nupp, return 2 sts to LH needle, k2tog, [k1, return 2 sts to LH needle, k2tog] 4
times; rep from ** 6 more times,
***BO nupp, return 2 sts to LH needle, k2tog, [k1, return 2 sts to LH needle, k2tog] 4
times; rep from *** 3 more times,
BO nupp, return 2 sts to LH needle, k2tog, [k1, return 2 sts to LH needle, k2tog] 2
times. Cut yarn leaving a 9" (23 cm) tail, pull tail through rem st.
FINISHING
Weave in ends but do not trim. Soak in cool water until fully saturated (about 30
minutes). Press to remove water, roll in a towel, and blot to remove extra water.
Block to 60" (152.5 cm) diameter. Shawl will relax to finished measurements after
removing pins. Note: Use a ruler to measure the radius of each section as you pin it out,
first in quarters, then eighths. Pin each eyelet from the last eyelet round and so each
nupp lies between each pinned eyelet, creating picots along the edge when pins are
removed.
TIPS AND TRICKS
1. Use the tail from your cast-on as the beginning-of-round marker when you
begin on the double-pointed needles. You can add a “real” marker when you
switch to circular needles.
2. When I work a six- or twelve-segment piece I use a set of four double-pointed
needles. I arrange the stitches on three needles and work with the fourth.
When I work a four- or eight-segment piece I use a set of five double-pointed
needles. I arrange the stitches on four and work with the fifth.
3. When I begin a four- or eight-segment piece in the round, I start with four
needles (stitches on three, working with fourth) for the first few rounds. Once
it is past the point it can twist I add the fifth needle.
4. How can you tell how many segments the piece is when you are working in the
round? How many times are you repeating the chart? In this pattern we are
repeating the chart eight times per round and there are eight segments.
Puncák Jaya and Denali, also started in the round, repeat four times per
round, and there are four segments.
Chapter 6
THE EIGHTH SUMMIT: GEOMETRY
OF A TRIANGLE
Every mountain has more than one trail that will get
you to the summit. Some paths might be longer, some
easier, some very challenging. But almost every climb
can be approached from several trailheads. With that
in mind, I would like to consider the triangle as a
shawl.
© iStockphoto.com/DOUGBERRY
In my first book, New Vintage Lace (Interweave, 2014), I reviewed doily geometry in
the final chapter. There, we considered various increase rates for circles broken into
several different segments. Circles are all round and all have 360 degrees. Triangles, on
the other hand, come in various configurations. First, let’s consider the basics. A
triangle always has three sides and three angles, and those three angles always add up
to 180 degrees.
An equilateral triangle has three equal sides and three equal angles. When we divide
180 by 3 we get 60, so we know that all three angles will be 60 degrees. And by
definition it will also be an acute triangle! So the types are not necessarily exclusive.
You can review the table and see which of the projects here fall into which category.
Type of Triangle
Projects in
the category
Equilateral
(3 equal sides and 3 equal angles)
Pacific Crest
Right triangle
(has one 90-degree angle)
Persian Sunrise,
Franconia Traverse
Obtuse
(has one angle more than 90 degrees)
Charlotte Pass
Isosceles
(has 2 equal sides and 2 equal angles)
Persian Sunrise
Scalene
(Has no equal sides or angles)
Franconia Traverse
Acute
(all 3 angles are less than 90 degrees)
Pacific Crest
Just as there are quite a few different types of triangles, so are there quite a few ways to
approach a triangular shawl. We can start at the bottom tip and work up and out
equally, using either an isosceles right triangle or an obtuse triangle, based on the rate
of increase we select. If you would like a right triangle, simply increase one stitch on
each edge, every other row. If you would like an obtuse triangle, we can just increase
one stitch on each edge, every row.
ISOSCELES RIGHT TRIANGLE WORKED FROM THE TIP UP
OBTUSE TRIANGLE WORKED FROM THE TIP UP
We can start at the bottom tip and increase on one side only, working up and across
from a right angle (Franconia Traverse).
SCALENE TRIANGLE
We can start at one side (angle), increasing on one edge only, until we reach the
halfway point and then decrease along the same edge until we reach the far side angle.
OBTUSE TRIANGLE WORKED FROM ONE SIDE
We can begin with a provisional cast-on at the center back and work out and down,
creating an isosceles right triangle (Persian Sunrise).
ISOSCELES RIGHT TRIANGLE WORKED FROM THE NECK DOWN
We can start at the center on double-pointed needles and work out for an equilateral
triangle (Pacific Crest).
EQUILATERAL TRIANGLE WORKED FROM THE CENTER OUT
There are an unlimited number of possibilities, but two projects follow that I think will
whet your appetite for experimenting.
A Scalene Triangle
Franconia Traverse Wrap
Franconia Traverse is a nine-mile section of the Appalachian Trail that runs
through the White Mountains, in New Hampshire. If you look carefully you
can see alpine wildflowers along the way.
A scalene triangle is one in which all three sides and all three angles are
different. A 30-60-90 triangle is a very special example. The longest side
(the hypotenuse) is opposite the one 90-degree (right) angle and is twice
the length of the shortest side. That shortest side is the one on our knitting
needle as we work this piece from the first angle, increasing along only one
edge, every other row as we knit. This piece is worn with the hypotenuse as
the top edge and is asymmetrical. You can continue increasing, repeating
the row repeat, for as long as you like, limited only by your yarn and bead
supply.
FINISHED SIZE
52" (132 cm) wide along the hypotenuse and 211⁄2" (54.5 cm) long at center back.
YARN
Laceweight (#0 Lace).
Shown here: The Fibre Company Road to China Lace (65% baby alpaca, 15% silk, 10%
camel, 10% cashmere; 656 yd [600 m]/100 g): Blue Diamond, 1 skein.
NEEDLES
Size U.S. 2 (2.75 mm): 24" (60 cm) circular (cir). Adjust needle size if necessary to
obtain the correct gauge.
NOTIONS
20 g Miyuki 8/0 Japanese seed beads in sparkling pewter-lined crystal; size U.S. 14
(0.6 mm) steel crochet hook, or size to fit beads; markers (optional); tapestry needle;
stainless T-pins; blocking mats; three 60" (152.5 cm) lengths of flexible blocking wire.
GAUGE
24 sts = 4" (10 cm) over St st, blocked and relaxed.
NOTES
Beads: See Techniques.
A word about slipping selvedge stitches: Don’t! This piece was designed to block freely,
and slipped selvedge stitches will create a less flexible edge
There will be enough yarn to make the wrap larger if desired. Should you choose to
make the wrap larger, be sure to get more beads.
DIRECTIONS
CO 3 sts using long-tail method (see Techniques).
Row 1: (RS) Beg at right edge of chart, k3.
Row 2: (WS) Beg at left edge of chart, k3.
Work Rows 3–42 as established—22 sts.
Next row: (RS) Working Row 23 of chart, beg at right edge of chart, work 3 sts before
rep, work 9-st rep to last st, work 2 sts at left edge of chart after rep—1 st inc’d.
Next row: Working Row 24 of chart, beg at left edge of chart, work 2 sts before rep,
work 9-st rep to last 3 sts, work 3 sts at right edge of chart after rep.
Work chart Rows 25–42, then rep Rows 23–42 thirteen more times, working one
additional rep each time—148 sts.
Work chart Rows 43–46.
BO as foll, making sure to work evenly but loosely: K2, return 2 sts just worked to left
needle tip, k2togtbl, [k1, return 2 sts just worked to left needle tip, k2togtbl] to end. Cut
yarn leaving a 9" (23 cm) tail, pull tail through rem st.
FINISHING
Weave in ends but do not trim. Soak in cool water until fully saturated (about 30
minutes). Press to remove water, roll in a towel, and blot to remove extra water.
Weave a blocking wire through the vertical strand of garter st along each edge. Pin out
to schematic measurements, so longest edge (the hypotenuse) has a slight concave
shape. Allow it to dry completely. Shawl will relax to finished measurements when pins
are removed. Trim ends.
An Equilateral Triangle
Pacific Crest Shawl
The Pacific Crest Trail is 2,663 miles (4,285 km) long and runs from the
Canadian border down through California along some of the highest peaks
in the Cascade and Sierra Nevada mountain ranges. It is part of the Great
Western Loop, which is 6,875 miles (11,062 km) long and is one of the
classic long-distance hikes in the United States.
An equilateral triangle is a triangle with three equal sides and three equal
angles. This triangle is one of the most fun and surprising to work, because
the three increase lines are a little like playing with a kaleidoscope, and the
leaves and vines that form are fun to watch as they develop.
This project begins on double-pointed needles and grows out from the center, worked
in the round. As shown, the repeat charts (B–D) are worked a total of two times, but
you can make the piece larger by working them a third time if you have enough yarn
and beads! This is another riff on the stitch pattern I designed for the Mount Elbrus
triangle. Have fun!
FINISHED SIZE
28" (71 cm) from center to point of triangle and 491⁄2" (125.5 cm) across side.
YARN
Laceweight (#0 Lace).
Shown here: Miss Babs Yet (65% merino, 35% tussah silk; 400 yd [366 m]/ 65 g): Coos
Bay, 3 skeins.
NEEDLES
Size U.S. 4 (3.5 mm): set of 4 double-pointed (dpn), 24" (60 cm), 32" (80 cm), and 40"
(100 cm) circular (cir). Adjust needle size if necessary to obtain the correct gauge.
NOTIONS
20 g Miyuki 8/0 Japanese seed beads in silver-lined dark peacock AB #643B; 63 Czech
6/0 seed beads in metallic teal-lined crystal; size U.S. 14 (0.6 mm) steel crochet hook,
or size to fit beads; markers (m); tapestry needle; stainless T-pins; blocking mats.
GAUGE
20 sts and 34 rnds = 4" (10 cm) over St st, blocked and relaxed.
NOTES
Beads: See Techniques.
When you work on the double-pointed needles, use the yarn end from your cast-on to
mark the beginning of the round. A locking marker can also be used if desired.
STITCH GUIDE
Cluster: Slip 5 sts, one at a time, knitwise, return sts to left needle tip in their new
orientation, insert right needle tip into back loops from right to left and ([k5tog tbl yo]
2 times, k5togtbl).
DIRECTIONS
With dpn, CO 6 sts using long-tail method (see Techniques). Distribute sts evenly over
3 dpn. Use yarn tail or place locking marker (pm) for beg of rnd, and join for working in
rnds, being careful not to twist sts.
Next rnd: K1tbl around.
Next rnd: Work Rnd 1 of chart A around—9 sts.
Work Rows 2–31 in established patt—126 sts. Change to cir needle when there are too
many sts to work comfortably on dpn, then change to longer cir needle as number of sts
increases.
Work Rows 32–51 of chart B—84 sts inc’d.
Work Rows 52–71 of chart C—78 sts inc’d.
Work Rows 72–91 of chart D—78 sts inc’d.
Work charts B, C, and D once more—606 sts.
Work Rows 92–103 of chart E—900 sts.
Work Rows 104 and 105 of chart F—1,164 sts.
BO rnd: Working evenly but loosely, k2, return 2 sts just worked to LH needle tip,
k2togtbl, [k1, return 2 sts just worked to left needle tip, k2togtbl] to end. Cut yarn
leaving a 9" (23 cm) tail, and pull tail through rem st.
FINISHING
Weave in ends but do not trim. Soak in cool water until fully saturated (about 30
minutes). Press to remove water, roll in a towel, and blot to remove extra water.
Block to measurements as shown on schematic, pinning out each “point” at larger
beads to form scalloped edge. Allow to dry completely. Shawl will relax to finished
measurements after removing pins. Trim ends.
SOURCES FOR SUPPLIES
YARN
Alchemy Yarns of Transformation
alchemyyarns.com
Cascade Yarns
cascadeyarns.com
Crystal Palace Yarns
straw.com
The Fibre Company
thefibreco.com
Freia
freiafibers.com
Jade Sapphire
jadesapphire.com
Madelinetosh
madelinetosh.com
Malabrigo Yarn
malabrigoyarn.com
Miss Babs
missbabs.com
Quince & Co.
quinceandco.com
SweetGeorgia
sweetgeorgiayarns.com
Tess’ Designer Yarns
tessyarns.com
A Verb for Keeping Warm
averbforkeepingwarm.com
BEADS
Artbeads
artbeads.com
Caravan Beads
caravanbeads.net
Fusion Beads
fusionbeads.com
TOOLS
ChiaoGoo
chiaogoo.com
HiyaHiya
hiyahiyanorthamerica.com
Lacis
lacis.com
Skacel/Addi
skacelknitting.com/addi-Needles-and-Accessories
Bead Finishes
Finish Name
Description
Effect
Color-lined
lined with a colored coating
Inner color glows
Metal-lined
lined with a metallic coating, often silver or
gilt (gold)
Nice sparkle
AB (Aurora
Borealis)
an iridescent surface finish; can also be lined Reflects a rainbow along with base color
Iris
similar to AB with assorted hues
Reflects a rainbow along with base color
Rainbow
similar to AB
Reflects a rainbow along with base color
Luster
shiny finish that is slightly pearl-like
Extra glow
Gold Luster
shiny finish with a metallic/golden glow
Warm, metallic glow
Ceylon
opaque, solid pearl-like finish
More glow than plain opaque beads
Opaque
opaque, solid color
Reads as solid color
Transparent
allows color to show through
Glows more than solid color and allows yarn
color to show
Matte
dull finish
Recedes into the background
Lined Matte
matte translucent bead with metallic lining
Glows delicately; subtle
Permanent
Galvanized
metallic plated
Sparkles
Opal
semi-translucent usually with metallic lining Warm glow
Alabaster
similar to opal, also often with lining
Warm glow
ABOUT THE AUTHOR
Taken on Mount Whitney by J. A. Voulgaris
Andrea Jurgrau is a nurse practitioner and avid lace knitter, as well as author of New
Vintage Lace (Interweave). Her patterns have appeared in KnitScene, Vogue Knitting,
Spin-Off, Knit Red, One + One Scarves, Shawls & Shrugs, Enchanted Knits, and The
Unofficial Downton Abbey Knitting Collection. She resides in New York.
GRATITUDE
I would like to thank my husband, John, and daughter, Hallie, for their
continued patience and support, and for tolerating even more yarn all over
the house. And to Hallie, who has been my beautiful model for so long, try
as she might to escape that role. I thank my test knitting “posse” for
continuing to believe in me; every piece in this book was test knit at least
three times, thanks to Cara Baustian, Dawn Gayer, Mary Rose, Sue Elkind,
Amanda Wyngaard, and Sheila Macomber. Thanks to Margaret Carroll, who
continues to step in as my business consultant. I want to thank Sandra
Burkett again, for her support over many years, and for the great face shot.
I thank Allison Korleski and Kerry Bogert for once again giving me this
opportunity and Erica Smith and the entire team at Interweave for their
hard work to make this book happen. I thank my Thursday evening knitting
group for fiber friendships that have been long lasting. I also thank the
following yarn companies: Jane and Ken at Jade Sapphire, for not only yarn
but also encouragement and friendship; Crystal Palace, Malabrigo,
SweetGeorgia, The Fibre Company, Freia, A Verb for Keeping Warm, Quince
& Co., and Miss Babs for their generous yarn support. Finally, I thank my
new feline muse and blocking companion, Chai Latte; please do not chew
on my yarn, dude.
A note about the samples in this book: All samples were knit by the author
except the Persian Sunrise samples, which were knit by Dawn Gayer. Thank
you so much!
Lovely Lace Knitting,
Thanks to These Resources from Interweave
New Vintage Lace
Knits Inspired by the Past
Andrea Jurgrau
9781620331002 | $24.99
Wrapped in Lace
Knitted Heirloom Designs from Around the World
Margaret Stove
9781596682276 | $26.95
Knitted Lace of Estonia
Techniques, Patterns and Traditions with DVD
Nancy Bush
9781596683150 | $26.99
Available at your favorite retailer or Shop.
.com
Join Knittingdaily.com, an online community that shares your passion for knitting.
You’ll get a free eNewsletter, free patterns, a projects store, a daily blog, event updates,
galleries, tips and techniques, and more. Sign up at Knittingdaily.com.
From cover to cover, Interweave Knits magazine presents great projects for the
beginner to the advanced knitter. Every issue is packed full of captivating, smart
designs, step-by-step instructions, easy-to–understand illustrations, plus well-written,
lively articles sure to inspire. InterweaveKnits.com
New Heights in Lace Knitting Copyright © 2016 by Andrea Jurgrau. Manufactured in China. All rights reserved. No
part of this book may be reproduced in any form or by any electronic or mechanical means including information
storage and retrieval systems without permission in writing from the publisher, except by a reviewer who may quote
brief passages in a review. Published by Interweave Books, an imprint of F+W Media, 10151 Carver Road, Suite 200,
Blue Ash, Ohio 45242. (800) 289-0963. First Edition.
www.fwcommunity.com
Distributed in Canada by Fraser Direct
100 Armstrong Avenue
Georgetown, ON, Canada L7G 5S4
Tel: (905) 877-4411
Distributed in the U.K. and Europe by F&W MEDIA INTERNATIONAL
Brunel House, Newton Abbot, Devon, TQ12 4PU, England
Tel: (+44) 1626 323200, Fax: (+44) 1626 323319
E-mail: enquiries@fwmedia.com
Distributed in Australia by Capricorn Link
P.O. Box 704, S. Windsor NSW, 2756 Australia
Tel: (02) 4560 1600, Fax: (02) 4577 5288
E-mail: books@capricornlink.com.au
SRN: 16KN07
ISBN-13: 978-1-63250-231-5
Editor: Erica Smith
Technical Editor: Therese Chynoweth
Art Director: Elisabeth Lariviere
Design and layout: Nicola DosSantos
Photographer: Donald Scott (except where noted)
Stylist: Tina Gill
Hair/Makeup: Kathy Mackay
Metric Conversion Chart
To Convert:
To:
Multiply By:
Inches
Centimeters
2.54
Centimeters
Inches
0.4
Feet
Centimeters
30.5
Centimeters
Feet
0.03
Yards
Meters
0.9
Meters
Yards
1.1