/
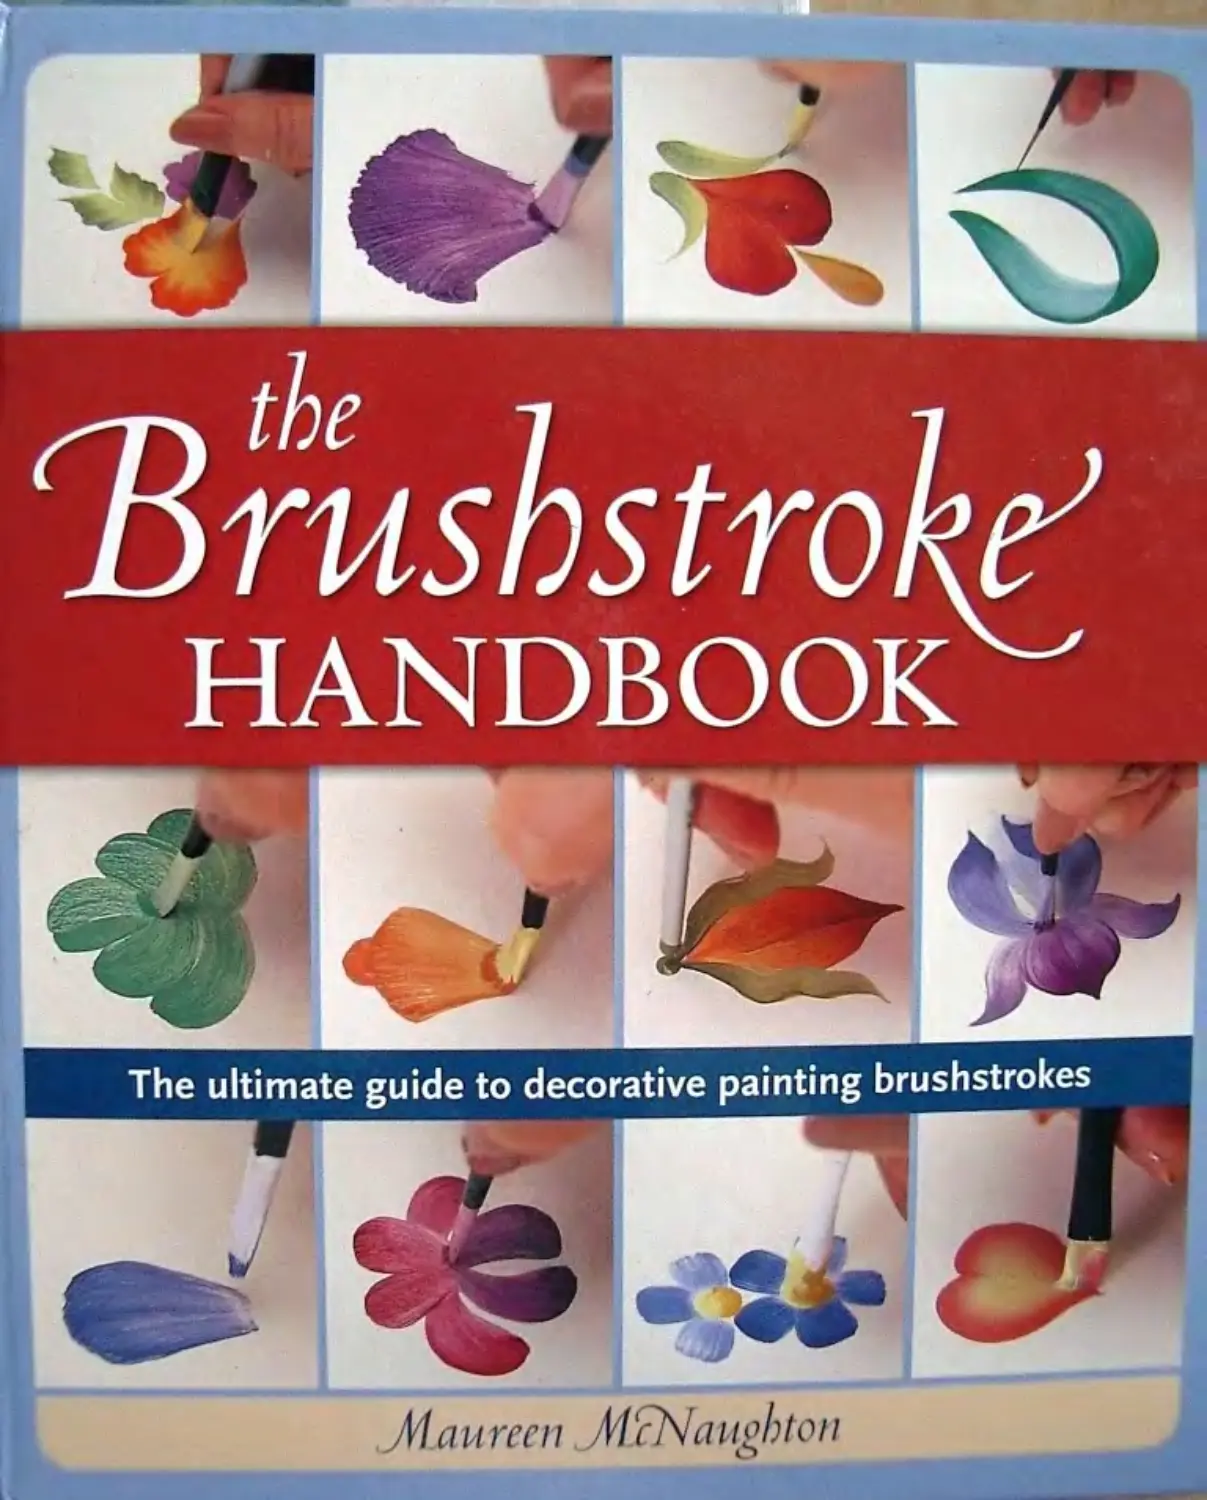


Text
                    The ultimate guide to decorative painting brushstrokes
Маигеен MWcut p b ton
Maureen McNaughton
The ultimate ouide
о
to decorative painting
brushstrokes
'Brushstroke
HANDBOOK
Й
North Light Books
Cincinnati, Ohio
www.artistsnetwork.com
The Brushstroke Handbook. Copyright © 2006 by Maureen McNaughton Manufactured in (	/.,
rights reserved. The patterns and drawings in this book are for the personal use of the reader By per-
mission of the author and publisher, they may be either hand-traced or photocopied to make single
copies, but under no circumstances may they be resold or republished. It is permissible for the purchas-
er to paint the designs contained herein and sell them at fairs, bazaars, and erpft shows. No other pan
of this book may be reproduced in any form or by any electronic or mechanical means including infor-
mation storage and retrieval systems without permission in writing from the publisher, except by a
reviewer, who may quote brief passages in a review. The content of this book has been thoroughly
reviewed for accuracy. However, the author and publisher disclaim any liability for any damages, losses
or injuries that may result from the use or misuse of any product or information presented herein. It is
the purchaser's responsibility to read and follow all instructions and warnings on all product labels.
44 at Published by North Light Books, an imprint of F+W Publications, Inc., 4700 E. Galbraith
I Vy Rd., Cincinnati. Ohio, 45236. (800) 289-0963. First edition
10 09 08 07 06 5432»
Distributed in Canada by Fraser Direct
too Armstrong Avenue
Georgetown, ON, Canada L7G 5S4
Tel: (905)877-444
Distributed in the U.K. and Europe by David & Charles
Brunel House, Newton Abbot, Devon. TQ12 4PU, England
Tel: (+44) 1626 323200, Fax: (+44) 1626 323319
Email: mail@davidandcharles.co.uk
Distributed in Australia by Capricorn Link
P.O. Box 704, S. Windsor NSW, 2756 Australia
Tel: (02 ) 4577-3555
Library of Congress Cataloging-in-Publication Data
McNaughton, Maureen
The brushstroke handbook : the ultimate
guide to decorative painting brushstrokes /
Maureen McNaughton.
p. cm.
Includes index.
ISBN-13: 978-1-58180-782-0 (hardcover: alk. paper) ISBN-io: 1-58180-782-1 (hardcover: alk. paper)	Metric Conversion Chart
1. Painting-Technique. 2. Brushwork. 3. Flowers in art. 1. Tide.	to convert	to	multiply by
TT385.M37 2006	Inches	Centimeters	2-54
745-7‘23-dc22 2005022448	Centimeters	Inches	0.4
Editor. Kathy Kipp	Feet	Centimeters	30.5
Designer: Clare Finney	Centimeters	Feet	0.03
Cover: Clare Finney and Brian Roeth Layout Artist Kathy Gardner	Yards	Meters	0 9
Production coordinator: Kristen Heller Photographer: Christine Polornsky	Meters	Yards	1.1
1Й UHil UtUlWWUllU’jU’.dlWUlUiUJUlWWUi’OW’
о
Maureen McNaughton. CDA, TDA with Master Stroke certification, has
been teaching tier strokework techniques for over 30 years. She is known
for her easy-to-follow instructions and relaxed teaching style. Maureen
teaches seminars at her home in Belwood. Ontario and also international-
ly. As an appointee to the Society of Decorative Painters Task Force on
Excellence in Teaching, she helped develop the Teacher Development
Program launched in 2001 to raise teaching standards through training
and evaluation. Maureen's work has been featured in countless magazines
including Decorative Artists Workbook and The Decorative Pointer, for
which her May 2003 cover was awarded "Cover of the Year." Her work is also a part of the presti-
gious Decorative Arts Collection Museum in Wichita, KS. Maureen's first book for North Light is
titled Beautiful Brushstrokes Step by Step, published in 2003.
"To live a creative life, we must
lose our fear of being wrong."
JOSEPH CHILTON PEARCE
Dedication
This book is dedicated to all painters and teachers of decorative
art who share their love of this art form with others.
Acknowledgments
Developing this book required the hard work of so many people.
Kathy Kipp, my editor at North Light Books, had the vision for this book
and was always there for me with encouragement and direction. Christine
Polomsky, our photographer, shared with us a dedication to showing our read-
ers how to paint step by step with her incredible photos in this book. Thank
you to all the folks at North Light whom I've not met, but who have worked
behind the scenes to make this a book of which I am most proud.
Stan Clifford from DecoArt has never failed with his generosity and support
through the years. Thank you, Stan.
Rosemary Reynolds, the Helping Artist Coordinator with
DecoArt, amazes me with her organization. She always goes that
extra mile, making sure we had those glorious DecoArt colors for
this book and also for my seminars and convention classes.
Thanks to my friend. Ann Ciesel. who expertly prepped all my sur-
faces for this book, and does so for all my seminars and classes. Ann
is always there to help me in any way she can. Her friendship means the world to me.
A loving thanks to my husband, Jim, and son, Graeme, who took care of everything at ome
and m our business so that I could work the long hours needed for this book. A loving hug .0 0
daughter, Laura, who is such an important part of our family. Their encouragement, love ar
belief in me make all things possible.
content
How to Load the Brush	6
8
SECTION ONE: ROUND BRUSH
>6
Pressure Strokes
Straight
Curved	’8
Combination Straight and Curved	20
22
Comma Strokes
Curved
Straight	24
Flat on Inside Edge
Combination Straight, Curved, and Flat on Inside Edge
Pointed Pressure Strokes
Straight
r ,	32
Curved
Flat on Inside Edge
Combination Straight. Curved,	and Flat on Inside Edge	38
Pointed Comma Strokes
Straight	40
Curved	_
42
Combination Straight and Curved
WavX	46
Flat on Inside Edge
Combination Wavy and Flat on	Inside Edge	50
Long Point, Quick Pressure	52
Fan Strokes
Fan	54
Combination Pointed Comma: Long Point, Quick Pressure and Fan 56
Straight Pointed	58
Bumpy	60
Combination Straight Pointed Fan and Bumpy Fan	62
Curved Pointed Fan	64
Chocolate Chip	66
Combination Curved Pointed Fan and Chocolate Chip	68
Teardrop Strokes
Teardrop	70
Teardrop Chip	72
Combination Teardrop and Teardrop Chip	74
Common Round Brush Mistakes
Ten Round Brush Borders

SECTION TWO: FLAT BRUSH	80
Pressure Strokes
Straight	g2
Curved	84
Combination	Straight	and Curved	8g
Comma Strokes
Curved	88
Straight	go
Combination Straight and Curved	g2
C Strokes and Scroll Strokes
C Stroke	94
Scroll	96
Combination C and Scroll	98
Pivot C	100
Closed C	102
Combination Closed C and Pivot C	104
Ruffled C Stroke Variations	106
S Strokes
S Stroke	108
Pivot S	110
Combination S and Pivot S	112
Pivot Strokes
Quarter-turn Pivot	114
Half-turn Pivot	116
Combination Quarter-turn and Half-turn Pivot	118
Ruffled S. Pivot S and Half-turn	Pivot	120
Common Flat Brush Mistakes	122
Ten Flat Brush Borders	124
Floral Compositions
"Roses and Calla Lilies"	126
"Trillium and Peach Blossoms"	,27
‘Jacobean Fantasy"	128
"Violet Posies”	129
"Red Poppies"	13°
"Forget-Me-Nots, Bumblebees & Butterfly”
Patterns	B2
Resources and Index	’42
GETTING START!
Materials
Learning to paint brushstrokes requires only a few easy-to-find supplies. A small
investment in good-quality brushes and paints will get you started. Practice the
designs in this book on smooth card stock or canvas. Soon you will be painting your
own greeting cards, decorating scrapbook pages and enjoying your new skills!
Brushes
In 1978 I introduced my line of McNaughton
brushes. They have evolved through the years as
my understanding of brush capabilities has
grown. The unique construction of the synthetic
filament is designed to carry the large amount of
paint required for my technique, with even distri-
bution through the bristles. Their spring and
resilience make these brushes ideal for stroke-
work.
Round The round brushes are full-bodied and
come to a sharp point. The sizes of round brush
used in this book are: no. 1, no. 2, no. 3, no. 4,
no. 5, no. 6. no. 7 and no. 8.
Liner The liner is a round brush with longer bris-
tles that taper to a very sharp point. It is used for
linework and detail in this book. The short liner is
used for very tight curls and tendrils. The liner
brush sizes used in this book are: the no. o, the
5/0, and the 5/0 short liner.
Flat The top edge of the bristles of a flat brush is
called a “chisel edge," or “chisel" for short. The
chisel must remain closed tightly when the brush
is filled with paint in order to form the points in
flat brush strokes. The flat brush sizes used in
this book are: no. o, no. 2, no. 4, no. 6. no. 8,
no. 10 and no. 14.
Pro Round Series 200 These brushes are made
from a flexible natural hair. They have a dense
construction to create their full-bodied shape. In
this book they are used for soft and delicate stip-
pling effects in large areas (see page 15).
Paints and Mediums
Acrylic Paints For the painting demonstrations in
this book, I used DecoArt Americana acrylic
paints. They are nontoxic, water-based, and come
in a wide variety of colors. You can find them eas-
ily in any arts and crafts supply store in handy
2-ounce (59ml) squeeze bottles. Use these colors
as they come from the bottle for basecoating your
painting surfaces. For strokework, add a drop or
two of my extender to most colors for effortless
and beautifully blended brushstrokes.
Extender This is the key ingredient that makes the
DecoArt paint blend into soft directional lines in
my tipping technique. It also allows you to stretch
the stroke as long as needed and still create
sharp points when required.
To make extender, combine three parts water
with one part DecoArt Easy Float in a clean
2-ounce (59ml) squeeze bottle.
Add one or two drops of extender to a i-inch
(2.5cm) puddle of paint. As you mix it into the
paint, you will feel the viscosity loosen. Some col-
ors do not require extender, and this is indicated
with an asterisk (*) in the color chart for each
strokework demonstration in this book. Visit my
Web site (see page 142) for a list of all the Deco-
Art colors that require extender for strokework.
Other Materials
Wet Palette The success of my technique
depends on keeping the acrylic paint at the cor-
rect consistency and open on the palette for as
long as possible. McNaughton Wet Palette Paper
prevents the water from seeping into the acrylic
yet keeps the viscosity of the paint consistent for
many hours.
6
Disposable Wax Palette This is a
book of tear-off coated paper
sheets. Make sure the palette
you choose appears to have a
shiny coating so it will not
absorb the moisture from the
acrylic paint.
Cotton Swabs These are used
for pouncing on color. Look for
swabs that are nicely rounded
and not too fuzzy. For smaller
areas, use a pointed cotton
cosmetic swab. These swabs
can be found in the cosmetics
department of your local drug-
store.
Brush Basin I prefer a rectangu-
lar brush basin because it has a
large area for brush cleaning.
There are ridges on the floor of
one side of the basin. To clean
paint out of the brush, drag the
ferrule across the ridges in one direction to
vibrate out any stubborn color.
Palette Knife I prefer a metal, bent-blade knife
because it scrapes up every last drop of color.
Stylus Tool This tool is used for painting dots.
Light and Dark Transfer Paper This paper has a
dark or light coating. Place it coated side down
on the surface under the pattern to transfer the
pattern to your surface. For a faint pattern line,
remove excess coating from the paper with a dry
paper towel.
Brush Cleaner At the end of the painting day, I
use DecoArt Magic Brush Cleaner or rubbing
alcohol to dissolve any stubborn acrylic paint still
left in the brush.
Bondo Spreader This flexible plastic spatula-type
tool is available where automotive supplies are
sold. I use it when preparing my wet palette to
express any excess water. It can also be used to
Here are some of the brushes, paints and other
supplies you'll need for the brushstroke demos in
this book: a. round brushes; b. liners; c. fat brush-
es; d. Pro Round brushes; e. wet palette; f pointed
and regular cotton swabs; g. stylus; h. DecoArt
acrylic paints; and i. DecoArt Easy Float.
burnish the edges of tape when masking off
stripes.
Frosted "Invisible" Tape and i fa-inch (6mm)
Painter's Tape There are several brands on the
market but choose one that removes easily. Both
kinds of tape can be used for masking off stripes.
Silk Sponge (cosmetic) A silk sponge is a finely-
textured natural sea sponge that I use for stip-
pling and streaking (the pole in the demo on
page 49 was painted with a silk sponge).
Paper Towels Use a soft, absorbent paper towel to
blot water and excess paint from your brush. If
you use coarse, rough towels you could quickly
ruin your brushes.
7
getting started
How to Load Round and Liner Brushes
The round brush is full-bodied and designed to hold a quantity of paint, which allows the
bristles to spread open. The lipping technique is a loading method I developed where you
load the brush in one color and tip in another. As the brush opens, the color on the tip drags
through the stroke to create soft streaks that change from light to dark.
1 Start by adding i to 3 drops
of extender to a i-inch (2.5cm)
puddle of most colors of Deco-
Art paint. Both colors—the
loading color and the tipping
color—must be the same con-
sistency to blend together. If
they're not. the tipping color
will not pull through the stroke.
2. Dampen the brush in clean
water and wipe it off on a paper
towel.
3.	To remove all excess water,
fold the paper towel over and
pinch-wipe the brush.
4.	Make a loading zone in the
loading color that is twice the
length of the bristles. Load the
brush with the first color using
firm pressure.
5.	Turn the brush over and load
the other side, again using firm
pressure.
6.	With no pressure, stroke all
sides in the loading zone to
reshape the bristles to a round
shape. Do not roll or twist the
brush. This would make the
outer hairs wrap around, pre-
venting the bristles from open-
ing during the stroke. The hairs
must go straight up to the tip.
8
7.	Take paint off all sides of the
tip of the brush against a sharp
edge, such as the edge of the
palette, so the brush has bare
bristles for the tipping color to
grab onto. With the liner, taking
the paint off the tip gives you
very fine lines.
9. Gently touch the tip to the
palette—this breaks the surface
tension between the two colors
on the brush and also removes
any excess color.
8.	Stir the tip of the brush in
the tipping color, shallow for a
short stroke and more deeply
for a long stroke.
10.	To reload for a new stroke,
wipe the tipping color off on a
paper towel, then reload in the
loading color. Repeat the entire
loading process for each stroke.
11.	If you get too much color in
the loading zone, you wind up
with ridges of paint on your
brushstroke. If there are ridges
in your loading zone, there are
ridges in your brushstroke.
Here, the paint is not evenly
distributed through the bristles.
12.	This is an incorrectly loaded
brush.
13.	To fix this, push the paint
out of the loading zone with a
palette knife.
15. A correctly loaded round
brush tipped in a second color
looks like this.
14.	Work the excess paint into
the brush in the drier loading
zone.
Tipping Deeply
1. If the tipping color is trans-
parent, you will need to carry
more of it on the tip of the
brush. Load your entire brush
in the first color. Scrape paint
off the tip on the edge of the
palette. To tip deeply, come into
the puddle at a low angle. Ro-
tate the brush within the pud-
dle, pull out, and blot the side
of the brush tip.
2. This is how a deeply tipped
brush looks.
Brush Loading and Handling Problems
Problem i: Large ridge on one
side of the stroke. You are prob-
ably holding the brush handle
off to one side, which pulls the
lip of the brush along the far
side of the stroke rather than
down the center.
Problem 2: Ridges on both sides
of the stroke. The paint could
be too thin; there may be water
in the brush; or there may be
too much paint in the brush.
Correct: This is a stroke made
with a properly loaded brush
with the handle held in the cor-
rect position.
Flat brushes offer two different loading options: tipping and double loading, with each producing a dif-
ferent effect. For a sneaked effect, load the entire brush in one color and tip the chisel edge in a con-
trasting color. To double load, load half the brush in one color and the other half in a different color.
Your stroke will be lighter on one side and darker on the other, with the middle area softly blended.
Tipping with a Flat Brush
1.	This is the chisel edge of
the Hat brush.
2.	Dampen the flat brush in
clean water and wipe it off on a
paper towel. To remove all
excess water, fold the paper
towel over and pinch-wipe the
brush. Make a loading zone in
the loading color that is twice
the length of the bristles. Load
the brush with the first color
using firm pressure.
5. Slice the chisel edge of the
brush through the tipping color
from left to right. Left-handers will
slice in the opposite direction.
3.	Turn the brush over and load
the other side, again using firm
pressure.
6. If you just dip the brush into
the tipping color, the color will
not go all the way to the cor-
ners of the chisel.
4. Wipe just the tip of the brush
off on a paper towel.
7. Blot the tip on the palette.
To reload, wipe the tipping
color off on a paper towel, then
reload in the loading color.
Repeat the entire loading
process for each stroke.
LAfUUK LUtlUlll^ и
1. Dip just the very tip of the
brush into the extender.
4. Turn the brush over and load
the other half into the puddle of
darker color.
7. This is what a properly dou-
ble loaded brush looks like. As
you practice loading your brush,
compare your results to this
photo until they are the same.
2. Brush-mix the extender with
the lighter color to make a
sheer loading zone.
5. Blend on the palette by
stroking one side of the brush.
Scoop-loading a Flat Brush
1. Load the flat completely with
the first color. With a scooping
motion, scoop the second color
onto one corner of your brush.
3. Load one-half of the brush
into the puddle of the lighter
color.
6. Turn the brush over and
stroke on the palette to blend
the other side TIP: If you blend
on a wet palette, you can occa-
sionally go back and reload
from the blending strip.
2. Touch the entire chisel edge
of the brush down on your sur-
face to achieve this effect. When
you notice you're not getting
the rounded dot. you can go
back and re-scoop without
reloading the entire brush.
Stippling, Dotting & Special Effects
Here are some tools I use to produce soft-edged, fuzzy, and textured effects which contrast so well
with the smooth, flowing look of brushstrokes. Colton swabs are great for making dots and stippling
Do not dampen your cotton swabs first—they must be loaded dry. Use them for stippling small areas-
use the Pro Round brush to stipple larger areas; and use a silk sponge for very large areas.
GETTING STARTED
Loading and Dotting with Cotton Swabs
1. Single loaded: Dip the blunt
end of a dry swab straight down
into the puddle of paint. Blot
once on the palette.
2. Stamp once on your surface
for a perfectly rounded dot.
Double Loading and Dotting with Cotton Swabs
1.	Double loaded: Come in on
the side of the first color so you
are loading half of the blunt
end.
2.	Blot the side of the swab on
your palette to remove excess
paint.
3.	Turn the swab and load the
other half in the second color.
4.	Blot off the excess paint on
this side of the swab. Then hold
the swab straight up and down
and touch the blunt end to your
surface for a two-toned dot.
13
Loading and Stippling with Swabs and Stylus
1. Dry Stippling: Dip the blunt
end of the swab straight down
into the puddle of paint. Blot
off several times on the palette
until you see a hole in the mid-
dle of the dot.
2. Stipple several times on your
surface until the swab is too
dry, then reload and reblot.
1. Stippling with a Pointed
Cotton Swab: I use pointed cot-
ton swabs to make very tiny
dots. You can find these in the
cosmetic department of your
local drugstore. Follow the load-
ing and blotting instructions
above. Stipple on your surface
until it becomes too dry, then
reload and reblot as needed.
2. Stippling with a Stylus:
Stippling with a stylus gives you
perfectly round dots. Dip the
ball of the stylus into the pud-
dle of paint. Dot off: the longer
you dot, the smaller the dots
become. Wipe off the tip fre-
quently.
Loading and Pouncing a Sponge
1.1 use a natural “silk" or sea
sponge because of its fine tex-
ture and irregularities. Dampen
in clean water, squeeze it out in
a paper towel, and load it into
the paint. Dab off the excess
paint on your palette until you
see a lacy effect.
2. Pounce lightly on your sur-
face, turning the sponge as you
go to avoid producing a regular
pattern.
14
Loading and Stippling with a Pro-Round and Liner
1. Pro Round: Do not wet this
brush first. Dip the tip into the
color and pounce firmly on your
palette so the bristles open up
and excess paint is removed.
2. Stipple lightly on your sur-
face.
1. Liner: Use a liner for greater
control when stippling. Damp-
en the brush and load the en-
tire brush even though you're
using just the end. Pull out
color from the puddle into the
loading zone. Shape the tip of
the liner in the loading zone.
2. Touch the tip of the liner to
the surface for strongly colored,
irregularly shaped dots.

How to Make a Brush Mix
1. When mixing two colors
together on your wet palette to
make a lighter or darker shade,
start by pulling the first color
into your brush. For the brush
mixes shown in this book, the
color listed first in the instruc-
tions is the color you load first.
2. Then pull the second color
listed into the loading zone
until that loading zone is the
shade you want.
15

SECTION ONE
я
я
я
brush
я
я
я
INTRODUCE STROKEWORK TO BEGINNERS with
the round brush because it is the easiest brush to
master. In the following pages, you will see how to
form your round brush strokes by applying and releasing pres-
sure as you move the brush. You can pull a straight stroke or
you can curve it.
я
3
3
3
3
You can also add more highlight and shading lines with the
use of a liner brush, which is a round brush with fewer but
longer bristles. Thin the color to an inky consistency, then load
the liner to the ferrule just as you would a round brush. Even
though you are using only the tip of the liner brush, having
paint throughout the bristles allows you to pull many lines and
the brush will spring back after each line.
3
3
3
3
3
3
и
3
Have fun and enjoy the quick and easy strokework demos in
this section, and if needed, review the tips on loading a round
brush shown on pages 8 through io.
ROUND BRUSH
Straight Pressure Stroke
The straight pressure stroke is the easiest round brush stroke to make, requiring no
curves or bending of any kind. You'll find many uses for the pretty little bellflowers
on the facing page—why not try them in other color combinations? The arrows
show you the direction or the order in which to pull the strokes.
No. 6 round
No. о liner
Williamsburg Blue Cool While	Celery Green	Payne's Grey
Winter Blue
Golden Straw
Limeade	Light Avocado
1.	Load the brush
with Cool While and
tip in Williamsburg
Blue. Lay the brush
down and hesitate
to allow the bristles
to open.
2.	Pull the brush
straight toward you
with a slight release
of pressure.
3.	At the end of the
stroke, stand the
brush up on its tip.
4.	Lift the brush off
the surface.

18
No. 6 round: Form
flowers and buds with
Cool White tipped
sparingly in Williams-
burg Blue. Pull the
strokes in the direc-
tion of the arrows.
Payne's Grey. Touch the
end of the swab at the
end of the pressure stroke
to form the opening.
0 Dip the end of a cotton
swab in Williamsburg
Blue. Then dip half in
0 Use a stylus tool to dot Cool
White and Winter Blue around
the opening. Dot Golden Straw
inside the opening.
1 _ No. 6 round: Load
in Limeade and tip
sparingly in Light
Avocado.
• No. о liner. Pull in
the vein with
Williamsburg
Blue.
Liner Detail:
Pull in the stems with
Celery Green.
The curl is Winter Blue.
Highlight the calyx with a
line of Limeade.
Place in the large dot on
the stem with a cotton
swab and Williamsburg
Blue.
19
ROUND 8k
Now we'll take the pressure stroke you learned in the previous demo and curve it.
Curving a pressure stroke is very easy to do—just follow the steps shown below.
This stroke is great for making so many flowers such as these delightful yellow
daisies. Again, the arrows will tell you in which direction to pull the strokes.
No. 4 round
Honey Brown 4 Burnt Sienna
No. о liner
P-neapp’e
Traditional Burnt
Umber
Celery Green
Light Avocado (* = do not add Extender)
1.	Load the brush
into Honey Brown
and tip into Pine-
apple. Lay the brush
down and hesitate
to allow the bristles
to open.
2.	Pull the brush
toward you in a
curved path,
3.	At the end of the
stroke, relax back up
onto the tip of the
brush.
4.	Lift off the
surface.
20
 No. 4 round: Load in
Honey Brown, tip deep-
ly in Pineapple. Pull the
strokes in the numbered
order.
0 Stipple Burnt Sienna in
the flower center with a
pointed cotton swab.
/ No. о liner. Stipple
Traditional Burnt Umber
around the center, next
to the petals. Pull in
crosshatch lines with
Pineapple.
• j No. 4 round: Load in
Pineapple, tip sparingly
in Light Avocado. Pull
the leaf strokes in the
direction of the arrows.
4
4
4
4
Liner Detail:
Pull in the stems with Celery Green.
Pull in the leaf veins with Burnt Sienna
Pull in the tendrils with a brush mix of
Honey Brown + Burnt Sienna.
Combination Straight & Curved
Pressure Strokes
Now let’s combine the straight pressure stroke you learned on pages 18-19 with the
curved pressure stroke from pages 20-21 to create these pretty little violets and busy
bumblebees. They’re easy and fun to paint!
No. 4 round
Son Sage
Pineapple
Whde Wash
$/o liner
Soft Black
Baby Pink
Royal Purple
Arbor Green
Cranberry Wine (* = do not add
Extender)
1.	Start with the
curved strokes. Load
a no. 4 round into
Baby Pink and tip
into Royal Purple.
Pull the two upper
petals first. For the
two side petals, load
into Baby Pink and
tip into Cranberry
Wine. Turn your sur-
face so you can see
the path of the
stroke.
2.	The two lower
petals are straight
pressure strokes with
the Baby Pink and
Cranberry Wine.
3.	Load the no. 4
round into Soft Sage
and tip into Arbor
Green. Pull two
curved strokes for
the lower part of the
leaf. Pull a straight
stroke for the tip.
4.	Repeat for the
other half of the leaf.


1 No. 4 round: Load in Baby
Pink. Tip Royal Purple for the
top stroke, tip Cranberry Wine
for the side strokes.
♦
' No. 4 round: Load in Baby
Pink, tip Cranberry Wine.
Form lower petal with two
straight pressure strokes.
♦
5/o liner. Load in Royal
Purple. Pull lines out from
base of lower petal.
Я
я
Liner Detail:
Use Soft Black for
.  No. 4 round: Pressure
stroke body and head.
Load in Honey brown, tip
Pineapple. The wings are
Soft Sage.
stripes, antennae,
legs. White Wash
detail on wings.
No. 4 round: Load in Soft Sage and tip in Arbor
Green. Do one side with one brush load. Reload
and repeat on second side.
Liner Detail:
Arbor Green leaf vein.
Brush mix Soft Sage +
Arbor Green for the stems.
Cranberry Wine lines on leaves.
Tendrils with Honey Brown.
Liner Detail:
Fill in the center with Honey Brown.
Highlight with Pineapple.
Pull White Wash line around base of
lower petal.
23
Curved Comma Stroke
The curved comma is one of the most commonly used strokes in decorative paint-
ing. It has a rich history, having been developed and perfected in the folk art tradi-
tion. You'll see designs made with this stroke on artwork and painted furniture from
Scandinavia, Europe and South America. Once mastered, you'll use it often.
No. о liner
Dow Grey
Raw Umber *
Camel
Red Iron О» ide
Rodwood Red
Russet
Reindeer Moss Green
Medium green: Raw
Umber ♦ Reindeer
Moss Green j:i
(* = do not add
Extender)
1.	Load a no. 4
round into Reindeer
Moss Green and tip
in Raw Umber. Lay
the brush down and
hesitate to allow the
bristles to open.
2.	Pull the brush in a
curved path while
releasing pressure.
3.	Relax the brush
onto the tip at the
end of the stroke to
pull out the tail.
4.	To curve your
comma stroke in the
opposite direction,
turn your surface so
you can see the path
of the stroke.
No. о linen
Load in
Camel for
the vein.
No. о liner Load in medium
green mix for the stems.
Q Dot Rookwood Red with
brush handle.
No. 4 round: 5 commas: Load in
Camel, tip shallow in Red Iron
Oxide.
6 commas: Load in Dove Grey,
tip shallow in Red Iron Oxide.
-1 No. 4 round: 4 commas:
Load in Reindeer Moss
Green, tip in Raw Umber.
No. 4 round: Load in Dove Grey and tip
into color as follows:
1 commas: tip shallow in Red Iron Oxide.
2 commas: tip shallow Rookwood Red.
3 commas: tip Russet.
Straight Comma Stroke
The straight comma always starts at the widest part of the stroke. Twisting the
brush about a quarter turn creates a straight tail. Straight comma strokes can be
used for both the petals and leaves in this poppy demonstration.

No. 6 round
Peaches ‘n Cream
Coral Rose
Anttque Rose *
No. о liner
Soft Peach
Country Red
Deep Burgundy-
Limeade
Light Avocado
Arbor Green
Pineapple •
Midnite Green
- do not add
Extender)
1.	Load a no. 6 round into
Peaches 'n Cream and tip
into Antique Rose. Lay the
brush down and hesitate to
allow the bristles to open.
2.	Pull the brush in a
straight path while releasing
pressure. In a straight
stroke, the brush relaxes to a
chisel edge rather than a
point.
3.	About three-quarters of
the way through the stroke,
twist the brush in your fin-
gers about a quarter turn
counterclockwise (clockwise
for left-handers).
4.	Slide on the chisel to
form the tail.

Straight Comma Stroke, Flat on Inside Edge
This stroke makes it easy to achieve a full heart-shape. Pair two of these strokes
together to create short and plump leaves and petals. The flat side of this stroke
prevents buildup of paint in the middle of your leaf or petal.
No. 6 round
Son Sage
Pineapple
Payne's Grey *
Blue Chiffon ft
5/0 liner
Violet Haze
Royal Purple
f * = do not add
Extender)
Medium green:
Avocado + Graphite r.i
Honey Brown -
1.	Load a no. 6 round into
Blue Chiffon and tip into
Violet Haze. Lay the brush
down with pressure to begin
opening the bristles.
2.	Pull the brush towards
you, fanning it out more on
the left side while keeping
the right side straight. If
you’re left-handed, fan out
the right side of the stroke.
3.	Pull and release pressure
while pivoting the brush a
quarter turn to bring the
fanned edge of the brush
over to the straight side of
the stroke.
4.	Relax the brush up on its
tip and slide with no pres-
sure to form the tail of the
stroke.
NOTE: When fanning the
opposite side of the stroke,
turn the surface and stroke
away front yourself in order
to see the path of the stroke.
28
<1
в
я
я
3
3
3
3
3
3
3
3
3
3
в
в
я
3
». ь No. б round: Load Soft Sage, tip in
medium green. Two strokes per leaf.
No. 6 round: Rear Petals:
Load in Blue Chiffon, tip
Violet Haze (two strokes
per petal).
Liner Detail:
Pull stamen stems and stipple
pollen with Paynes Grey.
Stipple Pineapple.
О 5/° l,ner- Medium green
leaf stems.
Veins with a brush mix
of Pineapple + Honey
О 5/o liner. Brush mix
Lilac + Royal Purple
for the tendril.
Brown.
© No. 6 round: Foreground
Petals: Load Lilac, tip
Royal Purple (two strokes
per petal).
@ Dot Honey Brown center
with cotton swab.
Highlight with Pineapple.
ROUND BRUSH
Combination Comma Strokes
This traditional folk art design makes use of all the comma strokes you have learned
so far. From the combination of straight commas, curved commas, and commas
that are flat on the inside edge, you can create birds, flowers, leaves and many other
designs.
No 4 round
Honey Brown -
Light Avocado
Medium Ыие;
Blue Chiffon + Baby
Blue 1:1
No. 6 round
No. о liner
Taffy C'eam
Baby B'ue
Victorian B’ue
Blush Flesh л
Blue Chiffon
Cranberry Wine 4
(* = do not
add Extender)
1.	Load a no. 4 round in Blush Flesh
and tip in Cranberry Wine. Paint the
left side of the heart with a comma
stroke that's flat on the inside edge.
Turn your surface upside down and
paint the right side of the heart with
the same stroke.
2.	Load a no. 4 round in Taffy
Cream and tip in Honey Brown.
Pull a straight comma stroke for
the stamen.
3.	Load a no. 4 round in Taffy
Cream and tip in Light Avocado.
Pull two curved comma strokes for
the green sepals.
1
«
I
I
I
i
fl
1
I
1
I
I
I
I
1
30
1 No. 6 round: Load Blush Flesh,
tip in Cranberry Wine.
Taffy Cream, tip in
Honey Brown.
No. 4 round: Load
Taffy Cream, tip in
Light Avocado.
X
No. 6 round: Load
Taffy Cream, tip in
Light Avocado.
: No. o liner. Vein is
Cranberry Wine.
Liner Detail:
Eye: Mix Victorian Blue +
No. 6 round: Load Blue Chiffon, Cranberry Wine.
tip in Baby Blue.	Beak: Mix Taffy Cream +
Honey Brown.
Cheek: Blush Flesh with
a cotton swab.
Highlights: Taffy Cream.
Wing: no. 6 round; tail: no. 4 round. Load medium
blue mix and tip in Victorian Blue.
Comma strokes with no. 4 round:
Yellow: Load Taffy Cream, tip in Honey Brown.
Red: Load Blush Flesh, tip in Cranberry Wine.
Blue: Load medium blue mix, tip in Victorian Blue.
Liner Detail:
Tail: Halo outline Baby Blue. Blue Chiffon quill.
Stems: Mix Light Avocado + Taffy Cream. Darken top stem
with mix of Light Avocado + Victorian Blue.
Red Curl: Cranberry Wine.
Halo outline on lower Blue commas with Blush Flesh.
 No. 4 round: Load
Taffy Cream, tip in
Blush Flesh. Turn
surface upside
down. Form bird's
tummy with a
curved pressure
stroke.
31
ROUND BRUSH
Straight Pointed Pressure Stroke
Up to this point, all of our outer edges have been rounded. Now you will see how to
create points on petals and leaf tips. I stippled the blue frame with a sponge and
Baby Blue. Mask off the frame with tape first to keep the edges straight. Reapply
tape over the blue frame before painting the flowers in the corners.
Baby Blue
(- = do not add
Extender)
1.	Load a no. 6
round in French
Mauve and tip in
Cranberry Wine.
Touch the tip of the
brush to the surface
and pull a small
point. Then begin
to apply a little
pressure.
2.	Apply pressure
to allow the bristles
to open up.
3.	Pull the stroke
following a straight
path. Relax the
brush up to its tip
al the end of the
stroke.
4.	Lift the brush off
the surface.
ЛЯВ^вявявввв’ввввяняЖКМ Ж VLl
32
я
я
а
S
3
3
5
3
3
3
3
3
3
3
3
3
3
3
О 5/о Pull lines of
French Mauve, then Taffy
Cream, out from point.
.y- No. 6 round: Load in Taffy Cream.
Petals 1-3: tip French Mauve.
Petals 45: tip Raspberry.
О No. 6 round: Load in Soft
Sage, tip in Light Avocado
for one side. Tip in Arbor
Green for the other side.
Leaf stems: Mix Light Avocado + Soft Sage
Leaf pein: Antique Mauve.
Tendrils: Baby Blue and French Mauve.
X' No. 6 round: Load in
French Mauve.
Petals 6-8: tip Antique
Mauve.
Petals 9-10: tip
Cranberry Wine.
Liner Detail:
Fill in oval center with Light Avocado.
Underline with Cranberry Wine
Taffy Cream highlight.
ROUND BRUSH
Curved Pointed Pressure Stroke
Here's a curved stroke with outer points. The curve gives dimension and graceful
ness to this traditional and colorful Jacobean design. In Steps 1 and г below, we'll
start with a simple C-shaped curve. In Steps 3, 4 and 5. the purple stroke is an S-
shape with an extended tip; the sharp curving point is achieved with a liner brush.
No. 4 round
B'.ght Orange
8u«nt Orange ’
Cranberry Wiine «
No. 7 round
No. 8 round
Pineapple
Royal Purple
Soft lilac
Antique Creen
( * = do not add
Extender)
ЬЖЖЖЖМ В M•и
No. о liner
1. Load a no. 7 round in
Pineapple and tip in Burnt
Orange. Touch the tip of the
brush to the surface and
apply a small point. Then
begin to apply a little pres-
sure. Apply more pressure
while pulling the stroke in a
curved path.
2.	At the end of the stroke,
relax back up onto the tip of
the brush. Lift off of the sur-
face.
3.	Load a no. 7 round with
Soft Lilac and tip in Royal
Purple. Touch the tip of the
brush to the surface and
apply a small point. Then
begin to apply a little pres-
sure. Apply pressure to allow
the bristles to open up. Pull
the brush toward you in a
curved path.
4.	Maintain pressure and
change the direction of the
path to create an S-shape.
5.	Refine the tips into sharp-
er points with a no. о liner
loaded in the tipping color.
SI
SI
•s
a
Pineapple, tip in Burnt Orange.
Center petal: Load in Bright Orange, tip in
Cranberry Wine.
Arrows indicate stroke direction.
Tendril: Brush mix Soft Lilac 4 Royal Purple
No. о liner. Extend
the dark ends to a
sharper point with
Royal Purple.
No. 4 round: Load in
Pineapple, tip in
Antique Green.
No. 8 round: Loac
in Pineapple, tip in
Antique Green.
Liner Detail:
Flower. Pull a Cranberry Wine vein in the lower petals.
Do the crosshatching in the center petal with Pineapple.
Do the halo outline on the lower petals with Royal Purple.
Do the curl with Bright Orange and shade with Burnt Orange
Dot the calyx with Royal Purple and a cotton swab.
Highlight with a line of Bright Orange and a dot of Pineapple.
Leaves: Vein with Cranberry Wine
Stems: Brush mix Pineapple r- Antique Green.
ROUND BRU!
rummu rivbbuic juumz, nuL uri irisiue tiuge
Place two of these strokes side-by-side for a plump shape with an outer point. Many
flower petals and leaves have this shape. In this trillium design, the petals, leaves
and sepals are all painted with this stroke.
No. J round
Soft Sage
Warm White
Baby Pink
Cranberry Wine '
No. 6 round
No. о liner
Medium warm green-
light Avocado 4 a
touch of Mauve
Medium cool green:
Arbor Green + a touch
of Mauve
Payne's Grey
(- = do not add
Extender)
1.	Load a no. 6 round in
Baby Pink and tip in
Cranberry Wine. Touch the
tip of the brush to the sur-
face and apply a small point.
Lay the brush down with
pressure to begin opening
the bristles.
2.	Pull the brush towards
you, fanning it out more on
the left side while keeping
the right side straight. If you
are left-handed, fan out the
right side of the stroke.
3.	Continue to pull in a
straight path to the end of
the stroke.
4.	Relax the brush up on its
tip and lift off the surface.
NOTE: When fanning the
opposite side of the stroke,
turn the surface and stroke
away from yourself in order
to see the path of the stroke.
36
О No. 3 round: Load
in Soft Sage, tip in
medium warm
green mix for two
sepals and medi-
um cool green mix
for one sepal.
No. о liner. Pull lines of Cranberry
Wine, then Payne's Grey, out from
opening.
Liner Detail—Flower:
Vein the petals with Warm White.
Pull fine lines of Warm White out from
the opening on the lower two petals.
Fill in the oval stamen with a mix of
Soft Sage + medium warm green mix.
Highlight with a dot of Warm White.
No. 6 round: Load in Soft Sage, tip in medium
warm green for the top and right leaf. Tip in
medium cool green for the left leaf.
No. 6 round: Lo.yj
in Baby Pink, tip
Cranberry Wine
Liner Detail—Leaves, Stems, Sepals and Tendrils:
Pull lines of medium warm green out from the opening on
the top leaf. Then pull shorter lines with a brush mix of
medium warm green + Payne’s Grey.
Pull Warm White lines below the opening.
Soft Sage stems. Brush mix in some medium cool green for
shading.
Mix Baby Pink r Cranberry Wine for tendrils, and for veins in
the sepals and leaves.
Accent tendril with Cranberry Wine and darken veins in the
dark areas of leaves and sepals.
ROUND Вй-USb
Combination Pointed Pressure Strokes
Combine all three varieties of pointed pressure strokes you learned on pages 32-37
to paint this bearded iris with cool, rich hues of violet and blue. The fuzzy texture of
the beard is stippled on with a liner brush.
No. 6 round
Honey Brown4
Light Avocado
No. 8 round
No. о liner
Taffy Cream *
Dart Ыие: Violet Haze
* Admiral Blue 1:1
Violet Haze
Blue Chiffon
Royal Purple = do not add
Extender)
Medium blue: Blue
Chiffon ♦ Baby Blue 1:1
1.	Load a no. 8 round with a medi-
um blue mix and tip in Blue Chiffon.
Paint the top petal with a straight
pointed pressure stroke. Load a no.
6 round with Blue Chiffon and tip in
Violet Haze. Paint the two lower
petals with a curved pointed pres-
sure stroke.
2.	Load a no. 8 round with medium
blue mix and tip in a dark blue mix.
Paint the two upper side petals with
a curved pointed pressure stroke.
3.	Load a no. 6 round with the medi-
um blue mix and tip in Royal Purple.
Form the lower petal with two
pointed pressure strokes that are
flat on the inside edge.
I
I
I
i
I
I
I
I
I
*
I
F
1
t
I
38
No. 8 round: Load
Blue Chiffon, tip in
Light Avocado
(straight pointed
pressure stroke).
3
3
3
в
а
а
з
з
3
3
я
и
3
- No. 8 round: Top petals: Load
medium blue, tip in dark blue
(curved pointed pressure stroke).
- No. 6 round: Lower petal, two
strokes: Load medium blue, tip in
Royal Purple (pointed pressure, flat
on inside edge).
& No. о liner. Sharpen
the tip with Light
Avocado. Vein with
Royal Purple.
No. 8 round: Top Petal: Load medium blue, tip
Blue Chiffon (straight pointed pressure stroke).
No. 6 round: Lower petals: Load Blue Chiffon,
tip Violet Haze (curved pointed pressure stroke).
Liner Detail:
Sharpen petal tips with the tipping color.
Do the following with fine lines (petals
are numbered to correspond with
steps below):
i.	Dark blue shading at base;
2.	Violet Haze out from base,
then Royal Purple;
3.	Lighten base with Blue Chiffon;
4.	Lighten base with Blue Chiffon.
Liner Detail (see painting below):
Vein top petals, using Violet Haze on #1 petal and
Royal Purple on #2 petals.
Anthers: stipple in shape with Honey Brown, then
Taffy Cream. Stipple Royal Purple underneath.
Stems: mix Blue Chiffon + Light Avocado.
ROUND BRUSH
Straight Pointed Comma Stroke
This stroke Will give you a point al both ends. You can elongate the stroke to paint
the leaves in th,s project, or shorten the stroke to paint the petals. If you'd like to
paint the octagonal border in this design, apply tape on both sides of the border
and fill in with Antique Rose.
No. a round
No. 6 round
No. 7 round
No. о liner
Light green
Limeade ♦ Reindeer
Moss (keen 3:1
Reindeer Moss Green
Medium violet:
Plum + Limeade 2:1
Plum
(* = do not add
Extender)
1.	Load a no. 7 round in
Reindeer Moss Green and
tip in Plum. Turn your sur-
face to begin at the base of
the leaf. Touch the brush tip
to the surface and pull a
small point, then apply a lit-
tle pressure.
2.	Pull a long straight stroke
as you increase pressure.
Maximum pressure should
be at the midpoint of the
length of the leaf.
about a quarter-turn coun-
terclockwise (clockwise for
left-handers). Slide on the
chisel to form the tail.
3.	About three-fourths of the
way through the stroke, twist
the brush in your fingers
4.	Load a no. о liner in Deep
Burgundy and pull a vein up
the center of the leaf.
40
»
I
I
I
I
I
1
]
!
1
1
3
3
a
з
3
a
a
ч
4
Ъ
4
я
я
d
d
No. 4 round: Load Soft
Peach, tip Antique Rose.
e No. 6 round: Load
Peaches 'n Cream, tip
Deep Burgundy.
No. о liner. Reindeer Moss
Green for the flower stems,
brush handle dot for the
um violet inside the edge.
Stem: Accent with a brush mix of
Plum » Reindeer Moss Green.
41
ROUND BRUSH
Curved Pointed Comma Stroke
Painting a ribbon and bow is very easy with the curved pointed comma stroke. The
same stroke is used to make all parts of the ribbon. The placement of dark and light
colors creates the three-dimensional effect.
No. 4 round
Blue Chiffon
Soft Blue
Colonial Green
Deep Teal *
No. 5 round
(* = do not
add Extender)
No. 6 round
No. о liner
1. Load a no. 5 round with
Blue Chiffon and tip in
Colonial Green. Pull a small
point and then gradually
apply pressure pulling in a
curved path until you reach
the widest part of the stroke.
2. Gradually release pres-
sure continuing the curve.
Relax the brush up onto its
tip and slide to form the tail
of the stroke.
4. Load a no. о liner with
Deep Teal and line the fore-
ground edge of the loop.
3. Load a no. 6 round with
Soft Blue and tip in Deep
Teal. Repeat steps 1 and 2
for the darker loop. Start at
the light end of the first
stroke.
5. Pull fine lines out from
where the knot will be using
the same brush and color.
42
: ' No. 4 round: Knot: Load
Soft Blue, tip Deep Teal.
. । No. о linen Create a
highlight with fine lines
of Blue Chiffon.
No. 6 round: Dark
Segments: Load Soft
Blue, tip Deep Teal.
Liner Detail with
Deep Teal:
Pull fine lines out
from the knot on
all strokes.
Line the foreground
edge of the loops.
| Extend the dark tip
on the right tie to
partially line the
neighboring light
segment.
No. 5 round: Light Segments:
Load Blue Chiffon, tip
Colonial Green.
1 No. о liner. Pull lines of
Soft Blue down from top
edge of the knot.
43
Combination Pointed Comma Strokes
The entire calla lily in this design is painted in just three strokes by combining
straight and curved pointed comma strokes. The turned petal that wraps from front
to back is one curved pointed comma stroke. If needed, review these strokes step-
by-step on pages 40-43.
No. 3 round
Honey Brown -
No. 7 round
No. 8 round
PmeappJe 4
Medium green: Light
Avocado + a touch of
Raspberry to dull
Medium red: Pink
Chiffon * Raspberry 2:1
Soft Sage
Raspberry
Pink Ch-ffon
No. о hner
Cranberry Wine	(* = do not add
Extender)
1.	Load a no. 8
round with Pink
Chiffon and tip in
Raspberry. Paint the
back of the calla lily
with a straight point-
ed comma stroke.
2.	Load a no. 7 round
with Pink Chiffon and
tip in Raspberry. Paint
the outer throat of
the calla lily with a
curved pointed
comma stroke.
3.	Load a no. 7
round with medium
red mix and tip
deeply in Cranberry
Wine. Paint the
turned edge of the lily
using a curved point-
ed comma stroke.
4.	Load a no. 3 round
with Soft Sage and
44
No. 8 round: Load Pink Chiffon, tip
Raspberry (straight pointed comma).
No. о liner. Pull lines of Pink Chiffon
out from light base.
No. 7 round: Load Pink Chiffon, tip
Raspberry for outer throat (curved
pointed comma).
О No. з round: Load Soft
Sage, tip in medium green
(curved pointed comma).
- No. 8 round: Load Soft
Sage, tip medium green
(curved pointed comma).
- No. у round:
Load medium
red, tip deeply
in Cranberry
Wine (curved
pointed
comma).
No. о liner. Fill in pistil
with a brush mix of
Pineapple + a touch of
Honey Brown. Stipple
Honey Brown shading
on one side.
No. о liner: Stipple
Pineapple highlight.
Lightly stipple
Cranberry Wine on
shaded side.
Liner Detail:
Turned Edge: Extend Cranberry Wine end to
partially line green tip. Pull lines of medium
red in from light end.
Stems: Soft Sage, merge into flower with fine
lines. Brush mix Soft Sage + medium green.
Shade stem with fine lines.
Tendril: Medium red, accent with Raspberry.
No. о liner. Vein leaves
with Raspberry.
45
Wauy Pointed Comma Stroke
This IS just a pointed comma stroke that has a wave in it. so don't hesitate to use
this stroke for unusual or exotic-looking flowers. Try this design in red tones for a
cheerful Christmas poinsettia.
Soft Blue
Violet Haze
Soft Sage
No. о liner
Medium vio'et: Violet
Royal Purple
Medium green:
Avocado + Graphite 1:1 Haze + Blue Chiffon 1:1
0 „e Cn I on (* = do not add
Extender)
ROUND BRU
No. 4 round
No. 7 round

Я fl fl fl fl fl tl 111И1Ч1Д
1.	Load a no. 4
round with Lilac
and tip into Royal
Purple. Touch the
tip of the brush to
the surface to make
a point. Apply pres-
sure to begin open-
ing the bristles and
pull the brush in a
curved path.
2.	While applying
pressure, pull the
brush in a curved
path.
3.	Pull and maintain
pressure while re-
versing the curve in
the opposite direc-
tion.
4.	Relax the brush
onto the tip, reverse
the curve again, and
slide on the chisel
to form the tail.
I
I
I
I
No. 4 round: Load Soft Blue,
tip in medium violet.
No. 4 round: Load Lilac, tip
Royal Purple.
Liner Detail—Flower
Light petals: Violet Haze veins.
Dark petals: Blue Chiffon veins.
Stamens: Brush mix Soft Sage +
medium green for stamen
stem and stippled ball shape.
Stipple medium green shading
on the ball shape, and a Blue
Chiffon highlight.
Liner Detail:
Leaf vein: Royal Purple.
Stems: Brush mix of Soft
Sage + a touch of
medium green.
Tendrils: Brush mix of
Lilac + a touch of
Royal Purple.
No. 4 round for
small leaves; No.
j round for large
leaves: Load Soft
Sage, tip medium
green.
47
впив ONnoa
Pointed Comma Stroke, Flat on Inside Edge
This stroke gives a plump shape with points at both ends. Pair a short stroke with a
longer stroke to create a leaf that appears to be turned slightly away from you. To
paint the pole in this design, tape off. and streak thinned Red Iron Oxide on the left
side. While it’s wet, streak thinned Camel over the entire pole area. Remove the tape
No. 4 round
5/0 liner
Camel	Limeade Reindeer Moss Green Antique Green
Dove Grey	Raw Umber	Red Iron Oxide RooWc-d Red (* = do not add
Extender)
1.	Load a no. 4 round with
Reindeer Moss Green and
tip into Raw Umber. Begin
with the short side of the
leaf. Pull a small point, then
lay the brush down gradually
while fanning the bristles
out on the left side while
keeping the right side
straight.
2.	Pull and release pressure
while pivoting the brush a
quarter turn to bring the
fanned edge of the brush
over to the straight side of
the stroke. Relax the brush
onto the tip and slide on the
chisel to form the tail.
3.	Load a no. 4 round with
Limeade and tip into Raw
Umber. The longer half of
the leaf starts higher than
the short side. Pull a small
point, then lay the brush
down gradually while fan-
ning the bristles out on the
right side while keeping the
left side straight.
4.	Pull and release pressure
while pivoting the brush a
quarter turn to bring the
fanned edge of the brush
over to the straight side of
the stroke. Relax the brush
onto the tip and slide on the
chisel to form the tail.
Г1ЛГ1ПГ1Г1ПППППГСППГ

иэтотаиоп wavy & Hat Edged
Pointed Commas
Here is one of the simplest strokework roses you'll Find. In this design, the pointed
comma stroke that's flat on the inside edge is used for the rose petals, while the
wavy pointed comma makes the leaves and sepals. You can review both of these
strokes on pages 46-49.
Eggshell
Antique Green
Pansy Lavender
Pineapple °
Cranberry Wine -
Bnghl Orange -
Burnt Orange
Medium green ( * = do not add
Eggsf-ei:. Antique	Extender)
Green 1:1
1.	Load a no. 4 round with
Pineapple and tip into Burnt
Orange. Pull two pointed
comma strokes that are flat
on the inside edge to form
the bud. Pull from the tip
toward the stem.
2.	Load a no. 2 round with
Eggshell and tip into
Antique Green. Paint one of
the sepals with a wavy point-
ed comma stroke. Pull from
the base toward the outer
tip.
3.	Paint the other sepal in
the same way with the same
colors.
4.	Dot the base of the bud
with Antique Green on the
tip end of the brush handle.
Highlight with Pineapple.
<1
3
я
3
5
3
3
3
3
3
3
3
3
3
3
3
3
3
3
а
з
я
я
а
ч
No. 6 round: Load Eggshell. Tip in
Antique Green for 3 of the leaves;
Pansy Lavender for 2 of the leaves.
Liner Detail:
Continue Cranberry Wine
to line edge of top petal.
Fill in center with Pansy
Lavender. Underline with
Cranberry Wine. Highlight
with Pineapple.
Brush handle dot Antique
Green calyx. Highlight
Pineapple.
? No. 4 round: Load Pineapple, tip Burnt
Orange. Form with two strokes (point-
ed comma, flat on inside edge).
) No. 2 round: Load Eggshell,
tip Antique Green. Leaves
are wavy pointed commas.
Liner Detail—Flower Petal:
Pull lines of Pineapple out from light
end of strokes.
• No. 4 round: Load Bright
Orange, tip Cranberry Wine.
Form with two strokes
(pointed comma, flat on
inside edge).
Liner Detail—Leaves:
Cranberry Wine leaf vein
and accent leaf tips.
Stems with medium
green. Tendril with Pansy
Lavender.
SI
ROUND 8PUSI
Pointed Comma with Long Point,
Quick Pressure
This decorative motif reminds me of the shell and acanthus leaves seen on carved
furniture, rugs, and Victorian wallpapers. By changing the tipping color for each
stroke in the leaves, you can easily achieve subtle variations in color. Nesting one
stroke onto the next gives the undulating edges of these leaves and shell.
No. 3 round
Soft Blue
Williamsburg Blue
Uniform Blue
No. 4 round
No. o liner
Blue Chiffon
Deep Midnight Blue'
Blue Haze
Hauser Dad Green
(* = do not add
Extender)
1.	Load a no. 4 round
in Soft Blue and tip in
Hauser Dark Green.
Pull an elongated tip.
2.	Lay the brush
down with quick pres-
sure to open the bris-
tles. Fan the brush
out on the left side
while keeping the
right side straight.
For this stroke, it
could be either a
straight or a curved
path.
3.	Gradually release
pressure as you pull
the stroke toward the
base of the leaf.
4.	Relax the brush
onto the tip and slide
on the chisel to form
the tail. To finish,
load a no. о liner in
Hauser Dark Green
and extend the elon-
gated tip at the top of
the stroke, as shown
at the top left corner
of this page.
ki’ \u 'ij 'll Ш Ш Ш LL Ш Ш 11 U Lt Ц [Д 14 U И и Й
No. 4 round: Load
Soft Blue. Tip in
Hauser Dark Green.
2
Tip in Blue Haze.
No. J round: Load Soft
Blue, tip Uniform Blue.
Load Soft Blue, tip
Hauser Dark Green.
0 Tip in Hauser
Dark Green,
0 Tip in Blue Haze.
£ No. з round: Load Soft Blue,
г tip Williamsburg Blue.
2: tip Uniform Blue.
3: tip Deep Midnight Blue.
Brush Handle Dots:
Center motif Blue Haze.
Curls: Williamsburg Blue.
Liner Detail:
Blue Chiffon lines out from base
of strokes; S-shaped highlight
lines (see below).
Uniform Blue halo outline on
center motif.
Liner Detail—Leaves:
Hauser Dark Green: pull in
53
ROUND BRUSH
Fan Stroke
Fan strokes are fun and easy and a joy to paint! I use these strokes for many differ-
ent design elements, from butterflies to birds, from flower petals to leaves. In the
cute butterfly designs at right, I just applied linework and dots to make each one
unique.
No, 4 round
No. 6 round
No. 8 round
5/o liner
Limeade
Soft Peach
Hauser Dark Green
Burnt Orange
Lilac
Royal Purple
Graphite ( * = do not add
Extender)
1.	Load a no. 8 round with
Lilac and tip in Royal Purple.
Lay the brush down with
pressure with the ferrule
resting on the surface.
2.	Twist the brush back and
forth in your fingers in small
increments to fan out the
bristles to the desired
width.
3.	Lift the ferrule slightly off
the surface and push for-
ward so that the bristles
open even more.
4.	Pull back toward you,
gradually releasing pressure.
At the end of the stroke,
relax back up onto the tip
and lift straight up off the
surface.
5.	If your tipping color does
not go all the way to the cor-
ners, here's a quick and easy
way to fix it. Load a liner
with the tipping color, and
holding the handle of the
round brush steady in your
other hand, paint the tipping
color on the corners of the
brush using your liner.
Butterfly i
No. 4 round: Load Lilac,
tip Royal Purple,
No. 6 round: Load Soft
Peach, tip Burnt Orange.
О Liner Detail:
Pull lines of loading color out from
body on both wings.
C-shape lines in Royal Purple.
Brush-handle dots in Limeade.
Body, antennae: Graphite, highlight
with Lilac.
Butterfly 2
tip Hauser Dark Green
No. 8 round: Load Lilac, tip
Royal Purple, Lilac lines out
from body with liner.
Liner Detail:
Lower wing: Pull Limeade lines out
from body.
Top wing: Limeade detail lines; line
Royal Purple in light areas.
Burnt Orange brush handle dots.
Underline with brush mix of Soft
Peach + touch Burnt Orange.
Body and antennae: Graphite, high-
light with Lilac.
Butterfly з
Dark Green in light areas.
Burnt Orange stylus dots.
; j 5/o liner. Body and antennae:
Graphite, highlight with Lilac.
Royal Purple brush-handle dots.
55
Combination Pointed Comma & Fan Strokes
This trumpet shape is seen in many different flowers such as daffodils, foxglove,
morning glories and. of course, trumpet vines. Use the fan stroke to make the back
of the flower's opening, and use the pointed comma stroke with long point & quick
pressure to make the leaves. See pages 52-55 for step-by-step stroke instructions.
Eggshell
Antique Green
Pink Chiffon
Pineapple
B'ush Flesh - Antique Rose *
Country Red -
( * = do not add Extender)
1.	Load a no. 6 round with
Pink Chiffon and tip in Blush
Flesh. Paint the throat of the
flower with a fan stroke.
Repeat for good coverage.
2.	Pull lines of Pineapple out
from the base of the fan
stroke using a 5/0 liner.
Load a no. 3 round with Pink
Chiffon and tip in Antique
Rose. Begin the turned part
of the flower petal by first
outlining the corner of the
fan stroke. Stay up on the tip
of the brush to achieve a
fine line.
3.	After outlining to the
front of the fan stroke, lay
the brush down with pres-
sure to open the bristles
while fanning the brush out
on the right side. Pull the
brush while gradually releas-
ing pressure to the end of
the stroke. Relax the brush
back up onto the tip and
slide to form the tail.
4.	Load a no. 3 round with
Pink Chiffon and tip in
Country Red. Outline the
other corner of the fan
stroke.
5.	Lay the brush down with
pressure to open the bristles
while fanning the brush out
on the left side. Pull the
brush while gradually releas-
ing pressure to the end of
the stroke. Relax the brush
back up onto the lip and
slide to form the tail.
3
я
a
з
з
з
i
1
1
J
1
1
О No. 7 round: load
Eggshell, tip Antique
Green,
J 5/o linen Extend leaf tip
into a sharper point with
Antique Green.
Center vein with Country
Red.
No 6 round for flouren
No. 4 round for bud: Load
Pink Chiffon, tip Blush
Flesh. Fan stroke.
1
i
1
3
3
1
i
4
4
4
No. з round: Load Pink
Chiffon. Tip Antique
Rose for one side and
Country Red for other.
5/0 liner. Stamen stem
and head with Antique
Green.
 5/o linen Pull lines of
Pineapple out from base
of fan stroke in flower.
No. i round: Load
Eggshell, tip Antique
Green.
Liner Detail:
Antique Green: Extend sepal tips into sharp-
er points, pull in stems.
Antique Rose: Accent rear petal on flower
with a broken line.
Underline stamen head with Country Red
and highlight with Pineapple.
4
ruirncu ran woKe
Pansies are quick and easy to make with the straight pointed fan stroke. Notice
that the front three petals may differ in color from the back two. The same stroke
is used to make the leaves in this design; just attach the stem line to the w.de part
of the leaf.
Light Avocado	Plum	Cranberry Wine Dark violet: Napa Red
+ Lamp Black XI
1.	Load a no. 4 round with
Pineapple and tip into
Cranberry Wine. To paint the
first half of the petal, lay the
brush down with pressure
with the ferrule resting on
the surface. Twist the brush
back and forth in your fin-
gers in small increments to
fan out the bristles to the
desired width. Lift the ferrule
slightly off the surface and
push forward so that the
bristles open even more.
Pull back toward you, gradu-
ally releasing pressure.
2.	Pivot the brush a quarter
turn to the left and pull to a
sharp point, releasing pres-
sure, then slide to form the
tail.
3.	Paint the other half of the
petal the same way.
4.	Load a 5/0 liner with
Pineapple and paint long
lines from the point out-
ward. Load the liner with
Light Avocado and paint
shorter lines at the point.
No. J round: Leaves: Load Light
Buttermilk, tip Light Avocado.
Bud: Load Taffy Cream, tip
Honey Brown.
Petal 3: Load Taffy
Cream, tip Plum.
Petal 4: Load
Pineapple, tip
Cranberry Wine
(2 fan strokes).
Liner Detail:
Leaf stem, vein: Plum.
Curls and tendrils: Brush mix Light
Buttermilk + Light Avocado or
Plum.
Dot: Light Avocado
Petal 2: Load Taffy
Cream, tip Honey
Brown.	3
5/0 liner Pull long lines
of loading color out from
petal base.
No. 4 round for all petals:
Petal i: Load Light
Buttermilk, tip Camel.
) 5/0 liner. Cranberry Wine
lines on top corners of
petals 2, 3 and 4, and
out from the base of
petal 2.
59
Bumpy Fan Stroke
Create the distinctive shape of these poppy petals with this unusual stroke. Due to
the way the brush is laid down, the color of the bump will be more uniform and
intense than the remainder of the stroke.
No. 4 round
White Wash
Lamp Black
Jade Green
No. 6 round
Avocado
Gingerbread -
Taffy Cream
Burnt Orange *
Oxblood
(-’ = do not
add Extender)
5/0 liner
No. 6 Pro Round
1.	Load a no. 6 round
with Taffy Cream and
tip in Gingerbread.
Begin the bump on
the top edge of the
petal by laying the
brush down with
slight pressure and
pulling it down just
past the shoulders of
the petal.
2.	Lay the ferrule
down on the surface.
3.	Fan the bristles
open to their widest
width.
4.	Pull the stroke
toward you as you
gradually release
pressure. At the end
of the stroke, relax the
brush back up onto
the tip and lift off.
f/)
1
No. 6 round: Load Taffy Cream.
Petal i: tip Burnt Orange.
Petal 2: tip Gingerbread.
No. 6 Pro Round: Stipple In the green center with:
Jade Green	Avocado	Taffy Crearn
• • •
No. 4 round: Load Taffy Cream,
tip Oxblood.
5/0 liner. Lines of Taffy Cream
out from base.
Dot Avocado at base, highlight
with Taffy Cream.
5/0 liner. Pull Lamp Black
lines in clusters out from the
center. Stipple Lamp Black
dots.
Liner Detail—Leaves:
Leaf veins: Oxblood.
Green Curls: Jade Green.
Tendrils: Gingerbread.
0 Liner Detail—Flowers:
Stipple White Wash dots.
Line valleys of petal tips:
Petal 2: Burnt Orange.
Petal i: Oxblood.
Petal 3: Oxblood + touch of Lamp
Black.
No. 4 round: Load in
Taffy Cream, tip
Avocado.
ROUND 8PUS
Combination Straight Pointed &
Вытру Fan Strokes
Combine the straight pointed fan stroke shown on pages 58-59 with the bumpy fan
stroke from pages 60 61 to create very different outer edges. The ruffly, serrated
edge of the fan stroke gives a realistic feel to the petals and contrasts with the
smoother bumpy fan stroke of the leaves in this design.
No 3 round
Light Avocado
Arbor Green
Violet Haze
No. 4 round
No. 6 round
Royal Purple
Medium blue: Blue
Chiffon + Baby Blue 1:1
Blue Chiffon
5/0 liner
Dark blue: Violet Haze
+ Admiral Blue r.i
1.	Load a no. 4 round with White
Wash and tip in medium blue mix.
For the first petal, paint a bumpy
fan stroke.
2.	Load a no. 3 round with White
Wash and tip in Violet Haze. Paint a
straight pointed fan stroke for the
petal to the right of the first one.
Load a no. 3 round with White Wash
and tip in dark blue mix. Paint two
more straight pointed fan strokes
on either side of the first two petals.
3.	Load a no. 4 round with medium
blue mix and tip in Royal Purple.
Turn the surface so you can see the
path of the stroke. Paint a longer
pointed fan stroke, extending the
tail along the side of the blue petal.
62
- No. 4 round: Load Blue Chiffon.
No. 4 round: Petal <
Load medium blue,
Royal Purple.
• 5/0 liner: Stems with Light Avocado. Tendrils
with medium blue, accent with dark blue.
No. 4 round: Load Blue Chiffon.
A. Tip Light Avocado
B. Tip Arbor Green
No. 4 round: Petal
’. Load While
Wash, tip medium
blue.
Liner Detail:
Blue Chiffon lines out
from base.
Leaf vein and stem
with Royal Purple.
5/0//ner: Pull lines
of White Wash out
from petal base.
Tip Violet Haze
for two side
petals.
No. j round: Load
White Wash.
Petal 2: tip Violet
Haze.
Petals 3 & 4: tip
dark blue.
Liner Detail:
Petal 5: Line lower edge
with Royal Purple.
Fill in center with brush
mix of White Wash +
touch Light Avocado,
highlight with White
Wash, shade dark blue.
Dark blue scallop lines
on Petal 1.
.•/ 5/0 liner. Fill in C-shape with
medium blue.
Lines of dark blue in from sides.
White Wash highlights in middle.
ccc
63
Curving the pointed fan stroke and layering several of them close together gives a
feathery, plumage effect. This is an attractive design for borders because of the sim-
plicity of its repeating, symmetrical motif.
Celery Green	Avocado
Pink Chiffon
Taffy Cream
Raspberry
Medium red: Spice
Pmk • Pink Chiffon 1:1
Dark red: Napa Red * a
touch of Payne's Grey
1.	Load a no. 6 round in
Pink Chiffon and tip in
Raspberry. Lay the brush
down with pressure with the
ferrule resting on the sur-
face. Twist the brush back
and forth in your fingers in
small increments to fan out
the bristles to the desired
width. Lift the ferrule slightly
off the surface and push for-
ward so that the bristles
open even more.
2.	Pull the brush in a curved
path while gradually releas-
ing pressure.
3.	Relax the brush back up
onto the tip and slide to
form the tail.
4.	TIP: Watch the inside
curve of the stroke—the out-
side curve will take care of
itself
3
3
3
a
э
з
ц
ч
и
Stroke i: Load no. 6 round in Pink
Chiffon, tip Raspberry.
Stroke 2: Large strokes: no. 4 round;
small strokes; no. 3 round:
Load Taffy Cream, tip Celery Green.
No. о liner. Pull lines of loading color
out from base.
’ Stroke у Load no. 4 round in medium
red, tip dark red.
: Stroke 4: Load no. 3 round in Taffy
Cream, tip Avocado.
f No. 0 liner. Pull lines of loading color
out from base.
Brush-handle dots: Pink Dots: Raspberry
on green curls, dark red at base ofcenter
motif.
Green Dots: Celery Green on pink curls.
Liner
Details:
5/0 short liner for
tight curls;
no. о liner for long
segments:
Green Curls: Celery Green.
Pink Curls: Raspberry.
5/0 short liner.
Lines of Taffy Cream at base of number
3 strokes in center motif.
Highlight pink and green dots with Taffy Cream,
dark red dot with medium red.
Chocolate Chip Stroke
This is the only chocolate chip that is calorie-free! Perfect for tiny designs and floral
sprigs when you want short, wide strokes that still have a delicate look. Although the
tipped technique is used, this stroke will produce more contrast.
Honey Brown * Dried Basil Green Raw Umber
Medium violet:
Summer Lilac ♦ Pansy
Lavender in
Pansy Lavender
(* = do not add
Extender)
1.	Load a no. 5
round with Summer
Lilac and tip in
Pansy Lavender. Lay
the brush down with
pressure. This
stroke is pulled side-
ways with the han-
dle of the brush at a
45 degree angle.
2.	Release the pres-
sure as you lift the
brush to the middle
of the petal.
3.	Lift to the tip of
the brush and flick it
to make a tiny tail.
4.	You may find it
easier to flick the tail
upward. This is
when the stroke
really looks like a
chocolate chip!
л
а
я
э
3
3
3
3
3
3
3
а
з
з
з
з
з
я
я
3
я
я
я
No. 5 round: Load
Dried Basil Green, tip
Raw Umber. Take
more than one stroke
off the brush for
lighter leaves.
No. 5 round: Light petals and
buds: Load Lilac, tip in medi-
um violet.
О Dark petals. Load Summer
Lilac, (ip Pansy Lavender.
U
I Flower centers: Load end of a
cotton swab half into Camel,
half into Honey Brown.
Stamp in the flower centers.
Dot Pineapple in light areas
with stylus.
'£i Dot Pansy Lavender calyx on
buds with stylus.
Combination Curved Fan &
Chocolate Chip Strokes
This is the curved pointed fan stroke you've seen before on pages 64-65; I just used
a bigger brush to create larger petals. Because the chocolate chip leaves are so
small, I grouped a lot of them together to balance out the large flower petals. I also
used a group of chocolate chip strokes for the flower center.
No. 2 round
Dned Bas<l Green
Raw Umber
No. 3 round
No. 7 round
Taffy Cream
No. 8 round
5/o liner
1.	These three petals are painted with a
no. 3 round and a curved pointed fan
stroke. The top petal is Taffy Cream tipped
in Gooseberry Pink. The middle petal is
Taffy Cream tipped in Antique Rose. The
bottom petal is Taffy Cream tipped in
Deep Burgundy.
2.	The leaves are chocolate chip strokes
painted with a no. 7 round. Load with
Dried Basil Green and tip in Raw Umber.
3.	Pull little stems into the leaves with
Deep Burgundy on a 5/0 liner.
4.	Use a 5/0 liner and Dried Basil Green
for the sterns, Antique Rose for the ten-
drils, and Gooseberry Pink for the curls

a
5
R
R
3
4
Я
Я
я
я
+ Dried Basil Green
round for all stem strokes:
Load Taffy Cream.
Stroke 2: Tip generously
in Deep Burgundy.
Stroke 3: Tip generous- J
ly in Antique Rose
5/0 liner Taffy
Cream lines out
from points of
Strokes 3.
'VO. 7 rouna; эиокс I. luuu icuiy
Cream, tip Gooseberry Pink.
No. 7 round: Chocolate Dried Basil Green Brush mix Raw Umber
chip strokes: Mix Taffy
Cream + Dried Basil Green.
5/0 liner. Fill in
Gooseberry Pink.
Deep Burgundy
w
Taffy Cream
£ No. 7 round: Load Dried Basil
Green, tip Raw Umber.
Liner Detail:
Deep Burgundy leaf vein
and stems.
Dried Basil Green flower stems.
Antique Rose tendril
Gooseberry Pink curls.
No. 2 round: Rear wing: Load Taffy
Cream, tip Gooseberry Pink. Fill in
head and body with Dried Basil
Green.
No. 2 round: Front Wing: Load
Taffy Cream, tip Deep Burgundy.
Liner Detail:
Highlight head: Taffy Cream.
Beak, lines on chest: Antique Rose.
Dot eye: Raw Umber
Crown: Deep Burgundy.
ROUND BROS
leararop ыгоке
The teardrop stroke is used often in rosemaling, a traditional Scandinavian folk art
style. The blending in a teardrop stroke is very distinct, with a puddle of the loading
color at the end of the stroke. A teardrop can be painted straight or curved. This
design has some of both.
No. 5 round
Limeade
Light Avocado
Spice Pink
Raspberry
5/0 liner
Cranberry Wine
Medium red: Spice
Pink 4 Raspberry i:j
Winter Blue
1.	Load a no. 5
round with Light
Avocado and tip in
Limeade. Start at the
narrowest part of the
stroke and pull a
small point.
2.	Gradually in-
crease the pressure
while pulling the
stroke toward you.
3.	When the stroke
is the desired length,
relax back up onto
the tip and pull the
tip three-fourths of
the way through.
4.	Lift the tip off the
surface.
70
я
3
3
3
3
3
3
3
3
3
3
3
3
3
3
3
3
3
3
а
и
3
1
ROUND BRUSH
Teardrop Chip Stroke
The teardrop chip combines the teardrop with the chocolate chip stroke. A nice
change from comma strokes, I usually cluster them, as the little chip stroke to the
side leads the eye through the design.
No. 3 round
Camel
Gingerbread
Red Iron Oi de
Reindeer Moss Green
5/0 liner
Medium green: Raw
Umber + Dried Basil
Green 2:1
Medium violet:
Summer lilac + Raw
Umber 3:1
Dove Grey
1.	Load a no. 3
round with Camel
and tip in Ginger-
bread. Start at the
narrowest part of
the stroke and pull
a small point.
2.	Gradually in-
crease the pressure
while pulling the
stroke toward you.
3.	When the stroke
is the desired
length, relax back
up onto the tip and
pull the tip three-
fourths of the way
through.
4.	Flick the tip of
the brush to the
side to create the
“chip" part of the
stroke.
72
No. J round: Teardrop chip strokes.
Orange: Load In Camel, tip
Gingerbread.
Violet: Load in Dove Grey, tip
medium violet.
Green: Load in Reindeer Moss
Green, tip medium green.
31
Я
31
Я
Я
.я
9
d
.3
_з
3
Я
3
Я
я
! я
! ч
! ч
5/0 liner: Finishing details.
Red Iron Oxide: Lines out from tail of orange strokes and
out from base of orange curls. Line over the green, out
from the V-shaped base of center panel.
Medium violet: Line shading over the grey lines, out from
the sides of center panel. Pull in the curls.
Medium green: Line shading out from the sides of
the green line along the top edge of middle
panel.
Dots: Gingerbread at point of center panel.
Medium violet for remaining.
.' 5/о /iner Linework and crosshatching.
Center crosshatching with Dove Grey.
Line top edge with Reindeer Moss
Green.
Outer crosshatching with Reindeer
Moss Green.
Extend medium green tail from top
green stroke down to outline the cen-
ter crosshatch panel.
Orange curls with Gingerbread.
Combination Teardrop & Teardrop Chip Strokes
This final round brush demo reminds me of Pennsylvania Dutch in both design and
color. Teardrop strokes form the center flower, teardrop chip strokes form the leaves
and decorative accents, and linework scrolls form a heart shape in the center
No. 2 round
No. 3 round
No. 4 round
Antique Cold
French Vanilla
|ade Green
Peaches 'n Cream
Medium blue: Baby
Blue + Blue Chiffon 1:1
Blush Flesh * Deep Burgundy °
Wilhamsburg Blue (~ = do not add
Extender)
5/o liner
1.	Begin with the tear-
drop strokes using a
no. 2 round. The dark
red teardrops are Deep
Burgundy tipped in
Blush Flesh. The light
red teardrop is Blush
Flesh tipped in Peaches
'n Cream. The yellow
teardrop is Antique
Gold tipped in French
Vanilla.
2.	Next paint the
teardrop chip strokes
using a no. J round.
The blue strokes are
Williamsburg Blue
tipped in medium blue
mix. The green strokes
are jade Green tipped in
French Vanilla.
3.	Load a 5/0 liner with
Jade Green and pull a
curving stem that curls
over on itself.
4.	Shade the middle
part of the stem with
Deep Burgundy on a 5/0
liner. Dot at the end of
the curl with Williams-
burg Blue using the tip
end of the brush handle.
74
л
ьЯ
Я
-л
£3
^3
я
я
я
я
Я
.3
No. 4 round: Teardrop strokes.
Tulip: Side petals, load Peaches *n Cream, tip Blush
Flesh.
Center petal, load Blush Flesh, tip Deep Burgundy.
@ No. з round: Teardrop chip strokes.
Green: Load Jade Green, tip French Vanilla.
Blue: Load Williamsburg Blue, tip medium blue.
Q No. 2 round:
Dark red strokes, load Deep Burgundy, tip Blush
Flesh.
Light red strokes, load Blush Flesh, tip Peaches 'n
Cream.
Yellow strokes, load Antique Gold, tip French Vanilla.
@ 5/0 liner. Linework.
Green: Jade Green.
Yellow: Antique Gold.
Curl: Blush Flesh.
Blue: Brush mix of Williamsburg Blue + medium blue.
Accent side petal tips on the tulips, and the
green and yellow curls with Deep Burgundy.
Liner handle dots: Jade Green below tulip;
Williamsburg Blue on curls; Antique Gold with
top red commas.
ROUND BRU'
Common Mistakes with the Round Brush
When you are first learning about brushstrokes, you may notice some problems that you
can't seem to correct. Usually the problems are related to how much pressure is applied
during the stroke or how the brush is moved. Here are ten of the most common round
brush mistakes and how to fix them.
Pressure Stroke
o. Mistake. Pressure released
too abruptly leaves deposits
of color on sides.
b. Correct. Release pressure
evenly and gradually.
Pressure Stroke
a.	Mistake. Failed to relax back
up onto the tip at the end of
the stroke.
b.	Correct. Gradually relax the
pressure as you lift back up
to the tip.
Comma Stroke,
flat on inside edge
a. Mistake. Over-fanned the
outer edge.
b.	Correct. Pull down straight to
the point sooner.
Pointed Comma
or Pressure Stroke
a.	Mistake. Pressure applied too
abruptly after the point.
b.	Correct. After painting the
point, apply pressure more
gradually.
Wavy Pointed Comma Stroke
a. Mistake. Pressure was
released between the waves.
b. Correct. Maintain even pres-
sure on the brush as you
wave.
1
i
i
fl
1
I
fl
fl
I
fl
I
fl
I
fl
fl
fl
fl
I
I
I
<
Pointed Comma with long point,
quick pressure
a.	Mistake. Did not fan out on one
side while holding the other side
straight.
b.	Correct. Fan out on one side
only.
Teardrop Stroke
a.	Mistake. Tip was pulled through
the entire stroke.
b.	Correct. Pull the tip three-fourths
of the way through, then lift off.
Fan Stroke
a.	Mistake. Bristles are not opening
up because ferrule is not down
on the surface.
b.	Correct. Lay the ferrule down and
twist the brush side-to-side in
small increments.
Fan Stroke
a.	Mistake. Pressure was released
too quickly, leaving deposits of
loading color along the edges.
b.	Correct. Release pressure gradu
ally as you lift back up onto the
tip.
Fan Stroke
a.	Mistake. Brush is being over-
twisted. which makes the bristles
fan out too widely.
b.	Correct. Twist the brush in small
increments to open the bristles
and avoid over-blending.
Ten Round Brush Borders
Borders arc easy and fun to paint and they serve as the finishing touch for many of
your decorative painting and home decor projects. Here are ten borders painted
with a round brush. The brushes and colors I used for each border are listed, but
feel free to use your own favorite colors if you prefer.
Brush: 5/0 hner. Color: Sapphire.
Brush: 5/0 liner. Colors: Canyon Orange, Plum.
Brushes: no. 4 round, no. о liner. Colors: Sapphire, Blue Chiffon, Spice Pink, Burgundy Wine.
Hauser Medium Green, Hauser Dark Green, Limeade.
Brushes: nos. 2 and 4 round; 5/0 liner. Colors: Limeade, Antique Green, Burgundy Wine,
Antique Rose, Taffy Cream.
Brushes: no. 2 round, 5/0 liner. Colors: Summer Lilac, Wisteria, Royal Purple, Lilac.
Brush: 5/o liner Colors: Reindeer Moss Green, Burnt Orange, Canyon Orange. Pansy lavender
Brush: no. 2 round. Colors: Spice Pink, Burgundy Wine, Pink Chiffon
Brushes: no. 2 round, 5/0 liner. Colors: Taffy Cream, Antique Rose, Limeade, Hauser Medium Green.
Brushes: no. 2 round, 5/0 liner. Colors: Pansy Lavender, Blue Chiffon, Country Blue, Lilac,
Bluegrass Green, Deep Teal.
Brushes: nos. 2 and 4 round, 5/0 liner. Colors: Rookwood Red, Reindeer Moss Green, Raw Umber, Dove Grey,
Brandy Wine, Yellow Ochre.
79

SECTION TWO
Tlat "brush
LAT BRUSH STROKES are more compact than those
!	made by a round brush, and the flat brush is perfect
J—	for making short, wide strokes. The "chisel" is what
we call the top edge of the bristles—slide on the chisel to make
points. Press down on the flat side of the brush for the wide
areas in the stroke. In some strokes on the following pages,
you’ll see how to twist the brush between your fingers to make
strokes with very wide shapes. Two of the demos show you how
to ruffle the outer edges by wiggling the brush in and out.
It's easier for right-handed painters to pull their flat brush
strokes from left to right, while left-handed painters pull from
right to left. Remember to always turn your surface so you can
clearly see your stroke from start to finish.
I think you’ll enjoy the flat brush demos coming up—relax and
have fun with them. If needed, please review the tips on load-
ing a flat brush on pages 11 and 12.
81
FLAT BRUSH
Straight Pressure Stroke
Let's start with the pressure stroke, the easiest of all Oat brush strokes. To get petals
that range from darker to lighter, keep stroking new petals without reloading your
brush for a while. And to get larger petals, just use a larger flat brush.
Medium blue Victorian Blue	Raspberry
Baby Blue +
Victorian Blue 2:1
1.	Load a no. 4 Hat with
Blue Chiffon and tip in the
medium blue mix. Pull a
straight pressure stroke to
form the first petal. Set the
brush down with pressure to
allow the bristles to open.
Pull in a straight path, and
at the end of the stroke,
relax the brush back up onto
the chisel and lift off.
2.	Without reloading, pull
two more straight pressure
strokes to form two more
petals that are lighter in
color than the first.
3.	Load a no. 4 flat with Blue
Chiffon and tip in Victorian
Blue. Pull one petal that
overlaps the light blue
flower, and without reload-
ing, pull the lighter blue
petal to the right of it.
Reload and pull the other
darker blue petal that over-
laps the first flower, and
without reloading, pull one
of the other lighter petals.
Reload and paint the fifth
and final petal.
4.	Double load a cotton
swab with half Taffy Cream
and half Marigold. Stamp in
the centers of the flowers.
I
I
I
J
I
9
I
S
J
82
3
3
s
□
э
э
s
в
а
a
в
в
в
в
в
No. 4 flat: Load Blue
Chiffon, tip Light
Avocado. Pull 2
strokes and reload.
No. 4 flat: Load Taffy > 5/0 liner. Pull in
Cream, tip Light	vein with Raspberry,
Avocado. Pull 2
strokes and reload.
; No. 4 flat: Load Blue
Chiffon, tip medium blue.
Pull 3 strokes and reload.
0 No. 4 flat: load Blue
Chiffon, tip Victorian
Blue. Pull 2 strokes.
Reload and pull last 3
strokes.
О Load cotton swab half in
Taffy Cream, half in
Marigold. Stamp in centers.
О Raspberry stylus dots
on dark edge.
light Avocado crescent
line with 5/0 liner.
, No. 4 flat: Load Taffy Cream,
tip Raspberry. Pull 5 strokes
and reload.
No. о flat: Load Taffy
Cream, tip Light Avocado
Pull all strokes and reload
for next curl
Taffy Cream stylus dots
83
Curved Pressure Stroke
Curving the pressure stroke you learned in the previous demo bends the petals and
leaves so they attach easily to the flower centers and stems. This effect is empha-
sized by adding fine lines that either shade or highlight the base of the stroke
No. 4 flat
Camel	light Avocado Arbor Green
No 6 flat
5/0 liner
Cool White *
Orchid
Tally Cream
Wild Orchid
Royal Purple
Boysenberry Pink
( * = do not add
Extender)
1.	Load a no. 6 flat with
Cool White and tip in
Orchid. To form the first
petal, pull a curved pressure
stroke starting at the outer
edge and pulling toward the
center. Set the brush down
with pressure to allow the
bristles to open. Pull in a
curved path and at the end
of the stroke, relax the brush
back up onto the chisel and
lift off.
2.	Reload and pull another
curved pressure stroke to
form the second petal. Turn
your surface so you can see
the path of the stroke.
3.	Load a no. 6 flat with
Cool White and tip in Wild
Orchid. Form the two darker
petals in the same way.
4.	Load a 5/0 liner with
Royal Purple and paint fine
lines on the petals, starting
at the base and pulling
toward the outer edges.
No. 6flat: Load Cool White,
tip Orchid.
. No. 6 flat: Load Cool White,
tip Wild Orchid.
5/0 liner. Turn your wort so you
can pull lines toward you with
Royal Purple.
(3Y
Camel	Taffy Pounce clean Curl with
Cream swab to blend	Boysen berry
Pink and liner
0 Center. Use cotton swabs to pounce color wet-into-wet.
r’j No. 6 flat: Load Orchid, tip
Royal Purple. Then pull lines of
Orchid out from the base with
the liner.
No. 4 flat: Stroke Load : No. 4 fiat: Stroke 3: Load Cool White, tip
Cool White, tip Arbor	Orchid. Stroke 4: Load Taffy Cream, tip
Green. Stroke 2: Load Taffy	Boysenberry Pink. Do all strokes in
Cream, tip Light Avocado.	group, then reload for the next.
Liner Detail:
Boysenberry Pink leaf veins.
Light Avocado cuds.
Orchid brush-handle dots.
Combination Straight & Curved
Pressure Strokes
Geraniums are the perfect flower to make with a straight pressure stroke because
the petals are short and square. Leave open spaces between the florets to give a lay
cred look. Elongate the curved pressure stroke to make the broad leaves, and use
the liner to make the red markings on the leaves
No. 2 flat
Moon Yellow
Celery Green
Light Avocado
No 6 flat
No. 8 flat
Taffy Ci earn
Blush Flesh
Counlry Rod '•
Deep Burgundy
Peaches n Qwm (tf = do not add
Extender)
$/o liner
No io Pro Round
1.	Using a no. 6 flat and
straight pressure strokes,
paint the petals of the gera-
nium floret, pulling from the
outer edge Io the center. The
lightest petal is Taffy Cream
tipped in Blush Flesh. The
medium petals are Moon
Yellow tipped in Country
Red. The darkest petal is
Moon Yellow tipped In
Deep Burgundy.
2.	Load a 5/0 liner with
Moon Yellow and pull fine
lines out from the center of
the floret. Using the tip end
of the liner handle, dot Light
Avocado In the center of the
floret and highlight with a
stylus dot of Taffy Cream.
3.	Load a no. 8 flat with Taffy
Cream and tip in Light
Avocado. Start the first half
of the leaf with a straight
pressure stroke at the top,
then overlap two curved
pressure strokes.
4.	Finish the other half of
the leaf the same way. Detail
the leaf with fine lines of
Taffy Cream on a 5/0 liner
stroked outward from the
center vein. The short red
parallel lines are painted
with Country Red on a 5/0
liner. Finish with a center
vein of Light Avocado.
I
I
I
I
I
Мл to FH' Round? Pounce
JVaches м Cream over the flowe»
head area to start.
«Ул 6 jJet; Medium petals
Load Moon Yellow. bp Country
Red.
Na 6 fiat; Datx petals Load
Moon Yellow. bp Deep
Burgundy.
Na ajL:t Ruds load Moon
Yellow. tip Counts Red
I
I
I
I
I
\’л 6/iat I ght petals: Low ’a’fy
Cream. bp S!ush Flesh. Petals a«e
straight pressure strokes.
Na 5 r’.:t.' u’X Gv.m'. t ? 1 f.'t
0 5/° I"**: Pull Moon Yellow
lutes w»t horn floret’s center.
Dot Celery Green centers in the
tight florets and Light Avocado
in the test with the bner handle.
Highlight centers with Tatty
Cream dot
Liner Detail:
tftjws? Tafly Cream
lines out from \v«n.
Country Rod lines.
Light Avocado veins
S:e#»»s? Ceeiv Green.
Tendrih Slush Flesh.
Dots. Slush. Flesh with
brush handle.
87
FLAT №M
Curved Comma Strokes
The curved axnma stroke is used to make a’.i the rose petals and leaves >n v«.$
destgn Use the *hv brush to hne the edges of the opening of'.he roses ard e.xter-d
the lines to wrap around and overlap »n back. This is a quiet vuv to indicate a rose
Nossom without havng to paint the whole th.ng?

К lead a no. $ fiat
лP nearpe an:
bp in Canyon
Orange. Set tn?
brush осчч" w»th
pressure to л км :*e
bastes to coe '
2.	P. "a curved
path *” e freas-rg
presswie.
3.	ле ruct
ecto th? chtse’ edge
jt\3 p'j: a ta.l coo-
t.ru.Ttg the лпес
path.
4.	 .-.co......
svoie that cunes
the ocher way it.*”
MCu* surface so «x.
can see t^e pith of
the strove, seoea:
steps
I
I
!
I
$
ш ш у
89
FLAT BRUSH
Straight Comma Stroke
The design in this demo is called a "medallion," which is a perfectly symmetrical
design that uses repeating elements. In this straight comma stroke, you'll learn how
to pivot the brush to make the straight point or tail of the comma.
No. 2 flat
Teal Green
Victorian Blue
Violet Haze
No. 6 flat
No. 3 flat
Wild Ochid
Plum
Blue Chiffon *
Medium blue: Blue
Chiffon + Sapphire r.»
(* = do not add
Extender)
5/o hner
1.	Load a no. 8 flat
with Blue Chiffon
and tip in Teal
Green. Set the
brush down with
pressure to allow
the bristles to open.
2.	Pull and release
pressure while piv-
oting the brush in
your fingers to turn
the left edge.
3.	Release more
pressure and con-
tinue pivoting the
brush a quarter
turn to bring the
left side of the
brush over to the
right side of the
stroke. A left-hand-
ed person would
pivot the right side
of the brush.
4.	Relax back up
onto the chisel edge
and pull a straight
tail.
90
Si
s
3
3
3
3
3
3
orusn-handle dots.
91
FLAT 8PUSH
Combination Straight & Curved
Comma Strokes
Combine straight and curved comma strokes and bold colors to create drama and
excitement. In this design, the yellow details on the lower petal of the flower are
made with a small flat brush using the scoop-loading technique shown on page 12.
Peony Pink Burgundy Wine	Napa Red
1.	These petals are made
with a straight comma
stroke and a no. 6 flat pulled
from the outer tip to the
point. The two outer petals
are Pink Chiffon tipped in
Peony Pink. The adjacent
petals are Baby Pink tipped
in Burgundy Wine. The cen-
ter petal is Baby Pink tipped
in Napa Red.
2.	Load a no. 4 flat with
Taffy Cream. Then scoop a
tiny bit of the same color
onto the corner of the brush
(see page 12 for the scoop- Wine,
loading technique). The
details are made by touching
the chisel edge of the brush
lightly to the surface.
3.	The leaves are made with
a curved comma stroke and
a no. 8 flat loaded with Taffy
Cream and tipped in Light
Avocado. Pull from the outer
tip to the point.
4.	With a no. о liner loaded
with Taffy Cream, pull fine
lines outward from the
point. The vein lines are
painted with Burgundy
I
I
I
No 6 flat: Load Pink
Chiffon, lip Peony Pink.
£ No. о liner Fill in center with Light Avocado
Taffy Cream highlight line.
Napa Red underline
f No. 4fat: Stipple
Taffy Cream.
Liner Detail:
Pull Taffy Cream lines out from point.
Burgundy Wine veins.
Peony Pink curl.
Stem: Brush mix Taffy Cream + Light Avocado.
' No. S flat: Load
Taffy Cream, tip
Light Avocado.
C Stroke	“Ч
С strokes are perfect for making little rosebuds and any other Rower that has a tight-
ly coiled center. This design introduces double loading on the Rat brush, which
shades and highlights each stroke at the same time. The final sparkle is added with
linework. The Rower strokes may require several coats for opaque coverage.
Taffy Geam Peaches’n Geam Coral Rose ’	Blush Flesh ♦
Country Red4 Mint Julep Green Arbor Green ( *  do not add
Extender)
1.	Double load a no
6 flat with Mint Julep
Green and Arbor
Green. Start on the
chisel edge and pull
to the left. Apply
pressure following a
curved path.
2.	Continue the
curve applying pres-
sure.
3.	Gradually release
pressure while con-
tinuing the curve.
Lift back up to the
chisel and slide to
the right to complete
the C shape.
4.	C strokes can be
pulled in any direc-
tion. Turn your sur-
face so you can see
the path of the
stroke.
L U к 1й
s
s
□
з
3
3
3
3
3
3
3
3
3
3
2
3
3
3
3
3
0 No. 8flat: Double
toad Coral Rose and
Country Red.
о Brush Country Red
below strokes in
opening.
© No. 6 flat: Double load
Peaches 'n Cream and
Blush Flesh.
O No. «flat: Double load
Peaches *n Cream and
Blush Flesh.
Country Red veins.
0 5/o liner. Line light
petal edges with
Peaches *n Cream.
Fill in calyx with
Arbor Green.
Taffy Cream highlight on
petal edge and calyx.
0 No. 6 flat: Double
load Mint Julep Green
and Arbor Green.
О 5/° l,ner- beend Mint
Julep Green tails into a
point
Scroll Stroke
FLAT BRUSH
A scroll stroke is very similar to a C stroke, with a longer tail at one end. Scrolls
have always been used in the decorative arts through the ages. Once you learn this
stroke, you'll use it often in your painting.
No S flat
Light Buttermilk *
Lilac
Pansy Laverxkr
5/0 liner
Soft lilac
Dark red-violet:
Boysenberry Pink +
Cranberry Wine t:t
1.	Double load a no.
8 flat with Soft Lilac
and dark blue-violet
mix. Start on the
chisel edge and pull
upward.
2.	Gradually apply
pressure and contin-
ue pulling upward,
following a curved
path to the right.
3.	Complete the
curve, gradually
releasing pressure.
Lift back up to the
chisel and slide to
form the point.
4.	Scroll strokes can
be pulled in any
direction. Turn your
surface so you can
see the path of the
stroke,
Dark blue-violet:	* do not add
Violet Haze + Crape	Extender)
Juke tn


I
я Ш M Ш
1
1
No. 8flat: Double load Lilac and dark red-violet mix.
) S/o liner. Crosshatch lines with
brush mix of Soft Lilac + dark blue-
violet mix.
No. 8 flat: Double	5/0 liner. Extend Soft	No. 8flat: Double	5/0 liner Extend Lilac
load Soft Lilac and	Lilac edge into a curl.	load Lilac and Pansy	edge into a curl.
dark blue-violet mix.
' 5/0 liner. Brush
mix Lilac + dark
red-violet mix.
Lavender.
5/0 liner. Darken
top curve with dark
red-violet mix.
Liner Detail:
Highlight all strokes with
short Light Buttermilk line.
Brush mix Lilac + Pansy
Lavender for curved line
resting inside the curve on
top strokes.
Brush mix Soft Lilac + dark
blue-violet for curved line
resting inside the curve on
lavender strokes.
Dot with no. 8 flat brush han-
dle. mix Soft Lilac + touch of
dark blue-violet.
Combination C Stroke and Scroll Stroke
In this combination, we’re taking the heart shape from the previous scroll stroke
design on pages 96-97 and using it for the leaves. Just fill in the middle with green.
The C stroke is used in the flowers, and linework detail is added.
No. 6 flat
Pineapple
Light Avocado
5/0 liner
Spice Pink
Napa Red
Avocado
Yellow Ochre
Terra Cotta
Light green: Limeade +
a touch of Dried Basil
Green
1.	Double load a no. 6 flat
with Yellow Ochre and Terra
Cotta. Paint three C stroke
petals as shown, keeping the
Terra Cotta to the outside
edge on each petal.
2.	Double load a no. 6 flat
with Spice Pink and Napa
Red. Paint three larger C
stroke petals between the
first three. Keep the Napa
Red to the outside edge on
each stroke.
3.	Double load a no. 6 flat
with light green mix and
Light Avocado. Paint two
mirror-image scroll strokes
that begin at the same point
and end at the same point.
Keep the Light Avocado to
the outside edge.
4.	Double load a no. 6 flat
with light green mix and
Avocado. Paint two smaller
scroll strokes nesting within
the larger scrolls. Keep the
Avocado to the outside
edge. Fill in the middle area
with the light green mix.
1
1
3
п
4
4
FLAT BRUSH
Pivot C Stroke
This is a variation on the C stroke. By putting the tails closer together, the sides of
the C-shape angle out rather than straight up. In this medallion design, we'll be
layering the C strokes to create depth and dimension.
No. 6 flat
Soft Blue
Blue Mist
No. 8 flat
5/0 liner
Blue Chiffon
Blue Haze
Wisteria
Violet Haze ( * = do not add Extender)
1.	Double load a no.
8 flat with Soft Blue
and Blue Mist. Start
on the chisel edge
and pull upwards on
the diagonal.
2.	Gradually apply
pressure and contin-
ue pulling upward,
pivoting the upper
corner of the brush
to form the rounded
back of the C shape.
3.	Gradually release
pressure and contin-
ue to pivot the
upper corner of the
brush, pulling
inward diagonally
and down.
4.	Relax back up
onto the chisel and
slide to form the
tail.

100
I
No. 8fiat:
Double load
Soft Blue and
Blue Mist
No. 6 fiat:
Double load
Blue Mist and
Blue Haze.
: r 5/0 liner.
Crescent line
with Wisteria.
Wisteria high-
light line on
small C
strokes.
5/0 liner Violet Haze
shading on crescent
line.
Blue Chiffon sparkle line
on the highlight of the
small C strokes.
Brush-handle dots with
Wisteria and Blue
Haze.
Cotton swabs:
Pounce:
Violet Haze outside,
Wisteria inside.
Blend while wet
with dry swab.
5/0 liner Stipple
highlight with Blue
Chiffon.
1
4
Closed C Stroke
A closed C stroke is a teardrop shape with very soft blending because of the double-
loaded brush. Compare this stroke to the pivot C stroke on the previous two pages;
you'll see that the closed C stroke does not have a hole in the center and the pivot C
does. In this design, well use the closed C stroke for the leaves and candle flames.
f * = do not add Extender)
1.	Double load a no. 6 flat
with Moon Yellow and
Tangelo Orange. Start on
the chisel edge and pull
upwards on the diagonal.
The outer corner of the
brush is in the lead.
2.	Gradually apply pressure
and continue pulling
upward, pivoting the outer
corner of the brush to form
the rounded back of the C
shape. The inner corner of
the brush moves only slightly.
3.	Gradually release pres-
sure and continue to pivot
the outer corner of the
brush, pulling inward diago-
nally and down. The inner
corner of the brush is now
in the lead, filling in the mid-
dle of the stroke. Relax back
up onto the chisel and slide
to form the tail that con-
nects to the starting point.
4.	You can make a candle
flame out of this stroke by
turning it upside down and
adding a wick to the Tangelo
Orange side. The wick is a
brush mix of Napa Red and
Avocado. Stipple Country
Red at the point where the
wick enters the flame.
102
No. 6 flat: Begin by masking
off both sides of candle with
tape. Double load Blush Flesh
and Country Red.
No. 6flat: Flame:
Double load Moon
Yellow and Tangelo
Orange.
0 5/0 liner: Wick:
Brush mix of Napa
Red + Avocado.
Stipple Country Red.
5/0 liner. Dark ribbons
and knot: Country Red.
Highlight knot with
Moon Yellow.
 5/0 liner. Blush
Flesh.
Final Details:
Twigs: Brush mix
Country Red +
Avocado on 5/0
liner.
Country Red berries
with brush handle.
Stipple Moon Yellow
highlight.
Double load Mint julep
Green and Arbor Green.
•' No. 6flat: Warm Leaves:
Double load jade Green
and Avocado.
: 5/0 linen Veins:
Cool Leaves: Soft Sage.
Warm Leaves: brush mix Moon
Yellow jade Green.
103
Combination Closed C Stroke & Pivot C Stroke
In this combination, the pivot C stroke is used for the violet petals and the yellow
bowl or cup of the flower. The closed C stroke is used for the leaves and the darker
petal inside the opening.
No. 6 flat
Moon Yellow
Reindeer Moss Green
Light Avocado
Summer Lilac
No. 8 flat
No. io flat
Plum	Med<um orange:
Burnt Orange +
Moon Yellow i;i
5/0 liner
1.	Double load a no.
6 flat with Summer
Lilac and Plum and
paint three pivot C
strokes as shown to
form the three petals.
2.	Double load a no.
8 flat with Moon
Yellow and Canyon
Orange. Paint a large
pivot C stroke to
form the center
opening.
3.	The opening is a
closed C stroke
painted with medium
orange mix and
Napa Red double
loaded on a no. 8
flat.
4.	Detail the opening
with a curl of Moon
Yellow on a 5/0 liner.
О
104
1
1
1
<
? . No. 8 flat: Double load
medium orange mix
and Napa Red (closed
C stroke).
No. to flat: Double load
Reindeer Moss Green
and Light Avocado
(closed C stroke).
Stems: brush mix Reindeer
Moss Green + Light
Avocado,
Tendrils and brush handle dots:
medium orange mix.
Liner Detail:
Flower. Moon Yellow curl.
Leaf stem and veins: Napa
No. 6 flat: Double load ' No. 8flat: Double load
Summer Lilac and	Moon Yellow and Canyon
Plum (pivot C strokes). Orange (pivot C stroke).
Ruffled C Stroke Variations & Scroll Stroke
With a flat brush, you can ruffle any of the strokes you’ve learned so far. When using
a double-loaded brush, you can go over the wet stroke several times for a soft
blend. You can also stop your brush at any time, reload, and come back. In this
design, remember to maintain even pressure on the brush while ruffling the petals.
Toffee
Reindeer Moss Green
Dusty Rose
Bultermilk
Gooseberry Pink
Antique Mauve
Medium green:
Avocado + a touch of
Gooseberry Pink
Dark red: Napa Red +
a touch of Avocado
1.	Double load a no. 10 flat
with Dusty Rose and dark
red mix. The first petal is a
ruffled scroll stroke. Start on
the chisel edge and pull
upwards on the diagonal,
gradually increasing pres-
sure. Wiggle the brush to
form ruffles at the lop of the
stroke.
2.	Continue to ruffle the
scroll stroke, then relax onto
the chisel and slide down-
ward to complete the stroke.
3.	The wider petal is a ruf-
fled closed C stroke. Double
load a no. ц flat with the
same colors. Start on the
chisel edge and pull up-
wards on the diagonal. The
outer corner of the brush is
in the lead. Gradually apply
pressure and begin to ruffle
the outer edge.
4.	Continue to ruffle, main-
taining even pressure. While
pivoting the outer corner of
the brush, pull inward diago-
nally and down. The inner
corner of the brush is now
m the lead, filling in the mid-
dle of the stroke.
5.	Relax back up onto the
chisel and slide to form the
tail that connects to the
starting point.
• No. 10flat: Double load Dusty
Rose and dark red mix. Petal 5
is a ruffled C stroke.
No. 14 flat: Double load Dusty
Rose and dark red mix. Petal 6
is a ruffled scroll stroke.
• No. 0 liner. Pull Buttermilk lines out
from base of petals 2 and 3.
О No. 10flat: Petal 3: Double load Toffee
and Antique Mauve. Petal 4: Double load
Dusty Rose and Antique Mauve. Petals 3
and 4 are ruffled C and pivot C strokes.
1
a
л
No. 14 flat: Double load Dusty
Rose and dark red mix. Petal 7
is a ruffled closed C stroke.
No. 10 flat: Fill in lower half of petals 1. 2 and 3
with Toffee.
No. 10 flat: Double load Toffee and Gooseberry Pink
Petals 1 and 2 are ruffled C and pivot C strokes.
j No. 14 flat: Double load
Reindeer Moss Green and
medium green mix. Leaf is a
scroll stroke.
Liner Detail:
Stamens: Medium green stem. Dark red head. Highlight
Gooseberry Pink.
Veins: Petals 4, 6, 7: Toffee. Petals 6. 7; lighten vein base with
Buttermilk.
Leaf: Antique Mauve curl on light edge.
Stems: Brush mix Reindeer Moss Green + medium green mix.
Tendril: Gooseberry Pink.

S Stroke
FLAT BRUSH
This simple S stroke is perfect for painting leaves. The brush continues to move in
one direction—no pivoting or turning is needed. The double loading on the brush
gives a range of shades from dark to light in each leaf.
No. o liner
Mint Julep Green
Arbor Green
Soft Lilac
Buttermilk
Wild Orchid
Pansy Lavender
Medium green;
Mint |ulep Green +
Arbor Green 2:1
1.	Double load a
no. to flat with
Mint Julep Green
and Arbor Green.
Turn your surface
so you can see the
path of the stroke.
Start on the chisel
edge and pull to the
right. Apply pres-
sure to begin open-
ing the bristles.
2.	Apply more pres-
sure while continu-
ing the stroke.
3.	Release pressure
and continue to
pull to the right.
Relax back up onto
the chisel; slide to
form the end point
of the stroke.
4.	S strokes can
face in any direc-
tion; just turn your
surface so that you
can always see the
path of the stroke.
О No. ioflat: Double load Mint Julep Green and Arbor Green
О No. о liner Pull in stems with medium green
109
No. o liner. Pansy Lavender leaf stems and veins.
Buttermilk highlight line.
Corner frames:
Tape on both sides of stripe. Pounce Soft Lilac over stripe
with silk sponge. While wet. lightly pounce Wild Orchid i
the corners. Remove tape.
Pivot S Stroke
Pivoting the S stroke and pairing two together gives you a light center and dark
edges. All the petals, leaves and butterfly wings in this design were done with the
same pivot S stroke—it's the liner details that distinguish one from the other
Extender)
1.	Double load a no. ю flat
with Canyon Orange and
Napa Red. Turn your surface
so you can see the path of
the stroke. To paint the first
half of the petal, start on the
chisel edge and pull to the
left. Apply pressure to begin
opening the bristles. Apply
more pressure while contin-
uing the stroke. The outer
corner (the Napa Red side)
of the brush begins to pivot
inward.
2.	Release pressure and con-
tinue to pull down and to
the right. Relax back up onto
the chisel, which is now
positioned in the middle of
the petal. Slide to form the
end point.
3.	Turn your surface so you
can see the path of the
stroke. The other half of the
petal is painted the same
way. Start on the chisel edge
and pull to the left. Apply
pressure to begin opening
the bristles. Apply more
pressure while continuing
the stroke. The outer corner
(the Napa Red side) of the
brush begins to pivot
inward.
4.	Release pressure and con-
tinue to pull up and to the
right. Relax back up onto the
chisel, which is now posi-
tioned in the middle of the
petal. Slide to form the end
point.
110
I
0 No. Sflat: Double load
Wisteria and Royal Purple.
Two strokes per wing.
i’f No. 10flat: Double load
Orchid and Plum. Two
strokes per wing.
О No. о /riWi Top wing: Moon Yellow
linework: Canyon Orange stylus dots.
Lower wing: Napa Red tip and linework.
Body: Royal Purple.
No. 8 flat for small petal:
no. 10 flat for large petal:
Double load Canyon
Orange and Napa Red.
Center is Avocado.
О No. Sflat: Double
load Limeade and
Avocado. Two
strokes per leaf.
О No. io flat: Double load
Moon Yellow and
Canyon Orange. Two
strokes per petal. x
Liner Detail—Flowers:
Small petals: Limeade vein.
Large petals: Royal Purple
lines.
Center highlight: Moon Yellow
stylus dot.
Liner Detail:
Leaf vein: Napa Red.
Sums: Brush mix Limeade + Avocado.
Tendril: Orchid
FLAT BRUSH
Combination S Stroke & Pivot S Stroke
In this design, the bird, the leaves, and the dark red flower petals are all painted
with a simple S stroke. The dark red buds, and the pink-and-violet petals are painted
with a pivot S stroke. Use the liner to accent the points.
No 4 flat
No. 6 flat
Avocado
Winter Blue
Plum -
Napa Red
5/0 liner
Peaches ‘n Cream
Blush Flesh 4
Light green: Reindeer
Moss Green ♦ Taffy
Cream 2:1
(* = do not add
Extender)
1.	Double load a
no. 6 flat with
Blush Flesh and
Napa Red. Using a
pivot S stroke, paint
the first half of the
flower bud, pulling
from the base lo
the tip.
2.	Reload your
brush and paint the
other half of the
bud.
3.	Load a no. 4 flat
with Avocado and
tip into light green
mix. Using two S
strokes, paint the
two sepals, pulling
the strokes back to
the base of the bud.
4.	Load a 5/0 liner
with a brush mix of
light green mix and
Avocado and paint
the stem. The ten-
dril is Winter Blue.
&
ж
4
1
I
1
1
1
1
я
I
1
I
I
1
I
I
I
4
1
*
112
3
3
3
J
1
а
: No. 4 flat: Load Winter
Blue, tip Plum.
No. 6 flat: Double load
Winter Blue and Plum.
• 1 No. 4 flat: Load Winter
Blue, tip Napa Red.
Liner Detail:
Eye: Plum.
Cheek: Blush Flesh.
Highlights: Peaches 'n Cream
Beak; Napa Red.
113
FLAT BRUSH
Quarter-turn Pivot Stroke
A quarter-turn pivot stroke is one in which the chisel edge of the brush turns 90
degrees as you pull the stroke. In this border design, I taped off along the top of the
row of green and purple strokes to make a perfectly straight edge. Start the stroke
on the tape and pull downward to the end point.
No 4 та
Mmt ju'ep Gteen
No. 14 Hat
No. о hner
Summer Lilac
Violet Haze
Colonial Crwn
Soft Lilac
(* = do not add Extender)
1.	Double load a
no. 14 flat with
Mint Julep Green
and Colonial Green.
Touch the chisel
edge of the brush
down at the base,
or widest part, of
the stroke. Keep the
Colonial Green to
the outside edge.
Begin to apply pres-
sure and pull down
as you start to pivot
the outer edge of
the brush inward.
2.	Begin to release
pressure while
pulling down and
continue to pivot
the outer edge of
(he brush inward
toward the center.
3.	Relax the brush
back up onto the
chisel and slide to
form the end point.
Reload your brush
and repeat the
stroke on the other
side.
114
J
a
з
з
з
з
3
3
3

No. 14 flat: Double load Mint Julep
Green and Colonial Green. Two
strokes per shape.
о No. 4 flat: Apply tape to make a
straight edge. Double load Soft
Lilac and Violet Haze. Two
strokes per shape.
No. 14 flat: Double load Summer Lilac and
Plum. Two strokes per shape. Remove tape.
1 No. 14 flat: Double load Soft Lilac and Violet Haze. For
clean straight edges, tape off above and below stripe.
Apply i/4-inch (6mm) painter's tape for the narrow
stripe.
0 5/0 liner: Colonial Green stripe. Remove tape.
FLAT BRUSH
Half-turn Pivot Stroke
A half-turn pivot stroke is one in which the chisel edge of the brush turns r8o
degrees as you pull the stroke. These dogwood petals are produced with two half
turn pivot strokes which are paired together to form the distinctive heart shape of
the dogwood blossom.

No. 6 Oat
Celery C'een
No. о liner
P.neappie -
Avocado
Sand
Spke Pink
Limeade
Peony Pmk *
Napa Red
(* = do not add
Extender)

1.	Double load a no. 6 flat
with Sand and Spice Pink.
Touch the chisel edge of the
brush to the surface.
2.	Apply pressure and begin
to pivot the outside (Spice
Pink) corner of the brush in
an arc. The inside (Sand)
corner moves only slightly.
3.	Start to release pressure
and continue to pivot as you
pull the stroke towards the
end point.
4.	At the end of the stroke,
your brush will have pivoted
the one-half turn. Relax back
up onto the chisel and slide
into the end point.
5.	To form a petal or a leaf,
reload your brush and paint
another half-turn pivot
stroke, turning your surface
to see the path of the stroke
116
117
Combination Quarter-turn &
Half-turn Pivot Strokes
I created this fanciful flower by combining the quarter- and half-turn pivot strokes
we learned on pages 114-117. The light blue petals, which are two quarter-turn piv-
ots. appear to be tucked behind the dark blue petals, which are two half-turn pivots.
I
I
3
No. 4 flat
No. 6 flat
5/0 liner
Moon Ye-low
Baby Blue
I
I
Blue Chiffon
Admiral Blu-e
Dark yellow •' Honey
Brown + Primary
Yellow 3:1
Medium blue: Blue
Chiffon + Baby Blue i;i
(* = do not add
Extender)
1. Double load a no. 6 flat
Hauser Medium
Green-
with Blue Chiffon and Baby
Blue. These light blue petals
are painted with two quarter-
turn pivot strokes per petal.
Paint the first half of the
petal with one quarter-turn
pivot stroke, then turn your
surface, reload your brush
and paint the other half of
the petal with a second
quarter-turn pivot stroke.
2. Double load a no. 6 flat
with medium blue mix and
Admiral Blue. Paint the dark-
er blue petal with two half-
turn pivot strokes, reloading
your brush between strokes.
3. The leaves are made up
of two quarter-turn pivot
strokes, using a no. 6 flat
double loaded with Limeade
and Hauser Medium Green.
4. Double load a no. 6 flat
with Moon Yellow and dark
yellow mix. Add the yellow
petal to the flower with two
half-turn pivot strokes. The
details are all painted with a
5/0 liner. The stems are a
brush mix of Limeade and
Hauser Medium Green. The
tendrils are dark yellow mix.
The light blue petals have
center veins and tip details
of Admiral Blue; the dark
blue petal's vein is Moon
Yellow; and the yellow
petal's detail lines are
Admiral Blue. Fill in the cen-
ter with Hauser Medium
Green; the curved line is
medium blue mix; the stylus
dot highlight is Light
Buttermilk.
118
n
п
п
и
и
п
и
п
;1
II
И
D
Л
31
Я
31
31
31
31
31
а
а	5/о liner: Baby Blue vein.
ч
a
Liner Detail—Leaves:
Stems: Brush mix Limeade +
Hauser Medium Green.
Tendrils: Dark yellow mix.
Liner Detail—Flower:
Yellow Petal: Admiral Blue lines.
Side Petals: Admiral Blue vein and tip accent.
Top Petal: Moon Yellow vein.
Center: Fill in with Hauser Medium Green
Medium blue line. Light Buttermilk stylus dot.
Ruffed S, Pivot S, & Half-turn Pivot Strokes 1
These flower petals and leaves are all ruffled variations of the S strokes and pivot	I
strokes we’ve just learned. Remember, any time you ruffle a stroke, maintain even
pressure on the brush while you are ruffling. You can go over your wet strokes	’
several times to soften the blend.
No. 10 flat
Moon Yellow
Limeade
Hauser Medium
Green -
No. о liner
Pineapple
Orchid
Dark violet * Vivid
Violet t Plum 1:1
Cadmium Orange
(* = do not add
Extender)
I
I
I
I
Continue to ruffle the stroke,
then stop, relax onto the
chisel and slide upward to
complete the stroke.
1.	Double load a no. 8 flat
with Limeade and Hauser
Medium Green. Paint the
leaves with a ruffled S
stroke. Start on the chisel
edge and pull upwards on
the diagonal, gradually
increasing pressure. Wiggle
the brush to form ruffles at
the top of the stroke, main-
taining even pressure.
2.	Double load a no. 14 flat
with Orchid and dark violet
mix. Paint the purple petal
with two ruffled pivot S
strokes. Keep the Orchid
side of the brush to the out-
side for the top half of the
petal, and next to the vein
for the bottom half.
3.	Double load a no. 10 flat
with Moon Yellow and
Cadmium Orange. The large
petal is painted with a ruf-
fled half-pivot stroke. Touch
the chisel edge of the brush
to the surface. Apply pres-
sure and begin to pivot the
outside (Cadmium Orange)
corner of the brush in an arc
while ruffling the outside
edge of the petal. Start to
release pressure, stop ruf-
fling and continue to pivot
as you pull the stroke
towards the end point.
4.	Use a no. о liner to paint
the center veins and ten-
drils. The center vein of the
purple petal is Moon Yellow;
of the orange petal is dark
violet mix; the tendril is
Orchid; and the curl is
Cadmium Orange.
9
120
No. 14 flat: Double load Limeade and
Hauser Medium Green. Cadmium
Orange veins with no. о liner.
No. 8 flat: Small leaves:
Double load Limeade and
Hauser Medium Green.
No. 8 flat: Orange
petal: Double load
Moon Yellow and
Cadmium Orange.
No. 8flat: Double
load Orchid and
dark violet mix; two
strokes per petal.
Moon Yellow vein.
Liner Detail:
Stems: Brush mix Limeade + Hauser
Medium Green.
Tendrils: Orchid, accented with dark
violet, Cadmium Orange.
FLAT BRUSH
Common Mistakes with the Flat Brush
When you are first learning about brushstrokes, you may notice some problems that
you can't seem to correct. Usually the problems are related to how much pressure
is applied during the stroke or how the brush is moved. Here are fifteen of the most
common flat brush mistakes and how to fix them.
Comma Stroke
a.	Mistake. Held pres-
sure too long, then
released pressure
too abruptly.
b.	Mistake. Too square.
Watch the inside
curve as you stroke.
d. Correct. Here is a
properly formed
comma stroke.
c.	Mistake. Did not
relax back up onto
the chisel when slid-
ing to form the tail.
C Stroke
*
a. Mistake. Released
pressure too quickly.
b.	Mistake. Applied
pressure while slid-
ing on the chisel.
c.	Mistake. Flicked the
chisel off the surface
rather than sliding.
d.	Correct. A properly
formed C stroke is
smooth and the col-
ors are evenly dis-
tributed.
Scroll Stroke
Closed C Stroke
r
b. Correct. Stop the
stroke at the top by
lifting to the chisel
and sliding.
a. Mistake. Pivoted
outer corner of the
brush around to
finish.
a.	Mistake. Continued
to pivot the outer
corner of the brush
into the tail of the
stroke.
b.	Correct. Halfway
through the stroke,
the inside corner
takes the lead.
122
31
31
ai
si
31
31
31
31
31
31
31
31
31
31
.31
31
31
31
.31
я
я
я
S Stroke
a. Mistake. Slid on the chisel too
long at start and end of stroke.
c. Mistake. Reversed direction
during stroke.
Ruffled Strokes
b. Mistake. Applied pressure when
sliding on the chisel.
d. Mistake. Too boxy—once the
brush starts to move to the
right, it must continue to
move diagonally to the right.

a. Mistake. Released
pressure and stood
up on chisel
between ruffles.
b. Correct. Maintain
even pressure as
you form the ruffles.
e. Correct. A properly formed
S stroke is a smooth con-
tinuous movement.
Pivot S Stroke
o. Mistake. Took chisel
ioo far across the
shape.
a. Mistake. Started the b. Correa. Begin both
second stroke al the	strokes at the same
opposite end.	end.
b. Correa. Chisel edge
must finish in the
middle of the shape.
123
an
31
31
si
Я1
л
л
л
31
л
3
al
31
л
3
31
31
31
31
31
а
а
я
л
а
S Stroke
a. Mistake. Slid on the chisel too
long at start and end of stroke.
b. Mistake. Applied pressure when
sliding on the chisel.
d. Mistake. Too boxy—once the
brush starts to move to the
right, it must continue to
move diagonally to the right.
c. Mistake. Reversed direction
during stroke.
e. Correct. A properly formed
S stroke is a smooth con-
tinuous movement.
Ruffled Strokes
a. Mistake. Released
pressure and stood
up on chisel
between ruffles.
b. Correct. Maintain
even pressure as
you form the ruffles.
Pinot S Stroke
a. Mistake. Took chisel b. Correct. Chisel edge
too far across the must finish in the
shape.	middle of the shape.
a. Mistake. Started the b. Correct. Begin both
second stroke at the	strokes at the same
opposite end.	end.
FLAT BRUSH
Ten Flat Brush Borders
Borders are easy and fun to paint and they serve as the finishing touch for many of
your decorative painting and home decor projects. Here are ten borders painted
with a flat brush. The brushes and colors I used for each border are listed, but feel
free to use your own favorite colors if you prefer.
-
Brush: no. 8 flat. Colors: Yellow Ochre. Brandy Wine.
=
-
Brush: no. 8 flat. Colors: Victorian Blue, Winter Blue, Royal Purple.
I
=
=
Brushes: no. 6 flat. no. о liner. Colors: Yellow Ochre, Brandy Wine, Avocado. )ade Green.
8
V V V V	V V	6:
Brushes: nos. 4 and 10 flat; 5/0 liner. Colors: Spice Pink, Burgundy Wine, Electric Pink, Pink Chiffon, Golden	_
Straw, Baby Blue, French Gray Blue, Reindeer Moss Green, Avocado.
Brushes: no. 4 flat. 5/0 liner. Colors: Dove Grey, Rookwood Red. Reindeer Moss Green, Raw Umber. Yellow Ochre.
Brandy Wine.
124
Brushes: no. 6 flat; 5/0 liner. Colors: Buttermilk, White Wash, Desert Sand, brush mix of Summer
Lilac + White Wash.
Brushes: no. 8 flat: 5/0 liner. Colors: Baby Pink, Burgundy Wine, Black.
Brushes: no. 4 flat; 5/0 liner. Colors: Wisteria, Deep Periwinkle, Plum, Lilac, Mint Julep Green, Deep Teal.
Brushes: nos. 4 and 6 flat. 5/0 liner. Colors: Lilac, Boysenberry Pink, Winter Blue. Williamsburg Blue, Midnite Blue.
French Vanilla, Honey Brown, Peaches 'n Cream.
Brushes: no. 4 flat; no. о liner. Colors: Reindeer Moss Green, Arbor Green, Light Avocado, Burnt Orange, Wild
Orchid, Lilac, Royal Purple, Golden Straw.
12S
Brushes
Rounds.' nos. 3 and 6
Liner: no. о
Flat: no. 4
Supplies
Pointed cotton swabs
Palette
Soft Black* (back-
ground)
Golden Straw*
Antique Gold*
Terra Cotta*
Light Avocado
Arbor Green
Midnite Green
Coral Rose
DeLane's Cheek Color-’
Brandy Wine*
Cranberry Wine*
Sand
Antique White
Khaki Tan
Medium gray mix:
Khaki Tan + Charcoal
Grey 2:1
* r do not add
extender
Brushstrokes
Trillium petals, sepals
and leaves: Pointed
comma stroke, flat
on the inside edge.
Peach blossoms:
Straight pressure
stroke with a flat
brush.
“Trillium & Peach Blossoms"
127
J
COMPOSITION'
Floral Compositions
On these next pages are six floral compositions you can paint using many of the
brushstrokes you have learned in this book. The brushes, colors and types of strokes
I used to create these paintings are listed. Feel free to substitute your own favorite
colors, and enjoy putting into practice all you have learned. Have fun!
“Roses & Calla Lilies"
Brushes
Rounds: nos. 3, 4
and 8
Liner: no. о
Palette
Napa Red'- + Charcoal
Grey 6:1 (back-
ground)
French Vanilla
Yellow Ochre
Honey Brown*
Light Avocado
Arbor Green
Midnite Green
Spice Pink
Raspberry
Cranberry Wine
Black Plum
Peaches *n Cream
Coral Rose
DeLane's Cheek Color
Brandy Wine
*	 do not add
extender
Brushstrokes
Roses and rose leaves:
Pointed comma
stroke, flat on the
inside edge.
Calla lilies and leaves:
Combination straight
pointed & curved
pointed comma
strokes.
126
Brushes
Rounds: nos. 3, 5
and 6
Liner: no. о
Supplies
Stylus
Palette
Paynes Grey* (back-
ground)
Hauser Light Green
Hauser Medium
Green
Forest Green
Hauser Dark Green
Calypso Blue
Medium blue mix:
Lavender + Ultra
Blue Deep 1:1
Midnite Blue
Lavender
Grape Juice
Dark violet mix:
Dioxazine Purple +
Paynes Grey 4:1
*	» do not add
extender
Brushstrokes
Large flowers and
leaves: Pointed pres-
sure stroke. Extend
light tips to sharper
points with the liner.
Small bellflowers:
Straight pressure
stroke.

“Jacobean Fantasy"
" * * R I» fl1 fl> fl fl fl W fl fl fl fl fl fl fl R R R R * *
“Violet Posies"
Brushes
Round: no. 4
Liner: no. о
Flats: nos. 6 and 8
Supplies
Cotton swabs, both regu-
lar and pointed
Palette
Shale Green*
(background)
French Vanilla
Moon Yellow
Celery Green
Light Avocado
Dark green mix: Avocado
+ Black Green 3:1
Mint Julep Green
Green Mist
Hauser Dark Green
V/isterla
Medium blue mix:
Wisteria + Country
Blue 2:1
Orchid
Pansy Lavender
Dark violet mix: Plum +
Red Violet 2:1
Royal Purple-
Light pink mix: Baby Pink
+ French Mauve 2:1
Raspberry
*	= do not add extender
Brushstrokes
Flower. Combination
quarter-turn and half-
turn pivot strokes with
flat brush.
Large leaves: Pointed
comma, long point/
quick pressure with
round brush.
Small leaves: S-strokes
with flat brush.
Purple leaves along green
curls: Curved pointed
comma strokes with
round brush.
FluJJy /lowers: Cotton
swabs.
129
“Red Poppies"
Brushes
Rounds: nos. 3, 6, 7
Liner: no. о
Pro Round: no. 8
Palette
Silver Sage Green* (back-
ground)
Tangerine*
Pineapple-
Reindeer Moss Green
Celery Green
Light Avocado
Dark green mix: Avocado
+ Black Green 4:1
Mint Julep Green
Green Mist
Hauser Dark Green
French Mauve
Spice Pink
Medium pink mix: French
Mauve + Raspberry 1:1
Raspberry
Burgundy Wine
Deep Burgundy
Cool White*
Lamp Black*
*	= do not add
extender
Brushstrokes
Large leaves: Pointed pres-
sure, flat on inside edge
PoppY: Bumpy fan stroke.
Bellflowers: Combination
fan stroke & pointed
comma with long point/
quick pressure.
Small leaves: Straight at d
curved pointed comma
strokes.
130
"Forget-Me-Nots, Bumblebees & Butterfly"
Brushes
Rounds: nos. i and 3
Liner: 5/0
Flats: nos. 4 and 6
Palette
French Vanilla (back-
ground)
Pineapple
Golden Straw
Camel
Reindeer Moss Green
Light Avocado
Soft Blue
Baby Blue
Sapphire Blue
Pink Chiffon
French Mauve
Raspberry
Burgundy Wine
Soft Black
White Wash
Brushstrokes
Flower petals: Straight
pressure strokes with
round brush.
Leaves: Straight and
curved pointed comma
strokes with round
brush.
Butterfly wings: Ruffled C
strokes with flat brush.
Flower centers: Lines and
dots with tip of liner.
Bumblebee body and
head: Stipple with liner.
Details on butterfly and
bumblebees: Linework
with liner.
131
132

I
I
I
I
I

134
135
136
137

138
Page ioi. Enlarge al 159%
139
140

p 141 |K
___________-I
Resources
Index
Brushes:
Maureen McNaughton
Enterprises
RR #2
Belwood, ON, NoB iJo
Tel: 519-843-5648
www.maureenmcnaughton.com
Paints & mediums:
DecoArt
P.O. Box 327
Stanford. KY 40484
Phone: (606) 365-3193
Fax: (606) 365-9739
E-mail: paint(5)decoart.com
Web site: www.decoart.com
Brush basin, palette knife,
stylus, transfer paper:
Loew-Cornell
563 Chestnut Ave.
Teaneck, N| 07666
Phone: (201) 836-7070
Fax: (201) 836-8110
Web site:
www.loew-comell.com
Canadian Retailers
Crafts Canada
120 North Archibald St.
Thunder Bay, ON P7C 3X8
888-482 59 78
www.craftscanada.ca
Folk Art Enterprises
P.O. Box 1088
Ridgetown. ON. NoP 2C0
Tel: 800-265-9434
MacPherson Arts & Crafts
91 Queen St. E.
P.O. Box 1810
St. Mary's. ON. N4X 1C2
Tel: 800-238-6663
www.macphersoncrafts.com
U.K. Retailers
Atlantis Art Materials
7-9 Plumber's Row
London El 1EQ
020 7377 8855
www.atlantisart.co.uk
Crafts World (head office)
No. 8 North Street
Guildford
Surrey GUi 4 AF
07000 757070
Green & Stone
259 Kings Road
London SW3 5EL
020 7352 0837
www. greenands to ne.com
Help Desk
HobbyCraft Superstore
The Peel Centre
St. Ann Way
Gloucester
Gloucestershire GLi 5SF
01452 424999
www.hobbycraft.co.uk
Acrylic paints, 6
Bellflowers. 18-19
Birds. 30-31,113
Border designs
flat brush. 124-125
round brush, 78-79
Brushes. 6
Brush mixing, 15
Brushstrokes
flat brush, 82-121
round brush. 18-77
Bumblebees, 22-23,131
Butterflies, 54-55. 111, 131
Calla lilies, 44-45,126
Candle flame, 102-103
Chisel edge, 6
Chocolate chip stroke, 66-
67
Comma strokes
combination, 30-31
pointed, 44-45
straight and curved.
92-93
wavy and flat edged,
pointed, 50-51
common mistakes, 76-
77. ’22
curved, 24-25. 88-89,126
pointed, 42-43,129.
130,131
pointed
combined with fan
stroke, 56-57
flat on inside edge, 48-
49. 126-127, 129
with long point, quick
pressure. 52-53
wavy, 46-47
straight, 26-27, 90-91.
130.131
flat on inside edge, 28-
29
pointed, 40-41
Cotton swabs. 7
loading, dotting, and
stippling with. 13-14
C stroke, 94-95
dosed, 102-103
common mistakes, 122
and pivot, combined,
104-105
142
combined with scroll,
98-99
common mistakes. 122
pivot, 100101
ruffled variations. 106-
107.131
Curved brushstrokes
comma, 24-25. 88-89,
126
combination straight
and, 22-23. 92-93
pointed, 42-43,129.
130. B1
fan
combination chocolate
chip and, 68-69
pointed, 64-65
pressure, 20-21, 84-85
combination straight
and, 86-87
pointed. 34-35
Daisies, 20-21
Dogwood petals. 116-117
Dotting, 13
Double loading
cotton swabs, 13
flat brush, 11-12
Extender, 6
Fan strokes
bumpy. 60-63, BO
combination straight
pointed and bumpy,
62-63
combined with pointed
comma stroke, 56-57
common mistakes. 77
curved
combined with choco-
late chip stroke, 68-
69
pointed, 64-65
straight pointed, 58-59
Flat brushes, 6
borders, 124-125
common mistakes with,
122-123
introduction to. 81
loading, 11-12
Floral sprigs, 66-67
Folk art traditions. 24-25,
30-31, 70-71
Forget-me-nots, 131
Geraniums. 86-87
Heart shape, creating, 28-
29. 75. ”7
Iris, bearded. 38-39
Jacobean design, 34-35,
128
Leaves, 30-31, 53,102-103,
108
pointed, 32-33
turned slightly, 48-49
Liner, 6
loading, 8-10
stippling with, 15
Loading
flat brush, 11-12
problems with, 10
round and liner brushes,
8-io
sponge, 14
See also Double loading,
Tipping technique
Medallion design, 90-91,
100-101
Mediums, 6
Paints, 6
mixing. See Brush mix-
ing
Palette knife, 7
Palettes, 6-7
Pansies, 58-59
Patterns. 132-141
Peach blossoms, 127
Petals, pointed, 32-33
Pivot strokes
combination quarter-
turn and half-turn,
118-119
half-turn, 116-117,129
ruffled. 120-121
quarter-turn, 114-115,129
See also C stroke, pivot;
S stroke, pivot
Poinsettia. 46-47
Pointed brushstrokes
comma, 48-49, 52-53,
126127.129
combination, 44-45
combination and fan,
56-57
curved, 42-43,129,130,
B’
straight. 40-41
wavy, 46-47
fan
bumpy, combination
straight and, 62-63
curved, 64-65
pressure, 36-37,128,130
combination, 38-39
curved. 34-35
straight. 32-33
wavy, and flat-edged, 50-
51
Poppies, 26-27, 60-61,130
Posies, 129
Pressure strokes
common mistakes. 76
curved, 20-21, 84-85.128
combination straight
and, 22-23, 86-87
pointed, 34-35
pointed
combination, 38-39
flat on inside edge,
36-37,128,130
straight, 32-33
straight, 18-19. 82-83,
127.131
Pro Round brushes, 6
loading and stippling
with, 15
Ribbon and bow, 42-43
Rosebuds. 94-95
Rosemaling, 70
Roses. 50-51, 88-89,126
Round brushes, 6
borders, 78-79
common mistakes with,
76-77
introduction to. 17
loading. 8-io
Ruffled strokes. 106107,
120-121,131
common mistake, 123
Scoop-loading technique.
12, 92-93
Scroll strokes. 96-97
combined with C stroke,
98-99
common mistakes. 122
and ruffled C Stroke vari-
ations. 106-107
Shell. 52-53
Single loading, cotton
swabs, 13
Sponge, silk, 7
loading and pouncing,
14
S stroke, -<08-109,129
combined with pivot S
Stroke, 112-113
common mistakes, 123
pivot, 110-111
common mistakes, 123
ruffled, 120-121
ruffled, 120-121
Stippling. 13-15, 32-33,38-
39
Stylus tool, 7
loading and stippling
with, 14
Tape, 7
masking with, 32-33, 40-
41. 48-49
Teardrop strokes. 70-71
chip. 72-73
combined with teardrop
chip. 7475
common mistakes, 77
See also C stroke, closed
Tipping technique. 8-11,
66
changing colors, 52
Transfer paper
light and dark. 7
Trillium, 36-37,127
Trumpet shape. 56-57
Violets. 22-23,104-105
Wet palette, 6
143
The best in painting instruction and inspiration
is from North Light Books!
With Maureen McNaughton as
your coach, you can learn to
paint an amazing array of fabu-
lous leaves and flowers with
skill and precision. She provides
start-to-finish instructions with
hundreds of detailed photos.
Beautiful Brushstrokes Step by
Step is packed with a variety of
techniques, from the most
basic stroke to the more chal-
lenging. as well as 5 gorgeous
strokework projects you can
paint on any surface.
ISBN-13: 978-1-58180-381-5;
ISBN-10:1-58180-381-8;
paperback, 128 pages, #32396
When you're in a hurry for
painting help, here's the book
to turn to for ideas, instruction
and inspiration. With more than
50 step-by-step demonstrations.
Painter's Quick Reference:
Flowers & Blooms shows you
how to pamt your favorite flow-
ers, including apple blossoms,
lilies, lilacs, poppies, roses,
orchids, trises, pansies and
many more. Use this special
guide to jumpstart your creativi-
ty, improve your strokework, or
explore new mediums-induding
acrylics, watercolors, oils and
gouache.
ISBN-13: 978-1-58180-761-5;
ISBN-10:1-58180-761-9;
paperback, 128 pages, #33430
Simple strokes. Fabulous bor-
ders! It's easy and fun to add
the perfect touch to every paint-
ing project with the charm and
beauty decorative borders, just
follow Jodie Bushman's step-
by-step instructions and let your
creativity do the rest. With
450 Decorative Borders You
Can Paint, you'll find 12 start-
to-finish projects, 32 beautiful
borders you can paint in just 3
easy steps, and hundreds of
borders, corner treatments,
medallions and other designs
you can copy outright or adapt
to your own painting projects.
ISBN-13: 978-1-58180-691-5;
ISBN-io: 1-58180-691-4;
paperback. 128 pages. #33326
Handpainted Tiles for Your
Home features over 20 fabu-
lous step-by-step projects for
transforming ordinary ceramic
floor and wall tiles into charm-
ing decorative accents. From
backsplash tiles and trivets to
serving trays and tin wall pock-
ets, you'll find fresh ideas and
creative inspiration for all types
of personal tastes, including
today's favorite decorating
themes such as wine country
accents, Tuscan-inspired motifs,
and French country designs.
Tiles of all kinds are inexpensive
and easy to find at any home
improvement center, and with
acrylic paints and sealers, no fir-
ing is required!
ISBN-13: 978-1-58180-641-0;
ISBN-10: 1-58180-641 -8;
paperback, 128 pages, #33227
These books and other fine
North Light titles are available
at your local arts & crafts
retailer, bookstore, or from on-
line suppliers.
beautiful brushstrokes
step by step!
THIS IS THE ONE! The Brushstroke Handbook is your complete
reference for mastering more than 50 fabulous strokes. Inside you’ll find
visual, step-by-step instruction divided into two sections that detail tech-
niques for working with both round and flat brushes in acrylics. The lay-flat
spiral binding makes it easy to quickly flip through and find the stroke
you want, featuring a range of comma strokes, pressure strokes, fan
strokes, teardrop strokes, scroll strokes and much more.
From the very basics of supplies and techniques to more in-depth
guidance for creating unique compositions, this guide offers every-
thing you need to build confidence, have fun and paint successfully—
whether you’re a beginner or a more experienced decorative painter.
This comprehensive guide includes:
ISBN-13:
ISBN-10:
UK £16.99
33451
US S26.99
(CAN $34.99)
978-1-58180-782-0
1-58180-782-1
•	Quick-reference photos for finding the right stroke, fast
•	Step-by-step stroke instructions that actually build a little
painting with every lesson
•	Easy-to-follow worksheets for combining strokes to
make complete flowers, birds, butterflies, lace, ribbons
and more
•	20 fresh and pretty borders painted with round and
flat brushes
•	Two sections highlighting common
mistakes and how to fix them
Plus, this guide offers a bonus
section that shows you how to
create six gorgeous com-
positions that feature
today’s most popular
colors and stroke
styles, It’s all here! The
Brushstroke Handbook
gives you everything you
need to master every
stroke and explore a range
of decorative painting possi-
bilities. It’s the one reference you'll want
to have handy for virtually every project.
9«78 158 H80782I