/


Text
The An pj
Painting Animals
4 on Rocks
1 Layout.
When you have found a promis-
ing scone, scrub and kt it dry. Then
sketch the wings on freehand as
shown. Or, if you prefer, use the "cm
plate method to lay out the wings.
Wing pattern.
3. Fold it in half. The curving side
will serve as the plate for the ladybug's
wings
I. Set your stone on a piece of paper
and carefully trace all the way azound
the bottom with a pencil.
4. With a pencil and ruler or other
straightedge, draw a line down the
exact center of yout stone.
2- Cut out the circle or oval you put
traced.
5. Place the curved edge of your
template so ft covers half of the stone.
Now carefully trace around the curved
edge of your template Flip the pattern
over and reposition to make j march-
ing cursed line on die opposite side
Yout stone should be divided into
three sections: two equal wings and a
slightly smaller head area, leaving only
a slight mangle showing at the tail end
where the wings curve in opposite di-
rections. Round our yout wing shapes
into ovals. If yout first attempt isn't
satisfactory, simply scrub away the
pencil mark* and trv again.
fl
The An of Pernting Animals on Rocks
2 Painting the Black Areas.
Four a small puddle ol black
acrylic pain; into vow painting dish H
you're using craft paint you probably
won't need to add water. With tube
paint, however, you may need to ex-
periment with water to obtain the right
cnniittency. The paint should be loose
enough to apply msily. but retain
erough body for solid coverage. If your
pant is runny or if the stone shows
Through a ben dry, yixir paint was too
ihir. and may require a second coot. H.
on rhe ocher hand, your brush drags
dryly over the stone and coverage is
rough and broken, Iry muuienmg
your paint by adding drops of water
sparingly.
Use black to cover every pan of the
и one except the oval wings and the
bottom of' the stone. You can use a
larger brjsh for mmt areas, but switch
to your smallest brush to paint the line
where the two wings come together on
rep This line should not be more than
wide. Allow the black paint to dry
thoroughly before you go on to the
next step.
Cos er even* pan of the stone except the wings.
I um тоиг stone io paint around the wings.
3 Adding Wing Color.
Have you decided what color you
want your hug to bcJ Red, yellow and
orange arc all good choices, but lighter
cdors may need several coats for com*
pJcte coverage. Paint around the edizes
of the wings, keeping your strokes
steady. If you need more than one coat,
cet the paint dry between applications.
Turn your stone around as you paint
to insure that your wines arc colored
in all the wav around If ’•’ou accidently
punt over the black uisdercoat at any
paint. don*: panic Simply allow the
irtu ю dry. then go over ic with a little
пн.:« bhek paint to repair the place
Red, yeRuw iind отипде me £<hxI choice* for wirg cciors
Huiv tu Ptirni л Ldifybug
Suggested SpOl designs.
4 Painting the Spots.
How many decorative spots you
paint and where they go is up to you-
You may only want a couple of large
spots on each side, or you may decide
to scatter smaller ones about. However
many you choose to paint, be sure to
space them uniformly so they don’t
touch or overlap. Both wings should
match. Use a pencil to sketch spots on
the dried wing areas- Remember that
sketch marks can be painted over at
any point and redone until you are
You can ikeich the spots on freehand with a
pencil.
2
If you don’t feci you can paint a
round spot freehand or if you want all
the spots exactly the бате sire, try
making a stencil. (1) Trace a circle of
the desired ske on a note card oc other
stiff material. (2) Cut out the center.
(3) Line the hole up over one of the
spots you sketched onto your stone.
Press firmly around the edges of the
stencil to hold it in place and use your
medium brush to dab on fust enough
black paint to fill in the circle. Care-
fully lift the card straight up to avoid
smearing- Allow each sper to dry be-
fore going on to the next. To speed
things up, switch to the other wing and
work there while waiting. (4) After you
have completed your pattern of Бреи
and let them dry. >ou may need to go
around some of them with the wing
color and smallest brush to smooth
rough edges
IC
The Art of Fainting Animals on Rocks
5 The Face.
Your bug's personality will be de-
termined by the expression she wears.
[ prefer a happy look, but there ate
many other choices.
Whether you use one of my expres-
siondesigns or make up your own, take
extra care when painting your bug's
features. Use a small brush and be sure
the paint is thick enough to show up
against the black background of the
face. You may have to go over the fea-
tures more than once to make them
stand out clearly. If you aren’t happy
with your first attempt, you can always
paint our what you don’t like and try
again.
To protect your bug and make the
colors look brighter, you may wish to
seal the surface. Use spray-on polyure-
thane or wtpc on an acrylic finish such
al Future floor polish with a lint-free
cloth.
Aftct you've painted a ladybug or
two, you may feel like really going
buggy! Bugs come in an amaring array
of shapes and colors. Books about in-
sects arc a great place to get ideas for
other kinds of bugs to try painting. Or
use your imagination to come up with
your own make-believe bugs.
Use thick white paint for the eyeballs. antennae.
Аг аплу of colorful bugs.
How ГО Point a Ladybug
II
* *
12
TFic Art of Painting Animals cm Rods
Ноги to Paint a
Thae "rocky tcpiiks" are only
3 little more involved than
ladybugs and make another
excellent project for beginning stone
pointers. My stone coral snake has an
interesting pattern of variegated baruls
dw is colorful ye: still relatively simple
to patnt.
The be« snake stones arc either
round or oval, 6rt co Г m diameter and
2’ or 3“ thick at then center. As with
all stone projects, begin by scrubbing
y<wr stone and allowing it to dry.
A perfect tnakc cock.
Side Views.
Round or oval Tocki worfc well *5 sn*ke>
How icj Paint a 5лаке
Finishing Touches.
After the black areas have dried,
paint in a small red eye circle w ith your
narrowest brush. The eye should be
placed in the black area of the snout
about И*’ from the beginning of the
first yellow b^id. Using the same fine
brush define individual coils by mixing
a drop of red paint with just enough
black co get a deep maroon color.
Stroke three or four thin, closely
spaced horizontal lines along the bot-
tom half of every red band. These
brush fines need not be perfectly uni-
foam. Your snake will actually look
more realistic if thev are anmewhat un-
even and random
Hl^h5‘gh' rhe red cnib with maroon sirokn
The bar rem of the e>e shouL rest on
the Inwginaty mijline <>f the head
Heighten >cnir make's realism with huriSixrlftl lines akinj the Ьчсып of e rch емй.
How to Paint a Snake
17
2 Creating Contours.
Use bl и:к paint and your small
teush to give the stone the illusion of
having contours. Outline aroun.1 the
head rival, front legs, tail, and back
legs. then fill in any remaining areas
between the top and bottom shells all
he wav around. Do not paint over the
cenaecttng stdc segments- Be sure the
line around the top of the bead is dis-
kk: w the head stands out Allow the
pant IO dry.
3 Adding a Bas4* Color
Mix enough shell cdot to cover
£ remaining surface areas. I mix a me-
dium preen with just enough brown co
оеме a subtle, understated olive color.
Yuu may prefer to use straight green,
or to mix green and blue for a deep
lurquoisc The darker rhe basic shell
celtt is. the more contrast you'll have
when vixi paint in the details later- You
tan use vpur largest brush co fill m the
top shell fast, but for better control,
use your small or medium brush to
cdor in the the head, tegs and tail.
Also pamr the connecting segments
between the top and bottom shell .it
this nme. Allow the green to dry.
Side view of turtle hjvut-
Outline the head ard k;rj in black
Hou1 ro Pdinr a Stone Turtle
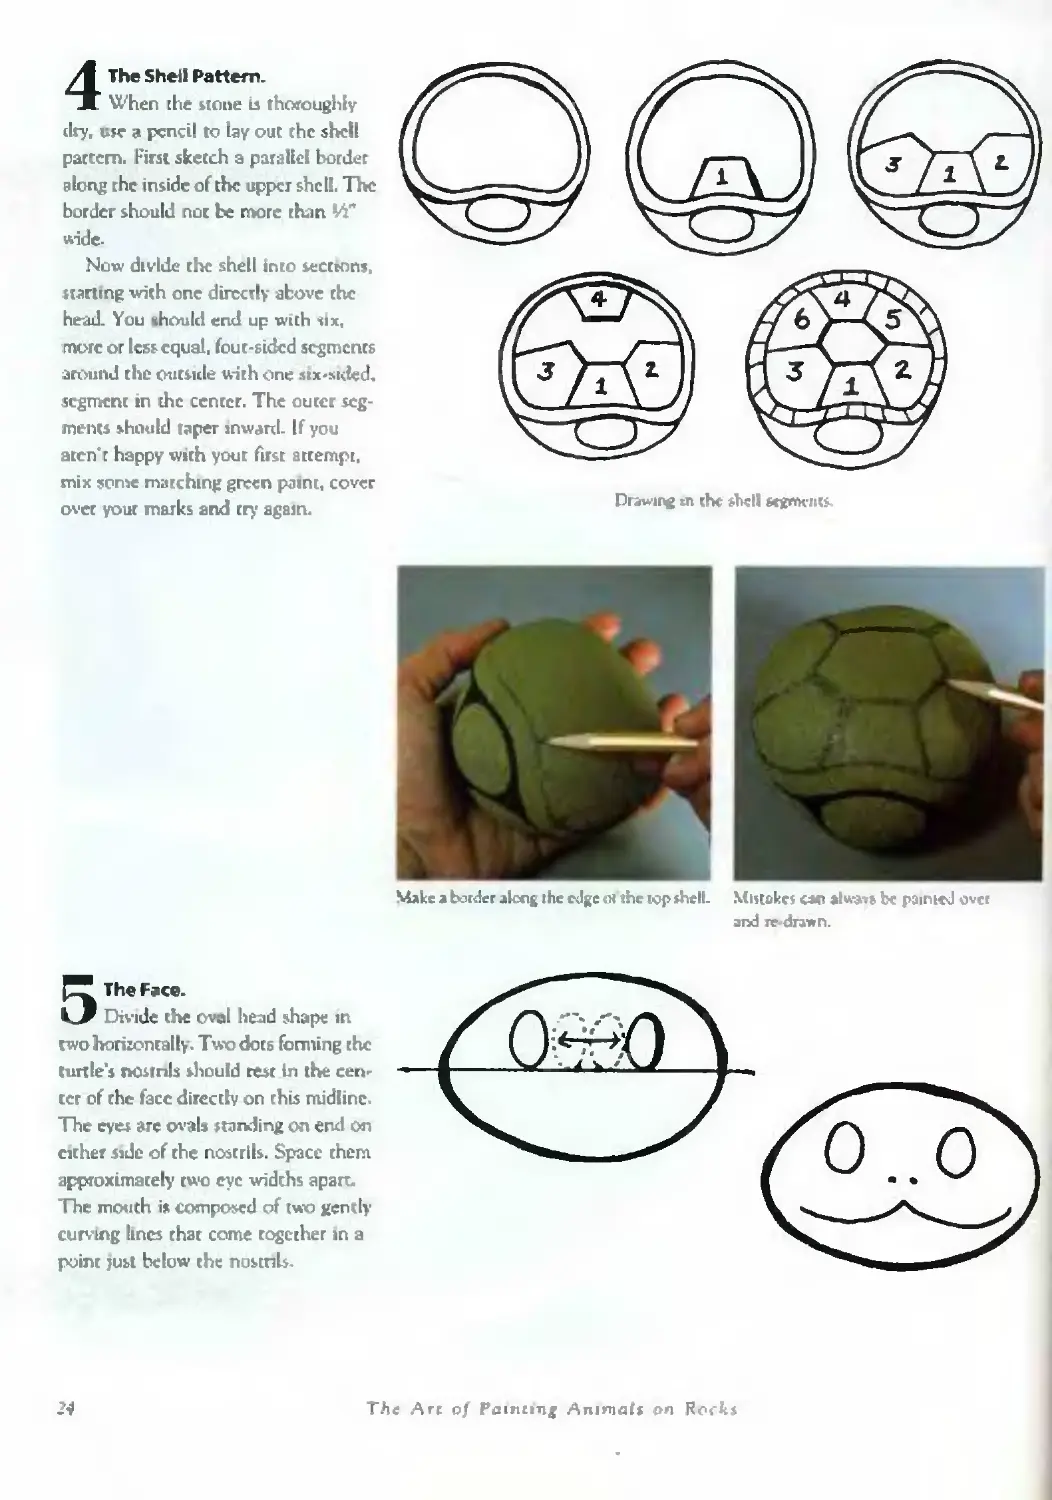
4 The Shell Pattern.
When the stone is thoroughly
dry, ute a pencil to lay out the shell
pattern. First sketch a parallel border
along rhe inside of rhe upper shell. The
border should not be more than W"
л-ide-
Now divide the shell into secttons,
Harting with one directly above the
head. You should end up with six,
more or less equal, four-sided segments
around the outside with one six-sided,
segment in the center. The outer seg-
ments should taper inward- If you
aren't happy with your first attempt,
mix some matching green paint, cover
over your marks and try again.
Drawing tn the shell segrtH-ius
Make a border экэд the edge «the юр *hell.
5 The Face.
Divide the oval head shape in
two horizontally. Two dots forming the
turtle’s nostnls should rest In the cen-
ter of the face directly on this midline»
The eyes arc oval» standing on end on
cither side of the nostrils. Space them
approximately two eye widths apart.
The mouth is composed of two gently
curving lines that come together in a
point just below the nostrils-
24
The Arc of Painting Animats on Rock*
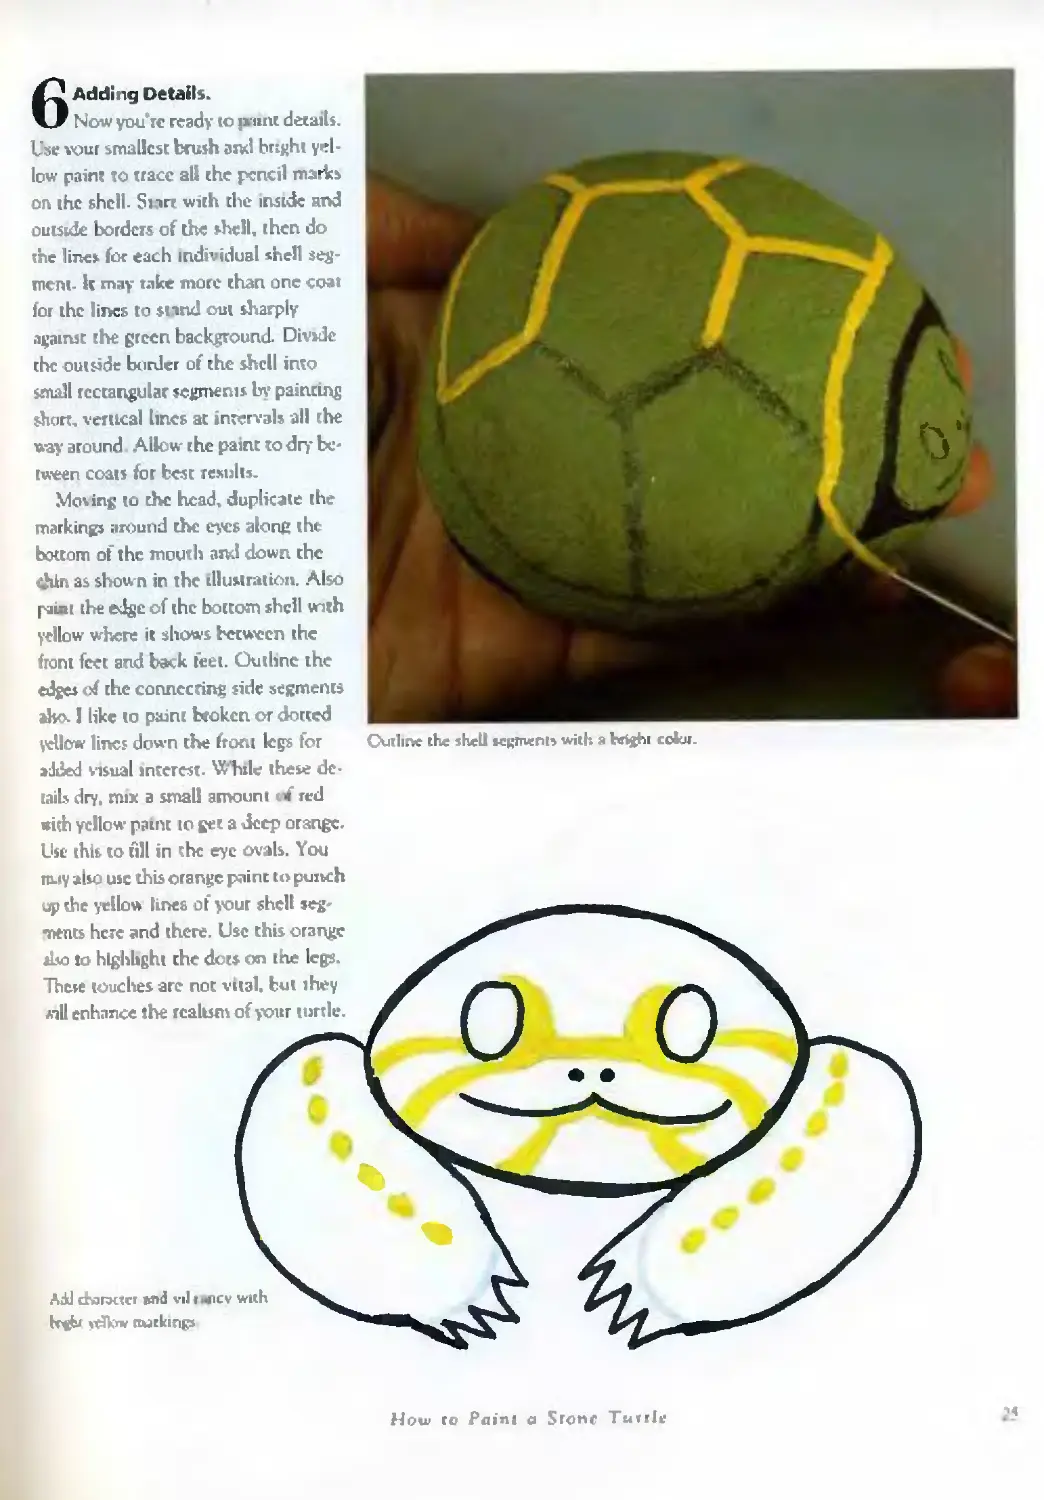
6 Adding Details.
Now you're ready to paint details.
Use vour smallest brush and bright yel-
low paint to trace all the pencil marks
on the shell- Start with the inside and
outside borders of the shell, then do
rhe lines for each individual shell seg-
ment- It may rake more than one coat
for the lines to stind out sharply
against the green background. Divide
the outside border of the shell into
small rectangular segments by painting
short, vertical lines at intervals all she
way around Allow rhe paint to dry be-
tween coats for best results.
Moving to the head, duplicate the
markings around the eyes along the
bottom of the mouth and down the
chin as shown in the illustration. Also
paiat ihe edge of the borrom shell with
yellow where it shows between the
front feet and back feet. Outline the
edges of rhe connecting side segments
aho. 1 like to paint beoken or dotted
yellow lines down the front legs for
added visual interest. While these de-
tails dry, mix a small amount red
with yellow paint to get a deep orange.
Use this to fill in the eye ovals. You
may also use this orange paint to puitch
up the yellow lines of your shell seg-
ments here and there. Use this orange
sko to highlight rhe dots on the legs.
These touches are nor vital, but ihey
Aill enhance the realism of your turtle.
Outline rhe shell нцтепп with я hr^i ccJkn.
Add character and vil < «rev with
k«fcj rtJkrw rurkinp
How to Point a Stone Turrle
7 Finishing Touches.
When the orange eyes ere dry,
paint a small black iris in the center of
each one. At the same time, carefully
outline the eyes with black to make
them stand Out clearly. Create bulging
eye sockets by echoing the shape of the
eyes in Hack as shown.
Clean yout btush well and mix a
combination of green and yellow to get
a light green. Use this color to create
the geometric pattern on each segment
of the turtle’s shell. The simplest de-
sign resembles a squared-off capital G.
If you're good at doing fine lines, you
can make sets of nesting squares in-
stead Finish by placing a tiny doc of
pure white at the edge of the ins in
each eye to give your turtle the “spar-
kle of life." Sign the bottom and apply
a coat of finish to heighten the colors.
Look for photos in magazines or
books for more ideas of other varieties
of turtles. Box turtles are basically
brown but some have wonderful shell
Outline ibe orange eve* in Hack.
patterns.
26
The Art of Pointing Animals on Rocks
The Art of Painting Axutnnls on Ruck*
How to Paint a
Rock Rabbit
When you’re ready to tackle
a more detailed project,
this wild rabbit is a goixl
place to start. Select a smooth stone
similar in shape to a large baking po-
tato. The stone should have a flat bot-
tom so tt will sit without rolling ewer.
While rhe ideal rabbit rock is oval
as shown in view- A. there are many
v-inarions that wilt also work. Yout
none may be taller and narrower (B)
it may have a blunt, somewhat squared
shape, (C) or taper off slightly at one
enJ (D). The most important features
arc a rial bottom for stability anJ over-
all svmrnetry of shape.
Once you find a promising stone,
prepare the surtace with a good scrub-
bing and allow to dry. Beginners will
find it easier to paint on a stone with
a smooth or line-grained surface. It's
much more difficult to achieve the
kind of derail you'll want on a rough
or pitted surface.
What You'll Need
• jerdic paint* in black, white, gold,
red and burnt sienna
• large. medium and narrow brus-hes
• a pencil or jwce or chalk
— -----------------------------
Top View».
A perfect rabbit rock.
A vanelv of stone si:es and
‘tapes wul work as ponied rabbits
How To faint a Rock Rabbit
29
Layout.
Д Using your largest brush, cover
all bur the very botrom of your scone
with a coat of Hack paint. If the stone
dries with a grayish ease, applv a sec-
ond. heavier coat. When the paint is
dry you can begin sketching in basic
shapes. Imagine your stone is divided
into thirds (view A). The first third en-
compasses the jowl area, and the back
third is the haunch area. With a sharp-
ened pencil or white chalk, lightly
sketch in these guidelines. Sketch
curving jowl lines on i»th sides of the
head end, and check from the top to
he sure both jowls are about the same.
At the top of the мопс (view B) these
two hncs meet to form the forehead.
The ears begin at the top of the fore-
head, extending backward toward the
middle of the stone (view B).
Now move to the face (view- C).
Imagine the front of your stone is di-
vided into quarters. The bottoms of the
eves will rest on a bisecting horizontal
line. Eyes that arc too large m propor-
tion to the stone will give your bunny
a “cartoon" look, so keep them small.
Allow a minimum of one and one-halt
eve widths between them. Cheek for
svmmetry by lining up a pencil with the
bottom of the eve circles.
If you aren’t satisfied with your
guidelines at any point, simply dab
them away with a damp rag or go over
them with more black paint and try
again.
Next, center a no$c triangle along
the vertical bisecting line- it shouldn’t
be much wider across the top than one
of the eyes. Turn your stone around
and add an oval-shaped tail to the rear
end (view D) Tuck two sets of paws
along the bottom edge of either side.
Now you're ready to begin painting.
Pawl ihuubd be earth visibie but not too bifi.
2 White Contrasts.
bill in the paws and tail areas
with white, using enough paint for
solid coverage.
The paws and tail look fluffier if you
feather your strokes outward along the
edges. Next switch io a smaller brush
to paint in two shott white lines along
the bottom angles of the nose. Outline
rhe basic shape of the cars. Paint a sec-
ond, parallel line inside the upper edge
of each ear to indicate a flap.
Add э line te the uuaJc of each ear to ruake
a flap-
I Ajc A*1 of Painting Animate и is Rocks
3 Eyelashes
Still using white paint and your
«rail brush, stroke in a senes of deli'
cate "evelash" lines. Begin ar the out-
»4e upper cornet of each eye and
stroke in a long, curved line extending
nearly rc the base of the ear. Add more
ashes, shortening them as you work
toward the inside of each eve. Make a
Imge of shorter, curving lashes along
the bottom edges of both eyes. Leave
an (Xfciine of black between these h>h
fetes and the eve circle.
Binning the eye* мср-Ьу.яер.
4 Eye and Ear Color
Fill iii both eye circles with burnt
тал? Keep the суы neat and round.
If they’look uneven, or if you acci-
ikndy paint ever rhe eyelash lines, let
nW brown paint dry. then use black
to taccircle and redefine the eyes later.
Add a touch of golden yellow paint to
±£ sienna on your palette and Wend
wget a lighTcr shade of brown. With
7£S соки fem a half-circle inside the
kficm рсстюп of each eve. This u ill
(ne the eyes a mi re lifelike depth.
ben the eves arc dry. use bhrk paint
« stake two oval irises- They should
much the top each eye circle.
Work on the ears next Clean your
brush well and mix small amounts of
red with white until you huve .1 me-
dium shade of pink. Add Ju’t enough
gold to soften it to a pale fleshcone.
Use this color to fill in the insides of
(he ears, not quire meeting the white
outlines you painted earlier-1 cave the
car flap ui «painted for now. Add burnt
sienna to darken ihe tleshione on vour
paieuc Lise this new color co crr.ue a
shadowed effect along the upper edges
of the cars jusi below the ear flaps.
SIi3ihfi|2 ihr tntides <jc ihc ears.
Hw io Prtinr <i J?ock Riibbti
5 Fur Lines.
You're now ready to paint in the
fur lines char will give your r»bbii ns
soft, realistic look. Fur lines should be
as thin and delicate as possible. Dilute
the paint enough to flow on easily but
not to the point of transparency. You’ll
want your fur lines to dry crisp and
clear. Begin the fur by- making a senes
of short, perpendicular strokes follow-
ing the curved line of the jowl. Refer
to the directional guide at rignt for
guidance in placing your strokes
Do a second row of longer strokes
just inside the first set. Allow each line
to taper into a point by casing the pres-
sure on the brush as you lift. Create a
shingled effect, allowing your rows to
overlap slightly. Vary the direction and
sise of your strokes for realism.
Three or four sets of overlapping fur
lines should bring you close to the bot-
tom eyelashes. Be sure to stop before
reaching these lash lines so that some
dark contrast remain» around the eye
areas. Repeat the process with the
other jowl, then move on to the
haunches.
Follow the arrows on this gusje for realistic fur pilches.
Fill in the haunch with rows of
strokes thar angle out like spokes on a
wheel. Starr on the outside and work
toward the center of each haunch.
Overlap your strokes ro create a shin-
gled effect.
Next, move co your rabbit’s back
Start between the ears, leaving a nar-
row area of black paint surrounding the
ears for contrast. Work back toward
the tail, varying the length and angle
of your strokes. You may indicate
shoulders by allowing your strokes io
form an M-shaped row behind the
head Skip a space and start a fresh row
of fur farther back- Leave several other
similar spaces showing as vou continue
to work toward rhe back of the stone
5iup just short of the tail. Allow pour
lines to dwindle in number as you
move down the body so that much of
the bottom remains plain black above
the paws.
Fill in the haunch with strokes that angle oui like spokes in a wheel
32
The Art of Pointing Animals on Rnckr
Rtmc-nbr- to leave epen space» anxind the eats and other features Tiny fur lines soften the ears.
6 Facial Features.
The nose, mu”le and forehead
are next. Darken a little deep pink
paint with a bit of burnt sienna. Fill in
:hc center of the nose triangle, leaving
an outline of black surrounding it.
Clean your brush and switch to
«hue paint. Make a series of tiny,
FkiiI feature».
splintef'slsed tur strokes along the out'
sides of the ears to make them softer
and more natural looking. Scatter
some longer whisker lines in the pink
pan of each ear
The forehead Kir begins just above
the nose and fans upward and outward
You may find it euier to print the forehead fur by holding your поле up^de diMtn.
in uneven, shingled rows. Stop before
you reach rhe base of the cars and
make one final row of dense, short lines
along the top of the htad. Le^ve an
area of black showing between these
lines and the base of the cars for
contrast.
How Го Paint a Rock Rabbrr
TFi€ Are of Painting Animals on Rocks
4 Basic Stripes.
For the stripes use a medium'
sired flat brush. I prefer an older bnnh
whose bristles have separated with age.
This allows me to create a distinct rut
texture with each stroke. If you don't
have a brush like this, apply stripes in
solid but ragged lines. You can go back
over them later and add texture with
a contrasting color.
Mix gold paint with a bit of white
to get a pale, sandy color. You cat’s
stripes may be uniform or more uneven
ond broken If you aren’t sure how to
do the stripes, try sketching them in
with chalk first and curving them to
create the illusion of roundness to the
haunch. Next, turn your stone around
and begin the tack stripes in two set*
an inch or so beyond rhe top of the
head Leave a snip of the darker base
coat at the nape of the neck and run-
ning down along the curve of the spine
until it disappears around the edge of
stone. The back slopes should be an
Inch or so wide, curving gently around
the shoulders.
Use the same pale gold and your
medium or smallest brush to paint m
the pattern of facial stripes as shown.
Fill in the musk arc as well.
Without rinsing out your brush,
switch to plain white paint and stroke
in the lighter stripes alonji the cat's tail
and the lips of the cats paws- Make
several narrower stripes along the front
kgs also. Encircle the eyes with while,
and make two small white parches co
the muck just below the nose. Лк
paint in the chin area with white
Painting the haunch itrtyei.
Lew a strip of buic cost ihcmuie between the itnpe» cn
ce’i bock.
The Arr of Pcinrbt£ Aniniiftls on Rocks
7 Finishing Touches.
To complete your cat, add just
enough water to yuur white paint to
get a consistency Ehat will flow on
smoothly yet remain opaque- Extend
four or five long, curving whiskers out'
ward from each side of rhe muck area.
The lower whiskers may overlap the
tail or the paws. Мике another set of
king, graceful lines inside the cars.
At this рол t examine your cat from
every angle to see if touching up Is
needed. Pay particular Attention to
easily overlooked areas like the side of
rhe stone just beyond the outside edge
ct die head Determine if the paws re'
quire seme additional texture You
may use the tip of your brush to stroke
a line of white fun along the tops of
them. The whiskers may need going
over mote than once to insure that
they standi out clearly. Or you can
bring them out nicely by painting a
narrow line of black along the bottom
Cl each one.
You can adapt these techniques to
вп* number of curled'up cat rocks. Try
a sleeping cat with its eyes closed in
contented crescents; or change the
bait coat co deep brown, make the
lighter stripes tan and the fur lines
black to paint a brown tiger cat- These
cits look especially nice displayed in
baskets or curled onto pillows. Expeif-
ment with stripe patterns and collect
gbotos of cats to help you achieve a
core realistic leek.
Whisker dead.
A car ecu a Up-
How lc Paint a Yellow-Si rrped ТйЬЬу Crtt
59
60
The Art о/ Pabiiinj! Animals on Recta
Hou- to Paint a
Raccoon
Whether real or stone, these
little masked bandits are
лр! to mmI away the hard*
est of hearts- With their mischievous
antics and comical face*, live raccoons
base won widespread populatin'. They
also make terrific subjects for rwek
minting because so пипу diftervni
irone shape' work for them-
The most common shape, and the
aw dcmoaitrated here, is an upright,
hjtf'Circle*shap«a stnnc. it <ы» he uni*
wrmlv tuned on top, slightly squared
ctf.ot perhaps even sloping io one ride.
Occasionally I run across what I call a
‘tombstone’-tyre rock, one which is
HjmIv rounded but stands taller.
These rocks are ideal for painting и
“raccoon" as though it has reared up
tin its hind legs, with the front paws
held to its chest- It's OK tor в raccoon
rock to be on the narrow side, but any
stones less than 4Л thick wiR he tcx>
thin Since yxxi have manv cho&es» try’
to envision some ways an animal can
be filled to virion* shapes jzai sizes.
A variety <if rock
j ha per. am be
crinsfonneJ
into тчоспз-
Yvur lavui t will dc|ivrxl un div Jiir<n*iTO» ! unir Sk*n«
Ifciw ifj Point u Яйссолп
Prepare your «one for painting by-
insuring the surface is clean and free
of loose material or debris.
Before you begin your layout, use
your largest brush and black paint to
completely cover the surface of the
stone, leaving only the bottom un-
painted. Let this base coat dry
thoroughly.
Selecting your rock.
1 Layout.
The proportions for a crouching
pose will differ from those for a stand-
ing animat Generally, the he^d takes
up a forger percentage of the stone in
a crouched pose (roughly half the
width of the stone). In an upright pose
the raccoon s head will take up less
space m proportion to overall body size
(usually a little over W).
Positioning the head is the first and
most important step of the layout pro-
cess. The head can be set level or tilted
slightly, as I have done. On sloping
stones where there is not much room,
tilting the head may be the best solu-
tion for fitting the ears into the avail-
able space. Another option is to place
the head on the higher .side ind fit the
haunch onto the sloping end
The head will be shaped like * short,
fat heart- On my 9й stone, du» heart
measures 4" эстом the top. Use chalk
to sketch in your head until it looki
right. The haunch is similar in sire to
the head, but circular instead of heart
shaped. Let it curve around the end of
the stone. The tail is fat with a blunt
tip. Bang it around from the end of rhe
stone, stopping jusr short of the head
If you have posrioned your head high
enough, sketch in a front paw unde;
the chin.
Note that raccoons’ front feet (on
page 63) look almost like snudl human
hands while the rear feet are longer
with shorter toes. Turn your stone
around and make a matching haunch
on the back side with a little bit ci the
long back foot showing. New you are
ready to begin sketching in facial de-
tails.
The bate coat.
62
The An of Patnling Animals on Rocki
Face Layout
Divide the heart-shaped face in
thirds vertically. If You opted to tilt rhe
field, angle rhe lines to match- Set she
oft Ю i hear inside comers touch the
Ines you’ve drawn. Raccoon ears vary
insi:e depending on the age of the ani-
mal. Here, the ears extend a hide over
Г frcen the top of the head. The total
hegbt of one ear should be about equal
io the distance between the two ears.
Next, bisect the head horizontally
The raccoon's eyes will be centered on
she peencs where this horizontal line
oijwci the two vertical lines. Space
ibt eyes slightly less than two eye
widths apart. Add triangle* to the in-
side edge of each eye to suggest tew
ducts.
Draw another hoctawal guideline
halfway between the mid line and the
bottom of ihe face. This point repre-
sents the top edge of the animal’s muz-
zle- The outside perimeters of the muz-
zle circle are ilefined by the two
vertical lines you made earlier. Draw a
circle to create the music-
In the center of the muzzle sketch
an oval note shape. The raccoon’s nose
should be slightly larger than one of
hts eyes.
That complete* the Layout process.
Now' you are ready to paini.
How co Piiini a Racecon
63
2 Fur Patches.
Use your medium brush and
white paini to fill in the muzrle area
surrounding the nose» but leave я
wedge-shaped portion of the black
base coat uncovered ar rhe top. Heav-
ily outline the cars with white. Next,
without rinsing your brush, add several
drops of gold paint to your dish and
soften it to a pale straw color with
white. Use this color to brush in three
or four vertical bands along the rac-
coon’s tail. These bands should be
to W wide with njajed edges
Tail fund*
The fur lines are next. Study the di-
rectional guide above to determine the
general pattern.
Using your narrowest brush and
plain white paint, begin your first lines
nt the inside corner of each eye. Your
strokes should be nearly solid at the
base, but should fan out above ihe eye.
Lengthen and angle your strokes as you
move around toward the side of the
face. Bfend a second tier of fur lines
into the first, allowing your tapering
strokes to vary slightly in length and
direction as they fill in the remaining
area below the ear
Move to the other eye and repeat
these step. Leave a blank space tn the
middle of the roiche.sJ is an extension
of rhe dark area above the nose and
between rhe eyes. Also leave a narrow
The
Рашппц ihe tad scep»by-4cp
4 The Eyes.
The eyes should now be she last
unpainted portion of your stone rac-
coon. Real raccoons' eyes are so dark
they seem blade but I paint them dark
brown so they stand out from the sur-
rounding black mask. Mix a brushful
of burnt sienna with a tinge or black to
get a deep chocolate brown. Carefully
fill in the eye circle* with this «4ог.
While they arc still wet. dtp the tip of
your brush into a drop of straight burnt
sienna and stroke it sparingly in a half-
circle around the lower half of the eyes.
This «'arms the eyes, giving them
depth and clarity. While they dry. go
around the outside of rhe eyes with a
dclkarc line of black to emphasiie
their shape- Add a very thin eyelid line
just above etcher eye as well. While you
have Hack on your brush, look for
areas where your fur lines may need
separating or redefining. A few thin
black strokes can correct white fur
lines that look blotchy or are too thick.
Filling in the eyes.
Detailing the Face.
Clean your brush and return to
Hraight burnt sienna. Use this color co
make a fringe along the top of each
eye. Stroke in a few longer lines along
the inside comers of the eyes and both
ears. Do в similar fringe around the top
half of the musk and sprinkle more
reddish-brown stroke* up into the
bridge of the nose
Add texture to the light stripes on
the tail with ® scries of brown horizon-
tal strokes. Turn your raccoon on his
side and sprinkle some brown Fur along
hit front and rear paws
Now add enough gdd paint to your
burnt sienna to get a warm golden-
brown. Llsc this color to soften the
Hack mas* below each eye with fine
lines.
Clean your brush, switch to black
pint and carefully place an oval tris
two the center of each eye so it just
touches the top of rhe eye circle.
3knJing die fail fur for a skek took.
Add hiKhlielus with burnt iaenn-i
At Аги. the face к vnly black and while-
Spctllc toshes of solden-brown under the
eye* and on the bndge of the nose.
Face dttuil with «nice luchlijjhl*.
How I4J Penne a Raccoon
67
2 Painting the Shadows
With a large or medium brush
and black paint, till tn the shadows be-
tween the haunch and the inside ear.
ai>d behind the ear inside the curving
line of the spinc-.Feathex out the shad-
ows as you move £way from these. Fea-
tures. Outline rhe ears, the .upper
haunch, and cheipacc between the
•chin andffrind leg. Also black out any
portion showing below the crooked
hind leg- This isC^Jccially intpnrtant if
tout stone has a convex front side shat
wu want to play* down. Use your small
or medium brush to our line the he»id
and the eye, and to fill the nose and
1 hoof P.iiQt the t$il in black, feathering
out vou: strokes Siong the edges.
3&as® Color
Ibur two good-sized puddles of
bum! sienna and gold into your paint
dish. Use your large- or medium-sized
brush to mix rhe two colors in the cen-
ter, leaving some unmixed pigment on
cither side. Fill in the haunch and the
entire hind leg- Also fill in the head,
being careful not to paint over any
bbek outlines. Dip the tip of your
bwsh into the gold side of your paint
Kid stroke highlights along the top
edge of the forehead and the top of the
outside ear. A little straight gold along
the upper curve of the haunch will
bnng out its shape as well. Clean your
brash and dip it into straight burnt si-
enna. Stroke this color in a curve be-
ginning ar the nape of the neck and
moving back along the spine all the
e&y ground to the base of the rail.
Feather a few horizontal strokes here
ind there in the black area between
the haunch and the inside ear to soften
the shadows. Use burnt sienna all
iJong the lower edge of the hind leg to
p\v it mere volume. Leave the chest
«ei unpainred for now.
Painting rhe shadows
Burnt sienna serve* as я color.
How to P«<nr « Stone Fawn
Tinting.
Vr Next mix several drops of burnt
sienna with an cq-iat amount of geld
to get a warm red-brown. Fill in the
eye circles with this color. Switching
to your Larger brush, add water to this
reddish-brown color to make a wash.
Test the consistency on newspaper to
be sure the tint is transparent. Use this
tint to deepen the color of select fur
lines. Begin by feathering strokes out
from behind the head, but leave the
tips of your lines untinted. Move down
co the next sets of lines on the back
and tint the area closest to the shad-
owed borders, again leaving the tips
untouched.
On the haunch, avoid tinting the
outermost set of prickly strokes, but
tint the inner fur lines. Remember, if
the tint pigment is too heavy, it will
obscure your original brush strokes. If
that happens, pick up the excess pig-
ment with a tissue while it is still wet
and add more water to your wash.
On the face, tint the area between
the eyes and feather your strokes into
the forehead. Leave the light areas
around the eyes. Tint the entire tail.
Filling In the eyes
Tinting behind the cars.
Avoid cokxui£ the edge* of the haunch.
The Ari of Painting Animals on Rocks
Ф jO
V
Step» fw face Uyout-
After the face oval is in place, mod-
ify it by creating a V-shape in the mid’
die of the forehead. Then bisect the
oval horizontally and use (he midline
as a guide for the eves- Owls have dra-
matically large, round eyes. Eye diame-
ter will vary v* Ich the size of your stone.
On the three owls 1 measured pre-
viously. rhe size of the eyes are:
• 8" tall owl—just over across
• 7' tall owl—Pi" across
• t tall owl—just over W across
• 5’Л* tall owl—just under 14" across
L’sc the height of your own stone to
determine the яге of the eves, then
center them on the mudline one eye
space apart- To determine beak place-
ment, measure one eye-width down
from between the eyes on the midline-
Мэгк that as the top of the beak. The
beak itself should be a narrow triple
whose point doesn't quire reach to the
bottom of the face.
Now turn your rock so ebe back is
facing you. Draw a neck line around
the back of the head. Indicate the mil
with a wide V at the base. The sides of
ihu V should bow gently outward
around the curving sides of your sronc
and couch the penmeter* of the face
oval in front. If you look at your rock
sideways, the wing lines should cut di-
agonally from the face to the tail. The
remaining portion of the body will be
rhe breast.
2 Face and Head Details.
Use your narrow brush ro outline
rhe eye endes in black. Paint the beak
next, making the point sharp and well
defined. The wide upper end should be
raggeddooking to create the illusion of
'mall overlapping feathers. Next use a
medium flat brush to encircle the face
with short, derue strokes. Create feath-
ery points along the bottom of the face.
Fill in the test of the he.nl shape with
solid black alt the way around. Let the
paint dry.
Now take up your finest brush and
switch to gold paint softened with a
little white. Ide this color to make
thin, dense lines like sunrays emanat-
ing from the eyes and beak. Leave a
border of white encircling the eyes but
allow your brushstrokes to overlap
some of the dark areas ort the head.
Use gold at full strength to fill in the
eye circles. The owl's eyes will be the
focal point of the piece, so take your
rime to paint them as neat And round
as you can. If you accidently paint over
your black outlines, retrace them in
black later when the eyes arc dry.
Shade the bxk of the head
Subtle cold hlchlighis Surround the trjw and beak
Outline With bold black Strokes,
Gold ew color.
94
The Art t>j Fainting Animals an Kock:
Sketching the fradutx pattern.
4 Wing and Tad Feather Layout
Once the back is dry-, use chalk
co sketch the pattern for the feathers.
Begin at the neck and extend a V
shape halfway down the Ькк, mirror-
ing the V of the wiL On each side make
narrower V shapes like epaulettes at
the shoulders. Connect the bottom
points of these V shapes with curved
lines- Below these curved lines, skerch
in two sets of overlapping feather
patches as shown. If you arc dissatisfied
with your layout, rub out the chalk and
revise.
Feathers meet to form V sluptf-
Feitncr drsign
5 Painting the Feathers.
When you’re satisfied with rhe
layout, add a senes of white strokes
along the back V with a small or me-
dium brush. Use your narrower brush
to outline both upper and lower sets of
wing feathers, and make a scries of
white dots along the two curving tines
connecting the «houlders to rhe
back V.
Next, mix burnt stenna and uold
paint in equal proportions to get a
warm golden-brown. With your nar-
row brush make a row of connected U
shapes along rhe white neckline in
back. Do a second row below the first,
starting each L’ in rhe middle of the
one above so that you have an overbp-
ping erteci- You should have room for
four or more rows, each one shorter
than the one above until there u space
Outline (he tail feathen with a brush
for only a single U at the point. Do a
similar pattern on the epaulettes м
each shoulder.
To connect the shoulder pattern
and the back pattern, make a serie.*, of
diagonal feather lines as shown. Add
depth and visual interest to rhe very
bottom set %if wing feathers by running
U shapes overlap at rhe neck
several thin lines of brown alongside
the white outlines.
Add Neck to the brown color
you've been using and shade the ba=
tom edges of each scalloped row of L’-
shaped feathers. Use this same color to
shadow the base with thin, wispy
brushstrokes.
96
The Arx of Painting Animah on Ruckj
PMnt a wmi of слwbrfilne L' shapes ai each DiagunaJ father lines connect the -wir^ to
*hixj|Jer rhe tack
Delicate Jtv-wn lines ztt interspersed with
white jiroiiu ne Till fathers
6 Head Feathers.
Going kick io rhe head. use d
clean, narrow brush and white paint in
begin a rencs ot >h.ir„ crookeiL bnikcn
lines starling along the top border of
rhe face and radiating hack into the
black area of the head. Allow your
шоке* tu become more uniform as you
work around the sides of rhe head. The
stroke» should radiate out like short
srekes. Add consecutive favors of simi-
lar strokes to cover the back and sides
of rhe head.
While wavy lines xadure fr<>m the top al" the he.tj.
Сепппмс laverani! white lines...
- - - Jewn rhe h*ck cf tlx head.
How fo Ptrinr Sionev Owlx
7 Rather Details.
Switch back to rhe deep brown
shade and add crisp details to the
lighter brown feathers ar the breast-
Paint a row of dcruc. random strokes
just below the neckline. Then scatter
more of these lines in clustered secs
among the breast feathers.
«finishing Details
Surround the eyes with delicate
Lashlike strokes. Ac the inside lower
comer of each eye, elongate the
strokes and f.fi them out to look pat
ttcularly dense and heavy. Allow a few
strokes to reach into the top of the
beak and a few more co strecch hori-
zontally above the beak from either
side until they almost touch-
Fan another set of strokes below
each eye. A few should even overlap
the top of the beak, while others сип е
away in rhe opposite direction.
Brush m a set of short tines just in-
side the face oval from either side of
the V. Follow rhe curve of the face.
Refer to the directional guide for
feather placement.
Fill in the eyes with black, oval
irises. The irises should be slightly
skewed toward the center of each eye
circle. Darken the upper portion of
each eye with burnt sienna to add
depth. Then highlight the eye by strok-
ing a narrow half-circle of bright yellow
paint around the lower half.
Finally, switch to white paint and
define anv light areas chat may require
more detail with your narrow brush-
pay particular attention to the outer
edges of the wings on cither side of the
breast. These feathers should look
fluffy.
Dera I the hra« м«к wtih randnen fsae liars-
Fa'fkyw the arrow* tar Uncial feather j-aitems.
Face debiil.
Irises should be dighcl. skewed гимхг-i th
center
98
The A»r of Painting Animals on Racks
You may oho want co add some
white strokes co the breast, overlap-
ping the brown streaks here and thcrc-
Rntih by placing two small dors in the
inside upper quadrant or each eye hir.
a lifelike sparkle.
Owls arc quire ornamental and w»ll
add an exciting touch to any decor- Try
jaerchine one or two on a section of
wood for an almost sculptural effect.
Touchinj; up the wing edj^s.
A white glknmcc фэгк&ь in cad-, piercing
CW-
|{<iw Io Pain* Sroncy Owfs
Step* for eye detail.
zoo
The Art of Painting Animals on Rocks
Expand Your Horizons
A Gallery of
Stone Animals
he previous chapters have
shown you how co create a
number of different scone ani-
mals step-by-step. Once you have mas-
tered the bask, techniques there is no
end to the variations. These next few
pages arc intended co give you just a
taste of ocher possibilities.
Colt
Like fawns, cdts are characterised
by the way their lung legs fold beneath
them. Look for a fawn-type stone, one
with a "crook" at one end to accom-
modate the angle of the back leg. The
colt's head is longer than a fawn’s, the
muzzle more rounded, and the ears
slightly shorter.
CoSt stone ard hyvut.
Л colt nestled in the hay.
A GaHery of Stone Animal»
101
Wild Cats
The leopard and cheetah are two
wild cat» that make attesting subjects.
Note the way a lump on the leopard
stone was transformed into a shoulder
Hade. Wild cats may be handler! much
like domestic cats, but are most effec-
tive in crouching rather than curled
positions. Other wild cats to try are ti-
gers, lions cougars and bobcats. Pho-
tographs of these animals will help you
envision how they might fit onto
stones.
Here's my leopard curled up on the heanb at home
№
The Art of Penning Animals an Kocks
Chceuh ffrontj
Cheetah (rear).
Lecyarf (irone). Lwfsnd (rear).
A GnUevy of Stone Animals
Mouse
Good mouse stones aren’t always
easy ro fir.d. but if you come across one,
these little rodents can be fun co paint.
Look Гог a pear-shaped stone. It should
be similar to that for a rock rabbin but
more pointed at the end and preferably
a little flatter overall In coloring and
execution this project is also simihtr ro
the rabbit, rhe differences being pri-
marily the short, more rounded ears
and larger, bulgy, closely set black eyes.
The tail am be panted in as though
wrapped around one side, or you can
glue on a length of rawhide lacing.
Mouse rucks and laveut.
A very cautious mouse.
KM
The Ait i>/ Pdinnng Animals p>i Racks
Pandas
These roly-poly critters create real
“penda-monitim” among animal lovers
and arc surprisingly easy к) paint. Look
for a plump “tombstonc”-shapcd rock
The cop in particular needs to he bead
and well rounded for best results. The
panda is basically black and white, with
dark brown for the eyes and a touch ot
gold mixed with gray to detail its white
fur for softer, more subtle shading.
Front.
S>Je.
Hear.
A Gallery of Xirinc Animals
105
Dog
This little fellow seems to be implor-
ing someone to give hiai з tre.it. I used
an upright stone with a pronounced
forward tilt. Small, long-haired dogs
can be handled like long-haired cats in
a crouched positron,
iKur. Front.
Stone «hepti and layout сЬокм for fong-halreJ dc$&.
Г 06
The A*r of Pointing Animals on Rock^
Beavers
Like raccoons, beavers can be done
In two basic poses, cither crouching oc
standing upright with the paws tucked
under the chin-1 cut leaf-shaped oils
from a sheer of scrap leather and
darken them with a light coat of black
spray paint in a matt finish. Leave extra
length on rhe tail so the base can be
glued to the bottom of the stone. Al-
though a beaver's leeih arc not always
vuiblc in photographs, 1 invariably
point them in as people seem disap-
pointed when that distinctive trade-
mark is nut apparent.
Vanaus heaver projet"-
A Ga2fcry pf 5co4c Animitl-
Double Animals
A numbei of double animats fit
nicely on rounded stones of assorted
sizes. While foxes with kits may be
“too ciitc" for your taste. others art
charmed by the combination of mother
and baby. The lox layout is in the same
fashion as a single animal, then the kit
is added, usually tucked behind the
tail. The same thing can be done with
a mother raccoon and her kit. Make
sure your habits look like babies,
though, and not simply like miniature
versions of adults. Usually this means
giving them shorter muzzles and ears,
and larger eyes.
Sarnpdc armceiiKnti,
The Ari of Painting Animal» on Hocks
DiMjhkc сан
Ьг IU1IB 41Г
mother-fob
reft wntj«i< hi»
Double cats and kittens. Not only
:<re these fun to do, they can be done
on a wide range of rock shapes. You
can make identical twins by painting
the same animal twice, or vary the po-
sition, expression and coloration foe an
even more dramatic look. Double caw
can also be done with one facing for-
ward and the ocher facing backward.
A Gallery of Slone Anueab
Ю9
Double squirrels. 1 hove pamied
these babv squirrel» э number <jf times
since comingflesoss a photograph that
helped me see ho« I could fit them
onto a stone. Ordinarily squirrels are
difficult subjects because their fluffy
tails do not readily conform to stone
shape» Bat these tivo, clinging to one
another with their tails wrapped
around their feet, arc made tu order for
painting on stone.
Approach them much as you would
wild bunnies, beginning with a black
base ccot Note chat squirrels' fnxit
paws have very distinctive fingers.
Sftfripk а папист егнк
110
Vhc A*i mJ P^inwnjf Anrnuib an Kncfc
Paired squirrels (back)
Paired squirrels (skit)-
Л GdiJery о/ Лсолл Anitndb
i* J!
Pebble Pets
There is something irresistible
about miniature animals- It vou enjoy
doing very fine detail, these can be a
lot of fun. Kuh in particular seem t<i
enjoy working on sach a small sc«le.
Be sure to select smooth sinner fix best
effect.
Any anim.d in this took can tv
ilijnc in a '"pebble pet” version with a
bit of patience. They come in handy a»
small gift items and usually sell д» f*<c
is I can make them.
Other animals I have painted over
the years include calves, wolves, bruwn
hear*. cocker spaniel, chow chiw and
German shepherd dogs, and even a fer-
ret. Trying new animals keeps stone
(Minting fresh and exciting. 1 am always
looking for new challenges. That’s one
smwe reawxi why stone painting сип be
such a satisfying creative outlet.
112
The A*r of Peinring AnitniiJs i?n ftpiTRS
... cci ihe perch . -.
Display tout reck anflhtsls in ihe hcnjtc - -.
Enhancing Your Decor Weth
Rock Animals
Your rock animals can be displayed
anywhere in your living space. They
can add various moods to your room,
from cute ami cosy to dramatic and ex-
otic- Use your imagination to duplay
each unique and beautiful conversa-
tion piece- Mv rock animaU have nude
their home in every room in. and out
of. our house—even the barn.
... even in rhe мгл!
A Gallrrv Scene Animoh
Marketing Tips
1 hope the projects in this book have
.rupired you to keep painting stones,
refining your techniques and develop-
ing your awn „pecial style. With lime
vou arc likely to sec even more possibll
ines than I have shown you. Friends
and relatives may -опк to treasure
your stone creations as gifts at Christ-
mas and birthdays as mine have. If you
find yourself 'horoughlv " ooked эп
stone painting you might begin to
wonder if the quality of your work is
g >od enough to sell.
Displaying your work. One way to
find out is to participate tn an .itts and
crafts fair. Chouse an event where
Ixx-tli space is relatively inexpensive.
Plan ahead and make sure you have
enough inventory to make the venture
worthwhile. Put seme thought into
how best co display >our pieces Pol-
ished slabs of hardwood make attrac-
tive bases for larger works and wilt give
them a “sculptural" i-ppeatance. Cats
can be nestled on pillows or into inex-
pensive baskets. bin be sure u- ligure
the cast of the pillow or basket in pout
sales pnee. Many people will expect to
get them as part of the package. Sec-
tions oi logs make rustic pedestals for
wildlife stones like raccoons, while a
simple bed of straw can set off a fawn
rock in an appealing way
Pricing. Pricing pour work will
probably be a mattei 01 trial and error.
Beginner, may start by keeping prices
low, sav under ten dollar on smaller
plccc-s, to encourage those oh-so-in-
spiring first sales. As skill level In-
creases, rhe prices your work com-
mands wilt naturally rise If your stones
sell briskly, rhar is evidence 'he price
is too low and could be raised. Another
school of .bought, however, is that an
artist should begin with a higher price
and adjust it gradually downward until
it seems xccepKihle to a reasonable
number bf customers.
Building a business. Once sou
hav< established that there is a market
for your painted stones, it’s a good idea
to print some business cards to pass
out- As yxju become more proficient,
you will almost certainly be asked
about commissions. Cat owners, m
par-icular, are apt to want their pet s
likeness captured on stone Insist on
receiving good phot^is of the subject,
and agree . n a price at the cutset to
avoid any misunderstandings. Dog lov-
ers may also inqu.re about stone por-
traits of their petj. Due to the .rcrncn-
dous differences be w-ccn brecro. dcr>
can be 'rickier than cats, but it you are
comfort ible with the challenge, give it
a try. You car always forfeit the com
missions if you find vourself unable *0
Jo justice to the project. bhort-ha-ted
dogs are somewhat similar to fawns.
while long haired dogs can be handled
more in the manner of Persian cats or
foxes. I rarely do dogs unless it is by
commission because people who love
dogs usually have a favorite breed,
wnile cat lovers tend to be less patticc
lar And 1 always offer a money-back
guar miee on commissioned work to
insure satisfaction.
By distributing -our card and dis-
playing vour work ar various fairs mid
shows, you should be able to build up
business in custom work and special
order.,, par'icularlv around the holi
davs.
When experience has given you an
idea of how much vou can realistically
charge, the next step may be th market
your stones through retail outlets.
Shop owners on the lookout for un-
usual items might inquire about a
wholesale pricelist Remember most
114
The Art of Punning Anonuls on Rocks
uo WUoidcomcsfrorna^^^ul
^«SS u^« "u^’°°dUj^1’*
lists.. She b‘ -ltl adMertrt>n8 a^alds
Й Mcnagenc"
'sS^-S*
and сошлись к
4°"anO .like
art «vets abke.
Sair^le Ьш|г«» c*nl
v fadjexattf 1Ы
X ЯНИМЖЖДДНТа
and
distroctiw
жтгЪ of art
by Arkaman
-Zin tyVettfod
bxajoa.
retailers expect to double the price of
anything they buy. Ask yourself, based
on personal experience, wh.it kind of
wholesale pricing would give you a sat-
isfactory return on your rime and tal-
ent. You don’t want to price your work
an of the range most people arc will-
ing to pay. h you are j prolific painter
as I am, wholesale accounts can ex-
pand your markets and keep you busy.
Bui if you enjoy taking your time with
each stone you paint and don’t want
to be pressured to produce quickly,
wholesaling is probubly nor for you.
Another possibility ts selling nn
commission. Since this requires в cer-
tain level of trust, stick to well-estab-
lished businesses. The standard agree-
ment for selling on commission is that
you scr the puce for your work and rhe
shop owner keeps i portion of the sales
price of each item sold, usually be-
tween 30 and 40 percent. The advan-
tage of this type of arrangement is that
you will make more than you might he
able to charge wholesale while keeping
the actual sides price lower. On the
down side, you won't get paid until a
piece sells. Commission also means
more bookkeeping for you. It's impor-
tant io keep careful records of which
items you have placed in whet stores.
Most shopkeepers are honest and pay
within thirty days on any sales they
make- Bur nearly everyone who has
sold work on commission can tell sto-
nes of waiting month* for payment, or
of having unscrupulous merchants
ckwe down and disappear, taking their
ill-gotten. inventory along. So и pays to
be discriminating in your choke of out-
lets. Look for stores that specialise in
handcr.4tcd items, or upscale gift
shops that appreciate the value of your
unique, one-of-e-kind work. Better
still are galleries whose chvntdc will
see vour stones as wviks <af art rather
than mere сглгь. Mv best ouilw by far
is » wildlife art gallery where my work
conunandt a respectable price and
turnover ls dependably steady.
Yet another option i* to sec if your
art» has a craft mall where booth space
»S rented by rhe month and sale* arc
handled by sr.tif salespeople. Yom will
be changed a commisa* n on any items
that sell. but unlike other uutlm*. you
can set up your own sales area. An at-
tractive display and realistic pnees
could make this a lucrative venture.
Whether you choose to produce in
volume or conrine your ertbrts to "lim-
ned editions" for friends and family,
«tone painting can he a terrific low-
cost hobby und a truly s.icislymg outlet
for vour creative urge.
A Gdlcn of Stone Aniff.uh
Author, Un Wellford, or her porch with pm of her stone mcnacene.
The Art of Painting Animals on Mucks
ART INSTRUCTION
The At t of
О
Painting Animals
on Rocks
This book holds a mountain of fun for rock
artists of all ages! With the instructor
inside, creating these critters is as
easy as picking up a rock.
Ел’Ь jw'ijeci is
ГЧъп :d in
e<isy-t ‘-/blktu'
stej'-hy-step
j nMografrfis
anJ Jugram<
>MX>
•21.54
<<« «31.4'1
isbn о-вч1зч-5?г-в
4«ИийШ1) 1г>шМм