/


Tags: weapons
Year: 1937


Text
NOT TO BE PUBLISHED
The information given in this document
is not to be communicated, either directly
or indirectly, tq the Press or to any person
not holding an official position in HSu
Majesty’s Service.
Manuals
Notified in
Аттпу Orders for
March,
1937.
Small Arms Training
Volume I, Pamphlet No. 6
Anti-Aircraft
1937
{Reprinted with Amendments, 1940.)
Crown Copyright Reserved
• A. M. R. & О. 1Б88В.
{Reprinted with the permission of the Controller, His Majesty’s
Stationery Office, London.)
By Authority: Wilke & Co. Pty. Ltd., Melbourne.
AMENDMENTS.
No. 1, A.CJ.. 12th Oct., 1938) .
No. 2, A.C.1, 14 Feb., 1939 J Embodled in thls
No. 3, Notified nJ A.A.OJs, 31st August, 1940. Embodied in
this repiiht.
INUT TU bJK FUHJLilbHbD
The information given in this document
is not to be communicated, either directly
or indirectly, to the Press or to any person
not holding an official position in His
Majesty's Service.
Small Arms Training
Volume I, Pamphlet No. 6
Anti-Aircraft
' 1937
(Reprinted with Amendments, 1940.*)
Crown Copyright Reserved
•A.M. R. &O. 1588B
By Authority: Wilke & Co. Pty. Ltd.» Melbourne.
CONTENTS.
General:— Page
Introductory......................................... 5
Principles of small arms defence..................... 6
Protection........................................... 6
Warning and air sentries............................. 7
Ranging.............................................. 8
Recognition’......................................... 8
Considerations in training........................... 9
Lesson 1. Pr6cis of introductory lecture.............. 11
„ 2. Direct attacker (Rifle)..................... 12
„ 3. Direct attacker (Rifle—Spotlight) .......... 15
„ 4. The lead (Rifle) ........................... 16
„ 5. Crossing aeroplane (Rifle).................. 18
„ 6. Crossing aeroplane (Rifle—Spotlight) ... 19
„ 7. Fire discipline training.................... 20
„ 8. Direct attacker (Light machine gun—
Spotlight) ............................ 22
„ 9. Crossing aeroplane (Light machine gun—
Spotlight) ............................ 23
„ 10. Anti-aircraft handling (Light machine gun) 25
Appendix I.—Apparatus and accessories—
Silhouette model diagrams........................... 28
12-degree lead measurements......................... 28
Model aeroplane with pole and stand............. 30
Spotlight projector................................. 32
Moving target for spotlight projector............... 36
Appendix II.—
Lesson 8a. Direct attacker (Hotchkiss or Lewis) 39
„ 9a. The crossing aeroplane (Hotchkiss or
Lewis) ................................ 40
,, 10a. Anti-aircraft handling (Hotchkiss) .. 41
„ 10b. Anti-aircraft handling (Lewis) . ... 43
Appendix III.—
Appearance of tracer................................ 45
5
General.
Introductory.
1. The principles of protection against aircraft are con-
tained in Field Service Regulations, Vol. II, 1935, Sec. 38, and
Infantry Training, 1937, Sec. 55.
2. So far as troops are concerned, probably the most vulner-
able target that presents itself to aircraft is that of a column
on the line of march, but all conditions must receive due
consideration. Attacks may be made either by bomber air-
craft from altitudes at which small arms fire is ineffective,
i.e., over 2,000 feet, or by fighter and bomber aircraft flying
low, when the main defence is small arms fire.
In the former case there will usually be some warning
owing to the height at which the aircraft fly, although in
cloudy weather such warning will be reduced.
In the latter case, owing to the risk from small arms fire
the aircraft will seek to effect surprise. They may, there-
fore, use clouds, low hills, woods, etc., for concealment and
by attacking out of the sun will endeavour to put the anti-
aircraft defence on the ground at a disadvantage.
3. Instructions contained in this chapter are concerned only
with low-flyiqg attacks, i.e., attacks made at a range of 600
yards or under. These attacks will be made at high speed,
probably between 200 and 300 m.p.h., and so will be quickly
ended. They may be repeated at short intervals, usually a
combination of light bombs and machine-gun fire will be
employed. In the case of two-seater aircraft the rear
machine guns may also be brought to bear as the aircraft
is climbing and turning away.
On occasions the attack may be purely by gas spray, in
which case the aircraft is likely to fly straight over, or low
and parallel to, the column on an even keel in accordance
with the direction of the wind.
Attacks may be made either individually by aircraft flying
along a column and diving in succession or by a simultaneous
converging attack by several aircraft from different direc-
tions. With the first method little or no warning can be
expected beyond possibly the noise of bombs exploding or of
6
fire from other troops which are being attacked, with the
second some warning should be forthcoming, as the aircraft
must first get into a definite formation above their target.
Against undisciplined or demoralized troops air attacks
may have a decisive effect.
Enemy reconnaissance aeroplanes searching for informa-
tion are sometimes forced to fly low. Small arms anti-
aircraft fire is of great value to prevent them achieving their
object.
Principles of small arms defence.
4. The following are the main principles to be observed:—
i. There must be a system whereby warning of the
approach of hostile aircraft is conveyed to the
troops (see para. 6 below).
ii. The maximum fire of all available small arms weapons
will immediately be brought to bear on the attacking
aircraft, provided that they are within range. It is
only by adopting an offensive attitude that morale
can be maintained and that low-flying attacks by
aircraft will be made so costly as to become unsound
policy for the enemy.
iii. Subject to (ii), above, units of all arms will present to
the attacking aircraft the least favourable target,
according to the situation in which they find them-
selves.
iv. When movement is stopped, it must be continued at
the earliest moment.
v. When troops are on the move, rifle fire will generally
be quicker to produce and, therefore, more suitable.
vi. In bivouacs, billets, or when otherwise halted, light
machine guns, suitably sited and concealed, should
form the main small arms defence.
vii. To be effective, fire must be controlled.
viii. Speed in opening fire is essential. This requires
strict fire discipline training.
ix. Fire unit commanders must know beforehand whether
they are to open fire on their own initiative or not.
Protection.
5. Every commander is responsible for the protection of
his command against surprise, and for concealing his disposi-
tions from enemy ground troops and aircraft.
i. On the move.—In cases of troops on the march, the time
factor precludes, as a normal procedure, the possibility of
7
advance across country and, except in small columns, large
spaces between units and sub-units. Columns must, there-
fore, generally be protected by light machine guns piqueting
the area and particularly the defiles through which the troops
are moving. Other means of protection are light machine
guns mounted on M.T. vehicles moving within the column
or on the flanks.
The dispersion of small infantry parties throughout a
column on the march for protective duties should be resorted
to only in most exceptional circumstances, or when tactical
considerations are of no account.
All units must protect themselves with the weapons at
their disposal. The rifle will normally be used, but light
machine guns should be brought into action if time permits;
it is essential that as great a volume of fire as possible
should be speedily produced. Normally, therefore, all avail-
able rifles will be fired.
Since there will not be time to issue orders for opening
fire through the usual chain of command, responsibility must
be delegated. The fire unit will be the platoon. Men will
march with magazines charged with ten rounds and sights
set at 500 yards.
ii. When halted.—The fire of light machine guns is the
most economical form of protection. It should be organised
in the form of area defence, the guns being sited not less
than 500 yards or more than 800 yards apart at the corners
of a series of equilateral triangles, disposed so as to cover
the area protected. It will sometimes be of advantage to
site guns in pairs in order to produce a greater volume of
fire in the more likely lines of approach of enemy aircraft.
The extent fo which this is advisable must depend on the
total number of guns available in proportion to the area to
be defended. When troops are concealed, orders must be
issued whether light machine guns are to be posted and are
to open fire against hostile aircraft or not; the opening of
fire may betray to the hostile observer the fact that the
area is occupied. During short halts anti-aircraft light
machine guns will be disposed under company arrangements.
During long halts or in camp, billets, or bivouacs, the anti-
aircraft defence will be co-ordinated under brigade and
battalion arrangements.
Warning and air sentries.
6. The efficiency of the defence will depend firstly on the
speed at which warning of the attack can be conveyed to
subordinate commanders; secondly on the quickness with
which warning can be followed by executive orders for move-
8
ment or fire, and lastly on the skill, steadiness, and fire
discipline of the troops.
In certain types of attack and under conditions favourable
to the attacking aircraft, there will often be not more than
a few seconds warning, even with quick, well-trained air
sentries. With well-trained and disciplined troops even these
few seconds will be valuable.
The number of air sentries to be detailed must depend on
circumstances, but should not be less than two for each com-
pany. The direction and area in which each sentry is to
watch must be Carefully regulated. Sentries must continu-
ally watch the sky, especially in the direction of the sun,
towards low hills, woods, etc.; they must also listen for the
approach of aircraft.
At the halt, if time allows, they should be posted on high
ground to get a clear view of the horizon. Their attention
must be concentrated all the time on the approach of air-
craft. The duties will be exhausting and entail great strain
on the eyes. Arrangements, therefore, must be made for
constant reliefs. Details of warning signals are given in
Lesson 7.
Ranging.
7. Rifle and light machine gun fire may be taken as effec-
tive up to 600 yards. The following is a rough guide as to
whether the target is within this range or notj—
At 600 yards the aircraft is almost a silhouette; the
national markings may be visible, but the colours are not
discernible. At closer ranges such details as the pilot’s head,
struts and colours of national markings become more clearly
defined.
Training will be carried out with the co-operation of air-
craft when available, by demonstration flights arranged at a
height of 600 yards and at distances over and within that
range. Full use will be made of opportunities of ranging
on aeroplanes during training.
Recognition.
8. Those in constant practice can recognize aircraft by
silhouette, or, at closer ranges, by national markings. But,
since in peace, practice in recognition of foreign aircraft is
not possible, the most that can be aimed at, practically, is to
train personnel to recognize our own aircraft. On the out-
break of war, silhouettes and markings of allied aircraft will
be issued.
In training, emphasis should be laid on the necessity for
trying to distinguish between a friendly aeroplane flying low
9
in order to drop a message and a hostile one diving to attack.
But, at the beginning of a campaign, it must be realized that,
in actual fact, any suspicious action by an aeroplane will
render it liable to be fired on.
Recognition by silhouette demands a high standard of
training, since hostile aircraft will usually present them-
selves head on, when identification is most difficult. Troops
will, therefore, be trained in peace to recognize those types
of our own aeroplanes which are most likely to be operating
in their neighbourhood.
Recognition by national markings offers the surest means
of identification, but such markings are only visible at close
range, when an aeroplane is crossing or overhead. National
markings consist of signs of different shapes and colours,
standardized for each country. These are painted on the
wings, body, and tail
Considerations in training.
9. Owing to the speed of modern aircraft it is impractic-
able to provide the ground firer with any form of anti-
aircraft sight or other mechanical aid for either the rifle or
the light machine gun. Extreme accuracy of fire must,
therefore, give way to quick retaliation and volume. Esti-
mation of range can be limited to a knowledge of when fire
can usefully be opened.
Training, therefore, will primarily be concentrated on
obtaining:—
i. Speed in opening fire. The time available will depend
on early warning.
ii. Strict fire discipline.
iii. Maximum volume of controlled fire.
10. The following are the two main types of anti-aircraft
target to be considered:—
i. The direct attacker.
ii. The crosser.
Of these i. presents the more urgent problem and will allow
of practically no warning. It consists of an aeroplane diving
to the attack or climbing away after it. On the march, the
rifle is likely to be the most effective means of retaliation
against this type of attack, and men must be instructed how
to shoot and turn quickly. Light machine guns should also
be brought into action, if time permits.
As regards ii, this type is likely to provide opportunities
to both rifle and light machine gun firers. Since no mecha-
10
meal aid is practicable, the firers will have no assistance
other than a “lead” calculated as being 12 degrees when the
target is crossing at right angles to the line of fire. They
must receive instruction as to how they can instinctively
recognize the lead in the sky. The swing of the weapon is
of the utmost importance and it must be impressed on all
troops that the movement of the rifle or light machine gun
must not be checked at the moment of pressing the trigger.
11. Riflemen and light machine gunners will receive train-
ing on identical lines.
12. Officers responsible for training should study carefully
the Appendix, page 28, which gives in detail the methods of
preparing and setting up all of the apparatus required for
teaching lessons in anti-aircraft training.
The spotlight projector should be looked upon as one of
the most valuable means of teaching the soldier to aim and
fire quickly at aircraft, and use should be made of it through-
out the soldier’s service. The projector is intended to provide
an instructor with a means of checking correctness of aim,
judgment of deflection and swing. The light projected takes
the place of the bullet, thus adding interest and allowing the
individual to see the results of his fire.*
13. When units are not exercised in anti-aircraft training
with the rifle and are being taught the light machine gun
only, the relevant portions of Lessons 1 and 2 will be given
before Lesson 8, and Lesson 4 should precede Lesson 9.
* Pending receipt of Spotlight Projectors, valuable instruction might be
obtained by local improvisation in units using trade pattern torches
actuated by the trigger of weapons concerned. An improvised apparatus
for teaching “The Lead” can also be constructed by using a pole of
suitable length surmounted by a model aeroplane, the “lead” being
illustrated by means of a double lath or metal conduit pivoted to the
pole below the aeroplane and controlled by a stout cord and peg.
11
LESSON 1Л-ANTI-AIRCRAFT DEFENCE.
This lesson will be given in the form of a lecture and,
whenever possible, illustrated by diagrams. The basis of the
lecture will be a summary of the general paras. 1 to 12, and
Infantry Training.
Precis of lecture:—
1. Methods of air attack.
2. Principles of small arms defence.
3. Protection and defence against air attack.
4. Warning and air sentries.
5. Ranging and recognition.
6. Considerations in training.
/
12
LESSON 2.—DIRECT ATTACKER (RIFLE).
Instructors Notes.
Stores.—
Diagrams of diving and climbing aeroplanes fixed along the top
oj all four walls of the barrack room, or place of parade, so
as to allow of the 25 degrees safety angle.
Squad in two ranks, 10 yards or less from the diagrams. Order:
“Standing*—“10 rounds, Charge magazines”*—“500”—“Rest.”
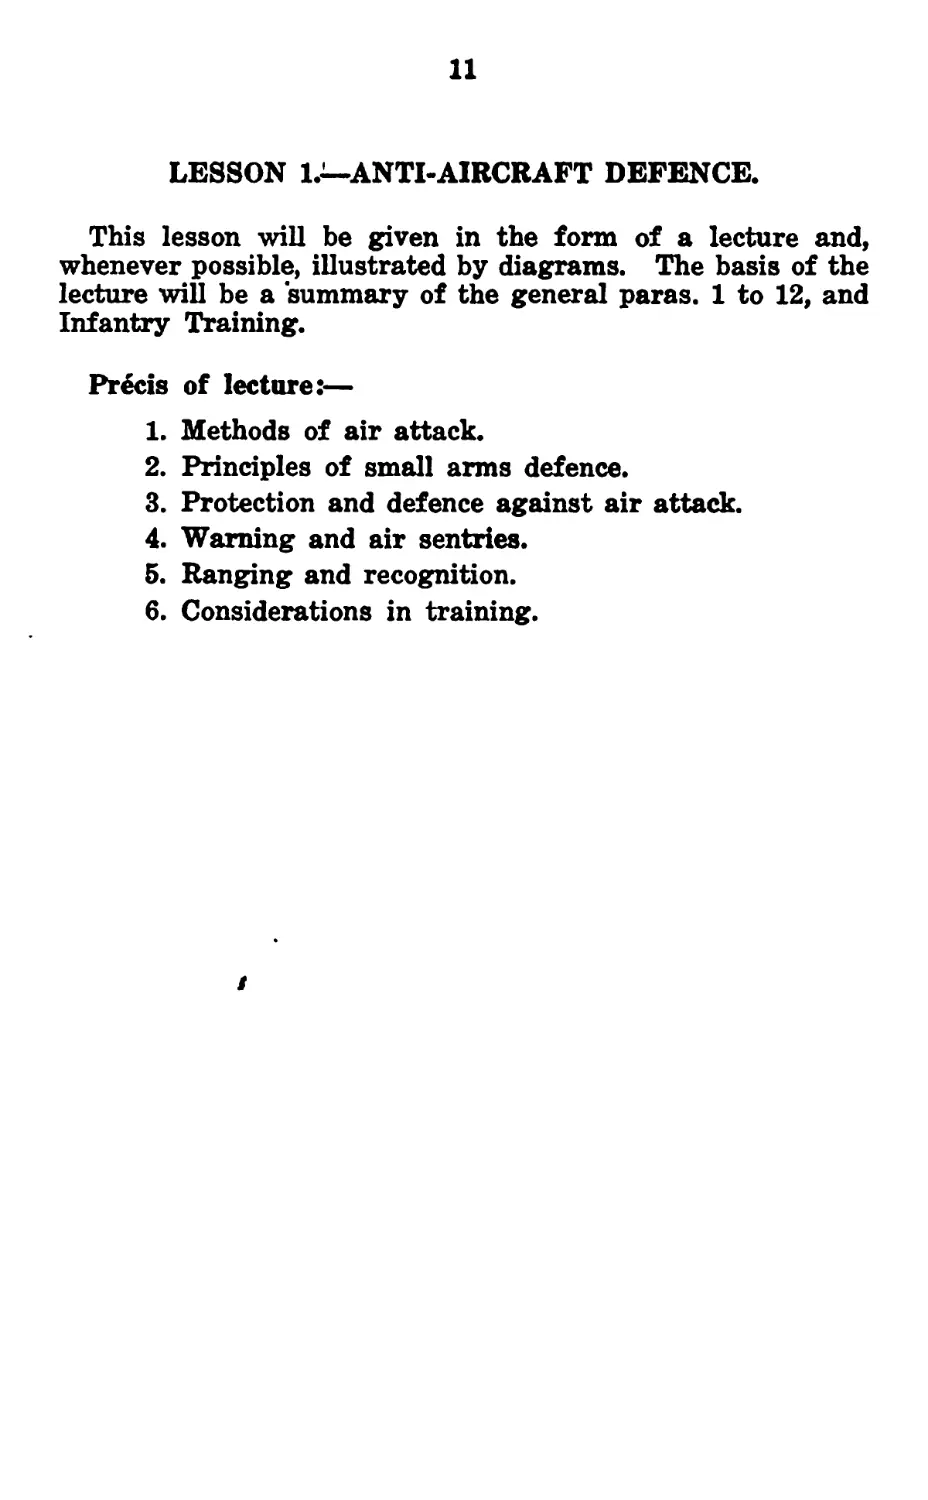
1. i. Explain that, owing to the high speed of modem air-
craft, it is essential that fire should be delivered
quickly and with reasonable accuracy. This lesson
deals with the method of firing at diving and climb-
ing aeroplanes. There are two rules of aiming (see
Fig. 1):—
(a) Sights set at 500.
(b) Align the sights on the centre of the aero-
plane.
ii. Demonstrate from the standing position:—
Aircraft action.
Aircraft front.
Firing.
Stop.
Charge magazines.
* For anti-aircraft purposes magazines will always be charged with
10 rounds.
13
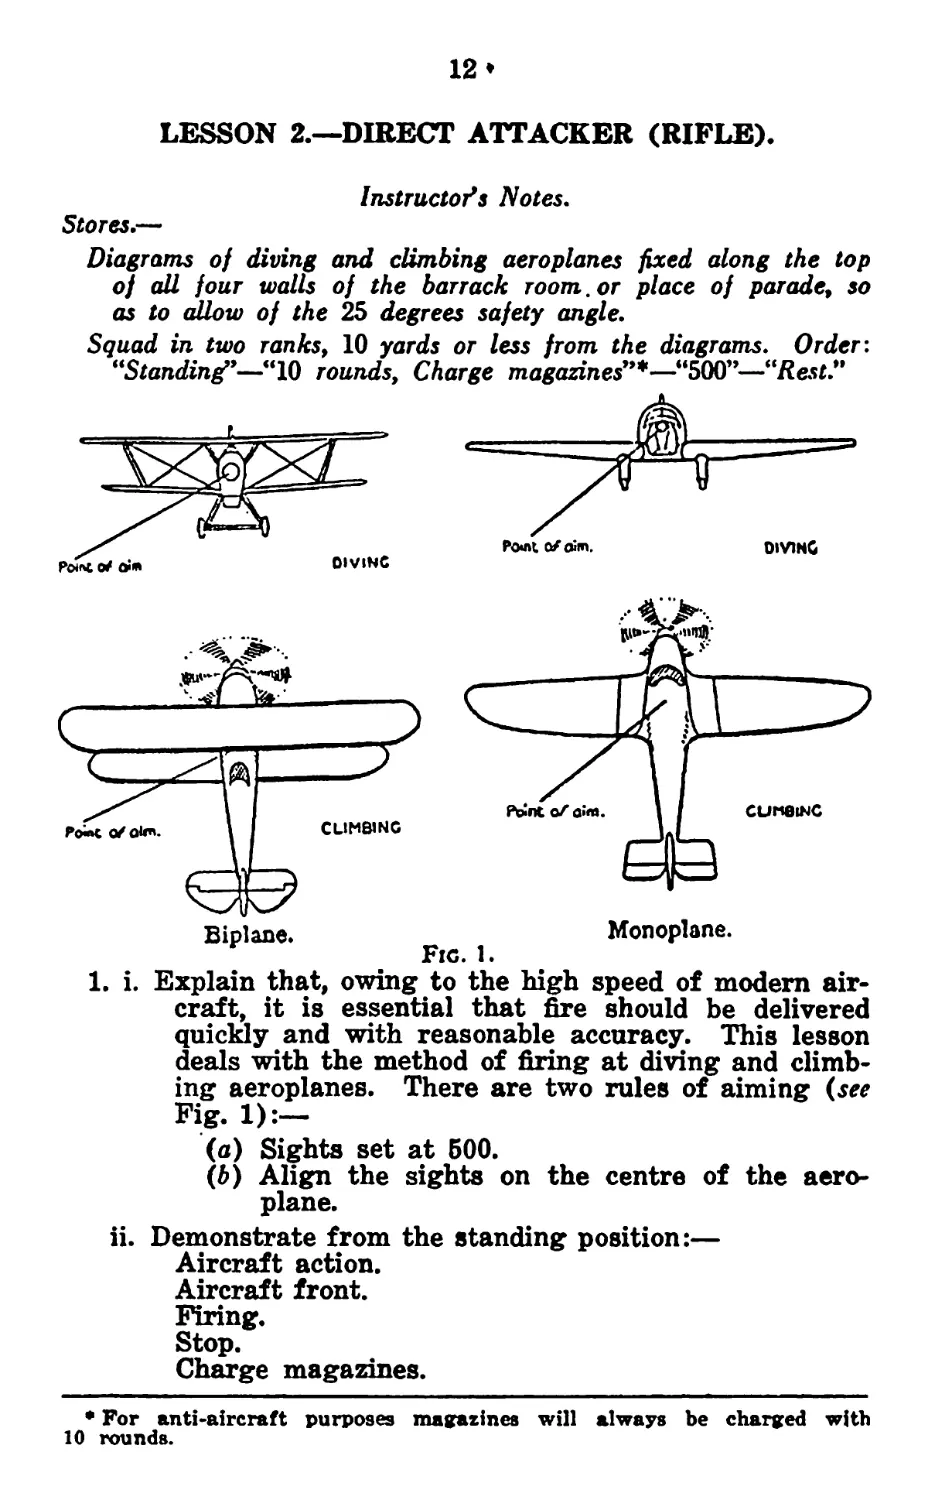
2. Explain and demonstrate with squad imitating:—
i. Aircraft action.—On the order “Aircraft action” adopt
the standing load position with the muzzle of the
rifle as vertical as possible and load, leaving the
safety catch forward.
Fic. 2.
ii. Safety angle.—The rifle when held in the firing posi-
tion should be at an angle of not less than 25 degrees
with the horizontal. A useful guide is that the
upper part of the left arm must be parallel with the
ground (see Fig. 2).
iii. Practise squad.
14*
3. Quick aiming and turning—
i. Explain that, owing to aircraft being within range for
such a short period, it is essential that all move-
ments, such as coming into the aiming position and
changing direction, should be carried out with the
utmost speed. A standard of firing the first shot
within two seconds should be aimed at.
ii. Explain and demonstrate with detail:—
On the order “Aircraft front,” raise the rifle
quickly to the aiming position, take first pressure
and aim. On a new direction being ordered, turn
quickly, pivoting on the right leg, in the direction
named and aim. Finally, return to the loading
position.
iii. Practise squad.
4. Firing—
i. Explain that fire against aircraft will always be at
tne rapid rate. Before a new target or direction is
ordered, the command “Stop” will be given. If a
new direction is immediately ordered, the man, with-
out applying the safety catch, will turn quickly and,
on the command “Rapid fire,” continue to fire as
before. When the safety angle cannot be main-
tained, men will adopt the loading position and load
if necessary.
ii. Practise squad.
LESSON 3.—DIRECT ATTACKER (RIFLE—SPOTLIGHT).
Instructor’s Notes.
Stores.^
Diagrams of diving and climbing aeroplanes as in Lesson 2.
One rifle fitted With a spotlight projector apparatus with flex and
transformer. (See page 32.)
Aiming rest placed in the centre of the room so that diagrams
are on all sides and approximately at equal distances from the
aiming rest. .
Forms or choirs as required.
As proficiency increases, this lesson can be repeated with respira-
tors.
1. Practise each man in firing—by word of command (men
should stand close to the aiming rest):—
“Without dummies”: “Standing”—“Charge magazines”
—“500” — “Rest” — “Aircraft action” <— “Aircraft
front”—“Rapid fire”—“Stop”—“Aircraft about”—
“Rapid fire”—“Stop”—“Rest.”
On the order “Rest,” men will lower the rifle gently to
the ground in order not to disturb the focus and
registration of the projector.
Repeat the above afe necessary, using targets in all
directions. i.e., right, left, front and about, until the
men develop quidmess in firing and turning. Each
man should be given not more than two directions
before the order “Rest.”
2. Repeat, using dummies.
la
LESSON 4.—THE LEAD (RIFLE).
Instructors Note».
It may be convenient, on occasions, to combine Lessons 4 and 5
into one lesson. *
Stores.—
Model aeroplane with pole and stand fitted with movable arm,
rectangle and line-of'flight rod (see Fig. 11). Set up with a
sky background.
12 degrees displayed in barracks at 10 yards, 30 yards, and 100
yards.
The model aeroplane will be set up as a direct crossing plane
with the rectangle a 12 degrees lead in front. Distance from
the centre of the stand to the centre of the aiming rest—nine
yards.
Place rifles on the aiming rests.
1. Explain that it was necessary to aim off a “lead” in
front of moving targets on the ground (Rifle—Lesson 12)
and that the same principle will apply in aiming and firing
at aircraft crossing the front. A lead of 12 degrees will
therefore always be maintained in front of all crossing tar-
gets, whatever their direction, except the “direct attacker.”
The two rules of aiming at crossing aeroplanes are:—
i. Sights set at 500 yards.
ii. Direct the rifle the required lead in front of the
aeroplane and in the direction of its flight. Main-
tain the lead by swinging with the aeroplane and
fire without checking the swing.
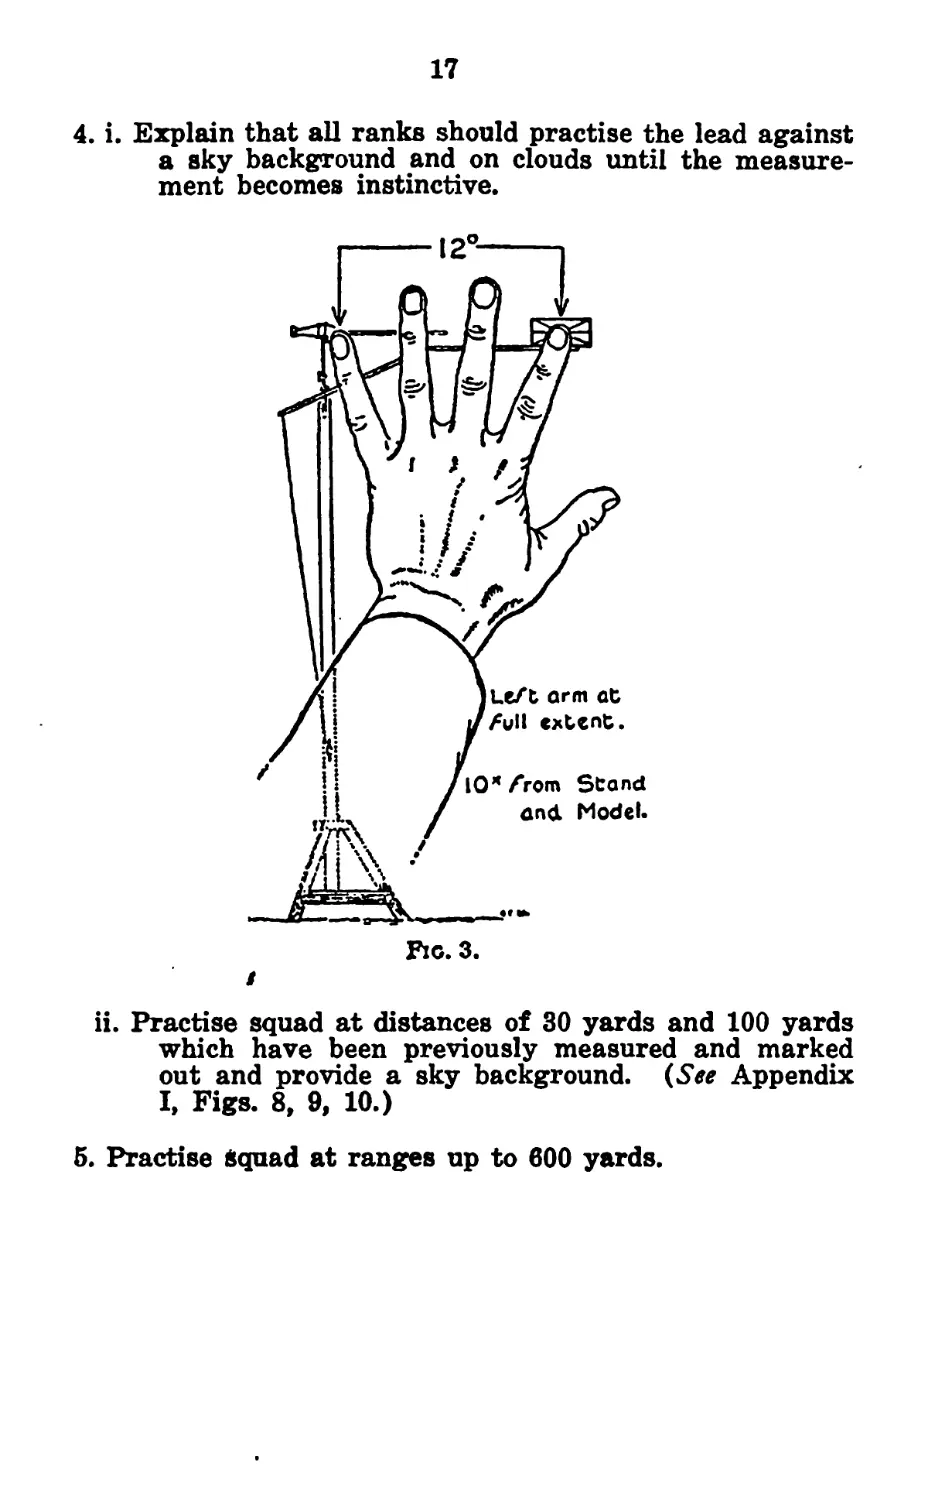
2. i. Question squad on the method of measuring degrees
taught in application of fire (Lesson 6) and explain
that each man must measure for himself what part
of his left hand when at arm’s length will give 12
degrees from the nose of the aeroplane to the centre
of the rectangle (see Fig. 3). The parts of the hand
which give this measurement at ten yards will also
give 12 degrees at any range.
ii. Practise squad at ten yards measuring the lead in the
aircraft action position with the left arm extended.
3. Lower the rectangle. Practise squad aiming off 12
degrees with and without the aid of the hand. Check by the
rectangle, which will always be raised at right angles to the
firer irrespective of the direction of flight of the plane.
17
4. i. Explain that all ranks should practise the lead against
a sky background and on clouds until the measure-
ment becomes instinctive.
ii. Practise squad at distances of 30 yards and 100 yards
which have been previously measured and marked
out and provide a sky background. (See Appendix
I, Figs. 8, 9, 10.)
5. Practise equad at ranges up to 600 yards.
18
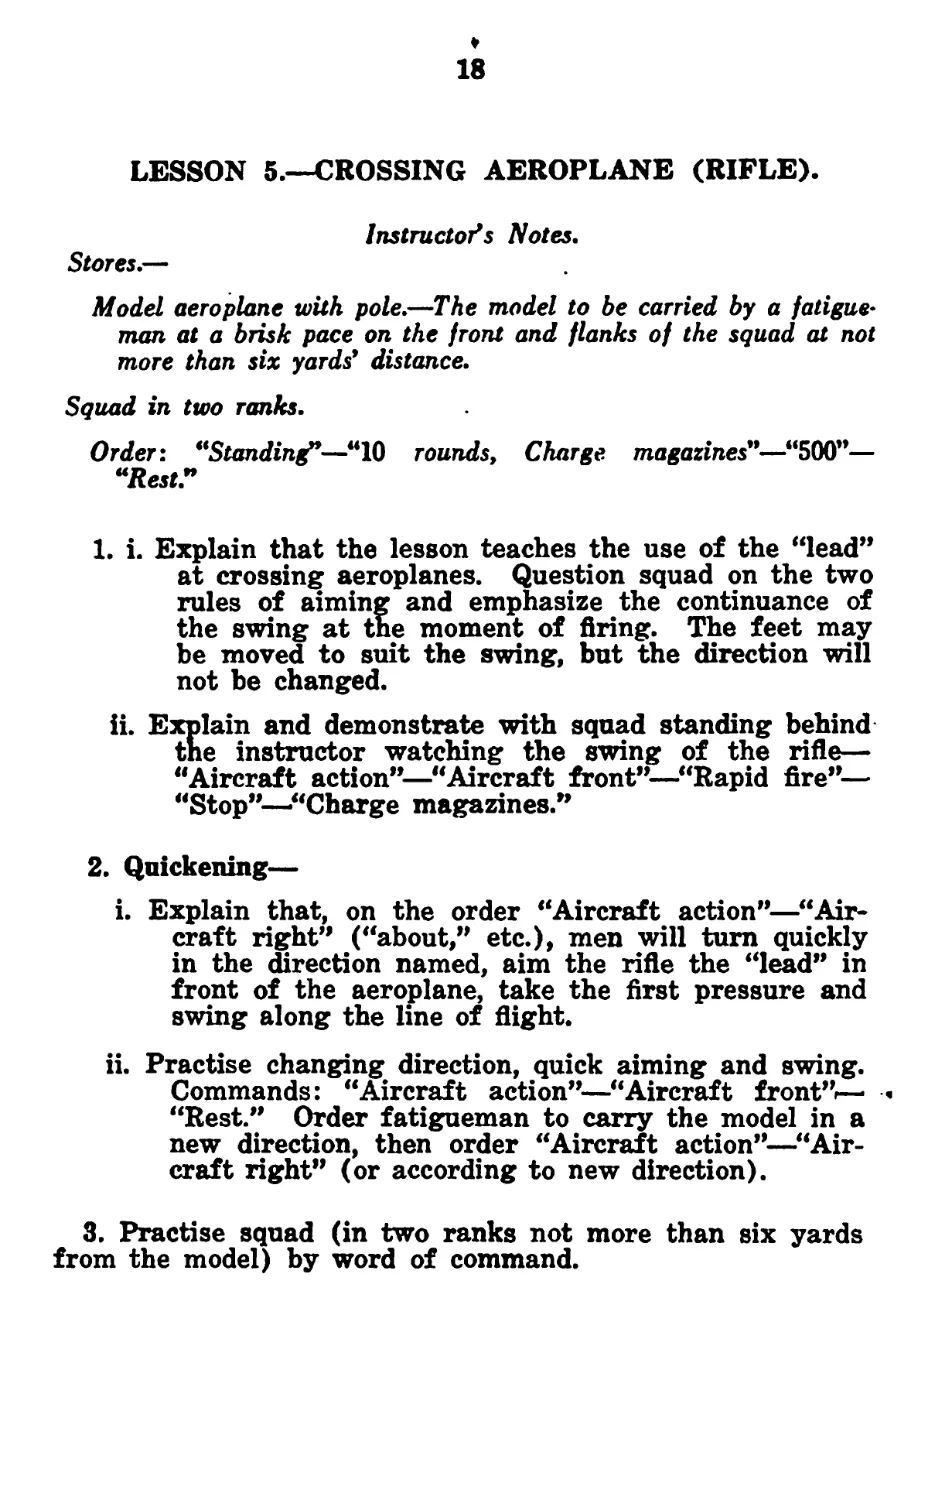
LESSON 5.—CROSSING AEROPLANE (RIFLE).
Instructors Notes,
Stores.—
Model aeroplane with pole.—The model to be carried by a fatigue-
man at a brisk pace on the front and flanks of the squad at not
more than six yards9 distance.
Squad in two ranks.
Order: “Standing9—“10 rounds, Charge magazines99—“500”—
“Rest."
1. i. Explain that the lesson teaches the use of the “lead”
at crossing aeroplanes. Question squad on the two
rules of aiming and emphasize the continuance of
the swing at the moment of firing. The feet may
be moved to suit the swing, but the direction will
not be changed.
ii. Explain and demonstrate with squad standing behind
the instructor watching the swing of the rifle—
"Aircraft action”—"Aircraft front”—“Rapid fire”—
"Stop”—"Charge magazines.”
2. Quickening—
i. Explain that, on the order "Aircraft action”—"Air-
craft right” ("about,” etc.), men will turn quickly
in the direction named, aim the rifle the "lead” in
front of the aeroplane, take the first pressure and
swing along the line of flight.
ii. Practise changing direction, quick aiming and swing.
Commands: "Aircraft action”—"Aircraft front”.— «
"Rest.” Order fatigueman to carry the model in a
new direction, then order "Aircraft action”—"Air-
craft right” (or according to new direction).
3. Practise squad (in two ranks not more than six yards
from the model) by word of command.
19
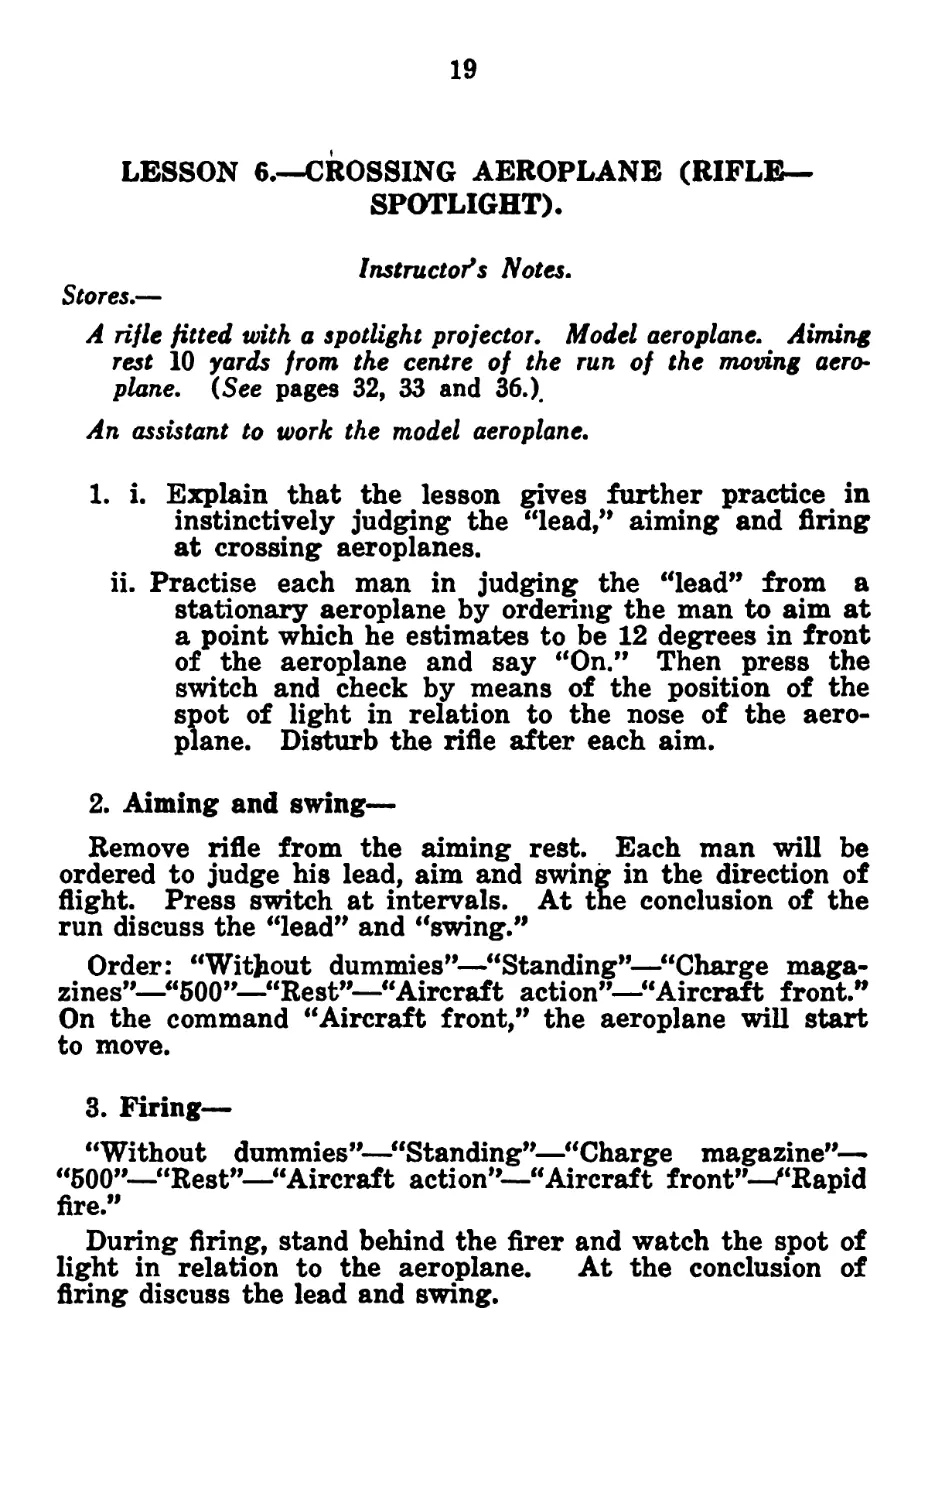
LESSON 6.—CROSSING AEROPLANE (RIFLE-
SPOTLIGHT).
Instructors Notes.
Stores.—
A rifle fitted with a spotlight projector. Model aeroplane. Aiming
rest 10 yards from the centre of the run of the moving aero-
plane. (See pages 32, 33 and 36.X
An assistant to work the model aeroplane.
1. i. Explain that the lesson gives further practice in
instinctively judging the “lead,” aiming and firing
at crossing aeroplanes.
ii. Practise each man in judging the “lead” from a
stationary aeroplane by ordering the man to aim at
a point which he estimates to be 12 degrees in front
of the aeroplane and say “On.” Then press the
switch and check by means of the position of the
spot of light in relation to the nose of the aero-
plane. Disturb the rifle after each aim.
2. Aiming and swing—
Remove rifle from the aiming rest. Each man will be
ordered to judge his lead, aim and swing in the direction of
flight. Press switch at intervals. At tne conclusion of the
run discuss the “lead” and “swing.”
Order: “Without dummies”—“Standing”—“Charge maga-
zines”—“500”—“Rest”—“Aircraft action”—“Aircraft front.”
On the command “Aircraft front,” the aeroplane will start
to move.
3. Firing—
“Without dummies”—“Standing”—“Charge magazine”—
“500”—“Rest”—“Aircraft action”—“Aircraft front”—/“Rapid
fire.”
During firing, stand behind the firer and watch the spot of
light in relation to the aeroplane. At the conclusion of
firing discuss the lead and swing.
20
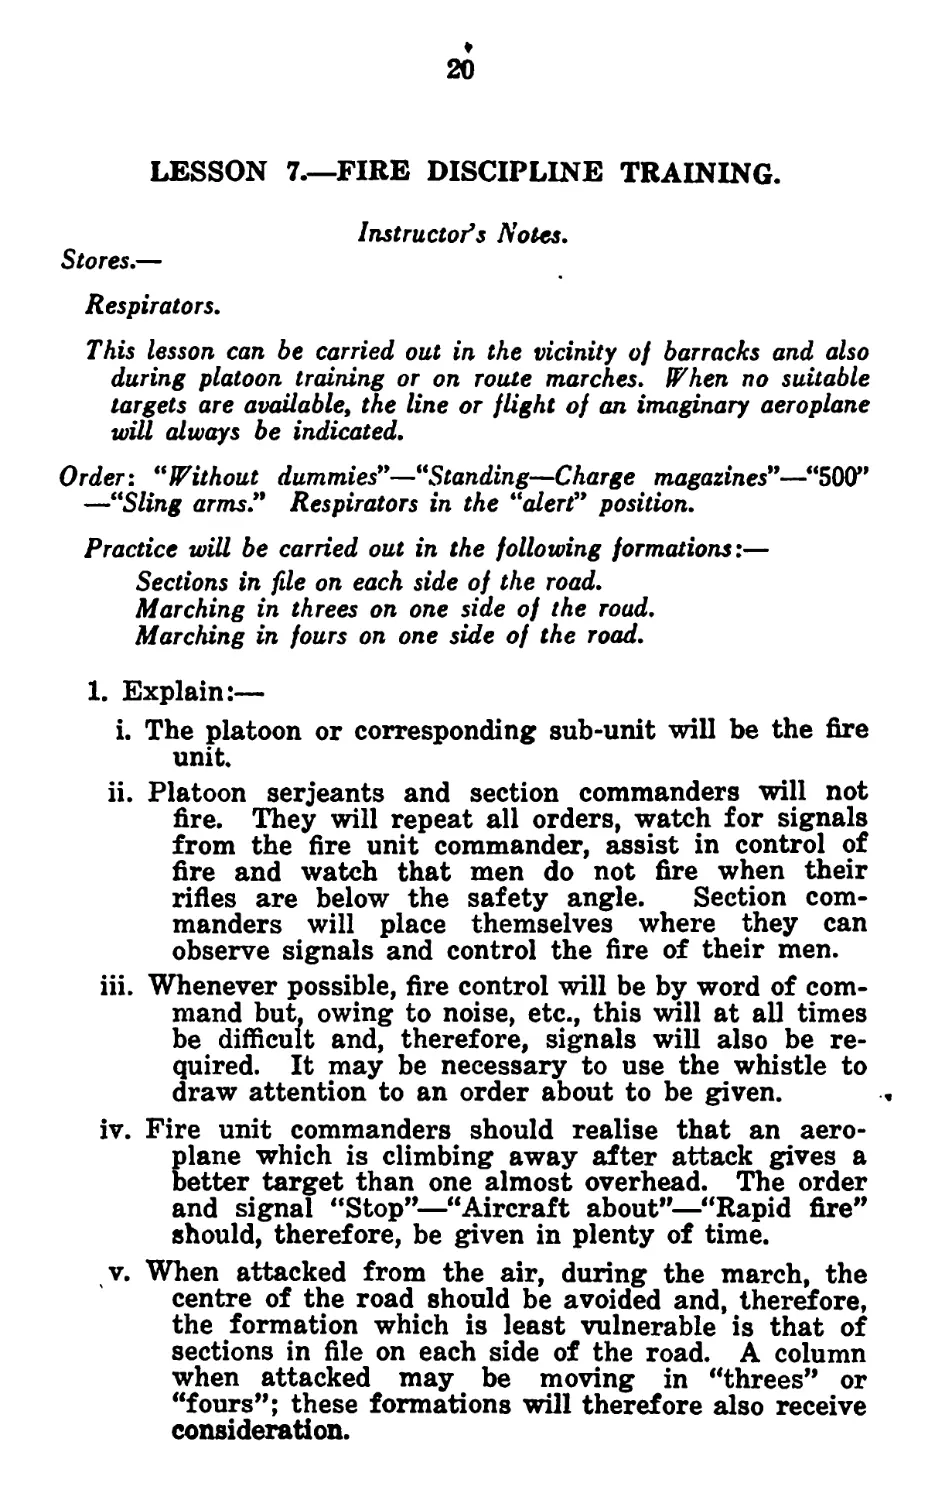
LESSON 7.—FIRE DISCIPLINE TRAINING.
Instructors Noles,
Stores.—
Respirators.
This lesson can be carried out in the vicinity of barracks and also
during platoon training or on route marches. When no suitable
targets are available, the line or flight of an imaginary aeroplane
will always be indicated.
Order*. “Without dummies”—“Standing—Charge magazines”—“500”
—“Sling arms.” Respirators in the “alert” position.
Practice will be carried out in the following formations*.—
Sections in file on each side of the road.
Marching in threes on one side of the road.
Marching in fours on one side of the road.
1. Explain:—
i. The platoon or corresponding sub-unit will be the fire
unit
ii. Platoon serjeants and section commanders will not
fire. They will repeat all orders, watch for signals
from the fire unit commander, assist in control of
fire and watch that men do not fire when their
rifles are below the safety angle. Section com-
manders will place themselves where they can
observe signals and control the fire of their men.
iii. Whenever possible, fire control will be by word of com-
mand but, owing to noise, etc., this will at all times
be difficult and, therefore, signals will also be re-
quired. It may be necessary to use the whistle to
draw attention to an order about to be given.
iv. Fire unit commanders should realise that an aero-
plane which is climbing away after attack gives a
better target than one almost overhead. The order
and signal “Stop”—“Aircraft about”—“Rapid fire”
should, therefore, be given in plenty of time.
v. When attacked from the air, during the march, the
centre of the road should be avoided and, therefore,
the formation which is least vulnerable is that of
sections in file on each side of the road. A column
when attacked may be moving in “threes” or
“fours”; these formations will therefore also receive
consideration.
21
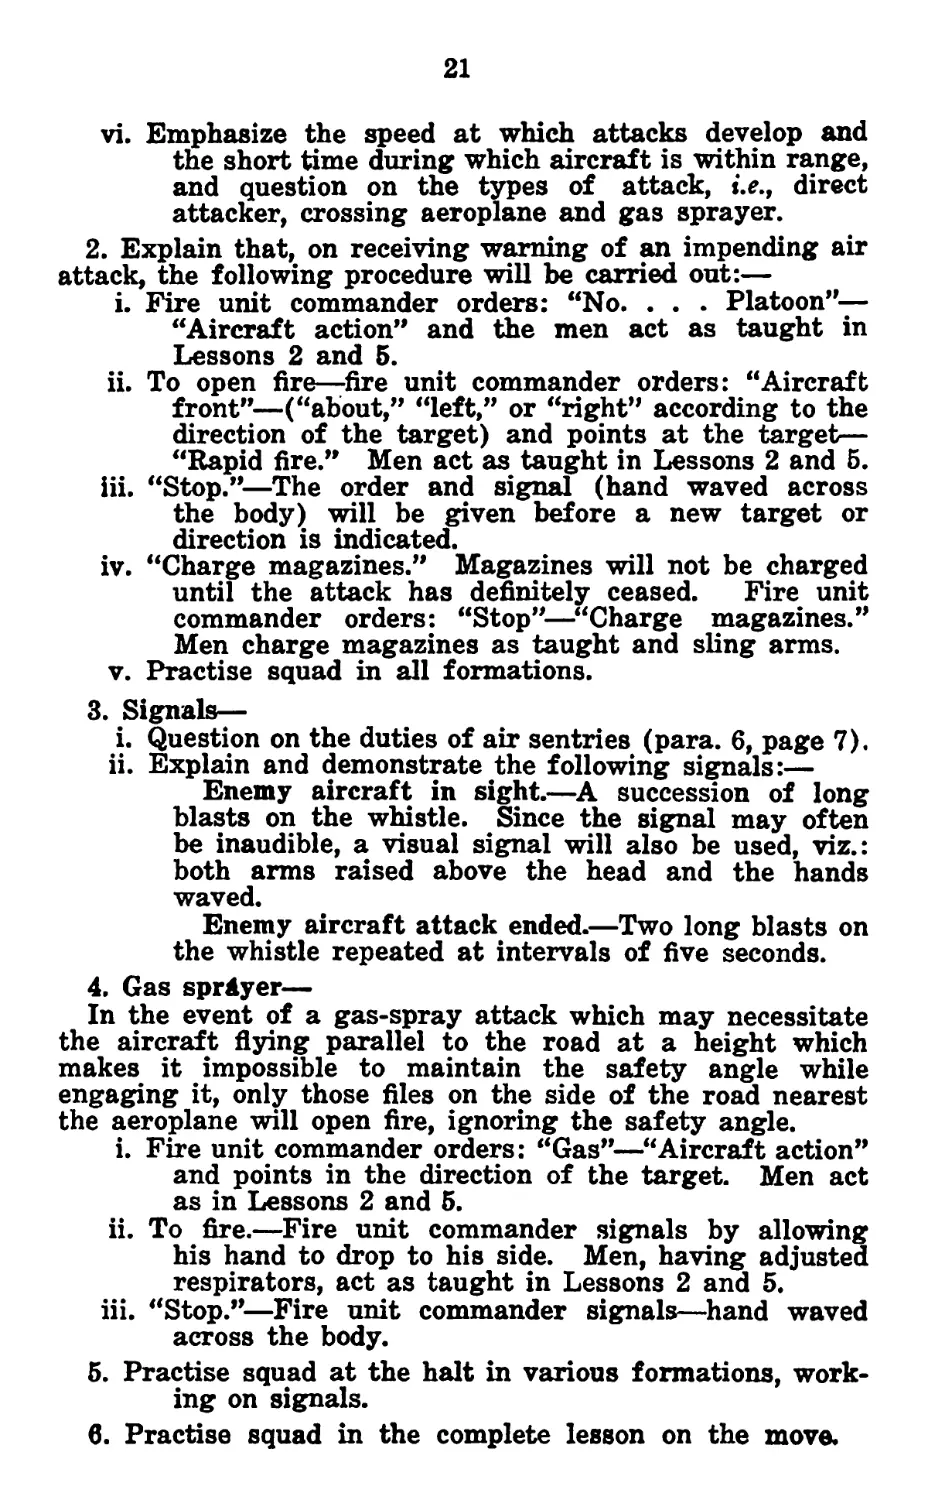
vi. Emphasize the speed at which attacks develop and
the short time during which aircraft is within range,
and question on the types of attack, i.e.t direct
attacker, crossing aeroplane and gas sprayer.
2. Explain that, on receiving warning of an impending air
attack, the following procedure will be carried out:—
i. Fire unit commander orders: “No. . . . Platoon”—
“Aircraft action” and the men act as taught in
Lessons 2 and 5.
ii. To open fire—fire unit commander orders: “Aircraft
front”—(“about,” “left,” or “right” according to the
direction of the target) and points at the target—
“Rapid fire.” Men act as taught in Lessons 2 and 5.
iii. “Stop.”—The order and signal (hand waved across
the body) will be given before a new target or
direction is indicated.
iv. “Charge magazines.” Magazines will not be charged
until the attack has definitely ceased. Fire unit
commander orders: “Stop”—“Charge magazines.”
Men charge magazines as taught and sling arms.
v. Practise squad in all formations.
3. Signals—
i. Question on the duties of air sentries (para. 6, page 7).
ii. Explain and demonstrate the following signals:—
Enemy aircraft in sight.—A succession of long
blasts on the whistle. Since the signal may often
be inaudible, a visual signal will also be used, viz.:
both arms raised above the head and the hands
waved.
Enemy aircraft attack ended.—Two long blasts on
the whistle repeated at intervals of five seconds.
4. Gas sprayer—
In the event of a gas-spray attack which may necessitate
the aircraft flying parallel to the road at a height which
makes it impossible to maintain the safety angle while
engaging it, only those files on the side of the road nearest
the aeroplane will open fire, ignoring the safety angle.
i. Fire unit commander orders: “Gas”—“Aircraft action”
and points in the direction of the target. Men act
as in Lessons 2 and 5.
ii. To fire.—Fire unit commander signals by allowing
his hand to drop to his side. Men, having adjusted
respirators, act as taught in Lessons 2 and 5.
iii. “Stop.”—Fire unit commander signals—hand waved
across the body.
5. Practise squad at the halt in various formations, work-
ing on signals.
6. Practise squad in the complete lesson on the move.
22
LESSON 8.—DIRECT ATTACKER (L<M.G.—
SPOTLIGHT).’
Instructors Notes..
Stores.—
Gun fitted with spotlight projector, tripod, magazines. Diagrams
of diving and climbing aeroplanes pasted on all four walls of
the barrack room or place of parade.
Gun and magazine will be mounted on the tripod which, if possible,
should not be more then 10 yards from all diagrams.
The projector will be focussed and registered before the lesson.
The projector will be adjusted so that the light will appear each
time the trigger is pressed. (See Appendix.) In order not to
disturb the registration, the working parts of the light machine
gun will be left forward throughout this lesson.
1. Explain that the lesson deals with aiming and firing the
light machine gun at diving and climbing aeroplanes. The
rules for aiming are similar to those taught in Lesson 2.
Question squad on the rules of aiming.
Note.—For units not exercised in the rifle, see para. 13,
page 10.
2. Explain and demonstrate:—
i. On the order “Aircraft front,” raise the butt quickly
to the shoulder and aim.
ii. On the order “Rapid fire,” fire continuously until the
order “Stop” is given or the aeroplane is out of
range. Once fire has been opened, observation and
correction must be made entirely from the spot-
light and all further reference to sights ignored.
3. Practise squad aiming and firing by word of command
to include aeroplanes diving and climbing from different
directions. Observe the spotlight, and discuss the actions
of the firer.
4. Explain that, in engaging aircraft; tracer ammunition
may be used and the stream of tracer will be directed at the
target in exactly the same way as the spotlight.
* Where suitable spotlight gear, etc., is not available, Lesson 8a,
Appendix II, can be carried out instead of Lesson 8.
23
LESSON 9.—THE CROSSING AEROPLANE (LIGHT
MACHINE GUN—SPOTLIGHT).*
Instructor’s Notes.
Stores.—
Gun with spotlight projector, tripod, magazines, model aeroplane
(see Appendix).
Gun, with magazine on, will be mounted on the tripod 10 yards
from the centre of the run of the moving aeroplane.
Focus and register the projector before the lesson (see Appendix).
1. Practise each man in judging the lead from a stationary
model aeroplane. Order the man to aim at a point which he
estimates to be 12 degrees in front of the aeroplane and say
“On.” Then press the switch and check by means of the
position of the spot in relation to the nose of the aeroplane.
Note.—For units not exercised in the rifle, see para. 13,
page 10.
2. Firing—
Explain and demonstrate at moving model.
i. On the order “Aircraft front” raise the butt quickly to
the shoulder and direct the gun the lead in front of
the aeroplane and swing along the line of flight.
ii. On the order “Rapid fire,” fire continuously. Once
fire has been opened, observation must be made
entirely from the spotlight and all further reference
to the sights ignored.
iii. Check/)г increase the swing of the gun according to
the observation of the spotlight in its relation to the
nose of the aeroplane. Balance the body by moving
the feet as required.
3. Practise squad.—During the practice watch the spot of
light projected when the trigger is pressed, in relation to the
nose of the aeroplane and any corrections made by the firer.
At the conclusion of firing discuss the firer’s actions.
4. Hosepipe firef—
Explain with the use of diagrams:—
i. In this method of engaging aircraft the firer, having
set his sights at 500 yards, directs his gun the lead
* Where suitable spotlight gear, etc., is not available, Lesson 9a,
Appendix II, can be carried out instead of Lesson 9.
t Provisional.
24*
of what he judges to be 12 degrees in front of the
aeroplane; and, glancing over his sights to obtain
elevation, swings along the line of flight and presses
the trigger. Once fire is opened, observation must
be made entirely from the stream of the tracer at,
or near, the target and not in its initial flight. All
further reference to the sights should be ignored.
The object is to place a continuous stream of bullets
(much on the same principle as the fireman directs
the jet of water from his hose) close in front of the
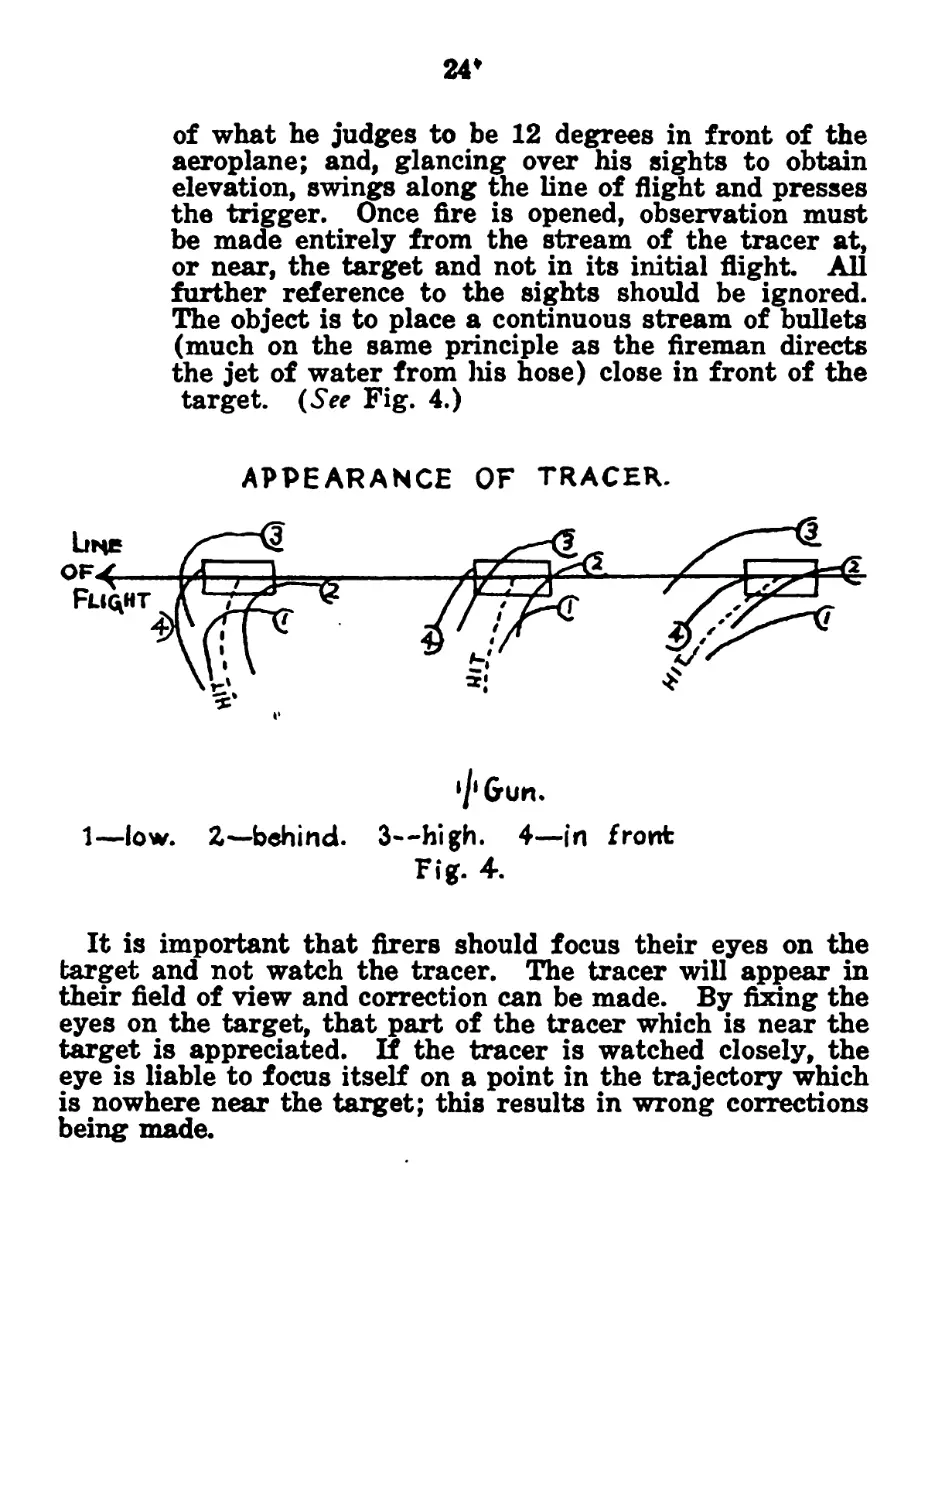
target. (See Fig. 4.)
1—low. 2—behind. 3—high. 4—in front
Fig. 4.
It is important that firers should focus their eyes on the
target and not watch the tracer. The tracer will appear in
their field of view and correction can be made. By fixing the
eyes on the target, that part of the tracer which is near the
target is appreciated. If the tracer is watched closely, the
eye is liable to focus itself on a point in the trajectory which
is nowhere near the target; this results in wrong corrections
being made.
25
LESSON 10.—ANTI-AIRCRAFT HANDLING (LIGHT
, MACHINE GUN).*
Instructofs Notes,
In this lesson, solely to make training easy, “numbers” are sometimes
mentioned. Every man in a section, however, must be an efficient
shot with the LM.G. and, in addition, be able to carry out every
duty that will maintain the gun in action under all conditions.
Stores.—
Gun, magazines and dummies, magazine box, tripod, model aero*
plane on pole.
A fatigueman to carry the model.
As proficiency increases, this lesson can be repeated with respira-
tors.
1. Explain:—
i. The gun will be mounted for action against aircraft
in a position which affords a field of fire over as
wide an expanse of sky as possible, at the same time
allowing it to be protected and concealed. Gun
positions should not be in the open, but under cover
or in the shadow of trees, buildings or other cover.
It is rarely possible to obtain an all-round view of
the sky and maintain concealment. The siting of
the guns in an area (see para. 5, page 7) must,
therefore, be co-ordinated under unit arrangements
so that each can watch a portion of the sky. When
cover is inadequate, camouflage should be used.
ii. Care must be taken, in engaging low-flying aircraft,
that the gun is not fired in a direction dangerous to
our own troops.
iii. The tjeam required to operate the gun in action
against aircraft will consist of three. Their duties
will be as follows:—
Section commander.—Select the position for the
gun, in accordance with the plan. Direct and con-
trol the fire. In normal circumstances the section
commander will exercise control by word of com-
mand and signal (see Lesson 7). There will, how-
ever, be occasions when No. 1 is operating alone,
such as when the gun is mounted on a vehicle.
In these circumstances No. 1 will have to select a
suitable target and direct and control his own fire.
No. 1.—Fire and maintain the gun in action.
No. 2.—Assist No. 1 to change magazines and
keep the gun supplied with ammunition.
* While the Hotchkiss and Lewis Light Machine Guns are on issue.
Leesons 10a and 10b, respectively, will be taught. Details of these
lessons are given in Appendix IL
26
The other men in the section will carry out any
duties for which they may be detailed by the section
commander. These may include protective duties
(ground) and replenishment of ammunition.
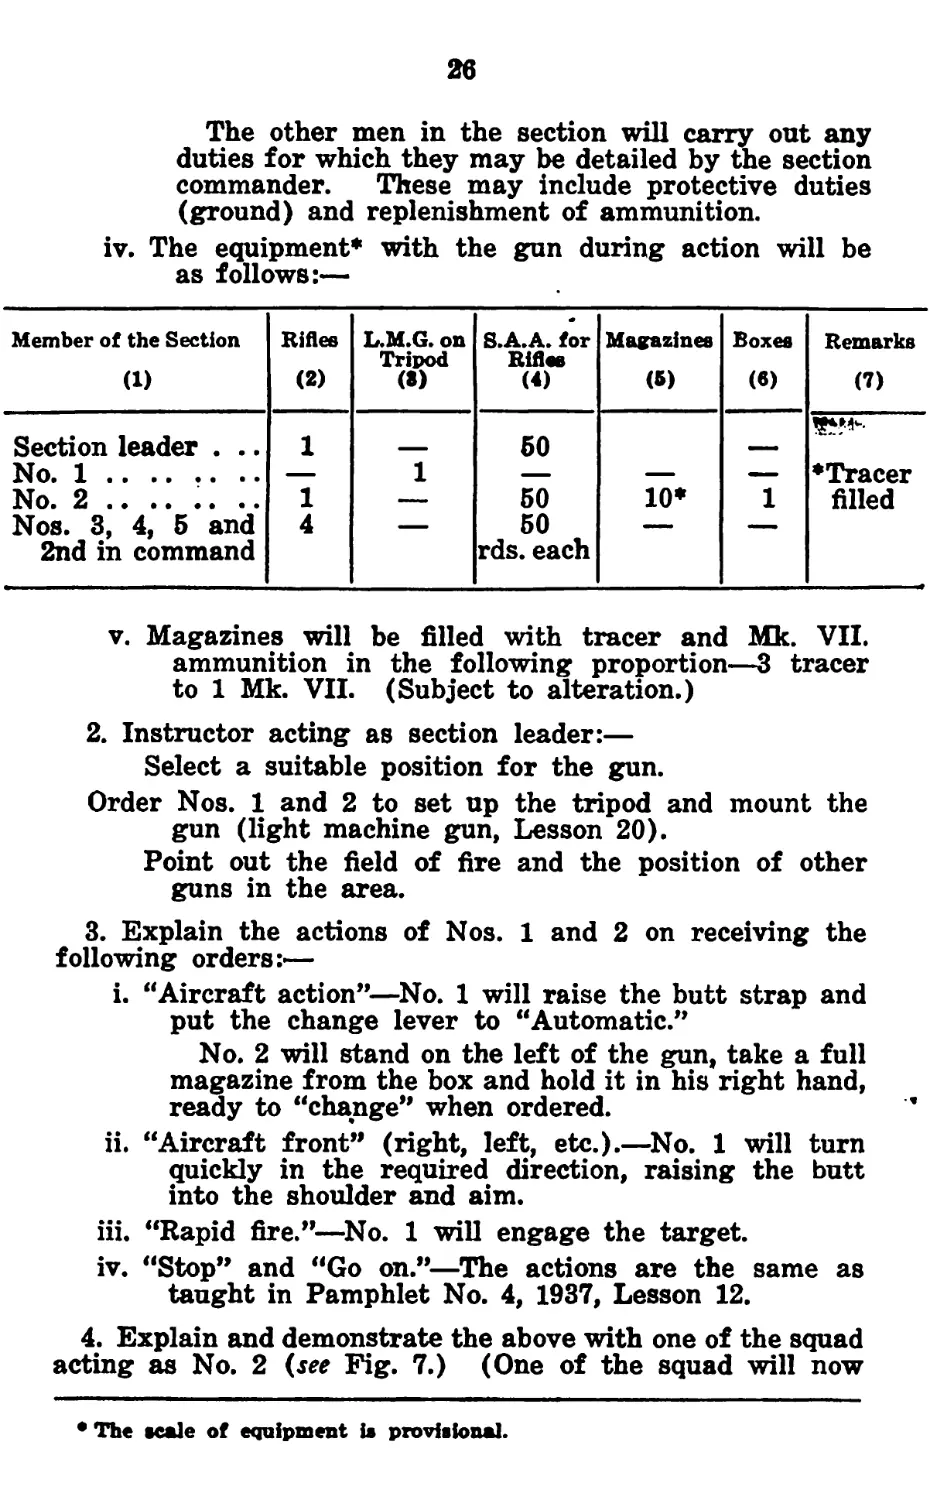
iv. The equipment* with the gun during action will be
as follows:—
Member of the Section (1) Rifles (2) L.M.G. on Tripod (8) S.A.A. for Rifles (4) Magazines (6) Boxes (в) Remarks (7)
Section leader . .. 1 50
No. 1 — 1 — — — ♦Tracer
No. 2 .. .. .. .. 1 — 50 10* 1 filled
Nos. 3, 4, 5 and 2nd in command 4 — 50 rds. each — —
v. Magazines will be filled with tracer and Mk. VII.
ammunition in the following proportion—3 tracer
to 1 Mk. VII. (Subject to alteration.)
2. Instructor acting as section leader:—
Select a suitable position for the gun.
Order Nos. 1 and 2 to set up the tripod and mount the
gun (light machine gun, Lesson 20).
Point out the field of fire and the position of other
guns in the area.
3. Explain the actions of Nos. 1 and 2 on receiving the
following orders:—
i. “Aircraft action”—No. 1 will raise the butt strap and
put the change lever to “Automatic.”
No. 2 will stand on the left of the gun, take a full
magazine from the box and hold it in his right hand,
ready to “change” when ordered.
ii. “Aircraft front” (right, left, etc.).—No. 1 will turn
quickly in the required direction, raising the butt
into the shoulder and aim.
iii. “Rapid fire.”—No. 1 will engage the target.
iv. “Stop” and “Go on.”—The actions are the same as
taught in Pamphlet No. 4, 1937, Lesson 12.
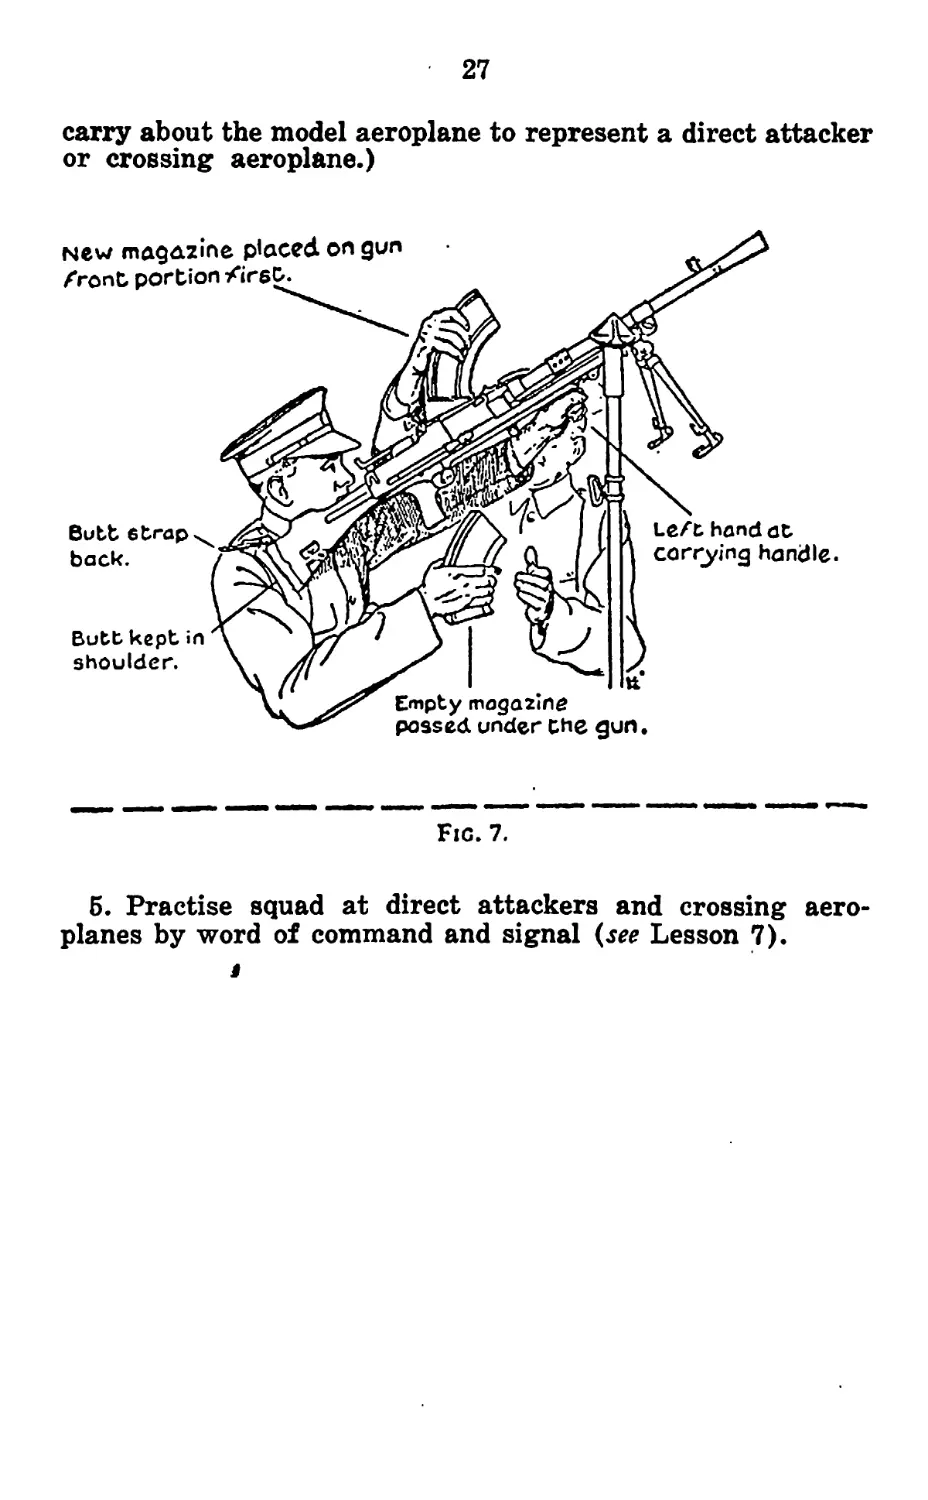
4. Explain and demonstrate the above with one of the squad
acting as No. 2 (see Fig. 7.) (One of the squad will now
• The scale of equipment is provisional.
27
carry about the model aeroplane to represent a direct attacker
or crossing aeroplane.)
Fig. 7.
5. Practise squad at direct attackers and crossing aero*
planes by word of command and signal (see Lesson 7).
APPENDIX I.
APPARATUS AND ACCESSORIES.
1. The following equipment is required in connection with
anti-aircraft training:—
i. Silhouette model diagrams of aircraft.
ii. 12-degree lead measurements.
iii. Model aeroplane with pole and stand.
iv. Spotlight projector.
v. Moving target for use with the spotlight projector.
2. Silhouette model diagrams.—Silhouette model diagrams
should be affixed to walls of barrack rooms or the places of
parade selected for anti-aircraft training. They should be
placed at a height which will permit the man under instruc-
tion to aim and fire at them while maintaining the safety
angle of 25 degrees. The diagrams should all be approxi-
mately the same distance from the firer. Diagrams should
be mounted on plywood to give a white surround of approxi-
mately 9 inches.
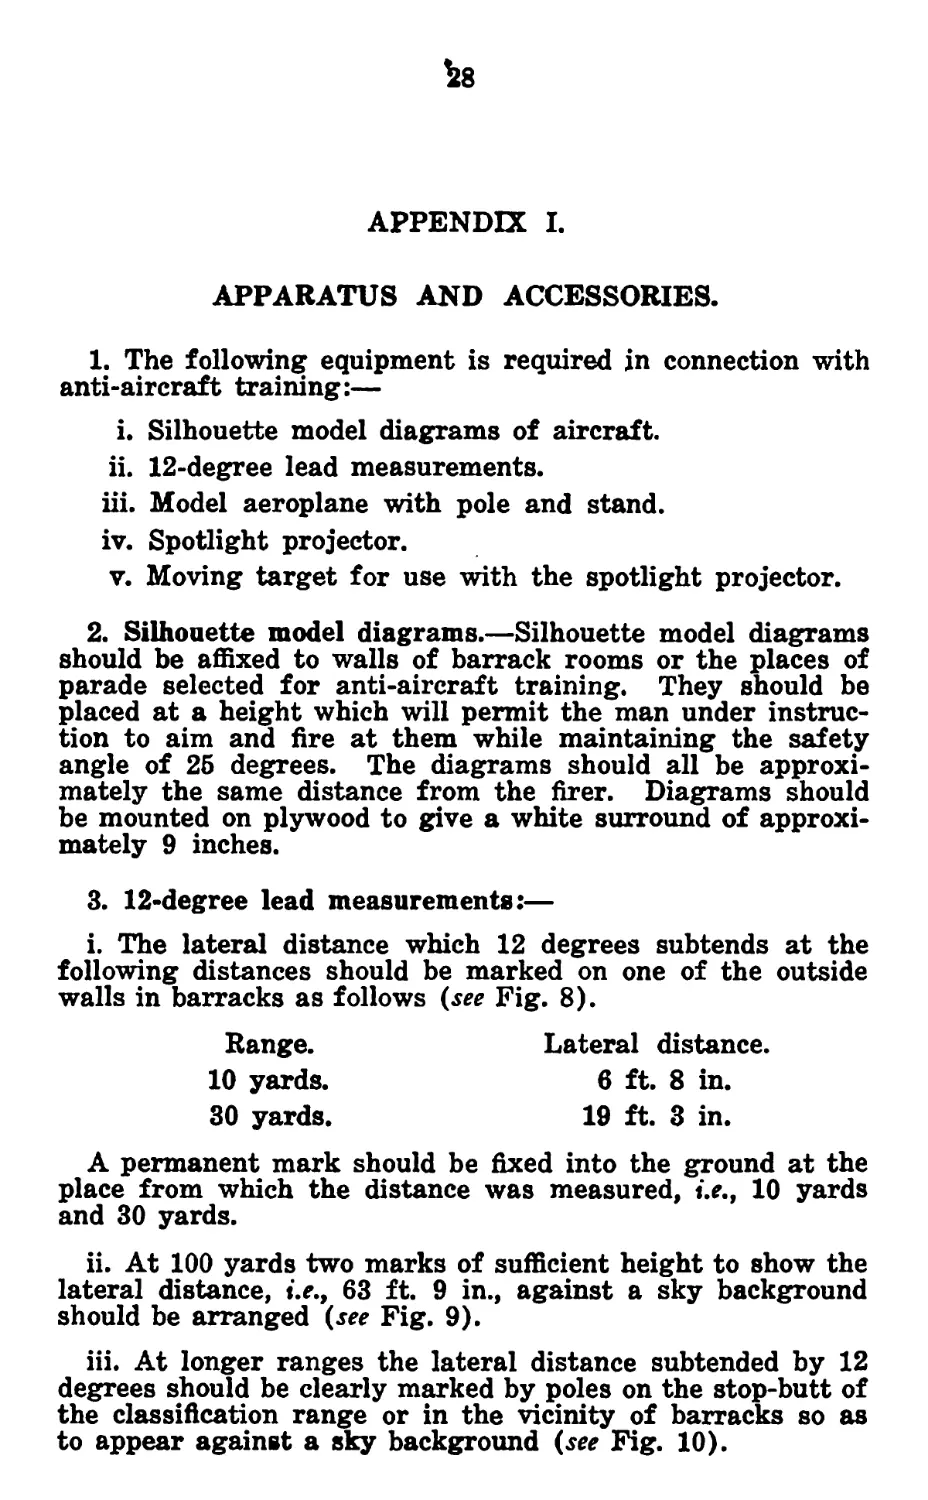
3. 12-degree lead measurements:—
i. The lateral distance which 12 degrees subtends at the
following distances should be marked on one of the outside
walls in barracks as follows (see Fig. 8).
Range. Lateral distance.
10 yards. 6 ft. 8 in.
30 yards. 19 ft. 3 in.
A permanent mark should be fixed into the ground at the
place from which the distance was measured, i.e., 10 yards
and 30 yards.
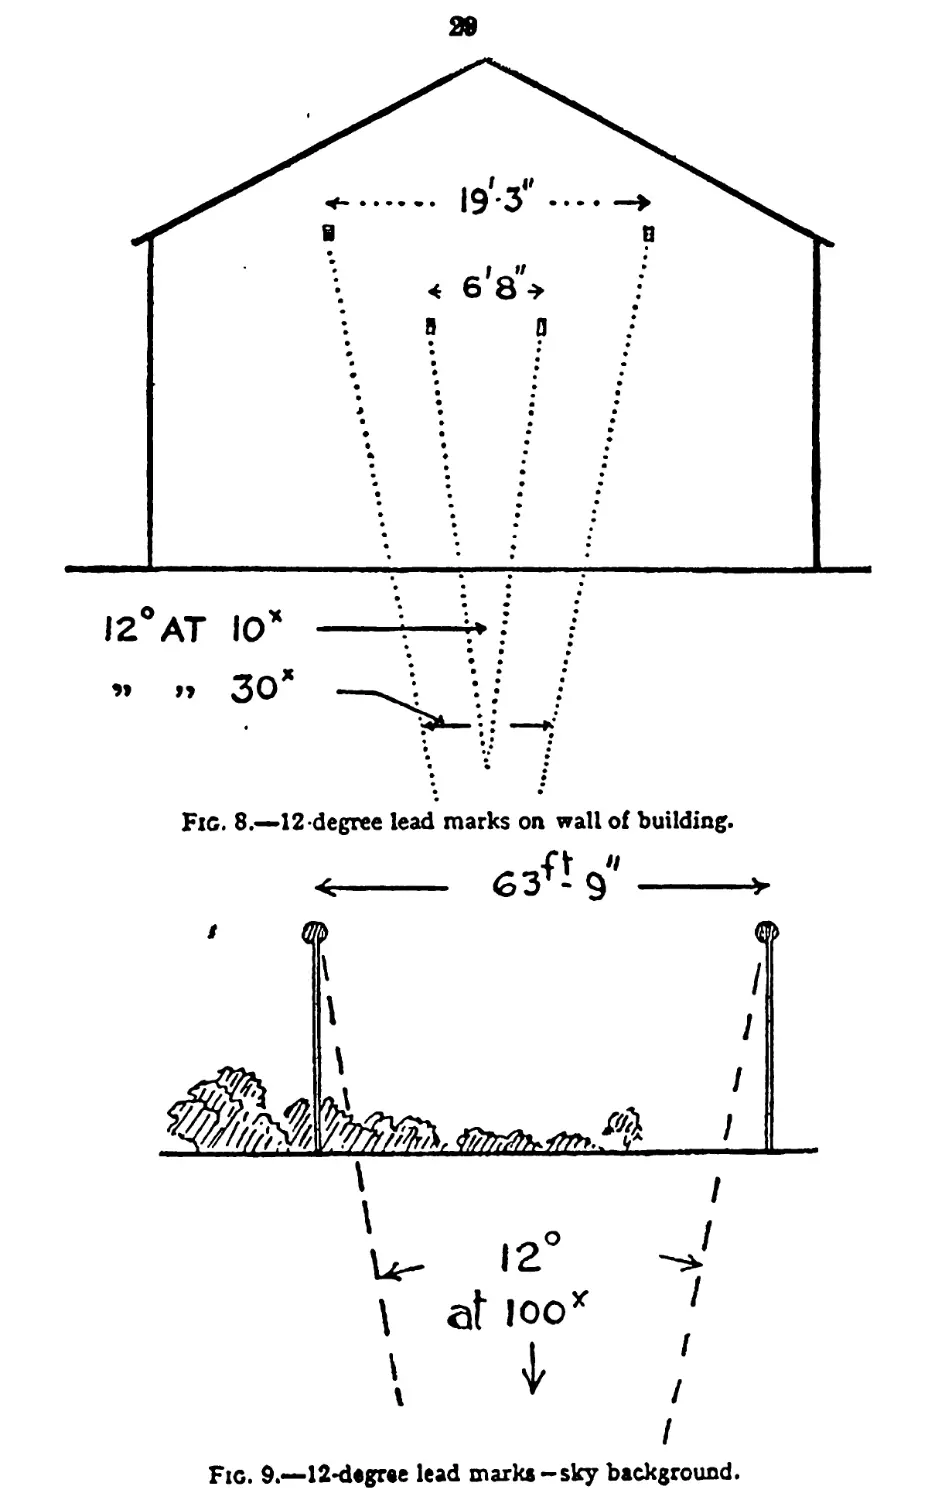
ii. At 100 yards two marks of sufficient height to show the
lateral distance, i.e., 63 ft. 9 in., against a sky background
should be arranged (see Fig. 9).
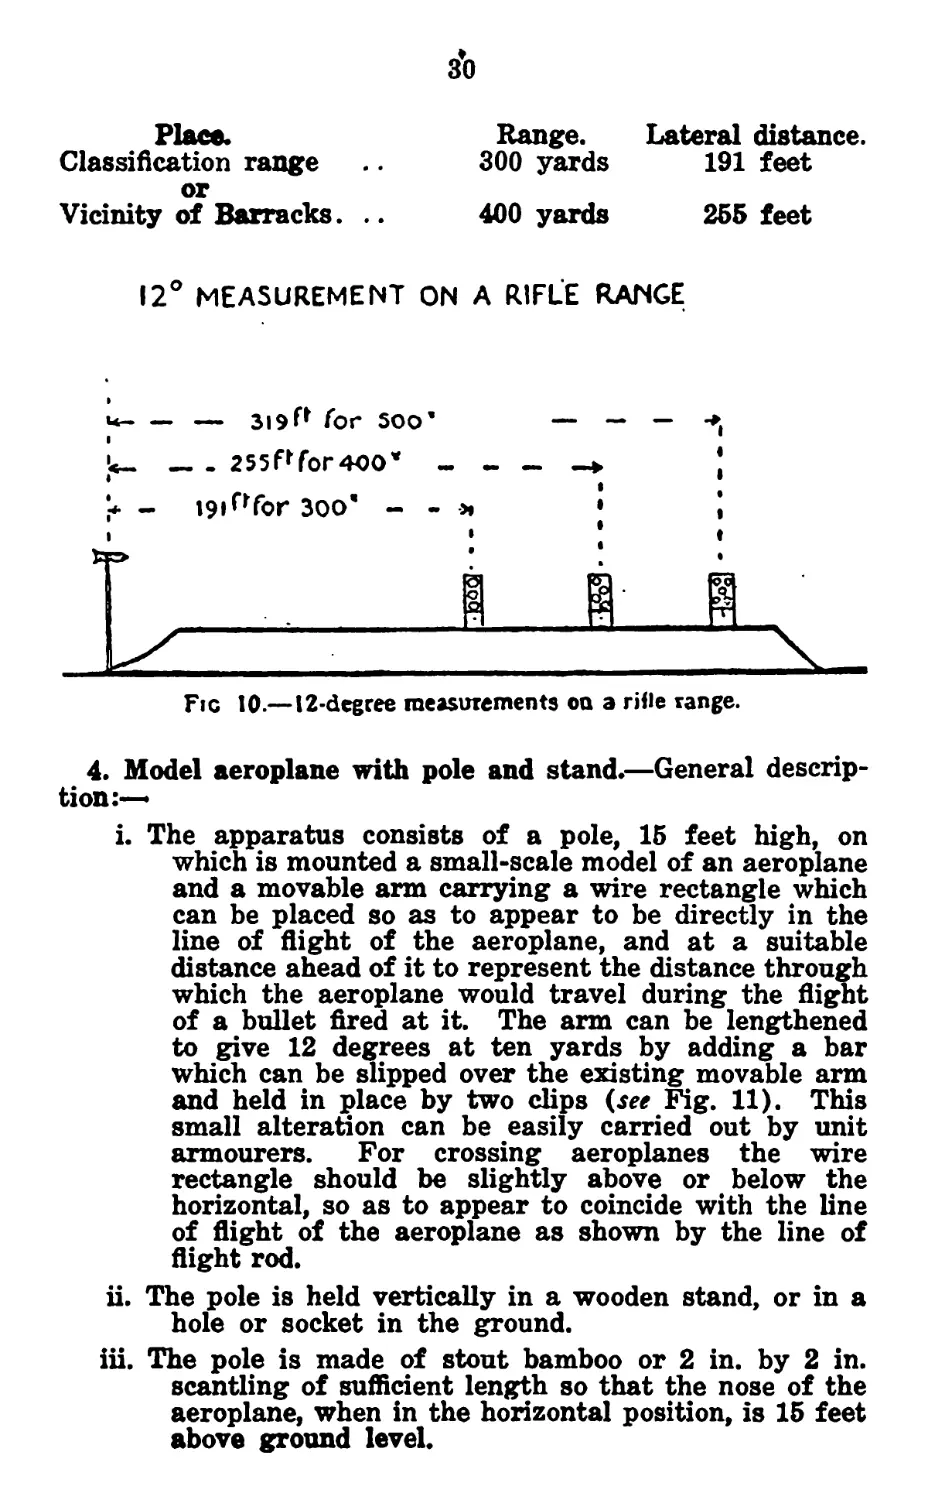
iii. At longer ranges the lateral distance subtended by 12
degrees should be clearly marked by poles on the stop-butt of
the classification range or in the vicinity of barracks so as
to appear against a sky background (see Fig. 10).
29
Fig. 8.—12 degree lead marks on wall of building.
G3f- 9"
Fig. Э.—12-degree lead marks-sky background.
Place.
Classification range
or
Vicinity of Barracks. ..
Range. Lateral distance.
300 yards 191 feet
400 yards 255 feet
12° MEASUREMENT ON A RIFLE RANGE
U----— for 500’
k-______ 255РГОГ4СО* -
»
U - 19|ПГоГ 300’ - - *
Fig 10.-—12-degree measurements on a rifle range.
4. Model aeroplane with pole and stand.—General descrip-
tion:—
i. The apparatus consists of a pole, 15 feet high, on
which is mounted a small-scale model of an aeroplane
and a movable arm carrying a wire rectangle which
can be placed so as to appear to be directly in the
line of flight of the aeroplane, and at a suitable
distance ahead of it to represent the distance through
which the aeroplane would travel during the flight
of a bullet fired at it. The arm can be lengthened
to give 12 degrees at ten yards by adding a bar
which can be slipped over the existing movable arm
and held in place by two clips (see Fig. 11). This
small alteration can be easily carried out by unit
armourers. For crossing aeroplanes the wire
rectangle should be slightly above or below the
horizontal, so as to appear to coincide with the line
of flight of the aeroplane as shown by the line of
flight rod.
ii. The pole is held vertically in a wooden stand, or in a
hole or socket in the ground.
iii. The pole is made of stout bamboo or 2 in. by 2 in.
scantling of sufficient length so that the nose of the
aeroplane, when in the horizontal position, is 15 feet
above ground level.
81
iv. The aeroplane model is fixed on a spike on top of the
pole. This spike is connected to the pole through an
adjustable two-way knuckle joint fitted with bolts
and wing nuts.
v. The spike can be inclined at any angle within wide
limits and the aeroplane may be slewed round on the
spike so as to appear to be flying towards or away
from the firer at any desired angle. The movable
arm and rectangle, when in use, must always be at
right angles to the firer’s line of sight.
82
vi. The arm which carries the rectangle is pivoted on the
pole, so that it can be dropped while a rifle is being
laid on the target, and then raised so that the “lead”
may be checked by comparison with the centre of
the rectangle.
vii. When in use, the foot of the pole should be nine yards
distant from the centre of the rifle rest or tripod
mounting, or the equivalent distance, about 10 yards
from the flrer’s eye when the weapon is in the
shoulder.
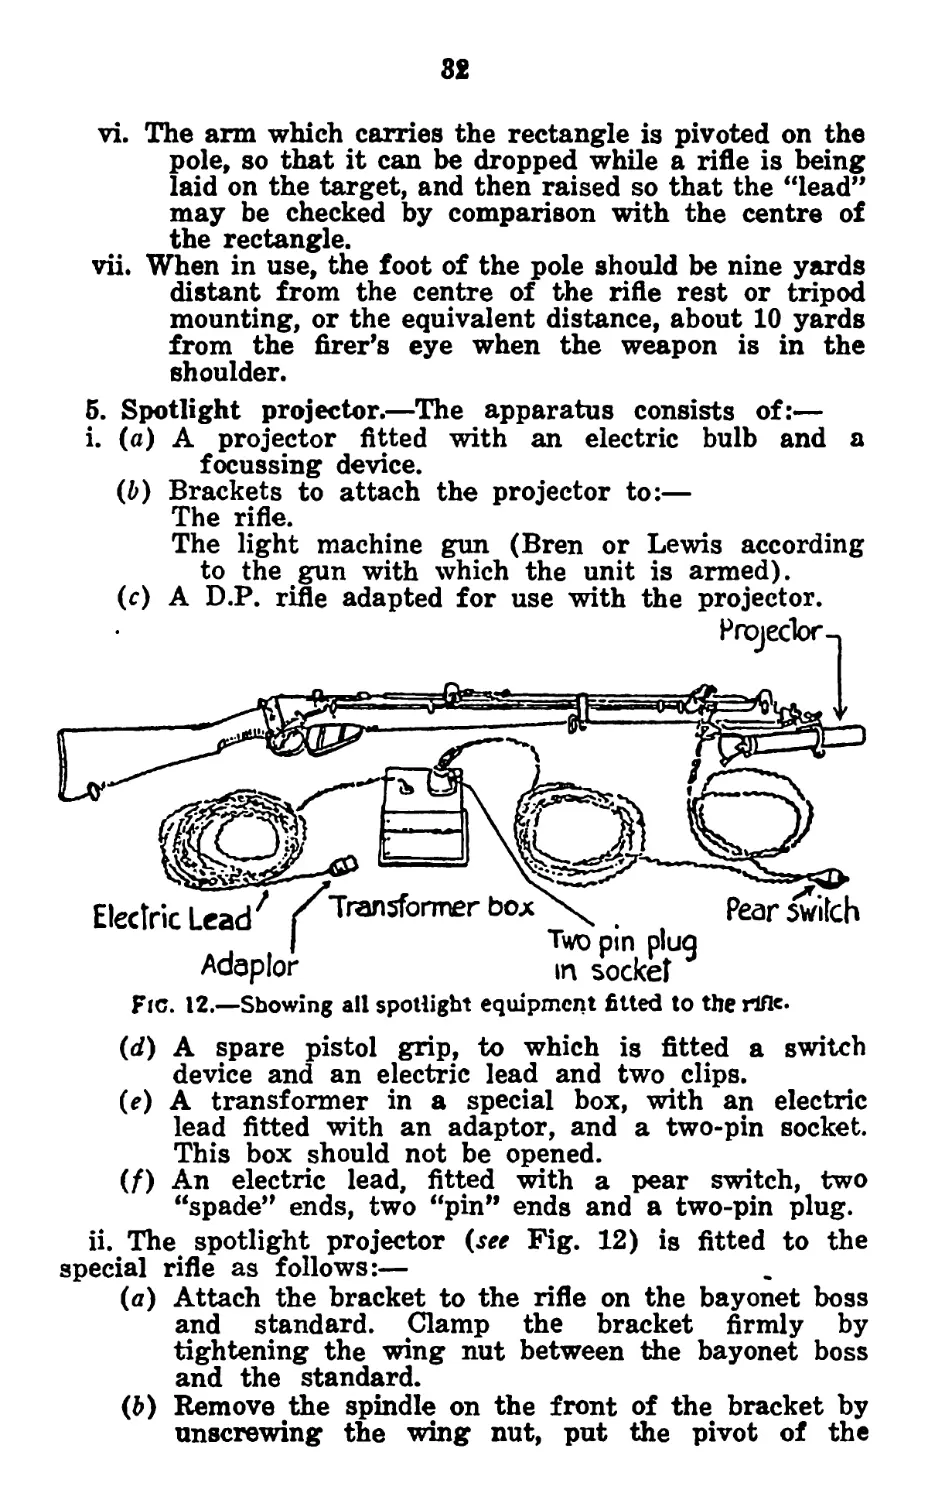
5. Spotlight projector.—The apparatus consists of:—
i. (a) A projector fitted with an electric bulb and a
focussing device.
(b) Brackets to attach the projector to:—
The rifle.
The light machine gun (Bren or Lewis according
to the gun with which the unit is armed).
(c) A D.P. rifle adapted for use with the projector.
Projector-.
Fic. 12.—Showing all spotlight equipment fitted to the rifle.
(d) A spare pistol grip, to which is fitted a switch
device and an electric lead and two clips.
(e) A transformer in a special box, with an electric
lead fitted with an adaptor, and a two-pin socket.
This box should not be opened.
(f) An electric lead, fitted with a pear switch, two
“spade” ends, two “pin” ends and a two-pin plug.
ii. The spotlight projector (see Fig. 12) is fitted to the
special rifle as follows:—
(a) Attach the bracket to the rifle on the bayonet boss
and standard. Clamp the bracket firmly by
tightening the wing nut between the bayonet boss
and the standard.
(b) Remove the spindle on the front of the bracket by
unscrewing the wing nut, put the pivot of the
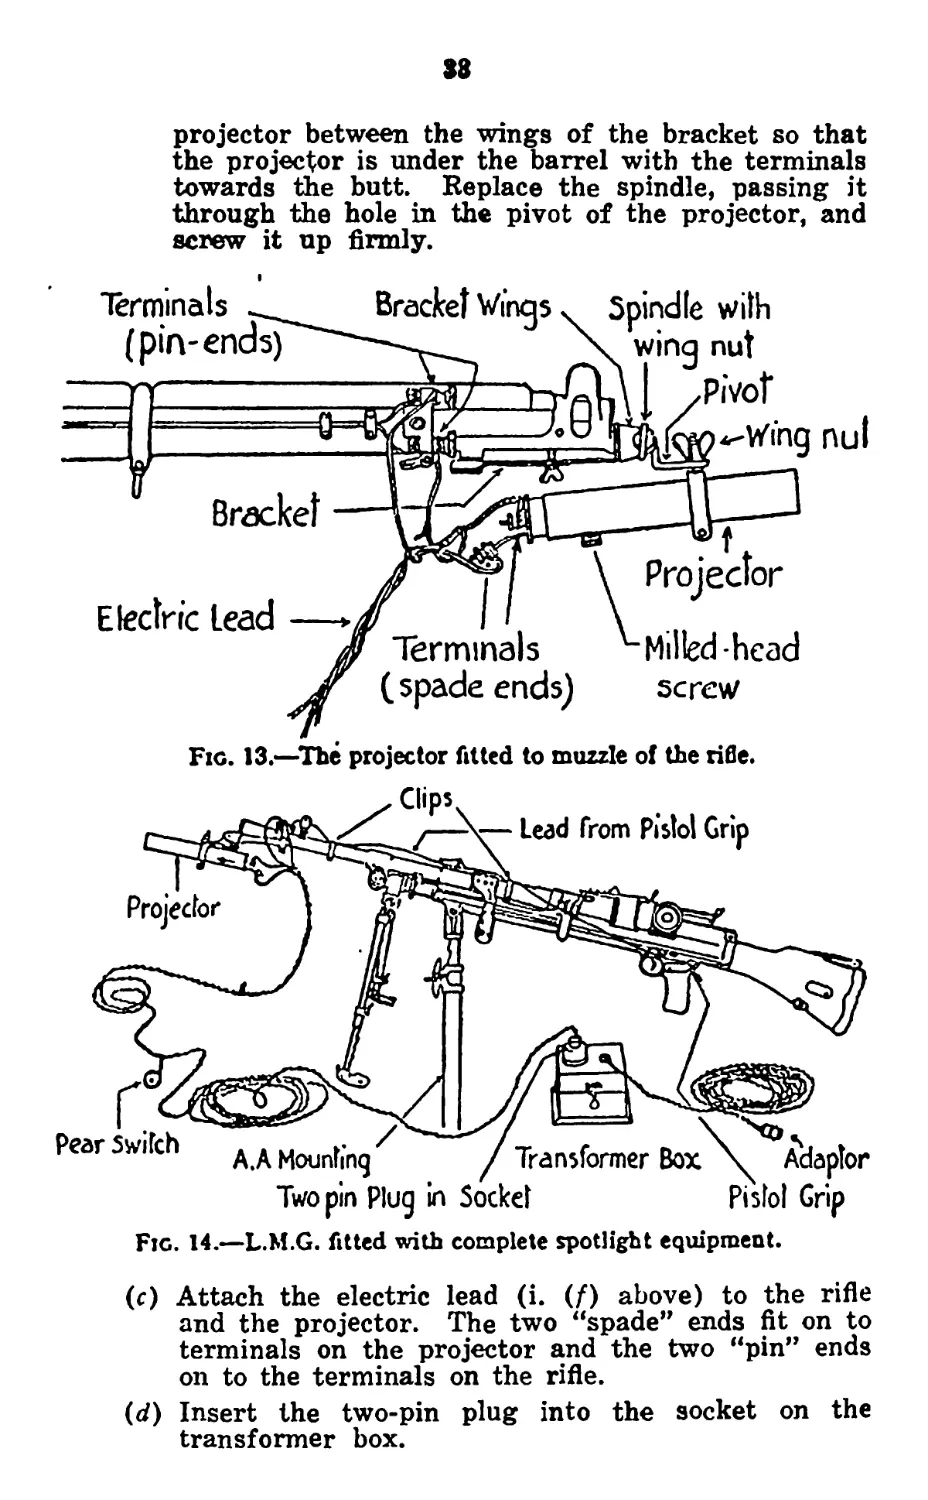
38
projector between the wings of the bracket so that
the projector is under the barrel with the terminals
towards the butt. Replace the spindle, passing it
through the hole in the pivot of the projector, and
screw it up firmly.
Terminals
(pin-ends)
Spindle with
wing nut
Pivot
Bracket
Electric Lead
Bracket Wings
Terminals
(spade ends) screw
Fig. 13.—The projector fitted to muzzle of the rifle.
Fig. 14.—L.M.G. fitted with complete spotlight equipment.
(c) Attach the electric lead (i. (f) above) to the rifle
and the projector. The two “spade” ends fit on to
terminals on the projector and the two “pin” ends
on to the terminals on the rifle.
(J) Insert the two-pin plug into the socket on the
transformer box.
34
(г) Having first ascertained that the controlling switch
is off, remove the bulb from a convenient electric
light and insert the adaptor of the transformer.
Switch on the current to the light, and the pro-
jector is ready for use. When the trigger is
Sressed or the pear switch is operated, a spot of
ght will be projected from* the projector.
iii. The spotlight is fitted to the Bren gun as follows (see
Fig. 14):—
(a) The attachment is fitted to the pistol grip.
(b) Attach the bracket to the muzzle of the Bren gun by
unscrewing and removing the wing nut, slipping
the hinged portion over the barrel and pushing it
back until the ring of the bracket fits over the
flash eliminator. Replace the wing nut and screw
up firmly.
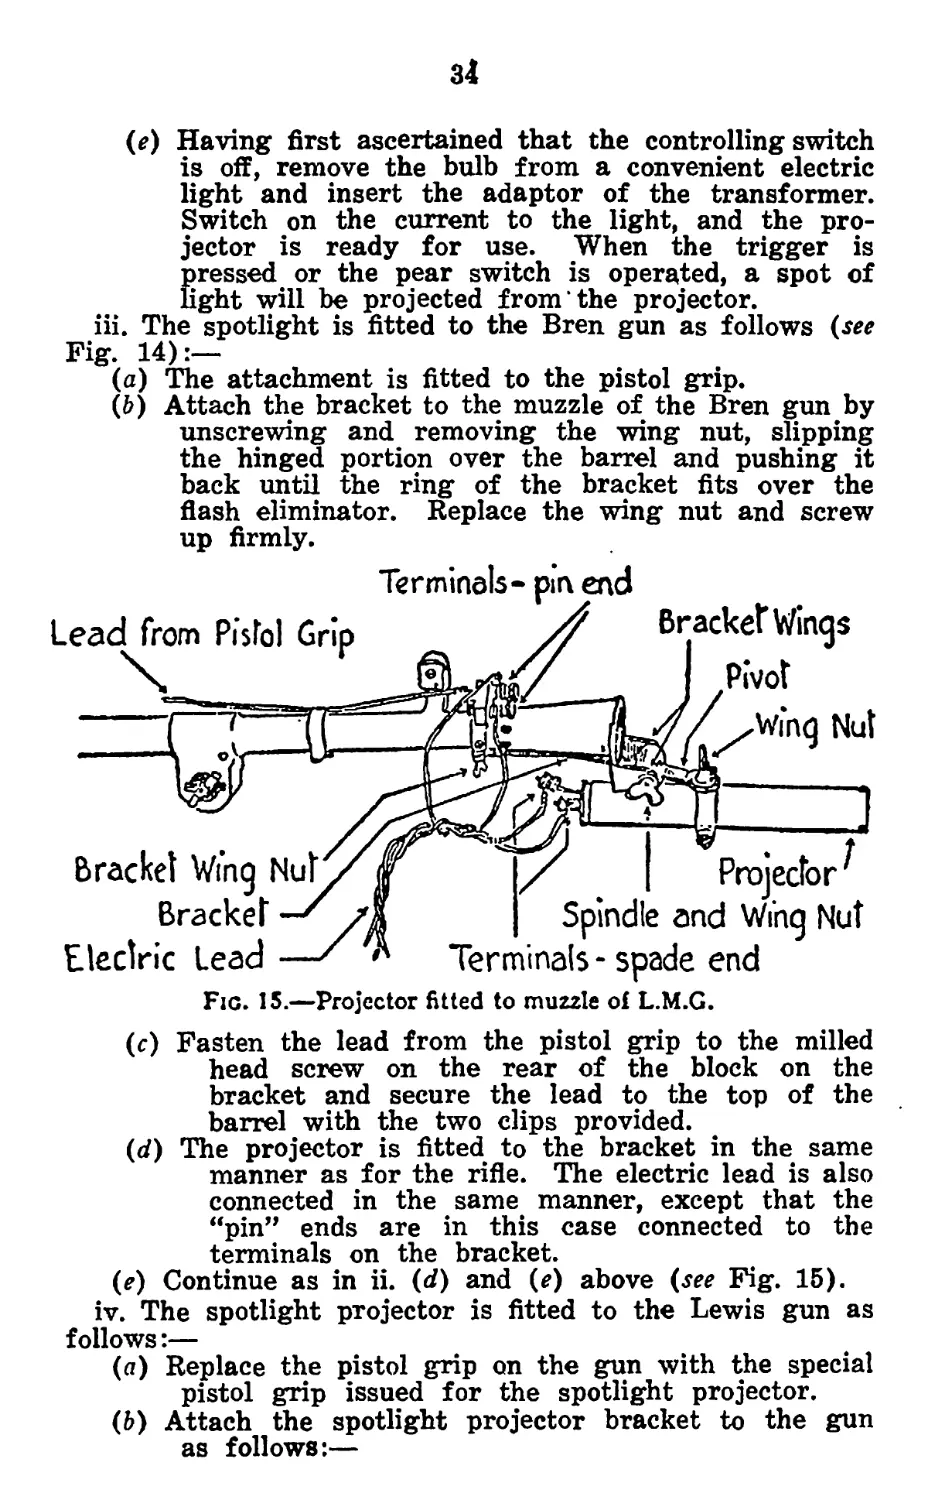
IS
Nut
Terminals- pin end
Lead from Pistol Grip
Bracket Wing Nut
Bracket
Electric Lead
Spindle and Wing Nut
Terminals - spade end
Fig. 15.—Projector fitted to muzzle of L.M.G.
(c) Fasten the lead from the pistol grip to the milled
head screw on the rear of the block on the
bracket and secure the lead to the top of the
barrel with the two clips provided.
(d) The projector is fitted to the bracket in the same
manner as for the rifle. The electric lead is also
connected in the same manner, except that the
“pin” ends are in this case connected to the
terminals on the bracket.
(e) Continue as in ii. (d) and (e) above (see Fig. 15).
iv. The spotlight projector is fitted to the Lewis gun as
follows:—
(a) Replace the pistol grip on the gun with the special
pistol grip issued for the spotlight projector.
(b) Attach the spotlight projector bracket to the gun
as follows:—
35
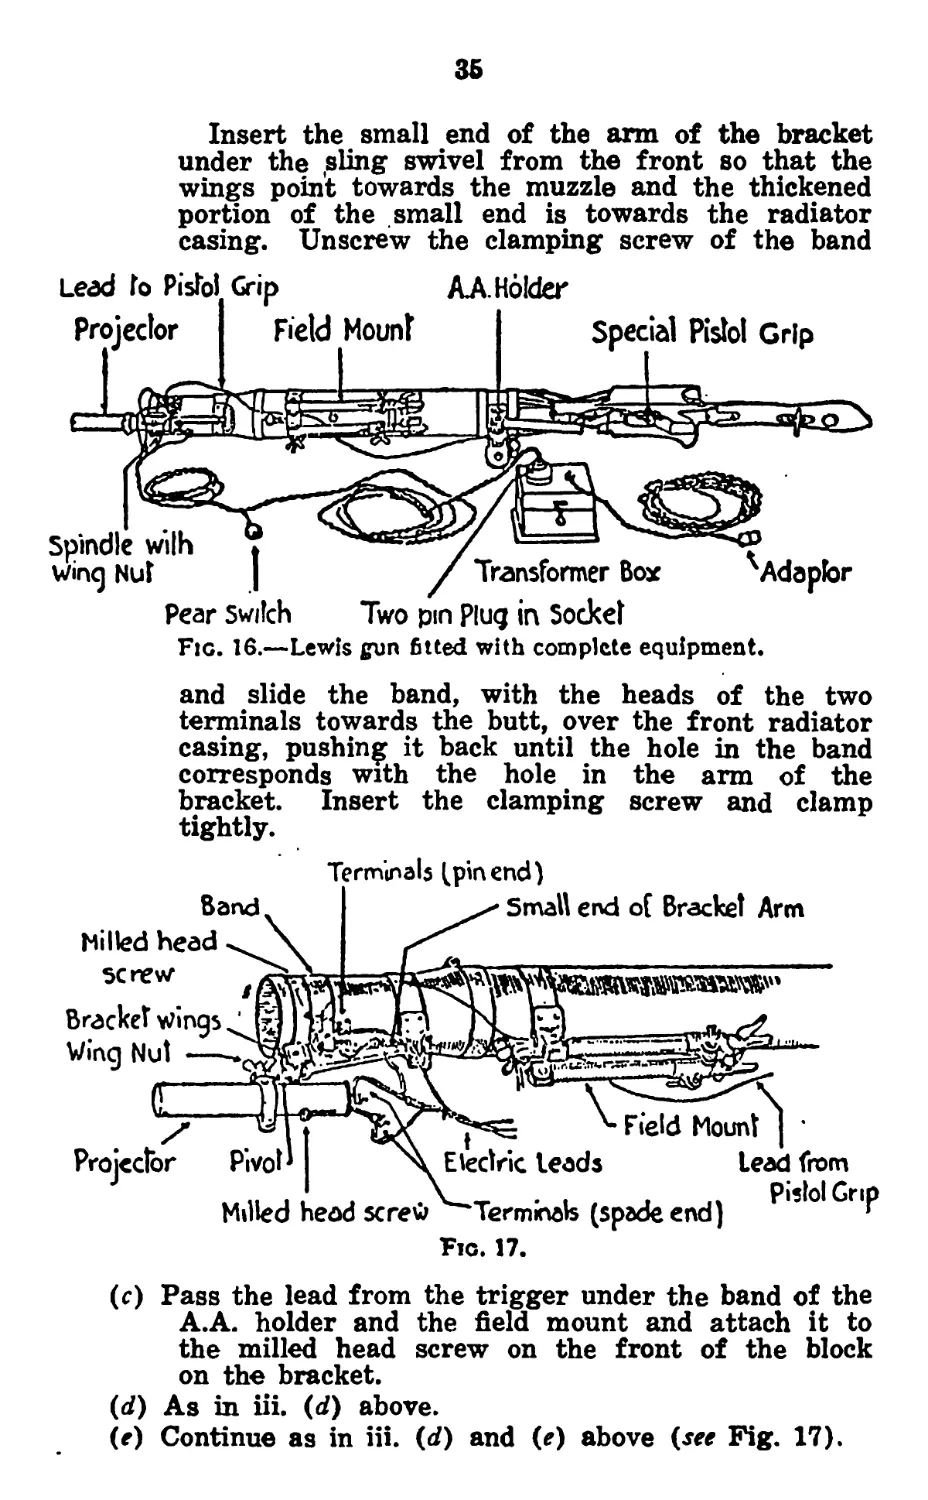
Insert the small end of the arm of the bracket
under the sling swivel from the front so that the
wings point towards the muzzle and the thickened
portion of the small end is towards the radiator
casing. Unscrew the clamping screw of the band
Lead Го Pistol Grip
kA. Holder
Fig. 16.—Lewis gun fitted with complete equipment.
and slide the band, with the heads of the two
terminals towards the butt, over the front radiator
casing, pushing it back until the hole in the band
corresponds with the hole in the arm of the
bracket. Insert the clamping screw and clamp
tightly.
Band
Milled head
screw*
Bracket wings
Wing Nut
Projector
Terminals (pin end)
Small end o[ Bracket Arm
Electric leads
Lead from
Milled head screw Terminals (spade end) P^ol Grip
Fig. 17.
(c) Pass the lead from the trigger under the band of the
A.A. holder and the field mount and attach it to
the milled head screw on the front of the block
on the bracket.
(d) As in iii. (d) above.
(e) Continue as in iii. (d) and (e) above (see Fig. 17).
v. The transformer is issued complete in its box with all
necessary connexions made. No alterations will be made to
the internal wiring of the box. Any necessary repairs must
be made by an electrician.
vi. To focus the light from the projector, unscrew the
small milled head screw under the barrel of the projector
a few turns and slide this backwards and forwards until a
small clear ring of light is thrown. Clamp by screwing
tightly.
vii. To register the projector for aiming at diving and
climbing targets, place the rifle in an aiming rest, slightly
loosen the wing nut on the top of the projector and the wing
nut on the wings of the bracket. Take a correct aim at a
target and clamp the aiming rest firmly. Press the trigger
and order an assistant to move the projector until the spot
rests on the point of aim. Clamp the projector. Check
correctness of registration and adjust as necessary.
viii. To register the projector for aiming at crossing aero-
planes, use two marks painted on the screen (see para. 6 ii.)
6 ft. 8 in. apart. With the rifle on the rest or the gun on
the tripod, order one man to aim at the left of the two
marks and then register the light on the right-hand mark
as in vii. above. The centre of the rest or tripod to be 10
yards from the screen.
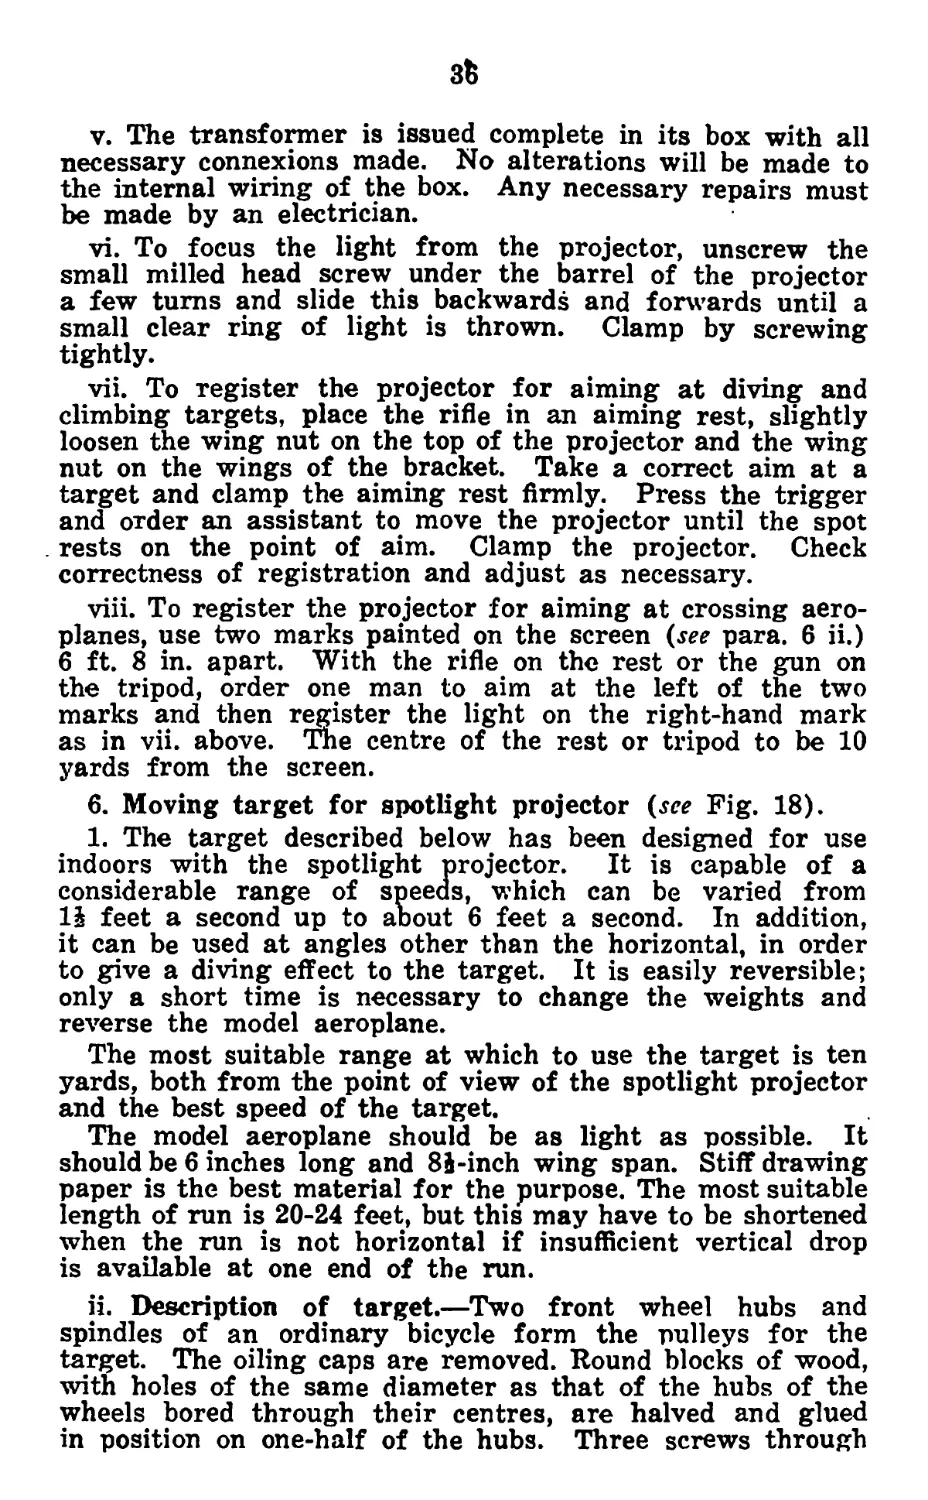
6. Moving target for spotlight projector (see Fig. 18).
1. The target described below has been designed for use
indoors with the spotlight projector. It is capable of a
considerable range of speeds, which can be varied from
li feet a second up to about 6 feet a second. In addition,
it can be used at angles other than the horizontal, in order
to give a diving effect to the target. It is easily reversible;
only a short time is necessary to change the weights and
reverse the model aeroplane.
The most suitable range at which to use the target is ten
yards, both from the point of view of the spotlight projector
and the best speed of the target.
The model aeroplane should be as light as possible. It
should be 6 inches long and 8i-inch wing span. Stiff drawing
paper is the best material for the purpose. The most suitable
length of run is 20-24 feet, but this may have to be shortened
when the run is not horizontal if insufficient vertical drop
is available at one end of the run.
ii. Description of target.—Two front wheel hubs and
spindles of an ordinary bicycle form the pulleys for the
target. The oiling caps are removed. Round blocks of wood,
with holes of the same diameter as that of the hubs of the
wheels bored through their centres, are halved and glued
in position on one-half of the hubs. Three screws through
87
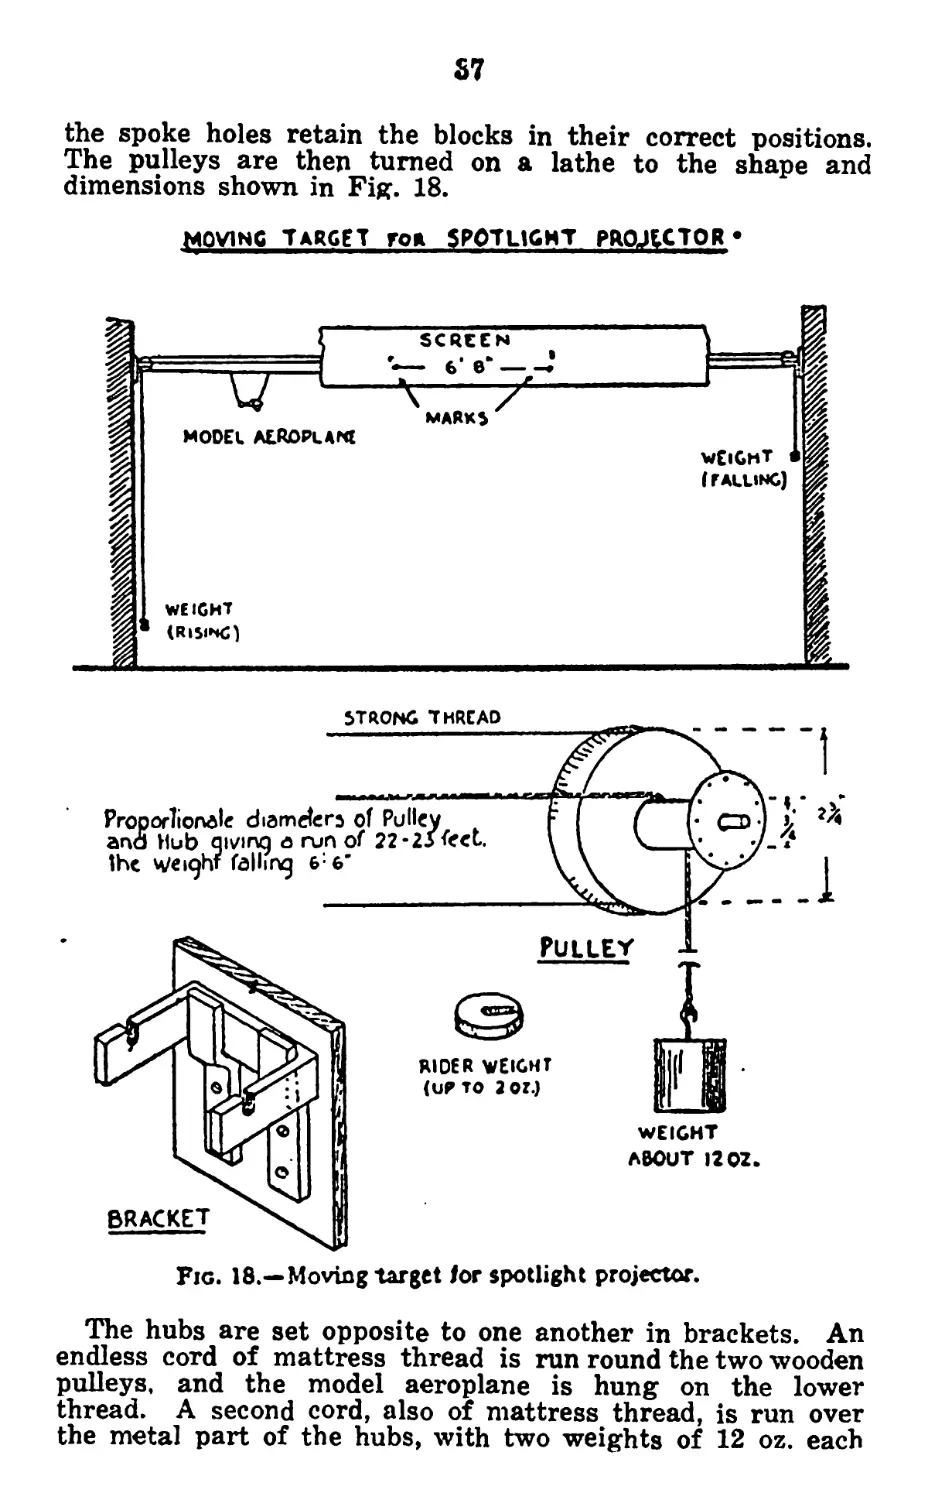
the spoke holes retain the blocks in their correct positions.
The pulleys are then turned on a lathe to the shape and
dimensions shown in Fig. 18.
MOVING TARGET год SPOTLIGHT PROJECTOR*
Fig. 18.—Moving target tor spotlight projector.
The hubs are set opposite to one another in brackets. An
endless cord of mattress thread is run round the two wooden
pulleys, and the model aeroplane is hung on the lower
thread. A second cord, also of mattress thread, is run over
the metal part of the hubs, with two weights of 12 oz. each
88
hung at either end of the cord. The length of this cord
should be adjusted so that, when one weight is resting on the
ground, the other is against the stop close to the pulley.
A complete turn should not be taken round the hub with
the weight cord; this introduces friction, and is quite un-
necessary.
Screens should be erected in front to hide the mechanism
and track, and behind to show up the spot.
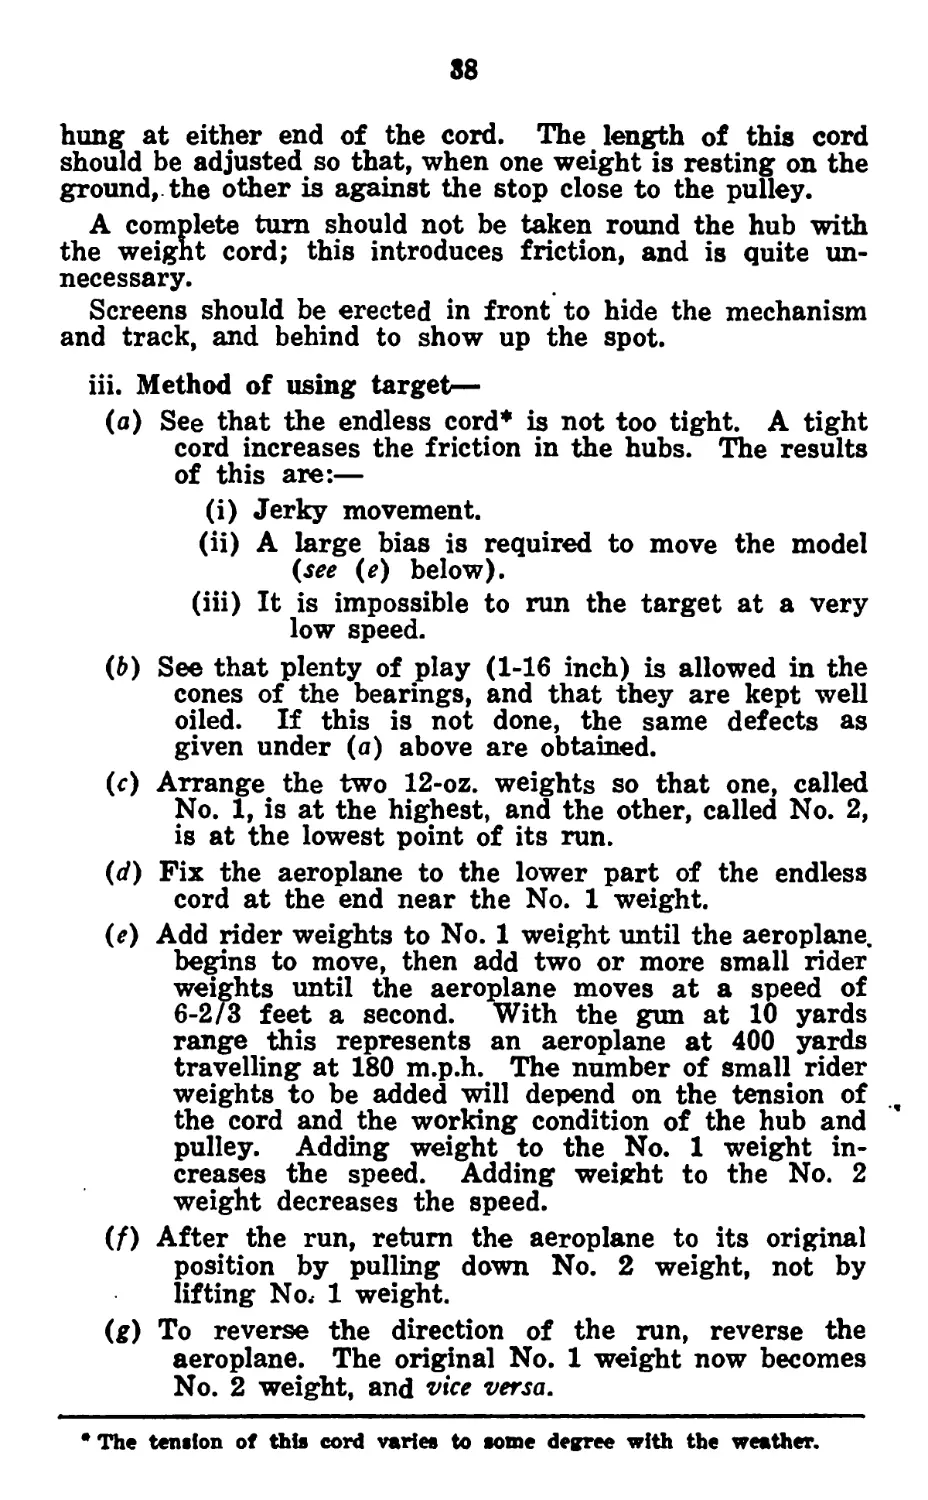
iii. Method of using target—
(a) See that the endless cord* is not too tight. A tight
cord increases the friction in the hubs. The results
of this are:—
(i) Jerky movement.
(ii) A large bias is required to move the model
(see (e) below).
(iii) It is impossible to run the target at a very
low speed.
(b) See that plenty of play (1-16 inch) is allowed in the
cones of the bearings, and that they are kept well
oiled. If this is not done, the same defects as
given under (a) above are obtained.
(r) Arrange the two 12-oz. weights so that one, called
No. 1, is at the highest, and the other, called No. 2,
is at the lowest point of its run.
(d) Fix the aeroplane to the lower part of the endless
cord at the end near the No. 1 weight.
(?) Add rider weights to No. 1 weight until the aeroplane,
begins to move, then add two or more small rider
weights until the aeroplane moves at a speed of
6-2/3 feet a second. With the gun at 10 yards
range this represents an aeroplane at 400 yards
travelling at 180 m.p.h. The number of small rider
weights to be added will depend on the tension of
the cord and the working condition of the hub and
pulley. Adding weight to the No. 1 weight in-
creases the speed. Adding weight to the No. 2
weight decreases the speed.
(f) After the run, return the aeroplane to its original
position by pulling down No. 2 weight, not by
lifting Norf 1 weight.
(f) To reverse the direction of the run, reverse the
aeroplane. The original No. 1 weight now becomes
No. 2 weight, and vice versa.
• The tension of this cord varies to some degree with the weather.
89
APPENDIX II.
LESSON 8a.—DIRECT ATTACKER (HOTCHKISS OR
LEWIS).
Instructors Notes.
Stores (where suitable spotlight gear or improvisation not avail-
able).—
Gun АЛ. Mounting, Magazines (or Strips), Diagrams of Diving
and Climbing Aeroplanes (or model aeroplanes on poles).
Gun, loaded and with sights at 500 mounted on АЛ. Mounting,
which should be about 10 yards from each target aeroplane.
1. Explain that the lesson deals with aiming and firing the
light machine gun at Diving and Climbing aeroplanes. The
rules for aiming are similar to those taught in Lesson 2
(Rifle)—show diagrams. Question squad on the rules for
aiming.
Note.—For units not exercised in the rifle, see para. 13,
page 10.
2. Explain and Demonstrate:—
i. On the order “Aircraft Front,” raise the butt quickly
to the1 shoulder and aim.
ii. On the order “Rapid Fire,” fire continuously until the
order “Stop” is given or the aeroplane is out of
range. Once fire has been opened look at the
aeroplane, and not through the sights.
3. Practise squad aiming and firing by word of command
to include aeroplanes diving and climbing from different
direction. Instructor orders “Stop”—“Aircraft Right (Left,
about)”—“Rapid Fire,” etc. Discuss the actions of the firer.
4. Explain that, in engaging aircraft, tracer ammunition*
may be used. Once fire has been opened, observation and
correction must be made entirely on the flight of the tracer
and all further reference to sights ignored.
* Proportion of tracer ammunition in magazines (or strips) will be
8 tracer to 1 Mk. VIT.
io
LESSON 9a.—THE CROSSING AEROPLANE
(HOTCHKISS OR LEWIS)
Instructors Notes.
Stores (where suitable spotlight gear or improvisation not avail'
able).—
Gun, A.A. Mounting, Magazines (or Strips), Crossing Aeroplane
on wall or Model Aeroplane on pole, 12 degree “lead? (6 ft.
8 in.) on pole of suitable height.
Gun, loaded and with sights at 500, mounted on АЛ. Mounting 10
yards from target aeroplane.
1. Practise each man in judging the “lead” from a
stationary aeroplane target. Order the man to aim at a
point which he estimates to be 12 degrees in front of the
aeroplane and say “On.” Assistant raises 12 degree “lead”
in front of nose of target. Firei* corrects aim as necessary.
Change direction of target and repeat.
Note.—For units not exercised in the Rifle, see para. 13,
page 10.
2. Firing.—
Explain and demonstrate at moving target aeroplane
(drawn or carried):—
i. On the order “Aircraft Front,” raise the butt quickly
to the shoulder and direct the gun the “lead” in
front of the aeroplane and swing along the line of
flight.
ii. On the order “Rapid Fire,” fire continuously whilst
maintaining the swing until the order “Stop” or
the aeroplane is out of range. Balance the body by
moving the feet as required. Once fire has been
opened look at the aeroplane and not at the sights.
3. Practise squad. At the conclusion of firing, discuss
the firer’s actions.
4. Hosepipe fire.—
Sec Lesson 9, pages 23, 24.
The explanation set out in Lesson 9 will be given in this
Lesson 9a.
41
LESSON 10a.—ANTI-AIRCRAFT HANDLING
(HOTCHKISS).
Instructors Notes,
Stores.—
Gun with tripod, Spare Parts Bag, Ammunition Carrier containing
strips and drill cartridges, A.A. Mounting fitted with sling.
Model aeroplane on pole.
A fatigueman will be required to carry the model.
As proficiency increases, the lesson can be repeated wearing
respirators.
1.—Explain:—
i. The gun will be mounted for action against aircraft in
a position which affords a field of fire over as wide
an expanse of sky as possible, at the same time
allowing it to be protected and concealed. Gun
positions should not oe in the open, but under cover
or in the shadow of trees, buildings, or other cover.
It is rarely possible to obtain an all-round view of
the sky and maintain concealment. The siting of
guns in an area (see para. 5, page 7) must, there-
fore, be co-ordinated under unit arrangements so
that each can watch a portion of the sky. When
cover is inadequate, camouflage should be used.
ii. Care must be taken, in engaging low-flying aircraft,
that the gun is not fired in a direction dangerous
to our own troops.
iii. The team required to operate a gun against aircraft
will consist of three. Their duties are as follows:*—
Section leader—selects a position for the gun.
Directs and controls the fire.
No. 1—fires and maintains the gun in action.
No. 2—assists No. 1 to change strips and keep
up the ammunition supply.
iv. Carriers, ammunition with strips containing Tracer
and Mk. VII. ammunition are carried on Squadron
A.A. Pack and H.Q. Limber, solely for A.A. pur-
poses. Strips will be filled with tracer and Mk. VII.
in the following proportion:—
3 tracer to 1 Mk. VII. (subject to alteration).
2. Instructor, acting as Section Leader:—
Select a suitable position for the gun.
Order Nos. 1 and 2 to set up the A.A. Mounting and
mount the gun. (Light Machine Gun (Hotchkiss)
Elementary Handling.)
Point out the field of fire and the position of other
guns in the area.
42
3. Explain and demonstrate actions of Nos. 1 and 2 on the
following orders:—“AIRCRAFT ACTION,” “AIRCRAFT
FRONT” (Right, Left, &c.).
i. No. 1 will raise the butt strap and set the cocking
handle to “A.”
ii. No. 2 will stand ready on the right of the gun with a
full strip, ready to change when ordered.
iii. No. 1 will turn quickly in the required direction, raise
the butt into the shoulder and aim.
iv. On the command “RAPID FIRE,” No. 1 will fire con-
tinuously, employing the “hose-pipe” method of
firing.
v. “STOP” and “GO ON” as already taught.
4. One of the squad will now carry about the model aero-
plane to represent a direct attacker or crossing aeroplane.
5. Practise squad at direct attackers and crossing aero-
planes by word of command and signals (see Lesson 7).
43
LESSON 10b.—ANTI-AIRCRAFT HANDLING (LEWIS).
Instructor's Notes.
Stores.—
Gun, fitted with A.A. Holder, Holdall, Magazine Carrier contain-
ing four magazines with drill cartridges, A.A. Mounting fitted
with sling, model aeroplane on pole.
A fatigueman will be required to carry the model.
As proficiency increases, the lesson can be repeated wearing
respirators.
1. Explain:—
i. The gun will be mounted for action against aircraft
in a position which affords a field of fire over as
wide an expanse of sky as possible, at the same
time allowing it to be protected and concealed. Gun
positions should not be in the open, but under cover
er in the shadow of trees, buildings, or other cover.
It is rarely possible to obtain an all-round view of
the sky and maintain concealment. The siting of
guns in an area (see para. 5, page 7) must, there-
fore, be co-ordinated under unit arrangements so
that each can watch a portion of the sky. When
cover is inadequate, camouflage should be used.
ii. Care must be taken, in engaging low-flying aircraft,
that the gun is not fired in a direction dangerous
to our own troops.
iii. The team required to operate a gun against aircraft
will consist of three. Their duties are as follows:—
Section Commander—selects a position for the
gun. Directs and controls the fire.
No. 1—fires and maintains the gun in action.
No. 2—assists No. 1 to change magazines and
keep up the ammunition supply.
iv. Eight magazines carried in the rear half limber will
be filled with Tracer and Mk. VII. ammunition, and
used solely for A.A. purposes. Magazines will be
filled with tracer and Mk. VII. in the following
proportion:—
3 tracer to 1 Mk. VII. (subject to alteration).
2. Instructor, acting as Section Commander:—
Select a suitable position for the gun.
Order Nos. 1 and 2 to set up the A.A. Mounting
and mount the gun. (Light Machine Gun (Lewis)
Elementary Handling.)
44
Point out the field of fire and the position of other
guns in the area.
3. Explain and demonstrate actions of Nos. 1 and 2 on the
following orders:—“AIRCRAFT ACTION,” “AIRCRAFT
FRONT” (Right, Left, &c.).
i. No. 1 will turn quickly in the required direction, raise
the butt into the shoulder and aim.
ii. No. 2 will stand ready on the left of the gun with a
full magazine ready to change when ordered.,
iii. On the command “RAPID FIRE,” No. 1 will fire con-
tinuously, employing the “hose-pipe” method of
firing.
iv. “STOP” and “GO ON” as already taught.
4. One of the squad will now carry about the model aero-
plane to represent a direct attacker or crossing aeroplane.
5. Practise squad at direct attackers and crossing aero-
planes by word of command and signals (see Lesson 7).
45
APPENDIX III.
APPEARANCE OF TRACER.
ipG
/ Fig. 19.
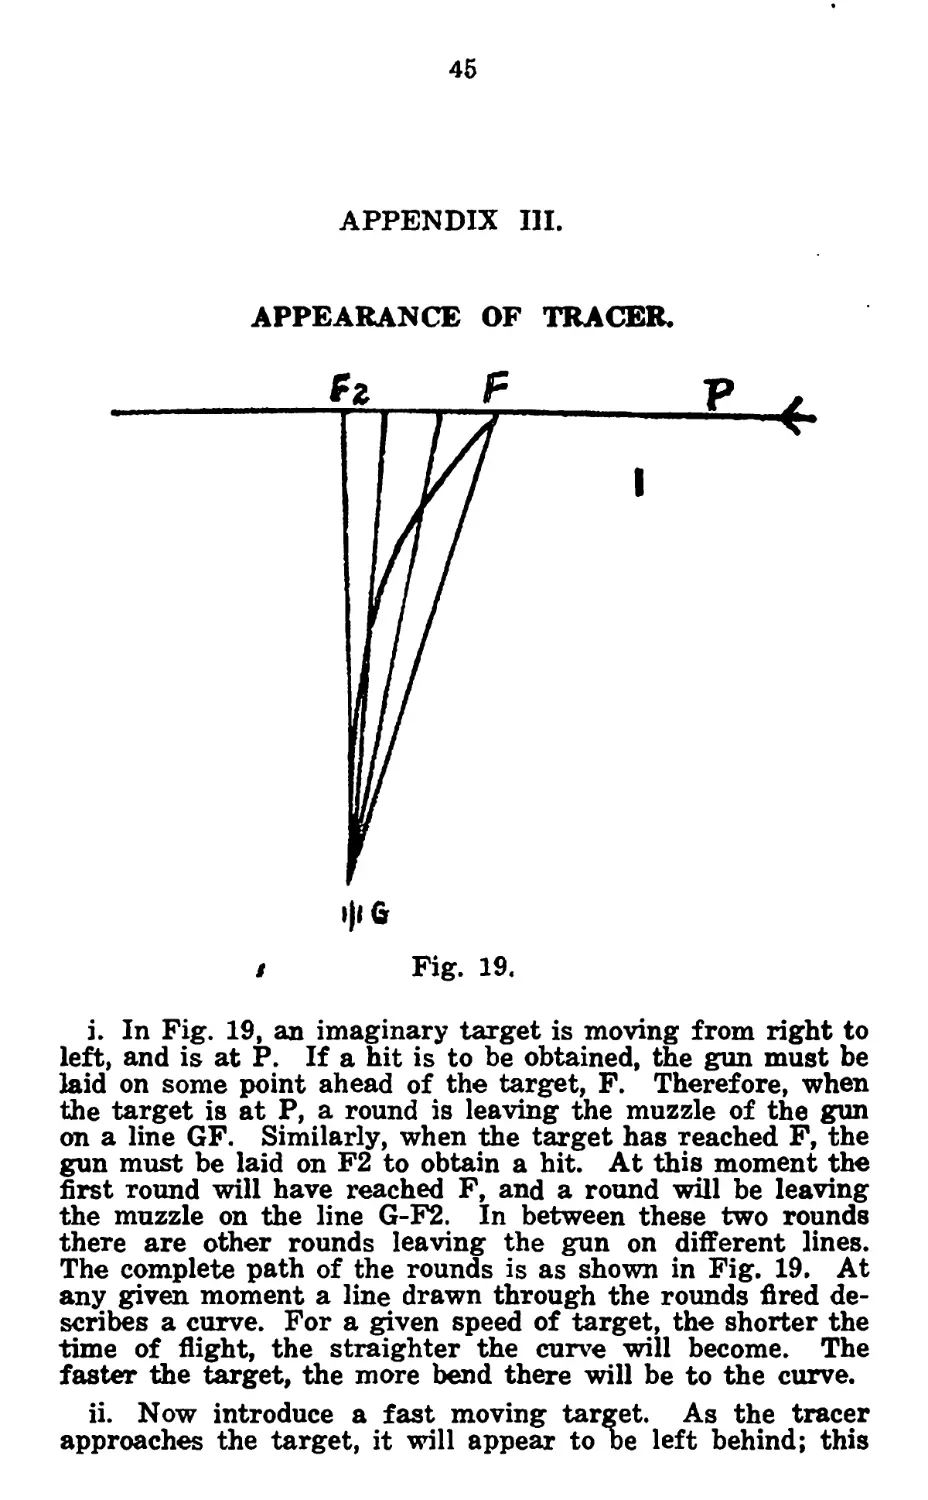
i. In Fig. 19, an imaginary target is moving from right to
left, and is at P. If a hit is to be obtained, the gun must be
laid on some point ahead of the target, F. Therefore, when
the target is at P, a round is leaving the muzzle of the gun
on a line GF. Similarly, when the target has reached F, the
gun must be laid on F2 to obtain a hit. At this moment the
first round will have reached F, and a round will be leaving
the muzzle on the line G-F2. In between these two rounds
there are other rounds leaving the gun on different lines.
The complete path of the rounds is as shown in Fig. 19, At
any given moment a line drawn through the rounds fired de-
scribes a curve. For a given speed of target, the shorter the
time of flight, the straighter the curve will become. The
faster the target, the more bend there will be to the curve.
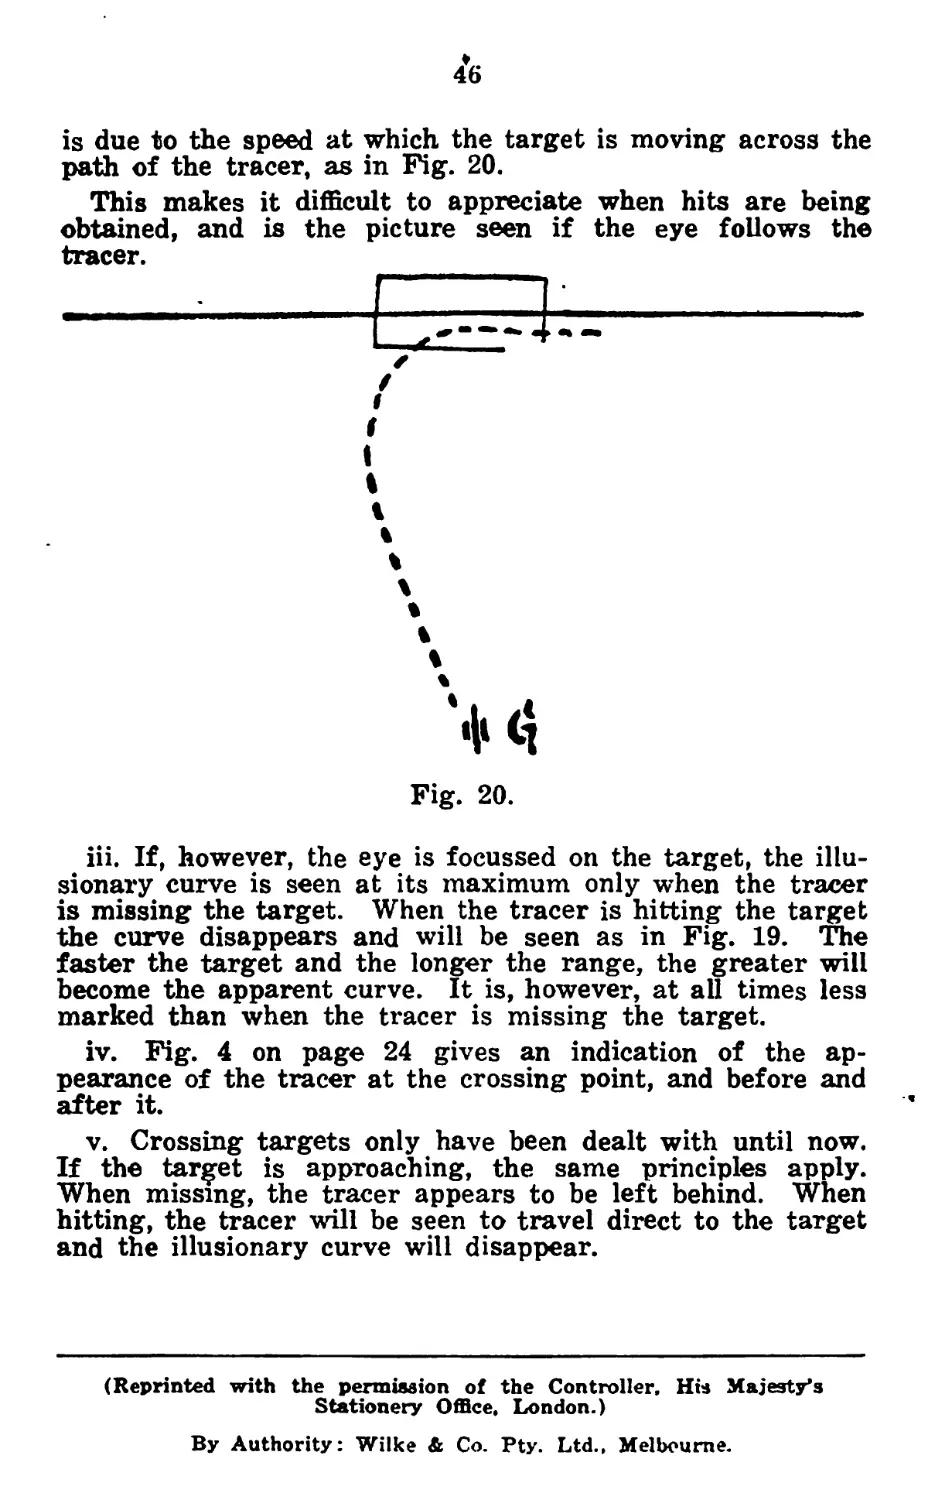
ii. Now introduce a fast moving target. As the tracer
approaches the target, it will appear to be left behind; this
46
is due to the speed at which the target is moving across the
path of the tracer, as in Fig. 20.
This makes it difficult to appreciate when hits are being
obtained, and is the picture seen if the eye follows the
tracer.
—-----------------------------------------
z
/
I
I
i
i
i
*
%
ч
%
%
%
Fig. 20.
iii. If, however, the eye is focussed on the target, the illu-
sionary curve is seen at its maximum only when the tracer
is missing the target. When the tracer is hitting the target
the curve disappears and will be seen as in Fig. 19. The
faster the target and the longer the range, the greater will
become the apparent curve. It is, however, at all times less
marked than when the tracer is missing the target.
iv. Fig. 4 on page 24 gives an indication of the ap-
pearance of the tracer at the crossing point, and before and
after it.
v. Crossing targets only have been dealt with until now.
If the target is approaching, the same principles apply.
When missing, the tracer appears to be left behind. When
hitting, the tracer will be seen to travel direct to the target
and the illusionary curve will disappear.
(Reprinted with the permission of the Controller. His Majesty’s
Stationery Office, London.)
By Authority: Wilke & Co. Pty. Ltd., Melbourne.
Notified in A. A.О., 31 st August, 1941.
NOT TO BE PUBLISHED
The information given in this document
is not to be communicated* either directly
or indirectly* to the Press or to any person
not holding an official position in His
Majesty's Service.
SMALL ARMS TRAINING
Vol. 1, Pamphlet No. 6* 1937.
LOCAL AMENDMENT (No. 4).
1. Page 5, delete para. 1 and insert :—
The Principles of Protection against Aircraft are shown in
M.T.P. No. 23, Pt. IV, F.S.R. Vol. II, 1935, Sec. 38, and Inf.
Tng., 1937, Sec. 55. Action taken may be passive or active and will
be governed by Tactical requirements. The main effect of attack
by aircraft against troops is moral so long as dispersion is resorted
to. Therefore, if continued movement is essential, troops on foot
will be deployed down to sections or even smaller groups ; clear of
the road if possible, if not, Sections or groups will continue to advance
on both sides of the road in single file.
Should active measures be desirable then dispersion for pro-
tection is still essential either clear of the road or on both sides of
it according to circumstances.
Active measures will entail halting during the air attack in
order to bring all available small arms fire to bear on attacking planes.
If Sections or men have been deployed off the road they must be
called in immediately the attack is oyer and the advance resumed
without delay with Sections on both sides of the road in single file.
Troops carried in M.T. will normally remain embussed.
They may use L.M.Gs. Mounted on Vehicles for A/Aircraft De-
fence during movement, that of the first vehicle firing forward,
that of the second firing to the rear and so on throughout the convoy.
If circumstances warrant the most active measures, then action
will be taken as laid down in M.T.P. No. 23, Pt. IV, Sec. 5 (6).
It must be borne in mind that troops who open fire on a plane
whose pilot is not aware of their presence will draw Air attacks
on to themselves.
Indiscriminate firing at planes will be avoided as their speed
is so great that enemy planes flying below 2,000 ft. are difficult to
recognize as such and their pilots very often fail to discover troops
on the ground ; again there is the danger of firing on planes of
our own Air Force. Generally, therefore, Anti-Aircraft Small Arms
fire will be confined to planes which are within range and attacking
our troops.
2. Para 3, delete from “ between — to — m.p.h.” and substitute—
“ at 300 m.p.h. or over.”
3. Para. 6, delete sub-para, (i) and substitute :—
ON THE MOVE.—In the case of troops on the march the
time factor precludes as a normal procedure advance across country
and large spaces between units and sub-units except in small columns.
If liable to air attack troops on foot will avoid the crown of the
road and march on each side of it. M.T. will move with the lowest
practicable density.
Columns will be protected generally by A/A L.M.Gs. pic-
queting the area particularly defiles through which troops are
moving. Other means include L.M.Gs. mounted on M.T. vehicles
moving within the column or on the flanks.
All units must protect themselves with the weapons at their
disposal and available L.M.Gs. will be brought into action without
tripods if the latter are not at hand.
It is essential that as great a volume of fire as possible be speedily
produced and normally all available rifles will be used.
There will be no time to issue orders for opening fire through
the usual chain of command ; responsibility must be delegated.
The fire unit will be the Section or such groups as dispersion
makes necessary controlled by the Senior Officer, N.C.O., or man
present.
Men will march with magazines charged with ten rounds
and sights set at 500 yards.
2
4. Page 20, Lesson 7 :— ’
Delete paras. 1 and 2 and substitute :—
1. Explain :—
(i) The Section or equivalent will be the usual fire unit,
depending on dispersion necessary.
(ii) Fire unit Comdrs, will make use of available cover
for their men and place themselves where they can
observe signals from Pl. H.Q. and control the fire
of the section or group. They normally will not
fire themselves.
(iii) They will ensure that the fire from their section or group
does not endanger their own neighbouring troops.
Fire will be controlled by word of Command or by
the use of whistle and hand signals when voice control
is impracticable.
(iv) An aeroplane climbing away after attack gives a better
target than one almost overhead. There is NO
possibility of the same men engaging a plane during
and after a direct attack owing to the speed and,
therefore, a platoon might well detail a section before
hand to fire at planes as they climb away.
(v) The rapid approach of a Direct Attacker from a dif-
ferent direction must be anticipated. The order or
signal 1 ‘ Stop—Aircraft about (or left or right)—
Rapid Fire ” should therefore be given in plenty of
time.
(vi) Sections should march on both sides of the road and
never in threes or fours if liable to air attack. If
attacked, a Sec. Comdr, when signalled by his Pl.
Comdr, takes available cover and then concentrates
his fire on Firstly, Enemy planes attacking his section—
Secondly, Enemy planes attacking neighbouring
sections.
(vii) Emphasize speed with which attacks develop and short
time enemy is in their range.
The direct attacker using bombs and M.G. fire
and the gas sprayer crossing plane which would doubt-
less be supported by the former are considered to be
the essential targets to be engaged.
3
2. Explain that on receiving warning of an impending air
attack the following procedure should be carried out in case of troops
moving by road on foot:—
(i) Pl. Comdr, deploys sections on each side of road.
(ii) On order or signal from Pl. Comdr., Section Comdrs,
take cover and order “ Aircraft—action ” men act
as in lesson 2 and 5 modified to prevailing circum-
stances.
(iii) To open fire—Sec. Comdrs, order “Aircraft Front”
(about, left or right according to direction of target),
and points to target—“ Rapid Fire ”—men act as in
lesson 2 and 5.
(iv) “ Stop ”—The order or signal (hand waved across
the body) will be given before a fresh target or direc-
tion is indicated.
(v) “Charge Magazines”—Magazines will be charged
when the attack has ceased. Sec. Comdr, orders—
“ Stop ”—“ Charge Magazines ”—Men charge Maga-
zines and sling arms. The advance is resumed as
rapidly as possible, and men who have left the road
must be got back immediately.
(vi) Practice squad in all section formations and from all
positions, standing, kneeling and lying from cover.
5. Delete para. 4 and substitute :—
4. GAS SPRAYER.
Gas spray attacks will necessitate :—
(a) Adjustment of eye shields and capes,
or (b) Adjustment of respirators and capes.
If gas spray has been used in the theatre of operations, (a)
above will always be adjusted when in the open.
If the nature of the gas used by the enemy or other circum-
stances or previous experience warrants it, respirators will be adjusted
at the outset as in (b) above. This would be indicated by Coy.
and Pl. Comdrs, in their initial orders. In this case all fire control
will be by signal.
4
Section Commanders will be trained to watch the safety of
their neighbouring troops from their own fire, particularly when
engaging air spray aircraft which may sometimes need to fly very
low on a straight course.
If necessary, those troops nearest such enemy craft will engage
it only. Squads will, therefore, be practiced in Anti-Aircraft
Fire Control with anti-gas equipment adjusted as in both (a) and
(b) above.
6. Lesson 10 :—
Delete paras. 2 and 3 and substitute :—
2. Instructor acting as Section Commander :—
Select a position for the gun.
Order “ Aircraft Action ” (Pamph. No. 4, Lesson 20).
Point out Arc of Fire and position of other guns in the area.
3. Explain the actions of Nos. 1 and 2 on receiving the follow-
ing orders :—
(i) “ Aircraft—Front ” (Right, Left, etc.).
No. 1 will set change lever to “A” (Automatic).
Turn quickly in the required direction raising the
butt into the shoulder and aim.
No. 2 will stand on the left of the gun with a magazine
in his right hand, ready to “ change ” when ordered.
(ii) “ Rapid Fire ”—No. 1 will engage the target firing
continuously.
(iii) “ Stop ” and “ Go on ”—As already taught.
(iv) L.M.G. fire may be required against hostile aircraft
often with no tripod available. The use of L.M.G. for
anti-aircraft fire without a tripod will be practiced
therefore, sitting, kneeling, and standing with the
following methods :—
(a) Butt of gun in shoulder, left hand grasping
carrying handle.
(b) Butt of gun on hip or under armpit, left hand
grasping carrying handle.
7. Lesson 10a.
Delete paras. 2 and 3 and substitute :—
2. The Instructor acting as Section Leader :—
Select a position for the gun.
Order “Aircraft Action” (L.M.G., Hotchkiss, Elementary
Handling).
6
Paint out Arc of Fire and position of other guns in the
area.
3. Explain the actions of Nos. 1 and 2 on receiving the
following orders :—
(i) “ Aircraft—Front ” (Right, Left, etc.) :—
No. 1 will set the Cocking handle to “A,” turn
quickly in the required direction, raise the butt
into the shoulder and aim.
No. 2 will stand on the right of the gun with a full
strip ready to “ change ” when ordered.
(ii) “ Rapid Fire ” :—
No. 1 will engage the target firing continuously.
(iii) “ Stop ”—“ Go on ”—as already taught.
8. Lesson 10b :—
Delete paras. 2 and 3 and substitute:—
2. Instructor acting as Section Commander :—
Select a position for the gun.
Order—“Aircraft Action” (Elementary Handling).
Point out Arc of Fire and other guns in the area.
3. Explain the actions of Nos. 1 and 2 on receiving the
following orders :—
(i) “Aircraft—Front” (Right, Left, etc.):—
No. 1 will turn quickly in the required direction,
' raise the butt into the shoulder and aim.
No. 2 will stand on the left of the gun with a full
magazine in his right hand ready to “ change ”
^vhen ordered.
(ii) “ Rapid Fire ”—No. 1 will engage the target firing
continuously.
(iii) “ Stop ”—“ Go on ”—As already taught.
By Command of the Military Board,
3ist August, 1941. 4348—41
By Authority Victorian Railways Printing Works, Laurens Street,
North Melbourne.