/


Tags: weapons machine gun thompson carbine
Year: 1942
Text
NOT TO BE PUBLISHED
ihe information gi^en in this document
is not to be communicated, either directly
or indirectly, to the Press о/ to any person
not hnidlnjl an official position in His
Majcst) ’s Service.
Small Arms Training
Vol и и к1 1, Pamphlet No. 21
The Thompson Machine
Carbine
1912
This pamphlet supersedes the 1910 edition)
Л1
Wa>< i i< j:,
15//, Ji:lv J9-12.
UJ.'X I'
DISTRIBUTION
SCAtE
All arms ... ... ... ... ... ... .. D
AU O. R.T.I's.......... .......................'. D
O.C.l.Ls. ... ... ........................IV
V'.. Hytlie Wing ... • ... ... ... ... 140
Netheravon Wing ... ... ... ... ... 50
CONTENTS
PAGE
General Notes ... ... ... ... ... ... 1
Lesson 1. Introduction—l.oadiiig and unloading ... 2
Lesson 2, Holding and liriiig ... .. ... ... 4
Lesson 3. Stripping and cb aning ... ... ... S
Appendix ... ... ... ... ... ... ...' 11
SMALL ARMS TRAINING
Volume I, Pamphlet No. 21
THE THOMPSON MACHINE CARBINE
GENERAL NOTES
1. Object
The sole object of weapon training is to teach all ranks
the most efficient way of handling their weapons in order to
kill the enemy. Instructors will always bear this fact in
mind and will continually impress it upon those whom they
instruct.
2. Safety precautions
At the beginning of every lesson the instructor will inspect
the machine carbine, pouches, and drill cartridges.
3. Training
Instructors must appreciate that, while the lessons are
designed to be taught in one period, more time will be
necessary in order to permit of sufficient practice to obtain
proficiency.
Excellent training value can also be obtained by using
the spotlight projector (see Appendix).
4. The machine carbine is normally the weapon of the sec-
tion commander. Occasions will arise, however, when it
may be advisable to give it to another man in the section.
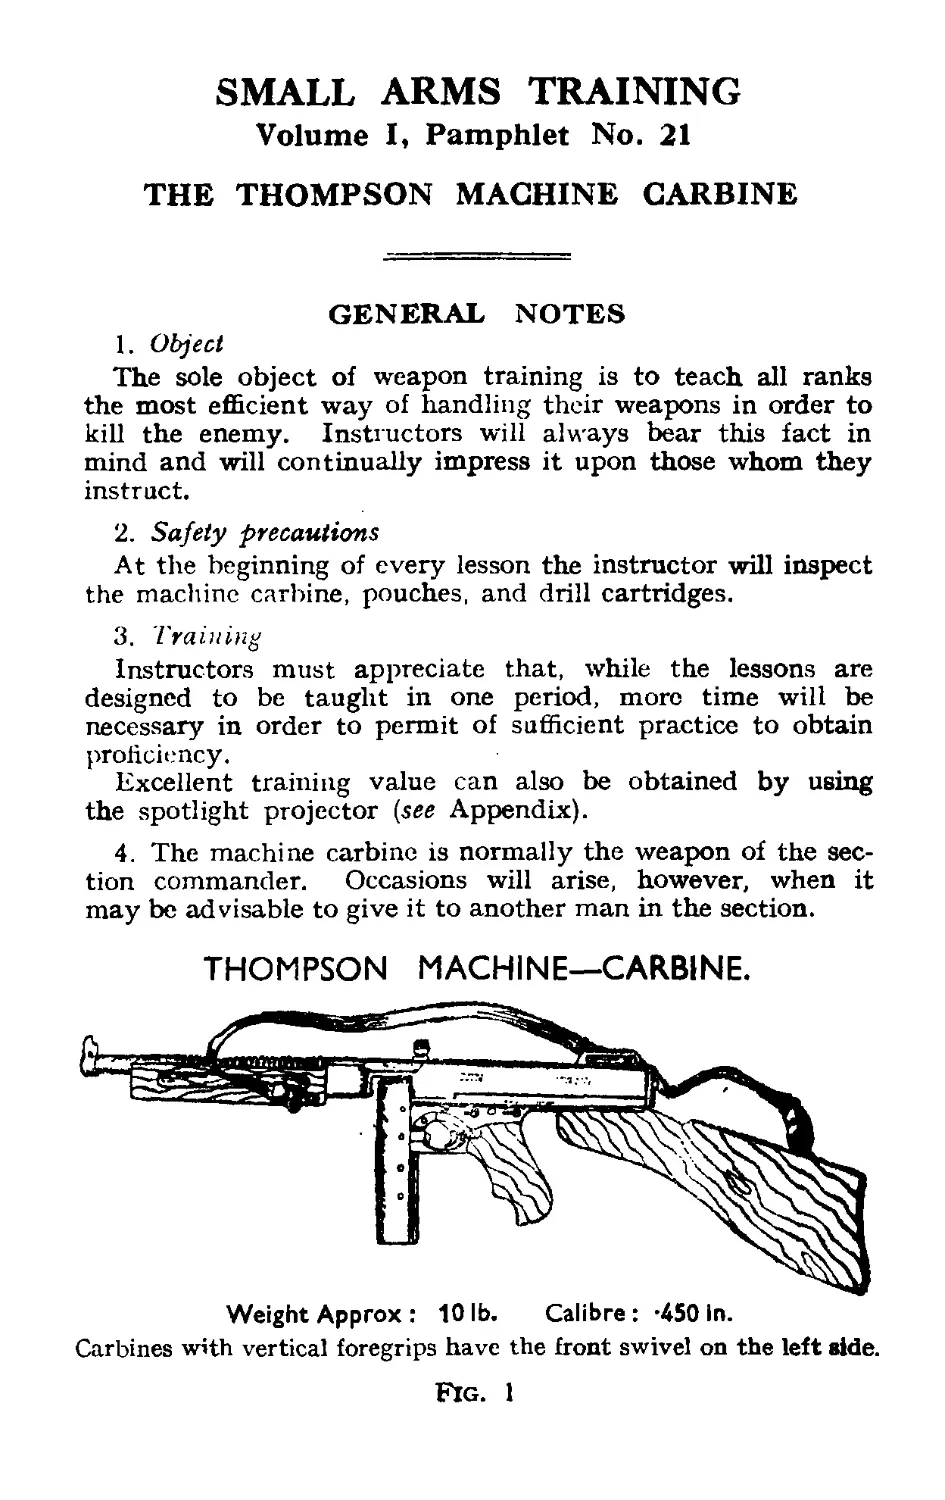
THOMPSON MACHINE—CARBINE.
Weight Approx : 10 lb. Calibre : -450 in.
Carbines with vertical foregrips have the front swivel on the left ride.
Fig. 1
LESSON 1.—INTRODUCTION—LOADING AND
UNLOADING
Instructor’s Notes
Stores.—Machine carbine ; magazines ; drill cartridges, if
available.
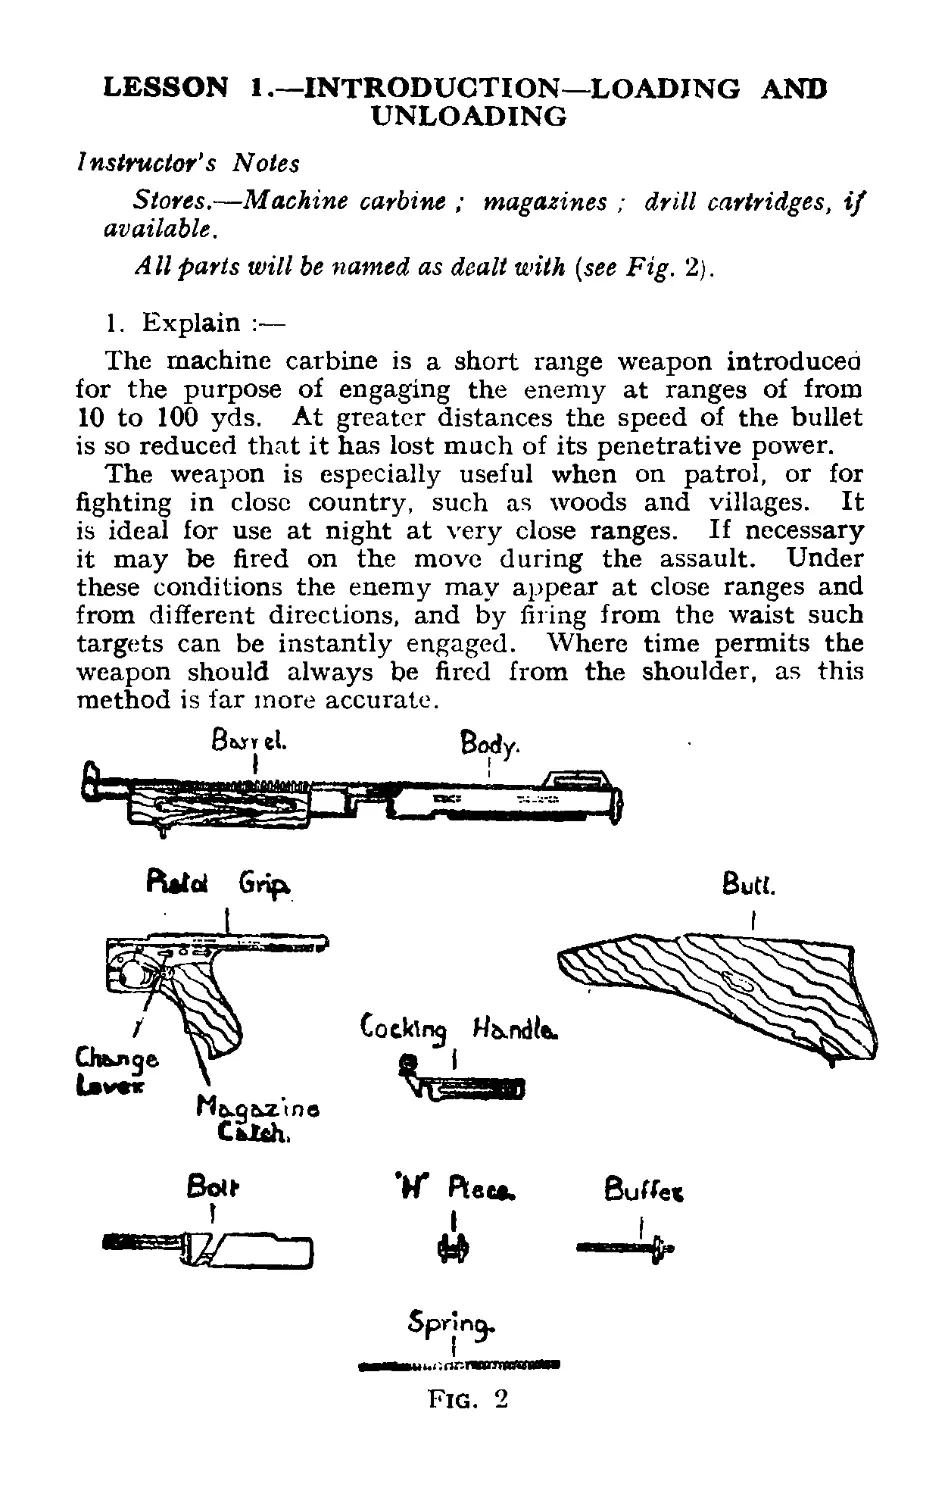
All parts will be named as dealt with {see Fig. 2).
1. Explain :—
The machine carbine is a short range weapon introduced
for the purpose of engaging the enemy at ranges of from
10 to 100 yds. At greater distances the speed of the bullet
is so reduced that it has lost much of its penetrative power.
The weapon is especially useful when on patrol, or for
fighting in close country, such as woods and villages. It
is ideal for use at night at very close ranges. If necessary
it may be fired on the move during the assault. Under
these conditions the enemy may appear at close ranges and
from different directions, and by firing from the waist such
targets can be instantly engaged. Where time permits the
weapon should always be fired from the shoulder, as this
method is far more accurate.
*W* Reca.
Buffet
I
Fig. 2
It is an automatic weapon, operated by the recoil of the spent
case acting on the bolt face.
The machine carbine can be fired in bursts or in single
rounds.
2. Magazine filling
i. Explain and demonstrate :—
The magazine holds 20 rounds. Hold magazine
in left hand, ribs away from the body. Pick up a
convenient number of rounds in the right hand and
place each round in by pressing downwards and
backwards. Count the number of rounds, and ensure
that ammunition is kept clean.
ii. To empty—press each round forward with the nose
of a bullet or remove with finger and thumb.
iii. Practise squad.
3. Loading and unloading
Explain and demonstrate :—
i. To load.—Hold the machine carbine with the right
hand on the pistol grip, forefinger outside the trigger
guard, butt under the arm, muzzle pointing down at
an angle of 45 degrees. Turn the machine carbine
to the right, grasp the magazine in the left hand,
rib to the rear, and insert it in the recess in front of
the trigger guard. Force the magazine upwards
and ensure that it is FULLY ENGAGED.
Loading is fully completed by cocking the machine
carbine when it is required to fire, or when action is
imminent.
Note.—The safety catch should NEVER be used—
it being only necessary to cock the weapon to be
ready for firing.
ii. To unload.—Turn the machine carbine to the right.
Press the magazine catch on the left side of the
pistol grip upwards with the thumb of the left hand,
and remove the magazine. Cock the machine
carbine, if not already cocked, and, holding the
cocking handle with the left hand, press the trigger
and ease the working parts forward under control.
Repeat this action.
iii. Practise squad—Words of command—" Load ”—
" Action imminent ”—" Unload ”.
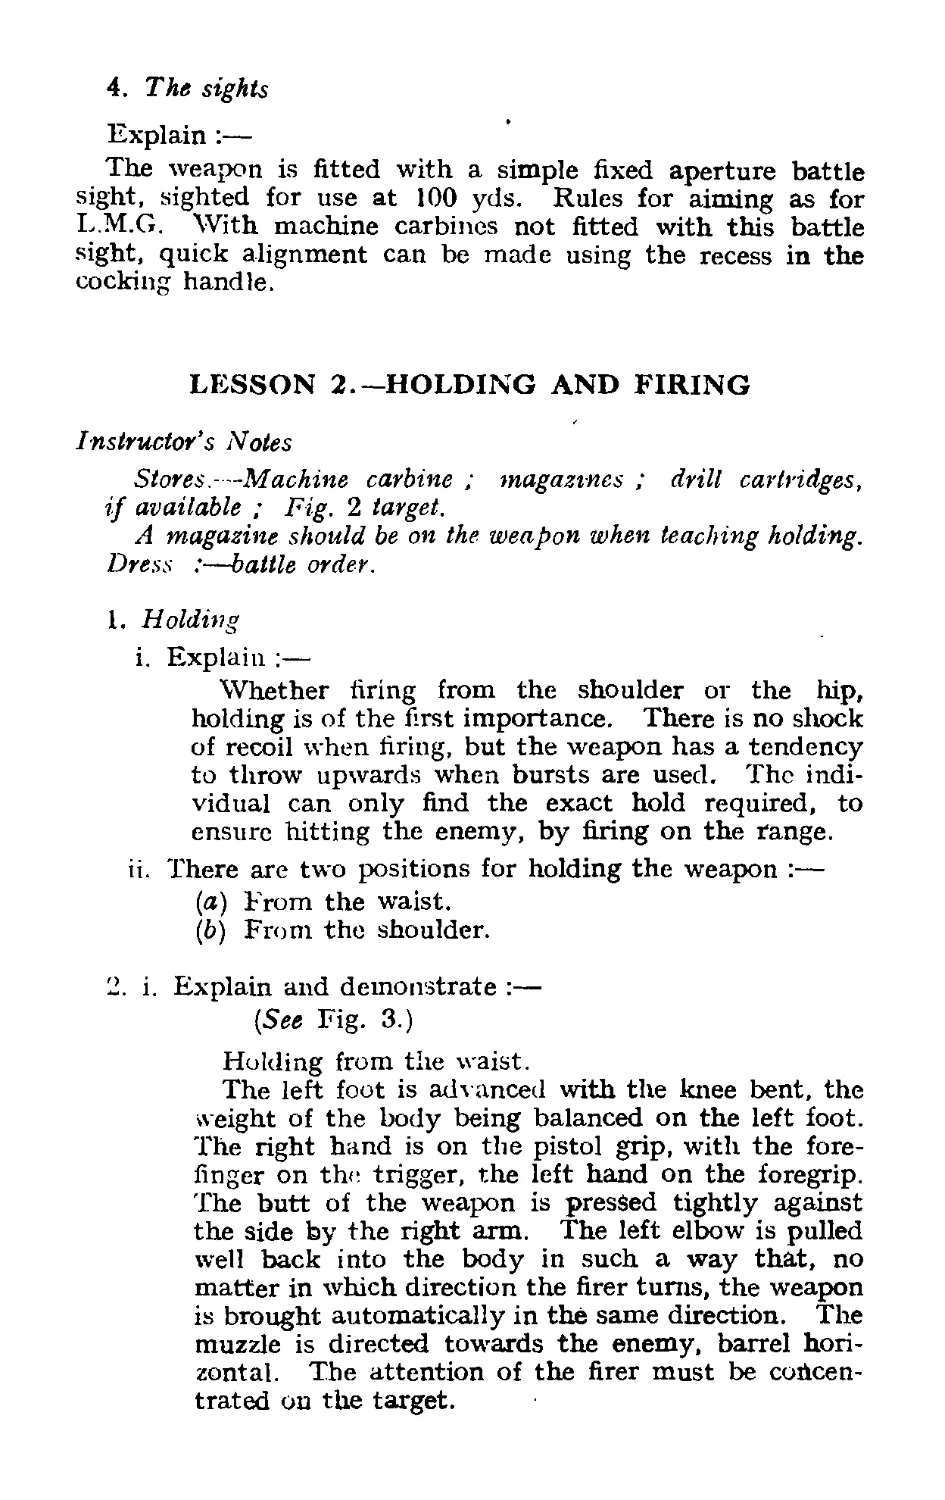
4. The sights
Explain :—
The weapon is fitted with a simple fixed aperture battle
sight, sighted for use at 100 yds. Rules for aiming as for
L.M.G. With machine carbines not fitted with this battle
sight, quick alignment can be made using the recess in the
cocking handle.
LESSON 2.—HOLDING AND FIRING
Instructor’s Notes
StoresMachine carbine ; magazines ; drill cartridges,
if available ; Fig. 2 target.
A magazine should be on the weapon when teaching holding.
Dress :—battle order.
1. Holding
i. Explain :—
Whether firing from the shoulder or the hip,
holding is of the first importance. There is no shock
of recoil when firing, but the weapon has a tendency
to throw upwards when bursts are used. The indi-
vidual can only find the exact hold required, to
ensure hitting the enemy, by firing on the range.
ii. There are two positions for holding the weapon :—
(a) From the waist.
(b) From the shoulder.
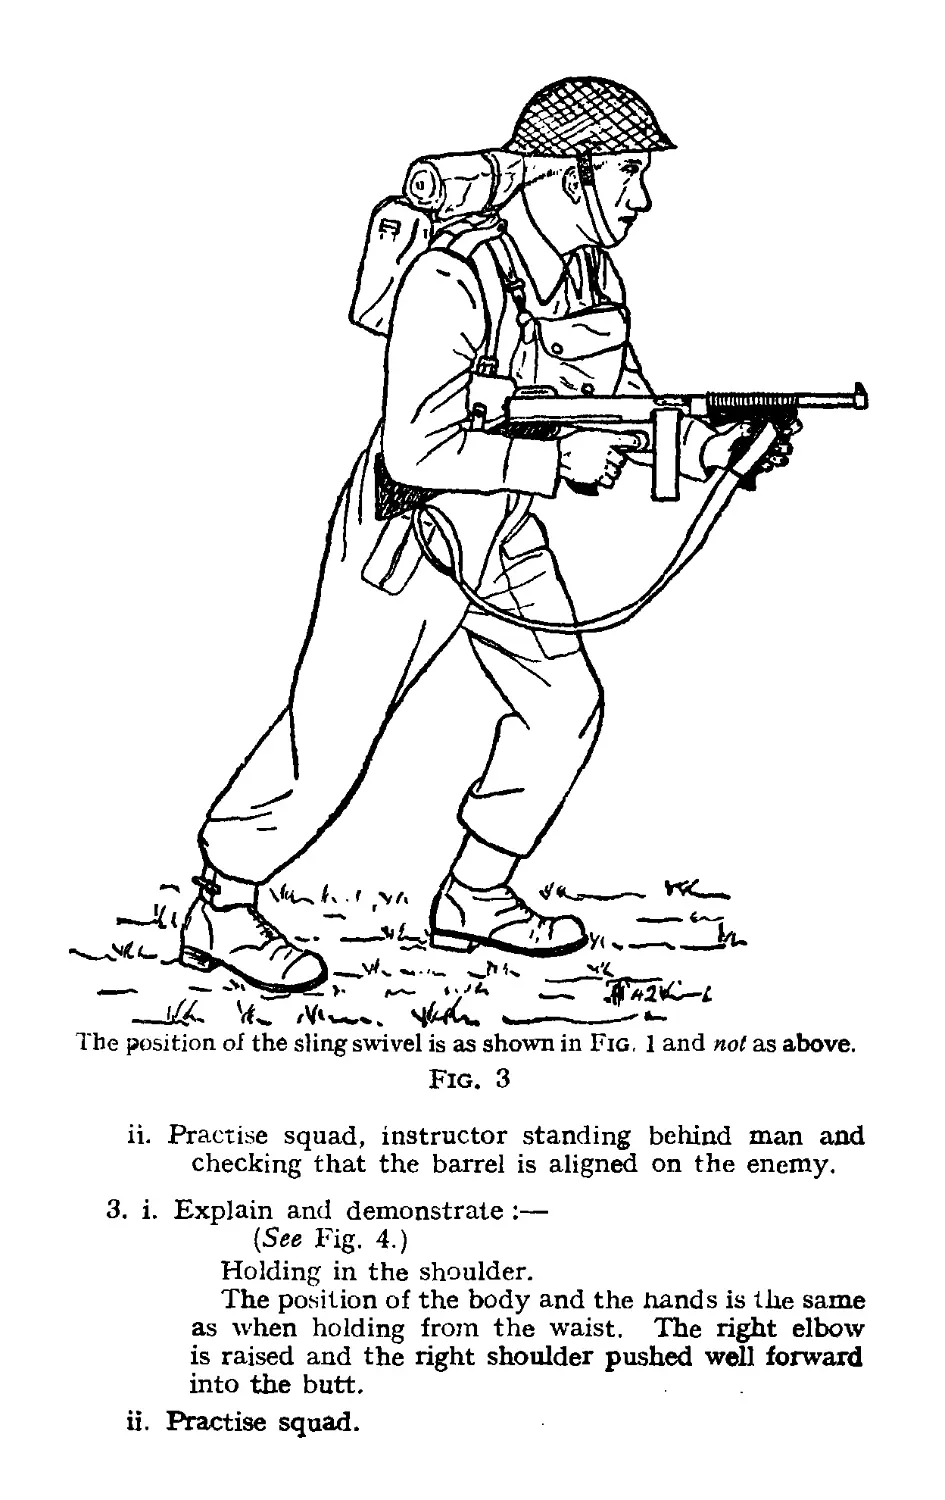
2. i. Explain and demonstrate :—
(See Fig. 3.)
Holding from the waist.
The left foot is advanced with the knee bent, the
weight of the body being balanced on the left foot.
The right hand is on the pistol grip, with the fore-
finger on the trigger, the left hand on the foregrip.
The butt of the weapon is pressed tightly against
the side by the right arm. The left elbow is pulled
well back into the body in such a way that, no
matter in which direction the firer turns, the weapon
is brought automatically in the same direction. The
muzzle is directed towards the enemy, barrel hori-
zontal. The attention of the firer must be concen-
trated on the target.
The position of the sling swivel is as shown in Fig, 1 and not as above.
Fig. 3
ii. Practise squad, instructor standing behind man and
checking that the barrel is aligned on the enemy.
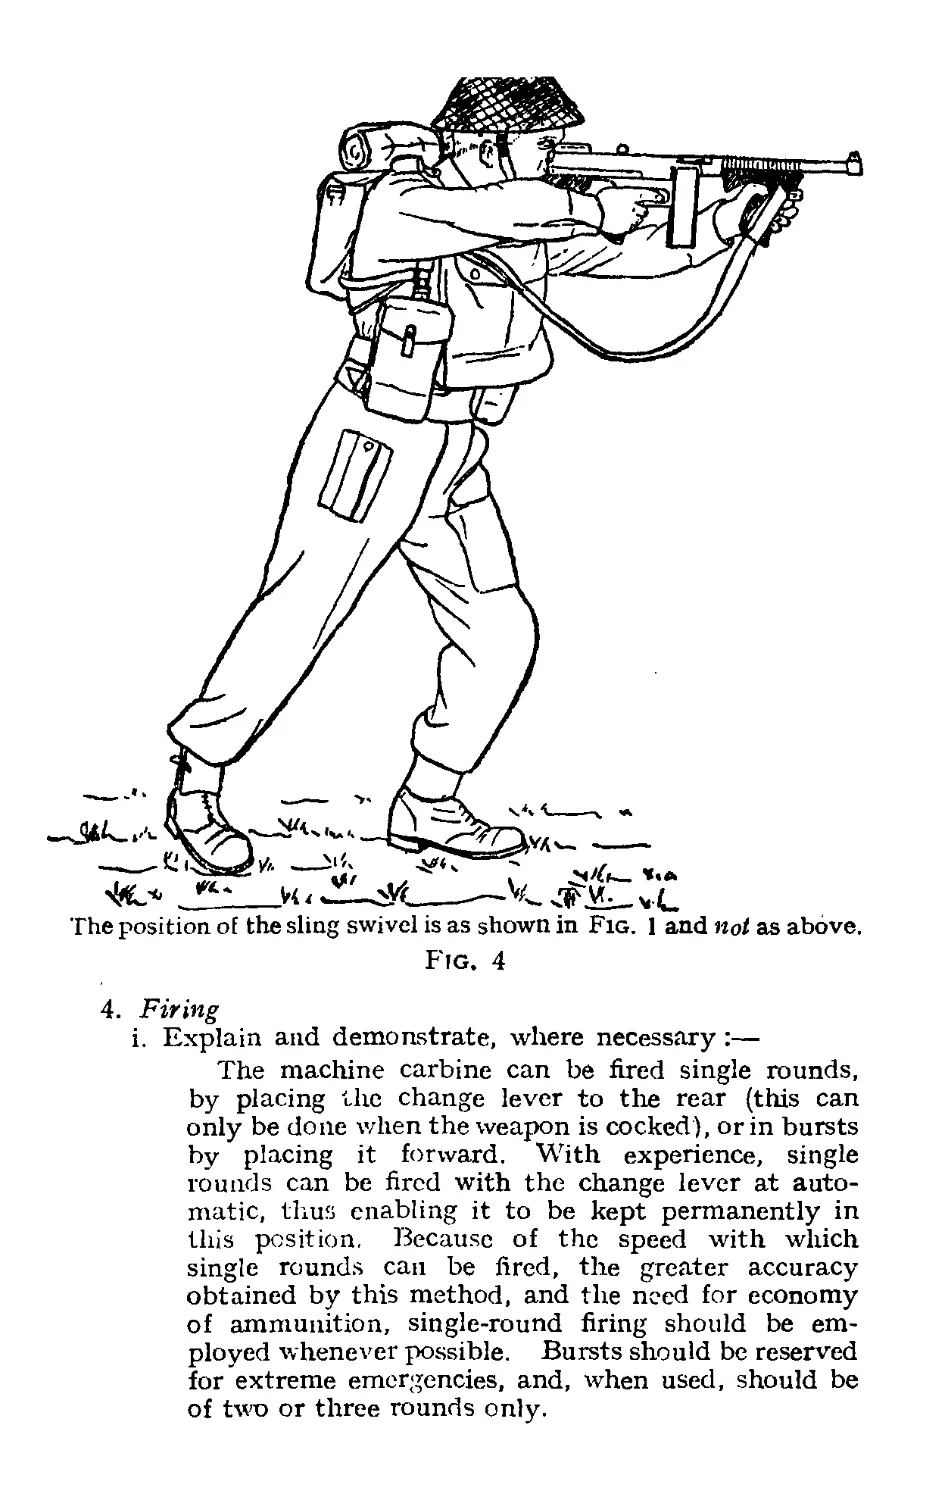
3. i. Explain and demonstrate :—
(See Fig. 4.)
Holding in the shoulder.
The position of the body and the hands is the same
as when holding from the waist. The right elbow
is raised and the right shoulder pushed well forward
into the butt.
ii. Practise squad.
The position of the sling swivel is as shown in Fig. 1 and not as above.
Fig. 4
4. Firing
i. Explain and demonstrate, where necessary :—
The machine carbine can be fired single rounds,
by placing the change lever to the rear (this can
only be done when the weapon is cocked), or in bursts
by placing it forward. With experience, single
rounds can be fired with the change lever at auto-
matic, thus enabling it to be kept permanently in
this position. Because of the speed with which
single rounds can be fired, the greater accuracy-
obtained by this method, and the need for economy
of ammunition, single-round firing should be em-
ployed whenever possible. Bursts should be reserved
for extreme emergencies, and, when used, should be
of two or three rounds only.
ii. The machine carbine can be carried in any convenient
position, but when expecting to meet the enemy it
should be held at the waist, supported by the sling
round the neck.
iii. If time permits the weapon will always be fired from
the shoulder, as this method is far more accurate
An approximate aim should be taken using the
battle sight, if fitted, or the recess in the cocking
handle. Should the enemy appear too suddenly to
allow of this method being used, it should be fired
from the waist by sense of direction. From this
position it can be cocked and fired instantly. Which-
ever method is used an attempt should be made to
observe the shots, as this is the only quick method
of making necessary corrections.
Although the weapon can be fired whilst on the
move, greater accuracy is obtained by halting
momentarily.
iv, Having disposed of the enemy the weapon can be
placed at safety, to resume movement, by removing
the magazine, easing the cocking handle forward,
and placing on a full magazine.
5. Immediate action
Explain and demonstrate, using an empty magazine and
also one fitted with a depressor, if drill cartridges are not
available :—
(A halfpenny makes a good depressor.)
i. When the magazine becomes empty the machine
carbine will stop with the cocking handle to the rear.
The remedy is to change the magazine and continue
firing.
ii. If the machine carbine stops during firing, cock it and
continue firing.
iii. Should the above immediate action fail, then cock the
machine carbine, turn it to the right, and shake
vigorously, when a live round or an empty case
should fall out ; continue firing.
iv. If nothing falls out when the machine carbine is
shaken, remove the magazine, when the obstruction
should drop out. Look into the chamber, if practic-
able, replace magazine (or a full one) and continue
firing.
Note.—Unless drill cartridges are available, work-
ing parts must be eased forward under control to
prevent damage.
v. Practise squad, varying the order of stoppages as
progress is made.
LESSON 3.—STRIPPING AND CLEANING
Instructor’s Notes
Stores.—Machine carbine ; flannelette and oil foil can in
butt trap} ; pullthrough ; brush, cleaning, chamber ; gauze ;
grapkited grease ; nail : magazines.
Note.—Buffer rods are drilled with a hole | in. diameter,
§ in. from forward end of rod and at an angle of 90 degrees from
the flat of the buffer collar, to enable the use of a nail for replacing
recoil spring.
1. Stripping
Explain and demonstrate :—
(For names of parts see Fig. 2.)
i. Cock the machine carbine and press the trigger.
Ensure change lever is at automatic. (If the
weapon is stripped with change lever at single
rounds, the tripping lever will become damaged.)
Press down butt plunger and remove butt. Turn
the machine carbine upside down and press down
pistol grip plunger. Press the trigger and remove
pistol grip. Assemble in reverse order.
ii. Practise squad.
iii. After removing butt and pistol grip, compress the
buffer and spring towards the bolt. When the
rear end of the buffer is clear of its seating,
lift it out, with the recoil spring under control.
Move the working parts to the rear and lift out the
bolt. Push cocking handle forward until “ H ”
piece rises and then lift it out. Bring cocking handle
to the rear and lift out.
Assemble in reverse order, recoil spring being
replaced as follows :—
Place end of buffer in pilot seating OUTSIDE the
rear of the body, with flat side of the collar down-
wards. Place the recoil spring on the buffer and
compress the spring with the fingers until 2 or 3 ins.
remain free. Insert nail into the hole in buffer to
hold spring in position. Remove buffer and spring,
and insert free end of spring into the recess in the
rear end of the cocking handle. Make sure that the
flat on the buffer collar is downwards and guide the
end of the buffer into the pilot seating. Using the
cocking handle, draw back the bolt until it meets the
nail. Withdraw the nail and allow the cocking
handle to go forward under control. After complete
assembly, cock machine carbine and press trigger,
easing cocking handle forward.
iv. Practise squad.
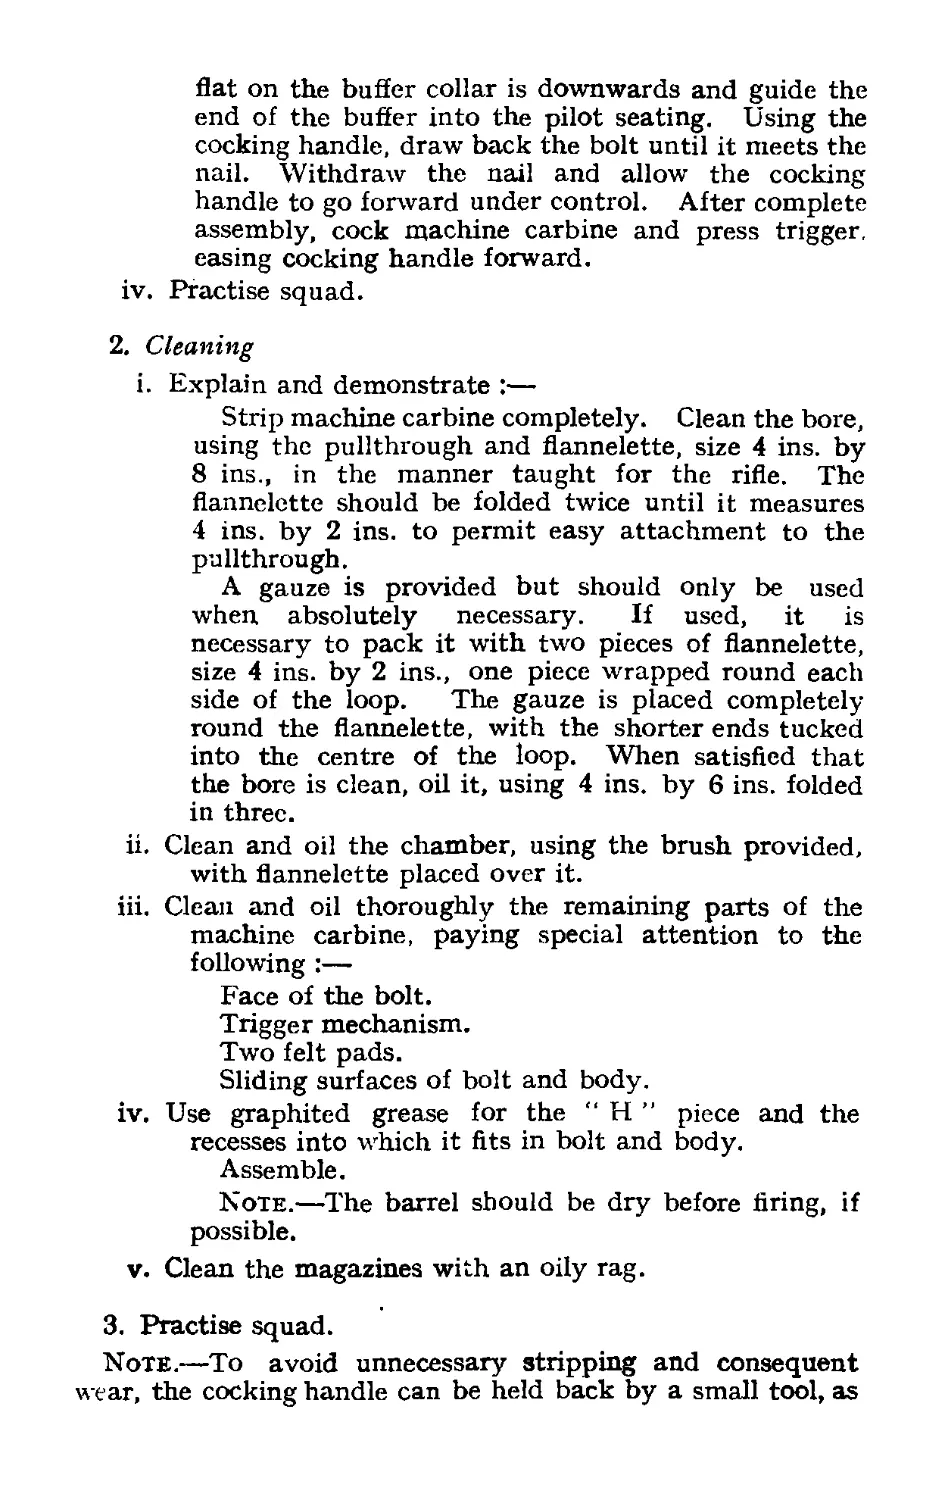
2. Cleaning
i. Explain and demonstrate :—
Strip machine carbine completely. Clean the bore,
using the pullthrough and flannelette, size 4 ins. by
8 ins., in the manner taught for the rifle. The
flannelette should be folded twice until it measures
4 ins. by 2 ins. to permit easy attachment to the
pullthrough.
A gauze is provided but should only be used
when, absolutely necessary. If used, it is
necessary to pack it with two pieces of flannelette,
size 4 ins. by 2 ins., one piece wrapped round each
side of the loop. The gauze is placed completely
round the flannelette, with the shorter ends tucked
into the centre of the loop. When satisfied that
the bore is clean, oil it, using 4 ins. by 6 ins. folded
in three.
ii. Clean and oil the chamber, using the brush provided,
with flannelette placed over it.
iii. Clean and oil thoroughly the remaining parts of the
machine carbine, paying special attention to the
following :—
Face of the bolt.
Trigger mechanism.
Two felt pads.
Sliding surfaces of bolt and body.
iv. Use graphited grease for the “ H ” piece and the
recesses into which it fits in bolt and body.
Assemble.
Note.—The barrel should be dry before firing, if
possible.
v. Clean the magazines with an oily rag.
3. Practise squad.
Note.—To avoid unnecessary stripping and consequent
wear, the cocking handle can be held back by a small tool, as
shown in the diagram. The machine carbine need then only
be stripped as far as the bolt for all cleaning, with the
exception of periodical cleanings or decontamination (see
Fig. 5).
4. Decontamination
i. Explain :—
Should the machine carbine be subjected to gas it
will be cleaned in the manner laid down for the rifle
(see Pamphlet No. 3, Lesson 1).
ii. Question squad.
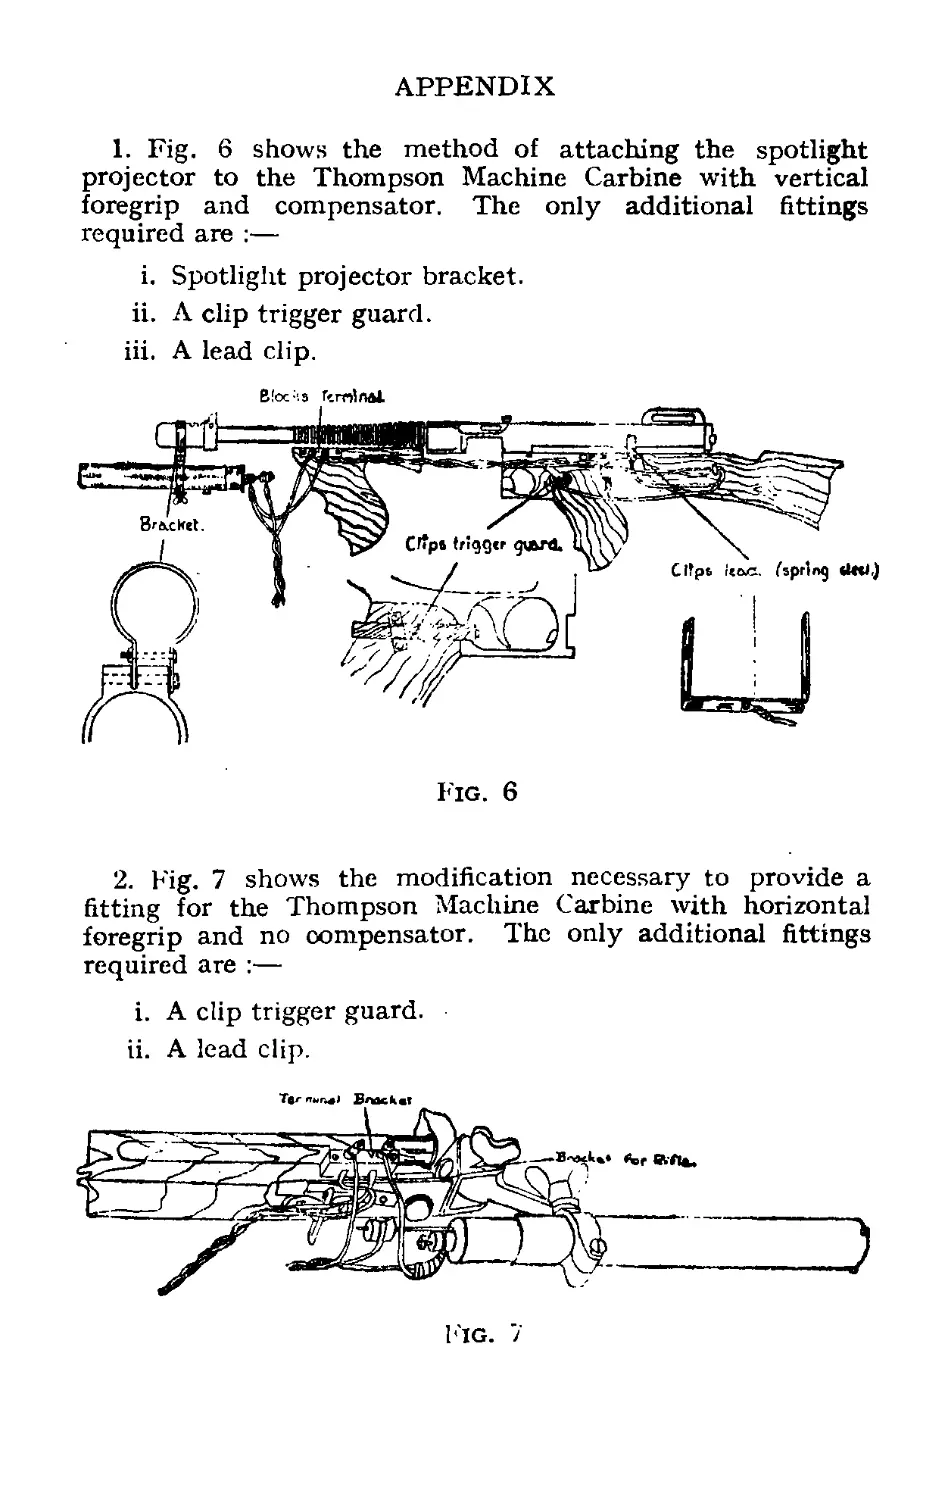
APPENDIX
1. Fig. 6 shows the method of attaching the spotlight
projector to the Thompson Machine Carbine with vertical
foregrip and compensator. The only additional fittings
required are :—
i. Spotlight projector bracket.
ii. Л clip trigger guard.
iii. A lead clip.
Fig. 6
2. Fig. 7 shows the modification necessary to provide a
fitting for the Thompson Machine Carbine with horizontal
foregrip and no compensator. The only additional fittings
required are :—
i. A clip trigger guard.
ii. A lead clip.
Fig. 7
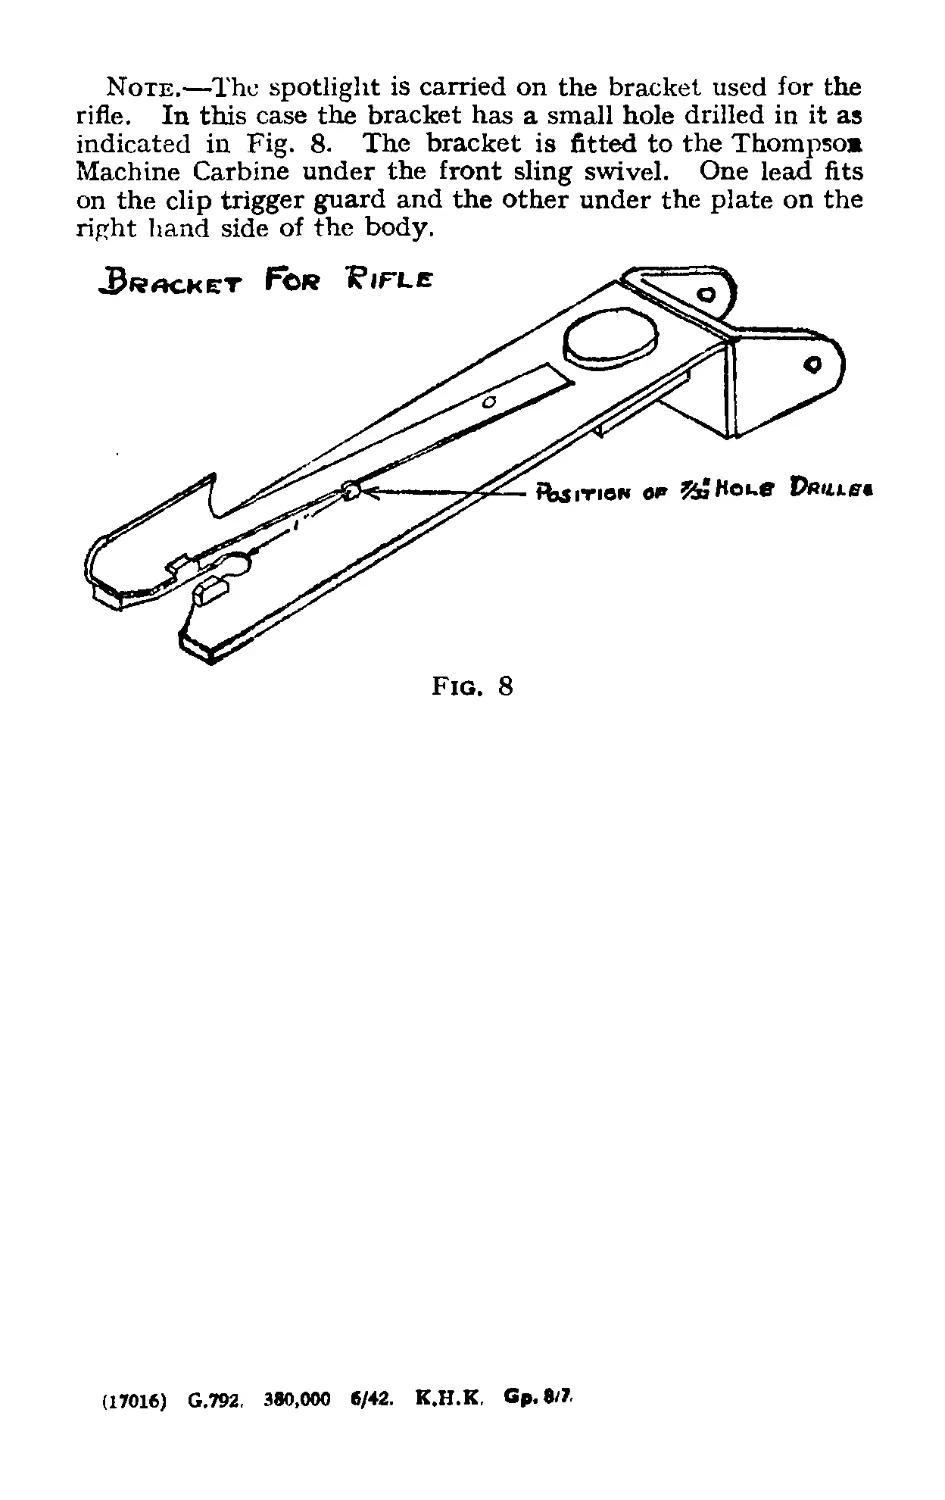
Note.—The spotlight is carried on the bracket used for the
rifle. In this case the bracket has a small hole drilled in it as
indicated in Fig. 8. The bracket is fitted to the Thompsoa
Machine Carbine under the front sling swivel. One lead fits
on the clip trigger guard and the other under the plate on the
right hand side of the body.
.BRACKET FCK KlFLE
Fig. 8
(17016) G.792, 380,000 6/42. K.H.K, Gp. 8/7