/


Tags: weapons military affairs
Year: 1960


Text
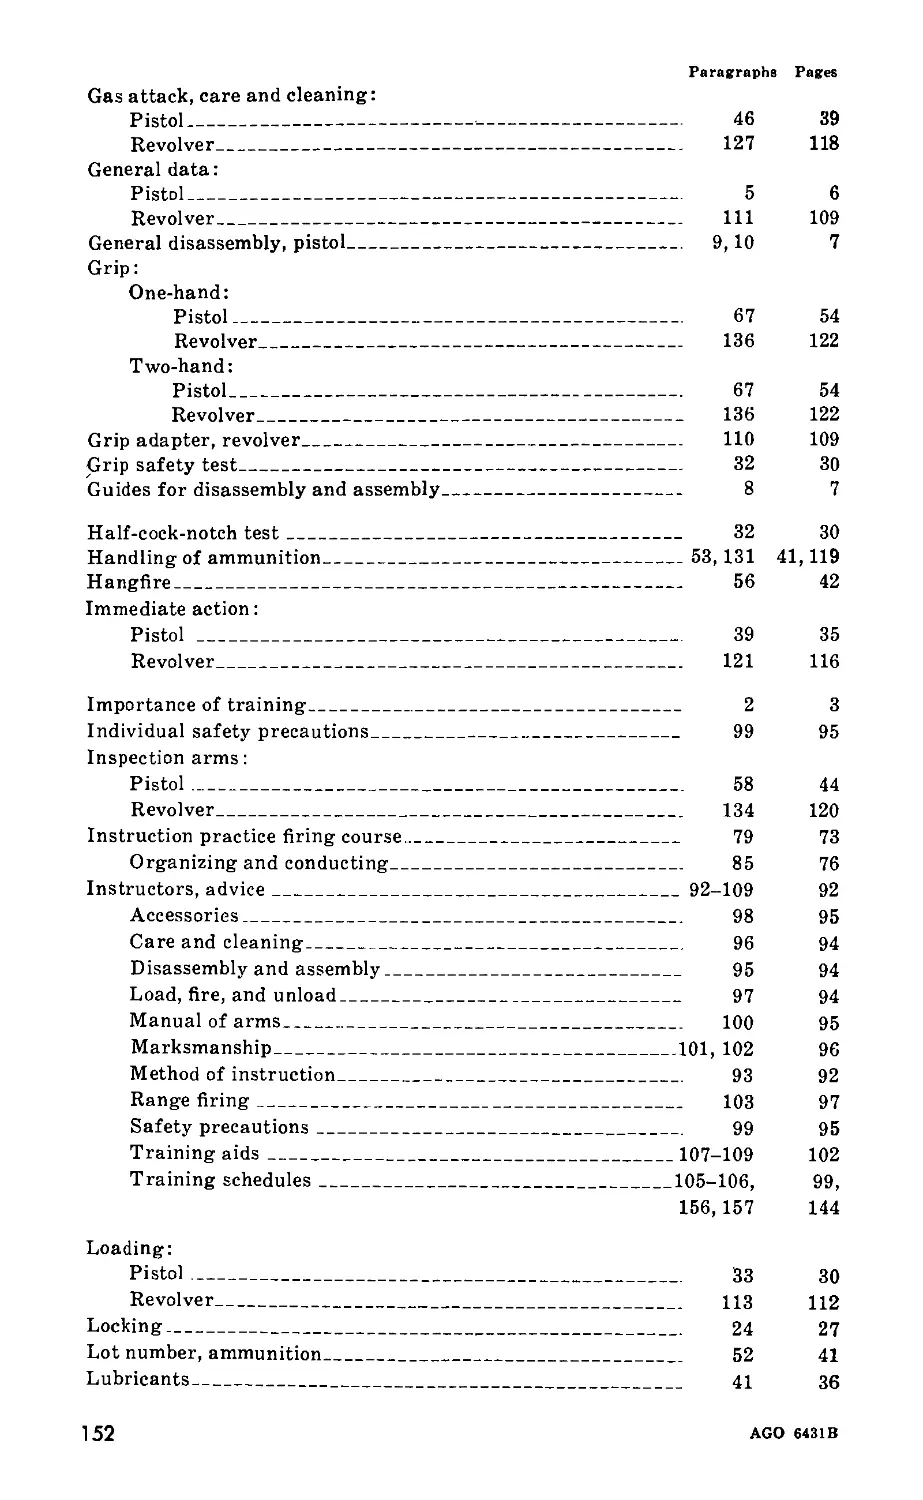
J’.”. FM 23-35
жж AFM 50-17
PISTOLS
AND
REVOLVERS
PAUL J. ROBERTS
5915 Monte Verde Dr.
Santa Rosa, Calif.
95405
DEPARTMENTS OF THE ARMY AND THE
AIR FORCE
JULY 1S60
AGO 6431B
FM 23—35/AFM 50-17
Army Field Manual ) DEPARTMENTS OF THE ARMY
No. 23-35 ( AND THE AIR FORCE
No 50-17 I Washington 25, D. C., 1 July 1960
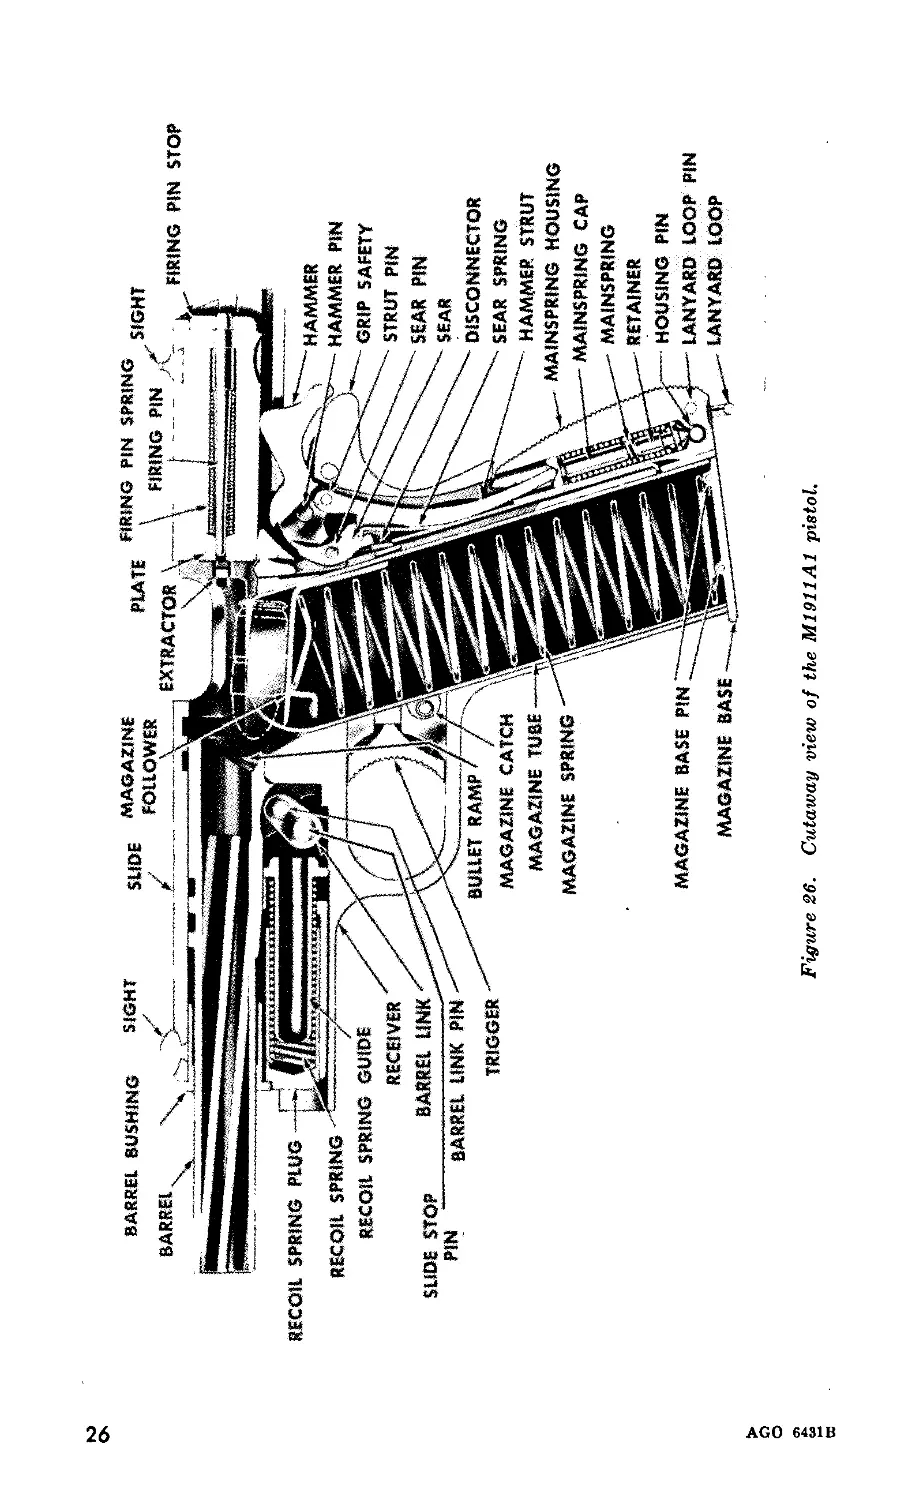
PISTOLS AND REVOLVERS
Paragraphs Page
Part One. INTRODUCTION____________________________ 1,2 3
Two. PISTOLS, AUTOMATIC, CALIBER .45,
M1911 AND M1911A1.
Chapter 1. INTRODUCTION____________________________ 3-5 4
2. MECHANICAL TRAINING
Section I. Disassembly and assembly_______________ 6-19 7
II. Functioning of the pistol_____________ 20-32 24
III. Loading, firing, and unloading--------- 33-35 30
IV. Malfunctions, stoppages, and immediate 36-39 32
action. '
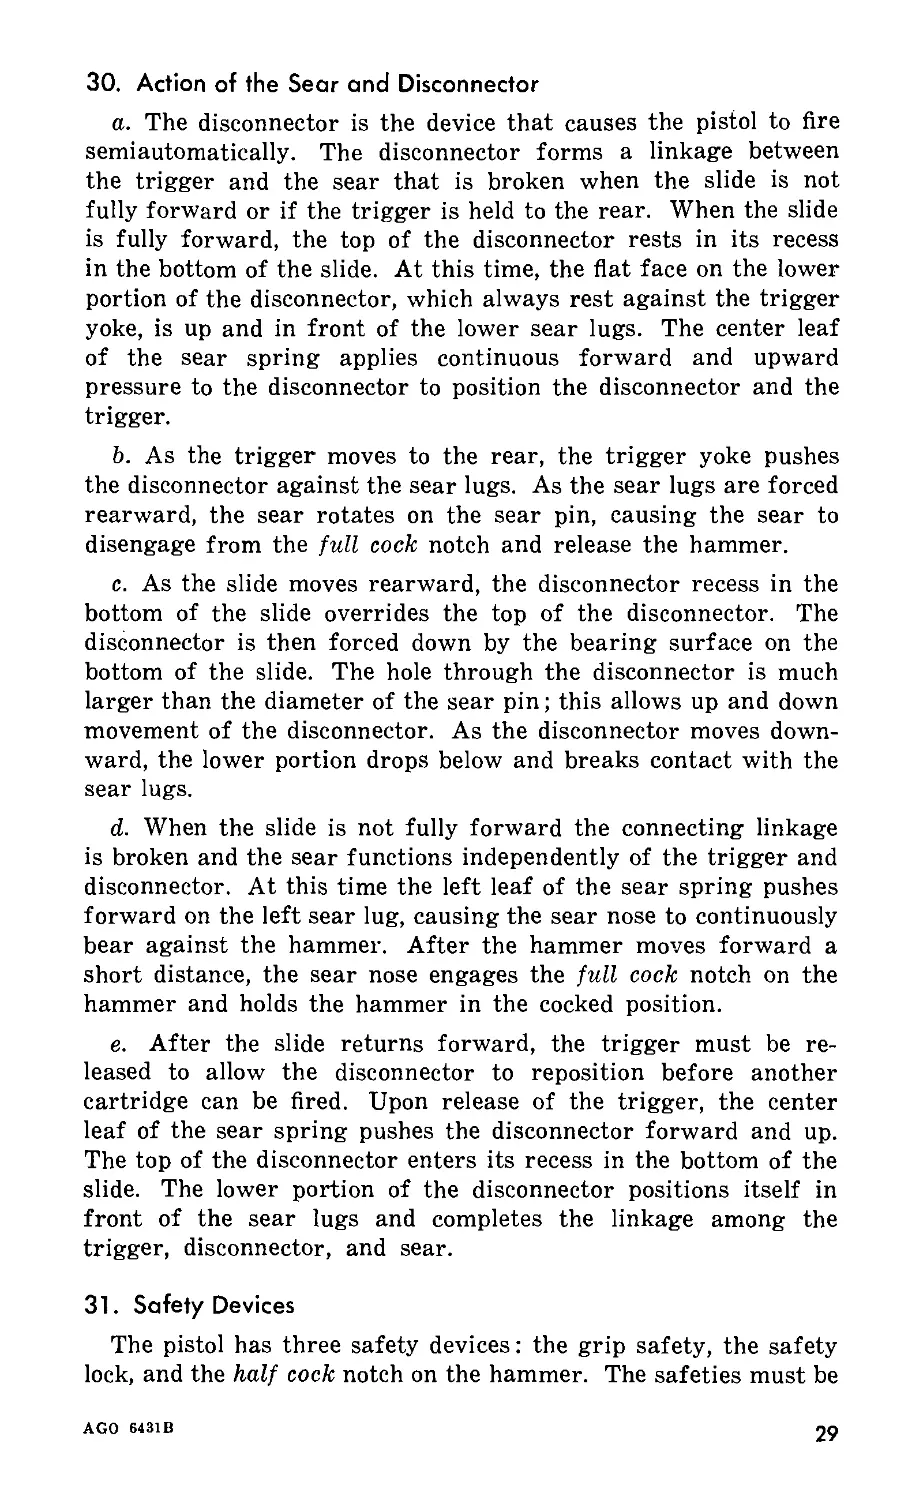
V. Care and cleaning_____________________ 40-47 35
VI. Repair parts and accessories__________ 48,49 39
VII. Ammunition_____________________________ 50-56 40
Chapter 3. MANUAL OF ARMS FOR THE PISTOL______ 57-59 44
4. MARKSMANSHIP TRAINING
Section I. General_______________________________ 60-62 50
II. Preparatory marksmanship training_____ 63-77 50
III. Courses fired_________________________ 78-82 73
IV. Range firing and safety precautions__ 83-89 76
V. Targets and ranges___________________ 90, 91 88
Chapter 5. ADVICE TO INSTRUCTORS
Section I. General______________________________ 92, 93 92
II. Mechanical training___________________ 94-99 93
III. Manual of arms for the pistol____________ 100 95
IV. Marksmanship_________________________101-103 96
V. Training schedules___________________104-106 98
VI. Training aids______________i_________107-109 102
Part Three. REVOLVER, COLT, CALIBER .38, 2-INCH
BARREL, DETECTIVE SPECIAL.
Chapter 6. INTRODUCTION_________________________110,111 109
7. MECHANICAL TRAINING
Section I. Disassembly and assembly________________ 112 112
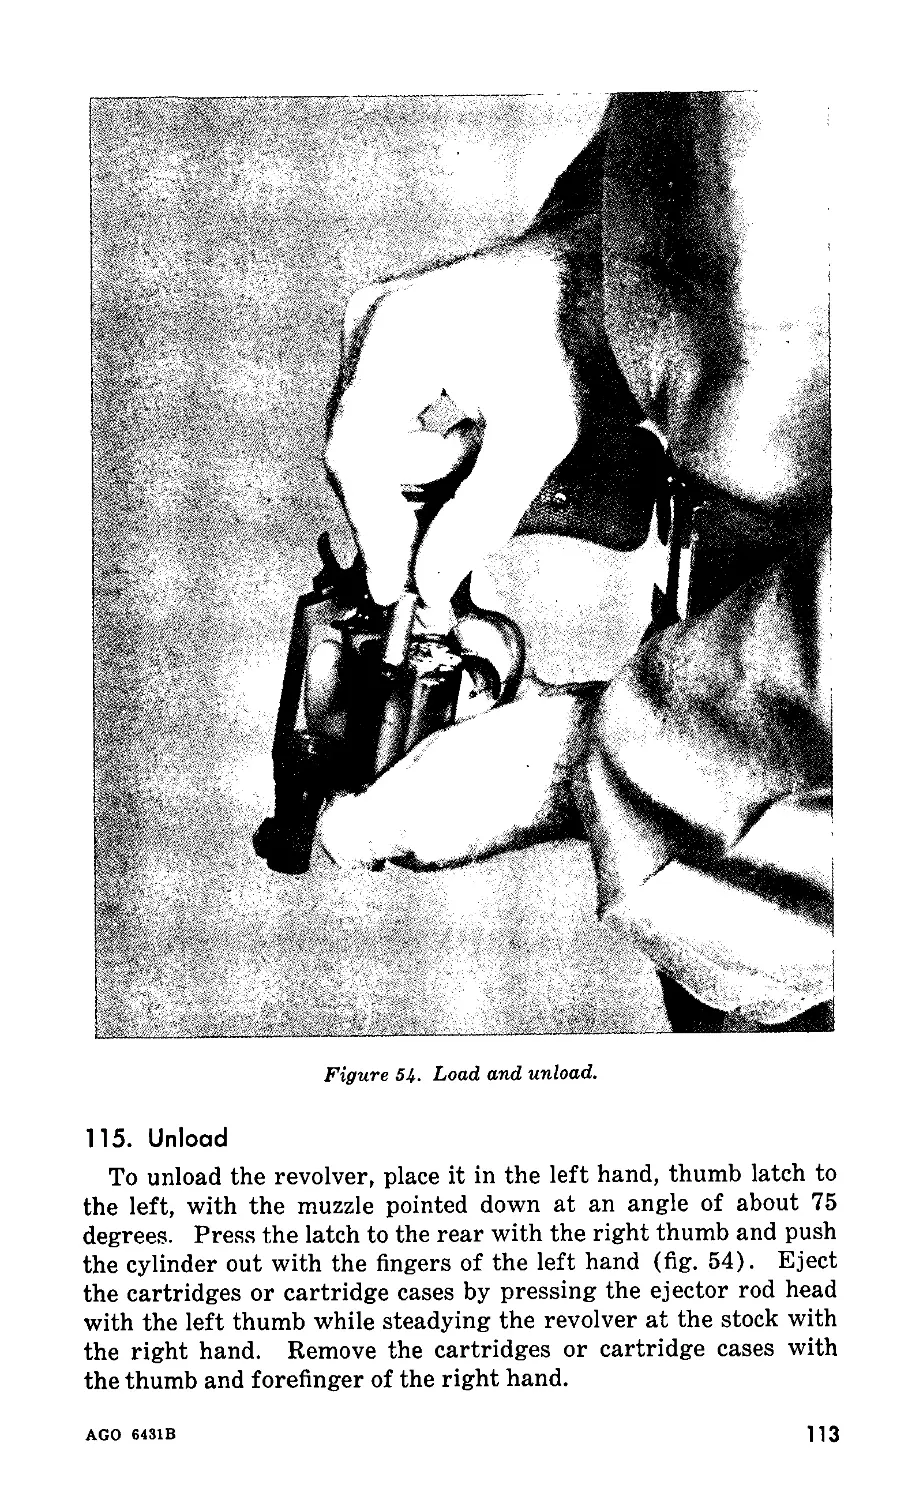
II. Loading, firing, and unloading_______113-115 112
*This manual supersedes FM 23-35/AFM 50-17, 26 February 1953, including
Cl, 31 December 1953.
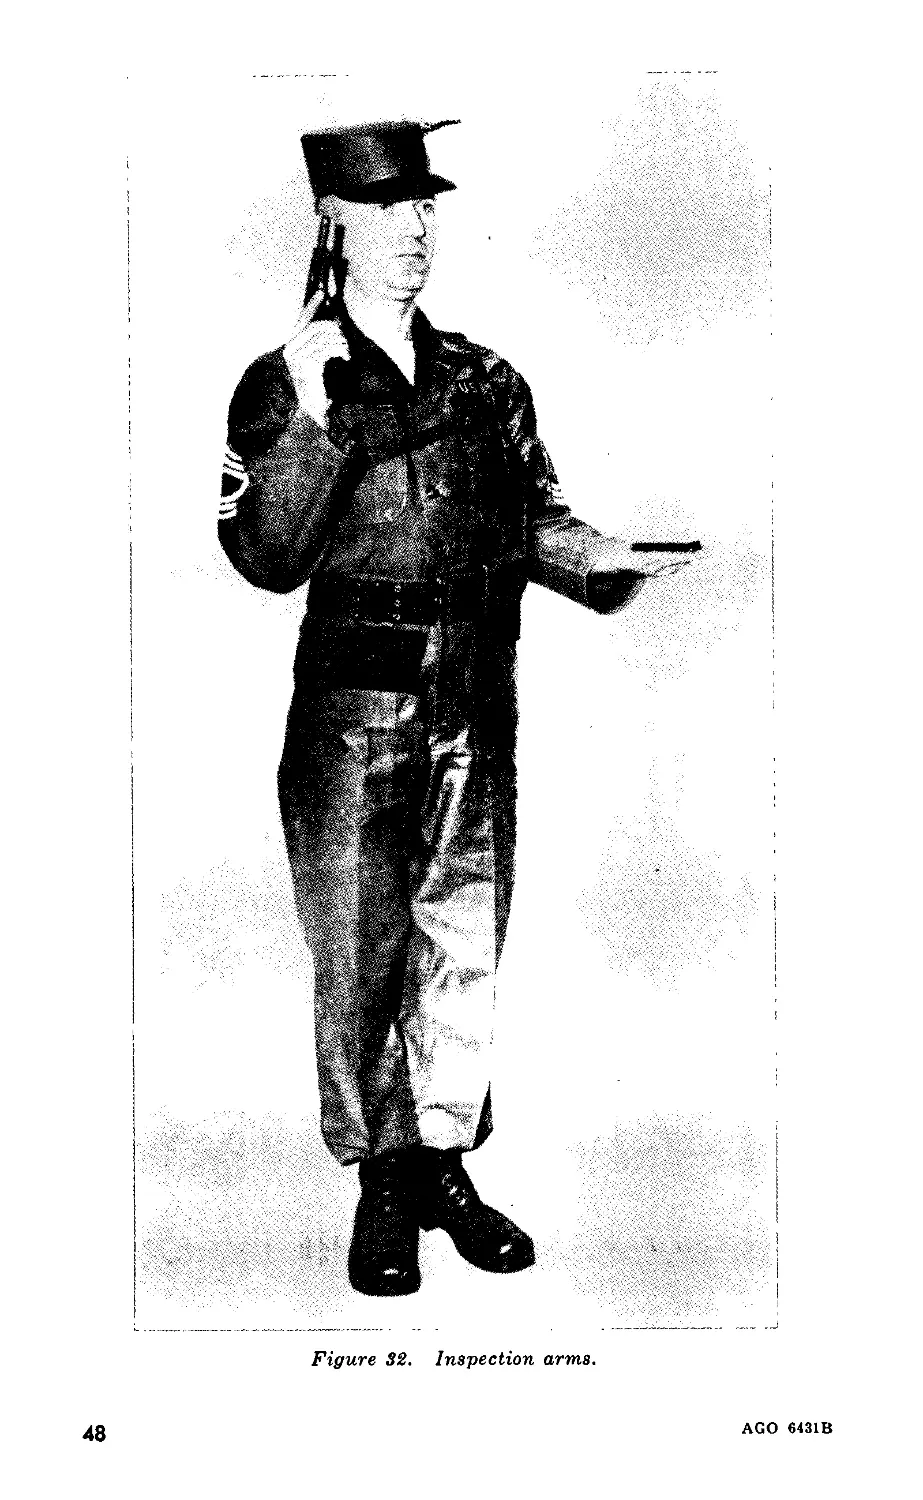
TAGO 6431B—Jun
1
Paragraphs Page
Section III. Safety devices and safety tests---------116,117 114
IV. Malfunctions, stoppages, and immediate 118-121 114
action.
V. Care and cleaning_______________________122-127 116
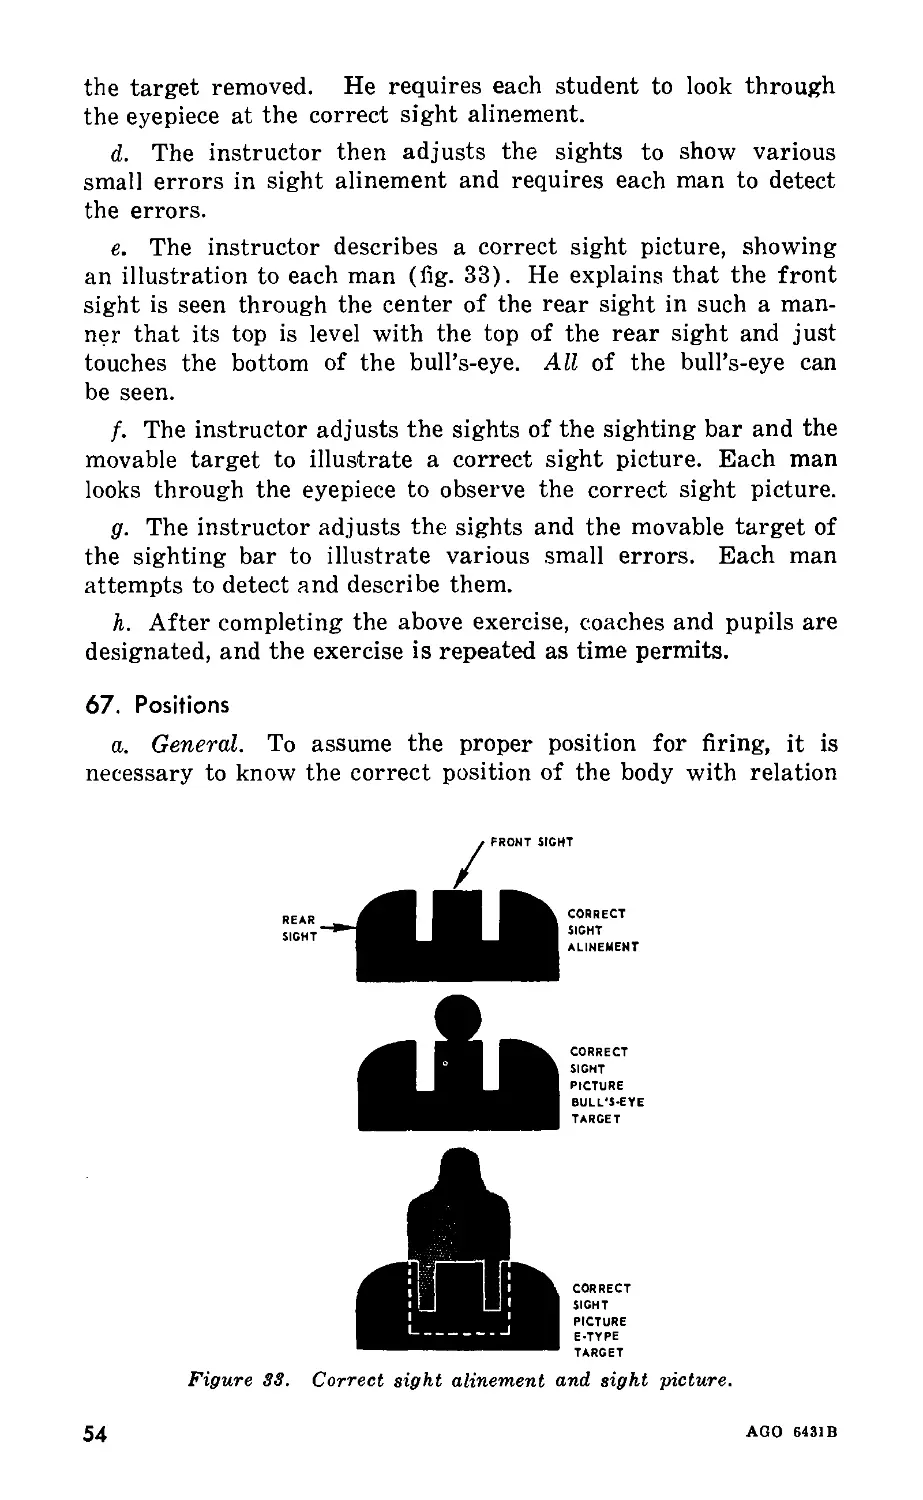
VI. Repair parts and accessories_______________ 128 118
VII. Ammunition______________________________129-131 118
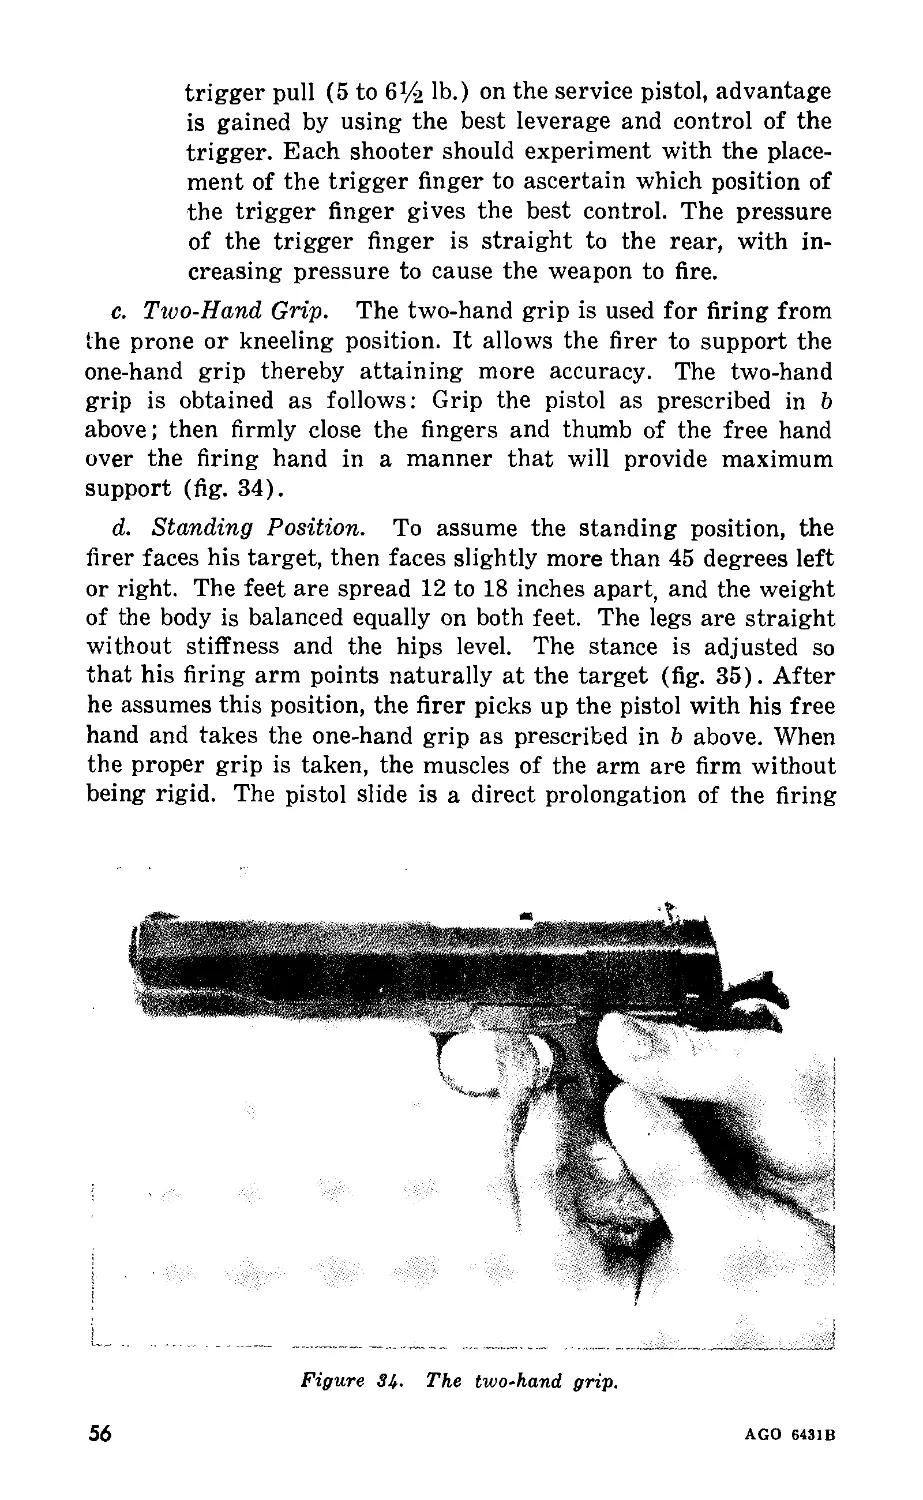
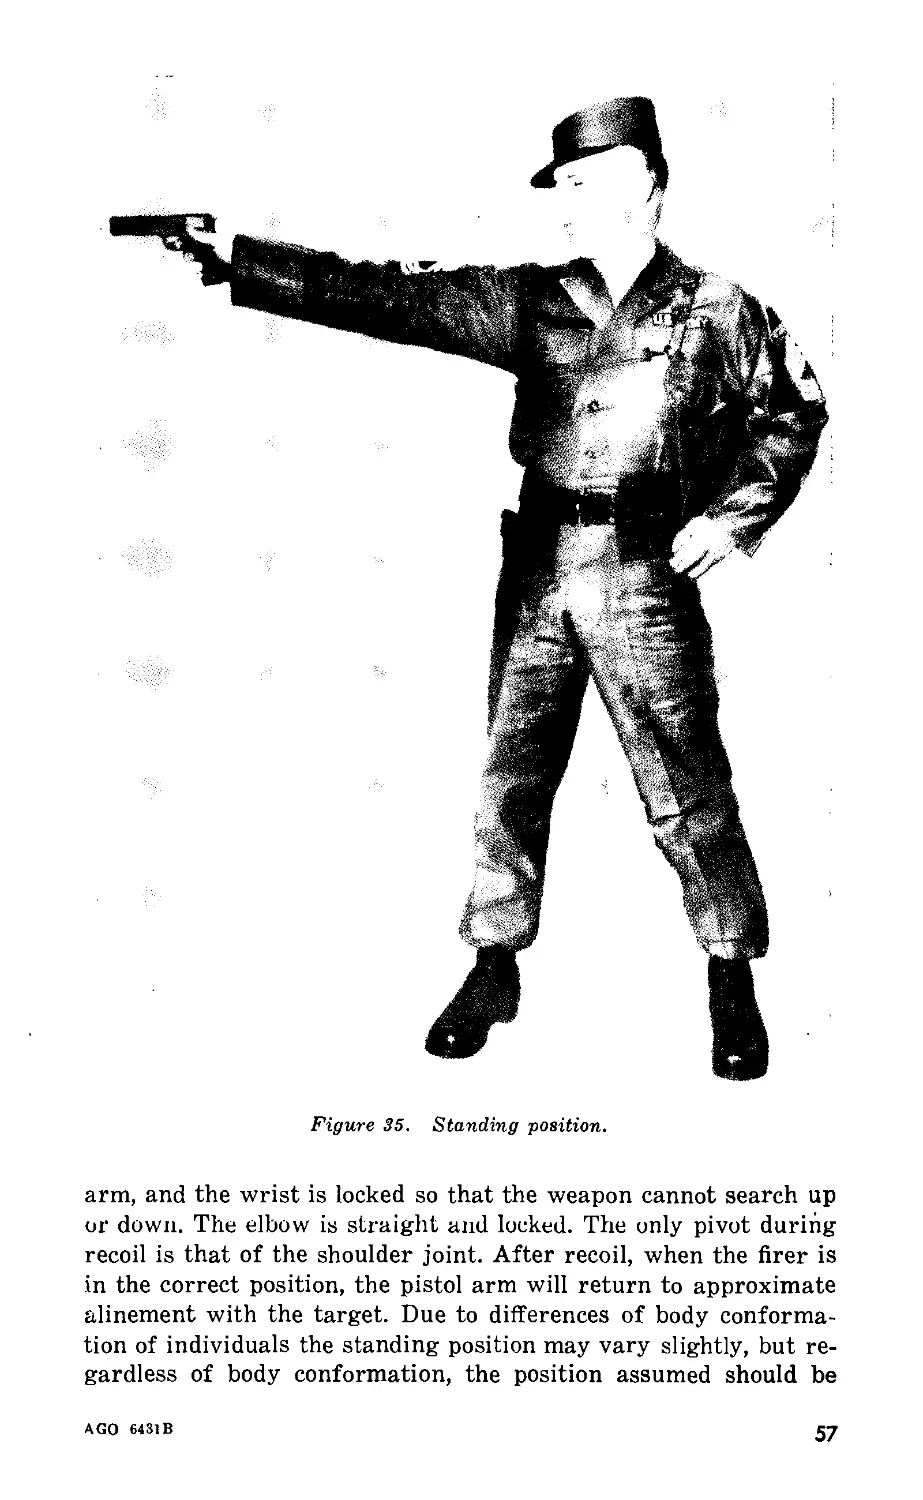
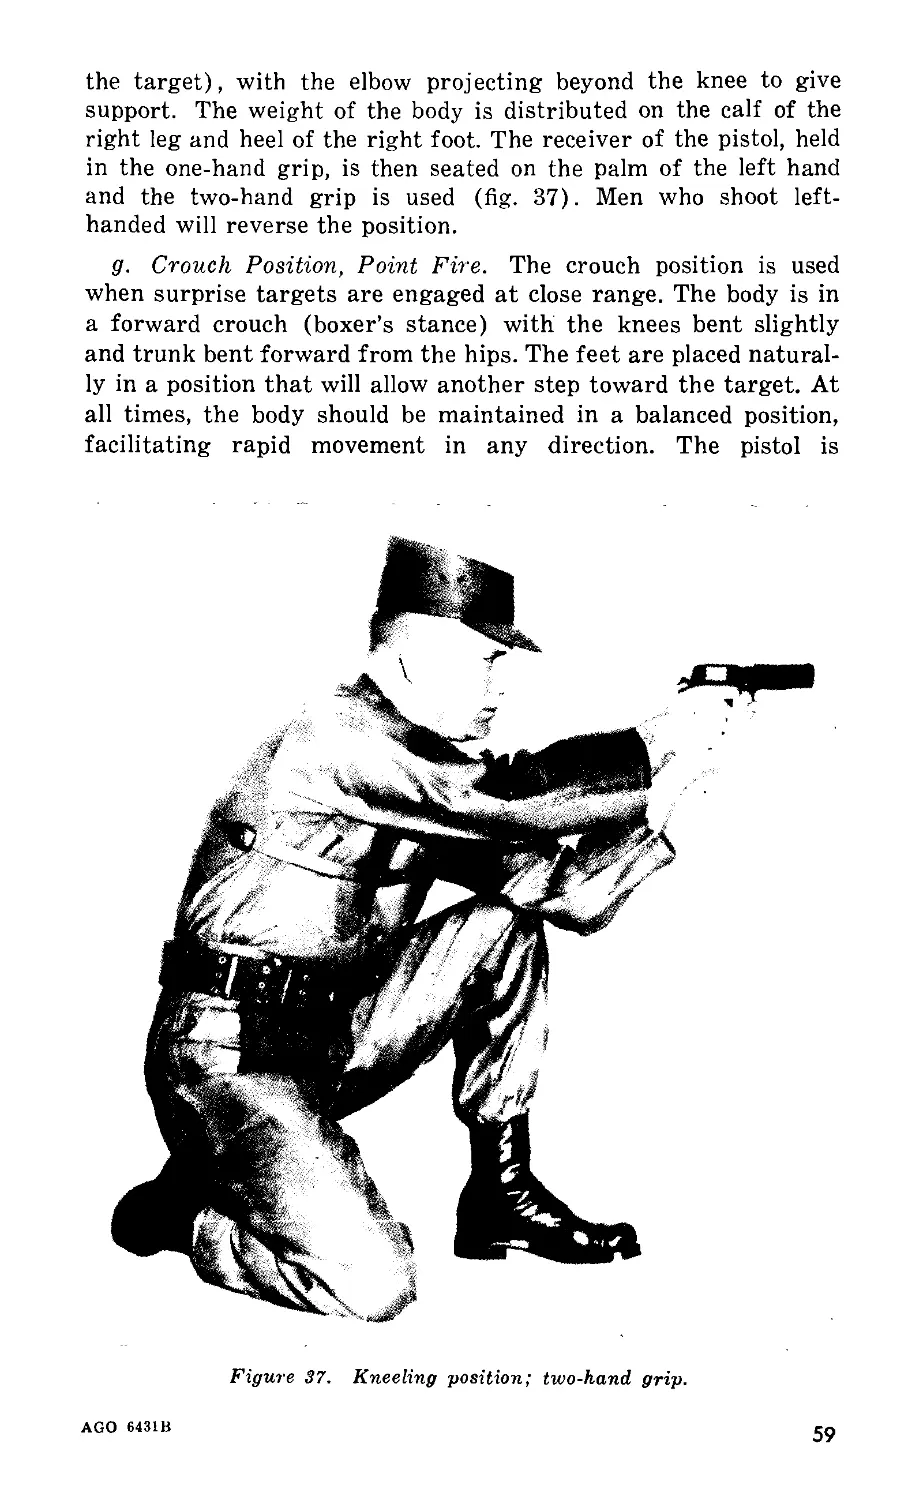
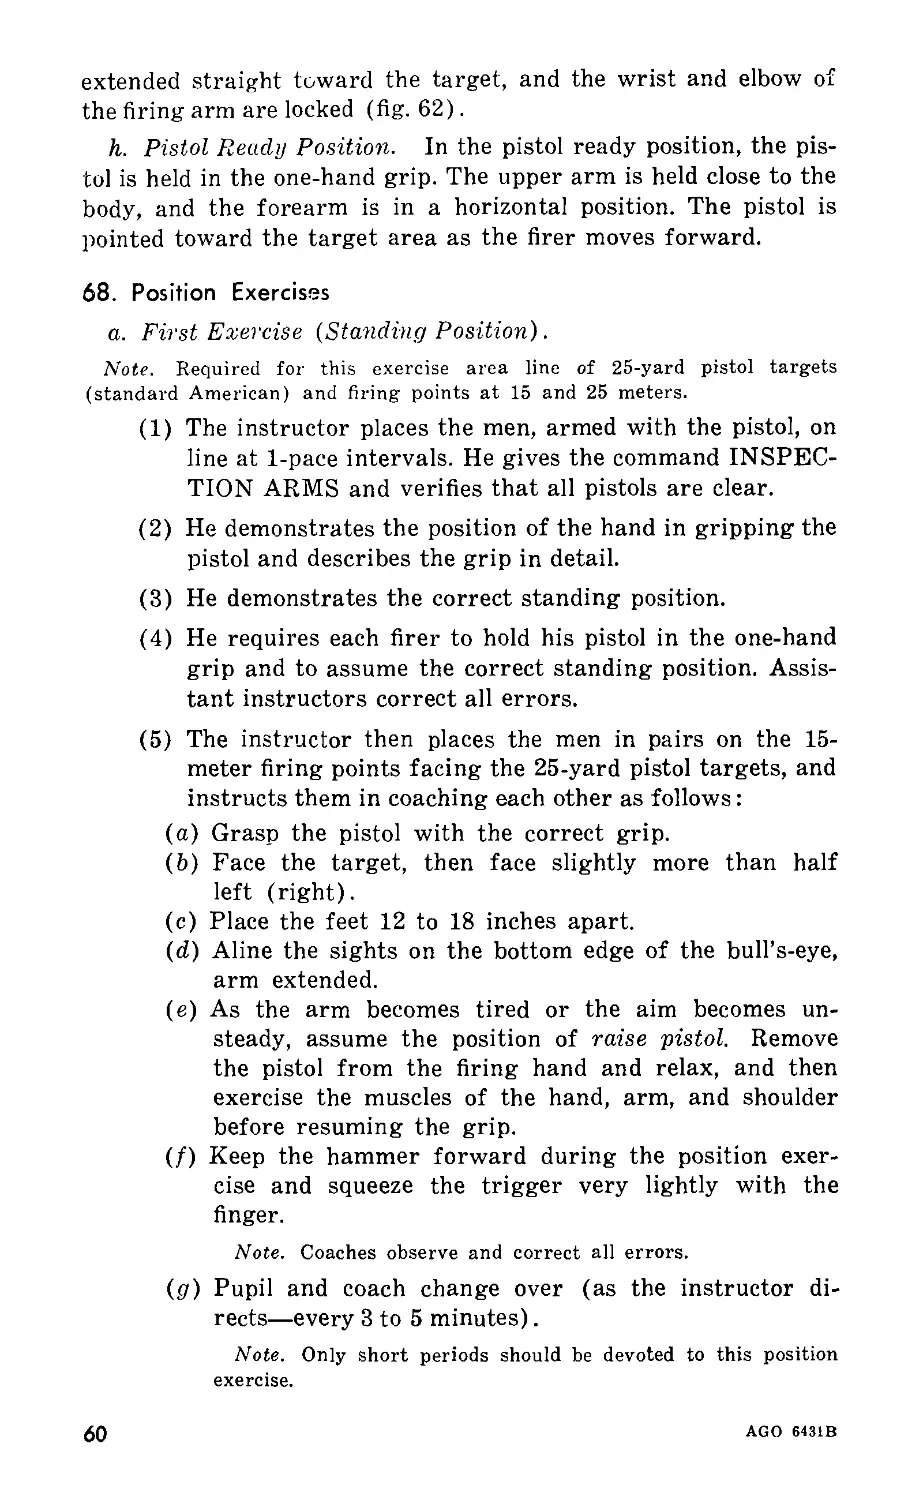
Chapter 8. MANUAL OF ARMS FOR THE REVOLVER_132-135 120
9. MARKSMANSHIP TRAINING
Section I. General_________________________________ ______ 122
II. Preparatory marksmanship training_______136-145 122
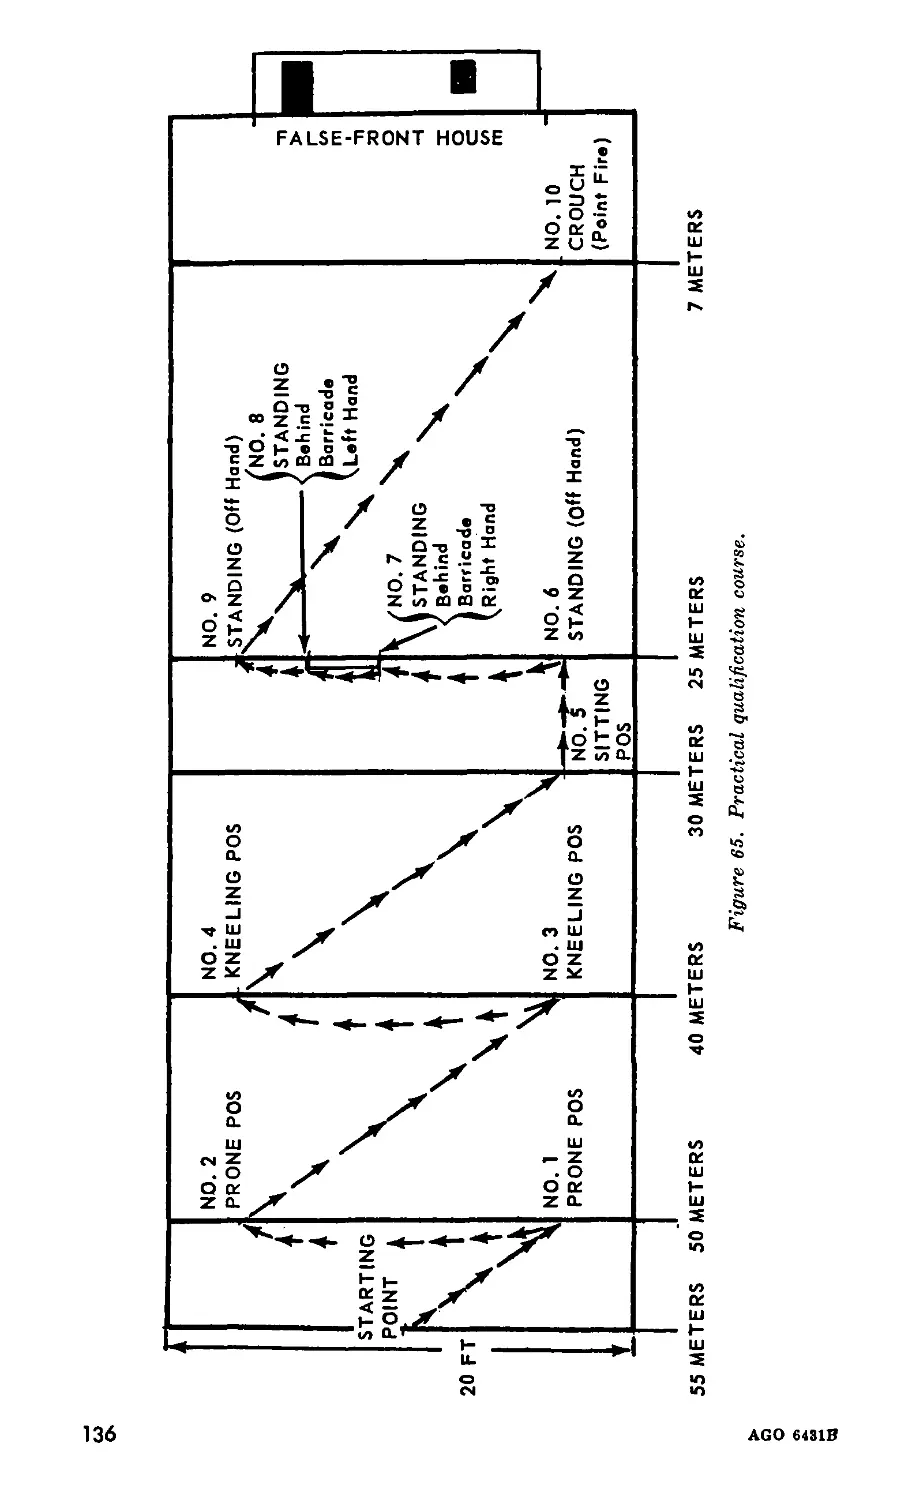
III. Courses fired___________________________146,147 133
IV. Range firing and safety precautions_____148-152 134
V. Targets and ranges______________________153,154 139
Chapter 10. ADVICE TO INSTRUCTORS
Section I. General____________________________________ 155 143
II. Training schedules______________________156,157 143
Appendix. REFERENCES_______________________________ ______ 147
Index________________________________________________ ______ 149
2
AGO 6431В
PART ONE
INTRODUCTION
1. Purpose and Scope
a. The purpose of this manual is to—
(1) Teach methods of caring for pistols and revolvers in the
field and in garrison.
(2) Outline principles, methods, and techniques that will
insure the effective use of pistols both in training and in
combat.
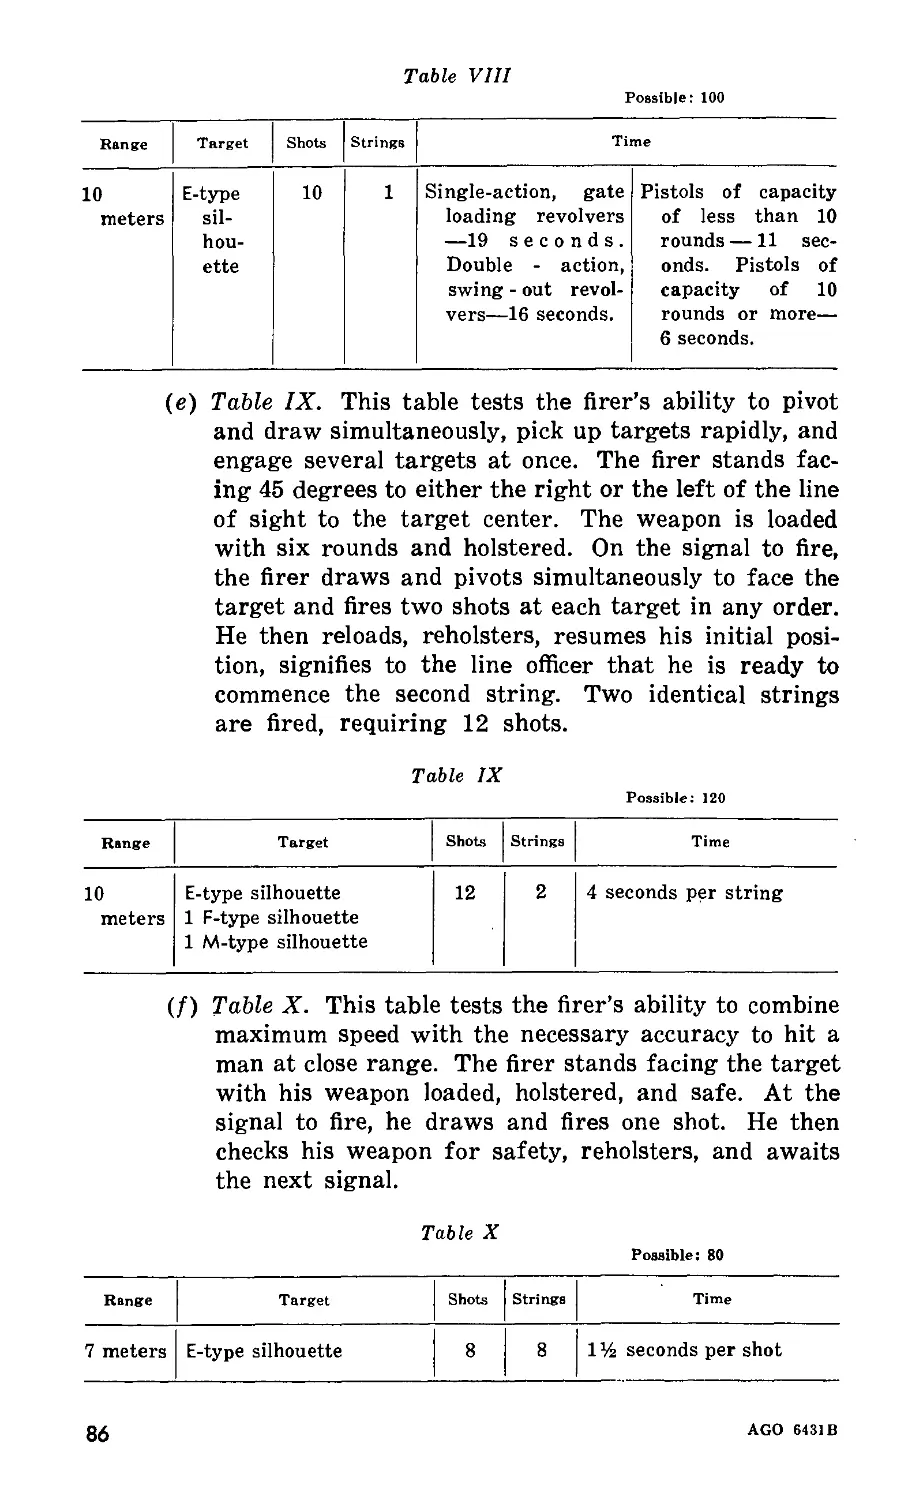
(3) Promote uniformity in training.
(4) Provide a handbook for the soldier in learning and teach-
ing the pistol and revolver.
b. This manual is in three parts and explains how to dis-
assemble, assemble, fire, and take care of the Pistols, Automatic,
Caliber .45, M1911 and M1911A1, and the Revolver, Colt, Caliber
.38, 2-Inch Barrel, Detective Special. It describes the parts and
explains how they work. The step-by-step arrangement of the
text provides for progressive training, promotes learning, and
aids in organizing and presenting instruction.
c. Where training in the pistol and revolver is similar, refer-
ence is made to the paragraph pertaining to the pistol that may be
used for training in the revolver. Where pertinent, simply substi-
tute the word revolver for the word pistol.
2. Importance of Pistol Training
The pistol is an individual weapon intended for use in close
combat. It is carried by members of weapons crews and used as
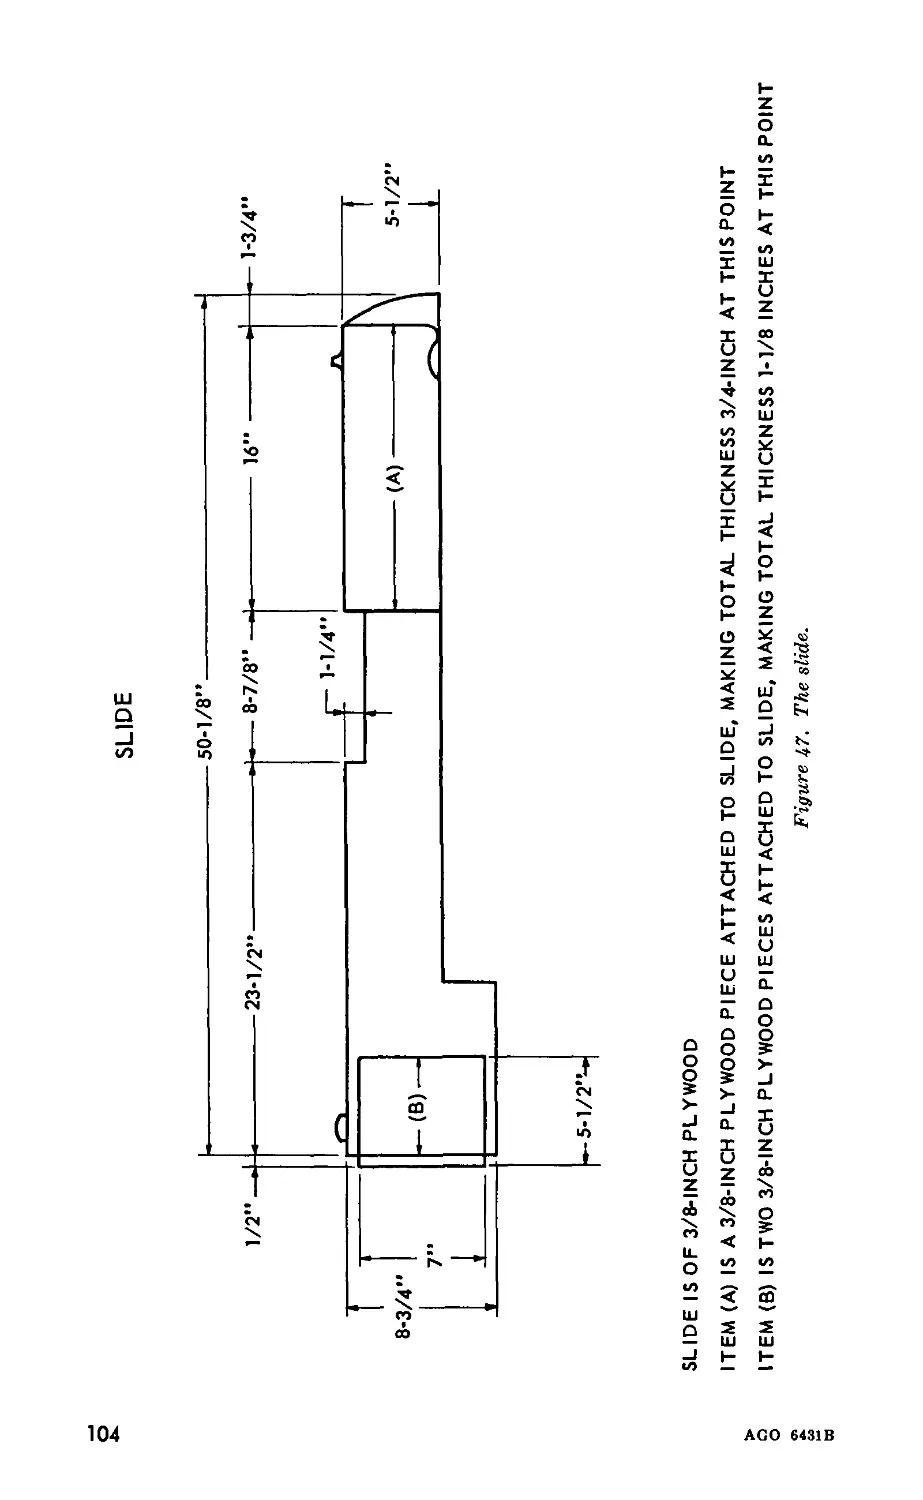
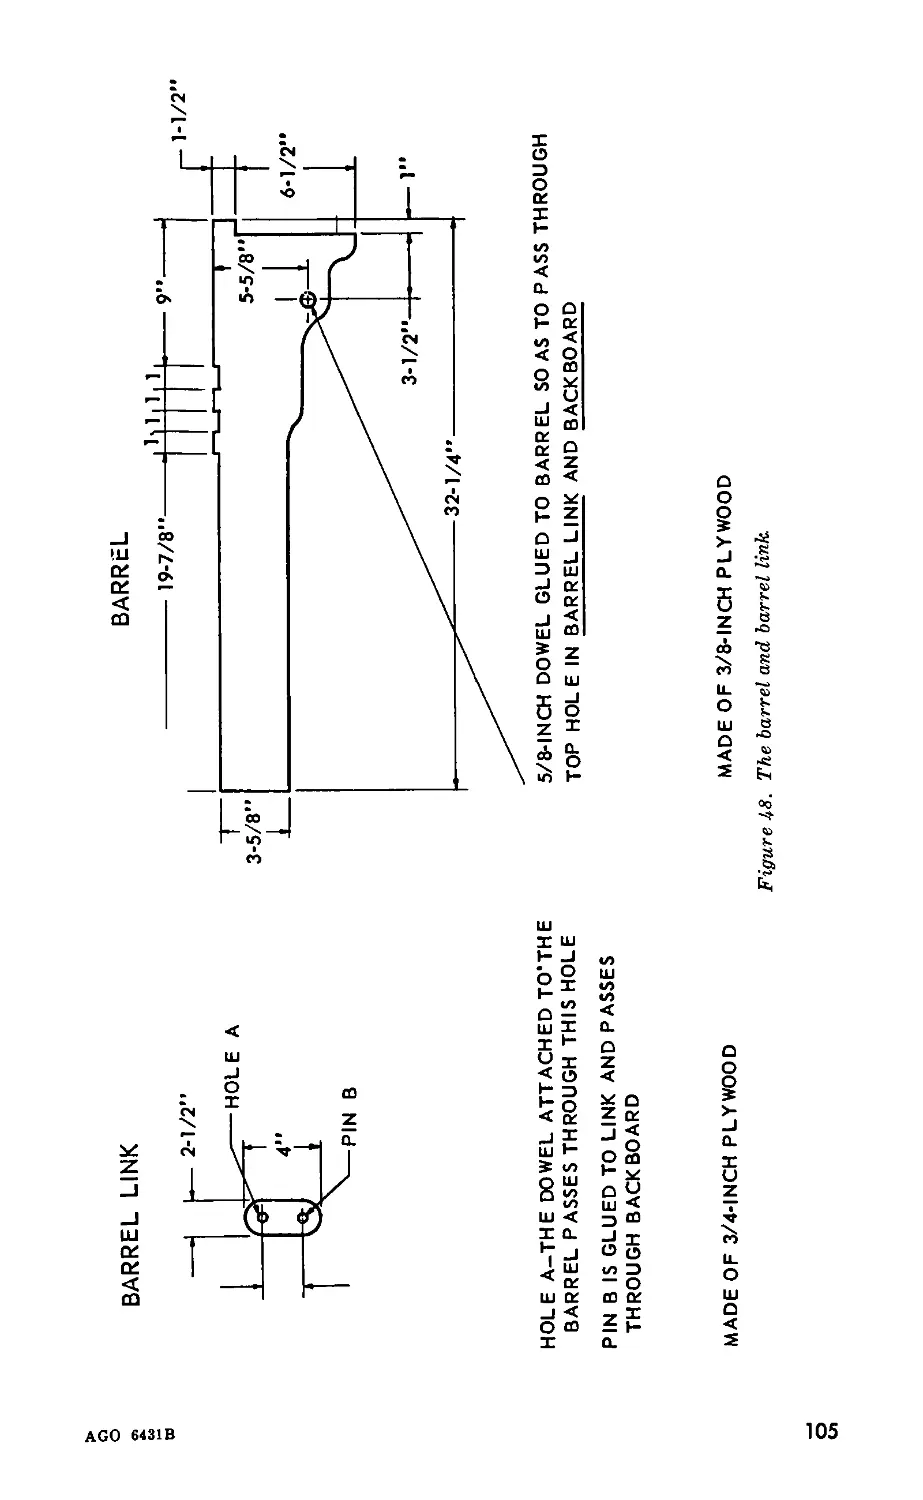
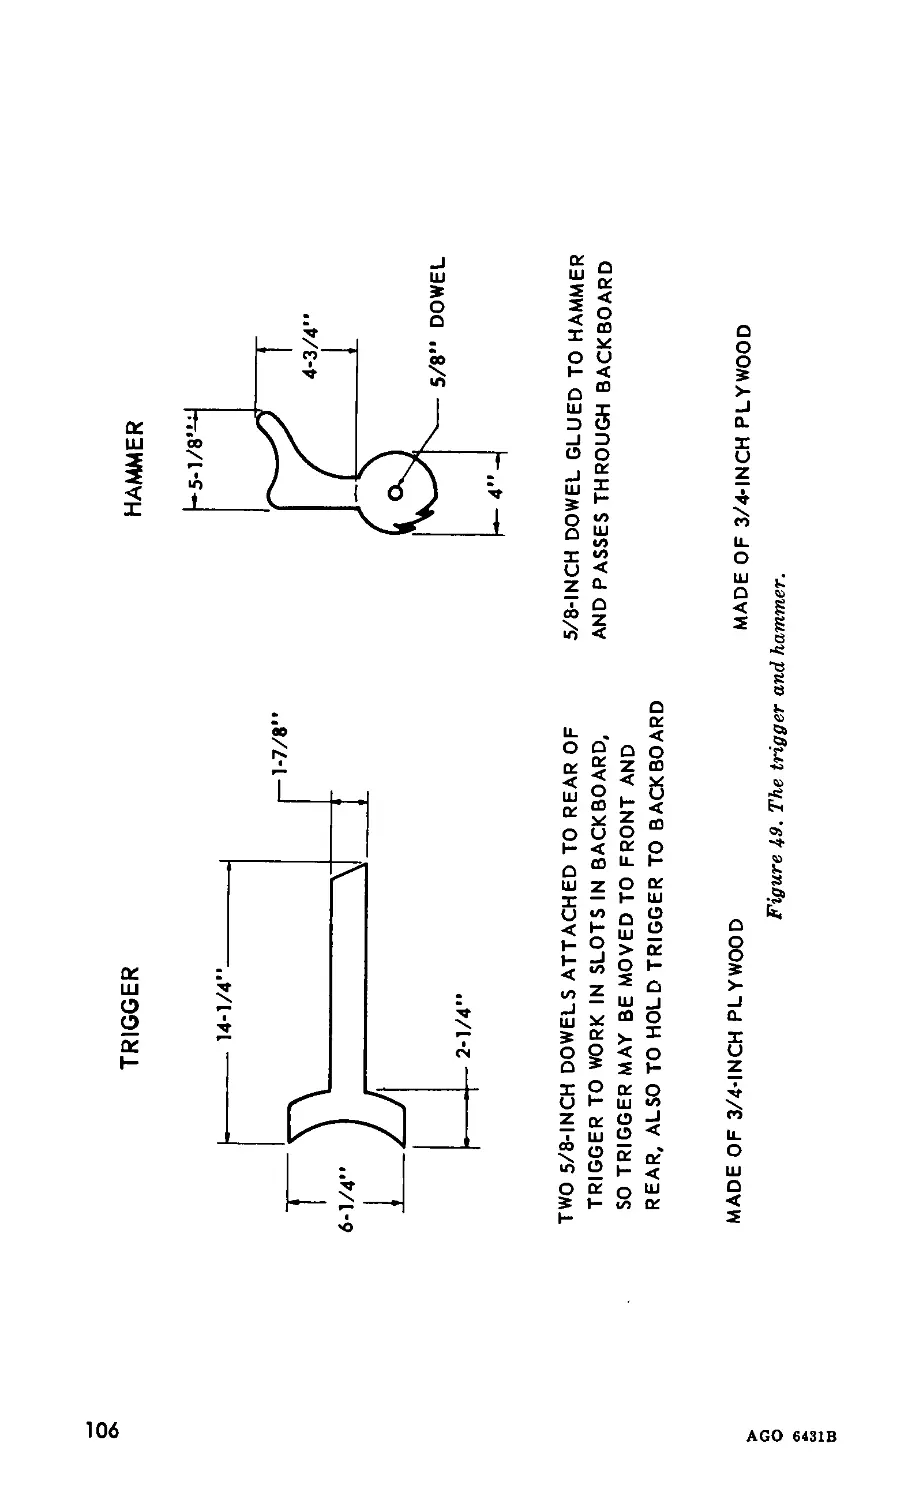
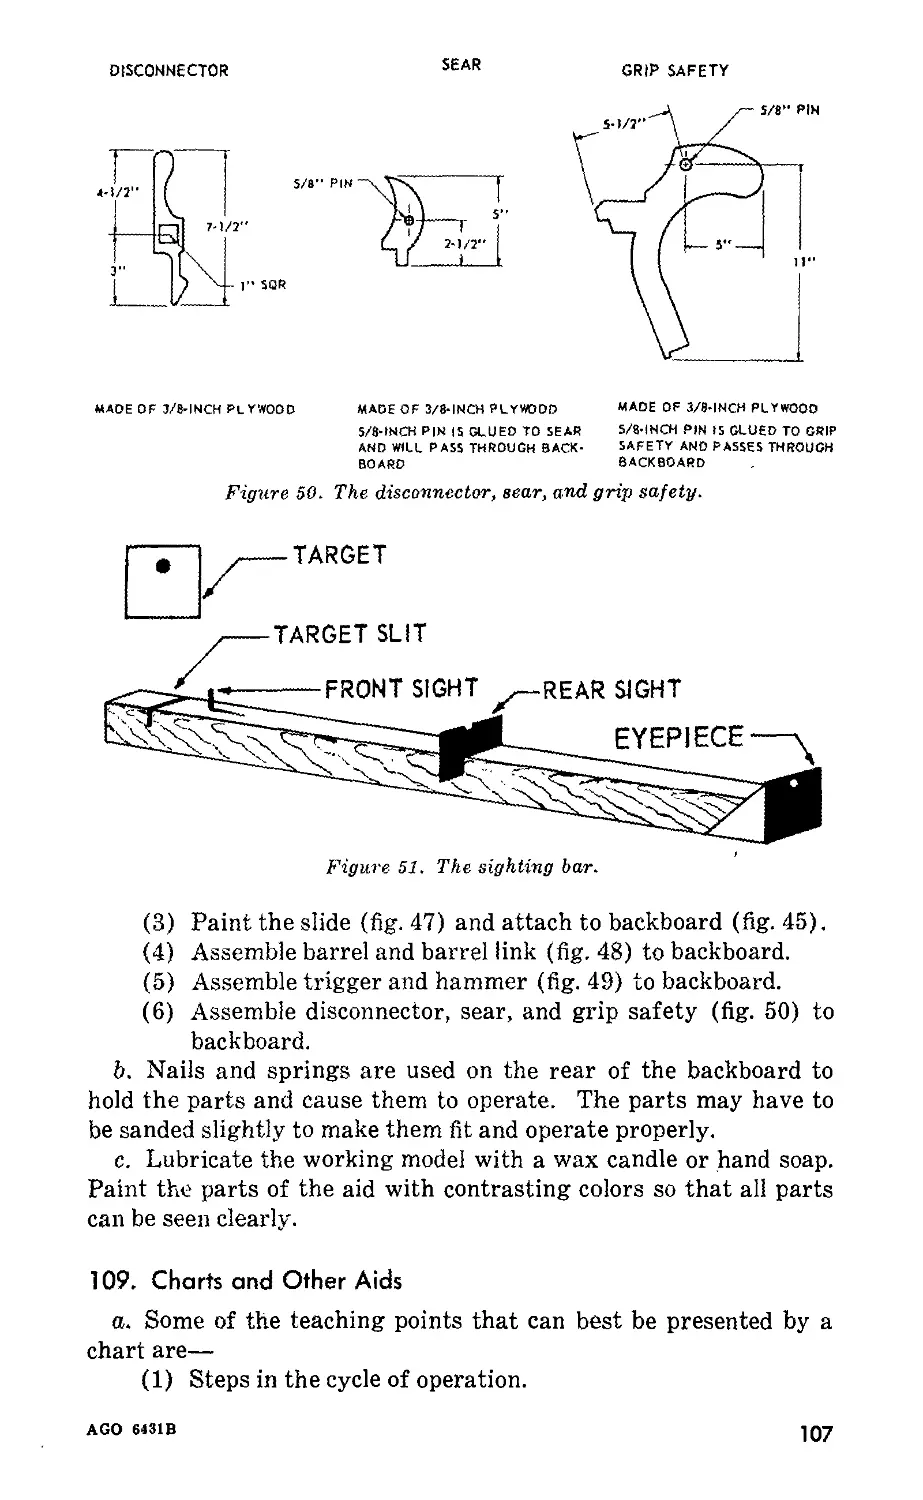
a side arm in military police duties. The soldier must keep his
pistol in good working condition and have the utmost confidence
in his marksmanship ability. This ability can be acquired only
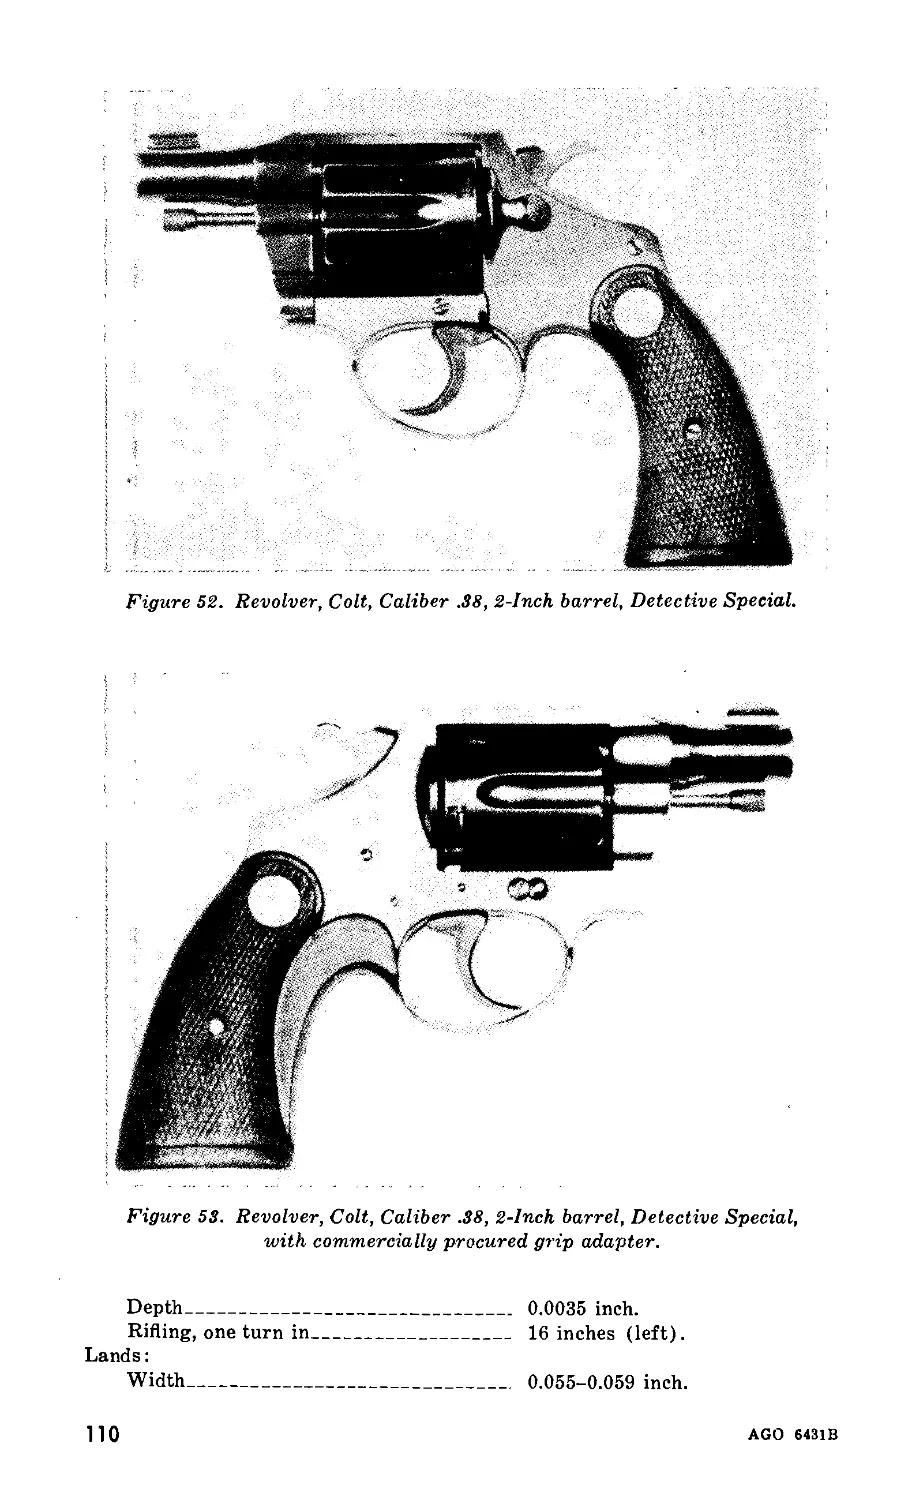
through study and practical training.
AGO 6431 в
3
PART TWO
PISTOLS, AUTOMATIC, CALIBER .45, Ml911
AND M1911A1
CHAPTER 1
INTRODUCTION
3. General Description
a. Pistol. The Pistols, Automatic, Caliber .45, M1911 and
and M1911A1, are semiautomatic, recoil operated, magazine fed,
hand weapons. The pistol fires one round each time the trigger
is squeezed. The energy needed to operate the pistol for each
round after the first comes from the recoil of the previous round
fired (rearward force of expanding powder gases).
b. Magazine. The magazine holds seven cartridges. The upper
cartridge is stripped from the magazine and chambered by the
forward movement of the slide. When the last cartridge from
the magazine has been fired, the slide remains to the rear.
c. Rate of Fire. The rate of fire is limited only by the soldier’s
ability to rapidly change magazines, aim, and squeeze the trigger.
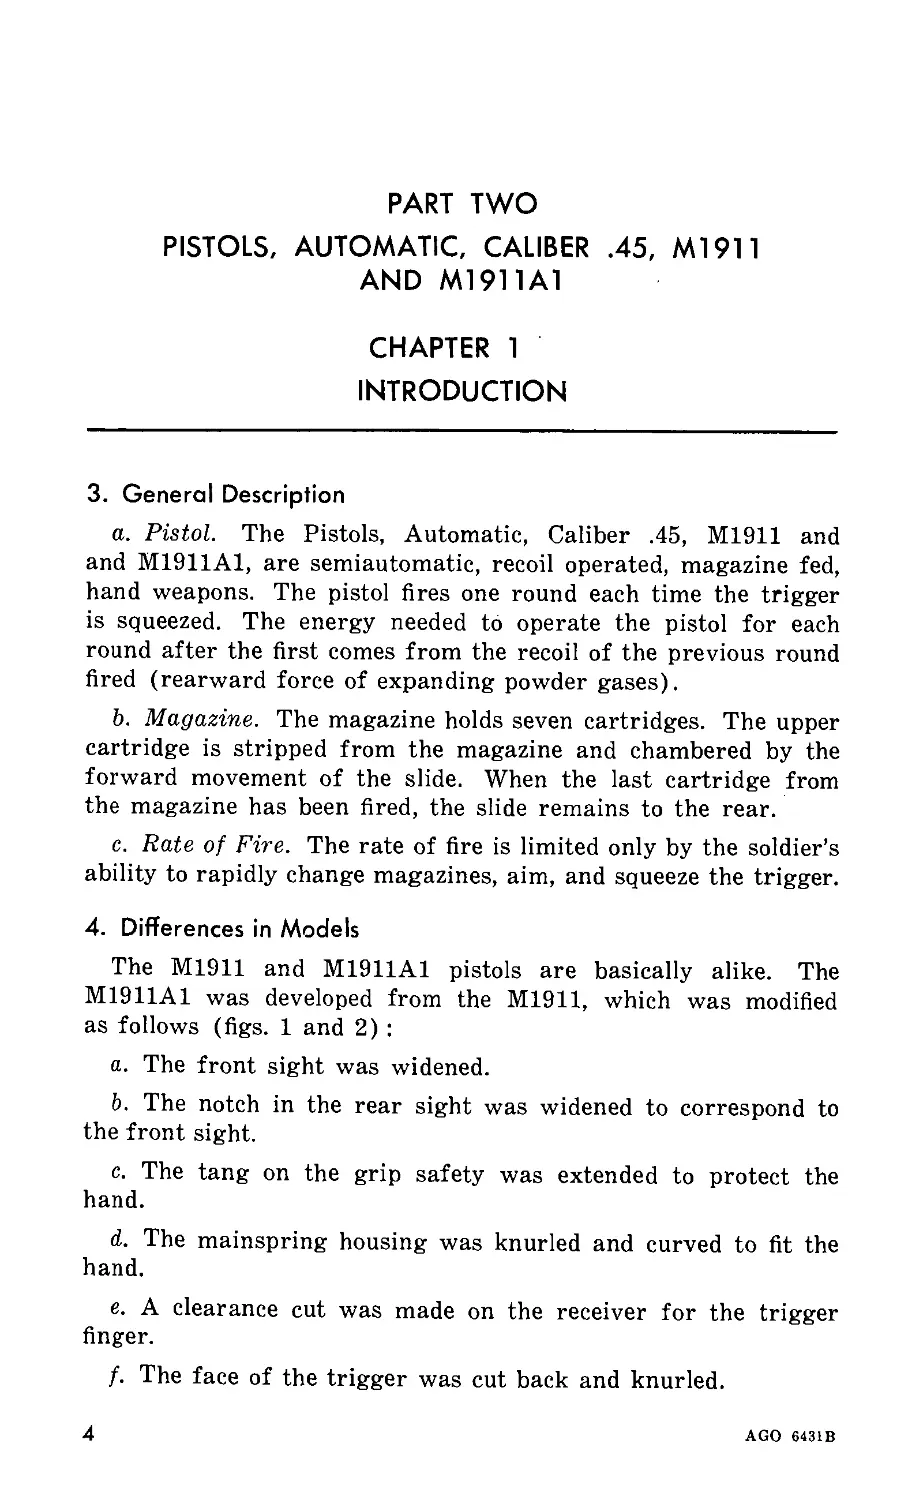
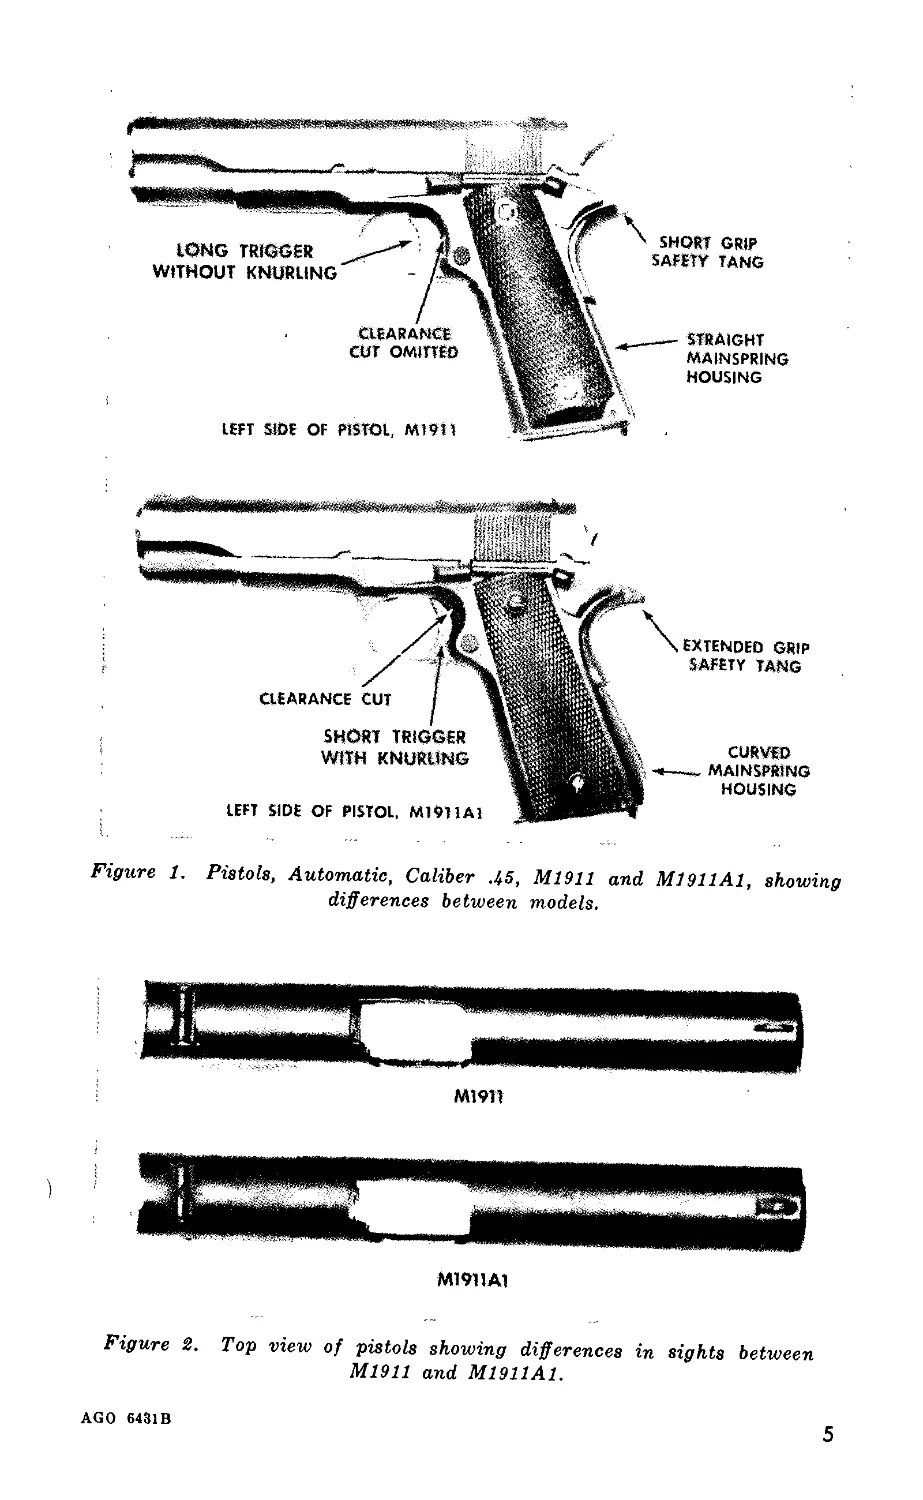
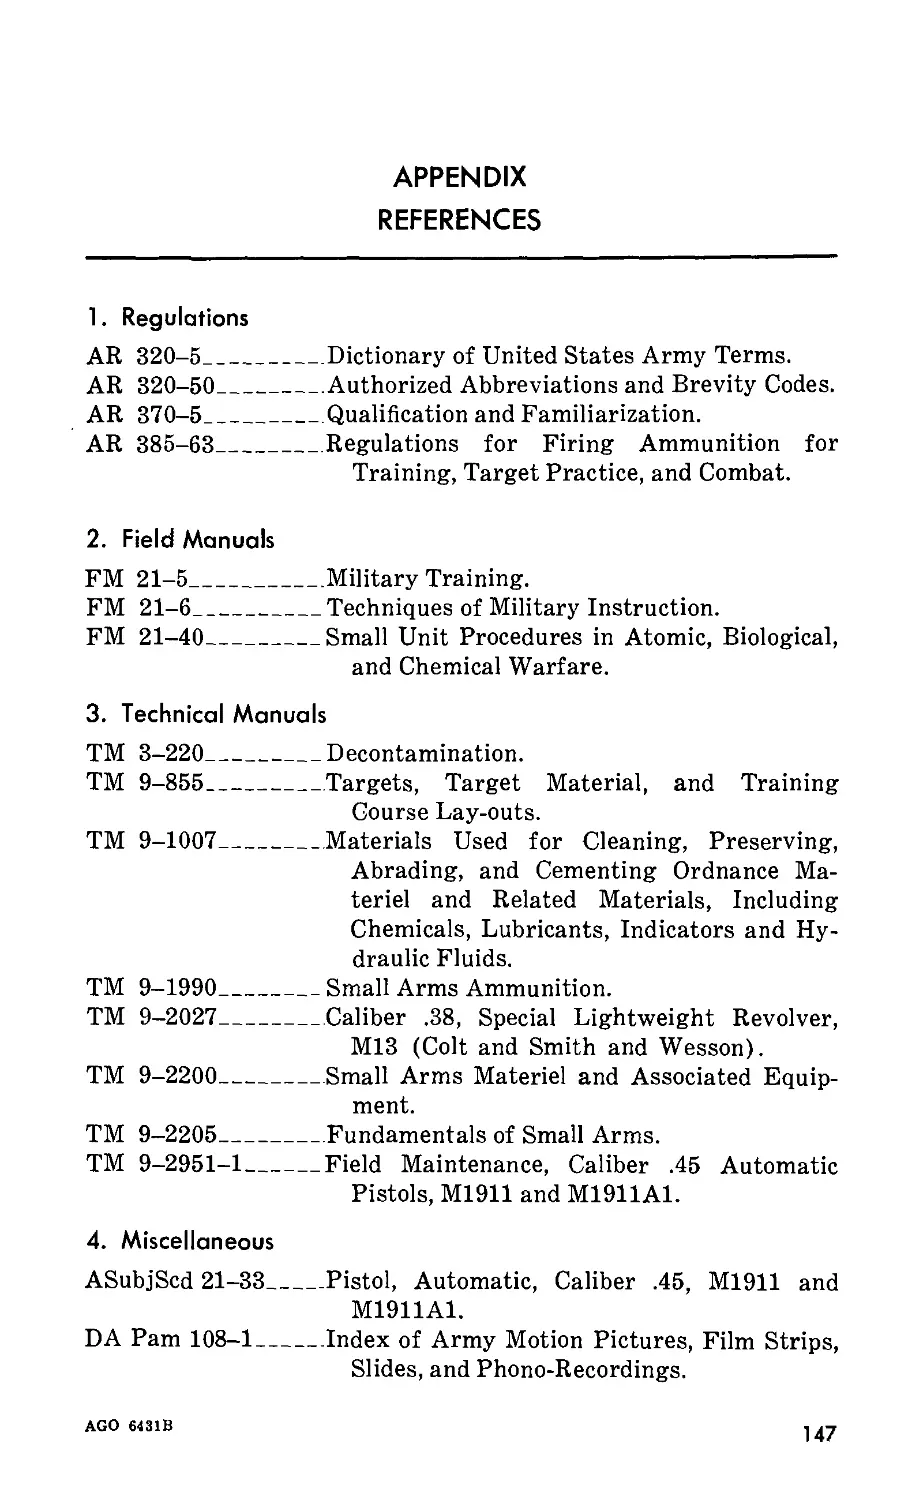
4. Differences in Models
The M1911 and M1911A1 pistols are basically alike. The
M1911A1 was developed from the M1911, which was modified
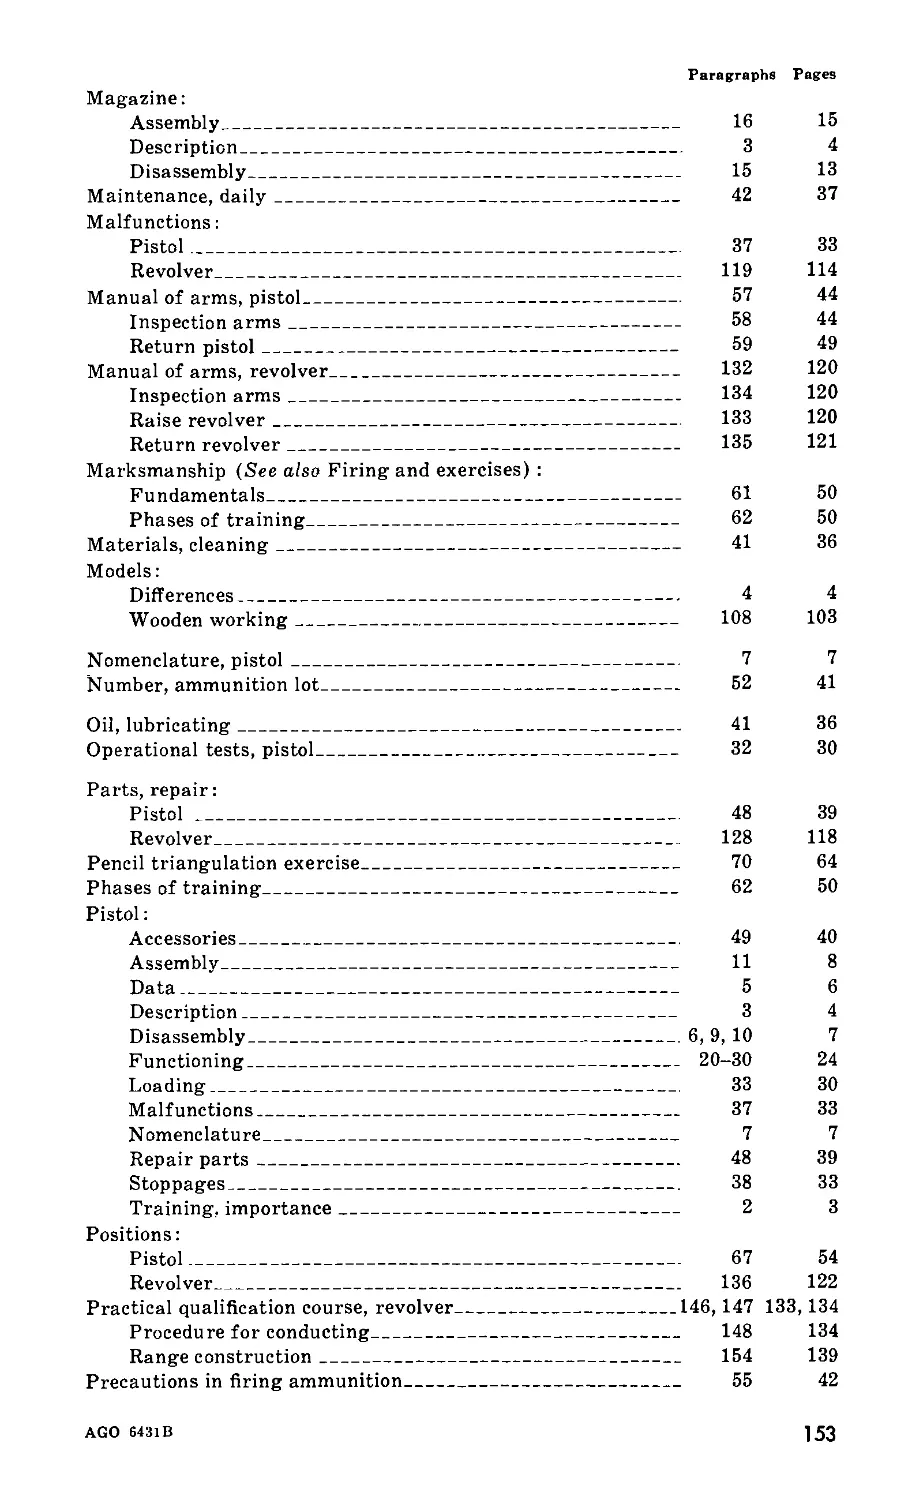
as follows (figs. 1 and 2) :
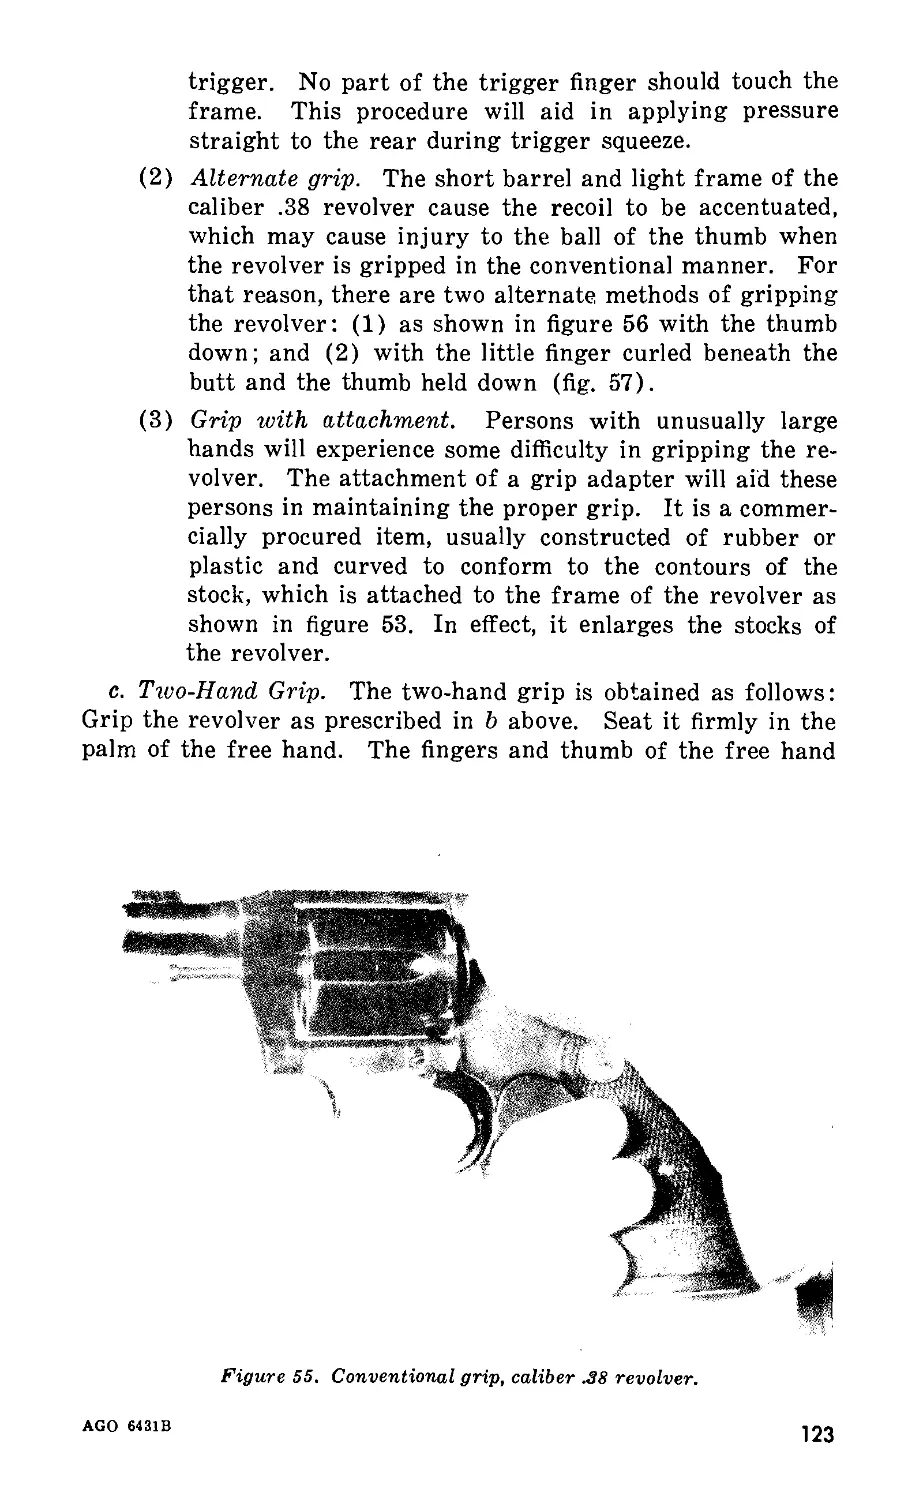
a. The front sight was widened.
b. The notch in the rear sight was widened to correspond to
the front sight.
c. The tang on the grip safety was extended to protect the
hand.
d. The mainspring housing was knurled and curved to fit the
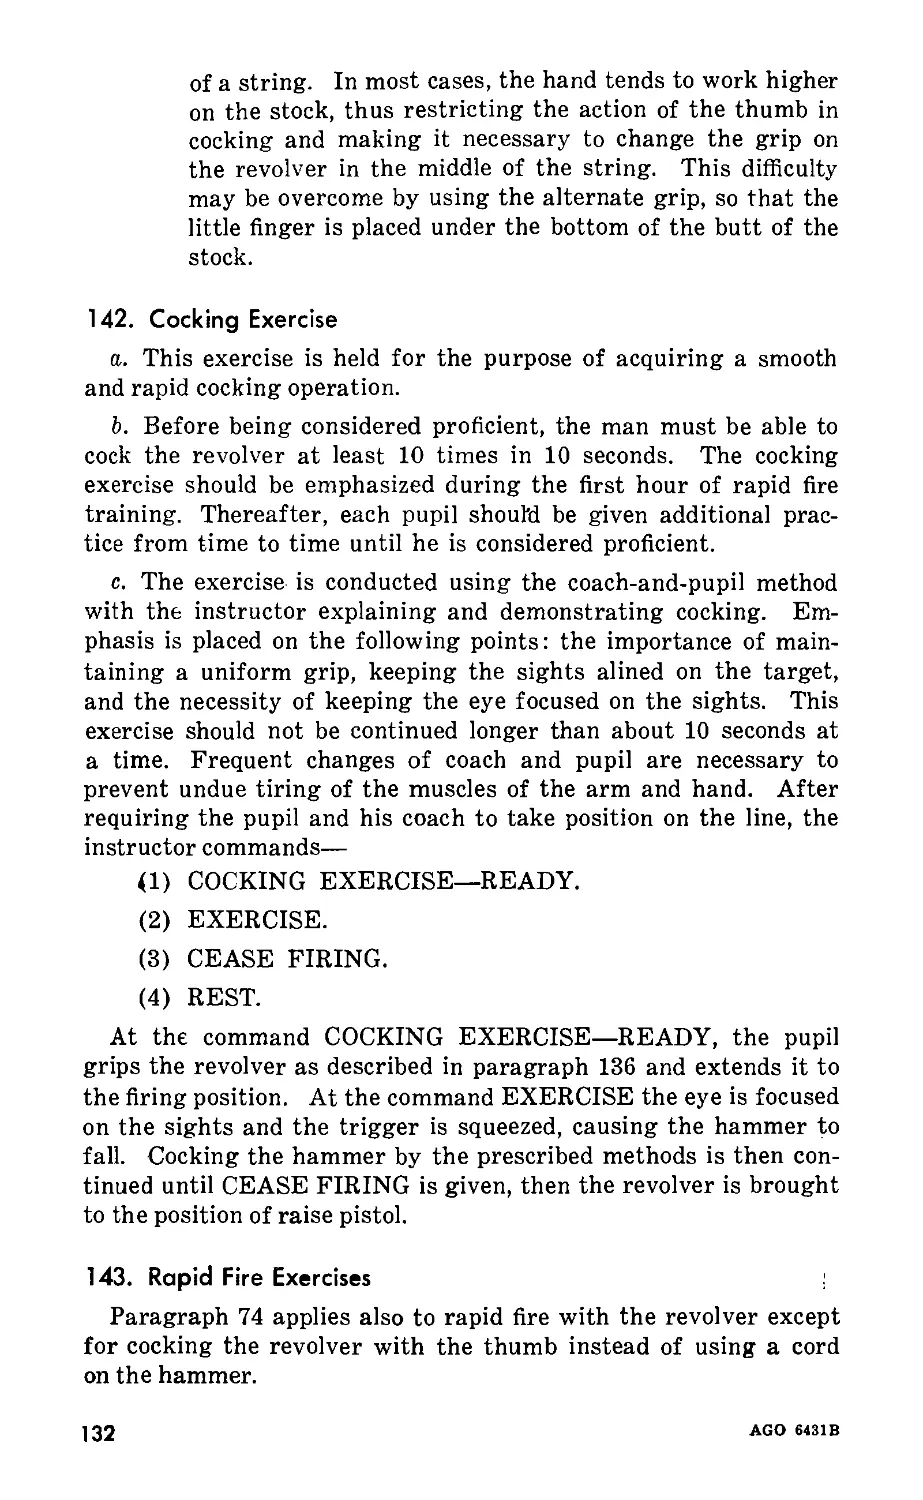
hand.
e. A clearance cut was made on the receiver for the trigger
finger.
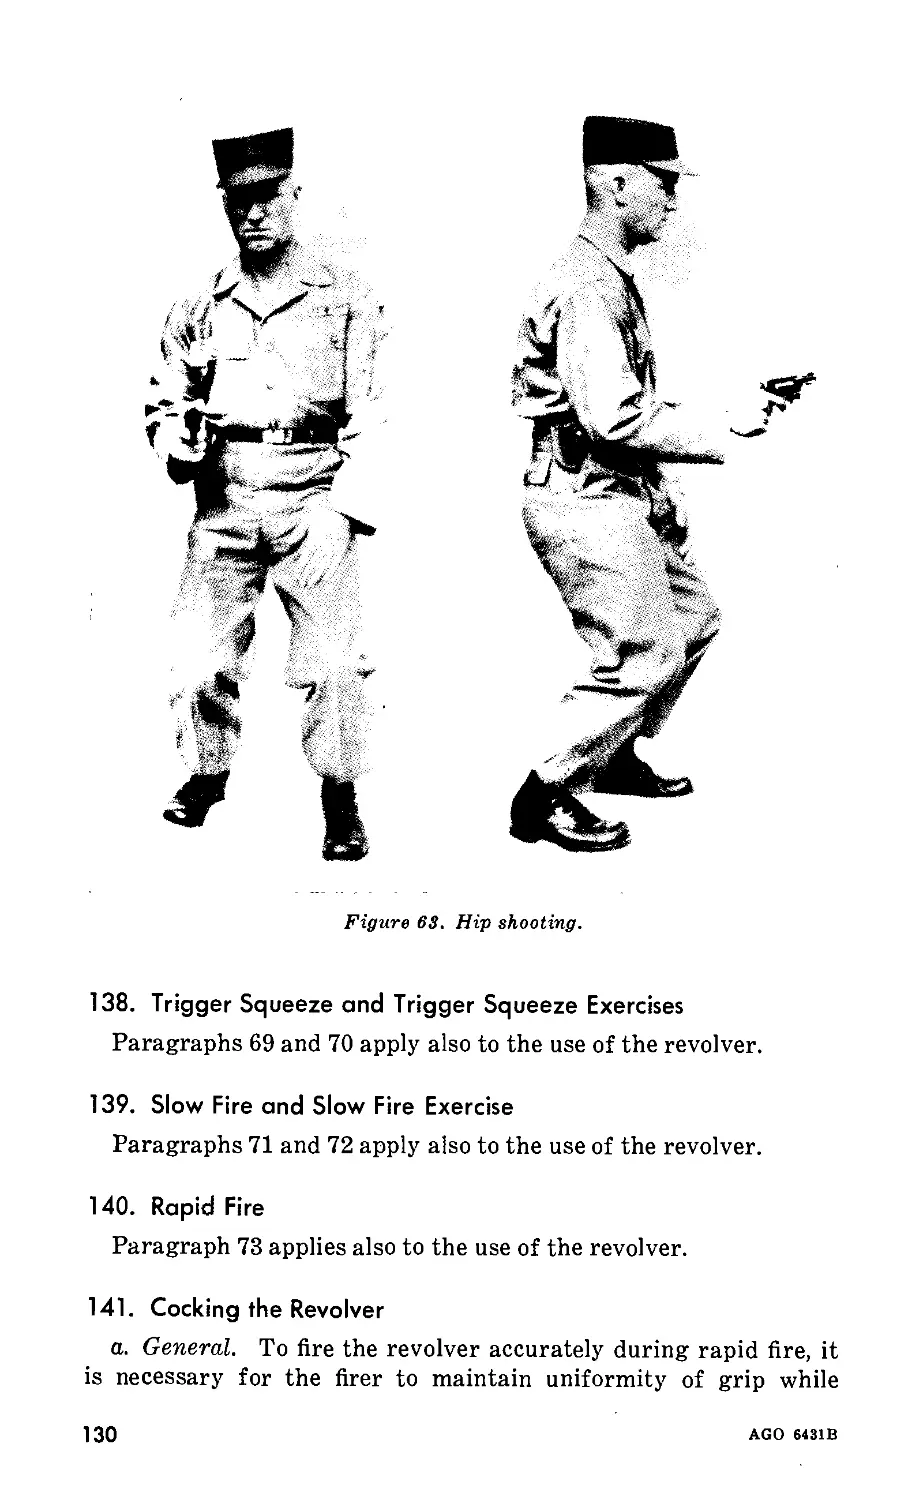
f. The face of the trigger was cut back and knurled.
4
AGO M31B
Figure 1.
Pistols, Automatic, Caliber .45,
differences between models.
M1911 and M1911A1, showing
М19П
Figure 2. Top view of pistols showing differences in sights between
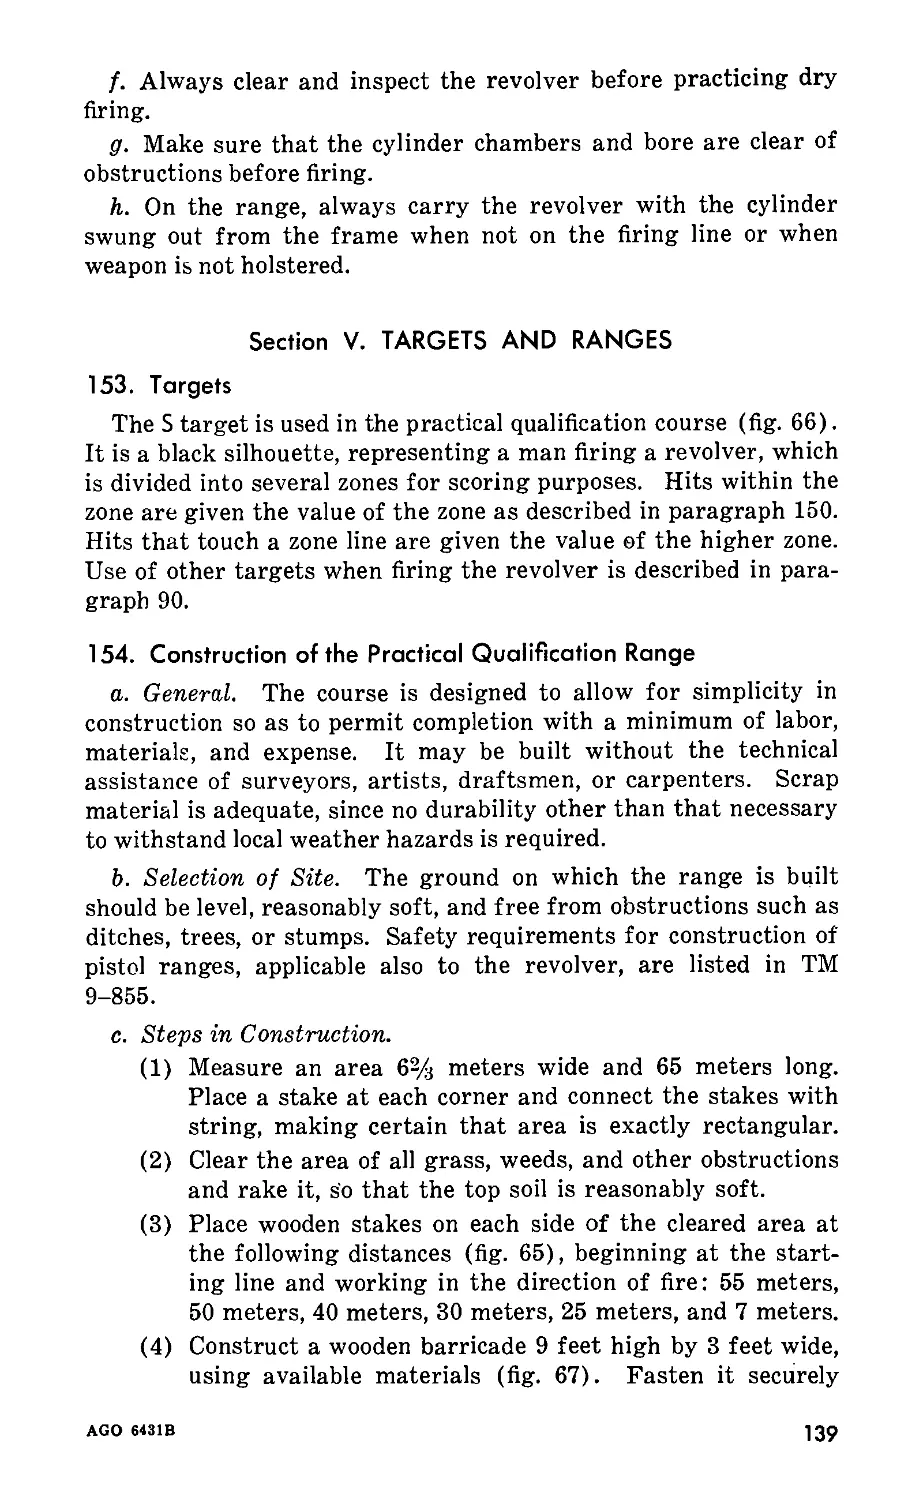
M1911 and M1911A1.
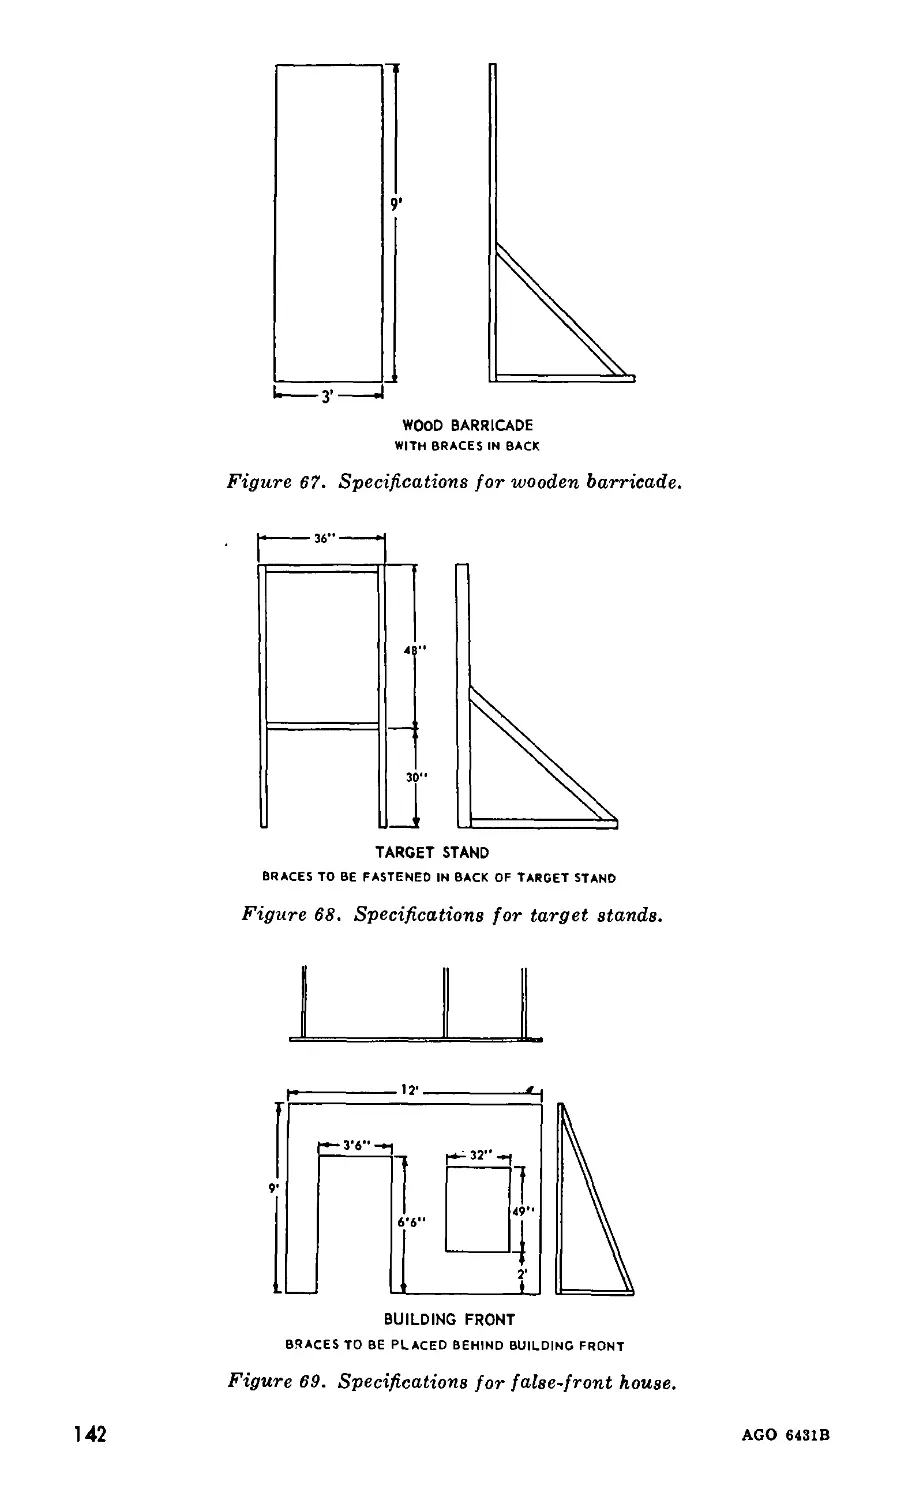
AGO 6431B
5
5. General Data
a. Barrel.
Diameter of bore___________________________________0.45 inch
Number of lands and grooves------------------------6
Length of barrel___________________________________5.03 inches
Rifling, left hand, one turn in____________________16 inches
b. Pistol, General.
Length_____________________________________________8% inches
Weight:
With empty magazine__________________________2.437 pounds
With loaded magazine (7 rounds)_______________3 pounds,
approximately
Height of front sight above axis of bore___________0.5597 inch
Sight radius_______________________________________6.481 inches
c. Miscellaneous.
Chamber pressure (maximum)_________________________17,000 pounds
per square inch
Muzzle velocity (maximum)__________________________830 feet per second
Maximum range______________________________________1500 meters
Maximum effective range____________________________50 meters
Trigger pull---------------------------------------5 to 6% pounds
d. Ballistics. For information concerning exterior ballistics,
including accuracy, drift, velocity with striking energy, penetra-
tion, and trajectory, see TM 9-1990.
6
AGO 6431В
CHAPTER 2
MECHANICAL TRAINING
Section I. DISASSEMBLY AND ASSEMBLY
6. General
To insure that the pistol will function correctly, it is necessary
to disassemble it to inspect and clean the parts. This chapter
explains general disassembly, detailed disassembly of the three
main groups, assembly, functioning, care and cleaning, stoppages,
and immediate action. It is a guide for mechanical training and
outlines the procedures to be followed.
7. Nomenclature
The names of the parts of the pistol are learned during prac-
tice in disassembly and assembly. As each part is removed and
replaced, the nomenclature is repeated until known. Generally,
the parts are named for their functions. For example, the trigger
guard guards the trigger, the extractor extracts the cartridge
case from the chamber, and the ejector ejects the cartridge case
from the pistol.
8. Guides to Follow in Disassembly and Assembly
These guides should be followed when the pistol is being dis-
assembled and assembled.
a. Follow the step-by-step explanation in disassembling the
pistol.
b. If it is necessary to apply force, do it carefully so that none
of the parts become damaged.
c. As the weapon is disassembled, lay out the parts in the
order of their removal. Dissassembly mats (GTA 9-617) are
excellent aids during this phase of training. This procedure helps
in assembly of the weapon, which is done in the reverse order of
disassembly.
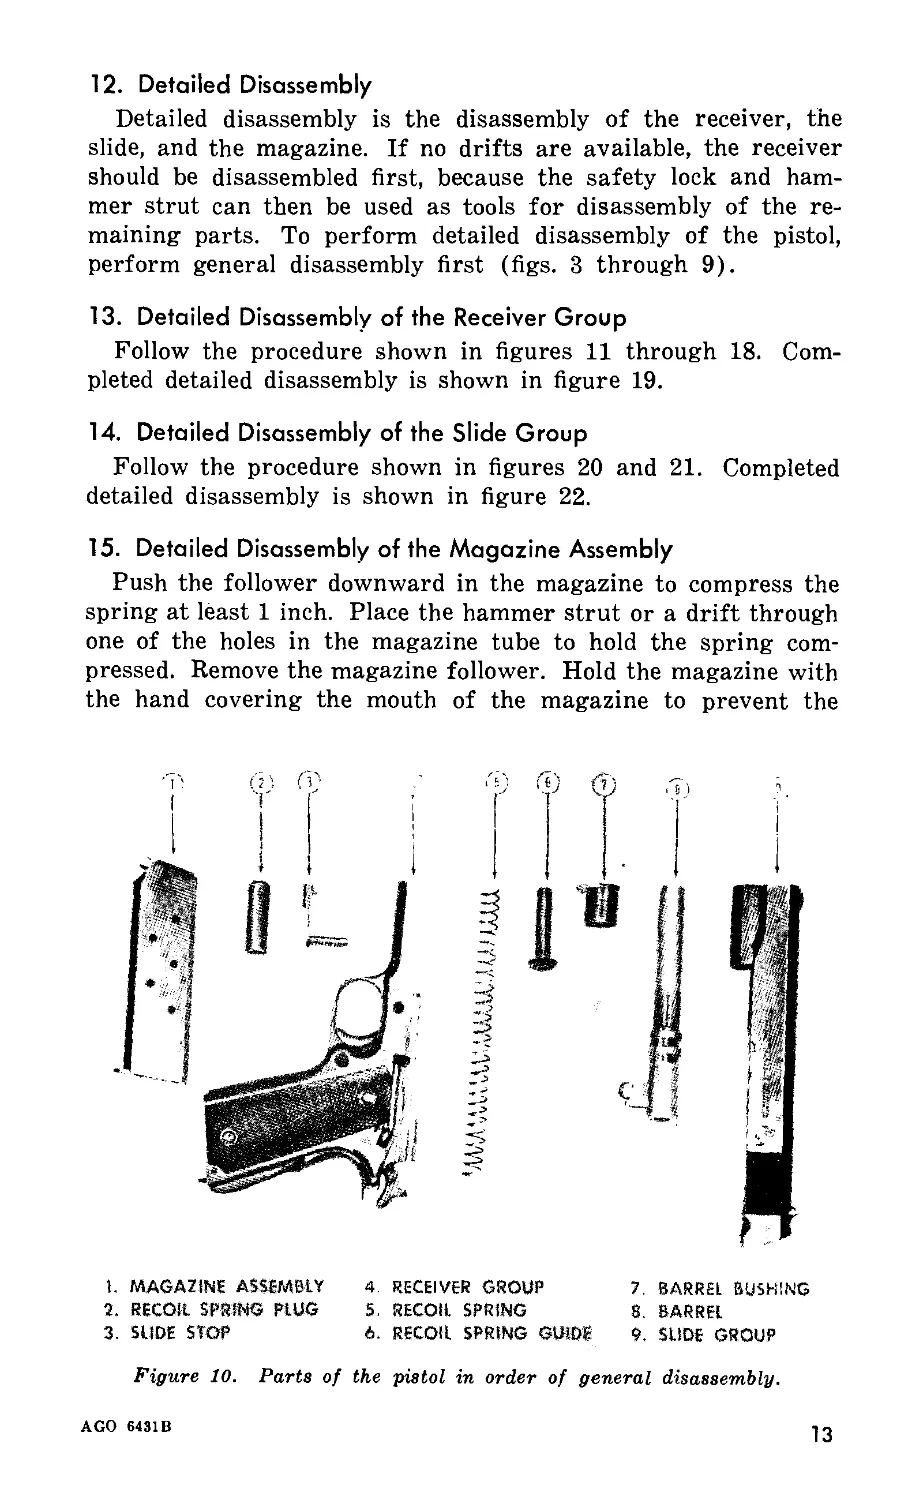
9. General Disassembly
General disassembly is the disassembly necessary for normal
care and cleaning. General disassembly consists of the removal
of the parts shown in figure 10.
AGO 6431B
7
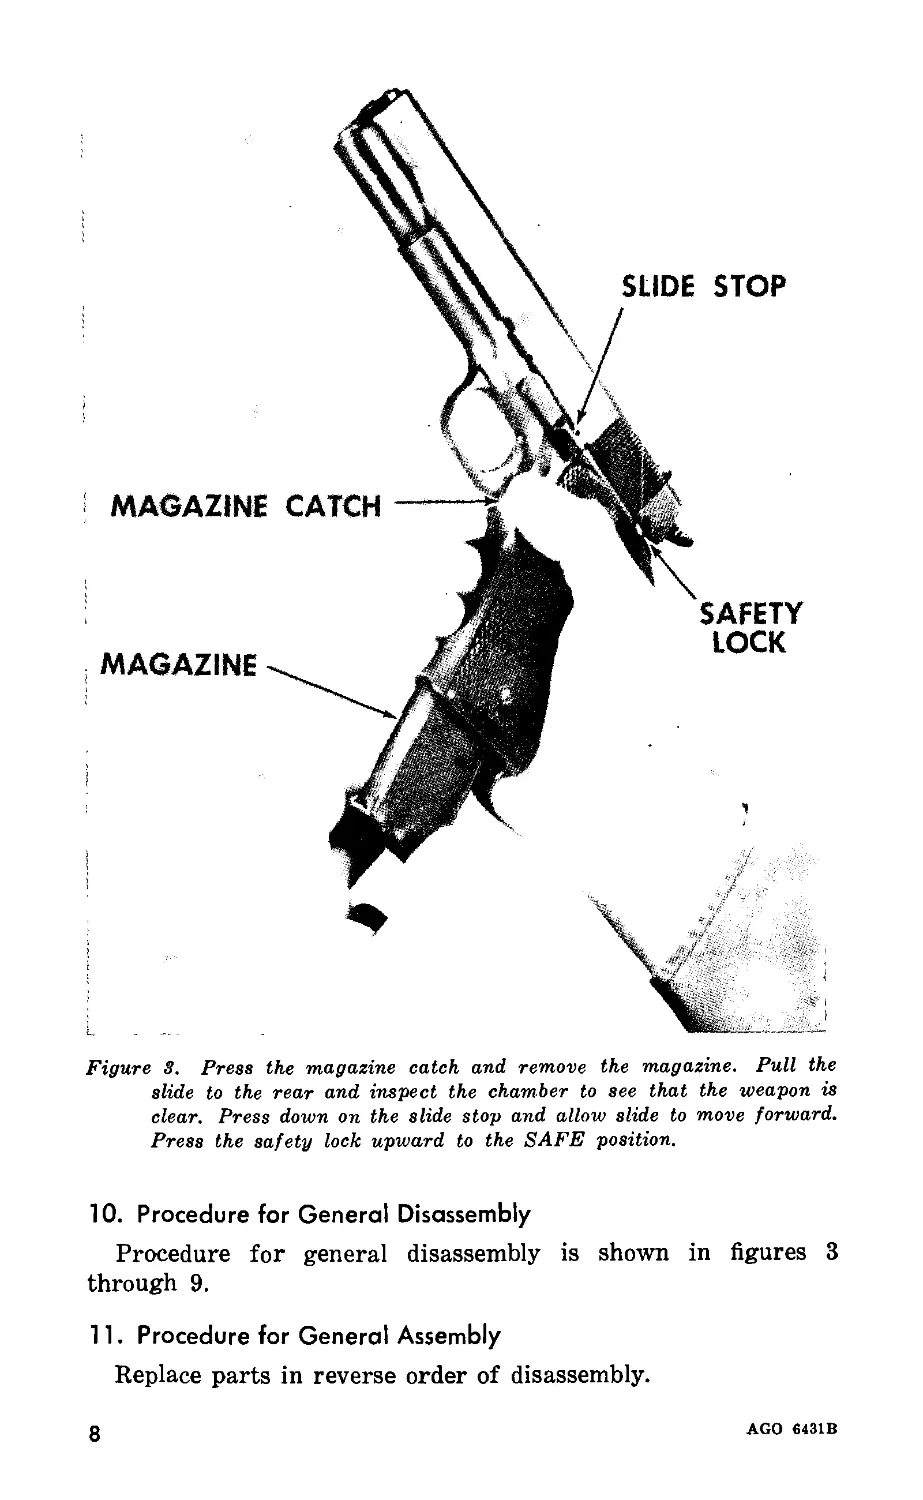
Figure 3. Press the magazine catch and remove the magazine. Pull the
slide to the rear and inspect the chamber to see that the weapon is
clear. Press down on the slide stop and allow slide to move forward.
Press the safety lock upward to the SAFE position.
10. Procedure for General Disassembly
Procedure for general disassembly is shown in figures 3
through 9.
11. Procedure for General Assembly
Replace parts in reverse order of disassembly.
8
AGO 6431B
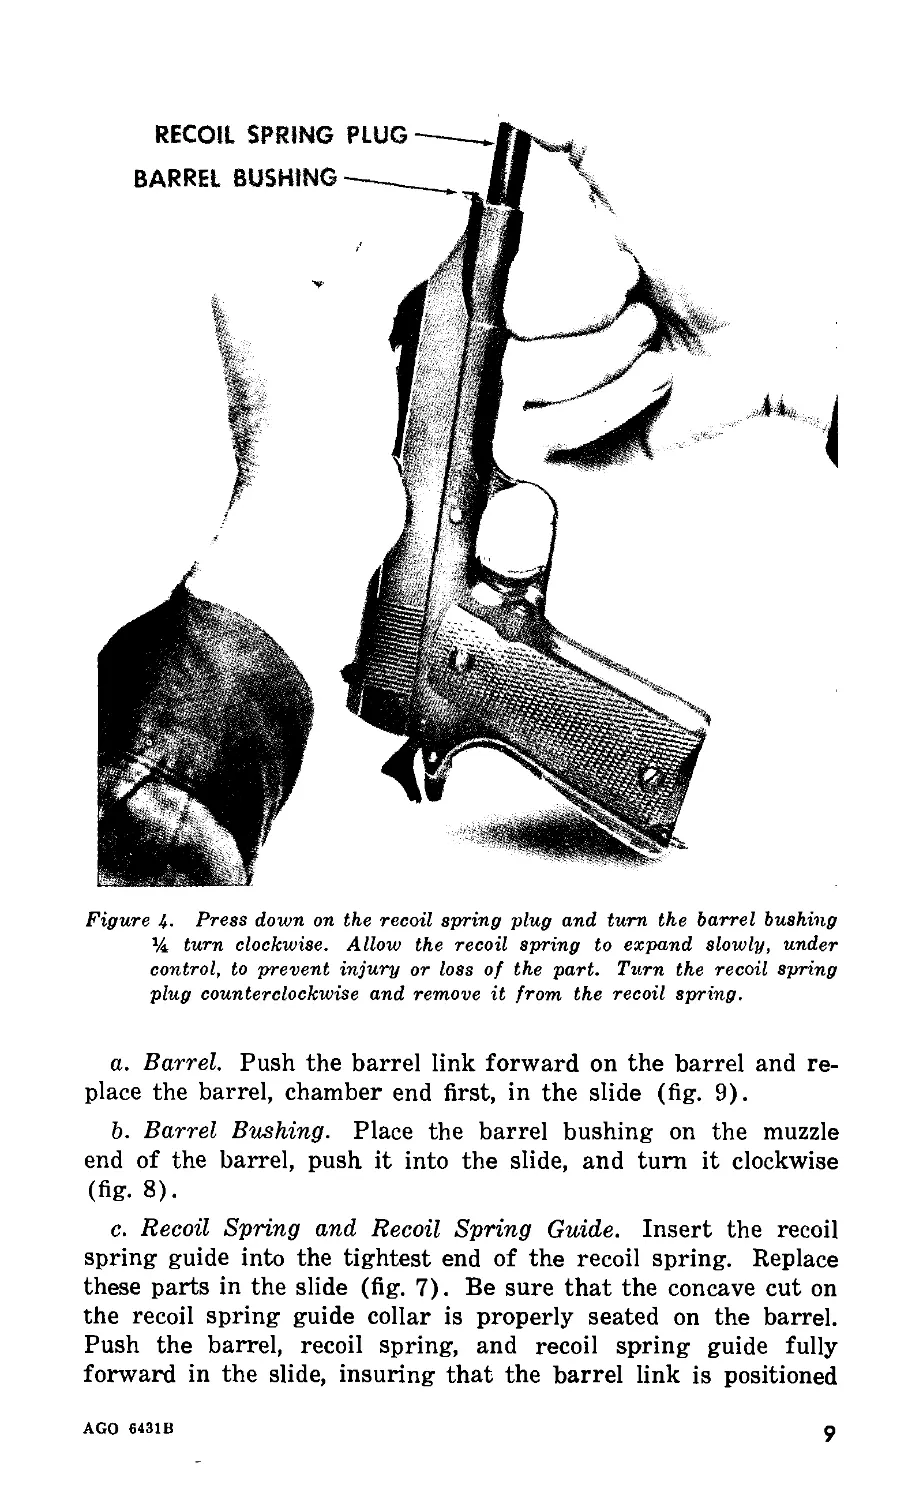
RECOIL SPRING PLUG
Figure 4- Press down on the recoil spring plug and turn the barrel bushing
% turn clockwise. Allow the recoil spring to expand slowly, under
control, to prevent injury or loss of the part. Turn the recoil spring
plug counterclockwise and remove it from the recoil spring.
a. Barrel. Push the barrel link forward on the barrel and re-
place the barrel, chamber end first, in the slide (fig. 9).
b. Barrel Bushing. Place the barrel bushing on the muzzle
end of the barrel, push it into the slide, and turn it clockwise
(fig. 8).
c. Recoil Spring and Recoil Spring Guide. Insert the recoil
spring guide into the tightest end of the recoil spring. Replace
these parts in the slide (fig. 7). Be sure that the concave cut on
the recoil spring guide collar is properly seated on the barrel.
Push the barrel, recoil spring, and recoil spring guide fully
forward in the slide, insuring that the barrel link is positioned
AGO 6431B
9
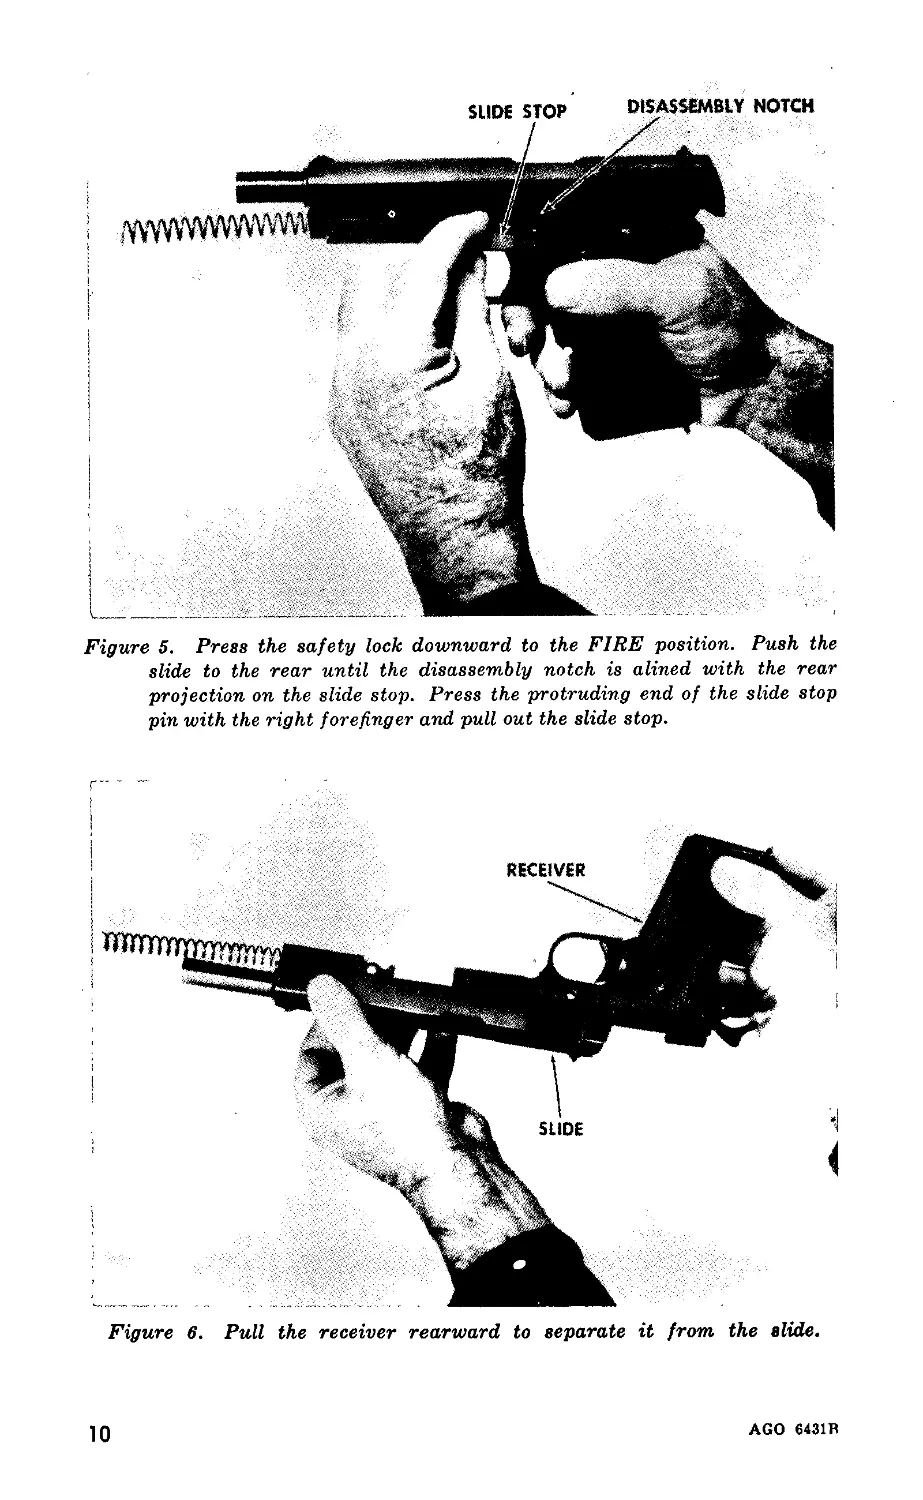
Figure 5. Press the safety lock downward to the FIRE position. Push the
slide to the rear until the disassembly notch is alined with the rear
projection on the slide stop. Press the protruding end of the slide stop
pin with the right forefinger and pull out the slide stop.
Figure 6. Pull the receiver rearward to separate it from the slide.
10
AGO 6431R
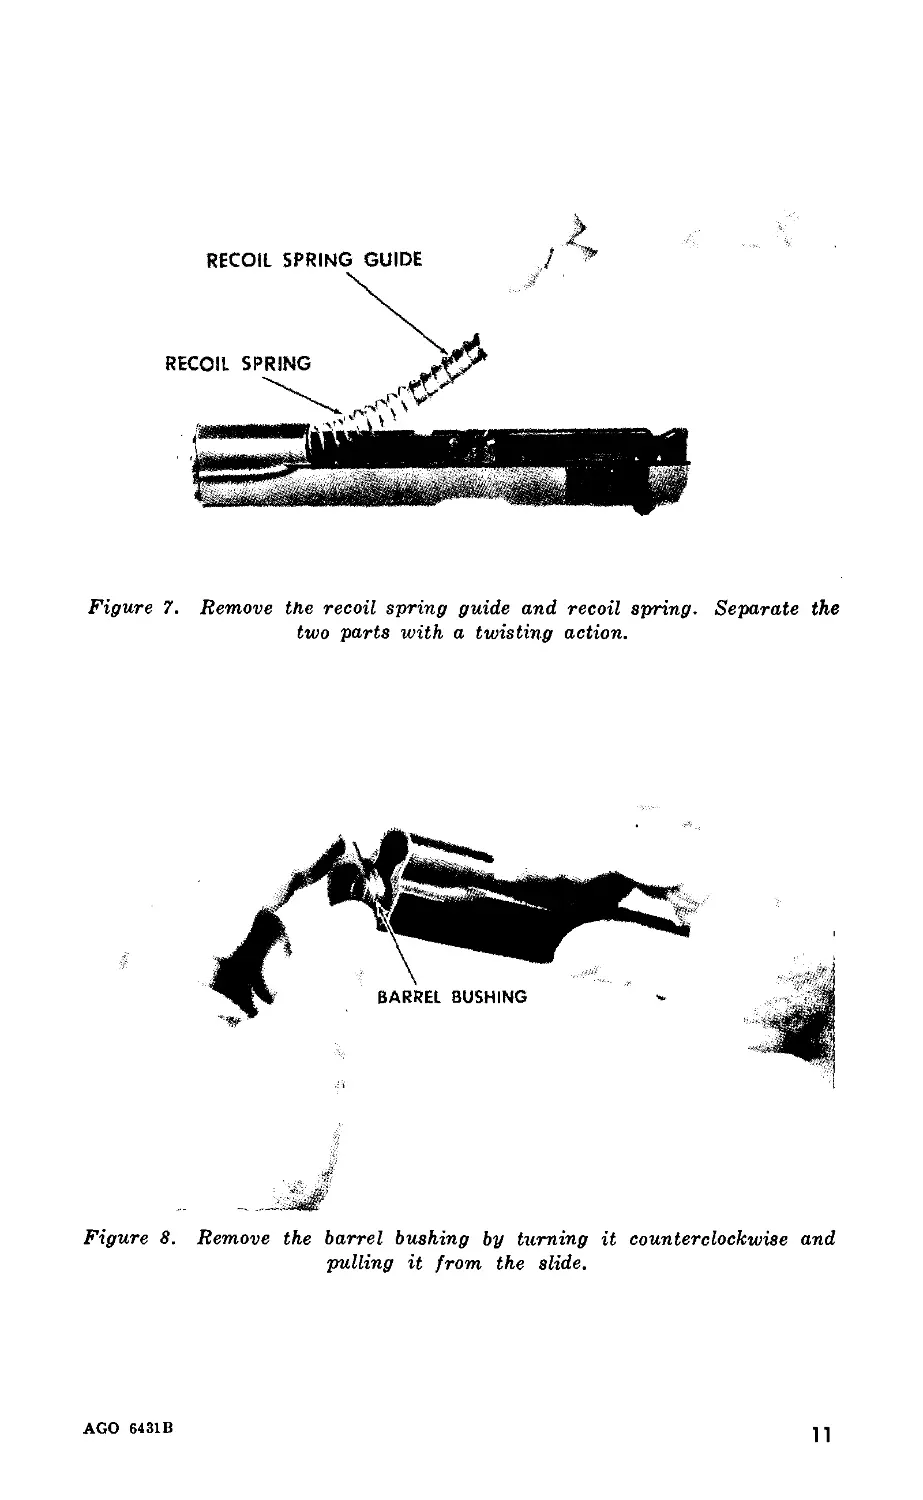
Figure 7. Remove the recoil spring guide and recoil spring. Separate the
two parts with a twisting action.
Figure 8. Remove the barrel bushing by turning it counterclockwise and
pulling it from the slide.
AGO 6431B
11
forward and rests against the hole in the recoil spring guide
(fig. 6).
d. Assembling the Receiver Group to the Slide Group. Hold
the slide with the sights down in the palm of one hand. Invert
the receiver (the safety lock must be in the FIRE position) and
engage the guide rails of the receiver in the grooves of the slide
(fig. 6). Push the receiver all the way forward on the slide with
a quick motion.
e. Slide Stop. Hold the pistol as shown in figure 5. Look
through the slide stop pin hole in the receiver for alinement of
this hole with the hole in the barrel link. If the holes are not
alined, move the muzzle end of the barrel forward or rearward
to aline them. Insert the slide stop pin into the holes. Move the
slide forward until the disassembly notch is over the square hole
in the left side of the receiver (fig. 5). Press the slide stop up
and in to fully seat it. In some cases, a drift may be required to
depress the slide stop plunger in order to fully seat the slide stop.
f. Recoil Spring Plug. Push the slide fully forward on the re-
ceiver and press the safety lock upward to the SAFE position.
Place the recoil spring plug on the recoil spring. Turn the recoil
spring plug clockwise to lock the plug to the recoil spring. Hold-
ing the pistol as shown in figure 4, insert the recoil spring and
push downward on the recoil spring plug, compressing the spring
until the plug is inside the slide. Turn the barrel bushing counter-
clockwise to lock the recoil spring plug in place. Press the safety
lock downward to the FIRE position and squeeze the trigger.
g. Magazine. Insert the magazine into the magazine recess of
the pistol until it is fully seated and held by the magazine catch
(fig. 3). This completes general assembly.
Figure 9. Push the barrel link forward and remove the barrel from the
front end of the slide. This completes general disassembly.
12
AGO 6431B
12. Detailed Disassembly
Detailed disassembly is the disassembly of the receiver, the
slide, and the magazine. If no drifts are available, the receiver
should be disassembled first, because the safety lock and ham-
mer strut can then be used as tools for disassembly of the re-
maining parts. To perform detailed disassembly of the pistol,
perform general disassembly first (figs. 3 through 9).
13. Detailed Disassembly of the Receiver Group
Follow the procedure shown in figures 11 through 18. Com-
pleted detailed disassembly is shown in figure 19.
14. Detailed Disassembly of the Slide Group
Follow the procedure shown in figures 20 and 21. Completed
detailed disassembly is shown in figure 22.
15. Detailed Disassembly of the Magazine Assembly
Push the follower downward in the magazine to compress the
spring at least 1 inch. Place the hammer strut or a drift through
one of the holes in the magazine tube to hold the spring com-
pressed. Remove the magazine follower. Hold the magazine with
the hand covering the mouth of the magazine to prevent the
1. MAGAZINE ASSEMBLY
2. RECOIL SPRING PLUG
3. SHOE STOP
4. RECEIVER GROUP
5. RECOIL SPRING
6. RECOIL SPRING GUIDE
7 BARREL BUSHING
8. BARREL
9. SLIDE GROUP
Figure 10.
Parts of the pistol in order of general disassembly.
AGO 6431B
13
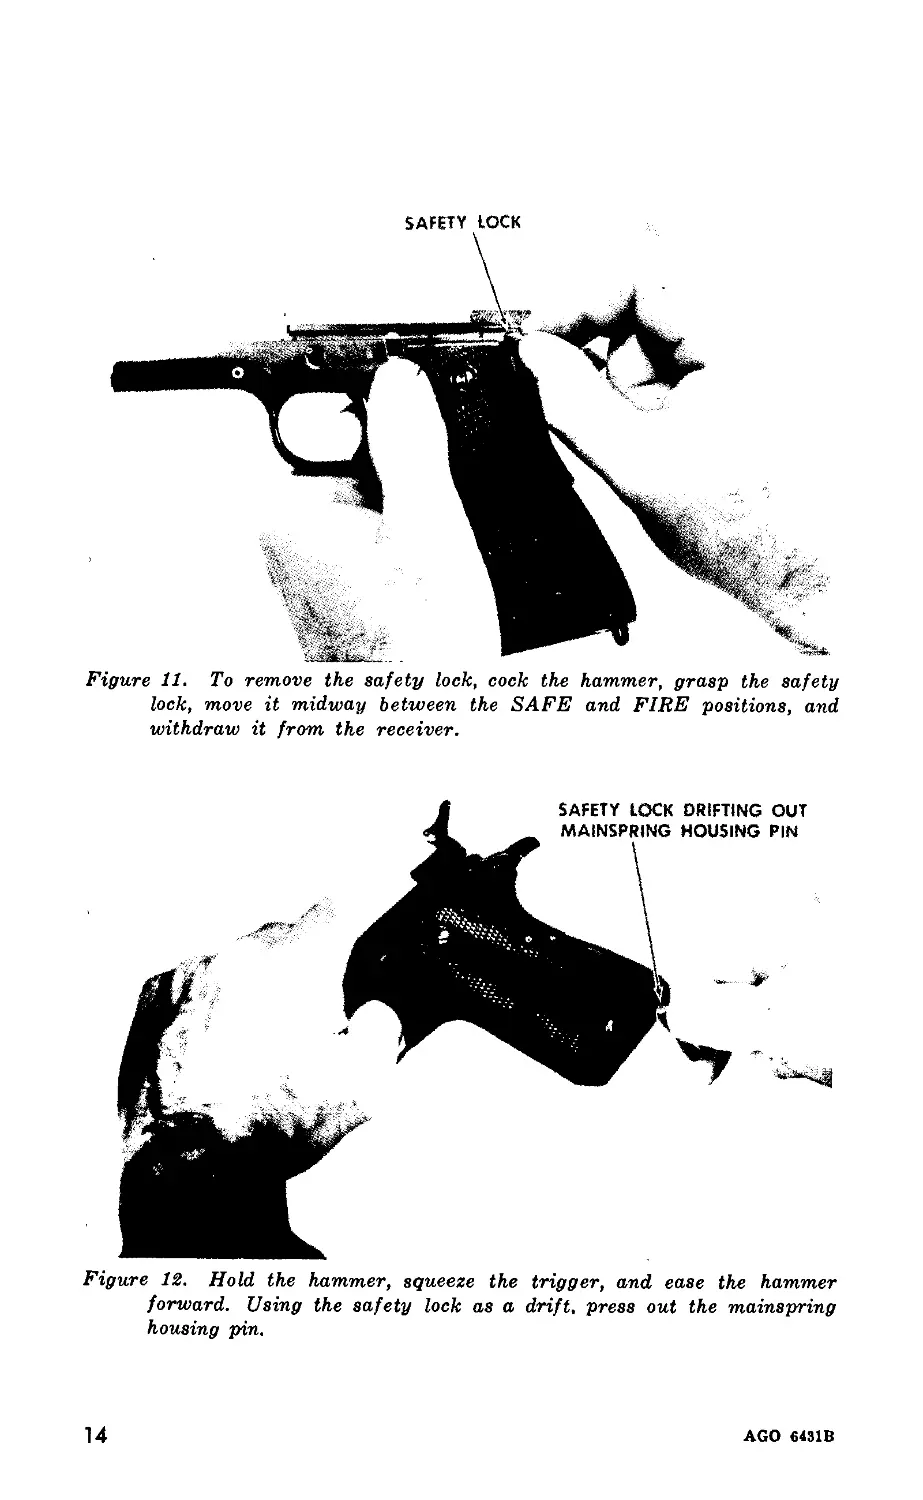
SAFETY ЮСК
Figure 11. To remove the safety lock, cock the hammer, grasp the safety
lock, move it midway between the SAFE and FIRE positions, and
withdraw it from the receiver.
Figure 12. Hold the hammer, squeeze the trigger, and ease the hammer
forward. Using the safety lock as a drift, press out the mainspring
housing pin.
14
AGO «431В
5Й-
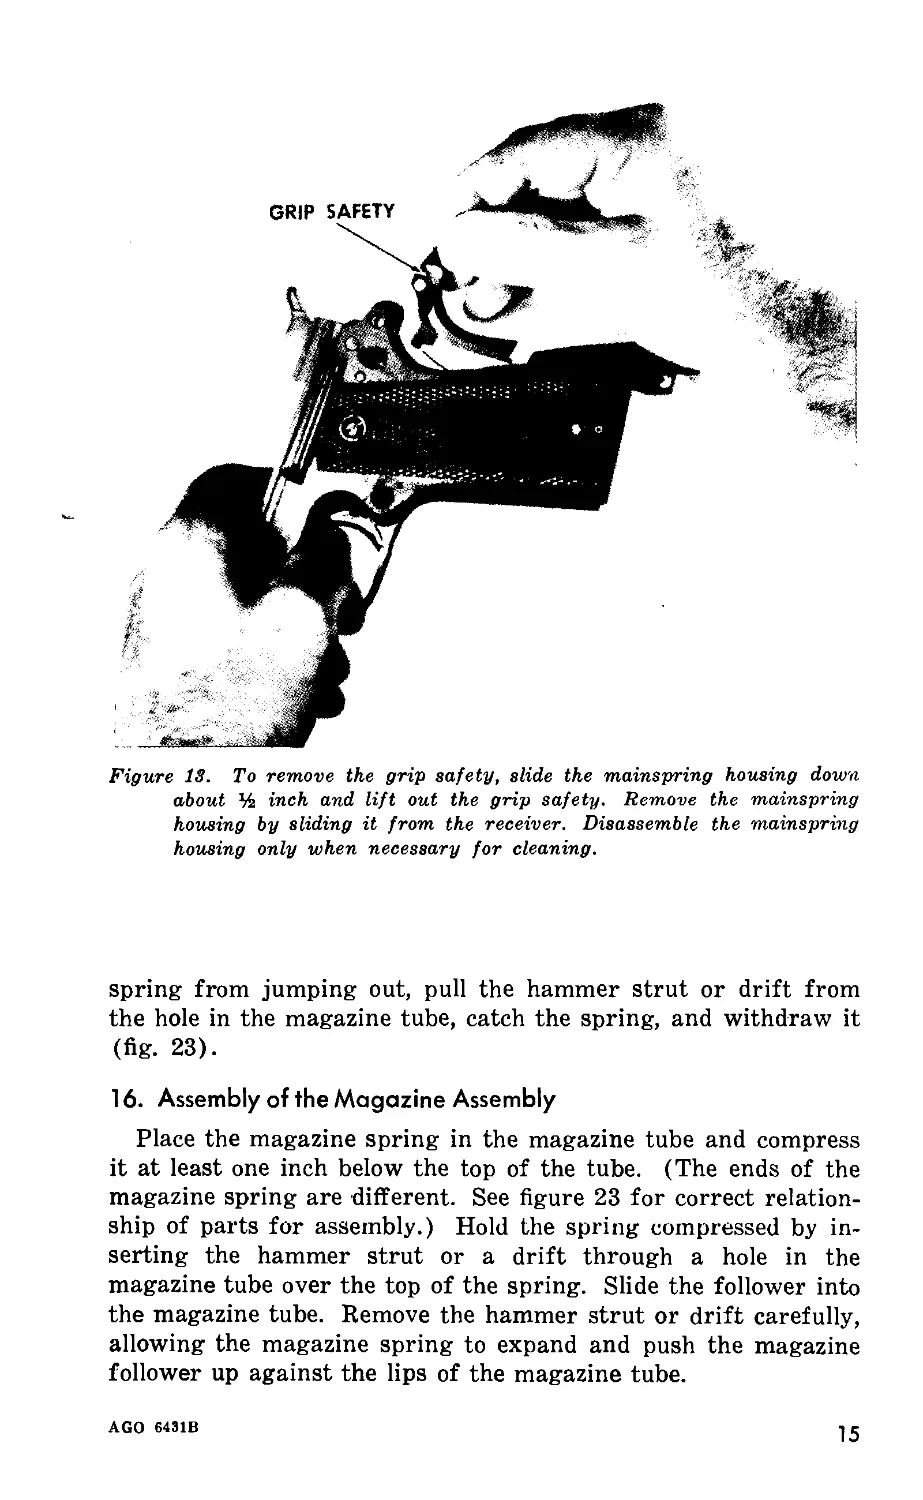
Figure 13. To remove the grip safety, slide the mainspring housing down
about % inch and lift out the grip safety. Remove the mainspring
housing by sliding it from the receiver. Disassemble the mainspring
housing only when necessary for cleaning.
spring from jumping out, pull the hammer strut or drift from
the hole in the magazine tube, catch the spring, and withdraw it
(fig. 23).
16. Assembly of the Magazine Assembly
Place the magazine spring in the magazine tube and compress
it at least one inch below the top of the tube. (The ends of the
magazine spring are different. See figure 23 for correct relation-
ship of parts for assembly.) Hold the spring compressed by in-
serting the hammer strut or a drift through a hole in the
magazine tube over the top of the spring. Slide the follower into
the magazine tube. Remove the hammer strut or drift carefully,
allowing the magazine spring to expand and push the magazine
follower up against the lips of the magazine tube.
AGO 6431B
15
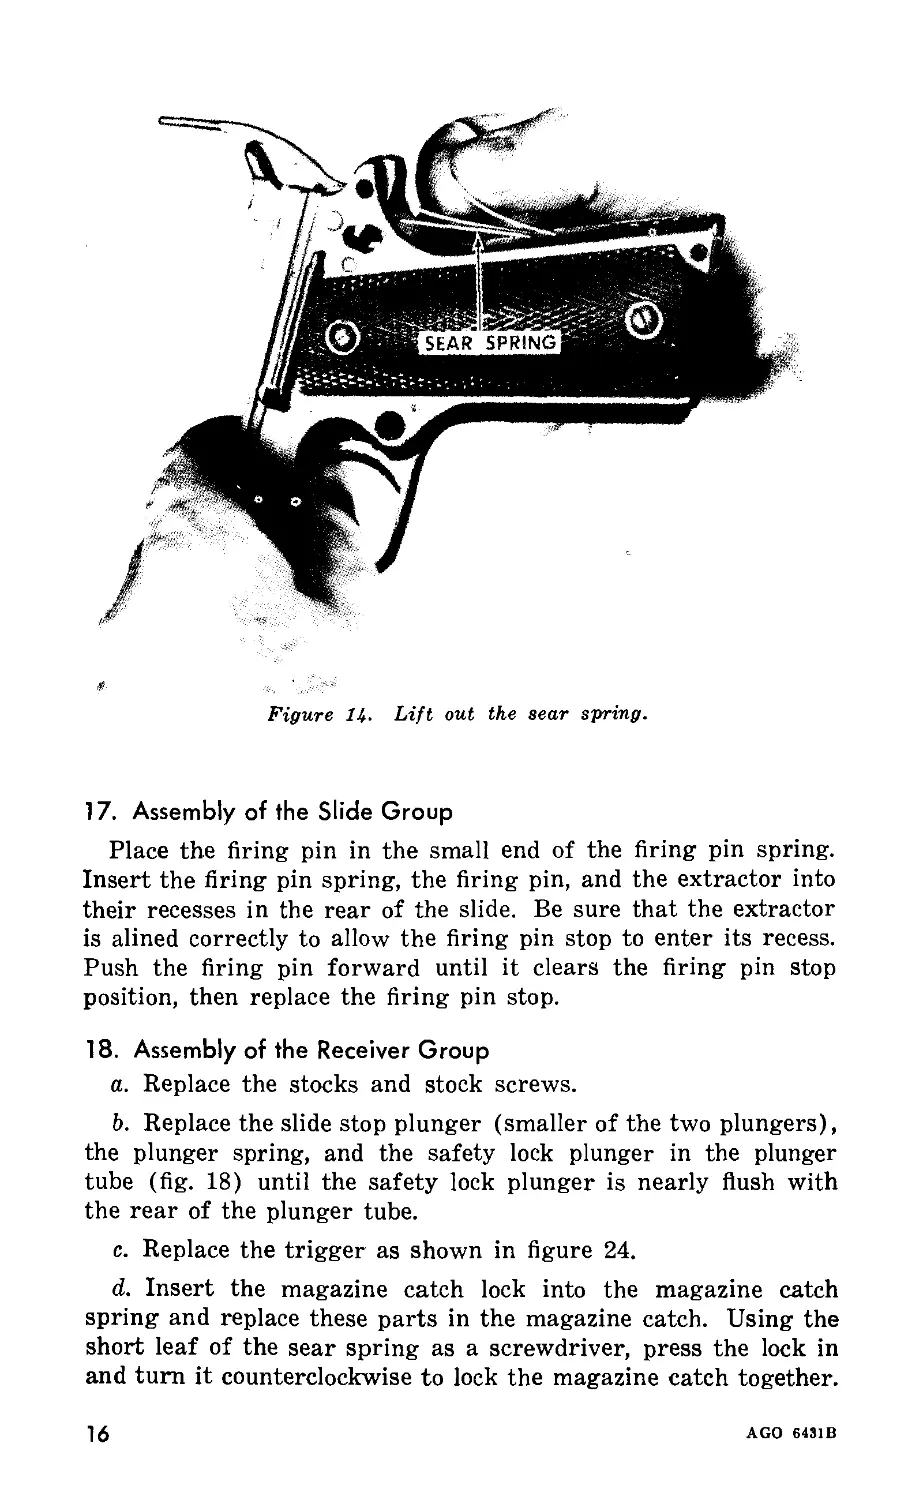
Figure Ц. Lift out the sear spring.
17. Assembly of the Slide Group
Place the firing pin in the small end of the firing pin spring.
Insert the firing pin spring, the firing pin, and the extractor into
their recesses in the rear of the slide. Be sure that the extractor
is alined correctly to allow the firing pin stop to enter its recess.
Push the firing pin forward until it clears the firing pin stop
position, then replace the firing pin stop.
18. Assembly of the Receiver Group
a. Replace the stocks and stock screws.
b. Replace the slide stop plunger (smaller of the two plungers),
the plunger spring, and the safety lock plunger in the plunger
tube (fig. 18) until the safety lock plunger is nearly flush with
the rear of the plunger tube.
c. Replace the trigger as shown in figure 24.
d. Insert the magazine catch lock into the magazine catch
spring and replace these parts in the magazine catch. Using the
short leaf of the sear spring as a screwdriver, press the lock in
and turn it counterclockwise to lock the magazine catch together.
16
AGO 6431B
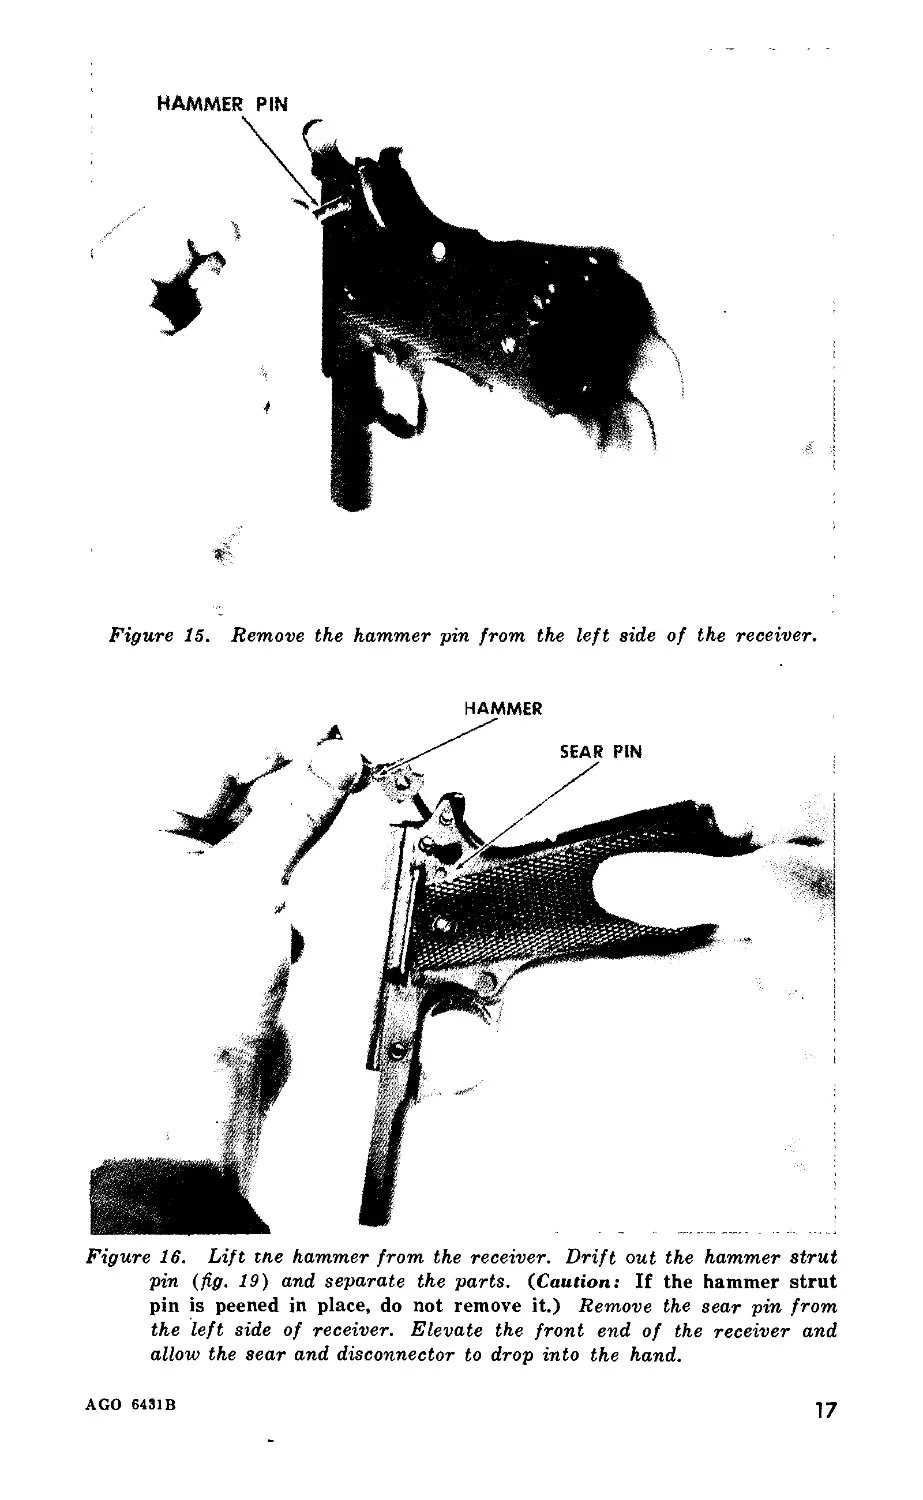
HAMMER PIN
Figure 15. Remove the hammer pin from the left side of the receiver.
HAMMER
Figure 16. Lift me hammer from the receiver. Drift out the hammer strut
pin (fig. 19) and separate the parts. (Caution: If the hammer strut
pin is peened in place, do not remove it.) Remove the sear pin from
the left side of receiver. Elevate the front end of the receiver and
allow the sear and disconnector to drop into the hand.
AGO 6431 в
17
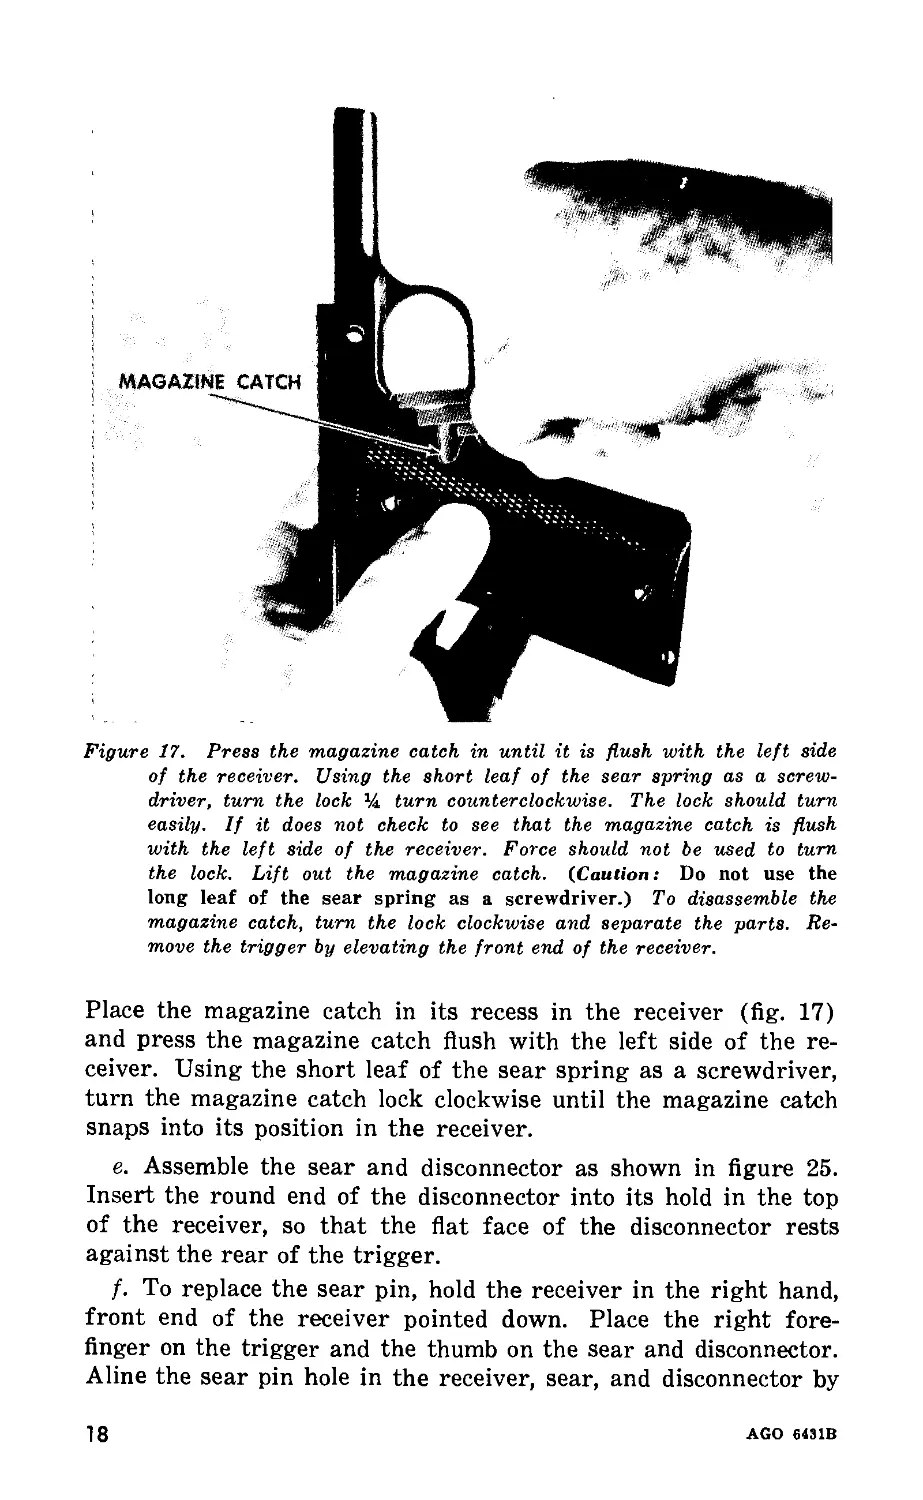
Figure 17. Press the magazine catch in until it is flush with the left side
of the receiver. Using the short leaf of the sear spring as a screw-
driver, turn the lock % turn counterclockwise. The lock should turn
easily. If it does not check to see that the magazine catch is flush
with the left side of the receiver. Force should not be used to turn
the lock. Lift out the magazine catch. (Caution: Do not use the
long leaf of the sear spring as a screwdriver.) To disassemble the
magazine catch, turn the lock clockwise and separate the parts. Re-
move the trigger by elevating the front end of the receiver.
Place the magazine catch in its recess in the receiver (fig. 17)
and press the magazine catch flush with the left side of the re-
ceiver. Using the short leaf of the sear spring as a screwdriver,
turn the magazine catch lock clockwise until the magazine catch
snaps into its position in the receiver.
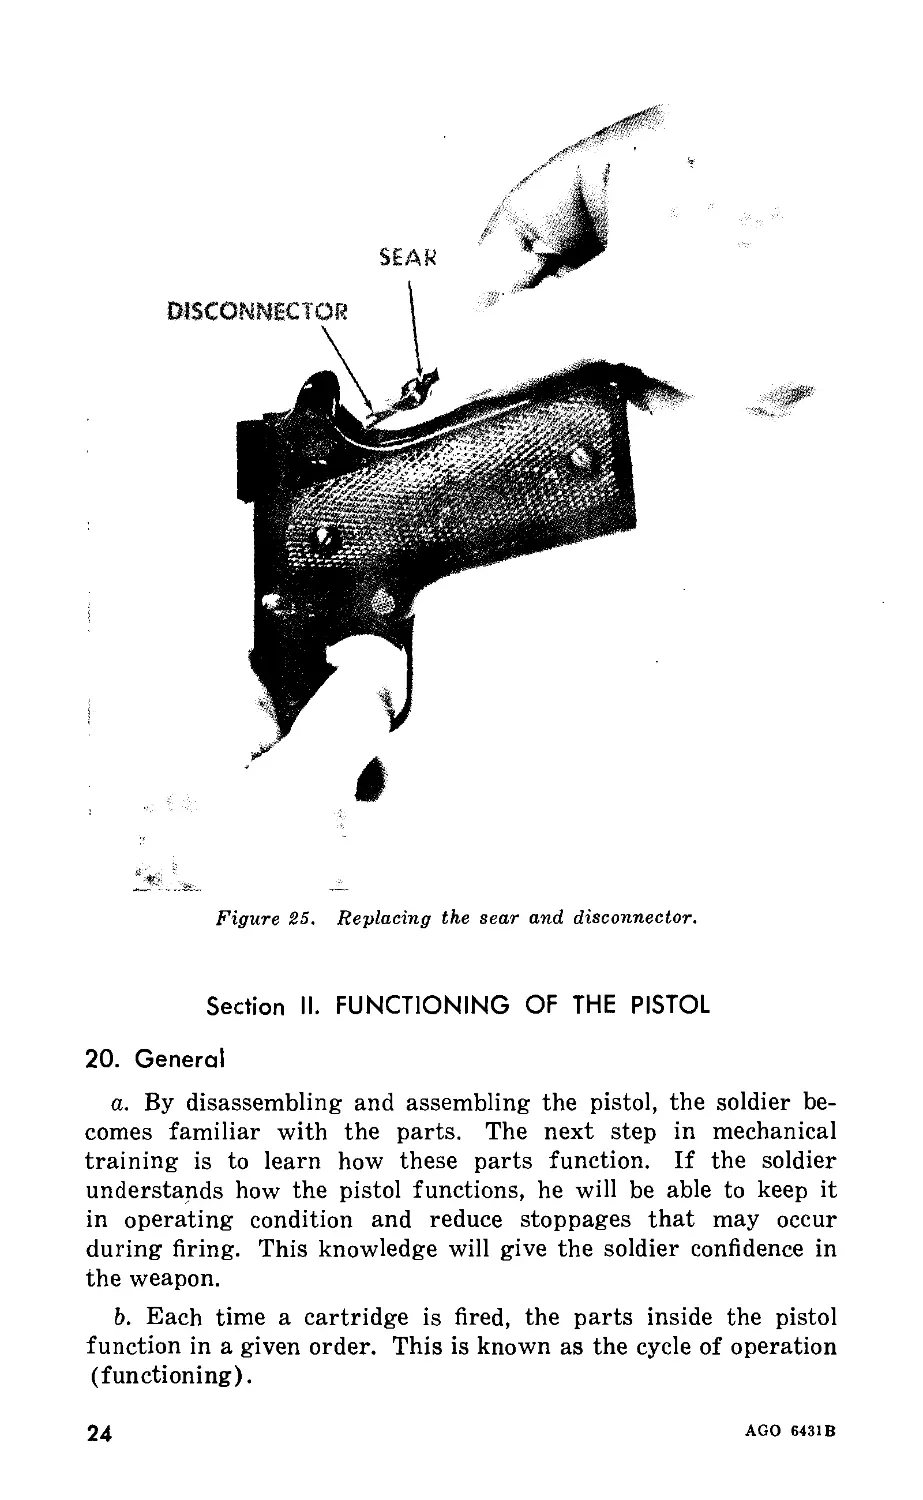
e. Assemble the sear and disconnector as shown in figure 25.
Insert the round end of the disconnector into its hold in the top
of the receiver, so that the flat face of the disconnector rests
against the rear of the trigger.
f. To replace the sear pin, hold the receiver in the right hand,
front end of the receiver pointed down. Place the right fore-
finger on the trigger and the thumb on the sear and disconnector.
Aline the sear pin hole in the receiver, sear, and disconnector by
18
AGO 6431B
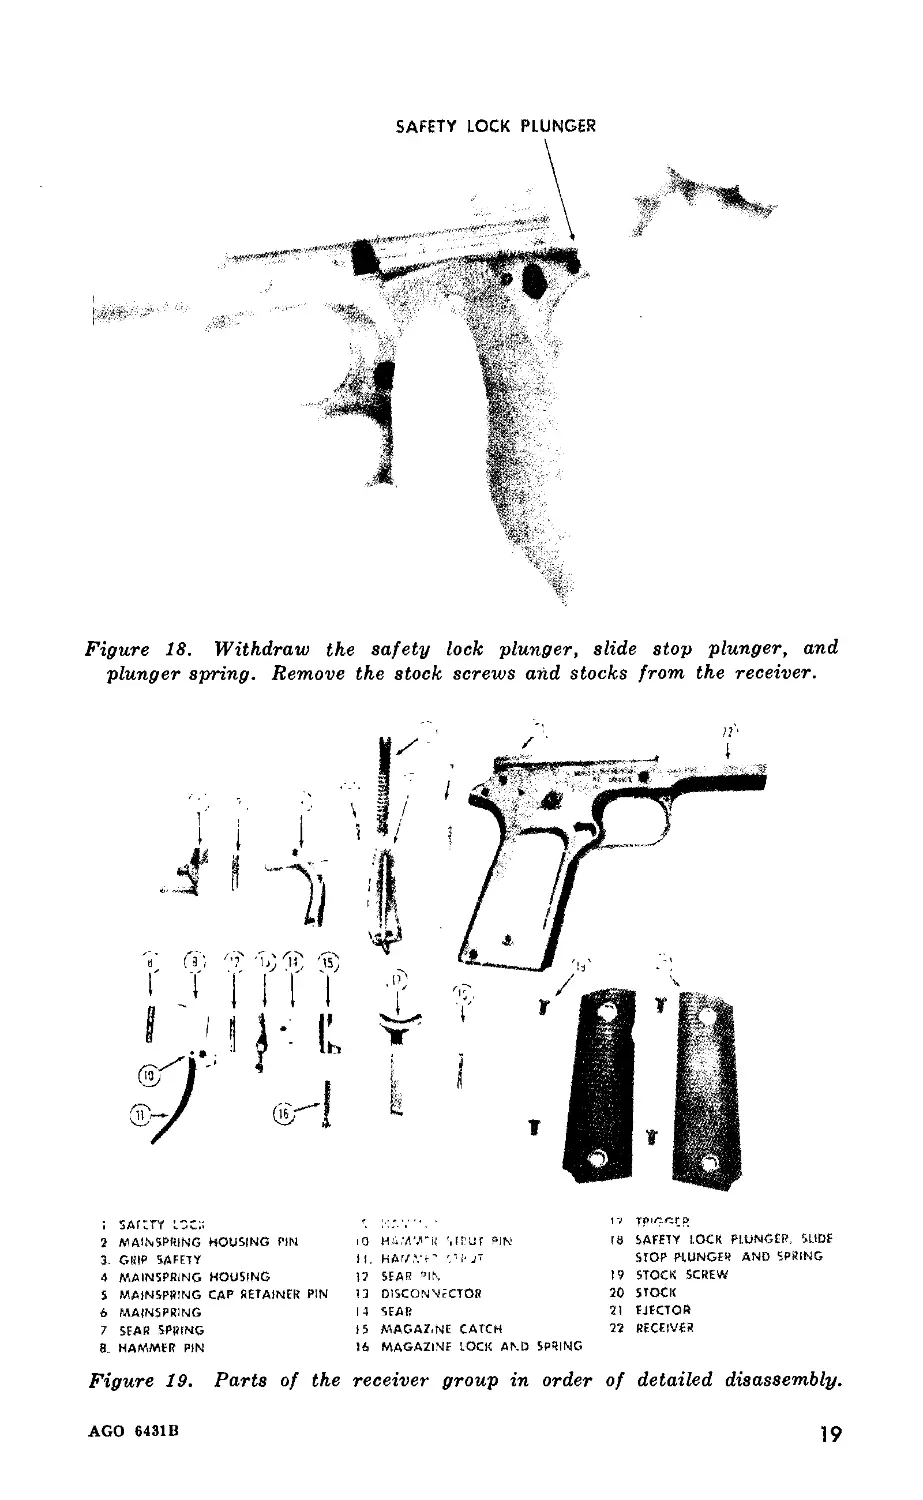
SAFETY LOCK PLUNGER
Figure 18. Withdraw the safety lock plunger, slide stop plunger, and
plunger spring. Remove the stock screws and stocks from the receiver.
; SArtrr lock r. ". •
2 MAINSPRING HOUSING PIN iO Н^ЛТИ UTUf PIN 18
3. GRIP SAFETY II, HA7.VF’ L'i'J"
4 MAINSPRING HOUSING 1? SEAR "IN I?
5 MAINSPRING CAP RETAINER PIN 13 DISCONNECTOR 20
6 MAINSPRING 14 SEAR 21
7 SEAR SPRING 15 MAGAZrNE CATCH 22
rp'^cri)
SAFETY LOCK PLUNGER, SLIDE
STOP PLUNGER AND SPRING
STOCK SCREW
stock
EJECTOR
RECEIVER
8. HAMMER PIN 16 MAGAZINE LOCK AND SPRING
Figure 19.
Parts of the receiver group in order of detailed disassembly.
AGO 6431B
19
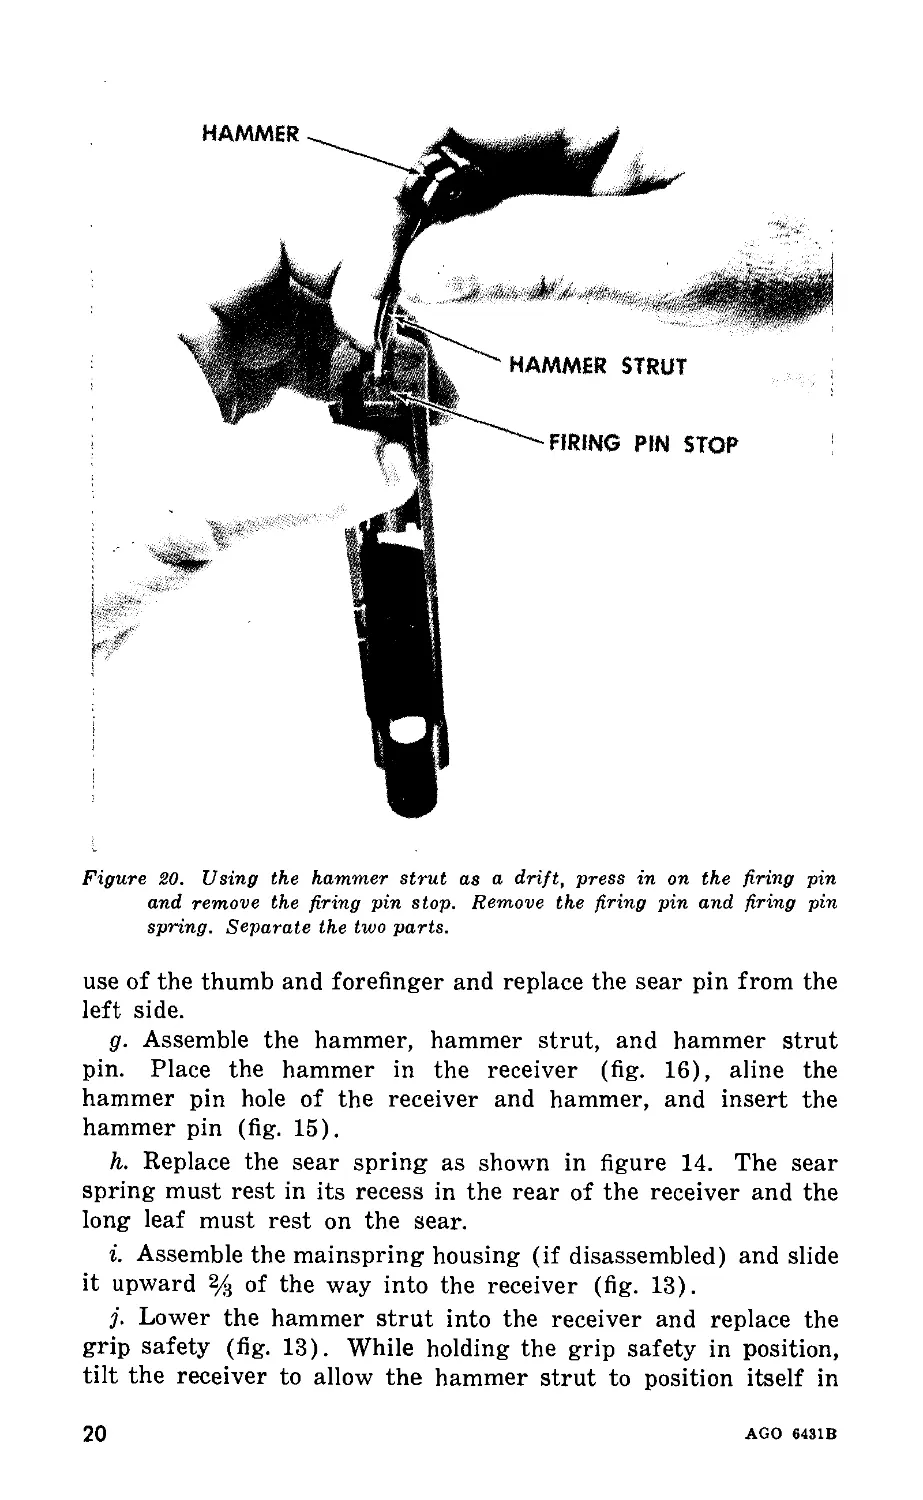
HAMMER
FIRING PIN STOP
HAMMER STRUT
Figure 20. Using the hammer strut as a drift, press in on the firing pin
and remove the firing pin stop. Remove the firing pin and firing pin
spring. Separate the two parts.
use of the thumb and forefinger and replace the sear pin from the
left side.
g. Assemble the hammer, hammer strut, and hammer strut
pin. Place the hammer in the receiver (fig. 16), aline the
hammer pin hole of the receiver and hammer, and insert the
hammer pin (fig. 15).
h. Replace the sear spring as shown in figure 14. The sear
spring must rest in its recess in the rear of the receiver and the
long leaf must rest on the sear.
i. Assemble the mainspring housing (if disassembled) and slide
it upward % of the way into the receiver (fig. 13).
j. Lower the hammer strut into the receiver and replace the
grip safety (fig. 13). While holding the grip safety in position,
tilt the receiver to allow the hammer strut to position itself in
20
AGO 6431B
EXTRACTOR
HAMMER STRUT
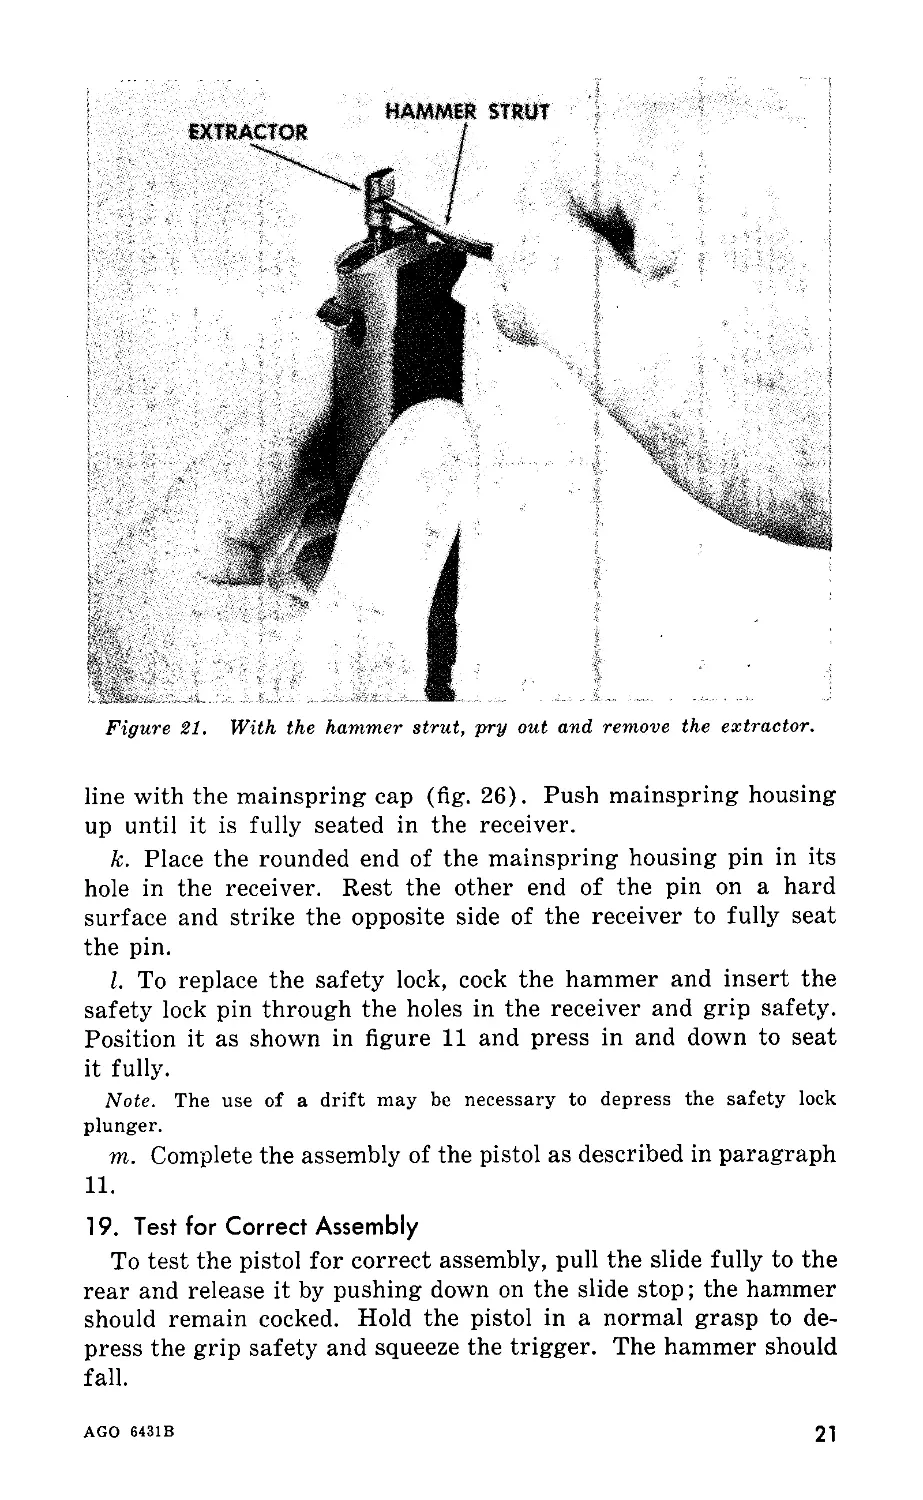
Figure 21. With the hammer strut, pry out and remove the extractor.
line with the mainspring cap (fig. 26). Push mainspring housing
up until it is fully seated in the receiver.
k. Place the rounded end of the mainspring housing pin in its
hole in the receiver. Rest the other end of the pin on a hard
surface and strike the opposite side of the receiver to fully seat
the pin.
I. To replace the safety lock, cock the hammer and insert the
safety lock pin through the holes in the receiver and grip safety.
Position it as shown in figure 11 and press in and down to seat
it fully.
Note. The use of a drift may be necessary to depress the safety lock
plunger.
m. Complete the assembly of the pistol as described in paragraph
11.
19. Test for Correct Assembly
To test the pistol for correct assembly, pull the slide fully to the
rear and release it by pushing down on the slide stop; the hammer
should remain cocked. Hold the pistol in a normal grasp to de-
press the grip safety and squeeze the trigger. The hammer should
fall.
AGO 6431B
21
1. FIRING PIN
2. FIRING PIN
3. FIRING PIN
4. EXTRACTOR
5. SLIDE
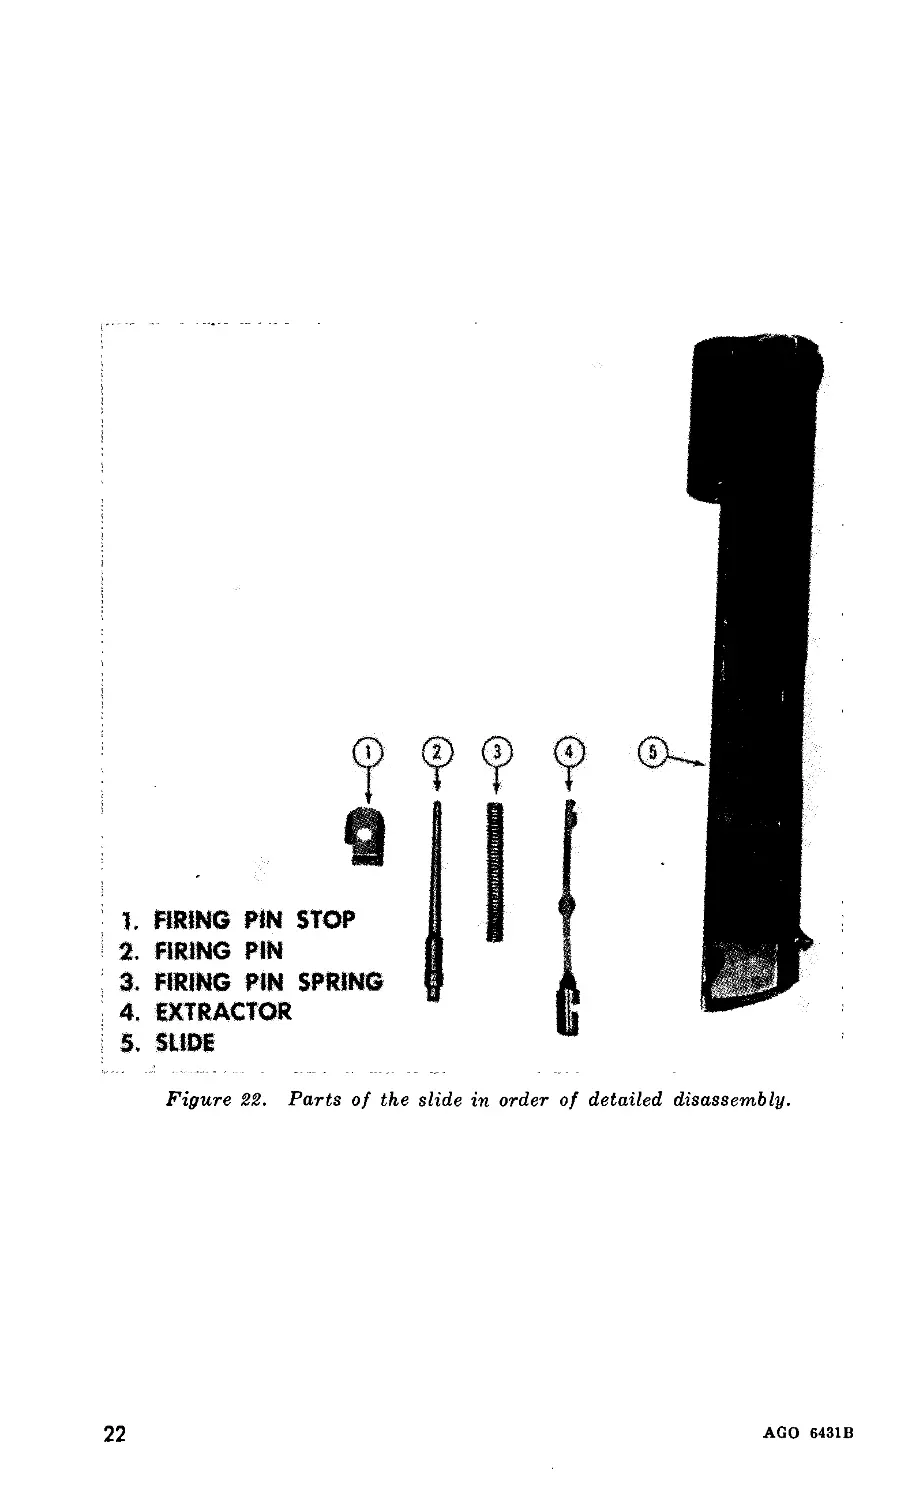
Figure 22. Parts of the slide in order of detailed disassembly.
22
AGO 6431B
1. MAGAZINE TUBE
2. MAGAZINE BASE
3. FOLLOWER
4. FOLLOWER
5. MAGAZINE
6. FOLLOWER END OF
MAGAZINE SPRING
STEP
SPRING
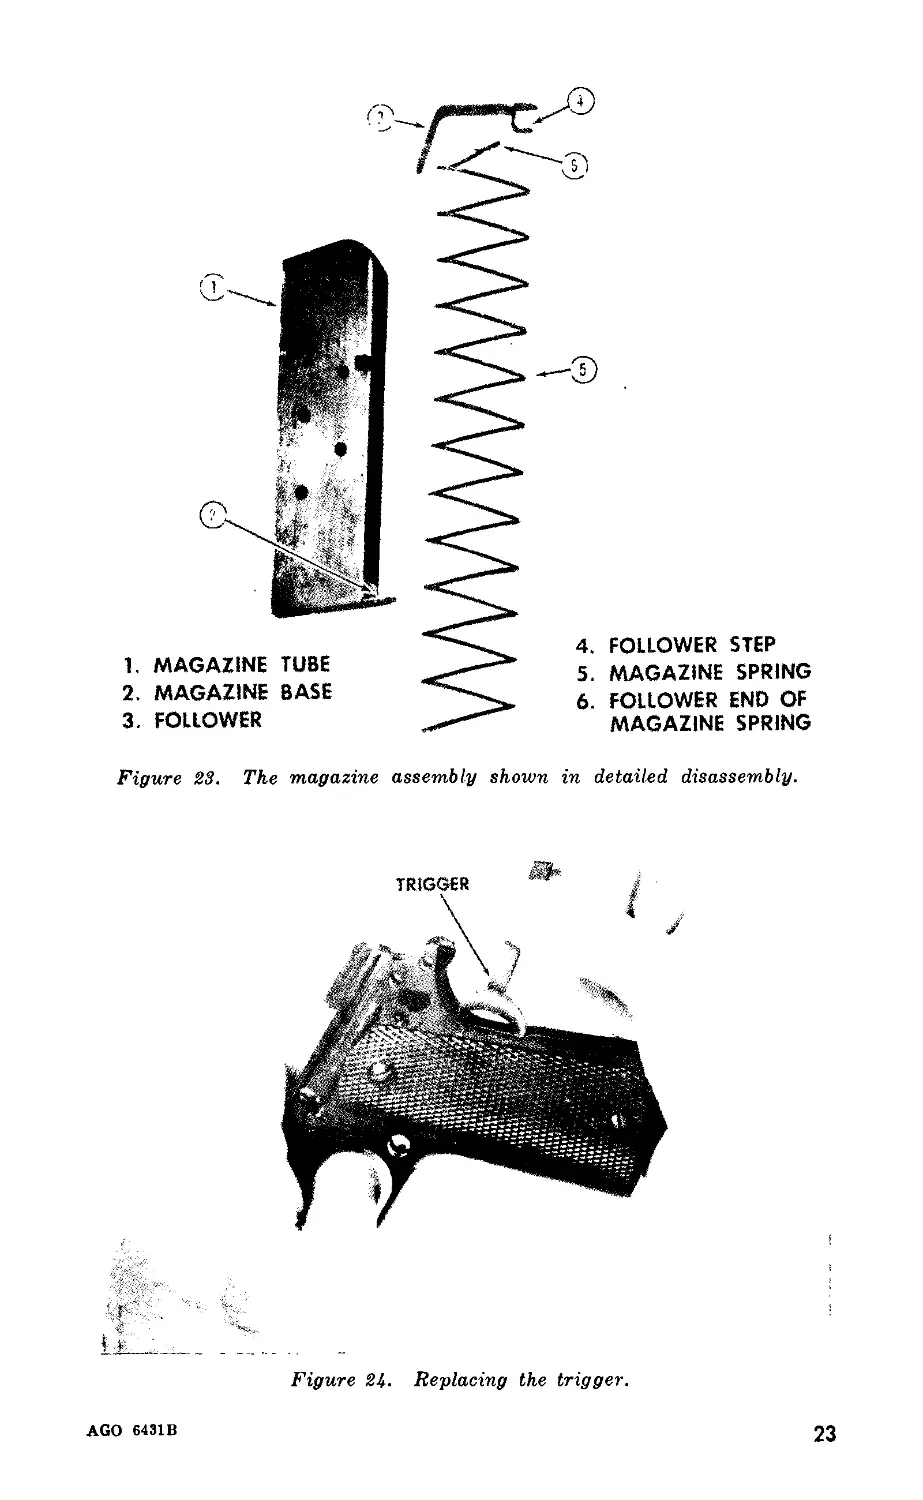
Figure 23. The magazine assembly shown in detailed disassembly.
Figure 24. Replacing the trigger.
AGO 6431B
23
Figure 25. Replacing the sear and disconnector.
Section II. FUNCTIONING OF THE PISTOL
20. General
a. By disassembling and assembling the pistol, the soldier be-
comes familiar with the parts. The next step in mechanical
training is to learn how these parts function. If the soldier
understands how the pistol functions, he will be able to keep it
in operating condition and reduce stoppages that may occur
during firing. This knowledge will give the soldier confidence in
the weapon.
b. Each time a cartridge is fired, the parts inside the pistol
function in a given order. This is known as the cycle of operation
(functioning).
24
AGO 6431В
c. The cycle of operation of the pistol is divided into eight
basic steps, which are listed below in the order they occur; how-
ever, more than one step may be occurring at the same time.
(1) Feeding—placing a cartridge in the receiver, approxi-
mately in back of the barrel, ready for chambering.
(2) Chambering—moving the cartridge from the magazine
into the chamber.
(3) Locking—sealing the cartridge in the chamber and
blocking the breech end of the barrel.
(4) Firing—igniting the primer and firing the cartridge.
(5) Unlocking—unsealing the breech end of the barrel.
(6) Extracting—removing the cartridge case from, the
chamber.
(7) Ejecting—removing the cartridge case from the weapon.
(8) Cocking—returning the firing mechanism to the cocked
position ready to fire another cartridge.
21. Functioning of the Pistol, General
a. A magazine containing ammunition is placed in the receiver
and' the slide is pulled fully to the rear and released. As the
slide moves forward, it strips the top round from the magazine
and pushes it into the chamber. The hammer remains in the
cocked position (fig. 26) and the pistol is ready to be fired.
b. The pistol fires one round each time the trigger is squeezed.
Each time a cartridge is fired, the slide and barrel recoil (moves
rearward) locked together a short distance. This permits the
bullet and expanding powder gases to escape from the muzzle
before unlocking is completed. The barrel then unlocks from the
slide, and the slide continues its rearward movement, extracting
the cartridge case from the chamber and ejecting it from the
weapon. During rearward movement, the magazine feeds
another cartridge, the recoil spring is compressed, and the
hammer is cocked. At the termination of rearward movement,
the recoil spring expands and forces the slide forward, and the
cycle of operation continues until the ammunition in the magazine
is expanded. As the last round is fired, the magazine spring
exerts upward pressure on the magazine follower, and the step
on the follower strikes the slide stop and raises it, forcing the
slide stop to engage in the slide stop recess on the bottom of the
slide and holding it in the rear position. This action serves as an
indicator that the magazine is empty and permits faster loading.
22. Feeding
When a magazine containing ammunition is inserted into the
receiver (slide forward), the top cartridge in the magazine con-
AGO 6431B
25
к>
О
PLATE FW,NC P,N SPR,NG,SIGHT
FIRING PIN
BARREL
BARREL BUSHING SIGHT
SLIDE «AGAZINE
FOLLOWER
FIRING PIN STOP
TRIGGER
MAGAZINE SPRING
MAGAZINE BASE PIN
MAGAZINE BASE ~
SLIDE STOP
PIN BARREL LINK PIN
Figure 26. Cutaway view of the M1911A1 pistol.
RECOIL SPRING PLUG
RECOIL SPRING '.......?
RECOIL SPRING GUIDE
RECEIVER
BARREL LINK
BULLET RAMP
MAGAZINE CATCH
MAGAZINE TUBE
HAMMER
HAMMER PIN
GRIP SAFETY
STRUT PIN
SEAR PIN
SEAR
DISCONNECTOR
SEAR SPRING
HAMMER STRUT
MAINSPRING HOUSING
MAINSPRING CAP
MAINSPRING
RETAINER
HOUSING
LANYARD
LANYARD
PIN
LOOP PIN
LOOP
AGO 6431В
tacts the bottom of the slide. This pushes the ammunition deeper
into the magazine, forcing the follower down and further com-
pressing the magazine spring. When the magazine is fully seated
in the receiver, the magazine catch enters its recess and holds the
magazine in place. Feeding takes place as the slide moves rear-
ward off the top of the magazine. At this time, the expanding
magazine spring forces the follower and the ammunition up until
the top cartridge is held by the magazine lips, ready for chamber-
ing. Feeding is then complete.
23. Chambering
At the termination of the rearward movement of the slide
the expanding recoil spring forces the slide forward. The lower
portion of the face of the slide passes between the lips of the
magazine, strips the top cartridge from the magazine, and pushes
it to the bullet ramp and up into the chamber. During this move-
ment, the base of the cartridge slides up the face of the slide for
chamber alinement. At this time, the extractor enters the ex-
tractor groove on the base of the cartridge case. Chambering is
complete when the cartridge is fully seated in the chamber, and
the face of the slide is against the rear extension of the barrel.
24. Locking
After chambering is completed, the slide continues its forward
movement and pushes the barrel forward. As the slide continues
to exert force against the rear of the barrel, the barrel pivots up
and forward on the barrel link. At this time, the locking ribs on
the barrel enter the locking recesses in the slide, thereby locking
the barrel to the slide. The forward movement of the recoiling
parts terminates when the barrel lugs strike the slide stop pin.
25. Firing
a. For the pistol to fire, the slide must be fully forward to com-
plete the linkage between the trigger, disconnector, and sear. The
grip safety must be pressed inward in order to elevate the for-
ward projection on the grip safety. This causes it to clear the
trigger and allows trigger movement rearward.
b. When the trigger is squeezed, the trigger yoke presses
against the disconnector, which in turn transmits this movement
to the sear. The sear rotates on the sear pin and disengages from
the full cock notch of the hammer. The expanding mainspring
pushes the hammer strut up, forcing the hammer to rotate for-
ward on the hammer pin and strike the firing pin. The inertia-
type firing pin travels forward, compressing the firing pin spring.
AGO 6431 в
27
The firing pin striker moves through the firing pin well in the
face of the slide and strikes the cartridge primer. The primer
ignites the propellant and the expanding powder gases force the
bullet through the barrel. The firing pin spring expands and
withdraws the firing pin from the face of the slide.
26. Unlocking
The powder gases exert equal pressure in all directions, but
because the resistance of the recoil spring and the weight of the
slide and barrel are so much greater than the weight of the
bullet, these parts react more slowly than the bullet. This allows
the bullet to leave the barrel before unlocking is completed. As
the slide and barrel move rearward, the barrel pivots to the rear
and down on the barrel link, separating the barrel locking ribs
from the locking recesses in the slide, and unlocking is completed.
27. Extracting
The slide continues its rearward movement and the extractor,
engaged in the extractor groove of the cartridge, withdraws the
cartridge case from the chamber. Extraction is completed as the
cartridge case clears the chamber.
28. Ejecting
As the slide continues to move rearward, the cartridge case,
which is held against the face of the slide by the extractor, strikes
the ejector on the receiver, pivots on the extractor, and is ejected
from the pistol.
29. Cocking
Cocking begins as the slide starts rearward in recoil. At this
time, the firing pin stop pushes the hammer rearward. As the
hammer moves rearward, the hammer strut is pushed down
against the mainspring cap, compressing the mainspring. Rear-
ward movement of the slide terminates as the slide strikes the
recoil spring guide collar, which rests against the receiver. The
expanding recoil spring causes the slide to begin its forward
movement. As the slide moves forward, the hammer follows it
for a short distance; then the sear, which is bearing against the
hammer through the action of the sear spring, enters the full
cock notch of the hammer and holds it in the cocked position.
When the slide is fully forward and the trigger is released, the
disconnector positions itself in its recess in the bottom of the slide
and cocking is completed.
28
AGO 6431B
30. Action of the Sear and Disconnector
a. The disconnector is the device that causes the pistol to fire
semiautomatically. The disconnector forms a linkage between
the trigger and the sear that is broken when the slide is not
fully forward or if the trigger is held to the rear. When the slide
is fully forward, the top of the disconnector rests in its recess
in the bottom of the slide. At this time, the flat face on the lower
portion of the disconnector, which always rest against the trigger
yoke, is up and in front of the lower sear lugs. The center leaf
of the sear spring applies continuous forward and upward
pressure to the disconnector to position the disconnector and the
trigger.
b. As the trigger moves to the rear, the trigger yoke pushes
the disconnector against the sear lugs. As the sear lugs are forced
rearward, the sear rotates on the sear pin, causing the sear to
disengage from the full cock notch and release the hammer.
c. As the slide moves rearward, the disconnector recess in the
bottom of the slide overrides the top of the disconnector. The
disconnector is then forced down by the bearing surface on the
bottom of the slide. The hole through the disconnector is much
larger than the diameter of the sear pin; this allows up and down
movement of the disconnector. As the disconnector moves down-
ward, the lower portion drops below and breaks contact with the
sear lugs.
d. When the slide is not fully forward the connecting linkage
is broken and the sear functions independently of the trigger and
disconnector. At this time the left leaf of the sear spring pushes
forward on the left sear lug, causing the sear nose to continuously
bear against the hammer. After the hammer moves forward a
short distance, the sear nose engages the full cock notch on the
hammer and holds the hammer in the cocked position.
e. After the slide returns forward, the trigger must be re-
leased to allow the disconnector to reposition before another
cartridge can be fired. Upon release of the trigger, the center
leaf of the sear spring pushes the disconnector forward and up.
The top of the disconnector enters its recess in the bottom of the
slide. The lower portion of the disconnector positions itself in
front of the sear lugs and completes the linkage among the
trigger, disconnector, and sear.
31. Safety Devices
The pistol has three safety devices: the grip safety, the safety
lock, and the half cock notch on the hammer. The safeties must be
AGO 6431B
29
tested often and always before the pistol is fired. The discon-
nector is not considered a positive safety, as are the three safeties
mentioned above, since it is designed to cause the pistol to fire
semiautomatic fire and cannot be controlled by the firer.
32. Operational Tests Before Firing
Warning: Before making the following tests inspect to insure
that the magazine is removed and the chamber is empty.
a. Safety Lock. Cock the hammer and press the safety lock up
into the SAFE position. Grasp the stock so that the grip safety
is depressed and squeeze the trigger three or four times. If the
hammer falls, the safety lock is not safe and must be replaced.
b. Grip Safety. Cock the hammer and, being careful not to
depress the grip safety, point the pistol down, and squeeze the
trigger three or four times. If the hammer falls, the grip safety
or sear spring must be replaced.
c. Half Cock Notch. Pull the hammer rearward until the sear
engages the half cock notch and squeeze the trigger. If the
hammer falls, the hammer or sear must be replaced. Pull the
hammer rearward nearly to the full cock notch and let it fall. It
should fall only to the half cock notch.
d. Disconnector. Cock the hammer and push the slide % inch
to the rear; hold the slide in that position and squeeze the trigger.
Let the slide go forward, maintaining the pressure on the trigger.
If the hammer falls, the disconnector is worn and must be re-
placed. Pull the slide all the way to the rear, squeeze the trigger
and release the slide; the hammer should not fall. Release the
pressure on the trigger, squeeze it, and the hammer should fall.
The disconnector prevents the release of the hammer until the
slide and barrel are fully forward and locked. If the hammer falls
upon release of the slide, the disconnector should be replaced.
Section III. LOADING, FIRING, AND UNLOADING
33. Load
Draw the pistol from the holster and hold it at the position of
raise pistol (fig. 29). Insert a magazine loaded with from one to
seven rounds of ammunition. Grasp the slide with the left hand,
thumb on the right side of slide as shown in figures 27 and 28.
Pull the slide fully to the rear, release, and press the safety lock
up to the SAFE position with the left forefinger.
34. Fire
To fire the pistol, press the safety lock down to the FIRE
position with the left thumb to prevent disturbing the firing grip
30
AGO 6431B
Figure 27. Load.
AGO 643113
31
Figure 28. Position of hands at load.
of the right hand. Obtain the correct sight alinement and sight
picture and squeeze the trigger. To fire successive shots, the
trigger must be released and squeezed again. When the last
cartridge from the magazine has been fired, the slide remains
to the rear.
35. Unload
To unload, come to the position of raise pistol. Press the mag-
azine catch and remove the magazine (fig. 30). If the slide is in
the forward position, pull the slide to the rear and push the slide
stop up. Inspect the chamber to insure that the pistol is clear.
Press the slide stop down, allowing the slide to go forward. Re-
maining at raise pistol, squeeze the trigger; then holster the
weapon.
Section IV. MALFUNCTIONS, STOPPAGES, AND
IMMEDIATE ACTION
36. General
The pistol is a mechanical device and, as parts become worn,
broken, dirty, or dry, stoppages may occur during firing. Sufficient
knowledge of malfunctions, stoppages, and immediate action is
32
AGO 6431В
required to find and correct malfunctions or stoppages in a mini-
mum of time.
37. Malfunctions
A malfunction is a failure of the weapon to function satis-
factorily. Malfunctions are classified as defects in the weapon
that normally do not cause a break in the cycle of operation. These
may be discovered when the operational tests are being performed
(par. 32). The following are some malfunctions and their causes:
a. The grip safety does not block the trigger; a faulty sear
spring.
b. The slide does not remain to the rear after the last round
is fired; a worn or broken magazine follower step, slide stop, or a
weak or broken magazine spring.
38. Stoppages
a. A stoppage is any unintentional interruption in the cycle of
operation. If the pistol stops firing through no fault of the firer,
or an attempt to fire is made and the weapon does not fire, then a
stoppage has occurred.
b. Stoppages are classified in accordance with the eight steps
in the cycle of operation. Stoppages are usually the result of worn
parts or improper care of the weapon. A knowledge of func-
tioning enables the soldier to classify and correct stoppages. The
following are the main classifications of stoppages and their
causes:
(1) Failure to feed. The top cartridge in the magazine is not
properly positioned behind the barrel and in the path
of the slide. Caused by—
(a) Dirty or dented magazine.
(b) Weak or broken magazine spring.
(c) Worn or broken magazine catch.
(d) Improper assembly (magazine spring backwards).
(e) Bent magazine follower.
(2) Failure to chamber. The top cartridge from the mag-
azine is not fully seated in the chamber. Caused by—
(a) Dirty chamber.
(b) Dented cartridge case.
(c) Weak recoil spring.
(d) Obstruction in the chamber.
(e) Lack of lubrication.
AGO 6431B
33
(У) Extractor applying too much pressure on the right
side of the cartridge.*
(3) Failure to lock. The barrel locking ribs do not interlock
with the locking recesses in the slide. Caused by—
(a) Lack of lubrication of operating parts.
(b) Burred or dirty barrel locking ribs or locking recesses.
(c) Weak recoil spring.
(d) Broken barrel link.
(e) Extractor applying too much pressure on the right
side of the cartridge.*
(4) Failure to fire. The hammer falls but the primer of the
cartridge is not ignited. Caused by—
(a) Faulty ammunition.
(b) Broken firing pin.
(c) Bent or broken hammer strut.
(d) Weak mainspring.
(5) Failure to unlock. The barrel locking ribs do not dis-
engage from the locking recesses in the slide. Caused
by—
(a) Broken barrel link.
(b) Broken barrel link pin.
(c) Broken barrel lugs.
(6) Failure to extract. The cartridge case is not removed
from the chamber. Caused by—
(a) Broken or worn extractor.
(b) Dirty or pitted chamber.
(7) Failure to eject. The cartridge case is not ejected from
the pistol. Caused by—
(a) Faulty extractor (does not position the cartridge case
for ejection).
(b) Broken ejector.
(8) Failure to cock. The hammer does not return to the
cocked position. Caused by—
(a) Worn full cock notch on the hammer.
(b) Worn sear.
(c) Defective sear spring.
(d) Worn or broken disconnector.
•The extractor groove in steel cased ammunition is shorter than that of
brass cases. The extractor was designed for use with brass cases. When
firing with steel cased ammunition, the extractor, in many instances, will not
fully seat in the extractor groove. This will create friction during the for-
ward movement of the slide, particularly with tight fitted weapons. Modifi-
cation of the extractor is permitted only by Ordnance personnel, or specially
trained Armorers.
34
AGO 6431В
39. Immediate Action
a. Immediate action is the prompt action taken by the firer to
reduce a stoppage. The procedure for applying immediate action
should become instinctive for the soldier armed with the pistol.
If a stoppage occurs, immediate action is applied automatically
in an effort to reduce the stoppage without attempting to dis-
cover the cause at that time.
b. In the event the slide is fully forward, the hammer falls,
and the pistol fails to fire, apply immediate action as follows:
(1) Manually cock the hammer without opening the chamber
and make one additional attempt to fire. If the pistol
still fails to fire, wait 10 seconds, and then come to the
position of raise pistol. Grasp the slide with the thumb
and first finger of the left hand, keeping the thumb on
the right side of the slide. Pull the slide rearward
rapidly, to its full extent. Rotate the pistol to the right
allowing the unfired round to drop out, release the slide
and allow it to return to the forward position, chamber-
ing a new cartridge.
Caution: Keep the weapon pointed downrange during
this operation.
(2) Aim and attempt to fire.
c. In the event the slide is not fully forward, remove the trigger
finger from the trigger guard and with the non-firing hand at-
tempt to push the slide fully forward. If the slide will not move
forward, proceed as follows:
(1) Bring the weapon to raise pistol.
(2) Remove the magazine.
(3) Grasp the slide with the left hand as in inspection arms,
pull the slide to the rear, and lock it with the slide stop.
(4) Inspect the chamber. Remove any obstructions.
(5) Insert another loaded magazine into the pistol.
(6) Release the slide.
(7) Aim and attempt to fire.
d. If the weapon does not fire after application of immediate
action as outlined above, a detailed inspection should be made to
determine the cause of the stoppage.
Section V. CARE AND CLEANING
40. General
Care and cleaning of the pistol includes daily preventive main-
tenance, which is that ordinary care of the pistol required to
AGO 6431B
35
preserve its condition and appearance when no firing is done.
Before-firing cleaning insures that the pistol is safe to fire and
is properly lubricated for efficient operation, and after-firing
cleaning insures that all corrosion-inducing agents deposited in
the bore and chamber of the pistol are completely removed.
41. Cleaning Materials, Lubricants, and Rust Preventives
a. Cleaning Materials.
(1) Cleaning compound, solvent (rifle bore cleaner), is used
to clean the bore and the face of the slide after firing.
It dissolves corrosive primer salts and removes powder
ash and carbon. This cleaner has preservative properties
and provides temporary protection against rust.
Caution: Rifle bore cleaner is usable at temperatures
of minus 20° Fahrenheit and higher. Do not mix water
with rifle bore cleaner. This destroys its preservative
qualities and impairs its value as a cleaner.
(2) Hot soapy water may be used to clean the bore when
rifle bore cleaner is not available. One-quarter pound of
soap dissolved in one gallon of water makes a desirable
cleaning solution. After using the solution, dry the
barrel thoroughly and apply a light coat of oil.
(3) Volatile mineral spirits, paint thinner, and dry-cleaning
solvent are noncorrosive solvents used for removing oil,
grease, or light rust-preventive compounds from
weapons. Apply these cleaning agents with a rag to
large parts, and use it as a bath for small parts.
Caution: These solvents are highly flammable. Do
not smoke when using them. Continuous contact with
them will dry the skin and may cause irritation.
(4) Decontaminating agents are used under special condi-
tions to remove chemical agents (par. 46).
(5) The swab, small arms cleaning, is a good grade of un-
bleached, single-base, napped flannel cotton. Swabs are
in the form of cut patches, 2Ц> inches square, and are
used for the cleaning of bores of small arms.
(6) Rags, wiping, cotton, are soft and absorbent cloth,
usually composed of light clothing rags, free from dust,
alkali, and corrosive agents. Rags are used to clean
small arms and other items of equipment.
b. . Lubricants.
(1) Lubricating oil, general purpose, PL medium, is a highly
36
AGO 6431B
refined, nonhardening mineral oil containing a rust
inhibiting additive. It forms a relatively heavy film
that resists direct action of salt spray. This makes it
useful for coating all parts of a weapon before am-
phibious operations. It should be used in preference to
lubricating oil, general purpose, PL special, only when
the weapon is exposed to salt water, high humidity, or
high temperatures. This oil should not be used in tem-
peratures below freezing.
(2) Lubricating oil, general purpose, PL special, is a thin
oil used for lubricating at below freezing temperatures,
and for providing temporary protection against rust.
When this oil is used, moving parts of weapons must be
inspected frequently to make sure that they have an
adequate film of lubricant.
(3) Engine oil, SAE 10, may be used when preservative
lubricating oils cannot be obtained. In cold weather, any
heavy oil will cause sluggish operation, and may prevent
the pistol from functioning properly. Engine oil does
not contain the rust-preventive properties of lubricating,
preservative oils. When engine oil is used, the pistol
must be inspected, cleaned, and oiled frequently.
42. Daily Preventive Maintenance
a. Damp air and sweaty hands are great promoters of rust.
Pistols should be cleaned and protected with oil after every drill
or handling. The pistol should be inspected each day and cleaned
if necessary.
b. To clean the pistol, rub it with a rag lightly saturated with
oil, and then rub with a dry rag. Clean the bore with a swab
saturated with oil, then with a dry swab. Dust out all crevices
with a small, clean brush.
c. To protect the pistol after it has been cleaned, cover all the
surfaces, including the bore and chamber, with a light coat of
lubricating, preservative oil.
d. After cleaning and oiling the pistol, place it in the pistol
rack. The use of canvas or similar covers is prohibited, since
they collect moisture, which rusts the metal.
43. Care and Cleaning Before Firing
Before the pistol is fired, the bore and chamber and exterior
parts of the receiver of the pistol should be cleaned and dried.
The guide rails on the receiver and the grooves on the slide should
be lubricated with oil. A light coat of oil should be placed on all
AGO 6431B
37
other interior metal parts except those that come into contact
with ammunition. Excess oil should be removed from the grips
and the grip area of the receiver to aid the firer in gripping the
weapon.
44. Care and Cleaning After Firing
The pistol must be cleaned as soon as practicable on the day of
firing and daily for the next three days, or longer if necessary, in
the following manner:
a. Disassemble the pistol.
b. Clean all parts with a rag lightly saturated with oil. Dry
all parts and apply a light coat of oil.
c. Clean the bore and chamber as follows:
(1) Wet a swab with rifle bore cleaner and run it back and
forth through the bore several times.
(2) Attach the pisol bore brush to the cleaning rod and run
it through the bore and chamber several times.
(3) Run dry swabs through the bore and chamber until they
are clean.
(4) Inspect the bore for cleanliness. If it is not free of all
residue, repeat the cleaning process.
(5) When the chamber and bore are clean, coat them with
rifle bore cleaner and leave overnight.
(6) Assemble the pistol.
(7) Perform the test for correct assembly (par. 19).
(8) Apply a light coat of oil to the exterior surfaces of the
pistol.
(9) After the third daily cleaning, if the bore and chamber
are clean, remove the rifle bore cleaner and replace with
a light coat of lubricating, preservative oil.
45. Care and Cleaning Under Unusual Climatic Conditions
a. Cold Weather.
(1) In temperatures below freezing, it is necessary that the
moving parts of the weapon be kept free from moisture.
Excess oil on working parts will solidify and cause
sluggish operation or complete failure.
(2) Before cleaning, allow the weapon to attain room tem-
perature. Perform detailed disassembly and clean with
dry-cleaning solvent or mineral spirits before use in
temperatures below 0° F. Working surfaces that show
signs of wear may be lubricated by rubbing lightly with
a rag that has been wet with oil, lubricating, general
purpose, PL special.
38
AGO «431В
Ъ. Hot Weather.
(1) In tropical climates where temperature and humidity
are high, or where salt air is present, and during rainy
seasons the weapon should be inspected daily and kept
lightly oiled. It should be disassembled daily and all
parts dried and oiled.
(2) In hot, dry climates where sand and dust may get into
the mechanism and bore, all lubricants should be re-
moved from the pistol, and it should be disassembled
daily for thorough cleaning. It should be wiped clean
as often as required.
46. Care and Cleaning After a CBR Attack
a. Before Attack. If a chemical, biological, or radiological
(CBR) attack is anticipated, the following action is taken: Apply
oil to all outer metal surfaces of the pistol. Do not apply oil to
the ammunition. If the pistol is not to be used, cover the weapon,
accessories, and ammunition with protective coverings and place
them under natural cover. Ammunition should be kept in original
containers as long as possible before anticipated use.
b. After Attack. After a CBR attack, determine by means
of detectors whether or not the equipment is contaminated. A
complete suit of protective clothing, including protective gloves
and a gas mask, must be worn during decontamination. If the
contamination is too great, it may be necessary to discard the
equipment. Detailed information on decontamination is con-
tained in FM 21-40 and TM 3-220.
47. Cleaning Pistols Received From Storage
Pistols removed from storage are coated with lubricating oil,
general purpose, preservative, medium, or corrosion-preventive
compound, class 2, (medium film). Weapons received from ord-
nance storage are usually coated with corrosion-preventive com-
pound. Use mineral spirits or paint thinner to remove the com-
pound or oil. Failure to thoroughly clean all the parts may
cause a stoppage at below normal temperatures, since the cor-
rosion-preventive compound will congeal during cold weather.
After using mineral spirits or paint thinner, dry all parts with
a dry cloth, and apply a thin film of appropriate lubricating oil.
Section VI. REPAIR PARTS AND ACCESSORIES
48. Repair Parts
a. Repair parts sets are provided for replacement and must be
kept complete at all times. The allowance of these repair parts is
prescribed in ORD 7, SNL B6.
AGO 6431B
39
b. The allowance of spare magazines issued with the pistol is
also prescribed in ORD 7, SNL B6.
49. Accessories
The names or general characteristics of many of the acces-
sories required for the pistol indicate their use and application.
They consist of the hip holster, shoulder holster, and pistol clean-
ing kit. The pistol kit contains wire bore brushes, cleaning rods,
pistol screwdrivers, an oiler, and a small brass can in which a
set of repair parts is carried.
Section VII. AMMUNITION
50. General
a. The soldier armed with the pistol must be familiar with the
types of ammunition for use in the pistol, ways of identifying
each type of ammunition, and how to care for, handle, and use it.
b. A pistol cartridge is a complete assembly consisting of all
the components necessary to fire the weapon once; that is, the
cartridge case, bullet, propellant powder, and primer.
51. Classification of Ammunition
The contents of original boxes or containers can be identified
by markings on the box. These markings indicate the number of
cartridges in the container, the caliber, the type, the code symbol,
and the lot number. The types, uses and means of identification
of ammunition for use in the pistol are:
a. Cartridge, Caliber .45, Ball, M1911, is for use against per-
sonnel and light materiel targets. The ball bullet consists of a
metal jacket surrounding a lead alloy core. The bullet tip is
unpainted.
b. Cartridge, Caliber .45, Blank, M9, is used to simulate fire
and for salutes. This cartridge can be fired single shot only in
the pistol. It can be identified by the absence of a bullet and by
its tapered mouth.
c. Cartridge, Caliber .45, Dummy, M1921, is used for training
personnel in the operation of loading and unloading the pistol,
and for testing weapons. It is used also in marksmanship train-
ing by being mixed with live ammunition during instruction prac-
tice firing. This cartridge can be identified by the empty primer
pocket and two holes in the cartridge case.
d. Cartridge, Caliber >45, Tracer, M26, is used for observation
of fire. Secondary uses are for incendiary effect and for signaling.
40
AGO 6431B
The bullet consists of three parts: a copper-plated steel, or guid-
ing metal-clad, steel jacket; a slug of lead hardened with anti-
mony; and a tracer mixture in the rear portion of the jacket.
For identification the bullet is painted red for a distance of
approximately y16 of an inch from the tip.
52. Ammunition Lot Number
At time of manufacture, ammunition is assigned a lot number
that is marked on all packing containers and is entered on all
records pertaining to that ammunition. It must be included in
all reports on the condition and functioning of the ammunition
and in all reports of accident in which the ammunition is involved.
Therefore, it is important to retain the lot number with the car-
tridges after they are removed from their original containers.
If cartridges cannot be identified by ammunition lot number,
they are automatically placed in grade 3. Grade 3 ammunition
is unserviceable; it will not be fired, but will be turned in to the
issuing ordnance officer.
53. Сагё, Handling, and Preservation of Ammunition
a. Small arms ammunition is generally safe to handle. How-
ever, do not allow ammunition boxes to become broken or dam-
aged. Repair broken boxes immediately. Transfer all original
markings to the new parts of the box.
b. Do not open ammunition boxes until the ammunition is to
be used. Ammunition removed from airtight containers, particu-
larly in damp climates, is likely to corrode, thereby becoming
unserviceable.
c. Use care when opening wooden ammunition boxes, which
can be continued in use as long as they are serviceable.
d. Protect ammunition from mud, sand, dirt, and water. If
it appears wet or dirty, wipe clean with a dry cloth immediately.
Wipe off light corrosion as soon as it is discovered. Cartridges
with a heavy coat of corrosion must be turned in to the issuing
ordnance officer.
e. Do not oil or polish cartridges.
f. Do not expose ammunition to the direct rays of the sun for
any length of time. If the powder is heated, excessive pressure
will be developed when the weapon is fired. This condition will
affect accuracy and the operation of the weapon.
g. Do not attempt to fire cartridges that have dents, scratches,
loose bullets, or corroded cases. If the cartridge is defective, turn
it in. Do not throw away or attempt to destroy defective
ammunition.
AGO 6431B
41
h. Do not strike the primer of a cartridge; it may ignite and
cause injury.
54. Storage of Ammunition
a. Small arms ammunition is not an explosive hazard; how-
ever, under poor storage conditions it may become a fire hazard.
b. Small arms ammunition should be stored away from all
sources of extreme heat.
c. Whenever practicable, small arms ammunition should be
stored under cover. If necessary to leave ammunition in the open,
it should be raised on dunnage at least six inches from ground.
It should be covered with a double thickness of tarpaulin or suit-
able canvas. The cover should be placed so that it gives maximum
protection, yet allows free circulation of air. Suitable trenches
should be dug to prevent water from flowing under the
ammunition.
55. Precautions in Firing Ammunition
The precautions concerning the firing and handling of ammuni-
tion in the field prescribed in AR 385-63 and TM 9-1990 must
be observed. Precautions particularly applicable to small arms
ammunition include the following:
a. No small arms ammunition will be fired until it has been
positively identified by ammunition lot number and grade.
b. Before firing, the firer must be sure that the bore of the
pistol is free from any foreign matter. Firing a pistol with any
obstruction in the bore will result in damage to the weapon and
possible injury to the firer.
56. Hangfire
a. A hangfire is a delay in the functioning of a propelling
charge or explosive train at the time of firing. The amount of the
delay is unpredictable but in most cases will be from a fraction
of a second to several seconds. Thus, a hangfire cannot be dis-
tinguished immediately from a misfire and therein lies the prin-
cipal danger—that of assuming that a failure of the weapon to
fire immediately is a misfire when in fact it proves to be a hang-
fire. For this reason, the time interval of 10 seconds should be
observed before the slide is opened after a failure to fire.
Caution: During the prescribed time interval keep the pistol
pointed toward the target.
b. If the slide is fully forward and the pistol fails to fire,
recock the hammer without opening the chamber, and make one
42
AGO 6431B
additional attempt to fire. If the pistol still fails to fire wait 10
seconds before pulling the slide to the rear to remove the car-
tridge from the chamber.
c. When a hangfire occurs in any lot, use of the ammunition
in that lot should be suspended and a report made to the post
ordnance officer, giving the number of the lot involved. The lot
thus affected will be withdrawn and replaced by serviceable
ammunition.
AGO 6431B
43
CHAPTER 3
MANUAL OF ARMS FOR THE PISTOL
57. General
a. Pistol movements are not executed in cadence.
t>. During the manual of arms for the rifle, personnel armed
with the pistol remain at attention except when the command
INSPECTION ARMS or PRESENT ARMS is given.
c. When PRESENT ARMS is given, the HAND SALUTE is
executed.
58. Inspection Arms
At the command INSPECTION ARMS, execute the following
movements in sequence. (These movements may be executed
separately in response to the appropriate command.)
a. Raise Pistol. At the command RAISE PISTOL, unbutton
the snap fastener of the shoulder holster with the right hand and
grasp the receiver with the back of the hand facing outward.
Draw the pistol from the holster. Bring the elbow in to the side
and hold the forearm at an angle from the vertical, so that the
hand is as high as, and approximately 6 inches in front of, the
right shoulder. Hold the receiver with the thumb and last three
fingers and extend the forefinger outside and along the trigger
guard. Point the muzzle outward and up at an angle approxi-
mately 30 degrees from the vertical (fig. 29). If wearing a hip
holster, at the command RAISE PISTOL, unbutton the flap, draw
the pistol from the hip holster, and assume the position of raise
pistol.
b. Withdraw Magazine. At the command WITHDRAW MAG-
AZINE, without lowering the right hand, turn the pistol slightly
to the right and press the magazine catch with the right thumb
(fig. 30). With the left hand, remove the magazine and place it
between your belt and outer garment on the left side, with open
end down and front to the right.
c. Open Chamber. At the command OPEN CHAMBER, with-
out lowering the right hand, grasp the slide with the left thumb
and first two fingers so that the thumb is on the left side of the
slide and pointing down. Keeping the muzzle elevated, shift
44
AGO 6431В
Figure 29. Raise pistol.
AGO 6431В
45
Figure 30. Withdraw magazine.
46
AGO 6431В
Figure 31. Open chamber.
AGO 6431B
47
Figure 32. Inspection arms.
48
AGO «431В
the grip of your right hand, so that the right thumb engages the
slide stop; push the slide fully to the rear and engage the slide
stop in the slide stop recess with the right thumb (fig. 31). Re-
sume the position of raise pistol, with the slide to the rear. Take
the magazine out of the belt and hold it in the open hand at the
height of the belt, with the open end of the magazine to the front
and the front of the magazine to the left (fig. 32). If the inspect-
ing officer takes the pistol for inspection, lower the right hand
smartly to your side as in the position of attention. When the
inspector is ready to return the pistol, raise the right hand to the
raise pistol position.
d. Close Chamber. After the pistol has been inspected, or at
the command of CLOSE CHAMBER or PORT ARMS, press the
slide stop down with the right thumb and let the slide go forward.
Pull the trigger and remain at raise pistol.
e. Insert Magazine. At the command of INSERT MAGAZINE,
without lowering the right hand, turn the barrel slightly to the
right. Grasp the magazine with the first two fingers and thumb
of the left hand, insert it into the pistol, press the magazine
upward until it is engaged by the magazine catch, and resume the
position of raise pistol (fig. 29).
59. Return Pistol
a. Execute this movement on the command RETURN PISTOL
or on the command ORDER (RIGHT SHOULDER) ARMS after
INSPECTION ARMS and PORT ARMS have been given.
b. Upon the command of execution, lower the pistol to the
shoulder holster, raise the snap fastener of the holster with your
right thumb, insert the muzzle of the pistol into the holster, and
thrust it home. Button the snap fastener of the holster with the
right hand. When wearing a hip holster, at the command RE-
TURN PISTOL, return the pistol to the holster, directly from the
position of raise pistol.
AGO 6481B
49
CHAPTER 4
MARKSMANSHIP TRAINING
Section I. GENERAL
60. Introduction
The primary use of the pistol is to engage an enemy at close
range with quick, accurate fire. Accurate shooting is the result of
knowing and correctly applying the important elements of marks-
manship.
61. Fundamentals of Marksmanship
The important elements of marksmanship are—
a. Aiming (sight alinement and sight picture).
b. Positions (grip of the pistol and body positions).
c. Trigger squeeze.
62. Phases of Training
a. Marksmanship training is divided into two phases—
(1) Preparatory marksmanship training.
(2) Range firing.
b. Each of the two phases may be divided into separate instruc-
tional steps. All marksmanship training must be progressive.
Section II. PREPARATORY MARKSMANSHIP TRAINING
63. General
a. A thorough course in preparatory marksmanship training
must precede any range firing. This training must be given to
all soldiers expected to fire the pistol on the range, including
those who have previously qualified with the weapon. The soldier
should develop correct shooting habits before range firing. The
purpose of preparatory marksmanship training is to establish
and correct shooting habits.
b. Preparatory marksmanship draining is divided into seven
steps which should be taught in the following order:
(1) Aiming.
(2) Positions.
50
AGO 6431B
(3) Trigger squeeze.
(4) Slow fire.
(5) Rapid fire.
(6) Quick fire.
(7) Examination.
64. Coaching
a. Throughout preparatory marksmanship training, the coach-
and-pupil method of training should be used. The ultimate pro-
ficiency of a pupil depends to a great extent on how well his coach
performs his coaching duties. The coach assists the firer by—
(1) Correcting any errors made.
(2) Insuring that he takes proper firing positions.
(3) Insuring that he observes all safety precautions.
b. Duties of the coach during instruction practice and record
firing are—
(1) Check to see that the—
(a) Pistol is cleared.
(b) Ammunition is clean.
(c) Sights are blackened.
(d) Magazines are clean and operational.
(2) Observe the firer to see that he—
(a) Takes the correct firing position.
(b) Loads the pistol properly and only on command.
(c) Takes up the trigger slack correctly.
(d) Squeezes the trigger correctly. The coach cannot tell
by watching the trigger finger whether the shooter
squeezes or jerks the trigger. The coach must observe
the firer for signs that indicate that the firer is antici-
pating the recoil of the weapon. These signs are gen-
eral nervousness, fluttering of the eyelids, small mus-
cular spasms around the mouth, nose, and eyes. The
most obvious indication of faulty trigger squeeze is
the location of the strike of the bullet in relation to
the center of the target. It is the coach’s duty to
observe the firer during the firing and look for these
indications and correct them.
(e) Calls the shot each time he fires. (Except for quick
fire and rapid fire.)
(/) Holds his breath correctly.
(g) Lowers his pistol and rests his arm when he does not
fire a round within 8 or 9 seconds.
AGO 6431B
51
(3) If a firer is tense and nervous, have him breathe deeply
several times to relax.
(4) After each table of fire is completed, inspect the pistol
to make sure it is clear. Score the target and record the
results.
c. During record firing, coaching is not permitted. No person
may render or attempt to render the firer any assistance while
he is taking his position or after he has taken his position at the
firing point. Each firer must observe the location of his hits and
assist the coach in scoring. The coach will manipulate the targets
during rapid fire and quick fire exercises. He will also insure
that the magazines are loaded with the correct amount of ammuni-
tion for each firing table.
65. Aiming
a. Sight alinement or aiming is placing the front and rear sights
of the pistol into correct alinement with the eye. For correct
sight alinement, the firer must center the front sight in the rear
sight and raise or lower the top of the front sight, so that it is
level with the top of the rear sight (fig. 33).
b. A sight picture is the pattern of the pistol sights in relation
to the target as seen by the firer when he aims the pistol. A cor-
rect sight picture consists of correct sight alinement with the
bull’s-eye centered above and appearing to touch the top of the
front sight (fig. 33). When aiming, the eye cannot focus on three
objects (rear sight, front sight, bull’s-eye) at different ranges.
Therefore, the last focus of the eye is always on the front sight.
The front and rear sights will be seen clear and sharp while the
bull’s-eye will appear to be a bit hazy. With correct sight aline-
ment, the strike of the bullet will be in the bull’s-eye even if the
sight picture is partially off the center but still touches the bull’s-
eye. Since it is impossible to hold the weapon perfectly still, the
shooter must understand that he must apply trigger squeeze (par.
69b) and maintain correct sight alinement while the weapon is
moving in and around the bull’s-eye. This movement of the weapon
is referred to as “wobble area.” The shooter must trust this
wobble area or movement and make an effort to keep the wobble
or movement of the weapon to a minimum.
c. Correct sight alinement is essential for accuracy, particularly
with the pistol because of the short sight radius. For example,
if a Ио-inch error is made in alining the front sight in the rear
sight, the bullet will miss the point of aim by approximately 15
inches at 25 meters of range. The У „-inch error in sight alinement
52
AGO 6431В
magnifies itself as the range increases; at 25 meters it is magni-
fied 150 times.
d. If the firer does not call his shot correctly in range firing,
he is not concentrating on sight alinement; consequently, he does
not know what his sight picture is as he fires. To call the shot
is to state where the bullet should strike the target according to
the sight picture at the instant the weapon fires: e.g. “high,”
“a little low,” “to the left,” “to the right,” or “bull’s-eye.” Another
specific method of calling the shot is the clock system: e.g., 9
o’clock or 2 o’clock.
e. It is important to emphasize that holding the breath properly
is necessary to good marksmanship. Emphasis upon this point is
required because many men hold their breath improperly or not
at all. The breath should be held while the firer is aiming and
squeezing the trigger. While the procedure is simple, it requires
explanation, demonstration, and supervised practice. To hold the
breath properly, the firer inhales an ordinary breath, lets a little
out, and holds the rest by closing the throat.
66. Sighting Bar Exercise
This exercise teaches correct sight alinement and the correct
sight picture. The M15 sight device may be used in addition to
the sighting bar.
a. The instructor displays a sighting bar and points out the
front and rear sights, the eyepiece, and the movable target. He
explains the following:
(1) The front and rear sights on the sighting bar represent
enlarged pistol sights.
(2) The sighting bar is used in the first aiming exercise
because, by its use, small errors can be detected easily
and explained to the pupil.
(3) Use of the eyepiece requires the pupil to place his eye
in such a position that he sees the sights in exactly
the same alinement as seen by the coach.
(4) Although there is no eyepiece on the pistol, the pupil
learns by use of the sighting bar how to aline the
sights properly when aiming the pistol.
(5) The movable target attached to the end of the sighting
bar provides a simple means for alining the bull’s-eye
with the sights.
b. The instructor explains how to sight with the sighting bar
and shows an example of correct sight alinement (fig. 33).
c. To illustrate correct sight alinement, the instructor, by
moving the rear sight, adjusts the sights of the sighting bar, with
AGO 6431 в
53
the target removed. He requires each student to look through
the eyepiece at the correct sight alinement.
d. The instructor then adjusts the sights to show various
small errors in sight alinement and requires each man to detect
the errors.
e. The instructor describes a correct sight picture, showing
an illustration to each man (fig. 33). He explains that the front
sight is seen through the center of the rear sight in such a man-
ner that its top is level with the top of the rear sight and just
touches the bottom of the bull’s-eye. All of the bull’s-eye can
be seen.
f. The instructor adjusts the sights of the sighting bar and the
movable target to illustrate a correct sight picture. Each man
looks through the eyepiece to observe the correct sight picture.
g. The instructor adjusts the sights and the movable target of
the sighting bar to illustrate various small errors. Each man
attempts to detect and describe them.
h. After completing the above exercise, coaches and pupils are
designated, and the exercise is repeated as time permits.
67. Positions
a. General. To assume the proper position for firing, it is
necessary to know the correct position of the body with relation
Figure 33. Correct sight alinement and sight picture.
54
AGO 6431В
to the target and how to grip the pistol correctly. The qualifica-
tion course is fired from the standing, kneeling, crouch, and
prone positions. The appropriate positions outlined and illus-
trated in this paragraph or similar positions contained in para-
graph 136 may be used. The one-hand grip is used for firing
from the standing position. The two-hand grip is used for firing
from the prone and kneeling positions.
b. One-Hand Grip. The most important feature of the grip
is uniformity. For tight shot groups, the grip must be the same
each time a shot is fired.
(1) To obtain the correct grip, pick up the pistol and place
it in the firing hand until the grip safety is pressed into
the Y formed between the thumb and forefinger of the
firing hand. The hand should be as high as possible on
the receiver without having the flesh squeezed between
the hammer and the grip safety.
(2) Grip the receiver firmly with the hand and fingers.
It is important to maintain the same degree of firmness
throughout the firing, because a change in the firmness
and position of the grip will change the location of the
shot group on the target. A tight grip will cause the
strike of the bullet to be low on the target, and a loose
grip will cause the shot to hit high on the target. There-
fore, a firm grip throughout the course of fire is essential.
To obtain a firm grip, the pistol is placed into the Y
formed by the thumb and forefinger with the main
spring housing resting firmly in the palm of the hand.
The lower three fingers are then wrapped around the
grip with the index finger resting comfortably under
the trigger guard. The thumb is held up and along the
left side of the pistol with enough pressure to steady
the pistol and to equalize any pressure being exerted on
the right side of the pistol by the palm and forefinger.
(3) Place the trigger finger inside the trigger guard so that
the finger will engage the front surface of the trigger
(fig. 35). The position of the trigger finger on the trig-
ger will differ among firers; however, the closer to the
second joint of the finger to the point of contact with
the trigger, the more leverage you can apply to the trig-
ger. Care should be exercised so that the trigger finger
does not touch either side of the receiver. Many shooters
use the first joint or tip of the finger. This area will af-
ford more sensitivity but less leverage. With the heavy
AGO 6431B
55
trigger pull (5 to 6]/2 lb.) on the service pistol, advantage
is gained by using the best leverage and control of the
trigger. Each shooter should experiment with the place-
ment of the trigger finger to ascertain which position of
the trigger finger gives the best control. The pressure
of the trigger finger is straight to the rear, with in-
creasing pressure to cause the weapon to fire.
c. Two-Hand Grip. The two-hand grip is used for firing from
the prone or kneeling position. It allows the firer to support the
one-hand grip thereby attaining more accuracy. The two-hand
grip is obtained as follows: Grip the pistol as prescribed in b
above; then firmly close the fingers and thumb of the free hand
over the firing hand in a manner that will provide maximum
support (fig. 34).
d. Standing Position. To assume the standing position, the
firer faces his target, then faces slightly more than 45 degrees left
or right. The feet are spread 12 to 18 inches apart, and the weight
of the body is balanced equally on both feet. The legs are straight
without stiffness and the hips level. The stance is adjusted so
that his firing arm points naturally at the target (fig. 35). After
he assumes this position, the firer picks up the pistol with his free
hand and takes the one-hand grip as prescribed in b above. When
the proper grip is taken, the muscles of the arm are firm without
being rigid. The pistol slide is a direct prolongation of the firing
Figure 3b. The two-hand grip.
56
AGO 6431B
Figure 35. Standing position.
arm, and the wrist is locked so that the weapon cannot search up
ur down. The elbow is straight and locked. The only pivot during
recoil is that of the shoulder joint. After recoil, when the firer is
in the correct position, the pistol arm will return to approximate
alinement with the target. Due to differences of body conforma-
tion of individuals the standing position may vary slightly, but re-
gardless of body conformation, the position assumed should be
AGO 6431В
57
relaxed and comfortable. The pistol, held in the firing position,
should point naturally and without undue effort at the center of
the target. Unless the body, the pistol, and the target are in cor-
rect alinement, the firer will be tense while aiming and firing each
shot. Muscular tension, in turn, causes trembling, excessive fa-
tigue, and movement of sights in the target area. If this occurs,
the entire body must be moved by shifting the feet until the pistol,
held in the firing position, points toward the center of the target.
The position of the body in the standing position is the same for
firing the revolver.
e. Prone Position. The prone position is used by the soldier
to obtain maximum stability when firing at 25-meter targets and
at longer ranges. This position will be used often in combat as it
makes a firer a smaller target and makes for maximum accuracy.
To assume the prone position, the firer drops to his knees and falls
forward, breaking his fall with his free hand. He lies flat on the
ground with legs apart, heels down. The head and body are on a
line with the target. The arms are extended with the pistol held
in the two-hand grip (fig. 36).
Caution: The arms must be extended far enough to prevent the
slide from striking the firer in the face during recoil. This pre-
caution also applies in the kneeling position.
f. Kneeling Position. The kneeling position is used to obtain
increased accuracy, in rapid fire, at longer ranges. To assume the
kneeling position, the firer kneels on the right knee and rests his
left upper arm on the raised left knee (which is pointed toward
Figure 36. The prone position; two-hand grip.
58
AGO 64Э1В
the target), with the elbow projecting beyond the knee to give
support. The weight of the body is distributed on the calf of the
right leg and heel of the right foot. The receiver of the pistol, held
in the one-hand grip, is then seated on the palm of the left hand
and the two-hand grip is used (fig. 37). Men who shoot left-
handed will reverse the position.
g. Crouch Position, Point Fire. The crouch position is used
when surprise targets are engaged at close range. The body is in
a forward crouch (boxer’s stance) with the knees bent slightly
and trunk bent forward from the hips. The feet are placed natural-
ly in a position that will allow another step toward the target. At
all times, the body should be maintained in a balanced position,
facilitating rapid movement in any direction. The pistol is
Figure 37. Kneeling position; two-hand grip.
AGO 6431B
59
extended straight toward the target, and the wrist and elbow of
the firing arm are locked (fig. 62).
h. Pistol Ready Position. In the pistol ready position, the pis-
tol is held in the one-hand grip. The upper arm is held close to the
body, and the forearm is in a horizontal position. The pistol is
pointed toward the target area as the firer moves forward.
68. Position Exercises
a. First Exercise (Standing Position).
Note. Required for this exercise area line of 25-yard pistol targets
(standard American) and firing points at 15 and 25 meters.
(1) The instructor places the men, armed with the pistol, on
line at 1-pace intervals. He gives the command INSPEC-
TION ARMS and verifies that all pistols are clear.
(2) He demonstrates the position of the hand in gripping the
pistol and describes the grip in detail.
(3) He demonstrates the correct standing position.
(4) He requires each firer to hold his pistol in the one-hand
grip and to assume the correct standing position. Assis-
tant instructors correct all errors.
(5) The instructor then places the men in pairs on the 15-
meter firing points facing the 25-yard pistol targets, and
instructs them in coaching each other as follows:
(a) Grasp the pistol with the correct grip.
(5) Face the target, then face slightly more than half
left (right).
(c) Place the feet 12 to 18 inches apart.
(d) Aline the sights on the bottom edge of the bull’s-eye,
arm extended.
(e) As the arm becomes tired or the aim becomes un-
steady, assume the position of raise pistol. Remove
the pistol from the firing hand and relax, and then
exercise the muscles of the hand, arm, and shoulder
before resuming the grip.
(f) Keep the hammer forward during the position exer-
cise and squeeze the trigger very lightly with the
finger.
Note. Coaches observe and correct all errors.
(g) Pupil and coach change over (as the instructor di-
rects—every 3 to 5 minutes).
Note. Only short periods should be devoted to this position
exercise.
60
AGO 6431B
b. Second Exercise (Prone Position).
Note. Required for this exercise are a line of silhouette targets (E targets),
and firing points at 25 meters.
(1) The instructor places the men, armed with the pistol,
on line at 2-pace intervals. He gives the command
INSPECTION ARMS and verifies that all pistols are
clear.
(2) He explains and demonstrates the two-hand grip.
(3) He explains and demonstrates the prone position and
explains in detail the method of assuming the position.
(4) He requires each man to apply the two-hand grip until
it is understood .
(5) He requires each man to assume the prone position.
Assistant instructors and coaches correct all errors.
(6) The instructor then pairs the men as coach and pupil,
places them in position 25 meters from their targets,
and instructs them to take turns coaching each other
as follows:
(a) Hold the pistol at the ready position.
(b) Face the target and move into the prone position.
(c) Grasp the pistol in the two-hand grip.
(d) Aim at the center of mass of the target with cor-
rect sight alinement.
(e) As soon as the arms become tired or the aim un-
steady, rise to the knees, return the pistol to the
ready position, and stand up. To rest the firing hand,
transfer the pistol to the free hand.
(/) Keep the hammer forward during the position exer-
cise and squeeze the trigger lightly with the finger.
(g) After a short rest, repeat the exercise.
Note. Coaches observe and correct all errors.
(h) Coach and pupil change over (as the instructor di-
rects—this should be every 3 to 5 minutes).
c. Third Exercise (Kneeling Position). Procedures are the
same as listed in the second exercise (b above), except that the
kneeling position is substituted for the prone position.
d. Fourth Exercise (Crouch Position).
Note. Required for this exercise are a line of E targets and firing points at
10 meters.
(1) The instructor explains and demonstrates the crouch
position and the pistol ready position.
AGO 6431B
61
(2) He pairs the men as coach and pupil, places them in
position 2 paces apart on the 10-meter line, facing their
targets, and instructs them to take turns coaching each
other as follows:
(a) Grasp the pistol using the one-hand grip.
(f>) Hold the pistol at the ready position.
(c) Face the target and assume the crouch standing
position.
(d) Aline the pistol on the target by thrusting it forward
as if pointing a finger at the target. Direct the eyes
at the target only. Lock the wrist and elbow; the
only pivot is the shoulder.
(e) Check the alinement by holding the pistol in position
and looking to see if the sights are alined on the
target.
Note. Remainder of the exercise is the same as in a (5) (Г)
and (g) above.
69. Trigger Squeeze
a. General. Poor shooting is generally caused by the aim being
disturbed before the bullet leaves the barrel of the pistol. This is
usually the result of the firer jerking the trigger or flinching.
The trigger does not have to be jerked violently to spoil the aim;
even a slight off-center pressure of the trigger finger on the
trigger is enough to cause the pistol to move and disturb the
firer’s sight alinement. Flinching is a subconscious reflex caused
by the firer’s anticipating the recoil of the weapon. Jerking is
an effort by the firer to fire the pistol at the precise time the
sights aline with the target. Flinching and jerking will cause the
strike of the bullet to hit the lower left section of the target for
a right-hand shooter. Heeling is caused by a firer’s tightening
the large muscle in the heel of the hand to keep from jerking the
trigger. A firer who has had difficulty with jerking the trigger
will attempt to correct the fault by tightening the bottom of the
hand, which results in a heeled shot. Heeling will cause the
strike of the bullet to hit on the top right section of the target.
The firer can correct all these shooting errors by understanding
and applying correct trigger squeeze. Correctly applied trigger
squeeze imparts no unnecessary movement to the pistol. Im-
proper trigger squeeze will cause more misses on the target than
any other single step of preparatory marksmanship training.
b. Definition of Trigger Squeeze. Trigger squeeze may be de-
fined as the independent movement of the trigger finger apply-
ing a uniformly increasing pressure on the trigger, straight to
62
AGO 6431B
the rear, without disturbing the sight alinement until the pistol
fires. The trigger slack, or free play, is taken up first and the
squeeze is continued steadily until the hammer falls. If the
trigger is squeezed properly, the firer will not know when the
hammer will fall; thus, he will not know when to flinch or heel.
To apply correct trigger squeeze, the trigger finger may contact
the trigger anywhere from the tip to the second joint, depending
on the length of the trigger finger. If pressure from the trigger
finger is applied to the right side of the trigger or pistol, the
strike of the bullet will be to the left. This is due to the normal
hinge action of the fingers. When the fingers of the right are
closed, as in gripping, they hinge or pivot to the left, thereby
applying pressure to the left. (With the left hand, this action
is to the right.) The firer must exercise care in the squeeze of
the trigger, so as not to apply pressure left or right but straight
to the rear. The method of trigger squeeze used by the firer will
determine his marksmanship ability as follows:
(1) The man who has learned to apply pressure on the
trigger only when the sights are in alinement with the
target, who holds the pressure if the muzzle swerves,
and continues to add pressure when the sights are again
in line with the target is an excellent shot.
(2) The man who holds the sights of the pistol as nearly
on the target as possible and continues to squeeze the
trigger with a uniformly increasing pressure until the
pistol fires, is a good shot.
(3) The man who tries to “catch his target” as his sight
alinement moves past the target, and fires the pistol
at that instant, is a very bad shot.
c. Calling Shot. To call the shot is to state where the bullet
should strike the target according to the sight picture at the
instant the pistol fires; for example: “high,” “a little low,” “to
the left,” “to the right,” or “bull’s-eye.” Another specific method
of calling the shot is the clock system; for example: a 9 ring hit
at 8 o’clock, and 8 ring hit at 3 o’clock. Another good method of
calling a shot is to provide the shooters with a target center.
(Placed beside him on the firing line) and as soon as the shot
is fired the shooter is required to place a finger on the target face
or center at the point where he expected the round to hit on the
target. This method eliminates guessing and computation on the
part of the shooter, and the immediate action of placing the finger
on the target face will give a more accurate call. If the soldier
does not call his shots correctly in range firing, he is not properly
concentrating on sight alinement and trigger squeeze, and con-
AGO 6431B
63
sequently does not know what his sight picture is as the weapon
fires.
70. Pencil Triangulation Exercise
This exercise consists of firing a pencil or pointed dowel point-
blank at a miniature target. This exercise combines position,
grip, sight alinement, breathing, and trigger squeeze into a
single practical work exercise and at the same time measures the
student’s performance without the effects of recoil. This practical
work is designed to teach and develop correct shooting habits, and
can be conducted indoors as well as outdoors. This makes it an
ideal type of practical exercise where range facilities are limited
or during inclement weather.
a. Equipment. In the conduct of this exercise the following
equipment is necessary:
(1) One dowel or lead pencil per two students. (This pencil
should be at least 6 inches long and wrapped with mask-
ing or cellophane tape, forming two bushings that fit
the inside diameter of the pistol barrel (fig. 38).
(2) One sheet of miniature bull’s-eyes per two students.
(This sheet of buP’s-eyes, as shown in figure 38, can
be mimeographed, drawn, or stamped by using the
eraser of a pencil and ink pad. The bull’s-eyes should
not be larger than (4 inch and at least 1 inch apart.)
b. Conduct of the Exercise. The instructor explains and dem-
onstrates the details of this exercise, prior to practical work by
the students, in the following manner:
(1) The shooter faces the target and takes up a good shoot-
ing position. (This position is close enough to the
miniature bull’s-eye so that when the pencil is inserted
into the barrel, with the arm extended and sights aimed
at the miniature bull’s-eye, the point of the pencil is
within 1 inch of the target. The sheet of bull’s-eyes
should be affixed to a target or any type support and
should be shoulder high to the shooter.)
(2) The shooter inserts the pencil into the muzzle of the
barrel, eraser end first, and cocks the hammer.
(3) He grips the weapon properly, extends the shooting
arm and aims the weapon at the miniature bull’s-eye,
squeezes the trigger and the hammer falls. The hammer
strikes the firing pin, which in turn strikes the rubber
eraser of the pencil, driving it out of the barrel and
causing it to make a pencil dot approximately 1/2 inch
64
AGO 6431-B
below the bull’s-eye (assuming that the shooter had the
correct sight alinement and trigger squeeze).
(4) The shooter continues this exercise until he has fired a
group of five pencil marks below each target. (The
object of the exercise is to keep the five pencil marks
in a group as small as the i/s-inch bull’s-eye, У-> inch
directly below the bull’s-eye.) With practice, many
shooters will be able to keep the pencil hitting in the
same mark. This is an indication that the shooter is
performing trigger squeeze and sight alinement properly
each time.
(5) The coach should observe and be alert to detect any
errors the shooter may be making. Upon completion of
the firing, the coach will critique the shooter on his shot
groups. (The coach will be able to tell whether or not
the shooter jerks or heels the shots by observing the
mark of the pencil in relation to the bull’s-eye and the
shot group.) This exercise should be repeated until the
shooter is able to make a five-round shot group i/8 inch
or smaller. Men who are not able to attain this pro-
ficiency need additional instruction including trigger
squeeze and sight alinement.
71. Slow Fire
a. Slow fire teaches the firer to coordinate and apply the first
three steps of preparatory marksmanship; aiming, positions,
and trigger squeeze. It is the elementary phase of instruction
practice and record firing. Time must be taken to permit proper
explanation of the causes of errors that are determined and to
allow time for correcting these errors during instruction practice
firing.
b. Training for slow fire is begun after the trigger squeeze
exercises are thoroughly understood and can be applied. The
slow fire exercise is a continuation of the trigger squeeze exer-
cises and is conducted in the same manner with the same equip-
ment. However, greater emphasis is placed on coordination of
aiming, position, and trigger squeeze rather than on each of these
steps individually. The slow fire exercise simulates slow fire in
range firing. The pistol is cocked with the thumb of the free hand
after each simulated shot.
72. Slow Fire Exercise
a. To perform the slow fire exercise, the firer assumes the
standing position with the pistol pointed at the target. He takes
AGO 6431B
65
M ' CELLOPHANE
ТАРЕ
EQUIPMENT
CONDUCT OF EXERCISE
Figure 38. Pencil triangulation exercise.
66
AGO 6431B
in a normal breath and lets part of it out, locking the remainder
in his lungs by closing his throat. He then relaxes, aims at the
target, takes the correct sight alinement and sight picture, takes
up the trigger slack, and squeezes the trigger straight to the rear
with a steadily increasing pressure until the hammer falls,
simulating firing. If the firer does not cause the hammer to
fall in 8 or 9 seconds, he should come to position of raise pistol
and rest his arm and hand, then start the procedure over again.
The sequence of actions that make up this process can be summed
up by the key word BRASS. It is a word the firer should think
of every time he fires his weapon:
_Breathe—take a normal breath, let part of it out, and lock
the remainder in by closing the throat.
Itelax—relax the body muscles as much as possible.
Aim—take correct sight alinement and sight picture and
focus the eye at the top of the front sight.
Shack—take up the trigger slack.
Squeeze—squeeze the trigger straight to the rear with a
steadily increasi'~~ pressure without disturbing the sight
alinement un^i the hammer falls.
b. The pencil triangulation exercise may also be used for slow
fire practice.
73. Rapid Fire
a. Rapid fire is a series of aimed shots fired at regular, short
intervals. Accuracy in rapid fire, as in slow fire, requires a steady
aim, good position, and proper trigger squeeze. These three
elements are blended together by a high degree of coordination
with a minimum loss of time between shots. The firer must be
trained in rapid fire to develop his ability to fire rapidly and ac-
curately, so that he can take maximum advantage in combat of
the firepower of the pistol if confronted by more than one enemy
soldier at close range.
b. The time limit for firing rapid fire is 5 shots in 12 seconds
from the 25-meter line. Rapid fire is fired from the prone and
kneeling positions using the two-hand grip. There are two rapid
fire exercises for training the soldier. The first exercise teaches
him to simulate firing 5 shots from the prone position in the
prescribed time limit of 12 seconds. The second rapid fire exercise
is the same as the first, except that the kneeling position is used.
AGO 6431B
67
74. Rapid Fire Exercises
a. First Exercise.
Note. Required for this exercise are a row of E targets spaced in groups
of 3, firing points 25 meters away, and a piece of strong cord about 4 feet
long for each firer.
(1) The instructor explains and demonstrates the prone
position and states that the firer is in position and com-
pletes the exercise in 12 seconds.
Note. Rapid fire exercises should begin by establishing a longer
time limit and reducing it until the soldier can complete the exer-
cise in 12 seconds.
(2) The instructor explains and demonstrates to the stu-
dents—
(a) Tying the cord to the hammer of the pistol.
(b) Trigger squeeze—the same in rapid fire as in slow
fire except that it is accomplished in a shorter length
of time.
(c) Loading the pistol—accomplished while in the prone
position.
(d) The prone position.
(e) The sight picture—taken on the center of mass of the
E target.
(/) The aim—shifted from one target to the other by
shifting the body rather than just the arms.
(g) The action of the pistol in recoil—pulling on the cord
to cock the pistol for each shot.
(h) Keeping the eyes from closing as the weapon fires.
(г) Holding the breath for the five-shot string.
(3) The instructor places the men in pairs in front of the
line of targets, one as coach and the other as the firer.
(a) If a line of disappearing targets has been arranged
for this exercise, the instructor conducts the simulated
firing with the commands:
1. FIVE ROUNDS.
2. SIMULATE LOAD AND LOCK.
3. READY ON THE RIGHT.
4. READY ON THE LEFT.
5. READY ON THE FIRING LINE.
The targets are faced to the firer, allowed to remain
facing him for the allotted time, and then edged.
While the targets are facing the firer, he fires five
68
AGO 6431B
shots (simulated fire), and the coach cocks the
pistol by jerking the cord after each shot. At the
end of the rapid fire sequence, the targets disappear
and the instructor commands UNLOAD.
(b) If the targets for the exercises are stationary, the
commands are—
1. FIVE ROUNDS.
2. SIMULATE LOAD AND LOCK.
3. READY ON THE RIGHT.
4. READY ON THE LEFT.
5. READY ON THE FIRING LINE.
6. TARGETS.
On command TARGETS, the firers commence firing
five rounds (simulated fire). The coach cocks the
pistol after each shot by jerking the cord. When the
time has expired, the commands to stop firing are
(1) CEASE FIRING, (2) UNLOAD.
(c) After performing the rapid fire exercise three or four
times, the coaches and pupils change over.
(4) In this exercise, the instructor makes sure that the
coach notes and corrects all errors in grip, position,
trigger squeeze, and holding the breath. He gives par-
ticular attention to trigger squeeze.
Note. Rapid fire exercises should be frequent but of short
duration.
It is advisable to extend the time limits several
seconds when the rapid fire exercise is first begun. The
time limit is then gradually reduced until it corre-
sponds to the time prescribed for record firing.
Caution: The firer should be warned to make sure
that his arms are extended forward to prevent the slide
from striking his face while in the prone and kneeling
positions.
b. Second Exercise. This exercise is conducted in the same
manner using the same equipment as in the first exercise except
that the kneeling position is used.
75. Quick Fire
a. Training in quick fire is begun after the rapid fire exercise
has been practiced enough to be thoroughly understood. Exercises
in slow fire, rapid fire, and quick fire should be continued until
the period preparatory marksmanship training is completed.
AGO 6431B
69
b. In quick fire, the prone, kneeling, and crouch positions are
used.
76. Quick Fire Exercise
Note. Required for this exercise are a row of E targets spaced in groups
of 3, and firing lines at 25 meters, 15 meters, and 10 meters.
a. The instructor explains and demonstrates the standing to
prone, kneeling, crouch, and ready positions. He explains the
conduct of the exercise as follows:
(1) The firer begins the exercise approximately 35 meters
from the targets. The instructor commands—
(a) FOUR ROUNDS.
(b) SIMULATE LOAD AND LOCK.
(c) READY ON THE RIGHT.
(d) READY ON THE LEFT.
(e) PISTOL AT READY POSITION, FORWARD,
MARCH.
(2) At this command, the firer moves forward, holding the
pistol at the ready position, and continues to walk until
the command TARGETS is given. (If a line of dis-
appearing targets has been arranged for the exercise,
the firer will continue to walk until the target is faced
toward him.)
(3) At the command TARGETS, the firer takes the prone
position, moves the safety lock to the FIRE position,
and simulates firing at the targets, engaging each target
with at least one shot. The command TARGETS is
given when the firer is at the 25-meter line. The targets
are exposed for 15 seconds.
(4) The instructor then commands—
(a) UNLOAD.
(5) RISE.
(c) SIX ROUNDS.
(d) SIMULATE LOAD AND LOCK.
(e) READY ON THE RIGHT.
(/) READY ON THE LEFT.
(g) PISTOL AT READY POSITION, FORWARD,
MARCH.
(5) At this command, the firer moves forward, holding the
pistol at the ready position on SAFE, and continues to
walk until the command TARGETS is given. (If a line
70
AGO 6431B
of disappearing targets have been arranged for the
exercise, the firer will continue to walk until the target
is faced toward him.)
(6) At the command TARGETS, the firer takes the kneeling
position, moves the safety lock to the FIRE position,
and fires 4 rounds at the targets, engaging each target
with at least 1 shot. The command TARGETS is given
when the firer is at the 15-meter line. The targets are
exposed for 15 seconds.
(7) The instructor then commands—
(a) CEASE FIRING.
(b) LOCK.
(c) RISE.
(d) PISTOL AT THE READY POSITION, FORWARD,
MARCH.
(8) At this command, the firer moves forward, holding the
pistol at the ready position on SAFE, and continues to
walk until the command TARGETS is given. (If a
line of disappearing targets have been arranged for the
exercise, the firer will continue to walk until the target
is faced toward him.)
(9) At the command TARGETS, the firer moves into the
crouch position, presses the safety lock to the FIRE
position, and fires two rounds at separate targets. The
command TARGETS is given when the firer is at the
10-meter line. The targets are exposed for six seconds.
(10) The instructor then commands—
(a) CEASE FIRING.
(b) UNLOAD.
b. The quick fire exercise should be practiced until the firer
can assume the correct firing position, aim, and simulate firing
the required number of rounds in the specified time limits.
77. Examination Before Range Firing
a. Each soldier will be examined before he fires the pistol on
the range. This examination will detect any deficiencies in his
preparatory marksmanship training. The examination must be
given far enough in advance so that additional training may be
scheduled to correct the deficiencies noted. The examination may
be conducted concurrently with the steps of preparatory marks-
manship by the use of oral or written questions and answers.
It should also be given immediately after completing the six steps
AGO 6431 в
71
of preparatory marksmanship training as a single, performance-
type test.
b. The performance-type test, given at the completion of pre-
paratory marksmanship training, is commonly called the “county
fair.” It is made up of a number of stations to test the men on
marksmanship training. The men to be tested are divided into
groups and rotated through each of the stations. A minimum
number of trained assistant instructors in a minimum of time
can test a large number of men by using the county fair system.
c. In the conduct of the examination, the men are broken down
into groups, one group for each station. Each group is sent to a
station and the test begins. Upon completion of testing at the
first station of each group and upon the instructor’s command,
the groups move in a clockwise direction to the next station.
The testing procedure is repeated until each group has been
tested at each station. Grading sheets are reproduced locally, and
the assistant instructors grade each man as he performs the
various examination requirements.
d. Examples of how the county-fair type of examination may
be conducted at each station are discussed below.
(1) Station 1, aiming. Each man is required to demonstrate
his ability to set up correct sight alinement and a cor-
rect sight picture on the aiming bar.
(2) Station 2, aiming. Each man is required to make a shot
group using the pencil triangulation exercise.
(3) Station 3, positions. The men demonstrate their ability
to assume the various positions (standing, crouch,
kneeling, and prone).
(4) Station 4, trigger squeeze.
(5) Station 5, rapid fire. The men perform one of the rapid
fire exercises and the assistant instructor grades them
on the correct procedures and timing.
(6) Station 6, quick fire. The men perform a portion of the
quick fire exercise and are graded on procedure and
timing.
(7) Station 7, load, immediate action, unload.
(8) Station 8, testing the grip safety, safety lock, dis-
connector, and half cock.
e. Other stations may be set up to test different items of in-
struction. The items listed above are for use as an instructor’s
guide.
72
AGO 6431B
Section III. COURSES FIRED
78. General
a. AR 370-5 prescribes details as to the requirements for firing
of record and familiarization courses.
b. Range firing is started after the soldier satisfactorily com-
pletes preparatory marksmanship training. Range firing courses
are—
(1) Instruction practice firing, which is practice firing on
a range using the assistance of a coach.
(2) Record firing, which is the final test of the soldier’s pro-
ficiency, and is the basis for his marksmanship classi-
fication.
(3) Familiarization firing, which acquaints the soldier with
the weapon. It is fired only by soldiers who are not re-
quired to fire the record course for qualification.
(4) Specialized firing (par. 88) which is for use by specially
qualified and selected individuals whose military duties
demand special ability with hand guns. This course is
not to be used for mass training of all individuals armed
with the pistol or revolver.
c. The amount of instruction practice firing is not limited to
that prescribed. Additional practice may be given as time and
ammunition allowances permit.
d. Scores of instruction practice and record firing done with
the pistol should be entered on the score card to enable the firer
to maintain a record of his progress and scores.
79. Instruction Practice Firing Course
The following tables prescribe the instruction practice to be
fired from the standing, prone, kneeling, and crouch positions.
The E target and the 25-yard (standard American) pistol target
are used in the practice firing.
Table I. Slow Fire (25-yard standard American pistol target (fig. 42))
Range (meters) Position Time Shots
15 Standing None (10 min in record firing) 10
25 Standing None (10 min in record firing) 10
AGO 6431B
73
Table II. Rapid Fire (E target, bobbing (3) (fig. 41))
Range (meters) Position Time Shots
25 Prone 12 seconds 5
25 Kneeling 12 seconds 5
Table III. Quick Fire (E target, bobbing (3) (fig. 41))
Range (meters) Position Time Shots
25 Standing to prone 15 seconds 4
15 Standing to kneeling 15 seconds 4
10 Crouch 6 seconds 2
80. Record Firing Course
a. Tables I, II, and III used in instruction practice firing (par.
79) are fired for record in numerical order. Procedures to be
followed for the conduct of the range and scoring are outlined
in paragraphs 83 through 89.
b. Coaching is not permitted during record firing.
c. Qualification scores, of a total possible score of 400, are as
follows:
Expert ---------------------------------------------------350
Sharpshooter______________________________________________330
Marksman _________________________________________________300
d. Record of scores should be entered on each individual’s score
card. A correctly filled-in sample score card is shown in figure 39.
81. Familiarization Firing
a. All persons authorized or required to fire the pistol for
familiarization will receive four hours of preliminary instruc-
tion, which will include the following:
(1) Mechanical training: disassembly and assembly.
(2) Operation: loading, firing, unloading, immediate action.
(3) Preparatory marksmanship training: aiming, positions,
trigger squeeze.
(4) Care and cleaning.
b. Table IV is the prescribed familiarization exercise.
74
AGO 6431B
INDIVIDUAL SCORF CARD caliber c pistol ano caliber л revolver RECORO FIRING (ГН 11-lt)
\»HTTe К Pre
A, ч/vl ЯКМой
T'AOL( SLOW FIRE irm-lilr >00)
IHk** RO^TIOM time limit SCORE
li 10 ohola la /0 /4» 4
s 4 fa S'
10 mlnvtoo /о 9 9 Я
В if 7 7 7
TOTAL
TABLE II • RAPID FIRE ГЯо»<161.- 100)
ПАНОВ ГМ«<м«) POSITION time limit SCORE
2S Pn>«« 3 thol* In 13 aacnnda /0 /л /л !& /О
» Kaaatlna /0 /о io /О /л
TOTAL /
table iii cuick fire <ро«иы« юо>
ПАНОВ (К>1*4 roiiTiOH Timelimit SCORE
» S..O0U4 la о theta in И ateonda /о fb Ю to
1$ ,e 4 (hot* 1» li a.condo /0 to tb to
IB Crouch в otcondo z. to to
TOTAL f
TOTAL RECORD SCORE -34>l>
POtllSLE 1С01Г. 100 (HAtFIMOOTIt 1» •coat* I liq»«Tu«<
INSTRUCTION PRACTICE FIRING
TABLE !• SLOW FIRE (Voatlhl./ KO)
ТОННОЙ TIME LIMIT SCORE
IS kaadlofl 10 ahou Na Um liaU /0 to я Я Я
? S’ 8 4> С,
u Bta^lat 10 that. No Um Hut to ? Я S т
4 7 Г S'
TOTAL /6/
TABLE II • RAPID FIRE (РолЧЫ; Ю0)
(>*«*•) POSITION TIME LIMIT SCORE
м РНМ» S «hole la 13 oaaoada to /в ю ю /о
23 Enn.Hn. 12 ?%*Й /0 lb /о / о /о
TOTAL / ОО
TABLE III > QUICK FIRE (Роы/Ыч too)
POSITION TIMELIMiT SCORE
23 < abolT la IS «acoada /0 /О to о
IS SundUf la 4 «hoi. la IS aaeoeda /О to ю /0
to Croacb 2 abMa la 2 Ю /а
TOTAL
TOTAL PRACTICE SCORE Sfl
A FORM QO ioitiOk»
J I JUN 00 OO
( Front)
(BackJ
Figure 39.
Score card.
Table IV. Familiarization Firing (E target, bobbing (3) (fig. 41))
Range (meters) Position Time Shots
15 Standing No time limit 10
25 Standing 3 seconds per shot 15
82. Specialized Firing
The procedures for organizing and conducting this course are
covered in paragraph 88.
AGO 6431B
75
Section IV. RANGE FIRING AND SAFETY PRECAUTIONS
83. Responsibility
Organization commanders are responsible for the conduct of
range firing of their organizations in accordance with the pro-
visions of this manual and applicable Army Regulations. All
range firing will be conducted under the direct supervision of a
comissioned officer.
84. Blackening Sights
In all range firing, both sights of the weapon should be black-
ened to eliminate glare and to silhouette the sights distinctly.
Before being blackened, the sights should be cleaned and all
traces of oil removed. The blackening is done by holding each
sight for a few seconds in the point of a small flame that will
deposit a uniform coating of lampblack on the metal. A carbide
lamp, candle, or other flame device may be used for this purpose.
Flame from a carbide lamp is the most satisfactory.
85. Procedure for Organizing and Conducting Instruction Practice
Firing
a. Table I—Slow Fire.
(1) The officer in charge (OIC) of the range organizes the
men into alternate orders, designated firers and coaches.
Each order of firers is matched with an order of coaches.
One firer with coach is assigned to each firing point on
the 15-meter firing line.
(2) One 25-yard (standard American) pistol target and a
group of three E targets are installed in front of each
firing point.
(3) The OIC commands LOAD TWO MAGAZINES WITH
FIVE ROUNDS EACH. At this command, the coach
loads each magazine with five rounds of ball ammuni-
tion. (He may space one or two dummy cartridges in
the magazine to aid in determining whether the firer is
squeezing the trigger properly or flinching.)
(4) The OIC commands:
(a) SLOW FIRE (10-MINUTE TIME LIMIT—Record
firing; no time limit in instruction practice).
(b) FIVE ROUNDS.
(c) LOAD AND LOCK.
(d) READY ON THE RIGHT.
(e) READY ON THE LEFT.
76
AGO 6431B
(/) READY ON THE FIRING LINE.
(g) COMMENCE FIRING.
(5) As the firer completes the firing of these 5 rounds, he will
reload the pistol with another 5 and continue to fire
until all 10 rounds are fired or the time limit expires.
He will place the pistol on the stand, then step approxi-
mately 2 paces to the rear of the firing line, indicating
to the OIC that he has completed the firing.
(6) When time has expired, or when the firers have finished
the exercise, the OIC commands:
(a) CEASE FIRING.
(5) UNLOAD.
(c) CLEAR ON THE RIGHT.
(d) CLEAR ON THE LEFT.
(7) The OIC looks to the right and left of the firing line
at the safety officer or safety noncommissioned officers
to determine that the firing line is clear. When the firing
line is clear, he commands:
(a) THE FIRING LINE IS CLEAR.
(b) FIRERS AND COACHES MOVE FORWARD.
(c) SCORE AND PASTE TARGETS (par. 86b (2) and
(7)).
(8) The above sequence is used in firing the 10 rounds in
slow fire from the 25-meter line.
(9) The other assigned order fires slow fire from the 15-
meter line. The pistol stands are moved back to the
25-meter line, where the firing orders will complete the
firing of table I.
b. Table II—Rapid Fire.
(1) The OIC assigns one firer to each firing point at the
25-meter line and has the coach load 2 magazines each
with 5 rounds of ball ammunition.
(2) The OIC commands—
(a) RAPID FIRE, 12-SECOND TIME LIMIT.
(5) FIRERS ASSUME THE PRONE POSITION.
(c) FIVE ROUNDS.
(d) LOAD AND LOCK.
(e) READY ON THE RIGHT.
(/) READY ON THE LEFT.
If a firer is not ready, he will announce to the OIC,
NOT READY ON POINT NUMBER When
AGO 6431B
77
everyone is ready, the fire command is continued:
READY ON THE FIRING LINE.
(3) The targets are then faced toward the firer for 12
seconds, then edged. The firer fires 5 rounds, engaging
each of the 3 targets during this exercise.
(4) The OIC then commands UNLOAD.
(5) If an alibi occurs, the coach on whose point it occurs
will announce ALIBI ON POINT NUMBER
All alibis will be fired at the completion of firing table II.
(6) To fire the kneeling position of table II, the OIC
commands—
(a) RAPID FIRE, 12-SECOND TIME LIMIT.
(b) FIRERS ASSUME THE KNEELING POSITION.
(c) FIVE ROUNDS.
(d) LOAD AND LOCK.
(e) READY ON THE RIGHT.
(f) READY ON THE LEFT.
(p) READY ON THE FIRING LINE.
Targets are exposed for 12 seconds, then edged. The
firer fires 5 rounds, engaging each of the 3 targets
during this exercise. The OIC commands UNLOAD.
(7) Alibis are fired at the completion of table II. The posi-
tion where the alibi occurred will be used by the firer
when firing the alibi string of his remaining rounds.
The firer will fire his remaining rounds at 3 seconds
per round. Procedure for firing the alibi is as follows:
(a) The OIC commands—
1. LOAD AND LOCK.
2. READY ON THE RIGHT.
3. READY ON THE LEFT.
4. READY ON THE FIRING LINE.
(b) The OIC then will turn the targets to face the firer
for three seconds, then edge them. The firer will fire
only one shot each time the targets are faced until
all rounds are fired.
(c) The OIC commands—
1. UNLOAD, PLACE PISTOLS ON STANDS.
2. CLEAR ON THE RIGHT.
3. CLEAR ON THE LEFT.
4. THE FIRING LINE IS CLEAR.
78
AGO 6431B
5. FIRERS AND COACHES MOVE FORWARD.
6. SCORE AND PASTE TARGETS.
c. Table III—Quick Fire.
(1) The officer in charge has the firers move the pistol
stands to the 35-meter line.
(2) Each firer is assigned a firing point on the firing line.
(3) Load 1 magazine with 4 rounds and 1 magazine with 6
rounds.
(4) The officer in charge commands—
(a) QUICK FIRE FOUR ROUNDS.
(b) LOAD AND LOCK.
(c) READY ON THE RIGHT.
(d) READY ON THE LEFT.
(e) READY ON THE FIRING LINE.
(/) PISTOL AT THE READY POSITION, FORWARD,
MARCH.
(5) At this command, the firers on line move forward at a
walk, holding the pistol at the ready position, and con-
tinue to walk until the targets are faced toward them.
(6) The OIC has the targets faced toward the firers as they
approach the 25-meter line. As the targets face, the
firers assume the prone position, move the safety lock
to the FIRE position, and fire all 4 rounds at the targets,
engaging each target with at least 1 shot. The targets
are exposed for 15 seconds, then edged.
(7) The OIC commands—
(a) CLEAR ALL WEAPONS.
(5) RISE.
(8) The OIC commands—
(a) SIX ROUNDS, LOAD AND LOCK.
(5) READY ON THE RIGHT.
(c) READY ON THE LEFT.
(d) READY ON THE FIRING LINE.
(e) PISTOL AT THE READY POSITION, FORWARD,
MARCH.
(&) As the firers approach the 15-meter line the targets are
faced for 15 seconds. The firers assume the kneeling
position, move the safety to the FIRE position, and fire
4 shots at the targets, engaging each target with at least
1 shot.
AGO 6431 в
79
(10) At the end of 15 seconds, the officer in charge edges the
target and commands—
(a) LOCK.
(5) RISE.
The firer announces ALIBI ON POINT NUMBER
if any have occurred.
(11) The OIC commands PISTOL AT THE READY POSI-
TION, FORWARD, MARCH.
(12) The firers move forward and the targets are faced to
the firers as they approach the 10-meter line. As the
targets are faced, the firers engage 2 targets from the
crouch position, with 1 shot each within 6 seconds. At
the end of 6 seconds, the targets are edged.
(13) The OIC checks to confirm alibis, if any, and commands—
(a) CLEAR ALL WEAPONS.
Note. Safety noncommissioned officers examine each man’s
pistol to see that it is clear.
(b) CLEAR ON THE RIGHT.
(c) CLEAR ON THE LEFT.
(d) THE FIRING LINE IS CLEAR.
(e) HOLSTER PISTOL. (Slide to the rear.)
(f) MOVE FORWARD.
(g) SCORE AND PASTE TARGETS.
Note. Alibi targets will be pasted but not scored.
(14) The OIC then commands the firers to move to the 35-
meter line at completion of scoring and pasting the
targets.
(15) All alibis are then fired as a complete firing order, in
the sequence listed in table III.
86. Procedure for Conducting Record Firing
a. Record firing is conducted using tables I, II, and III. The
procedure for record firing is the same as for instruction practice
(par. 85).
b. Regulations governing record firing are as follows:
(1) Coaching. Coaching is not permitted during record
firing. No person may render or attempt to render the
firer any assistance while the firer is taking his position
or after he has taken his position at the firing point.
Each firer must Observe the location of his own hits.
The man assigned as coach has the duties of scoring the
firer and loading the magazine with the correct amount
of ammunition for each table of fire.
80
AGO 6431B
(2) Shots cutting edge of bull’s-eye or lines. A shot hole
whose edge comes in contact with the outside of a scor-
ing ring on the target is given the higher value. Any
visible hit on an E target is valued at 10 points.
(3) Accidental discharges. All shots fired by the firer when
the target is ready, and when he has taken his place
on the firing line, are considered in his score even if
his pistol is not directed toward the target or is acci-
dentally discharged.
(4) Firing on wrong target. Shots fired upon the wrong
target are entered as misses on the score card of the
firer. The person at fault is credited with only such
hits as he may have made on his own target.
(5) More than allotted number of shots on same target. If
more than the allotted number of rounds appear on the
target, the coach scores the hits of lowest value equal to
the number of shots fired, or the firer will be given the
option of retiring that portion of the course in question.
(6) Unused cartridges in rapid and quick fire. Each unfired
cartridge is recorded as a miss.
(7) Score cards and scoring.
(a) Score cards will be maintained by coaches. Entries
on all score cards will be made in ink or with indelible
pencil. Alterations or corrections will be made on the
score card by the coach, who will strike over and
initial each alteration or correction made. The cards
at the firing point will be filled out as shown in figure
39.
(b) Officers and noncommissioned officers will exercise
care to insure correct scoring. When record firing is
completed, the score card will be signed by the scorer
and firer, collected and signed by the officer or non-
commissioned officer supervising the scoring, and
turned over to the OIC of the range firing. Score
cards will be retained by the unit commander until
the firer’s qualification is verified and published in
orders.
(8) Hit values. Values of hits on the 25-yard (standard
American) pistol target, are 10 through 5. Any hit out-
side the 5 ring is a miss and recorded as zero. Each hit
on the E target has a value of 10 points. For each E
target that has not been hit with at least 2 shots, sub-
tract 10 points from the total score of that particular
table of fire.
AGO 6431 в
81
87. Procedure for Conducting Familiarization Firing (Table IV)
a. The familiarization firing course consists of slow fire and
quick fire exercises.
(1) The OIC of firing will organize the firers into firing
orders and assign a firer and coach to each firing point
on the 15-meter line.
(2) Each magazine will be loaded with five rounds of am-
munition for the exercises.
b. Slow fire (10 rounds—15 meters) and quick fire (15 rounds
—25 meters) in 5-shot strings will be fired at the group of three
E targets. The standing position is used for familiarization firing.
(1) The OIC commands—
(a) SLOW FIRE, FIVE ROUNDS.
(5) LOAD AND LOCK.
(c) READY ON THE RIGHT.
(d) READY ON THE LEFT.
(e) READY ON THE FIRING LINE.
(/) COMMENCE FIRING.
(2) At the completion of slow fire the OIC commands—
(a) CEASE FIRING.
(5) CLEAR ALL WEAPONS, PLACE PISTOLS ON
STANDS.
(c) CLEAR ON THE RIGHT.
(d) CLEAR ON THE LEFT.
(e) THE FIRING LINE IS CLEAR.
(/) MOVE FORWARD, SCORE AND PASTE TARGETS.
c. Quick fire, using the E target, bobbing (3), is conducted as
follows:
(1) One firer and one coach in each order will be assigned
to a firing point on the 25-meter line.
(2) When all firers are in their proper positions on the firing
line, the OIC of the firing line has the targets edged.
He then commands—
(a) FIVE ROUNDS.
(5) LOAD AND LOCK.
(3) The officer in charge of firing then calls—
(a) READY ON THE RIGHT.
(5) READY ON THE LEFT.
Any firer who is not ready calls out, NOT READY
ON NUMBER
82
AGO 6431B
(4) If all is ready on the firing line, the OIC commands—
READY ON THE FIRING LINE. The safety on each
weapon is disengaged and the firers remain at raise
pistol.
(5) The officer in charge of the firing line then signals for
the targets to be exposed to the firers. As soon as the
front of the targets begins to turn toward the firers, they
aim at the target and fire one shot. Pistols are returned
to raise pistol as soon as the one shot is fired, or as soon
as the edge of the targets is again turned toward the
firers. This procedure is continued until the targets have
been exposed five times. The officer in charge of firing
then commands—
(a) CEASE FIRING.
(b) CLEAR ALL WEAPONS.
(6) On orders from the OIC, firers and scorers move to the
targets to count the number of hits on each. The scorers
make the correct entry on the score card.
(7) Upon the conclusion of the scoring, the OIC directs that
the targets be pasted and made ready for another firing
order.
88. Procedure for Conducting Specialized Firing
a. Rules.
(1) Weapons. Any pistol or revolver of 9-mm size or larger
may be used. The same weapon must be used through-
out. Any weapon not a standard item of issue must be
inspected and approved by the officer in charge of range
firing.
(2) Ammunition. No midrange or reduced-charge ammuni-
tion is permitted.
(3) Holster. A holster is required in tables VII through X,
inclusive. Any serviceable holster designed for con-
tinuous wear is allowed. Impractical or unserviceable
holsters (such as simple hook on the belt) are not per-
mitted. If the holster has a retaining device, such as a
strap or cover, the device must be used, securing the
weapon in the holster before each draw. The same hol-
ster must be used throughout.
(4) Condition of readiness. All weapons must be carried in
the holster in a safe condition. This means revolvers
with the hammer down and pistols with the manual
safety set on SAFE or the hammer down. Neither re-
AGO 6431B
83
volvers nor pistols may be bolstered on half cock. If a
double action piston is used, it must be bolstered with
the hammer down and safety on. The firer’s stance or
position is not restricted in tables requiring a draw,
except that both of the firer’s hands must be at least
10 inches from the weapon when the signal to fire is
given. (This provision serves to equalize the unpredict-
able factor of the actual position of the hands in a com-
bat situation.)
(5) Timing. Time in all tables is considered to be the inter-
val between the signal to fire and the firing of the last
(or only) shot in the string. The firer does not initiate
his own signals, but must wait for the command of the
. line officer. In competition, if a firer moves so that his
hands are closer than the prescribed distance (10 inches)
from his weapon before the signal to fire is given, he
will be required to repeat the string. If this happens
more than twice the firer’s score will be declared invalid.
b. Course of Fire.
(1) The course is divided into six tables. It comprises a
total of 50 rounds with a maximum of 500 points.
(2) The following tables prescribe the conduct of the firing
of the course:
(a) Table V. This table tests the maximum accuracy of
the firer and his weapon. Although time and position
are unrestricted, the firer will not be permitted to
use optical instruments because, to be effective in
combat, the firer must know where his weapon will
shoot before he opens fire.
Table V
Possible: 50
Range Target Shots Strings Position Time
50 meters 50 - yard standard American pistol tar- get. All hits inside the 8-inch ring, i.e., in the black, count 10. Hits inside the 5-inch ring but out- side the 8-inch ring count' 5. Hits out- side the 5-inch ring count zero. 5 1 Any position that does not employ an artificial rest. Prone or sitting, using one - hand grip, or two-hand grip, is recom- mended but not required. No limit.
84
AGO 6431B
(b) Table VI. This table tests the effectiveness of delib-
erate fire at what is considered to be the maximum
combat range of the hand gun under ideal conditions.
The firer starts from the position of raise pistol and
does not aim until the command to fire is given.
Table VI
Range Target Shots Strings Position Time
50 meters E-type silhouette 5 1 Standing 15 seconds
(c) Table VII. This table tests the firer’s ability to draw
rapidly and shoot carefully at midranges. The firer
holsters his weapon and stands facing the target area.
A standby signal is given, and approximately 1 second
later the target is turned or raised into his line of
vision. It remains visible for 2J/2 seconds and then
disappears; or is edged, without signal, during which
time the firer draws and fires 1 shot. After each shot,
the firer renders his weapon safe, reholsters, and sig-
nals READY to the line officer, who then repeats the
process. Any stance, position, or system of firing
that fulfills the above requirements is permissible.
Table VII
Range Target Shots Strings Time
25 meters E-type silhouette 10 10 2% seconds per shot
(d) Table VIII. This table tests the firer’s ability to draw
and shoot very rapidly at short range, as well as his
ability to reload his weapon and continue firing with
speed and dexterity. The firer stands facing the
target with his weapon bolstered and loaded with 5
rounds. At the signal to fire, he draws and fires 5
shots, reloads, and fires 5 more. If the weapon holds
10 rounds or more, 10 rounds may be loaded initially
and fired successively with reduced time allowance
as shown in table VIII. Spare ammunition or a loaded
magazine may be held in the free hand during the
initial phase, prior to reloading.
AGO 64Э1В
85
Table VIII
Possible: 100
Range Target Shots Strings Time
10 meters E-type sil- hou- ette 10 1 Single-action, gate loading revolvers —19 seconds. Double - action, swing - out revol- vers—16 seconds. Pistols of capacity of less than 10 rounds —11 sec- onds. Pistols of capacity of 10 rounds or more— 6 seconds.
(e) Table IX. This table tests the firer’s ability to pivot
and draw simultaneously, pick up targets rapidly, and
engage several targets at once. The firer stands fac-
ing 45 degrees to either the right or the left of the line
of sight to the target center. The weapon is loaded
with six rounds and bolstered. On the signal to fire,
the firer draws and pivots simultaneously to face the
target and fires two shots at each target in any order.
He then reloads, reholsters, resumes his initial posi-
tion, signifies to the line officer that he is ready to
commence the second string. Two identical strings
are fired, requiring 12 shots.
Table IX
Possible: 120
Range Target Shots Strings Time
10 meters E-type silhouette 1 F-type silhouette 1 M-type silhouette 12 2 4 seconds per string
(/) Table X. This table tests the firer’s ability to combine
maximum speed with the necessary accuracy to hit a
man at close range. The firer stands facing the target
with his weapon loaded, bolstered, and safe. At the
signal to fire, he draws and fires one shot. He then
checks his weapon for safety, reholsters, and awaits
the next signal.
Table X
Possible: 80
Range Target Shots Strings Time
7 meters E-type silhouette 8 8 1% seconds per shot
86
AGO 6431В
c. Scoring. The firer’s individual score is equal to the total
number of hits multiplied by 10. The maximum possible is 500.
The following scores indicate the degree of proficiency achieved
by individuals:
Superior—455 points
Excellent—415 points
Satisfactory—375 points
d. Miscellaneous Information.
(1) Overtime. In tables VI, VIII, and IX, any shots fired
after the time limit has expired count as misses. In
addition, the firer loses the value of one additional hit
(10 points) for the string in which the overtime
occurred.
(2) Failing to fire. In table X, if the firer cannot fire in l1/^
seconds, he is told to fire the table at maximum speed
and is given half credit on his resulting score.
(3) Individual competition. In the event individual competi-
tion is desired, the time required for each string in
tables IX and X will be recorded for each firer on his
score sheet. In the cases of tied scores, the average time
for the 2 strings in table IX will be computed to the
nearest y10 second. This average will be added to the
average time required for each of the 8 shots in table X
to the nearest y10 second. The sum of the two averages
will be compared and the tie will be resolved in favor
of the faster firer.
(4) Test of general ability. If this course is used as a test
of general ability with the hand gun, the firer in ques-
tion should be permitted to shoot it only twice, prefer-
ably on successive days, and his second score taken as
an index of his skill.
89. Safety Precautions on the Range
a. Never place a loaded magazine in the pistol until you have
taken your place at the firing point and have received the com-
mand to load.
b. Always remove the magazine and clear the pistol before
leaving the firing point.
c. Always hold the loaded pistol at the position of raise pistol
or ready except while aiming. If the arm becomes weary, trans-
fer the pistol to the other hand, keeping the weapon in the position
of raise pistol.
AGO 6431 в
87
d. When firing ceases temporarily, lock the piece and hold it
at position of raise pistol or ready.
e. If one or more cartridges remain unfired at the end of a fir-
ing string, remove the magazine and clear the weapon.
Section V. TARGETS AND RANGES
90. Targets
a. E Target. The E target is a drab silhouette the size of which
is about the height of a soldier in the kneeling position. It is made
of bookbinder’s board or similar material (fig. 40). Hits are
valued at 10 points. Any shot cutting the edge of the target is a
hit.
b. E Target, Bobbing (3). E target, bobbing (3), is so arranged
as to be fully exposed to the firer for a limited time. The edge of
the target is toward the firer when the target is not exposed
(fig. 41).
Figure 40. E target.
88
AGO 6431В
3/8" DlA.-J HOLES V BOTH SIDES
Figure 41. E target, bobbing (3),
c. 25-Yard Standard American Pistol Target. The 25-yard
standard American pistol target is used in preparatory marks-
manship training and for slow fire in range firing (fig. 42).
91. Range Construction
Organization and construction of a pistol range used in firing
the qualification course with the caliber .45 pistol is shown in
figure 43.
AGO 6431B
89
Figure 1,2. Standard American 25-yard pistol target mounted on E target.
90
AGO 6431B
PER FIRING POINT
Tow
(QUICK FIRE)
10 METER FIRING LINE
(QUICK FIRE)15 METER FIRING LINE
(QUICK FIRE)
25 METER FIRING LINE
□ □ □
MOVEABLE PISTOL
STANDS
35 METER FIRING LINE
50 METER FIRING LINE
|___| CONTROL TOWER
Figure 43. Diagram of a pistol range.
AGO 6431B
91
CHAPTER 5
ADVICE TO INSTRUCTORS
Section I. GENERAL
92. Purpose
The information and suggestions contained in this chapter are
advisory and should be considered as a guide only. They are not
intended to limit the imagination and initiative of the instructor.
93. Method of Instruction
It is advisable to make use of the applicatory system where in-
struction is conducted in subjects covered in this manual. Several
phases comprise this system of instruction: explanation, demon-
stration, application (practical work), and examination.
a. Explanation. The initial explanation and demonstration of
any particular phase of the instruction is presented to the assem-
bled unit by the instructor, assisted by essential demonstration
personnel. The general purpose of the entire course or period of
instruction should be explained first. The various phases or steps
of the course should then be presented in a series of explanations
and demonstrations.
b. Demonstration.
(1) Demonstrations that are skillfully conceived and executed
expedite and simplify instruction as well as stimulate
interest. Successful demonstrations are usually short and
concise. The demonstrations incident to all subjects
should be arranged in progressive sequence, and, where
practicable, should alternate with practical work to per-
mit the student to fix these successive phases of instruc-
tion in his mind.
(2) The men who constitute the demonstration unit should be
carefully selected for their intelligence, ability, and ap-
pearance. They should be thoroughly trained and re-
hearsed in the duties they are to perform, so that the
demonstration will proceed smoothly and illustrate
clearly and simply the phase of instruction being pre-
sented.
(3) The equipment used for demonstrations should be the
best available. A demonstration platform or an area is
92
AGO 6431В
essential in which the students can be assembled quickly
at a position from which they can see and hear every part
of the demonstration.
(4) Interest is added and valuable instruction is provided by
repeating demonstrations, including common errors, and
requiring the students to detect these errors.
c. Application (Practical Work).
(1) This third step of instruction is of major importance,
since it gives the student an opportunity actually to
accomplish that which has been previously explained and
demonstrated.
(2) During the practical work phase of instruction, best
results are obtained if the unit is divided into groups.
Groups should consist of four to eight men, depending
upon the number of men undergoing instruction and the
number of assistant instructors available. Each group
is provided with a set of equipment and placed under the
direct supervision of a trained assistant instructor. The
group then executes the previously demonstrated phase
of instruction, individuals rotating with the groups, until
all men have mastered the instruction.
(3) The initial allotment of time and equipment should be
made carefully. However, the instructor should not
hesitate to alter this allotment, if the majority of the men
fail to master the instruction within the allotted time or
are kept at one activity to the point of boredom. The
frequent rotation of duties within each group is prefer-
able to keeping each man in one position for a long time.
d. Examination. Upon completion of each phase of instruction
an informal or practical examination should be conducted. In
addition to the examination required before starting range prac-
tice, the organization commander should conduct such additional
examinations as are necessary to insure that all men have com-
pleted the training.
Section II. MECHANICAL TRAINING
94. General
The unit to be instructed is assembled in a suitable area and
divided into conveniently sized groups, each under the supervision
of an assistant instructor. The instruction is centralized under
the supervision of the unit instructor. Explanation and demon-
stration are concurrent, each assistant instructor demonstrating
AGO 6431B
93
the elements of the particular phase of instruction as the instructor
explains it from the platform. For short periods of practical work,
the instruction is decentralized under the assistant instructors.
95. Disassembly and Assembly of the Pistol
a. Equipment Required. One pistol, with magazine, per man;
one pistol cleaning kit per group, and one disassembly mat (GTA
9-617) per two students.
b. Procedure. An assistant instructor disassembles and assem-
bles the pistol as the instructor is explaining the procedure.
(1) Practical work. Assistant instructors explain and dem-
onstrate the procedure and the students perform each
operation in unison with the assistant instructor. When
acquainted with the procedure, each student disassembles
and assembles the pistol without assistance.
(2) Questions and answers. Students ask questions concern-
ing points about which they are doubtful; instructors ask
questions designed to test the effectiveness of their
instruction.
96. Care and Cleaning
a. Equipment Required. Same as described in paragraph 95,
plus additional equipment required for demonstration purposes.
b. Procedure.
(1) The pistol is compared with any other mechanism and
the necessity explained for keeping it clean, lubricated,
and in working condition.
(2) The proper method of cleaning the pistol is explained and
demonstrated.
(3) Students ask questions concerning points about which
they are in doubt; the instructor asks questions designed
to test effectiveness of his instruction.
97. Load, Fire, and Unload
a. Equipment Required. Pistol with magazines and dummy
rounds.
b. Procedure.
(1) The various phases of loading, unloading, or clearing the
pistol are explained.
(2) Students practice loading a magazine with dummy am-
munition, inserting the magazine into the pistol, and
loading and unloading the pistol.
94
AGO 6431В
(3) Students ask questions concerning points about which
they are in doubt; instructor asks questions designed to
test effectiveness of his instruction.
98. Accessories
a. Equipment Required. One hip holster, shoulder holster, and
pistol cleaning kit.
b. Procedure.
(1) The use of each accessory is explained and demonstrated.
(2) Students examine accessories.
99. Individual Safety Precautions
a. Equipment Required. Pistol with magazine.
b. Procedure.
(1) Tests for safety devices are explained and demonstrated
(half cock, safety lock, grip safety).
(2) Students practice the application of the safety rules dis-
cussed and the tests of safety devices. Observation of
the rules for safety becomes a habit only after constant
practice over a long period. Instructors and assistant
instructors must be constantly alert to enforce the safety
rules.
(3) Students ask questions concerning points about which
they are in doubt; instructor asks questions designed to
test the effectiveness of his instruction.
Section III. MANUAL OF ARMS FOR THE PISTOL
100. General
a. Concurrent Instruction. Instruction in the manual of arms
for the pistol is conducted concurrently with dismounted drill and
with previous instruction in this chapter.
b. Equipment Required. Each man is equipped with a pistol, 3
magazines (2 extra), holster, belt, and magazine pocket.
c. Procedure. The manual of arms for the pistol lends itself
readily to the applicatory system of instruction.
(1) The instructor, employing a trained demonstration unit,
explains and demonstrates each movement in the manual.
(2) Assistant instructors drill the groups in the various move-
ments.
(3) Each group is tested by the instructor at the end of the
training period and a critique is conducted.
AGO 6431B
95
Section IV. MARKSMANSHIP
101. General
a. Marksmanship is the basic step in training the soldier to
employ the pistol in combat. A soldier will subconsciously employ
in combat the principles he has been taught in marksmanship,
hence these principles must be sound.
b. The procedure used in conducting marksmanship instruction
is similar to that used in the preceding sections of this chapter,
except that it is more decentralized. During instruction in each
step of marksmanship training, the entire unit is assembled ini-
tially under the unit instructor, who is assisted by a trained dem-
onstration unit. Following the initial explanation and demonstra-
tion, the groups move to their individual sets of equipment and
start practical work under the assistant instructors.
c. Firing exercises should be conducted under centralized
control.
102. Preparatory Marksmanship Training
a. General.
(1) During these periods, the soldier learns all the mechanics
of target practice except actual firing. Preparatory
marksmanship training may be performed in the vicinity
of the barracks. Range equipment is not required but
adds realism and interest to training.
(2) Adequate time should be allowed and thorough super-
vision provided to insure that each man has thoroughly
mastered the instruction before he is permitted to fire.
(3) Each instructional phase is taken up in proper sequence,
and training in that step is completed by each man before
the next step is initiated. If men fail to progress uni-
formly, groups should be rearranged, so that instruction
will not be held up by men who are slow to learn.
(4) A careful record should be kept of the progress of each
man and each group in order that the instructor will know
the progress of instruction, and when the men are ready
for range firing.
b. Equipment for Each Group.
(1) One sighting bar.
(2) One pencil or dowel triangulation device per two students.
(3) A sheet of i/s-inch miniature bull’s-eyes per student.
(4) A flat surface to support paper for triangulation exercises.
96
AGO 6431B
(5) One 25-yard pistol target (standard American).
(6) One group of 3 bobbing E targets.
(7) One pistol with 3 magazines, holster, belt, and magazine
pocket.
(8) Material for blackening sights.
(9) Pencils.
(10) Additional equipment such as chalkboard, charts, and
drawings as required by the instructor.
c. Procedure.
(1) Each phase of training is initiated with a discussion
covering the purpose and scope of the instruction and the
manner in which it is to be conducted. Where appropri-
ate, the instructor employs a trained demonstration group
to emphasize important points of instruction.
(2) When practical work is undertaken, groups are kept as
small as circumstances permit and are supervised by
assistant instructors.
(3) The proficiency of the students is determined by means
of oral examination and by close observation of the man-
ner in which they accomplish practical work, such as the
“county fair” system of examination.
103. Range Firing
a. General. The number of men who are to fire and the avail-
ability of range facilities are the primary factors affecting details
of administration and supply. These matters must be the subject
of detailed prior planning in order that firing may proceed smoothly
and without interruption. Plans should include training of neces-
sary assistants and demonstration units and adequate provision
for keeping all men occupied by concurrent marksmanship train-
ing of an appropriate nature.
b. Equipment.
(1) Pistols. Every effort should be made to detect and repair
mechanical defects before marksmanship training is con-
ducted. Proper lubrication of the pistol is essential.
Lack of lubrication causes excessive malfunctions.
(2) Magazines. Damaged or dirty magazines are the great-
est single cause of malfunctions of the pistol. Principal
defects in magazine are dents, spread lips, and the
presence of sand or dirt inside the magazine.
c. Safety Precautions. Range officers, the officer in charge of
firing and the commander responsible for the location of ranges
AGO 6431B
97
and the conduct of firing thereon must have a thorough knowledge
of AR 385-63. Before firing is begun, all officers and men who are
to fire or who are concerned with range firing will be familiarized
with the safety precautions contained in paragraph 89.
Section V. TRAINING SCHEDULES
104. General
To aid in the individual training phase, training schedules for
the courses in marksmanship training are shown in paragraphs
105 and 106. These schedules are based on the desirable number
of training hours for a pistol course. Use them as a guide in pre-
paring lesson plans. Conditions may require a longer or shorter
period to complete the training. When time is available, more
training should be added to the schedule. When suggested equip-
ment and training aids are not available, improvise or substitute
the best that are available. Unless otherwise noted, all references
in the training schedules are to this manual. For more detailed
information pertaining to training schedules and lesson outlines,
see Army Subject Schedule 21-33.
98
AGO 6431B
AGO 6431В
105. Pistols, Automatic, Caliber .45, M1911 andM1911Al (Qualification Course) (16 hours)
Period Hour Lesson Text references Area Training aids and equipment
1 3 MECHANICAL TRAINING (4 hours). Characteristics, disassembly and AR 370-5; FM 23-25, pars. 3-30, Classroom or field For instructor: chalkboard;
2 1 assembly, functioning, and care and cleaning. Malfunctions, stoppages, im- 40-46. FM 23-35; pars. 31-39, 51-56— do wooden working model; FB 7- 273; GTA 9-620, 9-621, and 9-622; projector and screen; cleaning equipment. For each man: 1 pistol and GTA 9-617. For each group: table or shelter half. Same as first period, plus am-
3 2 mediate action, loading, un- loading, ammunition, safety precautions. PREPARATORY MARKSMAN- SHIP TRAINING (4 hours). Aiming, position, and trigger FM 23-35; pars. 65-70 Pistol range or munition display, less FB 7- 273. For all: training aids listed in
4 1 squeeze exercises. Slow, rapid, and quick fire exer- FM 23-35; pars. 71-76 field. Pistol range or pars. 65-70. For all: One 25-yard (std Amer-
5 1 cises. Review and examination FM 23-35; par. 77 field. do. ican) target, one E target, one score card for each firer. For all: all equipment used in previous periods.
O O
О
О
Period Hour Lesson Text references Area Training aids and equipment
RANGE FIRING (8 hours) ___ AR 370-5; AR 385-63
6 4 Safety precautions, instruction practice firing, tables I, II, and III. FM 23-35; pars. 79, 85, 89 Pistol range For all: same as third period, plus ammunition and 1 score card for each man, one 25- yard pistol target (std Amer- ican), 1 E target (group of 3).
7 4 Record firing, tables I, II, and III. AR 370-5; FM 23-35; pars. 80, 86, 89. Pistol range Do.
AGO 6431В
6431В
106. Pistols, Automatic, Caliber .45, Ml 911 and Ml 911A1 (Familiarization Course) (8 hours)
Period Hour Lesson Text references Area Training aids and equipment
1 1 MECHANICAL TRAINING (1 hour). Characteristics, general disas- AR 370-5; FM 23-35, pars. 3, Classroom or field For instructor: chalkboard;
2 3 sembly and assembly, immedi- ate action, and care and clean- ing. PREPARATORY MARKSMAN- SHIP TRAINING (3 hours). Marksmanship training in aim- 5, 6-11, 39-45. FM 23-25, pars. 65-76 Pistol range or wooden working model; FB 7- 273; projector and screen. For each man: 1 pistol, 1 GTA 9-617, and accessories. For each group: 1 table or shelter half. For all: training aids listed in
3 4 ing, positions, trigger squeeze, slow and quick fire exercises, and safety precautions. RANGE FIRING (4 hours) Safety precautions and familiar- AR 370-5; AR 385-63; FM 23- field. Pistol range pars. 65-70, one 25-yard pistol target (std American), 1 E target. For all: same as second period,
ization firing. 35, pars. 87, 89. plus ammunition, 1 score card for each man; one 25-yard pistol target (std American), 1 E target, bobbing (group of three) for each firing point.
о
BACK BOARD
72”
Figure J^5. Backboard for wooden working model.
Section VI. TRAINING AIDS
107. General
In conducting training, make the greatest possible use of work-
ing models, charts, and other suitable visual training aids. Excel-
lent pistol training aids are available through normal supply
102
AGO 6431B
Figure 46. Parts to paint on backboard.
channels, or they can be constructed locally. Some recommenda-
tions and suggestions concerning the construction and use of
various training aids are listed below.
a. Scrap lumber in good condition or plywood may be used to
construct models. Other materials that are needed in making
models are nails, screws, and springs.
b. Charts and models should be painted with contrasting colors
to help the students distinguish the various parts.
c. All lettering on charts and other training aids must be large
enough to be read easily. Lettering 2^2 inches high is readable
at a distance of 75 feet.
108. Wooden Working Model
a. A large scale working model (fig. 44) is an excellent train-
ing aid for teaching nomenclature of parts and the cycle of opera-
tion of the pistol. Figures 44 through 50 show the dimensions of
the parts and a detailed plan of construction is given in (1)
through (6) below.
(1) Cut out the parts and drill holes and slots in backboard
(figs. 44-50).
(2) Paint the outline of the receiver and other parts on the
backboard (fig. 46).
AGO 6431B
103
о
SLIDE
AGO 6431В
SLIDE IS OF 3/8-INCH PLYWOOD
ITEM (A) IS A 3/8-INCH PLYWOOD PIECE ATTACHED TO SLIDE, MAKING TOTAL THICKNESS 3/4-INCH AT THIS POINT
ITEM (B) IS TWO 3/8-INCH PLYWOOD PIECES ATTACHED TO SLIDE, MAKING TOTAL THICKNESS 1-1/8 INCHES AT THIS POINT
Figure i7. The slide.
о
о
6431В
BARREL LINK
BARREL
HOLE A-THE DOWEL ATTACHED TO’THE
BARREL PASSES THROUGH THIS HOLE
PIN В IS GLUED TO LINK AND PASSES
THROUGH BACKBOARD
TOP HOLE IN BARREL LINK AND BACKBOARD
MADE OF 3/4-INCH PLYWOOD
MADE OF 3/8-INCH PLYWOOD
Figure J>8. The barrel and barrel link.
TRIGGER
HAMMER
TWO 5/8-INCH DOWELS ATTACHED TO REAR OF
TRIGGER TO WORK IN SLOTS IN BACKBOARD,
SO TRIGGER MAY BE MOVED TO FRONT AND
REAR, ALSO TO HOLD TRIGGER TO BACKBOARD
5/8-INCH DOWEL GLUED TO HAMMER
AND PASSES THROUGH BACKBOARD
AGO 6431В
MADE OF 3/4-INCH PLYWOOD
MADE OF 3/4-INCH PLYWOOD
Figure i9. The trigger and hammer.
SEAR
DISCONNECTOR
GRIP SAFETY
MADE OF 3/8‘INCH PLYWOOD
3/8-INCH PIN IS GLUED TO GRIP
SAFETY AND PASSES THROUGH
BACKBOARD
MADE OF 3/8-INCH PLYWOOD
Figure 50. The disconnector, sear, and grip safety.
MADE OF 3/8-INCH PLYWOOD
5/8-tNCH PIN IS GLUED TO SEAR
AND WILL PASS THROUGH BACK*
BOARD
Figure 51. The sighting bar.
(3) Paint the slide (fig. 47) and attach to backboard (fig. 45).
(4) Assemble barrel and barrel link (fig. 48) to backboard.
(5) Assemble trigger and hammer (fig. 49) to backboard.
(6) Assemble disconnector, sear, and grip safety (fig. 50) to
backboard.
b. Nails and springs are used on the rear of the backboard to
hold the parts and cause them to operate. The parts may have to
be sanded slightly to make them fit and operate properly.
c. Lubricate the working model with a wax candle or hand soap.
Paint the parts of the aid with contrasting colors so that all parts
can be seen clearly.
109. Charts and Other Aids
a. Some of the teaching points that can best be presented by a
chart are—
(1) Steps in the cycle of operation.
AGO 6131B
107
(2) Steps in care and cleaning.
(3) Characteristics and general data.
(4) Steps in preparatory marksmanship training.
b. Other helpful training aids that can be procured through
supply channels or made by the unit are—
(1) Sighting bars (fig. 51).
(2) Operable Transparency 17-1, Caliber .45 Pistol.
(3) Training Device (DVC) 23-1, Pistol Marksmanship
Device.
(4) Film Bulletin 7-273, “Infantry Weapons and Their
Effects.”
(5) M15 sight device.
(6) Graphic training aids:
(a) GTA 9-617, Pistol, Automatic, Caliber .45, M1911A1,
Disassembly Mat.
(b) GTA 9-620, Pistol Safety Lock Mechanism.
(c) GTA 9-621, Function of Pistol Grip Safety.
(d) GTA 9-622, Pistol Firing Mechanism.
108
AGO 6431В
PART THREE
REVOLVER, COLT, CALIBER .38, 2-INCH BARREL,
DETECTIVE SPECIAL
CHAPTER 6
INTRODUCTION
110. Description
(figs. 52 and 53)
a. The Revolver, Colt, Caliber .38, 2-Inch Barrel, Detective
Special, is a cylinder-loaded, exposed-hammer, selective-double-
action, hand weapon. The revolving cylinder of the weapon has
six chambers, permitting the weapon to fire six shots without being
reloaded. When the cylinder is loaded and closed, the revolver is
ready for firing. The action of cocking the hammer causes the
cylinder to rotate clockwise and aline the next chamber with the
barrel. The exposed hammer may be cocked by the thumb or may
be cocked and dropped by the continuous squeezing of the trigger,
which performs the double action of cocking and releasing the
hammer.
b. If one or more of the chambers are empty, the cylinder
should be rotated so that a loaded chamber will be moved into line
with the barrel when the revolver is cocked. The closed cylinder
may be rotated to its proper position by holding the hammer back
at about one-fourth full cock. With the hammer down, the first
loaded chamber should be next on the left of the one alined with
the barrel.
c. The rate of fire is limited by the dexterity of the firer in
reloading the cylinder and by his ability to aim and squeeze.
111. General Data
Weight________________
Total length----------
Barrel:
Length____________
Diameter of bore__.
Diameter of rifling.
Number of grooves.
Grooves:
Width_____________
.. 1 pound, 5 ounces.
_ 6% inches.
. 2 inches.
_ 0.346-0.347 inch.
_ 0.353-0.354 inch.
_ 6.
.. 0.120-0.124 inch.
AGO 6431B
109
Figure 52. Revolver, Colt, Caliber .38, 2-Inch barrel. Detective Special.
Figure 53. Revolver, Colt, Caliber .38, 2-lnch barrel, Detective Special,
with commercially procured grip adapter.
Depth_________________________________
Rifling, one turn in__________________
Lands:
Width_________________________________
0.0035 inch.
16 inches (left).
0.055-0.059 inch.
no
AGO 6431B
Cylinder:
Length_______________________________
Diameter_____________________________
Chambers:
Number___________________________________
Diameter:
Maximum_________________________
Minimum_________________________
Muzzle velocity__________________________
Type of front sight______________________
Type of rear sight_______________________
Maximum effective range__________________
1.570 inches.
1.4015 inches.
6.
0.380 inch.
0.359 inch.
(158-grain bullet) 870 feet per
second.
Blade, fixed.
Groove, fixed.
50 meters.
AGO 6431B
111
CHAPTER 7
MECHANICAL TRAINING
Section I. DISASSEMBLY AND ASSEMBLY
112. Disassembly Limitations
Revolvers are not disassembled by user personnel. The only
part the soldier is authorized to remove from the revolver is the
side plate, and this must be performed under the supervision of
an officer or a noncommissioned officer. The side plate is removed
only for performance of emergency maintenance. When parts of
the revolver become broken or worn, the weapon must be turned
in to an ordnance maintenance unit for repair. To remove the side
plate, see procedures listed in TM 9-2027.
Section II. LOADING, FIRING, AND UNLOADING
113. Load
To load the revolver, hold it in the left hand, thumb latch to
the left, with the muzzle pointed down at an angle of approximately
75 degrees (fig. 54). Press the latch to the rear with the right
thumb and push the cylinder out with the fingers of the left hand.
With the right hand, insert a cartridge into each chamber of the
cylinder. Close the cylinder with the left thumb.
114. Fire
a. The revolver may be fired single action or double action. To
fire single action, cock the revolver by pulling back the hammer
with the thumb as far as it will go. Obtain the correct sight aline-
ment and sight picture, and squeeze the trigger. To fire successive
shots single action, the trigger must be released, the revolver must
be cocked with the thumb, and the trigger squeezed for each shot.
b. To fire double action, apply a steady rearward pressure to the
trigger with the trigger finger until the hammer cocks and falls
forward striking the primer of the cartridge. The trigger must
be released after each shot and squeezed again for each succeeding
shot.
112
AGO 6431B
Figure 54. Load and unload.
115. Unload
To unload the revolver, place it in the left hand, thumb latch to
the left, with the muzzle pointed down at an angle of about 75
degrees. Press the latch to the rear with the right thumb and push
the cylinder out with the fingers of the left hand (fig. 54). Eject
the cartridges or cartridge cases by pressing the ejector rod head
with the left thumb while steadying the revolver at the stock with
the right hand. Remove the cartridges or cartridge cases with
the thumb and forefinger of the right hand.
AGO 6431B
113
Section III. SAFETY DEVICES AND SAFETY TESTS
116. Safety Devices
The revolver has two safety devices. These devices are the
safety and the cylinder bolt.
a. The safety prevents the hammer from striking the primer
of a cartridge by blocking the hammer and preventing it from
moving forward enough to strike the primer of the cartridge. The
safety blocks the hammer each time the trigger is released.
b. The cylinder bolt, another safety device, insures positive
alinement of one of the chambers of the cylinder with the barrel
each time the cylinder rotates.
117. Tests of Safety Devices
The safety devices should be tested frequently, and always
before firing the revolver. The following procedure is used to
test the safety devices.
a. Safety. With the revolver unloaded and cylinder closed,
cock the hammer. Holding the hammer back with the thumb,
squeeze the trigger and let the hammer move forward about 14
inch, still holding it with the thumb. Release the trigger. Then
release the hammer and let it go forward. If the firing pin pro-
jects through the hole in the frame, the safety is faulty.
b. Cylinder Bolt. With the hammer down attempt to rotate the
cylinder. If more than about inch in rotation is possible, the
cylinder bolt is faulty. Repeat this test with the hammer cocked.
Note. With the hammer about one-fourth cocked the cylinder should rotate
freely.
Section IV. MALFUNCTIONS, STOPPAGES, AND IMMEDIATE
ACTION
118. General
Most stoppages or malfunctions of the revolver can be prevented
by proper care and cleaning before and after firing. If a stoppage
occurs, and immediate action does not reduce the stoppage, the
revolver should be turned in to ordnance for repair.
119. Malfunctions
A malfunction is a failure of the weapon to function satisfac-
torily. Malfunctions are classified as defects in the weapon that
normally do not cause a break in the cycle of operation. Listed
below aTe some malfunctions and their causes:
a. The safety does not block the trigger: Caused by a faulty
safety or safety lever.
114
AGO 6431B
b. Failure to function freely: Caused by lack of lubrication,
use of improper lubricants, or dirt in the revolver. Corrective
action consists of cleaning and lubricating properly.
120. Stoppages
a. A stoppage is any unintentional interruption in the cycle of
operation. If the revolver stops firing through no fault of the
firer, or an attempt to fire is made and the weapon does not fire, a
stoppage has occurred.
b. Stoppages can normally be attributed to failure to feed or
fire.
(1) Failure to feed. Feeding is the process that begins with
a cartridge properly positioned in the cylinder and ends
with the firing chamber of the cylinder alined with the
barrel. Failure to feed is a failure of some part of the
revolver or of the ammunition to properly aline the
firing chamber with the barrel. It is generally caused
by—
(a) A broken or defective cylinder bolt (spring), or latch
(pin, spring), hand rebound lever, or ratchet on the
ejector.
(t>) A dirty, malformed, or battered cartridge.
(c) Dirt or an obstruction in the chamber. Corrective
action consists of cleaning, if dirty, and checking to
determine if there are any obstructions or any defec-
tive parts. If the failure is caused by dirty, malformed,
or battered cartridges, they must be removed.
(2) Failure to fire. Firing is the process that begins with
the firing chamber of the cylinder alined with the barrel
and ends with the firing of the cartridge. A failure to
fire is caused by faulty ammunition or by some part of
the firing mechanism not performing properly. Failure
to fire is generally caused by a—
(a) Broken firing pin.
(b) Weak or broken mainspring.
(c) Defective primer.
(d) Broken hammer strut.
(e) Dirt or obstruction under the hammer. Corrective
action consists of determining which part or parts are
the cause of the malfunction and the subsequent re-
placement of the faulty parts. If the primer of the
AGO 6481B
115
round is deeply indented, the cartridge is defective.
If the primer is only slightly dented, the firing pin is
worn or broken. A weak or broken mainspring may
not furnish enough energy to drive the hammer for-
ward and allow the firing pin to forcefully strike the
primer of the cartridge.
121. Immediate Action
a. Immediate action is the prompt action taken by the firer to
reduce a stoppage. The procedures for applying immediate action
should become instinctive for the soldier armed with the revolver.
It is applied automatically in an effort to reduce the stoppage
without attempting to discover the cause at that time.
b. The procedure for applying imfnediate action when the re-
volver fails to fire and the hammer is forward (cartridge misfires)
is as follows:
(1) Keep the revolver pointed at the target and recock it
with the thumb. (This rotates the cylinder, and the
firing chamber, with a new cartridge, is alined with the
barrel.)
(2) Aim and attempt to fire.
c. The procedure for applying immediate action when the revol-
ver fails to fire and the hammer is cocked or partly cocked is as
follows: Keep the revolver pointed at the target and attempt to
recock it with the thumb. If the weapon cocks, aim and attempt
to fire.
Note. If the application of the procedure for immediate action does not
clear the stoppage, ordnance personnel must be called to complete clearance.
d. If the revolver fails to fire after the application of immediate
action, the stoppage is probably an unusual type and will require
a detailed inspection for the cause. If the firer cannot ascertain
the cause of the stoppage, the weapon should be sent to ordnance
for inspection and repair.
Section V. CARE AND CLEANING
122. General
The information in paragraph 40 applies also to the revolver.
123. Cleaning Materials, Lubricants, and Rust Preventives
The instructions in paragraph 41 apply also to the revolver.
116
AGO 6431B
124. Daily Preventive Maintenance
The instructions in paragraph 42 apply also to the revolver.
125. Care and Cleaning Before Firing
Before the revolver is fired, the bore and chambers of the revol-
ver must be cleaned and dried. The exterior of the revolver should
be dried to remove excess oil. The cylinder and the ejector rod
inside the cylinder should be lightly oiled, and a drop or two of oil
should be placed on the interior parts of the revolver to insure
proper operation. All screws should be tightened before firing
and should be checked during and after firing to see that they are
tight.
126. Care and Cleaning After Firing
a. After the revolver has been fired, the primary consideration
is the prevention of rust. The residue left in the bore and cham-
bers after firing consists mainly of primer salts, powder ashes,
and carbon. The primer salts collect moisture and promote rust.
This salt collects in the chambers and throughout the bore. Rifle
bore cleaner removes it, as well as the powder ashes and carbon.
b. When a revolver has been fired, the bore and chamber must
be cleaned thoroughly not later than the evening of the day on
which it is fired and each day for at least the next three days.
c. To clean the bore after firing, open the cylinder, hold the
revolver with the muzzle pointed up, toward the operator, and
hold the cylinder in its fully opened position. Saturate a swab
with rifle bore cleaner or soapy water. Insert the swab in a clean-
ing rod and move forward and back through the bore several times.
Run the cleaning rod, with cleaning brush attached, back and
forth through the bore one or two times. Again run several swabs
saturated with cleaner or water through the bore. Follow this
with dry swabs until the bore is clean. When the bore is clean,
saturate a swab in rifle bore cleaner and run it back and forth
through the bore several times.
d. Repeat the operation in c above for each of the chambers of
the cylinder, holding the revolver with the muzzle toward the
operator, cylinder beneath the frame.
e. After performing steps c and d above, inspect for residue and
corrosion. If none is apparent, saturate a swab with oil, lubri-
cating, preservative, and swab the bore and chambers making
certain that the bore and all exposed metal parts of the revolver
are covered with a light coat of oil.
AGO 6431B
117
f. Due to corrosion caused from the gas that escapes between
the barrel and the cylinder, the following parts require special
care after firing:
(1) The frame just above the cylinde'r in the rear of the
barrel.
(2) The nose of the hammer.
(3) The firing pin channel and the hammer groove in the
frame.
127. Care and Cleaning After a CBR Attack
The instructions in paragraph 46 apply also to the revolver.
Section VI. REPAIR PARTS AND ACCESSORIES
128. Repair Parts and Accessory Allowances
Allowances for accessories and repair parts are prescribed in
Department of the Army Supply Manual ORD 7, SNL B29. The
following holsters are provided for use specifically with the Revol-
ver, Colt, 2-Inch Barrel:
a. Holster, hip, Revolver, Colt, Caliber .38, 2-Inch Barrel, Detec-
tive Special.
b. Holster, shoulder, Revolver, Colt, Caliber .38, 2-Inch Barrel,
Detective Special.
Section VII. AMMUNITION
129. General
Ammunition for use in the Revolver, Colt, Caliber .38, 2-Inch
Barrel, Detective Special, is authorized by Department of the Army
Supply Manual 9-5-1305.
130. Classification
The nomenclature and types of ammunition authorized for use
in the caliber .38 revolver are listed below:
a. Cartridge, ball, revolver, caliber .38, short Colt, 125- or 130-
grain bullet.
b. Cartridge, ball, revolver, caliber .38, special, midrange, 146-
grain bullet (wad-cutter).
c. Cartridge, ball, revolver, caliber .38, special, midrange, 148-
grain bullet, nickeled cartridge case (wad-cutter).
d. Cartridge, ball, revolver, caliber .38, special, 158-grain bullet.
118
AGO 6431B
e. Cartridge, ball, revolver, caliber .38, special, 158-grain bullet,
steel jacket (copper-plated).
/. Cartridge, ball, revolver, caliber .38, special, 200-grain bullet,
nickeled cartridge case (super-police).
g. Cartridge, ball, revolver, caliber .38, 200-grain coated bullet
(Lubaloy), nickel-plated cartridge case (super-police).
h. Cartridge, blank, revolver, caliber .38, special.
i. Cartridge, test, high-pressure, revolver, caliber .38, special,
158-grain bullet (for use only in ordnance test of weapons).
j. Cartridge, tracer, revolver, caliber .38, special, 120-grain
bullet, steel jacket.
k. Cartridge, tracer, revolver, caliber .38, special, 158-grain
bullet, steel jacket.
131. Care, Handling, and Preservation of Ammunition
Paragraphs 52 through 56.
AGO 6431B
119
CHAPTER 8
MANUAL OF ARMS FOR THE REVOLVER
132. General
a. The movements described in this chapter differ in purpose
from the manual of arms for the rifle, because they are not de-
signed to be executed in exact unison in that, with few exceptions,
no real necessity exists for their simultaneous execution. They
are not planned as a drill to be executed in cadence with snap and
precision; they are designed to provide safe and uniform methods
of handling the revolver.
b. Officers and enlisted personnel armed with the revolver render
the hand salute at the command PRESENT ARMS. They hold
the salute until the command ORDER ARMS is given.
133. Raise Revolver
The command is RAISE REVOLVER. At the command RE-
VOLVER unbutton the strap of the holster with the right hand
and grasp the stock. Draw the revolver from the holster with
the thumb and last three fingers of the right hand, holding the
stock with the forefinger extended outside the trigger guard.
Incline the barrel of the revolver upward at an angle of 30 degrees
from the vertical, and raise the hand as high as, and approximately
six inches in front of, the point of the right shoulder.
134. Inspection Arms
The command is INSPECTION ARMS. At the command ARMS
assume the position of raise revolver if not already in that posi-
tion. Open the cylinder by operating the thumb latch with the
forefinger of the left hand and pushing the cylinder to the left
with the right forefinger. Return the left hand to the side. Raise
the revolver to a point where the cylinder and chambers can be
visually inspected and check for clearance. After this inspection,
return to the position of raise revolver. If the revolver is inspected
in ranks and the inspecting officer takes the revolver for inspec-
tion, lower the right arm and hand smartly to the side, as in the
position of attention. When the inspecting officer is ready to re-
turn the revolver, raise the right arm and hand to the raise revol-
120
AGO 6431B
ver position. After the revolver is returned by the inspecting
officer, take the position of raise revolver and, without command,
execute RETURN REVOLVER.
135. Return Revolver
The command is RETURN REVOLVER. At the command
RETURN, close the cylinder with the forefinger of the left hand.
At the command REVOLVER, lower the revolver, muzzle down,
to the holster; raise the holster strap with the right thumb; insert
the revolver in the holster; button the holster strap with the right
hand; and resume the position of attention.
AGO 6431B
121
CHAPTER 9
MARKSMANSHIP TRAINING
Section I. GENERAL
Note. The instructions in paragraphs 60 through 62 apply also to marks-
manship training with the revolver.
Section II. PREPARATORY MARKSMANSHIP TRAINING
Note. The instructions in paragraphs 63 through 66 apply also to prepara-
tory marksmanship training for the revolver.
136. Grips and Positions
a. General. To assume the proper position for firing, it is nec-
essary to know the correct position of the body with relation
to the target and how to grip the revolver correctly. The one-hand
grip is used for firing from standing and hip-shooting positions.
The two-hand grip is used when firing from the prone, kneeling,
and sitting positions. Once a correct grip has been taken, it must
be maintained exactly, even when other actions such as cocking
the hammer are performed, if the firer is to shoot a tight shot
group.
b. One-Hand Grip. The revolver can be held in any of three
different grips, depending upon the size of the firer’s hand and
the degree of firmness desired. The different grips should be
practiced and the one adopted that best suits the conformation of
the hand.
(1) Conventional grip. To take the conventional grip, pick
up the revolver and place it in the firing hand. The
lower three fingers grip the stock firmly to prevent recoil
from twisting the weapon in the hand and causing the
firer to lose uniformity of grip. The thumb is held as
shown in figure 55 to aid in controlling the revolver dur-
ing trigger squeeze and recoil. The trigger finger is
placed inside the trigger guard, so that any portion of
the finger from the tip to the first joint will contact the
122
AGO 6431B
trigger. No part of the trigger finger should touch the
frame. This procedure will aid in applying pressure
straight to the rear during trigger squeeze.
(2) Alternate grip. The short barrel and light frame of the
caliber .38 revolver cause the recoil to be accentuated,
which may cause injury to the ball of the thumb when
the revolver is gripped in the conventional manner. For
that reason, there are two alternate methods of gripping
the revolver: (1) as shown in figure 56 with the thumb
down; and (2) with the little finger curled beneath the
butt and the thumb held down (fig. 57).
(3) Grip with attachment. Persons with unusually large
hands will experience some difficulty in gripping the re-
volver. The attachment of a grip adapter will aid these
persons in maintaining the proper grip. It is a commer-
cially procured item, usually constructed of rubber or
plastic and curved to conform to the contours of the
stock, which is attached to the frame of the revolver as
shown in figure 53. In effect, it enlarges the stocks of
the revolver.
c. Two-Hand Grip. The two-hand grip is obtained as follows:
Grip the revolver as prescribed in b above. Seat it firmly in the
palm of the free hand. The fingers and thumb of the free hand
Figure 55. Conventional grip, caliber .38 revolver.
AGO 6431B
123
Figure 56. Alternate grip with thumb down, caliber .38 revolver.
Figure 57. Alternate grip with little finger under butt, caliber .38 revolver.
are then closed over the firing hand in a manner that will provide
maximum support (fig. 34).
d. Standing Position, Offhand. Paragraph 67d is applicable
also to the use of the revolver in this position.
e. Prone Position. To assume the prone position (fig. 58), the
124
AGO 6431B
Figure 58. The prone position.
firer faces the target, draws his revolver from the holster, bends
slightly forward at the waist, and drops to his knees. He then
falls forward, breaking his fall with his free hand and arm and
simultaneously pointing the revolver at the target with his firing
hand and arm. He lies on the ground with his legs straight and
feet together with his body as flat on the ground as possible. The
chest and forearms should rest on the ground. He reaches out
with his free hand and takes the two-hand grip on the revolver.
If the firer is unable to aline the sights properly using the two-
hand grip, he may form the free hand into a fist and support the
revolver. The firer may then cock the weapon, aim, and squeeze
the trigger.
Caution: When assuming any of the firing positions, do not
place the trigger finger inside the trigger guard until the re-
volver is pointed toward the target.
/. Kneeling Position. To assume the kneeling position (fig. 59),
the firer faces the target, draws his revolver from the holster, and
drops to his right knee. His left knee is up and pointed toward
the target. His right knee is on the ground about 4 inches behind
the left heel. The weight of the body is distributed on the calf and
heel of the right leg. His left elbow is projected beyond the knee,
allowing the fleshy part of his arm to rest on the knee. The two-
hand grip is taken on the revolver, and the right elbow and wrist
are held straight and locked. The firer may then cock the revolver,
aim, and squeeze the trigger.
g. Sitting Position. To assume the sitting position (fig. 60),
the firer stands facing the target with the feet about 6 inches apart.
AGO 6431B
125
He then sits down, breaking his fall with his left hand and draws
the revolver from the holster, swinging it widely to the right and
forward. His knees are bent and his knees and feet are about 6
inches apart. Both elbows project beyond the knees, allowing the
fleshy part of the arms to make contact with the knees. For the
heavily built man, it may be necessary to place the fleshy part of
the forearms on the knees. When the sitting position is first as-
sumed and the revolver is not directly at eye level, the feet should
be drawn closer to the body. This raises the knees and elevates the
revolver. This procedure should be reversed if the revolver is too
high. The firer then takes the two-hand grip on the revolver with
his right wrist and elbow straight and locked. The firer may
then cock the revolver, aim, and squeeze the trigger.
h. Standing Position (Behind Barricade, Right Hand). To as-
sume the standing position behind the right side of a barricade
(fig. 61), the firer places his left foot forward with the toe pointed
to the right, at about a 45-degree angle, near the edge of the bar-
ricade. The right foot is placed to the rear of the left foot at a
comfortable position. The left hand, palm open, is placed against
the barricade, so that the forefinger (held along the edge of the
barricade) and the thumb form an L. The firer leans slightly on
the left arm so that the arm is stiff. He grips the revolver in his
right hand, resting the right wrist on the left thumb, with the
left thumb up against the wrist for a steadier rest.
He keeps well
Figure 59. The kneeling position.
126
AGO 6431B
Figure 60. The sitting position.
behind the barricade, with only the revolver, right hand, left
thumb, right temple, and the right eye visible from the other side
of the barricade.
i. Standing Position (Behind Barricade, Left Side). The posi-
tion for firing from the left side of the barricade is the same as
for the right side except that the procedures in taking the position
are reversed and the pistol is fired with the left hand.
j. Crouch Position, Point Fire. The firer approaches the firing
point at double time. About 5 feet from the firing point, he slows
to a walk and draws the weapon, keeping it pointed toward the
target area. At the firing point he stops and bends the knees,
crouching with the body bent forward at the hips, feet spread well
apart, with the left foot slightly forward. He swings the weapon
up to shoulder height, pointing it at the target as though pointing
a finger. Keeping the arm locked in position, he quickly alines the
sights and fires double action (fig. 62).
k. Hip Shooting. To execute the draw and fire from the hip
(fig. 63), the firer does the following in one continuous motion:
Assume a boxer’s stance by bending the body forward at the waist
and spreading the feet to obtain perfect balance. The left foot
should be forward and the knees slightly bent. At the same time
the firer assumes his stance, he grasps the revolver by the stock
and draws it from the holster. As soon as the muzzle clears the
holster, the forearm, hand, and revolver are pointed at the target,
and the revolver is fired double action. The trigger finger should
AGO 6431B
127
Figure 61. Standing position (behind barricade, right side).
128
AGO 6431B
Figure 62. Crouch position, point fire.
not be inserted in the trigger guard, until the weapon points in
the direction of the target. To improve hip shooting, the firer
should practice before a mirror. Such practice will show him the
direction in which the weapon is pointed and reveal any errors that
he is making.
137. Position Exercises
Position exercises should be conducted as outlined in paragraph
68 for each position that is fired with the revolver.
AGO M81B
129
Figure 63. Hip shooting.
138. Trigger Squeeze and Trigger Squeeze Exercises
Paragraphs 69 and 70 apply also to the use of the revolver.
139. Slow Fire and Slow Fire Exercise
Paragraphs 71 and 72 apply also to the use of the revolver.
140. Rapid Fire
Paragraph 73 applies also to the use of the revolver.
141. Cocking the Revolver
a. General. To fire the revolver accurately during rapid fire, it
is necessary for the firer to maintain uniformity of grip while
130
AGO 6431B
cocking the piece. A great deal of practice is necessary before
sufficient skill is acquired to cock the hammer without shifting
the position of the stock in the hand. The following method of
gripping the revolver should be taught.
b. Straight-Back Method.
(1) With this method of cocking the revolver (fig. 64), the
grip is not loosened, and the revolver is not shifted from
its line of sight. As soon as the shot is fired and while
the gun recoils, the thumb is placed on the hammer spur
and the hammer is drawn straight back to the full cock
position by the action of the thumb. During the time the
hammer is being drawn back, the revolver is lowered to
the aiming position and the sights are alined on the
target. As soon as the hammer is cocked, the thumb is
replaced alongside the frame. This method has the fol-
lowing advantages:
(a) Cocking in this manner permits the grip to be uni-
formly maintained throughout firing.
(b) Since there is no side movement of the revolver during
the process of cocking, the sights can be readily alined
and brought back on the point of aim.
(2) Some individuals may experience difficulty in keeping the
grip in the same position on the revolver during the firing
Figure 64. Cocking the revolver.
AGO 6431B
131
of a string. In most cases, the hand tends to work higher
on the stock, thus restricting the action of the thumb in
cocking and making it necessary to change the grip on
the revolver in the middle of the string. This difficulty
may be overcome by using the alternate grip, so that the
little finger is placed under the bottom of the butt of the
stock.
142. Cocking Exercise
a. This exercise is held for the purpose of acquiring a smooth
and rapid cocking operation.
b. Before being considered proficient, the man must be able to
cock the revolver at least 10 times in 10 seconds. The cocking
exercise should be emphasized during the first hour of rapid fire
training. Thereafter, each pupil should be given additional prac-
tice from time to time until he is considered proficient.
c. The exercise is conducted using the coach-and-pupil method
with the instructor explaining and demonstrating cocking. Em-
phasis is placed on the following points: the importance of main-
taining a uniform grip, keeping the sights alined on the target,
and the necessity of keeping the eye focused on the sights. This
exercise should not be continued longer than about 10 seconds at
a time. Frequent changes of coach and pupil are necessary to
prevent undue tiring of the muscles of the arm and hand. After
requiring the pupil and his coach to take position on the line, the
instructor commands—
(1) COCKING EXERCISE—READY.
(2) EXERCISE.
(3) CEASE FIRING.
(4) REST.
At the command COCKING EXERCISE—READY, the pupil
grips the revolver as described in paragraph 136 and extends it to
the firing position. At the command EXERCISE the eye is focused
on the sights and the trigger is squeezed, causing the hammer to
fall. Cocking the hammer by the prescribed methods is then con-
tinued until CEASE FIRING is given, then the revolver is brought
to the position of raise pistol.
143. Rapid Fire Exercises
Paragraph 74 applies also to rapid fire with the revolver except
for cocking the revolver with the thumb instead of using a cord
on the hammer.
132
AGO 6431В
144. Quick Fire and the Quick Fire Exercise
Paragraphs 75 and 76 apply also to quick fire with the revolver.
However, in table III the revolver is fired double action for the two
rounds at the crouch position on the 10-meter line.
145. Examination Before Range Firing
Paragraph 77 applies also to the revolver.
Section III. COURSES FIRED
Note. Instruction practice and record firing courses applicable also for the
revolver are described in paragraphs 78 through 80 and 82.
146. Practical Qualification Course
a. General. Practical qualification with the revolver is the at-
tainment of a minimum designated score on a firing course designed
to simulate the actual conditions under which the weapon will
ordinarily be used.
(1) The objective of the practical qualification course is to
train personnel in the practical use of the revolver, to
demonstrate the capabilities and limitations of the weap-
on, and to familiarize the firer in firing under conditions
of stress. The course supplements known-distance range
practice and develops the firer’s ability to fire quickly,
instinctively, and accurately, under varying conditions of
stress.
(2) Qualification in practical revolver shooting includes firing
from several positions at varying ranges; shooting with
the right and left hands; point firing, double action; and
hip shooting. The course does not represent one con-
tinuing situation; it represents several possible situations
that personnel armed with the revolver may encounter.
b. Prior Training Requirements.
(1) Training in practical revolver firing should not begin
until the individual has demonstrated a mastery of basic
marksmanship training by attaining the score of marks-
man or higher in record firing (pars. 80, 85, and 86).
(2) The firer should be in good physical condition, as qualifica-
tion will depend in part on his ability to get into the pre-
scribed positions quickly, move from one firing point to
another rapidly, instinctively coordinate the movements
of his body, and complete the course within the time
prescribed.
AGO 6431B
133
147. Description of the Course
The practical qualification course is divided into two phases
(fig. 65).
a. Phase I. The firer begins at the 55-meter line (the starting
line) with 50 rounds of ammunition in his pocket and 5 rounds in
the weapon. Once he begins the course, he continues until phase I
is completed. He reloads with 5 rounds each time the weapon is
empty. Time for this phase is 6(4 minutes. The phase is out-
lined in table XI.
Table XI
Range
(meters)
Point
Position
Rounds
50
50
40
40
30
25
25
25
25
7
1
2
3
4
5
6
7
8
9
10
Prone_______________________________________
do_______________________________________
Kneeling___________________________________
do_______________________________________
Sitting____________________________________
Standing (offhand)_________________________
Standing (behind right portion of barricade) _
Standing (behind left portion of barricade)_
Standing (off hand)________________________
Crouch (point fire)________________________
5
5
5
5
5
5
5
5
5
5
b. Phase II. The firer, with five rounds loaded in the revolver
and with weapon in holster, enters a simulated room. The moment
he sees the target, he draws his weapon as quickly as possible, and
fires five rounds double action from the hip. Time limit for this
phase is 5 seconds.
Section IV. RANGE FIRING AND SAFETY PRECAUTIONS
Note. Range firing procedure and safety precautions contained in para-
graphs 83 through 86 and 88 pertain also to the revolver.
148. Procedure for Conducting Practice Firing on Practical Quali-
fication Course
a. Purpose. The purpose of practice firing on the practical
qualification course is to permit the firer to fire a modification of
the course under competent close supervision, in order that any
errors or bad firing habits may be detected and corrected. Prac-
tice firing will also determine if the firer is prepared to fire for
qualification.
134
AGO 6431B
b. Conduct of Practice Firing.
(1) Place an S target in the window of the house.
(2) Load the revolver with 5 rounds and place 30 rounds in
the pocket.
(3) Stand at the starting point with the revolver in the
holster.
(4) At the command GO, double time to point 1 on the 50-
meter line, assume the prone position, and fire five rounds.
Clear and inspect the weapon and holster it.
(5) Move forward with the instructor and inspect the target.
The instructor will use this opportunity to critique the
firer. The hits are then pasted so that subsequent hits
may be determined.
(6) Return to the 50-meter line, reload with 5 rounds, and
assume the prone position. At the command GO, double
time to point 3, on the 40-meter line, and repeat the pro-
cedure of (4) and (5) above, except that the firing will
be from the kneeling position.
(7) Repeat these procedures from the sitting position, point
5; standing (off hand), point 6; standing position (be-
hind right side of barricade), point 7; and crouch position
(point fire), point 10. Phase I is now completed.
(8) For phase II, the firer enters the simulated room with the
revolver loaded with 5 rounds of ammunition and bol-
stered. Immediately upon seeing the target, the firer
executes a quick draw and fires the 5 rounds double action
at the target as quickly as possible.
149. Conduct of Record Firing on Practical Qualification Course
a. Phase I.
(1) During record firing on the practical qualification course
the instructor (coach) merely times the firer and follows
him from point to point to insure that he complies with
all safety regulations and fires from the correct firing
points.
(2) One S target is placed in the window, and one in the door
of the house. The firer fires on the target in the window
from all firing points on the right side of the course and
on the target in the door from all firing points on the left
side of the course.
(3) To begin firing for record, the firer stands at the starting
point with 5 rounds loaded in the bolstered revolver.
AGO M31B
135
O>
О-
SITTING
POS
NO. 9
STANDING (OH Hand)
NO. 8
STANDING
Behind
Barricade
Left Hand
NO. 7
STANDING
Behind
Barricade
Right Hand
NO. 6
STANDING (О» Hand)
55 METERS 50 METERS 40 METERS 30 METERS 25 METERS
NO. 10
CROUCH
(Point Fire)
7 METERS
AGO 6431В
Figure 65. Practical qualification course.
When the instructor gives the command GO, he begins to
time the firer.
Note. The revolver is loaded with 5 rounds and bolstered at
completion of firing at each firing point except at firing points
6 and 7.
(4) At the command GO, the firer proceeds at double time to
point 1, draws the revolver, assumes the prone position,
takes the two-hand grip on the revolver and fires 5 rounds
single action. He reloads while in the prone position, then
moves at double time to point 2 and repeats the same
procedure.
(5) The firer double times to point 3, draws the revolver,
assumes the kneeling position, fires 5 rounds single action,
assumes the prone position, and reloads. He repeats the
same procedure at point 4.
(6) The firer proceeds at double time to point 5, draws the
revolver, assumes the sitting position, and fires 5 rounds
single action. He then assumes the prone position, re-
loads, and runs to point 6.
(7) At point 6, the firer draws the revolver, assumes the
standing position (off hand), and fires 5 rounds. Holding
the revolver pointed downrange, the firer ducks behind
the barricade to point 7.
(8) At point 7, he reloads with 5 rounds and fires from behind
the barricade, right side. He reloads and then moves to
point 8, firing 5 more rounds from behind the barricade,
left side.
(9) He reloads the revolver while behind the barricade, then
double times to point 9, draws the weapon, assumes the
standing position (off hand), fires 5 rounds single action,
and ducks back behind the barricade and reloads.
(10) The firer then double times to point 10 and fires 5 rounds
double action from the crouch position, point fire. This
completes phase I and the instructor (coach) stops timing.
b. Phase IL To prepare for phase II, the instructor, out of
sight of the firer, places the target in the simulated room behind
the false-front house, 5 yards inside the door. The firer should
not know the exact location of target.
(1) The firer loads 5 rounds in the revolver and places it in
the holster. He then proceeds through the door. At the
instant he sees the target, he draws and fires 5 rounds
double action as quickly as possible.
(2) Timing starts as soon as the firer’s hand moves toward
the weapon and stops when the last round is fired.
AGO 6481B
137
150. Scoring and Classification
a. Phase I.
(1) Scoring. Phase I must be completed within б1/; minutes.
Regardless of the score attained, the firer has not quali-
fied unless he completes the course in the allotted time.
Hits are scored as 5, 4, 3, or 2, depending upon their loca-
tion on the target. To compute the score, count the
number of hits in each zone, multiply by the value of the
zone and add the total. Misses are scored as zero.
(2) Classification. Personnel will be qualified according to
the following minimum scores, out of a total possible
250, provided that the course has been completed in the
time allotted:
Expert...........200
Sharpshooter ....175
Marksman ..........150
Unqualified......Below 150 or exceeding 6i/£-minute
time limit.
b. Phase II. To qualify in phase II, the firer must score at
least 3 hits upon the target in 5 seconds. The position of the hits
on the target is immaterial. Classification as outlined above is not
confirmed unless the firer can achieve the requirements of phase
II. Refiring of phase II will be continued until this standard is
achieved, at which time classification based upon scores fired in
phase I will be established.
151. ScoreCard
DA Form 88 (Individual Score Card—Caliber .45 Pistol and
Caliber .38 Revolver) will be used.
152. Safety Precautions on the Range
a. Never load the revolver until you have taken your place at
the firing point and have received the command to load.
b. Always clear the revolver before leaving the firing point.
c. Always hold the loaded revolver at the position of raise pistol
or ready except while aiming. If the arm becomes weary, transfer
the weapon to the other hand, keeping it in the position of raise
pistol.
d. If one or more cartridges remain unfired at the end of a firing
string, remove the cartridge and clear the revolver.
e. When drawing the revolver from the holster, keep the muzzle
from pointing at any portion of the body.
138
AGO 6481B
f. Always clear and inspect the revolver before practicing dry
firing.
g. Make sure that the cylinder chambers and bore are clear of
obstructions before firing.
h. On the range, always carry the revolver with the cylinder
swung out from the frame when not on the firing line or when
weapon is not bolstered.
Section V. TARGETS AND RANGES
153. Targets
The S target is used in the practical qualification course (fig. 66).
It is a black silhouette, representing a man firing a revolver, which
is divided into several zones for scoring purposes. Hits within the
zone are given the value of the zone as described in paragraph 150.
Hits that touch a zone line are given the value of the higher zone.
Use of other targets when firing the revolver is described in para-
graph 90.
154. Construction of the Practical Qualification Range
a. General. The course is designed to allow for simplicity in
construction so as to permit completion with a minimum of labor,
materials, and expense. It may be built without the technical
assistance of surveyors, artists, draftsmen, or carpenters. Scrap
material is adequate, since no durability other than that necessary
to withstand local weather hazards is required.
b. Selection of Site. The ground on which the range is built
should be level, reasonably soft, and free from obstructions such as
ditches, trees, or stumps. Safety requirements for construction of
pistol ranges, applicable also to the revolver, are listed in TM
9-855.
c. Steps in Construction.
(1) Measure an area 6% meters wide and 65 meters long.
Place a stake at each corner and connect the stakes with
string, making certain that area is exactly rectangular.
(2) Clear the area of all grass, weeds, and other obstructions
and rake it, so that the top soil is reasonably soft.
(3) Place wooden stakes on each side of the cleared area at
the following distances (fig. 65), beginning at the start-
ing line and working in the direction of fire: 55 meters,
50 meters, 40 meters, 30 meters, 25 meters, and 7 meters.
(4) Construct a wooden barricade 9 feet high by 3 feet wide,
using available materials (fig. 67). Fasten it securely
AGO 6431B
139
NO. 2, 3, 4 NUMERALS 1-1/2 INCHES WIDE X
1-3/4 INCHES HIGH 1/8 INCHES THICK. NO. 5
NUMERAL. 1-3/4 INCHES WIDE X 2 INCHES HIGH
1/4 INCHES THICK.
12-3/4-
-------24- 3/8'-!—
Figure 66. S target.
140
AGO 6481B
with wooden braces, making sure that the braces are on
the side of the barricade toward the target. Place the
barricade in the center of the firing lane on the 25-meter
line so that it cannot be accidentally moved by the firer.
(5) Construct 11 rectangular signs, 18 inches wide by 12
inches high; paint them white, and letter them with 2-inch
black letters as follows:
STARTING POINT POINT 1 POINT 2
55 Meters Prone Prone
50 Meters 50 Meters
POINT 3 POINT 4 POINT 5
Kneeling Kneeling Sitting
40 Meters 40 Meters 30 Meters
POINT 6 POINT 7 POINT 8
Standing—Off Hand Barricade—Right Barricade—Left
25 Meters Side—25 Meters Side—25 Meters
POINT 9 POINT 10
Standing—Off Hand Crouch—Point
25 Meters Fire—7 Meters
(6) Nail all the signs (except those for points 7 and 8) to
suitable stakes and set them securely in the ground at
each of the firing points, as shown in figure 65. The signs
should be located about 1 yard from the left and right
sides of the firing lane. Be sure that the signs can be
read from the appropriate firing position. Nail the signs
for points 7 and 8 to the appropriate side of the barricade
about 2 yards above the ground.
(7) Construct two portable wooden target stands, with back
braces, from available materials, according to the speci-
fications shown in figure 68.
(8) Construct a false-front for a house, representing an open
door and an open window, according to specifications
shown in figure 69. Place the false front in position at
the end of the firing lane as shown in figure 65.
d. Firing Lanes. Ordinarily, 1 firing lane will be sufficient to
accommodate the average unit armed with the caliber .38 2-inch
barrel revolver. However, 2 additional lanes may be constructed
on this range at about 45 degree angles from the center lane. If
additional lanes are constructed, careful consideration must be
given to the safety requirements.
e. Construction of Other Ranges. Construction of targets and
other ranges is described in paragraphs 90 and 91.
AGO M81B
141
Figure 67. Specifications for wooden barricade.
TARGET
BRACES TO BE FASTENED IN BACK OF TARGET STAND
Figure 68. Specifications for target stands.
BRACES TO BE PLACED BEHIND BUILDING FRONT
Figure 69. Specifications for false-front house.
142
AGO 6431B
CHAPTER 10
ADVICE TO INSTRUCTORS
Section I. GENERAL
155. General
Refer to paragraphs 92 through 94, 96 through 99, and 101
through 103 for general instructions, mechanical training, and
marksmanship. Training schedules are shown in paragraphs 156
and 157.
Section II. TRAINING SCHEDULES
AGO M81B
143
156. Minimum Subject Schedule, Familiarization Course, Revolver, Caliber .38 (8 hours)
Period Hour Subject Text references Area Training aids and equipment
1 1 General characteristics; immedi- ate action, care and cleaning; load, fire, unload. FM 23-35, pars. 110, 111, ИЗ- 115, 118-127. Classroom or field- 1 revolver per man; 1 table or shelter half per 4 men.
2 3 Preparatory marksmanship, aim- ing, positions, trigger squeeze, slow and quick fire exercises. FM 23-35, pars. 136-142, 144— Pistol range or field. Training aids and equipment as listed in pars. 65-70.
3 4 Range firing , FM 23-35, pars. 81, 87, 89, and 148. AR 370-5, AR 385-63. Pistol range Range equipment: 1 revolver per firer; 25 rd ammo, 1 score card, 1 E target (group of 3) per firing point.
AGO 6431В
157. Minimum Subject Schedule, Qualification Course, Revolver, Caliber .38 (16 hours)
Period Hours Subject Text references Area Training aids and equipment
1 4 General characteristics, loading, unloading. Immediate action, malfunctions, and stoppages. Care and cleaning, accessories, ammunition, individual safety precautions. FM 23-35, pars. 110-131 Classroom or out- door training area. 1 revolver per man; 1 table or shelter half pep 4 men. Clean- ing rod, bore brush, oil, bore cleaner, swabs, all accessories listed in par. 128. Various types of ammunition listed in par. 129.
2 2 Preparatory marksmanship, aim. ing, position exercises, trigger squeeze exercises. FM 23-35, pars. 60-66, 136-138 Pistol range or field. Training aids and equipment as listed in pars. 65-70.
3 1 Preparatory marksmanship; slow, rapid, and quick fire ex- ercises. FM 23-35, pars. 139-144 Pistol range or field. Same as period 2.
4 1 Review and examination FM 23-35, par. 145 and all previous references. do All equipment used in preceding periods.
5 4 Instruction practice firing FM 23-35, pars. 79, 85, 89 Pistol range Range equipment; 40 rd ammo, 1 revolver, 1 score card, dummy cartridges for each firer; 1 25-yard (std Ameri- can) pistol target and one E target (group of 3) per firing point.
Period Hours Subject Text references Area Training aids and equipment
6 4 Record firing or firing practical qualification course. FM 23-35, pars. 80, 86, 89, 149_ Pistol range Range equipment; 40 rd ammo, 1 score card, dummy cart- ridges for each firer; 1 25- yard (std American) pistol target and E target (group of 3) per firing point. (Note. If practical course is fired, the $ target will be used and 55 rounds of ammunition will be re- quired. )
AGO 6431В
APPENDIX
REFERENCES
1. Regulations
AR 320-5____________Dictionary of United States Army Terms.
AR 320-50___________Authorized Abbreviations and Brevity Codes.
AR 370-5____________Qualification and Familiarization.
AR 385-63___________Regulations for Firing Ammunition for
Training, Target Practice, and Combat.
2. Field Manuals
FM 21-5_____________Military Training.
FM 21-6_____________Techniques of Military Instruction.
FM 21-40____________Small Unit Procedures in Atomic, Biological,
and Chemical Warfare.
3. Technical Manuals
TM 3-220____________Decontamination.
TM 9-855____________Targets, Target Material, and Training
Course Lay-outs.
TM 9-1007___________Materials Used for Cleaning, Preserving,
Abrading, and Cementing Ordnance Ma-
teriel and Related Materials, Including
Chemicals, Lubricants, Indicators and Hy-
draulic Fluids.
TM 9-1990___________Small Arms Ammunition.
TM 9-2027___________Caliber .38, Special Lightweight Revolver,
M13 (Colt and Smith and Wesson).
TM 9-2200___________Small Arms Materiel and Associated Equip-
ment.
TM 9-2205___________Fundamentals of Small Arms.
TM 9-2951-1_________Field Maintenance, Caliber .45 Automatic
Pistols, M1911 and M1911A1.
4. Miscellaneous
ASubjScd 21-33______Pistol, Automatic, Caliber .45, M1911 and
M1911A1.
DA Pam 108-1--------Index of Army Motion Pictures, Film Strips,
Slides, and Phono-Recordings.
AGO 6431B
147
DA Pam 310-series—Military Publications (Indexes).
ORD 7, SNL B6______Pistols, Automatic, Caliber .45, M1911 and
M1911A1.
ORD 7, SNL B29-----Revolver, Colt, Caliber .38, 2-inch Barrel,
Detective Special.
148
AGO 6431B
INDEX
Paragraphs Pages
Accessories:
Pistol___________________________________________________________ 49 40
Revolver___________________________________________________ 128 118
Action of sear and disconnector__________________________________ 30 29
Advice to instructors-------------------------------------- 92-109, 92,143
155-157
After-fire care and cleaning:
Pistol___________________________________________________________ 44 38
Revolver___________________________________________________ 126 117
After-storage cleaning___________________________________________ 47 39
Aids, training_______________________________________________107-109 102
Aiming (See Sighting and aiming)
Ammunition_______________________________________________________ 50 40
Care, handling, and preservation________________________53,131 41,119
Classification, caliber .45_________________________________ 51 40
caliber .38__________________________________ 130 118
Hangfire____________________________________________________ 56 42
Lot number__________________________________________________ 52 41
Precaution in firing________________________________________ 55 42
Assembly, pistol_________________________________________________ 11 8
Guides to follow_____________________________________________ 8 7
Magazine____________________________________________________ 16 15
Receiver group______________________________________________ 18 16
Slide group_________________________________________________ 17 16
Test for correct____________________________________________ 19 21
Before-firing care and cleaning:
Pistol___________________________________________________________ 43 37
Revolver___________________________________________________ 125 117
Biological attack, care and cleaning:
Pistol___________________________________________________________ 46 39
Revolver___________________________________________________ 127 118
Blackening sights________________________________________________ 84 76
Card, score:
Pistol______________________________________________________ 80 74
Revolver___________________________________________________ 151 138
Care and cleaning:
After firing:
Pistol_____________ ________________________________ 44 38
Revolver____________________________________________ 126 117
Before firing:
Pistol_______________________________________________________ 43 37
Revolver_______________________________________________ 125 117
CBR attack:
Pistol_______________________________________________________ 46 39
Revolver_______________________________________________ 127 118
AGO 6431B
149
Paragraphs Pages
Care and cleaning—Continued
From storage________________________________________________ 47 39
Unusual climatic conditions--------------------------------- 45 38
Care of ammunition____________________________________________53,131 41,119
Cause of stoppages:
Pistol______________________________________________________ 38 33
Revolver___________________________________________________ 120 115
Chambering_______________________________________________________ 23 27
Charts__________________________________________________________ 109 107
Chemical attack, care and cleaning:
Pistol______________________________________________________ 46 39
Revolver___________________________________________________ 127 118
Classification of ammunition:
Caliber .45_________________________________________________ 51 40
Caliber .38________________________________________________ 130 118
Cleaning materials_______________________________________________ 41 36
Coaching________________________________________________________ 64 51
Cocking:
Pistol_____________________________________________________ 29 28
Revolver___________________________________________________ 141 130
Cocking exercise, revolver------------------------------------- 142 132
Construction:
Ranges__________________________________________________ 91,154 89,139
Wooden working model_______________________________________ 108 103
Courses:
Familiarization, pistol_____________________________________ 81 74
Instruction practice, pistol________________________________ 79 73
Practical qualification, revolver______________________146, 147 133,134
Record firing:
Pistol__________________________________________________ 80 74
Revolver_______________________________________________ 149 135
Specialized firing-------------------------------------- 82,88 75,83
Daily maintenance:
Pistol______________________________________________________ 42 37
Revolver___________________________________________________ 124 117
Data:
Pistol_______________________________________________________ 5 6
Revolver___________________________________________________ 111 109
Description:
Magazine_____________________________________________________ 3 4
Pistol_______________________________________________________ 3 4
Practical qualification course_____________________________ 147 134
Revolver___________________________________________________ 110 109
Detail disassembly, pistol____________________________________ 12-15 13
Devices, safety:
Pistol______________________________________________________ 31 29
Revolver___________________________________________________ 116 114
Difference in pistol models_______________________________________ 4 4
150
AGO 6431B
Paragraphs Pages
Disassembly:
Guides_______________________________________________________ 8 7
Pistol:
Detail_____________________________________________ 12-15 13
General______________________________________________ 9,10 7,8
Magazine assembly______________________________________ 15 13
Receiver group_________________________________________ 13 13
Slide group____________________________________________ 14 13
Revolver___________________________________________________ 112 112
Disconnector:
Action______________________________________________________ 30 29
Test________________________________________________________ 32 30
Ejection________________________________________________________ 28 28
Examination_____________________________________________________ 77 71
Exercises:
Aiming______________________________________________________ 66 53
Cocking, revolver__________________________________________ 142 132
Pencil triangulation________________________________________ 70 64
Position:
Pistol_____________________________________________________ 68 60
Revolver______________________________________________ 137 129
Quick fire:
Pistol ____________________________________________________ 76 70
Revolver______________________________________________ 144 133
Rapid fire:
Pistol_____________________________________________________ 74 68
Revolver______________________________________________ 143 132
Slow fire, pistol__________________________________________ 72 65
Trigger squeeze:
Pistol_____________________________________________________ 70 64
Revolver______________________________________________ 138 130
Extraction______________________________________________________ 27 28
Failures:
Pistol______________________________________________________ 38 33
Revolver___________________________________________________ 120 115
Familiarization course__________________________________________ 81 74
Procedure for conducting____________________________________ 87 82
Feeding_________________________________________________________ 22 25
Firing:
Familiarization_____________________________________________ 81 74
Instruction practice________________________________________ 79 73
Pistol______________________________________________________ 34 30
Practical qualification_________________________________146, 147 133,134
Record:
Pistol_________________________________________________ 80 74
Revolver______________________________________________ 149 135
Revolver___________________________________________________ 114 112
Specialized______________________________________________ 82,88 75,83
Functioning, pistol__________________________________________ 20-30 24
Fundamentals of marksmanship____________________________________ 61 50
AGO 6431B
151
Paragraphs Pages
Gas attack, care and cleaning:
Pistol________________________________________________________ 46 39
Revolver_________________________________________________ 127 118
General data:
Pistol__________________________________________________________ 5 6
Revolver_________________________________________________ 111 109
General disassembly, pistol_______________________________ 9,10 7
Grip:
One-hand:
Pistol________________________________________________________ 67 54
Revolver_____________________________________________ 136 122
Two-hand:
Pistol____________________________________________________ 67 54
Revolver_____________________________________________ 136 122
Grip adapter, revolver_______________________________________ 110 109
Grip safety test______________________________________________ 32 30
Guides for disassembly and assembly____________________________ 8 7
Half-cock-notch test__________________________________________ 32 30
Handling of ammunition____________________________________53, 131 41,119
Hangfire______________________________________________________ 56 42
Immediate action:
Pistol_________________________________________________________ 39 35
Revolver_________________________________________________ 121 116
Importance of training_________________________________________ 2 3
Individual safety precautions_________________________________ 99 95
Inspection arms:
Pistol_________________________________________________________ 58 44
Revolver_________________________________________________ 134 120
Instruction practice firing course____________________________ 79 73
Organizing and conducting_________________________________ 85 76
Instructors, advice_______________________________________ 92-109 92
Accessories_______________________________________________ 98 95
Care and cleaning_________________________________________ 96 94
Disassembly and assembly__________________________________ 95 94
Load, fire, and unload____________________________________ 97 94
Manual of arms___________________________________________ 100 95
Marksmanship__________________________________________101, 102 96
Method of instruction_____________________________________ 93 92
Range firing_____________________________________________ 103 97
Safety precautions________________________________________ 99 95
Training aids________________________________________ 107-109 102
Training schedules___________________________________105-106, 99,
156, 157 144
Loading:
Pistol--------------------------------------------------------- 33 30
Revolver-------------------------------------------------- ИЗ Ц2
Locking------------------------------------------------------- 24 27
Lot number, ammunition________________________________________ 52 41
Lubricants____________________________________________________ 41 36
152
AGO 6431B
Paragraphs Pages
Magazine:
Assembly___________________________________________________ 16 15
Description_________________________________________________ 3 4
Disassembly________________________________________________ 15 13
Maintenance, daily_____________________________________________ 42 37
Malfunctions:
Pistol_____________________________________________________ 37 33
Revolver__________________________________________________ 119 114
Manual of arms, pistol_________________________________________ 57 44
Inspection arms____________________________________________ 58 44
Return pistol______________________________________________ 59 49
Manual of arms, revolver______________________________________ 132 120
Inspection arms___________________________________________ 134 120
Raise revolver____________________________________________ 133 120
Return revolver___________________________________________ 135 121
Marksmanship (See also Firing and exercises) :
Fundamentals___________________________________________________ 61 50
Phases of training_________________________________________ 62 50
Materials, cleaning____________________________________________ 41 36
Models:
Differences_________________________________________________ 4 4
Wooden working____________________________________________ 108 103
Nomenclature, pistol____________________________________________ 7 7
Number, ammunition lot_________________________________________ 52 41
Oil, lubricating_______________________________________________ 41 36
Operational tests, pistol______________________________________ 32 30
Parts, repair:
Pistol_____________________________________________________ 48 39
Revolver_______________________________________________ 128 118
Pencil triangulation exercise__________________________________ 70 64
Phases of training_____________________________________________ 62 50
Pistol:
Accessories____________________________________________________ 49 40
Assembly_______________________________________________ 11 8
Data________________________________________________________ 5 6
Description_________________________________________________ 3 4
Disassembly____________________________________________6, 9, 10 7
Functioning_____________________________________________ 20-30 24
Loading____________________________________________________ 33 30
Malfunctions_______________________________________________ 37 33
Nomenclature________________________________________________ 7 7
Repair parts_______________________________________________ 48 39
Stoppages__________________________________________________ 38 33
Training, importance________________________________________ 2 3
Positions:
Pistol_________________________________________________________ 67 54
Revolver__________________________________________________ 136 122
Practical qualification course, revolver___________________146,147 133,134
Procedure for conducting__________________________________ 148 134
Range construction________________________________________ 154 139
Precautions in firing ammunition_______________________________ 55 42
AGO 6431 в
153
Paragraphs Pages
Preparatory markmanship------------------------------------- 102 96
Preservation of ammunition----------------------------------53,131 41,119
Procedures for organizing and conducting:
Familiarization firing-------------------------------------- 87 82
Instruction practice firing_________________________________ 85 76
Record firing_______________________________________________ 86 80
Specialized firing__________________________________________ 88 83
Qualification scores:
Pistol__________________________________________________________ 80 74
Revolver___________________________________________________ 150 138
Quick fire:
Pistol__________________________________________________ 75, 76 69
Revolver________________________________________________ 144 133
Radiological attack, care and cleaning:
Pistol__________________________________________________________ 46 39
Revolver___________________________________________________ 127 118
Raise pistol____________________________________________________ 58 44
Raise revolver_________________________________________________ 133 120
Return revolver_______________________________________________ 135 121
Range:
Construction____________________________________________ 91,154 89,139
Firing_______________________________________________85-88,103, 76,97,
148, 149 134
Responsibility during firing________________________________ 83 76
Safety precautions_____________________________ 89,152 87, 138
Rapid fire:
Pistol___________________________________________________ 73,74 67
Revolver_______________________________________________ 140,143 130
Receiver group, pistol:
Assembly____________________________________________________ 18 16
Disassembly_____________________________________________ 13 13
Record firing course____________________________________________ 80 74
Repair parts:
Pistol______________________________________________________ 48 39
Revolver__________________________________________________ 128 118
Responsibility, range firing____________________________________ 83 76
Return pistol___________________________________________________ 59 49
Revolver:
Cocking____________________________________________________ 141 130
Data_______________________________________________________ 111 109
Description________________________________________________ 110 109
Disassembly________________________________________________ 112 112
Fire_______________________________________________________ 114 112
Immediate action___________________________________________ 121 116
Load_______________________________________________________ 113 112
Malfunctions_______________________________________________ 119 114
Repair parts and accessories_______________________________ 128 118
Safety devices_____________________________________________ 116 114
Stoppages__________________________________________________ 120 115
Unload_____________________________________________________ 115 113
154
AGO 6431В
Safety devices:
Pistol___________________________________________________ 31 29
Revolver_________________________________________________ 116 H4
Tests of:
Pistol__________________________________________________ 32 30
Revolver_______________________________________________ 117 114
Safety lock test_________________________________________________ 32 30
Safety precautions:
Pistol_______________________________________________________ 89 87
Revolver_____________________________________________________ 152 138
Score card:
Pistol_______________________________________________________ 80 74
Revolver____________________________________________________ 151 138
Scoring:
Pistol firing_______________________________________________ 86 80
Revolver firing_____________________________________________ 146 133
Sear action______________________________________________________ 30 29
Sighting and aiming___________________________________________ 65,66 52
Sights, blackening______________________________________________ 84 76
Slide group:
Assembly_____________________________________________________ 17 16
Disassembly__________________________________________________ 14 13
Slow fire:
Pistol_______________________________________________________ 71 65
Revolver____________________________________________________ 139 130
Steps in functioning_____________________________________________ 20 24
Stoppages:
Pistol____________________________________________________ 38 33
Revolver____________________________________________________ 120 115
Storage:
Ammunition________________________________________________ 54 42
Removal______________________________________________________ 47 39
Table:
Familiarization firing, pistol--____________________________ 81 74
Instruction practice firing, pistol ...______________________ 79 73
Practice qualification firing, revolver_____________________ 147 134
Record firing, pistol________________________________________ 80 74
Specialized firing___________________________________________ 88 83
Targets:
Pistol______________________________________________________ 90 88
Revolver____________________________________________________ 153 139
Tests:
Correct assembly_____________________________________________ 19 21
Operational__________________________________________________ 32 30
Safety devices:
Pistol__________________________________________________ 32 30
Revolver_______________________________________________ 117 114
AGO 6431B
155
Training:
Aids_____________
Importance_______
Marksmanship_____
Schedules________
Trigger squeeze:
Pistol___________
Revolver_________
Unloading:
Pistol___________
Revolver_________
Unlocking____________
Wooden working model
107-109 102
2 3
60-62 50
. 105,106, 99,144
156,157
69,70 62
138 130
35 32
115 113
26 28
108 103
156
AGO 6431B
[AG 353 (18 Маг 60)]
By order of the Secretaries of the Army and the Air
Force:
L. L. LEM'NITZER,
General, United States Army,
Official : Chief of Staff.
R. V. LEE,
Major General, United States Army,
The Adjutant General.
THOMAS D. WHITE,
OFFICIAL: Chief of Staff, United States Air Force.
J. L. TARR,
Colonel, United States Air Force,
Director of Administrative Services.
Distribution:
Active Army:
Tech Stf, DA (1)
Tech Stf, Bd (1)
USCONARC (25)
US ARADCOM (2)
US ARADCOM Rgn (2)
Armies (10) except
First US Army (12)
Corps (5)
Div (8)
Log Comd (5)
Bn (5)
Co (3)
USMA (30)
PMGS (500)
USASCS (110)
USA Ord Sch (70)
USAES (20)
USAIS (1104)
USAARMS (600)
USA Corps (Res) (1)
Units org under fol TOE:
7-11 (5)
7-31 (5)
NG: State AG (3); units—same as Active Army except allowance is
two copies to each unit.
USAR: Same as Active Army except allowance is two copies to each
unit.
For explanation of abbreviations used, see AR 320-50.
* U.S. GOVERNMENT PRINTING OFFICE ; 1ЭЕ1 0—59672 7
For sale by the Superintendent of Documents, U.S. Government Printing Office
Washington 25, D.C. - Price 45 cents
AGO 6431B
157