/


Tags: weapons military affairs
Year: 1988


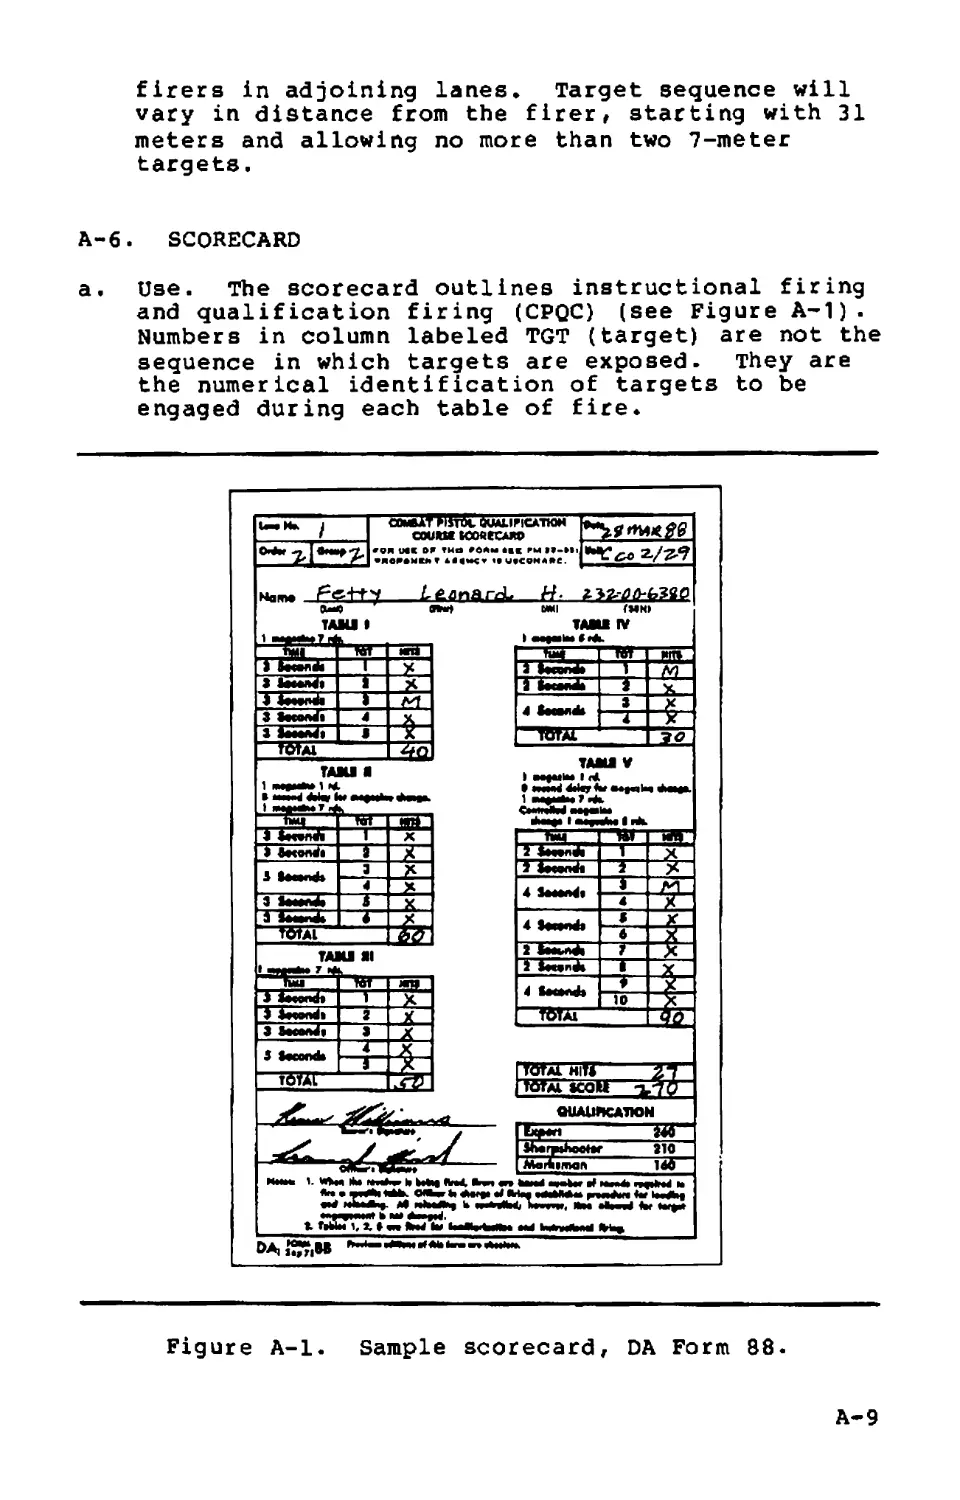
Text
FM 23-35
COMBAT TRAINING WITH
PISTOLS AND REVOLVERS
DISTRIBUTION RESTRICTION: Distribution outhoriMd to US Government
agendas end their contractors to protect technical or operational Information
from automatic diseominetlon under the International Exchange Program or by
other moans. This protection appilee to publlootlons required ooiefy for official
uoe and for thoM containing valuable technical or operational Information. Thle
determination wee made on 1S October 1SS7. Other requests for thledocument
will bo referred to Commendant, US Army Infantry School, ATTN: ATSH-IN-
B3, Fort Benning, GA 31S06-BSB3.
О ESTR UCTION NOTICE: Destroy by any method that will prevent disclosure of
contents or reconstruction of this document.
FIELD MANUAL
NO. 23-35
*FM 23-35
HEADQUARTERS
DEPARTMENT OF THE ARMY
Washington, DC, 3 October 1988
COMBAT TRAINING WITH
PISTOLS AND REVOLVERS
DISTRIBUTION RESTRICTION: Distribution authorized to
US Government agencies and their contractors to
protect technical or operational information from
automatic dissemination under the International
Exchange program or by other means♦ This protection
applies to publications required solely for official
use and for those containing valuable technical or
operational information. This determination was made
on 15 October 1987♦ Other requests for this document
will be referred to Commandant, US Army Infantry
School, ATTN: ATSH-IN-S3, Fort Benning, GA
31905-5593.
DESTRUCTION NOTICE—Destroy by any method that will
prevent disclosure of contents or reconstruction of
the document.
*This publication supersedes FM 23-35, 24 September 1971.
FM 23-35
Contents
Pa^e
Preface........................................... ii
Chapter 1. US Army Handguns.................... 1-1
Chapter 2. Marksmanship Training............... 2-1
Section I. Basic Marksmanship.............. 2-1
Section II. Combat Marksmanship.............2-16
Section Hi, Coaching and Training Aids......2-26
Section iv. Safety..........................2-37
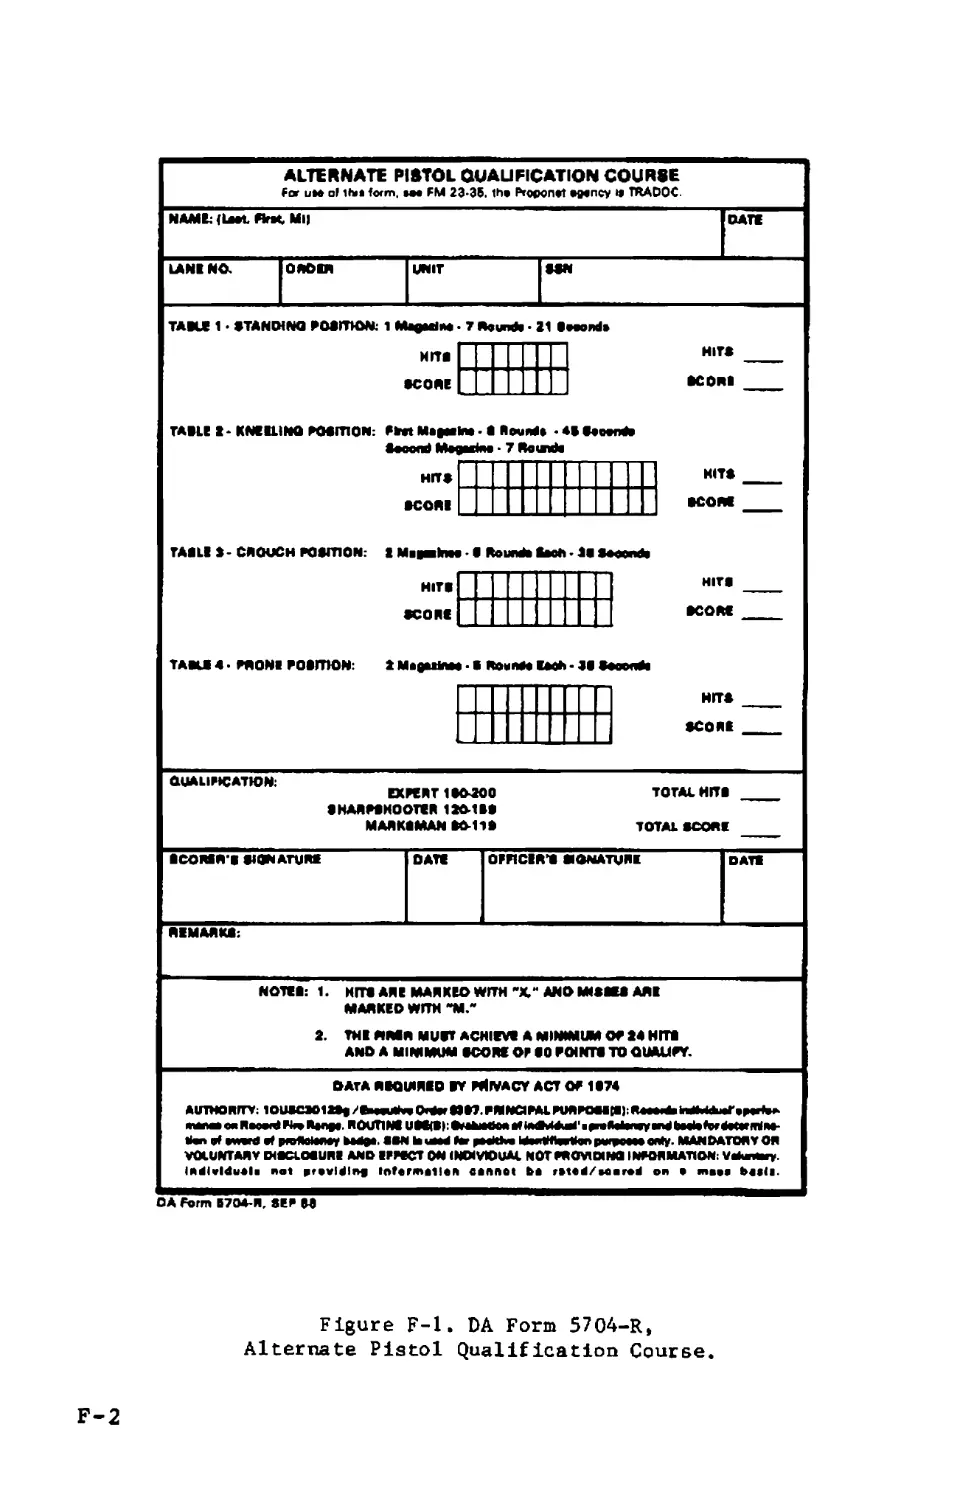
Appendix A. Combat Pistol Qualification Course.. A-l
Appendix B. Alternate Pistol Qualification
Course...............................B-l
Appendix C. Revolver Qualification Course........C-l
Appendix D. Alternate Revolver Qualification
Course............................. D-l
Appendix E. Training Schedules.................. E-l
Appendix F. Reproducible Forms.................. F-l
Glossary•.•
References.
..Glossary-1
References-1
PREFACE
This manual provides guidance on the operation and
marksmanship of the pistol, M9, 9-mm; pistol,
M1911A1, caliber ,45; and the revolver, caliber .38.
It reflects current Army standards in weapons
qualifications. It is a guide for the instructor to
develop training programs, plans, and lessons that
meet the objectives of the United States Army
Marksmanship program for developing combat effective
marksmen. The soldier develops confidence, knowledge,
and skills by following the guidelines in this
manual.
The proponent of this publication is HQ TRADOC.
Submit changes for improving this publication on DA
Form 2028 (Recommended Changes to publications and
Blank Forms) and forward it to Commandant, US Army
Infantry School, ATTN: ATSH-IN-S3, Fort Benning, GA
31905-5593.
Unless otherwise stated, whenever the masculine
gender is used, both men and women are included.
i i
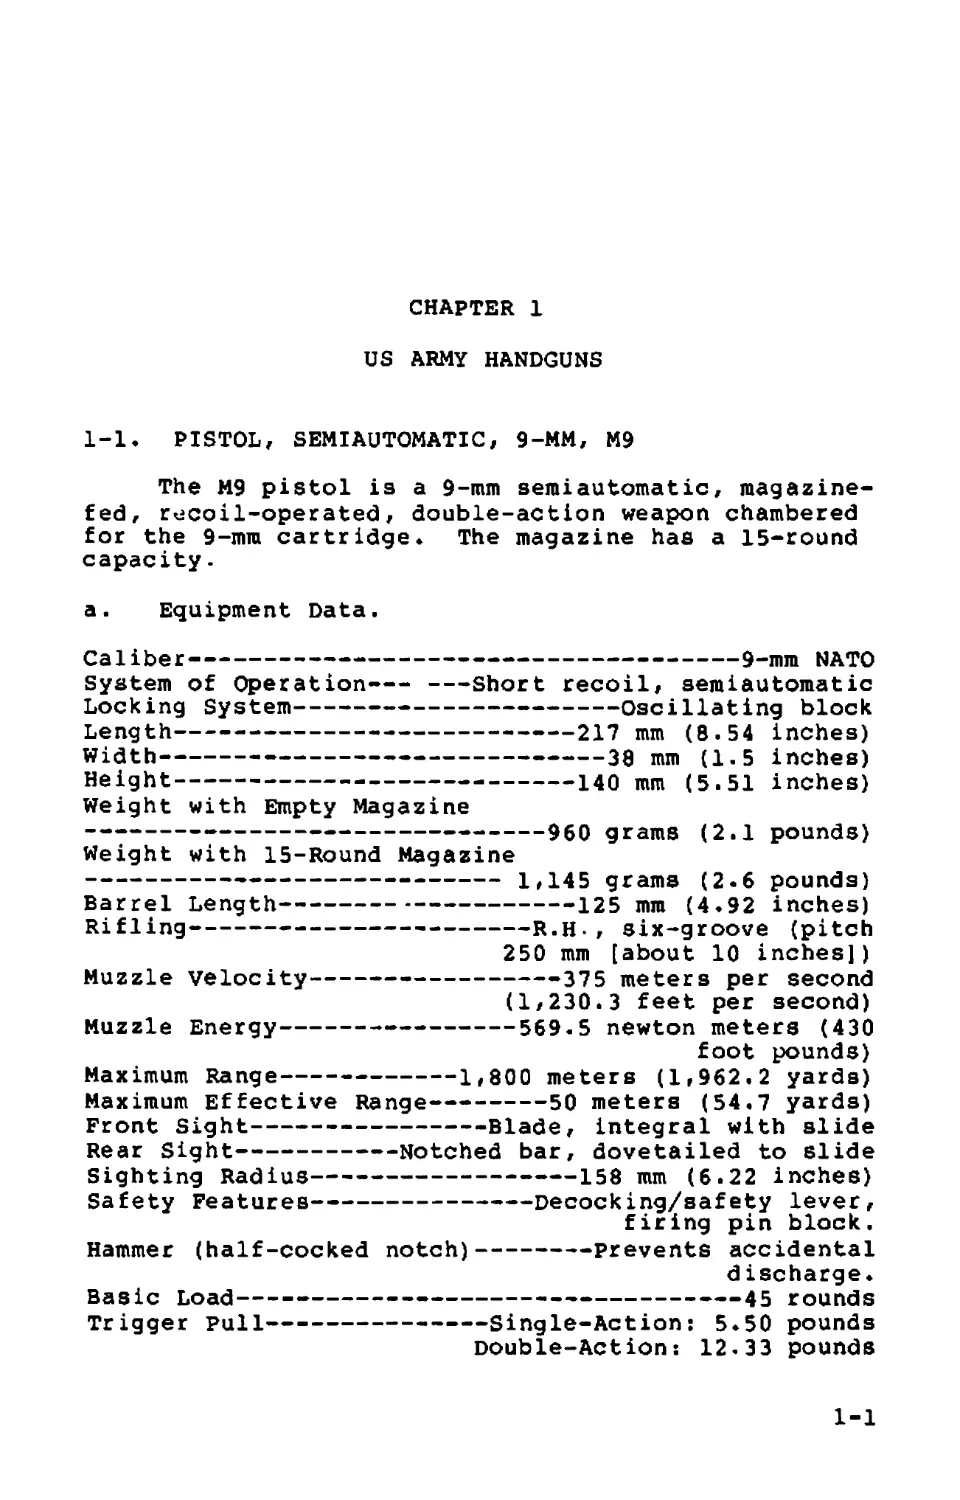
CHAPTER 1
US ARMY HANDGUNS
1-1. PISTOL, SEMIAUTOMATIC, 9-MM, M9
The M9 pistol is a 9-mm semiautomatic, magazine-
fed, recoil-operated, double-action weapon chambered
for the 9-mra cartridge♦ The magazine has a 15-round
capacity.
a. Equipment Data.
Caliber---------------------------------------9-mm NATO
System of Operation-— Short recoil, semiautomatic
Locking System-----------------------Oscillating block
Length---------------------------—217 mm (8.54 inches)
Width------------------------------38 mm (1.5 inches)
Height-----------------------------140 mm (5.51 inches)
Weight with Empty Magazine
--------------------------------960 grams (2.1 pounds)
Weight with 15-Round Magazine
----------------------------------1,145 grama (2.6 pounds)
Barrel Length----------------125 mm (4.92 inches)
Rifling-------------------------R.H-, six-groove (pitch
250 mm [about 10 inches])
Muzzle velocity------------------375 meters per second
(1,230.3 feet per second)
Muzzle Energy---------------------569.5 newton meters (430
foot pounds)
Maximum Range--------------1,800 meters (1,962.2 yards)
Maximum Effective Range—--------50 meters (54.7 yards)
Front Sight-----------------------Blade, integral with slide
Rear Sight-------------Notched bar, dovetailed to slide
Sighting Radius--------------------158 mm (6.22 inches)
Safety Features--------------------—Decocking/safety lever,
firing pin block.
Hammer (half-cocked notch)---------prevents accidental
d ischarge.
Basic Load------------------------------------45 rounds
Trigger Pull----------------Single-Action: 5.50 pounds
Double-Actions 12.33 pounds
1-1
NOTE: Гог additional information on technical aspects
of the M9 pistol see TM 9-1005-317-310.
WARNING
THE HALF-COCKED POSITION CATCHES THE HAMMER AND
PREVENTS IT FROM FIRING IF THE HAMMER IS
RELEASED WHILE MANUALLY COCKING THE WEAPON. IT
IS NOT TO BE USED AS A SAFETY POSITION. THE
PISTOL WILL FIRE FROM THE HALF-COCKED POSITION
IF THE TRIGGER IS PULLED.
b. Operation*
The M9 pistol has a short recoil system using a
falling locking block. The pressure developed by the
expanding gases of a fired round recoils the slide and
barrel assembly. After a short run, the locking block
is disengaged from the slide, the barrel stops against
the frame, and the slide continues its rearward
movement. The slide then extracts and ejects the
fired cartridge case, cocks the hammer, and compresses
the recoil spring. The slide moves forward feeding
the cartridge from the magazine into the chamber. The
slide and barrel assembly remain open after the last
cartridge has been fired and ejected.
1-2. PISTOL, AUTOMATIC, .45 CALIBER, M1911 AND
M1911A1
The M1911 and M1911A1 pistols are semiautomatic,
.45-caliber, recoil-operated, magazine-fed, single-
action pistols. The magazine has a seven-round
capacity.
a. Equipment Data.
Caliber------------------------------------0.45 inches
System of Operation----------------------Short recoil,
semiautomatic
Length-------------------------------------8 5/8 inches
Weight With Empty Magazine-------------------2.4 pounds
Weight With Full Magazine---------------------3 pounds
Length of Barrel---------------------------5.03 inches
Rifling------— ---------------------—-L.H. , six groove
(Pitch 1 in 16 inches)
Muzzle Velocity--------------------830 feet per second
Muzzle Energy------------------------17,000 pounds per
square inch
Maximum Range------------------------------1,500 meters
Maximum Effective Range----------------------50 meters
Front Sight-----------------Blade, integral with slide
1-2
Rear Sight------------Notched bar, dovetailed to slide
Sight Radius------------------------------6.481 inches
Safety Features-------------------Manual safety lever,
grip safety, half-cock position
Basic Load-----------------------------------21 rounds
Trigger Pull-------------------------5 to 6 1/2 pounds
b. Operation.
(1) Each time a cartridge is fired, the parts inside
the weapon function in a given order. This is
known as the functioning cycle or cycle of
operation.
(2) The cycle of operation of the weapon is divided
into eight steps: feeding, chambering, locking,
firing, unlocking, extracting, ejecting, and
cocking. The steps are listed in the order in
which functioning occurs; however, more than one
step may occur at the same time.
(3) A magazine containing ammunition is placed in the
receiver. The slide is pulled fully to the rear
and released. As the slide moves forward, it
strips the top round from the magazine and pushes
it into the chamber. The hammer remains in the
cocked position, and the weapon is ready to
fire.
(4) The weapon fires one round each time the trigger
is pulled. Each time a cartridge is fired, the
slide and barrel recoil or move a short distance
locked together. This permits the bullet and
expanding powder gases to escape from the muzzle
before the unlocking is completed.
(5) The barrel then unlocks from the slide and
continues to the rear, extracting the cartridge
case from the chamber and ejecting it from the
weapon. During this rearward movement the
magazine feeds another cartridge, the recoil
spring is compressed, and the hammer is cocked.
(6) At the end of the rearward movement, the recoil
spring expands, forcing the slide forward,
locking the barrel and slide together. The
weapon is ready to fire again. The same cycle of
operation continues until the ammunition is
expended.
1-3
(7) As the last round is fired, the magazine spring
exerts upward pressure on the magazine follower.
The stop on the follower strikes the slide stop,
forcing it into the recess on the bottom of the
slide and locking the slide to the rear. This
action indicates that the magazine is empty and
aids in faster reloading.
NOTE: For additional information on the technical
aspects of the caliber .45 pistol see
TM 9-1005-211-12.
1-3. REVOLVER, CALIBER .38
There are six basic caliber .38 service revolvers
in use by the Army. One is a 2-inch barreled, .38-
caliber revolver made by Smith and Wesson; five are 4-
inch barreled, .38-caliber revolvers—three made by
Ruger, and two by Smith and Wesson. The 2-inch
barreled revolver is used mainly by Army CID and
counter intelligence personnel. The 4-inch barreled
revolvers are used by aviators and military police.
a. Equipment Data.
Smith and Wesson
Caliber-----------------------------------0.38 inches
System of Operation-------------------Rotated chamber
Length: 2-Inch Barrel--------------------7 1/4 inches
4-Inch Barrel-------------------9 1/4 inches
Weight: 2-inch Barrel---------------------26.5 ounces
4-inch Barrel---------------- -30.5 ounces
Length of Barrel---------------------2 inches/4 inches
Muzzle Velocity--------------- --—950 feet per second
Muzzle Energy-------------------16,000 per square inch
Maximum Range: 2-inch Barrel---------------868 meters
4-Inch Barrel---------------992 meters
Maximum Effective Range——45 meters (2-inch barrel)
60 meters (4-inch barrel)
Front Sight--------------Fixed 1/8-inch serrated ramp
Rear Sight-------------------------------Square notch
Safety Features—---------No manually operated safety
Basic Load------------—----------------------18 rounds
Ruger
Caliber-----------------------------------0.38 inches
System of Operation--------------------Rotated chamber
Length------------------------------------9 1/4 inches
Weight---------------------------------------33 ounces
1-4
Length of Barrel—---
Muzzle Velocity----—
Muzzle Energy—---------
Maximum Range-
Maximum Effective Range
Front Sight---------
Rear Sight----—
Safety Features—----—
Basic Load--—--------
—-——-----4 inches
--------------950 feet per second
-------16f000 per square inch
————---992 meters
———-----------60 meters
------------------.-Fixed blade
►-----------——---------Fixed groove
►No manually operated safety
——----------——-—---IB rounds
b. Operation.
(1) When firing single-action, the hammer is pulled
back, and the sear engaged the full-cock notch in
the hammer*
{a} Smith and Wesson: Pulling the trigger lowers the
hammer block, allowing the hammer to fall.
(b) Ruger: pulling the trigger raises the transfer
bar into the firing position between the hammer
and firing pin, allowing the hammer to strike the
firing pin.
(2) When firing double-action, the trigger is
squeezed. This engages the sear, raising the
hammer to nearly full-cock position. Continued
pressure on the trigger allows the sear to escape
from the trigger and the hammer to fall.
(a) Smith and Wesson: When the trigger is squeezed,
the rebound slide pivots the hammer block
downward, striking the cartridge primer.
(b) Ruger: When the trigger is squeezed and held to
the rear, the transfer bar passes force from the
transfer bar to the firing pin, striking the
cartridge primer. If the trigger is not held to
the rear, the hammer rests directly on the frame
and the transfer bar remains below the firing
pin.
(3) The cylinder stop (Smith and Wesson) or latch
(Ruger) prevents the cylinder from making more
than one-sixth of a revolution each time the
weapon is cocked. The cylinder stop/latch
withdraws from the cylinder as the trigger moves.
The trigger hand (Smith and Wesson) or pawl
(Ruger) pivots and engages the ratchet on the
extractor/ejector portion of the cylinder. The
1-5
trigger slips off of the cylinder stop/latch as
it continues rearward. The cylinder stop/latch
then engages the next notch.
NOTES: 1. In firing the Ruger, the trigger must
remain all the way back till the hammer falls.
If the trigger is released before the hammer
falls, the weapon will not fire. In firing the
Smith and Wesson, the weapon fires only when
the trigger is pulled all the way back.
2. For additional information on the technical
aspects of the caliber .38 see TM 9-1005-226-14
and TM 9-1005-205-14&P-1.
1-6
CHAPTER 2
MARKSMANSHIP TRAINING
Section I. BASIC MARKSMANSHIP
2 1. PHASES OF TRAINING
Marksmanship training is divided into two phases:
preparatory marksmanship training and range firing.
Each phase may be divided into separate instructional
steps. All marksmanship training must be progressive.
Combat marksmanship techniques should be practiced
after the basics have been mastered.
2-2. FUNDAMENTALS
The main use of the pistol or revolver is to
engage an enemy at close range with quickr accurate
fire. Accurate shooting results from knowing and
correctly applying the elements of marksmanship. The
elements of combat pistol or revolver marksmanship
ar e:
о Grip.
о Aiming.
о Breath control.
о Trigger squeeze.
о Target engagement.
о Positions.
2-3. GRIP
The weapon must become an extension of the hand
and arm. It should replace the finger in painting at
an object. A firm, uniform grip must be applied to
the weapon. A proper grip is one of the most
important fundamentals of quick fire.
2-1
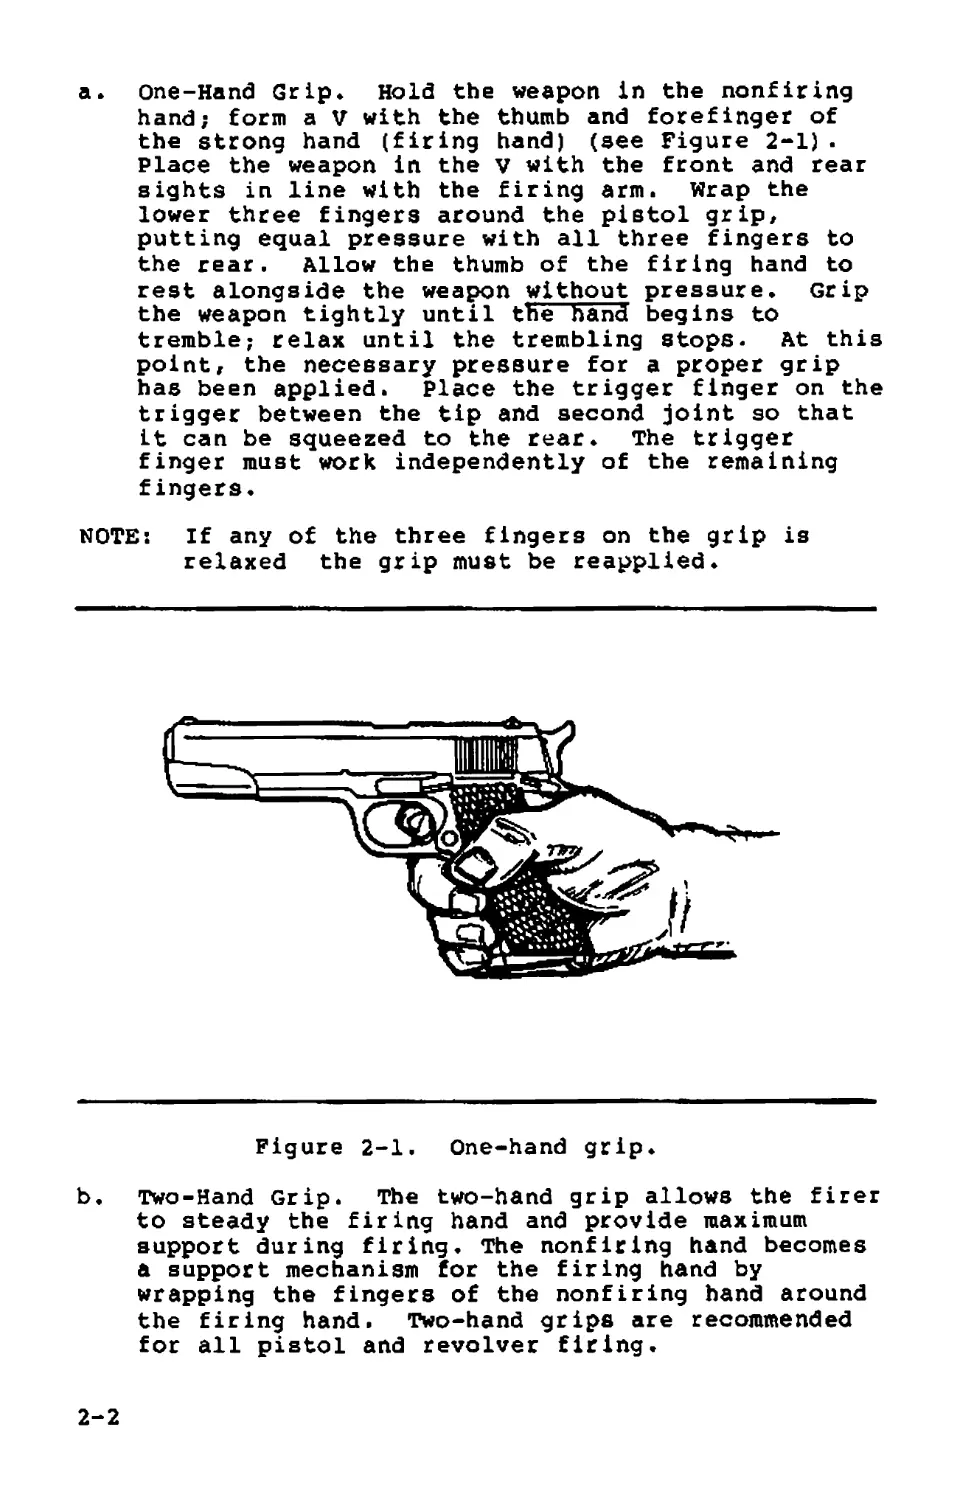
a» One-Hand Grip» Hold the weapon in the nonfiring
hand; form a V with the thumb and forefinger of
the strong hand (firing hand) (see Figure 2-1).
Place the weapon in the v with the front and rear
sights in line with the firing arm. Wrap the
lower three fingers around the pistol grip,
putting equal pressure with all three fingers to
the rear. Allow the thumb of the firing hand to
rest alongside the weapon without pressure. Grip
the weapon tightly until the hand begins to
tremble; relax until the trembling stops. At this
point, the necessary pressure for a proper grip
has been applied. Place the trigger finger on the
trigger between the tip and second joint so that
it can be squeezed to the rear. The trigger
finger must work independently of the remaining
fingers.
NOTE: If any of the three fingers on the grip is
relaxed the grip must be reapplied.
Figure 2-1. One-hand grip.
b. Two-Hand Grip. The two-hand grip allows the firer
to steady the firing hand and provide maximum
support during firing. The nonfiring hand becomes
a support mechanism for the firing hand by
wrapping the fingers of the nonfiring hand around
the firing hand. Two-hand grips are recommended
for all pistol and revolver firing.
2-2
WARNING
IF THE NONFIRING THUMB IS PLACED IN THE REAR
OF THE WEAPON THE RECOIL FROM THE WEAPON
COULD RESULT IN PERSONAL INJURY.
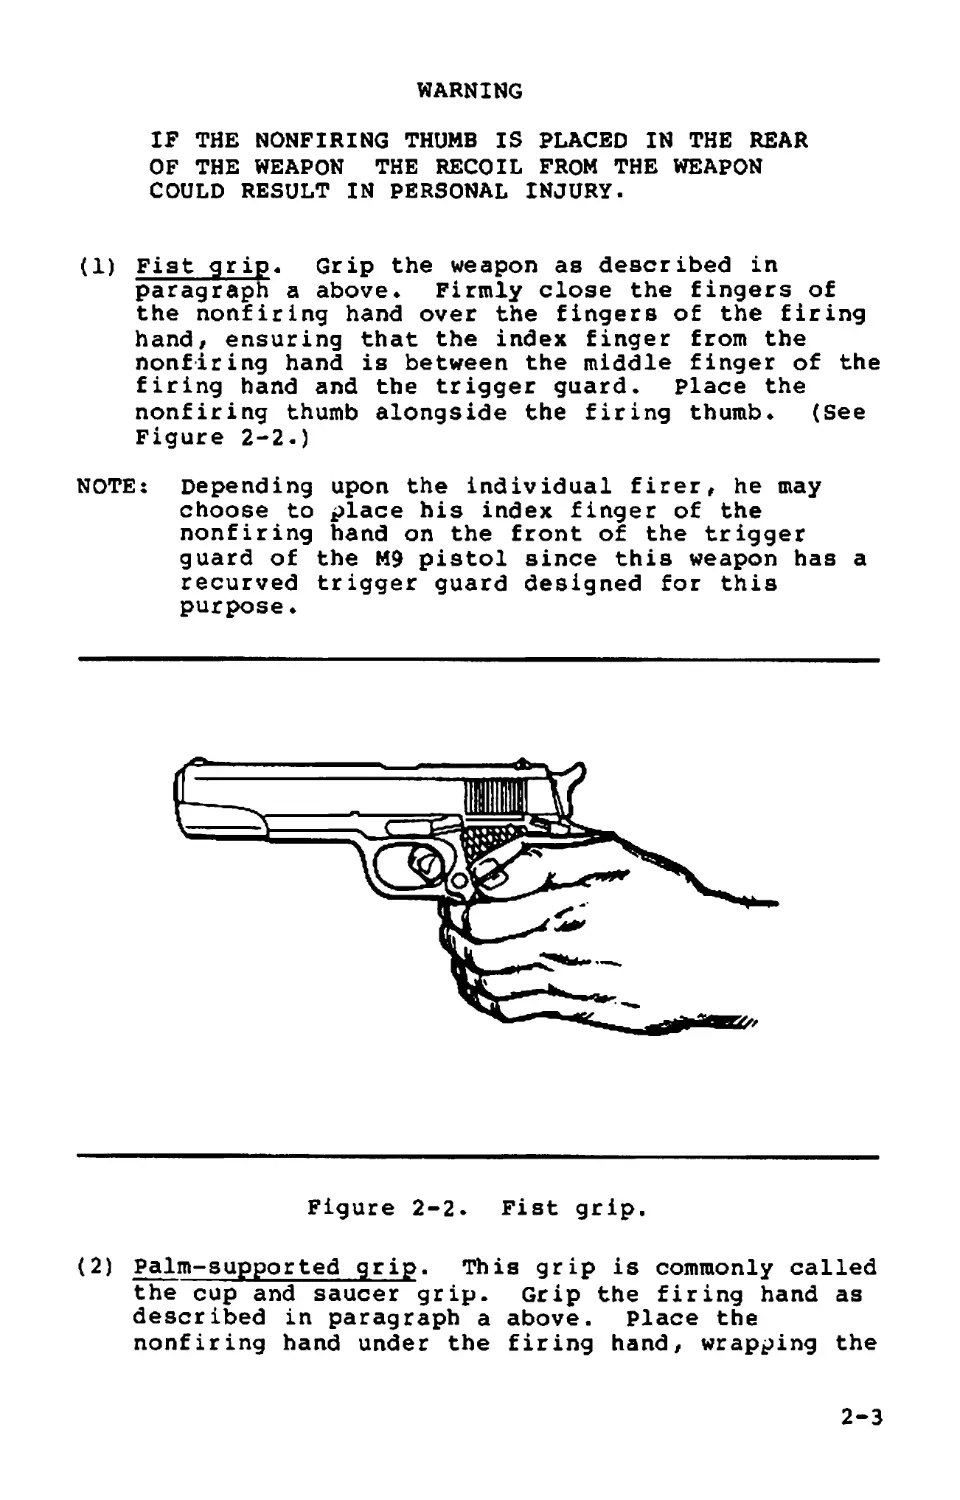
(1) Fiat grip. Grip the weapon as described in
paragraph a above. Firmly close the fingers of
the nonfiring hand over the fingers of the firing
hand, ensuring that the index finger from the
nonfiring hand is between the middle finger of the
firing hand and the trigger guard, place the
nonfiring thumb alongside the firing thumb. (See
Figure 2-2.)
NOTE: Depending upon the individual firer, he may
choose to place his index finger of the
nonfiring hand on the front of the trigger
guard of the M9 pistol since this weapon has a
recurved trigger guard designed for this
purpose.
Figure 2-2. Fist grip.
(2) Palm-supported grip. This grip is commonly called
the cup and saucer grip. Grip the firing hand as
described in paragraph a above. Place the
nonfiring hand under the firing hand, wrapping the
2-3
nonfiring fingers around the back of the firing
hand* Place the nonfiring thumb over the middle
finger of the firing hand. (See Figure 2—3•)
Figure 2-3* PaIm-supported grip.
(3) Weaver grip. Apply this grip the same as the
fist grip. The only exception is that the
nonfiring thumb is wrapped over the firing thumb.
(See Figure 2-4.)
Figure 2-4. Weaver grip
2-4
c. isometric Tension. The fixer raises his arms to a
firing position and applies isometric tension.
This is commonly known as the push-pull method for
maintaining weapon stability isometric tension
is when the firer applies forward pressure with
the firing hand and pulls rearward with the
nonfiring hand with equal pressure. This creates
an isometric force but never so much to cause the
firer to tremble. This steadies the weapon and
reduces barrel rise from recoil. The supporting
arm is bent with the elbow pulled downward. The
firing arm is fully extended with the elbow and
wrist locked. The firer must experiment to find
the right amount of isometric tension to apply.
NOTE: The firing hand should exert the same pressure
as the nonfiring hand. If it does not, a
missed target could result.
d. Natural Point of Aim. The firer should check his
grip for use of his natural point of aim. He
grips the weapon and sights properly on a distant
target. While maintaining his grip and stance, he
closes his eyes for three to five seconds. He
then opens his eyes and checks for proper sight
picture. If the point of aim is disturbed/ the
firer adjusts his stance to compensate. If the
sight alignment is disturbed, the firer adjusts
his grip to compensate by removing the weapon from
his hand and reapplying the grip. The firer
repeats this process until the sight alignment and
sight placement remain almost the same when he
opens his eyes. This enables the firer to
determine and use his natural point of aim once he
has sufficiently practiced. This is the most
relaxed position for holding and firing the
weapon.
2-4. AIMING
a. Aiming is sight alignment and sight placement (see
Figure 2-5)♦ Sight alignment is the centering of
the front blade in the rear sight notch. The top
of the front sight is level with the top of the
rear sight and is in correct alignment with the
eye. For correct sight alignment, the firer must
center the front sight in the rear sight. He
raises or lowers the top of the front sight so it
is level with the top of the rear sight.
2-5
b, Sight placement is the positioning of the weapon's
sights in relation to the target as seen by the
firer when he aims the weapon (see Figure 2-5). A
correct sight picture consists of correct sight
alignment with the front sight placed center mass
of the target. The eye can focus on only one
object at a time at different distances. There-
fore the last focus of the eye is always on the
front sight. When the front sight is seen
clearly, the rear sight and target will appear
hazy. Correct sight alignment can only be
maintained through focusing on the front sight.
The firer1s bullet will hit the target even if the
sight picture is partly off center but still
remains on the target. Therefore, sight alignment
is more important than sight placement. Since it
is impossible to hold the weapon completely still,
the firer must apply trigger squeeze and maintain
correct sight alignment while the weapon is moving
in and around the center of the target. This
natural movement of the weapon is referred to as
wobble area. The firer must strive to control the
limits of the wobble area through proper breath
control, trigger squeeze, positioning, and grip.
c. Sight alignment is essential for accuracy because
of the short sight radius of the pistols and
revolvers. For example, if a 1/10-inch error is
made in aligning the front sight in the rear
sight, the firer's bullet will miss the point of
aim by about 15 inches at a range of 25 meters.
The 1/10-inch error in sight alignment magnifies
as the range increases—at 25 meters it is
magnified 150 times.
CORRECT SIGHT ALIGNMENT
CORRECT SIGHT PLACEMENT
Figure 2-5. Correct sight alignment and
sight picture.
2-6
d. Focusing on the front sight while applying proper
trigger squeeze will help the firer resist the
urge to jerk the trigger and anticipate the actual
moment the weapon will fire* Mastery of trigger
squeeze and sight alignment requires practice.
Trainers should use concurrent training stations
or have fire ranges to enhance proficiency of
marksmanship skills.
2-5. BREATH CONTROL
The firer must learn to hold his breath properly
at any time during the breathing cycle if he wishes to
attain accuracy that will serve him in combat. This
must be done while aiming and squeezing the trigger.
While the procedure is simple, it requires explana-
tion, demonstration, and supervised practice. To hold
the breath properly the firer takes a breath, lets it
out, then inhales normally, lets a little out until
comfortable, holds, and then fires. It is diffi-
cult to maintain a steady position keeping the front
Bight at a precise aiming point while breathing.
Therefore, the firer should be taught to inhale, then
exhale normally, and hold his breath at the moment of
the natural respiratory pause (see Figure 2-6). The
shot must then be fired before he feels any discomfort
from not breathing. When multiple targets are
presented, the firer must learn to hold his breath at
Figure 2-6. Breath control, firing
at a single target.
2-7
any part of the breathing cycle (see Figure 2-7)
Breath control must be practiced during dry-fire
exercises until it becomes a natural part of the
firing process.
TRK) GER
SQUEEZE
2 - 6. TRIGGER SQUEEZE
a» Improper trigger squeeze causes more misses than
any other step of preparatory marksmanship* Poor
shooting is caused by Ebe aim being disturbed
before the bullet leaves the barrel of the weapon.
This is usually the result of the firer jerking
the trigger or flinching. A slight off-center
pressure of the trigger finger on the trigger can
cause the weapon to move and disturb the firer*s
sight alignment. Flinching is an automatic human
reflex caused by anticipating the recoil of the
weapon* Jerking is an effort to fire the weapon
at the precise time the sights align with the
target.
NOTE: See problems in target engagement, paragraph
b. Trigger squeeze is the independent movement of the
trigger finger in applying increasing pressure on
the trigger straight to the rear, without
disturbing the sight alignment until the weapon
fires. The trigger slack, or free play, is taken
up first, and the squeeze is continued steadily
until the hammer falls. If the trigger is squeezed
properly, the firer will not know exactly when the
hammer will fall; thus, he does not tend to flinch
or heel, resulting in a bad shot* Novice firers
2-8
must be trained to overcome the urge to anticipate
recoil* Proper application of the fundamentals
will lower this tendency*
c. To apply correct trigger squeeze, the trigger
finger should contact the trigger between the tip
of the finger to the second joint (without
touching the weapon anywhere else) . Where contact
is made depends on the length of the firer1a
trigger finger. If pressure from the trigger
finger is applied to the right side of the trigger
or weapon, the strike of the bullet will be to the
left. This is due to the normal hinge action of
the fingers. When the fingers on the right hand
are closed, as in gripping, they hinge or pivot to
the left, thereby applying pressure to the left.
(With left-handed firers, this action is to the
right.) The firer must not apply pressure left or
right but increase finger pressure straight to the
rear Only the trigger finger must perform this
action. Dry-fire training improves a firer’s
ability to move the trigger finger straight to the
rear without cramping or increasing pressure on
the hand grip.
(1) The firer who is a good shot holds the sights of
the weapon as nearly on the target center as
possible and continues to squeeze the trigger with
increasing pressure until the weapon fires.
(2) The soldier who is a bad shot tries to "catch his
target" as his sight alignment moves past the
target and fires the weapon at that instant. This
is called ambushing , which causes trigger jerk.
d. Follow-through is the continued effort of the
firer to maintain sight alignment before, during,
and after the round has fired. The firer must
continue the rearward movement of the finger even
after the round has been fired. Releasing the
trigger too soon after the round has been fired
results in an uncontrolled shot, causing a missed
target.
NOTEs The trigger squeeze of the M9 pistol, when
fired in the single-action mode, is 5.50
pounds; when fired in double-action mode, it is
12.33 pounds. The firer must be aware.of the
mode he is firing in. He must also practice
squeezing the trigger in each mode to develop
expertise in single-action and double-action
target engagements.
2-9
2-7* TARGET ENGAGEMENT
To engage a single target, the firer applies the
method discussed in paragraph 2-6 when multiple
targets are engaged. The closest and most dangerous
multiple target in combat is engaged first and should
be fired at with two rounds* This is commonly
referred to as a double tap* The firer then traverses
and acquires the next target, aligns the sights in the
center of mass, focuses on the front sight, applies
trigger squeeze, and fires* The firer ensures his
firing arm elbow and wrist are locked during all
engagements. If the firer has missed the first target
and has fired upon the second target, he shifts back
to the first’ and engages it. Some problems in target
engagement are as follows:
a* Recoil Anticipation. When a soldier first learns
to shoot, he may begin to anticipate recoil. This
reaction may cause him to tighten his muscles
during or just before the hammer falls* He may
fight the recoil by pushing the weapon downward in
anticipating or reacting to its firing. In either
case, the rounds will not hit the point of aim. A
good method to show the firer that he is antici-
pating the recoil is the ba11-and-dummy method
(see paragraph 2-16) -
b. Trigger Jerk. Trigger jerk occurs when the
soldier sees that he has acquired a good sight
picture at center mass and "snaps” off a round
before the good sight picture is lost. This may
become a problem, especially when the soldier is
learning to use a flash sight picture (see
paragraph 2-9)♦
c* Heeling. Heeling is caused by a firer tightening
the large muscle in the heel of the hand to keep
from jerking the trigger. A firer who has had
problems with jerking the trigger tries to correct
the fault by tightening the bottom of the hand,
which results in a heeled shot* Heeling causes
the strike of the bullet to hit high on the firing
hand side of the target. The firer can correct
shooting errors by knowing and applying correct
trigger squeeze.
2-8* POSITIONS
The qualification course is fired from a
standing kneeling, or crouch position. All of the
2-10
firing positions described below must be practiced so
they become natural movements, during qualification
and combat firing. Though these positions seem
natural, practice sessions must be conducted to ensure
the habitual attainment of correct firing positions»
Assuming correct firing positions ensures that
soldiers can quickly assume these positions without a
conscious effort. Pistol marksmanship requires a
soldier to rapidly apply all the fundamentals at
dangerously close targets while under stress.
Assuming a proper position to allow for a steady aim
is critical to survival.
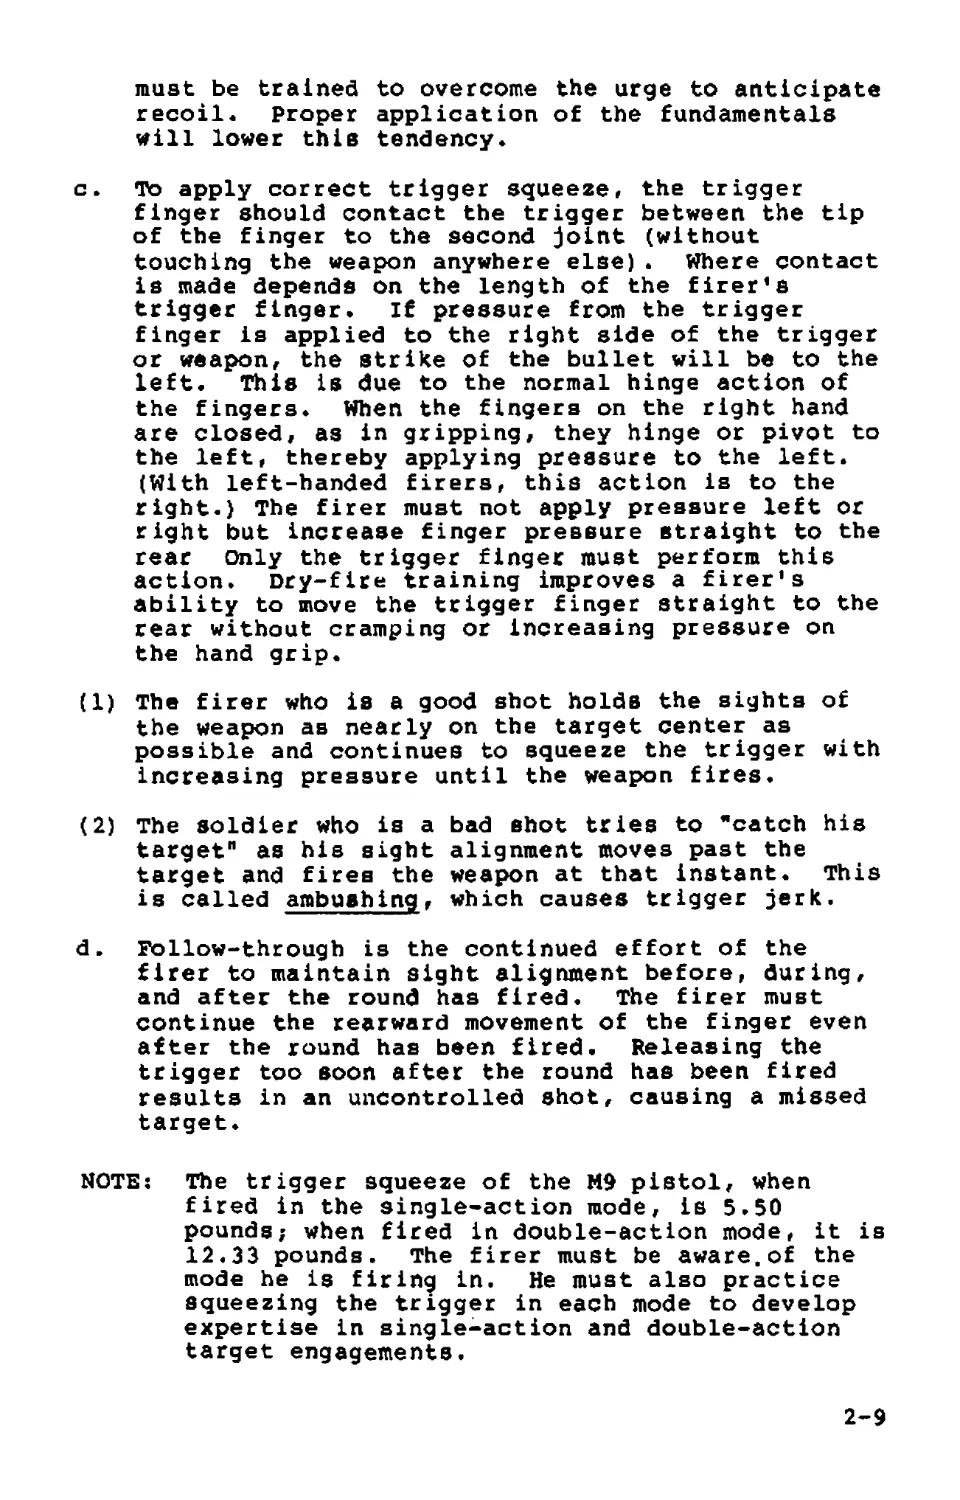
a. Pistol-Ready position. In the pistol-ready
position, hold the weapon in the one-hand grip.
Hold the upper arm close to the body, and the
forearm at about a 45° angle. Point the weapon
toward target center as you move forward (see
Figure 2-8) ♦
Figure 2-8. Pistol-ready position.
2-11
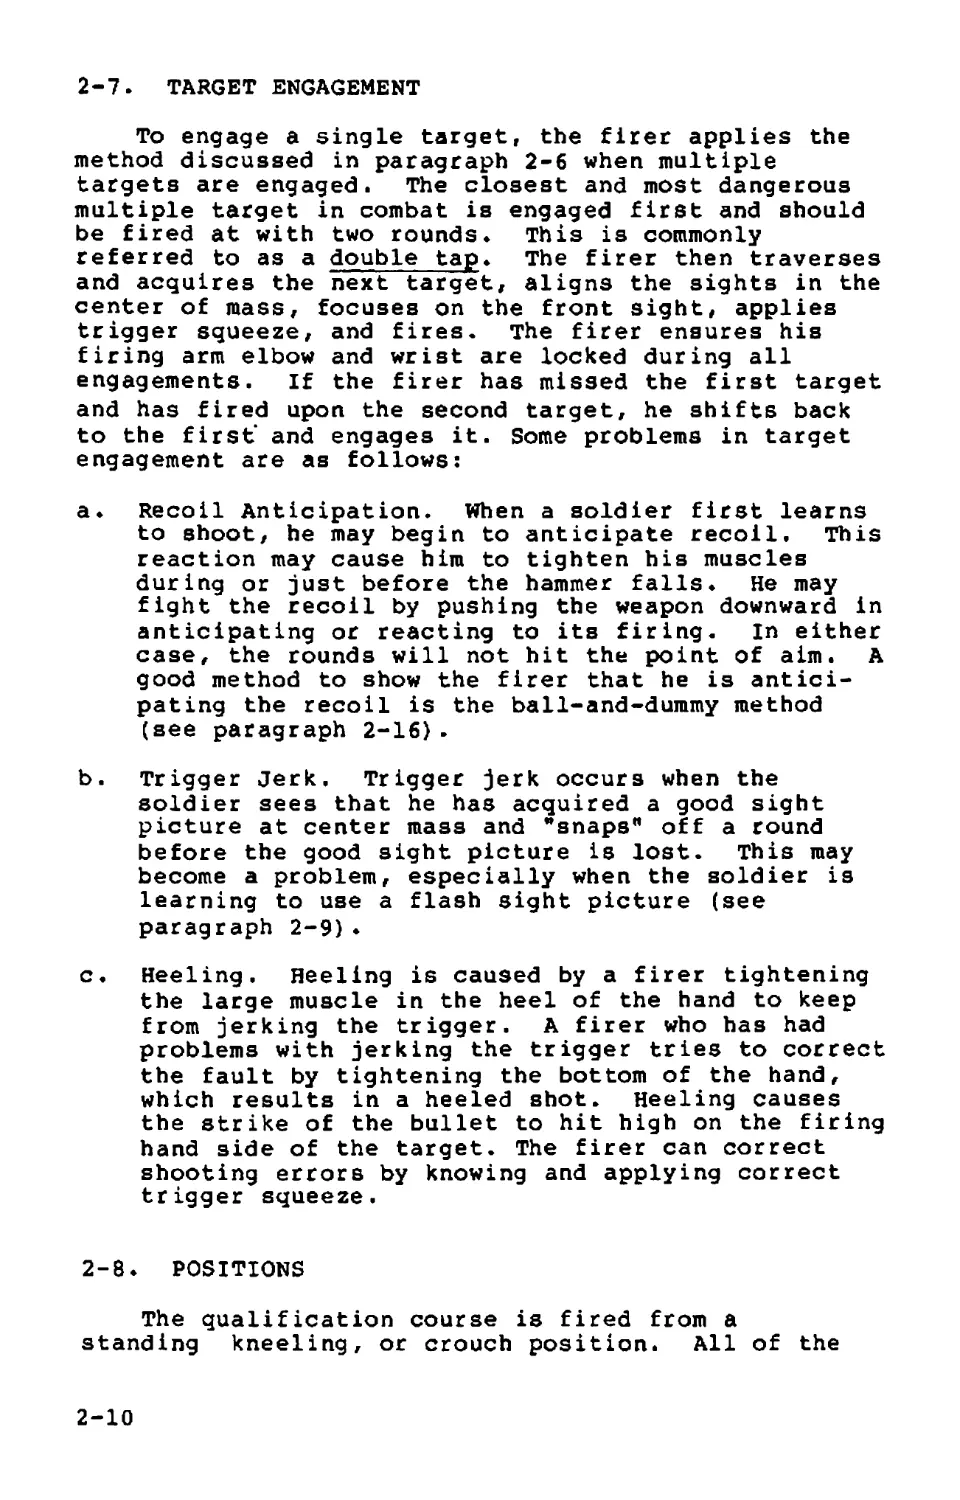
b. Standing Position Without Support. Face the
target (see Figure 2-9) ♦ Place feet a comfortable
distance apart, about shoulder width. Extend the
firing arm and attain a two-hand grip- The wrist
and elbow of the firing arm are locked and pointed
toward target center. Keep the body straight with
the shoulders slightly forward of the buttocks.
Figure 2-9. Standing position without
support.
NOTE: During combat, there may not be time for a
soldier to assume a position that will allow
him to establish his natural point of aim.
Firing from a covered position may require the
soldier to adapt his shooting stance to
available cover.
c. Kneeling Position. In the kneeling position,
ground only the firing side knee as the main
support (see Figure 2-10)- vertically place the
foot, used as the main support, under the
buttocks. Rest the body weight on the heel and
toes. Rest the nonfiring arm just above the elbow
on the knee not used as the main body support.
2-12
Use the two-handed grip for firing. Extend the
firing arm, and lock the firing arm elbow and
wrist to ensure solid arm control.
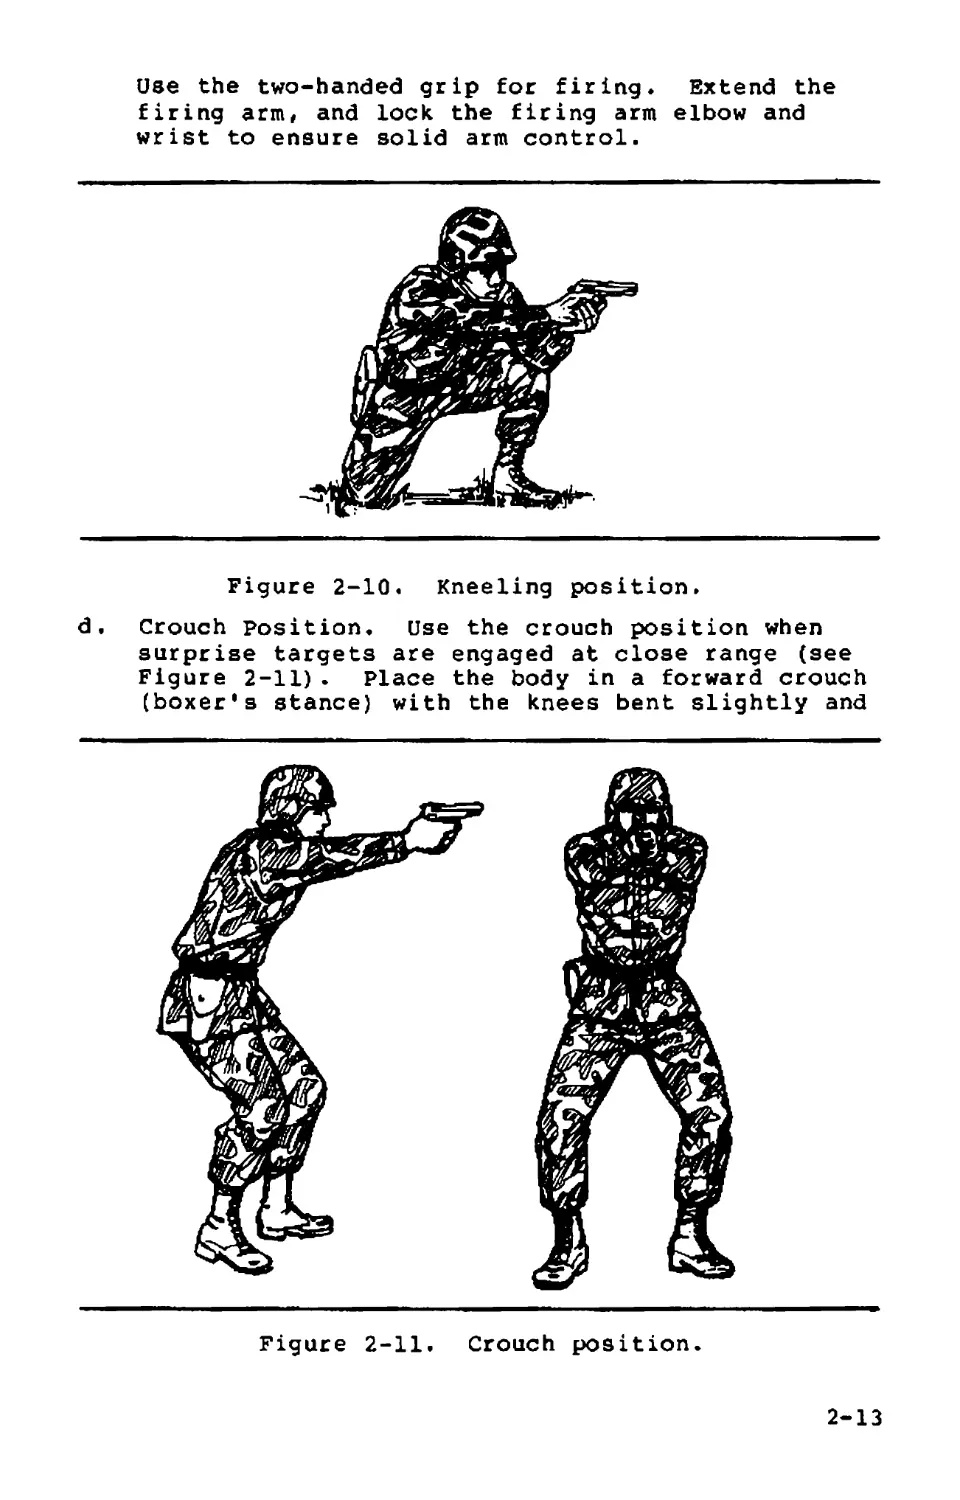
Figure 2-10. Kneeling position.
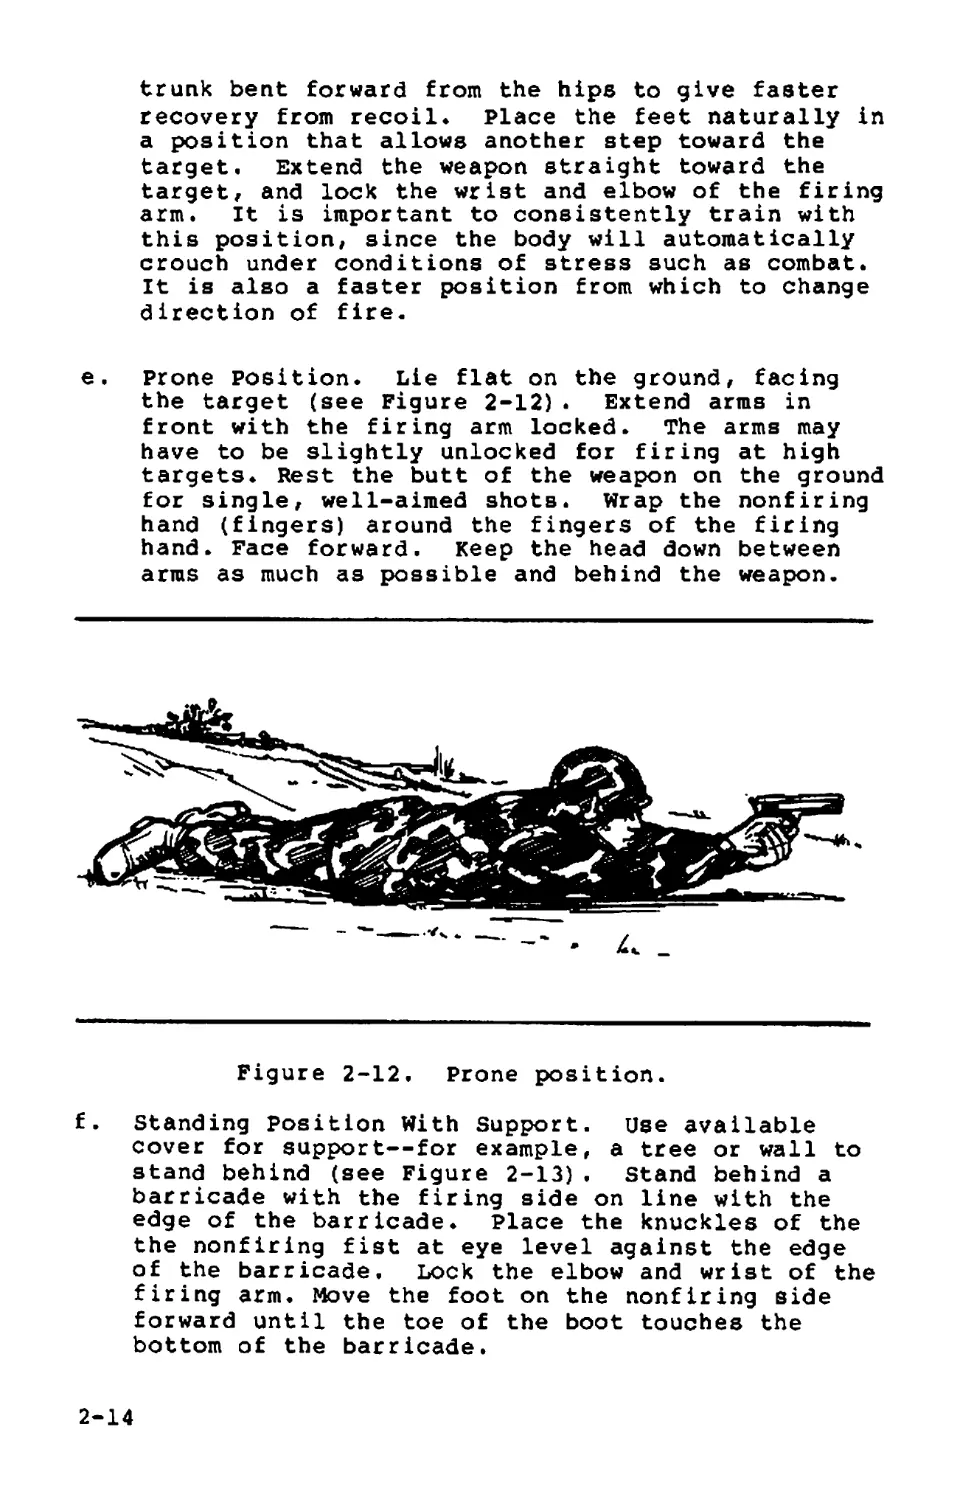
d. Crouch Position. Use the crouch position when
surprise targets are engaged at close range (see
Figure 2-11). Place the body in a forward crouch
(boxer’s stance) with the knees bent slightly and
Figure 2-11, Crouch position.
2-13
trunk bent forward from the hips to give faster
recovery from recoil» Place the feet naturally in
a position that allows another step toward the
target. Extend the weapon straight toward the
target, and lock the wrist and elbow of the firing
arm. It is important to consistently train with
this position, since the body will automatically
crouch under conditions of stress such as combat.
It is also a faster position from which to change
direction of fire.
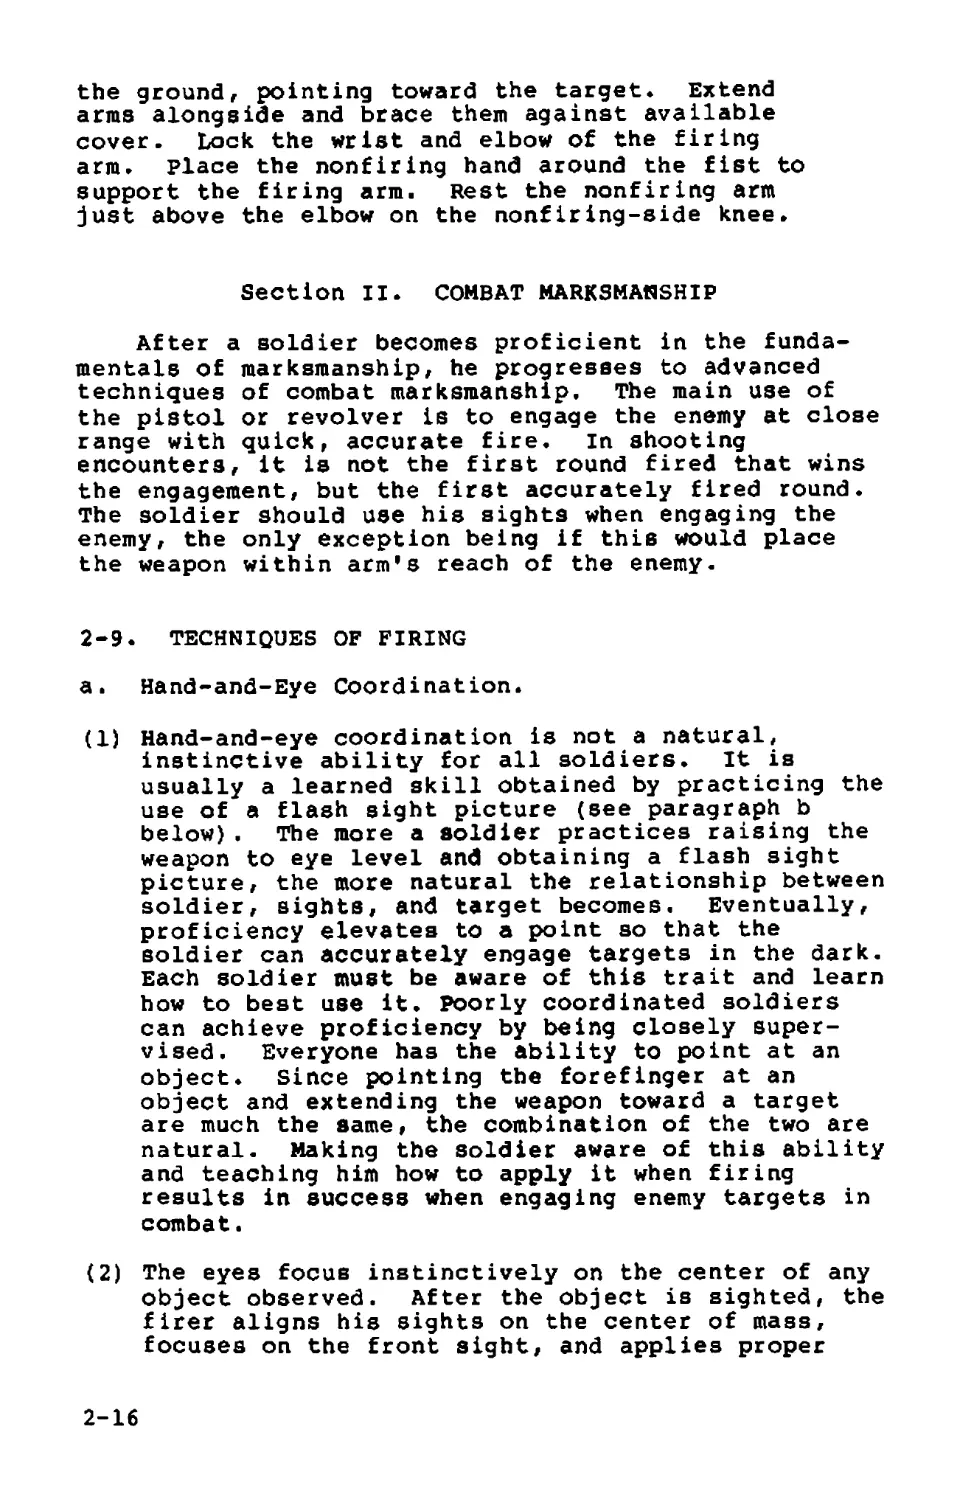
e. Prone Position. Lie flat on the ground, facing
the target (see Figure 2-12). Extend arms in
front with the firing arm locked. The arms may
have to be slightly unlocked for firing at high
targets. Rest the butt of the weapon on the ground
for single, well-aimed shots. Wrap the nonfiring
hand (fingers) around the fingers of the firing
hand. Face forward. Keep the head down between
arms as much as possible and behind the weapon.
Figure 2-12, Prone position.
f. Standing position With Support. Use available
cover for support—for example, a tree or wall to
stand behind (see Figure 2-13) . Stand behind a
barricade with the firing side on line with the
edge of the barricade. Place the knuckles of the
the nonfiring fist at eye level against the edge
of the barricade. Lock the elbow and wrist of the
firing arm. Move the foot on the nonfiring side
forward until the toe of the boot touches the
bottom of the barricade.
2-14
Figure 2-13. Standing position with support.
g. Kneeling Supported Position, use available cover
for support—for example, use a low wall, rocks,
or vehicle (see Figure 2-14) . Place the
firing-side knee on the ground. Bend the other
knee and place the foot (nonfiring side) flat on
Figure 2-14. Kneeling supported.
2-15
the ground, pointing toward the target♦ Extend
arms alongside and brace them against available
cover. Lock the wrist and elbow of the firing
arm. place the nonfiring hand around the fist to
support the firing arm. Rest the nonfiring arm
just above the elbow on the nonfiring-side knee.
Section II. COMBAT MARKSMANSHIP
After a soldier becomes proficient in the funda-
mentals of marksmanship, he progresses to advanced
techniques of combat marksmanship. The main use of
the pistol or revolver is to engage the enemy at close
range with quick, accurate fire. In shooting
encounters, it is not the first round fired that wins
the engagement, but the first accurately fired round.
The soldier should use his sights when engaging the
enemy, the only exception being if this would place
the weapon within arm’s reach of the enemy.
2-9. TECHNIQUES OF FIRING
a. Hand-and-Eye Coordination.
(1) Hand-and-eye coordination is not a natural,
instinctive ability for all soldiers. It is
usually a learned skill obtained by practicing the
use of a flash sight picture (see paragraph b
below), The more a soldier practices raising the
weapon to eye level and obtaining a flash sight
picture, the more natural the relationship between
soldier, sights, and target becomes. Eventually,
proficiency elevates to a point so that the
soldier can accurately engage targets in the dark.
Each soldier must be aware of this trait and learn
how to best use it. Poorly coordinated soldiers
can achieve proficiency by being closely super-
vised. Everyone has the ability to point at an
object. Since pointing the forefinger at an
object and extending the weapon toward a target
are much the same, the combination of the two are
natural. Making the soldier aware of this ability
and teaching him how to apply it when firing
results in success when engaging enemy targets in
combat.
(2) The eyes focus instinctively on the center of any
object observed. After the object is sighted, the
firer aligns his sights on the center of mass,
focuses on the front sight, and applies proper
2-16
trigger squeeze. Most crippling or killing hits
result from maintaining the focus on the center of
mass. The eyes must remain fixed on some part of
the target throughout firing.
(3) When a soldier points, he instinctively points at
the feature on the object on which his eyes are
focused. An impulse from the brain causes the arm
and hand to stop when the finger reaches the
proper position. When the eyes are shifted to a
new object or feature, the finger, hand, and arm
also shift to this point. It is this inherent
trait that can be used by the soldier to rapidly
and accurately engage targets. This instinct is
called hand-and-eye coordination,
b. Flash Sight picture, usually when engaging an
enemy at pistol/revolver ranges, the firer has
little time to ensure a correct sight picutre.
The quick-kill (or natural point of aim) method
does not always ensure a first-round hit. A
compromise between a correct sight picture and the
quick-kill method is known as a flash sight
picture. As the soldier raises the weapon to eye
level, his point of focus switches from the enemy
to the front sight, ensuring that the front and
rear sights are in proper alignment left and
right, but not necessarily up and down. Pressure
is applied to the trigger as the front sight is
being acquired, and the hammer falls as the flash
sight picture is confirmed. Initially, this
method should be practiced slowly, gaining speed
as proficiency increases.
c. Quick-Fire Point Shooting. This is for engaging
an enemy at less than 5 yards. It is also useful
for night firing. The weapon should be held in a
two-hand grip. It is brought up close to the body
until it reaches chin level and is then thrust
forward until both arms are straight. The-arms and
body form a triangle, which can be aimed as a
unit. In thrusting the weapon forward, the firer
can imagine that there is a box between him and
the enemy, and he is thrusting the weapon into the
box. The trigger is smoothly squeezed to the rear
as the elbows straighten out.
d, Quick-Fire Sighting. This is used when engaging
an enemy at 5 to 10 yards away. It is used only
when there is no time available to get a full
2-17
picture» The firing position is the same as for
quick-fire point shooting. The sights are aligned
left and right to save time, but not up and down.
The firer must determine in practice what the
sight picture will look like and where the front
sight must be aimed to hit the enemy in the
chest.
2-10. TARGET ENGAGEMENT
In close combat, there is seldom time to precisely
apply all of the fundamentals of marksmanship. When a
soldier fires a round at the enemy, many times he will
not know if he hit his target. Therefore, two rounds
should be fired at the target. This is called a
double tap. If the enemy continues to attack, two
more shots should be placed in the pelvic area to
break the body's support structure, causing the enemy
to fall.
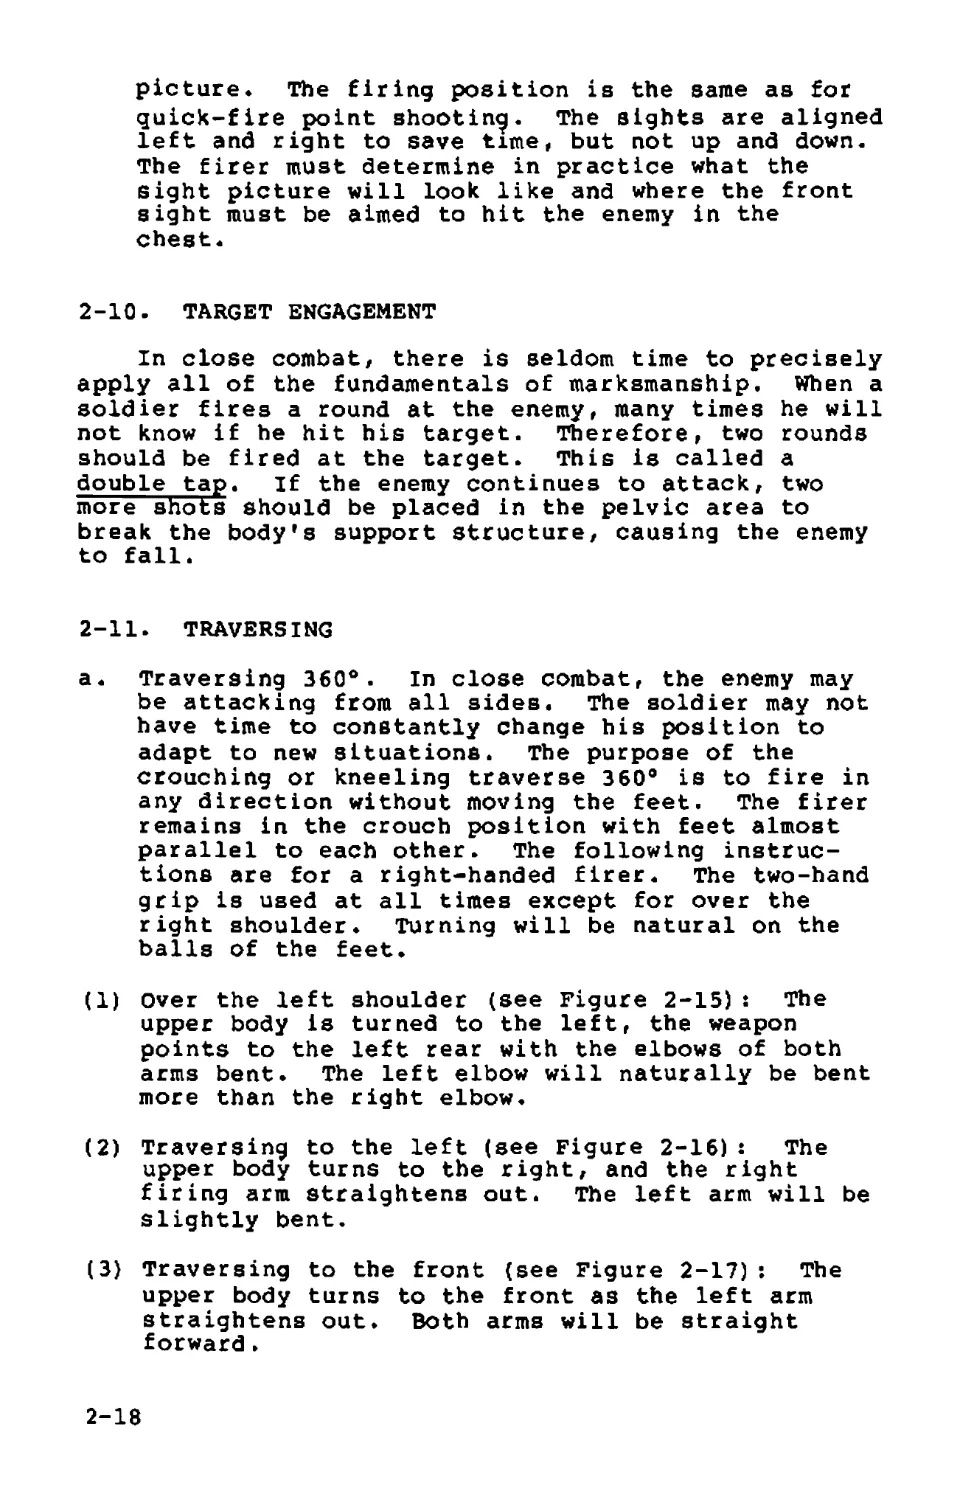
2-11. TRAVERSING
a. Traversing 360°. In close combat, the enemy may
be attacking from all sides. The soldier may not
have time to constantly change his position to
adapt to new situations. The purpose of the
crouching or kneeling traverse 360° is to fire in
any direction without moving the feet. The firer
remains in the crouch position with feet almost
parallel to each other. The following instruc-
tions are for a right-handed firer. The two-hand
grip is used at all times except for over the
right shoulder. Turning will be natural on the
balls of the feet.
(1) Over the left shoulder (see Figure 2-15) s The
upper body is turned to the left, the weapon
points to the left rear with the elbows of both
arms bent. The left elbow will naturally be bent
more than the right elbow.
(2) Traversing to the left (see Figure 2-16): The
upper body turns to the right, and the right
firing arm straightens out. The left arm will be
slightly bent.
(3) Traversing to the front (see Figure 2-17): The
upper body turns to the front as the left arm
straightens out. Both arms will be straight
forward »
2-18
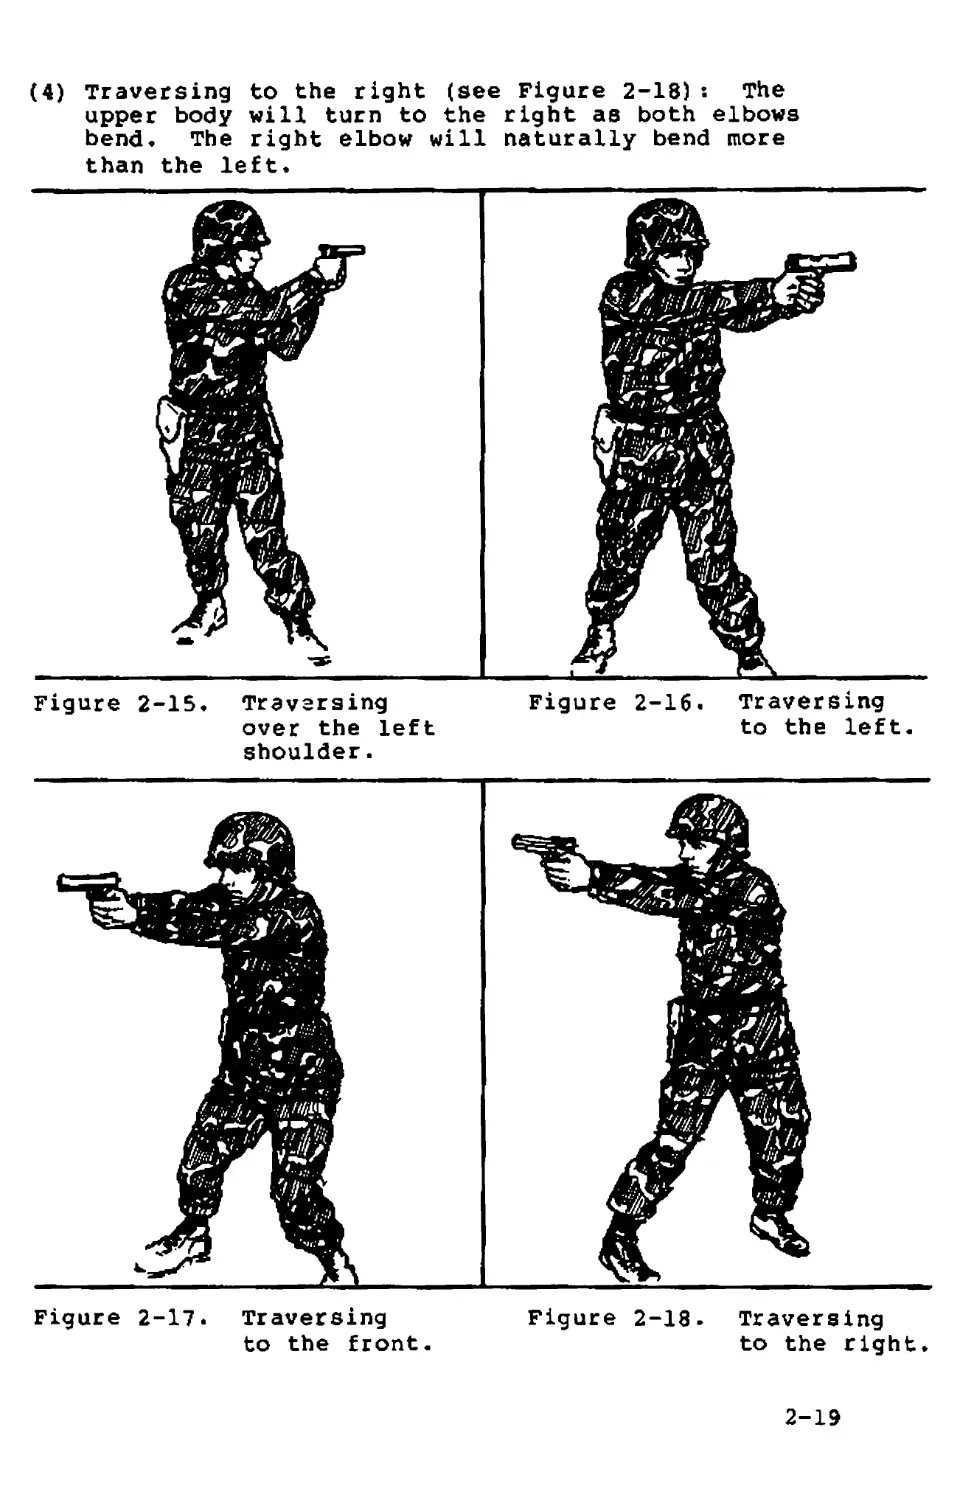
(4) Traversing to the right (see Figure 2-18) s The
upper body will turn to the right as both elbows
bend. The right elbow will naturally bend more
than the left.
Figure 2-16. Traversing
to the left.
Figure 2-15. Traversing
over the left
shoulder.
Figure 2-17. Traversing
to the front.
Figure 2-18- Traversing
to the right.
2-19
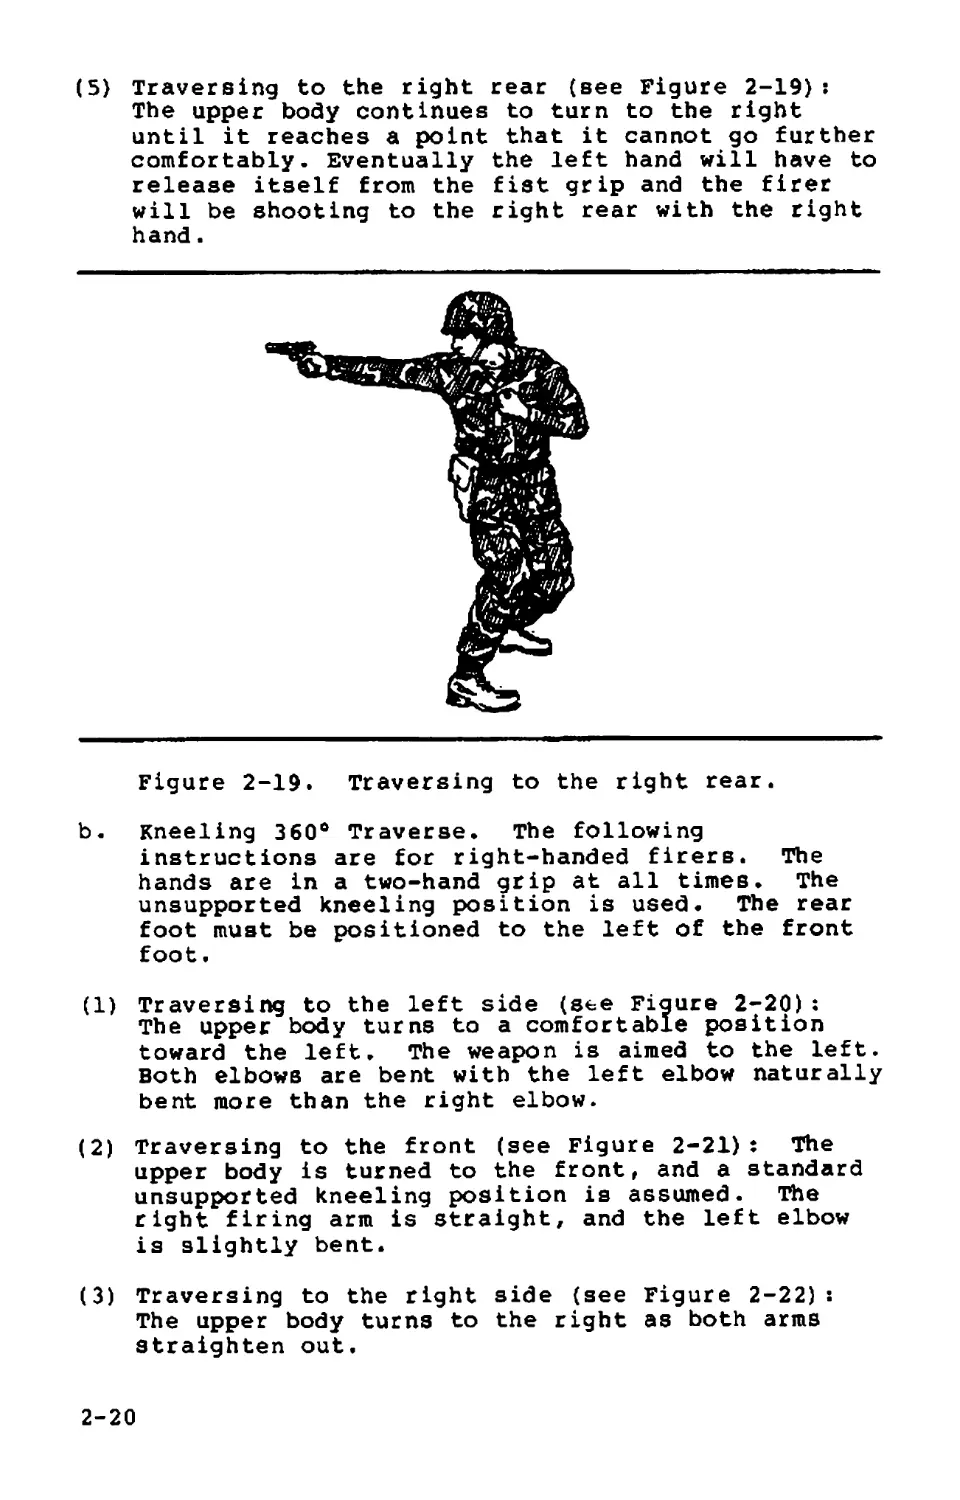
(5) Traversing to the right rear (see Figure 2-19):
The upper body continues to turn to the right
until it reaches a point that it cannot go further
comfortably. Eventually the left hand will have to
release itself from the fist grip and the firer
will be shooting to the right rear with the right
hand.
Figure 2-19. Traversing to the right rear.
b. Kneeling 360° Traverse. The following
instructions are for right-handed firers. The
hands are in a two-hand grip at all times. The
unsupported kneeling position is used. The rear
foot must be positioned to the left of the front
foot,
(1) Traversing to the left side (see Figure 2-20):
The upper body turns to a comfortable position
toward the left. The weapon is aimed to the left.
Both elbows are bent with the left elbow naturally
bent more than the right elbow.
(2) Traversing to the front (see Figure 2-21): The
upper body is turned to the front, and a standard
unsupported kneeling position is assumed. The
right firing arm is straight, and the left elbow
is slightly bent.
(3) Traversing to the right side (see Figure 2-22):
The upper body turns to the right as both arms
straighten out.
2-20
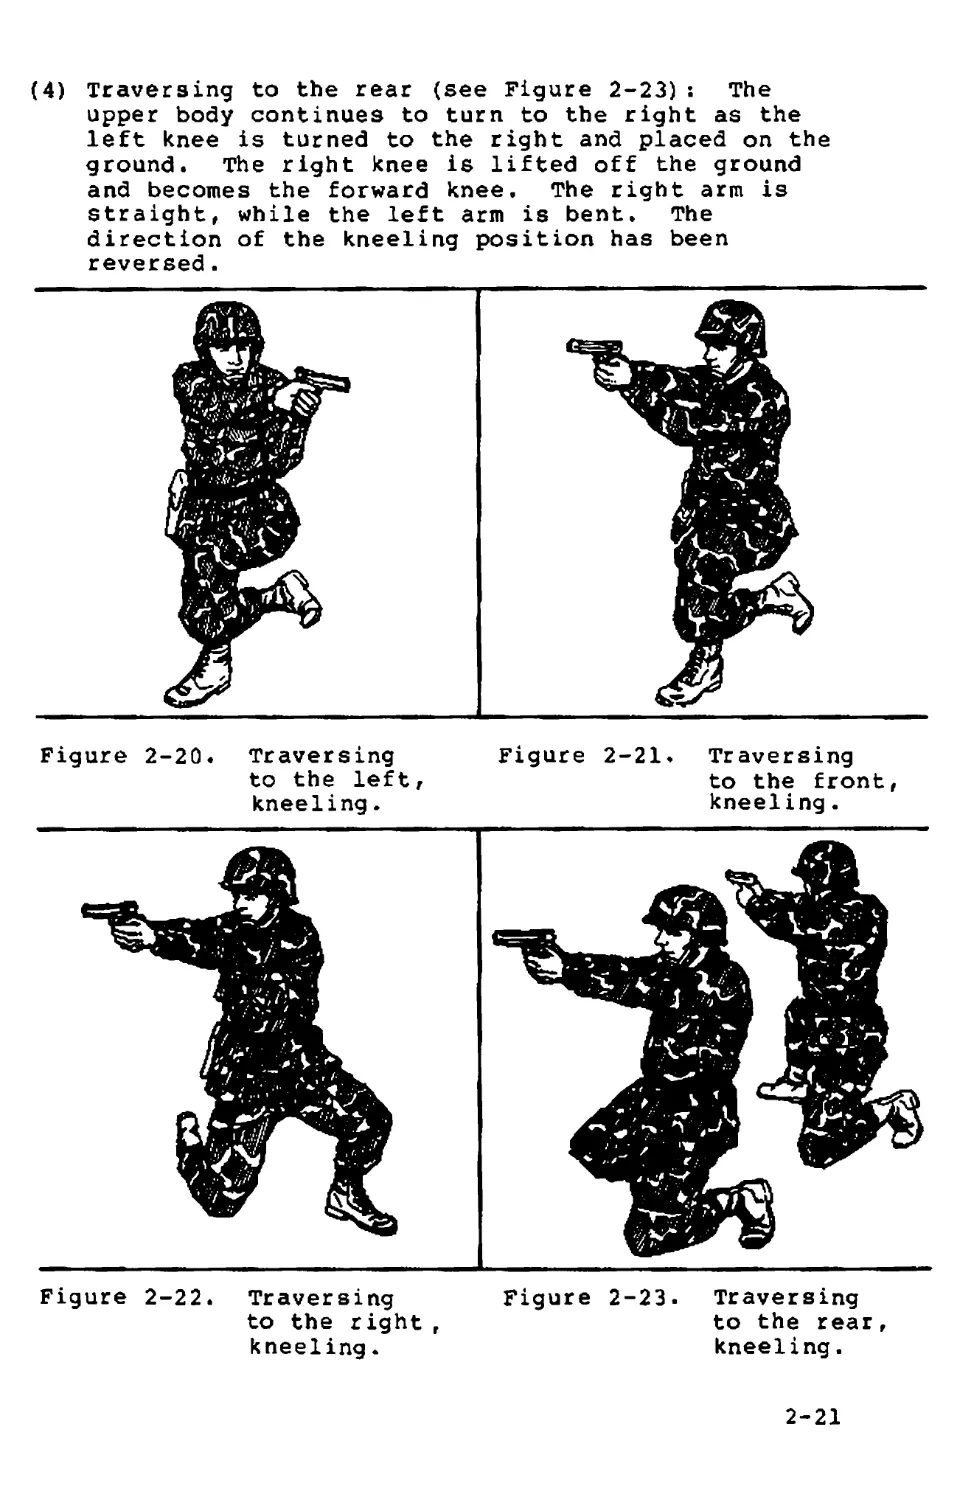
(4) Traversing to the rear (see Figure 2-23)s The
upper body continues to turn to the right as the
left knee is turned to the right and placed on the
ground. The right knee is lifted off the ground
and becomes the forward knee. The right arm is
straight, while the left arm is bent. The
direction of the kneeling position has been
reversed.
Figure 2-20. Traversing Figure 2-21. Traversing
to the left, to the front,
kneeling. kneeling.
Figure 2-22. Traversing Figure 2-23. Traversing
to the right, to the rear,
kneeling. kneeling.
2-21
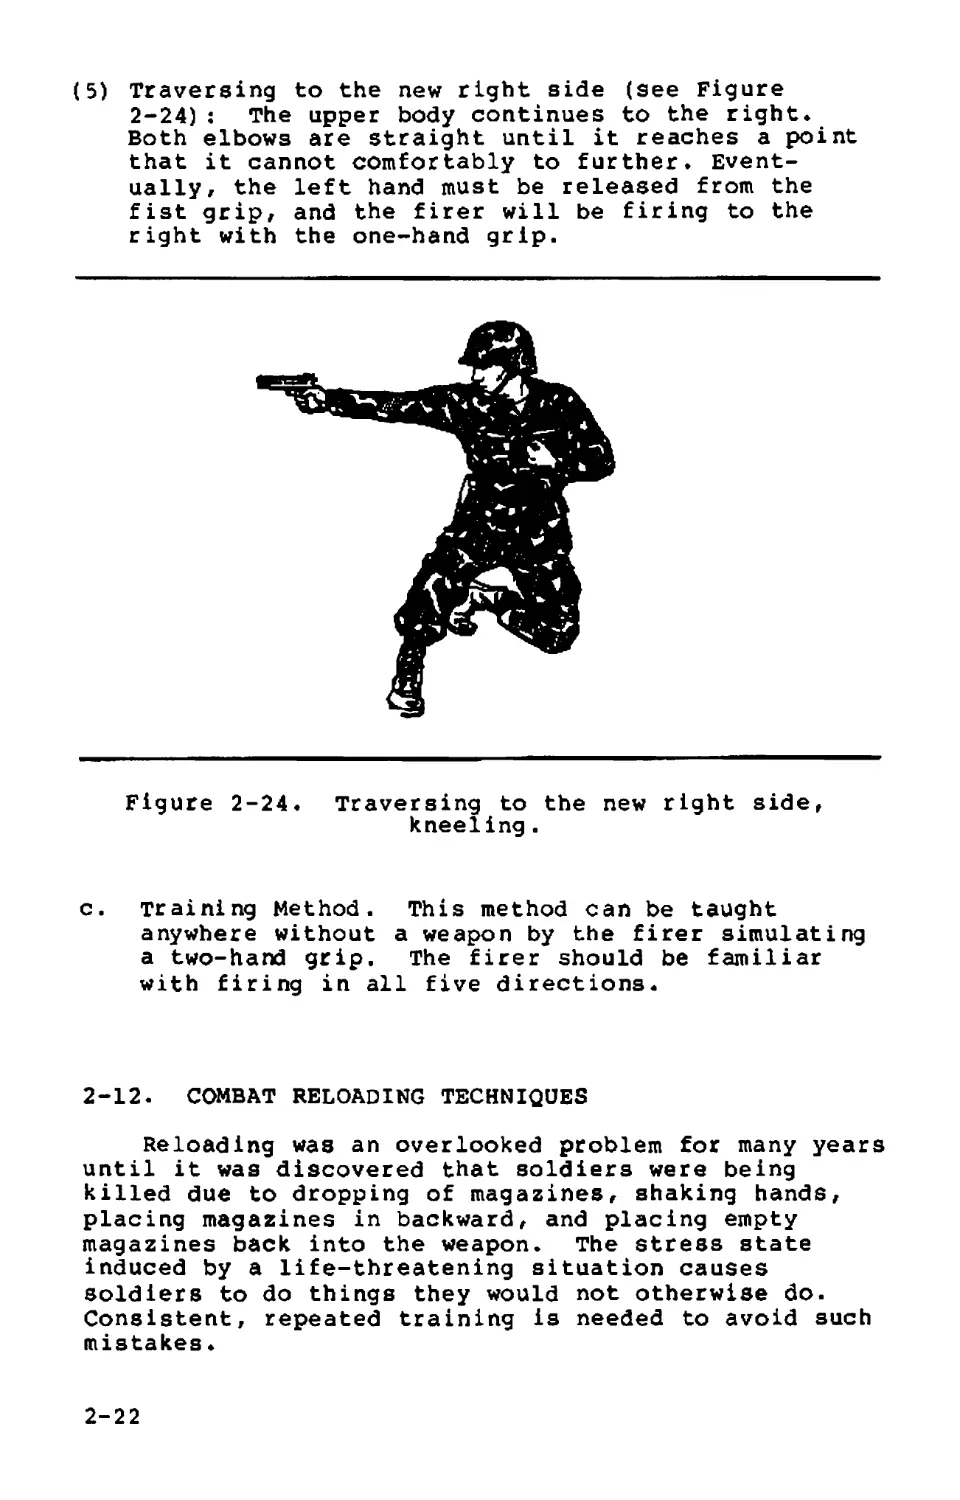
(5) Traversing to the new right side (see Figure
2-24): The upper body continues to the right*
Both elbows are straight until it reaches a point
that it cannot comfortably to further. Event-
ually, the left hand must be released from the
fist grip, and the firer will be firing to the
right with the one-hand grip.
Figure 2-24. Traversing to the new right side,
kneeling.
c. Training Method. This method can be taught
anywhere without a weapon by the firer simulating
a two-hand grip. The firer should be familiar
with firing in all five directions.
2-12. COMBAT RELOADING TECHNIQUES
Reloading was an overlooked problem for many years
until it was discovered that soldiers were being
killed due to dropping of magazines, shaking hands,
placing magazines in backward, and placing empty
magazines back into the weapon. The stress state
induced by a life-threatening situation causes
soldiers to do things they would not otherwise do.
Consistent, repeated training is needed to avoid such
mistakes♦
2-22
NOTE: These procedarев should only be used in combatt
not on firing ranges.
о STEP 1: Develop a consistent method for carrying
magazines in the ammuntion pouches. All
magazines should face down with the bullets
facing forward and to the center of the body.
о STEP 2: Know when to reload. When possible,
count the number of rounds fired. However, it is
possible to lose count in close combat. If this
happens, there is a distinct difference in recoil
of the pistol when the last round has been fired.
Change magazines when two rounds may be left—one
in the magazine and one in the chamber. This
prevents being caught with an empty weapon at a
crucial time. Reloading is faster with a round
in the chamber since time is not needed to
release the slide.
о STEP 3: Obtain a firm grip on the magazine.
This precludes the magazine being dropped or
difficulty in getting the magazine into the
weapon. Ensure the knuckles of the hand are
toward the body while gripping as much of the
magazine as possible. Place the index finger high
on the front of the magazine when withdrawing
from the pouch. Use the index finger to guide
the magazine into the magazine well.
о STEP 4: Know which reloading procedure to use
for the tactical situation. There are three
systems of reloading: rapid, tactical, and
one-handed. Ra^id reloading is used when the
soldier’s life is in immediate danger, and the
reload must be accomplished quickly. Tactical
reloading is used when there is more time, and it
is desirable to keep the replaced magazine
because there are rounds still in it or it will
be needed again. One-handed reloading is used
when there is an arm injury.
a. Rapid Reloading.
о Place your hand on the next magazine in the
ammunition pouch to ensure there is another
magazine.
о Withdraw the magazine from the pouch while
releasing the other magazine from the weapon.
Let the replaced magazine drop to the ground.
2-23
о Insert the replacement magazine, guiding it into
the magazine well with the index finger»
о Release the slide, if necessary.
о Pick up the dropped magazine if time allows.
Place it in your pocket, not back into the
ammunition pouch where it may become mixed with
full magazines.
b, Tactical Reloading.
о Place your hand on the next magazine in the
ammunition pouch to ensure there is a remaining
magazine.
о Withdraw the magazine from the pouch.
о Drop the used magazine into the palm of the
nonfiring hand, which is the same hand holding
the replacement magazine.
о Insert the replacement magazine, guiding it into
the magazine well with the index finger.
о Release the slide, if necessary.
о Place the used magazine into a pocket. Do not
mix it with full magazines.
c. One-Hand Reloading.
(1) With the right hand.
о Push the magazine release button with the
thumb.
о Place the safety ON with the thumb if the slide
is forward.
о Place the weapon backwards into the holster.
NOTE: If placing the weapon in the holster backwards
is a problem, place the weapon between the calf
and thigh to hold the weapon.
о Insert the replacement magazine.
о Withdraw the weapon from the holster.
о Remove the safety with the thumb if the slide is
forward, or push the slide release if the slide
is back.
2-24
(2) With the left hand.
о Push the magazine release button with the middle
finger .
о Place the safety ON with the thumb if the slide
is forward. With the .45-caliber pistol, the
thumb must be switched to the left side of the
weapon.
о place the weapon backwards into the holster,
f
NOTE: If placing the weapon in the holster backwards
is a problem, place the weapon between the calf
and thigh to hold the weapon.
о Insert the replacement magazine.
о Remove the weapon from the holster.
о Remove the safety with the thumb if the slide is
forward, or push the slide release lever with the
middle finger if the slide is back.
2-13. POOR VISIBILITY FIRING
Poor visibility firing with any weapon is diffi-
cult since shadows can be misleading to the soldier.
This is mainly true during EENT and EMNT (a half hour
before dark and a half hour before dawn)♦ Even though
the weapon is a short-range weapon, the hours of dark-
ness and poor visibility further decrease its effect.
To compensate, the soldier must use the three princi-
ples of night vision.
a. Dark Adaptation. This process conditions the eyes
to see during poor visibility conditions. The
eyes usually need about 30 minutes to become 98-
percent dark adapted in a totally darkened area.
b. Off-Center Vision. When looking at an object in
daylight, a person looks directly at it. However,
at night he would see the object only for a few
seconds. To see an object in darkness, he must
concentrate on it while looking 6° to 10° away
from it.
c. Scanning. This is the short, abrupt, irregular
movement of the firer’s eyes around an object or
area every 4 to 10 seconds. When artificial
illumination is used, the firer uses night fire
techniques to engage targets, since targets seem
to shift without moving.
2-25
NOTE: For more detailed information on the three
principles of night vision, see FM 21-75.
2-14. NUCLEAR, BIOLOGICAL, CHEMICAL FIRING
When firing under NBC conditions with a pistol or
revolver, the firer should use optical inserts, if
applicable. Firing in M0PP1 through МОРРЗ levels
should not be a problem for the firer» unlike wearing
a protective mask while firing a rifle, the firer’s
sight picture will be acquired the same as with or
without a protective mask. M0PP4 is the only level
that may present a problem for a firer since gloves
are worn. Gloves may require the firer to adjust his
grip to attain a proper grip and proper trigger
squeeze. Firers should practice firing in M0PP4 to
become proficient in NBC firing.
Section III. COACHING AND TRAINING AIDS
2-15. COACHING
a. Throughout preparatory marksmanship training, the
coach-and-pupi1 method of training should be used.
The proficiency of a pupil depends on how well his
coach performs his duties. The coach assists the
firer by correcting errors, ensuring he takes
proper firing positions, and ensuring he observes
all safety precautions. The criteria for select-
ing coaches are a command responsibility; coaches
must have experience in pistol marksmanship above
that of the student firer.
b. Duties of the coach during instruction practice
and record firing include:
(1) Checking that the—
(a) Weapon is cleared.
(b) Ammunition is clean.
(c) Magazines are clean and operational.
(2) Observing the firer to see that he—
(a) Takes the correct firing position.
(b) Loads the weapon properly and only on command.
2-26
(c) Takes up the trigger slack correctly,
(d) Squeezes the trigger correctly (see paragraph
2-7)
(e) Calls the shot each time he fires (except for
quick fire and rapid fire) ,
(f) Holds his breath correctly (see paragraph 2-5).
(g) Lowers his weapon and rests his arm when he does
not fire a round within five to six seconds.
(3) Having the firer breathe deeply several times to
relax if he is tense.
2-16. ВALL-AND-DUMMY METHOD
In this method the coach loads the weapon for the
firer. He may hand the firer a loaded weapon or an
empty one. When firing the empty weapon, the firer
observes that in anticipating recoil he is forcing the
weapon downward as the hammer falls. Repetition of the
ba11-and-dummy method helps to alleviate recoil
anticipation.
2-17. CALLING THE SHOT
To call the shot is to state where the bullet
should strike the target according to the sight
picture at the instant the weapon fires--for example:
"high," "a little low," "to the left," "to the right,"
or "bull's-eye.* If the firer does not call his shot
correctly in range firing, he is not concentrating on
sight alignment. Consequently, he does not know what
his sight picture is as he fires. Another method of
calling the shot is the clock system—for example, a
three-ring hit at 8 o'clock, a four-ring hit at 3
o’clock. Another method is to provide the firer with
a target center (placed beside him on the firing
line). As soon as the shot is fired, the firer must
place a finger on the target face or center where he
expected the round to hit on the target. This method
avoids guessing and computing for the firer. The
immediate placing of the finger on the target face
gives an accurate call. If the firer does not call
his shot correctly, he is not concentrating on sight
alignment and trigger squeeze. Thus, he does not know
what his sight picture is as the weapon fires.
2-27
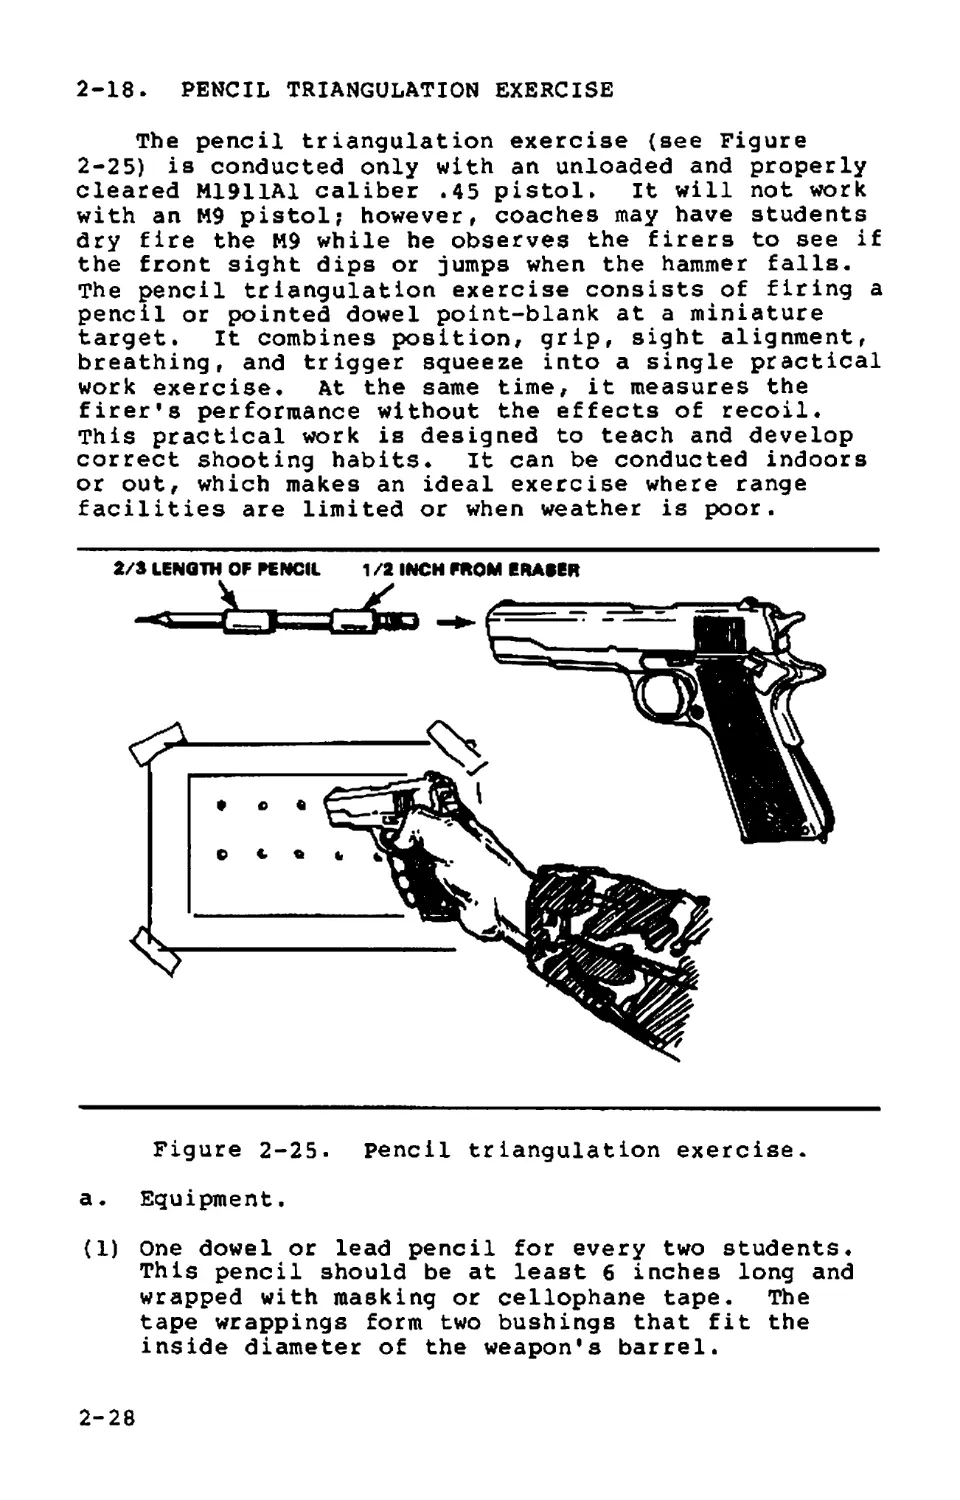
2-18. PENCIL TRIANGULATION EXERCISE
The pencil triangulation exercise (see Figure
2-25) is conducted only with an unloaded and properly
cleared M1911A1 caliber .45 pistol. It will not work
with an M9 pistol; however, coaches may have students
dry fire the M9 while he observes the firers to see if
the front sight dips or jumps when the hammer falls.
The pencil triangulation exercise consists of firing a
pencil or pointed dowel point-blank at a miniature
target. It combines position, grip, sight alignment,
breathing, and trigger squeeze into a single practical
work exercise. At the same time, it measures the
firer’s performance without the effects of recoil.
This practical work is designed to teach and develop
correct shooting habits. It can be conducted indoors
or out, which makes an ideal exercise where range
facilities are limited or when weather is poor.
Figure 2-25. Pencil triangulation exercise.
a. Equipment.
(1) One dowel or lead pencil for every two students.
This pencil should be at least 6 inches long and
wrapped with masking or cellophane tape. The
tape wrappings form two bushings that fit the
inside diameter of the weapon's barrel.
2-28
(2) One miniature bull’s-eye sheet for every two
students. The bull's-eye sheet can be copied,
drawn, or stamped by using the eraser of a pencil
and ink pad» The bull's-eyes should not be larger
than 1/8 inch and at least 1 inch apart.
b. Conduct of the Exercise. The instructor explains
and demonstrates the details of the exercise
before practical work by the students. The firer
should begin by using a two-hand grip, progressing
to the one-hand grip as his skills increase.
(1) The firer faces the target and takes up a good
shooting position. This position is close enough
to the miniature bull’s-eye so when the pencil is
inserted into the barrel, with the firer's arm
extended and the sights aimed at the miniature
bull's-eye, the point of the pencil is within 1
inch of the target. The bull's-eye sheet should
be affixed to a target, or any type support, and
should be shoulder-high to the firer.
(2) The firer inserts the pencil into the muzzle of
the barrel, eraser end first, and cocks the
hammer. He grips the weapon properly, extends the
shooting arm, aims the weapon at the miniature
bull’s-eye, squeezes the trigger, and the hammer
falls. The hammer strikes the firing pin, which
in turn strikes the rubber eraser of the pencil,
driving it out of the barrel and causing it to
make a pencil dot 1/2 inch below the bull's-eye
(if the firer had the correct sight alignment and
trigger squeeze) •
(3) The firer continues this exercise until he has
fired a group of five pencil marks below each
target. The object of the exercise is to keep the
five pencil marks in a group as small as the
1/8-inch bull's-eye, 1/2 inch directly below the
bull's-eye. With practice, many firers can hit
the same mark with the pencil. This indicates
that the firer is properly performing the funda-
mentals of marksmanship each time.
2-19. SLOW-FIRE EXERCISE
a. This is a dry-fire exercise. The slow-fire
exercise is one of the most important exercises
for both amateur and competitive marksmen. Coaches
should ensure soldiers practice this exercise as
2-29
much as possible. To perform the slow-fire exer-
cise, the firer assumes the standing position with
the weapon pointed at the target. The firer
should begin by using a two-hand grip, progressing
to the one-hand grip as his skill increases. He
takes in a normal breath and lets part of it out,
locking the remainder in his lungs by closing his
throat. He then relaxes, aims at the target,
takes the correct sight alignment and sight
picture, takes up the trigger slack, and squeezes
the trigger straight to the rear with steady,
increasing pressure until the hammer falls,
simulating firing.
b. If the firer does not cause the hammer to fall in
5 or 6 seconds, he should come to the pistol ready
position, and rest his arm and hand. He then
starts the procedure again. The action sequence
that makes up this process can be summed up by the
key word BRASS. It is a word the firer should
think of each time he fires his weapon:
Breathe—Take a normal breath, let part of it
out, and lock the remainder in the lungs
by closing the throat.
Re lax--Re lax the body muscles.
Aim—Take correct sight alignment and sight
picture, and focus the eye at the top of
the front sight.
Slack—Take up the trigger slack.
Squeeze—Squeeze the trigger straight to the rear
with steadily increasing pressure without
disturbing sight alignment until the
hammer falls.
c. Coaches should observe the front sight for erratic
movements during the application of trigger
squeeze. Proper application of trigger squeeze
allows the hammer to fall without the front sight
moving. A small bouncing movement of the front
sight is acceptable. Firer's should call the shot
by the direction of movement of the front sight
(high, low, left, or right).
2-20. AIR-OPERATED PISTOL, .177 MM
The air-operated pistol is used as a training
device to teach the soldier the method of quick fire,
2-30
to increase confidence in his ability, and to afford
him more practice firing, A range can be set up
almost anywhere with a minimum of effort and coordi-
nation, which is ideal for USAR and NG, If conducted
on a standard range, live firing of pistols and
revolvers can be conducted along with the firing of
the .177-mm air-operated pistol. Due to light recoil
and little noise of the pistol, the soldier can
concentrate on fundamentals. This helps build
confidence, because the soldier can hit a target
faster and accurately. The air-operated pistol should
receive the same respect as any firearm. A thorough
explanation of the weapon and a safety briefing are
given to each soldier.
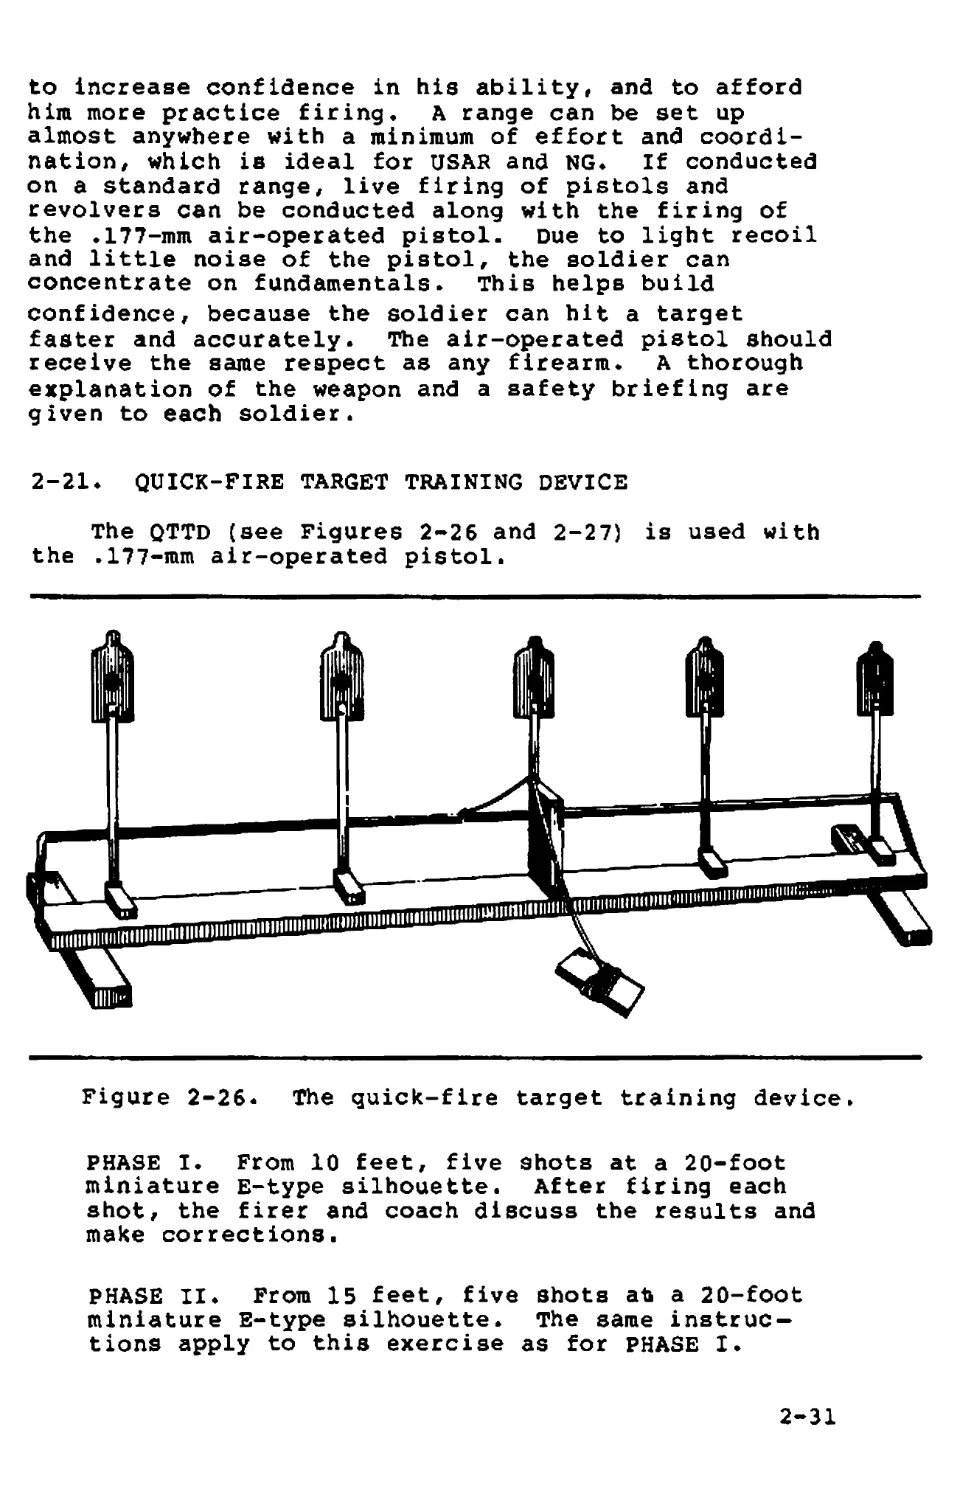
2-21. QUICK-FIRE TARGET TRAINING DEVICE
The QTTD (see Figures 2-26 and 2-27) is used with
the ,177-mm air-operated pistol.
Figure 2-26* The quick-fire target training device.
PHASE I. From 10 feet, five shots at a 20-foot
miniature E-type silhouette. After firing each
shot, the firer and coach discuss the results and
make corrections.
PHASE II. From 15 feet, five shots at a 20-foot
miniature E-type silhouette. The same instruc-
tions apply to this exercise as for PHASE I.
2-31
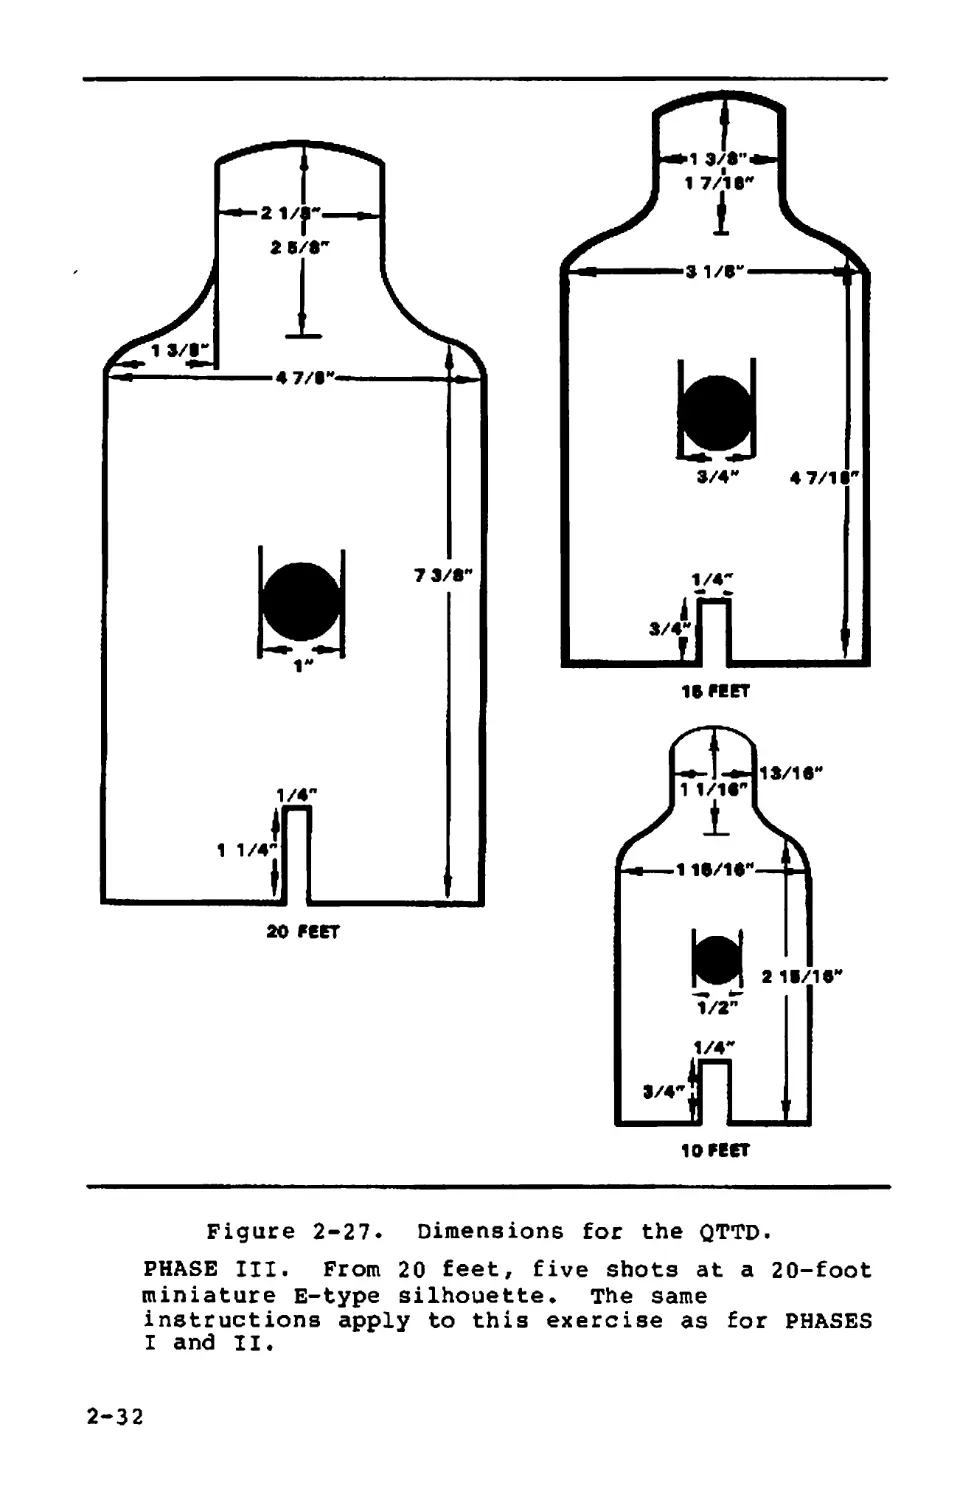
Figure 2-27. Dimensions for the QTTD.
PHASE III. From 20 feet, five shots at a 20-foot
miniature E-type silhouette. The same
instructions apply to this exercise as for PHASES
I and II.
2-32
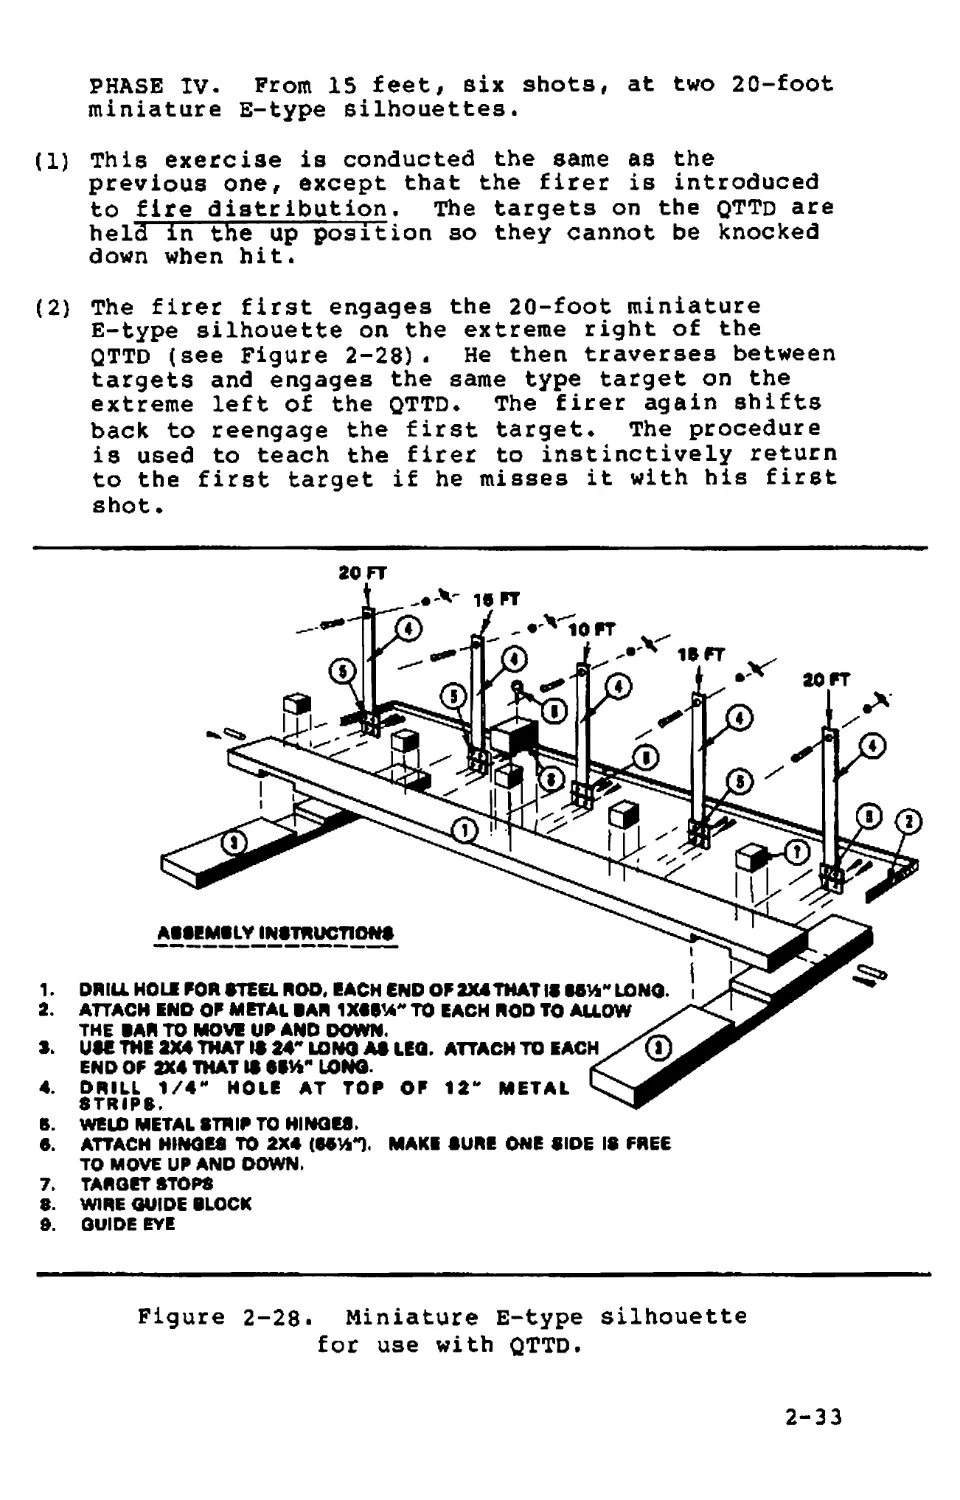
PHASE IV. From 15 feet, six shots, at two 20-foot
miniature E-type silhouettes.
(1) This exercise is conducted the same as the
previous one, except that the firer is introduced
to fire distribution. The targets on the QTTD are
held in the up position so they cannot be knocked
down when hit.
(2) The firer first engages the 20-foot miniature
E-type silhouette on the extreme right of the
QTTD (see Figure 2-28)• He then traverses between
targets and engages the same type target on the
extreme left of the QTTD. The firer again shifts
back to reengage the first target. The procedure
is used to teach the firer to instinctively return
to the first target if he misses it with his first
shot •
ASSEMBLY INSTRUCTIONS
1.
2.
3.
4.
B.
B.
7.
DRILL HOLE FOR STEEL ROD. EACH END OF 2X4THAT IS LONG, i
ATTACH END OF METAL BAR 1X1BU" TO EACH ROD TO ALLOW
THE BAR TO MOVE UP ANO DOWN.
USE THE 2X4 THAT IS 24* LONG AS LEG. ATTACH TO EACH
END OF 2X4 THAT IS SSK" LONG.
DRILL 1/4H HOLE AT TOP OF 12* METAL
STRIPS.
WELD METAL STRIP TO HINGES.
ATTACH HINGES TO 2X4 MAKE SURE ONE SIDE IS FREE
TO MOVE UP AND DOWN.
TARGET STOPS
S. WIRE GUIDE BLOCK
9. GUIDE EYE
Figure 2-28- Miniature E-type silhouette
for use with QTTD.
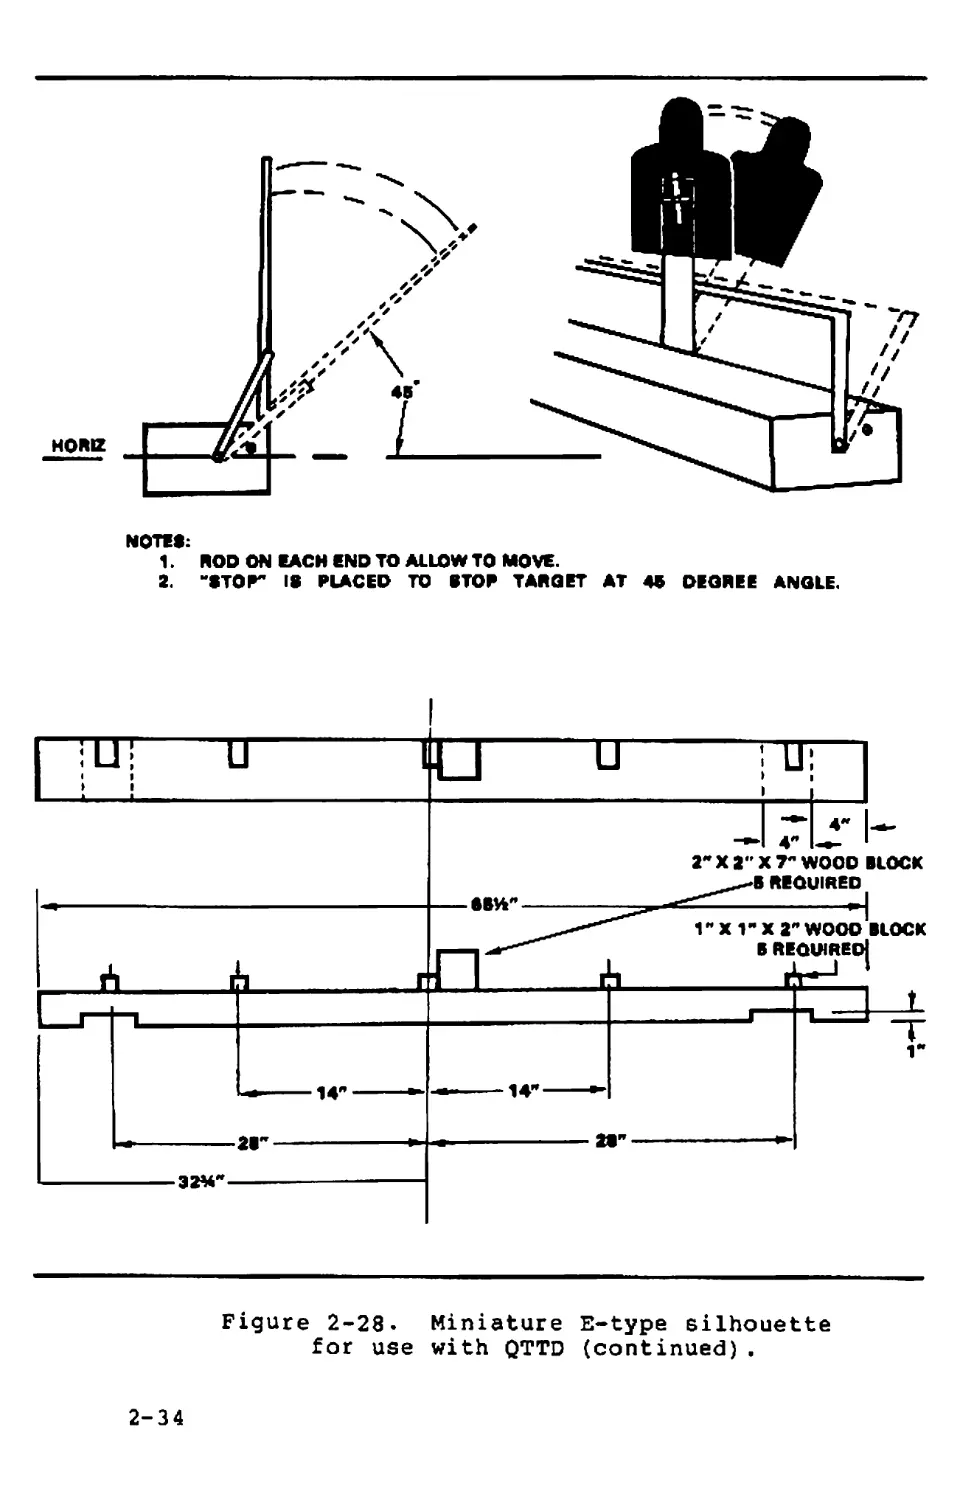
2-33
NOTES:
1. ROD ON EACH END TO ALLOW TO MOVE.
2. “STOP" IS PLACED TO STOP TARGET AT 49 DEOREE ANOLE.
Figure 2-28. Miniature E-type silhouette
for use with QTTD (continued),
2-34
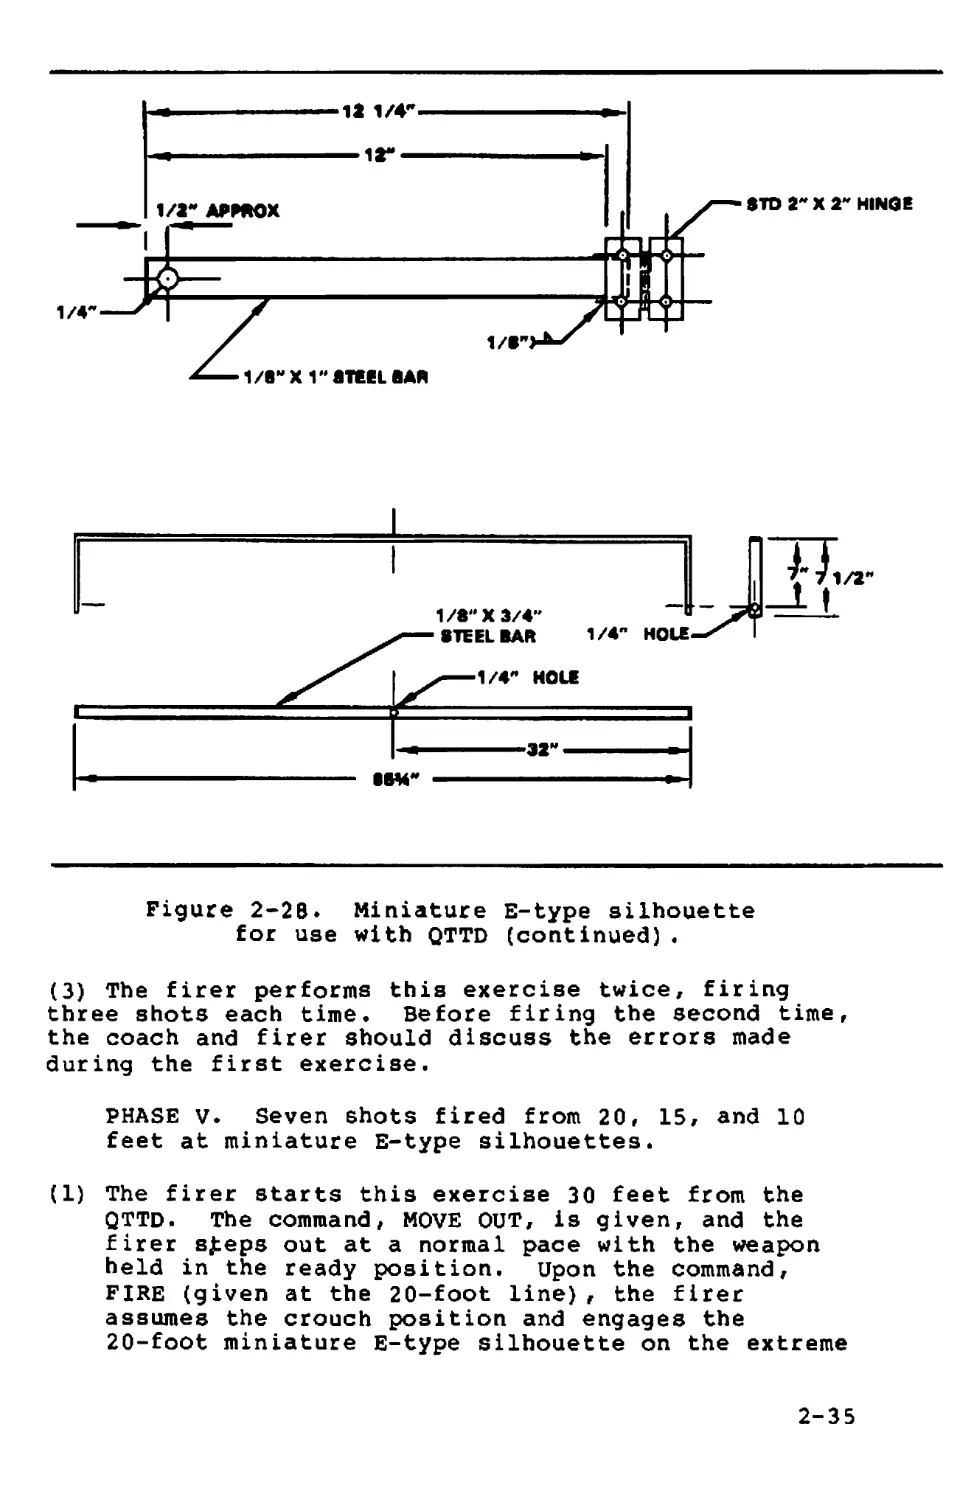
STD 2м X 2м HINGE
Figure 2-2B. Miniature E-type silhouette
for use with QTTD (continued).
(3) The firer performs this exercise twice, firing
three shots each time. Before firing the second time,
the coach and firer should discuss the errors made
during the first exercise.
PHASE V. Seven shots fired from 20, 15, and 10
feet at miniature E-type silhouettes.
(1) The firer starts this exercise 30 feet from the
QTTD. The command, MOVE OUT, is given, and the
firer s£eps out at a normal pace with the weapon
held in the ready position, upon the command,
FIRE (given at the 20-foot line) , the firer
assumes the crouch position and engages the
20-foot miniature E-type silhouette on the extreme
2-35
right of the QTTD* He then traverses between
targets, engages the same type target on the
extreme left of the QTTD/ and shifts back to the
first target. If the target is still up, he
engages it. The firer then assumes the standing
position and returns the weapon to the ready
position. Upon completion of each exercise, the
coach makes corrections as the firer returns to
the standing position.
(2) On the command, MOVE OUT, the firer again steps
off at a normal pace. Upon the command, FIRE
{given at the 15-foot line), he engages the
15”foot targets on the QTTD. The same sequence of
fire distribution is followed as with the previous
exercise.
(3) During this exercise, the firer moves forward on
command, until he reaches the 10-foot line. At
the command, FIRE, the firer engages the 10-foot
miniature E-type silhouette in the center of the
QTTD.
2-22. RANGE FIRING COURSES
Range firing is conducted after the firers have
satisfactorily completed preparatory marksmanship
training. The range firing courses are:
a. Instructional firing is practice firing on a
range, using the assistance of a coach.
(1) All personnel authorized or required to fire the
pistol or revolver receive 12 hours of preliminary
instruction that includes the following:
о Disassembly and assembly (does not apply to
revolver).
о Loading, firing, unloading, and immediate action,
о Preparatory marksmanship.
о Care and cleaning.
(2) The tables fired for instructional practice are
prescribed in the combat pistol qualification
course in Appendix A and in the revolver qualifi-
cation course in Appendix C. During the instruc-
tional firing, the CPQC or RQC is fired with a
coach or instructor.
NOTE: The RQC is fired on the same range as the CPQC;
for a picture of the CPQC see FM 25-7.
2-36
b. The CPQC stresses the fundamentals of quick fire*
It is the final test of a soldier's proficiency
and the basis for his marksmanship classification*
After the soldier has completed the instructional
practice firing he will shoot the CPQC for record.
A detailed description of the CPQC tables,
standards, and conduct of fire is in Appendix A*
NOTE: The alternate pistol qualification course
(APQC) or alternate revolver qualification
course (ARQC) can be used for sustainment/
qualification if the CPQC is not available
(see Appendix В and Appendix D).
c. The military police firearms qualification
course is a practical course of instruction for
police firearms training (see FM 19-10)*
Section IV. SAFETY
Safety must be observed during all marksmanship
training* Listed below are the precautions for each
phase of training* It is not intended to replace AR
385-63 or local range regulations. Range safety
requirements vary according to the requirements of the
course of fire* It is mandatory that the latest range
safety directives and local range regulations be
consulted to determine current safety requirements.
2-2 3 * REQUIREMENTS
a. A red flag is displayed prominently on the range
during all firing.
b. Weapons must be handled carefully and are never
pointed at anyone except the enemy in actual
combat.
c. A weapon is always assumed loaded until it has
been thoroughly examined and found to contain no
ammunition*
d. Firing limits are indicated by red-and-white-
striped poles visible to all firers*
e. Obstructions should never be placed in the muzzle
of any weapon about to be fired.
f* Weapons are kept in a prescribed area with proper
safeguards.
2-37
g. Smoking is not allowed on the range near
ammunition, explosives, or flammables.
2-24. BEFORE FIRING
a. All prescribed roadblocks and barriers are closed,
and guards are posted.
b. All weapons are checked to ensure they are clear
of ammunition and obstructions, and slides are
locked to the rear.
C. All firers are briefed on the firing limits of the
range and firing lanes. They must keep their
fires within prescribed limits.
d. All firers are instructed on how to load and
unload the weapon, and on safety features.
e. All personnel are briefed on all safety aspects of
fire and range pertaining to the conduct of the
courses
f. NO one moves forward of the firing line without
permission of the tower operator, safety officer,
or QIC.
g. Weapons are loaded and unlocked only on command
from the tower operator except during the conduct
of the courses requiring automatic magazine
changes.
h. Weapons are not handled except on command from the
tower operator.
1. Firers must keep their weapons pointed downrange
when loading, preparing to fire, or firing.
2-25. DURING FIRING
a. A firer does not move from his position until his
weapon has been cleared by safety personnel, and
it has been placed in its proper safety position.
An exception is the assault phase.
b. During Table 5 of the CPQC, firers remain on line
with other firers on their right or left.
c. Firers are careful to fire in their own firing
lane and not to point the weapon into an adjacent
lane, mainly during the assault phase.
2-38
d. The air-operated pistol is treated as a loaded
weapon. Firers observe the same safety
precautions as with other weapons.
e. All personnel wear helmets during live-fire
exercises.
f. The weapon is held in the raised position except
when preparing to fire. It is then held in the
ready position, pointed downrange.
2-26. AFTER FIRING
a. Safety personnel inspect all weapons to ensure
they are clear. A check is conducted to determine
if any brass or live ammunition is in possession
of soldiers.
b. Once cleared, pistols are secured with the slides
locked to the rear, and revolvers with cylinders
open.
2-27. INSTRUCTIONAL PRACTICE AND RECORD QUALIFICATION
FIRING
During these phases of firing, safety personnel
ensure that the—
a. Firer understands the conduct of the exercise.
b. Firer has the required ammunition, and understands
the commands for loading and unloading.
c. Firer complies with all commands from the tower
operator.
d. Proper alignment is maintained with other firers
while moving downrange.
e. Weapon is always pointed downrange.
f. Firer fires within the prescribed range limits.
g. Weapon is cleared after each phase of firing, and
the tower*-opera tor is aware of the clearance.
2-39
h* Malfunction or failure to fire, due to no fault of
the firer, is reported immediately. On command of
the tower operator, the weapon is cleared and
action is taken to allow the firer to continue
with the exercise.
NOTE: For training and qualification standards see
Appendixes A through E.
2-40
APPENDIX A
COMBAT PISTOL QUALIFICATION COURSE
A-l. COURSE INFORMATION
a. The CPQC may be used for both the pistol and
revolver (for use with revolvers see Appendix C).
It requires the soldier to engage single and
multiple targets at various ranges using the
fundamentals of quick fire. If the CPQC is not
available, training may still be sustained and
qualification achieved by using the APQC or ARQC.
NOTE: For a picture of the CPQC, see FM 25-7.
b. For each table of the CPQC, the firer is afforded
extra rounds to reengage targets that are missed.
During the course, 30 targets are exposed to the
firer. However, 40 rounds of ammunition are
issued with which to engage the exposed targets.
A soldier who can reengage a target with an extra
round during the exposure time is just as
effective as one who hits the target with one
round. The firer is not penalized for using or
not using the extra ammunition. All excess
ammunition is turned in after the completion of
each table and may not be used during subsequent
tables.
c. Two magazine changes are required when firing the
CPQC. For safety purposes, one magazine contains
one round of ammunition and is loaded first. A
target appears in front of the firer, and he
engages it. Eight seconds later, another target
appears. During the eight-second delay, the firer
must reload the weapon and be prepared to engage
the next exposed target. There are no commands
from range personnel or coaches for the* magazine
change. If the firer fails to reload his pistol
in time to engage the next target, it is scored as
a miss. This exercise teaches the soldier to
quickly and safely change his magazine by instinct
under pressure.
A-1
NOTE: When using the M9 pistol, the firer fires the
first round in the double-action mode for all
tables.
d* The range to exposed targets does not exceed 31
meters from the firer* Target exposure times are
as follows:
(1) Tables I, II, and III:
(a) Single targets ----- three seconds,
(b) Multiple targets - - - - five seconds*
(2) Tables IV and V:
(a) Single targets ----- two seconds*
(b) Multiple targets - - - - four seconds*
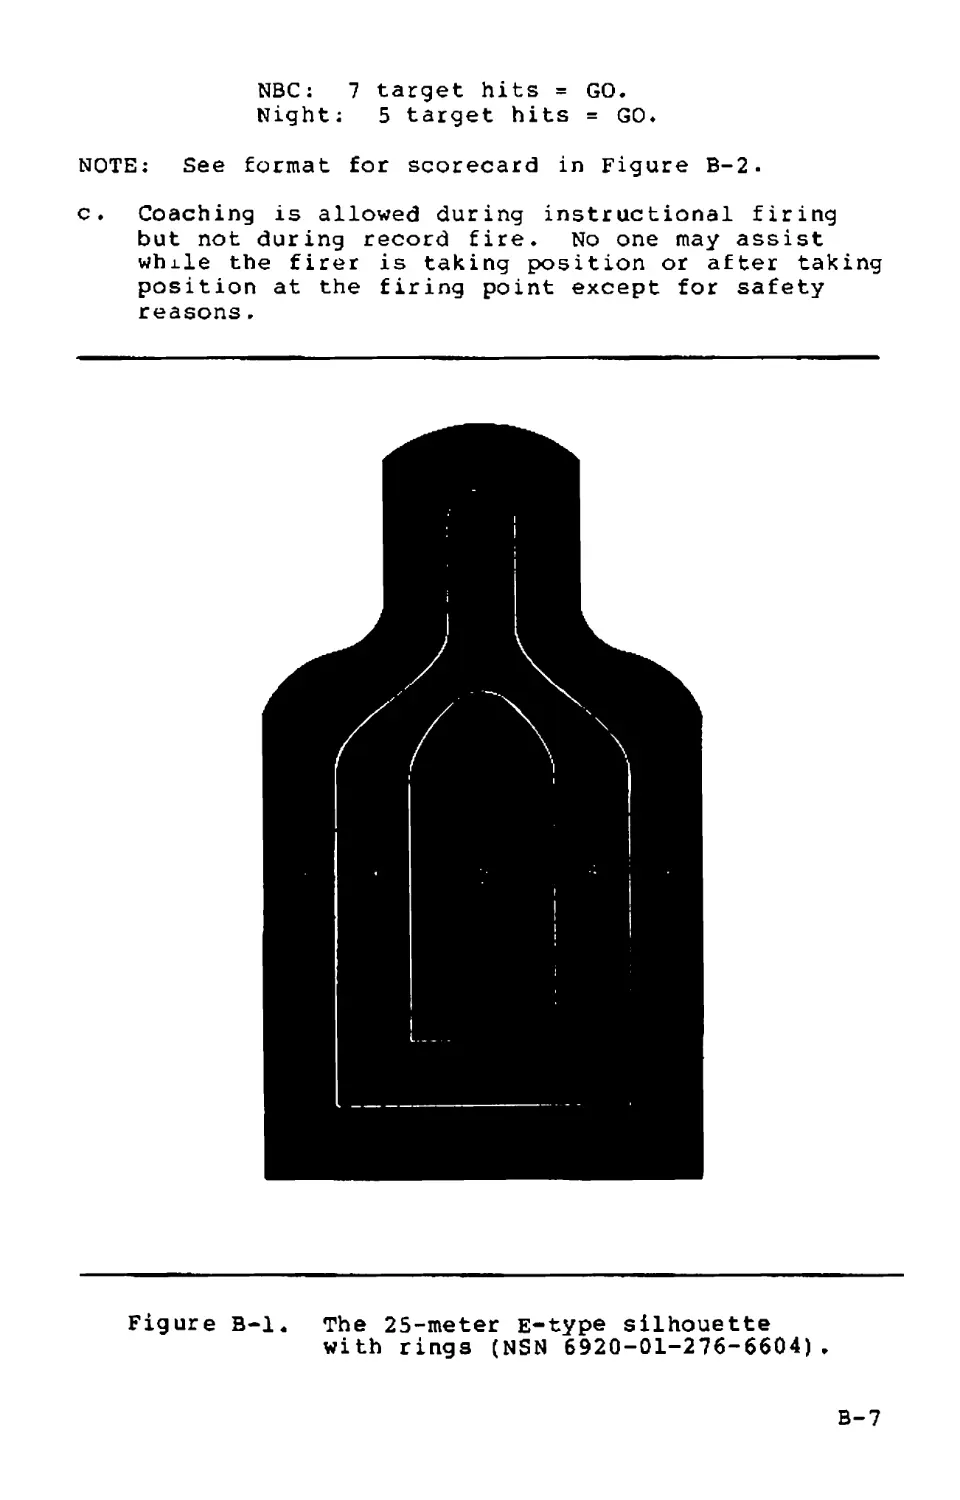
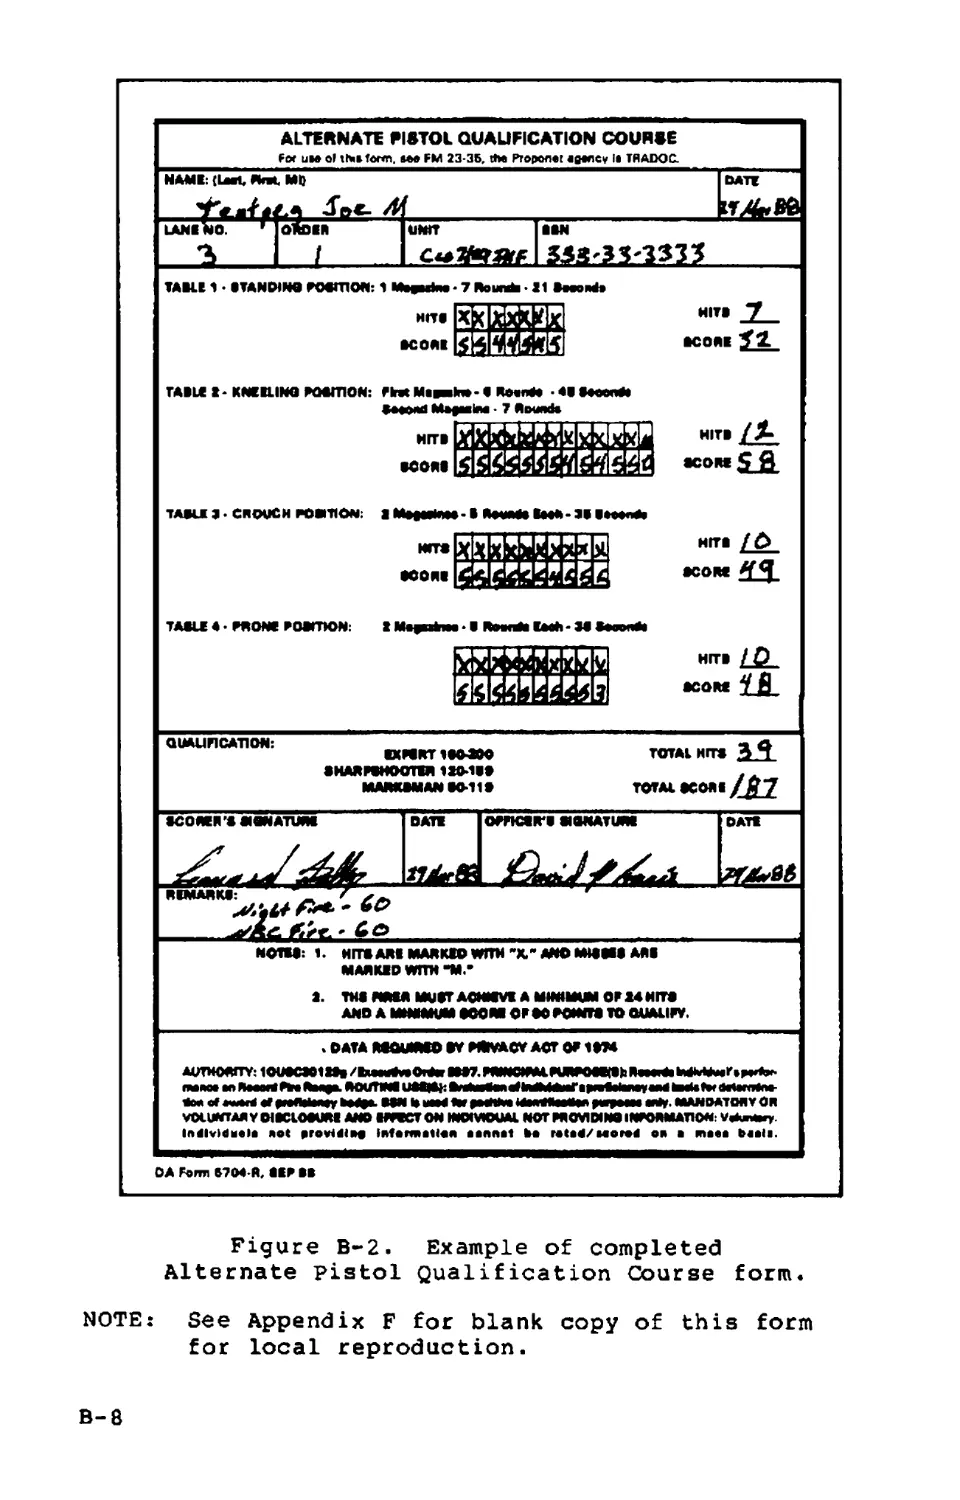
A-2. FIRING THE CPQC
NOTE: The target sequence is decided by the tower
operators but is the same for all lanes. This
prevents firers from getting ahead of firers in
adjoining lanes. Target sequence will vary in
distance from the firer, starting with 31
meters and allowing no more than two 7-meter
targets.
a. Qualification tables are as follows:
NOTE: Tower controls all reloading for revolvers,
(1) Table I: One magazine with seven rounds, and five
targets exposed. The standing position is assumed
at the firing line with the weapon held at the
ready position* Only single targets are exposed
to the firer in this table. Target sequence is
decided by the tower operator*
(2) Table II: One magazine with one round, one
magazine with seven rounds, and six targets
exposed. The firer assumes the same position on
the firing line as in Table I, There are four
single targets and one set of multiple targets
exposed to the firer.
(a) The magazine with one round is loaded into the
weapon—one target is then exposed to the firer.
A-2
(b) After firing the pistol, the firer must change
magazines at once. Three seconds after the target
appears, the target is lowered if not hit.
(c) Eight seconds later, another target appears.
Again, the firer must engage this target in the
required time, or it is scored a miss.
(3) Table III: One magazine with seven rounds is
loaded. Five targets are exposed—fired following
rotation to another firing point. The firer
assumes the same position on the firing line as in
Tables I and II. Three single targets and one set
of multiple targets are exposed to the firer.
Target sequence is usually single, multiple,
multiple, single, and multiple.
(4) Table IV? One magazine with five rounds is
loaded. Four targets are exposed starting with
the same position used in the previous tables.
Two single targets and one sot of multiple targets
are exposed to the firer.
{5) Table Vs One magazine with one round, one
magazine with seven rounds, one magazine with five
rounds, and ten targets exposed. The firer begins
10 meters behind the firing line in the middle of
the trail.
(a) The magazine containing one round is loaded into
the pistol. The firer places the magazine
containing seven rounds in his magazine pouch
where it is closest to the firing hand. The
magazine containing five rounds is placed in the
magazine pouch farthest from the firing hand.
(b) When the firer reaches the firing line, a single
target is exposed for two seconds, then lowered if
not hit. There is an eight-second delay to allow
the firer to change magazines. The seven-round
magazine should be loaded at this time.
(c) At the end of eight seconds, another single target
is exposed to the firer. Again, should the firer
not have loaded his second magazine in time to
engage this target, it is scored a miss.
(d) When the tower operator is sure that the firing
line has completed the magazine change, he gives
the command, MOVE OUT. He exposes two sets of
multiple targets at various ranges from the firer.
A-3
(e) After exposure of two sets of multiple targets,
the pistol is reloaded with the five-round
magazine. The command, MOVE OUT, is given; and the
remaining targets are presented to the firer in
sequence. After the last targets are hit or
lowered, the weapon is cleared.
(f) The firer, holding the weapon in the raised pistol
position with the slide to the rear, returns to
the starting point and places the weapon on the
stand. Excess ammunition is turned in to the
ammunition point. The next order moves to the
firing line.
b. The same course is fired for night qualification.
It is based on a GO/NO-GO scoring system: 5
target hits equal a GO; 10 seconds are allowed for
each round.
c. The same course is fired for NBC qualification.
It is based on a GO/NO-GO scoring system: 7
target hits equal a GO; 10 seconds are allowed for
each round.
NOTE: Night and NBC qualification is required IAW DA
Pam 350-38.
A-3. CONDUCT OF FIRE
When the weapon is being fired, firers are issued
the rounds required to fire a specific table. The
following list of commands outlines a step-by-step
sequence for conducting range firing on the CPQC.
a. Table I.
(1) The tower operator orders firers to move to the
firing line in preparation for firing. The tower
operator orders firers to position themselves next
to the weapon stands and secure their weapons.
Magazines containing seven rounds are issued to
the scorers and given to the firers.
(2) The tower operator commands:
TABLE ONE, SEVEN ROUNDS.
LOAD AND LOCK.
READY ON THE RIGHT.
READY ON THE LEFT.
READY ON THE FIRING LINE
UNLOCK YOUR WEAPONS.
WATCH YOUR LANE.
A-4
(3) The tower operator exposes the targets to the
firers. When all targets have been exposed and
engaged or lowered, the tower operator commands:
CEASE FIRE.
CLEAR ALL WEAPONS.
CLEAR ON THE RIGHT.
CLEAR ON THE LEFT.
THE FIRING LINE IS CLEAR.
FIRERS, PLACE YOUR WEAPONS ON THE STANDS.
b. Table II.
(1) The tower operator orders firers to secure their
weapons. One magazine of one round and one
magazine of seven rounds are issued to the
firers.
(2) The tower operator commands:
TABLE TWO, EIGHT ROUNDS.
LOAD AND LOCK.
READY ON THE RIGHT.
READY ON THE LEFT.
READY ON THE FIRING LINE
UNLOCK YOUR WEAPONS.
WATCH YOUR LANE.
(3) The tower operator exposes the targets to the
firers. When all targets have been exposed and
engaged or lowered, the tower operator commands:
CEASE FIRE.
CLEAR ALL WEAPONS.
CLEAR ON THE RIGHT.
CLEAR ON THE LEFT.
THE FIRING LINE IS CLEAR.
FIRERS, KEEP YOUR WEAPONS POINTED UP
AND DOWNRANGE.
MOVE TO THE FIRING POINT TO YOUR
RIGHT.
c. Table III.
(1) The tower operator orders the firers to position
themselves next to the weapon stands. One
magazine of seven rounds is issued to the firers.
A-5
{2) The tower operator commands:
TABLE THREE, SEVEN ROUNDS.
LOAD AND LOCK
READY ON THE RIGHT.
READY ON THE LEFT.
READY ON THE FIRING LINE.
UNLOCK YOUR WEAPONS.
WATCH YOUR LANE.
(3) The tower operator exposes the targets to the
firerв. When all targets have been exposed and
engaged or lowered, the tower operator commands:
CEASE FIRE.
CLEAR ALL WEAPONS.
CLEAR ON THE RIGHT.
CLEAR ON THE LEFT.
THE FIRING LINE IS CLEAR.
FIRERS, PLACE YOUR WEAPONS ON THE STAND.
d. Table IV.
(1) The tower operator orders the firers to secure
their weapons and move to the center of the trail
Firers are issued one magazine of five rounds.
(2) The tower operator commands:
TABLE FOUR, FIVE ROUNDS.
LOAD AND LOCK.
READY ON THE RIGHT.
READY ON THE LEFT.
READY ON THE FIRING LINE.
UNLOCK YOUR WEAPONS.
WATCH YOUR LANE.
(3) The tower operator exposes the targets to the
firers. When all targets have been exposed and
engaged or lowered, the tower operator commands:
CEASE FIRE.
CLEAR ALL WEAPONS.
CLEAR ON THE RIGHT.
CLEAR ON THE LEFT.
THE FIRING LINE IS CLEAR.
FIRERS, PLACE YOUR WEAPONS ON THE STAND
TO THE REAR OP THE FIRING LINE.
e. Table V.
(1) The tower operator orders the firers to secure
their weapons. Firers are issued one magazine of
A-6
one round, one magazine of seven rounds, and one
magazine of five rounds.
(2) The tower operator commands:
TABLE FIVE, THIRTEEN ROUNDS.
LOAD AND LOCK.
READY ON THE RIGHT.
READY ON THE LEFT.
READY ON THE FIRING LINE.
PISTOLS AT THE READY POSITION.
UNLOCK YOUR WEAPON.
WATCH YOUR LANE.
MOVE OUT.
(3) The tower operator exposes the targets to the
firers. He gives the firers the commands, WEAPONS
AT THE READY POSITION and MOVE OUT, after each
target or group of targets has been engaged.
(4) Upon completion of Table v, the tower operator
commands:
CEASE FIRE.
CLEAR ALL WEAPONS.
CLEAR ON THE RIGHT.
CLEAR ON THE LEFT.
THE FIRING LINE IS CLEAR.
FIRERS, KEEP YOUR WEAPONS UP AND DOWN-
RANGE.
SCORERS AND FIRERS MOVE BACK TO THE
FIRING LINE AND PLACE YOUR WEAPONS
ON THE STAND.
(5) The tower operator has each scorer total the
firer's scorecard and turn it in to the range
officer or his representative. The firing orders
are rotated and the above sequence continued until
all orders have fired.
NOTE: For night qualification and NBC qualification,
the same course is used. Ten seconds is
allowed for each round.
A-4. ALIBIS
a. Alibis are fired at the completion of each
table from the position where the alibi occurred.
Fire commands that apply to the table are used to
fire an alibi.
A-7
b. If a malfunction of weapon or targets occurs
during firing from stationary positions, the firer
reports the malfunction, and keeps his weapon
pointed up and downrange. Should the malfunction
occur during Table V, the firer keeps his weapon
pointed up and downrange. He continues to move
forward, keeping aligned with the firers to his
right and left.
A-5. RULES
Rules governing firing the CPQC are as follows:
a. Coaching. Coaching is not allowed during record
firing. No person may give or try to give help
while the firer is taking his position or after he
has taken his position at the firing point. Each
firer must observe the location of the target in
his own lane. During the instructional firing, the
coach and assistant instructors should assist the
firer in correcting errors.
b. Accidental Discharges. All shots fired by the
firer are scored after he has taken his place on
the firing lane. Even if the weapon is not
directed toward a target or is accidentally
discharged, a replacement round is not issued.
c. Firing on the Wrong Target. Shots fired on the
wrong target are entered as a miss on the firing
scorecard. A firer is credited with hits he
attains in his own firing lane.
d. Firing After the Signal to Lower Targets. Any
shot fired by a firer after targets start to lower
are scored as a miss.
e. More Than One Shot Fired at an E-Type Silhouette
Target. The firer is credited with a hit if the
hit is made during the target exposure time. The
number of rounds fired to obtain the hit is
immaterial.
f. Excess Ammunition at the End of a Firing Table.
Excess ammunition from each table is turned in to
the ammunition point and not used by the firer for
subsequent tables.
g«
Target Sequence. The target sequence is decided
by the tower operator but is the same for all
lanes. This prevents firers from getting ahead of
A-8
firers in adjoining lanes* Target sequence will
vary in distance from the firer, starting with 31
meters and allowing no more than two 7-meter
targets.
A-6. SCORECARD
a. Use. The scorecard outlines instructional firing
and qualification firing (CPQC) (see Figure A-1).
Numbers in column labeled TGT (target) are not the
sequence in which targets are exposed. They are
the numerical identification of targets to be
engaged during each table of fire*
Figure A-l. Sample scorecard, DA Form 88.
A-9
b. Scoring. Each time a target is hit or killed, an
X is placed in the column labeled HITS. The value
of a hit is 10 points. Upon completion of firing
the CPQC, the scorer totals and signs the
scorecard. Qualification standards are listed in
the bottom right corner on the record firing side
of the scorecard. They are:
Expert - 260 to 300.
Sharpshooter - 210 to 250.
Marksman - 160 to 200.
Unqualified - below 160.
NBC and Night Firing is on a GO/NO-GO
scoring system and recorded in the
remarks column.
Night: 5 target hits « GO.
NBC: 7 target hits » GO.
c. Supply of Forms. DA Form 88 is available through
normal publications supply channels.
A-7. TARGETS
Seven electric target device targets and E-type
silhouettes for each firing lane are required.
Aggressor figures may be superimposed on the
silhouettes to add realism to the course of fire.
A-8. QUICK-TARGET TRAINING DEVICE
The QTTD may be procured locally. For durability
and appearance, it should be made by the training aids
section or an equally capable agency.
A-10
APPENDIX В
ALTERNATE PISTOL QUALIFICATION COURSE
B-l. PROCEDURES
Once the soldier has completed instructional
firing, he must then fire the CPQC for record♦ If the
CPQC is not available, the soldier can fire the APQC.
a. Procedures for firing the APQC are as follows,
given 40 rounds of ammunition, fire Tables 1
through 4.
(1) Table 1: Engage the 25-meter APQC target from the
standing position with 7 rounds of ammunition;
given one 7-round magazine on a 25-meter range
during daylight hours. Within 21 seconds engage
the APQC target from the standing position.
(2) Table 2: Engage the 25-meter APQC target from the
kneeling position with 13 rounds; given two
magazines, one 6-round and one 7-round, on a
25-meter range during hours of daylight. Within
45 seconds, from a standing position, assume a
good kneeling position, engage the target with 6
rounds, perform a rapid magazine change, and
engage the target with a 7-round magazine.
(3) Table 3: Engage the 25-meter APQC target from the
crouch position with 10 rounds; given two
magazines with 5 rounds each on a 25-meter range
during daylight hours. Within 35 seconds, from a
standing position, assume a good crouch position,
engage the target with one 5-round magazine,
perform a rapid magazine change, and engage the
target with the second 5-round magazine.
(4) Table 4: Engage the 25-meter APQC t-arget from the
prone position with 10 rounds; given two magazines
with 5 rounds each on a 25-meter range during
daylight hours. Within 35 seconds from a standing
position, assume a good prone position, engage the
B-l
target with one 5-round magazine, perform a rapid
magazine change, and engage the target with the
second 5-round magazine.
b. Firing Pistol Under Night Conditions. Engage the
25-meter target from the crouch position with 30
rounds; given two 15-round magazines of M9 9-mm
ammunition or four 7-round magazines and one
2-round magazine of M1911A1 ammunition on a
25-meter range under night conditions. Given 10
seconds for each round, engage E-type silhouettes
with 10 rounds. Conduct magazine changes without
command. Tower will allow 8 seconds for each
magazine change.
c. Firing Pistol Under NBC Conditions. Engage a
25-meter target from a crouch position with 20
rounds; given one 15-round magazine and one
5-round magazine of M9 9-mm ammunition or two
7-round magazines and one 6-round magazine of
M1911A1 ammunition on a 25-meter range under
simulated NBC conditions. During daylight hours,
given 10 seconds for each round, engage E-type
silhouettes with 20 rounds of ammunition. Conduct
magazine changes without command. Tower will
allow 10 seconds for each magazine change.
NOTE: When using the 9-mm pistol, the first round is
fired in the double-action mode for all four
tables. Night and NBC qualification is
required IAW DA Pam 350-38.
B-2. CONDUCT OF FIRE
a. The following commands outline a step-by-step
sequence for conducting range firing on the APQC.
(1) Table 1: Standing position.
(a) The tower operator gives the order to move to the
firing line and to prepare to fire. The magazine
containing seven rounds is issued to the scorer
and given to the firer on command. The tower
operator commands:
TABLE ONE, STANDING POSITION, SEVEN
ROUNDS.
LOAD AND LOCK.
IS THE LINE READY?
(The 9-mm firers place their weapons in the
double-action mode at this time.)
B-2
THE FIRING LINE IS READY.
FIRERS, WATCH YOUR LANEI
(b) At the end of prescribed firing time, the tower
operator commands:
CEASE FIRE*
ARE THERE ANY ALIBIS?
(Alibis are given eight seconds for each round not
fired.)
NOTE: For more information see paragraph B-3.
UNLOAD AND CLEAR ALL WEAPONS.
IS THE FIRING LINE CLEAR?
THE FIRING LINE IS NOW CLEAR.
FIRERS AND SCORERS MOVE DOWNRANGE AND
CHECK YOUR TARGETS.
(Weapons are left on firing line with slides locked to
the rear.)
NOTE: Clear, lock open, and leave weapons on the
table, or stand weapons at the firing line when
the firer and scorer go downrange to score
their target.
(2) Table 2: Kneeling position.
The tower operator orders firers to move up to the
firing line. Two magazines containing six rounds and
seven rounds each are issued to the scorer to be given
to the firer on command. The tower operator
commands.
TABLE TWO, KNEELING POSITION WITH
MAGAZINE CHANGE, FORTY-FIVE SECONDS.
LOCK AND LOAD ONE SIX-ROUND MAGAZINE
LOAD YOUR SEVEN-ROUND MAGAZINE WITHOUT
COMMAND.
NOTE: The following commands are the same as for
Table 1.
(3) Table 3: Crouch position.
The tower operator orders firers to move up to the
firing line. Scorers are issued two 5-round magazines
to be issued to the firer on command. The tower
operator commands:
B-3
TABLE THREE, CROUCH POSITION WITH
MAGAZINE CHANGE, THIRTY-FIVE SECONDS*
LOAD YOUR SECOND FIVE-ROUND MAGAZINE
WITHOUT COMMAND.
NOTE: The following commands are the same as for
Tables 1 and 2.
(4) Table 4: Prone position*
The tower operator orders firers to move to the
firing line* Firers are issued two 5-round magazines.
The tower operator orders:
TABLE FOUR, PRONE POSITION WITH MAGAZINE
CHANGE, THIRTY-FIVE SECONDS*
LOAD YOUR SECOND FIVE-ROUND MAGAZINE
WITHOUT COMMAND*
NOTE: The following commands are the same as for
Tables 1, 2, and 3*
(5) The scorer and firer repair or replace targets for
the next firing order.
b. The commands for the pistol night fire for record
are as rollows.-
(1) The tower operator orders to move to the firing
line and to prepare to fire. Two magazines of 15
rounds of M9 ammunition or four 7-round magazines
and one 2-round magazine of M1911A1 ammunition are
issued to firers*
(2) The tower operator commands;
NIGHT FIRE, CROUCH POSITION WITH
MAGAZINE CHANGES.
LOAD OTHER MAGAZINES WITHOUT COMMAND*
LOAD AND LOCK ONE MAGAZINE*
(M1911A1 firers must load their two-round magazine
first.)
IS THE FIRING LINE READY?
(M9 firers must place their weapons in the
double-action mode.)
THE FIRING LINE IS READY.
FIRERS, WATCH YOUR LANE*
B-4
(3) At the end of the prescribed firing time, the
tower operator commands:
CEASE FIRE,
ARE THERE ANY ALIBIS?
(Alibis are given 10 seconds for each round not
f ired.)
UNLOAD AND CLEAR ALL WEAPONS,
IS THE FIRING LINE CLEAR?
THE FIRING LINE IS NOW CLEAR.
FIRERS AND SCORERS MOVE DOWNRANGE AND
CHECK YOUR TARGETS.
(Weapons are left on the firing line with slides
locked to the rear.)
c. The commands for the pistol NBC fire for record
are as follows:
(1) The tower operator orders to move to the firing
line and to prepare to fire. Firer is given one
15-round magazine and one 5-round magazine of M9
ammunition or two 7-round magazines and one
6-round magazine of M1911A1 ammunition.
(2) The tower operator commands:
NBC FIRE, CROUCH POSITION WITH MAGAZINE
CHANGE.
LOAD OTHER MAGAZINES WITHOUT COMMAND.
LOAD AND LOCK ONE MAGAZINE.
(M9 firers load 5-round magazine first; M1911A1 firers
load 6-round magazine first.)
IS THE FIRING LINE READY?
(M9 firers must place their weapons in the
double-action mode.)
THE FIRING LINE IS READY.
FIRERS, WATCH YOUR LANE.
(3) At the end of the prescribed firing time, the
tower operator commands:
CEASE FIRE.
ARE THERE ANY ALIBIS?
B-5
(Alibis are given 8 seconds for each round not fired»)
UNLOAD AND CLEAR ALL WEAPONS.
IS THE FIRING LINE CLEAR?
THE FIRING LINE IS NOW CLEAR*
FIRERS AND SCORERS MOVE DOWNRANGE AND
CHECK YOUR TARGETS*
(Weapons are left on the firing line with slides
locked to the rear*)
NOTE: Excess ammunition at the end of a firing table
is turned in to the scorer and not used by the
firer in subsequent tables» At the end of the
course, all excess ammunition is turned in to
the ammunition point.
B-3* ALIBIS
If there is a malfunction of the weapon or target
during firing, the scorer reports and records the
malfunction» The firer is allowed one alibi (eight
seconds for each round) at the completion of each
table. All alibis are fired from the position in
which the alibis occur. Firing commands that apply
are used to fire alibis.
B-4* SCORING
a. The firer is scored on the number of target
hits during the time limit. The firer must
achieve at least 24 hits with a minimum score of
80 points to qualify* The target hits are
multiplied by the number inside the scoring rings
to determine the score. No credit is given for
rounds fired after the command CEASE FIRE. Shots
that touch the next higher scoring ring are scored
the next higher value* (See Figure B-l.)
b. The qualification scores are:
Expert - 160 to 200.
Sharpshooter - 120 to 159.
Marksman - 80 to 119.
NBC and night firing are done on a GO/
NO-GO scoring system and recorded in
remarks column.
B-6
NBC: 7 target hits = GO.
Night: 5 target hits = GO.
NOTE: See format for scorecard in Figure B-2.
c. Coaching is allowed during instructional firing
but not during record fire. No one may assist
whj.le the firer is taking position or after taking
position at the firing point except for safety
reasons.
Figure B-l. The 25-meter E-type silhouette
with rings (NSN 6920-01-276-6604).
B-7
ALTERNATE PISTOL QUALIFICATION COURSE
TABLE 1 STANDING POSITION: 1 Hl^dN * 7 Rourah • 11 1кой«
ЯЯОСТ
HITB 7
SCORE "ft
TABLE 1 CROUCH POSITION: 1 МиИЙМ-i М*Й<М* ПВН«<1*
ППТ^ИЯ!!!
TABLE 4 PRONE POSITION: 1 Ma^abwa • В RamMa ЕмА - М ВмояМ
BSKtfGIWB
ВЗГЖИЙ
QUALIFICATION:
EXFBRT1SG3B0
SHARPSHOOTER 110-1 В»
МАМАМ AN ВО-1 It
TOTAL MITB Ъ
TOTAL ВС OR I /#7
SCORER'S MON ATOM
DAT!
OFFICER'S MQNATUM
Дгьr fP______________________________
NOTES: 1. HITS ARE MAR KID WITH "X." AN© MIS BIB ABB
MANKID WITH -МЛ
1. THS ROM MUST ACHIEVE A MINIMUM OF 14 MITB
AND A MHSMUM BOOM OF DO POINTS TO QUALIFY.
. DATA MQIAMO BY PNNACY ACT OF 1ST*
AUTHORITY: lOUBCSBIM* /EmwBwOM* BBB7.PMNCMALPUNPOMIB):N«w4iММАмГ^рНЫ-
гмяоа an Raaoftf Pba йм|ь ROUTM UMNl: ВмНаВм МММВмТавяМмауаМ Mate ВМвгЖм-
Ем of owa«a at вмЯИааау baApa. BSN •» нам Nr paMva ИааМааОа» рмраааа аМу- MANDATORY OR
VOLUNTARY DISCLOSURE AND IWBCT ON NKOIVIOUAL NOT FROVIDINQ INFORMATION: V^un^ry
InilvHaala not arov44ia« IMawwaHaa aannal ba ratab/Moral oa a maaa baaii.
DA Form S704 R, SEP BB
Figure B-2. Example of completed
Alternate pistol Qualification Course form.
NOTE: See Appendix F for blank copy of this form
for local reproduction.
B-8
APPENDIX С
REVOLVER QUALIFICATION COURSE
C-l* COURSE INFORMATION
a The CPQC is used for both pistols and revolvers.
This appendix outlines its use with revolvers only
(for use with pistols see Appendix A), The CPQC
requires the soldier to engage single and multiple
timed targets at various ranges using the
fundamentals of quick fire* if a CPQC is not
available, training and qualification may be
conducted using the standard 25-meter range and
the ARQC (see Appendix D)♦
NOTE: For range design and layout of the CPQC, see FM
25-7.
b. For each table of the RQC, the firer is afforded
extra rounds to reengage targets that are missed*
During the course 30 targets are presented to the
firer; however, the firer is given 40 rounds to
engage these targets. A firer who can
successfully reengage the target with a second
round during the exposure time is just as
effective as a firer who hits the target with the
first round. The firer is not penalized for using
or not using the extra rounds he is allocated.
All excess ammunition is turned in at the end of
each table and is not used for subsequent tables.
c. All reloads will be controlled by the tower
operator. If the firer fails to engage a target
within the timed exposure, that target is scored
as a miss* This teaches him to quickly apply the
fundamentals of pistol marksmanship under stress,
d- The range to exposed targets does not exceed 31
meters from the firer. Target exposure times are
as follows
(1) Tables I, II, and III:
(a) Single targets -----three seconds*
C-l
(b) Multiple targets
five seconds.
(2) Tables IV and V:
(a) Single targets-----two seconds
(b> Multiple targets-----four seconds.
C-2. FIRING THE RQC
NOTE. Target sequence is decided by the tower
operator, but is the same for all lanes to
prevent firers from getting in front of other
firers in adjoining lanes Targets will vary
in distance to the firers, starting at 31
meters and allowing no more than two 7-meter
targets.
a. Qualification tables are as follows:
(1) Table I: The revolver is loaded with six rounds.
The standing position is assumed at the firing
line with the weapon in the ready position. Four
targets are exposed. The tower operator controls
the reloading of the last round, followed by the
exposure of the last target. Firers are reminded
before the beginning of the table that they will
have only seven rounds for five targets.
(2) Table II: The revolver is loaded with six rounds.
Two single and one set of multiple targets are
exposed before reloading is conducted under
control of the tower operator. The remaining two
rounds are loaded, and the last two single targets
are exposed. The firer is advised before the
start of the table that he will only have eight
rounds with which to engage the six targets.
Firers assume the same position as Table I.
(3) Table III: The revolver is loaded with six
rounds. One single and one set of multiple
targets are exposed, followed by the reloading of
the last round under the control of the tower
operator. The remaining two single targets are
then exposed to the firer. Firers are reminded
before the start of the table that they will have
seven rounds to engage five targets.
C-2
(4) Table IV: The revolver is loaded with five
rounds. Two single and one multiple target are
exposed to the firer. No reloading takes place in
this table.
(5) Table V: Firers are given 13 rounds. Ten targets
are exposed throughout the table. The firer
begins 10 meters behind the firing line in the
middle of the trail.
(a) Six rounds are loaded into the revolver.
(b) When the firer reaches the firing line, a single
target is exposed for two seconds, then lowered if
not hit.
(c) One set of multiple targets is exposed to the
firer. The firer is allowed four seconds to
engage the targets. If targets are not engaged,
they are scored a miss.
(d) When the tower operator has controlled reloading,
he gives the command, MOVE OUT, and exposes two
sets of multiple targets at various ranges from
the firer.
(e) When the tower operator has controlled reloading,
he gives the command, MOVE OUT, and the remaining
targets are presented in sequence. After the last
targets are hit or lowered, the weapon is
cleared.
(f) The firer, holding the weapon in the raised
position with the cylinders open, returns to the
starting point and places the weapon on the stand.
Excess ammunition (if any) is turned in to the
ammunition point. The next order moves to the
firing line.
b. The same course is fired for night qualification.
It is scored on a GO/NO-GO scoring system: five
target hits equal a GO. Ten seconds are allowed
for each round.
c. The same course is fired for NBC qualification.
It is based on a GO/NO-GO scoring system: seven
target hits equal a GO. Ten seconds are allowed
for each round.
NOTE: Night and NBC qualification is required IAW
DA Pam 350-38.
C-3
C-3. CONDUCT OF FIRE
When the weapon is being fired firers are issued
the number of rounds required to fire a specific
table. The tower operator controls all loading and
reloading. The following list of commands outlines a
step-by-step sequence for conducting range firing on
the RQC.
a. Table I.
(1) The tower operator orders firers to move to the
firing line in preparation for firing. The tower
operator orders firers to position themselves next
to the weapon stands and secure their weapons.
Seven rounds are issued to scorers to be given to
firers.
(2) The tower operator commands:
TABLE ONE, SEVEN ROUNDS.
LOAD SIX ROUNDS.
READY ON THE RIGHT.
READY ON THE LEFT.
READY ON THE FIRING LINE.
WATCH YOUR LANE.
(3) The tower operator exposes two single targets to
the firers. Once these targets have been engaged
or lowered, the tower operator commands:
CEASE FIRE.
LOAD REMAINING ROUND. (Tower allows
appropriate time.)
READY ON THE RIGHT.
READY ON THE LEFT.
READY ON THE FIRING LINE.
WATCH YOUR LANE.
(4) The tower operator exposes remaining three single
targets to the firers. When all targets have been
engaged or lowered, the tower operator commands:
CEASE FIRE.
CLEAR ALL WEAPONS.
CLEAR ON THE RIGHT.
CLEAR ON THE LEFT.
THE FIRING LINE IS CLEAR.
FIRERS PLACE YOUR WEAPONS ON THE STANDS.
(Leave cylinders open.)
C-4
b. Table II.
(1) The tower operator orders firers to secure their
weapons Eight rounds are issued to the scorers
to be given to the firers.
(2) The tower operator commands:
TABLE TWO, EIGHT ROUNDS.
LOAD SIX ROUNDS.
READY ON THE RIGHT.
READY ON THE LEFT.
READY ON THE FIRING LINE
WATCH YOUR LANE.
(3) The tower operator exposes four single targets to
the firers. When these targets have been engaged
or lowered, the tower operator commands:
CEASE FIRE.
LOAD TWO REMAINING ROUNDS. (Tower allows
appropriate time.)
READY ON THE RIGHT.
READY ON THE LEFT.
READY ON THE FIRING LINE.
WATCH YOUR LANE.
(4) The tower operator exposes one set of multiple
targets to firers. Once these targets have been
engaged or lowered, the tower operator commands:
CEASE FIRE.
CLEAR ALL WEAPONS.
CLEAR ON THE RIGHT.
CLEAR ON THE LEFT.
THE FIRING LINE IS CLEAR.
FIRERS, KEEP YOUR WEAPONS POINTED UP AND
DOWN RANGE, MOVE TO THE FIRING POINT
TO YOUR RIGHT.
c. Table III.
(1) The tower operator orders the firers to position
themselves next to the weapon stands and secure
their weapons. Seven rounds are issued to the
scorers to be given to the firers.
(2) The tower operator commands:
C-5
TABLE THREE, SEVEN ROUNDS
READY ON THE RIGHT.
READY ON THE LEFT.
READY ON THE FIRING LINE.
WATCH YOUR LANE.
(3) The tower operator exposes three single targets to
the firers. When all targets have been engaged or
lowered, the tower operator commands:
CEASE FIRE.
LOAD REMAINING ROUND. (Tower allows
appropriate time.)
READY ON THE RIGHT.
READY ON THE LEFT.
READY ON THE FIRING LINE.
WATCH YOUR LANE.
(4) The tower operator exposes one set of multiple
targets to the firers. When all targets have been
engaged or lowered, the tower operator commands:
CEASE FIRE.
CLEAR ALL WEAPONS.
CLEAR ON THE RIGHT.
CLEAR ON THE LEFT.
THE FIRING LINE IS CLEAR.
FIRERS, PLACE YOUR WEAPONS ON THE STAND.
(Leave cylinders open.)
d. Table IV.
(1) The tower operator orders the firers to secure
their weapons from the weapon stand and move to
the center of the trail. Scorers are issued five
rounds to be given to the firers.
(2) The tower operator commands:
TABLE FOUR, FIVE ROUNDS.
LOAD FIVE ROUNDS.
READY ON THE RIGHT.
READY ON THE LEFT.
READY ON THE FIRING LINE
WATCH YOUR LANE.
(3) The tower operator exposes two single targets and
one set of multiple targets to the firers. When
all targets have been engaged or lowered, the
tower operator commands:
C-6
CEASE FIRE.
CLEAR ALL WEAPONS.
CLEAR ON THE RIGHT.
CLEAR ON THE LEFT.
THE FIRING LINE IS CLEAR.
FIRERS, PLACE YOUR WEAPONS ON THE STANDS
TO THE REAR OF THE FIRING LINE.
(Leave cylinders open.)
e, Table V.
(1) The tower operator orders the firers to secure
their weapons. Scorers are given 13 rounds to be
given to the firers.
(2) The tower operator commands:
TABLE FIVE, THIRTEEN ROUNDS.
LOAD SIX ROUNDS.
READY ON THE RIGHT.
READY ON THE LEFT.
READY ON THE FIRING LINE.
WEAPONS AT THE READY POSITION.
WATCH YOUR LANE.
MOVE OUT.
(3) The tower operator exposes one single target, then
one set of multiple targets to the firers. Once
the targets have been engaged or lowered, the
tower operator commands:
CEASE FIRE.
RELOAD CHAMBERS. (Tower operator allows
appropriate time.)
READY ON THE RIGHT.
READY ON THE LEFT.
READY ON THE FIRING LINE.
WEAPONS IN THE READY POSITION.
WATCH YOUR LANE.
MOVE OUT.
(4) The tower operator exposes two sets of multiple
targets to the firers. Once targets have been
engaged or lowered, the tower operator commands:
CEASE FIRE.
RELOAD CHAMBERS.
READY ON THE RIGHT.
READY ON THE LEFT.
READY ON THE FIRING LINE.
WEAPONS IN THE READY POSITION.
C-7
WATCH YOUR LANE*
MOVE OUT*
(5) The tower operator exposes one set of multiple
targets and one single target to the firers. Once
targets have been engaged or lowered, the tower
operator commands:
CEASE FIRE*
CLEAR ALL WEAPONS*
CLEAR ON THE RIGHT.
CLEAR ON THE LEFT.
THE FIRING LINE IS CLEAR.
FIRERS, KEEP YOUR WEAPONS UP AND
DOWNRANGE.
SCORERS AND FIRERS MOVE BACK TO THE
FIRING LINE AND PLACE YOUR WEAPONS
ON THE WEAPON STANDS. (Leave cylinders
open.)
(6) The tower operator has each scorer total the
firers scorecard and turn it in to the range
officer or his representative. The firing orders
are rotated and the above sequence continued until
all orders have fired.
NOTE: For night qualification and NBC qualification,
the same course is used. Ten seconds is
allowed for each round.
C-4. ALIBIS
a. Alibis are fired at the completion of each table
from the position where the alibi occurred. Fire
commands that apply to the table are used to fire
the alibi.
b* If a malfunction of the weapon or target occurs
during firing from stationary positions, the firer
reports the malfunction and keeps his weapon
pointed up and downrange. Should the malfunction
occur during Table V, the firer keeps his weapon
pointed up and downrange. He continues to move
forward, keeping aligned with the firers to his
right and left.
C-5* RULES
Rules governing firing the CPQC are as follows:
C-8
a. Coaching. Coaching is not allowed during record
firing* No person may give or try to give help
while the firer is taking his position or after he
has taken his position at the firing point. Each
firer must observe the location of the target in
his own lane. During the instructional firing,
the coach and assistant instructors should assist
the firer in correcting errors.
b. Accidental Discharges. All shots fired by the
firer are scored after he has taken his place on
the firing lane. Even if the weapon is not
directed toward a target or is accidentally
discharged, a replacement round is not issued.
c. Firing on the Wrong Target. Shots fired on the
wrong target are entered as a miss on the firing
scorecard. A firer is credited with hits he
attains on his own firing lane.
d. Firing After the signal’to Lower Targets. Any
shot fired by a firer after targets start to lower
are scored as a miss.
e. More Than One Shot Fired at an E-type Silhouette
Target. The firer is credited with a hit if the
hit is made during the target exposure time. The
number of rounds fired to obtain the hit is
immaterial.
f. Excess Ammunition at the End of the Firing Table.
Excess ammunition from each table is turned in to
the ammunition point and not used by the firer for
subsequent tables.
g. Rounds Issued. Firers are issued the number of
rounds required to fire a specific table.
h. Target Sequence. Target sequence is controlled by
the tower operator but is the same for all lanes
to prevent firers from getting in front of firers
in adjoining lanes. Targets vary in distance from
the firers, starting with 31 meters and allowing
no more than two 7-meter targets.
C—6. SCORECARD
a. Use. The scorecard (DA Form 88) outlines
instructional firing and qualification firing
(CPQC) (see Figure C-l). Numbers in columns
labeled TGT (target) are not the sequence in which
C-9
targets are exposed. They are the numerical
identification of targets to be engaged during
each firing table.
NOTE: DA Form 68 is used to score the revolver
qualification course.
b. Scoring. Each time a target is hit or "killed,"
an X is placed in the column labeled HITS. The
value of a hit is 10 points. Upon completion of
firing the CPQCf the scorer totals and signs the
scorecard. Qualification standards are listed in
the bottom right-hand corner of the record firing
side of the scorecard. They are:
Expert
Sharpshooter .
Marksman
Unqualified
260-300.
210-250.
160-200.
Below 160.
NBC and night qualification is on a GO/NO-GO scoring
system and recorded in the remarks column.
Night: 5 target hits « GO
NBC: 7 target hits • GO
c. Supply of Forms. DA Form 88 is available through
normal publications supply channels (see Figure
A-l) .
C-7. TARGETS
Seven electric target device targets and E-type
silhouettes for each firing lane are required.
Aggressor figures may be superimposed on the
silhouettes to add realism to the course of fire.
C- 8. QUICK TARGET TRAINING DEVICE
The QTTD may be procured locally. For durability
and appearance, it should be made by the training aids
section or an equally capable agency.
C-10
APPENDIX D
ALTERNATE REVOLVER QUALIFICATION COURSE
D-L. PROCEDURES
Once the soldier completes instructional firing,
he must then fire the CPQC for record. If the CPQC is
not available, then the soldier may fire the ARQC.
NOTE: The tower operator controls all reloading.
a. Procedures for Firing ARQC With the Caliber .38
Revolver.
(1) Table 1: Engage the 25-meter E-type silhouette
target with rings from the standing position with
six rounds of ammunition; given six rounds for the
caliber .38 revolver on a 25-meter range during
daylight. Within 21 seconds from the standing
position, engage the E-type silhouette target (see
Figure B-1) .
(2) Table 2: Engage the 25-meter target from the
kneeling position with 12 rounds; given 12 rounds
of ball ammunition and a caliber .38 revolver on a
25-meter range during daylight. Within 23
seconds from a standing position, assume a good
kneeling position and engage the target with six
rounds. Repeat steps for next six rounds.
(3) Table 3: Engage the 25-meter target from the
crouch position with 12 rounds; given 12 rounds of
ball ammunition and a caliber .38 revolver on a
25-meter range during daylight. Within 23 seconds
from a standing position, assume a good crouch
position and engage the target with the first six
rounds within 23 seconds. Repeat steps for next
six rounds.
(4) Table 4: Engage the 25-meter target from the
prone position with 10 rounds; given 10 rounds of
ball ammunition and a caliber .38 revolver on a
D-l
25-meter range during daylight hours. Within 23
seconds from a standing position, assume a good
prone position, and engage the target with the
first six rounds. Repeat steps for next four
rounds, allowing only 18 seconds.
b. Firing Revolver Under Night Conditions. Engage
the 25-meter target from a crouch position with 30
rounds; given 30 rounds of ball ammunition and a
caliber .38 revolver on a 25-meter range during
nighttime conditions. Within 80 seconds, engage
six pop-up E-type silhouettes with six rounds.
Reload only on command from the tower. Repeat
steps for next 24 rounds.
c. Firing Revolver Under Simulated NBC Conditions.
Engage the 25-meter target from a crouch position
with 20 rounds; given 20 rounds of ball ammunition
and a caliber .38 revolver on a 25-meter range
under simulated NBC conditions during daylight.
Within 40 seconds, engage the 25-meter pop-up
target with six rounds. Reload only on command
from the tower. Repeat steps for next 14 rounds.
NOTE: Night and NBC qualification is required IAW DA
Pam 350-38.
D-2. CONDUCT OF FIRE
a. The following commands outline a step-by-step
sequence for conducting range firing on the ARQC.
(1) Table It Standing position.
(a) The tower operator orders firers to move to the
firing line and to prepare to fire. The caliber
.38 rounds are issued to the scorer and given to
the firer on command.
(b) The tower operator commands:
TABLE ONE, STANDING POSITION, SIX ROUNDS.
LOAD.
IS THE LINE READY?
THE FIRING LINE IS READY.
FIRERS, WATCH YOUR LANEI
(c) At the end of prescribed firing time, the tower
operator commands:
CEASE FIRE.
ARE THERE ANY ALIBIS?
D-2
(Allowable alibis are given two seconds for each round
not fired»)
NOTE: For more information, see paragraph C-3.
UNLOAD AND CLEAR ALL WEAPONS.
IS THE FIRING LINE READY?
THE FIRING LINE IS NOW CLEAR.
FIRERS AND SCORERS MOVE DOWNRANGE AND
CHECK YOUR TARGETS.
(All weapons are cleared and left on table, or they
are left at the firing line with the cylinder in the
open position.)
FIRERS AND SCORERS MOVE DOWNRANGE AND
CHECK YOUR TARGETS.
(2) Table 2i Kneeling position.
(a) The tower operator orders firers to move to the
firing line. Scorers are issued 12 rounds of
caliber .38 ammunition to be given to the firer on
command.
(b) The tower operator commands:
TABLE TWO, KNEELING POSITION, TWELVE
ROUNDS;
FIRST SIX ROUNDS, TWENTY-THREE SECONDS;
RELOAD, SECOND SIX ROUNDS, TWENTY-THREE
SECONDS.
LOAD FIRST SIX ROUNDS.
IS THE LINE READY?
THE FIRING LINE IS READY.
FIRERS, WATCH YOUR LANE!
(c) At the end pf prescribed firing time, the tower
operator commands:
CEASE FIRE.
ARE THERE ANY ALIBIS?
UNLOAD AND CLEAR ALL WEAPONS.
LOAD SECOND SIX ROUNDS.
IS THE LINE READY?
THE FIRING LINE IS READY.
FIRERS WATCH YOUR LANE!
(d) At the end of prescribed firing time, the tower
operator commands:
CEASE FIRE.
ARE THERE ANY ALIBIS?
D-3
NOTE; Allowable alibis are given two seconds for each
round *
UNLOAD AND CLEAR ALL WEAPONS.
IS THE FIRING LINE CLEAR?
THE FIRING LINE IS NOW CLEAR.
FIRERS AND SCORERS MOVE DOWNRANGE AND
CHECK YOUR TARGETS.
NOTE: All weapons are cleared and left on a table, or
they are left standing at the firing line with
the cylinder in the open position. Then the
firers and scorers move downrange to check
their targets.
(3) Table 3; Crouch position.
(a) The tower operator orders the firers and scorers
to move to the firing line. The scorers are
issued 12 rounds of caliber .38 ammunition to be
given to the firer on command.
(b) The tower operator commands;
TABLE THREE, CROUCH POSITION, TWELVE
ROUNDS;
FIRST SIX ROUNDS, TWENTY-THREE SECONDS;
RELOAD, SECOND SIX ROUNDS, TWENTY-THREE
SECONDS.
NOTE: All commands are the same as for Table 2.
(4) Table 4: Prone position.
(a) The tower operator orders the firers to move to
the firing line. The firers are issued 10 rounds
of caliber .38 ammunition.
(b) The tower operator orders;
TABLE FOUR, PRONE POSITION, TEN ROUNDS;
FIRST SIX ROUNDS, TWENTY-THREE SECONDS;
RELOAD, NEXT FOUR ROUNDS, EIGHTEEN
SECONDS.
NOTE; All commands are the same as for Tables 1, 2,
and 3. The scorers and firers replace all
targets for the next firing order. Excess
ammunition at then end of the course is turned
in to the ammunition point.
D-4
b. The commands for the revolver night fire for
record are as follows:
(1) The tower operator orders firers to move to the
firing line. Scorers are issued 30 rounds to be
given to the firer on command.
(2) The tower operator commands:
NIGHT FIRE, CROUCH POSITION, SIXTY
SECONDS, SIX ROUNDS♦
RELOAD ONLY ON COMMAND.
LOAD FIRST SIX ROUNDS.
IS THE FIRING LINE READY?
THE FIRING LINE IS READY.
FIRERS, WATCH YOUR LANE.
(3) At the end of the prescribed time, the tower
operator commands:
CEASE FIRE
ARE THERE ANY ALIBIS?
(Alibis are allowed 10 seconds for each round not
fired♦)
unload and clear all weapons.
NOTE: These commands are repeated for each six rounds
fired.
IS THE FIRING LINE CLEAR?
THE FIRING LINE IS CLEAR.
FIRERS AND SCORERS, MOVE DOWNRANGE AND
CHECK YOUR TARGETS.
c. The commands for the revolver NBC fire for record
are as follows:
(1) The tower operator orders firers to move to the
firing line. Scorers are issued 20 rounds to be
given to the firer on command.
(2) The tower operator commands:
GAS (Firers don protective masks.)
NBC FIRING, CROUCH POSITION, FORTY
SECONDS, SIX ROUNDS.
RELOAD ONLY ON COMMAND.
LOAD FIRST SIX ROUNDS.
IS THE FIRING LINE READY?
D-5
THE FIRING LINE IS READY.
FIRERS, WATCH YOUR LANE.
(3) At the end of the prescribed time, the tower
operator commands:
CEASE FIRE.
ARE THERE ANY ALIBIS?
(Alibis are allowed eight seconds for each round not
f ired.)
UNLOAD AND CLEAR ALL WEAPONS.
NOTE: These commands are repeated for each six rounds
f ired.
IS THE FIRING LINE CLEAR?
THE FIRING LINE IS NOW CLEAR.
(The tower operator also gives the command, ALL
CLEAR.)
FIRERS AND SCORERS, MOVE DOWNRANGE AND
CHECK YOUR TARGETS.
(All weapons are left on firing line with cylinders
open.)
NOTE: The scorers and firers replace all targets for
the next firing order. Excess ammunition at
the end of a table is turned in to the scorer
and is not used by the firer in subsequent
tables. At the completion of all four tables,
ammunition is turned in to the ammunition
point.
D-3. ALIBIS
If a malfunction of the weapon or the target
occurs during firing, the scorer reports and records
the malfunction. The firer is allowed one alibi at
the completion of each table. All alibis are fired
from the position in which the alibis occurs. Firing
commands that apply are used to fire alibis.
D-4. SCORING
a. The firer is scored on the number of target hits
during the prescribed time limit. He must achieve
at least 24 hits and a score of 80 points to
D-6
qualify. The target hits are then multiplied by
the number inside the scoring rings to achieve a
score. No credit is given for rounds fired after
the command, CEASE FIRE. Shots that touch the
next higher scoring ring are scored the next
higher value (see Figure B-l) .
b. The qualification scores are:
Expert - 160 to 200.
Sharpshooter - 120 to 159.
Marksman - 80 to 119.
NBC and Night Firing is done on a GO/NO-GO
scoring system and recorded in the remarks
column•
NBC 7 target hits - GO.
Night; 5 target hits • GO.
NOTE: For sample scorecard see Figure D-l.
c. Coaching is allowed during instructional firing
but not during record fire. No one may assist the
firer while he is taking position or after taking
position at the firing point except for safety
reasons.
D-7
ALTERNATE REVOLVER QUALIFICATION COURSE For им «Л thlt lorm, FM 23-35: tb* Pmponm ManeV ** TRADOC
NAME |LwL Яг* Mt) 7k M Tot /*_ DATE
LANE NO. _2 Order -I UNIT С-^Алг
TABLE 1 mNOHM POBIYIQN: В fHwMa - 21 SoomMb
hite Ь&МхЫк!
SCORE
TABLE 2 KNEEUM POSITION: • Rawxb IS NmNk Rrtoad Lbdar
Central of the Тамм
HITS
•CORE I
SCORl6~ У
TABLE 1- CROUCH POSITION: • hw* 2» Moondt; Rataad IMAf
TABLE 4 • PROM POSITION:
HITS
•CORI
QUALIFICATION:
EXPERT IBOIDO
SHARPSHOOTER 120-1BB
MARKSMAN SQ11B
TOTAL ЮОМ/ГЯ
SCDMR'S SIGNATURE
DAT*
DATE
NOTE
OfflCM’l BIONATURE
^TmaSCLo. ’
лкшг&к - gc
MAC tire - &O
NOTIB: 1. HITS ARI MARKED WITH "X'ANO MISSES ARE
MARKED WITH -M.~
2- THE RRER MUST ACHIEVE A MINIMUM OF 24 HIT*
AND A MINIMUM SCORE OF «0 TO QUALIFY.
DATA REQUIRED BY PRIVACY ACT OF 1*74
МММ Am*N FWa Ranfa.
Spa И award Л naBNtn,yB>M« tNH aHtet|iiHln IBhIMmMii»hhwiwN. MANDATORY OR
VOLUNTARY DISCLOSURE ANO EFFECT OH INDIVIDUAL NOT PROWONM INFORM ATtQNe УсАнгмгу.
DA Form S706-R, SEP BS
Figure D-1. Example of completed Alternate
Revolver Qualification Course form*
See Appendix F for a blank copy of this form
for local reproduction.
Jsaacas
D-8
APPENDIX E
TRAINING SCHEDULES
To aid in the individual training phase, training
schedules for the courses in pistol and revolver
marksmanship training are described in this appendix.
These schedules are based on the desirable number of
training hours for a pistol or revolver course. They
should be used as a guide in preparing lesson plans.
Conditions may require a longer or shorter period to
complete the training. When time is available,
additional training should be included in the
schedule. When suggested equipment and training aids
are not available, the best that are available should
be improvised or substituted. Each firer should be
allowed 50 rounds for instructional firing and 40
rounds for record firing.
E-l
A. Pistol Sei automatic, Caliber <Hnn, Caliber *45 M1911A1
Itevolver, Caliber *38 (practice or Instructional Firing
Course (12 Hours)
foriod Hours 1АМСП fteferenoes Training fteilUias Training Aida
:?wg
acsMiicK. twonihg (4 hours)
1 2 2 Ojaxacteristica, die» «••«bly and BMMbly* functioning, and cam and cleaning. » 5-1005- 317-10, M P-1005? 211-12,and « P-1005- 226-14. daaarooe or field. Bar instructor chalk- board, working model. Er ejector and acraan, cleaning equipment (for each man), for each group: Table or suitable ground cloth.
2 2 2 * И unction*, stop- pages, famdiate action, loading, un- loading. «munition, and safety precaution». TH 9-1005- 317-10, TM P-1005- 211-12 t»m TH P-1005- 226-14* ....do.... Sbaa as period 1, plus «unltion display.
РЯИЛЖК MMNMNH ship теадюад (6 awe)
3 3 3 {toaching, aiming, grip* position», trlgcer Squeeae {to include double-action) , target eng sj mi nt, panel! tri- angulation exercise {ЮЭ11Л1 only) , •low- fl ra axard»a* Chapter 2 this manual* «...do.... for each man: Gw pistol with Mgaslns, sheet of 1/B-inch bull's-eyes, pencil with masking or cello- phane tape, for all: fi-ailhouette.
ММЖ HHN3 {2 Bws)
4 2 2 instructional firing Itobles 1, 2, 3r 4» t 5* ooabat pistol Qualifi- cation Owse. App A this manual* Live-fire range. Equipment used in period 6 of the quali- fication course.
E-2
В Pistol, Semiautomatic, Caliber 9-trin, Caliber .45 M1911A1
Revolver, Caliber .38 (Qualification Course) (12 Hours)
Period ЙЯП 1Л8Я0П References Draining Facilities Training Aids
Peace Itoblli- zation
RANCE FIRING (4 Hours)
5 2 2 instructional Citing combat pistol qualifi- cation course, for practice with a coach or instructor. Existing range reg- ulations. App A,this manual. Pistol range. For all; All equipment used for periods 3 and 4 plus scorecard and aimnunition.
6 2 2 Record firing. Tables 1, through 5, combat pistol qualification course. App A,this manual. do
E-3
В. Pistol, Semiautomatic, Caliber 9-mm, Caliber .45 M1911A1;
Revolver, .38 (Qualification Course) (12 Hours) (Continued)
Period Hours Lesson References Training Facilities Training Aids
Peace K>biLi- ra t ion
MECHANICAL TRAINING (4 hours)
1 2 2 Characteristics, dis- assembly, and assembly, functioning and care and cleaning. TO 9-1005- 317-10, IM 9-1005- 211-12,and TO 9-1005- 220-14. Classroom or field. Fbr instructor: chalk- board, working model, projector and screen, cleaning equipment (for each man). Bor each group; Tfeble or suitable ground cloth.
2 2 2 Malfunctions, stop- pages, immediate action, loading, un- loading, ammunition, and safety precautions. TO 9-1005- 317-10, TO 9-1005- 211-12,and IM 9-1005- 220-14. ....do.... Same as period 1 plus ammunition display.
PREPARATORY MARKSMAN- SHIP TRAINING (4 Hours)
3 2 2 (baching, aiming, grip, positions, trigger squeeze (to include double-action). Target engagement, pencil tri- angulation exercise (M1911AL only), slow- fire exercise. Chapter 2 this manual. ... .do.... Fbr each man. One pistol with magazine, sheet of 1/8-inch bull’s-eyes, pencil with masking or cello- phane tape. Fbr all: E-silhouette.
4 2 2 Review and examination. All previous references ....do.... Fbr all All equipment used in previous periods.
E-4
APPENDIX F
REPRODUCIBLE FORMS
F-l
ALTERNATE PISTOL QUALIFICATION COURSE
For им □! thra form. FM 23-ЗБ. th» Proponvt eaency И TRADOC.
NAME; (UeL HtK Ml) DATE
LANE NO. ORDER UNIT SSN
TABU! 1 • STANDING FOBfflON: 1 MaQaaina • 7 Round* • 21 Brenda
NOTES: 1. ИГТВ ДВЕ MARKED WITH -Xй ANO MtSSES ARK
MARKED WITH ~M.~
2. THE NMR MUST ACHIEVE A MINIMUM Of 24 HITS
AND A MINIMUM SCORE OF BO FOINTB TO QUALIFY.
DATA RBQURID BY FRWACY ACT Of 1874
AUTHORITY: lOUSCSOUSf /ЪааиЕаа Order BIST. FRINCIFALFURFOMtS):ReebidBindMAiareRwtan
мм« on Raowd Тйо Ron**- ROUTINS USS(B|: ОмМавм аяяМопоунй MofortfotormiM-
lion <rf award of ргаЯойму Mdse. ESN h«md tar реаМм IdaiiWWedwi pMipeaaa OR». MANDATORY OR
VOLUNTARY DISCLOSURE AND EFFECT ON INDIV1DUAI NOTFROVUMM INFORMATION: Vatatawy
Indlvldueli not prevldlnf infermallen «ennot ba ratad/маrad on a maai bead.
DA Form 67ОА-Я, 8EF M
Figure F-l. DA Form 5704-R,
Alternate Pistol Qualification Course.
F-2
ALTERNATE REVOLVER QUALIFICATION COURSE For uw of itea form, ем FM 23-ЗБ; the Arooonm agancy «* TRADOC
NAME (Laal, HrwL Ml) DATS
LANE NO. ORDER UMT SEN
TAKE 1 STANDING POSITION; A Round»- >1 Second»
HITS
SCORE
HITS
SCORE
TABLE 2 • KNEELING POSITION:
S Round» ISSMWMl
HITS
HITS
SCORE
SCORE
TABLE 4 PRQNS POSITION: S Round» 21 Stow'd»; RaloU
Without Commend
HITS
SCORE
HITS
SCORE
QUALIFICATION:
EXPERT 140200
SHARPSHOOTER 12O1BS
MARKSMAN SO-11 S
TOTAL NITS
TOTAL SCOM
SCORER S SIGNATURE
OAT1
OFFICER’S SIGNATURE
REMARKS:
NOTES: 1. HITS ARE MARKED WITH “X." AND MISSES ARE
MARKED WITH "M."
2. THE FIRER MUST ACHIEVE A MINIMUM OF 24 HITS
ANO A MINIMUM SCORE OF SOTO QUALIFY.
DATA REQUIRED SY PRIVACY ACT OF1>74
AUTHORITY: 10USCS012S» /SwartlM Order SM7. PKNOMAL PURPOSE{B|: Ra»oid MMdHWapwtoo
там» м АамН Pirn Ran»». ROUTINE QSEtS): B»alu»don оНвЕМЕмаГ араКаНму i я Mi ih te< dotarmlHa
VOLUNTARY DISCLOSURE ANO EFFECT ON INDIVIDUAL NOT FROVICMNO INFORMATION: Votwmry.
OA Form B70S-R. BEP SS
Figure F-2. DA Form 5705-R,
Alternate Revolver Qualification Course,
F-3
GLOSSARY
APQC
ARQC
AR
CID
CPQC
СТА
DA
FM
HQ
mm
NATO
NBC
NG
OIC
QTTD
RQC
TM
TRADOC
USAR
alternate pistol qualification course
alternate revolver qualification course
Army regulation
criminal investigations division
combat pistol qualification course
common table of allowances
Department of the Army
field manual
headquarters
millimeter
North Atlantic Treaty Organization
nuclear, biological, chemical
Army National Guard
officer in charge
quick-fire target training device
revolver qualification course
technical manual
US Army Training and Doctrine Command
United States Army Reserve
Glossary-1
REFERENCES
Required Publications
Required publications are sources that users must
read in order to understand or to comply with this
publication-
Army Regulation (AR)
385-63 Policies and Procedures for
Firing Ammunition for Training
Target Practice, and Combat,
Department of the Army Forms (DA Forms)
88 Combat Pistol Qualification
Course Scorecard
5704-R Alternate Pistol Qualification Course
5705-R Alternate Revolver Qualification Course
Technical Manuals (TMs)
9-1005-206-14&P1 Operator's, Organizational,
Direct Support and General
Support Maintenance Manual
Including Repair Parts and
Special Tools List for Revolver,
Caliber ,38 Special: Smith and
Wesson, Military and police, MIO,
Round Butt, 4-Inch Barrel, 2-Inch
Barrel; Square Butt, 4-Inch
Barrel and Revolver, Caliber .38
Special: Ruger Service Sixz
4-Inch Barrel, M108; Square Butt
w/o Lanyard Loop, w/Lanyard and
Round Butt w/Lanyard Loop,
9-1005-211-12 Operator and Organizational
Maintenance Manual (Including
Basic Issue Items List and Repair
Parts and Special Tools List):
Pistol, Caliber .45, Automatic,
M1911A1, with Holster, Hip
(1005-673-7965); with Holster,
Shoulder (1005-561-2003).
References-1
Training Manuals (TMs) Co nt i nued
9-1005-226-14 Operation and Unit Maintenance: Caliber .22 High Standard Automatic Pistol (Supermatic) Caliber .22 Ruger Mark I Automatic Pistol (Target Model) {6 7/8-Inch Barrel); Caliber .38 Special Smith and Wesson Revolver (Masterpiece); Caliber .30-06 Winchester Rifle, Model 70 (Special Match Grade; Caliber .22 Winchester Rifle, Model 52; Caliber .22 Remington Rifle, 40x51 (National Match) and Front and Rear Sights.
9-1005-317-10 Operator's Manual for Pistol, Semiautomatic, 9-mm, M9 (1005-01-118-2640)
9-1300-200 Ammunition, General.
Related Publications
Related publications are sources of additional
information. They are not required in order to
understand this publication.
Army Regulations (ARs)
140-1 Marksmanship Training and Competitive Program.
350-6 Army-Wide Small Arms Competitive Marksmanship.
920-30 Rules and Regulations for National Matches and other Excellence-in-Competitive (EIC) Matches•
Common Tables of Allowances (CTAs)
8-100 Army Medical Department
Sxpendable/Durable Items.
50-970 Expendable/Durable Items
(Except: Medical, Class V/
Repair Parts and Heraldic Items).
References-2
Department of the Army Pamphlet (DA Pam)
350-38 738-750 Standards in Weapons Training The Army Maintenance Management System (TAMMS).
Field Manuals (FMs)
3-4 3-5 21-11 21-75 25-7 NBC Protection, NBC Decontamination. First Aid for Soldiers. Combat Skills of the Soldier. Training Ranges.
Technical Manuals (TMs)
9-1005-211-35 Direct Support, General Support, and Depot Maintenance Manual (Including Repair Parts and Special Tools List): Pistol, Caliber .45, M1911A, with Holster (1005-673-7965) and M1911A1 (1005-561-2003).
9-1005-317-23&P Unit and Intermediate Direct Support Maintenance Manual Maintenance Manual including Repair Parts and Special Tools List for pistol, Semiautomatic, 9-mm, M9 (1005-01-118-2640).
9-1300-206 Ammunition and Explosives Standards.
9-6920-210-14 Operator's, Organizational, Direct Support and General Support Maintenance Manual (In- cluding Basic Issue Items List and Repair Parts List) for Small Arms Targets and Target Material.
43-0001-27 Army Ammunition Data Sheets: Small Caliber Ammunition.
References-3
INDEX
air-operated pistol, <177 mm , 2-30
alibis, A-7, B-б, C-B, D-6
alternate pistol qualification course, Bl
alibis, B—6
conduct of fire, B-2
form, F-2
scoring, B-6
tables, B-l
alternate revolver qualification course, D-l
alibis, D-6
conduct of fire, D—2
form, F-3
scoring D-6
tables, D-l
basic marksmanship, 2-1
aiming, 2-5
breath control, 2-7
fundamentals, 2-1
phases of training, 2-1
positions, 2-10
target engagement. 2-10
trigger squeeze, 2-8
ball-a nd-dummy method, 2-27
breath control, 2-7
aiming, 2-5
calling the shot, 2-27
coaching, 2-26
combat marksmanship 2-16
nuclear, biological, chemical firing, 2-26
poor visibility firing, 2-25
reloading techniques, 2-22
target engagement, 2-18
techniques of firing, 2-16
traversing, 2-18
combat pistol qualification course, A-l
alibis, A-7
conduct of fire, A-4
rules A-8
scorecard, A-9
tables, A-2
targets, A-10
Index-1
combat reloading techniques, 2-22
one-hand, 2-24
rapid, 2-23
tactical, 2-24
equipment data
pistol, automatic, .45 caliber, M1911 and M1911A1
1-2
pistol automatic, 9-mm, M9, 1-1
revolver, caliber .38/ 1-4
flash sight picture, 2-17
forma, reproducible, F-l
grip, 2-1
isometric tension, 2-5
one-hand, 2-2
two-hand, 2-2
fist, 2-3
palm-supported, 2-3
Weaver, 2-4
hand-and-eye coordination, 2-16
instructional practice and record qualification
firing, 2-39
safety, 2-39
marksmanship training, 2-1
basic, 2-1
coaching and training aids, 2-26
combat, 2-16
safety, 2-37
nuclear, biological, chemical firing, 2-26
pencil triangulation exercise, 2-28
pistol, automatic, .45 caliber, M1911 and M1911A1
equipment data, 1-2
operation, 1-3
pistol, automatic 9-mm, M9
equipment data, 1-1
operation, 1-2
point of aim, 2-5
poor visibility firing, 2-25
positions, 2-10
crouch, 2-13
kneeling, 2-12
kneeling supported, 2-15
pistol-ready, 2-11
prone, 2-14
standing without support, 2-12
standing with support, 2-14
quick-fire point shooting, 2-17
quick-fire sighting, 2-17
quick-fire target training device, 2-31, A-8 , C-10
dimensions, (illus) 2-28
range firing courses, 2-36
alternate pistol qualification course, B-l
alternate revolver qualification course, D-l
Index-2
combat pistol qualification course, A-l
revolver qualification course, C-l
revolver, caliber <38
equipment data, 1-4
operation, 1-5
revolver qualification course C-l
alibis, C-9
conduct of fire, C-4
rules, C-8
scorecard, C-9
tables, C-2
targets, C-10
Huger revolver, caliber .38
equipment data, 1-4
operation, 1-5
safety 2-37
after firing, 2-39
before firing, 2-38
during firing, 2-38
instructional practice and record qualification
firing, 2-39
requirements, 2-37
scorecard, DA Form 88, A-9, C-9
slow-fire exercise, 2-29
Smith and Wesson revolver, caliber .38
equipment data 1-4
operation, 1-5
target engagement, 2-10, 2-18
targets, B-l, C-10
techniques of firing, 2-16
flash sight picture, 2-17
hand-and-eye coordination, 2-16
quick-fire point shooting, 2-17
quick-fire sighting, 2-17
training aids, 2-26
air-operated pistol, .177 mm, 2-30
quick-fire target training device, 2-31
training schedules, E-l
traversing, 2-18
kneeling 360° , 2-20
training method, 2-22
trigger squeeze, 2-8
Index-3