/


Author: Crockett C.
Tags: diy creativity handicrafts


Text
ACKNOWLEDGMENTS
To Larry Duke, a superb artist and graphic designer, who did the
illustrations.
To Leslie Wolcott Meyer of The Electronic Page, who created and
refined the pattern drafts and graphs.
To Dale Kistemaker, whose photographic expertise, advice, and careful work was invaluable. With the exception of those supplied by museums,
he developed and printed most of the photographs.
To Jose Gaspar Vibal for his good cheer, and for the many hours he
spent threading cards and working on samples.
I would like to thank San Francisco State University for a grant that
underwrote the cost of photographs, illustrations, and graphs, and to my
colleagues for their intellectual support.
To the many people who contributed information, photographs, and
advice, including Helen Durbin, Helen Pope, Donna Armstrong, Anne
Blinks, Lillian Elliott, Gail Manners, Kay Sekimachi, Jackie Wollenberg,
Ron Meyer, Nancy Harvey, Peter Collingwood, and Noemi Speiser. My
students were enthusiastic supporters of the project and contributed to the
publication, particularly the instructional part, in many ways. More than
anything else, they kept me sane and alive.
To Interweave Press and Deborah Robson, who responded immediately and enthusiastically to this publication.
I am most grateful to the following institutions for making their
collections available for research and reproduction: University Museum of
National Antiquities, Oslo; Liverpool Museum, Liverpool; Museum of
Ethnology, Hamburg; National Museum, Denmark; Smithsonian Institution, Washington, D.C; the Victoria and Albert Museum, London; the
Leicestershire Museums, Leicester, England; Stadtische Kunstsammlungen, Augsburg; Royal Ontario Museum, Toronto; Historical Museum,
Bern; Cora Ginsberg Collection, New York.
My special thanks go to Theodore Kroeber, who encouraged and
supported this project, was helpful in every aspect of the manuscript
preparation, and who showed great patience.
All weavings and photographs are by the author unless otherwise
noted.
CONTENTS
1. A HISTORY OF CARD WEAVING
Card Weaving: An Explanation
Patterns in Card Weaving
The Origins and Distribution of Card Weaving
Traditional Tools and Materials
Card Weaving in Ancient Egypt
Card Weaving in Scandinavia
Card Weaving in Medieval Europe
The Rediscovery of Card Weaving
Card Weaving in Asia and the Middle East
Card Weaving Today
7
9
9
10
10
11
12
14
18
19
20
2. TOOLS AND MATERIALS
25
3. THE BASIC TECHNIQUE
Sample Band A
List of Materials
The Pattern Draft
Threading Direction
Colors
Warping Instructions
Numbering the Cards
Threading the Cards
Combing the Warp Threads
The Weft Thread
Securing the Warp
Turning the Cards
Weaving
Warp Twist
. ,
Shifting the Weaving
Starting a New Weft Thread
Repairing a Broken Warp Thread
Pattern Variations
Controlling the Weft Thread
Finishing
Problems and Mistakes in Weaving
31
32
32
33
33
33
34
35
35
37
37
37
38
39
44
45
45
46
46
48
48
49
4. PATTERN DRAFTING AND DESIGNING
Defining the Space
Designing the Pattern
Selecting Colors
Threading the Cards
Alternate Threading
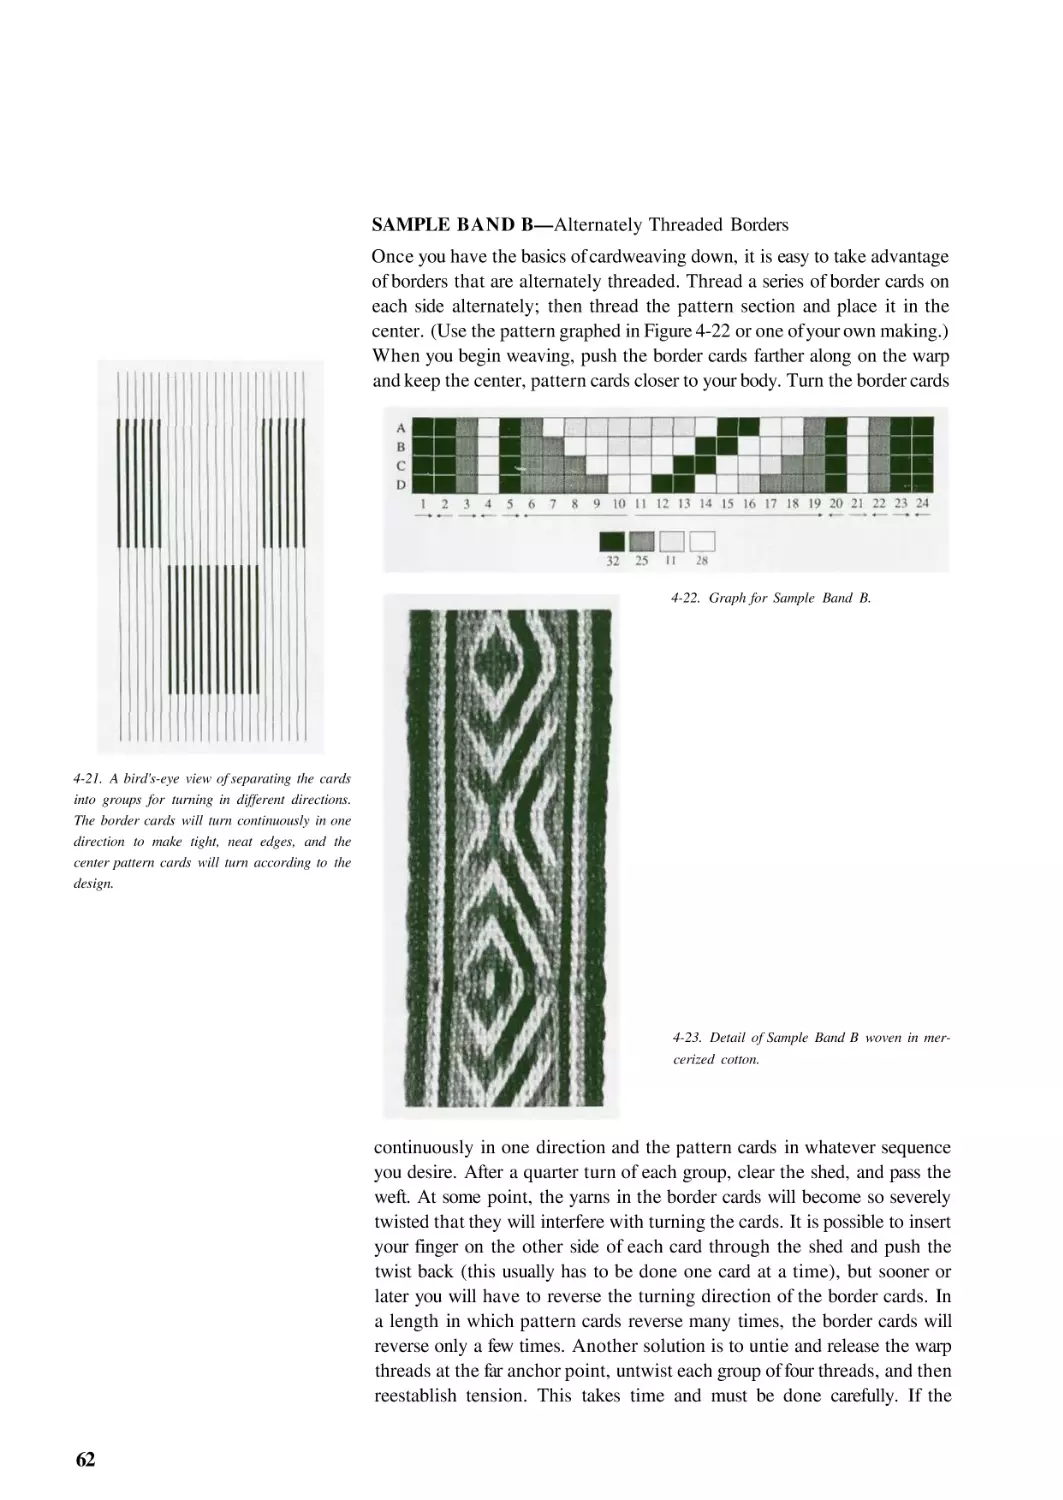
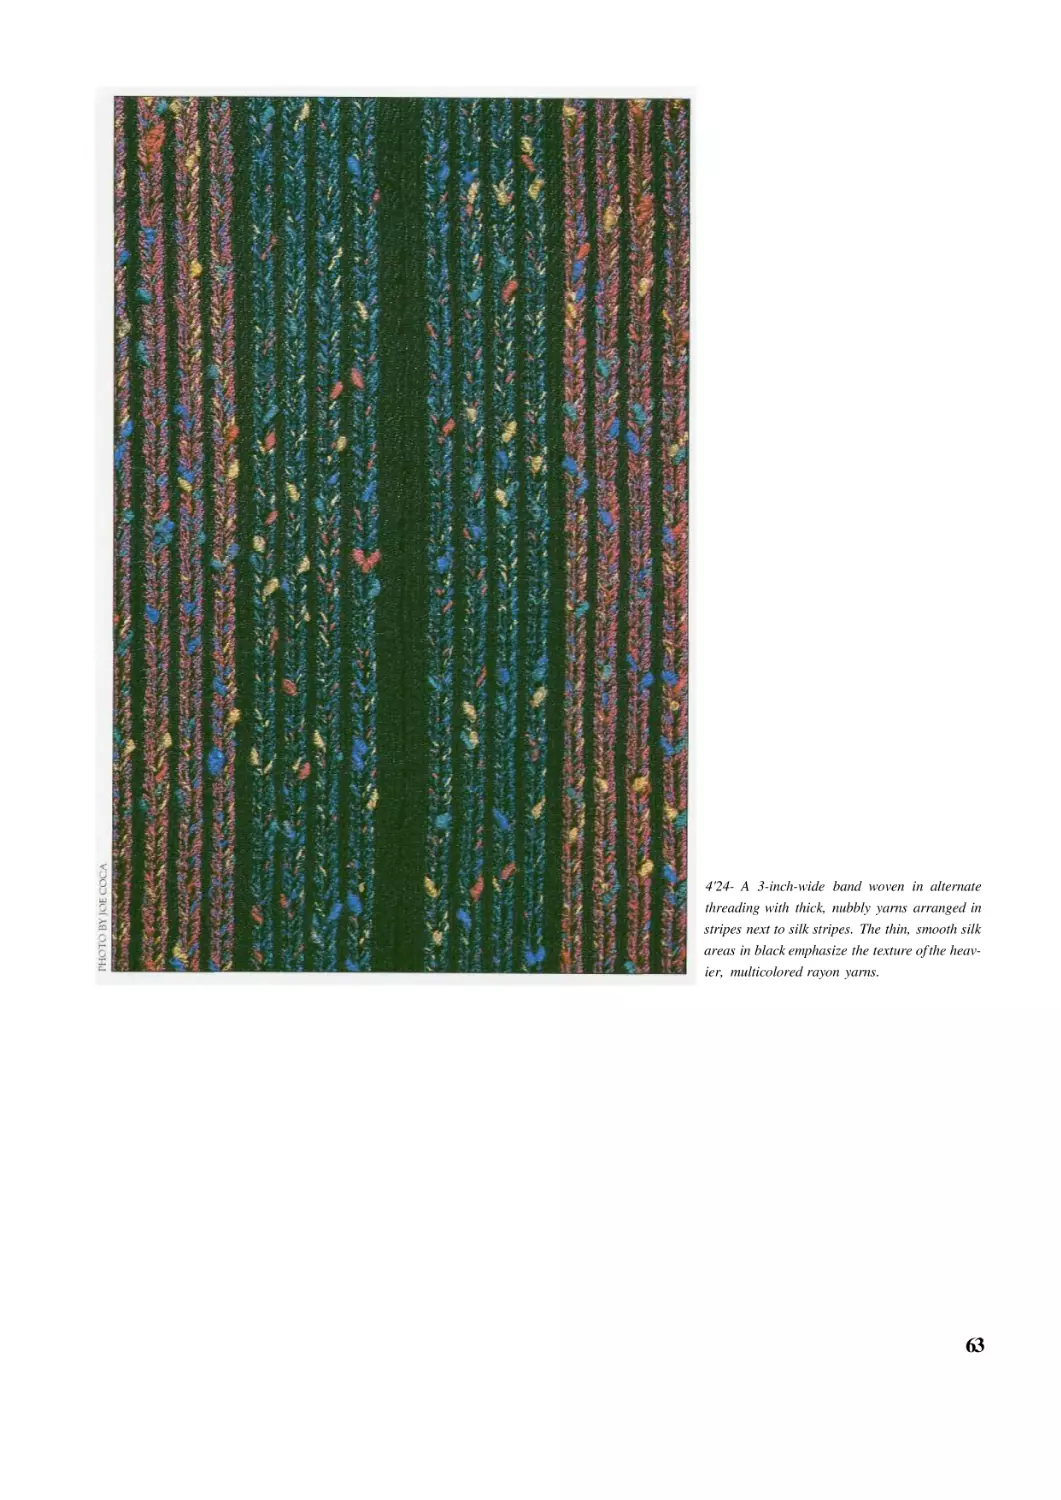
Sample Band B—Alternately Threaded Borders
51
52
52
53
55
60
62
Elongating Design Elements
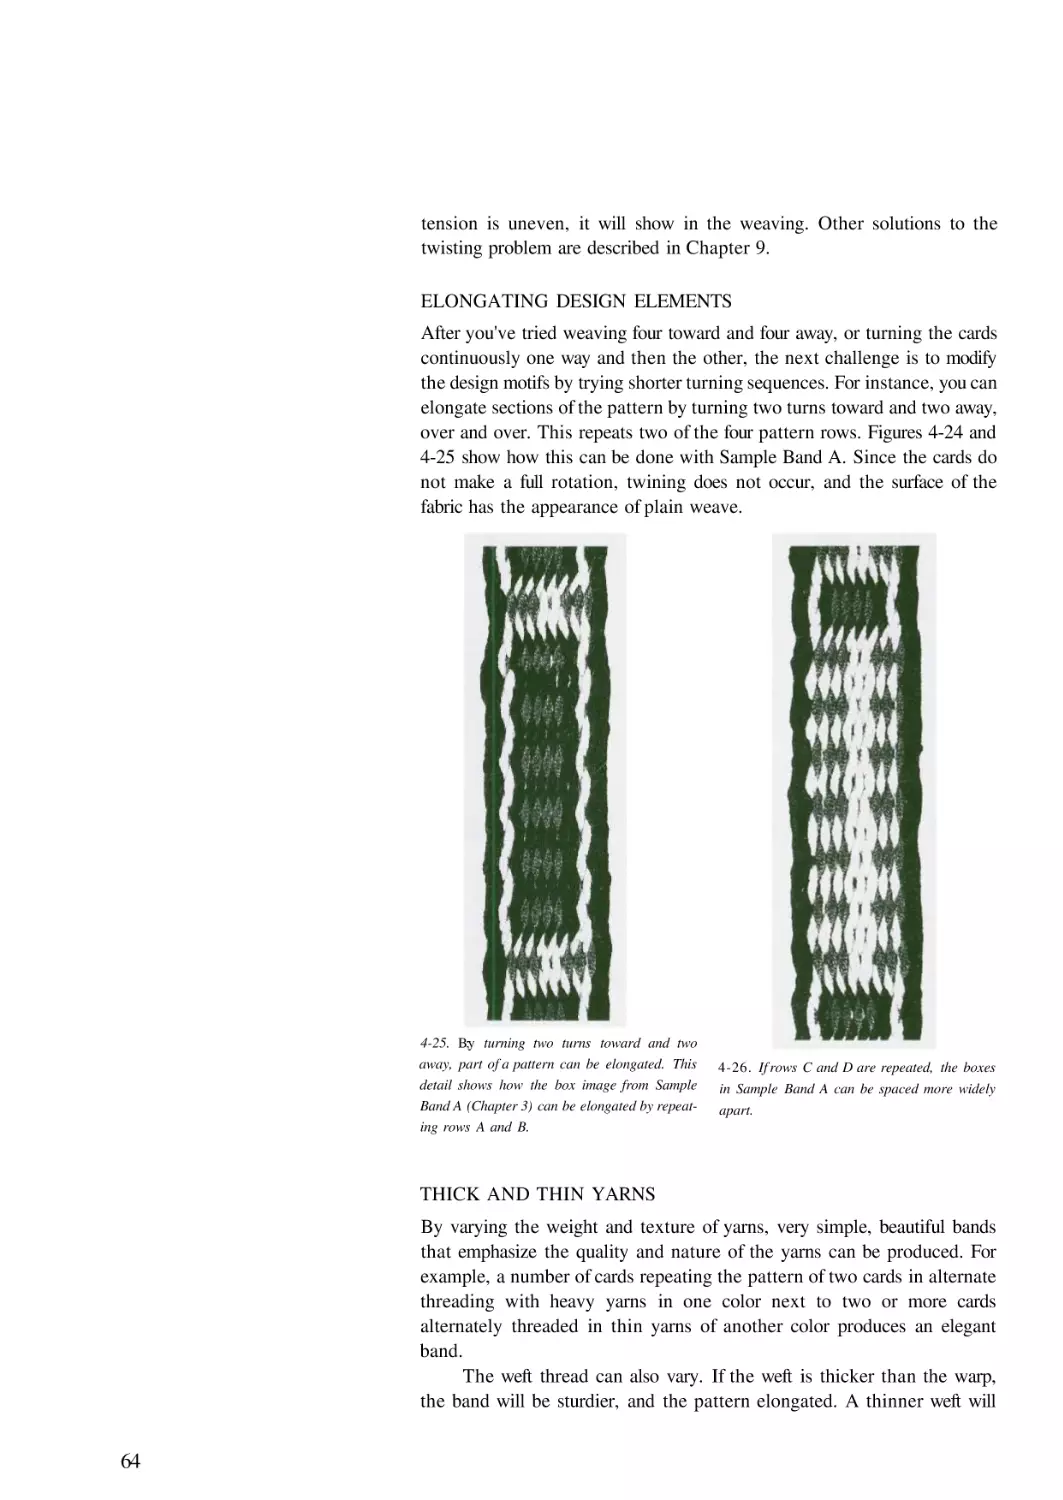
Thick and Thin Yarns
Variations
5. PATTERN DRAFTS
63
63
65
67
6. DARK AND LIGHT PATTERNING
Sample Band C
Pattern #1—Horizontal Stripes
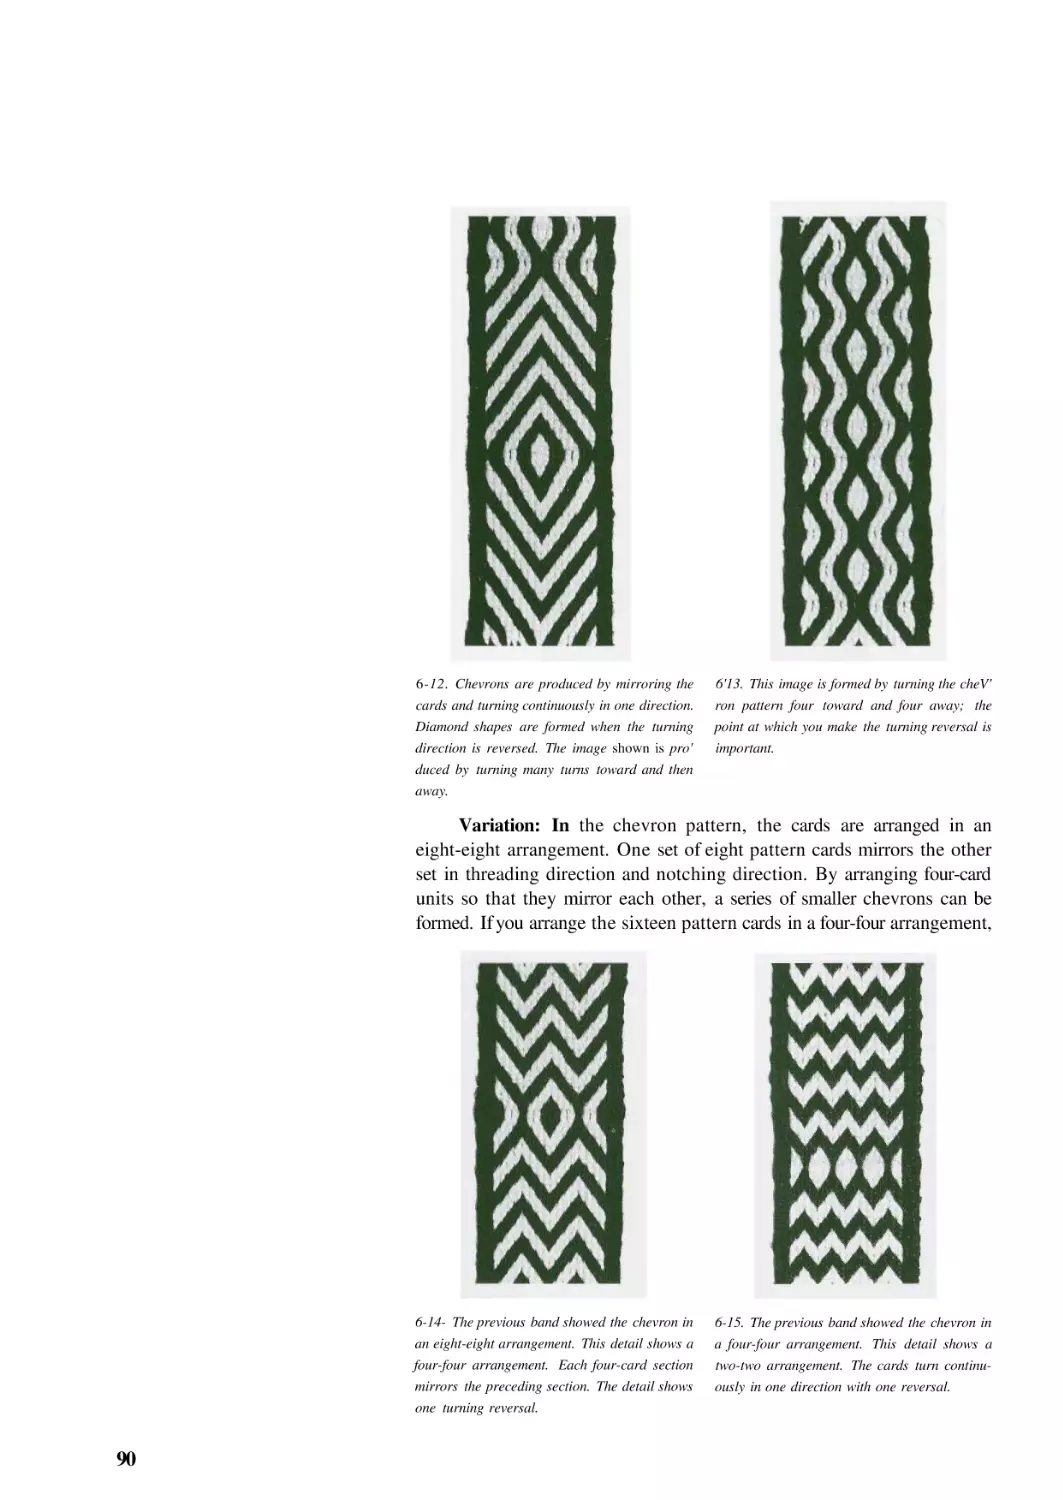
Pattern #2—Diagonal Stripes
Pattern #3—Chevrons
Pattern #4—Double-Faced Weave
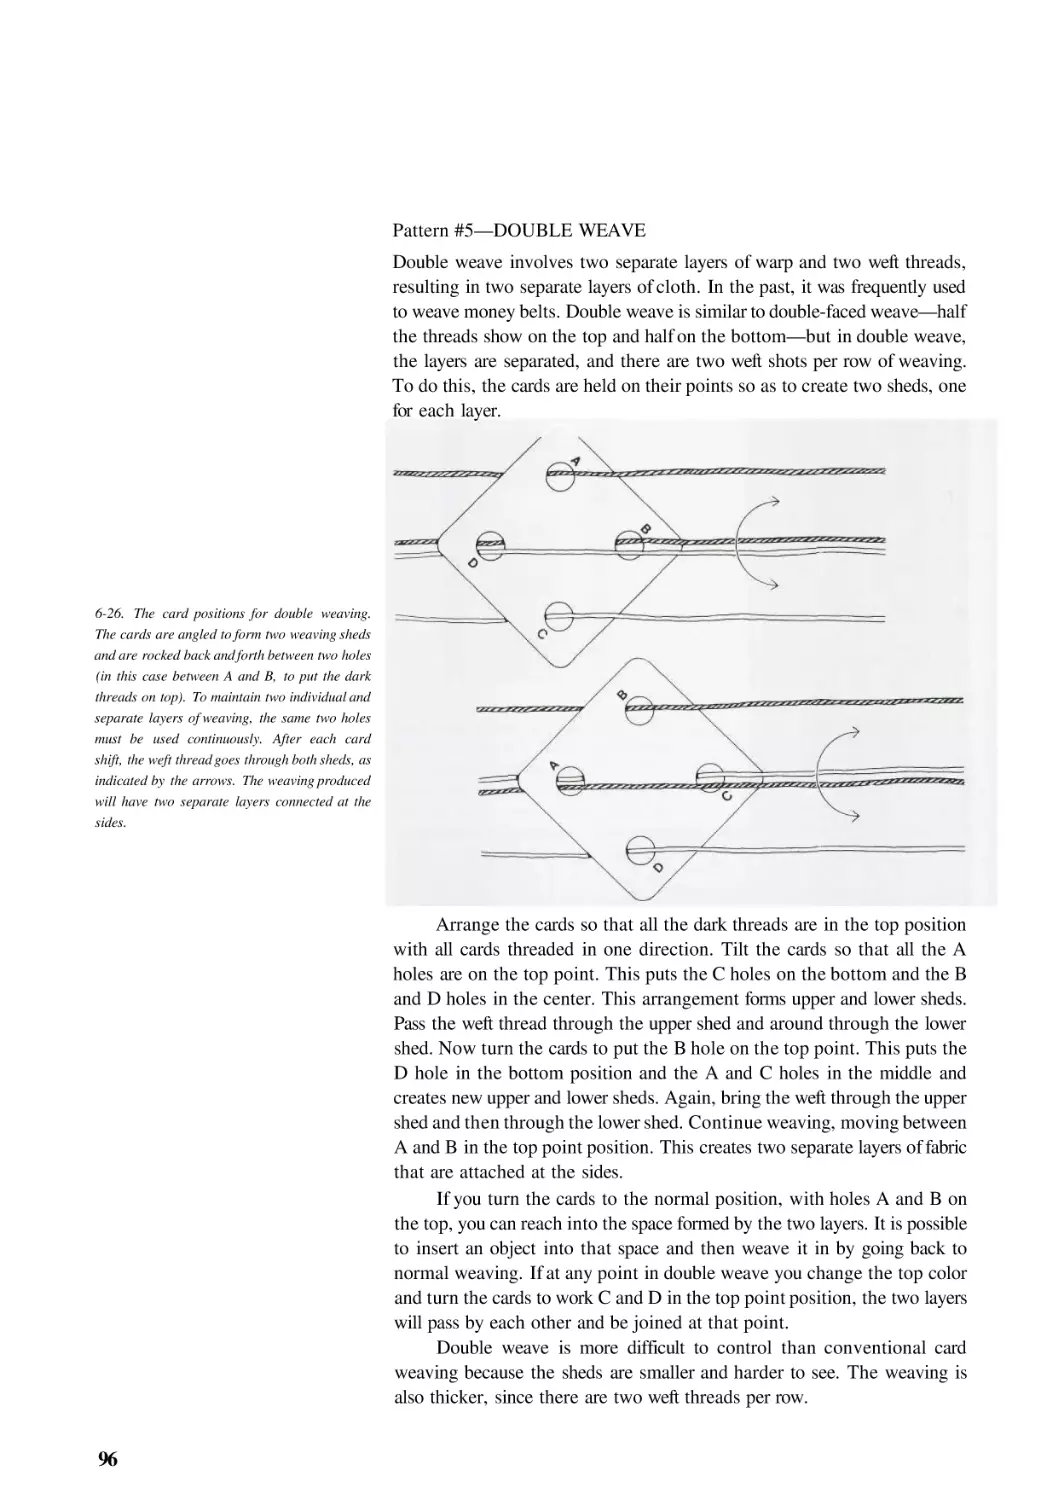
Pattern #5—Double Weave
Pattern #6—Broad Diagonals
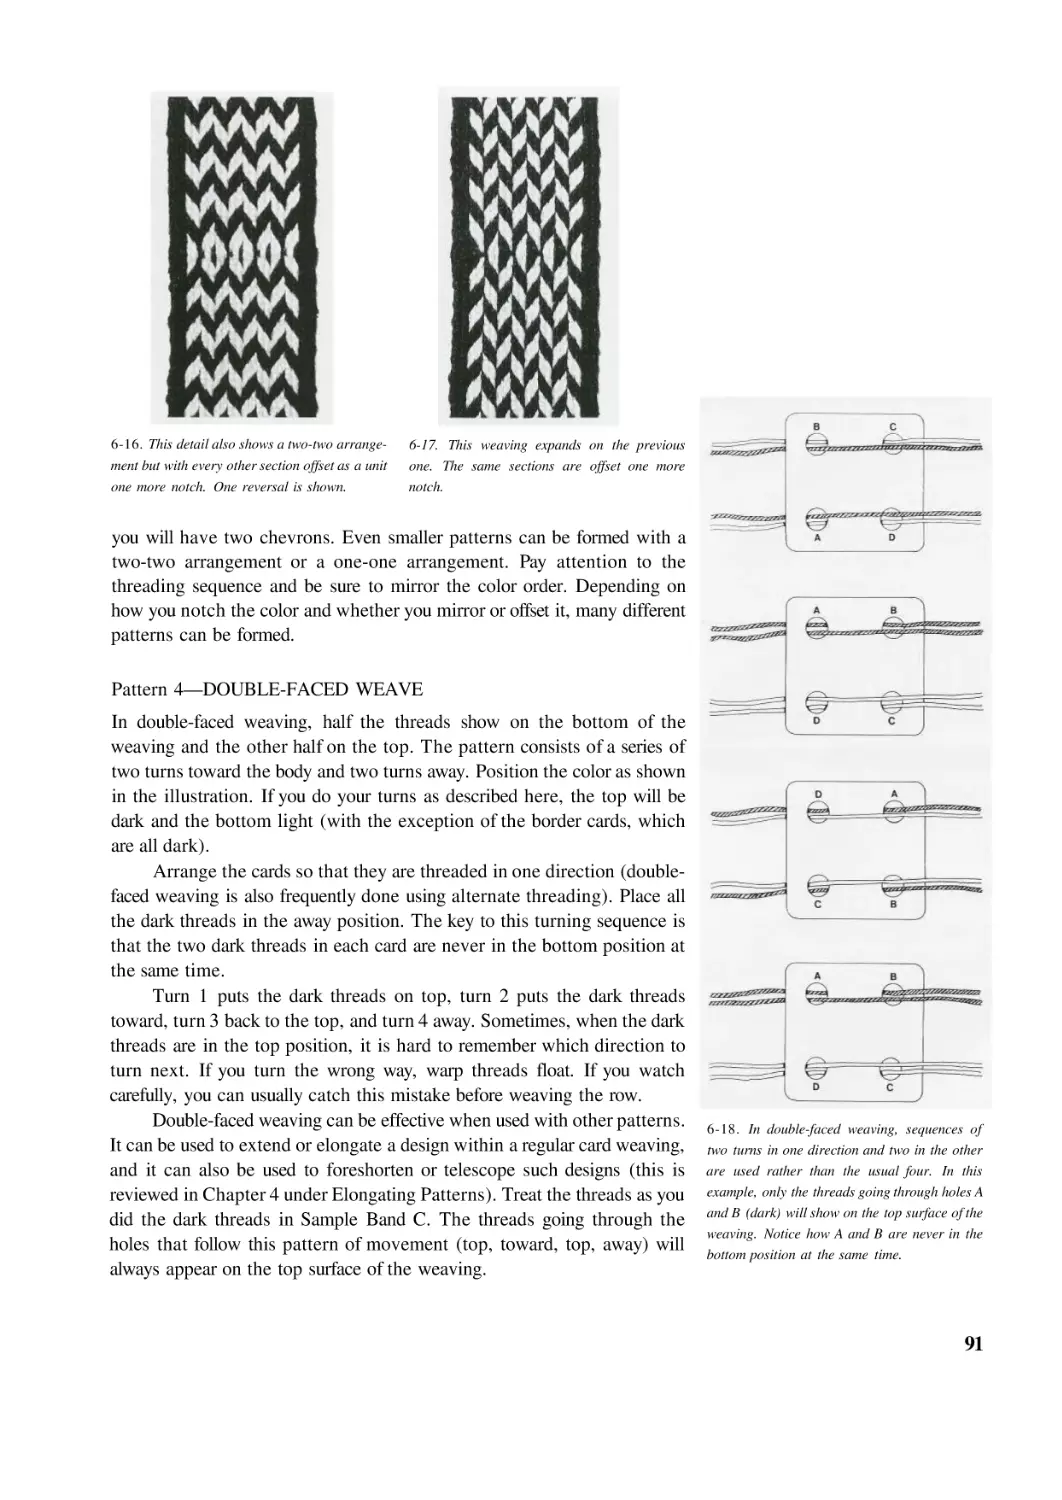
In Conclusion
83
84
86
87
88
91
96
98
102
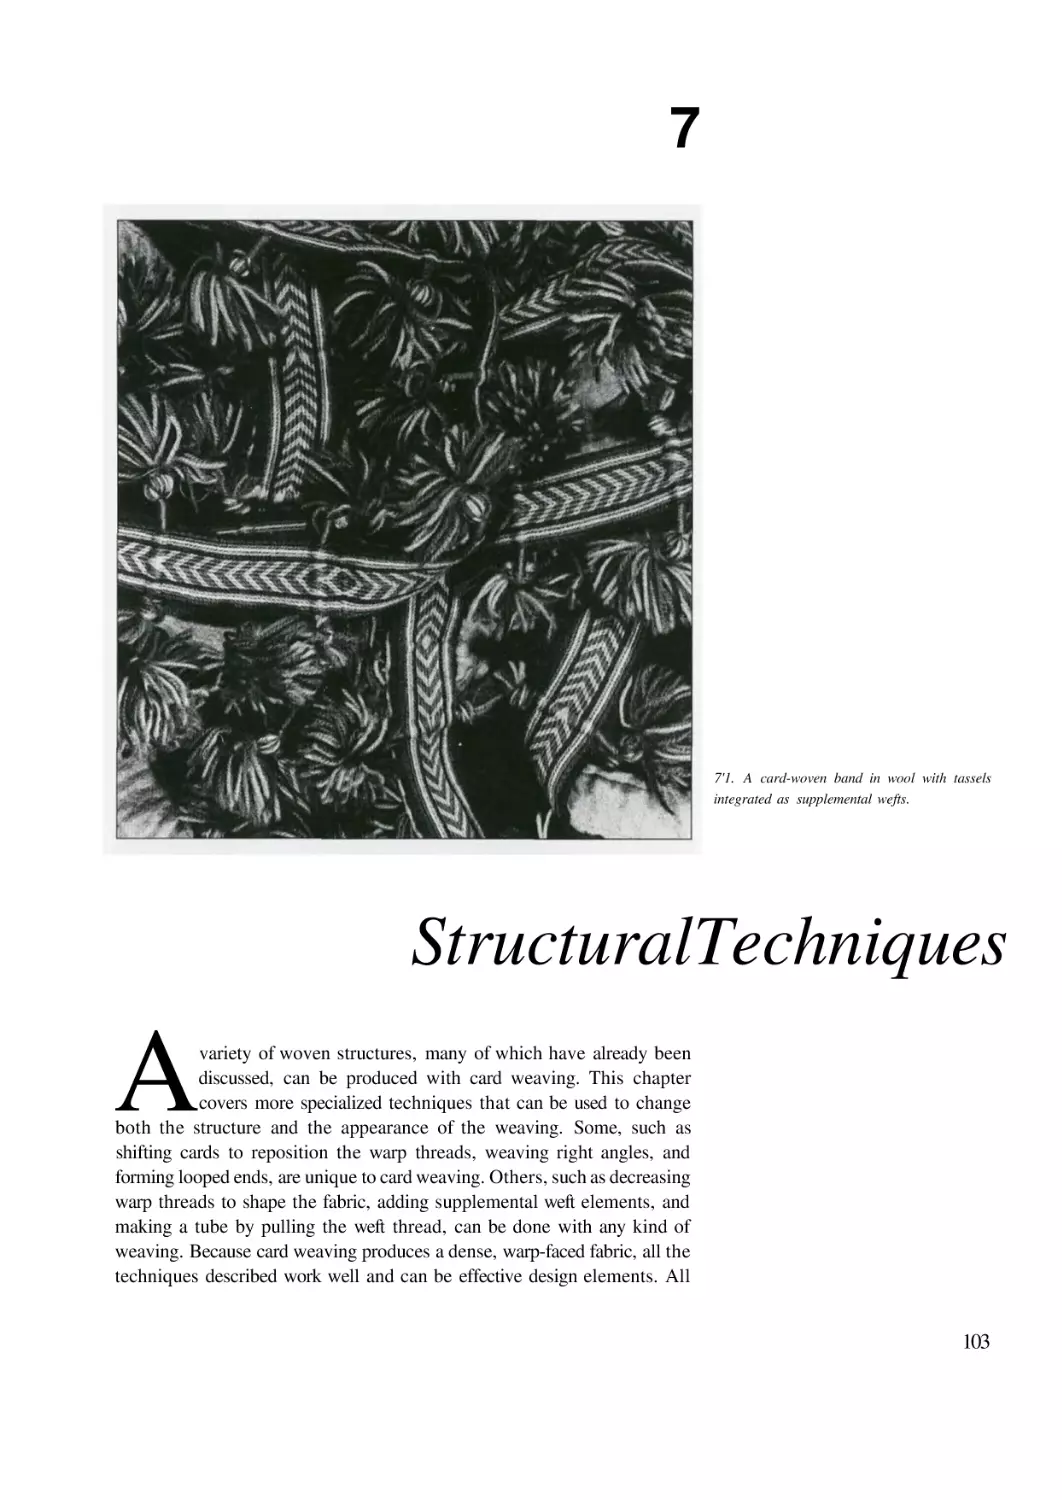
7. STRUCTURAL TECHNIQUES
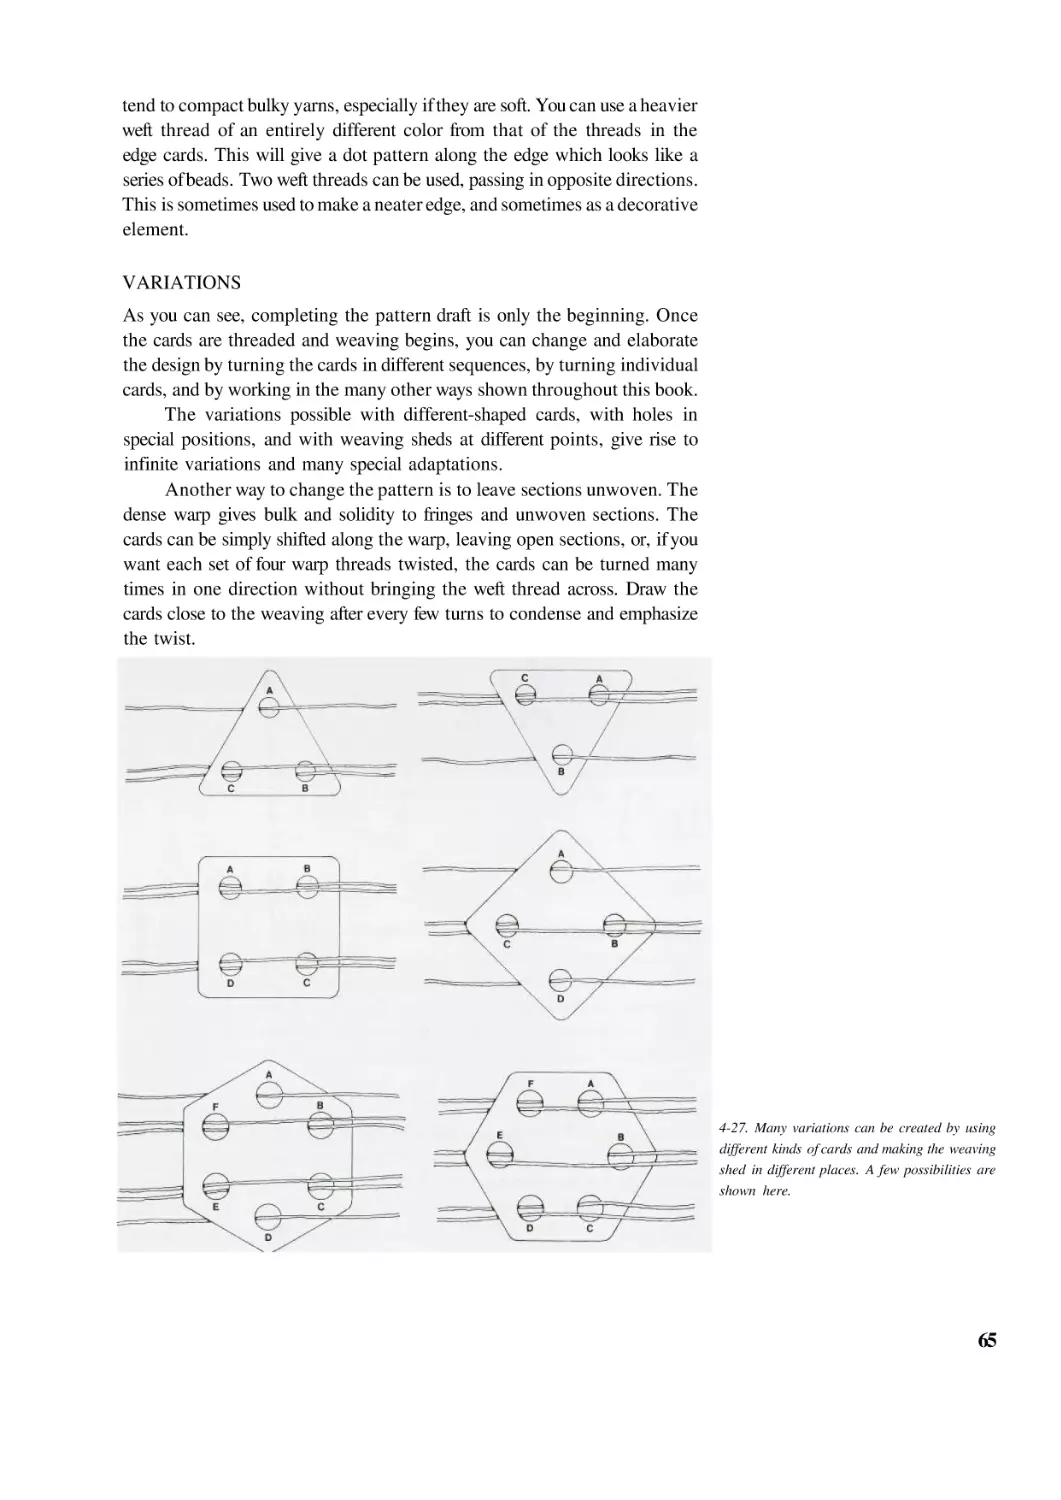
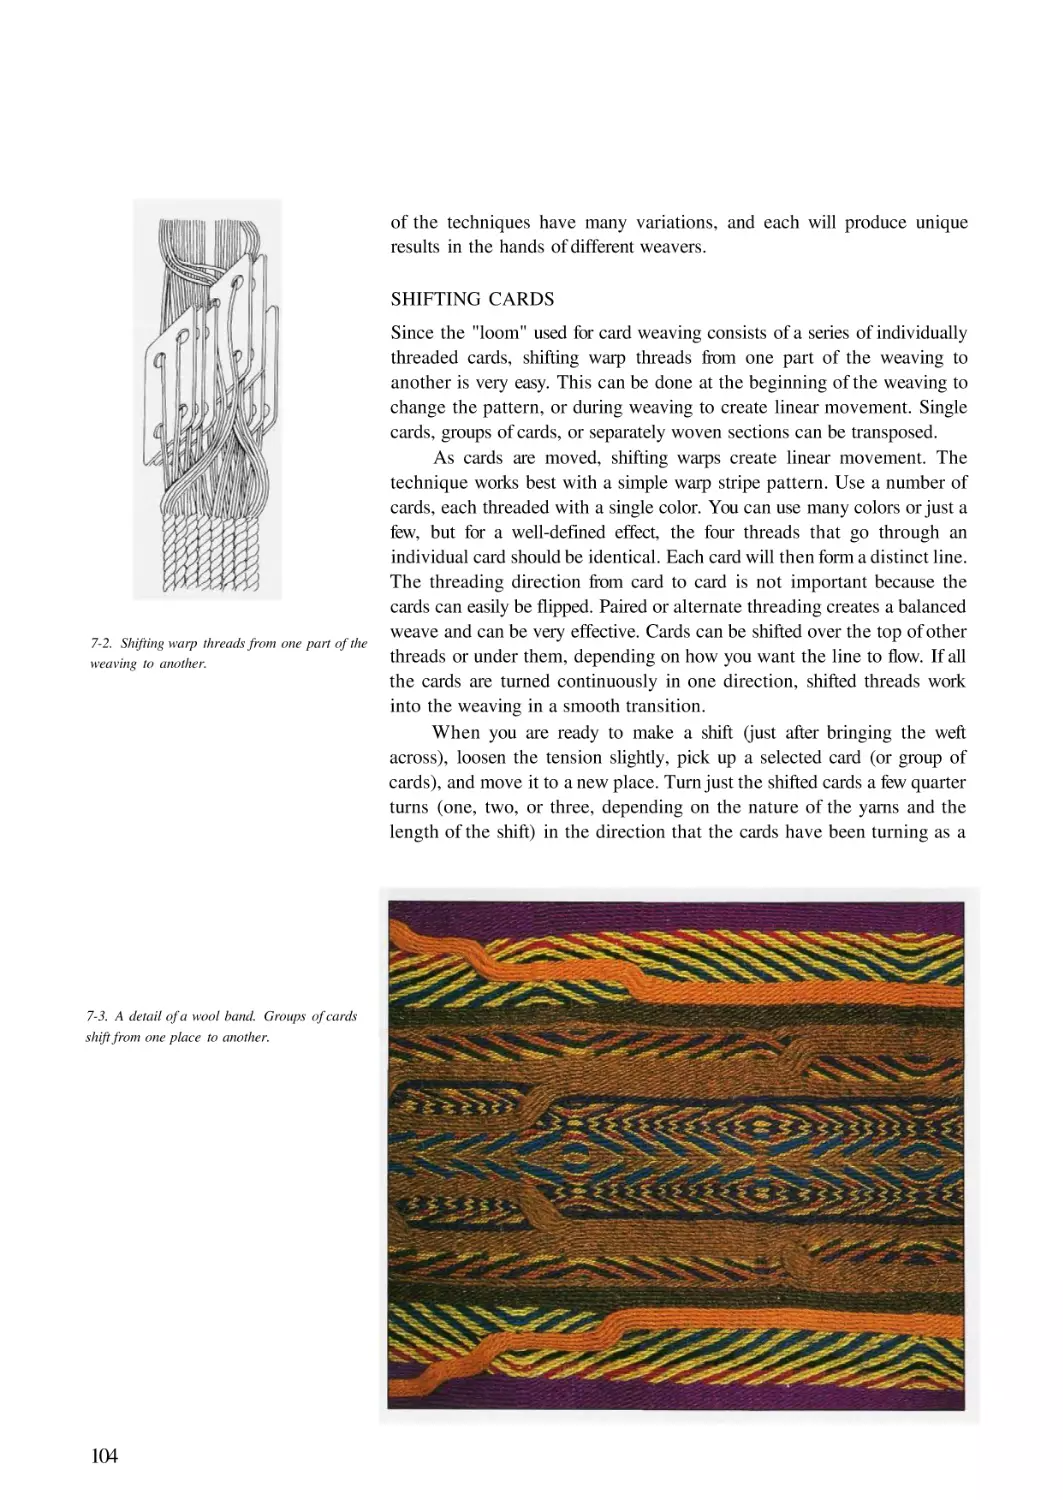
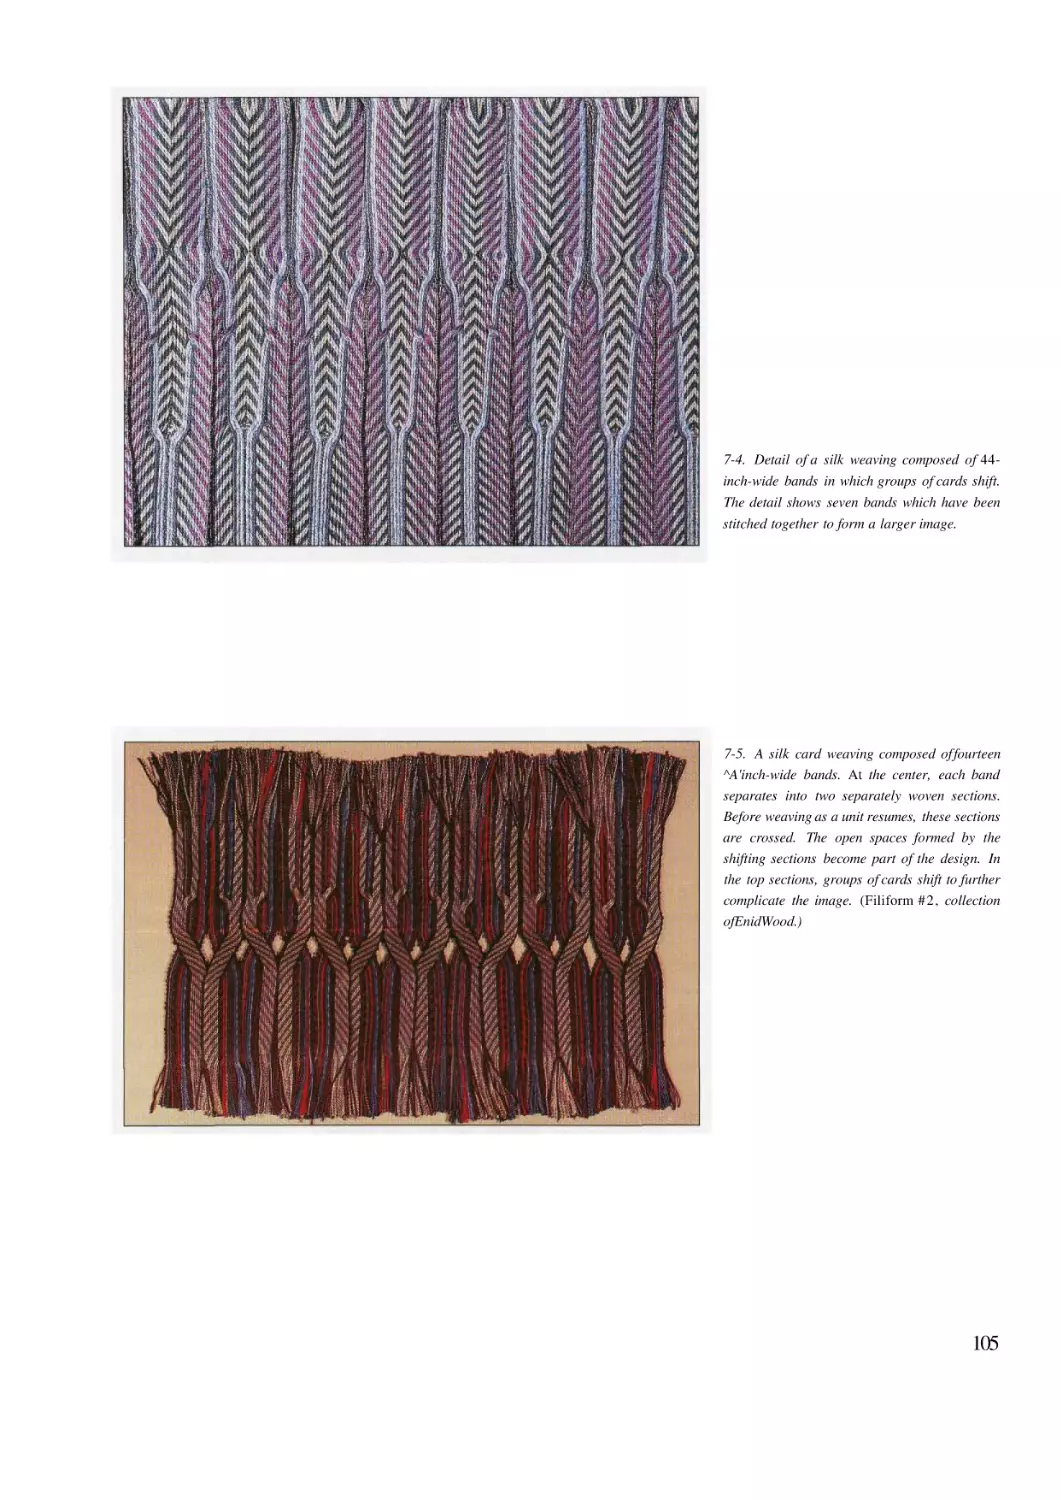
Shifting Cards
Decreasing and Increasing Warp Threads
Varying the Warp Threads
Supplemental Wefts
Tubular Weaving
Slits and Loops
Curves and Angles
103
104
106
107
108
110
114
115
8. FINISHING
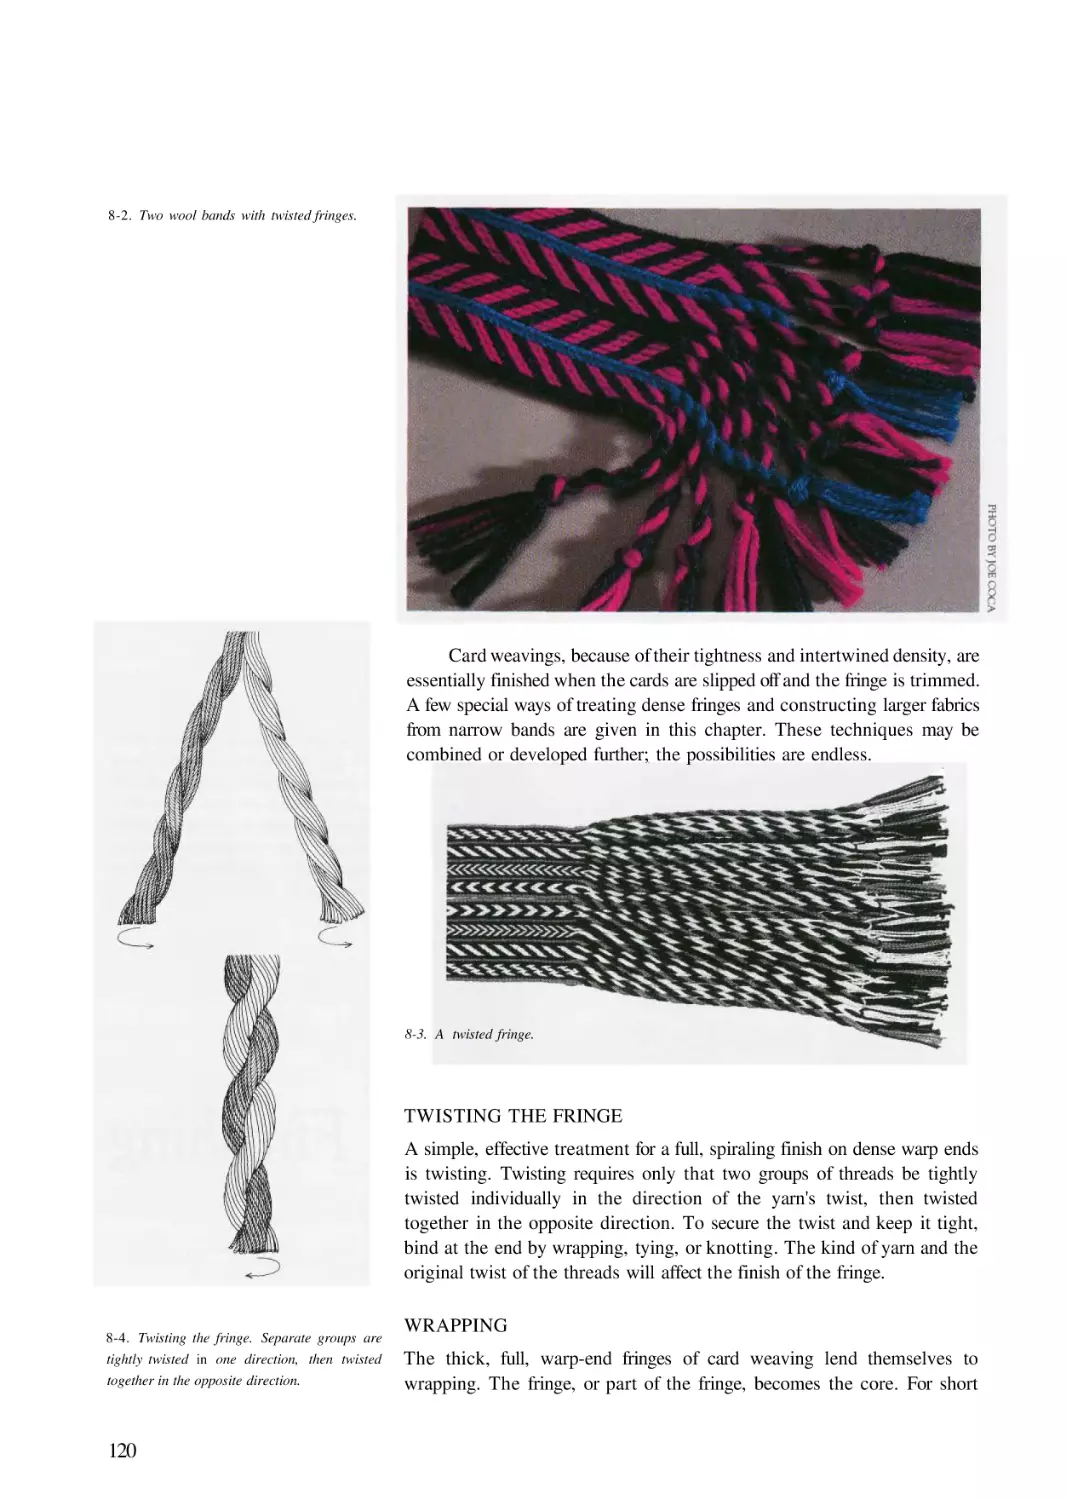
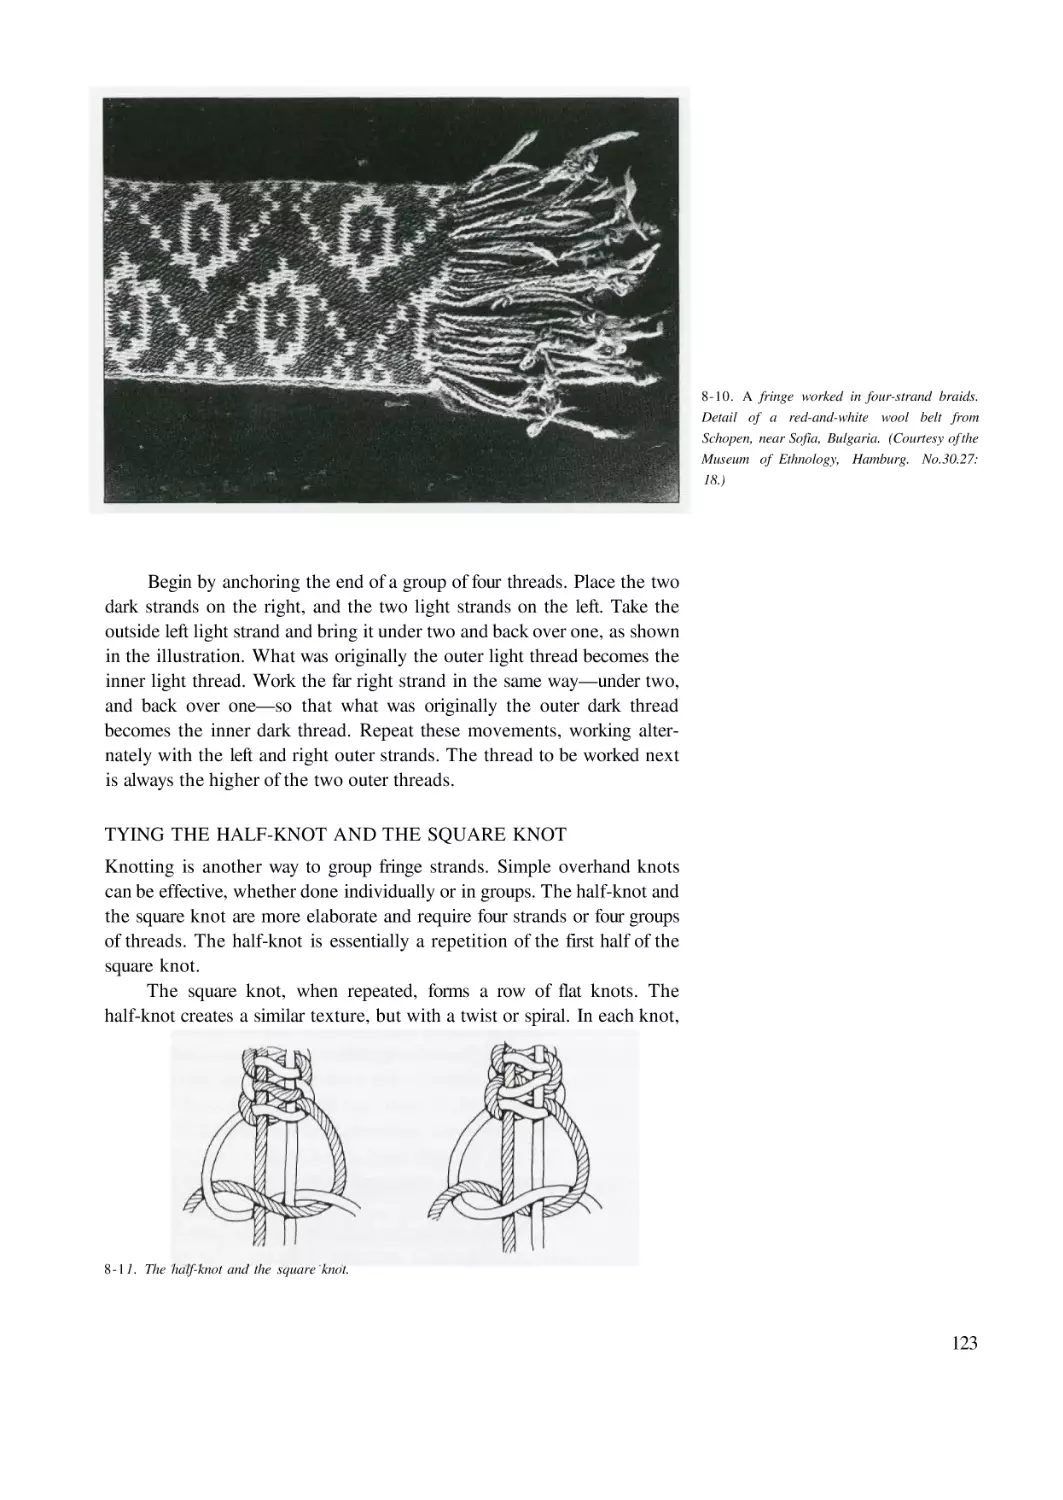
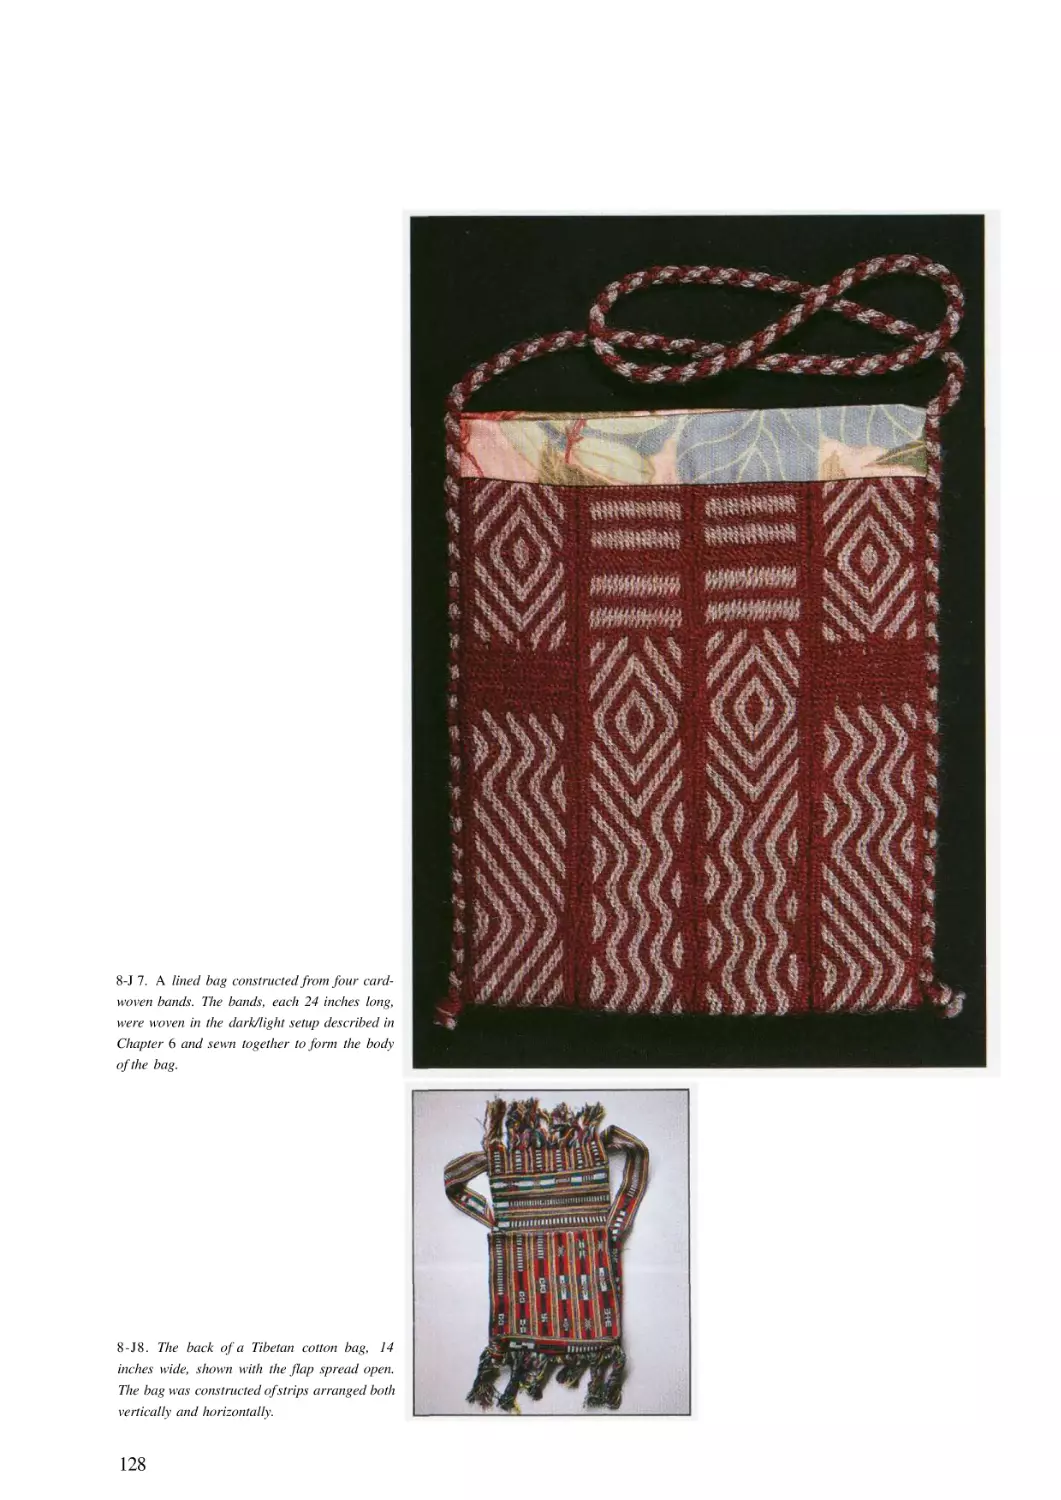
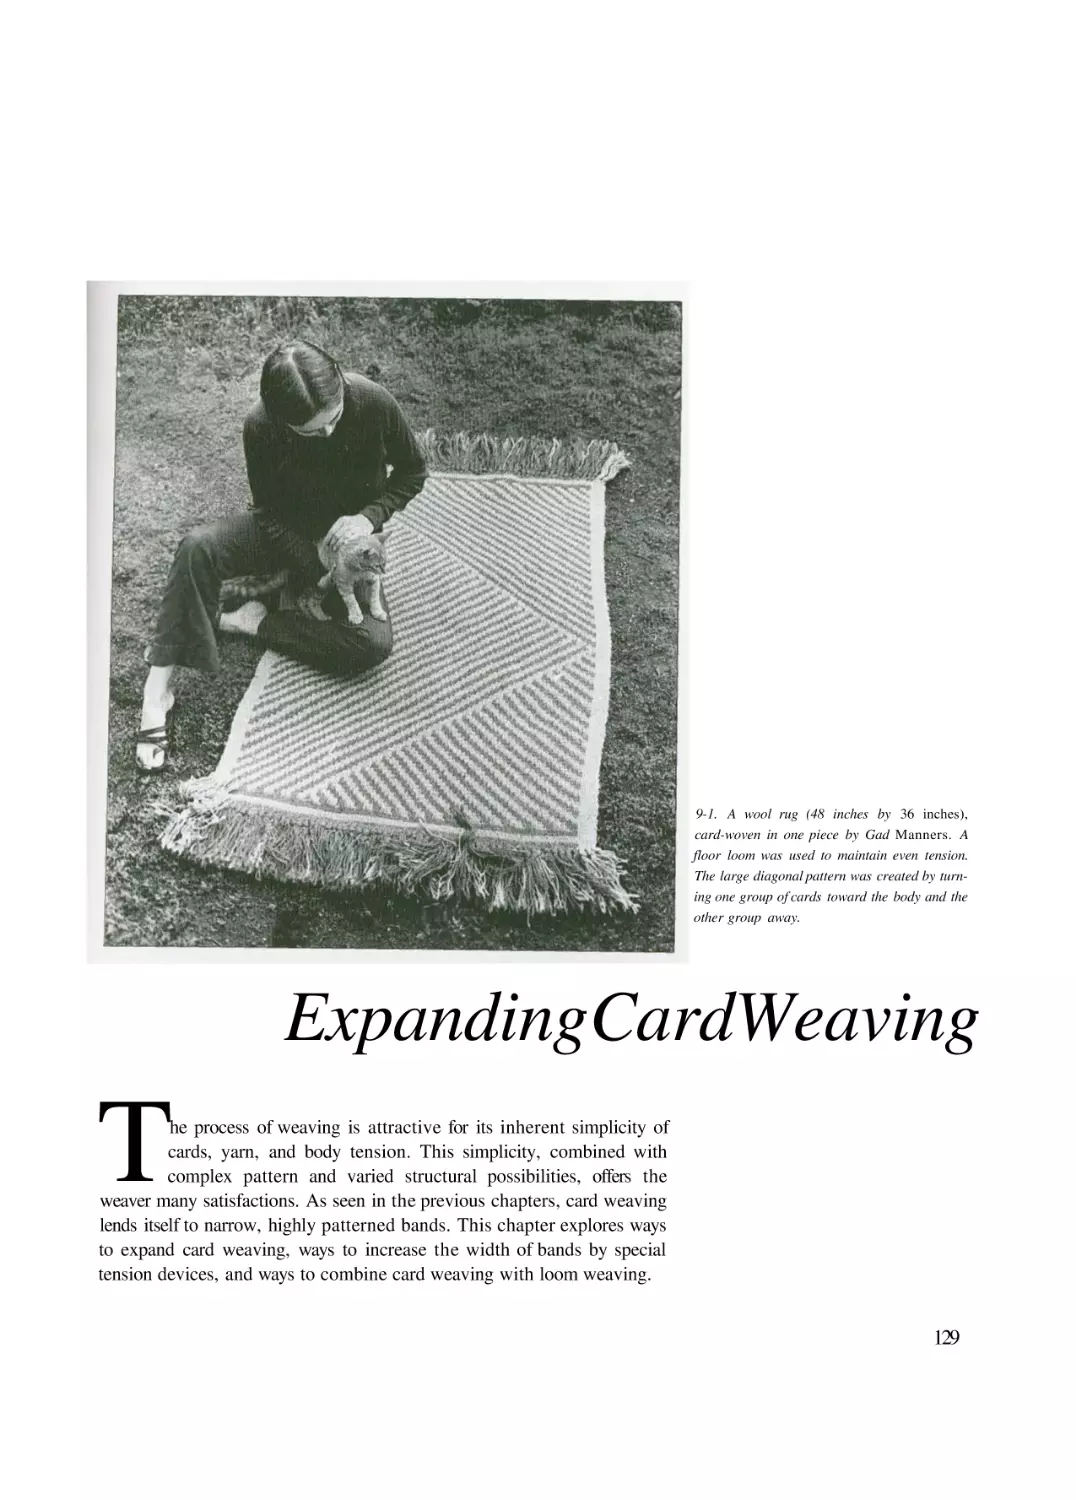
Twisting the Fringe
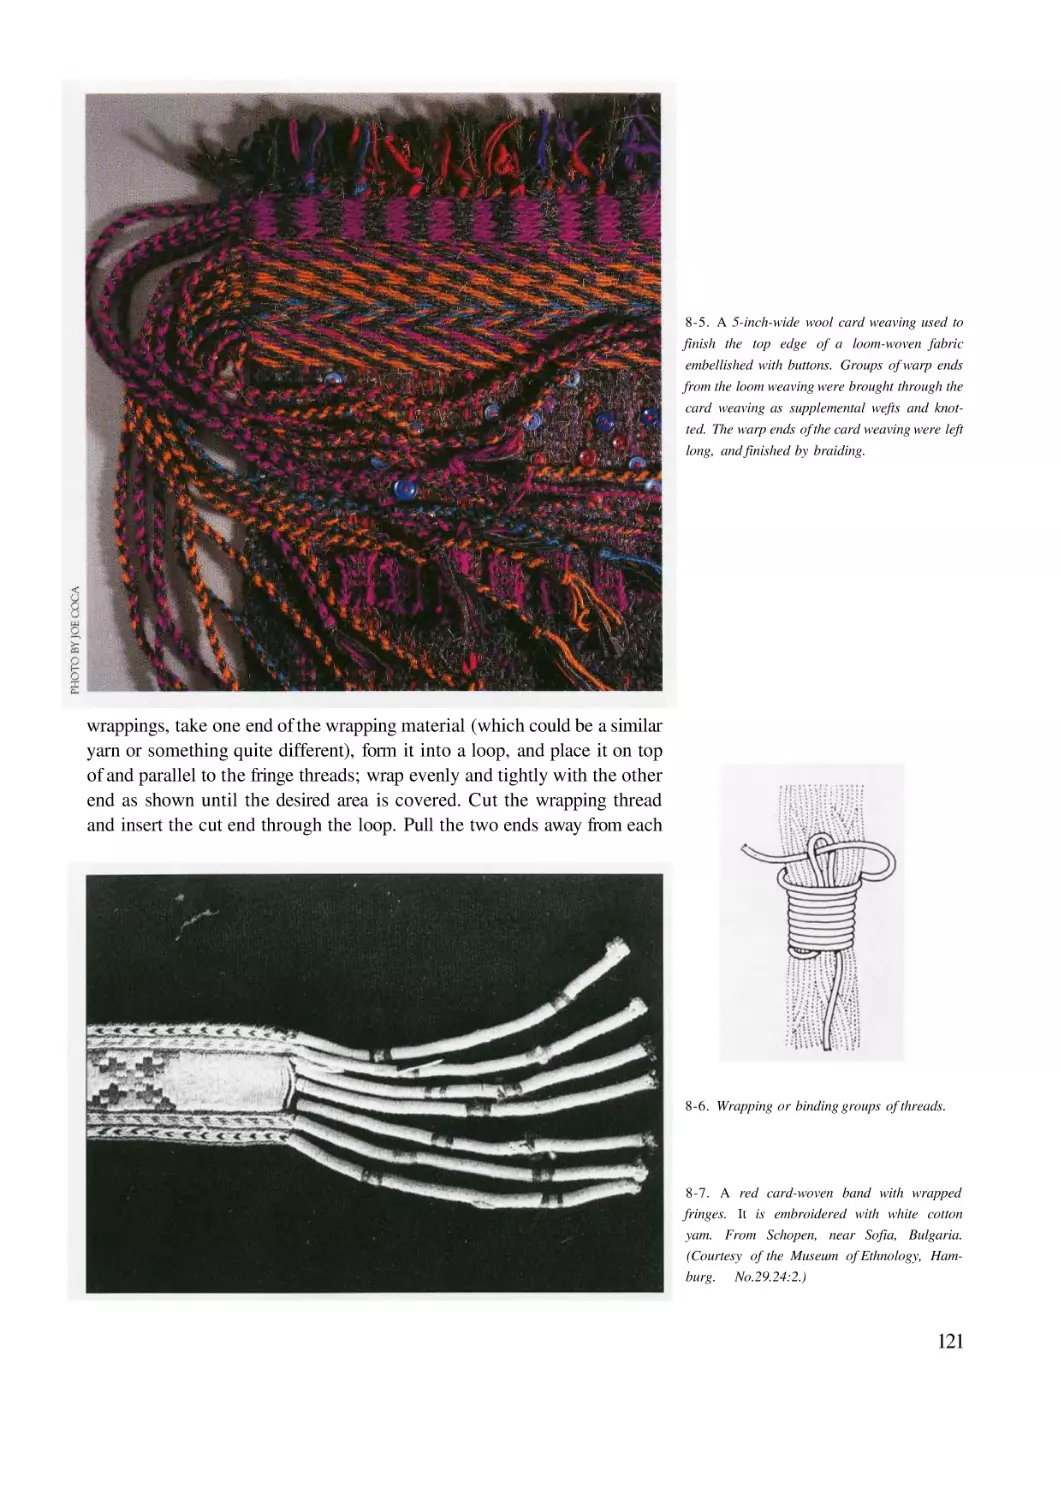
Wrapping
Four-Strand Braiding
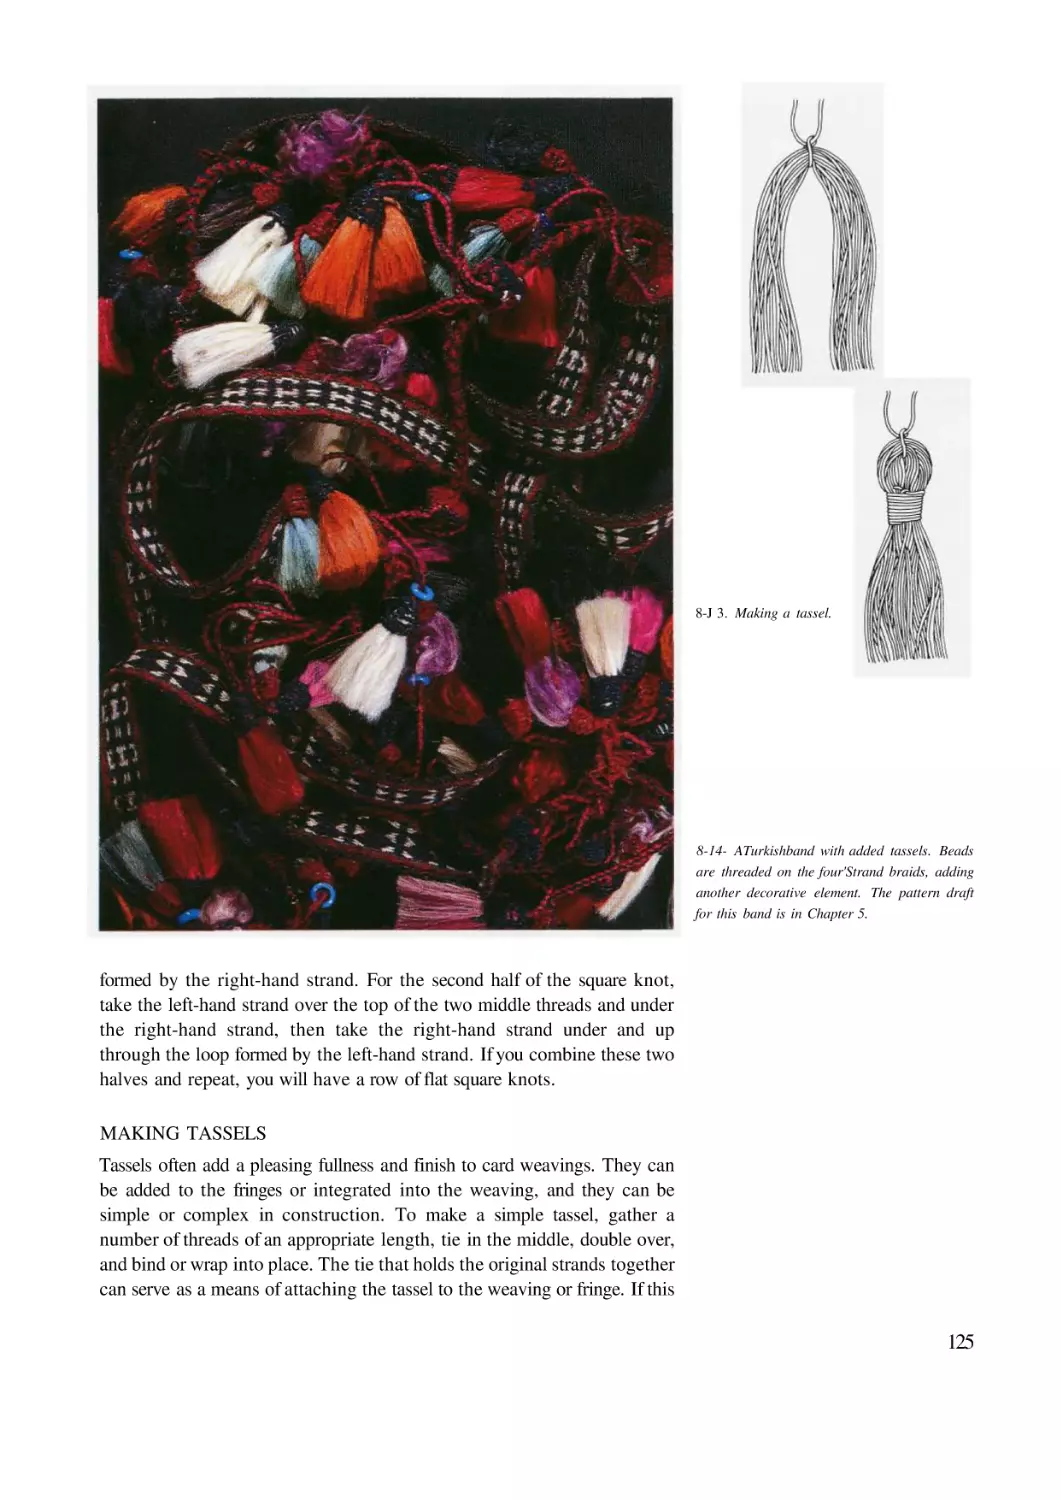
Tying the Half-Knot and the Square Knot
Making Tassels
Sewing Strips Together
119
120
120
122
123
125
126
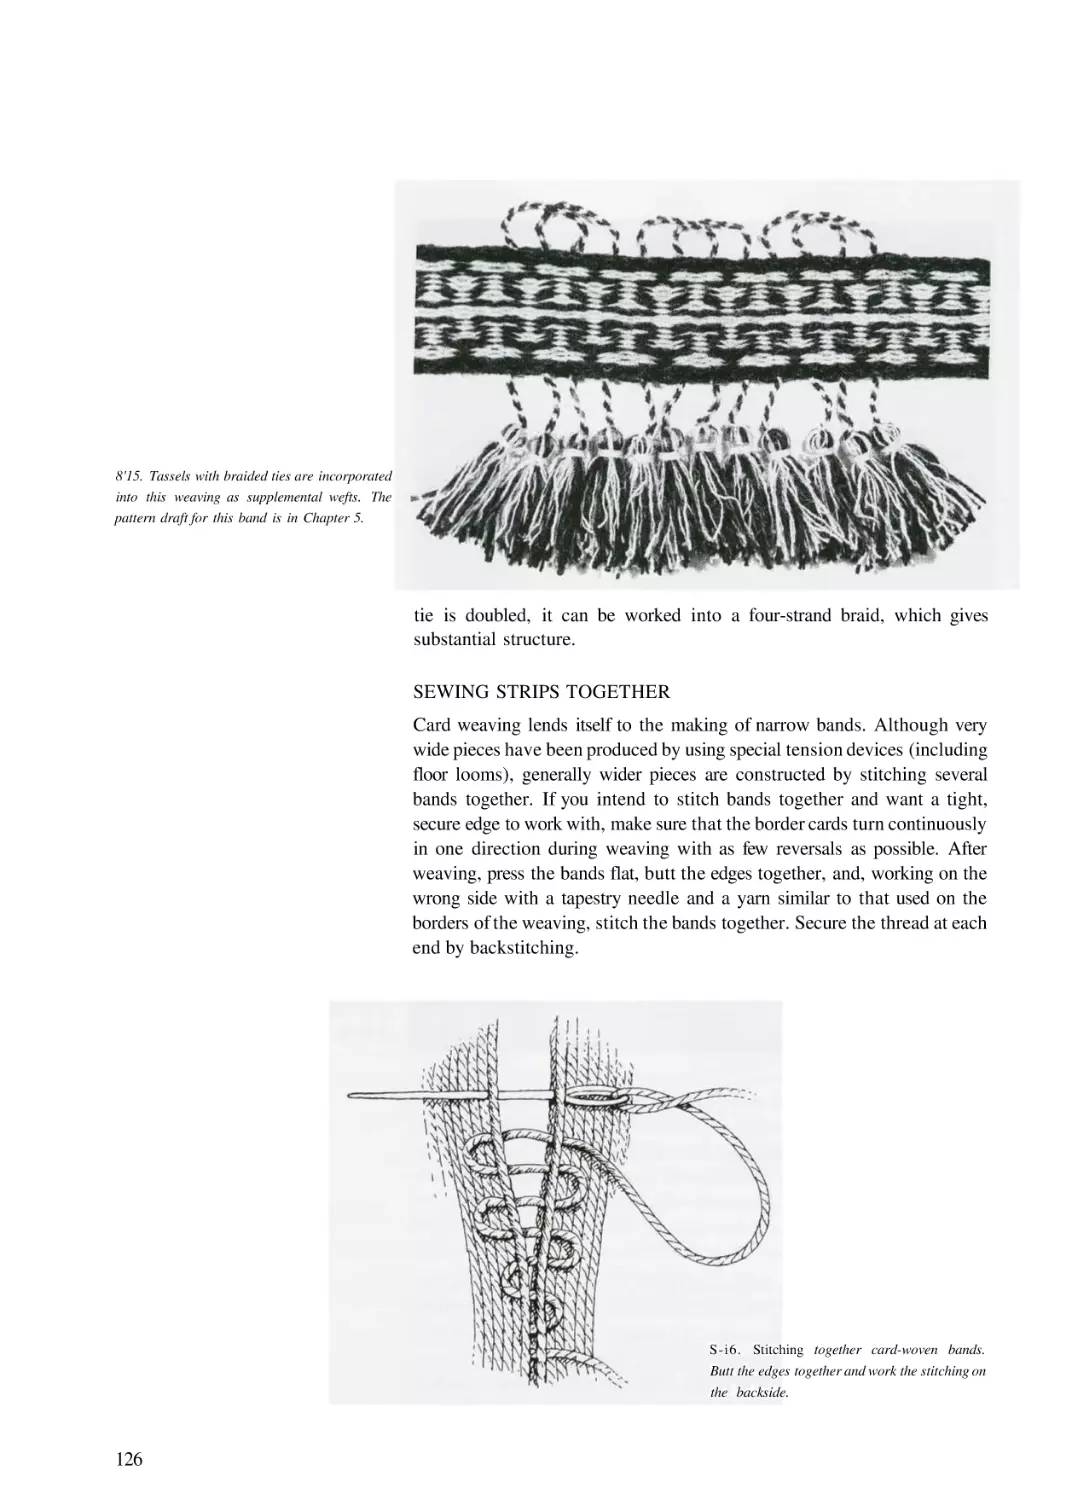
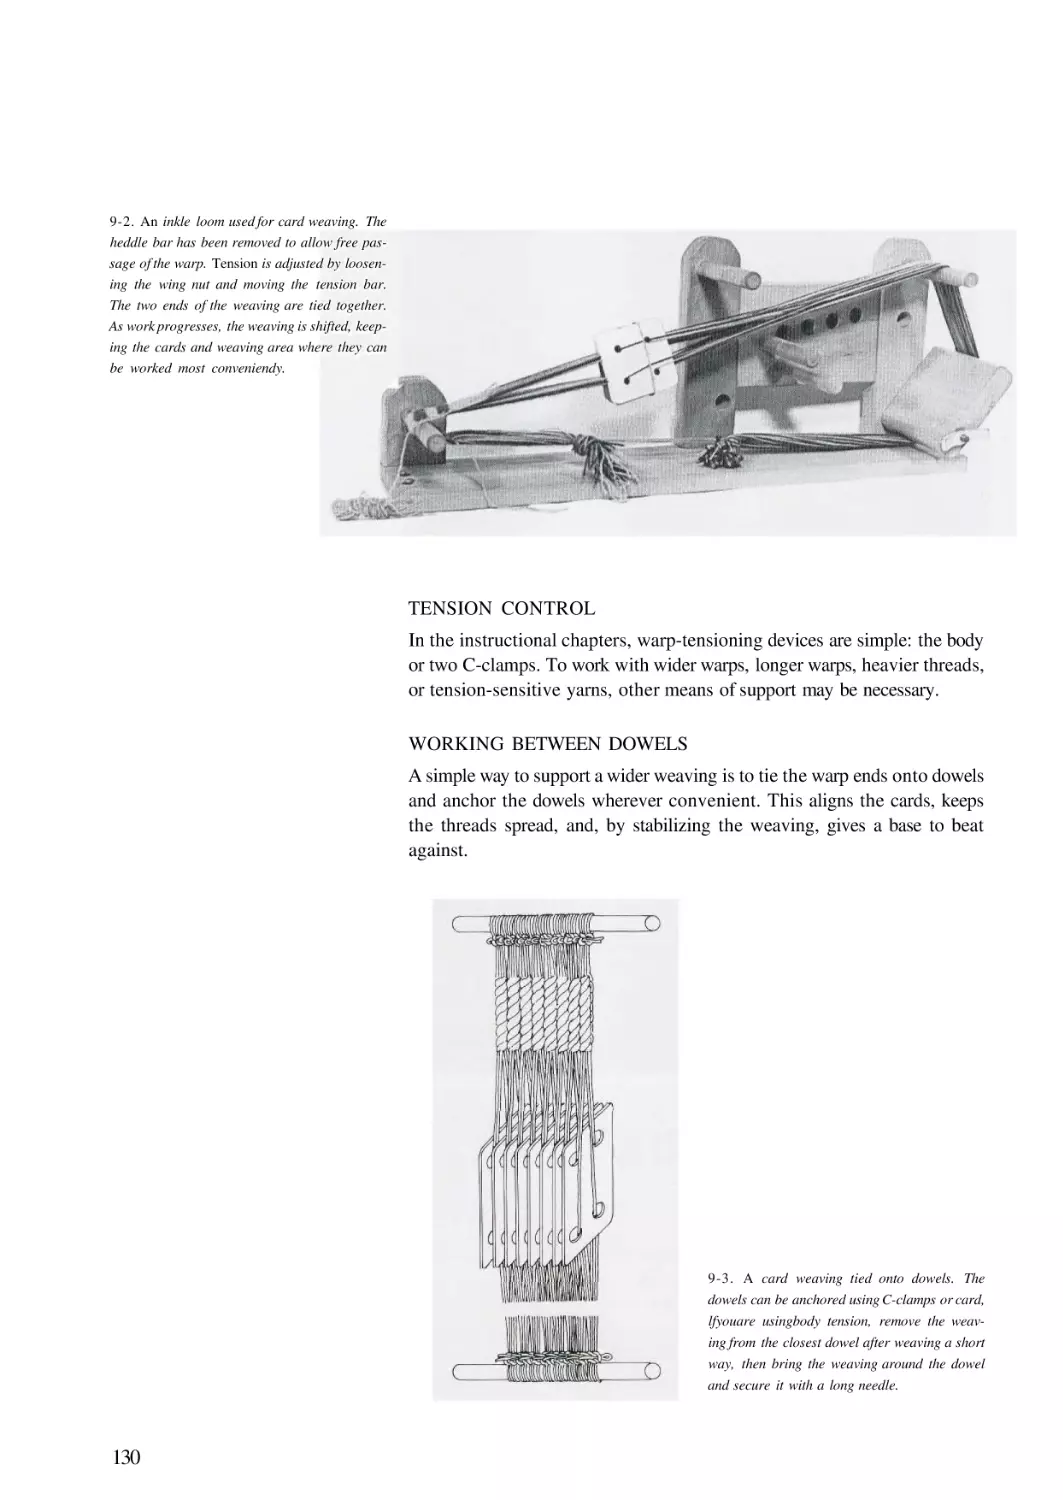
9. EXPANDING CARD WEAVING
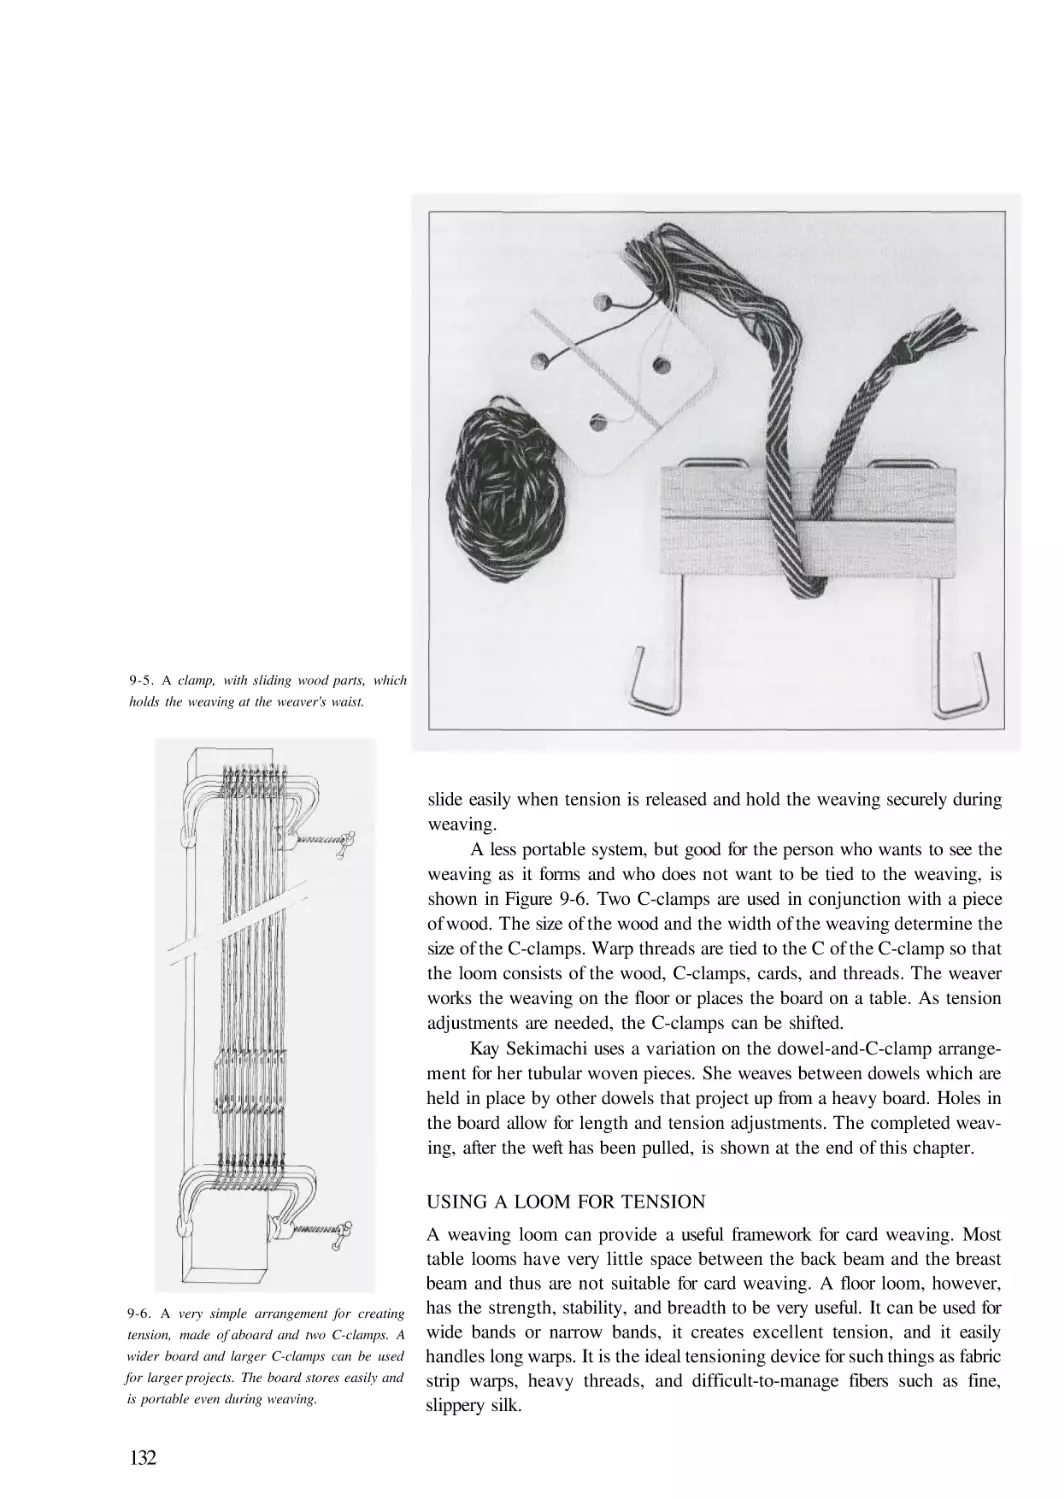
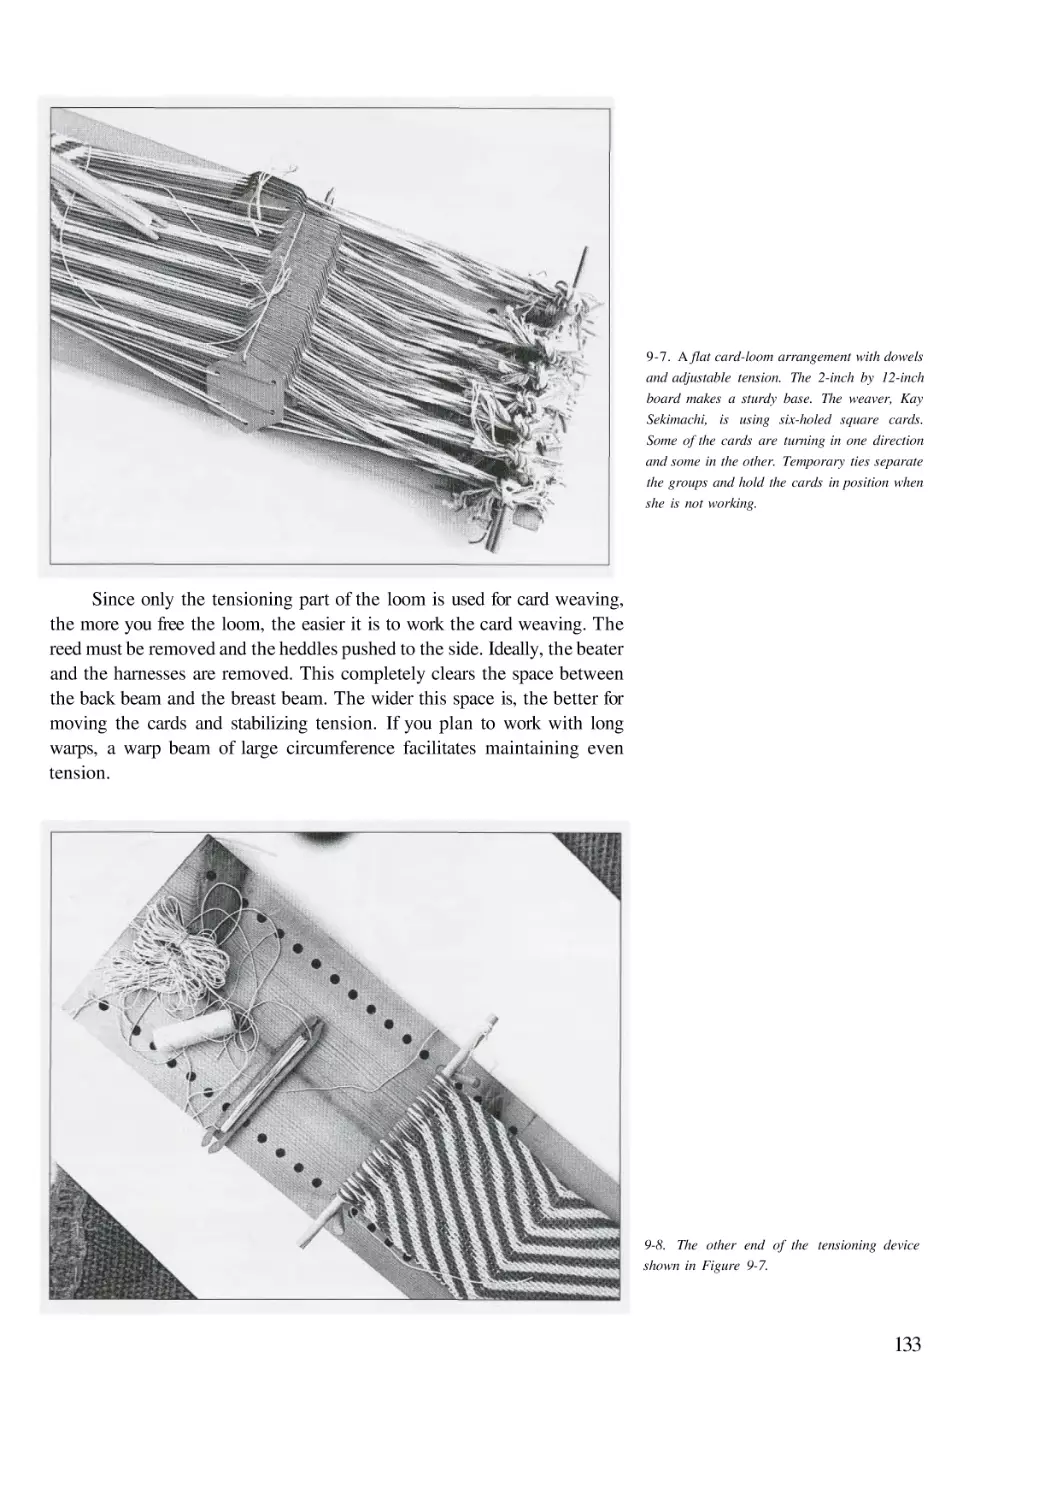
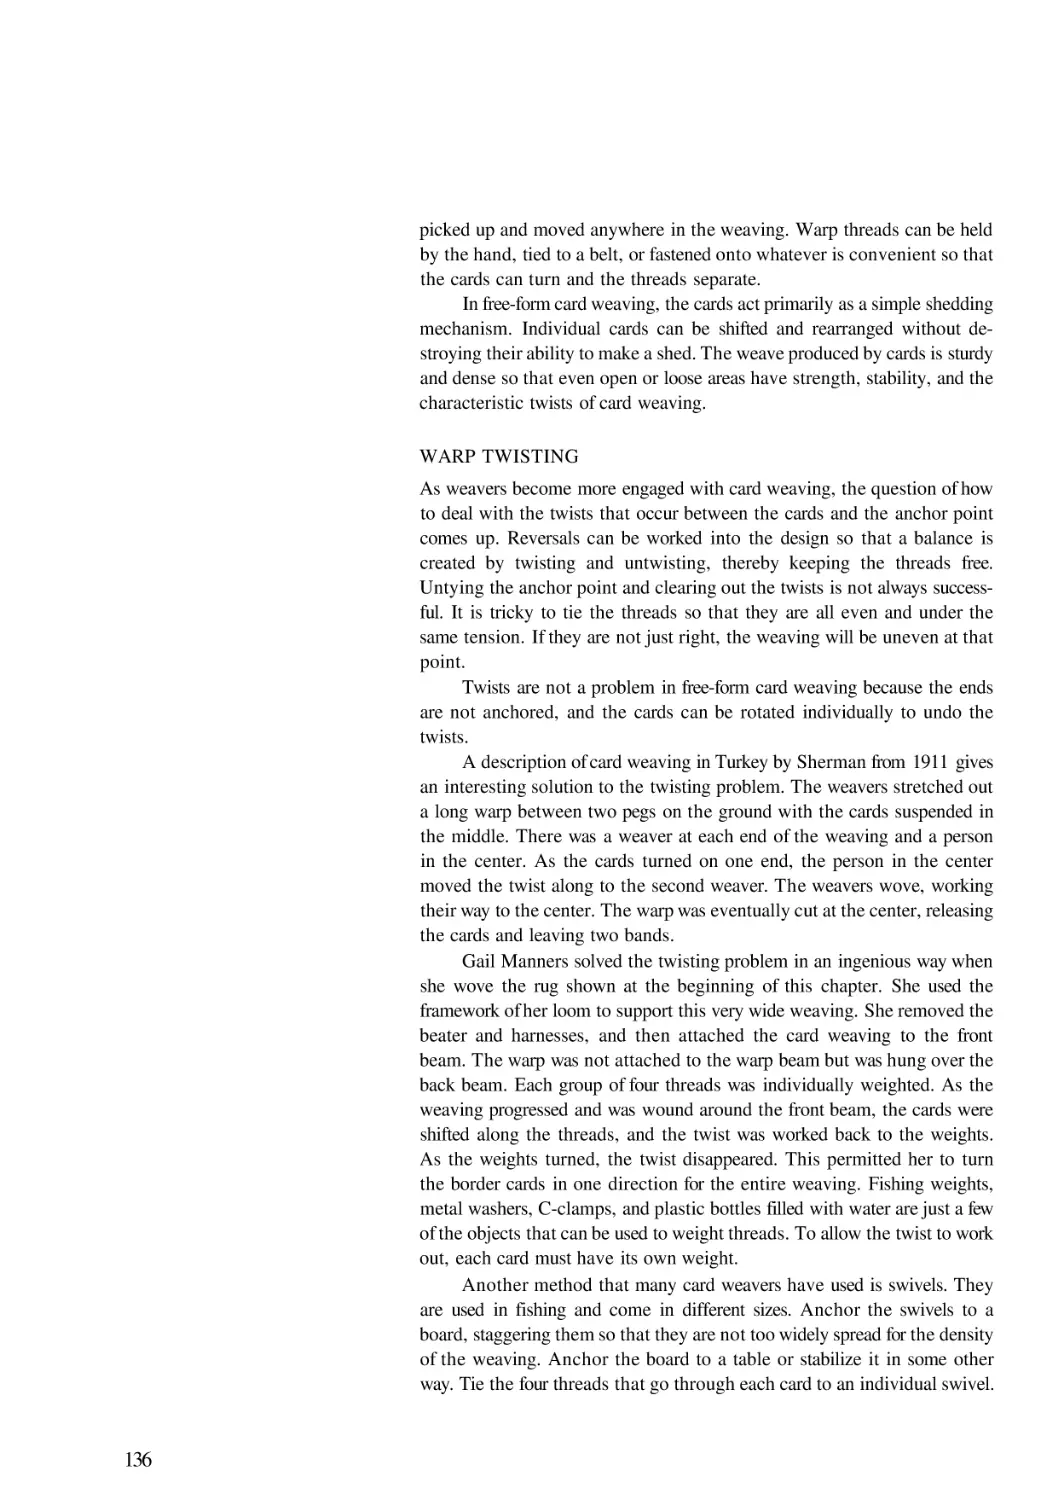
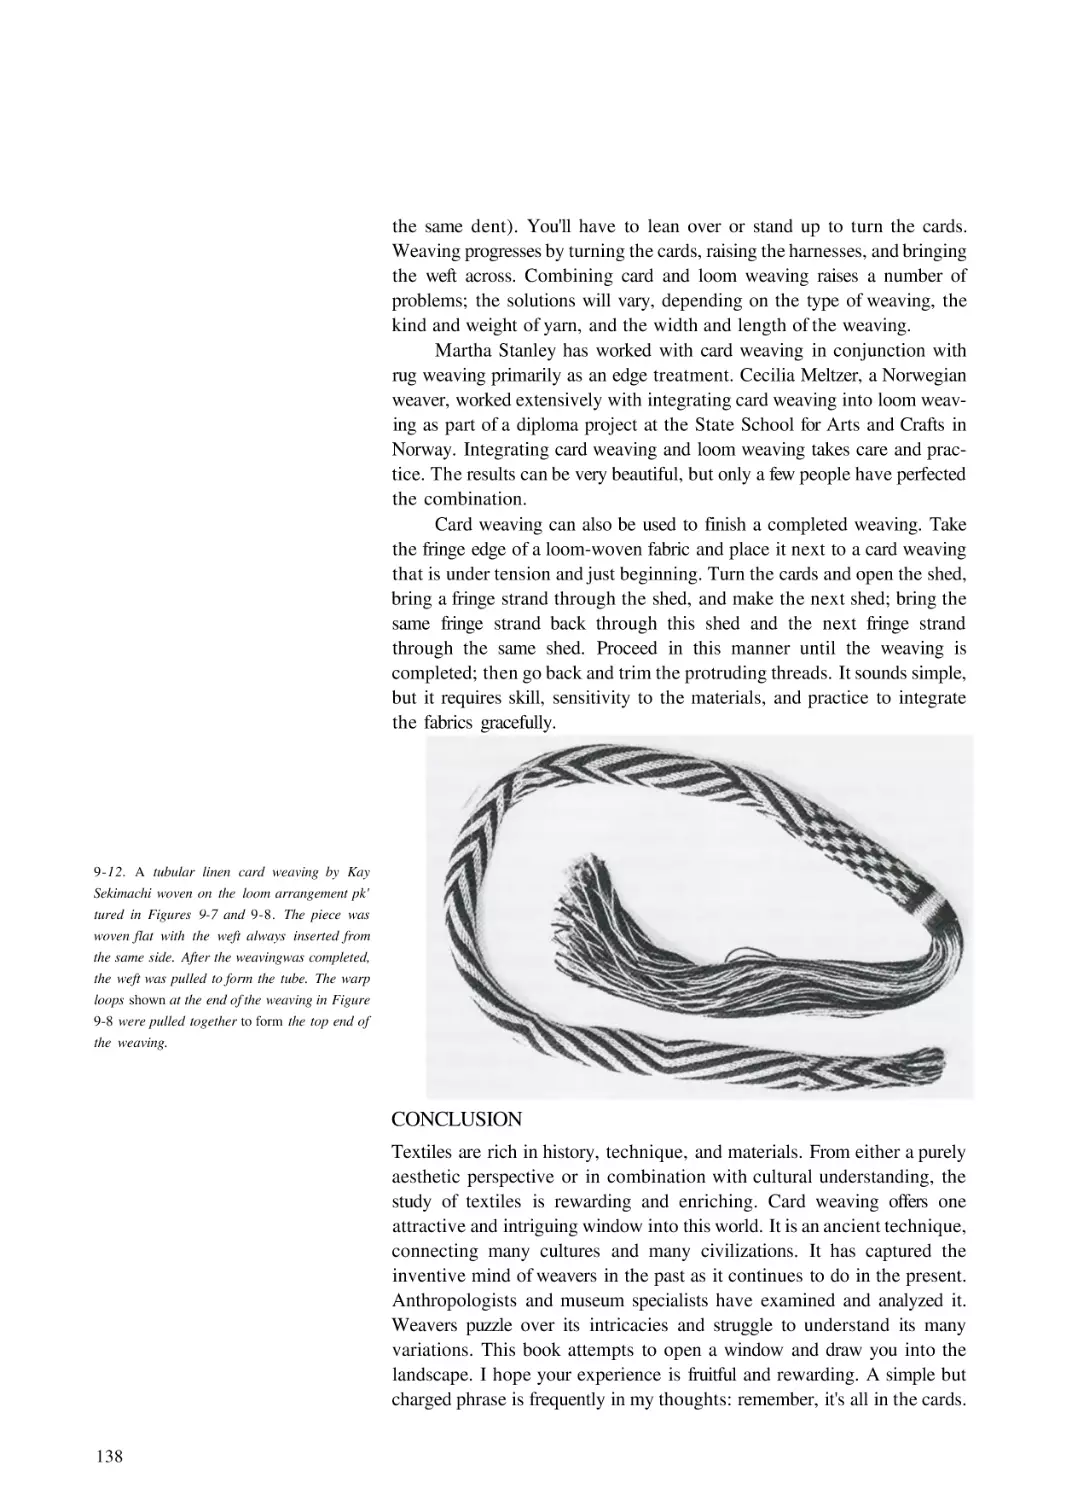
Tension Control
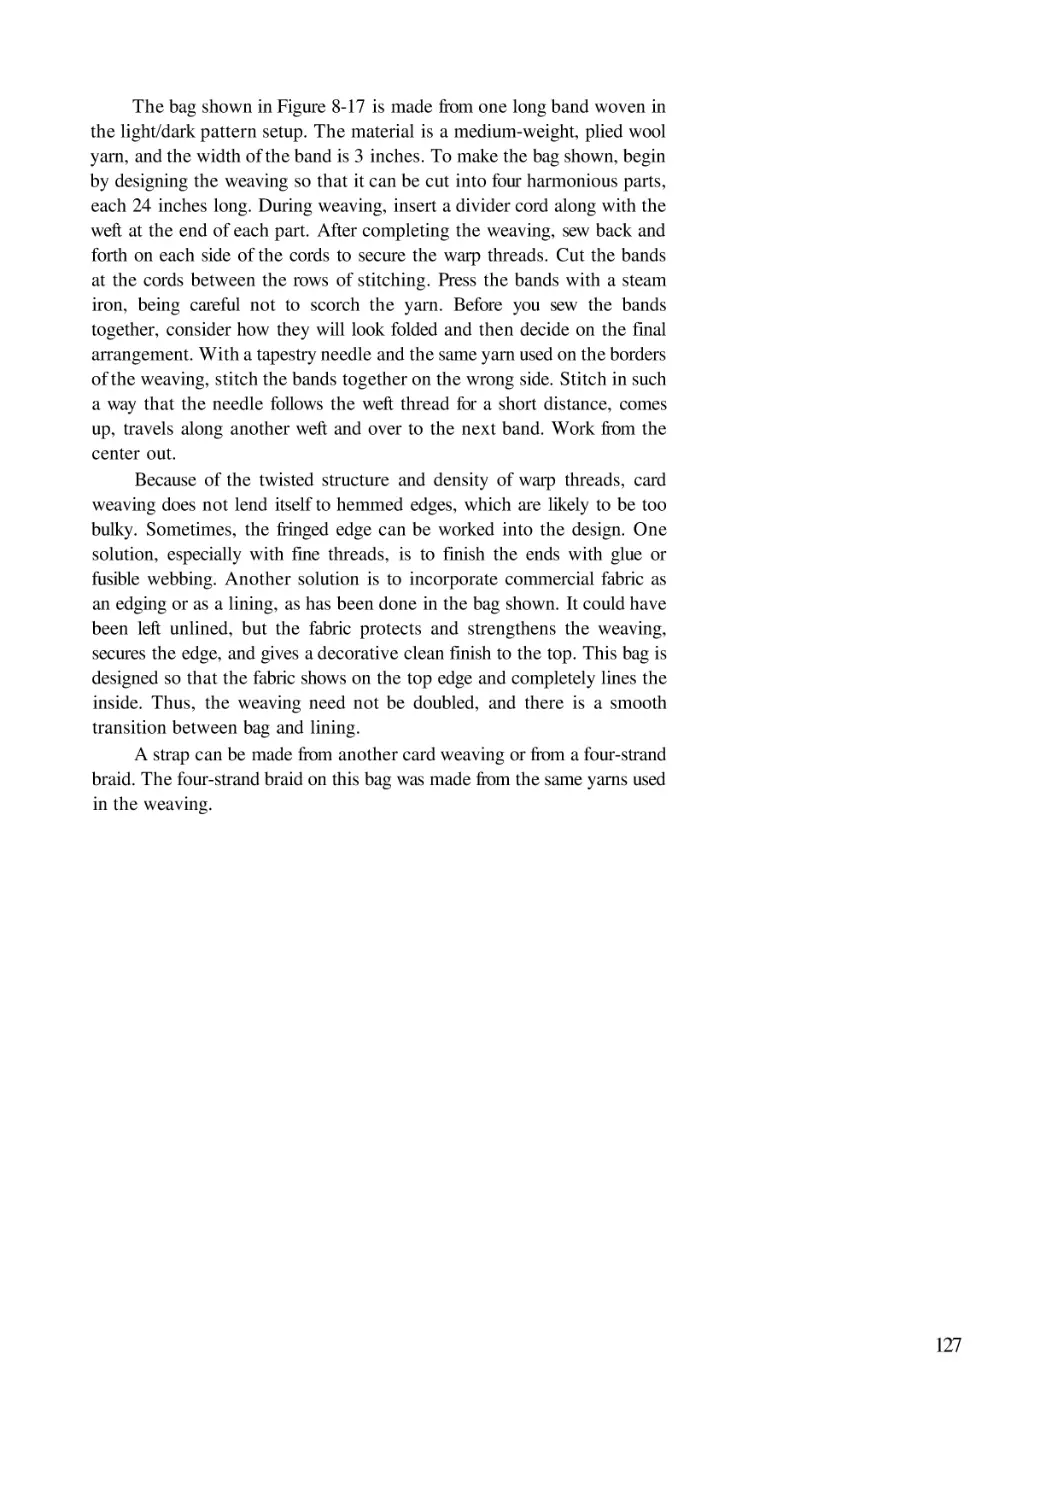
Working between Dowels
Tension Knot
Using a Loom for Tension
Free-Form or Open-Ended Card Weaving
Warp Twisting
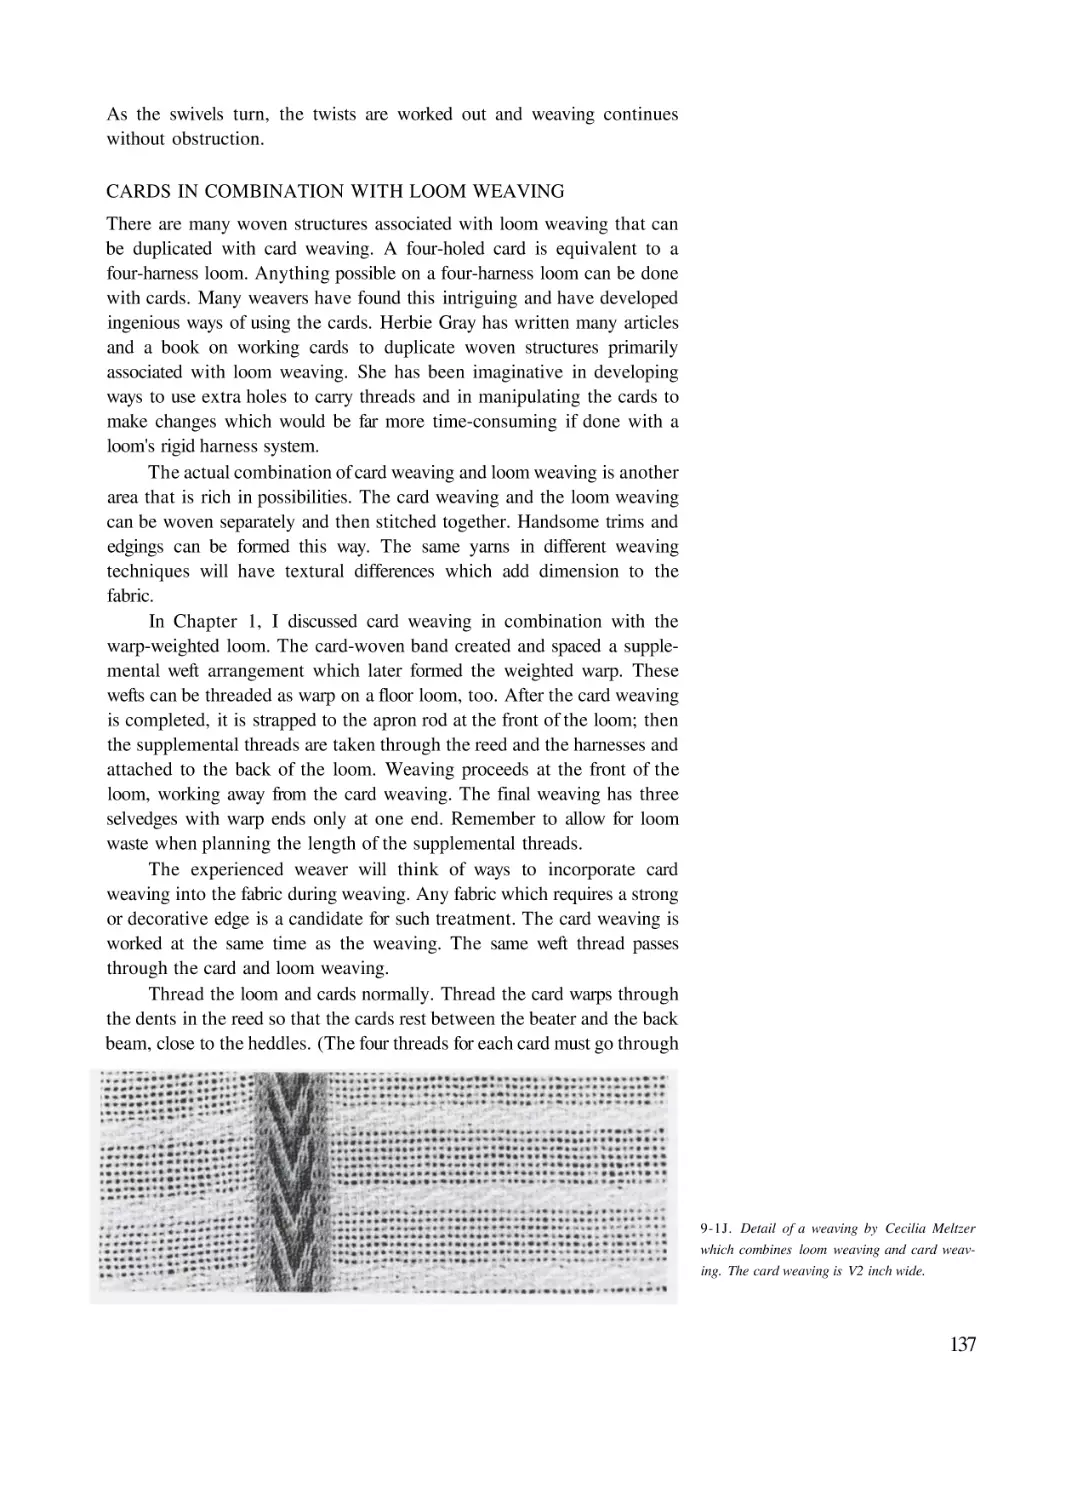
Cards in Combination with Loom Weaving
Conclusion
129
130
130
131
132
135
136
137
138
SELECTED BIBLIOGRAPHY
139
SUPPLIERS
140
INDEX
141
1
] - ] . A sixteenth-century French tapestry in
Rheims Cathedral, showing a card weaving in
progress with six-holed cards strung between
two columns. (Courtesy of the Board of Trustees of the Victoria and Albert Museum, London. No. 49452.)
A History of Card Weaving
C
ARD WEAVING IS an ancient craft in which simple cards, or
flat tablets, form the "loom". Yarns are threaded through holes
in a set of cards or flat tablets. These cards are rotated to create
patterns in the weaving. Card weaving has traditionally been used for
making strong, narrow, decorative bands. In China, card weaving was used
to make reins, bridles, and saddle girths. Nomadic tribes in Turkey used
long card-woven bands to tie, suspend, and attach a variety of items. In
1-2. A card weaver near Kutais, Caucasus
(USSR), after a sketch done by M. Barteb in
1897. The weaver, working on a circular warp,
moves the warp around as the weaving progresses. Tension is maintained by the pegs and
the weavers knee. A comb spaces the warp
threads and helps maintain the width of the
weaving.
northern Africa, card weavers in local markets wove valuables into belts.
The monks of Burma wore card-woven girdles that were red on one side
and yellow on the other. In Bulgaria, the traditional peasant costume
includes a card-woven sash 20 to 27 feet long in bold patterns that wraps
several times around the waist. In Yugoslavia, woolen card-woven bands
with long fringes were used to trim aprons. In Greece, the red garters of the
national costume were card woven. Bands with inscriptions were used as
love tokens in Iceland and Persia. Almost without exception, the bands
from the past were narrow, strong, and decorative.
Card weaving developed and continues to exist in widely scattered
parts of the world. It has remained basically unchanged over two thousand
years, is easy to learn, and requires little equipment. Nonetheless, it is a
sophisticated craft capable of producing complex weaves and woven struc-
1-3. A red, white, blue, and black camel strap
from Turkey in tightly twisted wool yarn. Dyed,
unspun goat-hair tassels are attached to the
fringe with four-strand braids. Twentieth century. (Author's collection.)
tures unachievable with any other technique. The simplicity and the
relative ease of working with the cards, the complexity and variety of
patterns, the full texture and beauty of the woven fabric, and its rich history
all make card weaving a uniquely rewarding and gratifying activity. Today,
as in the past, people who love intricacy in pattern and structure are drawn
to card weaving.
CARD WEAVING: AN EXPLANATION
In loom weaving, the longitudinal threads, or warp, pass through harnesses
that alternately raise and lower them in fixed sequences, forming a shed, or
space, through which to pass the weft thread. In card weaving, the shed is
created by turning or rotating the cards, usually as a unit. The cards can be
any shape or size, but today most are square, about 4 inches by 4 inches,
with a hole in each corner. Once the cards are threaded, with the warp
threads passed through the card holes and anchored for tension at each
end, the "loom" is ready. (This process is described in detail in Chapter 3.)
At any point during weaving, cards can be individually turned to put warp
threads in different relationships.
Card weaving produces a warp-faced fabric. The threads that are
visible in the completed weaving are the warp (longitudinal) threads that
were originally threaded through the card holes. The weft thread simply
binds the warp threads in place and is hidden in the weaving. Each rotation,
or turn, of the cards brings new warp threads to the surface and forms a new
shed through which the weft will pass.
The threads that go through the holes in each card twist around each
other as the cards are rotated. This spiraling of the warp threads is characteristic of—and unique to—card weaving. It forms an important element
of the technique, relating it directly to braiding and cordmaking (just as
the use of the weft thread and shedding mechanism relate it to loom
weaving). The direction in which the warp threads twist, to the right or to
the left, is determined by the way individual cards are threaded and by the
direction the cards are turned. Much of the unique beauty of card weaving
is the result of these twists in the structure of the fabric.
When scholars study ancient textiles, they look for three elements as
evidence of card weaving: (1) the presence of cards, (2) warp twisting in
the fabric, and (3) reversal lines which happen on both surfaces of the fabric
when the direction in which the cards were turned changes.
PATTERNS IN CARD WEAVING
Card weaving is capable of producing an infinite variety of complex
patterns. An amazing amount of change and complexity is possible within
a single band. Patterns can be predetermined by plotting them on a grid
indicating the arrangement of color, right or left threading, and the turning
sequence (explained in Chapters 4 and 5). Once weaving begins, the
weaver can create new textures and new patterns by simply shifting the
positions of individual cards or by changing the turning sequence. The
modern card weaver can create new designs, or use traditional patterns that
were first woven hundreds or even thousands of years ago.
Once the pattern is determined and the cards are threaded, the
weaving goes very quickly. Many card weavers get a special pleasure from
the knowledge that in each turn of the cards there is creative potential.
THE ORIGINS AND DISTRIBUTION OF CARD WEAVING
Evidence of early card weaving has been found in North Africa, Egypt,
Europe, Asia, and Iceland. Ancient card weavings have been found in
northern Europe and the East, but it is impossible to say where or by whom
card weaving was invented. The earliest known card comes from a fourthcentury B.C. Spanish grave. There are also strong indications that card
weaving has a long and varied history in Russia and China. Card weaving
may have been practiced for many thousands of years, and may have been
brought from the East through Rome to western and northern Europe.
Archaeological evidence of card weaving in Scandinavia is not as old as
the earliest known card weavings, but is rich and varied and especially
interesting since it shows a continuous development from the simple to the
complex. Scholars working at the beginning of the twentieth century
thought they had traced the development to early Egypt, but their deductions are now disputed.
Whether from Egypt, Scandinavia, or the East, card weaving spread
throughout Europe and was in wide popular use through the sixteenth
century. There is, however, no evidence that it existed historically in
Australia, the Americas, or South Africa.
TRADITIONAL TOOLS AND MATERIALS
The techniques, colors, patterns, materials, and cards differ from one
geographical area to the next, depending on available materials and on
tradition. Cards have been found made of stone, wood, bone, horn, tortoiseshell, ivory, fish skin, parchment, leather, and even of playing cards.
The size, number, and placement of holes, as well as the shape of the cards,
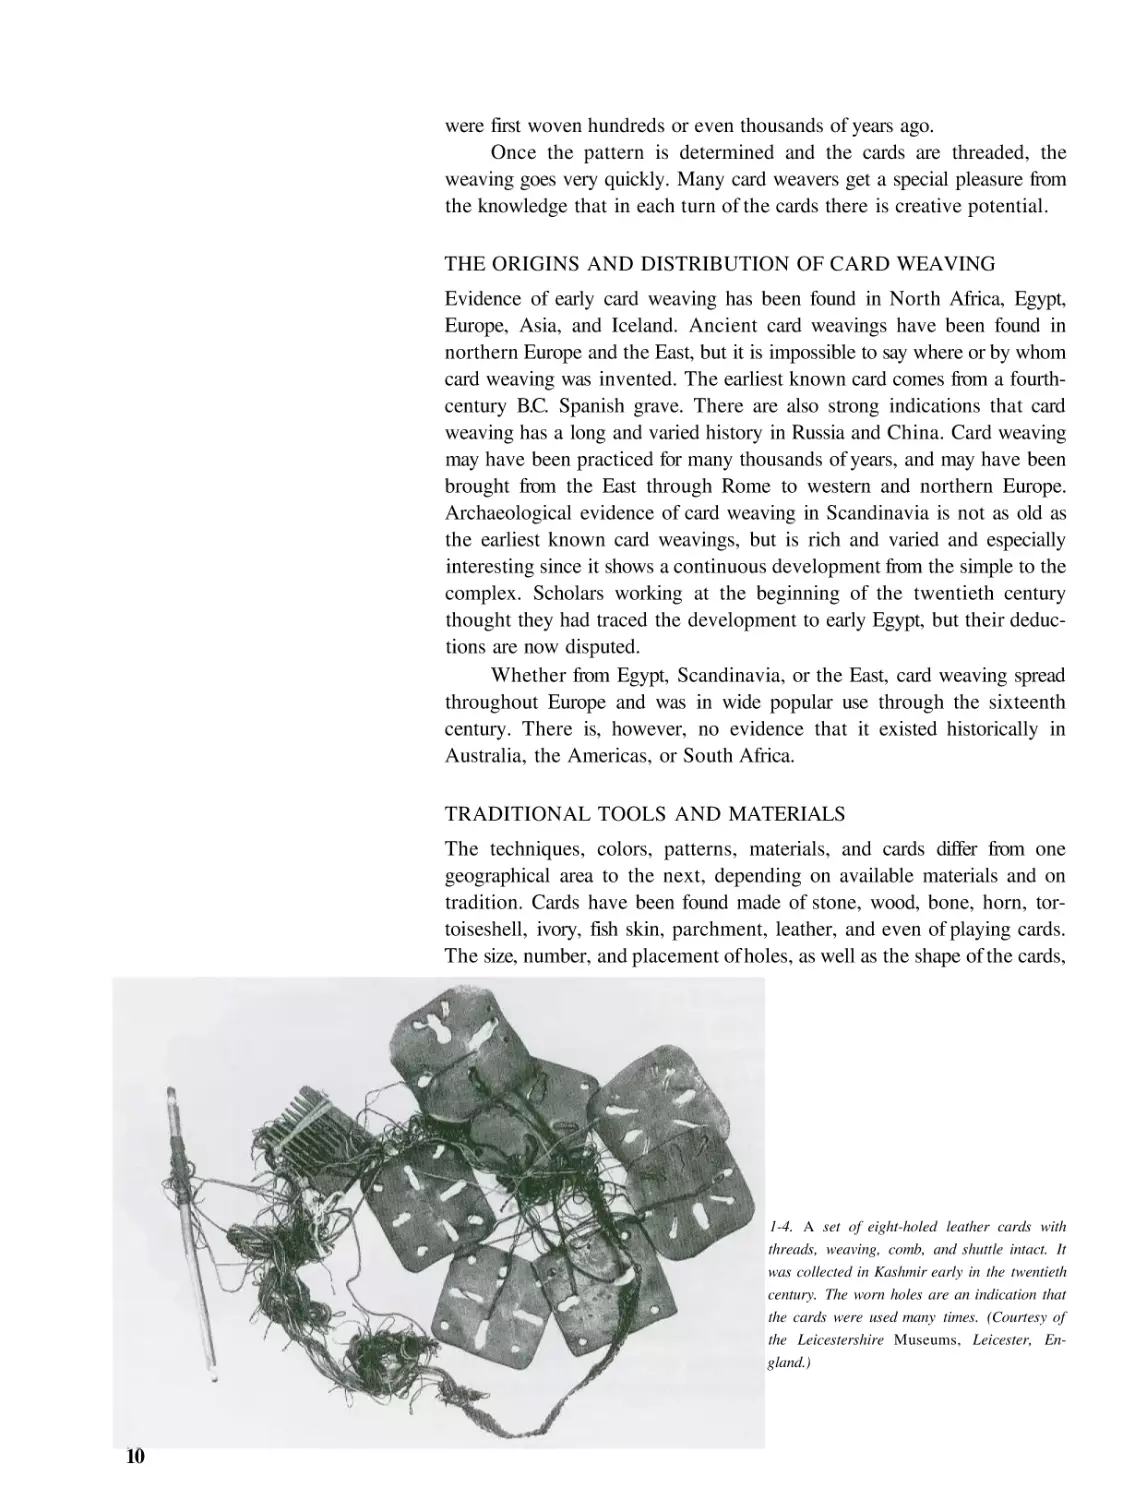
1-4. A set of eight-holed leather cards with
threads, weaving, comb, and shuttle intact. It
was collected in Kashmir early in the twentieth
century. The worn holes are an indication that
the cards were used many times. (Courtesy of
the Leicestershire Museums, Leicester, England.)
10
vary. The materials used for weaving range from coarse handspun wool and
hair yarns to linen, silk, and even spun gold. Fine wool and cotton threads
have always been widely used. Brocading was done using gold and silver
threads, and in some cases, human hair.
In Europe, card weaving began as a peasant craft, but also became a
highly sophisticated court pastime after about A.D. 800. Many of the old
card-woven textiles, particularly those from the Middle Ages, are incredibly intricate. Some bands made of fine silk threads display inscriptions and
decorative motifs, and required hundreds of cards. Such intricate bands
were often woven on cards no more than 2 inches square.
CARD WEAVING IN ANCIENT EGYPT
The Egyptians have frequently been credited with the invention and
development of card weaving. In 1916, van Gennep and Jequier published
a beautiful and influential book which presented their argument that card
weaving was invented by the Egyptians before the year 4000 B.C. and was
highly developed by the year 2000 B.C. Their premises are highly questionable: their arguments are convincing only if one is willing to accept a
number of assumptions. Their position depends upon the recurrence in
ancient Egyptian statuary and paintings of designs such as the chevron and
the zigzag, patterns which are frequently associated with card weaving. Van
Gennep's argument also depends upon his belief that the girdle of Rameses
III, an incredible piece of weaving 17 feet long, presently in excellent
condition, and firmly dated from near 1200 B.C., was card woven. Unfortunately, this is unlikely. None of the characteristics unique to card weaving
is present in the weaving (van Gennep never saw or examined the piece,
but worked from photographs). Nevertheless, van Gennep and Jequier
presented evidence strong enough at the time to create a controversy that
still endures.
No cards have been found in Egypt dating earlier than the Coptic
period (twenty-five wooden, four-holed tablets were found in the Gayet
excavations at Antinoe from the fourth and fifth centuries A.D.). Loom
J -5. Facsimiles of designs found on Egyptian
statuary from the eighteenth dynasty. Early
twentieth-century scholars felt that such designs
indicated that card weaving existed in ancient
Egypt.
1-6. The so-called girdle of Rameses 111 (1200
B.C.j from Egypt. It is 17 feet long and woven
in blue, red, yellow, green, and natural linen.
The width tapers from 5 inches to 2 inches by
decreasing warp threads in the center. The number of warp threads varies from 272 to 340 per
inch. The fabric is connected with Rameses 111
on the basis of an ink inscription on the weaving.
Experts have agreed on the structure as double
weave, but they have not agreed on the weaving
technique. The consensus at this point is that it
is not card woven. (Courtesy of the Liverpool
Museum.)
11
i -7. An Egyptian band in wool and linen from
the seventh to tenth century AD. (Courtesy of
the Board of Trustees of the Victoria and Albert
Museum, London. No. 1535.)
implements and drawings of looms from earlier times have been found, but
no evidence of cards or of card looms has surfaced. Three narrow linen
bands dating from the twenty-second dynasty (945-745 B.C.) were cited by
van Gennep and Jequier as the oldest known card weavings. These were
originally part of the Graf collection in Vienna and are no longer available
for study. Peter Collingwood, in his careful examination of the existing
evidence and reconstructions, questions the van Gennep and Jequier
conclusions that the pieces were card woven. Considering the wealth of
textiles recovered from Egypt, card-woven pieces are very few, and those
pieces found are unsophisticated.
CARD WEAVING IN SCANDINAVIA
In Scandinavia, card weaving can be traced back to the Celtic Bronze Age,
with the earliest findings in the second century A.D. Bronze-Age cardwoven strips were used to bind and space the warp threads on the vertical
warp-weighted loom then in common use. In these early pieces, a cardwoven strip with dangling weft threads was stretched across the top of the
loom; the long weft threads hung vertically and were weighted, becoming
warps. The finished loom-woven fabric would then have a narrow cardwoven band along one margin, and would have as warp threads the
1-8. A drawing of the warp-weighted loom in
use in ancient Scandinavia. A card-woven band
across the top of the warp was sometimes used
to bind and space the loom warp (illustration
after H. Ling Roth, Ancient Egyptian and
Greek Looms).
12
well-spaced weft threads from the narrow card-woven band. Fabrics of this
sort are known to have existed in Norway as early as the third century A.D.
These card-woven borders were apparently always an important aesthetic
part of the fabric and not merely a technical means of creating or spacing
warp threads. In later Scandinavian loom weavings, card-woven borders,
often very intricate, were woven separately and sewn onto finished textiles.
1-9. Two wooden cards from the later Celtic
Iron Age found in Denmark. They belong to the
cart find from the Dejhjerg Bog. (Courtesy of
the National Museum, Denmark.)
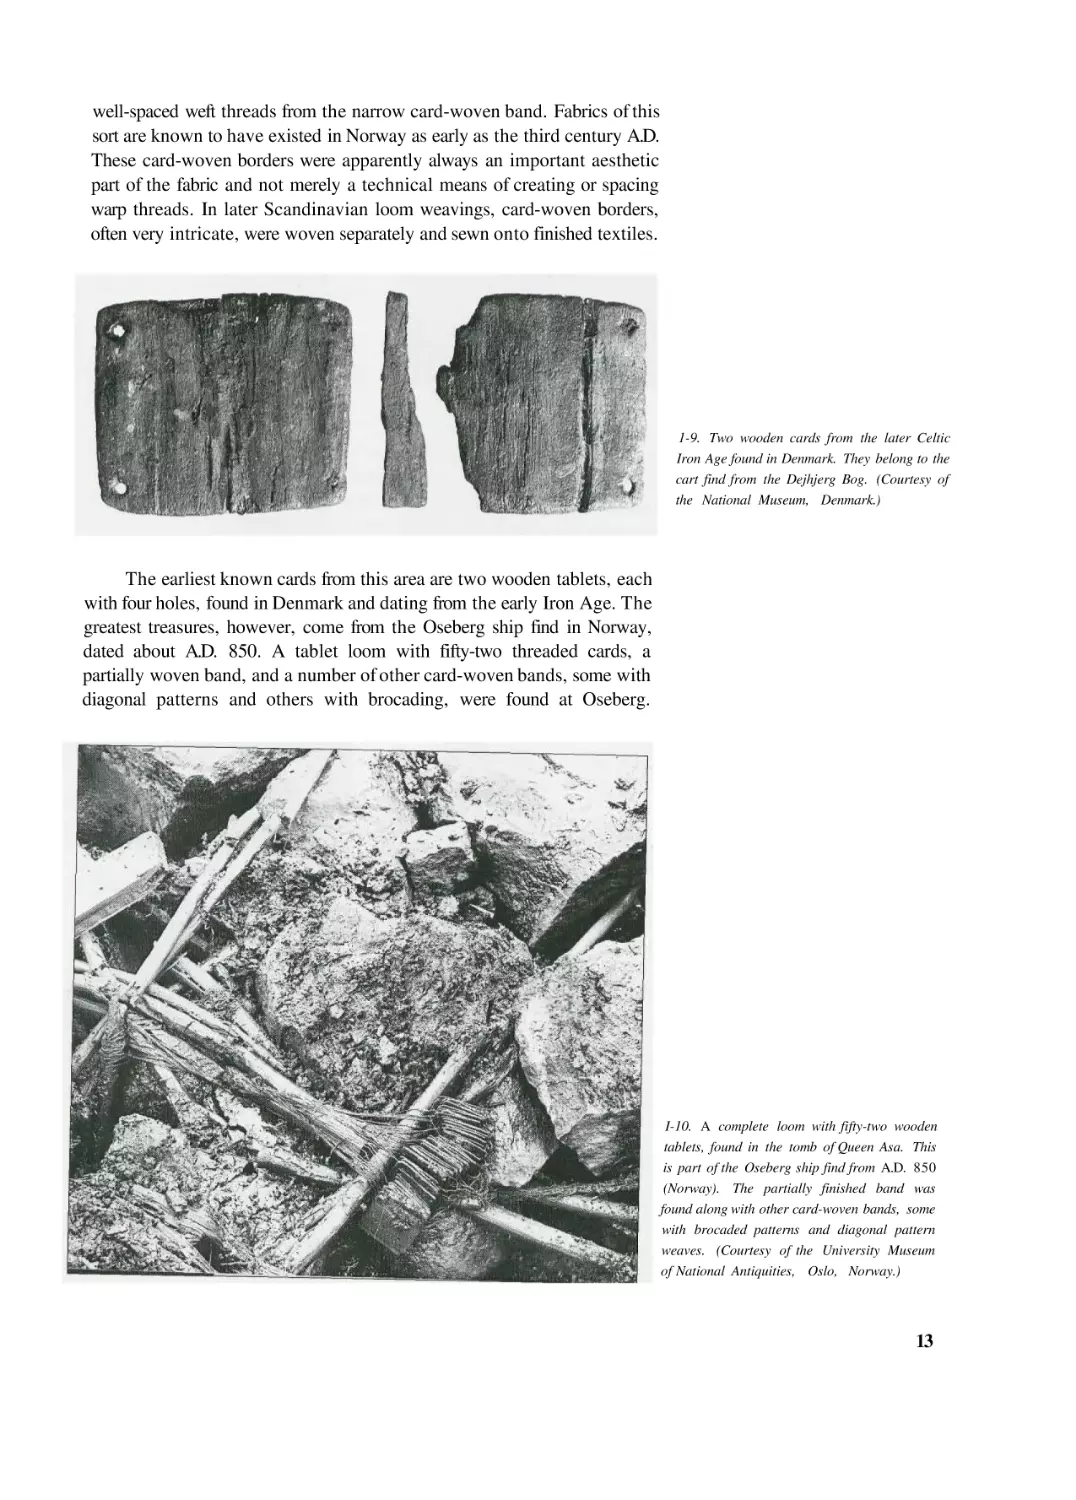
The earliest known cards from this area are two wooden tablets, each
with four holes, found in Denmark and dating from the early Iron Age. The
greatest treasures, however, come from the Oseberg ship find in Norway,
dated about A.D. 850. A tablet loom with fifty-two threaded cards, a
partially woven band, and a number of other card-woven bands, some with
diagonal patterns and others with brocading, were found at Oseberg.
I-10. A complete loom with fifty-two wooden
tablets, found in the tomb of Queen Asa. This
is part of the Oseberg ship find from A.D. 850
(Norway). The partially finished band was
found along with other card-woven bands, some
with brocaded patterns and diagonal pattern
weaves. (Courtesy of the University Museum
of National Antiquities, Oslo, Norway.)
13
I'll. Sectkms of a band from Snartemo, Norway, in red, yellow, green, and blue wool:
Hogebostad, sixth century. The image is created
by allowing some warp threads to float during
weaving. (Courtesy of the University Museum
of National Antiquities, Oslo, Norway. No.
26001. Photo: Smedstad.)
Archaeological discoveries from the Viking trading center of Birka in
Sweden revealed a number of technically sophisticated card-woven bands
from A.D. 800-975. Some of the bands are brocaded in gold, others are of
pure silk, and some are a combination of linen and silk.
1-12. A card weaving from the Roman Iron
Age (third century A.D.) found at Donbaek,
North Jutland, Denmark. The card weaving,
which required 150 cards, formed the border of
a cloak. The weft of the card weaving continues
as weft in the ordinary weave. (Courtesy of the
National Museum, Denmark.)
CARD WEAVING IN MEDIEVAL EUROPE
Archaeological remains indicate that card weaving has been known in
western Europe from Roman times. It existed primarily as a peasant craft,
using natural, undyed wools. Trade with the East, particularly after the
eighth century, brought silk, and very probably, fine card weavings, to the
court of Charlemagne and to other European trade and cultural centers.
Textiles preserved from the Middle Ages indicate that card weaving rapidly
14
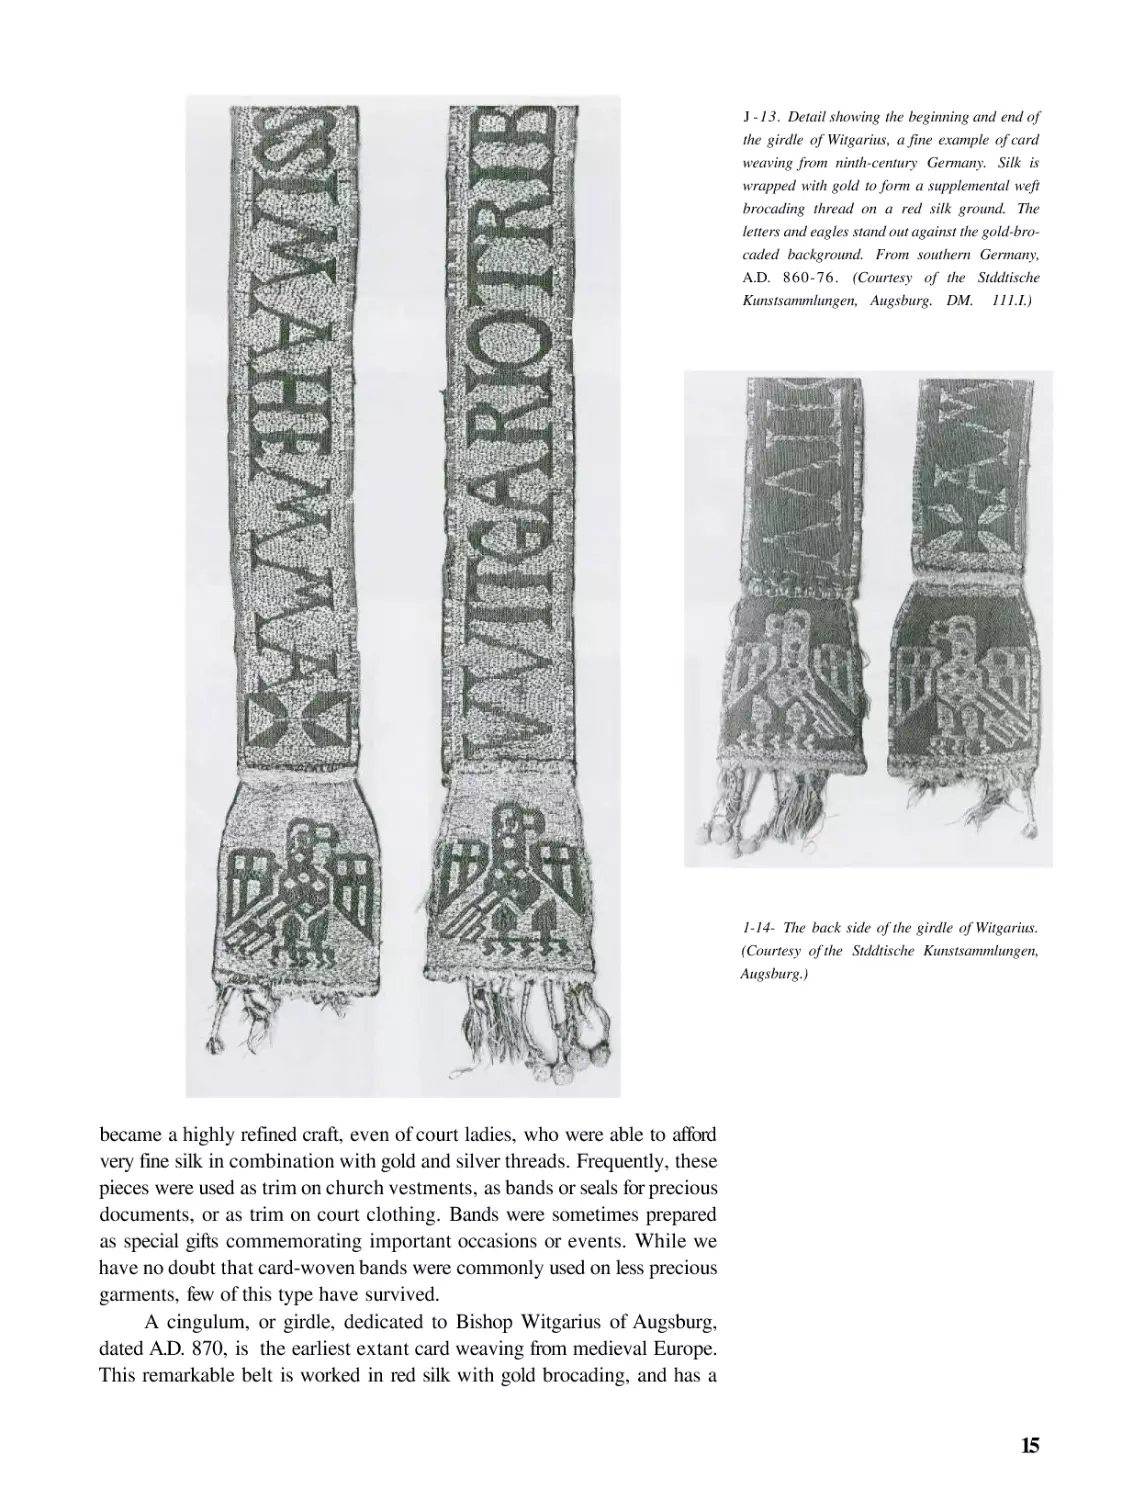
J -13. Detail showing the beginning and end of
the girdle of Witgarius, a fine example of card
weaving from ninth-century Germany. Silk is
wrapped with gold to form a supplemental weft
brocading thread on a red silk ground. The
letters and eagles stand out against the gold-brocaded background. From southern Germany,
A.D. 860-76. (Courtesy of the Stddtische
Kunstsammlungen, Augsburg. DM. 111.I.)
1-14- The back side of the girdle of Witgarius.
(Courtesy of the Stddtische Kunstsammlungen,
Augsburg.)
became a highly refined craft, even of court ladies, who were able to afford
very fine silk in combination with gold and silver threads. Frequently, these
pieces were used as trim on church vestments, as bands or seals for precious
documents, or as trim on court clothing. Bands were sometimes prepared
as special gifts commemorating important occasions or events. While we
have no doubt that card-woven bands were commonly used on less precious
garments, few of this type have survived.
A cingulum, or girdle, dedicated to Bishop Witgarius of Augsburg,
dated A.D. 870, is the earliest extant card weaving from medieval Europe.
This remarkable belt is worked in red silk with gold brocading, and has a
15
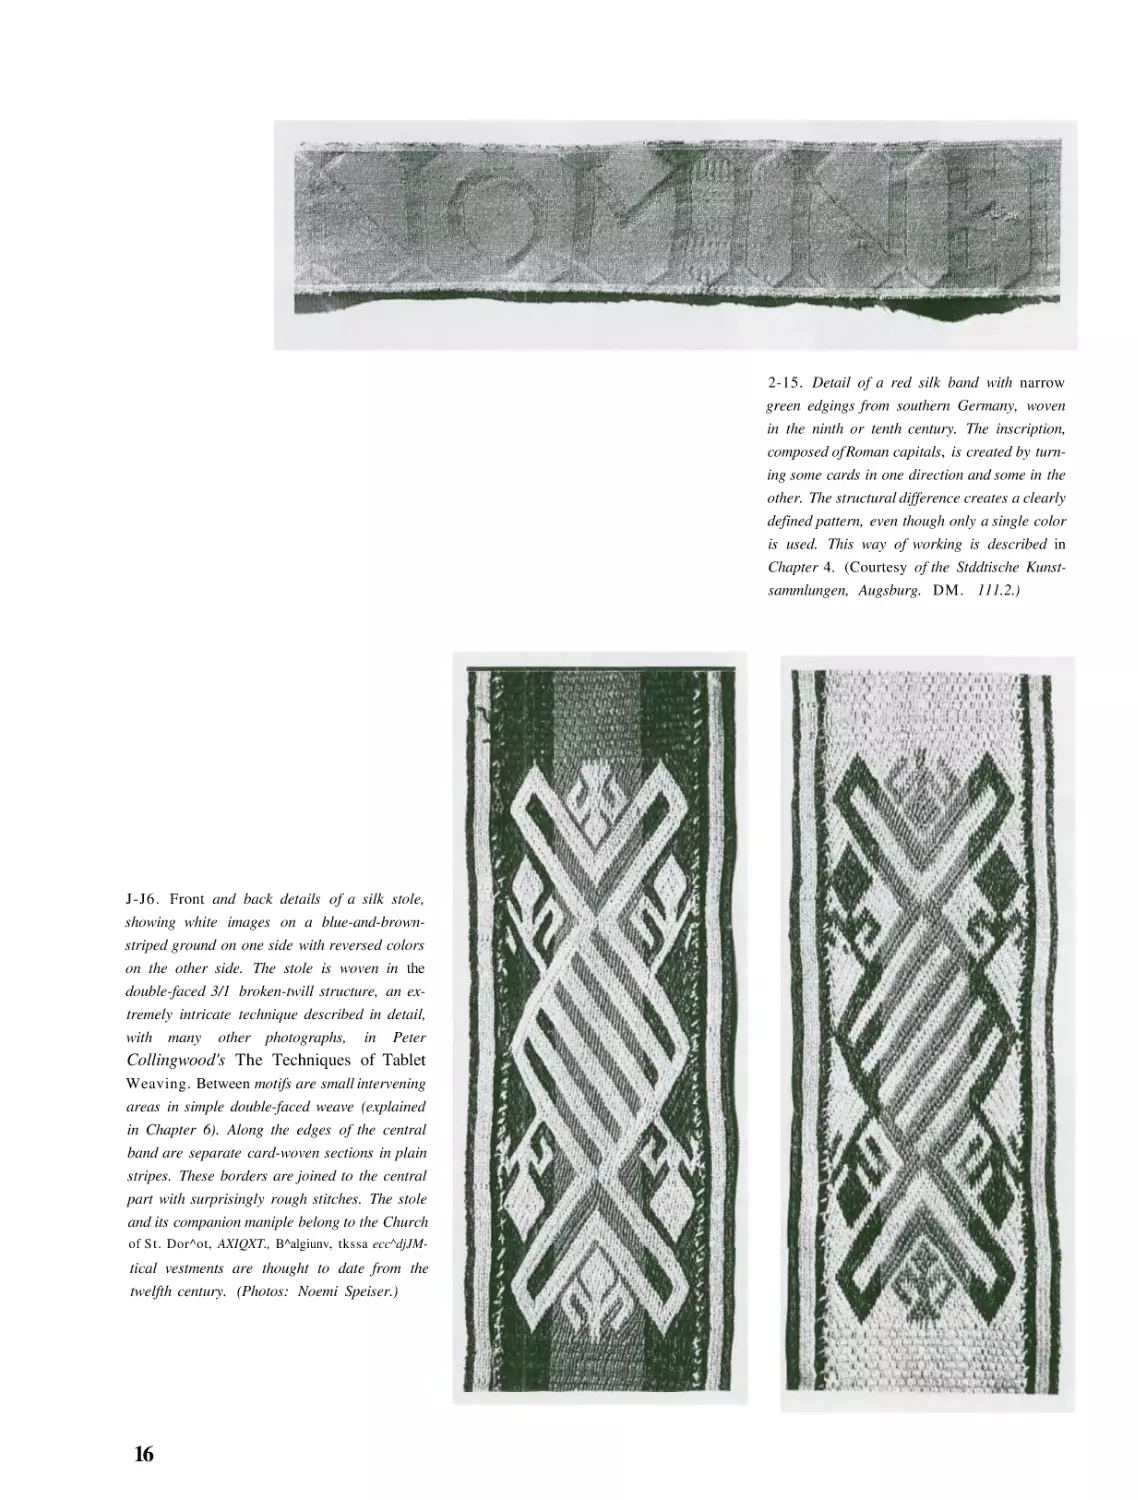
2-15. Detail of a red silk band with narrow
green edgings from southern Germany, woven
in the ninth or tenth century. The inscription,
composed of Roman capitals, is created by turning some cards in one direction and some in the
other. The structural difference creates a clearly
defined pattern, even though only a single color
is used. This way of working is described in
Chapter 4. (Courtesy of the Stddtische Kunstsammlungen, Augsburg. DM. 111.2.)
J-J6. Front and back details of a silk stole,
showing white images on a blue-and-brownstriped ground on one side with reversed colors
on the other side. The stole is woven in the
double-faced 3/1 broken-twill structure, an extremely intricate technique described in detail,
with many other photographs, in Peter
Collingwood's The Techniques of Tablet
Weaving. Between motifs are small intervening
areas in simple double-faced weave (explained
in Chapter 6). Along the edges of the central
band are separate card-woven sections in plain
stripes. These borders are joined to the central
part with surprisingly rough stitches. The stole
and its companion maniple belong to the Church
of St. Dor^ot, AXIQXT., B^algiunv, tkssa ecc^djJM-
tical vestments are thought to date from the
twelfth century. (Photos: Noemi Speiser.)
16
beautiful inscription done in Roman capitals. The piece displays refined
craftsmanship and technical mastery. Another exceptional card weaving
from this period is the Augsburg piece from southern Germany. The
weaving is done in one color, a fine red silk, with the inscription formed
entirely through structural manipulation.
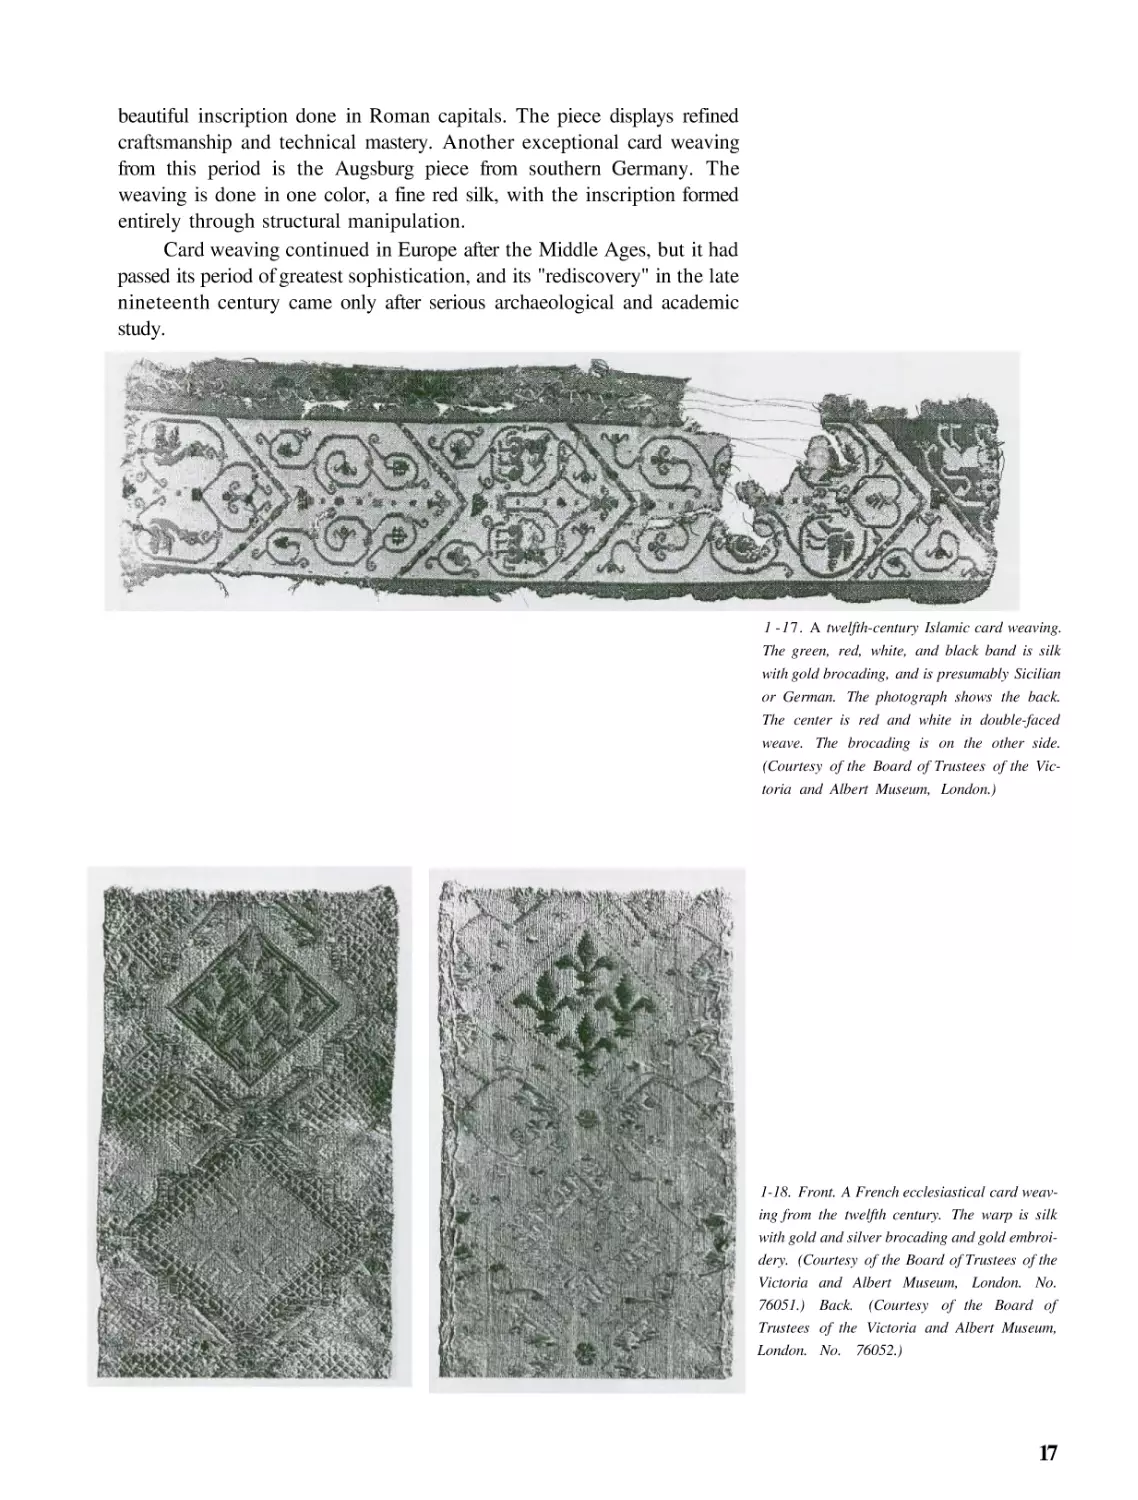
Card weaving continued in Europe after the Middle Ages, but it had
passed its period of greatest sophistication, and its "rediscovery" in the late
nineteenth century came only after serious archaeological and academic
study.
1 -17. A twelfth-century Islamic card weaving.
The green, red, white, and black band is silk
with gold brocading, and is presumably Sicilian
or German. The photograph shows the back.
The center is red and white in double-faced
weave. The brocading is on the other side.
(Courtesy of the Board of Trustees of the Victoria and Albert Museum, London.)
1-18. Front. A French ecclesiastical card weaving from the twelfth century. The warp is silk
with gold and silver brocading and gold embroidery. (Courtesy of the Board of Trustees of the
Victoria and Albert Museum, London. No.
76051.) Back. (Courtesy of the Board of
Trustees of the Victoria and Albert Museum,
London. No. 76052.)
17
I-19. A maniple in silk and gold threads, probably Sicilian, dating from the early thirteenth
century. (Courtesy of the Board of Trustees of
the Victoria and Albert Museum, London. No.
27914.)
THE REDISCOVERY OF CARD WEAVING
For the Western world, interest in card weaving was renewed toward the
end of the nineteenth century by a German scholar, Margarethe LehmannFilhes. This rediscovery was sparked by the great surge of interest in
archaeological studies, stimulated by the successes of Schliemann and
others during the latter part of the nineteenth century. Hjalmar Stolpe, an
anthropologist, found a bone card or tablet at Birka, Sweden, in 1873. This
added greatly to the interest, as did the recording in the 1880s of card
weaving in India (by Reuleaux) and in Bukhara (by Knapp). At this time,
Margarethe Lehmann-Filhes began a serious study of Icelandic card weaving.
To understand the weaving, she actually reconstructed the techniques. She developed plain-weave, double-faced, and double-weave
bands. Her investigations opened the door to an understanding of the
history and widespread distribution of card weaving, as well as its technical
aspects. Tablets and cards that had long collected dust on museum shelves
were suddenly identified as weaving tools. Only then was it realized that
card weaving had not only a full and rich history, but was still being
practiced in widely separated parts of the world. Her interest led to the
publication in 1901 of Ueber Brettchenweberei, in which she described and
explained card weaving. Popular magazines ran articles, serious literature
was published, museums presented special exhibitions, and card-weaving
18
collections were established. As scholars exchanged information, it was
established that card weaving was still going on in isolated areas in Japan,
China, Tibet, India, Burma, India, Syria, Palestine, North Africa, Turkey,
Greece, and Scandinavia.
CARD WEAVING IN ASIA AND THE MIDDLE EAST
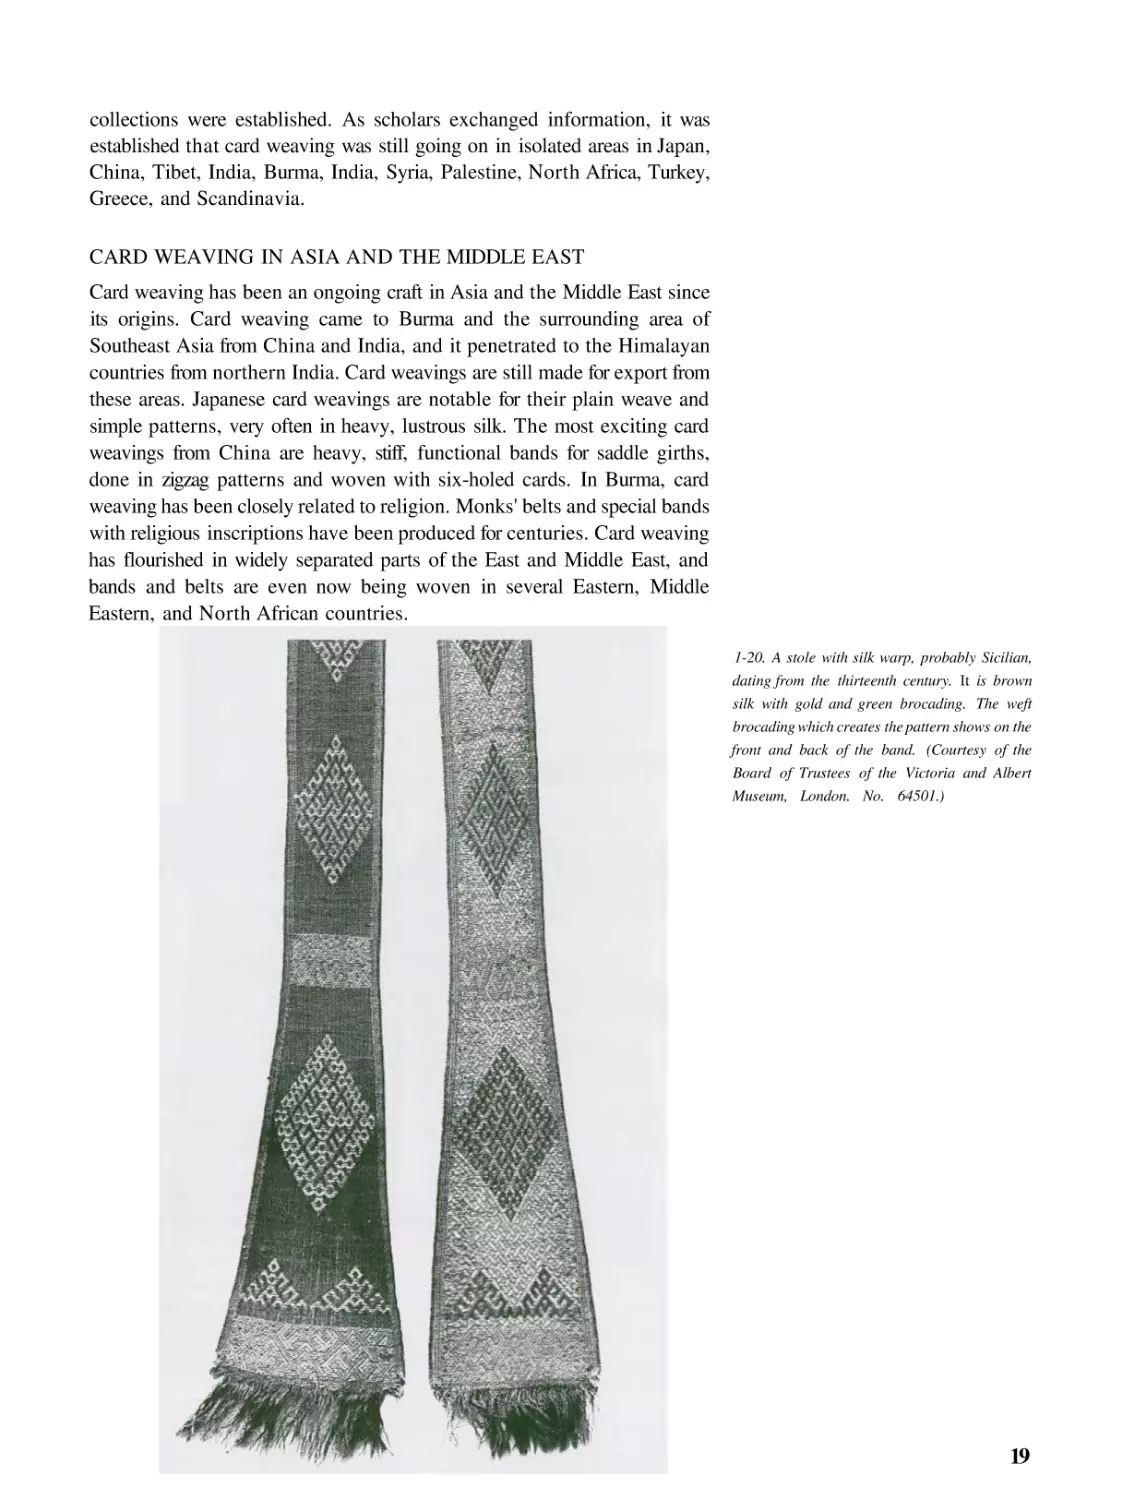
Card weaving has been an ongoing craft in Asia and the Middle East since
its origins. Card weaving came to Burma and the surrounding area of
Southeast Asia from China and India, and it penetrated to the Himalayan
countries from northern India. Card weavings are still made for export from
these areas. Japanese card weavings are notable for their plain weave and
simple patterns, very often in heavy, lustrous silk. The most exciting card
weavings from China are heavy, stiff, functional bands for saddle girths,
done in zigzag patterns and woven with six-holed cards. In Burma, card
weaving has been closely related to religion. Monks' belts and special bands
with religious inscriptions have been produced for centuries. Card weaving
has flourished in widely separated parts of the East and Middle East, and
bands and belts are even now being woven in several Eastern, Middle
Eastern, and North African countries.
1-20. A stole with silk warp, probably Sicilian,
dating from the thirteenth century. It is brown
silk with gold and green brocading. The weft
brocading which creates the pattern shows on the
front and back of the band. (Courtesy of the
Board of Trustees of the Victoria and Albert
Museum, London. No. 64501.)
19
CARD WEAVING TODAY
Card weaving was introduced into the United States by Mary Meigs
Atwater in the 1920s. She and others popularized the craft among American weavers, but only considerably later (in the 1960s) did weavers such
as Lillian Elliot, Robert Cranford, and Kay Sekimachi begin to gain
national attention with card-woven tapestries and hangings. Many universities here and in Europe teach the technique as part of their textile
curriculum. The simplicity of the tools and the intricacies possible with the
technique continue to intrigue weavers. Card weaving does not lend itself
to mechanization and is outside the development of production weaving.
Mary Meigs Atwater aptly referred to it as a "byway" in handweaving. As
far as we know, card weaving did not precede loom weaving. It was used
and developed by cultures that already had a strong history of and sensitivity to woven fabric. It is a fascinating, complex technique that challenges
the mind and hand, and appeals in particular to sophisticated weavers. A
few artists have chosen it as a primary means of aesthetic expression, many
explore it purely for technical mastery, and still others use it simply as a
means for weaving that involves simple tools.
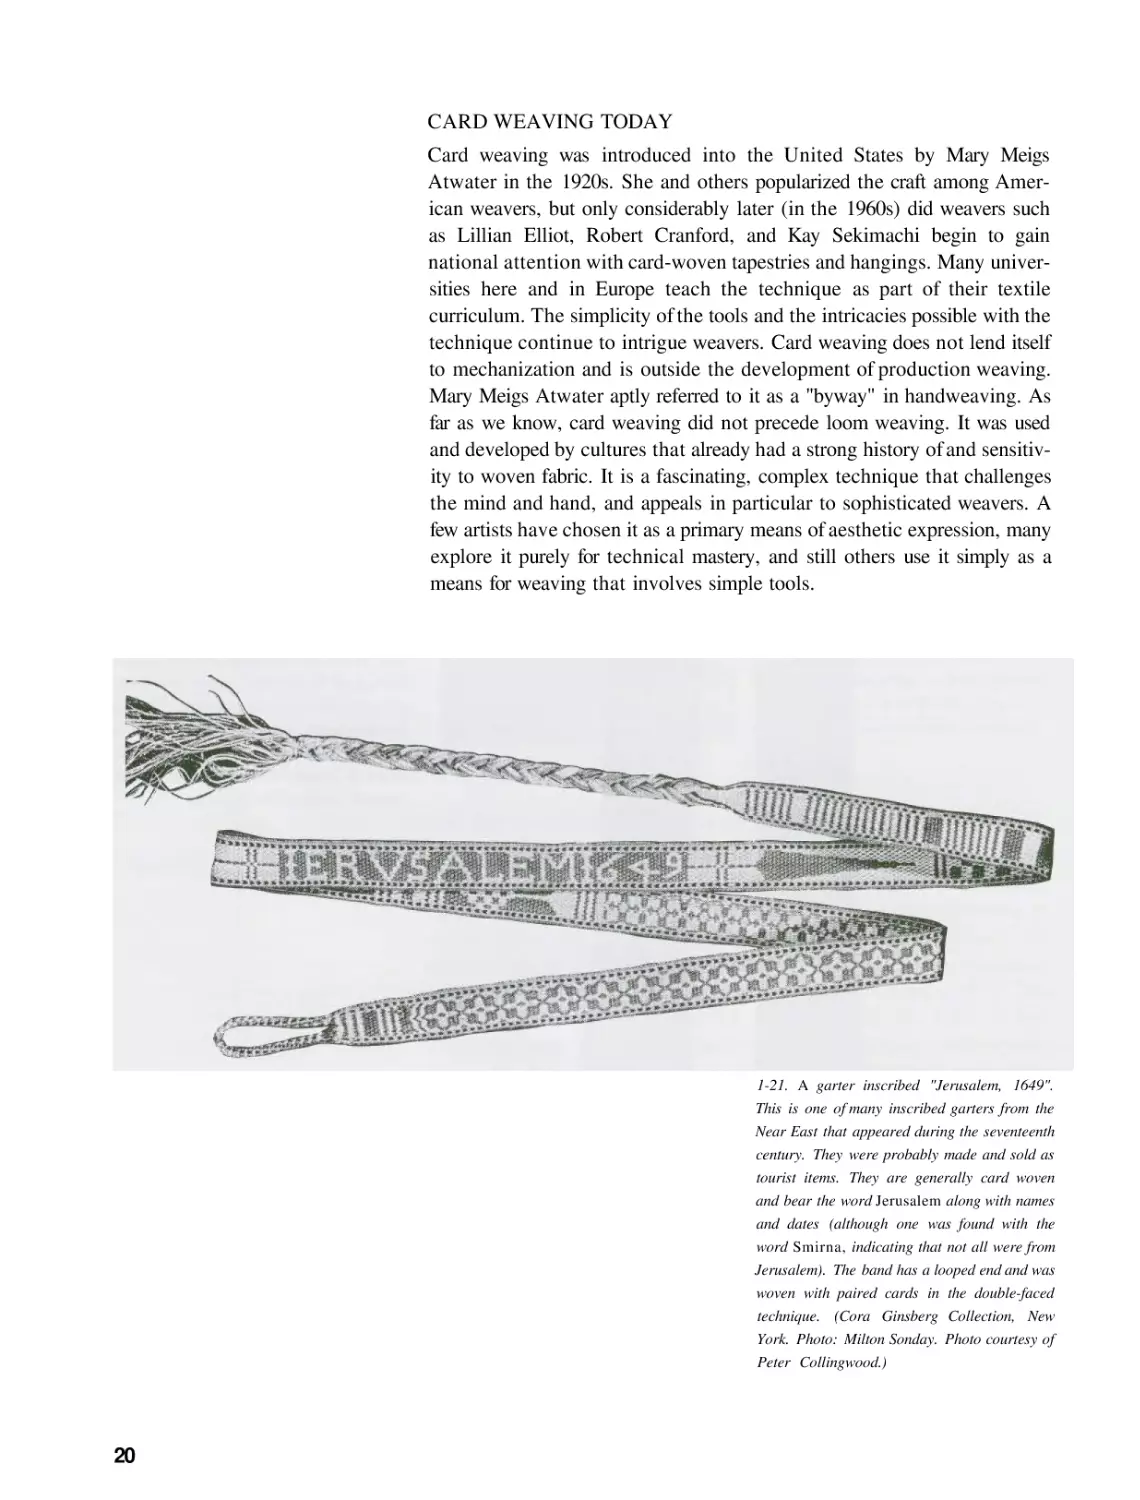
1-21. A garter inscribed "Jerusalem, 1649".
This is one of many inscribed garters from the
Near East that appeared during the seventeenth
century. They were probably made and sold as
tourist items. They are generally card woven
and bear the word Jerusalem along with names
and dates (although one was found with the
word Smirna, indicating that not all were from
Jerusalem). The band has a looped end and was
woven with paired cards in the double-faced
technique. (Cora Ginsberg Collection, New
York. Photo: Milton Sonday. Photo courtesy of
Peter Collingwood.)
20
1-22. An exceptionally large piece of card
weaving consisting of three silk strips. Each
section required about 350 cards. Intricate,
subtle patterns contrast with large designs produced by double-faced weaving. Human figures, lions, crosses, and various symbolic objects are depicted. The textile is a mystery in
many respects. Scholars now believe that it was
woven for a church built in Gondar (northwestern Ethiopia) by Yasu the Great shortly after
1680, or fry Empress Mentwab in the early
eighteenth century. It is known that the piece
was part of the booty taken by the British in
1866 in Abyssinia. Originally, there was a pair
of card-woven silk curtains. At the time, one of
the curtains was divided into four parts (one of
these parts is in the British Museum). The other
member of the pair, shown here, ultimately
went, intact, to the Royal Ontario Museum.
The piece is exceptional because of its size,
complexity, and rich imagery. (Gift of General
George W. Sweny, from the estate of Colonel
George A. Sweny; courtesy of the Textile Department, Royal Ontario Museum, Toronto.
No. 922.26.1.)
21
1-23. Detail of the Gondar tapestry. (Gift of
General George W. Sweny, from the estate of
Colonel George A. Sweny; courtesy of the
Textile Department, Royal Ontario Museum,
Toronto.)
1-24- Detail of the Gondar tapestry. (Gift of
General George W. Sweny, from the estate of
Colonel George A. Sweny; courtesy of the
Textile Department, Royal Ontario Museum,
Toronto.)
22
Scholars continue to find and analyze special pieces such as the
Gondar tapestry, in the textile collection at the Royal Ontario Museum in
Toronto, and the silk stole in the Church of St. Donat, Arlon, Belgium.
These examinations increase our knowledge technically, culturally, and
aesthetically.
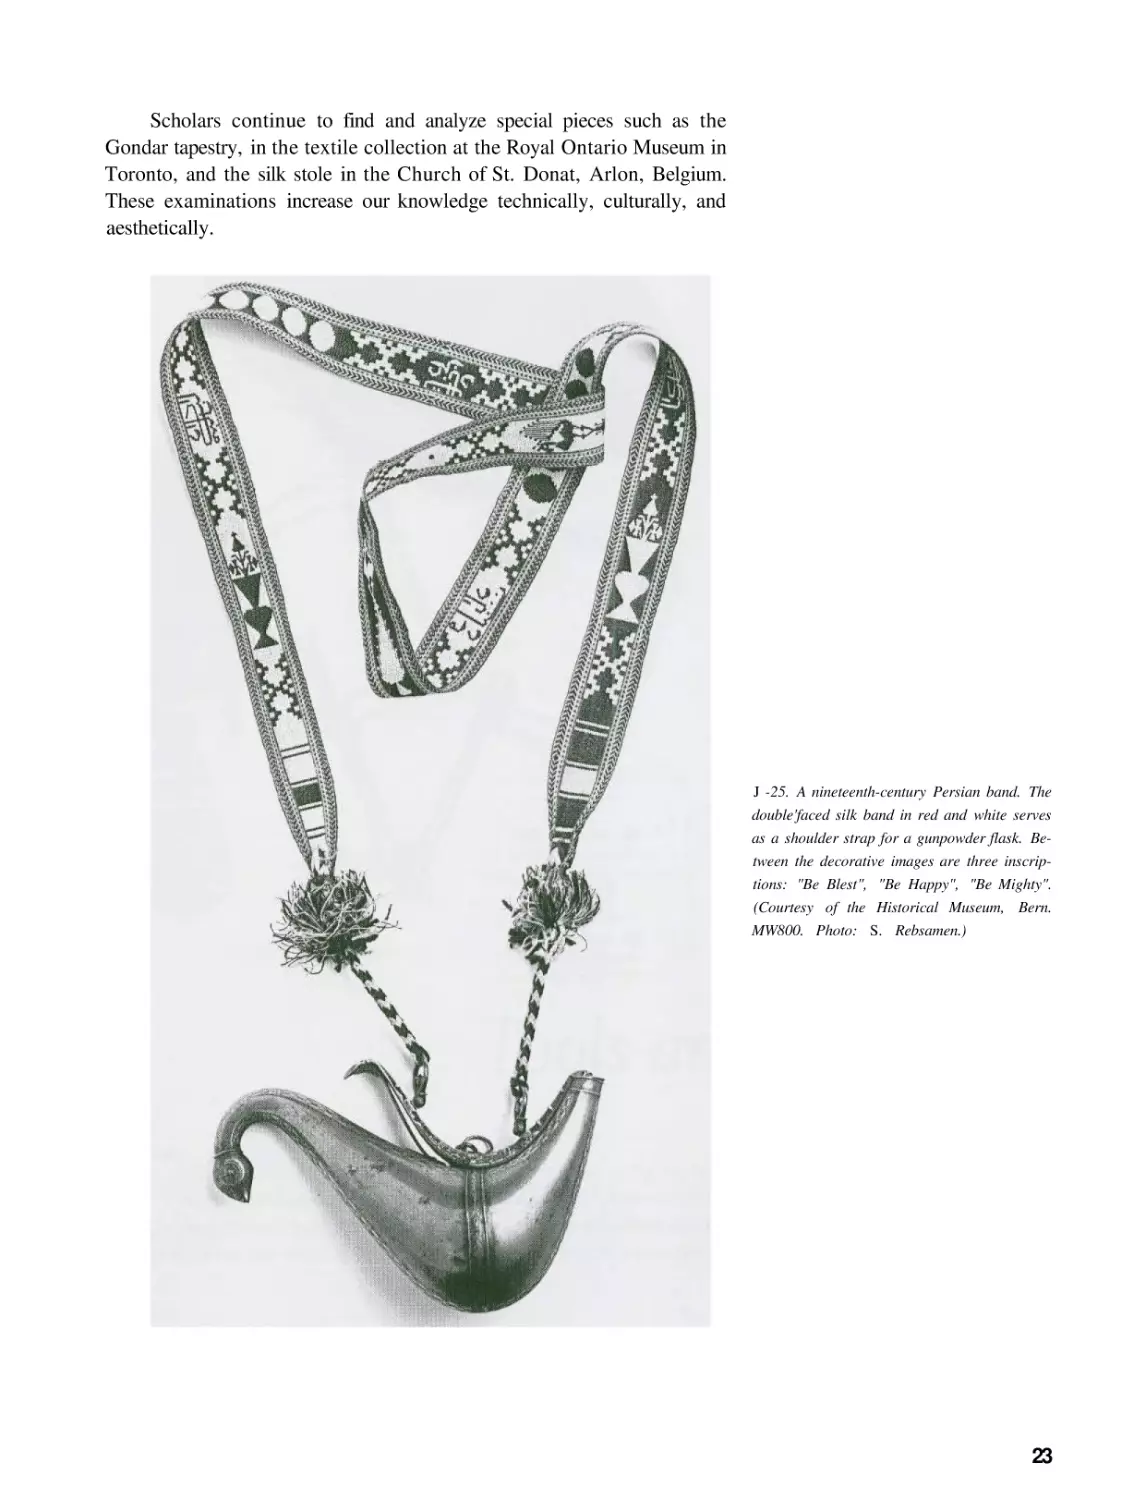
J -25. A nineteenth-century Persian band. The
double'faced silk band in red and white serves
as a shoulder strap for a gunpowder flask. Between the decorative images are three inscriptions: "Be Blest", "Be Happy", "Be Mighty".
(Courtesy of the Historical Museum, Bern.
MW800. Photo: S. Rebsamen.)
23
Since the turn of the century, there have been a number of books and
articles published on card weaving in many different languages. In particular, Peter Collingwood's book, The Techniques of Tablet Weaving, published
in 1982, is a wonderful, scholarly compilation of all available information.
It is the ideal source book for the serious student.
24
2
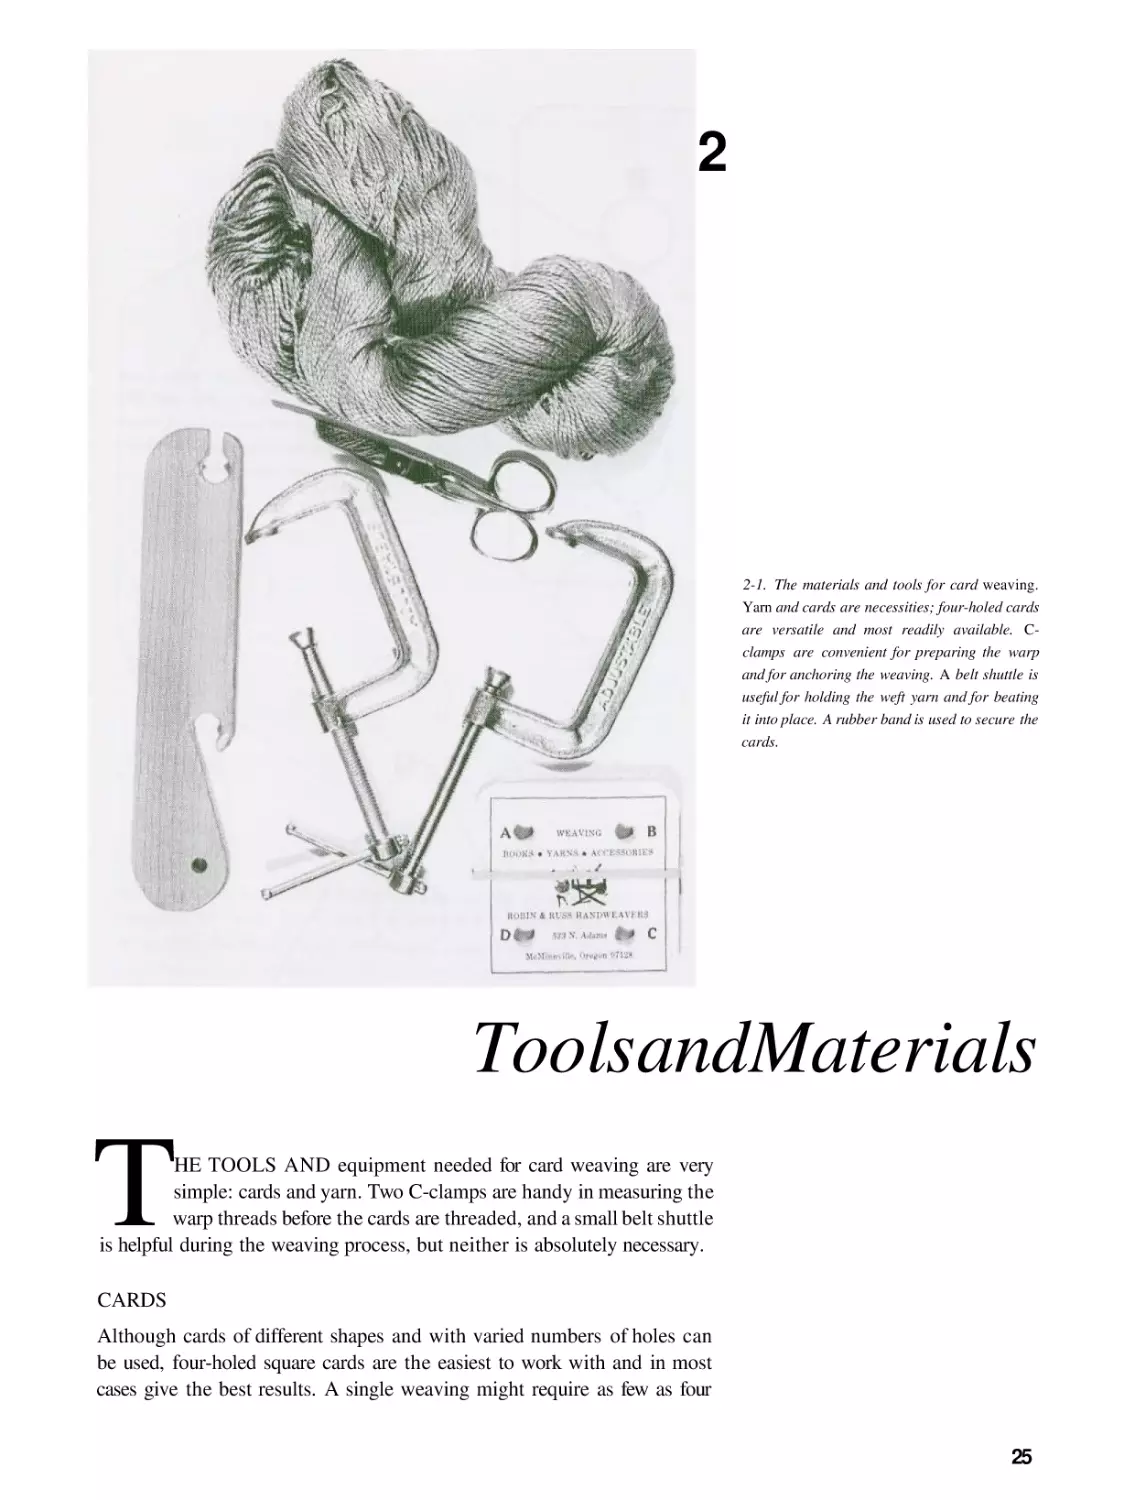
2-1. The materials and tools for card weaving.
Yarn and cards are necessities; four-holed cards
are versatile and most readily available. Cclamps are convenient for preparing the warp
and for anchoring the weaving. A belt shuttle is
useful for holding the weft yarn and for beating
it into place. A rubber band is used to secure the
cards.
ToolsandMaterials
T
HE TOOLS AND equipment needed for card weaving are very
simple: cards and yarn. Two C-clamps are handy in measuring the
warp threads before the cards are threaded, and a small belt shuttle
is helpful during the weaving process, but neither is absolutely necessary.
CARDS
Although cards of different shapes and with varied numbers of holes can
be used, four-holed square cards are the easiest to work with and in most
cases give the best results. A single weaving might require as few as four
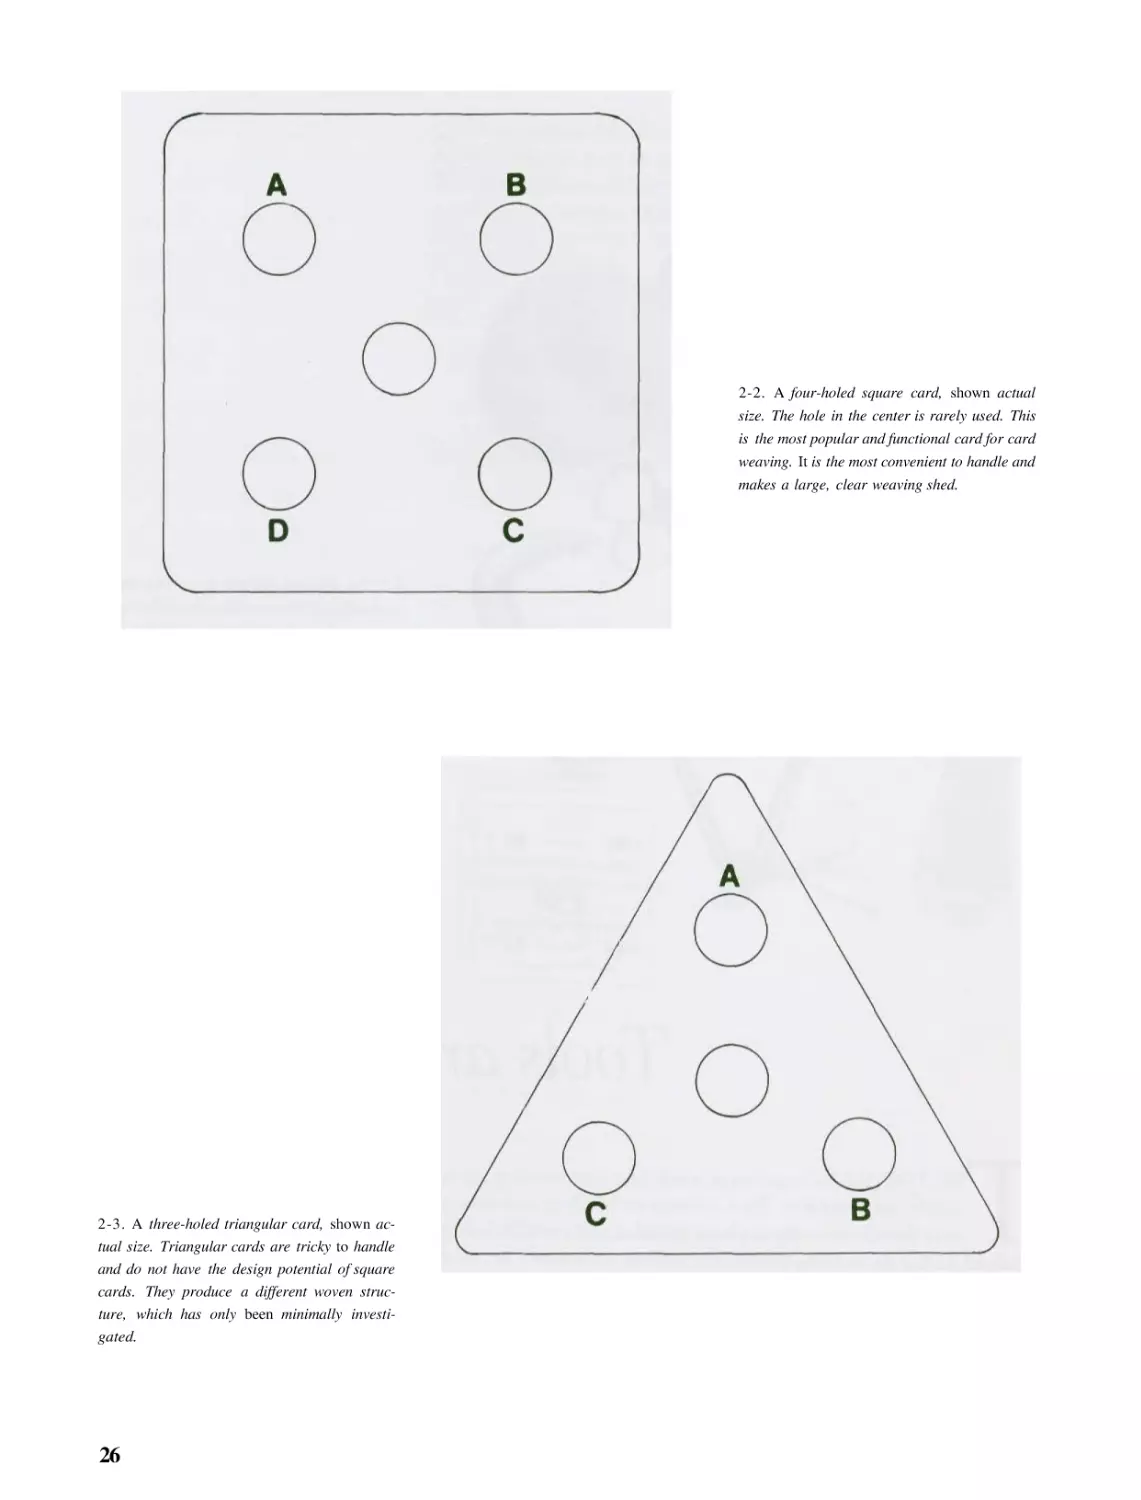
25
2-2. A four-holed square card, shown actual
size. The hole in the center is rarely used. This
is the most popular and functional card for card
weaving. It is the most convenient to handle and
makes a large, clear weaving shed.
2-3. A three-holed triangular card, shown actual size. Triangular cards are tricky to handle
and do not have the design potential of square
cards. They produce a different woven structure, which has only been minimally investigated.
26
2-4. A six-holed hexagonal card, shown actual
size. Six-holed cards have a greater design potential than four-holed cards, but they are difficult to keep in order and they make a very thick
band.
cards or as many as several hundred. The sample pattern band in Chapter
3 requires ten cards. The bands discussed in Chapters 4 and 5 require from
ten to sixty-five each. With only a few exceptions, the weavings pictured
in this book were produced with four-holed square cards. Additional cards
can be purchased at minimal cost (see page 140), or you can make your
own, using poster board or medium-weight cardboard. The cards illustrated here are shown actual size and may be used as patterns. Keep in mind
that cards can be made in any size or shape, and with any number of holes.
Only three examples are shown here.
Cards should be stiff enough to hold their shape and not buckle during turning. If the cards are too thick, however, a group of them becomes
bulky, heavy, and difficult to work with. Corners should be slightly rounded so that they do not catch the warp threads as the cards turn. Holes can
be either drilled or punched.
Some manufactured cards have a hole in the center of each card.
Traditionally, this was used to carry an extra warp thread that remained
hidden in the center of the weaving. These threads increased the thickness,
stiffness, and strength of the fabric. Today, a dowel or a thread is occasionally placed through the central holes of a pack of cards to keep the cards in
27
order, but otherwise such holes are seldom used.
The holes on just one side—the "face" side—of each card are lettered
clockwise (A, B, C, D). This aids the weaver in threading a specific pattern.
Many weavers prefer to work without a pattern, ignoring the letters.
WARP YARNS
The warp threads go through the card holes and are anchored at each end.
The width of the band will depend on the number of cards and the weight
of the warp threads. These threads must be strong and relatively smooth.
Weak threads will shred and break as the cards move back and forth. As
the cards turn, the packed threads must pass by each other. Fuzzy threads
catch and hold and prevent shifting.
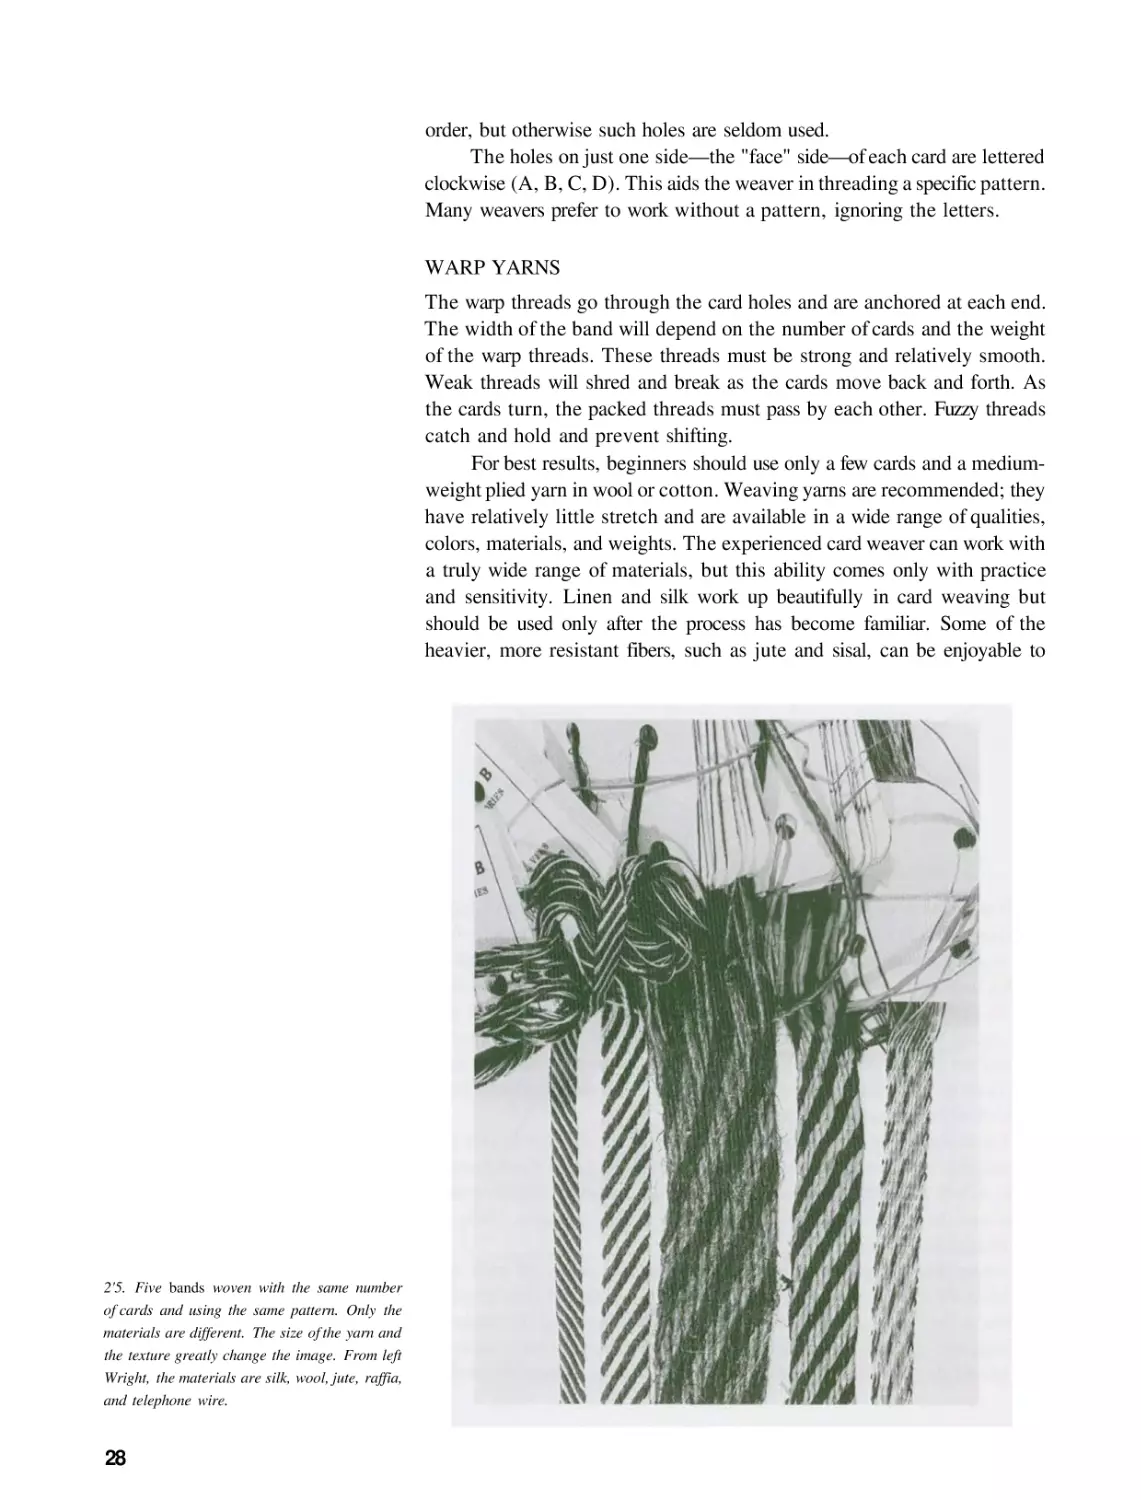
For best results, beginners should use only a few cards and a mediumweight plied yarn in wool or cotton. Weaving yarns are recommended; they
have relatively little stretch and are available in a wide range of qualities,
colors, materials, and weights. The experienced card weaver can work with
a truly wide range of materials, but this ability comes only with practice
and sensitivity. Linen and silk work up beautifully in card weaving but
should be used only after the process has become familiar. Some of the
heavier, more resistant fibers, such as jute and sisal, can be enjoyable to
2'5. Five bands woven with the same number
of cards and using the same pattern. Only the
materials are different. The size of the yarn and
the texture greatly change the image. From left
Wright, the materials are silk, wool, jute, raffia,
and telephone wire.
28
work and experiment with, have great potential for wall hangings, and
usually dye well. Synthetic materials such as wire, rope, monofilament, and
plastic cord are exciting and dimensional but require experience and special
consideration.
The color of the warp threads is very important. Since card-woven
bands are warp-faced, the weft is not visible and the pattern shows primarily
as a result of contrasting colors in the warp threads.
WEFT YARNS
Any weaving results from the interlacing of a weft thread with the warp
threads. In card weaving, the weft thread goes through the shed or open
space formed by each turn of the cards. It pulls the warp threads together
and holds them in place. Because card weaving is warp-faced, the weft will
be hidden in the weaving, showing only on the edges. If the weft thread is
the same color as the warp threads that go through the outside or border
cards, it will not be noticeable. Usually the weft is the same material as the
warp. If the warp threads are bulky, a lighter-weight weft will pack down
more easily and not make bumps along the edges. A thicker band can be
made by using a heavier weft. Sometimes, other threads or materials may
be inserted along with the weft thread to create a fringe on one or both
sides. Sticks, rods, bones, beads, feathers, and many other materials may be
laid in with the weft thread to add to the texture, color, and dimensionality
of the weaving.
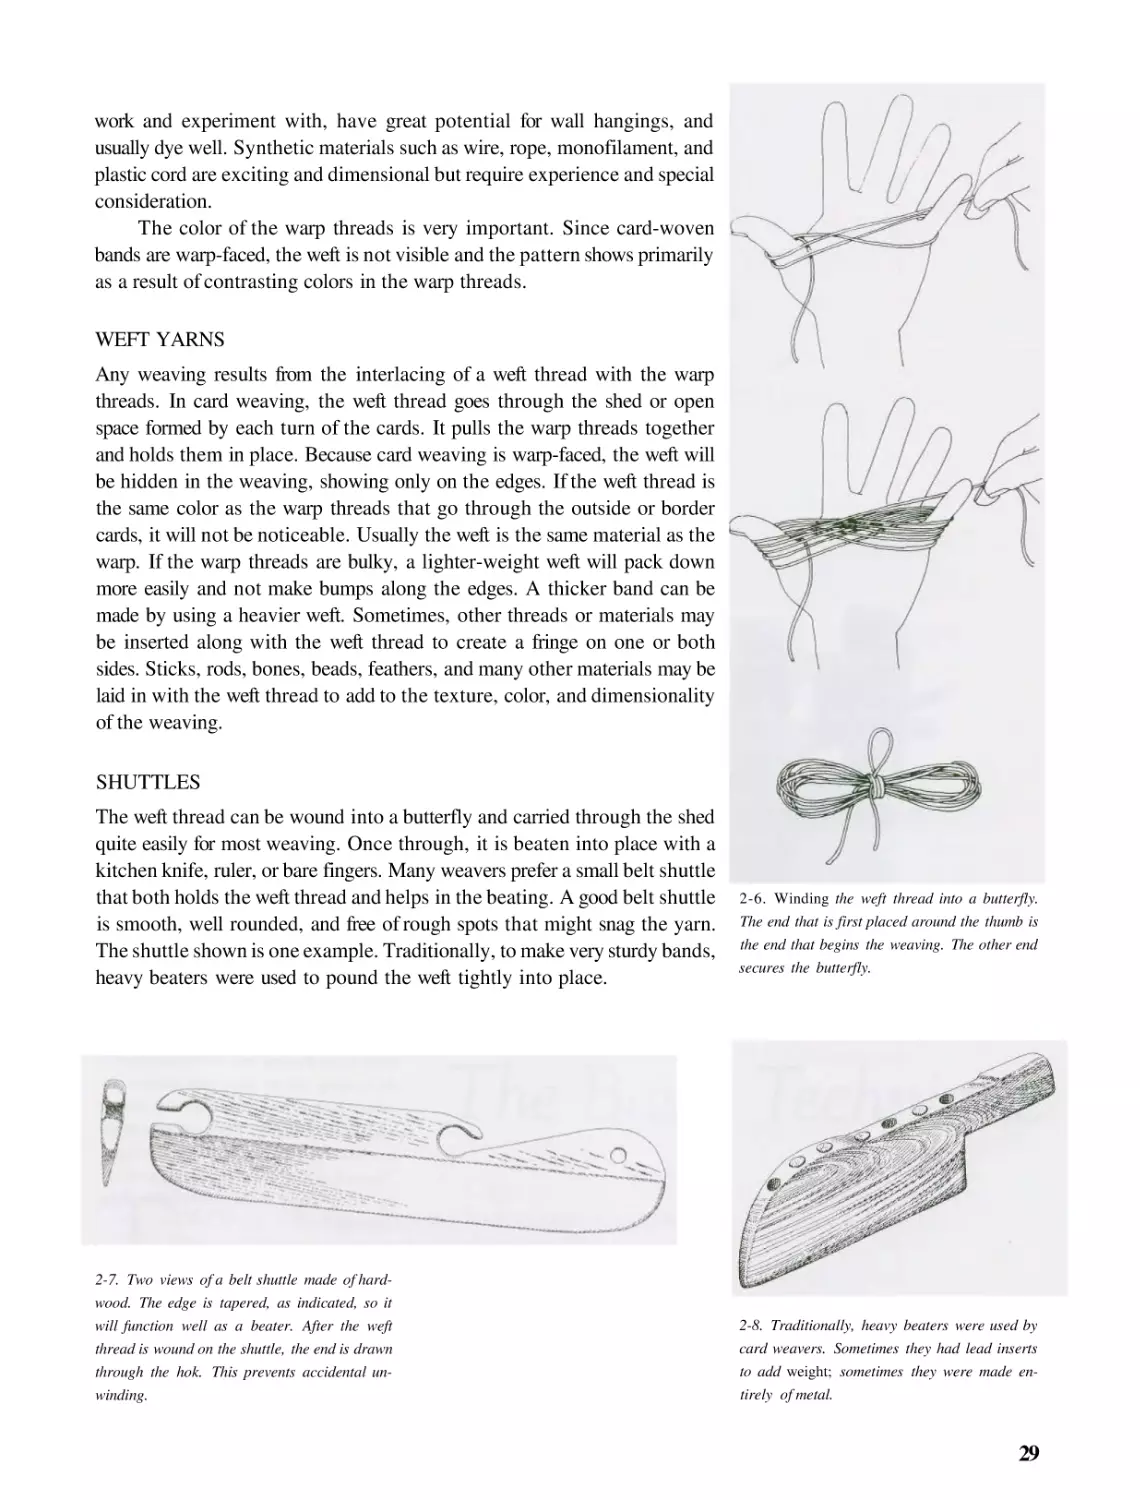
SHUTTLES
The weft thread can be wound into a butterfly and carried through the shed
quite easily for most weaving. Once through, it is beaten into place with a
kitchen knife, ruler, or bare fingers. Many weavers prefer a small belt shuttle
that both holds the weft thread and helps in the beating. A good belt shuttle
is smooth, well rounded, and free of rough spots that might snag the yarn.
The shuttle shown is one example. Traditionally, to make very sturdy bands,
heavy beaters were used to pound the weft tightly into place.
2-7. Two views of a belt shuttle made of hardwood. The edge is tapered, as indicated, so it
will function well as a beater. After the weft
thread is wound on the shuttle, the end is drawn
through the hok. This prevents accidental unwinding.
2-6. Winding the weft thread into a butterfly.
The end that is first placed around the thumb is
the end that begins the weaving. The other end
secures the butterfly.
2-8. Traditionally, heavy beaters were used by
card weavers. Sometimes they had lead inserts
to add weight; sometimes they were made entirely of metal.
29
C-CLAMPS
Because the warp threads in a card weaving are usually all the same length,
some means must be found to conveniently measure many warp threads at
once. One widely used method is to attach two C-clamps securely to a
bench or table and then wrap the appropriate number of threads around
them. This allows for flexibility in determining the length of the warp and
assures uniform tension. C-clamps may also be used as anchor points during
weaving.
Other methods for preparing warps and creating tension are discussed
later. Once you have completed your first weavings, you can move on to
more complex ways of working.
2-9. A card-weaving "loom" from Hara S'rira,
Djerba Island, Tunisia. The date is uncertain.
The cards are suspended in the middle; at each
end is a device for winding up the warp. A comb
which spaces the warp threads is suspended from
the weaving. In the past, card weavers frequently used a comb or spreader to space and
separate warp threads. The comb helps maintain weaving width and makes turning easier.
The comb shown has a removable peg across the
top. (Courtesy of the Museum of Ethnology,
Hamburg.)
30
3
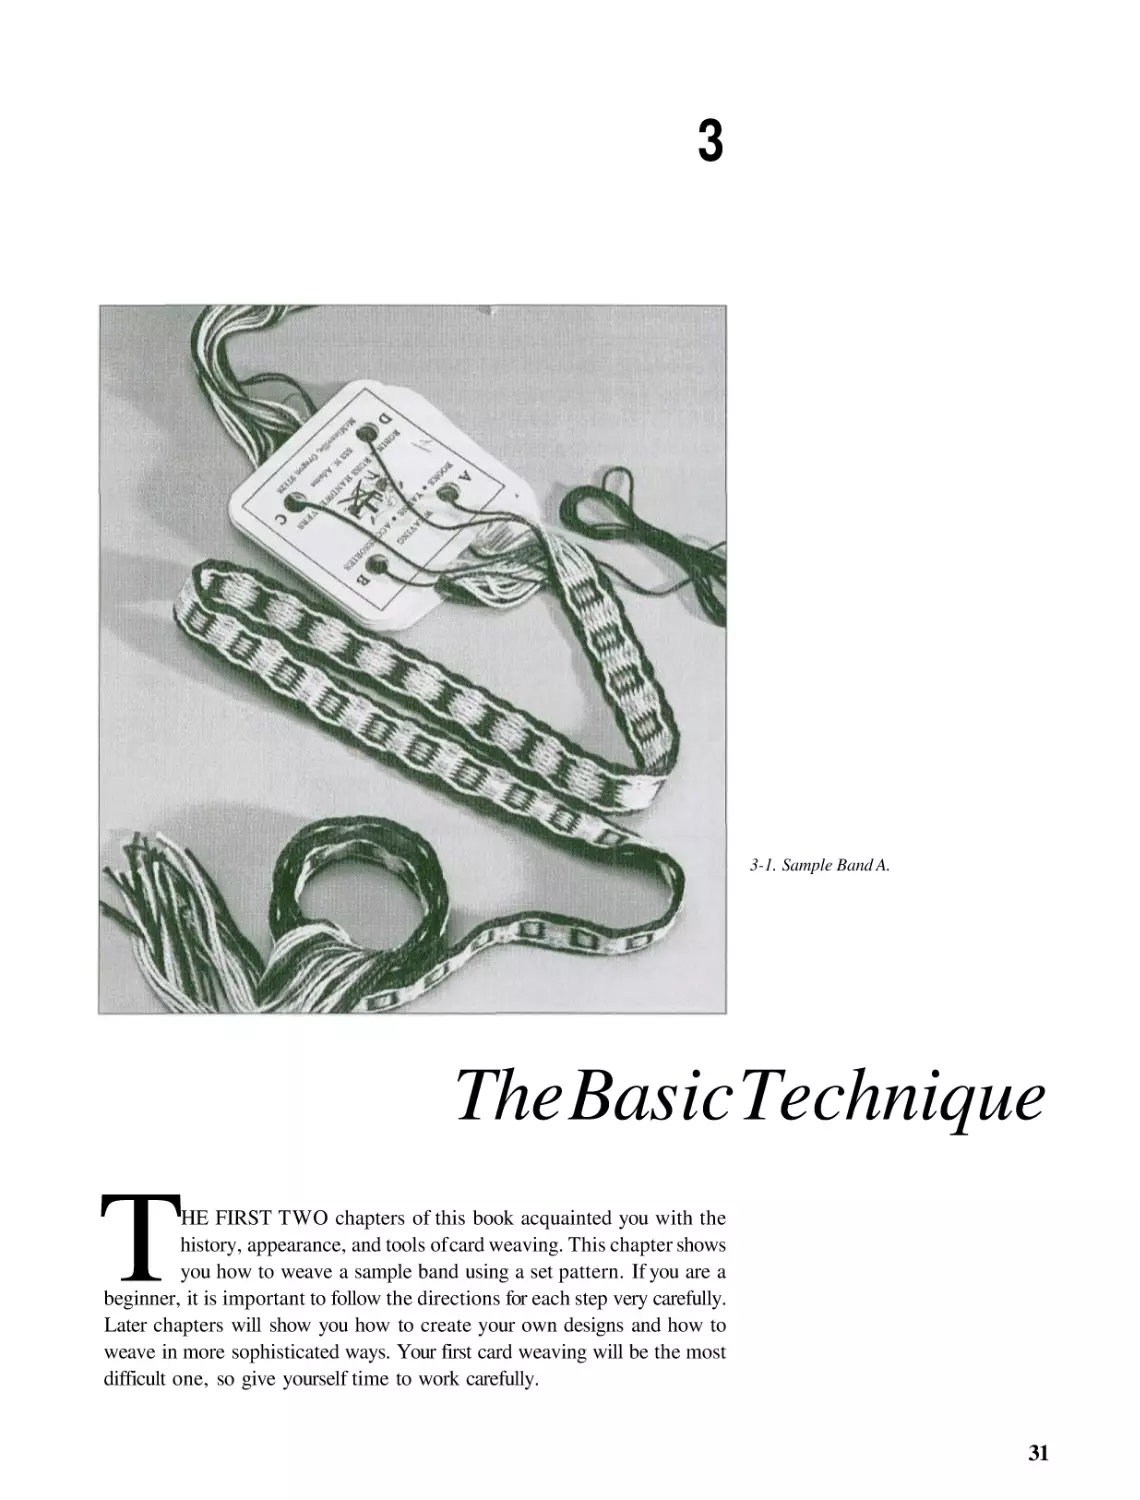
3-1. Sample Band A.
The Basic Technique
T
HE FIRST TWO chapters of this book acquainted you with the
history, appearance, and tools of card weaving. This chapter shows
you how to weave a sample band using a set pattern. If you are a
beginner, it is important to follow the directions for each step very carefully.
Later chapters will show you how to create your own designs and how to
weave in more sophisticated ways. Your first card weaving will be the most
difficult one, so give yourself time to work carefully.
31
SAMPLE BAND A
If you follow each step in this chapter, you will weave a band very much
like the one shown at the beginning of this chapter. The design is bold and
distinct, and the pattern is particularly easy to follow. The weaving requires
just ten cards, an easy number for the beginning card weaver to work with.
The primary objective of this chapter is to teach a system. You will
learn the mechanics of the weaving process and how the weaving relates
to the pattern draft so that with each turn of the cards you know exactly
what to expect. Such factors as how the cards are threaded, which direction
the cards face, and what card edge is used as the reversal point will change
the weaving dramatically. If you follow the system outlined in this chapter,
all future chapters will fall into place. If you are a beginner who is unfamiliar
with other weaving techniques, you may have to work through Sample
Band A a couple of times to fully understand the complexities of the system.
Be sure to read the captions as well as the text.
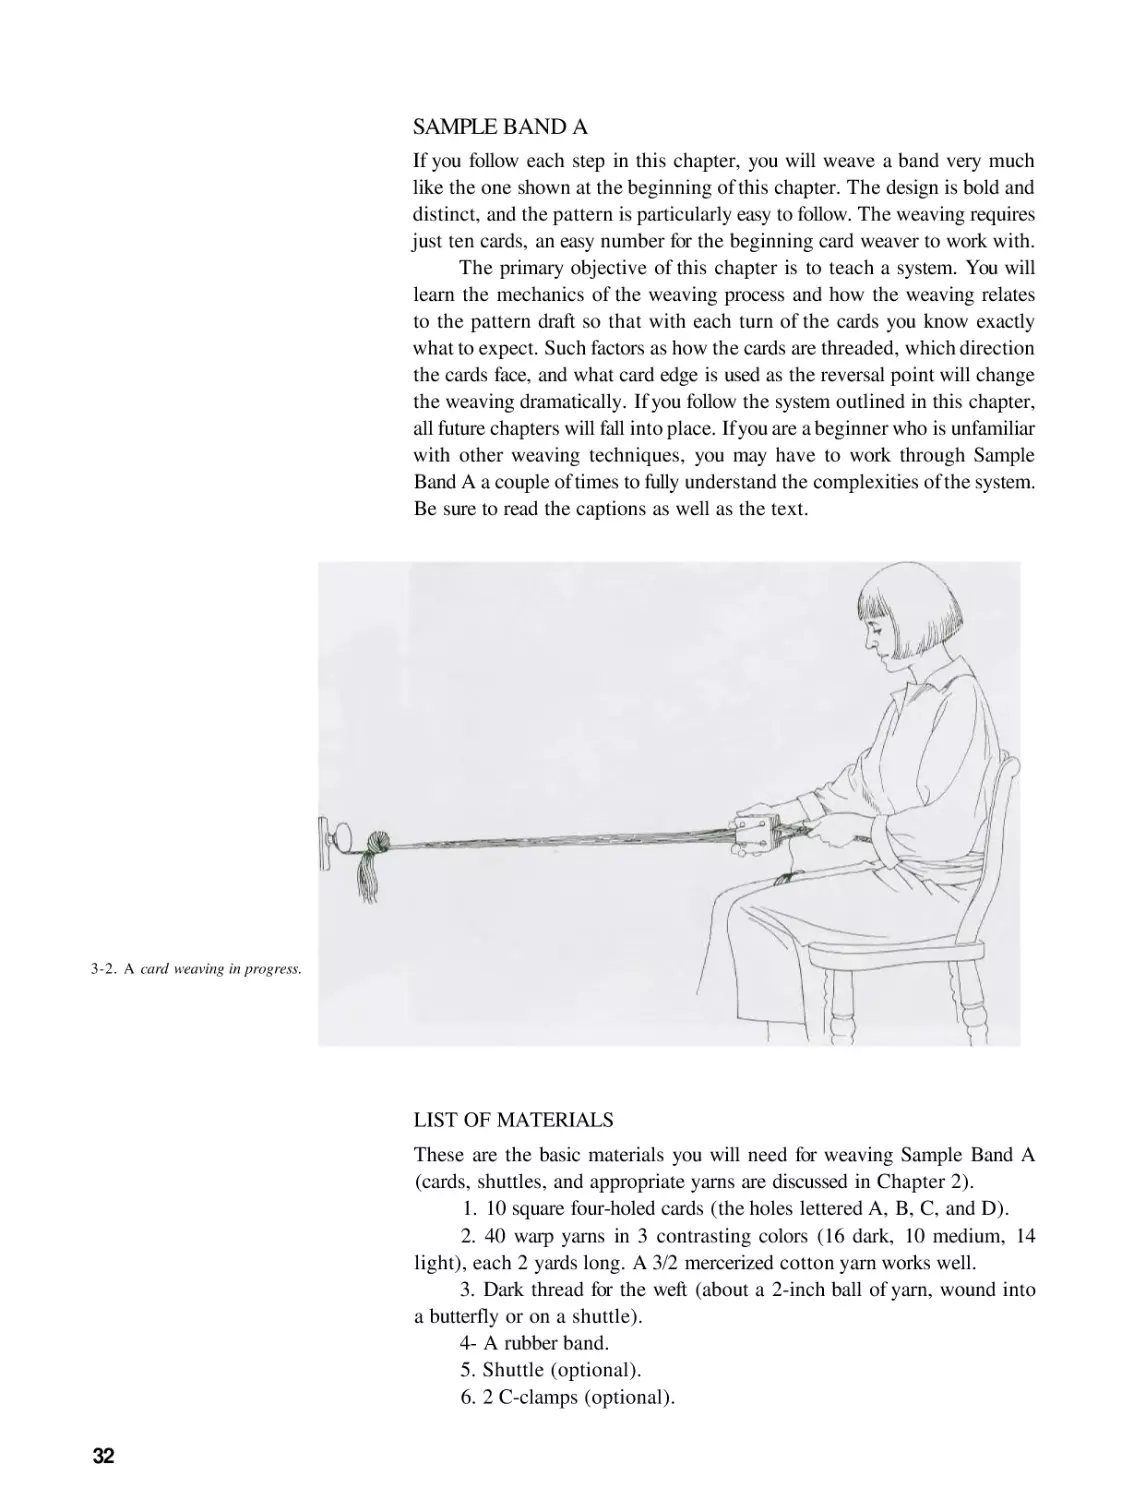
3-2. A card weaving in progress.
LIST OF MATERIALS
These are the basic materials you will need for weaving Sample Band A
(cards, shuttles, and appropriate yarns are discussed in Chapter 2).
1. 10 square four-holed cards (the holes lettered A, B, C, and D).
2. 40 warp yarns in 3 contrasting colors (16 dark, 10 medium, 14
light), each 2 yards long. A 3/2 mercerized cotton yarn works well.
3. Dark thread for the weft (about a 2-inch ball of yarn, wound into
a butterfly or on a shuttle).
4- A rubber band.
5. Shuttle (optional).
6. 2 C-clamps (optional).
32
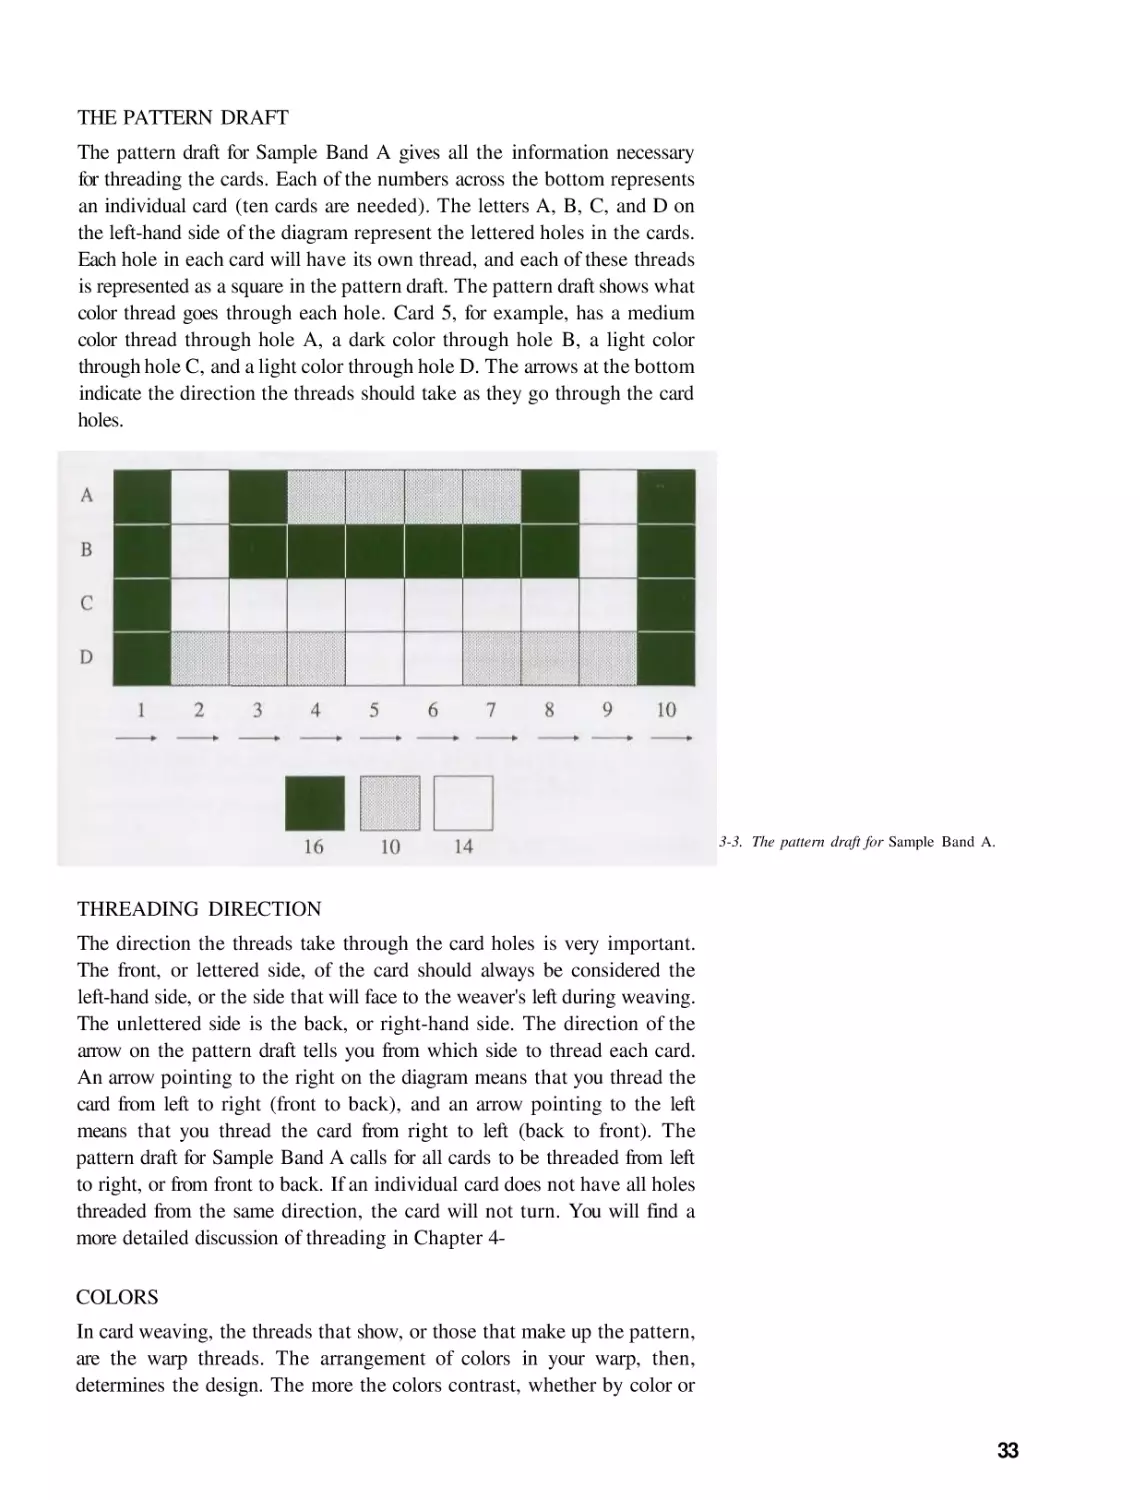
THE PATTERN DRAFT
The pattern draft for Sample Band A gives all the information necessary
for threading the cards. Each of the numbers across the bottom represents
an individual card (ten cards are needed). The letters A, B, C, and D on
the left-hand side of the diagram represent the lettered holes in the cards.
Each hole in each card will have its own thread, and each of these threads
is represented as a square in the pattern draft. The pattern draft shows what
color thread goes through each hole. Card 5, for example, has a medium
color thread through hole A, a dark color through hole B, a light color
through hole C, and a light color through hole D. The arrows at the bottom
indicate the direction the threads should take as they go through the card
holes.
3-3. The pattern draft for Sample Band A.
THREADING DIRECTION
The direction the threads take through the card holes is very important.
The front, or lettered side, of the card should always be considered the
left-hand side, or the side that will face to the weaver's left during weaving.
The unlettered side is the back, or right-hand side. The direction of the
arrow on the pattern draft tells you from which side to thread each card.
An arrow pointing to the right on the diagram means that you thread the
card from left to right (front to back), and an arrow pointing to the left
means that you thread the card from right to left (back to front). The
pattern draft for Sample Band A calls for all cards to be threaded from left
to right, or from front to back. If an individual card does not have all holes
threaded from the same direction, the card will not turn. You will find a
more detailed discussion of threading in Chapter 4COLORS
In card weaving, the threads that show, or those that make up the pattern,
are the warp threads. The arrangement of colors in your warp, then,
determines the design. The more the colors contrast, whether by color or
33
3'4- When you thread the card from the front
(lettered side) to the back, you are threading
from left to right (the arrow on the pattern draft
points from left to right —>).
3-5. When you thread the card from back (unlettered side) to front, you are threading from
right to left (the arrow on the pattern draft points
from right to left <—). During weaving, the
lettered sides of the cards always face to the
weaver's left.
intensity, the more obvious the woven pattern will be. Strongly contrasting
colors are generally best for the beginning weaver. Sample Band A calls for
three colors labeled dark, medium, and light.
WARPING INSTRUCTIONS
To weave Sample Band A, you will need 40 warp threads; 16 dark, 10
medium, and 14 light, each about 2 yards long (length can vary). In
calculating the length of warp, keep in mind that there is waste at the
beginning and end and some take-up in the weaving. When you approach
the far end, at a certain point there will not be enough room to turn the
cards and weave. The amount of warp wastage will also depend on the
weight of the yarns. Heavier yarns require longer lengths.
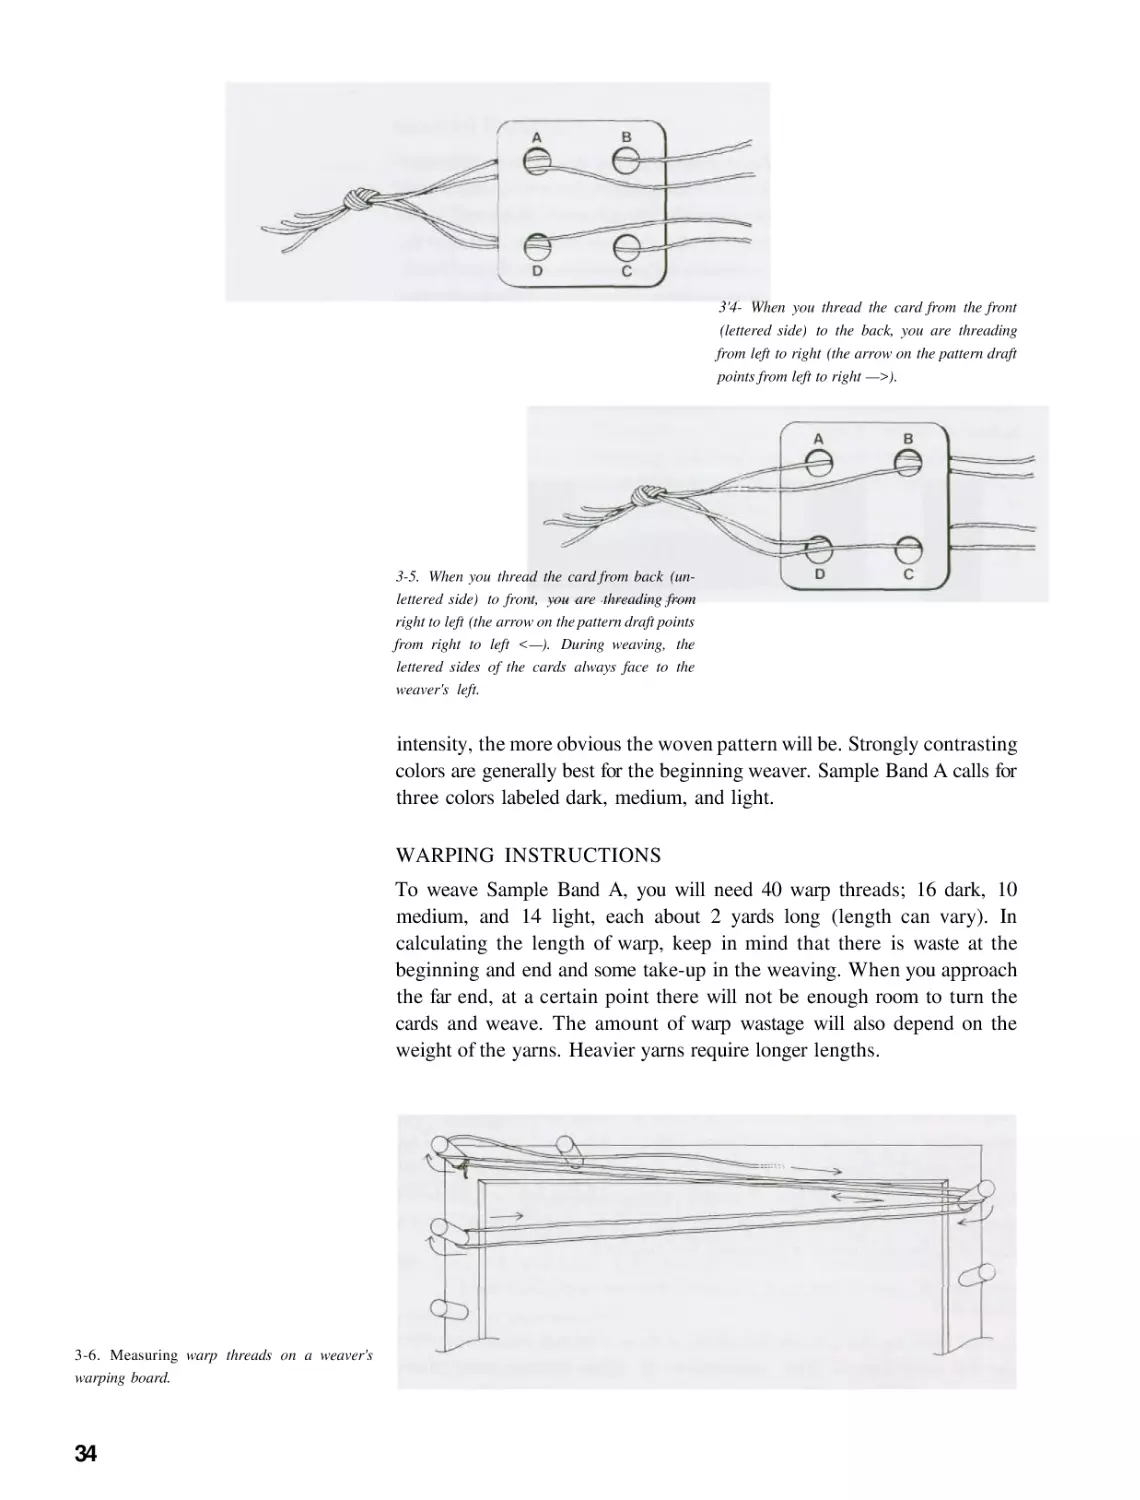
3-6. Measuring warp threads on a weaver's
warping board.
34
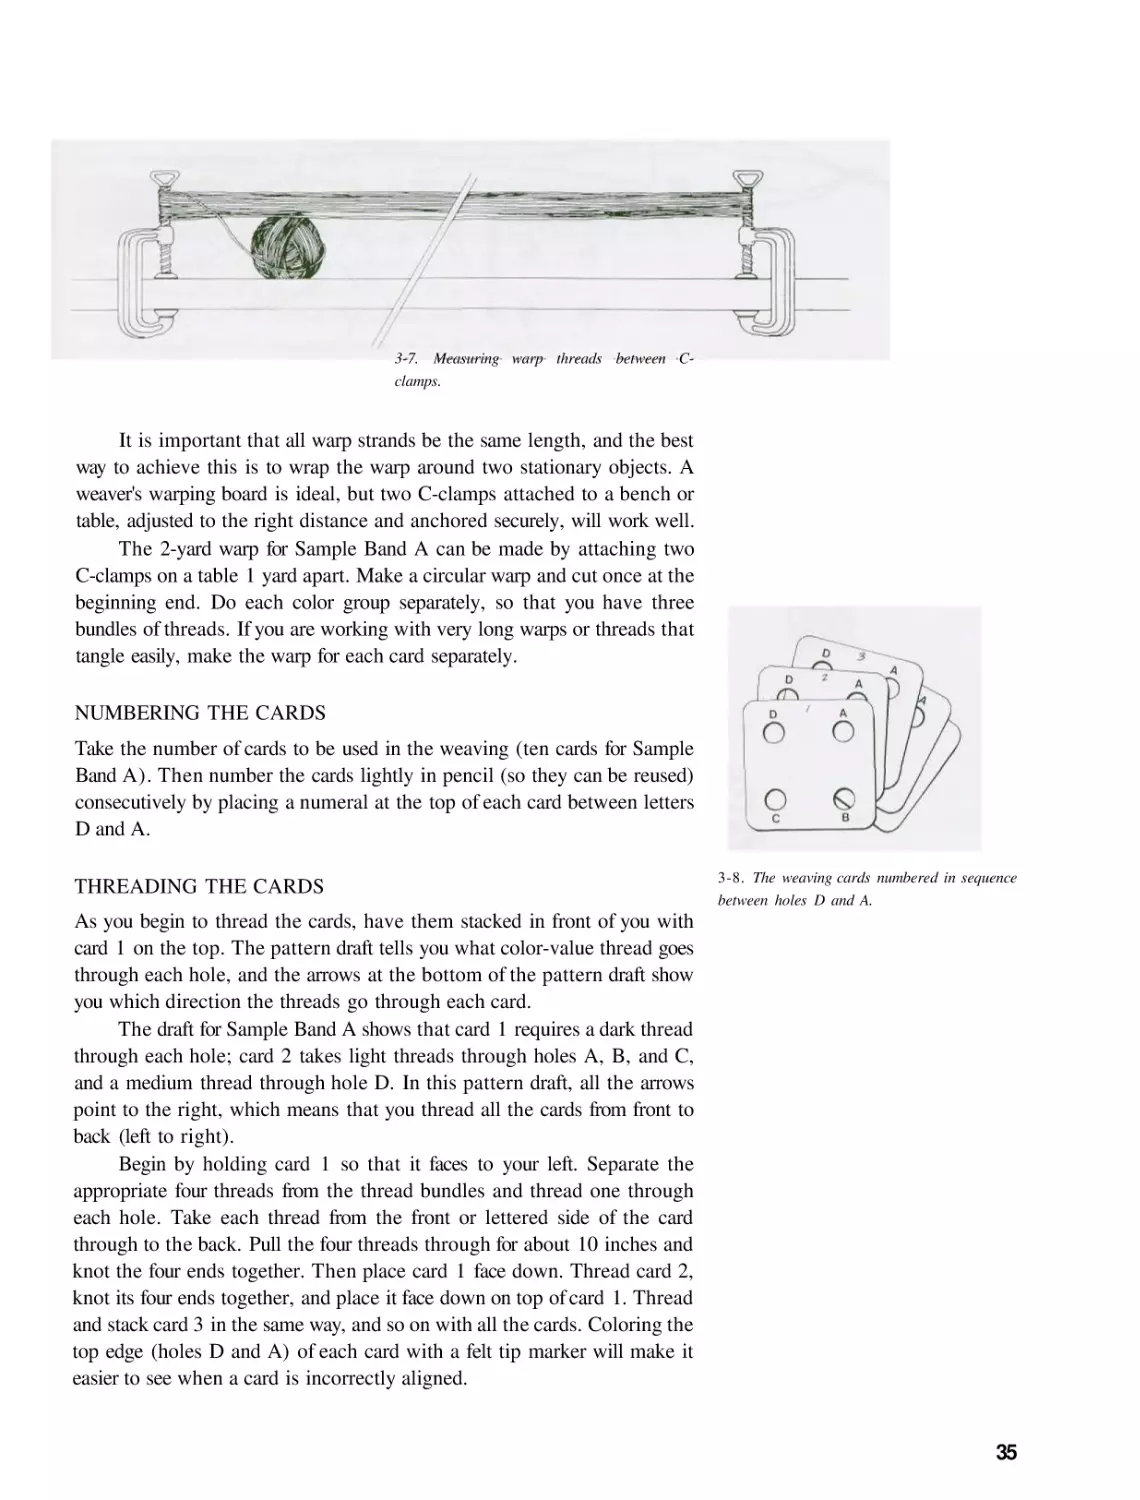
3-7. Measuring warp threads between Cclamps.
It is important that all warp strands be the same length, and the best
way to achieve this is to wrap the warp around two stationary objects. A
weaver's warping board is ideal, but two C-clamps attached to a bench or
table, adjusted to the right distance and anchored securely, will work well.
The 2-yard warp for Sample Band A can be made by attaching two
C-clamps on a table 1 yard apart. Make a circular warp and cut once at the
beginning end. Do each color group separately, so that you have three
bundles of threads. If you are working with very long warps or threads that
tangle easily, make the warp for each card separately.
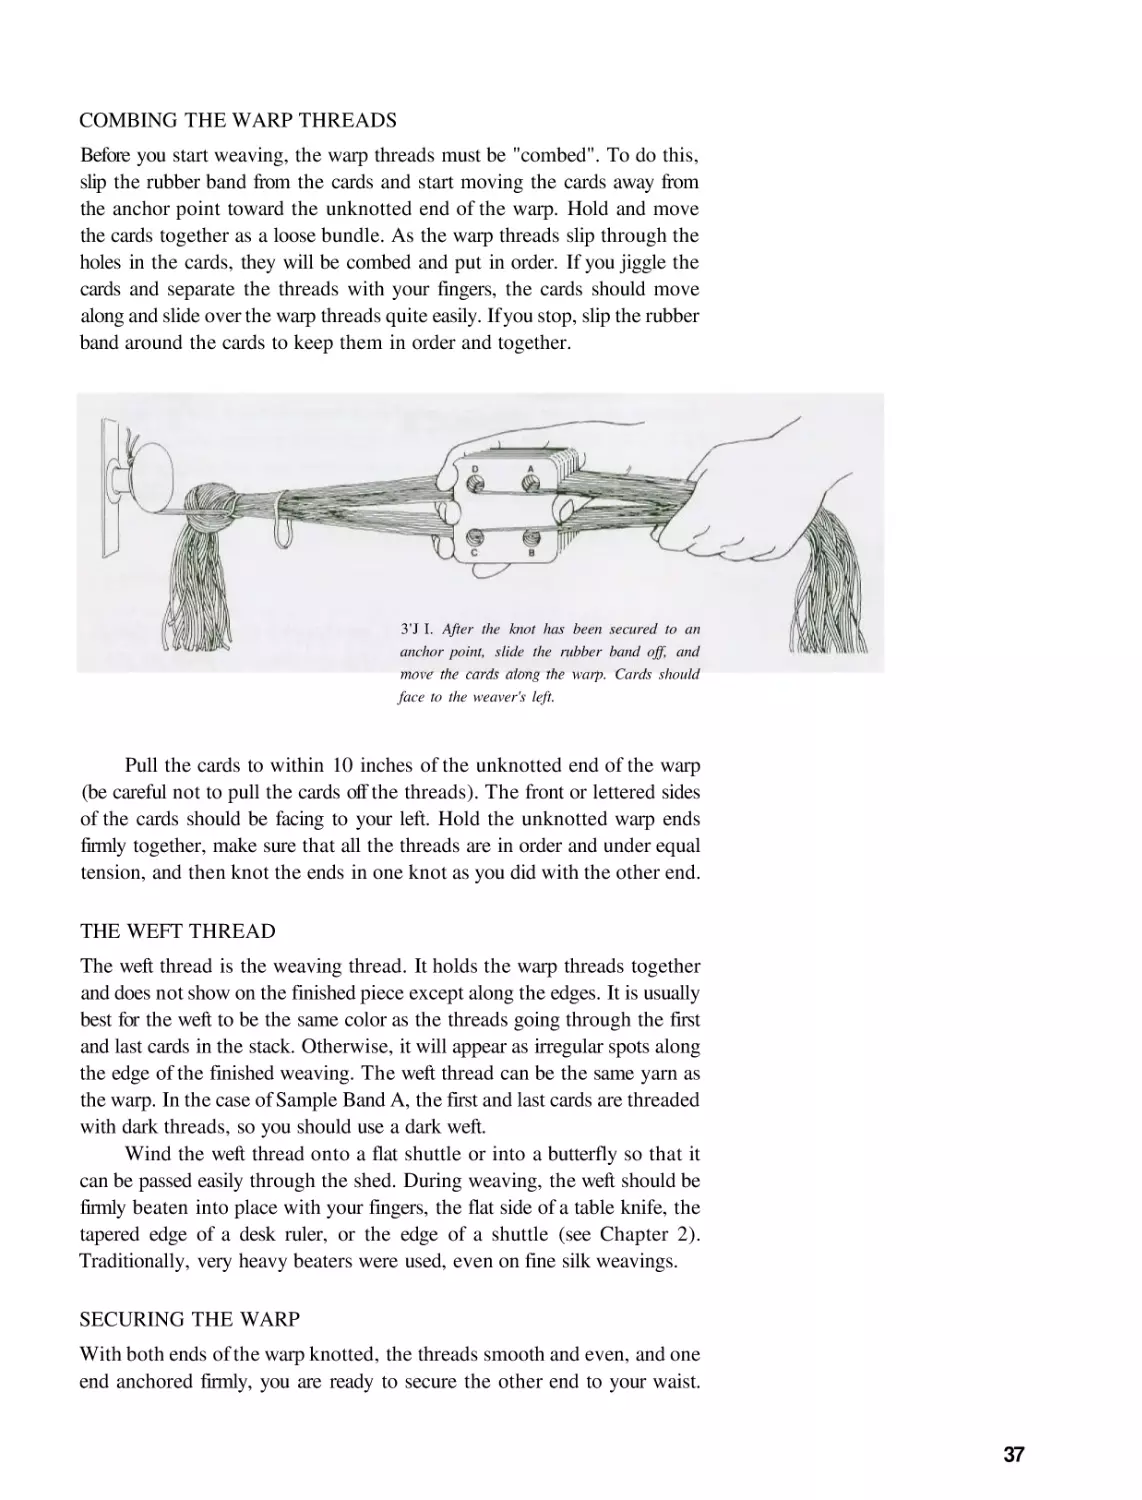
NUMBERING THE CARDS
Take the number of cards to be used in the weaving (ten cards for Sample
Band A). Then number the cards lightly in pencil (so they can be reused)
consecutively by placing a numeral at the top of each card between letters
D and A.
THREADING THE CARDS
3-8. The weaving cards numbered in sequence
between holes D and A.
As you begin to thread the cards, have them stacked in front of you with
card 1 on the top. The pattern draft tells you what color-value thread goes
through each hole, and the arrows at the bottom of the pattern draft show
you which direction the threads go through each card.
The draft for Sample Band A shows that card 1 requires a dark thread
through each hole; card 2 takes light threads through holes A, B, and C,
and a medium thread through hole D. In this pattern draft, all the arrows
point to the right, which means that you thread all the cards from front to
back (left to right).
Begin by holding card 1 so that it faces to your left. Separate the
appropriate four threads from the thread bundles and thread one through
each hole. Take each thread from the front or lettered side of the card
through to the back. Pull the four threads through for about 10 inches and
knot the four ends together. Then place card 1 face down. Thread card 2,
knot its four ends together, and place it face down on top of card 1. Thread
and stack card 3 in the same way, and so on with all the cards. Coloring the
top edge (holes D and A) of each card with a felt tip marker will make it
easier to see when a card is incorrectly aligned.
35
3-9. The cards are threaded, beginning with
card I, and then placed face down on the table.
When all the cards have been threaded and are face down before you,
slip a rubber band over the threads and around the cards. The rubber band
secures the cards whenever you are not weaving or combing the threads.
Now, take the knotted warp threads, tie them firmly into one overhand
knot, loop a separate cord around the knot, and tie the cord to a fixed object:
a furniture leg, doorknob, or sturdy hook. It is important that the lettered
sides of the cards face toward the left.
3-10. Take an 18-inch length of strong cord,
fold it in half, and loop the center as shown. Take
this loop over the end knot of your warp threads.
Use the cord to tie the warp to an anchor point.
36
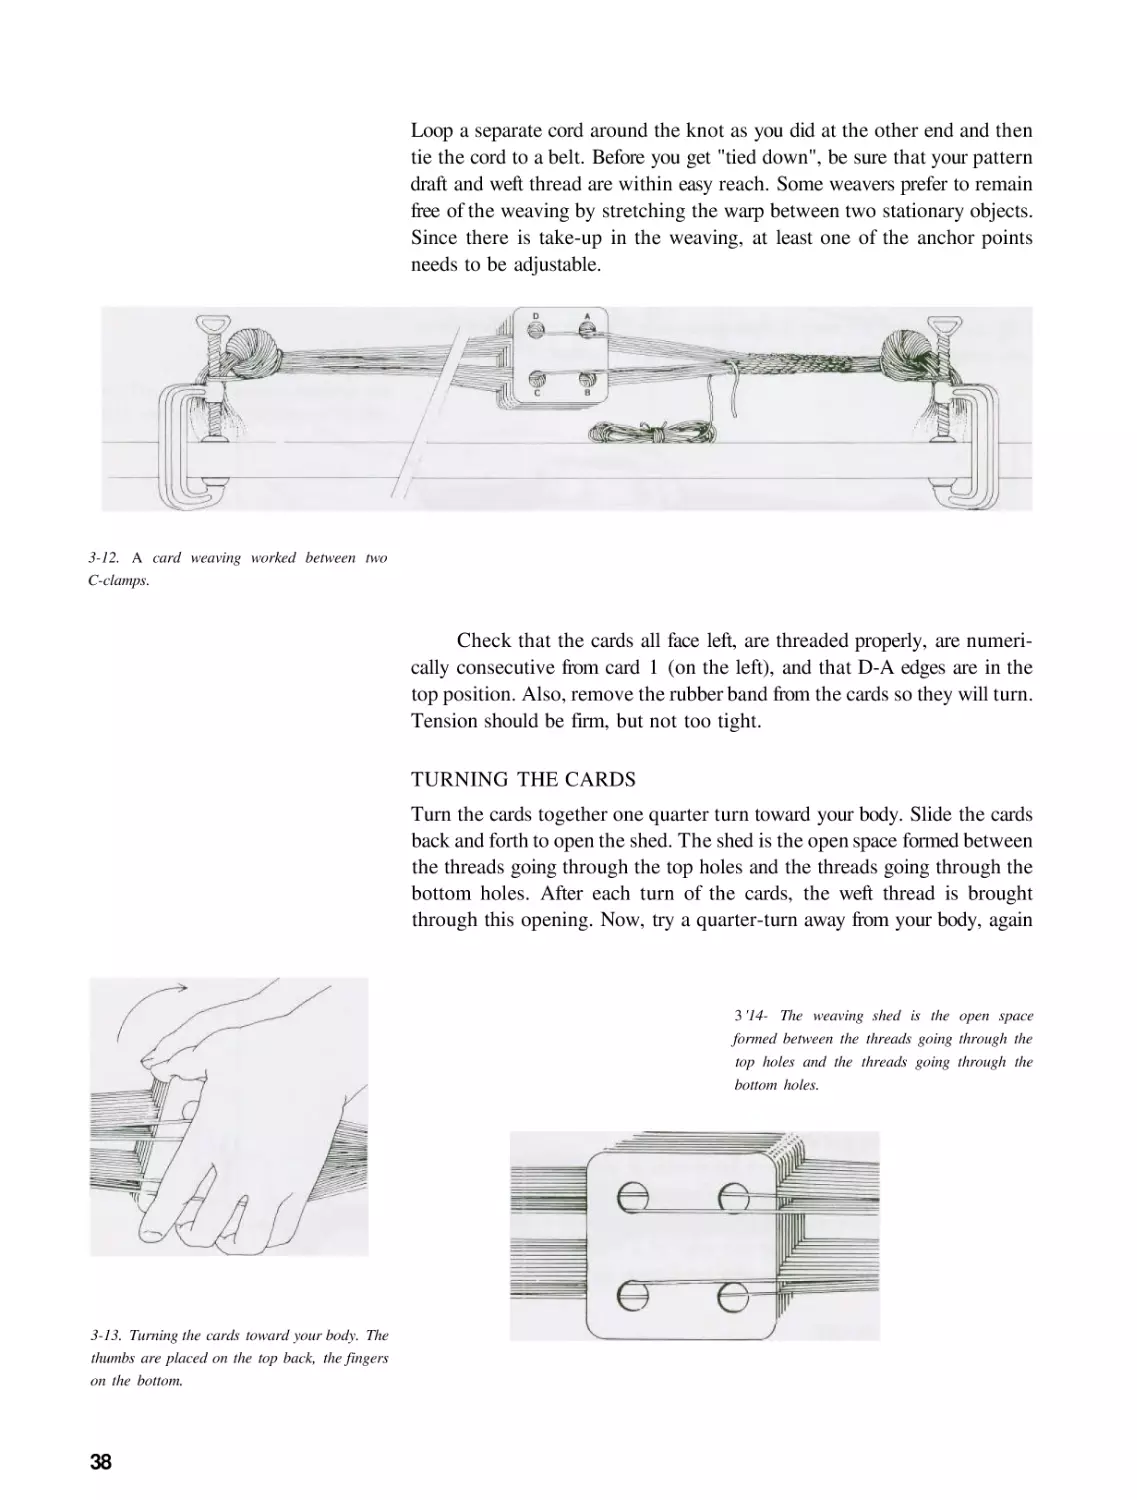
COMBING THE WARP THREADS
Before you start weaving, the warp threads must be "combed". To do this,
slip the rubber band from the cards and start moving the cards away from
the anchor point toward the unknotted end of the warp. Hold and move
the cards together as a loose bundle. As the warp threads slip through the
holes in the cards, they will be combed and put in order. If you jiggle the
cards and separate the threads with your fingers, the cards should move
along and slide over the warp threads quite easily. If you stop, slip the rubber
band around the cards to keep them in order and together.
3'J I. After the knot has been secured to an
anchor point, slide the rubber band off, and
move the cards along the warp. Cards should
face to the weaver's left.
Pull the cards to within 10 inches of the unknotted end of the warp
(be careful not to pull the cards off the threads). The front or lettered sides
of the cards should be facing to your left. Hold the unknotted warp ends
firmly together, make sure that all the threads are in order and under equal
tension, and then knot the ends in one knot as you did with the other end.
THE WEFT THREAD
The weft thread is the weaving thread. It holds the warp threads together
and does not show on the finished piece except along the edges. It is usually
best for the weft to be the same color as the threads going through the first
and last cards in the stack. Otherwise, it will appear as irregular spots along
the edge of the finished weaving. The weft thread can be the same yarn as
the warp. In the case of Sample Band A, the first and last cards are threaded
with dark threads, so you should use a dark weft.
Wind the weft thread onto a flat shuttle or into a butterfly so that it
can be passed easily through the shed. During weaving, the weft should be
firmly beaten into place with your fingers, the flat side of a table knife, the
tapered edge of a desk ruler, or the edge of a shuttle (see Chapter 2).
Traditionally, very heavy beaters were used, even on fine silk weavings.
SECURING THE WARP
With both ends of the warp knotted, the threads smooth and even, and one
end anchored firmly, you are ready to secure the other end to your waist.
37
Loop a separate cord around the knot as you did at the other end and then
tie the cord to a belt. Before you get "tied down", be sure that your pattern
draft and weft thread are within easy reach. Some weavers prefer to remain
free of the weaving by stretching the warp between two stationary objects.
Since there is take-up in the weaving, at least one of the anchor points
needs to be adjustable.
3-12. A card weaving worked between two
C-clamps.
Check that the cards all face left, are threaded properly, are numerically consecutive from card 1 (on the left), and that D-A edges are in the
top position. Also, remove the rubber band from the cards so they will turn.
Tension should be firm, but not too tight.
TURNING THE CARDS
Turn the cards together one quarter turn toward your body. Slide the cards
back and forth to open the shed. The shed is the open space formed between
the threads going through the top holes and the threads going through the
bottom holes. After each turn of the cards, the weft thread is brought
through this opening. Now, try a quarter-turn away from your body, again
3 '14- The weaving shed is the open space
formed between the threads going through the
top holes and the threads going through the
bottom holes.
3-13. Turning the cards toward your body. The
thumbs are placed on the top back, the fingers
on the bottom.
38
3-15. Turning the cards away from your body.
The thumbs are on the top front, the fingers on
the bottom.
testing the shed. Hold the cards loosely but firmly and turn them as a unit.
As you turn the cards, a slight jiggle will help move them into place. If an
individual card does not turn or seems stubborn, make certain that it is
threaded properly. Keep in mind that each "turn" is really only a quarter
turn of the cards.
WEAVING
Before you start weaving, read through the rest of this chapter to get an idea of
how the weaving will develop. When you are ready to start weaving, begin
with holes D-A in the top position. This is the beginning point of the
pattern, and is sometimes referred to as the neutral position, since turning
reversals for conventional weaving are made here. If they are not in the top
position, turn the cards to put them there.
When you begin, the threads are bunched together. It will take about
eight rows to spread the threads and establish the width of the weaving. At
this point, the pattern will begin to show clearly. The spreading will happen
more quickly if you use a heavier weft thread for the first few rows (this can
be pulled out when the weaving is completed).
To begin weaving, slip the weft thread through the shed between the
cards and your body, with the loose end hanging about 6 inches out of the
shed. Turn the cards as a group one turn toward your body, bring the weft
3-16. The cards, the warp threads, and the
weaving shed in relation to the weaver.
39
3'17. The first eight turns of the cards. After
each turn, the weaver clears the shed, passes the
weft thread through the shed, and beats the weft
firmly into place before making the next turn.
I. Neutral err beginning position. Holes D and
A are at the top.lt is in this position that the weft
thread is first passed through the cleared shed.
2. The first turn toward your body brings hole
C to the top; holes C and D are now on top.
This row of weaving is equivalent to the D row
that is represented on the pattern draft. Whenever you are turning the cards toward your body,
the row that shows up on the top face of the
weaving consists of the threads that go through
the holes on top closest to the body. This is
confusing, as two sets of holes are on top, in this
case C andD. The C threads are hidden under
the D threads and will appear on the next turn,
if the next turn is toward the body.
3. The second turn toward your body. Holes
B and C are now on top. This row of weaving
is equivalent to the C row represented on the
pattern draft.
40
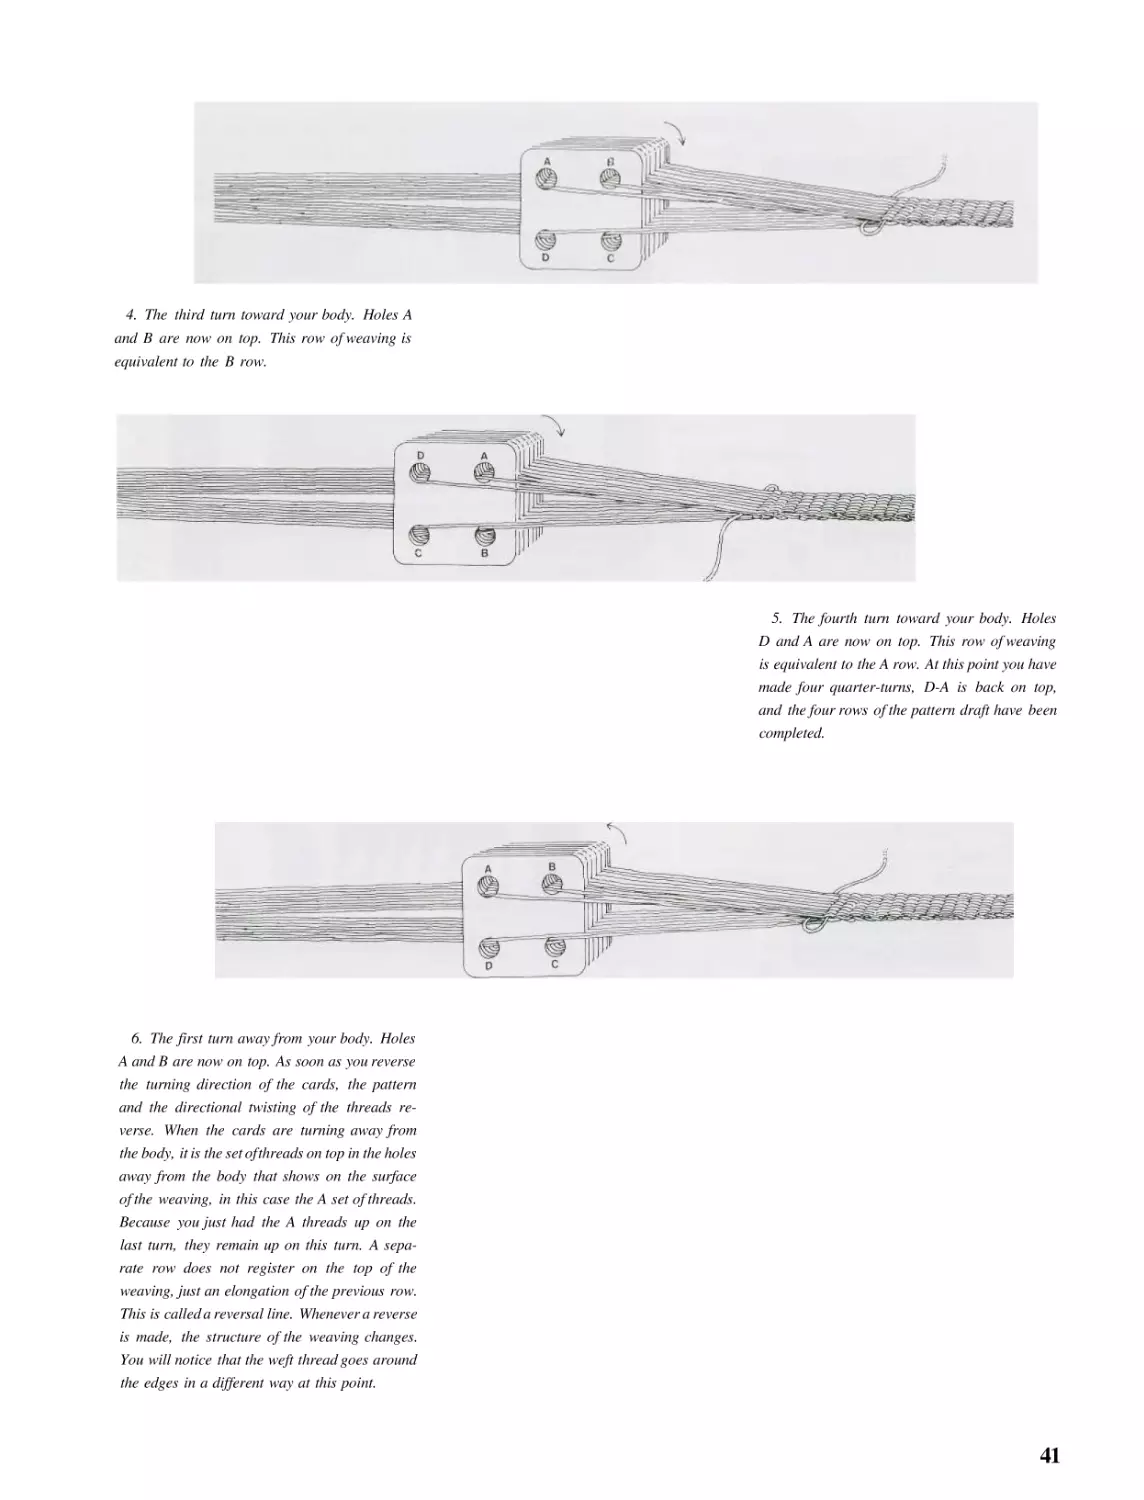
4. The third turn toward your body. Holes A
and B are now on top. This row of weaving is
equivalent to the B row.
5. The fourth turn toward your body. Holes
D and A are now on top. This row of weaving
is equivalent to the A row. At this point you have
made four quarter-turns, D-A is back on top,
and the four rows of the pattern draft have been
completed.
6. The first turn away from your body. Holes
A and B are now on top. As soon as you reverse
the turning direction of the cards, the pattern
and the directional twisting of the threads reverse. When the cards are turning away from
the body, it is the set of threads on top in the holes
away from the body that shows on the surface
of the weaving, in this case the A set of threads.
Because you just had the A threads up on the
last turn, they remain up on this turn. A separate row does not register on the top of the
weaving, just an elongation of the previous row.
This is called a reversal line. Whenever a reverse
is made, the structure of the weaving changes.
You will notice that the weft thread goes around
the edges in a different way at this point.
41
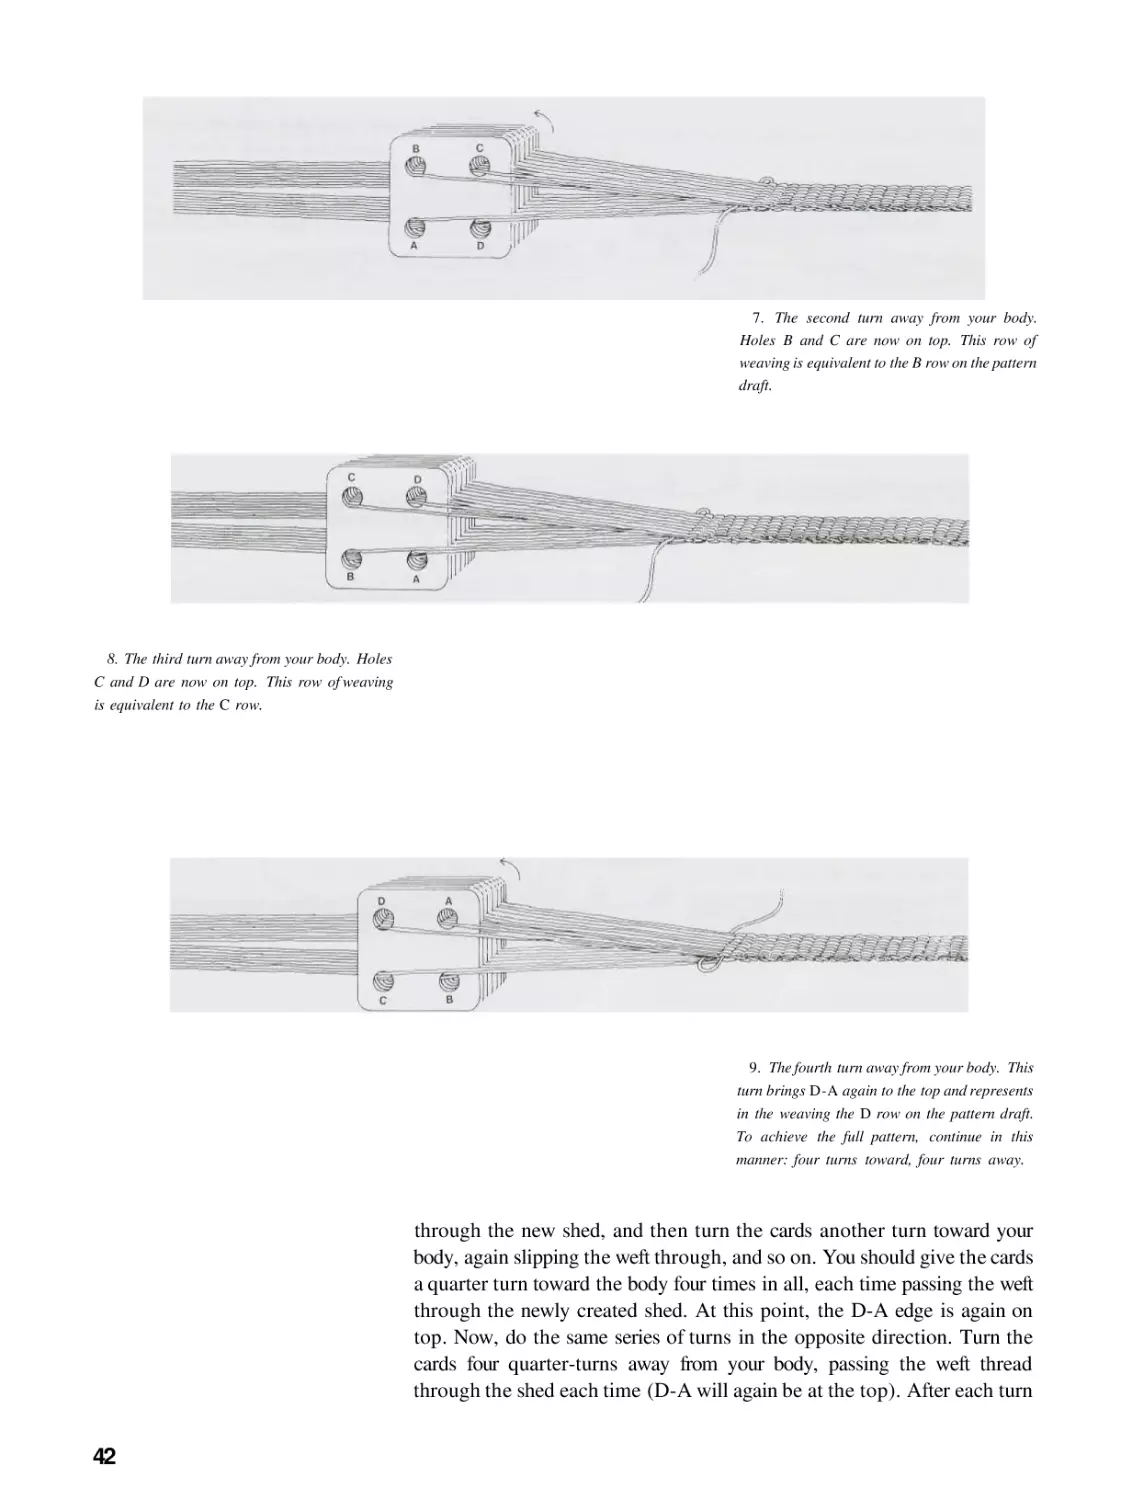
7. The second turn away from your body.
Holes B and C are now on top. This row of
weaving is equivalent to the B row on the pattern
draft.
8. The third turn away from your body. Holes
C and D are now on top. This row of weaving
is equivalent to the C row.
9. The fourth turn away from your body. This
turn brings D-A again to the top and represents
in the weaving the D row on the pattern draft.
To achieve the full pattern, continue in this
manner: four turns toward, four turns away.
through the new shed, and then turn the cards another turn toward your
body, again slipping the weft through, and so on. You should give the cards
a quarter turn toward the body four times in all, each time passing the weft
through the newly created shed. At this point, the D-A edge is again on
top. Now, do the same series of turns in the opposite direction. Turn the
cards four quarter-turns away from your body, passing the weft thread
through the shed each time (D-A will again be at the top). After each turn
42
of the cards, the shed will open cleanly if the cards are pulled toward you,
then pushed away. Notice the elongation in the pattern that occurs each
time you reverse turning directions.
3-J8. A graphic view of the weaving after the
first eight turns. Rows 1 through 4 were created
when the cards were turned toward the weaver's
body, rows 5 through 8 when the cards were
turned away from the weaver's body. This image
represents the full pattern.
3-19. A close-up of Sample Band A, showing
the woven image created by turning four turns
toward and four turns away from the body.
Compare the woven fabric to the graph. The
first four rows show distinctly. When the reversal is made, row 4, the A row, duplicates. In the
weaving this creates an elongation of the A
threads rather than a separate, distinct row.
Wherever there isareversal in the turning direction of the cards, this occurs.
After you have woven for a short while, you will be able to recognize
at any time which way the next turn of the cards should go. As you weave
Sample Band A, you will find that as you turn the cards toward you, a design
emerges, and as you turn the cards away the mirror image appears. The
complete pattern is eight quarter-turns—four toward and four away. As you
proceed, notice that the pattern is a box structure outlined in the light
color. The light color also links the boxes. On the first turn, the light color
comes up in the center with the medium color on each side. The second
turn brings all light threads up, and the third turn brings dark threads up
in the center with light threads at each edge. Turn four brings up a medium
center with a dark edge and then a light edge. The dark border (cards 1 and
10) always frames the very edge of each row. As you turn the cards toward
your body, the box opens, and all the threads slant to the right. As you turn
them away, the box closes, and the threads slant to the left.
If this is your first weaving you may feel overwhelmed. If you pay
attention to your craftsmanship, you lose the pattern; if you pay attention
43
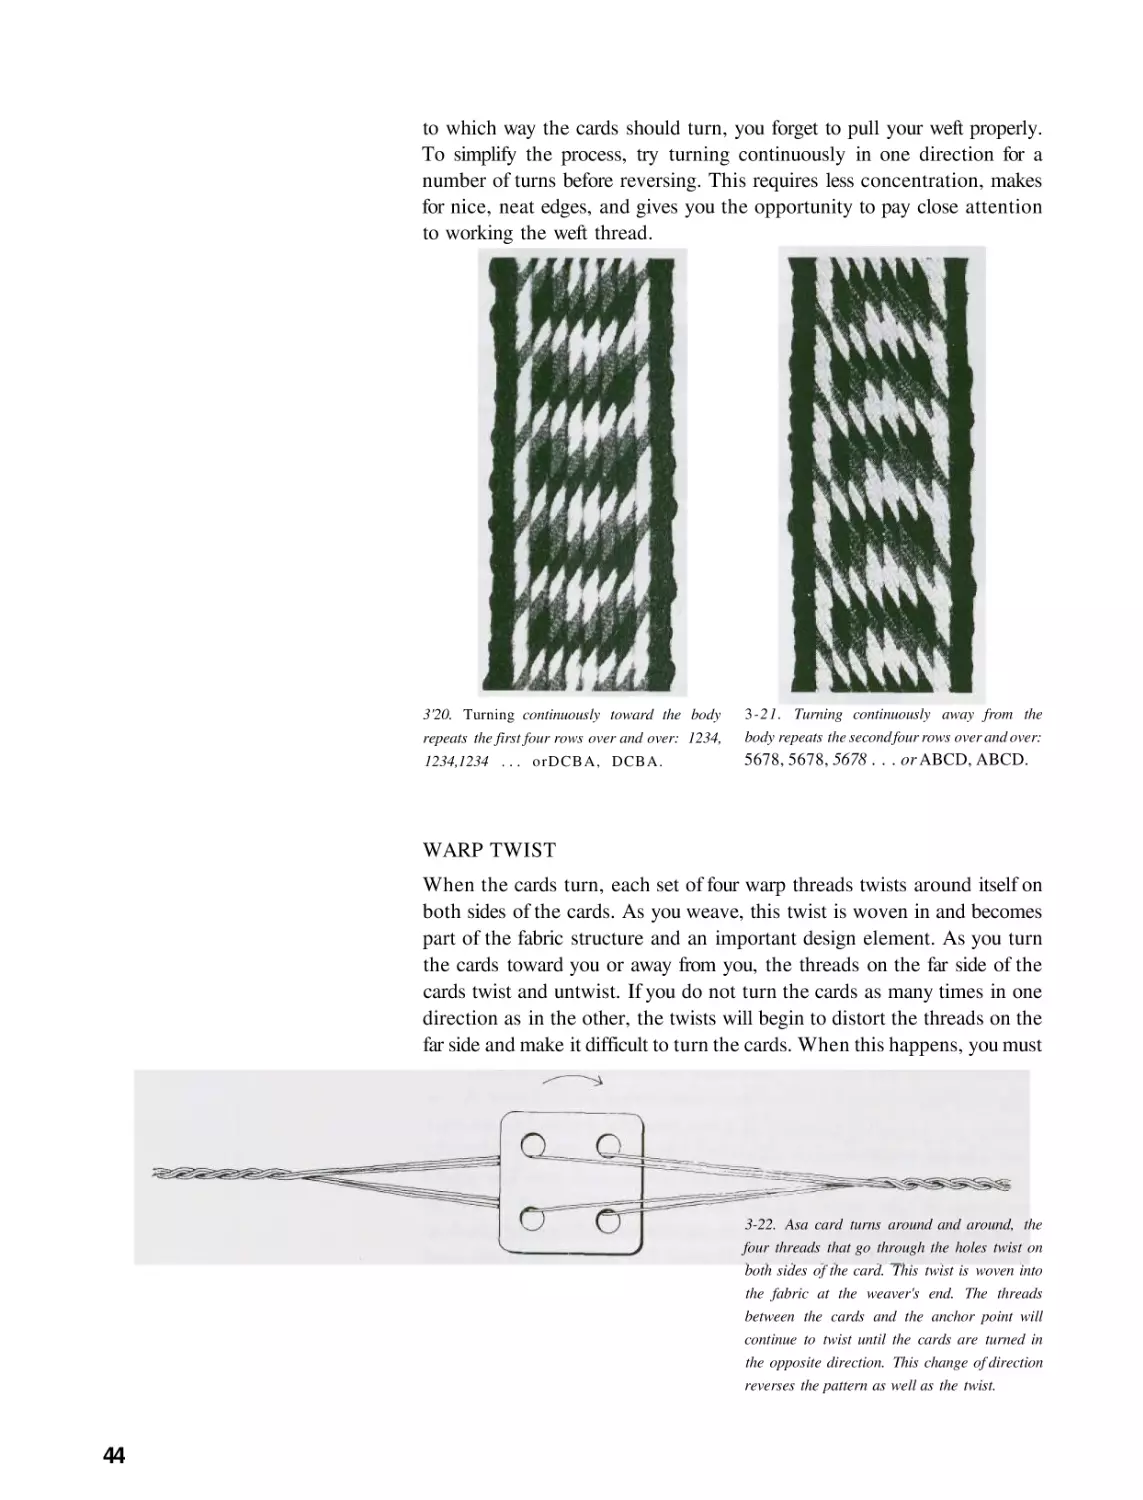
I
to which way the cards should turn, you forget to pull your weft properly.
To simplify the process, try turning continuously in one direction for a
number of turns before reversing. This requires less concentration, makes
for nice, neat edges, and gives you the opportunity to pay close attention
to working the weft thread.
repeats the first four rows over and over: 1234,
3-21. Turning continuously away from the
body repeats the second four rows over and over:
1234,1234 . . . orDCBA, DCBA.
5678, 5678, 5678 . . . or ABCD, ABCD.
3'20. Turning continuously toward the body
WARP TWIST
When the cards turn, each set of four warp threads twists around itself on
both sides of the cards. As you weave, this twist is woven in and becomes
part of the fabric structure and an important design element. As you turn
the cards toward you or away from you, the threads on the far side of the
cards twist and untwist. If you do not turn the cards as many times in one
direction as in the other, the twists will begin to distort the threads on the
far side and make it difficult to turn the cards. When this happens, you must
3-22. Asa card turns around and around, the
four threads that go through the holes twist on
both sides of the card. This twist is woven into
the fabric at the weaver's end. The threads
between the cards and the anchor point will
continue to twist until the cards are turned in
the opposite direction. This change of direction
reverses the pattern as well as the twist.
44
either reverse the turning direction of the cards (this reverses the twisting
direction) or untie the anchored end of the warp and comb out the twists.
It is possible to move the twists back a long way by taking each card
individually and putting your finger between the top and bottom threads
on the far side of it and pushing the twist back. Done one card at a time,
the twist is quite easy to shift.
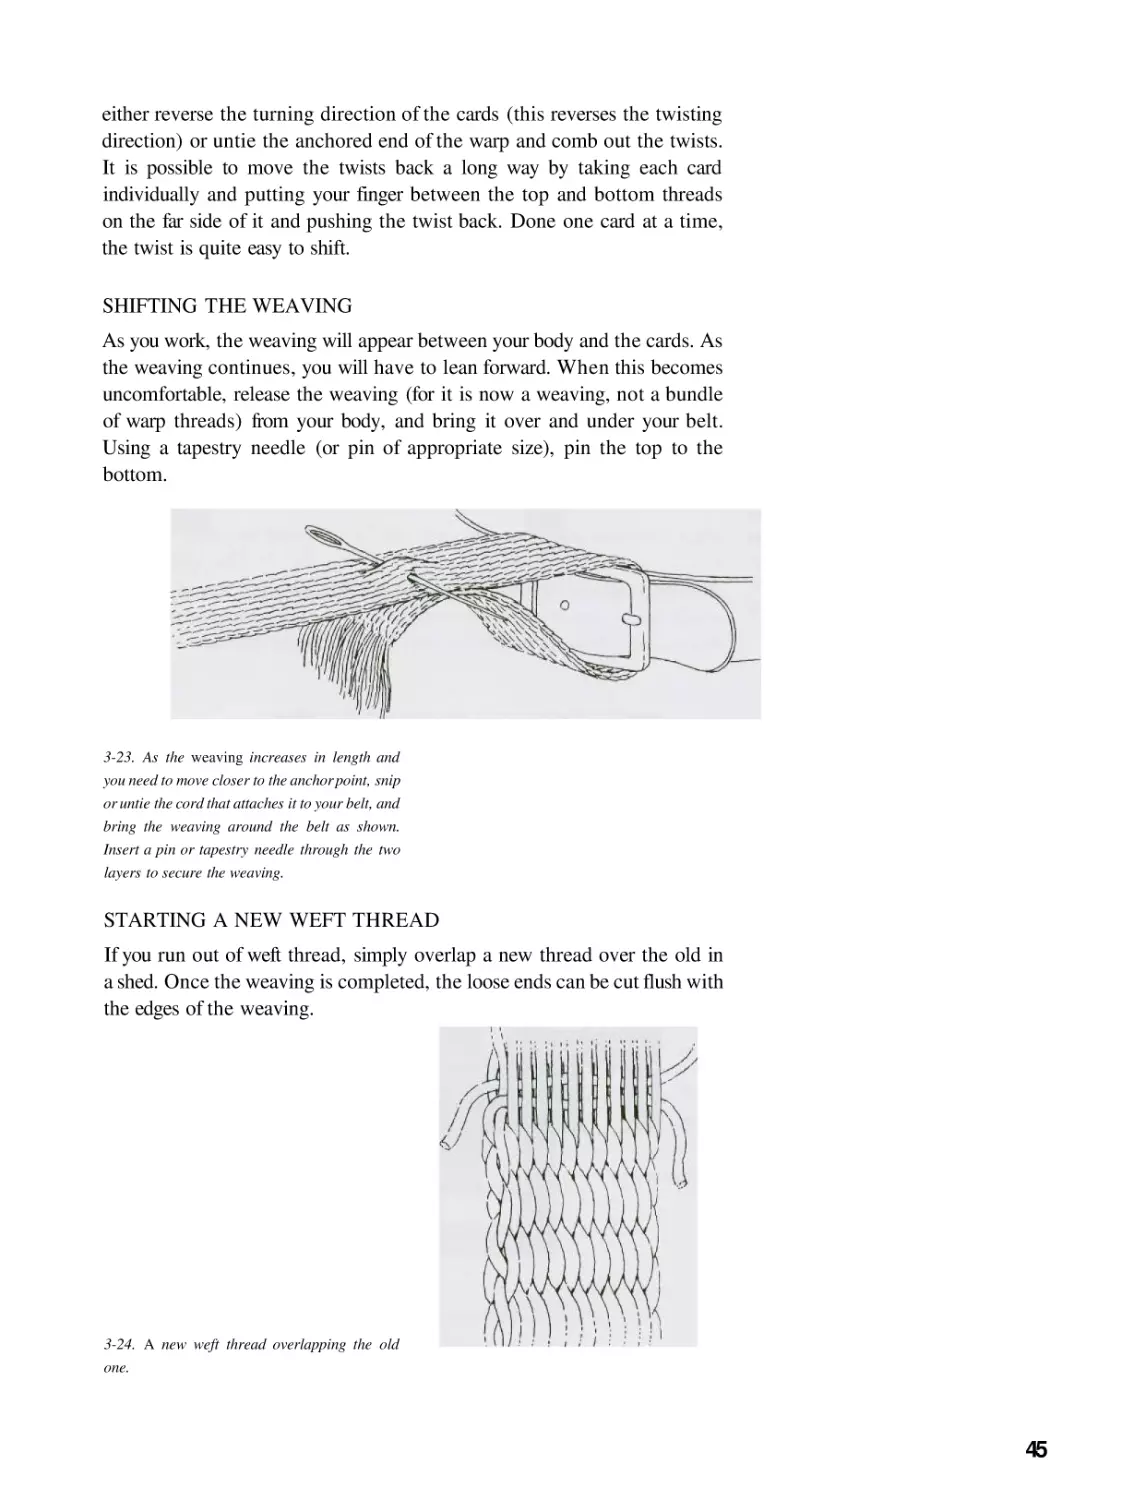
SHIFTING THE WEAVING
As you work, the weaving will appear between your body and the cards. As
the weaving continues, you will have to lean forward. When this becomes
uncomfortable, release the weaving (for it is now a weaving, not a bundle
of warp threads) from your body, and bring it over and under your belt.
Using a tapestry needle (or pin of appropriate size), pin the top to the
bottom.
3-23. As the weaving increases in length and
you need to move closer to the anchor point, snip
or untie the cord that attaches it to your belt, and
bring the weaving around the belt as shown.
Insert a pin or tapestry needle through the two
layers to secure the weaving.
STARTING A NEW WEFT THREAD
If you run out of weft thread, simply overlap a new thread over the old in
a shed. Once the weaving is completed, the loose ends can be cut flush with
the edges of the weaving.
3-24. A new weft thread overlapping the old
one.
45
REPAIRING A BROKEN WARP THREAD
There are two ways to repair a broken warp thread. If the end protruding
from the weaving is long enough, use a secure knot to attach a new warp
strand to the broken thread. Tie the knot as close to the woven area as
possible. Thread the new warp strand properly through the card and carry
it along to the anchor point, adjust the tension, and tie. If the warp thread
breaks within the weaving, pin a new warp thread in place as shown in
Figure 3-25and continue weaving. When the weaving is completed, pull
the pin and use a needle or crochet hook to weave the end back into the
piece. You can avoid broken warp strands by choosing strong threads and
by being gentle with them when you begin to weave. Yarn sometimes comes
from the factory with knots—avoid using knotted lengths in your warp, as
the cards will work the knots loose.
3-25. Replacing a warp thread broken and lost
in the weaving. Secure the far end of the new
thread at the knot, thread through the card,
adjust the tension, and wind the thread figureeight style around a pin inserted in the weaving
until it holds.
PATTERN VARIATIONS
Many different pattern variations can be achieved by using different
reversal points. Try reversing with B-C on top or C-D. This will create a
different sequence of rows, and a new pattern. Another way of working
which can be very effective is to turn five or six rows before reversing, and
then to turn the same number of rows in the opposite direction.
4 turns toward
4 turns away
3-26. A woven example of Figure 3-27.
4 turns toward
3-27. The graphed image of Sample Band A
using B-C as the reversal point and turning four
turns toward and four away.
46
Using B-C as reversal point
4 turns toward
4 turns away
3-28. A woven example of Figure 3-29.
4 turns toward
3-29. The graphed image of Sample Band A
usingC-D as the reversalpoint and turning four
turns toward and four away.
Using C-D as reversal point
5 turns toward
5 turns away
3-30. A woven example of Figure 3-31.
5 turns toward
Using D-A as the reversal point and
turning five toward and five away
3-31. The graphed image of Sample Band A
using D-A as the reversal point and turning five
turns toward and five away.
47
6 turns toward
6 turns away
3-32. A woven example of Figure 3-33,
6 turns toward
3-33. The graphed image of Sample Band A
using D-A as the reversal point and turning six
turns toward and six away.
Using D-A as the reversal point and
turning six toward and six away
CONTROLLING THE WEFT THREAD
There is a feeling for card weaving that comes with practice, with sensitivity
to the materials, and with respect for the importance of good craftsmanship.
As you weave, pull the weft thread tightly enough that it goes smoothly
into the next shed, but not so tightly that it cramps the edges or causes the
middle area of the weaving to bunch up. The weft thread binds the warp
threads together and keeps the weaving flat and the edges straight. It should
pull the warp threads close enough together that they cover the weft. It is
most important that the weft go around the edges neatly and snugly. The
weft thread should be beaten firmly into place immediately after it has been
placed in its new shed. As the process of turning and shifting the cards will
loosen the weft, give it a little tug before bringing it through the next shed.
FINISHING
Continue weaving until the sample is long enough or the cards are too close
to the knot to turn. Untie the knot or cut it off, slip the cards off, and trim
the fringe. Card weaving is tight and dense enough that no special precautions need be taken to avoid unraveling. When you slip the band from your
waist, you will be holding the completed weaving. You will notice that the
band does not lie completely flat, but turns up on one edge and then the
48
other. This comes from the warp twist that is woven into the fabric. Since
all the cards are threaded in one direction, the threads all twist either one
way or the other, depending on which direction the cards turn. This creates
a torque in the fabric which is particularly noticeable when the cards are
turned continuously in one direction for many rows. After you finish, press
the weaving with a steam iron. This will settle the threads and help flatten
the band.
PROBLEMS AND MISTAKES IN WEAVING
Clearing the shed. For a good shed, the warp threads must be under strong
and even tension. Slide the cards once toward you and once away in a
smooth, easy movement. Frantic or harsh movement will tend to shred the
warp. The cards should be worked as a unit, and must be "square", not
uneven. Always insert the weft close to the cards where the shed is largest.
If you have a sticky warp or are working with many cards and the shed is
hard to find, use a flat, smooth bar tapered on each end (it could be plastic,
wood, or metal) to insert through the shed and turn on edge. If this is
tapered on one long edge, it can also be used to beat the weft firmly into
place.
Turning the cards. As you turn the cards, beware of loose tension, of
cards too tightly packed together, and of individual cards incorrectly
threaded. Cards turn most easily on smooth threads, less easily on threads
that are thick or fuzzy.
Weft loops under the weaving. When you examine your weaving you
might find loops of thread which run from one selvedge to the other on the
back side. During weaving, especially on your first effort, it is very easy to
drop the weft thread and, after picking it up, insert it from the wrong side,
leaving a loop of thread underneath. This can be corrected by snipping the
loop in the middle and reweaving the ends with a needle or crochet hook.
Floating warp threads. You might find warp threads (that seem exceptionally long) floating on the top and bottom surface of your weaving. If
you look closely you will probably see that in between is a woven section,
but some threads did not catch. During weaving, you probably turned one
turn one direction and then one the other direction, back and forth for a
number of rows, so that two sets of holes created a woven center, the threads
through one set of holes floated on the top, and the threads through the
other set of holes floated on the bottom. This way of working is sometimes
used to create a design element.
Mistakes in weaving. Most card-weaving errors occur as a result of
incorrect turning or of inaccurate threading. Always be doubly certain that
the correct color is threaded through the right hole in each card. As you
gain experience, you will work more accurately and confidently. As a
beginner, you probably will not notice a mistake until you have woven
several rows beyond it. If you make a mistake on your first weaving, do not
worry. Try to identify the cause and continue weaving. Taking out a woven
section to get at an error can be very frustrating and can sometimes cause
even greater problems. When you must take out a section, you will
49
essentially be weaving backward (or unweaving). To do this, turn the border
card on the side from which the weft protrudes in such a way as to open
the shed and free the weft thread. Use this border card as a guide, and follow
by moving all the remaining cards into the position of the guide border
card. Threads often become very firmly entwined during weaving, so
removing the weft thread can in some cases, especially with wool, require
considerable force.
50
4
4-1 • Two sections of a band based on Figure 4-3
m silk and cotton.
PatternDraftingandDesigning
T
HERE ARE MANY approaches to visualizing and creating patterns for card weaving. The method described in this chapter
involves working out the pattern, color, and threading direction
on graph paper. A description of how the weaving is set up, how cards are
turned, and how the weaving relates to the pattern draft is contained in
Chapter 3. You will need to understand that information fully.
51
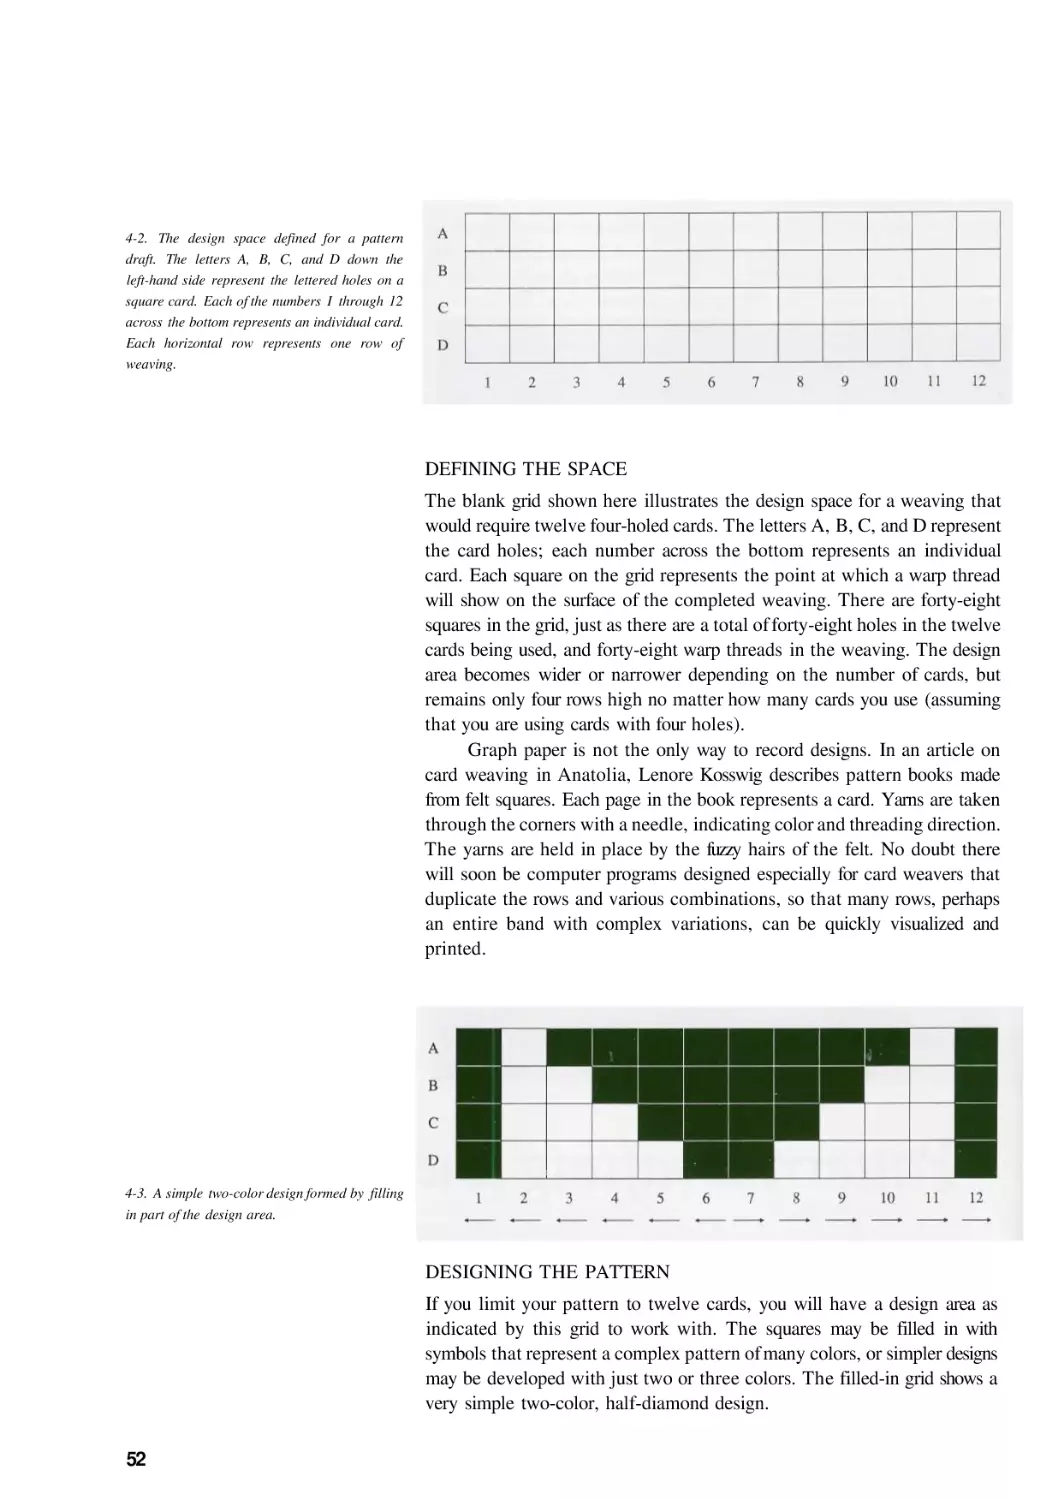
4-2. The design space defined for a pattern
draft. The letters A, B, C, and D down the
left-hand side represent the lettered holes on a
square card. Each of the numbers I through 12
across the bottom represents an individual card.
Each horizontal row represents one row of
weaving.
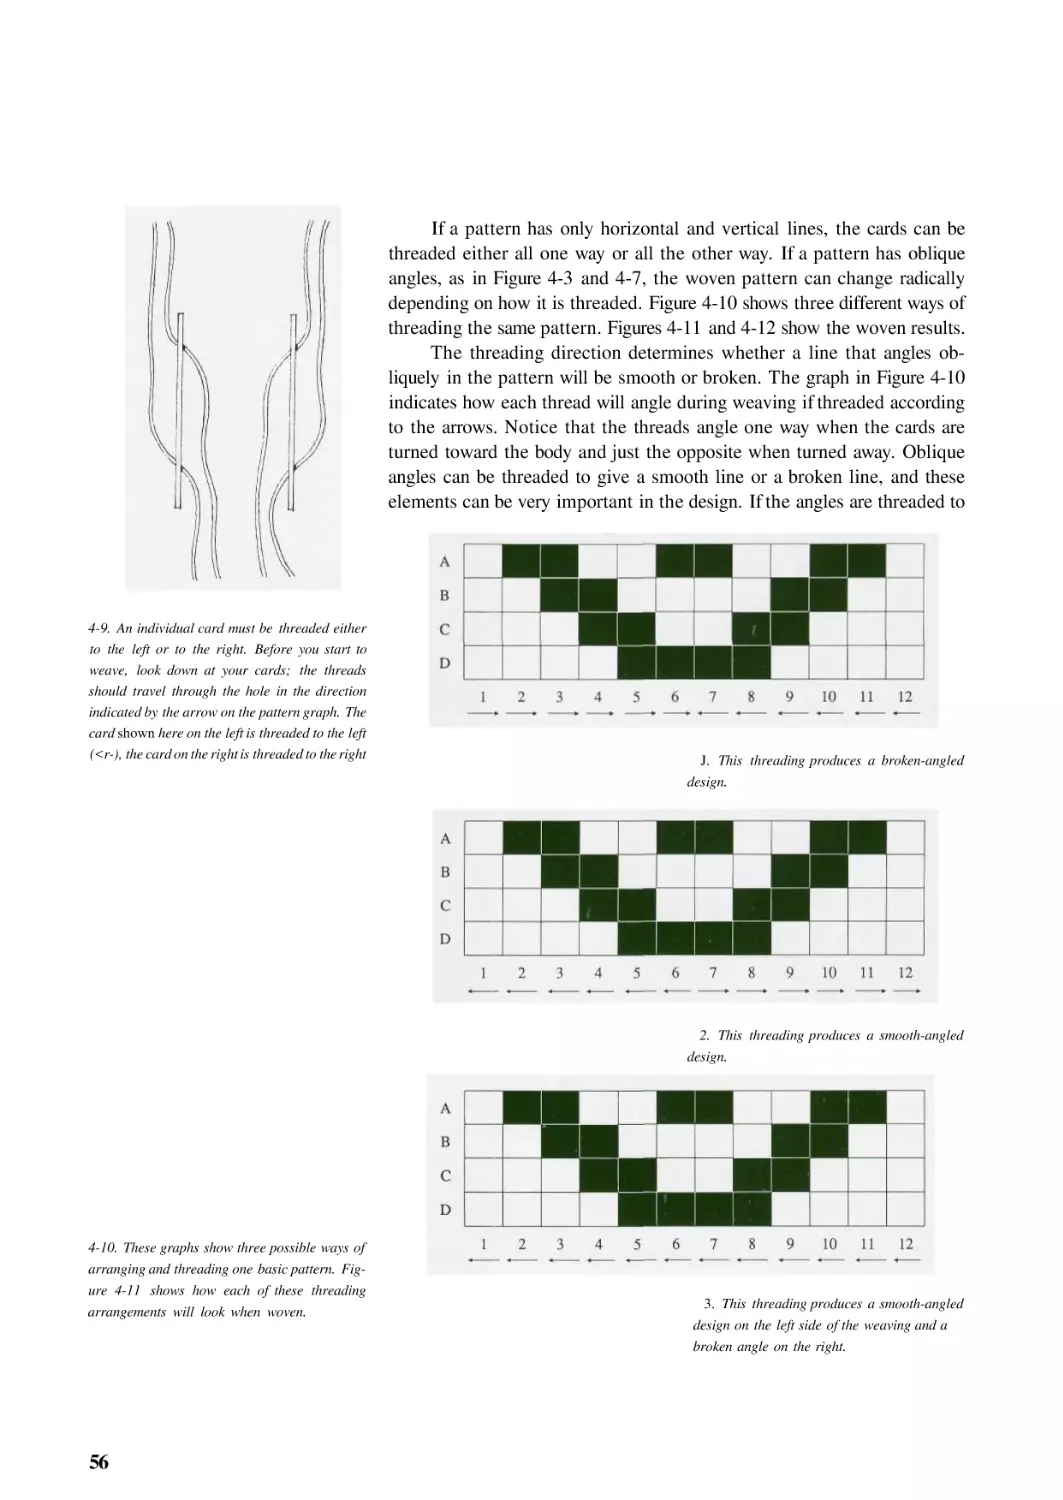
DEFINING THE SPACE
The blank grid shown here illustrates the design space for a weaving that
would require twelve four-holed cards. The letters A, B, C, and D represent
the card holes; each number across the bottom represents an individual
card. Each square on the grid represents the point at which a warp thread
will show on the surface of the completed weaving. There are forty-eight
squares in the grid, just as there are a total of forty-eight holes in the twelve
cards being used, and forty-eight warp threads in the weaving. The design
area becomes wider or narrower depending on the number of cards, but
remains only four rows high no matter how many cards you use (assuming
that you are using cards with four holes).
Graph paper is not the only way to record designs. In an article on
card weaving in Anatolia, Lenore Kosswig describes pattern books made
from felt squares. Each page in the book represents a card. Yarns are taken
through the corners with a needle, indicating color and threading direction.
The yarns are held in place by the fuzzy hairs of the felt. No doubt there
will soon be computer programs designed especially for card weavers that
duplicate the rows and various combinations, so that many rows, perhaps
an entire band with complex variations, can be quickly visualized and
printed.
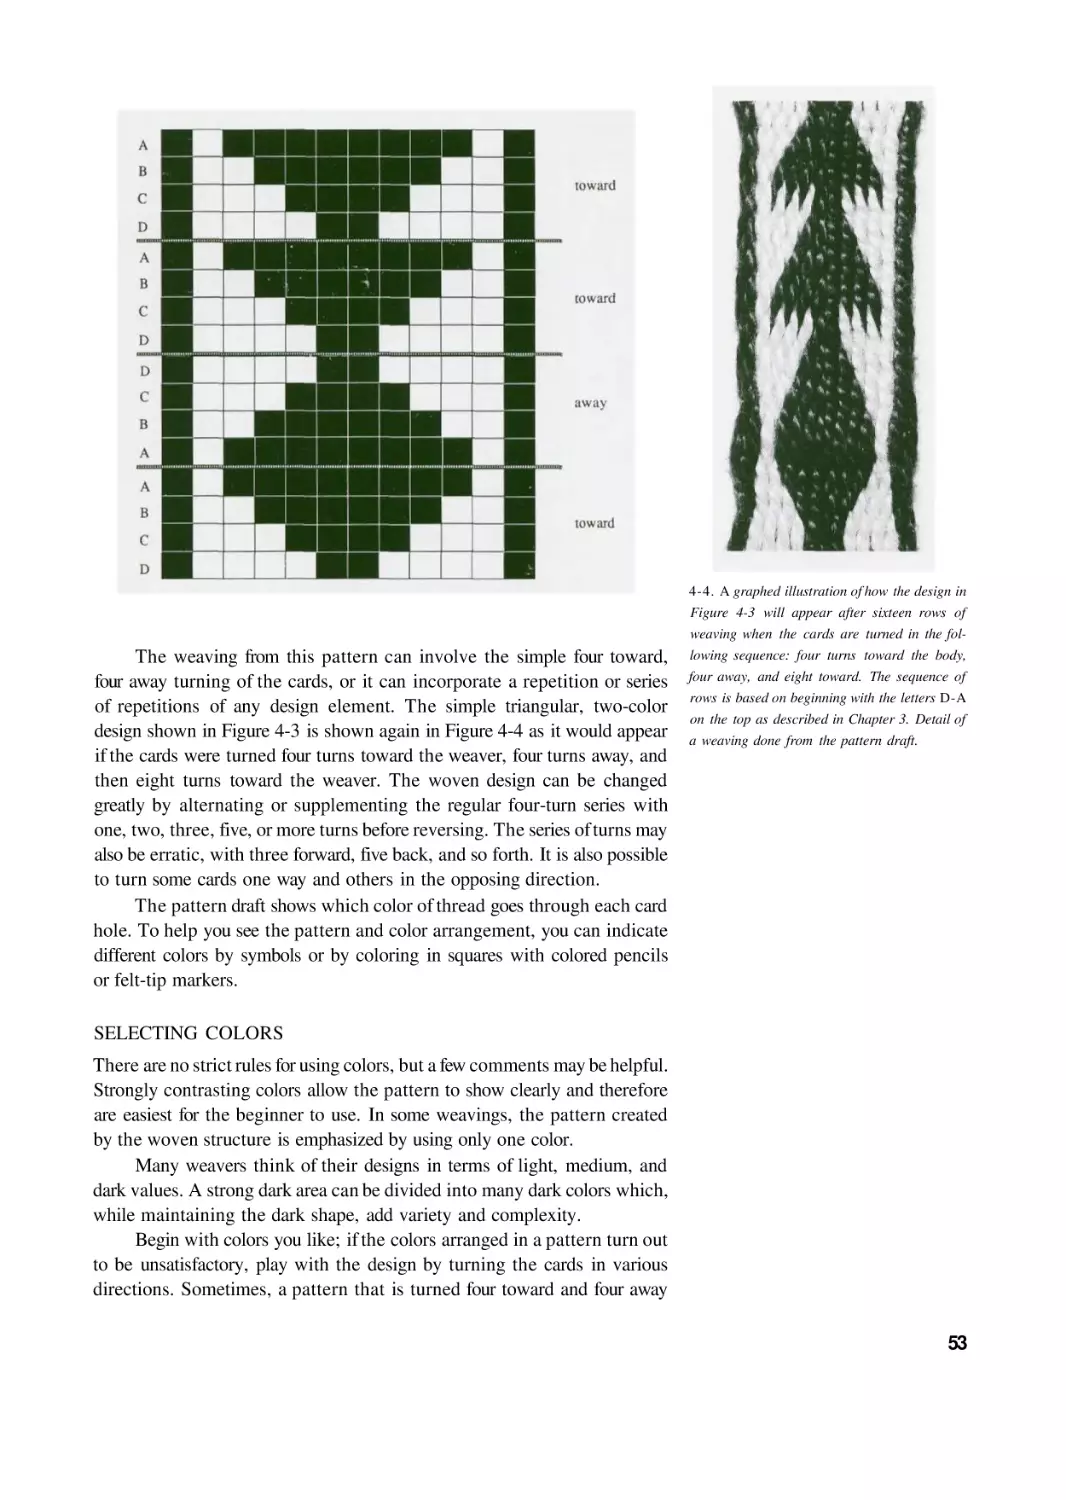
4-3. A simple two-color design formed by filling
in part of the design area.
DESIGNING THE PATTERN
If you limit your pattern to twelve cards, you will have a design area as
indicated by this grid to work with. The squares may be filled in with
symbols that represent a complex pattern of many colors, or simpler designs
may be developed with just two or three colors. The filled-in grid shows a
very simple two-color, half-diamond design.
52
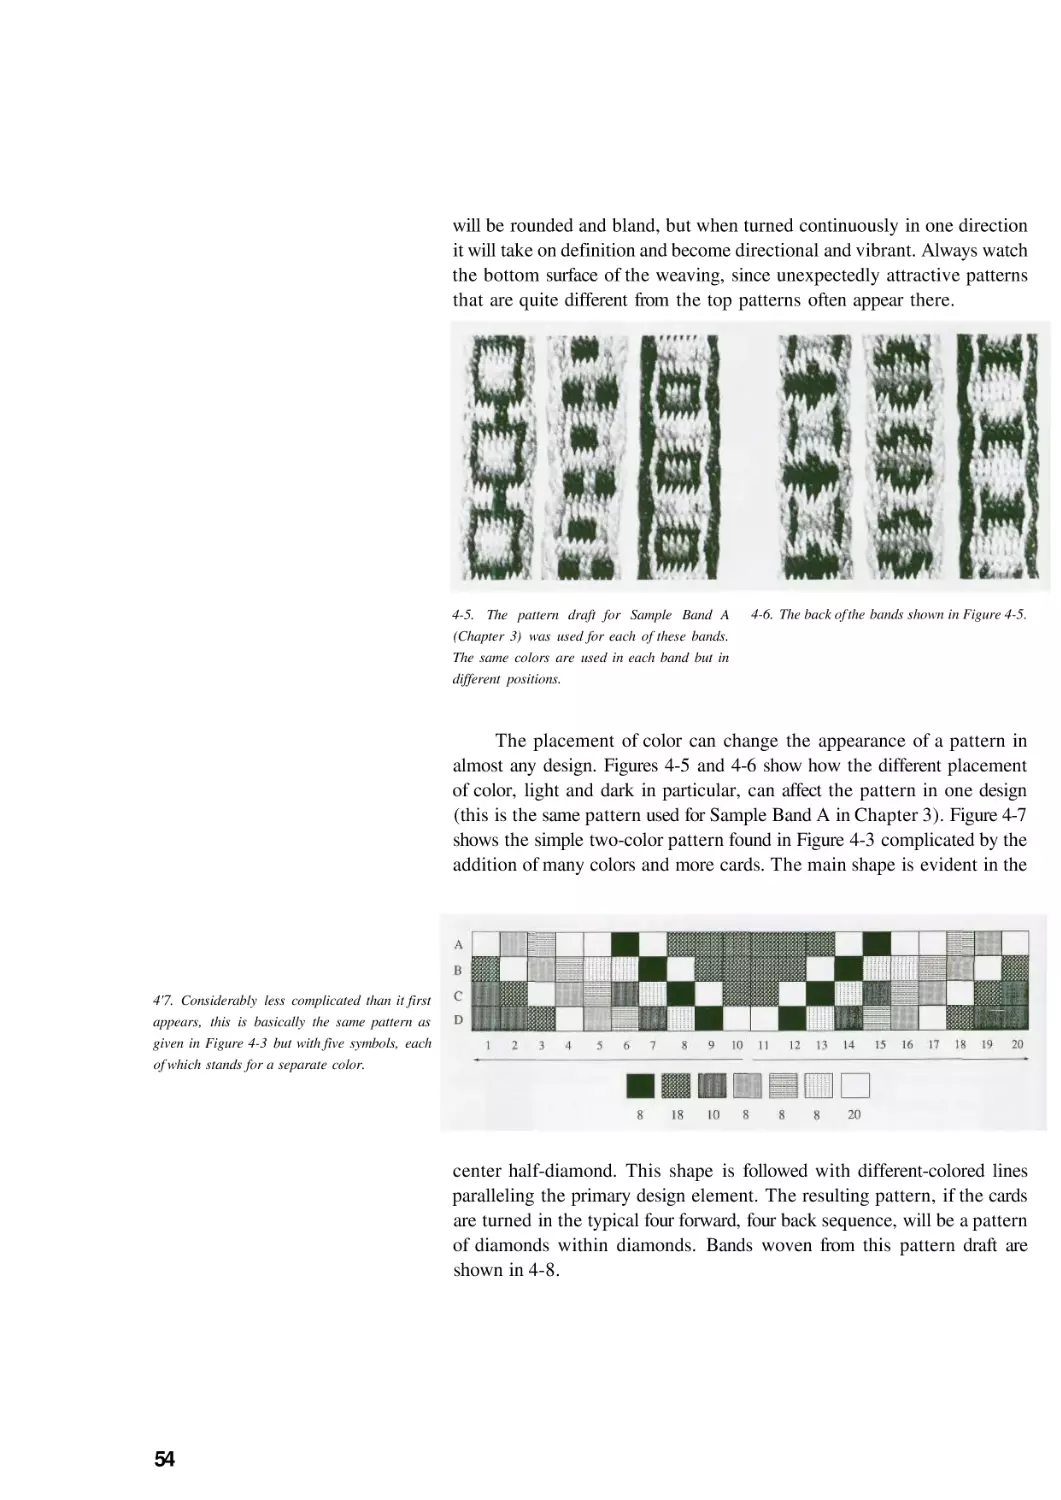
The weaving from this pattern can involve the simple four toward,
four away turning of the cards, or it can incorporate a repetition or series
of repetitions of any design element. The simple triangular, two-color
design shown in Figure 4-3 is shown again in Figure 4-4 as it would appear
if the cards were turned four turns toward the weaver, four turns away, and
then eight turns toward the weaver. The woven design can be changed
greatly by alternating or supplementing the regular four-turn series with
one, two, three, five, or more turns before reversing. The series of turns may
also be erratic, with three forward, five back, and so forth. It is also possible
to turn some cards one way and others in the opposing direction.
The pattern draft shows which color of thread goes through each card
hole. To help you see the pattern and color arrangement, you can indicate
different colors by symbols or by coloring in squares with colored pencils
or felt-tip markers.
4-4. A graphed illustration of how the design in
Figure 4-3 will appear after sixteen rows of
weaving when the cards are turned in the following sequence: four turns toward the body,
four away, and eight toward. The sequence of
rows is based on beginning with the letters D-A
on the top as described in Chapter 3. Detail of
a weaving done from the pattern draft.
SELECTING COLORS
There are no strict rules for using colors, but a few comments may be helpful.
Strongly contrasting colors allow the pattern to show clearly and therefore
are easiest for the beginner to use. In some weavings, the pattern created
by the woven structure is emphasized by using only one color.
Many weavers think of their designs in terms of light, medium, and
dark values. A strong dark area can be divided into many dark colors which,
while maintaining the dark shape, add variety and complexity.
Begin with colors you like; if the colors arranged in a pattern turn out
to be unsatisfactory, play with the design by turning the cards in various
directions. Sometimes, a pattern that is turned four toward and four away
53
will be rounded and bland, but when turned continuously in one direction
it will take on definition and become directional and vibrant. Always watch
the bottom surface of the weaving, since unexpectedly attractive patterns
that are quite different from the top patterns often appear there.
4-5. The pattern draft for Sample Band A
(Chapter 3) was used for each of these bands.
The same colors are used in each band but in
different positions.
4-6. The back of the bands shown in Figure 4-5.
The placement of color can change the appearance of a pattern in
almost any design. Figures 4-5 and 4-6 show how the different placement
of color, light and dark in particular, can affect the pattern in one design
(this is the same pattern used for Sample Band A in Chapter 3). Figure 4-7
shows the simple two-color pattern found in Figure 4-3 complicated by the
addition of many colors and more cards. The main shape is evident in the
4'7. Considerably less complicated than it first
appears, this is basically the same pattern as
given in Figure 4-3 but with five symbols, each
of which stands for a separate color.
center half-diamond. This shape is followed with different-colored lines
paralleling the primary design element. The resulting pattern, if the cards
are turned in the typical four forward, four back sequence, will be a pattern
of diamonds within diamonds. Bands woven from this pattern draft are
shown in 4-8.
54
4-8. A weaving produced from the pattern draft
shown in Figure 4-7.
THREADING THE CARDS
The direction of the twist that each card creates in its four warp threads is
an important element of the design and texture of the finished weaving. It
is determined by the direction from which the warp threads enter the card.
Arrows at the bottom of the pattern draft indicate the threading direction.
All four holes on each card must be threaded from the same direction,
but each card may be threaded from either left or right, regardless of how
the other cards are threaded. (For more information about threading, refer
to the section titled Threading in Chapter 3.)
Before you begin to weave, check your cards. The threads that go
through each card should go through in the same direction as indicated by
the arrows. A mixed threading direction in one card will prevent the card
from turning. If one of your cards seems particularly unruly, check the
threading direction.
55
If a pattern has only horizontal and vertical lines, the cards can be
threaded either all one way or all the other way. If a pattern has oblique
angles, as in Figure 4-3 and 4-7, the woven pattern can change radically
depending on how it is threaded. Figure 4-10 shows three different ways of
threading the same pattern. Figures 4-11 and 4-12 show the woven results.
The threading direction determines whether a line that angles obliquely in the pattern will be smooth or broken. The graph in Figure 4-10
indicates how each thread will angle during weaving if threaded according
to the arrows. Notice that the threads angle one way when the cards are
turned toward the body and just the opposite when turned away. Oblique
angles can be threaded to give a smooth line or a broken line, and these
elements can be very important in the design. If the angles are threaded to
4-9. An individual card must be threaded either
to the left or to the right. Before you start to
weave, look down at your cards; the threads
should travel through the hole in the direction
indicated by the arrow on the pattern graph. The
card shown here on the left is threaded to the left
(<r-), the card on the right is threaded to the right
J. This threading produces a broken-angled
design.
2. This threading produces a smooth-angled
design.
4-10. These graphs show three possible ways of
arranging and threading one basic pattern. Figure 4-11 shows how each of these threading
arrangements will look when woven.
56
3. This threading produces a smooth-angled
design on the left side of the weaving and a
broken angle on the right.
4-11. These cotton bands, each I inch wide, are
woven samples of the graphed patterns in Figure
4-10. Pattern 1 is on the left and Pattern 3 is
on the right.
4'12. The back of the bands shown in Figure
4-11.
be smooth on the surface, they will be broken on the underneath or back
side. Compare the weavings in Figure 4-11 with their back sides, shown in
Figure 4-12.
At the point during weaving where the threading direction is changed
(between cards 6 and 7 on the graphs in Figure 4-10), the weft thread, which
usually remains hidden in the weaving, will show on the woven surface as
a short horizontal bar. It will appear every eight rows on the top surface if
the cards are turned four turns toward the body and four away (see Figures
4-13 and 4-14). If the cards are turned continuously in one direction, the
weft bar will not appear at all. Each time there is a change in the turning
direction combined with a change in the threading direction, a space will
open, exposing the weft thread either on the top or the bottom of the
weaving. This small, horizontal bar can be an important design element,
and the color and weight of the weft might be chosen with this in mind.
4-13. The individual threads in card weaving
twist to the right or left depending on the direction from which the cards are threaded and on
the direction in which they are turned. This way
of drafting a pattern shows how the threads will
angle as the cards are turned four turns toward
the body and four turns away. Cards I through
6 are threaded to the left and will angle to the
left (in the same direction the pattern angles)
when the cards are turned toward the body.
Cards 7 through 12 are threaded to the right and
will angle to the right. Changing the turning
direction mirrors the pattern and reverses the
twisting direction.
57
4-14- A silk band, 2 inches wide, in a pattern
that combines angles and horizontal lines. The
short bars of the weft thread show every eight
rows in the center of the weaving (at the apex
of the diamond) as a result of the change in
threading direction and the change in turning
direction. When the cards are turned continuously in one direction, the weft bar does not
show.
4-15. Pattern draft for the weaving shown in
Figure 4-14.
Many patterns that could be threaded all one way, such as Sample
Band A in Chapter 3, take on a different look when threaded in other ways.
Also notice that the twining or twisting that comes from the cards
influences the twist in the thread (the twist that has been imparted during
spinning and plying). The twist created by the cards will either increase or
decrease this original twist. As a result, textural differences will occur and
create patterns, even when only one color is used.
4-16. Sample Band A from Chapter 3 woven
with three different threading arrangements. In
the band on the right, all the cards are threaded
in one direction. In the middle band, half the
cards are threaded in one direction, the other
half in the other. In the left band, threading
alternates.
58
4-17. The pattern in this monochromatic silk
band comes from changes in threading direction
and turning direction. For the beginning and
end of the bands, the cards were arranged in
alternate threading. During weaving, turning
reversals were done at one-inch intervals, ere'
ating definite horizontal lines. For the central
section of the weaving, the 80 cards were divided
into five groups of 16 cards each. The cards
were flipped (discussed in Chapter 6). One
group was threaded one way and the adjacent
group the other way. During weaving, turning
reversals were done at approximately one-inch
intervals, resulting in a checkerboard pattern.
59
ALTERNATE THREADING
In the first example (on the left in Figure 4-16), the threading direction
alternates from one card to the next; one card is threaded one way, the
next the other. In alternate threading, the woven structure has a very different look from the card weavings examined so far. The surface structure
has the appearance of knitting. In addition to the visual design factor, alternate threading produces a balanced weave and therefore a flat fabric.
4-18. When cards are threaded in pairs, one in
one direction and the next in the opposite (alternate threading), the weaving (when the cards
are turned continuously in one direction) has the
appearance of knitting.
Traditionally, alternate threading was used on a series of border cards
on each side of the pattern cards to balance the twist and flatten the band.
The border cards were turned continuously in one direction to avoid
reversals while the pattern cards were turned to create designs. As you saw
earlier, each time the turning direction is reversed, the weft thread shows.
With alternate or paired threading, it will show between every two thread
groups. This can be used successfully as a design element, as shown in
Figures 4-19 and 4-20. When used as a border treatment, frequent reversals
can be distracting and unattractive. While weaving Sample Band A, you
probably noticed that when you reversed turning directions, the weft thread
showed differently on the edges at that point. Since the pattern creates a
mirror image, there is a repeat of the previous row and an elongation. This
spreads the warps a little and creates a bulge at the edge. If you turn the
60
cards continuously in one direction, there are no reverses and no elongations and the weft goes around the edge tightly and neatly every single row.
Ideally, for the smoothest edge, the border cards would be alternately
threaded and turned continuously in one direction and the center (pattern)
cards would turn and reverse to create the pattern.
4-19. This band, woven of waxed linen thread,
is all one color. The structure and pattern come
from alternate threading. The cards were turned
seven rows before reversing. The reversals show
clearly and the exposed weft thread is especially
obvious.
4'20. In this pattern the twenty cards are alternately threaded, using white cotton threads in
the center with two border cards on each side in
red. The weft thread is red and is clearly visible
as dark against light at the reversals.
61
SAMPLE BAND B—Alternately Threaded Borders
Once you have the basics of cardweaving down, it is easy to take advantage
of borders that are alternately threaded. Thread a series of border cards on
each side alternately; then thread the pattern section and place it in the
center. (Use the pattern graphed in Figure 4-22 or one of your own making.)
When you begin weaving, push the border cards farther along on the warp
and keep the center, pattern cards closer to your body. Turn the border cards
4-22. Graph for Sample Band B.
4-21. A bird's-eye view of separating the cards
into groups for turning in different directions.
The border cards will turn continuously in one
direction to make tight, neat edges, and the
center pattern cards will turn according to the
design.
4-23. Detail of Sample Band B woven in mercerized cotton.
continuously in one direction and the pattern cards in whatever sequence
you desire. After a quarter turn of each group, clear the shed, and pass the
weft. At some point, the yarns in the border cards will become so severely
twisted that they will interfere with turning the cards. It is possible to insert
your finger on the other side of each card through the shed and push the
twist back (this usually has to be done one card at a time), but sooner or
later you will have to reverse the turning direction of the border cards. In
a length in which pattern cards reverse many times, the border cards will
reverse only a few times. Another solution is to untie and release the warp
threads at the far anchor point, untwist each group of four threads, and then
reestablish tension. This takes time and must be done carefully. If the
62
4'24- A 3-inch-wide band woven in alternate
threading with thick, nubbly yarns arranged in
stripes next to silk stripes. The thin, smooth silk
areas in black emphasize the texture of the heavier, multicolored rayon yarns.
63
tension is uneven, it will show in the weaving. Other solutions to the
twisting problem are described in Chapter 9.
ELONGATING DESIGN ELEMENTS
After you've tried weaving four toward and four away, or turning the cards
continuously one way and then the other, the next challenge is to modify
the design motifs by trying shorter turning sequences. For instance, you can
elongate sections of the pattern by turning two turns toward and two away,
over and over. This repeats two of the four pattern rows. Figures 4-24 and
4-25 show how this can be done with Sample Band A. Since the cards do
not make a full rotation, twining does not occur, and the surface of the
fabric has the appearance of plain weave.
4-25. B;y turning two turns toward and two
away, part of a pattern can be elongated. This
detail shows how the box image from Sample
Band A (Chapter 3) can be elongated by repeating rows A and B.
4-26. If rows C and D are repeated, the boxes
in Sample Band A can be spaced more widely
apart.
THICK AND THIN YARNS
By varying the weight and texture of yarns, very simple, beautiful bands
that emphasize the quality and nature of the yarns can be produced. For
example, a number of cards repeating the pattern of two cards in alternate
threading with heavy yarns in one color next to two or more cards
alternately threaded in thin yarns of another color produces an elegant
band.
The weft thread can also vary. If the weft is thicker than the warp,
the band will be sturdier, and the pattern elongated. A thinner weft will
64
tend to compact bulky yarns, especially if they are soft. You can use a heavier
weft thread of an entirely different color from that of the threads in the
edge cards. This will give a dot pattern along the edge which looks like a
series of beads. Two weft threads can be used, passing in opposite directions.
This is sometimes used to make a neater edge, and sometimes as a decorative
element.
VARIATIONS
As you can see, completing the pattern draft is only the beginning. Once
the cards are threaded and weaving begins, you can change and elaborate
the design by turning the cards in different sequences, by turning individual
cards, and by working in the many other ways shown throughout this book.
The variations possible with different-shaped cards, with holes in
special positions, and with weaving sheds at different points, give rise to
infinite variations and many special adaptations.
Another way to change the pattern is to leave sections unwoven. The
dense warp gives bulk and solidity to fringes and unwoven sections. The
cards can be simply shifted along the warp, leaving open sections, or, if you
want each set of four warp threads twisted, the cards can be turned many
times in one direction without bringing the weft thread across. Draw the
cards close to the weaving after every few turns to condense and emphasize
the twist.
4-27. Many variations can be created by using
different kinds of cards and making the weaving
shed in different places. A few possibilities are
shown here.
65
4-28. Another effective design element is to
interspace woven and unwoven sections. This
small piece (10 inches try 10 inches) in fine silk
is composed of a series of twelve bands, assembled in a traditional kimono shape. (Collection
of Mr. and Mrs. Kroll.)
66
5
5-1. Bands based on the "ram's horn" (Pattern
Draft 12).
PatternDrafts
I
N THIS CHAPTER, you will find a number of pattern drafts along
with descriptions and photographs of bands that were woven from
them. After working through Chapters 3 and 4, studying these bands
will give a fuller understanding of how the pattern draft relates to the woven
image and of some of the complexities possible. The patterns shown in this
chapter were chosen for their variety and aesthetic potential. Many factors
affect the final appearance of each card-woven band: placement of color,
kind and weight of yarn, and most important, turning sequence. The initial
pattern draft is an exciting design tool, but it is only the beginning.
Along with each pattern draft is a legend indicating the number of
warp threads needed for each color and a brief discussion of how the woven
pattern was formed. When specific colors are given, they correspond to the
legend, starting with the darkest color. Do not feel restricted to the
materials or colors listed, or to the position of a particular color within a
weaving. Use the drafts as inspiration.
67
Pattern Draft 1.
5-2. The. 2-inch-wide band woven from Pattern
Draft 1 is of tightly spun, plied wool in black,
red, and white. The pattern is a series of three
half-diamonds outlined in black on a white
ground. The border threads are red, and red
warp threads appear in the centers of the halfdiamonds. The red weft thread, which does not
show in the black-and-white photograph, is an
important part of the design, appearing whenever there is a reversal. The beginning and end
of the band are woven with the usual four turns
toward the body and four away. The middle
section shows the results of turning the cards
arbitrarily out of the usual sequence (five toward, two away, etc.). When the cards turn
continuously in one direction the black halfdiamonds become zigzags with red tip extensions.
5-3. A detail of the midsection.
68
Pattern Draft 2.
5-4. This band, woven in silk, elaborates on
Sample Band A from Chapter 3. The box shape
is wider and rounded on the sides. The pattern
is not quite symmetrical. In the detail shown,
the sequence of turns is the conventional four
toward and four away.
69
Pattern Draft 3.
5-5. Three sections of a band woven from
Pattern Draft 3; the image is very directional
when the cards are turned continuously in one
direction. When the cards are turned four toward and four away, the shapes connect and
soften. Random turning breaks the pattern up
even more. The bold, light shapes that work
along the edges contrast with the smaller, subtler
shapes in the center.
70
Pattern Draft 4.
5-6. Two sections of a contemporary cardwoven band from Syria. The warp consists of
synthetic fibers, and the weft is a heavier cotton
cord. The weaving is tightly packed, producing
a stiff band. There is only one reversal, in the
center of the band. The wide blue section in the
center in paired threading is especially effective.
71
Pattern Draft 5.
5-7. This band is made of a natural, plied,
roughly spun goat-hair in black and white. The
heavy, coarse materials spread the pattern. The
simple dark lines on the white ground emphasize
the materials. The cards are turned conventionally, four toward and four away.
72
Pattern Draft 6.
5-8. Turn the cards continuously in one direction to produce this fretwork pattern. It makes
an excellent border pattern. It can also be split
and a different pattern can be added to the
center. The yarns used here are silk and cotton.
73
Pattern Draft 7.
5-9. For the pattern at the top of the band, turn
the cards four toward and four away. The
image at the bottom was created by turning the
cards continuously toward. This pattern makes
a good edge or border pattern when split, cards
1 through 10 on one side and 11 through 20 on
the other.
74
Pattern Draft 8.
5-10. This pattern is composed of a number of
small patterns separated by stripes. Although
simple, it is quite beautiful. The cards are turned
continuously in one direction. Two sections of
the band are shown.
75
Pattern Draft 9.
5-11. This pattern combines circles, horizontal
lines, and vertical lines. The cards are turned
four toward and four away.
76
Pattern Draft 10.
5-\2. This band is bas ed on an Egyptian pattern
detailed in Mary Meigs Atwater's book, Byways
in Handweaving. Woven in 3/2 mercerized
cotton, it is 4Vi inches wide. Turning consists of
four toward and four away. The offset pattern
works very well and shows only in the four-four
turning sequence. The four border cards on each
side can be turned continuously in one direction
to give a firm, neat edge.
77
Pattern Draft 11.
5-13. This pattern was taken from a Turkish
band purchased by the author more than twenty
years ago. The original is shown in color on page
125. This band is woven in 3/2 mercerized
cotton.The main pattern image (two diamonds
separated by a bar) involves a turning sequence
of five toward and five away beginning with A-B
m the top position. The five border cards on each
side turn continuously in one direction. If the
cards in the center are turned continuously in
one direction, half-diamonds appear.
78
Pattern Draft 12.
Notice the reversal on the upper part of the band.
I drew a line across at that point and compared
the four rows of weaving with the pattern draft.
This gave me a starting point. My first attempt
to weave the pattern indicated that individual
cards were turned to extend part of the pattern.
After many attempts, I came up with the following sequence for creating this pattern.
5-14- The band on the left is a more complicated
Turkish band, and is shown in color on page 67.
It is duplicated on the right in 3/2 mercerized
cotton. Exactly how the pattern was woven
remained a mystery to me for many years. The
shape and repeats are such that the images cannot be made with a normal turning sequence
(such as 4-4, 5-5, or all in one direction). I
began my sleuthing by drafting the pattern.
Start the weaving by turning continuously
toward you for a while and then away, to see
the basic pattern and to establish the weaving.
End with D-A on the top and bring the weft
through. Separate the cards by sliding3,4, 5—
8, 9, JO—13, 14, 15—18, 19, 20 along the
warp away from you. Notice the pattern: two
cards near, three away, two near, three away,
two near, three away, two near, three away,
two near. Turn the cards near you (the sets of
twos) away from your body. Turn the distant
cards (the sets of threes) toward your body.
After you have turned all the sets, bring the weft
across. Continue in this manner until D-A is
back on top (total of four turns of each set).
Now turn all the cards (keep groups separate)
four turns away. These eight turns create the
image and are repeated over and over in the
example shown. To reverse the image do the
same actions, but reverse the turning directions.
Begin by turning all the cards four turns toward,
then separate the cards and turn the sets of twos
toward and the sets of threes away.
It takes a while to get used to the system and
to see clearly how the patterns dovetail. In the
course of getting the angles right, you will probably come up with some interesting variations.
This is an exceptionally beautiful image frequently referred to as the ram's-horn pattern.
It is a wonderful example of how inventive
weavers develop and refine a pattern.
79
Pattern Draft 13.
5'16. This band was set up to shift and interlace
woven sections during weaving. The forty cards
for the pattern were set up in groups of ten cards
each. The yarn is a 5/2 mercerized cotton, and
the band is 2VA inches wide at its widest point.
Notice that each section has border cards of
similar colors. As the sections shift, there will
always be an appropriate color at the edge. In
the weaving shown, the cards were turned continuously in one direction and then in the other.
Reversals were arranged to occur in the middle
of the flat-weave sections. In the beginning all
the cards were worked together and turned toward the body for 6 inches.
The four groups were then split and woven
separately with individual weft threads (each
section 2 inches long). It is easier to complete
one section before going on to the next. Push the
cards that you are not turning back on the
threads out of the way. If you slightly lift the
group you are working with after turning, it will
be clear which warp threads to include. As you
finish weaving each group, make sure the letters
on the cards match so that your pattern will be
even.
80
After all the sections have been woven, loosen
the tension and interlace them by lifting one over
another. Turn all the cards as a unit and resume
weaving with a single weft thread. As weaving
continues, tighten warp tension. Inserting a
rigid element like a long needle on a weft row
helps to stabilize the weaving. The first few turns
are tricky—turn with one hand and hold the
weaving with the other. It is important not to get
the weft too tight. Measure the width near the
beginning of your band and do your best to
maintain this width. After the band is finished,
the threads will migrate and fill out the weaving.
Two elements need special attention: the
length of the smaller sections and the tightness
of the weft thread when full-width weaving is
resumed. The sections must be long enough to
shift but not so long as to cause a lot of slack.
The weft at the point at which you resume
weaving after shifting must be loose enough to
accommodate the full width. If it is too tight, the
weaving will look strangled at that point.
There will be many extra weft ends. Worry
about them later. ]f you have overlapped them
with ano ther weft thread, you can cut them flush
when the weaving is completed. If they need
special securing, draw them through another
weft row with a crochet hook or needle.
Picking cards up and moving them from one
position to another transforms the texture and
pattern of the weaving. The possibilities in this
technique are discussed further in Chapter 7.
Pattern Draft 14.
5-17. This is an example of the skip-hole
technique. The holes represented by the dark
spaces on the pattern draft are not threaded and
remain empty, causing depressions in the
woven surface and exposure of the weft thread.
The warp threads are all the same color to emphasize the surface texture. The band is silk
and the cards were turned continuously in one
direction. Varying the weight and color of the
weft thread will change the appearance of the
pattern.
81
6
6-1. Contemporary Tibetan belts, with images
woven in the double-faced technique.
Dark and Light Patterning
T
HE METHOD OF card weaving explained in Chapter 4 and the
patterns in Chapter 5 require working the pattern out carefully on
graph paper, using as many different colors and shapes as desired
and threading each card according to the graph. The method explained in
this chapter is a completely different approach. Each pattern card is set up
with the same color of threads, usually two dark and two light in a dark, dark,
light, light sequence. And because all cards carry the same color of threads
in the same order, a special, quick way of warping can be used.
83
You can use the dark/light pattern threading to create a vast array of
striped angular motifs, or for linear angles, double-faced or double weave
bands. Patterns are created by varying the turning sequences, by turning
individual cards in systematic sequences, and by "flipping" cards to reverse
the threading direction. Working this way, you can change color arrangement and threading direction at will. This simple, consistent dark/light
setup allows for great design flexibility. The lettered holes and the fronts
and backs of cards are no longer important and are frequently ignored.
Border cards carrying the same color in each hole are frequently added to
frame the pattern.
Weaving Sample Band C will give you an idea of how the dark/light
threads interact to give a variety of pattern and structural possibilities. All
the examples illustrated, unless otherwise noted, are woven in black and
white 3/2 mercerized pearl cotton.
SAMPLE BAND C
The warp can be prepared as described in Chapter 4 or in a special, speedier
way described here. In this method, called circular or continuous warping,
the warp is wrapped, combed, threaded, and tensioned all at the same time.
For this example, you will need a total of twenty cards
Make two balls of dark yarn and two balls of light. Stack sixteen cards
so that the holes match. Pull a dark thread through all the A holes, the
second dark thread through all the B holes, a light thread through the C
holes, and the second light thread through the D holes as shown in the
illustration. For instructional purposes, it is helpful to have the dark threads
through holes A and B. Whichever holes are used, it is important that the
color sequence is dark, dark, light, light.
Attach two C-clamps to a table. The distance between will be the
length of the warp (and the length of the weaving minus take-up and end
waste). Tie the four ends that you have just drawn through the card holes
to one C-clamp. Put the four balls of yarn in a box or basket to keep them
from rolling.
6-2. To wind a warp by dropping cards, use four
balls of yarn, with each yam end going through
one hole of each card. For Sample Band C, dark
threads go through holes A and B and light
threads through holes C and D. As the cards are
drawn along the threads, a single card is dropped
with each pass. Drop one card at the beginning,
go around the second C-clamp and as you pass
the first card, drop a second card, then around
the first C-clamp, and immediately drop a third
card.
84
Begin by drawing the stack of cards along the threads toward the
second C-clamp. As you start, slide one card away toward the first C-clamp
so that it is separated from the pack and hanging on the threads. Shift the
remaining cards along the threads, around the second C-clamp and back,
dropping another card near the first as you approach the first C-clamp. Each
time the warp threads pass the threaded cards, another card is dropped, one
on one side, then one on the other, until all the cards are individually
threaded. Watch the tension—it should be the same for all passes. When
you complete the warping process, tie the thread ends to the first C-clamp
or to the first four ends. These sixteen cards will be referred to as the pattern
cards. For easy reference, number them, beginning with the card on the
left.
The remaining four cards will be threaded for the borders. To make a
dark border, use four balls of dark yarn and thread the four cards as before.
Put two of these cards threaded with dark yarn on each side, with the
sixteen pattern cards in between.
The cards are now threaded, the warp is combed, and the tension is
established. Notice that the first two cards are at the center and the last
cards are on the edges. Half the cards are threaded in one direction and half
in the other.
6-3. Ultimately, the cards will be threaded half
one way and half the other. This is a bird's-eye
view of the threading. Continuous warping can
result in a number of different threading variations, depending on how the cards are taken
around the C-clamps.
Weaving can progress between the C-clamps, or one or both ends can
be cut, knotted, and tied to something else. To keep the weaving from
turning sideways, slide the loops off each C-clamp, run a cord through the
loops, and attach this cord back to the C-clamps or other anchor points.
Arrange the cards by turning them individually or in groups so that
all the dark threads are in the top position. Half the cards will be threaded
to the left and half to the right. To get all the cards threaded in the same
direction (left to right), stand at the first C-clamp (this is where you will
begin your weaving) and look down so that you can see which cards are
threaded right to left. Flip them individually to change their threading
85
6-4. Cards can be flipped to change the threading direction. Although it is not obvious, the
sequence of the threads changes when cards are
flipped. This is why flipping is successful only
with some patterns. This particular way of flipping is on the vertical axis. It is also possible to
flip horizontally or diagonally.
direction. To flip a card, put the weaving under tension as for weaving, and
turn the card on its vertical axis as shown in the illustration. It will turn
only one way; this is determined by its threading direction. This will reverse
the card (the card will now face in the opposite direction), reverse the
threading direction, and reverse the sequential order of the threads in the
card. The card can now be turned so that both dark threads are on top.
Changing threading direction doesn't create color sequence problems on a
dark, dark, light, light threading, but could be a problem if each of the holes
were threaded with a different color.
To space the threads and give a foundation for the weaving, weave
four turns toward the body and four away to establish the weaving width.
As you follow the instructions, always bring the weft thread through
the shed opening after every quarter turn of the cards. The weft should be
the same color as the border cards.
Pattern I—HORIZONTAL STRIPES
All the dark threads and all the light threads should be lined up and all the
cards threaded left to right. Turn the cards continuously in one direction
for an even number of turns to produce horizontal stripes. Turn the same
number of turns in the opposite direction to keep the warp from twisting.
At this point of reversal, there will be a subtle change in the structure of
the weave and the appearance of the pattern. Depending on where you
reverse the turning direction, the stripe might widen or stay about the same.
When you turn the cards toward your body, all the threads will angle or
twist to the right; when you turn the cards away, they will angle to the left.
Variation: Arrange the cards so that all the dark threads are on top.
Flip alternate pattern cards. The weaving is now alternately threaded (as
explained in Chapter 4). This arrangement is also called a paired, or
one-one, threading. Weave a number of turns in one direction and then in
the other. This produces horizontal stripes that look as though they have
been knitted; they have a serrated edge. Because the cards are alternately
threaded the weave is balanced (half the threads twisWne way and half the
other) and lies flat.
86
6-5. Horizontal stripes take on a different appearance depending on the threading. The hot'
torn image is threaded in one direction and
turned in one direction. The top stripes are
alternately threaded, and turned in one
direction.
Pattern 2—DIAGONAL STRIPES
Now we are going to turn individual cards to create a color sequence that
will weave diagonal stripes. First, flip the necessary cards, including the
borders, so that all are threaded to the right. Then turn the first pattern
card on the left (1) so that the dark threads are in the top position. Turn
the next card (2) so the dark threads are in the away position; put card 3
in the down position, card 4 in the toward position, and so on to the end.
If you were to graph this pattern, it would look like Figure 6-6. I call this
arrangement notching.
6-6. This draft shows how the dark-light sequence would be arranged if drafted. Each card
has two dark threads and two light threads. The
direction of threading from left to right will
produce a smooth angle on the weaving surface.
If cards are threaded with two darks and two
lights, individual cards can be turned to put the
colors in the right places to produce this pattern.
With the cards in this notched arrangement, make a series of turns
toward and then away, weaving after each turn. The angles should be clear
and smooth. When you turn toward the body, the lines angle to the right;
when you turn away, they angle to the left. If your lines are not smooth,
check the underside of your weaving; you might find that the lines are
smooth on the bottom side of the band. If so, and if you want the bottom
image to be on the top, either change the threading direction or reverse
the notching direction.
87
6-7. After setting up the threading and color for
the diagonal pattern, smooth lines will form to
the left when the cards are turned away, and to
the right when turned toward.
6-8. The previous image showed a pattern with
all the threads threaded in one direction. The
image shown here results if the cards are alternately threaded. You can weave this image by
flipping every other card.
6-9. With the diagonal pattern, turn the cards
four toward and four away to create wavy lines.
Pattern 3—CHEVRONS
This arrangement of color and threading direction produces chevrons when
the cards are turned continuously in one direction. For this pattern, we
want half the cards to produce lines that angle diagonally to the right, and
the other half to the left. The setup is tricky. You'll probably have to try it
a couple of times before the weaving looks right.
Begin by arranging the colors and threading as indicated for diagonal
stripes (all cards threaded to the right and notched). To create the chevron
image, you have to reverse half the cards (flipping each card reverses the
threading and the notching direction): take the left half of the cards
including the border cards (two border cards and eight pattern cards if you
have twenty) and flip each one in turn so that the left cards are all threaded
to the left. The last pattern card in the left group will be pattern card 8,
and the first card in the right group will be pattern card 9. Turn all the cards
in the left section simultaneously so that the dark threads in pattern card
8 are in the same position as the dark threads in pattern card 9. As card 8
is placed properly, all the other cards (1 through 7) are automatically placed
as well. Now the left side mirrors the right side in threading direction and
notching direction.
If you turn continuously toward the body, the chevrons will begin
with a point and become wider as they are woven—when you turn away
continuously, the chevrons become narrower as they are woven and then
will come to a point. A series of diamonds can be formed by turning four
turns toward and four away (begin the sequence with the point of the
chevron).
88
6-10. A series of card-woven bands in fine silk.
The pattern is based on the dark-tight setup and
incorporates horizontal stripes, diagonal tines,
chevrons, and doublefaced weave. (Plum
Kimono, 9" x 7", collection James Storey)
6-11. This detail of a series of silk bands shows
variations created from diagonal tines and chevrons. The basic setup is dark-light, but the light
threads vary in color.
89
6-12. Chevrons are produced by mirroring the
cards and turning continuously in one direction.
Diamond shapes are formed when the turning
direction is reversed. The image shown is pro'
duced by turning many turns toward and then
away.
6'13. This image is formed by turning the cheV'
ron pattern four toward and four away; the
point at which you make the turning reversal is
important.
Variation: In the chevron pattern, the cards are arranged in an
eight-eight arrangement. One set of eight pattern cards mirrors the other
set in threading direction and notching direction. By arranging four-card
units so that they mirror each other, a series of smaller chevrons can be
formed. If you arrange the sixteen pattern cards in a four-four arrangement,
6-14- The previous band showed the chevron in
an eight-eight arrangement. This detail shows a
four-four arrangement. Each four-card section
mirrors the preceding section. The detail shows
one turning reversal.
90
6-15. The previous band showed the chevron in
a four-four arrangement. This detail shows a
two-two arrangement. The cards turn continuously in one direction with one reversal.
6-16. This detail also shows a two-two arrangement but with every other section offset as a unit
one more notch. One reversal is shown.
6-17. This weaving expands on the previous
one. The same sections are offset one more
notch.
you will have two chevrons. Even smaller patterns can be formed with a
two-two arrangement or a one-one arrangement. Pay attention to the
threading sequence and be sure to mirror the color order. Depending on
how you notch the color and whether you mirror or offset it, many different
patterns can be formed.
Pattern 4—DOUBLE-FACED WEAVE
In double-faced weaving, half the threads show on the bottom of the
weaving and the other half on the top. The pattern consists of a series of
two turns toward the body and two turns away. Position the color as shown
in the illustration. If you do your turns as described here, the top will be
dark and the bottom light (with the exception of the border cards, which
are all dark).
Arrange the cards so that they are threaded in one direction (doublefaced weaving is also frequently done using alternate threading). Place all
the dark threads in the away position. The key to this turning sequence is
that the two dark threads in each card are never in the bottom position at
the same time.
Turn 1 puts the dark threads on top, turn 2 puts the dark threads
toward, turn 3 back to the top, and turn 4 away. Sometimes, when the dark
threads are in the top position, it is hard to remember which direction to
turn next. If you turn the wrong way, warp threads float. If you watch
carefully, you can usually catch this mistake before weaving the row.
Double-faced weaving can be effective when used with other patterns.
It can be used to extend or elongate a design within a regular card weaving,
and it can also be used to foreshorten or telescope such designs (this is
reviewed in Chapter 4 under Elongating Patterns). Treat the threads as you
did the dark threads in Sample Band C. The threads going through the
holes that follow this pattern of movement (top, toward, top, away) will
always appear on the top surface of the weaving.
6-18. In double-faced weaving, sequences of
two turns in one direction and two in the other
are used rather than the usual four. In this
example, only the threads going through holes A
and B (dark) will show on the top surface of the
weaving. Notice how A and B are never in the
bottom position at the same time.
91
6-19. A weaving in fine silk (10 inches by 10
inches) composed of several bands. The midsection of each band is woven in the double-faced
technique to put the dark color on the top surface.
6-20. Detail of a silk weaving composed of a
series of bands worked in double-faced weave.
Cards threaded in a dark color create stripes
which break up the surface.
92
6-21. This silk band shows how dark/light patterning can work to place very different images
in the same band.
Variation: Double-faced weave is the format for many images that
involve dark/light or positive/negative patterning. You can bring light
threads to the surface by turning individual cards 180 degrees and thus
create complex images that change row by row. This is the usual way of
making letters or dates on commemorative pieces. Slight differences in the
image edges occur, depending on whether you turn the cards toward or away
when changing the color and at what point in the two-two turning
sequence you change the color.
The following method generally works. You are working along with
the two-two turning sequence and ready to reverse the color on some of
the cards. First bring the weft thread across, note in which direction the
next turn will be, then take the cards which carry the threads you want
reversed and turn them two quarter-turns in the opposite direction (this
reverses the color arrangement). Then turn all the cards in the appropriate
direction before inserting the next weft. To get the feeling for how this
works try the following.
1. Using the double-faced structure, weave a section that is dark on
top, light on bottom. After completing either row 2 or row 4 in the turning
93
6-22. Ulack squares worked on a white ground
in the double'faced technique.
6-24- A Bulgarian woolen belt in brown, red,
green, yellow, andwhite. The pattern cards are
alternately threaded, and the images are formed
using the double-faced technique. (Courtesy of
the Museum of Ethnology, Hamburg.)
94
6-23. A shape worked in the double-faced technique. Individual cards are randomly turned 90
degrees to bring the bottom color to the surface.
6-25. Detail of a Persian band in black silk and
silver-wrapped thread. The pattern cards are
alternately threaded, giving a paired structure to
the weaving. The peacock image is created with
the double-faced technique. Early twentieth
century. (Courtesy of the Historical Museum,
Bern. MT 105.)
sequence, keep going two more turns in the same direction, weaving after
each turn. This puts the light threads in position to work on top. If the light
threads are in the position toward the body, turn two turns away, then two
toward and continue in this manner for however long you want the white
section to be on top. Alternate between dark sections and light sections
until you are comfortable with changing the color. Then go on to step 2.
2. Turn half the cards 180 degrees to reverse the color on half the
weaving. Since only some of the cards are turned, do not bring the weft
across. Bring the weft across only when you turn all the cards as a unit
Weave so that the top has dark threads on the left and light on the rightthen turn all the cards 180 degrees to reverse the color.
3. Weave a light square on a dark ground, and then a dark square on
a light ground. This involves turning groups of cards 180 degrees to reverse
the color (without weaving) in order to create an image.
4. Weave a triangle. This involves turning individual cards at just the
right time to create smooth diagonal lines.
5. Weave a broken horizontal line. By turning cards randomly on
different rows of weaving to reverse the color you can create a broken line.
95
Pattern #5—DOUBLE WEAVE
Double weave involves two separate layers of warp and two weft threads,
resulting in two separate layers of cloth. In the past, it was frequently used
to weave money belts. Double weave is similar to double-faced weave—half
the threads show on the top and half on the bottom—but in double weave,
the layers are separated, and there are two weft shots per row of weaving.
To do this, the cards are held on their points so as to create two sheds, one
for each layer.
6-26. The card positions for double weaving.
The cards are angled to form two weaving sheds
and are rocked back and forth between two holes
(in this case between A and B, to put the dark
threads on top). To maintain two individual and
separate layers of weaving, the same two holes
must be used continuously. After each card
shift, the weft thread goes through both sheds, as
indicated by the arrows. The weaving produced
will have two separate layers connected at the
sides.
Arrange the cards so that all the dark threads are in the top position
with all cards threaded in one direction. Tilt the cards so that all the A
holes are on the top point. This puts the C holes on the bottom and the B
and D holes in the center. This arrangement forms upper and lower sheds.
Pass the weft thread through the upper shed and around through the lower
shed. Now turn the cards to put the B hole on the top point. This puts the
D hole in the bottom position and the A and C holes in the middle and
creates new upper and lower sheds. Again, bring the weft through the upper
shed and then through the lower shed. Continue weaving, moving between
A and B in the top point position. This creates two separate layers of fabric
that are attached at the sides.
If you turn the cards to the normal position, with holes A and B on
the top, you can reach into the space formed by the two layers. It is possible
to insert an object into that space and then weave it in by going back to
normal weaving. If at any point in double weave you change the top color
and turn the cards to work C and D in the top point position, the two layers
will pass by each other and be joined at that point.
Double weave is more difficult to control than conventional card
weaving because the sheds are smaller and harder to see. The weaving is
also thicker, since there are two weft threads per row.
96
6-27. A double-woven scarf in three-ply wool,
4 inches wide. Except for the extreme borders,
the color and design on the back of the weaving
are the exact reverse of what appears on the top
surface.
Variation: You can work the same images with double weave that you
worked with double-faced weave. The weaving will have a different texture
and appearance because of the total separation of the layers.
It is also possible in double weave to use two separate weft threads so
that the sides are not attached, or to use one weft thread and manipulate
it so that one edge is open and the other closed. The weft thread can also
be worked so that it begins at the middle on the top, goes halfway across
the top shed, around the edge and through the bottom shed, and then across
6-28. A band that uses double weaving to make
letters.
97
the top to the center. If this is done for a number of turns so that the weft
never passes over center top, the weaving will have two separate layers
joined at the sides with a vertical opening at the center top.
Pattern 6—BROAD DIAGONALS
6-29. Color-coding card edges is an aid to keeping track of where you are.
6-30. To weave this variation of broad diagonals, turn all the cards in one direction for two
turns; then separate two cards on the left into a
second group. Turn this second group in the
opposite direction. After two rows of weaving,
shift two more cards. Continue in this manner
until all cards are in the left group. (Border cards
are worked with the two adjacent pattern cards.)
98
This way of working is complex and rather tricky. It involves turning some
cards in one direction and some in another and then, after every two turns,
shifting two cards from one group to another. This technique works
directionally with angled lines and is an expansion of Pattern 2.
Arrange the cards as indicated in Pattern 2 (threading and notching).
Now, to make life simpler, color'Code the edges of all the cards. First, make
sure that everything is right by turning four turns toward the body. You
should have clear lines that angle to the right. Now, with a broad-tipped
blue marking pen, mark across their top edges. Then mark the away edge
red, the bottom edge green, and the toward edge orange. Blue and green
will always go together, and red and orange will always go together.
Turn all the cards one turn toward the body: red is now up; weave.
The second turn brings green up; weave. Now shift the first two pattern
cards on the left (plus the two border cards) along the weft threads so that
they form a separate group and turn them away from the body. Continue
turning the right group toward the body. Bring the weft thread through the
shed formed by the two groups. Now turn the left group away and the right
group toward and weave. Turn in the same manner and weave again. Then
6-31. This variation on broad diagonals is similar to the previous illustration. As in the previous weaving, begin by turning all the cards two
turns in one direction, then separate in pairs on
the left after every two rows of weaving (this
group turns in the opposite direction), and when
all the cards are in the left group, turn all the
cards for two turns. This is where this pattern
differs. Separate cards by pairs on the right after
every two rows of weaving and turn these in the
opposing direction.
6-32. This variation on broad diagonals is like
the previous illustration except that there is a
reversal in the turning direction after all cards
have shifted.
separate two cards from the right group and shift them to join with the left
group. Continue in this manner until all the cards have been shifted from
the right group to the left and do a final two rows, turning all the away cards
as a unit.
The basic principle is that two cards are shifted after every two turns.
The shifts always happen on either green or blue, and green always shifts
to green and blue to blue (you can shift on the orange-red combination and
6-33. As you play with broad diagonals, all
kinds of variations are possible. You can turn in
opposing directions to reverse lines at any point.
6-34. Variation using broad diagonals. In the
center of this detail, the cards on the right were
flipped to mirror the cards on the left (chevron
pattern). The top part of the band shows what
can happen when three groups of cards are
worked with this arrangement.
6-35. Variation using broad diagonals. The
weaving begins with the chevronsetup. Then the
cards are separated into three groups, and two
cards are shifted from each side of the center
group on every shift row.
let blue-green be the in-between turn). One group of cards always turns
one direction, the other group the other direction.
Now, reverse everything. Turn all the cards toward for two turns, then
separate two cards from the right (plus the two border cards) and turn them
away, while turning the larger group toward. Make a note indicating which
group is turning which direction. If you make a mistake, it is a little like a
run in a stocking—it will appear on each successive row. With all the
changes it is very difficult to go backward and correct a mistake.
This way of working imparts a beautiful texture to the woven surface.
Because groups of cards turn in opposing directions, one section will be
convex and the other concave. This emphasizes the angled line that divides
the parts and gives the fabric an elegant movement.
Variation: There are amazing possibilities with this technique, as you
have control over every individual line. You will touch on some of the
possibilities by trying the following.
1. Play around with the shifting sequence. Shift on the orange-red
combination.
99
6-36. These five examples of broad diagonals
are worked with more cards and finer threads.
The two bands on the right and the band on the
left begin with the chevron setup. The other two
bands begin with the setup for diagonal stripes.
2. Try three groups of cards. The group in the middle turns in the
opposing direction from the two side groups. After every two turns, two
cards from each group shift. The direction in which they shift determines
the shape and line.
3. Start by arranging the cards for chevrons as in Pattern 3. Separate
two cards out on the right and two on the left so that you are working three
groups of cards. The center group will turn in one direction, the side groups
in the other. After every two turns, shift two cards from each side of the
center group—two to the left group and two to the right group.
To fully realize the possibilities of Variations 2 and 3, you would need
more pattern cards.
6-37. lkat patterning in the light threads cangive
an exciting and different look to the weaving.
The strong dark lines give sharpness and direction, while the changing background color gives
variety, softness, and richness. This is a detail
of a wool weaving constructed from a series of
bands.
100
6-38. Broad diagonals used with, a larger
number of cards can be very impressive. The
more cards, the grander the scale.
101
IN CONCLUSION
This chapter touches on the variations possible with dark/light threading.
It is meant as an introduction and a beginning. Feel free to improvise and
expand. The complexities will become clear as you work with the technique
and think through the steps. Written explanations and photographs can go
only so far in clarifying the process. Have patience and be inventive.
102
7
7'1. A card-woven band in wool with tassels
integrated as supplemental wefts.
StructuralTechniques
A
variety of woven structures, many of which have already been
discussed, can be produced with card weaving. This chapter
covers more specialized techniques that can be used to change
both the structure and the appearance of the weaving. Some, such as
shifting cards to reposition the warp threads, weaving right angles, and
forming looped ends, are unique to card weaving. Others, such as decreasing
warp threads to shape the fabric, adding supplemental weft elements, and
making a tube by pulling the weft thread, can be done with any kind of
weaving. Because card weaving produces a dense, warp-faced fabric, all the
techniques described work well and can be effective design elements. All
103
of the techniques have many variations, and each will produce unique
results in the hands of different weavers.
SHIFTING CARDS
7-2. Shifting warp threads from one part of the
weaving to another.
7-3. A detail of a wool band. Groups of cards
shift from one place to another.
104
Since the "loom" used for card weaving consists of a series of individually
threaded cards, shifting warp threads from one part of the weaving to
another is very easy. This can be done at the beginning of the weaving to
change the pattern, or during weaving to create linear movement. Single
cards, groups of cards, or separately woven sections can be transposed.
As cards are moved, shifting warps create linear movement. The
technique works best with a simple warp stripe pattern. Use a number of
cards, each threaded with a single color. You can use many colors or just a
few, but for a well-defined effect, the four threads that go through an
individual card should be identical. Each card will then form a distinct line.
The threading direction from card to card is not important because the
cards can easily be flipped. Paired or alternate threading creates a balanced
weave and can be very effective. Cards can be shifted over the top of other
threads or under them, depending on how you want the line to flow. If all
the cards are turned continuously in one direction, shifted threads work
into the weaving in a smooth transition.
When you are ready to make a shift (just after bringing the weft
across), loosen the tension slightly, pick up a selected card (or group of
cards), and move it to a new place. Turn just the shifted cards a few quarter
turns (one, two, or three, depending on the nature of the yarns and the
length of the shift) in the direction that the cards have been turning as a
7-4. Detail of a silk weaving composed of 44inch-wide bands in which groups of cards shift.
The detail shows seven bands which have been
stitched together to form a larger image.
7-5. A silk card weaving composed of fourteen
^A'inch-wide bands. At the center, each band
separates into two separately woven sections.
Before weaving as a unit resumes, these sections
are crossed. The open spaces formed by the
shifting sections become part of the design. In
the top sections, groups of cards shift to further
complicate the image. (Filiform #2, collection
ofEnidWood.)
105
of the techniques have many variations, and each will produce unique
results in the hands of different weavers.
SHIFTING CARDS
7-2. Shifting warp threads from one part of the
weaving to another.
7-3. A detail of a wool band. Groups of cards
shift from one place to another.
104
Since the "loom" used for card weaving consists of a series of individually
threaded cards, shifting warp threads from one part of the weaving to
another is very easy. This can be done at the beginning of the weaving to
change the pattern, or during weaving to create linear movement. Single
cards, groups of cards, or separately woven sections can be transposed.
As cards are moved, shifting warps create linear movement. The
technique works best with a simple warp stripe pattern. Use a number of
cards, each threaded with a single color. You can use many colors or just a
few, but for a well-defined effect, the four threads that go through an
individual card should be identical. Each card will then form a distinct line.
The threading direction from card to card is not important because the
cards can easily be flipped. Paired or alternate threading creates a balanced
weave and can be very effective. Cards can be shifted over the top of other
threads or under them, depending on how you want the line to flow. If all
the cards are turned continuously in one direction, shifted threads work
into the weaving in a smooth transition.
When you are ready to make a shift (just after bringing the weft
across), loosen the tension slightly, pick up a selected card (or group of
cards), and move it to a new place. Turn just the shifted cards a few quarter
turns (one, two, or three, depending on the nature of the yarns and the
length of the shift) in the direction that the cards have been turning as a
7-4. Detail of a silk weaving composed of V4inch-wide bands in which groups of cards shift.
The detail shows seven bands which have been
stitched together to form a larger image.
7-5. A silk card weaving composed of fourteen
3/4'inch-wide bands. At the center, each band
separates into two separately woven sections.
Before weaving as a unit resumes, these sections
are crossed. The open spaces formed by the
shifting sections become part of the design. In
the top sections, groups of cards shift to further
complicate the image. (Filiform # 2 , collection
of Enid Wood.)
105
7-6. To decrease warp threads, cut the four ends
that go through each card, slide the card off, and
slip the threads through the shed to the other side
of the weaving.
group. This twists the four threads that go through each of these cards and
creates a nice tight grouping.
When the cards are in their new place, turn all the cards as a unit and
bring the weft across. For the next few rows of weaving, keep the tension
a bit on the loose side so that the cards and threads can work in easily. Do
not pull the weft thread too tight. The shift will have a tendency to pull
the warp threads in, and you will have to fight a bit to keep the weaving
spread out. Leave the weft a bit loose; then, when the card weaving is
finished and the tension released, the warp threads will "migrate" and
assume a natural, graceful curve.
Before and after you shift, it is important to turn the cards continuously in one direction. A reversal at this point (just before or after the warp
threads are worked in) makes a distracting bump. Turn continuously in one
direction until you have to reverse, then arrange to make the reversal well
spaced between card shifts.
If cards are moved frequently, puckered areas will appear, creating
interesting bulges and depressions.
Sections of warp can be woven as individual bands and then shifted
so that one goes over or under another. A complete discussion of this is
found in Chapter 5 (Pattern Draft 13). When designing your pattern, keep
in mind how the pattern will break up. Also, keep an eye on the border
cards in each section. As the weaving divides and shifts, the border cards
will change. Generally, you will want similar borders so that the weft
thread will show in the same way on each edge.
Shifting woven sections is especially effective with a weaving that
breaks into distinct longitudinal patterns. Whether a section shifts over or
under can completely change the look of a band. Crossovers can be simple
and involve just two elements, or they can be complex and involve many.
DECREASING AND INCREASING WARP THREADS
7-7. Detail of a cotton band that decreases to a
center point.
106
An interesting way to shape a card weaving is to decrease the number of
warp threads as the weaving progresses. In this technique, the warp threads
to be decreased are cut near the anchor knot, the card or cards slipped off,
and the resulting loose threads laid through the open shed as supplemental
wefts along with the normal weft thread. The decreased warp threads
extend in a group out the other side, where they can be trimmed or left as
fringe. It is important for maintaining even edges to keep the regular, or
structural, weft going through each shed.
This manner of decreasing can be done evenly on both sides, on only
one side, from the center out, or irregularly. As with the other techniques
discussed in this chapter, this method works best structurally and aesthetically when the cards are turned continuously in one direction.
Weavings can be expanded by adding new warp threads by half-hitching them to the weft, or changed by rethreading cards to condense and
enlarge the weave.
7-8. Detail of a woolen band from Tunisia. The
widely spaced warp in the center of the band
combines with a heavy weft to create delicate
light and dark lines. (Courtesy of the Museum
of Ethnology, Hamburg. No. 13.216.3.)
VARYING THE WARP THREADS
Warp threads that vary in weight and type within a weaving can add
interest and texture. Many warp threads can be threaded through each hole
so that a wide weaving may take only a few cards. This creates a bulky fabric
which shows the characteristic texture of card weaving beautifully by
greatly enlarging the design and clearly showing each turn of the cards.
This method of threading can be done evenly so that each hole has the
same number of threads, or it can be done unevenly, putting different
numbers of threads through each hole or even leaving some holes unthreaded.
By working the weft thread very loosely, you can spread out the warp
threads, leaving open spaces and shaped areas. You may also pull the weft
thread very tight to condense and pack the warp.
7-9. The half hitch can be used for attaching
new warp threads to a weft thread. The weft can
be stabilized by temporarily running a long
needle next to it and securing the needle so that
it does not shift.
7-10. A card'Woven hanging in one piece made
of wool and sisal with braided fringe (85 inches
by 34 inches). The bold pattern comes from
threading large numbers of threads through each
card hole. (Woven by Donna Armstrong.)
107
7-11. A fine silk neckband with beaded edge.
The beads were carried on a supplemental weft.
SUPPLEMENTAL WEFTS
7-12. Beads can be carried on a supplemental
weft and woven in at the appropriate places in
the weaving.
The regular, or structural, weft is the thread that holds the weaving
together. A supplemental weft is an additional element, usually decorative,
which is inserted during weaving. It might follow the structural weft with
each pass, or only every once in a while. It might also be a brocading weft
that floats on the surface and only follows the structural weft on the edges.
Beads, charms, coins, or other objects can be integrated into a piece
as weaving progresses by threading them onto a supplemental weft. This is
usually a very fine thread which works right along with the regular weft.
The objects slide along and are woven in at the appropriate places.
7-13. A I-inch-wide cotton band in progress
with flattened copper pennies carried on a supplemental weft.
108
7-14. A silk fringe with card-woven edge. The
fringe is integrated into the fabric as a supplemental weft.
Additional material can easily be "laid in" with the structural weft
thread as weaving progresses. There is no need to knot or tie, since the
twisting of the warp threads and the tightness of the weave ensure that the
material laid in, whether fleece, yarn, raffia, long feathers, or tassels, will
be held securely. Fringe can be inserted to extend on one or both sides, or
it can be pulled to the surface in the center of the weaving.
Wefts can be extended as shown to create a fringe of spaced threads.
These might be simply decorative, or designed to be worked up later into
a fabric using a different textile technique. If the supplemental wefts
produced in this process become warp threads, the final piece will have a
7-15. Detail of the band shown at the beginning
of the chapter. The tassels were inserted during
weaving.
7-16. Two ways to create fringe loops with a
supplemental weft.
109
7-17. Two wool caps based on Norwegian bog
finds from the Bronze Age. The card-woven
band was prepared with supplemental weft
fringe loops. After the band was woven, it was
attached to a frame with the loops hanging
down. A rod was inserted through the loops so
that they could be stretched taut. These threads
then became warp threads that were twisted (in
a technique called sprang) to form a netted
structure. Finally, a cord was taken through the
loops, replacing the rod, and drawn tight. A little
tassel was placed at this point and marks the
center back of the head. (Woven by Jackie
Wollenberg.)
finished edge bordered by card weaving. The wool caps shown in Figure
7-19 are a wonderful example of how card weaving can work with the
netting technique known as sprang.
TUBULAR WEAVING
Although it is possible to form a tube by double weaving, tubular weaving
refers specifically to a tube formed by drawing together the two edges of a
band woven in the regular weave. To create a tubular card weaving, begin
normally with a plain shed and pass the weft thread through from right to
left. On the next turn of the cards, do not bring the weft thread back
through the shed from the left, but instead carry it underneath the weaving
7-18. Construct a tubular weave b)> always
inserting the weft from the same side of the
weaving. With each new shed, bring the weft
under the weaving and through from right to left.
After a number of rows, the top of the band looks
normal (left), and the bottom is covered with a
series of loops (center). To pull the weavinginto
a tube, insert a card or dowel between the
weaving and the weft loops and pull the weft,
row by row, to draw the edges together (right).
Start pulling at the center and work out, first in
one, then in the other direction. The weft thread
moves, row by row, around thi weaving to form
a continuous circular construction. With each
pull, the weft loop becomes longer.
110
and insert it again from the right. After a while, the weaving will look
normal on the top with a series of weft loops underneath.
To form this band into a tube, pull the weft loops to bring the two
edges of the weaving together. This can be done during weaving or after
the weaving is completed. If you pull the weft as the weaving progresses,
do so a few rows behind where you are working; otherwise, you will find it
difficult to beat the next section.
The weft thread should be a smooth yarn without any knots so that
it will slide easily. You will get the best results by turning the cards
continuously for as long as possible in one direction. Whether you pull the
thread before or after the weaving is completed, you will find that each row
has to be pulled individually. For fine threads, tweezers are very helpful.
Inserting a cord or dowel between the weaving and loose weft loops will
give a solid core to pull against and insure a round, smooth tube. The core
size will depend on the width of the weaving. As each loop is pulled, you
gain back the weft. Slowly the thread is pulled through the whole weaving,
around and around.
7'19. A firm, round handle can be made with
the tubular technique. The body of the bag is
constructed in a netting technique called sprang.
Ill
7'20. This band is designed as an edging for a
garment. The center of the band is pulled into a
tube which will go around the neck.
7-21. A necklace by the author in collaboration
with metal artist Tex Gieling. Tubular card
weavings in different weights of yarn taper the
necklace.
112
7-22. The sections of this weaving were
structed as described in Figure 7-24.
threads pierced the bands to compact and
the fine silk bands. The weaving was
pressed and flattened under glass.
conTwo
hold
then
7-23. A series of woolen bands constructed in
the tubular technique. Each of these bands was
threaded in one direction, and the cards were
turned in one direction. After tension was released, the bands twisted. The weft loops were
not pulled and in the finished band they float
free.
113
An interesting spiral structure can be formed with this way of working.
If the cards are all threaded in one direction and then continuously turned
in one direction, a terrific torque builds up in the weaving. When the
weaving is released, it twists around and around, and the loose weft threads
(the loops underneath) create an interesting design element.
SLITS AND LOOPS
Vertical slits can be made by using individual weft threads for weaving
groups of warp threads. These slits can be used for functional purposes—
buttonholes, openings for the head, openings for belt ends, or spaces
through which to wind the weaving back on itself—or as decorative
elements.
A woven loop or loop of loose threads can be formed at one end of
the weaving by manipulating the waip in a variety of ways. The simplest is
to create loose loops at one end of the warp before weaving begins. If you
want a simple pattern setup, use the method of continuous warping discussed in Chapter 6. If you have a more complex, but symmetrical, pattern,
try the following method. If your pattern calls for twenty cards and a warp
length of 2 yards, you would normally need a total of eighty threads, each
2 yards long. To create loops at one end, cut half the number of threads
7-24. One of many ways to make a card weaving with an end loop. Thread two cards at once;
then slide them apart so that they are equidistant
from the center. Repeat with each successive pair
of cards until all have been threaded. Work the
weaving from the anchor point out, or anchor
the center loops to your waist and weave normally.
114
needed for each color but make each one 4 yards long. Stack cards 1 and
20 and thread them simultaneously, as shown in the illustration. Be sure
that the threads travel through the cards in the appropriate direction. Then
separate the cards by sliding one along the threads. Continue threading the
cards in this manner (cards numbered 2 and 19 would be next) until you
have ten cards on one side and ten on the other. Now bring all the cards
together so that the threads form a loop at the center. Run a cord through
the loop, attach this to your anchor point, and begin weaving at this end.
The weft can be beaten very close to the loops so that the weaving is
condensed and then gradually widens, or you can begin the weaving a little
distance away and the loops can become a decorative fringe.
To produce a woven loop, weave a center section first, using just ten
cards. Then bring the two groups of cards together; the woven section
becomes the anchor, and the weaving progresses using all twenty cards. If
the tubular technique is used for the center section, the loop becomes
rounded.
CURVES AND ANGLES
Angles and curves of varying degrees are particularly useful for shaping card
weavings that will be used to trim garments. By changing the tension and
pulling the weaving, it is possible to curve a band during the weaving
process. This is tricky and takes practice. The concept is similar to a
marching band. If the band turns to the left, the person on that side marches
in place and the person on the right takes more steps in order to swing
around. In weaving it's a balancing act that involves three elements: pulling
the weaving, packing the weft tightly on one side and loosely on the other,
and readjusting the threads at the anchor point. I begin by loosening the
weaving and holding it in my hand. As I turn the cards and weave with one
hand, I pull on the weaving with the other to create the new shape. A long
needle (could be a thin knitting needle) inserted through the shed along
7-25. A curved band created by manipulating
the tension during weaving.
115
7-26. This angle was created by first weaving
the band to a point. Two cards were dropped on
the left side for each two rows of weaving. Then
a long needle was inserted through the open shed
and the right point pulled down, tension readjusted on the warp threads at the other end, cards
turned individually to recreate the pattern, and
normal weaving resumed.
with the weft gives leverage. I tie this needle on both sides to something
rigid so I can force the weaving into the new shape (if I'm working on a
loom, I tie it to the apron bar). This stabilizes and anchors the weaving,
making it possible to untie the distant end and readjust the warp threads
for even tension.
A sharp angle can be created in a different way. Exactly how you do
it will vary depending on the number of cards, the weight of the threads,
and on what kind of angle you want. If you want the weaving to angle to
the left, begin by bringing the weft thread across part way, so the threads
of a certain number of cards are left unwoven. Shift these cards away and
do not turn them. Continue in a consistent manner until the weaving
comes to a point. In order to change the weaving direction you have to pull
the top point of the weaving down even with the low point. Insert a long
needle through the shed and pull the needle to realign the edge, anchor
the needle, and then retie the warp threads at the other end so there is even
tension. Before you resume weaving you may have to turn cards individually
to recreate your pattern. Continue weaving, turning all the cards as a unit.
When creating an angle it is also possible to pick cards back up in the same
way you dropped them off, but this involves a few more tension adjustments. Any needles you insert to help manipulate the weaving can be easily
pulled out later.
There is another way to create an angle. Take each individual card,
detach its four warp strands from the anchor point, and take the card and
116
7-27. This bag incorporates some of the techniques described in this chapter. The body of the
bag is loom-woven in tapestry weave. The same
yarns were then used for a card-woven band that
forms the strap and sides. The surface of the bag
was embellished with buttons and three cardwoven bands. A four-strand braid is used as a
supplemental weft for one band, and on another, tassels. (Ceremonial Bag, collection of
Helen Pope.)
117
threads through the shed and out the other side. Do this one or two cards
at a time, then readjust the weaving, retension the threads, and begin
weaving in the new direction.
This technique can be learned only through experience, since the
angle of the turn, the tension of the warp, and the dovetailing of the pattern
are difficult to control. All are affected by the weight of the yarn and the
width of the weaving.
118
8
8-1. A cape constructed from card-woven
bands. The middle back section splits at the top
into two sections of weaving which travel across
the shoulders. Warp ends from the other bands
were brought through these sections as supplemental wefts. These same warp ends were then
wrapped and the wrapped sections stitched together to form the stand-up collar.
Finishing
T
he prime characteristics of card weavings produced through the
ages have been their strength, pliability, and durability. For the
most part, card weaving has been used to produce narrow bands
used as reins, bridles, saddle girths, belts, straps and all manner of trim. The
rich and decorative patterns of these textiles, their strength and durability,
and their very special "feel" made them ideal for functional and decorative
pieces.
119
8-2. Two wool bands with twisted fringes.
Card weavings, because of their tightness and intertwined density, are
essentially finished when the cards are slipped off and the fringe is trimmed.
A few special ways of treating dense fringes and constructing larger fabrics
from narrow bands are given in this chapter. These techniques may be
combined or developed further; the possibilities are endless.
8-3. A twisted fringe.
TWISTING THE FRINGE
A simple, effective treatment for a full, spiraling finish on dense warp ends
is twisting. Twisting requires only that two groups of threads be tightly
twisted individually in the direction of the yarn's twist, then twisted
together in the opposite direction. To secure the twist and keep it tight,
bind at the end by wrapping, tying, or knotting. The kind of yarn and the
original twist of the threads will affect the finish of the fringe.
8-4. Twisting the fringe. Separate groups are
tightly twisted in one direction, then twisted
together in the opposite direction.
120
WRAPPING
The thick, full, warp-end fringes of card weaving lend themselves to
wrapping. The fringe, or part of the fringe, becomes the core. For short
8-5. A 5-inch-wide wool card weaving used to
finish the top edge of a loom-woven fabric
embellished with buttons. Groups of warp ends
from the loom weaving were brought through the
card weaving as supplemental wefts and knotted. The warp ends of the card weaving were left
long, and finished by braiding.
wrappings, take one end of the wrapping material (which could be a similar
yarn or something quite different), form it into a loop, and place it on top
of and parallel to the fringe threads; wrap evenly and tightly with the other
end as shown until the desired area is covered. Cut the wrapping thread
and insert the cut end through the loop. Pull the two ends away from each
8-6. Wrapping or binding groups of threads.
8-7. A red card-woven band with wrapped
fringes. It is embroidered with white cotton
yam. From Schopen, near Sofia, Bulgaria.
(Courtesy of the Museum of Ethnology, Hamburg. No.29.24:2.)
121
8-8. A belt from Egypt or Tunisia with wrapped
fringes angling to a point. (Courtesy of the
Museum of Ethnology, Hamburg. No.22.9:
265.)
other with strong, even pressure until the loop is brought snugly under and
to the center of the wrapped section. Cut the ends flush.
To wrap a larger area, place one end of the wrapping thread on top of
and parallel to the fringe threads. Don't make a loop. Bind the end in tightly
as in the first method. When about an inch of wrapping is left to do, take
a separate piece of thin, strong yarn about 6 to 8 inches long, double it, and
lay it on top of the fringe threads. Continue to wrap, binding it into the
wrapping with its ends and loop protruding. When the wrapping is complete, place the end of the wrapping thread in the loop. Pull the two free
ends belonging to the loop, bringing the end of the binding thread under
and out. Now discard the loop thread and trim the end of the wrapping
thread if it protrudes. If the core or binding material is slippery and you are
concerned about movement, use a little white glue as you wrap to hold
everything in place.
In either method, extra threads can be wrapped in to make heavier
fringes or to add color. The kind and color of the wrapping thread can
change. Small segments can be wrapped and then joined with other
wrapped elements. Wire can be bound in to make wrapped areas stiff and
easily formed. Wrapping can also be used to construct supplemental elements that are woven in during the weaving process or attached after the
weaving is completed.
FOUR-STRAND BRAIDING
8-9. The four-strand braid.
Ill
Many kinds of braids can be used to finish and control fringes. The
four-strand round braid is one of the most aesthetically pleasing. The four
elements can be single strands or groups of threads. The placement of color
strongly affects the pattern of the four-strand braid. If the color arrangement
is light, light, dark, dark, the color will alternate; if the colors alternate—
light, dark, light, dark—the colors will spiral.
8-10. A fringe worked in four-strand braids.
Detail of a red-and-white wool belt from
Schopen, near Sofia, Bulgaria. (Courtesy of the
Museum of Ethnology, Hamburg. No.30.27:
18.)
Begin by anchoring the end of a group of four threads. Place the two
dark strands on the right, and the two light strands on the left. Take the
outside left light strand and bring it under two and back over one, as shown
in the illustration. What was originally the outer light thread becomes the
inner light thread. Work the far right strand in the same way—under two,
and back over one—so that what was originally the outer dark thread
becomes the inner dark thread. Repeat these movements, working alternately with the left and right outer strands. The thread to be worked next
is always the higher of the two outer threads.
TYING THE HALF-KNOT AND THE SQUARE KNOT
Knotting is another way to group fringe strands. Simple overhand knots
can be effective, whether done individually or in groups. The half-knot and
the square knot are more elaborate and require four strands or four groups
of threads. The half-knot is essentially a repetition of the first half of the
square knot.
The square knot, when repeated, forms a row of flat knots. The
half-knot creates a similar texture, but with a twist or spiral. In each knot,
8-11. The half-knot and the square knot.
123
8-J2. A Turkish band with added tassels. The
fringe is finished in a weaving technique called
finger weaving. The dyed, unspun goat-hair
tassels are attached with four-strand braids. The
pattern draft for this band is in Chapter 5.
only the two outside strands are worked. The two middle threads are inert
and should be held taut as the knotting progresses.
To start a row of half-knots, align the four strands or threads parallel
to one another with the ends toward you. With the two middle threads
always pulled toward you, place the right-hand strand over the top of the
two middle threads and under the left-hand thread. Take the left-hand
strand under the two middle threads, and bring it up through the loop
formed by the right-hand strand, as shown in Figure 8-11. Each knot in the
series must be tied with the right-hand thread being worked first. For a
reverse spiral, each knot in the series must begin by working the left-hand
thread first.
The half-knot makes up the first half of the square knot: the righthand thread goes over the middle two, and under the left-hand thread,
which then goes under the two middle threads, and up through the loop
124
8-J 3. Making a tassel.
8-14- ATurkishband with added tassels. Beads
are threaded on the four'Strand braids, adding
another decorative element. The pattern draft
for this band is in Chapter 5.
formed by the right-hand strand. For the second half of the square knot,
take the left-hand strand over the top of the two middle threads and under
the right-hand strand, then take the right-hand strand under and up
through the loop formed by the left-hand strand. If you combine these two
halves and repeat, you will have a row of flat square knots.
MAKING TASSELS
Tassels often add a pleasing fullness and finish to card weavings. They can
be added to the fringes or integrated into the weaving, and they can be
simple or complex in construction. To make a simple tassel, gather a
number of threads of an appropriate length, tie in the middle, double over,
and bind or wrap into place. The tie that holds the original strands together
can serve as a means of attaching the tassel to the weaving or fringe. If this
125
8'15. Tassels with braided ties are incorporated
into this weaving as supplemental wefts. The
pattern draft for this band is in Chapter 5.
tie is doubled, it can be worked into a four-strand braid, which gives
substantial structure.
SEWING STRIPS TOGETHER
Card weaving lends itself to the making of narrow bands. Although very
wide pieces have been produced by using special tension devices (including
floor looms), generally wider pieces are constructed by stitching several
bands together. If you intend to stitch bands together and want a tight,
secure edge to work with, make sure that the border cards turn continuously
in one direction during weaving with as few reversals as possible. After
weaving, press the bands flat, butt the edges together, and, working on the
wrong side with a tapestry needle and a yarn similar to that used on the
borders of the weaving, stitch the bands together. Secure the thread at each
end by backstitching.
S-i6. Stitching together card-woven bands.
Butt the edges together and work the stitching on
the backside.
126
The bag shown in Figure 8-17 is made from one long band woven in
the light/dark pattern setup. The material is a medium-weight, plied wool
yarn, and the width of the band is 3 inches. To make the bag shown, begin
by designing the weaving so that it can be cut into four harmonious parts,
each 24 inches long. During weaving, insert a divider cord along with the
weft at the end of each part. After completing the weaving, sew back and
forth on each side of the cords to secure the warp threads. Cut the bands
at the cords between the rows of stitching. Press the bands with a steam
iron, being careful not to scorch the yarn. Before you sew the bands
together, consider how they will look folded and then decide on the final
arrangement. With a tapestry needle and the same yarn used on the borders
of the weaving, stitch the bands together on the wrong side. Stitch in such
a way that the needle follows the weft thread for a short distance, comes
up, travels along another weft and over to the next band. Work from the
center out.
Because of the twisted structure and density of warp threads, card
weaving does not lend itself to hemmed edges, which are likely to be too
bulky. Sometimes, the fringed edge can be worked into the design. One
solution, especially with fine threads, is to finish the ends with glue or
fusible webbing. Another solution is to incorporate commercial fabric as
an edging or as a lining, as has been done in the bag shown. It could have
been left unlined, but the fabric protects and strengthens the weaving,
secures the edge, and gives a decorative clean finish to the top. This bag is
designed so that the fabric shows on the top edge and completely lines the
inside. Thus, the weaving need not be doubled, and there is a smooth
transition between bag and lining.
A strap can be made from another card weaving or from a four-strand
braid. The four-strand braid on this bag was made from the same yarns used
in the weaving.
127
8-J 7. A lined bag constructed from four cardwoven bands. The bands, each 24 inches long,
were woven in the dark/light setup described in
Chapter 6 and sewn together to form the body
of the bag.
8-J8. The back of a Tibetan cotton bag, 14
inches wide, shown with the flap spread open.
The bag was constructed of strips arranged both
vertically and horizontally.
128
9-1. A wool rug (48 inches by 36 inches),
card-woven in one piece by Gad Manners. A
floor loom was used to maintain even tension.
The large diagonal pattern was created by turning one group of cards toward the body and the
other group away.
ExpandingCardWeaving
T
he process of weaving is attractive for its inherent simplicity of
cards, yarn, and body tension. This simplicity, combined with
complex pattern and varied structural possibilities, offers the
weaver many satisfactions. As seen in the previous chapters, card weaving
lends itself to narrow, highly patterned bands. This chapter explores ways
to expand card weaving, ways to increase the width of bands by special
tension devices, and ways to combine card weaving with loom weaving.
129
9-2. An inkle loom used for card weaving. The
heddle bar has been removed to allow free passage of the warp. Tension is adjusted by loosening the wing nut and moving the tension bar.
The two ends of the weaving are tied together.
As work progresses, the weaving is shifted, keeping the cards and weaving area where they can
be worked most conveniendy.
TENSION CONTROL
In the instructional chapters, warp-tensioning devices are simple: the body
or two C-clamps. To work with wider warps, longer warps, heavier threads,
or tension-sensitive yarns, other means of support may be necessary.
WORKING BETWEEN DOWELS
A simple way to support a wider weaving is to tie the warp ends onto dowels
and anchor the dowels wherever convenient. This aligns the cards, keeps
the threads spread, and, by stabilizing the weaving, gives a base to beat
against.
9-3. A card weaving tied onto dowels. The
dowels can be anchored using C-clamps or card,
lfyouare usingbody tension, remove the weaving from the closest dowel after weaving a short
way, then bring the weaving around the dowel
and secure it with a long needle.
130
When warp threads are grouped and tied, they are bunched together.
This is fine for a narrow band, but as you use more cards or heavier threads,
it is no longer satisfactory. The knots become too big and bulky to handle.
Separating the warp ends into smaller groups, each secured by a knot, can
take care of the anchor end. Tying the weaving between dowels will spread
the threads immediately to full width and facilitate equal tension. This can
be a huge improvement over the simple knot at each end. Figure 9-3 shows
the threads going through each card tied individually, but this is not always
necessary. The threads from three, four, or more cards can be tied as one
group. How many threads you group will depend on the weight and kind
of yarn you use. A special knot, called a tension knot, is used to adjust the
threads. It is important to use this knot at the second anchor point.
9-4. The tension knot used to attach a card
weaving to the second anchor point. Each knot
represents a group of threads. The number of
threads in each group will depend on the weight
and kind of yarn.
TENSION KNOT
This knot is ideally suited to creating equal tension when anchoring warp
threads. It is used by weavers all over the world for many different kinds of
weaving. It requires two threads or two groups of threads. Card-weaving
warps are usually so dense that groups of threads are used.
The complete knot is shown in Figure 9-4- To make it, bring two
groups of threads over the top, under the dowel, around to top center as
shown, and then tie a half-knot. Do this to all groups across the dowel. The
most convenient way is to tie the groups on each end, put the dowel under
tension, and tie the remaining threads. Then, working from the center out
with the dowel under tension and the warp stretched, pull the ends (the
two that go with each knot) to tighten each knot. Tighten each group until
all threads are under equal tension, then tie a half-bow to hold each knot
in place. Because card-weaving warps are very dense, these knots will be
closely packed.
A more sophisticated version of the dowel system is the clamp. One
version is shown in Figure 9-5. Two pieces of fitted wood slide on metal bars
to clamp and hold the weaving. A belt brought around the waist is attached
to the metal hooks, and the body supplies the tension. The wood pieces
131
9-5. A clamp, with sliding wood parts, which
holds the weaving at the weaver's waist.
slide easily when tension is released and hold the weaving securely during
weaving.
A less portable system, but good for the person who wants to see the
weaving as it forms and who does not want to be tied to the weaving, is
shown in Figure 9-6. Two C-clamps are used in conjunction with a piece
of wood. The size of the wood and the width of the weaving determine the
size of the C-clamps. Warp threads are tied to the C of the C-clamp so that
the loom consists of the wood, C-clamps, cards, and threads. The weaver
works the weaving on the floor or places the board on a table. As tension
adjustments are needed, the C-clamps can be shifted.
Kay Sekimachi uses a variation on the dowel-and-C-clamp arrangement for her tubular woven pieces. She weaves between dowels which are
held in place by other dowels that project up from a heavy board. Holes in
the board allow for length and tension adjustments. The completed weaving, after the weft has been pulled, is shown at the end of this chapter.
USING A LOOM FOR TENSION
9-6. A very simple arrangement for creating
tension, made of aboard and two C-clamps. A
wider board and larger C-clamps can be used
for larger projects. The board stores easily and
is portable even during weaving.
132
A weaving loom can provide a useful framework for card weaving. Most
table looms have very little space between the back beam and the breast
beam and thus are not suitable for card weaving. A floor loom, however,
has the strength, stability, and breadth to be very useful. It can be used for
wide bands or narrow bands, it creates excellent tension, and it easily
handles long warps. It is the ideal tensioning device for such things as fabric
strip warps, heavy threads, and difficult-to-manage fibers such as fine,
slippery silk.
9-7. A flat card-loom arrangement with dowels
and adjustable tension. The 2-inch by 12-inch
board makes a sturdy base. The weaver, Kay
Sekimachi, is using six-holed square cards.
Some of the cards are turning in one direction
and some in the other. Temporary ties separate
the groups and hold the cards in position when
she is not working.
Since only the tensioning part of the loom is used for card weaving,
the more you free the loom, the easier it is to work the card weaving. The
reed must be removed and the heddles pushed to the side. Ideally, the beater
and the harnesses are removed. This completely clears the space between
the back beam and the breast beam. The wider this space is, the better for
moving the cards and stabilizing tension. If you plan to work with long
warps, a warp beam of large circumference facilitates maintaining even
tension.
9-8. The other end of the tensioning device
shown in Figure 9-7.
133
picked up and moved anywhere in the weaving. Warp threads can be held
by the hand, tied to a belt, or fastened onto whatever is convenient so that
the cards can turn and the threads separate.
In free-form card weaving, the cards act primarily as a simple shedding
mechanism. Individual cards can be shifted and rearranged without destroying their ability to make a shed. The weave produced by cards is sturdy
and dense so that even open or loose areas have strength, stability, and the
characteristic twists of card weaving.
WARP TWISTING
As weavers become more engaged with card weaving, the question of how
to deal with the twists that occur between the cards and the anchor point
comes up. Reversals can be worked into the design so that a balance is
created by twisting and untwisting, thereby keeping the threads free.
Untying the anchor point and clearing out the twists is not always successful. It is tricky to tie the threads so that they are all even and under the
same tension. If they are not just right, the weaving will be uneven at that
point.
Twists are not a problem in free-form card weaving because the ends
are not anchored, and the cards can be rotated individually to undo the
twists.
A description of card weaving in Turkey by Sherman from 1911 gives
an interesting solution to the twisting problem. The weavers stretched out
a long warp between two pegs on the ground with the cards suspended in
the middle. There was a weaver at each end of the weaving and a person
in the center. As the cards turned on one end, the person in the center
moved the twist along to the second weaver. The weavers wove, working
their way to the center. The warp was eventually cut at the center, releasing
the cards and leaving two bands.
Gail Manners solved the twisting problem in an ingenious way when
she wove the rug shown at the beginning of this chapter. She used the
framework of her loom to support this very wide weaving. She removed the
beater and harnesses, and then attached the card weaving to the front
beam. The warp was not attached to the warp beam but was hung over the
back beam. Each group of four threads was individually weighted. As the
weaving progressed and was wound around the front beam, the cards were
shifted along the threads, and the twist was worked back to the weights.
As the weights turned, the twist disappeared. This permitted her to turn
the border cards in one direction for the entire weaving. Fishing weights,
metal washers, C-clamps, and plastic bottles filled with water are just a few
of the objects that can be used to weight threads. To allow the twist to work
out, each card must have its own weight.
Another method that many card weavers have used is swivels. They
are used in fishing and come in different sizes. Anchor the swivels to a
board, staggering them so that they are not too widely spread for the density
of the weaving. Anchor the board to a table or stabilize it in some other
way. Tie the four threads that go through each card to an individual swivel.
136
As the swivels turn, the twists are worked out and weaving continues
without obstruction.
CARDS IN COMBINATION WITH LOOM WEAVING
There are many woven structures associated with loom weaving that can
be duplicated with card weaving. A four-holed card is equivalent to a
four-harness loom. Anything possible on a four-harness loom can be done
with cards. Many weavers have found this intriguing and have developed
ingenious ways of using the cards. Herbie Gray has written many articles
and a book on working cards to duplicate woven structures primarily
associated with loom weaving. She has been imaginative in developing
ways to use extra holes to carry threads and in manipulating the cards to
make changes which would be far more time-consuming if done with a
loom's rigid harness system.
The actual combination of card weaving and loom weaving is another
area that is rich in possibilities. The card weaving and the loom weaving
can be woven separately and then stitched together. Handsome trims and
edgings can be formed this way. The same yarns in different weaving
techniques will have textural differences which add dimension to the
fabric.
In Chapter 1, I discussed card weaving in combination with the
warp-weighted loom. The card-woven band created and spaced a supplemental weft arrangement which later formed the weighted warp. These
wefts can be threaded as warp on a floor loom, too. After the card weaving
is completed, it is strapped to the apron rod at the front of the loom; then
the supplemental threads are taken through the reed and the harnesses and
attached to the back of the loom. Weaving proceeds at the front of the
loom, working away from the card weaving. The final weaving has three
selvedges with warp ends only at one end. Remember to allow for loom
waste when planning the length of the supplemental threads.
The experienced weaver will think of ways to incorporate card
weaving into the fabric during weaving. Any fabric which requires a strong
or decorative edge is a candidate for such treatment. The card weaving is
worked at the same time as the weaving. The same weft thread passes
through the card and loom weaving.
Thread the loom and cards normally. Thread the card warps through
the dents in the reed so that the cards rest between the beater and the back
beam, close to the heddles. (The four threads for each card must go through
9-1J. Detail of a weaving by Cecilia Meltzer
which combines loom weaving and card weaving. The card weaving is V2 inch wide.
137
the same dent). You'll have to lean over or stand up to turn the cards.
Weaving progresses by turning the cards, raising the harnesses, and bringing
the weft across. Combining card and loom weaving raises a number of
problems; the solutions will vary, depending on the type of weaving, the
kind and weight of yarn, and the width and length of the weaving.
Martha Stanley has worked with card weaving in conjunction with
rug weaving primarily as an edge treatment. Cecilia Meltzer, a Norwegian
weaver, worked extensively with integrating card weaving into loom weaving as part of a diploma project at the State School for Arts and Crafts in
Norway. Integrating card weaving and loom weaving takes care and practice. The results can be very beautiful, but only a few people have perfected
the combination.
Card weaving can also be used to finish a completed weaving. Take
the fringe edge of a loom-woven fabric and place it next to a card weaving
that is under tension and just beginning. Turn the cards and open the shed,
bring a fringe strand through the shed, and make the next shed; bring the
same fringe strand back through this shed and the next fringe strand
through the same shed. Proceed in this manner until the weaving is
completed; then go back and trim the protruding threads. It sounds simple,
but it requires skill, sensitivity to the materials, and practice to integrate
the fabrics gracefully.
9-12. A tubular linen card weaving by Kay
Sekimachi woven on the loom arrangement pk'
tured in Figures 9-7 and 9-8. The piece was
woven flat with the weft always inserted from
the same side. After the weavingwas completed,
the weft was pulled to form the tube. The warp
loops shown at the end of the weaving in Figure
9-8 were pulled together to form the top end of
the weaving.
CONCLUSION
Textiles are rich in history, technique, and materials. From either a purely
aesthetic perspective or in combination with cultural understanding, the
study of textiles is rewarding and enriching. Card weaving offers one
attractive and intriguing window into this world. It is an ancient technique,
connecting many cultures and many civilizations. It has captured the
inventive mind of weavers in the past as it continues to do in the present.
Anthropologists and museum specialists have examined and analyzed it.
Weavers puzzle over its intricacies and struggle to understand its many
variations. This book attempts to open a window and draw you into the
landscape. I hope your experience is fruitful and rewarding. A simple but
charged phrase is frequently in my thoughts: remember, it's all in the cards.
138