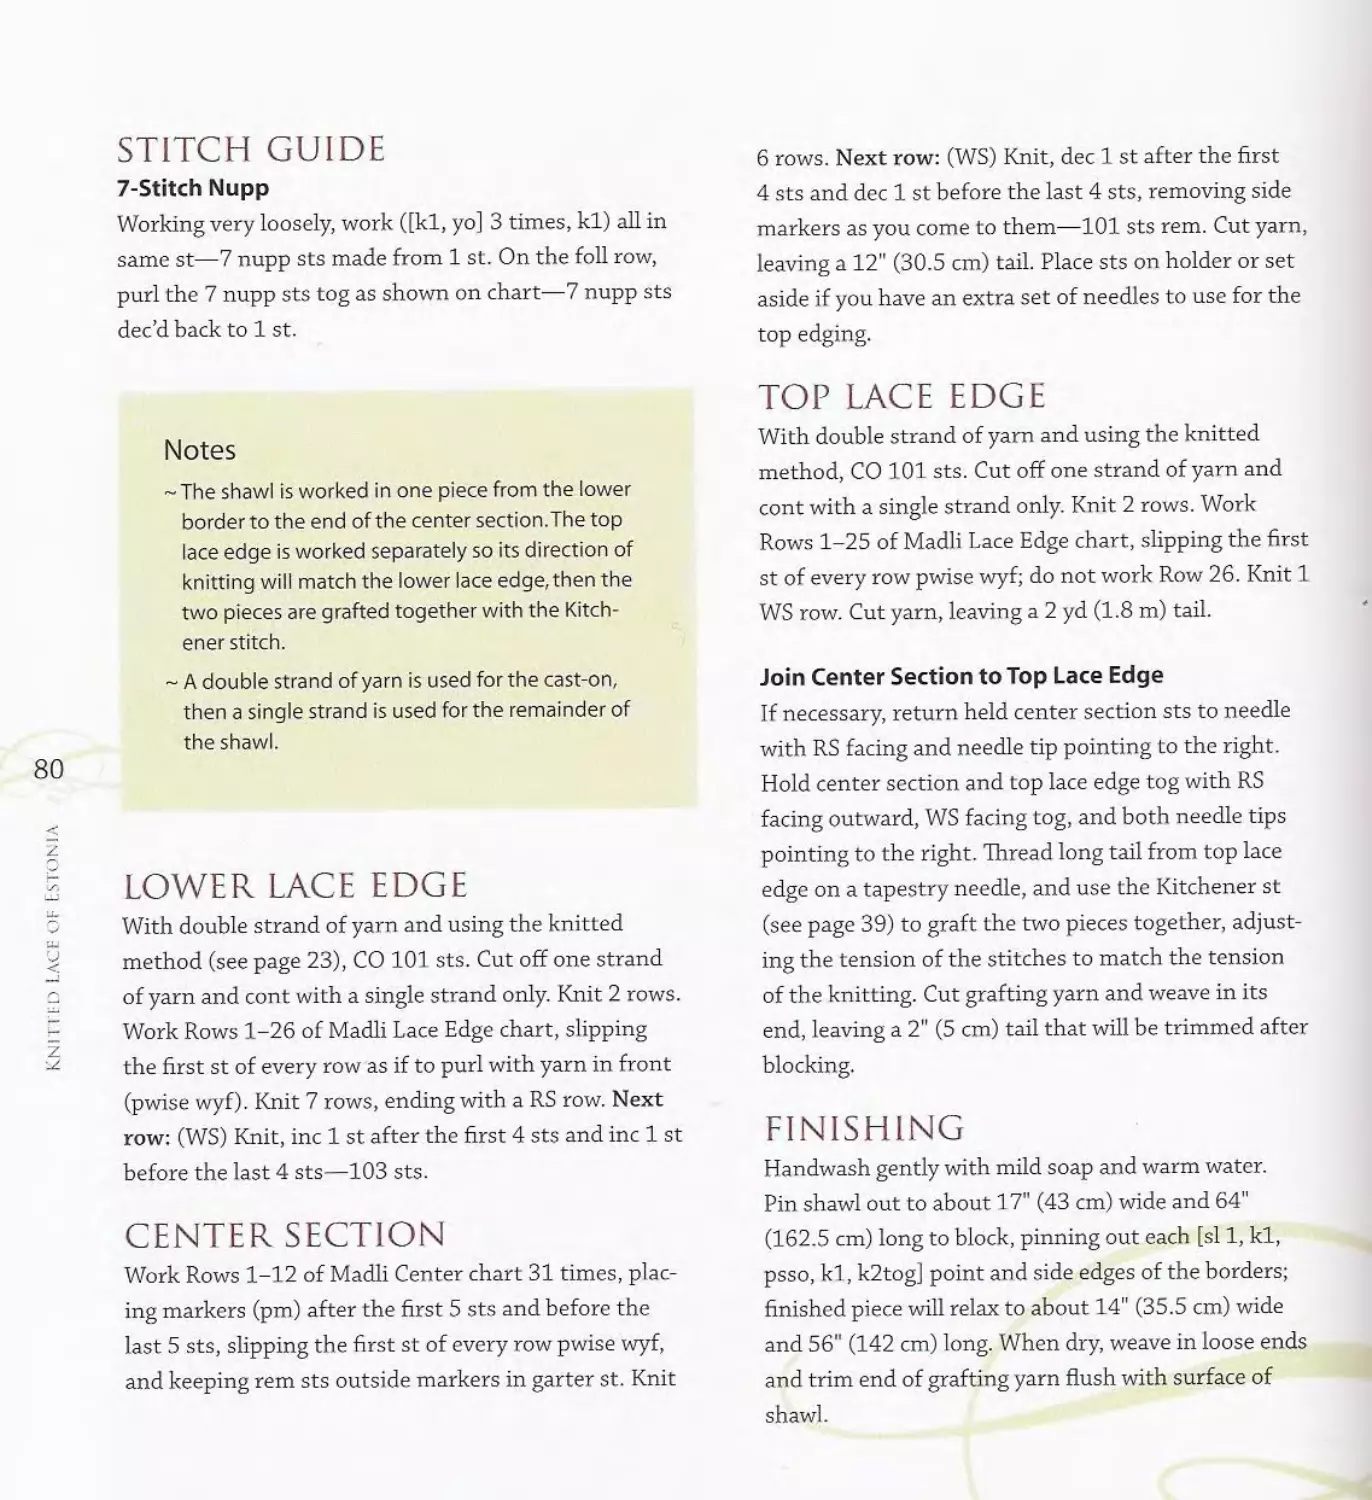
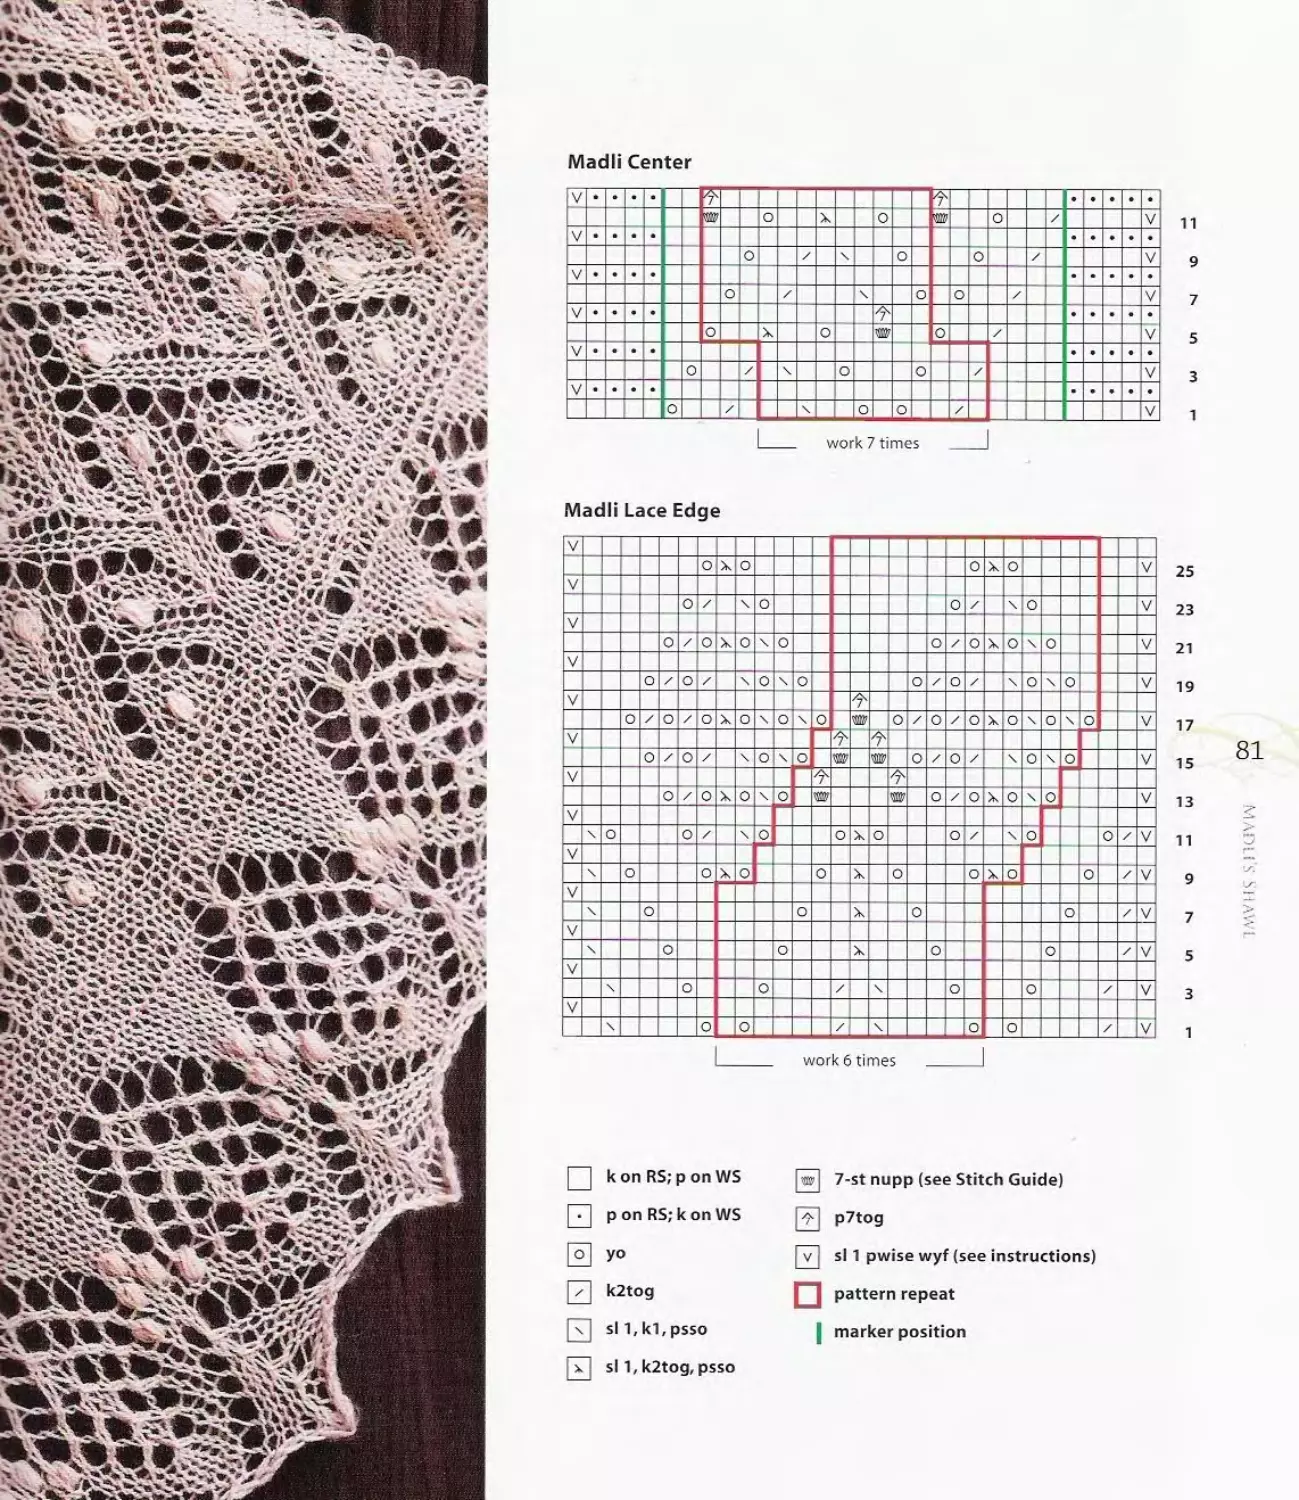
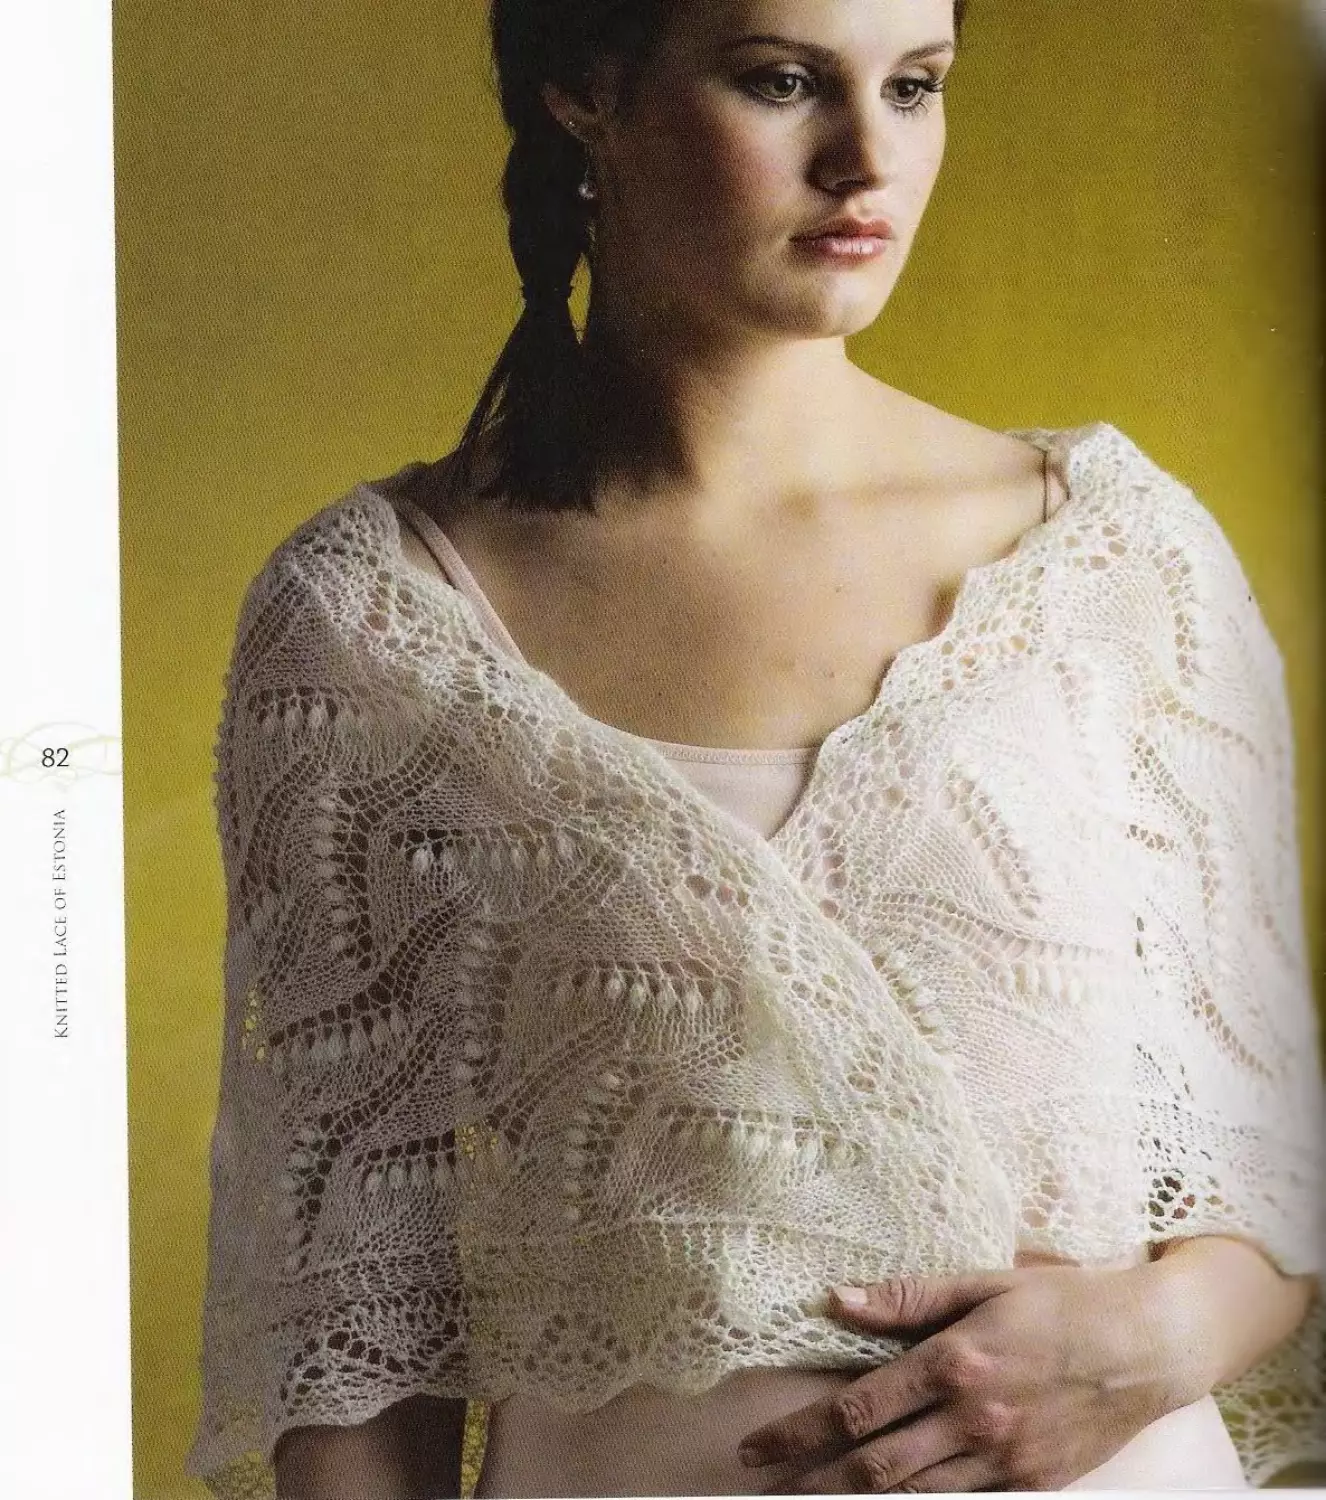
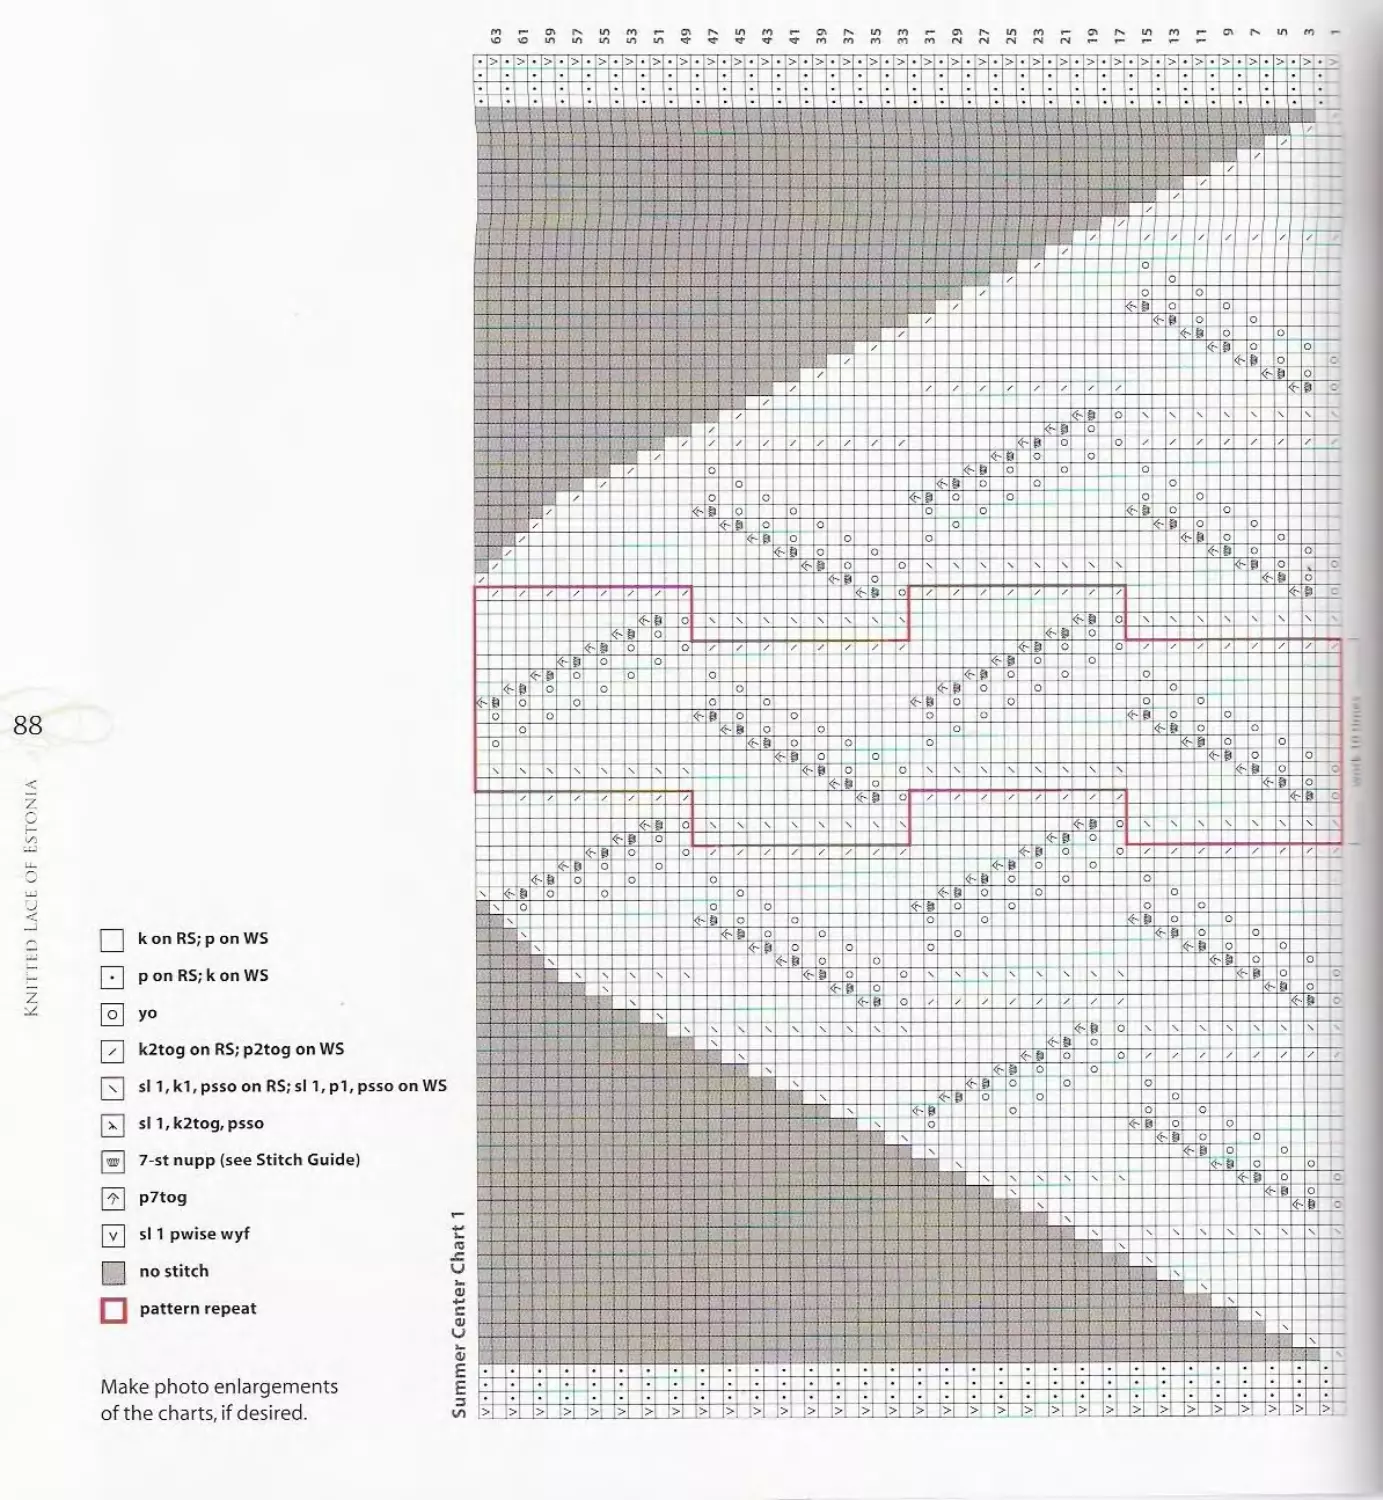
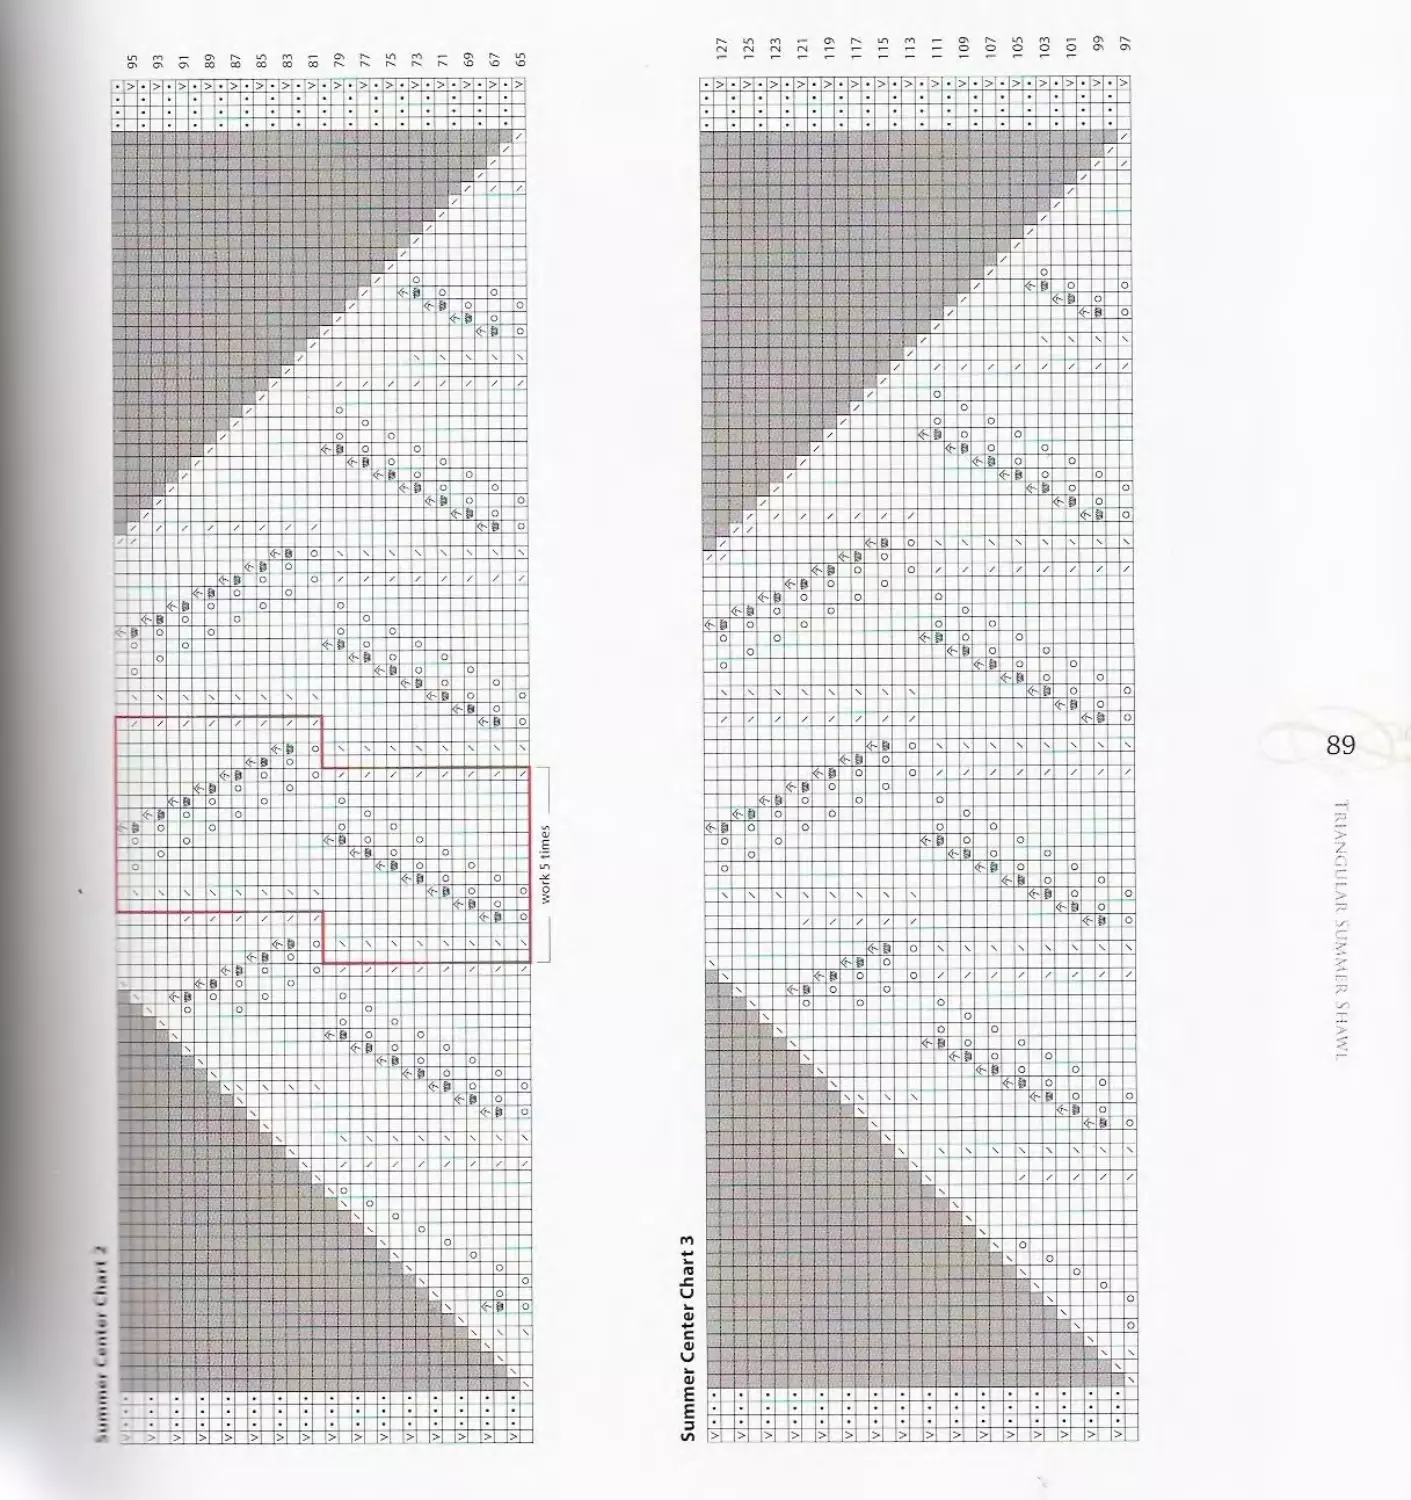
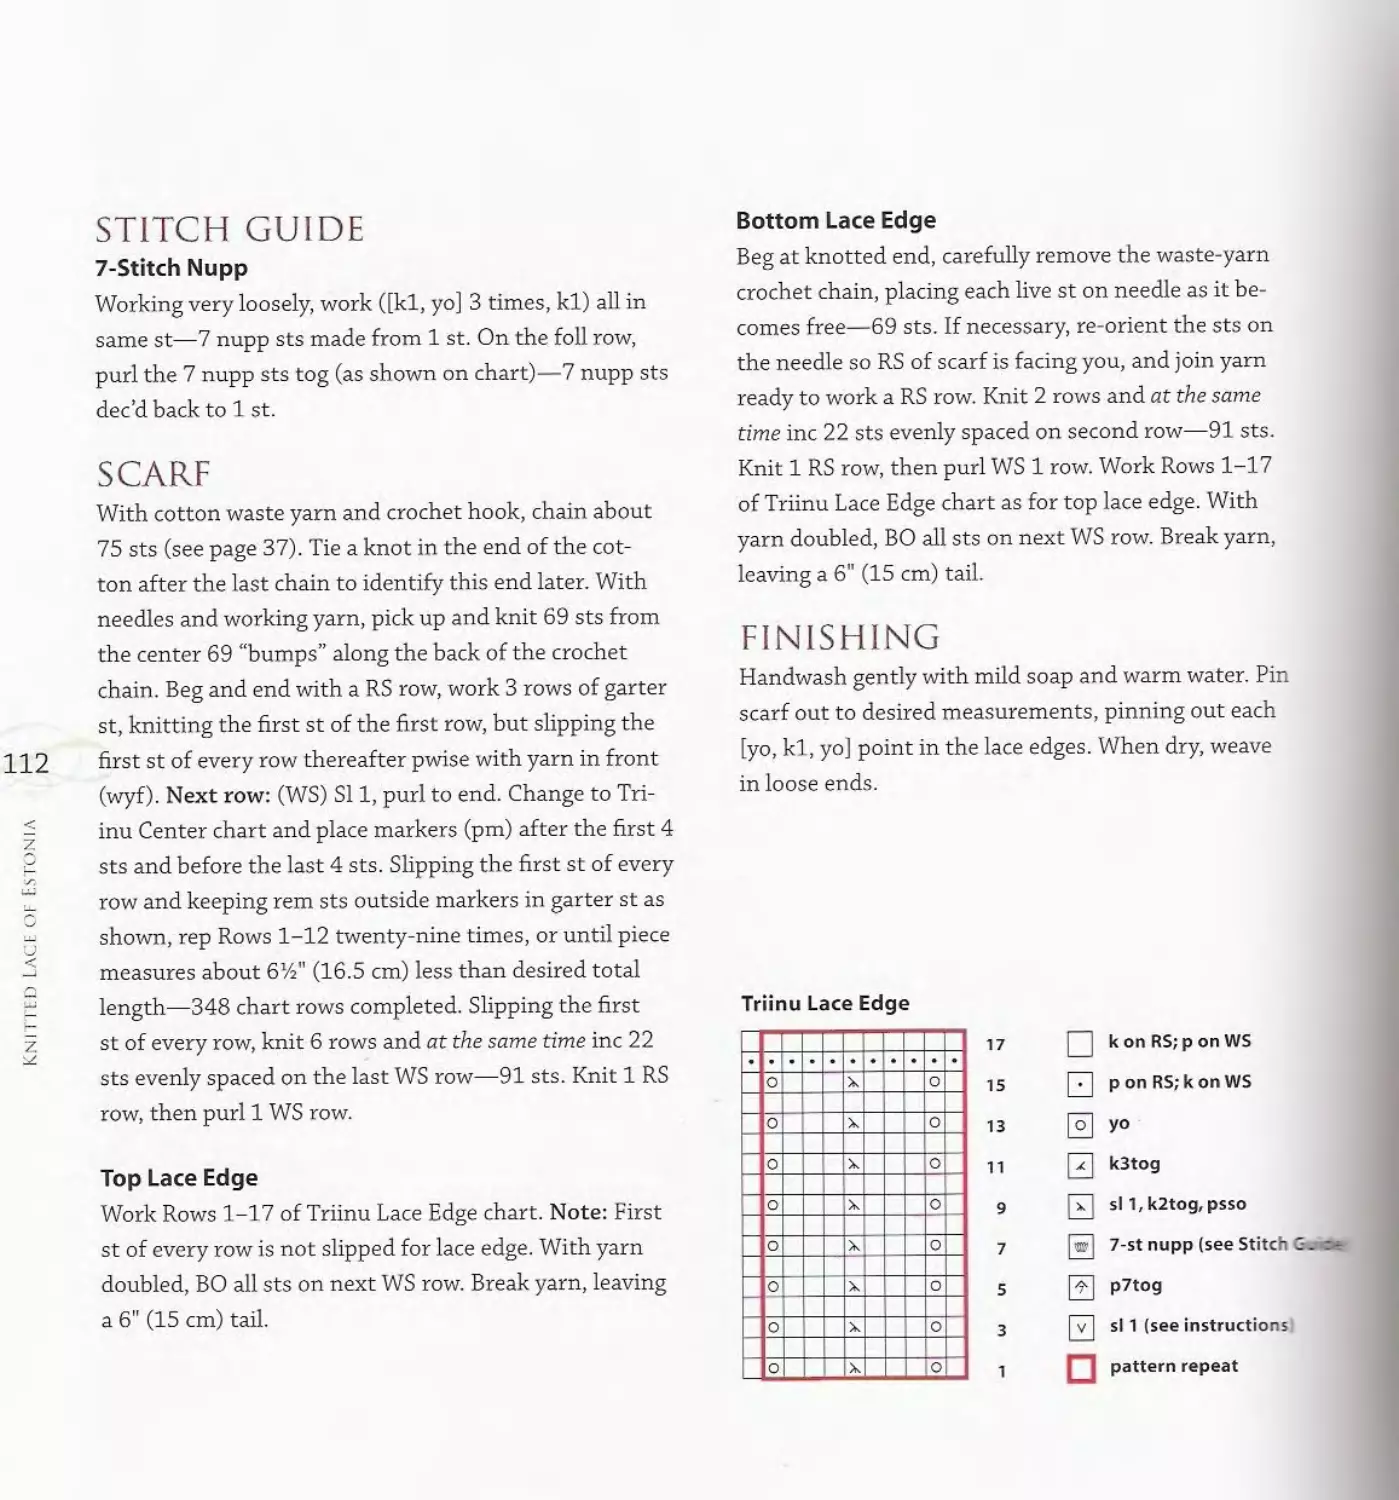
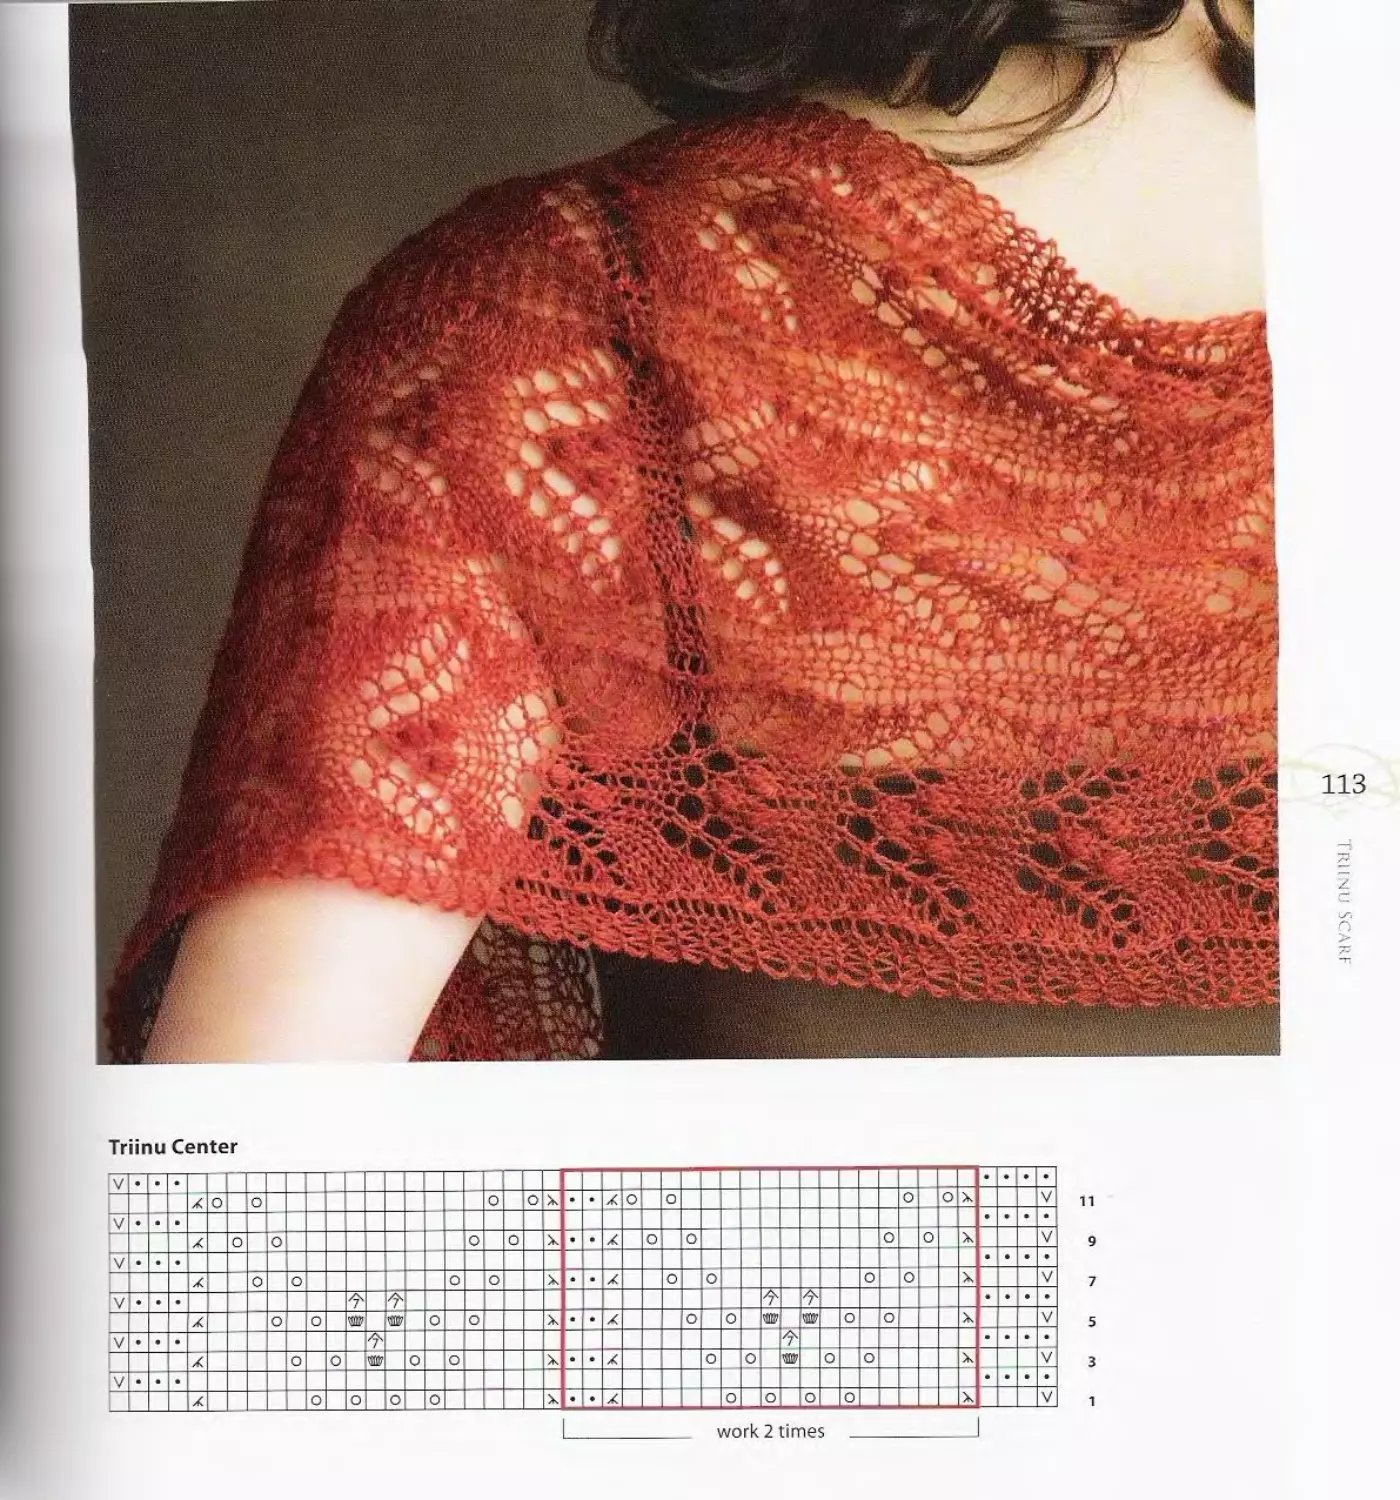
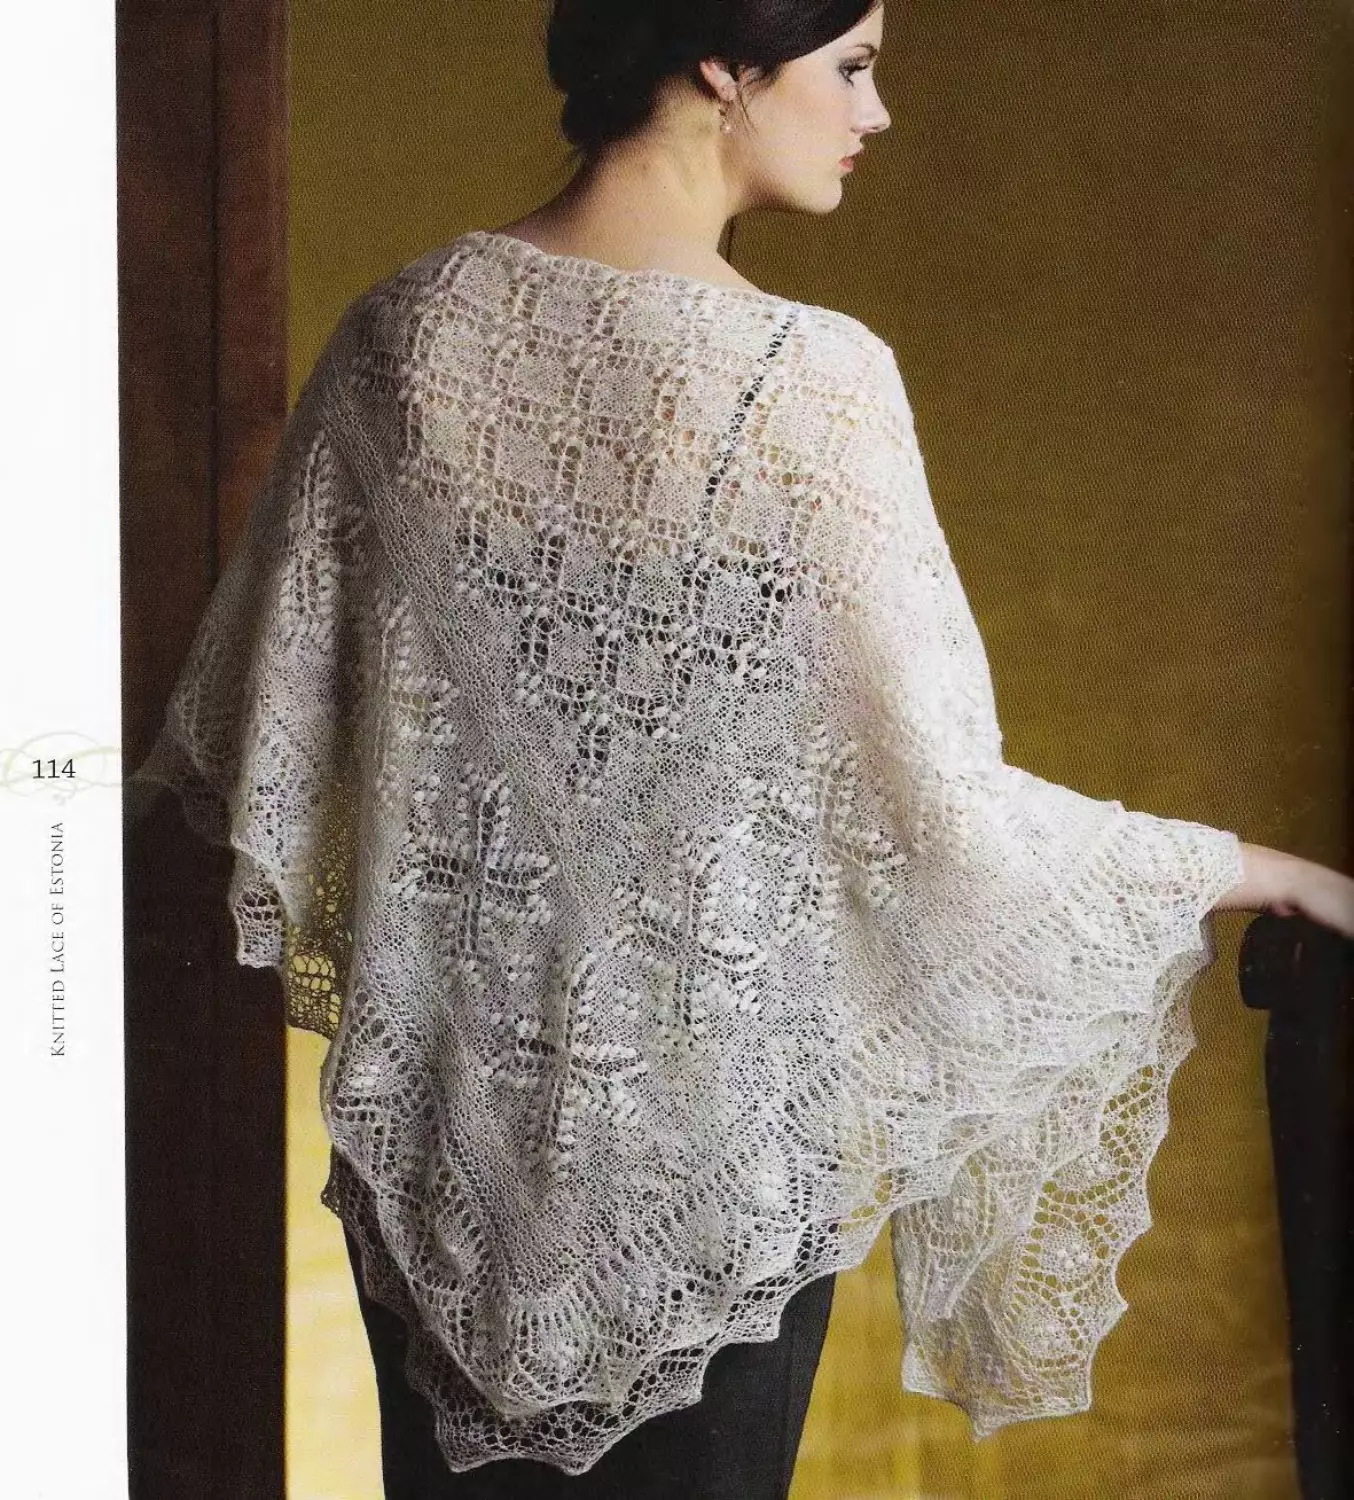
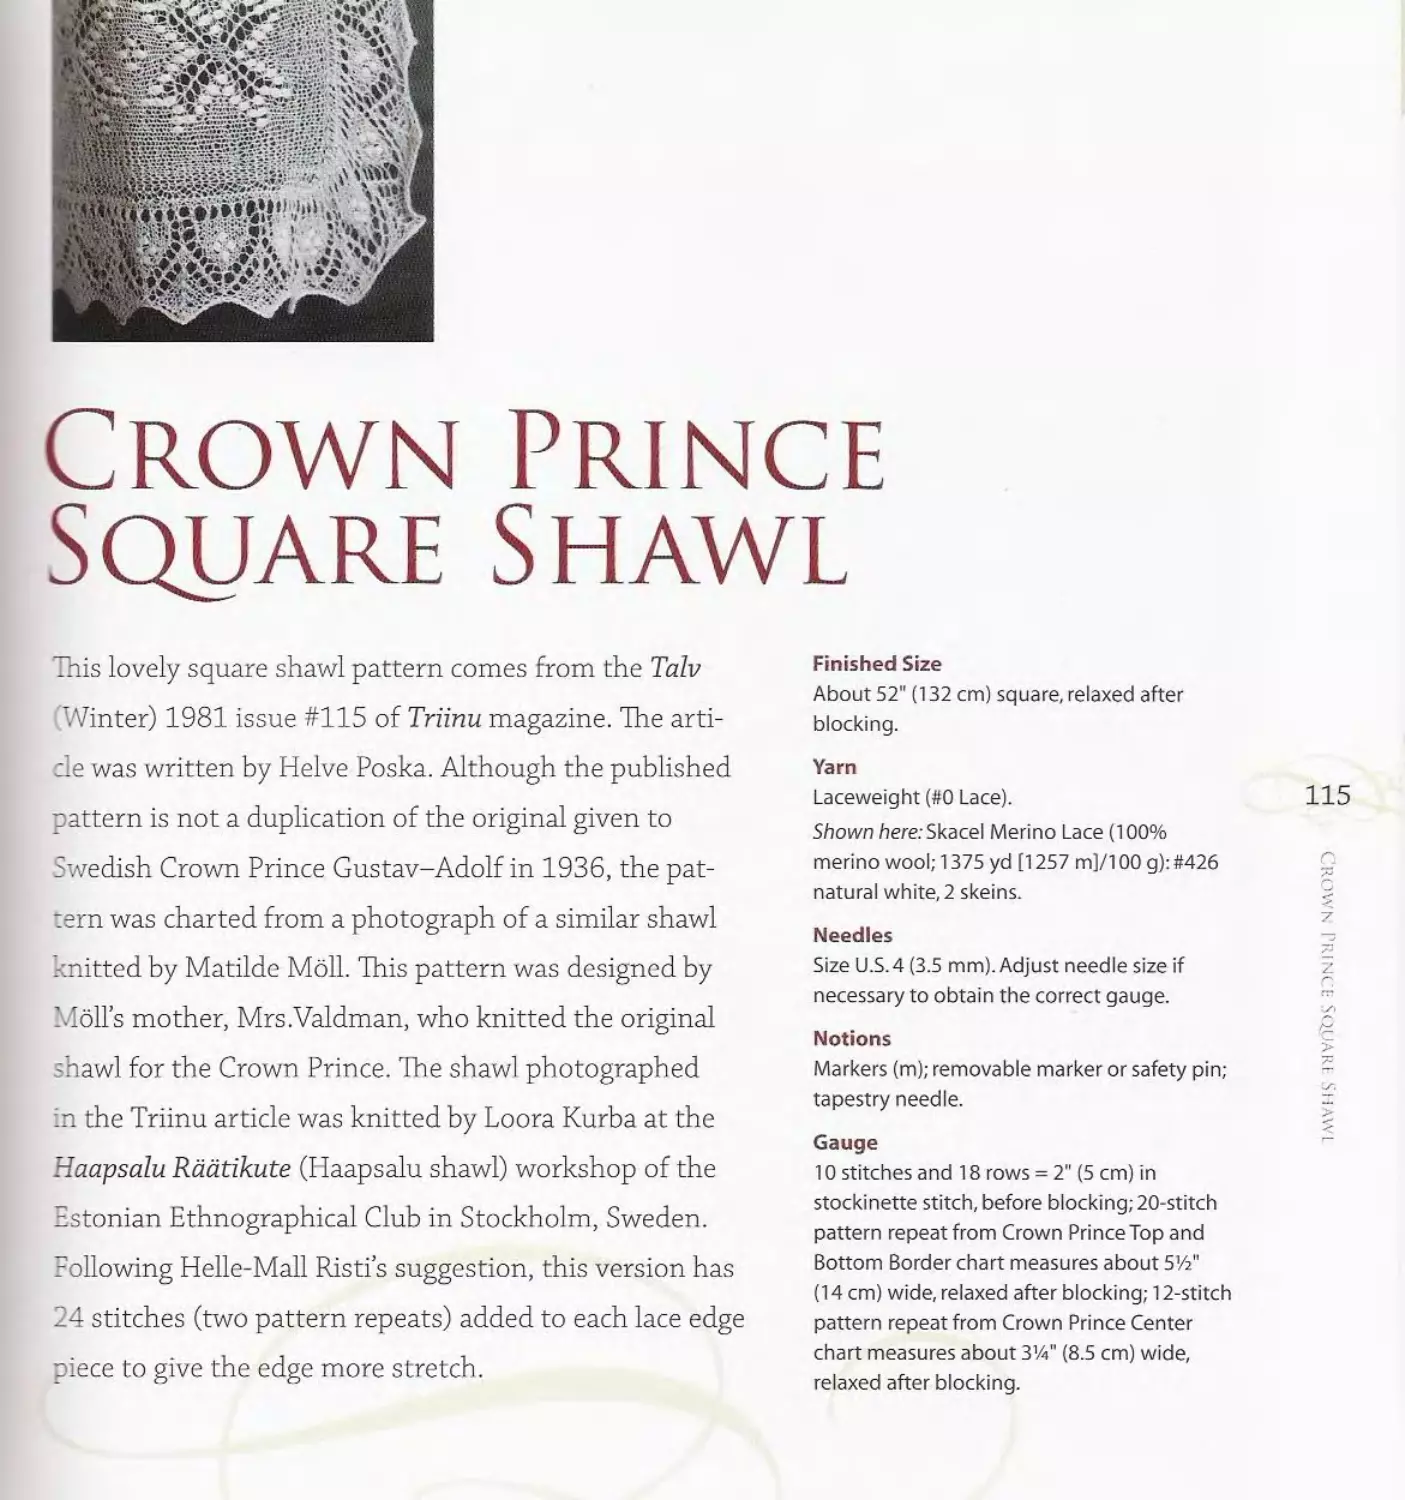
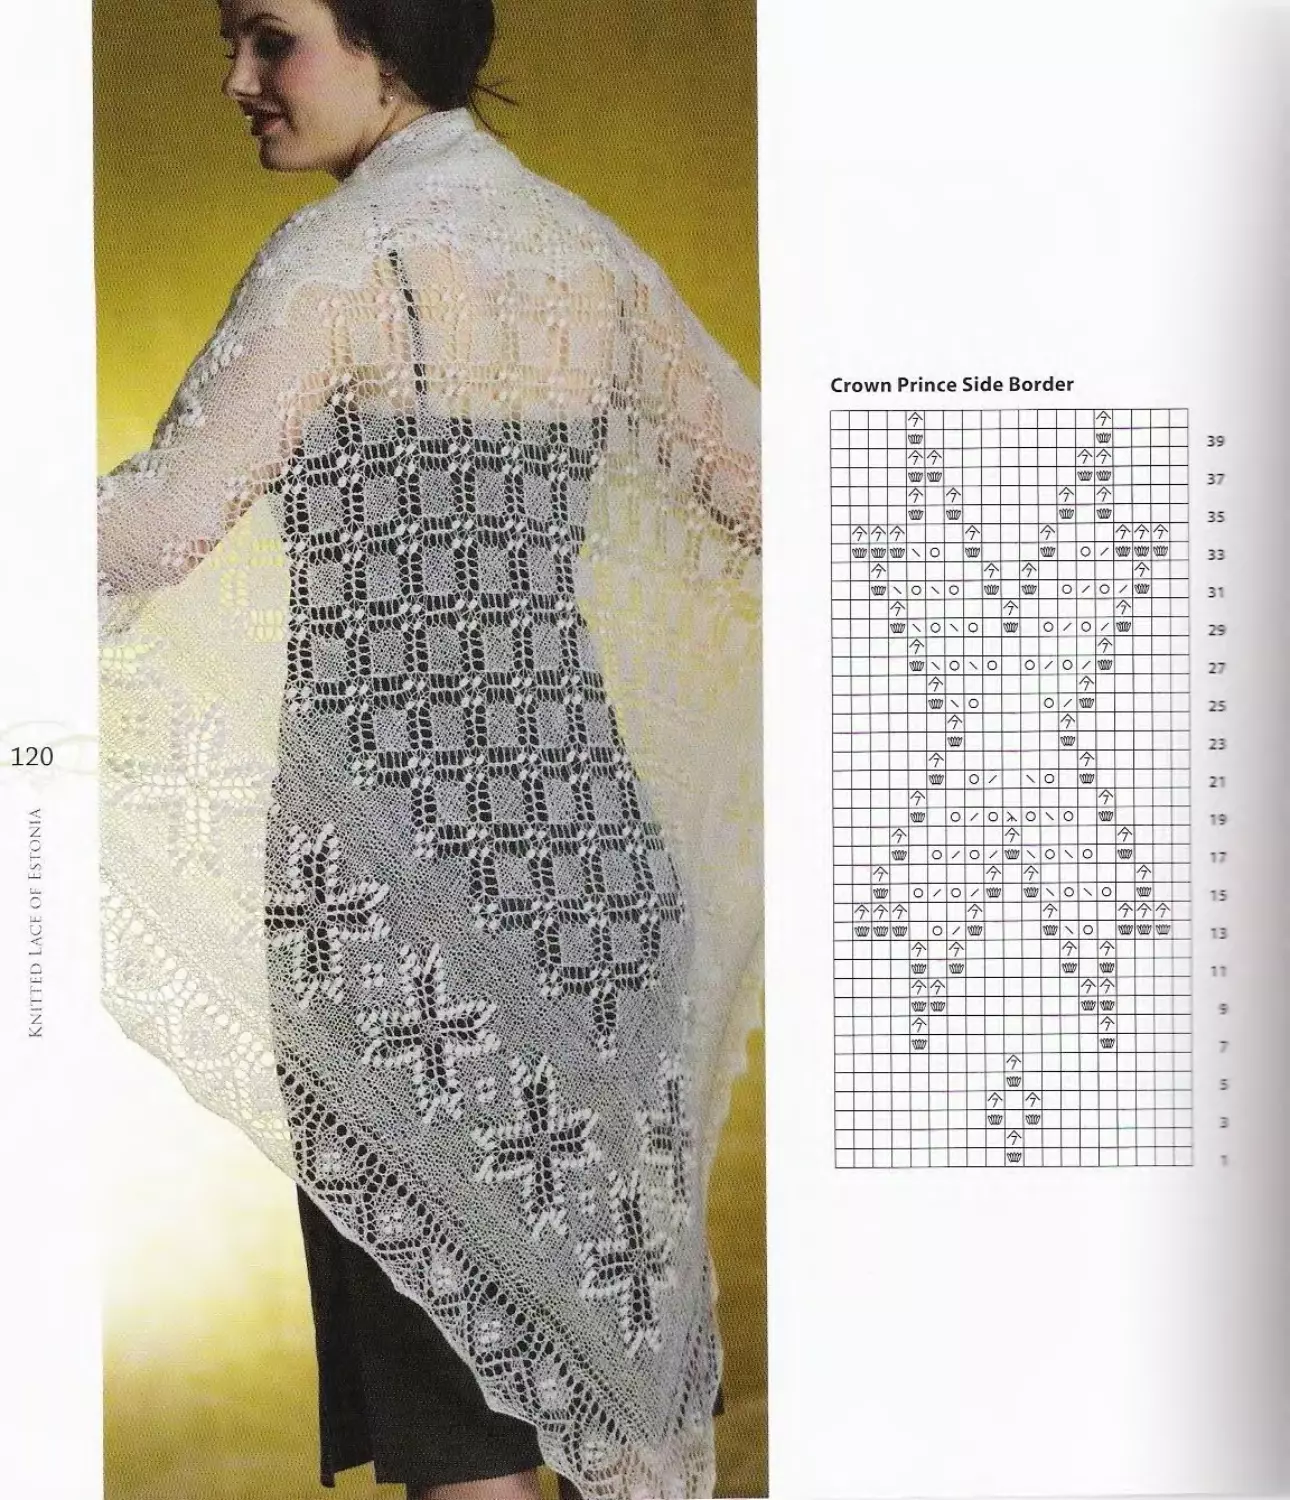
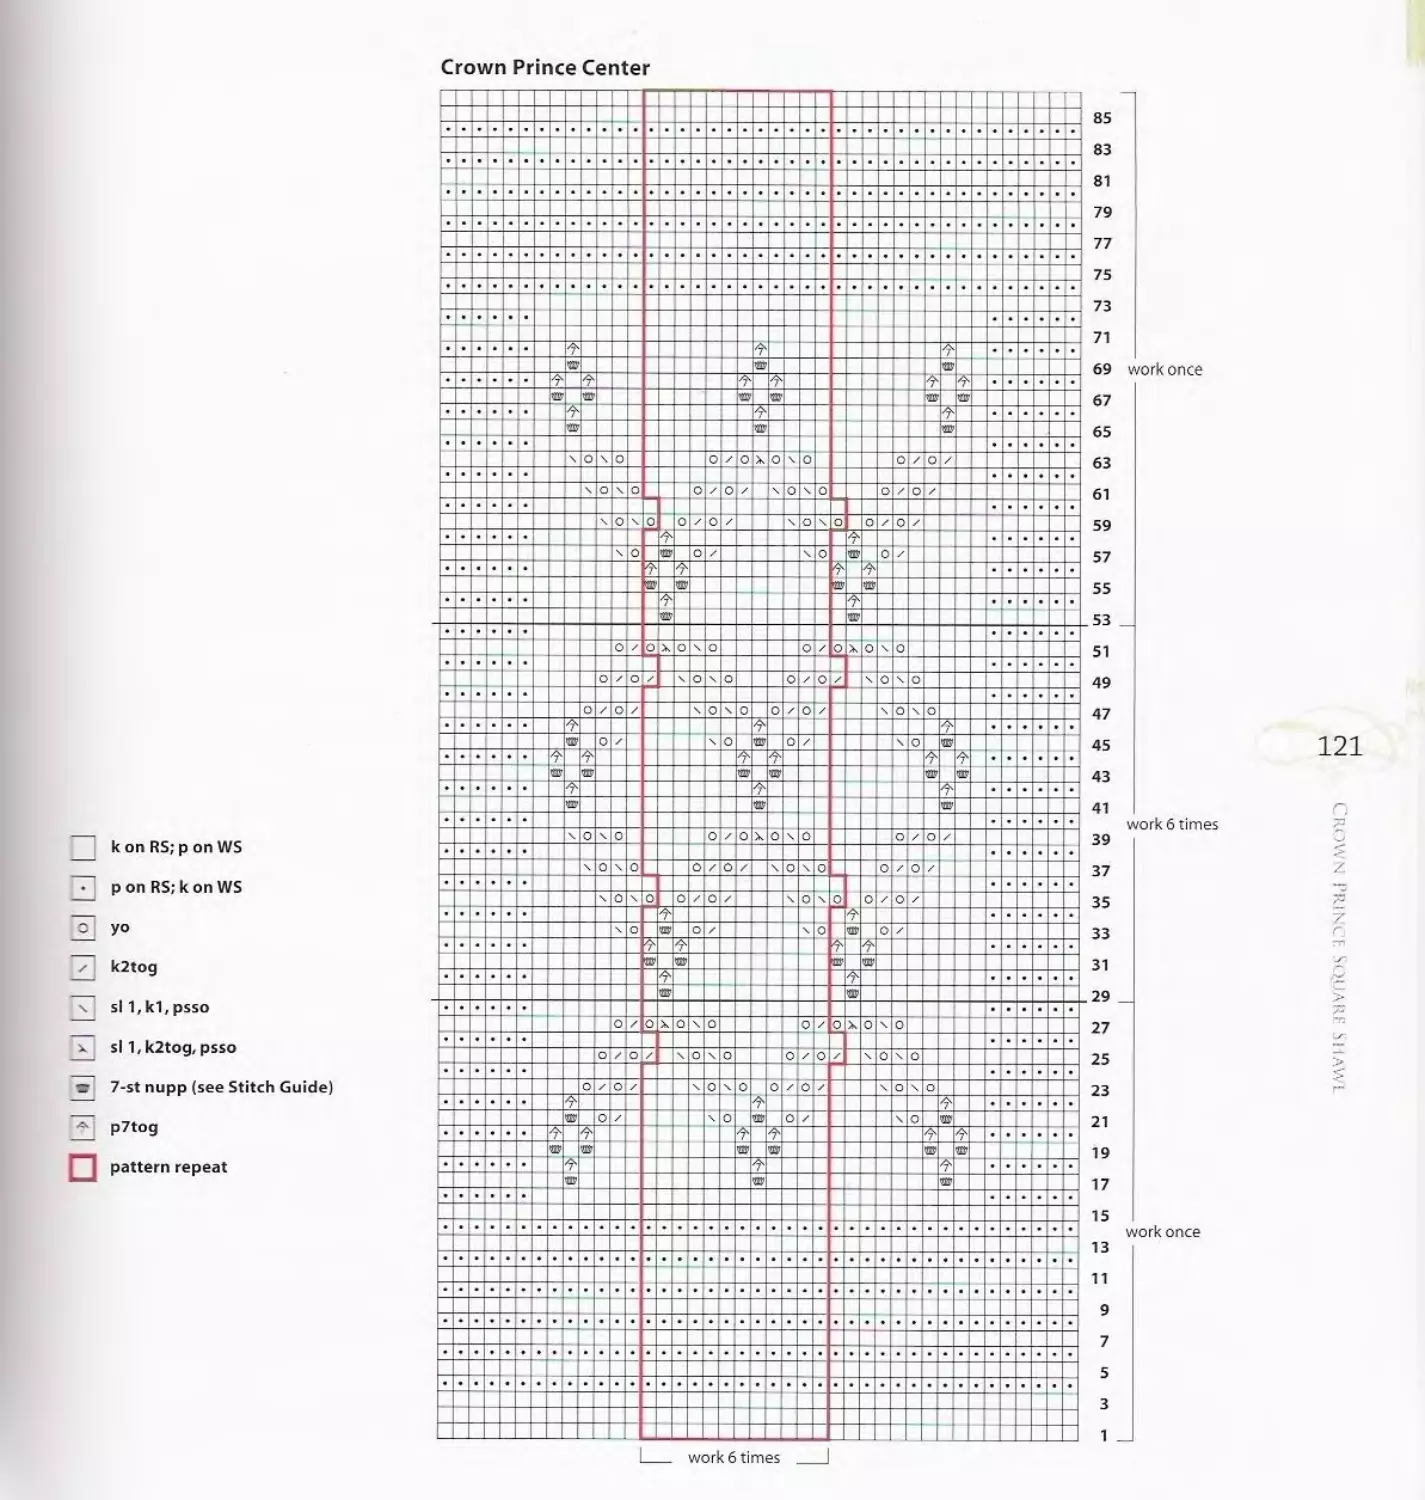
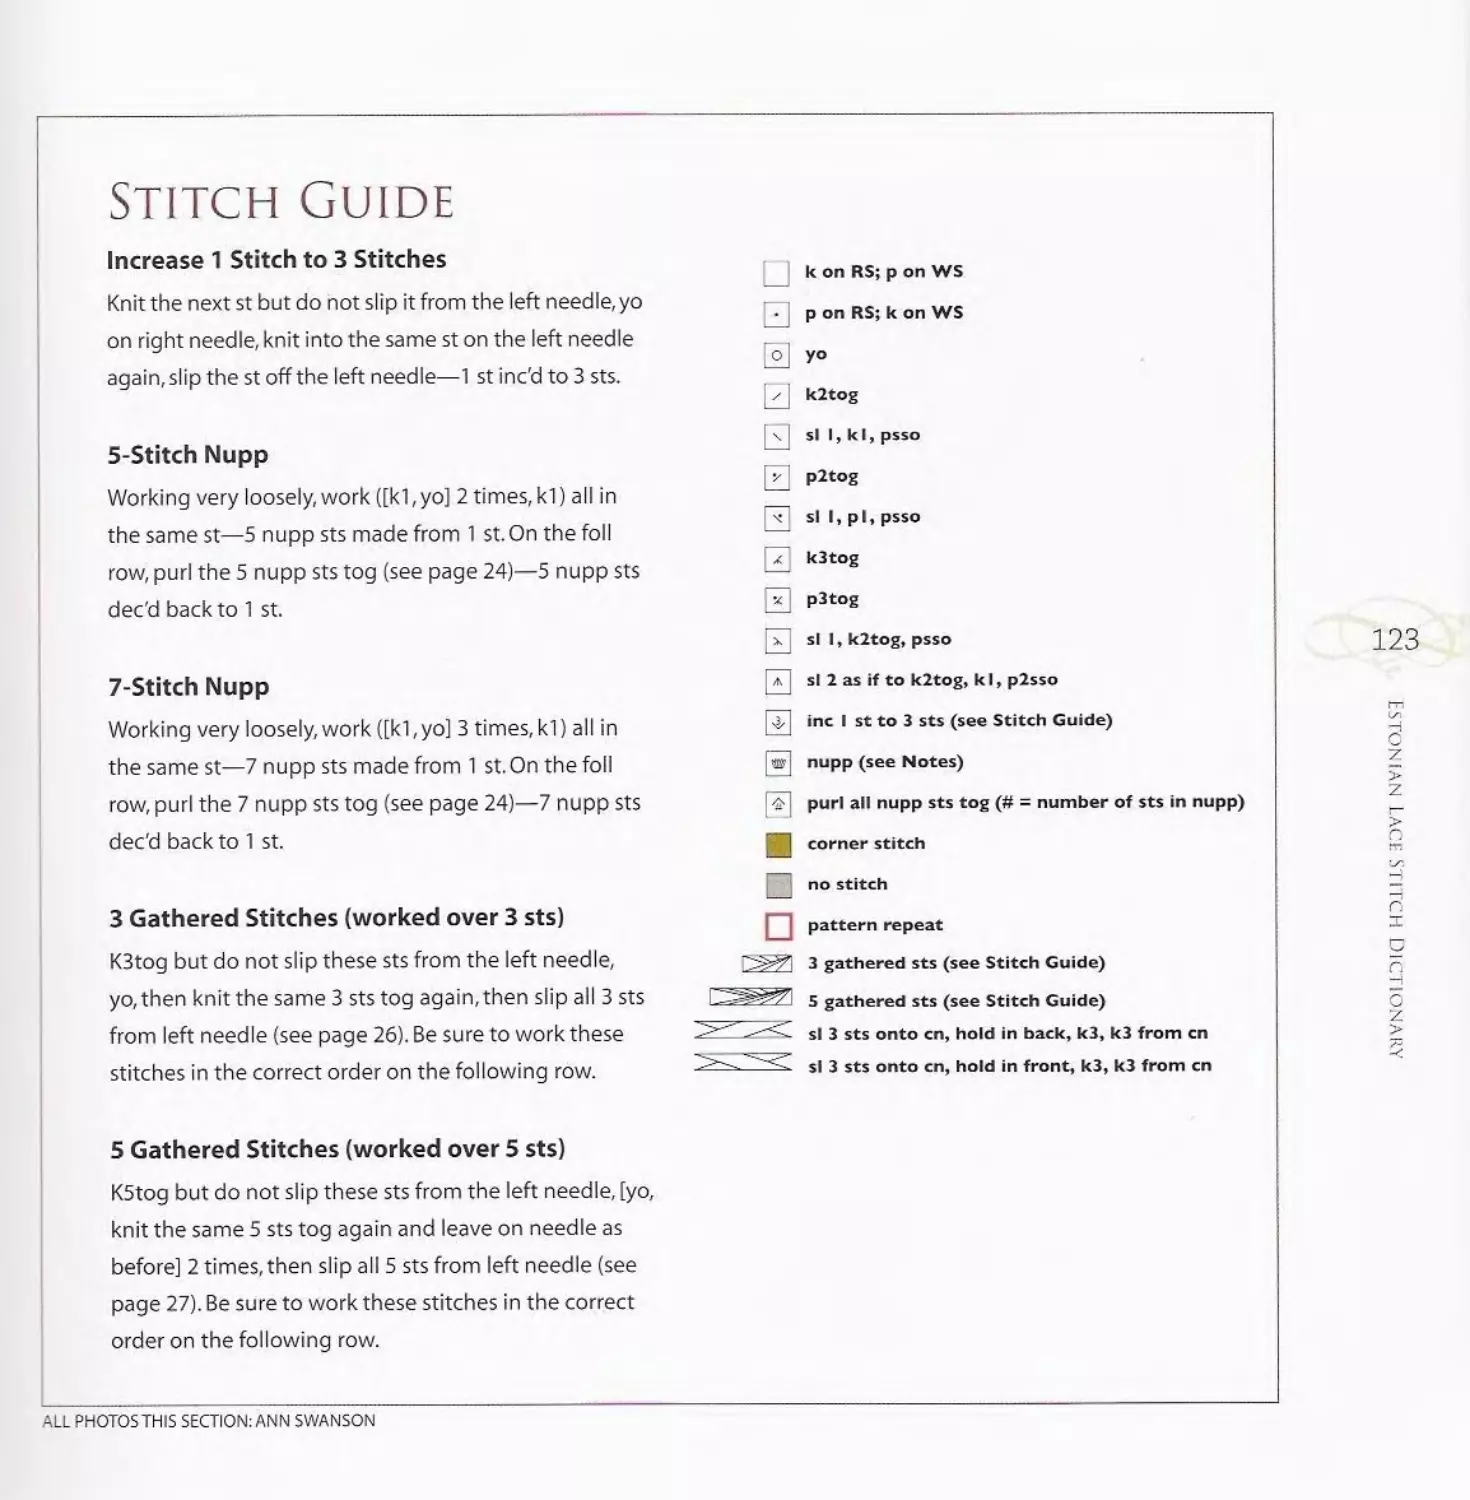
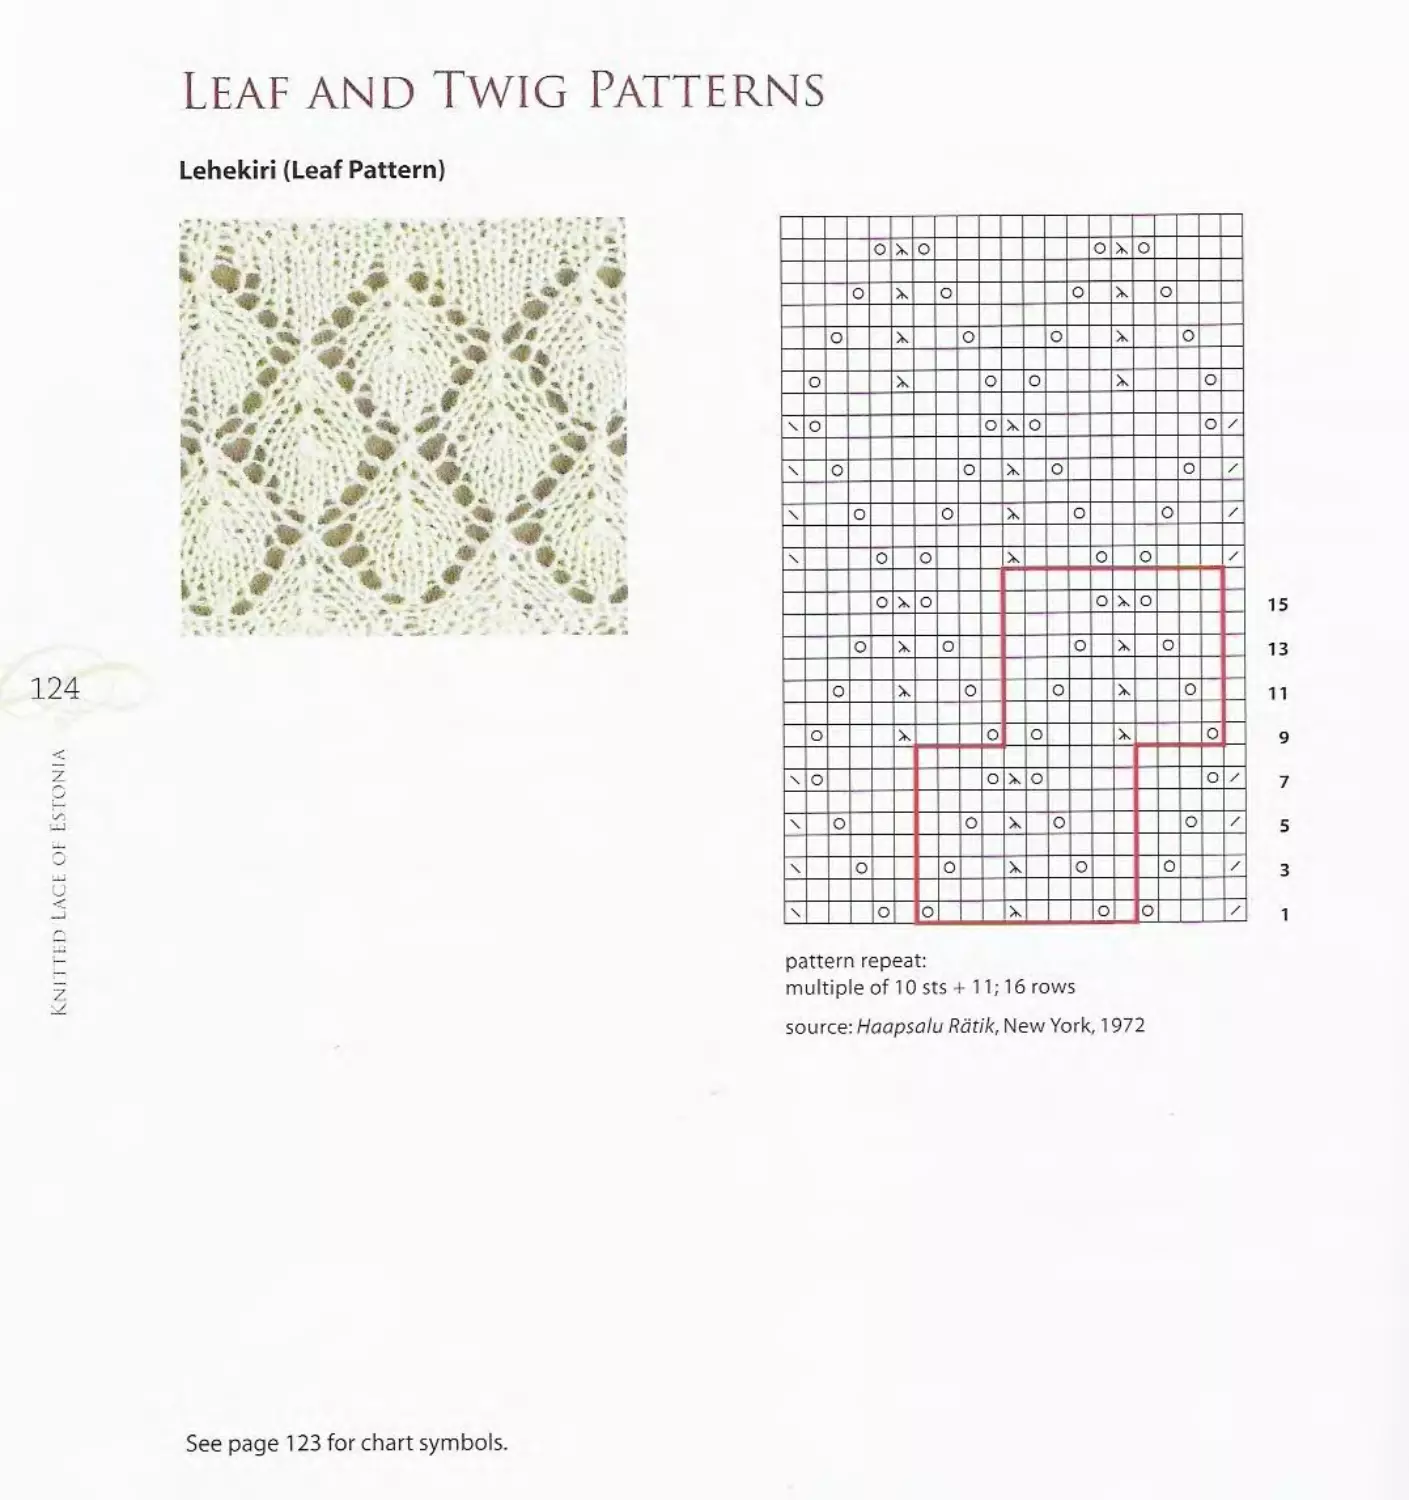
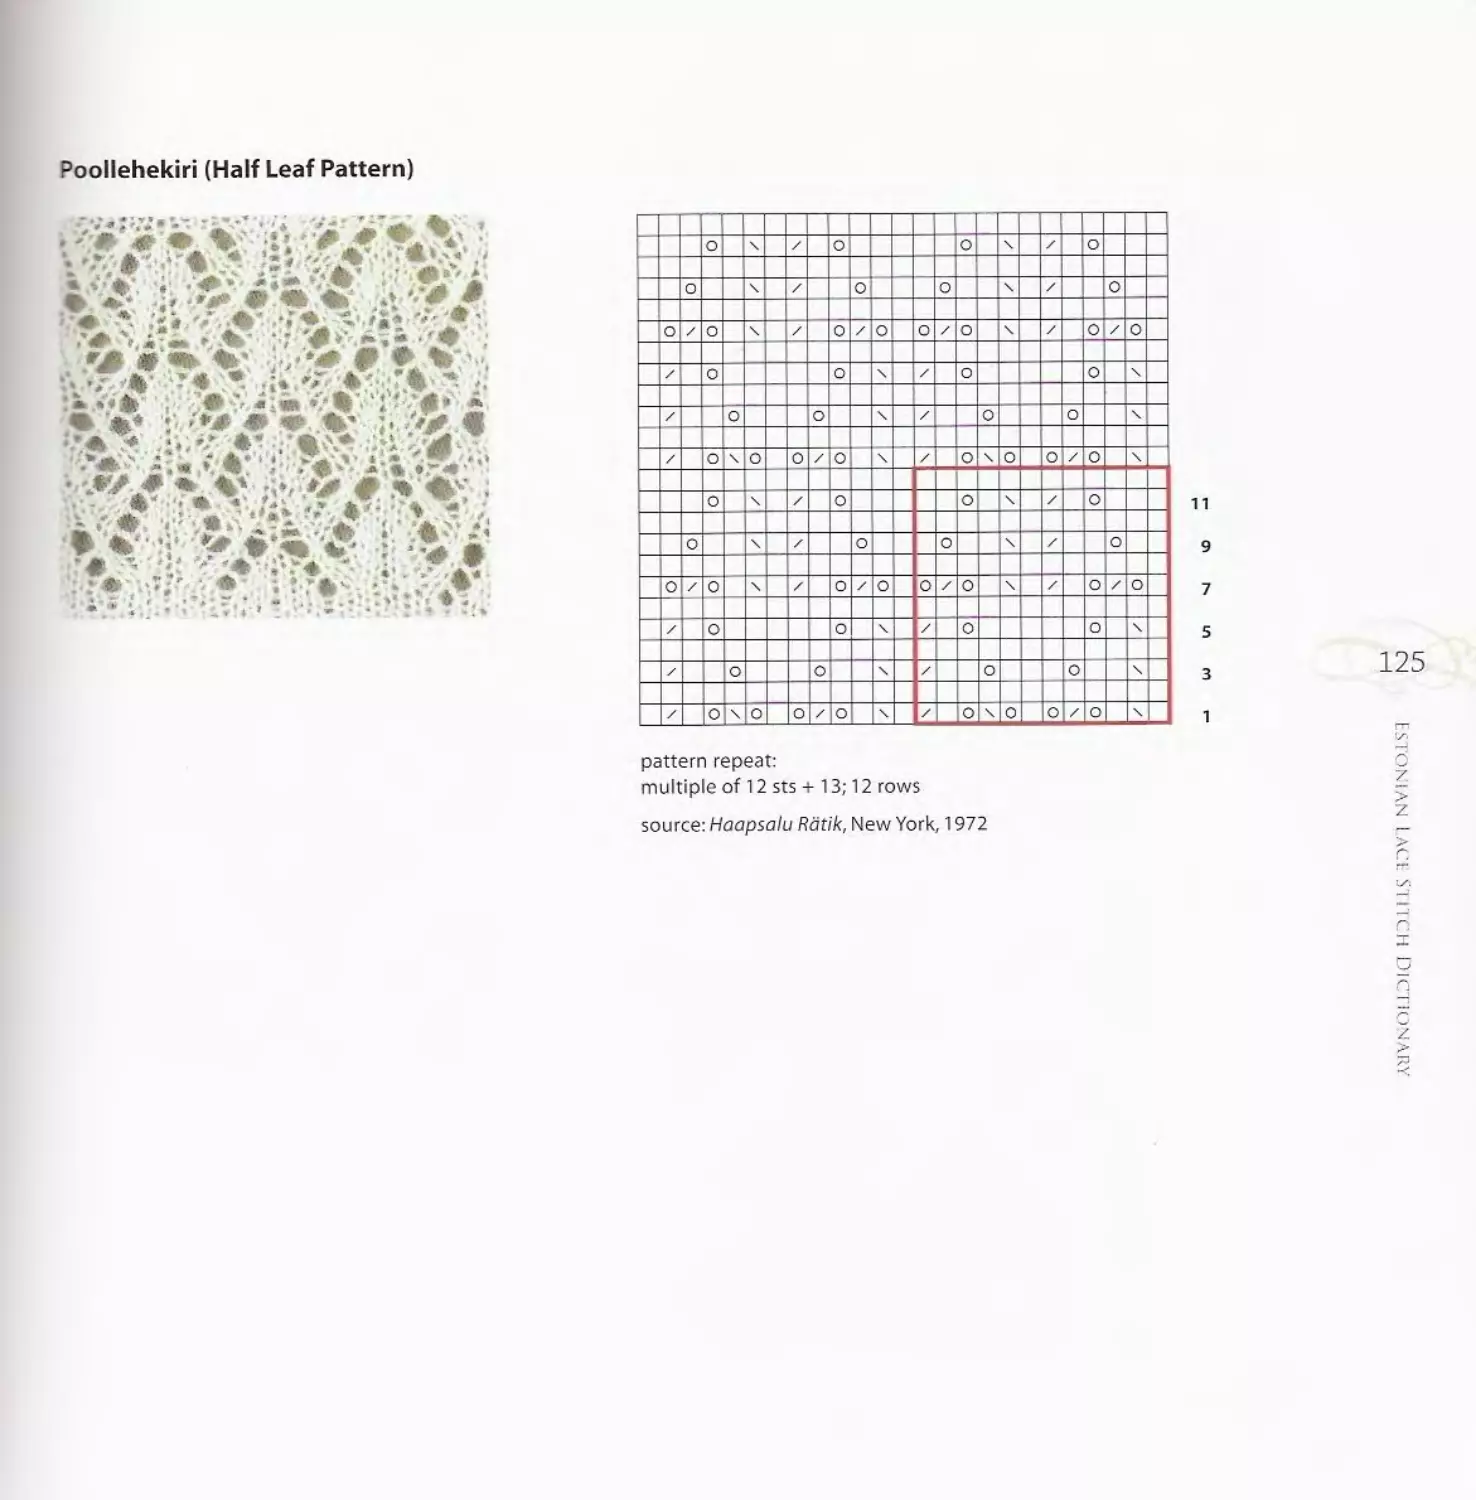
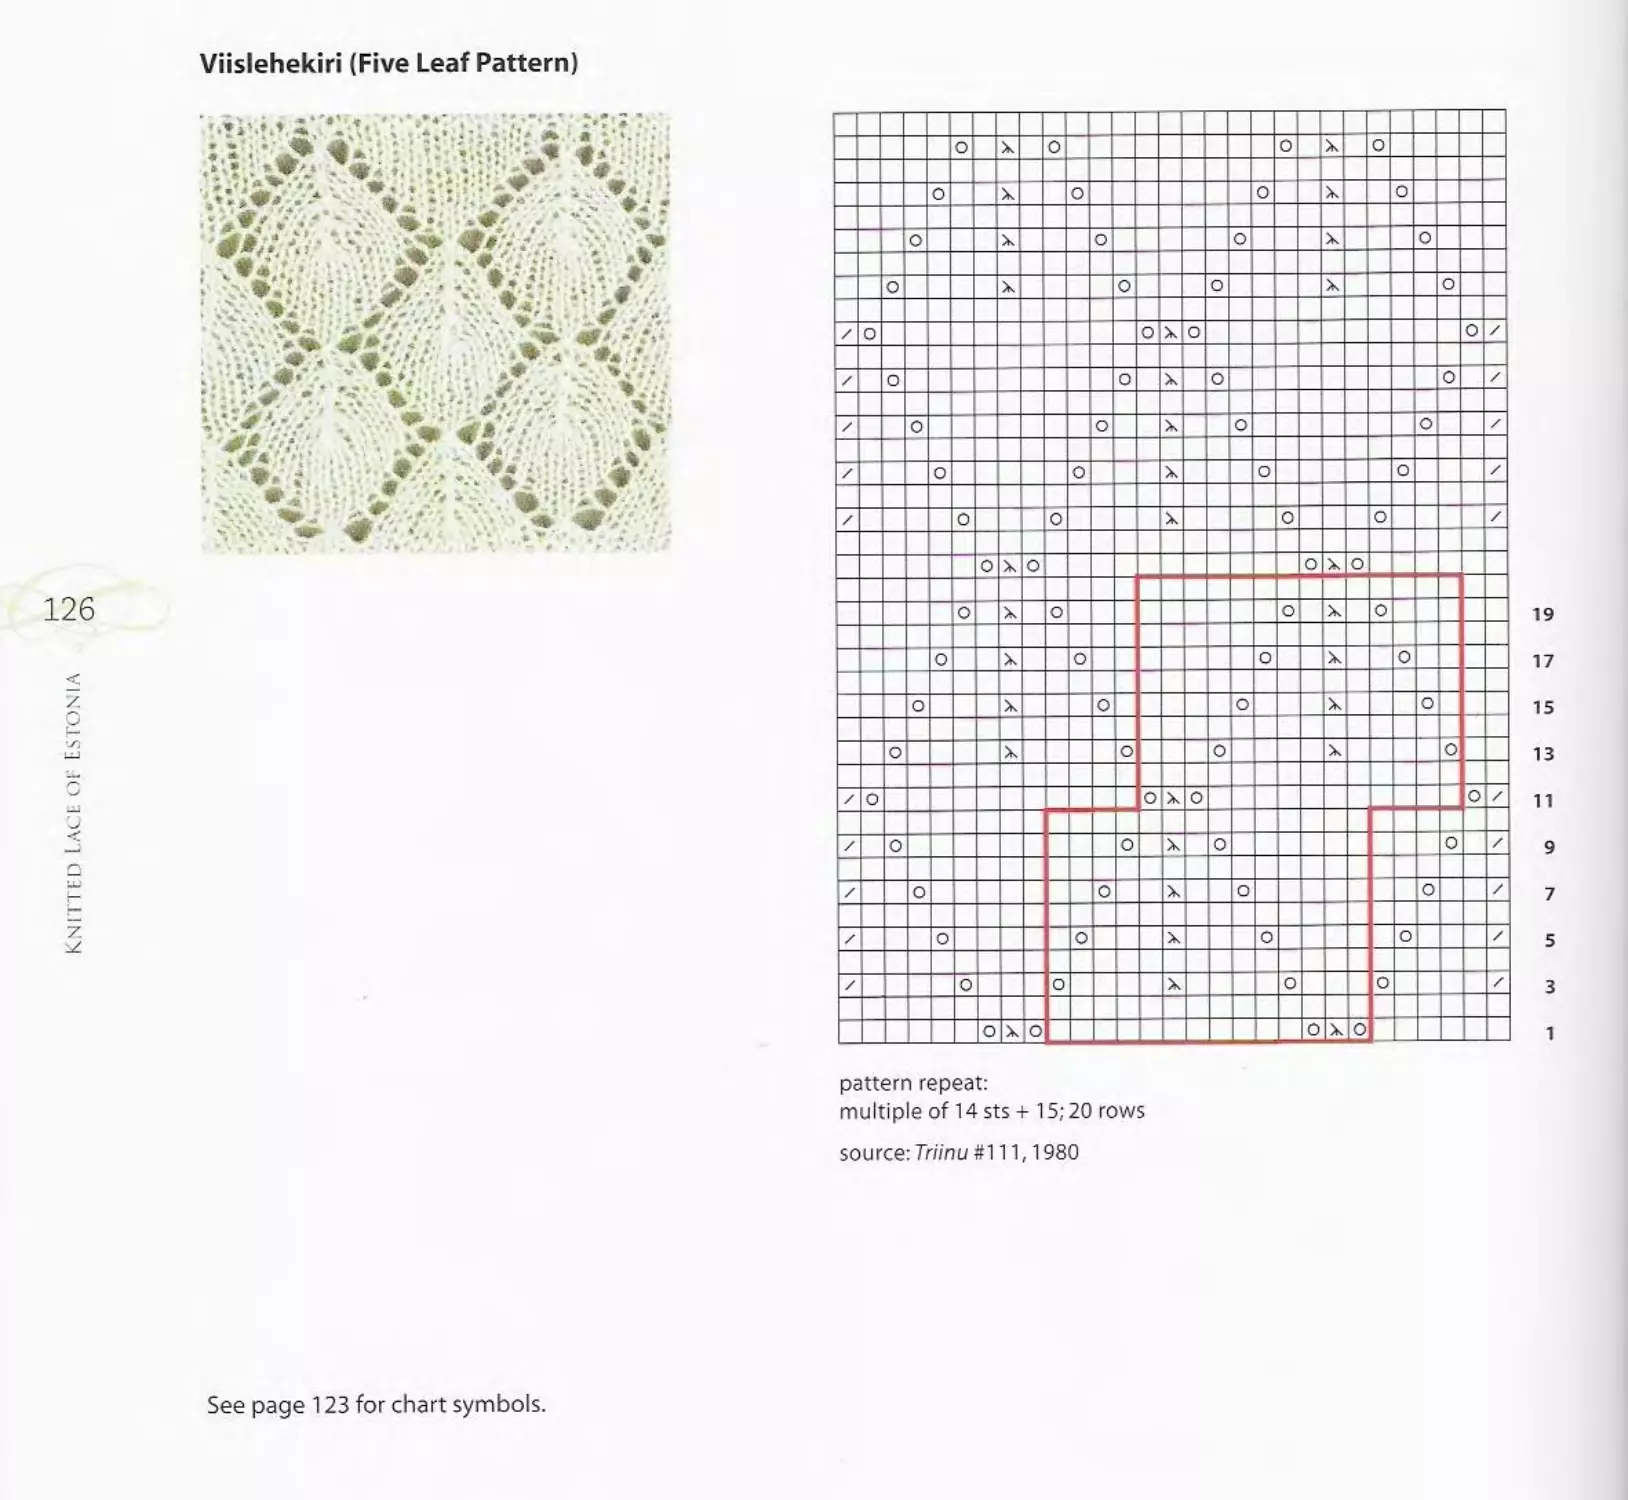
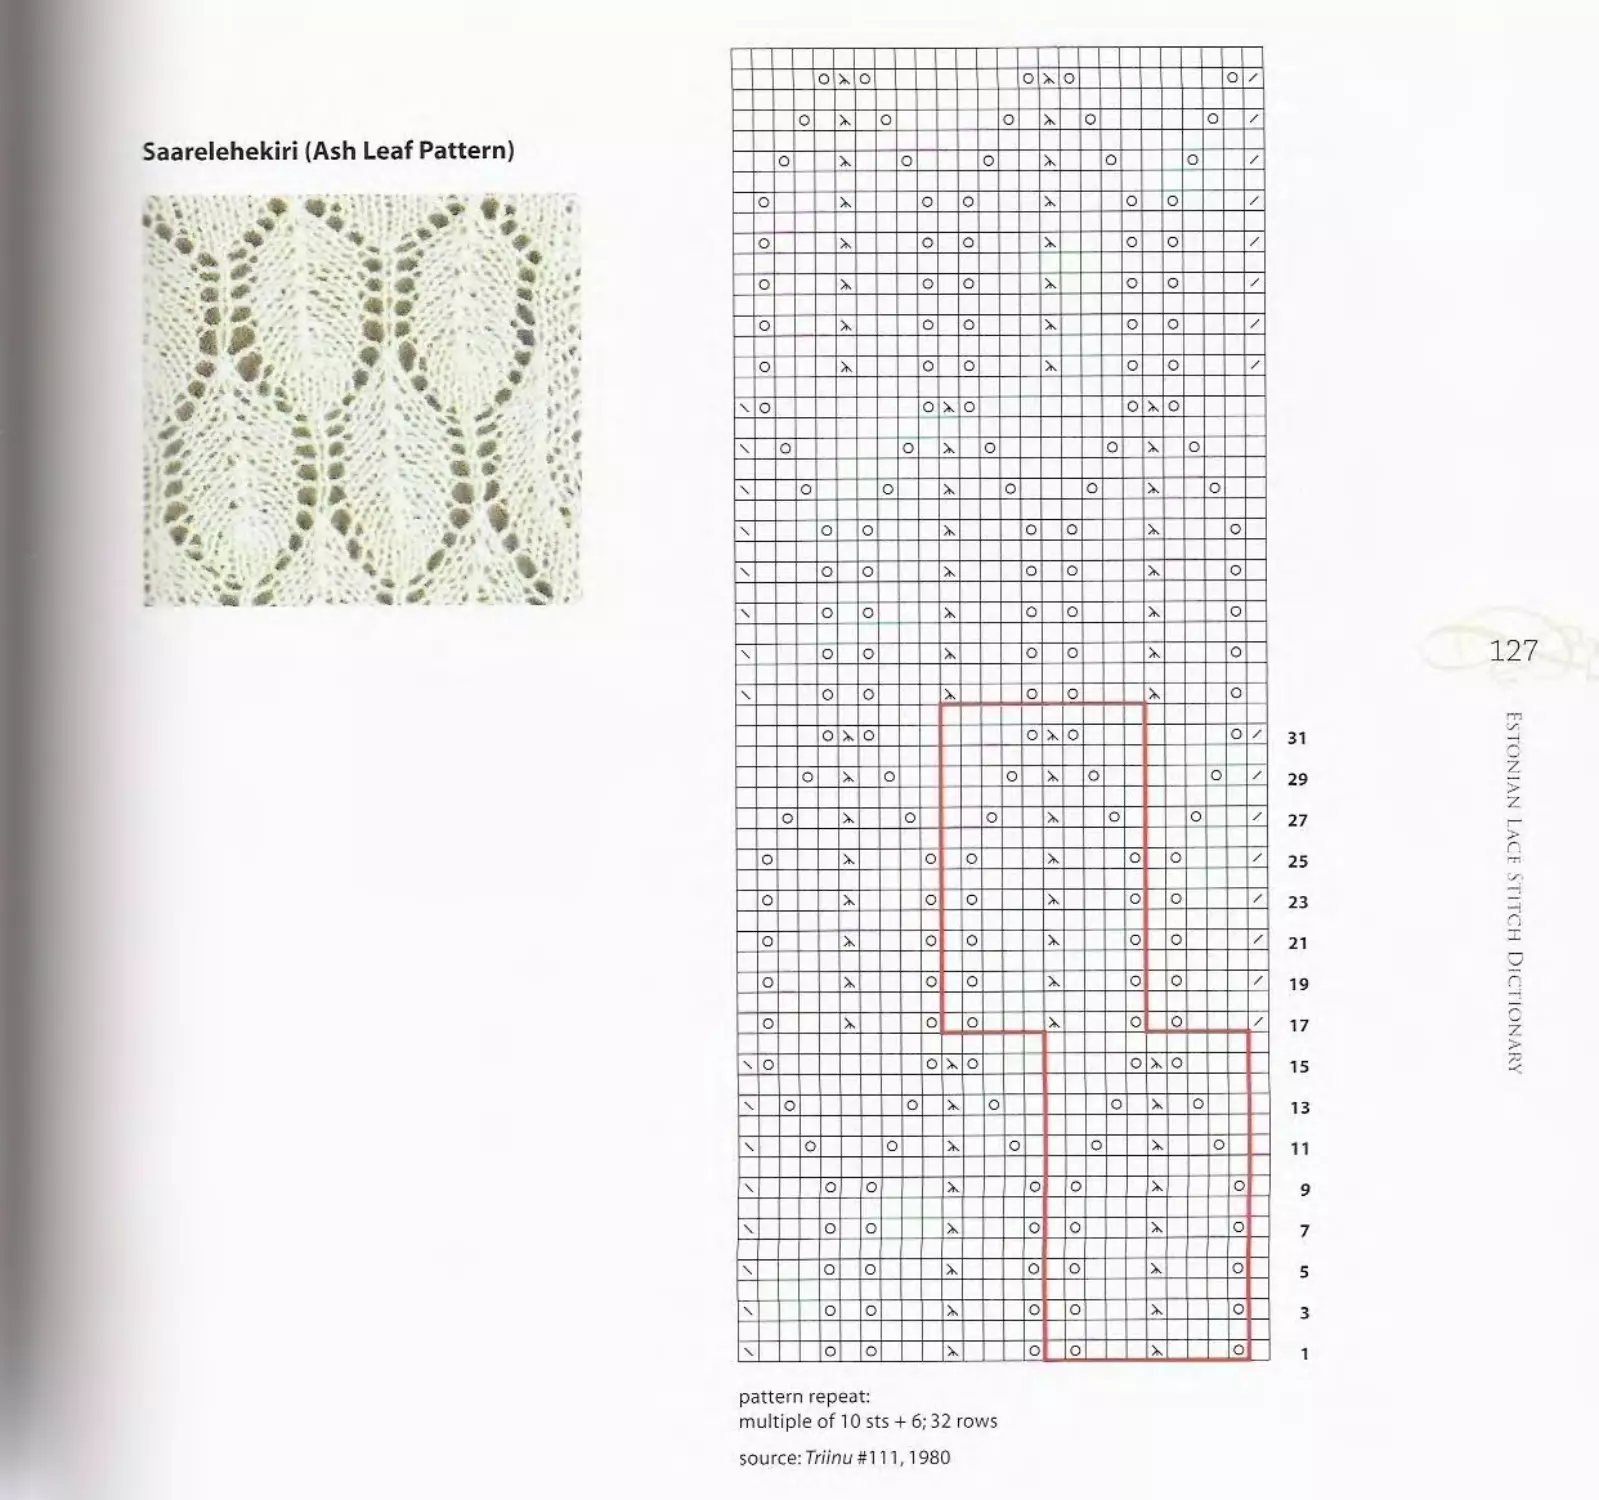
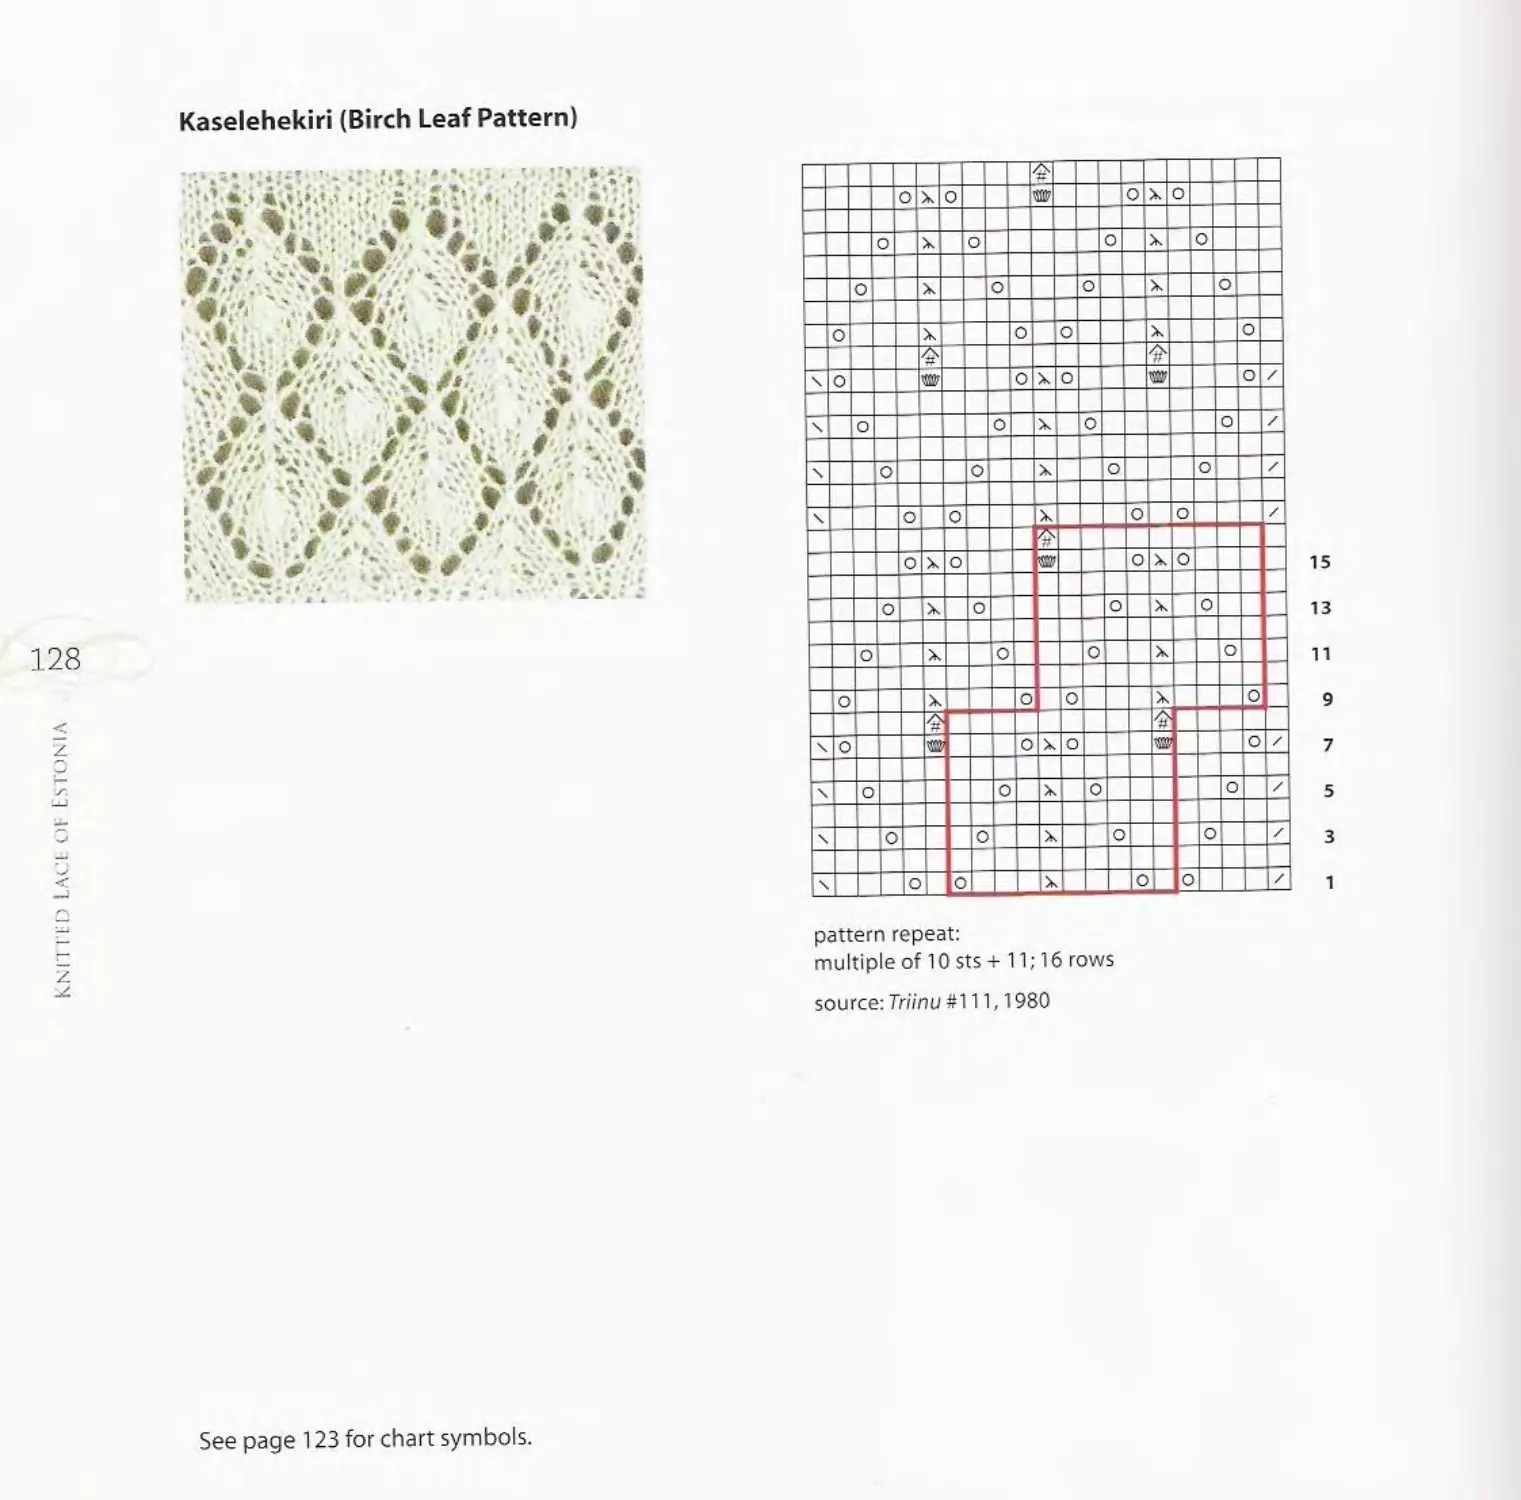
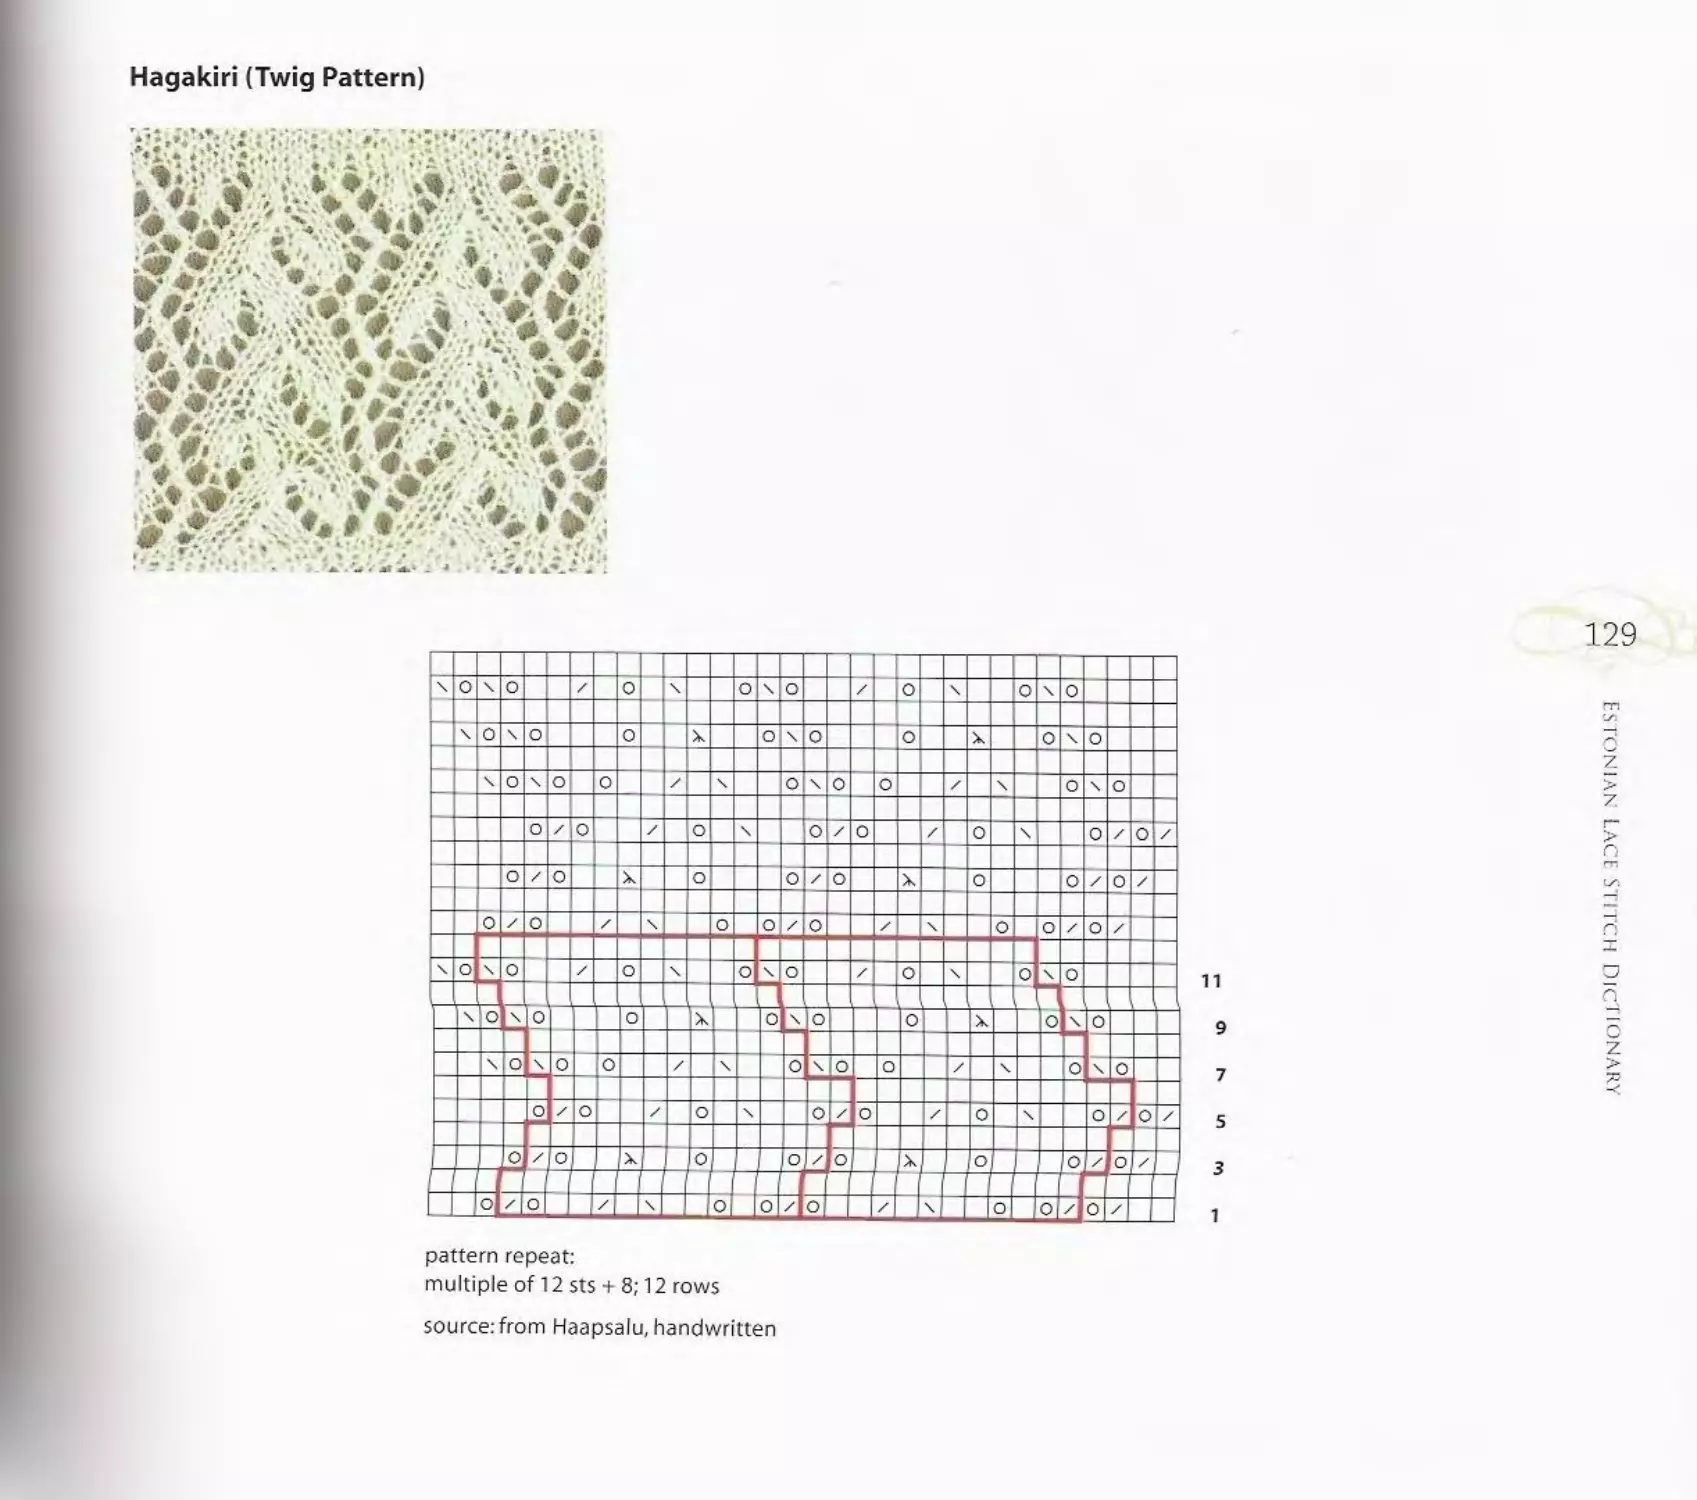
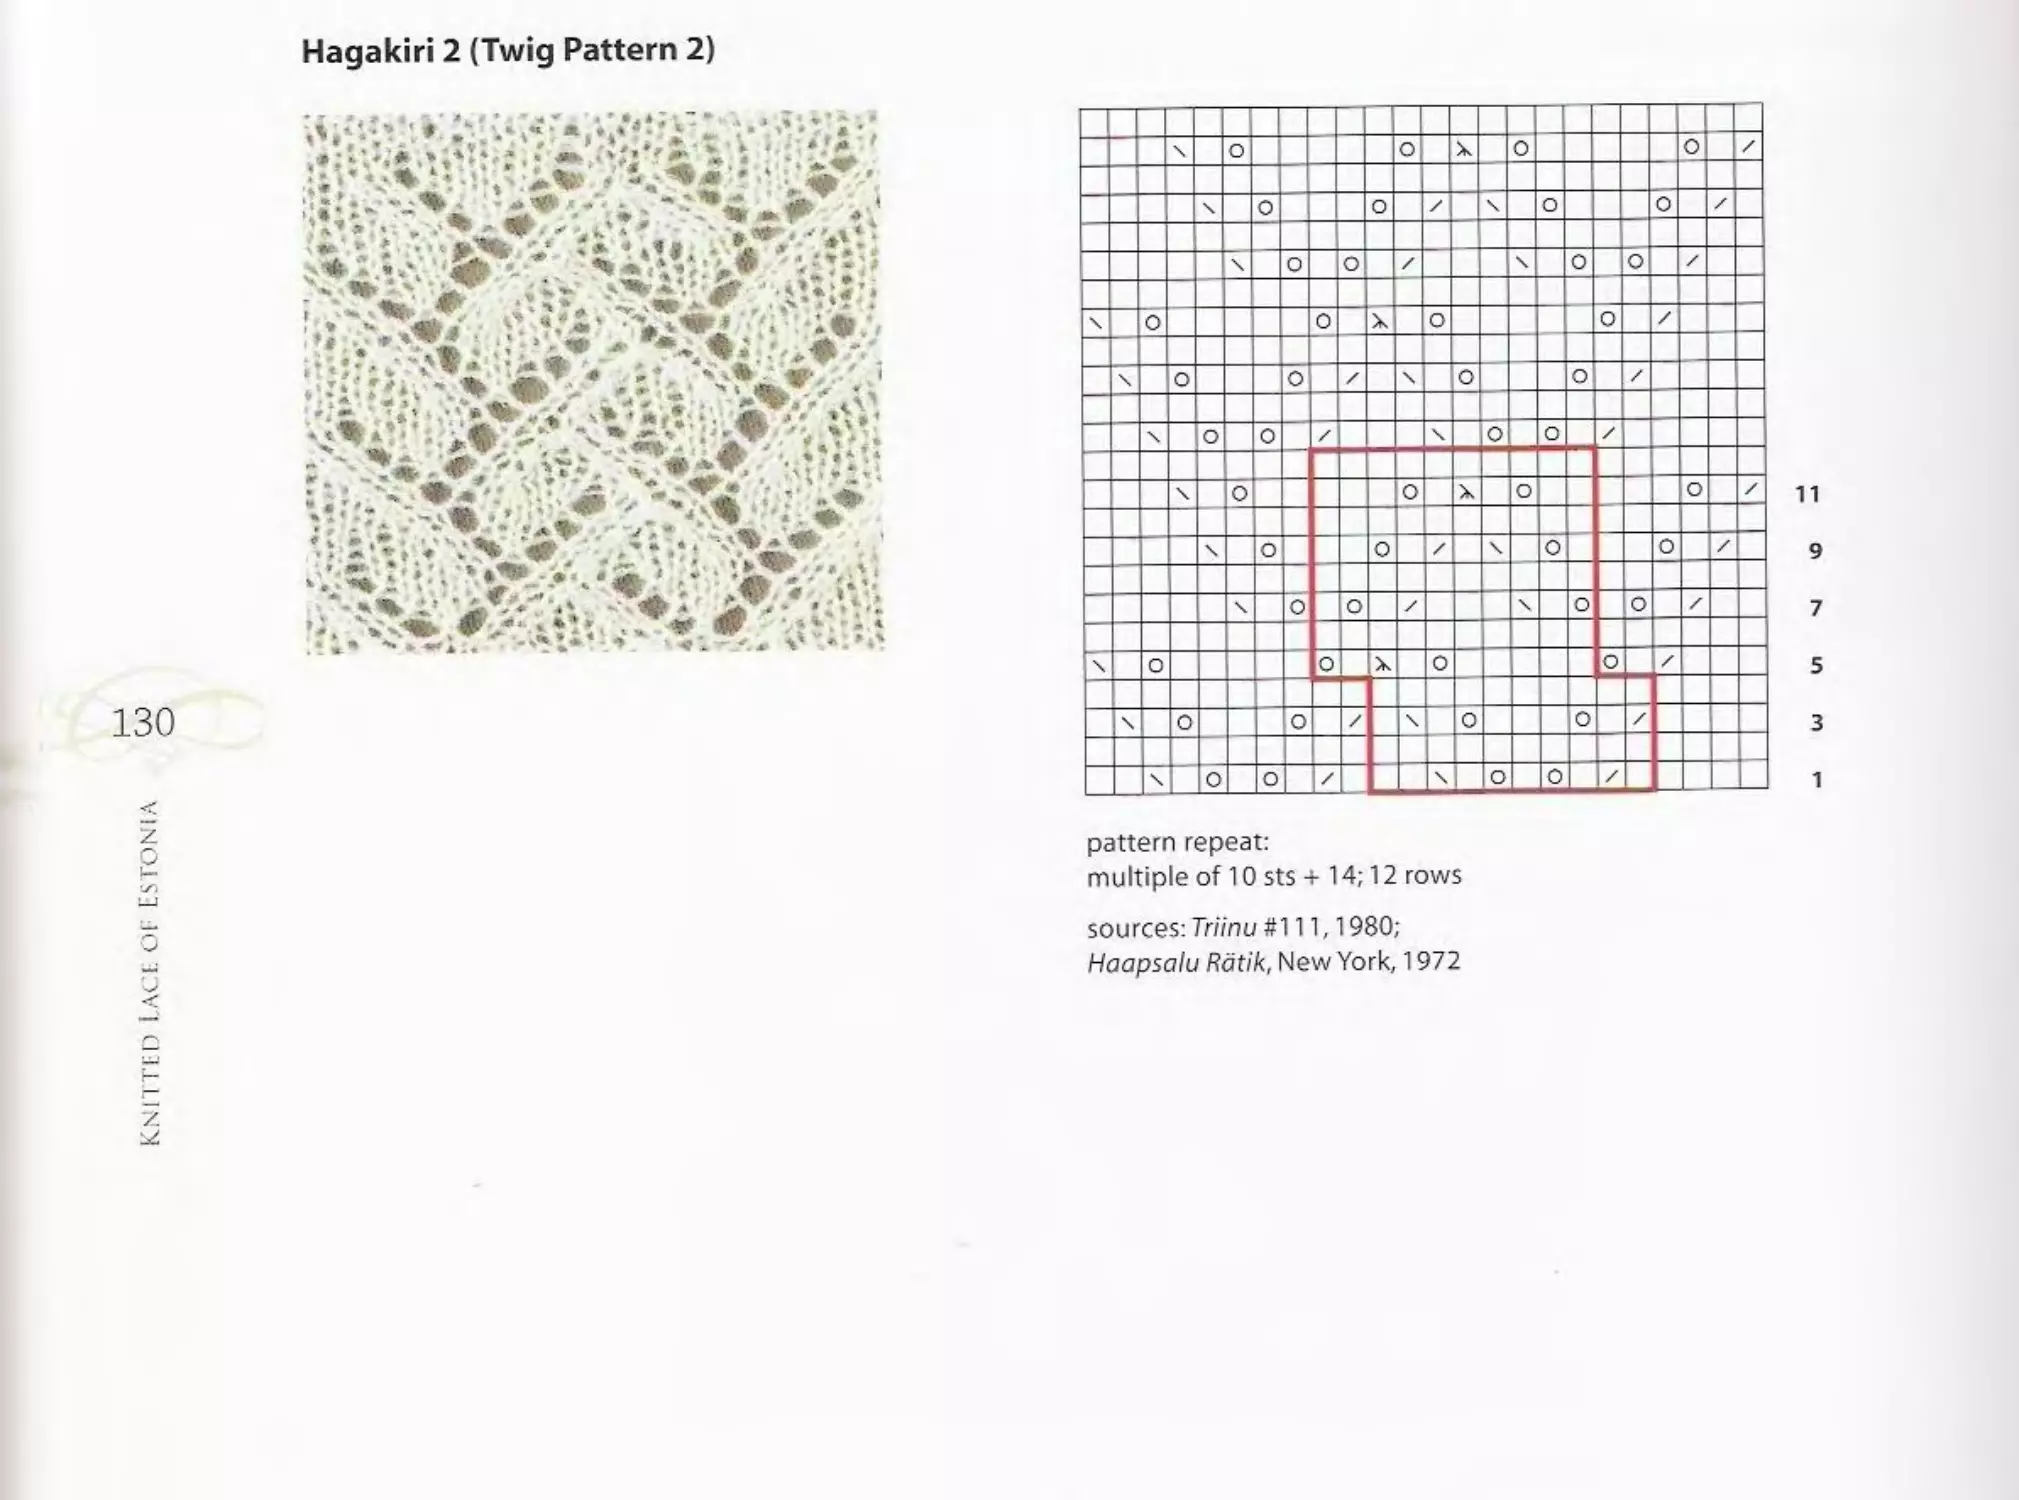
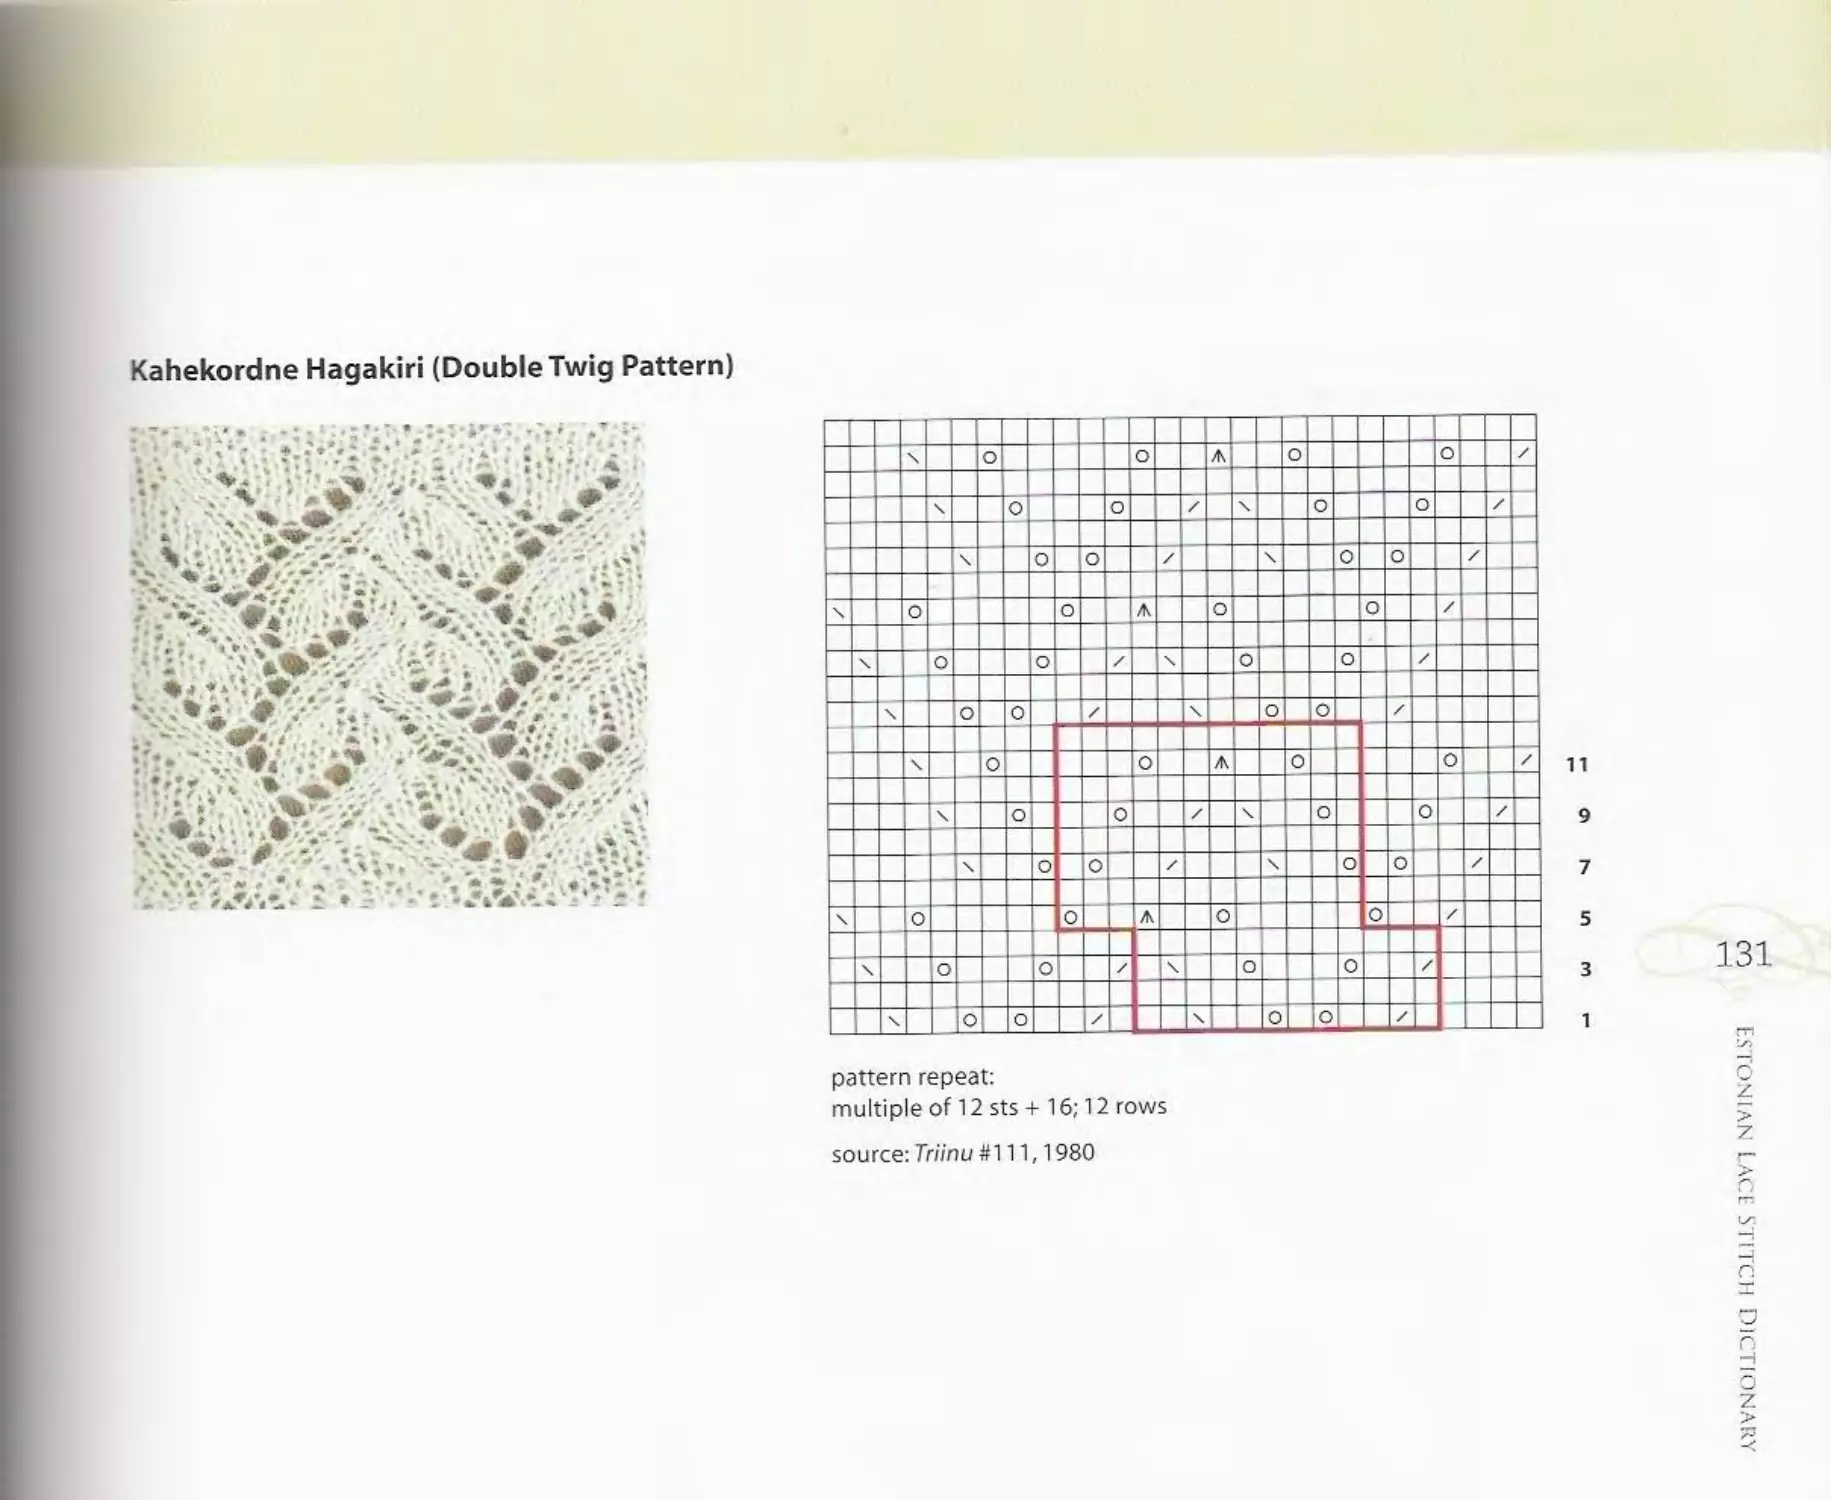
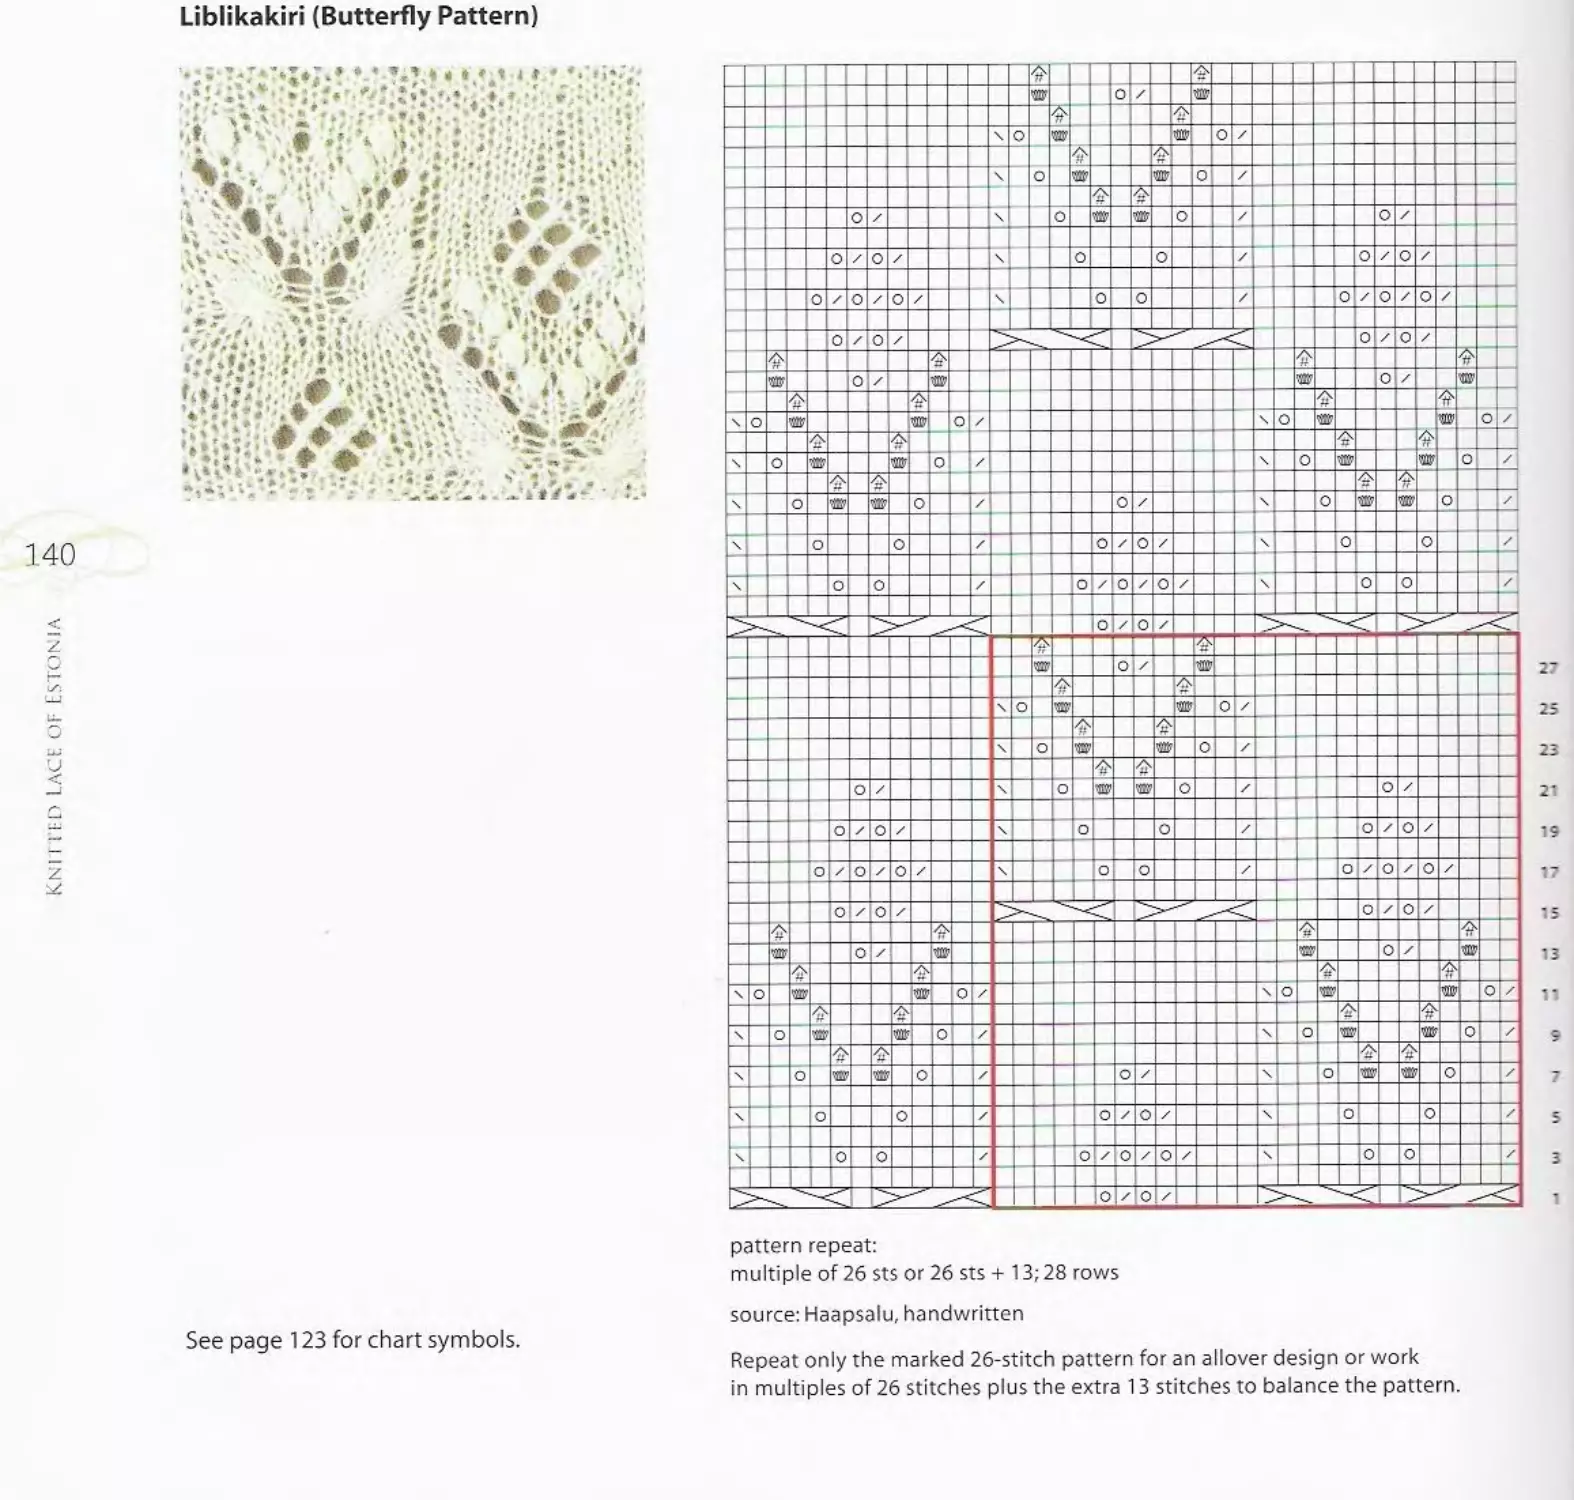
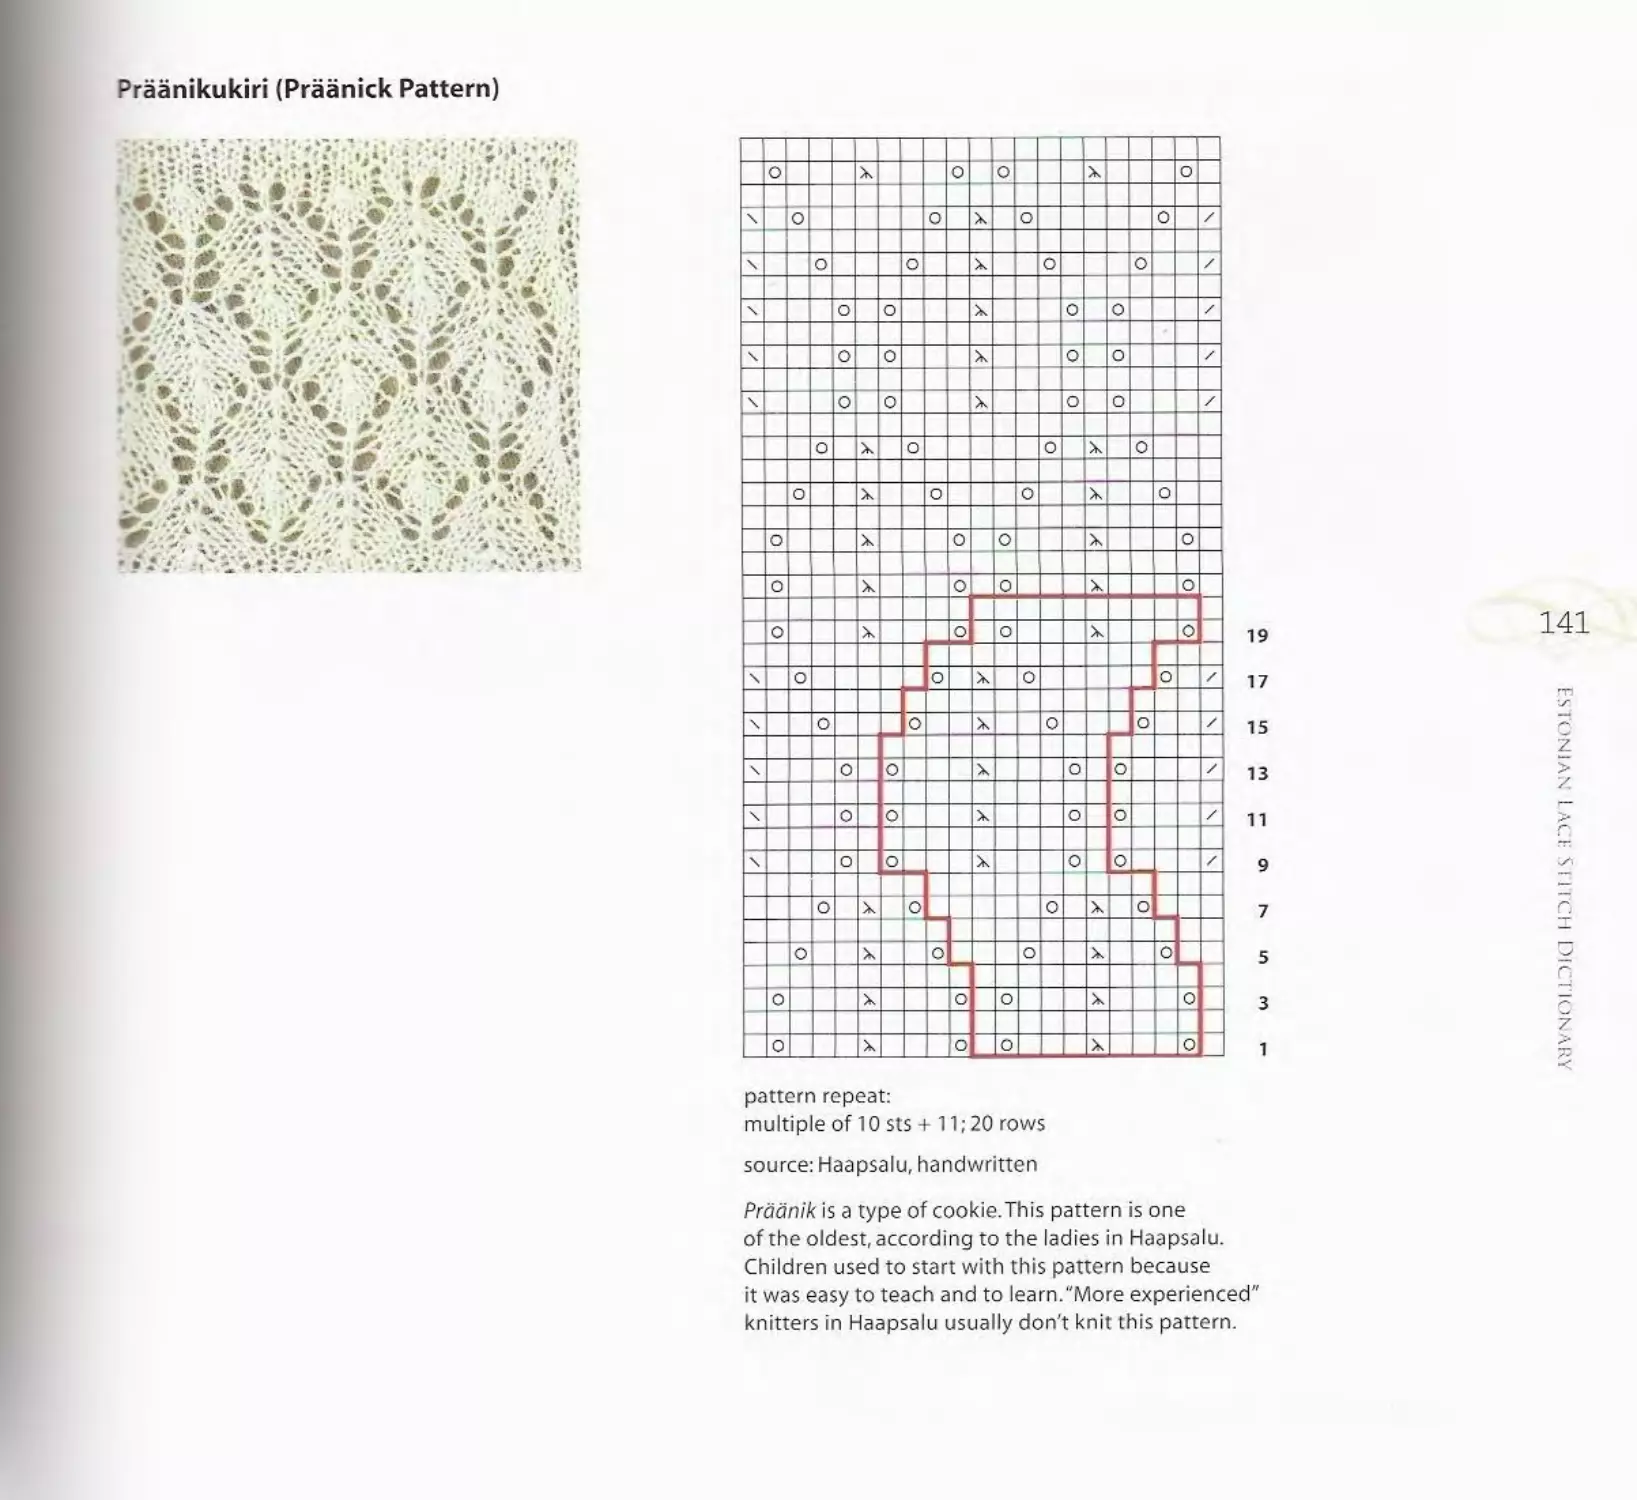
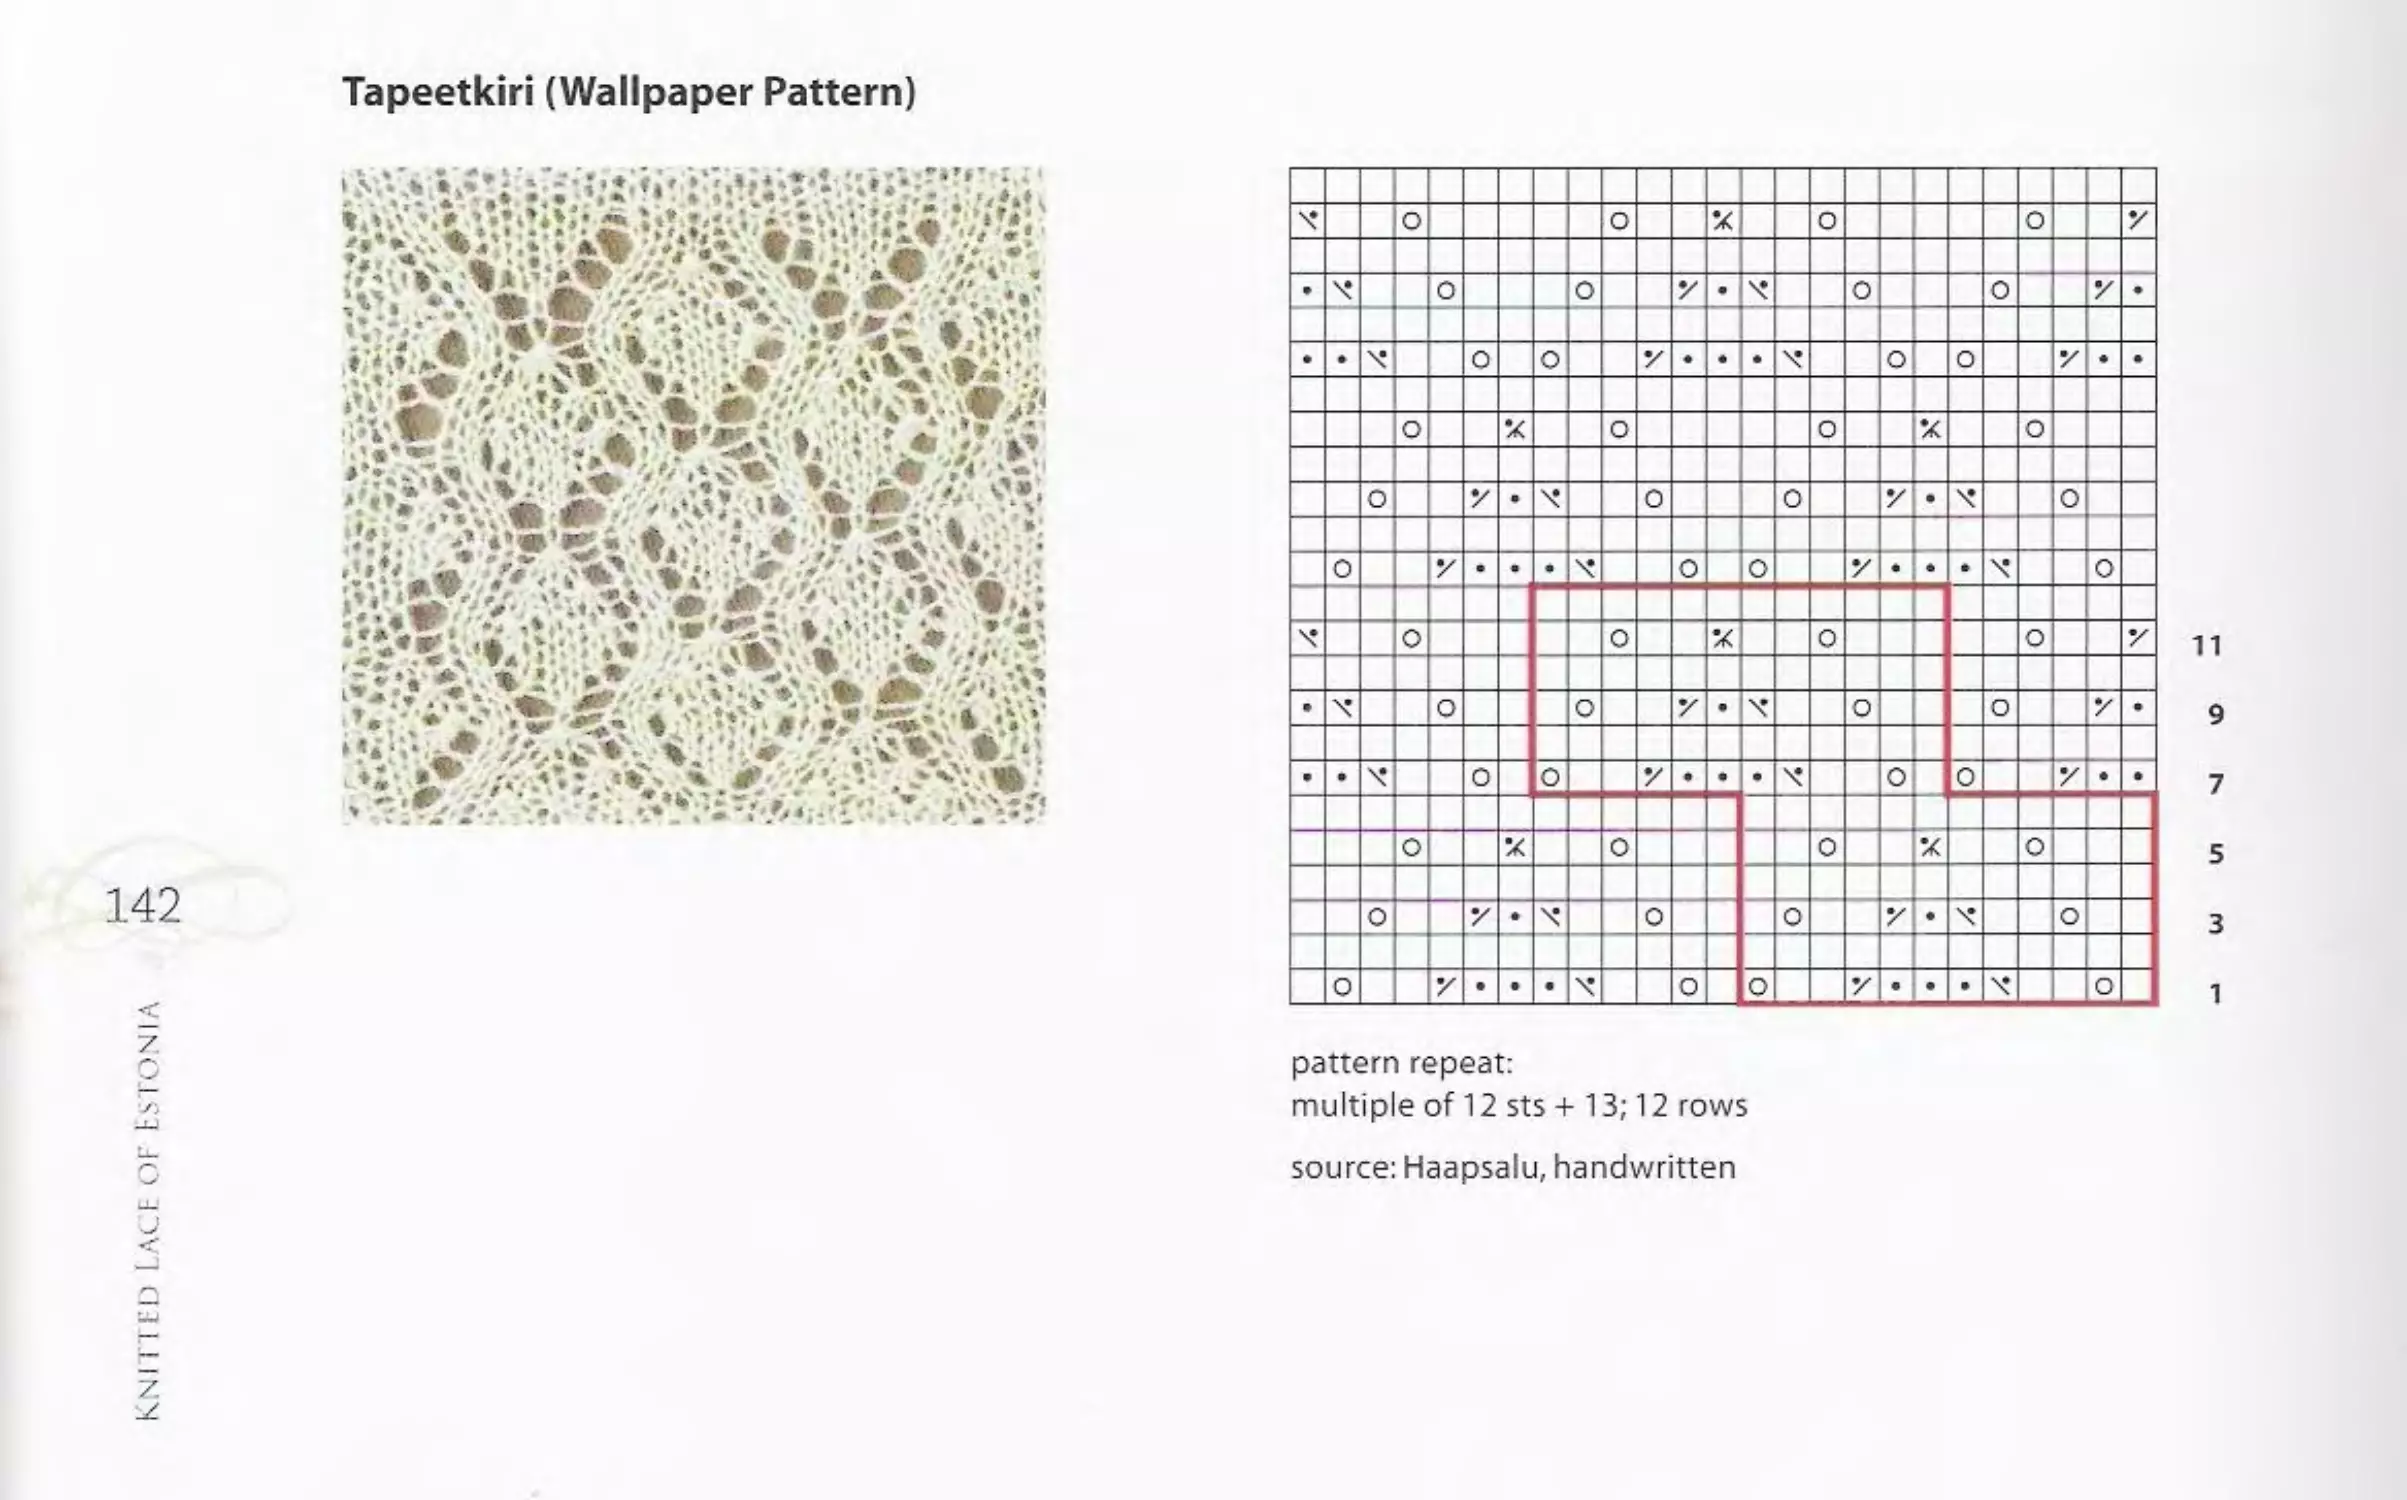
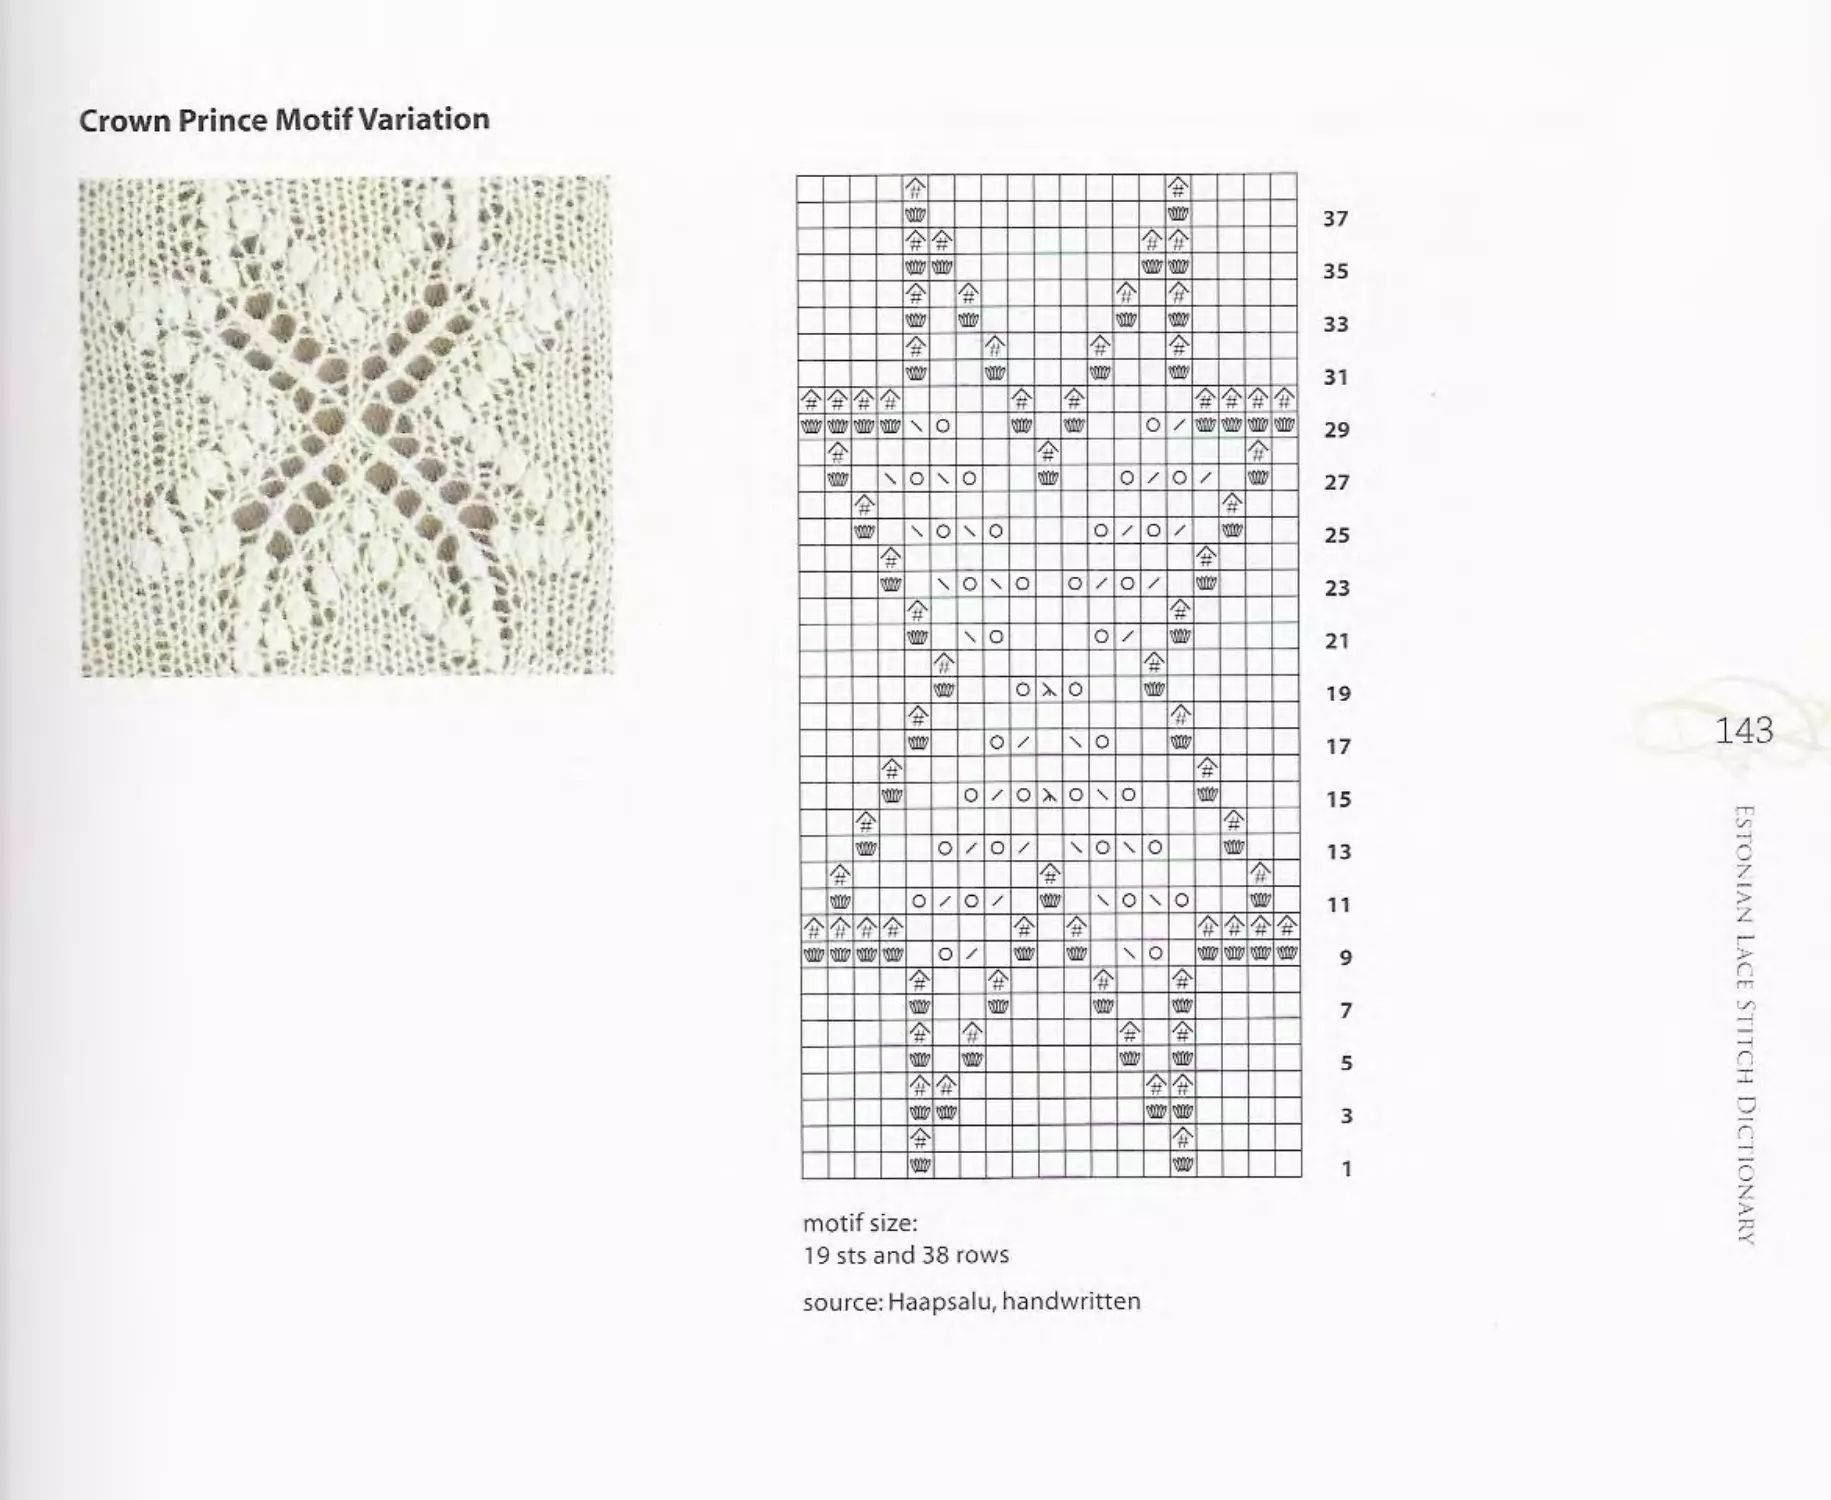
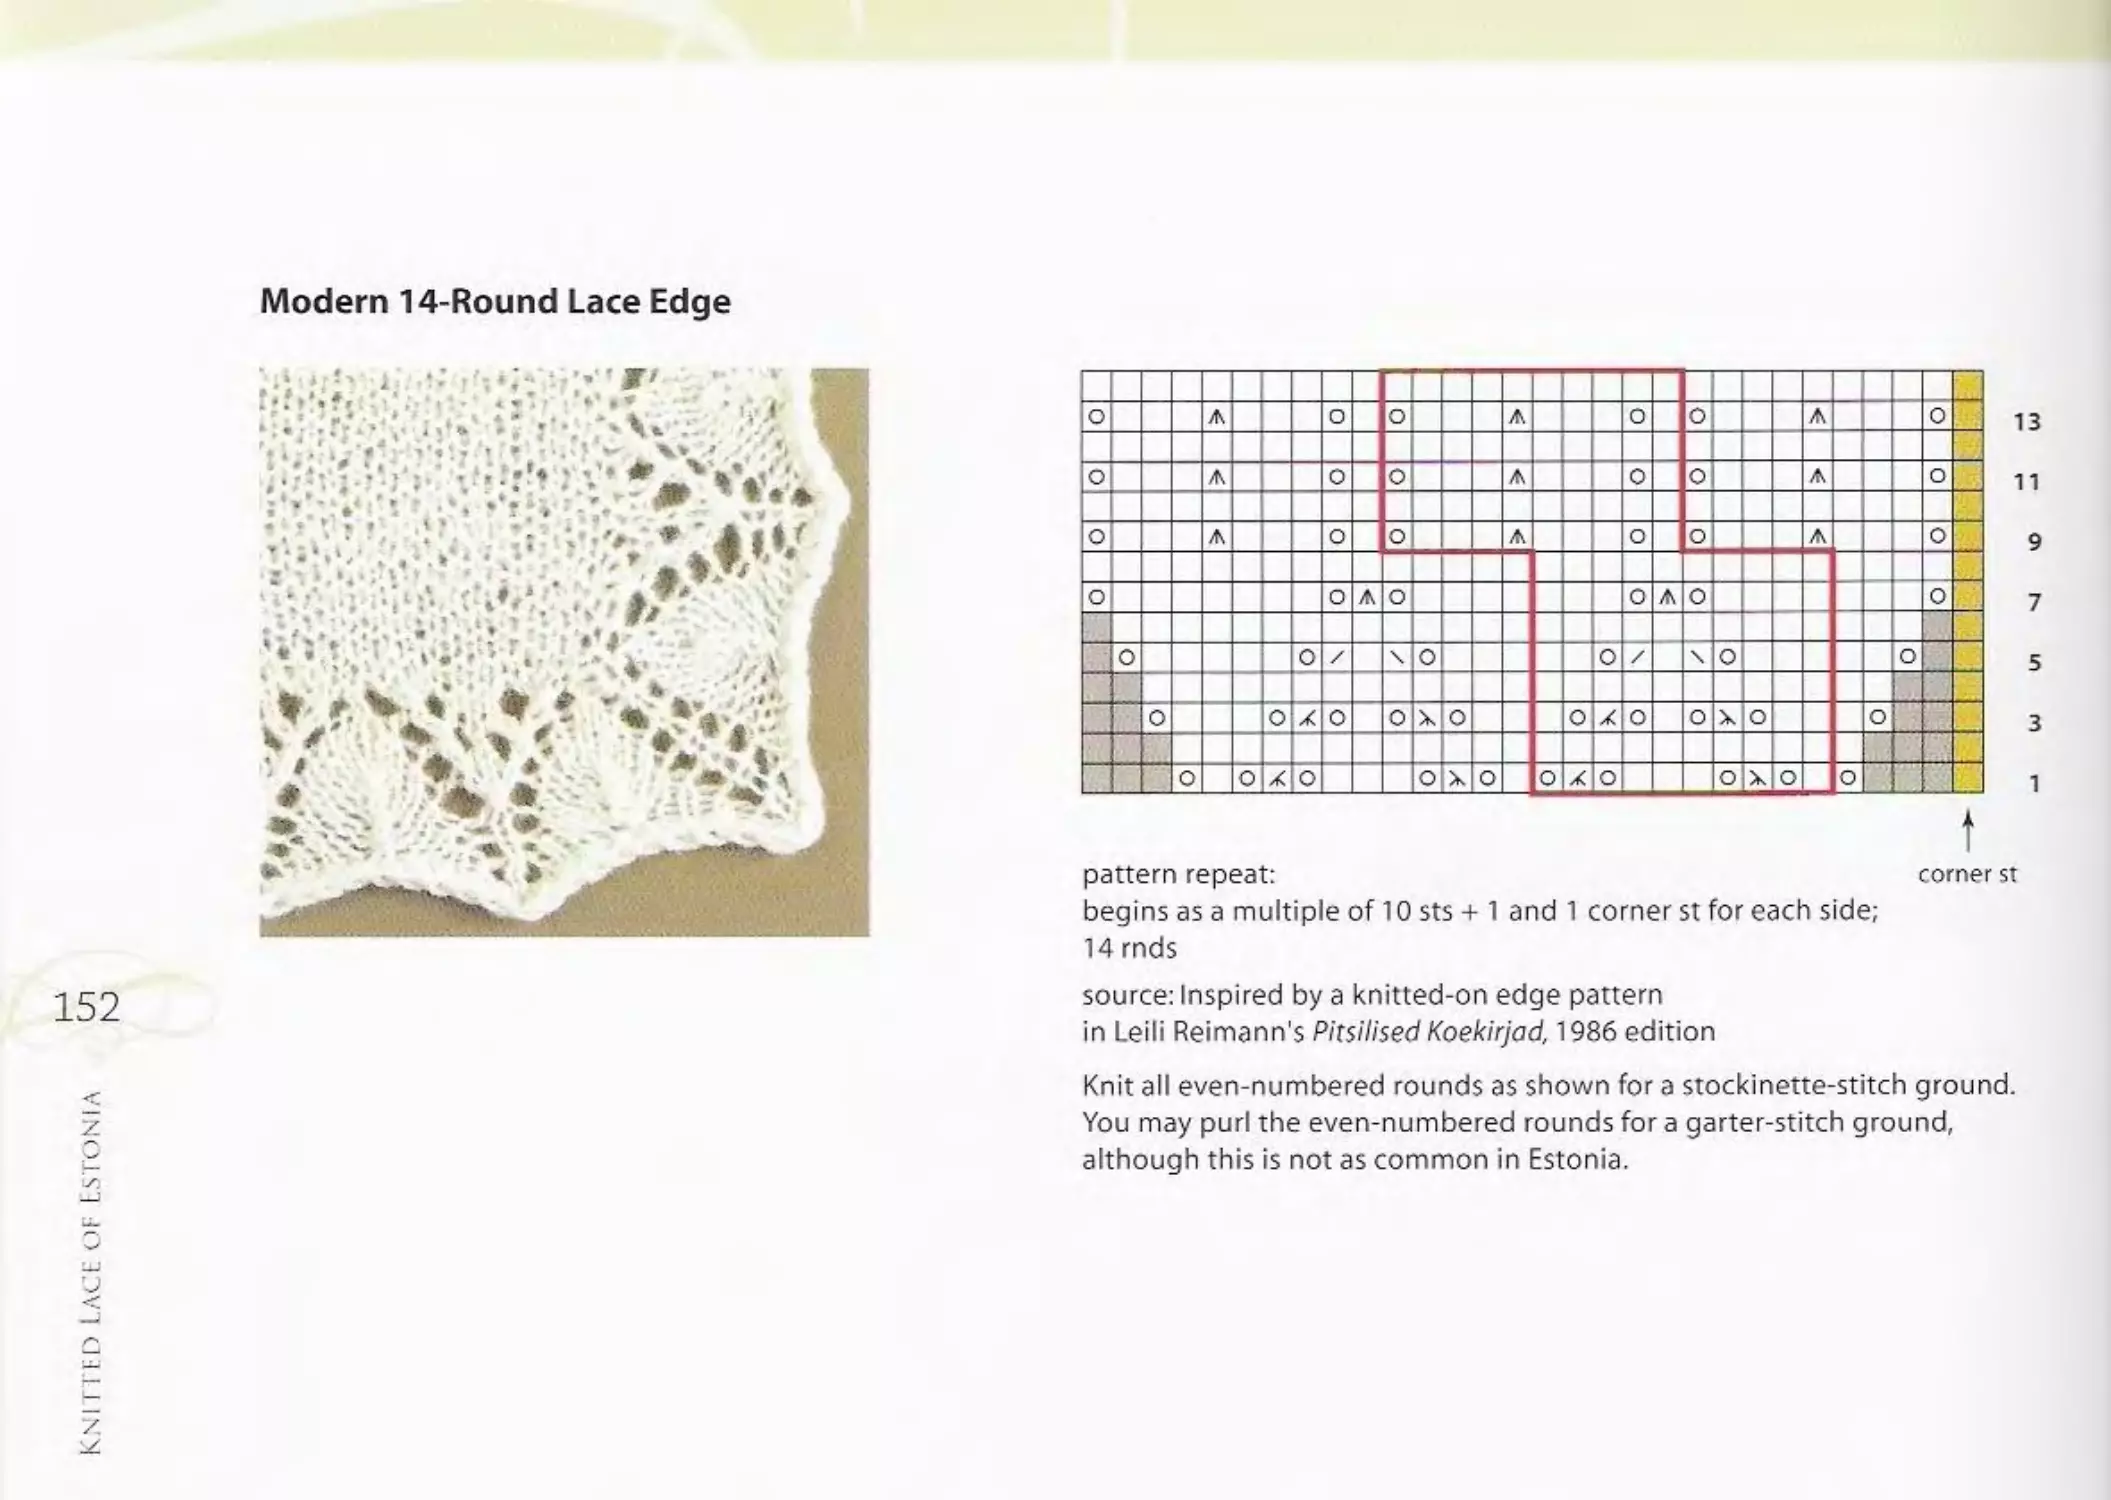
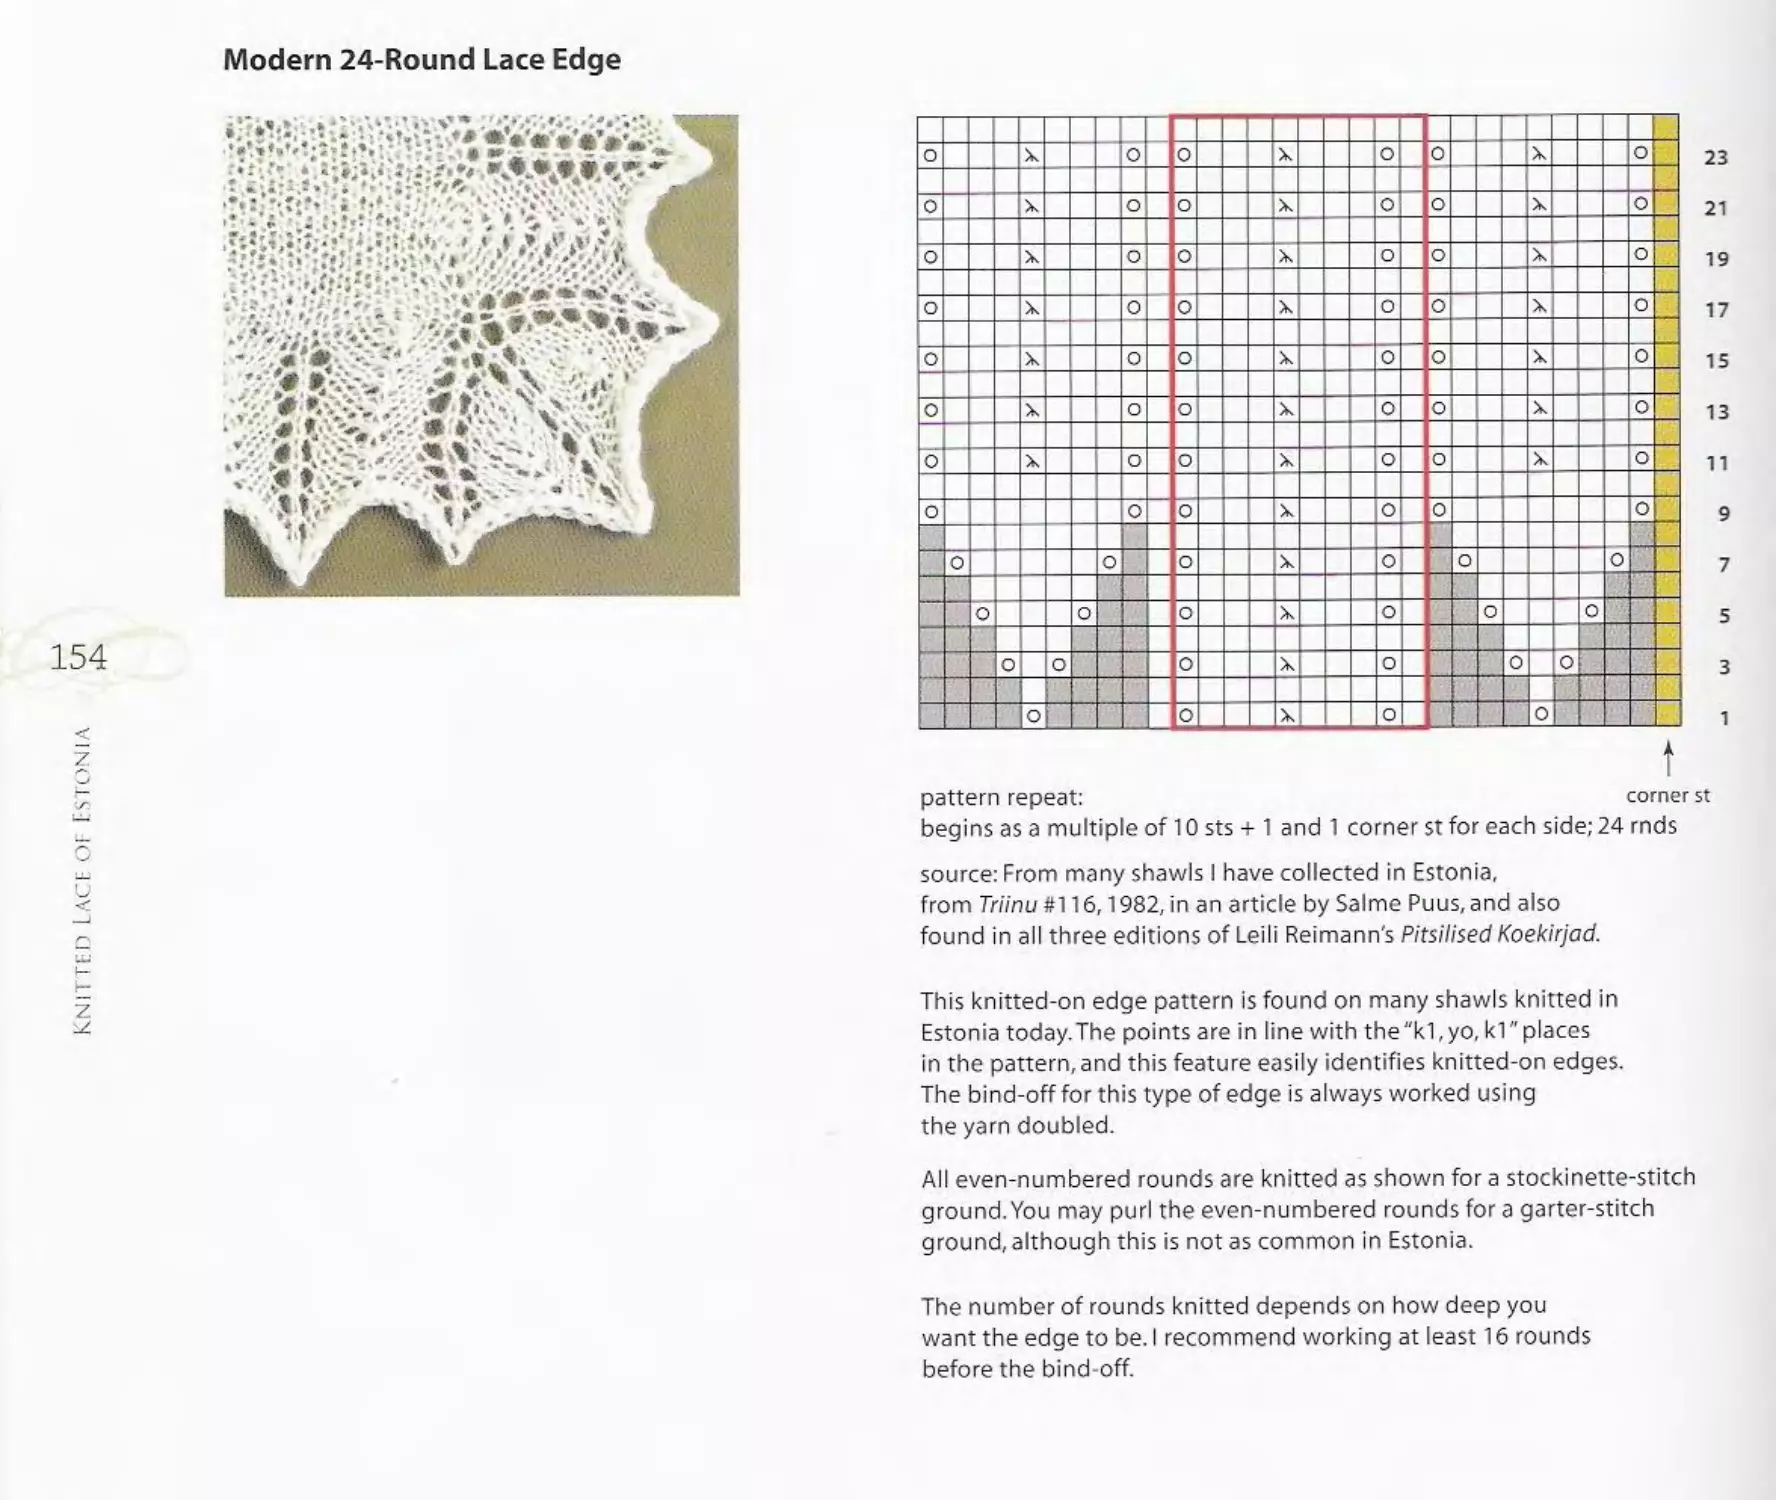
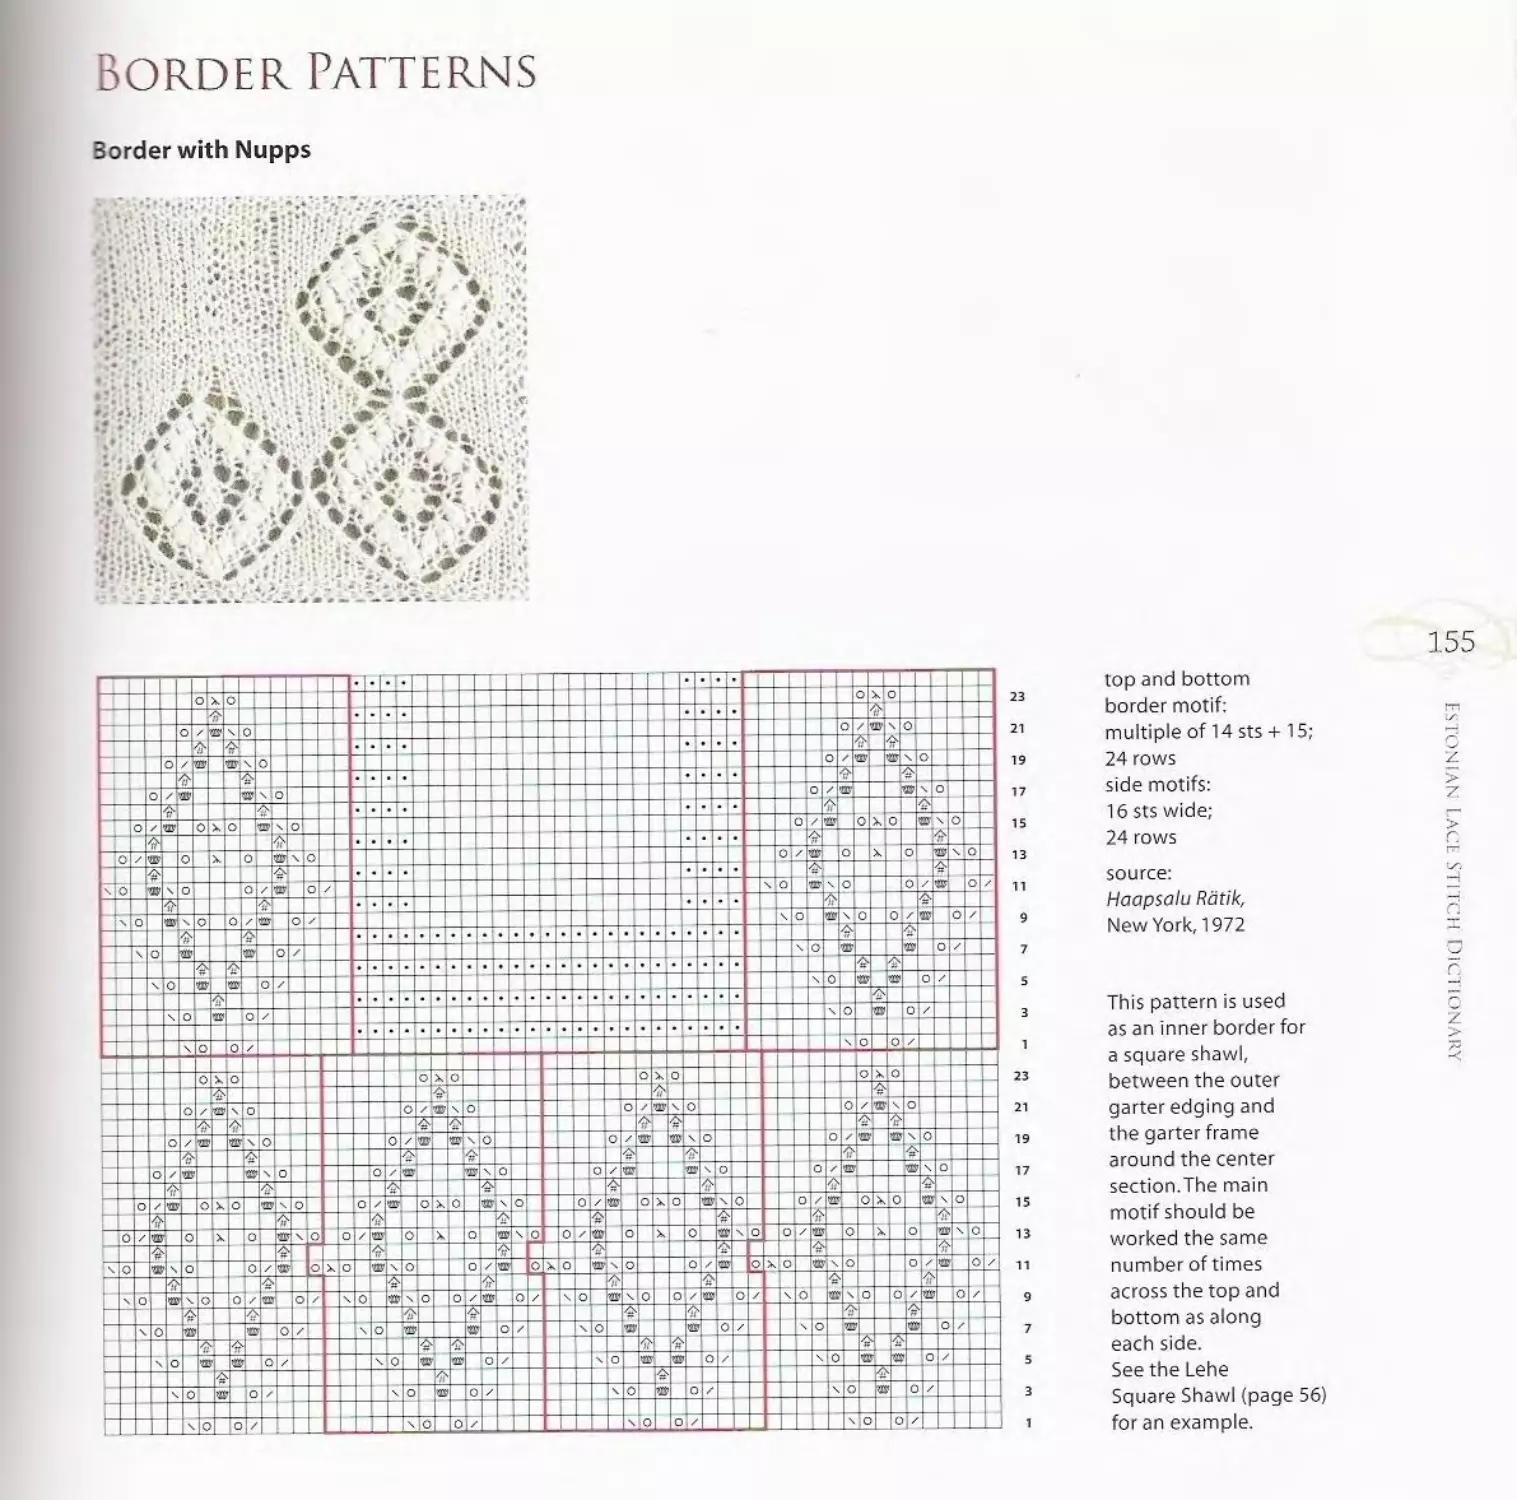
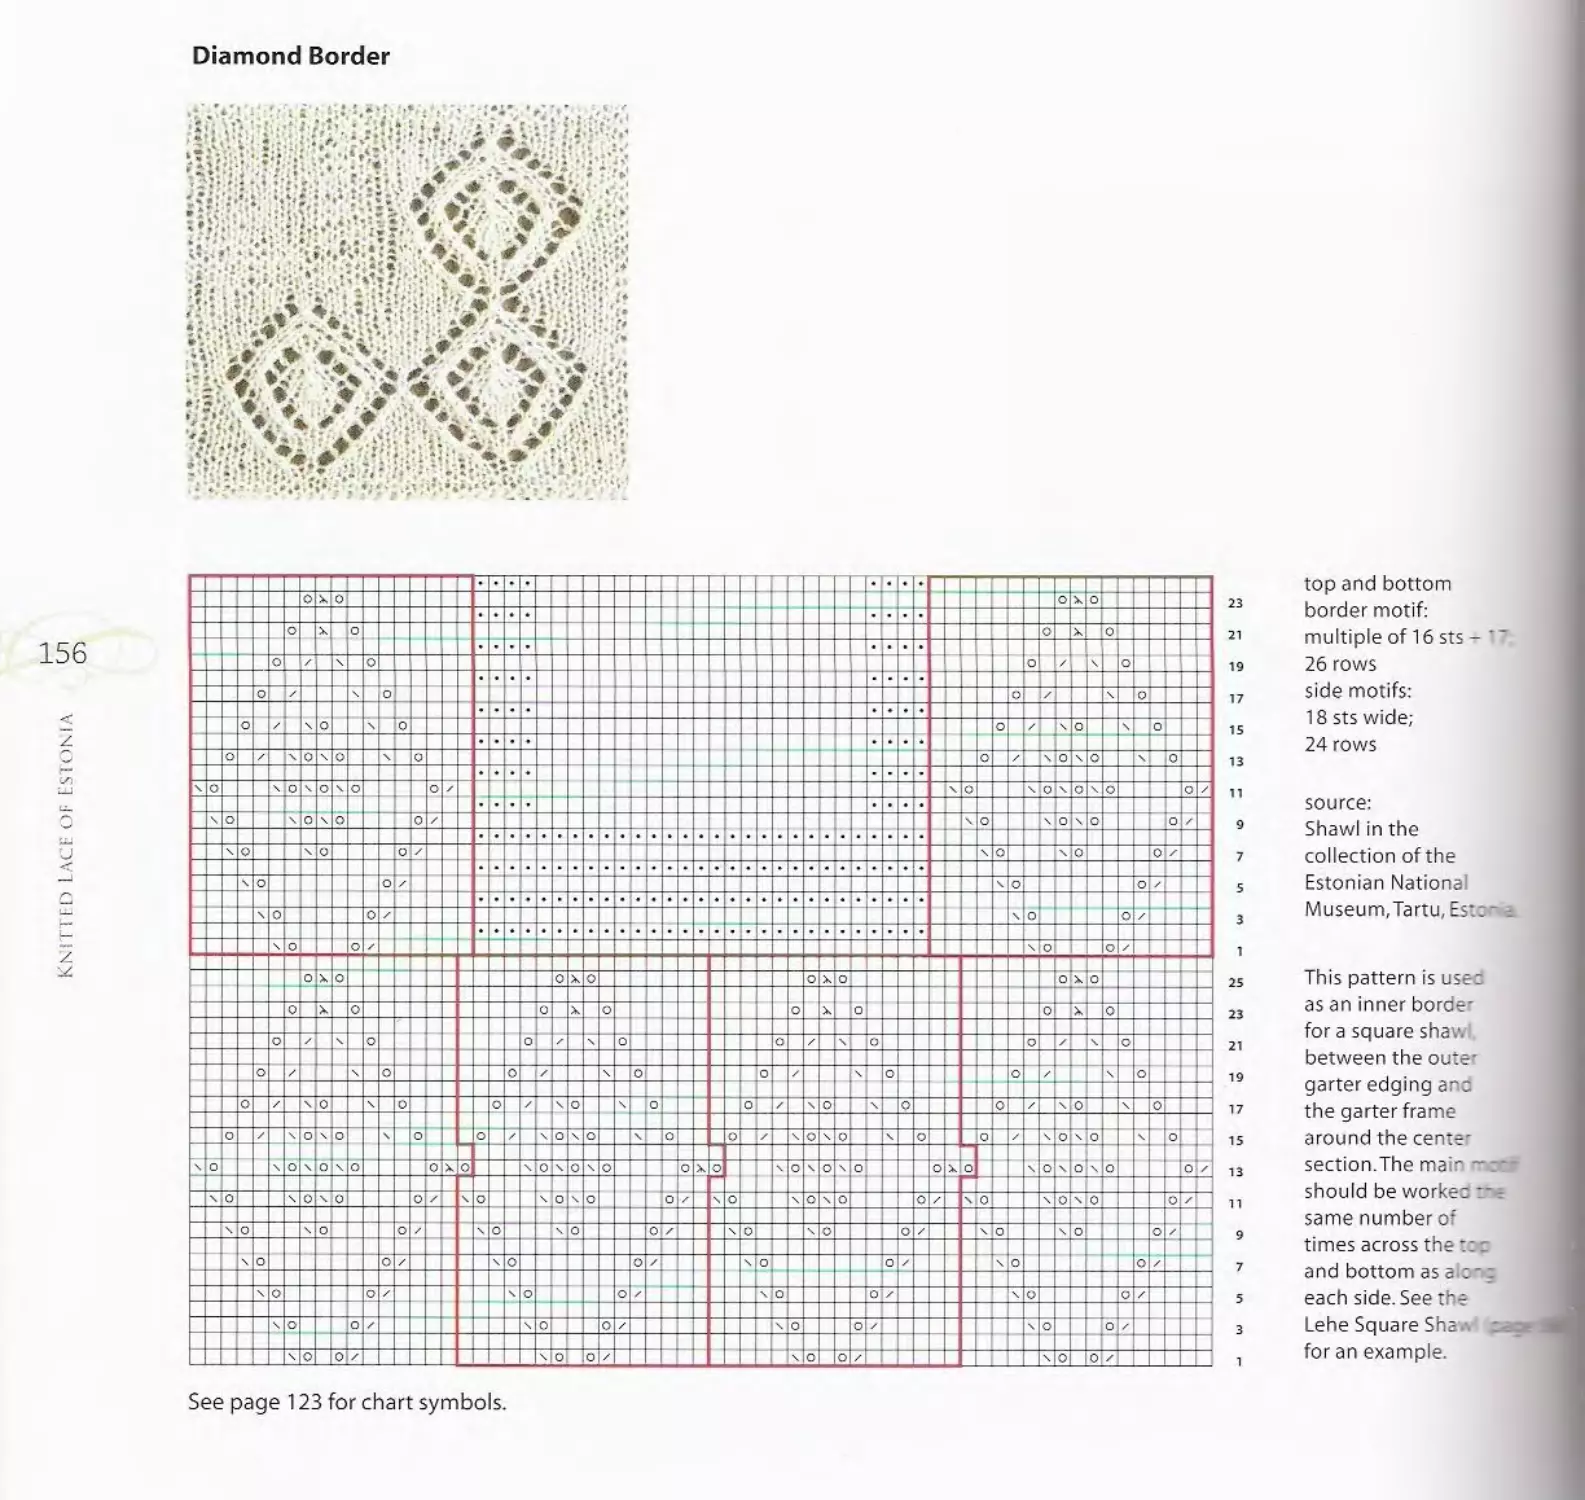
/


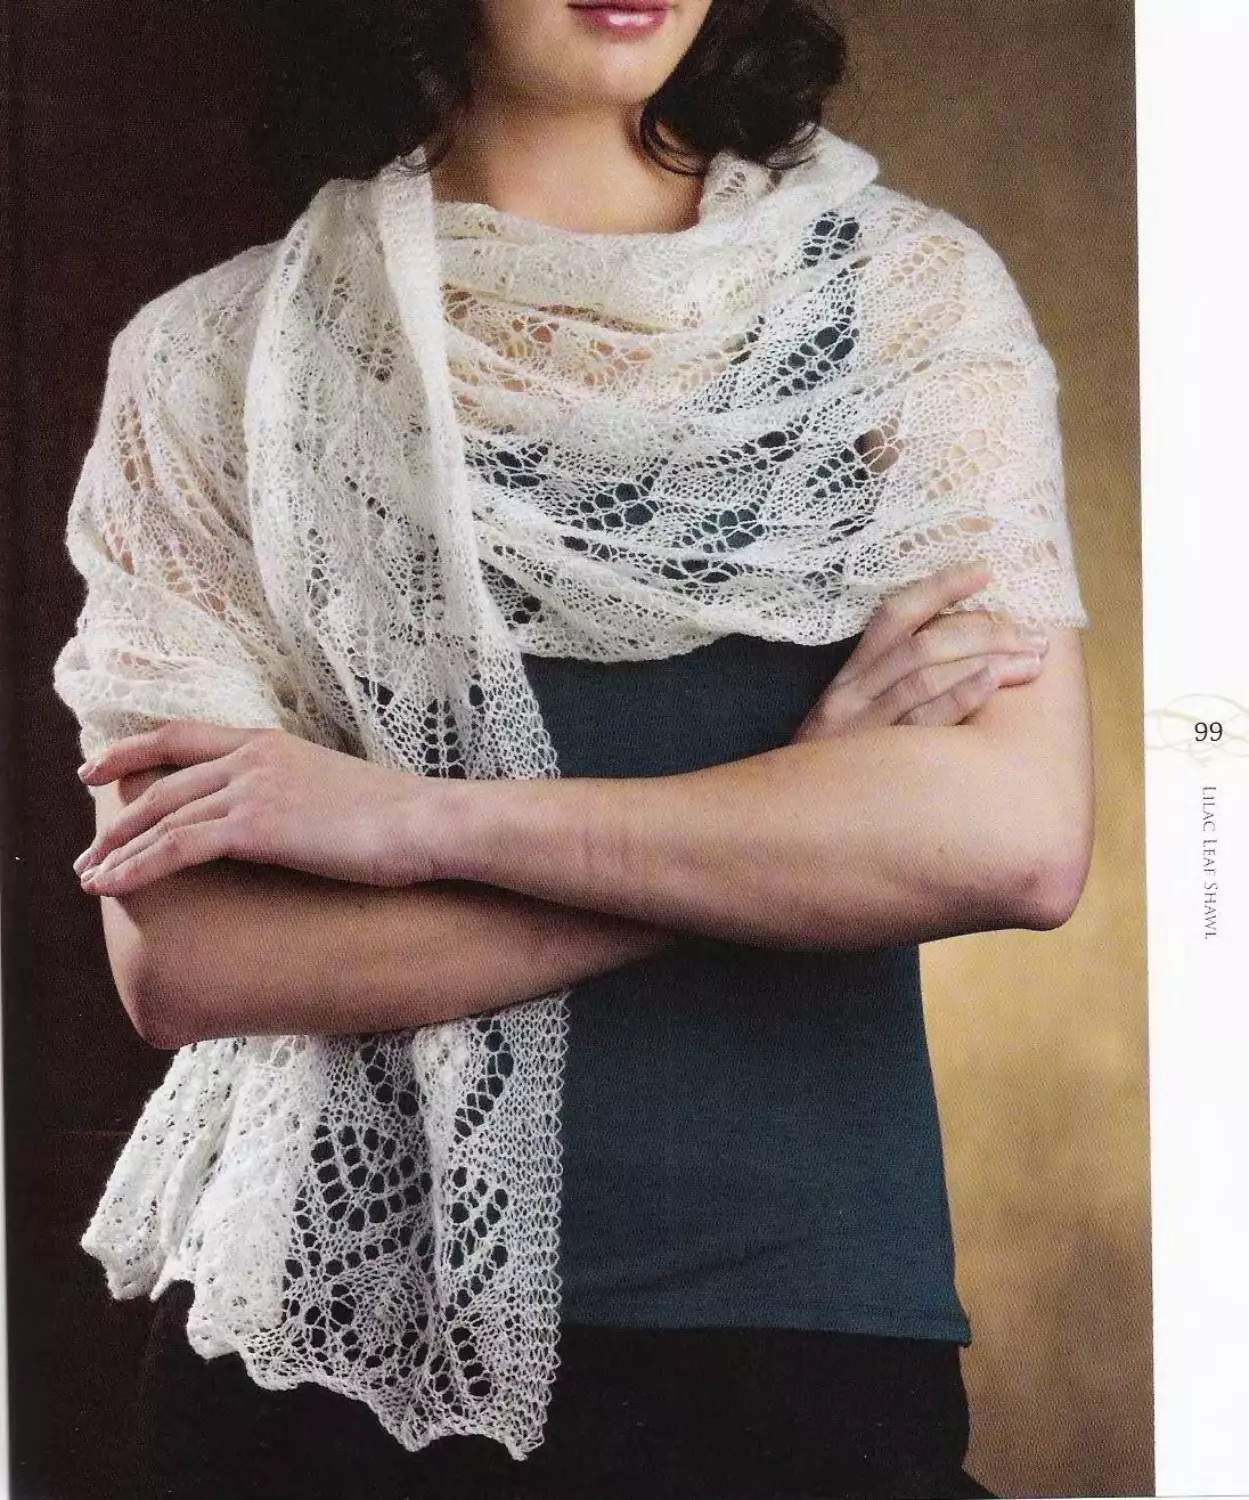


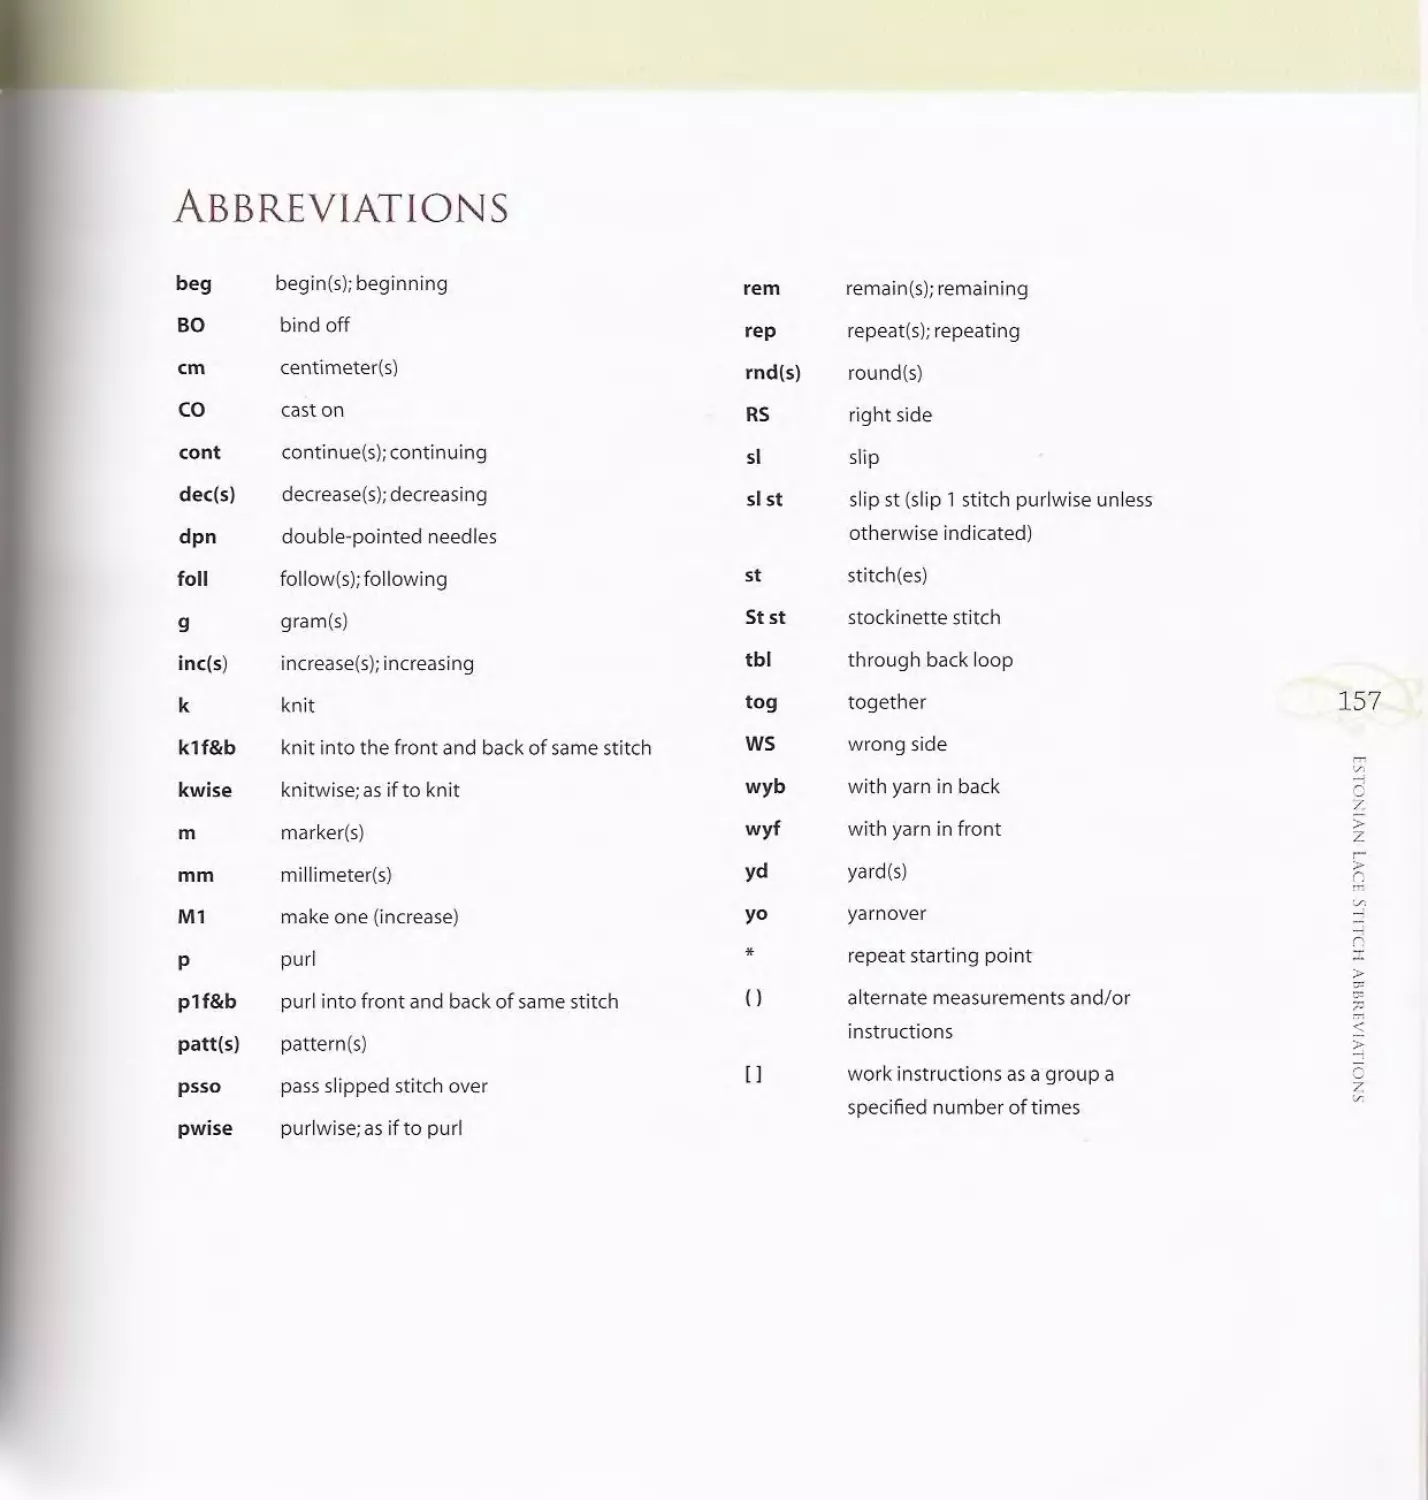


Text
of ESTONIA
TECHNIQUES, PATTERNS,
Mid TRADITIONS
How -txr knit
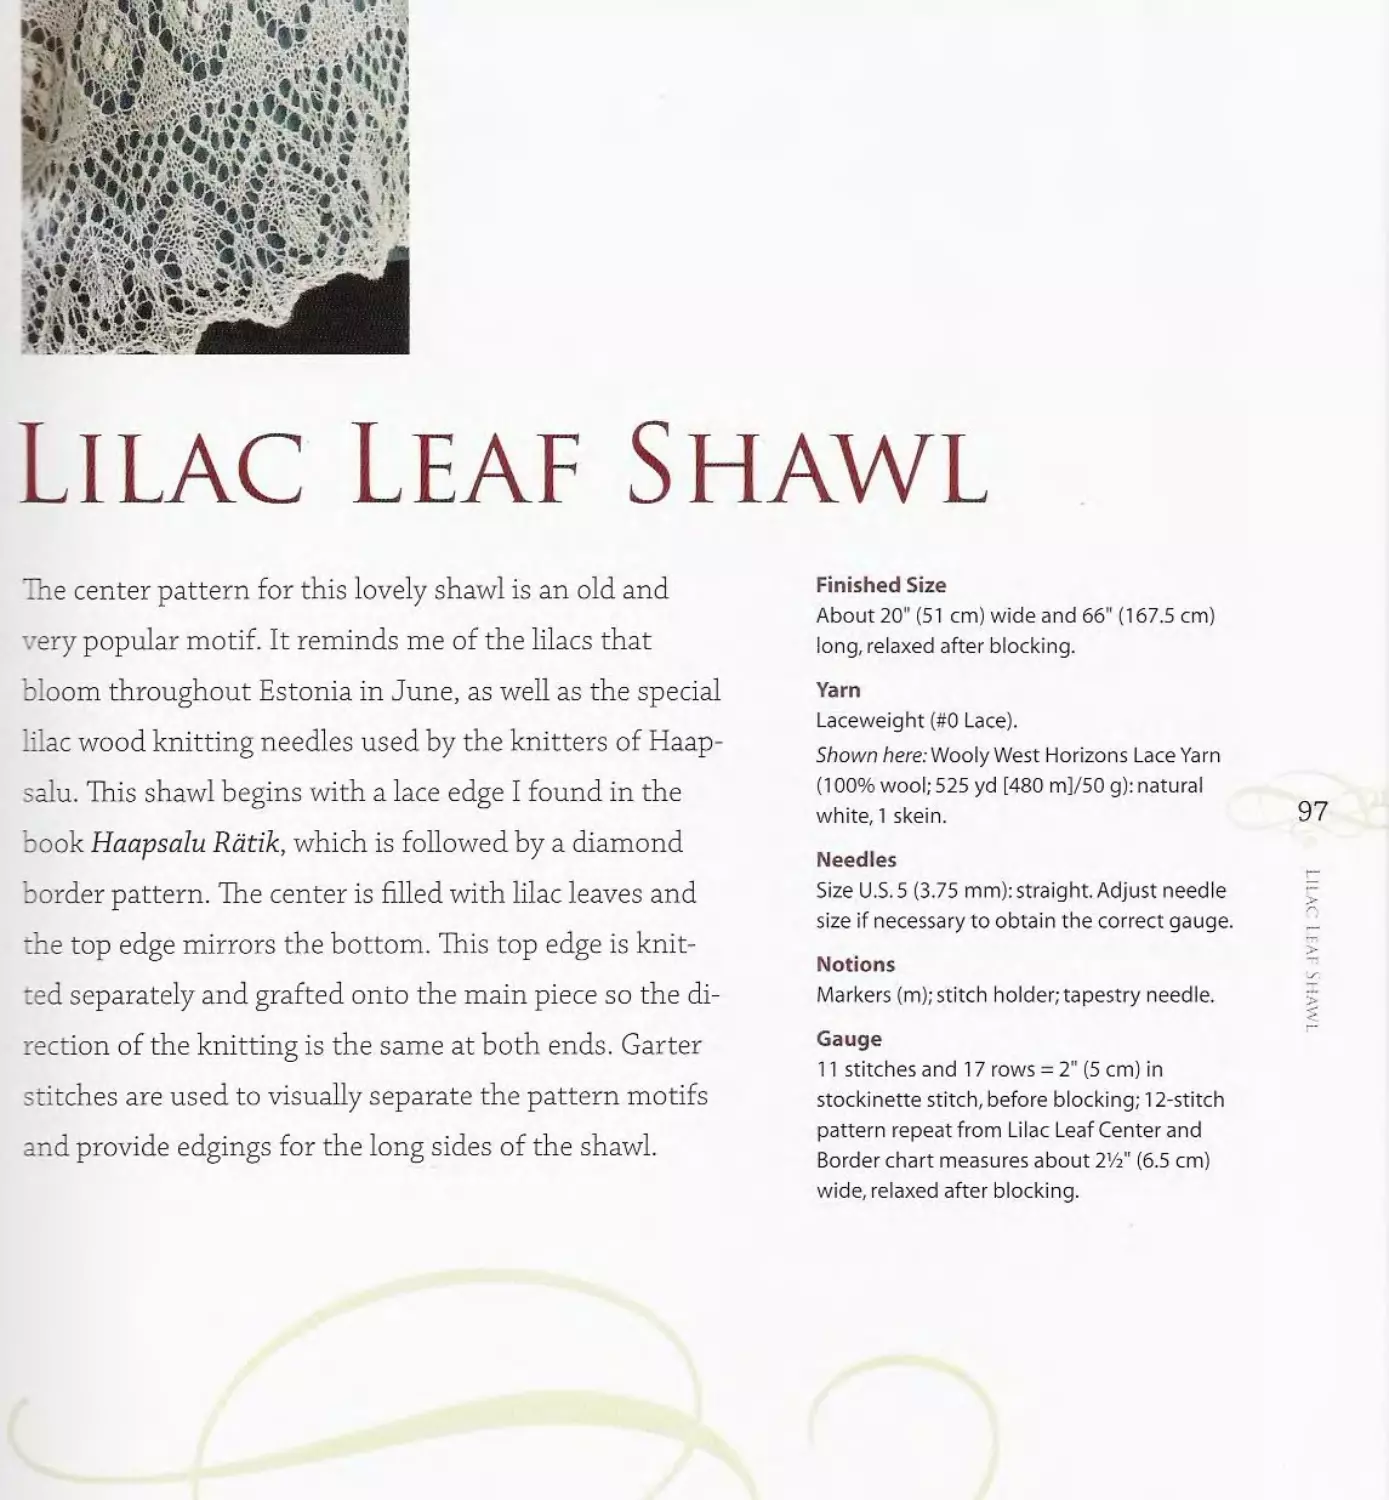
a. Haapsalu Sall
The term Haapsalu ratik (Haapsalu shawl or scarf) seems to be a universal
title for a lace shawl or scarf in Estonia. In Estonia, a true Haapsalu ratik is
square, while a triangular shawl is known as a kolmnurk ratik and rectan-
gular shawls or scarves are known as sail. All are made with openwork lace
patterns, whether traditional or newly designed, and if there is an aarepits
Z
or lacy edge for a traditional style, it is always knitted separately and sewn
to the completed center section by hand. A newer, nontraditional style of
construction is to pick up and knit the lace edge onto the completed shawl
center. Instructions are given here for both methods. There is much more to
these shawls than meets the eye. It is the small details that make them so
interesting and fun to knit.
Center Section
To design a rectangular sail (shawl or stole), begin by
choosing a stitch pattern for the center section from
the stitch dictionary on pages 122-145. See pages
24-27 for instruction for knitting nupps and special
stitches used in many of the patterns. Knit a sample
swatch of the pattern, perhaps two repeats wide and
two repeats high, then bind off the stitches. Block the
swatch to open up the lace design. When dry, measure
the width and height. Use these measurements to de-
termine the number of pattern repeats you’ll want for
the shawl center, which will determine the number of
stitches to cast on. Be sure to add balancing stitches
if necessary to make the pattern match or create a
mirror image at the two selvedge edges. When decid-
ing on the number of pattern repeats, keep in mind
that blocking will add considerable length and width,
as will the addition of frame stitches and a lacy edge.
The average size for a finished rectangular shawl from
Haapsalu measures about 23%" (60 cm) wide and 67"
(170 cm) long.
Beginning Frame
The center section is always surrounded by a narrow
garter-stitch frame. If a lace edge will be attached, the
frame is usually eight rows (four garter ridges) tall at
the top and bottom and four stitches wide along each
side. If there will be no lace edge, the garter frame is
usually five garter ridges tall at the top and bottom
and five stitches wide along the sides. The frame at
the bottom and top of the shawl must complement
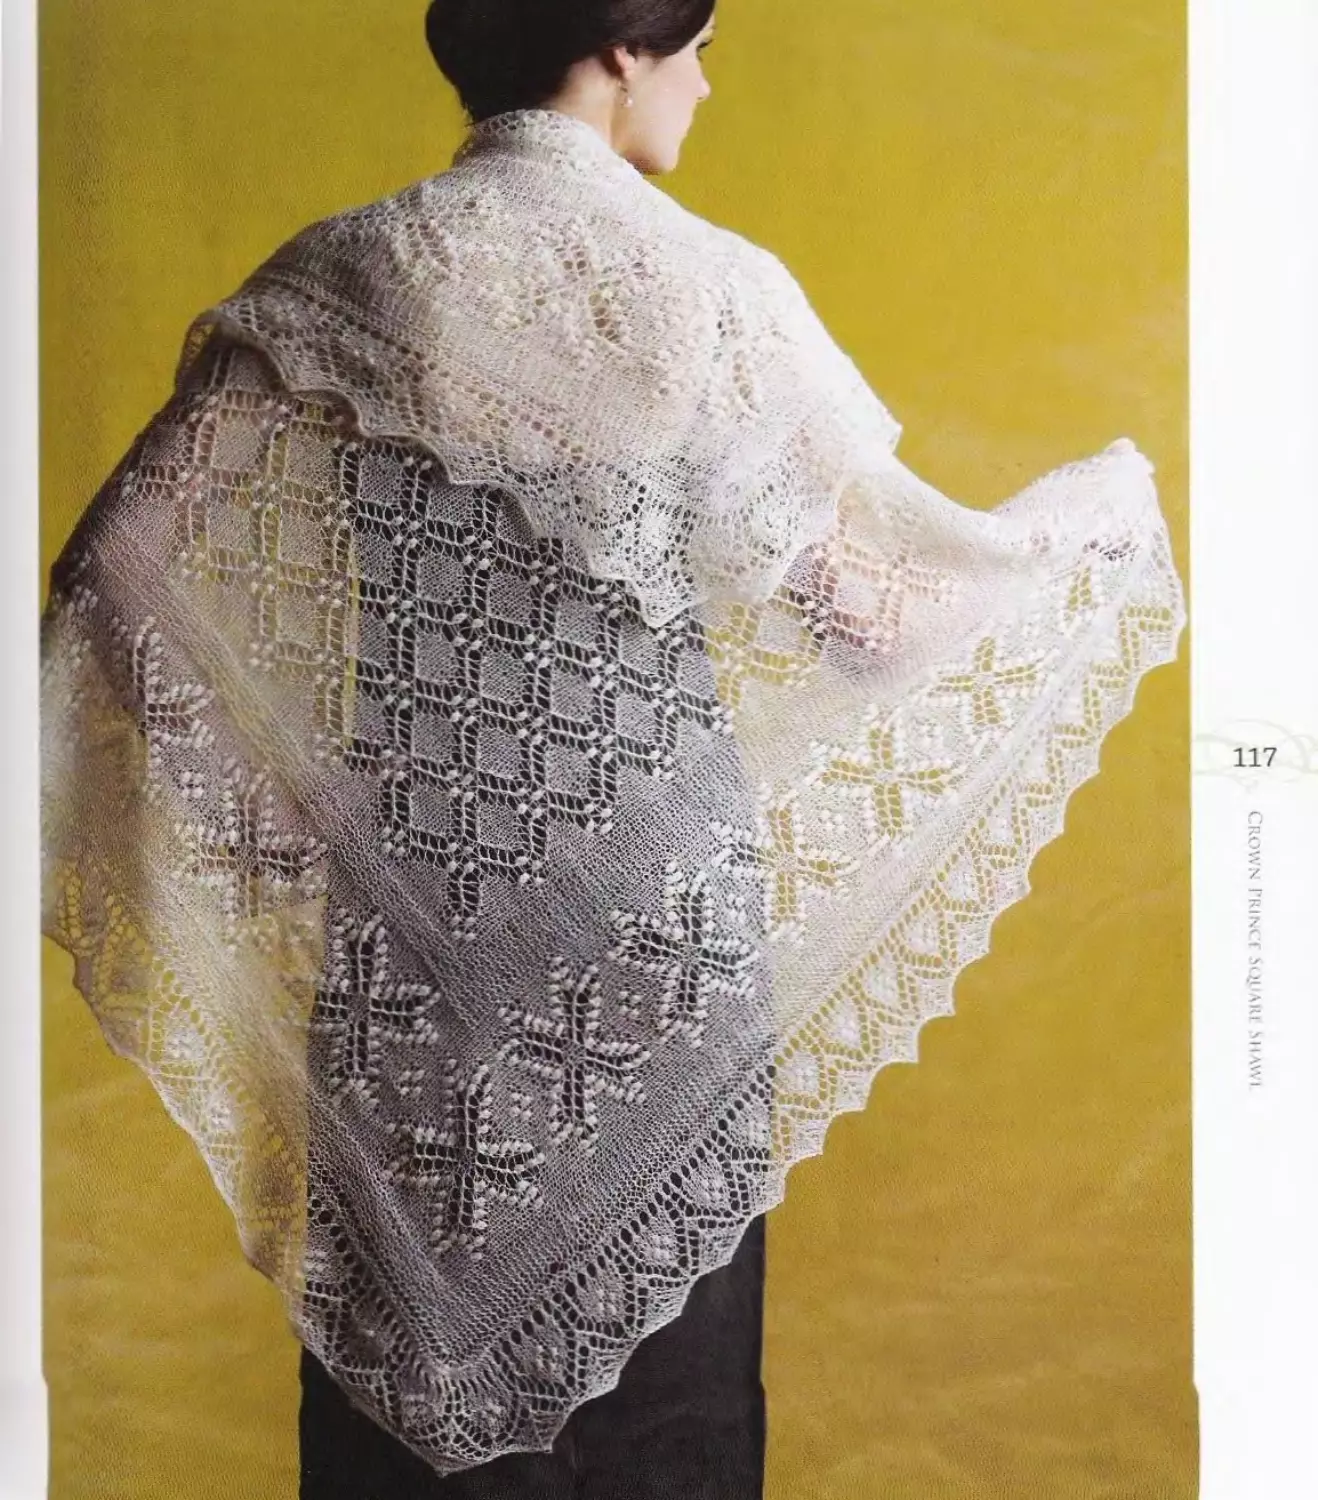
A Haapsalu sail consists of a center section
bordered on all sides with a frame and lacy edge.
the frame at each side. When planning your own
design, be sure to add in these frame stitches to the
total stitch count for the width and row count for
the length.
Using the elastic knitted method (see page 23), cast-
on the desired number of stitches. Except for the
very first row after the cast-on, begin every row with
a slipped stitch (the first stitch of the first row is
CAST-ON AND
EDGE STITCHES
KNITTED CAST-ON
In Estonia, this cast-on is called venivkootudserv or
stretchy knitted cast-on. Make a slipknot and place it onto
the left-hand needle. Bring the right-hand needle into
the slipknot as if to knit, wrap the yarn around the needle
(Figure 1),and pull through a new stitch. Place this new
stitch onto the left needle, in front (to the right) of the
slipknot (Figure 2). Repeat from *, always inserting the
right-hand needle into the last stitch formed.Cast on with
the yarn doubled if casting on for a lacy edge (cast on
with a single strand if casting on for the center section). At
the end of the cast-on row, break one end and continue
for the rest of the edge with a single strand. Often there
are two knitted rows worked directly after the doubled
cast-on before the pattern stitch begins.
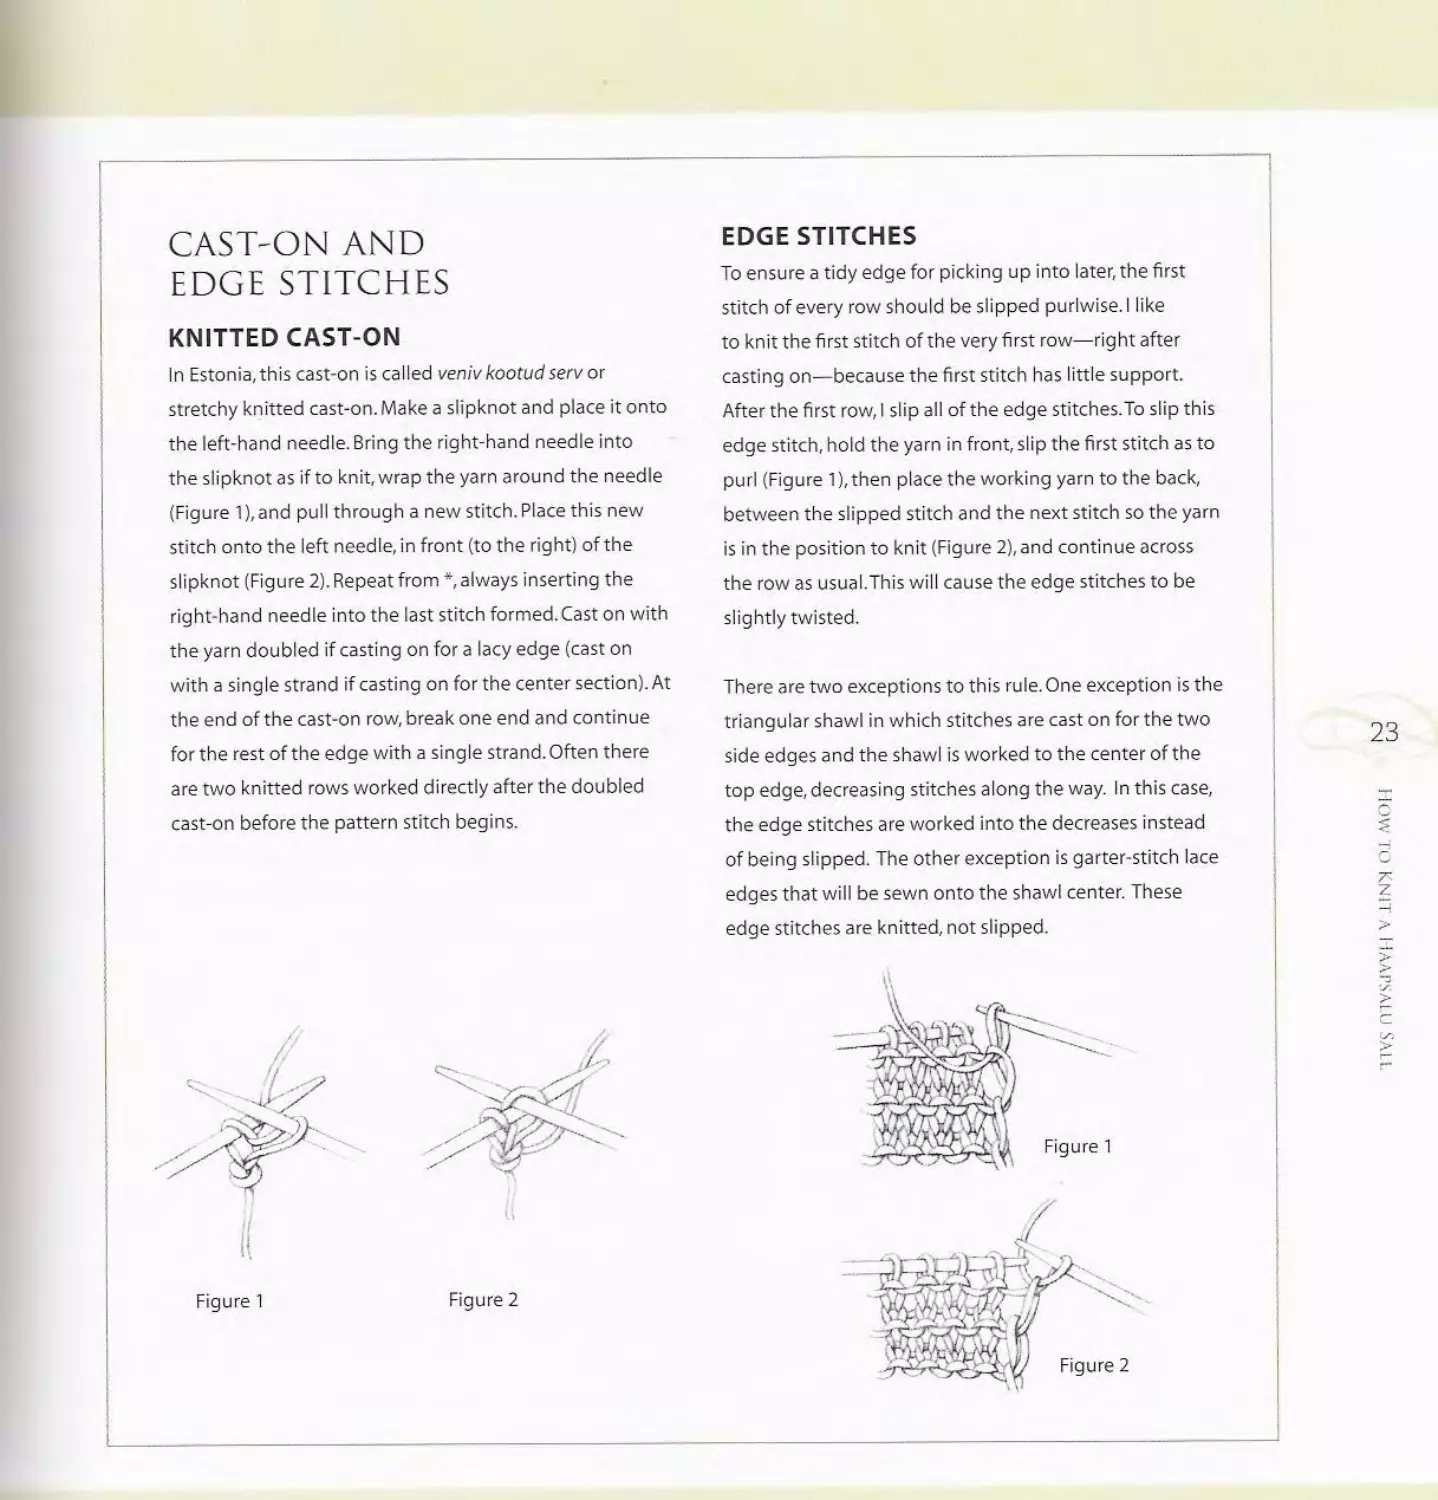
EDGE STITCHES
To ensure a tidy edge for picking up into later, the first
stitch of every row should be slipped purlwise. I like
to knit the first stitch of the very first row—right after
casting on—because the first stitch has little support.
After the first row, I slip all of the edge stitches.To slip this
edge stitch, hold the yarn in front, slip the first stitch as to
purl (Figure 1), then place the working yarn to the back,
between the slipped stitch and the next stitch so the yarn
is in the position to knit (Figure 2), and continue across
the row as usual.This will cause the edge stitches to be
slightly twisted.
There are two exceptions to this rule. One exception is the
triangular shawl in which stitches are cast on for the two
side edges and the shawl is worked to the center of the
top edge, decreasing stitches along the way. In this case,
the edge stitches are worked into the decreases instead
of being slipped. The other exception is garter-stitch lace
edges that will be sewn onto the shawl center. These
edge stitches are knitted, not slipped.
knitted) to form a selvedge edge (see page 23) that is
easy to see when sewing on or picking up and knitting
the lace edge later. Slip this edge stitch purlwise with
the yarn in front, then return the yarn to the back
between the two needles in preparation to knit the
next stitch.
Center pattern
Work your chosen number of garter rows, then begin-
ning with a right-side row, work the center pattern.
To help keep track of the garter-stitch frame at each
side, place markers after the frame stitches on the
right edge (as seen when the right side is facing) and
before the frame stitches on the left edge. Repeat your
chosen center pattern for the desired number of pat-
tern repeats.
Ending frame
Work eight or ten rows (four or five garter ridges) of
garter stitch to mirror the garter frame rows worked
at the beginning of the piece and end having worked a
right-side row.
With the wrong side facing, use the k2tog bind-off
(see page 27) to bind off all of the stitches. This
method will ensure an elastic edge that will stretch
with the center section.
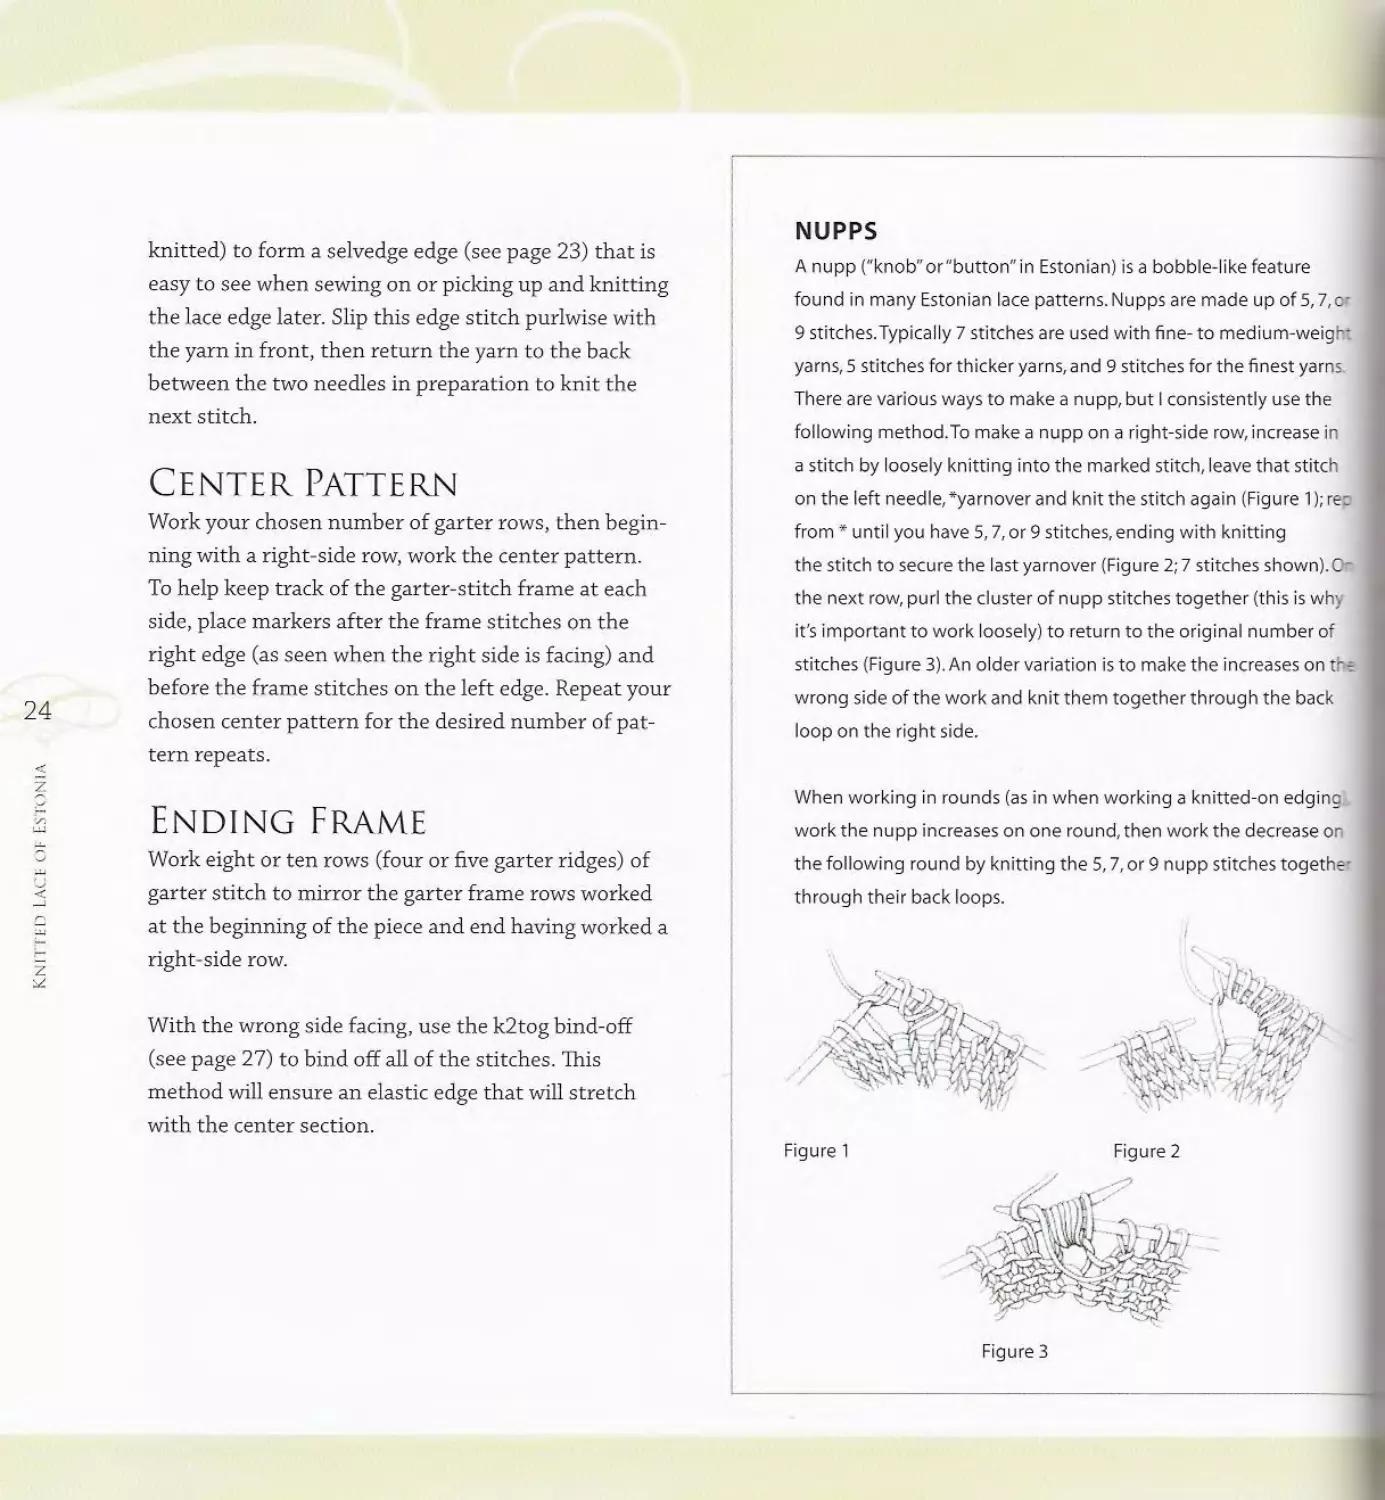
NUPPS
A nupp ("knob" or "button" in Estonian) is a bobble-like feature
found in many Estonian lace patterns. Nupps are made up of 5,7,or
9 stitches.Typically 7 stitches are used with fine- to medium-weight
yarns, 5 stitches for thicker yarns, and 9 stitches for the finest yarns.
There are various ways to make a nupp, but I consistently use the
following method.To make a nupp on a right-side row, increase in
a stitch by loosely knitting into the marked stitch, leave that stitch
on the left needle, *yarnover and knit the stitch again (Figure 1);rep
from * until you have 5,7, or 9 stitches, ending with knitting
the stitch to secure the last ya mover (Figure 2; 7 stitches shown). On
the next row, purl the cluster of nupp stitches together (this is why
it’s important to work loosely) to return to the original number of
stitches (Figure 3). An older variation is to make the increases on the
wrong side of the work and knit them together through the back
loop on the right side.
When working in rounds (as in when working a knitted-on edging),
work the nupp increases on one round, then work the decrease on
the following round by knitting the 5,7, or 9 nupp stitches together
through their back loops.
Figure 3
NUPP TIPS
Loose Tension
The best advice I can offer for making these small
gems of Estonian lace knitting is keep the tension
loose while making the nupp increases. I find it helpful
to have a long length of yarn released from the ball so
there isn't any extra tension on the yarn as you make
the yarnovers. I also find it helpful to pinch the nupp
stitches with the thumb and forefinger of the hand
that isn’t carrying the yarn to prevent the stitches from
becoming tight as they are being made. It also helps
if I pull up a bit on my right-hand needle to keep the
increased stitches loose as I make them.
Too Many or Too Few Stitches
If you have too many stitches in a repeat section, check
each nupp to be sure you worked all of the nupp
stitches together on the following row. It's easy to miss
a stitch when working the 5,7, or 9 stitches together,
and doing so will inadvertently add to the stitch count.
If you notice a missed nupp loop, try to repair it right
away. If you don't want to ravel back to the offending
stitch, at least thread a length of working yarn through
the missed stitch. Later, you can weave in the tails of
the length of yarn on the wrong side of the shawl to
secure the loop. Clip the ends of this yarn after the
shawl has been blocked to prevent them from finding
their way to the right side. If you find you are miss-
ing a stitch in a repeat, check to see if one stitch not
intended to be part of the nupp was purled together
when you completed the nupp on the wrong side.This
is especially possible when there are yarnovers before
or after the nupp stitches.
Weave in loose ends
If you don’t plan on adding a lacy edge, weave in any
loose ends into the wrong side of the garter-stitch
frame, (where they will be less visible). Trim the ends,
leaving 2" (5 cm) tails to be trimmed after the shawl
is blocked. If you plan to sew on a lace edge, leave one
tail at each corner (the lower left corner and the upper
right corner as viewed from the right side) where the
two halves of the lace edge will meet. These tails will
be used to sew the comers of the lace edges together.
TRADITIONAL
Lace Edge
For a traditional Haapsalu shawl, the lace edge is knit-
ted in two separate pieces that are sewn to the center
section by hand. You can choose one of the patterns
on pages 146-151 or an edging of your own. The most
common edgings are 2" to 4" (5 to 10 cm) wide and
most repeat over 10 stitches. Typically, ornate centers
are combined with simple edges. The two parts of the
lace edge are joined together at opposite corners of
the center piece. If you prefer to work the lace edge in
a single piece (which is not as common), there will be
a single join at just one corner.
25
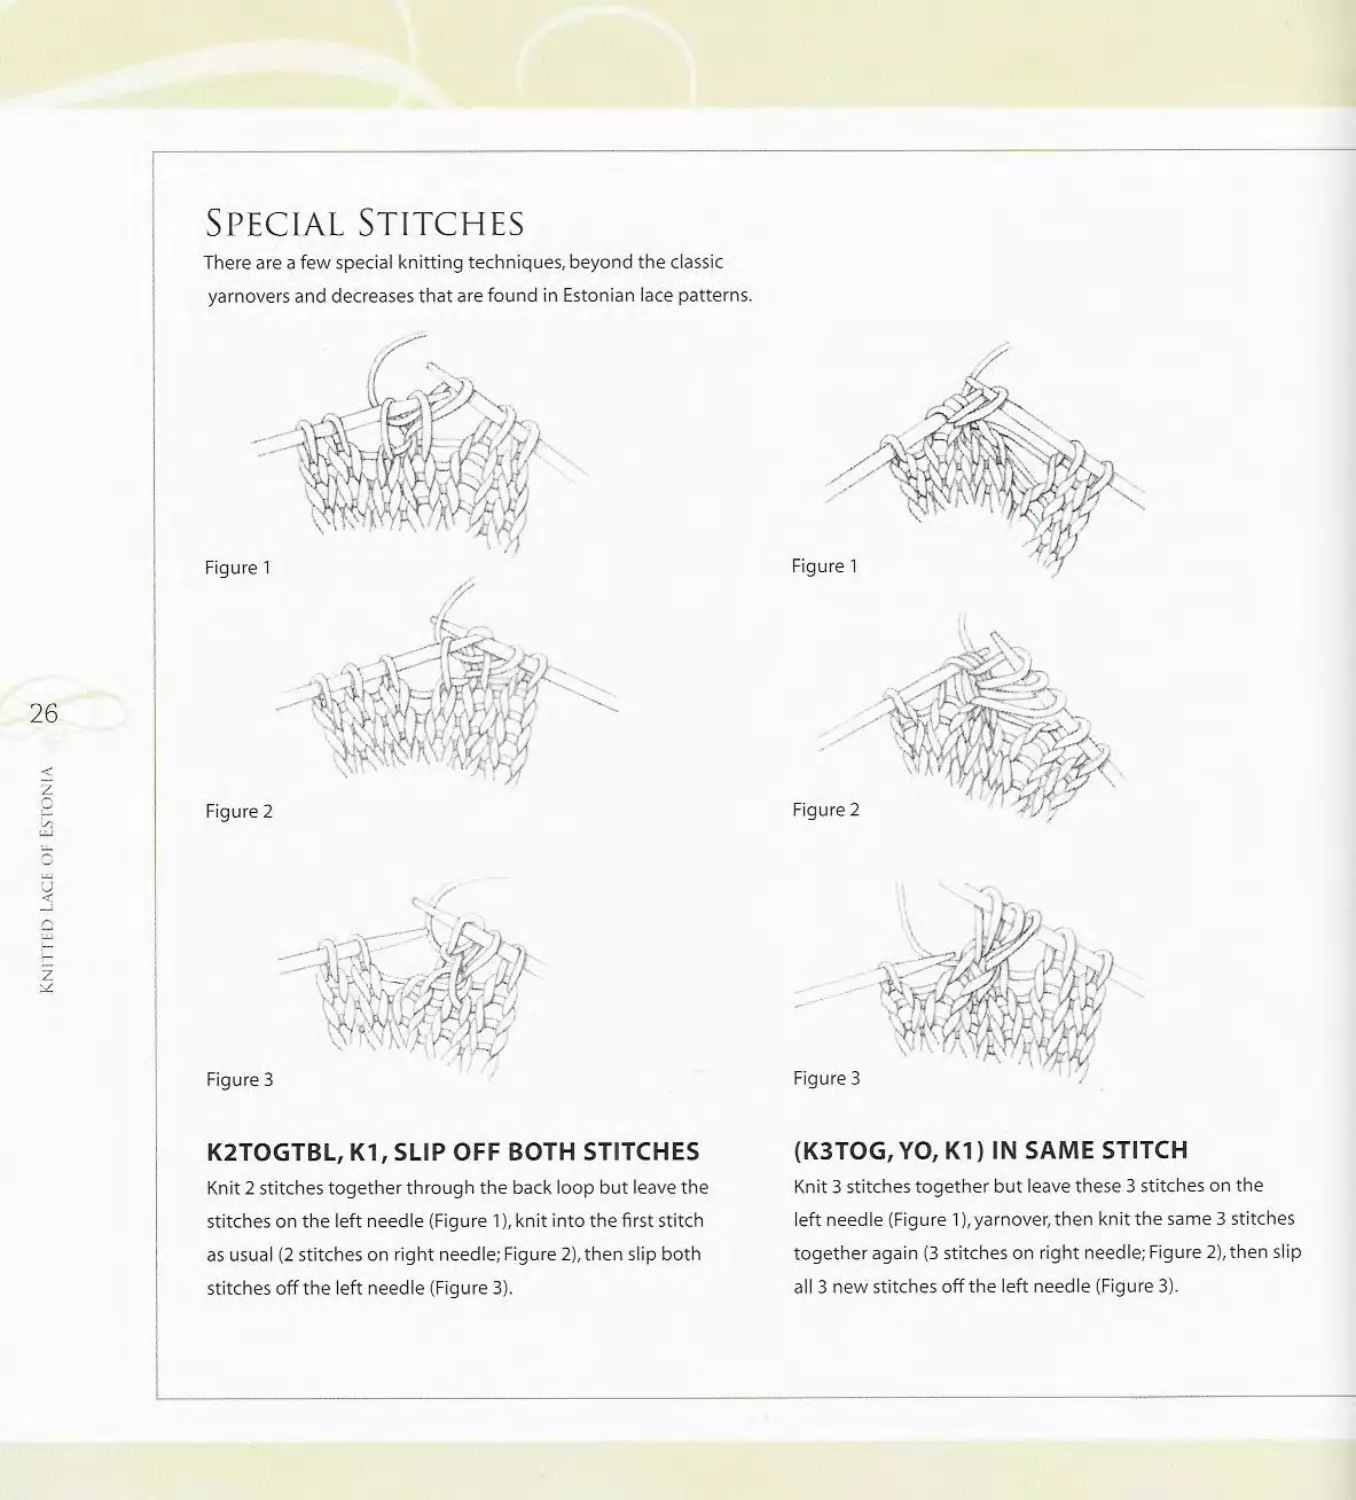
Special Stitches
There are a few special knitting techniques, beyond the classic
yarnovers and decreases that are found in Estonian lace patterns.
K2TOGTBL, KI, SLIP OFF BOTH STITCHES
Knit 2 stitches together through the back loop but leave the
stitches on the left needle (Figure 1), knit into the first stitch
as usual (2 stitches on right needle; Figure 2), then slip both
stitches off the left needle (Figure 3).
(K3TOG, YO, K1) IN SAME STITCH
Knit 3 stitches together but leave these 3 stitches on the
left needle (Figure l),yarnover,then knit the same 3 stitches
together again (3 stitches on right needle; Figure 2), then slip
all 3 new stitches off the left needle (Figure 3).
B1ND-OFF
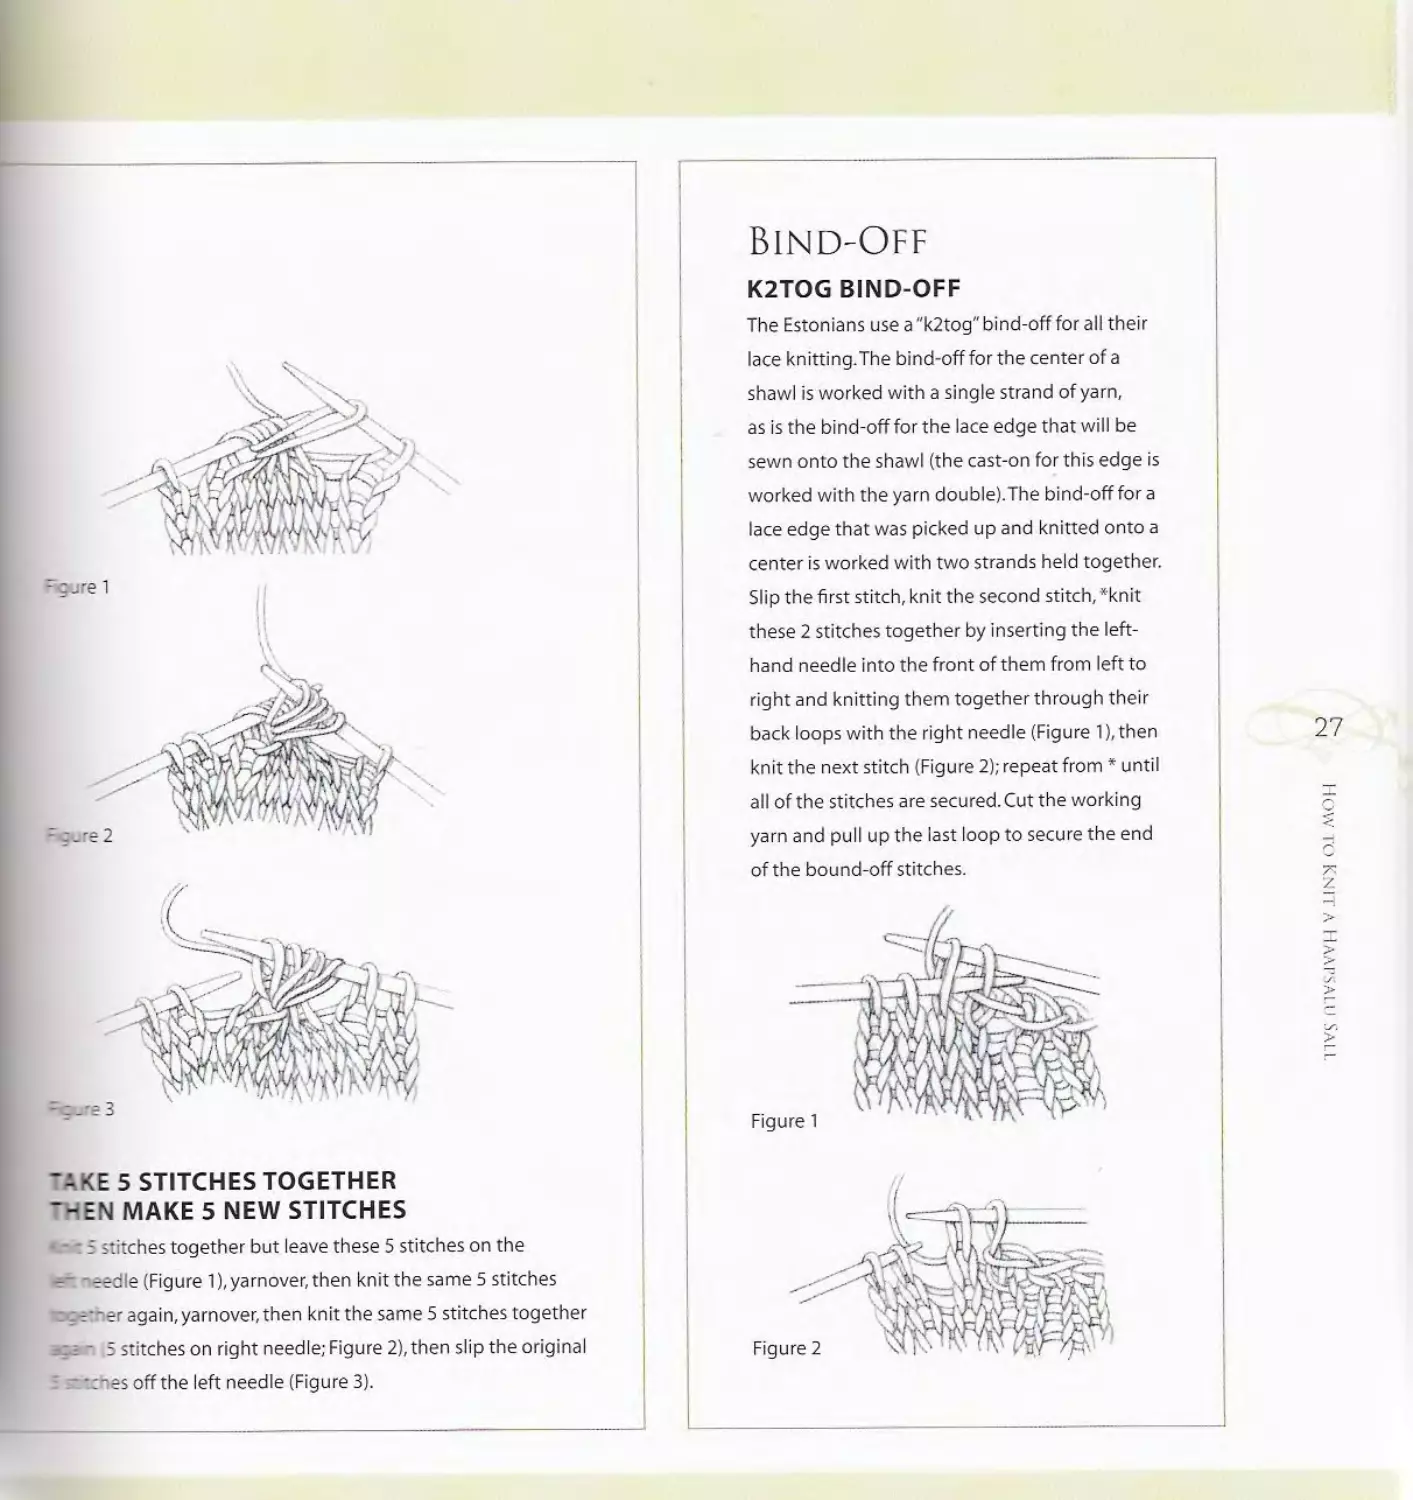
K2TOG BIND-OFF
The Estonians use a "k2tog" bind-off for all their
lace knitting.The bind-off for the center of a
shawl is worked with a single strand of yarn,
as is the bind-off for the lace edge that will be
sewn onto the shawl (the cast-on for this edge is
worked with the yarn double).The bind-off fora
lace edge that was picked up and knitted onto a
center is worked with two strands held together.
Slip the first stitch, knit the second stitch,*knit
these 2 stitches together by inserting the left-
hand needle into the front of them from left to
right and knitting them together through their
back loops with the right needle (Figure 1),then
knit the next stitch (Figure 2); repeat from * until
all of the stitches are secured. Cut the working
yarn and pull up the last loop to secure the end
of the bound-off stitches.
"AKE 5 STITCHES TOGETHER
'HEN MAKE 5 NEW STITCHES
«.-< 5 stitches together but leave these 5 stitches on the
fefi needle (Figure 1), yarnover, then knit the same 5 stitches
together again, yarnover, then knit the same 5 stitches together
. - 5 stitches on right needle; Figure 2), then slip the original
S seiches off the left needle (Figure 3).
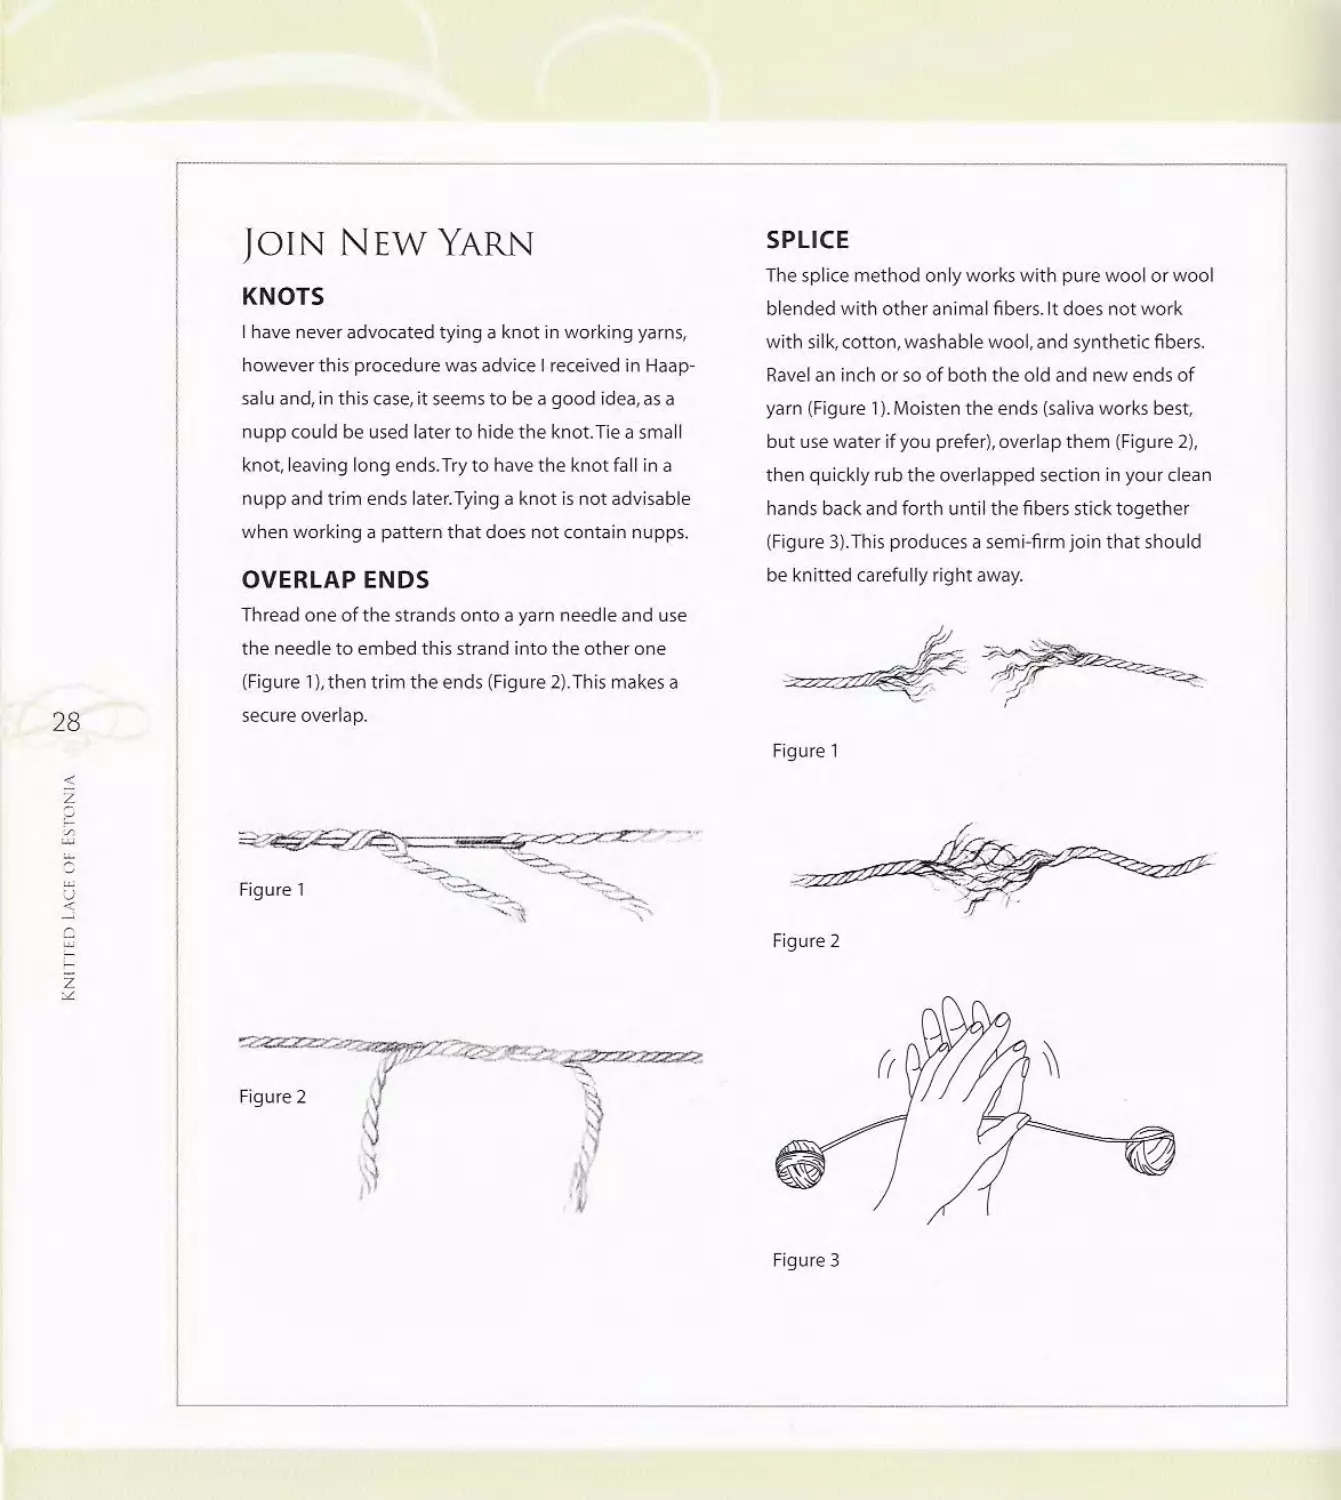
JOIN NEW YARN
KNOTS
I have never advocated tying a knot in working yarns,
however this procedure was advice I received in Haap-
salu and, in this case, it seems to be a good idea, as a
nupp could be used later to hide the knot.Tie a small
knot, leaving long ends.Tryto have the knot fall in a
nupp and trim ends later.Tying a knot is not advisable
when working a pattern that does not contain nupps.
OVERLAP ENDS
Thread one of the strands onto a yarn needle and use
the needle to embed this strand into the other one
(Figure 1),then trim the ends (Figure 2).This makes a
secure overlap.
SPLICE
The splice method only works with pure wool or wool
blended with other animal fibers. It does not work
with silk, cotton, washable wool, and synthetic fibers.
Ravel an inch or so of both the old and new ends of
yarn (Figure 1). Moisten the ends (saliva works best,
but use water if you prefer), overlap them (Figure 2),
then quickly rub the overlapped section in your clean
hands back and forth until the fibers stick together
(Figure 3).This produces a semi-firm join that should
be knitted carefully right away.
Figure 1
Figure 3
calculate Stitch
count for Lace edge
There are two ways to calculate the number of stitches
to cast on for the lace edge. Each method gives rough-
ly the same result, and I like to work through both to
confirm that my calculations are correct.
To begin, you’ll need to know the number of stitches
across the width of the center piece, including the
frame stitches. You’ll also need to count the number
of edge stitches along the length of the center piece,
again including the frame rows. Because the first
stitch of every row was slipped, there will be half as
many edge stitches as there are rows of knitting. For
example, if the center section is 300 rows long, there
will be 150 edge stitches.
METHOD 1
This method calculates the total number of stitches
needed for the entire length of the edge.
A = number of stitches in width x 2
В = number of edge stitches in length x 2
C = A + B
D = C + 5
Ease at corners = 18 extra stitches at each corner x 4
corners = 72
Total = C + D + 72
You’ll need to divide the total in half to get the num-
ber of stitches for each half of the edging (the top or
bottom plus one side). Finally, round the resulting
number up or down to achieve the closest stitch
count that represents a full number of pattern
repeats. For example, let’s say that our shawl is
121 stitches wide and 150 edge stitches (300 rows)
long, and let’s say that we want to use a pattern
with a 10-stitch-plus-l repeat for the edging.
A = 121 x2 = 242
В = 150x2 = 300
C = 242 + 300 = 542
D = 542 + 5 = 108
Ease at comers = 18 x 4 = 72
Total = 542+108 + 72 = 722
To work the edging in two halves, divide 722 by 2
to get the number of stitches in each half (361).
In this case, 361 stitches work perfectly for each
half. To obtain a number that fits the 10-stitch
lace pattern repeat evenly, we’d round down to 361
stitches for each half or up to 371 if out total were
between 362 and 370.
METHOD 2
This method calculates the number of stitches
needed for each half of the edge.
A = number of stitches in width +18 (for 2 corners)
В = number of edge stitches on one side + 3
C = Bx4
D = C +18 (for 2 corners)
Total = A + D
You’ll need to round the total number up or down
to be divisible by pattern repeat for the grand total.
In our example, we have the following numbers:
A = 121 + 18 = 139
B = 150 + 3 = 50
C = 50 x 4 = 200
D = 200+18 = 218
Total = 139+ 218 = 357
Rounding to the nearest number divisible by 10
+ 1 gives us 361 stitches for each half—the same
number calculated in the first method.
KNIT THE LACE EDGE
Cast on for the lace edge using the knitted cast-
on (see page 23) as for the main piece, but work
it with two strands of yarn held together to add
weight and strength to this cast-on edge. The
Haapsalu knitters may choose to use a needle one
to two sizes larger than was used for the center
for this cast on and a needle one size smaller than
the cast-on needle for knitting the lace. However, I
usually knit my shawls using the same size needle
for the center and lace edgings. Break off one
strand and continue with a single strand. Knit two
rows. Begin the lace edge pattern at the point in
the pattern where the lace edge scallops outward.
For most edging patterns, this will occur along a
line of double decreases. However, you’ll want to
begin the edge with a single decrease—“si 1, kl.
psso” at the beginning of the row, and “k2tog” at
the end of the row. The edge stitches on these lacy
edges are not slipped. All subsequent decreases at
this point in the repeat usually will be double de-
creases or two single decreases separated by a knit
stitch. Most true Haapsalu lace edges are worked in
garter stitch (right-side rows are pattern rows and
wrong-side rows are simply knitted).
Work the lace edging for the desired width, then
bind off with a single strand of yarn with the wrong
side facing, using the k2tog method (see page 27).
Join Lace edge
to Center Section
The lace edge is always joined so that the widest
part of a scallop is centered over two opposite
corners and so that the two sections are joined at
the other two opposite corners. (If the lace edge is
made in one piece, there is a join at just one cor-
ner.) The two pieces are sewn onto the center with
a single strand of yarn that is attached to the ball.
The sewing is always done with the yarn attached
to the ball instead of cutting a separate length (that
may not be long enough to work the entire seam).
The sewing yarn is not cut until both pieces of the
lace edge have been attached and eased around all
four corners to ensure that it will stretch as much
as the knitted stitches.
RECTANGULAR SHAWLS
I learned the following method of sewing the lace to
the center of a rectangular sail from Aime Edasi in
Haapsalu.
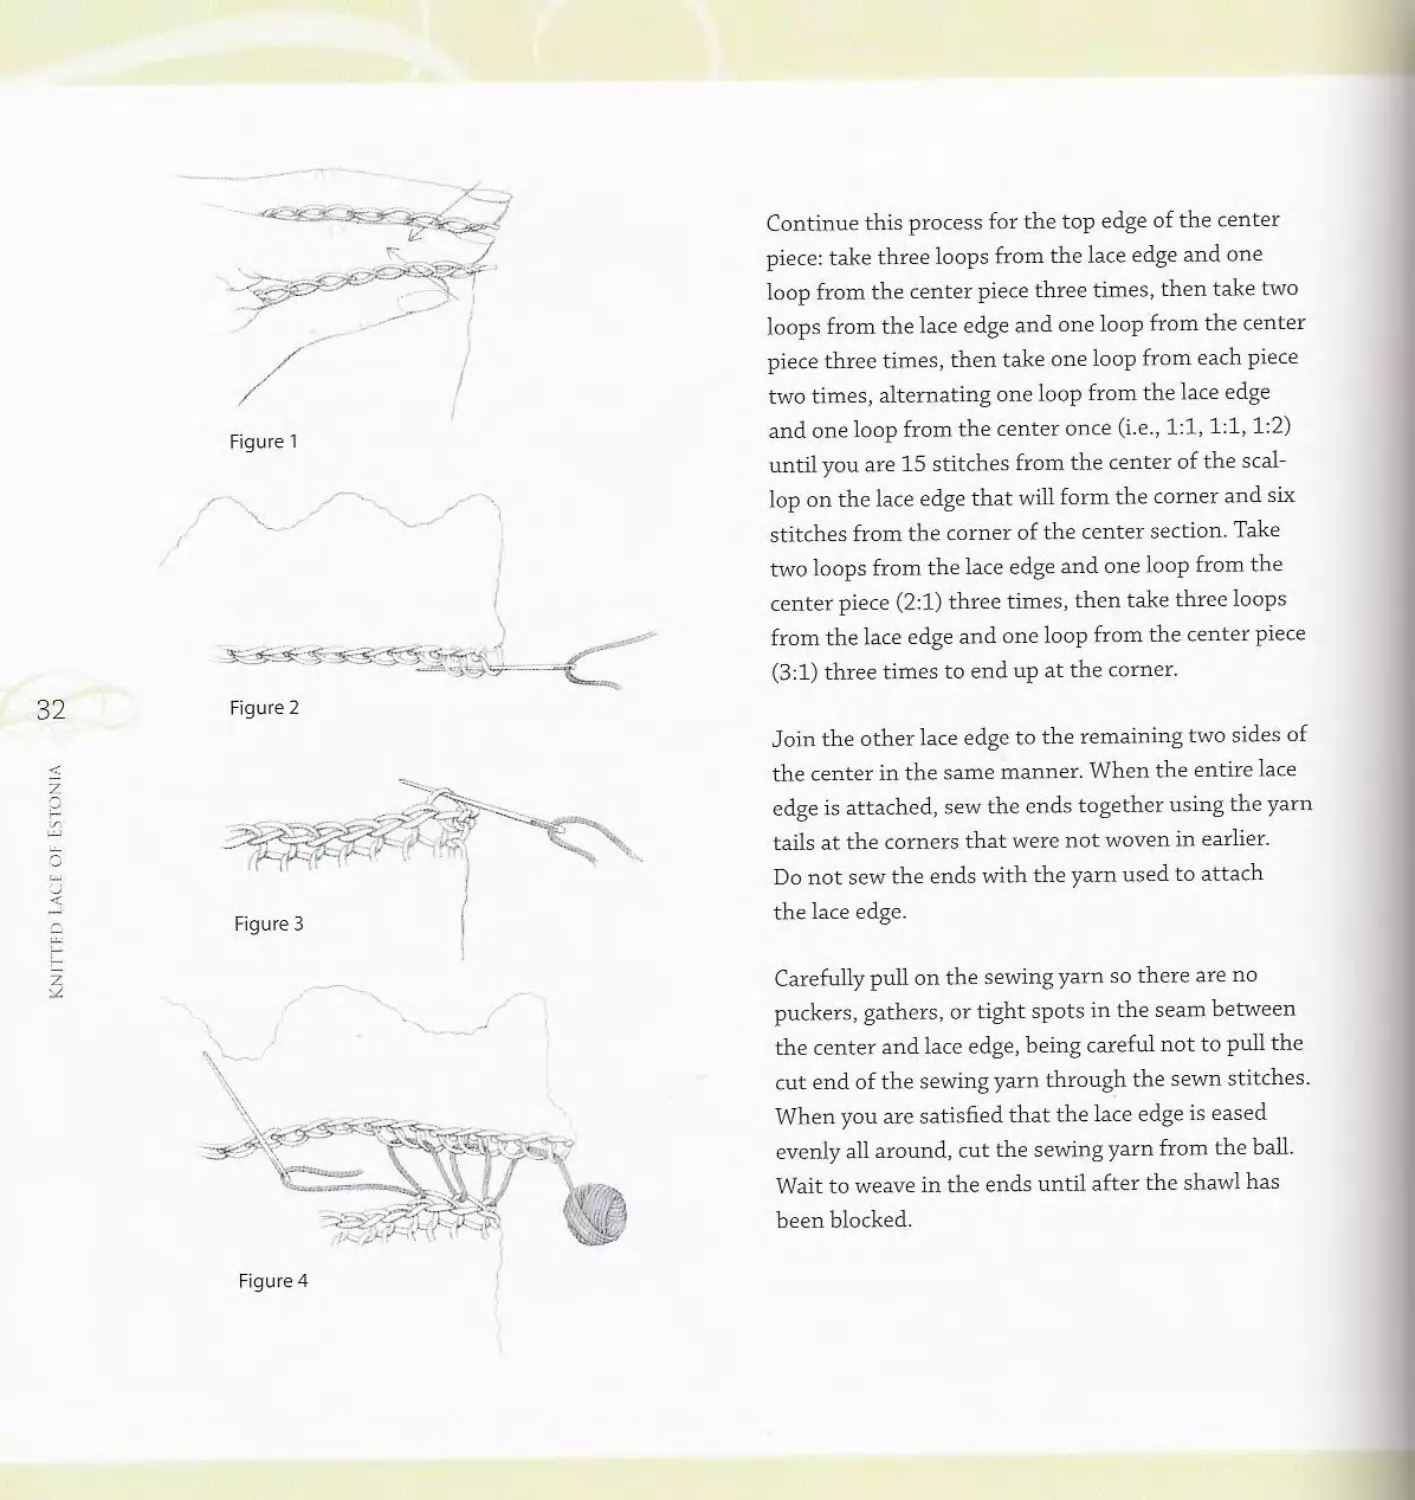
Hold the edge of the center section between your
thumb and index finger and the bind-off row of the
lace edge between your index and middle fingers
so that the right sides of the two pieces are facing
together (Figure 1, page 32; the arrows show the
direction the threaded needle will go through each
piece). The center piece is closest to you. The arrows
indicate the path of the needle while seaming. Begin
at the lower left corner of the center piece (the left
edge of the cast-on row). With the yarn from the ball
threaded on a tapestry needle, bring the threaded
needle from back to front through each of the first
three loops of the lace edge (Figure 2), then through
the first loop of the center piece from front to back
Figure 3). Repeat this three-one (3:1) ratio two more
times (three times total)—nine stitches of the lace
edge and three stitches of the center section have been
Coined (Figure 4). Next, take two loops from the lace
edge and one loop from the center piece. Repeat this
two-one ratio (2:1) two more times (three times total).
Then work up the side of the shawl, alternating taking
one loop from each piece two times, then two loops
from the lace edge and one loop from the center piece
i.e., alternate 1:1,1:1, 2:1) until you are 15 stitches
from the center of the scallop on the lace edge that will
form the corner and six stitches from the comer of the
center section. Next, take two loops from the lace edge
and one loop from the center piece three times, then
take three loops from the lace edge and one loop from
the center piece three times.
Because you rounded the number of stitches to
cast-on for the edge to get full repeats of the lace
pattern, you may need to make small adjustments in
the sewing so that you end up at the corner stitch of
the center piece and the exact center of a scallop on
the lace edge. Make adjustments by taking more or
fewer loops along the edge piece as needed; do not
skip any loops on either piece or you’ll end up with
unsightly holes where the lace is attached to the
center piece.
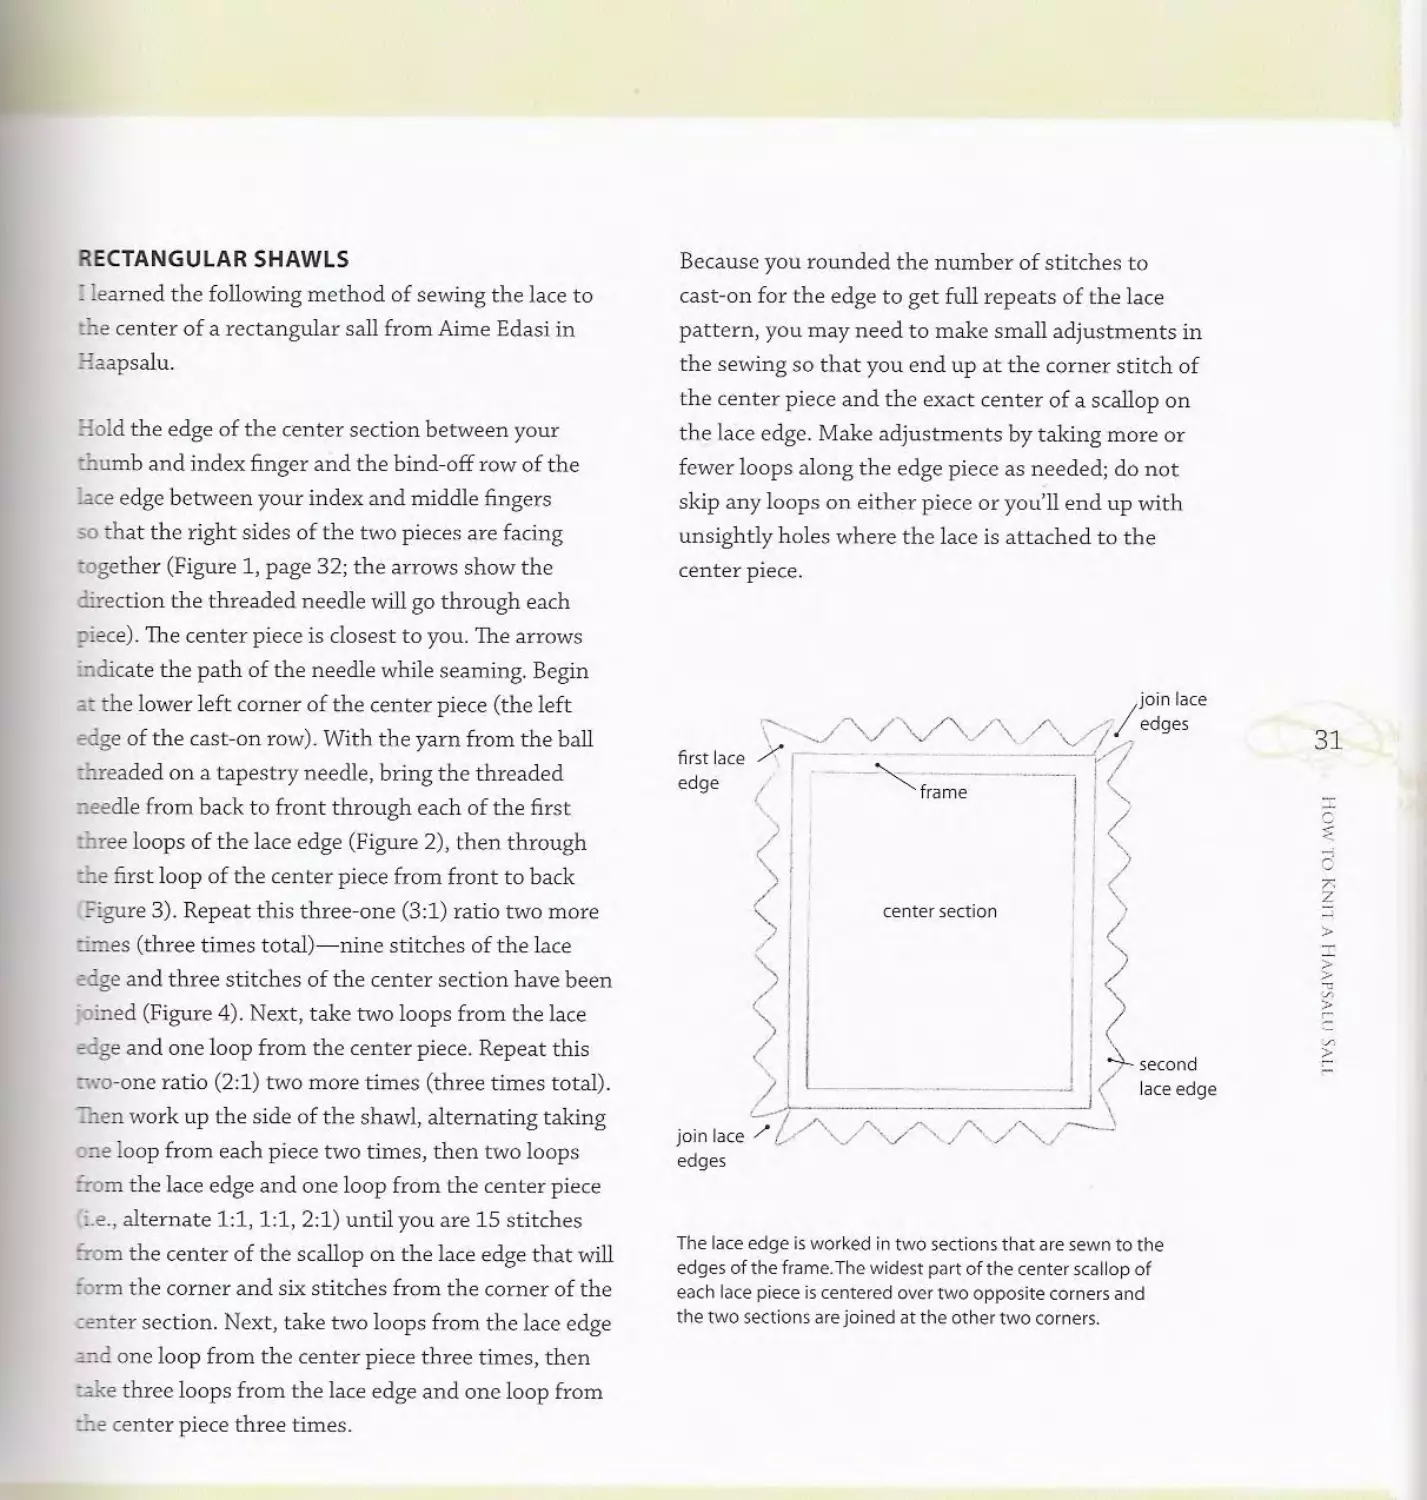
The lace edge is worked in two sections that are sewn to the
edges of the frame.The widest part of the center scallop of
each lace piece is centered over two opposite comers and
the two sections are joined at the other two corners.
31
Figure 1
Figure 2
Figure 3
Figure 4
Continue this process for the top edge of the center
piece: take three loops from the lace edge and one
loop from the center piece three times, then take two
loops from the lace edge and one loop from the center
piece three times, then take one loop from each piece
two times, alternating one loop from the lace edge
and one loop from the center once (i.e., 1:1,1:1,1:2)
until you are 15 stitches from the center of the scal-
lop on the lace edge that will form the corner and six
stitches from the corner of the center section. Take
two loops from the lace edge and one loop from the
center piece (2:1) three times, then take three loops
from the lace edge and one loop from the center piece
(3:1) three times to end up at the corner.
Join the other lace edge to the remaining two sides of
the center in the same manner. When the entire lace
edge is attached, sew the ends together using the yarn
tails at the corners that were not woven in earlier.
Do not sew the ends with the yam used to attach
the lace edge.
Carefully pull on the sewing yarn so there are no
puckers, gathers, or tight spots in the seam between
the center and lace edge, being careful not to pull the
cut end of the sewing yarn through the sewn stitches.
When you are satisfied that the lace edge is eased
evenly all around, cut the sewing yarn from the ball.
Wait to weave in the ends until after the shawl has
been blocked.
SQUARE SHAWLS
The following method for sewing the lace edge to the
center of a square shawl comes from Haapsalu Rati-
kud by Linda Elgas. Linda recommends to work the
corners as for rectangular shawls, but for the areas
between the corners, take one stitch from the lace
edge and one stitch from the center three times then
two stitches from the lace edge and one from the cen-
ter once (i.e,.l:l, 1:1,1:1, 2:1). This system is worked
between the comers on all sides.
For a square shawl, it is necessary to work an even
number of repeats for the lace edge. This will allow
for the same number of “points” on the edge between
the corners, one point at each corner (made up of a
whole repeat at two of the corners and half repeats,
sewed together to make a whole repeat, at the other
two corners; or whole points at three corners and
two half repeats at the last corner if you knitted the
edge in a single piece). You may need to adjust your
calculated stitch count to achieve this. If the number
you calculated for the number of stitches to cast on is
close to the number that will give you an even number
of repeats, round to the nearest number. If it is right
in the middle, round up to the number that will give
an even number of repeats. For example, if your total
is 111 stitches, round up to 121 (12 repeats of 10
stitches plus 1 stitch).
FINISHING
Wash the shawl in warm water (the Estonians use
rain water) and a mild soap. Squeeze gently, rinse and
squeeze again, never wring. While the shawl is still
wet, “dress” (block) it on a frame made of wooden
boards with nails at even intervals that are lashed
together at the corners or pin it out onto a carpet
covered with a sheet or towel (see page 35). An alter-
native that isn’t used in Estonia but is popular among
American knitters is to use blocking wires. Either way,
allow the shawl to thoroughly air-dry before moving
it, then weave in the loose ends.
Contemporary
Knitted-On
lace Edge
Although the traditional Haapsalu sail has a sewn-on
lace edge and the knitters in Haapsalu believe that
is the “correct” way to make a shawl, other Estonian
knitters pick up stitches around the edges of the cen-
ter section and work the lace edge in the round. This
method is described in Leili Reimann’s books, and I
suspect it was developed with the invention of circu-
lar knitting needles, as this type of edge couldn’t be
worked on single-point needles. I think of this way of
adding a lace edge as a contemporary or modern edge
treatment. The corners are formed by miters in which
increases are worked into the pattern at each corner
34
to allow the edge to lay flat. I learned this method of
adding edges to shawls from my friend Hilja Aavik, a
very skilled lace knitter and teacher from Tallinn.
Begin by choosing a center stitch pattern, knitting
a sample to determine your gauge, and deciding on
the number of stitches to cast-on, including frame
stitches as described for the traditional method on
pages 29-30.
In preparation to pick up stitches for the edging, the
center section begins with a provisional cast-on (see
page 37). Using a smooth cotton yam in a contrasting
color, make a crochet chain at least 10 loops longer
than the number of stitches you want to cast on. Cut
the yam and pull the tail through the last loop to
secure it. Tie a knot in this tail so you’ll be able to find
it later. With the working yarn and beginning and
ending several loops from the ends of the chain, pick
up and knit one stitch in each bump on the underside
of the chain until you have the required number of
stitches.
Edge Stitches
Except for the very first row after the cast-on, begin
every row with a slipped stitch (knit the first stitch
of the first row) to form a selvedge edge that's easy
to see when picking up stitches later. Slip this stitch
purlwise with the yam in front, then return the yarn
to the back between the two needles in preparation to
knit the next stitch (see page 23).
Center Pattern
Beginning with a few rows of garter stitch, work the
center pattern as for a traditional shawl (see page
22), ending having worked the last row of the pattern
repeat (a wrong-side row), then work a few rows of
garter stitch. Do not bind off the stitches.
Lace Edge
For the lace edge to be worked in the round, a circular
needle is needed. A few rounds of garter stitch are
sometimes worked after the edge is picked up, fol-
lowed by the lace pattern in which a patterned round
is followed by a plain knit round to produce a stock-
inette-stitch background. To produce a garter-stitch
background for the lace edge, purl the rounds between
the patterned rounds. Although purling alternate
rounds produces a garter-stitch ground that gives
the same look as the traditional shawls (in which the
edging is worked separately and sewn in place), this is
rarely done by Estonian knitters.
Determine the number of stitches needed in your
pattern repeat for the edge (for example, a multiple of
10 stitches plus 2 stitches for each of the four sides of
the shawl). With a circular needle and the right side
of the center facing, knit across the stitches at the top
of the piece (the stitches that are still on the needle),
placing a unique marker after the first stitch and
increasing 10 to 15 more stitches (whatever is needed
to give the correct stitch count for the pattern) to
give some fullness at the top. Next, pick up and knit
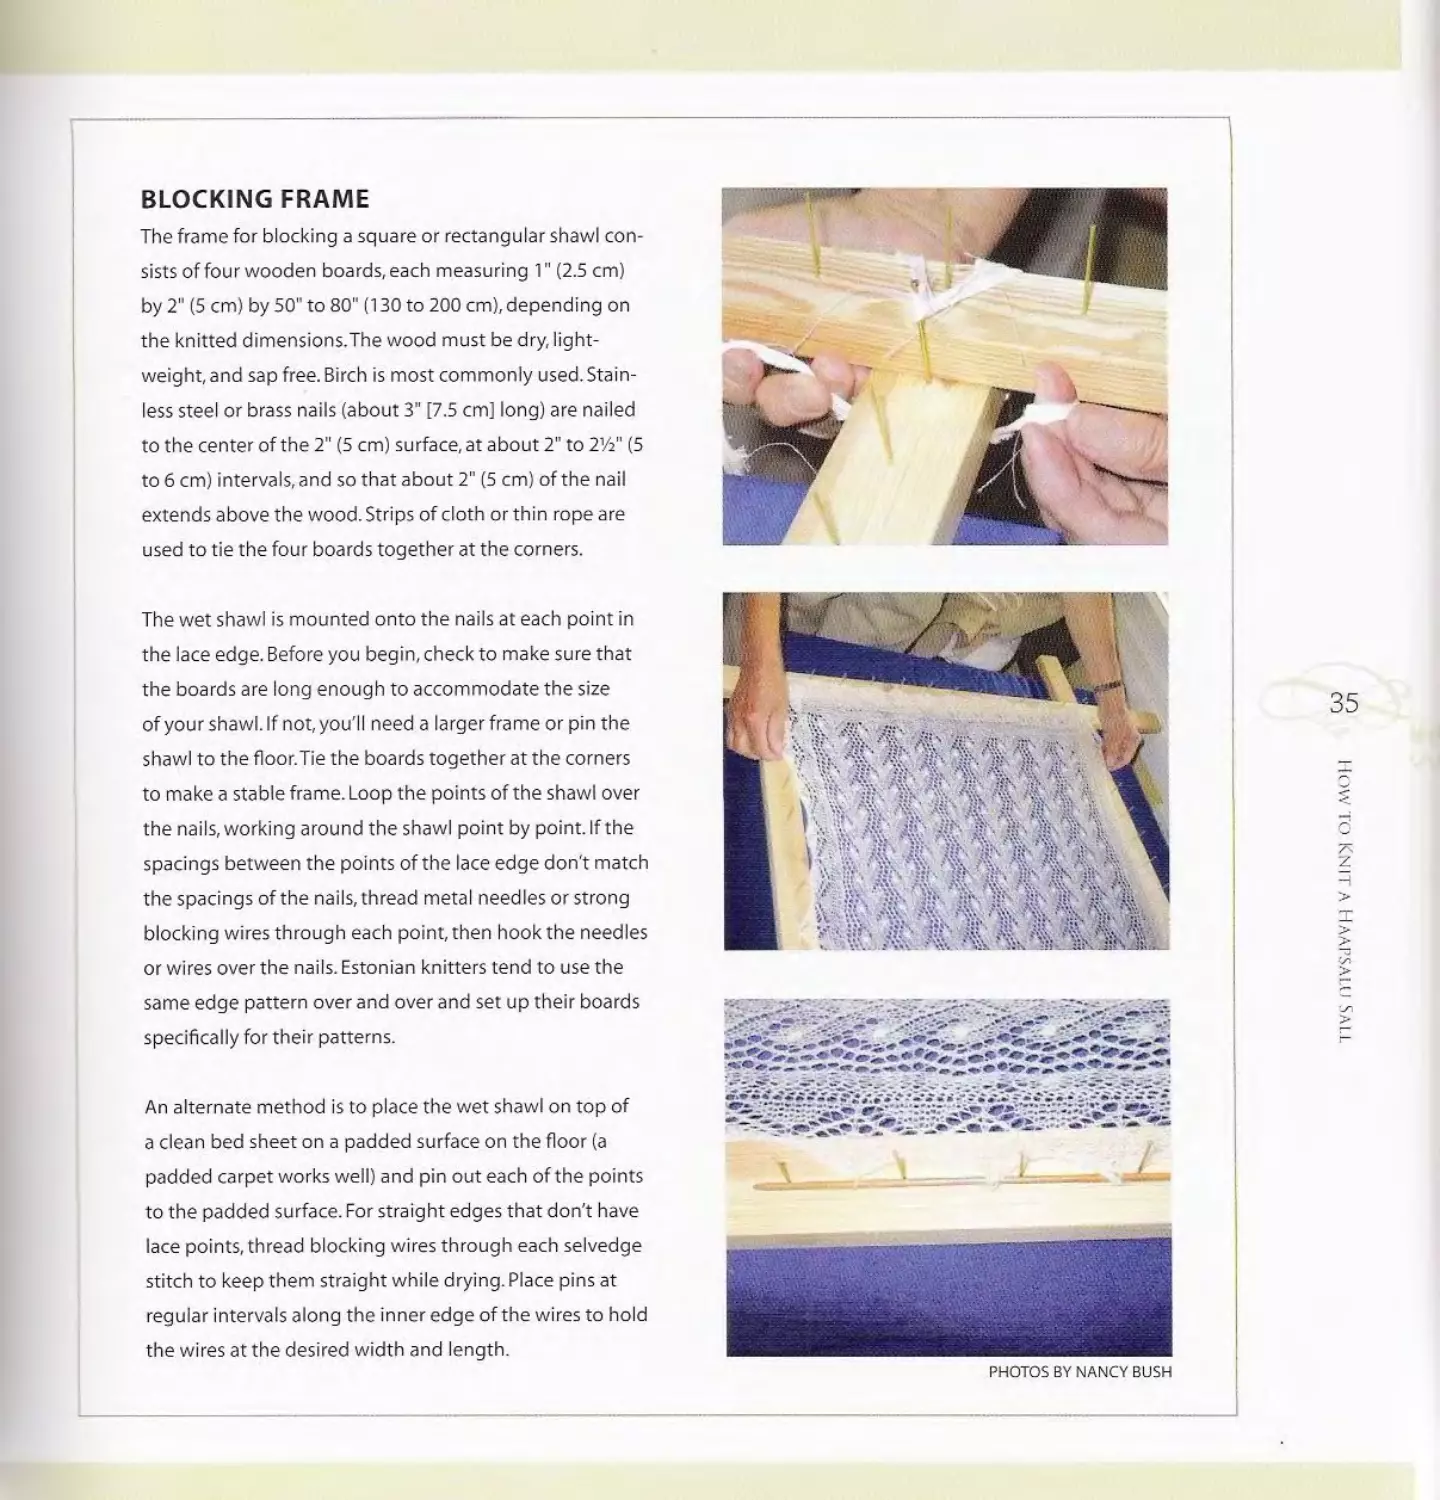
BLOCKING FRAME
The frame for blocking a square or rectangular shawl con-
sists of four wooden boards, each measuring 1" (2.5 cm)
by 2" (5 cm) by 50" to 80" (130 to 200 cm), depending on
the knitted dimensions.The wood must be dry, light-
weight, and sap free. Birch is most commonly used. Stain-
less steel or brass nails (about 3" [7.5 cm] long) are nailed
to the center of the 2" (5 cm) surface, at about 2" to 214" (5
to 6 cm) intervals, and so that about 2" (5 cm) of the nail
extends above the wood. Strips of cloth or thin rope are
used to tie the four boards together at the corners.
The wet shawl is mounted onto the nails at each point in
the lace edge. Before you begin, check to make sure that
the boards are long enough to accommodate the size
of your shawl. If not, you'll need a larger frame or pin the
shawl to the floor.Tie the boards together at the corners
to make a stable frame. Loop the points of the shawl over
the nails, working around the shawl point by point. If the
spacings between the points of the lace edge don't match
the spacings of the nails, thread metal needles or strong
blocking wires through each point, then hook the needles
or wires over the nails. Estonian knitters tend to use the
same edge pattern over and over and set up their boards
specifically for their patterns.
An alternate method is to place the wet shawl on top of
a clean bed sheet on a padded surface on the floor (a
padded carpet works well) and pin out each of the points
to the padded surface. For straight edges that don’t have
lace points, thread blocking wires through each selvedge
stitch to keep them straight while drying. Place pins at
regular intervals along the inner edge of the wires to hold
the wires at the desired width and length.
PHOTOS BY NANCY BUSH
stitches along the left side of the center, placing an-
other marker after the first stitch. Pick up with a ratio
of three stitches for every two selvedge stitches (see
page 38) along the entire selvedge edge to end with
about a third more stitches picked up than there are
selvedge stitches. For a fuller edge, pick up one stitch
from the first stitch, two from the second stitch, and
two from the third stitch, and repeat along the entire
selvedge edge.
When you reach the cast-on edge, you’ll need to
remove the waste yarn to expose the live stitches
from the provisional cast-on at the bottom of the
center piece. Find the knotted tail of the crochet
chain, carefully pull this end of the waste yarn out of
the last crocheted stitch, then gently pull the waste
yarn to expose the cast-on stitches one at a time and
place these stitches onto an empty needle. Count the
stitches to make sure that you’ve picked up one live
stitch for every stitch that was picked up in the chain.
Knit across these stitches, increasing the same num-
ber of stitches as you did at the top edge and placing a
third marker after the first stitch.
Pick up stitches along the other selvedge edge as
before, placing a fourth marker after the first picked-
up stitch on this edge and ending at the upper right
corner of the center section.
The stitch before each marker is a corner stitch, which
is where increases will be worked to miter the cor-
ners. The unique-colored marker after the first corner
stitch is to alert you that you are at the beginning of
the round as well as to mark the first corner stitch.
FINISH THE LACE EDGE
If the shawl has a lace edge, pick up each doubled
outer edge stitch on the lace edge with a knitting
needle, all around the shawl and pull on it slightly to
open up the edge stitches. This rounds the points of
the lace edge and is very important. Carefully fold the
dry shawl so that the points of the lace edge line up
with opposite points. Estonian knitters traditionally
place a pillow on top of the folded shawl and allow it
to "rest"for several hours or overnight.
Rather than using live stitches for the corners, you
may pick up one new stitch at each of these comer
points, including the picked-up stitches in the stitch
count. Always use markers at each comer to keep
track of these important comer stitches.
You may purl one round, then knit one round,
then purl one more round. These few rows of garter
stitch obscure the picked-up and increased stitches
around the perimeter of the center section. Or, you
may simply begin the lace edge pattern on the next
round. 1 have seen shawls from Estonia done
either way.
Eollow the pattern for the lace edge, remembering
to alternate each pattern round with a plain knit
(or purl) round, and increasing at each corner as
indicated until there are a full number of pattern re-
peats. Work four or six rounds (or more) in pattern
as established without increasing at the corners.
Complete when edge is desired width and end hav-
ing worked an even-numbered round.
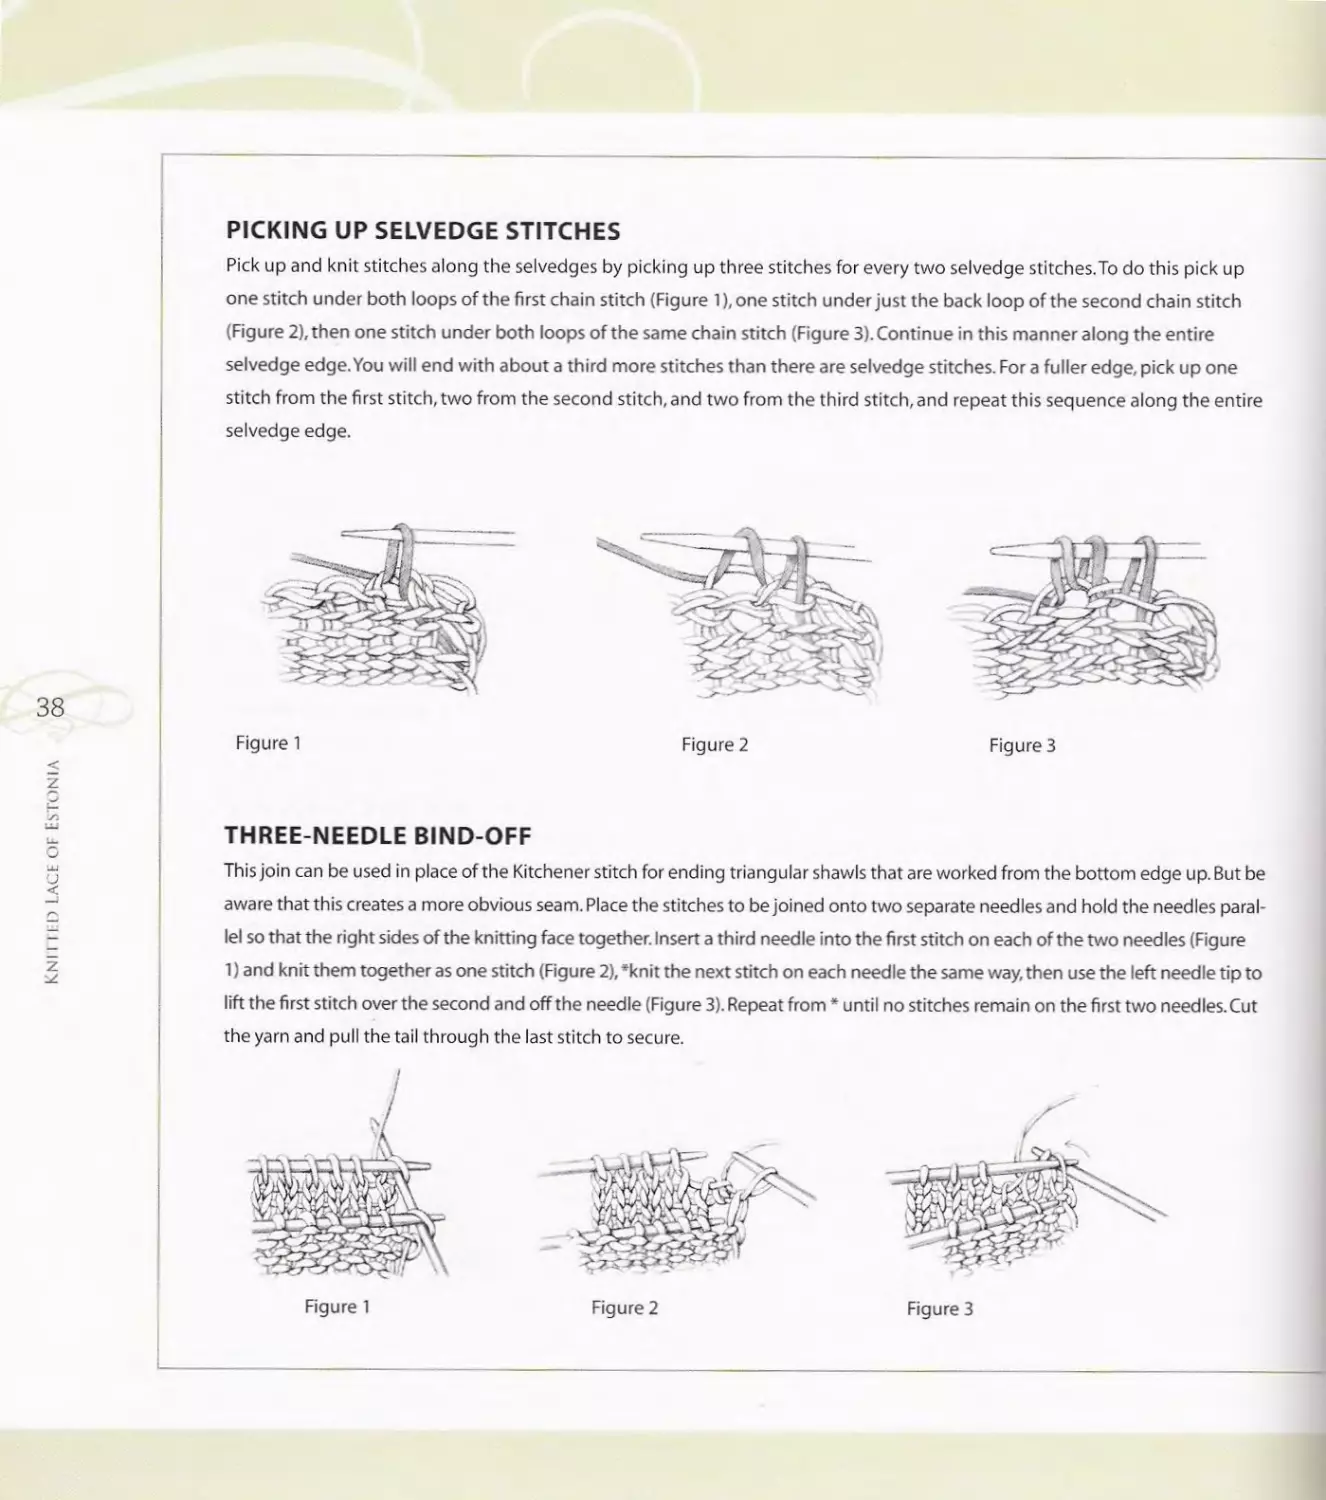
Cast On
CROCHET CHAIN
PROVISIONAL CAST-ON
This is the method I was taught in Estonia by
Hilja Aavik, my first Estonian lace teacher. Using
a contrast color yarn, preferably cotton, begin by
making a crochet chain at least 10 loops longer
than your required stitch count. Pull the tail up
through the last loop to secure it.Tie a knot in
the tail so that you'll be able to find it later. With
working yarn, pick up and knit the required
stitches in the bumps in the underside of the
chain (Figure 1),beginning and ending several
loops from each end of the chain.When it's time
to expose the loops of the picked-up stitches,
find the knotted tail of the contrast yarn, unloop
it from the last crochet stitch, then pull this tail to
expose the live stitches (Figure 2), placing them
on a needle as you go.
Bind off
Use the k2tog bind-off (see page 27) with the yarn
doubled. This doubled outer edge gives strength
and adds weight to the finished shawl, just as the
doubled cast-on does for the traditional style shawl.
Cut the yarn and pull the tail through the loop to
secure.
W.ash and block as for a traditional shawl (see
?age35).
Figure 2
PICKING UP SELVEDGE STITCHES
Pick up and knit stitches along the selvedges by picking up three stitches for every two selvedge stitches.To do this pick up
one stitch under both loops of the first chain stitch (Figure 1),one stitch under just the back loop of the second chain stitch
(Figure 2), then one stitch under both loops of the same chain stitch (Figure 3). Continue in this manner along the entire
selvedge edge. You will end with about a third more stitches than there are selvedge stitches. For a fuller edge, pick up one
stitch from the first stitch, two from the second stitch, and two from the third stitch, and repeat this sequence along the entire
selvedge edge.
Figure 1
THREE-NEEDLE BIND-OFF
This join can be used in place of the Kitchener stitch for ending triangular shawls that are worked from the bottom edge up. But be
aware that this creates a more obvious seam. Place the stitches to be joined onto two separate needles and hold the needles paral-
lel so that the right sides of the knitting face together. Insert a third needle into the first stitch on each of the two needles (Figure
1) and knit them together as one stitch (Figure 2), *knit the next stitch on each needle the same way, then use the left needle tip to
lift the first stitch over the second and off the needle (Figure 3). Repeat from * until no stitches remain on the first two needles. Cut
the yarn and pull the tail through the last stitch to secure.
Figure 2
Figure 1
Figure 3
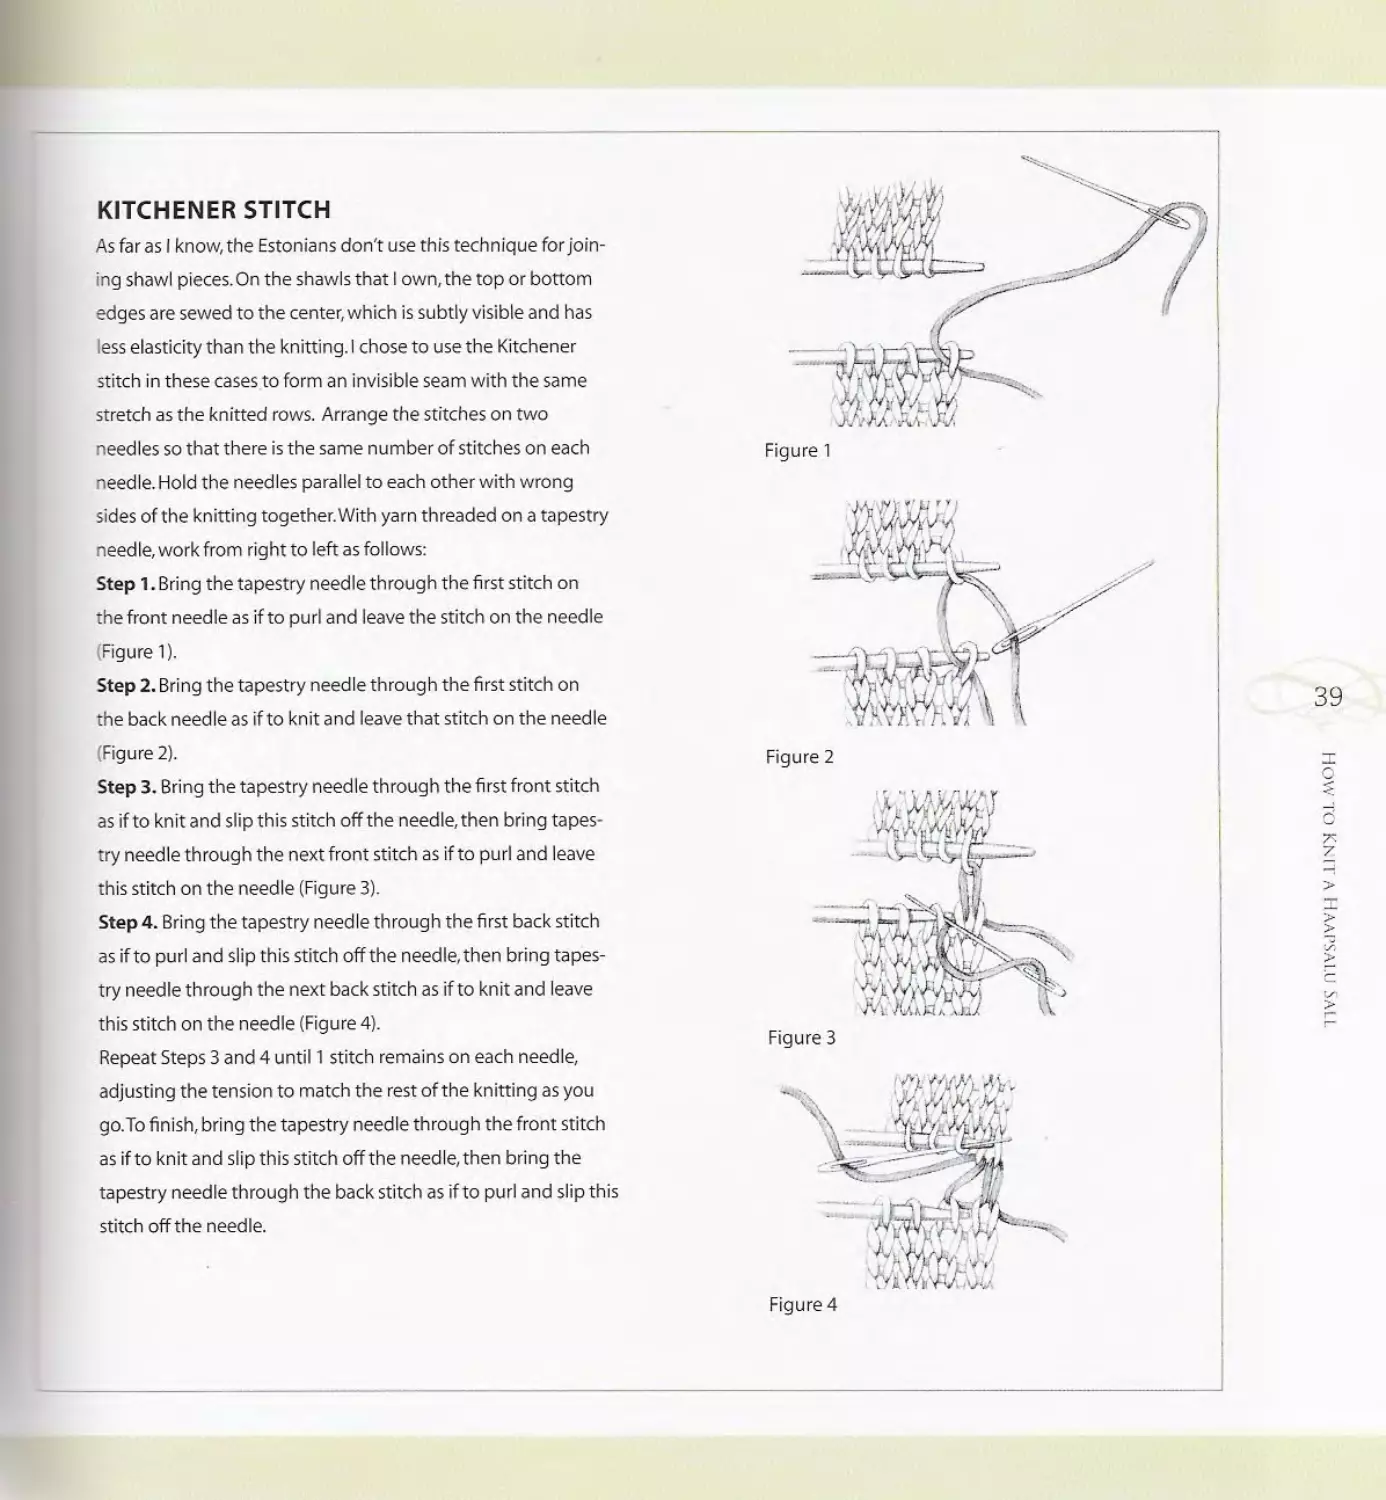
KITCHENER STITCH
As far as I know, the Estonians don't use this technique for join-
ing shawl pieces. On the shawls that I own, the top or bottom
edges are sewed to the center, which is subtly visible and has
less elasticity than the knitting. I chose to use the Kitchener
stitch in these cases to form an invisible seam with the same
stretch as the knitted rows. Arrange the stitches on two
needles so that there is the same number of stitches on each
needle. Hold the needles parallel to each other with wrong
sides of the knitting together. With yarn threaded on a tapestry
needle, work from right to left as follows:
Step 1. Bring the tapestry needle through the first stitch on
the front needle as if to purl and leave the stitch on the needle
(Figure 1).
Step 2. Bring the tapestry needle through the first stitch on
the back needle as if to knit and leave that stitch on the needle
(Figure 2).
Step 3. Bring the tapestry needle through the first front stitch
as if to knit and slip this stitch off the needle, then bring tapes-
try needle through the next front stitch as if to purl and leave
this stitch on the needle (Figure 3).
Step 4. Bring the tapestry needle through the first back stitch
as if to purl and slip this stitch off the needle, then bring tapes-
try needle through the next back stitch as if to knit and leave
this stitch on the needle (Figure 4).
Repeat Steps 3 and 4 until 1 stitch remains on each needle,
adjusting the tension to match the rest of the knitting as you
go.To finish, bring the tapestry needle through the front stitch
as if to knit and slip this stitch off the needle, then bring the
tapestry needle through the back stitch as if to purl and slip this
stitch off the needle.
Figure 1
Figure 4
/ *
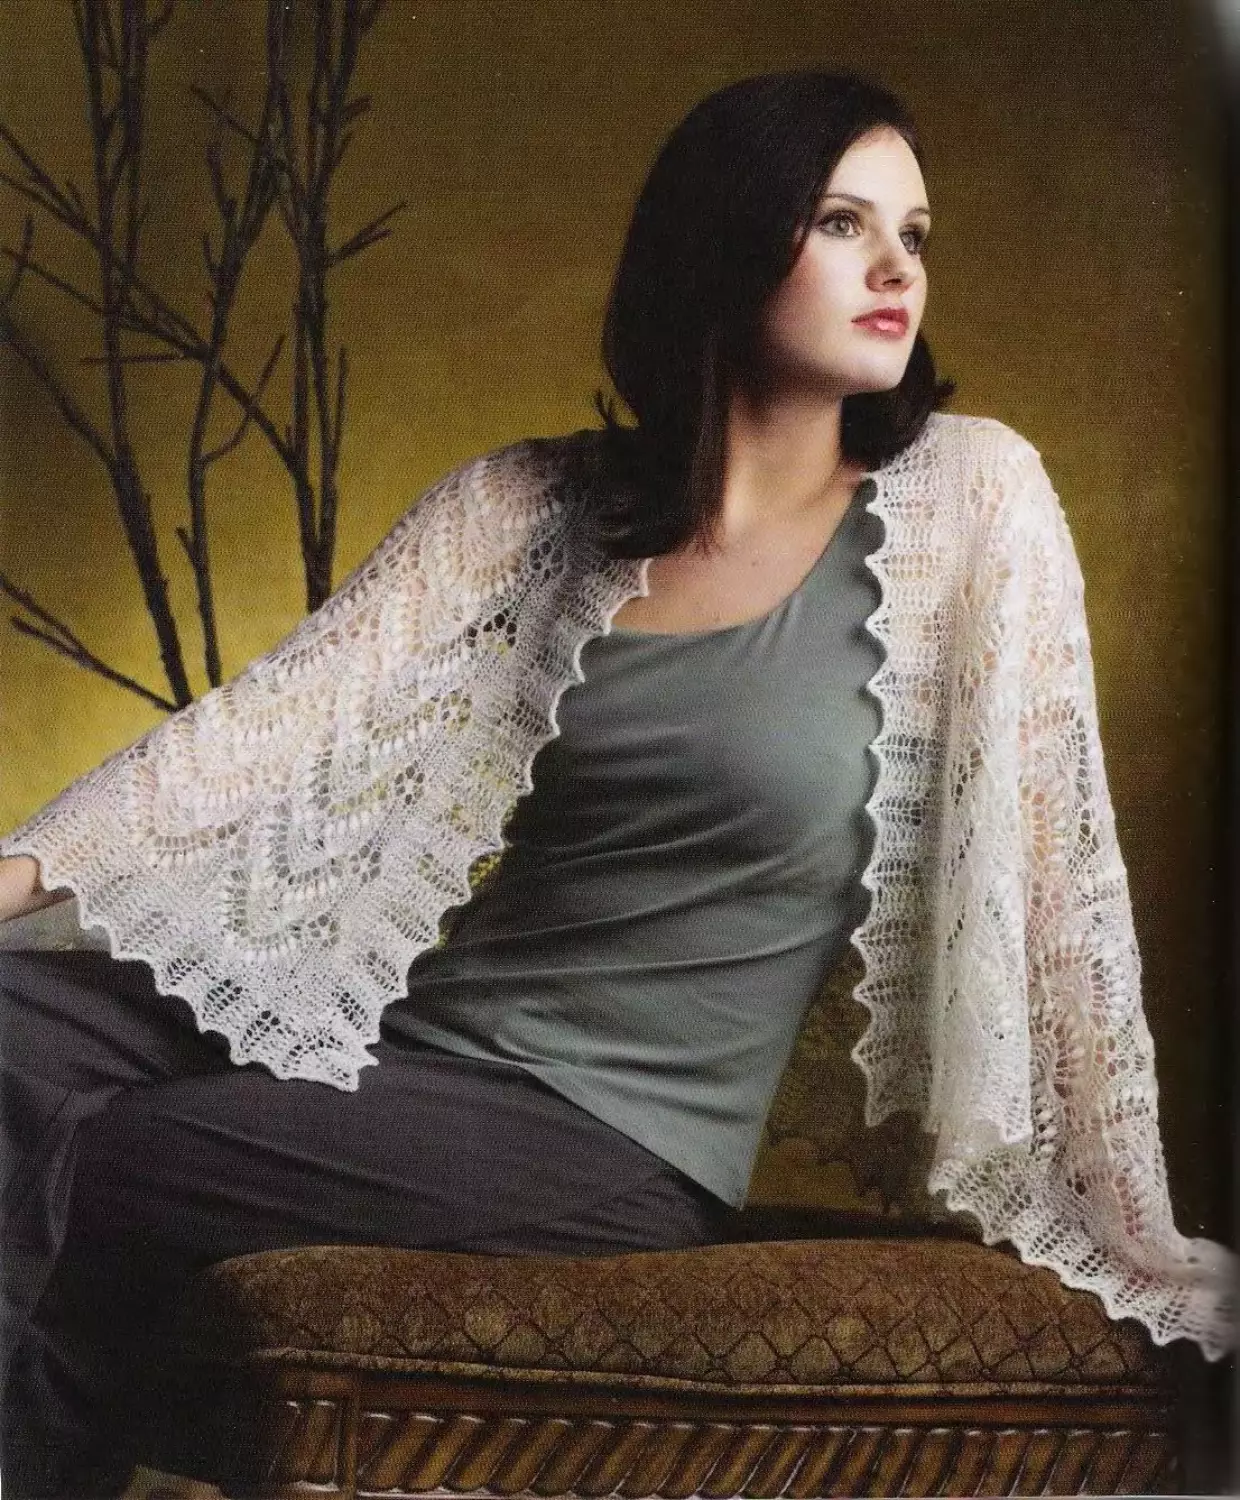
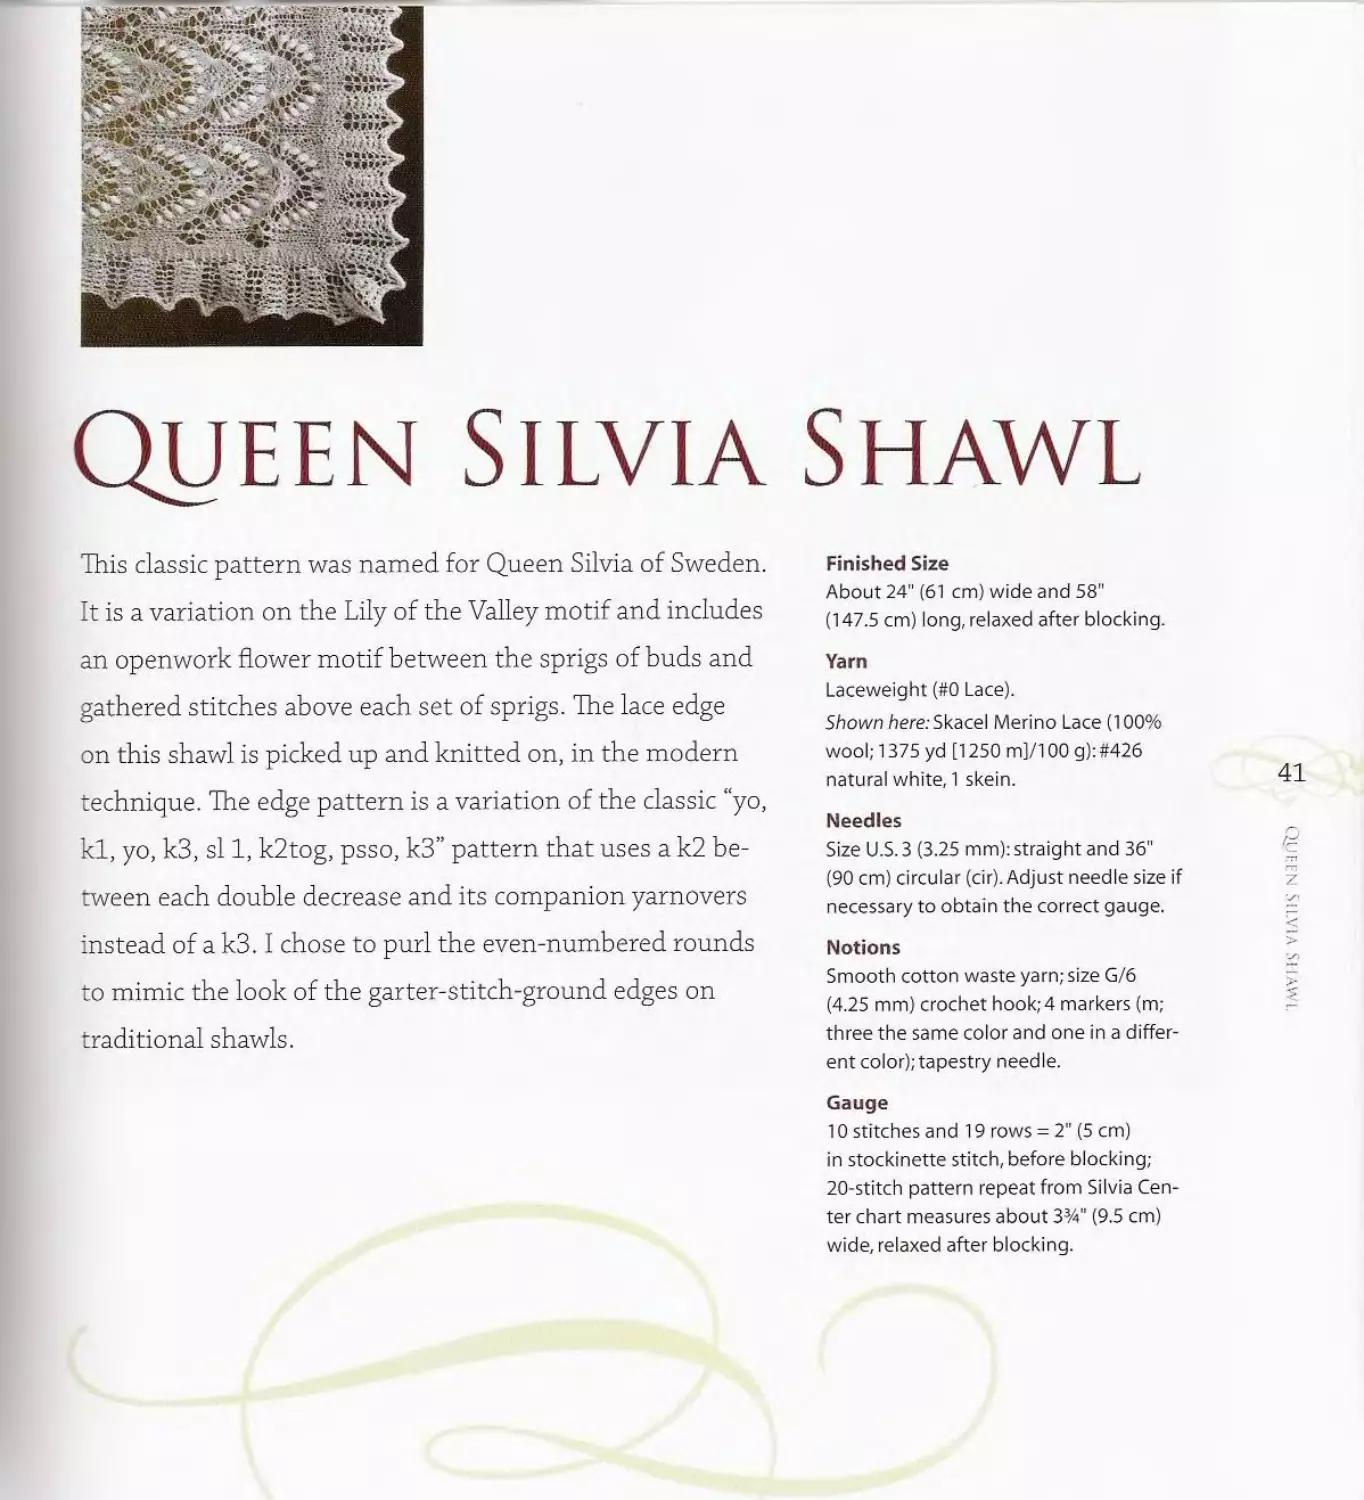
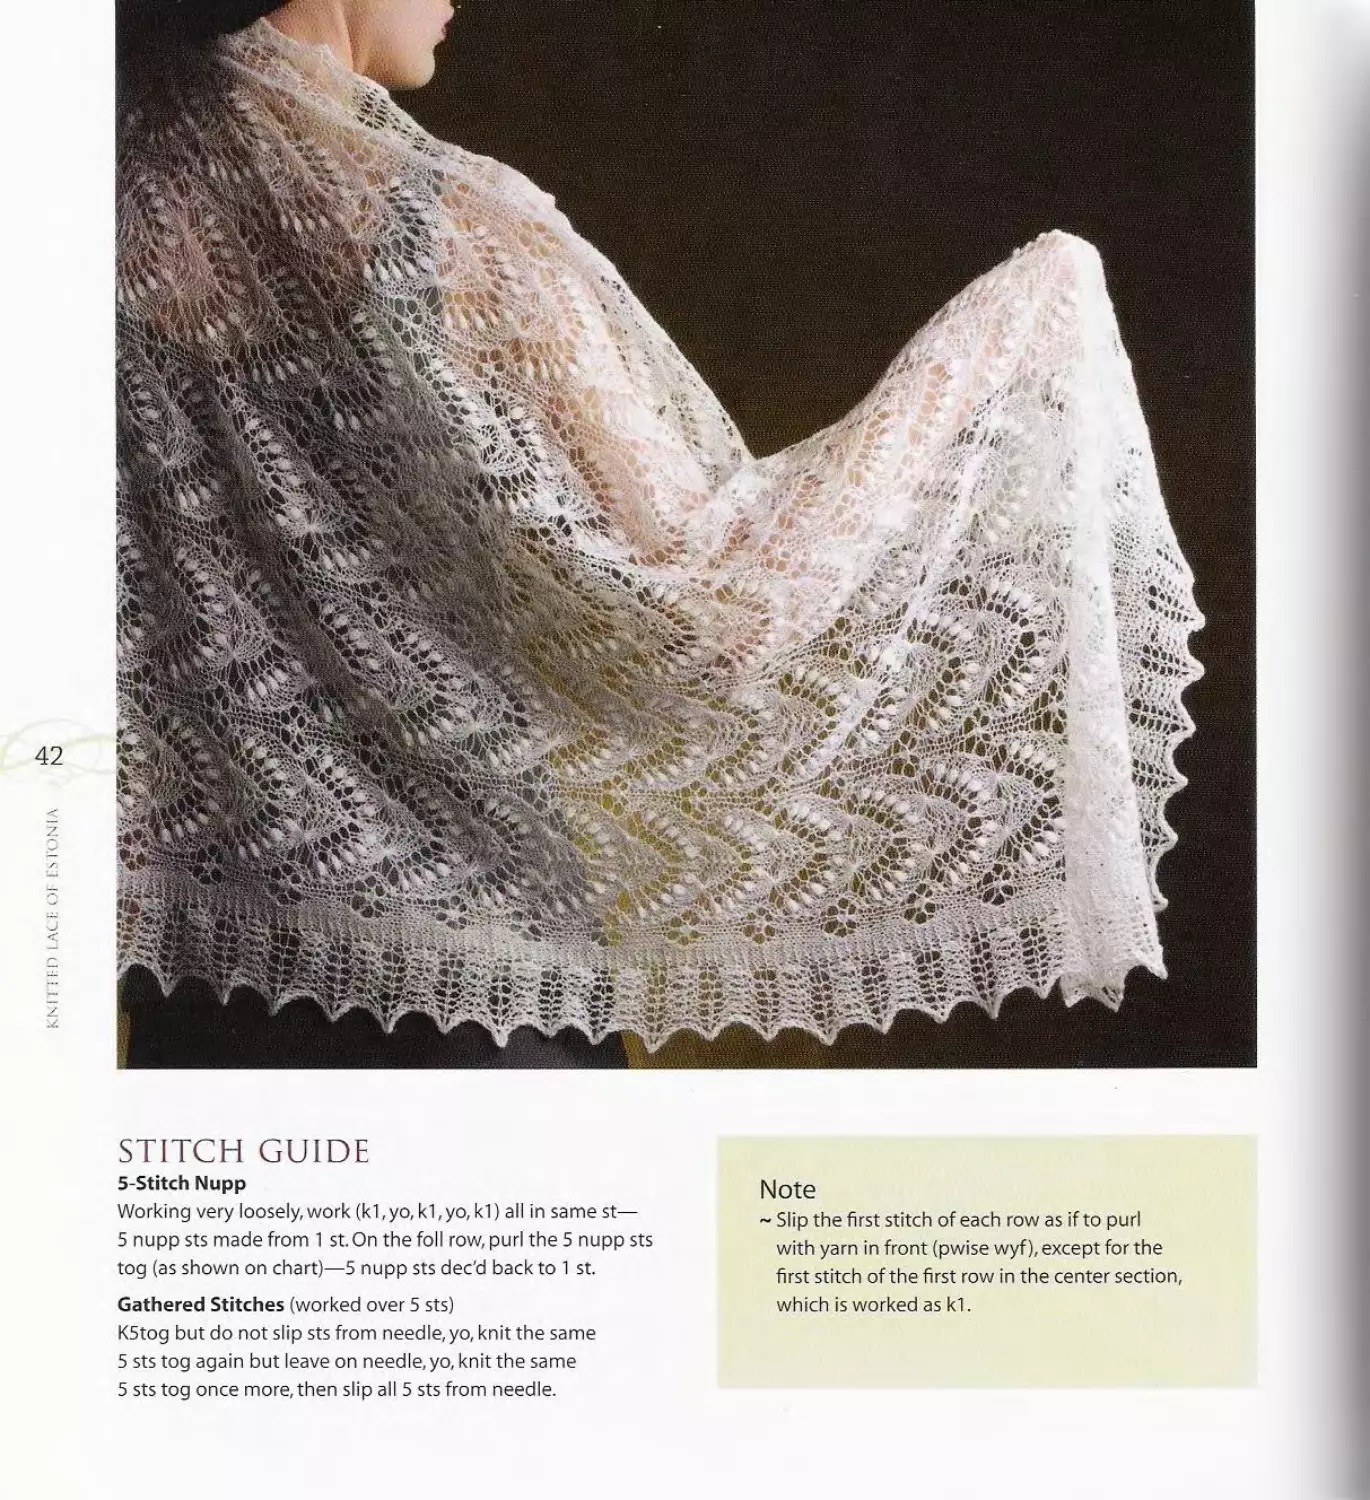
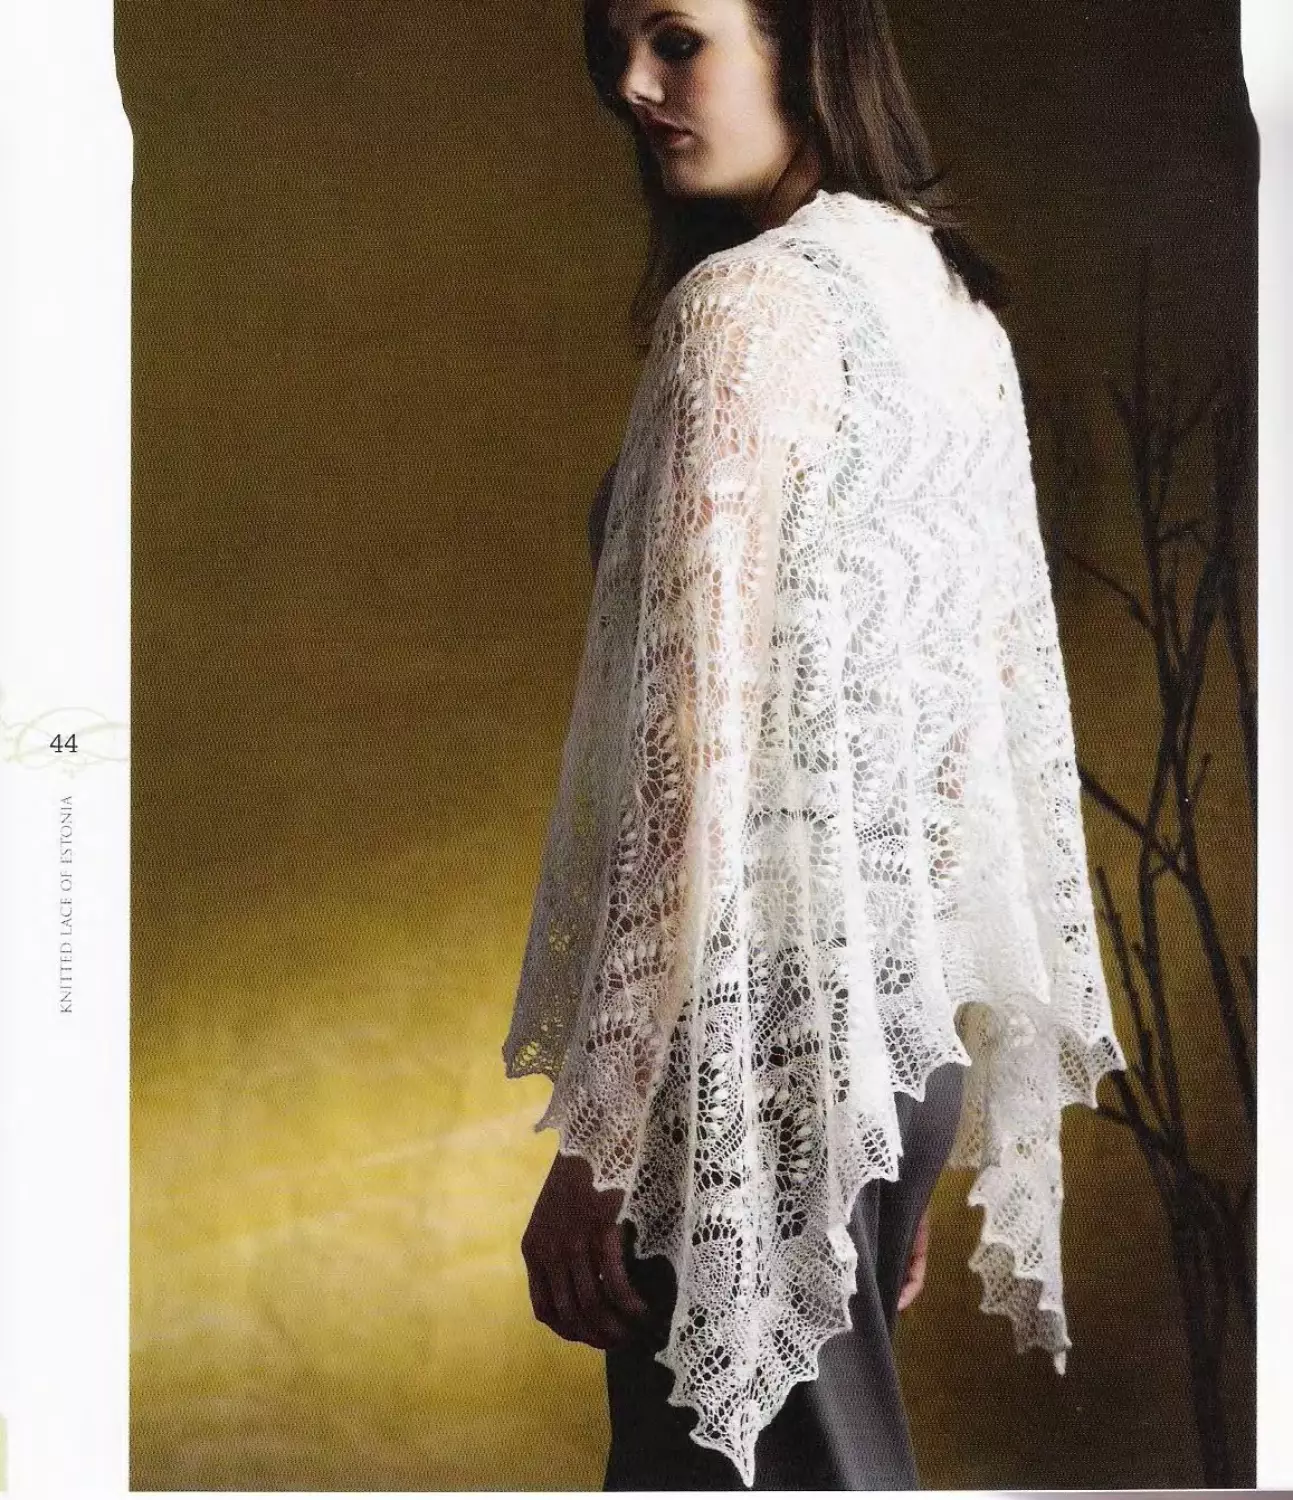
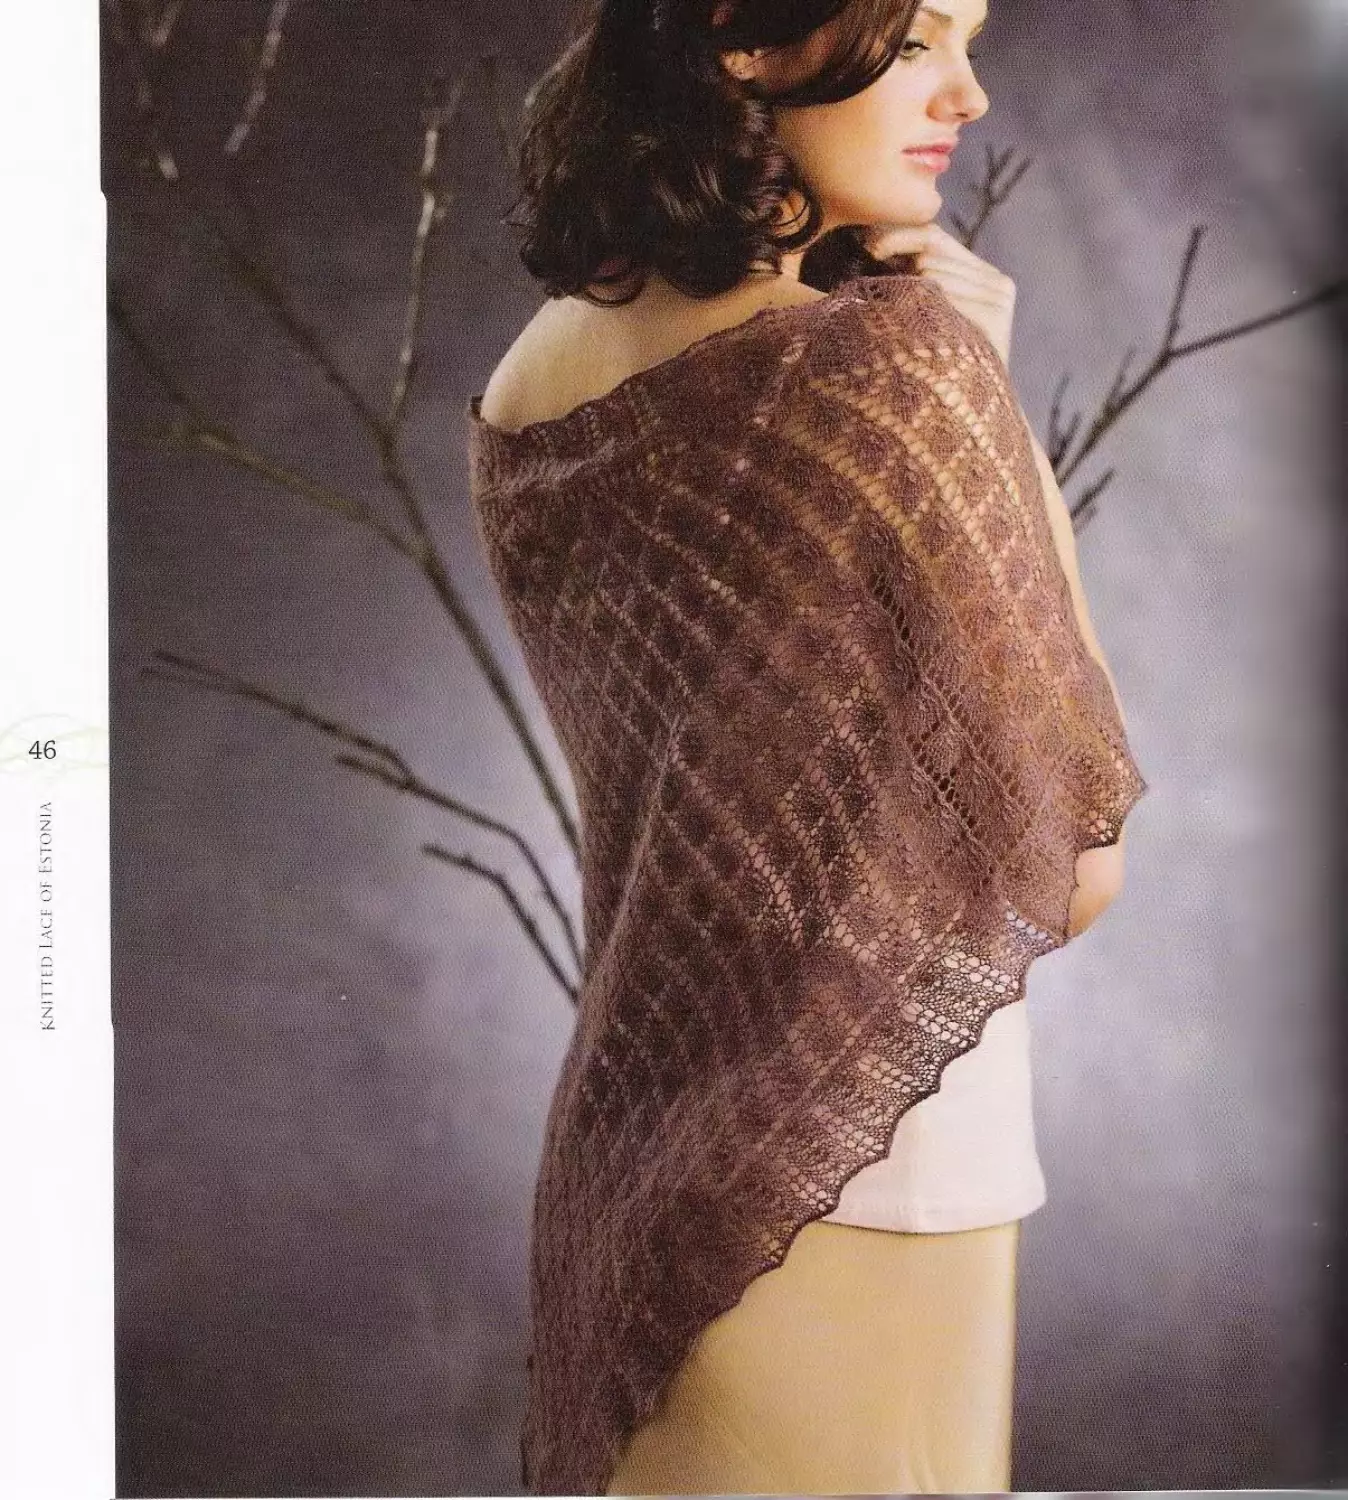
Queen Silvia Shawl
This classic pattern was named for Queen Silvia of Sweden.
It is a variation on the Lily of the Valley motif and includes
an openwork flower motif between the sprigs of buds and
gathered stitches above each set of sprigs. The lace edge
on this shawl is picked up and knitted on, in the modern
technique. The edge pattern is a variation of the classic “yo,
kl, yo, k3, si 1, k2tog, psso, k3” pattern that uses a k2 be-
tween each double decrease and its companion yarnovers
instead of а кЗ. I chose to purl the even-numbered rounds
to mimic the look of the garter-stitch-ground edges on
traditional shawls.
Finished Size
About 24" (61 cm) wide and 58"
(147.5 cm) long, relaxed after blocking.
Yarn
Laceweight (#0 Lace).
Shown here.Skacel Merino Lace (100%
wool; 1375 yd [1250 m]/100 g): #426
natural white, 1 skein.
Needles
Size U.S.3 (3.25 mm): straight and 36"
(90 cm) circular (cir). Adjust needle size if
necessary to obtain the correct gauge.
Notions
Smooth cotton waste yarn; size G/6
(4.25 mm) crochet hook;4 markers (m;
three the same color and one in a differ-
ent color); tapestry needle.
41
Gauge
10 stitches and 19 rows = 2" (5 cm)
in stockinette stitch, before blocking;
20-stitch pattern repeat from Silvia Cen-
ter chart measures about 3%” (9.5 cm)
wide, relaxed after blocking.
STITCH GUIDE
5-Stitch Nupp
Working very loosely, work (k1,yo, k1,yo, kl) all in same st—
5 nupp sts made from 1 st.On the foil row, purl the 5 nupp sts
tog (as shown on chart)—5 nupp sts dec’d back to 1 st.
Gathered Stitches (worked over 5 sts)
K5tog but do not slip sts from needle, yo, knit the same
5 sts tog again but leave on needle, yo, knit the same
5 sts tog once more, then slip all 5 sts from needle.
Note
~ Slip the first stitch of each row as if to purl
with yarn in front (pwise wyf), except for the
first stitch of the first row in the center section,
which is worked as k!.
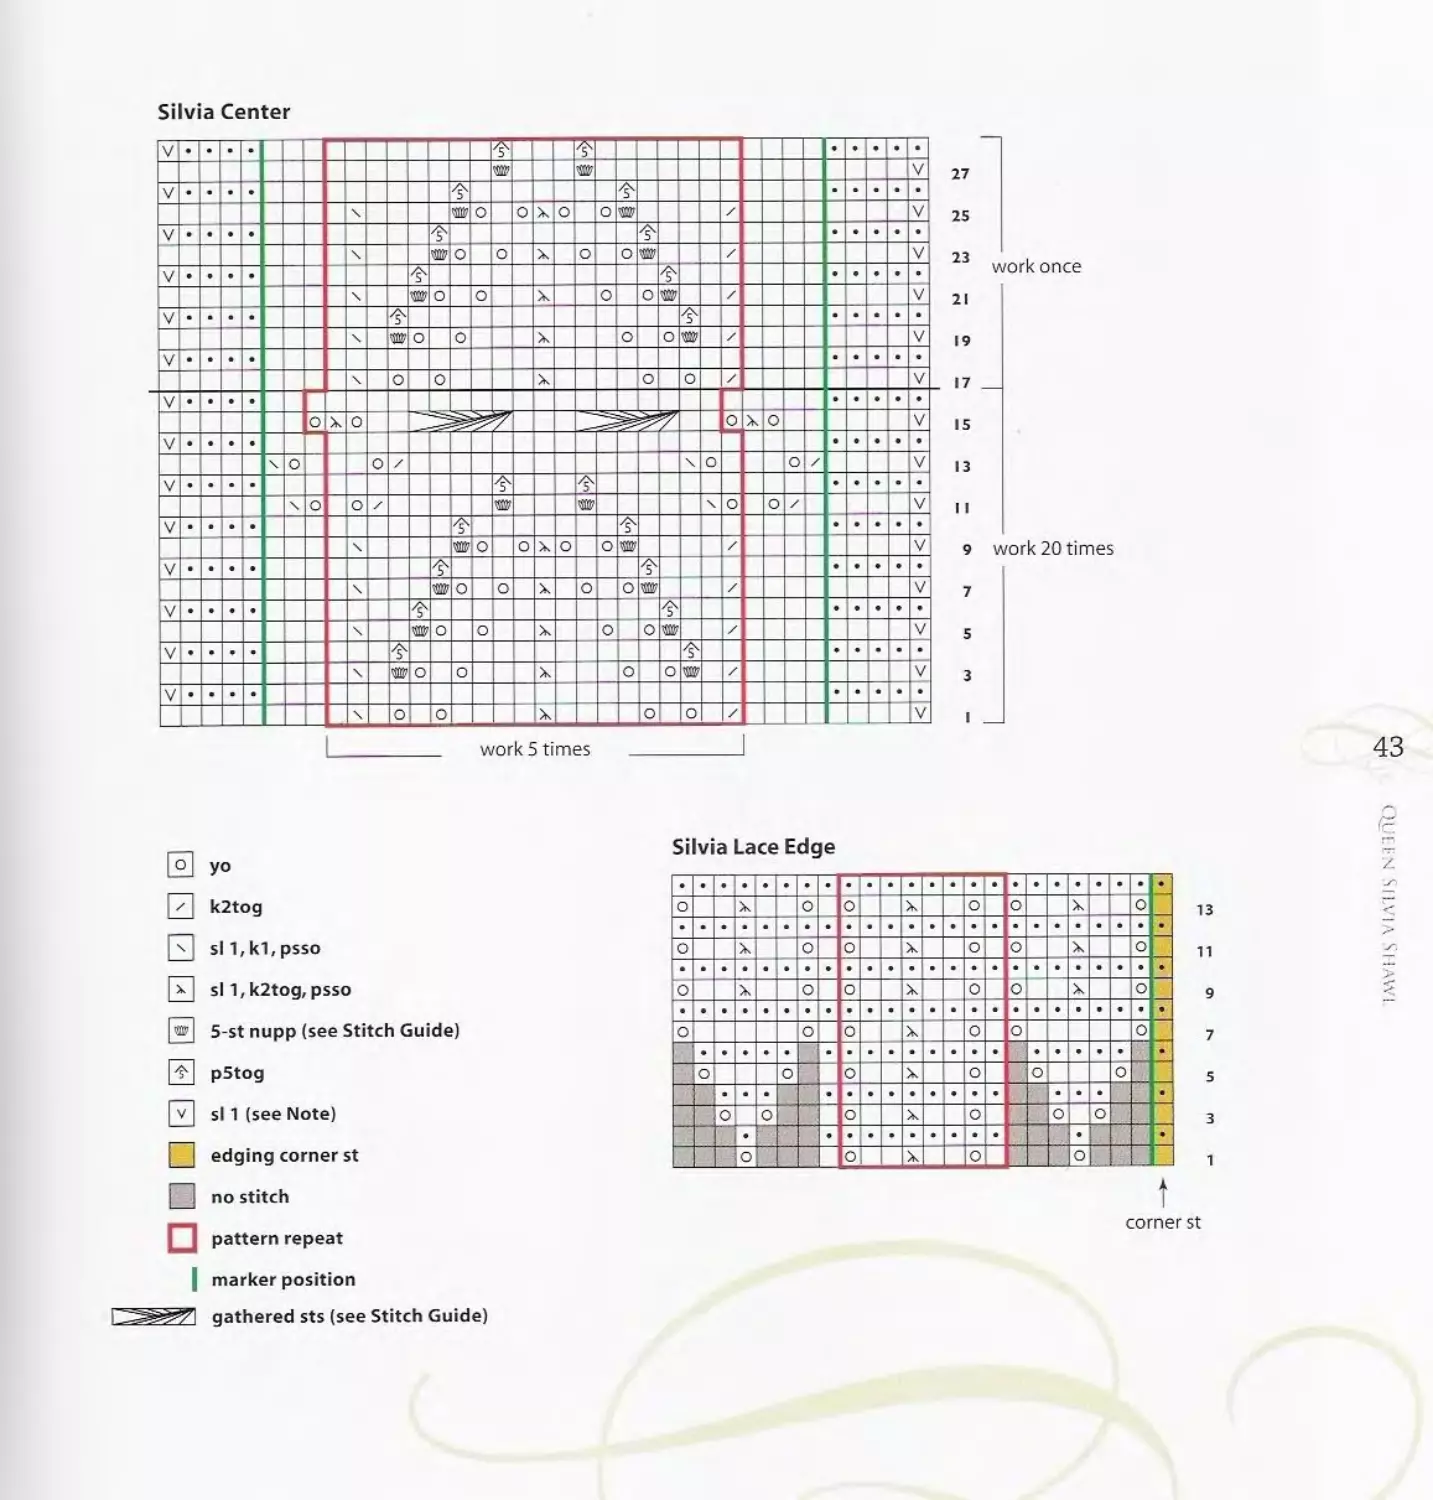
Silvia Center
43
0 yo
И k2tog
| | sl1,k1,psso
|~x~| si 1,k2tog,psso
[да] 5-st nupp (see Stitch Guide)
E pStog
|~v~| si 1 (see Note)
| | edging corner st
Q no stitch
Q pattern repeat
| marker position
I ZSig&7\ gathered sts (see Stitch Guide)
44
CENTER RECTANGLE
With cotton waste yam and crochet hook, chain about
130 sts (see page 37). Tie a knot in the end of the cot-
ton after the last chain so you’ll be able to identify this
end later. With straight needles and working yarn, pick
up and knit 117 sts from the center 117 “bumps” along
the back of the crochet chain. Work 8 rows in garter
st, knitting the first st of the first row, but slipping the
first st of every row thereafter (see Note). Rep Rows
1-16 of Silvia Center chart 20 times, placing mark-
ers (pm) after the first 5 sts and before the last 5 sts,
slipping the first st of every row as before, and keeping
rem sts outside markers in garter st. Work Rows 17-28
of chart once—332 chart rows total. Slipping the first
st of every row as established, knit 8 rows, ending with
a WS row. Leave sts on needle and do not cut yarn.
LACE EDGE
With cir needle and RS facing, kl (corner st), pm of
different color to indicate beg of rnd, knit to end and
at the same time inc 13 sts evenly spaced—130 sts.
With RS still facing, pick up and knit 1 st (corner st)
from left selvedge, pm, then pick up and knit (see page
38) 257 sts along rem selvedge—258 sts total picked
up along left selvedge. Beg at knotted end, carefully
remove the waste-yarn crochet chain, placing each live
st on empty straight needle as it becomes free—117
sts from CO edge. With RS facing and cir needle, work
across sts from CO edge as foil: Kl (corner st), pm,
knit to end and at the same time inc 13 sts evenly
spaced—130 sts from CO edge. With RS still facing,
pick up and knit 1 st (corner st) from right selvedge,
pm, then pick up and knit 257 sts along rem sel-
vedge—776 sts total: 130 sts each at upper and lower
edges, 258 sts along each side. The stitch before each
marker is a corner st. When working Silvia Lace Edge
chart, start each side at the beg of the chart with the
corner st (shown in gold). Establish patt from Rnd
1 of Silvia Lace Edge chart as foil: *K1 (corner st of
short side), slip marker (si m), yo, work marked 8-st
patt rep 16 times, kl, yo, kl (corner st of long side),
si m, yo, work marked 8-st patt rep 32 times, kl, yo;
rep from * once more for rem 2 sides of shawl—1 st
inc’d each side of each of the 4 corner sts. Work Rnds
2-14 of chart—832 sts after completing Rnd 7:144
sts along top and lower edges, 272 sts along each
side. Join a second strand of yarn and loosely BO all
sts with 2 strands held tog using the k2tog method
(see page 27).
FINISHING
Handwash gently in mild soap and warm water.
Pin shawl out to about 26" (66 cm) wide and 60"
(152.5 cm) long, pinning out each [yo, kl, yo] point
of the lace edge. When dry, weave in loose ends.
45
KNITTED LACE OF ESTONIA
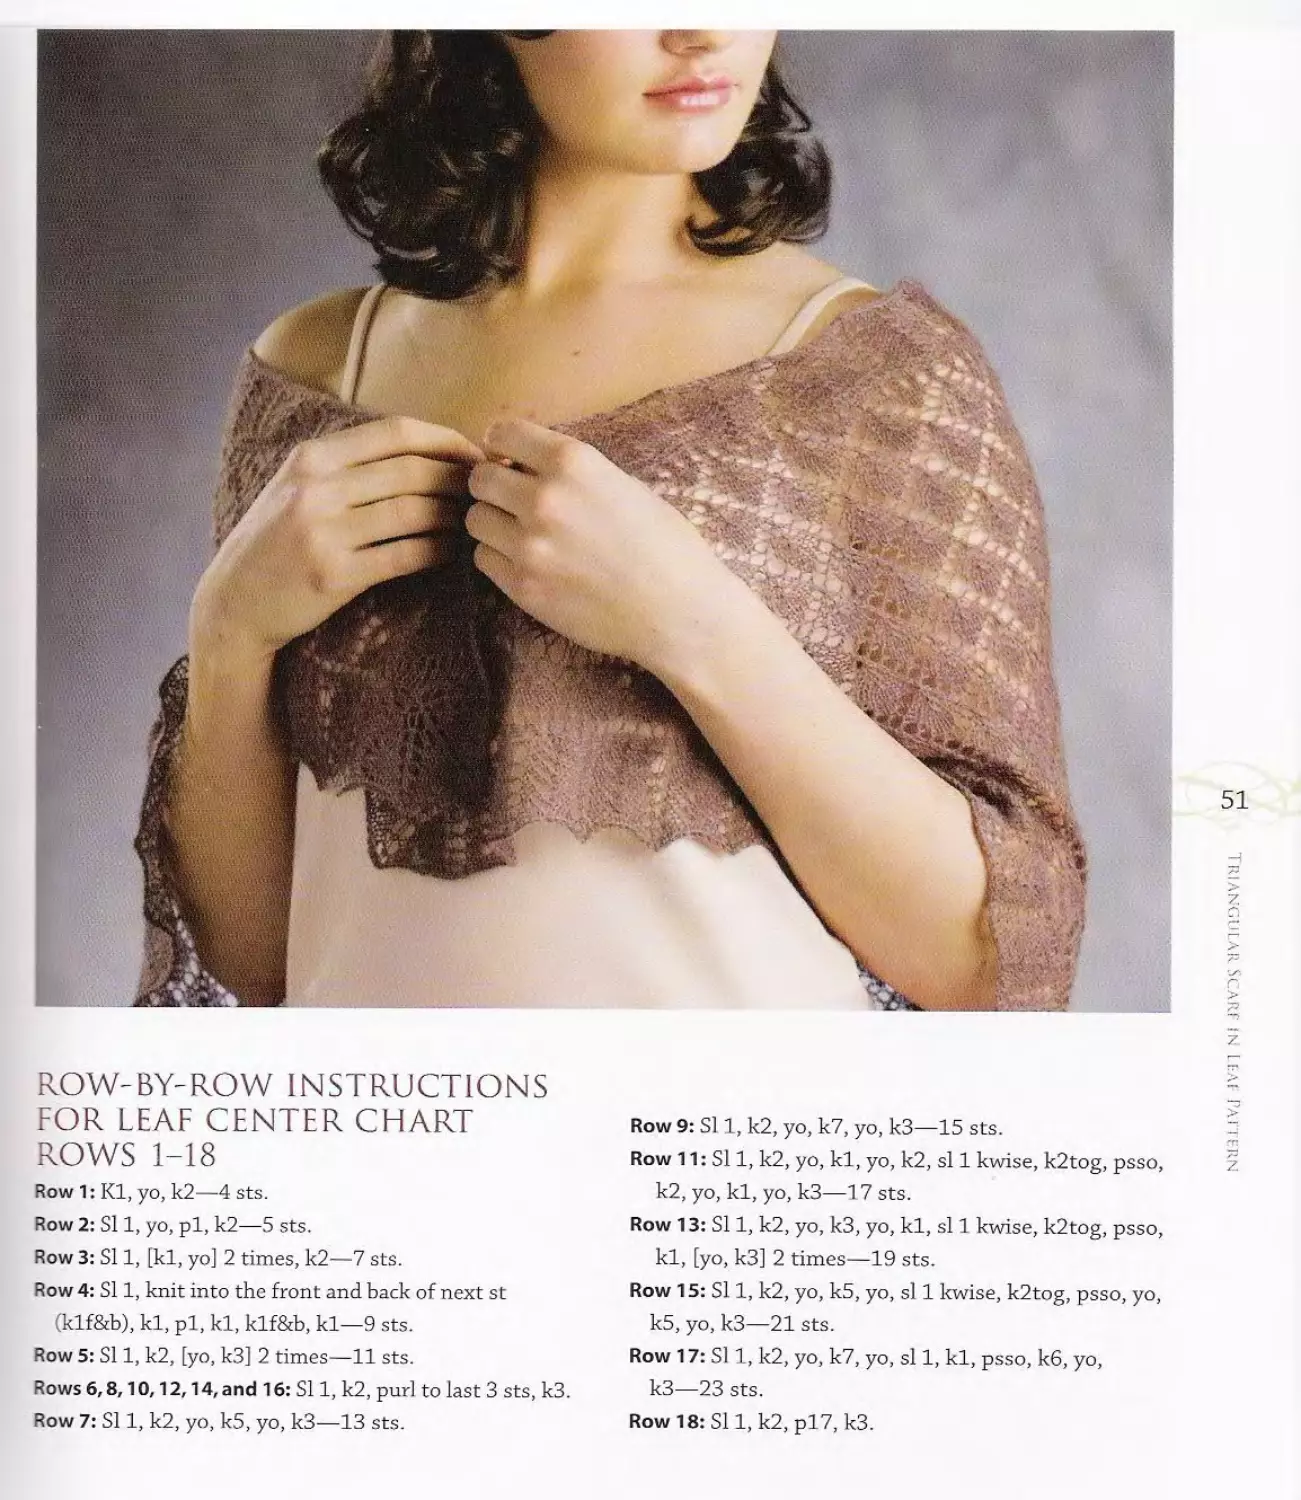
triangular Scarf
и leaf pattern
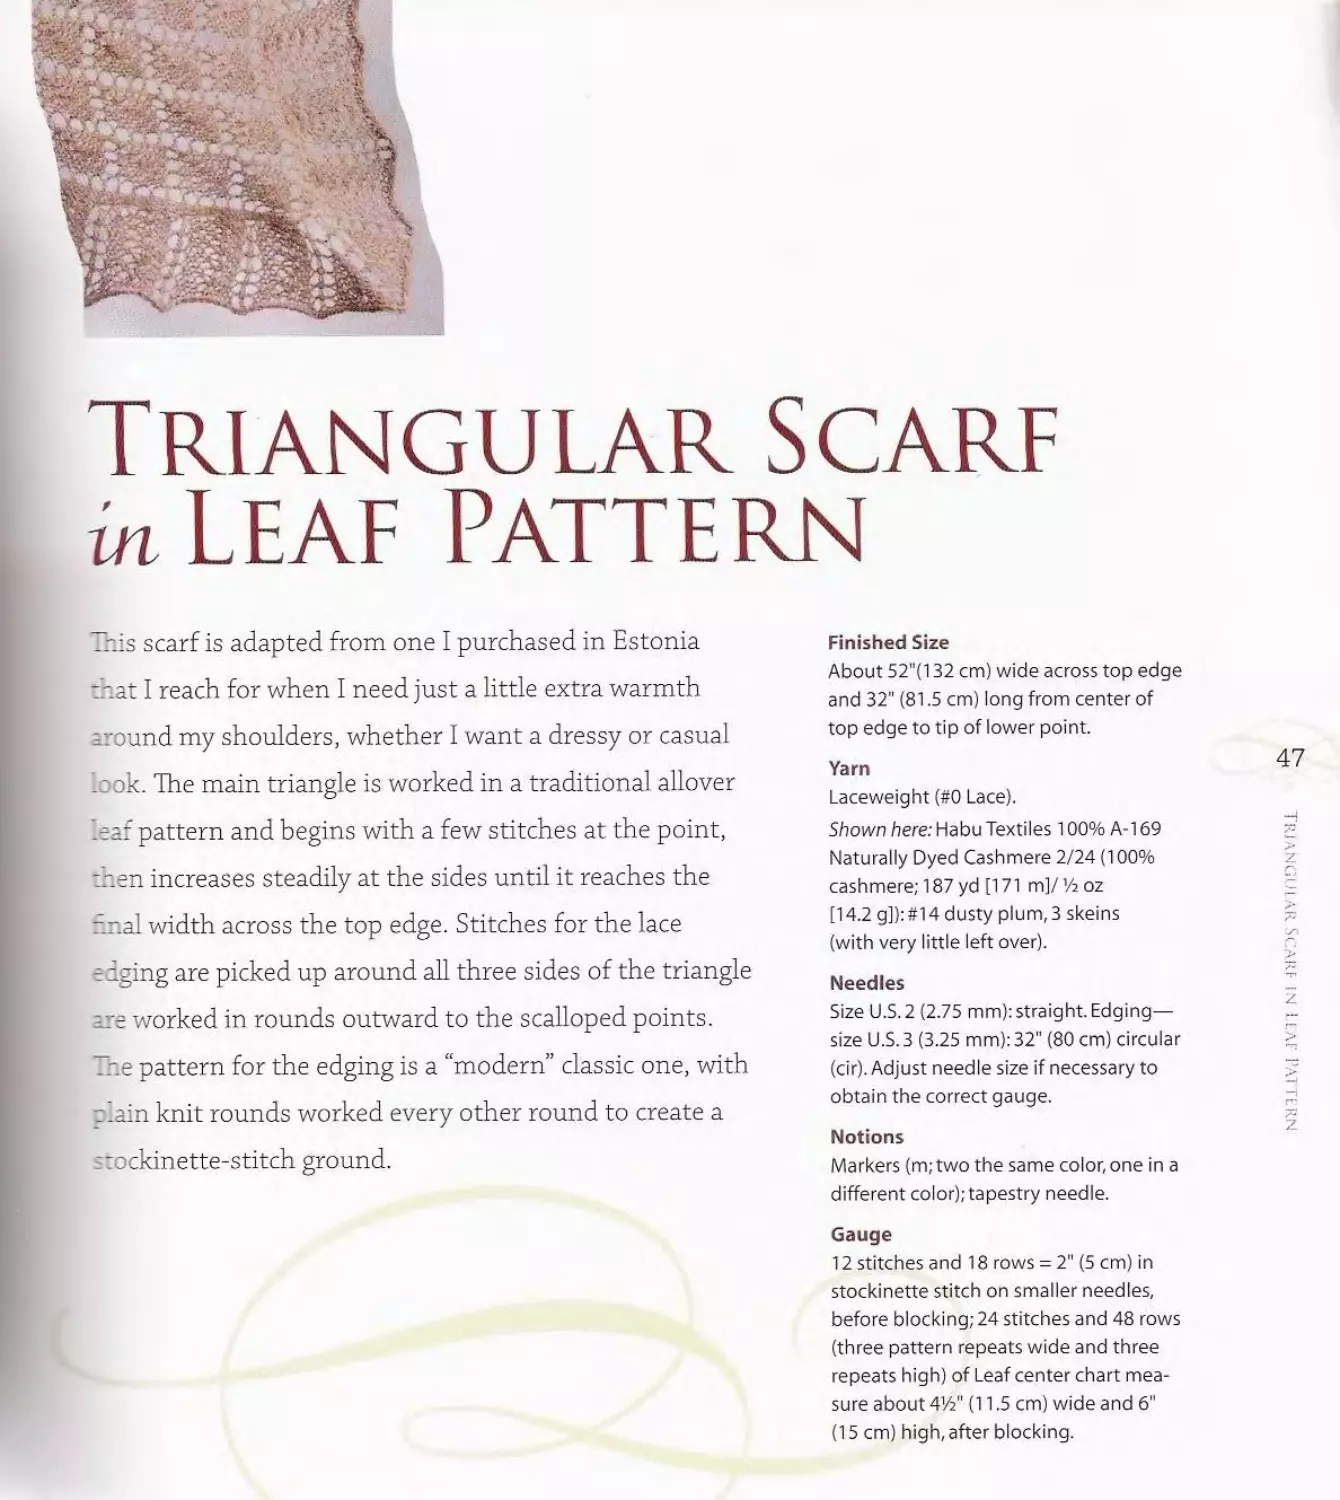
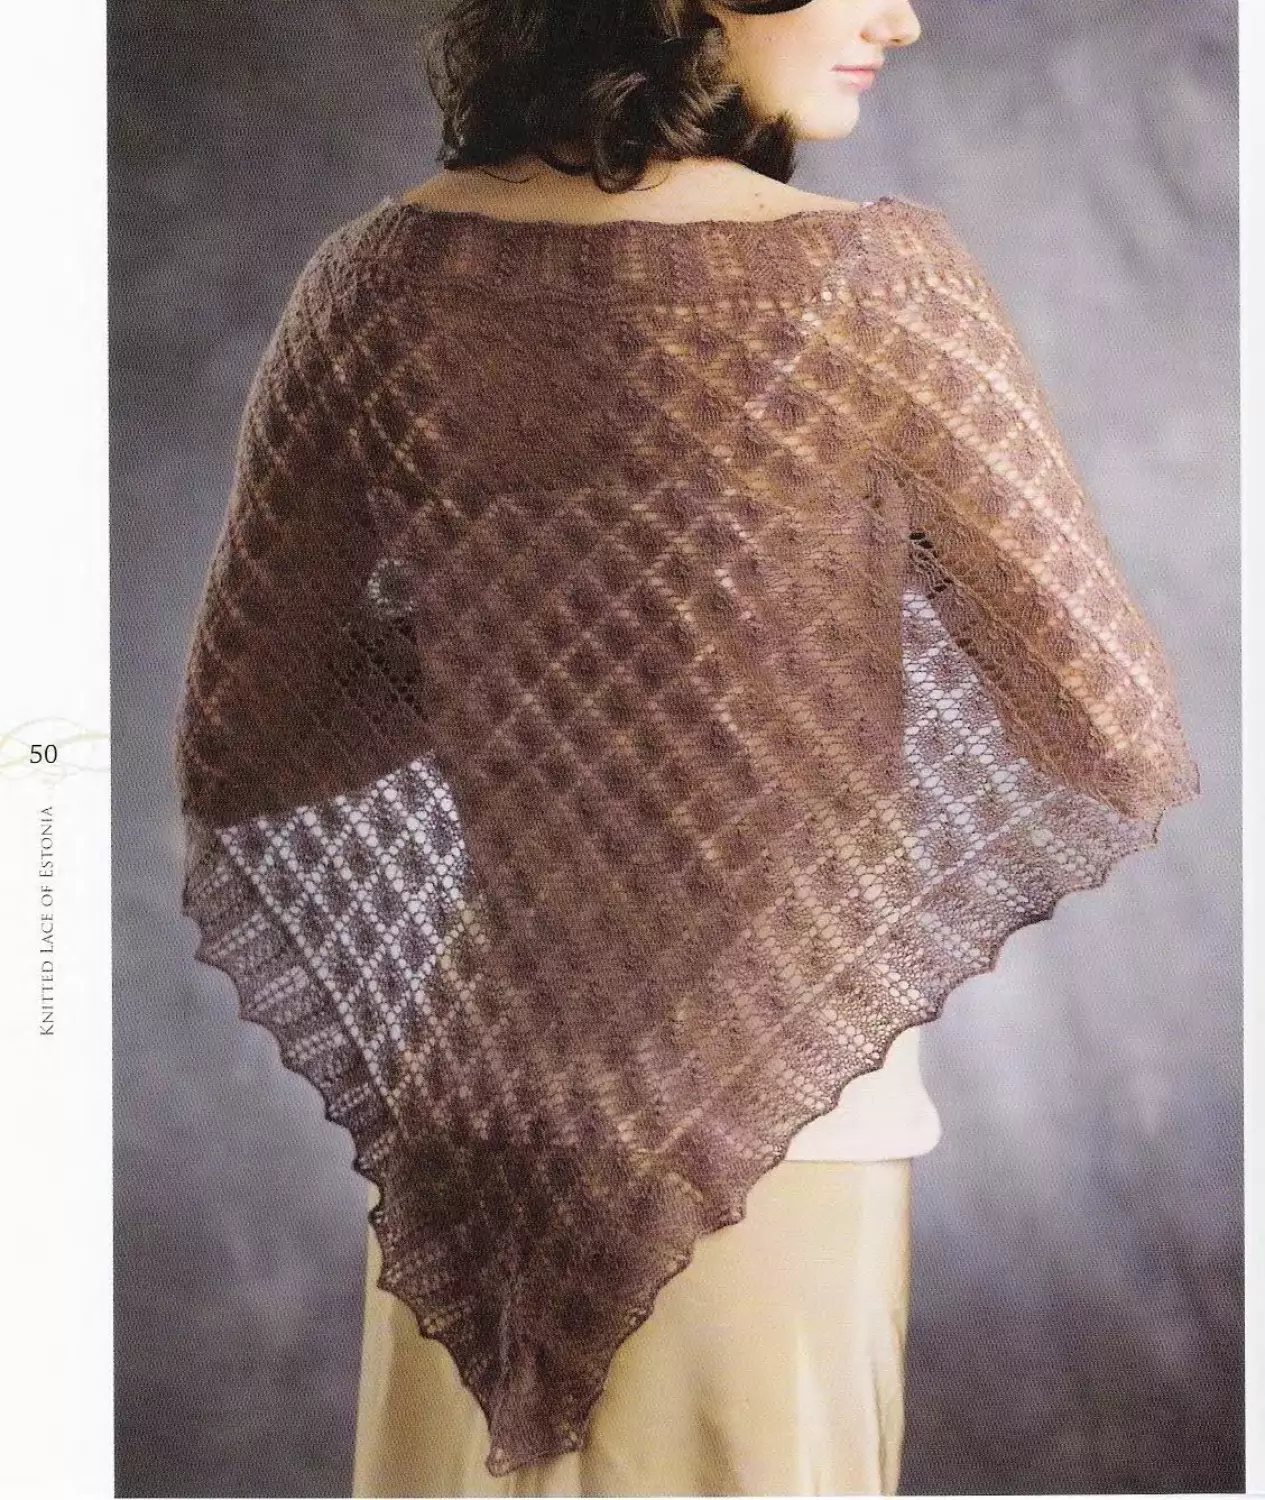
This scarf is adapted from one I purchased in Estonia
mat I reach for when I need just a little extra warmth
around my shoulders, whether I want a dressy or casual
look. The main triangle is worked in a traditional allover
leaf pattern and begins with a few stitches at the point,
then increases steadily at the sides until it reaches the
final width across the top edge. Stitches for the lace
edging are picked up around all three sides of the triangle
are worked in rounds outward to the scalloped points.
The pattern for the edging is a “modern” classic one, with
plain knit rounds worked every other round to create a
srockinette-stitch ground.
Finished Size
About 52"(132 cm) wide across top edge
and 32" (81.5 cm) long from center of
top edge to tip of lower point.
Yarn
Laceweight (#0 Lace).
Shown here: Habu Textiles 100% A-169
Naturally Dyed Cashmere 2/24 (100%
cashmere; 187 yd [171 m]/ % oz
[14.2 g]):#14 dusty plum, 3 skeins
(with very little left over).
Needles
Size U.S.2 (2.75 mm):straight. Edging—
size U.S.3 (3.25 mm): 32" (80 cm) circular
(cir). Adjust needle size if necessary to
obtain the correct gauge.
Notions
Markers (m;two the same color,one in a
different color);tapestry needle.
Gauge
12 stitches and 18 rows = 2" (5 cm) in
stockinette stitch on smaller needles,
before blocking; 24 stitches and 48 rows
(three pattern repeats wide and three
repeats high) of Leaf center chart mea-
sure about 416" (11.5 cm) wide and 6"
(15 cm) high, after blocking.
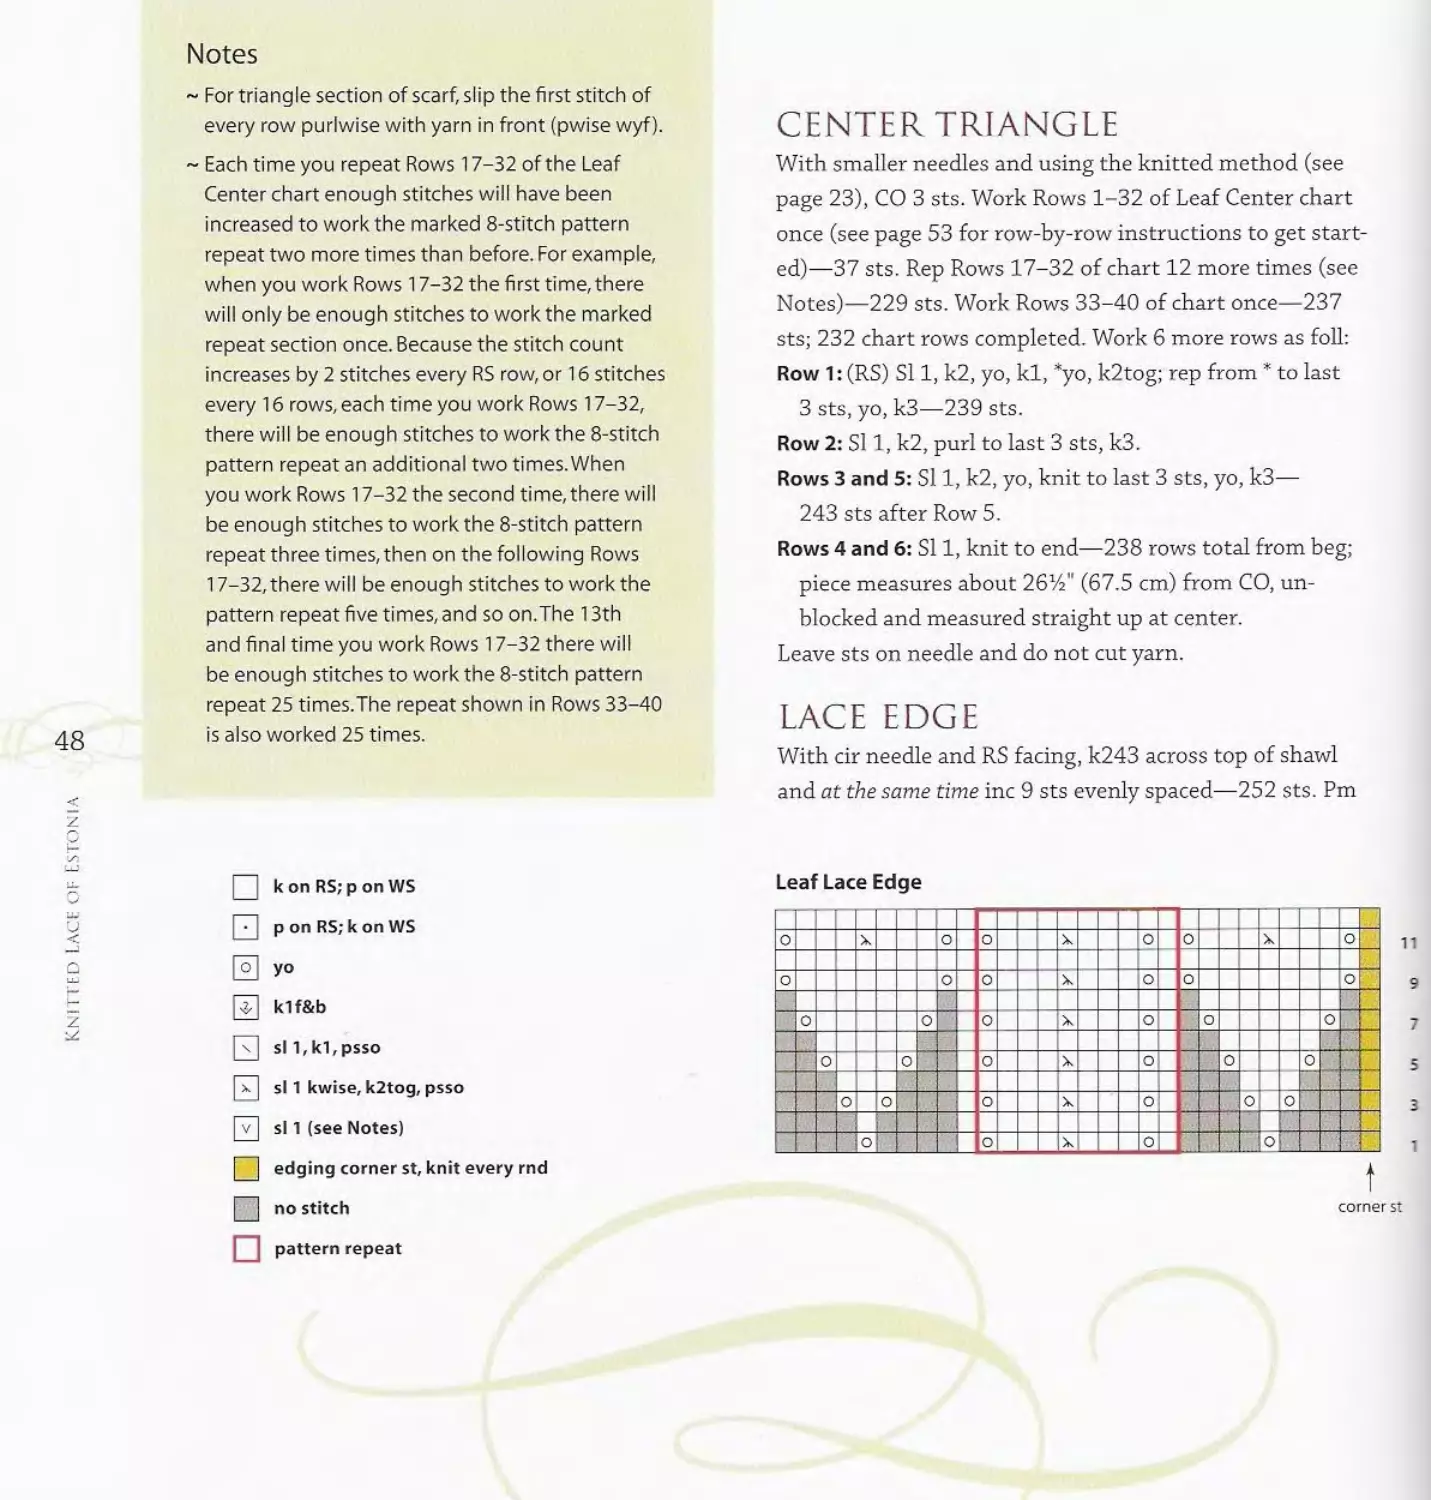
Notes
~ For triangle section of scarf, slip the first stitch of
every row purlwise with yarn in front (pwise wyf).
~ Each time you repeat Rows 17-32 of the Leaf
Center chart enough stitches will have been
increased to work the marked 8-stitch pattern
repeat two more times than before. For example,
when you work Rows 17-32 the first time, there
will only be enough stitches to work the marked
repeat section once. Because the stitch count
increases by 2 stitches every RS row, or 16 stitches
every 16 rows, each time you work Rows 17-32,
there will be enough stitches to work the 8-stitch
pattern repeat an additional two times.When
you work Rows 17-32 the second time, there will
be enough stitches to work the 8-stitch pattern
repeat three times, then on the following Rows
17-32, there will be enough stitches to work the
pattern repeat five times, and so on.The 13th
and final time you work Rows 17-32 there will
be enough stitches to work the 8-stitch pattern
repeat 25 times.The repeat shown in Rows 33-40
is also worked 25 times.
CENTER TRIANGLE
With smaller needles and using the knitted method (see
page 23), CO 3 sts. Work Rows 1-32 of Leaf Center chart
once (see page 53 for row-by-row instructions to get start-
ed)—37 sts. Rep Rows 17-32 of chart 12 more times (see
Notes)—229 sts. Work Rows 33-40 of chart once—237
sts; 232 chart rows completed. Work 6 more rows as foil;
Row 1: (RS) Si 1, k2, yo, kl, *yo, k2tog; rep from * to last
3 sts, yo, k3—239 sts.
Row 2: SI 1, k2, purl to last 3 sts, k3.
Rows 3 and 5: SI 1, k2, yo, knit to last 3 sts, yo, k3—
243 sts after Row 5.
Rows 4 and 6: SI 1, knit to end—238 rows total from beg;
piece measures about 26%" (67.5 cm) from CO, un-
blocked and measured straight up at center.
Leave sts on needle and do not cut yarn.
LACE EDGE
With cir needle and RS facing, k243 across top of shawl
and at the same time inc 9 sts evenly spaced—252 sts. Pm
□ к on RS; p on WS
p on RS; к on WS
[°] yo
Щ klf&b
]T| sll,k1,psso
rise, k2tog, psso
|~v~| si 1 (see Notes)
edging corner st, knit every rnd
В no stitch
□ pattern repeat
Leaf Lace Edge
(one of the two of the same color), pick up and knit 242
sts along selvedge to lower point of triangle (about 2 sts
for every slipped selvedge st; see page 38), pm (the other
of the same color), pick up and knit 242 sts along rem
selvedge, pm (different color) to denote beg of rnd—736
sts total. The first st after every marker is a corner st.
When working Leaf Lace Edge chart, start each side of
the triangle at the beg of the chart with the comer st
(shown in gold). Establish pattern from Rnd 1 of Leaf
Lace Edge chart as foil: KI (corner st), yo, work marked
10-st patt rep 25 times, kl, yo; *slip marker (si m), kl
(corner st), yo, work marked 10-st patt rep 24 times, kl,
yo; rep from * once more—1 st inc’d on each side of each
of the 3 comer sts. Work Rnds 2-12 of chart—790 sts:
270 sts in first section for top edge, and 260 sts in each of
next 2 sections for sides. Join a second strand of yarn and
BO all sts with 2 strands held tog using the k2tog method
(see page 27).
FINISHING
Handwash gently with mild soap and warm water. Pin scarf
out to desired measurements, pinning out each [yo, kl, yo]
point in the edging. When dry, weave in loose ends.
49
KNITTED LACE OF ESTONIA
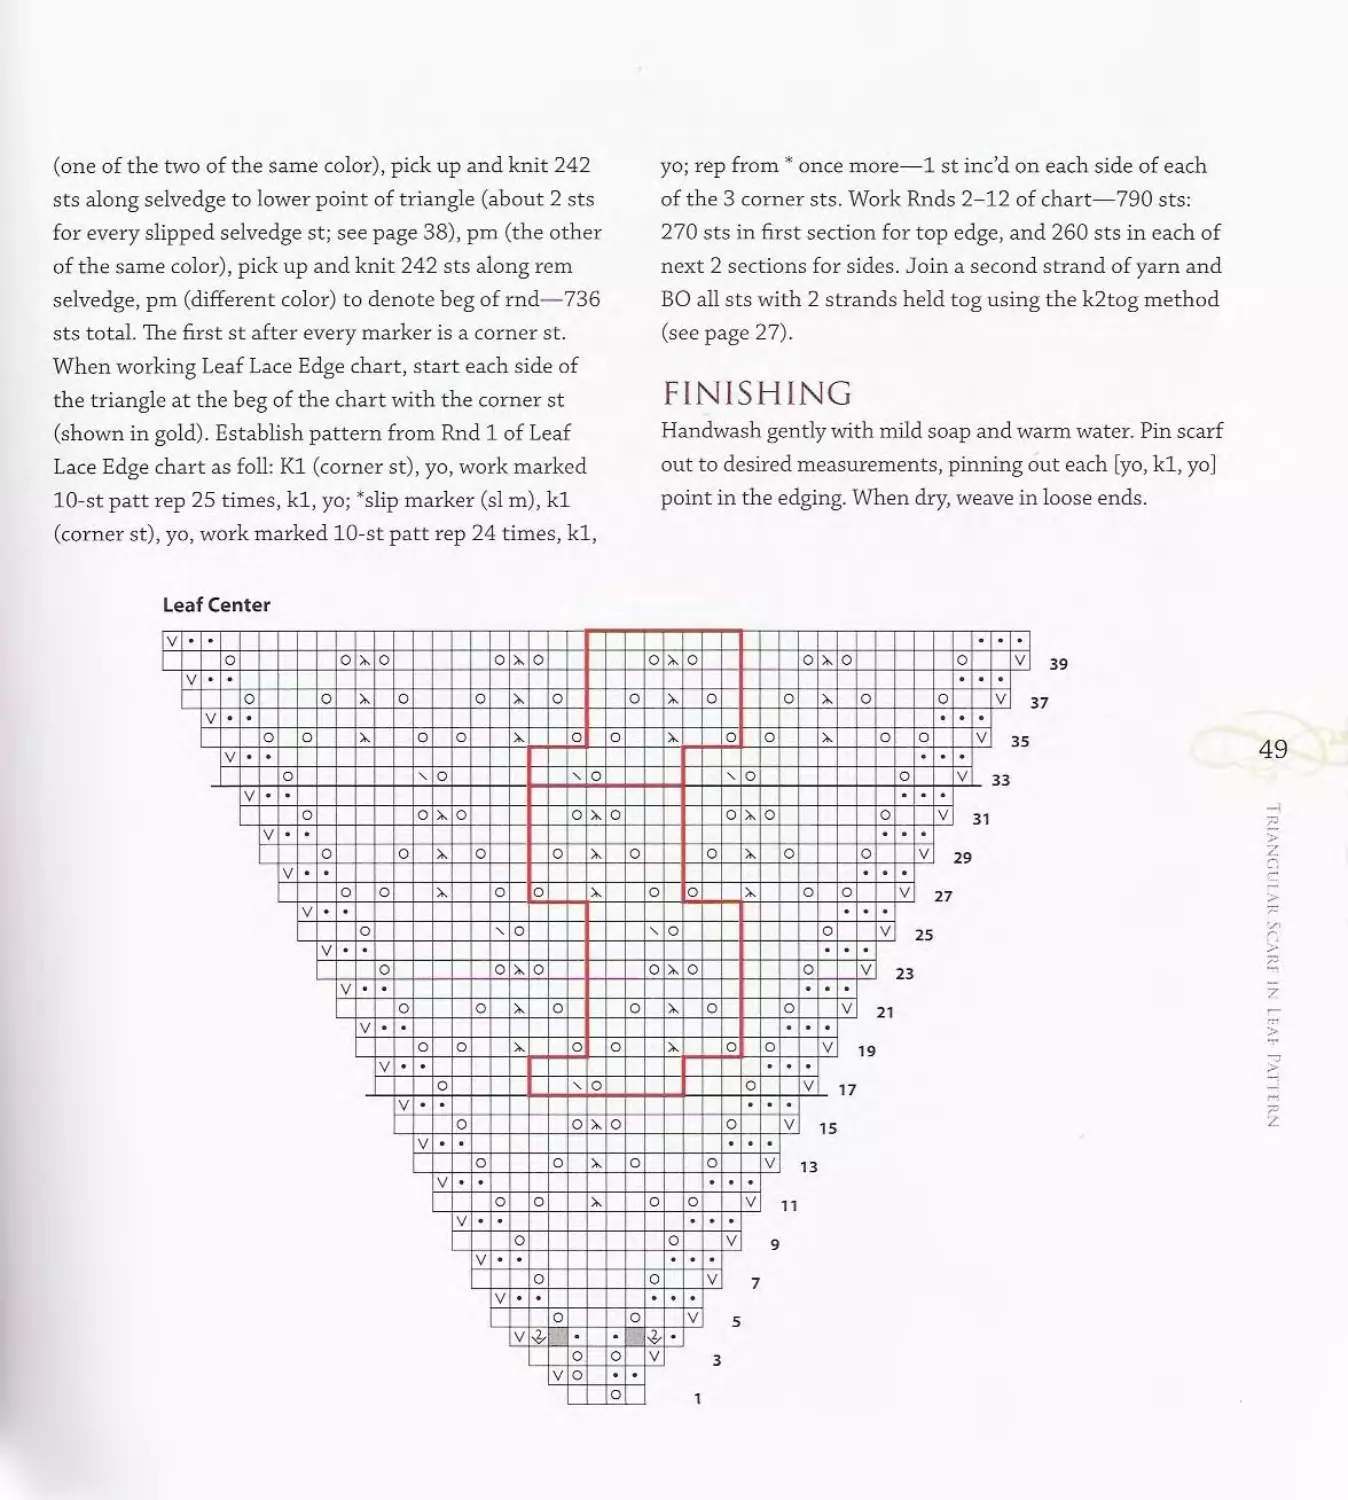
ROW- BY-ROW INSTRUCTIONS
FOR LEAF CENTER CHART
ROWS 1-18
Row 1: Kl, yo, k2—4 sts.
Row 2: SI 1, yo, pl, k2—5 sts.
Row 3: SI 1, [kl, yo] 2 times, k2—7 sts.
Row 4: SI 1, knit into the front and back of next st
(klf&b), kl, pl, kl, klf&b, kl—9 sts.
Row 5: SI 1, k2, [yo, k3] 2 times—11 sts.
Rows 6,8,10,12,14, and 16: SI 1, k2, purl to last 3 sts, k3.
Row 7: SI 1, k2, yo, k5, yo, k3—13 sts.
Row 9: SI 1, k2, yo, k7, yo, k3—15 sts.
Row 11: SI 1, k2, yo, kl, yo, k2, si 1 kwise, k2tog, psso,
k2, yo, kl, yo, k3—17 sts.
Row 13: SI 1, k2, yo, k3, yo, kl, si 1 kwise, k2tog, psso,
kl, [yo, k3] 2 times—19 sts.
Row 15: SI 1, k2, yo, k5, yo, si 1 kwise, k2tog, psso, yo,
k5, yo, k3—21 sts.
Row 17: SI 1, k2, yo, k7, yo, si 1, kl, psso, k6, yo,
k3—23 sts.
Row 18: SI 1, k2, pl7, k3.
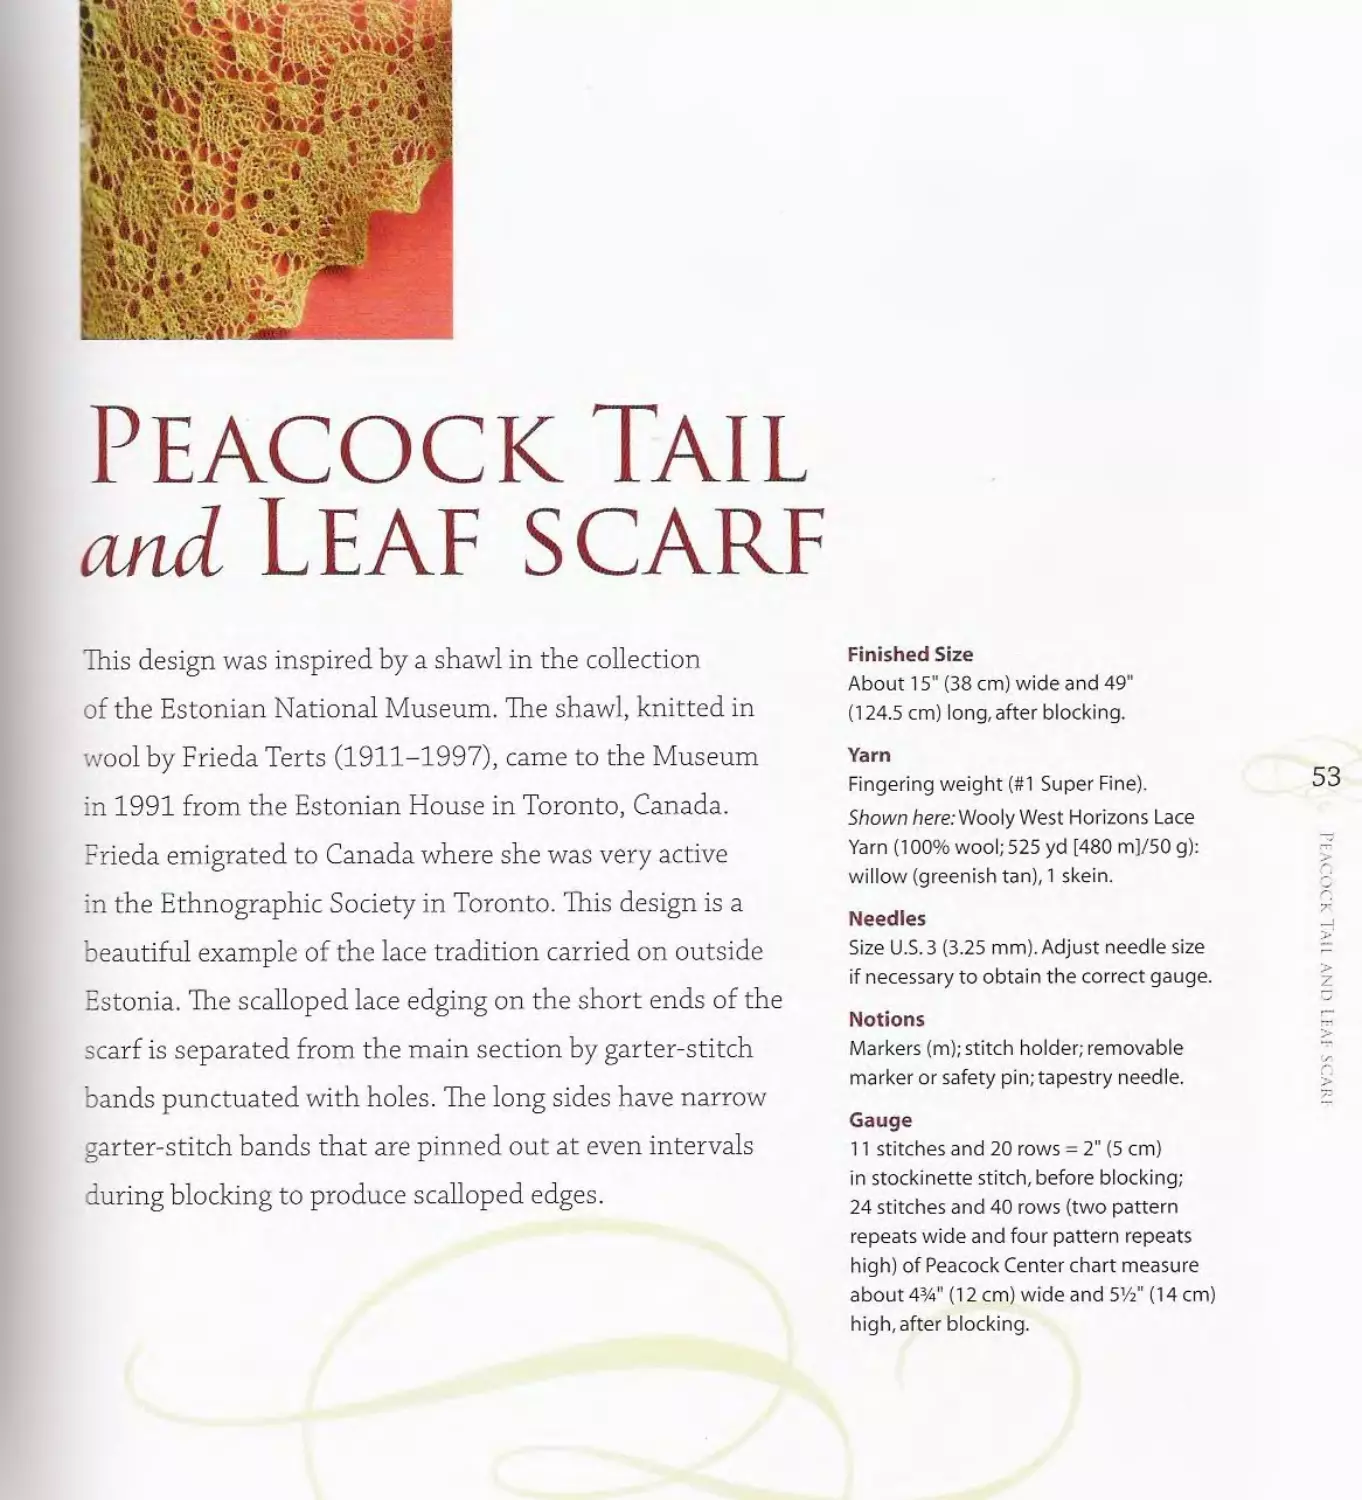
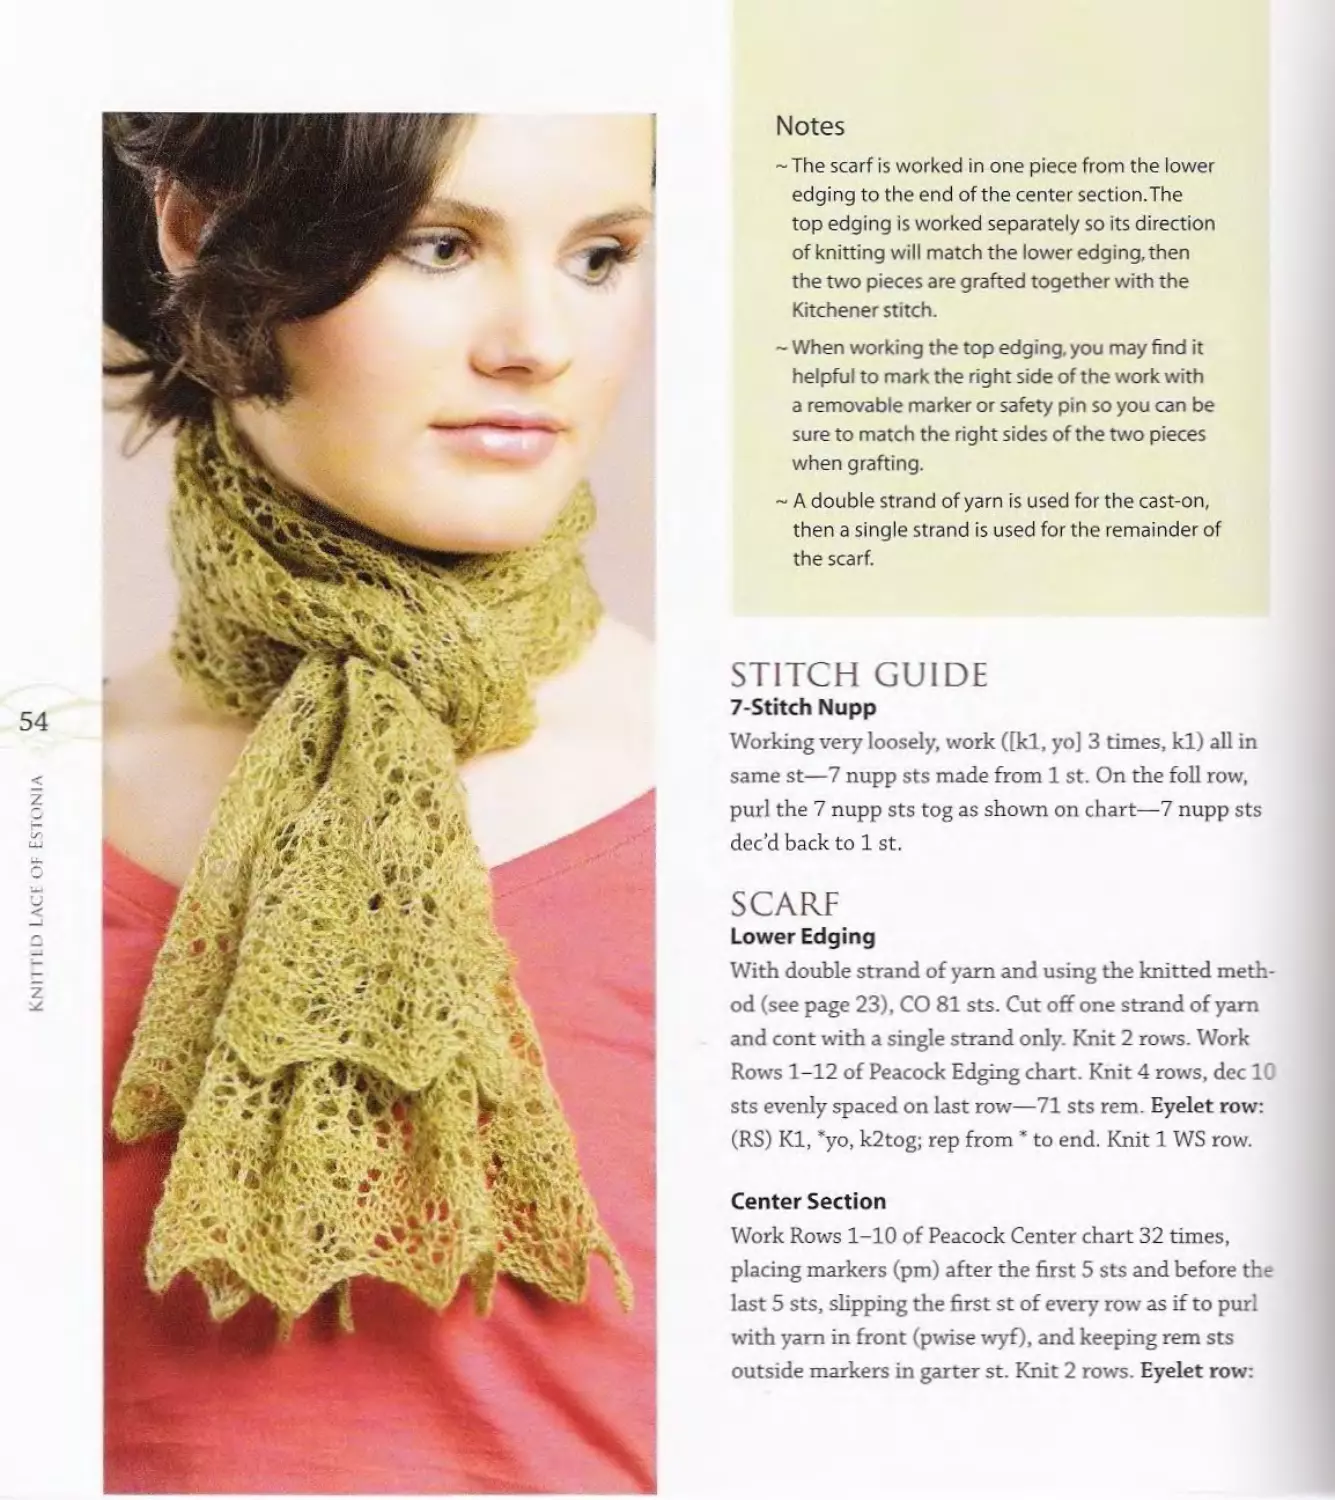
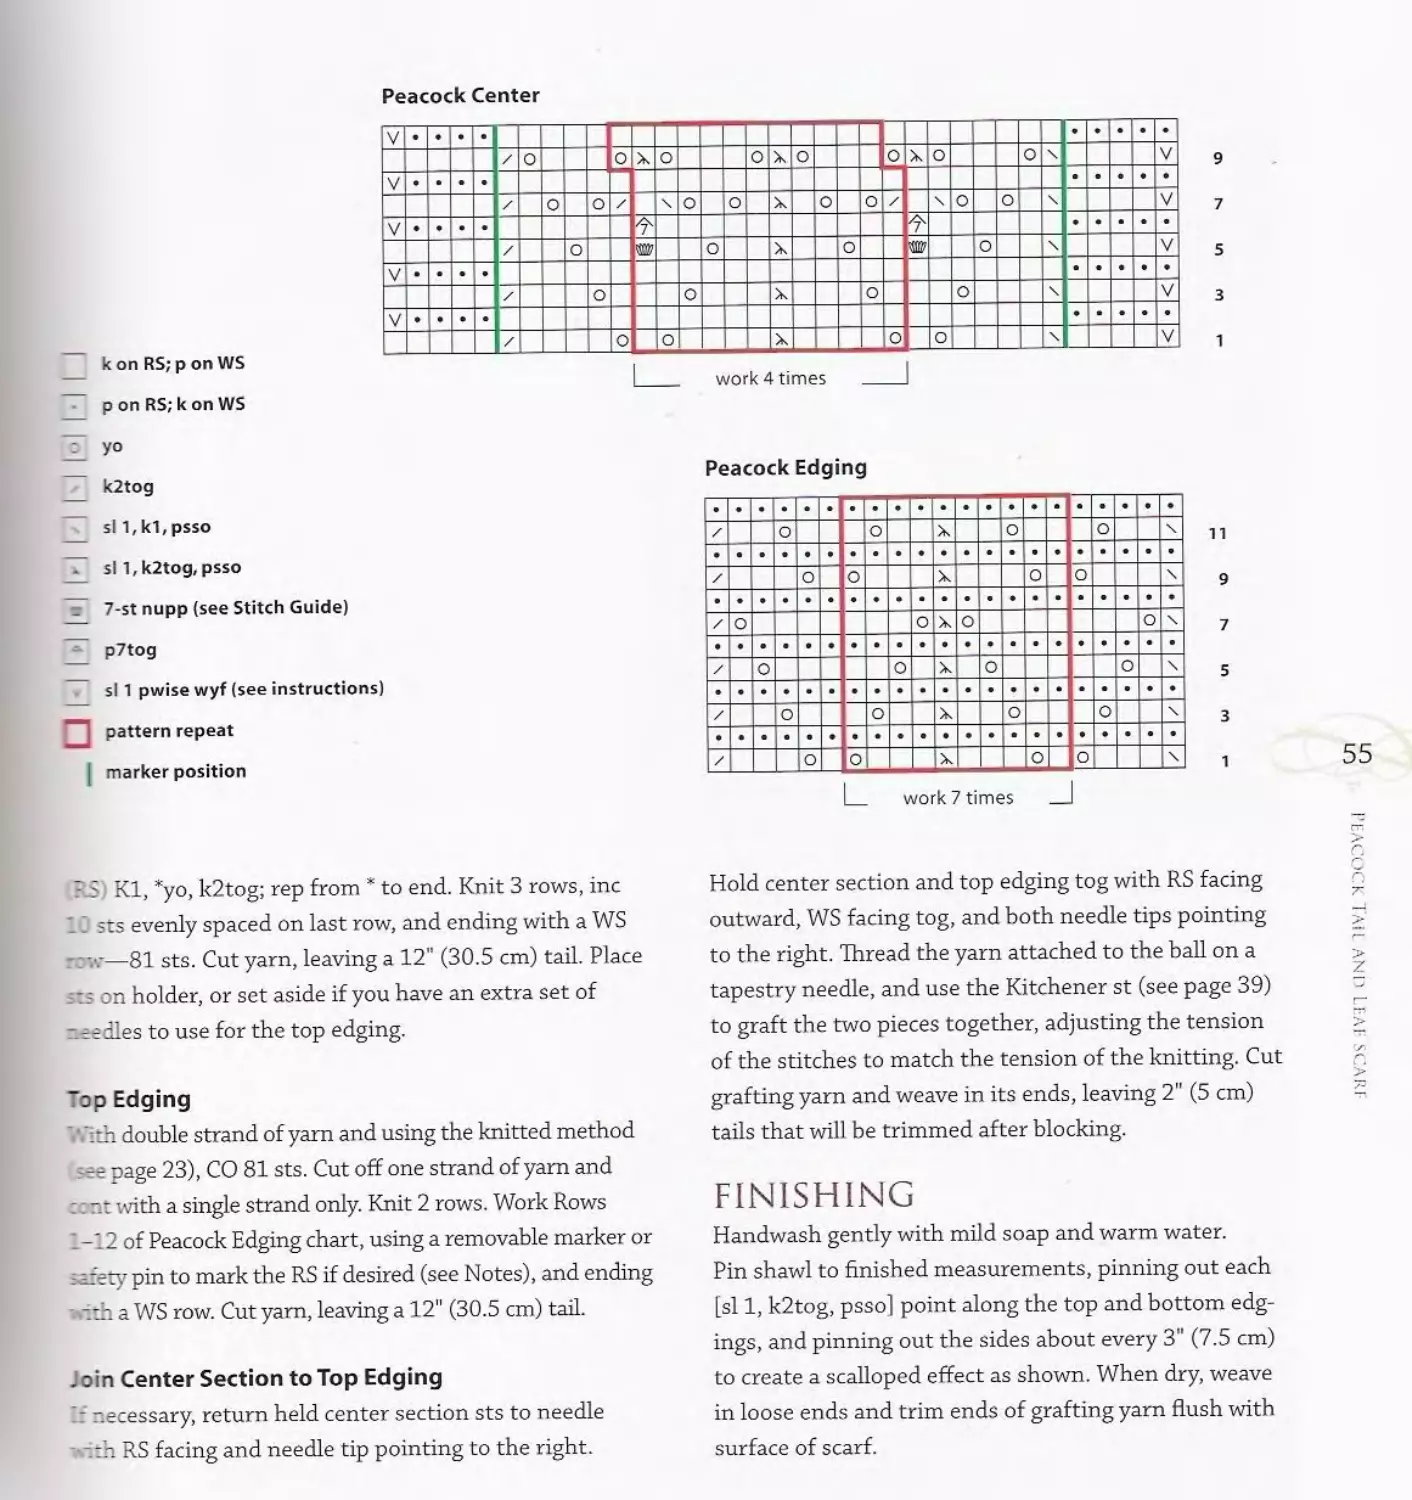
Peacock Tail
and Leaf scarf
This design was inspired by a shawl in the collection
of the Estonian National Museum. The shawl, knitted in
Finished Size
About 15" (38 cm) wide and 49"
(124.5 cm) long, after blocking.
wool by Frieda Terts (1911-1997), came to the Museum
in 1991 from the Estonian House in Toronto, Canada.
Frieda emigrated to Canada where she was very active
in the Ethnographic Society in Toronto. This design is a
beautiful example of the lace tradition carried on outside
Estonia. The scalloped lace edging on the short ends of the
scarf is separated from the main section by garter-stitch
bands punctuated with holes. The long sides have narrow
garter-stitch bands that are pinned out at even intervals
during blocking to produce scalloped edges.
Yarn
Fingering weight (#1 Super Fine).
Shown here: Wooly West Horizons Lace
Yarn (100% wool; 525 yd [480 m]/50 g):
willow (greenish tan), 1 skein.
Needles
Size U.S. 3 (3.25 mm). Adjust needle size
if necessary to obtain the correct gauge.
Notions
Markers (m); stitch holder; removable
marker or safety pin; tapestry needle.
Gauge
11 stitches and 20 rows = 2" (5 cm)
in stockinette stitch,before blocking;
24 stitches and 40 rows (two pattern
repeats wide and four pattern repeats
high) of Peacock Center chart measure
about 4%" (12 cm) wide and S'/i" (14 cm)
high, after blocking.
53
Notes
54
~ The scarf is worked in one piece from the lower
edging to the end of the center section.The
top edging is worked separately so its direction
of knitting will match the lower edging, then
the two pieces are grafted together with the
Kitchener stitch.
~ When working the top edging, you may find it
helpful to mark the right side of the work with
a removable marker or safety pin so you can be
sure to match the right sides of the two pieces
when grafting.
- A double strand of yarn is used for the cast-on,
then a single strand is used for the remainder of
the scarf.
STITCH GUIDE
7-Stitch Nupp
Working very loosely, work ([kl, yo] 3 times, kl) all in
same st—7 nupp sts made from 1 st. On the foil row,
purl the 7 nupp sts tog as shown on chart—7 nupp sts
dec’d back to 1 st.
SCARE
Lower Edging
With double strand of yam and using the knitted meth-
od (see page 23), CO 81 sts. Cut off one strand of yam
and cont with a single strand only. Knit 2 rows. Work
Rows 1-12 of Peacock Edging chart. Knit 4 rows, dec 10
sts evenly spaced on last row—71 sts rem. Eyelet row:
(RS) Kl, *yo, k2tog; rep from * to end. Knit 1 WS row.
Center Section
Work Rows 1-10 of Peacock Center chart 32 times,
placing markers (pm) after the first 5 Sts and before the
last 5 sts, slipping the first st of every row as if to purl
with yam in front (pwise wyf), and keeping rem sts
outside markers in garter st. Knit 2 rows. Eyelet row:
к on RS; p on WS
p on RS; к on WS
Peacock Center
о yo
____ k2tog
si 1,k1,psso
. si 1,k2tog,psso
- 7-st nupp (see Stitch Guide)
si 1 pwisewyf (see instructions)
~~ pattern repeat
| marker position
?_$) Kl, *yo, k2tog; rep from * to end. Knit 3 rows, inc
10 sts evenly spaced on last row, and ending with a WS
row—81 sts. Cut yarn, leaving a 12" (30.5 cm) tail. Place
=ts on holder, or set aside if you have an extra set of
needles to use for the top edging.
Top Edging
With double strand of yam and using the knitted method
see page 23), CO 81 sts. Cut off one strand of yam and
cont with a single strand only. Knit 2 rows. Work Rows
1-12 of Peacock Edging chart, using a removable marker or
safety pin to mark the RS if desired (see Notes), and ending
with a WS row. Cut yam, leaving a 12" (30.5 cm) tail.
Join Center Section to Top Edging
If necessary, return held center section sts to needle
with RS facing and needle tip pointing to the right.
Hold center section and top edging tog with RS facing
outward, WS facing tog, and both needle tips pointing
to the right. Thread the yarn attached to the ball on a
tapestry needle, and use the Kitchener st (see page 39)
to graft the two pieces together, adjusting the tension
of the stitches to match the tension of the knitting. Cut
grafting yam and weave in its ends, leaving 2" (5 cm)
tails that will be trimmed after blocking.
FINISHING
Handwash gently with mild soap and warm water.
Pin shawl to finished measurements, pinning out each
[si 1, k2tog, psso] point along the top and bottom edg-
ings, and pinning out the sides about every 3" (7.5 cm)
to create a scalloped effect as shown. When dry, weave
in loose ends and trim ends of grafting yam flush with
surface of scarf.
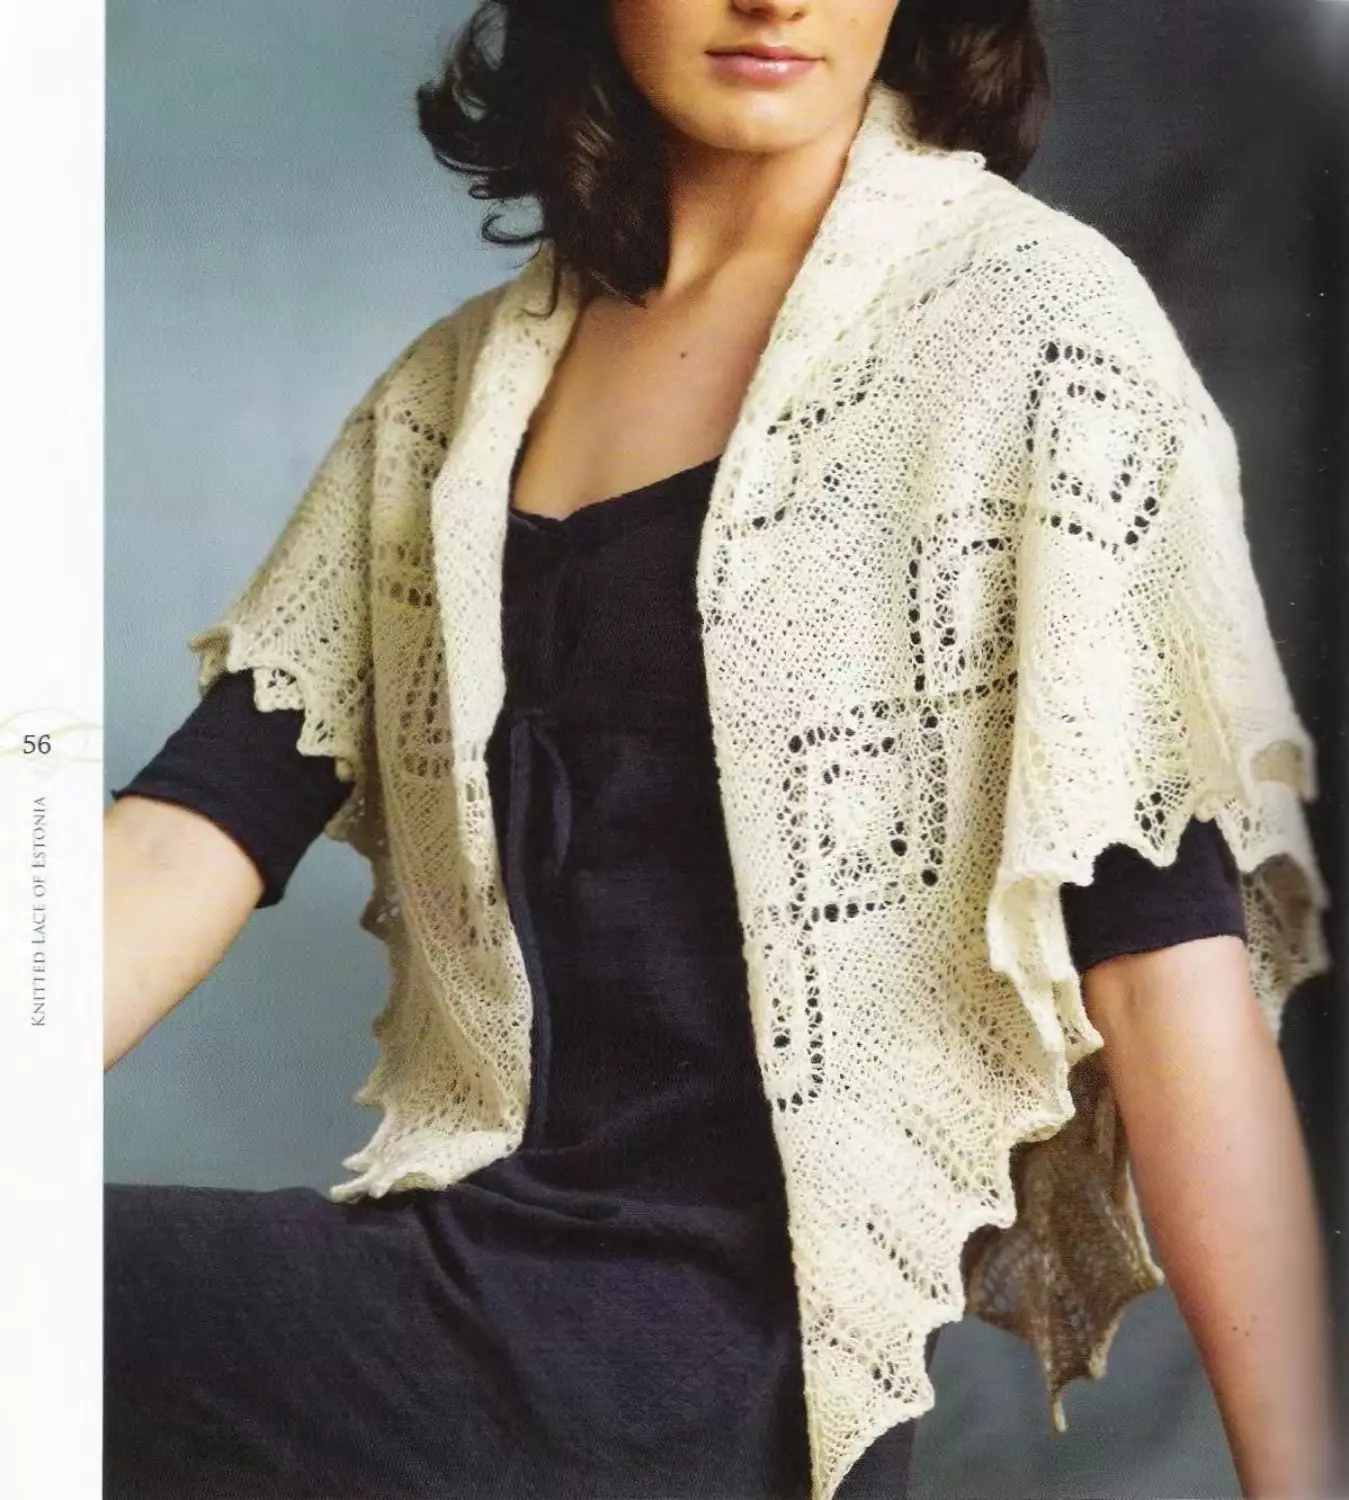
Lehe Square Shawl
For this square shawl, I wanted to use a very traditional
border pattern. I settled on a pattern from Haapsalu Ra-
nk, published by the Federated Estonian Woman’s Clubs
in New York in 1972. The border was called Lehemustri-
line Poort I, or Leaf Pattern Border 1.1 continued the na-
ture theme into the center section by choosing an allover
leaf pattern, which I found in the book Silmus Kudumine
by Claire Hallik. The lace edge is a contemporary one that
I worked by picking up stitches around all four sides of
he shawl and knitting outward. The pattern I chose for
the lace edge is a popular one found on many shawls and
scarves made in Estonia today.
Finished Size
About 42" (106.5 cm) square, relaxed
after blocking.
Yarn
Fingering weight (#1 Super Fine).
Shown here: Jamieson and Smith Shetland
2-Ply Laceweight (100% wool; 185 yd
[169 m]/25 g):#L1 A natural white, 6 skeins.
Needles
Size U.S. 5 (3.75 mm): straight and 32"
(80 cm) or longer circular (cir). Adjust
needle size if necessary to obtain the cor-
rect gauge.
Notions
Smooth cotton waste yarn for provisional
cast-on; markers (m;fourthe same color,
one in a different color); size G/6 (4.25 mm)
crochet hook; tapestry needle.
57
Gauge
1114 stitches and 16 rows = 2" (5 cm) in
stockinette stitch, before blocking; 16-stitch
pattern repeat from Lehe Top and Bottom
Border chart measures about 4’4“ (11 cm)
wide, relaxed after blocking; 20 stitches
and 32 rows (two pattern repeats wide
and two pattern repeats high) of leaf pat-
tern from Lehe Center chart measure about
4%" (12 cm) wide and 4’/2“ (11.5 cm) high,
relaxed after blocking.
Notes
-The center section of this shawl is worked in one
piece from lower border to top border.
~ Stitches for the lace edging are picked up and
knit around all four sides of the completed center
square and worked outward.
- Slip the first stitch of each row as if to purl with
yarn in front (pwise wyf), except for the first stitch
of the first row in the center section, which is
worked as kl.
CENTER SQUARE
With cotton waste yam and crochet hook, chain about
150 sts (see page 37). Tie a knot in the end of the cot-
ton after the last chain to identify this end later. With
straight needles and working yarn, pick up and knit 141
sts from the center 141 “bumps" along the back of the
crochet chain. Work 10 rows in garter st, knitting the first
58 st of the first row, but slipping the first st of every row
thereafter (see Notes), ending with a WS row. Next row:
2 (RS) SI 1, knit to end, placing same-color markers (pm)
g after the first 5 sts and before the last 5 sts.
“ Next row: (WS) SI 1, k4, purl to last 5 sts, k5. Establish
Ц patt from Lehe Top and Bottom Border chart on next RS
row as foil: Work 5 sts before marker (m) as established,
“ work Row 1 of chart over center 131 sts, work 5 sts after
? m in garter st as established. Cont to work edgings out-
side m as established, work Rows 2-28 of chart. Establish
patts from side border and center charts on next RS row
as foil: Work first 5 sts as established, work Row 1 of Lehe
Side Border chart over next 19 sts, pm, work Row 1 of
Lehe Center chart over next 93 sts, pm, work Row 1 of
Lehe Side Border chart over next 19 sts, work last 5 sts as
established. On the foil rows, for side border chart work
Rows 2-28 once, then work Rows 1-28 five more times;
for center chart, work Rows 2-12 once, then work Rows
13-28 nine times, then work Rows 29-40 once—168
patt rows total from beg of Lehe Side Border and Lehe
Center charts. Change to Lehe Top and Bottom Border chart,
and working 5 sts at each side as established, work Rows
1-28 of chart over center 131 sts. Next row: (RS) SI 1, knit
to end. Next row: (WS) SI 1, k4, purl to last 5 sts, k5. Slipping
first st of each row as established, work 10 rows garter st,
ending with a WS row.
LACE EDGE
With cir needle and RS facing, kl (corner st), pm of differ-
ent color to indicate beg of rnd, knit to end, inc 41 sts evenly
spaced as you go—182 sts. With RS still facing, pick up and
knit (see page 38) 1 st (comer st) from left selvedge, pm,
then pick up and knit 181 sts along rem selvedge (about 3 sts
for every 2 slipped edge sts)—182 sts total picked up along
left selvedge. Beg at knotted end, carefully remove the waste-
yarn crochet chain, placing each live st on empty straight
needle as it becomes free—141 sts from CO edge. With RS
facing and cir needle, work across sts from CO edge as foil:
Kl (corner st), pm, knit to end, inc 41 sts evenly spaced as
you go—182 sts from CO edge. With RS still facing, pick up
and knit 1 st (corner st) from right selvedge, pm, them pick
up and knit 181 sts along rem selvedge—728 sts total: 182
sts along each side; the st before each marker is a comer st.
When working lace edge, start each side at the beg of the
chart with the corner st (shown in gold). Establish patt from
Rnd 1 of Lehe Lace Edge chart as foil: *K1 (corner st), slip
marker (si m), yo, work marked 10-st patt rep 18 times, kl,
yo; rep from * 3 more for rem 3 sides of shawl—1 st inc’d
on each side of each of the 4 corner sts. Work Rnds 2-16 of
chart—800 sts after completing Rnd 9: 200 sts along each
side. Join a second strand of yam and loosely BO all sts with
2 strands held tog using the k2tog method (see page 27).
FINISHING
Handwash gently with mild soap and warm water. Pin shawl
out to about 44" (112 cm) square, pinning out each [yo, kl,
yo] point along the lace edge; finished piece will relax to
about 42" (106.5 cm) square. When dry, weave in loose ends.
Lehe Lace Edge
Lehe Side Border
61
| I |»| N I
к on RS;p on WS
p on RS; к on WS
yo
k2tog
si 1,k1,psso
si 1,k2tog, psso
edging corner stitch
no stitch
pattern repeat
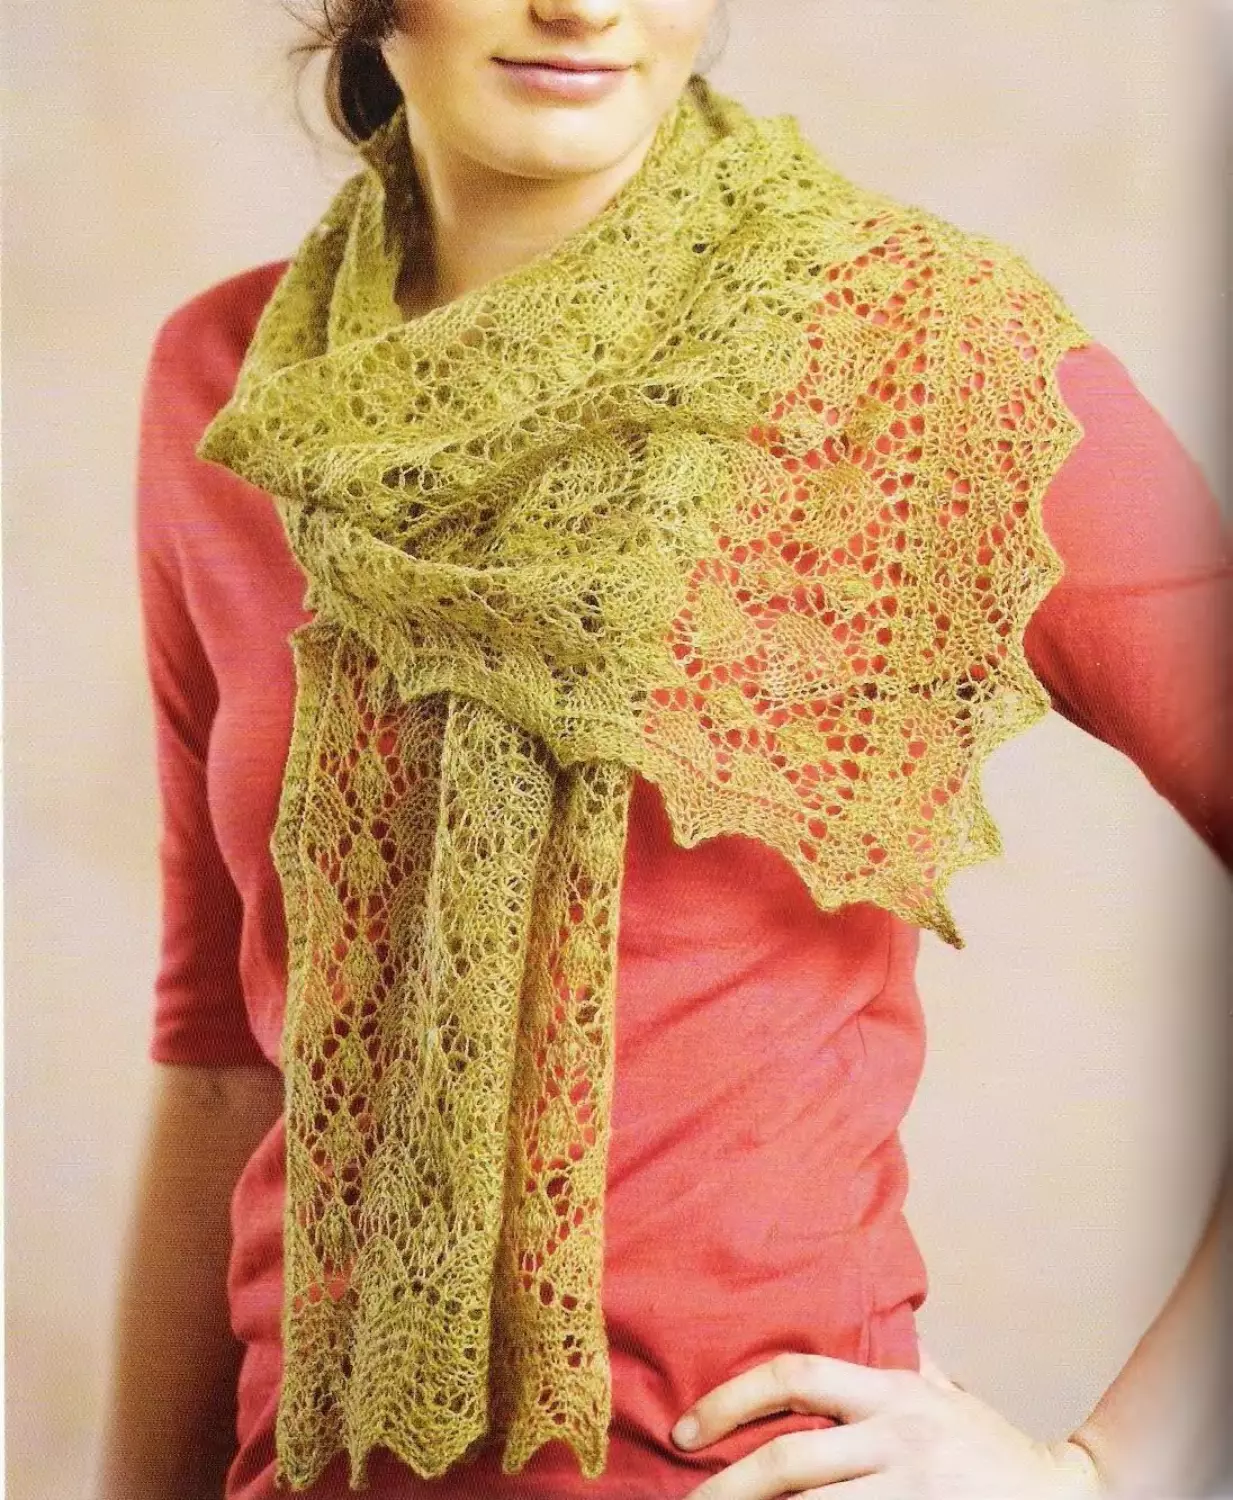
rah a Scarf
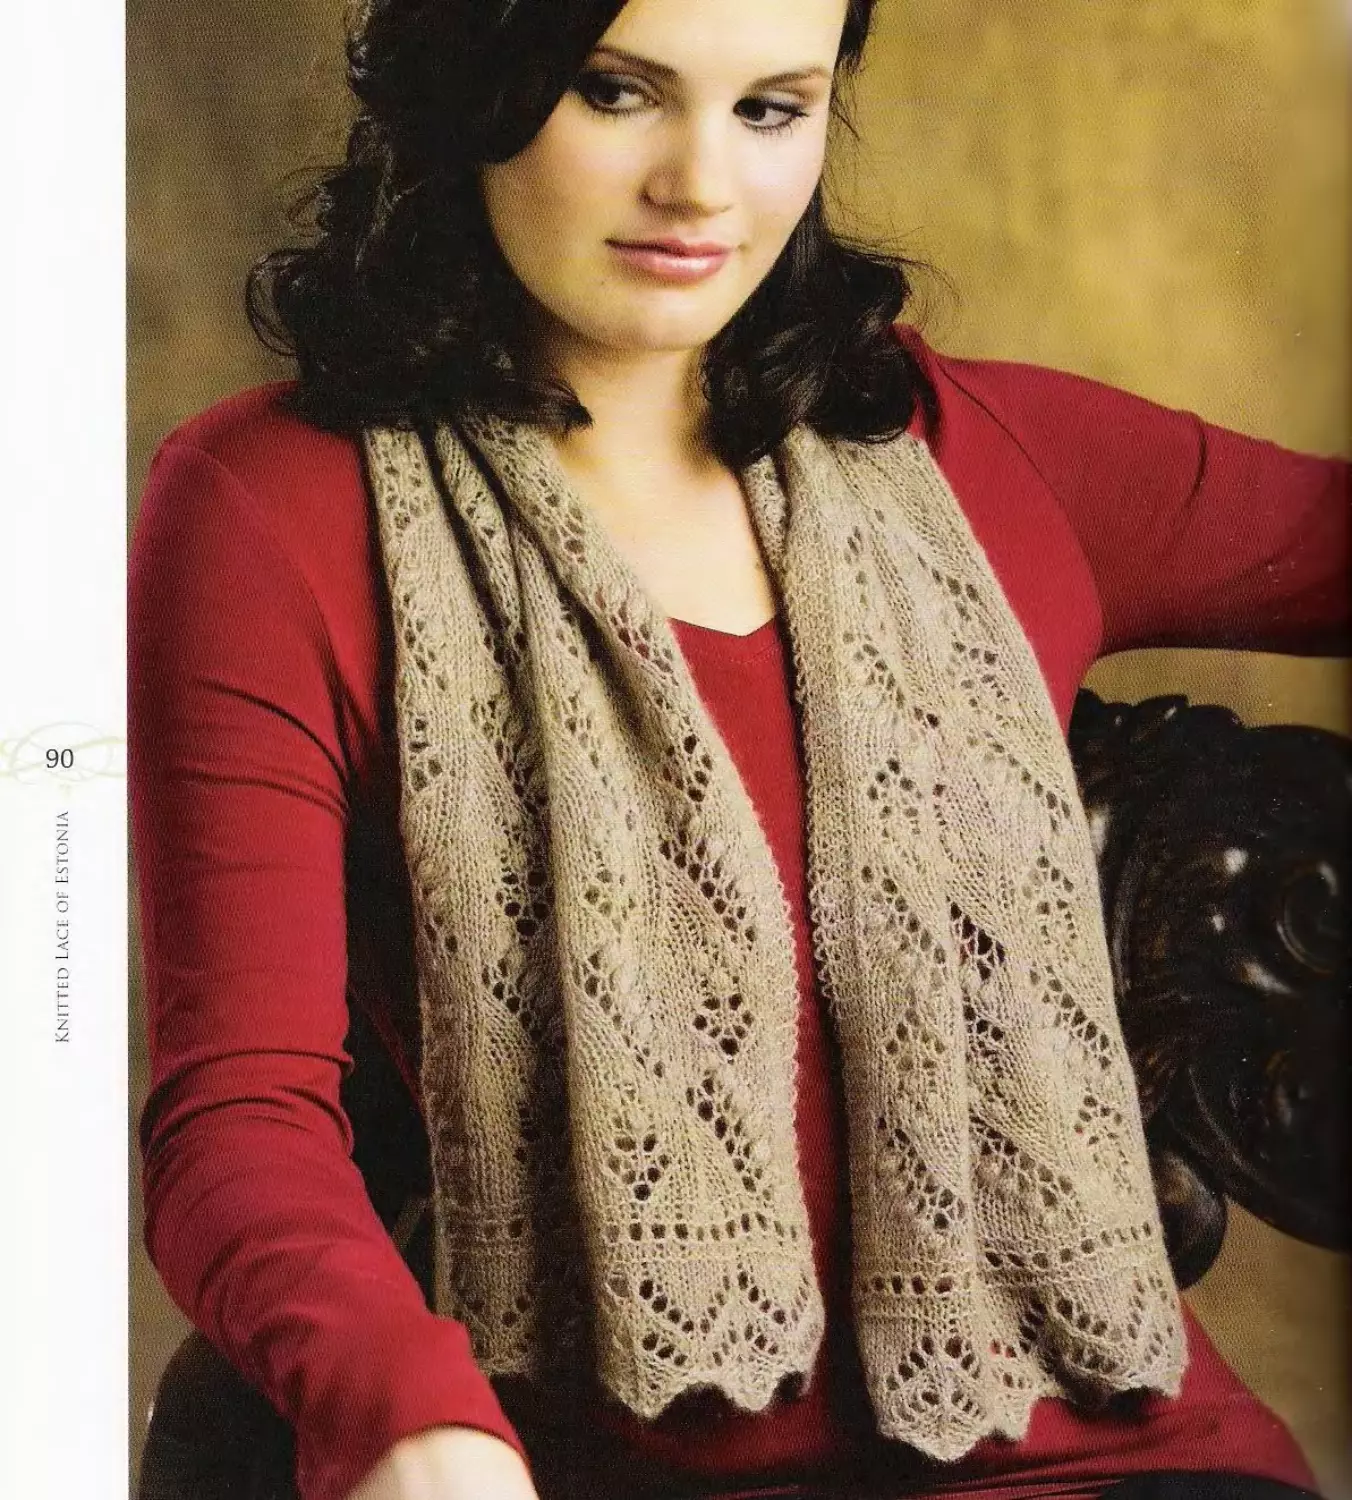
I got the idea for this scarf from my editor and friend,
Ann Budd. She thought it might be interesting to knit
a scarf using only one repeat of a pattern for the width.
When I came across this pattern, I knew it would be per-
fect for such a scarf. The Rahakiri or Money pattern is one
of the oldest Haapsalu patterns mentioned in the literature
I have found. This pattern came to me from the knitting
ladies in Haapsalu, and they have told me they “think” it is
the Raha pattern. In any case, it’s an interesting departure
from the leaf and lily patterns.
Finished Size
About 5’Л” (14 cm) wide and 53"
(1345 cm) long, relaxed after blocking.
Yam
Fingering weight (#1 Super Fine).
Shown here: Moco Yarns 45% Qiviut/45%
Merino/10% Silk Fingering Weight (45%
musk ox qiviut,45% merino, 10% silk;
220 yd [201 m]/1 oz [28.5 g]):DL-SUF 100
suntan, 1 skein.
Needles
Size U.S.4 (3.5 mm). Adjust needle size if
necessary to obtain the correct gauge.
Notions
Markers (m); tapestry needle.
Gauge
13 stitches and 16 rows = 2" (5 cm) in
stockinette stitch, before blocking; 21
pattern stitches from center of Raha chart
(not including garter edge sts) measure
4’4” (11 cm) wide, relaxed after blocking.
SCARF
Using the knitted method (see page 23), CO 29 sts.
Slipping the first st of every row pwise with yarn in
front (wyf), work in garter stitch for 5 rows, beg and
ending with a RS row. Next row: (WS) SI 1, k3, place
marker (pm), k21, pm, k4. Slipping the first st of every
row as before, work Rows 1-6 of Raha chart once,
then work Rows 7-38 eleven times, then work Rows
39-65 once—385 chart rows total. Slipping first st of
every row as before, work in garter st for 6 rows, end-
ing with a RS row. With WS facing and using the k2tog
method (see page 27), loosely BO all sts.
64 FINISHING
< Handwash gently with mild soap and warm water.
z Pin scarf out (or use blocking wires) to about 7"
— (18 cm) wide and 56" (142 cm) long to block; finished
piece will relax to about 5%" (14 cm) wide and 53"
< (134.5 cm) long. When dry, weave in loose ends.
Raha
65
| | к on RS; p on WS
p on RS; к on WS
0 k2tog
|~x~| sl1,k1,psso
[o] yo
|~v~| si 1 (see instructions)
|~a~| sl 2 as if to k2tog, kl, p2sso
□ pattern repeat
| marker position
knitted Lace of Est<
Leaf and Nupp Shawl
This delightful shawl was inspired by one in the
collection of the Estonian National Museum in Tartu.
The pattern is a mix of garter stripes embellished with
nupps and a double leaf motif and bordered with a very
decorative openwork zigzag at the top and bottom. I
began the shawl with a crochet-chain provisional east-
ern and worked the main part of the shawl up to the
top. The lace edge is picked up around all four sides and
knitted on in the more modern style. I used a pattern
similar to ones used where the lace edge is sewn onto
the shawl, reworked it to fit nicely around the corners,
and knitted it with a garter-stitch ground (purling every
even-numbered round) to mimic the look of many tradi-
tional shawls.
Finished Size
About 22" (56 cm) wide and 60" (152.5 cm)
long, after blocking.
Yarn
Fingering weight (#1 Super Fine).
Shown here:\Noo\y\Nest Horizons Lace Yarn
(100% wool; 525 yd [480 m]/50 g): sandhill
(taupe), 1 skein.
Needles
Size U.S.3 (3.25 mm): straight and 32" (60 cm)
or longer circular (cir) for edge. Adjust needle
size if necessary to obtain the correct gauge.
Notions
Smooth cotton waste yarn for provisional
cast-on; markers (m; three the same color, one
in a different color); size G/6 (4.25 mm) crochet
hook; tapestry needle.
Gauge
9 stitches and 14 rows = 2" (5 cm) in stocki-
nette stitch, before blocking; 22 stitches and
20 rows (one pattern repeat wide and one
pattern repeat high) of Leaf and Nupp Center
chart measure about 4%" (12 cm) wide and 314"
(8.5 cm) high, after blocking.
STITCH GUIDE
7-Stitch Nupp
Working very loosely, work ([kl, yo] 3 times, kl) all in
same st—7 nupp sts made from 1 st. On the foil row,
purl the 7 nupp sts tog as shown on chart—7 nupp sts
deed back to 1 st.
68
Notes
~The center section of this shawl is worked in one
piece from lower border to top border. Stitches for
the lace edging are picked up and knit around all
four sides of the completed center rectangle and
worked outward.
-Slip the first stitch of each row as if to purl with
yarn in front (pwise wyf), except for the first stitch
of the first row in the center section, which is
worked as kl.
| SHAWL
- Center Section
j With cotton waste yarn and crochet hook, chain about
~ 85 sts (see page 37). Tie a knot in the end of the cotton
н after the last chain to identify this end easily later. With
z straight needles and working yarn, pick up and knit 75
sts from the center 75 “bumps” along the back of the
crochet chain. Work 6 rows in garter st, knitting the
first st of the first row, but slipping the first st of every
row thereafter (see Notes), ending with a WS row. Work
Rows 1-25 of Leaf and Nupp Border chart, placing
same-color markers (pm) after the first 4 sts and before
the last 4 sts, and ending with a RS row. Next row:
(WS) SI 1, k3, purl to last 4 sts, k4. Next 3 rows: Knit,
slipping the first st of each row, and beg and ending with
a RS row. Next row: (WS) SI 1, knit to end, reposition-
ing markers after the first 8 sts and before the last 8 sts.
Change to Leaf and Nupp Center chart and work Rows
1-8 once, then work Rows 9-28 fourteen times, then work
Rows 29-39 once, ending with a RS row—299 chart rows
completed. Next 4 rows: Knit, slipping the first st of each
row, repositioning markers after the first 4 sts and before
the last 4 sts in the first row, and ending with a RS row.
Next row: (WS) SI 1, k3, purl to last 4 sts, k4. Work Rows
1-25 of Leaf and Nupp Border chart, ending with a RS
row. Next 5 rows: Knit, slipping the first st of each row,
and ending with a WS row—370 rows total from CO. Do
not break yarn.
Lace Edge
With cir needle and RS facing, kl (corner st), pm of dif-
ferent color to indicate beg of rnd, knit to end, inc 7 sts
evenly spaced as you go—82 sts. With RS still facing, pick
up and knit 1 st (corner st) from left selvedge, pm, then
pick up and knit (see page 38) 273 sts along rem selvedge
(about 3 sts for every 2 slipped edge sts)—274 sts total
picked up along left selvedge. Beg at knotted end, care-
fully remove the waste-yarn crochet chain, placing each
live st on empty straight needle as it becomes free—75 sts
from CO edge. With RS facing and cir needle, work across
sts from CO edge as foil: Kl (corner st), pm, knit to end,
inc 7 sts evenly spaced as you go—82 sts from CO edge.
With RS still facing, pick up and knit 1 st (corner st) from
right selvedge, pm, pick up and knit 273 sts along rem
selvedge—712 sts total: 82 sts each at upper and lower
edges, 274 sts along each side; the st before each marker
is a corner st. Purl 1 rnd, slipping markers as you come to
them. Note: When working the edge, start each side at the
beg of the chart with the corner st (shown in gold).
70
Establish patt from Rnd 1 of Leaf and Nupp Lace Edge
chart as foil: *K1 (comer st of short side), slip marker
(si m), yo, kl, work marked 8-st patt rep 9 times, yo,
si 1, kl, psso, k3, k2tog, yo, kl, yo, kl (comer st of
long side), si m, yo, kl, work marked 8-st patt rep 33
times, yo, si 1, kl, psso, k3, k2tog, yo, kl, yo; rep from
* once more for rem 2 sides of shawl—8 sts inc’d; 1 st
inc’d on each side of all 4 corner sts. Work Rnds 2-9 of
chart—736 sts after completing Rnd 5; 88 sts along top
and lower edges, 280 sts along each side. Purl 1 rnd, then
knit 1 md. Join a second strand of yam and loosely BO all
sts with 2 strands held tog using the k2tog method (see
page 27).
FINISHING
Handwash gently with mild soap and warm water. Pin
shawl out to finished measurements, pinning out each [yo,
kl, yo] point of the edging. When dry, weave in loose ends.
Q konRS;ponWS
|~7| ponRS;konWS
0 yo
0 k2tog
[~x~| s!1,k1,psso
[7] k3tog
[7] si 1,k2tog, psso
[w] 7-st nupp (see Stitch Guide)
0 p7tog
[~v~| si 1 pwise wyf (see Notes)
| | edging corner stitch
| | no stitch
[~~] pattern repeat
| marker position
I____ work 4 times
Leaf and Nupp Center
I--------------- work 2 times |
Knitted lace of Estonia
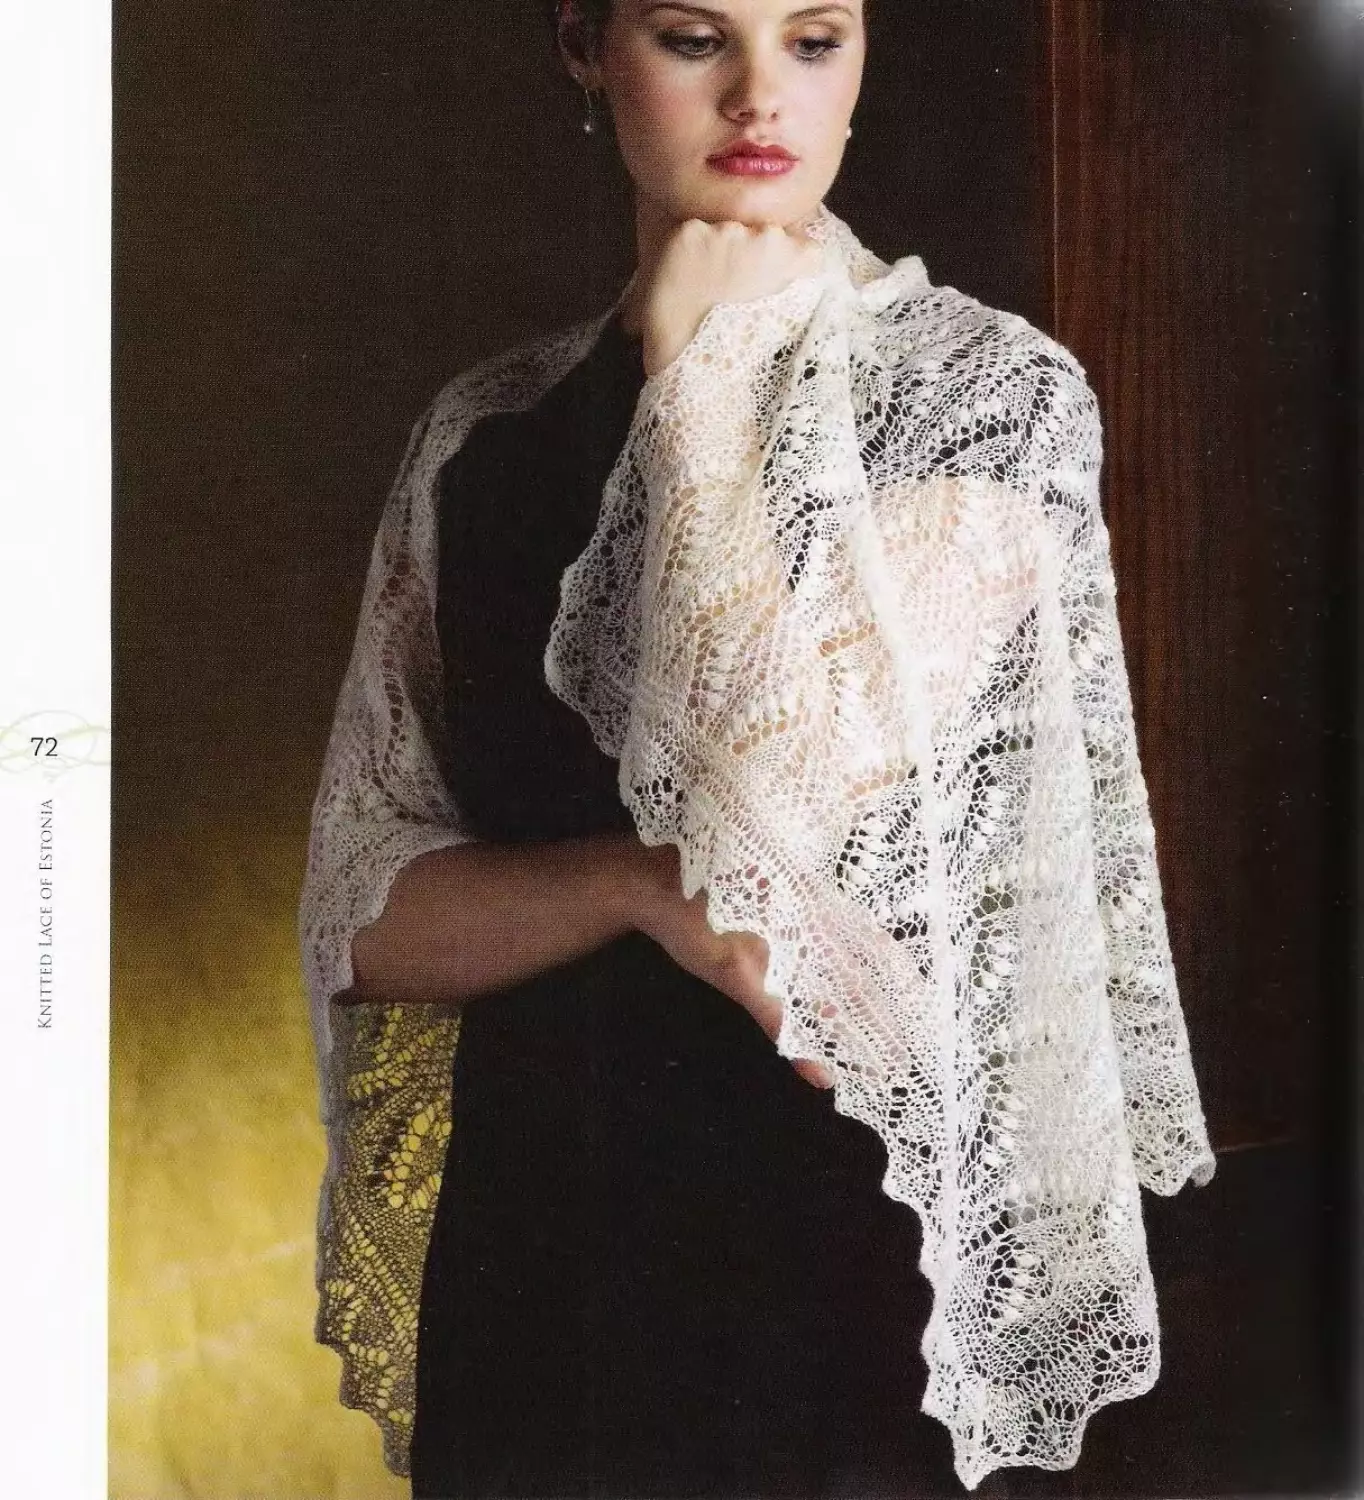
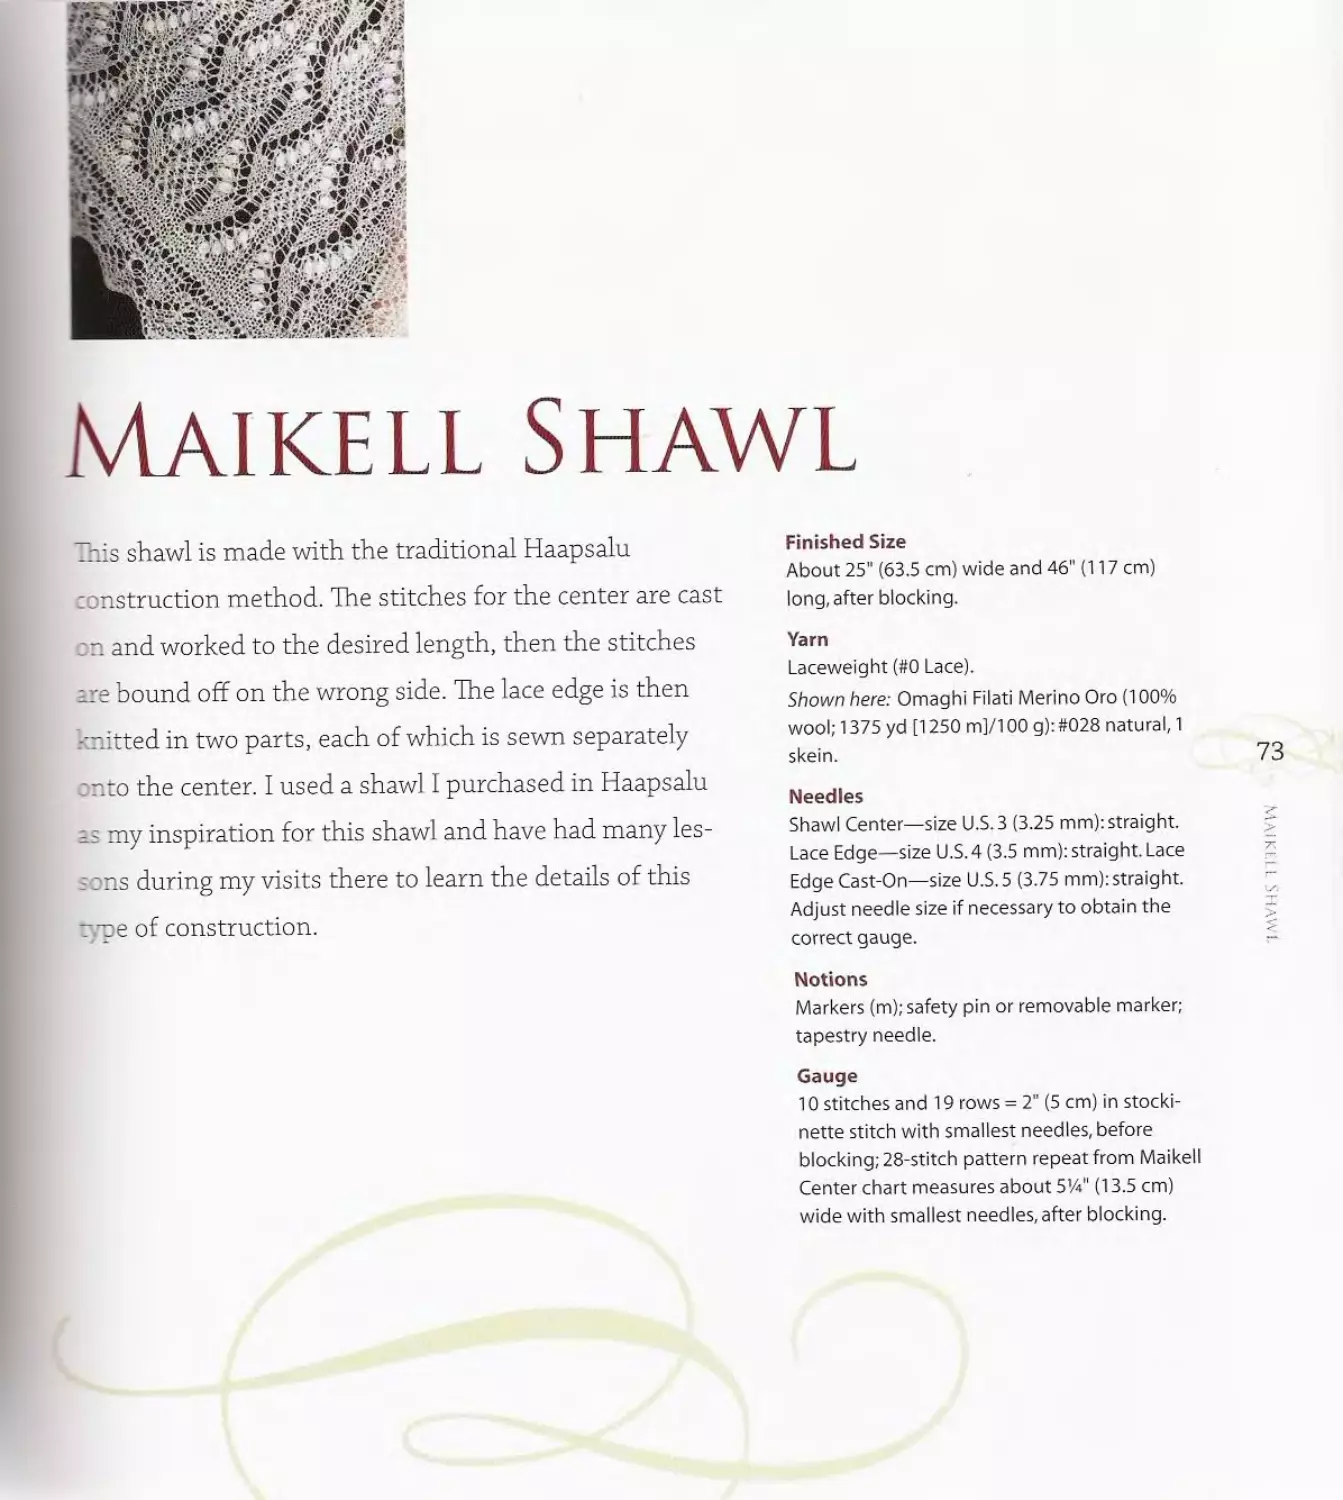
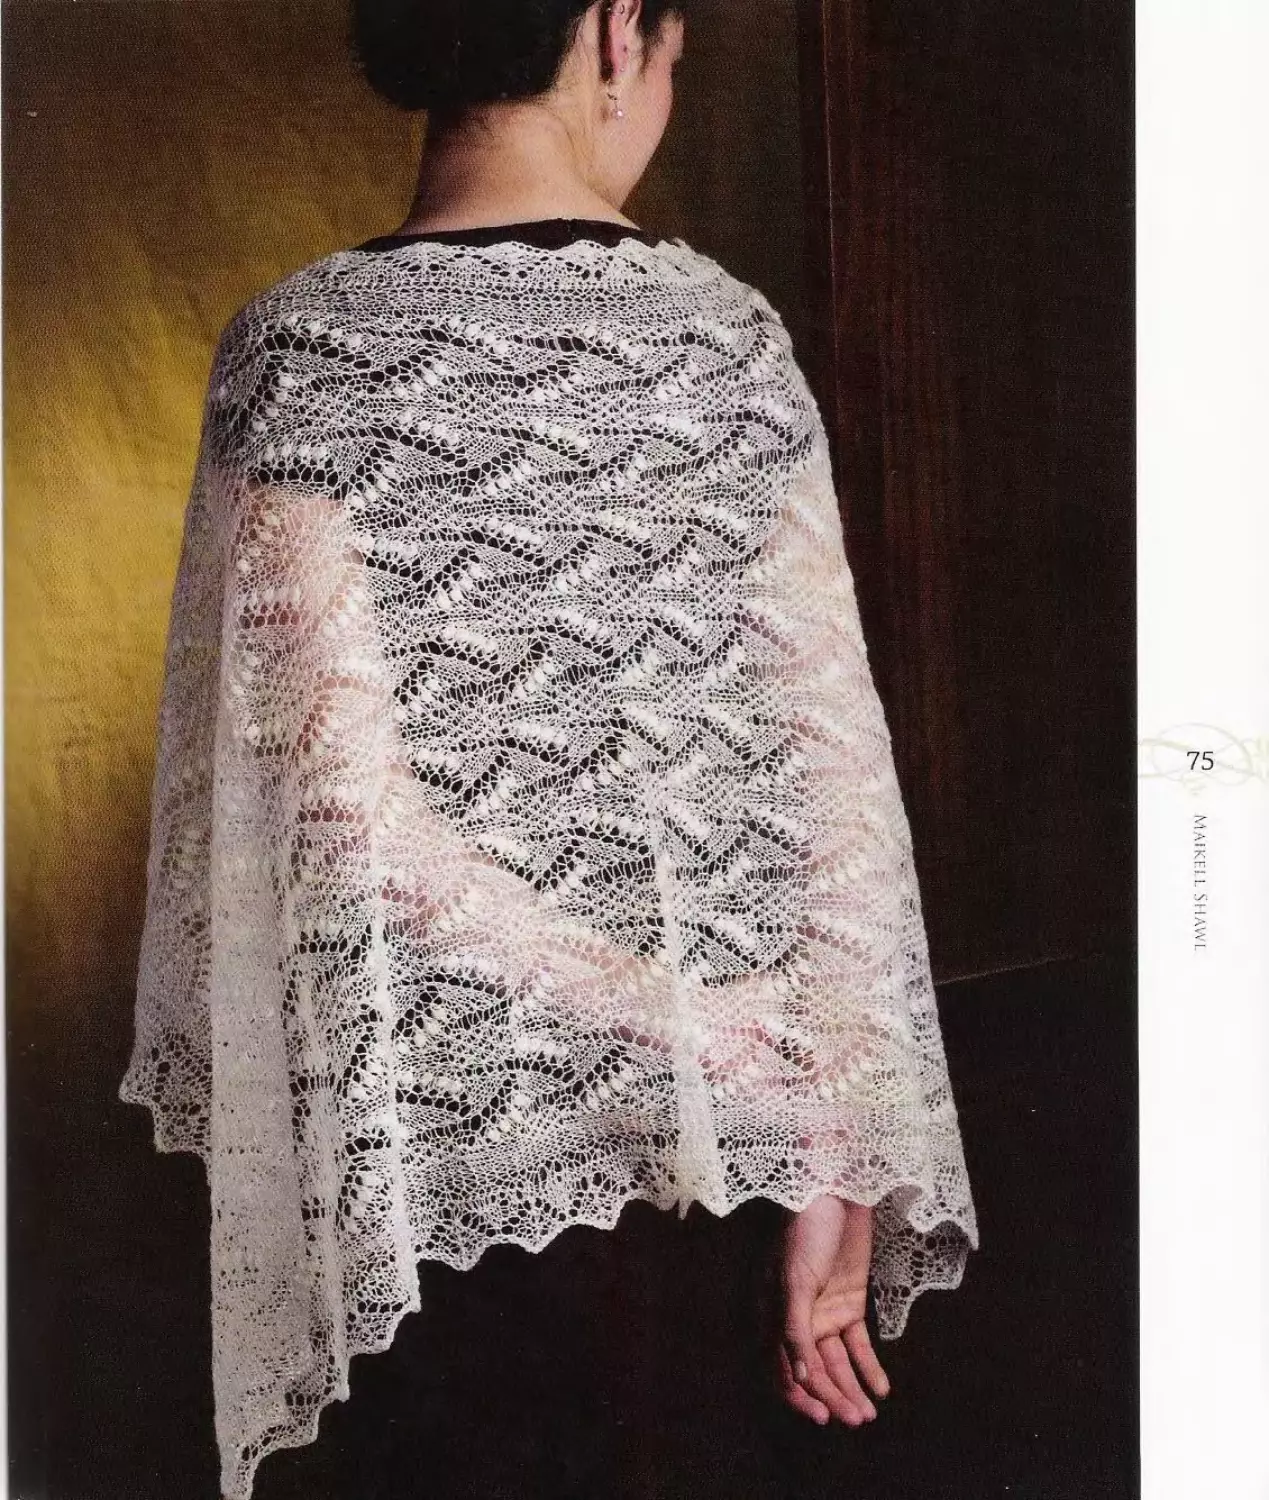
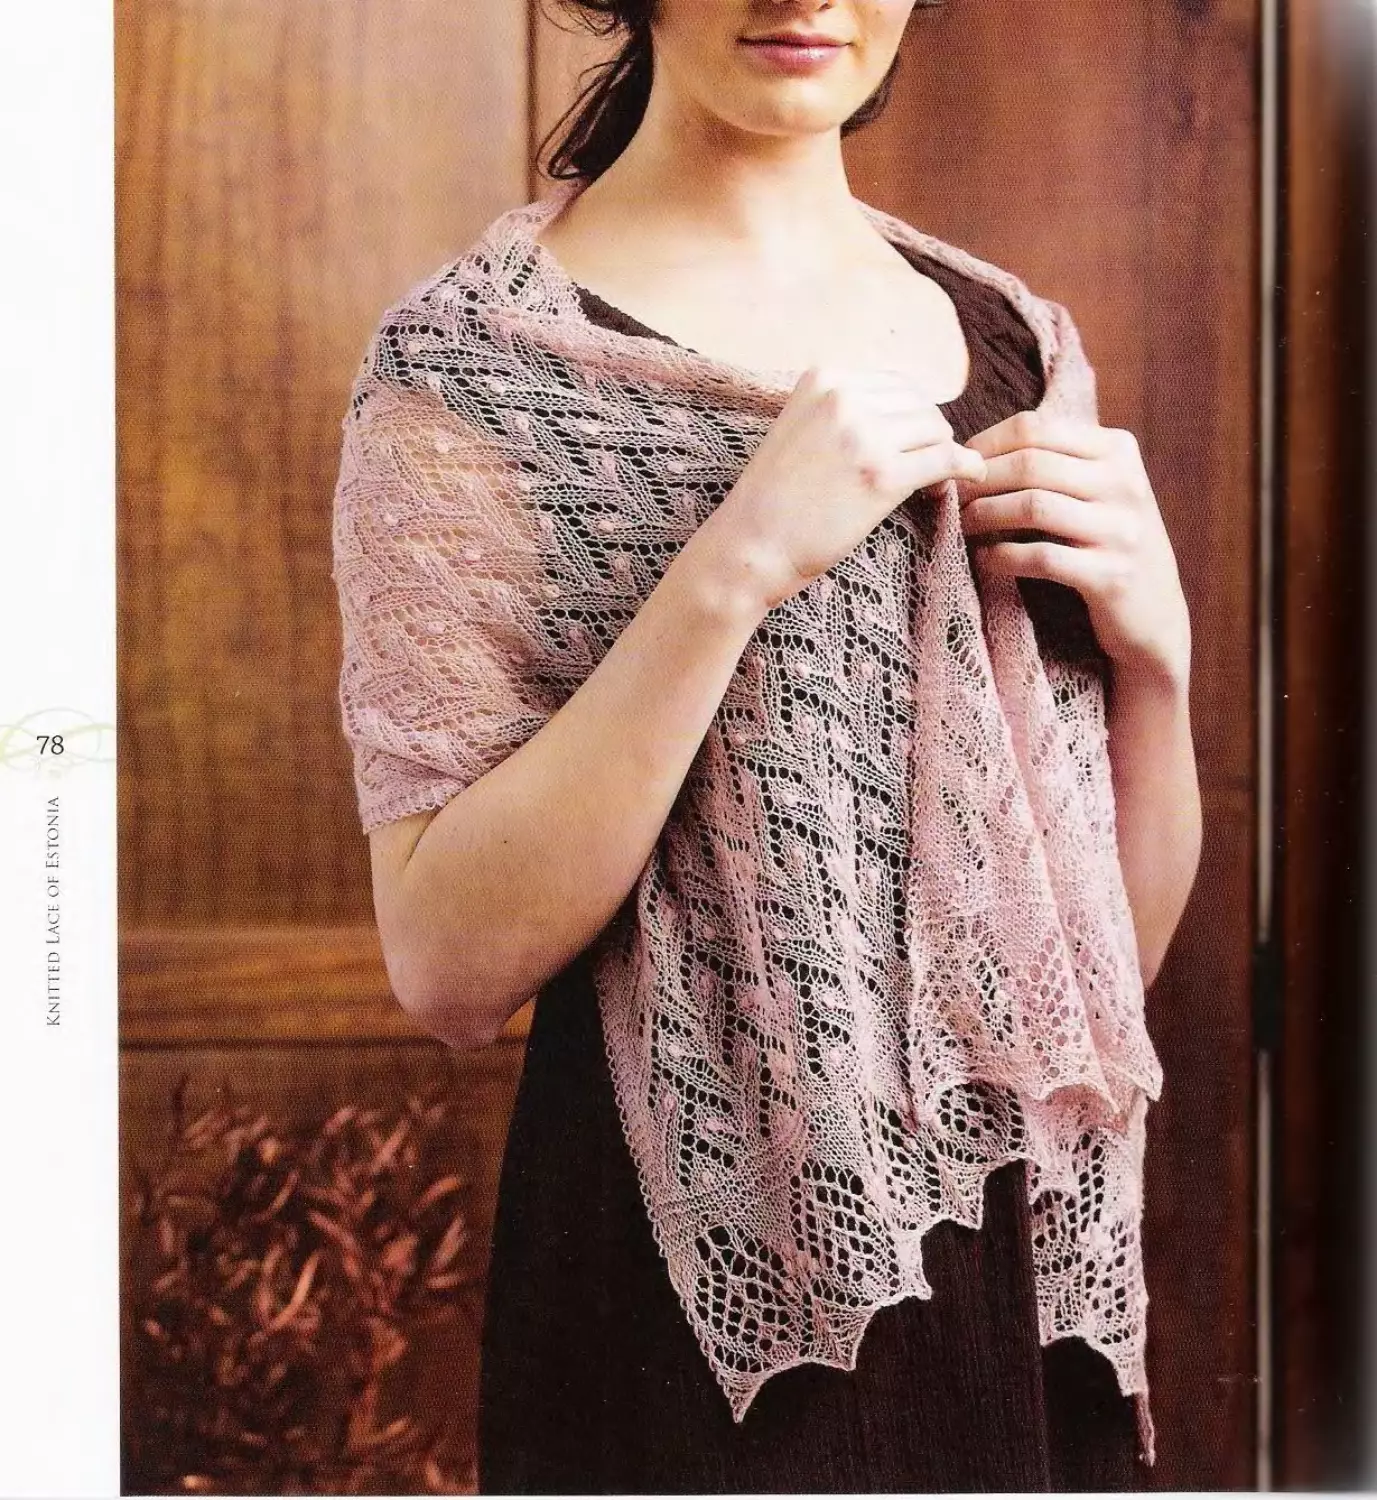
Maikell Shawl
This shawl is made with the traditional Haapsalu
construction method. The stitches for the center are cast
on and worked to the desired length, then the stitches
are bound off on the wrong side. The lace edge is then
knitted in two parts, each of which is sewn separately
onto the center. I used a shawl I purchased in Haapsalu
as my inspiration for this shawl and have had many les-
sons during my visits there to learn the details of this
type of construction.
Finished Size
About 25" (63.5 cm) wide and 46" (117 cm)
long, after blocking.
Yarn
Laceweight (#0 Lace).
Shown here: Omaghi Filati Merino Oro (100%
wool; 1375 yd [1250 m]/100 g): #028 natural, 1
skein. 73
Needles
Shawl Center—size U.S.3 (3.25 mm): straight.
Lace Edge—size U.S. 4 (3.5 mm): straight. Lace
Edge Cast-On—size U.S.5 (3.75 mm): straight.
Adjust needle size if necessary to obtain the
correct gauge.
Notions
Markers (m); safety pin or removable marker;
tapestry needle.
Gauge
10 stitches and 19 rows = 2" (5 cm) in stocki-
nette stitch with smallest needles, before
blocking; 28-stitch pattern repeat from Maikell
Center chart measures about 5'A" (13.5 cm)
wide with smallest needles, after blocking.
STITCH GUIDE
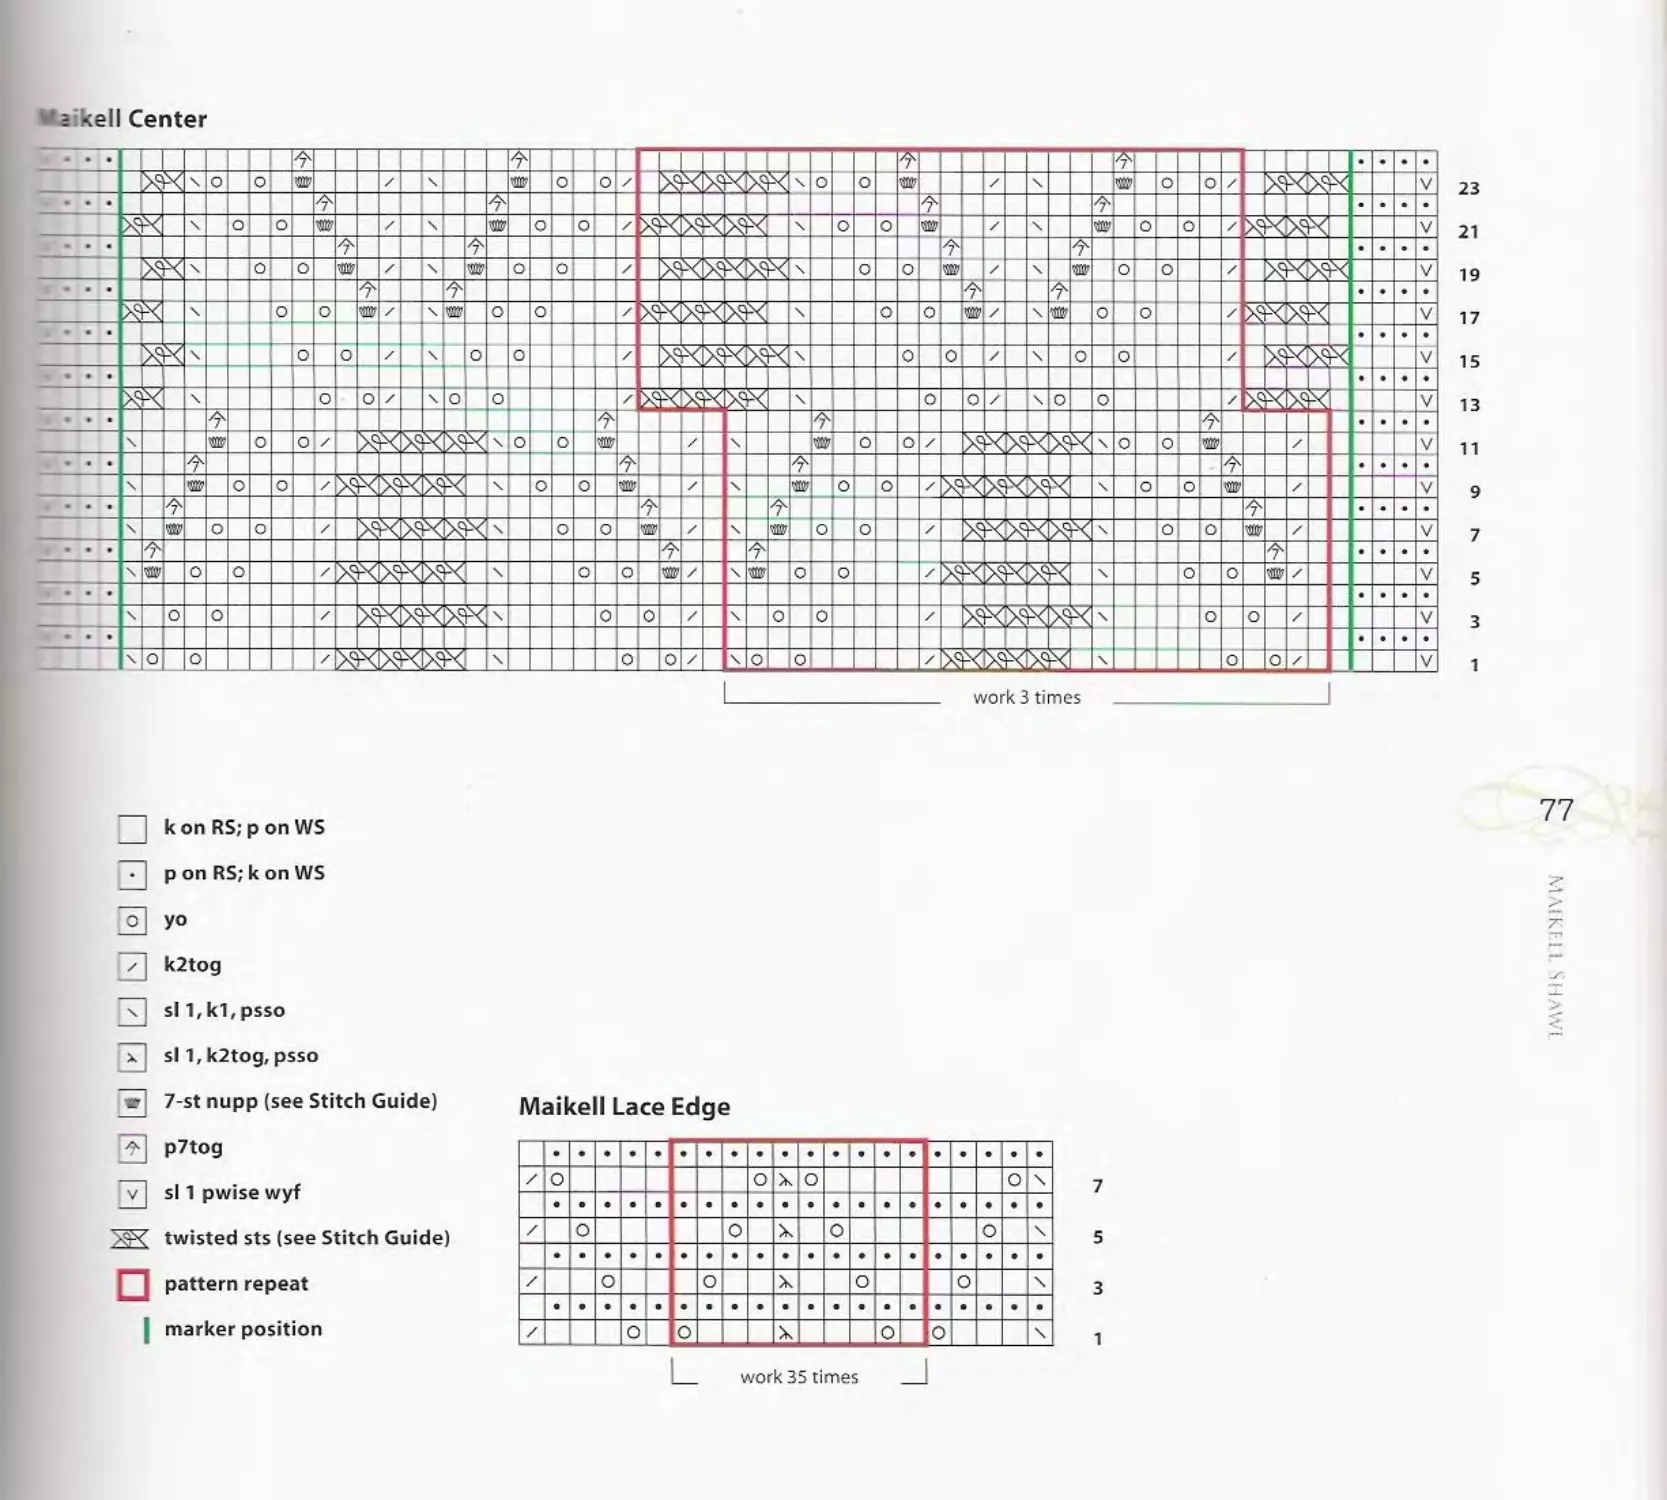
7-Stitch Nupp
Working very loosely, work ([kl, yo] 3 times, kl) all in
same st—7 nupp sts made from 1 st. On the foil row,
purl the 7 nupp sts tog (as shown on chart)—7 nupp sts
dec’d back to 1 st.
Twisted Sts (worked over 2 sts)
K2tog through the back loop (tbl) but do not slip sts
from left needle, insert needle tip between the 2 sts just
worked tog and knit the first st again, then slip both sts
from left needle.
74
Notes
~ The center of the shawl is worked in one piece.
The lace edge is worked in two identical pieces
that are sewn to the center section.
~ A double strand of yarn is used for the lace edge
cast-on, then a single strand is used for the re-
mainder of lace edge.
~ Right-side Rows 13-24 of the Center chart
intentionally do not contain the same number of
twisted-stitch sets at each side: there are two sets
at the beginning of these rows and only one set
at the end of these rows.
SHAWL CENTER
With middle-size needles and single strand of yarn, use
the knitted method (see page 23) to CO 121 sts. Change
to smallest-size needles. Knit all sts for 6 rows—3
garter ridges. Work Rows 1-24 of Maikell Center chart a
total of 12 times, placing markers (pm) after the first 4
sts and before the last 4 sts, slipping the first st of every
row as if to purl with yarn in front (pwise wyf), and
keeping rem sts outside markers in garter st—288 chart
rows completed. Knit all sts for 7 rows, beg and ending
with a RS row. With WS facing and single strand of yarn,
and using the k2tog method (see page 27), BO all sts. Set
aside.
LACE EDGE (make2)
With yarn doubled and largest-size needles, CO 361 sts.
Cut off one strand of yarn and cont with a single strand
only. Change to middle-size needles. Use a safety pin or
removable marker to mark the RS of the piece. Knit all sts
for 2 rows. Work Rows 1-8 of Maikell Lace Edge chart (do
not slip the edge sts). Knit 1 RS row across all sts. Using
the k2tog method, BO all sts. Make a second lace edge the
same as the first.
Join Lace Edge to Center
Hold the center section and one lace edge with RS tog and
so that the center piece is closest to you. With the yarn
from the ball threaded on a tapestry needle and beg at
the lower left corner of the center piece (the left edge of
the CO row), sew the two pieces tog (see page 30) as foil:
Bring the threaded needle from back to front through
each of the first 3 loops of the lace edge, then through the
first loop of the center piece from front to back. Rep this
3:1 ratio 2 more times (3 times total)—9 sts of lace edge
and 3 sts of center have been joined. Next, take 2 loops
from the lace edge and 1 loop from the center piece. Rep
this 2:1 ratio 2 more times (3 times total). Work along
the side of the shawl by taking [1 loop from the lace edge
and 1 loop from the center (1:1) 2 times, then 2 loops
from the lace edge and 1 loop from the center one time
(2:1)]—i.e., 1:1,1:1, 2:1—until 15 sts rem before the
center of the scallop that will form the corner and 6 sts
rem before the next comer of the center section. Next,
take 2 loops from the lace edge and 1 loop from the center
(2:1) 3 times, then take 3 loops from the lace edge and 1
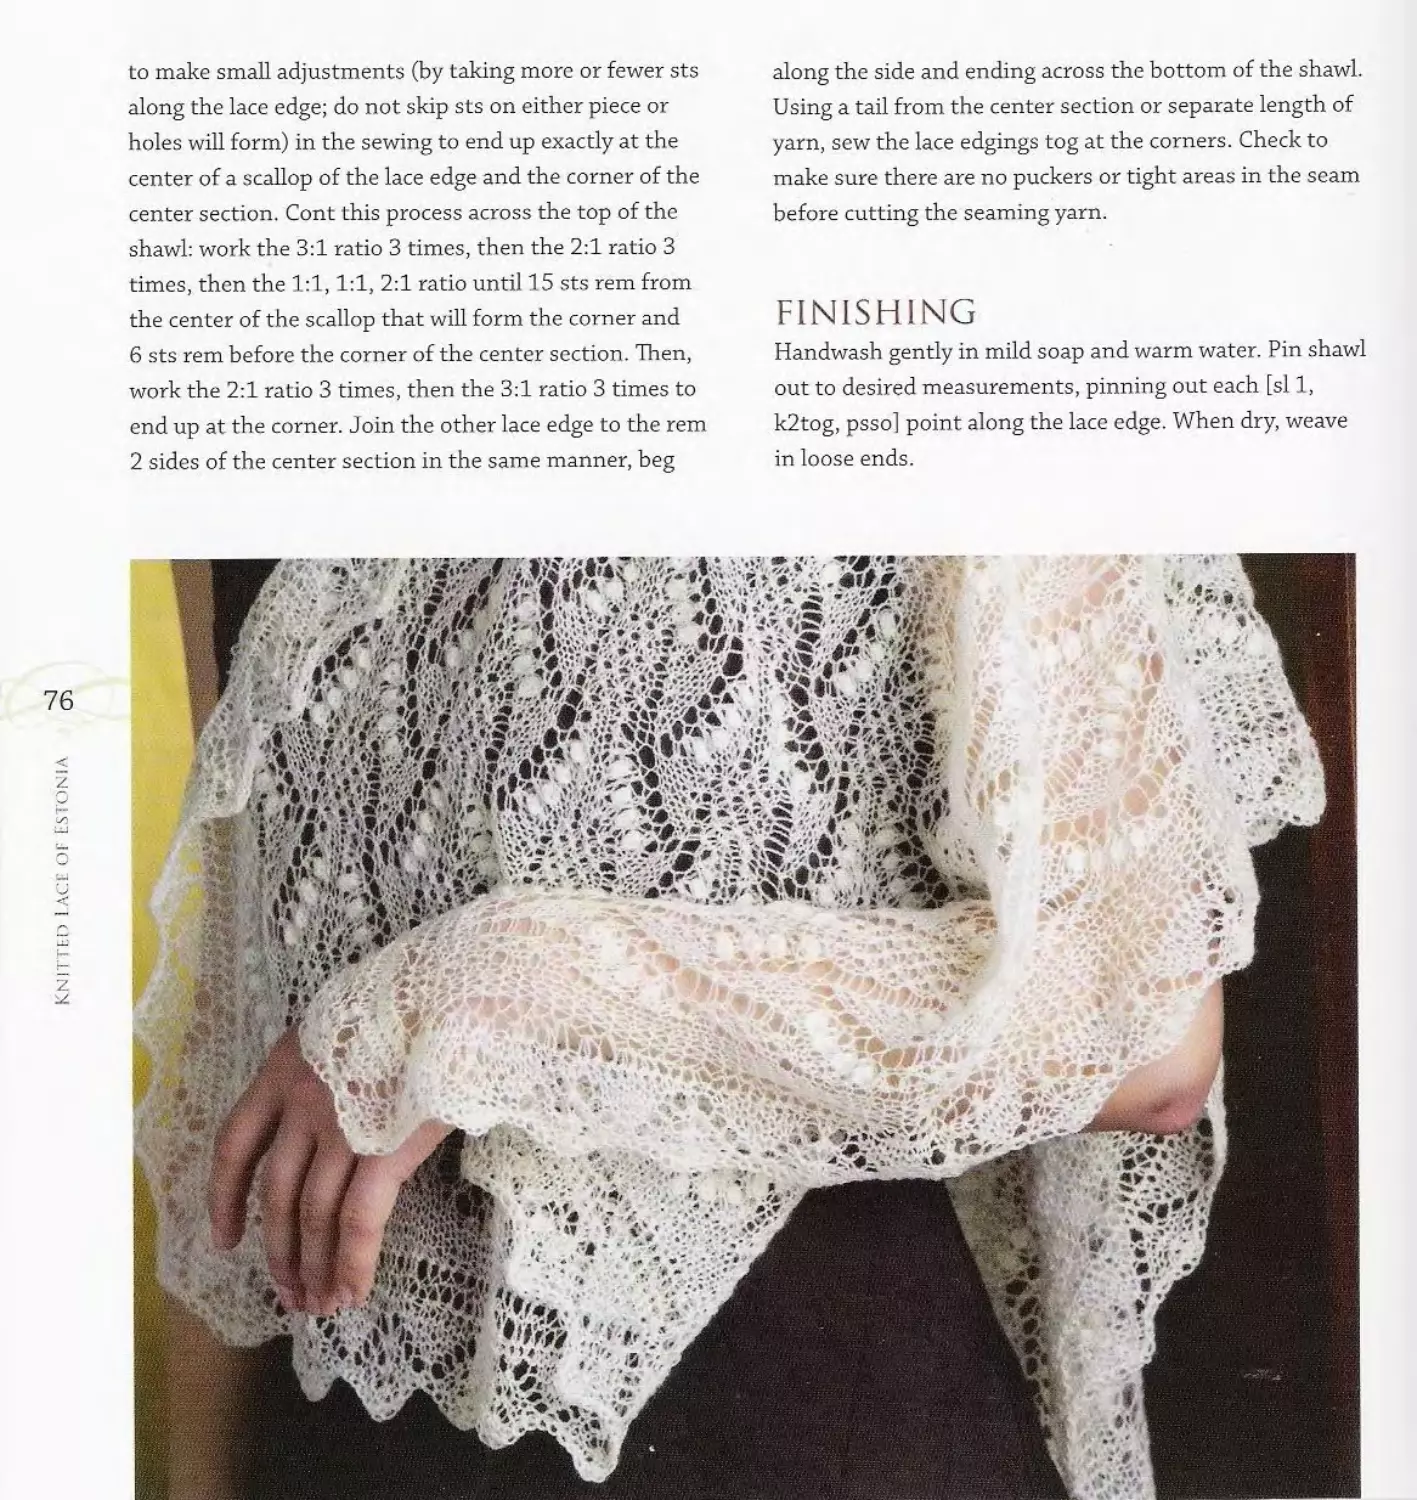
loop from the center (3:1) 3 times. Note: You may need
to make small adjustments (by taking more or fewer sts
along the lace edge; do not skip sts on either piece or
holes will form) in the sewing to end up exactly at the
center of a scallop of the lace edge and the corner of the
center section. Cont this process across the top of the
shawl: work the 3:1 ratio 3 times, then the 2:1 ratio 3
times, then the 1:1,1:1, 2:1 ratio until 15 sts rem from
the center of the scallop that will form the corner and
6 sts rem before the corner of the center section. Then,
work the 2:1 ratio 3 times, then the 3:1 ratio 3 times to
end up at the corner. Join the other lace edge to the rem
2 sides of the center section in the same manner, beg
along the side and ending across the bottom of the shawl.
Using a tail from the center section or separate length of
yarn, sew the lace edgings tog at the corners. Check to
make sure there are no puckers or tight areas in the seam
before cutting the seaming yarn.
FINISHING
Handwash gently in mild soap and warm water. Pin shawl
out to desired measurements, pinning out each [si 1,
k2tog, psso] point along the lace edge. When dry, weave
in loose ends.
sikell Center
□ к on RS; p on WS
2] ponRSjkonWS
[o] yo
□ k2tog
[~s~| sl1,k1,psso
i~x~] si 1,k2tog, psso
Madli’s Shawl
This shawl, reworked in finer yarn than the original
pattern in the Summer 2004 issue of Interweave Knits,
was named for Madli Puhvel, author of Symbol of
Dawn, the biography of the beloved nineteenth-century
Estonian poet Lydia Koidula. Madli has also provided
me valuable support and friendship as I researched this
book. The pattern in the main section of this shawl is a
version of the Haga, (twig or small branch) pattern to
which I have added nupps for texture.
Finished Size
About 14" (35.5 cm) wide and 56" (142 cm)
long, relaxed after blocking.
Yarn
Laceweight (#0 Lace).
Shown here: Yarn Place Gentle (95% wool,
5% cashmere; 1,380 yd [1,262 m]/100 g):
#13 dusty pink, 1 skein. 79
Needles
Size U.S.4 (3.5 mm):straight. Adjust
needle size if necessary to obtain the
correct gauge.
Notions
Markers (m);stitch holder;tapestry needle.
Gauge
15 stitches and 21 rows = 2" (5 cm) in
stockinette stitch, before blocking; 36
stitches and 48 rows (three pattern re-
peats wide and four pattern repeats high)
of Madli Center chart measure about 5’4"
(14 cm) wide and 6” (15 cm) high,after
blocking.
STITCH GUIDE
7-Stitch Nupp
Working very loosely, work ([kl, yo] 3 times, kl) all in
same st—7 nupp sts made from 1 st. On the foil row,
purl the 7 nupp sts tog as shown on chart—7 nupp sts
dec’d back to 1 st.
Notes
-The shawl is worked in one piece from the lower
border to the end of the center section.The top
lace edge is worked separately so its direction of
knitting will match the lower lace edge, then the
two pieces are grafted together with the Kitch-
ener stitch.
- A double strand of yarn is used for the cast-on,
then a single strand is used for the remainder of
the shawl.
80
LOWER LACE EDGE
With double strand of yarn and using the knitted
method (see page 23), CO 101 sts. Cut off one strand
of yarn and cont with a single strand only. Knit 2 rows.
Work Rows 1-26 of Madli Lace Edge chart, slipping
the first st of every row as if to purl with yam in front
(pwise wyf). Knit 7 rows, ending with a RS row. Next
row: (WS) Knit, inc 1 st after the first 4 sts and inc 1 st
before the last 4 sts—103 sts.
CENTER SECTION
Work Rows 1-12 of Madli Center chart 31 times, plac-
ing markers (pm) after the first 5 sts and before the
last 5 sts, slipping the first st of every row pwise wyf,
and keeping rem sts outside markers in garter st. Knit
6 rows. Next row: (WS) Knit, dec 1 st after the first
4 sts and dec 1 st before the last 4 sts, removing side
markers as you come to them—101 sts rem. Cut yarn,
leaving a 12" (30.5 cm) tail. Place sts on holder or set
aside if you have an extra set of needles to use for the
top edging.
TOP LACE EDGE
With double strand of yam and using the knitted
method, CO 101 sts. Cut off one strand of yarn and
cont with a single strand only. Knit 2 rows. Work
Rows 1-25 of Madli Lace Edge chart, slipping the first
st of every row pwise wyf; do not work Row 26. Knit 1
WS row. Cut yam, leaving a 2 yd (1.8 m) tail.
Join Center Section to Top Lace Edge
If necessary, return held center section sts to needle
with RS facing and needle tip pointing to the right.
Hold center section and top lace edge tog with RS
facing outward, WS facing tog, and both needle tips
pointing to the right. Thread long tail from top lace
edge on a tapestry needle, and use the Kitchener st
(see page 39) to graft the two pieces together, adjust-
ing the tension of the stitches to match the tension
of the knitting. Cut grafting yarn and weave in its
end, leaving a 2" (5 cm) tail that will be trimmed after
blocking.
FINISHING
Handwash gently with mild soap and warm water.
Pin shawl out to about 17" (43 cm) wide and 64"
(162.5 cm) long to block, pinning out each [si 1, kl,
psso, kl, k2tog] point and side edges of the borders;
finished piece will relax to about 14" (35.5 cm) wide
and 56" (142 cm) long. When dry, weave in loose ends
and trim end of grafting yam flush with surface of
shawl.
| | к on RS; p on WS
P~| ponRS;konWS
[°] yo
□ k2tog
[7~] sl1,k1,psso
|~x~| si 1, k2tog, psso
[w] 7-st nupp (see Stitch Guide)
0 p7tog
[~v~| si 1 pwise wyf (see instructions)
□ pattern repeat
| marker position
KNITTED LACE OF ESTONIA
triangular
Summer Shawl
This shawl, designed by Helve Poska, has been published
in issue #121 of Triinu magazine, in the Suvi (Summer)
of 1983 and by the Estniska Etnografiska Foreningen
Estonian Ethnographical Society) in Sweden in 1986.
Helve gave me permission to use it here. Instead of being
shaped by decreasing evenly from the top (cast-on) edge
to the tip, the decreases are worked at each end of every
right-side row for about half the length, then at each end
of every row thereafter to create slightly angled sides.
I modified the original pattern by adding a few rows of
garter stitch after the lace edge at the top and a garter-
stitch edging along each side. I also added more stitches
to the lace edge that is sewn onto the two lower sides to
give a more rounded shape to the three corners.
Finished Size
About 56" (142 cm) wide across top edge
and 24” (61 cm) long from center of top
edge to tip of lower point, relaxed after
blocking.
Yarn
Laceweight (#0 Lace).
Shown here: Wooly West Horizons Lace Yarn
(100% wool;525 yd [480 m]/50 g): natural
white, 2 skeins.
Needles
Size U.S.4 (3.5 mm):32" (60 cm) circular (cir).
Adjust needle size if necessary to obtain the
correct gauge.
Notions
Markers (m); removable marker or safety pin;
tapestry needle.
Gauge
1 V/2 stitches and 22 rows = 2" (5 cm) in
stockinette stitch, before blocking; 30
stitches (two 15-st pattern repeats) from
Summer Center charts measures about 6W
(16 cm) wide, relaxed after blocking.
83
STITCH GUIDE
7-Stitch Nupp
Working very loosely, work ([kl, yo] 3 times, kl) all in
same st—7 nupp sts made from 1 st. On the foil row,
purl the 7 nupp sts tog (as shown on chart)—7 nupp sts
dec’d back to 1 st.
Notes
~ The shawl begins with the lace edge at the top
(long) edge.The center section has a 4-stitch
garter-stitch border along each of the angled
lower sides.The lace edge for the lower sides is
knitted separately and sewn to the center section
during finishing.
~ When shaping the main section, one stitch is
decreased inside the 4-stitch garter edgings every
right-side row until Row 59,then beginning with
Row 60, one stitch is decreased at each side every
row to Row 138.
CENTER
Top Lace Edge
With yarn doubled and using the knitted method (see
page 23), CO 251 sts. Cut off one strand of yarn and
cont with a single strand only. Knit 2 rows. Work Rows
1-11 of Summer Lace Edge chart. Slipping the first st
of each row as if to purl with yarn in front (pwise wyf),
knit 2 rows, ending with a RS row. Next row: (WS) SI
1, knit to end and at the same time dec 14 sts evenly
spaced—237 sts rem. Slipping the first st of each row as
established, knit 2 rows, ending with a WS row.
Center Section
Work Rows 1-64 of Summer Center Chart 1, placing
markers (pm) after the first 4 sts and before the last 4
sts, slipping the first st of every row, and keeping rem
sts outside markers in garter st (see Notes)—167 sts
rem. Maintaining 4 sts at each end of needle as es-
tablished, work Rows 65-96 of Summer Center Chart
2—103 sts rem. Maintaining 4 sts at each end of needle
as established, work Rows 97-128 of Summer Center
Chart 3—39 Sts rem. Cont as foil:
Row 129: (RS) SI 1, k3, si 1, kl, psso, knit to last 6 sts,
k2tog, k4—2 sts dec’d
Row 130: SI 1, k3, p2tog, purl to last 6 sts, si 1, pl, psso,
k4—2 sts dec’d.
Rows 131-135: Rep Rows 129 and 130 two times, then
work Row 129 once more—25 sts rem.
Row 136: (WS) SI 1, k3, k2tog, knit to last 6 sts, si 1, kl,
psso, k4—2 sts dec’d.
Row 137: SI 1, k3, si 1, kl, psso, knit to last 6 sts, k2tog,
k4—2 sts dec’d.
Row 138: Rep Row 136—19 sts rem.
Row 139: SI 1, knit to end.
With a single strand of yarn, loosely BO all sts using the
k2tog technique (see page 27).
LACE EDGE (make i)
With yarn doubled and using the knitted method, CO
271 sts. Cut off one strand of yarn and continue with a
single strand only. Knit 2 rows (do not slip the first st
of the rows of the lace edge). Place a removable marker
or safety pin on the right side of the piece. Work Rows
1-11 of Summer Lace Edge chart. Knit 2 rows, ending
with a RS row. With a single strand of yarn, BO all sts
using the k2tog technique.
Join Lace Edge to Center
With right sides of both pieces facing up, distribute
the lace edge around the center section, matching the
midpoint of the lace to the center of the 19 BO sts of
the center and matching the “half points” at the ends of
the lace tog with the ends of the top lace edge to form a
continuous piece. Hold the center section and lace edge
with RS tog and so that the center section is closest to
you. Using a single strand of yarn attached to the ball
threaded on a tapestry needle, sew the lace edge to the
center as foil (see page 30): Working from top to lower
edge, take 1 st from the lace edge and 1 st from the
center (1:1) once, then take 2 sts from the lace edge and
1 st from the center (2:1) once. Rep this sequence to the
19 BO sts at the “point.” Work across these sts taking
86
3 sts from the lace edge and 1 from the center (3:1) 19
times. Cont up the other side, alternating 1:1 and 2:1 to
the top corner.
Using a tail or separate length of yarn, sew the ends of
the lace edging tog. Check to make sure there are no
puckers or tight areas in the seam before cutting the
seaming yarn.
FINISHING
Handwash gently with mild soap and warm water. Pin
shawl out to about 64" (162.5 cm) across the top edge and
24" (61 cm) from center of top edge to tip of lower point,
pinning out each [si 1, k2tog, psso] point along the lace
edges; finished piece will relax to about 56" (142 cm) wide
across the top. When dry, weave in loose ends.
| | к on RS; p on WS
□ p on RS; к on WS
[°] yo
|~z~| kltog on RS; p2tog on WS
|~x~| si 1,k1,pssoon RS;si 1, pl, psso on WS
[~x~| si 1, k2tog, psso
[w| 7-st nupp (see Stitch Guide)
Щ p7tog
[~v~| si 1 pwise wyf
| | no stitch
□ pattern repeat
Lily of the
Valley Scarf
This soft and interesting-to-knit scarf was adapted from
a pattern for a triangular shawl in issue #142 of Triinu
magazine, published in the autumn of 1988. The article
was written by Salme Puus, an Estonian who was living
in Australia at the same time. The center of the scarf
features the familiar Lily of the Valley motif, along with
small flower figures that include openwork leaves and
stems. The ends of the scarf have a scalloped lace bor-
ders, separated from the main section by garter-stitch
bands punctuated with eyelets; the sides have narrow
garter-stitch edges that prevent them from curling.
Finished Size
About 10" (25.5 cm) wide and 44" (112 cm)
long, relaxed after blocking.
Yarn
Fingering weight (#1 Super Fine).
Shown /rere.'Jojoland Cashmere 2-Ply (100%
cashmere; 400 yd [366 m]/2 oz [56.7 g]):
#2-101 natural brown, 1 skein (see Notes).
Needles
Size U.S.3 (3.25 mm). Adjust needle size if
necessary to obtain the correct gauge.
Notions
Markers (m); stitch holder; tapestry needle.
Gauge
10 stitches and 18 rows = 2" (5 cm) in
stockinette stitch, before blocking; 20-stitch
pattern repeat of Lily and Small Flower Cen-
ter chart measures about 3%" (9 cm) wide,
relaxed after blocking.
91
STITCH GUIDE
5-Stitch Nupp
Working very loosely, work (kl, yo, kl, yo, kl) all in
same st—5 nupp sts made from 1 st. On the foil row,
purl the 5 nupp sts tog (as shown on chart)—5 nupp sts
dec’d back to 1 st.
Notes
~ The shawl is worked in one piece from the lower
border to the top of the center section.The top
border is worked separately so its direction of
knitting will match the lower border, then the two
pieces are grafted together with the Kitchener
stitch.
~ A double strand of yarn is used for the cast-on,
then a single strand is used for the remainder of
the shawl.
- There was very little leftover yarn after finishing
the scarf shown. Plan on purchasing extra yarn if
making a longer scarf.
SCARF
With double strand of yarn and using the knitted
method (see page 23), CO 63 sts. Drop the extra strand
and cont with a single strand only.
Lower Lace Edge
Work Rows 1-21 of Lily Lace Edge chart, slipping the
first st of every row pwise with yarn in front (wyf)
except for Row 1 as shown. Next row: (WS) SI 1, knit to
end and at the same time dec 5 sts evenly spaced—58 sts
rem.
Center Section
Change to Lily and Small Flower Center chart and place
markers (pm) after the first 4 sts and before the last 4
sts. Slipping the first st of every row and keeping rem
sts outside markers in garter st, rep Rows 1-28 of chart
9 times, then work Rows 1-14 once more—266 chart
rows completed. Next row: (RS) SI 1, knit to end and at
the same time inc 5 sts evenly spaced—63 sts. Slipping
first st of every row, knit 3 rows. Next row: (RS) SI 1,
*yo, k2tog; rep from * to end. Next row: (WS) SI 1, knit
to end. Cut yarn, leaving a 12" (30.5 cm) tail. Place sts
on holder or set aside if you have an extra set of needles
to use for the top border.
Upper Lace Edge
With double strand of yarn and using the knitted
method, CO 63 sts. Cut off one strand of yarn and cont
with single strand only, work Rows 1-16 of Lily Lace
Edge chart, slipping the first st of every row except for
Row 1 as for lower border; do not work Rows 17-21. Cut
yarn, leaving a 12" (30.5 cm) tail. Without working any
sts, si all sts pwise to empty needle so needle tip points
to the left with RS of piece facing.
93
Join Center Section and Top Border
If necessary, return held center section sts to needle
with RS facing and needle tip pointing to the right.
Hold center section and top border tog with RS facing
outwards (WS facing tog) and both needle tips pointing
to the right. Thread the yarn attached to the ball on a
tapestry needle and use the Kitchener st (see page 39)
to graft the two pieces together, adjusting the tension
of the stitches to match the tension of the knitting. Cut
grafting yarn and weave in its ends, leaving 2" (5 cm)
tails that will be trimmed after blocking.
FINISHING
Handwash gently in mild soap and warm water.
Pin scarf out to about 12" (30.5 cm) wide and 36"
(91.5 cm) long to block, pinning out each [yo, kl,
yo] point in the lace edges; finished piece will nar-
row and lengthen to about 10" (25.5 cm) wide and
44" (112 cm) long. When dry, weave in loose ends
and trim ends of grafting yarn flush with surface of
scarf.
| | к on RS; p on WS
j - p on RS; к on WS
□ У°
P] k2tog
П sll.kl.psso
|V| sl2asiftok2tog,k1,p2sso
|p 5-st nupp (see Stitch Guide)
[¥] p5tog
|~v~| si 1 (see instructions)
pattern repeat
Lilac Leaf Shawl
The center pattern for this lovely shawl is an old and
very popular motif. It reminds me of the lilacs that
bloom throughout Estonia in June, as well as the special
lilac wood knitting needles used by the knitters of Haap-
salu. This shawl begins with a lace edge I found in the
book Haapsalu Ratik, which is followed by a diamond
border pattern. The center is filled with lilac leaves and
the top edge mirrors the bottom. This top edge is knit-
ted separately and grafted onto the main piece so the di-
rection of the knitting is the same at both ends. Garter
stitches are used to visually separate the pattern motifs
and provide edgings for the long sides of the shawl.
Finished Size
About 20" (51 cm) wide and 66" (167.5 cm)
long, relaxed after blocking.
Yarn
Laceweight (#0 Lace).
Shown here: Wooly West Horizons Lace Yarn
(100% wool; 525 yd [480 m]/50 g): natural
white, 1 skein.
Needles
Size U.S.5 (3.75 mm):straight. Adjust needle
size if necessary to obtain the correct gauge.
Notions
Markers (m);stitch holder; tapestry needle.
Gauge
11 stitches and 17 rows = 2" (5 cm) in
stockinette stitch, before blocking; 12-stitch
pattern repeat from Lilac Leaf Center and
Border chart measures about I'/i (6.5 cm)
wide, relaxed after blocking.
STITCH GUIDE
7-Stitch Nupp
Working very loosely, work ([kl, yo] 3 times, kl) all in
same st—7 nupp sts made from 1 st. On the foil row,
purl the 7 nupp sts tog (as shown on chart)—7 nupp sts
dec’d back to 1 st.
Notes
~ The shawl is worked in one piece from the lower
lace edging to the top of the center section.
The top lace edging is worked separately so its
direction of knitting will match the lower edging,
then the two pieces are grafted together with the
Kitchener stitch.
~ A double strand of yarn is used for the cast-on,
then a single strand is used for the remainder of
z the shawl.
| SHAWL
Lower Lace Edging, Border, and Center
With yam doubled and using the knitted method (see
page 23), CO 95 sts. Cut off one strand of yam and
cont with a single strand only. Knit 2 rows. Work Rows
1-56 of Lilac Leaf Lace Edge and Border chart, placing
markers (pm) after rhe first 5 sts and before the last 5
sts, slipping the first st of every row except Row 1 as if
to purl with yarn in front (pwise wyf), and keeping rem
sts outside markers in garter st. Change to Lilac Leaf
Center and Border chart. Maintaining 5 sts at each end
of needle as established, rep Rows 1-20 of chart a total
of 14 times, then work Rows 21-62 of chart once, ending
with a WS row—322 rows completed from Lilac Leaf Cen-
ter and Border chart; 378 chart rows completed from beg.
Cut yarn, leaving a 12" (30.5 cm) tail. Place sts on holder,
or set aside if you have an extra set of needles to use for
the top lace edging.
Top Lace Edging
With yarn doubled and using the knitted method, CO
95 sts. Cut off one strand of yarn and cont with a single
strand only. Knit 2 rows. Work only Rows 1-32 of Lilac
Leaf Lace Edge and Border chart as indicated, placing
markers as shown. Cut yarn, leaving a 12" (30.5 cm) tail.
Without working any sts, si all sts pwise to empty needle
so needle tip points to the left with RS of piece facing.
Join Center Section to Top Lace Edging
If necessary, return held center section sts to needle with
RS facing and needle tip pointing to the right. Hold center
section and top lace edging tog with RS facing outwards
(WS facing tog) and both needle tips pointing to the
right. Thread the yam attached to the ball on a tapestry-
needle and use the Kitchener st (see page 39) to graft the
two pieces together, adjusting the tension of the stitches
to match the tension of the knitting. Cut grafting yarn
and weave in its ends, leaving 2" (5 cm) tails that will be
trimmed after blocking.
FINISHING
Handwash gently in mild soap and warm water. Pin scarf
out to about 22" (56 cm) wide and 72" (183 cm) long to
block, pinning out each [si 2, kl, p2sso] point in each end:
finished piece will relax to about 20" (51 cm) wide and 66’
(167.5 cm) long. When dry, weave in loose ends and trim
ends of grafting yarn flush with surface of shawl.
lilac Leaf shawl
100
| | к on RS; p on WS
P~| p on RS; к on WS
[o] yo
[7] k2tog
|~7| sl1,k1,psso
|7~| si 2 as if to k2tog, k1,p2sso
[ж| 7-st nupp (see Stitch Guide)
0 p7tog
|~v~| si 1 pwise wyf (see instructions)
□
pattern repeat
| marker position
Lilac Leaf Center and Border
101
MIRALDA’S
TRIANGULAR SHAWL
This shawl was inspired by the beautiful triangular
shawls being made in Haapsalu today. I was intrigued by
their construction and bought several to study and deci-
pher. In addition, Miralda Piper, one of my dear knitting
friends in Haapsalu, gave me a number of traditional
motifs and some helpful clues to their “secrets." The
original shawls are larger, but I prefer this smaller size
for wearing with a coat or jacket.
Finished Size
About 59" (150 cm) wide across top edge
and 30" (76 cm) long from center of top
edge to tip of lower point, relaxed after
blocking.
Yarn
Fingering weight (#1 Super Fine).
Shown here: Rovings 100% Polworth 2-Ply
Fingering Weight (100% Polworth wool;
820 yd [750 m]/150 g): natural sheep's gray
(taupe), 1 skein.
Needles
Size U.S. 6 (4 mm): 32" (80 cm) or longer
circular (cir) and 2 double-pointed (dpn).
Adjust needle size if necessary to obtain the
correct gauge.
Notions
Markers (m);tapestry needle; coilless safety
pin or removable marker.
Gauge
10 stitches and 16 rows = 2" (5 cm) in stocki-
nette stitch, before blocking; 20 stitches (two
pattern repeats) of Miralda Lace Edge charts
measure about 5" (12.5 cm) wide, relaxed
after blocking; 20-stitch pattern repeat of
Diamond charts measures about 5"
(12.5 cm) wide, relaxed after blocking.
103
STITCH GUIDE
5-Stitch Nupp
Working very loosely, work (kl, yo, kl, yo, kl) all in
same st—5 nupp sts made from 1 st. On the foil row,
purl the 5 nupp sts tog (as shown on chart)—5 nupp sts
dec’d back to 1 st.
Gathered Sts (worked over 3 sts)
K3tog but do not slip sts from needle, yo, then knit the
same 3 sts tog again, then slip all 3 sts from needle.
3-Stitch Cross (worked over 3 sts)
SI 1 st as if to purl with yam in back, knit the next 2 sts,
then pass the slipped st over the 2 sts just knitted—3
sts dec’d to 2 sts. On the foil WS row, work a yo between
the 2 resulting sts as shown on charts, to inc to 3 sts
104 again.
Note
-The scarf begins with stitches cast on for the lace
edge along the two lower sides, then stitches are
decreased to produce a triangle shape.When only
the stitches of the garter edgings remain, these
stitches are grafted or bound off together at the
center of the top edge to finish the scarf.
SCARE
With yam doubled and using the knitted method (see
page 23), CO 331 sts. Cut off one strand of yarn and
cont with a single strand only. Knit 2 rows.
Lace Edge
Set up patt for lace edge charts as foil: Work Row 1 of
Miralda Right Lace Edge chart across first 166 sts, plac-
ing a marker (pm) after the first 4 sts, then work Row 1 of
Miralda Left Lace Edge chart over 165 sts, pm before last
4 sts—329 sts. Place a removable marker in the center st
itself (shown in gold) and not on the needle, and move this
marker up every few rows so you can always easily identify
the center st. Work Rows 2-20 of Right and Left Lace Edge
charts as established—305 sts.
Border
Change to Miralda Lower Border chart and work Rows
1-12—281 sts. Set up patt for diamond charts as foil:
Work Row 1 of Miralda Right Diamond chart across first
141 sts, then work Row 1 of Miralda Left Diamond chart
across last 140 sts. Work Rows 2-34 of Right and Left Dia-
mond charts as established—213 sts. Change to Miralda
Upper Border chart and work Rows 1-14—185 sts.
Center Section
Set up patt for center charts as foil: Work Row 1 of Miralda
Right Center chart across first 93 sts, then work Row 1
of Miralda Left Center chart across last 92 sts. Work
Rows 2-24 of charts once, then rep Rows 1-24 two more
times—41 sts rem. Note: The first time you work Rows
1-24, work each marked 4-st section 13 times; the second
time you work Rows 1-24, work each marked 4-st section
7 times; the third time you work Rows 1-24, work each
marked 4-st section only once. Work Rows 25-38 of charts
and on Rows 35 and 37 dec only in the center as shown;
do not dec inside the markers at each side—17 sts rem: 1
center st plus 8 garter edging sts at each side. Next row:
(WS) K2tog, yo, k6, k2tog, k7—16 sts rem. Arrange sts
105
evenly on 2 dpn so there are 8 sts on each needle. Cut
yarn, leaving a 12" (30.5 cm) tail. Thread the tail on a
tapestry needle, hold the dpn with RS facing outward (WS
facing tog) and use the Kitchener stitch (see page 39) to
graft the sts tog. For an optional non-grafted finish, hold
the dpn with WS facing outward (RS facing tog) and use
the empty cir needle to join sts using the three-needle
bind-off method (see page 38).
FINISHING
Handwash gently in mild soap and warm water. Pin
shawl out to about 64" (162.5 cm) wide across top
edge and 31" (78.5 cm) from center of top edge to tip
of lower point, pinning out each [si 2, kl, p2sso] point
along the lace edges; finished piece will relax to about
59" (150 cm) wide across the top and 30" (76 cm) long.
When dry, weave in loose ends.
106
| | konRS;ponWS
□ p on RS; к on WS
□ У°
□ k2tog
[~x~| s!1,k1,psso
|~a] si 2 as if to k2tog, k1,p2sso
[w] 5-st nupp (see Stitch Guide)
[T] p5tog
| | no stitch
| | center stitch
□ pattern repeat
| marker position
lb»yl gathered sts (see Stitch Guide)
(SSf-J 3-st cross (see Stitch Guide)
Miralda Left Lace Edge
107
center st
108
Miralda Left Diamond
| | к on RS; p on WS
p~| p on RS; к on WS
[о] yo
~ k2tog
|~C| sl1,k1,psso
|~a~| sl 2 as if to k2tog, k1,p2sso
ps~| 5-st nupp (see Stitch Guide)
[¥] pStog
[7~| no stitch
| | center stitch
П pattern repeat
| marker position
|>»У1 gathered sts (see Stitch Guide)
(SaS! 3-st cross (see Stitch Guide)
Miralda Right Diamond
Miralda Right Center
Triinu Scarf
This scarf pattern was inspired by an article written by
Ulle Slamer in issue #148, Kevad (Spring) 1990 of Triinu
magazine. According to the article translated by Helle-
Mail, “The original shawl came as a present from Estonia.
Although we had a few members in our crafts group who
had knitted many shawls, nobody had seen this pattern
before. So, we gave the shawl to Helle-Mall Risti who
worked out the pattern and put it on paper so that it
could be easily followed. At the next teaching workshop,
most chose to use this pattern. The results were very
interesting as the size of the shawl depended on the wool
used. Also wool in different colors was used including the
traditional white. The exhibition in September 1989 was
very impressive with so many fine shawls hanging on the
stands.”
Finished Size
About 11" (28 cm) wide and 63” (160 cm)
long, after blocking.
Yarn
Fingering weight (#1 Super Fine).
Shown here: Shelridge Farm Soft Touch
Lace, (100% wool; 500 yd [455 m]/50 g):
Rust, 1 skein.
Needles
Size U.S.4 (3.5 mm). Adjust needle size if
necessary to obtain the correct gauge.
Notions
Smooth cotton waste yarn, size G/6
(4.25 mm) crochet hook; markers (m);
tapestry needle.
Gauge
11 ’Л stitches and 22 rows = 2" (5 cm) in
stockinette stitch, before blocking; 21 -stitch
pattern repeat ofTrinu Center chart
measures about 3'4" (8.5 cm) wide, after
blocking.
Ill
STITCH GUIDE
7-Stitch Nupp
Working very loosely, work ([kl, yo] 3 times, kl) all in
same st—7 nupp sts made from 1 st. On the foil row,
purl the 7 nupp sts tog (as shown on chart)—7 nupp sts
dec’d back to 1 st.
SCARF
With cotton waste yam and crochet hook, chain about
75 sts (see page 37). Tie a knot in the end of the cot-
ton after the last chain to identify this end later. With
needles and working yam, pick up and knit 69 sts from
the center 69 “bumps” along the back of the crochet
chain. Beg and end with a RS row, work 3 rows of garter
st, knitting the first st of the first row, but slipping the
112 first st of every row thereafter pwise with yarn in front
(wyf). Next row: (WS) SI 1, purl to end. Change to Tri-
| inu Center chart and place markers (pm) after the first 4
sts and before the last 4 sts. Slipping the first st of every
tZ row and keeping rem sts outside markers in garter st as
" shown, rep Rows 1-12 twenty-nine times, or until piece
-j measures about 6%" (16.5 cm) less than desired total
r length—348 chart rows completed. Slipping the first
z st of every row, knit 6 rows and at the same time inc 22
sts evenly spaced on the last WS row—91 sts. Knit 1 RS
row, then purl 1 WS row.
Top Lace Edge
Work Rows 1-17 of Triinu Lace Edge chart. Note: First
st of every row is not slipped for lace edge. With yarn
doubled, BO all sts on next WS row. Break yarn, leaving
a 6" (15 cm) tail.
Bottom Lace Edge
Beg at knotted end, carefully remove the waste-yarn
crochet chain, placing each live st on needle as it be-
comes free—69 sts. If necessary, re-orient the sts on
the needle so RS of scarf is facing you, and join yam
ready to work a RS row. Knit 2 rows and at the same
time inc 22 sts evenly spaced on second row—91 sts.
Knit 1 RS row, then purl WS 1 row. Work Rows 1-17
of Triinu Lace Edge chart as for top lace edge. With
yarn doubled, BO all sts on next WS row. Break yarn,
leaving a 6" (15 cm) tail.
FINISHING
Handwash gently with mild soap and warm water. Pin
scarf out to desired measurements, pinning out each
[yo, kl, yo] point in the lace edges. When dry, weave
in loose ends.
□ к on RS; p on WS
|~7| p on RS; к on WS
[°] yo
H k3tog
[~x~| si 1, k2tog, psso
[g] 7-st nupp (see Stitch
0 p7tog
[~v~| si 1 (see instructions)
| | pattern repeat
114
Crown Prince
Square Shawl
This lovely square shawl pattern comes from the Talv
(Winter) 1981 issue #115 of Triinu magazine. The arti-
cle was written by Helve Poska. Although the published
pattern is not a duplication of the original given to
Swedish Crown Prince Gustav-Adolf in 1936, the pat-
tern was charted from a photograph of a similar shawl
knitted by Matilde Moll. This pattern was designed by
Moll’s mother, Mrs.Valdman, who knitted the original
shawl for the Crown Prince. The shawl photographed
in the Triinu article was knitted by Loora Kurba at the
Haapsalu Raatikute (Haapsalu shawl) workshop of the
Estonian Ethnographical Club in Stockholm, Sweden.
Following Helle-Mall Risti’s suggestion, this version has
24 stitches (two pattern repeats) added to each lace edge
piece to give the edge more stretch.
Finished Size
About 52" (132 cm) square, relaxed after
blocking.
Yarn
Laceweight (#0 Lace).
Shown here.’Skacel Merino Lace (100%
merino wool; 1375 yd [1257 m]/100 g): #426
natural white, 2 skeins.
Needles
Size U.S.4 (3.5 mm). Adjust needle size if
necessary to obtain the correct gauge.
Notions
Markers (m); removable marker or safety pin;
tapestry needle.
Gauge
10 stitches and 18 rows = 2" (5 cm) in
stockinette stitch, before blocking;20-stitch
pattern repeat from Crown Prince Top and
Bottom Border chart measures about 514"
(14 cm) wide, relaxed after blocking; 12-stitch
pattern repeat from Crown Prince Center
chart measures about 314” (8.5 cm) wide,
relaxed after blocking.
115
116
Reminiscences from Helve Poska
"My grandmother Lovisa Saarek (mother's side)
lived a ten-minute walk from my parents' house
on Opetaja tanav (in Haapsalu) in a small house
with four rooms and a large kitchen and a good-
size garden. She had four kinds of apple trees,
large and small plum trees, redcurrant bushes, and
various other berry bushes, and she grew different
vegetables and strawberries.Two of the rooms were
nearly always rented out. In the winter they were
let to school children from the countryside and
in the summer there were summer guests living
there, often the same family for several summers
in a row. Grandma always sat in her room by a
table with a white tablecloth by a window filled
with flowerpots. She loved begonias. My grandma
taught me to knit when I was only four years old.
I knitted little shawls to my dolls and she knitted
large square ones with border lace or with long
tassels. She knitted her shawls to be sold to a buyer
from Tallinn who sent them on to the U.S.A. I liked
watching her and smelling the scent of wet wool
shawls when they were assembled onto frames to
dry. Afterwards they were stiff. I loved my grandma
and she loved me and my siblings. My mother was
an only child. When my grandmother died in 1941
(during the war) I decided to become a handicraft/
sewing teacher. I traveled to Tallinn and studied two
years at a handicraft college after which I returned
to Haapsalu to practice as a teacher. I was only 18
years old. When I was 19,1 came to Sweden where I
demonstrated for the first time in 1947 how to knit
a Haapsalu ratik. Since then I have given several
courses and been to many exhibitions. I worked
as an office clerk doing book-keeping. I was never
good at knitting but enjoyed making patterns and
descriptions, knitting different pattern samples, and
teaching knitting Haapsalu ratikud.l only taught
patterns from before the second World War."
STITCH GUIDE
7-Stitch Nupp
Working very loosely, work ([kl, yo] 3 times, kl) all in
same st—7 nupp sts made from 1 st. On the foil row,
purl the 7 nupp sts tog (as shown on chart)—7 nupp sts
dec’d back to 1 st.
Notes
-The center square of the shawl is worked in one
piece.The lace edge is worked in two identical
pieces that are sewn to the center section.
- Unless otherwise instructed, work the first 7
stitches of every row of center square as slip 1 as
if to purl with yarn in front (pwise wyf), k6;then
work the last 7 stitches of every row of shawl
center as k7.
CENTER SQUARE
Using the knitted method (see page 23), CO 153 sts.
Next row: (RS) Knit. Next row: (WS) SI 1 (see Notes),
knit to end. Rep the last row 12 more times—14 garter
st rows completed. Next row: (RS) SI 1, k6, place marker
(pm), kl39, pm, k7. Next row: (WS) SI 1 pwise wyf, k6,
purl to last 7 sts, k7. Establish patt from Crown Prince
Top and Bottom Border chart on next RS row as foil:
Work 7 sts before marker (m) as established, work
Row 1 of chart over center 139 sts, work 7 sts after m as
established. Cont to work edgings outside m as estab-
lished, work Rows 2-34 of chart. Establish patts from
Crown Prince Side Border and Center charts on next RS
row as foil: Work first 7 sts as established, work Row 1
of Crown Prince Side Border chart over next 19 sts, pm,
work Row 1 of Crown Prince Center chart over next 101
sts, pm, work Row 1 of Crown Prince Side Border chart
over next 19 sts, work last 7 sts as established. On the
117
118
foil rows, for Side Border chart work Rows 2-40 once,
then work Rows 1-40 four times, then work Rows 1-6
once more; for Center chart work Rows 2-28 once, work
Rows 29-52 six times, then work Rows 53-86 once—206
patt rows total from beg of Side Border and Center
charts. Change to Crown Prince Top and Bottom Border
chart and, working 7 sts at each side as established, work
Rows 1-34 of chart. Next row: (RS) SI 1, knit to end.
Next row: (WS) SI 1, k6, purl to last 7 sts, k7. Slipping
first st of each row as established, work 13 rows in garter
st, beg and ending with a RS row. With WS facing and us-
ing the k2tog method (see page 27), loosely BO all sts.
LACE EDGE (make2)
With yarn doubled and using the knitted method, CO
409 sts. Cut off one strand of yarn and cont with a single
strand only. Knit 2 rows. Place a removable marker or
safety pin on the right side of the piece. Work Rows 1-21
of Crown Prince Lace Edge chart; do not slip the first st
of each row. With WS facing and using the k2tog method,
loosely BO all sts. Make a second lace edge the same as
the first.
Join Lace Edge to Center
Hold the center section and one lace edge with RS tog
and so that the center piece is closest to you. Beg at the
lower left corner (the left edge of the CO row), distribute
the lace edge so that you beg with a “half point,” have
16 points from the edge along one side, and the point of
the 17th scallop even with the corner of the center sec-
tion. With the yarn from the ball threaded on a tapestry
needle, sew the two pieces tog (see page 30) as foil: Bring
the threaded needle from back to front through each of
the first 3 loops of the lace edge, then through the first
loop of the center piece from front to back. Rep this 3:1
ratio 2 more times (3 times total)—9 sts of lace edge and
3 sts of center section have been joined. Next, take 2 loops
from the lace edge and 1 loop from the center piece. Rep
this 2:1 ratio 2 more times (3 times total). Work along the
side of the shawl by taking 1 loop from the lace edge and
1 loop from the center 3 times, then 2 loops from the lace
edge and 1 loop from the center once (i.e., 1:1,1:1,1:1,
2:1) until 15 sts rem before the center of the 17th scallop
on the lace edge and 6 sts rem before the next corner on
the center section. Next, take 2 loops from the lace edge
and 1 loop from the center (2:1) 3 times, then take 3 loops
from the lace edge and 1 loop from the center (3:1) 3 times,
ending at the center of 17th scallop on the lace edge and
the corner of the center piece. Note: You may need to make
small adjustments (by taking more or fewer sts along the
lace edge; do not skip sts on either piece or holes will form)
in the sewing to end up exactly at the center of a scallop
of the lace edge and the corner of the center section. Cont
this process across the top of the shawl: work the 3:1 ratio
3 times, then the 2:1 ratio 3 times, then the (1:1,1:1,1:1,
2:1) ratio until 15 sts rem from the center of the scallop
that will form the next corner and 6 sts rem before the cor-
ner of the center section. Then, work the 2:1 ratio 3 times,
then the 3:1 ratio 3 times to end up at the corner.
Join the other lace edge to the rem 2 sides of the center
section in the same manner, beg along the side and ending
across the bottom of the shawl. Using a tail from the center
section or separate length of yarn, sew the lace edgings tog
at the corners. Check to make sure there are no puckers or
tight areas in the seam before cutting the seaming yarn.
FINISHING
Handwash gently with mild soap and warm water. Pin
shawl out to about 54" (137 cm) square, pinning out each
[si 1, k2tog, psso] point along the lace edge; finished piece
will relax to about 54" (137 cm) square. When dry, weave in
loose ends.
Crown Prince Top and Bottom Border
119
Crown Pri ice Lace Edge
21 |_ ] к on RS; р on WS
z 0 z z □ z о z z э Z О о / с Z о 19 р~| ponRS;konWS
z x x э z х 17 0 У°
□ z x Q о X 0 15 □ k2tog
- z -
О * о • X 13 [х] s!1,k1,psso
И |~х~| si 1,k2tog, psso
z X 2 с Z
9 |то| 7-st nupp (see Stitch Guide)
—- 4 О О z о X о X о 1 О z С х
". Q о г c Ж С X 0 0 Z с X 7 [¥] p7tog
Cl к z с Ж о х 2 Z X ] J pattern repeat
c Ж о О X 3
c ж ; х
L work 33 times
120
39
37
35
33
31
29
25
23
Crown Prince Center
| | к on RS; p on WS
22 ponRSjkonWS
0 yo
Z k2tog
rx~] sl1,k1,psso
x si 1,k2tog, psso
p7tog
□ pattern repeat
121
Estonian lace
Stitch dictionary
When planning this dictionary to supplement the lace patterns in the projects, I collected the
most classic and traditional Estonian lace patterns I could find and those that had been named
or could easily be named. As a collection, these patterns represent the variety of patterns
developed and loved by Estonian lace knitters.
122
These patterns come from a number of sources. Many
were handwritten on graph paper for me by knitters in
Haapsalu. Some came from various volumes of Triinu
magazine, published from 1951 to 1995. Many of the
patterns were popular before WWII. Others came from
the booklet Haapsalu Ratik published by the Federated
Estonian Woman’s Clubs in New York in 1972. Still others
are from the three editions of Leili (Lehismets) Reimann’s
book Pitsilised Koekirjad (Lace Knitting Patterns), pub-
lished in 1978,1986, and 1995, with some additions and
variations included in each edition. These books contain
many lace patterns, not only patterns acceptable for Esto-
nian lace shawls, but for lace knitting in general, collected
from different sources and some created by Reimann
herself. These books, in Estonian, are a source for ideas as
well as information about modem shawl construction.
In the limited space available, I’ve included patterns that
can be used for the center section of shawls and scarves.
There are a variety of beloved leaf and Lily of the Valley
patterns, patterns featuring motifs inspired by nature
and everyday life, and patterns designed specifically to
honor Greta Garbo and the Crown Prince of Sweden.
There are also two border patterns that can be used as a
frame around the center section of square shawls, and
edge patterns that can be used to finish a shawl or scarf
with a classic lacy scalloped edge, whether sewn on in
the traditional method or picked up and knitted in the
modem method.
In some cases the original charts have been reworked
to make the patterns easier to follow than they might
otherwise have been. Often, one repeat of the pattern
was all that was available to me, either written out in Es-
tonian words or charted. When space allows, the charts
here provide a bigger picture of the motifs to show how
they look when repeated in width and height.
The symbols used for nupps on the charts don’t specify
the exact number of stitches to work. This number de-
pends on the weight of the yam. In general, five stitches
are used with thick yams; seven or nine stitches are
used with thinner yarns. Knit a swatch to determine the
number that you like best with your yam.
STITCH GUIDE
Increase 1 Stitch to 3 Stitches
Knit the next st but do not slip it from the left needle, yo
on right needle, knit into the same st on the left needle
again, slip the st off the left needle—1 st inc'd to 3 sts.
5-Stitch Nupp
Working very loosely, work ([kl,yo] 2 times, kl) all in
the same st—5 nupp sts made from 1 st. On the foil
row, purl the 5 nupp sts tog (see page 24)—5 nupp sts
dec'd back to 1 st.
7-Stitch Nupp
Working very loosely, work ([kl,yo] 3 times, kl) all in
the same st—7 nupp sts made from 1 st.On the foil
row, purl the 7 nupp sts tog (see page 24)—7 nupp sts
dec'd back to 1 st.
3 Gathered Stitches (worked over 3 sts)
K3tog but do not slip these sts from the left needle,
yo,then knit the same 3 sts tog again, then slip all 3 sts
from left needle (see page 26). Be sure to work these
stitches in the correct order on the following row.
к on RS; p on WS
Tj p on RS; к on WS
PI
I X | si I, к I, psso
' P2t°g
l~x~ si I, pl, psso
[x] k3tog
[x] p3tog
|~T~ si I, k2tog, psso
pp si 2 as if to k2tog, к I, p2sso
|~T~| inc I st to 3 sts (see Stitch Guide)
[g] nupp (see Notes)
pfr] purl all nupp sts tog (# = number of sts in nupp)
|^] corner stitch
123
5 Gathered Stitches (worked over 5 sts)
K5tog but do not slip these sts from the left needle, [yo,
knit the same 5 sts tog again and leave on needle as
before] 2 times, then slip alls sts from left needle (see
page 27). Be sure to work these stitches in the correct
order on the following row.
ALL PHOTOS THIS SECTION: ANN SWANSON
Leaf and Twig Patterns
124
Lehekiri (Leaf Pattern)
pattern repeat:
multiple of 10 Sts + 11; 16 rows
source: Haapsalu Rdtik, New York, 1972
See page 123 for chart symbols.
Poollehekiri (Half Leaf Pattern)
125
pattern repeat:
multiple of 12 sts + 13; 12 rows
source: Haapsalu Ratik, New York, 1972
Viislehekiri (Five Leaf Pattern)
126
See page 123 for chart symbols.
pattern repeat:
multiple of 14 sts +15; 20 rows
source: Triinu #111,1980
Saarelehekiri (Ash Leaf Pattern)
pattern repeat:
multiple of 10 sts + 6; 32 rows
source: Triinu #111,1980
Kaselehekiri (Birch Leaf Pattern)
128
See page 123 for chart symbols.
Hagakiri (Twig Pattern)
129
pattern repeat:
multiple of 12 sts + 8; 12 rows
source: from Haapsalu, handwritten
Hagakiri 2 (Twig Pattern 2)
130
pattern repeat:
multiple of 10 sts + 14; 12 rows
sources: Triinu #111,1980;
Haapsalu Ratik, New York, 1972
Kahekordne Hagakiri (DoubleTwig Pattern)
131
pattern repeat:
multiple of 12 sts + 16; 12 rows
source: TriinuHl 11,1980
Lily of the Valley Patterns
132
Uhekordse Maikellukese Kiri
(Single Lily of the Valley Pattern)
pattern repeat:
multiple of 13 sts + 1; 14 rows
sources: Triinu #111,1980;
Haapsalu Ratik, New York, 1972
Kahekordse Maikellukese Kiri
(Double Lily of the Valley Pattern)
pattern repeat:
multiple of 26 sts + 1; 14 rows
sources: Triinu #111,1980;
Haapsalu Ratik, New York, 1972
Maikellukese Kiri 1
(Lily of the Valley Pattern 1)
pattern repeat:
multiple of 22 sts + 23; 12 rows
source: Triinu #113,1981
See page 123 for chart symbols.
Maikellukese Kiri 2
(Lily of the Valley Pattern 2)
source: Triinu #113,1981
Piibelehtkiri (Lily of the Valley Pattern)
136
See page 123 for chart symbols.
pattern repeat:
multiple of 21 sts + 11; 28 rows
source: Haapsalu, handwritten,
design attributed to Ester Niip
Piibelehtkiri is another word for lily of the valley.This is a modern design
from Haapsalu. A shawl done in this pattern was given to Ingrid Riiutel, the
former First Lady of Estonia by the knitters of Haapsalu. Ingrid Riiiitel is
also an ethnographer and is involved in preserving Estonia's folk traditions.
Other Nature and Domestic Patterns
137
pattern repeat:
multiple of 6 sts + 9; 6 rows
source: Haapsalu Ratik, New York, 1972
Lepatrinukiri (Ladybug Pattern)
Vausabakiri (PeacockTail Pattern)
See page 123 for chart symbols.
pattern repeat:
multiple of 6 sts + 7;8 rows
source: Haapsalu Ratik, New York, 1972
pattern repeat:
multiple of 14 sts + 15; 12 rows
source: Triinu #111,1980
=ohlamarjakiri (Ligonberry Pattern)
pattern repeat:
multiple of 10 sts + 1; 16 rows
source: Haapsalu Rdtik, New York, 1972
Liblikakiri (Butterfly Pattern)
140
pattern repeat:
multiple of 26 sts or 26 sts + 13; 28 rows
source: Haapsalu, handwritten
Repeat only the marked 26-stitch pattern for an allover design or work
in multiples of 26 stitches plus the extra 13 stitches to balance the pattern.
See page 123 for chart symbols.
Praanikukiri (Praanick Pattern)
pattern repeat:
multiple of 10 sts + 11; 20 rows
source: Haapsalu, handwritten
Praanikis a type of cookie.This pattern is one
of the oldest, according to the ladies in Haapsalu.
Children used to start with this pattern because
it was easy to teach and to learn."More experienced"
knitters in Haapsalu usually don’t knit this pattern.
Tapeetkiri (Wallpaper Pattern)
142
pattern repeat:
multiple of 12 sts + 13; 12 rows
source: Haapsalu, handwritten
Crown Prince Motif Variation
143
motif size:
19 sts and 38 rows
source: Haapsalu, handwritten
Greta Garbo Pattern 1
144
motif size:
17 sts and 34 rows
source: Haapsalu, handwritten
Greta Garbo Pattern 2
Greta Garbo Pattern 3
145
EDGE PATTERNS
Aarepitsi Kiri (Lace Edge Pattern 1)
Cast on using a double strand of yarn. After RS Row
15, bind off on WS. This edge is best used knitted
separately and then sewn around the sides of a
rectangular or square shawl, or it can be used as the
beginning and ending edge of a shawl without lacy
edges, such as Madli's shawl.
source: Triinu #87,1974, in an article by Helve Poska
See page 123 for chart symbols.
Cast on using a double strand of yarn. After RS Row 15,
bind off on WS.This edge is best used knitted separately
and then sewn around the sides of a rectangular or
square shawl, or it can be used as the beginning and
ending edge of a shawl without lacy edges, such as
Madli's shawl.
Aarepitsi Kiri 3 (Lace Edge Pattern 3)
source: Triinu #138,1987, in an article by Salme Puus
Cast on using a double strand of yarn. After RS Row 15,
bind off on WS.This edge is best used knitted separately
and then sewn around the sides of a rectangular or
square shawl, or it can be used as the beginning and
ending edge of a shawl without lacy edges, such as
147
Madli's shawl.
Aarepitsi Kiri 4 (Lace Edge Pattern 4)
source: Triinu #108,1980, in an article by Salme Puus
Cast on using a double strand of yam. After RS Row 15,
bind off on WS.This edge is best used knitted separately
and then sewn around the sides of a rectangular or square
shawl, or it can be used as the beginning and ending edge
of a shawl without lacy edges, such as Madli's shawl.
Aarepitsi Kiri 5 (Lace Edge Pattern 5)
148
pattern repeat:
multiple of 10 sts + 11; 26 rows total
source: Haapsalu Ratik, New York, 1972
Cast on using a double strand of yarn.
This edge is best used at the top and bottom
of a rectangular shawl or as the edge.
Aarepitsi Kiri 6 (Lace Edge Pattern 6)
pattern repeat: Q
multiple of 12 sts + 13; 32 rows total
source: Triinu #106,1979, in an article by Salme Puus 2
Cast on using a double strand of yarn.This edge is best used
at the top and bottom of a rectangular shawl or as the edge 5
of a triangular shawl, such as Miralda's Shawl.
Aarepitsi Kiri 7 (Lace Edge Pattern 7)
150
pattern repeat:
multiple of 12 sts + 1;36 rows total
source: Haapsalu Ratik, New York, 1972
Cast on using a double strand of yarn.This edge is best used
at the top and bottom of a rectangular shawl or as the edge
of a triangular shawl, such as Miralda's Shawl.
Aarepitsi Kiri 8 (Lace Edge Pattern 8)
0 z О z О / О <, О \ 0 \ 0 \ o| ° || ozozoz s O s O s 0 1 lolzl ozozoz s 0 s О x О O z 0 1 O' ozoz W X 0 x 0 0 z хШ ML Llol Joklolslol J Нт!тг1 L "T" \ olslo s о
IT ozoz № ® \ О \ 0 OZO 1® ® <|O|\ 0
OZ ® ® SO OZ
OZ » W X О О z
0 0 W |O Л О W 0- 0-0 О AO_ 81 +
0- £ O' I® О x z 0 » » _O 1E_ £ _O X z 0 • О
0 $
О X z О О z о
151
pattern repeat:
multiple of 16 sts + 1; 30 rows total
source: Haapsalu Ratik, New York, 1972
Cast on using a double strand of yarn.
This edge is best used at the top and
bottom of a rectangular shawl or as the edge
of a triangular shawl, such as Miralda's Shawl.
Modern 14-Round Lace Edge
152
source: Inspired by a knitted-on edge pattern
in Leili Reimann's PitsilisedKoekirjad, 1986 edition
Knit all even-numbered rounds as shown for a stockinette-stitch ground.
You may purl the even-numbered rounds fora garter-stitch ground,
although this is not as common in Estonia.
Modern 16-Round Lace Edge
t
pattern repeat: corner st
begins as a multiple of 10 sts + 1 and 1 corner st for each side;
source: From a shawl knitted by Hilja Aavik. It is also found in all three editions of
Leili Reimann's PitsilisedKoekirjad
All even-numbered rounds are knit as shown for a stockinette-stitch ground.
To complete the nupps on even-numbered rounds, knit all nupp stitches
together through their back loops.
Modern 24-Round Lace Edge
154
begins as a multiple of 10 sts + 1 and 1 corner st for each side; 24 rnds
source: From many shawls I have collected in Estonia,
from Triinu #116,1982, in an article by Salme Puus, and also
found in all three editions of Leili Reimann's Pitsilised Koekirjad.
This knitted-on edge pattern is found on many shawls knitted in
Estonia today.The points are in line with the”k1,yo, k1"places
in the pattern, and this feature easily identifies knitted-on edges.
The bind-off for this type of edge is always worked using
the yarn doubled.
All even-numbered rounds are knitted as shown for a stockinette-stitch
ground. You may purl the even-numbered rounds for a garter-stitch
ground, although this is not as common in Estonia.
The number of rounds knitted depends on how deep you
want the edge to be. I recommend working at least 16 rounds
before the bind-off.
Border patterns
Border with Nupps
top and bottom
border motif:
multiple of 14 sts + 15;
24 rows
side motifs:
16 sts wide;
24 rows
source:
Haapsalu Ratik,
New York, 1972
This pattern is used
asaninner border for
a square shawl,
between the outer
garter edging and
the garter frame
around the center
section.The main
motif should be
worked the same
number of times
across the top and
bottom as along
each side.
See the Lehe
Square Shawl (page 56)
for an example.
156
Diamond Border
top and bottom
border motif:
multiple of 16 sts -
26 rows
side motifs:
18 sts wide;
24 rows
source:
Shawl in the
collection of the
Estonian National
Museum, Tartu, Estooa
This pattern is used
as an inner border
for a square shaw!
between the outer
garter edging and
the garter frame
around the center
section.The main ~ st#
should be workec те
same number of
times across the top
and bottom asalo'-g
each side. See the
Lehe Square Shaw xaci
for an example.
See page 123 for chart symbols.
Abbreviations
beg begin(s); beginning
BO bind off
cm centimeter(s)
CO cast on
cont continue(s); continuing
dec(s) decrease(s); decreasing
dpn double-pointed needles
foil follow(s);following
g gram(s)
inc(s) increase(s); increasing
к knit
k1 f&b knit into the front and back of same stitch
kwise knitwise; as if to knit
m marker(s)
mm millimeter(s)
M1 make one (increase)
p1f&b purl into front and back of same stitch
patt(s) pattern(s)
psso pass slipped stitch over
pwise purlwise;as if to purl
rem remain(s); remaining
rep repeat(s); repeating
rnd(s) round(s)
RS right side
si st slip st (slip 1 stitch purlwise u
otherwise indicated)
st stitch(es)
St st stockinette stitch
tbl through back loop
tog together
WS wrong side
wyb with yarn in back
wyf with yarn in front
yd yard(s)
yo yarnover
repeat sta rting point
() alternate measurements and.
instructions
[] work instructions as a group,
specified number of times
157
crafts/knitting
LEARN THE HISTORY,
TECHNIQUES & PATTERNS
/ESTONIAN KNITTING
NANCY BUSH teaches work-
shops for guilds, shops, and at
conferences throughout the
United States, Canada, Finland,
and Estonia. She owns The Wooly
West, a mail-order and online yarn
business. She is the author of Folk
Socks, Folk Knitting in Estonia, Knit-
ting on the Road, and Knitting Vin-
tage Socks (all from Interweave).
She lives in Salt Lake City, Utah.
«24.95 | 08KN5
ISBN 978-1-59668-053-1
Deepen your knowledge of knitting in Estonia with this in-depth
look at the west coast town of Haapsalu, its knitting traditions, and
how to make them your own. Estonian knitting authority Nancy
Bush has researched traditional lace-making techniques and in
Knitted Lace of Estonia offers modern adaptations of the classic ways
to construct shawls and scarves.
INSIDE YOU'LL FIND:
~ THE HISTORY OF ESTONIAN LACE
knitting as a cottage industry and
how it has evolved into the world-
renowned craft that it is today.
~ FOURTEEN HEIRLOOM-QUALITY
PROJECTS for scarves and shawls,
plus a stitch dictionary that gives
more than 20 additional lace patterns.
~ PATTERNS FOR EVERY LEVEL OF
KNITTER, from ones with easily
remembered repeats and garter-stitch
edges to those with complicated cen-
ter designs and lace edge borders.
- STUNNING PHOTOS THAT SHOW
THE PROJECTS at different angles
and include plenty of stitch detail.
~ HOW TO DESIGN YOUR OWN
LACE SCARF or shawl using the
stitch dictionary, clear instruc-
tions, and special tips and tech-
niques provided by the author.
INTERWEAVE
Illi interweavebooks.com