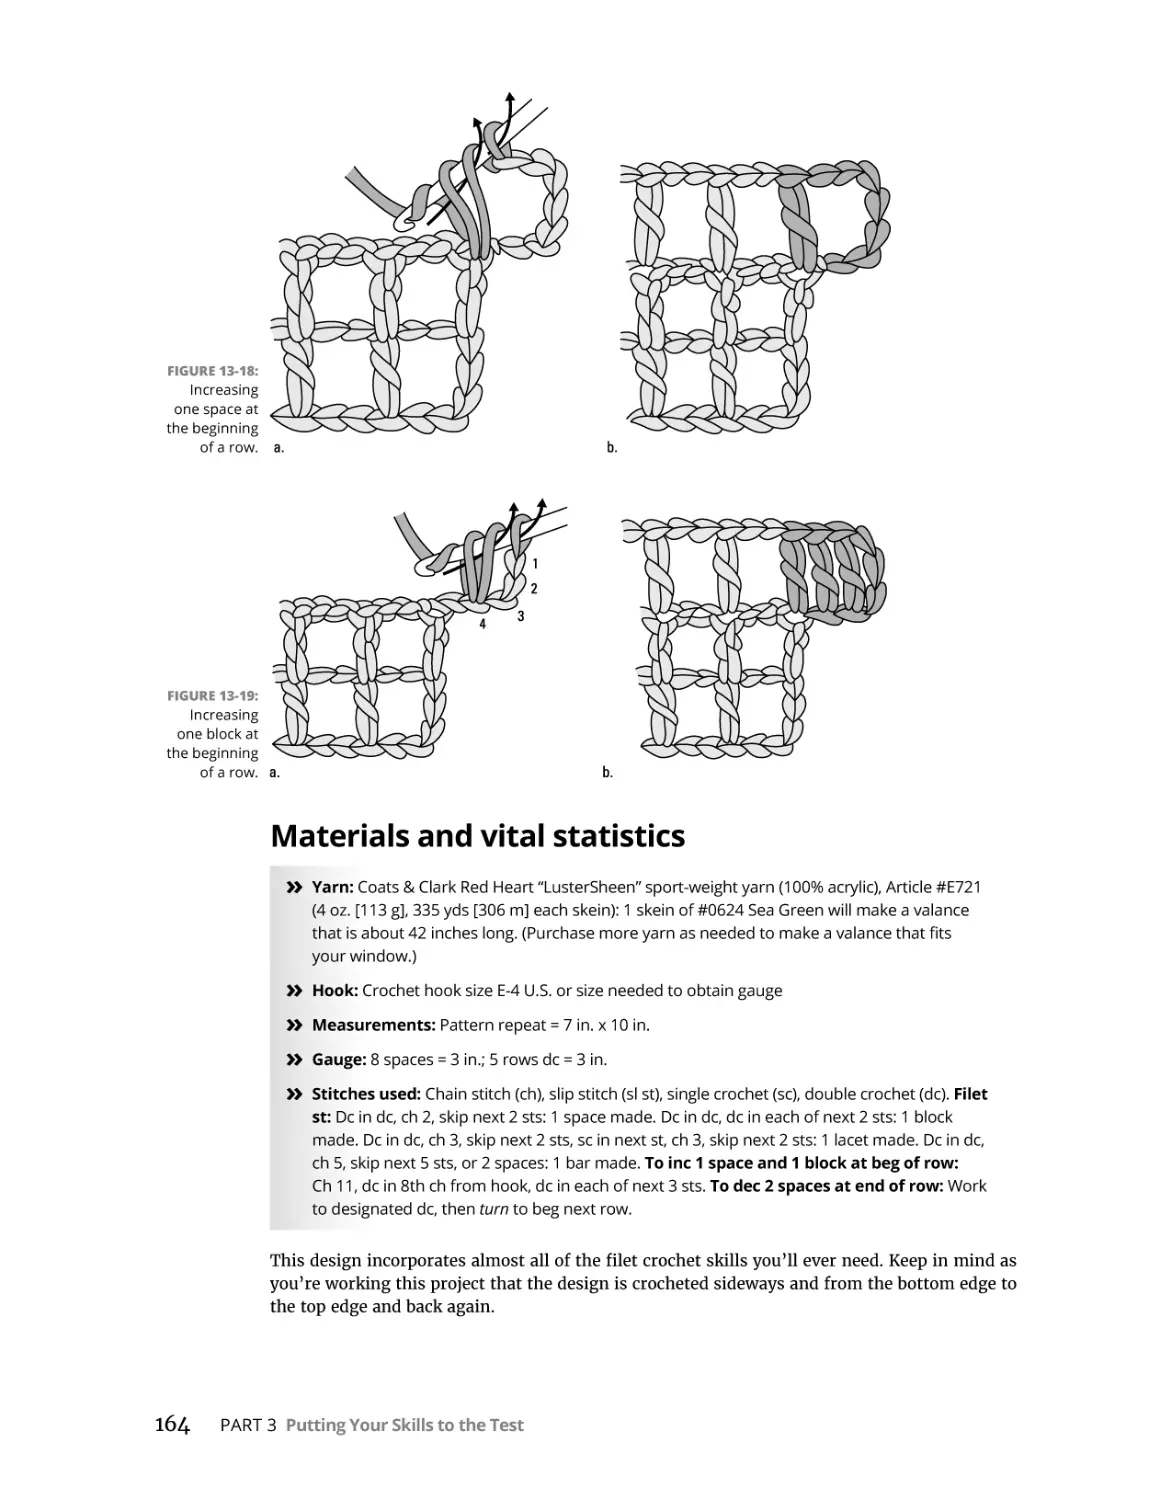
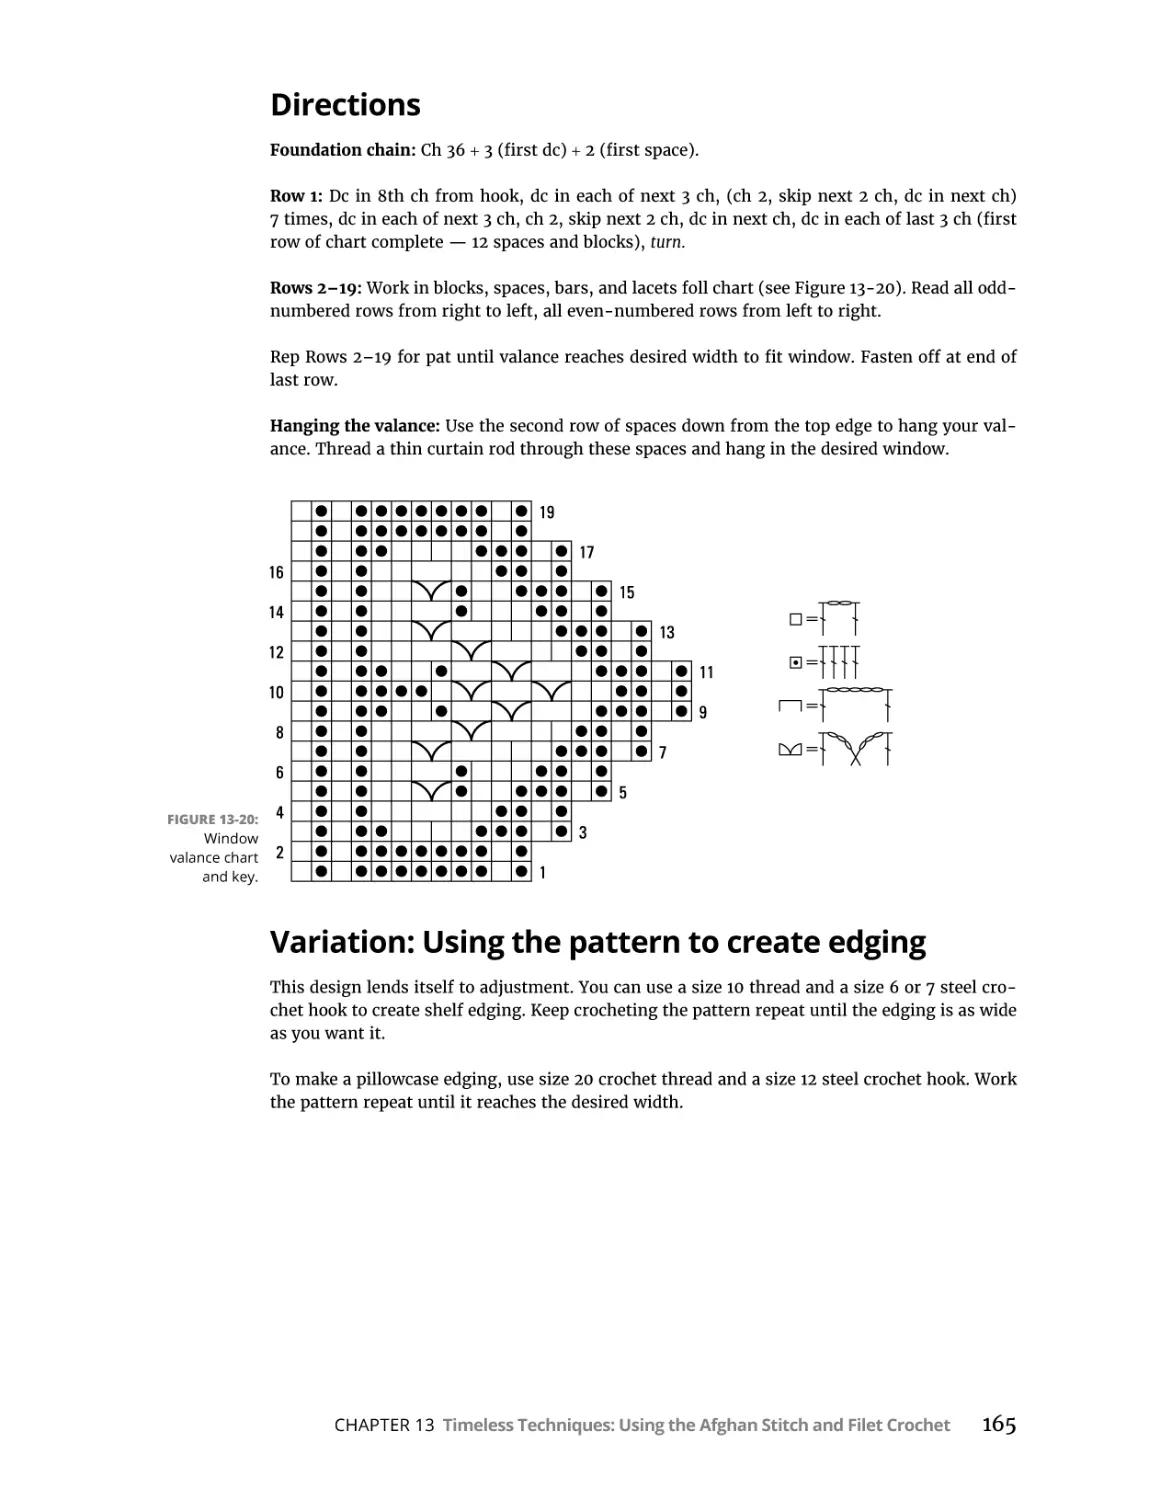
/


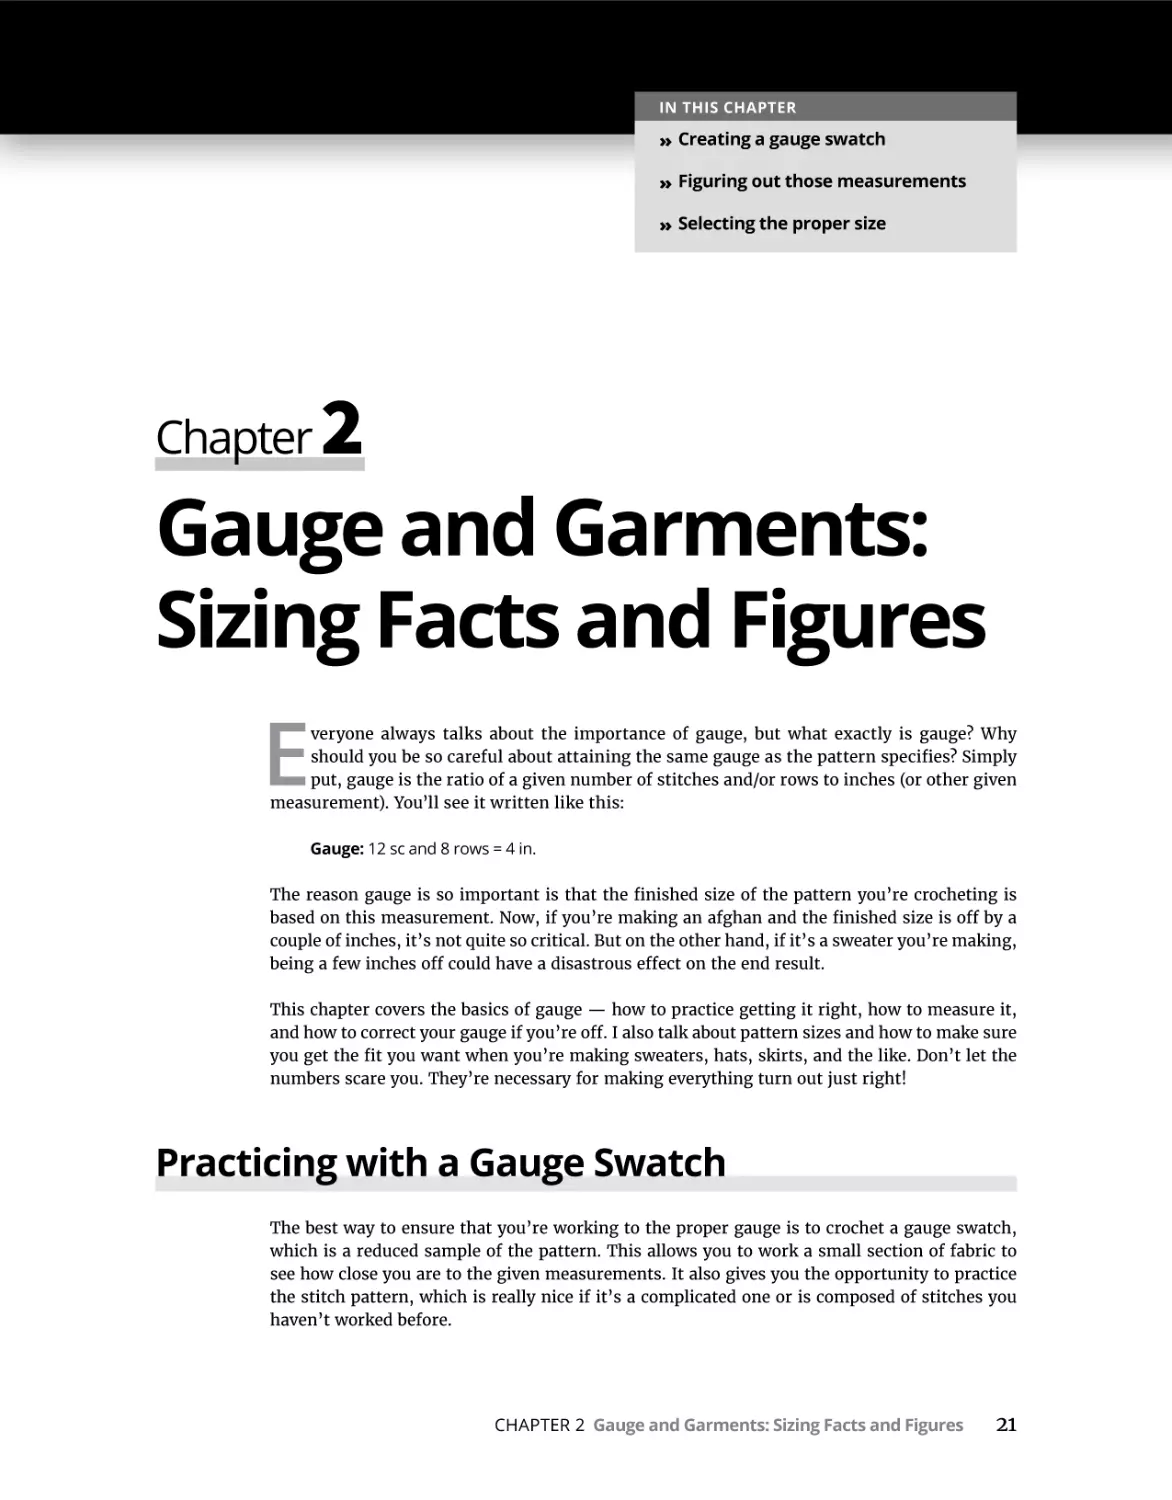
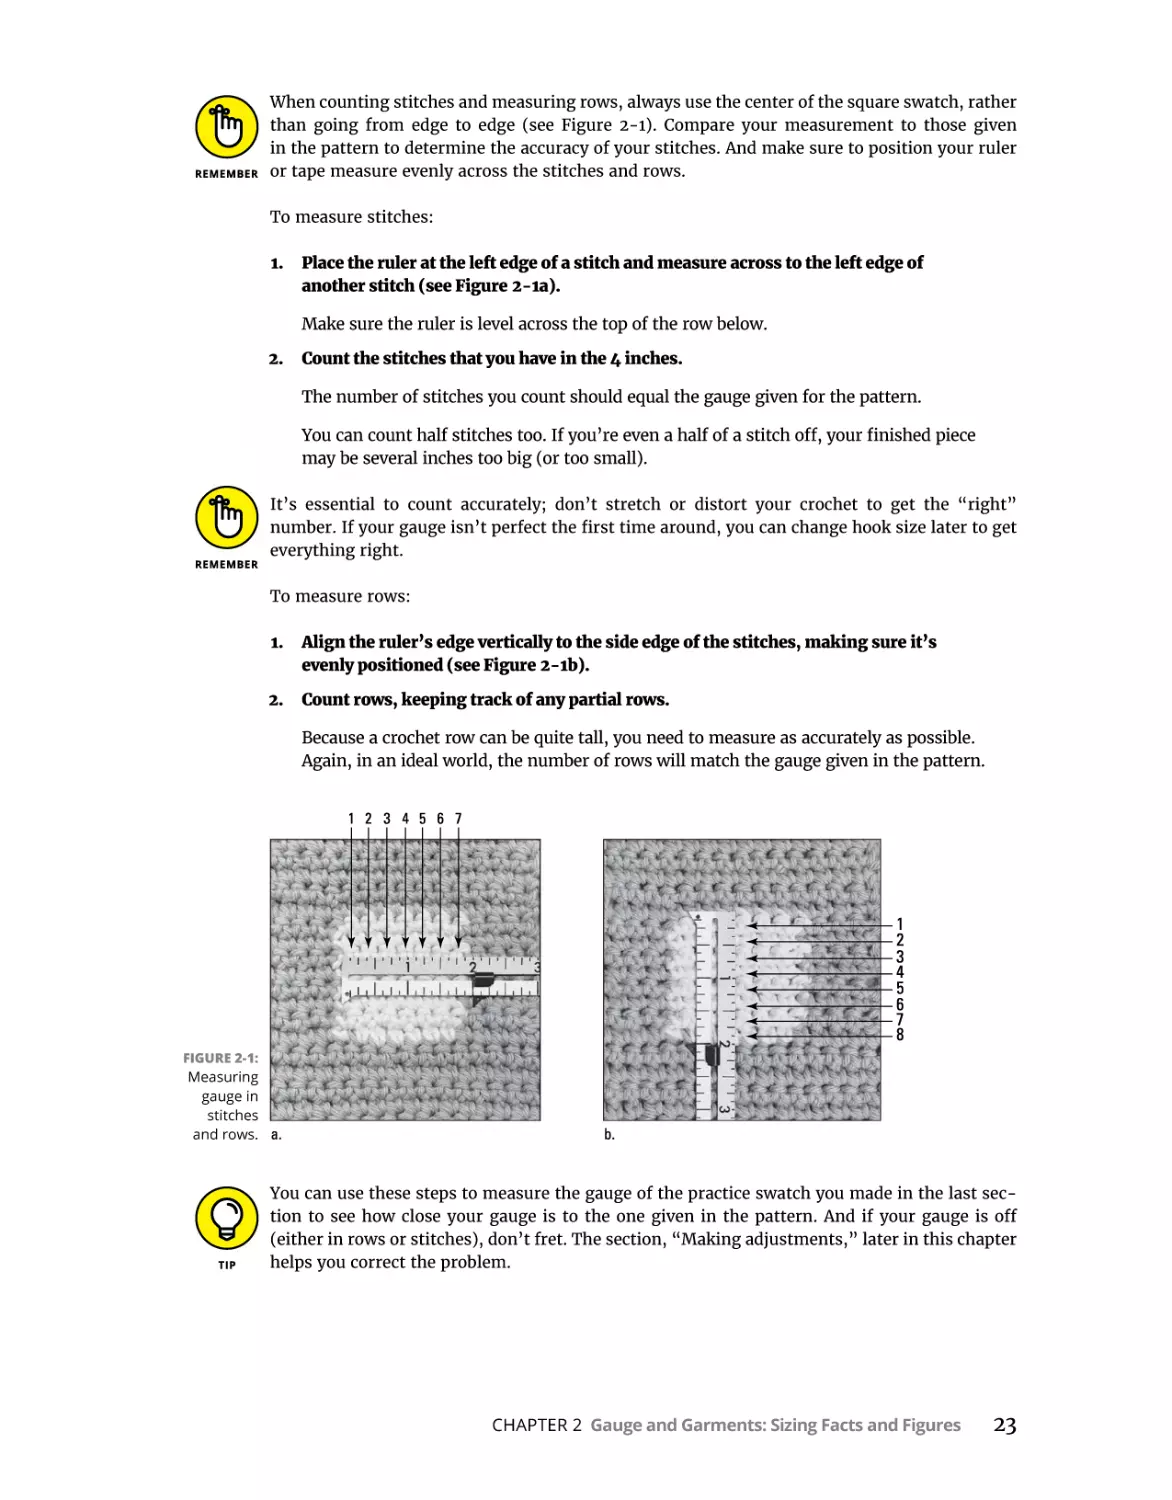
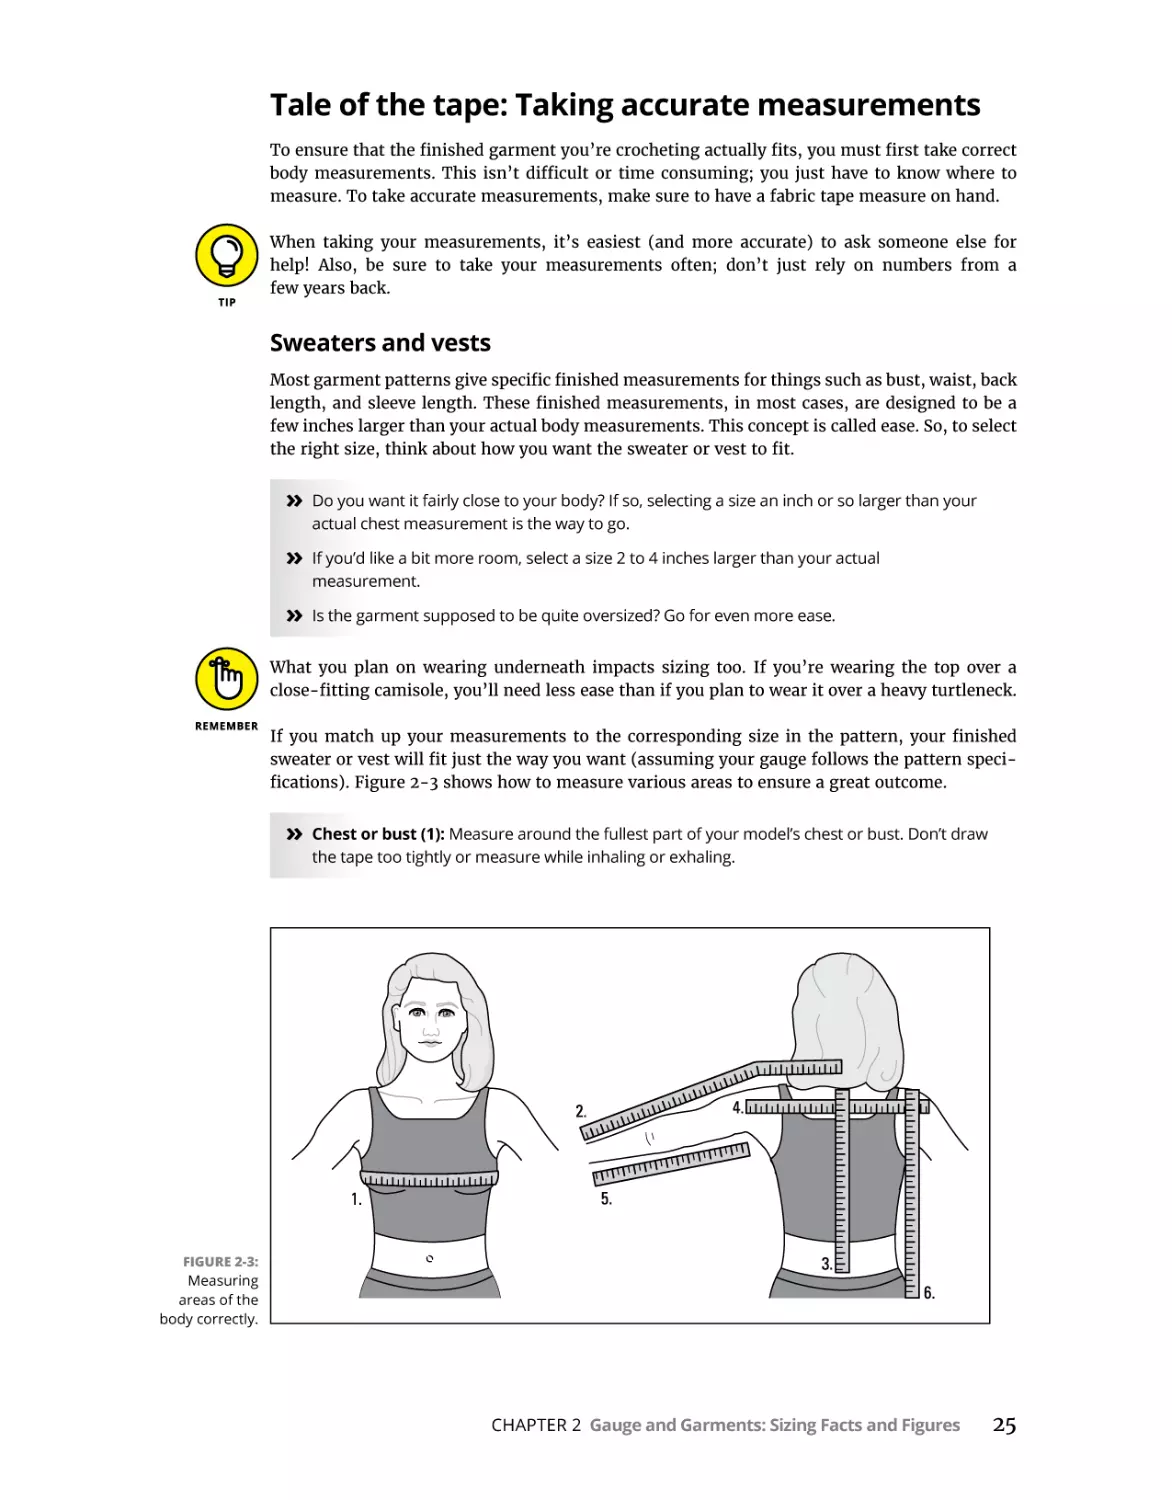


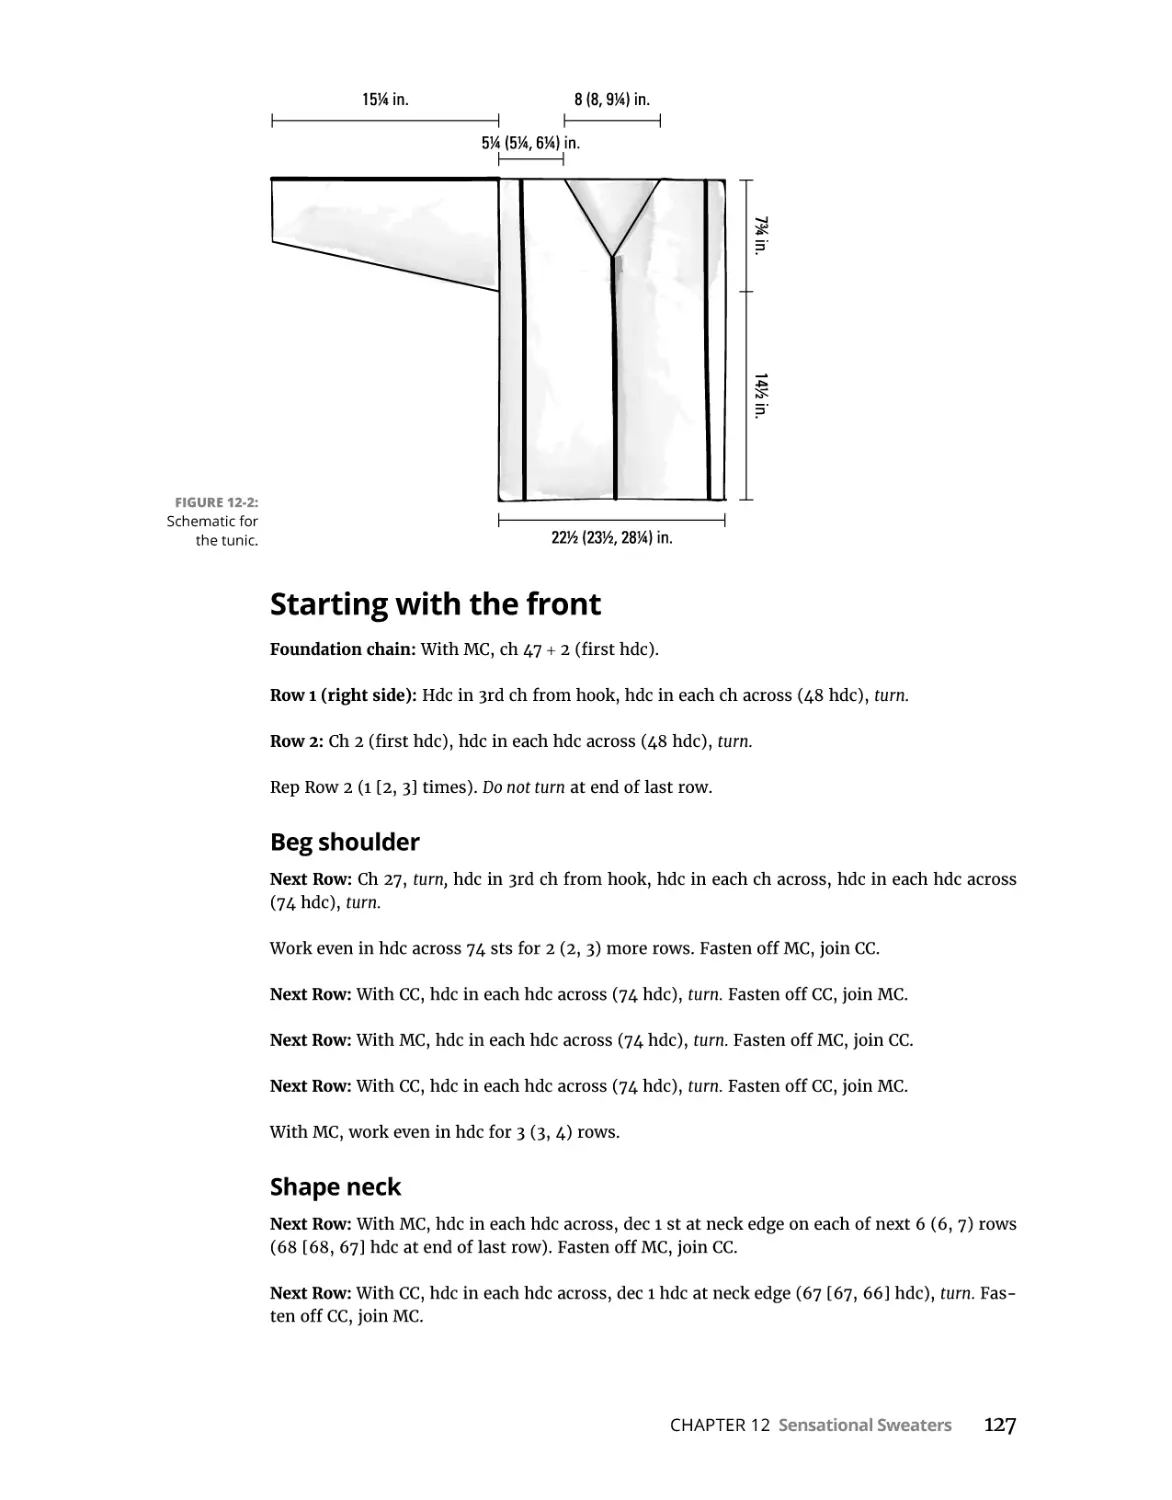


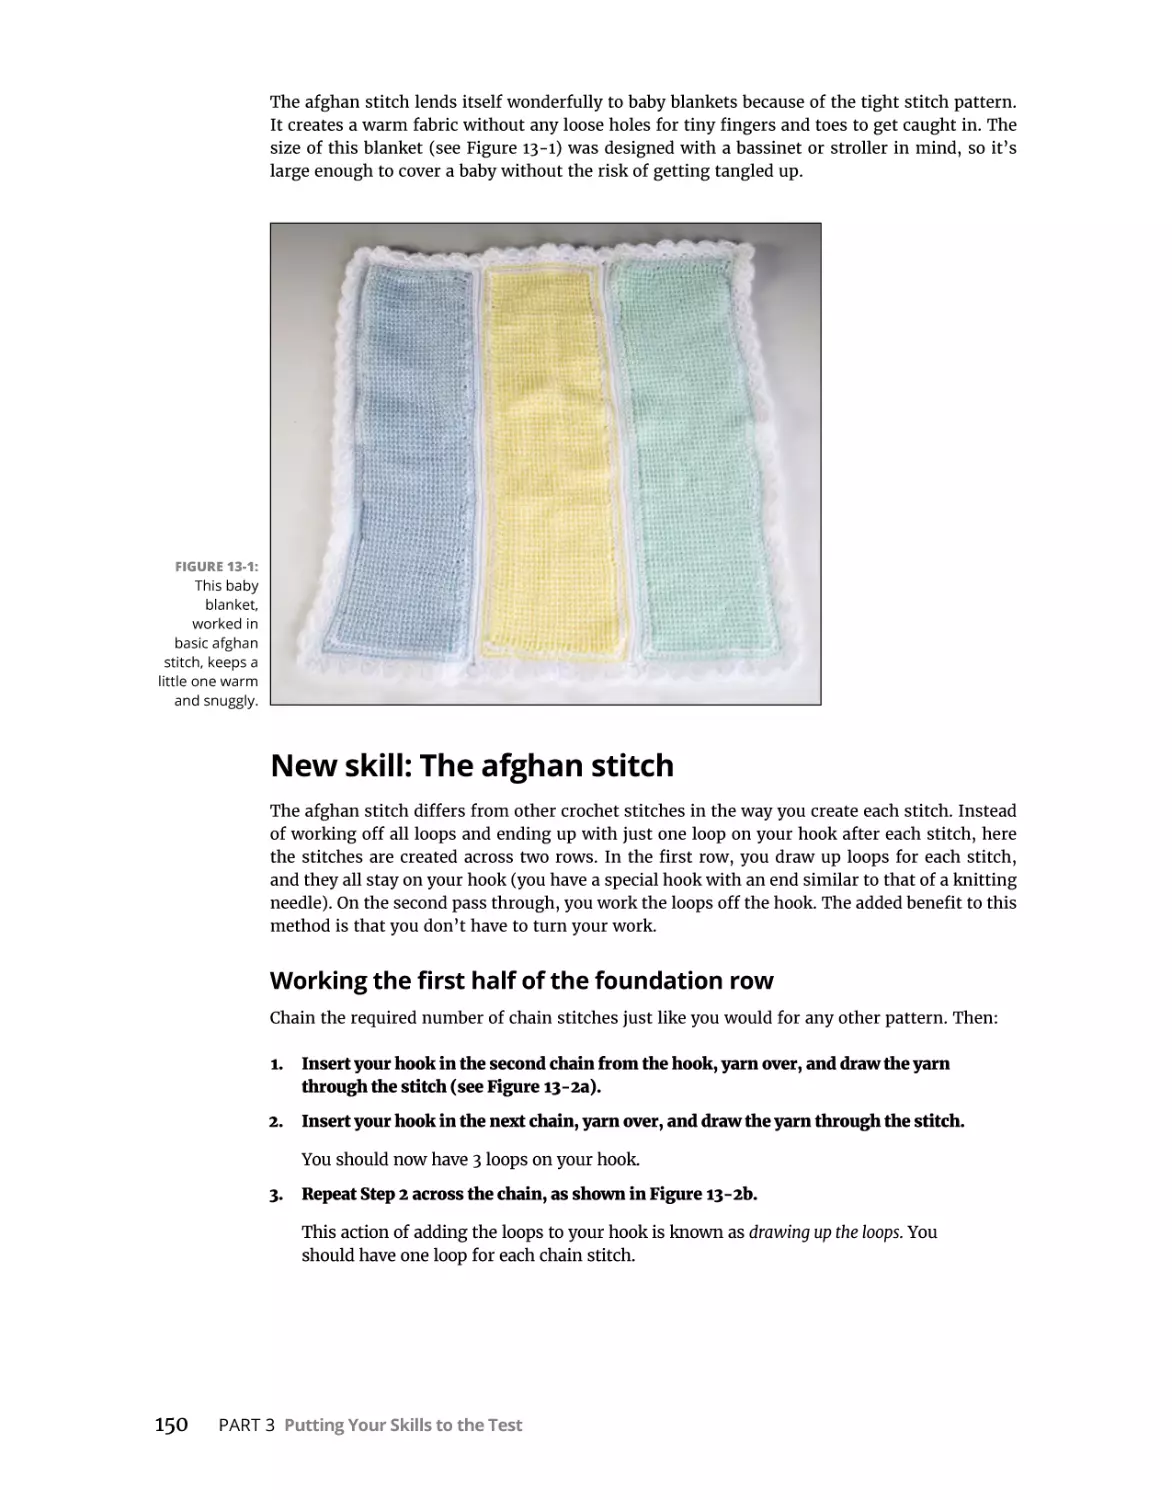


Author: Brittain S.
Tags: knitting needlework crafts and creativity crocheting
ISBN: 978-1-394-16206-2
Year: 2023

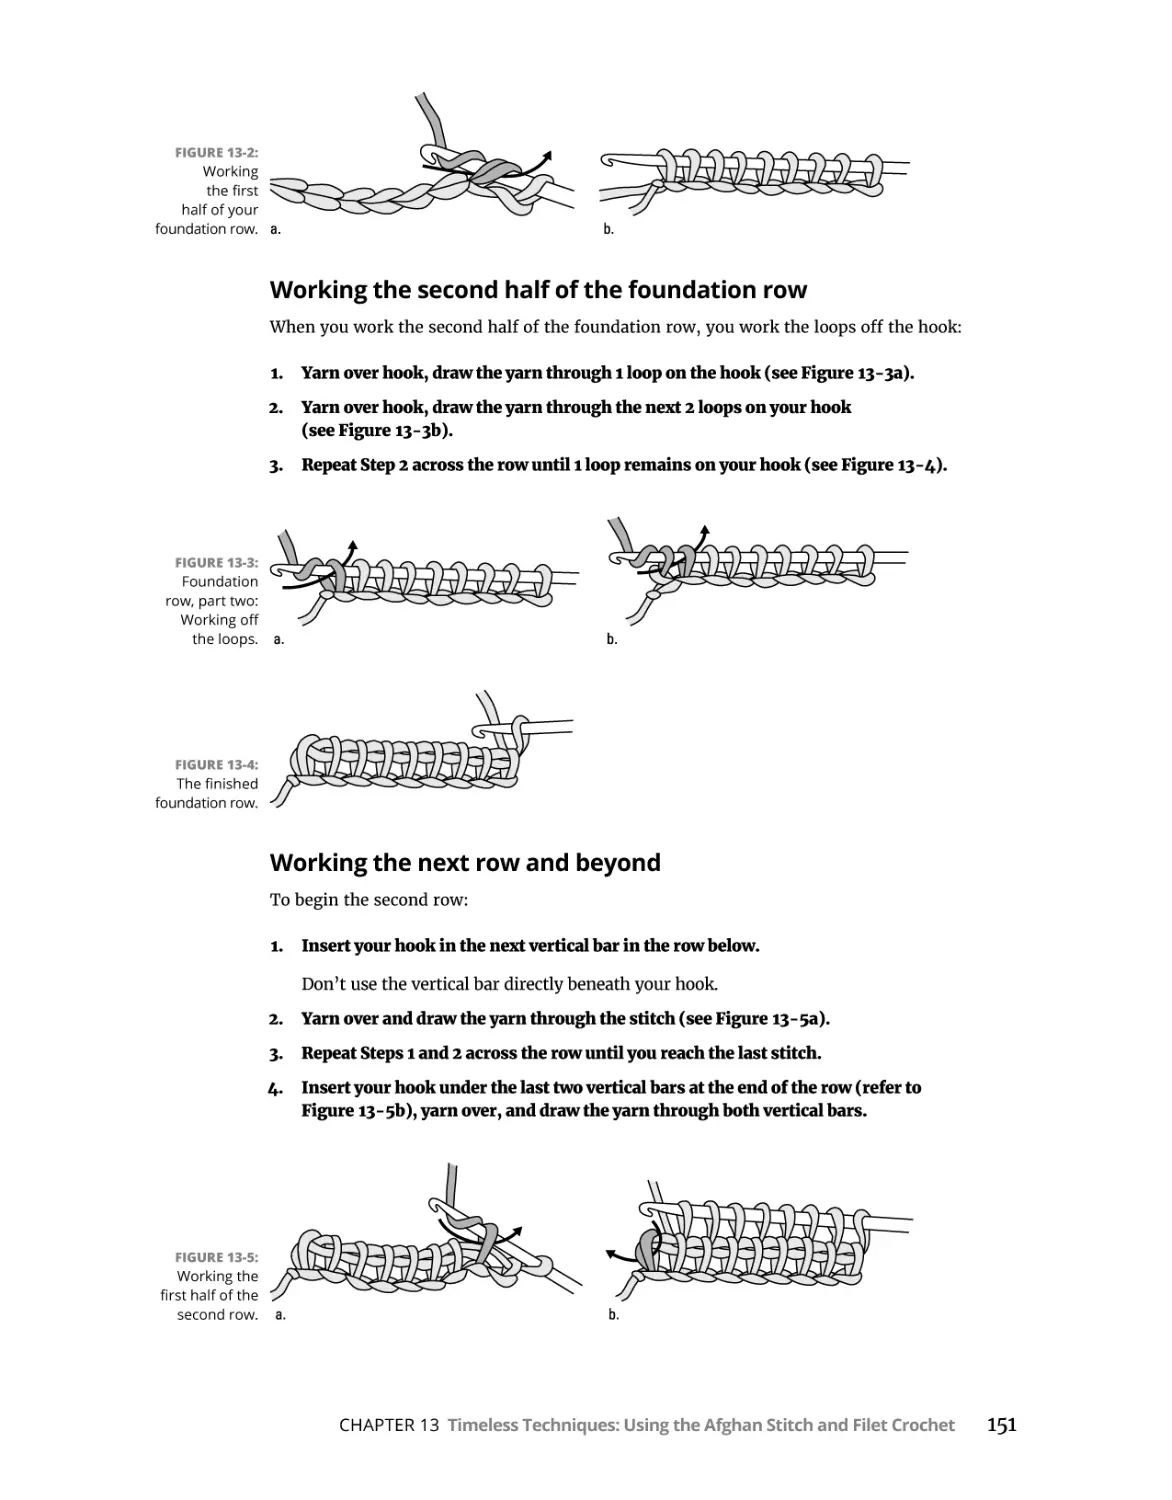
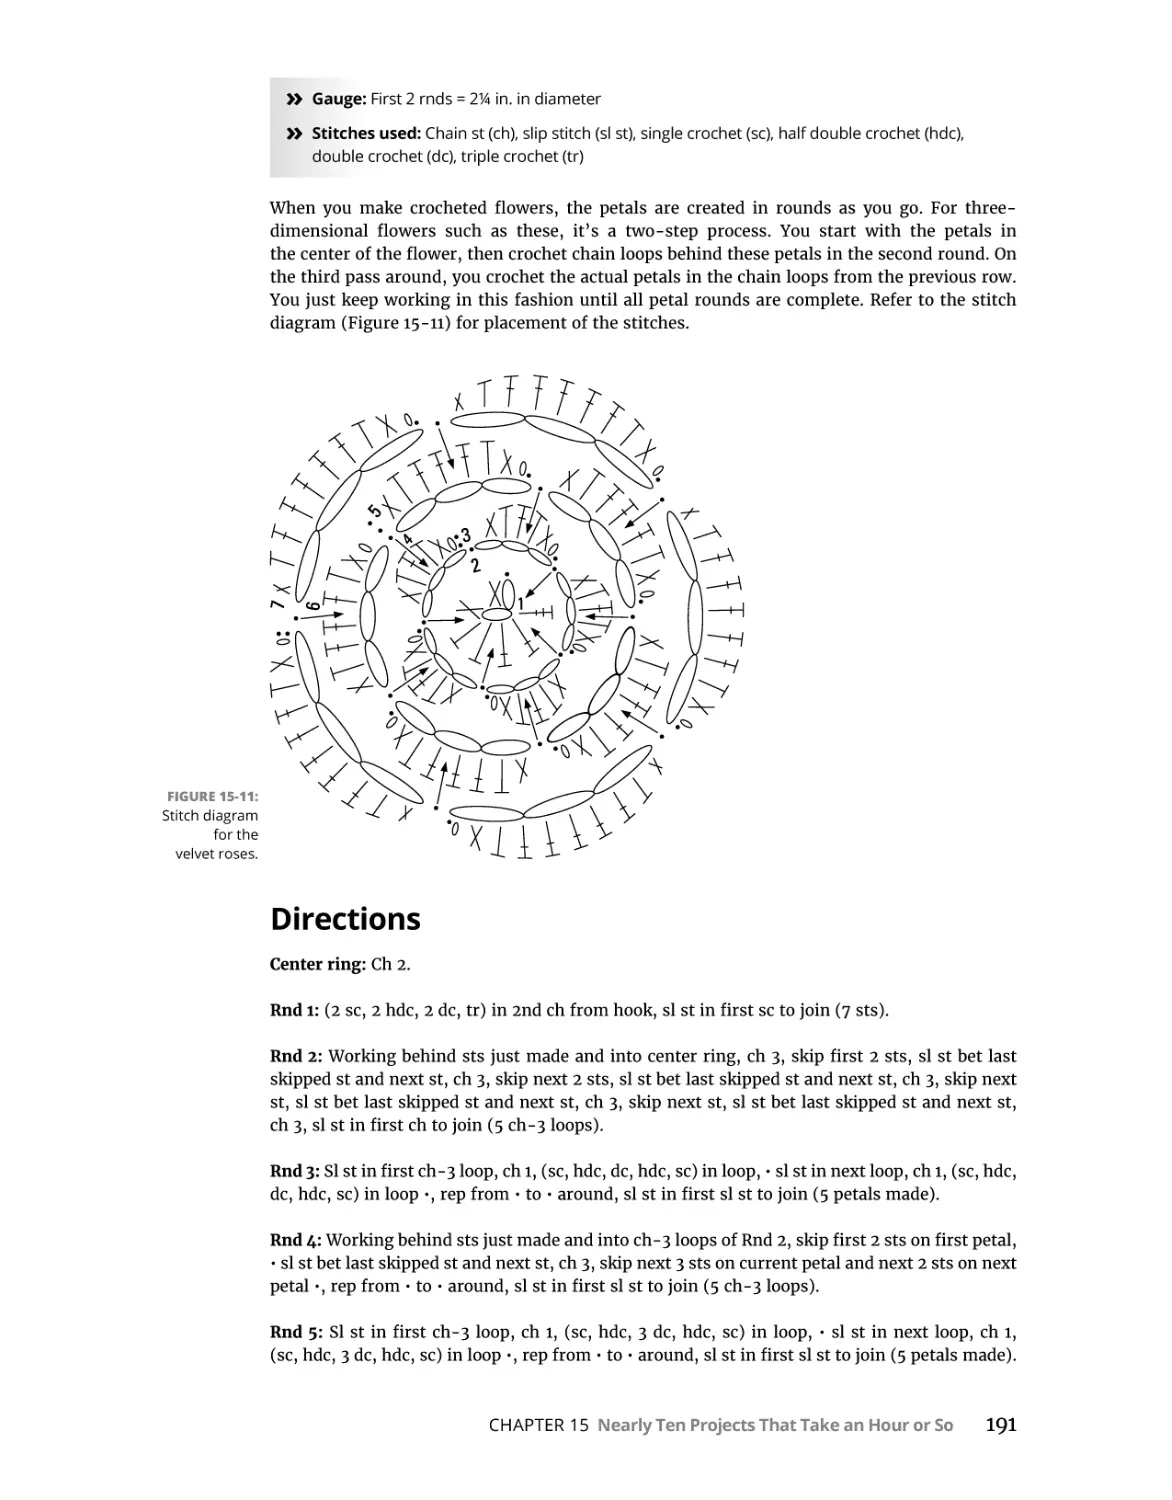
Text
Crochet
Patterns
by Susan Brittain
Crochet Patterns For Dummies®
Published by: John Wiley & Sons, Inc., 111 River Street, Hoboken, NJ 07030-5774, www.wiley.com
Copyright © 2023 by John Wiley & Sons, Inc., Hoboken, New Jersey
Media and software compilation copyright © 2023 by John Wiley & Sons, Inc. All rights reserved.
Published simultaneously in Canada
No part of this publication may be reproduced, stored in a retrieval system or transmitted in any form or by any means,
electronic, mechanical, photocopying, recording, scanning or otherwise, except as permitted under Sections 107 or 108 of
the 1976 United States Copyright Act, without the prior written permission of the Publisher. Requests to the Publisher for
permission should be addressed to the Permissions Department, John Wiley & Sons, Inc., 111 River Street, Hoboken, NJ 07030,
(201) 748-6011, fax (201) 748-6008, or online at http://www.wiley.com/go/permissions.
Trademarks: Wiley, For Dummies, the Dummies Man logo, Dummies.com, Making Everything Easier, and related trade dress
are trademarks or registered trademarks of John Wiley & Sons, Inc. and may not be used without written permission. All other
trademarks are the property of their respective owners. John Wiley & Sons, Inc. is not associated with any product or vendor
mentioned in this book.
LIMIT OF LIABILITY/DISCLAIMER OF WARRANTY: WHILE THE PUBLISHER AND AUTHORS HAVE USED THEIR BEST EFFORTS
IN PREPARING THIS WORK, THEY MAKE NO REPRESENTATIONS OR WARRANTIES WITH RESPECT TO THE ACCURACY OR
COMPLETENESS OF THE CONTENTS OF THIS WORK AND SPECIFICALLY DISCLAIM ALL WARRANTIES, INCLUDING WITHOUT
LIMITATION ANY IMPLIED WARRANTIES OF MERCHANTABILITY OR FITNESS FOR A PARTICULAR PURPOSE. NO WARRANTY
MAY BE CREATED OR EXTENDED BY SALES REPRESENTATIVES, WRITTEN SALES MATERIALS OR PROMOTIONAL STATEMENTS
FOR THIS WORK. THE FACT THAT AN ORGANIZATION, WEBSITE, OR PRODUCT IS REFERRED TO IN THIS WORK AS A CITATION
AND/OR POTENTIAL SOURCE OF FURTHER INFORMATION DOES NOT MEAN THAT THE PUBLISHER AND AUTHORS ENDORSE
THE INFORMATION OR SERVICES THE ORGANIZATION, WEBSITE, OR PRODUCT MAY PROVIDE OR RECOMMENDATIONS IT
MAY MAKE. THIS WORK IS SOLD WITH THE UNDERSTANDING THAT THE PUBLISHER IS NOT ENGAGED IN RENDERING
PROFESSIONAL SERVICES. THE ADVICE AND STRATEGIES CONTAINED HEREIN MAY NOT BE SUITABLE FOR YOUR SITUATION.
YOU SHOULD CONSULT WITH A SPECIALIST WHERE APPROPRIATE. FURTHER, READERS SHOULD BE AWARE THAT WEBSITES
LISTED IN THIS WORK MAY HAVE CHANGED OR DISAPPEARED BETWEEN WHEN THIS WORK WAS WRITTEN AND WHEN IT IS
READ. NEITHER THE PUBLISHER NOR AUTHORS SHALL BE LIABLE FOR ANY LOSS OF PROFIT OR ANY OTHER COMMERCIAL
DAMAGES, INCLUDING BUT NOT LIMITED TO SPECIAL, INCIDENTAL, CONSEQUENTIAL, OR OTHER DAMAGES.
For general information on our other products and services, please contact our Customer Care Department within the U.S.
at 877-762-2974, outside the U.S. at 317-572-3993, or fax 317-572-4002. For technical support, please visit https://hub.
wiley.com/community/support/dummies.
Wiley publishes in a variety of print and electronic formats and by print-on-demand. Some material included with standard print
versions of this book may not be included in e-books or in print-on-demand. If this book refers to media such as a CD or DVD
that is not included in the version you purchased, you may download this material at http://booksupport.wiley.com. For more
information about Wiley products, visit www.wiley.com.
Library of Congress Control Number: 2022950735
ISBN: 978-1-394-16204-8; ISBN 978-1-394-16205-5 (ebk); ISBN 978-1-394-16206-2 (ebk)
Contents at a Glance
Introduction . . . . . . . . . . . . . . . . . . . . . . . . . . . . . . . . . . . . . . . . . . . . . . . . . . . .
1
Part 1: Reinforcing Your Crochet Foundation . . . . . . . . . . . . . . . . . . . . . .
7
CHAPTER 1:
CHAPTER 2:
CHAPTER 3:
CHAPTER 4:
Gearing Up and Getting Started. . . . . . . . . . . . . . . . . . . . . . . . . . . . . . . . . . . . . . . . . . . . . . . 9
Gauge and Garments: Sizing Facts and Figures. . . . . . . . . . . . . . . . . . . . . . . . . . . . . . . . . 21
Sum and Substance: Reading a Pattern. . . . . . . . . . . . . . . . . . . . . . . . . . . . . . . . . . . . . . . 31
Brushing Up on Stitch Basics . . . . . . . . . . . . . . . . . . . . . . . . . . . . . . . . . . . . . . . . . . . . . . . . 39
Part 2: Hook, Yarn, Action! Crocheting Simple Projects . . . . . . . . . . . .
53
Working in the First Dimension . . . . . . . . . . . . . . . . . . . . . . . . . . . . . . . . . . . . . . . . . . . . . .
Expanding and Diminishing Dimensions: Adding Shape. . . . . . . . . . . . . . . . . . . . . . . . .
Going in Circles: Crocheting in the Round . . . . . . . . . . . . . . . . . . . . . . . . . . . . . . . . . . . . .
Coloring It In. . . . . . . . . . . . . . . . . . . . . . . . . . . . . . . . . . . . . . . . . . . . . . . . . . . . . . . . . . . . . . .
Mixing It Up: A Few Changes Make a Dramatic Difference. . . . . . . . . . . . . . . . . . . . . . .
55
63
71
83
95
CHAPTER 5:
CHAPTER 6:
CHAPTER 7:
CHAPTER 8:
CHAPTER 9:
Part 3: Putting Your Skills to the Test. . . . . . . . . . . . . . . . . . . . . . . . . . . .
CHAPTER 10:
CHAPTER 11:
CHAPTER 12:
CHAPTER 13:
CHAPTER 14:
Part 4: The Part of Tens . . . . . . . . . . . . . . . . . . . . . . . . . . . . . . . . . . . . . . . .
CHAPTER 15:
CHAPTER 16:
CHAPTER 17:
105
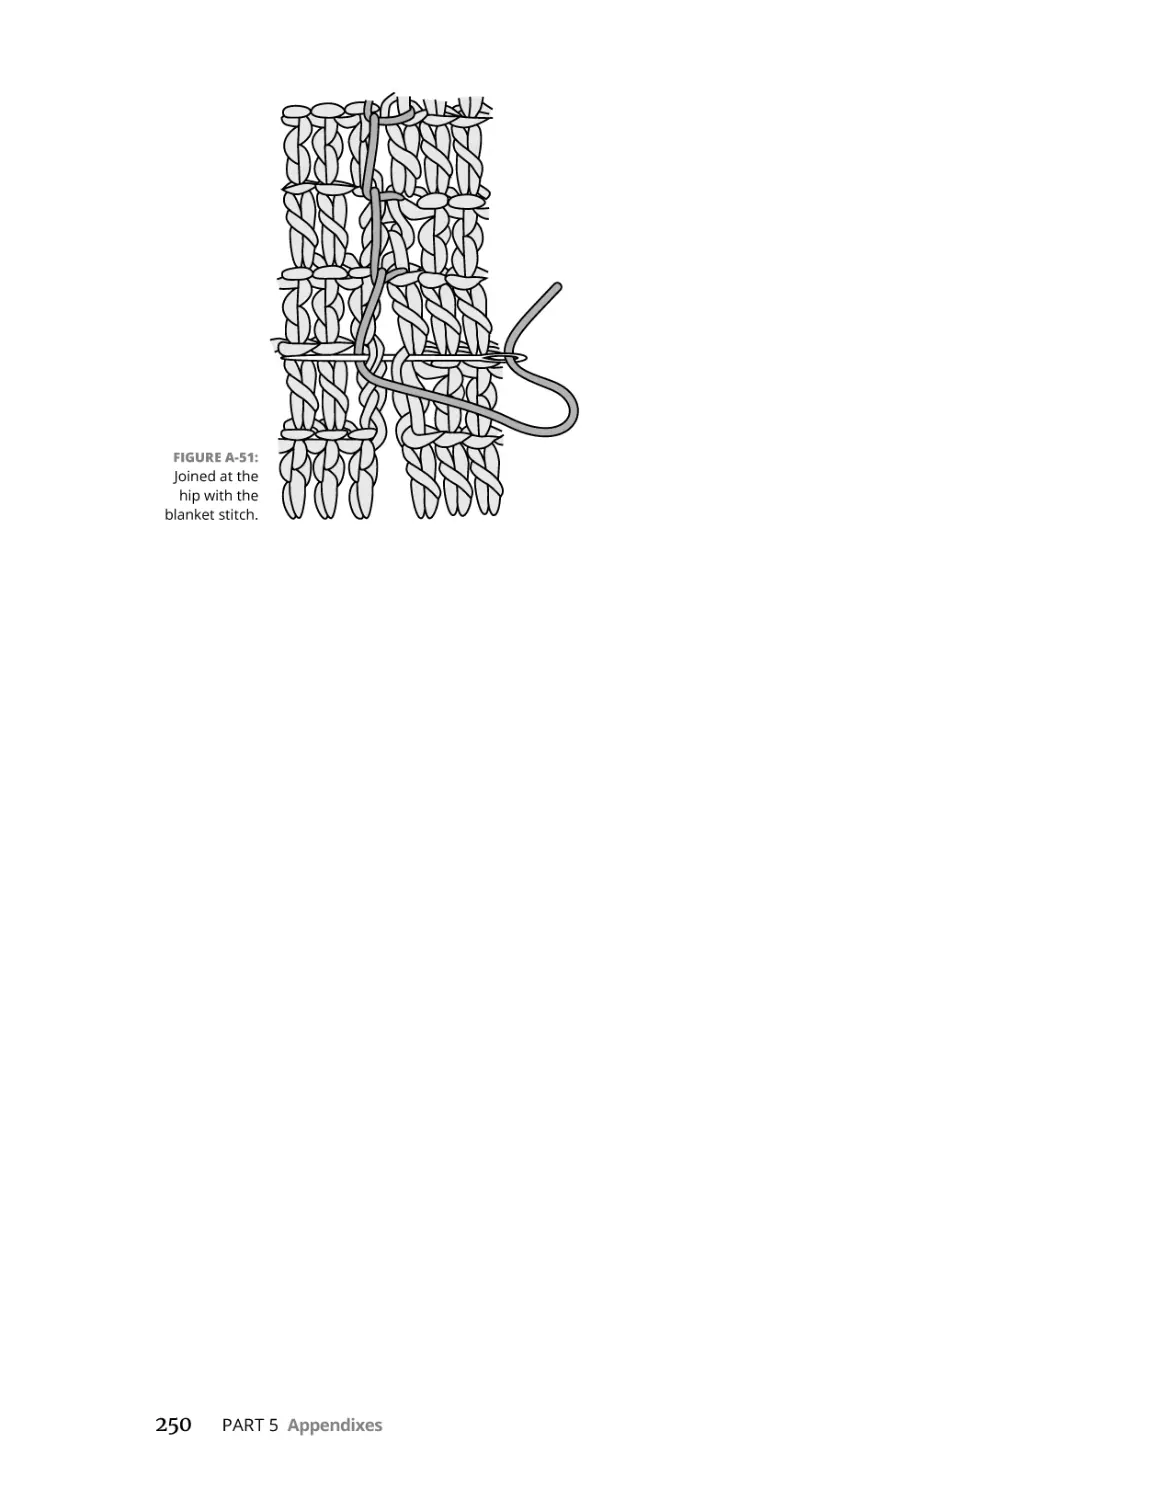
Seams Sew Easy: Joining Pieces Together. . . . . . . . . . . . . . . . . . . . . . . . . . . . . . . . . . . . .107
Finding the Loopholes and Creative Combinations. . . . . . . . . . . . . . . . . . . . . . . . . . . . 115
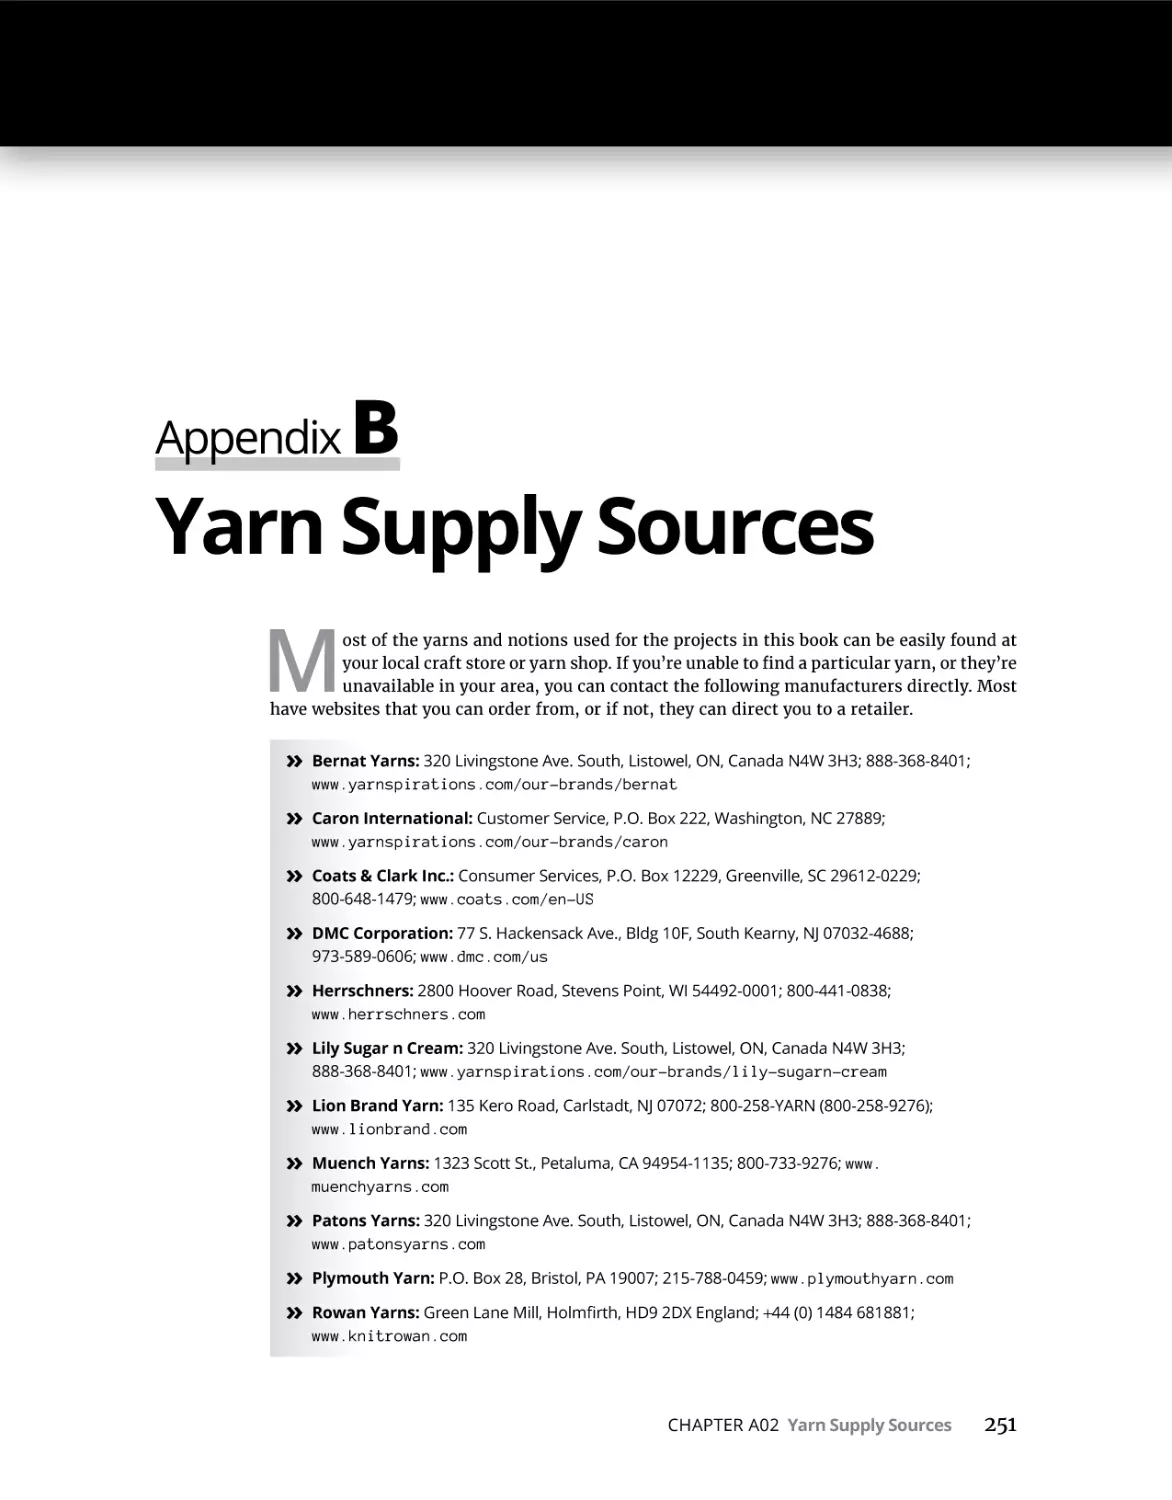
Sensational Sweaters. . . . . . . . . . . . . . . . . . . . . . . . . . . . . . . . . . . . . . . . . . . . . . . . . . . . . . 125
Timeless Techniques: Using the Afghan Stitch and Filet Crochet. . . . . . . . . . . . . . . . . 149
Mixing Traditional Stitches with Contemporary Materials. . . . . . . . . . . . . . . . . . . . . . .167
179
Nearly Ten Projects That Take an Hour or So . . . . . . . . . . . . . . . . . . . . . . . . . . . . . . . . . 181
Ten-Plus Tips for Caring for Your Crochet . . . . . . . . . . . . . . . . . . . . . . . . . . . . . . . . . . . . 201
Ten Kid-Friendly Projects. . . . . . . . . . . . . . . . . . . . . . . . . . . . . . . . . . . . . . . . . . . . . . . . . . . 207
Part 5: Appendixes. . . . . . . . . . . . . . . . . . . . . . . . . . . . . . . . . . . . . . . . . . . . .
227
Crochet Stitches. . . . . . . . . . . . . . . . . . . . . . . . . . . . . . . . . . . . . . . . . . . . . . . . . . . . . . . . . . . 229
APPENDIX B: Yarn Supply Sources. . . . . . . . . . . . . . . . . . . . . . . . . . . . . . . . . . . . . . . . . . . . . . . . . . . . . . . 251
APPENDIX A:
Index. . . . . . . . . . . . . . . . . . . . . . . . . . . . . . . . . . . . . . . . . . . . . . . . . . . . . . . . .
253
Table of Contents
INTRODUCTION. . . . . . . . . . . . . . . . . . . . . . . . . . . . . . . . . . . . . . . . . . . . . . . . .
1
About This Book. . . . . . . . . . . . . . . . . . . . . . . . . . . . . . . . . . . . . . . . . . . . . . . . . . . . . . . . . . . 1
Conventions Used in This Book. . . . . . . . . . . . . . . . . . . . . . . . . . . . . . . . . . . . . . . . . . . . . . 2
Foolish Assumptions. . . . . . . . . . . . . . . . . . . . . . . . . . . . . . . . . . . . . . . . . . . . . . . . . . . . . . . 3
How This Book Is Organized . . . . . . . . . . . . . . . . . . . . . . . . . . . . . . . . . . . . . . . . . . . . . . . . 3
Part 1: Reinforcing Your Crochet Foundation . . . . . . . . . . . . . . . . . . . . . . . . . . . . . . . 3
Part 2: Hook, Yarn, Action! Crocheting Simple Projects. . . . . . . . . . . . . . . . . . . . . . . 3
Part 3: Putting Your Skills to the Test . . . . . . . . . . . . . . . . . . . . . . . . . . . . . . . . . . . . . . 4
Part 4: The Part of Tens. . . . . . . . . . . . . . . . . . . . . . . . . . . . . . . . . . . . . . . . . . . . . . . . . . 4
Part 5: Appendixes. . . . . . . . . . . . . . . . . . . . . . . . . . . . . . . . . . . . . . . . . . . . . . . . . . . . . . 4
Icons Used in This Book . . . . . . . . . . . . . . . . . . . . . . . . . . . . . . . . . . . . . . . . . . . . . . . . . . . . 4
Beyond This Book . . . . . . . . . . . . . . . . . . . . . . . . . . . . . . . . . . . . . . . . . . . . . . . . . . . . . . . . . 4
Where to Go from Here . . . . . . . . . . . . . . . . . . . . . . . . . . . . . . . . . . . . . . . . . . . . . . . . . . . . 5
PART 1: REINFORCING YOUR CROCHET FOUNDATION. . . . . . . . . . . . .
7
Gearing Up and Getting Started. . . . . . . . . . . . . . . . . . . . . . . . . . . . . . . . . . . .
9
CHAPTER 1:
Taking a Look at the Crochet Hook. . . . . . . . . . . . . . . . . . . . . . . . . . . . . . . . . . . . . . . . . . . 9
Considering hook types and construction. . . . . . . . . . . . . . . . . . . . . . . . . . . . . . . . 10
Selecting the right size . . . . . . . . . . . . . . . . . . . . . . . . . . . . . . . . . . . . . . . . . . . . . . . . 11
Keeping your hooks in tiptop shape. . . . . . . . . . . . . . . . . . . . . . . . . . . . . . . . . . . . . 12
Comprehending Yarn Complexities . . . . . . . . . . . . . . . . . . . . . . . . . . . . . . . . . . . . . . . . 13
A light discussion of yarn weights. . . . . . . . . . . . . . . . . . . . . . . . . . . . . . . . . . . . . . . 13
Understanding what your yarn is made of . . . . . . . . . . . . . . . . . . . . . . . . . . . . . . . 14
Unraveling a yarn label. . . . . . . . . . . . . . . . . . . . . . . . . . . . . . . . . . . . . . . . . . . . . . . . 15
A ply for a ply: Swapping yarns . . . . . . . . . . . . . . . . . . . . . . . . . . . . . . . . . . . . . . . . . 16
Getting Your Fingers Moving . . . . . . . . . . . . . . . . . . . . . . . . . . . . . . . . . . . . . . . . . . . . . . 17
Holding the hook and yarn. . . . . . . . . . . . . . . . . . . . . . . . . . . . . . . . . . . . . . . . . . . . . 17
Working with the hook and yarn together. . . . . . . . . . . . . . . . . . . . . . . . . . . . . . . . 18
It’s in the Bag: Completing Your Crochet Kit . . . . . . . . . . . . . . . . . . . . . . . . . . . . . . . . . 20
CHAPTER 2:
Gauge and Garments: Sizing Facts and Figures. . . . . . . . . . . . . . . . .
21
Practicing with a Gauge Swatch. . . . . . . . . . . . . . . . . . . . . . . . . . . . . . . . . . . . . . . . . . . . 21
Making a swatch. . . . . . . . . . . . . . . . . . . . . . . . . . . . . . . . . . . . . . . . . . . . . . . . . . . . . . 22
Determining whether you’re on the right track. . . . . . . . . . . . . . . . . . . . . . . . . . . . 22
Making adjustments . . . . . . . . . . . . . . . . . . . . . . . . . . . . . . . . . . . . . . . . . . . . . . . . . . 24
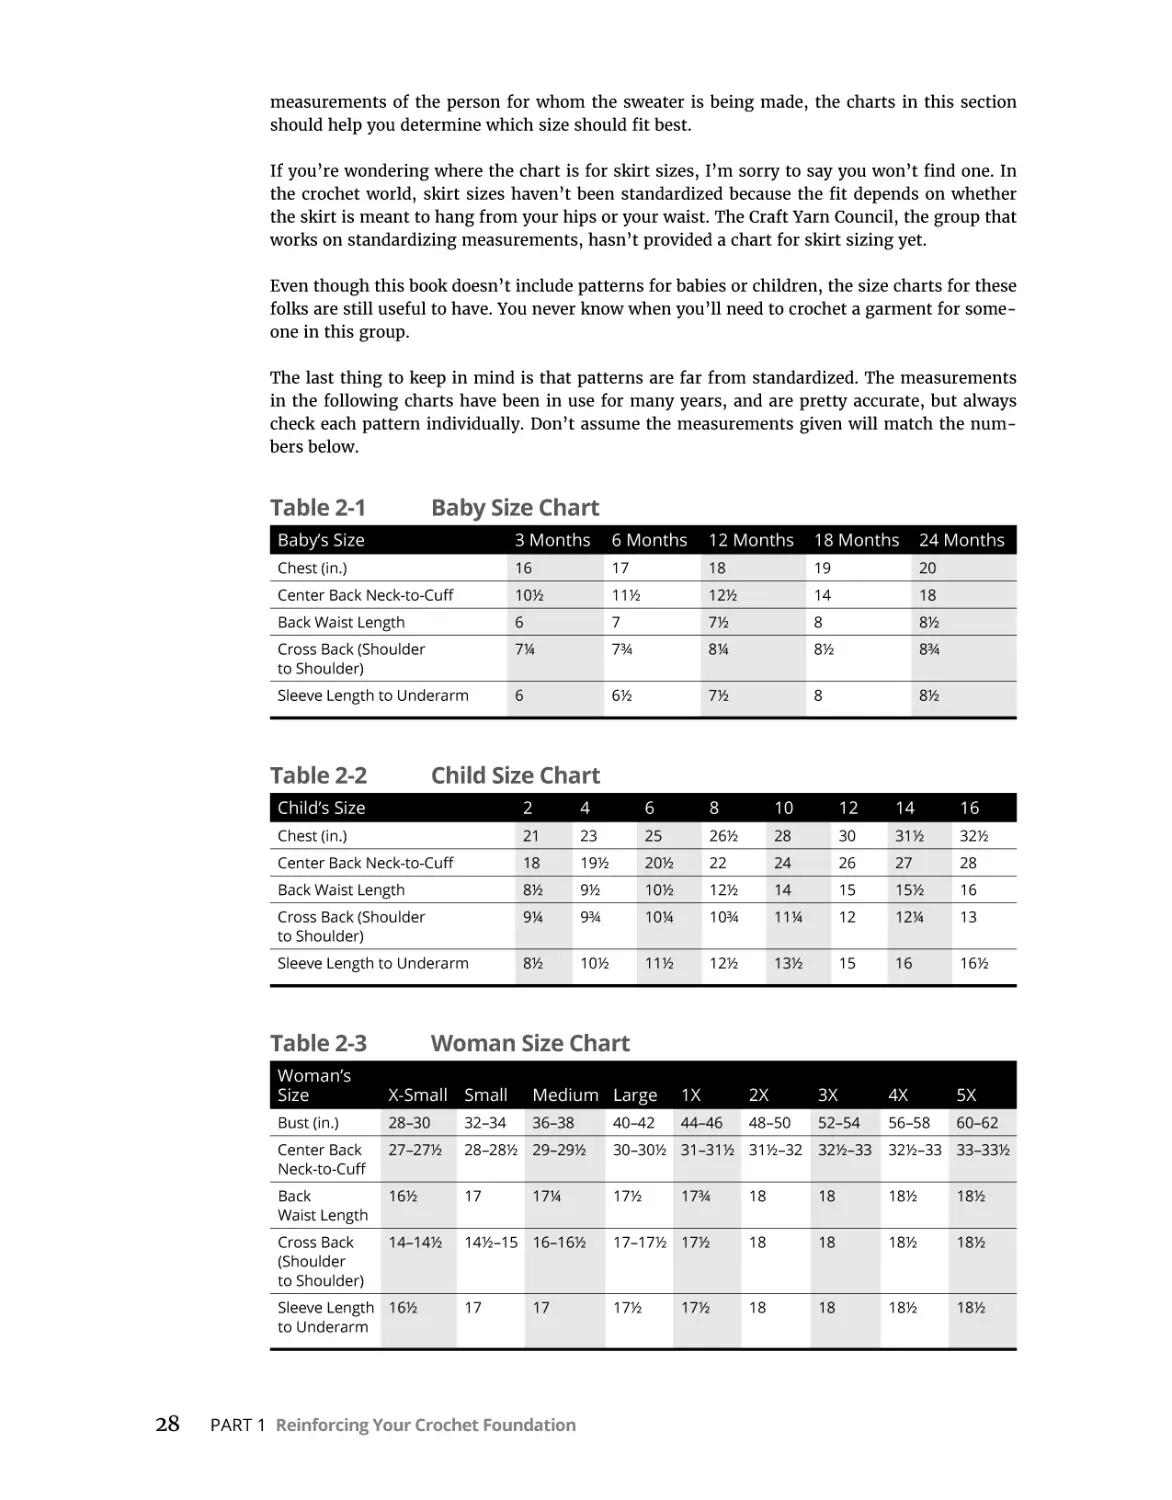
Sizing Your Garment. . . . . . . . . . . . . . . . . . . . . . . . . . . . . . . . . . . . . . . . . . . . . . . . . . . . . 24
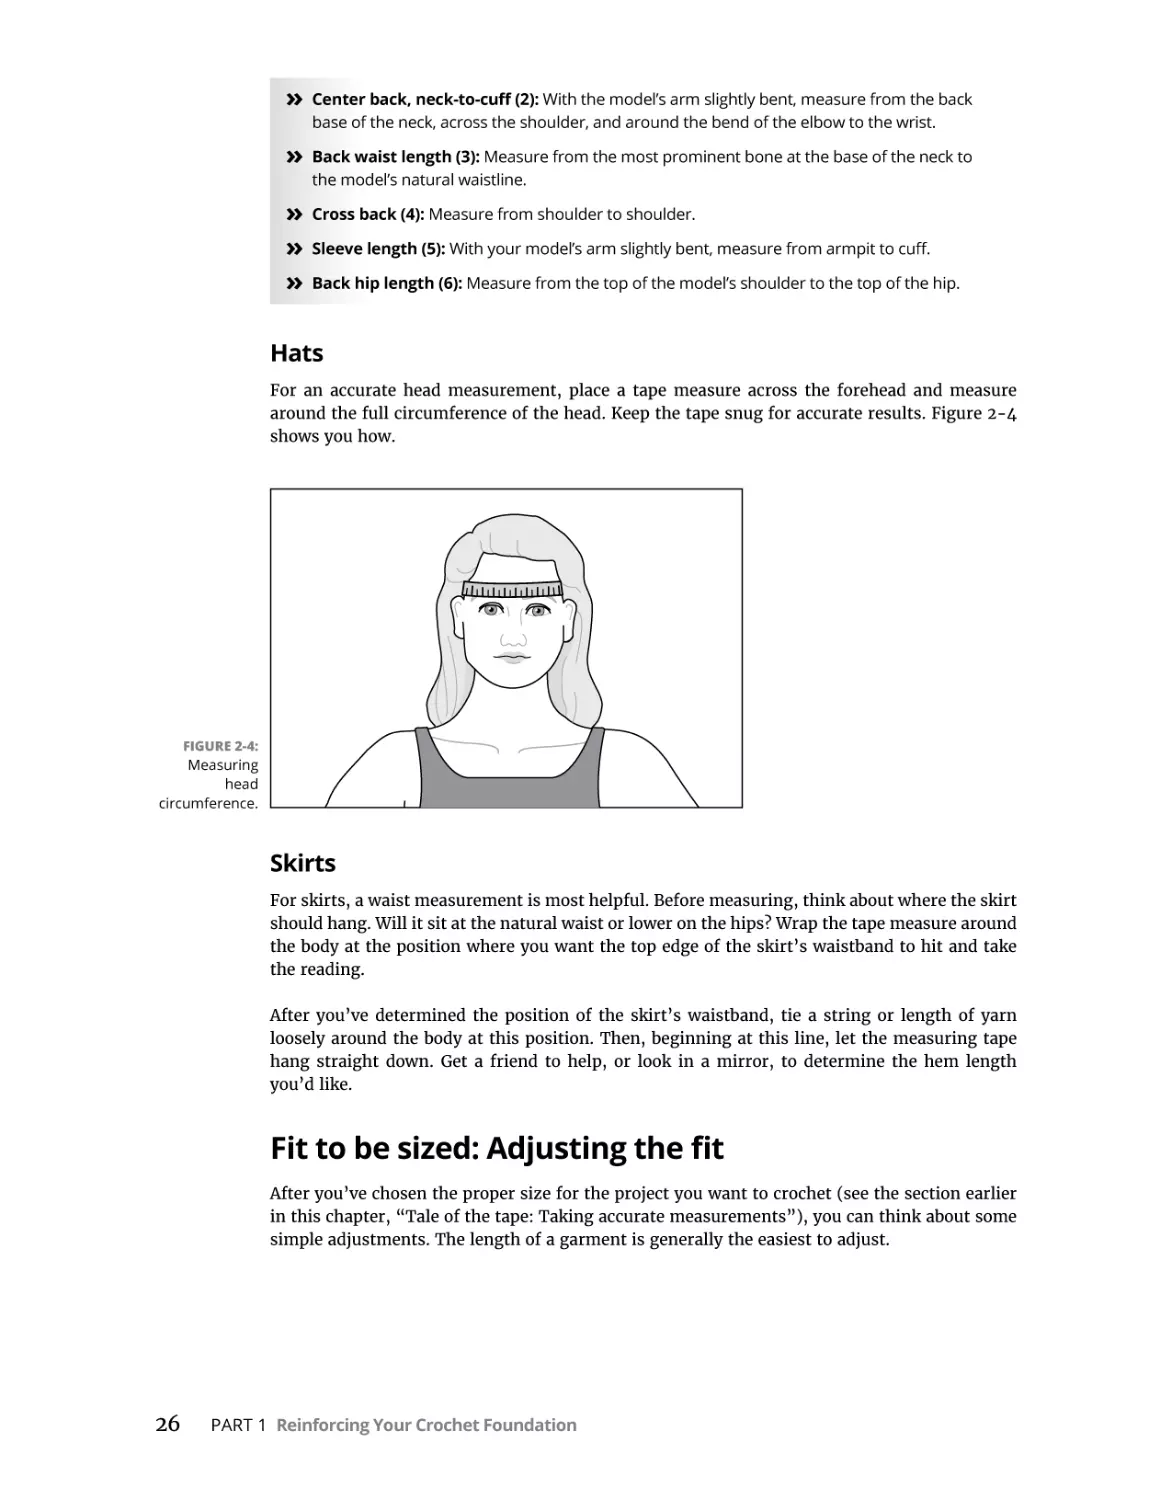
Tale of the tape: Taking accurate measurements. . . . . . . . . . . . . . . . . . . . . . . . . . 25
Fit to be sized: Adjusting the fit. . . . . . . . . . . . . . . . . . . . . . . . . . . . . . . . . . . . . . . . . 26
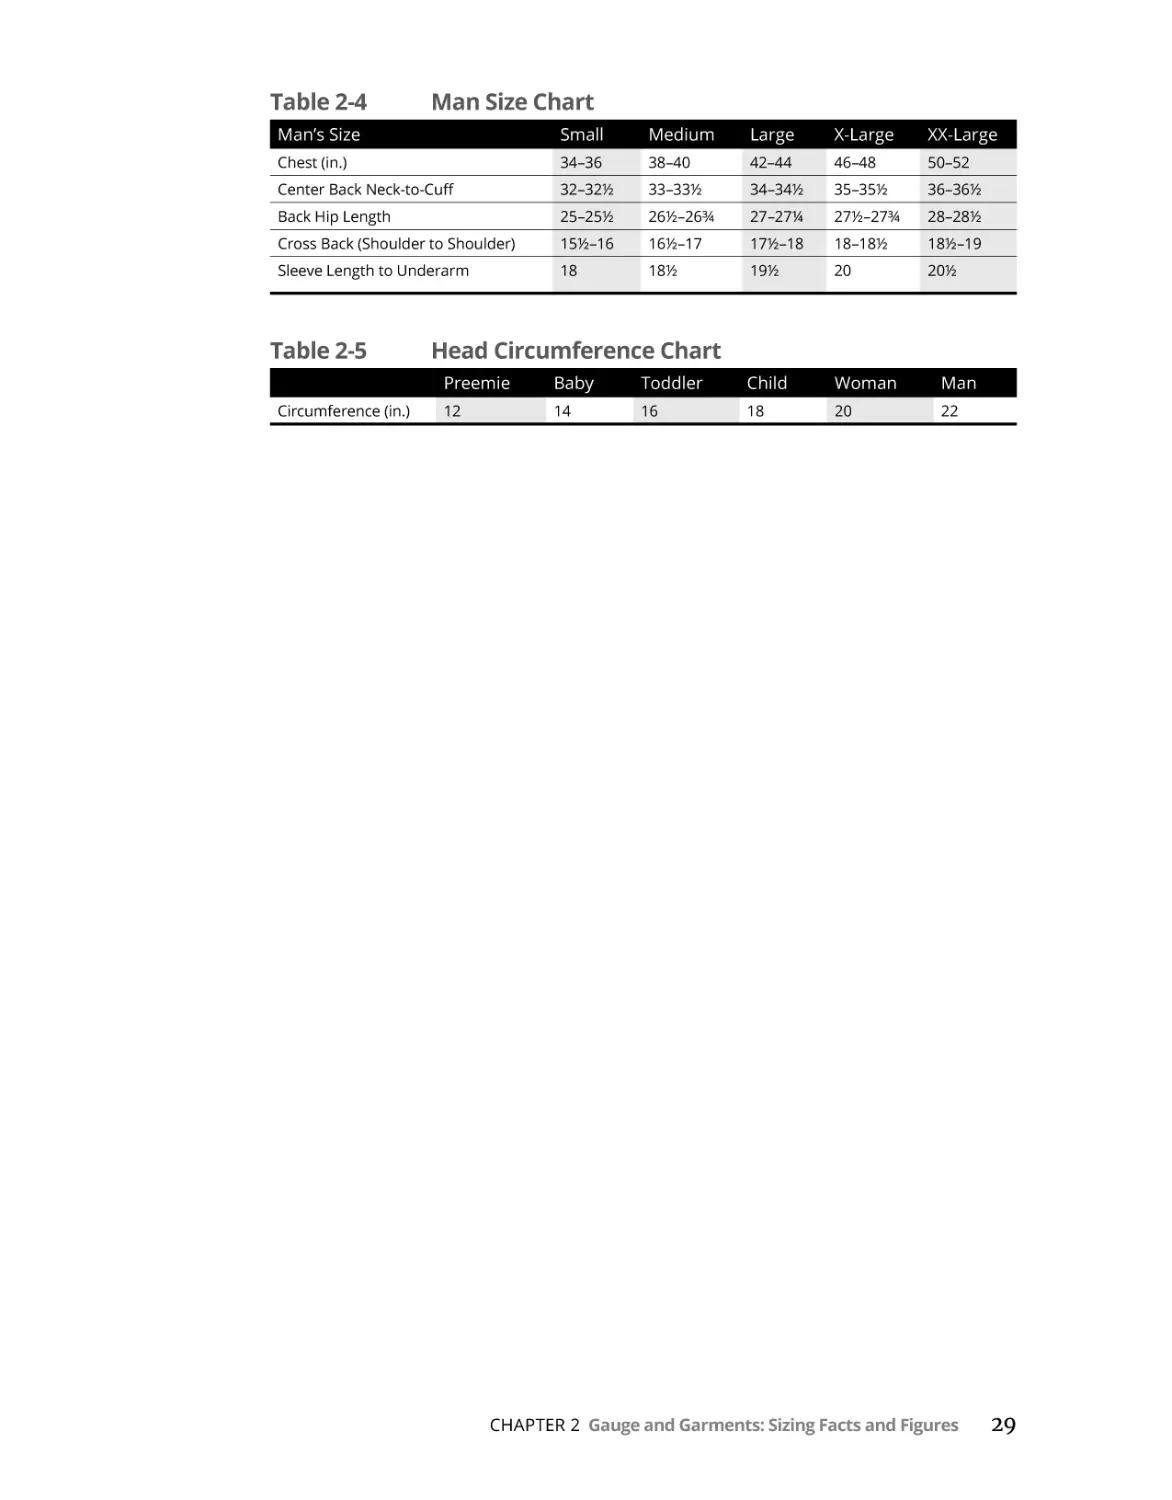
Picking the Right Pattern Size. . . . . . . . . . . . . . . . . . . . . . . . . . . . . . . . . . . . . . . . . . . . . . 27
CHAPTER 3:
Sum and Substance: Reading a Pattern. . . . . . . . . . . . . . . . . . . . . . . . . .
31
Interpreting the Written Instructions . . . . . . . . . . . . . . . . . . . . . . . . . . . . . . . . . . . . . . . 31
Understanding the abbreviations. . . . . . . . . . . . . . . . . . . . . . . . . . . . . . . . . . . . . . . 32
Taking note of common terms. . . . . . . . . . . . . . . . . . . . . . . . . . . . . . . . . . . . . . . . . . 33
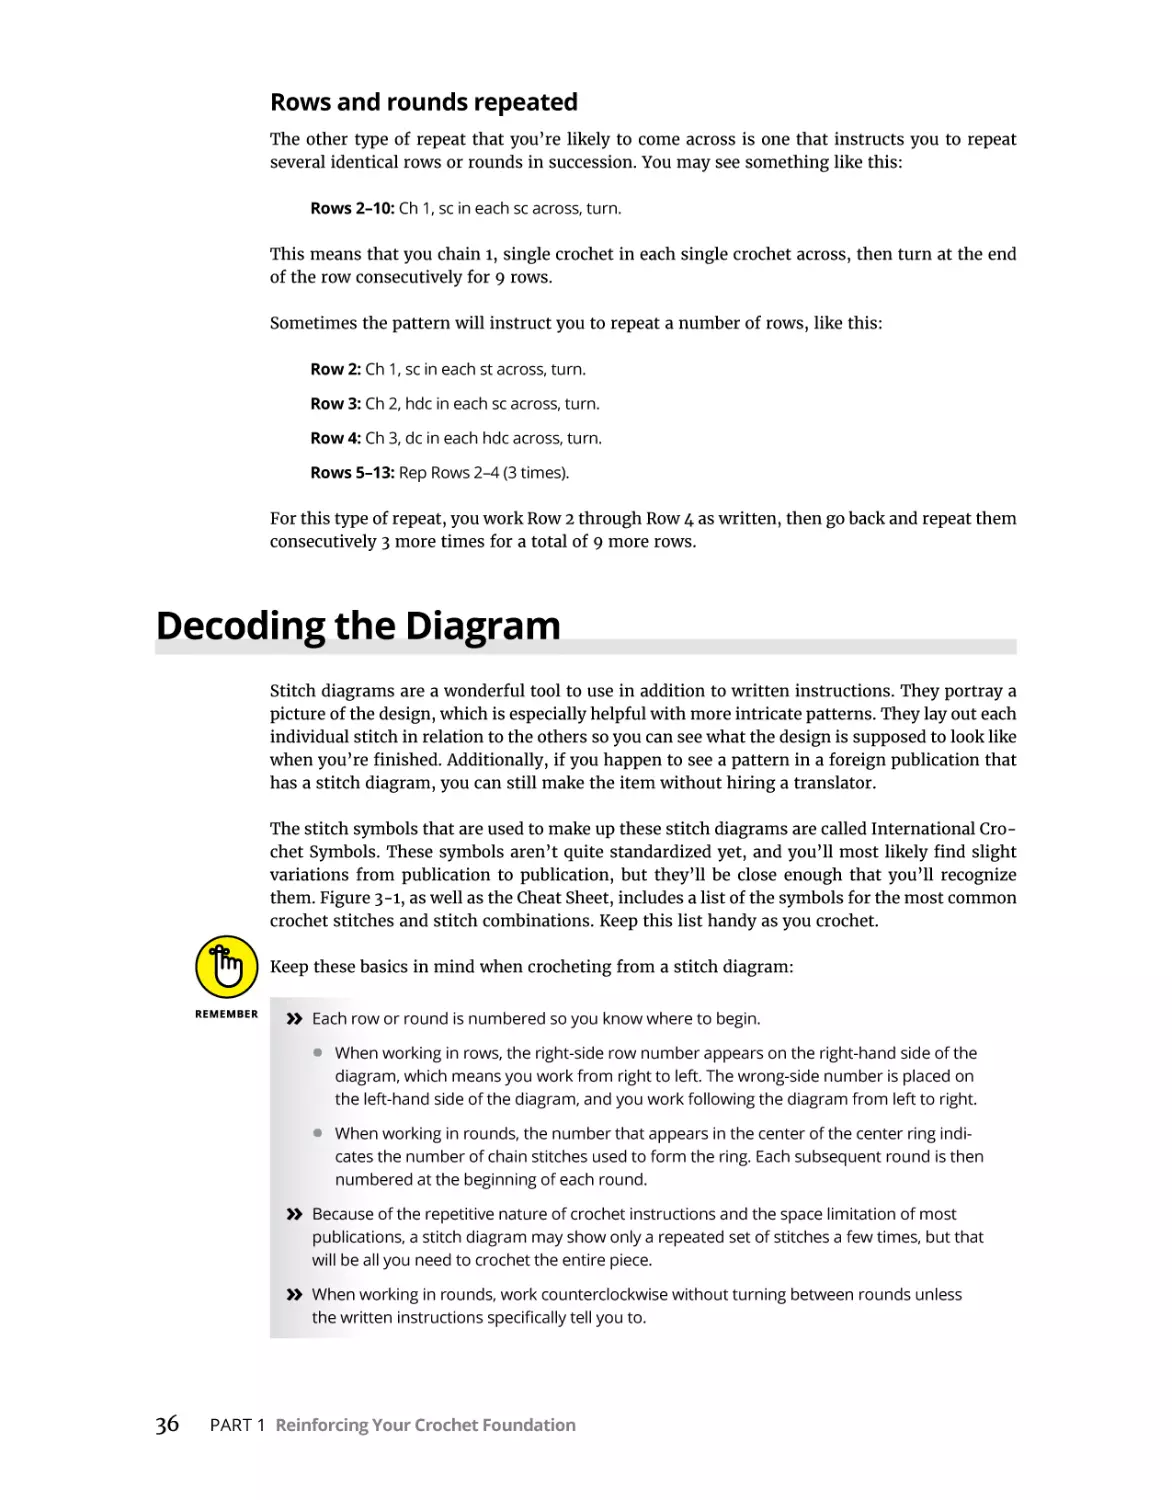
Deciphering the symbols . . . . . . . . . . . . . . . . . . . . . . . . . . . . . . . . . . . . . . . . . . . . . . 33
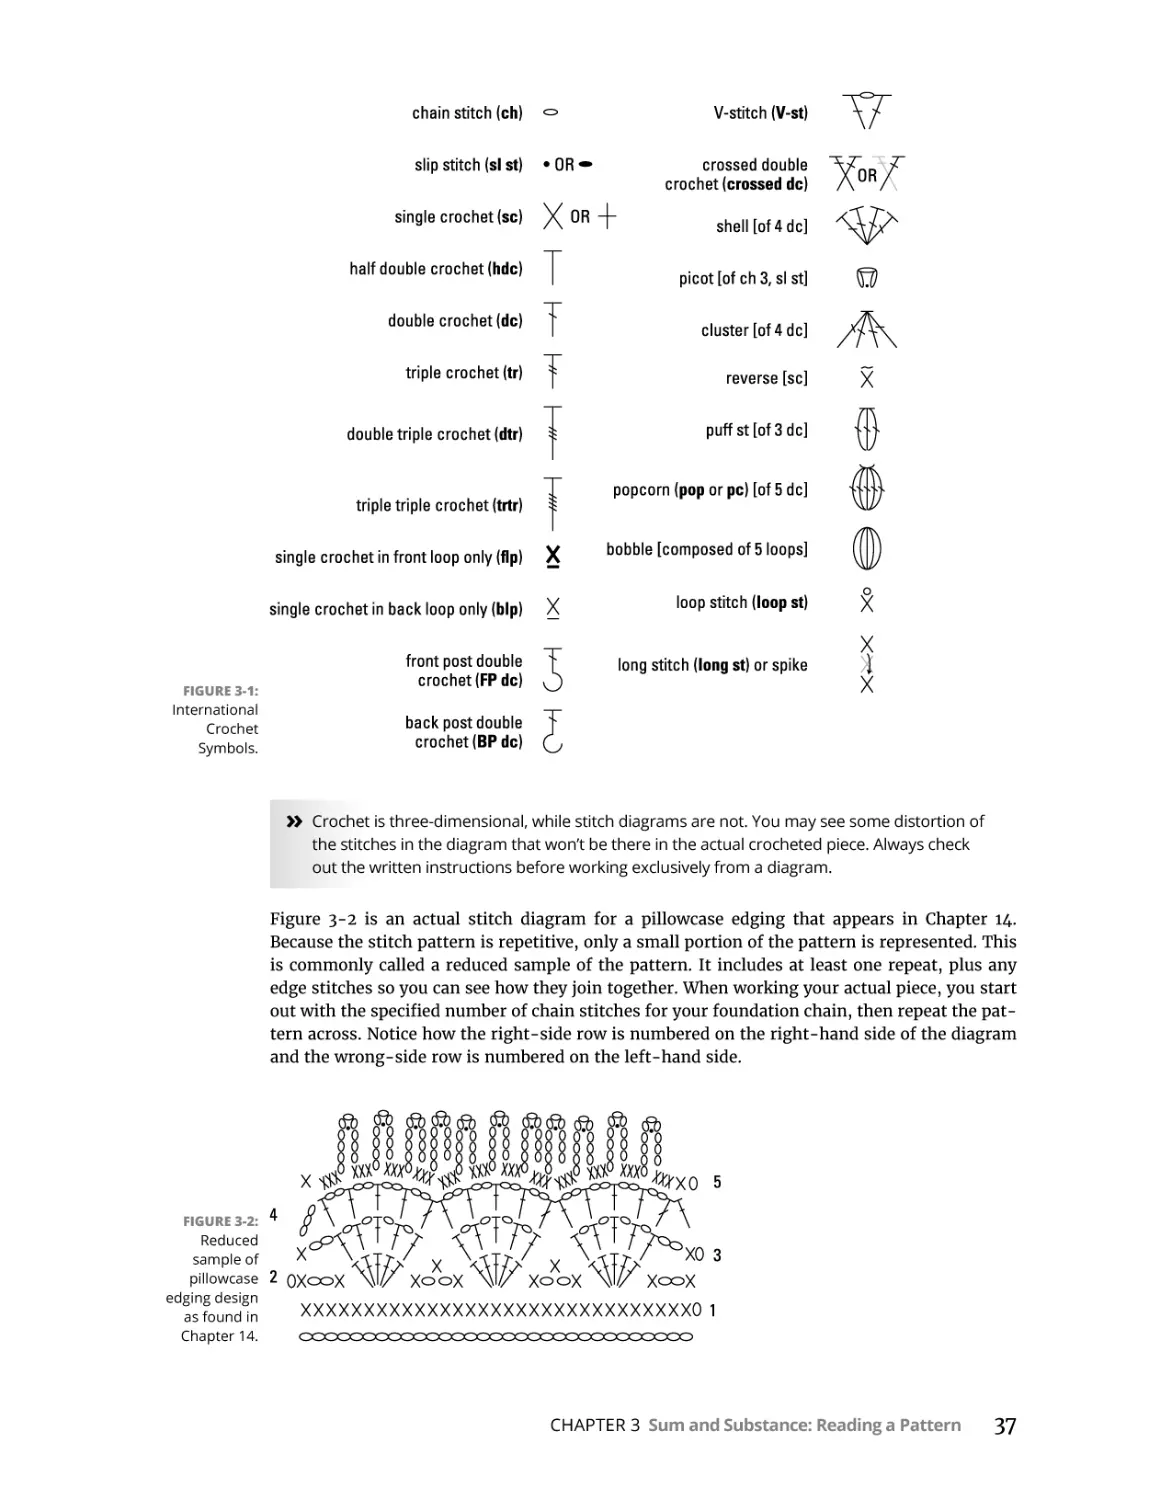
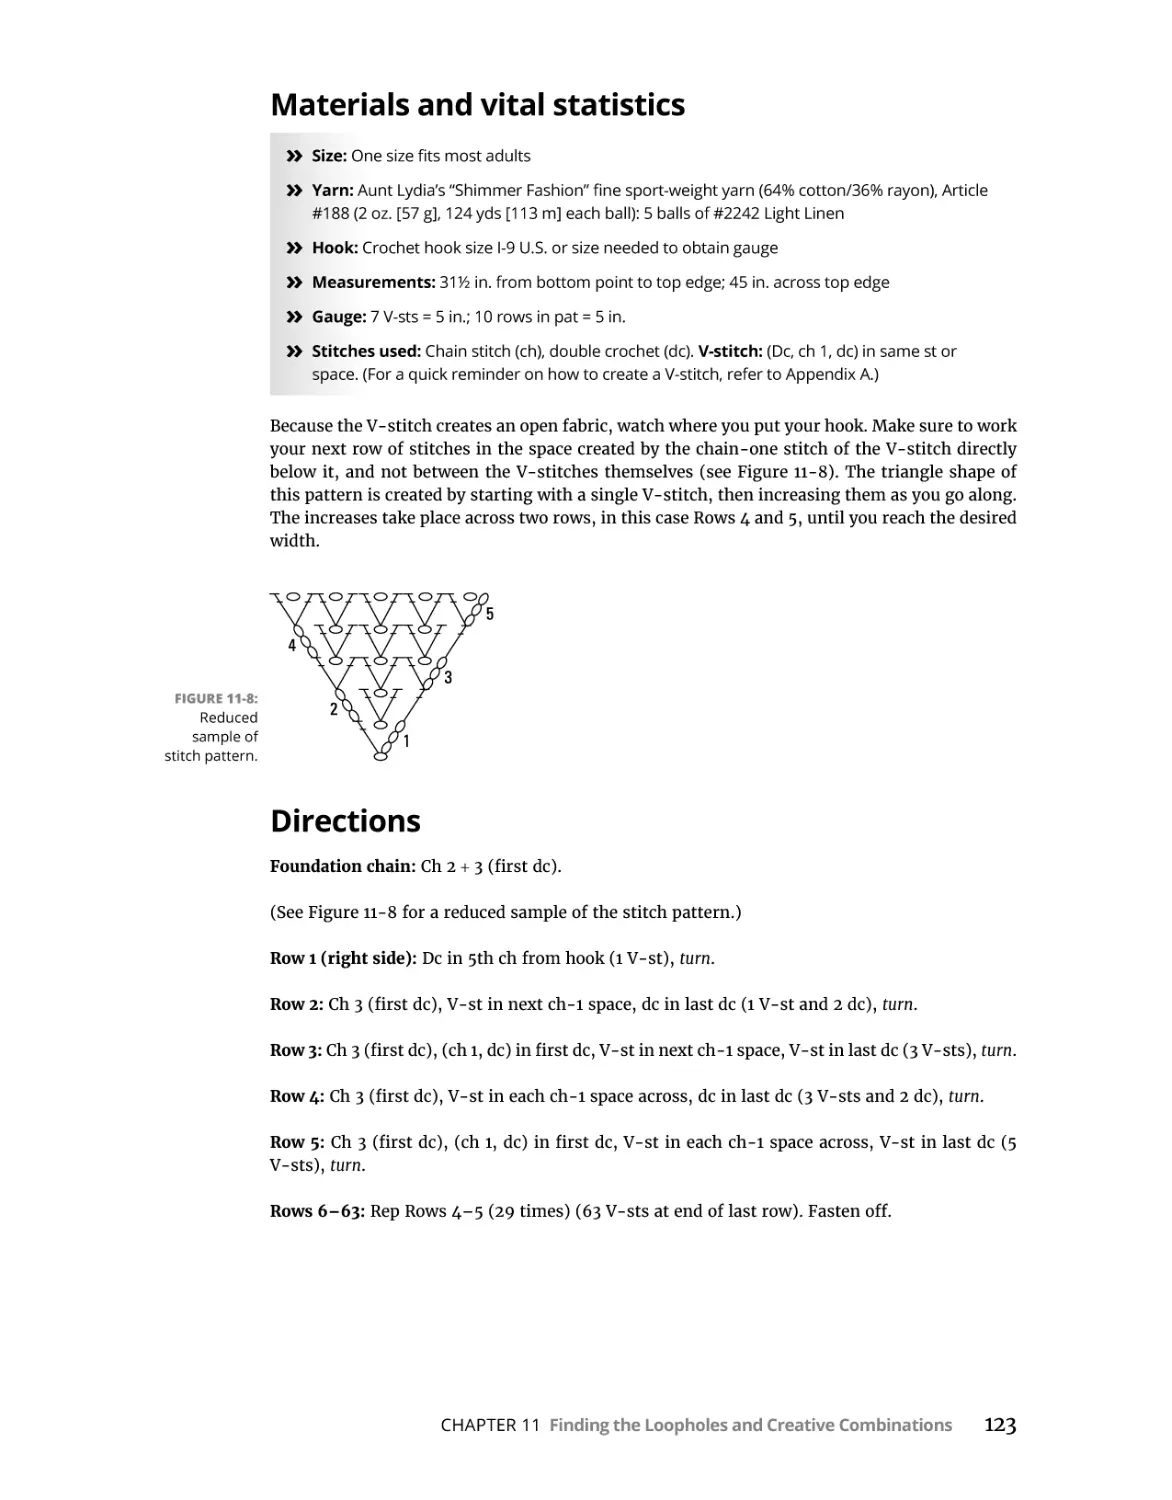
Decoding the Diagram . . . . . . . . . . . . . . . . . . . . . . . . . . . . . . . . . . . . . . . . . . . . . . . . . . . 36
Table of Contents
v
CHAPTER 4:
Brushing Up on Stitch Basics. . . . . . . . . . . . . . . . . . . . . . . . . . . . . . . . . . . . . . .39
Keeping You in Stitches. . . . . . . . . . . . . . . . . . . . . . . . . . . . . . . . . . . . . . . . . . . . . . . . . . . 39
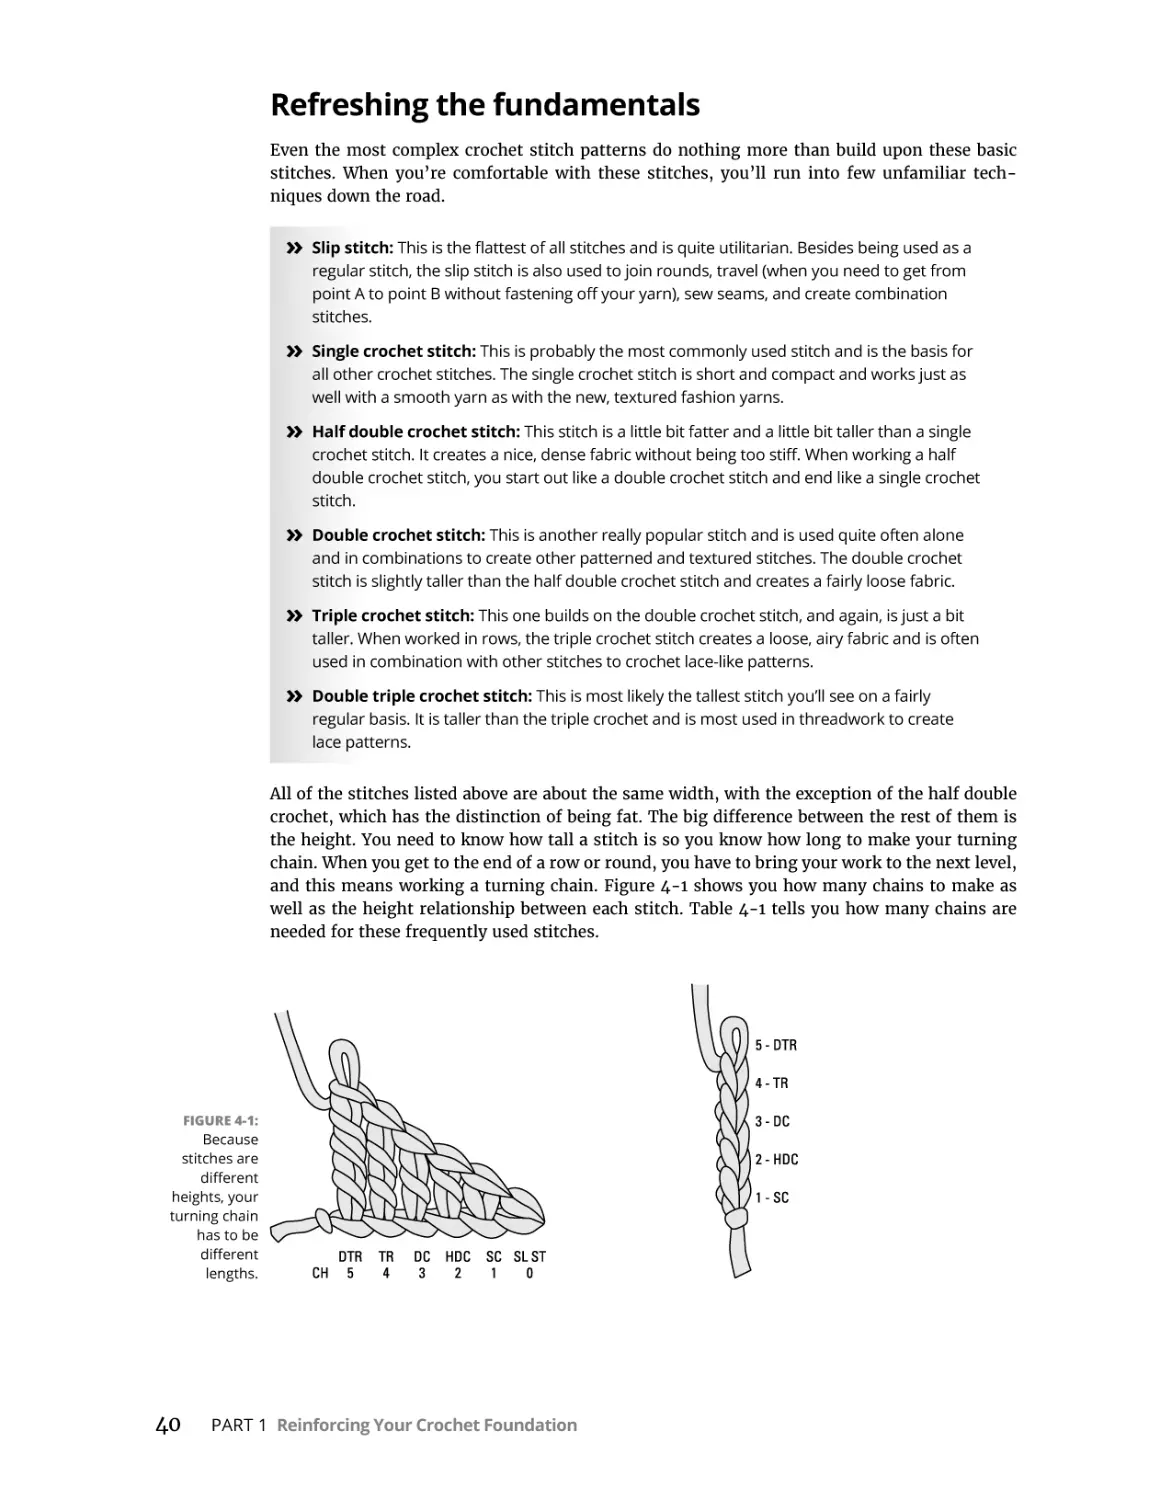
Refreshing the fundamentals. . . . . . . . . . . . . . . . . . . . . . . . . . . . . . . . . . . . . . . . . . . 40
Constructing combinations . . . . . . . . . . . . . . . . . . . . . . . . . . . . . . . . . . . . . . . . . . . . 41
Change Is Good: Adding New Yarn. . . . . . . . . . . . . . . . . . . . . . . . . . . . . . . . . . . . . . . . . 42
Making the switch at the beginning or end: It’s all the same . . . . . . . . . . . . . . . . 42
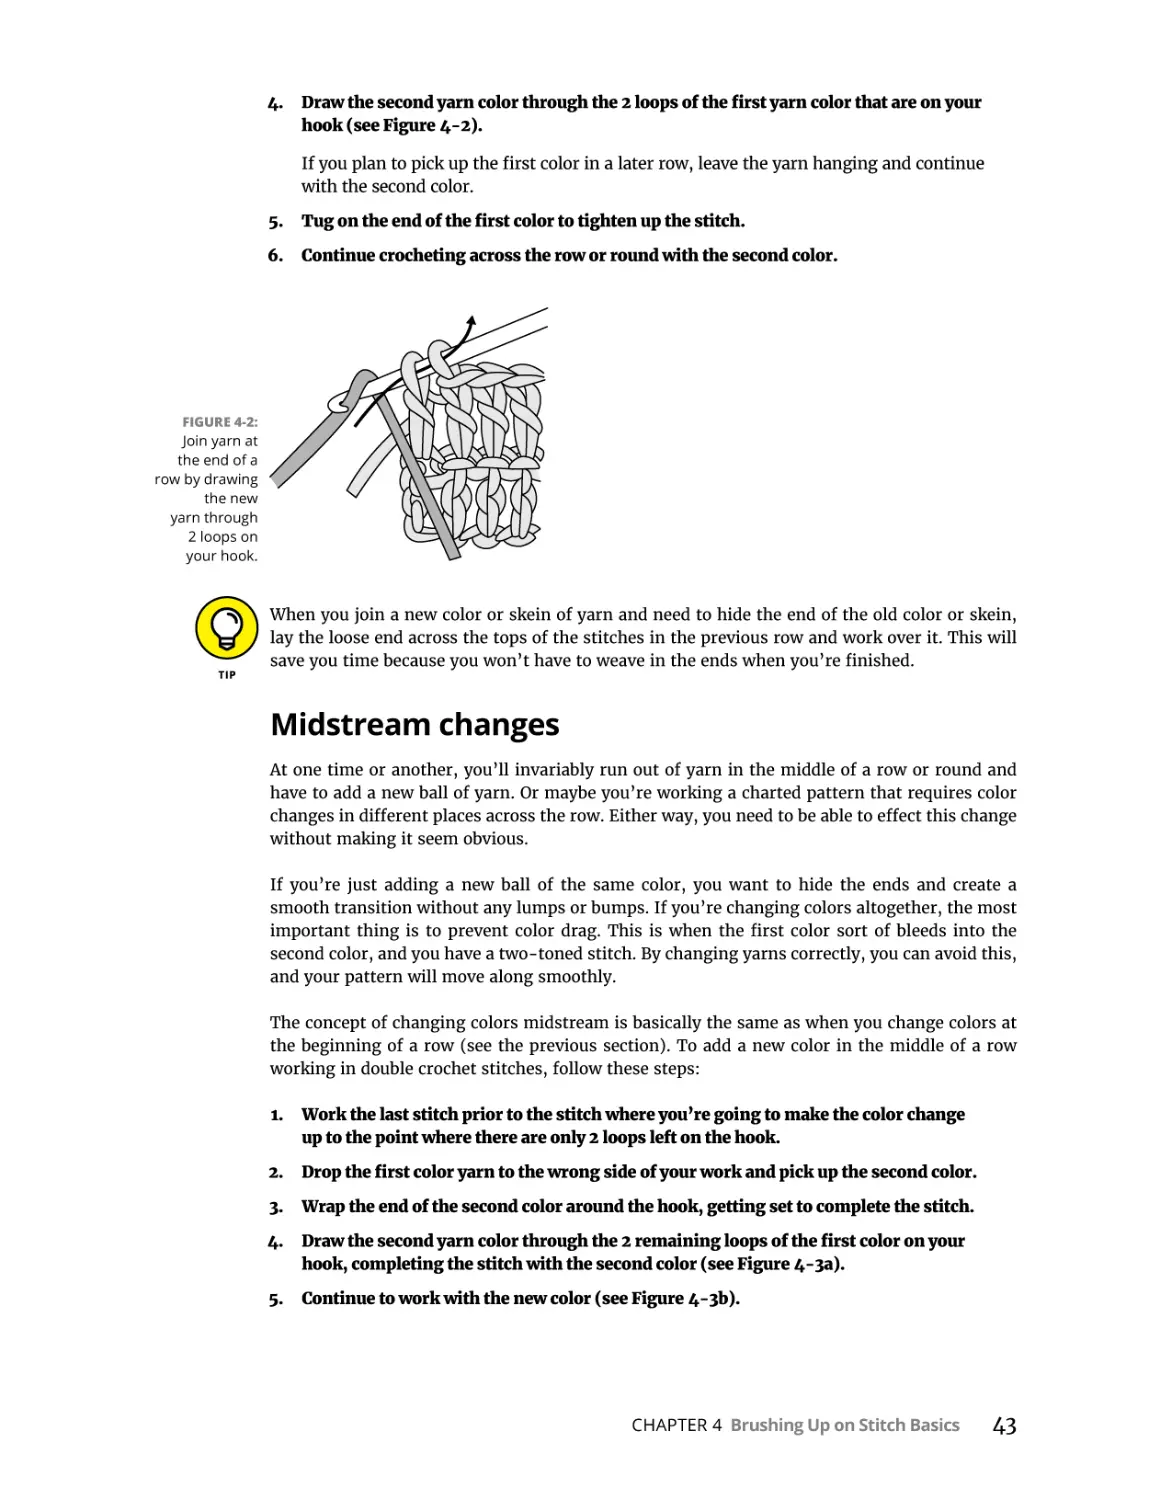
Midstream changes. . . . . . . . . . . . . . . . . . . . . . . . . . . . . . . . . . . . . . . . . . . . . . . . . . . 43
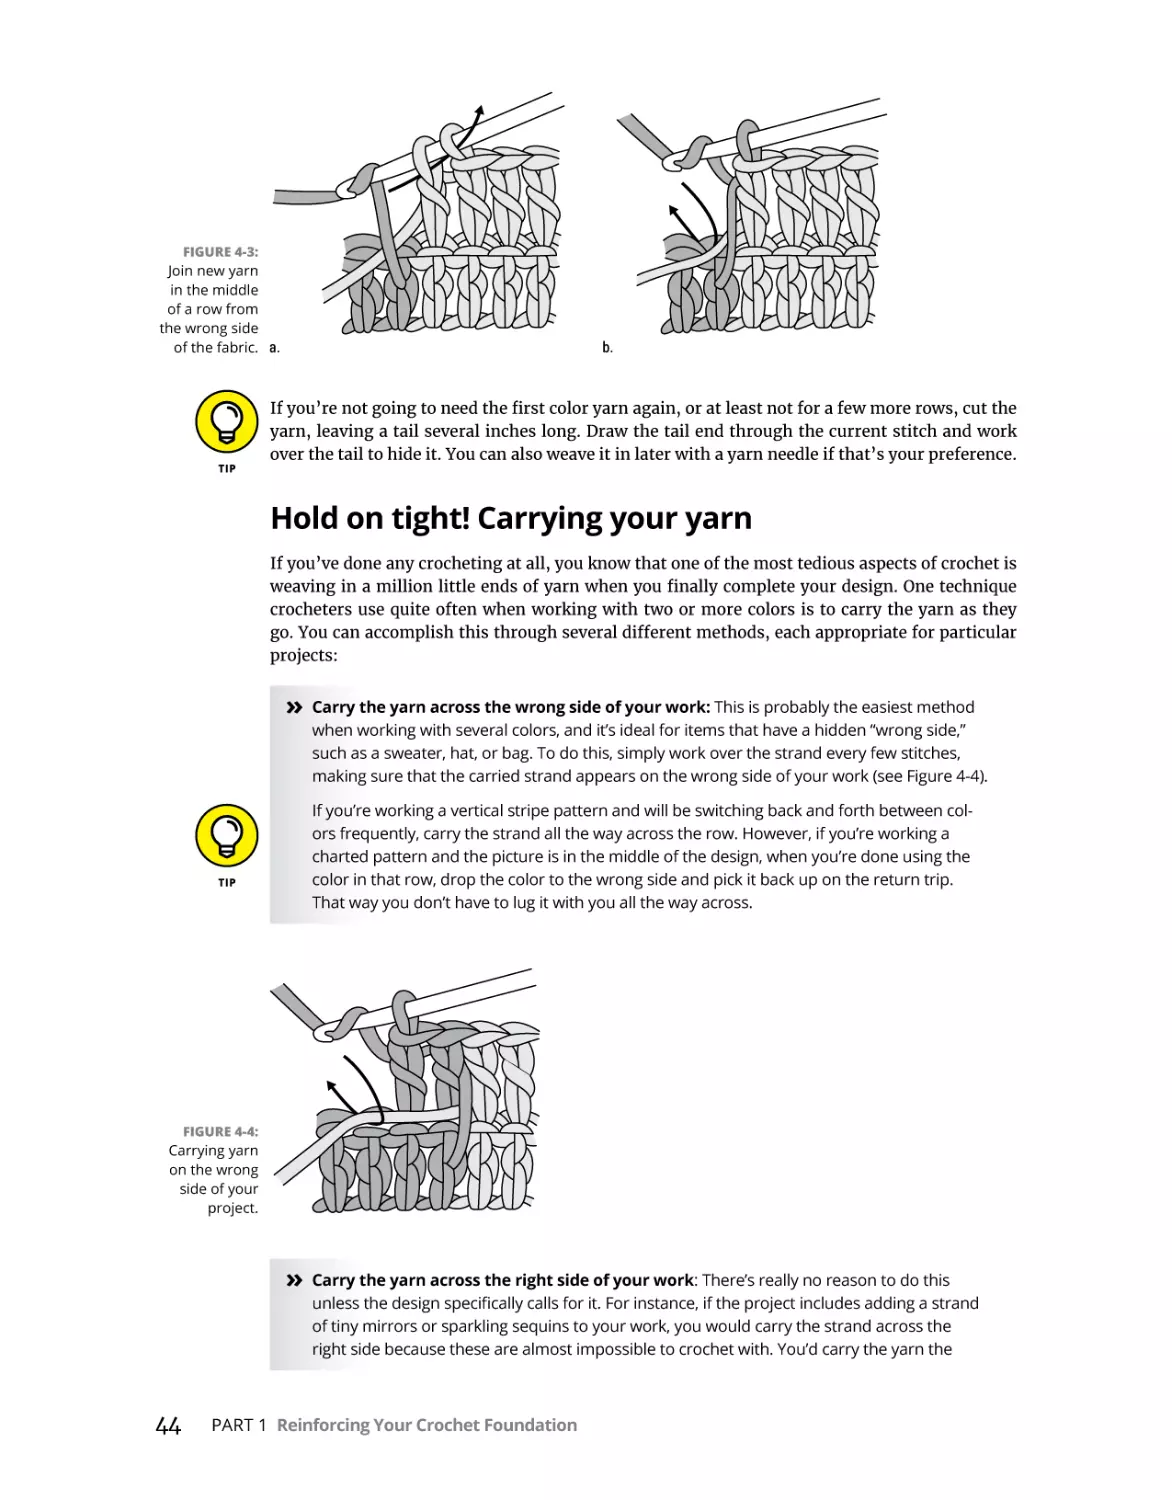
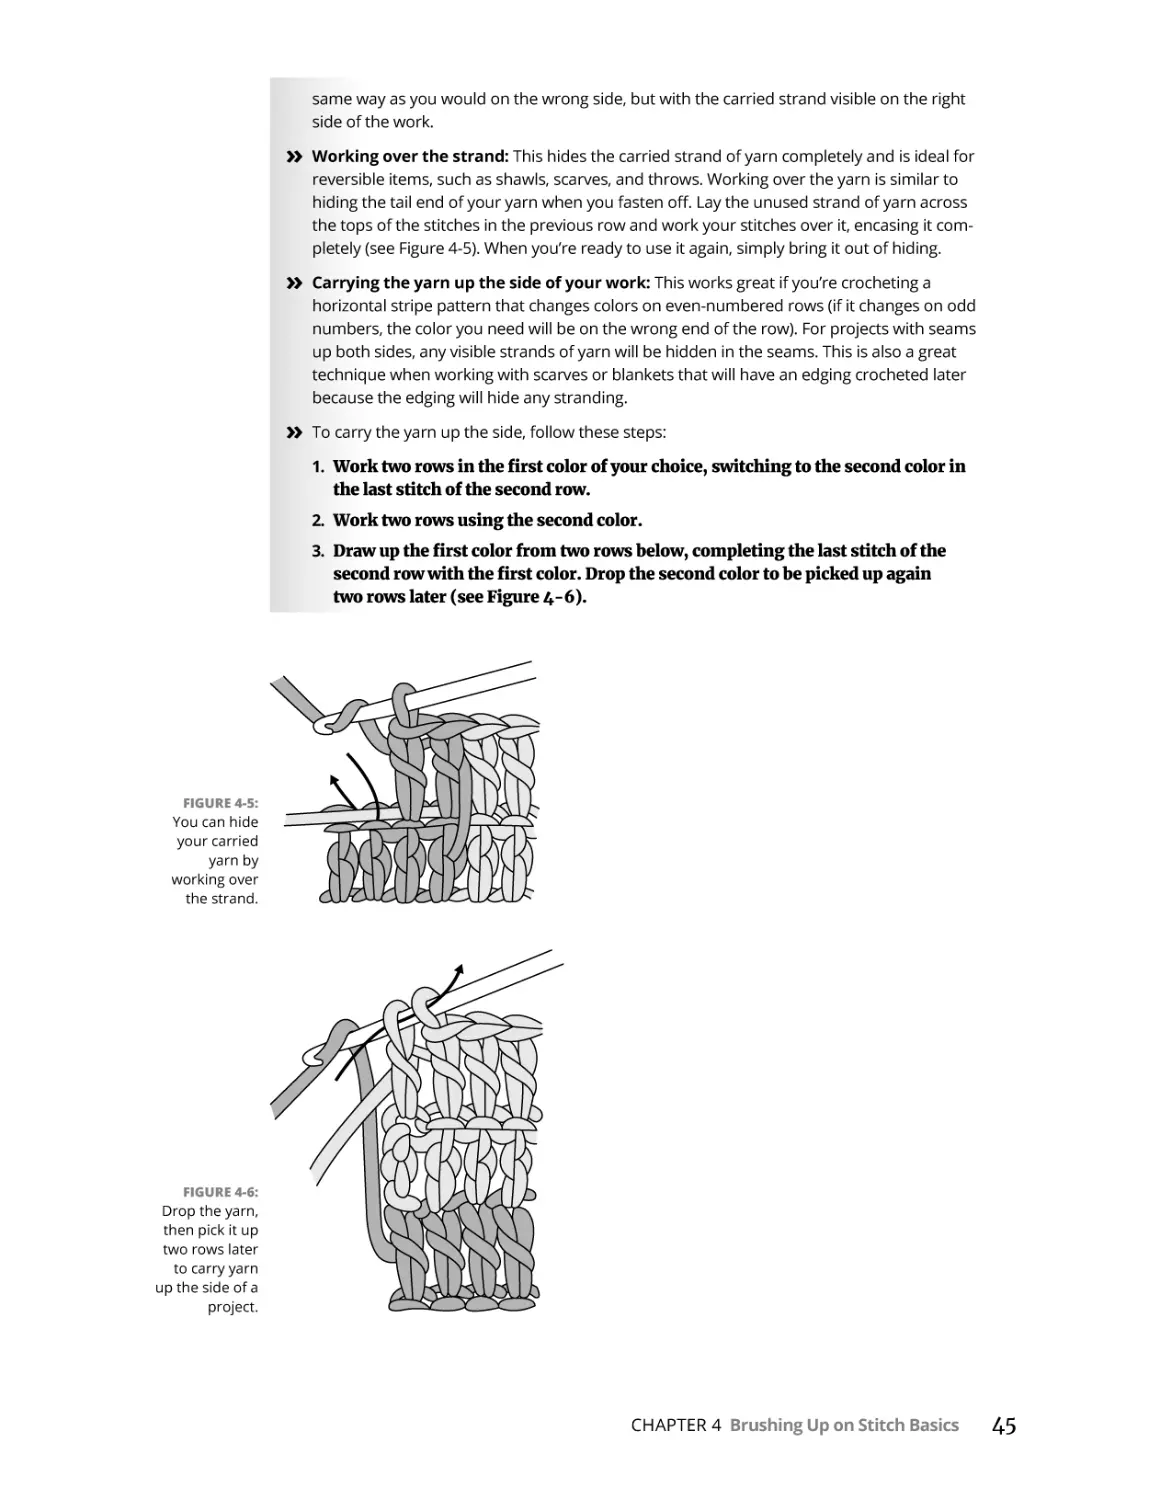
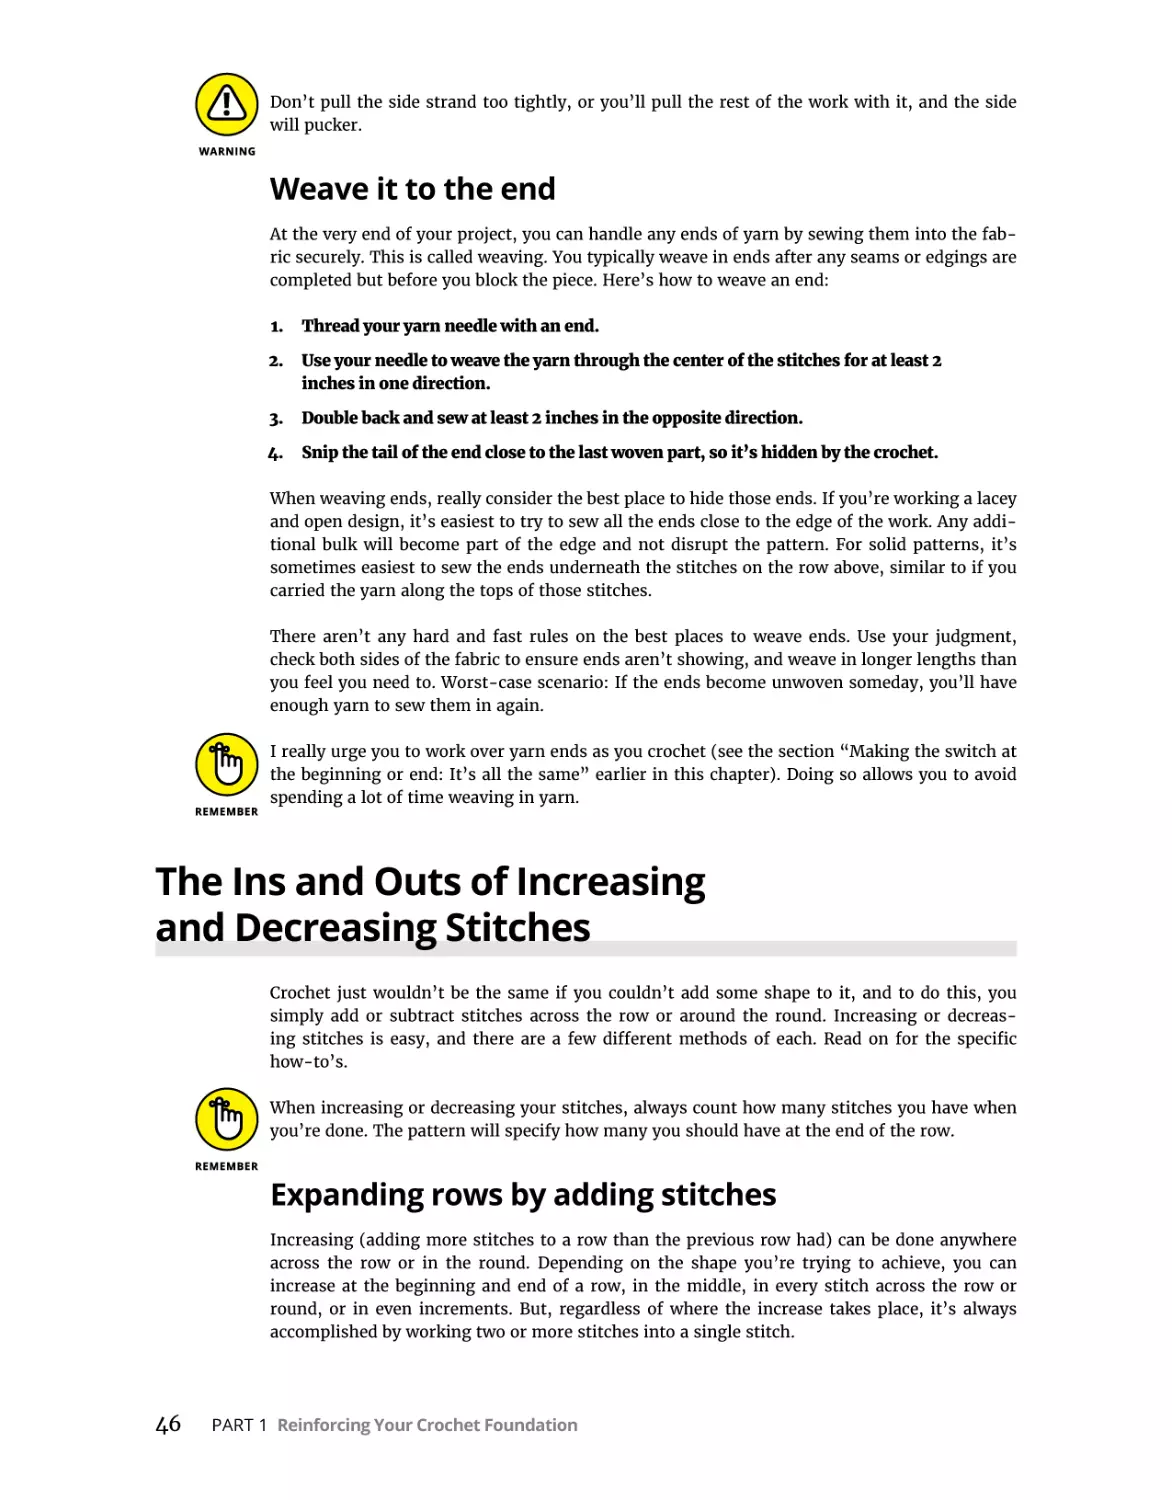
Hold on tight! Carrying your yarn . . . . . . . . . . . . . . . . . . . . . . . . . . . . . . . . . . . . . . . 44
Weave it to the end. . . . . . . . . . . . . . . . . . . . . . . . . . . . . . . . . . . . . . . . . . . . . . . . . . . 46
The Ins and Outs of Increasing and Decreasing Stitches. . . . . . . . . . . . . . . . . . . . . . . 46
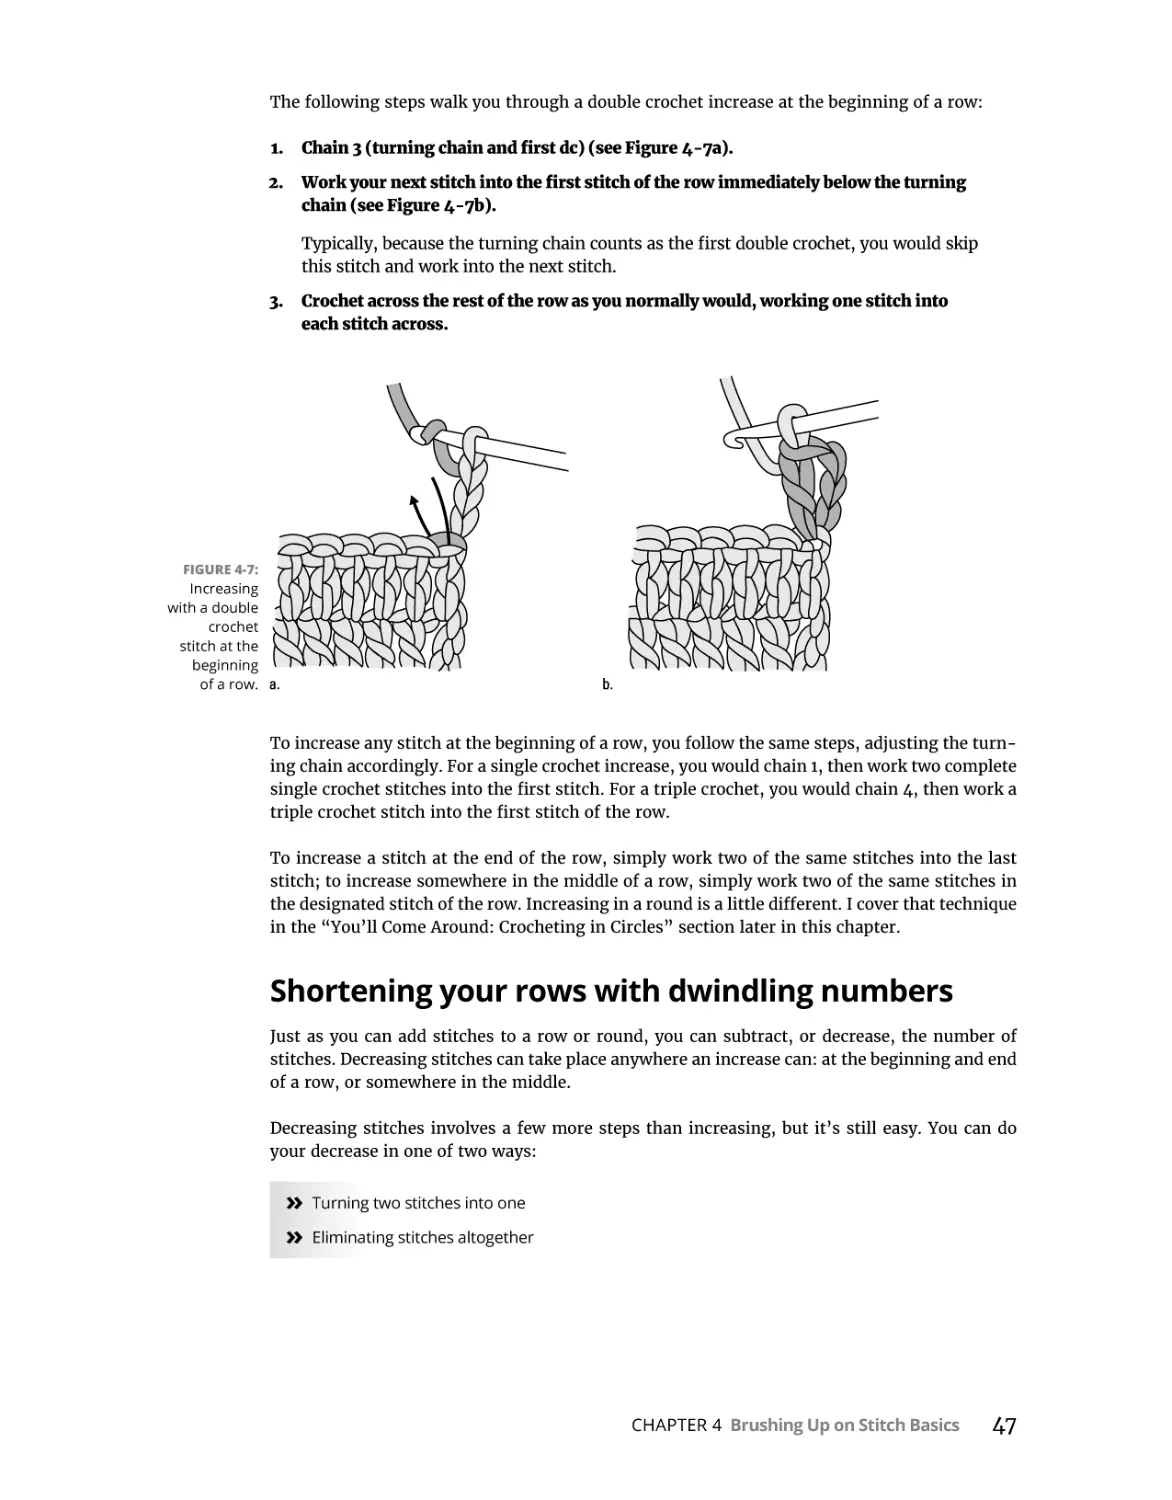
Expanding rows by adding stitches. . . . . . . . . . . . . . . . . . . . . . . . . . . . . . . . . . . . . . 46
Shortening your rows with dwindling numbers . . . . . . . . . . . . . . . . . . . . . . . . . . . 47
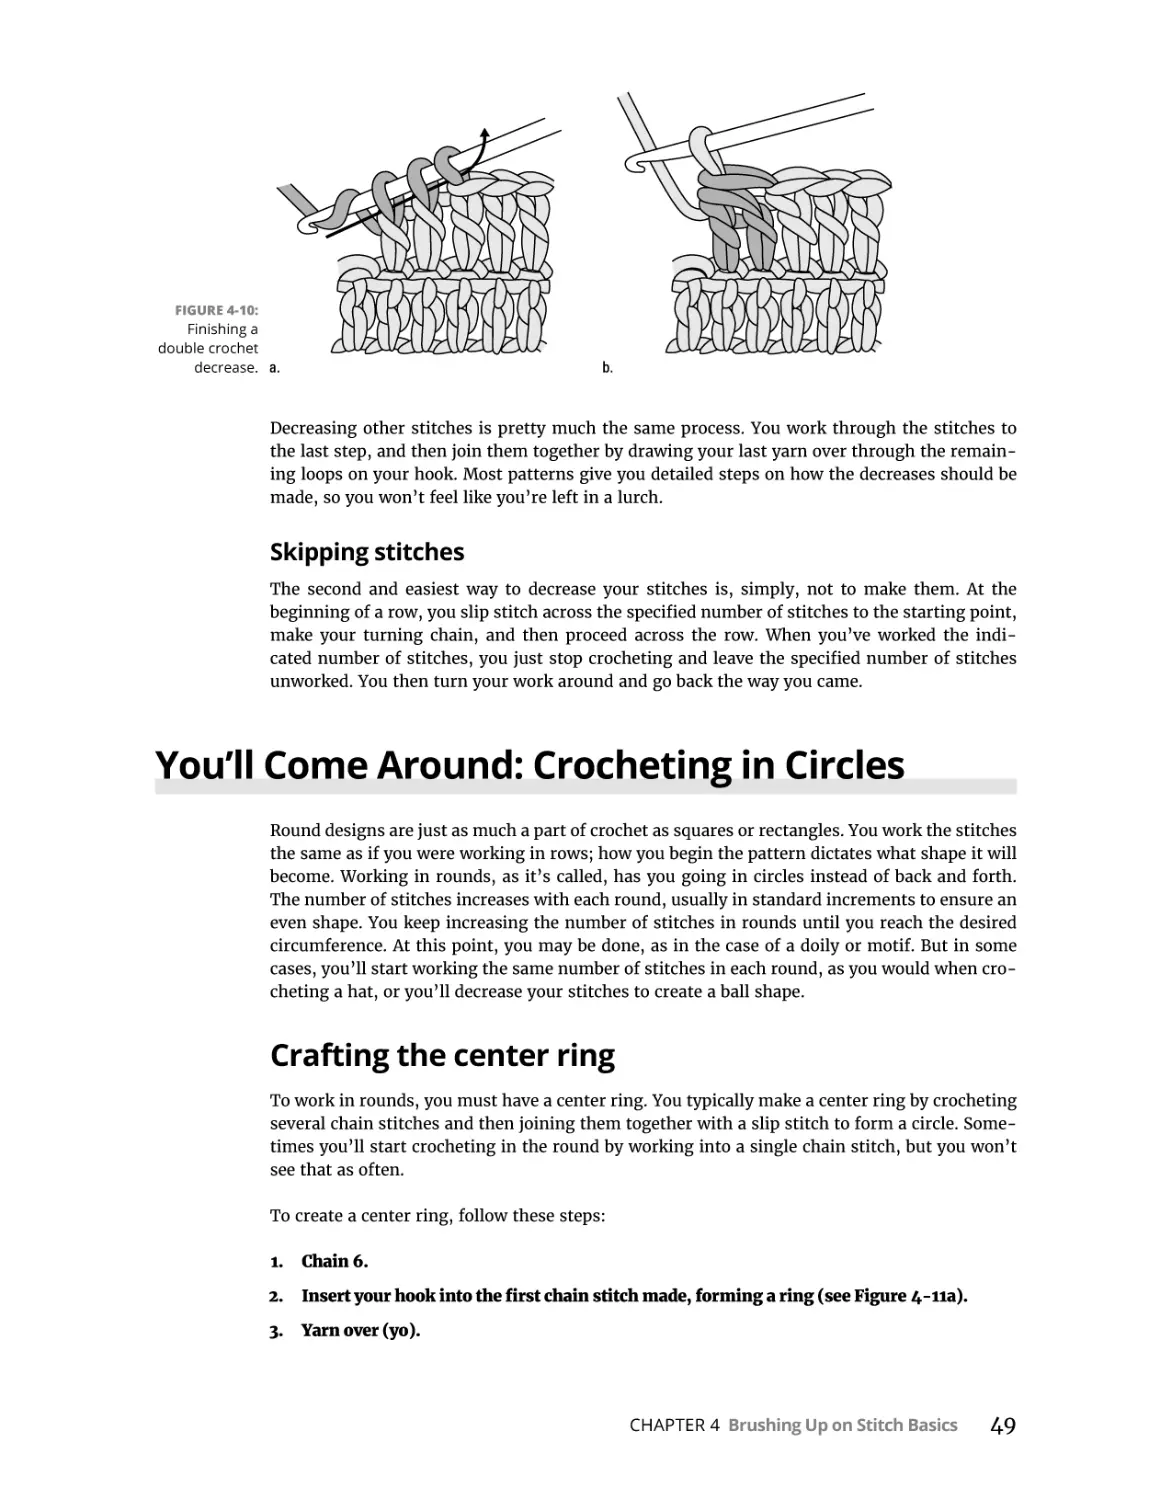
You’ll Come Around: Crocheting in Circles. . . . . . . . . . . . . . . . . . . . . . . . . . . . . . . . . . . 49
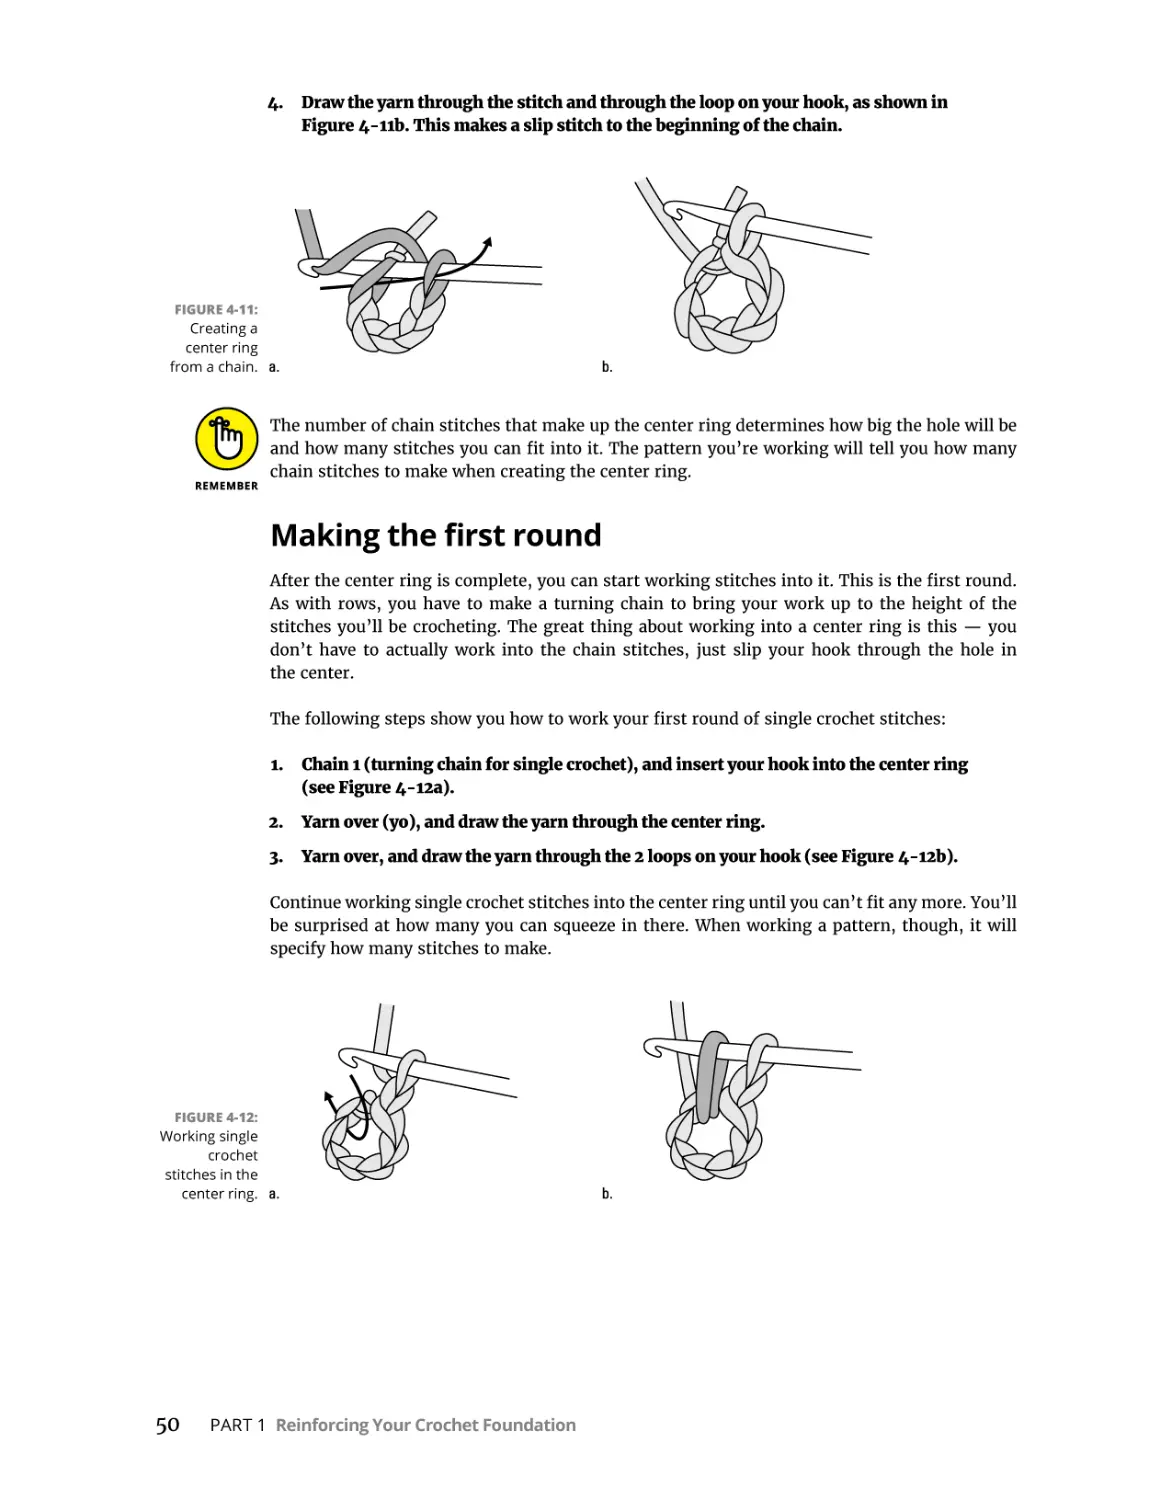
Crafting the center ring. . . . . . . . . . . . . . . . . . . . . . . . . . . . . . . . . . . . . . . . . . . . . . . . 49
Making the first round . . . . . . . . . . . . . . . . . . . . . . . . . . . . . . . . . . . . . . . . . . . . . . . . 50
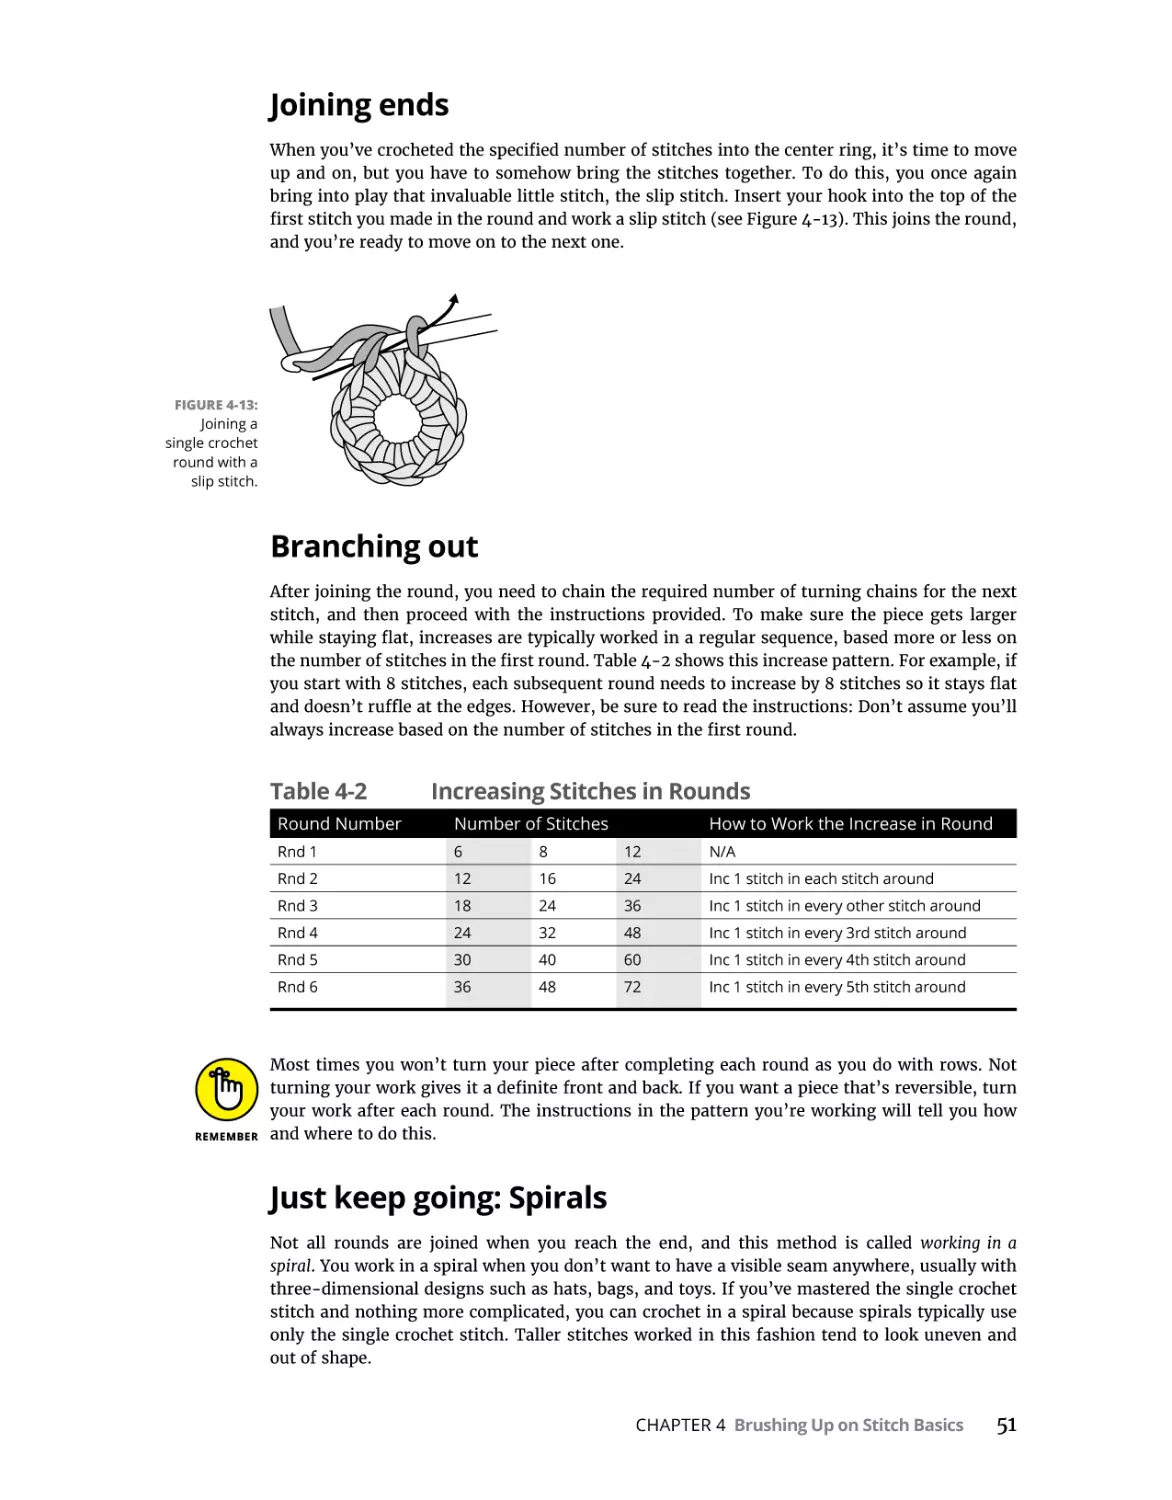
Joining ends . . . . . . . . . . . . . . . . . . . . . . . . . . . . . . . . . . . . . . . . . . . . . . . . . . . . . . . . . 51
Branching out. . . . . . . . . . . . . . . . . . . . . . . . . . . . . . . . . . . . . . . . . . . . . . . . . . . . . . . . 51
Just keep going: Spirals. . . . . . . . . . . . . . . . . . . . . . . . . . . . . . . . . . . . . . . . . . . . . . . . 51
Creating shapes. . . . . . . . . . . . . . . . . . . . . . . . . . . . . . . . . . . . . . . . . . . . . . . . . . . . . . 52
PART 2: HOOK, YARN, ACTION! CROCHETING SIMPLE
PROJECTS. . . . . . . . . . . . . . . . . . . . . . . . . . . . . . . . . . . . . . . . . . . . . . . . . . . . . .
53
Working in the First Dimension . . . . . . . . . . . . . . . . . . . . . . . . . . . . . . . . . . .
55
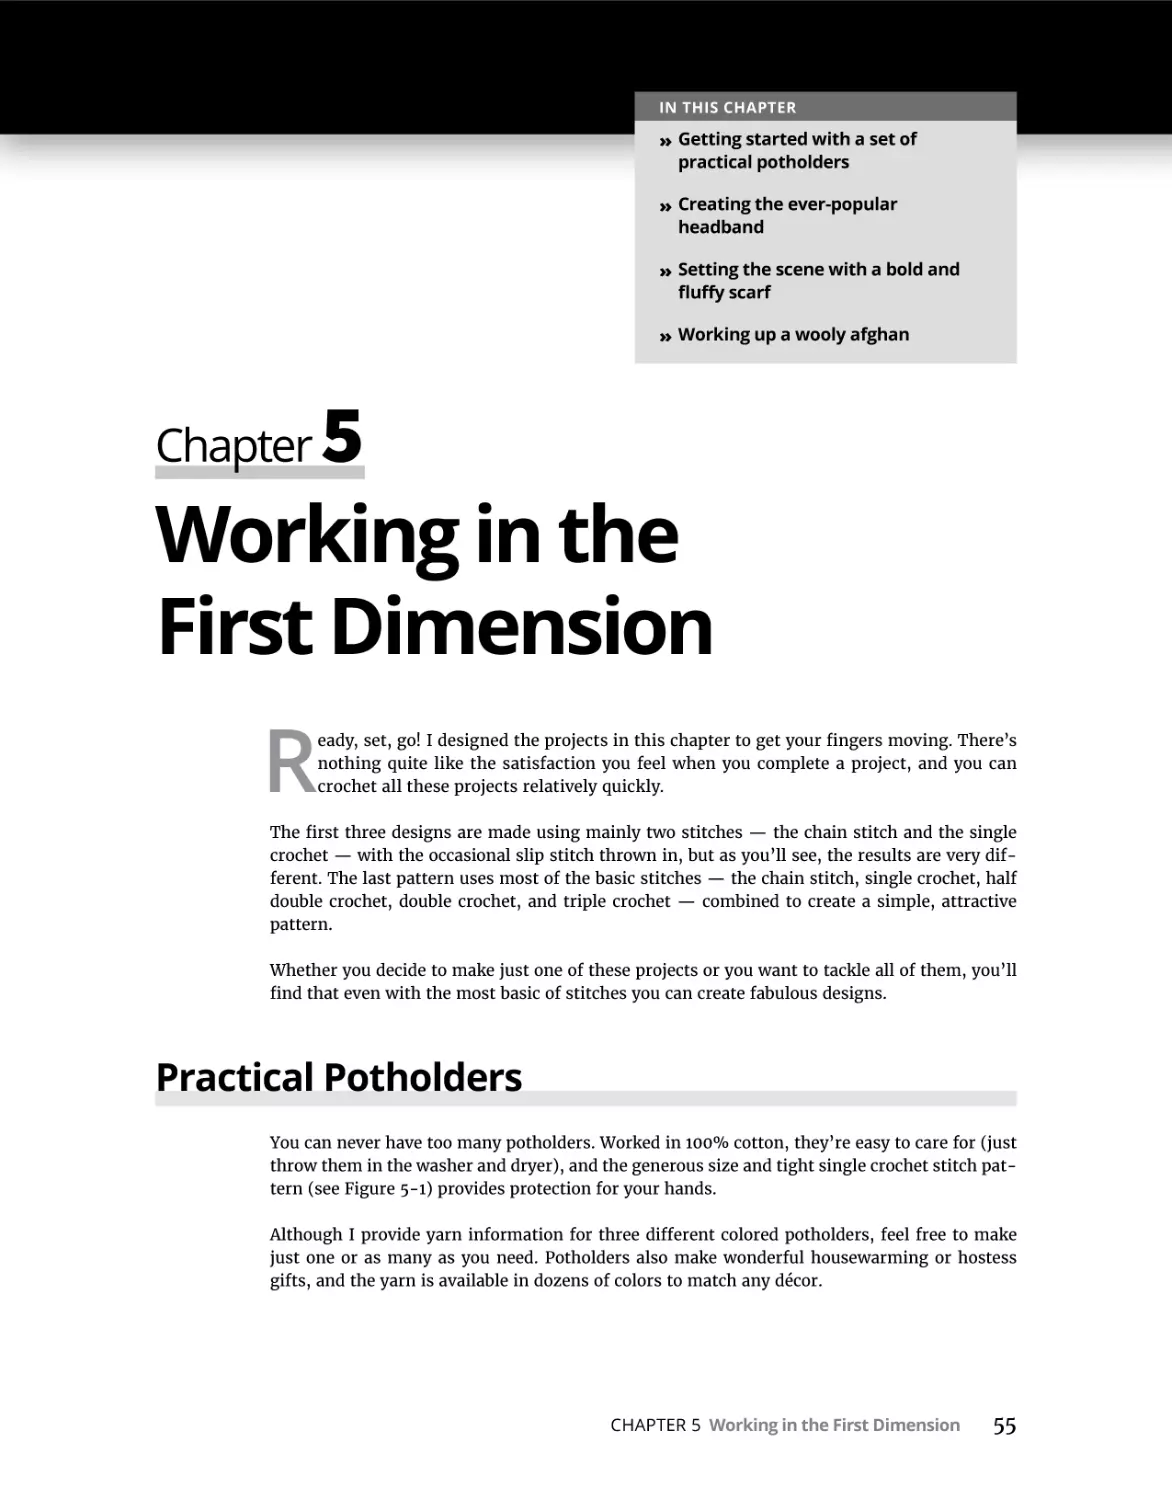
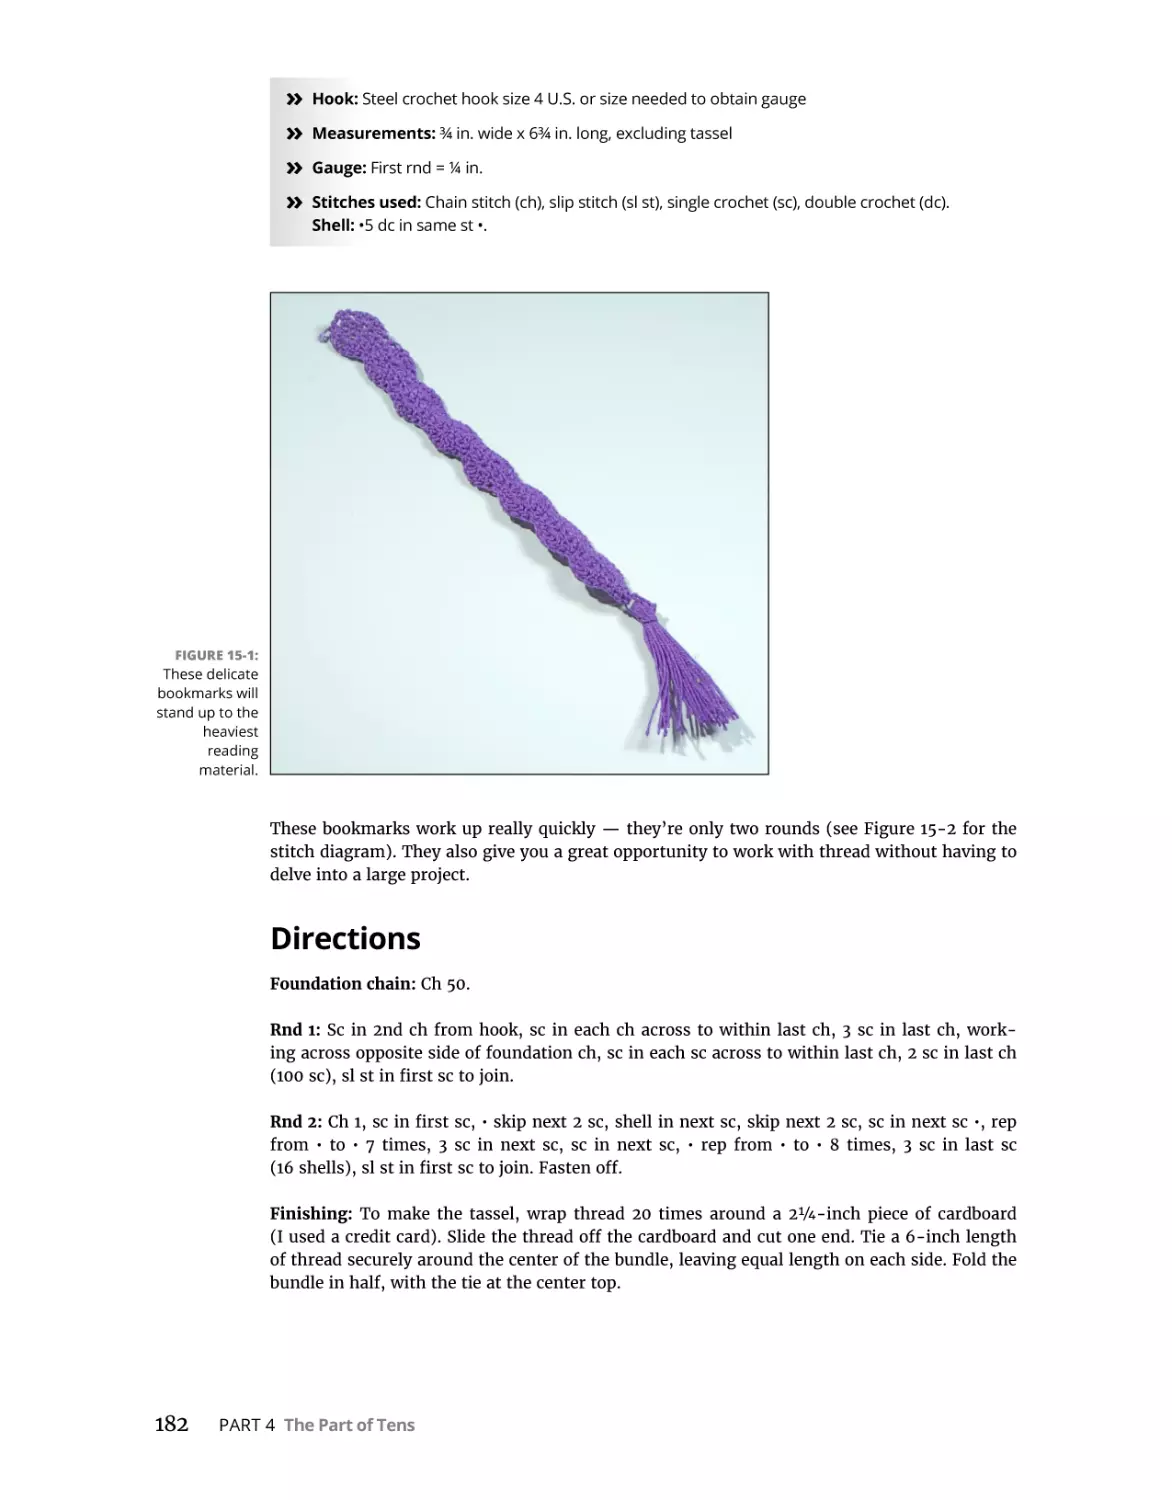
Practical Potholders. . . . . . . . . . . . . . . . . . . . . . . . . . . . . . . . . . . . . . . . . . . . . . . . . . . . . .
Materials and vital statistics. . . . . . . . . . . . . . . . . . . . . . . . . . . . . . . . . . . . . . . . . . . .
Directions . . . . . . . . . . . . . . . . . . . . . . . . . . . . . . . . . . . . . . . . . . . . . . . . . . . . . . . . . . .
Variation: Doubling the thickness. . . . . . . . . . . . . . . . . . . . . . . . . . . . . . . . . . . . . . .
Variation: Pumping up the size . . . . . . . . . . . . . . . . . . . . . . . . . . . . . . . . . . . . . . . . .
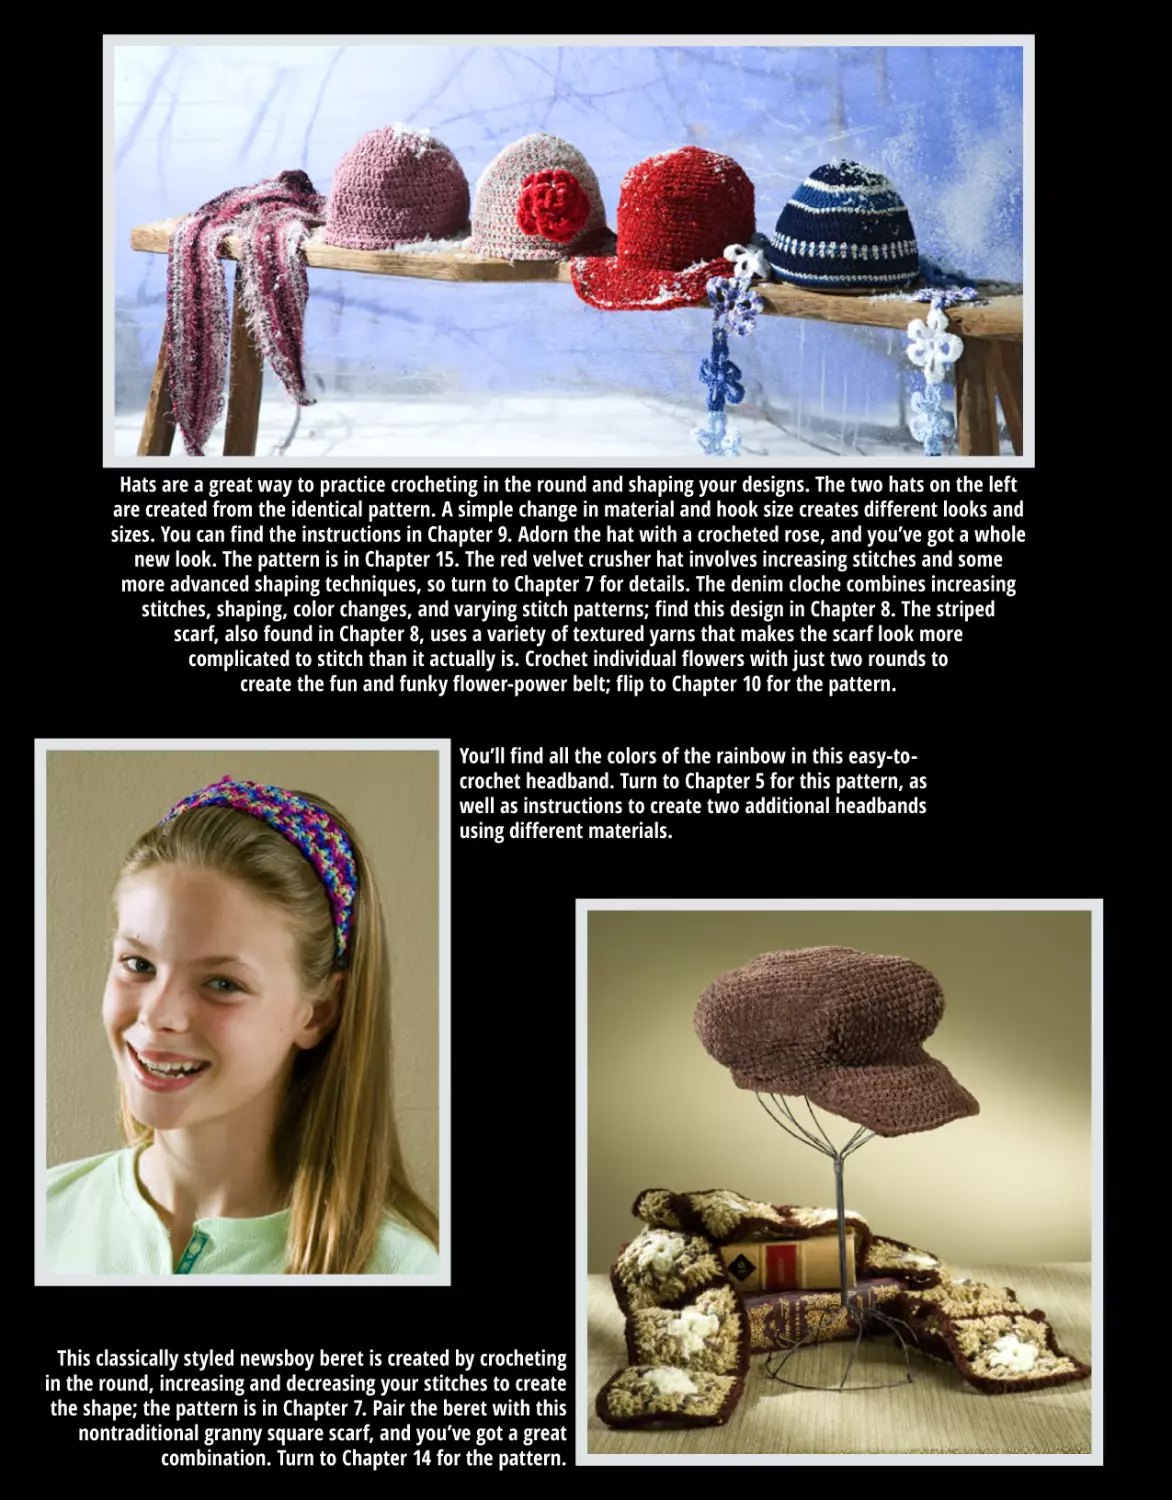
Handy Headbands. . . . . . . . . . . . . . . . . . . . . . . . . . . . . . . . . . . . . . . . . . . . . . . . . . . . . . .
Materials and vital statistics. . . . . . . . . . . . . . . . . . . . . . . . . . . . . . . . . . . . . . . . . . . .
Directions . . . . . . . . . . . . . . . . . . . . . . . . . . . . . . . . . . . . . . . . . . . . . . . . . . . . . . . . . . .
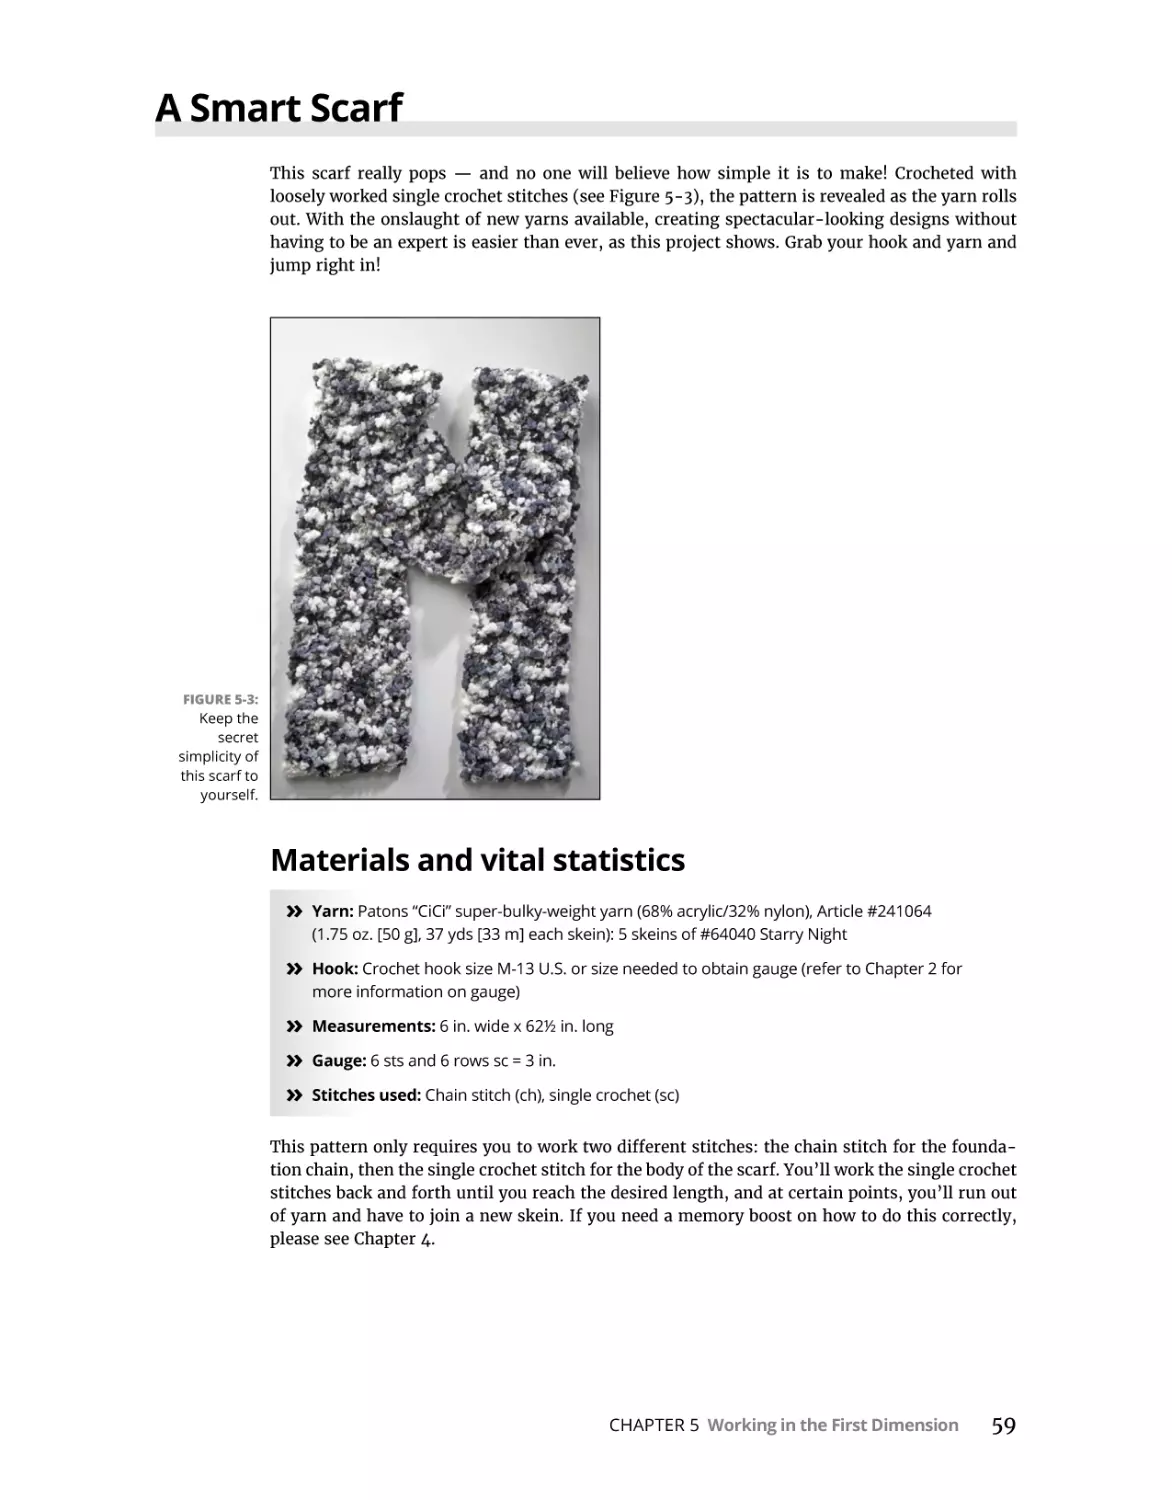
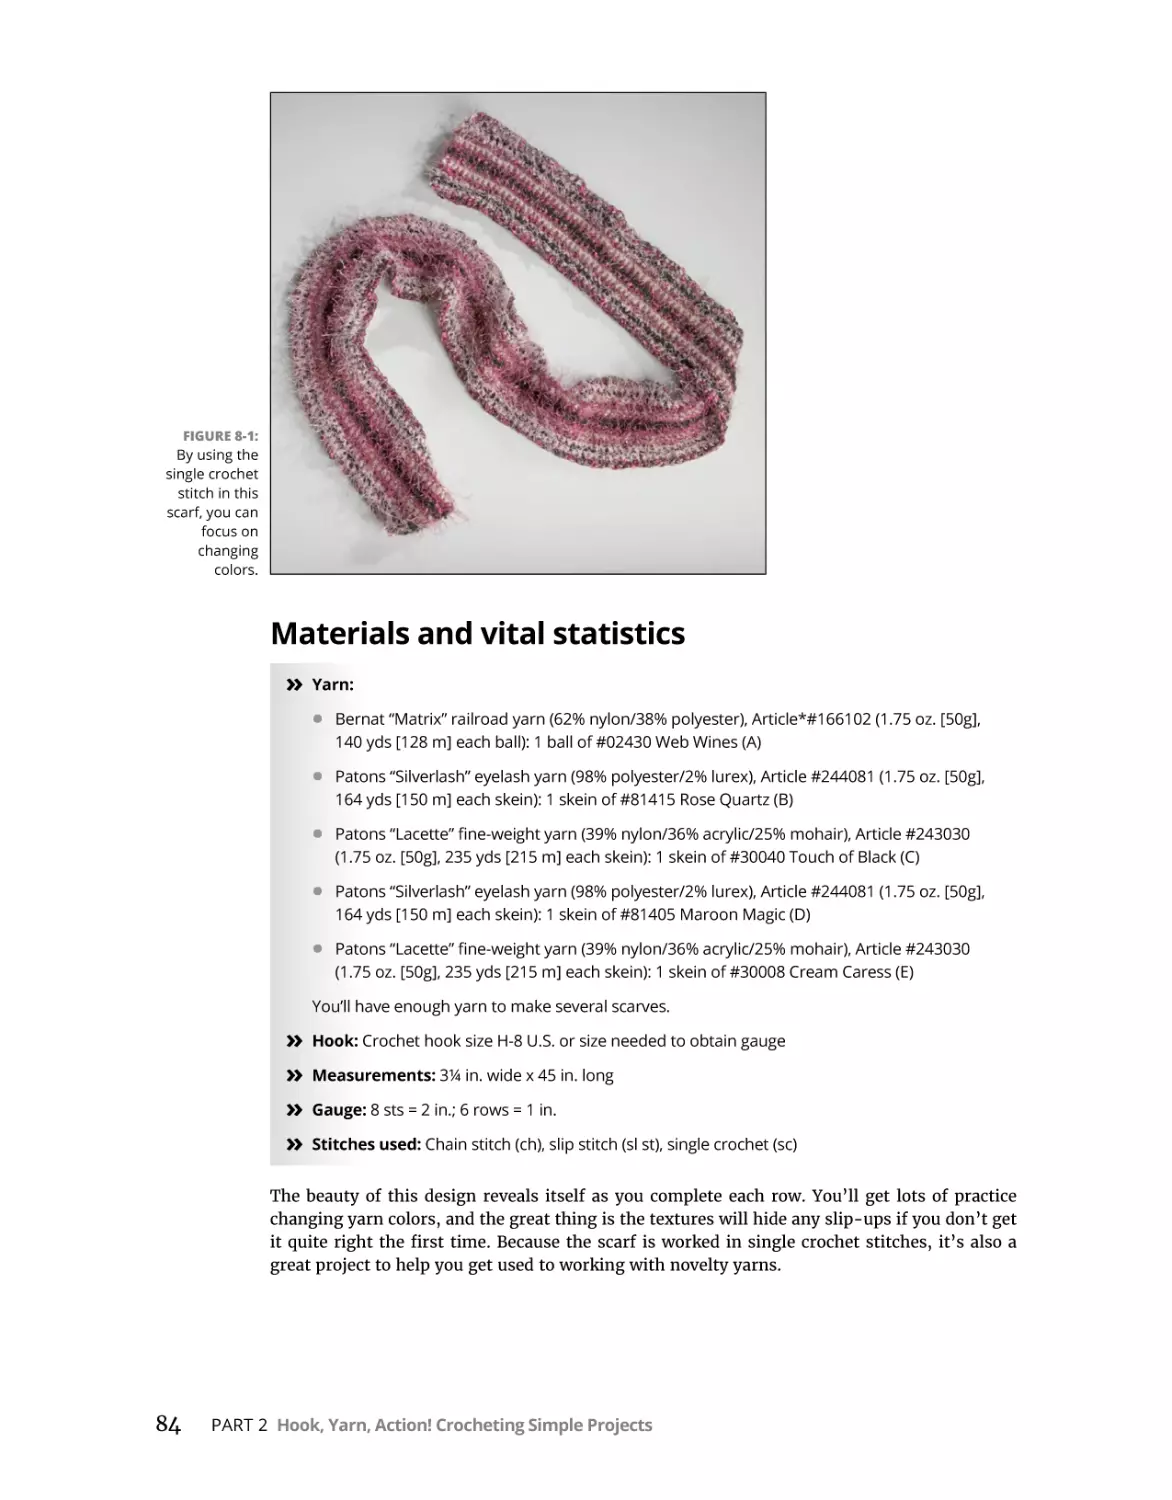
A Smart Scarf . . . . . . . . . . . . . . . . . . . . . . . . . . . . . . . . . . . . . . . . . . . . . . . . . . . . . . . . . . .
Materials and vital statistics. . . . . . . . . . . . . . . . . . . . . . . . . . . . . . . . . . . . . . . . . . . .
Directions . . . . . . . . . . . . . . . . . . . . . . . . . . . . . . . . . . . . . . . . . . . . . . . . . . . . . . . . . . .
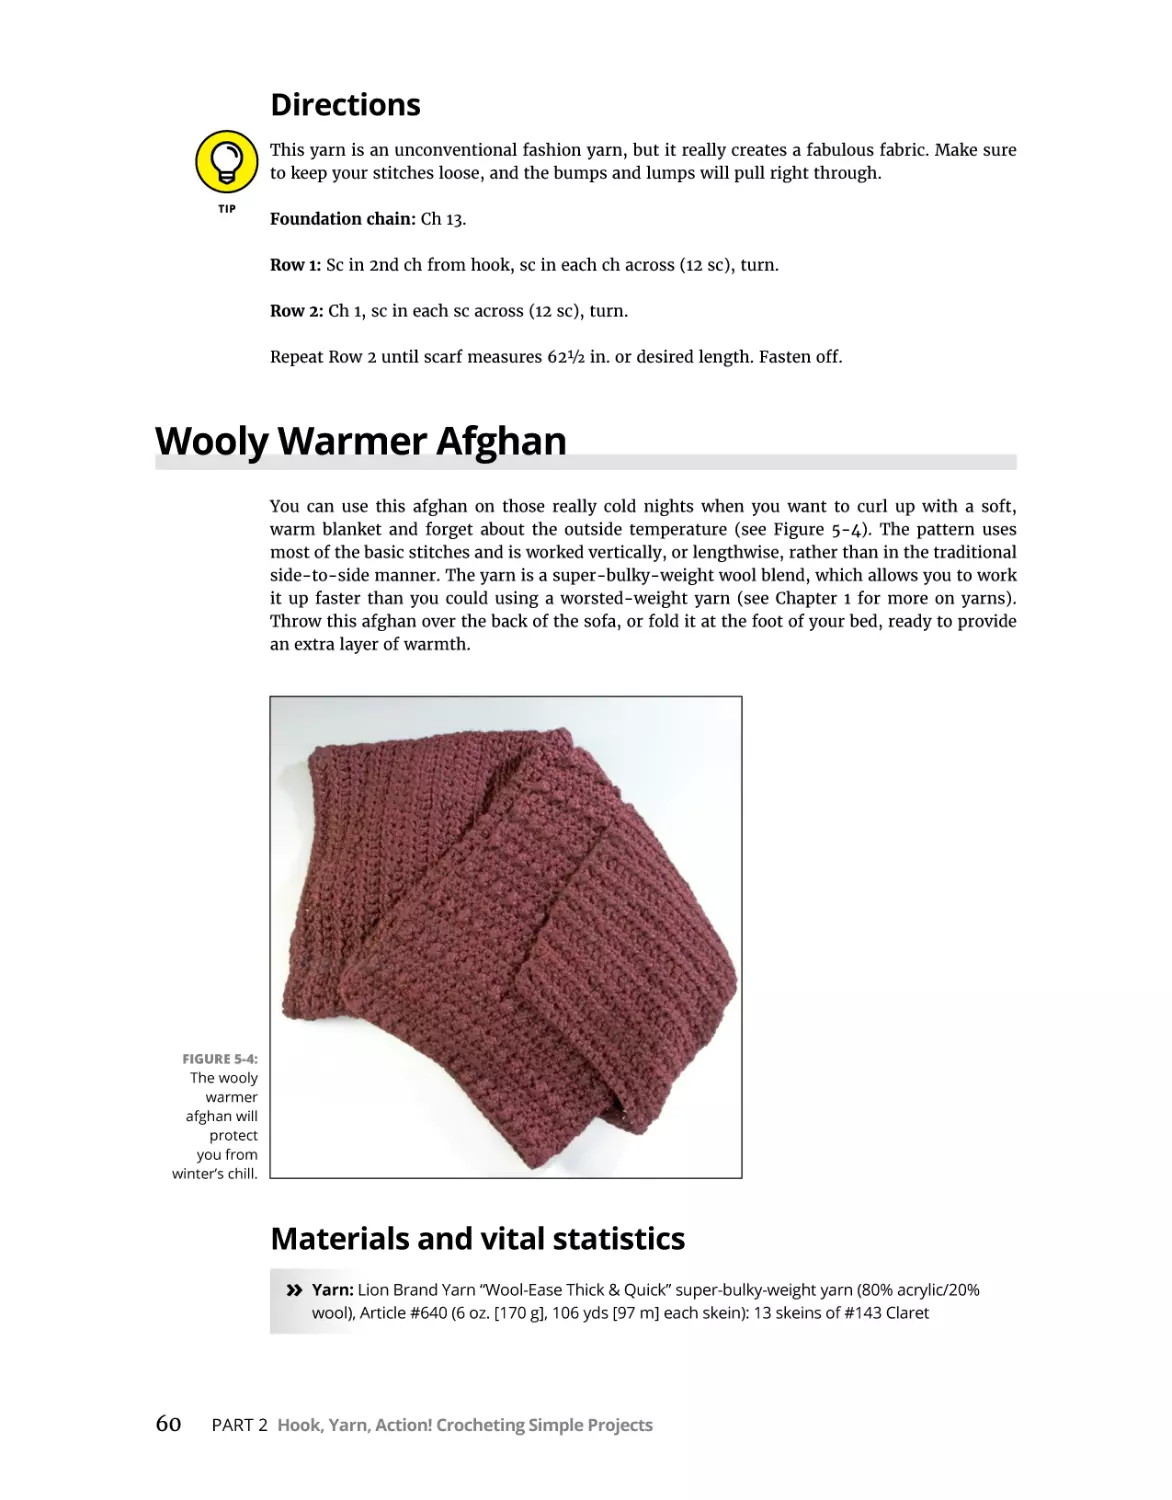
Wooly Warmer Afghan . . . . . . . . . . . . . . . . . . . . . . . . . . . . . . . . . . . . . . . . . . . . . . . . . . .
Materials and vital statistics. . . . . . . . . . . . . . . . . . . . . . . . . . . . . . . . . . . . . . . . . . . .
Directions . . . . . . . . . . . . . . . . . . . . . . . . . . . . . . . . . . . . . . . . . . . . . . . . . . . . . . . . . . .
Variation: Supersize it!. . . . . . . . . . . . . . . . . . . . . . . . . . . . . . . . . . . . . . . . . . . . . . . . .
Variation: Trying a different yarn. . . . . . . . . . . . . . . . . . . . . . . . . . . . . . . . . . . . . . . .
55
56
56
57
57
57
58
58
59
59
60
60
60
61
61
61
Expanding and Diminishing Dimensions: Adding Shape. . . . . .
63
CHAPTER 5:
CHAPTER 6:
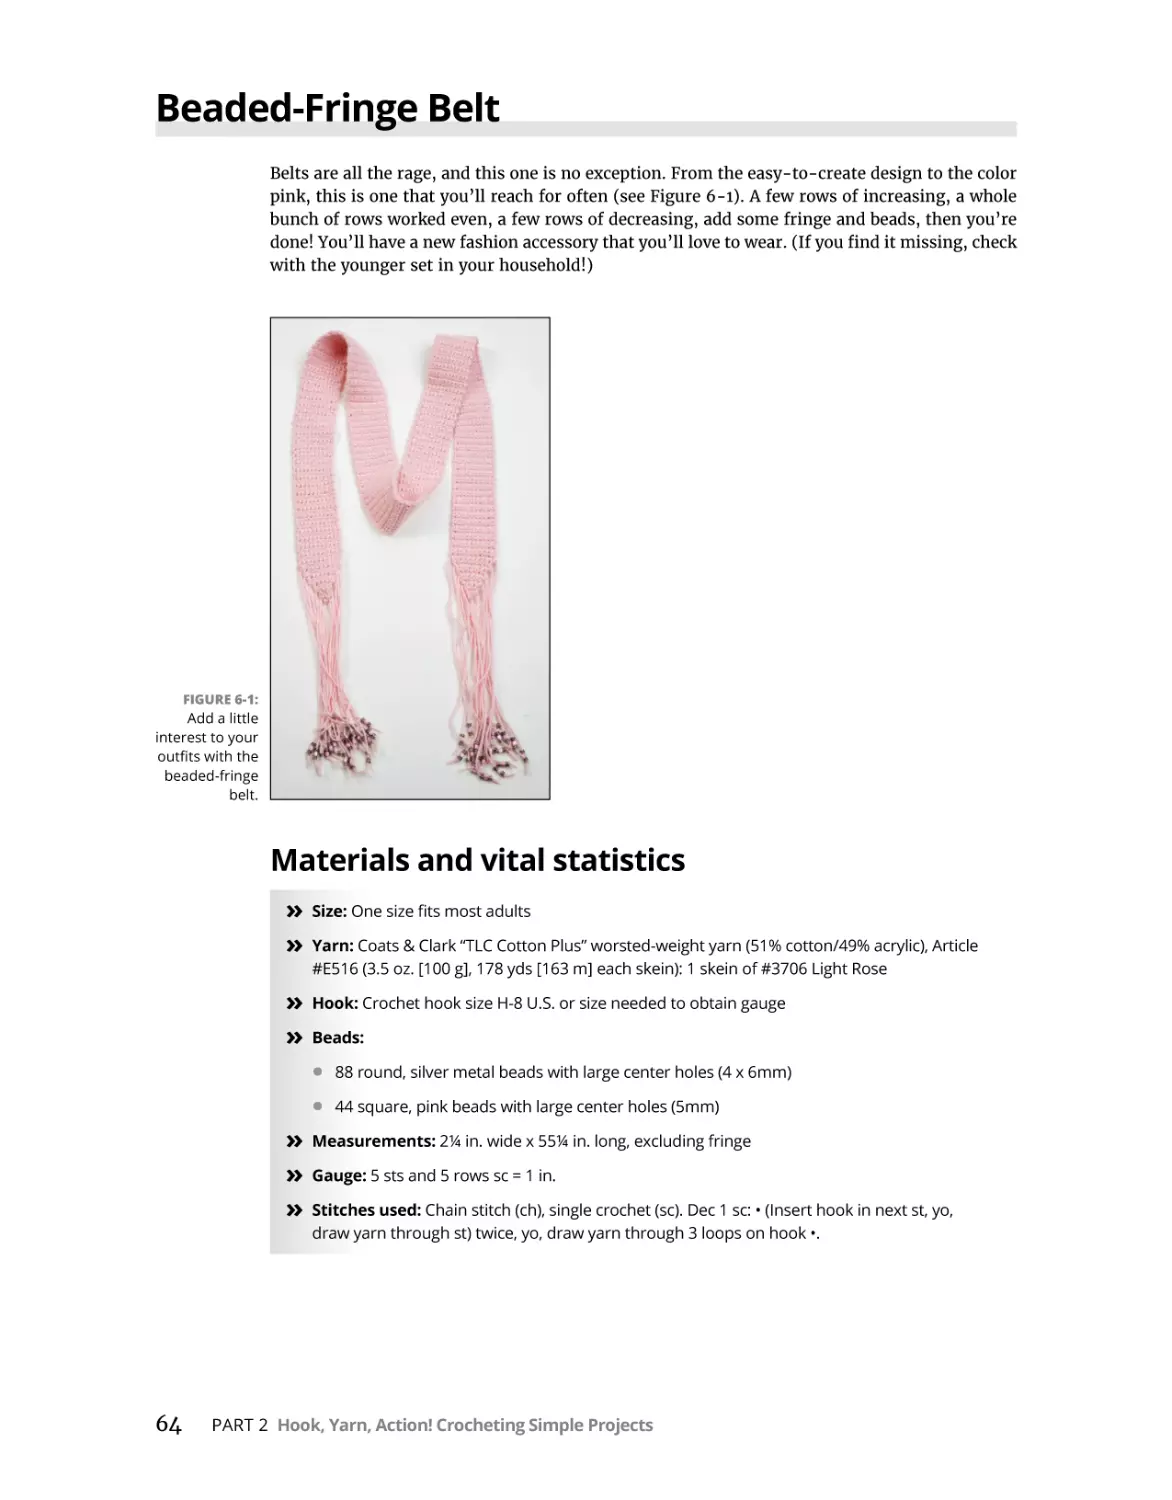
Beaded-Fringe Belt . . . . . . . . . . . . . . . . . . . . . . . . . . . . . . . . . . . . . . . . . . . . . . . . . . . . . . 64
Materials and vital statistics. . . . . . . . . . . . . . . . . . . . . . . . . . . . . . . . . . . . . . . . . . . . 64
Working up one end and the length of the belt . . . . . . . . . . . . . . . . . . . . . . . . . . . 65
Beginning the other end. . . . . . . . . . . . . . . . . . . . . . . . . . . . . . . . . . . . . . . . . . . . . . . 65
Finishing with fringe . . . . . . . . . . . . . . . . . . . . . . . . . . . . . . . . . . . . . . . . . . . . . . . . . . 66
Variation: Adding some color or a jingle. . . . . . . . . . . . . . . . . . . . . . . . . . . . . . . . . . 66
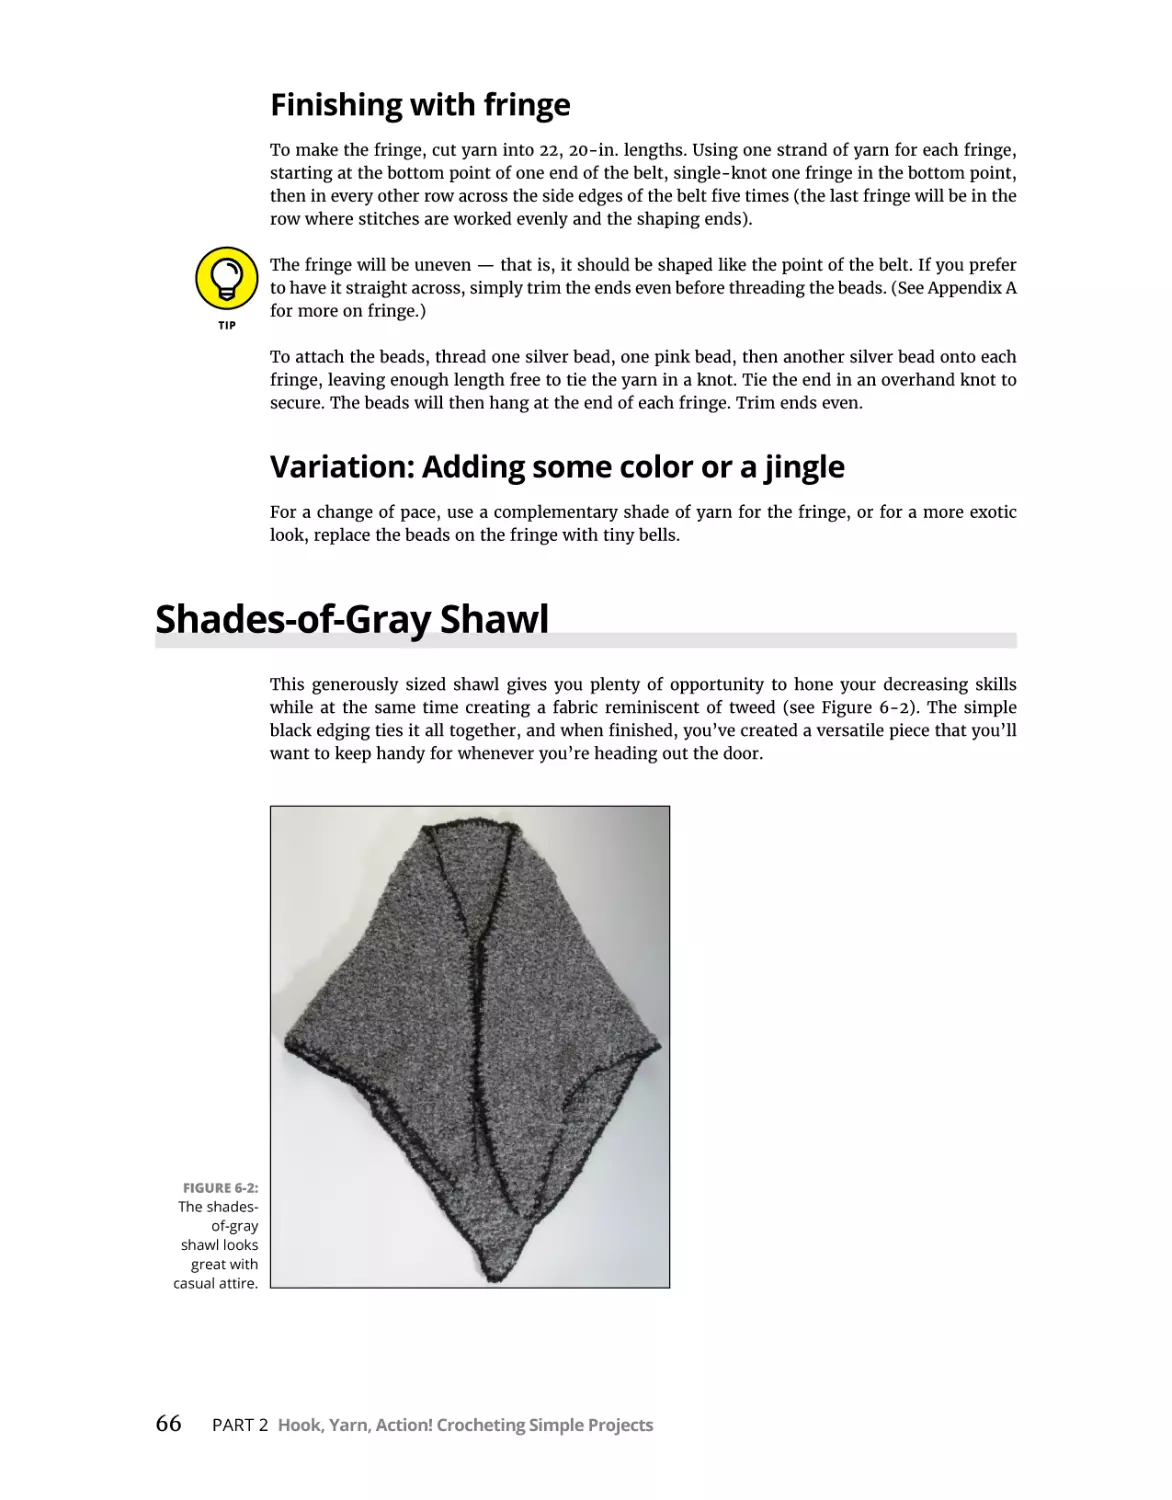
Shades-of-Gray Shawl. . . . . . . . . . . . . . . . . . . . . . . . . . . . . . . . . . . . . . . . . . . . . . . . . . . . 66
Materials and vital statistics. . . . . . . . . . . . . . . . . . . . . . . . . . . . . . . . . . . . . . . . . . . . 67
Directions . . . . . . . . . . . . . . . . . . . . . . . . . . . . . . . . . . . . . . . . . . . . . . . . . . . . . . . . . . . 67
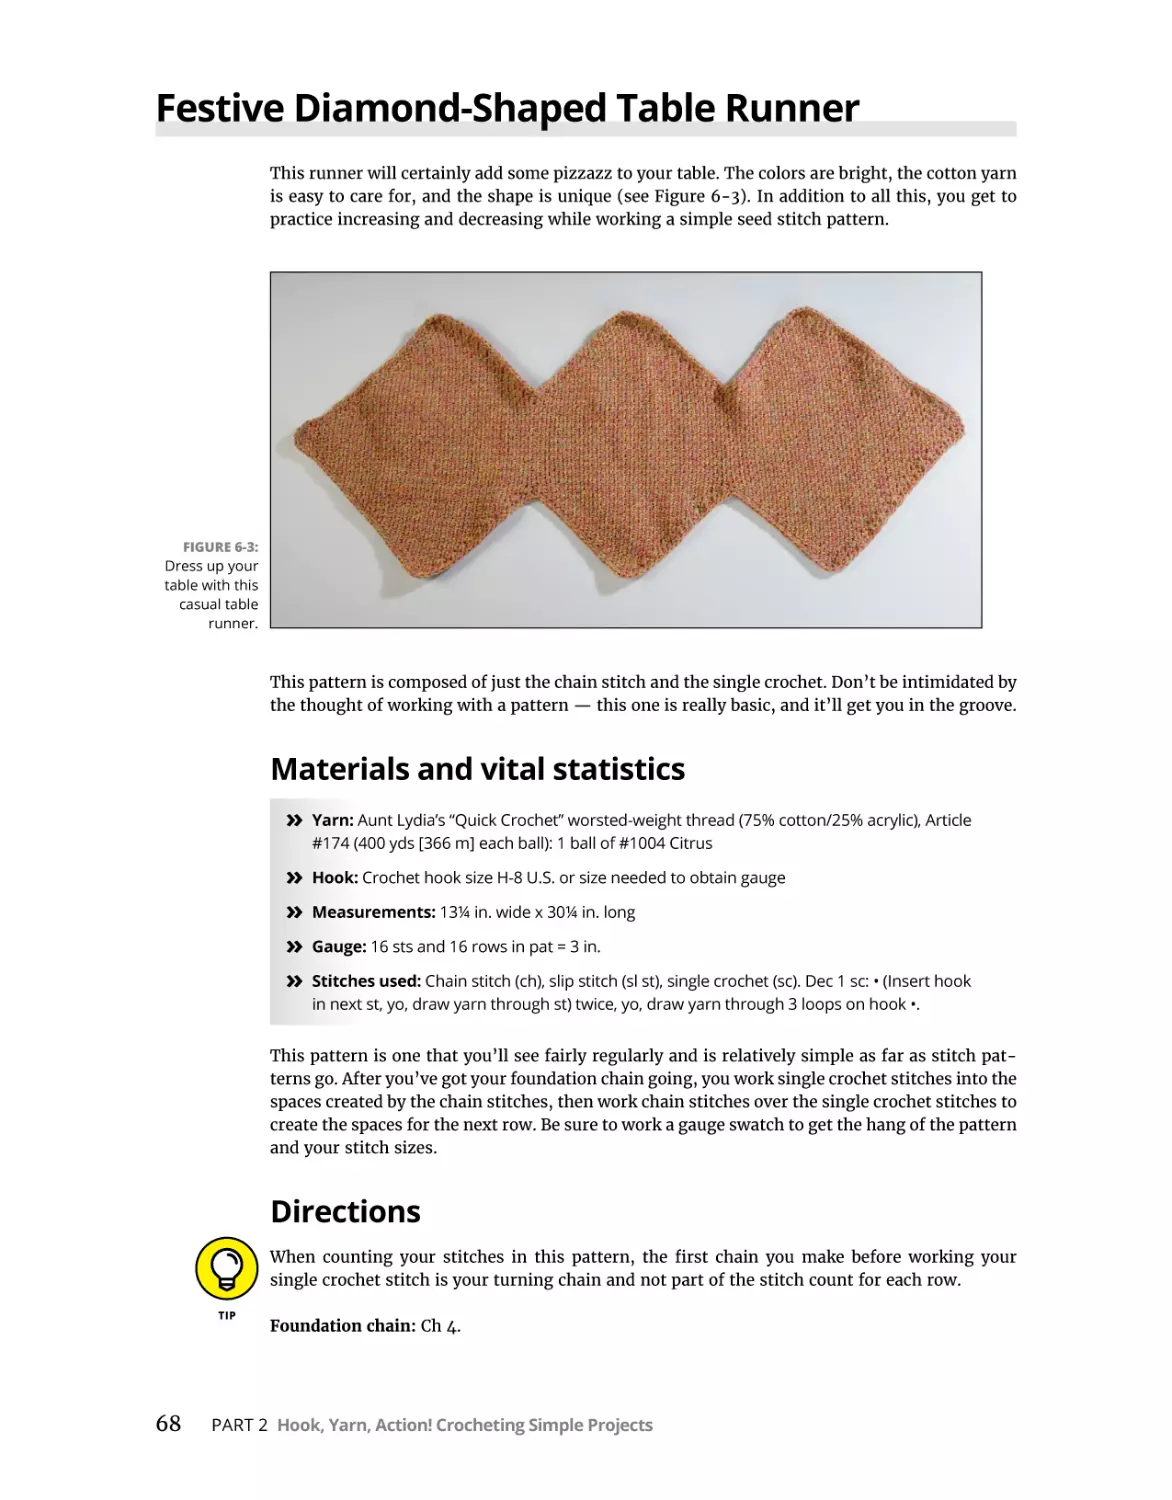
Festive Diamond-Shaped Table Runner. . . . . . . . . . . . . . . . . . . . . . . . . . . . . . . . . . . . . 68
Materials and vital statistics. . . . . . . . . . . . . . . . . . . . . . . . . . . . . . . . . . . . . . . . . . . . 68
Directions . . . . . . . . . . . . . . . . . . . . . . . . . . . . . . . . . . . . . . . . . . . . . . . . . . . . . . . . . . . 68
Variation: Giving it some shine or adding a detail . . . . . . . . . . . . . . . . . . . . . . . . . 69
vi
Crochet Patterns For Dummies
CHAPTER 7:
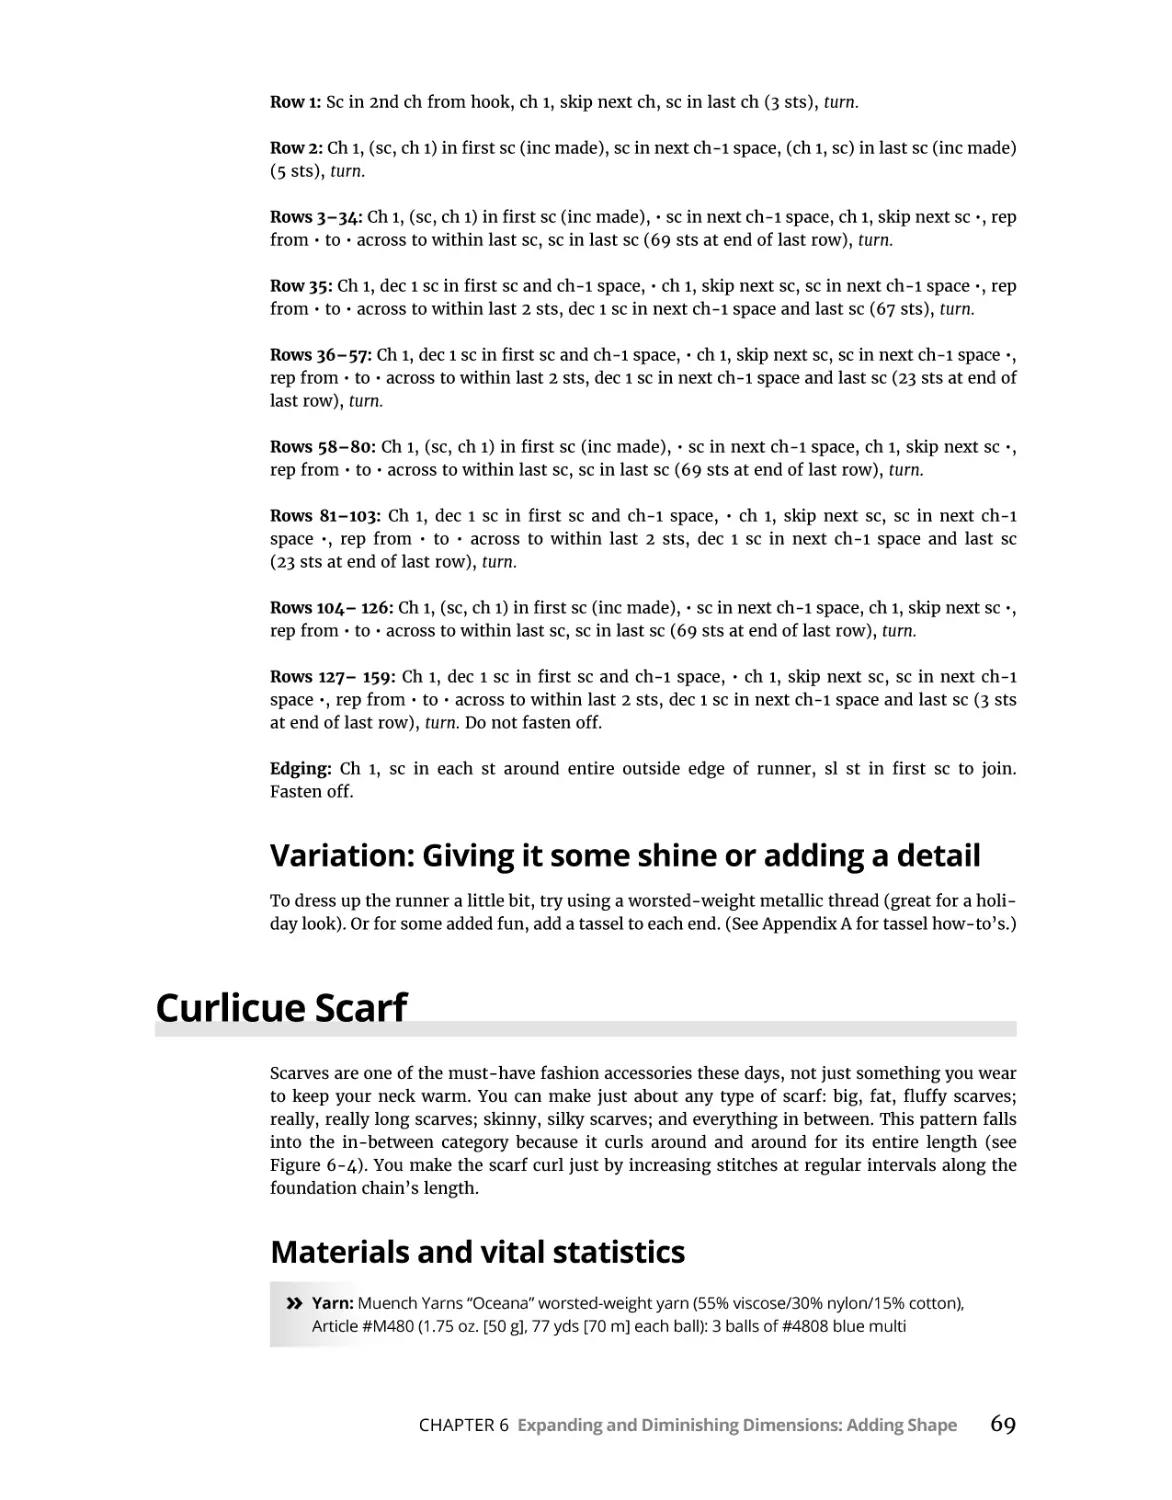
Curlicue Scarf. . . . . . . . . . . . . . . . . . . . . . . . . . . . . . . . . . . . . . . . . . . . . . . . . . . . . . . . . . .
Materials and vital statistics. . . . . . . . . . . . . . . . . . . . . . . . . . . . . . . . . . . . . . . . . . . .
Directions . . . . . . . . . . . . . . . . . . . . . . . . . . . . . . . . . . . . . . . . . . . . . . . . . . . . . . . . . . .
Variation: Shrinking the scarf. . . . . . . . . . . . . . . . . . . . . . . . . . . . . . . . . . . . . . . . . . .
69
69
70
70
Going in Circles: Crocheting in the Round. . . . . . . . . . . . . . . . . . . . . . .
71
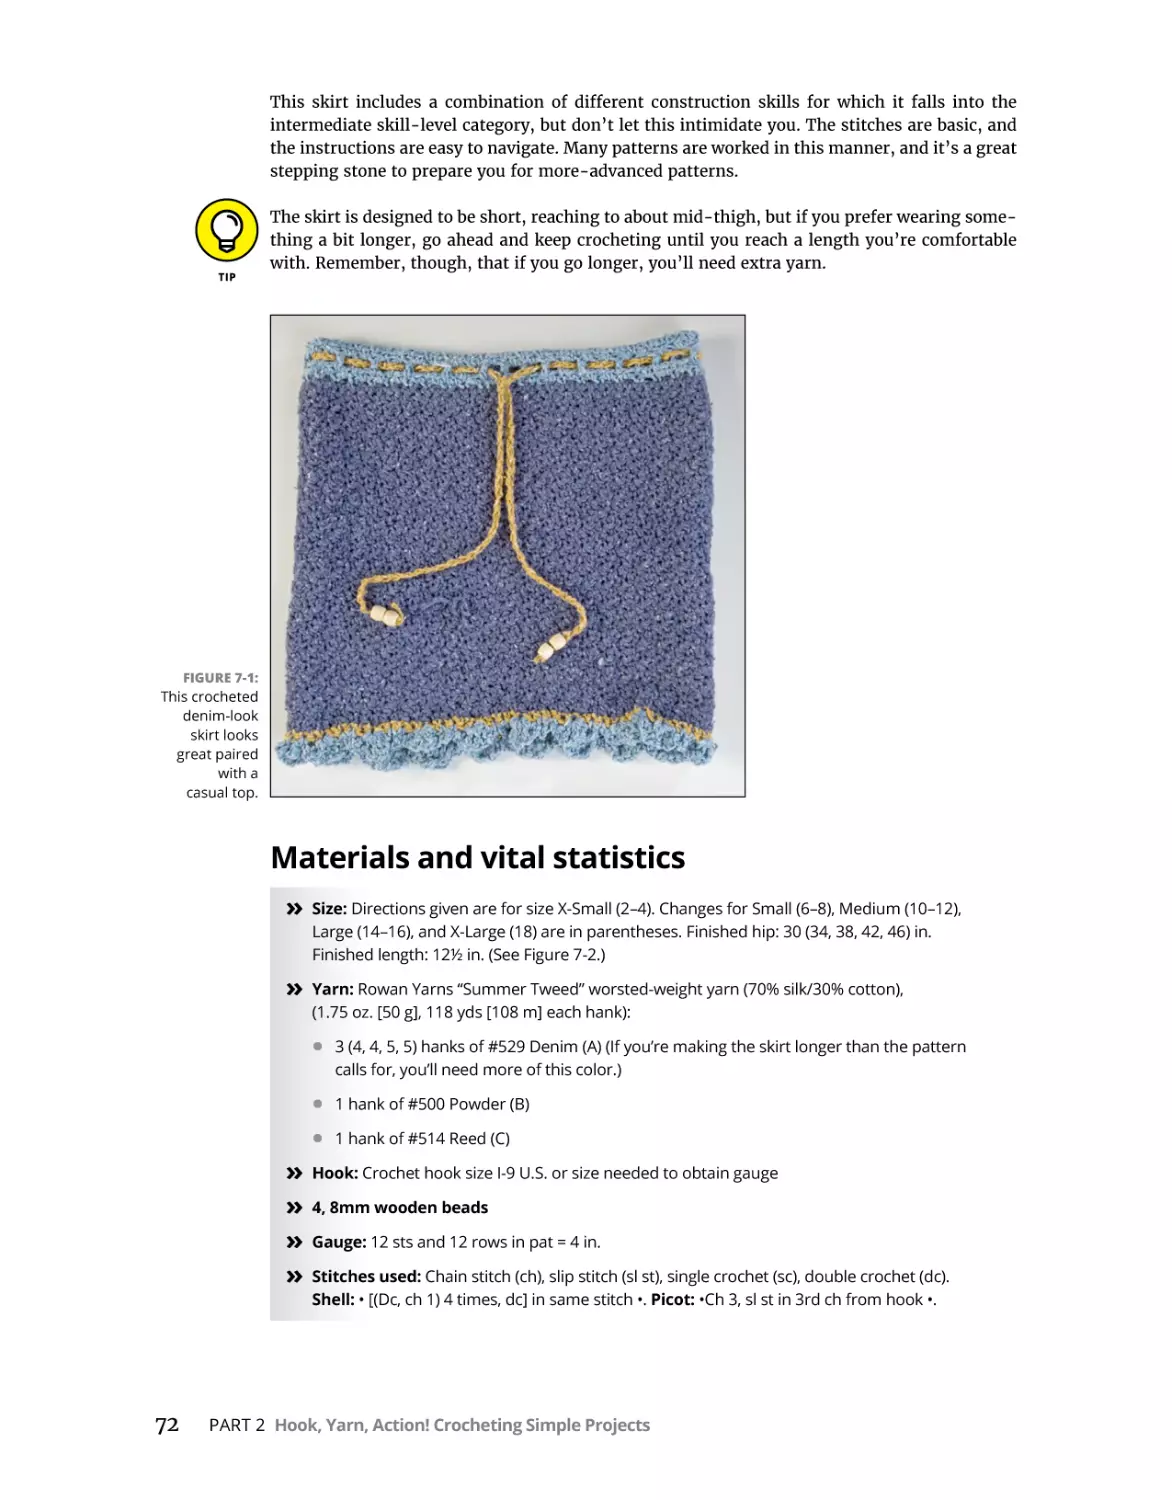
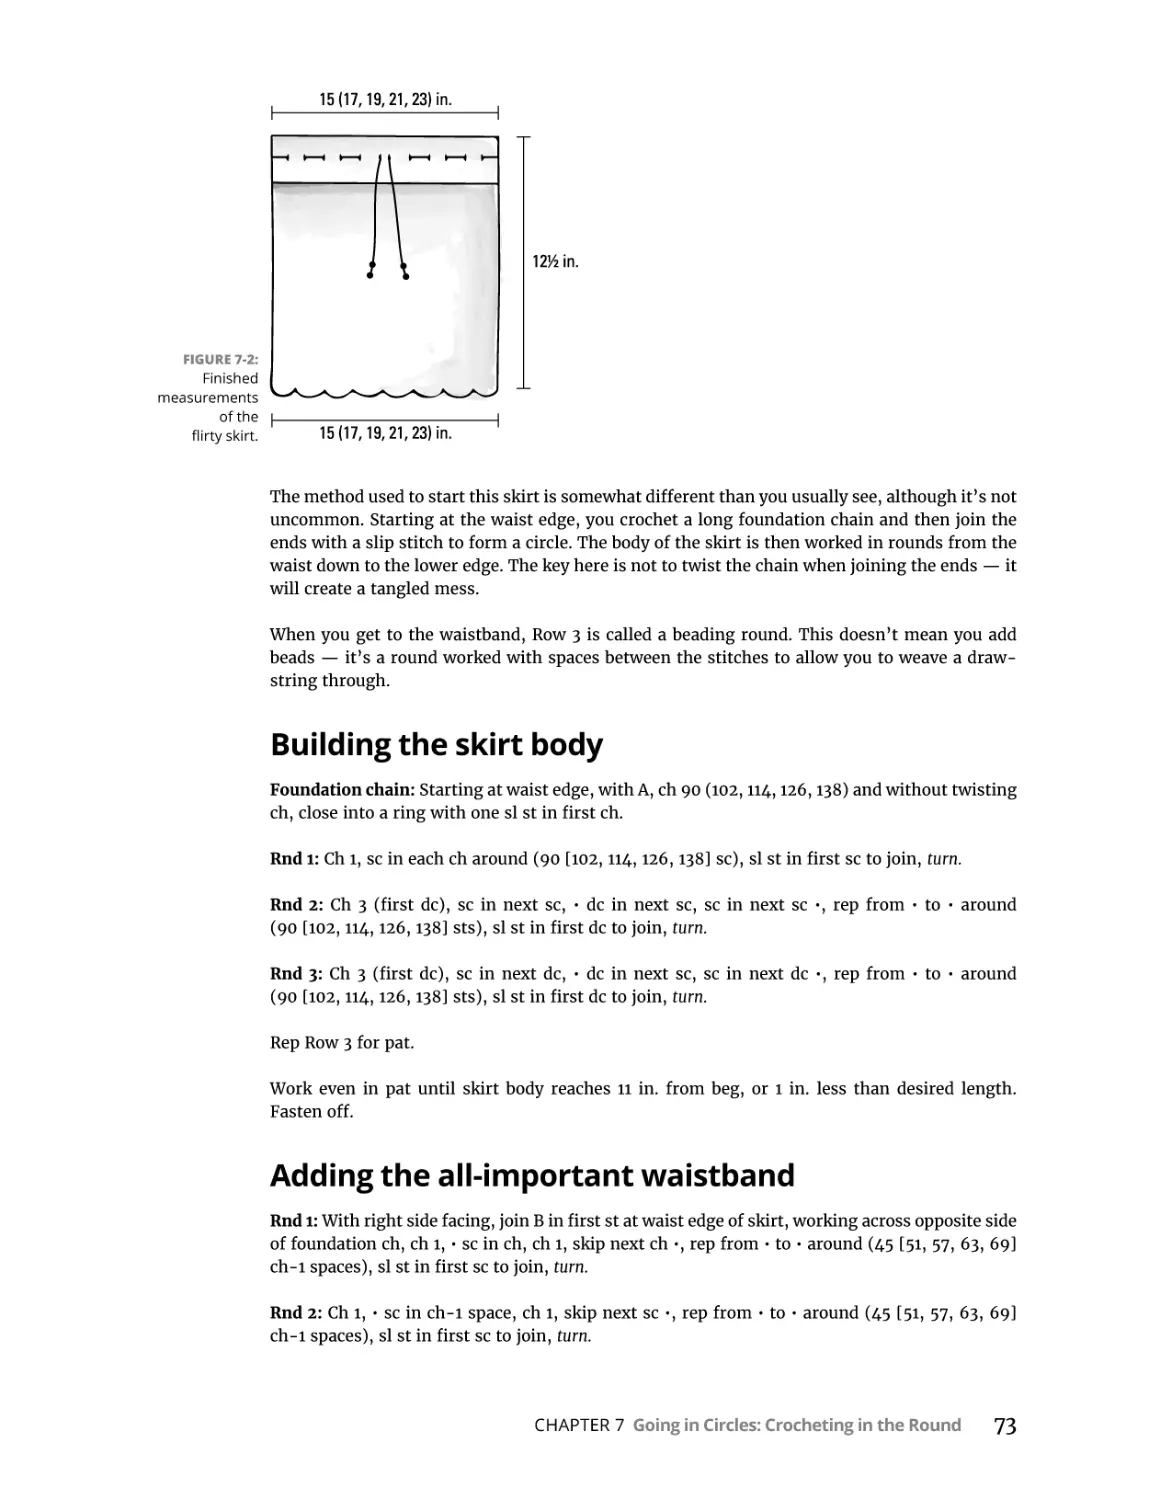
Flirty Denim Skirt. . . . . . . . . . . . . . . . . . . . . . . . . . . . . . . . . . . . . . . . . . . . . . . . . . . . . . . . 71
Materials and vital statistics. . . . . . . . . . . . . . . . . . . . . . . . . . . . . . . . . . . . . . . . . . . . 72
Building the skirt body . . . . . . . . . . . . . . . . . . . . . . . . . . . . . . . . . . . . . . . . . . . . . . . . 73
Adding the all-important waistband. . . . . . . . . . . . . . . . . . . . . . . . . . . . . . . . . . . . . 73
Decorating the hem with a ruffle. . . . . . . . . . . . . . . . . . . . . . . . . . . . . . . . . . . . . . . . 74
Finishing with the drawstring tie. . . . . . . . . . . . . . . . . . . . . . . . . . . . . . . . . . . . . . . . 74
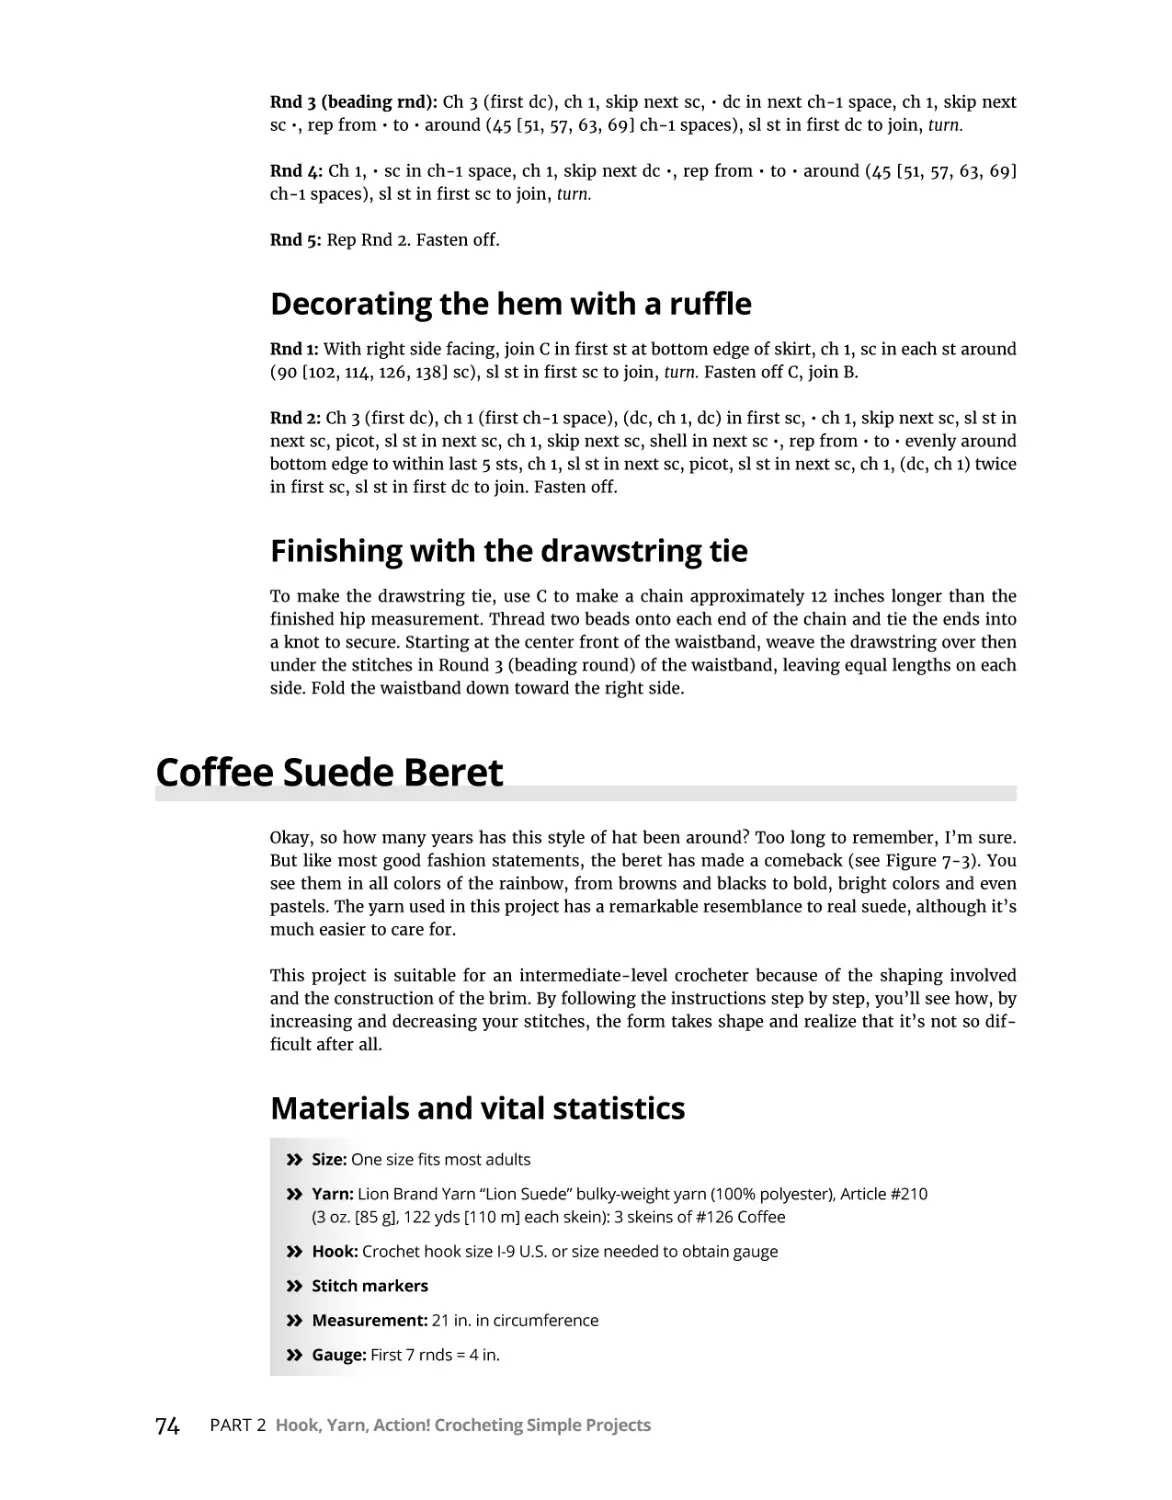
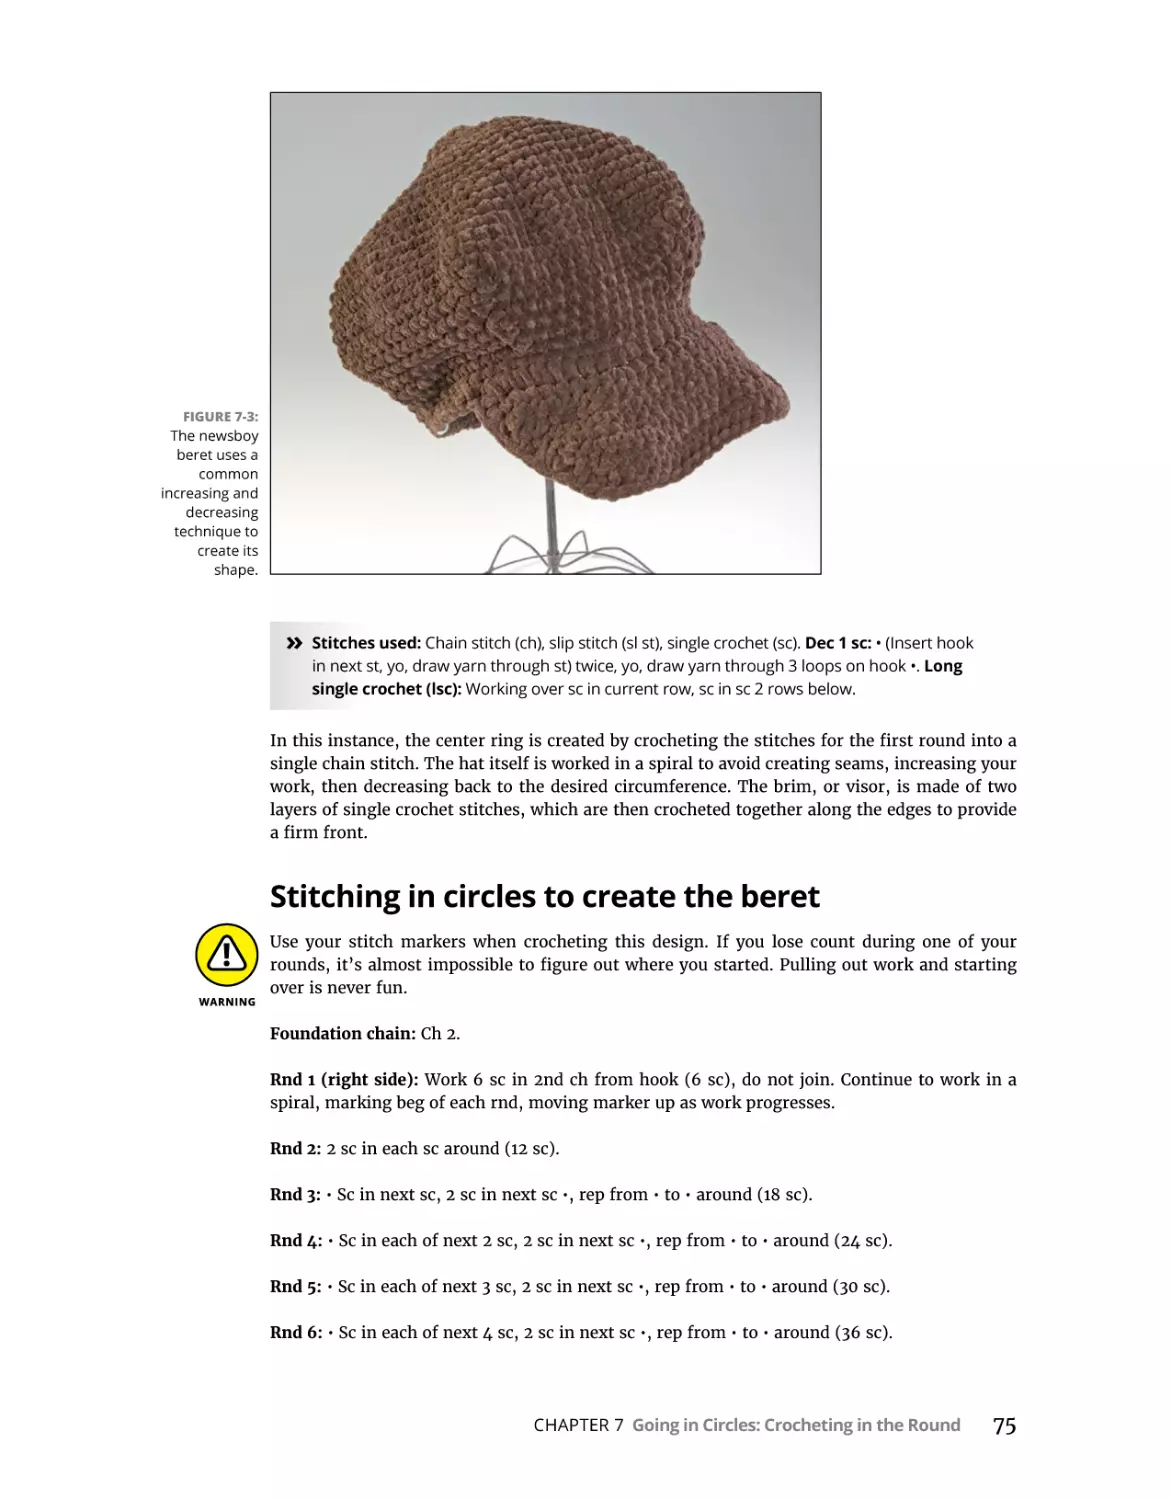
Coffee Suede Beret . . . . . . . . . . . . . . . . . . . . . . . . . . . . . . . . . . . . . . . . . . . . . . . . . . . . . . 74
Materials and vital statistics. . . . . . . . . . . . . . . . . . . . . . . . . . . . . . . . . . . . . . . . . . . . 74
Stitching in circles to create the beret . . . . . . . . . . . . . . . . . . . . . . . . . . . . . . . . . . . 75
Joining the visor as you craft it. . . . . . . . . . . . . . . . . . . . . . . . . . . . . . . . . . . . . . . . . . 76
Finishing with basic stitches. . . . . . . . . . . . . . . . . . . . . . . . . . . . . . . . . . . . . . . . . . . . 77
Variation: Add a different color. . . . . . . . . . . . . . . . . . . . . . . . . . . . . . . . . . . . . . . . . 77
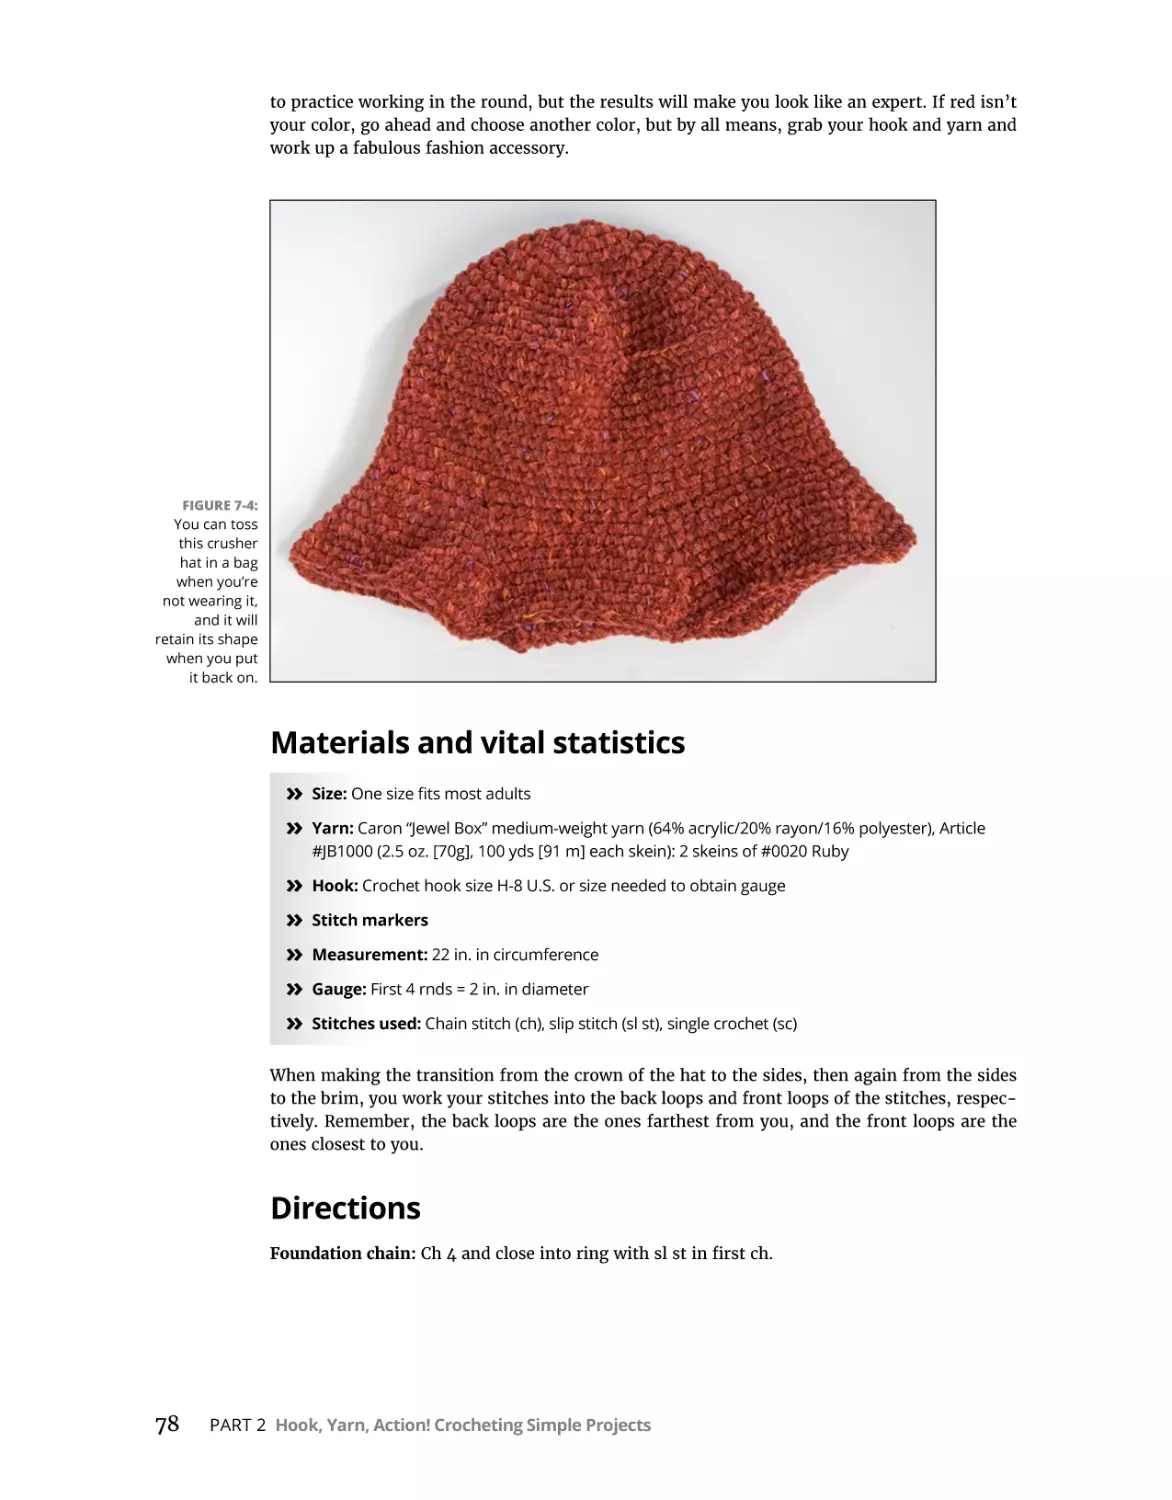
Red Velvet Crusher Hat. . . . . . . . . . . . . . . . . . . . . . . . . . . . . . . . . . . . . . . . . . . . . . . . . . . 77
Materials and vital statistics. . . . . . . . . . . . . . . . . . . . . . . . . . . . . . . . . . . . . . . . . . . . 78
Directions . . . . . . . . . . . . . . . . . . . . . . . . . . . . . . . . . . . . . . . . . . . . . . . . . . . . . . . . . . . 78
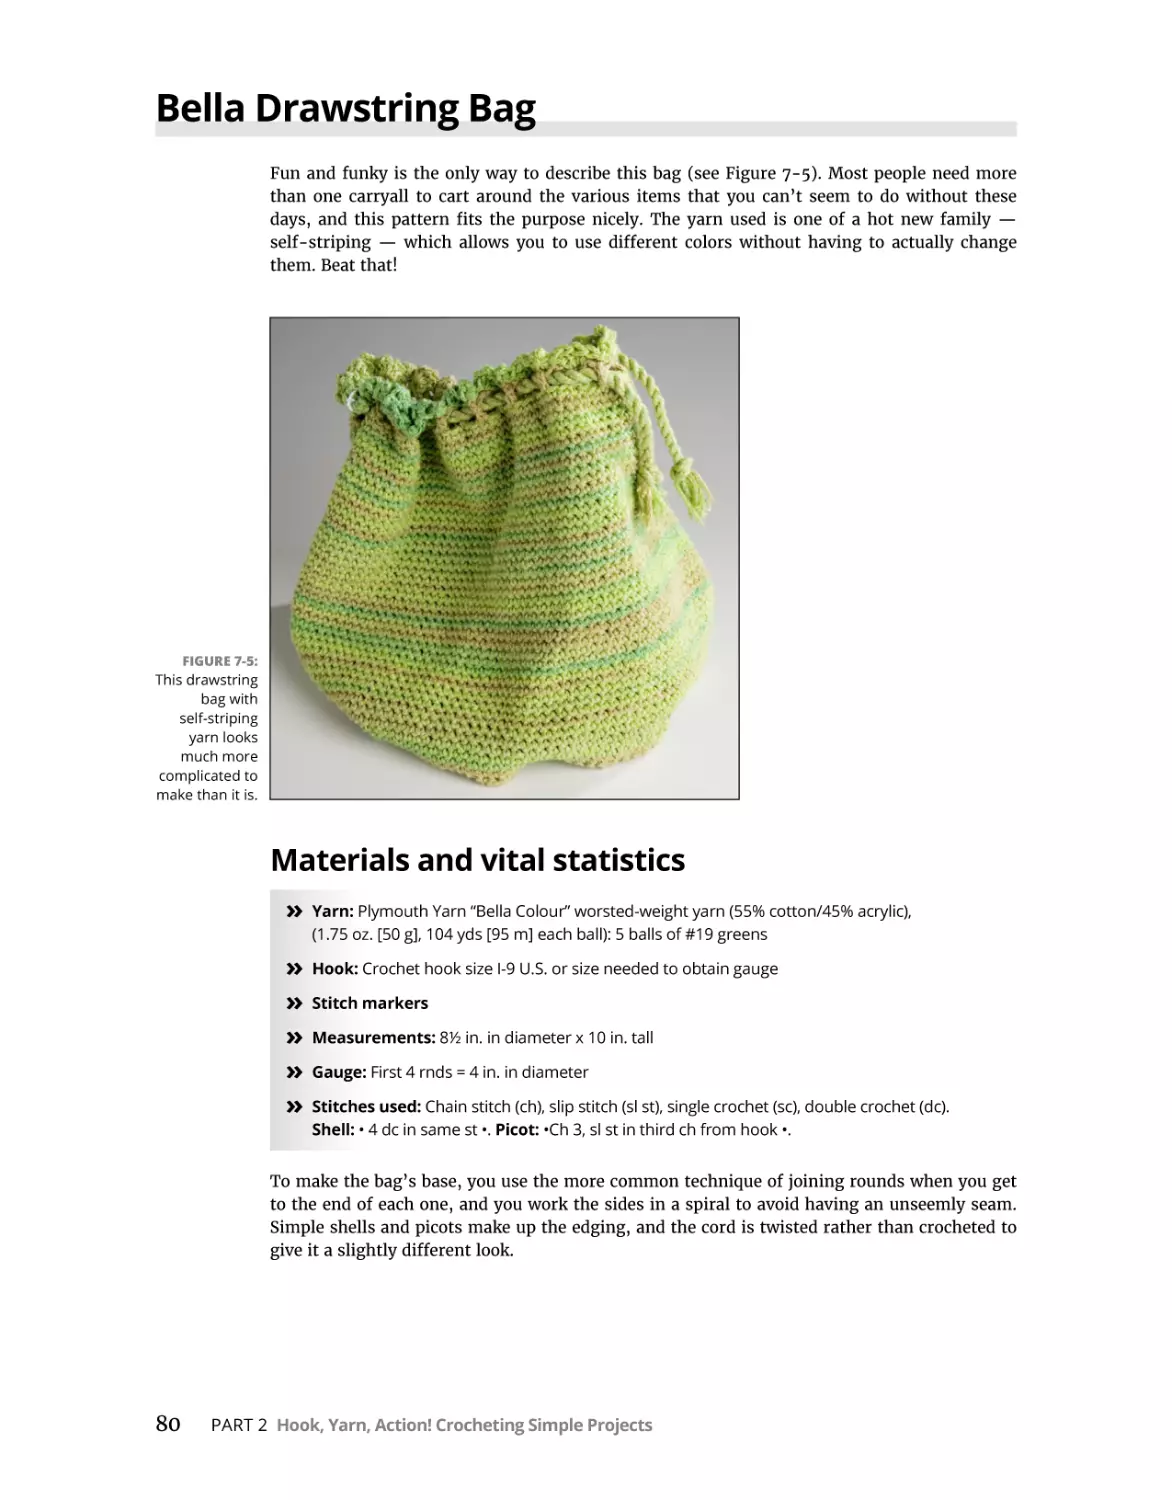
Bella Drawstring Bag. . . . . . . . . . . . . . . . . . . . . . . . . . . . . . . . . . . . . . . . . . . . . . . . . . . . . 80
Materials and vital statistics. . . . . . . . . . . . . . . . . . . . . . . . . . . . . . . . . . . . . . . . . . . . 80
Going 17 rounds for the base . . . . . . . . . . . . . . . . . . . . . . . . . . . . . . . . . . . . . . . . . . 81
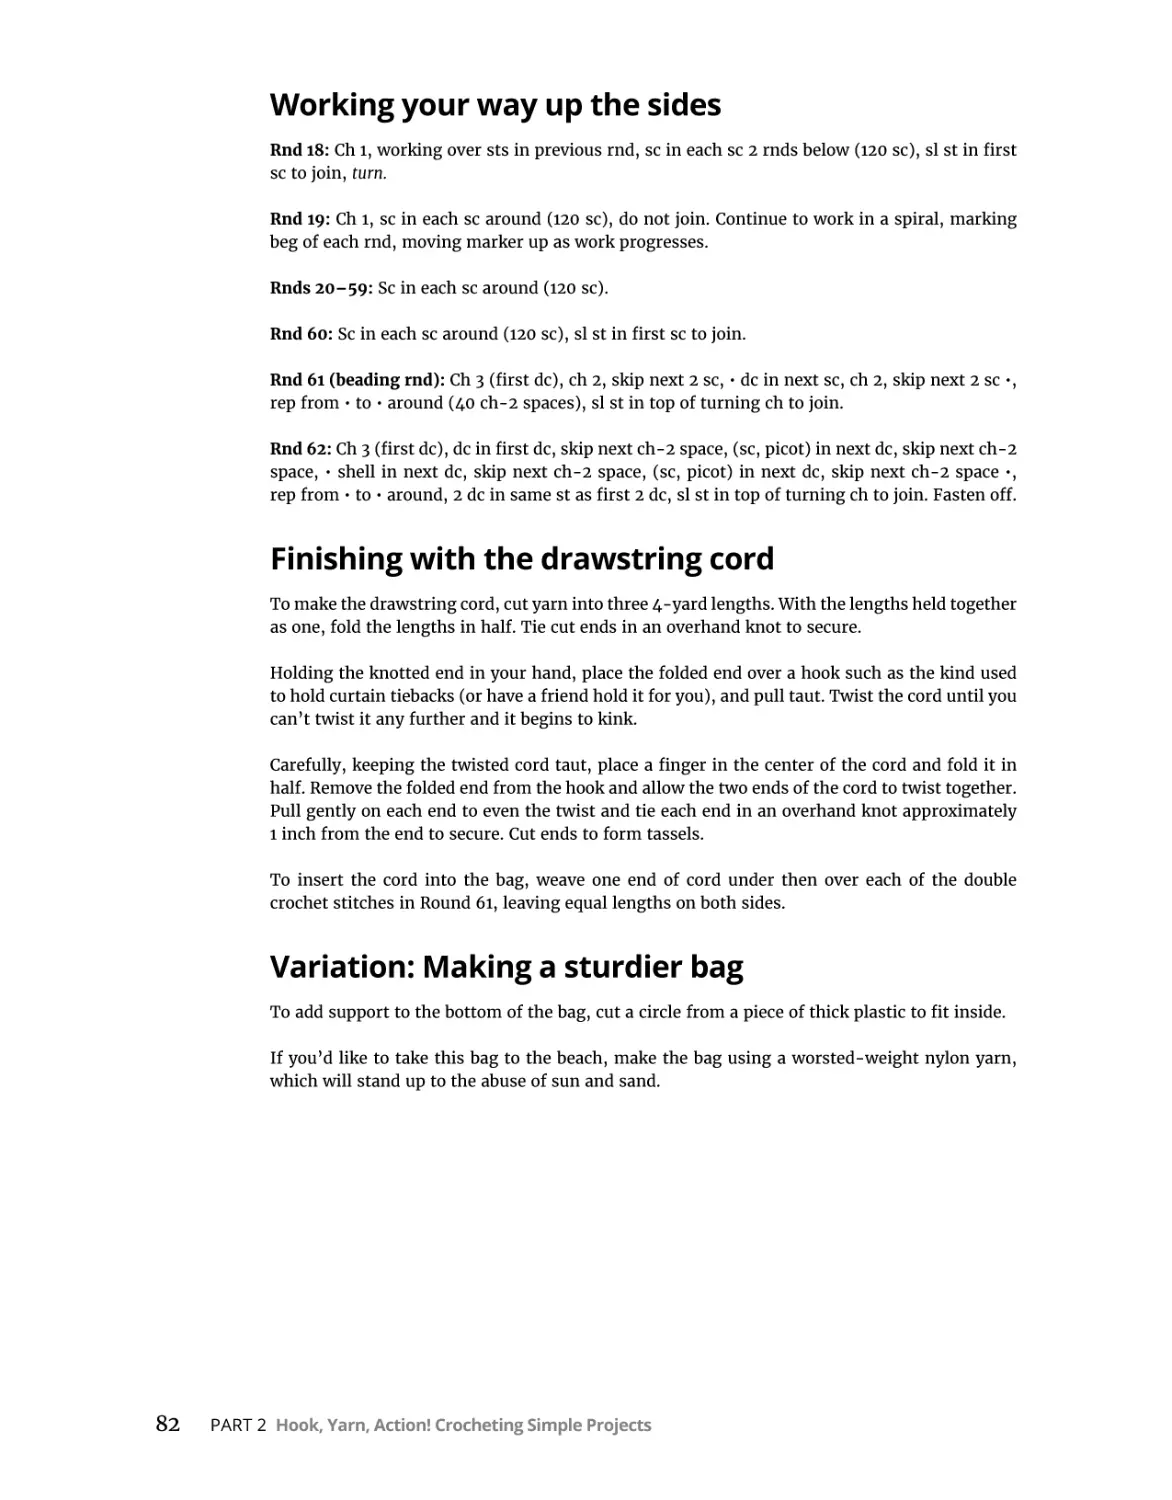
Working your way up the sides. . . . . . . . . . . . . . . . . . . . . . . . . . . . . . . . . . . . . . . . . 82
Finishing with the drawstring cord . . . . . . . . . . . . . . . . . . . . . . . . . . . . . . . . . . . . . . 82
Variation: Making a sturdier bag. . . . . . . . . . . . . . . . . . . . . . . . . . . . . . . . . . . . . . . . 82
CHAPTER 8:
CHAPTER 9:
Coloring It In. . . . . . . . . . . . . . . . . . . . . . . . . . . . . . . . . . . . . . . . . . . . . . . . . . . . . . . . . .
83
A Scarf of a Different Color. . . . . . . . . . . . . . . . . . . . . . . . . . . . . . . . . . . . . . . . . . . . . . . .
Materials and vital statistics. . . . . . . . . . . . . . . . . . . . . . . . . . . . . . . . . . . . . . . . . . . .
Directions . . . . . . . . . . . . . . . . . . . . . . . . . . . . . . . . . . . . . . . . . . . . . . . . . . . . . . . . . . .
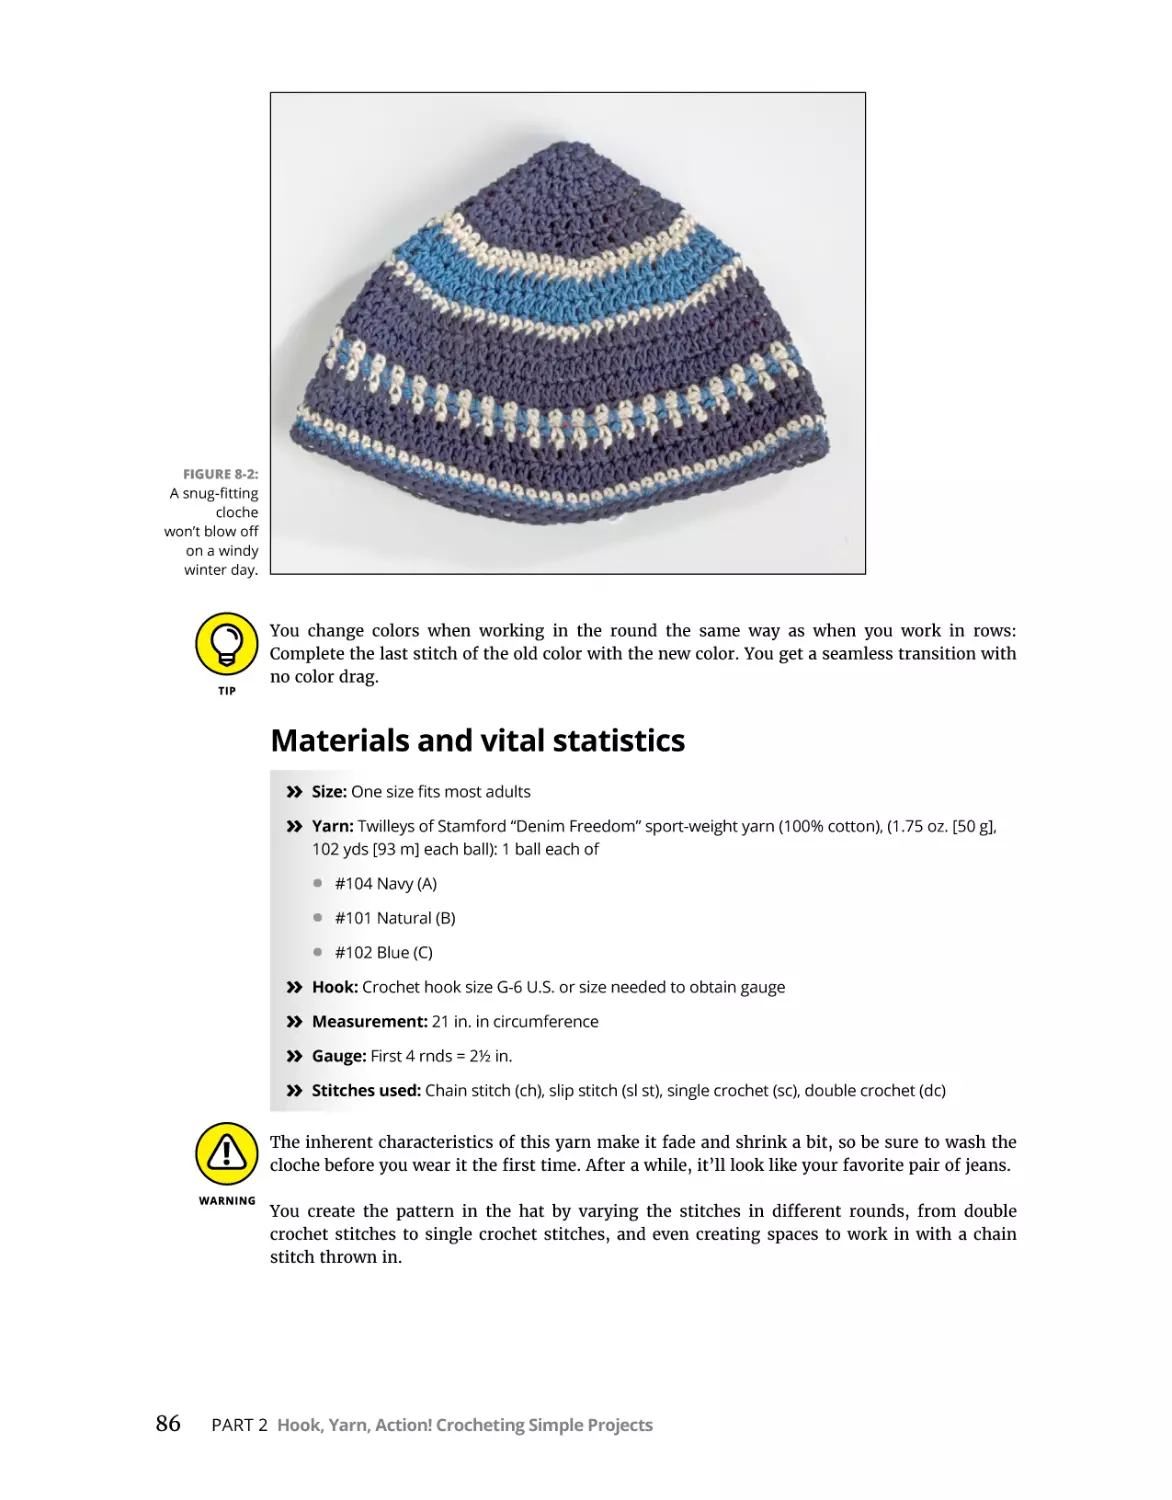
Denim Cloche. . . . . . . . . . . . . . . . . . . . . . . . . . . . . . . . . . . . . . . . . . . . . . . . . . . . . . . . . . .
Materials and vital statistics. . . . . . . . . . . . . . . . . . . . . . . . . . . . . . . . . . . . . . . . . . . .
Directions . . . . . . . . . . . . . . . . . . . . . . . . . . . . . . . . . . . . . . . . . . . . . . . . . . . . . . . . . . .
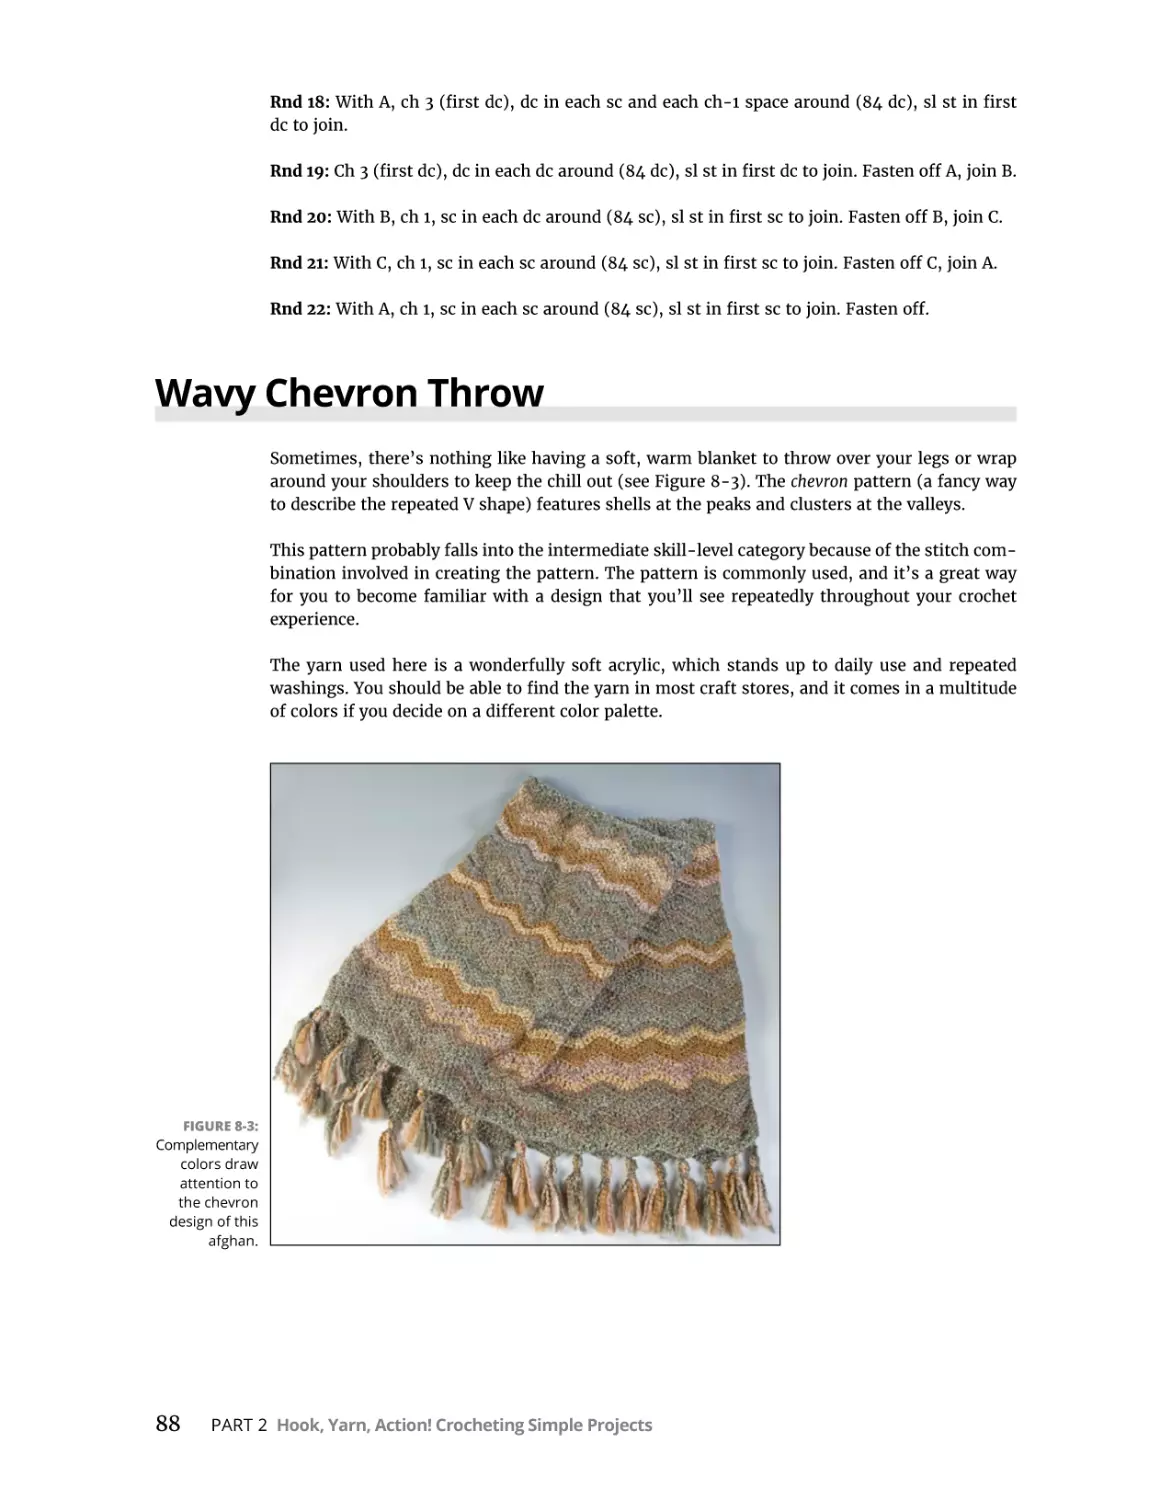
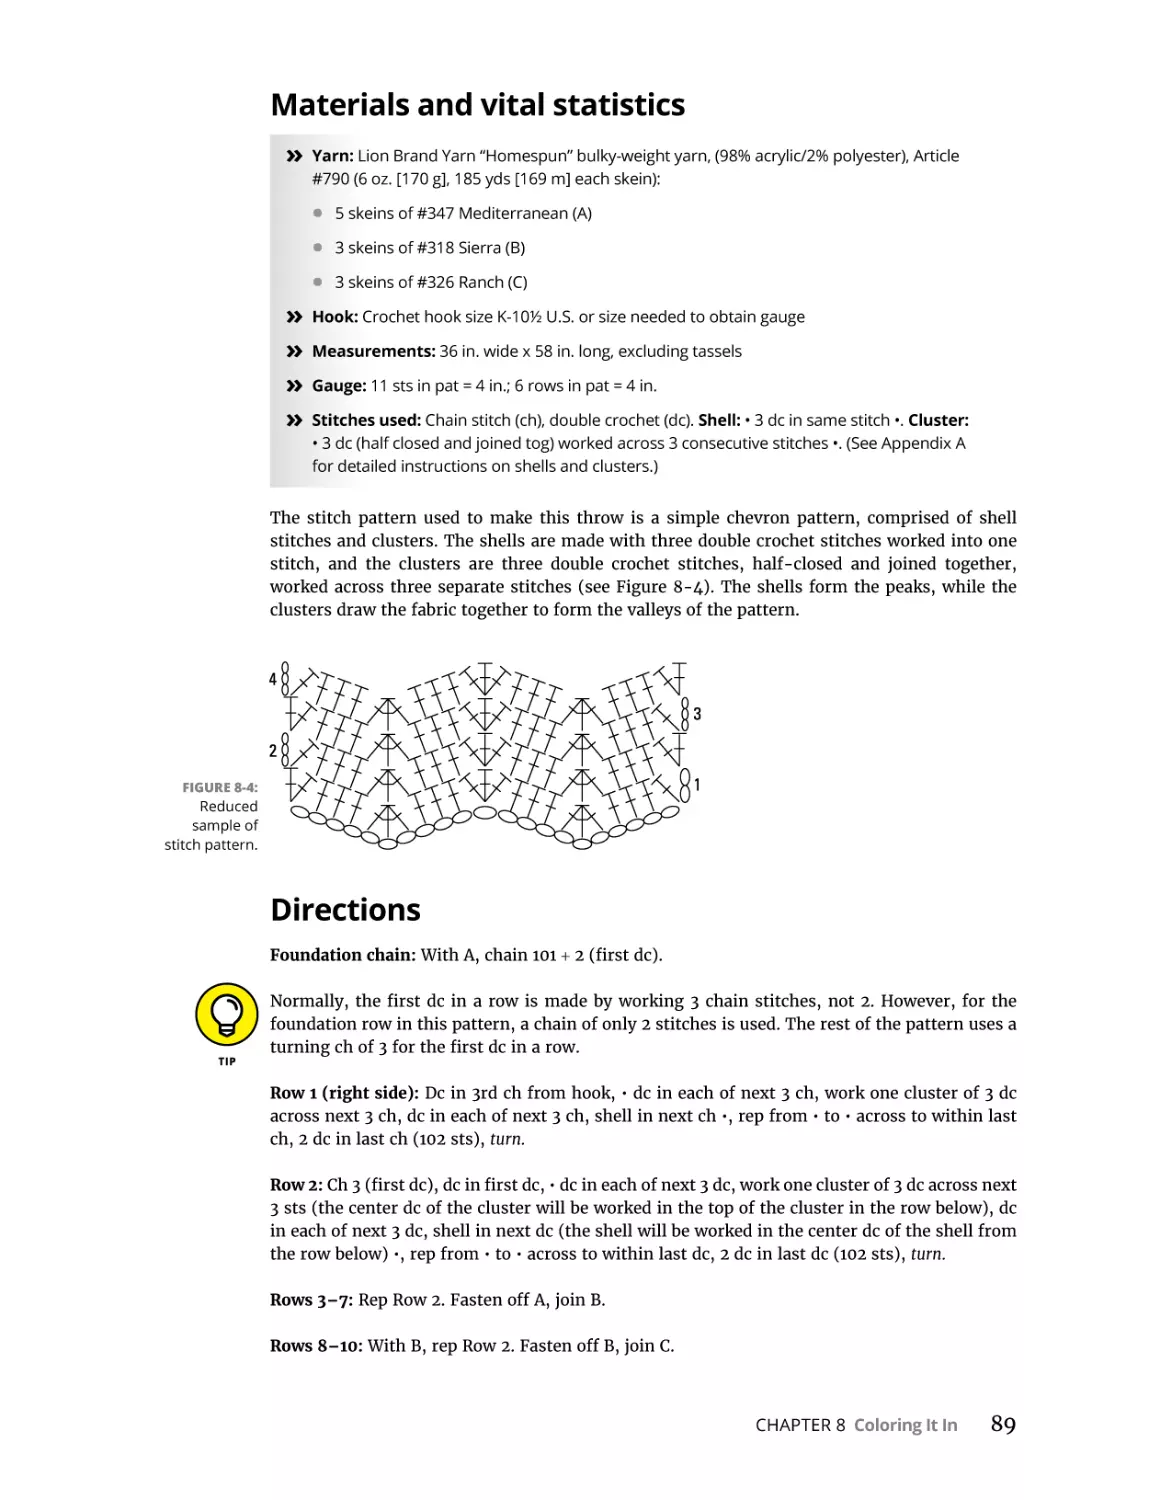
Wavy Chevron Throw . . . . . . . . . . . . . . . . . . . . . . . . . . . . . . . . . . . . . . . . . . . . . . . . . . . .
Materials and vital statistics. . . . . . . . . . . . . . . . . . . . . . . . . . . . . . . . . . . . . . . . . . . .
Directions . . . . . . . . . . . . . . . . . . . . . . . . . . . . . . . . . . . . . . . . . . . . . . . . . . . . . . . . . . .
Variation: Highlight the stitches, not the colors . . . . . . . . . . . . . . . . . . . . . . . . . . .
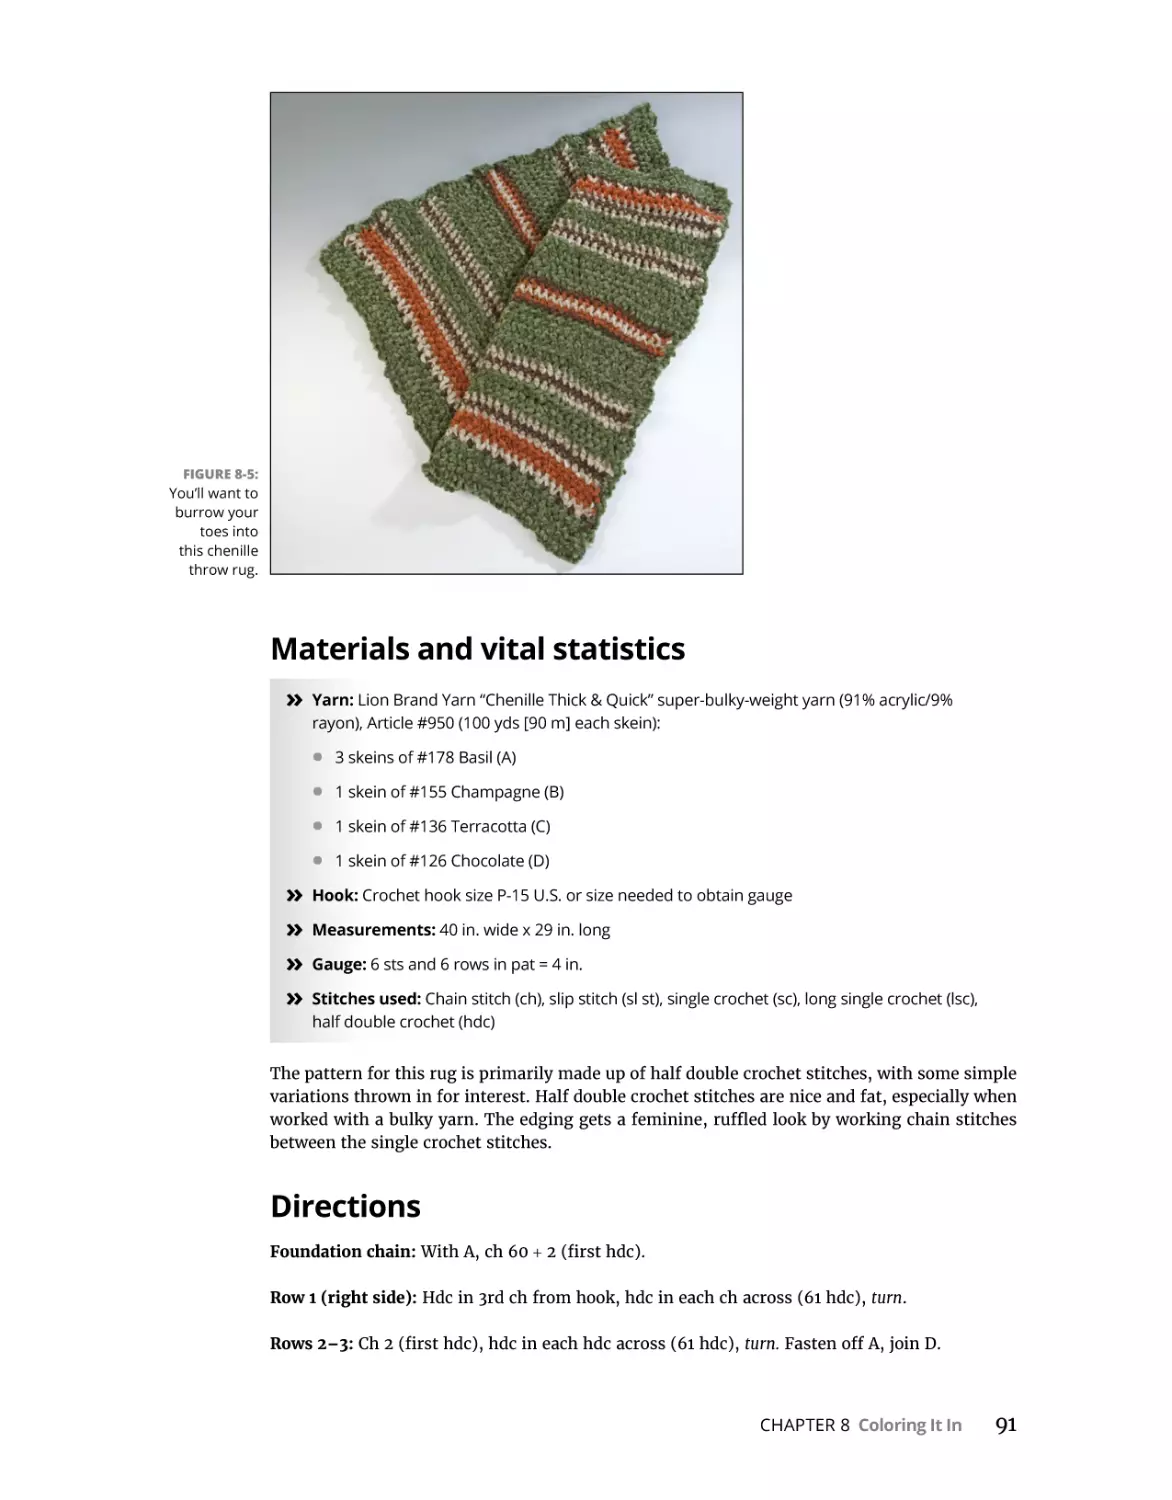
Cozy Chenille Throw Rug . . . . . . . . . . . . . . . . . . . . . . . . . . . . . . . . . . . . . . . . . . . . . . . . .
Materials and vital statistics. . . . . . . . . . . . . . . . . . . . . . . . . . . . . . . . . . . . . . . . . . . .
Directions . . . . . . . . . . . . . . . . . . . . . . . . . . . . . . . . . . . . . . . . . . . . . . . . . . . . . . . . . . .
Variation: Size it to fit just right . . . . . . . . . . . . . . . . . . . . . . . . . . . . . . . . . . . . . . . . .
Variation: Fringe it!. . . . . . . . . . . . . . . . . . . . . . . . . . . . . . . . . . . . . . . . . . . . . . . . . . . .
83
84
85
85
86
87
88
89
89
90
90
91
91
93
93
Mixing It Up: A Few Changes Make a Dramatic Difference . . . .
95
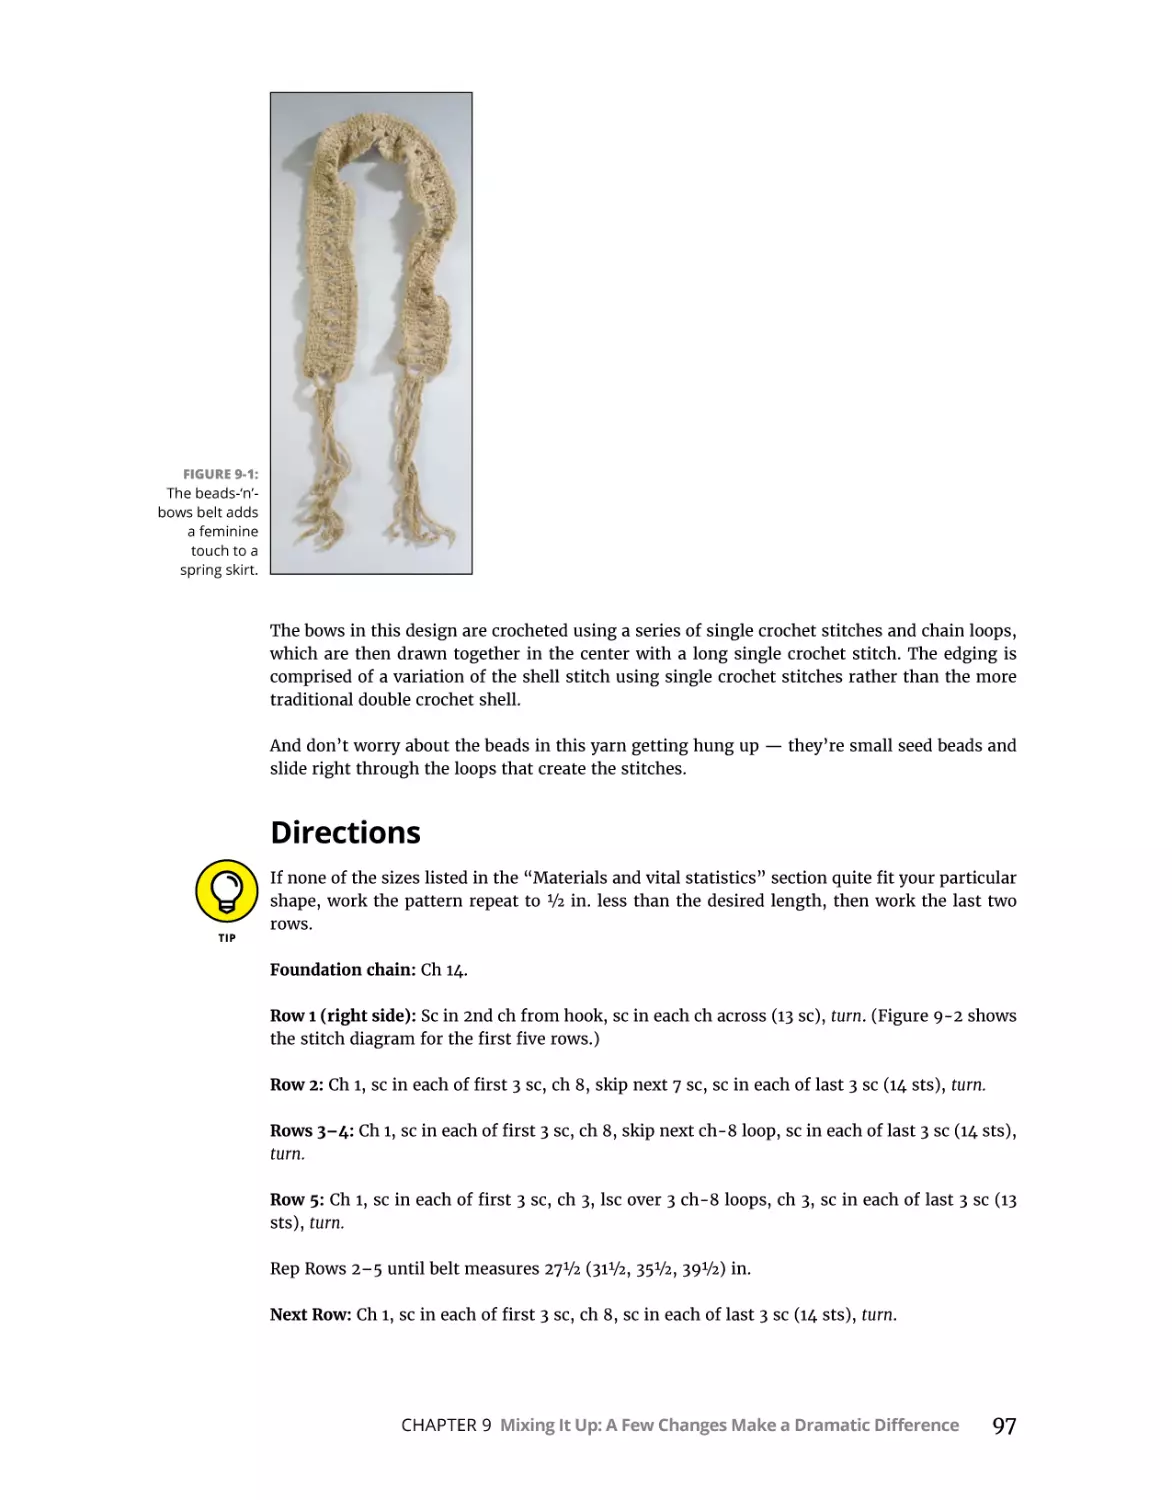
Beads-‘n’-Bows Belt. . . . . . . . . . . . . . . . . . . . . . . . . . . . . . . . . . . . . . . . . . . . . . . . . . . . . . 96
Materials and vital statistics. . . . . . . . . . . . . . . . . . . . . . . . . . . . . . . . . . . . . . . . . . . . 96
Directions . . . . . . . . . . . . . . . . . . . . . . . . . . . . . . . . . . . . . . . . . . . . . . . . . . . . . . . . . . . 97
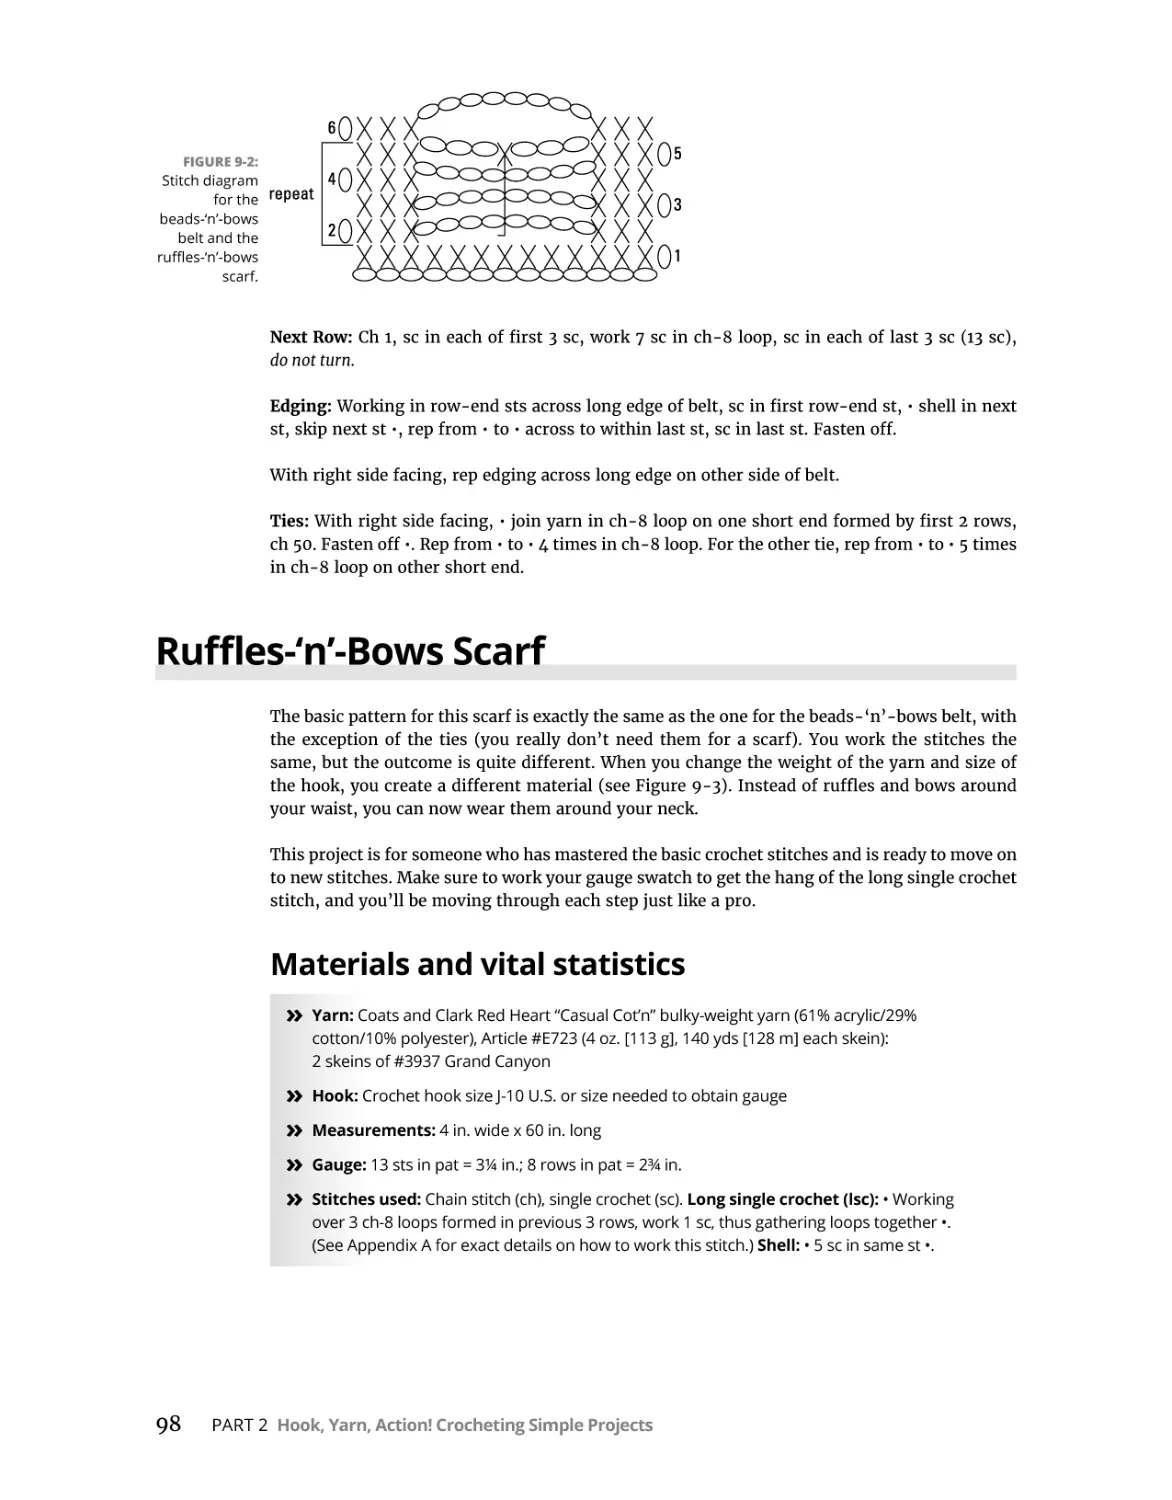
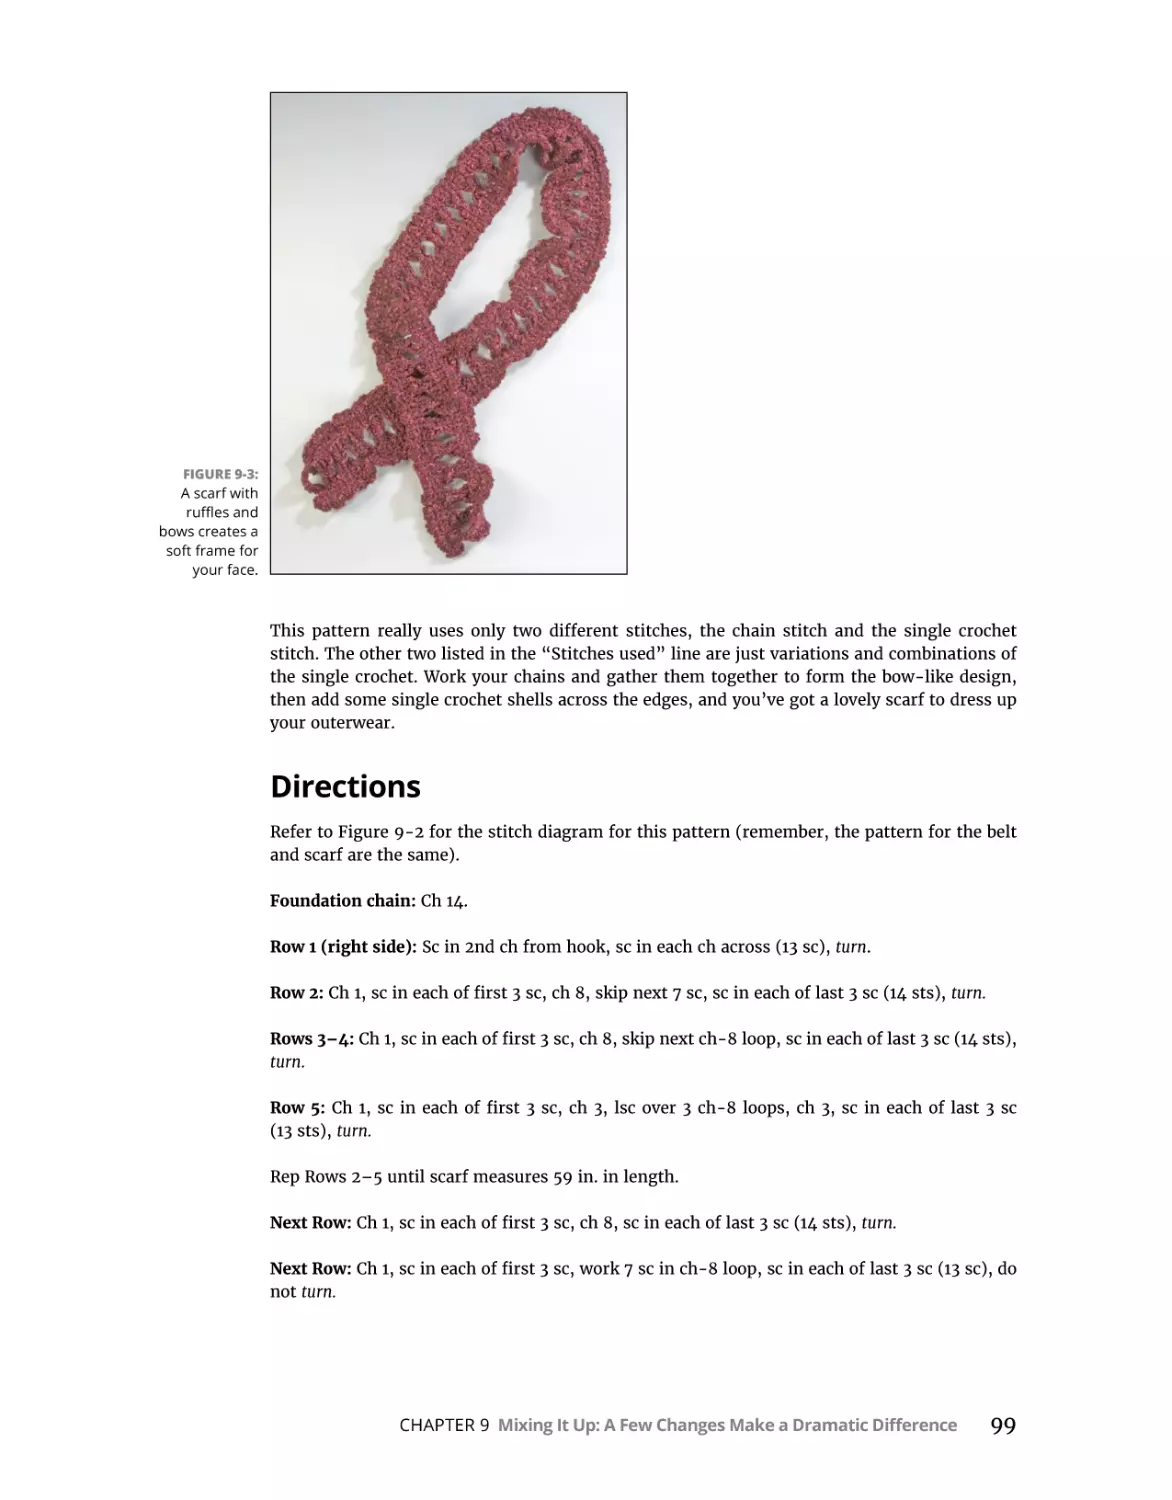
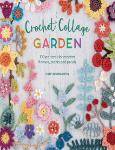
Ruffles-‘n’-Bows Scarf . . . . . . . . . . . . . . . . . . . . . . . . . . . . . . . . . . . . . . . . . . . . . . . . . . . . 98
Materials and vital statistics. . . . . . . . . . . . . . . . . . . . . . . . . . . . . . . . . . . . . . . . . . . . 98
Directions . . . . . . . . . . . . . . . . . . . . . . . . . . . . . . . . . . . . . . . . . . . . . . . . . . . . . . . . . . . 99
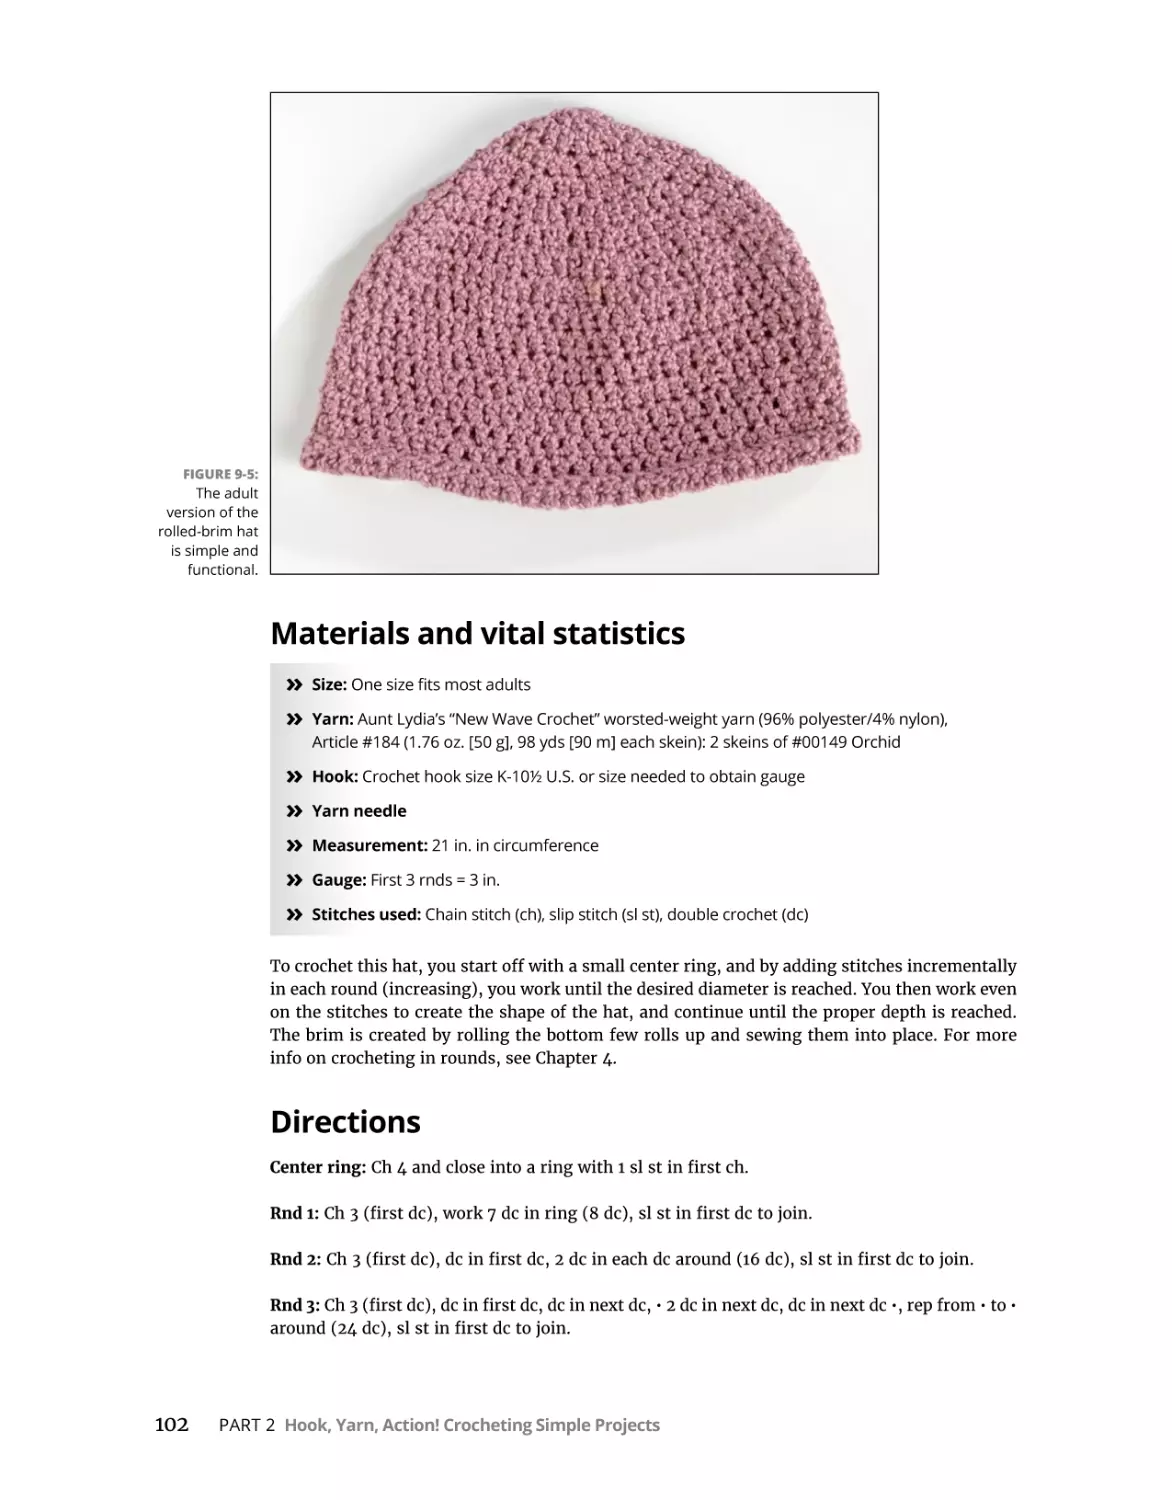
Child’s Rolled-Brim Hat. . . . . . . . . . . . . . . . . . . . . . . . . . . . . . . . . . . . . . . . . . . . . . . . . . 100
Materials and vital statistics. . . . . . . . . . . . . . . . . . . . . . . . . . . . . . . . . . . . . . . . . . . 100
Directions . . . . . . . . . . . . . . . . . . . . . . . . . . . . . . . . . . . . . . . . . . . . . . . . . . . . . . . . . . 101
Table of Contents
vii
Adult’s Rolled-Brim Hat. . . . . . . . . . . . . . . . . . . . . . . . . . . . . . . . . . . . . . . . . . . . . . . . . . 101
Materials and vital statistics. . . . . . . . . . . . . . . . . . . . . . . . . . . . . . . . . . . . . . . . . . . 102
Directions . . . . . . . . . . . . . . . . . . . . . . . . . . . . . . . . . . . . . . . . . . . . . . . . . . . . . . . . . . 102
PART 3: PUTTING YOUR SKILLS TO THE TEST. . . . . . . . . . . . . . . . . . . .
105
Seams Sew Easy: Joining Pieces Together . . . . . . . . . . . . . . . . . . . . . .
107
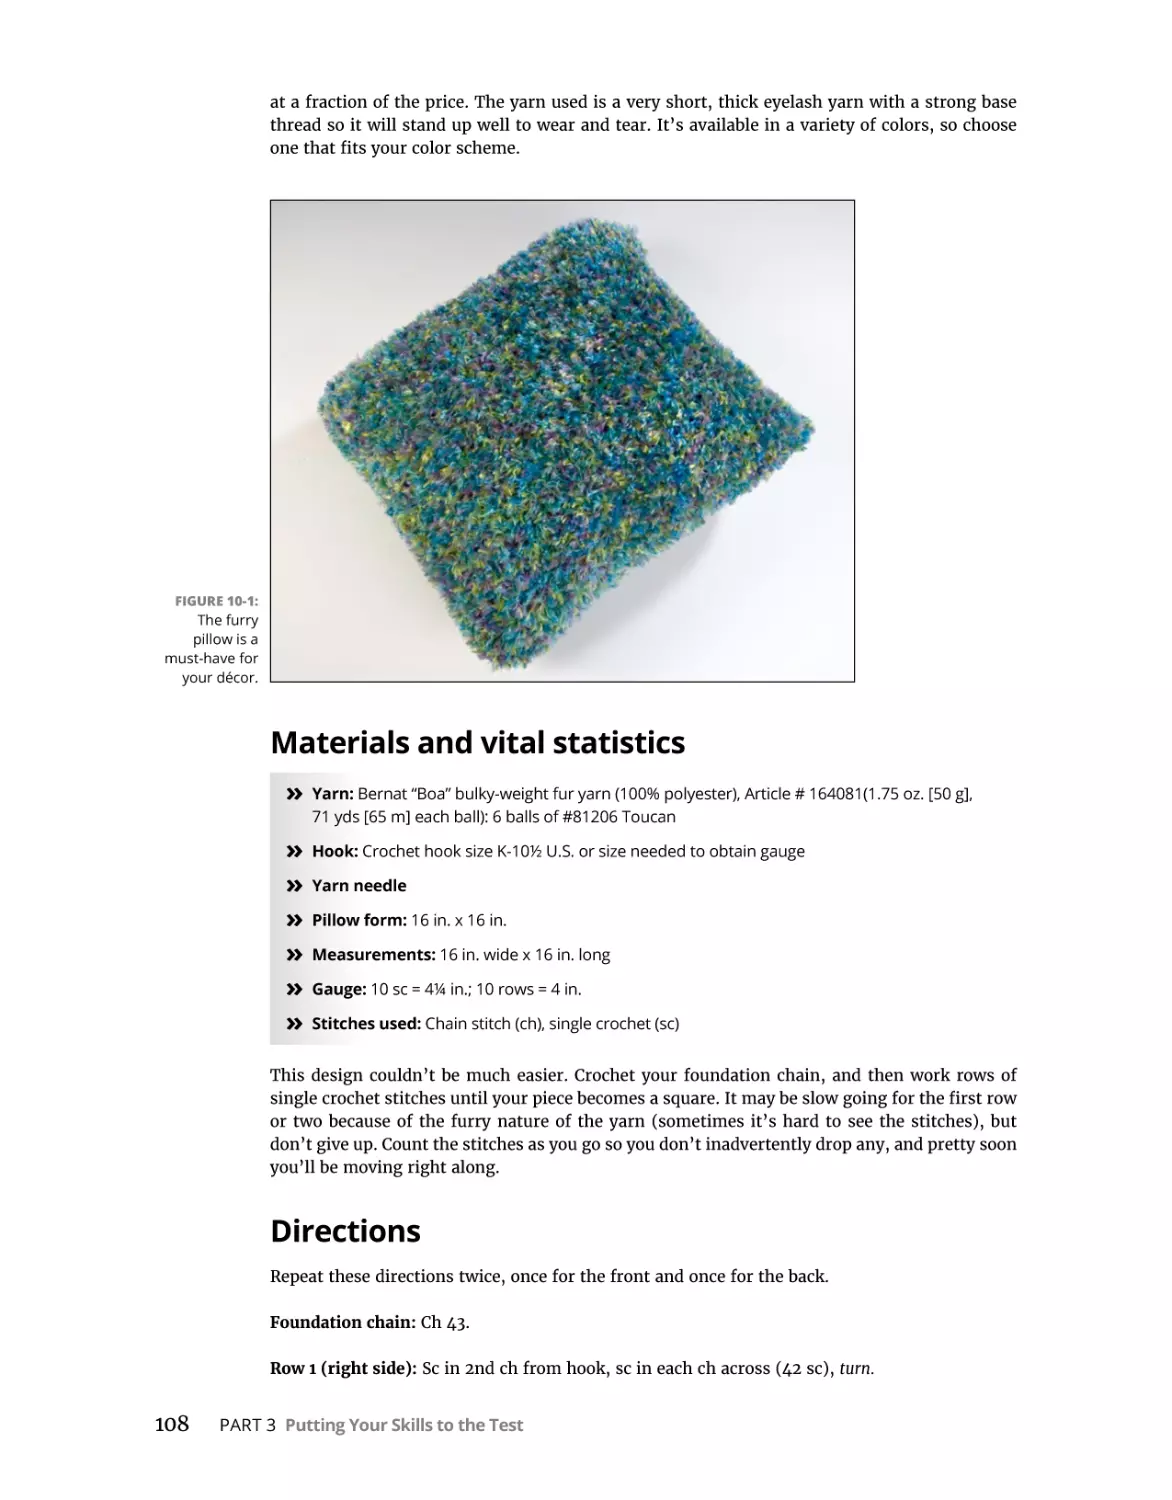
Furry Boa Pillow. . . . . . . . . . . . . . . . . . . . . . . . . . . . . . . . . . . . . . . . . . . . . . . . . . . . . . . .
Materials and vital statistics. . . . . . . . . . . . . . . . . . . . . . . . . . . . . . . . . . . . . . . . . . .
Directions . . . . . . . . . . . . . . . . . . . . . . . . . . . . . . . . . . . . . . . . . . . . . . . . . . . . . . . . . .
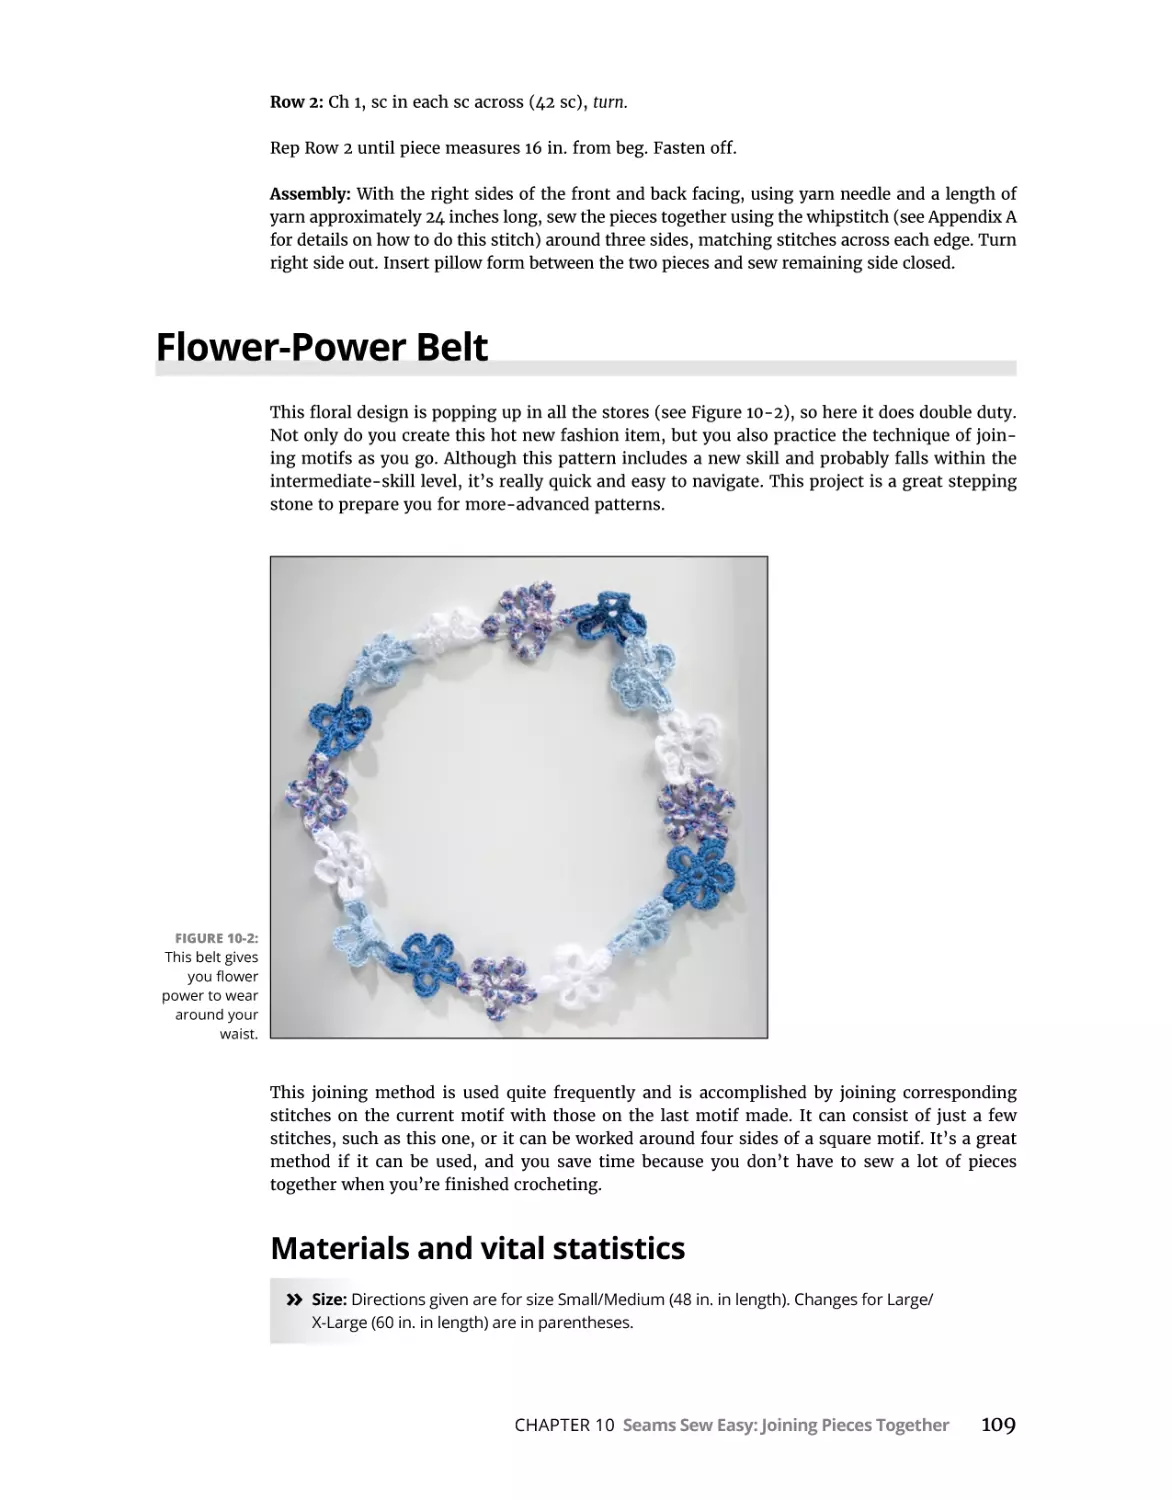
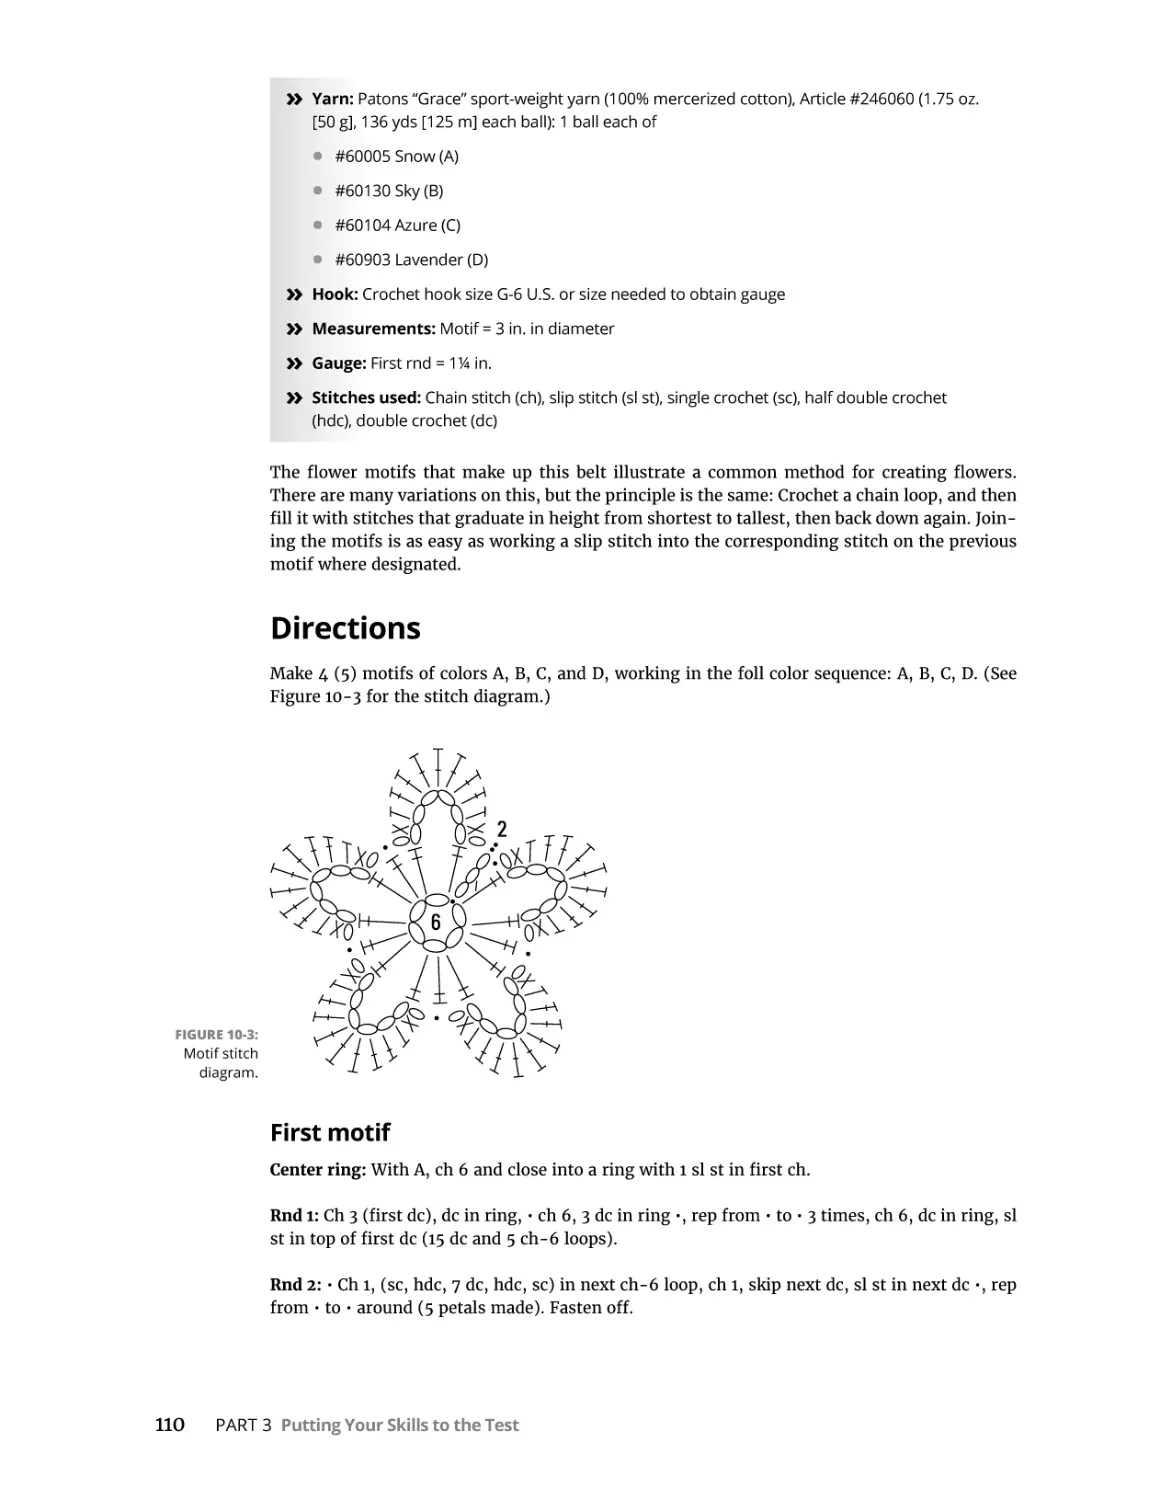
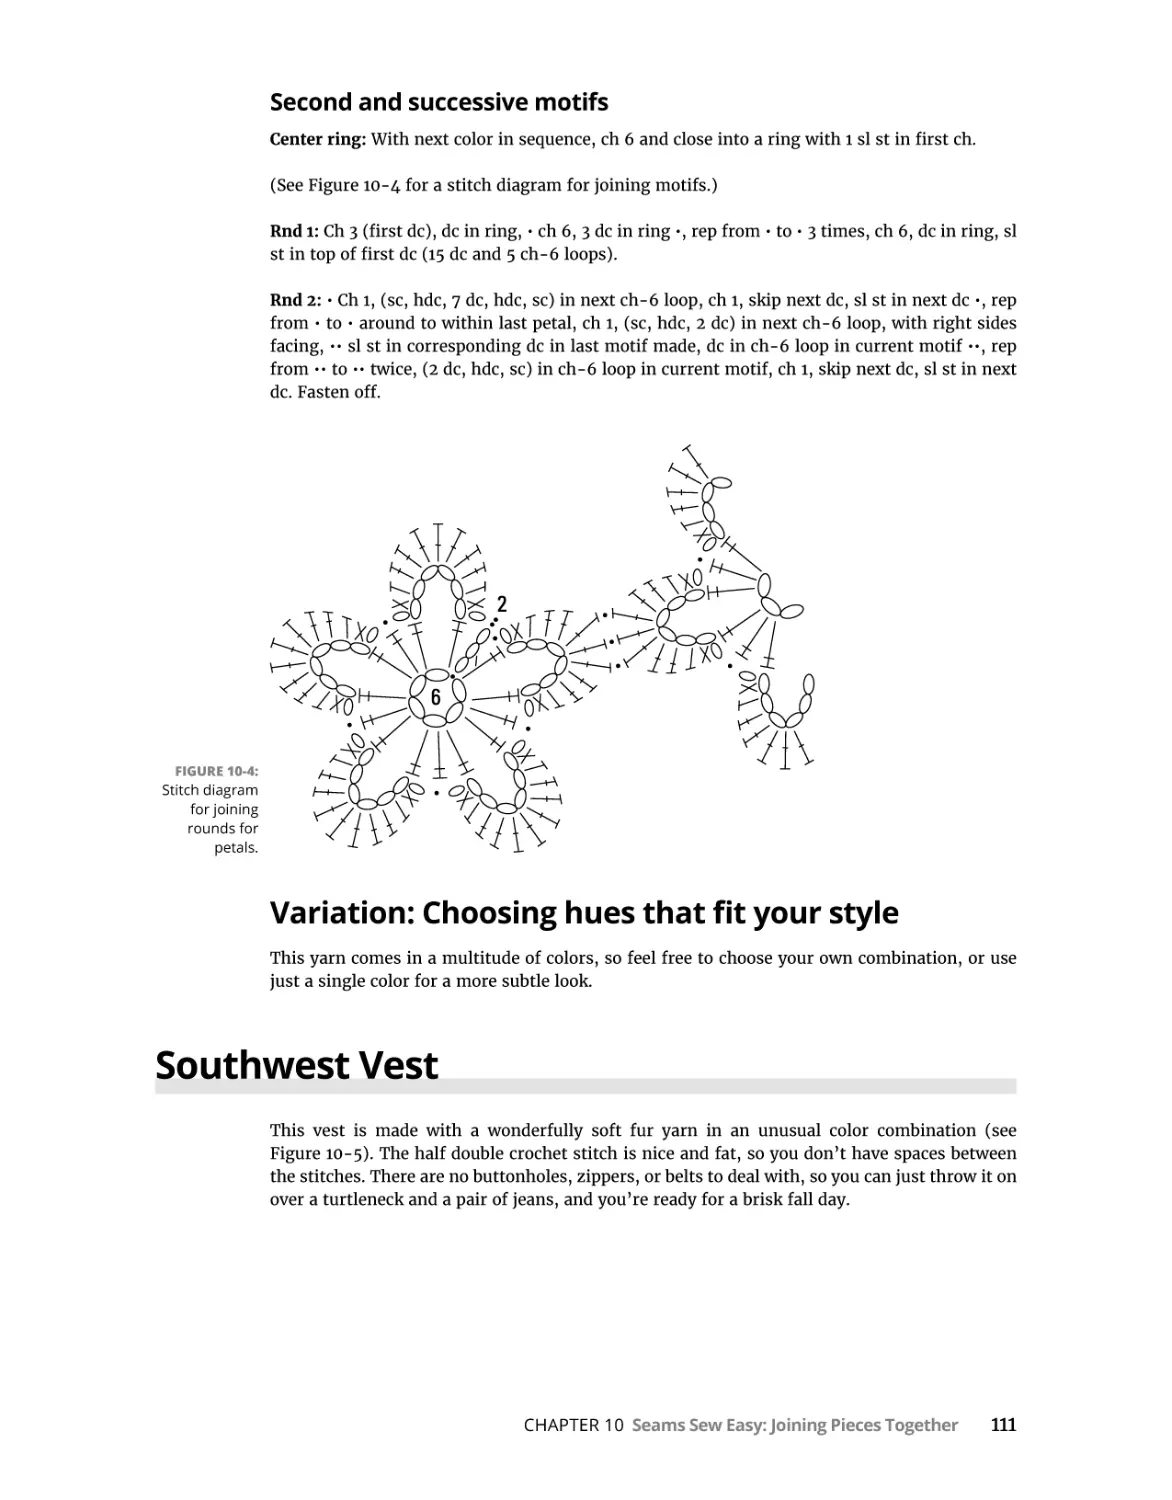
Flower-Power Belt . . . . . . . . . . . . . . . . . . . . . . . . . . . . . . . . . . . . . . . . . . . . . . . . . . . . . .
Materials and vital statistics. . . . . . . . . . . . . . . . . . . . . . . . . . . . . . . . . . . . . . . . . . .
Directions . . . . . . . . . . . . . . . . . . . . . . . . . . . . . . . . . . . . . . . . . . . . . . . . . . . . . . . . . .
Variation: Choosing hues that fit your style. . . . . . . . . . . . . . . . . . . . . . . . . . . . . .
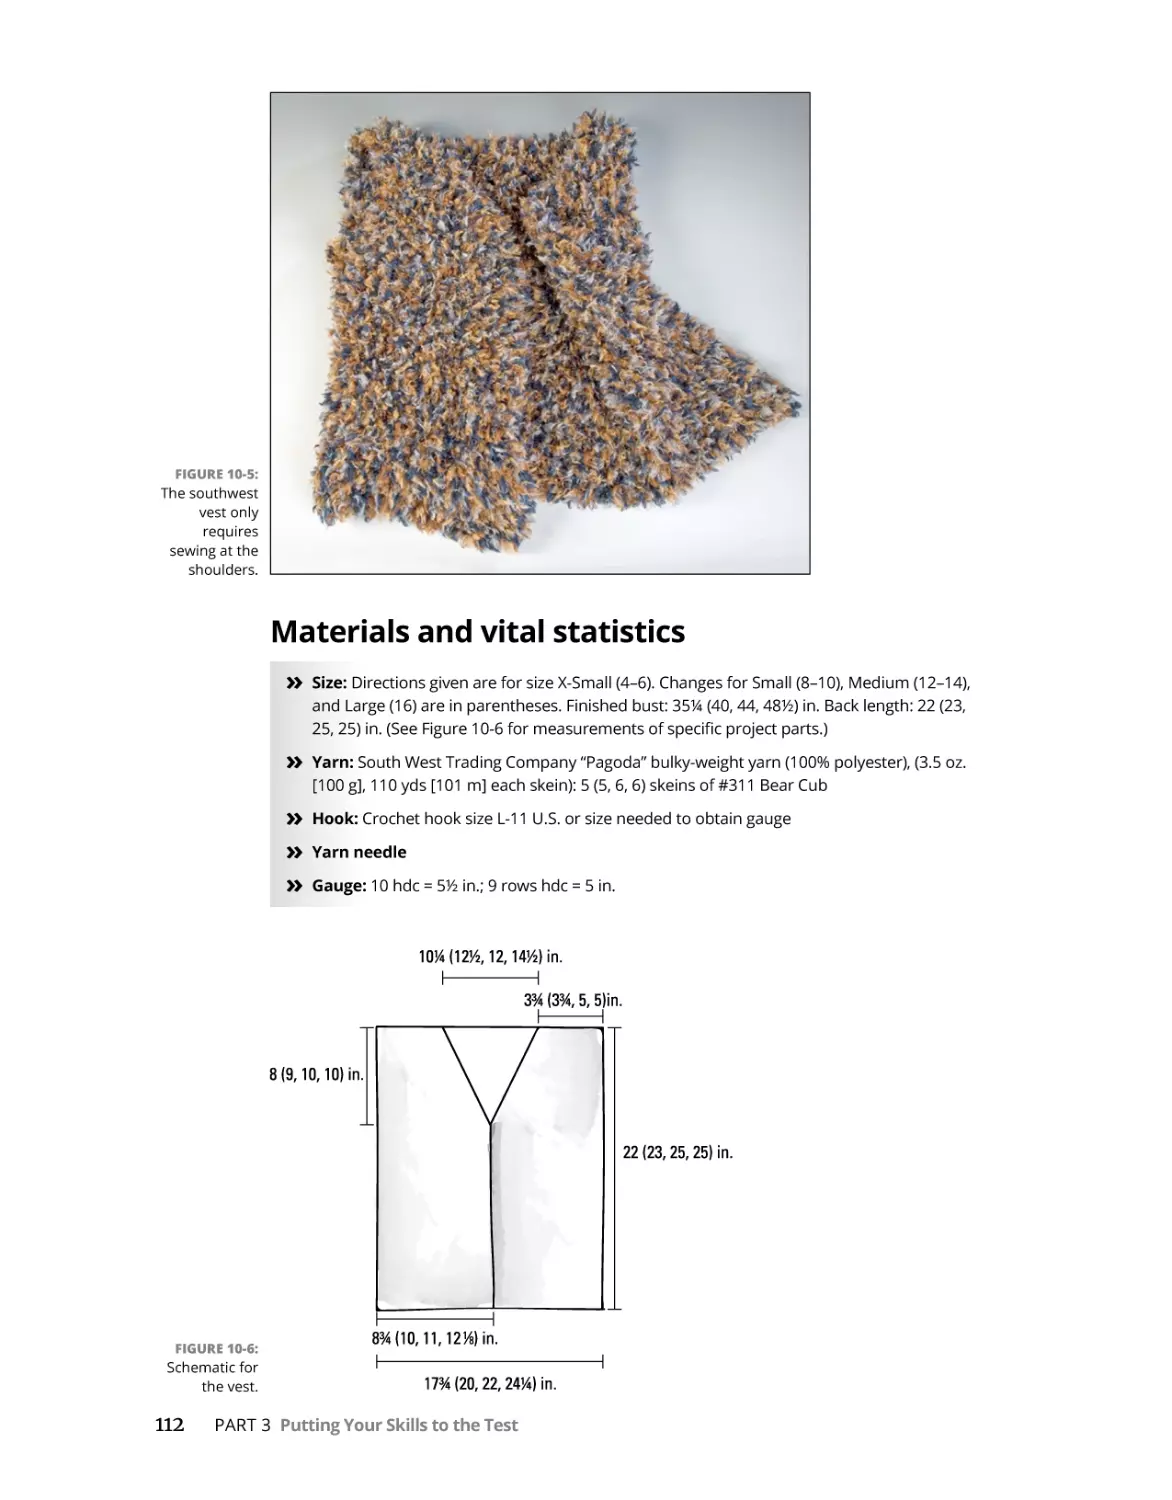
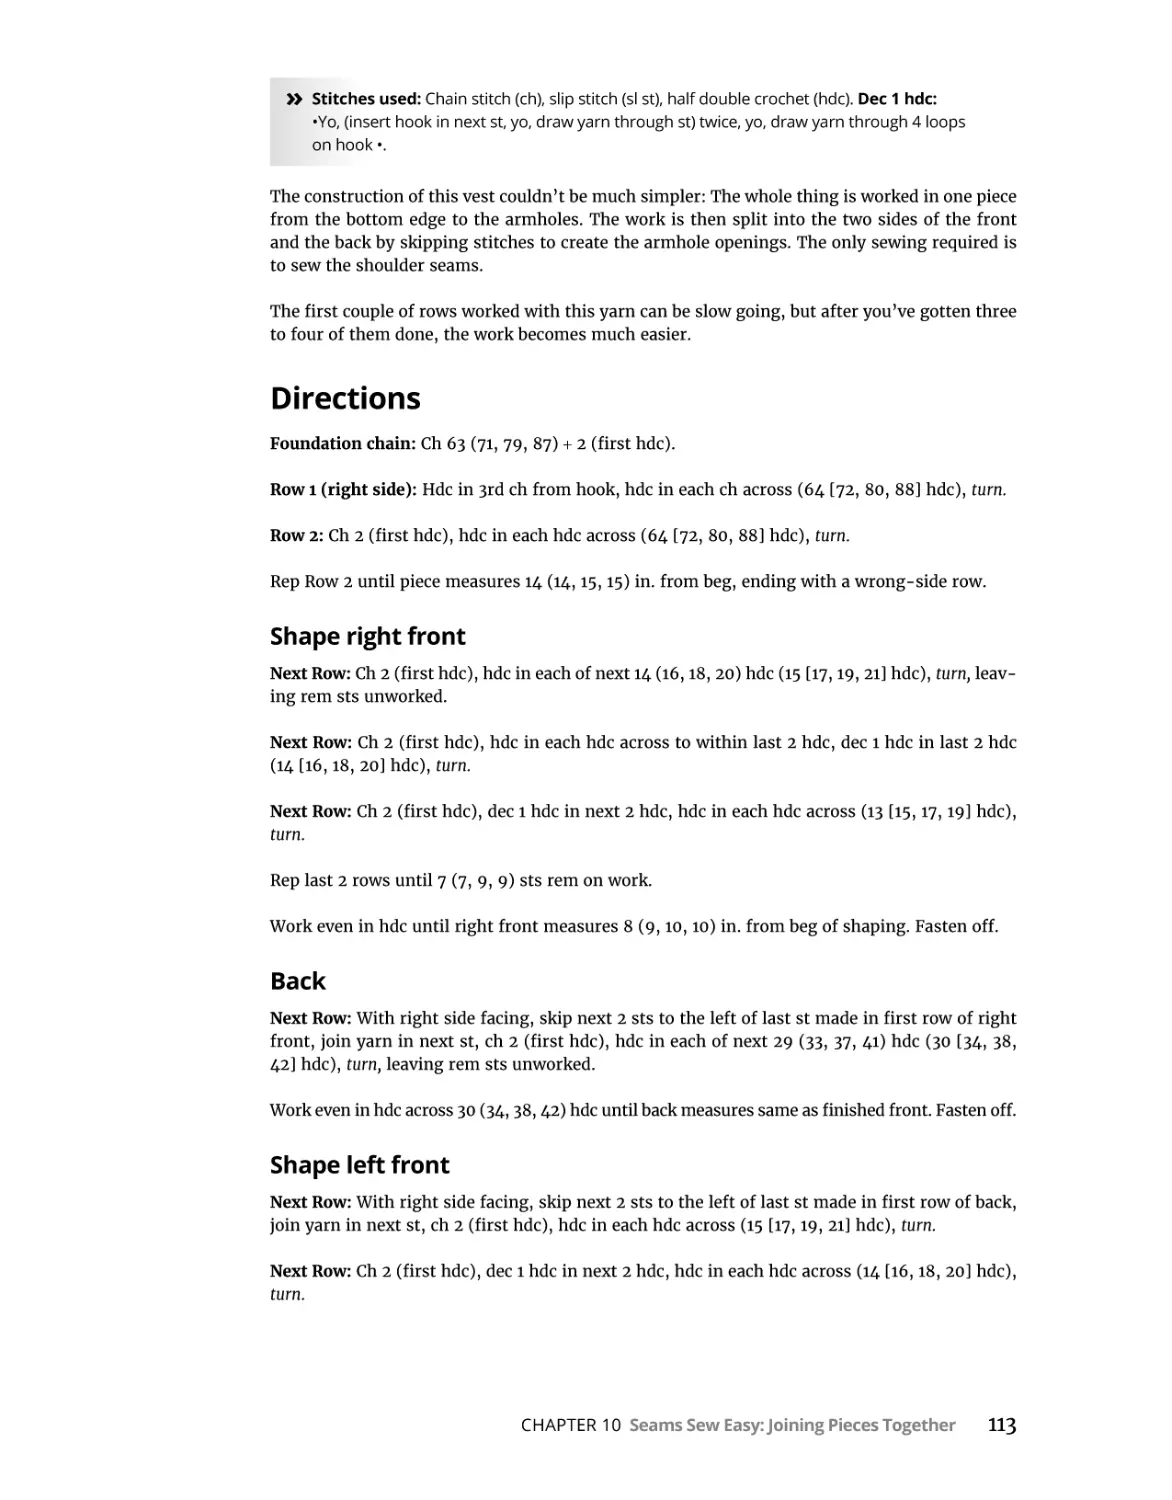
Southwest Vest. . . . . . . . . . . . . . . . . . . . . . . . . . . . . . . . . . . . . . . . . . . . . . . . . . . . . . . . .
Materials and vital statistics. . . . . . . . . . . . . . . . . . . . . . . . . . . . . . . . . . . . . . . . . . .
Directions . . . . . . . . . . . . . . . . . . . . . . . . . . . . . . . . . . . . . . . . . . . . . . . . . . . . . . . . . .
Variation: Belt it!. . . . . . . . . . . . . . . . . . . . . . . . . . . . . . . . . . . . . . . . . . . . . . . . . . . . .
107
108
108
109
109
110
111
111
112
113
114
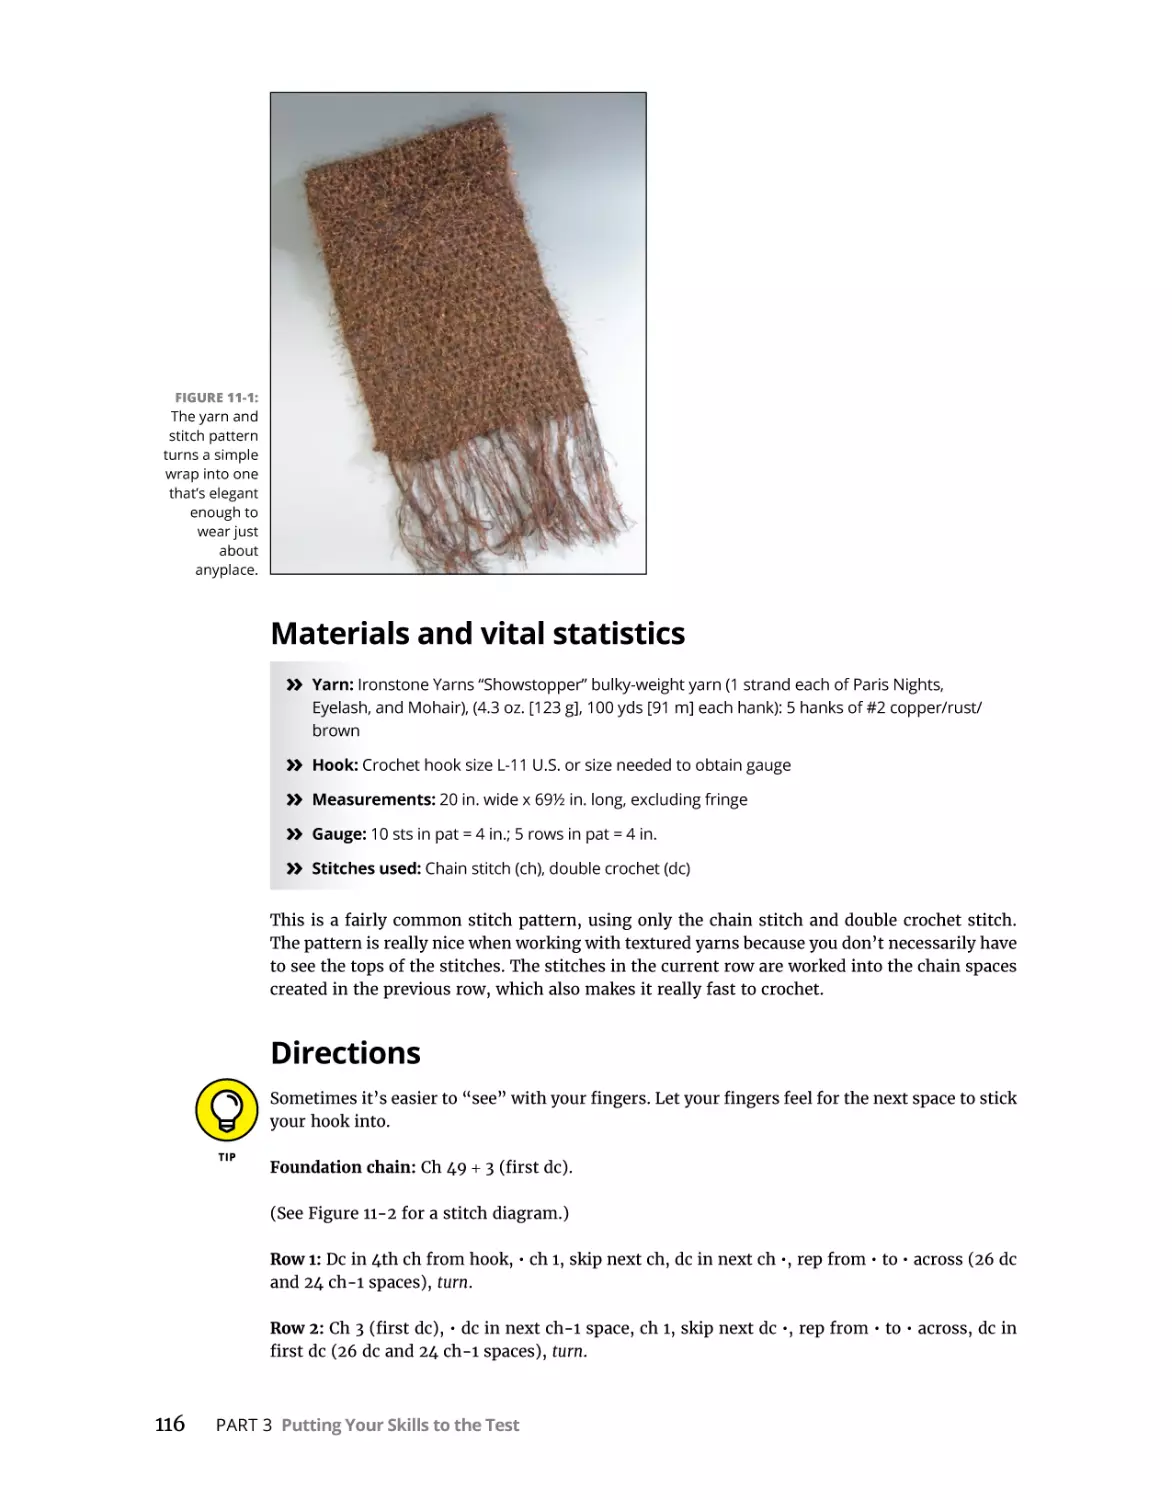
Finding the Loopholes and Creative Combinations . . . . . . . . . .
115
Elegant Evening Wrap. . . . . . . . . . . . . . . . . . . . . . . . . . . . . . . . . . . . . . . . . . . . . . . . . . .
Materials and vital statistics. . . . . . . . . . . . . . . . . . . . . . . . . . . . . . . . . . . . . . . . . . .
Directions . . . . . . . . . . . . . . . . . . . . . . . . . . . . . . . . . . . . . . . . . . . . . . . . . . . . . . . . . .
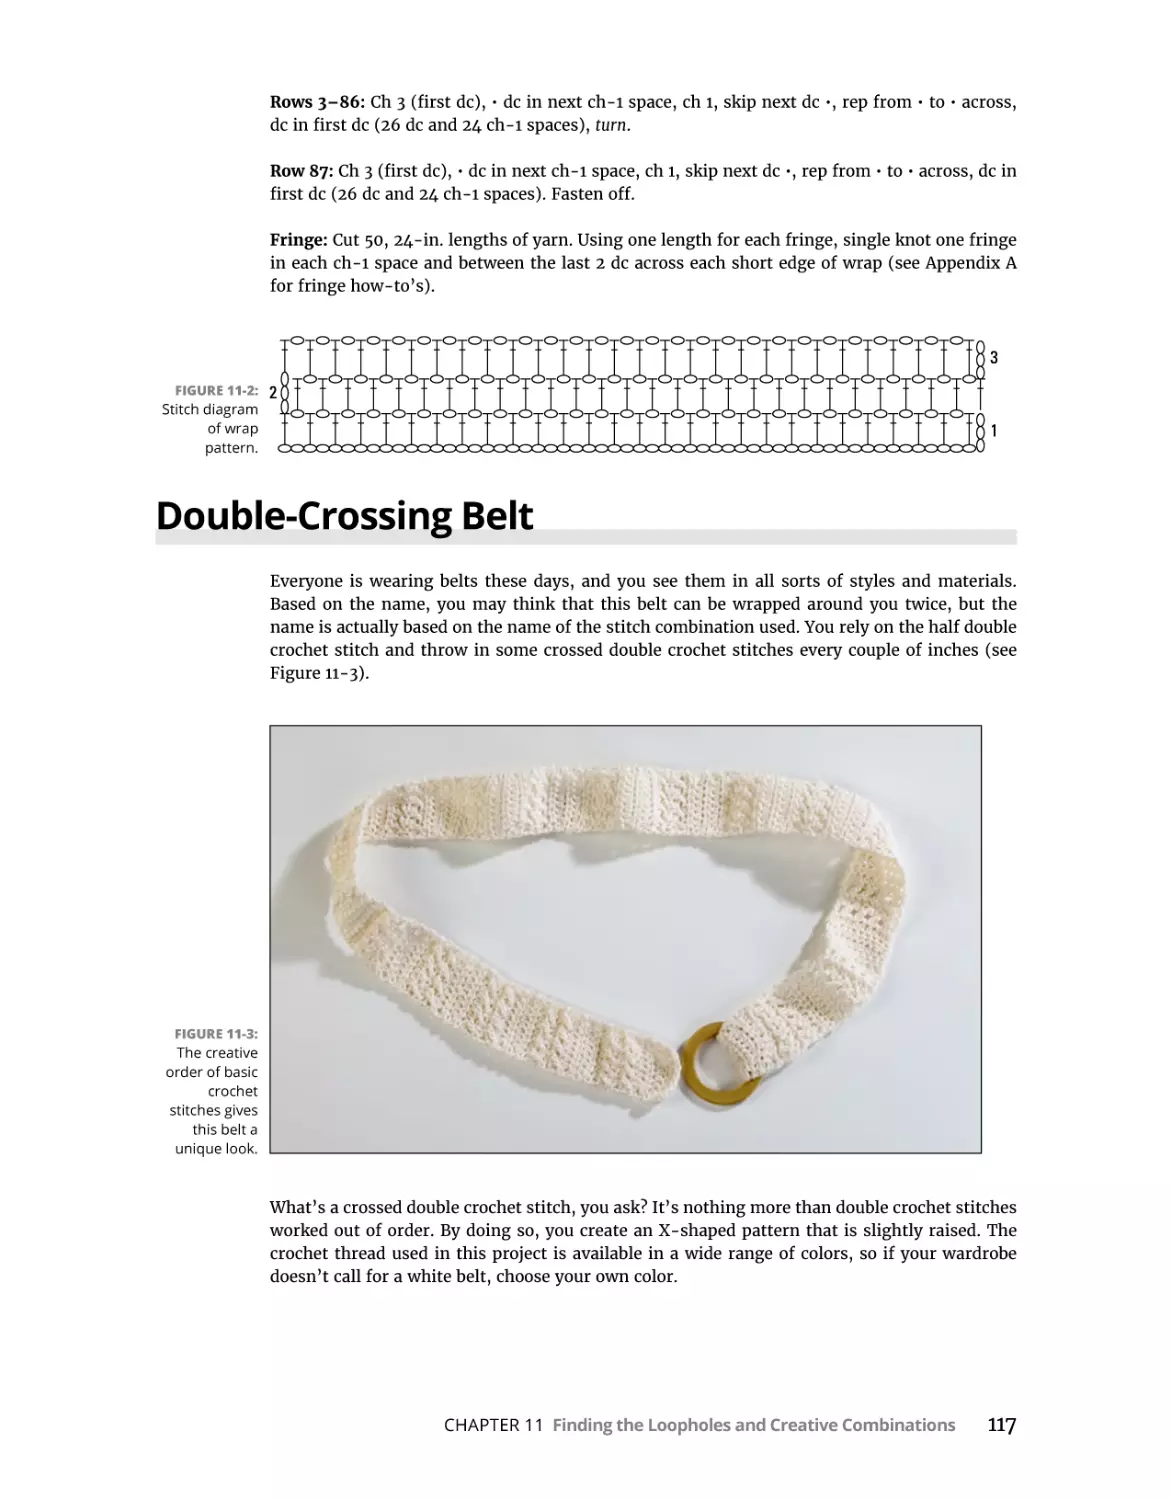
Double-Crossing Belt. . . . . . . . . . . . . . . . . . . . . . . . . . . . . . . . . . . . . . . . . . . . . . . . . . . .
Materials and vital statistics. . . . . . . . . . . . . . . . . . . . . . . . . . . . . . . . . . . . . . . . . . .
Directions . . . . . . . . . . . . . . . . . . . . . . . . . . . . . . . . . . . . . . . . . . . . . . . . . . . . . . . . . .
Love Those Loops Scarf . . . . . . . . . . . . . . . . . . . . . . . . . . . . . . . . . . . . . . . . . . . . . . . . .
New skill: The loop stitch . . . . . . . . . . . . . . . . . . . . . . . . . . . . . . . . . . . . . . . . . . . . .
Materials and vital statistics. . . . . . . . . . . . . . . . . . . . . . . . . . . . . . . . . . . . . . . . . . .
Directions . . . . . . . . . . . . . . . . . . . . . . . . . . . . . . . . . . . . . . . . . . . . . . . . . . . . . . . . . .
Variation: Adding more loops . . . . . . . . . . . . . . . . . . . . . . . . . . . . . . . . . . . . . . . . .
Variation: Fashioning a furry look. . . . . . . . . . . . . . . . . . . . . . . . . . . . . . . . . . . . . .
Variation: Swapping yarns . . . . . . . . . . . . . . . . . . . . . . . . . . . . . . . . . . . . . . . . . . . .
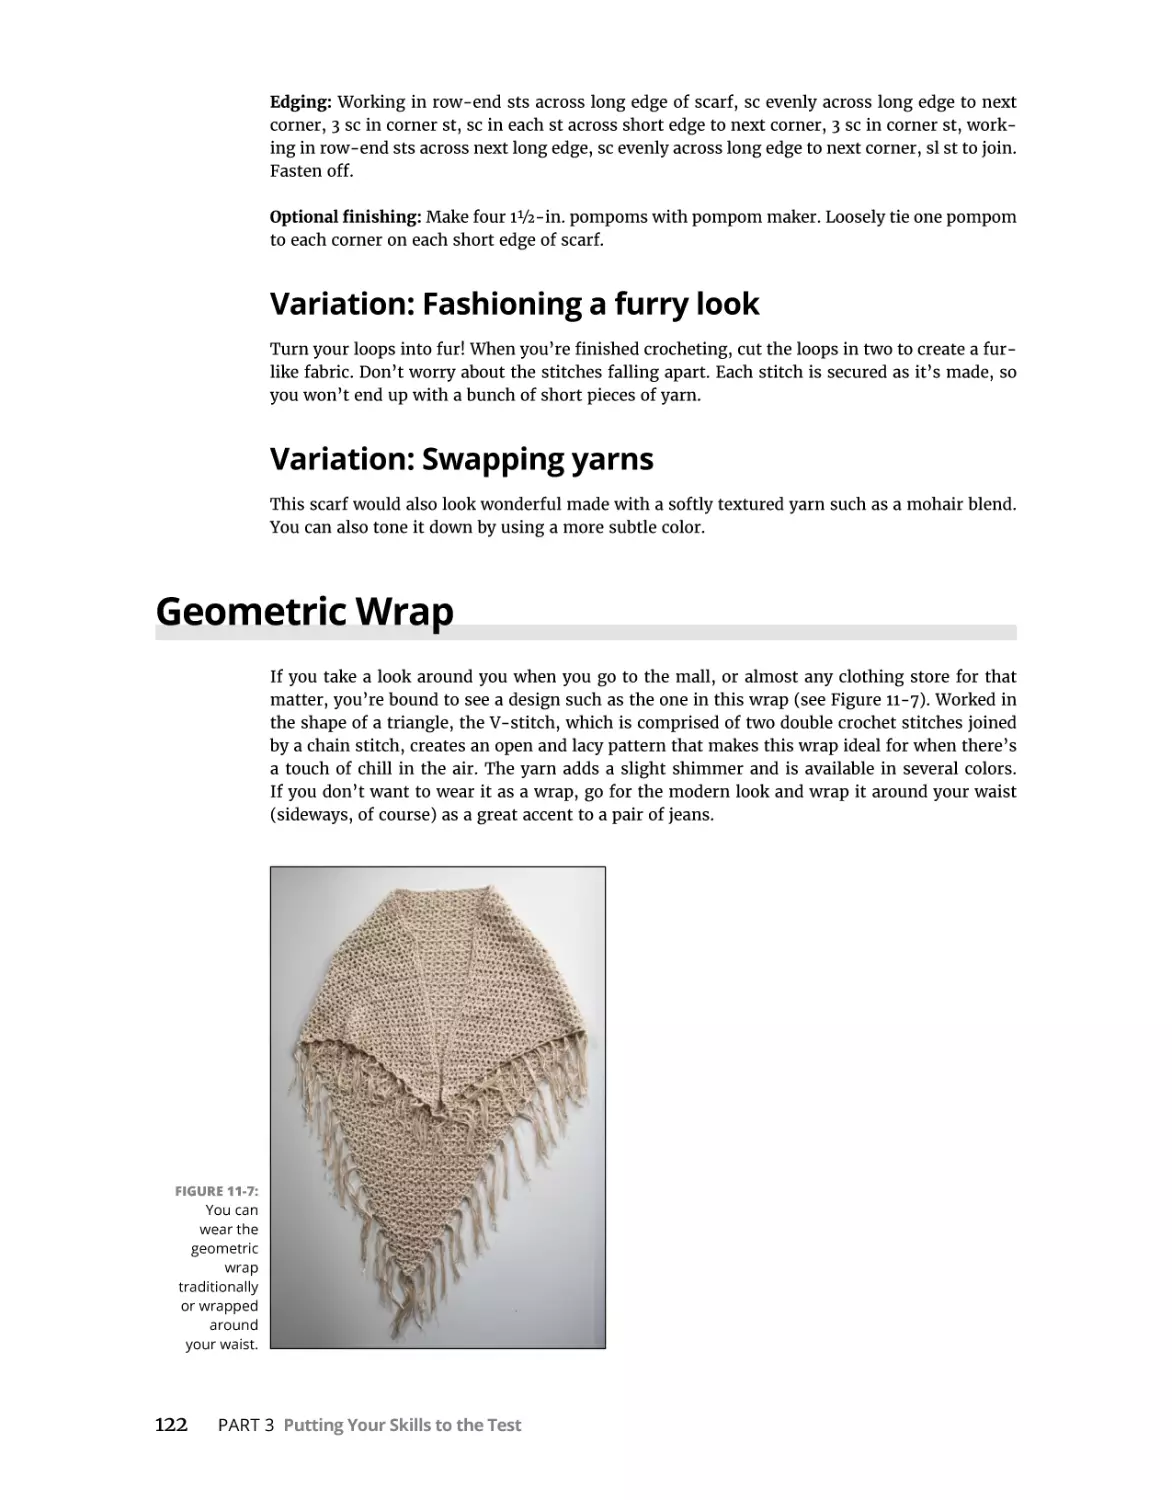
Geometric Wrap. . . . . . . . . . . . . . . . . . . . . . . . . . . . . . . . . . . . . . . . . . . . . . . . . . . . . . . .
Materials and vital statistics. . . . . . . . . . . . . . . . . . . . . . . . . . . . . . . . . . . . . . . . . . .
Directions . . . . . . . . . . . . . . . . . . . . . . . . . . . . . . . . . . . . . . . . . . . . . . . . . . . . . . . . . .
Variation: Why knot add beads? . . . . . . . . . . . . . . . . . . . . . . . . . . . . . . . . . . . . . . .
115
116
116
117
118
119
119
119
120
121
121
122
122
122
123
123
124
Sensational Sweaters . . . . . . . . . . . . . . . . . . . . . . . . . . . . . . . . . . . . . . . . . . . . . .
125
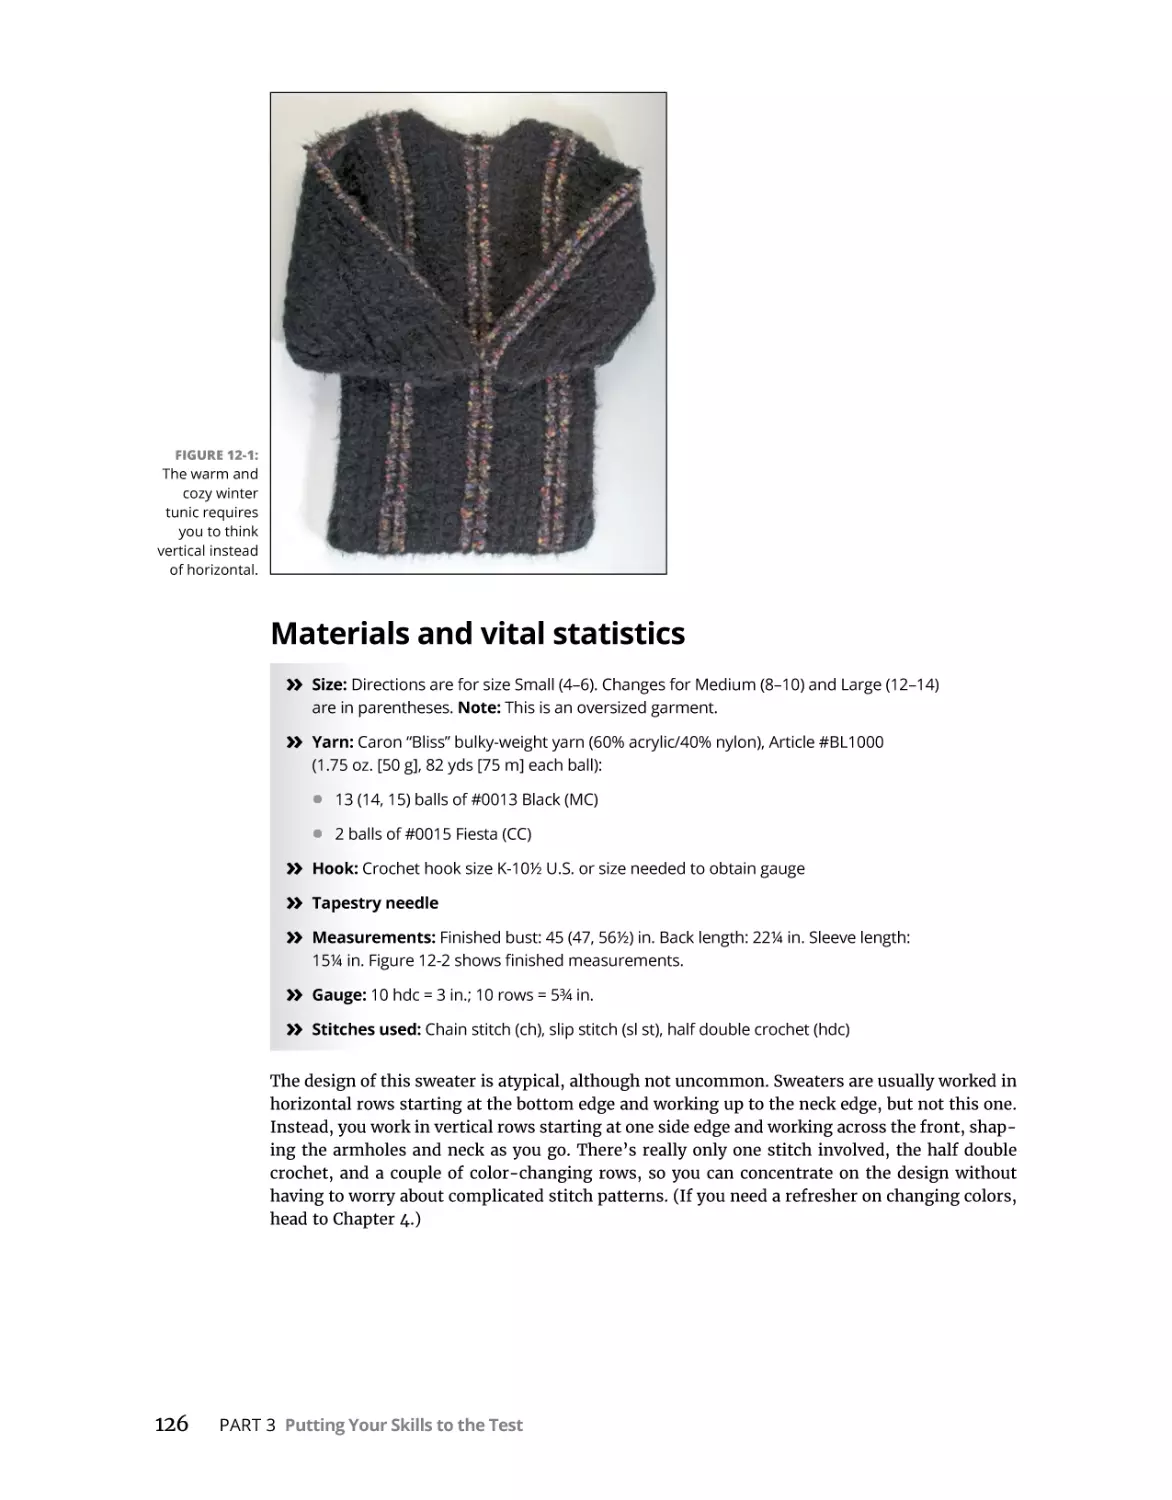
Vertical Stripes Tunic. . . . . . . . . . . . . . . . . . . . . . . . . . . . . . . . . . . . . . . . . . . . . . . . . . . .
Materials and vital statistics. . . . . . . . . . . . . . . . . . . . . . . . . . . . . . . . . . . . . . . . . . .
Starting with the front. . . . . . . . . . . . . . . . . . . . . . . . . . . . . . . . . . . . . . . . . . . . . . . .
Turning to the back. . . . . . . . . . . . . . . . . . . . . . . . . . . . . . . . . . . . . . . . . . . . . . . . . .
Moving on to the sleeves . . . . . . . . . . . . . . . . . . . . . . . . . . . . . . . . . . . . . . . . . . . . .
Putting the pieces together . . . . . . . . . . . . . . . . . . . . . . . . . . . . . . . . . . . . . . . . . . .
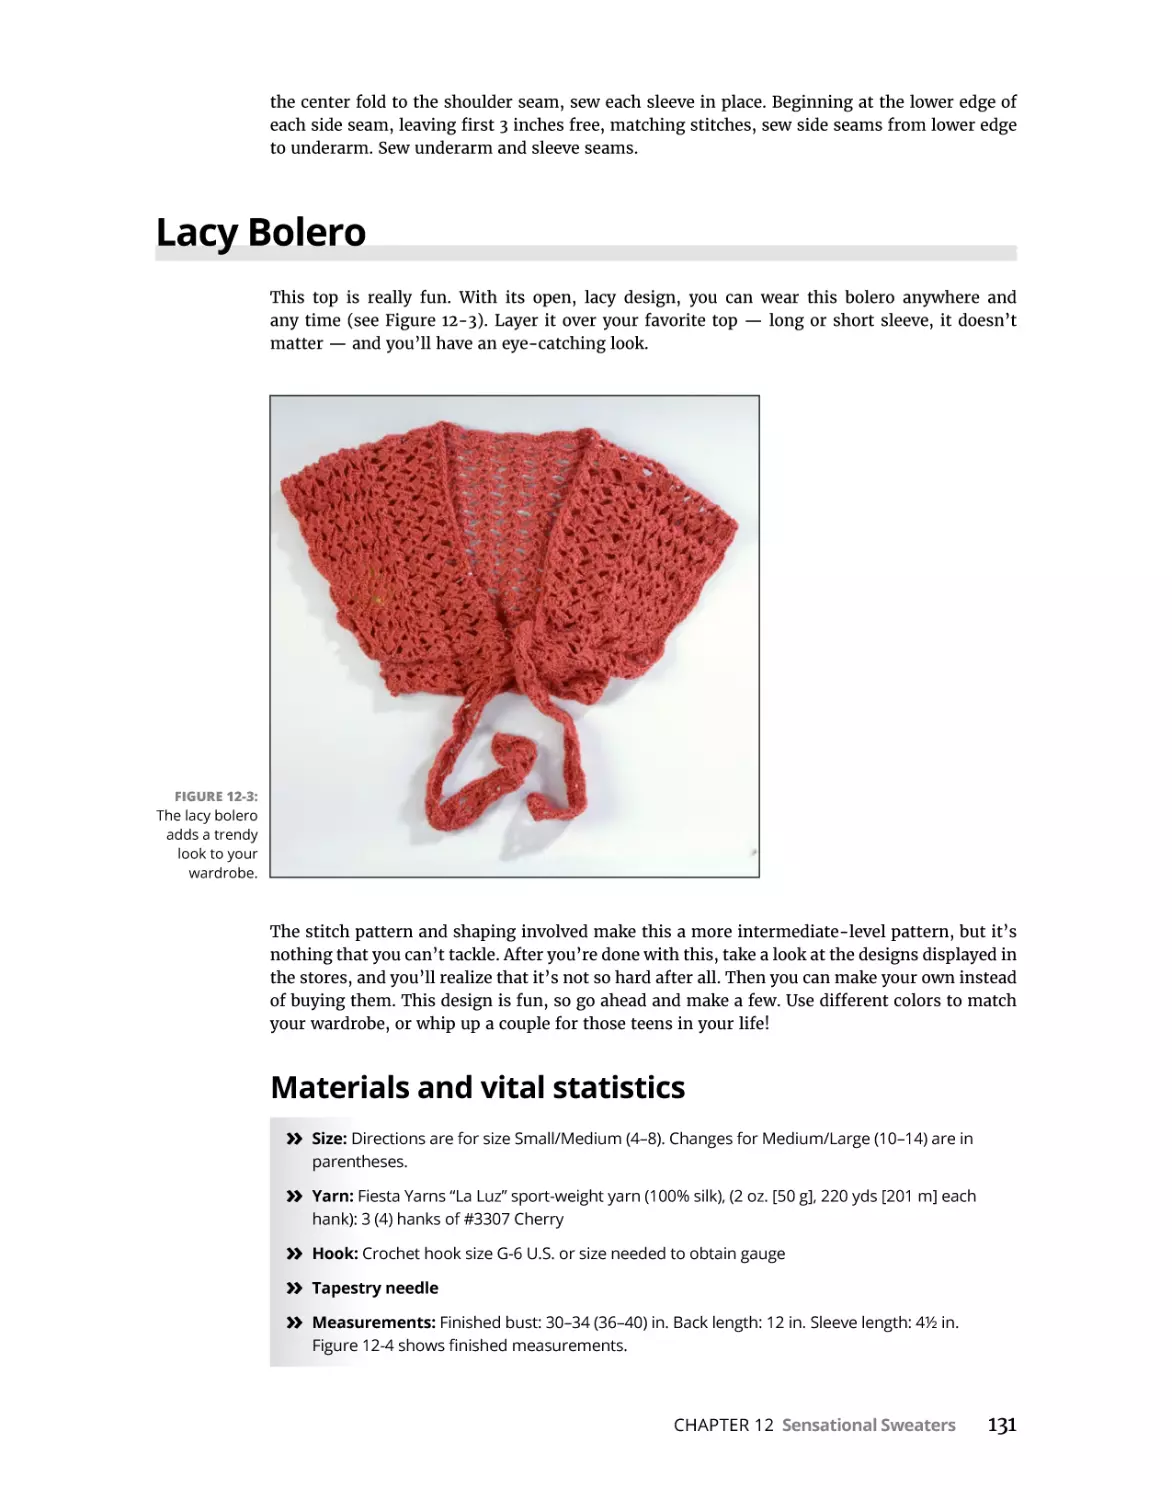
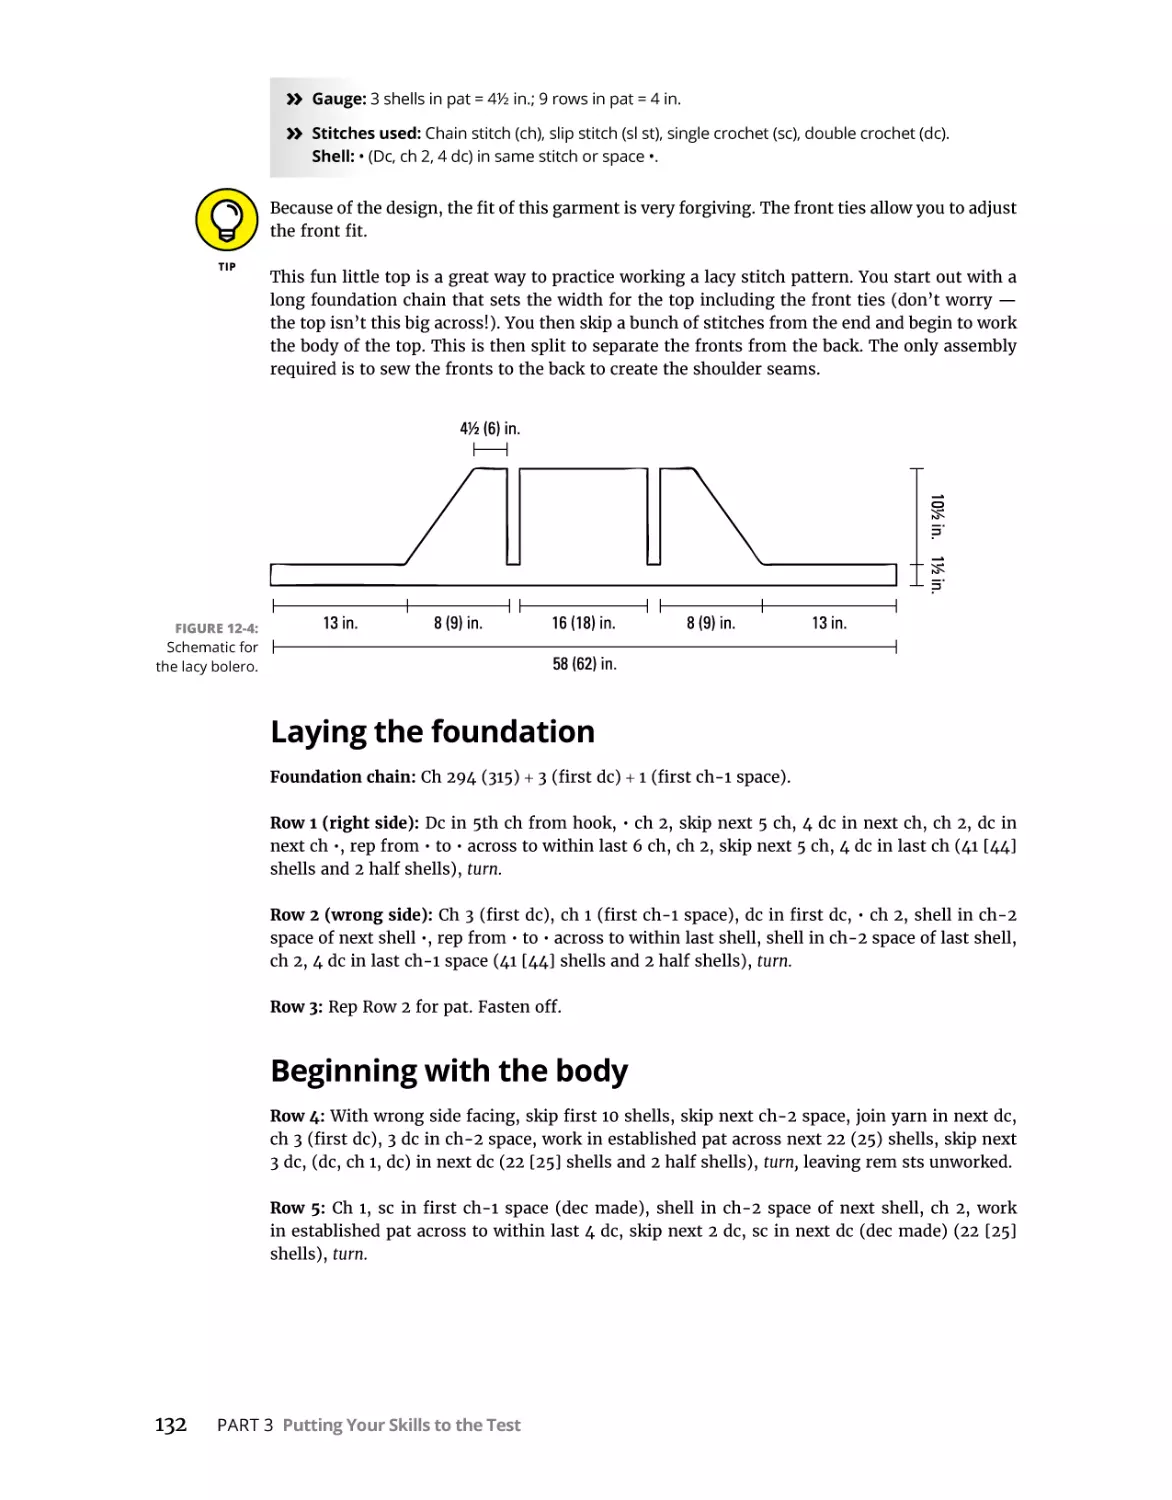
Lacy Bolero. . . . . . . . . . . . . . . . . . . . . . . . . . . . . . . . . . . . . . . . . . . . . . . . . . . . . . . . . . . .
Materials and vital statistics. . . . . . . . . . . . . . . . . . . . . . . . . . . . . . . . . . . . . . . . . . .
Laying the foundation. . . . . . . . . . . . . . . . . . . . . . . . . . . . . . . . . . . . . . . . . . . . . . . .
Beginning with the body. . . . . . . . . . . . . . . . . . . . . . . . . . . . . . . . . . . . . . . . . . . . . .
Focusing on the left front. . . . . . . . . . . . . . . . . . . . . . . . . . . . . . . . . . . . . . . . . . . . .
Heading around to the back. . . . . . . . . . . . . . . . . . . . . . . . . . . . . . . . . . . . . . . . . . .
Turning to the right front . . . . . . . . . . . . . . . . . . . . . . . . . . . . . . . . . . . . . . . . . . . . .
Joining the fronts to the back. . . . . . . . . . . . . . . . . . . . . . . . . . . . . . . . . . . . . . . . . .
Adding the sleeves. . . . . . . . . . . . . . . . . . . . . . . . . . . . . . . . . . . . . . . . . . . . . . . . . . .
Finishing with easy edgings . . . . . . . . . . . . . . . . . . . . . . . . . . . . . . . . . . . . . . . . . . .
125
126
127
128
129
130
131
131
132
132
133
133
133
134
134
135
CHAPTER 10:
CHAPTER 11:
CHAPTER 12:
viii
Crochet Patterns For Dummies
CHAPTER 13:
CHAPTER 14:
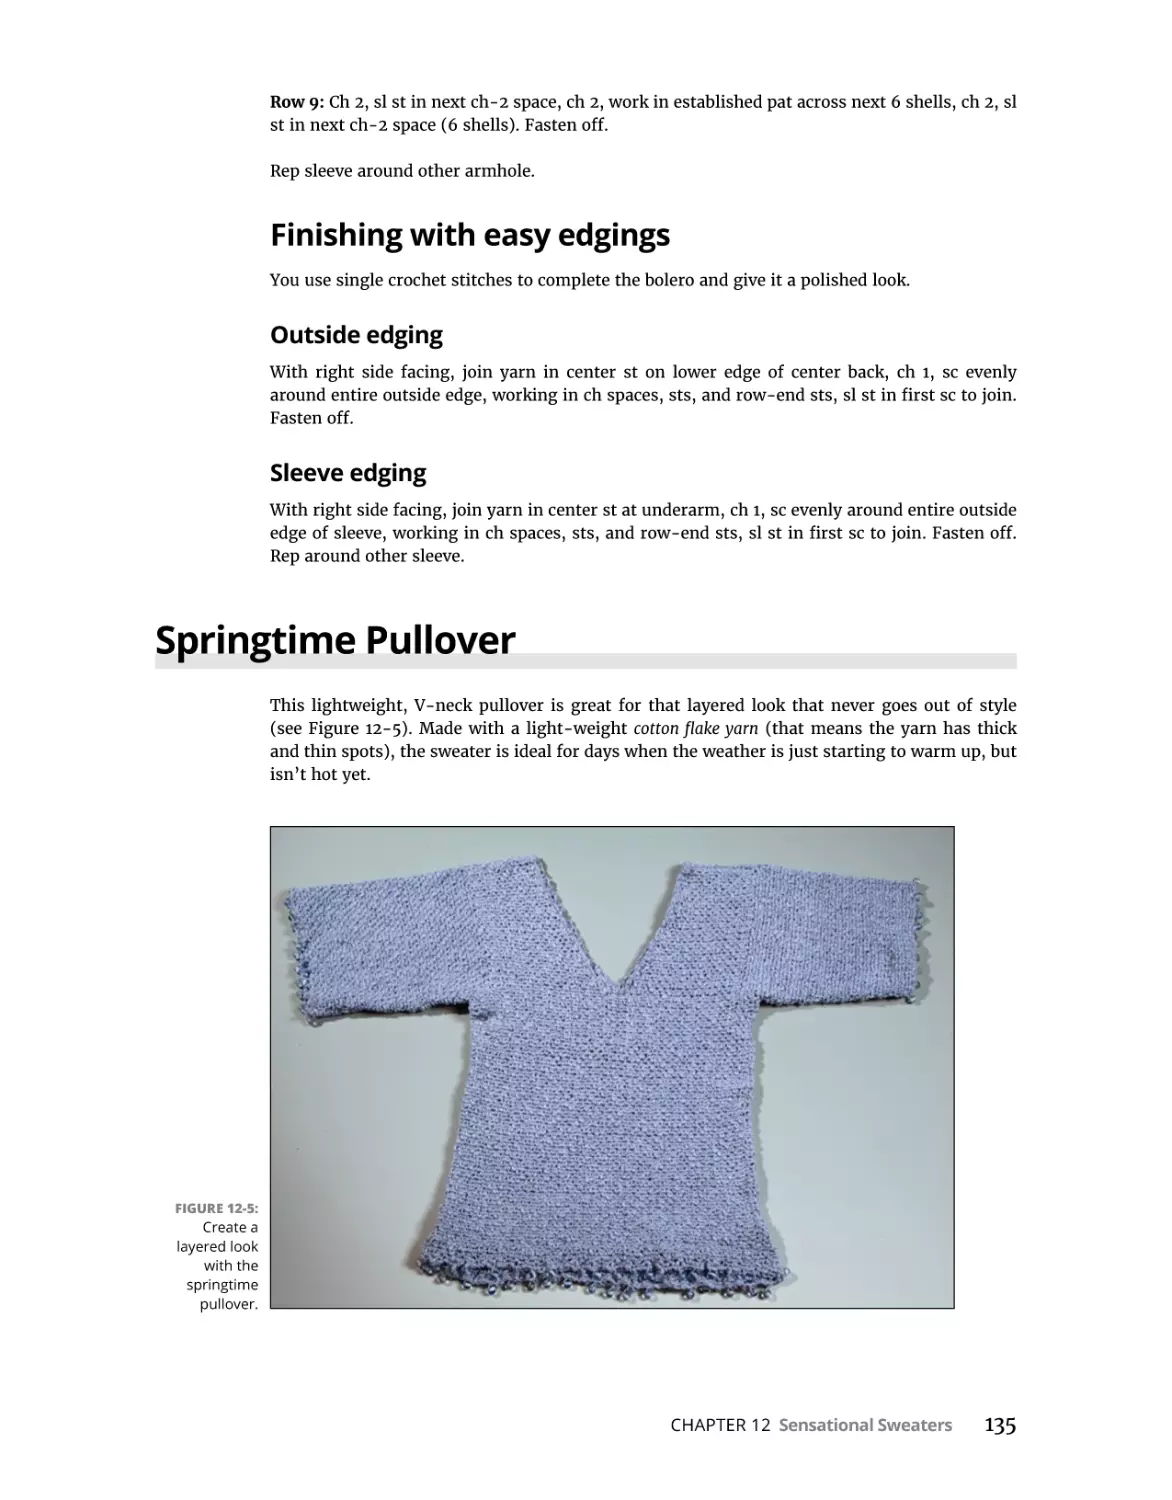
Springtime Pullover. . . . . . . . . . . . . . . . . . . . . . . . . . . . . . . . . . . . . . . . . . . . . . . . . . . . .
Materials and vital statistics. . . . . . . . . . . . . . . . . . . . . . . . . . . . . . . . . . . . . . . . . . .
Fashioning the front and back. . . . . . . . . . . . . . . . . . . . . . . . . . . . . . . . . . . . . . . . .
Attaching the front and back. . . . . . . . . . . . . . . . . . . . . . . . . . . . . . . . . . . . . . . . . .
Checking out what’s up with your sleeves. . . . . . . . . . . . . . . . . . . . . . . . . . . . . . .
Completing the sweater assembly . . . . . . . . . . . . . . . . . . . . . . . . . . . . . . . . . . . . .
Adding the finishing touches. . . . . . . . . . . . . . . . . . . . . . . . . . . . . . . . . . . . . . . . . .
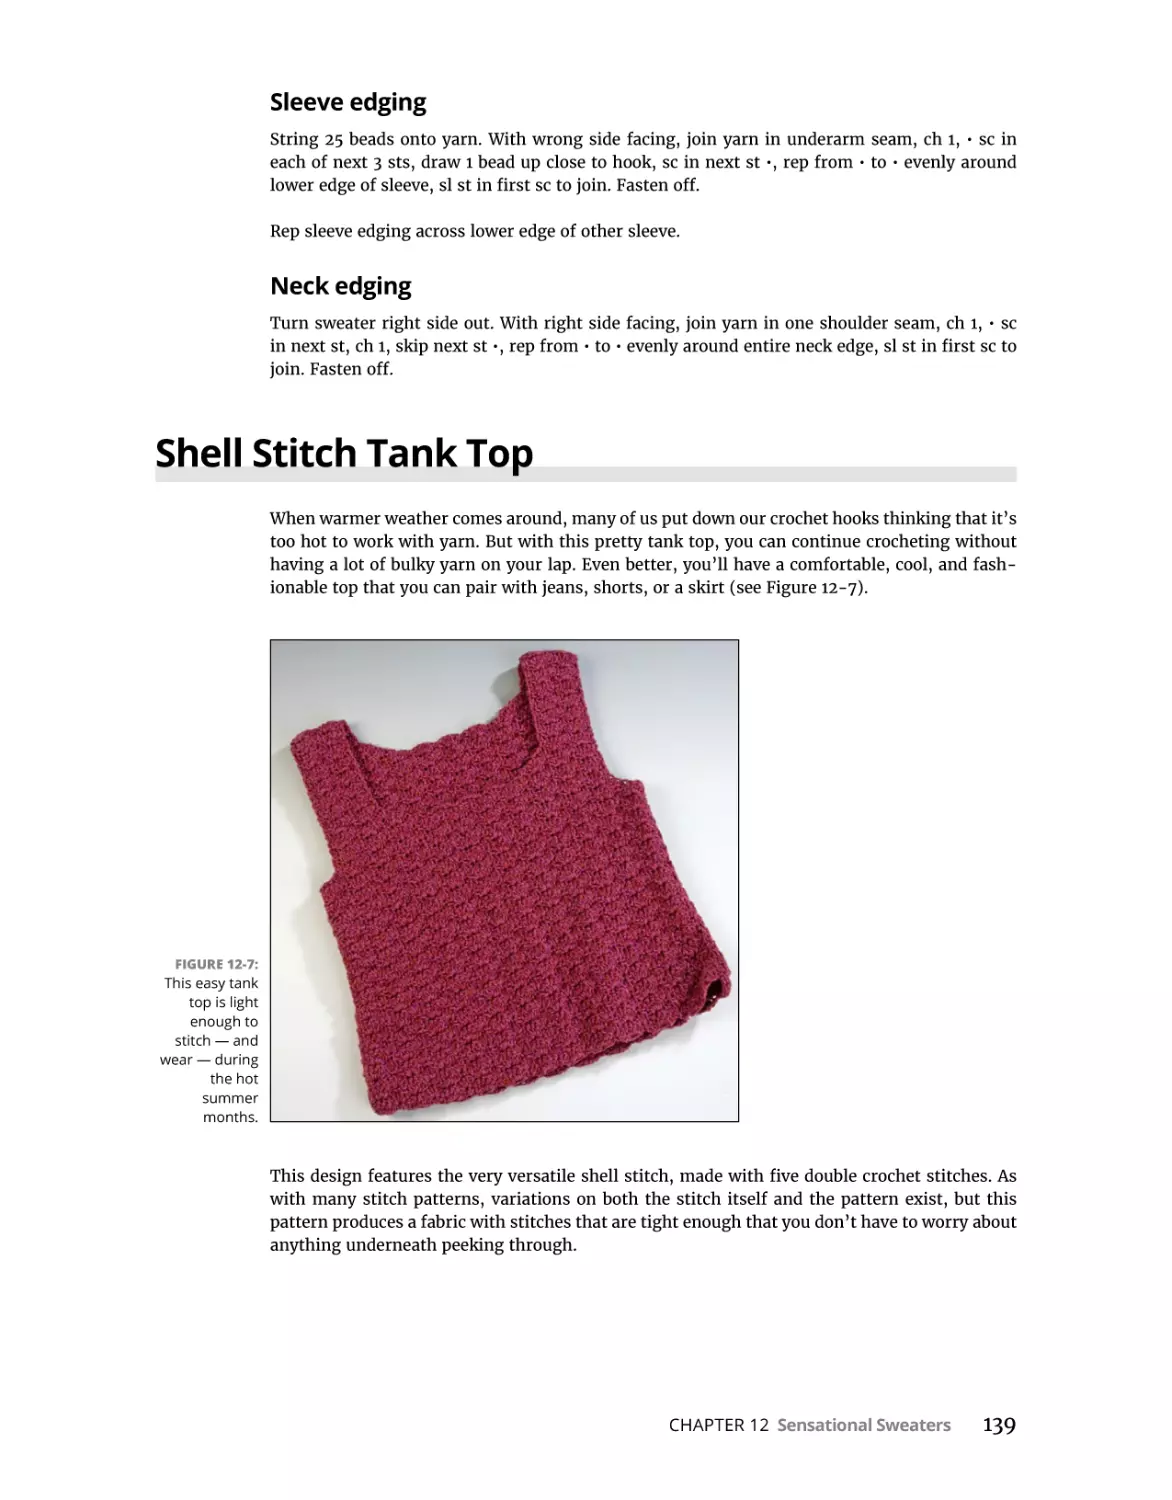
Shell Stitch Tank Top. . . . . . . . . . . . . . . . . . . . . . . . . . . . . . . . . . . . . . . . . . . . . . . . . . . .
Materials and vital statistics. . . . . . . . . . . . . . . . . . . . . . . . . . . . . . . . . . . . . . . . . . .
First, you’ve got your back . . . . . . . . . . . . . . . . . . . . . . . . . . . . . . . . . . . . . . . . . . . .
Next, focus on the front . . . . . . . . . . . . . . . . . . . . . . . . . . . . . . . . . . . . . . . . . . . . . .
In the home stretch! Tackling the assembly . . . . . . . . . . . . . . . . . . . . . . . . . . . . .
Finally, finishing with armhole edging . . . . . . . . . . . . . . . . . . . . . . . . . . . . . . . . . .
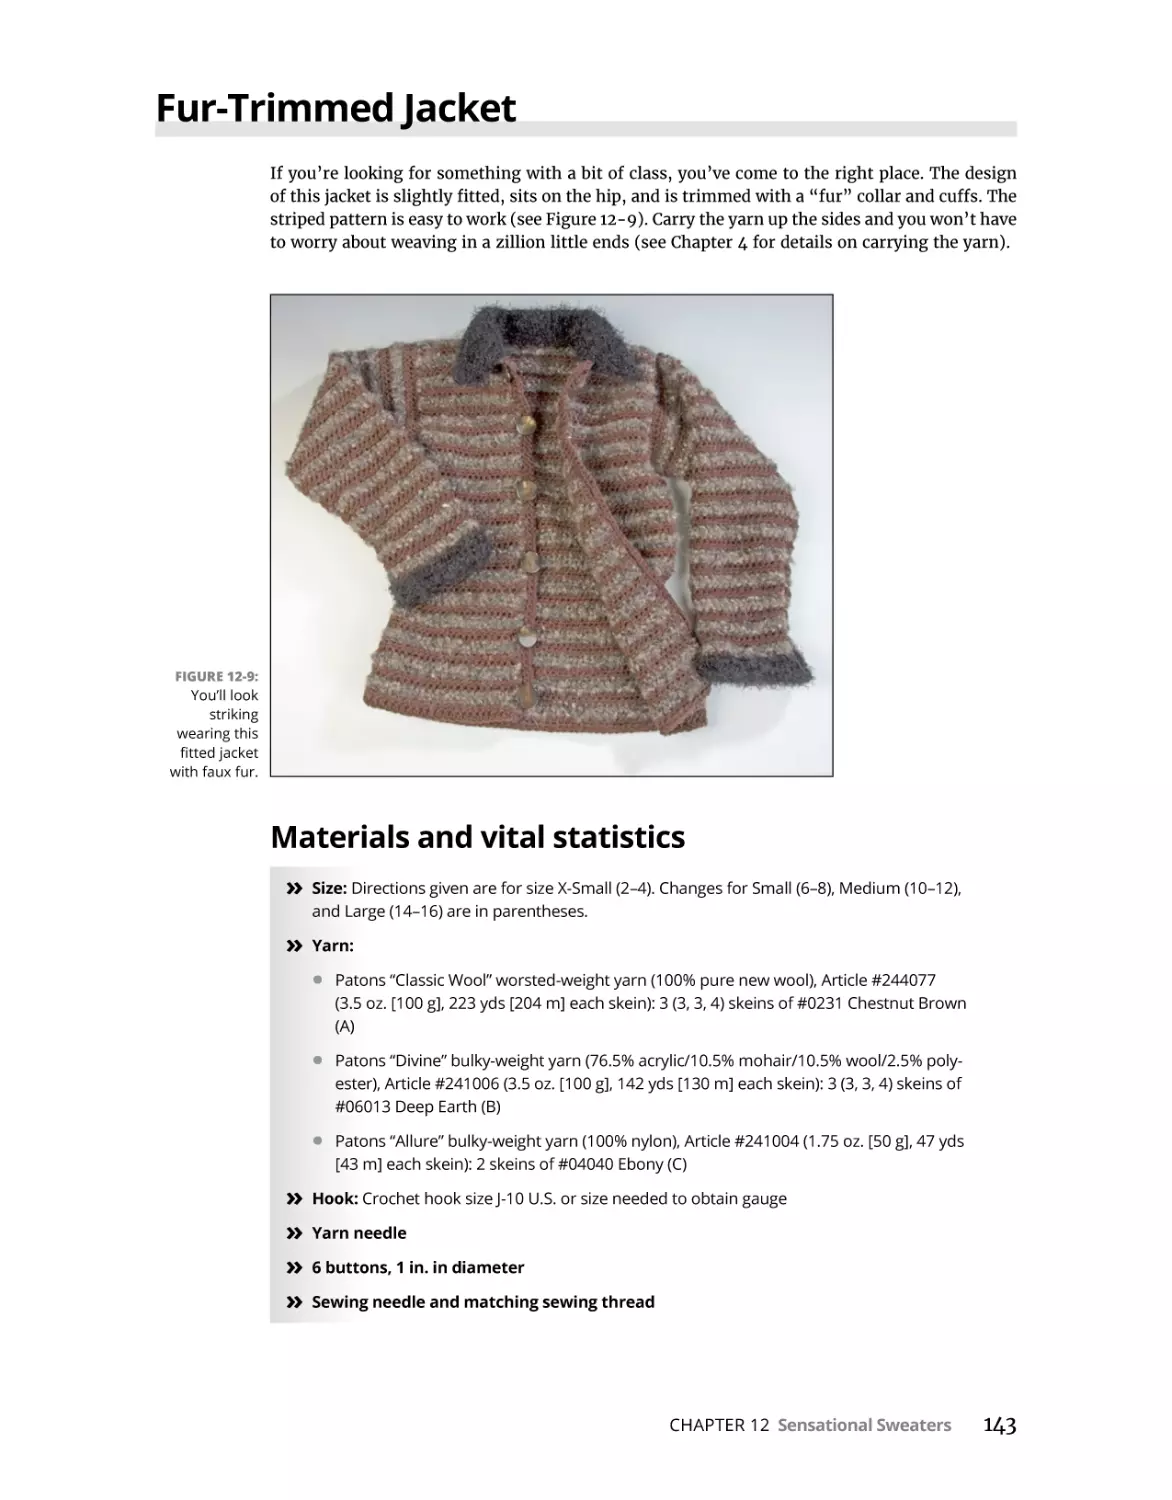
Fur-Trimmed Jacket. . . . . . . . . . . . . . . . . . . . . . . . . . . . . . . . . . . . . . . . . . . . . . . . . . . . .
Materials and vital statistics. . . . . . . . . . . . . . . . . . . . . . . . . . . . . . . . . . . . . . . . . . .
Getting down to business: The back. . . . . . . . . . . . . . . . . . . . . . . . . . . . . . . . . . . .
What’s left? The left front . . . . . . . . . . . . . . . . . . . . . . . . . . . . . . . . . . . . . . . . . . . . .
It’s all right: The right front. . . . . . . . . . . . . . . . . . . . . . . . . . . . . . . . . . . . . . . . . . . .
Fronts meet back: Attaching the pieces. . . . . . . . . . . . . . . . . . . . . . . . . . . . . . . . .
Armed and delicate: Creating the sleeves . . . . . . . . . . . . . . . . . . . . . . . . . . . . . . .
Sew what? Joining the sleeves to the jacket body. . . . . . . . . . . . . . . . . . . . . . . . .
Delightful! Finishing with details . . . . . . . . . . . . . . . . . . . . . . . . . . . . . . . . . . . . . . .
135
136
137
138
138
138
138
139
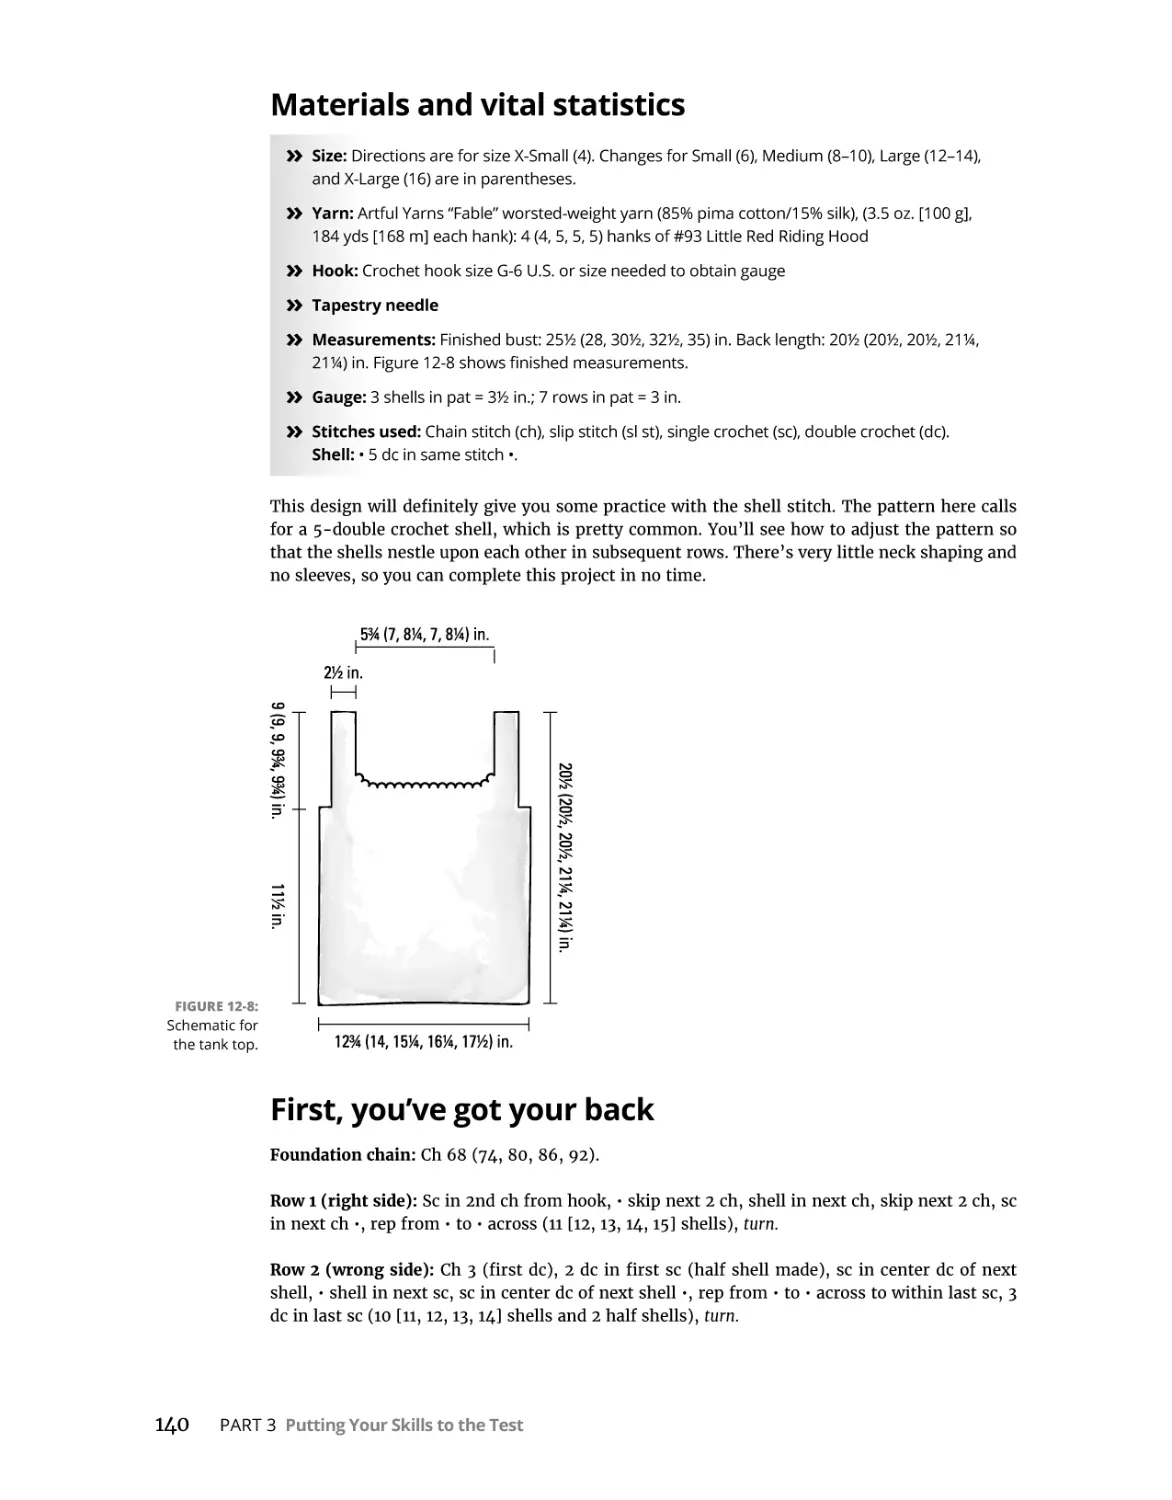
140
140
141
142
142
143
143
144
145
146
146
146
147
147
Timeless Techniques: Using the Afghan Stitch and
Filet Crochet . . . . . . . . . . . . . . . . . . . . . . . . . . . . . . . . . . . . . . . . . . . . . . . . . . . . . . . . .
149
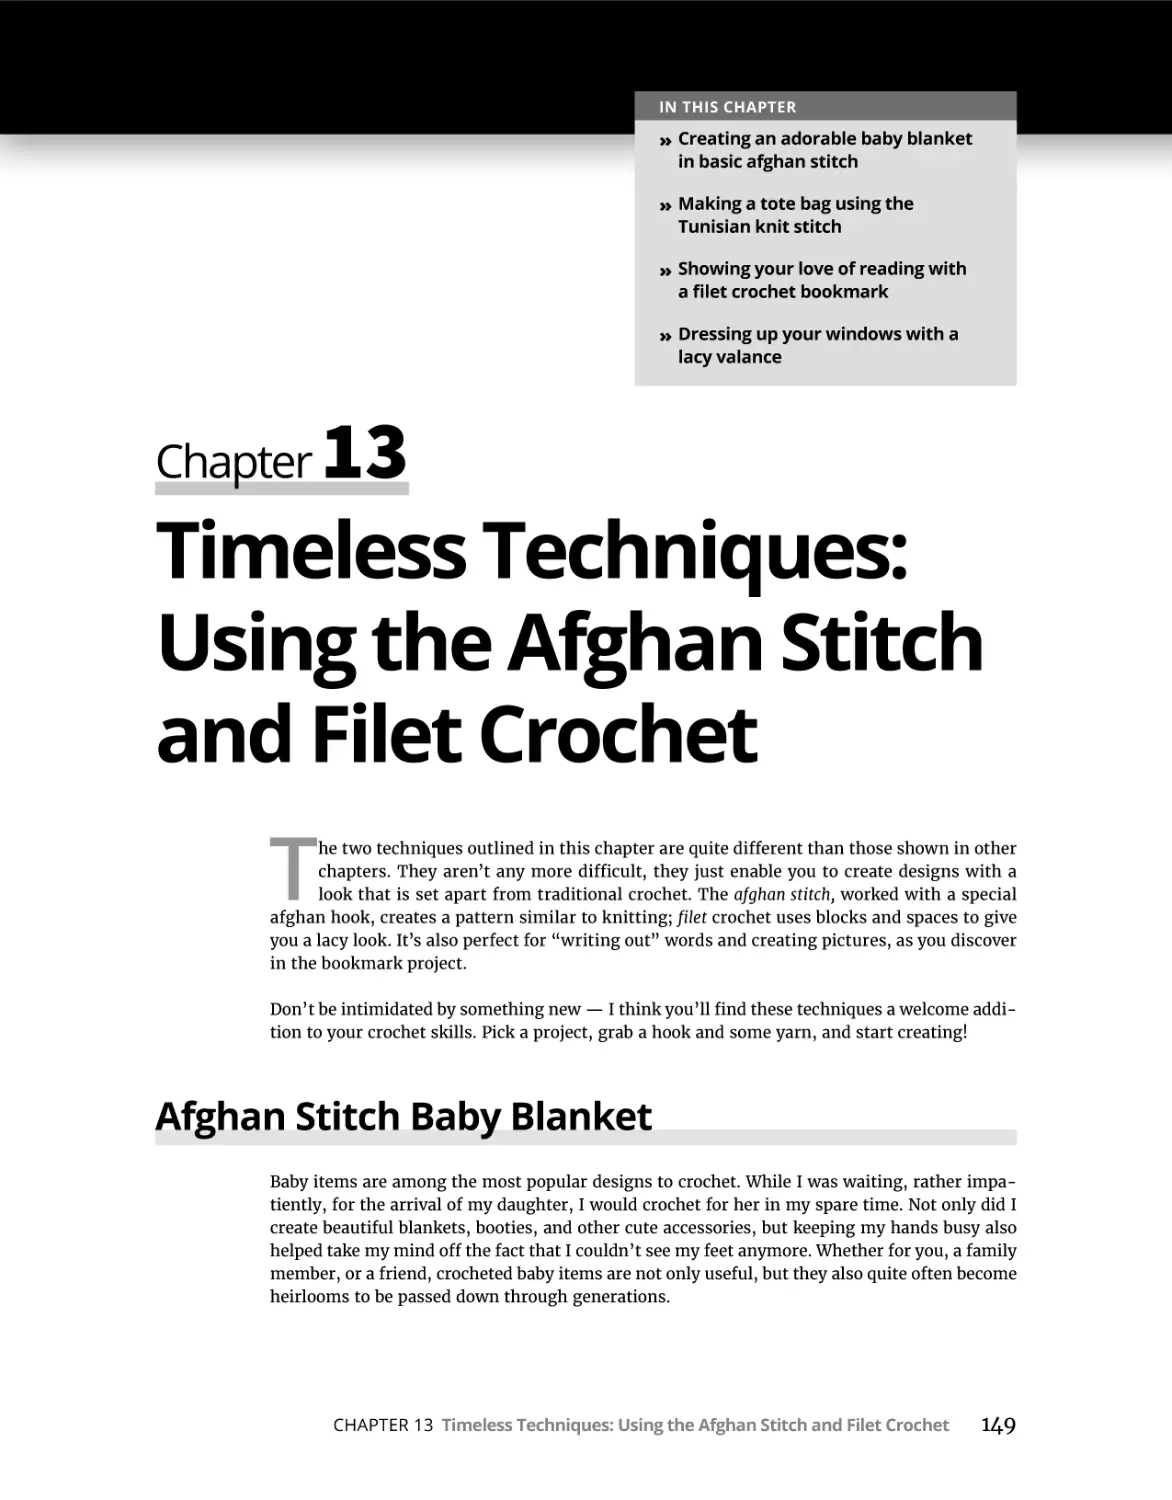
Afghan Stitch Baby Blanket . . . . . . . . . . . . . . . . . . . . . . . . . . . . . . . . . . . . . . . . . . . . . .
New skill: The afghan stitch . . . . . . . . . . . . . . . . . . . . . . . . . . . . . . . . . . . . . . . . . . .
Materials and vital statistics. . . . . . . . . . . . . . . . . . . . . . . . . . . . . . . . . . . . . . . . . . .
Creating a couple of panels . . . . . . . . . . . . . . . . . . . . . . . . . . . . . . . . . . . . . . . . . . .
Putting the panels together and adding the final touch . . . . . . . . . . . . . . . . . . .
Variation: Making a bigger blankie . . . . . . . . . . . . . . . . . . . . . . . . . . . . . . . . . . . . .
Variation: Picking a new color palette. . . . . . . . . . . . . . . . . . . . . . . . . . . . . . . . . . .
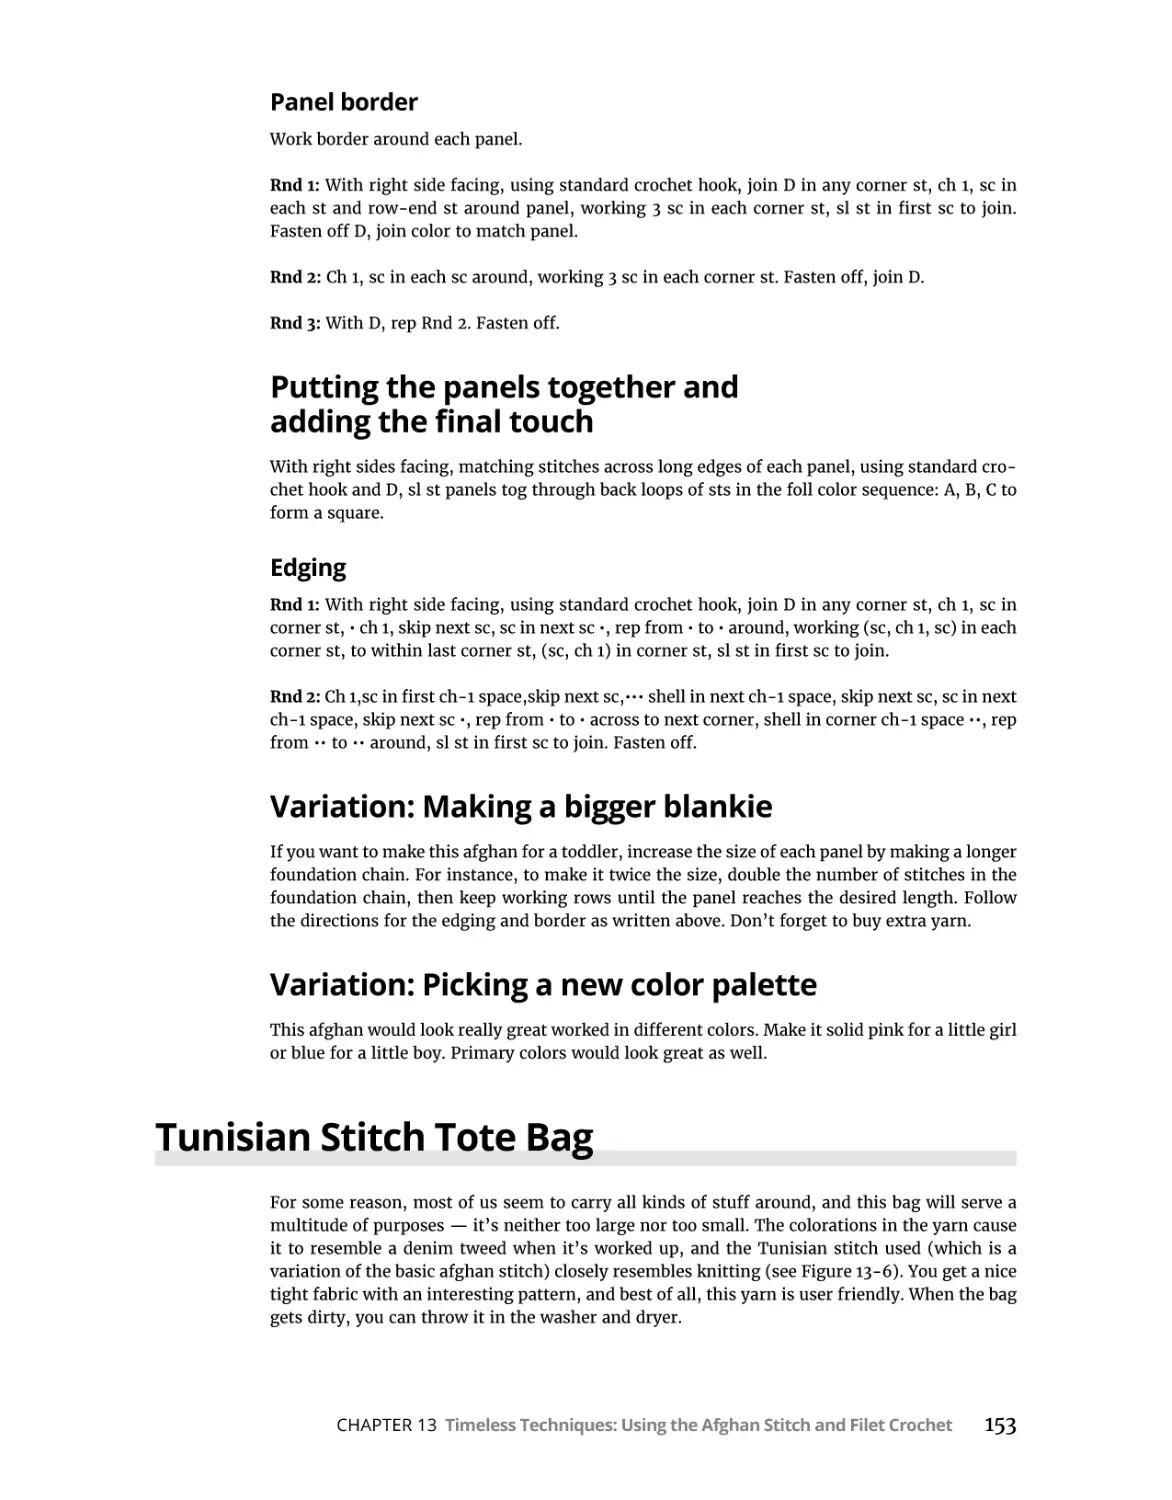
Tunisian Stitch Tote Bag. . . . . . . . . . . . . . . . . . . . . . . . . . . . . . . . . . . . . . . . . . . . . . . . .
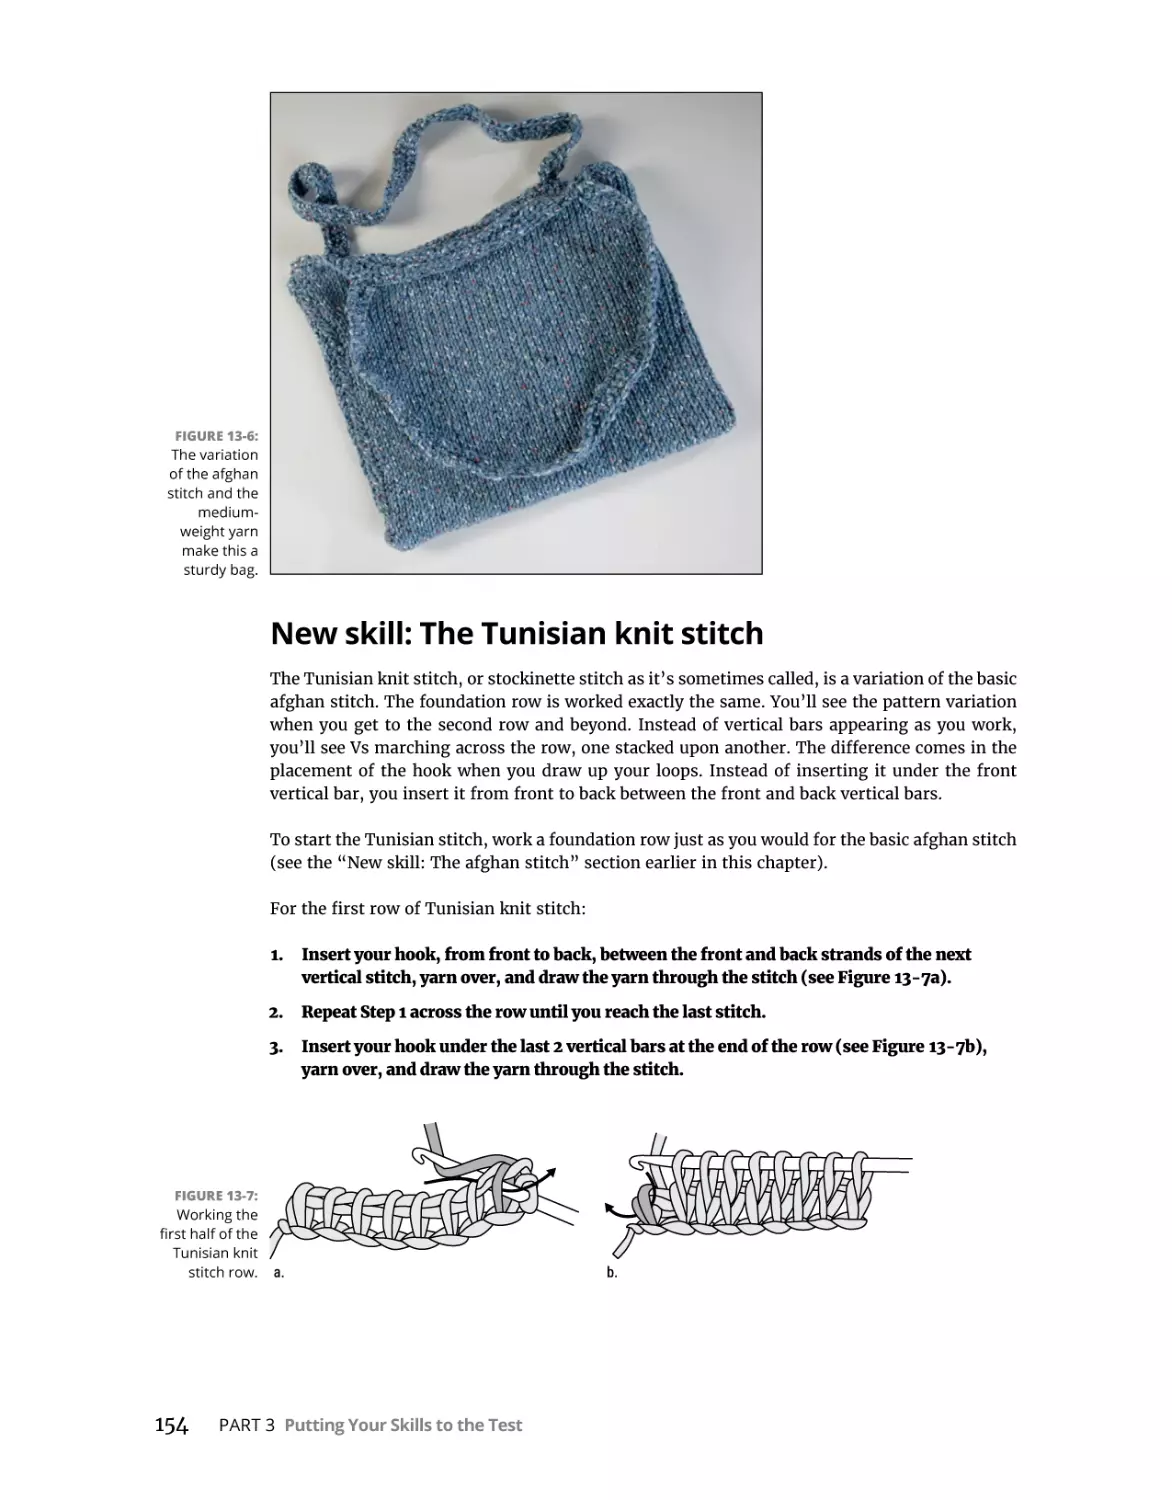
New skill: The Tunisian knit stitch. . . . . . . . . . . . . . . . . . . . . . . . . . . . . . . . . . . . . .
Materials and vital statistics. . . . . . . . . . . . . . . . . . . . . . . . . . . . . . . . . . . . . . . . . . .
Making the body of the bag. . . . . . . . . . . . . . . . . . . . . . . . . . . . . . . . . . . . . . . . . . .
Adding the handles . . . . . . . . . . . . . . . . . . . . . . . . . . . . . . . . . . . . . . . . . . . . . . . . . .
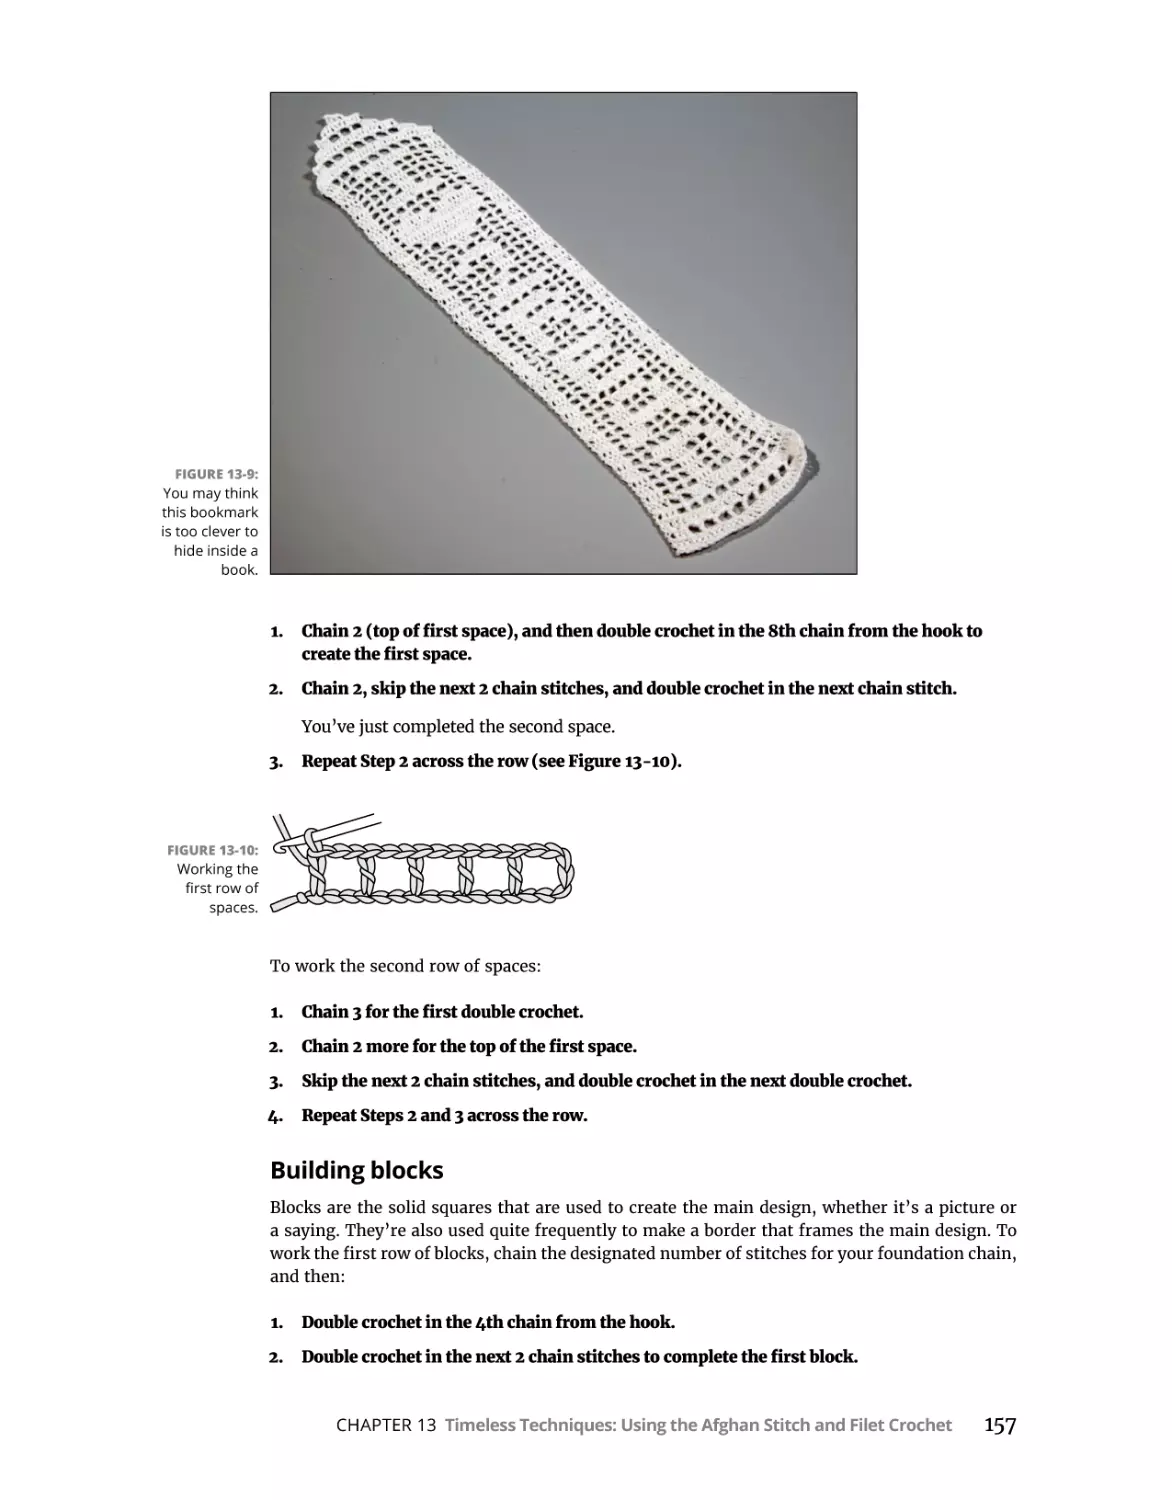
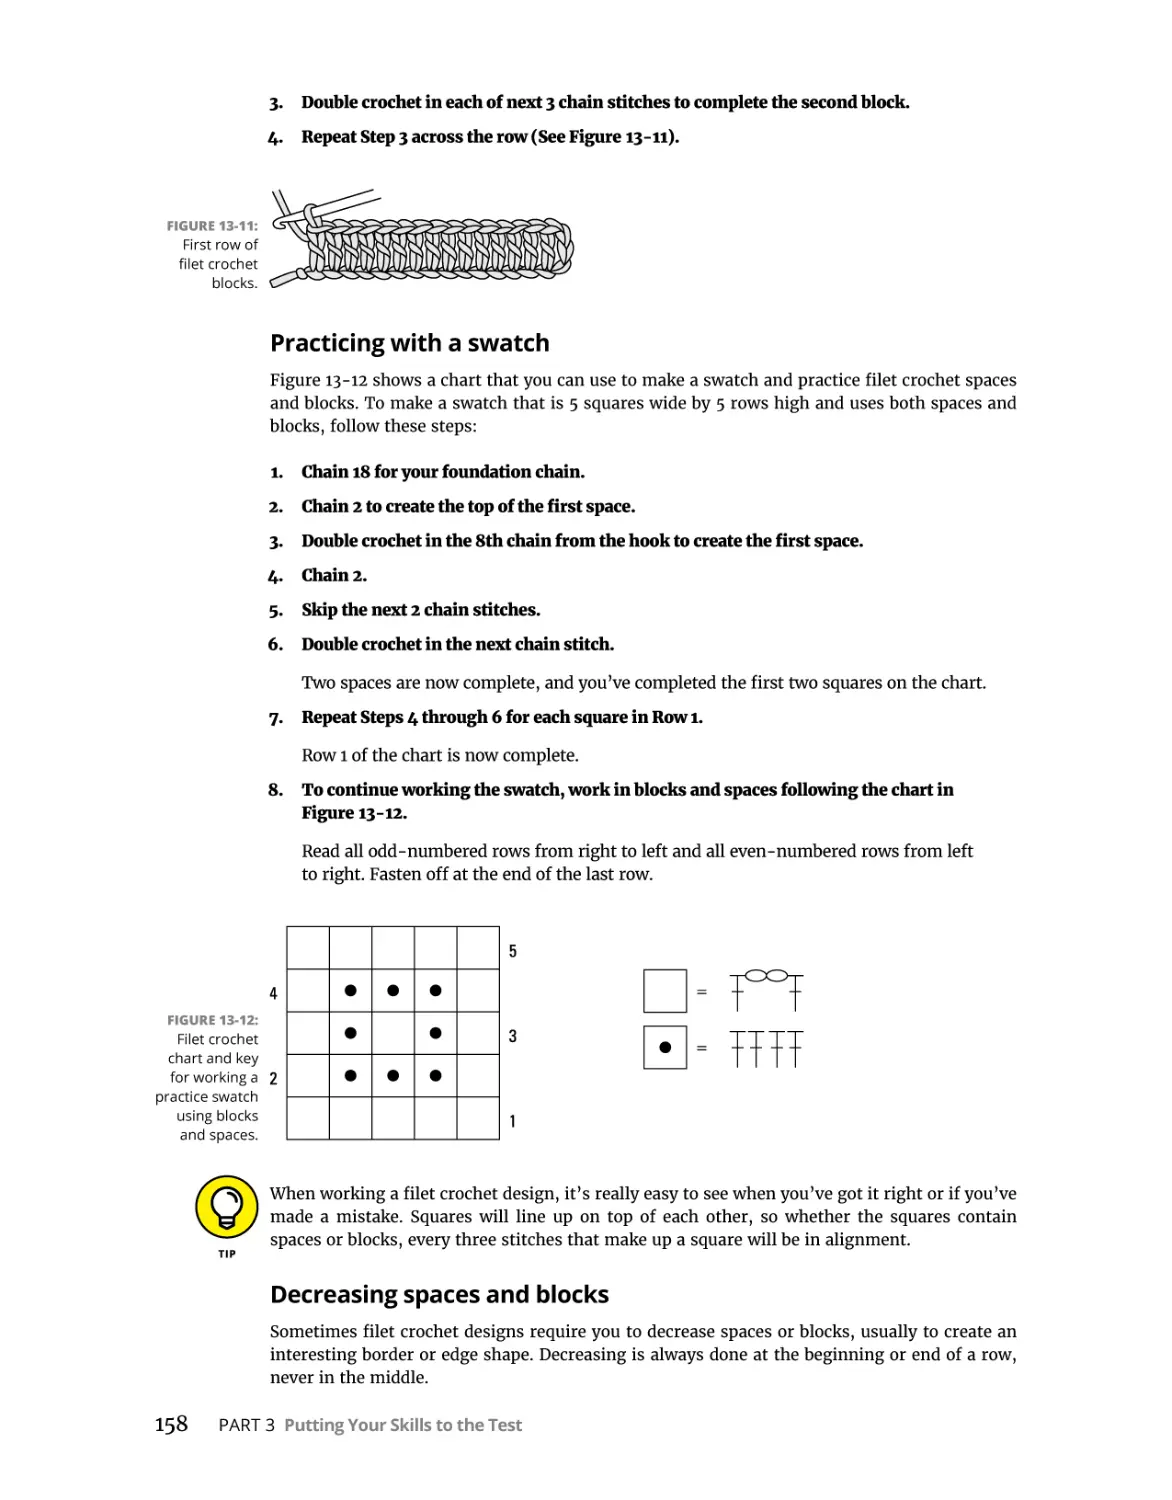
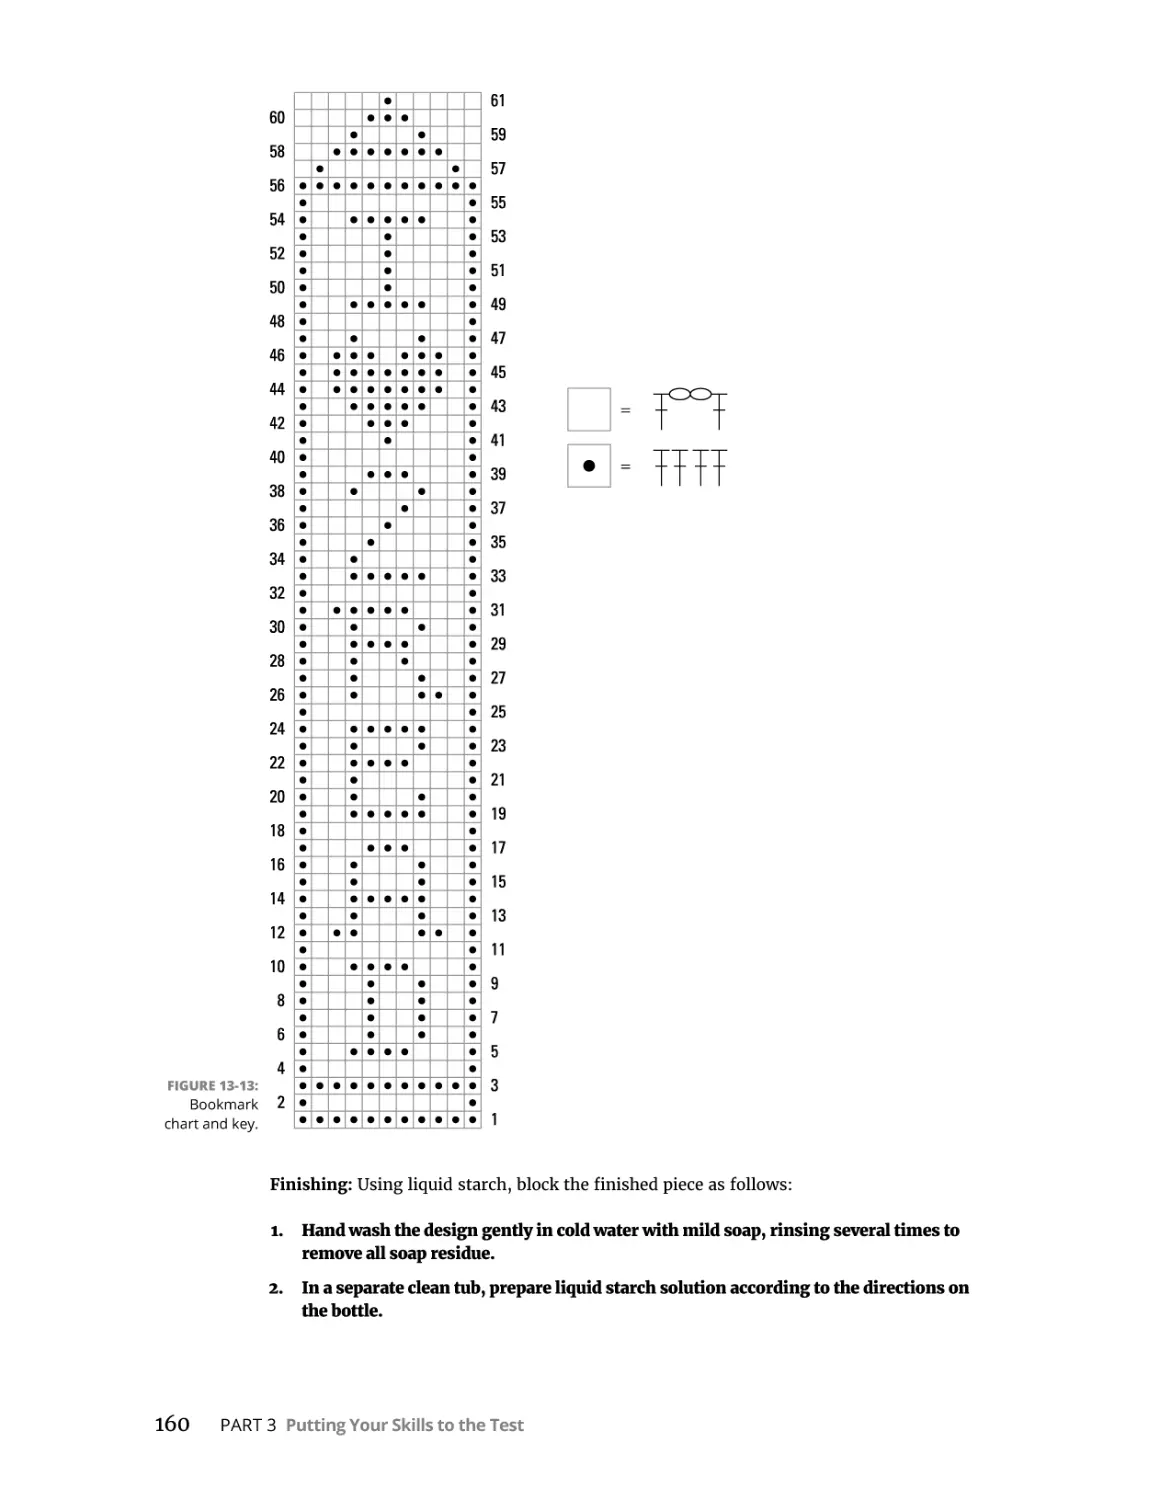
Love-to-Read Bookmark. . . . . . . . . . . . . . . . . . . . . . . . . . . . . . . . . . . . . . . . . . . . . . . . .
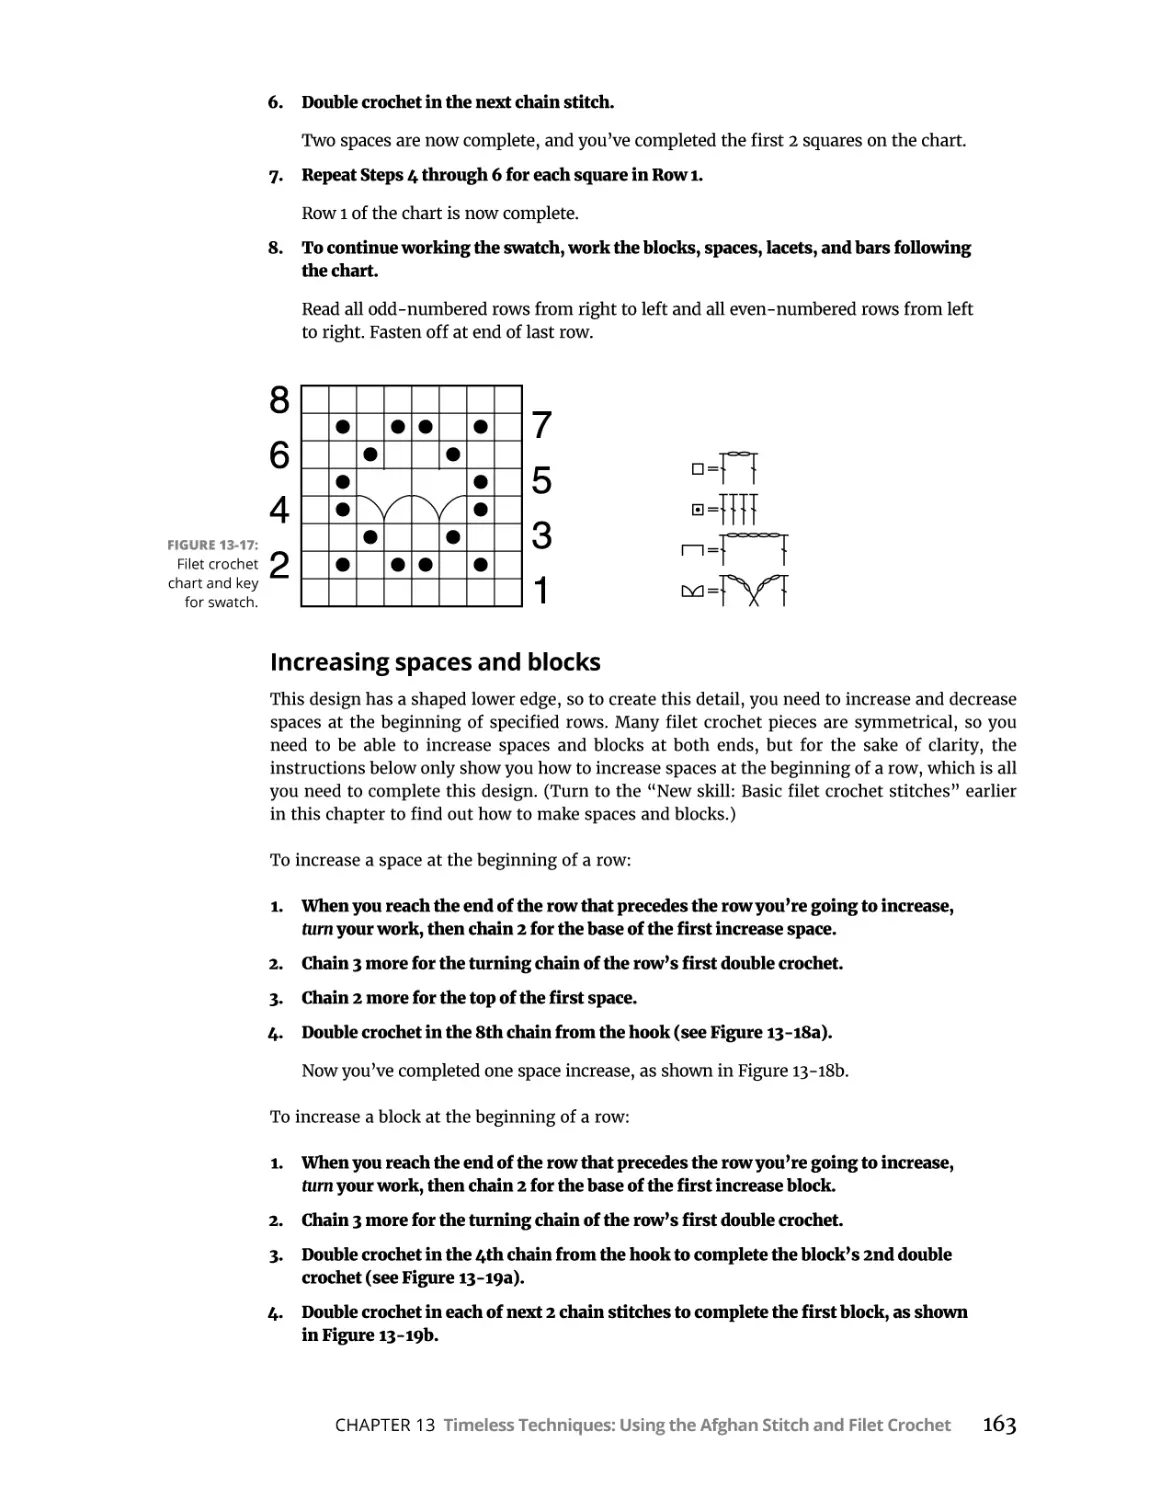
New skill: Basic filet crochet stitches. . . . . . . . . . . . . . . . . . . . . . . . . . . . . . . . . . . .
Materials and vital statistics. . . . . . . . . . . . . . . . . . . . . . . . . . . . . . . . . . . . . . . . . . .
Directions . . . . . . . . . . . . . . . . . . . . . . . . . . . . . . . . . . . . . . . . . . . . . . . . . . . . . . . . . .
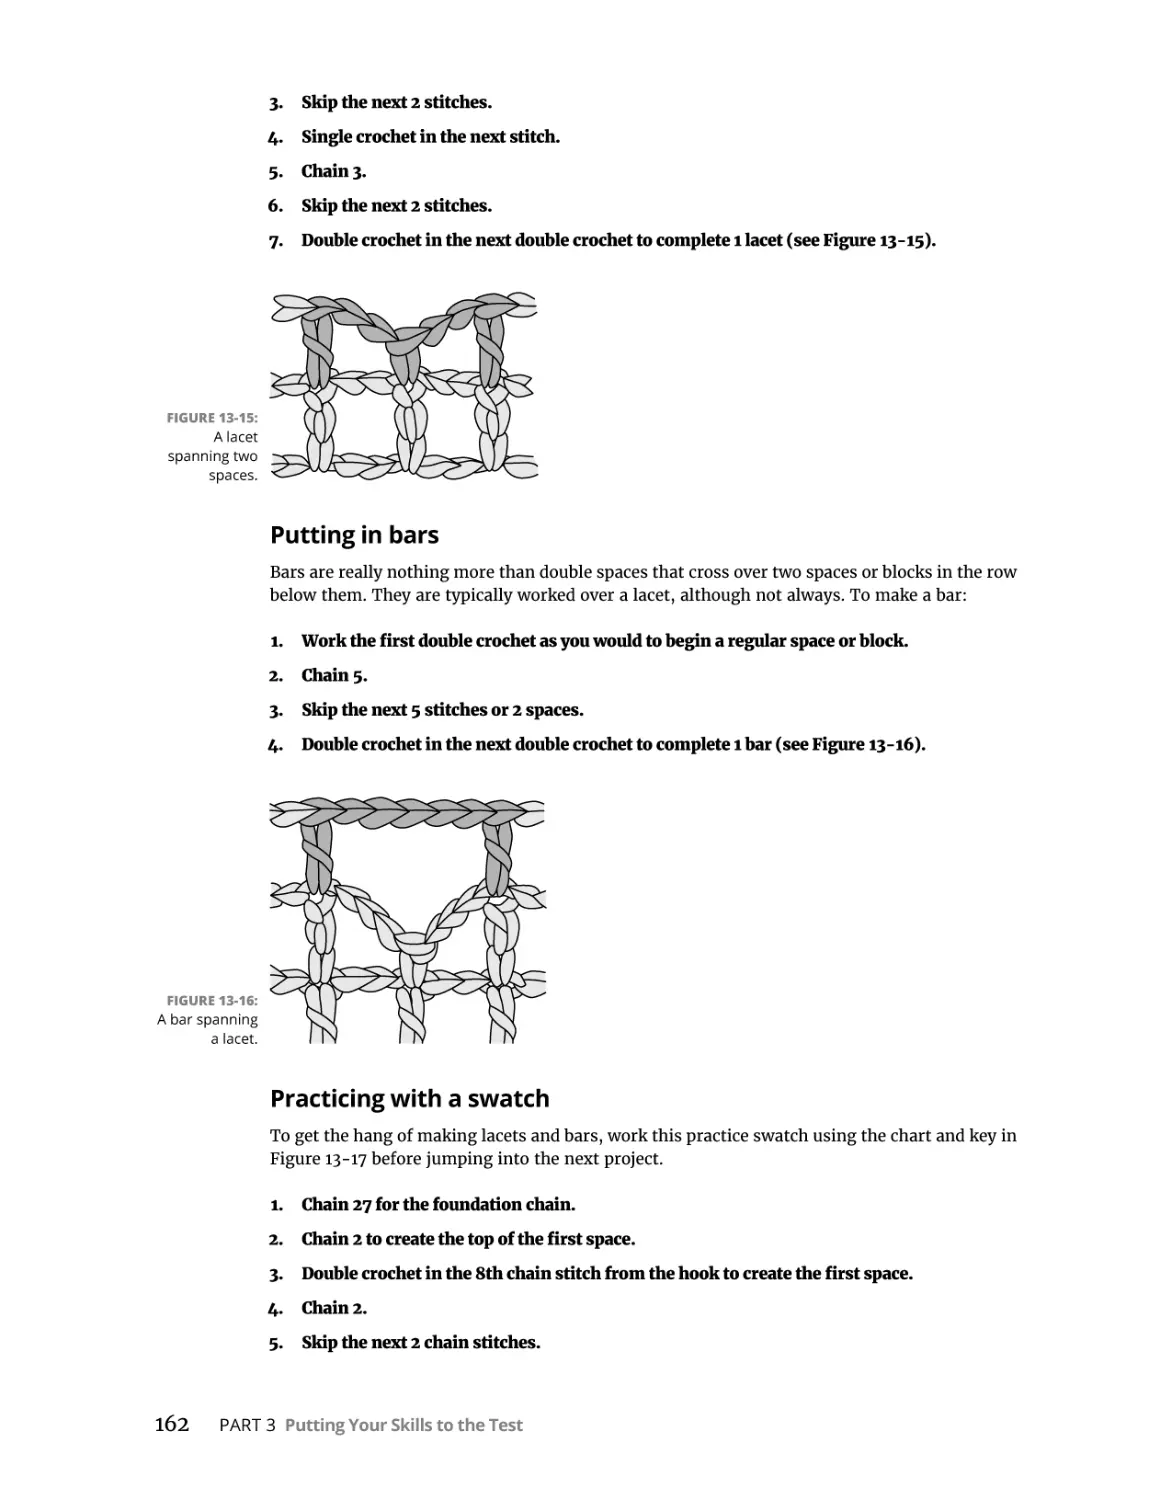
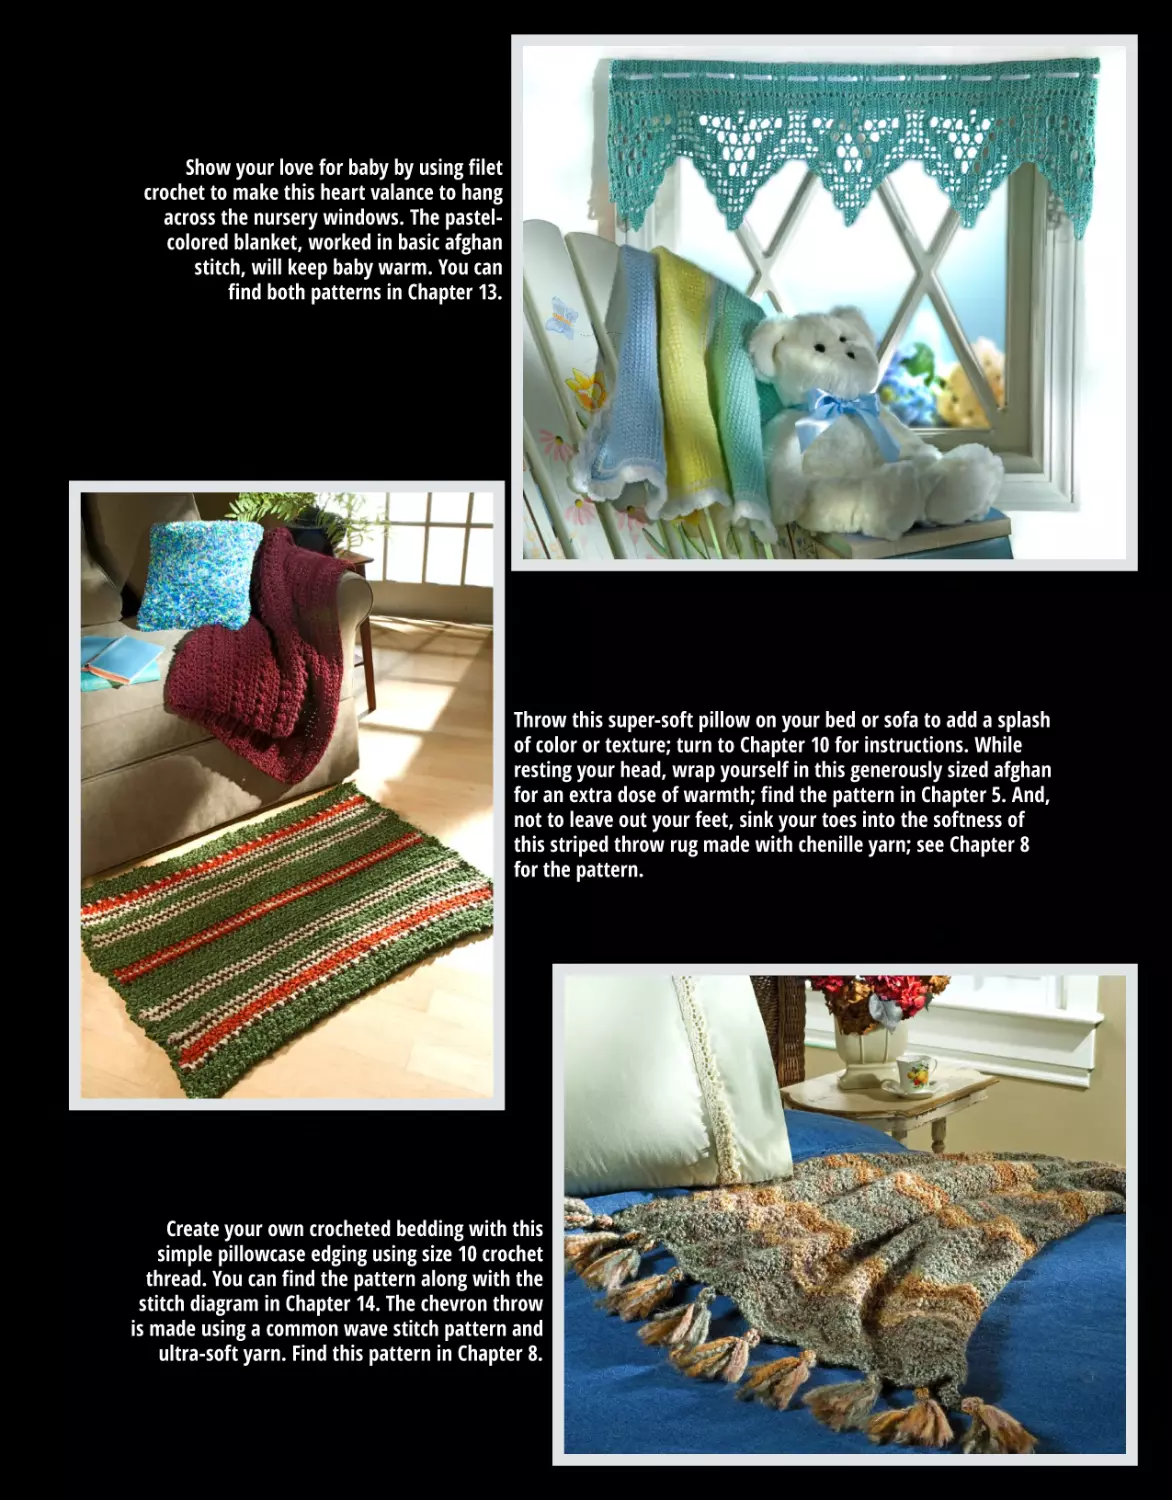
Heartland Window Valance . . . . . . . . . . . . . . . . . . . . . . . . . . . . . . . . . . . . . . . . . . . . . .
New skill: Fancy filet crochet stitches . . . . . . . . . . . . . . . . . . . . . . . . . . . . . . . . . . .
Materials and vital statistics. . . . . . . . . . . . . . . . . . . . . . . . . . . . . . . . . . . . . . . . . . .
Directions . . . . . . . . . . . . . . . . . . . . . . . . . . . . . . . . . . . . . . . . . . . . . . . . . . . . . . . . . .
Variation: Using the pattern to create edging. . . . . . . . . . . . . . . . . . . . . . . . . . . .
149
150
152
152
153
153
153
153
154
155
155
156
156
156
159
159
161
161
164
165
165
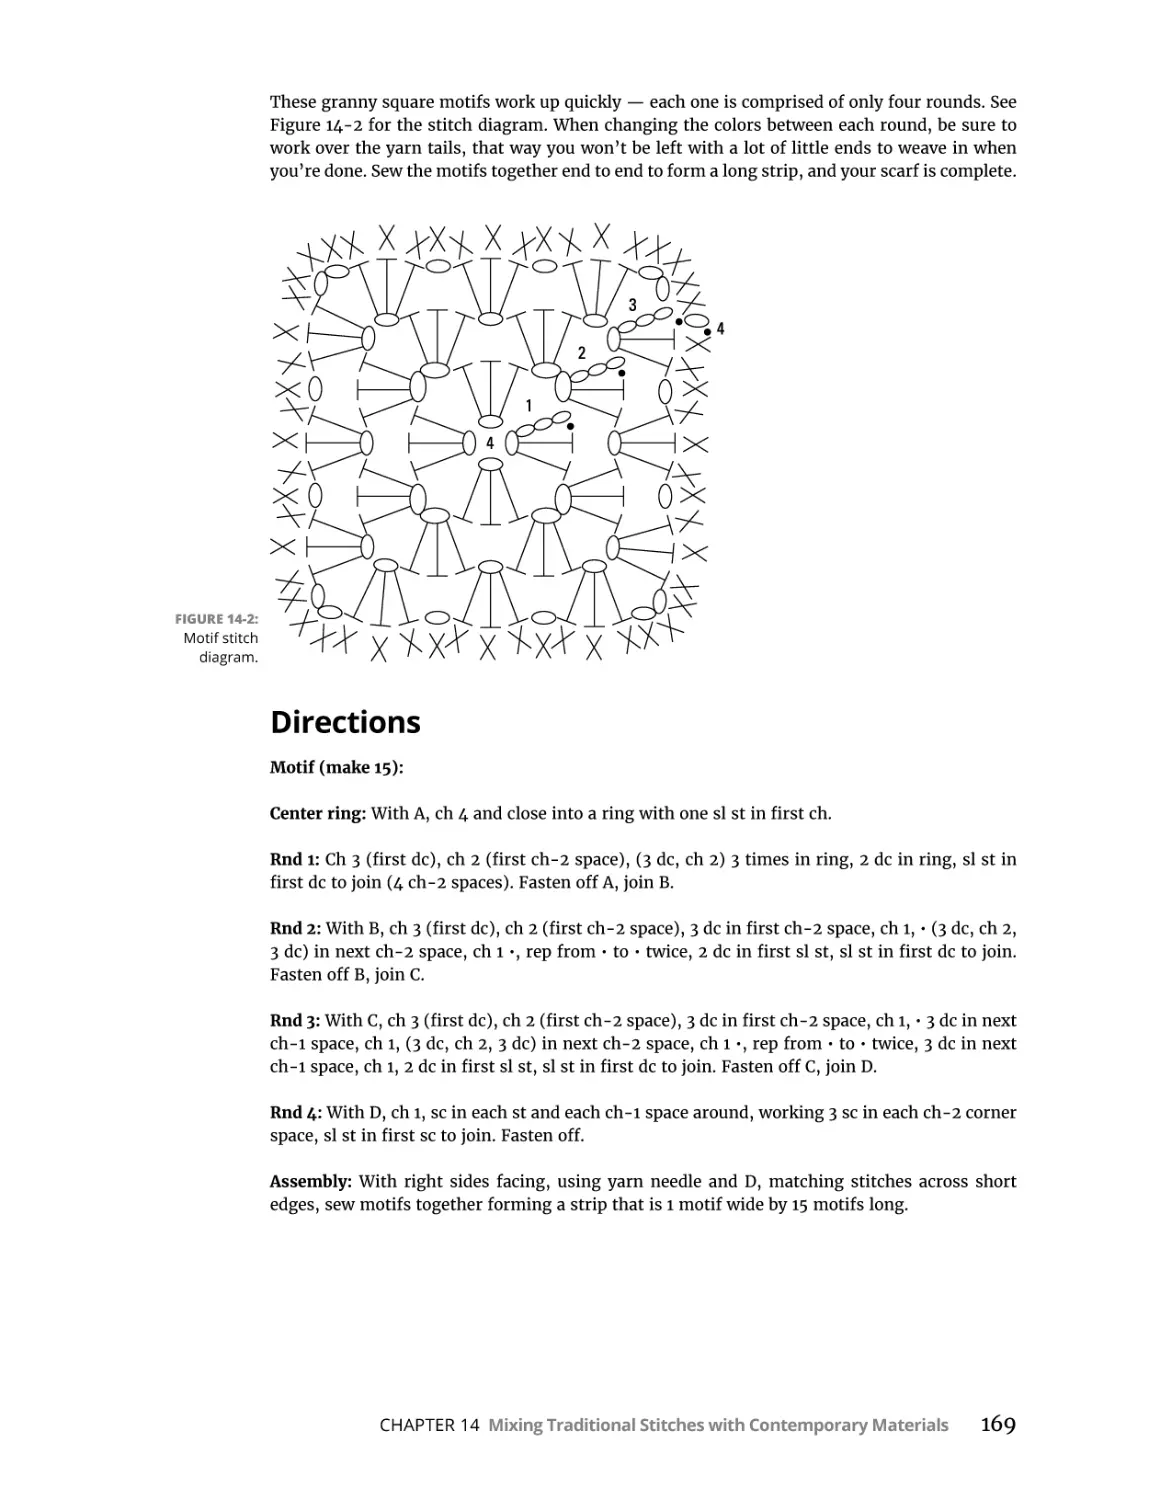
Mixing Traditional Stitches with Contemporary
Materials . . . . . . . . . . . . . . . . . . . . . . . . . . . . . . . . . . . . . . . . . . . . . . . . . . . . . . . . . . . . .
167
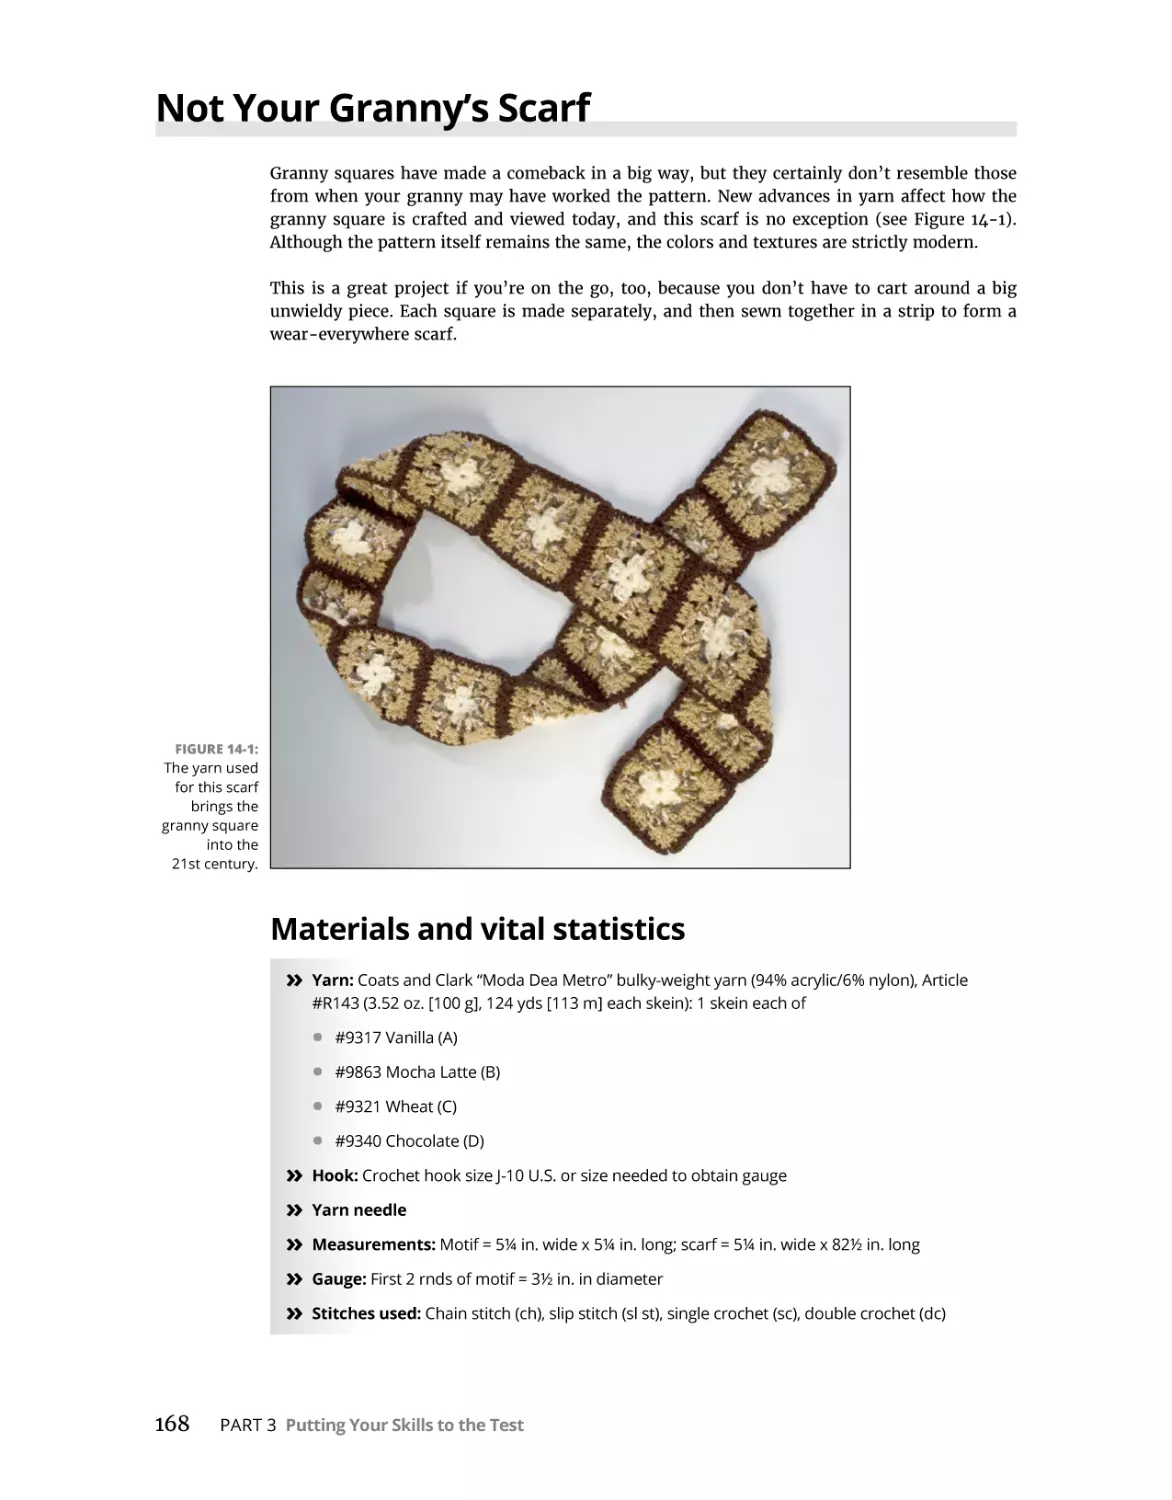
Not Your Granny’s Scarf . . . . . . . . . . . . . . . . . . . . . . . . . . . . . . . . . . . . . . . . . . . . . . . . .
Materials and vital statistics. . . . . . . . . . . . . . . . . . . . . . . . . . . . . . . . . . . . . . . . . . .
Directions . . . . . . . . . . . . . . . . . . . . . . . . . . . . . . . . . . . . . . . . . . . . . . . . . . . . . . . . . .
Variation: Making a cozy afghan . . . . . . . . . . . . . . . . . . . . . . . . . . . . . . . . . . . . . . .
168
168
169
170
Table of Contents
ix
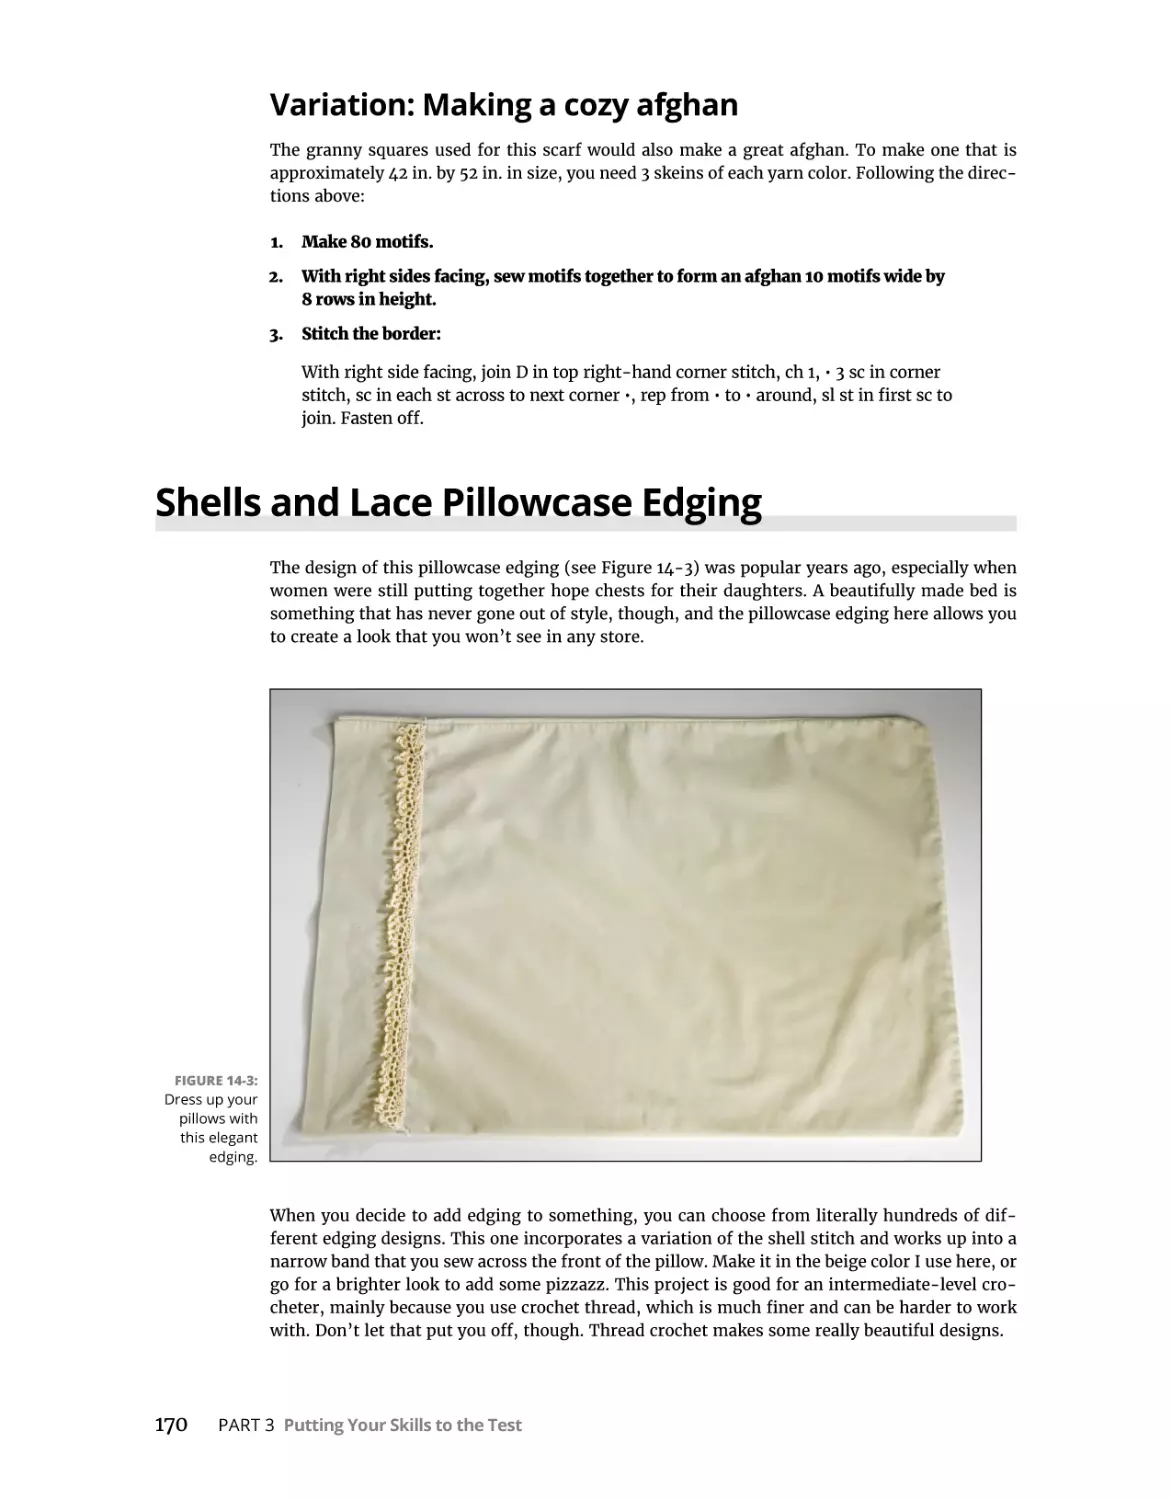
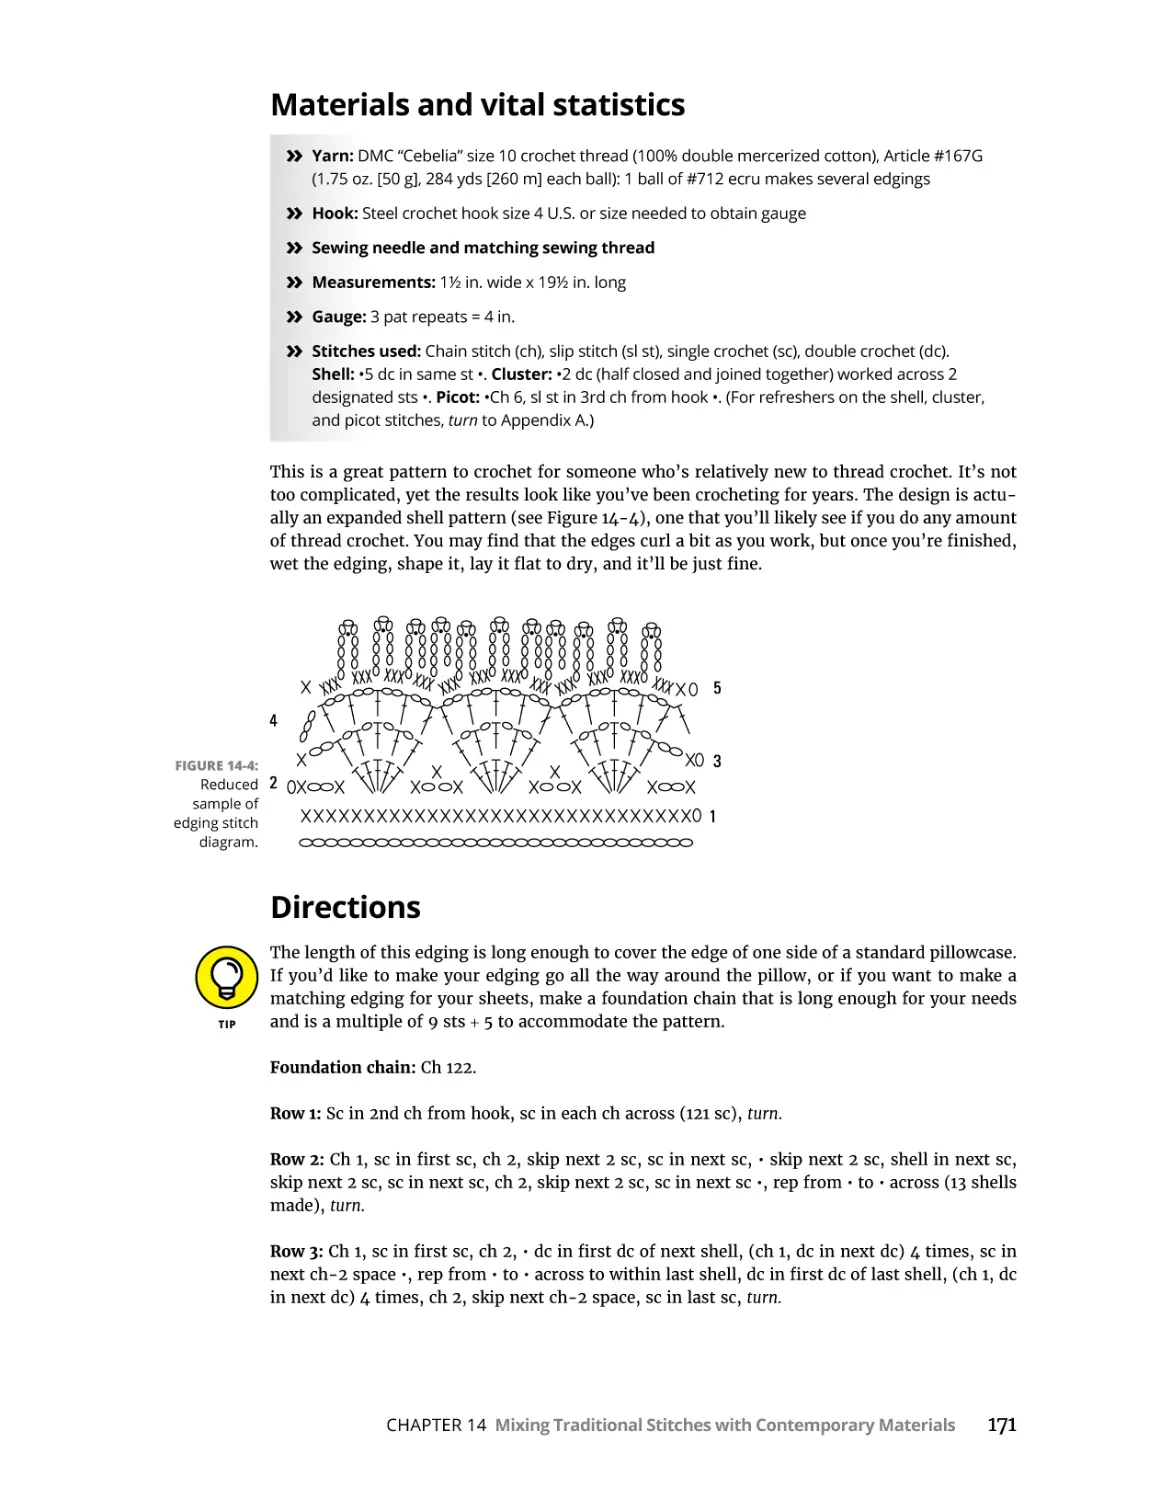
Shells and Lace Pillowcase Edging. . . . . . . . . . . . . . . . . . . . . . . . . . . . . . . . . . . . . . . . . 170
Materials and vital statistics. . . . . . . . . . . . . . . . . . . . . . . . . . . . . . . . . . . . . . . . . . . 171
Directions . . . . . . . . . . . . . . . . . . . . . . . . . . . . . . . . . . . . . . . . . . . . . . . . . . . . . . . . . . 171
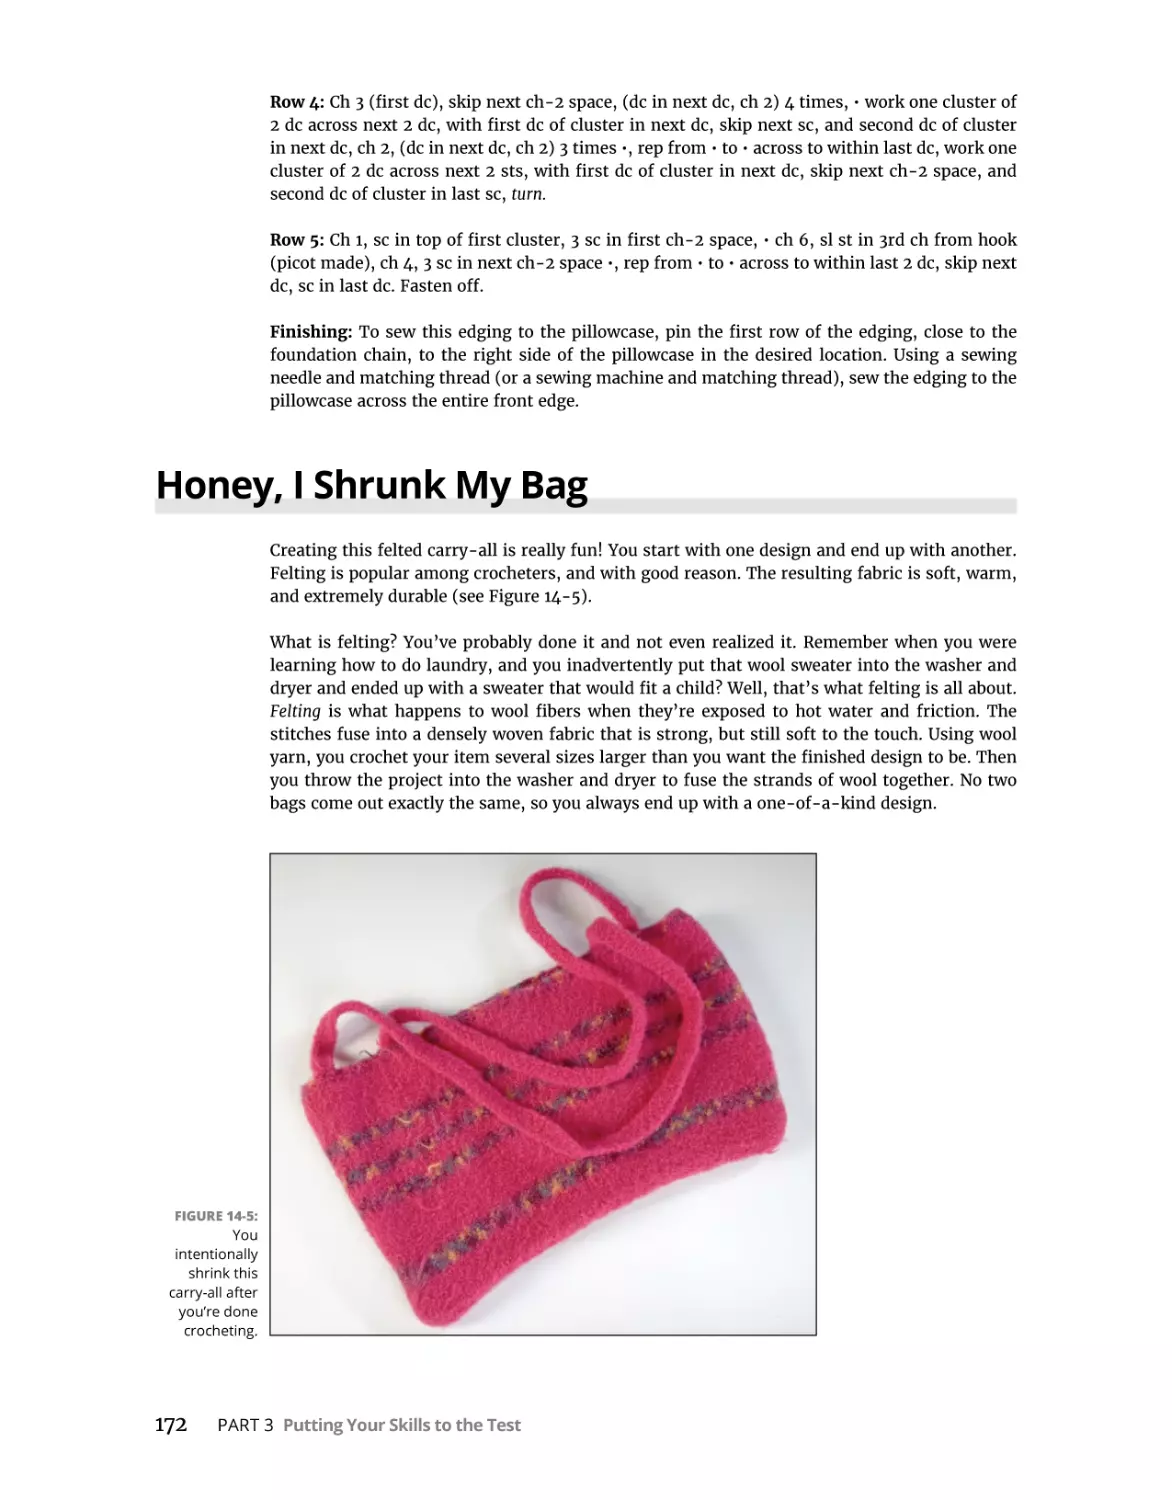
Honey, I Shrunk My Bag . . . . . . . . . . . . . . . . . . . . . . . . . . . . . . . . . . . . . . . . . . . . . . . . . 172
Materials and vital statistics. . . . . . . . . . . . . . . . . . . . . . . . . . . . . . . . . . . . . . . . . . . 173
Crafting the tote. . . . . . . . . . . . . . . . . . . . . . . . . . . . . . . . . . . . . . . . . . . . . . . . . . . . . 173
Getting the hang of the handles . . . . . . . . . . . . . . . . . . . . . . . . . . . . . . . . . . . . . . . 174
Finishing up with felting . . . . . . . . . . . . . . . . . . . . . . . . . . . . . . . . . . . . . . . . . . . . . . 174
Variation: Felting? Fuhgeddaboudit!. . . . . . . . . . . . . . . . . . . . . . . . . . . . . . . . . . . . 174
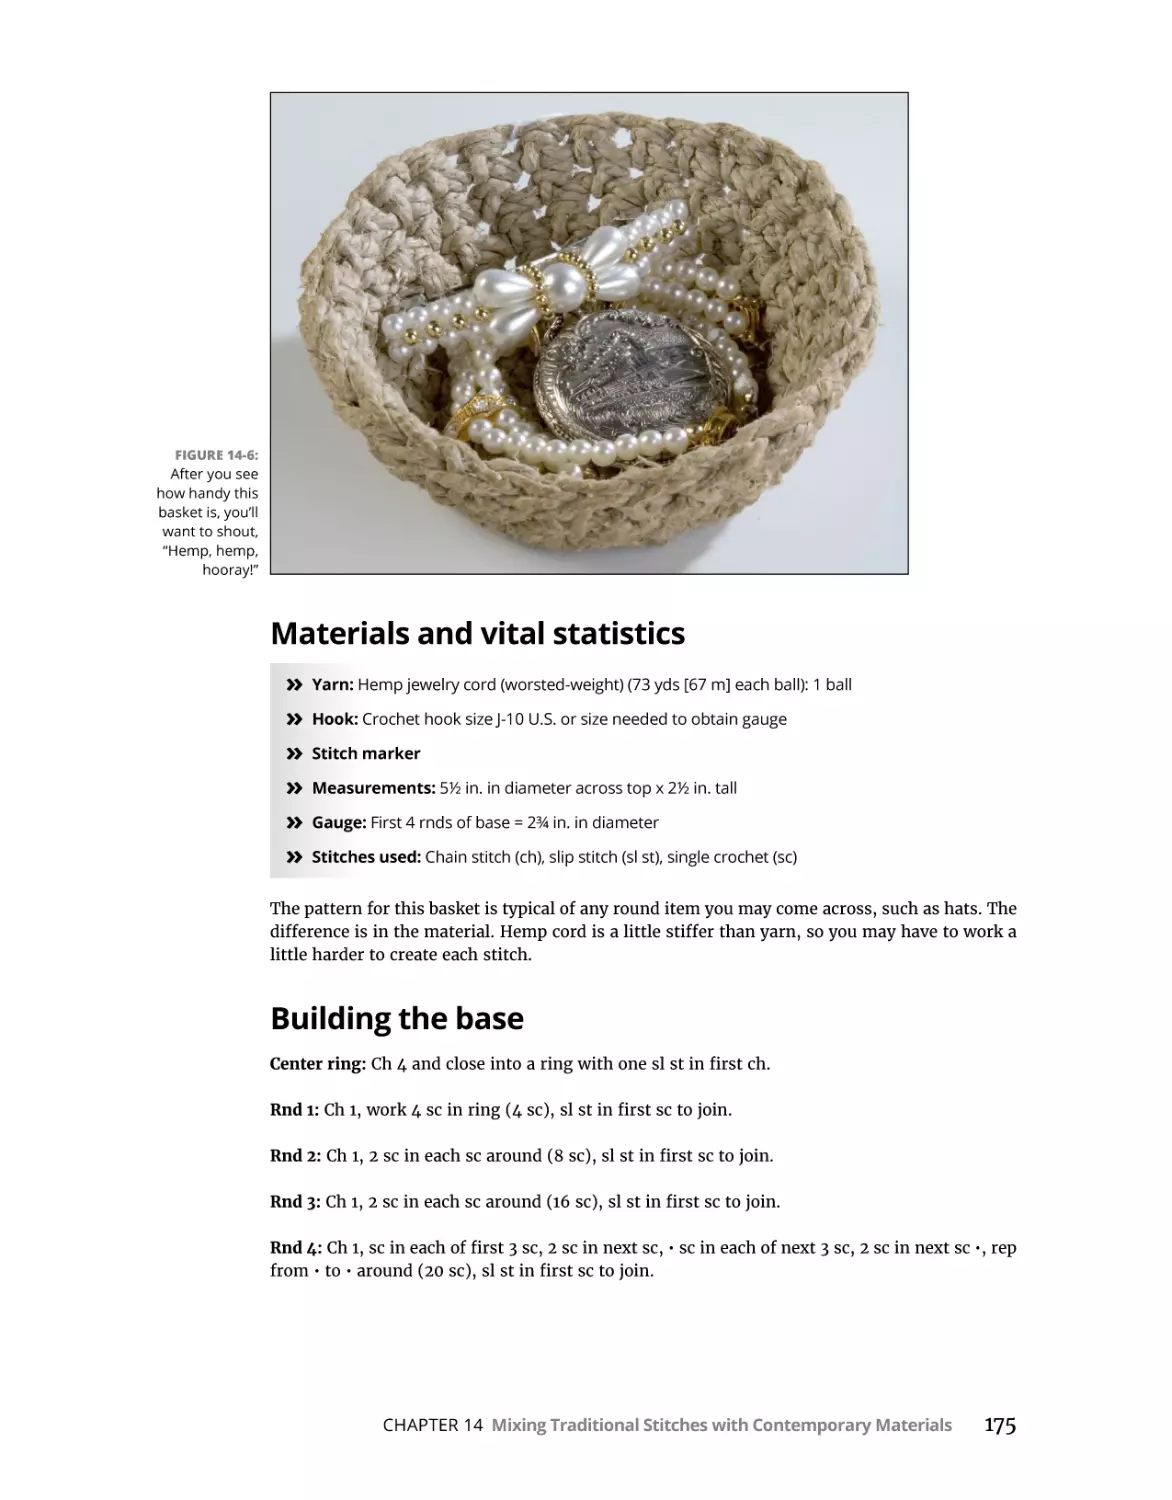
Hemp Basket . . . . . . . . . . . . . . . . . . . . . . . . . . . . . . . . . . . . . . . . . . . . . . . . . . . . . . . . . . 174
Materials and vital statistics. . . . . . . . . . . . . . . . . . . . . . . . . . . . . . . . . . . . . . . . . . . 175
Building the base. . . . . . . . . . . . . . . . . . . . . . . . . . . . . . . . . . . . . . . . . . . . . . . . . . . . 175
Working your way up the sides. . . . . . . . . . . . . . . . . . . . . . . . . . . . . . . . . . . . . . . . 176
Variation: Making the basket just the right size . . . . . . . . . . . . . . . . . . . . . . . . . . 176
Variation: Using different sizes of hemp cord. . . . . . . . . . . . . . . . . . . . . . . . . . . . 176
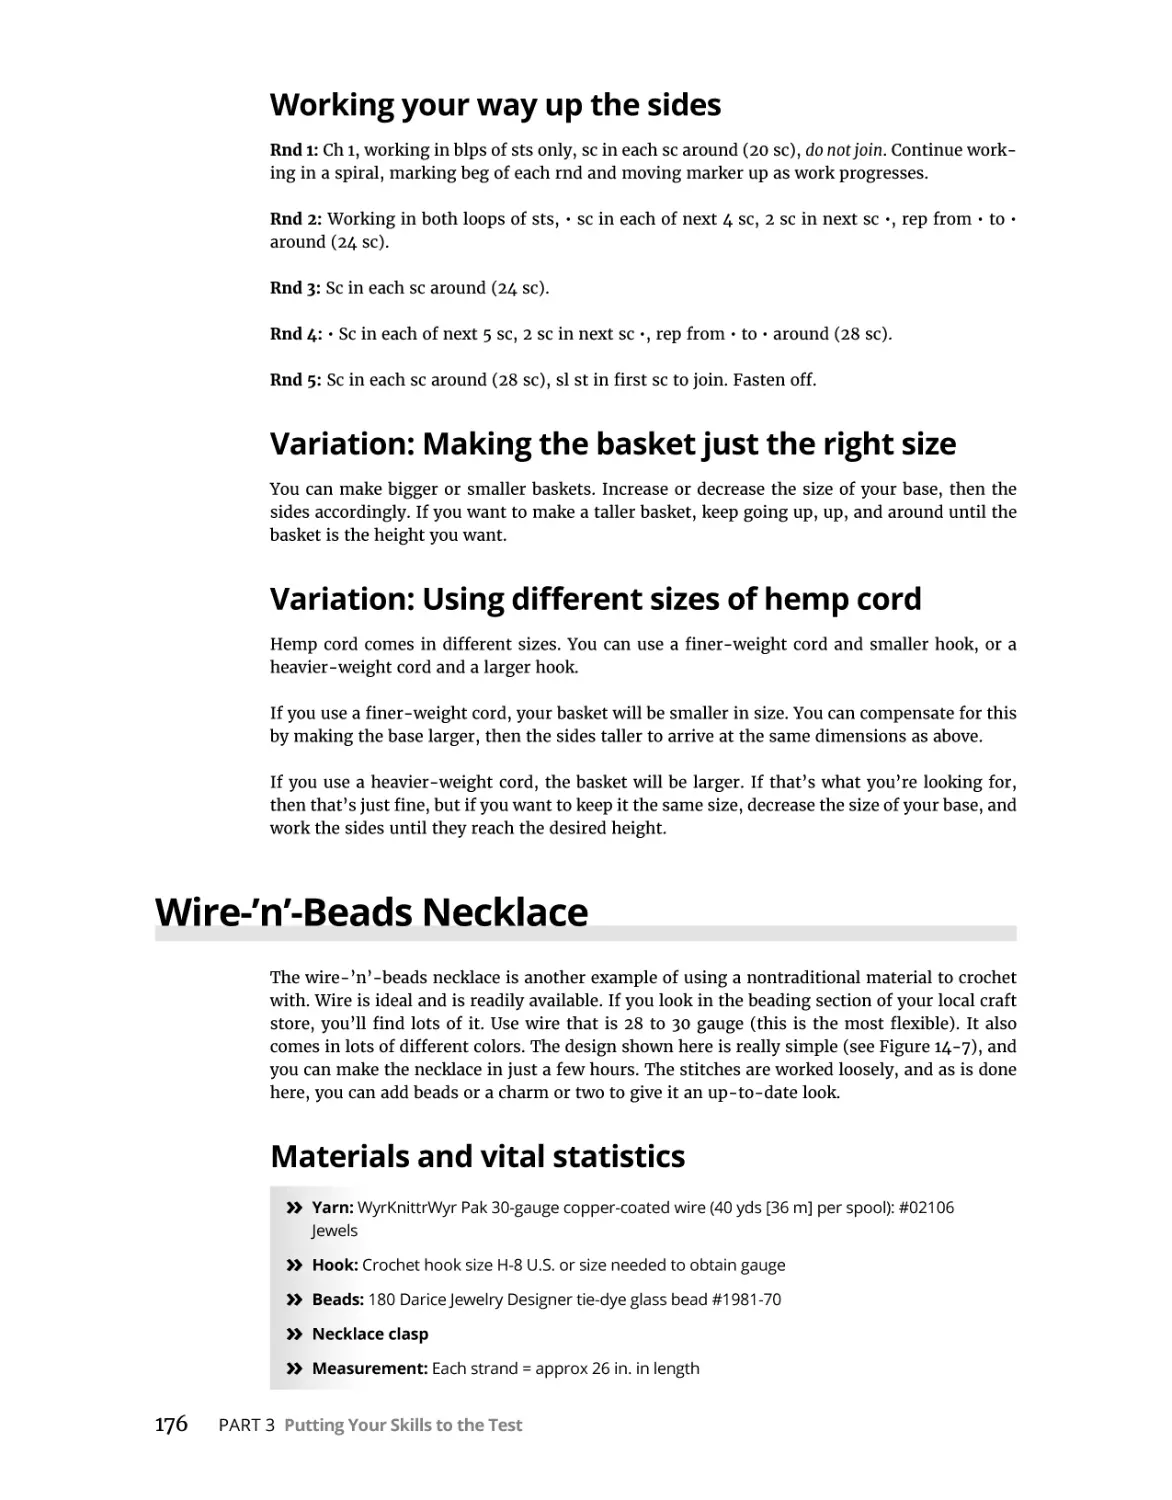
Wire-’n’-Beads Necklace . . . . . . . . . . . . . . . . . . . . . . . . . . . . . . . . . . . . . . . . . . . . . . . . . 176
Materials and vital statistics. . . . . . . . . . . . . . . . . . . . . . . . . . . . . . . . . . . . . . . . . . . 176
Directions . . . . . . . . . . . . . . . . . . . . . . . . . . . . . . . . . . . . . . . . . . . . . . . . . . . . . . . . . . 177
Variation: Dressing up the look. . . . . . . . . . . . . . . . . . . . . . . . . . . . . . . . . . . . . . . . 177
Variation: Complementing the necklace. . . . . . . . . . . . . . . . . . . . . . . . . . . . . . . . . 177
PART 4: THE PART OF TENS . . . . . . . . . . . . . . . . . . . . . . . . . . . . . . . . . . . .
179
Nearly Ten Projects That Take an Hour or So. . . . . . . . . . . . . . . . . .
181
Lacy Bookmark. . . . . . . . . . . . . . . . . . . . . . . . . . . . . . . . . . . . . . . . . . . . . . . . . . . . . . . . .
Materials and vital statistics. . . . . . . . . . . . . . . . . . . . . . . . . . . . . . . . . . . . . . . . . . .
Directions . . . . . . . . . . . . . . . . . . . . . . . . . . . . . . . . . . . . . . . . . . . . . . . . . . . . . . . . . .
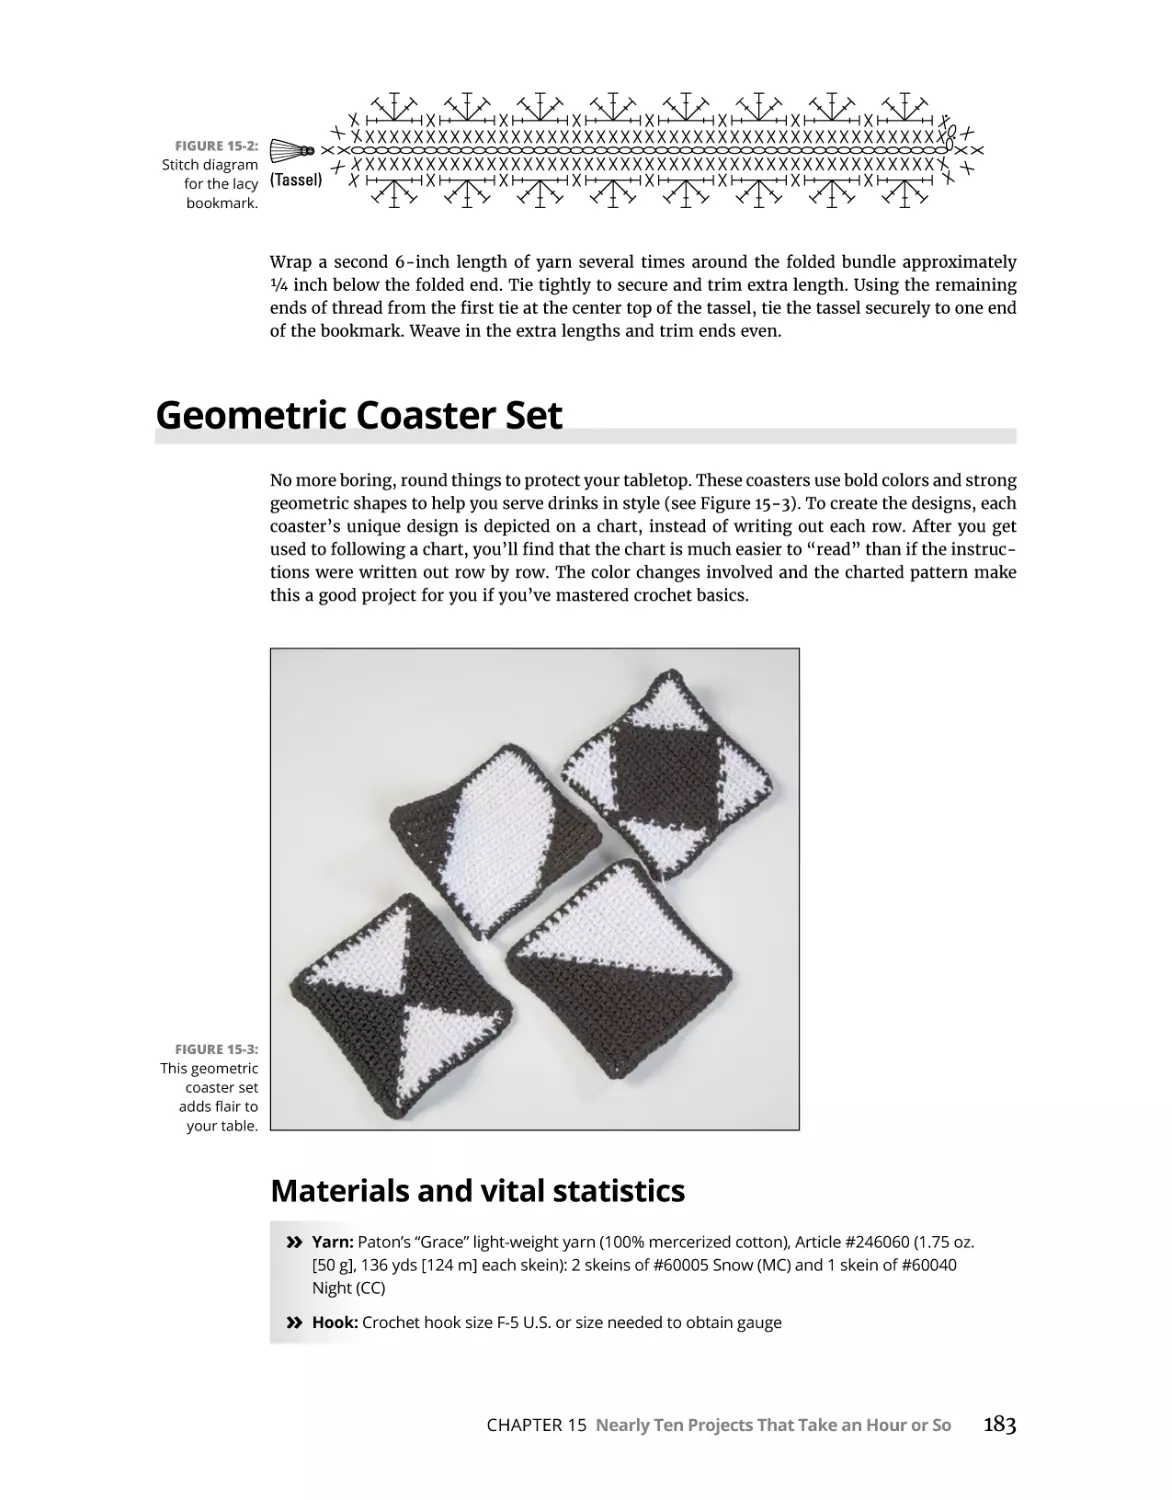
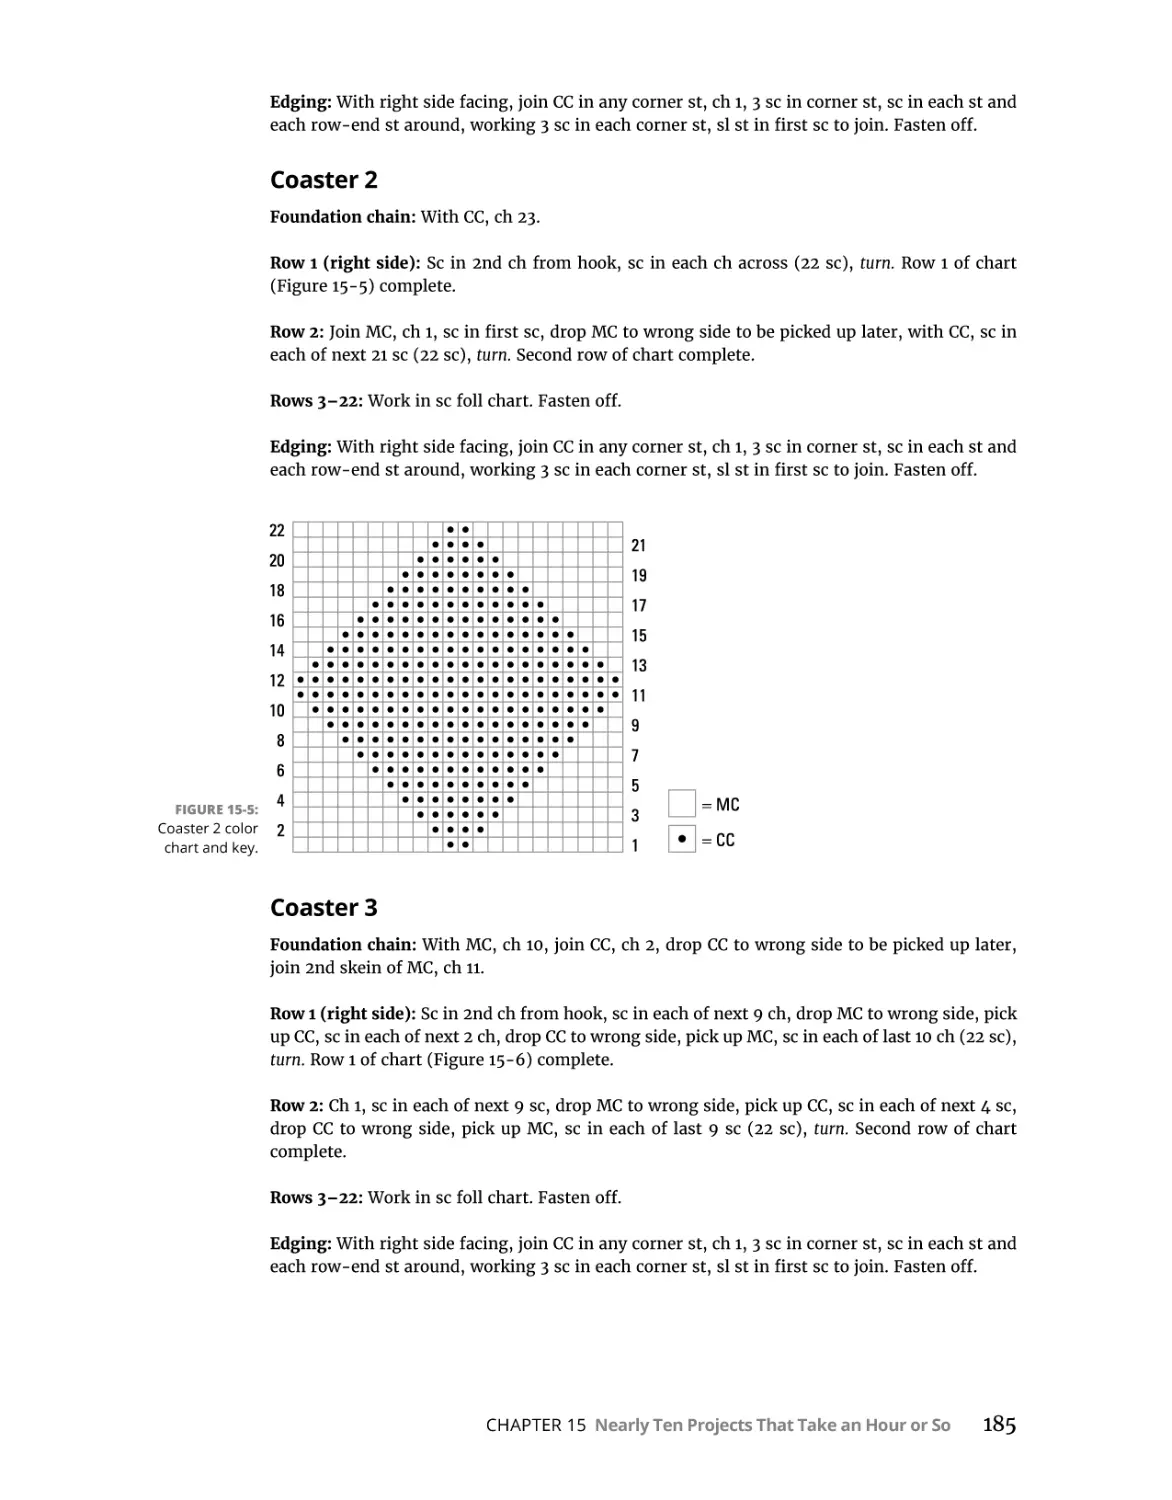
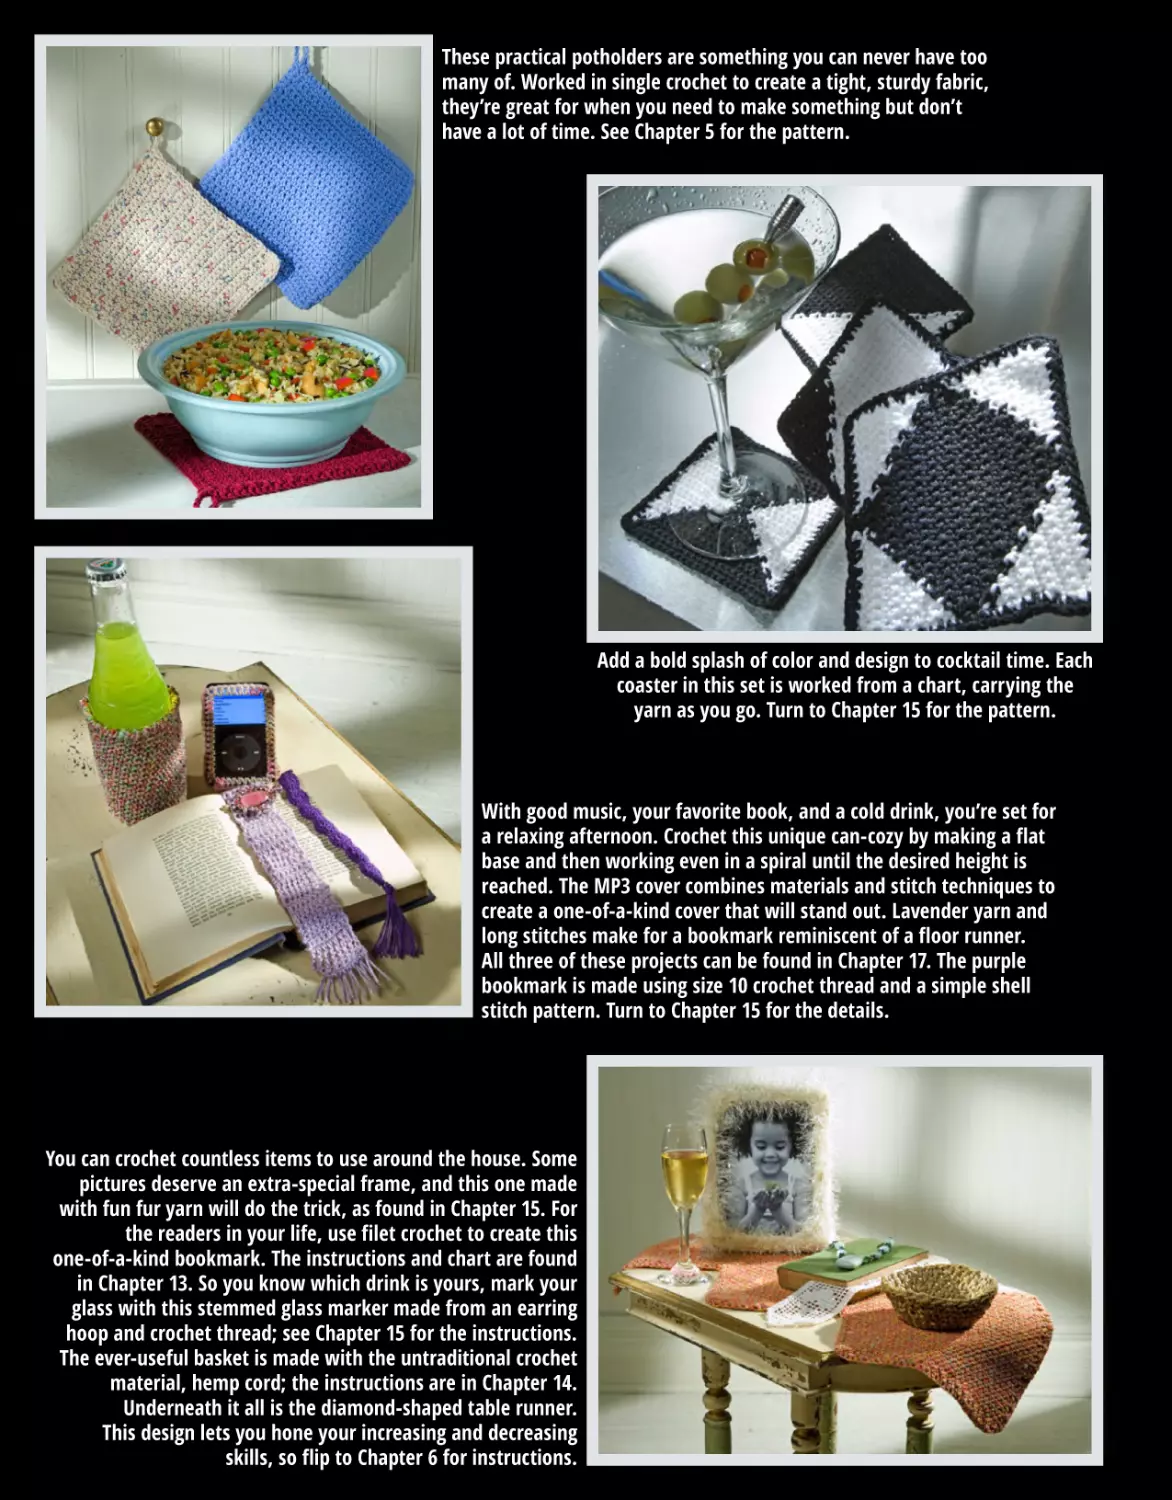
Geometric Coaster Set . . . . . . . . . . . . . . . . . . . . . . . . . . . . . . . . . . . . . . . . . . . . . . . . . .
Materials and vital statistics. . . . . . . . . . . . . . . . . . . . . . . . . . . . . . . . . . . . . . . . . . .
Directions . . . . . . . . . . . . . . . . . . . . . . . . . . . . . . . . . . . . . . . . . . . . . . . . . . . . . . . . . .
Variation: Creating coordinating table accessories. . . . . . . . . . . . . . . . . . . . . . . .
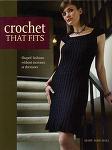
Fun Fur Scrunchies . . . . . . . . . . . . . . . . . . . . . . . . . . . . . . . . . . . . . . . . . . . . . . . . . . . . .
Materials and vital statistics. . . . . . . . . . . . . . . . . . . . . . . . . . . . . . . . . . . . . . . . . . .
Directions . . . . . . . . . . . . . . . . . . . . . . . . . . . . . . . . . . . . . . . . . . . . . . . . . . . . . . . . . .
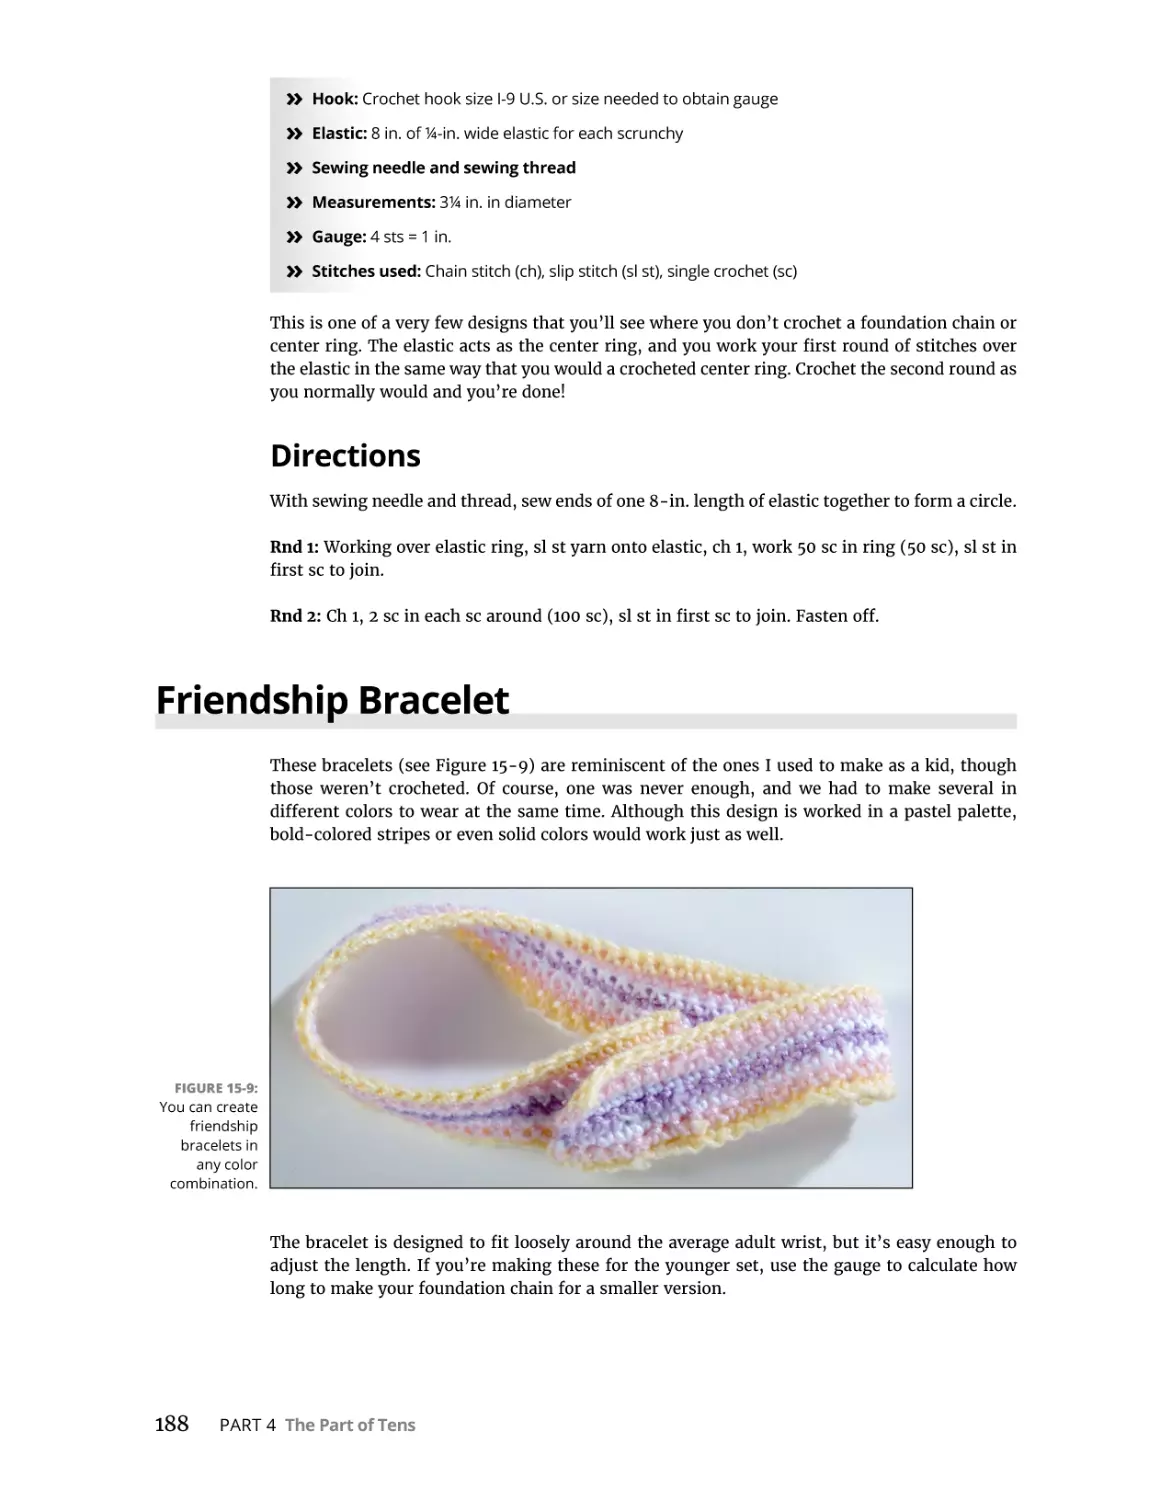
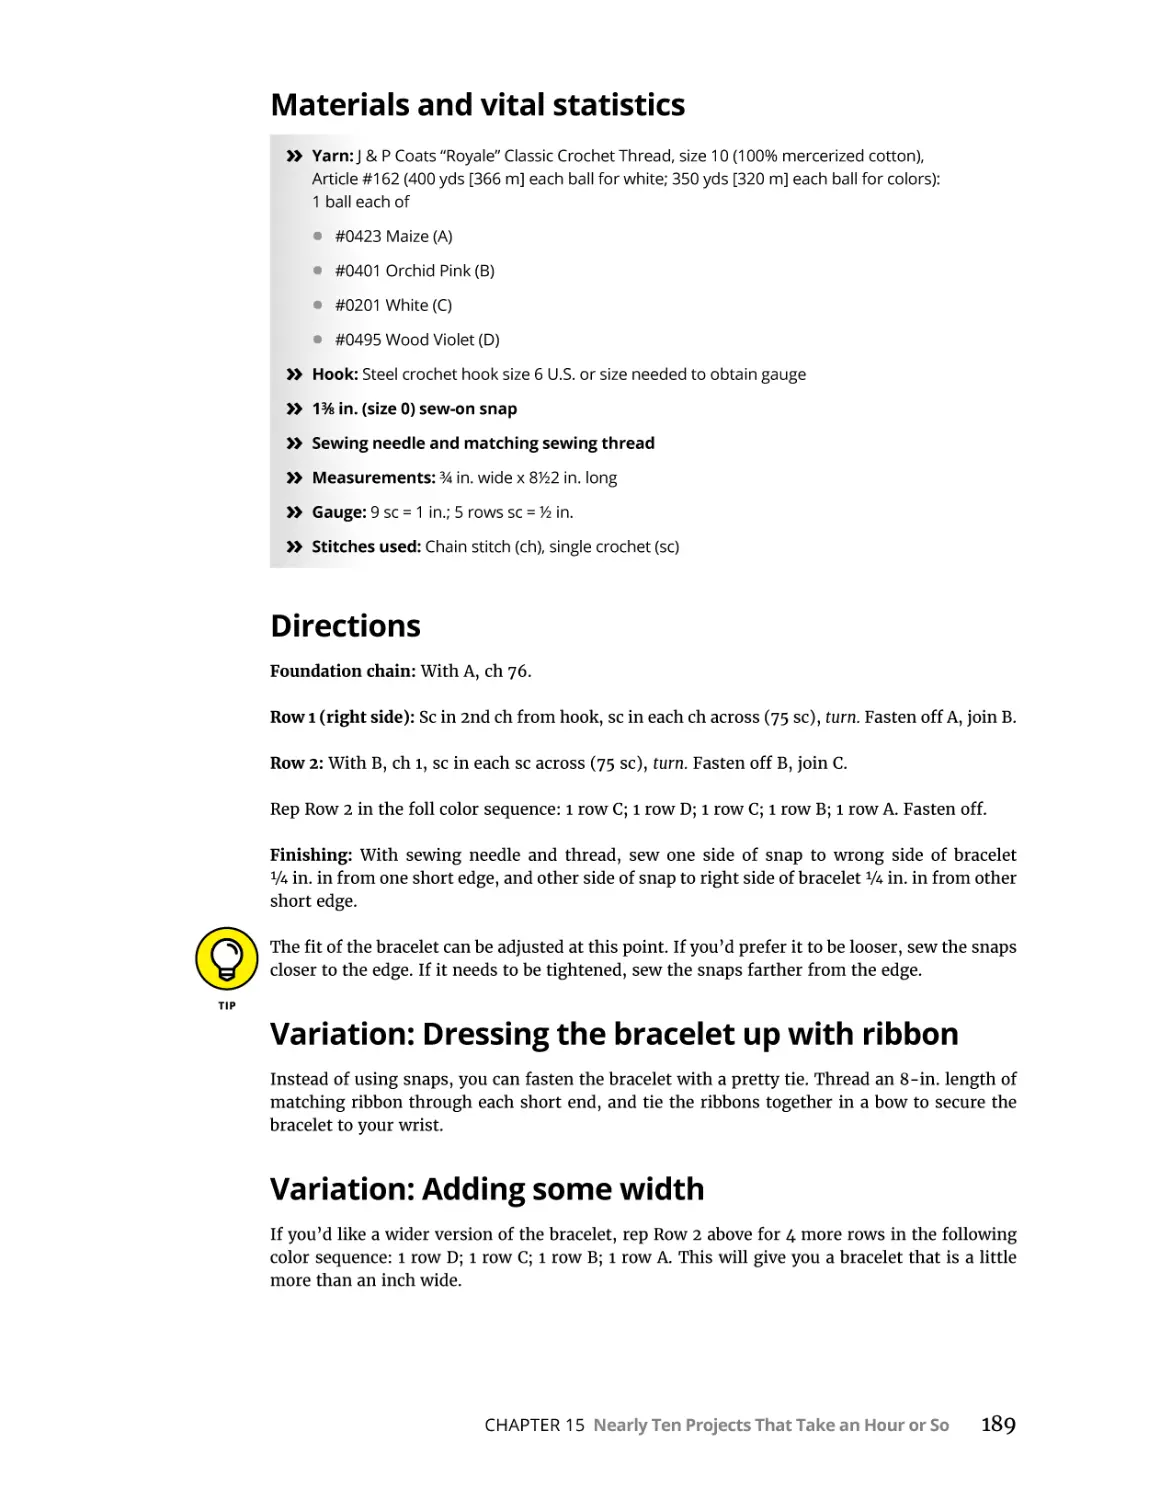
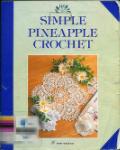
Friendship Bracelet. . . . . . . . . . . . . . . . . . . . . . . . . . . . . . . . . . . . . . . . . . . . . . . . . . . . .
Materials and vital statistics. . . . . . . . . . . . . . . . . . . . . . . . . . . . . . . . . . . . . . . . . . .
Directions . . . . . . . . . . . . . . . . . . . . . . . . . . . . . . . . . . . . . . . . . . . . . . . . . . . . . . . . . .
Variation: Dressing the bracelet up with ribbon. . . . . . . . . . . . . . . . . . . . . . . . . .
Variation: Adding some width . . . . . . . . . . . . . . . . . . . . . . . . . . . . . . . . . . . . . . . . .
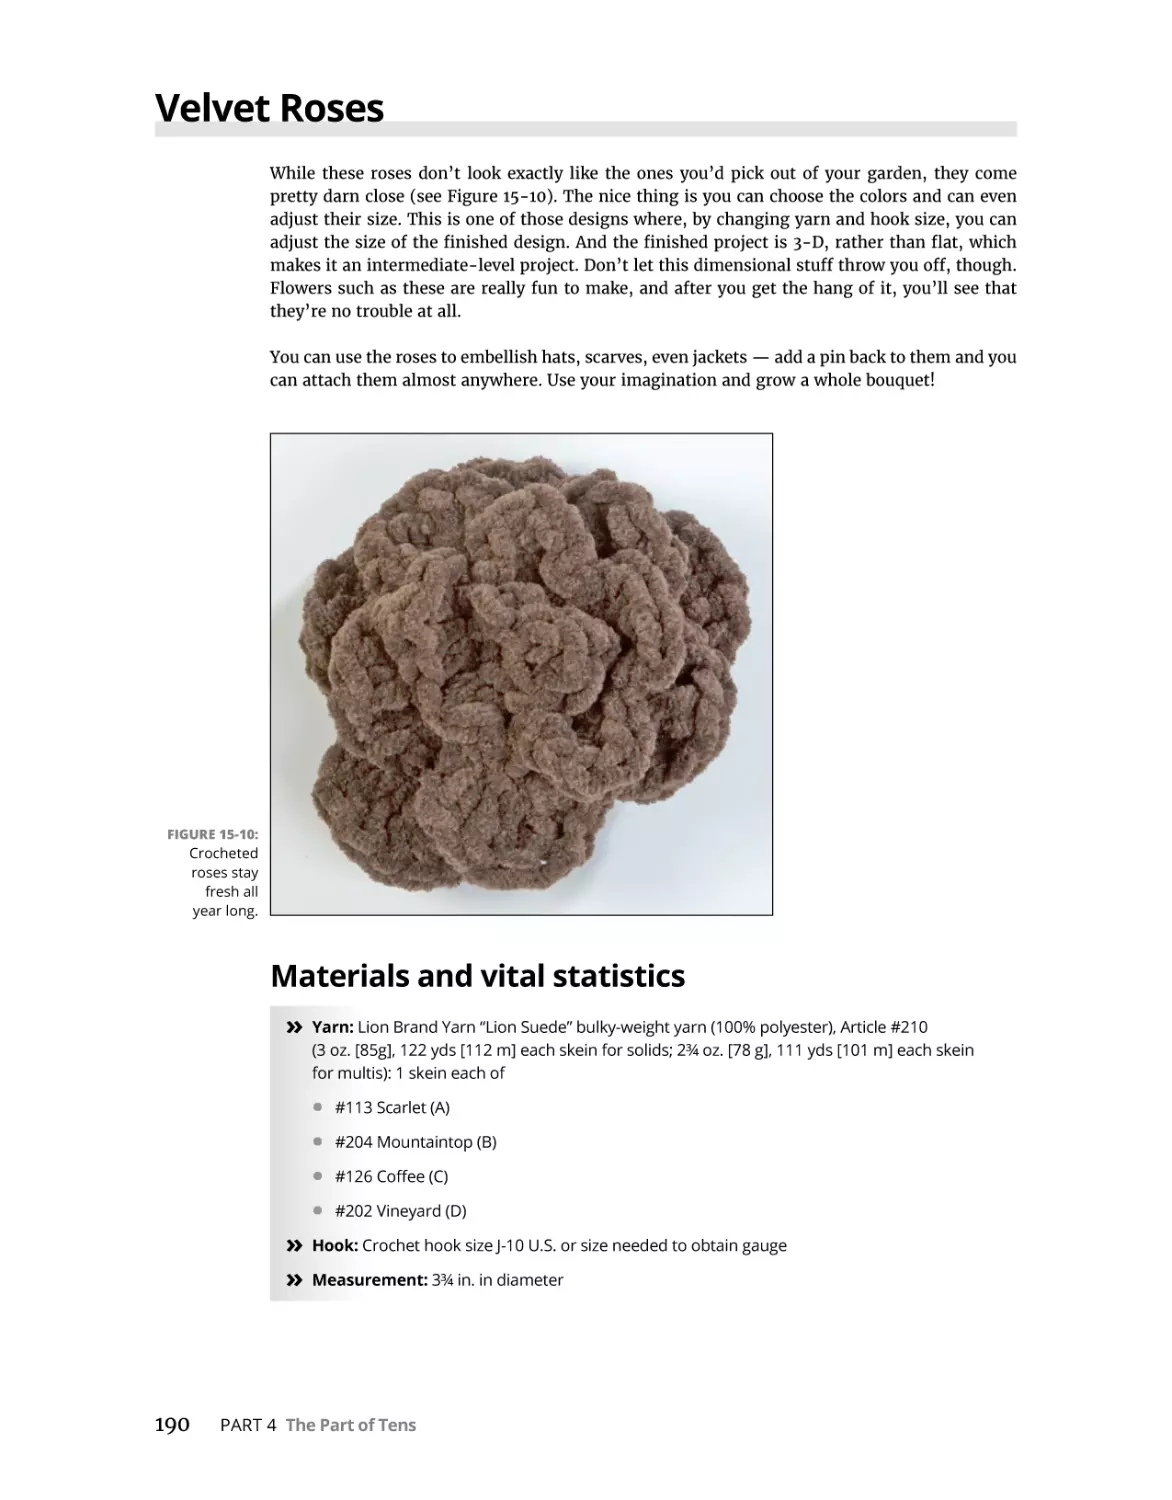
Velvet Roses. . . . . . . . . . . . . . . . . . . . . . . . . . . . . . . . . . . . . . . . . . . . . . . . . . . . . . . . . . .
Materials and vital statistics. . . . . . . . . . . . . . . . . . . . . . . . . . . . . . . . . . . . . . . . . . .
Directions . . . . . . . . . . . . . . . . . . . . . . . . . . . . . . . . . . . . . . . . . . . . . . . . . . . . . . . . . .
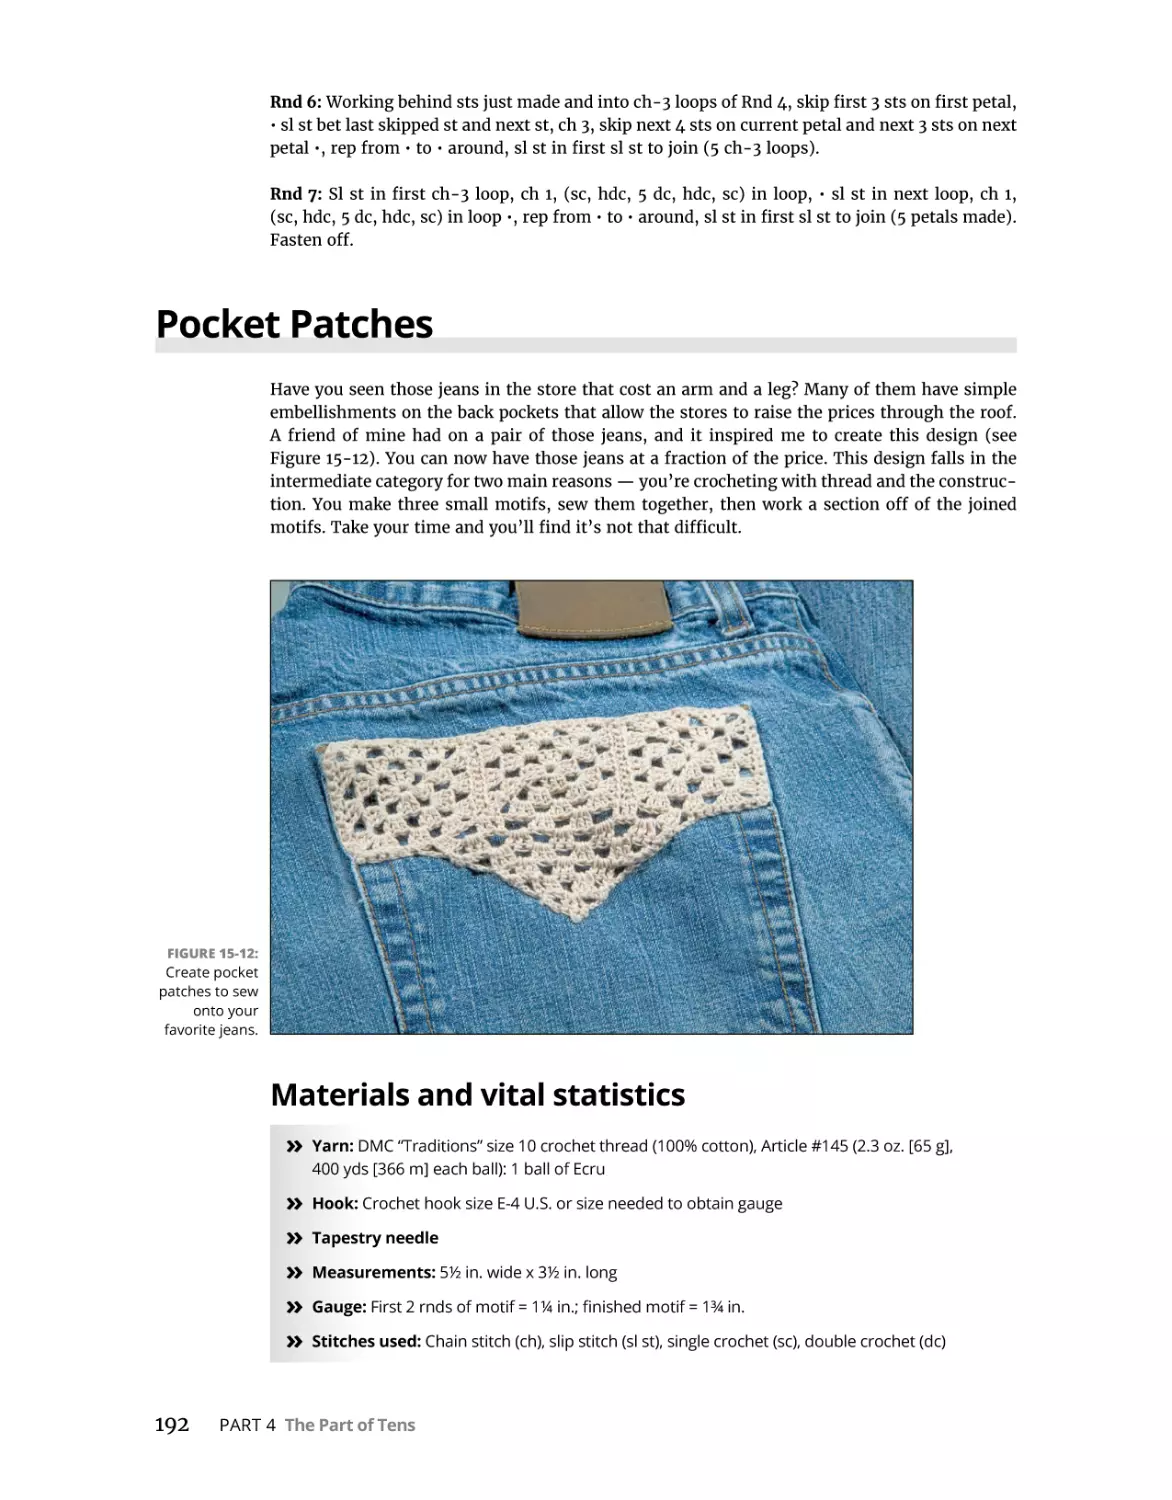
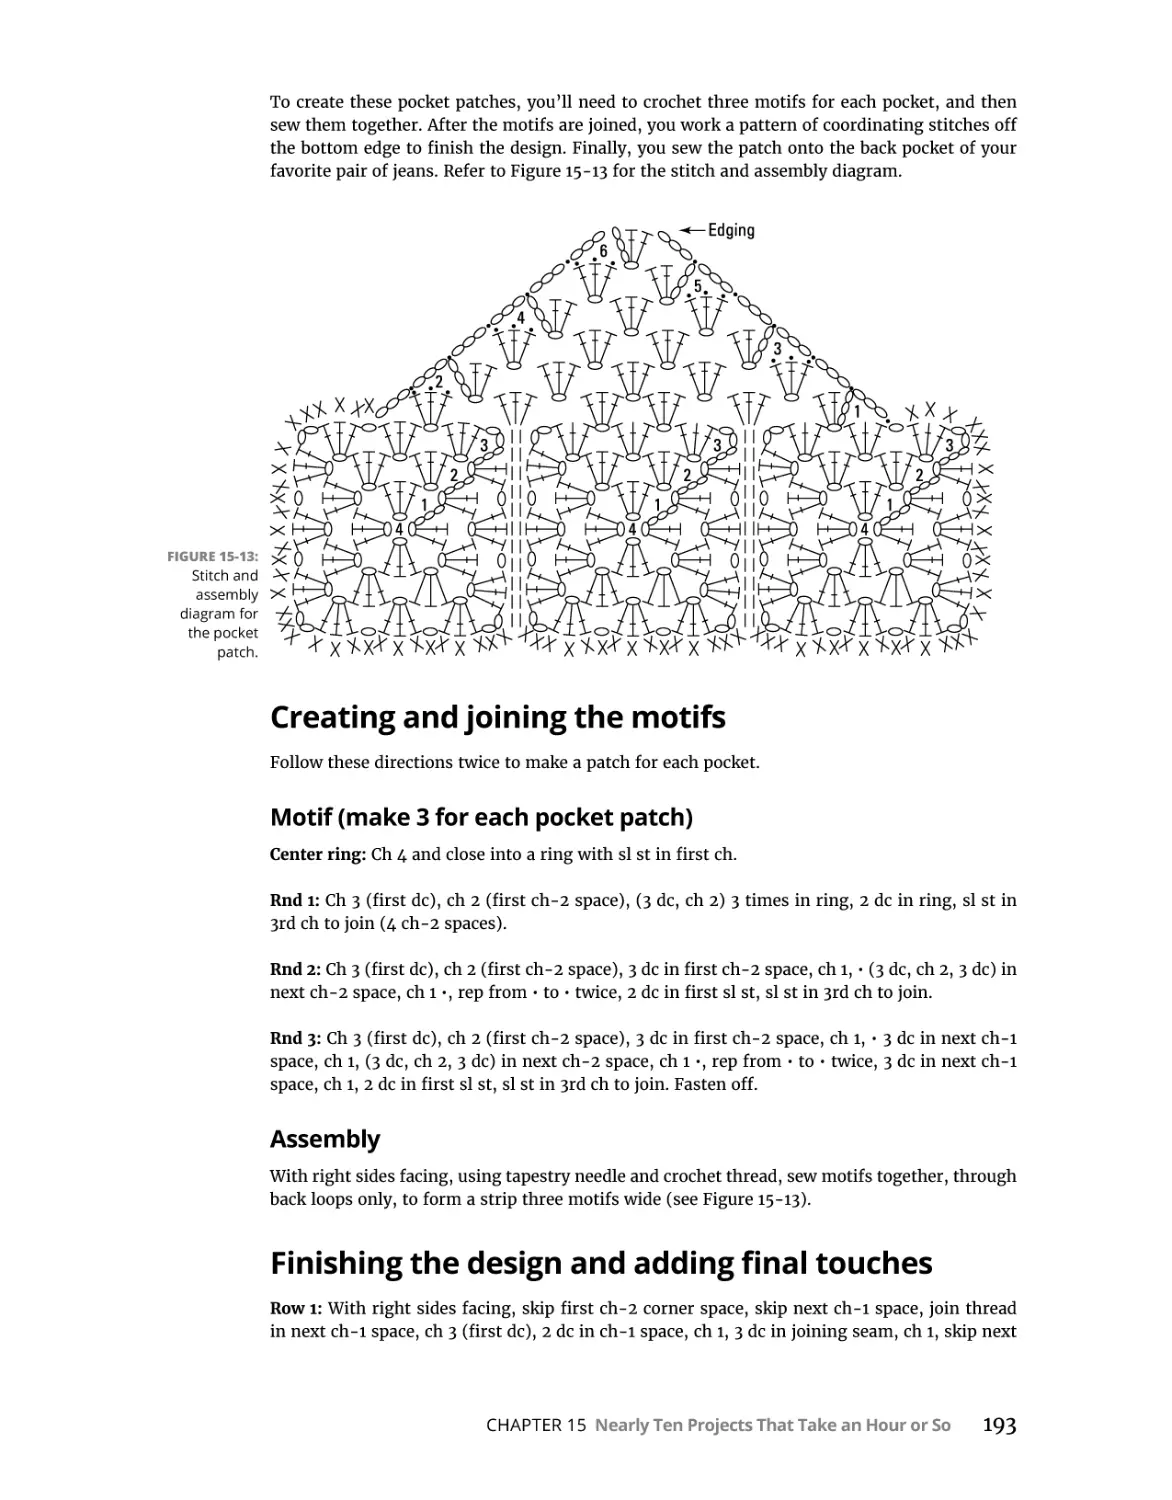
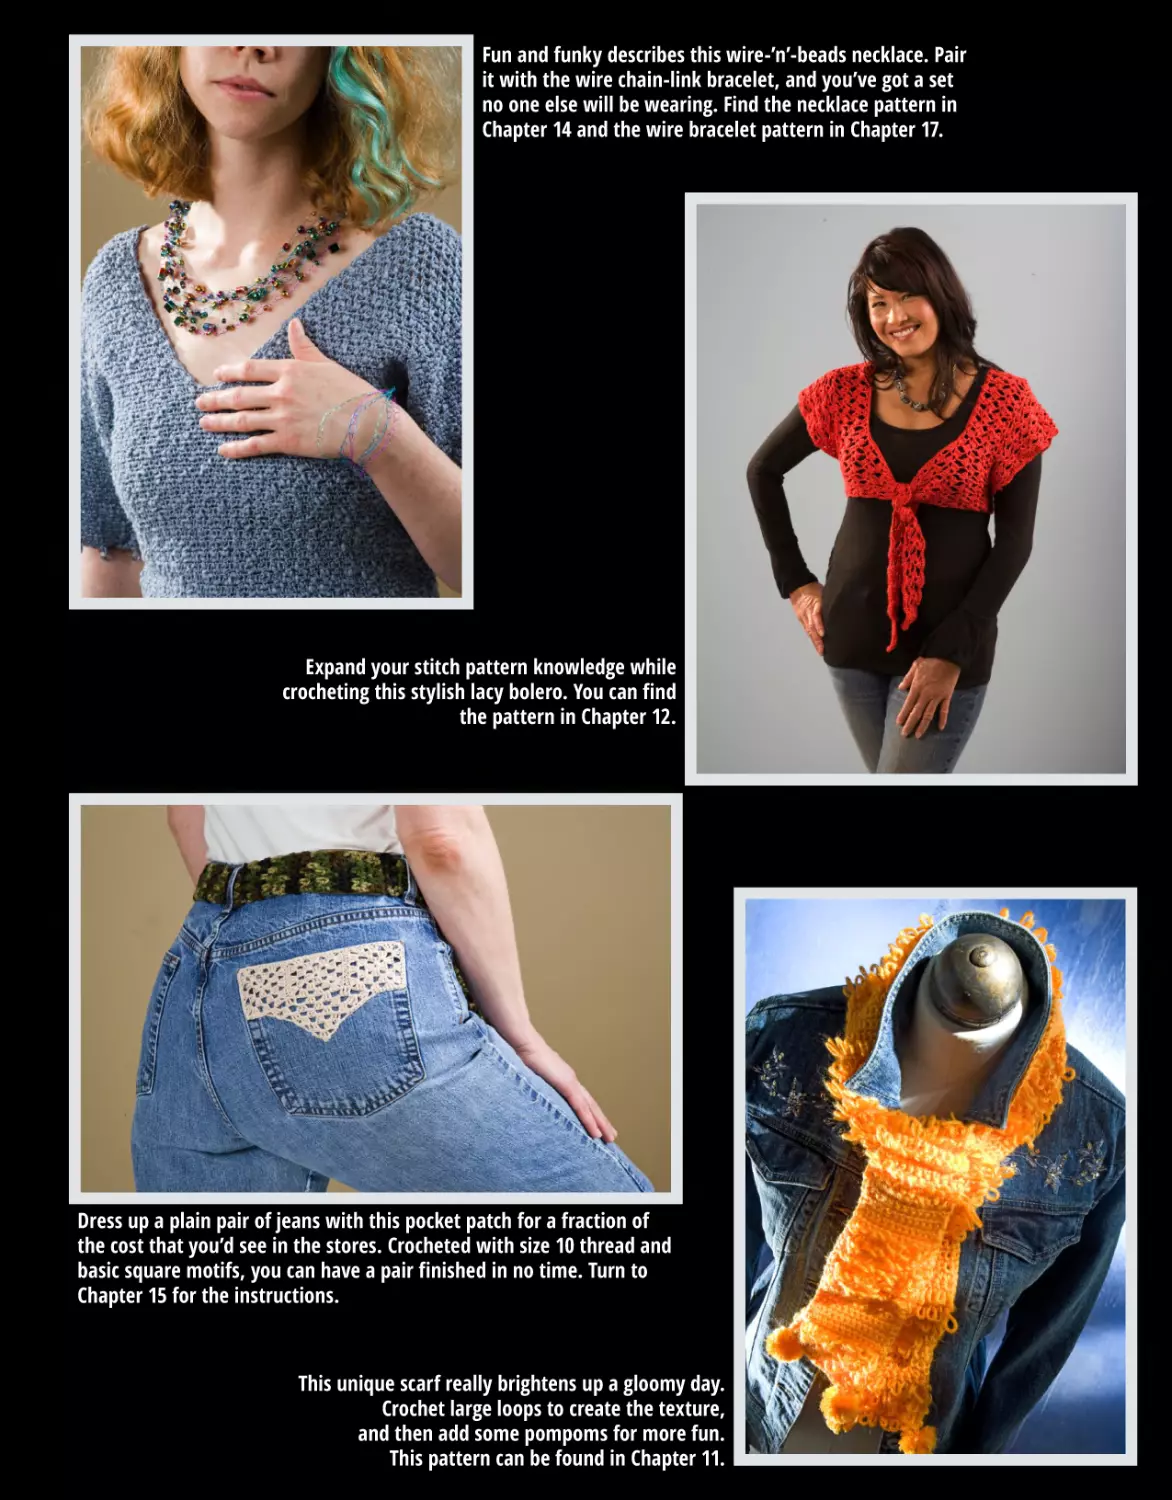
Pocket Patches. . . . . . . . . . . . . . . . . . . . . . . . . . . . . . . . . . . . . . . . . . . . . . . . . . . . . . . . .
Materials and vital statistics. . . . . . . . . . . . . . . . . . . . . . . . . . . . . . . . . . . . . . . . . . .
Creating and joining the motifs. . . . . . . . . . . . . . . . . . . . . . . . . . . . . . . . . . . . . . . .
Finishing the design and adding final touches . . . . . . . . . . . . . . . . . . . . . . . . . . .
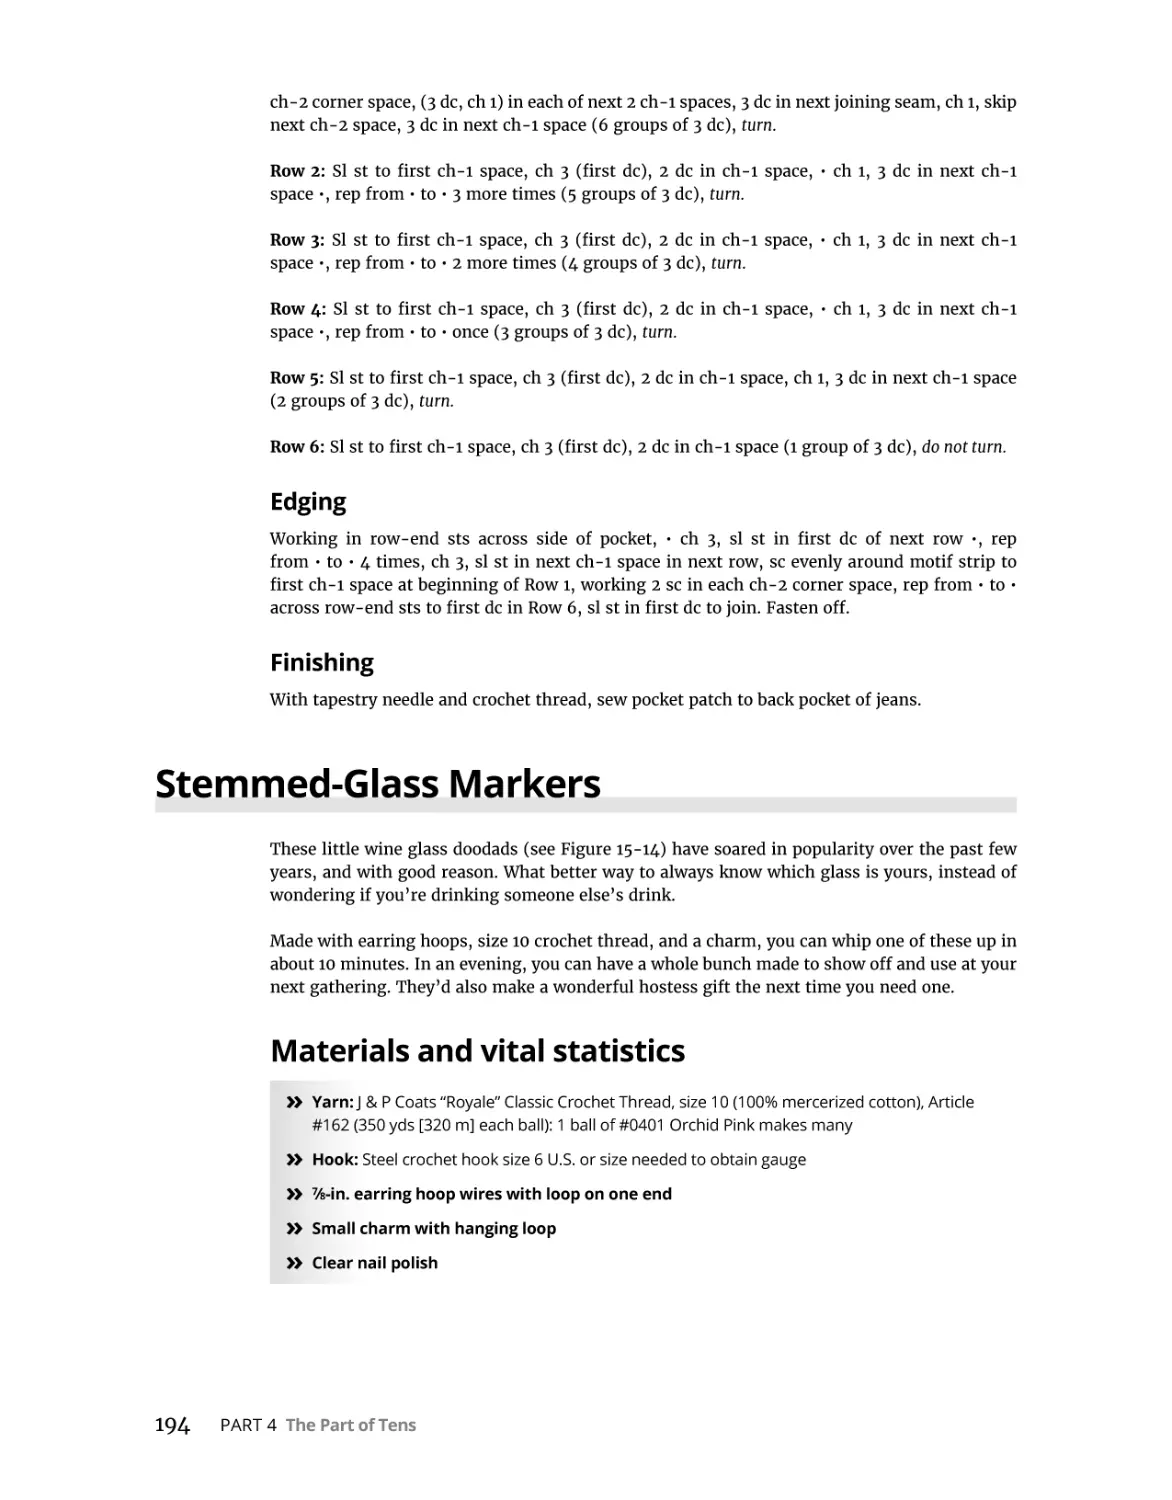
Stemmed-Glass Markers . . . . . . . . . . . . . . . . . . . . . . . . . . . . . . . . . . . . . . . . . . . . . . . .
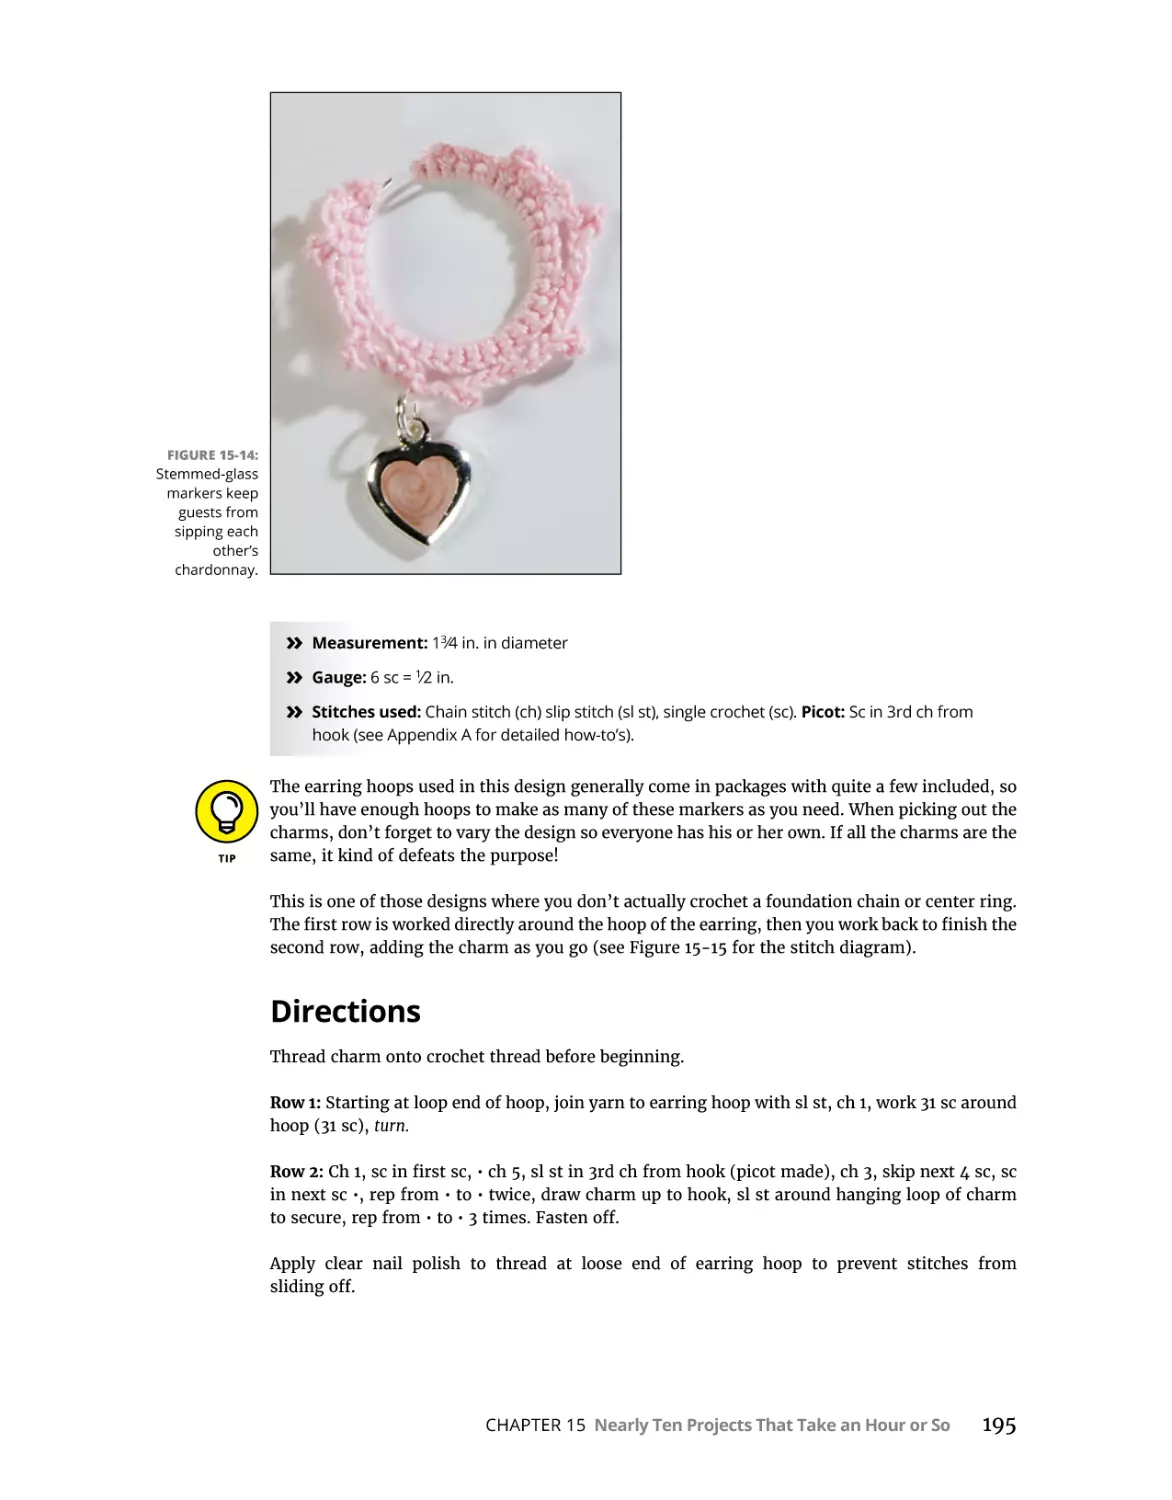
Materials and vital statistics. . . . . . . . . . . . . . . . . . . . . . . . . . . . . . . . . . . . . . . . . . .
Directions . . . . . . . . . . . . . . . . . . . . . . . . . . . . . . . . . . . . . . . . . . . . . . . . . . . . . . . . . .
Variation: Making a marker set for every occasion. . . . . . . . . . . . . . . . . . . . . . . .
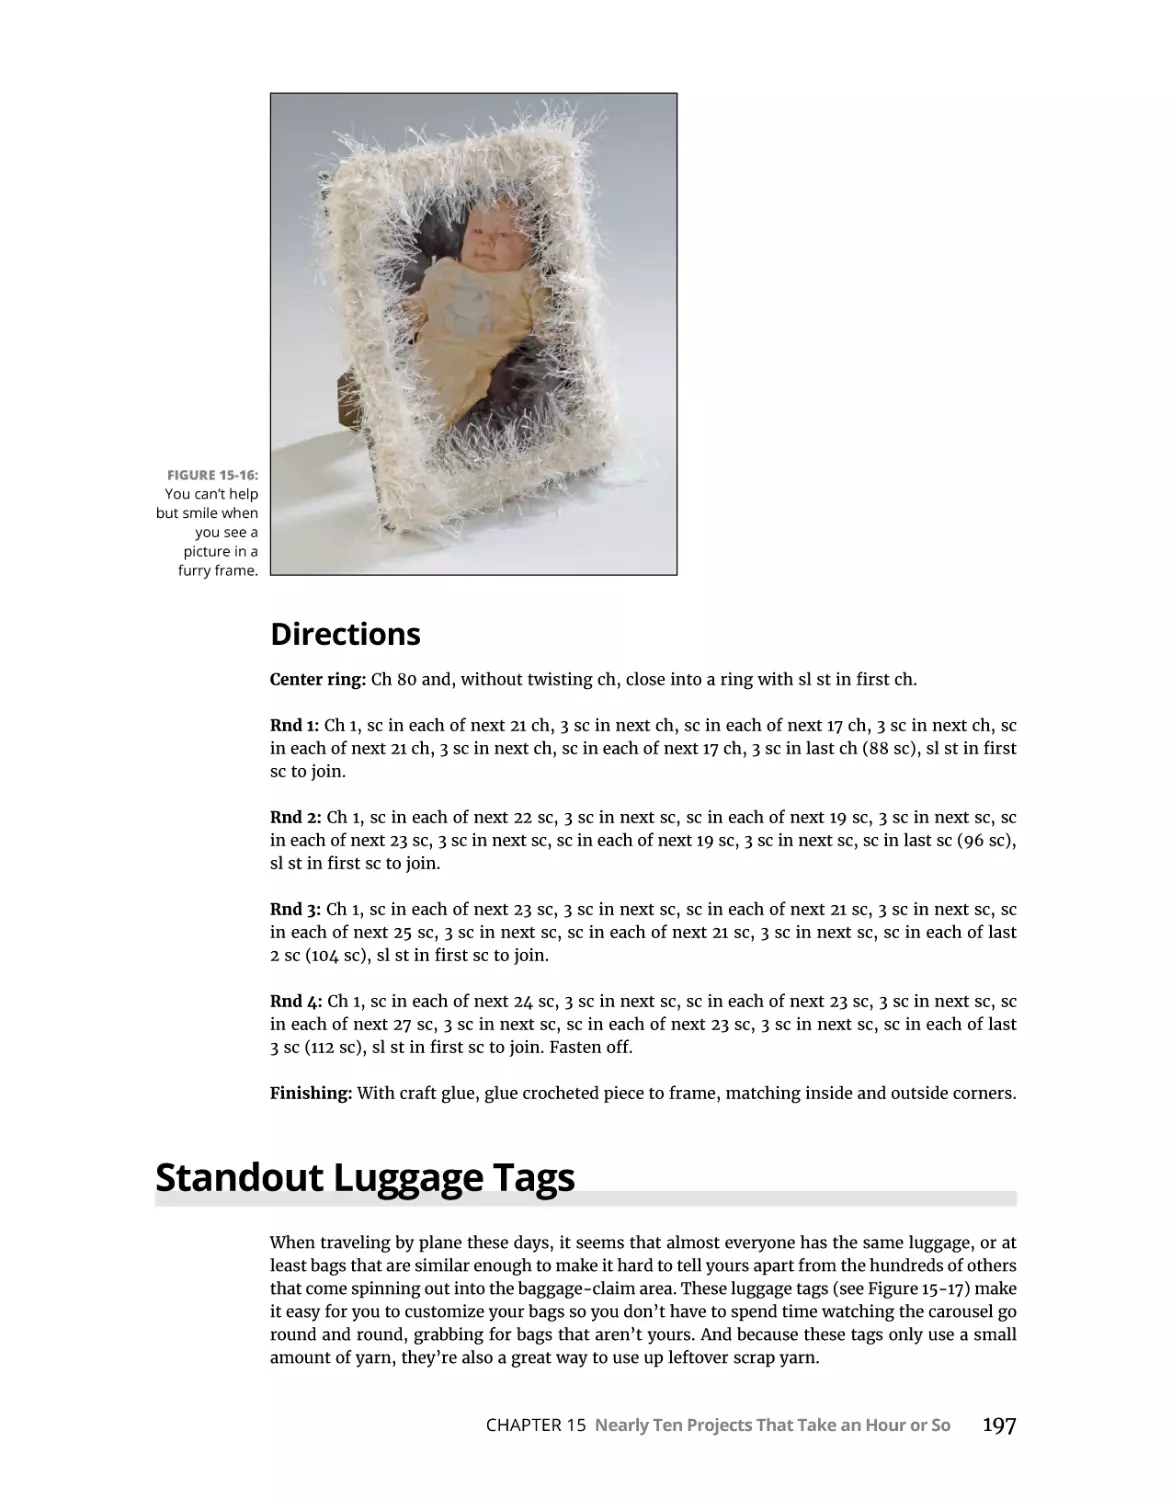
Must-See Fur Frame . . . . . . . . . . . . . . . . . . . . . . . . . . . . . . . . . . . . . . . . . . . . . . . . . . . .
Materials and vital statistics. . . . . . . . . . . . . . . . . . . . . . . . . . . . . . . . . . . . . . . . . . .
Directions . . . . . . . . . . . . . . . . . . . . . . . . . . . . . . . . . . . . . . . . . . . . . . . . . . . . . . . . . .
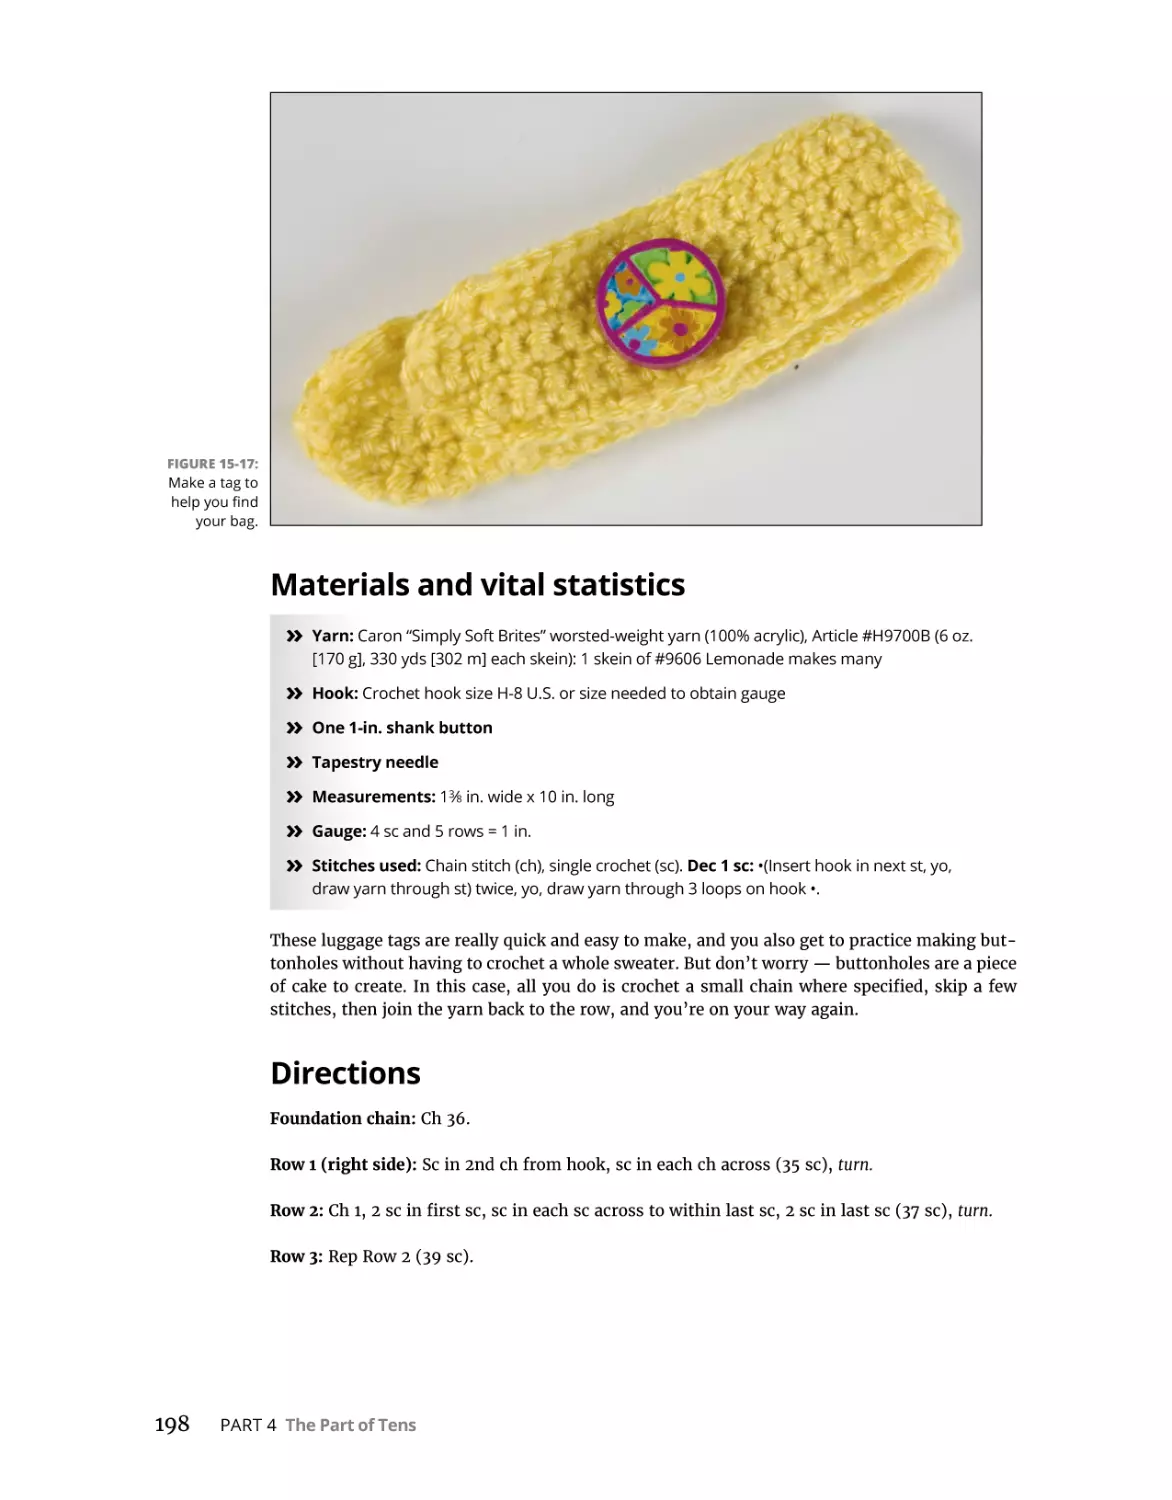
Standout Luggage Tags. . . . . . . . . . . . . . . . . . . . . . . . . . . . . . . . . . . . . . . . . . . . . . . . . .
Materials and vital statistics. . . . . . . . . . . . . . . . . . . . . . . . . . . . . . . . . . . . . . . . . . .
Directions . . . . . . . . . . . . . . . . . . . . . . . . . . . . . . . . . . . . . . . . . . . . . . . . . . . . . . . . . .
181
181
182
183
183
184
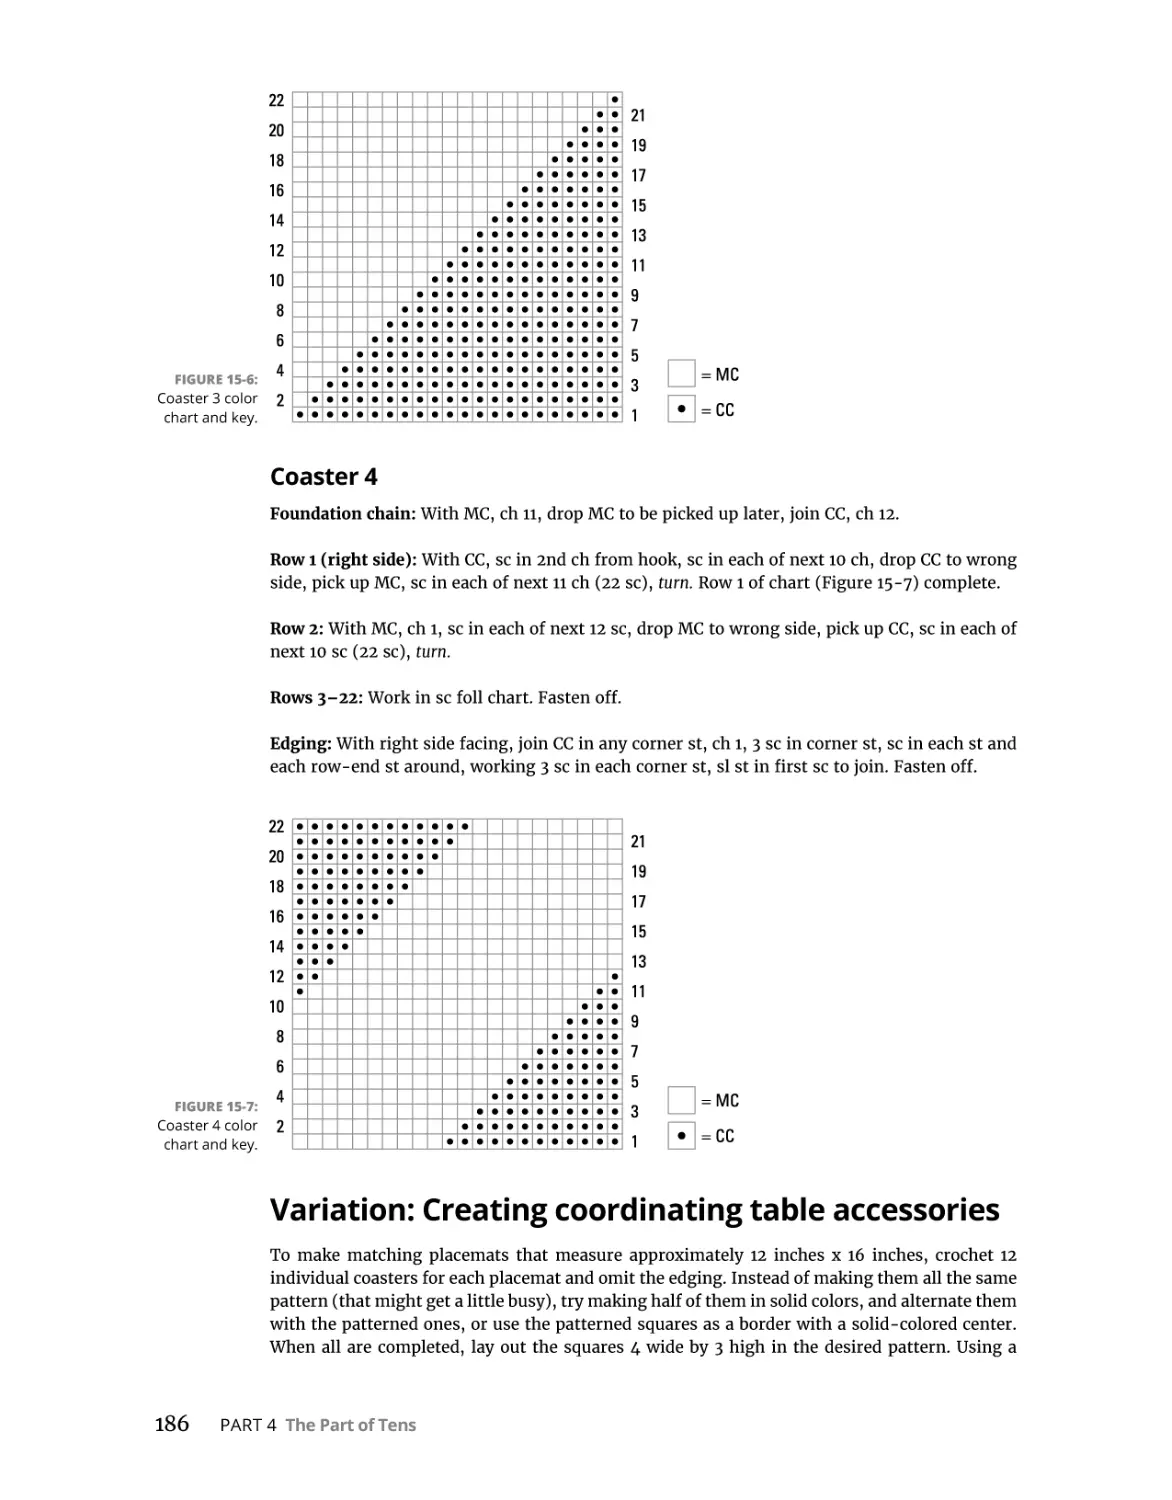
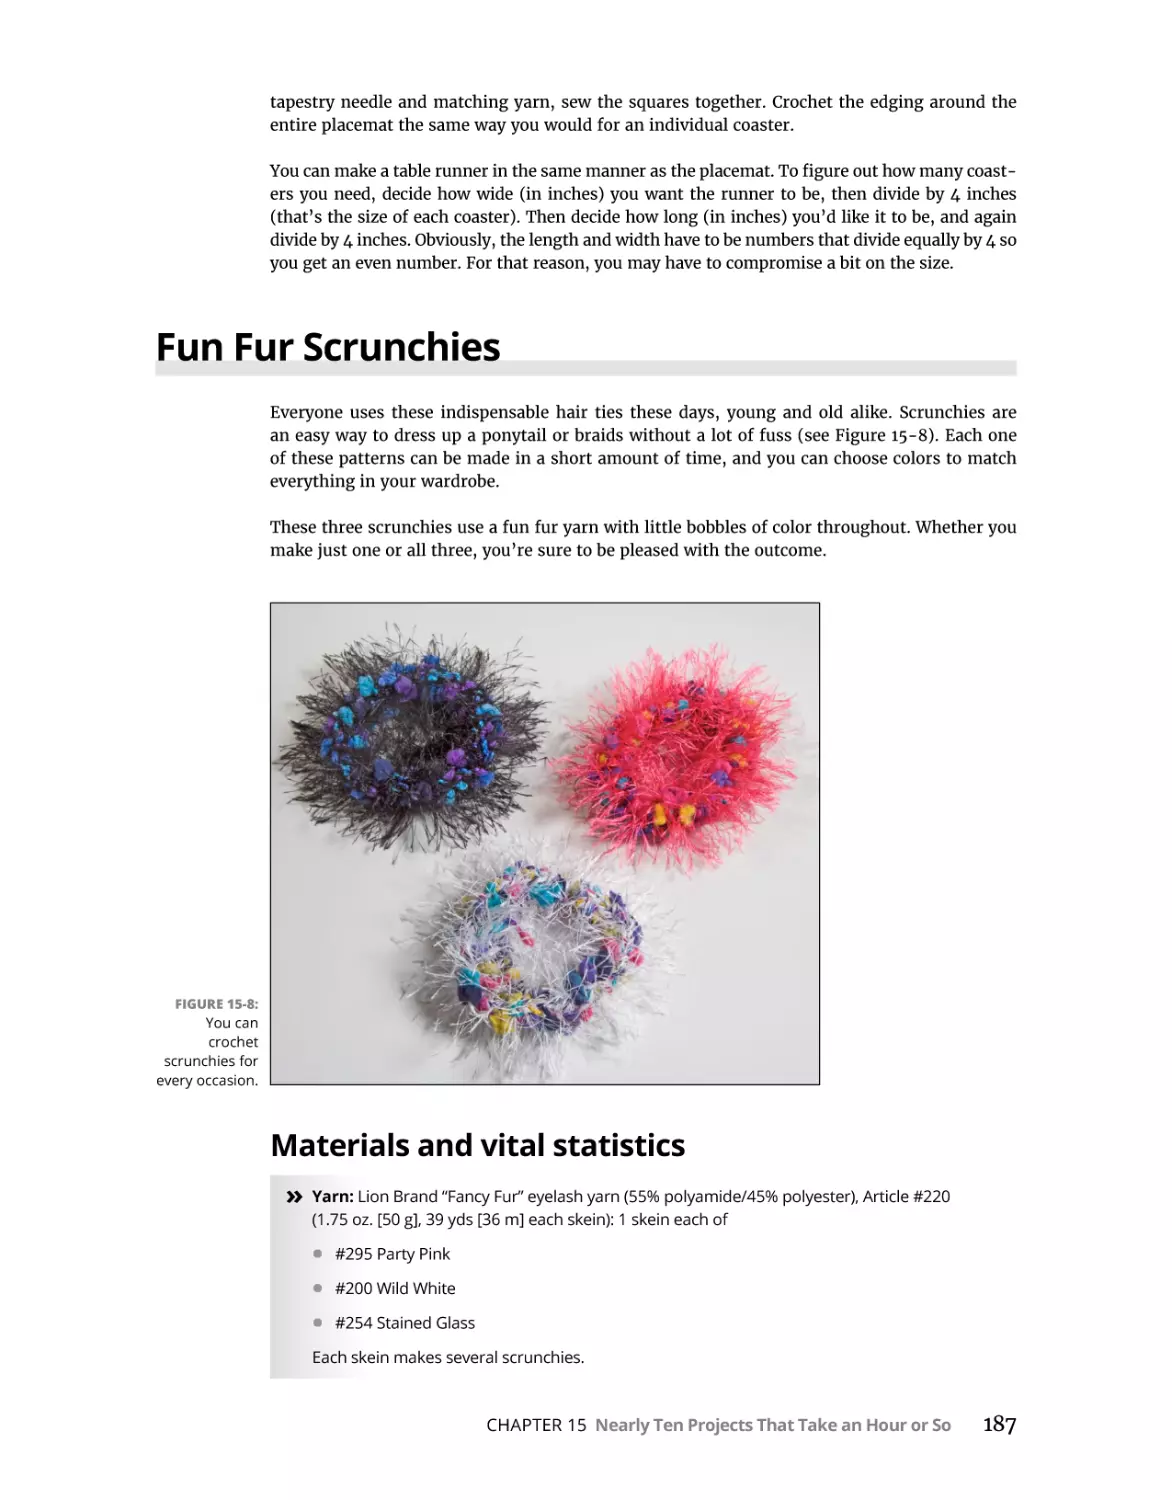
186
187
187
188
188
189
189
189
189
190
190
191
192
192
193
193
194
194
195
196
196
196
197
197
198
198
CHAPTER 15:
x
Crochet Patterns For Dummies
CHAPTER 16:
Ten-Plus Tips for Caring for Your Crochet . . . . . . . . . . . . . . . . . . . . . .
201
Be a Pack Rat: Save the Labels. . . . . . . . . . . . . . . . . . . . . . . . . . . . . . . . . . . . . . . . . . . .
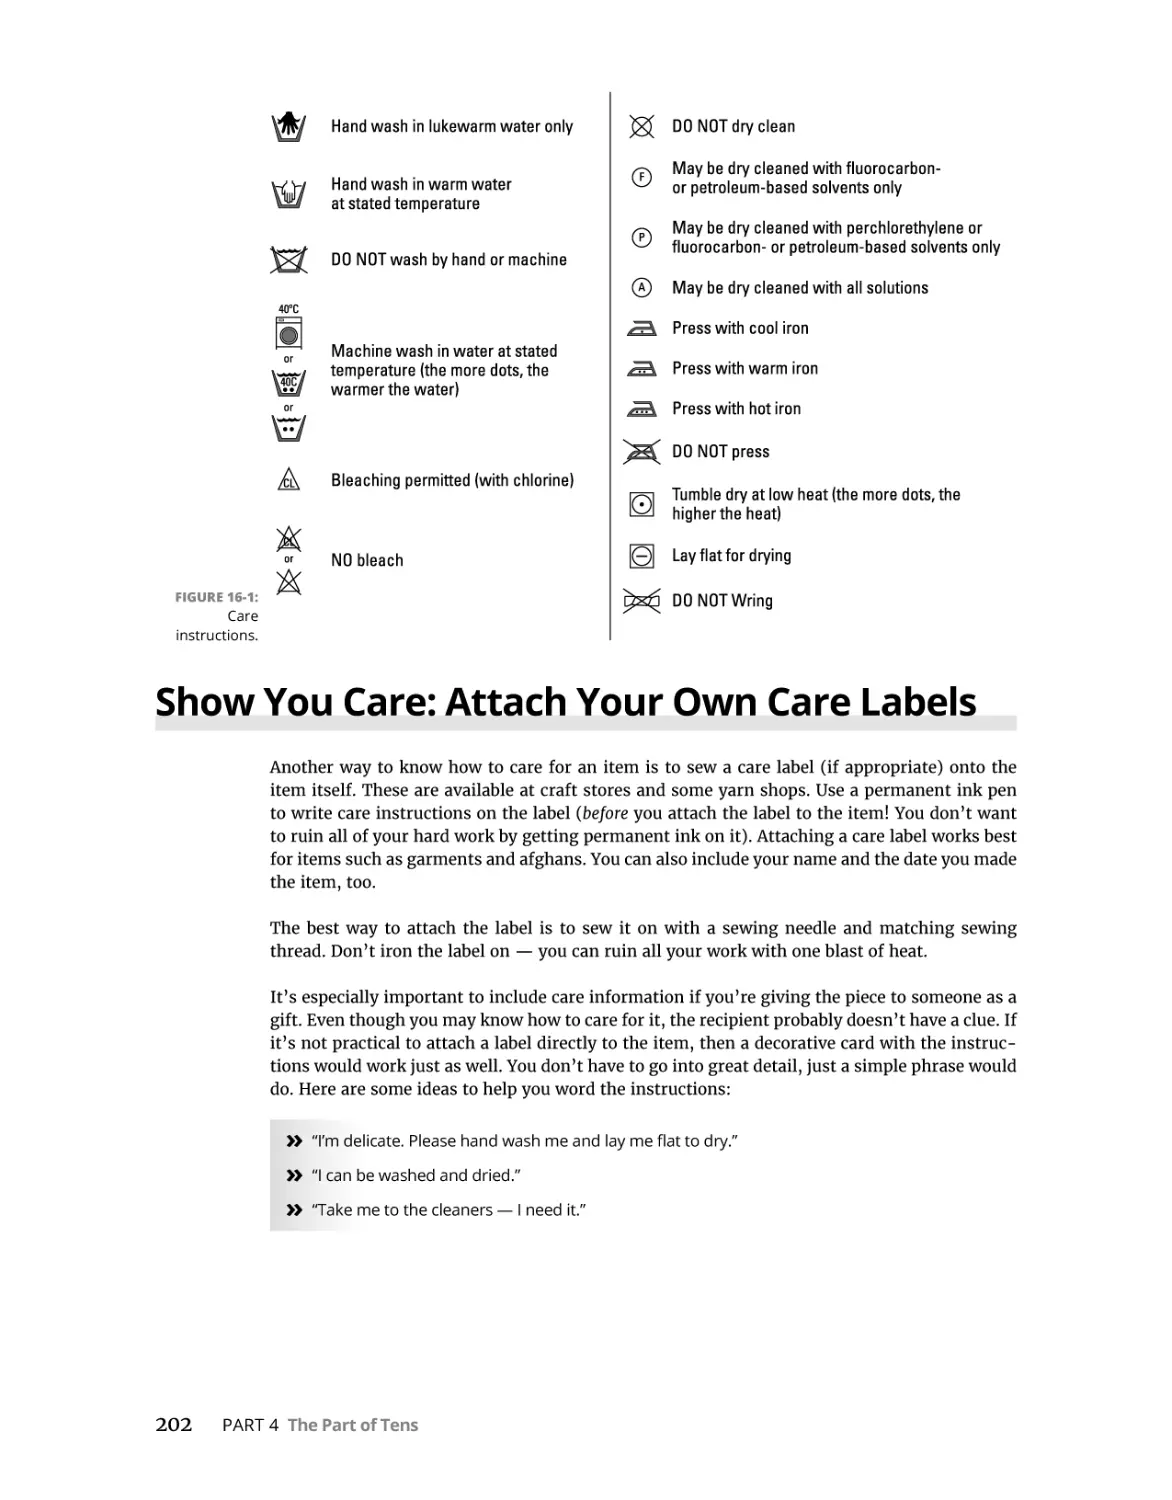
Show You Care: Attach Your Own Care Labels . . . . . . . . . . . . . . . . . . . . . . . . . . . . . .
Forget Dishpan Hands. Get Afghan Hands!. . . . . . . . . . . . . . . . . . . . . . . . . . . . . . . . .
Blocking for a Better Shape . . . . . . . . . . . . . . . . . . . . . . . . . . . . . . . . . . . . . . . . . . . . . .
Take It to the Cleaners . . . . . . . . . . . . . . . . . . . . . . . . . . . . . . . . . . . . . . . . . . . . . . . . . .
Get a Load of This: Machine Washing. . . . . . . . . . . . . . . . . . . . . . . . . . . . . . . . . . . . . .
Let It Go for a Spin: Machine Drying. . . . . . . . . . . . . . . . . . . . . . . . . . . . . . . . . . . . . . .
Iron It — but Only If You Must. . . . . . . . . . . . . . . . . . . . . . . . . . . . . . . . . . . . . . . . . . . .
Put Those Hangers Away!. . . . . . . . . . . . . . . . . . . . . . . . . . . . . . . . . . . . . . . . . . . . . . . .
Dazzling Displays and Safe Storage . . . . . . . . . . . . . . . . . . . . . . . . . . . . . . . . . . . . . . .
Get Rid of Those Pesky Pills. . . . . . . . . . . . . . . . . . . . . . . . . . . . . . . . . . . . . . . . . . . . . .
201
202
203
203
204
204
204
205
205
205
206
Ten Kid-Friendly Projects. . . . . . . . . . . . . . . . . . . . . . . . . . . . . . . . . . . . . . . . . .
207
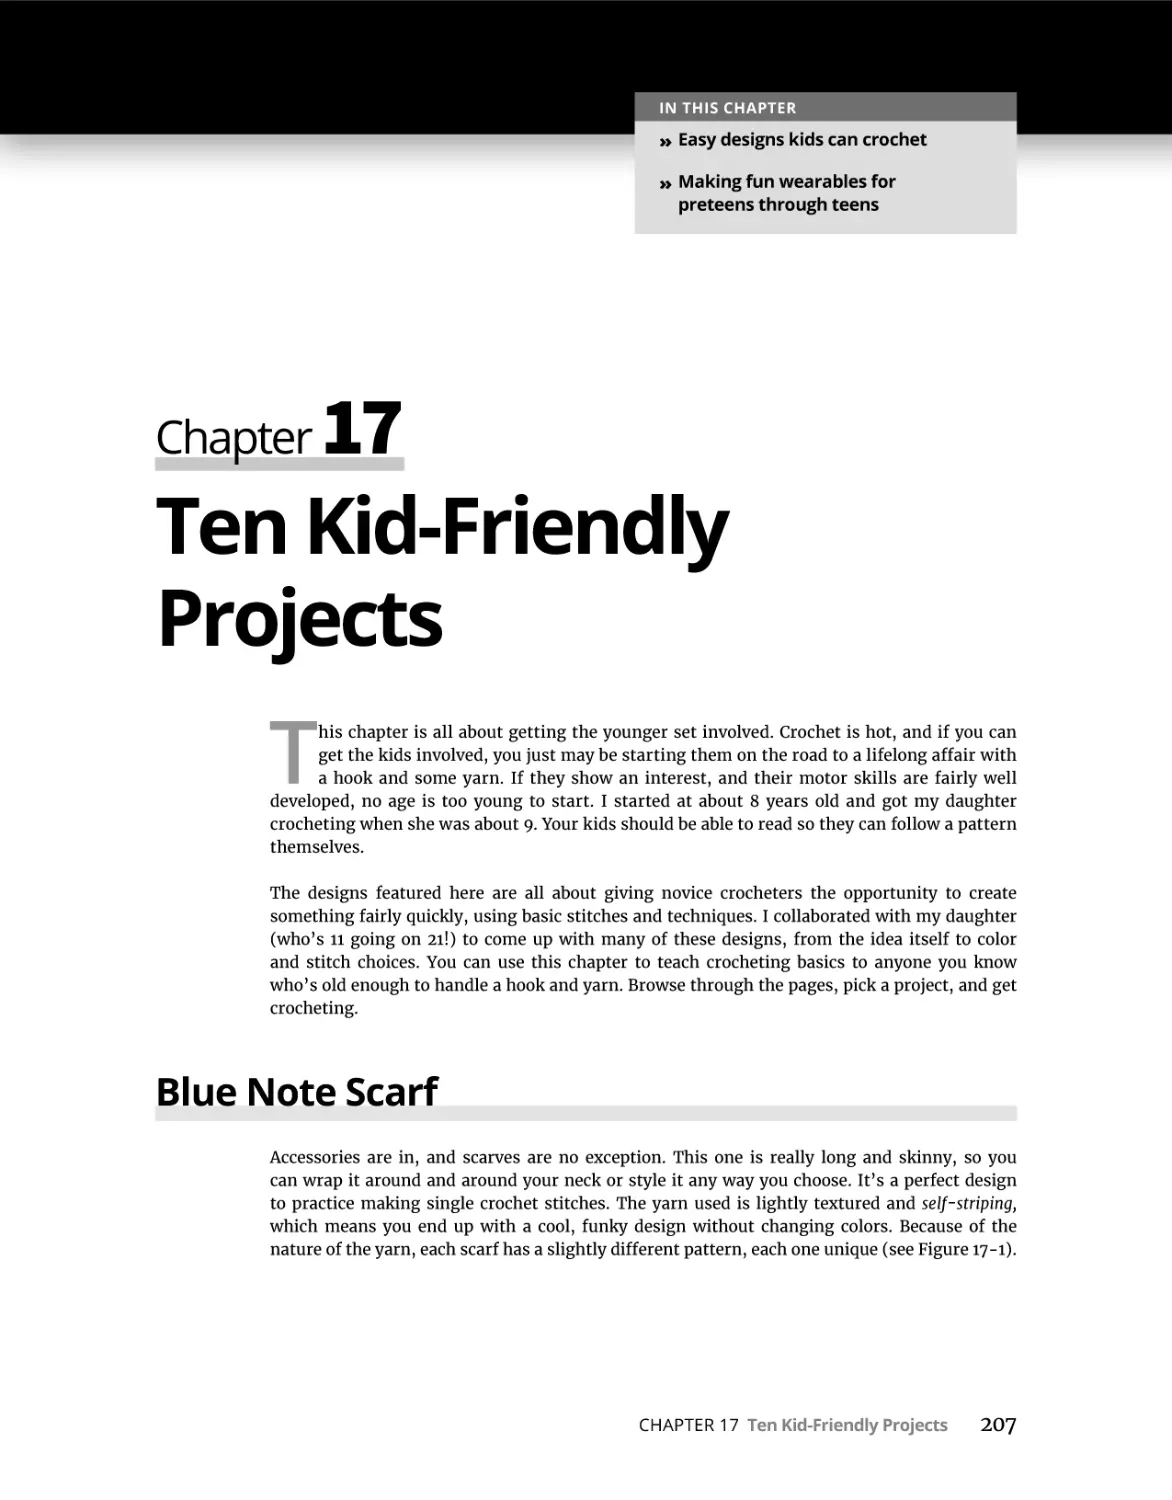
Blue Note Scarf . . . . . . . . . . . . . . . . . . . . . . . . . . . . . . . . . . . . . . . . . . . . . . . . . . . . . . . .
Materials and vital statistics. . . . . . . . . . . . . . . . . . . . . . . . . . . . . . . . . . . . . . . . . . .
Directions . . . . . . . . . . . . . . . . . . . . . . . . . . . . . . . . . . . . . . . . . . . . . . . . . . . . . . . . . .
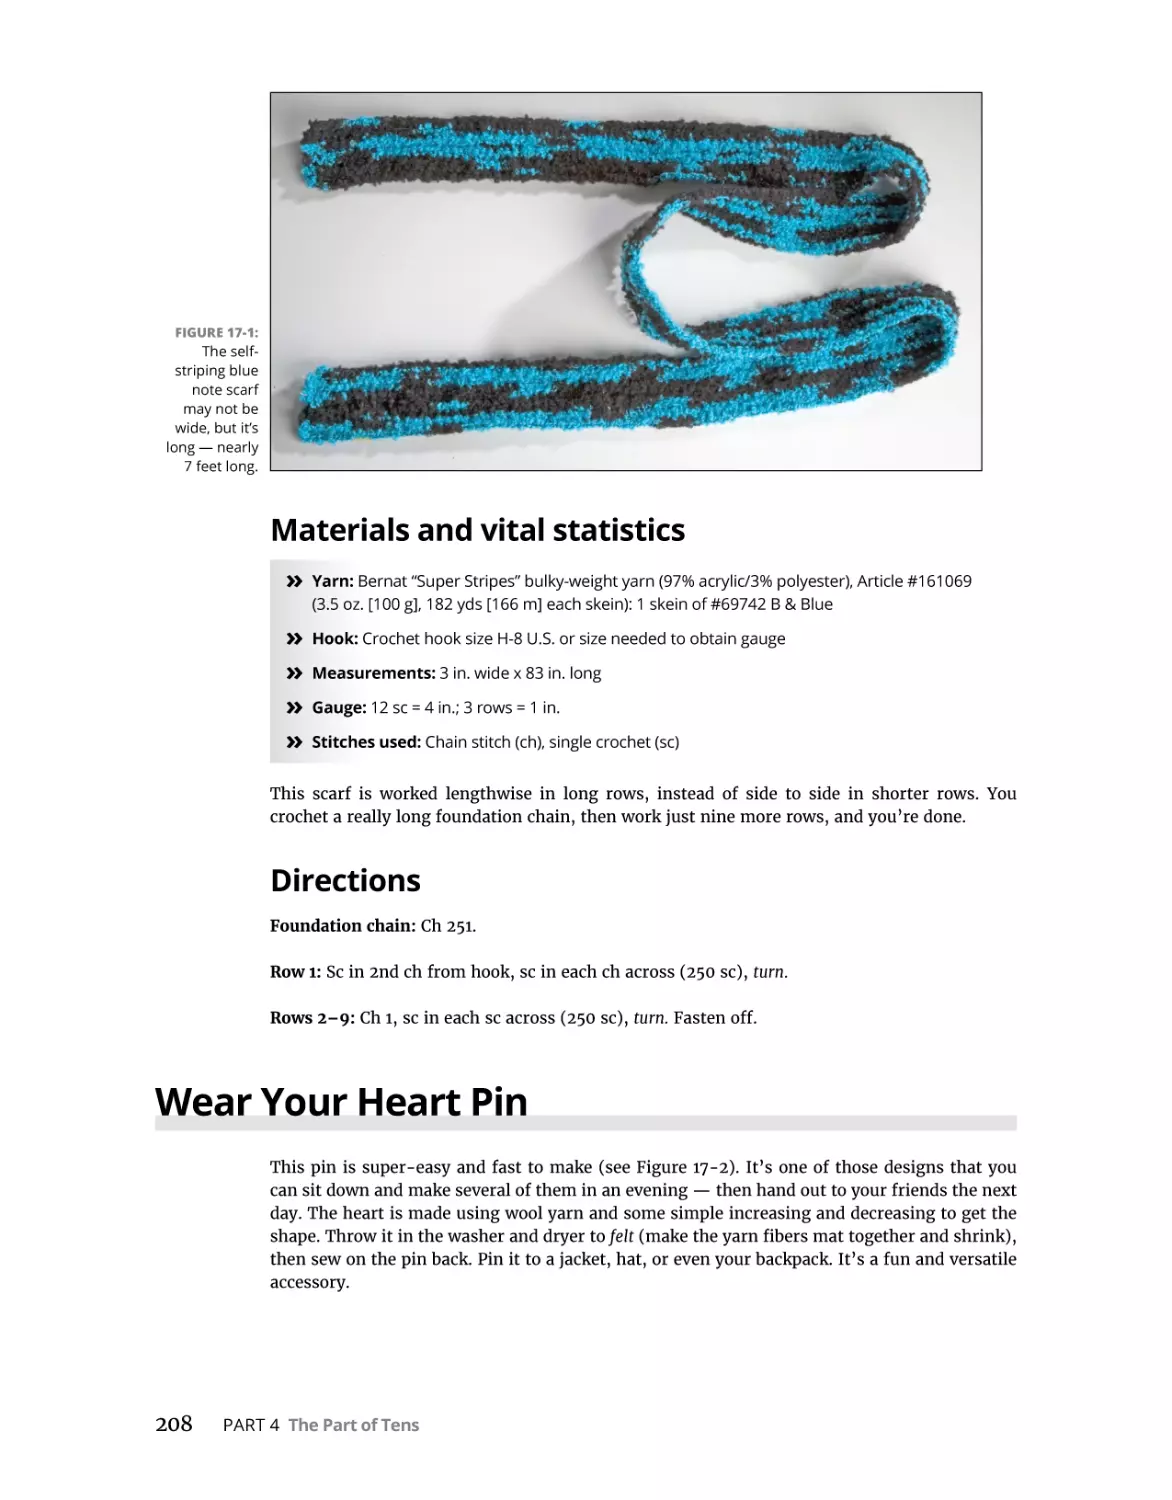
Wear Your Heart Pin . . . . . . . . . . . . . . . . . . . . . . . . . . . . . . . . . . . . . . . . . . . . . . . . . . . .
Materials and vital statistics. . . . . . . . . . . . . . . . . . . . . . . . . . . . . . . . . . . . . . . . . . .
Stitching the heart. . . . . . . . . . . . . . . . . . . . . . . . . . . . . . . . . . . . . . . . . . . . . . . . . . .
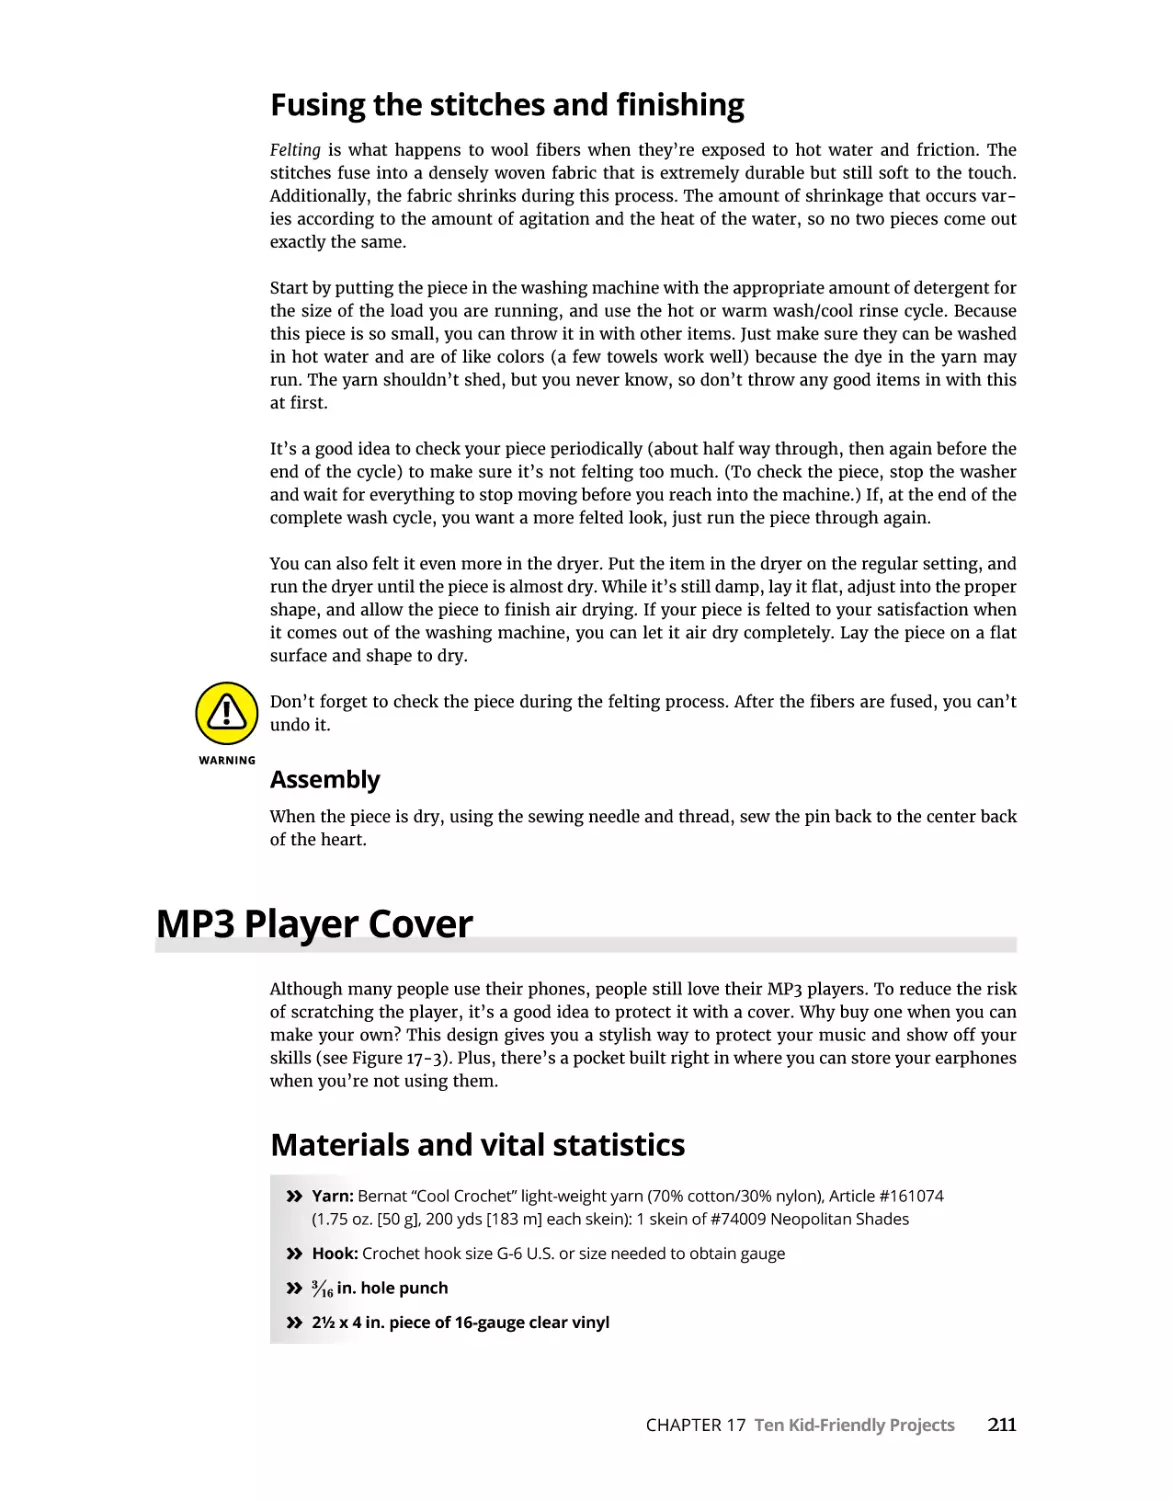
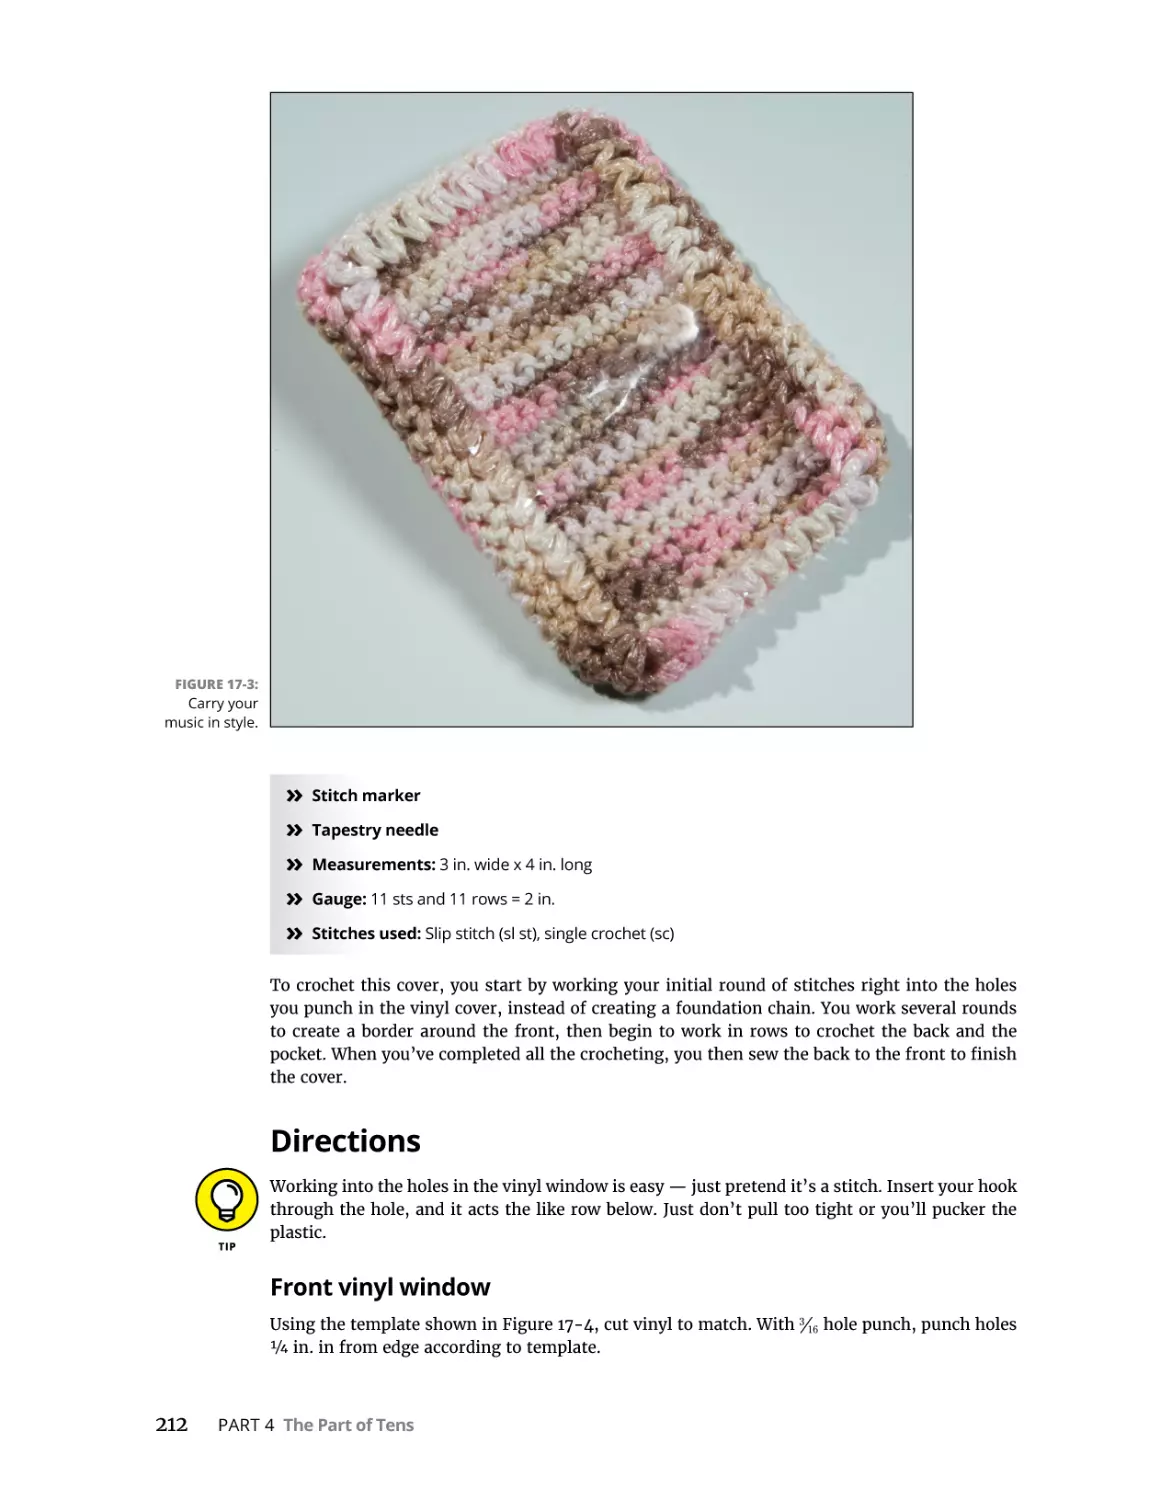
Fusing the stitches and finishing. . . . . . . . . . . . . . . . . . . . . . . . . . . . . . . . . . . . . . .
MP3 Player Cover. . . . . . . . . . . . . . . . . . . . . . . . . . . . . . . . . . . . . . . . . . . . . . . . . . . . . . .
Materials and vital statistics. . . . . . . . . . . . . . . . . . . . . . . . . . . . . . . . . . . . . . . . . . .
Directions . . . . . . . . . . . . . . . . . . . . . . . . . . . . . . . . . . . . . . . . . . . . . . . . . . . . . . . . . .
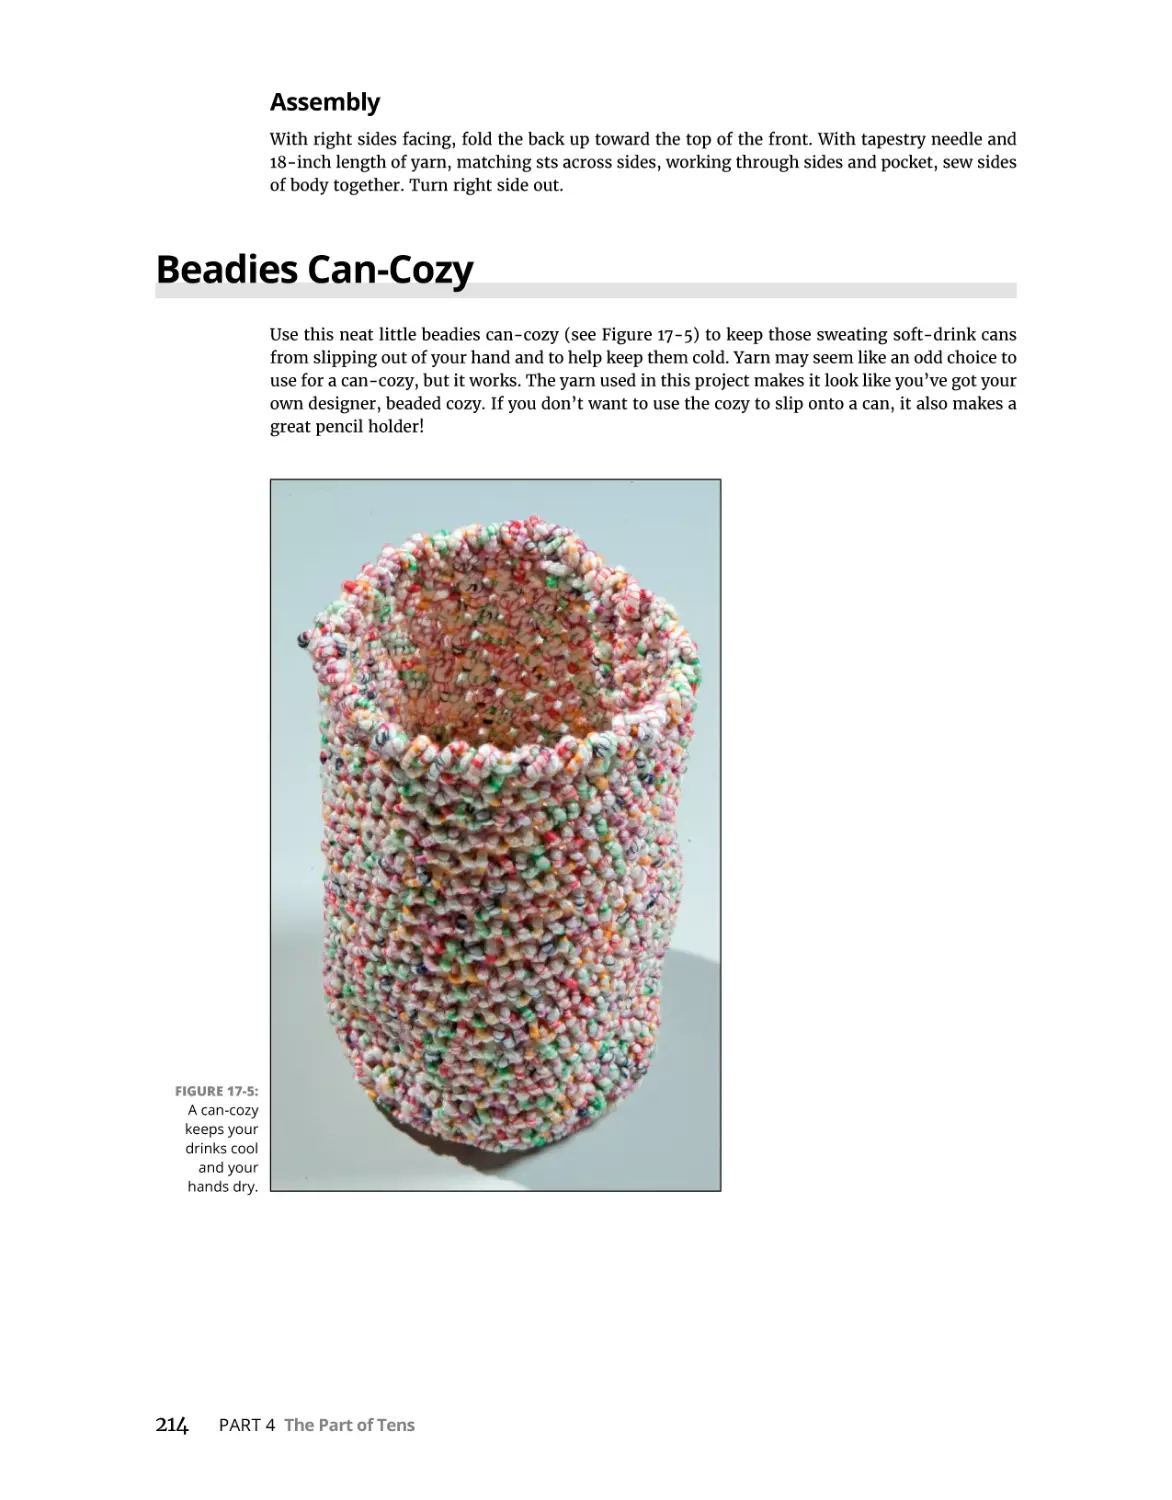
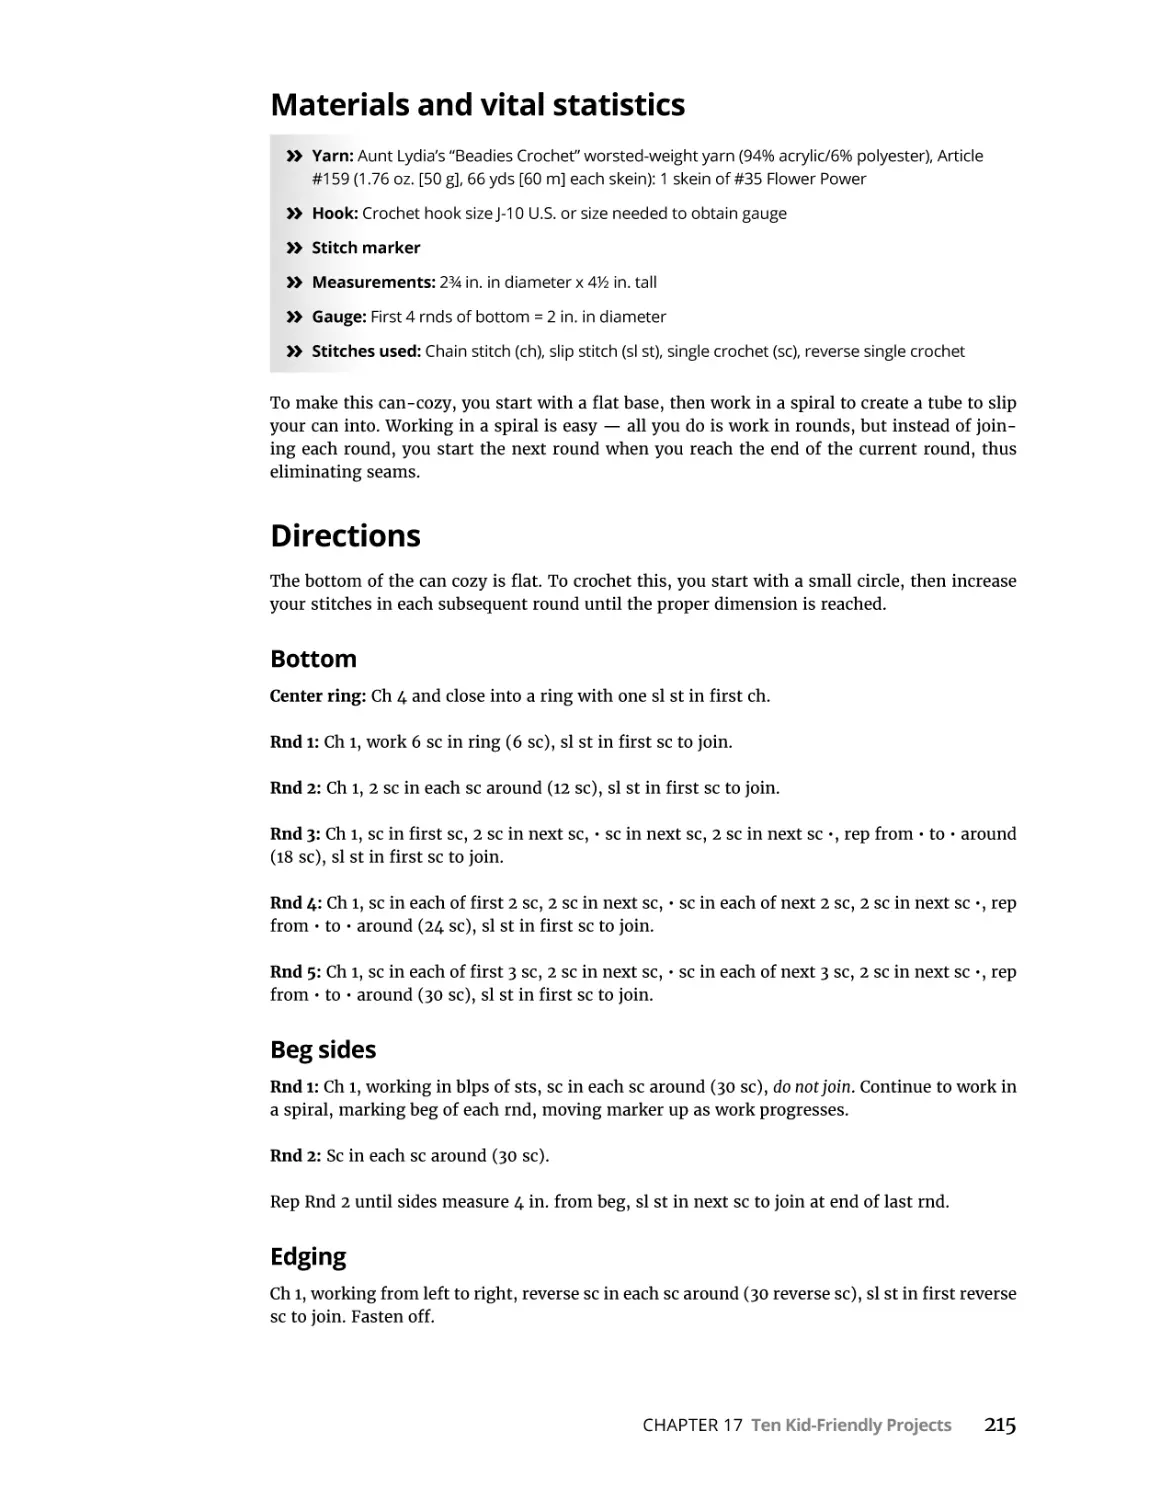
Beadies Can-Cozy . . . . . . . . . . . . . . . . . . . . . . . . . . . . . . . . . . . . . . . . . . . . . . . . . . . . . .
Materials and vital statistics. . . . . . . . . . . . . . . . . . . . . . . . . . . . . . . . . . . . . . . . . . .
Directions . . . . . . . . . . . . . . . . . . . . . . . . . . . . . . . . . . . . . . . . . . . . . . . . . . . . . . . . . .
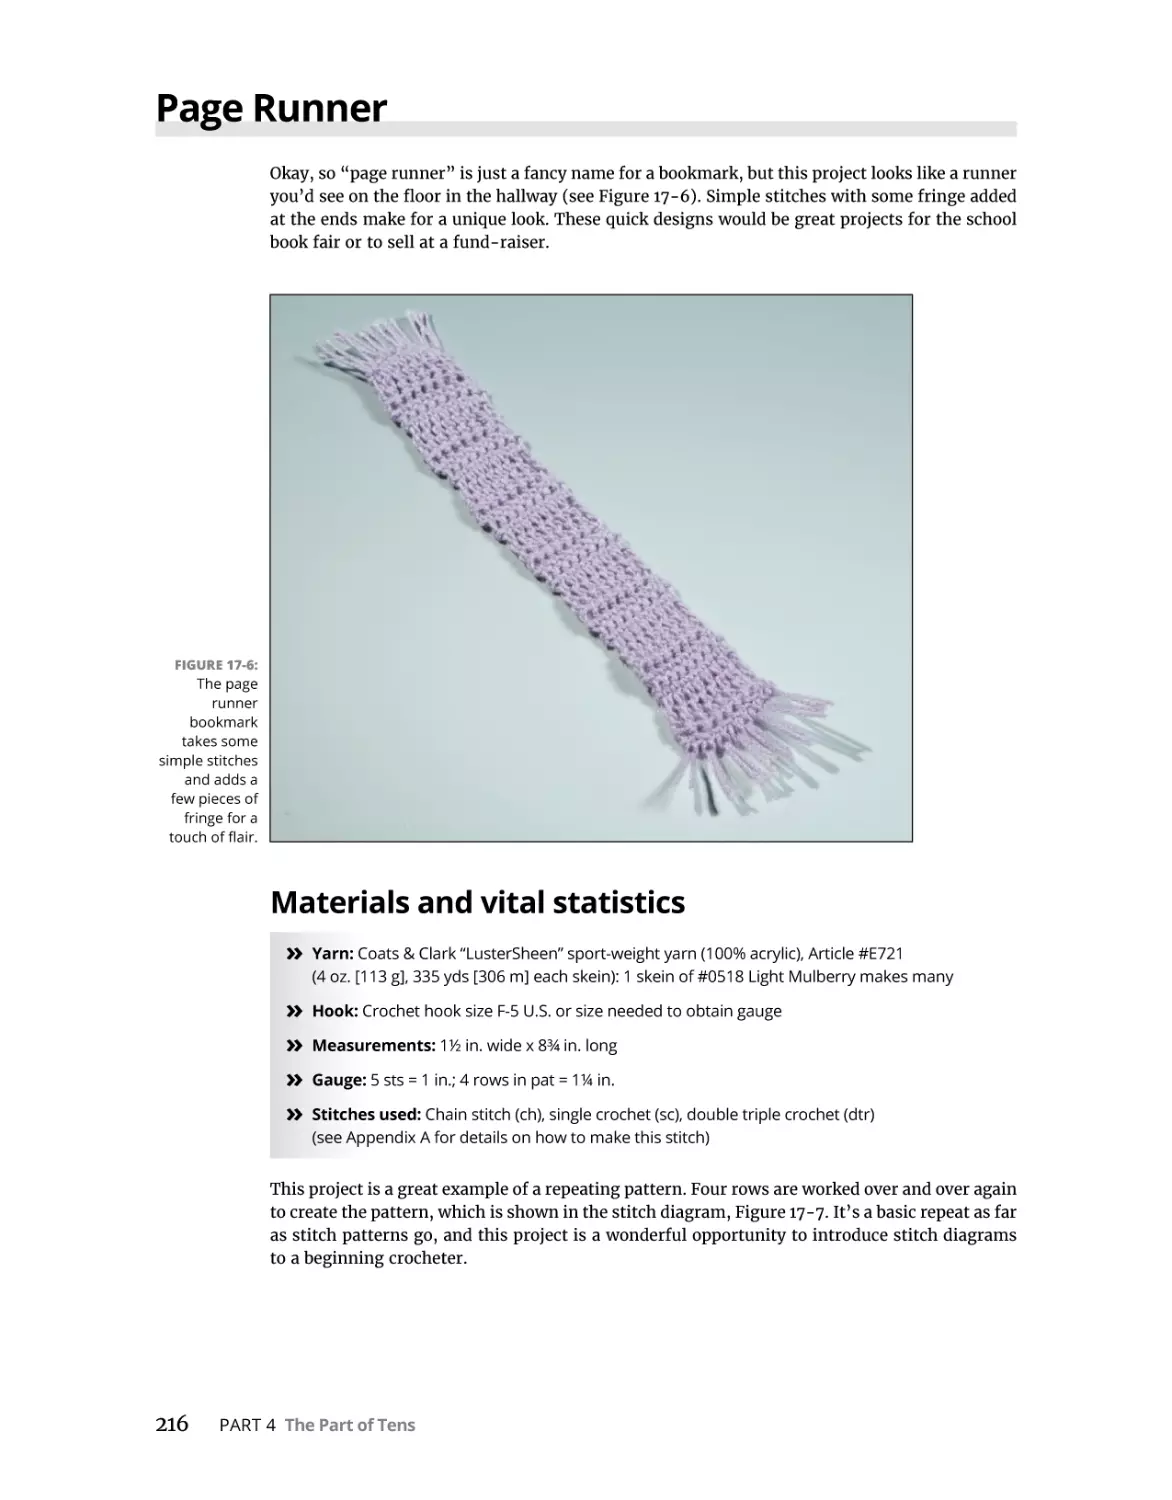
Page Runner. . . . . . . . . . . . . . . . . . . . . . . . . . . . . . . . . . . . . . . . . . . . . . . . . . . . . . . . . . .
Materials and vital statistics. . . . . . . . . . . . . . . . . . . . . . . . . . . . . . . . . . . . . . . . . . .
Directions . . . . . . . . . . . . . . . . . . . . . . . . . . . . . . . . . . . . . . . . . . . . . . . . . . . . . . . . . .
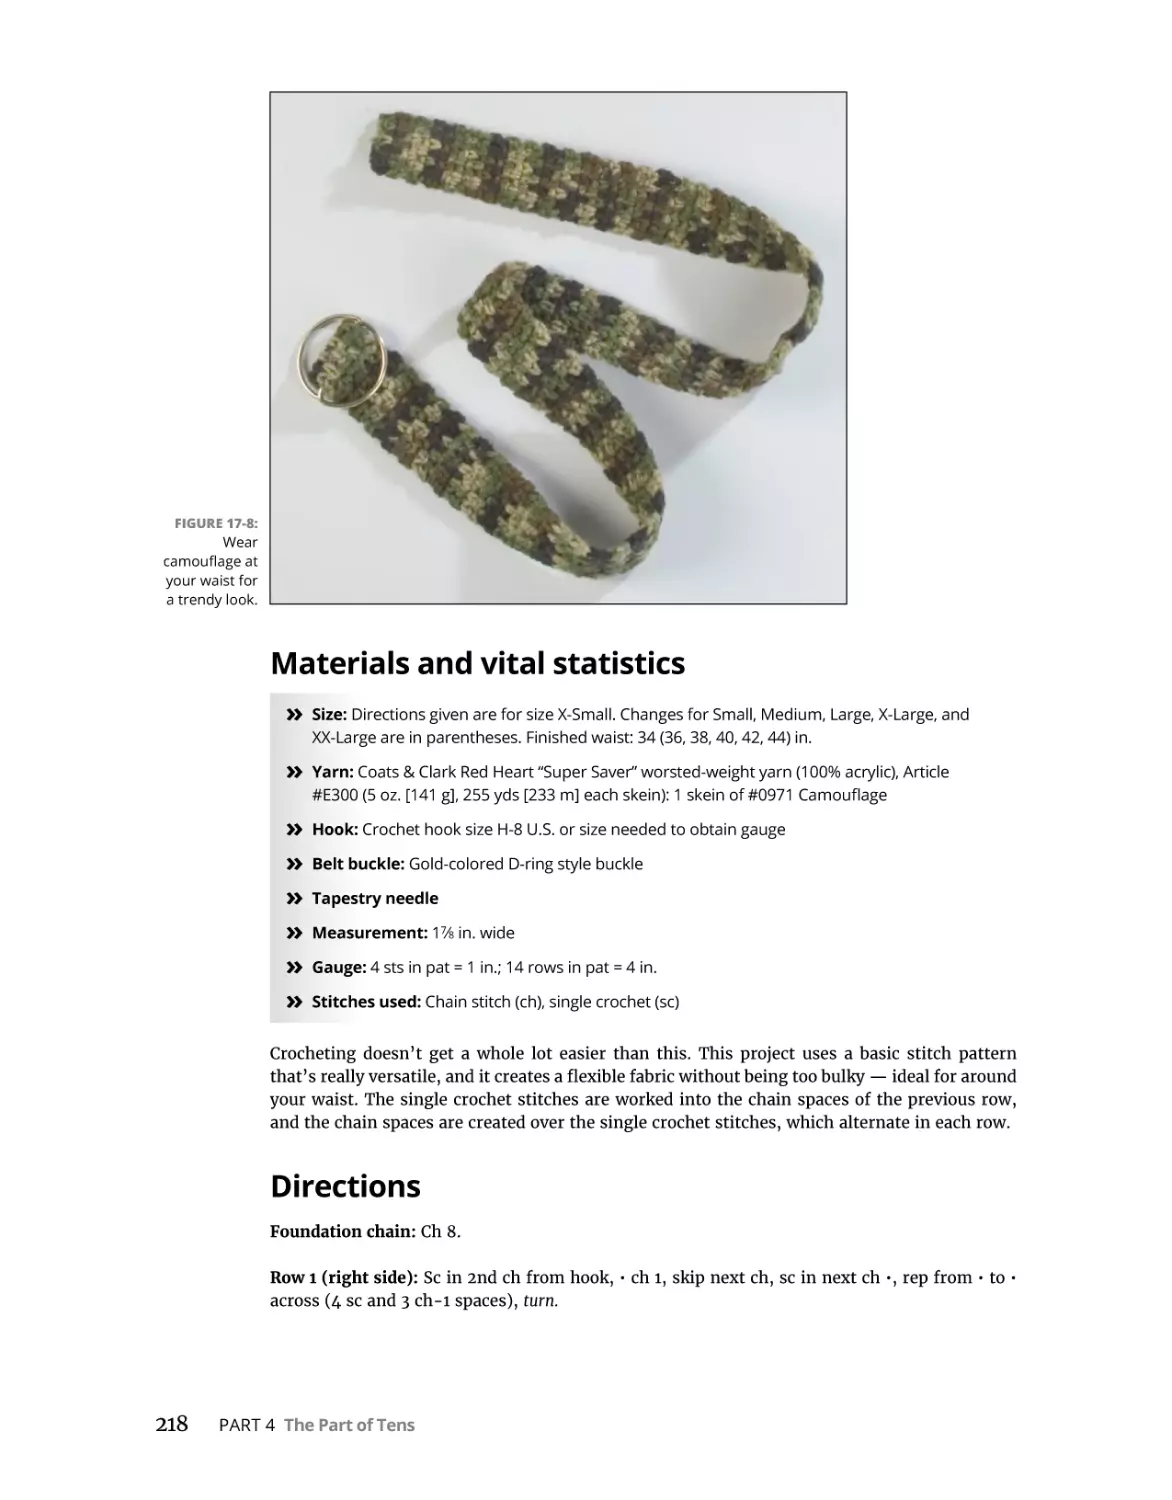
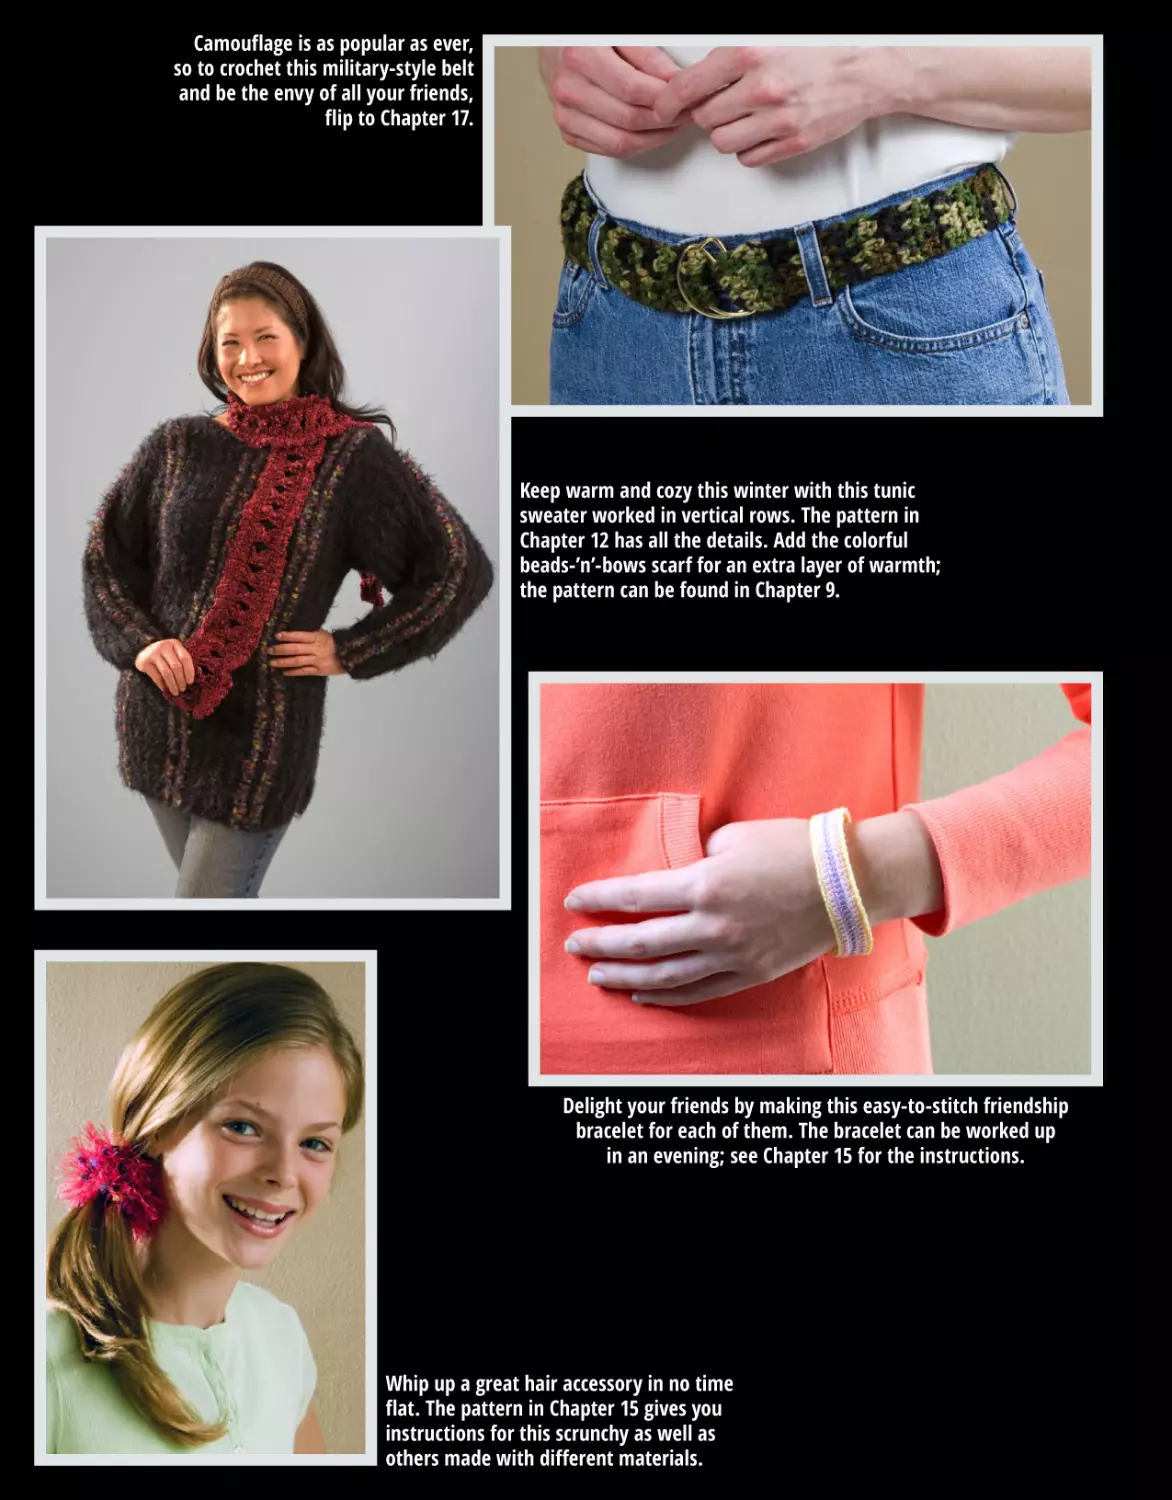
Camouflage Belt. . . . . . . . . . . . . . . . . . . . . . . . . . . . . . . . . . . . . . . . . . . . . . . . . . . . . . . .
Materials and vital statistics. . . . . . . . . . . . . . . . . . . . . . . . . . . . . . . . . . . . . . . . . . .
Directions . . . . . . . . . . . . . . . . . . . . . . . . . . . . . . . . . . . . . . . . . . . . . . . . . . . . . . . . . .
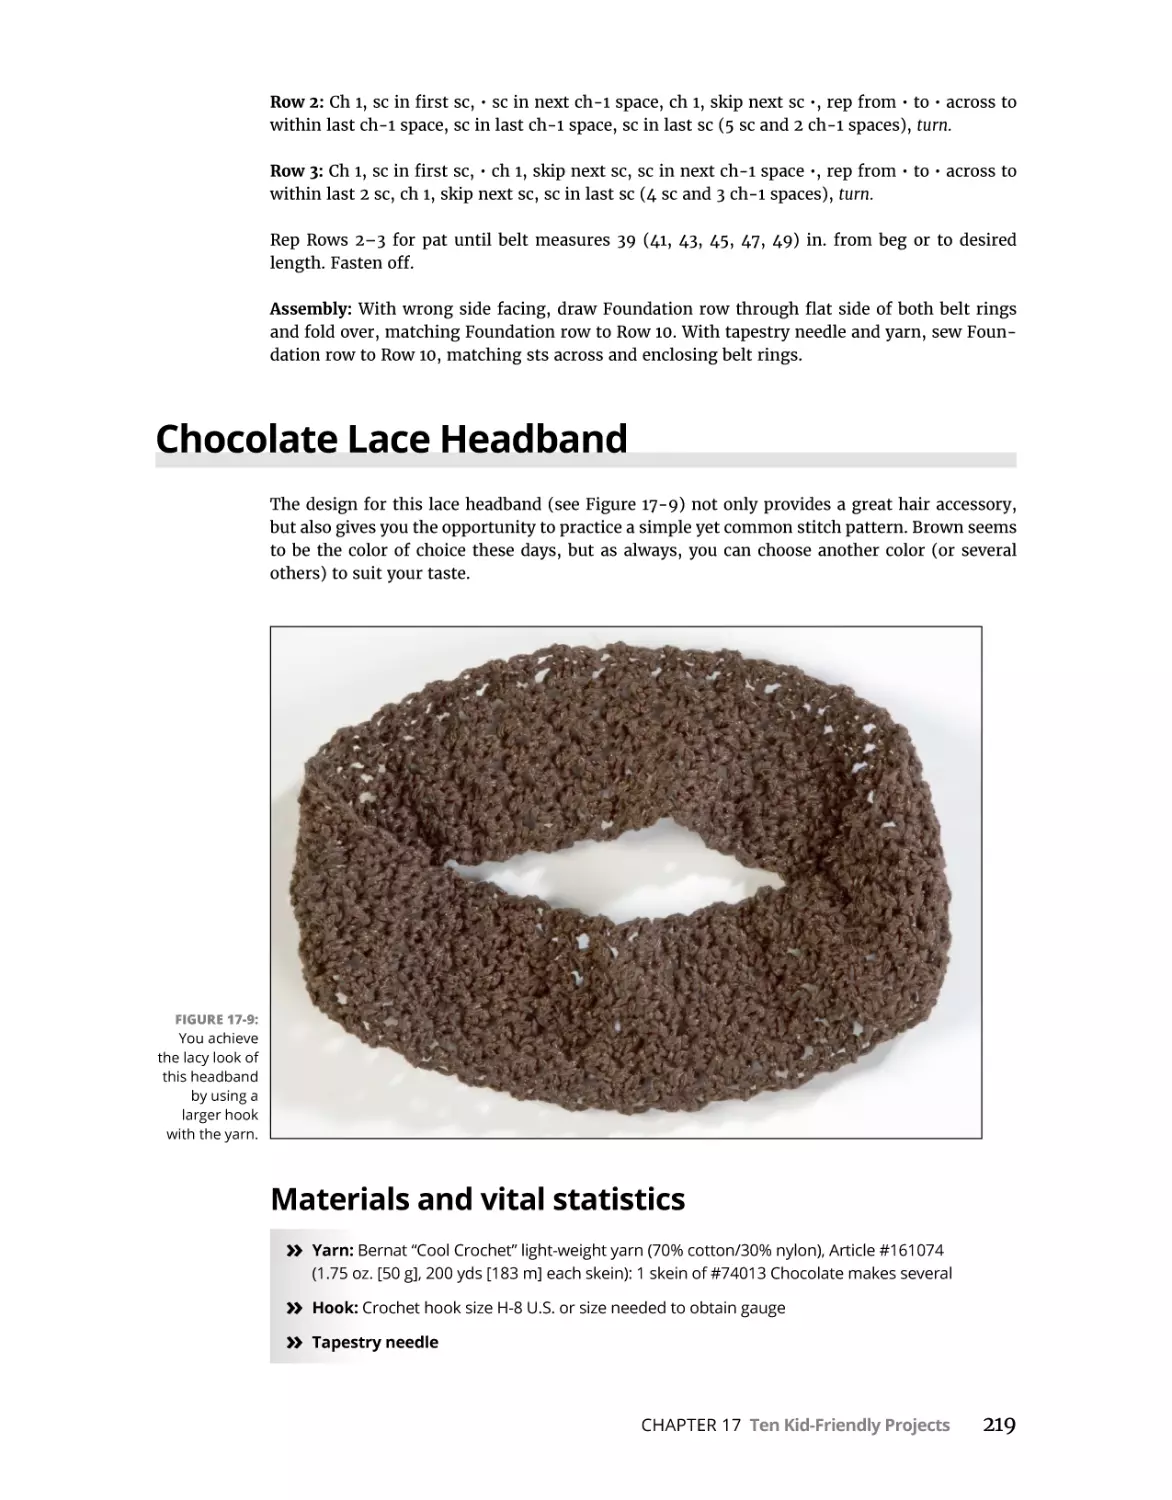
Chocolate Lace Headband . . . . . . . . . . . . . . . . . . . . . . . . . . . . . . . . . . . . . . . . . . . . . . .
Materials and vital statistics. . . . . . . . . . . . . . . . . . . . . . . . . . . . . . . . . . . . . . . . . . .
Directions . . . . . . . . . . . . . . . . . . . . . . . . . . . . . . . . . . . . . . . . . . . . . . . . . . . . . . . . . .
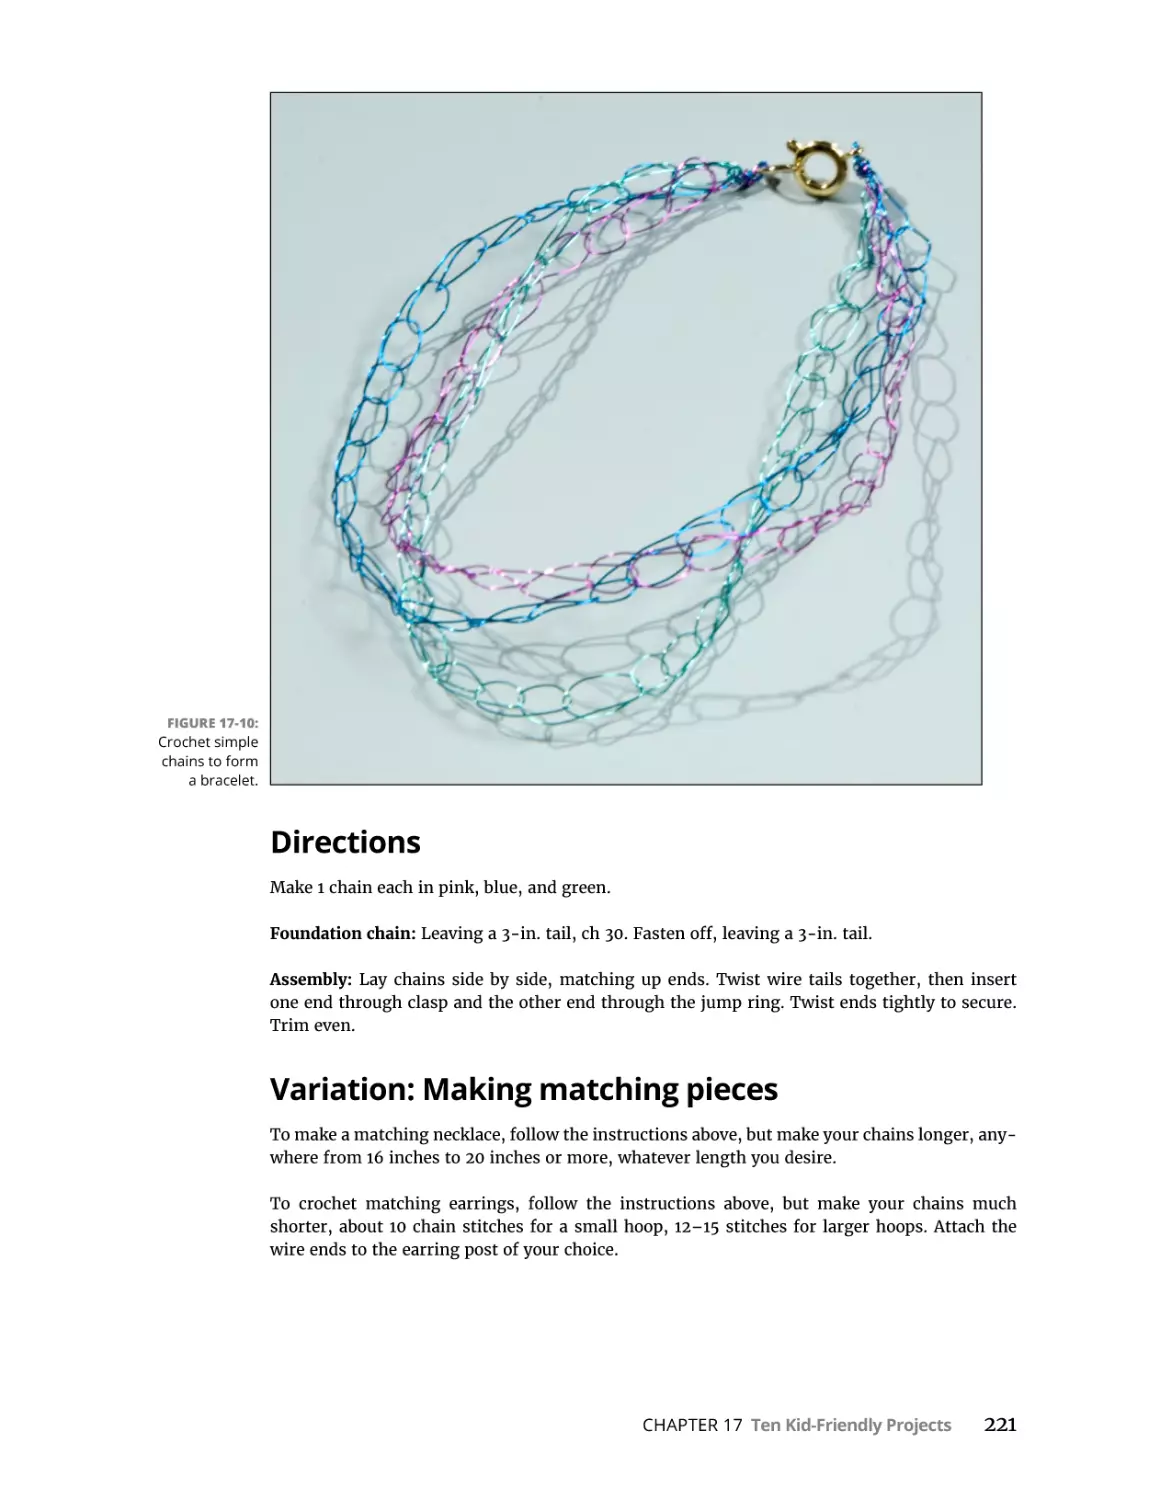
Chain-Link Bracelet . . . . . . . . . . . . . . . . . . . . . . . . . . . . . . . . . . . . . . . . . . . . . . . . . . . . .
Materials and vital statistics. . . . . . . . . . . . . . . . . . . . . . . . . . . . . . . . . . . . . . . . . . .
Directions . . . . . . . . . . . . . . . . . . . . . . . . . . . . . . . . . . . . . . . . . . . . . . . . . . . . . . . . . .
Variation: Making matching pieces. . . . . . . . . . . . . . . . . . . . . . . . . . . . . . . . . . . . .
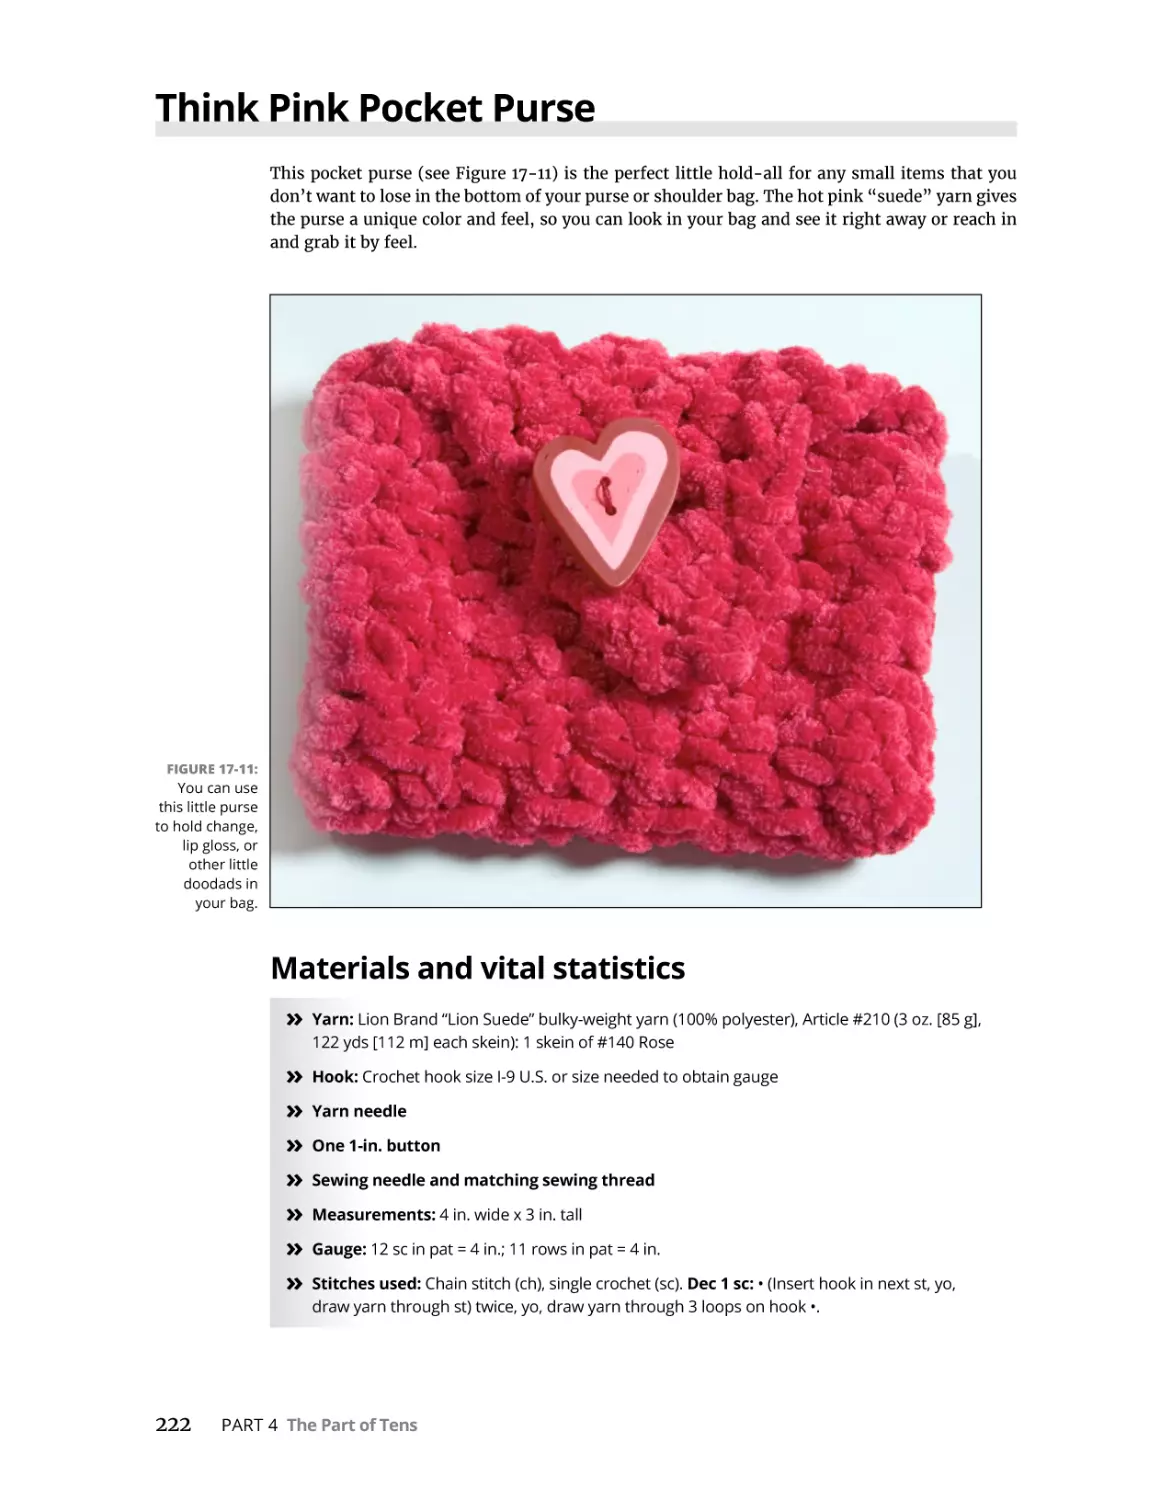
Think Pink Pocket Purse. . . . . . . . . . . . . . . . . . . . . . . . . . . . . . . . . . . . . . . . . . . . . . . . .
Materials and vital statistics. . . . . . . . . . . . . . . . . . . . . . . . . . . . . . . . . . . . . . . . . . .
Directions . . . . . . . . . . . . . . . . . . . . . . . . . . . . . . . . . . . . . . . . . . . . . . . . . . . . . . . . . .
Variation: Stitching a small handbag. . . . . . . . . . . . . . . . . . . . . . . . . . . . . . . . . . . .
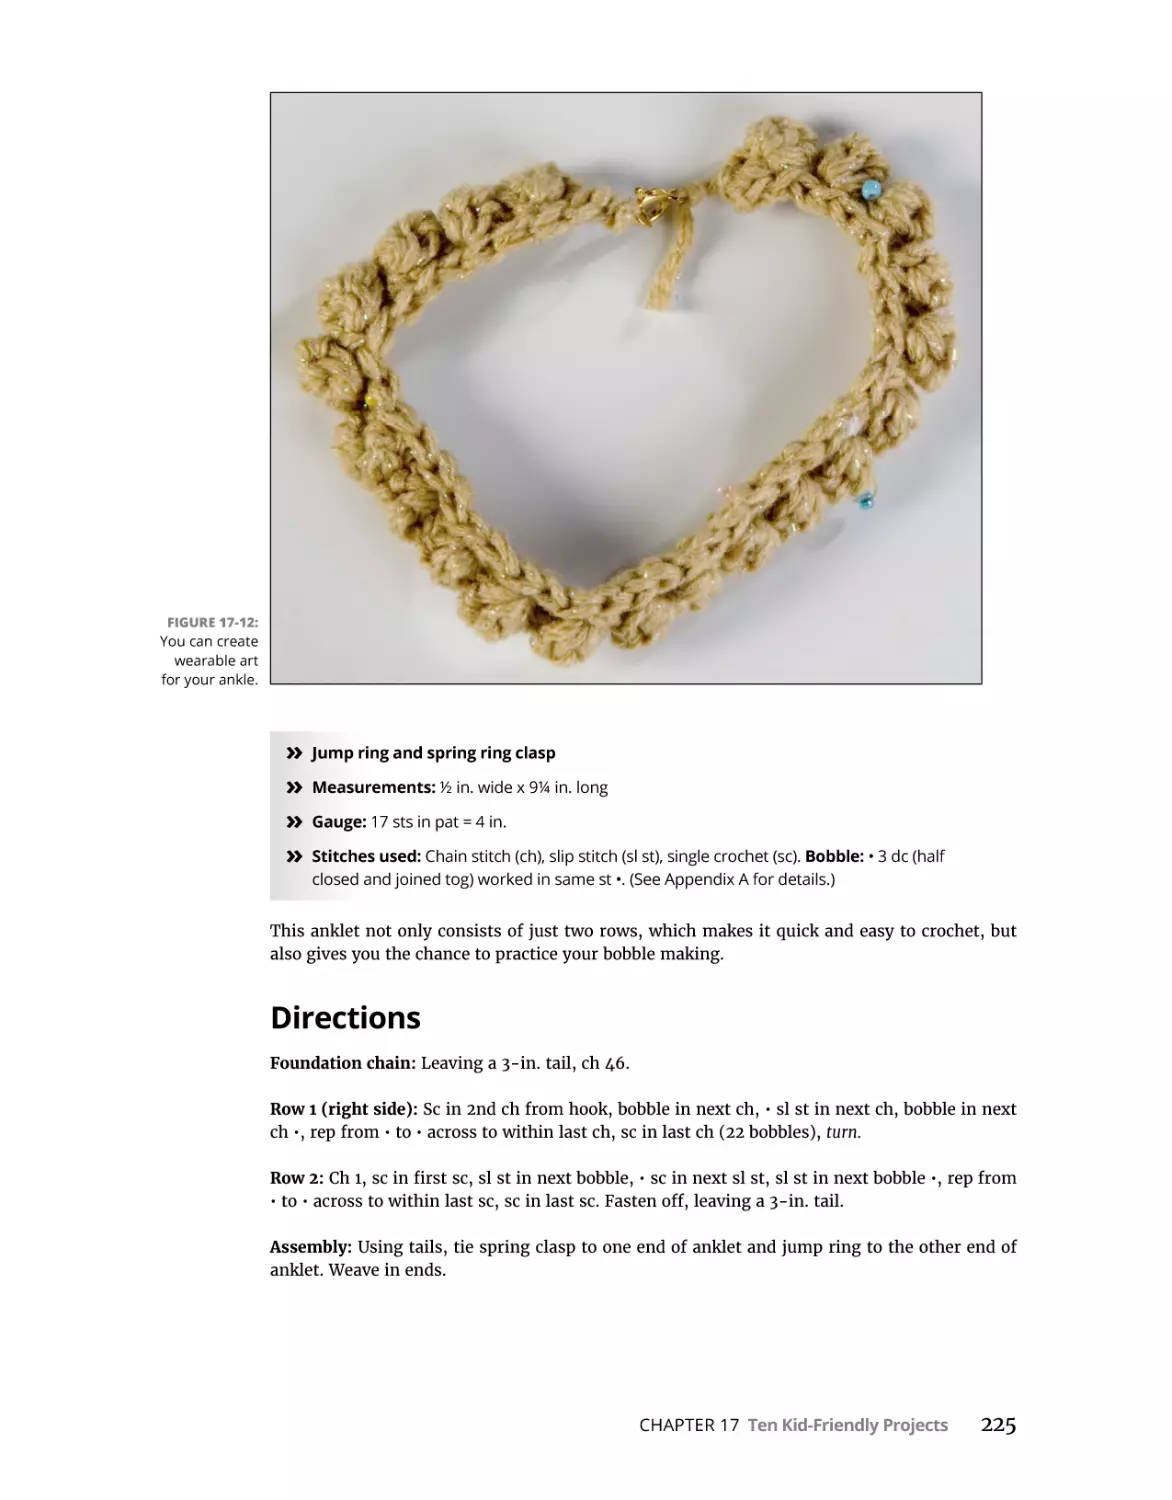
Beaded Anklet . . . . . . . . . . . . . . . . . . . . . . . . . . . . . . . . . . . . . . . . . . . . . . . . . . . . . . . . .
Materials and vital statistics. . . . . . . . . . . . . . . . . . . . . . . . . . . . . . . . . . . . . . . . . . .
Directions . . . . . . . . . . . . . . . . . . . . . . . . . . . . . . . . . . . . . . . . . . . . . . . . . . . . . . . . . .
207
208
208
208
209
210
211
211
211
212
214
215
215
216
216
217
217
218
218
219
219
220
220
220
221
221
222
222
223
223
224
224
225
PART 5: APPENDIXES . . . . . . . . . . . . . . . . . . . . . . . . . . . . . . . . . . . . . . . . . .
227
Crochet Stitches. . . . . . . . . . . . . . . . . . . . . . . . . . . . . . . . . . . . . . . . . . . . . . . . . . . . .
229
Slipknot. . . . . . . . . . . . . . . . . . . . . . . . . . . . . . . . . . . . . . . . . . . . . . . . . . . . . . . . . . . . . . .
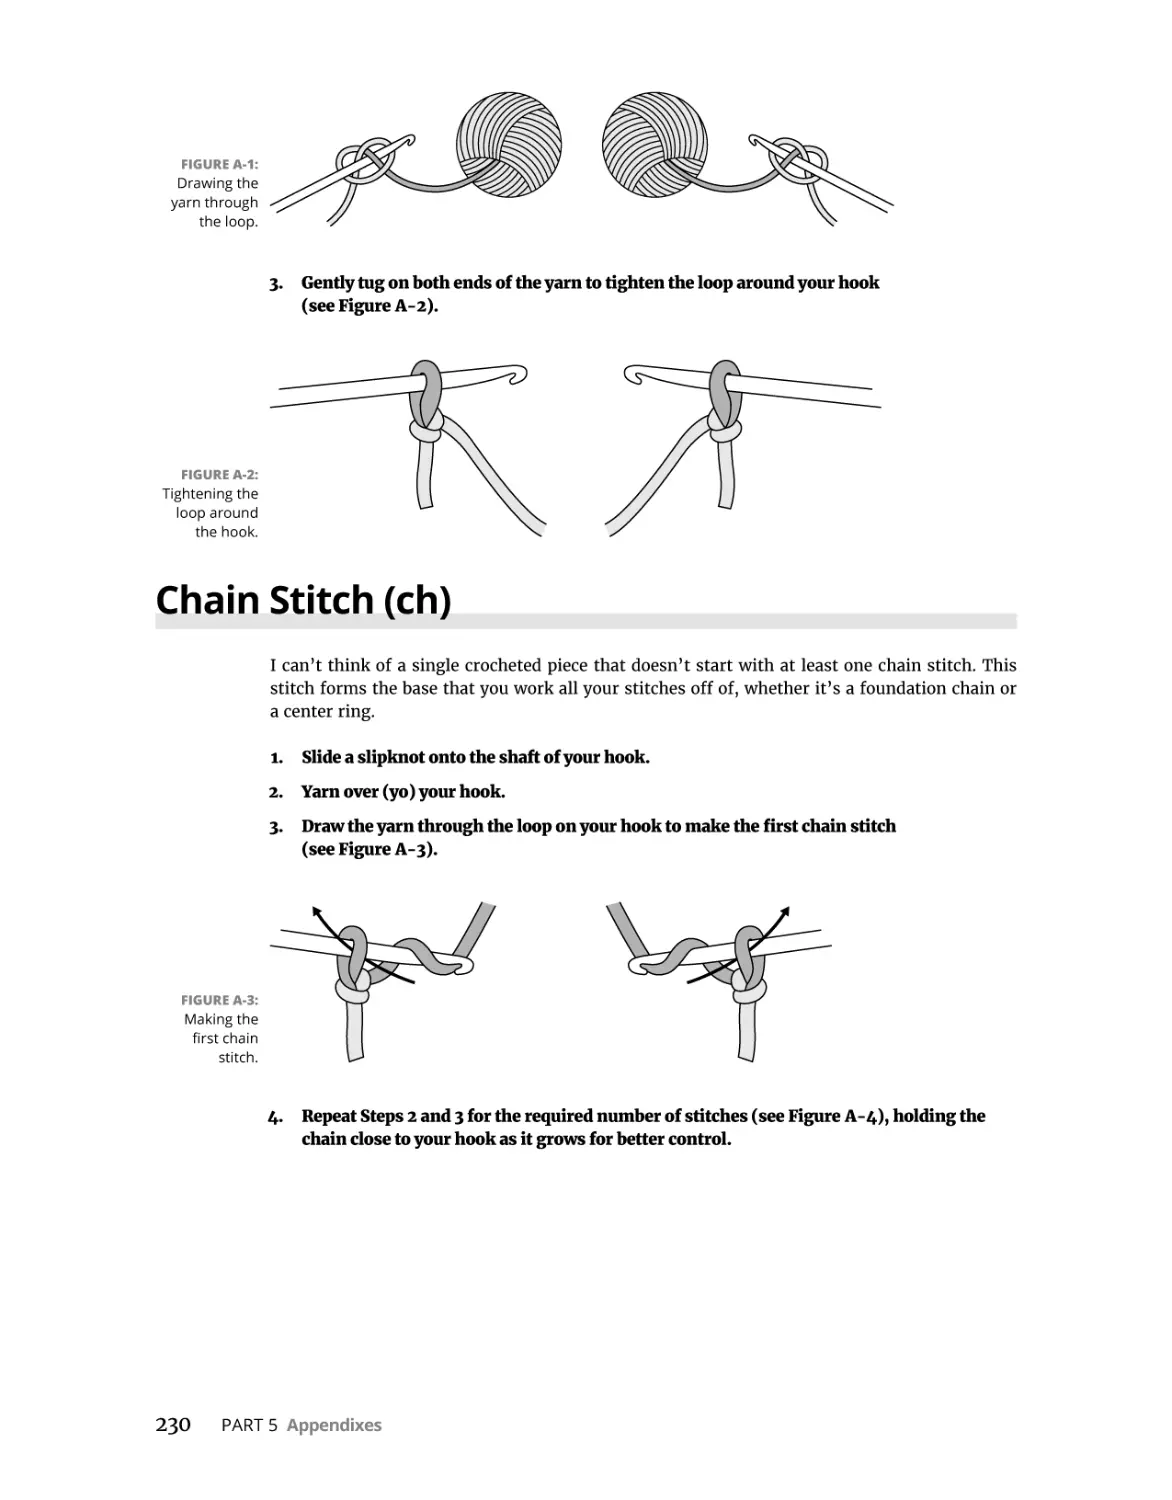
Chain Stitch (ch). . . . . . . . . . . . . . . . . . . . . . . . . . . . . . . . . . . . . . . . . . . . . . . . . . . . . . . .
Slip Stitch (sl st) . . . . . . . . . . . . . . . . . . . . . . . . . . . . . . . . . . . . . . . . . . . . . . . . . . . . . . . .
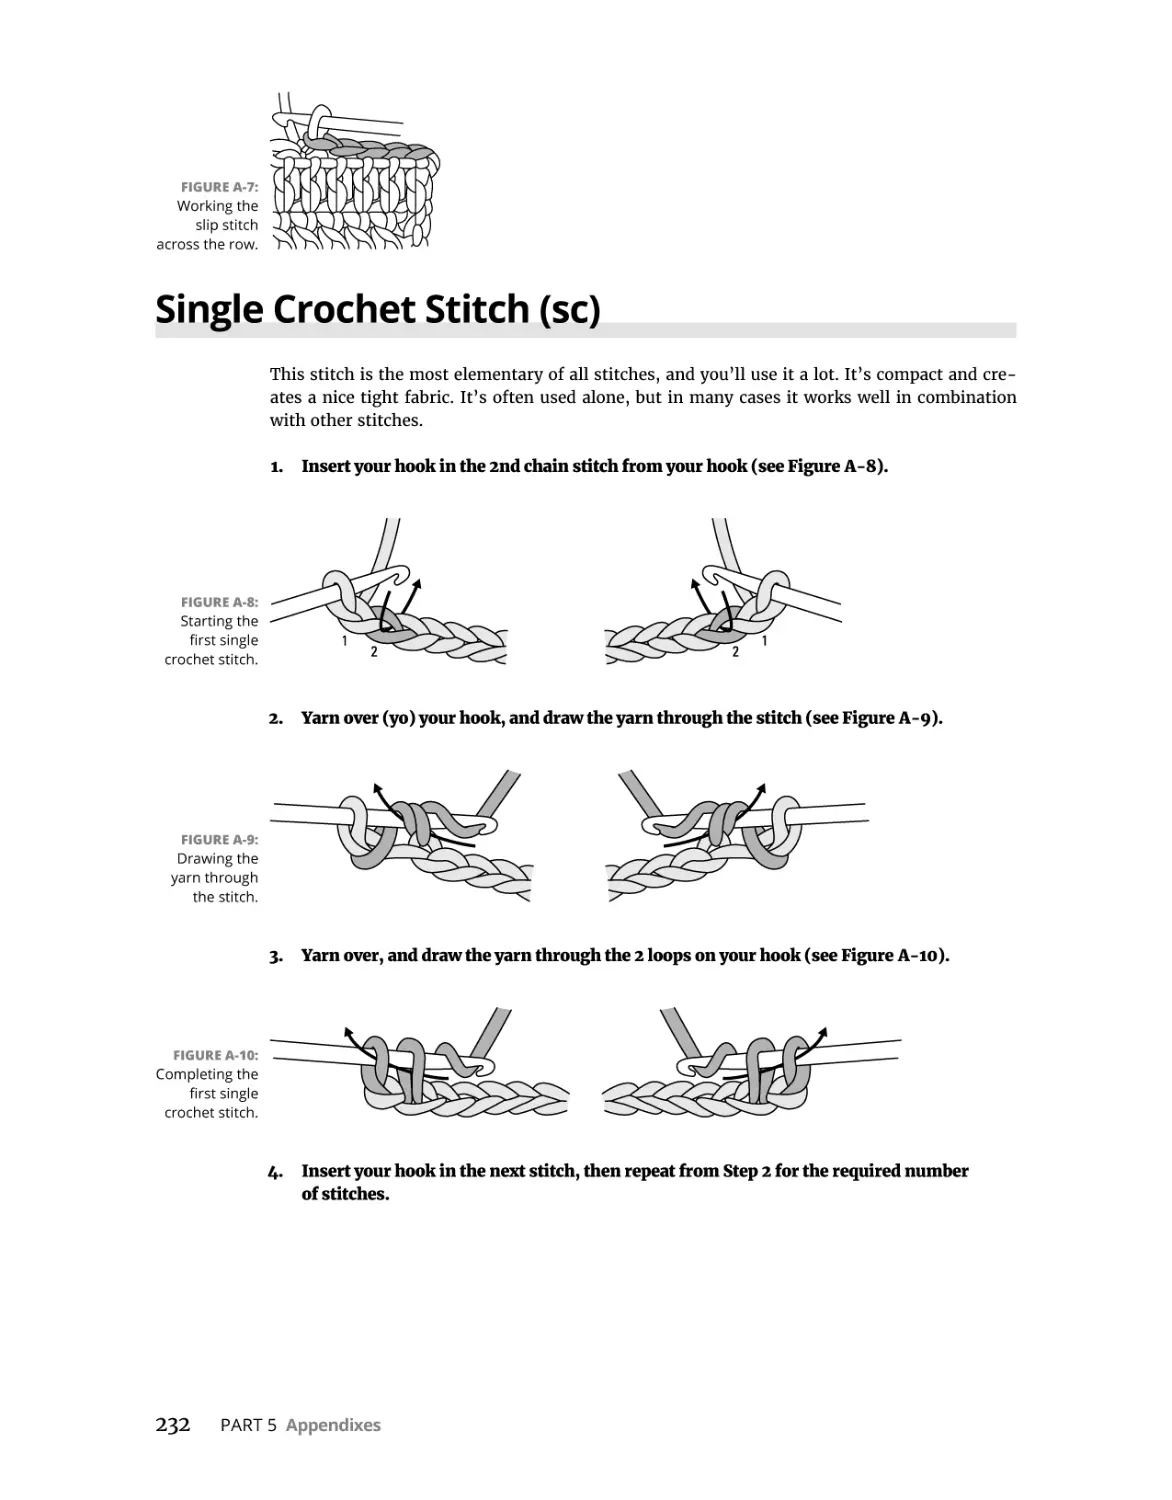
Single Crochet Stitch (sc). . . . . . . . . . . . . . . . . . . . . . . . . . . . . . . . . . . . . . . . . . . . . . . . .
229
230
231
232
CHAPTER 17:
APPENDIX A:
Table of Contents
xi
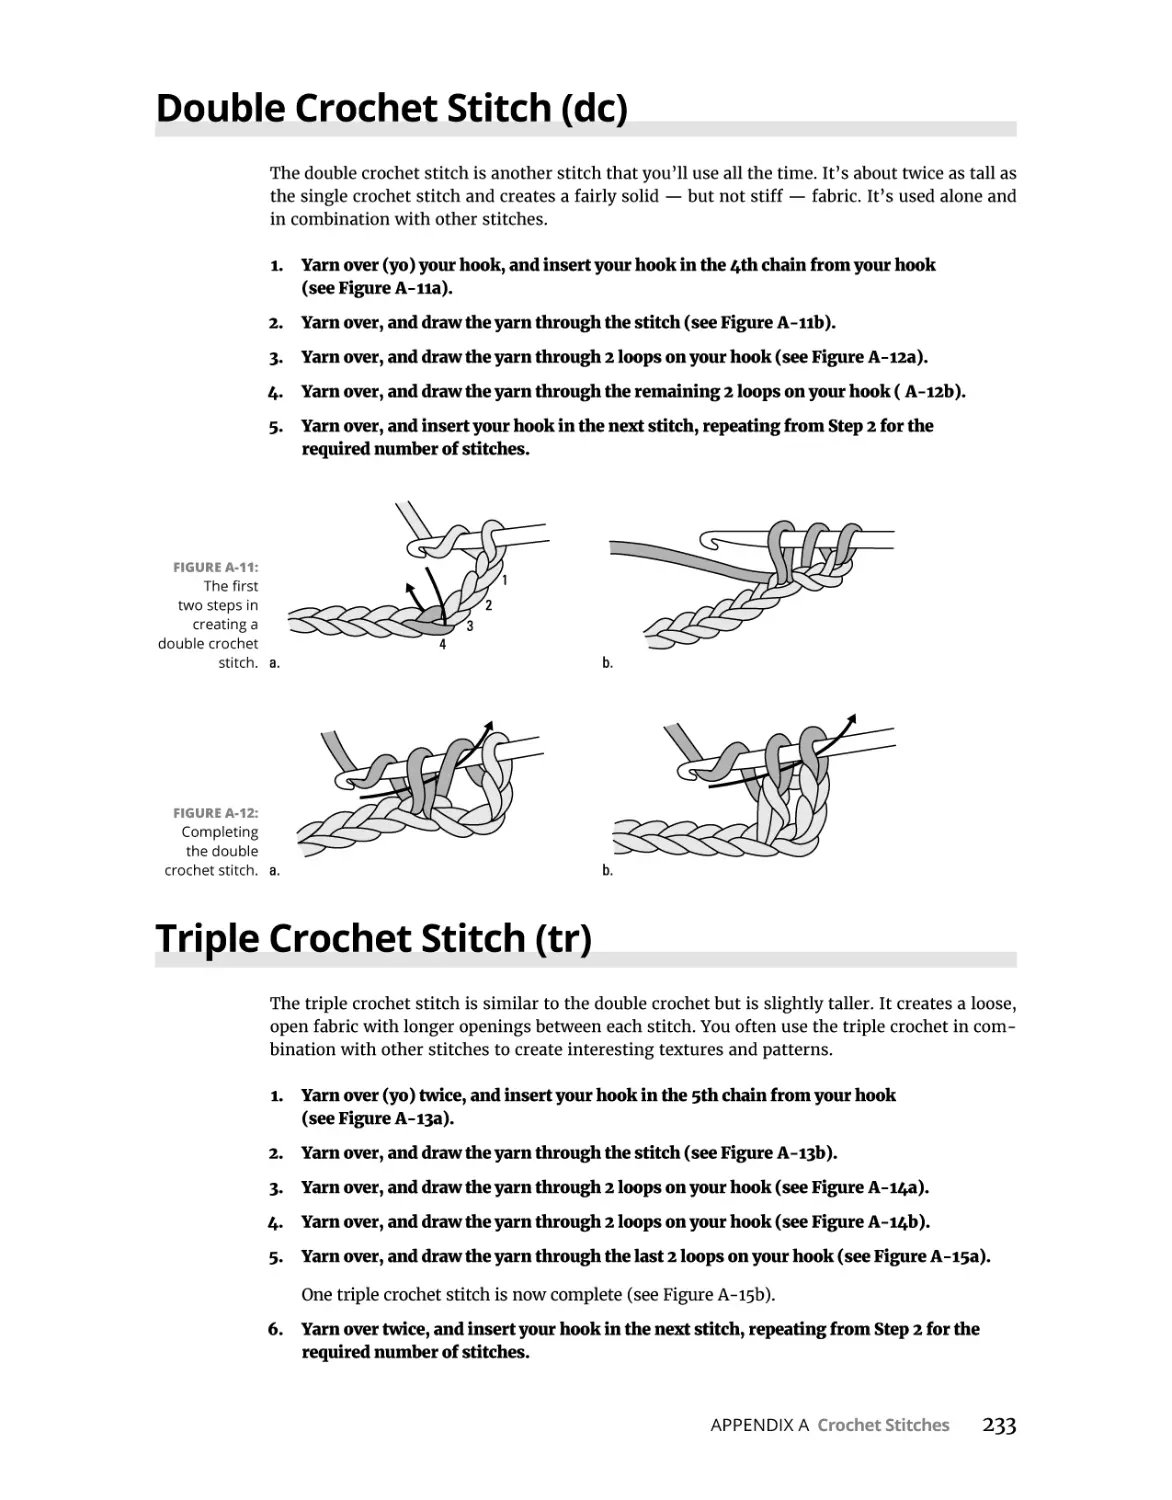
Double Crochet Stitch (dc) . . . . . . . . . . . . . . . . . . . . . . . . . . . . . . . . . . . . . . . . . . . . . . . 233
Triple Crochet Stitch (tr) . . . . . . . . . . . . . . . . . . . . . . . . . . . . . . . . . . . . . . . . . . . . . . . . . 233
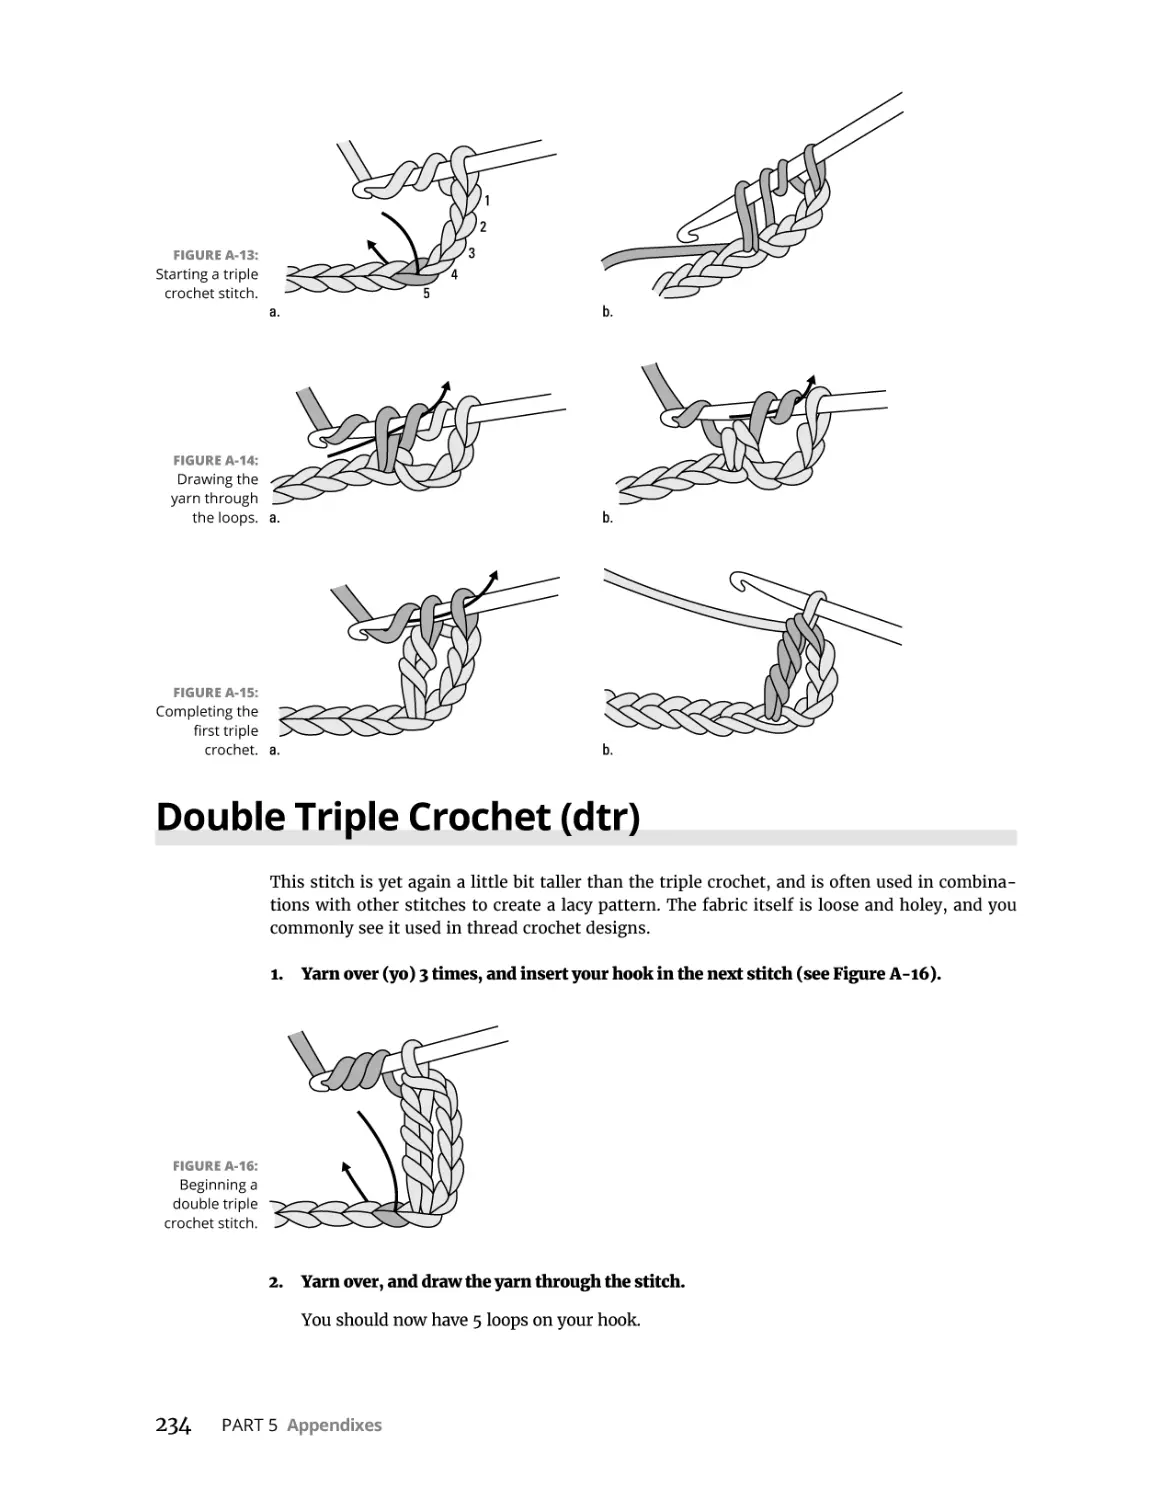
Double Triple Crochet (dtr). . . . . . . . . . . . . . . . . . . . . . . . . . . . . . . . . . . . . . . . . . . . . . . 234
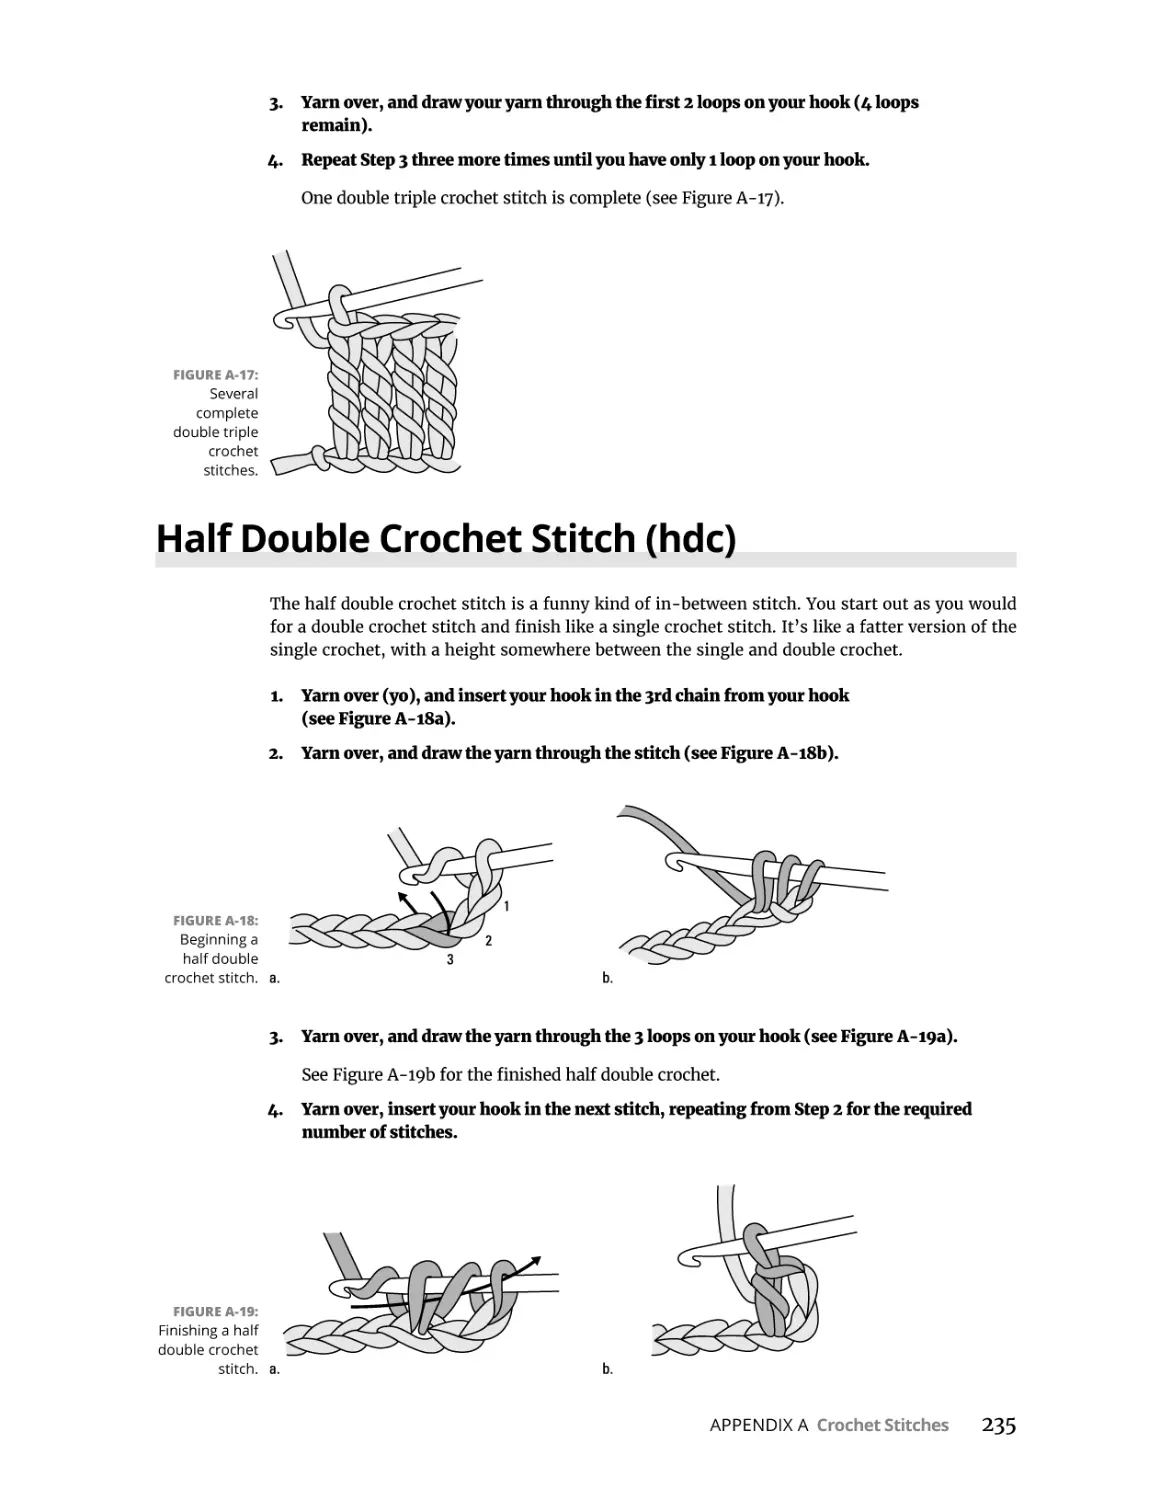
Half Double Crochet Stitch (hdc). . . . . . . . . . . . . . . . . . . . . . . . . . . . . . . . . . . . . . . . . . 235
Decrease 1 Single Crochet Stitch (dec 1 sc) . . . . . . . . . . . . . . . . . . . . . . . . . . . . . . . . . 236
Decrease 1 Double Crochet Stitch (dec 1 dc). . . . . . . . . . . . . . . . . . . . . . . . . . . . . . . . 236
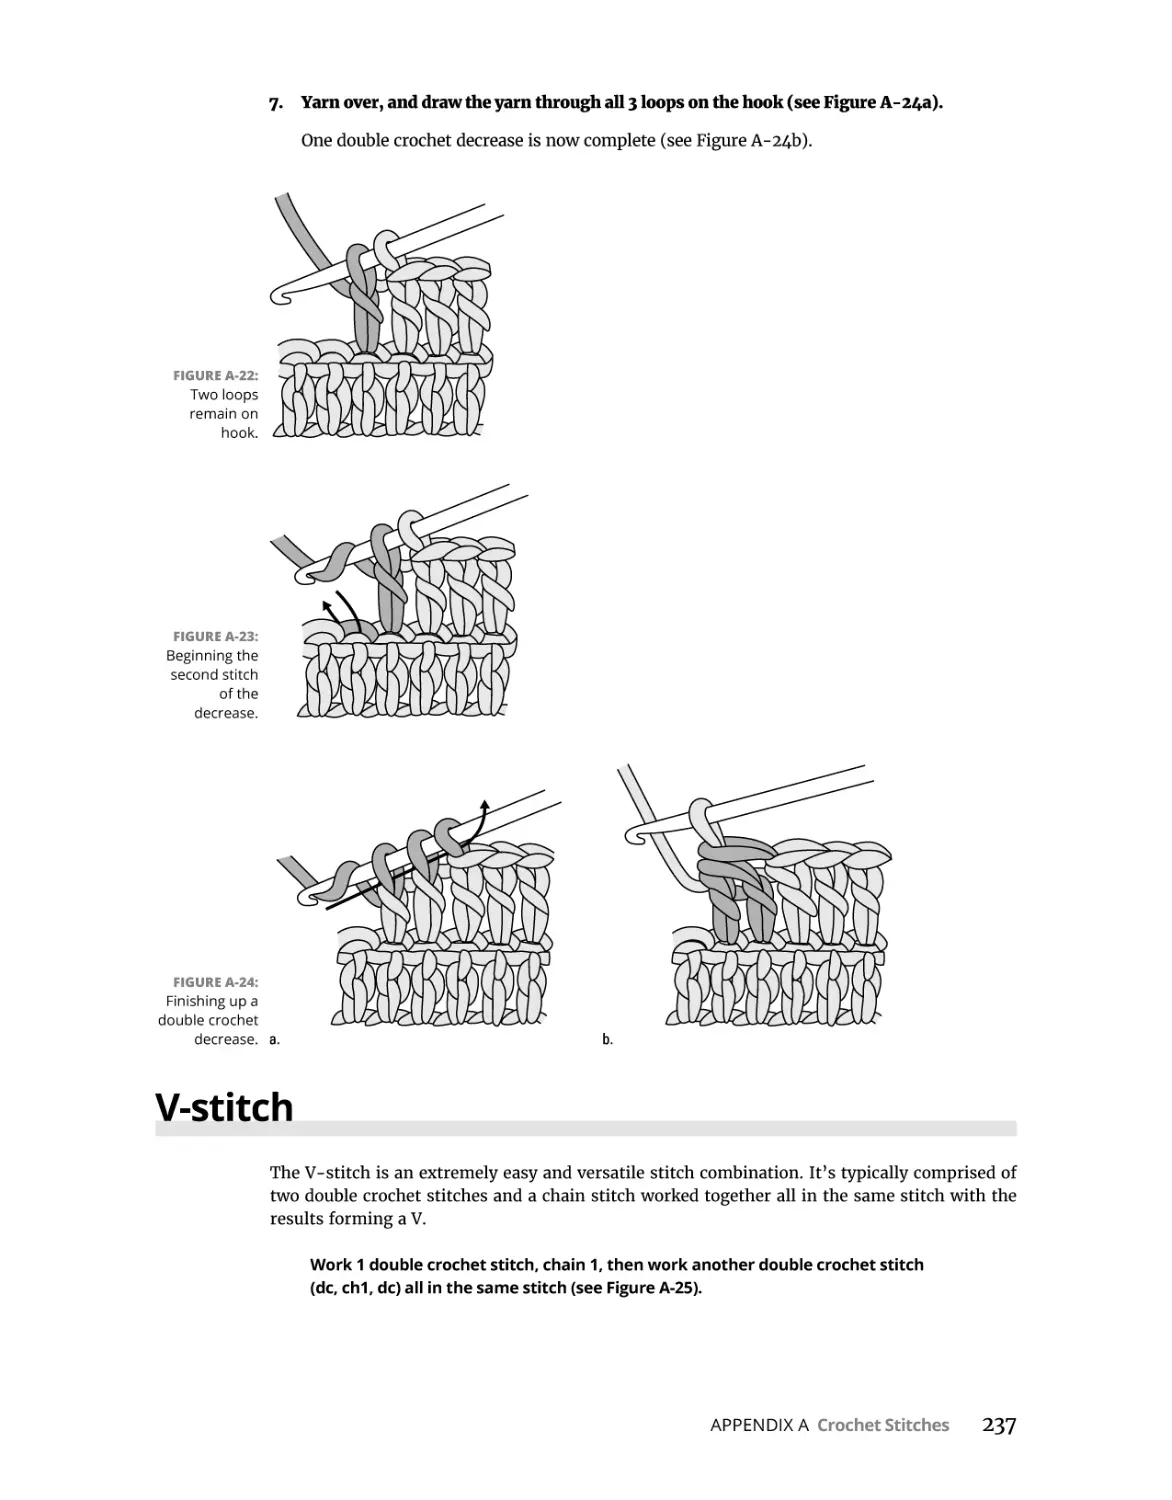
V-stitch. . . . . . . . . . . . . . . . . . . . . . . . . . . . . . . . . . . . . . . . . . . . . . . . . . . . . . . . . . . . . . . . 237
Crossed Double Crochet Stitch . . . . . . . . . . . . . . . . . . . . . . . . . . . . . . . . . . . . . . . . . . . 238
Shell Stitch. . . . . . . . . . . . . . . . . . . . . . . . . . . . . . . . . . . . . . . . . . . . . . . . . . . . . . . . . . . . . 238
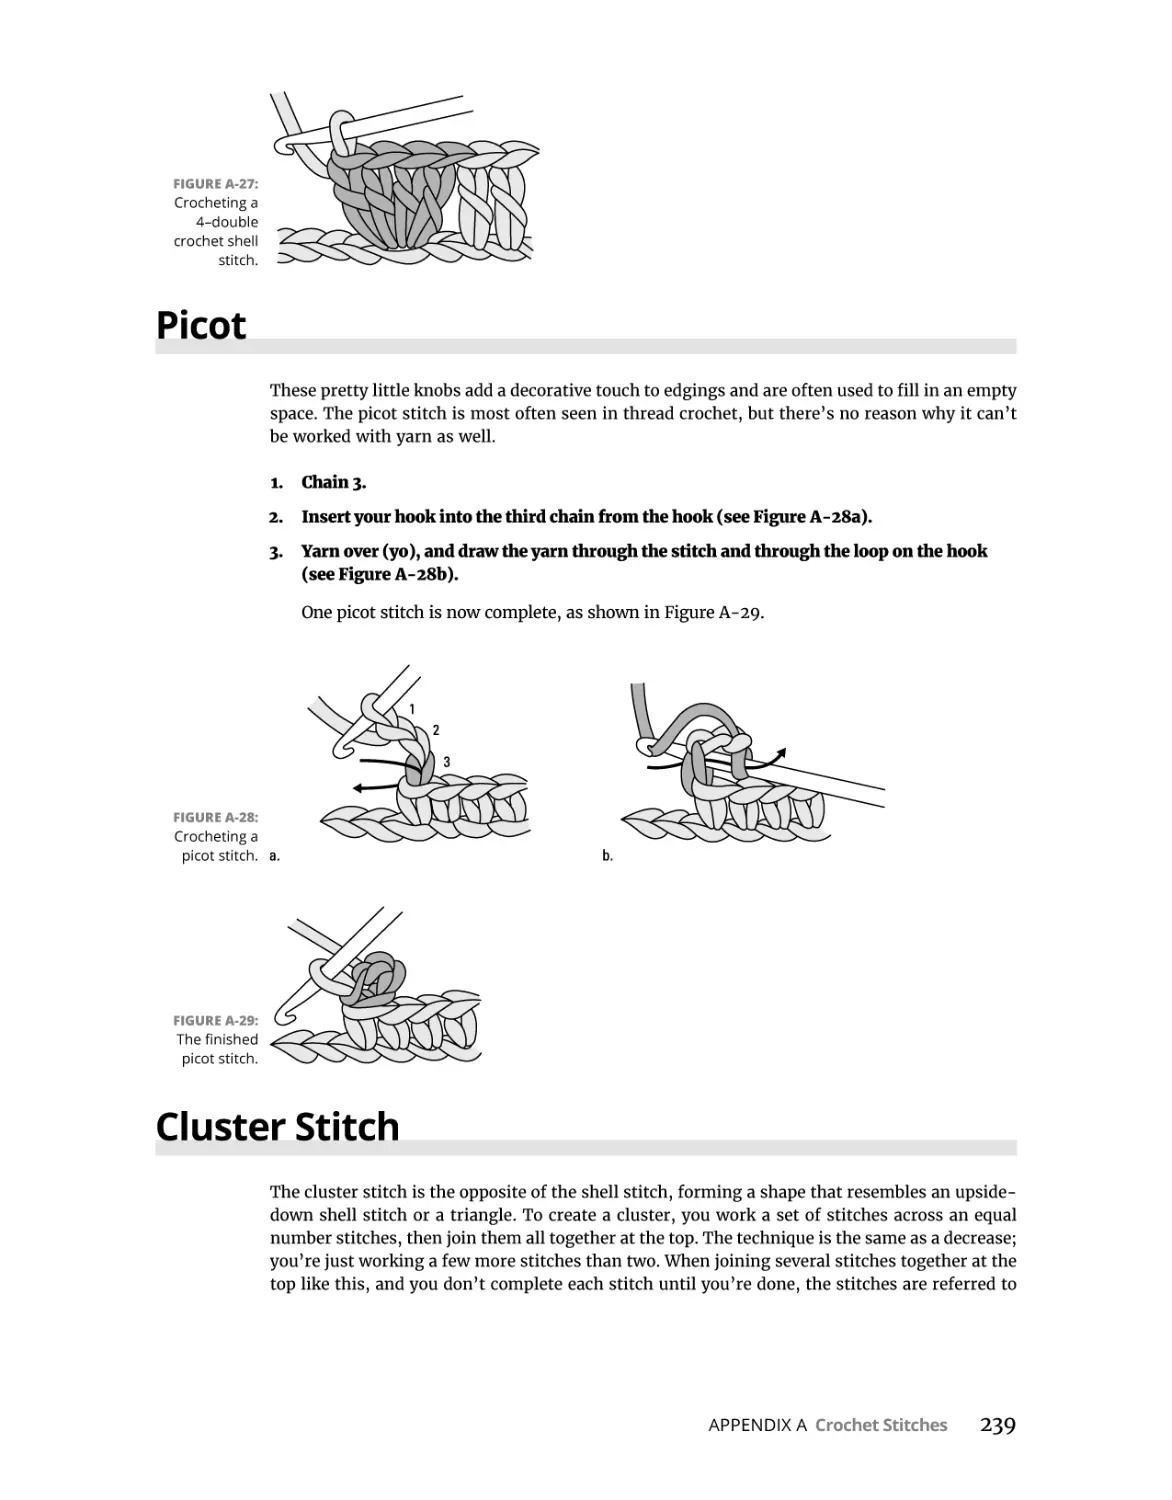
Picot. . . . . . . . . . . . . . . . . . . . . . . . . . . . . . . . . . . . . . . . . . . . . . . . . . . . . . . . . . . . . . . . . . 239
Cluster Stitch . . . . . . . . . . . . . . . . . . . . . . . . . . . . . . . . . . . . . . . . . . . . . . . . . . . . . . . . . . 239
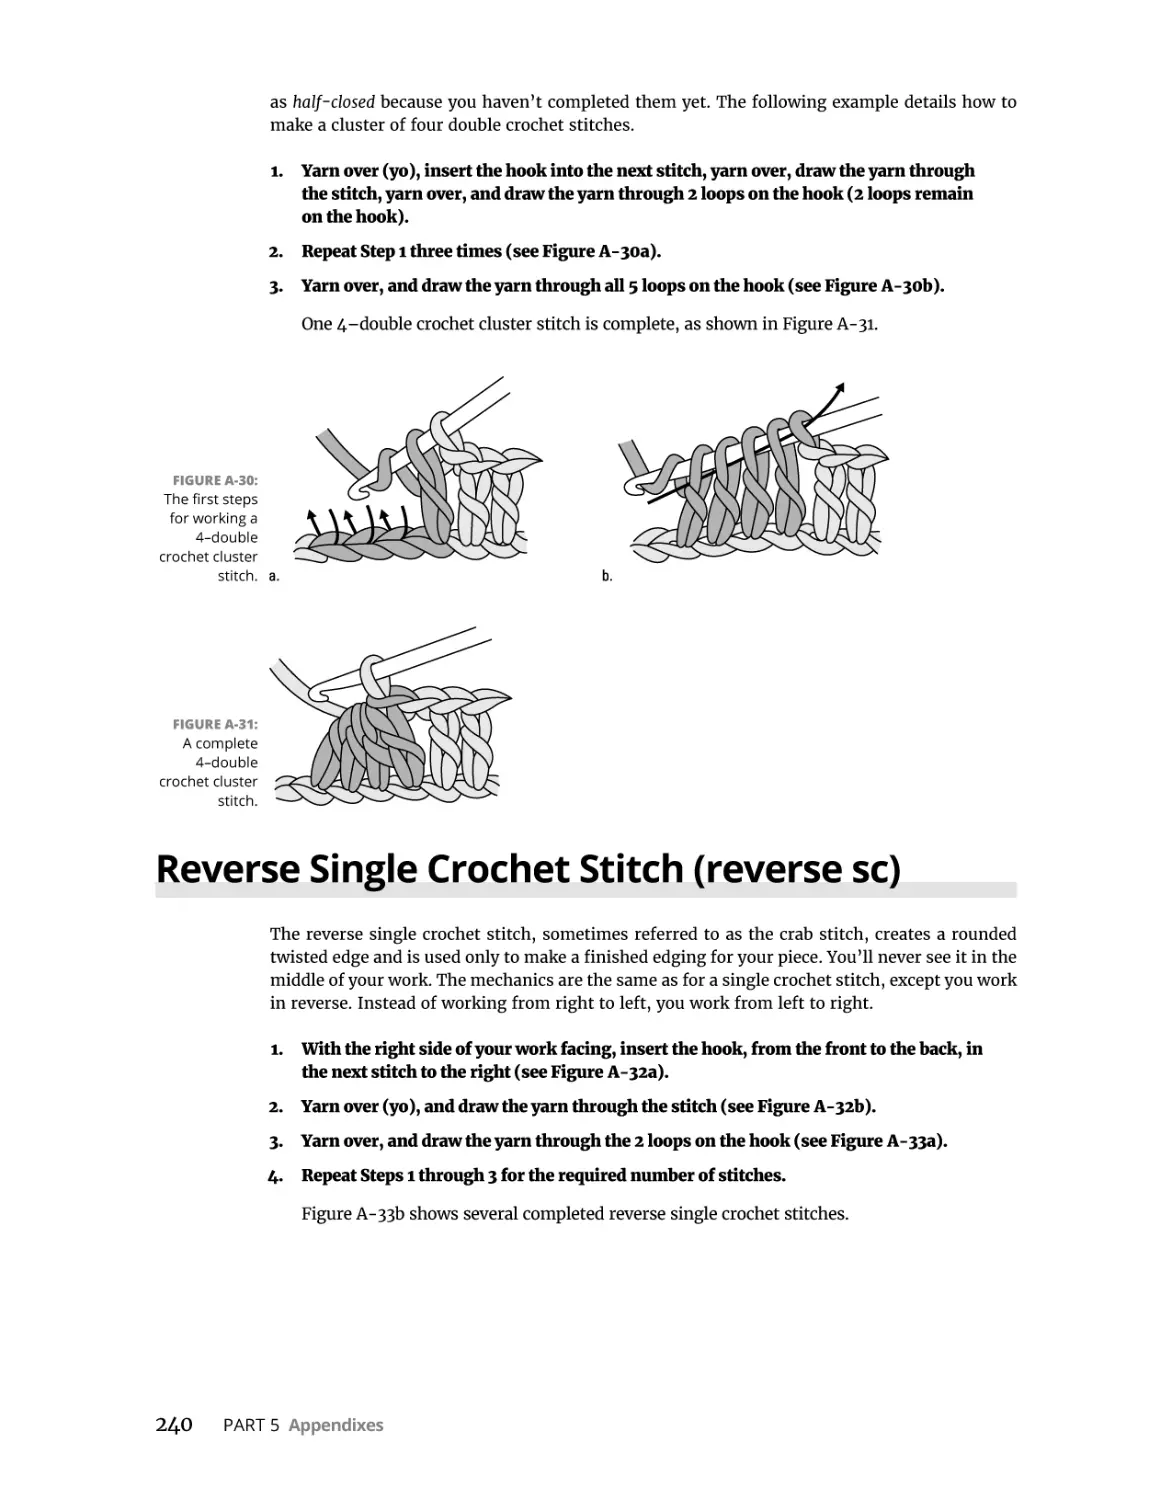
Reverse Single Crochet Stitch (reverse sc). . . . . . . . . . . . . . . . . . . . . . . . . . . . . . . . . . 240
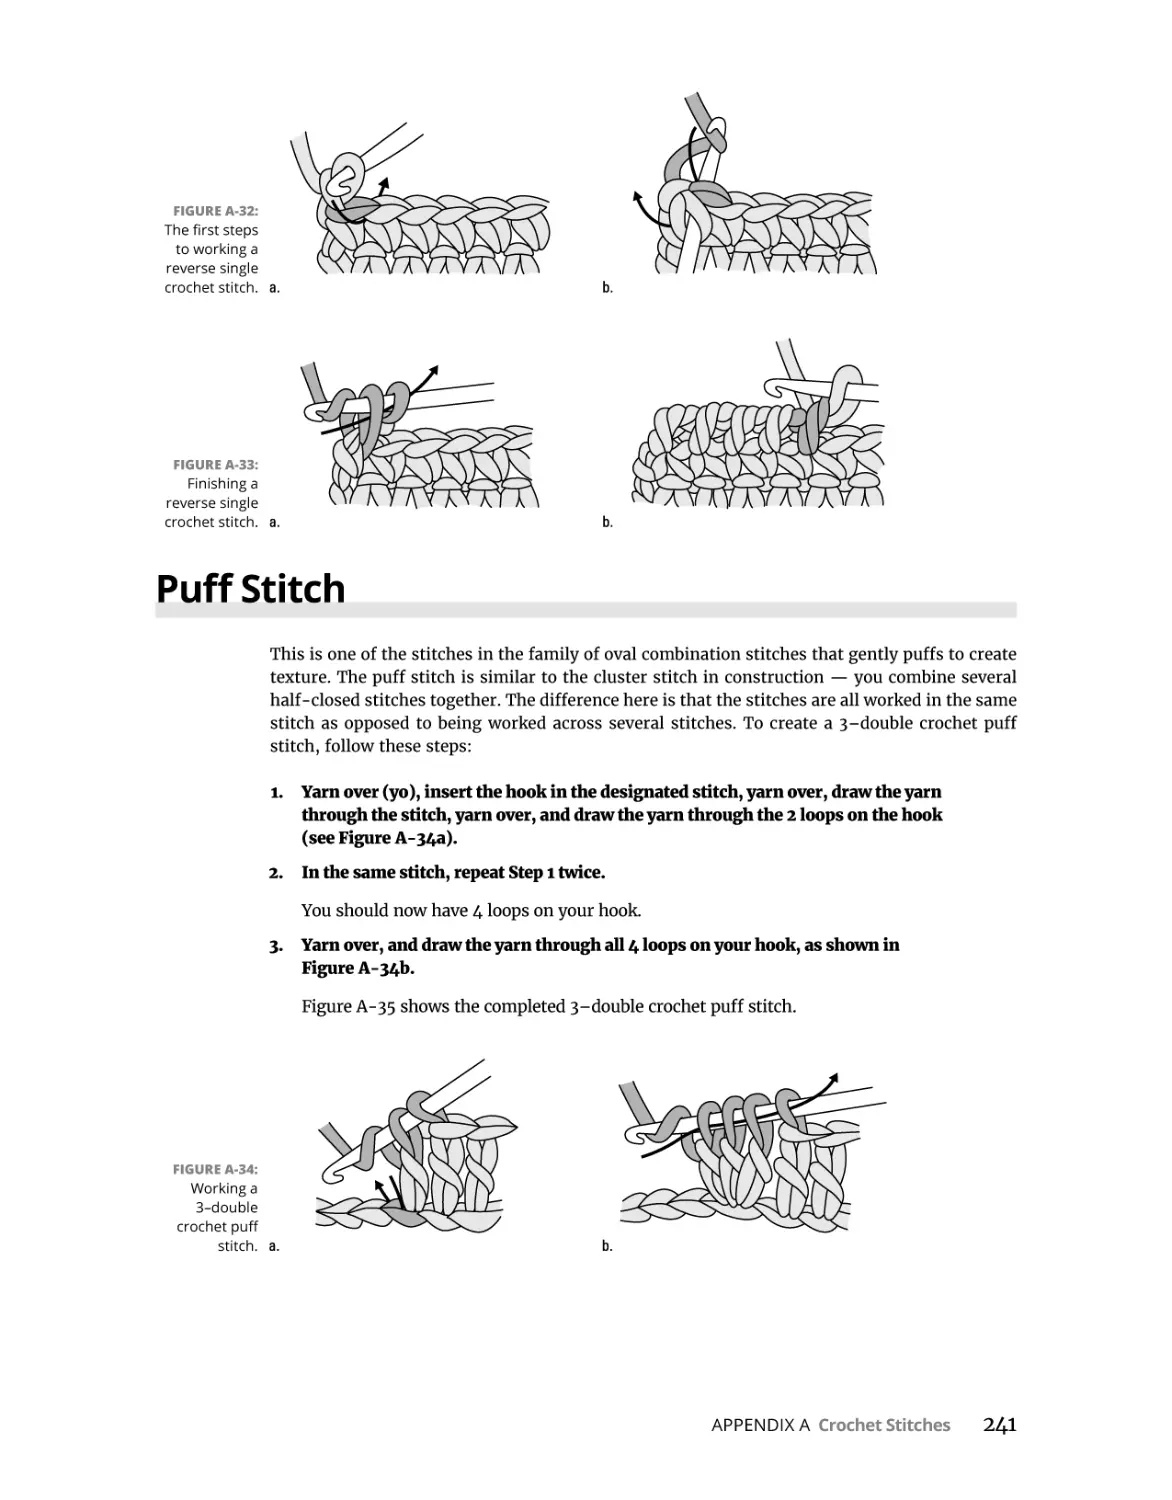
Puff Stitch. . . . . . . . . . . . . . . . . . . . . . . . . . . . . . . . . . . . . . . . . . . . . . . . . . . . . . . . . . . . . 241
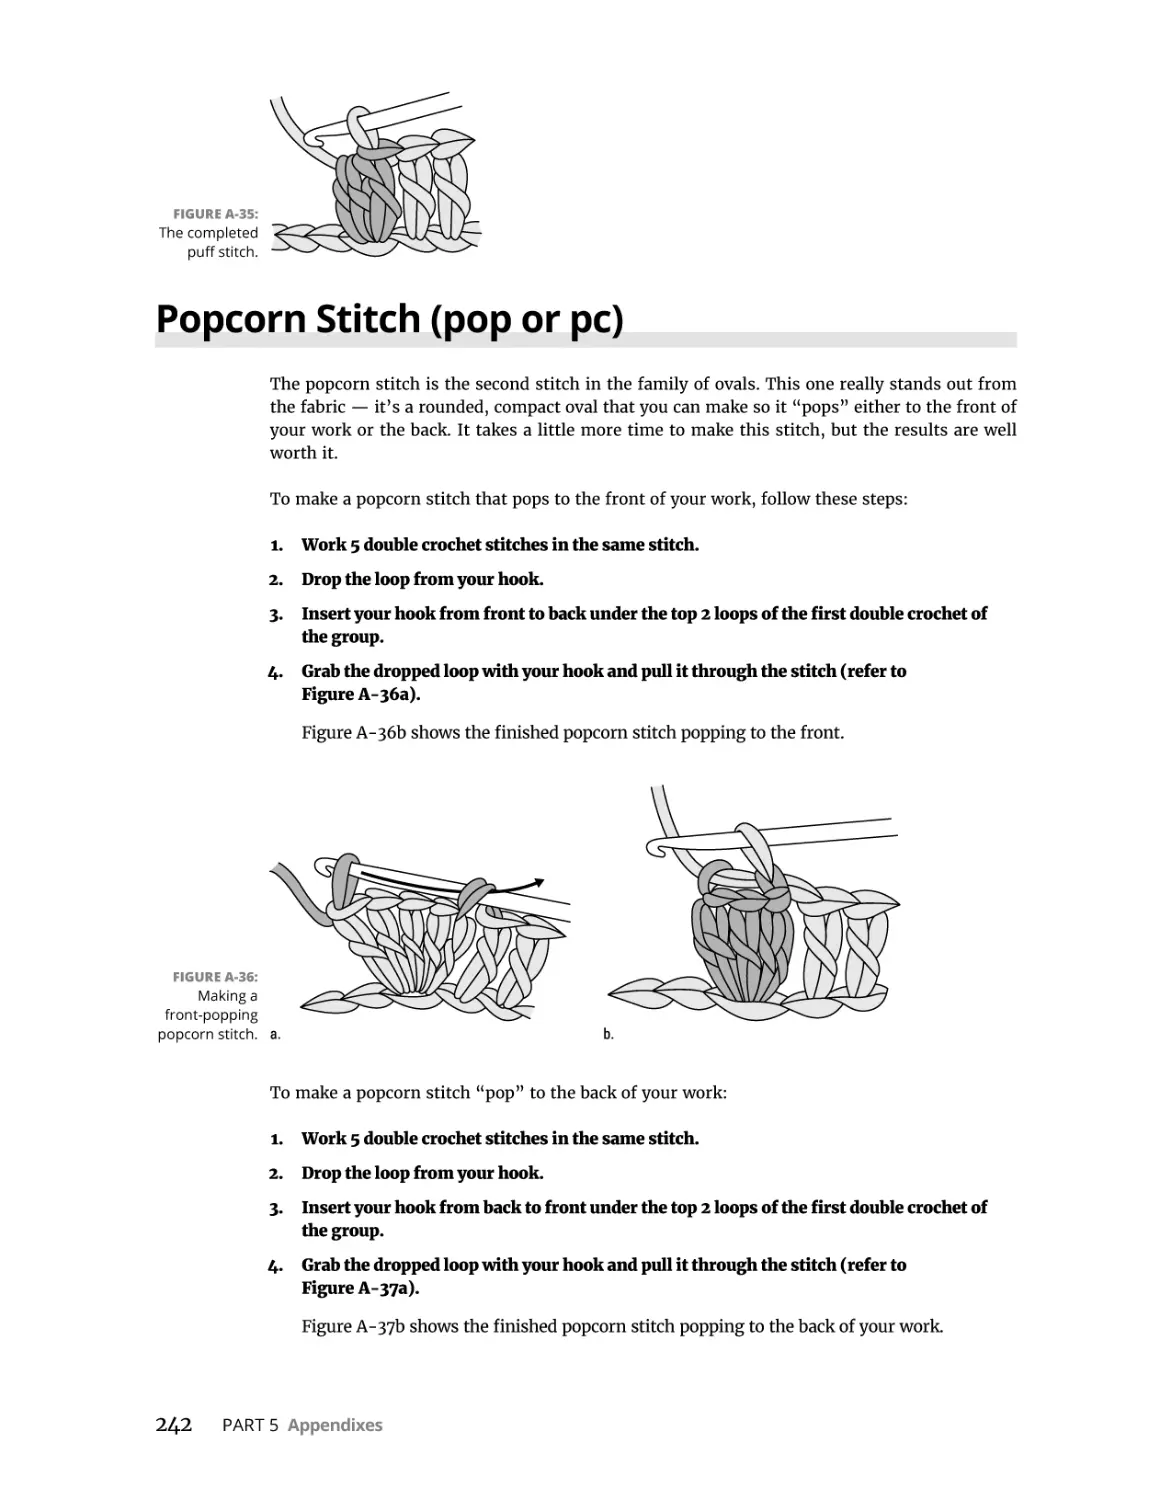
Popcorn Stitch (pop or pc) . . . . . . . . . . . . . . . . . . . . . . . . . . . . . . . . . . . . . . . . . . . . . . . 242
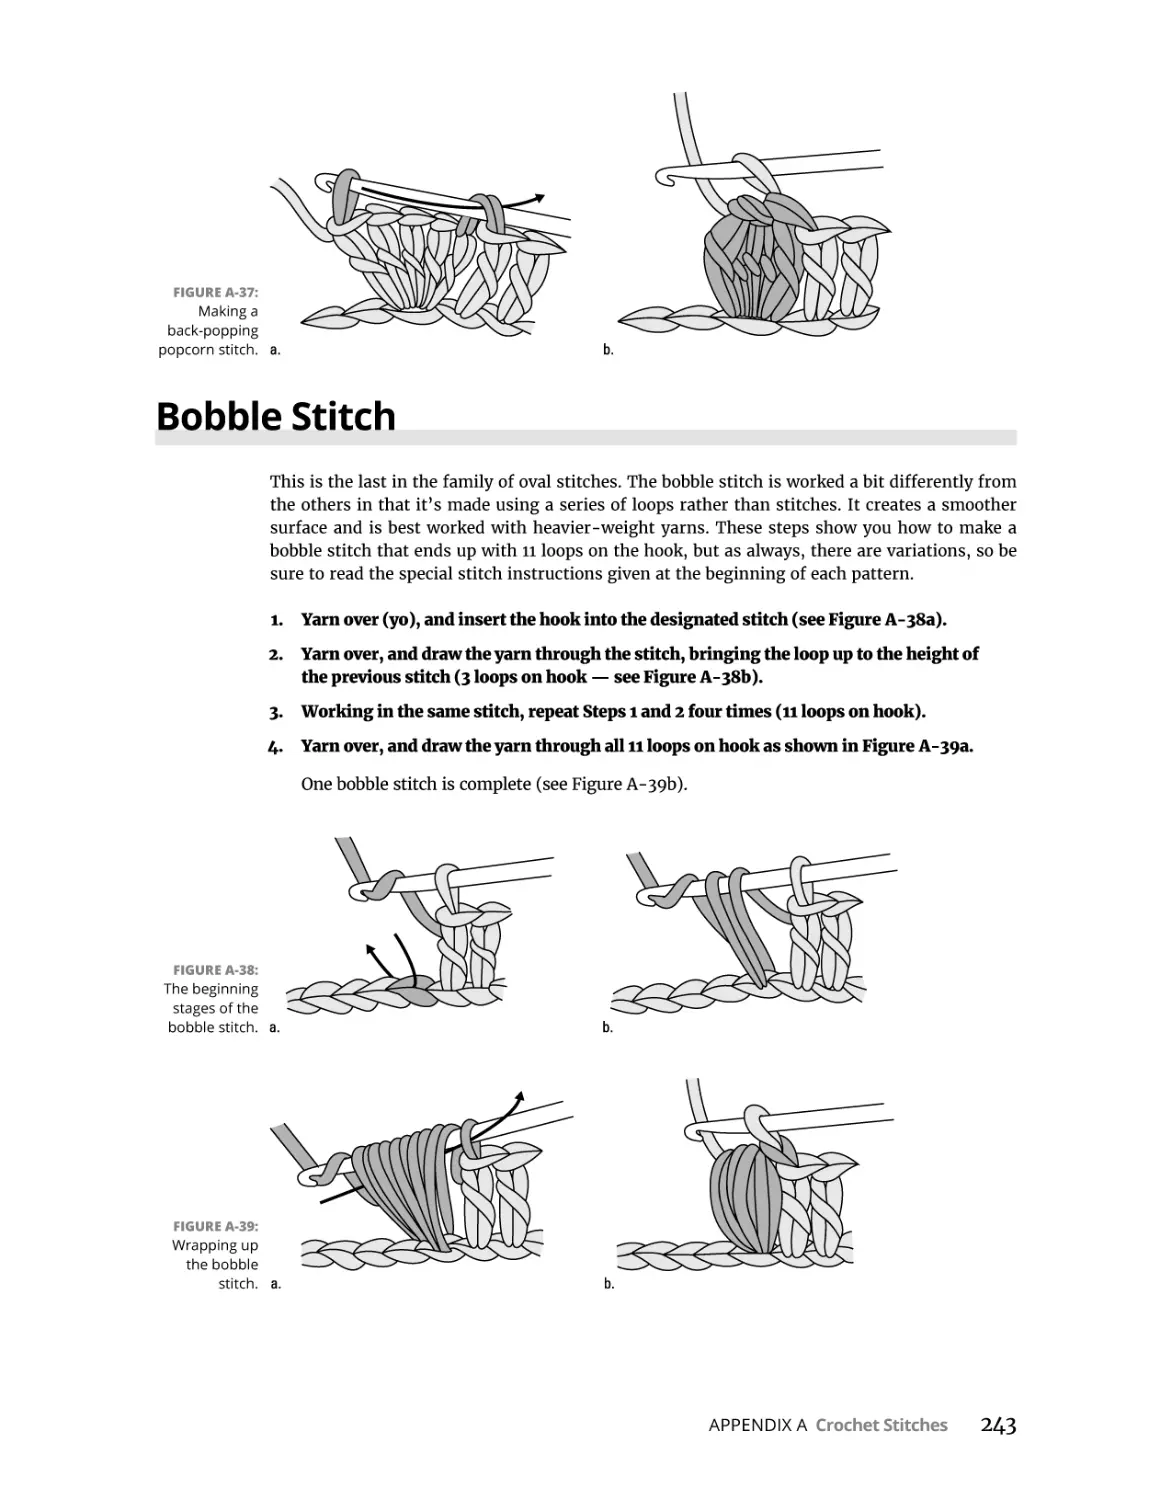
Bobble Stitch . . . . . . . . . . . . . . . . . . . . . . . . . . . . . . . . . . . . . . . . . . . . . . . . . . . . . . . . . . 243
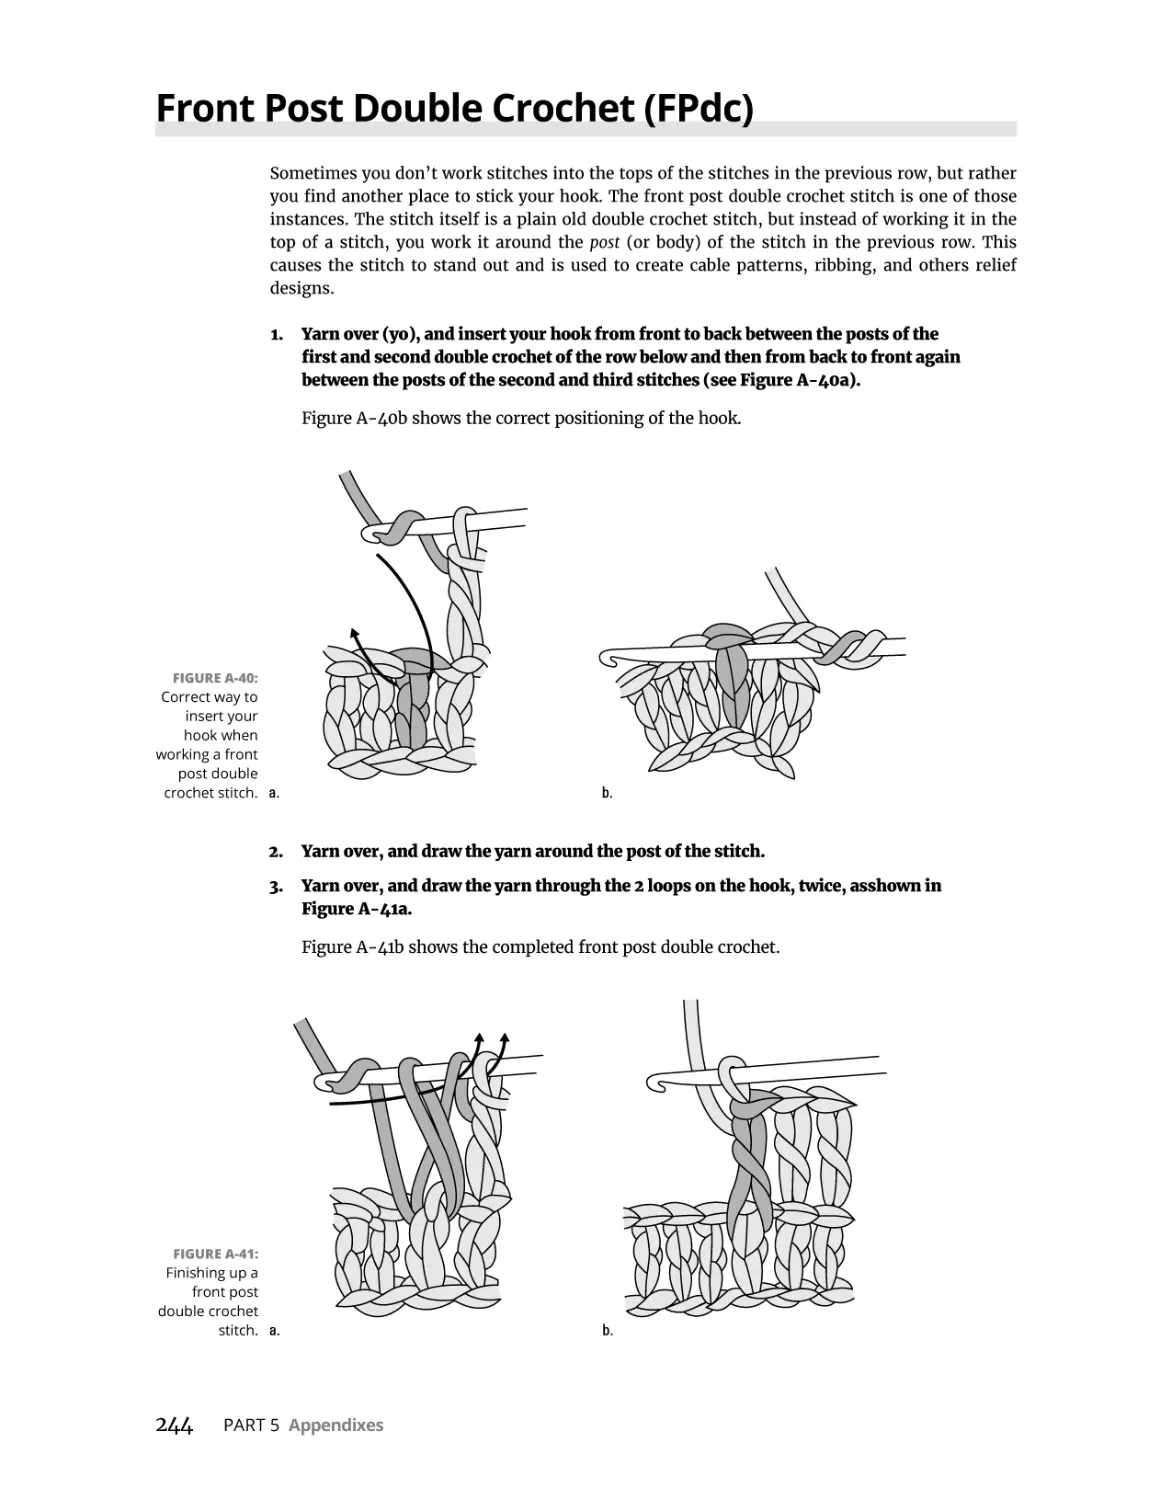
Front Post Double Crochet (FPdc). . . . . . . . . . . . . . . . . . . . . . . . . . . . . . . . . . . . . . . . . 244
Back Post Double Crochet Stitch (BPdc). . . . . . . . . . . . . . . . . . . . . . . . . . . . . . . . . . . . 245
Long (Spike) Stitch. . . . . . . . . . . . . . . . . . . . . . . . . . . . . . . . . . . . . . . . . . . . . . . . . . . . . . 246
Fringe. . . . . . . . . . . . . . . . . . . . . . . . . . . . . . . . . . . . . . . . . . . . . . . . . . . . . . . . . . . . . . . . . 246
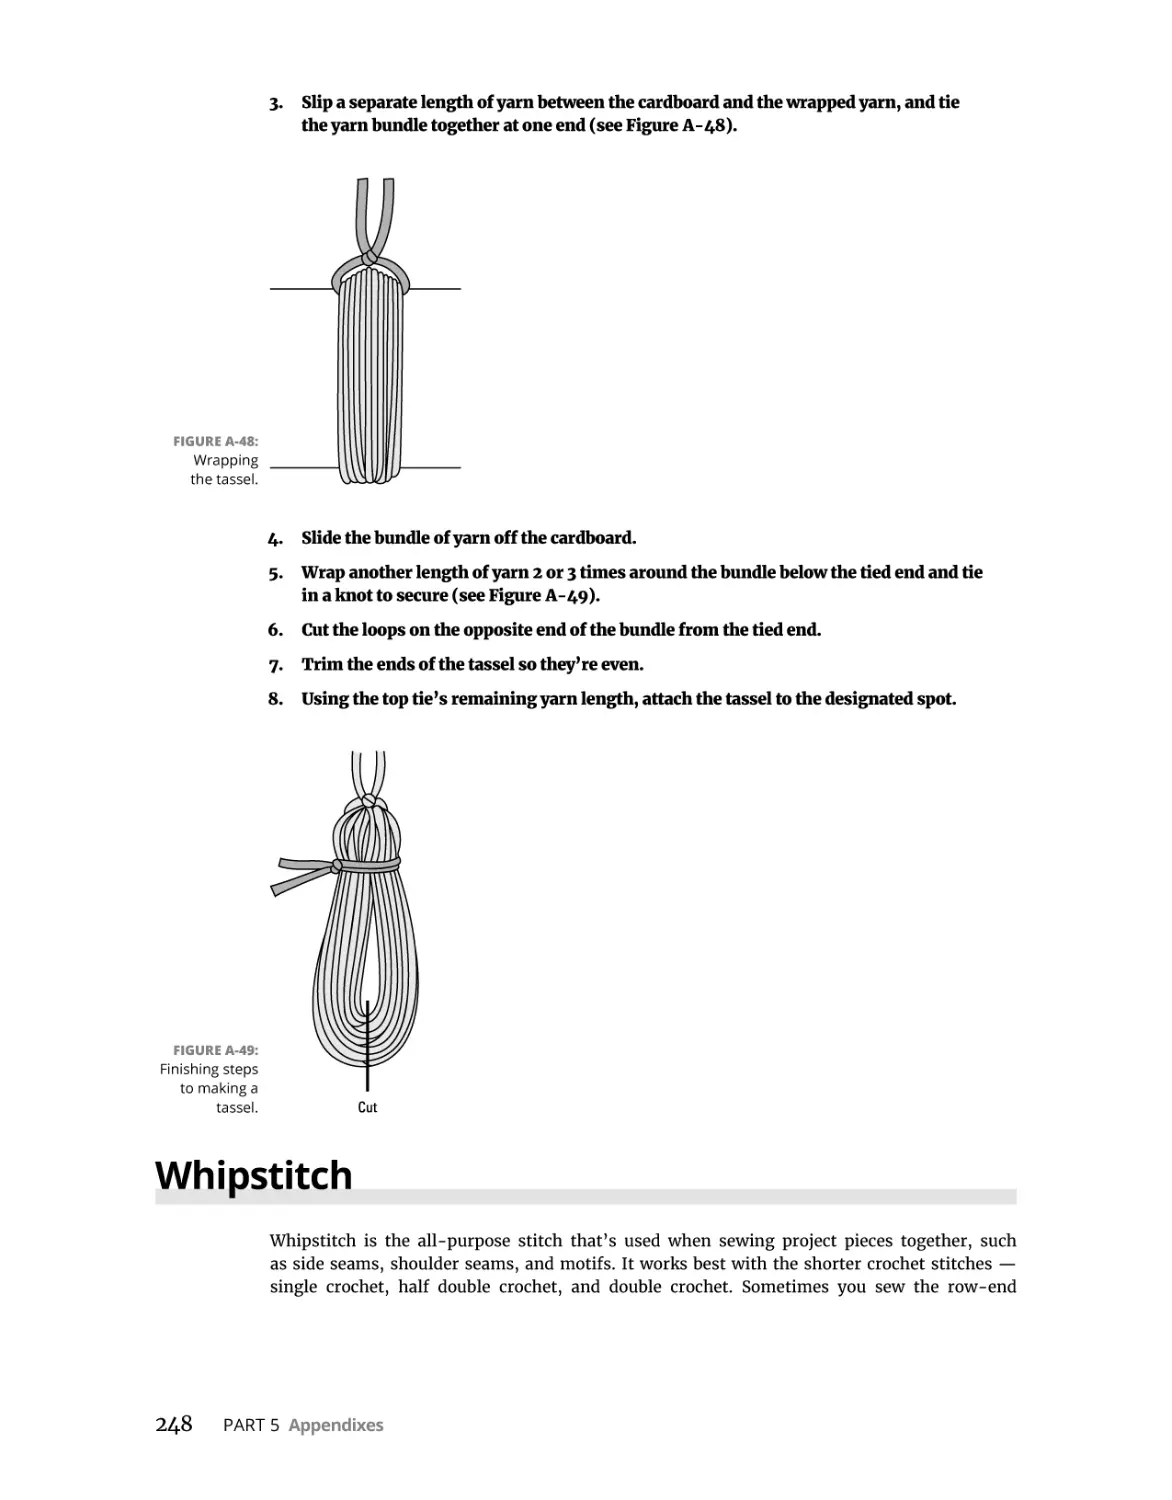
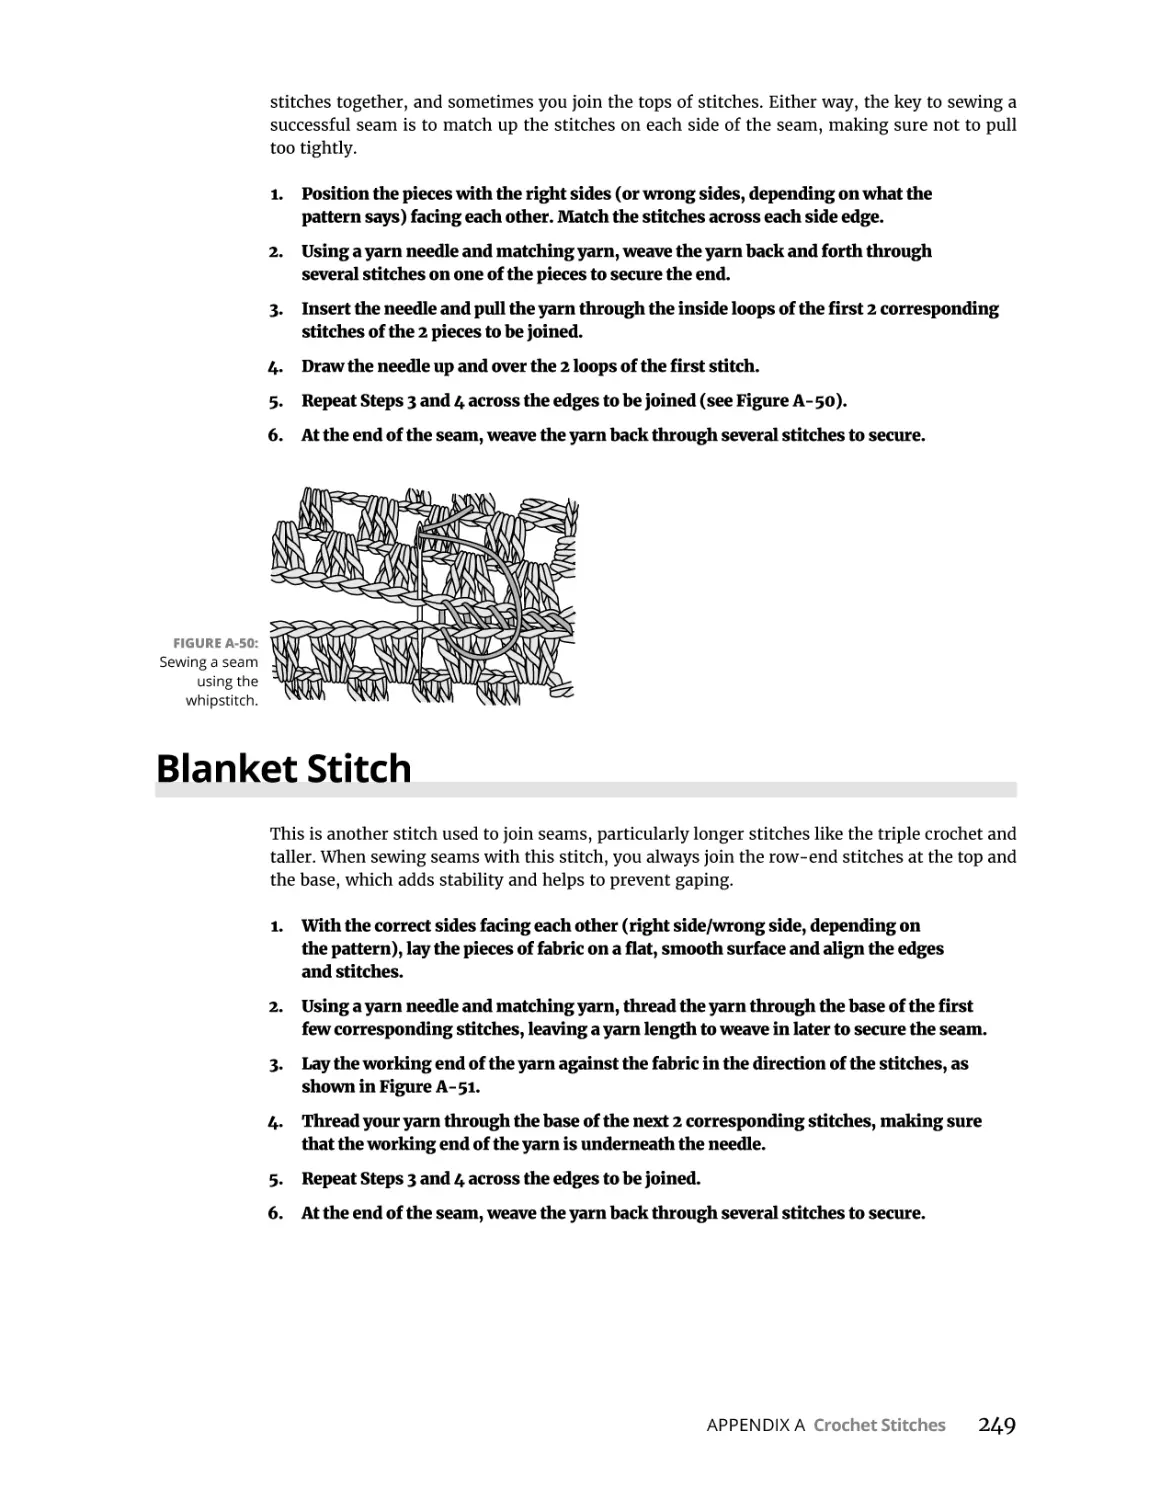
Tassels. . . . . . . . . . . . . . . . . . . . . . . . . . . . . . . . . . . . . . . . . . . . . . . . . . . . . . . . . . . . . . . . 247
Whipstitch. . . . . . . . . . . . . . . . . . . . . . . . . . . . . . . . . . . . . . . . . . . . . . . . . . . . . . . . . . . . . 248
Blanket Stitch. . . . . . . . . . . . . . . . . . . . . . . . . . . . . . . . . . . . . . . . . . . . . . . . . . . . . . . . . . 249
Yarn Supply Sources. . . . . . . . . . . . . . . . . . . . . . . . . . . . . . . . . . . . . . . . . . . . . . . .
251
INDEX . . . . . . . . . . . . . . . . . . . . . . . . . . . . . . . . . . . . . . . . . . . . . . . . . . . . . . . .
253
APPENDIX B:
xii
Crochet Patterns For Dummies
Introduction
T
here’s nothing like being able to sit down in a favorite chair for a while to catch up on
some much needed down time, whether it’s in the evening after the dinner dishes are
done or on a rainy afternoon. If you’re anything like me, though, you find it hard to just
sit. This is when I like to get my crocheting out and sit and relax, but still be creative at the
same time.
As with any new skill, practice makes perfect. Even after 30-plus years of working with a hook
and yarn, I still learn new techniques and new ways to do old things. Mastering the basics is, of
course, essential, and even if you’ve been crocheting for a while, it never hurts to review skills
that may be a little rusty.
Crochet Patterns For Dummies was written so you can practice and enhance your skills in this
time-honored craft, while at the same time create designs that are both useful and fashionable.
About This Book
The craft of crochet has been around for hundreds of years, originally developed out of necessity, and then continued throughout the ages because of the beautiful designs that can be created. I can’t even begin to count the variations of stitches that can be crocheted, but one thing
I can tell you is that they all begin with the basics. For that reason, I give you projects in this
book that allow you to develop a strong foundation of the most commonly used stitches and
stitch patterns.
Patterns’ skill levels are categorized as Beginner, Easy, Intermediate, or Advanced, and some
pattern books note the skill level using one of the following symbols:
I don’t include the symbols in this book because most of the patterns fall into the Beginner and
Easy categories. I note which patterns are more advanced in the pattern introductions. Each
chapter is organized so the patterns graduate from the least to the most complicated, so you
can pick and choose where you want to begin.
Introduction
1
Each part of this book focuses on a different aspect of crochet, and the parts are further broken
down into chapters pertaining to specific information, such as
»» Hook and yarn information, and how to choose the right materials
»» Deciphering crochet lingo, reading a pattern, and understanding garment sizing
»» A review of the basic stitches and stitch combinations, with a concise appendix containing
step-by-step instructions for working these stitches
»» Loads of patterns separated into chapters for specific skills used
To give you an idea of what the projects look like when they’re finished, I include photos:
»» Each set of project instructions within the chapter includes a photo of the completed item.
»» In the center of the book, you can find color photos of the projects. These photos also give
you a better idea about the yarn colors I chose. (Of course, if you’re not crazy about the yarn
I used, you can always branch out on your own and choose colors that are more suited to
your taste.)
Some instructions also include illustrations that show you stitch diagrams or project dimensions. Some things are easier to visualize than read about, and these illustrations are meant
to show you how stitches or sizes relate.
Some projects include a “Variation” section after the basic instructions. This can be as simple
as how to substitute materials, or it can give you ideas about creating a whole new project from
the original pattern. Read these sections even if you don’t want to employ them. They can
expand your knowledge about crochet and how you can adapt designs and patterns.
The best thing about this book is that you don’t have to read it cover to cover. You choose
where to start. If something looks interesting, go ahead and flip to that chapter. If you need
a refresher on a certain skill used, go ahead and flip back, make a practice swatch, and then
continue on with the project.
Conventions Used in This Book
The following conventions are used throughout the text to make the patterns consistent and
easy to understand:
»» New terms appear in italic and are closely followed by an easy-to-understand definition.
»» Bold is used to highlight the action parts of numbered steps and for keywords in
bulleted lists.
»» When you see a set of bulleted (•) instructions in this book, work the stitches through once,
and then go back and repeat them the number of times indicated.
»» If a new skill is introduced that is not included elsewhere in the book, you’ll find it listed
within that particular pattern under the heading “New skills.” In that section, you’ll find
step-by-step instructions on how to work that particular stitch.
2
Crochet Patterns For Dummies
»» The specific part of an illustration that relates to the step you’re working on is shaded
dark gray. For example, if you’re inserting your hook into a certain stitch, only that stitch
is shaded so you can clearly see where to go.
»» The patterns included in this book are all written in typical crochet fashion, as you’d see in
any publication. Crochet has a language all its own, most of it abbreviated. To brush up on
the lingo, see Chapter 4.
Foolish Assumptions
My greatest hope is that, by picking up this book, you are looking to further develop the crochet
skills that you already possess. If you have a working knowledge of the basics and are ready to
take your skills to the next level, then you’ve come to the right place. This book does contain
a little bit of very basic, beginner-level information to help jog your memory, but you should
have at least some prior experience.
If you’re looking to learn to crochet from the start, then look around the bookshelves for Crocheting For Dummies, the companion book to this one. In that book, you’ll find in-depth information about crochet from start to finish. If you’re feeling really adventurous, pick up both
books so you’ll have a complete set.
How This Book Is Organized
This book is divided into five easily identifiable parts, with a total of 17 chapters and two appendixes. Any brand-new stitches that are introduced within a particular chapter are illustrated
in the “New skills” section. If at any point it seems that you need specific knowledge about a
concept, I’ll point you in the right direction.
Part 1: Reinforcing Your Crochet Foundation
This part contains all the reference material you need to crochet your way through the rest of
the book. It starts off with choosing the right hook and yarn, and then moves on to figuring
out gauge. Information about reading patterns, sizing garments, and understanding stitches
and their relationships to each other is included in this section. And last, but not least, you can
refresh your memory about how to change colors correctly, increasing and decreasing stitches,
and crocheting in a circle.
Part 2: Hook, Yarn, Action! Crocheting
Simple Projects
Part 2 has five chapters packed full of patterns designed to get your fingers moving. Each
chapter focuses on a different aspect of the basic skills. You can choose a project in which you
concentrate on crocheting your stitches evenly, or one that has you shaping the design through
increases and decreases. You can make great accessories while crocheting in the round, or you
can crochet multicolored patterns designed to get you into the color-changing mode.
Introduction
3
Part 3: Putting Your Skills to the Test
Ready to take your skills a step further? The patterns in this part of the book combine all of the
basics and more. I include a whole bunch of sweater designs, as well as more home décor and
accessories. You’ll use some slightly more advanced techniques, as well as see what it’s like to
work with unconventional materials such as hemp and wire.
Part 4: The Part of Tens
Not to be outdone, Part 4 has loads of patterns as well. Included are quick ’n’ easy designs that
are great for when you need a creative fix. I also came up with a whole bunch of designs with
the younger set in mind. I hope these patterns get them crocheting, but they’re great for you
to make as gifts for tweens and teens as well. This part also contains information on caring for
your work after it’s done.
Part 5: Appendixes
When you get stuck, turn to this part for a little help. Appendix A walks you through how
to do basic and not-so-basic crochet stitches. Appendix B provides yarn companies’ names
and contact info that you can use when you can’t find the yarn you want in your neighborhood
craft store.
Icons Used in This Book
To make this book easier to read and simpler to use, I include some icons that can help you find
and fathom key ideas and information that are worth taking a second glance at.
This icon appears any time I provide information that can make your work a bit easier or show
you a trick that experienced crocheters have developed over the years.
Any time you see this icon, you should know that the information that follows is important.
It highlights different points in the skills or pattern that you should remember.
When you see this icon, be sure to read carefully the information that follows. It can help you
avoid common mistakes and pitfalls that can lead to a disastrous finished design.
Beyond This Book
Whether you’re new to crocheting or have been doing it for decades, you’ll find that I pack a
lot of information into this book. Some of it, however, I know you’ll need to look up constantly,
likely when you don’t have this book handy. So I made sure to put things like crochet abbreviations, standardized yarn weights, and metric conversions into an online Cheat Sheet you
can easily and quickly access. To find this Cheat Sheet, just go to www.dummies.com and type
“Crochet Patterns For Dummies” in the search box. You’ll find a link for the Cheat Sheet there.
4
Crochet Patterns For Dummies
Where to Go from Here
The beauty of this book is that you can start anywhere you want. If it’s been a while since
you’ve crocheted, or if you’re still a relative beginner, then by all means start at the beginning.
If you’re ready to jump right in, browse through the project chapters or take a look at the color
insert and choose one that looks like fun. Chapter 12 is all about sweaters. Chapter 15 has a
bunch of patterns that you can make in an hour or so. And I’ve scattered accessories and home
décor items throughout the project chapters.
Remember, though, that you can always seek additional, in-depth information in the companion book, Crocheting For Dummies. It provides detailed explanations on everything provided in
this book.
Introduction
5
1
Reinforcing
Your Crochet
Foundation
IN THIS PART . . .
Getting your crochet gear and knowing how to use it
properly
Understanding gauge and measurements
Checking out patterns and abbreviations
Picking up some stitch basics
IN THIS CHAPTER
»» Deciphering the difference
between hooks
»» Unraveling yarn mysteries
»» Collecting other crochet
accouterments
»» Holding the yarn and hook
1
Gearing Up and Getting
Started
Chapter
W
hen embarking on a new project, gathering the necessary supplies is a must before
you can even think about starting. To begin a new crochet design, you need a hook
and some yarn, and you’re all set to go.
Like most crafts, even those with the simplest needs, there are variations in the tools used.
This chapter covers the differences between the various types of hooks available and when it’s
appropriate to use each type. Additionally, you can now find yarns available in a huge array of
colors, textures, weights, and compositions. After you have a basic understanding of the more
common yarns available, you will have an easier time choosing which yarn is best for your
project.
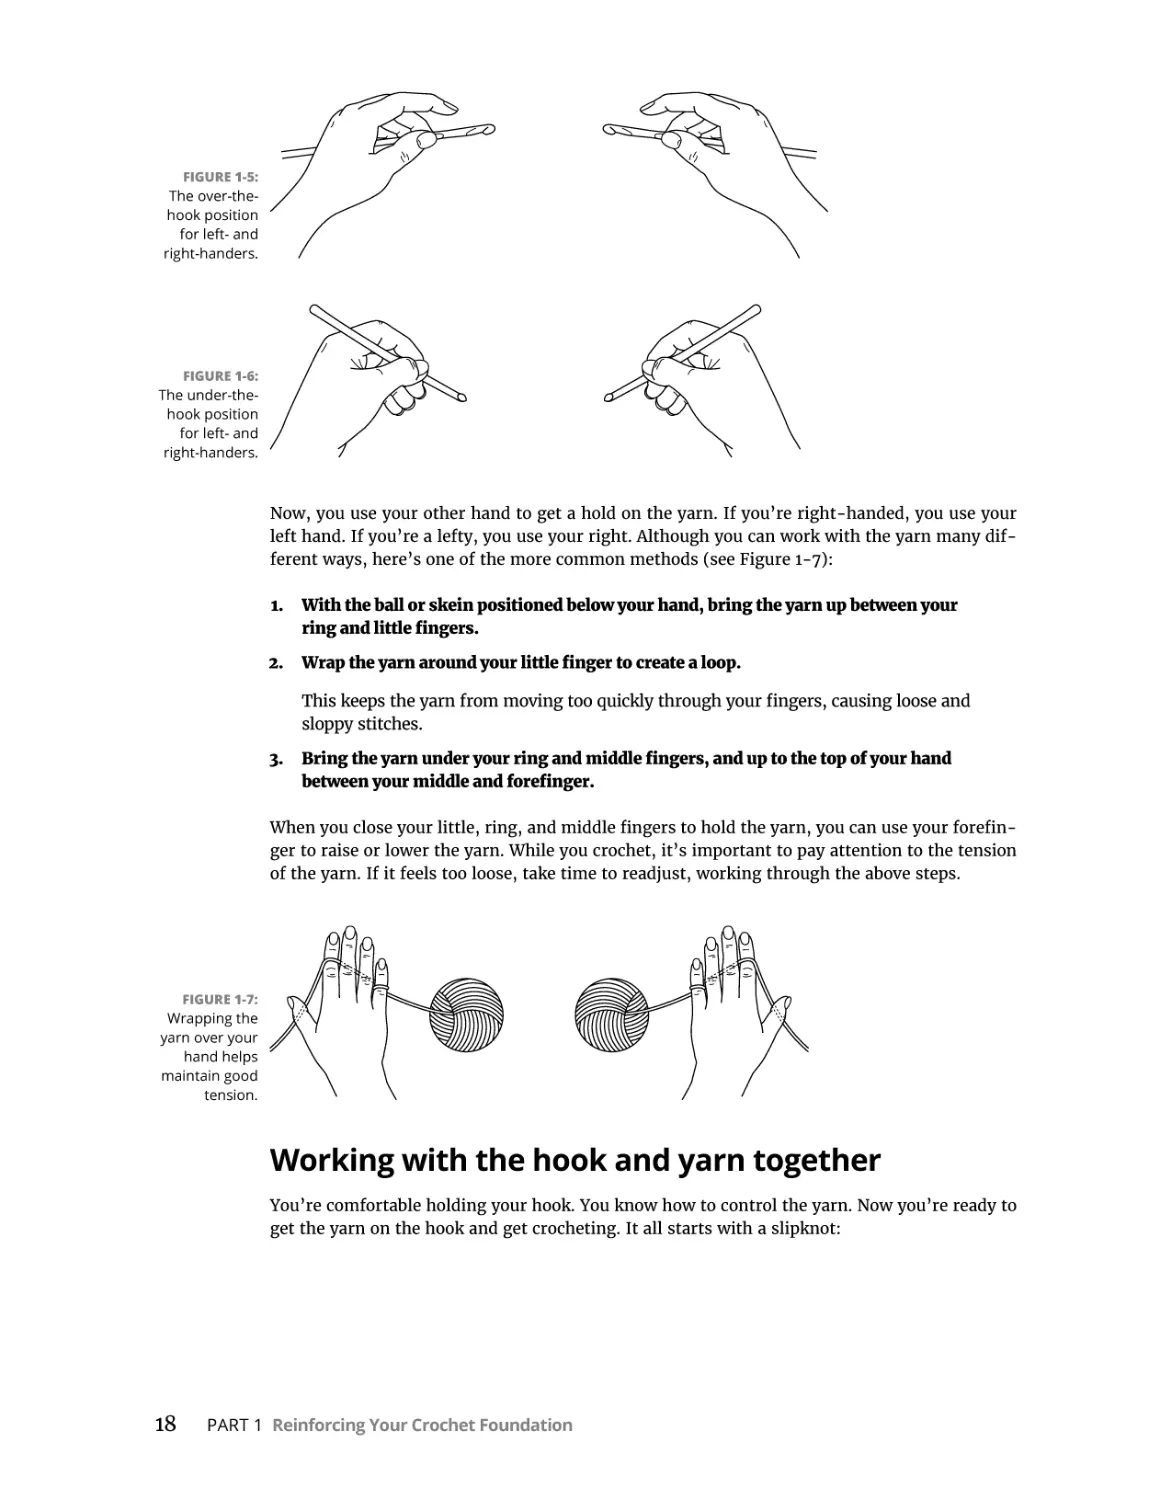
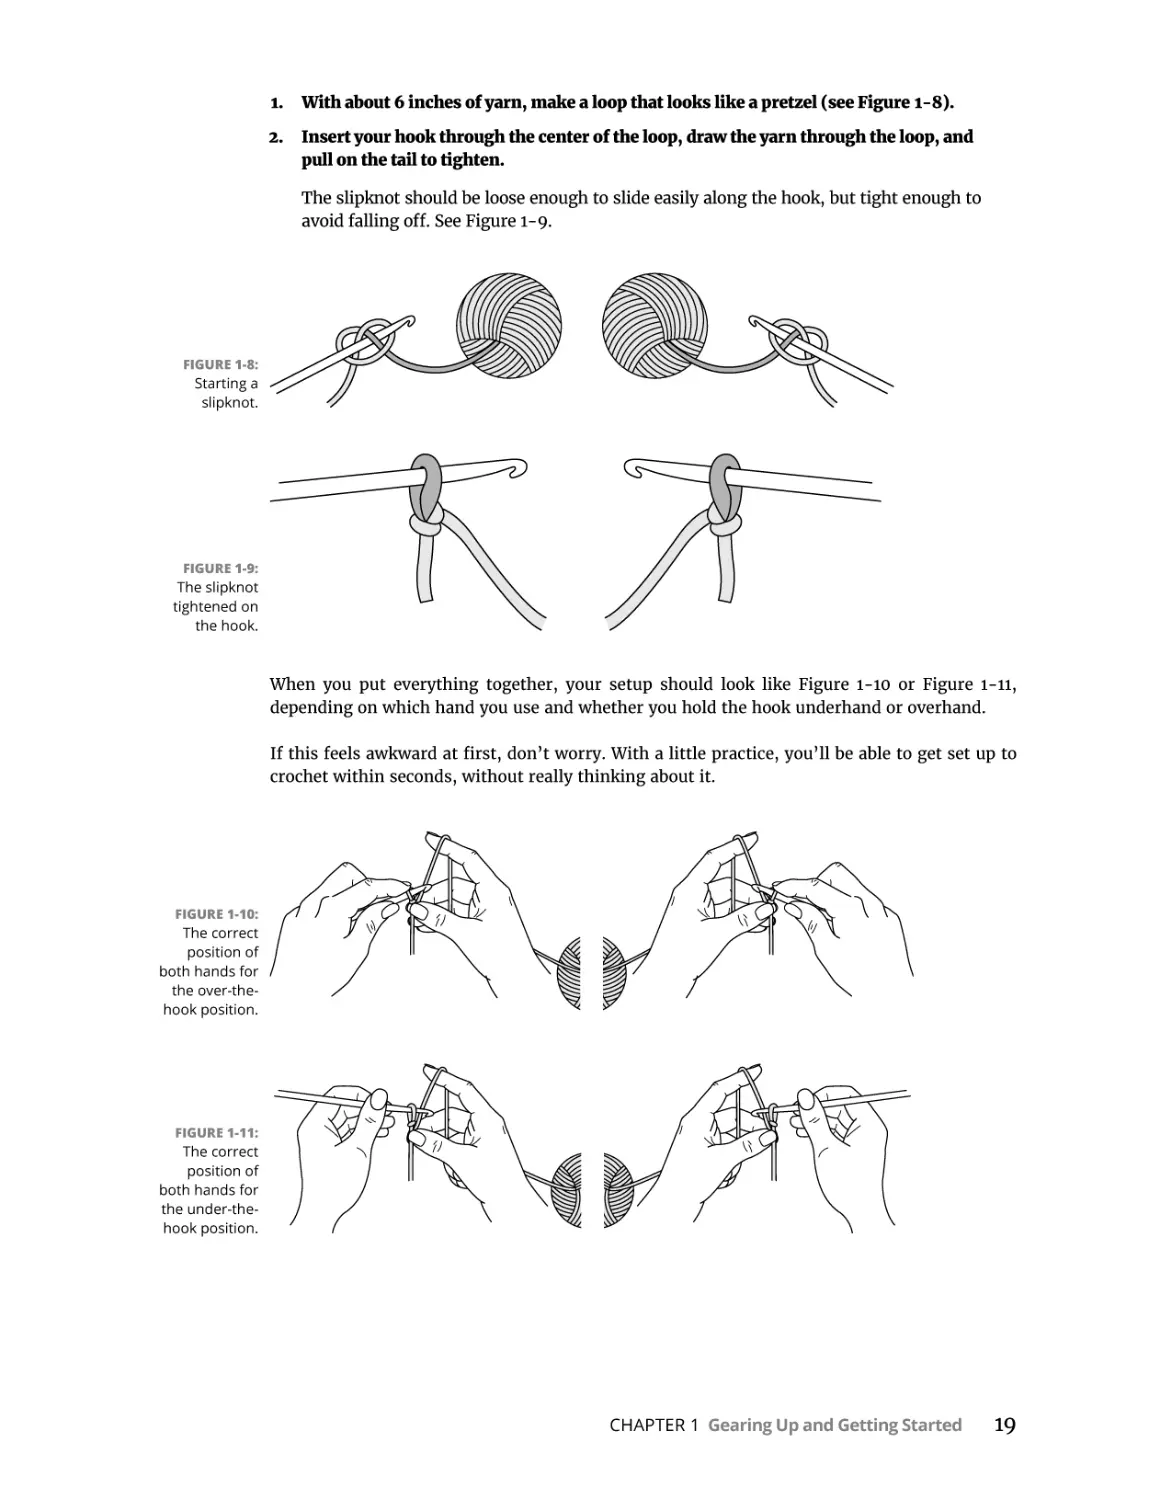
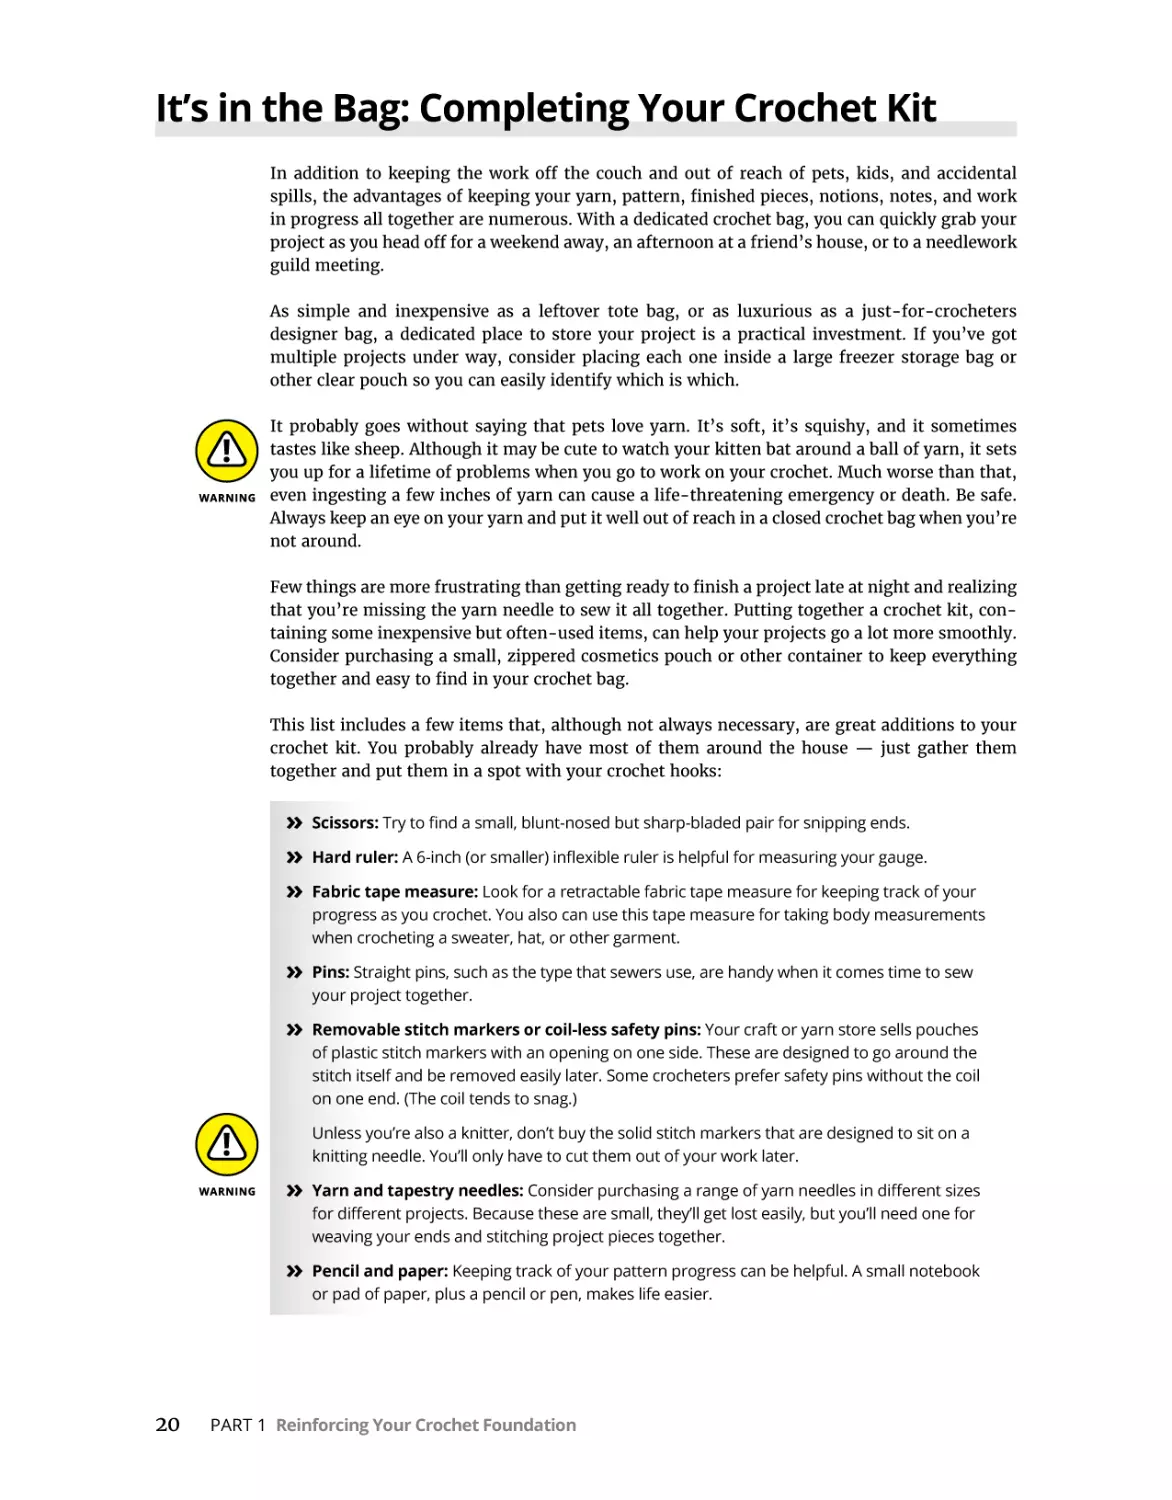
And if you want to brush up on the best way to hold your hook and yarn, you’ll find that information in this chapter, too.
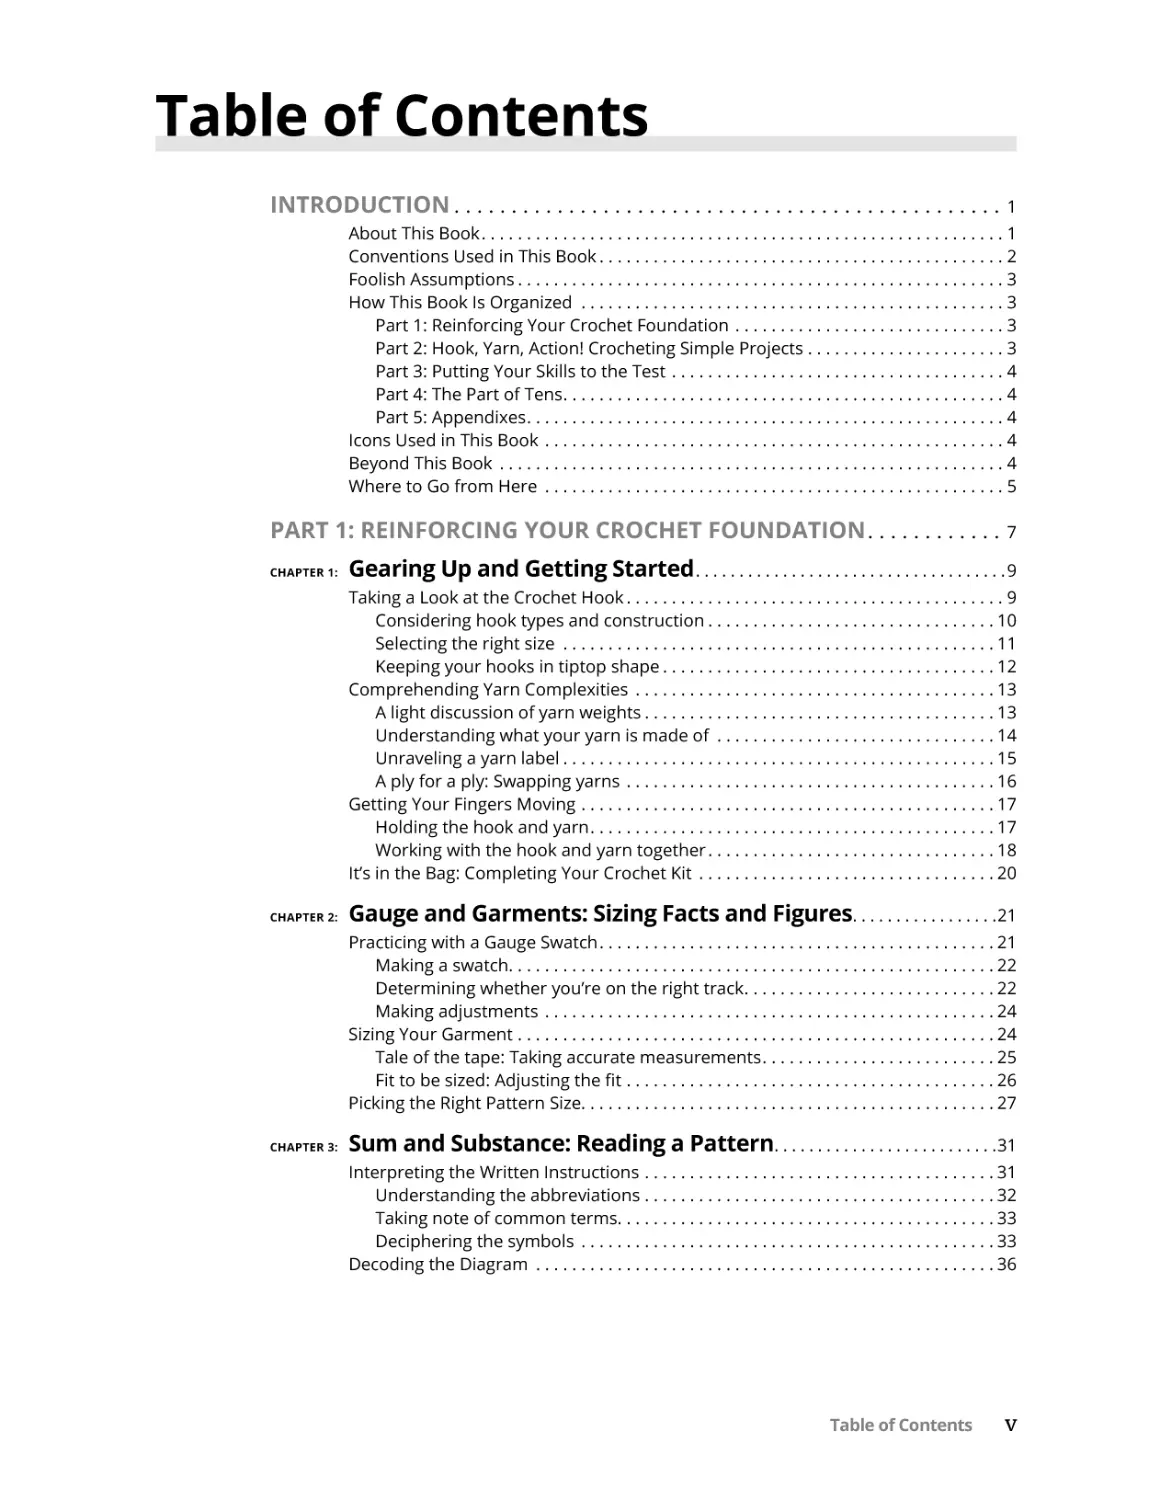
Taking a Look at the Crochet Hook
A hook is one of two essentials for crocheting. (The other being yarn, of course — more on yarn
later.) Choosing the proper crochet hook is essential to your comfort and the outcome of your
design.
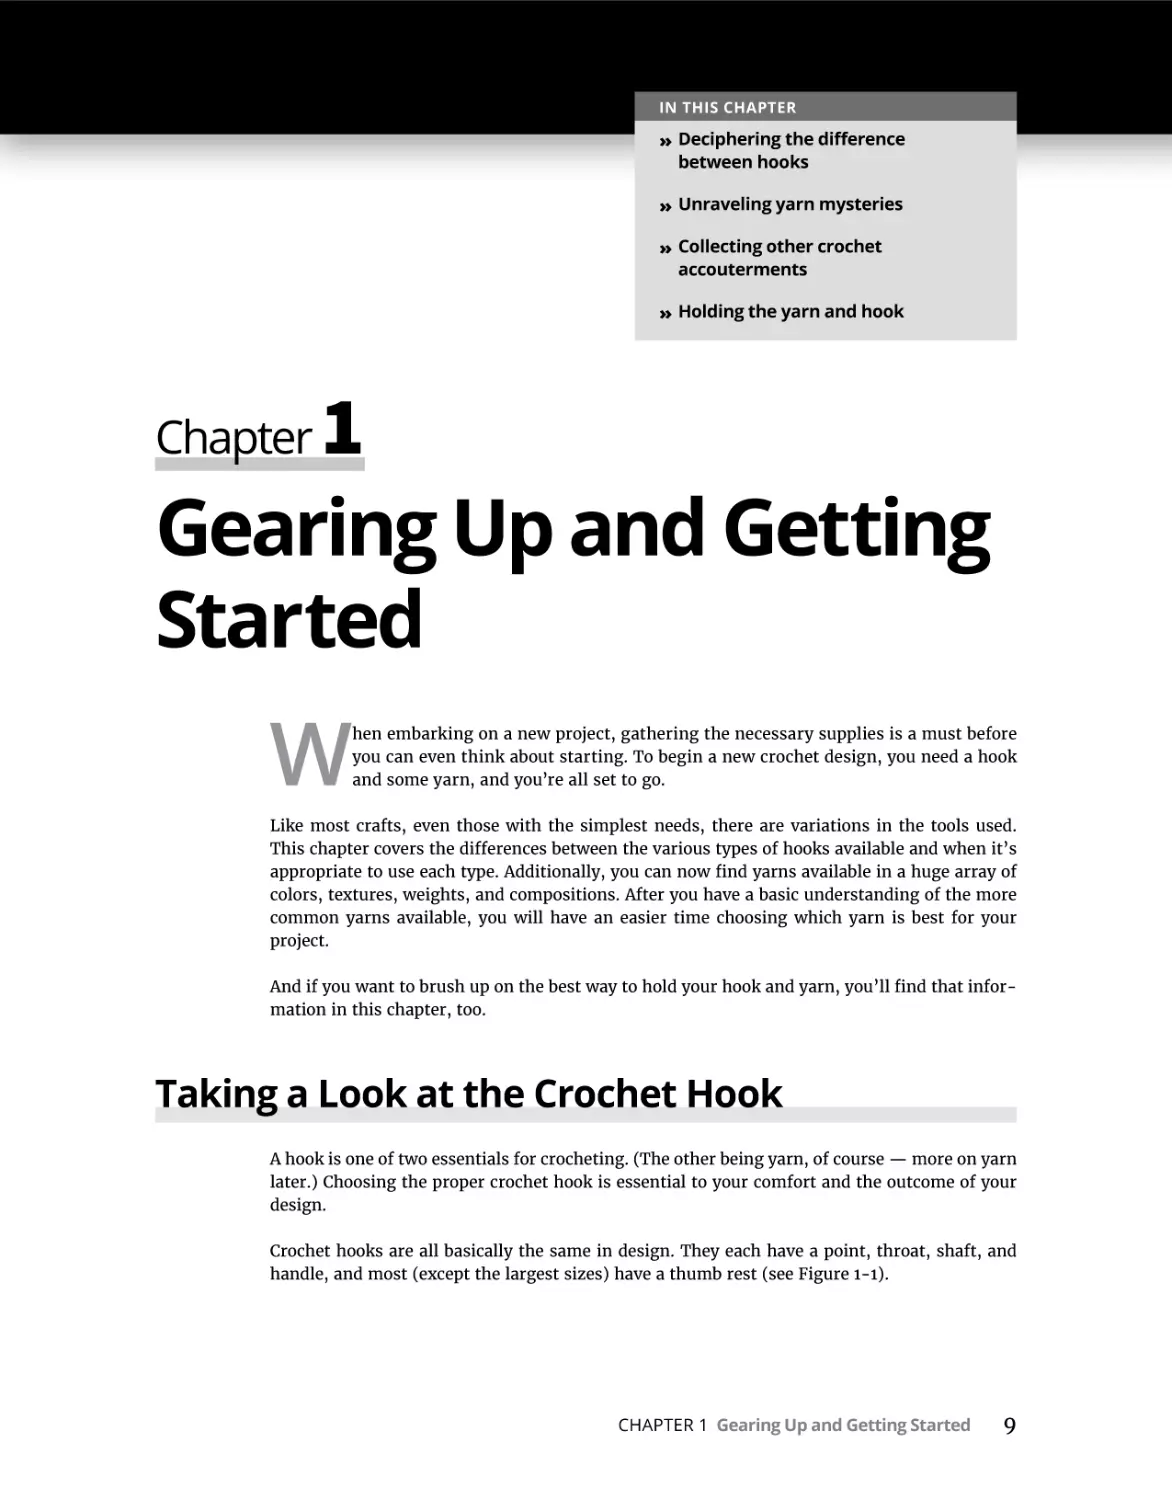
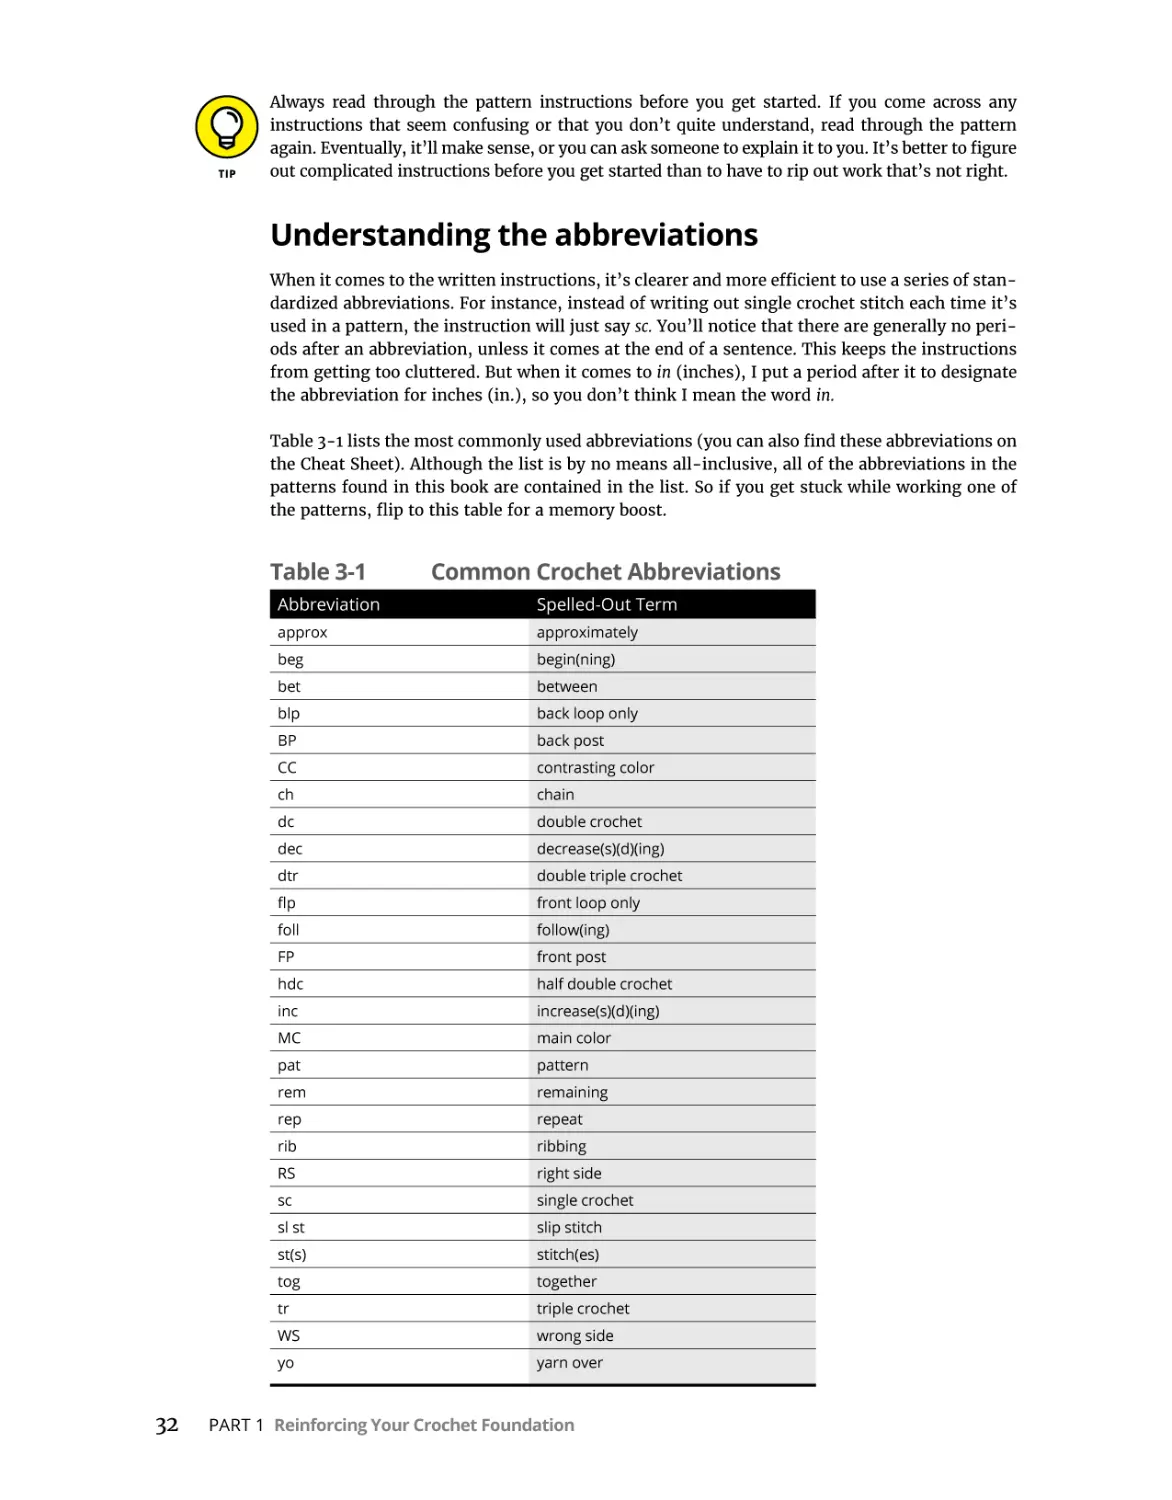
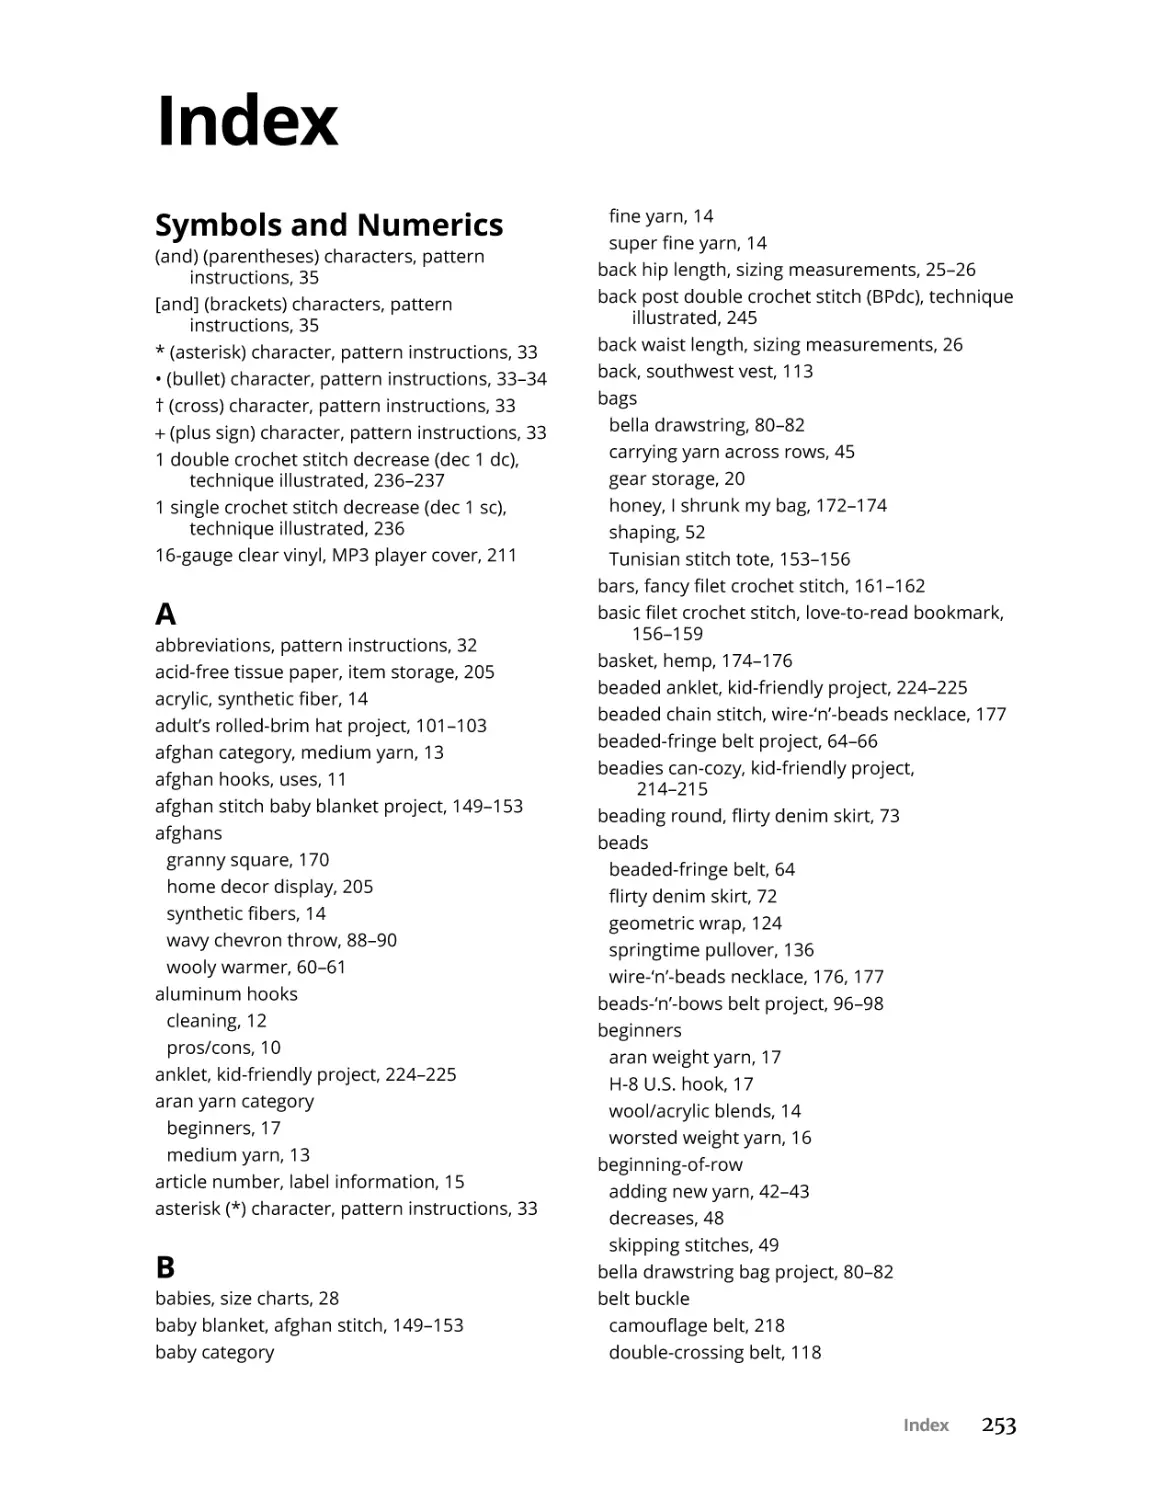
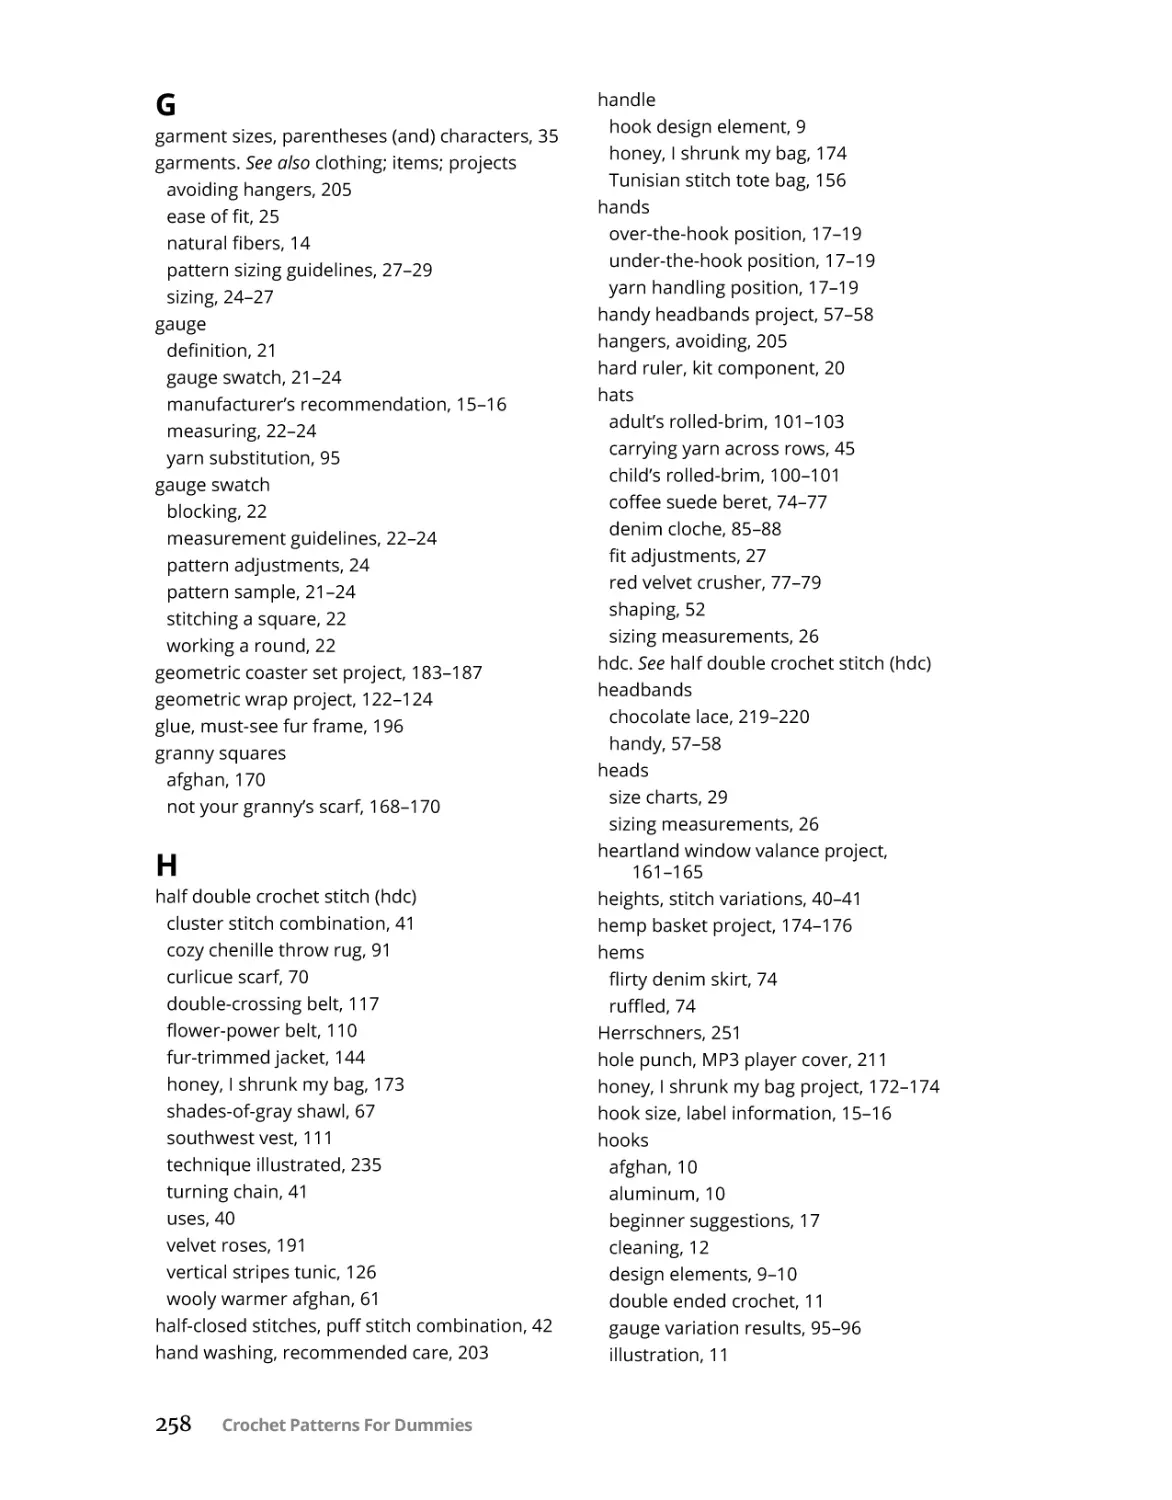
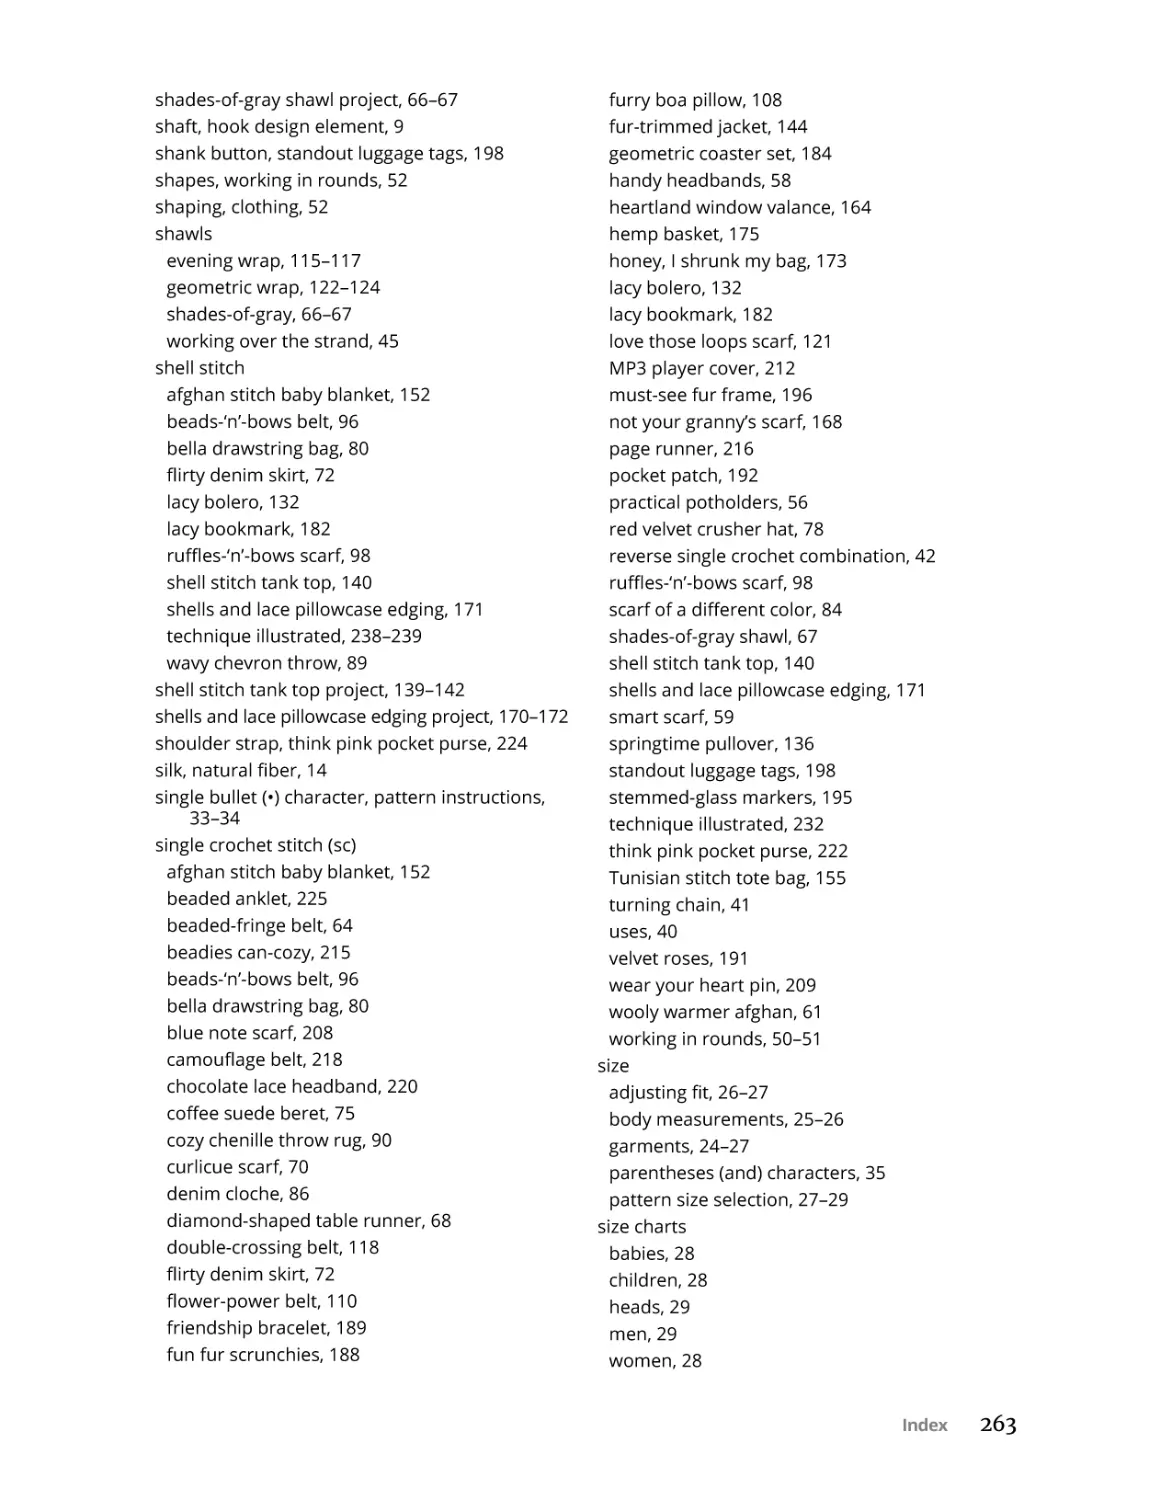
Crochet hooks are all basically the same in design. They each have a point, throat, shaft, and
handle, and most (except the largest sizes) have a thumb rest (see Figure 1-1).
CHAPTER 1 Gearing Up and Getting Started
9
FIGURE 1-1:
The anatomy
of a crochet
hook.
You can, however, find subtle differences in the hook’s shape. Some hooks have rounded points,
which generally work easiest with thicker yarns, while others have sharper points that are ideal
for thin yarns, wire, and other detail work. Some hooks have distinct, cutout throats that help
to keep the yarn in place on the hook. Others have a smoother, more rounded throat, which
enables you to work through stitches very quickly. As for which features to look for on your
hook, it’s just a matter of preference. Practice with every type to see which features you prefer.
Sometimes it’s just a matter of selecting the hook you like best for a particular yarn, stitch, or
project.
Considering hook types and construction
Crochet hooks are typically divided into two primary categories, based on the diameter of the
hook shaft. You can find hooks ranging from a fraction of a millimeter in diameter up to hooks
larger than your finger. Depending on the size, a hook can be sorted into two primary categories:
»» Standard: These hooks are typically used when crocheting with yarn, and they range from
2 millimeters up to 20 millimeters in diameter.
»» Steel: These hooks are smaller and generally used when working with crochet thread,
size 10 and smaller.
Steel hooks are made of, well, steel. But standard hooks can be made of different materials
including aluminum, plastic, and even wood. The following list helps you weigh the pros and
cons of each material:
»» Aluminum: These hooks are lightweight and smooth, helping you work with the yarn
quickly and without catching. Aluminum hooks are some of the easiest to find and are
often coated in a spectrum of colors.
»» Plastic: These hooks are also lightweight, but they can feel sticky to work with. While inexpensive, some crocheters feel the grippy plastic slows them down.
»» Wood: Crochet hooks can be made out of hard woods such as ebony, rosewood, and oak
with fine woodworking techniques. These hooks are beautiful to look at, and, when made
properly, can be as pleasant to use as your favorite aluminum workhorse. You also can
likely find inexpensive bamboo hooks, even in your local megastore. These also have a bit
more “grip” than aluminum, but many crafters enjoy how they stay warm in your hands.
For most of your crochet projects, the hook you’ll require is generally 5 to 6 inches long and
falls into one of the above categories. Don’t be surprised to read about — or see in the store —
other hook-ended tools, including
»» Afghan hooks: These hooks range from 12 to 16 inches in length, with a hook at one end
and a knob at the other. These hooks are used for afghan or Tunisian stitches that require
you to keep more than one loop on the hook shaft. For examples of some of these projects,
check out Chapter 13.
10
PART 1 Reinforcing Your Crochet Foundation
»» Double-ended crochet hooks: Also long like afghan hooks, these tools have a hook at each
end. They are used for something called double-ended crochet, which makes a thick and
reversible fabric.
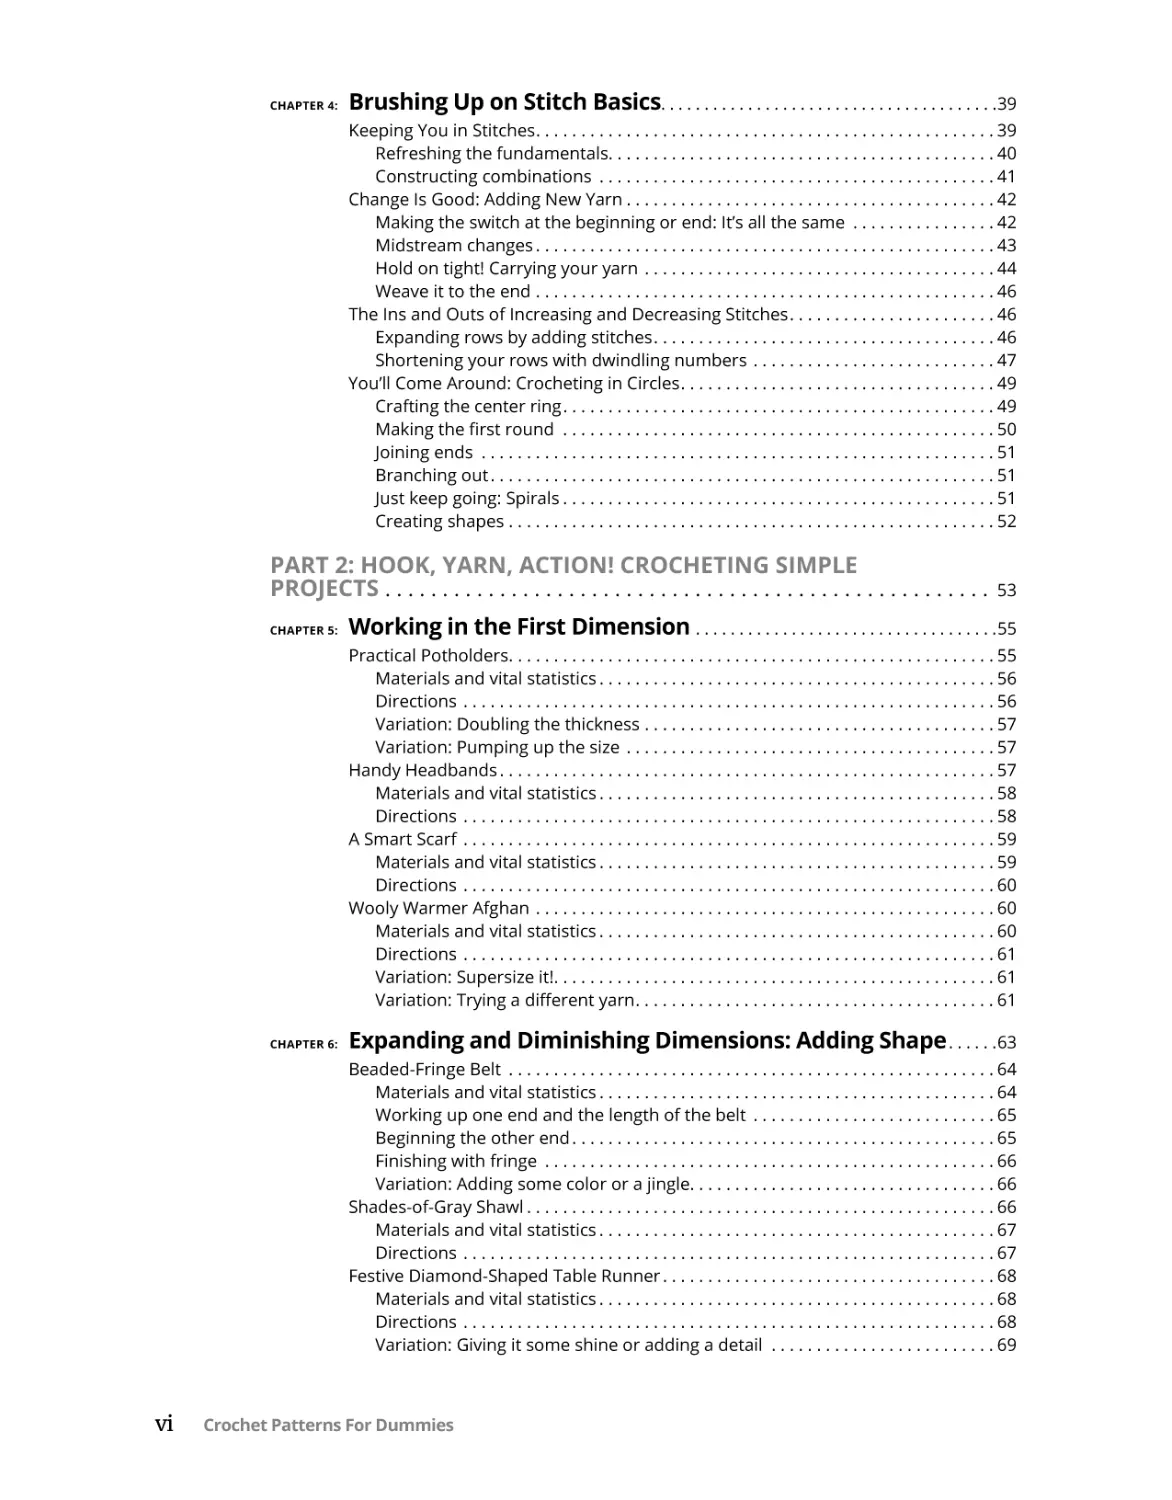
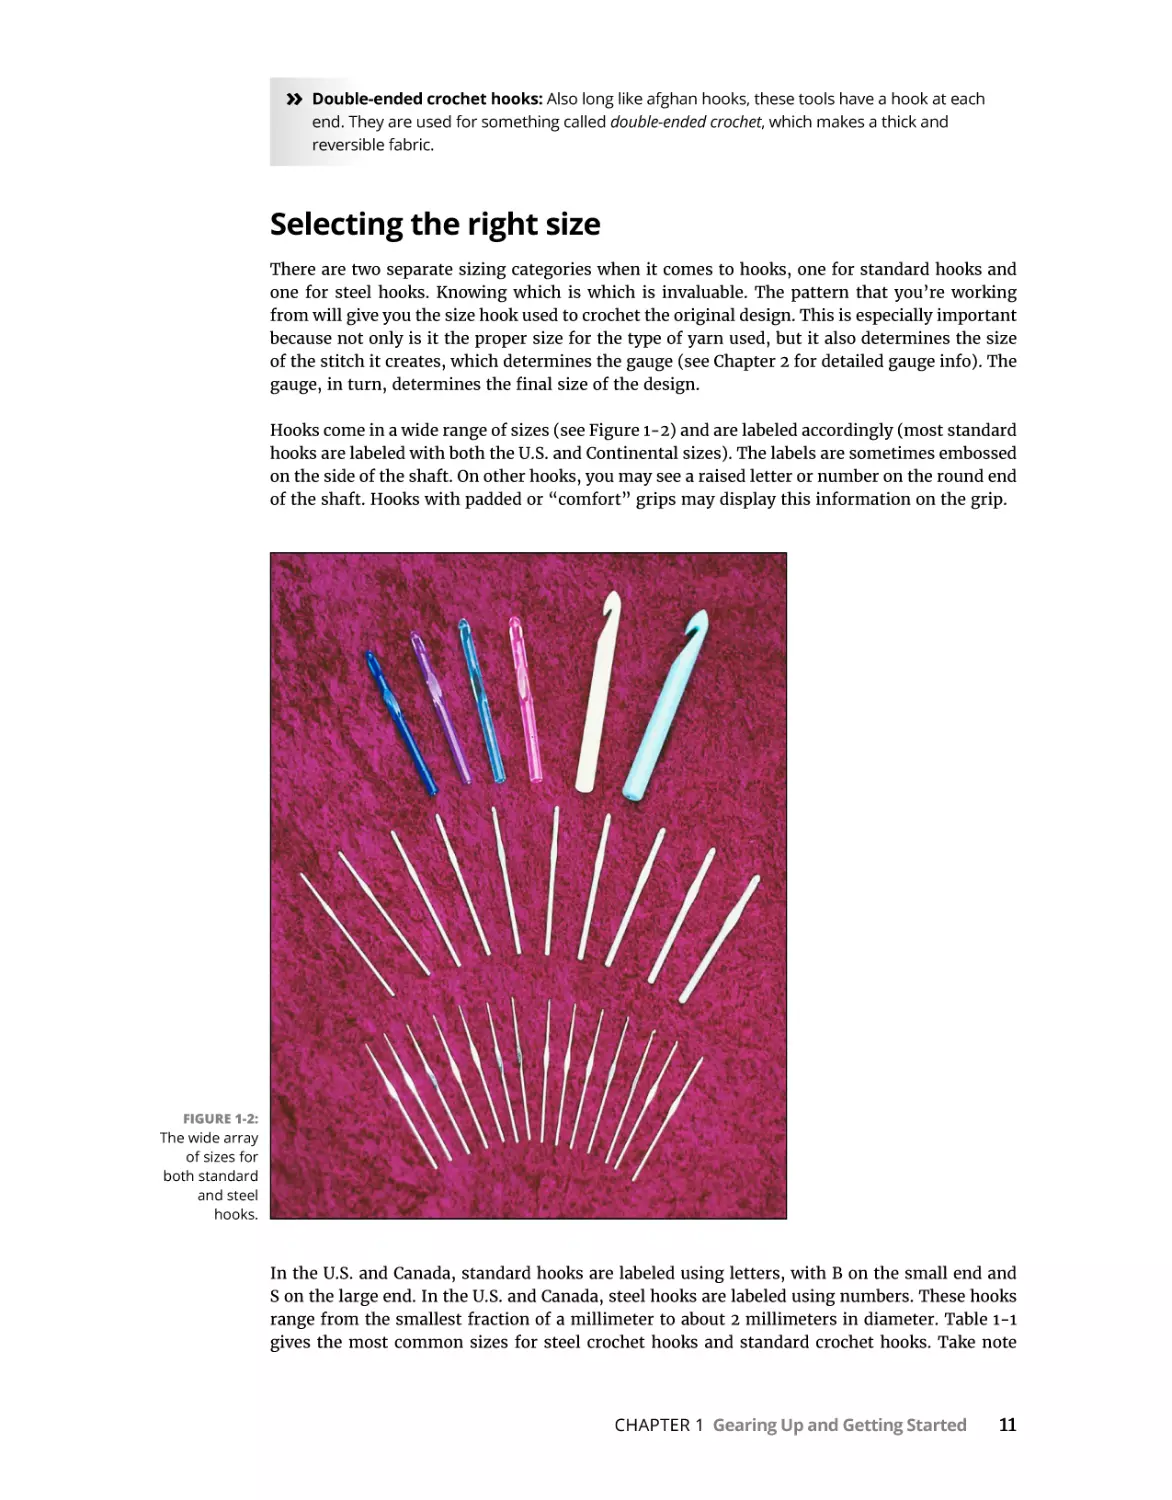
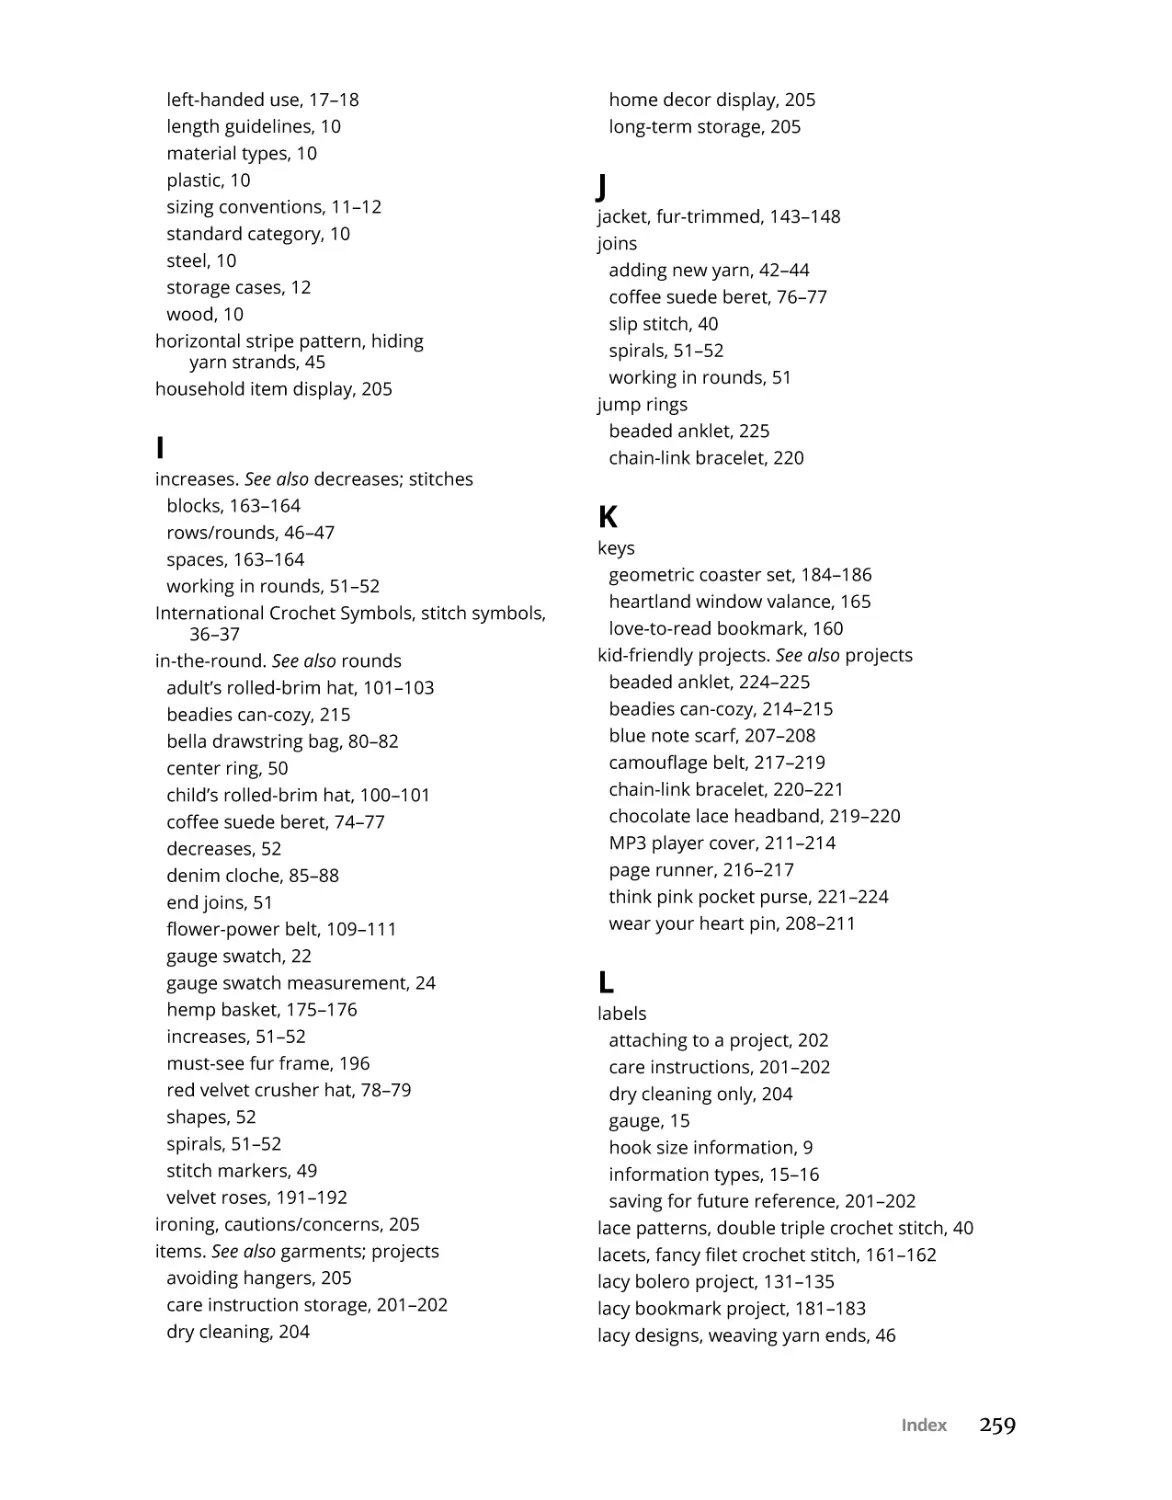
Selecting the right size
There are two separate sizing categories when it comes to hooks, one for standard hooks and
one for steel hooks. Knowing which is which is invaluable. The pattern that you’re working
from will give you the size hook used to crochet the original design. This is especially important
because not only is it the proper size for the type of yarn used, but it also determines the size
of the stitch it creates, which determines the gauge (see Chapter 2 for detailed gauge info). The
gauge, in turn, determines the final size of the design.
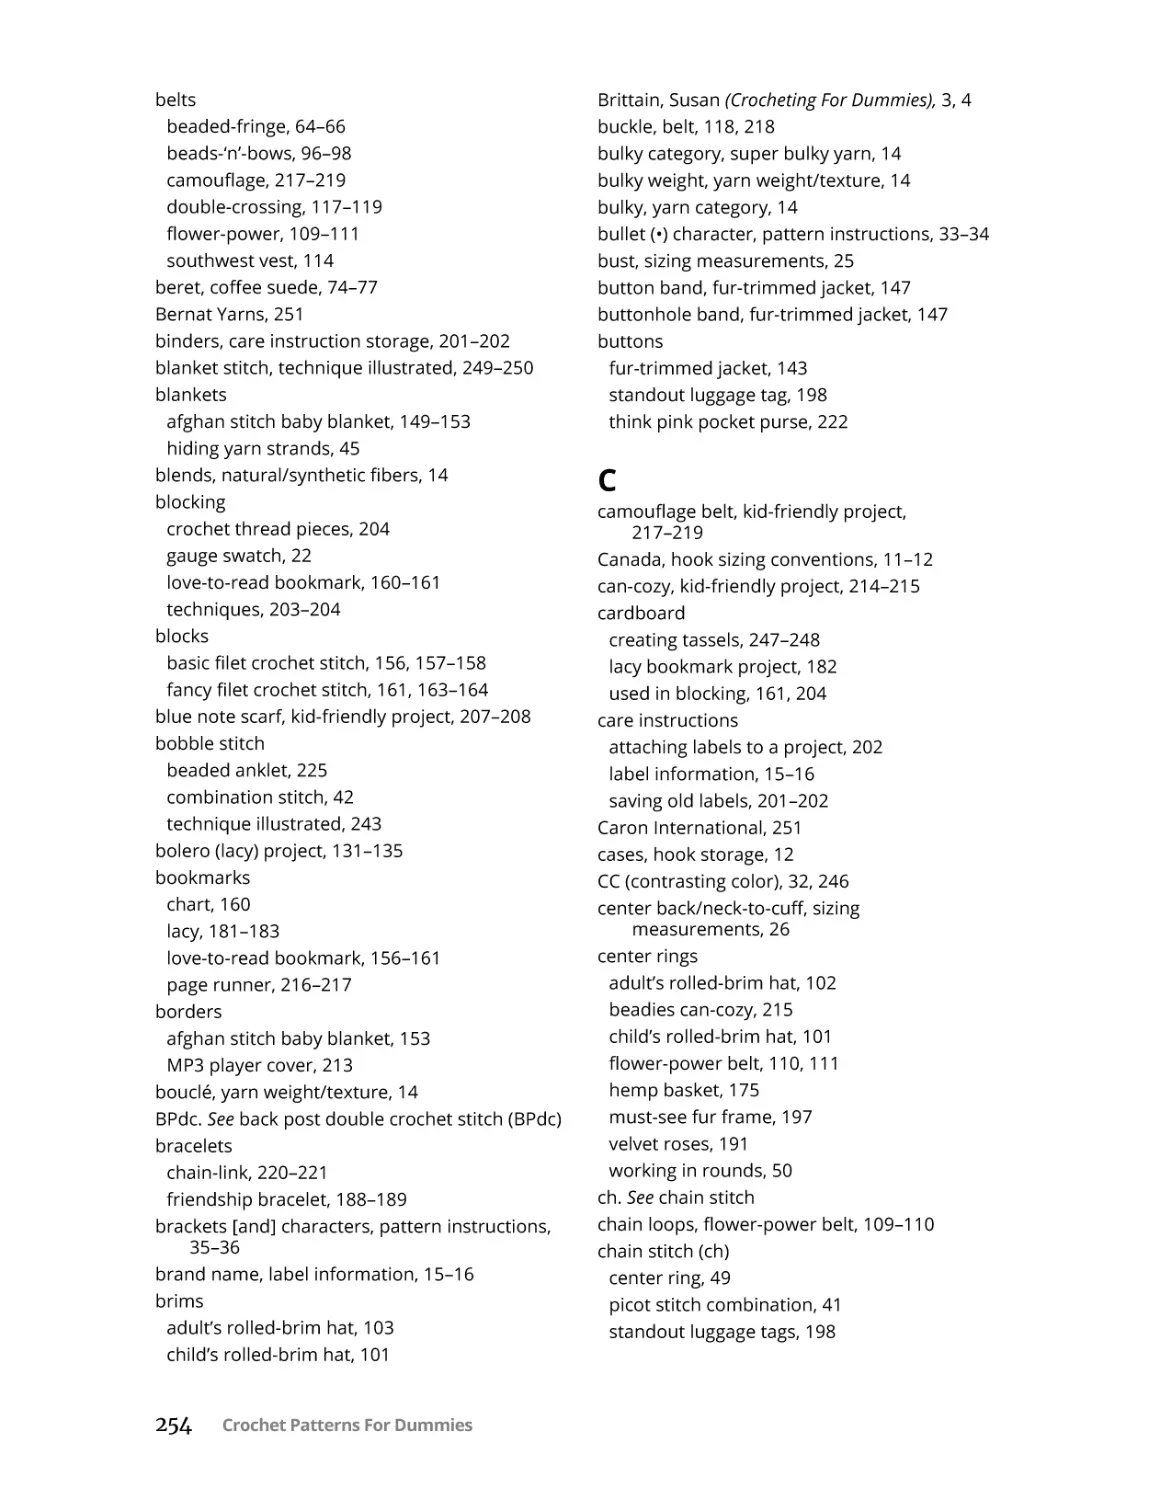
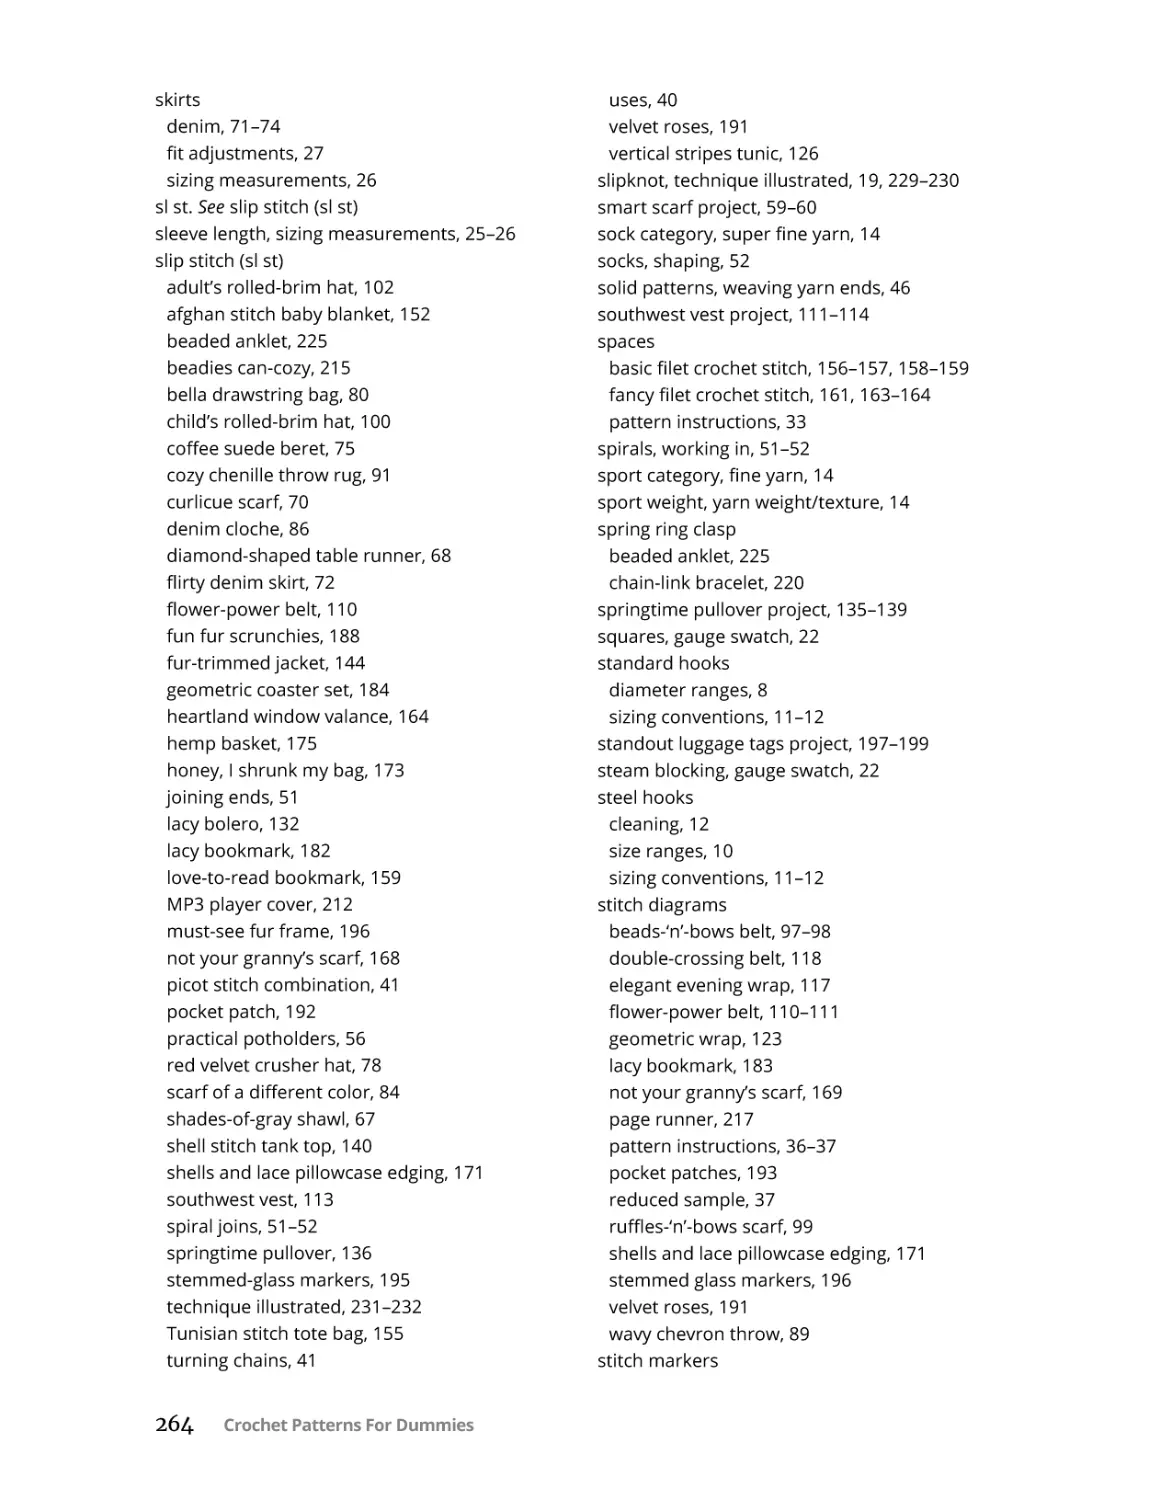
Hooks come in a wide range of sizes (see Figure 1-2) and are labeled accordingly (most standard
hooks are labeled with both the U.S. and Continental sizes). The labels are sometimes embossed
on the side of the shaft. On other hooks, you may see a raised letter or number on the round end
of the shaft. Hooks with padded or “comfort” grips may display this information on the grip.
FIGURE 1-2:
The wide array
of sizes for
both standard
and steel
hooks.
In the U.S. and Canada, standard hooks are labeled using letters, with B on the small end and
S on the large end. In the U.S. and Canada, steel hooks are labeled using numbers. These hooks
range from the smallest fraction of a millimeter to about 2 millimeters in diameter. Table 1-1
gives the most common sizes for steel crochet hooks and standard crochet hooks. Take note
CHAPTER 1 Gearing Up and Getting Started
11
that the U.S. and U.K. sizes for steel hooks are the opposite of what you’d expect — the larger
the number, the smaller the hook. And the U.K. sizes for standard hooks are a bit backwards,
too — the smaller the number, the larger the hook.
Table 1-1
Common Crochet Hook Sizes
Steel Crochet Hooks
U.S. (American)
Continental (Metric)
U.K. (English)
6
1.8mm
3½
7
1.65mm
4
8
1.5mm
4½
9
1.4mm
5
10
1.3mm
5½
Standard Crochet Hooks
U.S. (American)
Continental (Metric)
U.K. (English)
E-4
3½mm
9
F-5
3¾mm
(no equivalent)
G-6
4mm
8
G-7
4½mm
7
H-8
5mm
6
I-9
5½mm
5
J-10
6mm
4
K-10½
6½mm
3
Keeping your hooks in tiptop shape
Over time, you’ll build up quite a collection of hooks. And although hooks aren’t expensive,
you don’t want to have to run out and buy the same hook over and over again because you
damaged or lost the first one you bought in that size. Follow this advice to keep your hooks like
new and safe:
»» Cleaning: You may not think this is too important or wonder how the hooks get dirty. But if
you stop to think about it, it becomes obvious. The hook is tucked in your hand or between
your fingers for each and every stitch you work, and your hands have natural oils that protect the skin. Over time, these oils build up on your hook and may rub off on your yarn.
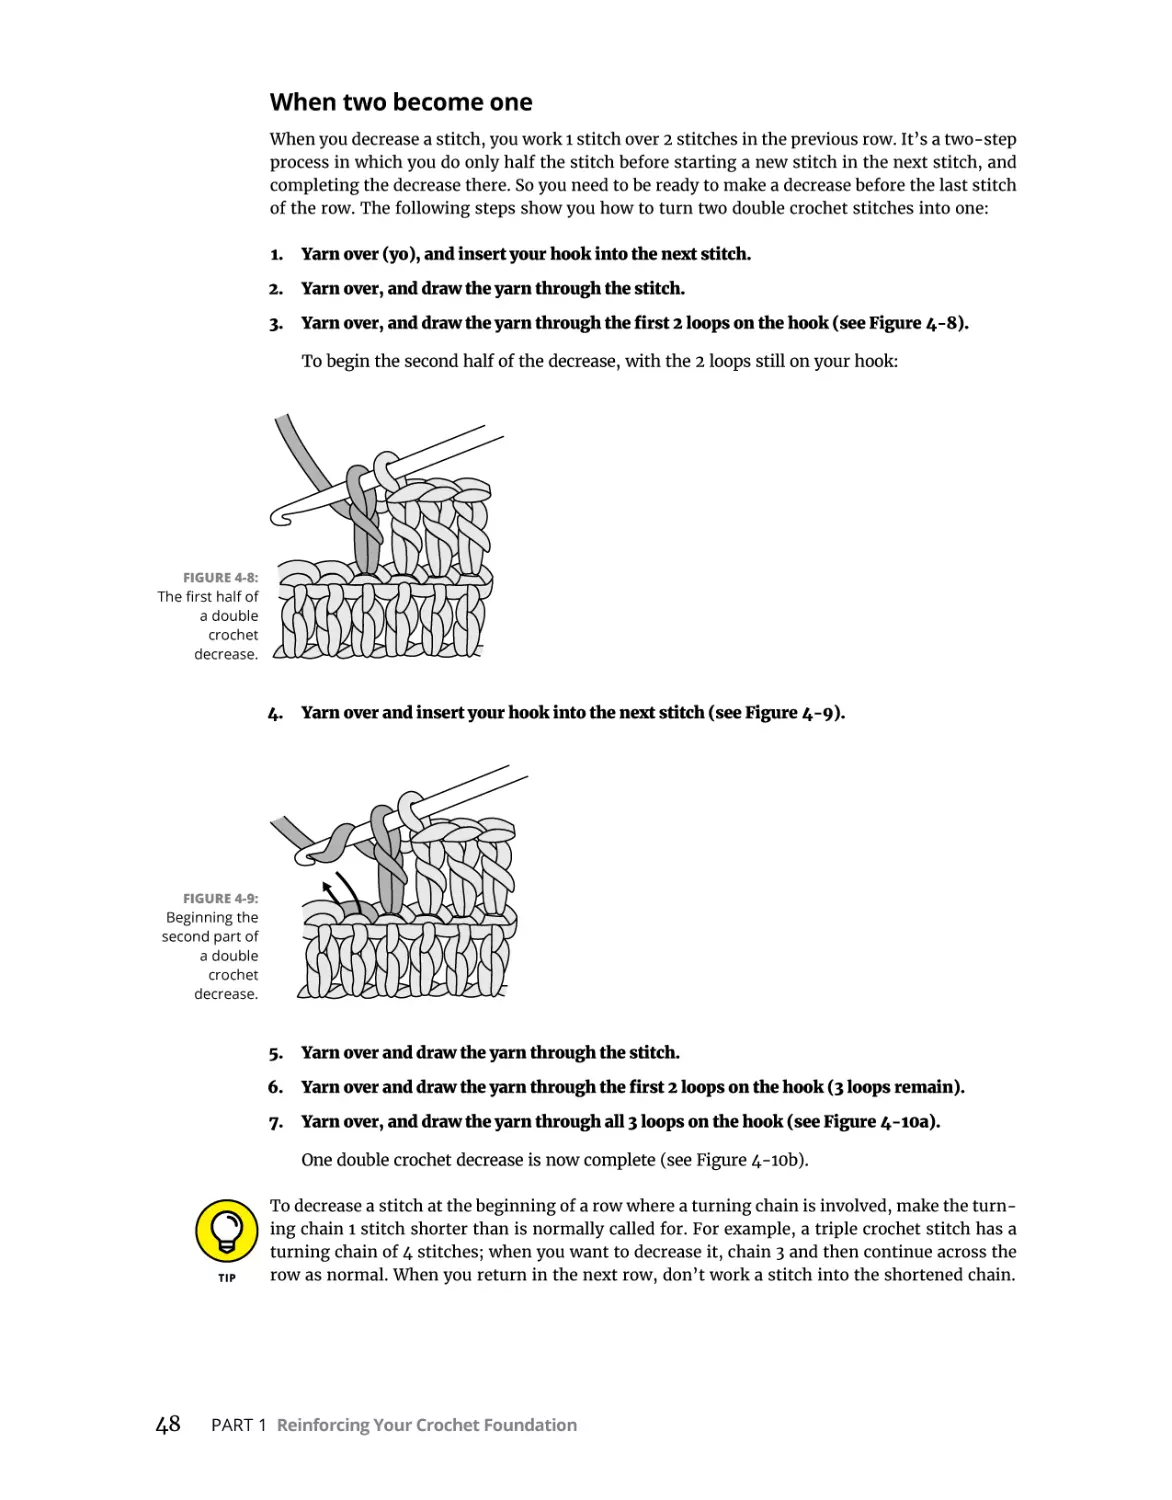
•
For your steel hooks, a good soaking in rubbing alcohol does the trick. Follow the bath by
rubbing down the hook with a clean, soft cloth.
•
Aluminum and plastic hooks benefit from a thorough washing with a mild detergent.
Dry completely before storage.
•
Wood hooks are a bit trickier to clean. Although most have been lacquered or coated to
resist splintering, it’s not advisable to soak or scrub the hook. Instead, use a damp cloth
to wipe clean. Be sure to dry it with a clean towel almost immediately.
»» Storing: Proper storage ensures that the hook you need for your next project is ready, willing, and able for work when you are. Invest in a case specially made to store hooks. They
are readily available at craft and yarn shops. If you can’t find one, or don’t want one, roll
your hooks in a piece of felt, keeping them separated.
12
PART 1 Reinforcing Your Crochet Foundation
Throwing your hooks in a bag or box can cause them to bang together, creating pits,
which in turn can cause snags in the yarn as you work. Plastic hooks can bend and
become warped as well as pit.
Comprehending Yarn Complexities
When I first started crocheting, choosing yarn wasn’t much more difficult than deciding which
color to use. Aside from crochet thread, there were only a couple different sizes, and no interesting textures. Colors were either solid or variegated (meaning they contain multiple colors). As
I’m sure you’ve seen, that’s not the case today. Just walk into the yarn aisle of your favorite
craft store or any yarn shop, and you can literally spend hours sorting through the variety of
colors and textures available.
Most of the time, you’ll decide to make a particular project based on how the item looks; you
like the overall design and the material it’s made with. Although pictures are nice, you can’t
always see all the details, and understanding what type of yarn is used to craft the project can
go a long way in determining if you’ll really like the finished design. The important points to
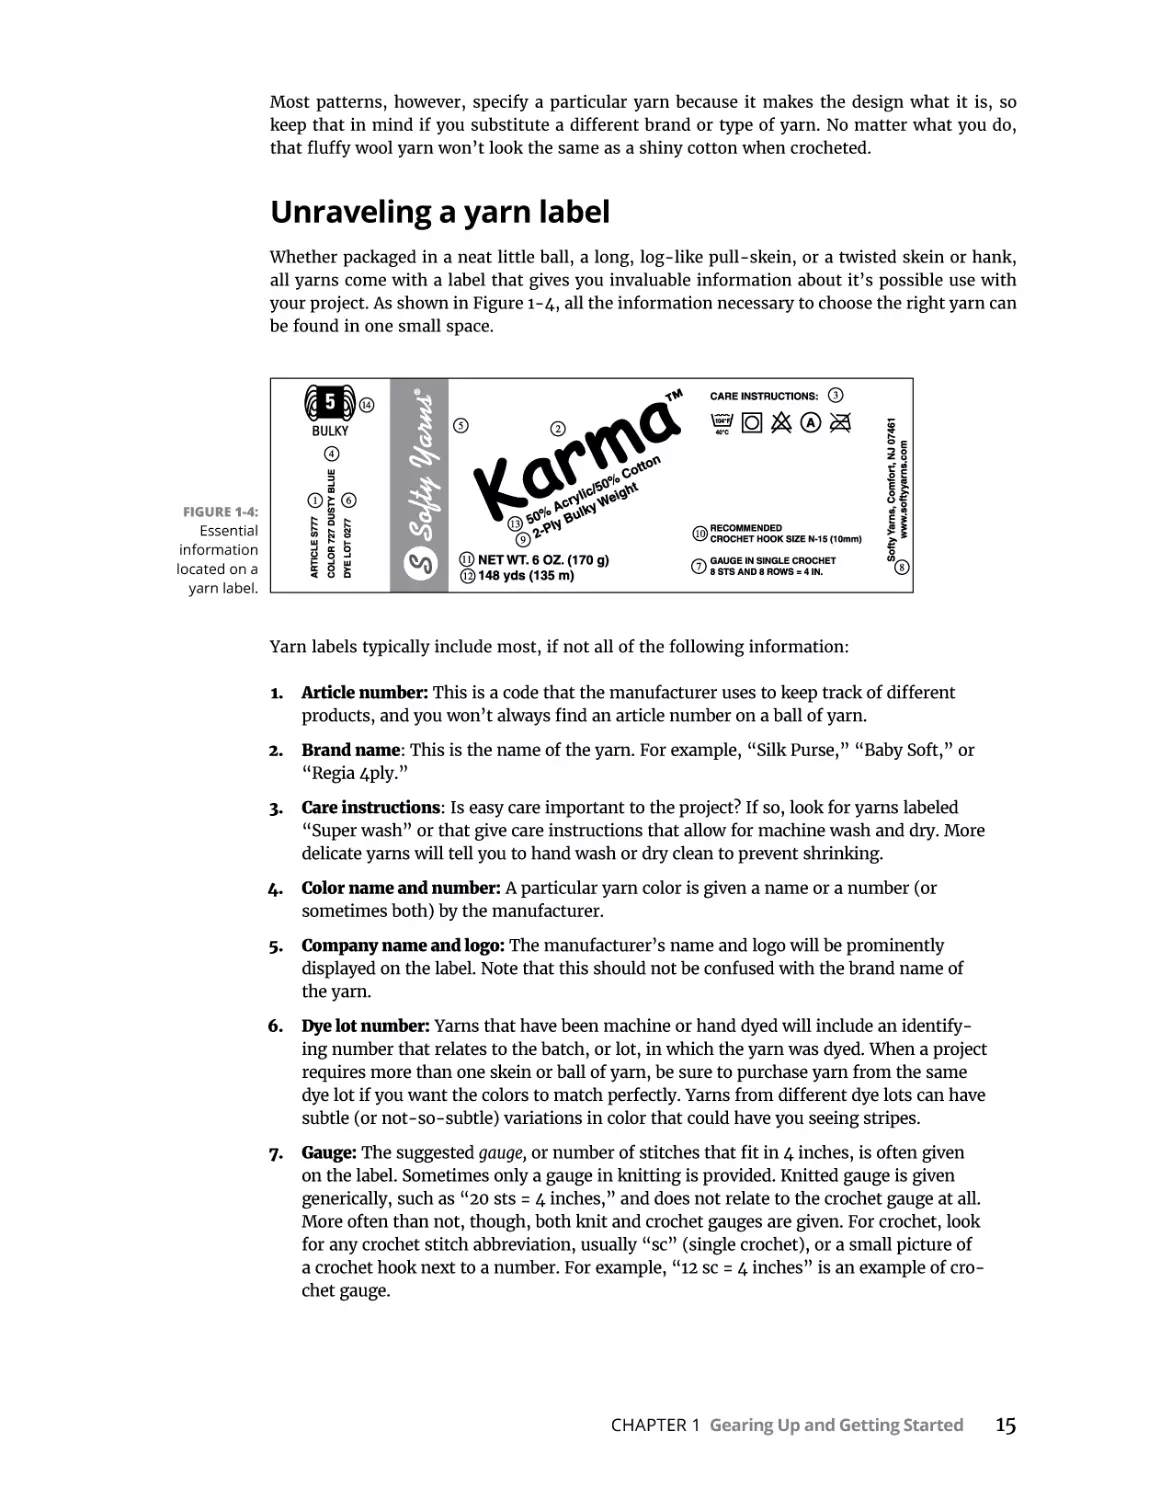
note about the materials can be found on the yarn label. Pay close attention to yarn size or
weight and yarn content, but don’t be afraid to mix it up. The “A ply for a ply: Swapping yarns”
section later in this chapter tells you how.
A light discussion of yarn weights
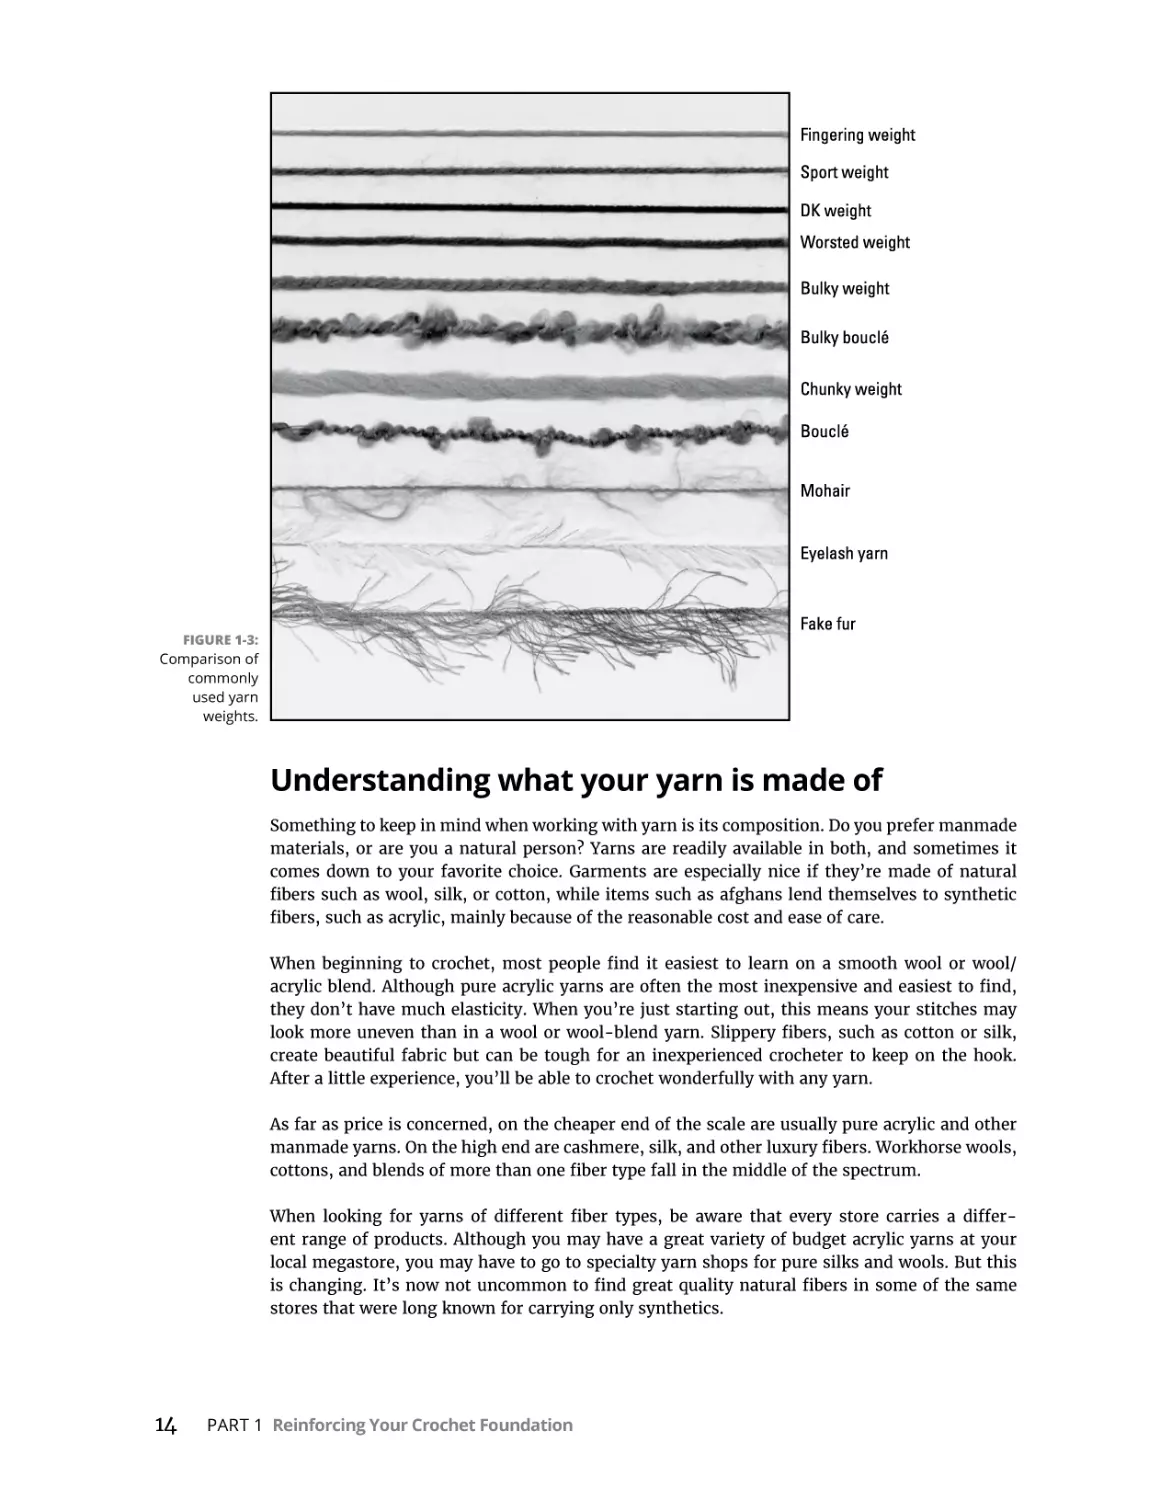
When the word weight is used in relation to yarn, it generally means the thickness of the yarn.
The thicker the yarn, the larger the stitches you’ll be able to create.
Yarns are labeled with any of about a dozen names that all describe the weight of the yarn. You
may see the words “worsted,” “aran,” “double knitting,” “sport,” or “chunky.” All of these
words (and several more) roughly correspond to the thickness of the yarns. So, if a pattern asks
for a chunky yarn, you can’t really use a substantially thinner sport weight and expect the same
results. But you can expect all worsted-weight yarns to crochet to more or less the same fabric. These yarn weights correspond to the gauge, or number of stitches per inch, that you can
expect to obtain while crocheting.
Figure 1-3 compares some of the more common weights and textures, but keep in mind that
the photo is far from inclusive.
Over the course of the last few years, the yarn industry has been making inroads into standardizing yarn weights. This is really a wonderful effort because one particular weight of yarn can
be called several different names (for example, yarns categorized as worsted, afghan, and aran
all have the same weight).
So if you really love a project but don’t like the suggested yarn, you can use the yarn-weight
symbol to find another yarn of the same weight that will work just as well for the item. If the
yarn or the pattern you like doesn’t use a standard yarn-weight symbol, you can still substitute effectively. Just look at the gauge information provided on the ball band (or yarn label) and
pattern and make sure they match. (Chapter 2 goes into more detail on the concept of gauge.)
CHAPTER 1 Gearing Up and Getting Started
13
FIGURE 1-3:
Comparison of
commonly
used yarn
weights.
Understanding what your yarn is made of
Something to keep in mind when working with yarn is its composition. Do you prefer manmade
materials, or are you a natural person? Yarns are readily available in both, and sometimes it
comes down to your favorite choice. Garments are especially nice if they’re made of natural
fibers such as wool, silk, or cotton, while items such as afghans lend themselves to synthetic
fibers, such as acrylic, mainly because of the reasonable cost and ease of care.
When beginning to crochet, most people find it easiest to learn on a smooth wool or wool/
acrylic blend. Although pure acrylic yarns are often the most inexpensive and easiest to find,
they don’t have much elasticity. When you’re just starting out, this means your stitches may
look more uneven than in a wool or wool-blend yarn. Slippery fibers, such as cotton or silk,
create beautiful fabric but can be tough for an inexperienced crocheter to keep on the hook.
After a little experience, you’ll be able to crochet wonderfully with any yarn.
As far as price is concerned, on the cheaper end of the scale are usually pure acrylic and other
manmade yarns. On the high end are cashmere, silk, and other luxury fibers. Workhorse wools,
cottons, and blends of more than one fiber type fall in the middle of the spectrum.
When looking for yarns of different fiber types, be aware that every store carries a different range of products. Although you may have a great variety of budget acrylic yarns at your
local megastore, you may have to go to specialty yarn shops for pure silks and wools. But this
is changing. It’s now not uncommon to find great quality natural fibers in some of the same
stores that were long known for carrying only synthetics.
14
PART 1 Reinforcing Your Crochet Foundation
Most patterns, however, specify a particular yarn because it makes the design what it is, so
keep that in mind if you substitute a different brand or type of yarn. No matter what you do,
that fluffy wool yarn won’t look the same as a shiny cotton when crocheted.
Unraveling a yarn label
Whether packaged in a neat little ball, a long, log-like pull-skein, or a twisted skein or hank,
all yarns come with a label that gives you invaluable information about it’s possible use with
your project. As shown in Figure 1-4, all the information necessary to choose the right yarn can
be found in one small space.
FIGURE 1-4:
Essential
information
located on a
yarn label.
Yarn labels typically include most, if not all of the following information:
1.
Article number: This is a code that the manufacturer uses to keep track of different
products, and you won’t always find an article number on a ball of yarn.
2.
Brand name: This is the name of the yarn. For example, “Silk Purse,” “Baby Soft,” or
“Regia 4ply.”
3.
Care instructions: Is easy care important to the project? If so, look for yarns labeled
“Super wash” or that give care instructions that allow for machine wash and dry. More
delicate yarns will tell you to hand wash or dry clean to prevent shrinking.
4.
Color name and number: A particular yarn color is given a name or a number (or
sometimes both) by the manufacturer.
5.
Company name and logo: The manufacturer’s name and logo will be prominently
displayed on the label. Note that this should not be confused with the brand name of
the yarn.
6.
Dye lot number: Yarns that have been machine or hand dyed will include an identifying number that relates to the batch, or lot, in which the yarn was dyed. When a project
requires more than one skein or ball of yarn, be sure to purchase yarn from the same
dye lot if you want the colors to match perfectly. Yarns from different dye lots can have
subtle (or not-so-subtle) variations in color that could have you seeing stripes.
7.
Gauge: The suggested gauge, or number of stitches that fit in 4 inches, is often given
on the label. Sometimes only a gauge in knitting is provided. Knitted gauge is given
generically, such as “20 sts = 4 inches,” and does not relate to the crochet gauge at all.
More often than not, though, both knit and crochet gauges are given. For crochet, look
for any crochet stitch abbreviation, usually “sc” (single crochet), or a small picture of
a crochet hook next to a number. For example, “12 sc = 4 inches” is an example of crochet gauge.
CHAPTER 1 Gearing Up and Getting Started
15
8.
Manufacturer’s address: The yarn manufacturer’s location is sometimes provided. It
can be helpful if you need to find another source for its yarns. Increasingly, the manufacturer’s website is being added, which can be a great resource for yarn information
and sometimes free patterns.
9.
Ply: Occasionally, a yarn label will provide ply information, such as 2 ply, 4 ply, or 12 ply,
which means the number of strands that are twisted together to create the yarn. The
number of plies does not correspond to the crochet gauge or the yarn weight. For
example, it’s possible to have a super-thick 2-ply or a super-thin 12-ply yarn, or vice
versa.
10.
Recommended hook size: When a crocheted gauge is given, a recommended hook size
to obtain that gauge is also provided. You may need a different size hook to obtain the
same gauge as the ball band or for the gauge provided in the pattern. (Read Chapter 2
for more details on gauge.)
11.
Weight: The physical weight of the ball or skein of yarn will be listed. This may be in
grams or ounces or both, depending on the country of origin.
12.
Yardage: The length of the yarn will be given in yards and/or meters depending on the
country of origin. Be sure to buy enough yards for your project. Don’t be tempted to
buy by weight only. Different types of yarn, even at the same thickness, contain vastly
different yards per gram or ounce, and you don’t want to run short.
13.
Fiber content: By law, every commercially available yarn must include a detailed
description of its fiber content. For example, you may see “100% merino wool” or
blends such as “65% acrylic, 15% nylon, 15% elastane, 5% cotton.”
14.
Yarn-weight symbol: Many yarn companies are beginning to include this symbol,
handy for yarn substitution, provided your pattern also includes the symbol. (See the
section, “A light discussion of yarn weights,” earlier in this chapter, for more on these
symbols.)
A ply for a ply: Swapping yarns
Most patterns will tell you specifically which yarn to use for best results, but never forget that
you have the option to substitute another yarn. Let your imagination go. With all the choices
available, there’s no reason not to make some changes to suit your own taste. (Appendix B contains a list of yarn companies and their web addresses for your browsing pleasure.)
Changing yarn can be as simple as choosing a different color of the same yarn used in the
original pattern, or much more complex by picking a different yarn altogether. If you prefer
wool and the pattern uses an acrylic yarn, you can look for a substitute. Just be sure to keep the
following in mind:
»» Weight (or thickness): If the pattern calls for a worsted- (or medium-) weight yarn, stick to
that. Using a chunky-weight yarn (yarn that is heavier than worsted-weight) or sport-weight
yarn (yarn that is lighter) will alter your results dramatically.
This is where the yarn-weight symbols come in handy. If your pattern and the yarn you want
both use the symbols, be sure they match. Otherwise, check the gauge section of the yarn
label and pattern to be sure the yarns crochet similarly. If your pattern gives only crocheted
gauge, and the yarn label only knitted gauge, you may have to research the pattern yarn to
determine its knitted gauge. This way, you can compare knitted gauges of the pattern yarn
and the yarn you want to use. If the knitted gauges are the same, the new yarn you’ve
16
PART 1 Reinforcing Your Crochet Foundation
chosen will substitute nicely. (You can research knitted gauge on the Internet or by asking at
your local yarn store.)
»» Yardage: Make sure to purchase enough yarn. Every type and brand of yarn varies in terms
of the yards per ball or skein. Even when buying a worsted-weight skein from company X
and one from Y, you may see a difference in yards per skein. For example, if your pattern
calls for five balls of X at 100 yards a ball, and you buy five balls of Y at 80 yards a ball, you’ll
be short by a full ball!
Buying enough yarn at the beginning of your project is important because most yarns have
dye lots (see the section “Unraveling a yarn label” earlier in this chapter). Although you may
not be able to see the subtle differences in color before the yarn is worked, when your piece
is crocheted, you probably won’t like the contrast. Better to be safe than sorry. Most shops
will let you exchange or return unused, unopened skeins of yarn if you purchase too much.
Getting Your Fingers Moving
Whether you’re brand-new to crochet or you learned the stitches years ago, it’s well worth a
few minutes to get a refresher on how to hold the hook and yarn and get started for your first
few stitches.
To get started, you’ll need a ball of yarn and a hook. Many beginners choose to practice using
a size H-8 U.S. hook and worsted- or aran-weight yarn. Smooth yarn is easiest to work with at
this point; too much texture makes it hard to see what you’re holding.
Most of the instructions in this book are from a right-hander’s perspective, but if you’re a lefty,
the same rules apply. You probably already have practice reversing directions, but here are a
few tips to help you work from your point of view:
»» Mirror it: Hold the picture up to a mirror to get a reverse view. It may feel a bit clumsy, but
it should work well enough to get you going.
»» Flip it: If you have a computer with a scanner, scan the illustration, and then use the photo
software to flip the illustration horizontally. If you don’t have a scanner, pull out some tracing paper and a pencil, trace the photo, and then view it from the opposite side.
»» Go righty: Try crocheting the right-handed way. You may be surprised to find that you’re
ambidextrous.
Holding the hook and yarn
Even though you use just one hook for crochet, both hands are involved in the action. Your
dominant hand, the one you write with, holds and moves the hook. Your other hand is responsible for holding and tensioning the yarn.
You can hold the hook in one of two ways: over the hook, as in Figure 1-5, and under the hook,
as in Figure 1-6. Neither grip is better or worse than the other. It’s just a matter of what feels
best in your hand.
CHAPTER 1 Gearing Up and Getting Started
17
FIGURE 1-5:
The over-thehook position
for left- and
right-handers.
FIGURE 1-6:
The under-thehook position
for left- and
right-handers.
Now, you use your other hand to get a hold on the yarn. If you’re right-handed, you use your
left hand. If you’re a lefty, you use your right. Although you can work with the yarn many different ways, here’s one of the more common methods (see Figure 1-7):
1.
With the ball or skein positioned below your hand, bring the yarn up between your
ring and little fingers.
2.
Wrap the yarn around your little finger to create a loop.
This keeps the yarn from moving too quickly through your fingers, causing loose and
sloppy stitches.
3.
Bring the yarn under your ring and middle fingers, and up to the top of your hand
between your middle and forefinger.
When you close your little, ring, and middle fingers to hold the yarn, you can use your forefinger to raise or lower the yarn. While you crochet, it’s important to pay attention to the tension
of the yarn. If it feels too loose, take time to readjust, working through the above steps.
FIGURE 1-7:
Wrapping the
yarn over your
hand helps
maintain good
tension.
Working with the hook and yarn together
You’re comfortable holding your hook. You know how to control the yarn. Now you’re ready to
get the yarn on the hook and get crocheting. It all starts with a slipknot:
18
PART 1 Reinforcing Your Crochet Foundation
1.
With about 6 inches of yarn, make a loop that looks like a pretzel (see Figure 1-8).
2.
Insert your hook through the center of the loop, draw the yarn through the loop, and
pull on the tail to tighten.
The slipknot should be loose enough to slide easily along the hook, but tight enough to
avoid falling off. See Figure 1-9.
FIGURE 1-8:
Starting a
slipknot.
FIGURE 1-9:
The slipknot
tightened on
the hook.
When you put everything together, your setup should look like Figure 1-10 or Figure 1-11,
depending on which hand you use and whether you hold the hook underhand or overhand.
If this feels awkward at first, don’t worry. With a little practice, you’ll be able to get set up to
crochet within seconds, without really thinking about it.
FIGURE 1-10:
The correct
position of
both hands for
the over-thehook position.
FIGURE 1-11:
The correct
position of
both hands for
the under-thehook position.
CHAPTER 1 Gearing Up and Getting Started
19
It’s in the Bag: Completing Your Crochet Kit
In addition to keeping the work off the couch and out of reach of pets, kids, and accidental
spills, the advantages of keeping your yarn, pattern, finished pieces, notions, notes, and work
in progress all together are numerous. With a dedicated crochet bag, you can quickly grab your
project as you head off for a weekend away, an afternoon at a friend’s house, or to a needlework
guild meeting.
As simple and inexpensive as a leftover tote bag, or as luxurious as a just-for-crocheters
designer bag, a dedicated place to store your project is a practical investment. If you’ve got
multiple projects under way, consider placing each one inside a large freezer storage bag or
other clear pouch so you can easily identify which is which.
It probably goes without saying that pets love yarn. It’s soft, it’s squishy, and it sometimes
tastes like sheep. Although it may be cute to watch your kitten bat around a ball of yarn, it sets
you up for a lifetime of problems when you go to work on your crochet. Much worse than that,
even ingesting a few inches of yarn can cause a life-threatening emergency or death. Be safe.
Always keep an eye on your yarn and put it well out of reach in a closed crochet bag when you’re
not around.
Few things are more frustrating than getting ready to finish a project late at night and realizing
that you’re missing the yarn needle to sew it all together. Putting together a crochet kit, containing some inexpensive but often-used items, can help your projects go a lot more smoothly.
Consider purchasing a small, zippered cosmetics pouch or other container to keep everything
together and easy to find in your crochet bag.
This list includes a few items that, although not always necessary, are great additions to your
crochet kit. You probably already have most of them around the house — just gather them
together and put them in a spot with your crochet hooks:
»» Scissors: Try to find a small, blunt-nosed but sharp-bladed pair for snipping ends.
»» Hard ruler: A 6-inch (or smaller) inflexible ruler is helpful for measuring your gauge.
»» Fabric tape measure: Look for a retractable fabric tape measure for keeping track of your
progress as you crochet. You also can use this tape measure for taking body measurements
when crocheting a sweater, hat, or other garment.
»» Pins: Straight pins, such as the type that sewers use, are handy when it comes time to sew
your project together.
»» Removable stitch markers or coil-less safety pins: Your craft or yarn store sells pouches
of plastic stitch markers with an opening on one side. These are designed to go around the
stitch itself and be removed easily later. Some crocheters prefer safety pins without the coil
on one end. (The coil tends to snag.)
Unless you’re also a knitter, don’t buy the solid stitch markers that are designed to sit on a
knitting needle. You’ll only have to cut them out of your work later.
»» Yarn and tapestry needles: Consider purchasing a range of yarn needles in different sizes
for different projects. Because these are small, they’ll get lost easily, but you’ll need one for
weaving your ends and stitching project pieces together.
»» Pencil and paper: Keeping track of your pattern progress can be helpful. A small notebook
or pad of paper, plus a pencil or pen, makes life easier.
20
PART 1 Reinforcing Your Crochet Foundation
IN THIS CHAPTER
»» Creating a gauge swatch
»» Figuring out those measurements
»» Selecting the proper size
2
Gauge and Garments:
Sizing Facts and Figures
Chapter
E
veryone always talks about the importance of gauge, but what exactly is gauge? Why
should you be so careful about attaining the same gauge as the pattern specifies? Simply
put, gauge is the ratio of a given number of stitches and/or rows to inches (or other given
measurement). You’ll see it written like this:
Gauge: 12 sc and 8 rows = 4 in.
The reason gauge is so important is that the finished size of the pattern you’re crocheting is
based on this measurement. Now, if you’re making an afghan and the finished size is off by a
couple of inches, it’s not quite so critical. But on the other hand, if it’s a sweater you’re making,
being a few inches off could have a disastrous effect on the end result.
This chapter covers the basics of gauge — how to practice getting it right, how to measure it,
and how to correct your gauge if you’re off. I also talk about pattern sizes and how to make sure
you get the fit you want when you’re making sweaters, hats, skirts, and the like. Don’t let the
numbers scare you. They’re necessary for making everything turn out just right!
Practicing with a Gauge Swatch
The best way to ensure that you’re working to the proper gauge is to crochet a gauge swatch,
which is a reduced sample of the pattern. This allows you to work a small section of fabric to
see how close you are to the given measurements. It also gives you the opportunity to practice
the stitch pattern, which is really nice if it’s a complicated one or is composed of stitches you
haven’t worked before.
CHAPTER 2 Gauge and Garments: Sizing Facts and Figures
21
Working a gauge swatch is a very simple process and only takes a few minutes. If you’re like
me, you probably want to jump right in and start working on the project itself. But, again if
you’re like me, you’ve done this and cried over the finished design, wondering why it didn’t
come out right. Nine times out of ten the answer will be — the gauge was off.
Getting the gauge right is very important. Don’t skip this step.
Making a swatch
You need to make a gauge swatch whether you’re working in rows or rounds:
»» Stitching a square: To get an accurate measurement, the swatch should be at least
4 inches square, but it can be larger depending on the pattern. Read the gauge
specifications at the beginning of the pattern, and then work the stitches for that
pattern that accommodate those measurements.
»» Working a round: The measurements given for a circular gauge will tell you what the
diameter is for a given number of rounds. Follow the instructions for the pattern, being sure
to crochet an extra few rounds above and beyond the number given for the gauge. This
ensures that you can take a measurement in the middle of the piece, because the first and
last round may be shorter or taller than a normal round, depending on the stitches used.
Typically, simple patterns that use one or two stitches repeated will give the gauge over
4 inches. For example, 12 sc and 8 rows measure 4 inches square. In this case, you would chain
a few more stitches than noted and work rows of single crochet, without increasing or decreasing, until you’ve worked a few more rows than required.
To put this theory into practice, you can try your hand at making a quick gauge swatch using
the double crochet stitch. Grab some yarn and a hook — anything will do.
Gauge: 11 dc = 4 in.
1.
Chain 20, turn, work one double crochet in the 4th chain from the hook, work one
double crochet in each chain across.
2.
Continue to work in rows of double crochet until the square measures slightly more
than 4 inches square.
When you’ve finished your swatch, take a set of gauge measurements. Then you can finish
the swatch as you would the finished design, which typically involves blocking, a process that
evens out the stitches and allows you to shape the piece. Depending on the type of yarn (see
Chapter 1 for details on reading your yarn label), you can usually just wet or steam the swatch,
shape it, and allow it to dry. Then take another set of measurements. This will give you an
accurate gauge.
Your measurements may change, so if necessary, you should adjust your hook size based on the
second set of measurements, which reflects a more accurate gauge. This is especially important
when making garments: If your gauge shrinks (or grows) after blocking, you’ll end up with a
different size garment than you intended, which wouldn’t do at all.
Determining whether you’re on the right track
Whether you’re measuring an unblocked or a blocked swatch, you want to obtain the most
accurate measurement possible, both in terms of stitches and rows. Specifically, you measure
the swatch from side to side, counting the stitches, and from bottom to top, counting the rows.
22
PART 1 Reinforcing Your Crochet Foundation
When counting stitches and measuring rows, always use the center of the square swatch, rather
than going from edge to edge (see Figure 2-1). Compare your measurement to those given
in the pattern to determine the accuracy of your stitches. And make sure to position your ruler
or tape measure evenly across the stitches and rows.
To measure stitches:
1.
Place the ruler at the left edge of a stitch and measure across to the left edge of
another stitch (see Figure 2-1a).
Make sure the ruler is level across the top of the row below.
2.
Count the stitches that you have in the 4 inches.
The number of stitches you count should equal the gauge given for the pattern.
You can count half stitches too. If you’re even a half of a stitch off, your finished piece
may be several inches too big (or too small).
It’s essential to count accurately; don’t stretch or distort your crochet to get the “right”
number. If your gauge isn’t perfect the first time around, you can change hook size later to get
everything right.
To measure rows:
1.
Align the ruler’s edge vertically to the side edge of the stitches, making sure it’s
evenly positioned (see Figure 2-1b).
2.
Count rows, keeping track of any partial rows.
Because a crochet row can be quite tall, you need to measure as accurately as possible.
Again, in an ideal world, the number of rows will match the gauge given in the pattern.
FIGURE 2-1:
Measuring
gauge in
stitches
and rows.
You can use these steps to measure the gauge of the practice swatch you made in the last section to see how close your gauge is to the one given in the pattern. And if your gauge is off
(either in rows or stitches), don’t fret. The section, “Making adjustments,” later in this chapter
helps you correct the problem.
CHAPTER 2 Gauge and Garments: Sizing Facts and Figures
23
When measuring gauge in the round, measure from the outside edges of the given round
through the center of the swatch (see Figure 2-2). Figure 2-2a shows three rounds of double
crochet stitches that equal 3½ inches in diameter. Figure 2-2b shows two rounds of a motif
that equal 3 inches in diameter across the widest point.
FIGURE 2-2:
Measuring
gauge in the
round.
If, after you measure your swatch, the gauge is right on, then you’re good to go, and you can
jump right in to the project. However, if you have too many stitches, then you’re crocheting too
tight, and you have to loosen up a bit. If you have too few stitches, then you’re too loose and
need to tighten up. But don’t try to adjust your crochet tension to correct the problem! The next
section tells you what to do instead.
Making adjustments
The best way to achieve the correct gauge is to change hook size. If your stitches are too tight,
use the next larger hook size. If they’re too loose, use the next smaller size. It’s okay to use a
different hook size because the gauge of the finished piece is way more important than what
hook you use to create it. And when you change hook size, make another swatch to make sure
the gauge is correct.
Don’t try to adjust your crocheting! Everyone has a natural way to crochet, and if you try to
change your method, you’ll invariably end up right back where you started.
Sizing Your Garment
This section covers a subject that I dearly wish clothing manufacturers would pay more attention to — sizing. I’m sure you’ve noticed that just because a label says a sweater is a certain
size, it doesn’t mean it really is that size. This makes me absolutely crazy when I shop — the
stuff I can wear spans three different sizes, and I don’t even know which one is correct anymore. There are, however, standards in sizing, even if many manufacturers don’t pay much
attention to them.
The good news is that when you’re making your own clothing, you can pay attention to sizing
and get the fit just right. You can take basic measurements, decide how you want the garment
to fit, and then figure out which size to make to meet your particular needs.
24
PART 1 Reinforcing Your Crochet Foundation
Tale of the tape: Taking accurate measurements
To ensure that the finished garment you’re crocheting actually fits, you must first take correct
body measurements. This isn’t difficult or time consuming; you just have to know where to
measure. To take accurate measurements, make sure to have a fabric tape measure on hand.
When taking your measurements, it’s easiest (and more accurate) to ask someone else for
help! Also, be sure to take your measurements often; don’t just rely on numbers from a
few years back.
Sweaters and vests
Most garment patterns give specific finished measurements for things such as bust, waist, back
length, and sleeve length. These finished measurements, in most cases, are designed to be a
few inches larger than your actual body measurements. This concept is called ease. So, to select
the right size, think about how you want the sweater or vest to fit.
»» Do you want it fairly close to your body? If so, selecting a size an inch or so larger than your
actual chest measurement is the way to go.
»» If you’d like a bit more room, select a size 2 to 4 inches larger than your actual
measurement.
»» Is the garment supposed to be quite oversized? Go for even more ease.
What you plan on wearing underneath impacts sizing too. If you’re wearing the top over a
close-fitting camisole, you’ll need less ease than if you plan to wear it over a heavy turtleneck.
If you match up your measurements to the corresponding size in the pattern, your finished
sweater or vest will fit just the way you want (assuming your gauge follows the pattern specifications). Figure 2-3 shows how to measure various areas to ensure a great outcome.
»» Chest or bust (1): Measure around the fullest part of your model’s chest or bust. Don’t draw
the tape too tightly or measure while inhaling or exhaling.
FIGURE 2-3:
Measuring
areas of the
body correctly.
CHAPTER 2 Gauge and Garments: Sizing Facts and Figures
25
»» Center back, neck-to-cuff (2): With the model’s arm slightly bent, measure from the back
base of the neck, across the shoulder, and around the bend of the elbow to the wrist.
»» Back waist length (3): Measure from the most prominent bone at the base of the neck to
the model’s natural waistline.
»» Cross back (4): Measure from shoulder to shoulder.
»» Sleeve length (5): With your model’s arm slightly bent, measure from armpit to cuff.
»» Back hip length (6): Measure from the top of the model’s shoulder to the top of the hip.
Hats
For an accurate head measurement, place a tape measure across the forehead and measure
around the full circumference of the head. Keep the tape snug for accurate results. Figure 2-4
shows you how.
FIGURE 2-4:
Measuring
head
circumference.
Skirts
For skirts, a waist measurement is most helpful. Before measuring, think about where the skirt
should hang. Will it sit at the natural waist or lower on the hips? Wrap the tape measure around
the body at the position where you want the top edge of the skirt’s waistband to hit and take
the reading.
After you’ve determined the position of the skirt’s waistband, tie a string or length of yarn
loosely around the body at this position. Then, beginning at this line, let the measuring tape
hang straight down. Get a friend to help, or look in a mirror, to determine the hem length
you’d like.
Fit to be sized: Adjusting the fit
After you’ve chosen the proper size for the project you want to crochet (see the section earlier
in this chapter, “Tale of the tape: Taking accurate measurements”), you can think about some
simple adjustments. The length of a garment is generally the easiest to adjust.
26
PART 1 Reinforcing Your Crochet Foundation
Sweaters and vests
Whether you’re crocheting a top for an adult or a child, taking a few additional measurements
can help you adjust the length of the pattern.
»» For a waist-length garment, take the measurement from the top of the model’s shoulder
down to the place where the model’s pants sit.
»» For a hip-length garment, measure past the top of the pants by 2 or 3 inches.
»» For a tunic length, your measurement will be even longer, up to mid-thigh.
Now, compare the measurement for the length you want to the finished length listed in the
pattern. If the jacket you like has a finished length of 20 inches for your size, but you’d like it to
be more of a coat length, your desired finished measurement may be 24 or 26 inches.
If you want to add additional length, do it before any necessary waist shaping; otherwise, do it
any time after the hem.
If the sweater you want to crochet isn’t sized large (or small) enough in the chest, it’s generally
too difficult to rewrite the pattern to allow for the change in width, unless you’d like to take
on a big project. Instead, consider using a thicker (or thinner) yarn for slight adjustments. Or
search for another pattern.
Hats
The easiest adjustment to make to a hat pattern is to alter the length of the hat. Want a hat with
a fold-up brim? Increase the length by enough inches to compensate for the fold. How about
adding a flared brim? If the hat is worked from the top down, add some increases a few rows
before finishing, and you’ll have a floppy, ruffled edge.
Skirts
If you want to change the length of a skirt, consider its shape. For a skirt with little or no
shaping, like a straight pencil skirt, you can shorten or lengthen at any point between the hem
and the waist.
For skirts with more shaping, such as flouncy or A-line shapes, think about where you want
the length to be altered. Adding length at the widest portion will make the skirt seem fuller all
around, while removing length here will make it slimmer. Making adjustments to the slimmer
portion of the skirt will have the opposite effect. You may choose to add (or subtract) a little
length in both places to keep the look proportional.
Picking the Right Pattern Size
The following charts will help when determining which pattern size is correct (see Tables 2-1,
2-2, 2-3, 2-4, and 2-5). Take your measurements, or those for whom the sweater will be made,
and choose the size in the pattern you’re making that corresponds the best. Don’t worry if
your numbers don’t match the pattern exactly — a half inch or an inch here and there won’t
make a huge difference, but if in doubt, go to the next larger size. Decide how much ease you’d
like in the sweater (see the “Tale of the tape: Taking accurate measurements” section earlier
in the chapter), then pick the size that comes closest to that measurement. If you can’t take
CHAPTER 2 Gauge and Garments: Sizing Facts and Figures
27
measurements of the person for whom the sweater is being made, the charts in this section
should help you determine which size should fit best.
If you’re wondering where the chart is for skirt sizes, I’m sorry to say you won’t find one. In
the crochet world, skirt sizes haven’t been standardized because the fit depends on whether
the skirt is meant to hang from your hips or your waist. The Craft Yarn Council, the group that
works on standardizing measurements, hasn’t provided a chart for skirt sizing yet.
Even though this book doesn’t include patterns for babies or children, the size charts for these
folks are still useful to have. You never know when you’ll need to crochet a garment for someone in this group.
The last thing to keep in mind is that patterns are far from standardized. The measurements
in the following charts have been in use for many years, and are pretty accurate, but always
check each pattern individually. Don’t assume the measurements given will match the numbers below.
Table 2-1
Baby Size Chart
Baby’s Size
3 Months
6 Months
12 Months
18 Months
24 Months
Chest (in.)
16
17
18
19
20
Center Back Neck-to-Cuff
10½
11½
12½
14
18
Back Waist Length
6
7
7½
8
8½
Cross Back (Shoulder
to Shoulder)
7¼
7¾
8¼
8½
8¾
Sleeve Length to Underarm
6
6½
7½
8
8½
Table 2-2
Child Size Chart
Child’s Size
2
4
6
8
10
12
14
16
Chest (in.)
21
23
25
26½
28
30
31½
32½
Center Back Neck-to-Cuff
18
19½
20½
22
24
26
27
28
Back Waist Length
8½
9½
10½
12½
14
15
15½
16
Cross Back (Shoulder
to Shoulder)
9¼
9¾
10¼
10¾
11¼
12
12¼
13
Sleeve Length to Underarm
8½
10½
11½
12½
13½
15
16
16½
Table 2-3
Woman Size Chart
Woman’s
Size
X-Small Small
Medium Large
1X
2X
3X
4X
5X
Bust (in.)
28–30
32–34
36–38
44–46
48–50
52–54
56–58
60–62
Center Back
Neck-to-Cuff
27–27½
28–28½ 29–29½
30–30½ 31–31½ 31½–32
32½–33
32½–33 33–33½
Back
Waist Length
16½
17
17½
Cross Back
(Shoulder
to Shoulder)
14–14½
Sleeve Length 16½
to Underarm
28
17¼
40–42
17¾
18
18
18½
18½
14½–15 16–16½
17–17½ 17½
18
18
18½
18½
17
17½
18
18
18½
18½
17
PART 1 Reinforcing Your Crochet Foundation
17½
Table 2-4
Man Size Chart
Man’s Size
Small
Medium
Large
X-Large
XX-Large
Chest (in.)
34–36
38–40
42–44
46–48
50–52
Center Back Neck-to-Cuff
32–32½
33–33½
34–34½
35–35½
36–36½
Back Hip Length
25–25½
26½–26¾
27–27¼
27½–27¾
28–28½
Cross Back (Shoulder to Shoulder)
15½–16
16½–17
17½–18
18–18½
18½–19
Sleeve Length to Underarm
18
18½
19½
20
20½
Table 2-5
Circumference (in.)
Head Circumference Chart
Preemie
Baby
Toddler
Child
Woman
Man
12
14
16
18
20
22
CHAPTER 2 Gauge and Garments: Sizing Facts and Figures
29
IN THIS CHAPTER
»» Brushing up on abbreviations
»» Rehashing repeats: Bullets,
brackets, and parentheses
»» Deciphering stitch diagrams
3
Sum and Substance:
Reading a Pattern
Chapter
B
esides knowing how to make the stitches, the most important aspect of crocheting is
being able to read a pattern. At first glance, patterns may appear to be nothing more
than a lot of gibberish, but that’s simply not so. If you think about all the stitches that
go into a project, be it large or small, and realize that each stitch has to be written out in some
form or another, you realize why creating an abbreviated language was necessary. Imagine the
length of a crochet pattern if each stitch had to be written out — you’d have what amounts to
an epic novel for each one.
In an effort to keep instructions relatively short and uncluttered, crochet patterns and diagrams are created using abbreviations and symbols. The language has developed over the years
and is relatively simple and mostly common sense. The more patterns that you read, the easier it becomes to recognize each abbreviation and symbol. Pretty soon it’ll become just like a
second language, and you won’t have to put much thought into it at all.
Interpreting the Written Instructions
A crochet pattern is more than just a set of abbreviations and symbols. In addition to line-byline directions, it includes everything you need to know to replicate the item as pictured. From
yarn quantities to hook sizes to any additional notes about the pattern construction, you’ll find
it all in a well-written crochet pattern.
Always read the section at the very beginning of the pattern. This is where you find all
the crucial information you need before you get started: yarn, hook size, gauge, garment sizes
(if applicable), and any special stitches used in the pattern. Be sure to pay attention to special
stitches because they vary from pattern to pattern and practice any that you’re unfamiliar with.
(For hints on making a practice swatch, flip to Chapter 2.)
CHAPTER 3 Sum and Substance: Reading a Pattern
31
Always read through the pattern instructions before you get started. If you come across any
instructions that seem confusing or that you don’t quite understand, read through the pattern
again. Eventually, it’ll make sense, or you can ask someone to explain it to you. It’s better to figure
out complicated instructions before you get started than to have to rip out work that’s not right.
Understanding the abbreviations
When it comes to the written instructions, it’s clearer and more efficient to use a series of standardized abbreviations. For instance, instead of writing out single crochet stitch each time it’s
used in a pattern, the instruction will just say sc. You’ll notice that there are generally no periods after an abbreviation, unless it comes at the end of a sentence. This keeps the instructions
from getting too cluttered. But when it comes to in (inches), I put a period after it to designate
the abbreviation for inches (in.), so you don’t think I mean the word in.
Table 3-1 lists the most commonly used abbreviations (you can also find these abbreviations on
the Cheat Sheet). Although the list is by no means all-inclusive, all of the abbreviations in the
patterns found in this book are contained in the list. So if you get stuck while working one of
the patterns, flip to this table for a memory boost.
Table 3-1
32
Common Crochet Abbreviations
Abbreviation
Spelled-Out Term
approx
approximately
beg
begin(ning)
bet
between
blp
back loop only
BP
back post
CC
contrasting color
ch
chain
dc
double crochet
dec
decrease(s)(d)(ing)
dtr
double triple crochet
flp
front loop only
foll
follow(ing)
FP
front post
hdc
half double crochet
inc
increase(s)(d)(ing)
MC
main color
pat
pattern
rem
remaining
rep
repeat
rib
ribbing
RS
right side
sc
single crochet
sl st
slip stitch
st(s)
stitch(es)
tog
together
tr
triple crochet
WS
wrong side
yo
yarn over
PART 1 Reinforcing Your Crochet Foundation
Taking note of common terms
In addition to stitch abbreviations, other phrases that you’ll frequently run across refer to
where to work stitches or how to proceed with the pattern without having to actually write out
each and every stitch, row, or round. The following list contains some commonly used terms:
»» Space: A space usually refers to the space that’s created by 1 or 2 chain stitches worked
between other stitches. To work in a ch-space, insert your hook into the space underneath
the chain stitches and complete the specified stitch.
»» Loop: A loop is 3 or more chain stitches worked in a row. Ch-loops are quite often seen in
lacy patterns and threadwork. To work in a ch-loop, insert your hook underneath the loop
and not into any particular chain stitch.
»» Work across: Crochet the designated stitches across the whole length of the row.
»» Work around: Crochet the same stitch or pattern repeatedly until you come back to where
you started.
»» Work to within last st: Crochet following the pattern until you have one stitch left in the
row or round. The instructions will tell you what to do with this last stitch. You may also see
this for 2, 3, or more stitches at the end of a row or round.
»» Established pat: This phrase is most often seen when crocheting garments. The stitch pat-
tern will be written out in the first few lines of the instruction, then, rather than keep writing
out the same thing over and over, you’ll be told to work in established pat, which means to
repeat the stitch pattern over and over until the instructions tell you to do something else.
»» Work even: This means to continue crocheting on the same number of stitches that you
currently have on your work without making any increases or decreases.
Deciphering the symbols
When you read a crochet pattern, you’ll notice some punctuation and symbols that you don’t
encounter very often in everyday reading. Bullets, brackets, and parentheses appear all over the
place in written instructions, and each one has its own meaning (or in some cases, more than
one meaning). You must be able to interpret these symbols correctly or you may be in for a big
surprise when you get to the end of your design.
Whether working in rounds or rows, punctuation serves the same purpose.
Bouncing bullets
Because crochet patterns tend to have repeating sets of stitches that you work across an entire
row or round, it makes sense to write them only once, then instruct you to repeat them a given
number of times. Several different symbols are used to denote the repeats, such as bullets (•),
asterisks (*), plus signs (+), and crosses (†). Bullets and asterisks are the most common, and
throughout this book, I use bullets in the patterns.
SINGLE BULLETS
Bullets are used basically two different ways:
»» To enclose an entire phrase, with a bullet at each end
»» At the beginning of a phrase, with repeat instructions immediately following
CHAPTER 3 Sum and Substance: Reading a Pattern
33
Either way is correct; it really just depends on the preference of the publication.
For a repeat that has only one bullet, you’ll see something like this:
• Sc in next st, ch 1, skip next st, rep from • 4 times.
In plain English, this means to work the stitches after the bullet once, then repeat those same
stitches 4 more times for a total of 5 times.
If you see a phrase that has bullets at both ends, enclosing the entire phrase, it may look like
this:
Ch 3, • dc in each of next 2 sts, ch 2, skip next 2 sts •, rep from • to • twice, dc in each of
next 5 sts, ch 2, skip next 2 sts, rep from • to • 3 times, dc in last 3 sts.
In this case, you would work the stitches between the bullets 3 times, then work the stitches
immediately following the phrase, then work the stitches between the bullets another 3 times,
then finish out the rest of the instructions.
Bullets are nice because they can be referred to more than once within a row without having
to rewrite the stitches. You won’t find, however, a phrase between bullets referenced within
another row. Each row or round has its own separate set of instructions.
DOUBLE BULLETS
Once in a while, you’ll come across double bullets (••) enclosing a phrase. These can be used
in one of two ways:
»» To note a second section to be repeated in any line of instructions
»» To note a group of instructions, including at least one single-bullet repeat, that will be
repeated
In general, double bullets denote a second section of instructions to repeat when there’s already
a single-bulleted section in the same row or round. When a particular row or round has two sets
of instructions that need repeating, you’ll see a set of stitches enclosed in single bullets first,
then a section later on enclosed by a set of double bullets. For example:
Dc in each of next 2 sts, ch 2, skip next 2 sts •, rep from • to • twice, •• dc in each of
next 3 sts, ch 2, skip next 2 sts ••, rep from •• to •• twice, dc in each of last 2 sts.
Simply put, you would work the stitches between the single bullets for a total of 3 times, then
work the stitches between the double bullets, which are different than the phrase between the
single bullets, a total of 3 times, then complete the rest of the row.
When a set of instructions enclosed in single bullets is part of a larger repeat, you’ll find double
bullets at either end of the larger repeat. For example:
•• 5 dc in loop, ch 2, skip next 2 dc, • dc in next dc, ch 2, skip next 2 dc •, rep from • to
• 5 times ••, rep from •• to •• 3 times.
In other words, you work the •• to •• phrase a total of 4 times, but within that phrase is
another • to • phrase that you work a total of 6 times within each •• to •• repeat.
34
PART 1 Reinforcing Your Crochet Foundation
Playing with parentheses
Parentheses are another way to denote repeats within an instruction; however, their role is
slightly different than that of bullets. Here’s a list of the parentheses’ purpose:
»» To isolate a set of stitches that are worked all in 1 stitch:
(dc, ch 1, dc) in next sc
This means that in the next single crochet stitch, you work 1 double crochet, chain 1, then
another double crochet in the same single crochet.
»» To enclose a set of stitches that you repeat a number of times in succession, in the
same way that single or double bullets would be used:
(3 dc in next st, ch 1, skip next st, sc in next st, ch 1, skip next st) 4 times
Simply put, this means that you work 3 double crochet in the next stitch, chain 1, skip the
next stitch, single crochet in the next stitch, chain 1, skip the next stitch, then repeat the
stitches within the parentheses 3 more times for a total of 4 times.
»» To sum up a completed row or round. At the end of a row or round, you’ll see a number
enclosed in parentheses that tells you how many stitches you should have (25 dc). Or, it
could say (15 shells) or (6 ch-5 loops). These numbers help keep you on track so you know if
you’ve made the correct number of stitches called for in the instructions.
»» To distinguish different sizes in garment patterns. Most garment patterns are written in
a variety of sizes to accommodate all of our different sizes. In order to distinguish the number of stitches needed for the different sizes, you’ll see something like this:
Sc in each of next 24 (26, 28, 30) sts
Now, the pattern will tell you at the beginning which sizes are which, but for the sake of this
example, if you were making a size Small you’d work 24 single crochet stitches, a size
Medium you’d work 26 single crochet stitches, a Large 28 single crochet stitches, and an
X-Large 30 single crochet stitches.
To avoid confusion as you work, it’s helpful to highlight, circle, or underline the numbers
that pertain to your size throughout the pattern.
Embracing brackets
Brackets are used in similar fashion to parentheses, usually in conjunction with them. Sometimes they are used interchangeably, but other times they are used like this:
»» As a set or phrase within another phrase:
(2 dc in center ring, [ch 3, sl st in 3rd ch from hook]) 3 times, 2 dc in center ring, sl st in
first dc to join.
In plain English, this means you would work 2 double crochet stitches in the center ring,
chain 3, then slip stitch in the 3rd chain from your hook, a total of 3 times, then work
another 2 double crochet in the center ring before working a slip stitch to the beginning
double crochet to join the stitches into a round.
»» To sum up the number of stitches at the end of a row for different sizes:
(85 [90, 95] sts)
For a size Small you’d have 85 stitches at the end of the row, 90 stitches for size Medium,
and 95 stitches for size Large.
CHAPTER 3 Sum and Substance: Reading a Pattern
35
Rows and rounds repeated
The other type of repeat that you’re likely to come across is one that instructs you to repeat
several identical rows or rounds in succession. You may see something like this:
Rows 2–10: Ch 1, sc in each sc across, turn.
This means that you chain 1, single crochet in each single crochet across, then turn at the end
of the row consecutively for 9 rows.
Sometimes the pattern will instruct you to repeat a number of rows, like this:
Row 2: Ch 1, sc in each st across, turn.
Row 3: Ch 2, hdc in each sc across, turn.
Row 4: Ch 3, dc in each hdc across, turn.
Rows 5–13: Rep Rows 2–4 (3 times).
For this type of repeat, you work Row 2 through Row 4 as written, then go back and repeat them
consecutively 3 more times for a total of 9 more rows.
Decoding the Diagram
Stitch diagrams are a wonderful tool to use in addition to written instructions. They portray a
picture of the design, which is especially helpful with more intricate patterns. They lay out each
individual stitch in relation to the others so you can see what the design is supposed to look like
when you’re finished. Additionally, if you happen to see a pattern in a foreign publication that
has a stitch diagram, you can still make the item without hiring a translator.
The stitch symbols that are used to make up these stitch diagrams are called International Crochet Symbols. These symbols aren’t quite standardized yet, and you’ll most likely find slight
variations from publication to publication, but they’ll be close enough that you’ll recognize
them. Figure 3-1, as well as the Cheat Sheet, includes a list of the symbols for the most common
crochet stitches and stitch combinations. Keep this list handy as you crochet.
Keep these basics in mind when crocheting from a stitch diagram:
»» Each row or round is numbered so you know where to begin.
• When working in rows, the right-side row number appears on the right-hand side of the
diagram, which means you work from right to left. The wrong-side number is placed on
the left-hand side of the diagram, and you work following the diagram from left to right.
•
When working in rounds, the number that appears in the center of the center ring indicates the number of chain stitches used to form the ring. Each subsequent round is then
numbered at the beginning of each round.
»» Because of the repetitive nature of crochet instructions and the space limitation of most
publications, a stitch diagram may show only a repeated set of stitches a few times, but that
will be all you need to crochet the entire piece.
»» When working in rounds, work counterclockwise without turning between rounds unless
the written instructions specifically tell you to.
36
PART 1 Reinforcing Your Crochet Foundation
FIGURE 3-1:
International
Crochet
Symbols.
»» Crochet is three-dimensional, while stitch diagrams are not. You may see some distortion of
the stitches in the diagram that won’t be there in the actual crocheted piece. Always check
out the written instructions before working exclusively from a diagram.
Figure 3-2 is an actual stitch diagram for a pillowcase edging that appears in Chapter 14.
Because the stitch pattern is repetitive, only a small portion of the pattern is represented. This
is commonly called a reduced sample of the pattern. It includes at least one repeat, plus any
edge stitches so you can see how they join together. When working your actual piece, you start
out with the specified number of chain stitches for your foundation chain, then repeat the pattern across. Notice how the right-side row is numbered on the right-hand side of the diagram
and the wrong-side row is numbered on the left-hand side.
FIGURE 3-2:
Reduced
sample of
pillowcase
edging design
as found in
Chapter 14.
CHAPTER 3 Sum and Substance: Reading a Pattern
37
IN THIS CHAPTER
»» Reviewing basic crochet stitches
»» Stitching creative combinations
»» Switching to a new color or skein
of yarn
»» Shaping your design by increasing
or decreasing stitches
»» Working in circles to crochet round
designs
4
Brushing Up on
Stitch Basics
Chapter
T
his chapter is all about action — the stitches and stitch combinations, how to add a new
ball of yarn, changing colors, increasing and decreasing your stitches, and working in
circles. You need to know how to do all of these things because they’re what make crochet interesting.
In this chapter, you find descriptions of stitches and their relationship to each other. I give you
a detailed explanation about how to add a new ball of yarn, whether it’s the same color or a new
one, and how to do it without color drag. When you want to shape your work, you need to know
all about increasing and decreasing your stitches, whether you’re working in rows or rounds,
and that how-to is here, too. So skim through these pages and refresh your memory. Then you
can jump into your first pattern.
Keeping You in Stitches
As I’m sure you know, crocheting is nothing more than a series of loops made with a hook and
yarn. You can work those loops back and forth, back and forth across the rows, or around and
around in circles. Appendix A goes into great detail on how to create each of these stitches,
but the following sections should give you a memory boost about the relationship between the
stitches and how they can be combined to create new stitches.
CHAPTER 4 Brushing Up on Stitch Basics
39
Refreshing the fundamentals
Even the most complex crochet stitch patterns do nothing more than build upon these basic
stitches. When you’re comfortable with these stitches, you’ll run into few unfamiliar techniques down the road.
»» Slip stitch: This is the flattest of all stitches and is quite utilitarian. Besides being used as a
regular stitch, the slip stitch is also used to join rounds, travel (when you need to get from
point A to point B without fastening off your yarn), sew seams, and create combination
stitches.
»» Single crochet stitch: This is probably the most commonly used stitch and is the basis for
all other crochet stitches. The single crochet stitch is short and compact and works just as
well with a smooth yarn as with the new, textured fashion yarns.
»» Half double crochet stitch: This stitch is a little bit fatter and a little bit taller than a single
crochet stitch. It creates a nice, dense fabric without being too stiff. When working a half
double crochet stitch, you start out like a double crochet stitch and end like a single crochet
stitch.
»» Double crochet stitch: This is another really popular stitch and is used quite often alone
and in combinations to create other patterned and textured stitches. The double crochet
stitch is slightly taller than the half double crochet stitch and creates a fairly loose fabric.
»» Triple crochet stitch: This one builds on the double crochet stitch, and again, is just a bit
taller. When worked in rows, the triple crochet stitch creates a loose, airy fabric and is often
used in combination with other stitches to crochet lace-like patterns.
»» Double triple crochet stitch: This is most likely the tallest stitch you’ll see on a fairly
regular basis. It is taller than the triple crochet and is most used in threadwork to create
lace patterns.
All of the stitches listed above are about the same width, with the exception of the half double
crochet, which has the distinction of being fat. The big difference between the rest of them is
the height. You need to know how tall a stitch is so you know how long to make your turning
chain. When you get to the end of a row or round, you have to bring your work to the next level,
and this means working a turning chain. Figure 4-1 shows you how many chains to make as
well as the height relationship between each stitch. Table 4-1 tells you how many chains are
needed for these frequently used stitches.
FIGURE 4-1:
Because
stitches are
different
heights, your
turning chain
has to be
different
lengths.
40
PART 1 Reinforcing Your Crochet Foundation
Table 4-1
How Many Chain Stitches Make a Turning Chain?
Stitch Name
Number of Turning Chains Needed
Slip stitch (sl st)
0
Single crochet (sc)
1
Half double crochet (hdc)
2
Double crochet (dc)
3
Triple crochet (tr)
4
Double triple crochet (dtr)
5
When you start the next row or round, you have to bring your work up to the correct height
of the stitch you’ll be working next. Many patterns will tell you how many chains to make for
the turning chain, but some don’t. If the row starts out with a double crochet (dc), be sure to
chain 3 instead of working an actual double crochet stitch.
In addition to bringing the hook to the proper height before working the next row or round,
sometimes the turning chain counts for an actual stitch. In patterns, you may see this written as, “Ch 3 (counts as 1 dc), dc in next and foll 3 sts . . .” If a turning chain stands in for a
“normal” stitch, you can expect to work the final stitch of the next row into that turning chain.
When working in single crochet, the chain 1 is never used in place of a stitch; it simply isn’t big
enough to work into later on. Throughout this book, every turning chain larger than a chain 1
counts as a stitch.
Constructing combinations
One of the things that I absolutely love about crochet is that you can take the simplest stitches
and create wonderful patterns and textures without having to learn new techniques. Pattern
and texture stitches come in all shapes and sizes. The toughest part about stitch combinations
is deciding where to place your hook and how to many yarn overs you need.
If a pattern includes a special stitch, it’ll give you the instructions on how to make that stitch at
the beginning of the pattern. However, you’ll see certain stitches on a fairly regular basis. The
list below names a few, and Appendix A gives you step-by-step instructions for each of them.
Although this list is by no means all-inclusive, these stitches give you a good base for creating
pattern and texture:
»» Shell stitch: This is typically made by crocheting anywhere from three to five double crochet stitches all in the same stitch. The resulting pattern looks like a seashell.
»» V-stitch: Like the name suggests, this stitch looks like a V. It’s usually made by crocheting a
double crochet stitch, chain 1, double crochet stitch all in the same stitch.
»» Crossed double crochet stitch: This one looks like an X when it’s complete. The double
crochet stitches are worked on an angle, where you skip a stitch for the first double crochet,
then work backward into the skipped stitch for the second double crochet.
»» Picot: These are most often used on edgings. They are pretty little round-shaped stitches
that add a decorative touch or fill an empty space. Picot stitches are almost always made by
crocheting three chain stitches and then a slip stitch into the third chain from the hook.
»» Cluster: The opposite of the shell stitch, the cluster looks like a triangle. It’s formed by
working a number of stitches across an equal number of stitches and joining them together
across the top. It’s similar to a decrease. Any of the basic stitches can be used to make a
cluster, although it’s most common to use half double crochet, double crochet, and triple
crochet.
CHAPTER 4 Brushing Up on Stitch Basics
41
»» Reverse single crochet: Just as the name suggests, this is a single crochet stitch, but
instead of working it from right to left, you work it from left to right creating a decorative
twisted rounded edge.
»» Puff stitch: As the name suggests, this stitch puffs up into a gently formed oval. It’s created
by crocheting several half-closed stitches all in the same stitch, then joining them together
at the top. Although you can use most of the basic stitches to make a puff stitch, you get the
best results from the taller stitches, such as double crochet and triple crochet.
»» Bobble: The bobble creates a similar look to the puff stitch, but instead of working actual
stitches, you use a series of loops to make it stand out.
»» Popcorn stitch: This one really pops! It’s a nicely rounded oval that stands out from the fabric, and you can make it “pop” to the front or the back of the fabric. It takes a bit more time
but is well worth the effort. As with puff stitches and clusters, the taller stitches make more
of an impact.
In most patterns, you won’t use these stitches across every stitch and every row. Textured
stitches, such as the bobble and the popcorn stitch, need a plain background for contrast. In
other cases, because the stitch either increases or decreases the total number of stitches, you’ll
need to make up that difference elsewhere in the row to keep your rows even. For example, with
a shell stitch, you work multiple stitches in the same stitch. To maintain your rows, you’ll need
to skip a few stitches before working the next shell stitch. With a cluster, the exact opposite
is true. In fact, it’s not uncommon to see stitch patterns made from equal numbers of shell
stitches and clusters.
Change Is Good: Adding New Yarn
At one point or another, you’re going to have to add another skein of yarn. You will simply run
out of the one you’re working with, or you will need to change colors. Don’t be tempted to tie a
little knot between the two skeins and continue to crochet it into the fabric. It may look secure,
but the knot will find its way to the front of your lovely project, and it may even unravel. Take
some time to use the proper technique.
Making the switch at the beginning or
end: It’s all the same
Many patterns call for you to change colors at the beginning of a row. In other cases, you may
get to the end of a row and realize you don’t have enough yarn left in the skein to get a good
start on the next row, so you decide to go ahead and start a new skein. The beginning of one
row or round is the end of the previous one, so we’re pretty much talking about the same spot
here. The following steps walk you through the correct way to join a new color at the beginning
of a row of double crochet:
42
1.
Work the last double crochet stitch of the row to the point where there are 2 loops left
on the hook.
2.
Drop the first yarn color and pick up the second yarn color.
3.
Wrap the end of the second yarn color around the hook as you would during any
double crochet stitch. Be sure to leave at least a 6-inch tail from the new yarn.
PART 1 Reinforcing Your Crochet Foundation
4.
Draw the second yarn color through the 2 loops of the first yarn color that are on your
hook (see Figure 4-2).
If you plan to pick up the first color in a later row, leave the yarn hanging and continue
with the second color.
5.
Tug on the end of the first color to tighten up the stitch.
6.
Continue crocheting across the row or round with the second color.
FIGURE 4-2:
Join yarn at
the end of a
row by drawing
the new
yarn through
2 loops on
your hook.
When you join a new color or skein of yarn and need to hide the end of the old color or skein,
lay the loose end across the tops of the stitches in the previous row and work over it. This will
save you time because you won’t have to weave in the ends when you’re finished.
Midstream changes
At one time or another, you’ll invariably run out of yarn in the middle of a row or round and
have to add a new ball of yarn. Or maybe you’re working a charted pattern that requires color
changes in different places across the row. Either way, you need to be able to effect this change
without making it seem obvious.
If you’re just adding a new ball of the same color, you want to hide the ends and create a
smooth transition without any lumps or bumps. If you’re changing colors altogether, the most
important thing is to prevent color drag. This is when the first color sort of bleeds into the
second color, and you have a two-toned stitch. By changing yarns correctly, you can avoid this,
and your pattern will move along smoothly.
The concept of changing colors midstream is basically the same as when you change colors at
the beginning of a row (see the previous section). To add a new color in the middle of a row
working in double crochet stitches, follow these steps:
1.
Work the last stitch prior to the stitch where you’re going to make the color change
up to the point where there are only 2 loops left on the hook.
2.
Drop the first color yarn to the wrong side of your work and pick up the second color.
3.
Wrap the end of the second color around the hook, getting set to complete the stitch.
4.
Draw the second yarn color through the 2 remaining loops of the first color on your
hook, completing the stitch with the second color (see Figure 4-3a).
5.
Continue to work with the new color (see Figure 4-3b).
CHAPTER 4 Brushing Up on Stitch Basics
43
FIGURE 4-3:
Join new yarn
in the middle
of a row from
the wrong side
of the fabric.
If you’re not going to need the first color yarn again, or at least not for a few more rows, cut the
yarn, leaving a tail several inches long. Draw the tail end through the current stitch and work
over the tail to hide it. You can also weave it in later with a yarn needle if that’s your preference.
Hold on tight! Carrying your yarn
If you’ve done any crocheting at all, you know that one of the most tedious aspects of crochet is
weaving in a million little ends of yarn when you finally complete your design. One technique
crocheters use quite often when working with two or more colors is to carry the yarn as they
go. You can accomplish this through several different methods, each appropriate for particular
projects:
»» Carry the yarn across the wrong side of your work: This is probably the easiest method
when working with several colors, and it’s ideal for items that have a hidden “wrong side,”
such as a sweater, hat, or bag. To do this, simply work over the strand every few stitches,
making sure that the carried strand appears on the wrong side of your work (see Figure 4-4).
If you’re working a vertical stripe pattern and will be switching back and forth between colors frequently, carry the strand all the way across the row. However, if you’re working a
charted pattern and the picture is in the middle of the design, when you’re done using the
color in that row, drop the color to the wrong side and pick it back up on the return trip.
That way you don’t have to lug it with you all the way across.
FIGURE 4-4:
Carrying yarn
on the wrong
side of your
project.
»» Carry the yarn across the right side of your work: There’s really no reason to do this
unless the design specifically calls for it. For instance, if the project includes adding a strand
of tiny mirrors or sparkling sequins to your work, you would carry the strand across the
right side because these are almost impossible to crochet with. You’d carry the yarn the
44
PART 1 Reinforcing Your Crochet Foundation
same way as you would on the wrong side, but with the carried strand visible on the right
side of the work.
»» Working over the strand: This hides the carried strand of yarn completely and is ideal for
reversible items, such as shawls, scarves, and throws. Working over the yarn is similar to
hiding the tail end of your yarn when you fasten off. Lay the unused strand of yarn across
the tops of the stitches in the previous row and work your stitches over it, encasing it completely (see Figure 4-5). When you’re ready to use it again, simply bring it out of hiding.
»» Carrying the yarn up the side of your work: This works great if you’re crocheting a
horizontal stripe pattern that changes colors on even-numbered rows (if it changes on odd
numbers, the color you need will be on the wrong end of the row). For projects with seams
up both sides, any visible strands of yarn will be hidden in the seams. This is also a great
technique when working with scarves or blankets that will have an edging crocheted later
because the edging will hide any stranding.
»» To carry the yarn up the side, follow these steps:
1. Work two rows in the first color of your choice, switching to the second color in
the last stitch of the second row.
2. Work two rows using the second color.
3. Draw up the first color from two rows below, completing the last stitch of the
second row with the first color. Drop the second color to be picked up again
two rows later (see Figure 4-6).
FIGURE 4-5:
You can hide
your carried
yarn by
working over
the strand.
FIGURE 4-6:
Drop the yarn,
then pick it up
two rows later
to carry yarn
up the side of a
project.
CHAPTER 4 Brushing Up on Stitch Basics
45
Don’t pull the side strand too tightly, or you’ll pull the rest of the work with it, and the side
will pucker.
Weave it to the end
At the very end of your project, you can handle any ends of yarn by sewing them into the fabric securely. This is called weaving. You typically weave in ends after any seams or edgings are
completed but before you block the piece. Here’s how to weave an end:
1.
Thread your yarn needle with an end.
2.
Use your needle to weave the yarn through the center of the stitches for at least 2
inches in one direction.
3.
Double back and sew at least 2 inches in the opposite direction.
4.
Snip the tail of the end close to the last woven part, so it’s hidden by the crochet.
When weaving ends, really consider the best place to hide those ends. If you’re working a lacey
and open design, it’s easiest to try to sew all the ends close to the edge of the work. Any additional bulk will become part of the edge and not disrupt the pattern. For solid patterns, it’s
sometimes easiest to sew the ends underneath the stitches on the row above, similar to if you
carried the yarn along the tops of those stitches.
There aren’t any hard and fast rules on the best places to weave ends. Use your judgment,
check both sides of the fabric to ensure ends aren’t showing, and weave in longer lengths than
you feel you need to. Worst-case scenario: If the ends become unwoven someday, you’ll have
enough yarn to sew them in again.
I really urge you to work over yarn ends as you crochet (see the section “Making the switch at
the beginning or end: It’s all the same” earlier in this chapter). Doing so allows you to avoid
spending a lot of time weaving in yarn.
The Ins and Outs of Increasing
and Decreasing Stitches
Crochet just wouldn’t be the same if you couldn’t add some shape to it, and to do this, you
simply add or subtract stitches across the row or around the round. Increasing or decreasing stitches is easy, and there are a few different methods of each. Read on for the specific
how-to’s.
When increasing or decreasing your stitches, always count how many stitches you have when
you’re done. The pattern will specify how many you should have at the end of the row.
Expanding rows by adding stitches
Increasing (adding more stitches to a row than the previous row had) can be done anywhere
across the row or in the round. Depending on the shape you’re trying to achieve, you can
increase at the beginning and end of a row, in the middle, in every stitch across the row or
round, or in even increments. But, regardless of where the increase takes place, it’s always
accomplished by working two or more stitches into a single stitch.
46
PART 1 Reinforcing Your Crochet Foundation
The following steps walk you through a double crochet increase at the beginning of a row:
1.
Chain 3 (turning chain and first dc) (see Figure 4-7a).
2.
Work your next stitch into the first stitch of the row immediately below the turning
chain (see Figure 4-7b).
Typically, because the turning chain counts as the first double crochet, you would skip
this stitch and work into the next stitch.
3.
Crochet across the rest of the row as you normally would, working one stitch into
each stitch across.
FIGURE 4-7:
Increasing
with a double
crochet
stitch at the
beginning
of a row.
To increase any stitch at the beginning of a row, you follow the same steps, adjusting the turning chain accordingly. For a single crochet increase, you would chain 1, then work two complete
single crochet stitches into the first stitch. For a triple crochet, you would chain 4, then work a
triple crochet stitch into the first stitch of the row.
To increase a stitch at the end of the row, simply work two of the same stitches into the last
stitch; to increase somewhere in the middle of a row, simply work two of the same stitches in
the designated stitch of the row. Increasing in a round is a little different. I cover that technique
in the “You’ll Come Around: Crocheting in Circles” section later in this chapter.
Shortening your rows with dwindling numbers
Just as you can add stitches to a row or round, you can subtract, or decrease, the number of
stitches. Decreasing stitches can take place anywhere an increase can: at the beginning and end
of a row, or somewhere in the middle.
Decreasing stitches involves a few more steps than increasing, but it’s still easy. You can do
your decrease in one of two ways:
»» Turning two stitches into one
»» Eliminating stitches altogether
CHAPTER 4 Brushing Up on Stitch Basics
47
When two become one
When you decrease a stitch, you work 1 stitch over 2 stitches in the previous row. It’s a two-step
process in which you do only half the stitch before starting a new stitch in the next stitch, and
completing the decrease there. So you need to be ready to make a decrease before the last stitch
of the row. The following steps show you how to turn two double crochet stitches into one:
1.
Yarn over (yo), and insert your hook into the next stitch.
2.
Yarn over, and draw the yarn through the stitch.
3.
Yarn over, and draw the yarn through the first 2 loops on the hook (see Figure 4-8).
To begin the second half of the decrease, with the 2 loops still on your hook:
FIGURE 4-8:
The first half of
a double
crochet
decrease.
4.
Yarn over and insert your hook into the next stitch (see Figure 4-9).
5.
Yarn over and draw the yarn through the stitch.
6.
Yarn over and draw the yarn through the first 2 loops on the hook (3 loops remain).
7.
Yarn over, and draw the yarn through all 3 loops on the hook (see Figure 4-10a).
FIGURE 4-9:
Beginning the
second part of
a double
crochet
decrease.
One double crochet decrease is now complete (see Figure 4-10b).
To decrease a stitch at the beginning of a row where a turning chain is involved, make the turning chain 1 stitch shorter than is normally called for. For example, a triple crochet stitch has a
turning chain of 4 stitches; when you want to decrease it, chain 3 and then continue across the
row as normal. When you return in the next row, don’t work a stitch into the shortened chain.
48
PART 1 Reinforcing Your Crochet Foundation
FIGURE 4-10:
Finishing a
double crochet
decrease.
Decreasing other stitches is pretty much the same process. You work through the stitches to
the last step, and then join them together by drawing your last yarn over through the remaining loops on your hook. Most patterns give you detailed steps on how the decreases should be
made, so you won’t feel like you’re left in a lurch.
Skipping stitches
The second and easiest way to decrease your stitches is, simply, not to make them. At the
beginning of a row, you slip stitch across the specified number of stitches to the starting point,
make your turning chain, and then proceed across the row. When you’ve worked the indicated number of stitches, you just stop crocheting and leave the specified number of stitches
unworked. You then turn your work around and go back the way you came.
You’ll Come Around: Crocheting in Circles
Round designs are just as much a part of crochet as squares or rectangles. You work the stitches
the same as if you were working in rows; how you begin the pattern dictates what shape it will
become. Working in rounds, as it’s called, has you going in circles instead of back and forth.
The number of stitches increases with each round, usually in standard increments to ensure an
even shape. You keep increasing the number of stitches in rounds until you reach the desired
circumference. At this point, you may be done, as in the case of a doily or motif. But in some
cases, you’ll start working the same number of stitches in each round, as you would when crocheting a hat, or you’ll decrease your stitches to create a ball shape.
Crafting the center ring
To work in rounds, you must have a center ring. You typically make a center ring by crocheting
several chain stitches and then joining them together with a slip stitch to form a circle. Sometimes you’ll start crocheting in the round by working into a single chain stitch, but you won’t
see that as often.
To create a center ring, follow these steps:
1.
Chain 6.
2.
Insert your hook into the first chain stitch made, forming a ring (see Figure 4-11a).
3.
Yarn over (yo).
CHAPTER 4 Brushing Up on Stitch Basics
49
4.
Draw the yarn through the stitch and through the loop on your hook, as shown in
Figure 4-11b. This makes a slip stitch to the beginning of the chain.
FIGURE 4-11:
Creating a
center ring
from a chain.
The number of chain stitches that make up the center ring determines how big the hole will be
and how many stitches you can fit into it. The pattern you’re working will tell you how many
chain stitches to make when creating the center ring.
Making the first round
After the center ring is complete, you can start working stitches into it. This is the first round.
As with rows, you have to make a turning chain to bring your work up to the height of the
stitches you’ll be crocheting. The great thing about working into a center ring is this — you
don’t have to actually work into the chain stitches, just slip your hook through the hole in
the center.
The following steps show you how to work your first round of single crochet stitches:
1.
Chain 1 (turning chain for single crochet), and insert your hook into the center ring
(see Figure 4-12a).
2.
Yarn over (yo), and draw the yarn through the center ring.
3.
Yarn over, and draw the yarn through the 2 loops on your hook (see Figure 4-12b).
Continue working single crochet stitches into the center ring until you can’t fit any more. You’ll
be surprised at how many you can squeeze in there. When working a pattern, though, it will
specify how many stitches to make.
FIGURE 4-12:
Working single
crochet
stitches in the
center ring.
50
PART 1 Reinforcing Your Crochet Foundation
Joining ends
When you’ve crocheted the specified number of stitches into the center ring, it’s time to move
up and on, but you have to somehow bring the stitches together. To do this, you once again
bring into play that invaluable little stitch, the slip stitch. Insert your hook into the top of the
first stitch you made in the round and work a slip stitch (see Figure 4-13). This joins the round,
and you’re ready to move on to the next one.
FIGURE 4-13:
Joining a
single crochet
round with a
slip stitch.
Branching out
After joining the round, you need to chain the required number of turning chains for the next
stitch, and then proceed with the instructions provided. To make sure the piece gets larger
while staying flat, increases are typically worked in a regular sequence, based more or less on
the number of stitches in the first round. Table 4-2 shows this increase pattern. For example, if
you start with 8 stitches, each subsequent round needs to increase by 8 stitches so it stays flat
and doesn’t ruffle at the edges. However, be sure to read the instructions: Don’t assume you’ll
always increase based on the number of stitches in the first round.
Table 4-2
Increasing Stitches in Rounds
Round Number
Number of Stitches
Rnd 1
6
8
How to Work the Increase in Round
12
N/A
Rnd 2
12
16
24
Inc 1 stitch in each stitch around
Rnd 3
18
24
36
Inc 1 stitch in every other stitch around
Rnd 4
24
32
48
Inc 1 stitch in every 3rd stitch around
Rnd 5
30
40
60
Inc 1 stitch in every 4th stitch around
Rnd 6
36
48
72
Inc 1 stitch in every 5th stitch around
Most times you won’t turn your piece after completing each round as you do with rows. Not
turning your work gives it a definite front and back. If you want a piece that’s reversible, turn
your work after each round. The instructions in the pattern you’re working will tell you how
and where to do this.
Just keep going: Spirals
Not all rounds are joined when you reach the end, and this method is called working in a
spiral. You work in a spiral when you don’t want to have a visible seam anywhere, usually with
three-dimensional designs such as hats, bags, and toys. If you’ve mastered the single crochet
stitch and nothing more complicated, you can crochet in a spiral because spirals typically use
only the single crochet stitch. Taller stitches worked in this fashion tend to look uneven and
out of shape.
CHAPTER 4 Brushing Up on Stitch Basics
51
To work a spiral, instead of joining the round when you get to the end, you simply work into the
next stitch, which is the first stitch of the last round. Because the last stitch of the last round
worked in a spiral will be raised, you have to join it to the previous round to smooth out the
edge. Slip stitch into the first stitch of the previous round and fasten off.
Use a stitch marker and always mark the first stitch of each round. You’d be amazed at how
easy it is to lose track of where you are and how many stitches you’ve worked. It’s always a
shame to have to tear out your work.
Creating shapes
To make a round shape get bigger, you keep adding stitches. To shape it, you can either stop
increasing and/or decrease your stitches. Many items such as hats, bags, socks, and mittens,
start out by crocheting rounds. You shape them by changing the number of stitches.
To make a hat, you start out by increasing rounds until you reach the desired circumference,
then you stop adding stitches and work even on the number of stitches that you already have.
This causes the flat round piece that you have to curve upward, and there you have it — a new
shape.
If you need to decrease your stitches, you work them the same way as you do when working in
rows (see the “Shortening your rows with dwindling numbers” section earlier in this chapter).
The instructions in the pattern will tell you where to make the decreases. They’re typically
made in a regular sequence the same as increases are.
52
PART 1 Reinforcing Your Crochet Foundation
2
Hook, Yarn, Action!
Crocheting Simple
Projects
IN THIS PART . . .
Creating simple projects from potholders to afghans
Incorporating shape with projects like shawls and table
runners
Making projects in the round, such as skirts, bags,
and hats
Figuring out how to switch colors seamlessly
Adding drama to scarves, belts, and hats
IN THIS CHAPTER
»» Getting started with a set of
practical potholders
»» Creating the ever-popular
headband
»» Setting the scene with a bold and
fluffy scarf
»» Working up a wooly afghan
5
Working in the
First Dimension
Chapter
R
eady, set, go! I designed the projects in this chapter to get your fingers moving. There’s
nothing quite like the satisfaction you feel when you complete a project, and you can
crochet all these projects relatively quickly.
The first three designs are made using mainly two stitches — the chain stitch and the single
crochet — with the occasional slip stitch thrown in, but as you’ll see, the results are very different. The last pattern uses most of the basic stitches — the chain stitch, single crochet, half
double crochet, double crochet, and triple crochet — combined to create a simple, attractive
pattern.
Whether you decide to make just one of these projects or you want to tackle all of them, you’ll
find that even with the most basic of stitches you can create fabulous designs.
Practical Potholders
You can never have too many potholders. Worked in 100% cotton, they’re easy to care for (just
throw them in the washer and dryer), and the generous size and tight single crochet stitch pattern (see Figure 5-1) provides protection for your hands.
Although I provide yarn information for three different colored potholders, feel free to make
just one or as many as you need. Potholders also make wonderful housewarming or hostess
gifts, and the yarn is available in dozens of colors to match any décor.
CHAPTER 5 Working in the First Dimension
55
FIGURE 5-1:
You’ll reach for
these handy
potholders
over and over.
Materials and vital statistics
»» Yarn: Lily “Sugar’n Cream” 4-ply worsted-weight yarn (100% cotton), Article #102001 for
solids; Article #102002 for ombres (2.5 oz. [70 g], 120 yds [109 m] each ball for solids;
2 oz. [56 g], 95 yds [86 m] each ball for ombres): 1 ball each of
•
•
•
#18083 Cornflower
#18015 Wine
#19178 Potpourri Print
Each ball makes several potholders.
»» Hook: Crochet hook size I-9 U.S. or size needed to obtain gauge (refer to Chapter 2 for more
information on gauge)
»» Measurements: 7¼ in. wide x 7¼ in. long
»» Gauge: 11 sts and 13 rows sc = 3 in.
»» Stitches used: Chain stitch (ch), slip stitch (sl st), single crochet (sc)
This is a great project to check for uniformity of stitches. The smooth yarn and simple pattern
make it easy to see your stitches and ensure that you’re working them evenly.
Directions
Foundation chain: Ch 26.
Row 1 (right side): Sc in 2nd ch from hook, sc in each ch across (25 sc), turn.
Rows 2–29: Ch 1, sc in each sc across (25 sc), turn.
Row 30: Ch 1, sc in each sc across (25 sc), do not turn.
56
PART 2 Hook, Yarn, Action! Crocheting Simple Projects
Edging: Working across side edge of potholder, work 1 sc in each row-end st across to next
corner, work 3 sc in corner st, sc in each ch across opposite side of foundation chain to next
corner, work 3 sc in corner st, working across next side edge, work 1 sc in each row-end st
across to next corner.
Finishing: To make the hanging loop, ch 10, sl st in next sc to join, forming a loop. Fasten off.
Variation: Doubling the thickness
If you’d like to make a heavier-weight potholder, make two potholders, omitting the edging.
When both are complete, put the wrong sides together, matching stitches, and crochet the edging through the double thickness of both potholders.
Variation: Pumping up the size
To make a larger potholder, increase the number of chain stitches in the foundation row until it
reaches the desired width. Then increase the numbers of rows worked accordingly so the potholder forms a square.
Handy Headbands
Whether you’re young, old, or somewhere in between, and whether you wear your hair long
or short, invariably you find yourself rooting through the drawers for a headband at one time
or another. These days, they’re a popular fashion accessory, but they’re also great for keeping your hair out of your face when you’re working out or cleaning the house. Crocheted using
single crochet stitches, the resulting fabric is slightly stretchy, which allows for a little “head
room” (see Figure 5-2).
FIGURE 5-2:
You can create
headbands in
different colors
and textures.
CHAPTER 5 Working in the First Dimension
57
The yarn information provided in the “Materials and vital statistics” section showcases three
different types of yarn — “Trellis,” “Incredible,” and “Microspun” — with one ball or skein
having enough yarn to make several headbands. After your family and friends see them, you’re
sure to get requests for more.
Materials and vital statistics
»» Yarn:
• Lion Brand Yarn “Trellis” bulky-weight ribbon yarn (100% nylon), Article #500
(1.75 oz. [50 g], 115 yds [105 m] each ball): 1 ball of #302 Ocean
•
Lion Brand Yarn “Incredible” bulky-weight ribbon yarn (100% nylon), Article #520
(1.75 oz. [50g], 110 yds [100 m] each ball): 1 ball of #205 Carnival
•
Lion Brand Yarn “Microspun” sport-weight yarn (100% microfiber acrylic), Article #910
(2.5 oz. [70 g], 168 yds [154 m] each skein): 1 skein of #109 Royal Blue
Each ball makes several headbands.
»» Hook: Crochet hook size H-8 U.S. or size needed to obtain gauge (refer to Chapter 2 for
more information on gauge)
»» Tapestry needle
»» Measurements: 1¾ in. wide x 18 in. in circumference
»» Gauge: 5 sts and 5 rows sc = 1 in.
»» Stitches used: Chain stitch (ch), single crochet (sc)
This pattern uses only two stitches to create the design. You crochet a short foundation chain,
then work rows of single crochet stitches until the piece reaches the specified length. Sew the
ends together when you’re done crocheting, and you’ve got a great accessory.
Directions
The yarns “Trellis” and “Incredible” are part of the hot new family of fashion yarns. When
crocheting with them, you may have difficulty at first because of the texture, but don’t give up.
Take your time, and you’ll soon get used to their look and feel. If you’re a little uncomfortable
with the textured yarns, start out with the “Microspun” and then pick up the others and give
it a whirl.
Foundation chain: Ch 9.
Row 1 (right side): Sc in 2nd ch from hook, sc in each ch across (8 sc), turn.
Row 2: Ch 1, sc in each sc across (8 sc), turn.
Repeat Row 2 until headband measures 18 in. or fits the circumference of your head (or the
recipient’s head if you’re giving it to someone else). Fasten off, leaving a sewing length of
about 10 in.
Finishing: With the right sides of the headband facing, line up the stitches across from each
other, and using the whipstitch (see Appendix A for directions on this stitch), sew the last row
to the foundation chain by using the tapestry needle and sewing length.
58
PART 2 Hook, Yarn, Action! Crocheting Simple Projects
A Smart Scarf
This scarf really pops — and no one will believe how simple it is to make! Crocheted with
loosely worked single crochet stitches (see Figure 5-3), the pattern is revealed as the yarn rolls
out. With the onslaught of new yarns available, creating spectacular-looking designs without
having to be an expert is easier than ever, as this project shows. Grab your hook and yarn and
jump right in!
FIGURE 5-3:
Keep the
secret
simplicity of
this scarf to
yourself.
Materials and vital statistics
»» Yarn: Patons “CiCi” super-bulky-weight yarn (68% acrylic/32% nylon), Article #241064
(1.75 oz. [50 g], 37 yds [33 m] each skein): 5 skeins of #64040 Starry Night
»» Hook: Crochet hook size M-13 U.S. or size needed to obtain gauge (refer to Chapter 2 for
more information on gauge)
»» Measurements: 6 in. wide x 62½ in. long
»» Gauge: 6 sts and 6 rows sc = 3 in.
»» Stitches used: Chain stitch (ch), single crochet (sc)
This pattern only requires you to work two different stitches: the chain stitch for the foundation chain, then the single crochet stitch for the body of the scarf. You’ll work the single crochet
stitches back and forth until you reach the desired length, and at certain points, you’ll run out
of yarn and have to join a new skein. If you need a memory boost on how to do this correctly,
please see Chapter 4.
CHAPTER 5 Working in the First Dimension
59
Directions
This yarn is an unconventional fashion yarn, but it really creates a fabulous fabric. Make sure
to keep your stitches loose, and the bumps and lumps will pull right through.
Foundation chain: Ch 13.
Row 1: Sc in 2nd ch from hook, sc in each ch across (12 sc), turn.
Row 2: Ch 1, sc in each sc across (12 sc), turn.
Repeat Row 2 until scarf measures 62½ in. or desired length. Fasten off.
Wooly Warmer Afghan
You can use this afghan on those really cold nights when you want to curl up with a soft,
warm blanket and forget about the outside temperature (see Figure 5-4). The pattern uses
most of the basic stitches and is worked vertically, or lengthwise, rather than in the traditional
side-to-side manner. The yarn is a super-bulky-weight wool blend, which allows you to work
it up faster than you could using a worsted-weight yarn (see Chapter 1 for more on yarns).
Throw this afghan over the back of the sofa, or fold it at the foot of your bed, ready to provide
an extra layer of warmth.
FIGURE 5-4:
The wooly
warmer
afghan will
protect
you from
winter’s chill.
Materials and vital statistics
»» Yarn: Lion Brand Yarn “Wool-Ease Thick & Quick” super-bulky-weight yarn (80% acrylic/20%
wool), Article #640 (6 oz. [170 g], 106 yds [97 m] each skein): 13 skeins of #143 Claret
60
PART 2 Hook, Yarn, Action! Crocheting Simple Projects
»» Hook: Crochet hook size M-13 U.S. or size needed to obtain gauge (refer to Chapter 2 for
more information on gauge)
»» Measurements: 50½ in. wide x 76 in. long
»» Gauge: 6 sts = 4 in.; 5 rows in pat = 4 in.
»» Stitches used: Chain stitch (ch), single crochet (sc), half double crochet (hdc), double crochet
(dc), triple crochet (tr)
Because this afghan is worked in long rows, it’s a great project to work on when you can sit
yourself down in a comfortable chair or on the sofa. After you get a few rows finished, you’ll
find that the afghan gets somewhat awkward to shift around, and the arms of the chair or seat
cushions of the sofa make a great support tool. You’ll also need to add new skeins of yarn regularly, so please refer to Chapter 4 for detailed instructions.
Directions
The bulky nature of this yarn requires the use of a larger hook, so you may find that you have
to adjust your hold on the hook. Keep your hands and stitches loose, and the afghan will be
finished in no time.
Foundation chain: Ch 124 + 2 (first hdc).
Row 1: Hdc in 3rd ch from hook, hdc in each ch across (125 hdc), turn.
Row 2: Ch 1, sc in first hdc, • tr in next hdc, sc in next hdc •, rep from • to • across to within last
2 hdc, tr in next hdc, sc in turning ch (125 sts), turn.
Row 3: Ch 2 (first hdc), hdc in each st across (125 hdc), turn.
Row 4: Ch 3 (first dc), dc in each hdc across, dc in turning ch (125 dc), turn.
Row 5: Ch 2 (first hdc), hdc in each dc across, hdc in turning ch (125 hdc), turn.
Rows 6–57: Rep Rows 2–5 (13 times).
Rows 58–59: Rep Rows 2–3. Fasten off.
Variation: Supersize it!
To make the afghan bigger, add stitches to your foundation chain until you reach the desired
length. Just make sure you end with an odd number of stitches so the pattern in Row 2 works.
Adjust the width by repeating Rows 2 to 5 as many times as you want and be sure to buy extra
skeins of yarn.
Variation: Trying a different yarn
This company also makes a super-bulky-weight chenille yarn that would work well with this
pattern. You can use the same size hook suggested in the original pattern.
CHAPTER 5 Working in the First Dimension
61
IN THIS CHAPTER
»» Adding shape to a playful belt
»» Expanding your skills with a soft
and stylish shawl
»» Creating interest for your table
with a diamond-shaped runner
»» Multiplying stitches to create a
corkscrew-shaped scarf
6
Expanding and
Diminishing
Dimensions:
Adding Shape
Chapter
I
f you try to imagine a world without shapes, it seems very boring, indeed. No shaping? No
fun! Shaping is involved in most crochet designs, and this chapter gives you the opportunity
to create some wonderful projects while getting used to both increasing and decreasing
stitches.
Adding stitches to your work, or increasing (inc) as it’s called, is really a simple process. You
just work more than one stitch in a given stitch. The pattern you’re crocheting will give you
specific details on how and where to place these stitches. On the opposite end of the spectrum
is to subtract stitches, or decrease (dec) them. This process is slightly more involved than
increasing, but don’t let that frighten you off. Again, the pattern will give you specific details
on how to get rid of those unwanted stitches. For detailed info on both of these skills, refer to
Chapter 4.
This chapter’s projects range from using basic crochet stitches to working with a simple pattern. You can practice not only working the stitches, but reading the patterns themselves,
which get more involved as the projects do. Look through the following patterns, grab your
hook and yarn, and create your favorite design. (Flip to Chapter 3 if you want a refresher on
how to read a pattern.)
CHAPTER 6 Expanding and Diminishing Dimensions: Adding Shape
63
Beaded-Fringe Belt
Belts are all the rage, and this one is no exception. From the easy-to-create design to the color
pink, this is one that you’ll reach for often (see Figure 6-1). A few rows of increasing, a whole
bunch of rows worked even, a few rows of decreasing, add some fringe and beads, then you’re
done! You’ll have a new fashion accessory that you’ll love to wear. (If you find it missing, check
with the younger set in your household!)
FIGURE 6-1:
Add a little
interest to your
outfits with the
beaded-fringe
belt.
Materials and vital statistics
»» Size: One size fits most adults
»» Yarn: Coats & Clark “TLC Cotton Plus” worsted-weight yarn (51% cotton/49% acrylic), Article
#E516 (3.5 oz. [100 g], 178 yds [163 m] each skein): 1 skein of #3706 Light Rose
»» Hook: Crochet hook size H-8 U.S. or size needed to obtain gauge
»» Beads:
• 88 round, silver metal beads with large center holes (4 x 6mm)
• 44 square, pink beads with large center holes (5mm)
»» Measurements: 2¼ in. wide x 55¼ in. long, excluding fringe
»» Gauge: 5 sts and 5 rows sc = 1 in.
»» Stitches used: Chain stitch (ch), single crochet (sc). Dec 1 sc: • (Insert hook in next st, yo,
draw yarn through st) twice, yo, draw yarn through 3 loops on hook •.
64
PART 2 Hook, Yarn, Action! Crocheting Simple Projects
This design starts out with just a single stitch on the first end and increases stitches until you
have all the stitches you need for the width of the belt. The chain-1 turning chain creates a
pretty scalloped effect along the edge of the belt, which eliminates the need for edging. When
you get close to the end, you decrease your stitches until, once again, you’re left with just a
single stitch. You finish it off by adding some beaded fringe.
Working up one end and the length of the belt
Foundation chain: Ch 2.
Row 1: Sc in 2nd ch from hook (1 sc), turn.
Row 2: Ch 1, 2 sc in sc (2 sc), turn.
Row 3: Ch 1, sc in each sc across (2 sc), turn.
Row 4: Ch 1, 2 sc in first sc, 2 sc in last sc (4 sc), turn.
Row 5: Ch 1, sc in each sc across (4 sc), turn.
Row 6: Ch 1, 2 sc in first sc, sc in each of next 2 sc, 2 sc in last sc (6 sc), turn.
Row 7: Ch 1, sc in each sc across (6 sc), turn.
Row 8: Ch 1, 2 sc in first sc, sc in each of next 4 sc, 2 sc in last sc (8 sc), turn.
Row 9: Ch 1, sc in each sc across (8 sc), turn.
Row 10: Ch 1, 2 sc in first sc, sc in each of next 6 sc, 2 sc in last sc (10 sc), turn.
Row 11: Ch 1, sc in each sc across (10 sc), turn.
Rep Row 11 until belt measures 53½ in., or 1¾ in. less than desired length.
Beginning the other end
Row 1: Ch 1, dec 1 sc in first 2 sc, sc in each of next 6 sc, dec 1 sc in last 2 sc (8 sc), turn.
Row 2: Ch 1, sc in each sc across (8 sc), turn.
Row 3: Ch 1, dec 1 sc in first 2 sc, sc in each of next 4 sc, dec 1 sc in last 2 sc (6 sc), turn.
Row 4: Ch 1, sc in each sc across (6 sc), turn.
Row 5: Ch 1, dec 1 sc in first 2 sc, sc in each of next 2 sc, dec 1 sc in last 2 sc (4 sc), turn.
Row 6: Ch 1, sc in each sc across (4 sc), turn.
Row 7: Ch 1, dec 1 sc in first 2 sc, dec 1 sc in last 2 sc (2 sc), turn.
Row 8: Ch 1, sc in each sc across (2 sc), turn.
Row 9: Ch 1, dec 1 sc in 2 sc (1 sc). Fasten off.
CHAPTER 6 Expanding and Diminishing Dimensions: Adding Shape
65
Finishing with fringe
To make the fringe, cut yarn into 22, 20-in. lengths. Using one strand of yarn for each fringe,
starting at the bottom point of one end of the belt, single-knot one fringe in the bottom point,
then in every other row across the side edges of the belt five times (the last fringe will be in the
row where stitches are worked evenly and the shaping ends).
The fringe will be uneven — that is, it should be shaped like the point of the belt. If you prefer
to have it straight across, simply trim the ends even before threading the beads. (See Appendix A
for more on fringe.)
To attach the beads, thread one silver bead, one pink bead, then another silver bead onto each
fringe, leaving enough length free to tie the yarn in a knot. Tie the end in an overhand knot to
secure. The beads will then hang at the end of each fringe. Trim ends even.
Variation: Adding some color or a jingle
For a change of pace, use a complementary shade of yarn for the fringe, or for a more exotic
look, replace the beads on the fringe with tiny bells.
Shades-of-Gray Shawl
This generously sized shawl gives you plenty of opportunity to hone your decreasing skills
while at the same time creating a fabric reminiscent of tweed (see Figure 6-2). The simple
black edging ties it all together, and when finished, you’ve created a versatile piece that you’ll
want to keep handy for whenever you’re heading out the door.
FIGURE 6-2:
The shadesof-gray
shawl looks
great with
casual attire.
66
PART 2 Hook, Yarn, Action! Crocheting Simple Projects
Materials and vital statistics
»» Size: One size fits most adults
»» Yarn: Bernat “Soft Bouclé” bulky-weight yarn (98% Gentle Soft acrylic/2% polyester), Article
#161026 (5 oz. [140 g], 255 yds [233 m] each skein):
•
•
3 skeins of #26928 Grey Shades (MC)
1 skein of #06756 Black (CC)
»» Hook: Crochet hook size K-10½ U.S. or size needed to obtain gauge
»» Measurements: 34½ in. from bottom point to top edge; 68½ in. across top edge
»» Gauge: 10 sts and 10 rows hdc = 4 in.
»» Stitches used: Chain stitch (ch), slip stitch (sl st), single crochet (sc), half double crochet
(hdc). Dec 1 hdc: • Yo, (insert hook in next st, yo, draw yarn through st) twice, yo, draw yarn
through 4 loops on hook •.
Working a decrease with the half double stitch is almost identical to the single crochet decrease.
In fact, you only do one more step, and that’s the yarn over you do at the very beginning of the
decrease.
This shawl is made from the top edge down. You start off with a long foundation chain, work a
single row of half double crochet stitches to get started, then begin to decrease the number of
stitches in each row until you get to the very end and there’s only one stitch left.
Directions
Take note that the decreasing is worked in the second and third stitches at the beginning of a
row and the second-to-last and third-to-last stitches at the end of the row, not the first two
and last two stitches as you usually see. This method creates a smoother finish to the edge and
doesn’t affect the way the decreasing looks.
Foundation chain: With MC, ch 167 + 2 (first hdc).
Row 1 (right side): Hdc in 3rd ch from hook, hdc in each ch across (168 hdc), turn.
Row 2 (wrong side): Ch 2 (first hdc), dec 1 hdc in next 2 hdc, hdc in each hdc across to within
last 3 hdc, dec 1 hdc in next 2 hdc, hdc in top of turning ch (166 hdc), turn.
Rows 3–84: Ch 2 (first hdc), dec 1 hdc in next 2 hdc, hdc in each hdc across to within last 3 hdc,
dec 1 hdc in next 2 hdc, hdc in top of turning ch (2 hdc at end of last row), turn.
Row 85: Dec 1 hdc in 2 hdc (1 hdc). Fasten off.
Edging: With right side facing, join CC in first hdc at top right-hand corner, ch 1, working
across top edge of shawl, sc in first hdc, ch 1, • sc in next hdc, ch 1 •, rep from • to • across to
next corner, (sc, ch 1, sc) in corner st, ch 1, working in row-end sts across side edge of shawl,
rep from • to • across to next corner, (sc, ch 1, sc) in bottom point, ch 1, working in row-end sts
across next side edge, rep from • to • across to top right-hand corner, (sc, ch 1, sc) in corner st,
ch 1, sl st in first sc to join. Fasten off.
CHAPTER 6 Expanding and Diminishing Dimensions: Adding Shape
67
Festive Diamond-Shaped Table Runner
This runner will certainly add some pizzazz to your table. The colors are bright, the cotton yarn
is easy to care for, and the shape is unique (see Figure 6-3). In addition to all this, you get to
practice increasing and decreasing while working a simple seed stitch pattern.
FIGURE 6-3:
Dress up your
table with this
casual table
runner.
This pattern is composed of just the chain stitch and the single crochet. Don’t be intimidated by
the thought of working with a pattern — this one is really basic, and it’ll get you in the groove.
Materials and vital statistics
»» Yarn: Aunt Lydia’s “Quick Crochet” worsted-weight thread (75% cotton/25% acrylic), Article
#174 (400 yds [366 m] each ball): 1 ball of #1004 Citrus
»» Hook: Crochet hook size H-8 U.S. or size needed to obtain gauge
»» Measurements: 13¼ in. wide x 30¼ in. long
»» Gauge: 16 sts and 16 rows in pat = 3 in.
»» Stitches used: Chain stitch (ch), slip stitch (sl st), single crochet (sc). Dec 1 sc: • (Insert hook
in next st, yo, draw yarn through st) twice, yo, draw yarn through 3 loops on hook •.
This pattern is one that you’ll see fairly regularly and is relatively simple as far as stitch patterns go. After you’ve got your foundation chain going, you work single crochet stitches into the
spaces created by the chain stitches, then work chain stitches over the single crochet stitches to
create the spaces for the next row. Be sure to work a gauge swatch to get the hang of the pattern
and your stitch sizes.
Directions
When counting your stitches in this pattern, the first chain you make before working your
single crochet stitch is your turning chain and not part of the stitch count for each row.
Foundation chain: Ch 4.
68
PART 2 Hook, Yarn, Action! Crocheting Simple Projects
Row 1: Sc in 2nd ch from hook, ch 1, skip next ch, sc in last ch (3 sts), turn.
Row 2: Ch 1, (sc, ch 1) in first sc (inc made), sc in next ch-1 space, (ch 1, sc) in last sc (inc made)
(5 sts), turn.
Rows 3–34: Ch 1, (sc, ch 1) in first sc (inc made), • sc in next ch-1 space, ch 1, skip next sc •, rep
from • to • across to within last sc, sc in last sc (69 sts at end of last row), turn.
Row 35: Ch 1, dec 1 sc in first sc and ch-1 space, • ch 1, skip next sc, sc in next ch-1 space •, rep
from • to • across to within last 2 sts, dec 1 sc in next ch-1 space and last sc (67 sts), turn.
Rows 36–57: Ch 1, dec 1 sc in first sc and ch-1 space, • ch 1, skip next sc, sc in next ch-1 space •,
rep from • to • across to within last 2 sts, dec 1 sc in next ch-1 space and last sc (23 sts at end of
last row), turn.
Rows 58–80: Ch 1, (sc, ch 1) in first sc (inc made), • sc in next ch-1 space, ch 1, skip next sc •,
rep from • to • across to within last sc, sc in last sc (69 sts at end of last row), turn.
Rows 81–103: Ch 1, dec 1 sc in first sc and ch-1 space, • ch 1, skip next sc, sc in next ch-1
space •, rep from • to • across to within last 2 sts, dec 1 sc in next ch-1 space and last sc
(23 sts at end of last row), turn.
Rows 104– 126: Ch 1, (sc, ch 1) in first sc (inc made), • sc in next ch-1 space, ch 1, skip next sc •,
rep from • to • across to within last sc, sc in last sc (69 sts at end of last row), turn.
Rows 127– 159: Ch 1, dec 1 sc in first sc and ch-1 space, • ch 1, skip next sc, sc in next ch-1
space •, rep from • to • across to within last 2 sts, dec 1 sc in next ch-1 space and last sc (3 sts
at end of last row), turn. Do not fasten off.
Edging: Ch 1, sc in each st around entire outside edge of runner, sl st in first sc to join.
Fasten off.
Variation: Giving it some shine or adding a detail
To dress up the runner a little bit, try using a worsted-weight metallic thread (great for a holiday look). Or for some added fun, add a tassel to each end. (See Appendix A for tassel how-to’s.)
Curlicue Scarf
Scarves are one of the must-have fashion accessories these days, not just something you wear
to keep your neck warm. You can make just about any type of scarf: big, fat, fluffy scarves;
really, really long scarves; skinny, silky scarves; and everything in between. This pattern falls
into the in-between category because it curls around and around for its entire length (see
Figure 6-4). You make the scarf curl just by increasing stitches at regular intervals along the
foundation chain’s length.
Materials and vital statistics
»» Yarn: Muench Yarns “Oceana” worsted-weight yarn (55% viscose/30% nylon/15% cotton),
Article #M480 (1.75 oz. [50 g], 77 yds [70 m] each ball): 3 balls of #4808 blue multi
CHAPTER 6 Expanding and Diminishing Dimensions: Adding Shape
69
FIGURE 6-4:
Add pizzazz
with this great
curlicue scarf.
»» Hook: Crochet hook size K-10½ U.S. or size needed to obtain gauge
»» Measurements: 3 in. wide x 56 in. long
»» Gauge: 6 sts in pat = 2 in.; first 2 rnds = 1½ in.
»» Stitches used: Chain stitch (ch), slip stitch (sl st), single crochet (sc), half double crochet (hdc),
double crochet (dc)
This pattern showcases another type of increasing. Because you’re working across both sides of
the foundation chain as opposed to just one side, it becomes a round instead of a row. By working two stitches into one, you make the piece curl, turning it into a loose spiral.
Directions
Foundation chain: Ch 151.
Rnd 1: Sc in 2nd ch from hook, sc in each ch across to within last ch, 3 sc in last ch, working across opposite side of foundation ch, sc in each sc across to within last ch, 2 sc in last
ch (302 sc), sl st in first sc to join.
Rnd 2: Ch 2 (first hdc), hdc in first sc, hdc in next sc, • 2 hdc in next sc, hdc in next sc •, rep
from • to • around (453 hdc), sl st in first hdc to join.
Rnd 3: Ch 3 (first dc), dc in first hdc, dc in next hdc, • 2 dc in next hdc, dc in next hdc •, rep
from • to • around to within last hdc, dc in last hdc (679 dc), sl st in first dc to join. Fasten off.
Variation: Shrinking the scarf
You can use this pattern to create curly ribbons to wrap packages or to tie your hair back with
by using a smaller hook, thinner yarn, and a shorter foundation chain.
70
PART 2 Hook, Yarn, Action! Crocheting Simple Projects
IN THIS CHAPTER
»» Creating a denim-look flirty skirt
»» Using suede to crochet a newsboy
beret
»» Designing a red velvet crusher hat
»» Combining circular techniques to
make a drawstring bag
7
Going in Circles:
Crocheting in the
Round
Chapter
M
any crocheted pieces are worked back and forth in rows, but you can also create projects by working in the round. Crocheting in the round allows you to add shape to your
designs that working in rows doesn’t. You can use many different techniques, and
this chapter highlights several of them.
In the first design, the denim-look skirt, you start off by joining your foundation chain and
creating a large circle to work from. For the other three, you start with a more traditional center
ring, but where you go from there makes the difference. Each one of the designs featured in
this chapter allows you to get in some practice time with important crochet skills. (If you need
a refresher on how crocheting in the round differs from crocheting in rows, turn to Chapter 4.
And Chapter 2 contains a reminder of how to measure gauge in the round.)
Flirty Denim Skirt
The denim skirt has been around for years and with good reason. As with any pair of jeans, you can
dress it up or dress it down and it still looks good. You use a denim-look yarn to create this skirt,
which is designed to sit at the hip, rather than up around your waist. The drawstring at the waist
allows you to adjust the fit, and the ruffles at the bottom give it a flirty edge (see Figure 7-1). Pair
the skirt with a T-shirt or throw some leggings on underneath for a different look.
CHAPTER 7 Going in Circles: Crocheting in the Round
71
This skirt includes a combination of different construction skills for which it falls into the
intermediate skill-level category, but don’t let this intimidate you. The stitches are basic, and
the instructions are easy to navigate. Many patterns are worked in this manner, and it’s a great
stepping stone to prepare you for more-advanced patterns.
The skirt is designed to be short, reaching to about mid-thigh, but if you prefer wearing something a bit longer, go ahead and keep crocheting until you reach a length you’re comfortable
with. Remember, though, that if you go longer, you’ll need extra yarn.
FIGURE 7-1:
This crocheted
denim-look
skirt looks
great paired
with a
casual top.
Materials and vital statistics
»» Size: Directions given are for size X-Small (2–4). Changes for Small (6–8), Medium (10–12),
Large (14–16), and X-Large (18) are in parentheses. Finished hip: 30 (34, 38, 42, 46) in.
Finished length: 12½ in. (See Figure 7-2.)
»» Yarn: Rowan Yarns “Summer Tweed” worsted-weight yarn (70% silk/30% cotton),
(1.75 oz. [50 g], 118 yds [108 m] each hank):
•
3 (4, 4, 5, 5) hanks of #529 Denim (A) (If you’re making the skirt longer than the pattern
calls for, you’ll need more of this color.)
•
•
1 hank of #500 Powder (B)
1 hank of #514 Reed (C)
»» Hook: Crochet hook size I-9 U.S. or size needed to obtain gauge
»» 4, 8mm wooden beads
»» Gauge: 12 sts and 12 rows in pat = 4 in.
»» Stitches used: Chain stitch (ch), slip stitch (sl st), single crochet (sc), double crochet (dc).
Shell: • [(Dc, ch 1) 4 times, dc] in same stitch •. Picot: •Ch 3, sl st in 3rd ch from hook •.
72
PART 2 Hook, Yarn, Action! Crocheting Simple Projects
FIGURE 7-2:
Finished
measurements
of the
flirty skirt.
The method used to start this skirt is somewhat different than you usually see, although it’s not
uncommon. Starting at the waist edge, you crochet a long foundation chain and then join the
ends with a slip stitch to form a circle. The body of the skirt is then worked in rounds from the
waist down to the lower edge. The key here is not to twist the chain when joining the ends — it
will create a tangled mess.
When you get to the waistband, Row 3 is called a beading round. This doesn’t mean you add
beads — it’s a round worked with spaces between the stitches to allow you to weave a drawstring through.
Building the skirt body
Foundation chain: Starting at waist edge, with A, ch 90 (102, 114, 126, 138) and without twisting
ch, close into a ring with one sl st in first ch.
Rnd 1: Ch 1, sc in each ch around (90 [102, 114, 126, 138] sc), sl st in first sc to join, turn.
Rnd 2: Ch 3 (first dc), sc in next sc, • dc in next sc, sc in next sc •, rep from • to • around
(90 [102, 114, 126, 138] sts), sl st in first dc to join, turn.
Rnd 3: Ch 3 (first dc), sc in next dc, • dc in next sc, sc in next dc •, rep from • to • around
(90 [102, 114, 126, 138] sts), sl st in first dc to join, turn.
Rep Row 3 for pat.
Work even in pat until skirt body reaches 11 in. from beg, or 1 in. less than desired length.
Fasten off.
Adding the all-important waistband
Rnd 1: With right side facing, join B in first st at waist edge of skirt, working across opposite side
of foundation ch, ch 1, • sc in ch, ch 1, skip next ch •, rep from • to • around (45 [51, 57, 63, 69]
ch-1 spaces), sl st in first sc to join, turn.
Rnd 2: Ch 1, • sc in ch-1 space, ch 1, skip next sc •, rep from • to • around (45 [51, 57, 63, 69]
ch-1 spaces), sl st in first sc to join, turn.
CHAPTER 7 Going in Circles: Crocheting in the Round
73
Rnd 3 (beading rnd): Ch 3 (first dc), ch 1, skip next sc, • dc in next ch-1 space, ch 1, skip next
sc •, rep from • to • around (45 [51, 57, 63, 69] ch-1 spaces), sl st in first dc to join, turn.
Rnd 4: Ch 1, • sc in ch-1 space, ch 1, skip next dc •, rep from • to • around (45 [51, 57, 63, 69]
ch-1 spaces), sl st in first sc to join, turn.
Rnd 5: Rep Rnd 2. Fasten off.
Decorating the hem with a ruffle
Rnd 1: With right side facing, join C in first st at bottom edge of skirt, ch 1, sc in each st around
(90 [102, 114, 126, 138] sc), sl st in first sc to join, turn. Fasten off C, join B.
Rnd 2: Ch 3 (first dc), ch 1 (first ch-1 space), (dc, ch 1, dc) in first sc, • ch 1, skip next sc, sl st in
next sc, picot, sl st in next sc, ch 1, skip next sc, shell in next sc •, rep from • to • evenly around
bottom edge to within last 5 sts, ch 1, sl st in next sc, picot, sl st in next sc, ch 1, (dc, ch 1) twice
in first sc, sl st in first dc to join. Fasten off.
Finishing with the drawstring tie
To make the drawstring tie, use C to make a chain approximately 12 inches longer than the
finished hip measurement. Thread two beads onto each end of the chain and tie the ends into
a knot to secure. Starting at the center front of the waistband, weave the drawstring over then
under the stitches in Round 3 (beading round) of the waistband, leaving equal lengths on each
side. Fold the waistband down toward the right side.
Coffee Suede Beret
Okay, so how many years has this style of hat been around? Too long to remember, I’m sure.
But like most good fashion statements, the beret has made a comeback (see Figure 7-3). You
see them in all colors of the rainbow, from browns and blacks to bold, bright colors and even
pastels. The yarn used in this project has a remarkable resemblance to real suede, although it’s
much easier to care for.
This project is suitable for an intermediate-level crocheter because of the shaping involved
and the construction of the brim. By following the instructions step by step, you’ll see how, by
increasing and decreasing your stitches, the form takes shape and realize that it’s not so difficult after all.
Materials and vital statistics
»» Size: One size fits most adults
»» Yarn: Lion Brand Yarn “Lion Suede” bulky-weight yarn (100% polyester), Article #210
(3 oz. [85 g], 122 yds [110 m] each skein): 3 skeins of #126 Coffee
»» Hook: Crochet hook size I-9 U.S. or size needed to obtain gauge
»» Stitch markers
»» Measurement: 21 in. in circumference
»» Gauge: First 7 rnds = 4 in.
74
PART 2 Hook, Yarn, Action! Crocheting Simple Projects
FIGURE 7-3:
The newsboy
beret uses a
common
increasing and
decreasing
technique to
create its
shape.
»» Stitches used: Chain stitch (ch), slip stitch (sl st), single crochet (sc). Dec 1 sc: • (Insert hook
in next st, yo, draw yarn through st) twice, yo, draw yarn through 3 loops on hook •. Long
single crochet (lsc): Working over sc in current row, sc in sc 2 rows below.
In this instance, the center ring is created by crocheting the stitches for the first round into a
single chain stitch. The hat itself is worked in a spiral to avoid creating seams, increasing your
work, then decreasing back to the desired circumference. The brim, or visor, is made of two
layers of single crochet stitches, which are then crocheted together along the edges to provide
a firm front.
Stitching in circles to create the beret
Use your stitch markers when crocheting this design. If you lose count during one of your
rounds, it’s almost impossible to figure out where you started. Pulling out work and starting
over is never fun.
Foundation chain: Ch 2.
Rnd 1 (right side): Work 6 sc in 2nd ch from hook (6 sc), do not join. Continue to work in a
spiral, marking beg of each rnd, moving marker up as work progresses.
Rnd 2: 2 sc in each sc around (12 sc).
Rnd 3: • Sc in next sc, 2 sc in next sc •, rep from • to • around (18 sc).
Rnd 4: • Sc in each of next 2 sc, 2 sc in next sc •, rep from • to • around (24 sc).
Rnd 5: • Sc in each of next 3 sc, 2 sc in next sc •, rep from • to • around (30 sc).
Rnd 6: • Sc in each of next 4 sc, 2 sc in next sc •, rep from • to • around (36 sc).
CHAPTER 7 Going in Circles: Crocheting in the Round
75
Rnd 7: • Sc in each of next 5 sc, 2 sc in next sc •, rep from • to • around (42 sc).
Rnd 8: • Sc in each of next 6 sc, 2 sc in next sc •, rep from • to • around (48 sc).
Rnd 9: • Sc in each of next 7 sc, 2 sc in next sc •, rep from • to • around (54 sc).
Rnd 10: • Sc in each of next 8 sc, 2 sc in next sc •, rep from • to • around (60 sc).
Rnd 11: • Sc in each of next 9 sc, 2 sc in next sc •, rep from • to • around (66 sc).
Rnd 12: • Sc in each of next 10 sc, 2 sc in next sc •, rep from • to • around (72 sc).
Rnd 13: • Sc in each of next 11 sc, 2 sc in next sc •, rep from • to • around (78 sc).
Rnd 14: • Sc in each of next 12 sc, 2 sc in next sc •, rep from • to • around (84 sc).
Rnd 15: • Sc in each of next 13 sc, 2 sc in next sc •, rep from • to • around (90 sc).
Rnd 16: Sc in each of next 29 sc, (2 sc in next sc, sc in each of next 14 sc) twice, 2 sc in next sc,
sc in each of next 30 sc (93 sc).
Rnd 17: Sc in each of next 29 sc, (2 sc in next sc, sc in each of next 15 sc) twice, 2 sc in next sc,
sc in each of next 31 sc (96 sc).
Rnds 18–19: Sc in each sc around (96 sc).
Rnd 20: Sc in each of next 29 sc, (dec 1 sc in next 2 sc, sc in each of next 15 sc) twice, dec 1 sc in
next 2 sc, sc in each of next 31 sc (93 sc).
Rnd 21: Sc in each of next 29 sc, (dec 1 sc in next 2 sc, sc in each of next 14 sc) twice, dec 1 sc in
next 2 sc, sc in each of next 30 sc (90 sc).
Rnd 22: • Dec 1 sc in next 2 sc, sc in each of next 13 sc •, rep from • to • around (84 sc).
Rnd 23: • Dec 1 sc in next 2 sc, sc in each of next 12 sc •, rep from • to • around (78 sc).
Rnd 24: • Dec 1 sc in next 2 sc, sc in each of next 11 sc •, rep from • to • around (72 sc).
Rnd 25: • Dec 1 sc in next 2 sc, sc in each of next 10 sc •, rep from • to • around (66 sc).
Rnds 26–27: Sc in each sc around (66 sc).
Rnd 28: Sc in each sc around (66 sc), sl st in first sc to join. Fasten off.
Joining the visor as you craft it
The visor is created by first making the bottom half, then crocheting the top half in exactly the
same manner. The resulting look before you join the edges will be somewhat like a duck bill.
The entire bottom edge of the hat is finished by working a round of stitches beginning at the
center back of the hat and working around, joining the two loose edges of visor as you go.
76
PART 2 Hook, Yarn, Action! Crocheting Simple Projects
Bottom
Row 1: With right side facing, skip first 20 sc, join yarn in next sc, ch 1, work 1 lsc in sc, lsc in
each of next 25 sc (26 lsc), turn.
Row 2: Ch 1, working in front loops of sts, sc in each of first 8 sc, (2 sc in next sc, sc in each of
next 8 sc) twice (28 sc), turn.
Row 3: Ch 1, working in both loops of sts, dec 1 sc in first 2 sc, sc in each sc across to last 2 sc,
dec 1 sc in last 2 sc (26 sc), turn.
Row 4: Ch 1, dec 1 sc in first 2 sc, sc in each of next 6 sc, 2 sc in next sc, sc in each of next 8 sc,
2 sc in next sc, sc in each of next 6 sc, dec 1 sc in last 2 sc (26 sc), turn.
Row 5: Ch 1, dec 1 sc in first 2 sc, sc in each sc across to last 2 sc, dec 1 sc in last 2 sc (24 sc), turn.
Row 6: Ch 1, dec 1 sc in first 2 sc, sc in each of next 5 sc, 2 sc in next sc, sc in each of next 8 sc,
2 sc in next sc, sc in each of next 5 sc, dec 1 sc in last 2 sc (24 sc), turn.
Row 7: Ch 1, dec 1 sc in first 2 sc, sc in each sc across to last 2 sc, dec 1 sc in last 2 sc (22 sc), turn.
Row 8: Ch 1, dec 1 sc in first 2 sc, sc in each of next 4 sc, 2 sc in next sc, sc in each of next 8 sc,
2 sc in next sc, sc in each of next 4 sc, dec 1 sc in last 2 sc (22 sc), turn.
Row 9: Ch 1, dec 1 sc in first 2 sc, sc in each sc across to last 2 sc, dec 1 sc in last 2 sc (20 sc).
Fasten off.
Top
Row 1: With right side facing, join yarn in rem loop of first st in Row 1 of visor bottom, ch 1,
working in rem loops, sc in each of first 8 sc, (2 sc in next sc, sc in each of next 8 sc) twice
(28 sc), turn.
Rows 2–8: Rep Rows 3–9 of visor bottom. Fasten off.
Finishing with basic stitches
With right side facing, join yarn in center st at back of beret, sl st in each st around to first row
of visor, working through double thickness of visor bottom and top, matching sts, sc in each
sc around entire front edge of visor, sl st in each st around edge of beret, sl st in first sl st to
join. Fasten off.
Variation: Add a different color
Add a colorful twist to the hat by working the visor and edging in a complementary color.
Red Velvet Crusher Hat
This hat will make you stand out in a crowd! The resulting fabric resembles crushed red velvet and is just as soft to the touch (see Figure 7-4). With hats featured so prominently these
days, this pattern is a must. You use basic stitches and techniques and get ample opportunity
CHAPTER 7 Going in Circles: Crocheting in the Round
77
to practice working in the round, but the results will make you look like an expert. If red isn’t
your color, go ahead and choose another color, but by all means, grab your hook and yarn and
work up a fabulous fashion accessory.
FIGURE 7-4:
You can toss
this crusher
hat in a bag
when you’re
not wearing it,
and it will
retain its shape
when you put
it back on.
Materials and vital statistics
»» Size: One size fits most adults
»» Yarn: Caron “Jewel Box” medium-weight yarn (64% acrylic/20% rayon/16% polyester), Article
#JB1000 (2.5 oz. [70g], 100 yds [91 m] each skein): 2 skeins of #0020 Ruby
»» Hook: Crochet hook size H-8 U.S. or size needed to obtain gauge
»» Stitch markers
»» Measurement: 22 in. in circumference
»» Gauge: First 4 rnds = 2 in. in diameter
»» Stitches used: Chain stitch (ch), slip stitch (sl st), single crochet (sc)
When making the transition from the crown of the hat to the sides, then again from the sides
to the brim, you work your stitches into the back loops and front loops of the stitches, respectively. Remember, the back loops are the ones farthest from you, and the front loops are the
ones closest to you.
Directions
Foundation chain: Ch 4 and close into ring with sl st in first ch.
78
PART 2 Hook, Yarn, Action! Crocheting Simple Projects
Rnd 1: Ch 1, work 6 sc in ring, do not join. Continue to work in a spiral, marking beginning of
each rnd and moving marker up as work progresses.
Rnd 2: Work 2 sc in each sc around (12 sc).
Rnd 3: • Sc in next sc, 2 sc in next sc •, rep from • to • around (18 sc).
Rnd 4: • Sc in each of next 2 sc, 2 sc in next sc •, rep from • to • around (24 sc).
Rnd 5: • Sc in each of next 3 sc, 2 sc in next sc •, rep from • to • around (30 sc).
Rnd 6: • Sc in each of next 4 sc, 2 sc in next sc •, rep from • to • around (36 sc).
Rnd 7: • Sc in each of next 5 sc, 2 sc in next sc •, rep from • to • around (42 sc).
Rnd 8: • Sc in each of next 6 sc, 2 sc in next sc •, rep from • to • around (48 sc).
Rnd 9: • Sc in each of next 7 sc, 2 sc in next sc •, rep from • to • around (54 sc).
Rnd 10: • Sc in each of next 8 sc, 2 sc in next sc •, rep from • to • around (60 sc).
Rnd 11: • Sc in each of next 9 sc, 2 sc in next sc •, rep from • to • around (66 sc).
Rnd 12: Sc in each sc around (66 sc), sl st in first sc to join.
Rnd 13: Ch 1, working in back loops of sts, sc in each sc around (66 sc), do not join. Continue to
work in a spiral as before.
Rnds 14–25: Sc in each sc around (66 sc).
Rnd 26: Working in front loops of sts, • sc in each of next 10 sc, 2 sc in next sc •, rep from • to •
around (72 sc).
Rnd 27: Working in both loops of sts, • sc in each of next 11 sc, 2 sc in next sc •, rep from • to •
around (78 sc).
Rnd 28: • Sc in each of next 12 sc, 2 sc in next sc •, rep from • to • around (84 sc).
Rnd 29: • Sc in each of next 13 sc, 2 sc in next sc •, rep from • to • around (90 sc).
Rnd 30: • Sc in each of next 14 sc, 2 sc in next sc •, rep from • to • around (96 sc).
Rnd 31: • Sc in each of next 15 sc, 2 sc in next sc •, rep from • to • around (102 sc).
Rnd 32: • Sc in each of next 16 sc, 2 sc in next sc •, rep from • to • around (108 sc).
Rnd 33: • Sc in each of next 17 sc, 2 sc in next sc •, rep from • to • around (114 sc).
Rnd 34: • Sc in each of next 18 sc, 2 sc in next sc •, rep from • to • around (120 sc), sl st in first
sc to join. Fasten off.
CHAPTER 7 Going in Circles: Crocheting in the Round
79
Bella Drawstring Bag
Fun and funky is the only way to describe this bag (see Figure 7-5). Most people need more
than one carryall to cart around the various items that you can’t seem to do without these
days, and this pattern fits the purpose nicely. The yarn used is one of a hot new family —
self-striping — which allows you to use different colors without having to actually change
them. Beat that!
FIGURE 7-5:
This drawstring
bag with
self-striping
yarn looks
much more
complicated to
make than it is.
Materials and vital statistics
»» Yarn: Plymouth Yarn “Bella Colour” worsted-weight yarn (55% cotton/45% acrylic),
(1.75 oz. [50 g], 104 yds [95 m] each ball): 5 balls of #19 greens
»» Hook: Crochet hook size I-9 U.S. or size needed to obtain gauge
»» Stitch markers
»» Measurements: 8½ in. in diameter x 10 in. tall
»» Gauge: First 4 rnds = 4 in. in diameter
»» Stitches used: Chain stitch (ch), slip stitch (sl st), single crochet (sc), double crochet (dc).
Shell: • 4 dc in same st •. Picot: •Ch 3, sl st in third ch from hook •.
To make the bag’s base, you use the more common technique of joining rounds when you get
to the end of each one, and you work the sides in a spiral to avoid having an unseemly seam.
Simple shells and picots make up the edging, and the cord is twisted rather than crocheted to
give it a slightly different look.
80
PART 2 Hook, Yarn, Action! Crocheting Simple Projects
Going 17 rounds for the base
Foundation chain: Ch 2.
Rnd 1: Work 4 sc in 2nd ch from hook (4 sc), sl st in first sc to join.
Rnd 2: Ch 1, 2 sc in each sc around (8 sc), sl st in first sc to join.
Rnd 3: Ch 1, 2 sc in each sc around (16 sc), sl st in first sc to join.
Rnd 4: Ch 1, 2 sc in first sc, sc in next sc, • 2 sc in next sc, sc in next sc •, rep from • to • around
(24 sc), sl st in first sc to join.
Rnd 5: Ch 1, 2 sc in first sc, sc in each of next 2 sc, • 2 sc in next sc, sc in each of next 2 sc •, rep
from • to • around (32 sc), sl st in first sc to join.
Rnd 6: Ch 1, 2 sc in first sc, sc in each of next 3 sc, • 2 sc in next sc, sc in each of next 3 sc •, rep
from • to • around (40 sc), sl st in first sc to join.
Rnd 7: Ch 1, 2 sc in first sc, sc in each of next 4 sc, • 2 sc in next sc, sc in each of next 4 sc •, rep
from • to • around (48 sc), sl st in first sc to join.
Rnd 8: Ch 1, 2 sc in first sc, sc in each of next 5 sc, • 2 sc in next sc, sc in each of next 5 sc •, rep
from • to • around (56 sc), sl st in first sc to join.
Rnd 9: Ch 1, 2 sc in first sc, sc in each of next 6 sc, • 2 sc in next sc, sc in each of next 6 sc •, rep
from • to • around (64 sc), sl st in first sc to join.
Rnd 10: Ch 1, 2 sc in first sc, sc in each of next 7 sc, • 2 sc in next sc, sc in each of next 7 sc •, rep
from • to • around (72 sc), sl st in first sc to join.
Rnd 11: Ch 1, 2 sc in first sc, sc in each of next 8 sc, • 2 sc in next sc, sc in each of next 8 sc •, rep
from • to • around (80 sc), sl st in first sc to join.
Rnd 12: Ch 1, 2 sc in first sc, sc in each of next 9 sc, • 2 sc in next sc, sc in each of next 9 sc •,
rep from • to • around (88 sc), sl st in first sc to join.
Rnd 13: Ch 1, 2 sc in first sc, sc in each of next 10 sc, • 2 sc in next sc, sc in each of next 10 sc •,
rep from • to • around (96 sc), sl st in first sc to join.
Rnd 14: Ch 1, 2 sc in first sc, sc in each of next 11 sc, • 2 sc in next sc, sc in each of next 11 sc •,
rep from • to • around (104 sc), sl st in first sc to join.
Rnd 15: Ch 1, 2 sc in first sc, sc in each of next 12 sc, • 2 sc in next sc, sc in each of next 12 sc •,
rep from • to • around (112 sc), sl st in first sc to join.
Rnd 16: Ch 1, 2 sc in first sc, sc in each of next 13 sc, • 2 sc in next sc, sc in each of next 13 sc •,
rep from • to • around (120 sc), sl st in first sc to join.
Rnd 17: Ch 1, sc in each sc around (120 sc), sl st in first sc to join, turn.
CHAPTER 7 Going in Circles: Crocheting in the Round
81
Working your way up the sides
Rnd 18: Ch 1, working over sts in previous rnd, sc in each sc 2 rnds below (120 sc), sl st in first
sc to join, turn.
Rnd 19: Ch 1, sc in each sc around (120 sc), do not join. Continue to work in a spiral, marking
beg of each rnd, moving marker up as work progresses.
Rnds 20–59: Sc in each sc around (120 sc).
Rnd 60: Sc in each sc around (120 sc), sl st in first sc to join.
Rnd 61 (beading rnd): Ch 3 (first dc), ch 2, skip next 2 sc, • dc in next sc, ch 2, skip next 2 sc •,
rep from • to • around (40 ch-2 spaces), sl st in top of turning ch to join.
Rnd 62: Ch 3 (first dc), dc in first dc, skip next ch-2 space, (sc, picot) in next dc, skip next ch-2
space, • shell in next dc, skip next ch-2 space, (sc, picot) in next dc, skip next ch-2 space •,
rep from • to • around, 2 dc in same st as first 2 dc, sl st in top of turning ch to join. Fasten off.
Finishing with the drawstring cord
To make the drawstring cord, cut yarn into three 4-yard lengths. With the lengths held together
as one, fold the lengths in half. Tie cut ends in an overhand knot to secure.
Holding the knotted end in your hand, place the folded end over a hook such as the kind used
to hold curtain tiebacks (or have a friend hold it for you), and pull taut. Twist the cord until you
can’t twist it any further and it begins to kink.
Carefully, keeping the twisted cord taut, place a finger in the center of the cord and fold it in
half. Remove the folded end from the hook and allow the two ends of the cord to twist together.
Pull gently on each end to even the twist and tie each end in an overhand knot approximately
1 inch from the end to secure. Cut ends to form tassels.
To insert the cord into the bag, weave one end of cord under then over each of the double
crochet stitches in Round 61, leaving equal lengths on both sides.
Variation: Making a sturdier bag
To add support to the bottom of the bag, cut a circle from a piece of thick plastic to fit inside.
If you’d like to take this bag to the beach, make the bag using a worsted-weight nylon yarn,
which will stand up to the abuse of sun and sand.
82
PART 2 Hook, Yarn, Action! Crocheting Simple Projects
IN THIS CHAPTER
»» Changing color and texture to
crochet a fashion-forward scarf
»» Using various colors and stitches
to create a comfortable cloche
»» Designing with shells and clusters
in a wavy throw
»» Crocheting with chenille to make a
feet-pleasing throw rug
8
Coloring It In
Chapter
C
hanging colors is an integral part of crochet, and being able to change colors properly is
absolutely essential. The technique is not difficult, but if you do it incorrectly, you can
ruin the final look of your design.
Here are a couple things to remember before you get started:
»» When joining a new yarn color, always finish the last stitch of the first color with the second
color, regardless of the type of stitch you’re working (see Chapter 4 for detailed info on
changing colors). Doing so gets you ready to start the first stitch of the second color with the
correct color loop on your hook. This also prevents color drag, which is what happens when
part of a stitch is one color and the rest of a stitch is another color. Starting the new color in
the last stitch of the old color applies to all color changes, regardless of whether you change
yarn at the end of a row or round, or midstream.
»» Hide the tail end of the yarn color by laying it across the tops of the stitches in the previous
row and working over it or weaving it in with a yarn needle when you finish crocheting.
The patterns in this chapter give you the opportunity to practice changing colors. The color
changes all take place at the beginning (or end) of a row or round, but the concept is the same
no matter where the change takes place.
A Scarf of a Different Color
Crocheting this scarf is really fun, and it’ll certainly brighten up your wardrobe. Not only are
you changing colors with each row but textures as well (see Figure 8-1). You work the scarf
completely with single crochet stitches, but you’d never know to look at it. Sometimes it’s okay
to mix and match yarns, and this design is a great example.
CHAPTER 8 Coloring It In
83
FIGURE 8-1:
By using the
single crochet
stitch in this
scarf, you can
focus on
changing
colors.
Materials and vital statistics
»» Yarn:
• Bernat “Matrix” railroad yarn (62% nylon/38% polyester), Article*#166102 (1.75 oz. [50g],
140 yds [128 m] each ball): 1 ball of #02430 Web Wines (A)
•
Patons “Silverlash” eyelash yarn (98% polyester/2% lurex), Article #244081 (1.75 oz. [50g],
164 yds [150 m] each skein): 1 skein of #81415 Rose Quartz (B)
•
Patons “Lacette” fine-weight yarn (39% nylon/36% acrylic/25% mohair), Article #243030
(1.75 oz. [50g], 235 yds [215 m] each skein): 1 skein of #30040 Touch of Black (C)
•
Patons “Silverlash” eyelash yarn (98% polyester/2% lurex), Article #244081 (1.75 oz. [50g],
164 yds [150 m] each skein): 1 skein of #81405 Maroon Magic (D)
•
Patons “Lacette” fine-weight yarn (39% nylon/36% acrylic/25% mohair), Article #243030
(1.75 oz. [50g], 235 yds [215 m] each skein): 1 skein of #30008 Cream Caress (E)
You’ll have enough yarn to make several scarves.
»» Hook: Crochet hook size H-8 U.S. or size needed to obtain gauge
»» Measurements: 3¼ in. wide x 45 in. long
»» Gauge: 8 sts = 2 in.; 6 rows = 1 in.
»» Stitches used: Chain stitch (ch), slip stitch (sl st), single crochet (sc)
The beauty of this design reveals itself as you complete each row. You’ll get lots of practice
changing yarn colors, and the great thing is the textures will hide any slip-ups if you don’t get
it quite right the first time. Because the scarf is worked in single crochet stitches, it’s also a
great project to help you get used to working with novelty yarns.
84
PART 2 Hook, Yarn, Action! Crocheting Simple Projects
Directions
Foundation chain: With A, ch 201.
Row 1 (right side): Sc in 2nd ch from hook, sc in each ch across (200 sc), turn. Fasten off A,
join B.
Row 2: With B, ch 1, sc in each sc across (200 sc), turn. Fasten off B, join C.
Row 3: With C, ch 1, sc in each sc across (200 sc), turn. Fasten off C, join B.
Row 4: With B, ch 1, sc in each sc across (200 sc), turn. Fasten off B, join A.
Row 5: With A, ch 1, sc in each sc across (200 sc), turn. Fasten off A, join D.
Row 6: With D, ch 1, sc in each sc across (200 sc), turn. Fasten off D, join E.
Row 7: With E, ch 1, sc in each sc across (200 sc), turn. Fasten off E, join D.
Row 8: With D, ch 1, sc in each sc across (200 sc), turn. Fasten off D, join A.
Row 9: With A, ch 1, sc in each sc across (200 sc), turn. Fasten off A, join C.
Row 10: With C, ch 1, sc in each sc across (200 sc), turn. Fasten off C, join A.
Row 11: With A, ch 1, sc in each sc across (200 sc), turn. Fasten off A, join D.
Row 12: With D, ch 1, sc in each sc across (200 sc), turn. Fasten off D, join E.
Row 13: With E, ch 1, sc in each sc across (200 sc), turn. Fasten off E, join D.
Row 14: With D, ch 1, sc in each sc across (200 sc), turn. Fasten off D, join A.
Row 15: With A, ch 1, sc in each sc across (200 sc), turn. Fasten off A, join B.
Row 16: With B, ch 1, sc in each sc across (200 sc), turn. Fasten off B, join C.
Row 17: With C, ch 1, sc in each sc across (200 sc), turn. Fasten off C, join B.
Row 18: With B, ch 1, sc in each sc across (200 sc), turn. Fasten off B, join A.
Row 19: With A, ch 1, sc in each sc across (200 sc), turn.
Row 20: Ch 1, sc in each sc across (200 sc). Fasten off.
Denim Cloche
You’ve probably seen these little hats everywhere, and now you can make your own in no time
at all (see Figure 8-2). Denim never goes out of style, and the yarn used here is probably as
close to the real thing as I’ve ever seen. My guess is you’ll have to fight your teens off to get to
wear this hat.
CHAPTER 8 Coloring It In
85
FIGURE 8-2:
A snug-fitting
cloche
won’t blow off
on a windy
winter day.
You change colors when working in the round the same way as when you work in rows:
Complete the last stitch of the old color with the new color. You get a seamless transition with
no color drag.
Materials and vital statistics
»» Size: One size fits most adults
»» Yarn: Twilleys of Stamford “Denim Freedom” sport-weight yarn (100% cotton), (1.75 oz. [50 g],
102 yds [93 m] each ball): 1 ball each of
•
•
•
#104 Navy (A)
#101 Natural (B)
#102 Blue (C)
»» Hook: Crochet hook size G-6 U.S. or size needed to obtain gauge
»» Measurement: 21 in. in circumference
»» Gauge: First 4 rnds = 2½ in.
»» Stitches used: Chain stitch (ch), slip stitch (sl st), single crochet (sc), double crochet (dc)
The inherent characteristics of this yarn make it fade and shrink a bit, so be sure to wash the
cloche before you wear it the first time. After a while, it’ll look like your favorite pair of jeans.
You create the pattern in the hat by varying the stitches in different rounds, from double
crochet stitches to single crochet stitches, and even creating spaces to work in with a chain
stitch thrown in.
86
PART 2 Hook, Yarn, Action! Crocheting Simple Projects
Directions
Foundation chain: With A, ch 4 and close into a ring with 1 sl st in first ch.
Rnd 1: Ch 3 (first dc), work 5 dc in ring (6 dc), sl st in first dc to join.
Rnd 2: Ch 3 (first dc), dc in first dc, 2 dc in each dc around (12 dc), sl st in first dc to join.
Rnd 3: Ch 3 (first dc), dc in first dc, dc in next dc, • 2 dc in next dc, dc in next dc •, rep from • to •
around (18 dc), sl st in first dc to join.
Rnd 4: Ch 3 (first dc), dc in first dc, dc in each of next 2 dc, • 2 dc in next dc, dc in each of next
2 dc •, rep from • to • around (24 dc), sl st in first dc to join.
Rnd 5: Ch 3 (first dc), dc in first dc, dc in each of next 3 dc, • 2 dc in next dc, dc in each of next
3 dc •, rep from • to • around (30 dc), sl st in first dc to join.
Rnd 6: Ch 3 (first dc), dc in first dc, dc in each of next 4 dc, • 2 dc in next dc, dc in each of next
4 dc •, rep from • to • around (36 dc), sl st in first dc to join. Fasten off A, join B.
Rnd 7: With B, ch 1, 2 sc in first dc, sc in each of next 5 dc, • 2 sc in next dc, sc in each of next
5 dc •, rep from • to • around (42 sc), sl st in first sc to join.
Rnd 8: Ch 1, 2 sc in first sc, sc in each of next 6 sc, • 2 sc in next sc, sc in each of next 6 sc •, rep
from • to • around (48 sc), sl st in first sc to join. Fasten off B, join C.
Rnd 9: With C, ch 3 (first dc), dc in first sc, dc in each of next 7 sc, • 2 dc in next sc, dc in each
of next 7 sc •, rep from • to • around (54 dc), sl st in first dc to join.
Rnd 10: Ch 3 (first dc), dc in first dc, dc in each of next 8 dc, • 2 dc in next dc, dc in each of next
8 dc •, rep from • to • around (60 dc), sl st in first dc to join. Fasten off C, join B.
Rnd 11: With B, ch 1, 2 sc in first dc, sc in each of next 9 dc, • 2 sc in next dc, sc in each of next
9 dc •, rep from • to • around (66 sc), sl st in first sc to join. Fasten off B, join A.
Rnd 12: With A, ch 3 (first dc), dc in first sc, dc in each of next 10 sc, • 2 dc in next sc, dc in each
of next 10 sc •, rep from • to • around (72 dc), sl st in first dc to join.
Rnd 13: Ch 3 (first dc), dc in first dc, dc in each of next 11 dc, • 2 dc in next dc, dc in each of next
11 dc •, rep from • to • around (78 dc), sl st in first dc to join.
Rnd 14: Ch 3 (first dc), dc in first dc, dc in each of next 12 dc, • 2 dc in next dc, dc in each of next
12 dc •, rep from • to • around (84 dc), sl st in first dc to join. Fasten off A, join B.
Rnd 15: With B, ch 1, sc in first dc, ch 1, skip next dc, • sc in next dc, ch 1, skip next dc •, rep from
• to • around (84 sts), sl st in first sc to join. Fasten off B, join C.
Rnd 16: With C, ch 2, skip first sc, • sc in next ch-1 space, ch 1, skip next sc •, rep from • to •
around (84 sts), sl st in first ch to join. Fasten off C, join B.
Rnd 17: With B, ch 1, sc in first ch-1 space, ch 1, skip next sc, • sc in next ch-1 space, ch 1, skip
next sc •, rep from • to • around (84 sts), sl st in first sc to join. Fasten off B, join A.
CHAPTER 8 Coloring It In
87
Rnd 18: With A, ch 3 (first dc), dc in each sc and each ch-1 space around (84 dc), sl st in first
dc to join.
Rnd 19: Ch 3 (first dc), dc in each dc around (84 dc), sl st in first dc to join. Fasten off A, join B.
Rnd 20: With B, ch 1, sc in each dc around (84 sc), sl st in first sc to join. Fasten off B, join C.
Rnd 21: With C, ch 1, sc in each sc around (84 sc), sl st in first sc to join. Fasten off C, join A.
Rnd 22: With A, ch 1, sc in each sc around (84 sc), sl st in first sc to join. Fasten off.
Wavy Chevron Throw
Sometimes, there’s nothing like having a soft, warm blanket to throw over your legs or wrap
around your shoulders to keep the chill out (see Figure 8-3). The chevron pattern (a fancy way
to describe the repeated V shape) features shells at the peaks and clusters at the valleys.
This pattern probably falls into the intermediate skill-level category because of the stitch combination involved in creating the pattern. The pattern is commonly used, and it’s a great way
for you to become familiar with a design that you’ll see repeatedly throughout your crochet
experience.
The yarn used here is a wonderfully soft acrylic, which stands up to daily use and repeated
washings. You should be able to find the yarn in most craft stores, and it comes in a multitude
of colors if you decide on a different color palette.
FIGURE 8-3:
Complementary
colors draw
attention to
the chevron
design of this
afghan.
88
PART 2 Hook, Yarn, Action! Crocheting Simple Projects
Materials and vital statistics
»» Yarn: Lion Brand Yarn “Homespun” bulky-weight yarn, (98% acrylic/2% polyester), Article
#790 (6 oz. [170 g], 185 yds [169 m] each skein):
•
•
•
5 skeins of #347 Mediterranean (A)
3 skeins of #318 Sierra (B)
3 skeins of #326 Ranch (C)
»» Hook: Crochet hook size K-10½ U.S. or size needed to obtain gauge
»» Measurements: 36 in. wide x 58 in. long, excluding tassels
»» Gauge: 11 sts in pat = 4 in.; 6 rows in pat = 4 in.
»» Stitches used: Chain stitch (ch), double crochet (dc). Shell: • 3 dc in same stitch •. Cluster:
• 3 dc (half closed and joined tog) worked across 3 consecutive stitches •. (See Appendix A
for detailed instructions on shells and clusters.)
The stitch pattern used to make this throw is a simple chevron pattern, comprised of shell
stitches and clusters. The shells are made with three double crochet stitches worked into one
stitch, and the clusters are three double crochet stitches, half-closed and joined together,
worked across three separate stitches (see Figure 8-4). The shells form the peaks, while the
clusters draw the fabric together to form the valleys of the pattern.
FIGURE 8-4:
Reduced
sample of
stitch pattern.
Directions
Foundation chain: With A, chain 101 + 2 (first dc).
Normally, the first dc in a row is made by working 3 chain stitches, not 2. However, for the
foundation row in this pattern, a chain of only 2 stitches is used. The rest of the pattern uses a
turning ch of 3 for the first dc in a row.
Row 1 (right side): Dc in 3rd ch from hook, • dc in each of next 3 ch, work one cluster of 3 dc
across next 3 ch, dc in each of next 3 ch, shell in next ch •, rep from • to • across to within last
ch, 2 dc in last ch (102 sts), turn.
Row 2: Ch 3 (first dc), dc in first dc, • dc in each of next 3 dc, work one cluster of 3 dc across next
3 sts (the center dc of the cluster will be worked in the top of the cluster in the row below), dc
in each of next 3 dc, shell in next dc (the shell will be worked in the center dc of the shell from
the row below) •, rep from • to • across to within last dc, 2 dc in last dc (102 sts), turn.
Rows 3–7: Rep Row 2. Fasten off A, join B.
Rows 8–10: With B, rep Row 2. Fasten off B, join C.
CHAPTER 8 Coloring It In
89
Rows 11–12: With C, rep Row 2. Fasten off C, join B.
Row 13: With B, rep Row 2. Fasten off B, join A.
Rows 14–21: With A, rep Row 2. Fasten off A, join C.
Row 22: With C, rep Row 2. Fasten off C, join B.
Row 23: With B, rep Row 2. Fasten off B, join C.
Row 24: With C, rep Row 2. Fasten off C, join A.
Rows 25–32: With A, rep Row 2. Fasten off A, join B.
Row 33: With B, rep Row 2. Fasten off B, join C.
Rows 34–35: With C, rep Row 2. Fasten off C, join B.
Rows 36–38: With B, rep Row 2. Fasten off B, join A.
Rows 39–46: With A, rep Row 2. Fasten off A, join B.
Rows 47–78: Rep Rows 8–38. Fasten off B, join A.
Rows 79–85: With A, rep Row 2. Fasten off.
Adding tassels: To make a tassel, cut two 8-inch lengths of colors A, B, and C. Holding all
lengths together as one, fold in half. Cut two more 6-inch lengths of color A. Using one 6-inch
length of yarn, tie the bundle securely together through the center fold, leaving equal lengths
on each side. With the bundle folded in half, wrap the second length of yarn several times
around the folded bundle approximately ¾ in. below folded end. Tie tightly to secure. Make
20 tassels.
To attach the tassels, use the ends of yarn from the first tie at the center top of the tassel to tie
one tassel to each point across each short edge of throw.
Variation: Highlight the stitches, not the colors
This stitch pattern also looks great worked in a solid color. The yarn used comes in a multitude
of shades, so choose your own solid or color combination.
Cozy Chenille Throw Rug
Your feet will absolutely love you every time they encounter this chenille throw rug. Place it
next to your bed or at the foot of your favorite chair and sink your feet into its cozy warmth.
The chenille yarn used is super bulky in weight, making this a quick project to work up, and it
also gives the rug depth (see Figure 8-5). Use the colors given, or choose a palate that matches
your décor.
90
PART 2 Hook, Yarn, Action! Crocheting Simple Projects
FIGURE 8-5:
You’ll want to
burrow your
toes into
this chenille
throw rug.
Materials and vital statistics
»» Yarn: Lion Brand Yarn “Chenille Thick & Quick” super-bulky-weight yarn (91% acrylic/9%
rayon), Article #950 (100 yds [90 m] each skein):
•
•
•
•
3 skeins of #178 Basil (A)
1 skein of #155 Champagne (B)
1 skein of #136 Terracotta (C)
1 skein of #126 Chocolate (D)
»» Hook: Crochet hook size P-15 U.S. or size needed to obtain gauge
»» Measurements: 40 in. wide x 29 in. long
»» Gauge: 6 sts and 6 rows in pat = 4 in.
»» Stitches used: Chain stitch (ch), slip stitch (sl st), single crochet (sc), long single crochet (lsc),
half double crochet (hdc)
The pattern for this rug is primarily made up of half double crochet stitches, with some simple
variations thrown in for interest. Half double crochet stitches are nice and fat, especially when
worked with a bulky yarn. The edging gets a feminine, ruffled look by working chain stitches
between the single crochet stitches.
Directions
Foundation chain: With A, ch 60 + 2 (first hdc).
Row 1 (right side): Hdc in 3rd ch from hook, hdc in each ch across (61 hdc), turn.
Rows 2–3: Ch 2 (first hdc), hdc in each hdc across (61 hdc), turn. Fasten off A, join D.
CHAPTER 8 Coloring It In
91
Row 4: With D, ch 1, sc in first hdc, • ch 1, skip next hdc, sc in next hdc •, rep from • to • across
(31 sc and 30 ch-1 spaces), turn. Fasten off D, join B.
Row 5: With B, ch 1, sc in first sc, • working over ch-1 in previous row, lsc in hdc 2 rows below,
sc in next sc in current row •, rep from • to • across (31 sc and 30 lsc), turn. Fasten off B, join C.
Rows 6–7: With C, ch 2 (first hdc), hdc in each hdc across (61 hdc), turn. Fasten off C, join B.
Row 8: With B, ch 1, sc in each hdc across (61 sc), turn. Fasten off B, join D.
Row 9: With D, ch 1, sc in each sc across (61 sc), turn. Fasten off D, join B.
Row 10: With B, ch 1, sc in each sc across (61 sc), turn. Fasten off B, join A.
Rows 11–13: With A, ch 2 (first hdc), hdc in each st across (61 hdc), turn. Fasten off A, join B.
Rows 14–16: Rep Rows 8–10.
Rows 17–22: With A, ch 2 (first hdc), hdc in each hdc across, turn. Fasten off A, join D.
Row 23: With D, ch 1, sc in each hdc across (61 sc), turn. Fasten off D, join C.
Row 24: With C, ch 1, sc in each sc across (61 sc), turn. Fasten off C, join B.
Row 25: With B, ch 1, sc in each sc across (61 sc), turn. Fasten off B, join C.
Row 26: With C, ch 1, sc in each sc across (61 sc), turn. Fasten off C, join D.
Row 27: With D, ch 1, sc in each sc across (61 sc), turn. Fasten off D, join A.
Rows 28–33: With A, ch 2 (first hdc), hdc in each sc across (61 hdc), turn. Fasten off A, join B.
Row 34: With B, ch 1, sc in each hdc across (61 sc), turn. Fasten off B, join D.
Row 35: With D, ch 1, sc in each sc across (61 sc), turn. Fasten off D, join B.
Row 36: With B, ch 1, sc in each sc across (61 sc), turn. Fasten off B, join A.
Rows 37–39: With A, ch 2 (first hdc), hdc in each sc across (61 hdc), turn. Fasten off A, join B.
Rows 40–41: Rep Rows 34–35. Fasten off D, join B.
Row 42: With B, ch 1, sc in each sc across (61 sc), turn. Fasten off B, join C.
Rows 43–44: With C, ch 2 (first hdc), hdc in each st across (61 hdc), turn. Fasten off C, join B.
Row 45: With B, ch 1, sc in first sc, • ch 1, skip next hdc, sc in next hdc •, rep from • to • across
(31 sc and 30 ch-1 spaces), turn. Fasten off B, join D.
Row 46: With D, ch 1, sc in first sc, • working over ch-1 in previous row, lsc in hdc 2 rows below,
sc in next sc in current row •, rep from • to • across (31 sc and 30 lsc), turn. Fasten off D, join A.
Rows 47–49: With A, ch 2 (first hdc), hdc in each st across (61 hdc), turn. Do not turn at end of
last row.
92
PART 2 Hook, Yarn, Action! Crocheting Simple Projects
Edging: Working in row-end sts across short edge of rug, sc in corner st, •• • ch 2, sc in next
st •, rep from • to • across to next corner, (sc, ch 2, sc) in corner st ••, rep from •• to •• around,
sl st in first sc to join. Fasten off.
Variation: Size it to fit just right
If you need a larger or smaller rug to fit your particular space, you can always change the number of chain stitches in your foundation chain. When working your foundation chain, make sure
you have an odd number of stitches to accommodate the stitch pattern.
To figure out how many more (or fewer) stitches you need to adjust the size, use the gauge
given in the beginning of the instructions (6 sts and 6 rows = 4 in.). Decide in inches what
you want the finished dimensions to be, then divide by 4 (gauge) and multiply by 6 (sts). See
Chapter 2 for detailed info on gauge.
Variation: Fringe it!
Omit the edging and add fringe to the short edges of the rug in colors to match the stripes for
a whole new look (see Appendix A for fringe how-to’s).
CHAPTER 8 Coloring It In
93
IN THIS CHAPTER
»» Crocheting a hip belt
»» Increasing in size to create a
fashion-forward scarf
»» Working in the round to make the
ever-popular rolled-brim hat for
kids
»» Moving up a size to crochet a
rolled-brim hat for adults
9
Mixing It Up: A Few
Changes Make a
Dramatic Difference
Chapter
T
he projects in this chapter illustrate the importance of gauge and of using the proper
materials listed with each pattern. The size of the hook you use dictates the size of the
stitches made, which in turn creates the stitch gauge, or number of stitches and rows per
a given measurement. Using a different weight yarn while keeping the hook size the same also
alters the outcome of your gauge and the appearance of your fabric. For instance, if you use a
lighter-weight yarn than the pattern calls for but keep your hook size the same, the resulting
fabric will have looser stitches and a more open look.
For a pattern to work consistently time after time, you have to use the same size materials, both
hook and yarn, each time. By changing the hook size and/or the yarn weight, your project can
turn out dramatically different (see Chapter 2 for detailed information on gauge and Chapter 1
for materials).
The following list explains how using different materials affects the gauge:
»» Larger hook with the same size yarn: Fewer stitches per given measurement with the
resulting project turning out larger than intended.
»» Smaller hook with the same size yarn: More stitches per given measurement with resulting project turning out smaller than intended.
»» Same size hook with heavier-weight yarn: Fewer stitches per given measurement with
the resulting project turning out larger than intended with a tighter fabric.
CHAPTER 9 Mixing It Up: A Few Changes Make a Dramatic Difference
95
»» Same size hook with a lighter-weight yarn: More stitches per given measurement with
the resulting project turning out smaller than intended with a looser fabric.
»» Larger hook with heavier-weight yarn: The finished design will increase in size propor-
tionally from the original size, provided that the hook size is the one recommended for use
with the yarn.
»» Smaller hook with lighter-weight yarn: The finished design will decrease in size propor-
tionally from the original size, provided that the hook size is the one recommended for use
with the yarn.
This isn’t to say that you can’t substitute yarn — but if you want your project to turn out the
same as the pattern dimensions, the yarn has to be the same weight as the recommended yarn
in the materials list.
In the first pattern, you create a fanciful belt with a pattern that creates a series of bows and
ruffles running across its length. That belt turns into a fun scarf in the second pattern, simply
by using a heavier weight of yarn and a larger hook.
In the third pattern, you make a child’s rolled-brim hat using a yarn that has the look of many
seed beads strung together. Using the identical pattern, you can create a softer (and larger)
version for an adult, simply by using different yarn and a larger hook.
Not all patterns can be adapted this way, but the ones in this chapter give you a sense of how
important it is to follow the directions given with an individual pattern, and how even the
smallest change can affect the final outcome.
Beads-‘n’-Bows Belt
This belt design is complete with frills, beads, and bows (see Figure 9-1). Don’t worry about
finding beads — this new yarn incorporates the beads right into the strands, which eliminates
the necessity of stringing the beads before getting started. Because this project introduces a
new stitch pattern, it’s suitable for someone with intermediate-level skills. To help you out,
the instructions walk you through each step, and you’ll find that you can work the new stitches
with relative ease and add a new skill to your repertoire.
Materials and vital statistics
»» Size: Directions given are for size Small (28 in.). Changes for Medium (32 in.), Large (36 in.),
and X-Large (40 in.) are in parentheses.
»» Yarn: ModaDea “Beadnik” worsted-weight yarn (90% acrylic/5% polyester/5% PVC), Article
#R149 (1.76 oz. [50 g], 103 yds [95 m] each ball): 2 balls of #2923 Daddy-O Tan
»» Hook: Crochet hook size H-8 U.S. or size needed to obtain gauge
»» Measurements: 3 in. wide x 28 (32, 36, 40) in. long, excluding ties
»» Gauge: 13 sts in pat = 2½ in.; 8 rows in pat = 2 in.
»» Stitches used: Chain stitch (ch), single crochet (sc). Long single crochet(lsc): • Working over
3 ch-8 loops formed in previous 3 rows, work 1 sc, thus gathering loops together •.
(See Appendix A for exact details on how to work this stitch.) Shell: • 5 sc in same st •.
96
PART 2 Hook, Yarn, Action! Crocheting Simple Projects
FIGURE 9-1:
The beads-‘n’bows belt adds
a feminine
touch to a
spring skirt.
The bows in this design are crocheted using a series of single crochet stitches and chain loops,
which are then drawn together in the center with a long single crochet stitch. The edging is
comprised of a variation of the shell stitch using single crochet stitches rather than the more
traditional double crochet shell.
And don’t worry about the beads in this yarn getting hung up — they’re small seed beads and
slide right through the loops that create the stitches.
Directions
If none of the sizes listed in the “Materials and vital statistics” section quite fit your particular
shape, work the pattern repeat to ½ in. less than the desired length, then work the last two
rows.
Foundation chain: Ch 14.
Row 1 (right side): Sc in 2nd ch from hook, sc in each ch across (13 sc), turn. (Figure 9-2 shows
the stitch diagram for the first five rows.)
Row 2: Ch 1, sc in each of first 3 sc, ch 8, skip next 7 sc, sc in each of last 3 sc (14 sts), turn.
Rows 3–4: Ch 1, sc in each of first 3 sc, ch 8, skip next ch-8 loop, sc in each of last 3 sc (14 sts),
turn.
Row 5: Ch 1, sc in each of first 3 sc, ch 3, lsc over 3 ch-8 loops, ch 3, sc in each of last 3 sc (13
sts), turn.
Rep Rows 2–5 until belt measures 27½ (31½, 35½, 39½) in.
Next Row: Ch 1, sc in each of first 3 sc, ch 8, sc in each of last 3 sc (14 sts), turn.
CHAPTER 9 Mixing It Up: A Few Changes Make a Dramatic Difference
97
FIGURE 9-2:
Stitch diagram
for the
beads-‘n’-bows
belt and the
ruffles-‘n’-bows
scarf.
Next Row: Ch 1, sc in each of first 3 sc, work 7 sc in ch-8 loop, sc in each of last 3 sc (13 sc),
do not turn.
Edging: Working in row-end sts across long edge of belt, sc in first row-end st, • shell in next
st, skip next st •, rep from • to • across to within last st, sc in last st. Fasten off.
With right side facing, rep edging across long edge on other side of belt.
Ties: With right side facing, • join yarn in ch-8 loop on one short end formed by first 2 rows,
ch 50. Fasten off •. Rep from • to • 4 times in ch-8 loop. For the other tie, rep from • to • 5 times
in ch-8 loop on other short end.
Ruffles-‘n’-Bows Scarf
The basic pattern for this scarf is exactly the same as the one for the beads-‘n’-bows belt, with
the exception of the ties (you really don’t need them for a scarf). You work the stitches the
same, but the outcome is quite different. When you change the weight of the yarn and size of
the hook, you create a different material (see Figure 9-3). Instead of ruffles and bows around
your waist, you can now wear them around your neck.
This project is for someone who has mastered the basic crochet stitches and is ready to move on
to new stitches. Make sure to work your gauge swatch to get the hang of the long single crochet
stitch, and you’ll be moving through each step just like a pro.
Materials and vital statistics
»» Yarn: Coats and Clark Red Heart “Casual Cot’n” bulky-weight yarn (61% acrylic/29%
cotton/10% polyester), Article #E723 (4 oz. [113 g], 140 yds [128 m] each skein):
2 skeins of #3937 Grand Canyon
»» Hook: Crochet hook size J-10 U.S. or size needed to obtain gauge
»» Measurements: 4 in. wide x 60 in. long
»» Gauge: 13 sts in pat = 3¼ in.; 8 rows in pat = 2¾ in.
»» Stitches used: Chain stitch (ch), single crochet (sc). Long single crochet (lsc): • Working
over 3 ch-8 loops formed in previous 3 rows, work 1 sc, thus gathering loops together •.
(See Appendix A for exact details on how to work this stitch.) Shell: • 5 sc in same st •.
98
PART 2 Hook, Yarn, Action! Crocheting Simple Projects
FIGURE 9-3:
A scarf with
ruffles and
bows creates a
soft frame for
your face.
This pattern really uses only two different stitches, the chain stitch and the single crochet
stitch. The other two listed in the “Stitches used” line are just variations and combinations of
the single crochet. Work your chains and gather them together to form the bow-like design,
then add some single crochet shells across the edges, and you’ve got a lovely scarf to dress up
your outerwear.
Directions
Refer to Figure 9-2 for the stitch diagram for this pattern (remember, the pattern for the belt
and scarf are the same).
Foundation chain: Ch 14.
Row 1 (right side): Sc in 2nd ch from hook, sc in each ch across (13 sc), turn.
Row 2: Ch 1, sc in each of first 3 sc, ch 8, skip next 7 sc, sc in each of last 3 sc (14 sts), turn.
Rows 3–4: Ch 1, sc in each of first 3 sc, ch 8, skip next ch-8 loop, sc in each of last 3 sc (14 sts),
turn.
Row 5: Ch 1, sc in each of first 3 sc, ch 3, lsc over 3 ch-8 loops, ch 3, sc in each of last 3 sc
(13 sts), turn.
Rep Rows 2–5 until scarf measures 59 in. in length.
Next Row: Ch 1, sc in each of first 3 sc, ch 8, sc in each of last 3 sc (14 sts), turn.
Next Row: Ch 1, sc in each of first 3 sc, work 7 sc in ch-8 loop, sc in each of last 3 sc (13 sc), do
not turn.
CHAPTER 9 Mixing It Up: A Few Changes Make a Dramatic Difference
99
Edging: Working in row-end sts across long edge of scarf, sc in first row-end st, • shell in next
st, skip next st •, rep from • to • across to within last st, sc in last st. Fasten off.
With right side facing, rep edging across long edge on other side of scarf.
Child’s Rolled-Brim Hat
In most parts of the country, hats are an indispensable part of a child’s cool-weather wardrobe.
The best kind of hat is one that your child can just pull on with no fuss and then pull off again
and throw in the closet (or shove into a backpack). This design is for a basic hat with a rolled
brim, and the yarn has the look of many tiny beads strung together, which gives it a really fun
pattern, as shown in Figure 9-4.
FIGURE 9-4:
The yarn
creates a
unique pattern
in the child’s
rolled-brim hat.
Materials and vital statistics
»» Size: One size fits most children
»» Yarn:Aunt Lydia’s “Beadies Crochet” worsted-weight yarn (94% acrylic/6% polyester), Article
#159 (1.765 oz. [50 g], 66 yds [60 m] each skein): 2 skeins of #00356 Flower Power
»» Hook: Crochet hook size I-9 U.S. or size needed to obtain gauge
»» Yarn needle
»» Measurement: 20 in. in circumference
»» Gauge: First 3 rnds = 2¾ in.
»» Stitches used: Chain stitch (ch), slip stitch (sl st), double crochet (dc)
100
PART 2 Hook, Yarn, Action! Crocheting Simple Projects
Starting at the top of the hat, working in rounds, you increase the diameter using double crochet stitches until the correct size is reached, and then you work the pattern evenly for several
rounds until the desired depth is met. You create the brim by rolling the last two rounds up
toward the outside, and then sewing the last round to the hat itself. For a refresher on working
in rounds, see Chapter 4.
Directions
Center ring: Ch 4 and close into a ring with 1 sl st in first ch.
Rnd 1:Ch 3 (first dc), work 7 dc in ring (8 dc), sl st in first dc to join.
Rnd 2: Ch 3 (first dc), dc in first dc, 2 dc in each dc around (16 dc), sl st in first dc to join.
Rnd 3: Ch 3 (first dc), dc in first dc, dc in next dc, • 2 dc in next dc, dc in next dc •, rep from • to •
around (24 dc), sl st in first dc to join.
Rnd 4: Ch 3 (first dc), dc in first dc, dc in each of next 2 dc, • 2 dc in next dc, dc in each of next
2 dc •, rep from • to • around (32 dc), sl st in first dc to join.
Rnd 5: Ch 3 (first dc), dc in first dc, dc in each of next 3 dc, • 2 dc in next dc, dc in each of next
3 dc •, rep from • to • around (40 dc), sl st in first dc to join.
Rnd 6: Ch 3 (first dc), dc in first dc, dc in each of next 4 dc, • 2 dc in next dc, dc in each of next
4 dc •, rep from • to • around (48 dc), sl st in first dc to join.
Rnd 7: Ch 3 (first dc), dc in first dc, dc in each of next 5 dc, • 2 dc in next dc, dc in each of next
5 dc •, rep from • to • around (56 dc), sl st in first dc to join.
Rnd 8: Ch 3 (first dc), dc in first dc, dc in each of next 6 dc, • 2 dc in next dc, dc in each of next
6 dc •, rep from • to • around (64 dc), sl st in first dc to join.
Rnds 9–16: Ch 3 (first dc), dc in each dc around (64 dc), sl st in first dc to join.
Rnd 17: Ch 3 (first dc), dc in each dc around (64 dc), sl st in first dc to join. Fasten off.
Brim: With right side facing, roll last two rounds of hat up toward the outside, creating a rolled
edge around the entire lower edge of hat. Using yarn needle and approximately 24 in. of yarn,
sew last round of stitches to third round from bottom edge.
Adult’s Rolled-Brim Hat
Just like kids, adults need to keep their heads warm, too, and this pattern, which is identical to
the child’s rolled-brim hat pattern (see the earlier section, “Child’s Rolled-Brim Hat”), adapts
well to the increase in size. Simply by changing the materials, you can create a hat that not
only functions well, but looks good, too. The resulting fabric is a bit more open and airy (see
Figure 9-5), providing a finished designed that will keep you warm and looking good.
As you create this project, you’ll see that by using different materials, you can change the final
outcome without a complete redesign.
CHAPTER 9 Mixing It Up: A Few Changes Make a Dramatic Difference
101
FIGURE 9-5:
The adult
version of the
rolled-brim hat
is simple and
functional.
Materials and vital statistics
»» Size: One size fits most adults
»» Yarn: Aunt Lydia’s “New Wave Crochet” worsted-weight yarn (96% polyester/4% nylon),
Article #184 (1.76 oz. [50 g], 98 yds [90 m] each skein): 2 skeins of #00149 Orchid
»» Hook: Crochet hook size K-10½ U.S. or size needed to obtain gauge
»» Yarn needle
»» Measurement: 21 in. in circumference
»» Gauge: First 3 rnds = 3 in.
»» Stitches used: Chain stitch (ch), slip stitch (sl st), double crochet (dc)
To crochet this hat, you start off with a small center ring, and by adding stitches incrementally
in each round (increasing), you work until the desired diameter is reached. You then work even
on the stitches to create the shape of the hat, and continue until the proper depth is reached.
The brim is created by rolling the bottom few rolls up and sewing them into place. For more
info on crocheting in rounds, see Chapter 4.
Directions
Center ring: Ch 4 and close into a ring with 1 sl st in first ch.
Rnd 1: Ch 3 (first dc), work 7 dc in ring (8 dc), sl st in first dc to join.
Rnd 2: Ch 3 (first dc), dc in first dc, 2 dc in each dc around (16 dc), sl st in first dc to join.
Rnd 3: Ch 3 (first dc), dc in first dc, dc in next dc, • 2 dc in next dc, dc in next dc •, rep from • to •
around (24 dc), sl st in first dc to join.
102
PART 2 Hook, Yarn, Action! Crocheting Simple Projects
Rnd 4: Ch 3 (first dc), dc in first dc, dc in each of next 2 dc, • 2 dc in next dc, dc in each of next
2 dc •, rep from • to • around (32 dc), sl st in first dc to join.
Rnd 5: Ch 3 (first dc), dc in first dc, dc in each of next 3 dc, • 2 dc in next dc, dc in each of next
3 dc •, rep from • to • around (40 dc), sl st in first dc to join.
Rnd 6: Ch 3 (first dc), dc in first dc, dc in each of next 4 dc, • 2 dc in next dc, dc in each of next
4 dc •, rep from • to • around (48 dc), sl st in first dc to join.
Rnd 7: Ch 3 (first dc), dc in first dc, dc in each of next 5 dc, • 2 dc in next dc, dc in each of next
5 dc •, rep from • to • around (56 dc), sl st in first dc to join.
Rnd 8: Ch 3 (first dc), dc in first dc, dc in each of next 6 dc, • 2 dc in next dc, dc in each of next
6 dc •, rep from • to • around (64 dc), sl st in first dc to join.
Rnds 9–16: Ch 3 (first dc), dc in each dc around (64 dc), sl st in first dc to join.
Rnd 17: Ch 3 (first dc), dc in each dc around (64 dc), sl st in first dc to join. Fasten off.
Brim: With right side facing, roll last two rounds of hat up toward the outside, creating a rolled
edge around the entire lower edge of hat. Using yarn needle and approximately 24 in. of yarn,
sew last round of stitches to third round from bottom edge.
CHAPTER 9 Mixing It Up: A Few Changes Make a Dramatic Difference
103
3
Putting Your
Skills to the Test
IN THIS PART . . .
Putting pieces together to make pillows, belts, and vests
Getting creative with loops and special stitches
Creating a variety of sweaters
Using traditional stitches for blankets, bags, and more
Incorporating updated materials with traditional stitches
IN THIS CHAPTER
»» Using furry squares to make a fun
decorative pillow
»» Joining as you go to add length to a
floral belt
»» Working up a warm winter vest
10
Seams Sew Easy: Joining
Pieces Together
Chapter
M
any crocheted items are comprised of several pieces joined together. The methods
used to join these pieces are varied, and the method that you choose is largely dictated by the design and the type of yarn that you’re using. For instance, the first pattern, the furry boa pillow, lends itself best to sewing, as does the third pattern, the southwest
vest, because these two projects use a novelty yarn that can create a somewhat bulky seam
when crocheted.
But the flower-power belt is created by joining each separate motif (a repeated figure in a
design) as you go. When crocheting a design that’s comprised of motifs, you generally have a
lot of them. Joining them as you go saves time (you don’t have to go back and sew everything
together), and it also creates a neater seam. Many motifs lend themselves to a quick slip stitch
in corresponding stitches across the edges to join.
Sewing separate pieces together creates a neater seam and works best in designs where you
don’t want the seam to be visible. On the other hand, crocheting a seam can be used as part of
the design. For instance, when joining pieces of an afghan, you can use a crocheted seam not
only to join the separate pieces, but to add color and dimension to the finished design.
This chapter allows you to practice two methods for joining pieces together and become familiar with why each is used. So pick a project, grab your hook and yarn, and get crocheting!
Furry Boa Pillow
Pillows are a must-have for home décor — and if you walk through any store that carries home
fashions, you’ll see proof of this. This project gives you practice sewing pieces together (see
Figure 10-1), and at the same time creates a pillow that rivals many that you see for sale — and
CHAPTER 10 Seams Sew Easy: Joining Pieces Together
107
at a fraction of the price. The yarn used is a very short, thick eyelash yarn with a strong base
thread so it will stand up well to wear and tear. It’s available in a variety of colors, so choose
one that fits your color scheme.
FIGURE 10-1:
The furry
pillow is a
must-have for
your décor.
Materials and vital statistics
»» Yarn: Bernat “Boa” bulky-weight fur yarn (100% polyester), Article # 164081(1.75 oz. [50 g],
71 yds [65 m] each ball): 6 balls of #81206 Toucan
»» Hook: Crochet hook size K-10½ U.S. or size needed to obtain gauge
»» Yarn needle
»» Pillow form: 16 in. x 16 in.
»» Measurements: 16 in. wide x 16 in. long
»» Gauge: 10 sc = 4¼ in.; 10 rows = 4 in.
»» Stitches used: Chain stitch (ch), single crochet (sc)
This design couldn’t be much easier. Crochet your foundation chain, and then work rows of
single crochet stitches until your piece becomes a square. It may be slow going for the first row
or two because of the furry nature of the yarn (sometimes it’s hard to see the stitches), but
don’t give up. Count the stitches as you go so you don’t inadvertently drop any, and pretty soon
you’ll be moving right along.
Directions
Repeat these directions twice, once for the front and once for the back.
Foundation chain: Ch 43.
Row 1 (right side): Sc in 2nd ch from hook, sc in each ch across (42 sc), turn.
108
PART 3 Putting Your Skills to the Test
Row 2: Ch 1, sc in each sc across (42 sc), turn.
Rep Row 2 until piece measures 16 in. from beg. Fasten off.
Assembly: With the right sides of the front and back facing, using yarn needle and a length of
yarn approximately 24 inches long, sew the pieces together using the whipstitch (see Appendix A
for details on how to do this stitch) around three sides, matching stitches across each edge. Turn
right side out. Insert pillow form between the two pieces and sew remaining side closed.
Flower-Power Belt
This floral design is popping up in all the stores (see Figure 10-2), so here it does double duty.
Not only do you create this hot new fashion item, but you also practice the technique of joining motifs as you go. Although this pattern includes a new skill and probably falls within the
intermediate-skill level, it’s really quick and easy to navigate. This project is a great stepping
stone to prepare you for more-advanced patterns.
FIGURE 10-2:
This belt gives
you flower
power to wear
around your
waist.
This joining method is used quite frequently and is accomplished by joining corresponding
stitches on the current motif with those on the last motif made. It can consist of just a few
stitches, such as this one, or it can be worked around four sides of a square motif. It’s a great
method if it can be used, and you save time because you don’t have to sew a lot of pieces
together when you’re finished crocheting.
Materials and vital statistics
»» Size: Directions given are for size Small/Medium (48 in. in length). Changes for Large/
X-Large (60 in. in length) are in parentheses.
CHAPTER 10 Seams Sew Easy: Joining Pieces Together
109
»» Yarn: Patons “Grace” sport-weight yarn (100% mercerized cotton), Article #246060 (1.75 oz.
[50 g], 136 yds [125 m] each ball): 1 ball each of
•
•
•
•
#60005 Snow (A)
#60130 Sky (B)
#60104 Azure (C)
#60903 Lavender (D)
»» Hook: Crochet hook size G-6 U.S. or size needed to obtain gauge
»» Measurements: Motif = 3 in. in diameter
»» Gauge: First rnd = 1¼ in.
»» Stitches used: Chain stitch (ch), slip stitch (sl st), single crochet (sc), half double crochet
(hdc), double crochet (dc)
The flower motifs that make up this belt illustrate a common method for creating flowers.
There are many variations on this, but the principle is the same: Crochet a chain loop, and then
fill it with stitches that graduate in height from shortest to tallest, then back down again. Joining the motifs is as easy as working a slip stitch into the corresponding stitch on the previous
motif where designated.
Directions
Make 4 (5) motifs of colors A, B, C, and D, working in the foll color sequence: A, B, C, D. (See
Figure 10-3 for the stitch diagram.)
FIGURE 10-3:
Motif stitch
diagram.
First motif
Center ring: With A, ch 6 and close into a ring with 1 sl st in first ch.
Rnd 1: Ch 3 (first dc), dc in ring, • ch 6, 3 dc in ring •, rep from • to • 3 times, ch 6, dc in ring, sl
st in top of first dc (15 dc and 5 ch-6 loops).
Rnd 2: • Ch 1, (sc, hdc, 7 dc, hdc, sc) in next ch-6 loop, ch 1, skip next dc, sl st in next dc •, rep
from • to • around (5 petals made). Fasten off.
110
PART 3 Putting Your Skills to the Test
Second and successive motifs
Center ring: With next color in sequence, ch 6 and close into a ring with 1 sl st in first ch.
(See Figure 10-4 for a stitch diagram for joining motifs.)
Rnd 1: Ch 3 (first dc), dc in ring, • ch 6, 3 dc in ring •, rep from • to • 3 times, ch 6, dc in ring, sl
st in top of first dc (15 dc and 5 ch-6 loops).
Rnd 2: • Ch 1, (sc, hdc, 7 dc, hdc, sc) in next ch-6 loop, ch 1, skip next dc, sl st in next dc •, rep
from • to • around to within last petal, ch 1, (sc, hdc, 2 dc) in next ch-6 loop, with right sides
facing, •• sl st in corresponding dc in last motif made, dc in ch-6 loop in current motif ••, rep
from •• to •• twice, (2 dc, hdc, sc) in ch-6 loop in current motif, ch 1, skip next dc, sl st in next
dc. Fasten off.
FIGURE 10-4:
Stitch diagram
for joining
rounds for
petals.
Variation: Choosing hues that fit your style
This yarn comes in a multitude of colors, so feel free to choose your own combination, or use
just a single color for a more subtle look.
Southwest Vest
This vest is made with a wonderfully soft fur yarn in an unusual color combination (see
Figure 10-5). The half double crochet stitch is nice and fat, so you don’t have spaces between
the stitches. There are no buttonholes, zippers, or belts to deal with, so you can just throw it on
over a turtleneck and a pair of jeans, and you’re ready for a brisk fall day.
CHAPTER 10 Seams Sew Easy: Joining Pieces Together
111
FIGURE 10-5:
The southwest
vest only
requires
sewing at the
shoulders.
Materials and vital statistics
»» Size: Directions given are for size X-Small (4–6). Changes for Small (8–10), Medium (12–14),
and Large (16) are in parentheses. Finished bust: 35¼ (40, 44, 48½) in. Back length: 22 (23,
25, 25) in. (See Figure 10-6 for measurements of specific project parts.)
»» Yarn: South West Trading Company “Pagoda” bulky-weight yarn (100% polyester), (3.5 oz.
[100 g], 110 yds [101 m] each skein): 5 (5, 6, 6) skeins of #311 Bear Cub
»» Hook: Crochet hook size L-11 U.S. or size needed to obtain gauge
»» Yarn needle
»» Gauge: 10 hdc = 5½ in.; 9 rows hdc = 5 in.
FIGURE 10-6:
Schematic for
the vest.
112
PART 3 Putting Your Skills to the Test
»» Stitches used: Chain stitch (ch), slip stitch (sl st), half double crochet (hdc). Dec 1 hdc:
•Yo, (insert hook in next st, yo, draw yarn through st) twice, yo, draw yarn through 4 loops
on hook •.
The construction of this vest couldn’t be much simpler: The whole thing is worked in one piece
from the bottom edge to the armholes. The work is then split into the two sides of the front
and the back by skipping stitches to create the armhole openings. The only sewing required is
to sew the shoulder seams.
The first couple of rows worked with this yarn can be slow going, but after you’ve gotten three
to four of them done, the work becomes much easier.
Directions
Foundation chain: Ch 63 (71, 79, 87) + 2 (first hdc).
Row 1 (right side): Hdc in 3rd ch from hook, hdc in each ch across (64 [72, 80, 88] hdc), turn.
Row 2: Ch 2 (first hdc), hdc in each hdc across (64 [72, 80, 88] hdc), turn.
Rep Row 2 until piece measures 14 (14, 15, 15) in. from beg, ending with a wrong-side row.
Shape right front
Next Row: Ch 2 (first hdc), hdc in each of next 14 (16, 18, 20) hdc (15 [17, 19, 21] hdc), turn, leaving rem sts unworked.
Next Row: Ch 2 (first hdc), hdc in each hdc across to within last 2 hdc, dec 1 hdc in last 2 hdc
(14 [16, 18, 20] hdc), turn.
Next Row: Ch 2 (first hdc), dec 1 hdc in next 2 hdc, hdc in each hdc across (13 [15, 17, 19] hdc),
turn.
Rep last 2 rows until 7 (7, 9, 9) sts rem on work.
Work even in hdc until right front measures 8 (9, 10, 10) in. from beg of shaping. Fasten off.
Back
Next Row: With right side facing, skip next 2 sts to the left of last st made in first row of right
front, join yarn in next st, ch 2 (first hdc), hdc in each of next 29 (33, 37, 41) hdc (30 [34, 38,
42] hdc), turn, leaving rem sts unworked.
Work even in hdc across 30 (34, 38, 42) hdc until back measures same as finished front. Fasten off.
Shape left front
Next Row: With right side facing, skip next 2 sts to the left of last st made in first row of back,
join yarn in next st, ch 2 (first hdc), hdc in each hdc across (15 [17, 19, 21] hdc), turn.
Next Row: Ch 2 (first hdc), dec 1 hdc in next 2 hdc, hdc in each hdc across (14 [16, 18, 20] hdc),
turn.
CHAPTER 10 Seams Sew Easy: Joining Pieces Together
113
Next Row: Ch 2 (first hdc), hdc in each hdc across to within last 2 hdc, dec 1 hdc in last 2 hdc
(13 [15, 17, 19] hdc), turn.
Rep last 2 rows until 7 (7, 9, 9) sts rem on work.
Work even in hdc until left front measures 8 (9, 10, 10) in. from beg of shaping. Fasten off.
Assembly
Turn the vest inside out so the right sides are facing each other. Using the yarn needle and a
12-inch length of yarn, use the whipstitch to sew the fronts to the back across the shoulders,
beginning at the armhole edge, matching stitches across.
Variation: Belt it!
If you’d like to have a vest that you can cinch, the easiest way is to make a belt.
Make a foundation chain long enough to fit around your waist, then add about 18 inches. Work
three rows of single crochet stitches to complete the belt, or more if you’d like it a bit wider.
114
PART 3 Putting Your Skills to the Test
IN THIS CHAPTER
»» Working in the spaces to create an
elegant wrap
»» Creating a belt in crossed double
crochet stitch for an up-to-date
accessory
»» Throwing a loop into your stitches
to create a standout scarf
»» Revisiting the V-stitch with a
fashion-forward wrap
11
Finding the Loopholes
and Creative
Combinations
Chapter
D
o you want to know why crocheting is unique when compared to the other needlework
arts? Because after you’ve gotten the hang of the basic stitches, you can combine them
in simple ways to create totally different looks. Using only the chain stitch, slip stitch,
single crochet stitch, and double crochet stitch, you can add a plethora of stitch patterns to
your skill library.
The patterns in this chapter give you a chance to practice these frequently used combinations
while creating designs you’ll be proud to show off.
Elegant Evening Wrap
Many of us love to have a wrap around because you can take it on and off easily and you can
wear it with countless outfits (see Figure 11-1). The yarn I suggest here is actually a combination of three strands of yarn wound together to create one, with rich browns, coppers, and gold
eyelash included.
When crocheting with some of these newer novelty yarns, you may have some difficulty working into the stitches, so a design such as this one is especially well-suited to these yarns. The
spaces are easy to see, the pattern is light and airy, and the strands of fur and eyelashes fill in
the spaces.
CHAPTER 11 Finding the Loopholes and Creative Combinations
115
FIGURE 11-1:
The yarn and
stitch pattern
turns a simple
wrap into one
that’s elegant
enough to
wear just
about
anyplace.
Materials and vital statistics
»» Yarn: Ironstone Yarns “Showstopper” bulky-weight yarn (1 strand each of Paris Nights,
Eyelash, and Mohair), (4.3 oz. [123 g], 100 yds [91 m] each hank): 5 hanks of #2 copper/rust/
brown
»» Hook: Crochet hook size L-11 U.S. or size needed to obtain gauge
»» Measurements: 20 in. wide x 69½ in. long, excluding fringe
»» Gauge: 10 sts in pat = 4 in.; 5 rows in pat = 4 in.
»» Stitches used: Chain stitch (ch), double crochet (dc)
This is a fairly common stitch pattern, using only the chain stitch and double crochet stitch.
The pattern is really nice when working with textured yarns because you don’t necessarily have
to see the tops of the stitches. The stitches in the current row are worked into the chain spaces
created in the previous row, which also makes it really fast to crochet.
Directions
Sometimes it’s easier to “see” with your fingers. Let your fingers feel for the next space to stick
your hook into.
Foundation chain: Ch 49 + 3 (first dc).
(See Figure 11-2 for a stitch diagram.)
Row 1: Dc in 4th ch from hook, • ch 1, skip next ch, dc in next ch •, rep from • to • across (26 dc
and 24 ch-1 spaces), turn.
Row 2: Ch 3 (first dc), • dc in next ch-1 space, ch 1, skip next dc •, rep from • to • across, dc in
first dc (26 dc and 24 ch-1 spaces), turn.
116
PART 3 Putting Your Skills to the Test
Rows 3–86: Ch 3 (first dc), • dc in next ch-1 space, ch 1, skip next dc •, rep from • to • across,
dc in first dc (26 dc and 24 ch-1 spaces), turn.
Row 87: Ch 3 (first dc), • dc in next ch-1 space, ch 1, skip next dc •, rep from • to • across, dc in
first dc (26 dc and 24 ch-1 spaces). Fasten off.
Fringe: Cut 50, 24-in. lengths of yarn. Using one length for each fringe, single knot one fringe
in each ch-1 space and between the last 2 dc across each short edge of wrap (see Appendix A
for fringe how-to’s).
FIGURE 11-2:
Stitch diagram
of wrap
pattern.
Double-Crossing Belt
Everyone is wearing belts these days, and you see them in all sorts of styles and materials.
Based on the name, you may think that this belt can be wrapped around you twice, but the
name is actually based on the name of the stitch combination used. You rely on the half double
crochet stitch and throw in some crossed double crochet stitches every couple of inches (see
Figure 11-3).
FIGURE 11-3:
The creative
order of basic
crochet
stitches gives
this belt a
unique look.
What’s a crossed double crochet stitch, you ask? It’s nothing more than double crochet stitches
worked out of order. By doing so, you create an X-shaped pattern that is slightly raised. The
crochet thread used in this project is available in a wide range of colors, so if your wardrobe
doesn’t call for a white belt, choose your own color.
CHAPTER 11 Finding the Loopholes and Creative Combinations
117
Materials and vital statistics
»» Size: Directions are for size X-Small. Changes for Small, Medium, Large, X-Large, and
XX-Large are in parentheses. Finished waist: 34 (36, 38, 40, 42, 44) in.
»» Yarn: Aunt Lydia’s Fashion Crochet Thread size 3 crochet cotton (100% mercerized cotton),
Article #182 (150 yds [137 m] each ball): 2 balls of #926 Bridal White
»» Hook: Crochet hook size E-4 U.S. or size needed to obtain gauge
»» Belt buckle: Dritz Glamour Rings, 2 ⁄ in., gold
»» Tapestry needle
»» Measurements: 2 in. wide x 34 (36, 38, 40, 42, 44) in. long
»» Gauge: 5 sts and 4 rows hdc = 1 in.
»» Stitches used: Chain stitch (ch), single crochet (sc), half double crochet (hdc), double
18
crochet (dc), triple crochet (tr). Crossed dc: Skip next st, dc in next st, working behind dc
just made, dc in last skipped st.
When determining which size to make, measure your waist (or hips, depending on where you’ll
wear the belt), and add approximately 3 inches to get your finished size.
To work the crossed double crochet stitch, you simply jump around a bit when you stitch the
double crochet stitches. Instead of working them straight across a row, you simply skip a stitch,
work your double crochet stitch, and then go back and work a double crochet stitch in the
skipped stitch. The stitch diagram in Figure 11-4 gives you an idea of what stitches to make
where. If you want more-detailed instructions on making the crossed double crochet stitch,
flip to Appendix A.
FIGURE 11-4:
Stitch diagram
of belt pattern.
118
PART 3 Putting Your Skills to the Test
Directions
Foundation chain: Ch 9 + 2 (first hdc).
(See Figure 11-4 for a stitch diagram.)
Row 1 (wrong side): Hdc in 3rd ch from hook, hdc in each ch across (10 hdc), turn.
Row 2 (right side): Ch 2 (first hdc), hdc in each hdc across (10 hdc), turn.
Rows 3–10: Rep Row 2.
Row 11: Ch 3 (first dc), • skip next hdc, dc in next hdc, working behind dc just made,
dc in skipped hdc (crossed dc made) •, rep from • to • across to within last hdc, dc in last hdc
(10 dc), turn.
Row 12: Ch 4 (first tr), • sc in next dc, tr in next dc •, rep from • to • across to within last dc, sc
in last dc (10 sts), turn.
Row 13: Ch 3 (first dc), • skip next tr, dc in next sc, working behind dc just made, dc in skipped
tr (crossed dc made) •, rep from • to • across to within last tr, dc in last tr (10 sts), turn.
Rows 14–18: Ch 2 (first hdc), hdc in each st across (10 hdc), turn.
Rep Rows 11–18 for pat until belt reaches 35 (37, 39, 41, 43, 45) in. in length. Fasten off.
Finishing: With wrong side facing, draw Foundation row through both belt rings and fold over,
matching Foundation row to Row 10. With tapestry needle and 12-in. length of yarn, sew Foundation row to Row 10, matching sts across.
Love Those Loops Scarf
Throw a loop into your wearable accessories with this design. The loop stitch used to create the
texture in this standout scarf is actually a variation of the single crochet. The loops appear on
the “wrong” side of the fabric, but because you work the stitch in consecutive rows, the loops
show up on both sides of the scarf (see Figure 11-5).
New skill: The loop stitch
When working the loop stitch, the most important thing is to try to get your loops uniform in
size. There really is no standard size, but they should be somewhere around an inch long. If
your loops vary in size across each row, it can tend to look a little messy. When working your
gauge swatch, which is a great way to practice this stitch as well, you’ll probably find that you
tend to create the loops at a certain length. Don’t try to change this, just concentrate on making them all the same. If you find that your loops are disappearing as you crochet subsequent
rows, don’t worry about it. When you’re finished, just go back and give them a gentle tug, and
they’ll reappear as good as new.
CHAPTER 11 Finding the Loopholes and Creative Combinations
119
FIGURE 11-5:
Your friends
will go loopy
over this
fun scarf.
To make a loop stitch:
1.
Using the index finger of your yarn hand to control the loop size, wrap the yarn
from front to back over your index finger, and insert your hook in the next stitch
(see Figure 11-6a).
2.
Pick up both threads of the loop and draw through stitch (3 loops on hook)
(see Figure 11-6b).
3.
Yarn over, and draw yarn through the 3 loops on your hook.
Figure 11-6c shows a completed loop stitch.
FIGURE 11-6:
The three steps
to creating a
loop stitch.
Make sure to work a practice swatch so you can get the hang of the stitch. It may take a little
time to get the loops uniform in size, but the end result is well worth it.
Materials and vital statistics
»» Yarn: Caron “Simply Soft Brites” worsted-weight yarn (100% acrylic), Article #H9700B (6 oz.
[170 g], 330 yds [302 m] each skein): 1 skein of #9605 Mango
»» Hook: Crochet hook size J-10 U.S. or size needed to obtain gauge
120
PART 3 Putting Your Skills to the Test
»» 1½ in. pompom maker (optional)
»» Measurements: 4 in. wide x 49 in. long, excluding pompoms
»» Gauge: 10 loop sts and 10 rows = 3 in.
»» Stitches used: Chain stitch (ch), single crochet (sc), loop stitch (see the “New skill: The loop
stitch” section)
Crocheting the loop stitch may seem intimidating, but it’s not hard. The stitch is simply a version of the single crochet. Instead of pulling your yarn tight as you draw it through the stitch,
you leave a loop hanging on the wrong side. This design is worked by crocheting rows of the
loops stitch, separated by several rows of single crochet, and finishing it off with fun pompoms
on each corner.
Directions
Foundation chain: Ch 13.
Row 1 (right side): Sc in 2nd ch from hook, sc in each ch across (12 sc), turn.
Rows 2–11: Ch 1, work one loop st in each st across (12 loop sts), turn.
Rows 12–19: Ch 1, sc in each st across (12 sc), turn.
Rep Row 2–19 ten times or until scarf measures 3 in. less than desired length.
Rep Rows 2–11 one time.
Last Row: Ch 1, sc in each st across (12 sc). Do not turn.
Edging: Working in row-end sts across long edge of scarf, sc evenly across long edge to next
corner, 3 sc in corner st, sc in each st across short edge to next corner, 3 sc in corner st, working in row-end sts across next long edge, sc evenly across long edge to next corner, sl st to join.
Fasten off.
Optional finishing: Make four 1½-in. pompoms with pompom maker. Loosely tie one pompom
to each corner on each short edge of scarf.
Variation: Adding more loops
If you’re looking for more loops, then you’ve come to the right place. In the main pattern, each
section of loops is separated with sections of single crochet stitches. Here, you omit the single
crochet sections and just keep going with the loops. To be on the safe side, pick up an extra
skein of yarn so you can be sure not to run out.
Foundation chain: Ch 13.
Row 1 (right side): Sc in 2nd ch from hook, sc in each ch across (12 scs), turn.
Row 2: Ch 1, work one loop st in each st across (12 loop sts), turn.
Rep Row 2 until scarf reaches 49 in. or desired length.
Last row: Ch 1, sc in each st across (12 sc). Do not turn.
CHAPTER 11 Finding the Loopholes and Creative Combinations
121
Edging: Working in row-end sts across long edge of scarf, sc evenly across long edge to next
corner, 3 sc in corner st, sc in each st across short edge to next corner, 3 sc in corner st, working in row-end sts across next long edge, sc evenly across long edge to next corner, sl st to join.
Fasten off.
Optional finishing: Make four 1½-in. pompoms with pompom maker. Loosely tie one pompom
to each corner on each short edge of scarf.
Variation: Fashioning a furry look
Turn your loops into fur! When you’re finished crocheting, cut the loops in two to create a furlike fabric. Don’t worry about the stitches falling apart. Each stitch is secured as it’s made, so
you won’t end up with a bunch of short pieces of yarn.
Variation: Swapping yarns
This scarf would also look wonderful made with a softly textured yarn such as a mohair blend.
You can also tone it down by using a more subtle color.
Geometric Wrap
If you take a look around you when you go to the mall, or almost any clothing store for that
matter, you’re bound to see a design such as the one in this wrap (see Figure 11-7). Worked in
the shape of a triangle, the V-stitch, which is comprised of two double crochet stitches joined
by a chain stitch, creates an open and lacy pattern that makes this wrap ideal for when there’s
a touch of chill in the air. The yarn adds a slight shimmer and is available in several colors.
If you don’t want to wear it as a wrap, go for the modern look and wrap it around your waist
(sideways, of course) as a great accent to a pair of jeans.
FIGURE 11-7:
You can
wear the
geometric
wrap
traditionally
or wrapped
around
your waist.
122
PART 3 Putting Your Skills to the Test
Materials and vital statistics
»» Size: One size fits most adults
»» Yarn: Aunt Lydia’s “Shimmer Fashion” fine sport-weight yarn (64% cotton/36% rayon), Article
#188 (2 oz. [57 g], 124 yds [113 m] each ball): 5 balls of #2242 Light Linen
»» Hook: Crochet hook size I-9 U.S. or size needed to obtain gauge
»» Measurements: 31½ in. from bottom point to top edge; 45 in. across top edge
»» Gauge: 7 V-sts = 5 in.; 10 rows in pat = 5 in.
»» Stitches used: Chain stitch (ch), double crochet (dc). V-stitch: (Dc, ch 1, dc) in same st or
space. (For a quick reminder on how to create a V-stitch, refer to Appendix A.)
Because the V-stitch creates an open fabric, watch where you put your hook. Make sure to work
your next row of stitches in the space created by the chain-one stitch of the V-stitch directly
below it, and not between the V-stitches themselves (see Figure 11-8). The triangle shape of
this pattern is created by starting with a single V-stitch, then increasing them as you go along.
The increases take place across two rows, in this case Rows 4 and 5, until you reach the desired
width.
FIGURE 11-8:
Reduced
sample of
stitch pattern.
Directions
Foundation chain: Ch 2 + 3 (first dc).
(See Figure 11-8 for a reduced sample of the stitch pattern.)
Row 1 (right side): Dc in 5th ch from hook (1 V-st), turn.
Row 2: Ch 3 (first dc), V-st in next ch-1 space, dc in last dc (1 V-st and 2 dc), turn.
Row 3: Ch 3 (first dc), (ch 1, dc) in first dc, V-st in next ch-1 space, V-st in last dc (3 V-sts), turn.
Row 4: Ch 3 (first dc), V-st in each ch-1 space across, dc in last dc (3 V-sts and 2 dc), turn.
Row 5: Ch 3 (first dc), (ch 1, dc) in first dc, V-st in each ch-1 space across, V-st in last dc (5
V-sts), turn.
Rows 6–63: Rep Rows 4–5 (29 times) (63 V-sts at end of last row). Fasten off.
CHAPTER 11 Finding the Loopholes and Creative Combinations
123
Fringe: Cut yarn into 130, 9-in. lengths. Using two strands of yarn held together as one for
each fringe, starting at the bottom point of wrap, single-knot one fringe in bottom point, then
in every even-numbered row across sides of wrap. Trim ends even. (See Appendix A for more
info on fringe.)
When cutting yarn for fringe, try to find something to wrap the yarn around that will produce
the lengths you need. You might try a book, a sturdy piece of cardboard, a CD case, and so on.
Variation: Why knot add beads?
For a different twist, add some beads to the fringe. Just keep them small and light so they don’t
add too much weight.
124
PART 3 Putting Your Skills to the Test
IN THIS CHAPTER
»» Working vertically to create a
winter tunic
»» Layering with a light bolero
»» Pulling off a pullover
»» Staying cool with a tank top
»» Warming up with a stylish jacket
12
Sensational Sweaters
Chapter
F
or as long as I can remember, whenever I would mention crochet to people, they would
get a funny look on their face, and I could almost see them thinking about all the doilies,
afghans, tablecloths, and other yarn stuff scattered around their grandmother’s house.
Fortunately, people now realize that crochet projects go way beyond home décor items. Crochet is hot, especially when it comes to garments. You can see crocheted sweaters, jackets,
and tops on the runways at all the major fashion shows, and you can’t go into a clothing store
without seeing clothes either entirely crocheted or at least embellished with it. And then, of
course, you have all sorts of crocheted accessories.
This chapter provides you with five patterns to crochet your own sweaters, from warm winter pullovers to lacy tops. Just think how great you’ll feel when someone asks you where you
bought your top and you can tell them, “I made it!”
Vertical Stripes Tunic
Everyone knows that vertical stripes are flattering. Combine this concept with dark tones, and
you’ve got a sweater that’s not only pretty and warm, but one that makes you look great as
well (see Figure 12-1). When the cold weather comes in, this is definitely a sweater to reach for.
Instead of working in rows from bottom to top as is typically done, you crochet this sweater
vertically. Because this method is different from normal crocheting, this tunic is best tackled after you’ve mastered the basic crochet skills and are ready to move on to intermediatelevel projects. That doesn’t make the method any more difficult; it’s just different. You’ll come
across sweaters worked this way from time to time, and after crocheting this one, you’ll know
just what to expect.
CHAPTER 12 Sensational Sweaters
125
FIGURE 12-1:
The warm and
cozy winter
tunic requires
you to think
vertical instead
of horizontal.
Materials and vital statistics
»» Size: Directions are for size Small (4–6). Changes for Medium (8–10) and Large (12–14)
are in parentheses. Note: This is an oversized garment.
»» Yarn: Caron “Bliss” bulky-weight yarn (60% acrylic/40% nylon), Article #BL1000
(1.75 oz. [50 g], 82 yds [75 m] each ball):
•
•
13 (14, 15) balls of #0013 Black (MC)
2 balls of #0015 Fiesta (CC)
»» Hook: Crochet hook size K-10½ U.S. or size needed to obtain gauge
»» Tapestry needle
»» Measurements: Finished bust: 45 (47, 56½) in. Back length: 22¼ in. Sleeve length:
15¼ in. Figure 12-2 shows finished measurements.
»» Gauge: 10 hdc = 3 in.; 10 rows = 5¾ in.
»» Stitches used: Chain stitch (ch), slip stitch (sl st), half double crochet (hdc)
The design of this sweater is atypical, although not uncommon. Sweaters are usually worked in
horizontal rows starting at the bottom edge and working up to the neck edge, but not this one.
Instead, you work in vertical rows starting at one side edge and working across the front, shaping the armholes and neck as you go. There’s really only one stitch involved, the half double
crochet, and a couple of color-changing rows, so you can concentrate on the design without
having to worry about complicated stitch patterns. (If you need a refresher on changing colors,
head to Chapter 4.)
126
PART 3 Putting Your Skills to the Test
FIGURE 12-2:
Schematic for
the tunic.
Starting with the front
Foundation chain: With MC, ch 47 + 2 (first hdc).
Row 1 (right side): Hdc in 3rd ch from hook, hdc in each ch across (48 hdc), turn.
Row 2: Ch 2 (first hdc), hdc in each hdc across (48 hdc), turn.
Rep Row 2 (1 [2, 3] times). Do not turn at end of last row.
Beg shoulder
Next Row: Ch 27, turn, hdc in 3rd ch from hook, hdc in each ch across, hdc in each hdc across
(74 hdc), turn.
Work even in hdc across 74 sts for 2 (2, 3) more rows. Fasten off MC, join CC.
Next Row: With CC, hdc in each hdc across (74 hdc), turn. Fasten off CC, join MC.
Next Row: With MC, hdc in each hdc across (74 hdc), turn. Fasten off MC, join CC.
Next Row: With CC, hdc in each hdc across (74 hdc), turn. Fasten off CC, join MC.
With MC, work even in hdc for 3 (3, 4) rows.
Shape neck
Next Row: With MC, hdc in each hdc across, dec 1 st at neck edge on each of next 6 (6, 7) rows
(68 [68, 67] hdc at end of last row). Fasten off MC, join CC.
Next Row: With CC, hdc in each hdc across, dec 1 hdc at neck edge (67 [67, 66] hdc), turn. Fasten off CC, join MC.
CHAPTER 12 Sensational Sweaters
127
Next Row: With MC, hdc in each hdc across (67 [67, 66] hdc), turn. Fasten off MC, join CC.
Next Row: With CC, hdc in each hdc across, inc 1 st at neck edge (68 [68, 67] hdc), turn. Fasten
off CC, join MC.
With MC, hdc in each hdc across, inc 1 st at neck edge on each of next 6 (6, 7) rows (74 [74, 74]
hdc at end of last row).
With MC, work even across 74 hdc for 3 (3, 4) rows. Fasten off MC, join CC.
Next Row: With CC, hdc in each hdc across (74 hdc), turn. Fasten off CC, join MC.
Next Row: With MC, hdc in each hdc across (74 hdc), turn. Fasten off MC, join CC.
Next Row: With CC, hdc in each hdc across (74 hdc), turn. Fasten off CC, join MC.
With MC, work even across 74 hdc for 3 (3, 4) rows.
Shape armhole
Next Row: Hdc in each of next 47 hdc (48 [48, 48] hdc), turn, leaving 26 sts at shoulder unworked.
Work even in hdc across 48 sts for 2 (3, 4) more rows. Fasten off.
Turning to the back
Foundation chain: With MC, ch 47 + 2 (first hdc).
Row 1 (right side): Hdc in 3rd ch from hook, hdc in each ch across (48 hdc), turn.
Row 2: Ch 2 (first hdc), hdc in each hdc across, hdc in top of turning ch (48 hdc), turn.
Rep Row 2 (1 [2, 3] times). Do not turn at end of last row.
Beg shoulder
Next Row: Ch 27, turn, hdc in 3rd ch from hook, hdc in each ch across, hdc in each hdc across
(74 hdc), turn.
Work even in hdc across 74 sts for 2 (2, 3) more rows. Fasten off MC, join CC.
Next Row: With CC, hdc in each hdc across (74 hdc), turn. Fasten off CC, join MC.
Next Row: With MC, hdc in each hdc across (74 hdc), turn. Fasten off MC, join CC.
Next Row: With CC, hdc in each hdc across (74 hdc), turn. Fasten off CC, join MC.
With MC, work even in hdc for 3 (3, 4) rows.
Shape neck
Next Row: With MC, hdc in each hdc across, dec 1 st at neck edge (73 hdc), turn.
Work even across 73 hdc for 5 (5, 6) more rows. Fasten off MC, join CC.
128
PART 3 Putting Your Skills to the Test
Next Row: With CC, hdc in each hdc across, (73 hdc), turn. Fasten off CC, join MC.
Next Row: With MC, hdc in each hdc across (73 hdc), turn. Fasten off MC, join CC.
Next Row: With CC, hdc in each hdc across, (73 hdc), turn. Fasten off CC, join MC.
With MC, hdc in each hdc across for 5 (5, 6) rows (73 hdc), turn.
Next Row: Hdc in each hdc across, inc 1 st at neck edge (74 hdc), turn.
With MC, work even in hdc for 3 (3, 4) rows. Fasten off MC, join CC.
Next Row: With CC, hdc in each hdc across (74 hdc), turn. Fasten off CC, join MC.
Next Row: With MC, hdc in each hdc across (74 hdc), turn. Fasten off MC, join CC.
Next Row: With CC, hdc in each hdc across (74 hdc), turn. Fasten off CC, join MC.
With MC, work even across 74 hdc for 3 (3, 4) rows.
Shape armhole
Next Row: Hdc in each of next 47 hdc (48 [48, 48] hdc), turn, leaving 26 sts at shoulder unworked.
Work even in hdc across 48 sts for 2 (3, 4) more rows. Fasten off.
Moving on to the sleeves
Note: You need to make two of these.
Foundation chain: With MC, ch 29 + 2 (first hdc).
Row 1: Hdc in 3rd ch from hook, hdc in each ch across (30 hdc), ch 4, turn.
Row 2: Hdc in 3rd ch from hook, hdc in next ch, hdc in each hdc across, (33 hdc), turn.
Row 3: Hdc in each hdc across (33 hdc), ch 4, turn.
Row 4: Hdc in 3rd ch from hook, hdc in next ch, hdc in each hdc across, (36 hdc), turn.
Row 5: Hdc in each hdc across (36 hdc), ch 4, turn.
Row 6: Hdc in 3rd ch from hook, hdc in next ch, hdc in each hdc across, (39 hdc), turn.
Row 7: Hdc in each hdc across (39 hdc), ch 4, turn.
Row 8: Hdc in 3rd ch from hook, hdc in next ch, hdc in each hdc across, (42 hdc), turn.
Row 9: Hdc in each hdc across (42 hdc), ch 4, turn.
Row 10: Hdc in 3rd ch from hook, hdc in next ch, hdc in each hdc across, (45 hdc), turn.
Row 11: Hdc in each hdc across (45 hdc), ch 4, turn.
CHAPTER 12 Sensational Sweaters
129
Row 12: Hdc in 3rd ch from hook, hdc in next ch, hdc in each ch across, (48 hdc), turn.
Row 13: Hdc in each hdc across (48 hdc), ch 4, turn.
Row 14: Hdc in 3rd ch from hook, hdc in next ch, hdc in each hdc across (51 hdc), turn.
Rows 15–20: Hdc in each hdc across (51 hdc), turn. Fasten off MC, join CC.
Row 21: With CC, hdc in each hdc across (51 hdc), turn. Fasten off CC, join MC.
Row 22: With MC, hdc in each hdc across (51 hdc), turn. Fasten off MC, join CC.
Row 23: With CC, hdc in each hdc across (51 hdc), turn. Fasten off CC, join MC.
Rows 24–29: With MC, hdc in each hdc across (51 hdc), turn.
Row 30: Sl st in each of first 3 sts, ch 2 (first hdc), hdc in each hdc across (48 hdc), turn.
Row 31: Hdc in each hdc across (48 hdc), turn.
Row 32: Sl st in each of first 3 sts, ch 2 (first hdc), hdc in each hdc across (45 hdc), turn.
Row 33: Hdc in each hdc across (45 hdc), turn.
Row 34: Sl st in each of first 3 sts, ch 2 (first hdc), hdc in each hdc across (42 hdc), turn.
Row 35: Hdc in each hdc across (42 hdc), turn.
Row 36: Sl st in each of first 3 sts, ch 2 (first hdc), hdc in each hdc across (39 hdc), turn.
Row 37: Hdc in each hdc across (39 hdc), turn.
Row 38: Sl st in each of first 3 sts, ch 2 (first hdc), hdc in each hdc across (36 hdc), turn.
Row 39: Hdc in each hdc across (36 hdc), turn.
Row 40: Sl st in each of first 3 sts, ch 2 (first hdc), hdc in each hdc across (33 hdc), turn.
Row 41: Hdc in each hdc across (33 hdc), turn.
Row 42: Sl st in each of first 3 sts, ch 2 (first hdc), hdc in each hdc across (30 hdc), turn.
Row 43: Hdc in each hdc across (30 hdc), do not turn.
Seam edging
Working in row-end sts toward cuff edge of sleeve, • hdc in base of “step,” sl st in top of
“step” •, rep from • to • across to next corner. Fasten off. Repeat on other side edge.
Putting the pieces together
When sewing the pieces of this sweater together, use the whipstitch (see Appendix A for
detailed instructions). With right sides facing, using yarn needle and MC, sew front to back
across shoulders. With right sides of sleeves facing in, fold sleeves in half lengthwise. Matching
130
PART 3 Putting Your Skills to the Test
the center fold to the shoulder seam, sew each sleeve in place. Beginning at the lower edge of
each side seam, leaving first 3 inches free, matching stitches, sew side seams from lower edge
to underarm. Sew underarm and sleeve seams.
Lacy Bolero
This top is really fun. With its open, lacy design, you can wear this bolero anywhere and
any time (see Figure 12-3). Layer it over your favorite top — long or short sleeve, it doesn’t
matter — and you’ll have an eye-catching look.
FIGURE 12-3:
The lacy bolero
adds a trendy
look to your
wardrobe.
The stitch pattern and shaping involved make this a more intermediate-level pattern, but it’s
nothing that you can’t tackle. After you’re done with this, take a look at the designs displayed in
the stores, and you’ll realize that it’s not so hard after all. Then you can make your own instead
of buying them. This design is fun, so go ahead and make a few. Use different colors to match
your wardrobe, or whip up a couple for those teens in your life!
Materials and vital statistics
»» Size: Directions are for size Small/Medium (4–8). Changes for Medium/Large (10–14) are in
parentheses.
»» Yarn: Fiesta Yarns “La Luz” sport-weight yarn (100% silk), (2 oz. [50 g], 220 yds [201 m] each
hank): 3 (4) hanks of #3307 Cherry
»» Hook: Crochet hook size G-6 U.S. or size needed to obtain gauge
»» Tapestry needle
»» Measurements: Finished bust: 30–34 (36–40) in. Back length: 12 in. Sleeve length: 4½ in.
Figure 12-4 shows finished measurements.
CHAPTER 12 Sensational Sweaters
131
»» Gauge: 3 shells in pat = 4½ in.; 9 rows in pat = 4 in.
»» Stitches used: Chain stitch (ch), slip stitch (sl st), single crochet (sc), double crochet (dc).
Shell: • (Dc, ch 2, 4 dc) in same stitch or space •.
Because of the design, the fit of this garment is very forgiving. The front ties allow you to adjust
the front fit.
This fun little top is a great way to practice working a lacy stitch pattern. You start out with a
long foundation chain that sets the width for the top including the front ties (don’t worry —
the top isn’t this big across!). You then skip a bunch of stitches from the end and begin to work
the body of the top. This is then split to separate the fronts from the back. The only assembly
required is to sew the fronts to the back to create the shoulder seams.
FIGURE 12-4:
Schematic for
the lacy bolero.
Laying the foundation
Foundation chain: Ch 294 (315) + 3 (first dc) + 1 (first ch-1 space).
Row 1 (right side): Dc in 5th ch from hook, • ch 2, skip next 5 ch, 4 dc in next ch, ch 2, dc in
next ch •, rep from • to • across to within last 6 ch, ch 2, skip next 5 ch, 4 dc in last ch (41 [44]
shells and 2 half shells), turn.
Row 2 (wrong side): Ch 3 (first dc), ch 1 (first ch-1 space), dc in first dc, • ch 2, shell in ch-2
space of next shell •, rep from • to • across to within last shell, shell in ch-2 space of last shell,
ch 2, 4 dc in last ch-1 space (41 [44] shells and 2 half shells), turn.
Row 3: Rep Row 2 for pat. Fasten off.
Beginning with the body
Row 4: With wrong side facing, skip first 10 shells, skip next ch-2 space, join yarn in next dc,
ch 3 (first dc), 3 dc in ch-2 space, work in established pat across next 22 (25) shells, skip next
3 dc, (dc, ch 1, dc) in next dc (22 [25] shells and 2 half shells), turn, leaving rem sts unworked.
Row 5: Ch 1, sc in first ch-1 space (dec made), shell in ch-2 space of next shell, ch 2, work
in established pat across to within last 4 dc, skip next 2 dc, sc in next dc (dec made) (22 [25]
shells), turn.
132
PART 3 Putting Your Skills to the Test
Focusing on the left front
Row 1: Ch 2, skip next ch-2 space, shell in ch-2 space of next shell, work in established pat
across next 4 (5) shells, ch 2, skip next 3 dc (dc, ch 1, dc) in next dc (5 [6] shells and 1 half shell),
turn, leaving rem sts unworked.
Row 2: Ch 3 (first dc), ch 1 (first ch-1 space), dc in first ch-1 space, ch 2, work in established pat
across next 5 shells, ch 2, skip next 3 dc, sc in last dc (4 [5] shells and 1 half shell), turn.
Row 3: Ch 2, 4 dc in ch-2 space of next shell, ch 2, work in established pat across next 3 (4)
shells, ch 2, skip next 4 dc, (dc, ch 1, dc) in last ch-1 space (3 [4] shells and 2 half shells), turn.
Row 4: Ch 3 (first dc), ch 1 (first ch-1 space), dc in first ch-1 space, ch 2, work in established pat
across next 3 (4) shells, ch 2, skip next 4 dc, skip next ch-2 space, sc in last dc (3 [4] shells),
turn.
Row 5: Ch 2, 4 dc in ch-2 space of next shell, ch 2, work in established pat across next 2 (3)
shells, ch 2, skip next 4 dc, (dc, ch 1, dc) in last ch-1 space (2 [3] shells and 2 half shells), turn.
Row 6: Ch 3 (first dc), ch 1 (first ch-1 space), dc in first ch-1 space, ch 2, work in established
pat across next 2 (3) shells, ch 2, skip next 4 dc, skip next ch-2 space, sc in last dc (2 [3] shells
and 1 half shell), turn.
Row 7: Ch 2, 4 dc in ch-2 space of next shell, ch 2, work in established pat across next 1 (2)
shells, ch 2, skip next 4 dc, (dc, ch 1, dc) in last ch-1 space (1 [2] shells and 2 half shells), turn.
Row 8: Ch 3 (first dc), ch 1 (first ch-1 space), dc in first ch-1 space, ch 2, shell in each of next
1 (2) shells, skip next ch-2 space, skip next 3 dc, (dc, ch 1, dc) in last dc (1 [2] shells and 2 half
shells), turn.
Work even in established pat for 16 rows. Fasten off.
Heading around to the back
Row 1: With wrong side facing, skip first shell to the left of last shell made in first row of left
front, skip next ch-2 space, join yarn in ch-2 space of next shell, ch 3 (first dc), 3 dc in ch-2
space, work in established pat across next 8 (9) shells, shell in next shell, ch 2, (dc, ch 1, dc) in
last dc of current shell (9 [10] shells and 2 half shells), turn, leaving rem sts unworked.
Work even in established pat for 23 rows. Fasten off.
Turning to the right front
Row 1: With wrong side facing, skip first shell to the left of last shell made in first row of back,
skip next ch-2 space, join yarn in next dc, ch 3 (first dc), (ch 1, dc) in next ch-2 space, ch 2,
shell in each of next 5 (6) shells, ch 2, skip next half shell, sc in next dc 2 rows below (5 [6]
shells), turn.
Row 2: Ch 2, shell in each of next 4 (5) shells, ch 2, (dc, ch 1, dc) in last ch-1 space (4 [5] shells
and 1 half shell), turn.
Row 3: Ch 3 (first dc), (ch 1, dc) in first ch-1 space, ch 2, work in established pat across next 3
(4) shells, ch 2, 4 dc in next shell (3 [4] shells and 2 half shells), turn, leaving rem sts unworked.
CHAPTER 12 Sensational Sweaters
133
Row 4: Ch 2, work in established pat across next 3 (4) shells, ch 2, (dc, ch 1, dc) in last ch-1
space (3 [4] shells and 1 half shell), turn.
Row 5: Ch 3 (first dc), (ch 1, dc) in first ch-1 space, ch 2, work in established pat across next
2 (3) shells, ch 2, 4 dc in next shell (2 [3] shells and 2 half shells), turn, leaving rem sts unworked.
Row 6: Ch 2, work in established pat across next 2 (3) shells, ch 2, (dc, ch 1, dc) in last ch-1
space (2 [3] shells and 1 half shell), turn.
Row 7: Ch 3 (first dc), (ch 1, dc) in first ch-1 space, ch 2, work in established pat across next
1 (2) shells, ch 2, 4 dc in next shell (1 [2] shells and 2 half shells), turn, leaving rem sts unworked.
Row 8: Ch 2, work in established pat across next 1 (2) shells, ch 2, (dc, ch 1, dc) in last ch-1 space
(1 [2] shells and 2 half shells), turn.
Work even in established pat for 16 rows. Fasten off.
Joining the fronts to the back
With right sides facing, using tapestry needle and yarn, whipstitch fronts to back across shoulders, matching sts from outside edges and working toward neck. Turn right side out.
Adding the sleeves
Rnd 1: With right side facing, join yarn in ch-2 space of shell at center of underarm, ch 3 (first dc),
3 dc in ch-2 space, ch 2, dc in same space, ch 2, working in row-end sts around edges of
armhole, • skip next 2 row-end sts, shell in next row-end st, ch 2 •, rep from • to • around
(16 shells and 1 half shell), ch 2, sl st in first dc to join, turn.
Rnd 2: Ch 3 (first dc), (ch 1, dc) in sl st, ch 2, work in established pat around (16 shells and 1 half
shell), ch 2, sl st in turning ch to join.
Rnd 3: Ch 3 (first dc), ch 2 (first ch-2 space), work in established pat around, ch 2, 3 dc in last
ch-1 space (16 shells and 1 half shell), sl st in first dc to join, turn.
Rnd 4: Sl st in each of first 4 dc, ch 2, work in established pat around to within last shell, shell
in last shell (16 shells), ch 2, sl st in first sl st to join, turn.
Work now progresses in rows.
Row 5: Sl st in first ch-2 space, ch 2, work in established pat across to within last 2 shells, shell
in next shell, ch 2, sl st in first dc of next shell (15 shells), turn, leaving rem sts unworked.
Row 6: Ch 2, work in established pat across to within last shell, shell in last shell (15 shells),
turn.
Row 7: Sl st in first ch-2 space, ch 2, work in established pat across next 10 shells, ch 2, 4 dc in
next shell (10 shells and 1 half shell), turn.
Row 8: Ch 2, sl st in next ch-2 space, ch 2, work in established pat across next 8 shells, ch 2, sl
st in next ch-2 space (8 shells), turn.
134
PART 3 Putting Your Skills to the Test
Row 9: Ch 2, sl st in next ch-2 space, ch 2, work in established pat across next 6 shells, ch 2, sl
st in next ch-2 space (6 shells). Fasten off.
Rep sleeve around other armhole.
Finishing with easy edgings
You use single crochet stitches to complete the bolero and give it a polished look.
Outside edging
With right side facing, join yarn in center st on lower edge of center back, ch 1, sc evenly
around entire outside edge, working in ch spaces, sts, and row-end sts, sl st in first sc to join.
Fasten off.
Sleeve edging
With right side facing, join yarn in center st at underarm, ch 1, sc evenly around entire outside
edge of sleeve, working in ch spaces, sts, and row-end sts, sl st in first sc to join. Fasten off.
Rep around other sleeve.
Springtime Pullover
This lightweight, V-neck pullover is great for that layered look that never goes out of style
(see Figure 12-5). Made with a light-weight cotton flake yarn (that means the yarn has thick
and thin spots), the sweater is ideal for days when the weather is just starting to warm up, but
isn’t hot yet.
FIGURE 12-5:
Create a
layered look
with the
springtime
pullover.
CHAPTER 12 Sensational Sweaters
135
The stitch pattern is used quite often for garments: single crochet and chain stitches. You
work in the chain spaces which makes the work move right along. Beads finish off the bottom
edge and sleeves, giving it a special flair. Because you work the sleeves right onto the garment
instead of working them separately, and then work some bead crochet, the pattern is suitable
when you’re ready for an intermediate-level project. I know you’ll be just fine and will add new
skills to your crochet library in the process.
Materials and vital statistics
»» Size: Directions are for size Small (2–4). Changes for Medium (6–8), Large (10–12), and
X-Large (14–16) are in parentheses.
»» Yarn: Ironstone Warehouse “Flake Cotton” light-weight cotton flake yarn (100% mercerized
cotton), (3.5 oz. [100 g], 328 yds [300 m] each skein): 3 (4, 4, 5) skeins of #8702
»» Hook: Crochet hook size H-8 U.S. or size needed to obtain gauge
»» Tapestry needle
»» Approximately 100 8mm clear blue glass or plastic beads
»» Measurements: Finished bust: 30 (34, 38, 42) in. Back length: 20 (20, 21, 21) in. Sleeve
length: 9¼ in. Figure 12-6 shows finished measurements.
»» Gauge: 15 sts and 15 rows in pat = 3 in.
»» Stitches used: Chain stitch (ch), slip stitch (sl st), single crochet (sc). Dec 1 sc: • (Insert hook
in next st, yo, draw yarn through st) twice, yo, draw yarn through 3 loops on hook •.
FIGURE 12-6:
Schematic for
the pullover.
The stitch pattern used to create the fabric for this sweater is really wonderful. It creates a fabric tight enough so you can’t see through it yet is still flexible so you don’t end up with a stiff
garment. The layered look works perfectly with this design — throw on one of those lacy little
tanks to finish off the look. Creating the V-neck shape for both the front and back is accomplished by decreasing your stitches in the designated rows only at the neck edge of the sweater
until you reach the correct number of stitches. Then you work even until the length of the
sweater is reached.
136
PART 3 Putting Your Skills to the Test
Fashioning the front and back
Note: You need to follow these directions twice — once for the front, once for the back.
Foundation chain: Ch 76 (86, 96, 106).
Row 1: Sc in 2nd ch from hook, sc in each ch across (75 [85, 95, 105] sc), turn.
Row 2: Ch 1, sc in first sc, • ch 1, skip next sc, sc in next sc •, rep from • to • across (37 [42, 47, 52]
ch-1 spaces), turn.
Row 3: Ch 1, sc in first sc, • sc in next ch-1 space, ch 1, skip next sc • rep from • to • across to
within last ch-1 space, sc in ch-1 space, sc in last sc (36 [41, 46, 51] ch-1 spaces), turn.
Row 4: Ch 1, sc in first sc, • ch 1, skip next sc, sc in next ch-1 space •, rep from • to • across to
within last 2 sc, ch 1, sc in last sc (37 [42, 47, 52] ch-1 spaces), turn.
Rep Rows 3–4 for pat. Work even in established pat until piece measures 12 in. from beg, ending with Row 3.
Shape armholes
Next Row: Sl st in each of next 5 (5, 7, 7) sts, ch 1, work in established pat across to within
last 6 (6, 8, 8) sts, sc in next st (32 [37, 42, 47] ch-1 spaces), turn, leaving rem sts unworked.
Work even in established pat across these sts for 3 (3, 5, 5) rows.
Beg first neck
Next Row: Ch 1, work in established pat across first 31 (37, 41, 47) sts (15 [18, 20, 23] ch-1
spaces), turn, leaving rem sts unworked.
Next Row: Dec 1 sc in first 2 sts, work in established pat across (30 [36, 40, 46] sts), turn.
Work even in established pat for 2 rows.
Maintaining established pat, dec 1 sc at neck edge every 3rd row until 20 (25, 28, 32) sts rem
on work.
Work even across 20 (25, 28, 32) sts until first neck measures 8 (8, 9, 9) in. from beg of armhole shaping. Fasten off.
Second neck
With appropriate side facing, skip one st to the left of last st made in first row of first neck, join
yarn in next st, ch 1, work in established pat across (31 [37, 41, 47] sts), turn.
Next Row: Ch 1, work in established pat across to within last 2 sts, dec 1 sc in last 2 sts (30 [36,
40, 46] sts), turn.
Work even in established pat for 2 rows.
Maintaining established pat, dec 1 sc at neck edge every 3rd row until 20 (25, 28, 32) sts rem
on work.
CHAPTER 12 Sensational Sweaters
137
Work even across 20 (25, 28, 32) sts until second neck measures 8 (8, 9, 9) in. from beg of armhole shaping. Fasten off.
Attaching the front and back
With right sides facing, using tapestry needle and yarn, sew front to back across shoulders
using the whipstitch. You’ll sew the side seams when the sleeves are complete.
Checking out what’s up with your sleeves
Don’t worry if you end up with more stitches in the sleeve than you worked across the body of
the sweater. Sleeves can be deceptive in size and are often wider than the front or back of the
sweater itself, though they don’t appear so.
Row 1: With right side facing, join yarn in first st at beg of armhole shaping, working in rowend sts across armhole, ch 1, sc in first row-end st, • ch 1, skip next st, sc in next st •, rep
from • to • across to beg of armhole shaping on opposite side of armhole, ending with an odd
number of sts, turn.
Row 2: Sl st in next st of armhole, ch 1, sc in first st in Row 1 of sleeve, work in established pat
across, turn.
Rep Row 2 (3 [3, 5, 5] times).
Next Row: Ch 1, work even in established pat across, turn.
Work even in established pat until sleeve measures 4 in. from beg.
Next Row: Dec 1 st in first 2 sts, work in established pat across to within last 2 sts, dec 1 st in
last 2 sts, turn.
Work even in established pat for 4 more rows, then dec 1 st at each end of next row and every
5th row thereafter 4 more times. Fasten off.
Rep sleeve across other armhole.
Completing the sweater assembly
With right sides facing, using tapestry needle and yarn, sew side seams and underarm seams
using the whipstitch. Leave sweater with wrong side facing out.
Adding the finishing touches
When crocheting with beads, the bead pops to the opposite side of the fabric that’s facing you,
so to get the beads to show up on the right side, you have to work from the wrong side.
Bottom edging
String 45 beads onto yarn. With wrong side facing, join yarn in one side seam, working across
opposite side of foundation ch, ch 1, • sc in each of next 3 sts, draw 1 bead up close to hook, sc
in next st •, rep from • to • evenly around bottom edge, sl st in first sc to join. Fasten off.
138
PART 3 Putting Your Skills to the Test
Sleeve edging
String 25 beads onto yarn. With wrong side facing, join yarn in underarm seam, ch 1, • sc in
each of next 3 sts, draw 1 bead up close to hook, sc in next st •, rep from • to • evenly around
lower edge of sleeve, sl st in first sc to join. Fasten off.
Rep sleeve edging across lower edge of other sleeve.
Neck edging
Turn sweater right side out. With right side facing, join yarn in one shoulder seam, ch 1, • sc
in next st, ch 1, skip next st •, rep from • to • evenly around entire neck edge, sl st in first sc to
join. Fasten off.
Shell Stitch Tank Top
When warmer weather comes around, many of us put down our crochet hooks thinking that it’s
too hot to work with yarn. But with this pretty tank top, you can continue crocheting without
having a lot of bulky yarn on your lap. Even better, you’ll have a comfortable, cool, and fashionable top that you can pair with jeans, shorts, or a skirt (see Figure 12-7).
FIGURE 12-7:
This easy tank
top is light
enough to
stitch — and
wear — during
the hot
summer
months.
This design features the very versatile shell stitch, made with five double crochet stitches. As
with many stitch patterns, variations on both the stitch itself and the pattern exist, but this
pattern produces a fabric with stitches that are tight enough that you don’t have to worry about
anything underneath peeking through.
CHAPTER 12 Sensational Sweaters
139
Materials and vital statistics
»» Size: Directions are for size X-Small (4). Changes for Small (6), Medium (8–10), Large (12–14),
and X-Large (16) are in parentheses.
»» Yarn: Artful Yarns “Fable” worsted-weight yarn (85% pima cotton/15% silk), (3.5 oz. [100 g],
184 yds [168 m] each hank): 4 (4, 5, 5, 5) hanks of #93 Little Red Riding Hood
»» Hook: Crochet hook size G-6 U.S. or size needed to obtain gauge
»» Tapestry needle
»» Measurements: Finished bust: 25½ (28, 30½, 32½, 35) in. Back length: 20½ (20½, 20½, 21¼,
21¼) in. Figure 12-8 shows finished measurements.
»» Gauge: 3 shells in pat = 3½ in.; 7 rows in pat = 3 in.
»» Stitches used: Chain stitch (ch), slip stitch (sl st), single crochet (sc), double crochet (dc).
Shell: • 5 dc in same stitch •.
This design will definitely give you some practice with the shell stitch. The pattern here calls
for a 5-double crochet shell, which is pretty common. You’ll see how to adjust the pattern so
that the shells nestle upon each other in subsequent rows. There’s very little neck shaping and
no sleeves, so you can complete this project in no time.
FIGURE 12-8:
Schematic for
the tank top.
First, you’ve got your back
Foundation chain: Ch 68 (74, 80, 86, 92).
Row 1 (right side): Sc in 2nd ch from hook, • skip next 2 ch, shell in next ch, skip next 2 ch, sc
in next ch •, rep from • to • across (11 [12, 13, 14, 15] shells), turn.
Row 2 (wrong side): Ch 3 (first dc), 2 dc in first sc (half shell made), sc in center dc of next
shell, • shell in next sc, sc in center dc of next shell •, rep from • to • across to within last sc, 3
dc in last sc (10 [11, 12, 13, 14] shells and 2 half shells), turn.
140
PART 3 Putting Your Skills to the Test
Row 3: Ch 1, sc in first dc, skip next 2 dc, • shell in next sc, sc in center dc of next shell •, rep
from • to • across to within last sc, shell in next sc, skip next 2 dc, sc in last dc (11 [12, 13, 14, 15]
shells), turn.
Rep Rows 2–3 for pat until back measures 111⁄2 in. from beginning, ending with Row 2 of pat.
Shape armholes
Next Row (right side): Sl st to center dc of first (first, first, second, second) shell, ch 1, sc in dc,
work in established pat across to within last 1 (1, 1, 2, 2) shell(s), sc in center dc of shell (9 [10,
11, 10, 11] shells), turn, leaving rem sts unworked.
Work even in established pat for 13 (13, 13, 15, 15) more rows.
Shape right neck
Next Row (right side): Ch 1, sc in first dc, • shell in next sc, sc in center dc of next shell •, rep
from • to • twice (3 shells), turn, leaving rem sts unworked.
Next Row: Sl st to center dc of first shell, ch 1, sc in dc, shell in next sc, work in established pat
across to last sc, 3 dc in last sc (2 shells and 1 half shell), turn.
Next Row: Ch 1, sc in first dc, • shell in next sc, sc in center dc of next shell •, rep from • to •
once (2 shells), turn, leaving rem sts unworked.
Work even in established pat for 4 more rows. Fasten off.
Shape left neck
Next Row: With right side facing, skip center 2 (3, 4, 3, 4) shells, skip next sc, join yarn in
center dc of next shell, ch 1, sc in dc, work in established pat across (3 shells), turn.
Next Row: Ch 3 (first dc), 2 dc in first sc, work in established pat across to within last shell,
sc in center dc of last shell (2 shells and 1 half shell), turn, leaving rem sts unworked.
Next Row: Sl st to center dc of first shell, ch 1, sc in dc, work in established pat across
(2 shells), turn.
Work even in established pat for 4 more rows. Fasten off.
Next, focus on the front
Foundation chain: Ch 68 (74, 80, 86, 92).
Row 1 (right side): Sc in 2nd ch from hook, • skip next 2 ch, shell in next ch, skip next 2 ch, sc
in next ch •, rep from • to • across (11 [12, 13, 14, 15] shells), turn.
Row 2 (wrong side): Ch 3 (first dc), 2 dc in first sc (half shell made), sc in center dc of next
shell, • shell in next sc, sc in center dc of next shell •, rep from • to • across to within last sc,
3 dc in last sc (10 [11, 12, 13, 14] shells and 2 half shells), turn.
CHAPTER 12 Sensational Sweaters
141
Row 3: Ch 1, sc in first dc, skip next 2 dc, • shell in next sc, sc in center dc of next shell •, rep
from • to • across to last sc, shell in next sc, skip next 2 dc, sc in last dc (11 [12, 13, 14, 15] shells),
turn.
Rep Rows 2–3 for pat until front measures 111⁄2 in. from beginning, ending with Row 2 of pat.
Shape armholes
Next Row (right side): Sl st to center dc of 1st (1st, 1st, 2nd, 2nd) shell, ch 1, sc in dc, work in
established pat across to within last 1 (1, 1, 2, 2) shell(s), sc in center dc of shell (9 [10, 11, 10, 11]
shells), turn, leaving rem sts unworked.
Work even in established pat for 3 more rows.
Shape left neck
Next Row (right side): Ch 1, sc in first dc, • shell in next sc, sc in center dc of next shell •, rep
from • to • twice (3 shells), turn, leaving rem sts unworked.
Next Row: Sl st to center dc of first shell, ch 1, sc in dc, shell in next sc, work in established pat
across to within last sc, 3 dc in last sc (2 shells and 1 half shell), turn.
Next Row: Ch 1, sc in first dc, • shell in next sc, sc in center dc of next shell •, rep from • to •
once (2 shells), turn, leaving rem sts unworked.
Work even in established pat for 14 (14, 14, 16, 16) more rows. Fasten off.
Shape right neck
Next Row: With right side facing, skip center 2 (3, 4, 3, 4) shells, skip next sc, join yarn in center dc of next shell, ch 1, sc in dc, work in established pat across (3 shells), turn.
Next Row: Ch 3 (first dc), 2 dc in first sc, work in established pat across to within last shell, sc
in center dc of last shell (2 shells and 1 half shell), turn, leaving rem sts unworked.
Next Row: Sl st to center dc of first shell, ch 1, sc in dc, work in established pat across (2 shells),
turn.
Work even in established pat for 14 (14, 14, 16, 16) more rows. Fasten off.
In the home stretch! Tackling the assembly
With right sides facing, using tapestry needle and yarn, sew front to back across shoulders,
using the whipstitch. Beginning at lower edge of each side, matching stitches across side edges,
sew side seams from lower edge to armholes.
Finally, finishing with armhole edging
With right side facing, join yarn in side seam at lower edge of one armhole, ch 1, sc evenly
around entire armhole, sl st in first sc to join. Fasten off.
Repeat armhole edging around other armhole.
142
PART 3 Putting Your Skills to the Test
Fur-Trimmed Jacket
If you’re looking for something with a bit of class, you’ve come to the right place. The design
of this jacket is slightly fitted, sits on the hip, and is trimmed with a “fur” collar and cuffs. The
striped pattern is easy to work (see Figure 12-9). Carry the yarn up the sides and you won’t have
to worry about weaving in a zillion little ends (see Chapter 4 for details on carrying the yarn).
FIGURE 12-9:
You’ll look
striking
wearing this
fitted jacket
with faux fur.
Materials and vital statistics
»» Size: Directions given are for size X-Small (2–4). Changes for Small (6–8), Medium (10–12),
and Large (14–16) are in parentheses.
»» Yarn:
• Patons “Classic Wool” worsted-weight yarn (100% pure new wool), Article #244077
(3.5 oz. [100 g], 223 yds [204 m] each skein): 3 (3, 3, 4) skeins of #0231 Chestnut Brown
(A)
•
Patons “Divine” bulky-weight yarn (76.5% acrylic/10.5% mohair/10.5% wool/2.5% polyester), Article #241006 (3.5 oz. [100 g], 142 yds [130 m] each skein): 3 (3, 3, 4) skeins of
#06013 Deep Earth (B)
•
Patons “Allure” bulky-weight yarn (100% nylon), Article #241004 (1.75 oz. [50 g], 47 yds
[43 m] each skein): 2 skeins of #04040 Ebony (C)
»» Hook: Crochet hook size J-10 U.S. or size needed to obtain gauge
»» Yarn needle
»» 6 buttons, 1 in. in diameter
»» Sewing needle and matching sewing thread
CHAPTER 12 Sensational Sweaters
143
»» Measurements: Finished bust: 32 (36, 40, 44) in. Back length: 20 (21, 22, 23) in. Sleeve
length: 17 (17, 17, 17½) in., excluding cuff. Figure 12-10 shows finished measurements.
»» Gauge: 12 sts and 12 rows in pat = 4 in.
»» Stitches used: Chain stitch (ch), slip stitch (sl st), single crochet (sc), half double crochet (hdc)
FIGURE 12-10:
Schematic for
the furtrimmed
jacket.
The construction of this jacket is pretty typical of garments in general. Each piece is made
separately and then sewn together. You start with the back, then make each of the fronts. When
these pieces are finished, you sew them together, and your project starts to look like something.
Then you crochet each of the sleeves and sew them into place. Last but not least, you add the
fur collar and cuffs to complete the design.
Getting down to business: The back
Foundation chain: With A, ch 47 (53, 59, 65) + 2 (first hdc).
Row 1 (right side): Hdc in 3rd ch from hook, hdc in each ch across (48 [54, 60, 66] hdc), turn.
Row 2: Ch 2 (first hdc), hdc in each hdc across (48 [54, 60, 66] hdc), turn. Drop A, join B.
Row 3: With B, ch 1, sc in each hdc across (48 [54, 60, 66] sc), turn.
Row 4: Ch 1, sc in each sc across (48 [54, 60, 66] sc), turn. Drop B, pick up A.
Row 5: With A, ch 2 (first hdc), hdc in each sc across (48 [54, 60, 66] hdc), turn.
Row 6: Ch 2 (first hdc), hdc in each hdc across (48 [54, 60, 66] hdc), turn. Drop A, pick up B.
Rep Rows 3–6 for pat. Work even in pat until back measures 4 in. from beg.
144
PART 3 Putting Your Skills to the Test
Maintaining established pat, dec 1 st at each end of next row and every row thereafter for 3 more
rows (40 [46, 52, 58] sts at end of last row).
Work even in established pat for 4 rows.
Maintaining established pat, inc 1 st at each end of next row and every row thereafter for 3 more
rows (48 [54, 60, 66] sts at end of last row).
Work even in established pat until back measures 12 (13, 13, 14) in. from beg.
Shape armholes
Next Row: Maintaining established pat, sl st in each of first 5 sts, work in pat across to within
last 5 sts, turn, leaving rem sts unworked (38 [44, 50, 56] sts).
Work even in established pat until back measures 8 (8, 9, 9) in. from beg of armhole shaping.
Fasten off.
What’s left? The left front
Foundation chain: With A, ch 23 (26, 29, 31) + 2 (first hdc).
Row 1 (right side): Hdc in 3rd ch from hook, hdc in each ch across (24 [27, 30, 32] hdc, turn.
Row 2: Ch 2 (first hdc), hdc in each hdc across (24 [27, 30, 32] hdc), turn. Drop A, join B.
Work even in pat as established in back until left front measures 4 in. from beg, ending with a
wrong-side row.
Next Row (right side): Dec 1 st in first 2 sts, work in established pat across (23 [26, 29, 31] sts),
turn.
Next Row: Work in established pat across to within last 2 sts, dec 1 st in last 2 sts (22 [25, 28, 30]
sts), turn.
Rep last 2 rows once (20 [23, 26, 28] sts at end of last row), turn.
Work even in established pat for 4 rows.
Maintaining established pat, inc 1 st at outside edge on next row and every row thereafter for 3
more rows (24 [27, 30, 32] sts at end of last row), turn.
Work even in established pat until left front measures 12 (13, 13, 14) in. from beg.
Shape armhole
Next Row: Maintaining established pat, sl st in each of first 5 sts, work in pat across (19 [22,
25, 27] sts), turn.
Work even in established pat until left front measures 5 rows less than finished back, ending
with a wrong-side row.
CHAPTER 12 Sensational Sweaters
145
Shape neck
Next Row (right side): Work in established pat across first 17 (20, 23, 23) sts, turn, leaving rem
sts unworked.
Maintaining established pat, dec 1 st at neck edge on next row and every row thereafter for
3 more rows (13 [16, 19, 19] sts at end of last row). Fasten off.
It’s all right: The right front
Work same as left front until right front measures 4 in. from beg, ending with a wrongside row.
Next Row (right side): Work in established pat across to within last 2 sts, dec 1 st in last 2 sts
(23 [26, 29, 31] sts), turn.
Next Row: Dec 1 st in first 2 sts, work in established pat across (22 [25, 28, 30] sts), turn.
Rep last 2 rows once (20 [23, 26, 28] sts at end of last row), turn.
Work even in established pat for 4 rows.
Maintaining established pat, inc 1 st at outside edge on next row and every row thereafter for 3
more rows (24 [27, 30, 32] sts at end of last row), turn.
Work even in established pat until right front measures 12 (13, 13, 14) in. from beg.
Shape armhole
Next Row: Work in established pat across first 19 (22, 25, 27) sts, turn, leaving rem sts unworked.
Work even in established pat until right front measures 5 rows less than finished back, ending
with a wrong side row.
Shape neck
Next Row (right side): Sl st in each of first 2 (2, 2, 4) sts, work in established pat across 17
(20, 23, 23) sts, turn.
Dec 1 st at neck edge on next row and every row thereafter for 3 more rows (13 [16, 19, 19] sts
at end of last row). Fasten off.
Fronts meet back: Attaching the pieces
With right sides facing, using yarn needle and A, sew fronts to back across shoulders using the
whipstitch.
Armed and delicate: Creating the sleeves
Note: You need to make two of these.
Foundation chain: With A, ch 51 (51, 51, 54) + 2 (first hdc).
146
PART 3 Putting Your Skills to the Test
Row 1 (right side): Hdc in 3rd ch from hook, hdc in each ch across (52 [52, 52, 55] hdc), turn.
Row 2: Ch 2 (first hdc), hdc in each hdc across (52 [52, 52, 55] hdc), turn. Drop A, join B.
Work even in pat as established in back body of sweater until sleeve measures 3 in. from beg.
Maintaining established pat, dec 1 st at each end of next row and every 4th row thereafter until
32 (32, 32, 35) sts rem on work.
Work even in established pat until sleeve measures 17 (17, 17, 171⁄2) in. from beg. Fasten off.
Sew what? Joining the sleeves to the jacket body
With right sides facing, using yarn needle and A, sew sleeves into armholes using the whipstitch. Sew side and underarm seams.
When sewing the side and underarm seams, make sure to match the stripes. That way your
sweater’s appearance will be “seamless”!
Delightful! Finishing with details
Many times, the details draw you to a piece of clothing. You can’t resist the feel of the fabric or
the fancy buttons or the collar. Here’s where you create the details that will really make people
notice your work of art.
Button band
Row 1: With right side facing, join A in first st at top edge of left front. Working in row-end sts
across center front edge, sc evenly across to last st at bottom edge, turn.
Rows 2–3: Ch 1, sc in each sc across, turn. Fasten off.
Buttonhole Band
Row 1: With right side facing, join A in first st at bottom edge of right front, ch 1, working in
row-end sts across center front edge, sc evenly across to beg of neck shaping, turn. Mark spaces
for buttonholes with top buttonhole 1 in. below top edge, bottom buttonhole 1 in. above bottom
edge, and rem 4 buttonholes evenly spaced between.
Row 2: Ch 1, sc in each sc across, working (ch 3, skip next 3 sc) at each marker, turn.
Row 3: Ch 1, sc in each sc across, working 3 sc in each ch-3 loop. Fasten off.
With sewing needle and matching thread, sew buttons to button band opposite buttonholes.
Collar
Row 1: With right side facing, join C in first st at beg of neck shaping, ch 1, sc evenly across neck
edge to last st of neck shaping on opposite side, turn.
Rows 2–7: Ch 1, 2 sc in first sc, sc in each sc across to within last sc, 2 sc in last sc, turn.
Fasten off.
CHAPTER 12 Sensational Sweaters
147
Cuff
Rnd 1: With right side facing, join C in underarm seam at cuff edge of one sleeve, ch 1, sc evenly
around cuff edge, sl st in first sc to join.
Rnds 2–5: Ch 1, sc in each sc around, sl st in first sc to join. Fasten off.
Rep cuff around lower edge of other sleeve.
148
PART 3 Putting Your Skills to the Test
IN THIS CHAPTER
»» Creating an adorable baby blanket
in basic afghan stitch
»» Making a tote bag using the
Tunisian knit stitch
»» Showing your love of reading with
a filet crochet bookmark
»» Dressing up your windows with a
lacy valance
13
Timeless Techniques:
Using the Afghan Stitch
and Filet Crochet
Chapter
T
he two techniques outlined in this chapter are quite different than those shown in other
chapters. They aren’t any more difficult, they just enable you to create designs with a
look that is set apart from traditional crochet. The afghan stitch, worked with a special
afghan hook, creates a pattern similar to knitting; filet crochet uses blocks and spaces to give
you a lacy look. It’s also perfect for “writing out” words and creating pictures, as you discover
in the bookmark project.
Don’t be intimidated by something new — I think you’ll find these techniques a welcome addition to your crochet skills. Pick a project, grab a hook and some yarn, and start creating!
Afghan Stitch Baby Blanket
Baby items are among the most popular designs to crochet. While I was waiting, rather impatiently, for the arrival of my daughter, I would crochet for her in my spare time. Not only did I
create beautiful blankets, booties, and other cute accessories, but keeping my hands busy also
helped take my mind off the fact that I couldn’t see my feet anymore. Whether for you, a family
member, or a friend, crocheted baby items are not only useful, but they also quite often become
heirlooms to be passed down through generations.
CHAPTER 13 Timeless Techniques: Using the Afghan Stitch and Filet Crochet
149
The afghan stitch lends itself wonderfully to baby blankets because of the tight stitch pattern.
It creates a warm fabric without any loose holes for tiny fingers and toes to get caught in. The
size of this blanket (see Figure 13-1) was designed with a bassinet or stroller in mind, so it’s
large enough to cover a baby without the risk of getting tangled up.
FIGURE 13-1:
This baby
blanket,
worked in
basic afghan
stitch, keeps a
little one warm
and snuggly.
New skill: The afghan stitch
The afghan stitch differs from other crochet stitches in the way you create each stitch. Instead
of working off all loops and ending up with just one loop on your hook after each stitch, here
the stitches are created across two rows. In the first row, you draw up loops for each stitch,
and they all stay on your hook (you have a special hook with an end similar to that of a knitting
needle). On the second pass through, you work the loops off the hook. The added benefit to this
method is that you don’t have to turn your work.
Working the first half of the foundation row
Chain the required number of chain stitches just like you would for any other pattern. Then:
1.
Insert your hook in the second chain from the hook, yarn over, and draw the yarn
through the stitch (see Figure 13-2a).
2.
Insert your hook in the next chain, yarn over, and draw the yarn through the stitch.
You should now have 3 loops on your hook.
3.
Repeat Step 2 across the chain, as shown in Figure 13-2b.
This action of adding the loops to your hook is known as drawing up the loops. You
should have one loop for each chain stitch.
150
PART 3 Putting Your Skills to the Test
FIGURE 13-2:
Working
the first
half of your
foundation row.
Working the second half of the foundation row
When you work the second half of the foundation row, you work the loops off the hook:
1.
Yarn over hook, draw the yarn through 1 loop on the hook (see Figure 13-3a).
2.
Yarn over hook, draw the yarn through the next 2 loops on your hook
(see Figure 13-3b).
3.
Repeat Step 2 across the row until 1 loop remains on your hook (see Figure 13-4).
FIGURE 13-3:
Foundation
row, part two:
Working off
the loops.
FIGURE 13-4:
The finished
foundation row.
Working the next row and beyond
To begin the second row:
1.
Insert your hook in the next vertical bar in the row below.
Don’t use the vertical bar directly beneath your hook.
2.
Yarn over and draw the yarn through the stitch (see Figure 13-5a).
3.
Repeat Steps 1 and 2 across the row until you reach the last stitch.
4.
Insert your hook under the last two vertical bars at the end of the row (refer to
Figure 13-5b), yarn over, and draw the yarn through both vertical bars.
FIGURE 13-5:
Working the
first half of the
second row.
CHAPTER 13 Timeless Techniques: Using the Afghan Stitch and Filet Crochet
151
To finish the second row, repeat Steps 1 through 3 from “Working the second half of the foundation row.” Each successive row will be worked in the same way as the second row.
As the saying goes, practice makes perfect. Be sure to work a gauge swatch so you can get the
hang of the stitch and make sure your gauge is accurate. Swatches should be about 4 inches
square, so if you’re using the yarn for this project, start with a foundation chain of 17 stitches,
and work 16 rows to make a square. You’ll know you’ve got it right if the vertical bars line up
one on top of another.
Materials and vital statistics
»» Yarn: Caron “Simply Soft” 4-ply worsted-weight yarn (100% acrylic), Article #H3000 (3 oz. [85 g],
165 yds [151 m] each skein): 1 skein each of
•
•
•
•
#2615 Soft Blue (A)
#2613 Soft Yellow (B)
#2705 Soft Green (C)
#2601 White (D)
»» Hooks:
• Afghan crochet hook size J-10 U.S. or size needed to obtain gauge
• Standard crochet hook size J-10 U.S. or size needed to obtain gauge
»» Measurements: Panel = 5¾ in. wide x 19½ in. long; blanket = 22½ in. wide x 22½ in. long
»» Gauge: Working in basic afghan stitch with afghan crochet hook, 17 sts and 16 rows = 4 in.
»» Stitches used: Chain stitch (ch), slip stitch (sl st), single crochet (sc), double crochet (dc),
basic afghan stitch (see the “New skill: The afghan stitch” section). Shell: • 5 dc in same st •.
No one will realize how easy it is to make this design when you show them the finished product. The afghan consists of three separate panels worked in the basic afghan stitch with no
increasing or decreasing necessary. After the panels are complete, you crochet a simple edging
consisting of single crochet stitches, then join those together with slip stitches. This is a perfect
example of how the joining seam becomes part of the design. Add a pretty border with the shell
stitch, and you’re done.
Creating a couple of panels
This afghan is made up of 3 panels, one each in colors A, B, and C.
Foundation row: With afghan hook and first color, ch 25. Insert hook in second ch from hook,
yo, draw yarn through st, • insert hook in next st, yo, draw yarn through st •, rep from • to •
across, keeping all loops on hook (25 loops — first half of foundation row complete), beg 2nd
half of row, yo, draw yarn through 1 loop on hook, •• yo, draw yarn through 2 loops on hook ••,
rep from •• to •• across (1 loop remains and counts as first st of next row).
Second and successive rows: Work in basic afghan stitch across all 25 stitches until panel measures 19½ in.
Last row: Sl st in each vertical stitch across. Fasten off.
152
PART 3 Putting Your Skills to the Test
Panel border
Work border around each panel.
Rnd 1: With right side facing, using standard crochet hook, join D in any corner st, ch 1, sc in
each st and row-end st around panel, working 3 sc in each corner st, sl st in first sc to join.
Fasten off D, join color to match panel.
Rnd 2: Ch 1, sc in each sc around, working 3 sc in each corner st. Fasten off, join D.
Rnd 3: With D, rep Rnd 2. Fasten off.
Putting the panels together and
adding the final touch
With right sides facing, matching stitches across long edges of each panel, using standard crochet hook and D, sl st panels tog through back loops of sts in the foll color sequence: A, B, C to
form a square.
Edging
Rnd 1: With right side facing, using standard crochet hook, join D in any corner st, ch 1, sc in
corner st, • ch 1, skip next sc, sc in next sc •, rep from • to • around, working (sc, ch 1, sc) in each
corner st, to within last corner st, (sc, ch 1) in corner st, sl st in first sc to join.
Rnd 2: Ch 1,sc in first ch-1 space,skip next sc,••• shell in next ch-1 space, skip next sc, sc in next
ch-1 space, skip next sc •, rep from • to • across to next corner, shell in corner ch-1 space ••, rep
from •• to •• around, sl st in first sc to join. Fasten off.
Variation: Making a bigger blankie
If you want to make this afghan for a toddler, increase the size of each panel by making a longer
foundation chain. For instance, to make it twice the size, double the number of stitches in the
foundation chain, then keep working rows until the panel reaches the desired length. Follow
the directions for the edging and border as written above. Don’t forget to buy extra yarn.
Variation: Picking a new color palette
This afghan would look really great worked in different colors. Make it solid pink for a little girl
or blue for a little boy. Primary colors would look great as well.
Tunisian Stitch Tote Bag
For some reason, most of us seem to carry all kinds of stuff around, and this bag will serve a
multitude of purposes — it’s neither too large nor too small. The colorations in the yarn cause
it to resemble a denim tweed when it’s worked up, and the Tunisian stitch used (which is a
variation of the basic afghan stitch) closely resembles knitting (see Figure 13-6). You get a nice
tight fabric with an interesting pattern, and best of all, this yarn is user friendly. When the bag
gets dirty, you can throw it in the washer and dryer.
CHAPTER 13 Timeless Techniques: Using the Afghan Stitch and Filet Crochet
153
FIGURE 13-6:
The variation
of the afghan
stitch and the
mediumweight yarn
make this a
sturdy bag.
New skill: The Tunisian knit stitch
The Tunisian knit stitch, or stockinette stitch as it’s sometimes called, is a variation of the basic
afghan stitch. The foundation row is worked exactly the same. You’ll see the pattern variation
when you get to the second row and beyond. Instead of vertical bars appearing as you work,
you’ll see Vs marching across the row, one stacked upon another. The difference comes in the
placement of the hook when you draw up your loops. Instead of inserting it under the front
vertical bar, you insert it from front to back between the front and back vertical bars.
To start the Tunisian stitch, work a foundation row just as you would for the basic afghan stitch
(see the “New skill: The afghan stitch” section earlier in this chapter).
For the first row of Tunisian knit stitch:
1.
Insert your hook, from front to back, between the front and back strands of the next
vertical stitch, yarn over, and draw the yarn through the stitch (see Figure 13-7a).
2.
Repeat Step 1 across the row until you reach the last stitch.
3.
Insert your hook under the last 2 vertical bars at the end of the row (see Figure 13-7b),
yarn over, and draw the yarn through the stitch.
FIGURE 13-7:
Working the
first half of the
Tunisian knit
stitch row.
154
PART 3 Putting Your Skills to the Test
Work the loops off the hook in the same way as described for the basic Afghan stitch in the
“New skill: The Afghan stitch” section in the baby blanket project. Now you’ve completed one
row of Tunisian knit stitch (see Figure 13-8).
FIGURE 13-8:
A finished first
row of Tunisian
knit stitch.
Work a practice swatch using the yarn suggested in this pattern not only to ensure that your
gauge is correct, but to get a handle on the stitch. Your swatch should be about 4 inches square,
so start with a foundation chain of 15 stitches, then work the Tunisian stitch for 16 rows. The
resulting pattern will remind you of a knitted fabric, with a whole bunch of V’s lined up side by
side, one on top of another.
Materials and vital statistics
»» Yarn: Coats & Clark Red Heart “Fiesta” worsted-weight yarn (73% acrylic/27% nylon), Article
#E704 (6 oz. [170 g], 316 yds [289 m] each skein): 2 skeins of #6382 Country Blue
»» Hooks:
• Afghan hook size J-10 U.S. or size needed to obtain gauge
• Standard crochet hook size J-10 U.S. or size needed to obtain gauge
»» Yarn needle
»» Measurements: 13 in. wide x 11½ in. deep, excluding handles
»» Gauge: Working in Tunisian knit stitch, 15 sts and 16 rows = 4 in.
»» Stitches used: Chain stitch (ch), slip stitch (sl st), single crochet (sc), Tunisian knit stitch (see
the “New skill: Tunisian knit stitch” section for how-to’s)
The construction of this bag couldn’t be easier. You crochet a big rectangle using the Tunisian
stitch, fold it in half to form the bag, and then sew the side edges together. The handles are
added afterward by crocheting several rows of single crochet stitches.
Making the body of the bag
Foundation row: With afghan hook and first color, ch 50. Insert hook in second ch from hook,
yo, draw yarn through st, • insert hook in next st, yo, draw yarn through st •, rep from • to •
across, keeping all loops on hook (50 loops — first half of foundation row complete), beg 2nd
half of row, yo, draw yarn through 1 loop on hook, •• yo, draw yarn through 2 loops on hook ••,
rep from •• to •• across (1 loop remains and counts as first st of next row).
Second and successive rows: Work in Tunisian knit stitch across all 50 stitches until panel
measures 22 in.
Last row: Sl st in each vertical stitch across. Fasten off.
CHAPTER 13 Timeless Techniques: Using the Afghan Stitch and Filet Crochet
155
Assembly
With right sides facing, fold piece in half crosswise, matching short edges. Using yarn needle
and yarn, sew sides of bag together using a whipstitch (see Appendix A for specifics of this
stitch), matching stitches. Turn bag right side out.
Top edging
Rnd 1: With right side facing, using standard crochet hook, join yarn in one side seam, ch 1, sc
in each st around, sl st in first sc to join.
Rnd 2: Ch 1, sc in each sc around, sl st in first sc to join. Fasten off.
Adding the handles
Row 1: With right side facing, using standard crochet hook, join yarn in st approx 2 in. in from
side seam, ch 75, and without twisting ch, sl st in corresponding st approx 2 in. in from other
side seam on same edge of bag, sl st in next st on edge of bag, turn.
Row 2: Ch 1, sc in each ch across, sl st in next sc on edge of bag, turn.
Rows 3–4: Ch 1, sc in each sc across, sl st in next sc on edge of bag, turn. Fasten off.
Rep handle on opposite side of bag.
Love-to-Read Bookmark
This design is for the readers in your life. Anyone who spends a lot of time with books knows
how valuable a good bookmark is. The pattern uses the filet crochet stitches of blocks and
spaces to spell out a special message (see Figure 13-9), with some basic decreasing at the top.
You’ll work from a chart to create this project. Make a copy of the chart and work from that. You
can then mark the rows you’ve completed or highlight the current row, and you’ll still have the
original for future use. To make the chart even easier to read, enlarge it so you can see where
you are and where you’re going without having to search for the right row.
New skill: Basic filet crochet stitches
Not only is filet crochet easy to work, but it’s easy to read as well. Because filet patterns are
charted, you don’t have to worry about reading rows and rows of written instructions. The
reason they are charted is this: Each square on the chart represents either a space or a block.
Each space or block is made up of a certain number of stitches, which are given to you in a key.
Typically, each square is 3 stitches, although as with anything, there are variations. The rows
on the chart are numbered, and you work from the bottom up.
Making spaces
Spaces form the mesh, or background, upon which the design is created. They are also used
within the design itself to separate the blocks, allowing the picture or words to appear. To work
the first row of spaces, chain the designated number of stitches for your foundation chain.
Then:
156
PART 3 Putting Your Skills to the Test
FIGURE 13-9:
You may think
this bookmark
is too clever to
hide inside a
book.
1.
Chain 2 (top of first space), and then double crochet in the 8th chain from the hook to
create the first space.
2.
Chain 2, skip the next 2 chain stitches, and double crochet in the next chain stitch.
.
You’ve just completed the second space.
3.
Repeat Step 2 across the row (see Figure 13-10).
FIGURE 13-10:
Working the
first row of
spaces.
To work the second row of spaces:
1.
Chain 3 for the first double crochet.
2.
Chain 2 more for the top of the first space.
3.
Skip the next 2 chain stitches, and double crochet in the next double crochet.
4.
Repeat Steps 2 and 3 across the row.
Building blocks
Blocks are the solid squares that are used to create the main design, whether it’s a picture or
a saying. They’re also used quite frequently to make a border that frames the main design. To
work the first row of blocks, chain the designated number of stitches for your foundation chain,
and then:
1.
Double crochet in the 4th chain from the hook.
2.
Double crochet in the next 2 chain stitches to complete the first block.
CHAPTER 13 Timeless Techniques: Using the Afghan Stitch and Filet Crochet
157
3.
Double crochet in each of next 3 chain stitches to complete the second block.
4.
Repeat Step 3 across the row (See Figure 13-11).
FIGURE 13-11:
First row of
filet crochet
blocks.
Practicing with a swatch
Figure 13-12 shows a chart that you can use to make a swatch and practice filet crochet spaces
and blocks. To make a swatch that is 5 squares wide by 5 rows high and uses both spaces and
blocks, follow these steps:
1.
Chain 18 for your foundation chain.
2.
Chain 2 to create the top of the first space.
3.
Double crochet in the 8th chain from the hook to create the first space.
4.
Chain 2.
5.
Skip the next 2 chain stitches.
6.
Double crochet in the next chain stitch.
Two spaces are now complete, and you’ve completed the first two squares on the chart.
7.
Repeat Steps 4 through 6 for each square in Row 1.
Row 1 of the chart is now complete.
8.
To continue working the swatch, work in blocks and spaces following the chart in
Figure 13-12.
Read all odd-numbered rows from right to left and all even-numbered rows from left
to right. Fasten off at the end of the last row.
FIGURE 13-12:
Filet crochet
chart and key
for working a
practice swatch
using blocks
and spaces.
When working a filet crochet design, it’s really easy to see when you’ve got it right or if you’ve
made a mistake. Squares will line up on top of each other, so whether the squares contain
spaces or blocks, every three stitches that make up a square will be in alignment.
Decreasing spaces and blocks
Sometimes filet crochet designs require you to decrease spaces or blocks, usually to create an
interesting border or edge shape. Decreasing is always done at the beginning or end of a row,
never in the middle.
158
PART 3 Putting Your Skills to the Test
To decrease one space or block at the beginning of a row:
1.
Slip stitch in each of the first 3 stitches.
2.
Chain 3 for the first double crochet of the next space or block.
3.
Continue following the chart across the row.
To decrease more than one space or block at the beginning of the row, simply slip stitch in each
stitch across for the number of spaces or blocks that you’re decreasing.
To decrease one space or block at the end of a row:
1.
Work the chart across the row until you reach the last 3 stitches (the beginning of the
last space or block).
2.
Turn your work, leaving the remaining stitches unworked.
To decrease more than one space or block at the end of a row, work the row according to the
chart, then stop crocheting when you’ve completed all the spaces or blocks. Turn your work
and begin the next row.
Materials and vital statistics
»» Yarn: DMC “Cebelia” size 20 crochet thread (100% mercerized cotton), Article #167 (1.75 oz.
[50 g], 405 yds [370 m] each ball): 1 ball of Blanc (white)
»» Hook: Steel crochet hook size 6 U.S. or size needed to obtain gauge
»» Measurements: 3¼ in. wide x 13 in. long
»» Gauge: 5 spaces = 1½ in.; 7 rows dc = 1½ in.
»» Stitches used: Chain stitch (ch), slip stitch (sl st), double crochet (dc). Filet st: Dc in dc,
ch 2, skip next 2 sts: 1 space made. Dc in dc, dc in each of next 2 sts: 1 block made.
To dec 1 space at beg of row: Sl st to designated dc, ch 3 (first dc) to beg row.
To dec one space at end of row: Work to designated dc, then turn to beg next row.
This design uses blocks to create a border around the entire edge of the design. After you make
the foundation chain, Row 1 writes out the instructions for the first row of the chart (read from
right to left), then you continue to work the chart from Row 2, which you read from left to right.
Directions
Foundation chain: Ch 33 + 3 (first dc).
Row 1: Dc in 4th ch from hook, dc in each ch across (first row of chart complete — 11 blocks),
turn.
Rows 2–61: Work in blocks and spaces, foll chart (see Figure 13-13). Read all odd-numbered
rows from right to left, all even-numbered rows from left to right. Fasten off at end of last row.
CHAPTER 13 Timeless Techniques: Using the Afghan Stitch and Filet Crochet
159
FIGURE 13-13:
Bookmark
chart and key.
Finishing: Using liquid starch, block the finished piece as follows:
160
1.
Hand wash the design gently in cold water with mild soap, rinsing several times to
remove all soap residue.
2.
In a separate clean tub, prepare liquid starch solution according to the directions on
the bottle.
PART 3 Putting Your Skills to the Test
3.
Immerse the crocheted piece in the solution and allow the solution to completely
penetrate the fabric.
4.
Prepare a blocking surface large enough to accommodate the design, such as a piece
of cardboard or foam board wrapped in plastic.
5.
Remove the item from the solution and blot it with a clean towel to remove any extra
solution.
6.
Using rustproof straight pins, pin the design onto the blocking board to the required
dimensions, taking care to shape any stitch patterns.
7.
Blot the design again to remove any excess solution that may still remain.
8.
Allow the piece to dry completely before removing the pins.
Heartland Window Valance
The design of this window valance is a variation of one that has been around for many, many
years. The pattern incorporates all the basic filet stitches: spaces, blocks, bars, and lacets (see
Figure 13-14). Using a heavier-weight yarn increases the size of the design, making it suitable
to hang at the top of a window.
FIGURE 13-14:
Because you
can add as
many panels
as you need,
you can make
this window
valance to fit
any size
window.
New skill: Fancy filet crochet stitches
Filet crochet includes stitches called bars and lacets, in addition to spaces and blocks (see the
“New skill: Basic filet crochet stitches” section under the bookmark project). Both lacets and
bars are worked across two spaces or blocks in the previous row, as opposed to just one. They
aren’t any harder to make; they just lend a decorative touch.
Creating lacets
Lacets resemble Vs, and it is the only filet crochet stitch to use a stitch other than the chain
stitch and double crochet. The center of the V is formed with a single crochet stitch as follows:
1.
Work the first double crochet as you would to begin a regular space or block.
2.
Chain 3.
CHAPTER 13 Timeless Techniques: Using the Afghan Stitch and Filet Crochet
161
3.
Skip the next 2 stitches.
4.
Single crochet in the next stitch.
5.
Chain 3.
6.
Skip the next 2 stitches.
7.
Double crochet in the next double crochet to complete 1 lacet (see Figure 13-15).
FIGURE 13-15:
A lacet
spanning two
spaces.
Putting in bars
Bars are really nothing more than double spaces that cross over two spaces or blocks in the row
below them. They are typically worked over a lacet, although not always. To make a bar:
1.
Work the first double crochet as you would to begin a regular space or block.
2.
Chain 5.
3.
Skip the next 5 stitches or 2 spaces.
4.
Double crochet in the next double crochet to complete 1 bar (see Figure 13-16).
FIGURE 13-16:
A bar spanning
a lacet.
Practicing with a swatch
To get the hang of making lacets and bars, work this practice swatch using the chart and key in
Figure 13-17 before jumping into the next project.
162
1.
Chain 27 for the foundation chain.
2.
Chain 2 to create the top of the first space.
3.
Double crochet in the 8th chain stitch from the hook to create the first space.
4.
Chain 2.
5.
Skip the next 2 chain stitches.
PART 3 Putting Your Skills to the Test
6.
Double crochet in the next chain stitch.
Two spaces are now complete, and you’ve completed the first 2 squares on the chart.
7.
Repeat Steps 4 through 6 for each square in Row 1.
Row 1 of the chart is now complete.
8.
To continue working the swatch, work the blocks, spaces, lacets, and bars following
the chart.
Read all odd-numbered rows from right to left and all even-numbered rows from left
to right. Fasten off at end of last row.
FIGURE 13-17:
Filet crochet
chart and key
for swatch.
Increasing spaces and blocks
This design has a shaped lower edge, so to create this detail, you need to increase and decrease
spaces at the beginning of specified rows. Many filet crochet pieces are symmetrical, so you
need to be able to increase spaces and blocks at both ends, but for the sake of clarity, the
instructions below only show you how to increase spaces at the beginning of a row, which is all
you need to complete this design. (Turn to the “New skill: Basic filet crochet stitches” earlier
in this chapter to find out how to make spaces and blocks.)
To increase a space at the beginning of a row:
1.
When you reach the end of the row that precedes the row you’re going to increase,
turn your work, then chain 2 for the base of the first increase space.
2.
Chain 3 more for the turning chain of the row’s first double crochet.
3.
Chain 2 more for the top of the first space.
4.
Double crochet in the 8th chain from the hook (see Figure 13-18a).
Now you’ve completed one space increase, as shown in Figure 13-18b.
To increase a block at the beginning of a row:
1.
When you reach the end of the row that precedes the row you’re going to increase,
turn your work, then chain 2 for the base of the first increase block.
2.
Chain 3 more for the turning chain of the row’s first double crochet.
3.
Double crochet in the 4th chain from the hook to complete the block’s 2nd double
crochet (see Figure 13-19a).
4.
Double crochet in each of next 2 chain stitches to complete the first block, as shown
in Figure 13-19b.
CHAPTER 13 Timeless Techniques: Using the Afghan Stitch and Filet Crochet
163
FIGURE 13-18:
Increasing
one space at
the beginning
of a row.
FIGURE 13-19:
Increasing
one block at
the beginning
of a row.
Materials and vital statistics
»» Yarn: Coats & Clark Red Heart “LusterSheen” sport-weight yarn (100% acrylic), Article #E721
(4 oz. [113 g], 335 yds [306 m] each skein): 1 skein of #0624 Sea Green will make a valance
that is about 42 inches long. (Purchase more yarn as needed to make a valance that fits
your window.)
»» Hook: Crochet hook size E-4 U.S. or size needed to obtain gauge
»» Measurements: Pattern repeat = 7 in. x 10 in.
»» Gauge: 8 spaces = 3 in.; 5 rows dc = 3 in.
»» Stitches used: Chain stitch (ch), slip stitch (sl st), single crochet (sc), double crochet (dc). Filet
st: Dc in dc, ch 2, skip next 2 sts: 1 space made. Dc in dc, dc in each of next 2 sts: 1 block
made. Dc in dc, ch 3, skip next 2 sts, sc in next st, ch 3, skip next 2 sts: 1 lacet made. Dc in dc,
ch 5, skip next 5 sts, or 2 spaces: 1 bar made. To inc 1 space and 1 block at beg of row:
Ch 11, dc in 8th ch from hook, dc in each of next 3 sts. To dec 2 spaces at end of row: Work
to designated dc, then turn to beg next row.
This design incorporates almost all of the filet crochet skills you’ll ever need. Keep in mind as
you’re working this project that the design is crocheted sideways and from the bottom edge to
the top edge and back again.
164
PART 3 Putting Your Skills to the Test
Directions
Foundation chain: Ch 36 + 3 (first dc) + 2 (first space).
Row 1: Dc in 8th ch from hook, dc in each of next 3 ch, (ch 2, skip next 2 ch, dc in next ch)
7 times, dc in each of next 3 ch, ch 2, skip next 2 ch, dc in next ch, dc in each of last 3 ch (first
row of chart complete — 12 spaces and blocks), turn.
Rows 2–19: Work in blocks, spaces, bars, and lacets foll chart (see Figure 13-20). Read all oddnumbered rows from right to left, all even-numbered rows from left to right.
Rep Rows 2–19 for pat until valance reaches desired width to fit window. Fasten off at end of
last row.
Hanging the valance: Use the second row of spaces down from the top edge to hang your valance. Thread a thin curtain rod through these spaces and hang in the desired window.
FIGURE 13-20:
Window
valance chart
and key.
Variation: Using the pattern to create edging
This design lends itself to adjustment. You can use a size 10 thread and a size 6 or 7 steel crochet hook to create shelf edging. Keep crocheting the pattern repeat until the edging is as wide
as you want it.
To make a pillowcase edging, use size 20 crochet thread and a size 12 steel crochet hook. Work
the pattern repeat until it reaches the desired width.
CHAPTER 13 Timeless Techniques: Using the Afghan Stitch and Filet Crochet
165
IN THIS CHAPTER
»» Creating a new design with the
age-old granny square
»» Using thread crochet to dress up a
plain pillowcase
»» Felting your way to a great
carry-all
»» Working with hemp to crochet a
basket
»» Crocheting with wire and beads to
create a funky necklace
14
Mixing Traditional
Stitches with
Contemporary
Materials
Chapter
G
one are the days when you could pick up only a skein of basic 4-ply yarn or crochet
thread to stitch your latest project. Today, you can use wire, hemp rope, and all sorts of
fancy yarns to let your creativity shine. This chapter has a bunch of fun projects that
incorporate old-time traditions with new ideas and materials. The granny square is showcased
in a new light, while the pillowcase edging shows how you can create beautiful bedding on
your own without having to rely on department stores.
This chapter also covers felting, a popular trend in crochet. And finally, you can check out two
projects that show how to use nontraditional materials to crochet. Browse through the projects,
then give one a try. You just may discover a whole new side to your creativity!
CHAPTER 14 Mixing Traditional Stitches with Contemporary Materials
167
Not Your Granny’s Scarf
Granny squares have made a comeback in a big way, but they certainly don’t resemble those
from when your granny may have worked the pattern. New advances in yarn affect how the
granny square is crafted and viewed today, and this scarf is no exception (see Figure 14-1).
Although the pattern itself remains the same, the colors and textures are strictly modern.
This is a great project if you’re on the go, too, because you don’t have to cart around a big
unwieldy piece. Each square is made separately, and then sewn together in a strip to form a
wear-everywhere scarf.
FIGURE 14-1:
The yarn used
for this scarf
brings the
granny square
into the
21st century.
Materials and vital statistics
»» Yarn: Coats and Clark “Moda Dea Metro” bulky-weight yarn (94% acrylic/6% nylon), Article
#R143 (3.52 oz. [100 g], 124 yds [113 m] each skein): 1 skein each of
•
•
•
•
#9317 Vanilla (A)
#9863 Mocha Latte (B)
#9321 Wheat (C)
#9340 Chocolate (D)
»» Hook: Crochet hook size J-10 U.S. or size needed to obtain gauge
»» Yarn needle
»» Measurements: Motif = 5¼ in. wide x 5¼ in. long; scarf = 5¼ in. wide x 82½ in. long
»» Gauge: First 2 rnds of motif = 3½ in. in diameter
»» Stitches used: Chain stitch (ch), slip stitch (sl st), single crochet (sc), double crochet (dc)
168
PART 3 Putting Your Skills to the Test
These granny square motifs work up quickly — each one is comprised of only four rounds. See
Figure 14-2 for the stitch diagram. When changing the colors between each round, be sure to
work over the yarn tails, that way you won’t be left with a lot of little ends to weave in when
you’re done. Sew the motifs together end to end to form a long strip, and your scarf is complete.
FIGURE 14-2:
Motif stitch
diagram.
Directions
Motif (make 15):
Center ring: With A, ch 4 and close into a ring with one sl st in first ch.
Rnd 1: Ch 3 (first dc), ch 2 (first ch-2 space), (3 dc, ch 2) 3 times in ring, 2 dc in ring, sl st in
first dc to join (4 ch-2 spaces). Fasten off A, join B.
Rnd 2: With B, ch 3 (first dc), ch 2 (first ch-2 space), 3 dc in first ch-2 space, ch 1, • (3 dc, ch 2,
3 dc) in next ch-2 space, ch 1 •, rep from • to • twice, 2 dc in first sl st, sl st in first dc to join.
Fasten off B, join C.
Rnd 3: With C, ch 3 (first dc), ch 2 (first ch-2 space), 3 dc in first ch-2 space, ch 1, • 3 dc in next
ch-1 space, ch 1, (3 dc, ch 2, 3 dc) in next ch-2 space, ch 1 •, rep from • to • twice, 3 dc in next
ch-1 space, ch 1, 2 dc in first sl st, sl st in first dc to join. Fasten off C, join D.
Rnd 4: With D, ch 1, sc in each st and each ch-1 space around, working 3 sc in each ch-2 corner
space, sl st in first sc to join. Fasten off.
Assembly: With right sides facing, using yarn needle and D, matching stitches across short
edges, sew motifs together forming a strip that is 1 motif wide by 15 motifs long.
CHAPTER 14 Mixing Traditional Stitches with Contemporary Materials
169
Variation: Making a cozy afghan
The granny squares used for this scarf would also make a great afghan. To make one that is
approximately 42 in. by 52 in. in size, you need 3 skeins of each yarn color. Following the directions above:
1.
Make 80 motifs.
2.
With right sides facing, sew motifs together to form an afghan 10 motifs wide by
8 rows in height.
3.
Stitch the border:
With right side facing, join D in top right-hand corner stitch, ch 1, • 3 sc in corner
stitch, sc in each st across to next corner •, rep from • to • around, sl st in first sc to
join. Fasten off.
Shells and Lace Pillowcase Edging
The design of this pillowcase edging (see Figure 14-3) was popular years ago, especially when
women were still putting together hope chests for their daughters. A beautifully made bed is
something that has never gone out of style, though, and the pillowcase edging here allows you
to create a look that you won’t see in any store.
FIGURE 14-3:
Dress up your
pillows with
this elegant
edging.
When you decide to add edging to something, you can choose from literally hundreds of different edging designs. This one incorporates a variation of the shell stitch and works up into a
narrow band that you sew across the front of the pillow. Make it in the beige color I use here, or
go for a brighter look to add some pizzazz. This project is good for an intermediate-level crocheter, mainly because you use crochet thread, which is much finer and can be harder to work
with. Don’t let that put you off, though. Thread crochet makes some really beautiful designs.
170
PART 3 Putting Your Skills to the Test
Materials and vital statistics
»» Yarn: DMC “Cebelia” size 10 crochet thread (100% double mercerized cotton), Article #167G
(1.75 oz. [50 g], 284 yds [260 m] each ball): 1 ball of #712 ecru makes several edgings
»» Hook: Steel crochet hook size 4 U.S. or size needed to obtain gauge
»» Sewing needle and matching sewing thread
»» Measurements: 1½ in. wide x 19½ in. long
»» Gauge: 3 pat repeats = 4 in.
»» Stitches used: Chain stitch (ch), slip stitch (sl st), single crochet (sc), double crochet (dc).
Shell: •5 dc in same st •. Cluster: •2 dc (half closed and joined together) worked across 2
designated sts •. Picot: •Ch 6, sl st in 3rd ch from hook •. (For refreshers on the shell, cluster,
and picot stitches, turn to Appendix A.)
This is a great pattern to crochet for someone who’s relatively new to thread crochet. It’s not
too complicated, yet the results look like you’ve been crocheting for years. The design is actually an expanded shell pattern (see Figure 14-4), one that you’ll likely see if you do any amount
of thread crochet. You may find that the edges curl a bit as you work, but once you’re finished,
wet the edging, shape it, lay it flat to dry, and it’ll be just fine.
FIGURE 14-4:
Reduced
sample of
edging stitch
diagram.
Directions
The length of this edging is long enough to cover the edge of one side of a standard pillowcase.
If you’d like to make your edging go all the way around the pillow, or if you want to make a
matching edging for your sheets, make a foundation chain that is long enough for your needs
and is a multiple of 9 sts + 5 to accommodate the pattern.
Foundation chain: Ch 122.
Row 1: Sc in 2nd ch from hook, sc in each ch across (121 sc), turn.
Row 2: Ch 1, sc in first sc, ch 2, skip next 2 sc, sc in next sc, • skip next 2 sc, shell in next sc,
skip next 2 sc, sc in next sc, ch 2, skip next 2 sc, sc in next sc •, rep from • to • across (13 shells
made), turn.
Row 3: Ch 1, sc in first sc, ch 2, • dc in first dc of next shell, (ch 1, dc in next dc) 4 times, sc in
next ch-2 space •, rep from • to • across to within last shell, dc in first dc of last shell, (ch 1, dc
in next dc) 4 times, ch 2, skip next ch-2 space, sc in last sc, turn.
CHAPTER 14 Mixing Traditional Stitches with Contemporary Materials
171
Row 4: Ch 3 (first dc), skip next ch-2 space, (dc in next dc, ch 2) 4 times, • work one cluster of
2 dc across next 2 dc, with first dc of cluster in next dc, skip next sc, and second dc of cluster
in next dc, ch 2, (dc in next dc, ch 2) 3 times •, rep from • to • across to within last dc, work one
cluster of 2 dc across next 2 sts, with first dc of cluster in next dc, skip next ch-2 space, and
second dc of cluster in last sc, turn.
Row 5: Ch 1, sc in top of first cluster, 3 sc in first ch-2 space, • ch 6, sl st in 3rd ch from hook
(picot made), ch 4, 3 sc in next ch-2 space •, rep from • to • across to within last 2 dc, skip next
dc, sc in last dc. Fasten off.
Finishing: To sew this edging to the pillowcase, pin the first row of the edging, close to the
foundation chain, to the right side of the pillowcase in the desired location. Using a sewing
needle and matching thread (or a sewing machine and matching thread), sew the edging to the
pillowcase across the entire front edge.
Honey, I Shrunk My Bag
Creating this felted carry-all is really fun! You start with one design and end up with another.
Felting is popular among crocheters, and with good reason. The resulting fabric is soft, warm,
and extremely durable (see Figure 14-5).
What is felting? You’ve probably done it and not even realized it. Remember when you were
learning how to do laundry, and you inadvertently put that wool sweater into the washer and
dryer and ended up with a sweater that would fit a child? Well, that’s what felting is all about.
Felting is what happens to wool fibers when they’re exposed to hot water and friction. The
stitches fuse into a densely woven fabric that is strong, but still soft to the touch. Using wool
yarn, you crochet your item several sizes larger than you want the finished design to be. Then
you throw the project into the washer and dryer to fuse the strands of wool together. No two
bags come out exactly the same, so you always end up with a one-of-a-kind design.
FIGURE 14-5:
You
intentionally
shrink this
carry-all after
you’re done
crocheting.
172
PART 3 Putting Your Skills to the Test
Materials and vital statistics
»» Yarn: Lion Brand “Lion Wool” worsted-weight yarn (100% wool), Article #820 (3 oz. [85 g],
158 yds [144 m] each skein for solids; 2¾ oz. [78 g], 143 yds [131 m] each skein for multis):
•
•
3 skeins of #140 Rose (MC)
1 skein of #201 Autumn Sunset (CC)
»» Hook: Crochet hook size K-10½ U.S. or size needed to obtain gauge
»» Measurements: 22 in. wide x 12½ in. deep, excluding handles, and before felting
• Note: The finished measurements after felting will vary, but the carry-all will be considerably smaller. The bag shown here measured 17 in. wide x 9 in. deep, excluding the
handles, after felting.
»» Gauge: First 2 rnds of base = 1¾ in.
»» Stitches used: Chain stitch (ch), slip stitch (sl st), single crochet (sc), half double crochet (hdc)
The beauty of this design is that the stitches are basic, and when you get done, you don’t really
see them at all. Whether you tend to crochet on the loose side or make your stitches tight, the
final outcome will be unique. The felting process blends the stitches together, so the look you
get is one of a solid fabric.
Crafting the tote
You create the base and sides of the bag as you crochet by working in rounds, instead of making
the pieces individually and putting everything together at the end.
Base
Foundation chain: With MC, ch 62.
Rnd 1 (wrong side): Hdc in 3rd ch from hook, hdc in each of next 58 ch, 3 hdc in last ch, working across opposite side of foundation ch, hdc in each of next 58 ch, hdc in same ch as first hdc
(122 hdc), sl st in turning ch to join.
Rnd 2: Ch 2 (first hdc), 2 hdc in next hdc, hdc in each of next 58 hdc, 2 hdc in each of next
3 hdc, hdc in each of next 58 hdc, 2 hdc in next hdc, hdc in same st as first hdc (128 hdc), sl st
in first hdc to join, turn.
Beg sides
Rnd 1 (right side): Ch 2 (first hdc), working in flps only, hdc in each hdc around (128 hdc),
sl st in first hdc to join.
Rnd 2: Ch 2 (first hdc), working in both loops of sts, hdc in each hdc around (128 hdc), sl st in
first hdc to join.
Rep Row 2 in the foll color sequence: 5 rows MC; 3 rows CC; 9 rows MC; 2 rows CC; 3 rows MC;
2 rows CC; 3 rows MC; 2 rows CC; 9 rows MC; 1 row CC.
Last Row: With MC, sl st in each hdc around. Fasten off.
CHAPTER 14 Mixing Traditional Stitches with Contemporary Materials
173
Getting the hang of the handles
Row 1: With right side facing, join MC in 11th st from side, ch 100, join with sl st in corresponding st on same side edge of bag being careful not to twist ch, sl st in next st on edge of bag, turn.
Row 2: Ch 1, sc in each st across handle, sl st in next st on side edge of bag, turn.
Rows 3–4: Rep Row 2. Fasten off.
Rep handle in corresponding sts on opposite side of bag.
Finishing up with felting
When felting an item, it’s just like washing any other article of clothing. Set the washer to the
hot or warm/cool rinse cycle and the appropriate load size. If you’re felting the piece by itself,
a small or medium wash setting will do the trick. Start the washer, and add the recommended
amount of detergent for the size load you’re going to run. If you want, you can throw some
like-colored items in with the piece to help increase the agitation (however, check the yarn
label to see if it tells you whether the yarn is colorfast).
It’s a good idea to check your piece periodically, once at least halfway through the cycle, then
again every few minutes or so to make sure it’s not felting (or shrinking) too much. (To check
the piece, stop the washer and wait for everything to stop moving before you reach into the
machine.) Take the bag out of the washer when it’s felted to your satisfaction, or if, at the end
of the cycle, you want a more felted look, just run the piece through again.
You can also felt the bag even more in the dryer. Put the item in the dryer on the regular setting,
and run the dryer until the piece is almost dry. Don’t worry if the shape is skewed — while the
bag is still damp, lay it flat, adjust into the proper shape, and allow the piece to finish air drying. If your piece is felted to your satisfaction when it comes out of the washing machine, you
can let it air dry completely. Lay the piece on a flat surface and shape to dry.
Don’t forget to check the piece during the felting process. After the fibers are fused, you can’t
undo it.
Variation: Felting? Fuhgeddaboudit!
If you really like the way the bag looks before the felting process, go ahead and use it that way.
If it gets wet or dirty, don’t worry — it won’t automatically felt. Just hand wash the bag in cool
water and lay flat to dry.
Hemp Basket
Baskets have a multitude of purposes, from displaying dried flowers in the living room to
holding pretty soaps in the bathroom. Large or small, square or round, they’re one of the most
useful items to have around the house. Now you can create your own baskets. This project
uses hemp cord instead of yarn (see Figure 14-6), and one ball will make enough baskets so
you can have several to place around the house or share with friends. It also proves that you
don’t always have to crochet with yarn. Almost any flexible material will work. Just use your
imagination!
174
PART 3 Putting Your Skills to the Test
FIGURE 14-6:
After you see
how handy this
basket is, you’ll
want to shout,
“Hemp, hemp,
hooray!”
Materials and vital statistics
»» Yarn: Hemp jewelry cord (worsted-weight) (73 yds [67 m] each ball): 1 ball
»» Hook: Crochet hook size J-10 U.S. or size needed to obtain gauge
»» Stitch marker
»» Measurements: 5½ in. in diameter across top x 2½ in. tall
»» Gauge: First 4 rnds of base = 2¾ in. in diameter
»» Stitches used: Chain stitch (ch), slip stitch (sl st), single crochet (sc)
The pattern for this basket is typical of any round item you may come across, such as hats. The
difference is in the material. Hemp cord is a little stiffer than yarn, so you may have to work a
little harder to create each stitch.
Building the base
Center ring: Ch 4 and close into a ring with one sl st in first ch.
Rnd 1: Ch 1, work 4 sc in ring (4 sc), sl st in first sc to join.
Rnd 2: Ch 1, 2 sc in each sc around (8 sc), sl st in first sc to join.
Rnd 3: Ch 1, 2 sc in each sc around (16 sc), sl st in first sc to join.
Rnd 4: Ch 1, sc in each of first 3 sc, 2 sc in next sc, • sc in each of next 3 sc, 2 sc in next sc •, rep
from • to • around (20 sc), sl st in first sc to join.
CHAPTER 14 Mixing Traditional Stitches with Contemporary Materials
175
Working your way up the sides
Rnd 1: Ch 1, working in blps of sts only, sc in each sc around (20 sc), do not join. Continue working in a spiral, marking beg of each rnd and moving marker up as work progresses.
Rnd 2: Working in both loops of sts, • sc in each of next 4 sc, 2 sc in next sc •, rep from • to •
around (24 sc).
Rnd 3: Sc in each sc around (24 sc).
Rnd 4: • Sc in each of next 5 sc, 2 sc in next sc •, rep from • to • around (28 sc).
Rnd 5: Sc in each sc around (28 sc), sl st in first sc to join. Fasten off.
Variation: Making the basket just the right size
You can make bigger or smaller baskets. Increase or decrease the size of your base, then the
sides accordingly. If you want to make a taller basket, keep going up, up, and around until the
basket is the height you want.
Variation: Using different sizes of hemp cord
Hemp cord comes in different sizes. You can use a finer-weight cord and smaller hook, or a
heavier-weight cord and a larger hook.
If you use a finer-weight cord, your basket will be smaller in size. You can compensate for this
by making the base larger, then the sides taller to arrive at the same dimensions as above.
If you use a heavier-weight cord, the basket will be larger. If that’s what you’re looking for,
then that’s just fine, but if you want to keep it the same size, decrease the size of your base, and
work the sides until they reach the desired height.
Wire-’n’-Beads Necklace
The wire-’n’-beads necklace is another example of using a nontraditional material to crochet
with. Wire is ideal and is readily available. If you look in the beading section of your local craft
store, you’ll find lots of it. Use wire that is 28 to 30 gauge (this is the most flexible). It also
comes in lots of different colors. The design shown here is really simple (see Figure 14-7), and
you can make the necklace in just a few hours. The stitches are worked loosely, and as is done
here, you can add beads or a charm or two to give it an up-to-date look.
Materials and vital statistics
»» Yarn: WyrKnittrWyr Pak 30-gauge copper-coated wire (40 yds [36 m] per spool): #02106
Jewels
»» Hook: Crochet hook size H-8 U.S. or size needed to obtain gauge
»» Beads: 180 Darice Jewelry Designer tie-dye glass bead #1981-70
»» Necklace clasp
»» Measurement: Each strand = approx 26 in. in length
176
PART 3 Putting Your Skills to the Test
FIGURE 14-7:
Chain stitches
and beads
make a funky
statement.
»» Gauge: 16 chsts = 4 in.
»» Stitches used: Chain stitch (ch). Beaded chain stitch: • Draw bead up close to hook, yo,
draw wire through •.
Who would have ever thought of crocheting with wire? Well, wait until you try this one. Wire is
really easy to work with. The only thing to remember is not to pull the stitches too tight because
they’re rather hard to undo. Leave them on the loose side, and don’t worry if each one is not
exactly the same size as the one before. This adds to the charm of the design.
Directions
Make 6 strands: 2 each in pink, green, and blue.
Foundation chain: Thread 30 beads onto wire. Leaving a 3-in. tail, ch 2, • work one beaded
chain st, ch 2 •, rep from • to • until all beads are used. Fasten off leaving a 3-in. tail.
Assembly: Lay strands side by side so that ends are even. Fasten ends to clasp according to
directions for your type of clasp.
Variation: Dressing up the look
Use gold or silver wire and clear or matching gold or silver beads for a more elegant look.
Variation: Complementing the necklace
You can make a bracelet or anklet to wear when you wear the necklace. Reduce the number of
beads you use (you’d probably need about 10 beads for each strand, so plan accordingly), and
shorten the length of wire you chain. Assemble as above, and wrap the piece around your wrist
or ankle.
CHAPTER 14 Mixing Traditional Stitches with Contemporary Materials
177
4
The Part of Tens
IN THIS PART . . .
Crocheting quick projects in an hour or so
Understanding how best to care for your crocheted
items
Picking out some kid-friendly projects
IN THIS CHAPTER
»» Crocheting for immediate
gratification
»» Some great gift-giving ideas
15
Nearly Ten Projects That
Take an Hour or So
Chapter
L
ooking for a quick crochet fix? Then you’ve turned to the right place. This chapter provides a bunch of quick and easy designs that are guaranteed to satisfy you when your
creative side needs a pick-me-up. If you’re anything like me (and lots of others out there),
sometimes you absolutely need to make something, but don’t want to get involved in a lengthy
project.
In this chapter, you’ll find an array of projects ranging from home décor to fashion accessories
and more. Many of them are great for gift-giving, or you can make a bunch to use as party
favors. You use size 10 crochet thread to make several of the designs, so you can make more
than one project using materials already at hand. And, as always, feel free to choose colors to
suit your own wardrobe or color scheme.
Lacy Bookmark
These bookmarks (see Figure 15-1) are for those who love to read and know the value of a
good book. No more dog-earred pages to mark the spot where you left off. This design is quick
enough, so you can make several in an evening. Then you’ll have plenty to use for your reading
and crochet books.
Materials and vital statistics
»» Yarn: Coats & Clark “South Maid” size 10 crochet thread (100% mercerized cotton), Article
#D54 (350 yds [320 m] each ball): 1 ball of #458 Purple
CHAPTER 15 Nearly Ten Projects That Take an Hour or So
181
»» Hook: Steel crochet hook size 4 U.S. or size needed to obtain gauge
»» Measurements: ¾ in. wide x 6¾ in. long, excluding tassel
»» Gauge: First rnd = ¼ in.
»» Stitches used: Chain stitch (ch), slip stitch (sl st), single crochet (sc), double crochet (dc).
Shell: •5 dc in same st •.
FIGURE 15-1:
These delicate
bookmarks will
stand up to the
heaviest
reading
material.
These bookmarks work up really quickly — they’re only two rounds (see Figure 15-2 for the
stitch diagram). They also give you a great opportunity to work with thread without having to
delve into a large project.
Directions
Foundation chain: Ch 50.
Rnd 1: Sc in 2nd ch from hook, sc in each ch across to within last ch, 3 sc in last ch, working across opposite side of foundation ch, sc in each sc across to within last ch, 2 sc in last ch
(100 sc), sl st in first sc to join.
Rnd 2: Ch 1, sc in first sc, • skip next 2 sc, shell in next sc, skip next 2 sc, sc in next sc •, rep
from • to • 7 times, 3 sc in next sc, sc in next sc, • rep from • to • 8 times, 3 sc in last sc
(16 shells), sl st in first sc to join. Fasten off.
Finishing: To make the tassel, wrap thread 20 times around a 2¼-inch piece of cardboard
(I used a credit card). Slide the thread off the cardboard and cut one end. Tie a 6-inch length
of thread securely around the center of the bundle, leaving equal length on each side. Fold the
bundle in half, with the tie at the center top.
182
PART 4 The Part of Tens
FIGURE 15-2:
Stitch diagram
for the lacy
bookmark.
Wrap a second 6-inch length of yarn several times around the folded bundle approximately
¼ inch below the folded end. Tie tightly to secure and trim extra length. Using the remaining
ends of thread from the first tie at the center top of the tassel, tie the tassel securely to one end
of the bookmark. Weave in the extra lengths and trim ends even.
Geometric Coaster Set
No more boring, round things to protect your tabletop. These coasters use bold colors and strong
geometric shapes to help you serve drinks in style (see Figure 15-3). To create the designs, each
coaster’s unique design is depicted on a chart, instead of writing out each row. After you get
used to following a chart, you’ll find that the chart is much easier to “read” than if the instructions were written out row by row. The color changes involved and the charted pattern make
this a good project for you if you’ve mastered crochet basics.
FIGURE 15-3:
This geometric
coaster set
adds flair to
your table.
Materials and vital statistics
»» Yarn: Paton’s “Grace” light-weight yarn (100% mercerized cotton), Article #246060 (1.75 oz.
[50 g], 136 yds [124 m] each skein): 2 skeins of #60005 Snow (MC) and 1 skein of #60040
Night (CC)
»» Hook: Crochet hook size F-5 U.S. or size needed to obtain gauge
CHAPTER 15 Nearly Ten Projects That Take an Hour or So
183
»» Measurements: 4 in. wide x 4 in. long
»» Gauge: 11 sc and 11 rows = 2 in.
»» Stitches used: Chain stitch (ch), slip stitch (sl st), single crochet (sc)
When working from a chart, it’s a good idea to make a copy of the chart before you get started.
If necessary, you can enlarge it so it’s easier to read, and you can also mark it up to keep track
of where you are. Doing so leaves the original chart intact for future use.
Only one skein of each color is needed to complete the set of four coasters. However, because of
the color changes in coasters 1 and 3, you need two skeins of white so you don’t have to carry
the yarn across too many stitches (see Chapter 4 for color-change information).
Directions
Each coaster is made following a chart (see Figures 15-4, 15-5, 15-6, and 15-7). Read all oddnumbered rows from right to left, all even-numbered rows from left to right. When you begin
this project, you’ll see that the first couple or rows are written out in normal crochet fashion.
This is typical when working from a chart, simply to get you going on the right track. After
these rows are completed, you then “read” the chart for the balance of the pattern.
To change color, complete the last single crochet of the first color with the next color. Drop
the first color to the wrong side to be picked up later. Attach separate balls of color as needed.
Fasten off colors when they’re not needed in the following row.
Coaster 1
Foundation chain: With CC, ch 23.
Row 1 (right side): Sc in 2nd ch from hook, sc in each ch across (22 sc), turn. Row 1 of chart
(Figure 15-4) complete.
Row 2: Join MC, ch 1, sc in first sc, drop MC to wrong side to be picked up later, with CC, sc in
each of next 20 sc, drop CC to wrong side to be picked up later, join 2nd skein of MC, sc in last
sc (22 sc), turn. Second row of chart complete.
Rows 3–22: Work in sc foll chart. Fasten off.
FIGURE 15-4:
Coaster 1 color
chart and key.
184
PART 4 The Part of Tens
Edging: With right side facing, join CC in any corner st, ch 1, 3 sc in corner st, sc in each st and
each row-end st around, working 3 sc in each corner st, sl st in first sc to join. Fasten off.
Coaster 2
Foundation chain: With CC, ch 23.
Row 1 (right side): Sc in 2nd ch from hook, sc in each ch across (22 sc), turn. Row 1 of chart
(Figure 15-5) complete.
Row 2: Join MC, ch 1, sc in first sc, drop MC to wrong side to be picked up later, with CC, sc in
each of next 21 sc (22 sc), turn. Second row of chart complete.
Rows 3–22: Work in sc foll chart. Fasten off.
Edging: With right side facing, join CC in any corner st, ch 1, 3 sc in corner st, sc in each st and
each row-end st around, working 3 sc in each corner st, sl st in first sc to join. Fasten off.
FIGURE 15-5:
Coaster 2 color
chart and key.
Coaster 3
Foundation chain: With MC, ch 10, join CC, ch 2, drop CC to wrong side to be picked up later,
join 2nd skein of MC, ch 11.
Row 1 (right side): Sc in 2nd ch from hook, sc in each of next 9 ch, drop MC to wrong side, pick
up CC, sc in each of next 2 ch, drop CC to wrong side, pick up MC, sc in each of last 10 ch (22 sc),
turn. Row 1 of chart (Figure 15-6) complete.
Row 2: Ch 1, sc in each of next 9 sc, drop MC to wrong side, pick up CC, sc in each of next 4 sc,
drop CC to wrong side, pick up MC, sc in each of last 9 sc (22 sc), turn. Second row of chart
complete.
Rows 3–22: Work in sc foll chart. Fasten off.
Edging: With right side facing, join CC in any corner st, ch 1, 3 sc in corner st, sc in each st and
each row-end st around, working 3 sc in each corner st, sl st in first sc to join. Fasten off.
CHAPTER 15 Nearly Ten Projects That Take an Hour or So
185
FIGURE 15-6:
Coaster 3 color
chart and key.
Coaster 4
Foundation chain: With MC, ch 11, drop MC to be picked up later, join CC, ch 12.
Row 1 (right side): With CC, sc in 2nd ch from hook, sc in each of next 10 ch, drop CC to wrong
side, pick up MC, sc in each of next 11 ch (22 sc), turn. Row 1 of chart (Figure 15-7) complete.
Row 2: With MC, ch 1, sc in each of next 12 sc, drop MC to wrong side, pick up CC, sc in each of
next 10 sc (22 sc), turn.
Rows 3–22: Work in sc foll chart. Fasten off.
Edging: With right side facing, join CC in any corner st, ch 1, 3 sc in corner st, sc in each st and
each row-end st around, working 3 sc in each corner st, sl st in first sc to join. Fasten off.
FIGURE 15-7:
Coaster 4 color
chart and key.
Variation: Creating coordinating table accessories
To make matching placemats that measure approximately 12 inches x 16 inches, crochet 12
individual coasters for each placemat and omit the edging. Instead of making them all the same
pattern (that might get a little busy), try making half of them in solid colors, and alternate them
with the patterned ones, or use the patterned squares as a border with a solid-colored center.
When all are completed, lay out the squares 4 wide by 3 high in the desired pattern. Using a
186
PART 4 The Part of Tens
tapestry needle and matching yarn, sew the squares together. Crochet the edging around the
entire placemat the same way you would for an individual coaster.
You can make a table runner in the same manner as the placemat. To figure out how many coasters you need, decide how wide (in inches) you want the runner to be, then divide by 4 inches
(that’s the size of each coaster). Then decide how long (in inches) you’d like it to be, and again
divide by 4 inches. Obviously, the length and width have to be numbers that divide equally by 4 so
you get an even number. For that reason, you may have to compromise a bit on the size.
Fun Fur Scrunchies
Everyone uses these indispensable hair ties these days, young and old alike. Scrunchies are
an easy way to dress up a ponytail or braids without a lot of fuss (see Figure 15-8). Each one
of these patterns can be made in a short amount of time, and you can choose colors to match
everything in your wardrobe.
These three scrunchies use a fun fur yarn with little bobbles of color throughout. Whether you
make just one or all three, you’re sure to be pleased with the outcome.
FIGURE 15-8:
You can
crochet
scrunchies for
every occasion.
Materials and vital statistics
»» Yarn: Lion Brand “Fancy Fur” eyelash yarn (55% polyamide/45% polyester), Article #220
(1.75 oz. [50 g], 39 yds [36 m] each skein): 1 skein each of
•
•
•
#295 Party Pink
#200 Wild White
#254 Stained Glass
Each skein makes several scrunchies.
CHAPTER 15 Nearly Ten Projects That Take an Hour or So
187
»» Hook: Crochet hook size I-9 U.S. or size needed to obtain gauge
»» Elastic: 8 in. of ¼-in. wide elastic for each scrunchy
»» Sewing needle and sewing thread
»» Measurements: 3¼ in. in diameter
»» Gauge: 4 sts = 1 in.
»» Stitches used: Chain stitch (ch), slip stitch (sl st), single crochet (sc)
This is one of a very few designs that you’ll see where you don’t crochet a foundation chain or
center ring. The elastic acts as the center ring, and you work your first round of stitches over
the elastic in the same way that you would a crocheted center ring. Crochet the second round as
you normally would and you’re done!
Directions
With sewing needle and thread, sew ends of one 8-in. length of elastic together to form a circle.
Rnd 1: Working over elastic ring, sl st yarn onto elastic, ch 1, work 50 sc in ring (50 sc), sl st in
first sc to join.
Rnd 2: Ch 1, 2 sc in each sc around (100 sc), sl st in first sc to join. Fasten off.
Friendship Bracelet
These bracelets (see Figure 15-9) are reminiscent of the ones I used to make as a kid, though
those weren’t crocheted. Of course, one was never enough, and we had to make several in
different colors to wear at the same time. Although this design is worked in a pastel palette,
bold-colored stripes or even solid colors would work just as well.
FIGURE 15-9:
You can create
friendship
bracelets in
any color
combination.
The bracelet is designed to fit loosely around the average adult wrist, but it’s easy enough to
adjust the length. If you’re making these for the younger set, use the gauge to calculate how
long to make your foundation chain for a smaller version.
188
PART 4 The Part of Tens
Materials and vital statistics
»» Yarn: J & P Coats “Royale” Classic Crochet Thread, size 10 (100% mercerized cotton),
Article #162 (400 yds [366 m] each ball for white; 350 yds [320 m] each ball for colors):
1 ball each of
•
•
•
•
#0423 Maize (A)
#0401 Orchid Pink (B)
#0201 White (C)
#0495 Wood Violet (D)
»» Hook: Steel crochet hook size 6 U.S. or size needed to obtain gauge
»» 1 ⁄ in. (size 0) sew-on snap
»» Sewing needle and matching sewing thread
»» Measurements: ¾ in. wide x 8½2 in. long
»» Gauge: 9 sc = 1 in.; 5 rows sc = ½ in.
»» Stitches used: Chain stitch (ch), single crochet (sc)
38
Directions
Foundation chain: With A, ch 76.
Row 1 (right side): Sc in 2nd ch from hook, sc in each ch across (75 sc), turn. Fasten off A, join B.
Row 2: With B, ch 1, sc in each sc across (75 sc), turn. Fasten off B, join C.
Rep Row 2 in the foll color sequence: 1 row C; 1 row D; 1 row C; 1 row B; 1 row A. Fasten off.
Finishing: With sewing needle and thread, sew one side of snap to wrong side of bracelet
¼ in. in from one short edge, and other side of snap to right side of bracelet ¼ in. in from other
short edge.
The fit of the bracelet can be adjusted at this point. If you’d prefer it to be looser, sew the snaps
closer to the edge. If it needs to be tightened, sew the snaps farther from the edge.
Variation: Dressing the bracelet up with ribbon
Instead of using snaps, you can fasten the bracelet with a pretty tie. Thread an 8-in. length of
matching ribbon through each short end, and tie the ribbons together in a bow to secure the
bracelet to your wrist.
Variation: Adding some width
If you’d like a wider version of the bracelet, rep Row 2 above for 4 more rows in the following
color sequence: 1 row D; 1 row C; 1 row B; 1 row A. This will give you a bracelet that is a little
more than an inch wide.
CHAPTER 15 Nearly Ten Projects That Take an Hour or So
189
Velvet Roses
While these roses don’t look exactly like the ones you’d pick out of your garden, they come
pretty darn close (see Figure 15-10). The nice thing is you can choose the colors and can even
adjust their size. This is one of those designs where, by changing yarn and hook size, you can
adjust the size of the finished design. And the finished project is 3-D, rather than flat, which
makes it an intermediate-level project. Don’t let this dimensional stuff throw you off, though.
Flowers such as these are really fun to make, and after you get the hang of it, you’ll see that
they’re no trouble at all.
You can use the roses to embellish hats, scarves, even jackets — add a pin back to them and you
can attach them almost anywhere. Use your imagination and grow a whole bouquet!
FIGURE 15-10:
Crocheted
roses stay
fresh all
year long.
Materials and vital statistics
»» Yarn: Lion Brand Yarn “Lion Suede” bulky-weight yarn (100% polyester), Article #210
(3 oz. [85g], 122 yds [112 m] each skein for solids; 2¾ oz. [78 g], 111 yds [101 m] each skein
for multis): 1 skein each of
•
•
•
•
#113 Scarlet (A)
#204 Mountaintop (B)
#126 Coffee (C)
#202 Vineyard (D)
»» Hook: Crochet hook size J-10 U.S. or size needed to obtain gauge
»» Measurement: 3¾ in. in diameter
190
PART 4 The Part of Tens
»» Gauge: First 2 rnds = 2¼ in. in diameter
»» Stitches used: Chain st (ch), slip stitch (sl st), single crochet (sc), half double crochet (hdc),
double crochet (dc), triple crochet (tr)
When you make crocheted flowers, the petals are created in rounds as you go. For threedimensional flowers such as these, it’s a two-step process. You start with the petals in
the center of the flower, then crochet chain loops behind these petals in the second round. On
the third pass around, you crochet the actual petals in the chain loops from the previous row.
You just keep working in this fashion until all petal rounds are complete. Refer to the stitch
diagram (Figure 15-11) for placement of the stitches.
FIGURE 15-11:
Stitch diagram
for the
velvet roses.
Directions
Center ring: Ch 2.
Rnd 1: (2 sc, 2 hdc, 2 dc, tr) in 2nd ch from hook, sl st in first sc to join (7 sts).
Rnd 2: Working behind sts just made and into center ring, ch 3, skip first 2 sts, sl st bet last
skipped st and next st, ch 3, skip next 2 sts, sl st bet last skipped st and next st, ch 3, skip next
st, sl st bet last skipped st and next st, ch 3, skip next st, sl st bet last skipped st and next st,
ch 3, sl st in first ch to join (5 ch-3 loops).
Rnd 3: Sl st in first ch-3 loop, ch 1, (sc, hdc, dc, hdc, sc) in loop, • sl st in next loop, ch 1, (sc, hdc,
dc, hdc, sc) in loop •, rep from • to • around, sl st in first sl st to join (5 petals made).
Rnd 4: Working behind sts just made and into ch-3 loops of Rnd 2, skip first 2 sts on first petal,
• sl st bet last skipped st and next st, ch 3, skip next 3 sts on current petal and next 2 sts on next
petal •, rep from • to • around, sl st in first sl st to join (5 ch-3 loops).
Rnd 5: Sl st in first ch-3 loop, ch 1, (sc, hdc, 3 dc, hdc, sc) in loop, • sl st in next loop, ch 1,
(sc, hdc, 3 dc, hdc, sc) in loop •, rep from • to • around, sl st in first sl st to join (5 petals made).
CHAPTER 15 Nearly Ten Projects That Take an Hour or So
191
Rnd 6: Working behind sts just made and into ch-3 loops of Rnd 4, skip first 3 sts on first petal,
• sl st bet last skipped st and next st, ch 3, skip next 4 sts on current petal and next 3 sts on next
petal •, rep from • to • around, sl st in first sl st to join (5 ch-3 loops).
Rnd 7: Sl st in first ch-3 loop, ch 1, (sc, hdc, 5 dc, hdc, sc) in loop, • sl st in next loop, ch 1,
(sc, hdc, 5 dc, hdc, sc) in loop •, rep from • to • around, sl st in first sl st to join (5 petals made).
Fasten off.
Pocket Patches
Have you seen those jeans in the store that cost an arm and a leg? Many of them have simple
embellishments on the back pockets that allow the stores to raise the prices through the roof.
A friend of mine had on a pair of those jeans, and it inspired me to create this design (see
Figure 15-12). You can now have those jeans at a fraction of the price. This design falls in the
intermediate category for two main reasons — you’re crocheting with thread and the construction. You make three small motifs, sew them together, then work a section off of the joined
motifs. Take your time and you’ll find it’s not that difficult.
FIGURE 15-12:
Create pocket
patches to sew
onto your
favorite jeans.
Materials and vital statistics
»» Yarn: DMC “Traditions” size 10 crochet thread (100% cotton), Article #145 (2.3 oz. [65 g],
400 yds [366 m] each ball): 1 ball of Ecru
»» Hook: Crochet hook size E-4 U.S. or size needed to obtain gauge
»» Tapestry needle
»» Measurements: 5½ in. wide x 3½ in. long
»» Gauge: First 2 rnds of motif = 1¼ in.; finished motif = 1¾ in.
»» Stitches used: Chain stitch (ch), slip stitch (sl st), single crochet (sc), double crochet (dc)
192
PART 4 The Part of Tens
To create these pocket patches, you’ll need to crochet three motifs for each pocket, and then
sew them together. After the motifs are joined, you work a pattern of coordinating stitches off
the bottom edge to finish the design. Finally, you sew the patch onto the back pocket of your
favorite pair of jeans. Refer to Figure 15-13 for the stitch and assembly diagram.
FIGURE 15-13:
Stitch and
assembly
diagram for
the pocket
patch.
Creating and joining the motifs
Follow these directions twice to make a patch for each pocket.
Motif (make 3 for each pocket patch)
Center ring: Ch 4 and close into a ring with sl st in first ch.
Rnd 1: Ch 3 (first dc), ch 2 (first ch-2 space), (3 dc, ch 2) 3 times in ring, 2 dc in ring, sl st in
3rd ch to join (4 ch-2 spaces).
Rnd 2: Ch 3 (first dc), ch 2 (first ch-2 space), 3 dc in first ch-2 space, ch 1, • (3 dc, ch 2, 3 dc) in
next ch-2 space, ch 1 •, rep from • to • twice, 2 dc in first sl st, sl st in 3rd ch to join.
Rnd 3: Ch 3 (first dc), ch 2 (first ch-2 space), 3 dc in first ch-2 space, ch 1, • 3 dc in next ch-1
space, ch 1, (3 dc, ch 2, 3 dc) in next ch-2 space, ch 1 •, rep from • to • twice, 3 dc in next ch-1
space, ch 1, 2 dc in first sl st, sl st in 3rd ch to join. Fasten off.
Assembly
With right sides facing, using tapestry needle and crochet thread, sew motifs together, through
back loops only, to form a strip three motifs wide (see Figure 15-13).
Finishing the design and adding final touches
Row 1: With right sides facing, skip first ch-2 corner space, skip next ch-1 space, join thread
in next ch-1 space, ch 3 (first dc), 2 dc in ch-1 space, ch 1, 3 dc in joining seam, ch 1, skip next
CHAPTER 15 Nearly Ten Projects That Take an Hour or So
193
ch-2 corner space, (3 dc, ch 1) in each of next 2 ch-1 spaces, 3 dc in next joining seam, ch 1, skip
next ch-2 space, 3 dc in next ch-1 space (6 groups of 3 dc), turn.
Row 2: Sl st to first ch-1 space, ch 3 (first dc), 2 dc in ch-1 space, • ch 1, 3 dc in next ch-1
space •, rep from • to • 3 more times (5 groups of 3 dc), turn.
Row 3: Sl st to first ch-1 space, ch 3 (first dc), 2 dc in ch-1 space, • ch 1, 3 dc in next ch-1
space •, rep from • to • 2 more times (4 groups of 3 dc), turn.
Row 4: Sl st to first ch-1 space, ch 3 (first dc), 2 dc in ch-1 space, • ch 1, 3 dc in next ch-1
space •, rep from • to • once (3 groups of 3 dc), turn.
Row 5: Sl st to first ch-1 space, ch 3 (first dc), 2 dc in ch-1 space, ch 1, 3 dc in next ch-1 space
(2 groups of 3 dc), turn.
Row 6: Sl st to first ch-1 space, ch 3 (first dc), 2 dc in ch-1 space (1 group of 3 dc), do not turn.
Edging
Working in row-end sts across side of pocket, • ch 3, sl st in first dc of next row •, rep
from • to • 4 times, ch 3, sl st in next ch-1 space in next row, sc evenly around motif strip to
first ch-1 space at beginning of Row 1, working 2 sc in each ch-2 corner space, rep from • to •
across row-end sts to first dc in Row 6, sl st in first dc to join. Fasten off.
Finishing
With tapestry needle and crochet thread, sew pocket patch to back pocket of jeans.
Stemmed-Glass Markers
These little wine glass doodads (see Figure 15-14) have soared in popularity over the past few
years, and with good reason. What better way to always know which glass is yours, instead of
wondering if you’re drinking someone else’s drink.
Made with earring hoops, size 10 crochet thread, and a charm, you can whip one of these up in
about 10 minutes. In an evening, you can have a whole bunch made to show off and use at your
next gathering. They’d also make a wonderful hostess gift the next time you need one.
Materials and vital statistics
»» Yarn: J & P Coats “Royale” Classic Crochet Thread, size 10 (100% mercerized cotton), Article
#162 (350 yds [320 m] each ball): 1 ball of #0401 Orchid Pink makes many
»» Hook: Steel crochet hook size 6 U.S. or size needed to obtain gauge
»» ⁄ -in. earring hoop wires with loop on one end
»» Small charm with hanging loop
»» Clear nail polish
78
194
PART 4 The Part of Tens
FIGURE 15-14:
Stemmed-glass
markers keep
guests from
sipping each
other’s
chardonnay.
»» Measurement: 1 ⁄4 in. in diameter
»» Gauge: 6 sc = ⁄2 in.
»» Stitches used: Chain stitch (ch) slip stitch (sl st), single crochet (sc). Picot: Sc in 3rd ch from
3
1
hook (see Appendix A for detailed how-to’s).
The earring hoops used in this design generally come in packages with quite a few included, so
you’ll have enough hoops to make as many of these markers as you need. When picking out the
charms, don’t forget to vary the design so everyone has his or her own. If all the charms are the
same, it kind of defeats the purpose!
This is one of those designs where you don’t actually crochet a foundation chain or center ring.
The first row is worked directly around the hoop of the earring, then you work back to finish the
second row, adding the charm as you go (see Figure 15-15 for the stitch diagram).
Directions
Thread charm onto crochet thread before beginning.
Row 1: Starting at loop end of hoop, join yarn to earring hoop with sl st, ch 1, work 31 sc around
hoop (31 sc), turn.
Row 2: Ch 1, sc in first sc, • ch 5, sl st in 3rd ch from hook (picot made), ch 3, skip next 4 sc, sc
in next sc •, rep from • to • twice, draw charm up to hook, sl st around hanging loop of charm
to secure, rep from • to • 3 times. Fasten off.
Apply clear nail polish to thread at loose end of earring hoop to prevent stitches from
sliding off.
CHAPTER 15 Nearly Ten Projects That Take an Hour or So
195
FIGURE 15-15:
Stitch diagram
of stemmedglass marker
with charm.
Variation: Making a marker set for every occasion
These markers would make great additions to holiday parties as well as for the different
seasons of the year: pastel threads for spring, black and orange with spooky charms for
Halloween, green and red or metallic thread with tiny ornament charms for Christmas. The
size 10 thread comes in every color of the rainbow, and the variety of charms available is
endless. Use your imagination and create a set for all occasions.
Must-See Fur Frame
Some pictures deserve to be shown off in a special frame, and this one does the trick (see
Figure 15-16). Made with a long eyelash yarn, it’s especially pleasing for tweens and teens to
show off pictures of themselves and their friends. This project is suitable for you if your skills
have advanced to an intermediate level. The yarn itself can be hard to work with (sometimes
it’s hard to see the stitches through the fur). And the large center ring can be a challenge. Just
make sure not to twist it when you join the ends, and count your stitches as you go so you get
the corners right on the first go-round.
Materials and vital statistics
»» Yarn: Lion Brand Yarn “Fun Fur” bulky-weight yarn (100% polyester), Article #320
(1.75 oz. [50 g], 60 yds [55 m] each ball): 1 ball of #098 Ivory makes several
»» Hook: Crochet hook size I-9 U.S. or size needed to obtain gauge
»» 5 x 7 in. photo frame with ⁄ -in. flat frame
»» Clear-drying craft glue
»» Measurements: Inside dimensions = 4 ⁄ in. wide x 6 ⁄ in. long; outside dimensions = 6½ in.
78
58
58
wide x 8½ in. long
»» Gauge: 9 sc = 3 in.; 4 rows = ⁄ in.
»» Stitches used: Chain stitch (ch), slip stitch (sl st), single crochet (sc)
78
This frame begins with a large center ring, which you have to be sure not to twist when you join
the ends. In the first row, you create the corners, turning the ring into a square. Each successive
row builds on the first, making it wider, so you’ll have plenty of material to attach to the frame
when you’re finished.
196
PART 4 The Part of Tens
FIGURE 15-16:
You can’t help
but smile when
you see a
picture in a
furry frame.
Directions
Center ring: Ch 80 and, without twisting ch, close into a ring with sl st in first ch.
Rnd 1: Ch 1, sc in each of next 21 ch, 3 sc in next ch, sc in each of next 17 ch, 3 sc in next ch, sc
in each of next 21 ch, 3 sc in next ch, sc in each of next 17 ch, 3 sc in last ch (88 sc), sl st in first
sc to join.
Rnd 2: Ch 1, sc in each of next 22 sc, 3 sc in next sc, sc in each of next 19 sc, 3 sc in next sc, sc
in each of next 23 sc, 3 sc in next sc, sc in each of next 19 sc, 3 sc in next sc, sc in last sc (96 sc),
sl st in first sc to join.
Rnd 3: Ch 1, sc in each of next 23 sc, 3 sc in next sc, sc in each of next 21 sc, 3 sc in next sc, sc
in each of next 25 sc, 3 sc in next sc, sc in each of next 21 sc, 3 sc in next sc, sc in each of last
2 sc (104 sc), sl st in first sc to join.
Rnd 4: Ch 1, sc in each of next 24 sc, 3 sc in next sc, sc in each of next 23 sc, 3 sc in next sc, sc
in each of next 27 sc, 3 sc in next sc, sc in each of next 23 sc, 3 sc in next sc, sc in each of last
3 sc (112 sc), sl st in first sc to join. Fasten off.
Finishing: With craft glue, glue crocheted piece to frame, matching inside and outside corners.
Standout Luggage Tags
When traveling by plane these days, it seems that almost everyone has the same luggage, or at
least bags that are similar enough to make it hard to tell yours apart from the hundreds of others
that come spinning out into the baggage-claim area. These luggage tags (see Figure 15-17) make
it easy for you to customize your bags so you don’t have to spend time watching the carousel go
round and round, grabbing for bags that aren’t yours. And because these tags only use a small
amount of yarn, they’re also a great way to use up leftover scrap yarn.
CHAPTER 15 Nearly Ten Projects That Take an Hour or So
197
FIGURE 15-17:
Make a tag to
help you find
your bag.
Materials and vital statistics
»» Yarn: Caron “Simply Soft Brites” worsted-weight yarn (100% acrylic), Article #H9700B (6 oz.
[170 g], 330 yds [302 m] each skein): 1 skein of #9606 Lemonade makes many
»» Hook: Crochet hook size H-8 U.S. or size needed to obtain gauge
»» One 1-in. shank button
»» Tapestry needle
»» Measurements: 1 ⁄ in. wide x 10 in. long
»» Gauge: 4 sc and 5 rows = 1 in.
»» Stitches used: Chain stitch (ch), single crochet (sc). Dec 1 sc: •(Insert hook in next st, yo,
38
draw yarn through st) twice, yo, draw yarn through 3 loops on hook •.
These luggage tags are really quick and easy to make, and you also get to practice making buttonholes without having to crochet a whole sweater. But don’t worry — buttonholes are a piece
of cake to create. In this case, all you do is crochet a small chain where specified, skip a few
stitches, then join the yarn back to the row, and you’re on your way again.
Directions
Foundation chain: Ch 36.
Row 1 (right side): Sc in 2nd ch from hook, sc in each ch across (35 sc), turn.
Row 2: Ch 1, 2 sc in first sc, sc in each sc across to within last sc, 2 sc in last sc (37 sc), turn.
Row 3: Rep Row 2 (39 sc).
198
PART 4 The Part of Tens
Row 4: Ch 1, 2 sc in first sc, sc in each of next 5 sc, ch 3, skip next 3 sc (buttonhole made), sc in
each sc across to within last sc, 2 sc in last sc (41 sts), turn.
Row 5: Ch 1, dec 1 sc in first 2 sc, sc in each sc across working 3 sc in ch-3 space to within last
2 sc, dec 1 sc in last 2 sc (39 sc), turn.
Row 6: Ch 1, dec 1 sc in first 2 sc, sc in each sc across to within last 2 sc, dec 1 sc in last 2 sc
(37 sc), turn.
Row 7: Rep Row 6 (35 sc). Fasten off.
Finishing: With right side facing, fold tag in half crosswise, forming a loop. Check loop to make
sure it fits snuggly around luggage handle and mark spot for button placement. Using tapestry
needle and yarn, sew button in place.
CHAPTER 15 Nearly Ten Projects That Take an Hour or So
199
IN THIS CHAPTER
»» What to do when the work is done
»» Maintaining the look of your
crocheted pieces
»» How to properly store your pieces
of art
16
Ten-Plus Tips for Caring
for Your Crochet
Chapter
N
ow that you’ve completed your design, the final step is making it look its best and
making sure that it stays looking its best. Because of all the time you’ve invested, it
would be a shame to have your project fall apart on the first wash, shrink to a babydoll size, stretch so far out of proportion it’s unrecognizable, or discolor by being improperly
stored.
It’s not difficult to preserve the beauty of the original finished piece, but you do need to take a
few extra steps. Follow the appropriate tips given in this chapter to ensure that your work will
stick around for a long time.
Be a Pack Rat: Save the Labels
Don’t throw out those yarn labels! Every yarn label has care instructions on it. Keep them
organized in a binder, or keep a notebook of your projects with the yarn label attached. Write
a note underneath the label with the name or description of the crocheted item so you’ll have
a handy reference when you need to launder that item. Figure 16-1 provides a complete list of
care symbols and information about each one.
CHAPTER 16 Ten-Plus Tips for Caring for Your Crochet
201
FIGURE 16-1:
Care
instructions.
Show You Care: Attach Your Own Care Labels
Another way to know how to care for an item is to sew a care label (if appropriate) onto the
item itself. These are available at craft stores and some yarn shops. Use a permanent ink pen
to write care instructions on the label (before you attach the label to the item! You don’t want
to ruin all of your hard work by getting permanent ink on it). Attaching a care label works best
for items such as garments and afghans. You can also include your name and the date you made
the item, too.
The best way to attach the label is to sew it on with a sewing needle and matching sewing
thread. Don’t iron the label on — you can ruin all your work with one blast of heat.
It’s especially important to include care information if you’re giving the piece to someone as a
gift. Even though you may know how to care for it, the recipient probably doesn’t have a clue. If
it’s not practical to attach a label directly to the item, then a decorative card with the instructions would work just as well. You don’t have to go into great detail, just a simple phrase would
do. Here are some ideas to help you word the instructions:
»» “I’m delicate. Please hand wash me and lay me flat to dry.”
»» “I can be washed and dried.”
»» “Take me to the cleaners — I need it.”
202
PART 4 The Part of Tens
Forget Dishpan Hands. Get Afghan Hands!
Hand washing your crocheted items is the safest bet. Unless the yarn specifically states “dry
clean only,” this is what I recommend. Here’s how:
1.
Grab a bottle of mild detergent and make sure your sink or bathtub is clean.
The best soap to use is a mild laundry detergent formulated for delicate items or baby
clothes, such as Woolite or Ivory Soap. For small items, the kitchen sink is the perfect
size. For larger items such as afghans, the bathtub or washtub works better.
2.
Fill the sink or tub with enough cool to warm water so the item can be submerged.
3.
Swish the item around gently.
By keeping the agitation to a minimum, you preserve the integrity of the stitches.
4.
After washing, rinse thoroughly and squeeze out excess moisture.
Rinse the item under cool water until it runs clear.
Never wring a crocheted item because the twisting motion can stretch the stitches and
ultimately ruin the item’s shape.
5.
Wrap the item in towels to absorb the extra moisture and lay flat to dry, blocking as
necessary (see the next section for blocking info).
Never hang a crocheted piece to dry (it will stretch out of shape beyond recognition),
and please, keep items out of the sun, which can cause fading.
Blocking for a Better Shape
If you’re an experienced seamstress or crafter, when you see the word blocking, you probably want to run the other direction. If you’re new to the term, I’m not talking about defensive sports moves or the movements of actors on stage. Blocking often involves lots of starch,
straight pins, and room to lay out your design, and this is true when blocking thread crochet.
Although blocking can be a complicated process in some cases, items you craft with yarn can
be whipped into shape rather easily.
Blocking can be as simple as the following four steps:
1.
Wet the item until it is saturated, squeezing out excess moisture if necessary.
2.
Lay it flat, using an absorbent towel underneath to soak up moisture.
Make sure to lay the piece away from sunlight and direct sources of heat.
3.
Shape it.
4.
Leave it to dry.
If your item looks a bit out of whack and isn’t really dirty, check the yarn care instructions,
then go ahead and block it. Items that may require blocking include any garments, including
hats that sometimes need to be reshaped, and thread crochet items such as doilies and table
runners. But keep in mind that any crocheted piece that looks a bit out of shape can usually, but
not always, be fixed by blocking.
CHAPTER 16 Ten-Plus Tips for Caring for Your Crochet
203
Blocking a piece made of thread crochet involves a few more steps:
1.
Hand wash the design gently in cold water with mild soap, rinsing several times to
remove all the soap residue.
2.
In a separate clean tub, prepare a liquid starch solution according to the directions on
the bottle based on the desired amount of stiffness for the finished piece.
3.
Immerse the crocheted piece in the solution and allow the solution to completely
penetrate the fabric.
4.
Prepare a blocking surface large enough to accommodate the design, such as a
plastic-wrapped piece of cardboard or foam board.
5.
Remove the item from the solution and blot it dry with a clean towel to remove any
extra solution.
6.
Using rustproof straight pins, pin the design onto the blocking board to the required
dimensions, taking care to shape any stitch patterns.
7.
Blot the design again to remove any excess solution that may still remain.
8.
Allow the piece to dry completely before removing the pins.
Take It to the Cleaners
This may be the easiest way of all to clean your crochet (but it may not be the cheapest). If the
yarn label says “Dry clean only,” then by all means, take the item to the cleaners. A word of
advice, though: Bring the label (or a copy of the label) to the cleaners with you. That way they’ll
know what material they’re working with and can use the appropriate chemicals.
Get a Load of This: Machine Washing
In some cases, it’s perfectly fine to throw your crocheted masterpieces in the washing machine.
This holds true for items made from synthetic yarns, such as acrylic, which won’t sustain so
much damage from the washing machine. Use the delicate cycle and, if size permits, throw the
item into a mesh laundry bag. Be sure to check the yarn label for the correct water temperature
settings.
It’s always a safe bet to wash these items alone the first time around, just to make sure the
colors won’t bleed into the rest of your laundry. If you’re not sure what the correct water temperature should be, opt for the safe route and use the cool water setting.
Let It Go for a Spin: Machine Drying
Sometimes tossing your afghan, scarf, or other piece of handiwork in the dryer is just fine.
Again, check the yarn label to make sure it’s okay. Most synthetic yarns will take a low heat
setting unless it’s got some funky stuff attached like sequins or mirrors. Add some smoothtextured items like pillowcases to the dryer to help absorb moisture.
204
PART 4 The Part of Tens
Don’t machine dry wool — it will shrink! Find a spot large enough to accommodate the piece
and lay it out flat, shape it if necessary, and allow to dry, preferably in a place that is out of
direct sunlight and won’t be disturbed by playful pets.
Iron It — but Only If You Must
If you feel that you need to add some heat to an item to get all the wrinkles out, set the iron
on the lowest heat setting suggested for the yarn. Place a slightly damp cloth, such as a clean
cotton dish towel, on top of your crocheted piece before ironing.
Never allow the iron to come into direct contact with the yarn. Excessive heat can ruin the
integrity of the yarn fibers, and even cotton thread can flatten out too much and ruin the original look of the design.
Put Those Hangers Away!
By all means, use and enjoy your crochet. That’s why you made it. But when you’re not using
the item, whether it’s a sweater or tablecloth or anything in between, never, ever, ever hang
crocheted items. Hanging stretches out the stitches, and the damage can’t be reversed.
»» For garments, find a spot to lay them flat with as few folds as possible. If this means
you have to rearrange your closet or drawers, go ahead and do it.
»» For items such as tablecloths, doilies, runners, and even afghans, roll them up and
store them that way to minimize creases and folds.
You’ve put in a lot of crochet time, so take the time to care for your pieces properly.
Dazzling Displays and Safe Storage
Home décor items are meant to be shown off, so go ahead and use them. If it’s a table runner,
then lay it out on the table. Afghans can be draped over the back of your favorite chair or sofa,
but be sure to keep them out of direct sunlight or extreme temperatures.
If items are to be stored for any length of time, such as holiday designs or winter sweaters,
invest in some acid-free tissue paper. Place the paper between the folds and around the outside
of the piece. This ensures that the piece stays clean and dust free, and helps preserve the yarn
fibers until you bring it out again.
Always put your items away clean. Time in storage allows stains to set, and you may not be able
to get them out a year later.
To avoid pulling out pieces that the moths have dined on (especially wool items), place these
items in a plastic storage bin with a couple of cedar blocks and store the bin in a cool, dry place.
CHAPTER 16 Ten-Plus Tips for Caring for Your Crochet
205
Get Rid of Those Pesky Pills
It’s inevitable — where there’s yarn there’s pills, those unsightly little balls that pop up on
fabric after laundering or from normal wear and tear. Removing the pills can revitalize your
crocheted pieces and make them look like new again.
You can get rid of pills two ways:
»» By using a sweater stone: This is the recommended preference because it is gentler on
the fabric and you have more control over it.
»» By using a sweater shaver: These devices are typically battery operated or electric, and if
you don’t use them properly, you can put holes in your item.
To use a sweater stone properly:
1.
Lay the item on a flat surface.
2.
Hold the stone in the palm of your hand and gently brush the fabric in smooth short
strokes.
The stone will crumble a bit, but don’t worry, this is normal and won’t damage your piece.
Gently shake the item or use a lint roller to remove these tiny pieces.
Never, ever try to remove pilling with scissors! Remember that crochet is a series of interlocking loops, and if you inadvertently slip and cut even one of the strands of yarn, your whole piece
can unravel.
206
PART 4 The Part of Tens
IN THIS CHAPTER
»» Easy designs kids can crochet
»» Making fun wearables for
preteens through teens
17
Ten Kid-Friendly
Projects
Chapter
T
his chapter is all about getting the younger set involved. Crochet is hot, and if you can
get the kids involved, you just may be starting them on the road to a lifelong affair with
a hook and some yarn. If they show an interest, and their motor skills are fairly well
developed, no age is too young to start. I started at about 8 years old and got my daughter
crocheting when she was about 9. Your kids should be able to read so they can follow a pattern
themselves.
The designs featured here are all about giving novice crocheters the opportunity to create
something fairly quickly, using basic stitches and techniques. I collaborated with my daughter
(who’s 11 going on 21!) to come up with many of these designs, from the idea itself to color
and stitch choices. You can use this chapter to teach crocheting basics to anyone you know
who’s old enough to handle a hook and yarn. Browse through the pages, pick a project, and get
crocheting.
Blue Note Scarf
Accessories are in, and scarves are no exception. This one is really long and skinny, so you
can wrap it around and around your neck or style it any way you choose. It’s a perfect design
to practice making single crochet stitches. The yarn used is lightly textured and self-striping,
which means you end up with a cool, funky design without changing colors. Because of the
nature of the yarn, each scarf has a slightly different pattern, each one unique (see Figure 17-1).
CHAPTER 17 Ten Kid-Friendly Projects
207
FIGURE 17-1:
The selfstriping blue
note scarf
may not be
wide, but it’s
long — nearly
7 feet long.
Materials and vital statistics
»» Yarn: Bernat “Super Stripes” bulky-weight yarn (97% acrylic/3% polyester), Article #161069
(3.5 oz. [100 g], 182 yds [166 m] each skein): 1 skein of #69742 B & Blue
»» Hook: Crochet hook size H-8 U.S. or size needed to obtain gauge
»» Measurements: 3 in. wide x 83 in. long
»» Gauge: 12 sc = 4 in.; 3 rows = 1 in.
»» Stitches used: Chain stitch (ch), single crochet (sc)
This scarf is worked lengthwise in long rows, instead of side to side in shorter rows. You
crochet a really long foundation chain, then work just nine more rows, and you’re done.
Directions
Foundation chain: Ch 251.
Row 1: Sc in 2nd ch from hook, sc in each ch across (250 sc), turn.
Rows 2–9: Ch 1, sc in each sc across (250 sc), turn. Fasten off.
Wear Your Heart Pin
This pin is super-easy and fast to make (see Figure 17-2). It’s one of those designs that you
can sit down and make several of them in an evening — then hand out to your friends the next
day. The heart is made using wool yarn and some simple increasing and decreasing to get the
shape. Throw it in the washer and dryer to felt (make the yarn fibers mat together and shrink),
then sew on the pin back. Pin it to a jacket, hat, or even your backpack. It’s a fun and versatile
accessory.
208
PART 4 The Part of Tens
FIGURE 17-2:
This felted
heart pin is so
easy that you
can make one
for all your
friends.
Materials and vital statistics
»» Yarn: Lion Brand “Lion Wool” worsted-weight yarn (100% wool), Article #820 (3 oz. [85 g],
158 yds [144 m] each skein): 1 skein of #113 Scarlet makes many
»» Hook: Crochet hook size H-8 U.S. or size needed to obtain gauge
»» Pin back
»» Sewing needle and matching sewing thread
»» Measurements: 4 in. wide x 4½ in. long before felting. Heart will shrink during felting process. The one shown here measured 3¼ in. wide x about 4 in. long after felting.
»» Gauge: 14 sts = 4 in; 16 rows = 4 in.
»» Stitches used: Chain stitch (ch), single crochet (sc). Dec 1 sc: • (Insert hook in next st, yo,
draw yarn through st) twice, yo, draw yarn through 3 loops on hook •. Dec 2 sc: • (Insert
hook in next st, yo, draw yarn through st) 3 times, yo, draw yarn through 4 loops on hook •.
This is a great project to crochet to get comfortable with shaping a piece using both increasing
and decreasing. You start off with just one single crochet stitch at the base of the heart, then
gradually increase your stitches until the project reaches the desired width. Each side of the top
of the heart is crocheted separately, and they are created by decreasing the stitches to form the
rounded tops.
CHAPTER 17 Ten Kid-Friendly Projects
209
Stitching the heart
Foundation chain: Ch 2.
Row 1 (right side): Sc in 2nd ch from hook (1 sc), turn.
Row 2: Ch 1, 2 sc in sc (2 sc), turn.
Row 3: Ch 1, 2 sc in each sc across (4 sc), turn.
Row 4: Ch 1, 2 sc in first sc, sc in each of next 2 sc, 2 sc in last sc (6 sc), turn.
Row 5: Ch 1, sc in each sc across (6 sc), turn.
Row 6: Ch 1, 2 sc in first sc, sc in each of next 4 sc, 2 sc in last sc (8 sc), turn.
Row 7: Ch 1, sc in each sc across (8 sc), turn.
Row 8: Ch 1, 2 sc in first sc, sc in each of next 6 sc, 2 sc in last sc (10 sc), turn.
Row 9: Ch 1, sc in each sc across (10 sc), turn.
Row 10: Ch 1, 2 sc in first sc, sc in each of next 8 sc, 2 sc in last sc (12 sc), turn.
Row 11: Ch 1, sc in each sc across (12 sc), turn.
Row 12: Ch 1, 2 sc in first sc, sc in each of next 10 sc, 2 sc in last sc (14 sc), turn.
Row 13: Ch 1, sc in each sc across (14 sc), turn.
Beg shaping
Row 14: Ch 1, sc in each of first 7 sc (7 sc), turn, leaving rem sts unworked.
Row 15: Ch 1, dec 1 sc in first 2 sc, sc in each sc across (6 sc), turn.
Row 16: Ch 1, sc in each of first 4 sc, dec 1 sc in last 2 sc (5 sc), turn.
Row 17: Ch 1, dec 1 sc in first 2 sc, sc in each sc across (4 sc), turn.
Row 18: Ch 1, sc in each sc across (4 sc), turn.
Row 19: Ch 1, dec 1 sc in first 2 sc, sc in each of last 2 sc (3 sc), turn.
Row 20: Ch 1, dec 2 sc in last 3 sc (1 sc). Fasten off.
Shape second side
Row 1: With right side facing, join yarn in first st of Row 13, ch 1, sc in each of first 7 sc (7 sc),
turn.
Rows 2–7: Rep Rows 15–20.
210
PART 4 The Part of Tens
Fusing the stitches and finishing
Felting is what happens to wool fibers when they’re exposed to hot water and friction. The
stitches fuse into a densely woven fabric that is extremely durable but still soft to the touch.
Additionally, the fabric shrinks during this process. The amount of shrinkage that occurs varies according to the amount of agitation and the heat of the water, so no two pieces come out
exactly the same.
Start by putting the piece in the washing machine with the appropriate amount of detergent for
the size of the load you are running, and use the hot or warm wash/cool rinse cycle. Because
this piece is so small, you can throw it in with other items. Just make sure they can be washed
in hot water and are of like colors (a few towels work well) because the dye in the yarn may
run. The yarn shouldn’t shed, but you never know, so don’t throw any good items in with this
at first.
It’s a good idea to check your piece periodically (about half way through, then again before the
end of the cycle) to make sure it’s not felting too much. (To check the piece, stop the washer
and wait for everything to stop moving before you reach into the machine.) If, at the end of the
complete wash cycle, you want a more felted look, just run the piece through again.
You can also felt it even more in the dryer. Put the item in the dryer on the regular setting, and
run the dryer until the piece is almost dry. While it’s still damp, lay it flat, adjust into the proper
shape, and allow the piece to finish air drying. If your piece is felted to your satisfaction when
it comes out of the washing machine, you can let it air dry completely. Lay the piece on a flat
surface and shape to dry.
Don’t forget to check the piece during the felting process. After the fibers are fused, you can’t
undo it.
Assembly
When the piece is dry, using the sewing needle and thread, sew the pin back to the center back
of the heart.
MP3 Player Cover
Although many people use their phones, people still love their MP3 players. To reduce the risk
of scratching the player, it’s a good idea to protect it with a cover. Why buy one when you can
make your own? This design gives you a stylish way to protect your music and show off your
skills (see Figure 17-3). Plus, there’s a pocket built right in where you can store your earphones
when you’re not using them.
Materials and vital statistics
»» Yarn: Bernat “Cool Crochet” light-weight yarn (70% cotton/30% nylon), Article #161074
(1.75 oz. [50 g], 200 yds [183 m] each skein): 1 skein of #74009 Neopolitan Shades
»» Hook: Crochet hook size G-6 U.S. or size needed to obtain gauge
»»3 16 in. hole punch
»» 2½ x 4 in. piece of 16-gauge clear vinyl
CHAPTER 17 Ten Kid-Friendly Projects
211
FIGURE 17-3:
Carry your
music in style.
»» Stitch marker
»» Tapestry needle
»» Measurements: 3 in. wide x 4 in. long
»» Gauge: 11 sts and 11 rows = 2 in.
»» Stitches used: Slip stitch (sl st), single crochet (sc)
To crochet this cover, you start by working your initial round of stitches right into the holes
you punch in the vinyl cover, instead of creating a foundation chain. You work several rounds
to create a border around the front, then begin to work in rows to crochet the back and the
pocket. When you’ve completed all the crocheting, you then sew the back to the front to finish
the cover.
Directions
Working into the holes in the vinyl window is easy — just pretend it’s a stitch. Insert your hook
through the hole, and it acts the like row below. Just don’t pull too tight or you’ll pucker the
plastic.
Front vinyl window
Using the template shown in Figure 17-4, cut vinyl to match. With 3 16 hole punch, punch holes
¼ in. in from edge according to template.
212
PART 4 The Part of Tens
Front window border
Rnd 1 (right side): Join yarn in top left-hand corner hole of vinyl, ch 1, • 3 sc in corner hole, sc
in each hole across to next corner •, rep from • to • around (52 sc), do not join. Continue to work
in a spiral, marking beg of each row, moving marker up as work progresses.
Rnd 2: Sc in next sc, • 3 sc in next sc (corner), sc in each sc across to next corner •, rep from •
to • twice, 3 sc in next sc (corner), sc in each sc around (60 sc). Work now progresses in rows.
Row 3: Sc in each of next 21 sc (21 sc), turn, leaving rem sts unworked.
Row 4: Ch 1, sc in each of first 49 sc (49 sc), turn.
Row 5: Ch 1, sc in each of first 31 sc (31), turn, leaving rem sts unworked.
FIGURE 17-4:
Template for
front cover —
actual size.
Beg back
Row 1 (wrong side): Ch 1, sc in each of first 13 sc (13 sc), turn, leaving rem sts unworked.
Rows 2–10: Ch 1, sc in each sc across (13 sc), turn.
Beg pocket lining
Row 1 (wrong side): Ch 1, working in flps of sts, sc in each sc across (13 sc), turn.
Rows 2–12: Ch 1, working in both loops of sts, sc in each sc across (13 sc), turn. Fasten off.
Beg pocket front
Row 1: With right side facing, join yarn in rem loop of first st in Row 10 of back, ch 1, sc in rem
loop of each sc across (13 sc), turn.
Rows 2–12: Ch 1, sc in each sc across (13 sc), turn. Fasten off.
CHAPTER 17 Ten Kid-Friendly Projects
213
Assembly
With right sides facing, fold the back up toward the top of the front. With tapestry needle and
18-inch length of yarn, matching sts across sides, working through sides and pocket, sew sides
of body together. Turn right side out.
Beadies Can-Cozy
Use this neat little beadies can-cozy (see Figure 17-5) to keep those sweating soft-drink cans
from slipping out of your hand and to help keep them cold. Yarn may seem like an odd choice to
use for a can-cozy, but it works. The yarn used in this project makes it look like you’ve got your
own designer, beaded cozy. If you don’t want to use the cozy to slip onto a can, it also makes a
great pencil holder!
FIGURE 17-5:
A can-cozy
keeps your
drinks cool
and your
hands dry.
214
PART 4 The Part of Tens
Materials and vital statistics
»» Yarn: Aunt Lydia’s “Beadies Crochet” worsted-weight yarn (94% acrylic/6% polyester), Article
#159 (1.76 oz. [50 g], 66 yds [60 m] each skein): 1 skein of #35 Flower Power
»» Hook: Crochet hook size J-10 U.S. or size needed to obtain gauge
»» Stitch marker
»» Measurements: 2¾ in. in diameter x 4½ in. tall
»» Gauge: First 4 rnds of bottom = 2 in. in diameter
»» Stitches used: Chain stitch (ch), slip stitch (sl st), single crochet (sc), reverse single crochet
To make this can-cozy, you start with a flat base, then work in a spiral to create a tube to slip
your can into. Working in a spiral is easy — all you do is work in rounds, but instead of joining each round, you start the next round when you reach the end of the current round, thus
eliminating seams.
Directions
The bottom of the can cozy is flat. To crochet this, you start with a small circle, then increase
your stitches in each subsequent round until the proper dimension is reached.
Bottom
Center ring: Ch 4 and close into a ring with one sl st in first ch.
Rnd 1: Ch 1, work 6 sc in ring (6 sc), sl st in first sc to join.
Rnd 2: Ch 1, 2 sc in each sc around (12 sc), sl st in first sc to join.
Rnd 3: Ch 1, sc in first sc, 2 sc in next sc, • sc in next sc, 2 sc in next sc •, rep from • to • around
(18 sc), sl st in first sc to join.
Rnd 4: Ch 1, sc in each of first 2 sc, 2 sc in next sc, • sc in each of next 2 sc, 2 sc in next sc •, rep
from • to • around (24 sc), sl st in first sc to join.
Rnd 5: Ch 1, sc in each of first 3 sc, 2 sc in next sc, • sc in each of next 3 sc, 2 sc in next sc •, rep
from • to • around (30 sc), sl st in first sc to join.
Beg sides
Rnd 1: Ch 1, working in blps of sts, sc in each sc around (30 sc), do not join. Continue to work in
a spiral, marking beg of each rnd, moving marker up as work progresses.
Rnd 2: Sc in each sc around (30 sc).
Rep Rnd 2 until sides measure 4 in. from beg, sl st in next sc to join at end of last rnd.
Edging
Ch 1, working from left to right, reverse sc in each sc around (30 reverse sc), sl st in first reverse
sc to join. Fasten off.
CHAPTER 17 Ten Kid-Friendly Projects
215
Page Runner
Okay, so “page runner” is just a fancy name for a bookmark, but this project looks like a runner
you’d see on the floor in the hallway (see Figure 17-6). Simple stitches with some fringe added
at the ends make for a unique look. These quick designs would be great projects for the school
book fair or to sell at a fund-raiser.
FIGURE 17-6:
The page
runner
bookmark
takes some
simple stitches
and adds a
few pieces of
fringe for a
touch of flair.
Materials and vital statistics
»» Yarn: Coats & Clark “LusterSheen” sport-weight yarn (100% acrylic), Article #E721
(4 oz. [113 g], 335 yds [306 m] each skein): 1 skein of #0518 Light Mulberry makes many
»» Hook: Crochet hook size F-5 U.S. or size needed to obtain gauge
»» Measurements: 1½ in. wide x 8¾ in. long
»» Gauge: 5 sts = 1 in.; 4 rows in pat = 1¼ in.
»» Stitches used: Chain stitch (ch), single crochet (sc), double triple crochet (dtr)
(see Appendix A for details on how to make this stitch)
This project is a great example of a repeating pattern. Four rows are worked over and over again
to create the pattern, which is shown in the stitch diagram, Figure 17-7. It’s a basic repeat as far
as stitch patterns go, and this project is a wonderful opportunity to introduce stitch diagrams
to a beginning crocheter.
216
PART 4 The Part of Tens
Directions
Foundation chain: Ch 9.
Row 1 (wrong side): Sc in 2nd ch from hook, sc in each ch across (8 sc), turn.
Row 2: Ch 5 (first dtr), dtr in each sc across (8 dtr), turn.
Rows 3–5: Ch 1, sc in each st across (8 sc), turn.
Rows 6–25: Rep Rows 2-5 (5 times).
Row 26: Rep Row 2.
Row 27: Ch 1, sc in each dtr across (8 sc). Fasten off.
Finishing: To make the fringe, cut yarn into 16 4-inch lengths. Using 1 strand of yarn for
each fringe, single-knot one fringe in each stitch across each short edge of bookmark. Trim
ends even.
FIGURE 17-7:
Page runner
stitch diagram.
Camouflage Belt
I dare you to try and find a preteen, tween, or teen who doesn’t have at least one camouflage
item in her wardrobe. Even adults are wearing it. This belt (see Figure 17-8) is perfect for adding a touch of camouflage to your outfit. If your favorite camouflage pants or that great camo
T-shirt is still in the laundry, throw this belt on with a pair of jeans. Simple stitches and a
D-ring belt buckle are all it takes to create this great fashion accessory.
CHAPTER 17 Ten Kid-Friendly Projects
217
FIGURE 17-8:
Wear
camouflage at
your waist for
a trendy look.
Materials and vital statistics
»» Size: Directions given are for size X-Small. Changes for Small, Medium, Large, X-Large, and
XX-Large are in parentheses. Finished waist: 34 (36, 38, 40, 42, 44) in.
»» Yarn: Coats & Clark Red Heart “Super Saver” worsted-weight yarn (100% acrylic), Article
#E300 (5 oz. [141 g], 255 yds [233 m] each skein): 1 skein of #0971 Camouflage
»» Hook: Crochet hook size H-8 U.S. or size needed to obtain gauge
»» Belt buckle: Gold-colored D-ring style buckle
»» Tapestry needle
»» Measurement: 1 ⁄ in. wide
»» Gauge: 4 sts in pat = 1 in.; 14 rows in pat = 4 in.
»» Stitches used: Chain stitch (ch), single crochet (sc)
78
Crocheting doesn’t get a whole lot easier than this. This project uses a basic stitch pattern
that’s really versatile, and it creates a flexible fabric without being too bulky — ideal for around
your waist. The single crochet stitches are worked into the chain spaces of the previous row,
and the chain spaces are created over the single crochet stitches, which alternate in each row.
Directions
Foundation chain: Ch 8.
Row 1 (right side): Sc in 2nd ch from hook, • ch 1, skip next ch, sc in next ch •, rep from • to •
across (4 sc and 3 ch-1 spaces), turn.
218
PART 4 The Part of Tens
Row 2: Ch 1, sc in first sc, • sc in next ch-1 space, ch 1, skip next sc •, rep from • to • across to
within last ch-1 space, sc in last ch-1 space, sc in last sc (5 sc and 2 ch-1 spaces), turn.
Row 3: Ch 1, sc in first sc, • ch 1, skip next sc, sc in next ch-1 space •, rep from • to • across to
within last 2 sc, ch 1, skip next sc, sc in last sc (4 sc and 3 ch-1 spaces), turn.
Rep Rows 2–3 for pat until belt measures 39 (41, 43, 45, 47, 49) in. from beg or to desired
length. Fasten off.
Assembly: With wrong side facing, draw Foundation row through flat side of both belt rings
and fold over, matching Foundation row to Row 10. With tapestry needle and yarn, sew Foundation row to Row 10, matching sts across and enclosing belt rings.
Chocolate Lace Headband
The design for this lace headband (see Figure 17-9) not only provides a great hair accessory,
but also gives you the opportunity to practice a simple yet common stitch pattern. Brown seems
to be the color of choice these days, but as always, you can choose another color (or several
others) to suit your taste.
FIGURE 17-9:
You achieve
the lacy look of
this headband
by using a
larger hook
with the yarn.
Materials and vital statistics
»» Yarn: Bernat “Cool Crochet” light-weight yarn (70% cotton/30% nylon), Article #161074
(1.75 oz. [50 g], 200 yds [183 m] each skein): 1 skein of #74013 Chocolate makes several
»» Hook: Crochet hook size H-8 U.S. or size needed to obtain gauge
»» Tapestry needle
CHAPTER 17 Ten Kid-Friendly Projects
219
»» Measurements: 2 in. wide x 16 in. in circumference
»» Gauge: 10 sts in pat = 2 in.; 13 rows in pat = 4 in.
»» Stitches used: Chain stitch (ch), single crochet (sc), double crochet (dc)
You create this pattern by using a slightly larger hook than is normally used for this yarn,
which creates a lacy look to a pattern that is normally tighter and textured. Just crochet a strip,
sew together the ends, and you’re done. This project can easily be made in a couple of hours.
Directions
Foundation chain: Ch 11.
Row 1 (right side): Sc in 2nd ch from hook, dc in next ch, • sc in next ch, dc in next ch •, rep
from • to • across (10 sts), turn.
Row 2: Ch 1, sc in first dc, dc in next sc, • sc in next dc, dc in next sc •, rep from • to • across
(10 sts), turn.
Rep Row 2 for pat until piece measures 16 in. from beg. Fasten off, leaving a 10-in. sewing
length.
Assembly: With right sides facing, using tapestry needle and sewing length, matching sts
across short edges, sew last row to foundation ch, thus forming a circle.
Chain-Link Bracelet
A girl can never have enough accessories, and with this easy pattern, you can make as many
bracelets as you can fit on your arms. This design can be crocheted in less than an hour, so you
can make dozens in no time at all. This bracelet features three wire chains held together with a
jump ring and spring ring clasp (see Figure 17-10), but feel free to branch out on your own. It
would look equally as good with just one chain or several, whatever suits your taste.
Materials and vital statistics
»» Yarn: Wyr Knittr Wyr Pak 30 gauge copper-coated wire (40 yds per spool) #02106 Jewels (1
spool each of pink, green, blue per pack)
»» Hook: Crochet hook size G-6 U.S. or size needed to obtain gauge
»» Jump ring and spring ring clasp
»» Measurement: 7 in. in circumference
»» Gauge: 17 chain sts = 4 in.
»» Stitches used: Chain stitch (ch)
This bracelet is just a bunch of chains, but what makes it unique is the material it’s crocheted
from. Wire crocheted jewelry is everywhere. But don’t be intimidated by the wire — it’s almost
easier to use than yarn. It tends to be a bit slippery, so you may have to work a little slower,
and be sure not to pull your stitches too tight. You want to leave them loose so you can see the
individual stitches.
220
PART 4 The Part of Tens
FIGURE 17-10:
Crochet simple
chains to form
a bracelet.
Directions
Make 1 chain each in pink, blue, and green.
Foundation chain: Leaving a 3-in. tail, ch 30. Fasten off, leaving a 3-in. tail.
Assembly: Lay chains side by side, matching up ends. Twist wire tails together, then insert
one end through clasp and the other end through the jump ring. Twist ends tightly to secure.
Trim even.
Variation: Making matching pieces
To make a matching necklace, follow the instructions above, but make your chains longer, anywhere from 16 inches to 20 inches or more, whatever length you desire.
To crochet matching earrings, follow the instructions above, but make your chains much
shorter, about 10 chain stitches for a small hoop, 12–15 stitches for larger hoops. Attach the
wire ends to the earring post of your choice.
CHAPTER 17 Ten Kid-Friendly Projects
221
Think Pink Pocket Purse
This pocket purse (see Figure 17-11) is the perfect little hold-all for any small items that you
don’t want to lose in the bottom of your purse or shoulder bag. The hot pink “suede” yarn gives
the purse a unique color and feel, so you can look in your bag and see it right away or reach in
and grab it by feel.
FIGURE 17-11:
You can use
this little purse
to hold change,
lip gloss, or
other little
doodads in
your bag.
Materials and vital statistics
»» Yarn: Lion Brand “Lion Suede” bulky-weight yarn (100% polyester), Article #210 (3 oz. [85 g],
122 yds [112 m] each skein): 1 skein of #140 Rose
»» Hook: Crochet hook size I-9 U.S. or size needed to obtain gauge
»» Yarn needle
»» One 1-in. button
»» Sewing needle and matching sewing thread
»» Measurements: 4 in. wide x 3 in. tall
»» Gauge: 12 sc in pat = 4 in.; 11 rows in pat = 4 in.
»» Stitches used: Chain stitch (ch), single crochet (sc). Dec 1 sc: • (Insert hook in next st, yo,
draw yarn through st) twice, yo, draw yarn through 3 loops on hook •.
222
PART 4 The Part of Tens
You crochet this pocket purse as one piece, using decreasing stitches to shape the front flap.
Then you sew the fabric together at the sides. Add a pretty button to the front for the closure,
and you’re good to go. This can easily be made in an evening, so make matching pocket purses
for all your friends.
Directions
Foundation chain: Ch 13.
Row 1 (right side): Sc in 2nd ch from hook, sc in each ch across (12 sc), turn.
Row 2: Ch 1, sc in flp of first sc, sc in blp of next sc, • sc in flp of next sc, sc in blp of next sc •,
rep from • to • across (12 sc), turn.
Row 3: Ch 1, sc in blp of first sc, sc in flp of next sc, • sc in blp of next sc, sc in flp of next sc •,
rep from • to • across (12 sc), turn.
Rep Rows 2–3 for pat until piece measures 53⁄4 in. from beg.
Beg front flap
Next Row: Ch 1, dec 1 sc in first 2 sc, maintaining flp/blp pat, sc in each sc across to within last
2 sc, dec 1 sc in last 2 sc (10 sc), turn.
Rep last row until 4 sts rem on work.
Next Row: Ch 1, sc in first sc, ch 2, skip next 2 sc (buttonhole made), sc in last sc (4 sts), turn.
Next Row: Ch 1, sc in first sc, 2 sc in ch-2 space, sc in last sc (4 sc), turn.
Next Row: Ch 1, (dec 1 sc in next 2 sc) twice (2 sc), turn.
Last Row: Ch 1, dec 1 sc in 2 sc (1 sc). Fasten off.
Assembly
With right sides facing, fold Foundation row up to last row before beginning of the front flap.
Using yarn needle and 12-in. length of yarn, sew side seams. With sewing needle and matching
sewing thread, sew button to the front aligned with buttonhole.
Variation: Stitching a small handbag
To make a larger bag that is approximately 10 in. wide x 8 in. deep, you need 3 skeins of yarn.
Beg the bag
Foundation chain: Ch 31.
Row 1 (right side): Sc in 2nd ch from hook, sc in each ch across (30 sc), turn.
Row 2: Ch 1, sc in flp of first sc, sc in blp of next sc, • sc in flp of next sc, sc in blp of next sc •,
rep from • to • across (30 sc), turn.
CHAPTER 17 Ten Kid-Friendly Projects
223
Row 3: Ch 1, sc in blp of first sc, sc in flp of next sc, • sc in blp of next sc, sc in flp of next sc •,
rep from • to • across (30 sc), turn.
Rep Rows 2–3 for pat until piece measures 16 in. from beg.
Beg front flap
Next Row: Ch 1, dec 1 sc in first 2 sc, maintaining flp/blp pat, sc in each sc across to within last
2 sc, dec 1 sc in last 2 sc (28 sc), turn.
Rep last row until 4 sts rem on work.
Next Row: Ch 1, sc in first sc, ch 2, skip next 2 sc (buttonhole made), sc in last sc (4 sts), turn.
Next Row: Ch 1, sc in first sc, 2 sc in ch-2 space, sc in last sc (4 sc), turn.
Next Row: Ch 1, (dec 1 sc in next 2 sc) twice (2 sc), turn.
Last Row: Ch 1, dec 1 sc in 2 sc (1 sc). Fasten off.
Assembly
With right sides facing, fold Foundation row up to last row before beginning of the front flap.
Using yarn needle and 18-inch length of yarn, sew side seams. With sewing needle and matching sewing thread, sew button to the front aligned with buttonhole.
Adding a shoulder strap
Row 1: With right side facing, join yarn in first stitch to the right of side seam on one side of
bag, ch 1, sc in st, sc in side seam, sc in next st (3 sc), turn.
Row 2: Ch 1, sc in each sc across (3 sc), turn.
Rep Row 2 until strap reaches desired length.
Next Row: With right side facing, being careful not to twist strap, sl st in corresponding st on
opposite side of bag, sl st in each of next 2 sts. Fasten off.
Beaded Anklet
Here’s a piece of jewelry that’s been around for many years. Anklets can be rather formal, made
with gold or silver and jewels, or casual, as this one is. The yarn used is studded with beads, and
the color reminds me of the always popular hemp jewelry (see Figure 17-12). Crochet a couple
rows, attach a clasp, and fasten around your ankle.
Materials and vital statistics
»» Yarn: Moda Dea “Beadnik” worsted-weight yarn (90% Acrylic/5% polyester/5%PVC), Article
#R149 (1.76 oz. [50 g], 103 yds [94 m] each ball): 1 ball of #2923 Daddy-O Tan makes many
»» Hook: Crochet hook size F-5 U.S. or size needed to obtain gauge
224
PART 4 The Part of Tens
FIGURE 17-12:
You can create
wearable art
for your ankle.
»» Jump ring and spring ring clasp
»» Measurements: ½ in. wide x 9¼ in. long
»» Gauge: 17 sts in pat = 4 in.
»» Stitches used: Chain stitch (ch), slip stitch (sl st), single crochet (sc). Bobble: • 3 dc (half
closed and joined tog) worked in same st •. (See Appendix A for details.)
This anklet not only consists of just two rows, which makes it quick and easy to crochet, but
also gives you the chance to practice your bobble making.
Directions
Foundation chain: Leaving a 3-in. tail, ch 46.
Row 1 (right side): Sc in 2nd ch from hook, bobble in next ch, • sl st in next ch, bobble in next
ch •, rep from • to • across to within last ch, sc in last ch (22 bobbles), turn.
Row 2: Ch 1, sc in first sc, sl st in next bobble, • sc in next sl st, sl st in next bobble •, rep from
• to • across to within last sc, sc in last sc. Fasten off, leaving a 3-in. tail.
Assembly: Using tails, tie spring clasp to one end of anklet and jump ring to the other end of
anklet. Weave in ends.
CHAPTER 17 Ten Kid-Friendly Projects
225
5
Appendixes
IN THIS PART . . .
Getting a refresher on crochet stitches
Finding your yarn supplier
A
Crochet Stitches
Appendix
E
ven if you’re familiar with how to make most crochet stitches, it never hurts to have
a reference. Almost all of the stitches that you’ll come across in your day-to-day crocheting can be found here, along with illustrations and step-by-step instructions. The
stitches are in relative order beginning with the easiest and moving forward from there. After
the basic stitches, you’ll find some of the more common stitch combinations, as well as a few
miscellaneous items such as sewing techniques and embellishments.
I include a few of the unique or more complex stitches as new skills in the chapters in which
they are used. So if you’re looking for instructions on how to do one of the following stitches,
you need to flip to the chapter indicated:
»» The loop stitch: Chapter 11
»» The afghan stitch: Chapter 13
»» The Tunisian knit stitch: Chapter 13
»» Filet crochet stitches (spaces, blocks, lacets, and bars): Chapter 13
Slipknot
Before you can do anything, you first have to join the yarn to the hook. This is accomplished by
making a slipknot.
1.
Starting about 6 inches from the end of the yarn, make a loop that looks somewhat
like a pretzel.
2.
Insert your hook through the center of the loop (see Figure A-1) and draw the working end of the yarn through.
APPENDIX A Crochet Stitches
229
FIGURE A-1:
Drawing the
yarn through
the loop.
3.
Gently tug on both ends of the yarn to tighten the loop around your hook
(see Figure A-2).
FIGURE A-2:
Tightening the
loop around
the hook.
Chain Stitch (ch)
I can’t think of a single crocheted piece that doesn’t start with at least one chain stitch. This
stitch forms the base that you work all your stitches off of, whether it’s a foundation chain or
a center ring.
1.
Slide a slipknot onto the shaft of your hook.
2.
Yarn over (yo) your hook.
3.
Draw the yarn through the loop on your hook to make the first chain stitch
(see Figure A-3).
4.
Repeat Steps 2 and 3 for the required number of stitches (see Figure A-4), holding the
chain close to your hook as it grows for better control.
FIGURE A-3:
Making the
first chain
stitch.
230
PART 5 Appendixes
FIGURE A-4:
Several chain
stitches
in a row.
Slip Stitch (sl st)
This is a handy little stitch that you can use for lots of reasons. It’s used for fastening off, traveling from one place to the next when you don’t want your stitches visible, joining seams, or
creating a nice smooth edge, just to name a few. It has next to no height and lays relatively flat.
It’s easier to work the slip stitch on an established row, so to practice this stitch, make a swatch
using double crochet stitches 16 stitches long and several rows deep.
1.
Insert your hook in the next stitch (see Figure A-5).
2.
Yarn over (yo) your hook.
3.
Draw the yarn through the stitch and through the loop on your hook (see Figure A-6).
4.
Repeat Steps 1 through 3 for the required number of stitches (see Figure A-7).
FIGURE A-5:
Beginning the
first slip stitch.
FIGURE A-6:
Completing the
first slip stitch.
APPENDIX A Crochet Stitches
231
FIGURE A-7:
Working the
slip stitch
across the row.
Single Crochet Stitch (sc)
This stitch is the most elementary of all stitches, and you’ll use it a lot. It’s compact and creates a nice tight fabric. It’s often used alone, but in many cases it works well in combination
with other stitches.
1.
Insert your hook in the 2nd chain stitch from your hook (see Figure A-8).
2.
Yarn over (yo) your hook, and draw the yarn through the stitch (see Figure A-9).
3.
Yarn over, and draw the yarn through the 2 loops on your hook (see Figure A-10).
4.
Insert your hook in the next stitch, then repeat from Step 2 for the required number
of stitches.
FIGURE A-8:
Starting the
first single
crochet stitch.
FIGURE A-9:
Drawing the
yarn through
the stitch.
FIGURE A-10:
Completing the
first single
crochet stitch.
232
PART 5 Appendixes
Double Crochet Stitch (dc)
The double crochet stitch is another stitch that you’ll use all the time. It’s about twice as tall as
the single crochet stitch and creates a fairly solid — but not stiff — fabric. It’s used alone and
in combination with other stitches.
1.
Yarn over (yo) your hook, and insert your hook in the 4th chain from your hook
(see Figure A-11a).
2.
Yarn over, and draw the yarn through the stitch (see Figure A-11b).
3.
Yarn over, and draw the yarn through 2 loops on your hook (see Figure A-12a).
4.
Yarn over, and draw the yarn through the remaining 2 loops on your hook ( A-12b).
5.
Yarn over, and insert your hook in the next stitch, repeating from Step 2 for the
required number of stitches.
FIGURE A-11:
The first
two steps in
creating a
double crochet
stitch.
FIGURE A-12:
Completing
the double
crochet stitch.
Triple Crochet Stitch (tr)
The triple crochet stitch is similar to the double crochet but is slightly taller. It creates a loose,
open fabric with longer openings between each stitch. You often use the triple crochet in combination with other stitches to create interesting textures and patterns.
1.
Yarn over (yo) twice, and insert your hook in the 5th chain from your hook
(see Figure A-13a).
2.
Yarn over, and draw the yarn through the stitch (see Figure A-13b).
3.
Yarn over, and draw the yarn through 2 loops on your hook (see Figure A-14a).
4.
Yarn over, and draw the yarn through 2 loops on your hook (see Figure A-14b).
5.
Yarn over, and draw the yarn through the last 2 loops on your hook (see Figure A-15a).
One triple crochet stitch is now complete (see Figure A-15b).
6.
Yarn over twice, and insert your hook in the next stitch, repeating from Step 2 for the
required number of stitches.
APPENDIX A Crochet Stitches
233
FIGURE A-13:
Starting a triple
crochet stitch.
FIGURE A-14:
Drawing the
yarn through
the loops.
FIGURE A-15:
Completing the
first triple
crochet.
Double Triple Crochet (dtr)
This stitch is yet again a little bit taller than the triple crochet, and is often used in combinations with other stitches to create a lacy pattern. The fabric itself is loose and holey, and you
commonly see it used in thread crochet designs.
1.
Yarn over (yo) 3 times, and insert your hook in the next stitch (see Figure A-16).
2.
Yarn over, and draw the yarn through the stitch.
FIGURE A-16:
Beginning a
double triple
crochet stitch.
You should now have 5 loops on your hook.
234
PART 5 Appendixes
3.
Yarn over, and draw your yarn through the first 2 loops on your hook (4 loops
remain).
4.
Repeat Step 3 three more times until you have only 1 loop on your hook.
One double triple crochet stitch is complete (see Figure A-17).
FIGURE A-17:
Several
complete
double triple
crochet
stitches.
Half Double Crochet Stitch (hdc)
The half double crochet stitch is a funny kind of in-between stitch. You start out as you would
for a double crochet stitch and finish like a single crochet stitch. It’s like a fatter version of the
single crochet, with a height somewhere between the single and double crochet.
1.
Yarn over (yo), and insert your hook in the 3rd chain from your hook
(see Figure A-18a).
2.
Yarn over, and draw the yarn through the stitch (see Figure A-18b).
3.
Yarn over, and draw the yarn through the 3 loops on your hook (see Figure A-19a).
FIGURE A-18:
Beginning a
half double
crochet stitch.
See Figure A-19b for the finished half double crochet.
4.
Yarn over, insert your hook in the next stitch, repeating from Step 2 for the required
number of stitches.
FIGURE A-19:
Finishing a half
double crochet
stitch.
APPENDIX A Crochet Stitches
235
Decrease 1 Single Crochet Stitch (dec 1 sc)
Decreasing stitches is an integral part of crochet. It’s not difficult; you just have a few simple
steps to follow. To shape any design, whether working in rows or rounds, you need to know
how to work this two-part process of turning two stitches into one.
1.
Insert your hook into the next stitch.
2.
Yarn over (yo), and draw the yarn through the stitch, leaving 2 loops on your hook.
3.
With the 2 loops still on your hook, insert your hook into the next stitch
(see Figure A-20).
4.
Yarn over, and draw the yarn through the stitch.
5.
Yarn over, and draw the yarn through all 3 loops on your hook (see Figure A-21a).
FIGURE A-20:
Beginning the
second half of
the single
crochet
decrease.
You’ve made one single crochet decrease, as shown in Figure A-21b.
FIGURE A-21:
Completing a
single crochet
decrease.
Decrease 1 Double Crochet Stitch (dec 1 dc)
Making a double crochet decrease is second only in frequency of use to the single crochet
decrease. It’s worked in a similar manner, but because of the extra loops you have an extra step.
236
1.
Yarn over (yo), and insert your hook into the next stitch.
2.
Yarn over, and draw the yarn through the stitch.
3.
Yarn over, and draw the yarn through the first 2 loops on the hook (see Figure A-22).
4.
With 2 loops still on your hook, yarn over, and insert your hook into the next stitch
(see Figure A-23).
5.
Yarn over, and draw the yarn through the stitch.
6.
Yarn over, and draw the yarn through the first 2 loops on the hook (3 loops remain).
PART 5 Appendixes
7.
Yarn over, and draw the yarn through all 3 loops on the hook (see Figure A-24a).
One double crochet decrease is now complete (see Figure A-24b).
FIGURE A-22:
Two loops
remain on
hook.
FIGURE A-23:
Beginning the
second stitch
of the
decrease.
FIGURE A-24:
Finishing up a
double crochet
decrease.
V-stitch
The V-stitch is an extremely easy and versatile stitch combination. It’s typically comprised of
two double crochet stitches and a chain stitch worked together all in the same stitch with the
results forming a V.
Work 1 double crochet stitch, chain 1, then work another double crochet stitch
(dc, ch1, dc) all in the same stitch (see Figure A-25).
APPENDIX A Crochet Stitches
237
FIGURE A-25:
Creating a
V-stitch.
Crossed Double Crochet Stitch
To create this pattern that looks like a bunch of Xs marching across your fabric, you work two
double crochet stitches on an angle. That’s not as hard as it may sound — you simply skip
stitches so you’re not working in the stitch directly below.
1.
Skip the next stitch in the row.
2.
Work 1 double crochet in the next stitch.
3.
Working behind the double crochet stitch you just made, work 1 double crochet into
the skipped stitch (see Figure A-26a).
Figure A-26b shows the completed crossed double crochet stitch.
4.
Repeat Steps 1 through 3 for the required number of stitches.
FIGURE A-26:
Working a
crossed double
crochet stitch.
Shell Stitch
This is another one of those stitch combinations that you’ll see everywhere. The shape of the
shell stitch resembles a clam shell, and the stitch can be used to create either a very tight fabric,
or when worked in combination with other stitches, a loose and airy pattern. The illustration
here shows a shell made with four double crochet stitches, but variations of the stitch can use
any number.
Work 4 double crochet stitches all in the same stitch, as shown in Figure A-27.
238
PART 5 Appendixes
FIGURE A-27:
Crocheting a
4–double
crochet shell
stitch.
Picot
These pretty little knobs add a decorative touch to edgings and are often used to fill in an empty
space. The picot stitch is most often seen in thread crochet, but there’s no reason why it can’t
be worked with yarn as well.
1.
Chain 3.
2.
Insert your hook into the third chain from the hook (see Figure A-28a).
3.
Yarn over (yo), and draw the yarn through the stitch and through the loop on the hook
(see Figure A-28b).
One picot stitch is now complete, as shown in Figure A-29.
FIGURE A-28:
Crocheting a
picot stitch.
FIGURE A-29:
The finished
picot stitch.
Cluster Stitch
The cluster stitch is the opposite of the shell stitch, forming a shape that resembles an upsidedown shell stitch or a triangle. To create a cluster, you work a set of stitches across an equal
number stitches, then join them all together at the top. The technique is the same as a decrease;
you’re just working a few more stitches than two. When joining several stitches together at the
top like this, and you don’t complete each stitch until you’re done, the stitches are referred to
APPENDIX A Crochet Stitches
239
as half-closed because you haven’t completed them yet. The following example details how to
make a cluster of four double crochet stitches.
1.
Yarn over (yo), insert the hook into the next stitch, yarn over, draw the yarn through
the stitch, yarn over, and draw the yarn through 2 loops on the hook (2 loops remain
on the hook).
2.
Repeat Step 1 three times (see Figure A-30a).
3.
Yarn over, and draw the yarn through all 5 loops on the hook (see Figure A-30b).
One 4–double crochet cluster stitch is complete, as shown in Figure A-31.
FIGURE A-30:
The first steps
for working a
4–double
crochet cluster
stitch.
FIGURE A-31:
A complete
4–double
crochet cluster
stitch.
Reverse Single Crochet Stitch (reverse sc)
The reverse single crochet stitch, sometimes referred to as the crab stitch, creates a rounded
twisted edge and is used only to make a finished edging for your piece. You’ll never see it in the
middle of your work. The mechanics are the same as for a single crochet stitch, except you work
in reverse. Instead of working from right to left, you work from left to right.
1.
With the right side of your work facing, insert the hook, from the front to the back, in
the next stitch to the right (see Figure A-32a).
2.
Yarn over (yo), and draw the yarn through the stitch (see Figure A-32b).
3.
Yarn over, and draw the yarn through the 2 loops on the hook (see Figure A-33a).
4.
Repeat Steps 1 through 3 for the required number of stitches.
Figure A-33b shows several completed reverse single crochet stitches.
240
PART 5 Appendixes
FIGURE A-32:
The first steps
to working a
reverse single
crochet stitch.
FIGURE A-33:
Finishing a
reverse single
crochet stitch.
Puff Stitch
This is one of the stitches in the family of oval combination stitches that gently puffs to create
texture. The puff stitch is similar to the cluster stitch in construction — you combine several
half-closed stitches together. The difference here is that the stitches are all worked in the same
stitch as opposed to being worked across several stitches. To create a 3–double crochet puff
stitch, follow these steps:
1.
Yarn over (yo), insert the hook in the designated stitch, yarn over, draw the yarn
through the stitch, yarn over, and draw the yarn through the 2 loops on the hook
(see Figure A-34a).
2.
In the same stitch, repeat Step 1 twice.
You should now have 4 loops on your hook.
3.
Yarn over, and draw the yarn through all 4 loops on your hook, as shown in
Figure A-34b.
Figure A-35 shows the completed 3–double crochet puff stitch.
FIGURE A-34:
Working a
3–double
crochet puff
stitch.
APPENDIX A Crochet Stitches
241
FIGURE A-35:
The completed
puff stitch.
Popcorn Stitch (pop or pc)
The popcorn stitch is the second stitch in the family of ovals. This one really stands out from
the fabric — it’s a rounded, compact oval that you can make so it “pops” either to the front of
your work or the back. It takes a little more time to make this stitch, but the results are well
worth it.
To make a popcorn stitch that pops to the front of your work, follow these steps:
1.
Work 5 double crochet stitches in the same stitch.
2.
Drop the loop from your hook.
3.
Insert your hook from front to back under the top 2 loops of the first double crochet of
the group.
4.
Grab the dropped loop with your hook and pull it through the stitch (refer to
Figure A-36a).
Figure A-36b shows the finished popcorn stitch popping to the front.
FIGURE A-36:
Making a
front-popping
popcorn stitch.
To make a popcorn stitch “pop” to the back of your work:
1.
Work 5 double crochet stitches in the same stitch.
2.
Drop the loop from your hook.
3.
Insert your hook from back to front under the top 2 loops of the first double crochet of
the group.
4.
Grab the dropped loop with your hook and pull it through the stitch (refer to
Figure A-37a).
Figure A-37b shows the finished popcorn stitch popping to the back of your work.
242
PART 5 Appendixes
FIGURE A-37:
Making a
back-popping
popcorn stitch.
Bobble Stitch
This is the last in the family of oval stitches. The bobble stitch is worked a bit differently from
the others in that it’s made using a series of loops rather than stitches. It creates a smoother
surface and is best worked with heavier-weight yarns. These steps show you how to make a
bobble stitch that ends up with 11 loops on the hook, but as always, there are variations, so be
sure to read the special stitch instructions given at the beginning of each pattern.
1.
Yarn over (yo), and insert the hook into the designated stitch (see Figure A-38a).
2.
Yarn over, and draw the yarn through the stitch, bringing the loop up to the height of
the previous stitch (3 loops on hook — see Figure A-38b).
3.
Working in the same stitch, repeat Steps 1 and 2 four times (11 loops on hook).
4.
Yarn over, and draw the yarn through all 11 loops on hook as shown in Figure A-39a.
One bobble stitch is complete (see Figure A-39b).
FIGURE A-38:
The beginning
stages of the
bobble stitch.
FIGURE A-39:
Wrapping up
the bobble
stitch.
APPENDIX A Crochet Stitches
243
Front Post Double Crochet (FPdc)
Sometimes you don’t work stitches into the tops of the stitches in the previous row, but rather
you find another place to stick your hook. The front post double crochet stitch is one of those
instances. The stitch itself is a plain old double crochet stitch, but instead of working it in the
top of a stitch, you work it around the post (or body) of the stitch in the previous row. This
causes the stitch to stand out and is used to create cable patterns, ribbing, and others relief
designs.
1.
Yarn over (yo), and insert your hook from front to back between the posts of the
first and second double crochet of the row below and then from back to front again
between the posts of the second and third stitches (see Figure A-40a).
Figure A-40b shows the correct positioning of the hook.
FIGURE A-40:
Correct way to
insert your
hook when
working a front
post double
crochet stitch.
2.
Yarn over, and draw the yarn around the post of the stitch.
3.
Yarn over, and draw the yarn through the 2 loops on the hook, twice, asshown in
Figure A-41a.
Figure A-41b shows the completed front post double crochet.
FIGURE A-41:
Finishing up a
front post
double crochet
stitch.
244
PART 5 Appendixes
Back Post Double Crochet Stitch (BPdc)
The back post double crochet stitch looks exactly the same as the front post double crochet,
but it’s raised to the back side of the fabric. When looking at it from the right side, it appears
to recede.
1.
Yarn over (yo), and insert your hook from back to front between the posts of the
first and second double crochet of the row below and then from front to back again
between the posts of the second and third stitches (see Figure A-42a).
Figure A-42b shows the correct positioning of the hook.
2.
Yarn over, and draw the yarn around the post of the stitch.
3.
Yarn over, and draw the yarn through the 2 loops on the hook, twice, as shown in
Figure A-43a.
FIGURE A-42:
Correct way to
insert your
hook when
working a back
post double
crochet stitch.
Figure A-43b shows the completed back post double crochet.
FIGURE A-43:
Finishing up a
back post
double
crochet stitch.
APPENDIX A Crochet Stitches
245
Long (Spike) Stitch
Long stitches, or spikes as they’re sometimes called, are stitches that you work into spaces or
stitches two or more rows below the current row you’re working on. Typically, they’re single
crochet stitches, and they create a long vertical spike of yarn on both sides of the fabric. This
is especially nice if you’re working on a project that’s reversible. When done in a contrasting
color, they really stand out.
1.
Insert the hook from front to back under the top 2 loops of the designated stitch one
or more rows below (see Figure A-44).
2.
Draw the yarn through the stitch and up to the current level of work, keeping the
stitch loose enough so it doesn’t pucker the fabric.
3.
Yarn over (yo), and draw the yarn through the 2 loops on your hook.
FIGURE A-44:
Working a long
single crochet
stitch three
rows below.
One long stitch is complete, as shown in Figure A-45.
FIGURE A-45:
Completed
long stitch in
single crochet.
Fringe
There are times when a pattern just doesn’t look complete without the addition of a little extra
something across the edges. A nice full fringe usually does the trick, and it also hides row ends,
which aren’t always so pretty.
246
PART 5 Appendixes
1.
Cut the yarn into the required number of equal lengths.
2.
Fold the strands of yarn for one fringe in half, forming a loop at one end and matching the cut ends of the yarn on the other end.
3.
Working from the right side of the fabric, take your hook and draw the loop through
the stitch that you’re attaching the fringe to (see Figure A-46a).
4.
Draw the loose ends of the yarn through the loop (see Figure A-46b).
5.
Holding the top of the fringe in one hand, gently pull on the fringe ends with your
other hand to tighten the knot.
6.
To finish, trim the ends of the fringe so they’re even.
FIGURE A-46:
The first steps
used to make a
single-knot
fringe.
Figure A-47 shows a completed single-knot fringe.
FIGURE A-47:
The completed
fringe
attached to a
crocheted row.
Tassels
Tassels add a decorative touch to particular spots on a design, such as the top of a hat or the
points of a shawl. Instead of working them directly onto the crocheted piece, you make tassels
separately and then attach them to the specified points.
1.
Cut a piece of cardboard the same width as your desired tassel length.
2.
Wrap the yarn several times around the cardboard.
APPENDIX A Crochet Stitches
247
3.
Slip a separate length of yarn between the cardboard and the wrapped yarn, and tie
the yarn bundle together at one end (see Figure A-48).
4.
Slide the bundle of yarn off the cardboard.
5.
Wrap another length of yarn 2 or 3 times around the bundle below the tied end and tie
in a knot to secure (see Figure A-49).
6.
Cut the loops on the opposite end of the bundle from the tied end.
7.
Trim the ends of the tassel so they’re even.
8.
Using the top tie’s remaining yarn length, attach the tassel to the designated spot.
FIGURE A-48:
Wrapping
the tassel.
FIGURE A-49:
Finishing steps
to making a
tassel.
Whipstitch
Whipstitch is the all-purpose stitch that’s used when sewing project pieces together, such
as side seams, shoulder seams, and motifs. It works best with the shorter crochet stitches —
single crochet, half double crochet, and double crochet. Sometimes you sew the row-end
248
PART 5 Appendixes
stitches together, and sometimes you join the tops of stitches. Either way, the key to sewing a
successful seam is to match up the stitches on each side of the seam, making sure not to pull
too tightly.
1.
Position the pieces with the right sides (or wrong sides, depending on what the
pattern says) facing each other. Match the stitches across each side edge.
2.
Using a yarn needle and matching yarn, weave the yarn back and forth through
several stitches on one of the pieces to secure the end.
3.
Insert the needle and pull the yarn through the inside loops of the first 2 corresponding
stitches of the 2 pieces to be joined.
4.
Draw the needle up and over the 2 loops of the first stitch.
5.
Repeat Steps 3 and 4 across the edges to be joined (see Figure A-50).
6.
At the end of the seam, weave the yarn back through several stitches to secure.
FIGURE A-50:
Sewing a seam
using the
whipstitch.
Blanket Stitch
This is another stitch used to join seams, particularly longer stitches like the triple crochet and
taller. When sewing seams with this stitch, you always join the row-end stitches at the top and
the base, which adds stability and helps to prevent gaping.
1.
With the correct sides facing each other (right side/wrong side, depending on
the pattern), lay the pieces of fabric on a flat, smooth surface and align the edges
and stitches.
2.
Using a yarn needle and matching yarn, thread the yarn through the base of the first
few corresponding stitches, leaving a yarn length to weave in later to secure the seam.
3.
Lay the working end of the yarn against the fabric in the direction of the stitches, as
shown in Figure A-51.
4.
Thread your yarn through the base of the next 2 corresponding stitches, making sure
that the working end of the yarn is underneath the needle.
5.
Repeat Steps 3 and 4 across the edges to be joined.
6.
At the end of the seam, weave the yarn back through several stitches to secure.
APPENDIX A Crochet Stitches
249
FIGURE A-51:
Joined at the
hip with the
blanket stitch.
250
PART 5 Appendixes
B
Yarn Supply Sources
Appendix
M
ost of the yarns and notions used for the projects in this book can be easily found at
your local craft store or yarn shop. If you’re unable to find a particular yarn, or they’re
unavailable in your area, you can contact the following manufacturers directly. Most
have websites that you can order from, or if not, they can direct you to a retailer.
»» Bernat Yarns: 320 Livingstone Ave. South, Listowel, ON, Canada N4W 3H3; 888-368-8401;
www.yarnspirations.com/our-brands/bernat
»» Caron International: Customer Service, P.O. Box 222, Washington, NC 27889;
www.yarnspirations.com/our-brands/caron
»» Coats & Clark Inc.: Consumer Services, P.O. Box 12229, Greenville, SC 29612-0229;
800-648-1479; www.coats.com/en-US
»» DMC Corporation: 77 S. Hackensack Ave., Bldg 10F, South Kearny, NJ 07032-4688;
973-589-0606; www.dmc.com/us
»» Herrschners: 2800 Hoover Road, Stevens Point, WI 54492-0001; 800-441-0838;
www.herrschners.com
»» Lily Sugar n Cream: 320 Livingstone Ave. South, Listowel, ON, Canada N4W 3H3;
888-368-8401; www.yarnspirations.com/our-brands/lily-sugarn-cream
»» Lion Brand Yarn: 135 Kero Road, Carlstadt, NJ 07072; 800-258-YARN (800-258-9276);
www.lionbrand.com
»» Muench Yarns: 1323 Scott St., Petaluma, CA 94954-1135; 800-733-9276; www.
muenchyarns.com
»» Patons Yarns: 320 Livingstone Ave. South, Listowel, ON, Canada N4W 3H3; 888-368-8401;
www.patonsyarns.com
»» Plymouth Yarn: P.O. Box 28, Bristol, PA 19007; 215-788-0459; www.plymouthyarn.com
»» Rowan Yarns: Green Lane Mill, Holmfirth, HD9 2DX England; +44 (0) 1484 681881;
www.knitrowan.com
CHAPTER A02 Yarn Supply Sources
251
Index
Symbols and Numerics
(and) (parentheses) characters, pattern
instructions, 35
[and] (brackets) characters, pattern
instructions, 35
* (asterisk) character, pattern instructions, 33
• (bullet) character, pattern instructions, 33–34
† (cross) character, pattern instructions, 33
+ (plus sign) character, pattern instructions, 33
1 double crochet stitch decrease (dec 1 dc),
technique illustrated, 236–237
1 single crochet stitch decrease (dec 1 sc),
technique illustrated, 236
16-gauge clear vinyl, MP3 player cover, 211
A
abbreviations, pattern instructions, 32
acid-free tissue paper, item storage, 205
acrylic, synthetic fiber, 14
adult’s rolled-brim hat project, 101–103
afghan category, medium yarn, 13
afghan hooks, uses, 11
afghan stitch baby blanket project, 149–153
afghans
granny square, 170
home decor display, 205
synthetic fibers, 14
wavy chevron throw, 88–90
wooly warmer, 60–61
aluminum hooks
cleaning, 12
pros/cons, 10
anklet, kid-friendly project, 224–225
aran yarn category
beginners, 17
medium yarn, 13
article number, label information, 15
asterisk (*) character, pattern instructions, 33
B
babies, size charts, 28
baby blanket, afghan stitch, 149–153
baby category
fine yarn, 14
super fine yarn, 14
back hip length, sizing measurements, 25–26
back post double crochet stitch (BPdc), technique
illustrated, 245
back waist length, sizing measurements, 26
back, southwest vest, 113
bags
bella drawstring, 80–82
carrying yarn across rows, 45
gear storage, 20
honey, I shrunk my bag, 172–174
shaping, 52
Tunisian stitch tote, 153–156
bars, fancy filet crochet stitch, 161–162
basic filet crochet stitch, love-to-read bookmark,
156–159
basket, hemp, 174–176
beaded anklet, kid-friendly project, 224–225
beaded chain stitch, wire-‘n’-beads necklace, 177
beaded-fringe belt project, 64–66
beadies can-cozy, kid-friendly project,
214–215
beading round, flirty denim skirt, 73
beads
beaded-fringe belt, 64
flirty denim skirt, 72
geometric wrap, 124
springtime pullover, 136
wire-‘n’-beads necklace, 176, 177
beads-‘n’-bows belt project, 96–98
beginners
aran weight yarn, 17
H-8 U.S. hook, 17
wool/acrylic blends, 14
worsted weight yarn, 16
beginning-of-row
adding new yarn, 42–43
decreases, 48
skipping stitches, 49
bella drawstring bag project, 80–82
belt buckle
camouflage belt, 218
double-crossing belt, 118
Index
253
belts
beaded-fringe, 64–66
beads-‘n’-bows, 96–98
camouflage, 217–219
double-crossing, 117–119
flower-power, 109–111
southwest vest, 114
beret, coffee suede, 74–77
Bernat Yarns, 251
binders, care instruction storage, 201–202
blanket stitch, technique illustrated, 249–250
blankets
afghan stitch baby blanket, 149–153
hiding yarn strands, 45
blends, natural/synthetic fibers, 14
blocking
crochet thread pieces, 204
gauge swatch, 22
love-to-read bookmark, 160–161
techniques, 203–204
blocks
basic filet crochet stitch, 156, 157–158
fancy filet crochet stitch, 161, 163–164
blue note scarf, kid-friendly project, 207–208
bobble stitch
beaded anklet, 225
combination stitch, 42
technique illustrated, 243
bolero (lacy) project, 131–135
bookmarks
chart, 160
lacy, 181–183
love-to-read bookmark, 156–161
page runner, 216–217
borders
afghan stitch baby blanket, 153
MP3 player cover, 213
bouclé, yarn weight/texture, 14
BPdc. See back post double crochet stitch (BPdc)
bracelets
chain-link, 220–221
friendship bracelet, 188–189
brackets [and] characters, pattern instructions,
35–36
brand name, label information, 15–16
brims
adult’s rolled-brim hat, 103
child’s rolled-brim hat, 101
254
Crochet Patterns For Dummies
Brittain, Susan (Crocheting For Dummies), 3, 4
buckle, belt, 118, 218
bulky category, super bulky yarn, 14
bulky weight, yarn weight/texture, 14
bulky, yarn category, 14
bullet (•) character, pattern instructions, 33–34
bust, sizing measurements, 25
button band, fur-trimmed jacket, 147
buttonhole band, fur-trimmed jacket, 147
buttons
fur-trimmed jacket, 143
standout luggage tag, 198
think pink pocket purse, 222
C
camouflage belt, kid-friendly project,
217–219
Canada, hook sizing conventions, 11–12
can-cozy, kid-friendly project, 214–215
cardboard
creating tassels, 247–248
lacy bookmark project, 182
used in blocking, 161, 204
care instructions
attaching labels to a project, 202
label information, 15–16
saving old labels, 201–202
Caron International, 251
cases, hook storage, 12
CC (contrasting color), 32, 246
center back/neck-to-cuff, sizing
measurements, 26
center rings
adult’s rolled-brim hat, 102
beadies can-cozy, 215
child’s rolled-brim hat, 101
flower-power belt, 110, 111
hemp basket, 175
must-see fur frame, 197
velvet roses, 191
working in rounds, 50
ch. See chain stitch
chain loops, flower-power belt, 109–110
chain stitch (ch)
center ring, 49
picot stitch combination, 41
standout luggage tags, 198
stemmed-glass markers, 195
technique illustrated, 230–231
chain-link bracelet, kid-friendly project, 220–221
charms, stemmed-glass markers, 196
charts
garment sizing, 27–29
geometric coaster set, 184–186
heartland window valance, 165
love-to-read bookmark, 156
chenille throw rug, 90–93
chest, sizing measurements, 25
children, size charts, 28
child’s rolled-brim hat project, 100–101
chocolate lace headband, kid-friendly project,
219–220
chunky category, bulky yarn, 13
chunky weight, yarn weight/texture, 13
circles, working in rounds, 49–52
clear pouch, project component storage, 20
clothing. See also garments; hats; scarves; shawls
care instruction storage, 201–202
dry cleaning, 204
elegant evening wrap, 115–117
flirty denim skirt, 71–74
fur-trimmed jacket, 143–148
geometric wrap, 122–124
label attachment, 202
lacy bolero, 131–135
pattern size selection, 27–29
red velvet crusher hat, 77–79
shaping, 52
sizing, 24–27
shell stitch tank top, 139–142
southwest vest, 111–114
springtime pullover, 135–139
velvet roses, 190–192
vertical stripes tunic, 125–131
cluster stitch
combination stitch, 41
shells and lace pillowcase edging, 171
technique illustrated, 239–240
triangles, 41
wavy chevron throw, 89
coasters, geometric coaster set, 183–187
Coats & Clark Inc., 251
coffee suede beret project, 74–77
coil-less safety pins, kit component, 20
collar, fur-trimmed jacket, 147
color changes, adding new yarn, 42–44
color drag, prevention techniques, 43
color name/number, label information, 15–16
colors, adding new yarn, 42–44
combination stitches
bobble, 42
cluster, 41
crossed double crochet stitch, 41
double crochet stitch, 40
double-crossing belt, 117–119
elegant evening wrap, 115–117
geometric wrap, 122–124
love those loops scarf, 119–122
picot, 41
popcorn stitch, 42
puff stitch, 42
reverse single crochet, 42
shell stitch, 41
slip stitch, 40
triple crochet stitch, 40
v-stitch, 41
company name/logo, label information, 15
complements, wire-‘n’-beads necklace, 177
Continental, hook sizing conventions, 11–12
contrasting color (CC), 32, 246
copper-coated wire, wire-‘n’-beads
necklace, 176
cords
drawstring, 82
hemp basket, 175
cosmetics pouch, gear storage, 20
cotton flake yarn, thick/thin spots, 135
cotton, natural fiber, 14–15
cozy chenille throw rug project, 90–93
craft category, bulky yarn, 12
craft glue, must-see fur frame, 196
crochet bag, gear storage, 20
crochet hooks. See hooks
crochet thread
blocking, 204
diamond-shaped table runner, 68
double-crossing belt, 117–118
friendship bracelet, 189
lacy bookmark, 181
love-to-read bookmark, 159
shells and lace pillowcase edging, 170–171
stemmed-glass markers, 194–195
velvet roses, 192–193
Index
255
Crocheting For Dummies (Susan Brittain), 3, 5
cross (†) character, pattern instructions, 33
cross back, sizing measurements, 25–26
crossed double crochet stitch
combination stitch, 41
double-crossing belt, 118
technique illustrated, 238
cuffs, fur-trimmed jacket, 143–144
curlicue scarf project, 69–70
D
dc. See double crochet stitch (dc)
decreases. See also increases; stitches
1 double crochet stitch (dec 1 dc), 236–237
1 single crochet stitch (dec 1 sc), 236
beaded-fringe belt, 65
blocks, 158–159
diamond-shaped table runner, 68
rows/rounds, 47–49
shades-of-gray shawl, 67
skipping stitches, 49
southwest vest, 113
spaces, 158–159
springtime pullover, 136
standout luggage tags, 198
think pink pocket purse, 222
wear your heart pin, 209
working in rounds, 52
denim cloche project, 85–88
denim skirt project, 71–74
diagrams, pattern instructions, 36–37
diamond-shaped table runner project, 68–69
DK weight, yarn weight/texture, 13
DMC Corporation, 251
double bullets (••), pattern instructions, 34–35
double crochet stitch (dc)
adding new yarn, 42–43
adult’s rolled-brim hat, 102
afghan stitch baby blanket, 152
bella drawstring bag, 80
child’s rolled-brim hat, 100
chocolate lace headband, 220
cluster stitch combination, 41
crossed double crochet stitch combination, 41
curlicue scarf, 70
decreases, 48–49
denim cloche, 86
256
Crochet Patterns For Dummies
double-crossing belt, 118
elegant evening wrap, 116
flower-power belt, 110
flirty denim skirt, 72
geometric wrap, 123
heartland window valance, 164
increases, 47
lacy bolero, 132
lacy bookmark, 182
love-to-read bookmark, 159
not your granny’s scarf, 168
pocket patch, 192
puff stitch combination, 42
shell stitch combination, 41
shell stitch tank top, 140
shells and lace pillowcase edging, 171
technique illustrated, 233
turning chains, 41
uses, 40
velvet roses, 191
v-stitch combination, 41
wavy chevron throw, 89
wooly warmer afghan, 61
double ended crochet, 11
double ended crochet hooks, uses, 11
double knitting category, light yarn, 13
double triple crochet stitch (dtr)
page runner, 216
technique illustrated, 234–235
turning chains, 41
uses, 40
double-crossing belt project, 117–119
drawstring bag project, 80–82
drawstring cord, bella drawstring bag, 82
drawstring ties, denim skirt, 74
dry cleaning, project care, 204
dtr. See double triple crochet stitch (dtr)
dye lot number, label information, 15–16
E
earring hoop wires, stemmed-glass markers, 194
ease, garment fit, 25
edgings
afghan stitch baby blanket, 153
beadies can-cozy, 215
beads-‘n’-bows belt, 98
cozy chenille throw rug, 93
diamond-shaped table runner, 67
geometric coaster set, 185–186
heartland window valance, 165
hiding yarn strands, 45
lacy bolero, 135
love those loops scarf, 121, 122
picot stitch, 41
pillowcase stitch diagram, 37
pocket patch, 194
practical potholders, 57
reverse single crochet stitch, 42
ruffles-‘n’-bows scarf, 100
shades-of-gray shawl, 67
shell stitch tank top, 142
shells and lace pillowcase, 170–172
springtime pullover, 138–139
Tunisian stitch tote bag, 156
vertical stripes tunic, 130
weaving yarn ends, 46
elastic, fun fur scrunchies, 188
elegant evening wrap project, 115–117
embellishments, pocket patches, 192–194
end-of-row, adding new yarn, 42–43
established pat, pattern instructions, 33
evening wraps, elegant evening wrap,
115–117
eyelash yarn, yarn weight/texture, 13
F
fabric tape measure
garment sizing, 24–27
kit component, 20
fake fur, yarn weight/texture, 13
fancy filet crochet stitch, heartland window
valance, 161–164
felting
honey, I shrunk my bag, 172–174
wear your heart pin, 211
fibers
blends, 14
felting, 172
label information, 15–16
natural, 14
synthetic, 14
fine, yarn category, 13
fingering category, super fine yarn, 13
fingering weight, yarn weight/texture, 13
finishing
bella drawstring bag, 82
coffee suede beret, 77
double-crossing belt, 119
flirty denim skirt, 74
friendship bracelet, 189
handy headband, 58
honey, I shrunk my bag, 174
lacy bookmark, 182
love those loops scarf, 121, 122
love-to-read bookmark, 160–161
page runner, 217
pocket patch, 193–194
practical potholders, 57
shells and lace pillowcase edging, 172
standout luggage tags, 199
flirty denim skirt project, 71–74
flower-power belt project, 109–111
forehead, sizing measurements, 26
foundation chain
attaching edgings, 172
becoming a round, 69
chain stitch (ch), 230–231
decreasing project size, 70, 93
definition, 37
increasing project size, 61, 93
joining, 71
foundation rows
afghan stitch baby blanket, 150–152
Tunisian stitch tote bag, 155–156
FPdc. See front post double
crochet (FPdc)
frames, must-see fur, 196–197
freezer bag, project component
storage, 20
friendship bracelet project, 188–189
fringe
beaded-fringe belt, 66
cozy chenille throw rug, 93
elegant evening wrap, 117
geometric wrap, 124
technique illustrated, 246–247
front post double crochet (FPdc), technique
illustrated, 244
fun fur scrunchies project, 187–188
fur-like fabric, love those loops scarf, 122
furry boa pillow project, 107–109
fur-trimmed jacket project, 143–148
Index
257
G
garment sizes, parentheses (and) characters, 35
garments. See also clothing; items; projects
avoiding hangers, 205
ease of fit, 25
natural fibers, 14
pattern sizing guidelines, 27–29
sizing, 24–27
gauge
definition, 21
gauge swatch, 21–24
manufacturer’s recommendation, 15–16
measuring, 22–24
yarn substitution, 95
gauge swatch
blocking, 22
measurement guidelines, 22–24
pattern adjustments, 24
pattern sample, 21–24
stitching a square, 22
working a round, 22
geometric coaster set project, 183–187
geometric wrap project, 122–124
glue, must-see fur frame, 196
granny squares
afghan, 170
not your granny’s scarf, 168–170
H
half double crochet stitch (hdc)
cluster stitch combination, 41
cozy chenille throw rug, 91
curlicue scarf, 70
double-crossing belt, 117
flower-power belt, 110
fur-trimmed jacket, 144
honey, I shrunk my bag, 173
shades-of-gray shawl, 67
southwest vest, 111
technique illustrated, 235
turning chain, 41
uses, 40
velvet roses, 191
vertical stripes tunic, 126
wooly warmer afghan, 61
half-closed stitches, puff stitch combination, 42
hand washing, recommended care, 203
258
Crochet Patterns For Dummies
handle
hook design element, 9
honey, I shrunk my bag, 174
Tunisian stitch tote bag, 156
hands
over-the-hook position, 17–19
under-the-hook position, 17–19
yarn handling position, 17–19
handy headbands project, 57–58
hangers, avoiding, 205
hard ruler, kit component, 20
hats
adult’s rolled-brim, 101–103
carrying yarn across rows, 45
child’s rolled-brim, 100–101
coffee suede beret, 74–77
denim cloche, 85–88
fit adjustments, 27
red velvet crusher, 77–79
shaping, 52
sizing measurements, 26
hdc. See half double crochet stitch (hdc)
headbands
chocolate lace, 219–220
handy, 57–58
heads
size charts, 29
sizing measurements, 26
heartland window valance project,
161–165
heights, stitch variations, 40–41
hemp basket project, 174–176
hems
flirty denim skirt, 74
ruffled, 74
Herrschners, 251
hole punch, MP3 player cover, 211
honey, I shrunk my bag project, 172–174
hook size, label information, 15–16
hooks
afghan, 10
aluminum, 10
beginner suggestions, 17
cleaning, 12
design elements, 9–10
double ended crochet, 11
gauge variation results, 95–96
illustration, 11
left-handed use, 17–18
length guidelines, 10
material types, 10
plastic, 10
sizing conventions, 11–12
standard category, 10
steel, 10
storage cases, 12
wood, 10
horizontal stripe pattern, hiding
yarn strands, 45
household item display, 205
I
increases. See also decreases; stitches
blocks, 163–164
rows/rounds, 46–47
spaces, 163–164
working in rounds, 51–52
International Crochet Symbols, stitch symbols,
36–37
in-the-round. See also rounds
adult’s rolled-brim hat, 101–103
beadies can-cozy, 215
bella drawstring bag, 80–82
center ring, 50
child’s rolled-brim hat, 100–101
coffee suede beret, 74–77
decreases, 52
denim cloche, 85–88
end joins, 51
flower-power belt, 109–111
gauge swatch, 22
gauge swatch measurement, 24
hemp basket, 175–176
increases, 51–52
must-see fur frame, 196
red velvet crusher hat, 78–79
shapes, 52
spirals, 51–52
stitch markers, 49
velvet roses, 191–192
ironing, cautions/concerns, 205
items. See also garments; projects
avoiding hangers, 205
care instruction storage, 201–202
dry cleaning, 204
home decor display, 205
long-term storage, 205
J
jacket, fur-trimmed, 143–148
joins
adding new yarn, 42–44
coffee suede beret, 76–77
slip stitch, 40
spirals, 51–52
working in rounds, 51
jump rings
beaded anklet, 225
chain-link bracelet, 220
K
keys
geometric coaster set, 184–186
heartland window valance, 165
love-to-read bookmark, 160
kid-friendly projects. See also projects
beaded anklet, 224–225
beadies can-cozy, 214–215
blue note scarf, 207–208
camouflage belt, 217–219
chain-link bracelet, 220–221
chocolate lace headband, 219–220
MP3 player cover, 211–214
page runner, 216–217
think pink pocket purse, 221–224
wear your heart pin, 208–211
L
labels
attaching to a project, 202
care instructions, 201–202
dry cleaning only, 204
gauge, 15
hook size information, 9
information types, 15–16
saving for future reference, 201–202
lace patterns, double triple crochet stitch, 40
lacets, fancy filet crochet stitch, 161–162
lacy bolero project, 131–135
lacy bookmark project, 181–183
lacy designs, weaving yarn ends, 46
Index
259
left-handers
hook holding, 17–18
technique suggestions, 17
yarn handling, 17–18
letters, hook sizing conventions, 11–12
light worsted category, light yarn, 13, 14
light, yarn category, 13
Lily Sugar n Cream, 251
Lion Brand Yarn, 251
long (spike) stitch, technique illustrated, 246
long single crochet stitch (lsc)
beads-‘n’-bows belt, 96–97
coffee suede beret, 75
cozy chenille throw rug, 91
ruffles-‘n’-bows scarf, 98
loop stitch, love those loops scarf, 119–120
loops
bobble stitch combination, 42
pattern instructions, 33
love those loops scarf project, 119–122
love-to-read bookmark project, 156–161
lsc. See long single crochet stitch
luggage tags, standout luggage tags,
197–199
M
machine drying, synthetic yarns, 204–205
machine washing, synthetic yarns, 204
manufacturer’s address, label information, 14–15
markers, stemmed-glass, 194–196
measurements
garment sizing, 24–27
gauge swatch, 22–24
sizing, 25–27
measuring tape
garment sizing, 24–27
kit component, 20
medium, yarn category, 13
men, size charts, 29
middle-of-a-row
adding new yarn, 43–44
skipping stitches, 49
mittens, shaping, 52
mohair, yarn weight/texture, 13
motifs
flower-power belt, 110–111
not your granny’s scarf, 169
260
Crochet Patterns For Dummies
pocket patches, 192–193
repeated figure design, 107
MP3 player cover, kid-friendly project,
211–214
Muench Yarns, 251
must-see fur frame project, 196–197
N
nail polish (clear), stemmed-glass markers,
195–196
names, yarn conventions, 13–14
natural fibers, yarn material type, 14
necklace clasp, wire-‘n’-beads necklace, 177
necklace, wire-‘n’-beads, 176–177
needles
tapestry, 20
yarn, 20
not your granny’s scarf project, 166–170
notebooks
care instruction storage, 201–202
kit component, 20
numbers, hook sizing conventions, 11–12
O
open designs, weaving yarn ends, 46
ovals, puff stitch, 42
over-the-hook, hand position, 17–19
P
page runner, kid-friendly project, 216–217
panels, afghan stitch baby blanket project,
152–153
parentheses (and) characters, pattern
instructions, 35
Patons Yarns, 251
patterns
abbreviations, 32
common terms, 33
diagram conventions, 36–37
garment sizing guidelines, 27–29
International Crochet Symbols, 36–37
reading/understanding written instructions,
31–36
reduced sample, 37
symbols, 33–35
turning chain instructions, 41
yarn substitution guidelines, 16–17
pencil/paper, kit component, 20
pets, yarn cautions/concerns, 20
photo frame, must-see fur frame, 196
phrases, brackets [ and ] characters, 36
picot stitch
bella drawstring bag, 80
combination stitch, 41
edgings, 41
flirty denim skirt, 72
shells and lace pillowcase edging, 171
stemmed-glass markers, 195
technique illustrated, 239
picture frames, must-see fur, 196–197
pillow forms, furry boa pillow, 108
pillowcase edging, stitch diagram, 37
pillowcases, shells and lace pillowcase edging,
170–172
pillow, furry boa, 107–109
pills, removal techniques, 206
pin back, wear your heart pin, 209
pin, wear your heart pin, 208–211
pins (straight), kit component, 20
placemats, geometric coaster set, 186–187
plastic hooks
cleaning, 12
pros/cons, 10
plastic storage bins, long-term storage, 205
plus sign (+), pattern instructions, 33
ply, label information, 15–16
Plymouth Yarn, 251
pocket patches project, 192–194
point, hook design element, 9–10
pompoms, love those loops scarf, 121, 122
pop/pc. See popcorn stitch
popcorn stitch (pop/pc)
combination stitch, 42
technique illustrated, 242–243
practical potholders project, 55–57
projects. See also kid-friendly projects
adult’s rolled-brim hat, 101–103
afghan stitch baby blanket, 149–153
beaded-fringe belt, 64–66
beads-‘n’-bows belt, 96–98
bella drawstring bag, 80–82
care instruction storage, 201–202
child’s rolled-brim hat, 100–101
coffee suede beret, 74–77
cozy chenille throw rug, 90–93
curlicue scarf, 69–70
denim cloche, 85–88
diamond-shaped table runner, 68–69
double-crossing belt, 117–119
dry cleaning, 204
elegant evening wrap, 115–117
flirty denim skirt, 71–74
flower-power belt, 109–111
friendship bracelet, 188–189
fun fur scrunchies, 197–188
furry boa pillow, 107–109
fur-trimmed jacket, 143–148
geometric coaster set, 183–187
geometric wrap, 122–124
handy headbands, 57–58
heartland window valance, 161–165
hemp basket, 174–176
honey, I shrunk my bag, 172–174
label attachment, 202
lacy bolero, 131–135
lacy bookmark, 181–183
love those loops scarf, 119–122
love-to-read bookmark, 156–161
must-see fur frame, 196–197
not your granny’s scarf, 168–170
pocket patches, 192–194
practical potholders, 55–57
red velvet crusher hat, 77–79
ruffles-‘n’-bows scarf, 98–100
scarf of a different color, 83–85
shades-of-gray shawl, 66–67
shell stitch tank top, 139–142
shells and lace pillowcase edging,
170–172
smart scarf, 59–60
southwest vest, 111–114
springtime pullover, 135–139
standout luggage tags, 197–199
stemmed-glass markers, 194–196
Tunisian stitch tote bag, 153–156
velvet roses, 190–192
vertical stripes tunic, 125–131
wavy chevron throw, 88–90
wire-‘n’-beads necklace, 176–177
wooly warmer afghan, 60–61
puff stitch
combination stitch, 42
technique illustrated, 241–242
Index
261
pullover, springtime, 135–139
purse, think pink pocket purse, 222–224
R
red velvet crusher hat project, 77–79
reduced sample, patterns, 37
repeats
pattern instructions, 36
stitch diagrams, 36
resources, yarn supply, 251
reverse sc. See reverse single crochet stitch
reverse single crochet stitch (reverse sc)
beadies can-cozy, 215
combination stitch, 41
technique illustrated, 240
ribbons, friendship bracelet, 189
right-handers
hook holding, 17
yarn handling, 17–18
right-side rows
carrying yarn across, 44
stitch diagram numbering conventions, 37
rounds. See also in-the-round
decreases, 47–49
parentheses (and) characters, 35
repeat instructions, 36
slip stitch, 40
stitch diagrams, 36
turning chains, 40–41
roving category, super bulky yarn, 13
Rowan Yarns, 251
rows
adding new yarn, 42–44
decreases, 47–49
gauge swatch measurement, 23
increases, 46–47
parentheses (and) characters, 35
repeat instructions, 36
stitch diagram numbering conventions, 37
stitch diagrams, 37
triple crochet stitch, 40
turning chains, 40–41
weaving yarn ends, 46
ruffled hem, flirty denim skirt, 74
ruffles-‘n’-bows scarf project, 98–100
rug, cozy chenille, 90–93
rugs category, bulky yarn, 13
262
Crochet Patterns For Dummies
S
safety pins, kit component, 19
sc. See single crochet stitch (sc)
scarf of a different color project, 83–85
scarves
blue note, 207–208
curlicue, 69–70
hiding yarn strands, 45
love those loops, 119–122
not your granny’s, 168–170
ruffles-‘n’-bows, 98–100
scarf of a different color, 83–85
smart, 59–60
working over the strand, 45
schematics
flirty denim skirt, 73
fur-trimmed jacket, 144
lacy bolero, 132
shell stitch tank top, 140
southwest vest, 112
springtime pullover, 136
vertical stripes tunic, 127
scissors
kit component, 20
pill removal, 206
scrunchies, fun fur, 187–188
seams
hiding yarn strands, 45
slip stitch, 40
weaving yarn ends, 46
self-striping yarn, blue note scarf, 207–208
sewing needles
friendship bracelet, 189
fun fur scrunchies, 188
fur-trimmed jacket, 143
shells and lace pillowcase edging, 171
think pink pocket purse, 222
wear your heart pin, 209
sewing seams, slip stitch, 39
sewing thread
friendship bracelet, 189
fun fur scrunchies, 188
fur-trimmed jacket, 143
shells and lace pillowcase edging, 171
think pink pocket purse, 222
wear your heart pin, 209
sew-on snaps, friendship bracelet, 189
shades-of-gray shawl project, 66–67
shaft, hook design element, 9
shank button, standout luggage tags, 198
shapes, working in rounds, 52
shaping, clothing, 52
shawls
evening wrap, 115–117
geometric wrap, 122–124
shades-of-gray, 66–67
working over the strand, 45
shell stitch
afghan stitch baby blanket, 152
beads-‘n’-bows belt, 96
bella drawstring bag, 80
flirty denim skirt, 72
lacy bolero, 132
lacy bookmark, 182
ruffles-‘n’-bows scarf, 98
shell stitch tank top, 140
shells and lace pillowcase edging, 171
technique illustrated, 238–239
wavy chevron throw, 89
shell stitch tank top project, 139–142
shells and lace pillowcase edging project, 170–172
shoulder strap, think pink pocket purse, 224
silk, natural fiber, 14
single bullet (•) character, pattern instructions,
33–34
single crochet stitch (sc)
afghan stitch baby blanket, 152
beaded anklet, 225
beaded-fringe belt, 64
beadies can-cozy, 215
beads-‘n’-bows belt, 96
bella drawstring bag, 80
blue note scarf, 208
camouflage belt, 218
chocolate lace headband, 220
coffee suede beret, 75
cozy chenille throw rug, 90
curlicue scarf, 70
denim cloche, 86
diamond-shaped table runner, 68
double-crossing belt, 118
flirty denim skirt, 72
flower-power belt, 110
friendship bracelet, 189
fun fur scrunchies, 188
furry boa pillow, 108
fur-trimmed jacket, 144
geometric coaster set, 184
handy headbands, 58
heartland window valance, 164
hemp basket, 175
honey, I shrunk my bag, 173
lacy bolero, 132
lacy bookmark, 182
love those loops scarf, 121
MP3 player cover, 212
must-see fur frame, 196
not your granny’s scarf, 168
page runner, 216
pocket patch, 192
practical potholders, 56
red velvet crusher hat, 78
reverse single crochet combination, 42
ruffles-‘n’-bows scarf, 98
scarf of a different color, 84
shades-of-gray shawl, 67
shell stitch tank top, 140
shells and lace pillowcase edging, 171
smart scarf, 59
springtime pullover, 136
standout luggage tags, 198
stemmed-glass markers, 195
technique illustrated, 232
think pink pocket purse, 222
Tunisian stitch tote bag, 155
turning chain, 41
uses, 40
velvet roses, 191
wear your heart pin, 209
wooly warmer afghan, 61
working in rounds, 50–51
size
adjusting fit, 26–27
body measurements, 25–26
garments, 24–27
parentheses (and) characters, 35
pattern size selection, 27–29
size charts
babies, 28
children, 28
heads, 29
men, 29
women, 28
Index
263
skirts
denim, 71–74
fit adjustments, 27
sizing measurements, 26
sl st. See slip stitch (sl st)
sleeve length, sizing measurements, 25–26
slip stitch (sl st)
adult’s rolled-brim hat, 102
afghan stitch baby blanket, 152
beaded anklet, 225
beadies can-cozy, 215
bella drawstring bag, 80
child’s rolled-brim hat, 100
coffee suede beret, 75
cozy chenille throw rug, 91
curlicue scarf, 70
denim cloche, 86
diamond-shaped table runner, 68
flirty denim skirt, 72
flower-power belt, 110
fun fur scrunchies, 188
fur-trimmed jacket, 144
geometric coaster set, 184
heartland window valance, 164
hemp basket, 175
honey, I shrunk my bag, 173
joining ends, 51
lacy bolero, 132
lacy bookmark, 182
love-to-read bookmark, 159
MP3 player cover, 212
must-see fur frame, 196
not your granny’s scarf, 168
picot stitch combination, 41
pocket patch, 192
practical potholders, 56
red velvet crusher hat, 78
scarf of a different color, 84
shades-of-gray shawl, 67
shell stitch tank top, 140
shells and lace pillowcase edging, 171
southwest vest, 113
spiral joins, 51–52
springtime pullover, 136
stemmed-glass markers, 195
technique illustrated, 231–232
Tunisian stitch tote bag, 155
turning chains, 41
264
Crochet Patterns For Dummies
uses, 40
velvet roses, 191
vertical stripes tunic, 126
slipknot, technique illustrated, 19, 229–230
smart scarf project, 59–60
sock category, super fine yarn, 14
socks, shaping, 52
solid patterns, weaving yarn ends, 46
southwest vest project, 111–114
spaces
basic filet crochet stitch, 156–157, 158–159
fancy filet crochet stitch, 161, 163–164
pattern instructions, 33
spirals, working in, 51–52
sport category, fine yarn, 14
sport weight, yarn weight/texture, 14
spring ring clasp
beaded anklet, 225
chain-link bracelet, 220
springtime pullover project, 135–139
squares, gauge swatch, 22
standard hooks
diameter ranges, 8
sizing conventions, 11–12
standout luggage tags project, 197–199
steam blocking, gauge swatch, 22
steel hooks
cleaning, 12
size ranges, 10
sizing conventions, 11–12
stitch diagrams
beads-‘n’-bows belt, 97–98
double-crossing belt, 118
elegant evening wrap, 117
flower-power belt, 110–111
geometric wrap, 123
lacy bookmark, 183
not your granny’s scarf, 169
page runner, 217
pattern instructions, 36–37
pocket patches, 193
reduced sample, 37
ruffles-‘n’-bows scarf, 99
shells and lace pillowcase edging, 171
stemmed glass markers, 196
velvet roses, 191
wavy chevron throw, 89
stitch markers
beadies can-cozy, 215
bella drawstring bag, 80
coffee suede beret, 74
kit component, 20
MP3 player cover, 212
red velvet crusher hat, 78
working in rounds, 49
stitches. See also combination stitches;
decreases; increases
afghan, 150–152
back post double crochet (BPdc), 245
basic filet crochet, 156–159
blanket stitch, 249–250
bobble stitch, 243
brackets [and] characters, 35
chain stitch (ch), 230–231
cluster stitch, 239–240
combinations, 41–42
crossed double crochet stitch, 238
decreases, 47–49
double crochet stitch (dc), 40, 233
double triple crochet (dtr), 40, 234–235
fancy filet crochet, 161–164
front post double crochet (FPdc), 244
gauge swatch measurement, 23
half double crochet stitch (hdc), 40, 235
height variations, 40
illustrated, 229–250
increases, 46–47
International Crochet Symbols, 36–37
long (spike) stitch, 246
parentheses (and) characters, 35
picot stitch, 239
popcorn stitch (pop/pc), 242–243
puff stitch, 241–242
reverse single crochet stitch (reverse sc),
240–241
shell stitch, 238–239
single crochet stitch (sc), 40, 232
skipping, 49
slip stitch (sl st), 40, 231–232
slipknot, 17, 229–230
triple crochet stitch (tr), 40, 233–234
Tunisian knit, 154–155
turning chains, 40–41
V-stitch, 237–238
whipstitch, 248–249
straight pins, kit component, 20
super bulky, yarn category, 14
super fine, yarn category, 14
sweater shaver, pill removal, 206
sweater stone, pill removal, 206
sweaters
carrying yarn across rows, 45
fit adjustments, 27
fur-trimmed jacket, 143–148
lacy bolero, 131–135
shell stitch tank top, 139–142
sizing measurements, 25–26
springtime pullover, 135–139
vertical stripes tunic, 125–131
symbols
International Crochet Symbols,
36–37
label information, 15–16
pattern instructions, 33–35
yarn weight, 13–14
synthetic fibers, yarn material type, 14
synthetic yarns
machine drying, 204–205
machine washing, 204
T
table runners
diamond-shaped, 68–69
geometric coaster set, 187
home decor display, 205
tags, standout luggage, 197–199
tank top, shell stitch, 139–142
tape measure
garment sizing, 24–27
kit component, 20
tapestry needles
camouflage belt, 218
chocolate lace headband, 219
double-crossing belt, 118
handy headbands, 58
kit component, 20
lacy bolero, 131
MP3 player cover, 212
pocket patch, 192
shell stitch tank top, 140
springtime pullover, 136
standout luggage tags, 198
vertical stripes tunic, 126
Index
265
tassels
lacy bookmark, 182
technique illustrated, 247–248
wavy chevron throw, 90
think pink pocket purse, kid-friendly project,
222–224
thread. See crochet thread; sewing thread
threadwork, double triple crochet stitch, 40
throat, hook design element, 9–10
throw rug, cozy chenille, 90–93
throws. See also afghans
wavy chevron, 88–90
working over the strand, 45
thumb rest, hook design element, 9
ties
beads-‘n’-bows belt, 98
drawstring, 74
tissue paper, item storage, 205
tote bag, Tunisian stitch, 153–156
tr. See triple crochet stitch (tr)
travel, slip stitch, 40
triangles
cluster stitch, 41
geometric wrap, 122–124
triple crochet stitch (tr)
cluster stitch combination, 41
double-crossing belt, 118
puff stitch combination, 42
technique illustrated, 233–234
turning chain decrease, 48
turning chain, 41
uses, 40
velvet roses, 191
wooly warmer afghan, 61
tunic, vertical stripes, 125–131
Tunisian knit stitch, 154–155
Tunisian stitch tote bag project, 153–156
turning chains
decreases, 48
skipping stitches, 49
stitch variations, 40–41
variations
afghan stitch baby blanket, 153
beaded-fringe belt, 66
bella drawstring bag, 82
chain-link bracelet, 221
coffee suede beret, 77
cozy chenille throw rug, 93
curlicue scarf, 70
diamond-shaped table runner, 69
flower-power belt, 111
friendship bracelet, 189
geometric coaster set, 186
geometric wrap, 124
granny squares, 170
heartland window valance, 165
hemp basket, 176
honey, I shrunk my bag, 174
love those loops scarf, 122
potholder, 57
southwest vest, 114
stemmed-glass markers, 196
think pink pocket purse, 223–224
wavy chevron throw, 90
wire-‘n’-beads necklace, 177
wooly warmer afghan, 61
variegated yarn, 13
velvet roses project, 190–192
vertical stripes tunic project, 125–131
vests
fit adjustments, 26–27
shaping, 113–114
sizing measurements, 25–26
southwest, 111–114
vinyl window, MP3 player cover, 212
visors, coffee suede beret, 77
V-stitch
combination stitch, 41
geometric wrap, 123
technique illustrated, 237
W
U
under-the-hook, hand position, 17–19
United Kingdom, hook sizing conventions,
11–12
United States, hook sizing conventions,
11–12
266
V
Crochet Patterns For Dummies
waistband, flirty denim skirt, 73
waists, sizing measurements, 26
wavy chevron throw, 88–90
wear your heart pin, kid-friendly project, 208–211
weaving, yarn ends, 46
Web sites
Bernat Yarns, 251
Caron International, 251
Coats & Clark Inc., 251
DMC Corporation, 251
Herrschners, 251
Lily Sugar n Cream, 251
Lion Brand Yarn, 251
Muench Yarns, 251
Patons Yarns, 251
Plymouth Yarn, 251
weight
label information, 15–16
yarn conventions, 13–14
yarn substitution guidelines, 16–17
wet blocking, gauge swatch, 22
whipstitch
furry boa pillow, 109
fur-trimmed jacket, 146
shell stitch tank top, 142
southwest vest, 114
springtime pullover, 138
technique illustrated, 248–249
vertical stripes tunic, 130
window border, MP3 player cover, 213
window valance, heartland, 161–165
wine glass, stemmed-glass markers, 194–196
wire-‘n’-beads necklace project, 176–177
women, size charts, 28–29
wood hooks
cleaning, 10
pros/cons, 10
wool fibers, felting, 172
wool, natural fiber, 14
wooly warmer afghan project, 60–61
work across, pattern instructions, 33
work around, pattern instructions, 33
work even, pattern instructions, 33
work to within last st, pattern instructions, 33
worsted category
medium yarn, 14
beginners, 16
worsted weight, yarn weight/texture, 14
wraps
elegant evening, 115–117
geometric, 122–124
wrong-side rows
carrying yarn across, 44
stitch diagram numbering conventions, 37
Y
yardage
label information, 16
yarn substitution guidelines, 17
yarn
adding to a row, 42–44
beginner suggestions, 16–17
blends, 14
carrying across rows, 44–46
carrying up the side, 45
category names, 14
cotton flake, 135
gauge variation results, 95
handling guidelines, 17–18
illustrated weights, 14
label information, 15–16
material types, 14
pattern substitution guidelines, 15–16
pills, 206
price ranges, 14
self-striping, 207
supply sources, 251
symbols, 14
variegated, 13
weaving, 46
weights, 13–14
working over the strand, 45
yarn needles
adult’s rolled-brim hat, 102
child’s rolled-brim hat, 100
furry boa pillow, 108
fur-trimmed jacket, 143
kit component, 20
not your granny’s scarf, 168
southwest vest, 112
think pink pocket purse, 222
Tunisian stitch tote bag, 155
yarn-weight symbol, label information, 15–16
Z
zippered bag, gear storage, 20
Index
267
About the Author
Susan Brittain’s fascination with crochet began very early, when she was 4 or 5 years old. She
would watch her grandmother, who had lost her sight in midlife, spend hours crocheting beautiful
afghans for friends and family, counting the stitches with her fingers. By the age of 8, Susan was
crocheting her own projects, starting with simple patterns such as scarves, and then moving on
to afghans, toys, and sweaters. Although her creative streak has led her to learn many different
crafts, crochet has been a steady thread throughout.
Susan finally had the opportunity to combine work with pleasure, and she held the position of
assistant editor for Crochet Fantasy magazine for a little more than two years, contributing as
a designer as well. She is also the coauthor of Crocheting For Dummies (Wiley) and continues to
design new projects for various yarn companies, as well as friends and family.
Dedication
This book is first and foremost dedicated to my family, without whom I could never have completed this book. They gave me the time and space I needed to crochet all the designs, and then
get them down on paper. My husband, Paul, and daughter, Angela, put up with boxes and bags
of yarn, late meals, and piles of laundry that never seemed to quite get finished. Also, to my
stepdaughters, Ashley and Sarah, who provided me with insights about what crochet projects
the younger generation would like to see. Ashley even took a whole box of yarn and hooks with
her when she went off to college.
Again, my gratitude goes to my family, the most important people in my life.
Author’s Acknowledgments
First of all, I’d like to thank Lindsay Lefevere at Wiley Publishing for giving me the opportunity
to write another For Dummies book and, hopefully, expose more people to the craft of crochet.
Even though crochet is “in” these days, it’s a dying art, and I’d hate to see it go by the wayside. I want to thank Elizabeth Kuball, my first project editor, and Alissa Schwipps, my second
and final PE, for attempting to keep me on track and for their wonderful insights, even though
I probably gave both of them some sleepless nights. Thanks also go to Vicki Adang, my copy
editor, for her creativity with words and making sense of my sometimes mixed-up wording.
I have to thank my husband, Paul, and my daughter, Angela, for putting up with piles of yarn,
hooks, and notes scattered throughout the house and my distraction when designing a new
project.
Publisher’s Acknowledgments
Acquisitions Editor: Lindsay Lefevere
Technical Editor: Karen Frisa
Illustrator: Many illustrations in this book are based
on illustrations published in Crochet Fantasy
magazine, an All American Crafts publication;
other illustrations are based on the art of Karen
Manthey.
Managing Editor: Kelsey Baird
Cover Image: © Fuzullhanum/Getty Images
Project Manager: Jennifer Connolly
Copy Editor: Jennifer Connolly
Photographer: Photographs, Kreber/Mark Madden;
Art Direction, Kreber/LeeAnn Kolka; Set Stylist,
Kreber/Suzanne King
Take dummies with you
everywhere you go!
Whether you are excited about e-books, want more
from the web, must have your mobile apps, or are swept
up in social media, dummies makes everything easier.
Find us online!
dummies.com
Leverage the power
Dummies is the global leader in the reference category and one
of the most trusted and highly regarded brands in the world. No
longer just focused on books, customers now have access to the
dummies content they need in the format they want. Together
we’ll craft a solution that engages your customers, stands out
from the competition, and helps you meet your goals.
Advertising & Sponsorships
Connect with an engaged audience on a powerful multimedia site,
and position your message alongside expert how-to content.
Dummies.com is a one-stop shop for free, online information
and know-how curated by a team of experts.
•
•
•
Targeted ads
Video
Email Marketing
•
•
Microsites
Sweepstakes
sponsorship
20
MILLION
PAGE VIEWS
EVERY SINGLE MONTH
15
MILLION
UNIQUE
VISITORS PER MONTH
43%
OF ALL VISITORS
ACCESS THE SITE
VIA THEIR MOBILE DEVICES
700,000 NEWSLETTER
SUBSCRIPTIONS
TO THE INBOXES OF
300,000 UNIQUE
INDIVIDUALS
EVERY WEEK
of dummies
Custom Publishing
you from competitors, amplify your message, and encourage customers to make a
buying decision.
•
•
Apps
Books
•
•
eBooks
Video
•
•
Audio
Webinars
Brand Licensing & Content
Leverage the strength of the world’s most popular reference brand to reach new
audiences and channels of distribution.
For more information, visit dummies.com/biz
PERSONAL ENRICHMENT
9781119187790
USA $26.00
CAN $31.99
UK £19.99
9781119179030
USA $21.99
CAN $25.99
UK £16.99
9781119293354
USA $24.99
CAN $29.99
UK £17.99
9781119293347
USA $22.99
CAN $27.99
UK £16.99
9781119310068
USA $22.99
CAN $27.99
UK £16.99
9781119235606
USA $24.99
CAN $29.99
UK £17.99
9781119251163
USA $24.99
CAN $29.99
UK £17.99
9781119235491
USA $26.99
CAN $31.99
UK £19.99
9781119279952
USA $24.99
CAN $29.99
UK £17.99
9781119283133
USA $24.99
CAN $29.99
UK £17.99
9781119287117
USA $24.99
CAN $29.99
UK £16.99
9781119130246
USA $22.99
CAN $27.99
UK £16.99
PROFESSIONAL DEVELOPMENT
9781119311041
USA $24.99
CAN $29.99
UK £17.99
9781119255796
USA $39.99
CAN $47.99
UK £27.99
9781119293439
USA $26.99
CAN $31.99
UK £19.99
9781119281467
USA $26.99
CAN $31.99
UK £19.99
9781119280651
USA $29.99
CAN $35.99
UK £21.99
9781119251132
USA $24.99
CAN $29.99
UK £17.99
9781119310563
USA $34.00
CAN $41.99
UK £24.99
9781119181705
USA $29.99
CAN $35.99
UK £21.99
9781119263593
USA $26.99
CAN $31.99
UK £19.99
9781119257769
USA $29.99
CAN $35.99
UK £21.99
9781119293477
USA $26.99
CAN $31.99
UK £19.99
9781119265313
USA $24.99
CAN $29.99
UK £17.99
9781119239314
USA $29.99
CAN $35.99
UK £21.99
9781119293323
USA $29.99
CAN $35.99
UK £21.99
dummies.com
Learning Made Easy
ACADEMIC
9781119293576
USA $19.99
CAN $23.99
UK £15.99
9781119293637
USA $19.99
CAN $23.99
UK £15.99
9781119293491
USA $19.99
CAN $23.99
UK £15.99
9781119293460
USA $19.99
CAN $23.99
UK £15.99
9781119293590
USA $19.99
CAN $23.99
UK £15.99
9781119215844
USA $26.99
CAN $31.99
UK £19.99
9781119293378
USA $22.99
CAN $27.99
UK £16.99
9781119293521
USA $19.99
CAN $23.99
UK £15.99
9781119239178
USA $18.99
CAN $22.99
UK £14.99
9781119263883
USA $26.99
CAN $31.99
UK £19.99
Available Everywhere Books Are Sold
dummies.com
Small books for big
imaginations
9781119177272
USA $9.99
CAN $9.99
UK £8.99
9781119177173
USA $9.99
CAN $9.99
UK £8.99
9781119262657
USA $9.99
CAN $9.99
UK £6.99
9781119291336
USA $9.99
CAN $9.99
UK £6.99
9781119177241
USA $9.99
CAN $9.99
UK £8.99
9781119233527
USA $9.99
CAN $9.99
UK £6.99
9781119291220
USA $9.99
CAN $9.99
UK £6.99
Unleash Their Creativity
dummies.com
9781119177210
USA $9.99
CAN $9.99
UK £8.99
9781119177302
USA $9.99
CAN $9.99
UK £8.99
This flirty denim-like skirt can go from school
to a night out at the movies. Chapter 7 has
all the details. The felted heart pin, crocheted
separately, can be attached to a jacket, sweater,
or even your backpack, while the beaded anklet
is a fast and fun accessory to stitch. Find the
designs for both in Chapter 17. The luggage tag
will make your bag stand out from everyone
else’s. Find the directions in Chapter 15.
Bags are something you can never have enough of, and these
three fulfill every need. Learn new techniques, such as felting,
by crocheting the pink-striped tote, featured in Chapter 14,
and the Tunisian afghan stitch as shown in the blue tweed
bag in Chapter 13. The small pink suede pocket purse works
up in an evening; you can find the pattern in Chapter 17.
Pick a scarf, any scarf. The curlicue scarf is made by increasing
stitches, which causes the length to curl, as the pattern in Chapter 6
describes. For a bold splash of black and white, crochet this textured
scarf using only single crochet stitches; the yarn does the work for
you. See Chapter 5 for the pattern. Set the mood with this unique
black-and-blue scarf. It’s really long, and no two will come out
exactly the same due to the self-striping yarn used.
Flip to Chapter 17 for instructions.
The springtime pullover, found in Chapter 12, is just what
you need for cooler days. It’s crocheted using a simple stitch
pattern that creates a flexible but non-see-through fabric.
You embellish the sweater with beads along the bottom
edge and sleeves. Grab this self-striping drawstring bag,
featured in Chapter 7, to hold your belongings, and off you
go (pin optional).
A belt for every reason: Wear the beads-’n’-bows belt
(top) around your waist or on your hips for a feminine
touch; the pattern is in Chapter 9. Pair the beaded-fringe
belt (middle) with your favorite jeans and T-shirt; it’s
featured in Chapter 6. The white belt, made from crossed
double crochet stitches, goes with everything; whip this
up from the pattern in Chapter 11.
This casual open-front vest is great for when it’s a
little cool outside but you don’t need a full coat. The
stitches and the shaping are easy; check out the
pattern in Chapter 10.
Casual warmth describes this oversized shawl
crocheted with a soft bouclé yarn. Start with a
single stitch and increase your way up to the final
width, and then add the edging with a contrasting
color. Find this pattern in Chapter 6.
Fun and funky describes this wire-’n’-beads necklace. Pair
it with the wire chain-link bracelet, and you’ve got a set
no one else will be wearing. Find the necklace pattern in
Chapter 14 and the wire bracelet pattern in Chapter 17.
Expand your stitch pattern knowledge while
crocheting this stylish lacy bolero. You can find
the pattern in Chapter 12.
Dress up a plain pair of jeans with this pocket patch for a fraction of
the cost that you’d see in the stores. Crocheted with size 10 thread and
basic square motifs, you can have a pair finished in no time. Turn to
Chapter 15 for the instructions.
This unique scarf really brightens up a gloomy day.
Crochet large loops to create the texture,
and then add some pompoms for more fun.
This pattern can be found in Chapter 11.
These practical potholders are something you can never have too
many of. Worked in single crochet to create a tight, sturdy fabric,
they’re great for when you need to make something but don’t
have a lot of time. See Chapter 5 for the pattern.
Add a bold splash of color and design to cocktail time. Each
coaster in this set is worked from a chart, carrying the
yarn as you go. Turn to Chapter 15 for the pattern.
With good music, your favorite book, and a cold drink, you’re set for
a relaxing afternoon. Crochet this unique can-cozy by making a flat
base and then working even in a spiral until the desired height is
reached. The MP3 cover combines materials and stitch techniques to
create a one-of-a-kind cover that will stand out. Lavender yarn and
long stitches make for a bookmark reminiscent of a floor runner.
All three of these projects can be found in Chapter 17. The purple
bookmark is made using size 10 crochet thread and a simple shell
stitch pattern. Turn to Chapter 15 for the details.
You can crochet countless items to use around the house. Some
pictures deserve an extra-special frame, and this one made
with fun fur yarn will do the trick, as found in Chapter 15. For
the readers in your life, use filet crochet to create this
one-of-a-kind bookmark. The instructions and chart are found
in Chapter 13. So you know which drink is yours, mark your
glass with this stemmed glass marker made from an earring
hoop and crochet thread; see Chapter 15 for the instructions.
The ever-useful basket is made with the untraditional crochet
material, hemp cord; the instructions are in Chapter 14.
Underneath it all is the diamond-shaped table runner.
This design lets you hone your increasing and decreasing
skills, so flip to Chapter 6 for instructions.
Show your love for baby by using filet
crochet to make this heart valance to hang
across the nursery windows. The pastelcolored blanket, worked in basic afghan
stitch, will keep baby warm. You can
find both patterns in Chapter 13.
Throw this super-soft pillow on your bed or sofa to add a splash
of color or texture; turn to Chapter 10 for instructions. While
resting your head, wrap yourself in this generously sized afghan
for an extra dose of warmth; find the pattern in Chapter 5. And,
not to leave out your feet, sink your toes into the softness of
this striped throw rug made with chenille yarn; see Chapter 8
for the pattern.
Create your own crocheted bedding with this
simple pillowcase edging using size 10 crochet
thread. You can find the pattern along with the
stitch diagram in Chapter 14. The chevron throw
is made using a common wave stitch pattern and
ultra-soft yarn. Find this pattern in Chapter 8.
Hats are a great way to practice crocheting in the round and shaping your designs. The two hats on the left
are created from the identical pattern. A simple change in material and hook size creates different looks and
sizes. You can find the instructions in Chapter 9. Adorn the hat with a crocheted rose, and you’ve got a whole
new look. The pattern is in Chapter 15. The red velvet crusher hat involves increasing stitches and some
more advanced shaping techniques, so turn to Chapter 7 for details. The denim cloche combines increasing
stitches, shaping, color changes, and varying stitch patterns; find this design in Chapter 8. The striped
scarf, also found in Chapter 8, uses a variety of textured yarns that makes the scarf look more
complicated to stitch than it actually is. Crochet individual flowers with just two rounds to
create the fun and funky flower-power belt; flip to Chapter 10 for the pattern.
You’ll find all the colors of the rainbow in this easy-tocrochet headband. Turn to Chapter 5 for this pattern, as
well as instructions to create two additional headbands
using different materials.
This classically styled newsboy beret is created by crocheting
in the round, increasing and decreasing your stitches to create
the shape; the pattern is in Chapter 7. Pair the beret with this
nontraditional granny square scarf, and you’ve got a great
combination. Turn to Chapter 14 for the pattern.
Dress it up or dress it down, this great little tank top goes
anywhere. You crochet it with a basic shell stitch pattern
and little shaping, so it’s a perfect choice for a starter
garment. See Chapter 12 for the pattern.
Wear this fur-trimmed jacket with a pair
of black pants or skirt and you’re ready
for a night out on the town. Turn to
Chapter 12 for instructions.
Wrap yourself in elegance with this
sparkly, soft evening wrap. The yarn
does all the work as you follow the
simple stitch pattern found in Chapter 11.
The neutral color and easy
stitch pattern make this
design a must-have. Wear it
over your shoulders as shown,
or wrap it around your waist
to make a fashion statement
all your own. The pattern is
featured in Chapter 11.
Camouflage is as popular as ever,
so to crochet this military-style belt
and be the envy of all your friends,
flip to Chapter 17.
Keep warm and cozy this winter with this tunic
sweater worked in vertical rows. The pattern in
Chapter 12 has all the details. Add the colorful
beads-’n’-bows scarf for an extra layer of warmth;
the pattern can be found in Chapter 9.
Delight your friends by making this easy-to-stitch friendship
bracelet for each of them. The bracelet can be worked up
in an evening; see Chapter 15 for the instructions.
Whip up a great hair accessory in no time
flat. The pattern in Chapter 15 gives you
instructions for this scrunchy as well as
others made with different materials.
WILEY END USER LICENSE AGREEMENT
Go to www.wiley.com/go/eula to access Wiley’s ebook EULA.