/


Author: Sanchez O.R.
Tags: tartas decoración decoración de tartas confitería tartas para niños
Year: 2004


Text
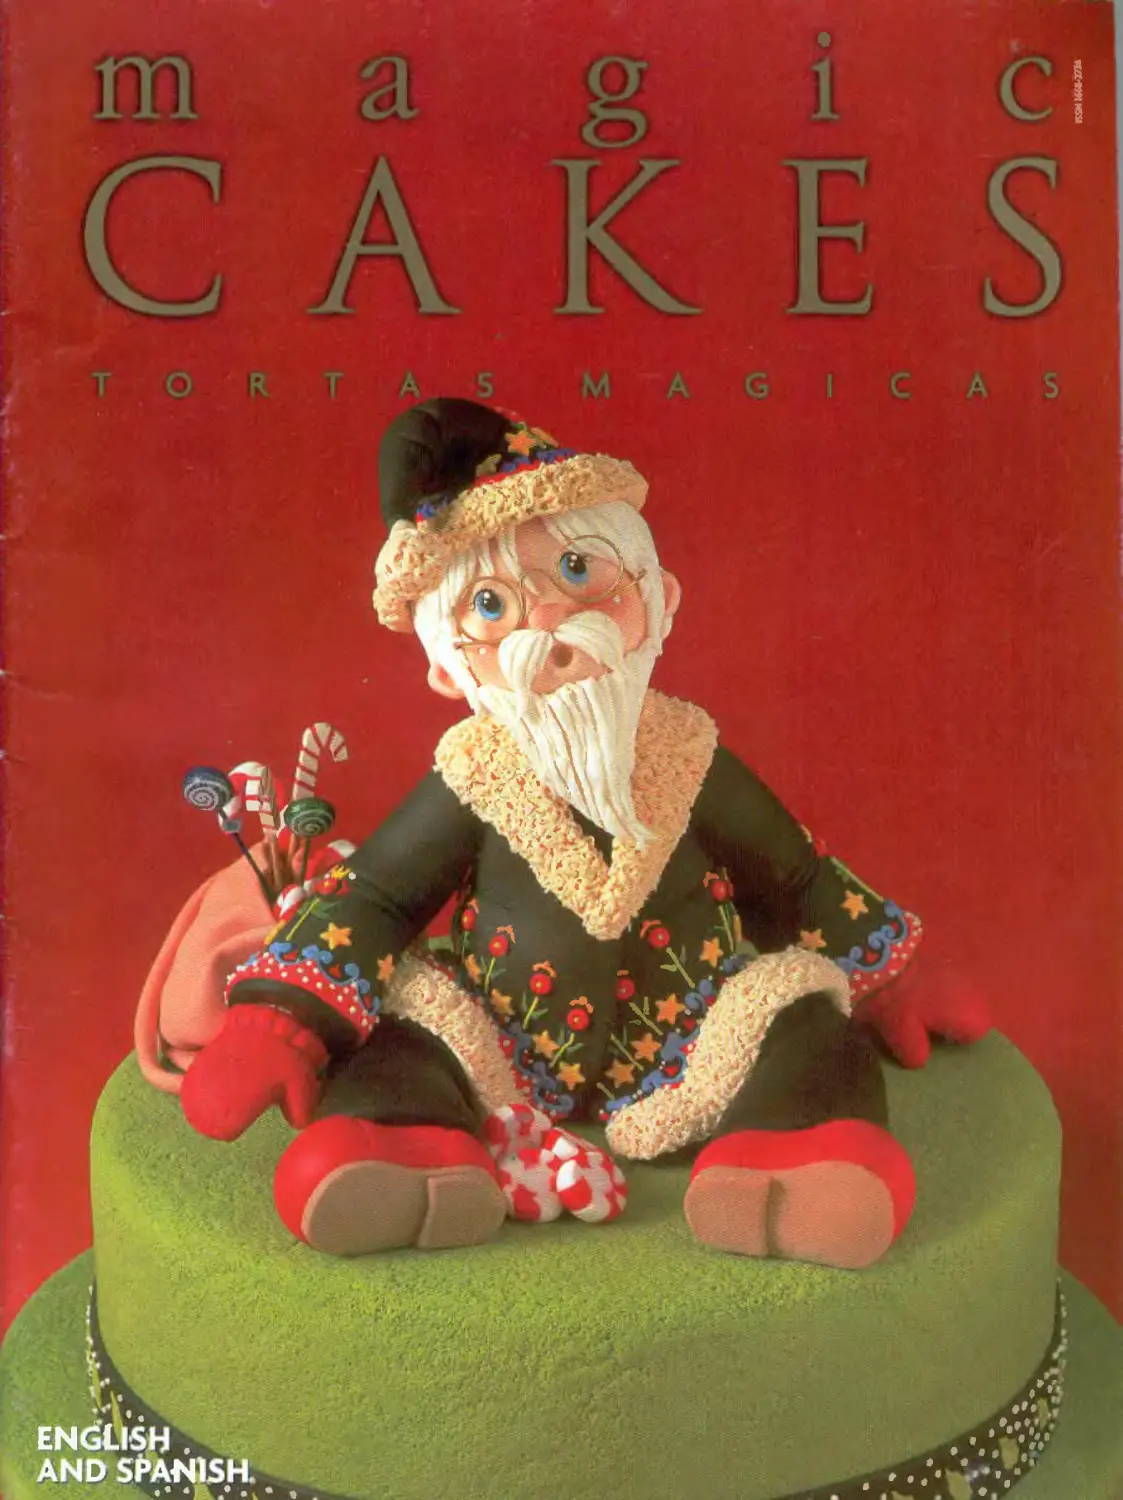
m a g i c
CALES
1 O « I A 5 MAGICA»
Publ caocn Bimestral
Año 2 - N‘ 6
Diciembre 2004
Director Editorial
Propietario
Oscar Rubén Sanche?
Directora Creativa
Coordinación - Producción General
Edith Mariel Sánchez
Taller Artesana
Paflrja Grenní
Silvana Lodeiro Martínez
Asistente
Adriana Di Píetranton o
Diseño Gráfico
Estudio Punte Sur
e-nr ' punto sur@speedy.com.ar
TE: (54-11)4241-7376
Fotografía
O S.
TE: [54-llj 4392-1571
Traducción
Srlv na Rodcfili
silvlna2CO4@infevia.CDm ar
TE 011)-292-2B94
Impresión
RIPARI Gráfica S.A
Pasa|e Juan G Lemos 2-16/8
Buenos Aires. Argén* na
TE 4555-4-136
Distribuidor en Argentina
y resto .del mundo
MAGIC CAKES
TEEAX: (5-1-11) 4298-1269
maglcc akes@speedy.com ai
MAGIC CAKES - TORTAS MAGICAS
es una publicación bimestral
de Edith Sánchez y Osea Sánchez
Lomas de Zamora, Buenos Aires, Argentina
Prohib da la rep educción total o parcial
del material Incluido en esta publicación,
a m menciona do ia fuenre.
ISSN: 1668-2726
RPi J277O7
EDITORIAL
En el cierre de esta última edición del año. quisiera compartir con ustedes
alguna; palabias para recordar y experimentar en el nuevo año que se aproxima:
"Pencar I bremente. practicai la paciencia, sonreír con frecuencia, hacei amigos
nuevos, recc-scubrir los de antes, perdonar a un ener go tener esperanzas, crecer
contar cada día nuestras bendiciones, dar. ceder, rener (a confianza que nos
permite recibir, cumpl r una promesa, ser prudente, tratar de comprender, rese var
tiempo para la gente, reservar tiernpc para uno mismo, esparcí! alegría, aceptar un
nesgo, ofrecerse abrirse a alguien, proba algo nuevo, ¿minorar la marcha, creei en
uno r i smo. confiar en otros, mirai un amanecer. escuchai la lluvia, reiiemoiai,
llorar cuando sea preciso, tener FE, cometer er ores, celeorir la vida."
Quiero dar las infinitas GRACIAS a todos los que apoyaron nuestin trabajo durante
este a o, nos alentaron e impulsaron a seguir con mayor empu|p ceda a.
Esoec alrne tte qu ero hacer un reconocim ento a nuestros auspiciantes, a todos los
que pasaren i por nuesva revista, para foi talecei ia y darle su voto de confianza.
Lós espero en el próximo numeio del nuevo año 2005..SALUD y FELICIDADES...!!!!!
Edrth S mbez
rfm abt>ttl tu dote thn ycar las¡ zu'/re mui l uutdd libe U» sbare utlb all of
yvu somjhtrig tu nituniber atul tu try ne\t yeur.
"Thitikfn /y, ¿epatdni. smdt man. ¡tutke neie priende, rtdisawer oíd m
ttur iiwmy, haré hope. gmi. ncbpn >trr Mtahijp ei-.-ry doy, yete yield,
trust tfiheis so as ¡o nenie. ketp a promise be modérate, ¡>y to uudersland, saya
rime for yemr peuplt. ¡ave time por we df spread h.tppinfss tabe ritis.
n¡ n yonr sutil lo somebudy, try ¡anuthing ; slou- duu n a bit,
¿diere tn youfs If trust Olheis. ¡l'atch ti sutirhe, listen tt> ¡he rain, reeall.
ery if neeess./ry. tor* FAITH. make mistabei. and celebran lij '
l watu !a da* /y TH.AXK al! time tuba jtíppurttd tmr ef¡ort ihrjuyjuui ¡bis
year andpusied us ¡o keep u¡ trying ei ery sttiglt day.
Esperta!!) I tatitld !ike >« thank our spemsom and al! time t<ho thared our
boftks u> iniproiv iban and lo beltaie tu ¡bem.
I lid! be hete aii ailitig yon all ifí our nexl issue tu 2<>t)5.
ClIEERS AND AÚL THE BEST..........!!!!!!
f Ed-th Sánchez
SUSCRIPCIONES
FOR SUBSCRIPTION
magiccakesPspeedy com.ar
www.tortasencantadas.com.ar
MAG I ( CASES
I
EN ESTE NÚMERO
PROYECTOS
BENDICION ANGELICAL. Batitamo Comunión 4
CON LOS MEJORES DESEOS, Afio Nuero 8
SORPRESAS EN EL ARBOL Navidad 11
SAN 1A CLAUS NORDICO, Navidad 14
PAN DULCE TRADICIONAL, Mese Navtd&ia 20
NOCHE DE PAZ. NOCHE DE AMOR. Navidad 24
GARRAPIÑADAS DE ALMENDRAS, Meta Navideña 30
NOTA DEL MES
USO DE BOQUILLAS (T entrega} . 22
TIP
RODAJAS Y CASCARITAS ESCARCHADAS 34
TECNICAS
FORRADO DE ESFERAS PARA REAl IZAR CABEZAS 35
RECETAS
TURRON DE MANI 36
GLACE REAL 37
CORREO DE LECTORES
DATOS DE INTERES. GUIA DE PRCFESIONAI ES. CONCURSOS Y MAS 38
MOLDES 39
I N THIS ISSUE
projiicts
ANGEL B11 SSIXG. -<< vmiuniwi 4
WÍTH THE BEST WISHEs, fW YMr' 8
A SHKPIUSE IN THE <’IIKFSIMAs ÍRI-I Chvistfíi.it 12
NORDK SANTA. í brnm.n 14
TR ADITIONAL Cl IRISTMAS CAKE. Cimsrmas 20
SILI.N T N1GI l'í’ '.'.hrifttfMS 24
CANDIED AI.MONDS. chriwrM 30
SPEC1A1. NOTE
HAG AND TIP DECOR,Vil Xcl? ssr. Parí 22
JO
IIP
CAND1ED ( ITRIJS SLICFS AND í’li I 34
I ECHMQUES
IIOW LO I.INi HAIIS TQ MAKl- IIEARS 35
RECIPES AND SECRETS
PI’ANUT NOIIGAT 36
R.OYAL ICING. 37
READERS SECTION 38
TEMPLA IES 39
MATERIALES
• i Torta ovalada ce 22cm x 30cm
(9' x 12') forrada cor.
pasta americana color gris
• 1 Bandeja rectangular dtt
30 cm x 38 cm (1Z x 15")
cubierta con la misma pasta
• Cmta colcr dorada
• asta de Turrón
de Almendras
• 3 cucuruchos de helados
• Pasta para modelan
gris claro, piel, amarillo marrón,
cobre, b anca
• Pasta de goma blanca
• Colorantes vegetales
ni-trón, blanco
• Colorantes en polvo dorado,
rojo tubo
• ace eal
negro, blanco.
• lor a.
• Givrc ¡Disco Color)
• Icohol
HI.RRAMIEM AS
• Bolillo pequeño
• Lsteca
• Pincel para humedecer
• Cortante de Nomeolvices
• Palillos de macera
• Cartucho de papel
paralizado
• Pincel llnner
• T fjera pequeña
MATERIALS
• I 22 cni x JOcmt9* i 12 >
ovni < ake covered vdth
gray rolled tonda ni
• 1 iú an x cm 112' x
rcctanglr cakc Ixwid
coveied wíth the «me juste
♦ Ribbon golden color
• Pea nut nougxt preste
• 3 Ice crean» tone»
• .Mi idelhng jxisle:
liglit gray skin color yel)r>v
Ittosvn axjptr whi'i
• VHútc gunt paste
• Bn i\vn, wfiite vegetable co.ors
- Golden. bluili red
ilnjtizg pmvdéi
• oval Icing
bkicx and wtüte
• \X4trer
• < Uvtc < 1 risco Color)
♦ Akt i> ?l
EQUIPMENT
• Ball lool
• Modelling tczil
• P.iini btushes
• Forger-:ne-not cuner
• Toothpleks
• P< xng bags
• Paira brushes (linner)
• Srriall scissors
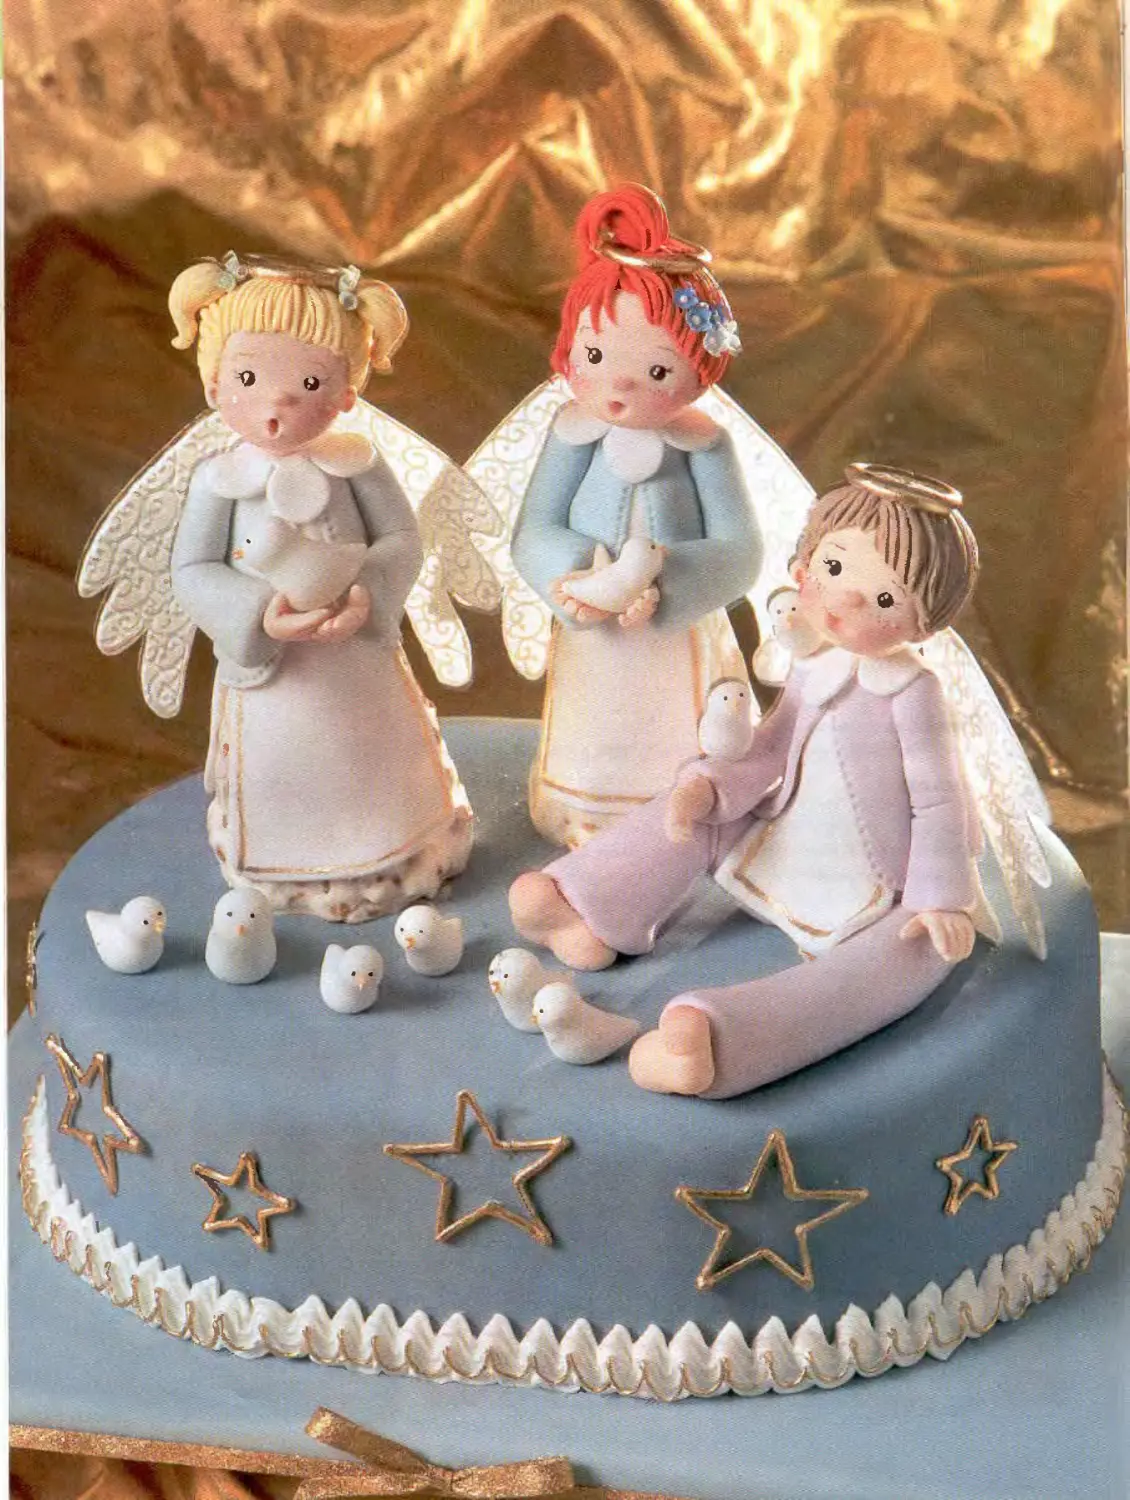
ANGEL BLESS1NG
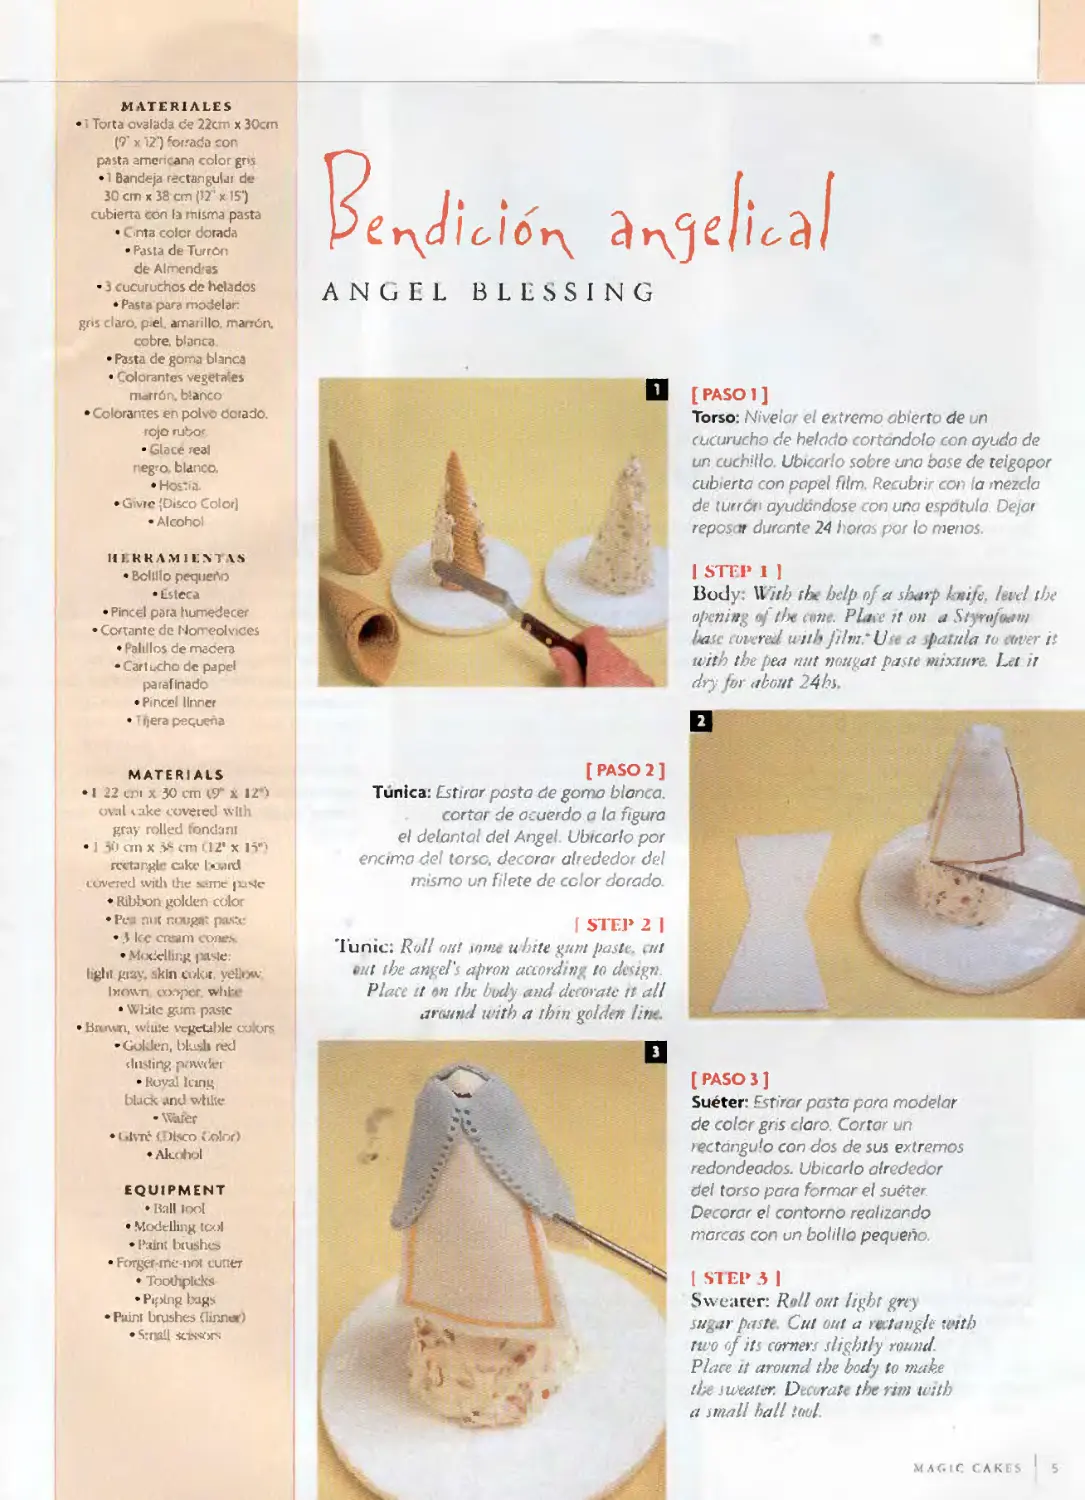
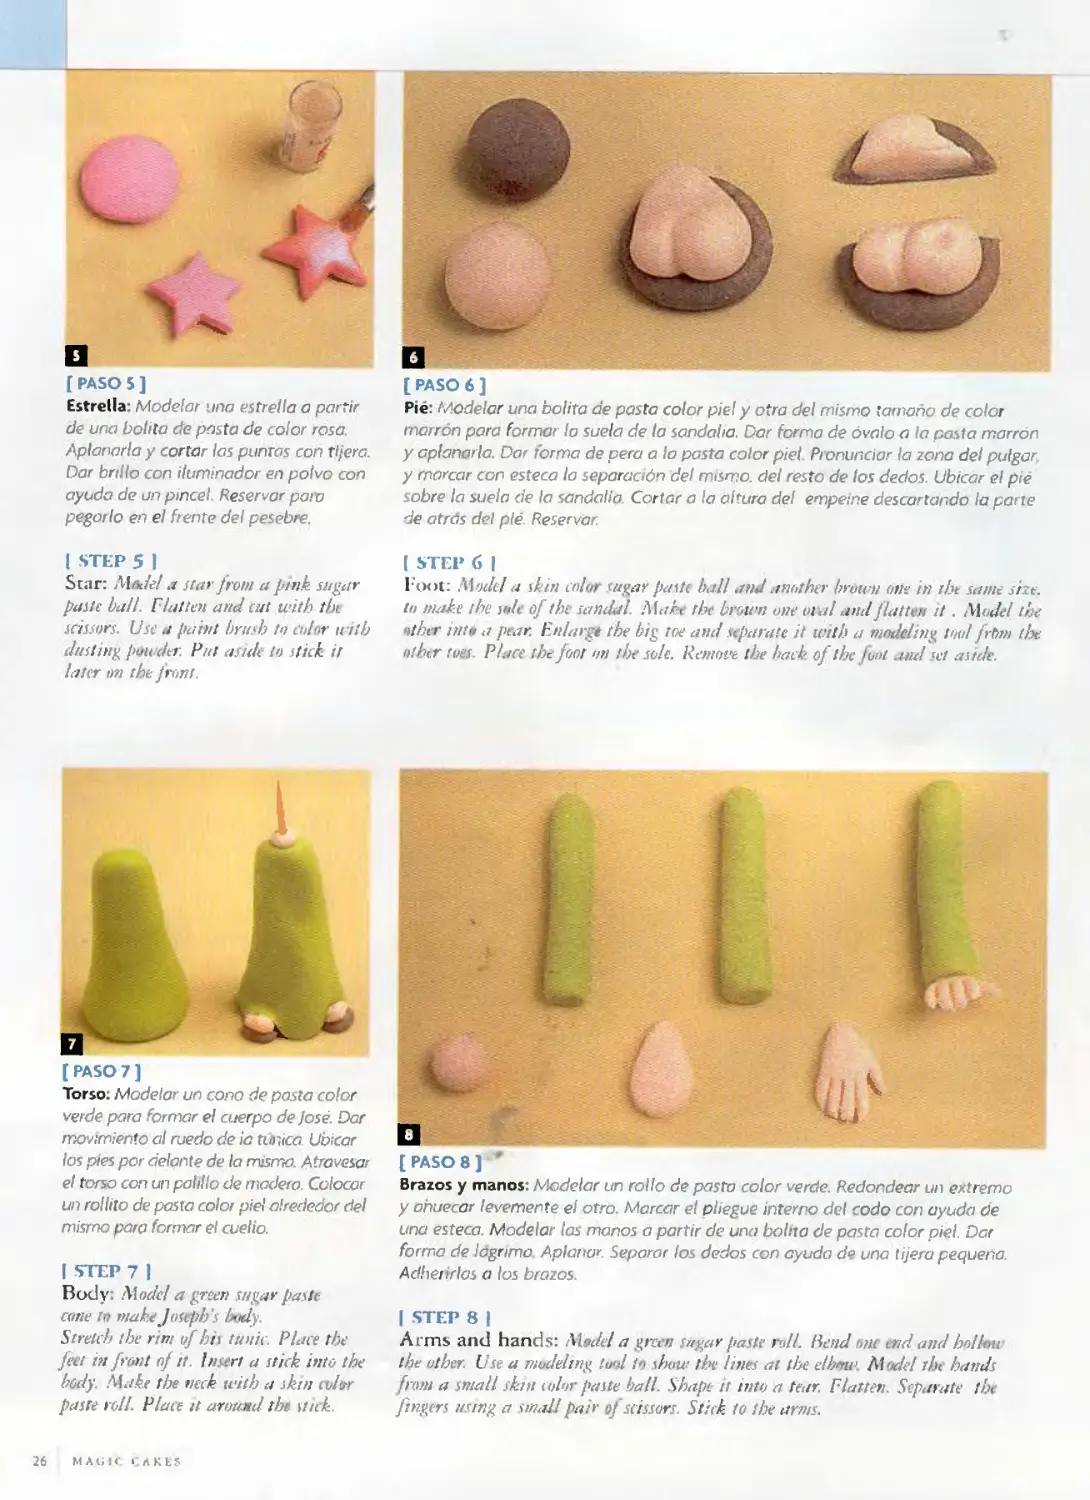
[ PASO 2 ]
Túnica: Estirar pasta de goma blanca,
cortar de acuerdo a la figura
el delantal del Angel Ubicarlo por
encima de! torso, decorar alrededor del
mismo un filete de color dorado.
f STE1» 2 |
Tupie: Roll otít uhite gum paste, mi
tul the angel's apron aaordtng lo dcsign.
Place it en the body and decórate tt all
arurrid ii’ith a thin golden Un-,
[ PASO 1 ]
Torso: Nivelar el extremo abierto de un
cucurucho de helado cortándolo con ayuda de
un cuchillo. Ubicarlo sobre una base de telgopor
cubierta con papel film. Recubrir con la mezcla
de turrón ayudándose con una espátula. Dejar
repoi tt durante 24 horas por lo menos.
| STF.P 1 ]
Body: Wirh ¡ix belp of a sharp l-aije. Ibiel the
opening of the un Place tt on a Sí rojoam
lase covered uith Jilm.'U'-. a fu mía to twer it
with the pea nut nougat paste mixture Let ir
dry fin about 24 hs.
[ PASO 3 ]
Suéter: Estirar pasta pora modelar
de color gns claro. Cortar un
rectánguio con dos de sus extremos
redondeados. Ubicarlo alrededor
del torso para formar el suéter.
Decorar el contorno realizando
marcas con un bolillo pequeño
| ST EP 3 I
Svvearer: Rdl out light grey
sugjr paste. Cut out a rectaugle with
ttvo of its comers slightly round.
Place it around the body lo make
tbe sweater. Decorad the ritn ivilh
a small hall lool.
I
5
MAGIC CAKES
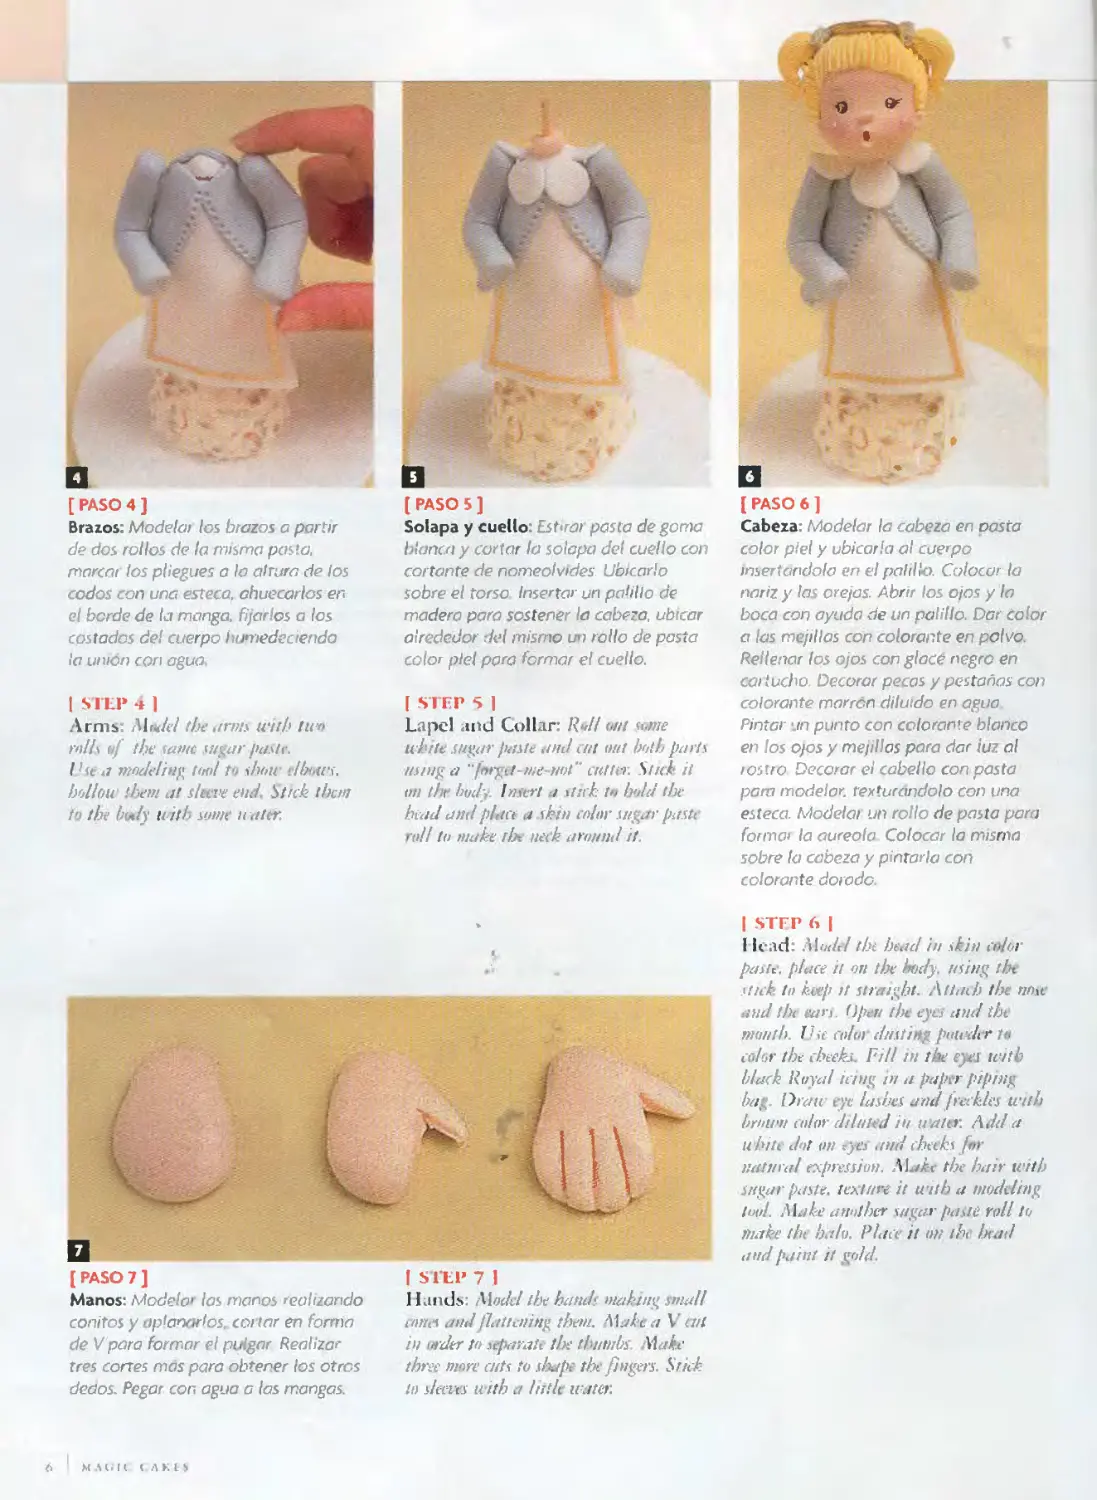
[ PASO 4 ]
Brazos: Modelen /os brazos a partir
de dos rollos de la misma pasta,
marcar los pliegues a la altura de los
codos con una esteca, ahuecarlos en
el borde de la manga, fijarlos a los
costados del cuerpo humedeciendo
la unión con agua,
| STEP4]
Arms Mtdel tbe amn uitb tun
rn/fa w/ tbe sana. tugar paste.
I /ít* a mndeling tnnl tu sbnif e/botus,
hfjllouJ ¡hem al s/í ve end. Sítck thcnj
¡k tbe bu/y uitb sume n ater.
[ PASO 7 ]
Manos: Modelar las manos realizando
conitos y cip1 ánodos,, cortar en forma
de V para formar el pugar Realizar
tres cortes mas para obtener los otros
dedos Pegar con agua a las mangas.
(PASO 5 ]
Solapa y cuello: Estirar pasta de goma
blanca y cortar la solapa del cuello con
cortante de nomeolvides Ubicarlo
sobre el torso Insertar un palillo de
madera para sostener la cabeza, ubicar
alrededor del mismo un rollo de pasta
color piel pora formar el cuello.
[ STEP 5 ]
Lape! and Collar: /?«// r/z/ time
uhite ,i//ivw paste and cía nut both parís
tifinga "l<rrgt!-we-in)t" aitttr. Sttcb it
un tbe bt/dy. bítert a ftfch tu huid tbe
huid andpl tu a skin ador su ar past
rul! tu matee rbv ueek aroimd it.
| STEP 7 I
Uands: Alodtd tbe harids inakiiig ftiúdl
ames and flathining theiti. VLz/y- a V tul
in eider t<> je/wíuZe tbe thnmbs Alabe
tbree more cutí to hapc tbe fingen Sr di
tu sit í es U'ith a Hit le water.
[ PASO 6 ]
Cabeza: Modelar la cabeza en pasta
color piel y ubicarla al cuerpo
insertándolo en el palillo. Colocar la
nariz y las orejas. Abrir los ojos y lo
boca con ayuda de un palillo. Dar co or
a las mejillas con colorante en polvo.
Rellenar los ojos con glacé negro en
cartucho. Decorar pecas y pestañas con
colorante marrón diluido en agua
Pintar -jn punto con colórame blanco
en los ojos y mejillas para dar iuz al
rostro Decorar el cabello con pasta
para modelar rextucandolo con una
esteca. Modelai un rollo de pasta para
forma> la aureola Colocar la misma
sobre la cabeza y pintarla con
colorante dorado.
| STEP6 |
Mead: Aludid tbt head in shin inlor
paste, place it on tbe hody tríitig tbt
ifiíh. tu keep >t straigbt. Atiiich tbe rime
and tbt sars. Upen tbe eyes and tbe
muuth. Iht color dnitmg pntrdrr tu
arfar tbt ebeeks. FUI in tbe e <’j witb
black tivyal iang in a papvr piping
bag. Drai eyc ¡ashet and f re kles wttb
brnum color dilatid in water: Add a
a bite dnt un eyes and thteki fnr
fíiirnrul expression. 'll./Xc tbi huir teitb
Silgar paste, texttire it u itb a tnodíding
lotd. Alabe arintbcr silgar pasté Yoll tu
fíiake tbe balo. Place it un ¡he bvad
andpa nt it g(dd.
6
M\GI( ( A K t S
[ PASO 8 ]
Cortar un pa de oías de acuerdo a los
moldes en hostia, decorada con glace rea1
en cartucho. Aplicar givré y dejar secar.
|STEP8 ]
Caí nía borh uings ¡n umfer, following
tbe témplales, ¿faúriitl thiw with R(/y<t!
lang in paper piping hag. ¿\dd "givrj'
and allí/W lo dry.
( PASO 9 ]
Ub'car las alas en la espalda del
Angel fijándola con glacé
l S’ITP 9 J
Slick the u tngs tm ¡be ángel’s
back u irh Reyal idng.
[ PASO 10 ]
Forrar una torta ovalada con pasta
americana color gris Decorar la unión de
la tarta con la bandeja con una guarda
de glacé y detalles en dorado. Ubicar los
Angeles sobre a torta y completar la
decoración ubicando pequeña palomas
modeladas en pasta blanca
(srtp 10 1
Cawr a» mal cakt with grey Rulled
joni ant. Da orate the separarían Une with
the cake bwrd hy usitig Roya! ¡ring and
Sonic goldcii decorad!»}. Phtce ibe angt!
t//z tap <)[the cafa, lanhb Ux decwatiM
teith v»>ie small whdtgur» pa\tepigams..
MAGIC t.AKES
8 MAGIC CAKES
MATERIALES
• I Torta redonda
de 32cm de diámetro
(121/2") cubierta-en
pasta americana b anca
• I Bandeja redonda
de íJcn' (16 1/2’) de diámetro
Cubierta cor- la misma pasta.
• Pasti .aje anee.
• Pasta de goma blanca,
amarilla y roja.
• Colorante en
polvo amarillo ciato
• Colorantes vegetales
ma.ron y plajeado.
• Cinta plateada,
* Glacé re-jl
blanco y verde hoja
BERRAMIEN TAS
• Plrl.cles.
• Bisturí o cr/cr
• Córrante de margarita
• Par .líos de madera
• Papel de alurrvmc
• Molde de «potro
áe marga-itaí de srlicorvas
• Canijchcs oe
p.pe patafínado
• Palito de amasar
• Moldes de numeres
MATERIALS
• 1 32 cn> rl2 12 )
.' round ca kc «W -i ed
wftb while rollecl bncbrn
• I t-’ irn 116 I _
i'júrw! ral.; board
cot e te vi with
lite same pasti-
• ftstrílagi.'
• Vi.iite ydlmv.
red gunipaste
• Bl'iAsn. rlwr
vcgetjbli Ctrl >r-
• Ijghl vi-IIíjw
d'.iíjting priwil r
• Kil Iwih Mhur
• Roy.il fcing
wln'te. giren
EQUIPMENT
• l’aint Ixirshr-v
• Sr d|>d «ir ciritcr
♦ Daisy cuttci
• Tisolhpicks
• Ahiinnuii'ii fruí
• Sflll irnc dlll-A
eenlv-r in. iukL
• titi-rix-pnroT p.iprr
piping I ..
• Kol.tng pirxs
• Teinp ite*
WITH THE BEST W1 SITES...
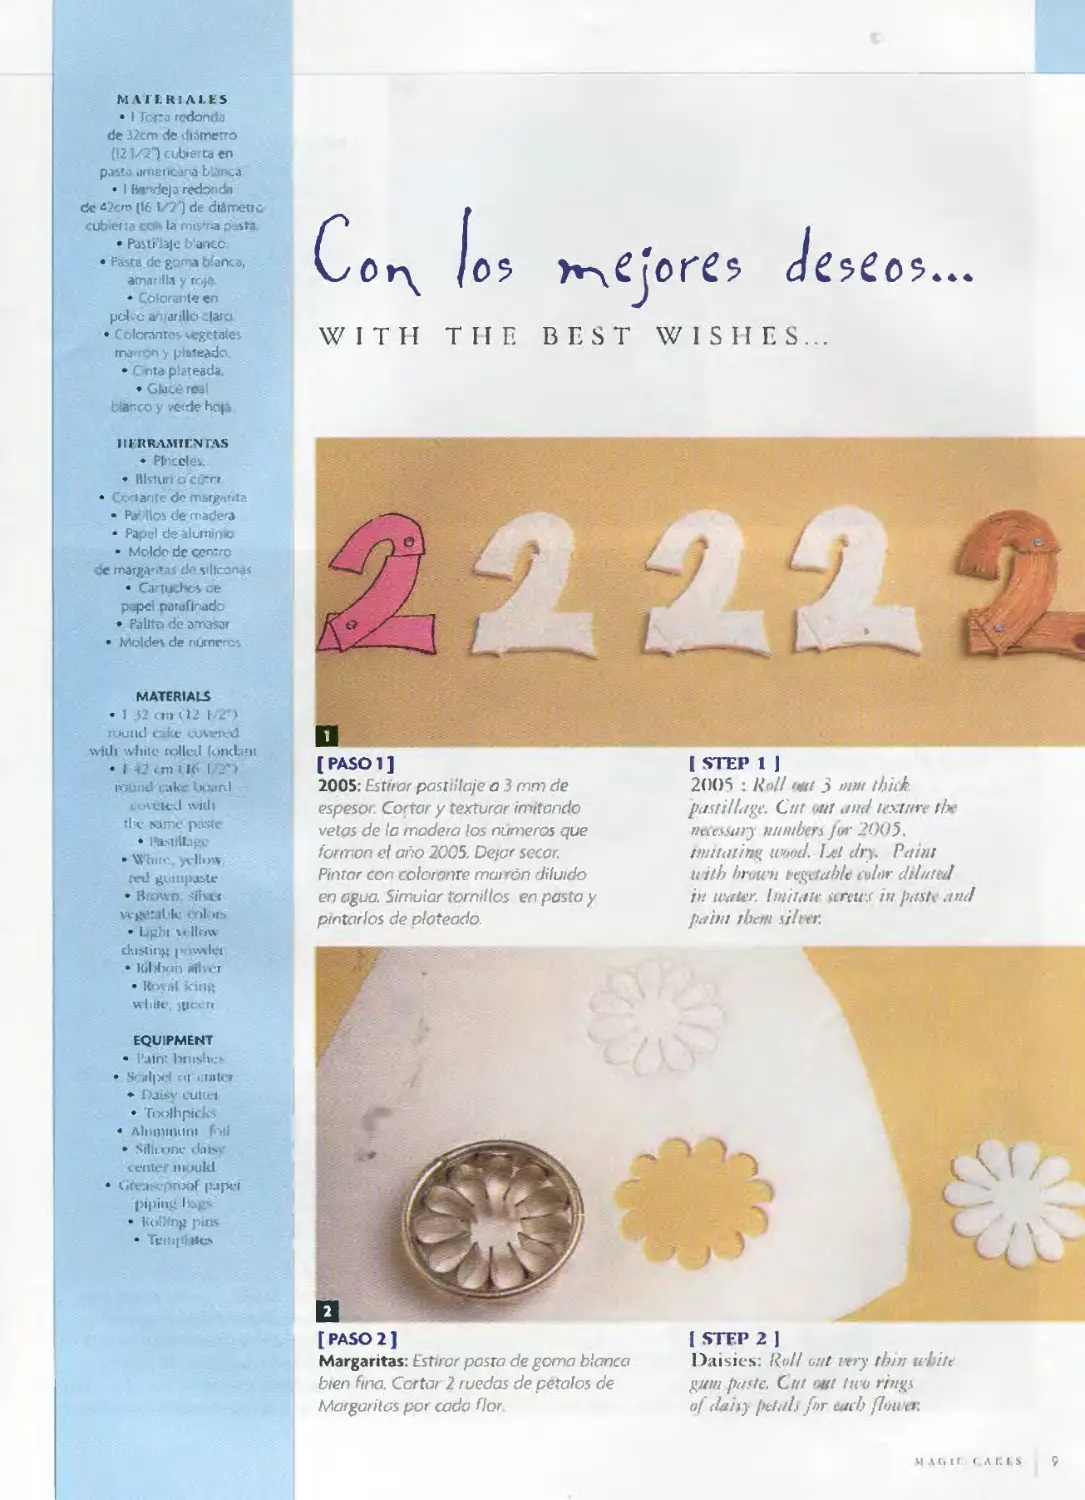
[ PAS01 ]
2005: Estirar pastiíla/e a 3 mm de
espesor. Cortar y texturar imitando
vetas de la madera los n /meros que
forman el año 2005. Dejar secar.
Pintar con colorante mar ron diluido
en agua. Simular tornillos en pasta y
pintarlos de plateado.
I STEP 1 ]
2005 : uüll jggi 3 mm thuk
piistilldge. Crrt <j/t uird te>:t»re flv
ntxwíi/ry nnmb ra Jvr 2005.
imiiaiing unrod. Ijrl cby. Pitint
u ilh bruU'H tti^lablc pfhir dibntJ
in uiaier. Imitare <tnu,.f in paste and
paim ihtrti si/ivr.
[ PASO 2 ]
Margaritas: Estirar pasta de goma blanca
bien fina. Cortai 2 ruedas de petalos de
Ma gañías por cada flor
| STEP 2 1
Daisies: /¿«// nnt vtry thrn white
gura paste. Ct/t ntft tuo rings
of d rhy [retáis fnr au b (hm ir.
m a ti ir. í.A i: i s
9
[PASO 3]
Ruietear cada petalo
con ayuda de un
palillo de madera
[ STEP 3 1
Sharpen eacb petal
uitb a ¡a oodcn »ick.
[ PASO 4 ]
Formar un aro de papel metalizado.
Dejar reposar ¡a primer rueda de
petalos sobre & para que seque con
movimiento. Humedecer con agua el
centro de la flor y ubicar sobre ésta
la segunda rueda. Dejar secar.
[STEP 4 )
Mndt’l a ¡tIver paper ring. Alloti
tbe Jim set nf petáis to dry on top of
it ro kcep natural shape. Monten
tbe floucr center, placing tbe second
set uf petáis mi it. dry.
[ PASO S ]
Centros: Modelar una bolita de parta
de goma amarilla. Colocaría dentro
de un mo!de de centros de Margaritas
de silicona para darle forma. Retirar
y ubicaría en el centro de la flor,
humedeciendo previamente la unión
con agua Dejar secar. Dar color con
colorante en polvo amarillo claro.
[ STEP 5 1
Cenrers: Mndel a small ytllou gwn
pasto ball. Place it into a siliione
mmdd for daisy ccnterr. Remót e and
place it in tbe temer of tbe flottvr,
pre iutisly moistening it. Leí dry. Colar
with lighl yei’late dusting pou-Jer.
10
MAGIC CAkl $
[ PASO 6 ]
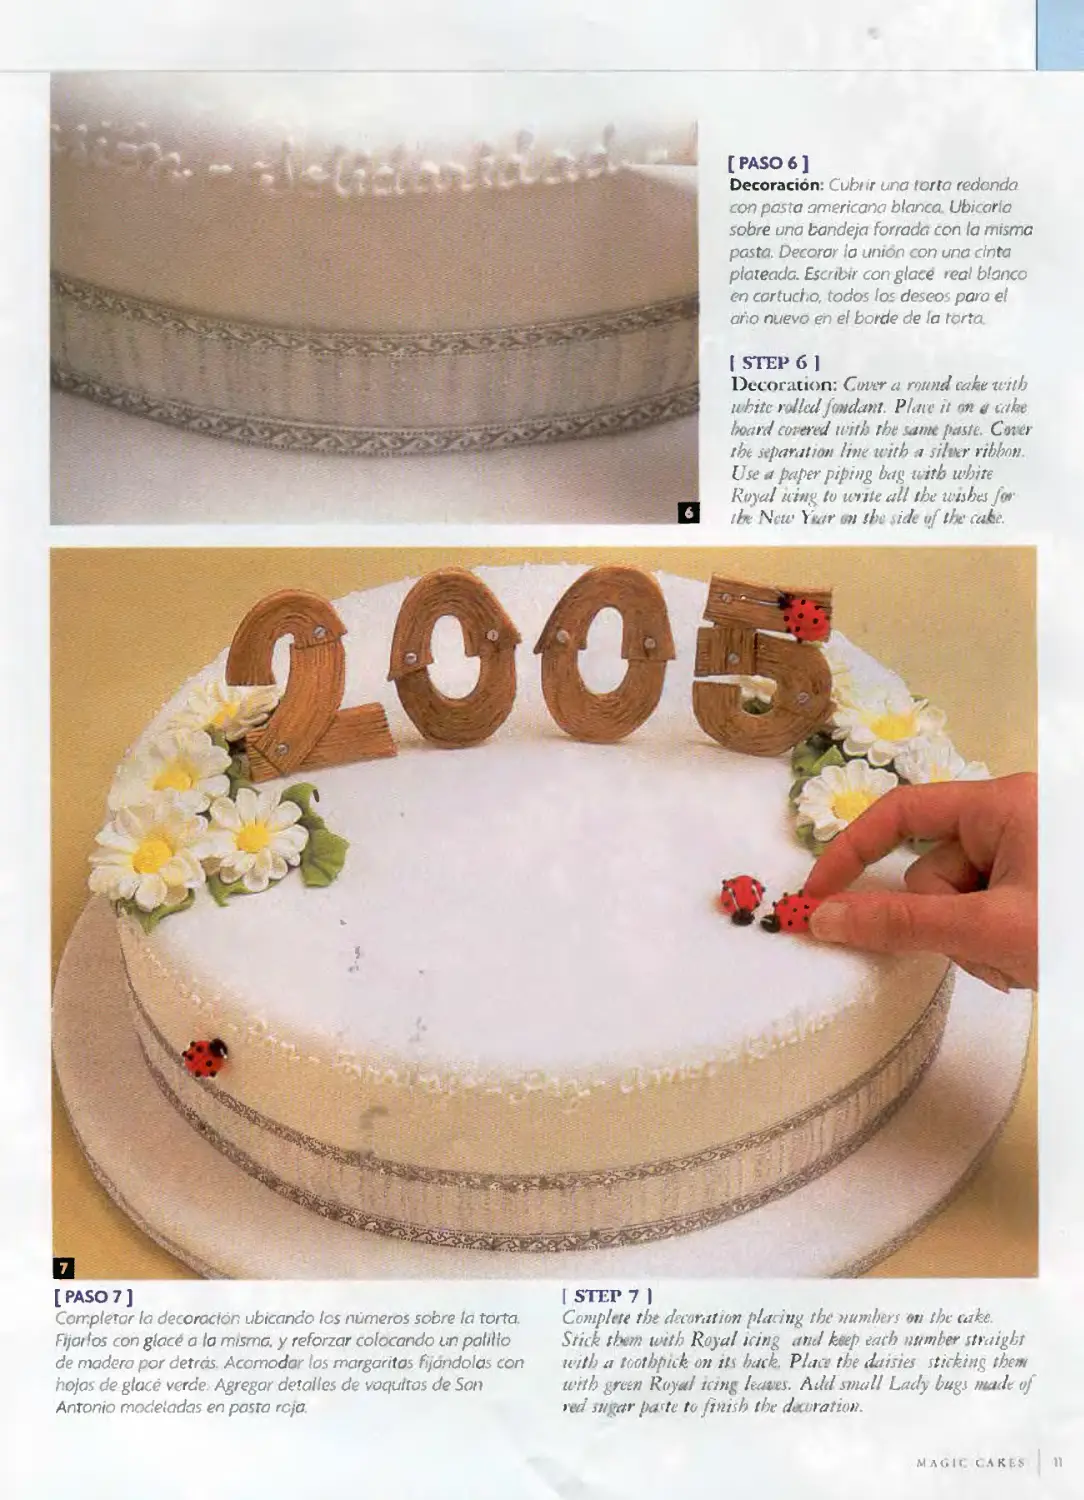
Decoración: Cubtir una torta redonda
con pasta americana blanca Ubicaría
sobre una bandeja forrada con la misma
pasta. Decorar ¡a unión con una cinta
plateada. Escribir con glace teal blanco
en cartucho, todos los deseos para el
año nuevo en el borde de la torta.
f STEP 6 ]
Decoración: C.invr a round cake with
whitc r Jled j\ ndant. Place it nn j irike
board co ered with the same paste Ctver
the separation Une with a rilver ríbbon.
Use a paper piping bag with white
Roya! teing lo writcall the wishes Jar
the Netí1 Year tm the ¡¿de «f the cabe
[ PASO 7 ]
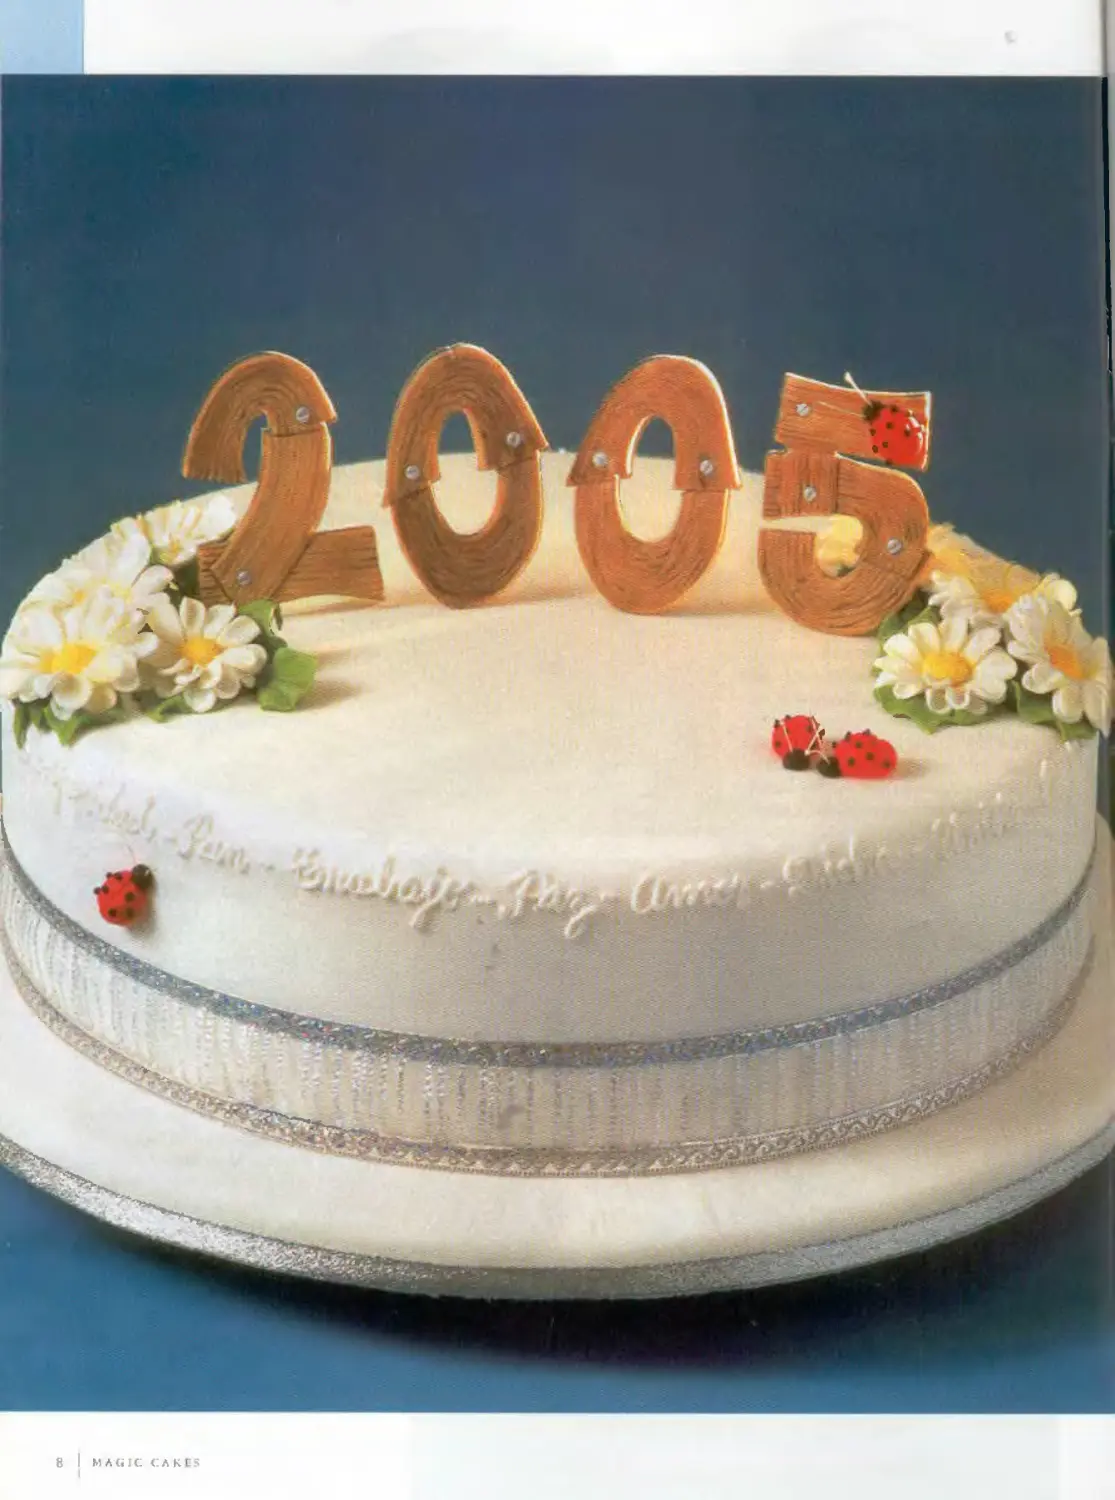
Completar la decoración ubicando los números sobre la torta,
fijados con glace a la misma, y reforzar colocando un palillo
de madera por detrás. Acomodar las margaritas fijándolas con
hojas de glacé verde. Agregar detalles de váquiros de Son
Antonio modeladas en posta roja.
| STEP 7 |
Complete the decoratton pin ing the numlters m the cake.
Srick tbí-m with Roya! icing and knep each number straight
with a tootbpuk on its hack. Place the daisies sticking them
with green Raya! ictng leales. Add small Lady bugs rnade oj
> ed rugar parte to finish the decoration
MAGIC cakes
n
TIEMPO I»F
PREPARACIÓN
55 MINUTOS
TIEMPO OE COCCION
10 MINUTOS
MATERIALES
• 6 tazas de harina coítiún
bien tamizada
• 2 cucharadita
de bicarbcriat de sodio
• 4 cucharaditas de
jengibre molido
• 4 cucharadita^ de
canela molida
• 11/2 cucharadíta de clavo
dé olor molido
• 11/2 cucharadíta de sal
* l cucharadíta de plmenta
• 1 Tiza de azúcar morera
• 1 Taza de manteca blanda
(mantequilla)
• 1 Taza de melaza
• 2 Huevos grandes
• Hai na para espolvorear
PREPARATION TIME.
35 MINUTES.
BAKING TIME:
10 MINUTES.
MATERIALS
• f> (,'nps de b.irin. común
bien tamizad
• ! Tsp Liking sixin
• -i Isp Ciinger powkr
• 4 Tsp Uinnamon powder
♦ 1 1/2 Tsp Clave pdwi fer
• I I 1/2 p. xilt
• I Lsp. iVtppci
• l Op tirnwsn sufrir
» 1 Clip bulter solí
• I i’.up rivdasso
• : litgs
• I ! ni in sprinldr
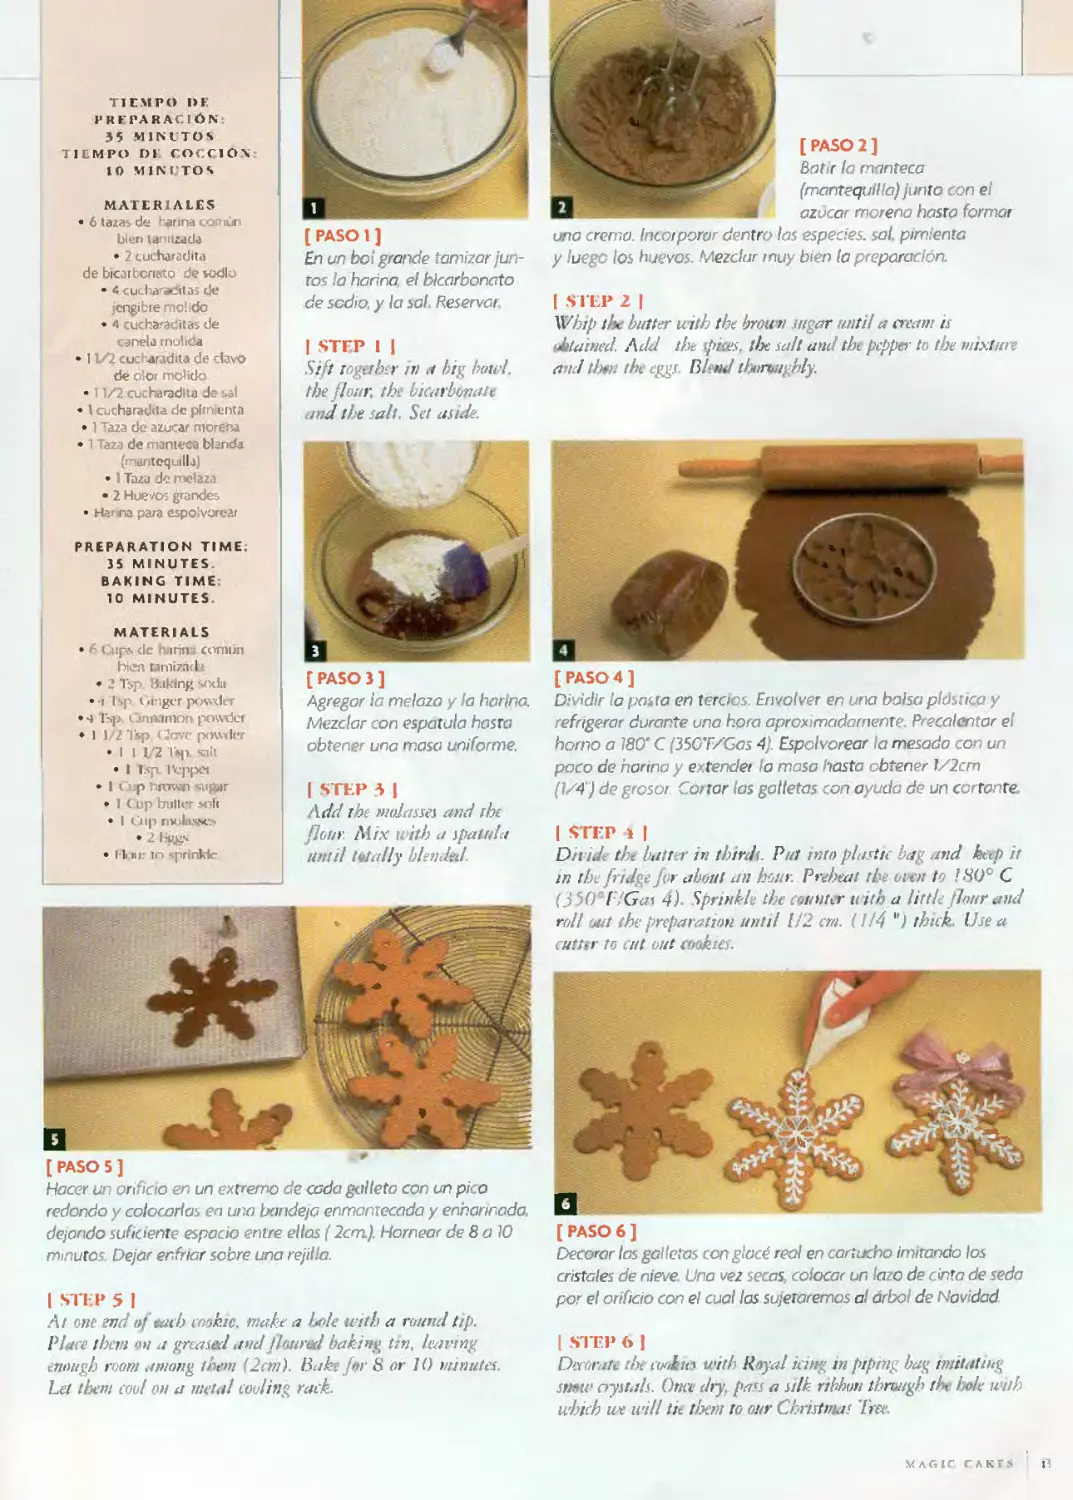
[ PASO 1 ]
En un bo grande tamizar jun-
tos la harina, el bicarbonato
de sodio, y la sal. Reservar.
| STEP 1 |
Sifí Together hi u big betel,
the flour, the bttarboncU c
and the salí. Sel asirle.
[ PASO 3 ]
Agregar la melaza y la harina.
Mezclar con espátula hasta
obtener una masa uniforme.
| STEP 3|
Add the maiasses and the
flour. 31 tx tvhh a spatnla
until tvtally blenda!
[PASO5]
Hacer un orificio en un extremo de cada galleta con un pico
redondo y colocarlas en uno bandeja enmantecada y er narinada
dejando suficiente espacio entre ellas ( 2cm). Hornear de 8 a 10
minutos. Dejar enfriar sobre una rejilla.
| STEP 5 I
Al orí endof«ach iwthic. makea hele a tth a roundtip.
Place them o v u greased and floured baking tin, leaving
enough roorn atuong trien (2cm). Bukeflr S or 10 minutes.
Leí ibem coul o>¡ a metal cooling rack.
[ PASO 2 ]
Batir la manteca
(mantequilla) junto con el
azúcar morena hasta formar
una crema. Incotpora dentro las especies, sai. pimienta
y luego los huevos. Mezclar muy bien la preparación.
| STEP2 |
Whip i!* butter uith the broun jugar until a cream ts
ubtuined. Add the ipites. tbe salí and the pepper to the mixture
and t/>‘ the eggs. Bhnd th nuighly.
[PASO 4]
Dividir la pasta en tercios. Divolver en una bolsa plástico y
refrigerar durante una hora aproximadamente. Precalentar el
horno a 180" C (350TSGas 4) Espoh orear la mesado con un
poco de harina y extendei la masa hasta obtener l/2cm
(1/4') de grosor. Cortar las galletas con ayuda de un cortante.
| STEP 4 |
Divide the bdtter in thirdt. Puf into plástic bag and keep it
in the fridge for abuut an hour. Preheal the oten te 180° C
(35O~ f /Gas 4). Sprinkle the < water uith a littk flimr and
roll (Mi the prepararon until 1/2 cm. (1/4 ") thick. Use a
cuttv to cut out tuokies.
[ PASO 6 ]
Decorar los galletas con glace real en cartucho imitando los
cristales de nieve. Una vez secas colocar un lazo de cinta de seda
por el orificio con el cual las sujetaremos al drbo de Nav dad
[ STEP 6 J
Daorate the twhits with Roya! icing in piping bag imtlaling
sntus crystals. Oria dry. pass a stlk ribhon ihrtsugh tK hele with
ii'hich ice mili tic them to ottr Christmas Tree
i
MATERIALES
• 1 Torta redonda
de M cm de diámetro (15*)
cuoierta con pasta
americana color verde
-1 Bande a redonda
de 46 cm de dlámeuo (18“|
cubierta con la
misma pista
• 18foque de telgopor
» Pasta para modelar color:
negra roja, marrón
odor piel
verde, blanca, marfil
• Glacc real colon
blanco, celeste,
rojo, veide naranja
• Givté (Disco color)
II ER RAM l ENT AS
• Esieca
- Pincel
• Rueda de pespunte
• Cepillo de cerdas duras
• Tijera pequefta
• Palillo de madera
• Cortante de esvella
y circuios pequehcs
• Cortante de volado
9a»\/a C|a^
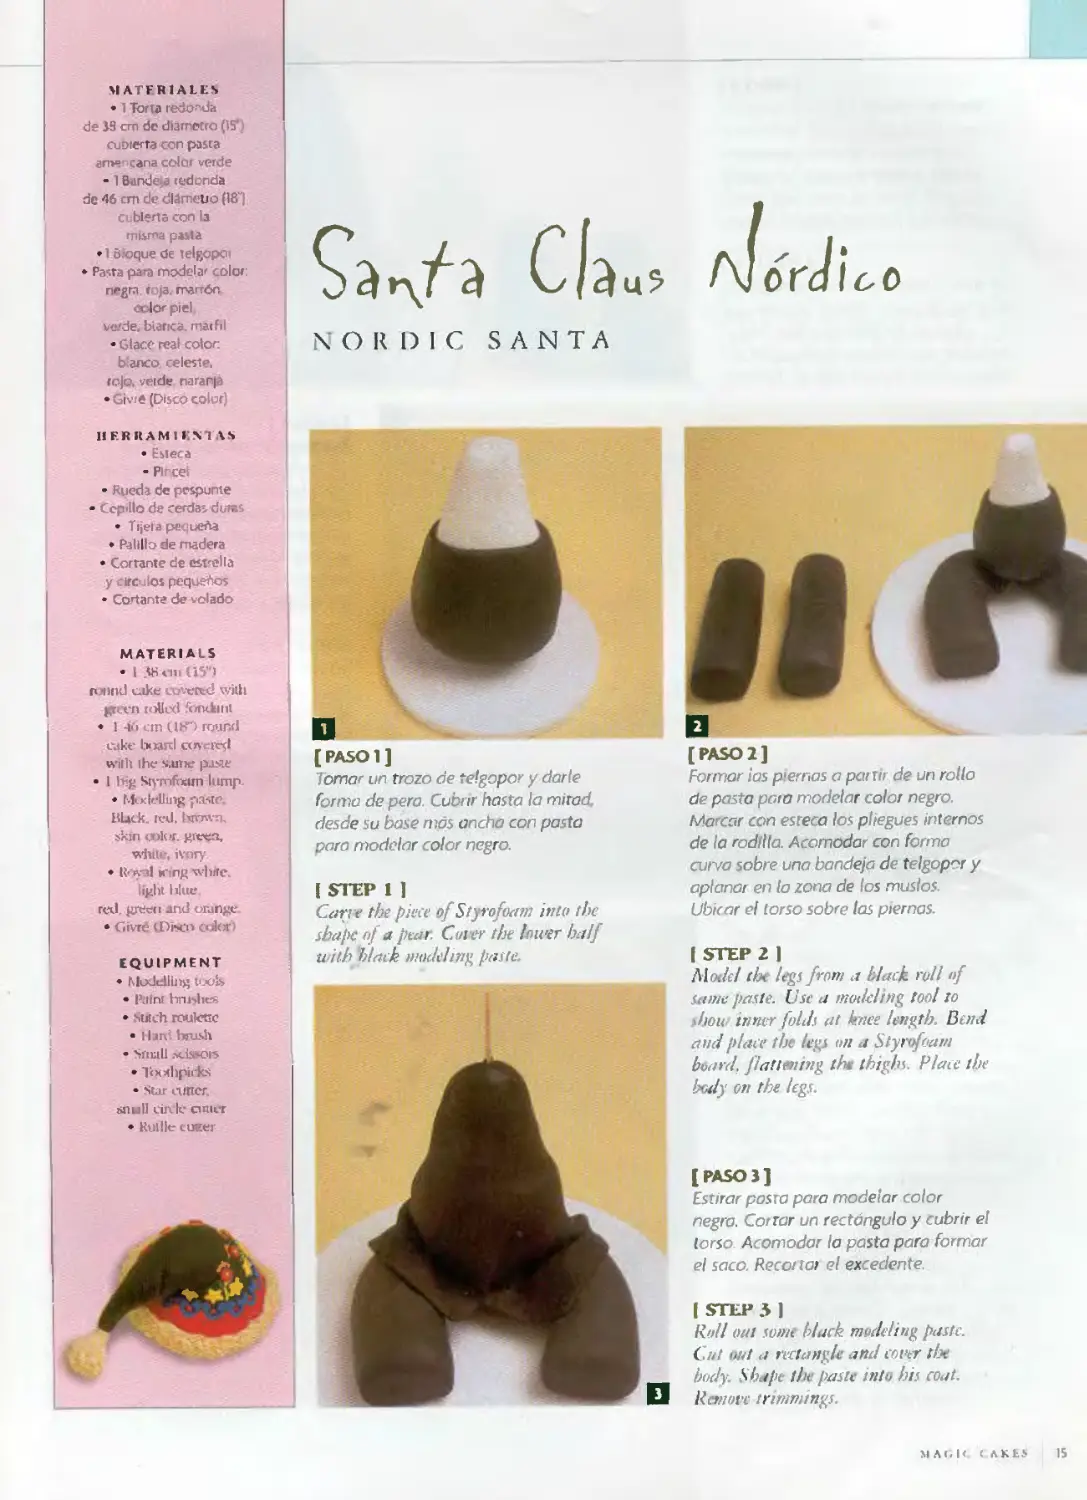
N O R I) 1 C SANTA
[ PAS01 ]
Tomar un trozo de telgopor y darle
forma de pera. Cubrir hasta la mirad
desde su base más ancha con pasta
paro modelar color negro.
MATERIALS
• l 38 cm <J5"i
rotind c.ike cwertcJ with
grcrn toUvd fondriiit
• 1 46 cm C1K> round
cake Ivnid cwcrecl
(Viril the s¡une paste
• I líg Siymfiüun lump-
♦ Mcxlellipg paste.
Black, red. brmvn,
skin wk .T. green,
whlt». ivory
• Roya! x'ing wbrte.
light lilue
red. greco and oraiige
• Ciivré t.Dbcn color)
EQUIPMENT
♦ MixlcUing t'Xiís.
• Pafnt bruslies
• sutch roulene
• 1 hrd brush
• Small .mJs.sois
• Torxhpirks
• star euncr,
snull einlc cuiict
• Rullle cucer
| STEP 1 ]
Cari e the píete of Styrofoam inte the
sbapc nf a pear. Cwitr the lower balf
uith black modehng paste.
[PASO 2]
Formar ¡as piernas a partir de un rollo
de pasta pata modelar color negro.
Marcar con esteca los pliegues internos
de la rodilla. Acomodar con formo
curva sobre una bandeja de telgopor y
aplanar en la zona de los muslos.
Ubicar el torso sobre las piernas.
| STEP 2 1
Motlel tbe legs from a black roll »f
sanie paste. Use a modeling too/ to
thom inner folds. at imee length. Bend
and place the legi orí a Styrvfoam
board. ftattening th thighs. Place the
bedy on the kgs.
[PASO 3]
Estirar posta para modelar color
negra. Cortar un rectángulo y cubrir el
torso Acomodar la pasta para formar
el saco. Recortar el excedente.
| STEP3)
l\rd¡ ont sonu blück medelitig paste.
Cid tud a nctanglc and covtr the
body. Shape the paste into bis coat.
Ronovc trimnnngs.
M AK Ir. ( AKLS
15
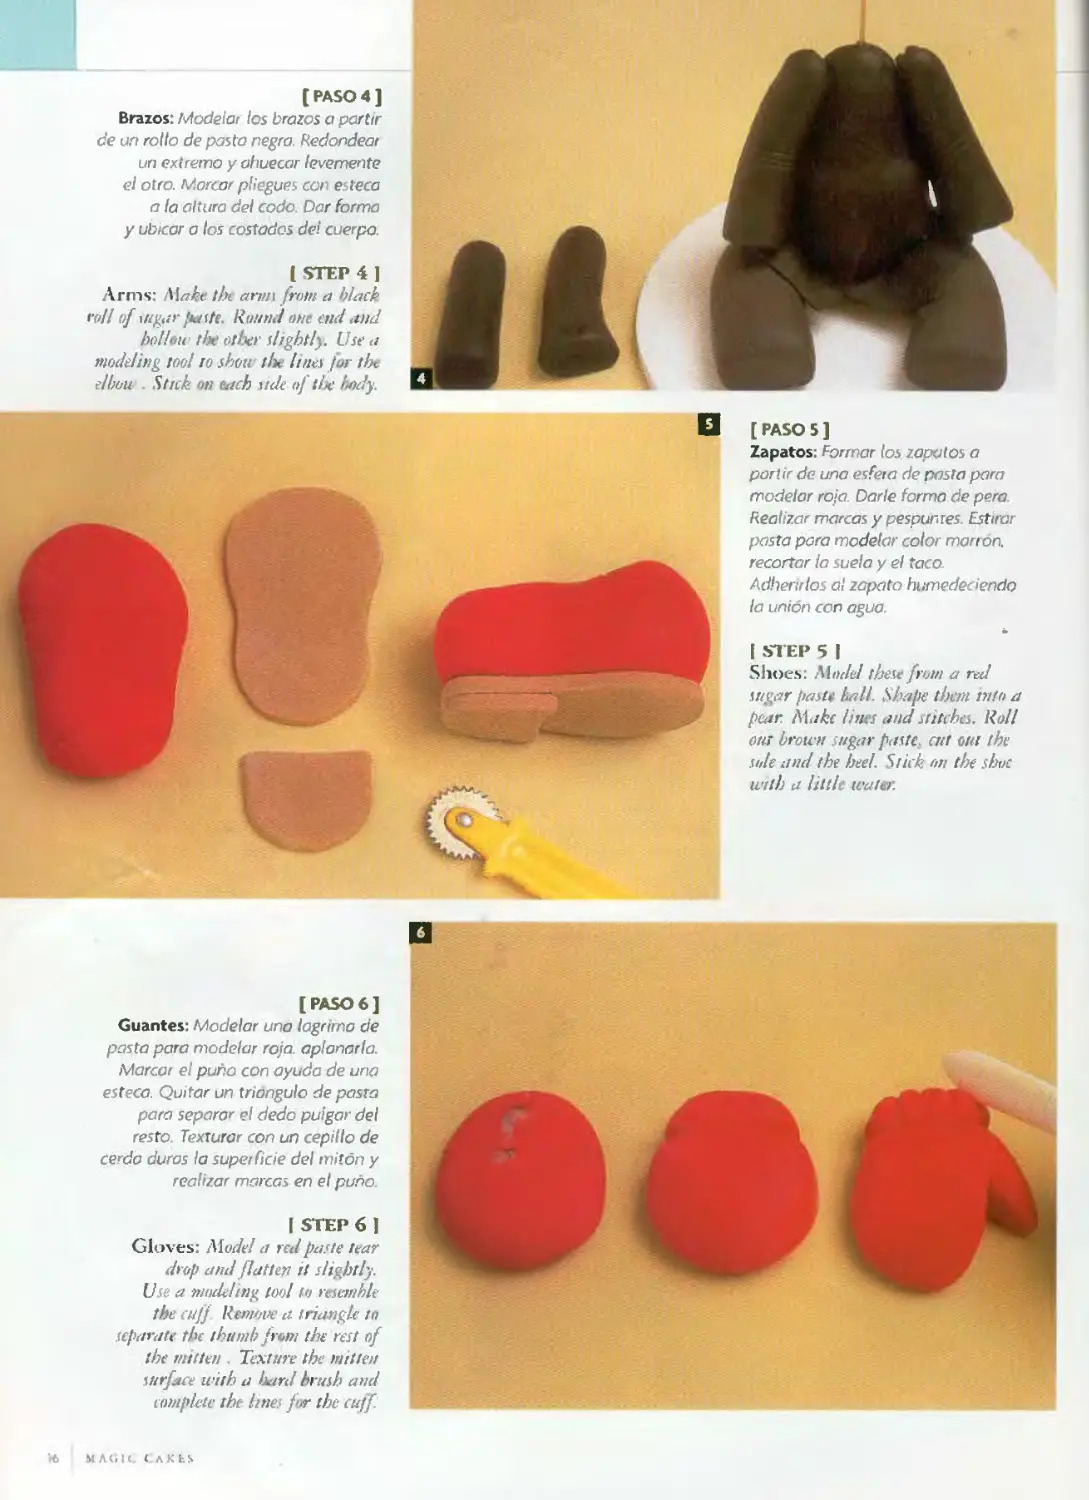
[ PASO 4 ]
Brazos: Modelar los brazos a partir
de un rollo de pasta negra. Redondear
un extremo y ahuecar levemente
el otro. Morcar pliegues con esteca
a la altura del codo. Dar forma
y ubicar a los costados dei cuerpo.
[ STEP 4]
Arms: the annsfrom a black
mil of mgar juste. Ruimd one end and
bollme the othcr sligbtly. Use a
modeling tool ro show th. Itries fur th<
el bou . Sticfa mi each i de of the bydy.
[ PASO 5 ]
Zapatos: Formar los zapatos a
partir de una esfera de pasta para
modelar roía. Darle forma de pera.
Realizar marcas y pespuntes Estirar
pasta para modelar color marrón,
recortar la suela y el taco.
Adherirlos al zapato humedeciendo
la unión con agua.
| STEP 5 |
Shoes: Mndel tbese frmn a red
silgar paste l. alfa S 'ipe tbem tufo a
p&tr. ¡Wtifae lints and stitches. Roll
(Mí browii tugar paste ait (¡ni the
stde and the heel. Stick rni the sbnt
u ilh a little water.
[PASO 6]
Guantes: Modelar una lagrimo de
pasta para modelar roja, aplanarla
Marcar el puño con ayuda de una
esteca. Quitar un triangulo de pasta
para separar el dedo pulgar del
resto Texturar con un cepillo de
cerda duras la superficie del mitón y
realizar marcas en el puño.
| STEP 6 J
Gloves: Model a red paste tear
drep and flatten it sligbtly.
Use a moriding tool lo rcsanhlt
the cufj. Reniwe a iriangk ¡o
sepárate the t hundí j rom the rest of
the mitten . Texture the minen
sur ace with a hard brush and
complete the lines fw the cujf.
>6 ilAGK. CAKLS
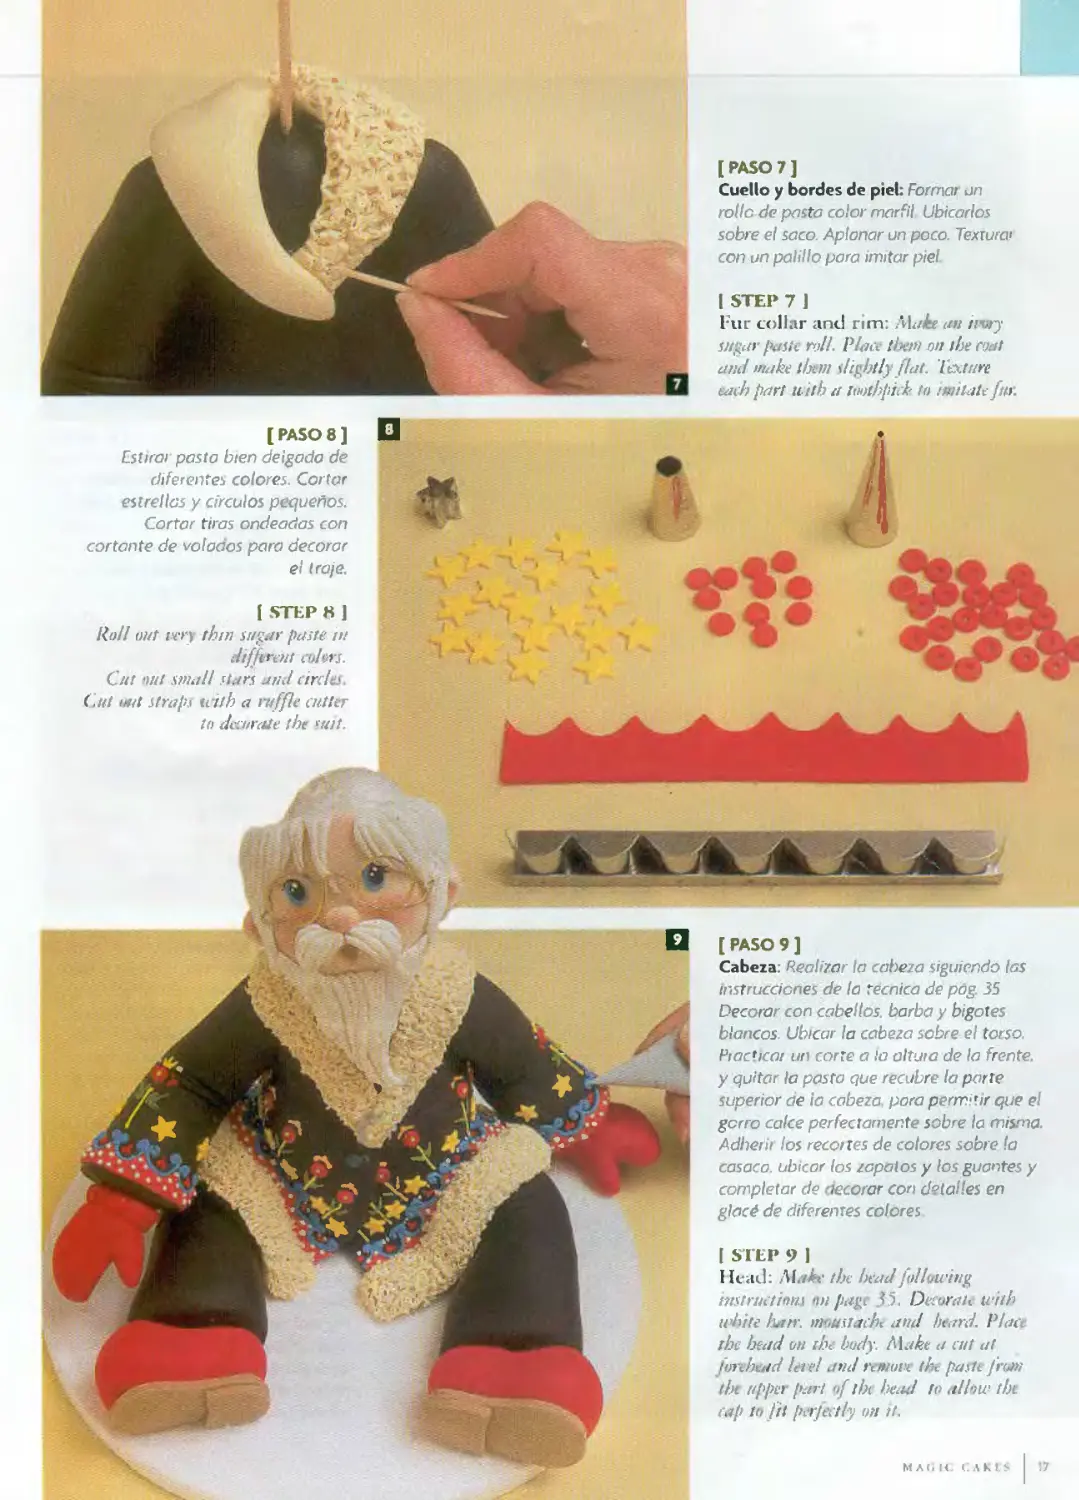
[ PASO 7 ]
Cuello y bordes de piel: Formal un
rolle de pasta color marfil Ubicarlos
sobre el saco. Aplanar un poco. Textura'
con un palillo para imitar piel
| STEP 7 J
Fur collar and rim: an hvry
silgar paste mil. Place //wv on the coat
clin! rnake tbont sligbtly fíat. Ttxrure
each parí uith a ¡tnabpic¡? to nailate [tu.
[ PASO 8 ]
Lstirai pasta bien delgada de
diferentes colores. Cortar
estrellas y círculos pequeños.
Cortar tiras ondeadas con
cortante de volados para decorar
el traje.
í STEP K J
Roll out i'i-ry thtn tugar paste in
iUffi rínt rdm.
Cut out vinall rictrí tnd driles.
C.ut iwl strapi uith a rtrffle cuitar
lo decórale the 1 uit.
[ PASO 9 ]
Cabeza: Realizar la cabeza siguiendo las
instrucciones de la técnica de póg. 35
Decorar con cabellos, barba y bigotes
blancos. Ubicar la cabeza sobre el torso.
Piacticar un corte a lo oltuia de la frente,
y quitar la pasta que recubre la parte
superior ae ¡a cabeza pora permitir que el
gorro calce perfectamente sobre la misma.
Adherir los recortes de colores sobre la
casaca, ubicar (os zapatos y los guantes y
completar de decorar con detalles en
glacé de diferentes colores
[ STEP 9 I
Hrad: Aí.z&' the bead frllutriiig
instruíti-tni nn page 35. Deiurah trith
udiife liiirr. m asi ache and beard. Plaa
rhe b^ad wi the Iwdy. Make a cut al
p» rbead leí el and rewoue ti r parte// j>¡
the ttppir parí '>[ibt bead to all¡u' the
tap tu fit perje tly on it.
[PASO 10]
Gorro: Modelar un cono de pasta
negra. Abrir la base. Marcar pliegues
con estece. Dai movimiento. Decorar
cor sastas de colores y glace. Ubicar
rollo de piel alrededor de su base.
| STEP 10 )
Cap: Mudd a hlatk tugar paste
ante. Opc/i the louvr part Use a
rwdvling tool to shote Ihhfn cj
uattfral moitment. Decórate mitb
color pastes and ruyal iang. Add
the fttr ¿lyojfítid its hottom lint
[ paso n ]
Acomodar el gorro sobre a cabeza,
fi ando o con abundante glace real
[ STEP 11 ]
Pin (e the cap on the htad sttcking tí
u ith citvtigh Rostid icing.
[ PASO 12 ]
Caramelos y bastones: Realizar rollos de
pasta de modelar rojos y blancos. Pora
formar los caramelos unir en brma de
círculo varios rollos Amasar haciendo
radar sobre la mesa para que se unan
entre si. Dejar orear y cortar rodajas
Pata los bostoi es. mode a> un tallo de
pasta roja y otro blanco. Enroscar ios
entre sí y amasar hasta obtener ¡ma rollo
delgado uniforme. Cortar y curvar un
extremo para forma los bastones
| STEP 12 J
Candies and stícks: Moded s*tng red
atrd rehire paste r<dls. Ptrr'he candía rr/ake
rings uith severa! rvlls. Blend the differetit
tufan by rollo rhet. orí the counter. la:!
dry and cu tt< t the dices to muhe lite
su veis. Pur tht stidts, raodel mdand rvh/t,
M/gar paste culis. 7 u'ist them ttrgtiher and
ndl ctit until thin etungb. Cut and bend
>ne tnd tt> shupe u¡ u-alking sticks.
18
N * i ir < A K E S
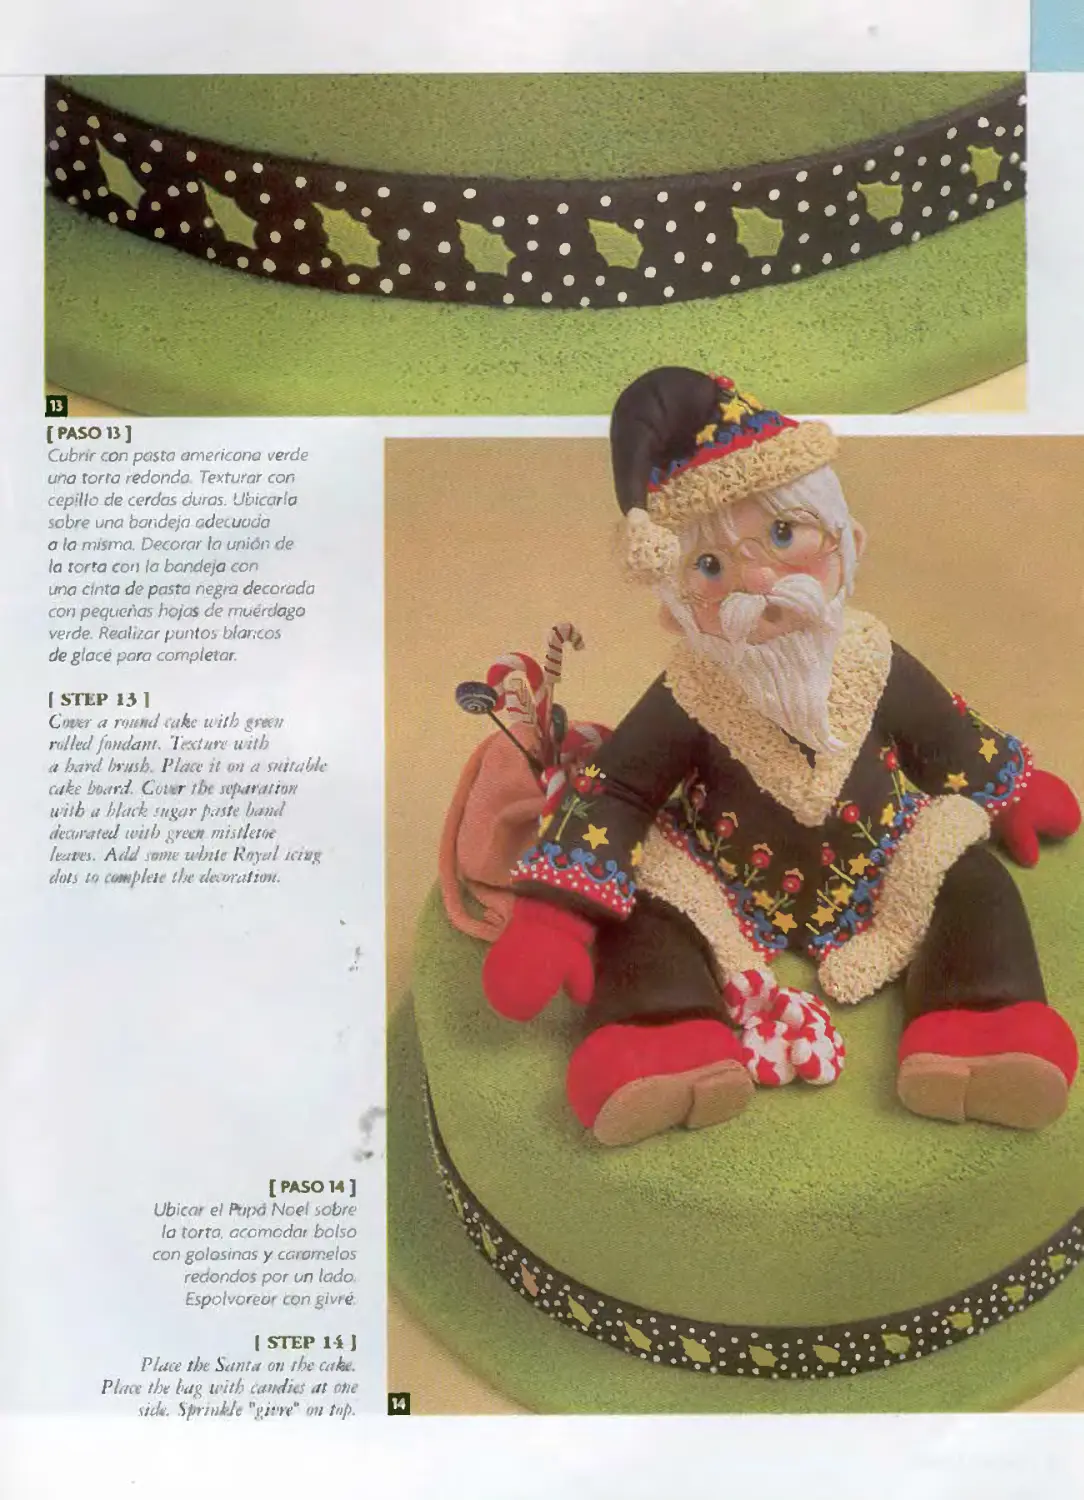
[ PASO B ]
Cubrir con pasta americana verde
una torta redonda. Texturar con
cepillo de cerdas duras. Ubicarla
sobre una bandeja adecuada
a la mi ma. Decorar la unión de
la torta con la bandeja con
una cinta de pasta negra decorada
con pequeñas hojas de muérdago
verde. Realizar puntos blancos
de glace para completar
| STLP 13 1
C'<Jter a rv« xd cake ti ith reen
nlled fundan/. l’cxture u itb
a hard brush. Place it un a sanable
cake bottrd. Cvttr fbt separaron
u ttb a black rugar paste band
decorated icilb reen mistleif/e
leat es. Add same tvb te Ruyal iavg
dais tu comí píete the da watt oh.
[ PAS014 ]
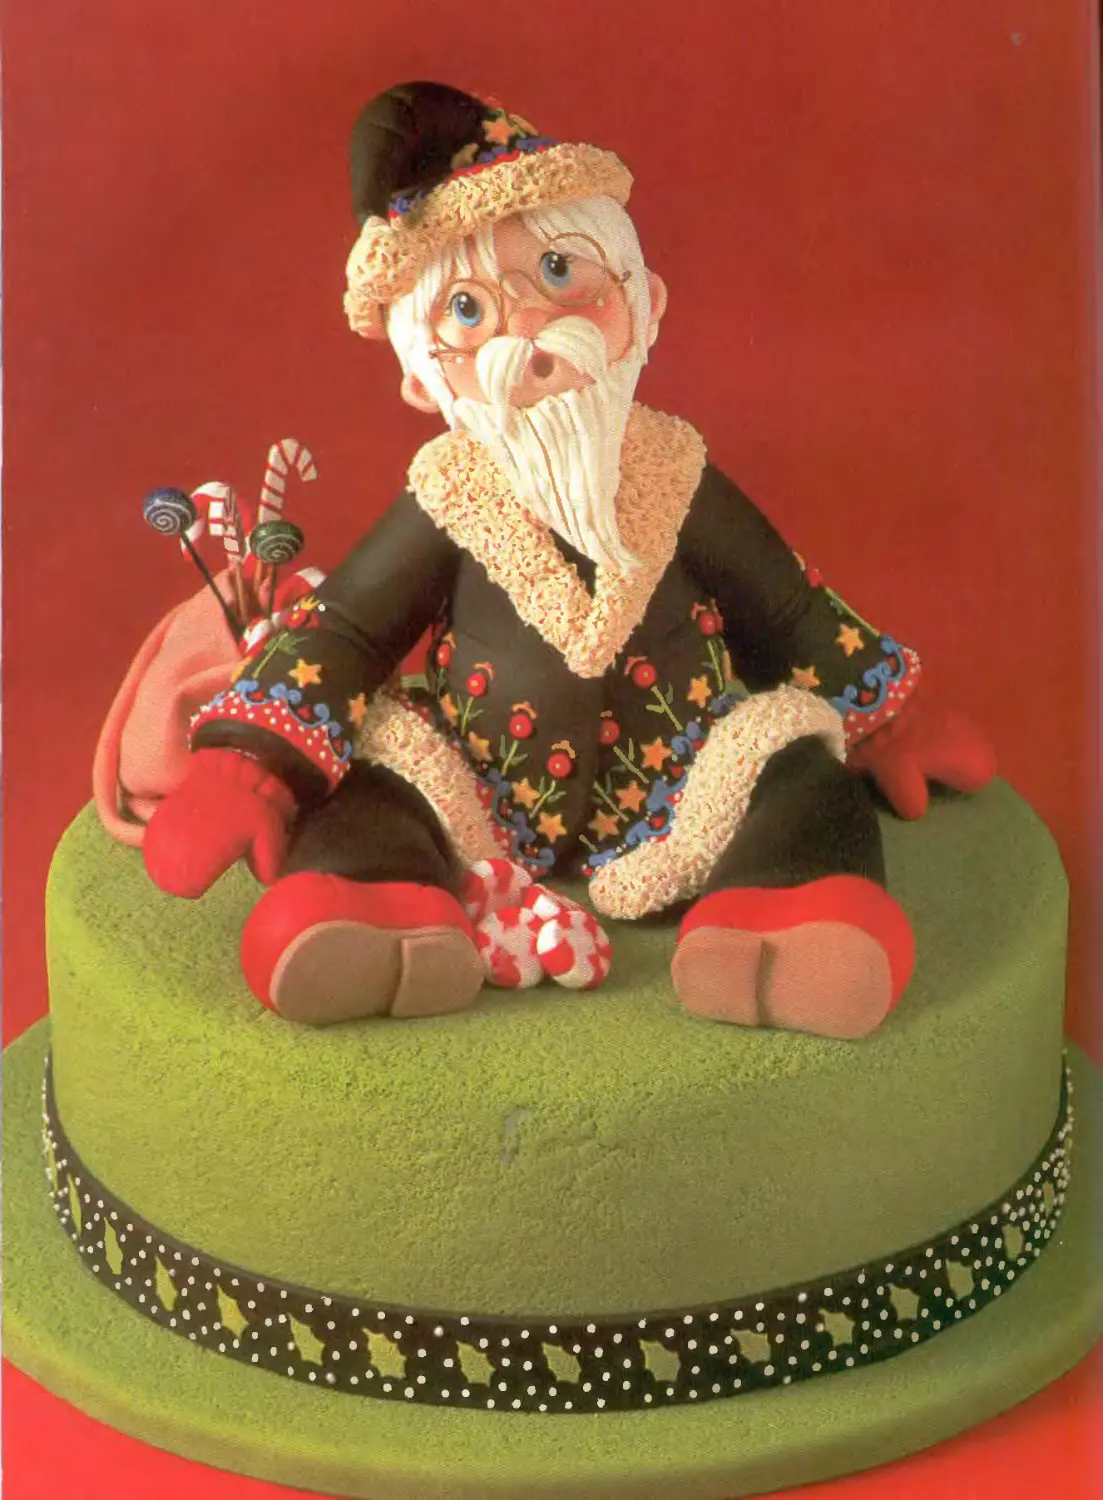
Ubici el Ptipá Noel sobre
la torta, acomodar bolso
con golosinas y caramelos
eaondos por un lado
Espolvorear con glvré
| STEP l í ]
Place the Santa on the cake.
Place the bag uñtb tandil, at otie
side. Sprnildt; "gifre" mi tnp.
20 M a '• i r: < a K es
lA'GREDIJL'N I ES
• 1/2 Taza de agua tibia
• 60 g de ¡evadí ira de cerveza
* 2 cucharadas de miel
• ISO g de azúcar
• 2 hueves
• 100 o de manteca
• Ralladura de 1 limón
• Ralladuia de 1 naranja
• Esencia de vainilla
• 1 cucharadtta de agua de azahar
• l cucharadita de extracto de malta
• 10 gozas de esencia de amaretto
• t cepita de coñac
• 601 gdehatlna
• 100 g de frutas abrillantadas
• 300 g de frutas secas
(nueces almendra . piñones,
avellanas, pasa- le uva]
• 1 pizca de sal
• 2 cucharadas ¿e moscato
INGREDIENTS
• 1 2 turi cup uf warm water
• 60 gr i2 w>Yeist
• 1 thsp of 1 •<!<
• 150 W ozl < 'I su'^JJ
• 2eggs
• lixjgr <3 1-2 <>z) hiittcr
• Rrnd oí 1 ! ix'-.n
♦ Rliul wí I i inge
* V.iiuíla esMLtice
• 1 tea spcKirdúl of cíente ixxiquct
• I ten sprxinfii) oí malt extcíct
• 10 dri'-ps 'amarvttr* esMrncc
♦ 3 tlxsp brandy
♦ íto gr < 19 ’i/i flour jU purpose
• 300 gr.»líl qz1 c.indtzd fii.nl
• 310 gi'. Nuis t w-.ilnuirs jIkkjx.Ij.
liazel nuts and laisins»
• \ pinch oí sal’.
• 2 rhsp of pon winv
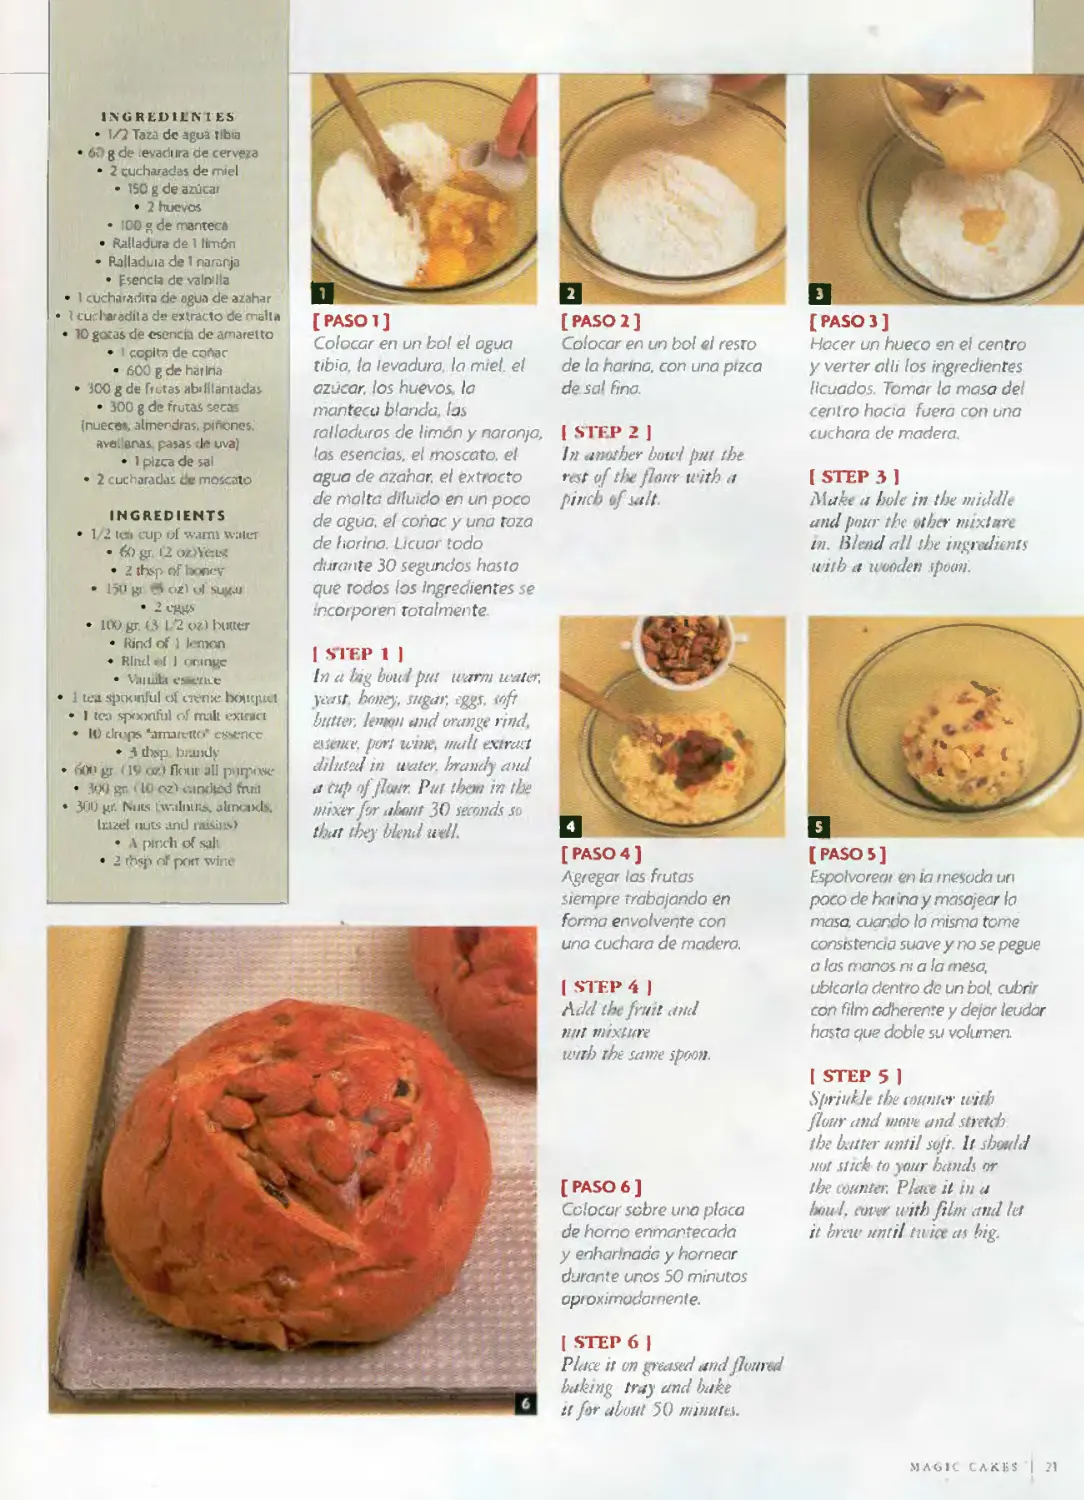
[ PASO 1 ]
Colocar en un bol el agua
tibia, la levadura, la miel, el
azúcar, los huevos, la
manteca blanda, las
ralladuras de limón y naranja,
tas esencias, el moscato. el
agua de azahar, el extracto
de malta diluido en un poco
de agua, el coñac y una taza
de harina. Licuar todo
durante 30 segundos hasta
que rodos los ingredientes se
incorpoien totalmente.
| STEP 1 1
lr¡ a tig buui pul ivarm u-aíer,
yeast. Poney, silgar, eggs, toft
blltter, lew» and orange rtnd,
üíStíiii'. parí wnie, malí exiracl
dihiled in uater. brandy and
a tup offluir. Put them in the
niixer for ahoiit 30 seconds so
that they bknd útil.
[ PASO 2 ]
Colocar en un bol el resto
de la harina, con una pizca
de sal fina.
| .STEP 2 1
In another hotel put the
rest >f tlx flour tvith a
piuch <f s.ilt
[ PASO 4 ]
Agregar las frutas
siempre trabajando en
forma envolvente con
una cuchara de madera.
[ STEP 4 ]
Add ib, fruit and
nut mixture
with the same spwn.
[ PASO 6 ]
Colocar sobre una placa
de horno enmantecada
y enharinada y hornear
duran'e unos 50 m¡ utos
api ox ¡moda mente.
| STEP 6 |
Place it on greased and floured
baking tray and bake
tt frr about 50 minutes.
[ PASO 3 ]
Hacer un hueco en el centro
y verter allí los ingtedientes
licuados. Tomar la masa del
centro hacia fuera con una
cuchara de madera.
[ STEP 3 ]
Mabt a bole in the middle
and pour the uther mixture
ni. Hlend all the ingradi nls
u ith a ti ooden tpoori.
[PASOS]
Espolvoreen en ¡a mesada uri
poco de hcit ¡na y masajear la
masa, cuando la misma tome
consistencia suave y no se pegue
a las manos n¡ a la mesa,
ubicarla dentro de un bol. cubrir
con film adhereme y dejar leudar
hasta que doble su vol tmen.
| STEP 5 ]
Sprint le the rounier tvith
flour and m¡ and streteh
the batter until soft It sbould
not stick to your híinds nr
the wunter. Píate it in a
Mid, uitvr tvith film and let
it brete until tu ice at big.
M A61C cakes | ?t
*
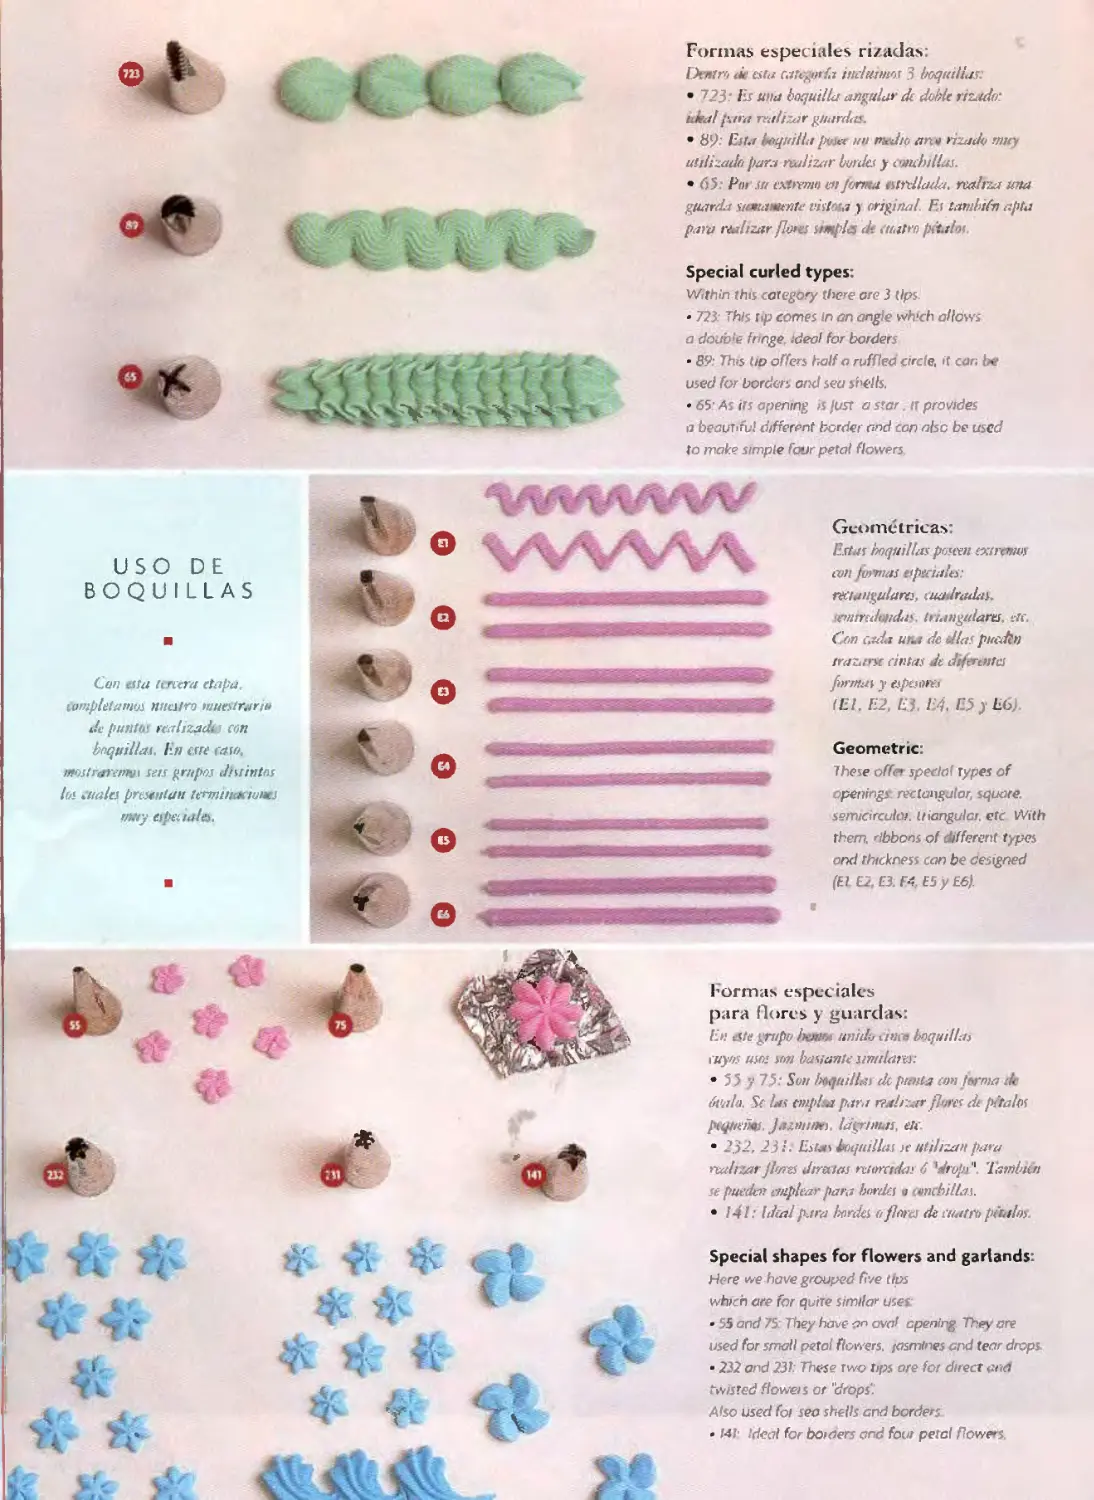
Formas especiales rizadas:
Dentro tic esta cak nfa incluimos 3 boquilla
• 723: Es una boquilla angular de dable rizado:
ideal fiara realizar guarda'
• 89- Esta boquilla posee un medio arm rizado muy
utilizada fiare! realizar borda y cuuhdlas.
• 65: Por su extremo e» Joma uurdladd. realiza una
guarda star. i tente vistosa ) orrg ¡nal. Et tanibiln afita
fiara realizar fie K suri files de, teatro pctalw.
Special curled types:
Wtthin thís caregory there are 3 Ups
• 723: Thls típ comes in an angle whích allows
a de !D(e fringe. ideal for borders
• 89: Thts Ud óffers half a ruffíea circle, ¡t car. be
used for borders and sea snells.
• 65: As ¡ti apening is just a star. tt provides
a beauraul different border and can alsc be used
to malte simple fajr peta! flowers
USO DE
BOQUILLAS
Con esta tercera etapa,
Completamos nuestro muestrariu
de punto' rcalizqdt con
boquillas. En este rato,
uKntrarenu. i seis grupos distintos
los cuales presentan termlqm iunts
muy apénala.
Geométricas:
'rías boquillas poseen extremos
con formas -aprendes-
rea angulares, cuadradas.
emindindas, triangulares, etc.
Con cada una de días puedin
trazarse cintas Je dífdüutct
firmal y espesores
(El. E2. E3. E'í, E5 y E6).
Geometric:
7 hese olíe* special types of
penings rectangular, square.
semicírculo!. triangulen, etc With
them, Ibbons of ddferent types
and rhtckness can be de: tgned
(El El, E3 f¿ E5 y £6/
Formas especiales
para flores y guardas:
En ate grufio Iku . unido tinca boquillas
cuyos usos son bastante simdares:
• 55 " 75: Son brufuillat de punta con tm>a de
óvalo. Se las e»i¡ w para realizar flores de ¡díalos
ptqiuiin. Jazm u> Id^rimas, etc.
• 2.J2, 23.!. Estas boquillas ¡e utilizan para
realizar jlwtí Jirutas nurrct.h' 6 'Jrofis' 'lambUh
se pueden niplear para bordes j imbi las.
• 141: Ideal p.tra borda a flora de ctMtn pirulos
Special shapes for Flowers and gartands:
riere we havegrouped fíve tlps
whitri are for quite similar uses:
• 55 and 75' They have an oval apenlrg. Tbey are
used for malí peto fícwers ¡asmlne and tear drops.
• 232 and 231: These two tips are for direct ana
rivisted ftoweis ot "d ops '.
A<so used foi seo shells and border
• I4V ideal for boioers and four petal flowers.
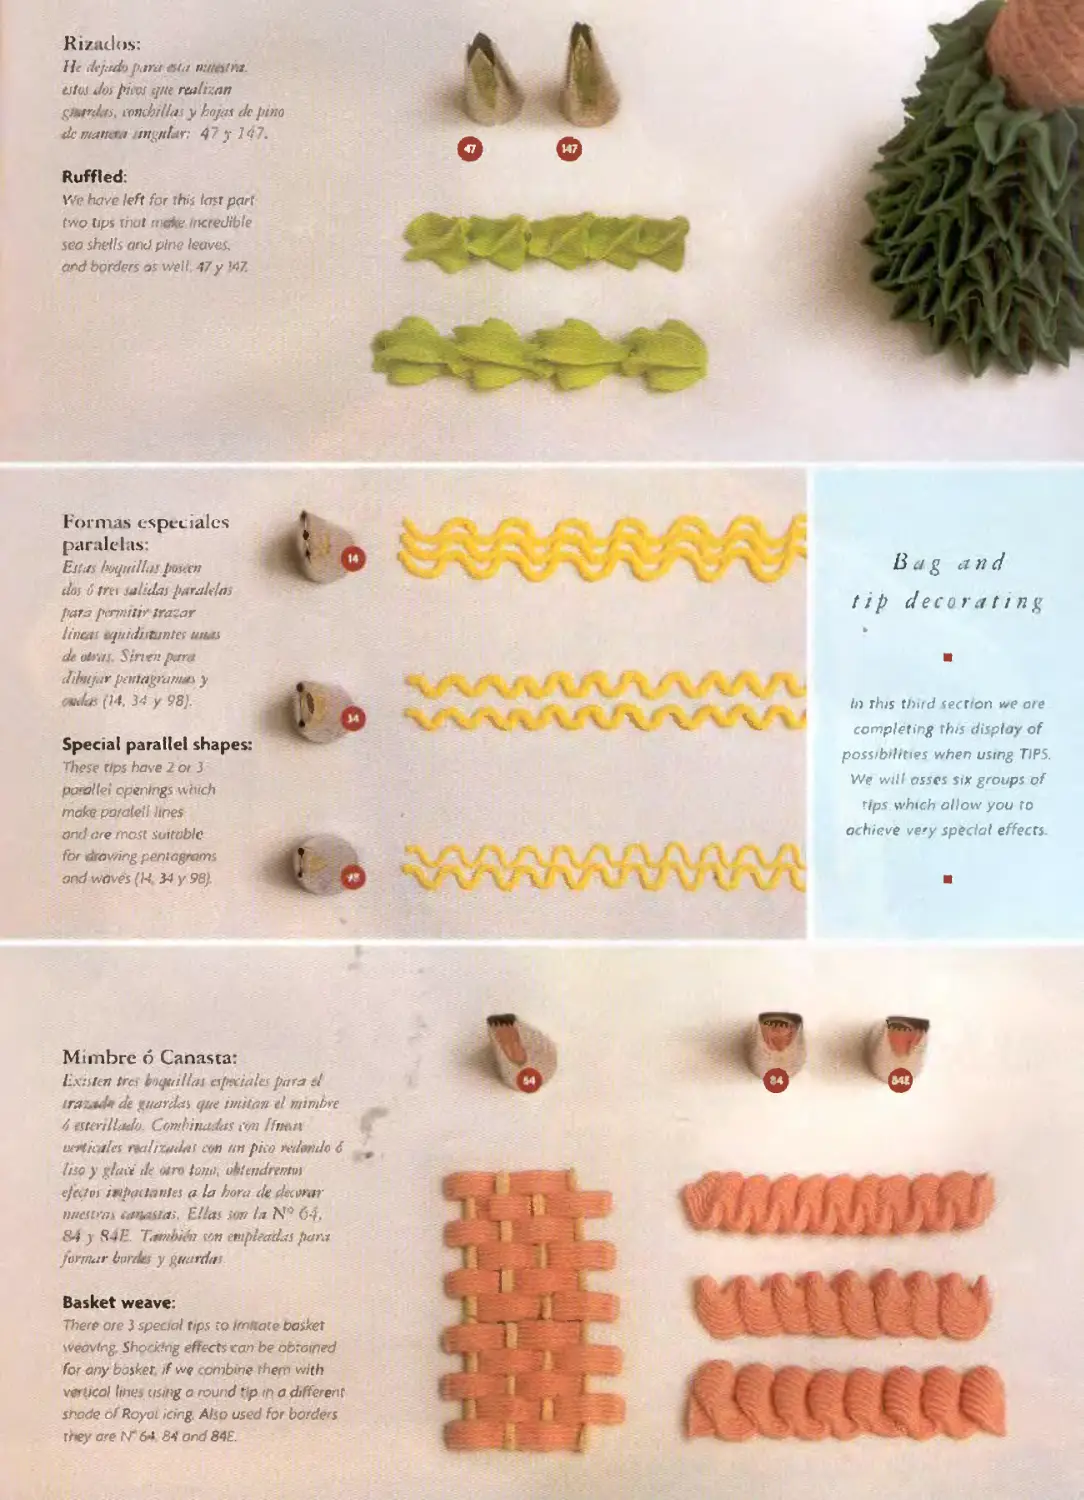
R zados:
lie dejadapara tita mmutra.
estes das piivs ¡pie realizan
gi ardas. if>fíi¿ las y hojas de pino
tic mam t r lingtdart 47 y 747.
Ruffled:
We have left for this lasr part
two tips t'nat mane incredible
seo shells and. pine leaves,
and bordees as v/ell. ;7y \47.
Formas especiales
paralelas
Estas btuprilLts poseen
dos ó trti salidas paralelos
paro permitir ¡rasar
lifiatt tqnidisbs mes unas
de otras Sinmfrrra
dibujar pemagranuts y
«G (14, 34 y 98).
Special paratlel shapes:
These tips have 2 ot 3
pa'allei openings vehich
make poraleU hnes
and are mest suttoble
for rirawing peyiiagrams
ond woves (14 34 y 98)
Mimbre ó Canasta:
Existen tres boquillas especiales para d
tra lla de guardas que imitan t ’ mtmbre
d esterillad Combinadas ton Ifmstt
uffiiiitles nali :,/dis con un pico redondo 6
liso y glasé de otro iotut, oh 'mdremm
efectos irípqslanta a la hora de decorar
nuestras tenastas. Ellas fon l / Nw 6-í.
8-i y 84E. 7.’ niüAi son empleadas para
armar Imrde y guarda
Basket weave:
Vie o ore 3 special tips to itn ate basket
weovfog. Sbodcfng effeets cari be obrained
for any basket. ¡f we combine them with
v&Ucol hnes usittg a round tlp tn a different
snade of Royot icing. Also used for borde s
rrey are N'6¿ 8a' ond 84E.
B ag and
t ip decor a t¡ng
In this thi d secrton m> ore
completing this displayof
possibilities when ustng TIPS.
We wtll osses stx groups of
rips which ollow you to
achieve vety special effeets.
M \T E RI t L I. S
• 1 Torta rectangular de 29cm x
40cm (IT x 16") cub erra coñ pasta
Americana color rosa
• l Bandeja rectangulai
36cm x 48 cm (14 * 19") cubierta
con pasta color salmón
• ^astíllate
• Pasta para modelar
• 'asta de goma
• ilacé real
• Colorantes vegetales amarillo
claro beige. negro. verde, rosa piel,
mairon. duiarnoclaro, gits claro
• Iluminador en polvo
Co;orante en polvo ro¡o robot
• Cifta'i cloradas
• Moldes
HERRAMIENTAS
• Pincel
• Mangas con acople y boquilla N' 233
♦ 1 Ijera
• rsteta
• Palillo de madera
• Alambre doiado
• Car luchos de papel parafinado
MATERIALS
• I 29rm x i’h'in 111 ’xlu’ 1
retunglc c*kc cnrred with
pink ixillcd Inniliril
• 1 36 un x 48 cm 11 rxluV >
rccunglc cake bourel oovwed
wrh salmón pmk paste
• PiiMilhge
• Mixk’üing paste
• .inn piste
• H< >j-.il kir.g
• F< « x.1 culnsi Lgli vellw. IxrJge.
hl¿cl< green, | Jnk. skin c»4or,
luí twn. light 'x-.-icIl liglit grey.
» tatrl cIum
• Itird dustlng pcrwirr
• i den ifbbon
• cinp’ales
EQUIPMENT
• ’nint bfusltcw
• Piping bag with unipler
Ttps * 233
• Sctssors
• .McxMteg tuol
• ’kiiitlipicks
• Gi’.ldrXÍ VKire
• J’iping ags
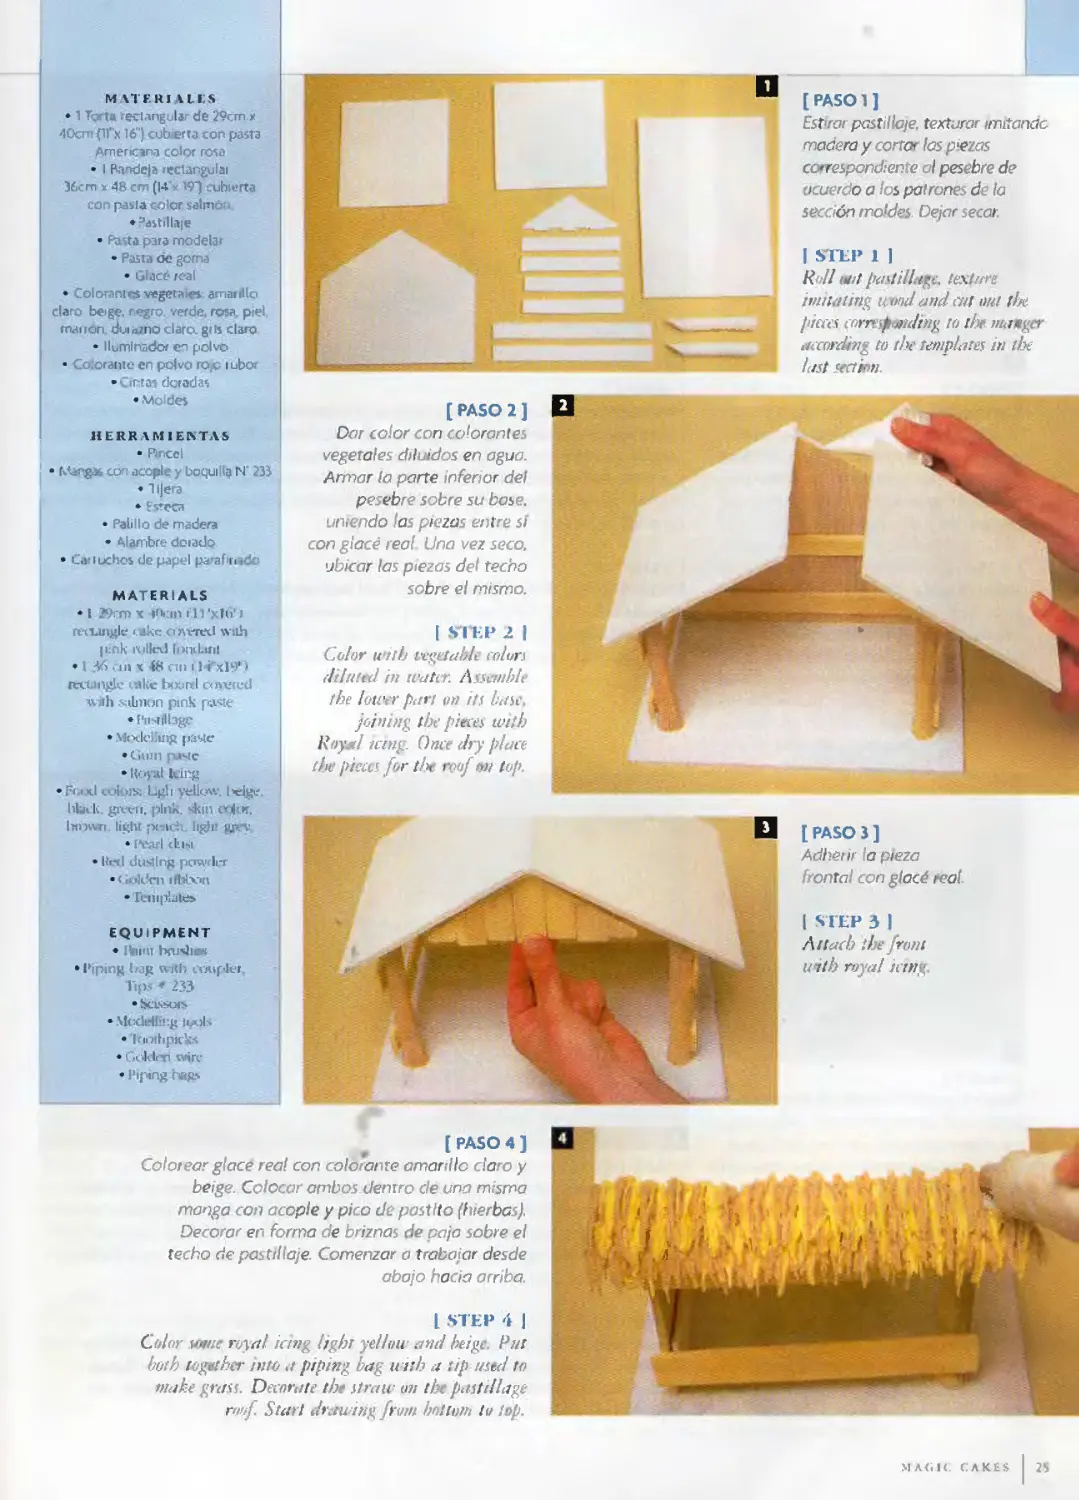
[ PASO 2 ]
Dar color con colorantes
vegetales diluidos en agua.
Armar la parte inferior del
pesebre sobre su base,
uniendo las piezas entre sí
con glacé real Una vez seco,
ubicar las piezas del techo
sobre el mismo.
[ STEP 2 |
Color utlb vegetable colon
diluitd in water. Assniddt
the louvr parí o» ,t base,
joining the pitees with
Royjd iíing. Ona dry place
the pieces. for th< roof oh top.
[ PASO 3 ]
Adherir la pieza
frontal con glacé real
| STEP3 I
Attach the front
mih roya! icmg.
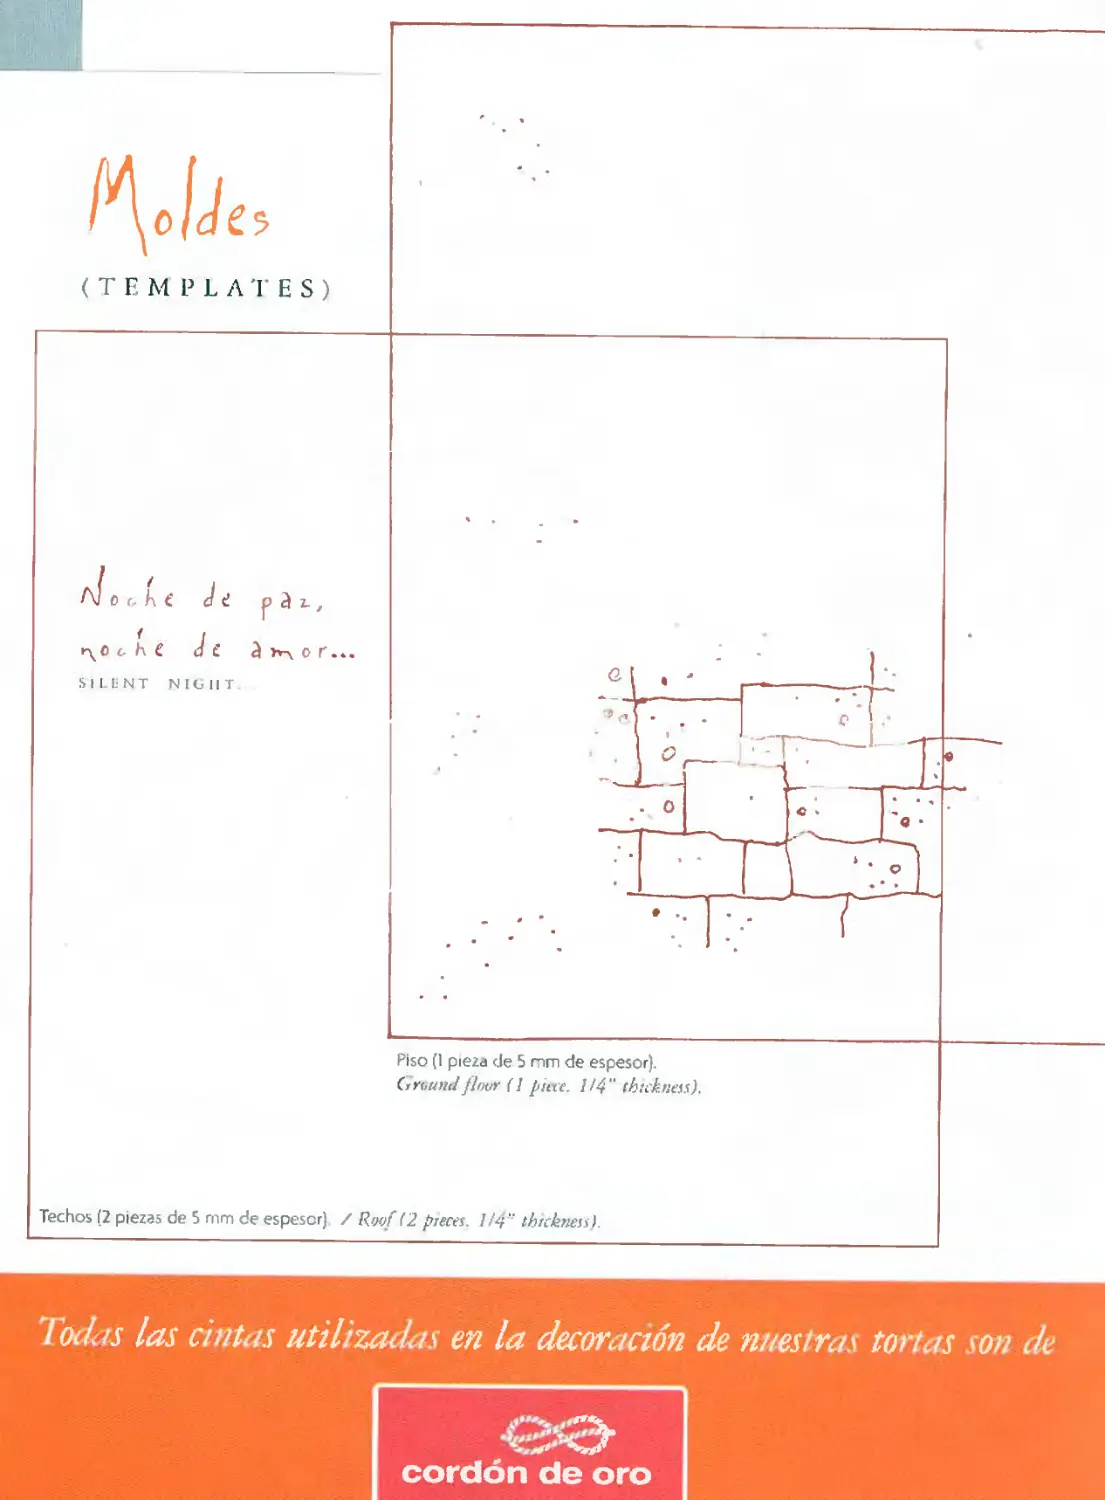
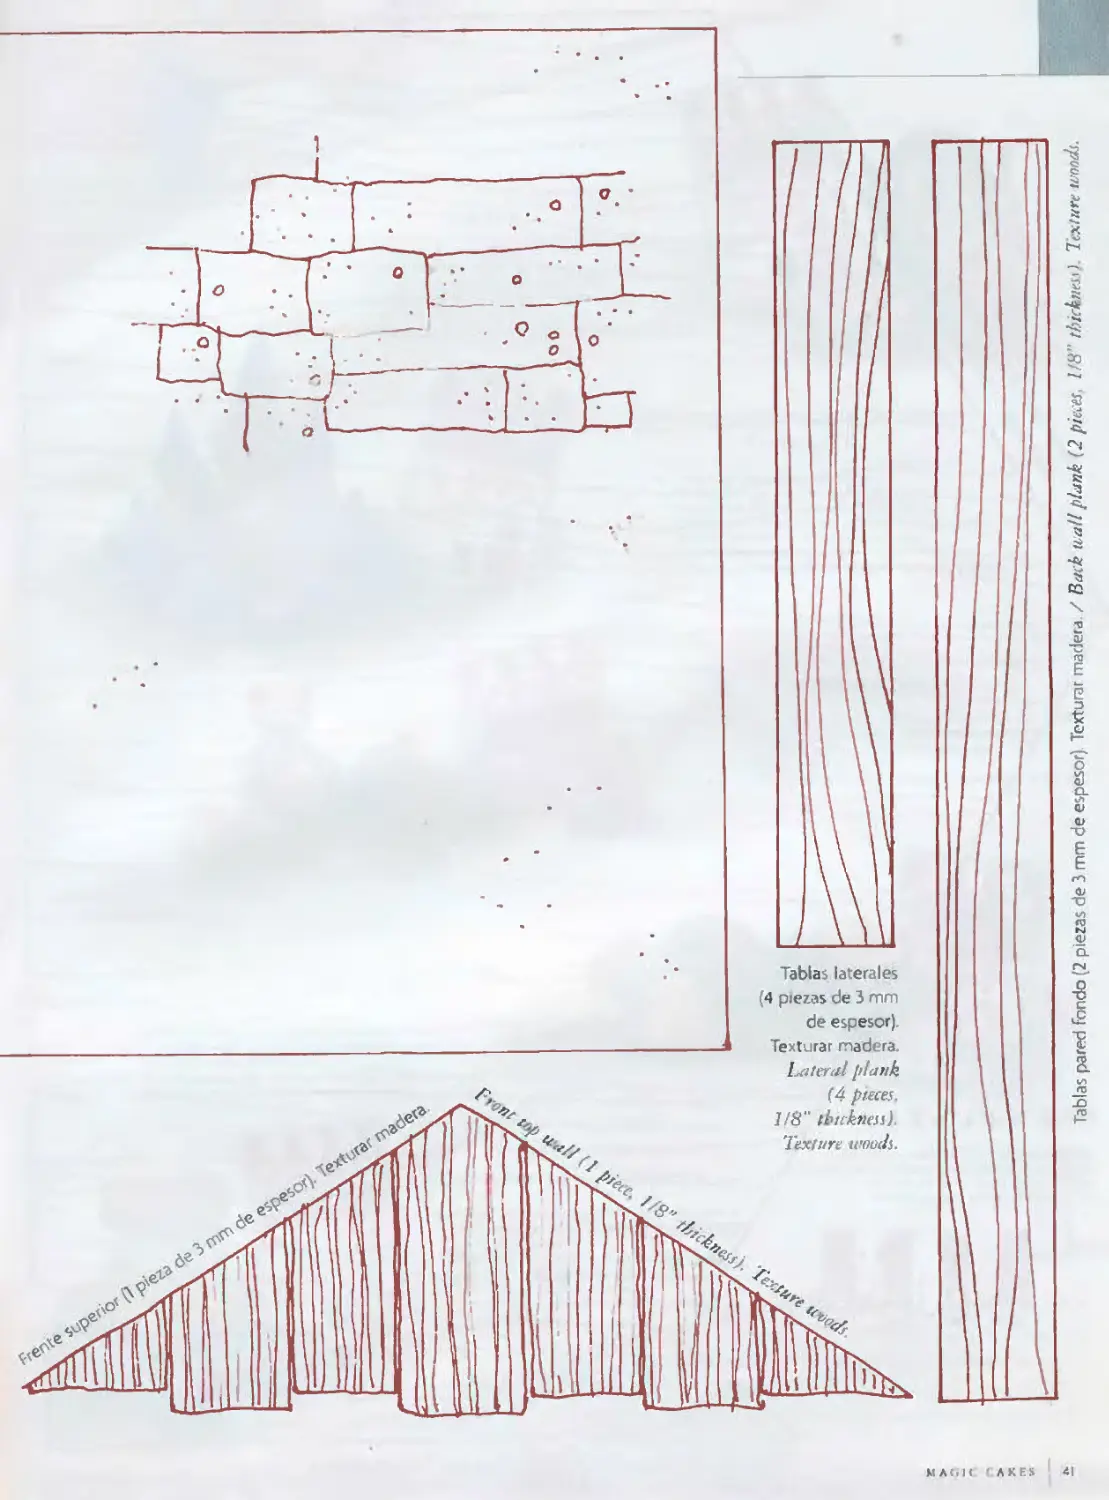
[ PASO 1 ]
Estirar pastillaje, texturas imitando
madera y cortar las p<e tas
correspondiente al pesebre de
acuerdo a los patrones de la
sección mobles. Dejar secar.
| STEP 1 1
Roll uit pcntilLtgc. lexticrs
imituting uwtd and cut mil the
pitees omsp mding to thr nwtger
uccording to the templares in the
last sectinn
[ PASO 4 ]
Colorear glace real con colorante amarillo claro y
beige. Colocar ambos dentro de una misma
manga con acopie y pico de pastlto (hierbas).
Decorar en forma de briznas de laja sobre el
techo de pastillaje. Comenzar a trabajar desde
abajo hacia arriba.
LSTEP 4 1
Calor srntit- roya! icmg lighr yelluw and beige. Put
búth toguthi r inte . / pipin bag u t’h a lip used tr>
muke grass. Decoróte the siraw on the pastillagé
rnnf Start drau;ing rm bnltom tu ti>
MACilf. t.AKES
25
□
[ PASO 5 ]
Estrella: Modelar una estrella a partir
de una bolita de pasta de color rosa.
Aplanarla y cortar las puntos con tijera.
Dar brillo con iluminador en polvo con
ayuda de un pincel. Reservar pam
pegar lo en el frente del pesebre.
[ PASO 6 ]
Pié: Modelar una bolita de pasta color piel y otra del mismo 'amaño de color
marrón para formar la suela de la sandalia. Dar forma de ovalo a la pasta marrón
y aplanarla. Dar orma de pera a la pasta color piel Pi anunciar la zona del pulgar
y marcar con esteca la separación del rrnsmo. del resto de los dedos. Ubicar el pié
sobre la suela de la sandalia. Cortar a la altura del empeine descartando la parte
de atrds del pié. Reservar.
I STEP 5 I
Star: Mfídel a star Jrottt a pmk silgar
paite ball. Flatten and cut with thi
scissors. Use a paint bnoh to ador u ith
dusting puudtr. Pal and< to stick ir
Inter tm the front.
[ STEP 6 |
Foot: Model a din caler tugar pastt ball and another brvwi¡ r>ne in rht sanie sise.
h> make the ¡olt of the sandal. Mar* the broten one nial andflattrn it. Model the
•ither int0 a piar. Enlargé the hig toe and sepárate it with a modeling twl frtmi the
athtr toes Place thefoot nn ¡he solé. Remwe the back of the fwrt and set aside.
[ PASO 7 ]
Torso: Modelar un cono de pasta color
verde para formar el cuerpo de José. Dar
movimiento al ruedo de ia túnica. Ubicar
los pies por delante de la misma Atravesar
el torso con un palillo de madera. Colocar
un rolltto de pasta color piel alrededor del
mismo para formar el cuelio.
| STEP 7 |
Bodv Modcl a green tugar paite
ame tn makejoseph's b»dy.
Stretch the rim uf hit turril Place the
jeet tn frrmt of it Inserí a stick inte the
búdy. Make the necé with a ¡kin ivltrr
paste roll. Place it armiad the stick.
[ PASO 8 ] *
Brazos y manos: Modelar un rollo de pasta color verde. Redondear un extremo
y ahuecar levemente el otro. Marcar el pliegue interno del codo con ayuda cíe
una esteca. Modelar las manos a partir de una bolita de pasta color piel. Dar
forma de lagrimo Aplanan Separar los dedos con ayuda de una tijera pequeña.
Adherirlas a los brazos.
[ STEP 8 |
Arms and hands: Mndel a greca tugar paste rull. tUnd mu end and bnllnu
the uther. Use a mudeling lu<d /o shau th<: Unes at the elbaw Ai odel the hands
frmn a small skin ador paste ball. Shapc it inte a tear. Flatten. Sepárate the
fingen using a ¡malí pair of scissors. Stick to the arms.
26 MAGK i AKtS
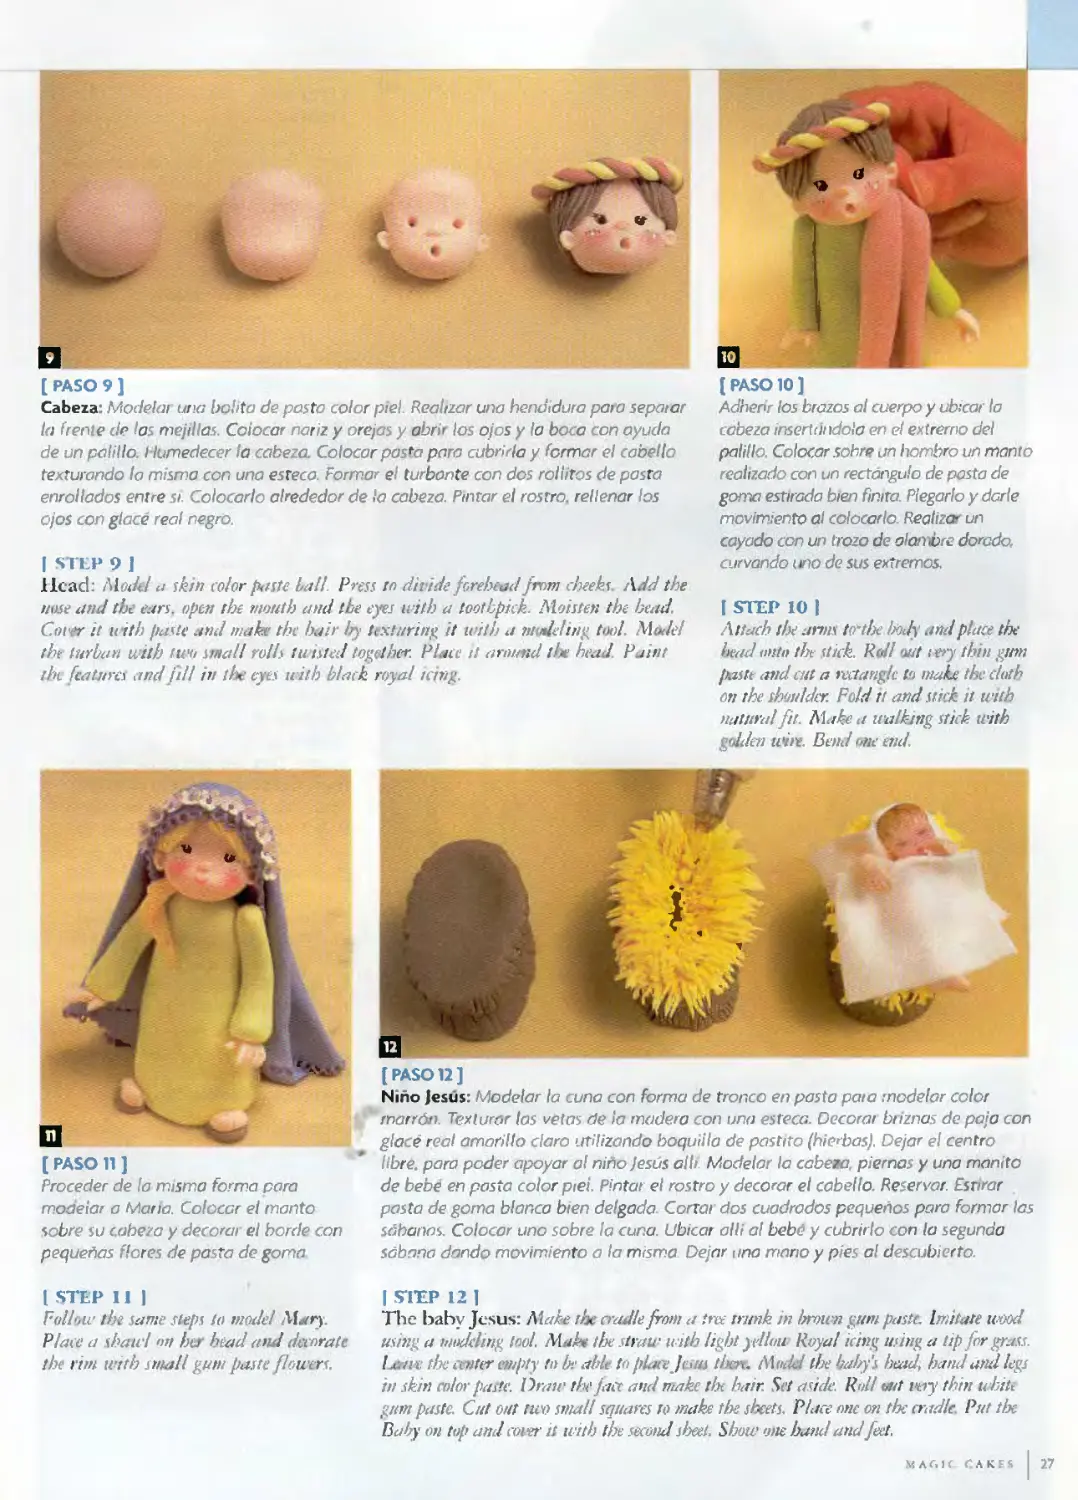
[ PASO 9 ]
Cabeza: Modelar una bolita de pasta color piel. Realizar una hendidura paro ¡epatar
la frente de las mejillas. Colocar nariz y orejas y abrir los ojos y la boca con ayuda
de un palillo. Humedecer la cabeza. Colocar posfa para cubrirla y formar el cabello
texturando la misma con una esteca. Formar el turbante con dos roliitos de pasta
enrollados entre si. Colocarlo alrededor de la cabeza. Pintar el rostro, rellenar los
ojos con glacé real negro.
| STEP 9 J
llcad: Modd » skih color paste hall. Press ro divide forebeadfmnj cheeks. Add the
u«se and the ears, opc-n the niotith and the eyes with a tootbpick. Moisten the bcad.
Coi r it uitb paste ¡ndmake the bu r by teXfuring it with a m ddtng tool Modd
the- turban with two sntall rolb fu nted togcther. Place it (¡round the head. Paint
the fcatnréj and [di iii the eyes u itb black roya! icing.
[ PASO 10 ]
Adheri los brazos al cuerpo y ubicar la
cabeza insertándola en el extremo del
palillo. Colocar sobre un hombro un manto
realizado con un rectángulo de pasta de
goma estirada bien finita Plegarlo y darle
movimiento ai colocarlo. Realiza' un
cayado con un trozo de alan v re dorado,
curvando uno de sus extremos.
I S1TP 10 |
¡Xttach ¡be ami\ to'tbe body .¡ndplace the
bead un tu the stuk Rdl ont i&y thin gum
paste and cal a rectanglc lo make the clath
on the shotddcr. Fcld it and stick it with
natural fu. Make a walking stick with
gijilen tiire. Bend «ne end.
[ PASO 11 ]
Proceder de la misma fo ma para
n O’ etar a Mana. Colocar el manto
sobre su cabeza y decorar el borde con
pequeñas flores de pasta de goma
[PASO 12]
Niño Jesús: Modelar la cuna con forma de tronco en pasta pata modelar color
marrón Texlurar las vetas de ¡a madera con una esteca. Decorai briznas de paja con
glacé real amarillo claro utilizando boquilla de pastito (hierbas). Dejar el centro
libre, para poder apoyar al niño Jesús allí Modelar la cabeza, piernas y una ma i to
de bebé en pasta color piel. Pintar el rostro y decorar el cabello. Reservar. Estirar
pasta de goma blanca bien delgada. Corral dos cuadrados pequeños para formar las
sábanos Colocar uno sobre la cuna. Ubicar allí al bebé y cubrirlo con la segunda
sábana dando movimiento a la misma. Dejar una mano y pies al descubierto.
I STEP 11 1
Foliote the same steps tu morid Mary.
Place i shaud on bu head a¡ l decórate
the rim with sniall gum paste flowers.
| VITP 12 1
The baby Jesús: Make irse eradle frmn a tree irunk in broten gum paste. Imitan wood
us ng a Mwkling tool. Moho the traw with ligbt ytdlou Royal iciíitz ¡ring a tip for grasa,
lai/tt the anter empty fn be able to placeJmís tben. Modd the haby’s bead, batid and legs
in skin color paste. Óraw rhe/act and make rbc hatr. Set asido. Roll nut vtry thin ubiie
gum paste. Cut out tuv small squares w make the sheets. Place one on the eradle. Put the
Baby on tup and cocer ii with tht: seccmd sheel. Show one hand and feet.
MAGIC CAKES 2.7
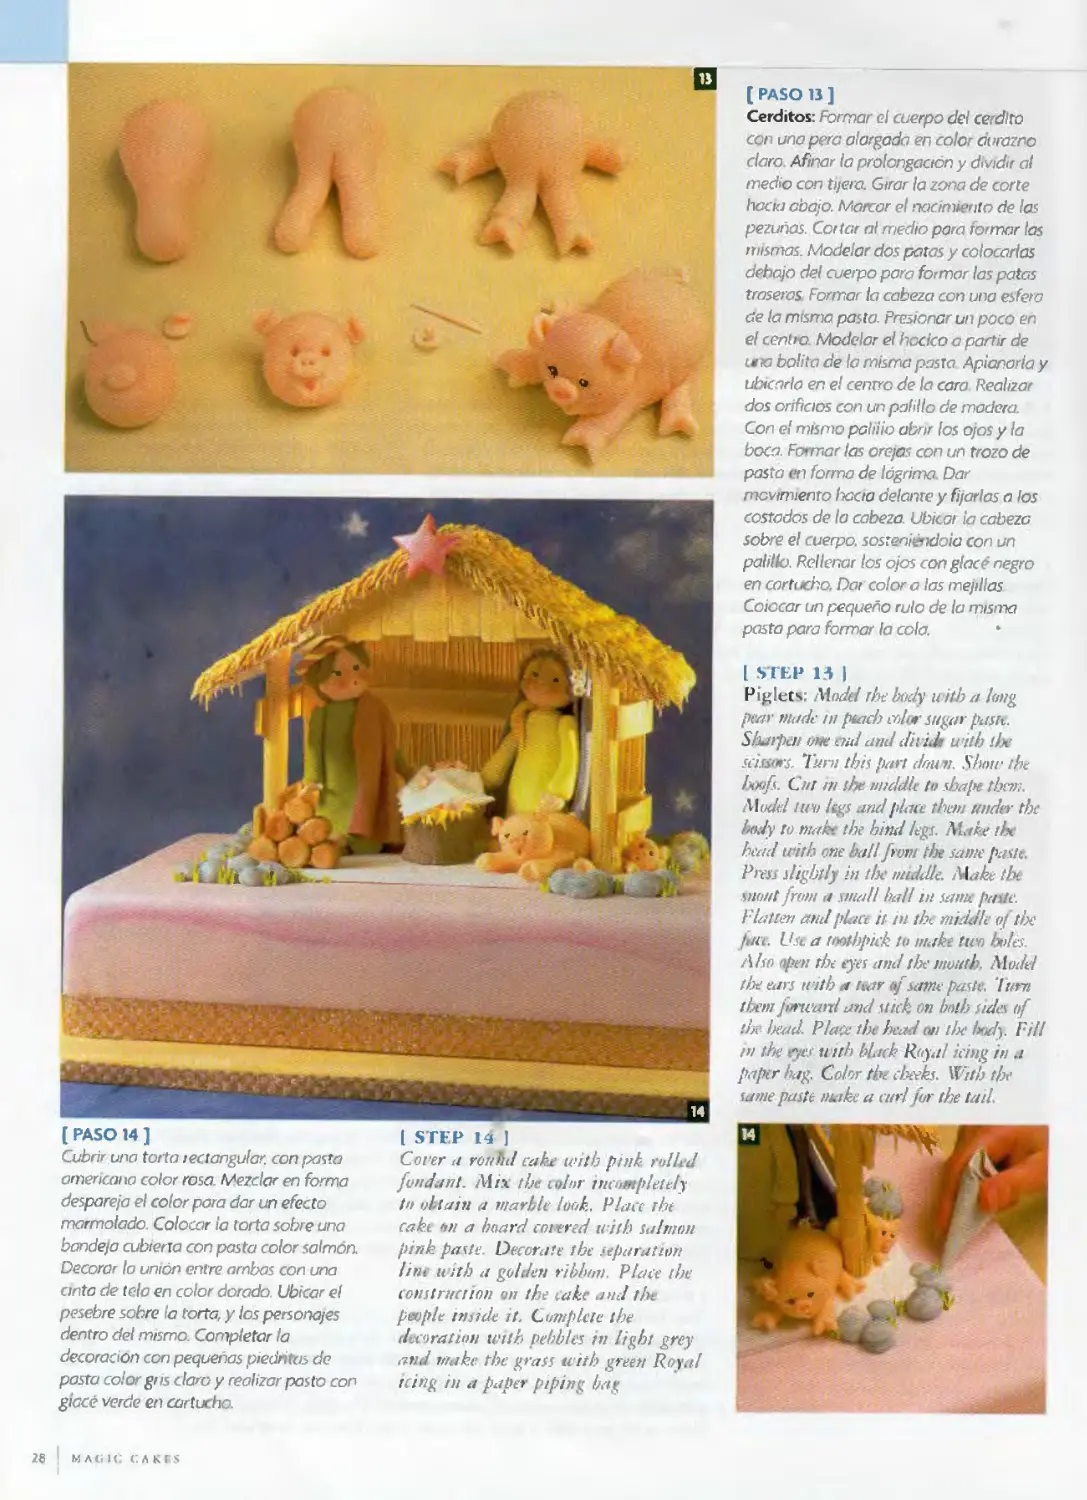
[ PASO 14 ]
Cubrir uno torta rectangular, con pasta
americana color rosa. Mezclar en forma
despareja el color para dar un efecto
mormolado Colocar ¡a torta sobre una
bandeja cubierta con pasta color salmón.
Decorar la unión entre ambas con una
cinta de telo en color dorado Ubicar el
pesebre sobre la torta, y los personajes
dentro del mtsmo. Completar la
decoración con pequeñas piedntus de
pasta color gris claro y realizar pasto con
giccé verde en cartucho.
I STEP 14 ]
Cocer ti ron ful cake tvith pink rollcd
fon dan t. /Un. the color tncumpletely
tn vbtain a ntarblc look. Place the
cafe olí a board anered u nh salmón
pink paste. Decórate the separation
lint u ith a golden ribbnn. Place the
construcción on the cake and the
people incide it. Complete the
decoration with pebbles tn light grey
and rnake the grass uith green Roy al
teing in a paper ptping bag
[ PASO 13 ]
Cerditos: Formar el cuerpo del cerdlto
con una pera alargada en color durazno
claro Afinar la prolongación y dividir al
medio con tijera. Girar la zona de corte
hacia abajo. Mancar el nacimiento de las
pezuñas. Cortar al medio para formar las
mismas. Modelar dos patas y colocarlas
debajo del cuerpo para formar las patas
traseras Formar la cabeza con una esfera
de la misma pasta, presionar un ¡zoco en
el cenho Modelar el hocico a partir de
tita bolita de la misma pasta Apianaría y
ubicada en el centro de la caro Realizar
dos orificios con un palillo de madera.
Con el mismo pahiio abrir los ojos y la
boca. Formar las orejas con un trozo de
pasta en forma de lagrima. Dar
movimiento hacia delante y fijarlas a los
costados de la cabeza. Ubicar la cabeza
sobre el cuerpo, sosteniéndola con un
palillo. Rellenar los ojos con glace negro
en cartucho. Dar color a las mejillas
Coiocar un pequeño rulo de la misma
pasta para formar la cola.
I STEP 13 |
Piglets: Modil rhebüdy u ith a long
pear mude rn píach color silgar paste.
Shaipen une end and di vid’ uith the
SCÍ.WS. Tunt ibis parí dffum. Show the
boofs. Cnt tn the nnddlt to shape tbrm.
Model tiro lígs and place them utider the
hody to mak- the hind legs. Mate the
head u ith ene ball frotn the same paste.
Press slightly in the mi dille. Make ib.
nnont /rom a mial! bal! in same paste.
Flatten and place it in the miadle of the
fon. Use a tmthpick lo make tico hiles
Also upen rhc eyes and tlx mouth. Model
the ears uith a toar >fsame paite, ’lum
them joneard and stick on btslh sida of
the head- Place tbi head un tlx body. Fifi
in the eyes ti ith black Roya! ieing in a
paper hag, Color the ebeeks. With the
same paste tnake a and jur the tai!.
28 macík; cakss
JO I .MAC re CAK1S
INGREDIENTES
• 'jOO cc da agua
• 2CO g (61/2 oz) de azúcar
• 2S0 g (8 cz} de almendras
• 1 cucharada sopera
de esencia de vainilla
MATERI Al l•:»
NECESARIOS
• Cuenco de cobre
• Espátula ele madera
• Placa
• Aceite para untar la placa
INGREDIENTES
• '00 mi eif w.ncr
• 2Q0 g (6 1/2 iV) «'I sug-ir
• 2¿ü g (B ozi of .iliiKinds
• 1 lr>p vanlh.i esscrwc
TOOLS
• A Cop|Jci pU
♦ Wwclcn spuiub
• Boaixl jnd sosne cnl
m sprc-.icl tile pan
[ PASO 2 ]
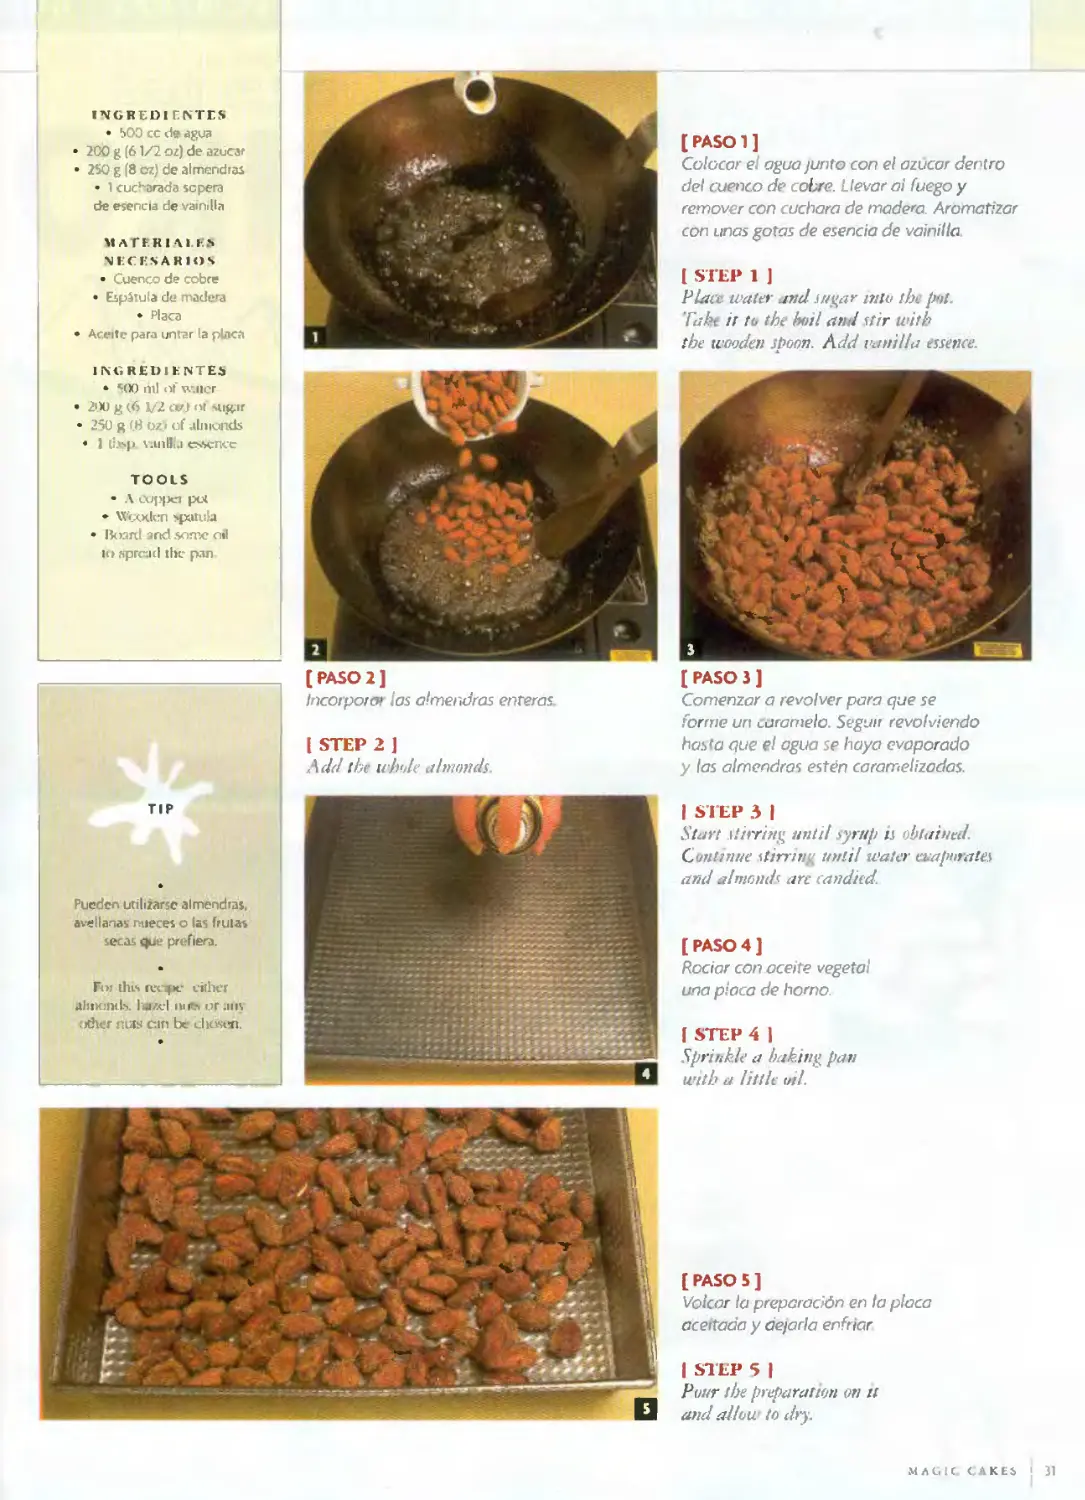
Incorporar las almendras enteras.
( STEP 2 J
A cid ¡be uh'de abnonds.
TIP
Pueden utilizarse almendras
avellanas nueces o las fruías
secas que prefiera.
For this rvope vitlicí
¿IiiKinds liazel ni ni t.ir.uiv
other nurs cin be chasen.
[ PASO 1 ]
Colocar el agua junto con el azúcar dentro
del cuenco de cobre. Llevar ai fuego y
remover con cuchara de madera. Aromatizar
con unas gotas de esencia de vainilla
( STEP 1 ]
Place water and rugar miv the p->t.
Takt ir to the hoil and rtir with
the wooden spoon. Add canilla essence
[ PASO 3 ]
Comenzar a revolver para que se
forme un caramelo. Seguir revolviendo
hasta que el agua se haya evaporado
y las almendras estén caramelizadas.
| STEP3 I
Star/ riirring unti! syrup n oblaiutd.
C ontinue rtirring unlil water evapórales
and almands are candied.
[ PASO 4 ]
Rociar con aceite vegetal
una placa de homo
í STEP 4 1
Sprinkle a bakittg pan
ivitb a little vil.
[ PASO 5 ]
Volcar la preparación en la placa
acc ada y dejada enfriar
| STEP 5 |
Pour ¡be preparation on tí
and allow to dry.
magic <;ms 31
ÍA DE COMPRAS • GUÍA DE COMPRAS • GUÍA DE COMPRAS • GUÍA
Cortantes
CHIRO
M.< r<*riat Pt ir. w.
Ü//7Ü6
Tel y Fax 4-602-7368 '
vvww.cortantasca¡ro.com ar
cair o@infovia.com,ar
ventas mayoristas únicamente.
COTILLON
“OSITO PANDA
MAITRIAS PRIMAS • RANADERIA • REPOSTERIA
CONFITERIA • HELADERIA • GASTRONOMIA
X^chocolatcs
DISTRIBUIDOR C NA APS/
• Líder en cortantes
para repostería
• Bolillos y marcadores
de nervadura
• Placas estampadoras
• Pinzas de filetear
Bstomha36l • Tel/I’ax (0291)i56 5020
C.P. (SOBO) • Bnhía Blanca • Provincia de Buenos tires
E mail; marticarlusfes jeed\ com.ar
°óqíofíqs - Ccike
Venta directa de fábrica por mayor y menor.
POSATORTAS DE HIERRO
• Cromados, oro, cobre y blanco
• Desmontables
• Bande as de acero inoxidable
• Modelos exclusivos
MOLDES DE ALUMINIO
• Extensa variedad de formas
y tamaños _
Vea la línea completa en:
www.marceladuran.com.ar
info@marceladuran.com.ar
TeleFax: (054) 011 - 4760-4286
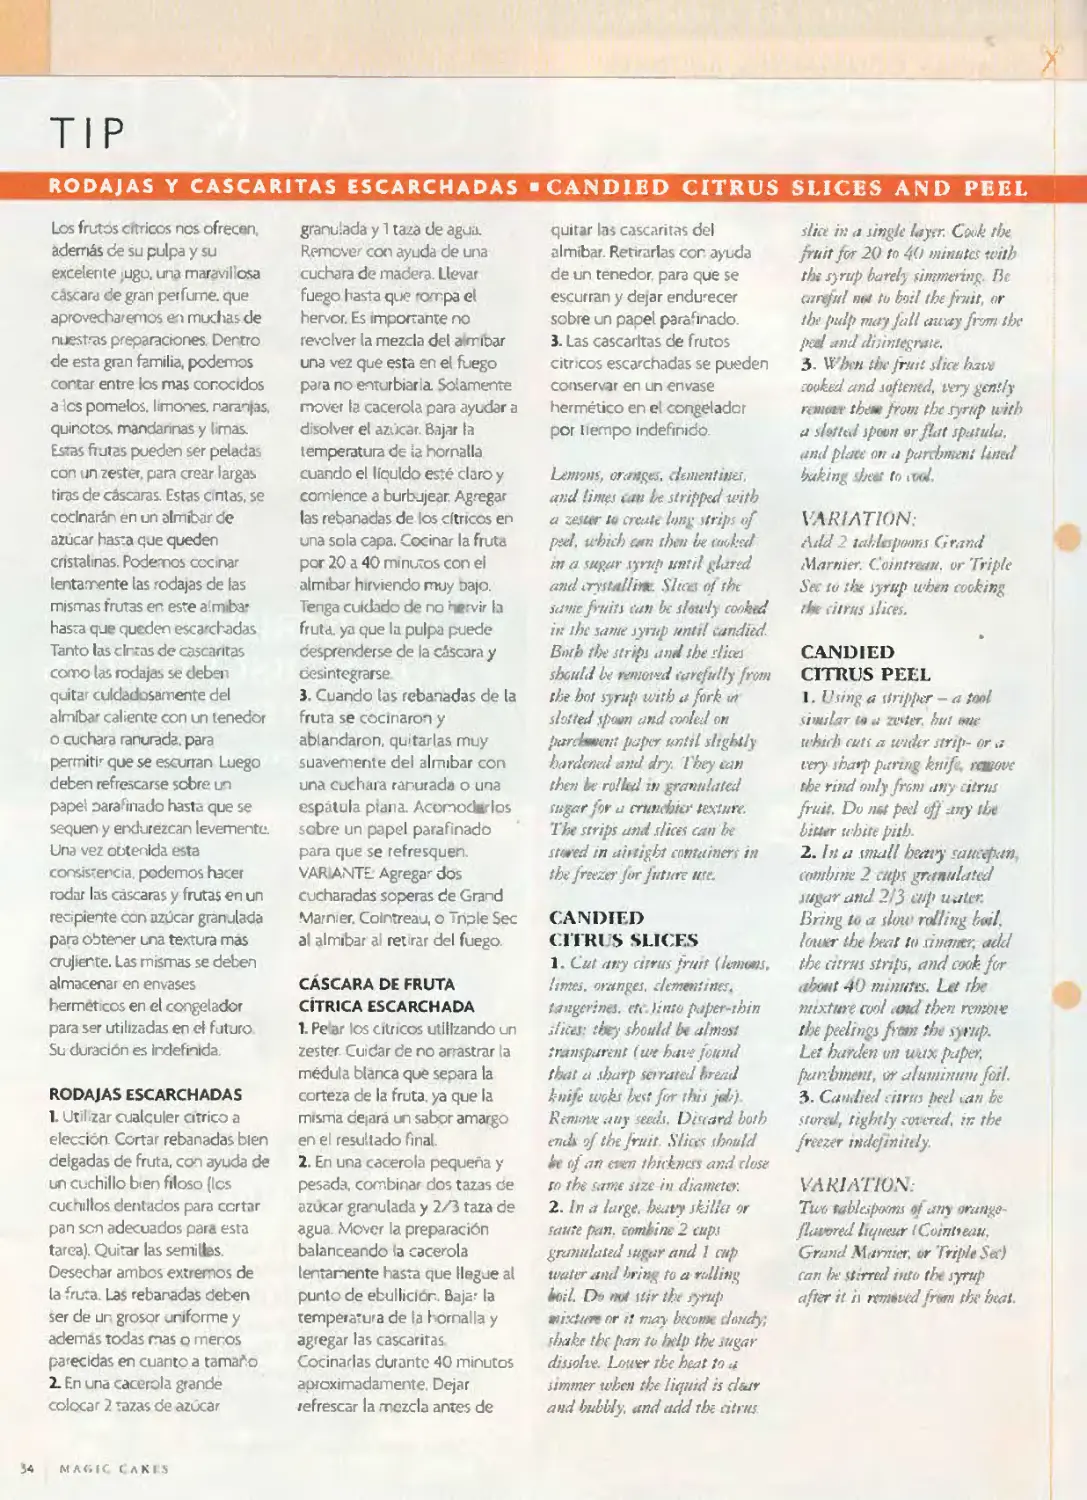
RODAJAS Y CASCARITAS ESCARCHADAS «CANDIED CITRUS SLICES AND PEEL
Los frutos cítricos nos ofrecen
además de su pulpa y su
excelente ugo, una maravillosa
cascara de gran perfume que
aprovecharemos en muchas de
nuestras preparaciones. Dentro
de esta gran familia, pedemos
cortar entre los mas conocidos
a les pomelos, limones, naranjas,
quinetos, mandarinas y limas.
Estas frutas pueden ser peladas
con rn zester. para crear largas
tiras de cáscaras. Estas cintas, se
cocinarán en un almíbar de
azúcar hasta que queden
cristalinas. Pódennos cecinar
lentamente las rodajas de fas
mismas frutas en este almifor
hasta que queden escarchadas
Tanto las cintas de cascaritas
como las rodajas se deben
quitar cuidadosamente del
almiba' caliente con un tenedor
cuchara ranurada. para
permitír que se escurran Luego
deben refrescarse sobre un
pape oarafinado hasta que se
sequen y endurezcan levemente.
Una vez obtenida esta
consistencia, podemos hacer
rodar las cáscaras y frutas en un
recipiente con azúcar granulada
para obtener una textura mas
crujiente. Las mismas se deben
almacenar en envases
hermet eos en el congelador
para ser utilizadas en el futuro
Su duración es indefinida.
RODAJAS ESCARCHADAS
1. Ut l<zar cualquier cítrico a
elección. Cortar rebanadas bien
delgadas de fruta, con ayuda de
un cuchillo bien filoso {les
cucmllos dentados para cortar
pan son adecuados para esta
tarea). Quitar las semilles.
Desechar ambos extremos de
la fruté. Las rebanadas deben
ser de un grosor uniforme y
ademas todas mas o menos
parecidas en cuanto a tamaño
2. En una cacerola grande
colocar 2 tazas de azúcar
granulada y 1 taza de agua.
Remover con ayuda de una
cuchara de madera. Llevar
fuego hasta que rompa el
hervor. Es importante no
revolver la mezcla del a-mibar
una vez que esta en el fuego
para no enturbiarla Solamente
mover le cacerola para ayudar a
d solver el azúcar. Bajar la
temperatura de ia hornada
cuando el líquido esté claro y
comience a burbujear. Agregar
las rebanadas de los cítricos en
una sola capa. Cocinar la fruta
por 20 a 40 minutos con el
almíbar hirviendo muy oajo.
Tenga cuidado de no htrvir la
fruta, ya que la pulpa puede
desprenderse de la cáscara y
desintegrarse
3. Cuando tas rebanadas de la
fruta se cocinaron y
ablandaron, quitarlas muy
suavemente del almíbar con
una cuchara ranurada o una
espátula piaña. Acomoda los
sobre un papel parafinado
para que se refresquen.
VARANTE Agregar dos
cucharadas soperas de Grand
Marnier. Coíntreau, o Triple Sec
al almíbar al retirar del fuego
CASCARA DE FRUTA
CITRICA ESCARCHADA
1. Pe ar los cítricos utilizando un
zester Cuidar de no arrastrar la
médula blanca que separa la
corteza de la fruta, ya que la
misma dejará un sabor amargo
en el resultado final
2. En una cacerola pequeña y
pesada, combinar dos tazas ce
azúcar granulada y 2/3 taza de
agua. Mover la preparación
balanceando la cacerola
lentamente hasta que llegue al
punto de ebullición. Baja- la
temperatura de la Icrnalla y
agregar las cascaritas
Cocinarlas durante 40 minutos
aproximadamente. Dejar
refrescar la mezcla antes de
quitar las cascaritas del
almíbar. Retirarlas cor ayuda
de un tenedor para que se
escurran y dejar endu-ecer
sobre un papel parafinado.
3. Las cascaritas de frutos
cítricos escarchadas se pueden
conservar en un envase
hermético en el congelador
por iiempo indefinido.
Lemaits, oranges, dentenfittes,
and times * jn be stripped with
a zesur ¡o créate Iwtg strips of
peel. whtch can the» be tookal
m a wg<w syrup unttl glared
and crystallime. Slices ot tht
same fruits can be slotrly cooked
in the same syrup untt! candied.
Bntb the Siripi andthe dices
shctdd be removed carefully (rom
the hot syrup with a fork ¡n
slülted sporn and moled on
pardawent paper unid sligbily
hardened and dry. Tbeycan
then ¿c rol lid in granulated
tugar for a crunehter textura.
The siripi and, s/iees can he
stwed in uhtigbt zonta inért in
the freezerfur j ature use.
CANDIED
CITRUS SLICES
1. Cut any arras fmtf (lenwns,
Ismti. as-unges, dementims.
tangerina. eti >into paper-thin
Hita they shou/d be almasi
transparent (wt havefettnd
that a iharp setrated bread
knife wdu best frr tisis pb)
Remolle auy seáis, Discard both
ende of thejruit. Slices should
ie (>j an ««77 thtfknas and clase
ra the ¡ame stze in diameur.
2. In a lar ge, beaty skilíei or
saute pan. combine 2 caps
granalated sugar and 1 cap
water and brittg to a rdling
boíl. D» not Mirthc syrup
mixture or it may befóme < Imdy;
dhike the pan to belp the tugar
dissolve. L&wer the hu.it to a
ummer when the liquid is citar
and bubbly. and add the diñes
sliu it; a ¡ingle /ayer. Cock the
jrmt fur 20 to 40 minutes with
th-syrup barely simmesing Be
umjid mJ tu bod the fmi t or
the pidp may jall away frvm the
peel and dhinlegntte.
5. Vt'hi'n the fruit si ice. haw
rooked and soltened, very genfly
reniMf tbetu from the syrup u ith
a slotted ipatn or fíat spattda.
and place on a parebntent luted
baktng dscat to ctnJ,
VÁRIATION:
Add 2 tcddmpmms Grand
Marnier. Cointreau. or Tiripie
Sec tu the syrup when cooking
the citrus ¡¡ices.
CANDIED
CITRUS PEEL
I k'sitig a strippcr — a tool
Similar ti a zester. bul <me
whuh cutí a wttür strip- or a
rery sharp paring knife. reáteme
the rtnd otdy frota any < itrus
fruit. Do ntí peel off any the
biticr white pitb.
2. h¡ a ¡malí Ixavy ¡aucepan.
combine 2 caps grantilated
Hipar and 2!^ a/p üid£r-
Bring tu a don rolUng boíl,
lounr the Ixat tu ximmtr. add
the cttrus strtps, and c<jok for
abrjHt 40 ntinttrts. Ltt the
mixture twl and t!xn remóte
the peelings fran the syrup.
Leí barden un uax papar,
panbment, or alumintim ful.
3. Candted citrtis peel can be
Storetl, ti.ghtly covered, tn the
freezer indefinitdy.
VAR1ATK)\
Tw<> tablespofms <>t any oranjte-
flatvred licjiiear (Coirtlteau.
Grand Mamar, or Triple Saj
can he itirred inta the syrup
after it ii nrntwidfren the hedí
3ó NAÍUC ( AKIS
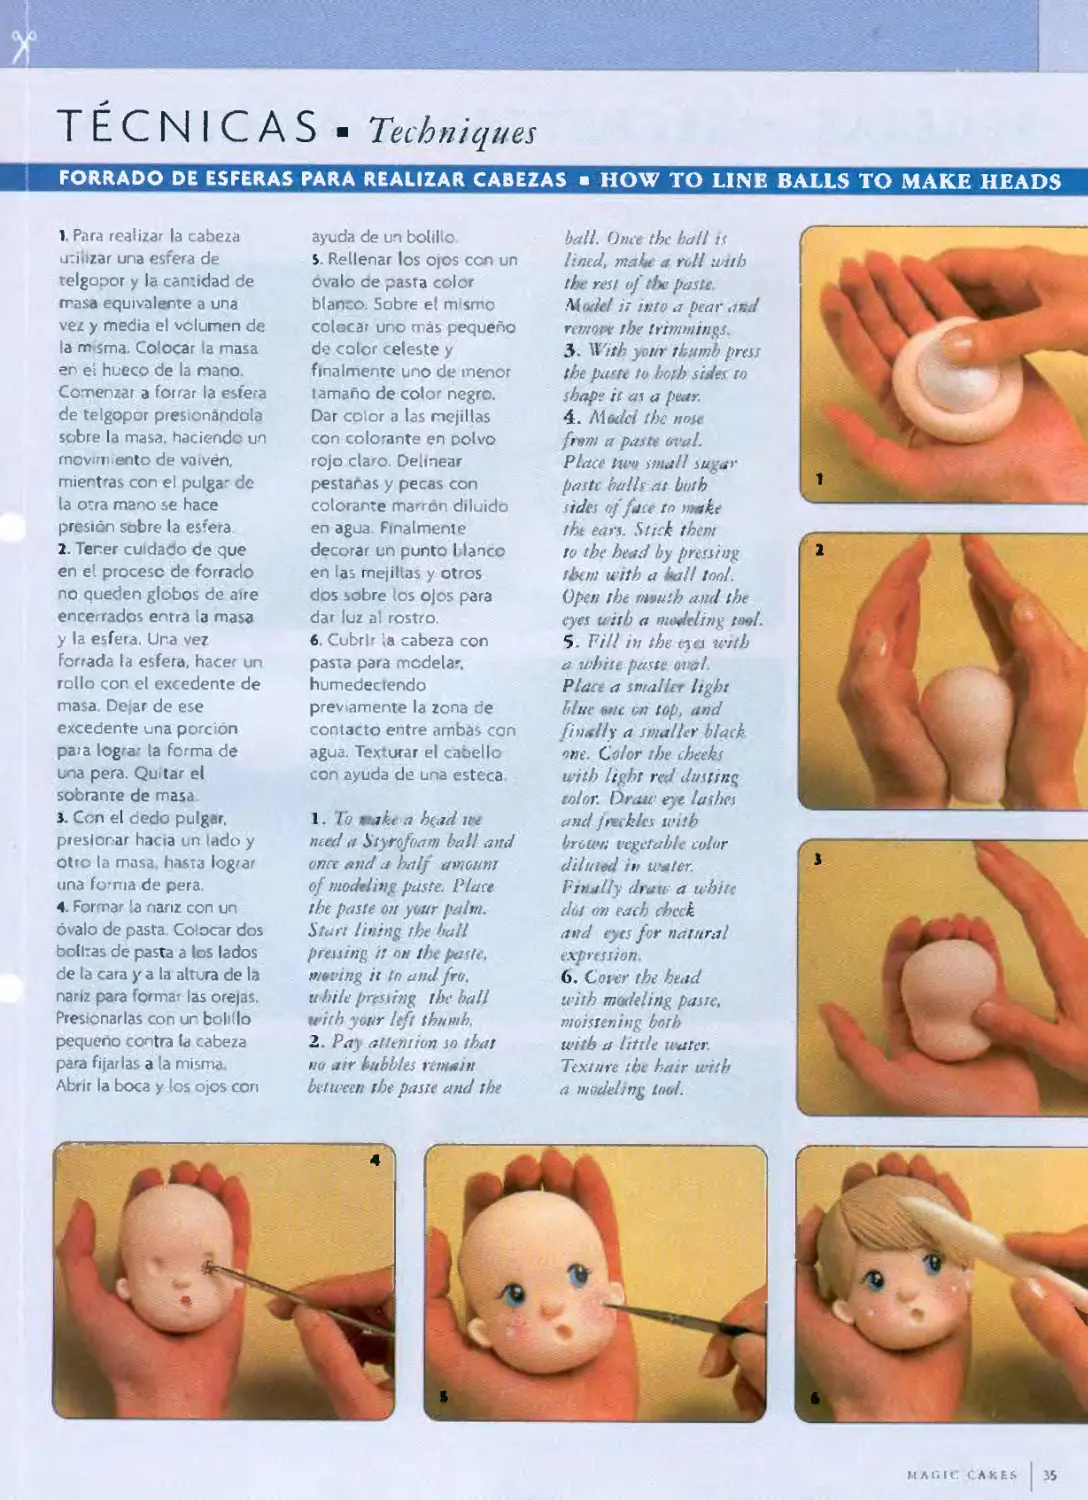
E NI AS- Technic[ues
FORRADO DE ESFERAS PARA REALIZAR CABEZAS HOW TO LENE BALAS TO MAKE HEADS
1. Para realizar la cabeza
utilizar una esfera de
telgooor y la cantidad de
masa equivalente a una
vez y medra el volumen de
la m sma. Colocar la masa
en eí hueco de la mano
Comenzar a forrar la esfera
de telgopor presionándola
sobre la masa, haciendo un
movirn ento de vaivén,
mientras con el pulga' de
la otra mano se hace
presión sobre la esfera
2. Tener cuidado de que
en e! procese de forrado
no queden globos de aire
encerrados entra la masa
y la esfera. Una vez
forrada la esfera, hacer un
rollo con el excedente de
masa. Dejar de ese
excedente una porción
pa>a lograr la forma de
una pera. Quitar el
sobrante de masa
3. Con el dedo pulgar,
presionar hacia un lado y
otro (a masa hasta lograr
una forma de pera.
4. Formar la nariz con un
óvalo de pasta. Colocar dos
bolitas de pasta a los lados
de la cara y a la altura de la
nariz para formar las orejas.
Presionarlas con ur bolillo
pequeño contra la cabeza
para fijarlas a a misma
Abrir la boca y los ojos con
ayuda de un bolillo
5. Rellenar los ojos con un
ovalo ae pasta color
blanco. Sobre e! m smo
colocar uno más pequeño
de color celeste y
finalmente uno de menor
tamaño de color negro.
Dar color a las mejillas
con colo'ante en polvo
rojo claro. Delinear
pestañas y pecas con
colorante marrón diluido
en agua. Finalmente
decorar un punto I lauco
en las mejillas y otros
dos sobre los ojos para
dar luz al rostro.
6. Cubrir ,a cabeza con
pasta para modela',
humedeciendo
previamente la zona ce
contacto entre ambas can
agua. Texturar el cabello
con ayuda de una esteca
1. Ib i ike a head we
need (r Styrtfoam ball and
once and a half amount
of tuodelivg paste. Place
the paste ou your pal ni.
Start lining the ball
pmsing it <>u //< paste,
moving it tn and fro.
ti hile presiing the ball
with your left ¡hundí.
2. Pay attetition so that
na air ínbbles remain
betunen the paste and ¡he
ball. Once, the ball ts
lined, mal* ¡t roH udih
the res t oj t!x paste
hiodel it ¡tito a bear and
remóte the trimmings.
3. \\"ith yot/r thumb prest
the paste to both sides to
shape it as a pear
4. Aiodci the nofe
fnm a paste oval.
Place twn stnall sugar
paste balls at both
sides of falce to makc
the ears. Stick them
to the head by pressiug
them u ith a hall tool.
Open the mnuth and the
eyes u. ith a mojeling tnel.
5. Pili in the tt<-.i with
a white paste, oval.
Place a sntallcr Itghi
bine uit en top, and
finally a smaller blacl
one. Color the theeks
u ith light red dusttng
color. Draw r las bes
and Jreiklcs with
bróUn; vegetable color
diluted in water.
Pithtlly draw a white
doí on each chcek
and eyes for natura!
ex-pression.
6. Coier the head
tvith madeling paste,
moistening both
tvith a lítele water.
Texture the hair with
a modehng tmd.
MAGUI cakes 35
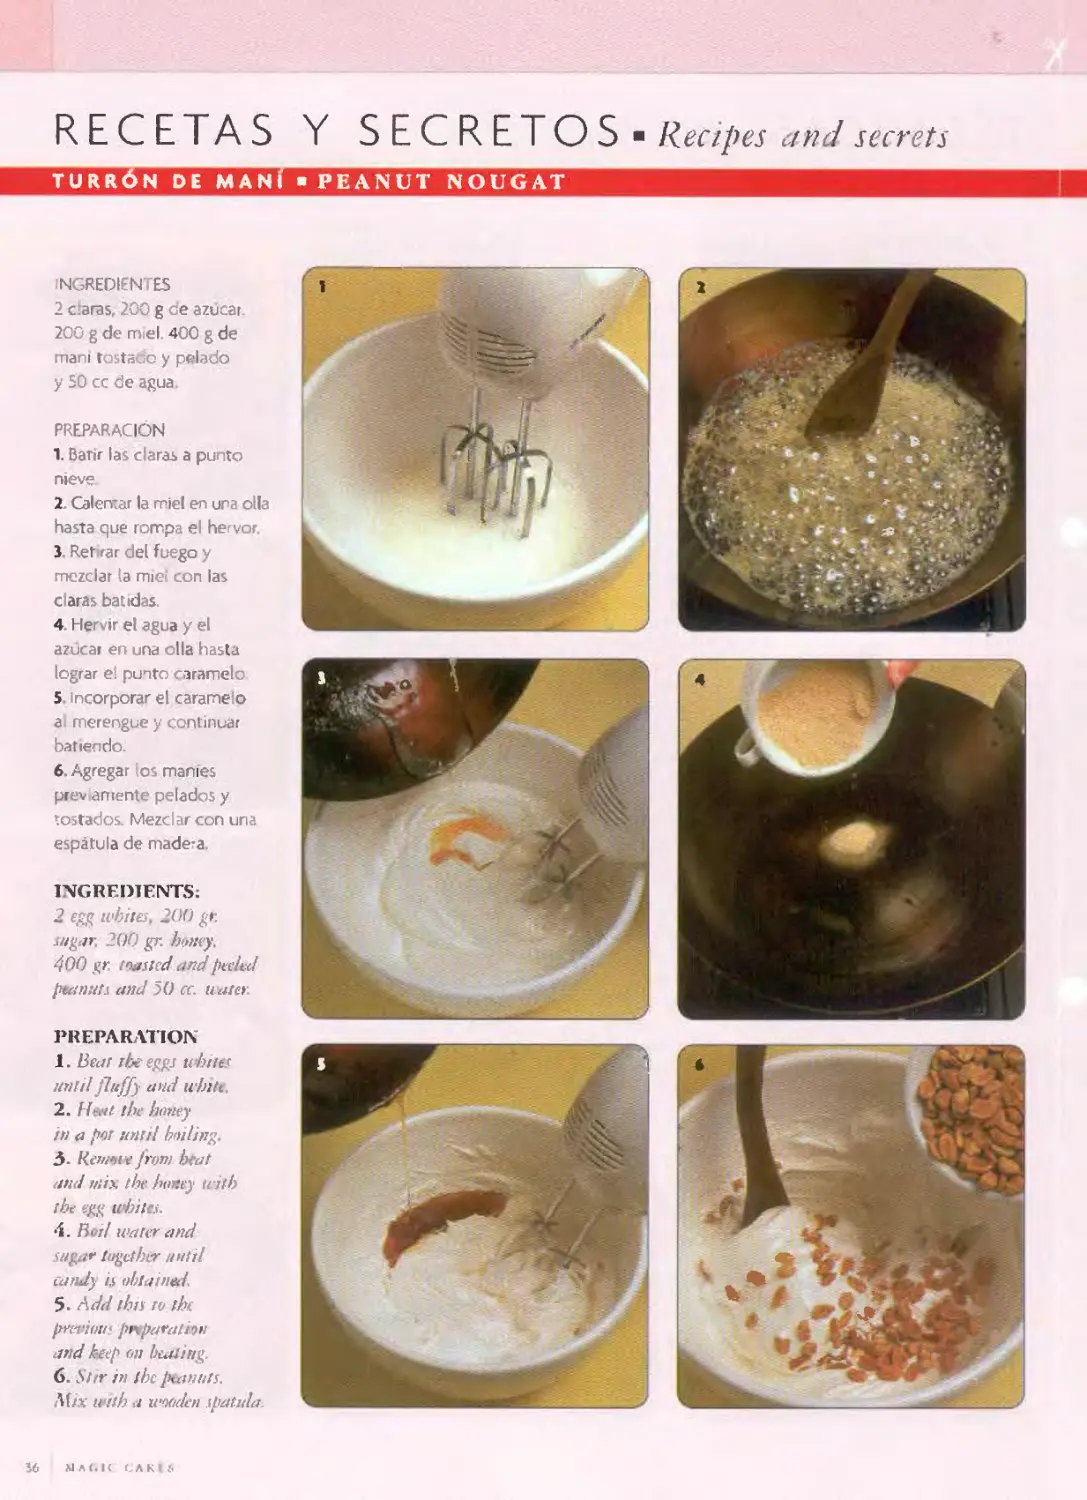
RECETAS Y SECRETOS" Recipes and secrets
TURRÓN DE MANI PEANUT NOUGAT
INGREDIENTES
2 c.'aras, 200 g ce azúcar.
200 g de miel 400 g de
maní tostado y pelado
y 50 cc de agua.
PREPARACION
1. Batir las claras a punto
nieve
2. Calentar la miel en una olla
hasta que rompa el hervor.
3 Retirar del fuego y
mezclar la meí con las
claras batidas
4. Hervir el agua y el
azúcar en una olla hasta
lograr el punto caramelo
5. incorporar el caramelo
ai merengue y continuar
batiendo.
6. Agregar los maníes
prev ámente pelados y
tostados Mezclar con una
espátula de madera.
INGREDIENTES
2 egg whites, 200 gr.
sugar, 200 gr. hwwy.
400 gr. twied andpeded
pía na ti and 50 cc. tiaiet
PREPARATION
1. lisa! ibeeggj ubiiet
unid fluffy and ivhite,
2. Hmí the hmiey
in a por nnril bniling.
3- Kewoie J'roni beat
and mix the honey tcitb
¡he egg tubilti.
•i. Rui! water and
tugar tugcthér itntil
candy is obla ned
5- Add ¡bis ro the.
pretMai. pnparation
and keep on bealing
6. 57ir in ¡he piannís.
Afzx with a ivoctden ¡batida.
16 MAÍ.IC CAKUi
RECETAS Y SECRETOS - Recipes and secrets
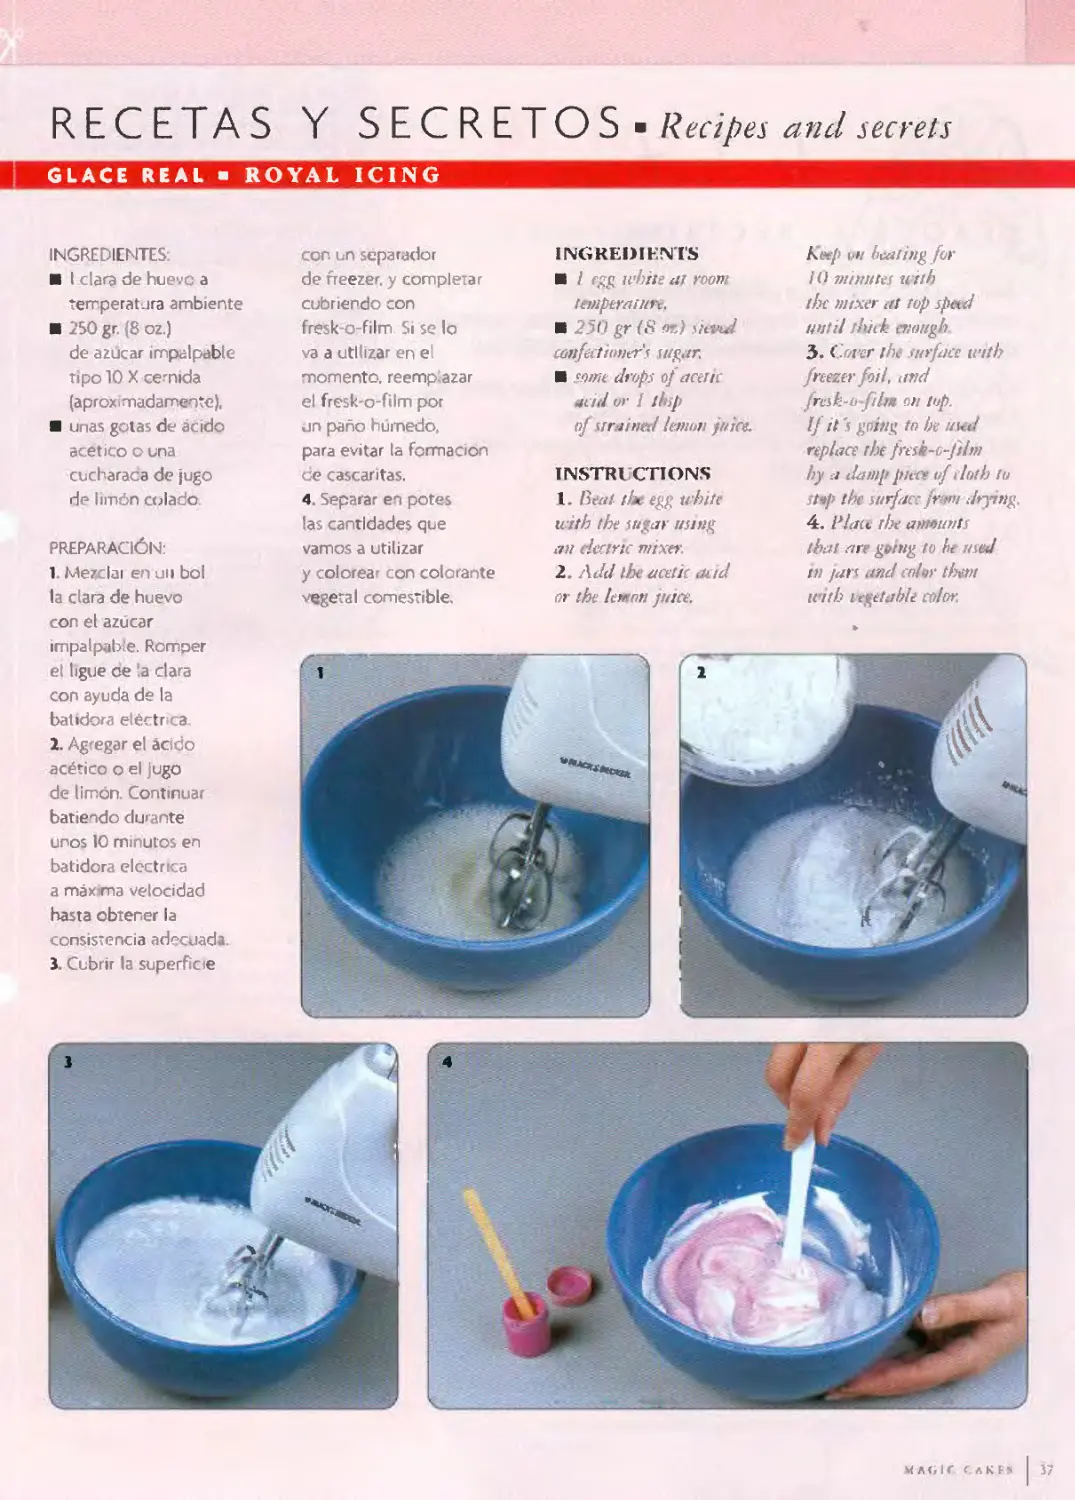
GLACE REAL ROYAL ICING
INGREDIENTE!
I clara de hueve a
tempera! ira ambiente
250 gr. {8 oz.)
de azúcar impalpable
tipo 10 X cernida
(aproximadamente),
unas gotas de ácido
acético o una
cucharaca de jugo
de limón colado.
PREPARACIÓN:
1. Mezclai en un bol
la clara de huevo
con el azúcar
impalp.ibie. Romper
el ligue de !a clara
con ayuda de la
batidora eléctr ca.
2. Agregar el ácido
acético o el jugo
de limón. Continuar
batiendo durante
unos 10 minutos en
batidora eléctrica
a máxima velocidad
hasta obtener la
consis*encia ade uada.
3. Cubrir la superficie
con un separador
de freezer. y completar
cubriendo con
fresk-o-film Si se lo
va a utilizar en el
momento, reemplazar
el fresk-o-film por
un paño húmedo,
para evitar la formación
de cascaritas.
4. Separar en potes
las cantidades que
vamos a utilizar
y colorear con colorante
vegetal comestible.
INGREIMENTS
/ tóg whiie af room
tempera ture.
250 gr {8 oz) dtved
confectioners sug ir.
some drops o/ averie
at iti or 1 íhsp
of strnined lemon juice.
INSTRLCTIONS
1. Beal the egg trhife
wrth the tugar usirig
an decirte mixer.
2. Add lh< ácetit and
or the tentón jtitce.
Kissp w bcáling for
10 minutes uilb
the tmxer ai top spnd
uvtil ihiite cnough.
3. Cover ¡he surfice ivitb
freezer foii, and
frak-ufilnt oh top.
If it 's goittg to be used
replace the fresk-o-Jtlm
by a datnp pitra of i loth lo
stop the surfact /'rom dr ng.
4. Plaa the amant/ls
tbai are gnng to t» usad
in jan and colar them
ivith vegetable color.
MAíilC CaKFk 37
Correo Je
R E A D E R ’ S SECTION
CALENDARIO
DE ACTIVIDADES
EN ARGENTINA
Próximos Seminarios
y Demostraciones
Aquí, esperamos tus cartas con sugerencias, consultas y
comentarios. A través de la misma responderemos a tus inquietudes.
Esctibenos a: magiccakes@speedy.com.ar FAX: (54-1) 4298-1269
Readers malí o letters froni our readers: W4 ¡ike tn hear from yon.
Send your commenis, reqnest and fifis and also any
question you havt. Ploase unte lo: magiccakes@spevdy.com.ar
Fax: (54-11) 4298-1269
uír^o» Itre»
Grucká por dar su maií paro preguntas.
Quiero hacerte a tm hija uno torta forwda y hacerle uno rnunequilo
encima para decoi arlo Que rr.e aconsejan utilizar para elle pasta
de goma o pasta para modelar..? Muy agradecida de antemano
lunu.Peru.
¡sílcf» lorZ d* ^-r\t d’\/ 4r/úS
PERFECCIONAMIENTO PARA PROFESORES
Dictado par Prof Edith Sánchez
)' Fecha: 6y7de Diciembre
27 Fecha. 13 y 14 de Diciembre
Duración. 16 horas
informes e inscripción (OH) 4298-1269
AÑO 2005 EN CAPITAL FEDERAL
-BUENOS AIRES -
Cursos regulares y ciases especiales.
Informes y reservas
de votantes. (011) 4298-1269
4^4,414^4 4 4441444 4 **♦
Est nada Mellssa-
F'ara cubrir la torro, puede» utilizar l.i pasta americana o fondant
extendido. En cuanto a la muñeca. puedes trabajar con cuj quiera de las
partas que mencionas. Lo unko que debes .recordar es que la pasta de
goma seca en menos tiempo que la de modelar. Con (o cual deberás
•'abajar con mucha más rapidez si utilizas la misma
l'H giufl ijjrifm ysunile "Edtth
II i id» !!!
Estuve revisando las recetas de pasta de gomo y posta de mcuiekit. me
gustaría saber CMll de ellas debo utilizar pora realizar un escenario con
un chico tocando la guitarra y otro >a bnteriri. Yo una vez hice el muñeco
de Diglmon con pasta de goma ñero esta cuando se seco quedó
quebradiza por auif? tuve algún error? De antemano muchas gracias por
su atención y co'aboracícn
Vc-ni n> Horacio
Querida Venus.
Como le expl taba a Mdissa. la pasta de goma seca mucho más rapédo que fa de
modelar por lo que si nc tienes mucha practica te conviene modelar con la
ultima Un error muy común en el preparado de la*, masas es el agregado tn
exceso de azúcar. Bte es uno ae los faetones que determinan que las mismas se
tomen arenosas o quebradizas al trabajadas La masa debe estar "ajustada para
trabajar ¿Que significa 'ajustada*? Significa, incorjaorar azocar en la medda justa
Se debe agregar poco a poco mientras te amasa. E| punto justo es cuando ya no
te pvga a lastraros ni a la mesa y su consistencia es firme pero suave □ la vat
.UMi
úQuC es Id «fjef a/í^AÍ
Mi nombre es Antenor Delgado, y soy de Perú
Hace urn días compre una revisto argentina de
tortas y decoración porque o mi esposa le
encanto todo lo fie repostería. pero entre los
ingredientes de la pasta ds modelar encontró la
siguiente palabra \egeiahna' Por lo que
quisiera por favor me puedan explicar que
significa pora ustedes vegetalmo y como puedo
hacer para pediría en mr pars.
I.n ahr.w» y gracias
Estimado Antenor
Gracias por escnLumos y vtyrat nuestra fagina
En cuanto a su consulta la Vegetalma, es para
nosotros uno de tos Ingredientes prlnclfwlci» en La
elaboración de las masas de azúcar Se trata de un
tij» de aceite vegetal hidrogenado, que se presenta
en envares como lo* de la mantequilla- Su aspecto
es bien blanco, no posee-oler, color ni sabor
Ayuda en la Imniectación de las pastas En algi/tos
países d similar es el Cosco, pero en aquellos lugares
en donde no se conocen estos productos. bien
puede reemplazarse los mismos por mantequilla o
margarina. Espr-ro Iviberle sido de utilidad
Lit nirdhil stiluiíi. Islitb
Alas (2 piezas) / (2 pitees)
Todas las cintas utilizadas en la decoración de nuestras tortas son de
cordón de oro
Tablas laterales
(4 piezas de 3 mm
de espesor)
J Texturar madera.
Tablas pared fondo (2 piezas de 3 mm de espesor). Texturar madera / Back watt plunk (2 pitees 1/8" tbkkjiéss) Ttxture tvfíods.
MAM, AKF.S 41
Tn-e trunki 12 piea's. diameter Ttxiurc wooíh.
• Cario» Te|eclor -16*1.9, (BI67SRWG) Caseios
PM»A
O I II I. R PRESENFATIONS
GUM PASTE
(. is cssnili.il m the su¿^« .nt
le ts idea? lo mate i owcrs and to ishapc lato dolh
I* K easy to moíd torsos and peopíe figi res.
r. can br cokired witi*. JUtharizcd rolor.ngs
It 1% alible and II l.s irady leí be used
Thcy corre in a practica Ihctrnofczmcd pací m;ing ol Ü.5S Ib
MARZIPAN I IKI PASTE
It h;»s i ikílcuuis ►ilrrHwicl kiste ¡1 can be «sed in a vnnety of wjyn
lo lili In a takci t| G4*r be uwd pljin ormi»w th
chocolate pra/lnc. cieoms, etc
Ti» covcr cdkts. lógclhrr ¿lili fundan t.
cuníttthmcr's sugjr ui pífwdcted ihi>cul.itc
To mixlel figures: i ntoi pord c* cunlccllor-tr s
sugar lili the dcslird ¿uroUleniV
fi can be cnloicd with uirtlxirlzcd coiorlngs. Rcady lo lx? u-»d
Thcy cíxnc in j prácnrit ihcrmuforn'rd ixrckaÁng of 0 55 Ib.
PASTILLAGE
it iv .1 voy nwllcjlilc and vuhilc paste
As Ihc pire es g«l really hñrd wbm llicy <lrv
il i% umó lo niakr ah' types oí cnn-unjcllcns and
solid figures: castics. houscs, plores oí lurrlfurr. coiurm, etc
h can be colorcd wllh aulhíxl7.e¿ color inga.
It Is cdtblc and iwcy lu be used
The)- come In a pracllcal Ihcrmolormcd p.ickaglngol I.K) Ib
SUGAKPASI l IO COVl.R PASEE
MODELINÜ PASTE
H is c¿sy lo be used verv mallcsble and with pleranl llaror.
Once moclelcd ihe f'guro cao he stiwcd fin i kmg'tif.ic.
I’. can be colorcd with aulhorUcd color ngs
Edible and iradj lo used
IIilV ciwnc In J p'.ictkal UiCíiiKikif med pJidteglng ol l.lü Ib.
¡I has a greal c asticny and m míense v-h>lc color It
lias a snxKJlJi and vclvet texnicc whldi «rales It idc?"
loi .iriY deemat ¡mi-
li irpJaccs lolled íondam Rraifr-tQ use. H be
uüloicd wtth duilioilzcd Lulorlngs.
In lwo fliívórs: yarnllu and ehtxolair
The)' «Mne In j pracitol ihcrmiiíbrmcd pactaglng
oí I 10 nnd l 65 fh -
Brsidrs Ihc practica Ihcrmoftirmrd padaging
viMf may a w ask !i>< Lsprctalld.kfrv Bnlliiiz lndustrl.il Une
You may ask m fci Ihc rniounl ypu dc»ire
wc «ave pjc».cU tú lulfill dllícicnl neetb
AMI NI Ul t S A
Pela, de Buenos Aires • Argenuna
Teíebxr (54 11J 4734-0404
e litad. a.*iie<tturl@aHienlud uunrar BVAv.bdlhna sugaipasLe.-ccuti
¿WEAREEXPORTING OUR RANGE OF PRODUCTS TO SWEDEN CHILE URUGUAY PARAGUAY AMONG OTIIER