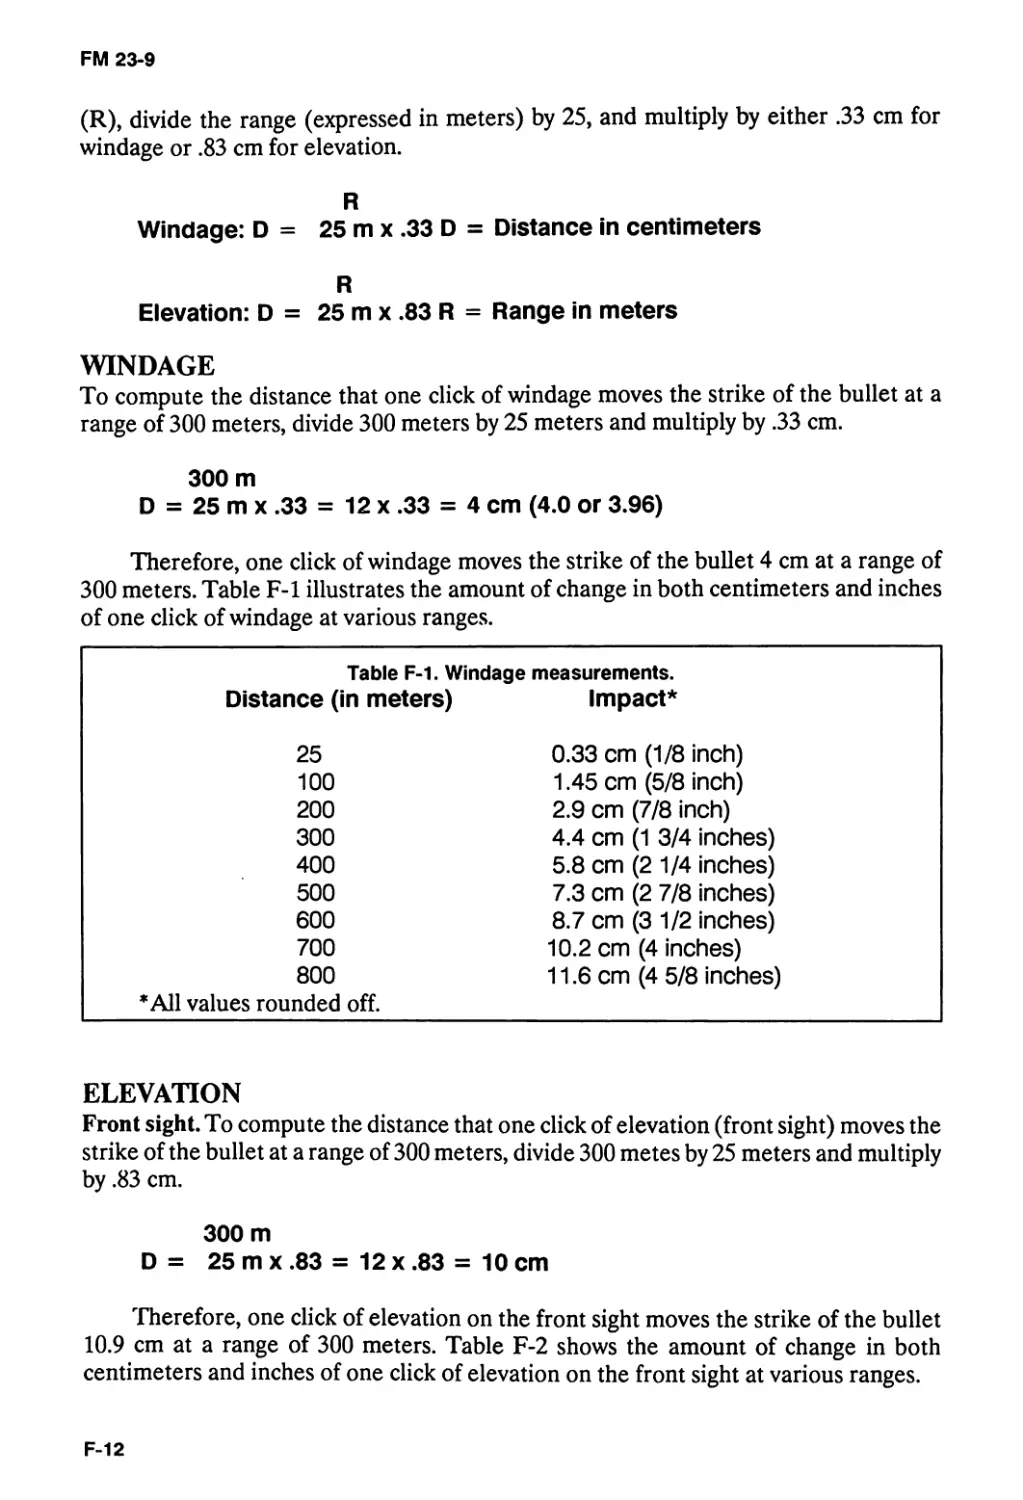
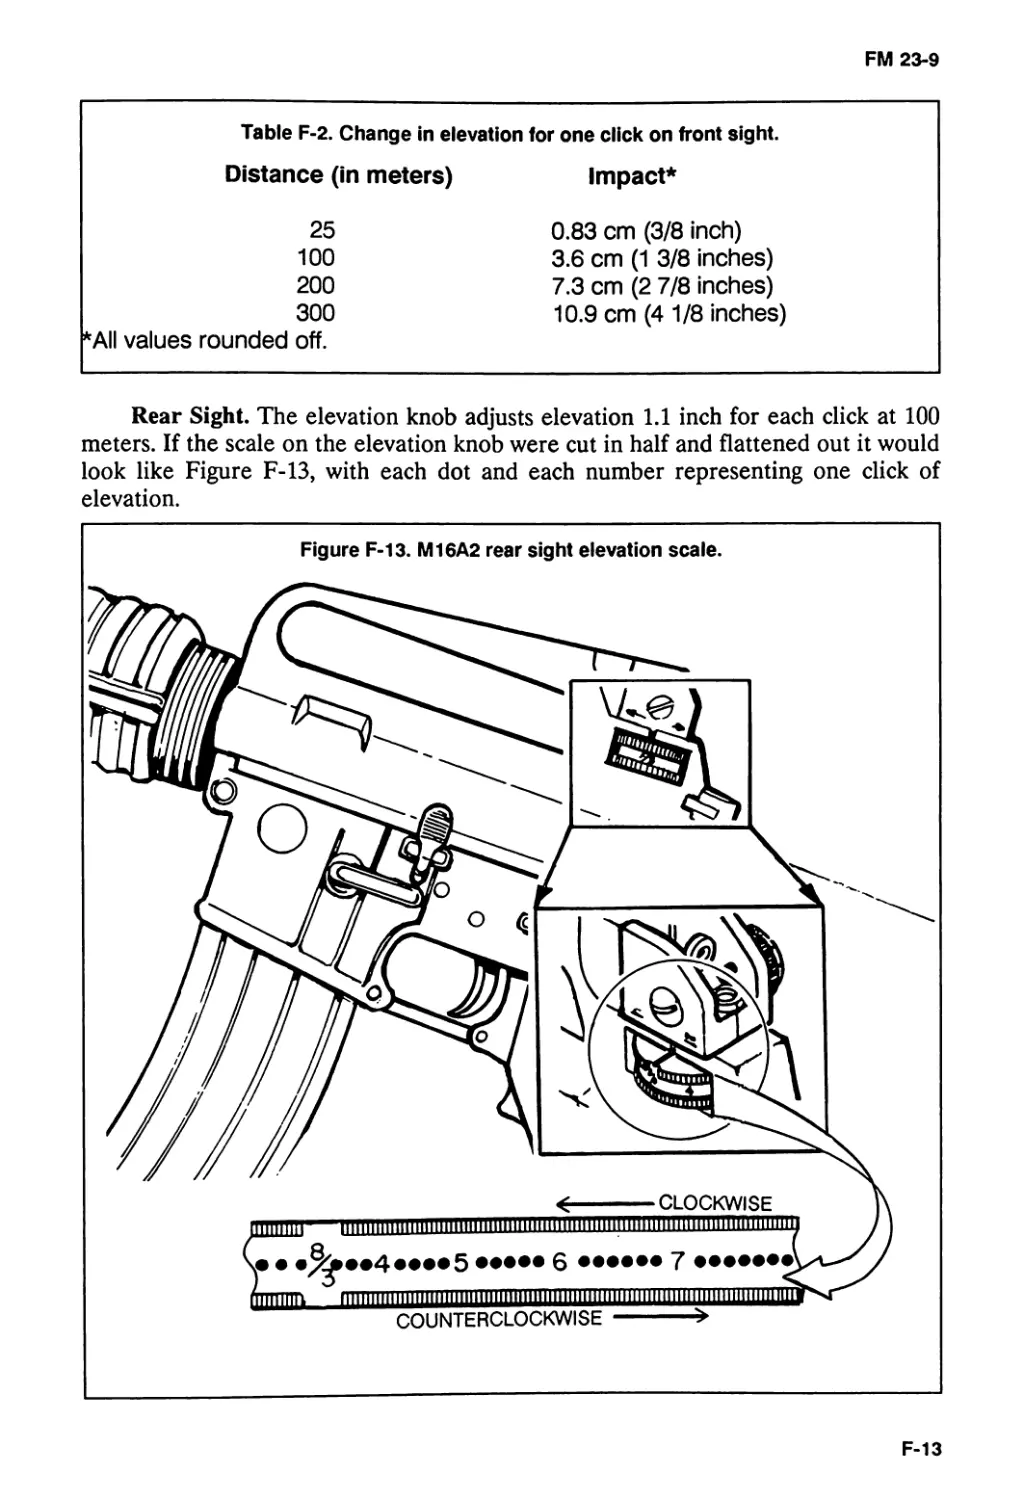
/


Tags: weapons
Year: 1989


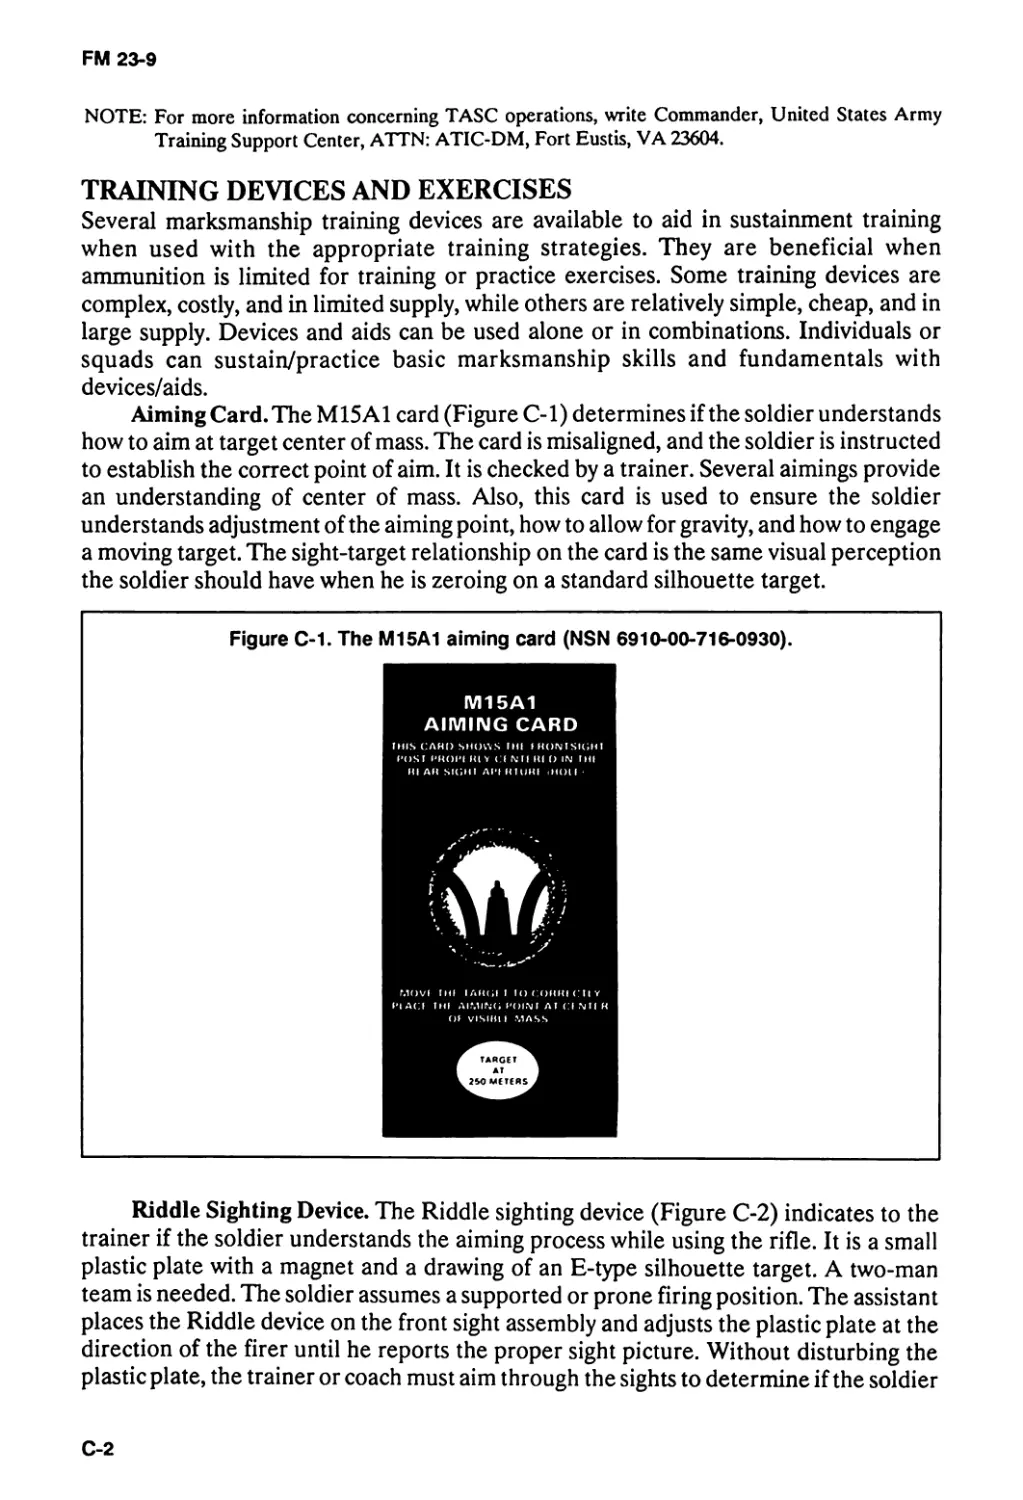
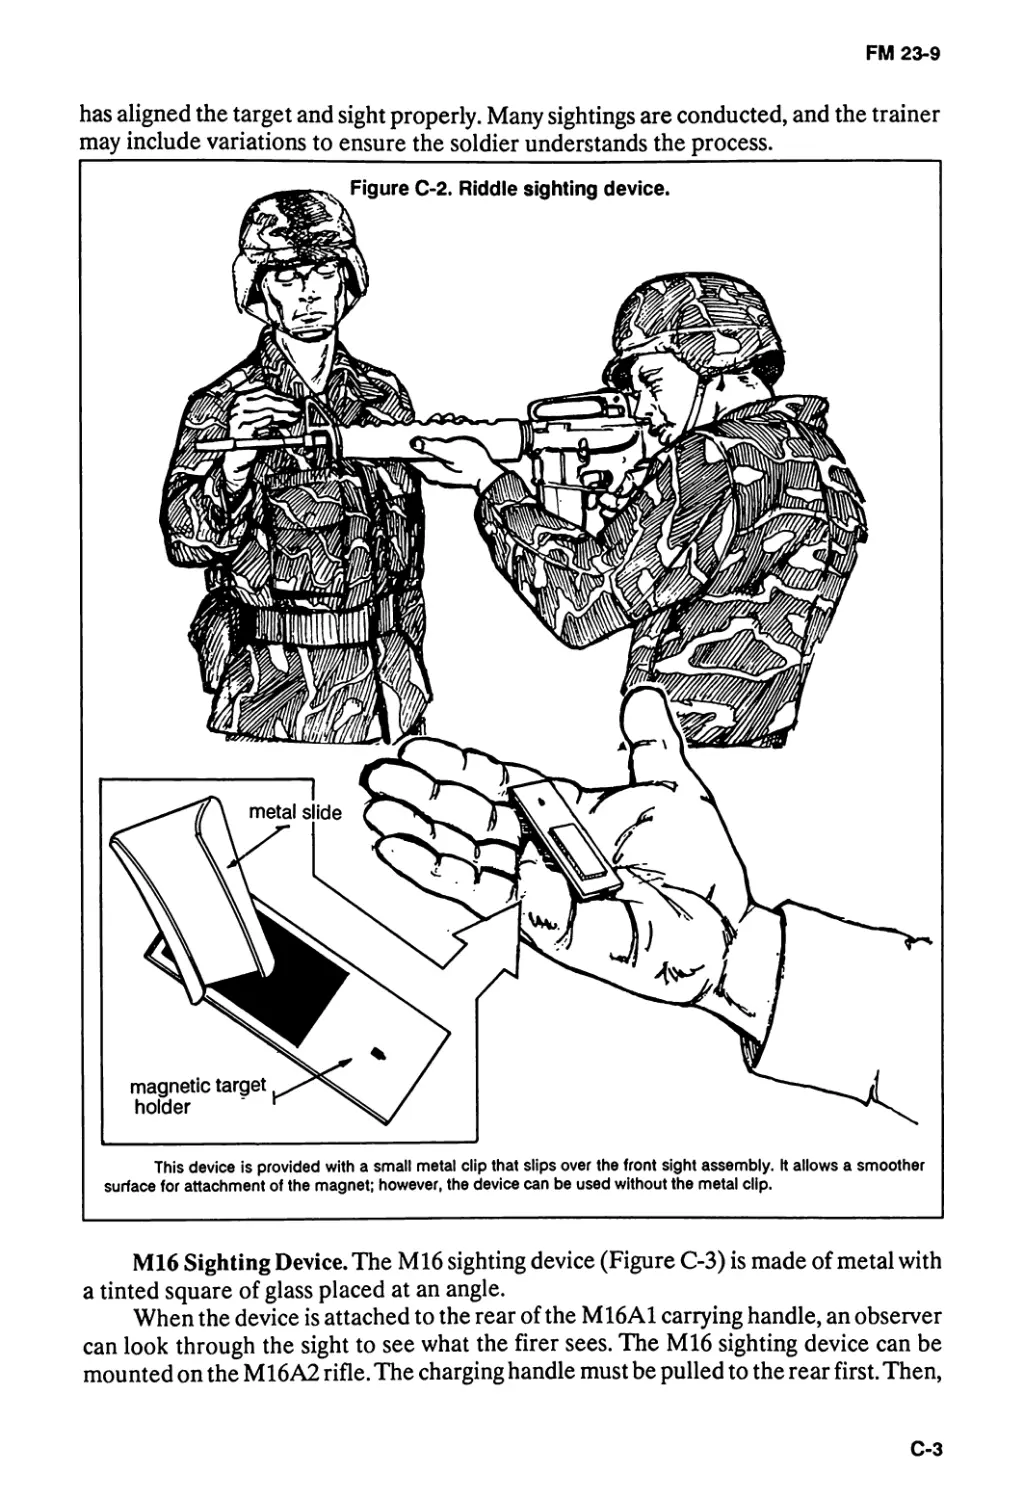
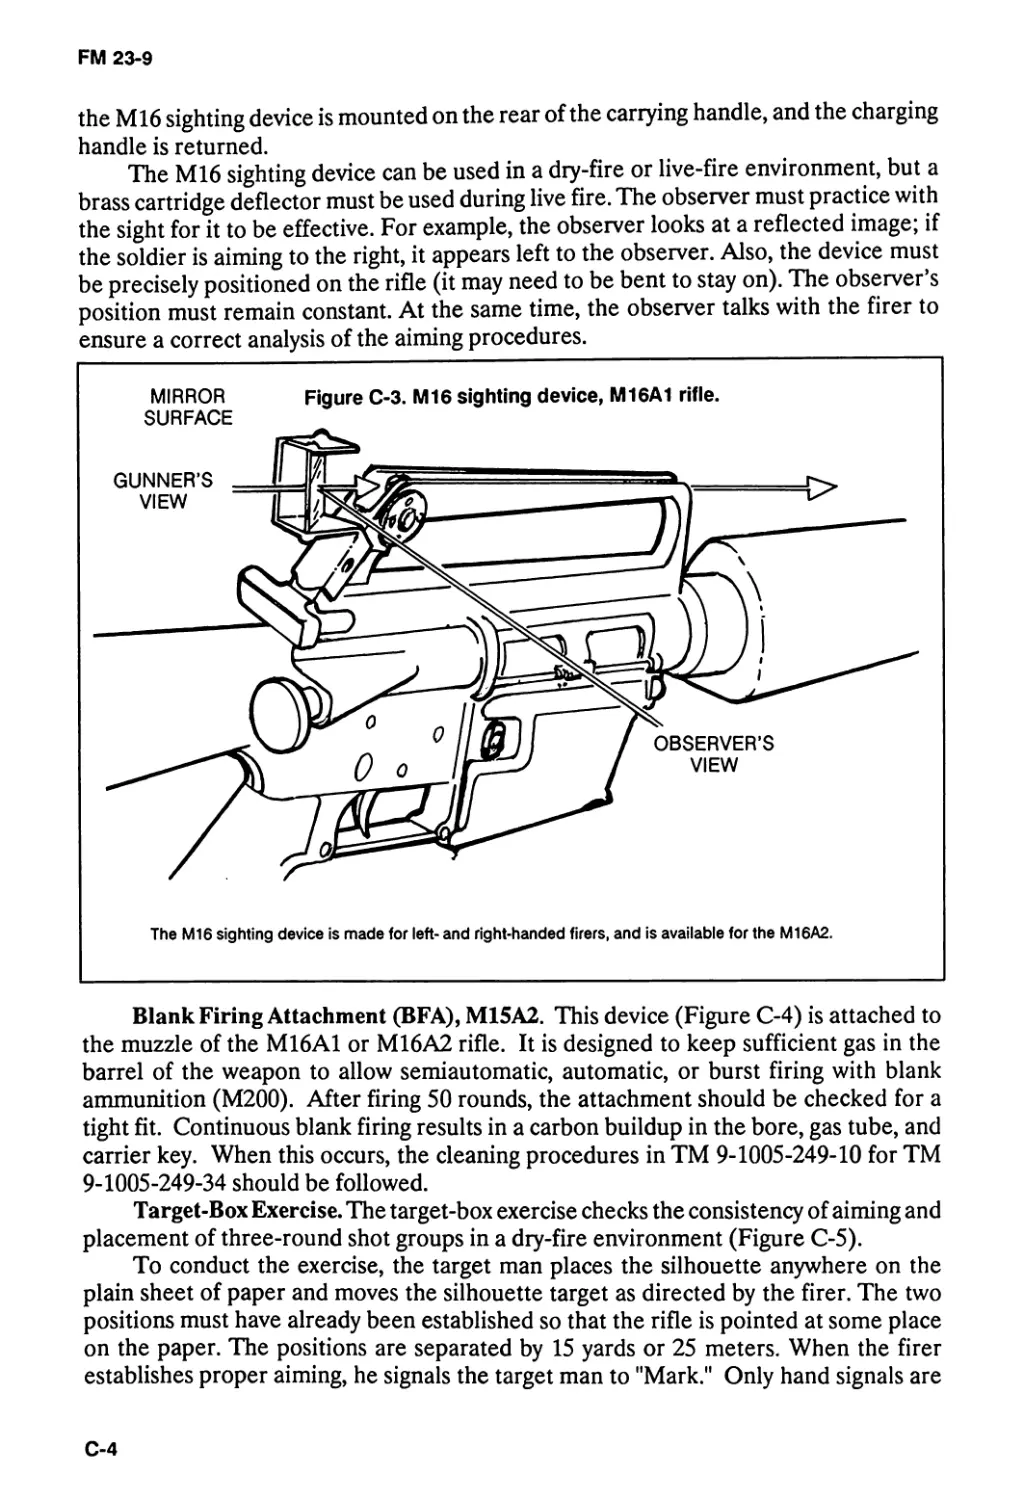
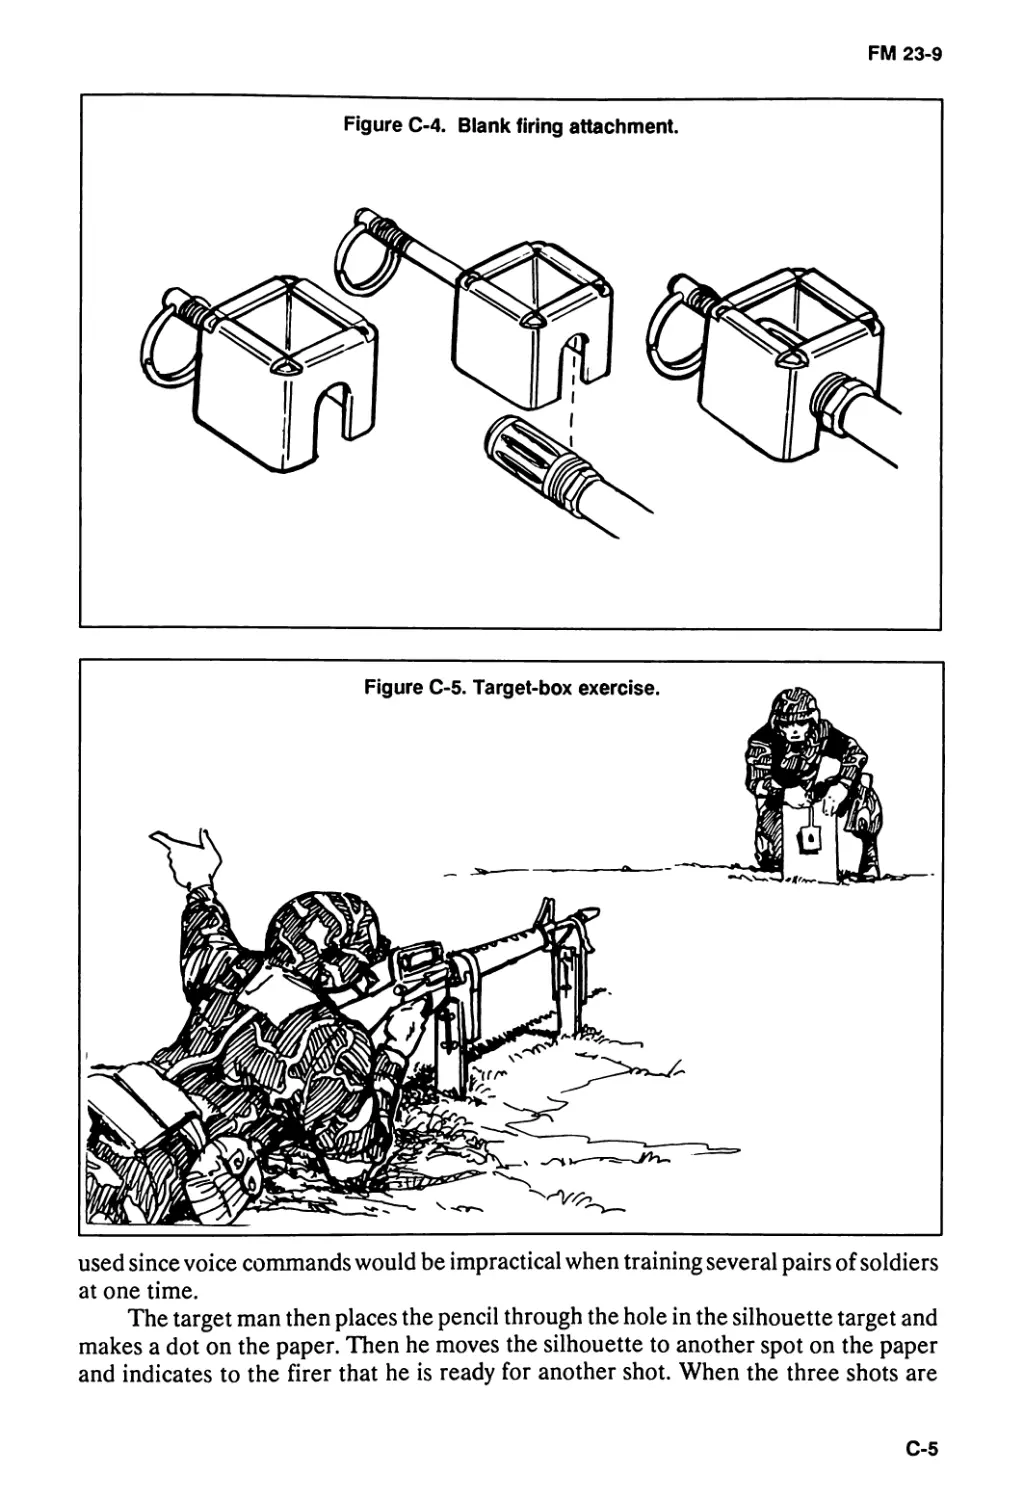
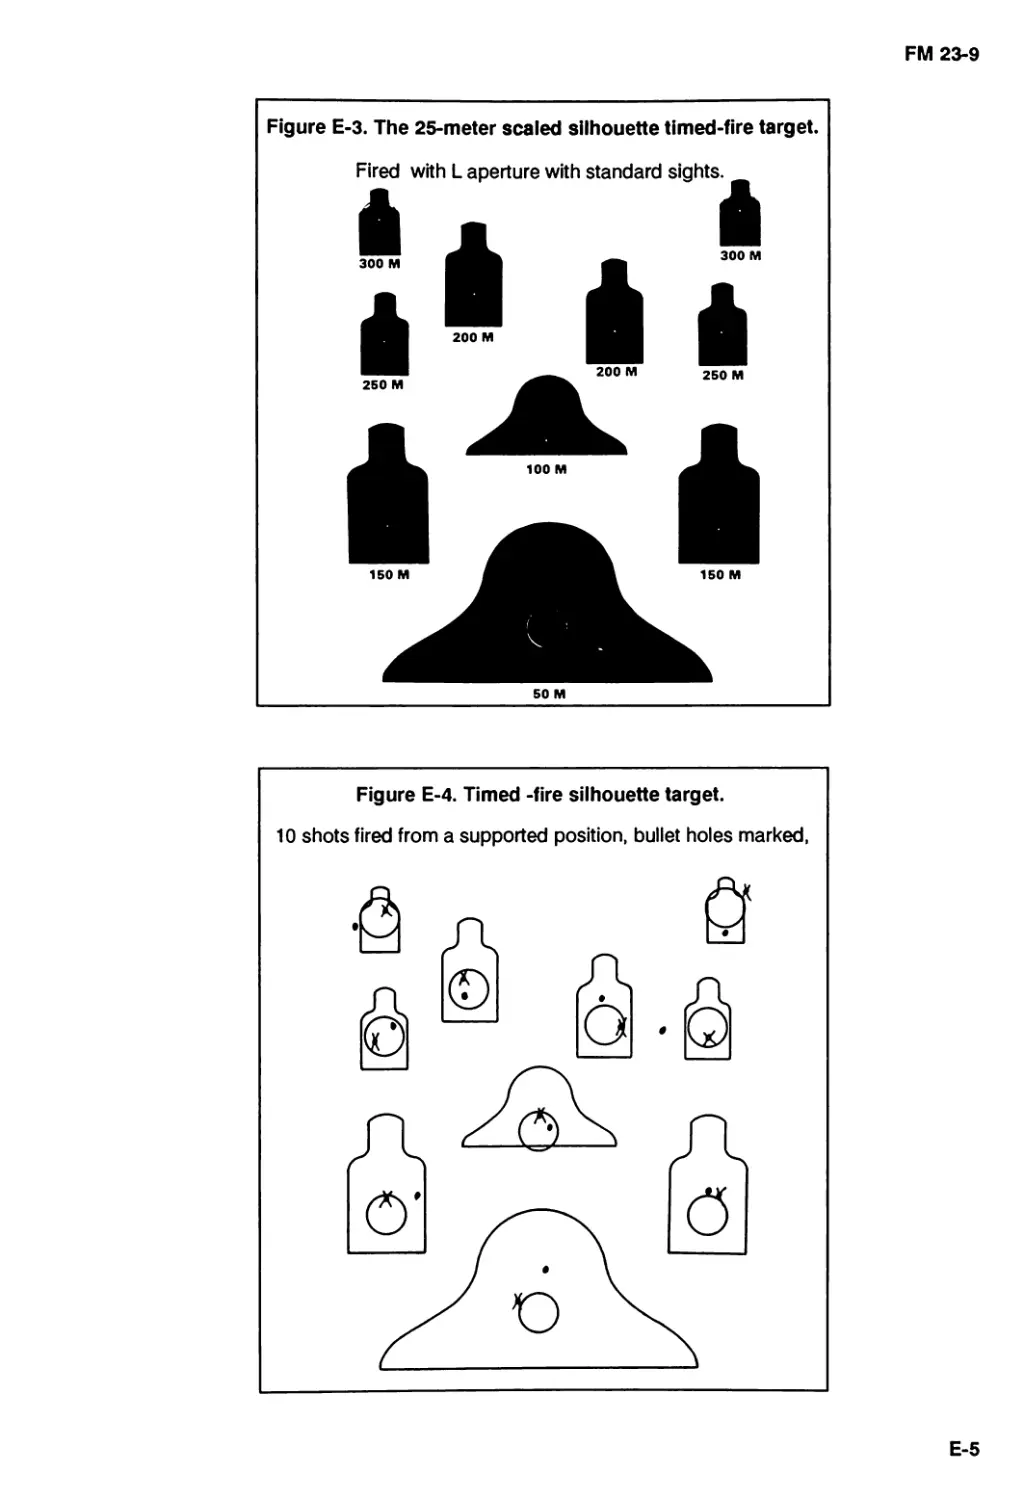
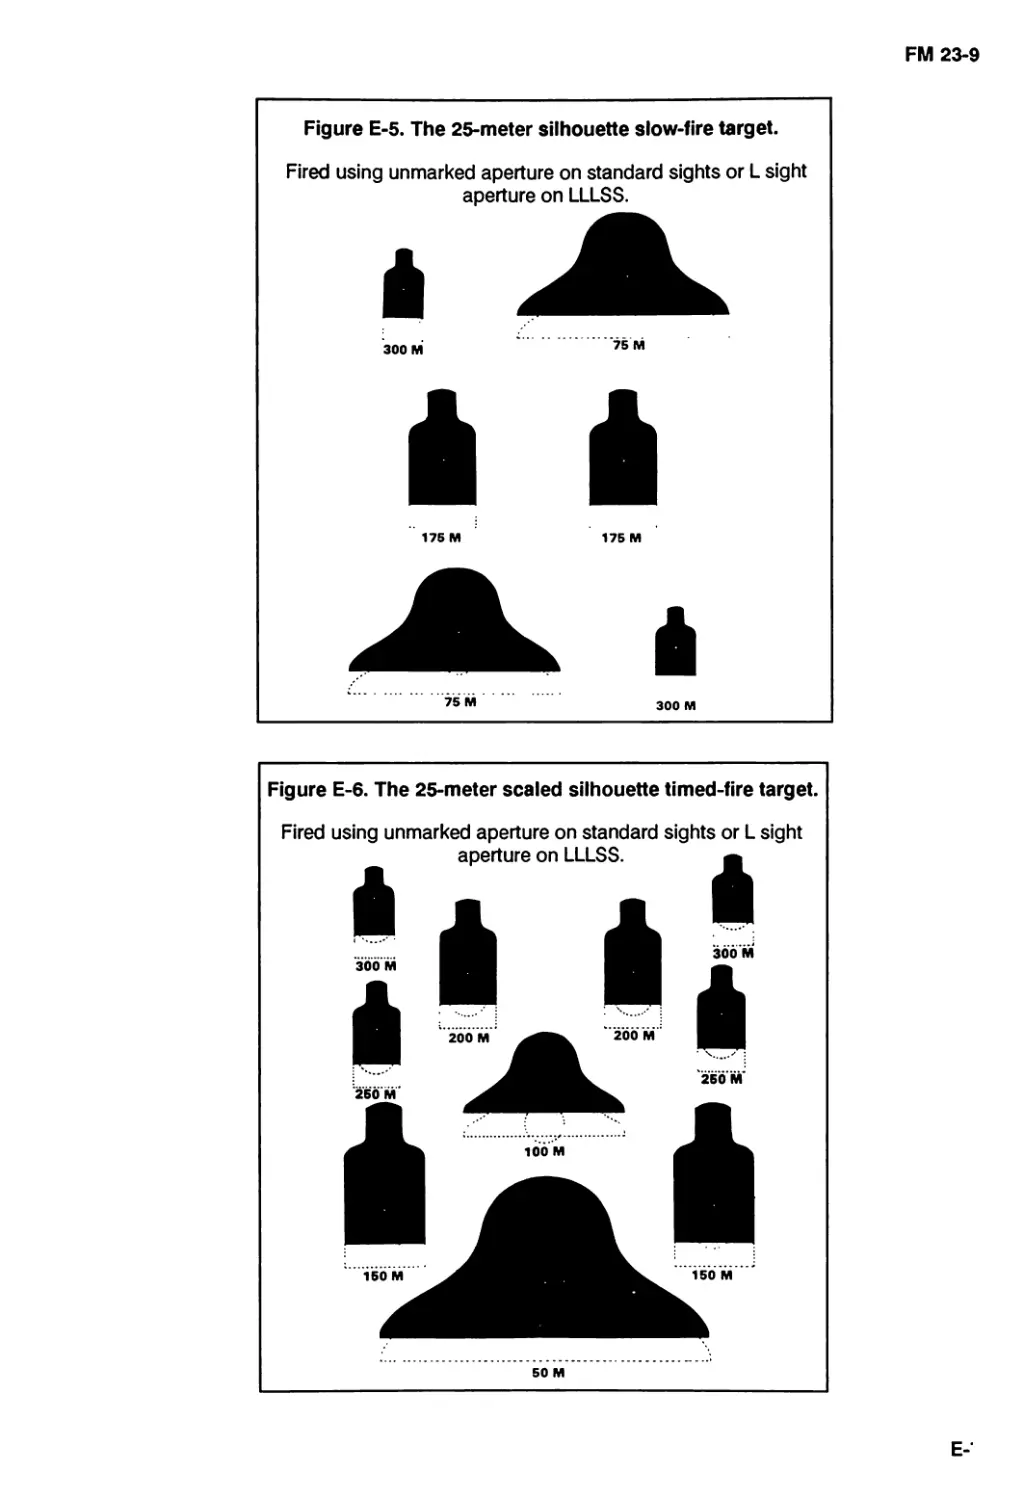
Text
HEADQUARTERS,
DEPARTMENT OF THE ARMY
FIELD MANUAL
NO. 23-9
M16A1 AND M16A2
RIFLE MARKSMANSHIP
DISTRIBUTION RESTRICTION-Distribution authorized to US Government agencies and their
contractors to protect technical and operational information from automatic dissemination under the
International Exchange Program or by other means. This determination was made on 2 November
1988. Other requests for this document will be referred to Commandant, US Army Infantry School,
ATTN: ATSH-I-V-P, Fort Benning, GA 31905-5593.
DESTRUCTION NOTICE-Destroy by any method that will prevent disclosure of contents or
reconstruction of the document.
JULY 1989
DIGITIZED FOR
YOUR REVIEW AT
WWW.SMALLARMSREVIEW.COM
FIELD MANUAL
No. 23-9
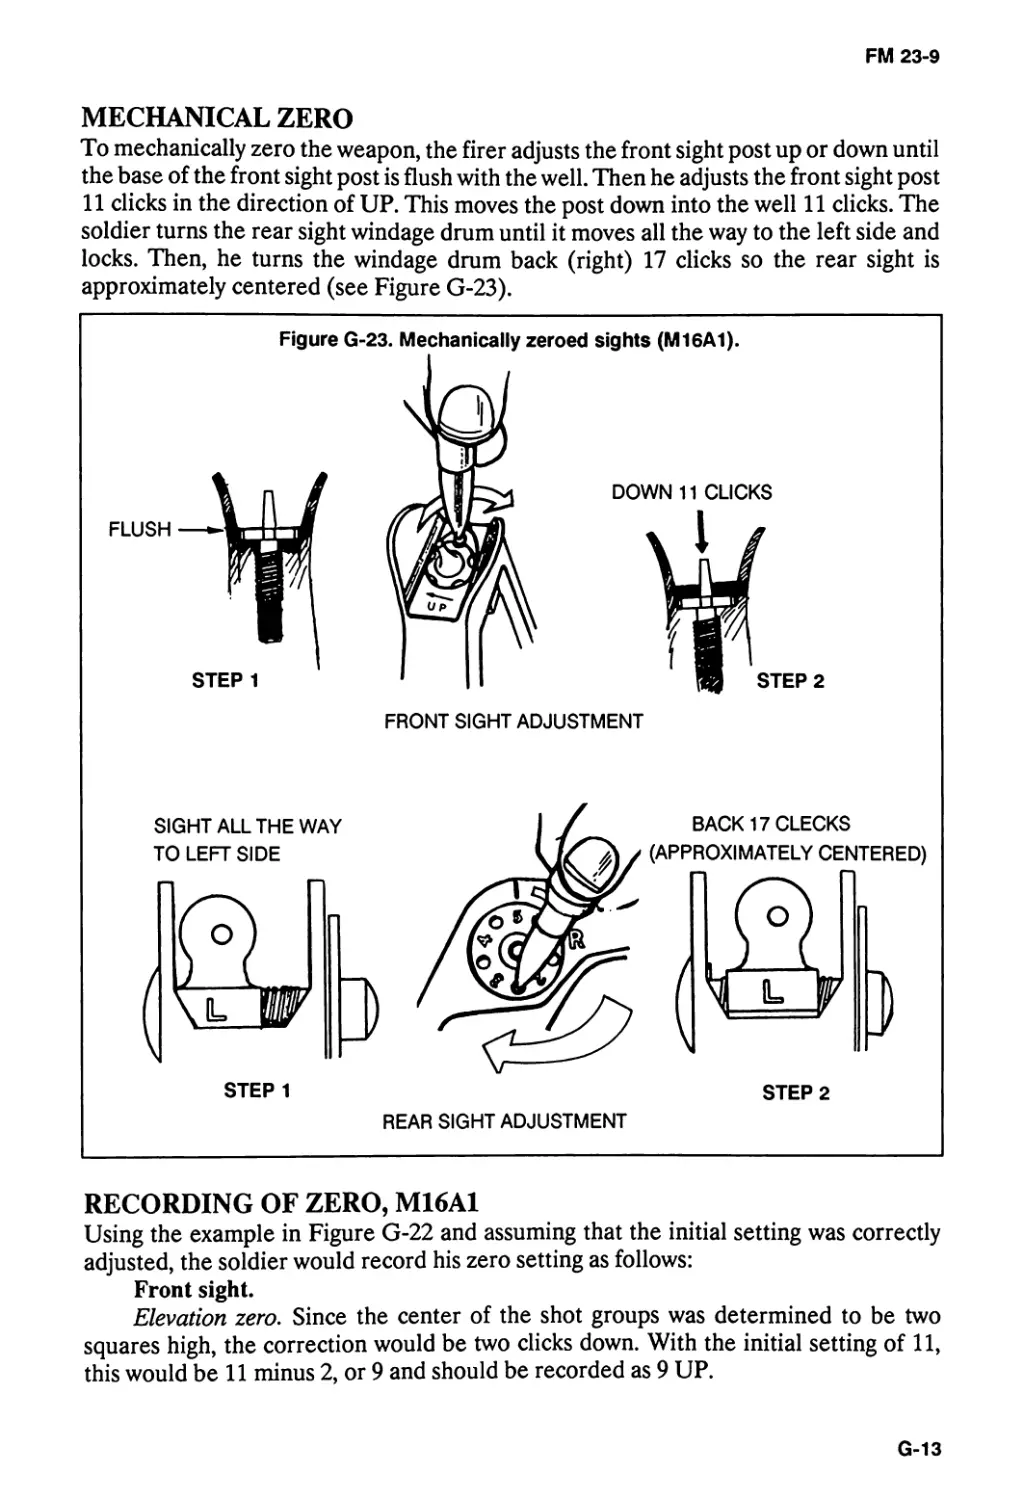
•FM 23-9
HEADQUARTERS
DEPARTMENT OF THE ARMY
Washington. DC, 3 July 1989
M16A1 AND M16A2 RIFLE
MARKSMANSHIP
DISTRIBUTION RESTRId'ION-Distribution authorized to IS Government
agencies and their contractors to protect technical and operational information from
automaticdissemination under the International Exchange Program or by other means.
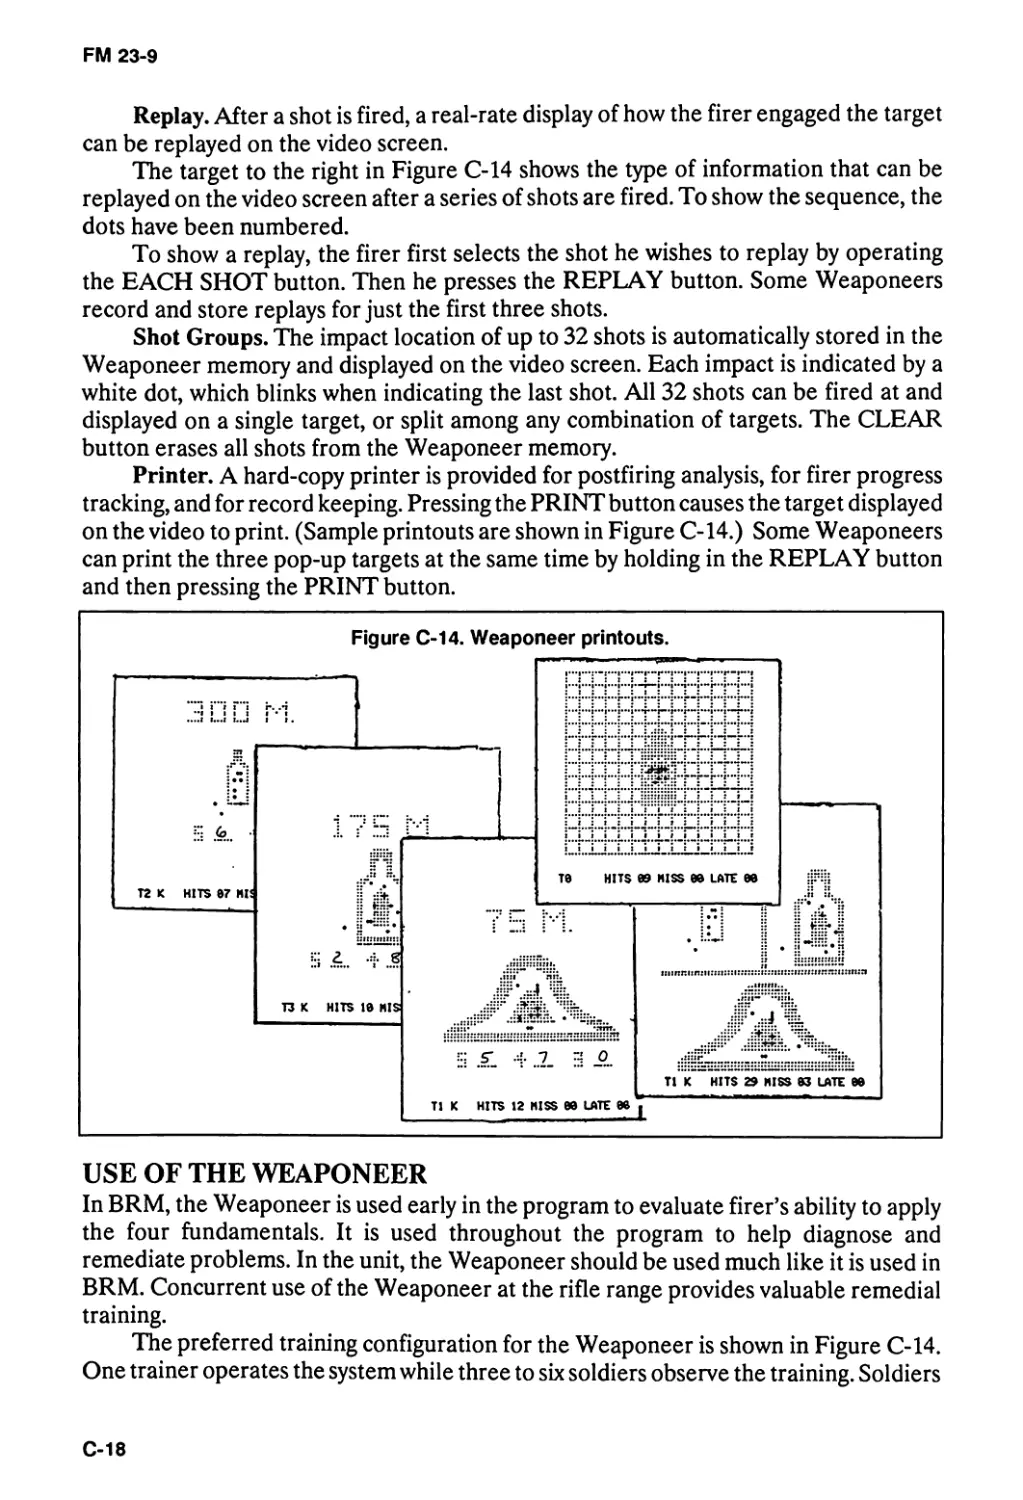
This determination was made on 2 November 19<SX. Other requests for this document
will be referred to Commandant, l;S Army Infantry School, AT l'N: ATS I 1-1-V-P, Fort
Benning, GA 319O5-55V3.
DESTRUCTION NOTICE-Destroy by any method that will prevent disclosure of
contents or reconstruction of the document.
’This publication supersedes FM 23-9. 1 1 June 1971 and rescinds l)A ! orms 300S-R. Nov 73;
523H, Jul КЗ, 52-10, Jul КЗ. 5212, Jul S3, and 52 1'!. Jul КЗ.
FM 23-9
CONTENTS
Page
PREFACE.................................................iv
CHAPTER 1. INTRODUCTION
Training Strategy....................................................1-1
Combat Conditions......................................1-4
CHAPTER 2. OPERATION AND FUNCTIONING
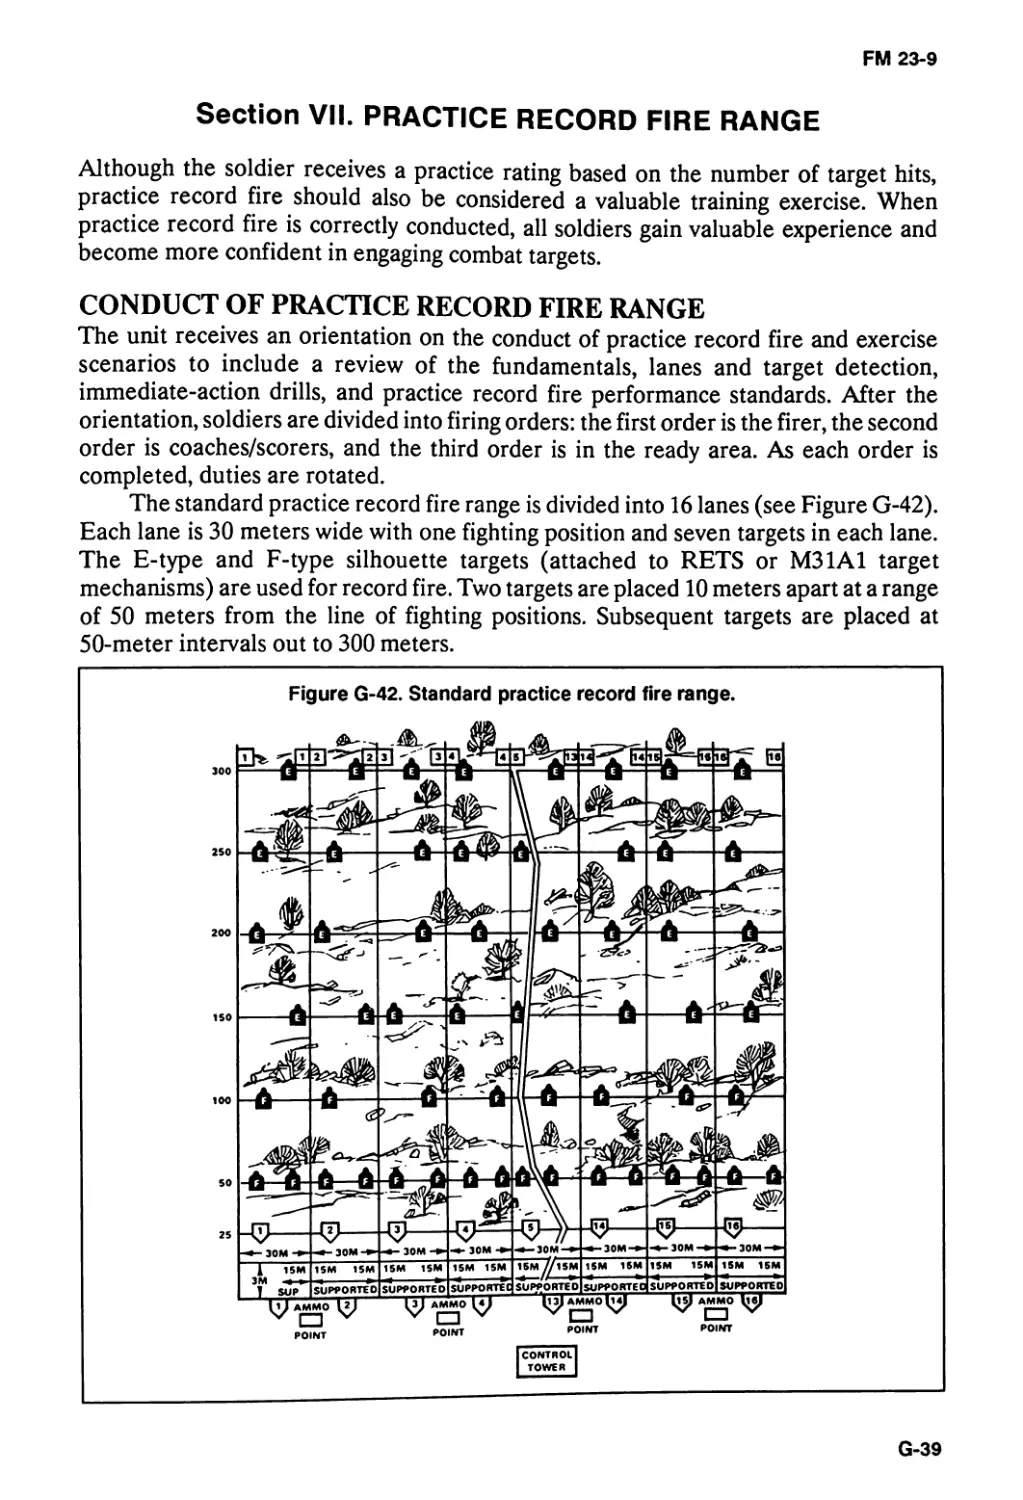
Section I. Operational Characteristics............................2-2
M16A1 Rifle............................................2-2
M16A2 Rifle............................................2-2
II. Functioning............................................2-3
Steps of Functioning...................................2-3
Semiautomatic Mode (M16A1 and M16A2)...................2-8
Automatic Fire Mode (M16A1)............................2-8
Burst Fire Mode (M16A2)................................2-9
III. Malfunctions and Corrections.........................2-10
Stoppage..............................................2-10
Major Categories of Malfunctions......................2-11
Other Malfunctions....................................2-14
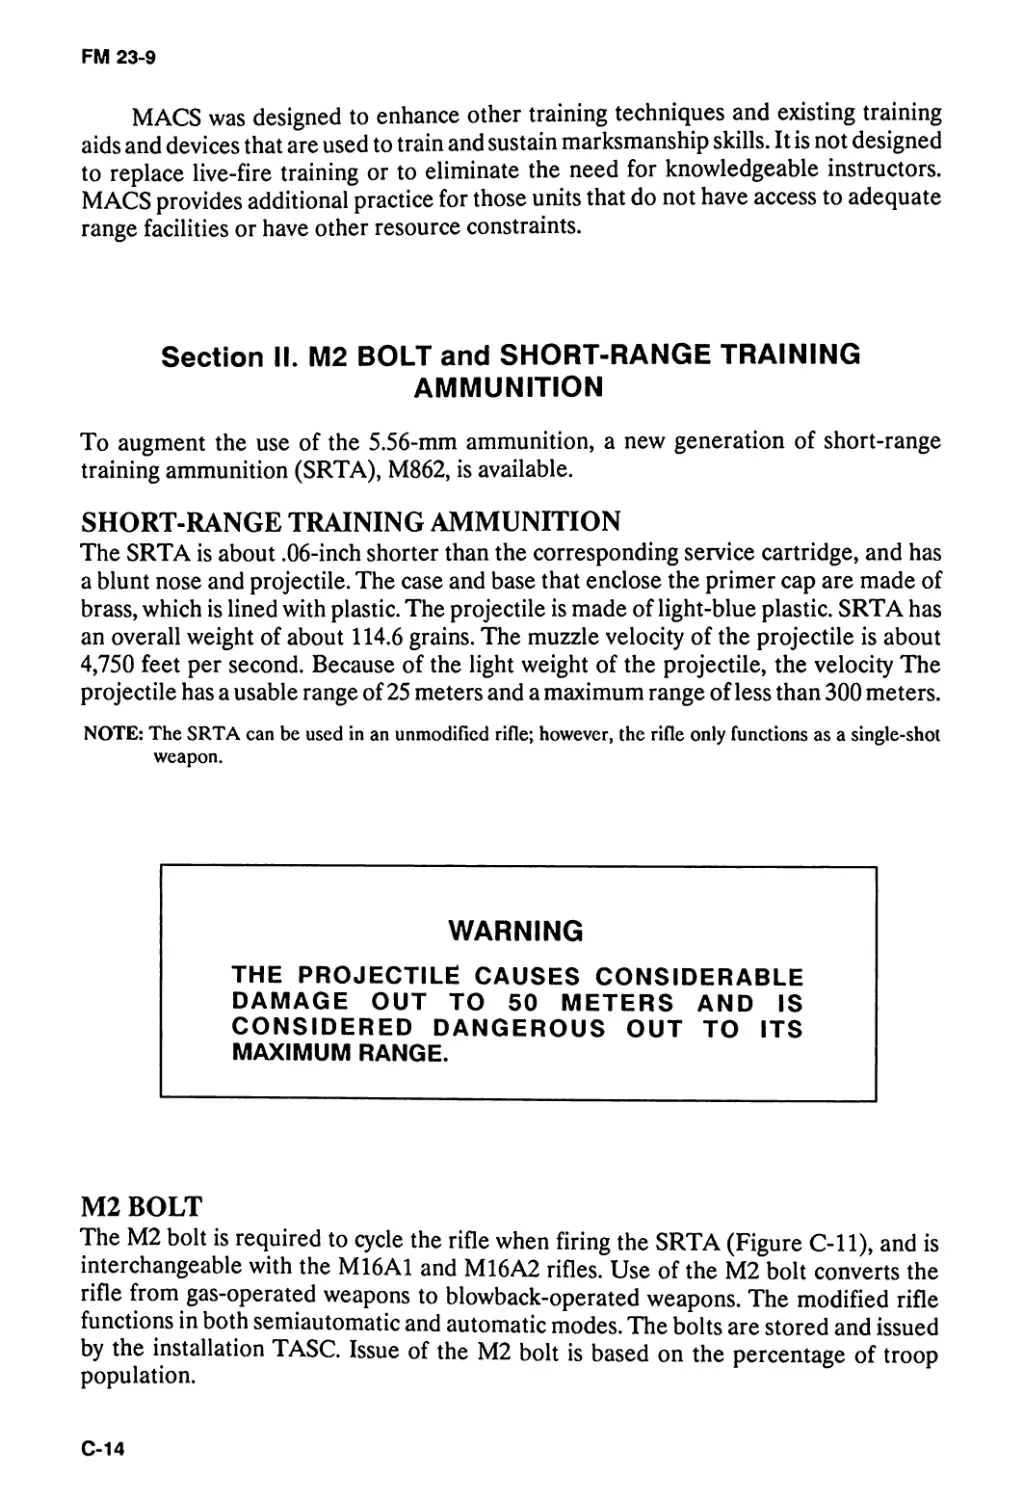
IV. Ammunition............................................2-16
Types and Characteristics.............................2-16
Care and Handling.....................................2-17
V. Destruction of Materiel...............................2-18
Means of Destruction..................................2-18
Field-Expedient Methods...............................2-18
CHAPTER 3. RIFLE MARKSMANSHIP TRAINING
Section I. Basic Program Implementation...........................3-1
Instructor/Trainer Selection...........................3-2
Duties of the Instructor/Trainer.......................3-2
II. Conduct of Training....................................3-3
Mechanical Training....................................3-3
Marksmanship Fundamentals..............................3-5
Firing Positions......................................3-12
III. Dry Fire 3-18
Conduct of Dry-Fire Training..........................3-18
Peer Coaching.........................................3-18
Checklist for the Coach...............................3-20
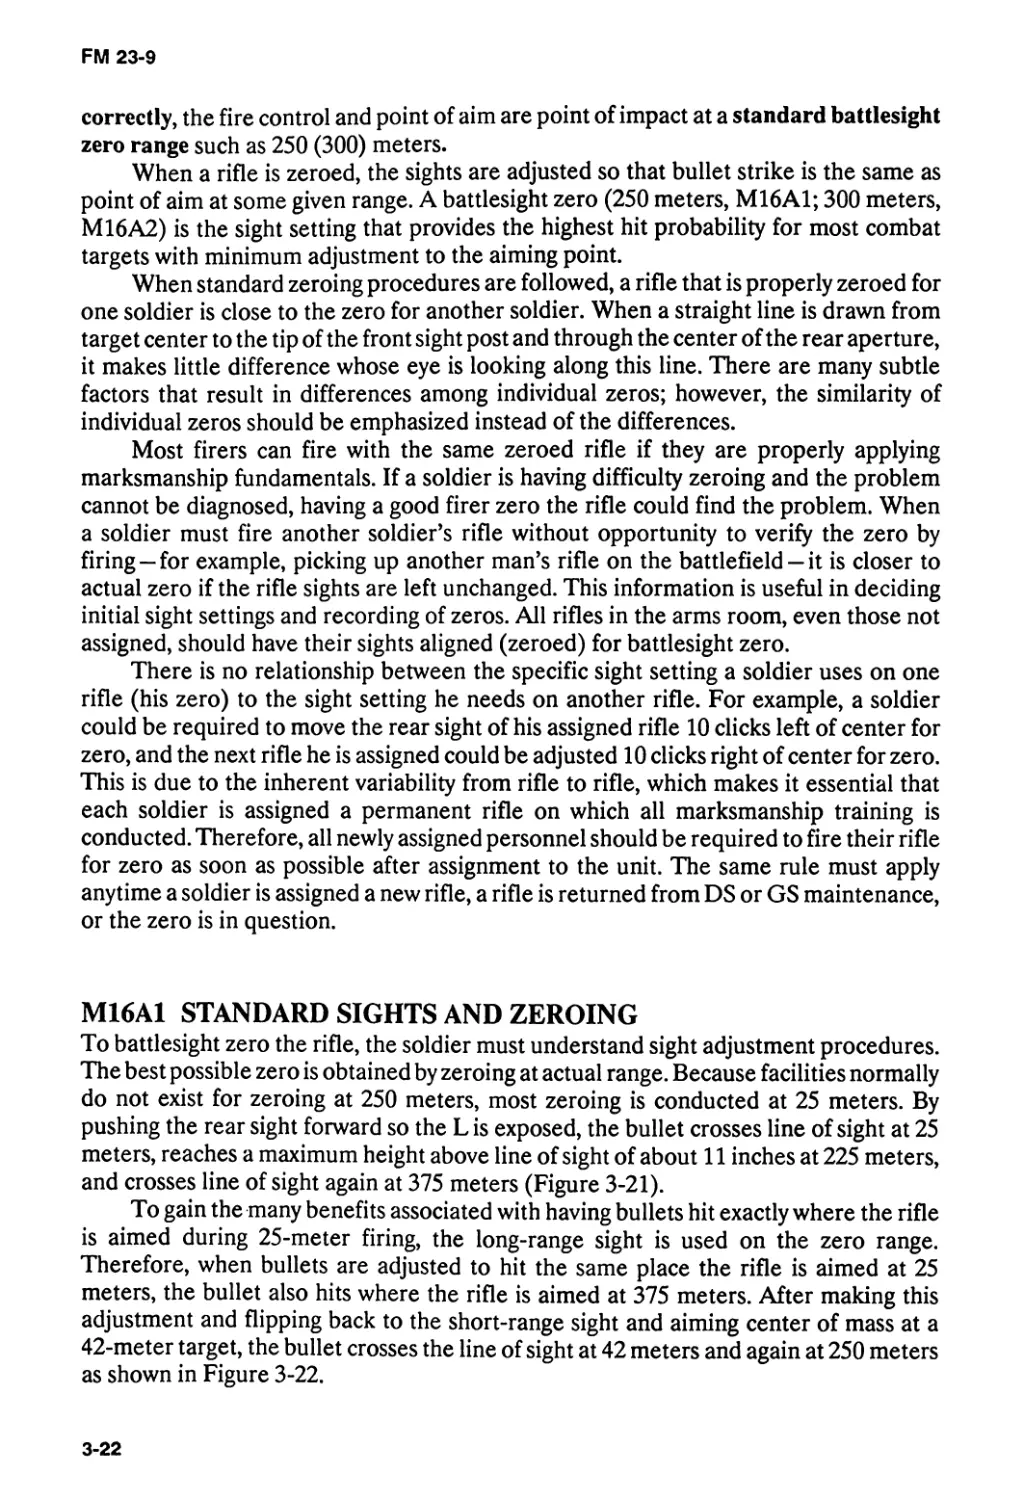
Position of the Coach ................................3-21
Grouping..............................................3-21
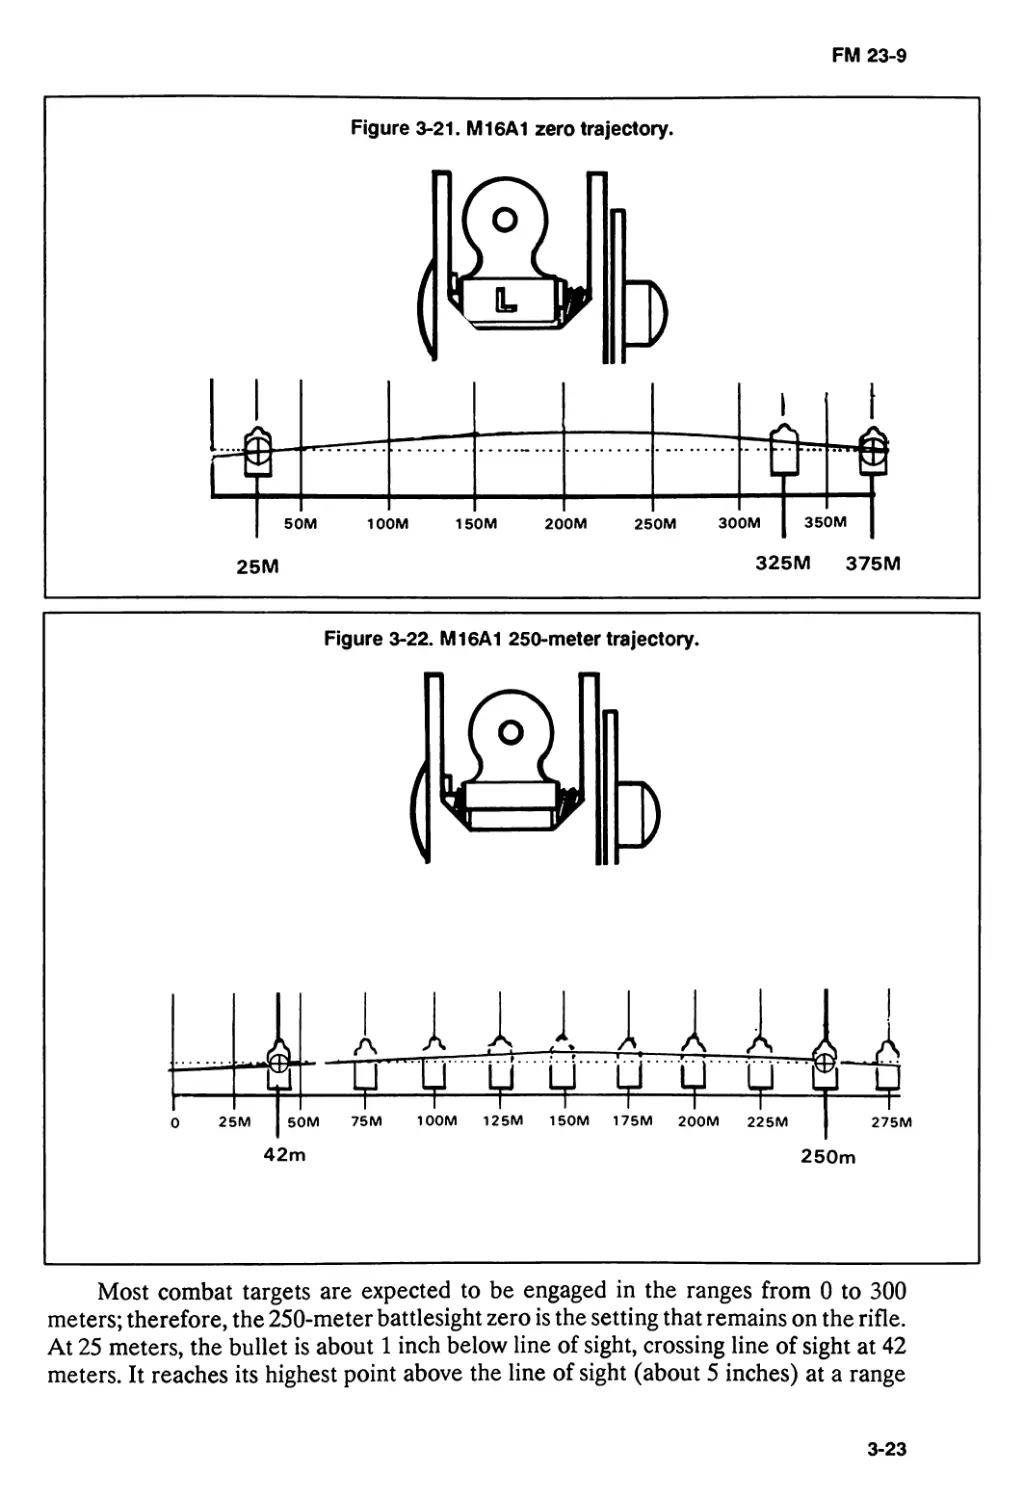
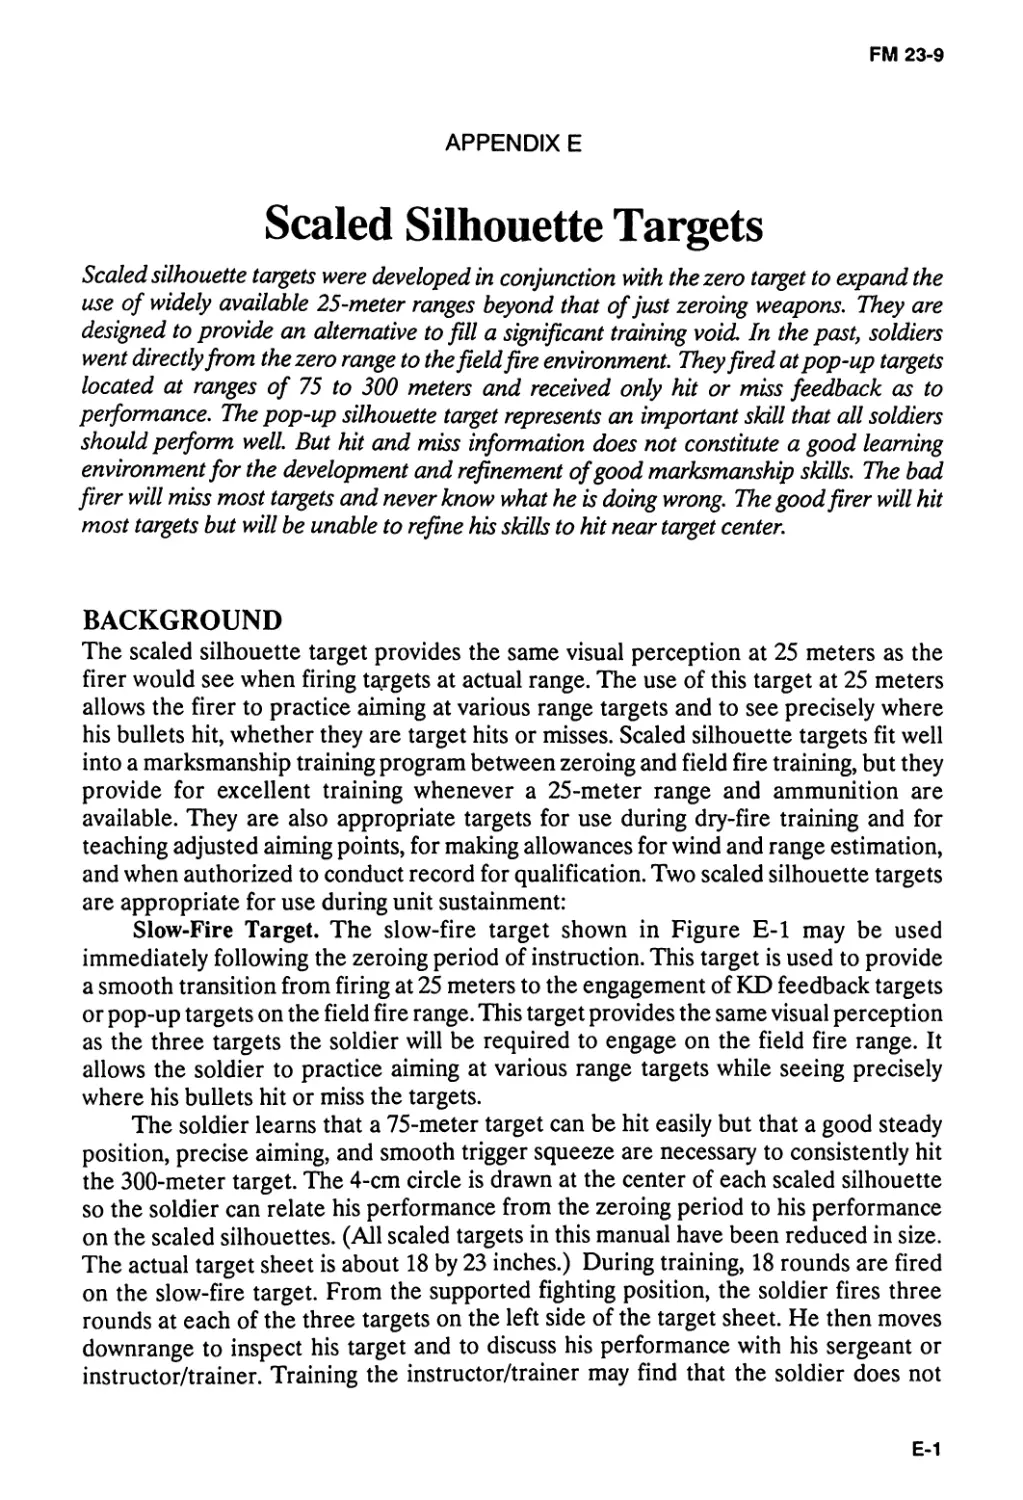
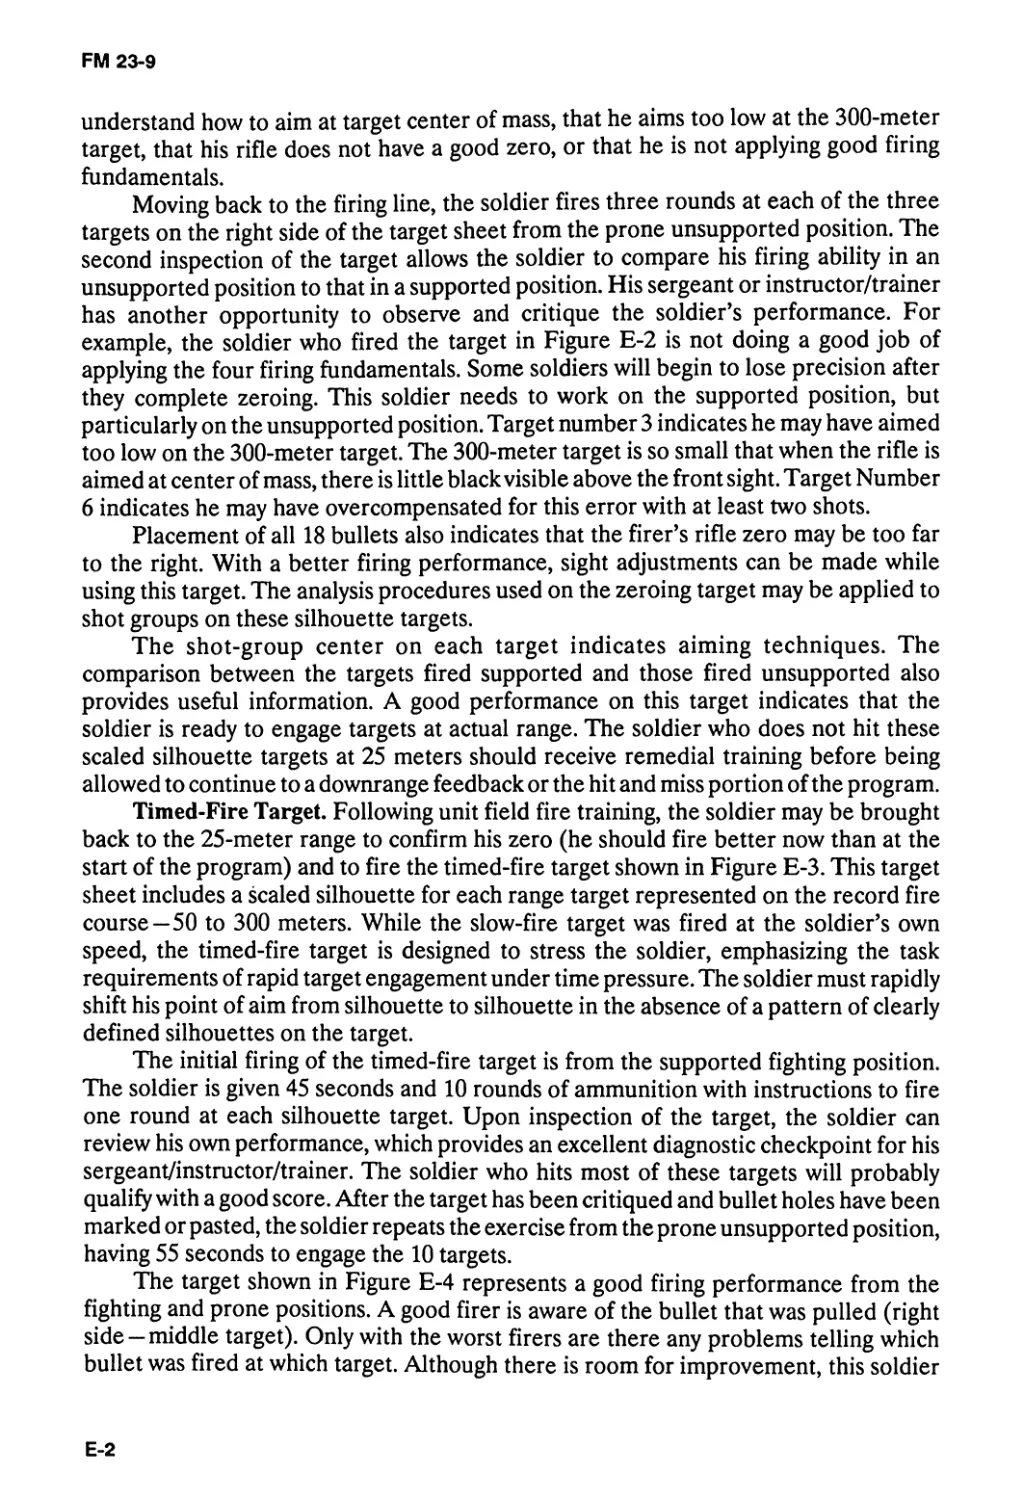
Concept of Zeroing....................................3-21
Page
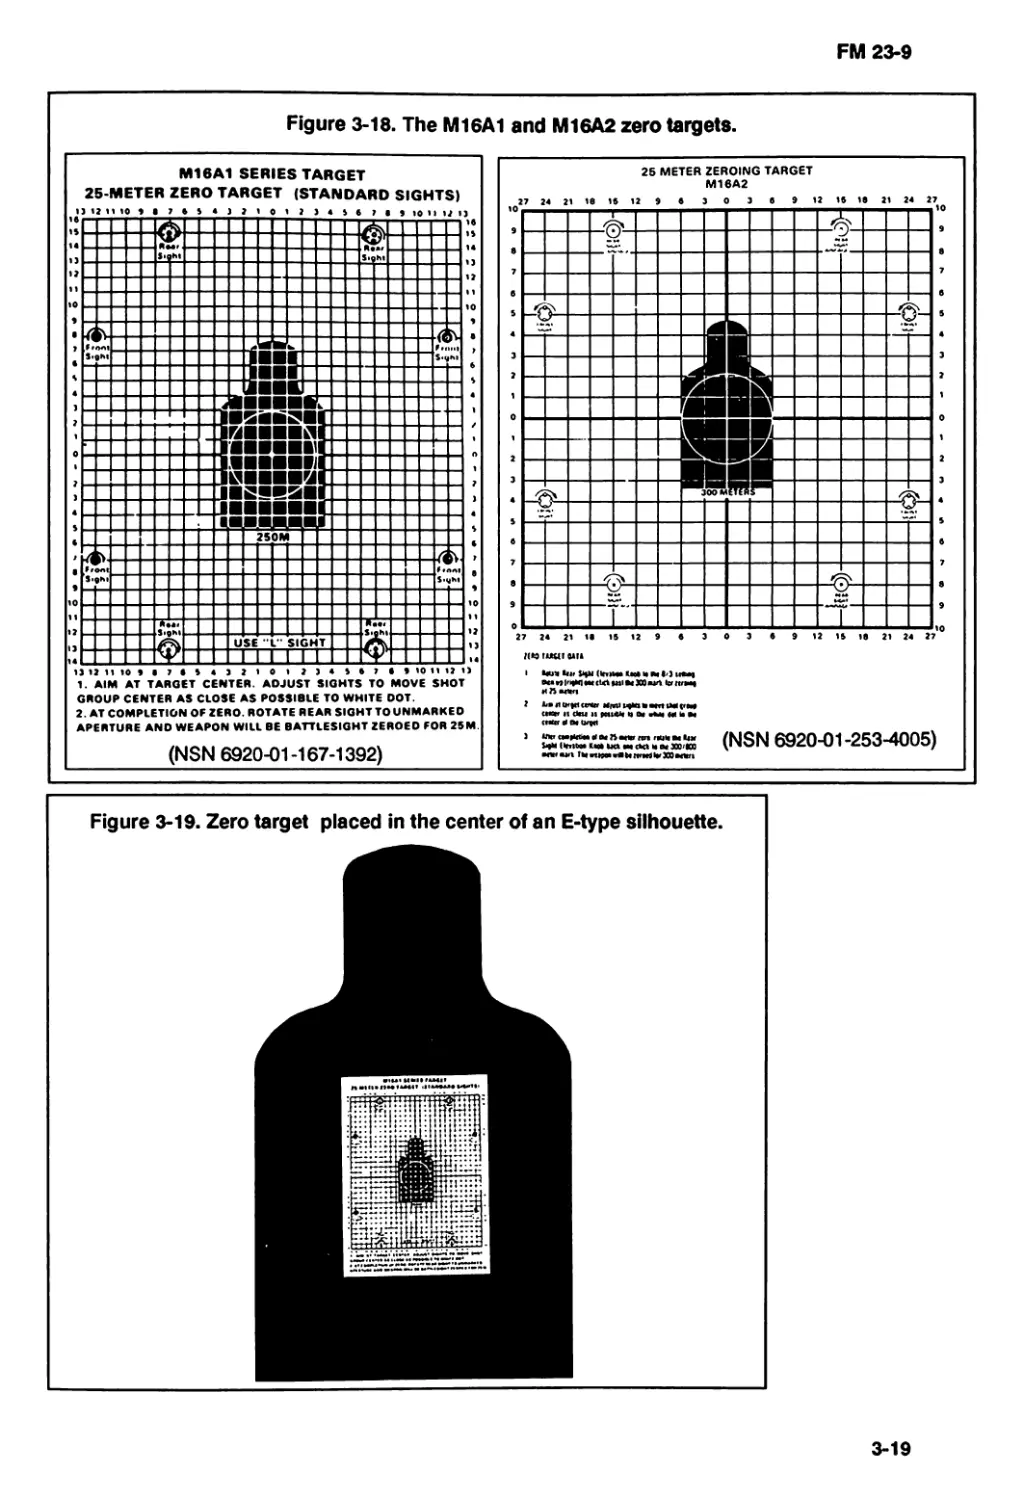
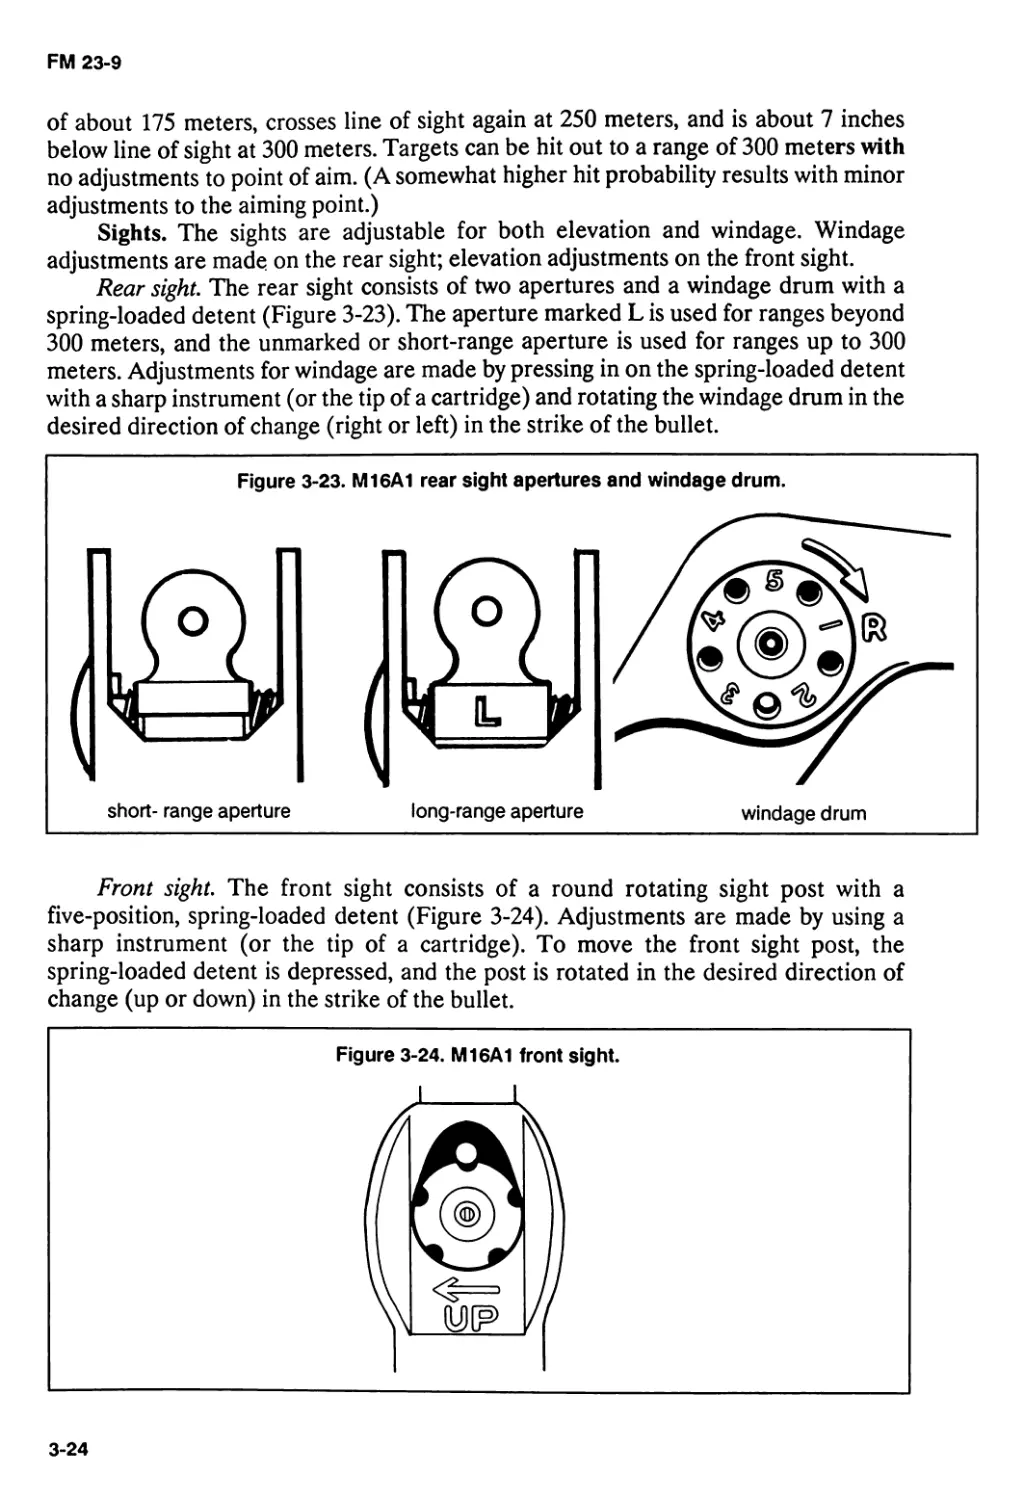
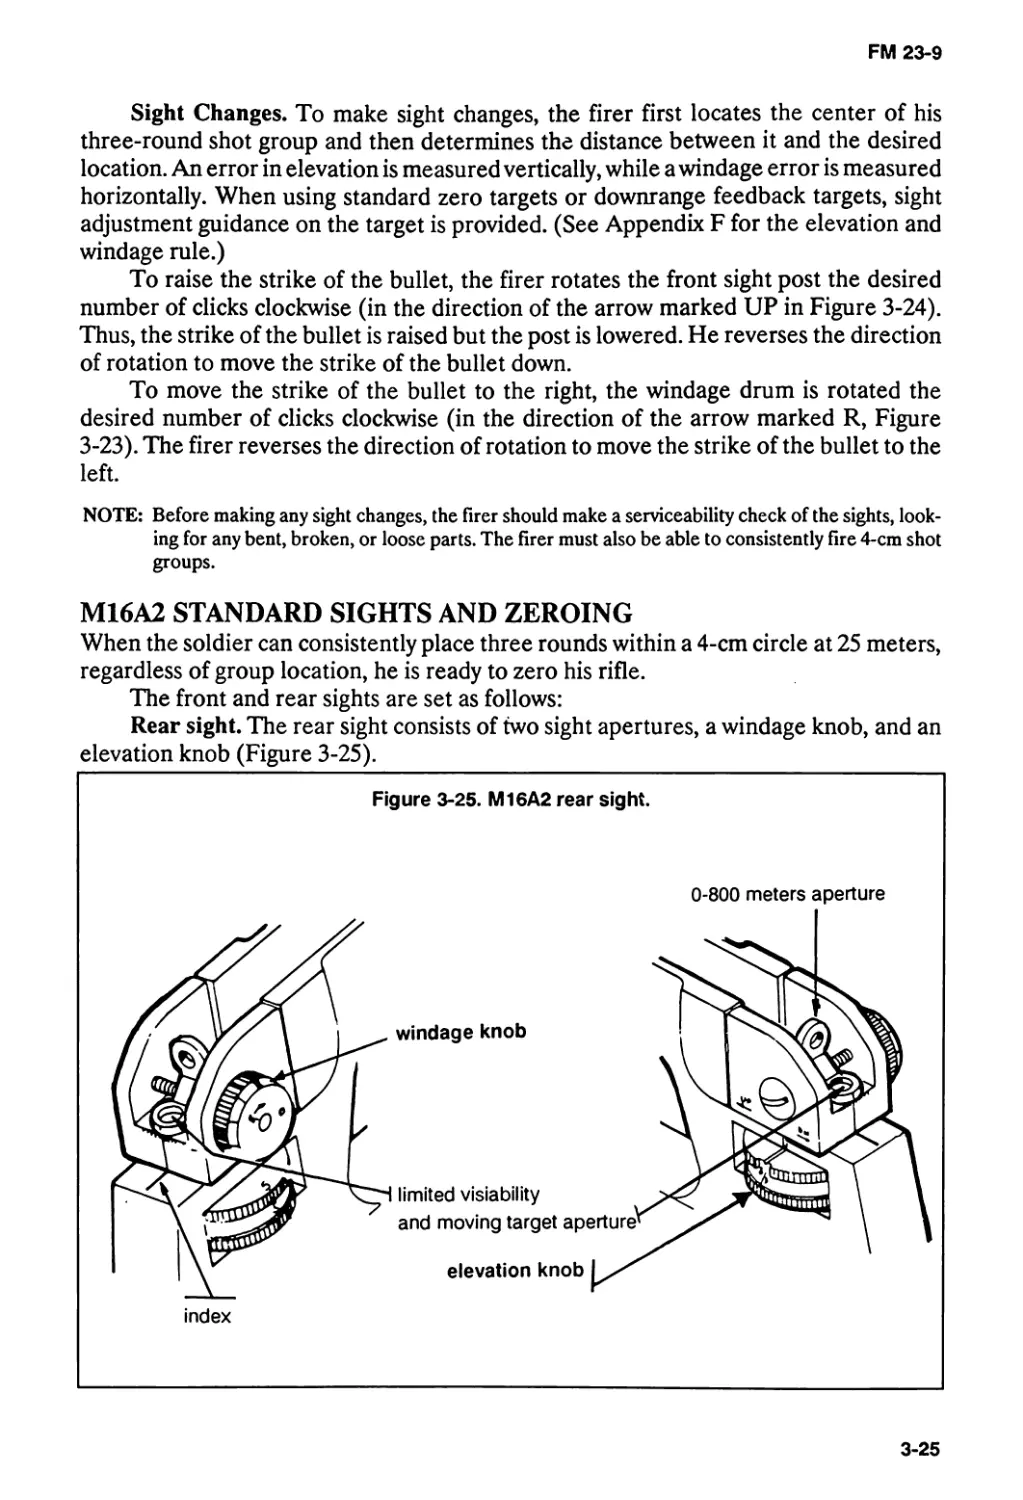
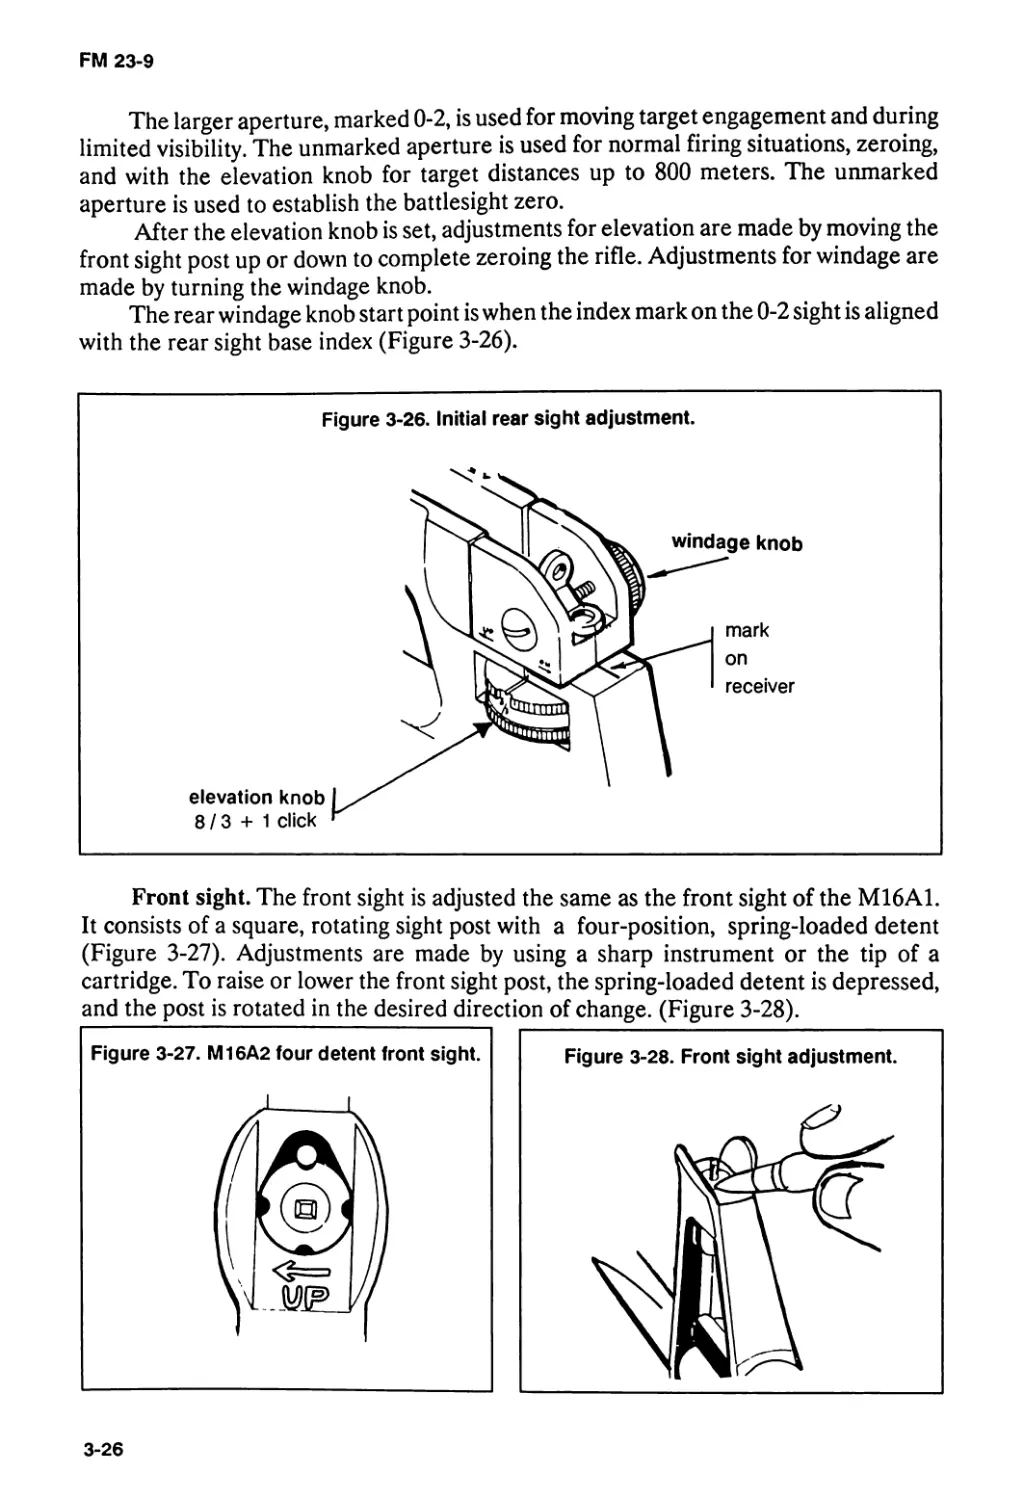
M16A1 Standard Sights and Zeroing............................3-22
M16A2 Standard Sights and Zeroing............................3-25
Downrange Feedback Training..................................3-27
Field Fire Training..........................................3-27
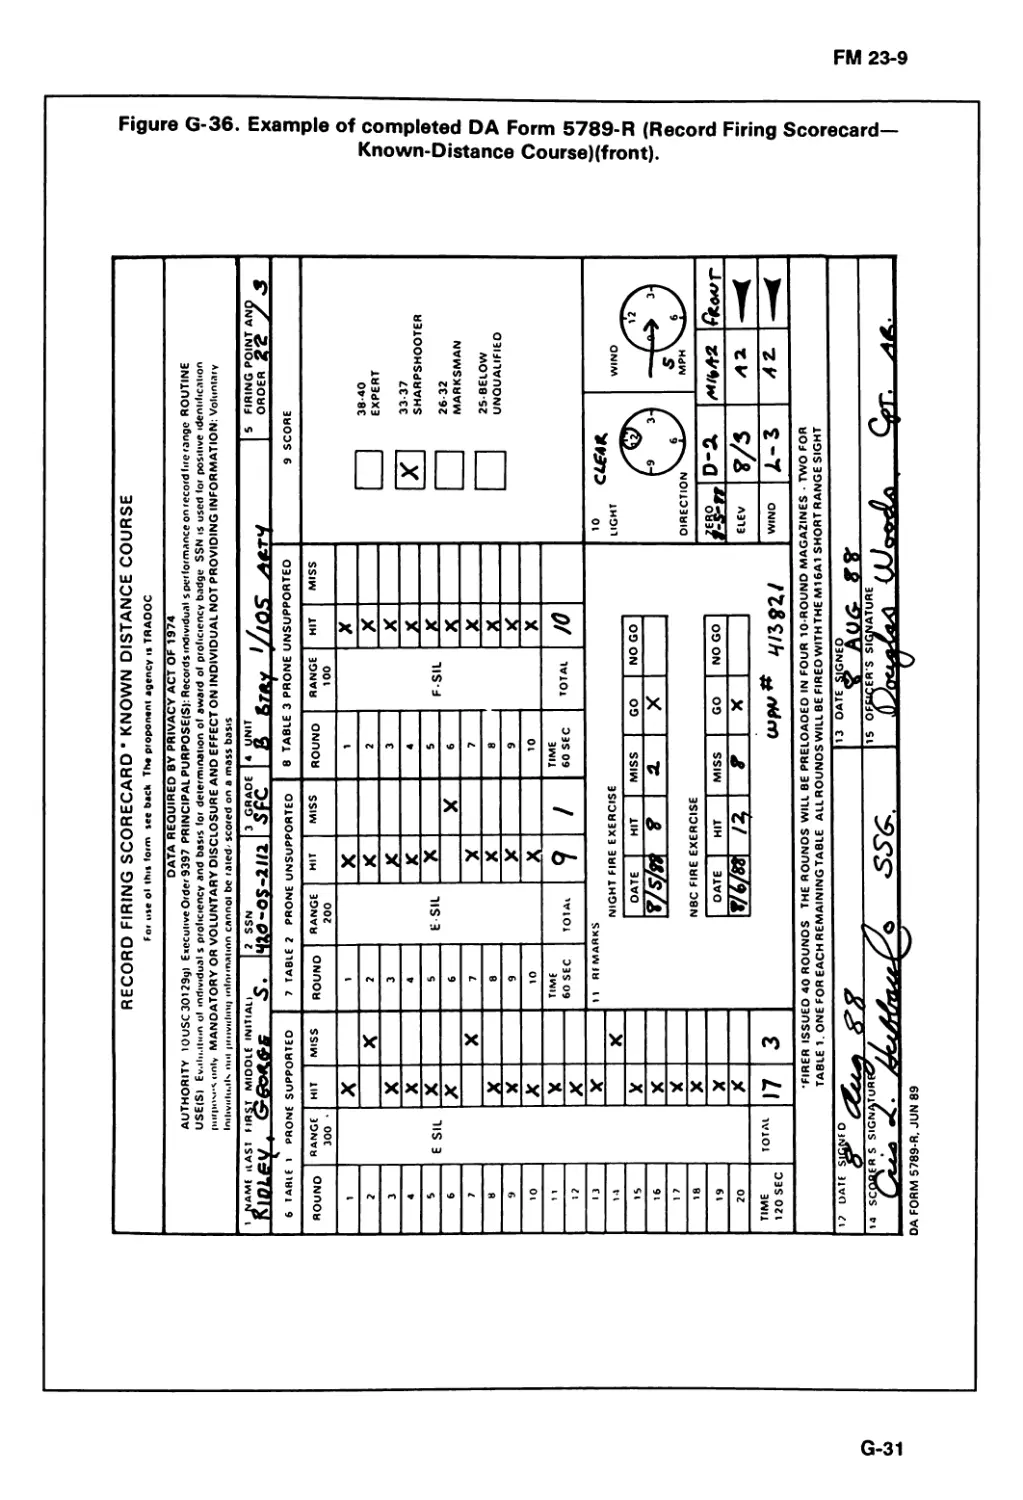
Practice Record Fire.........................................3-27
Record Fire..................................................3-27
CHAPTER 4. COMBAT FIRE TECHNIQUES
Section I. Suppressive Fire.............................................4-1
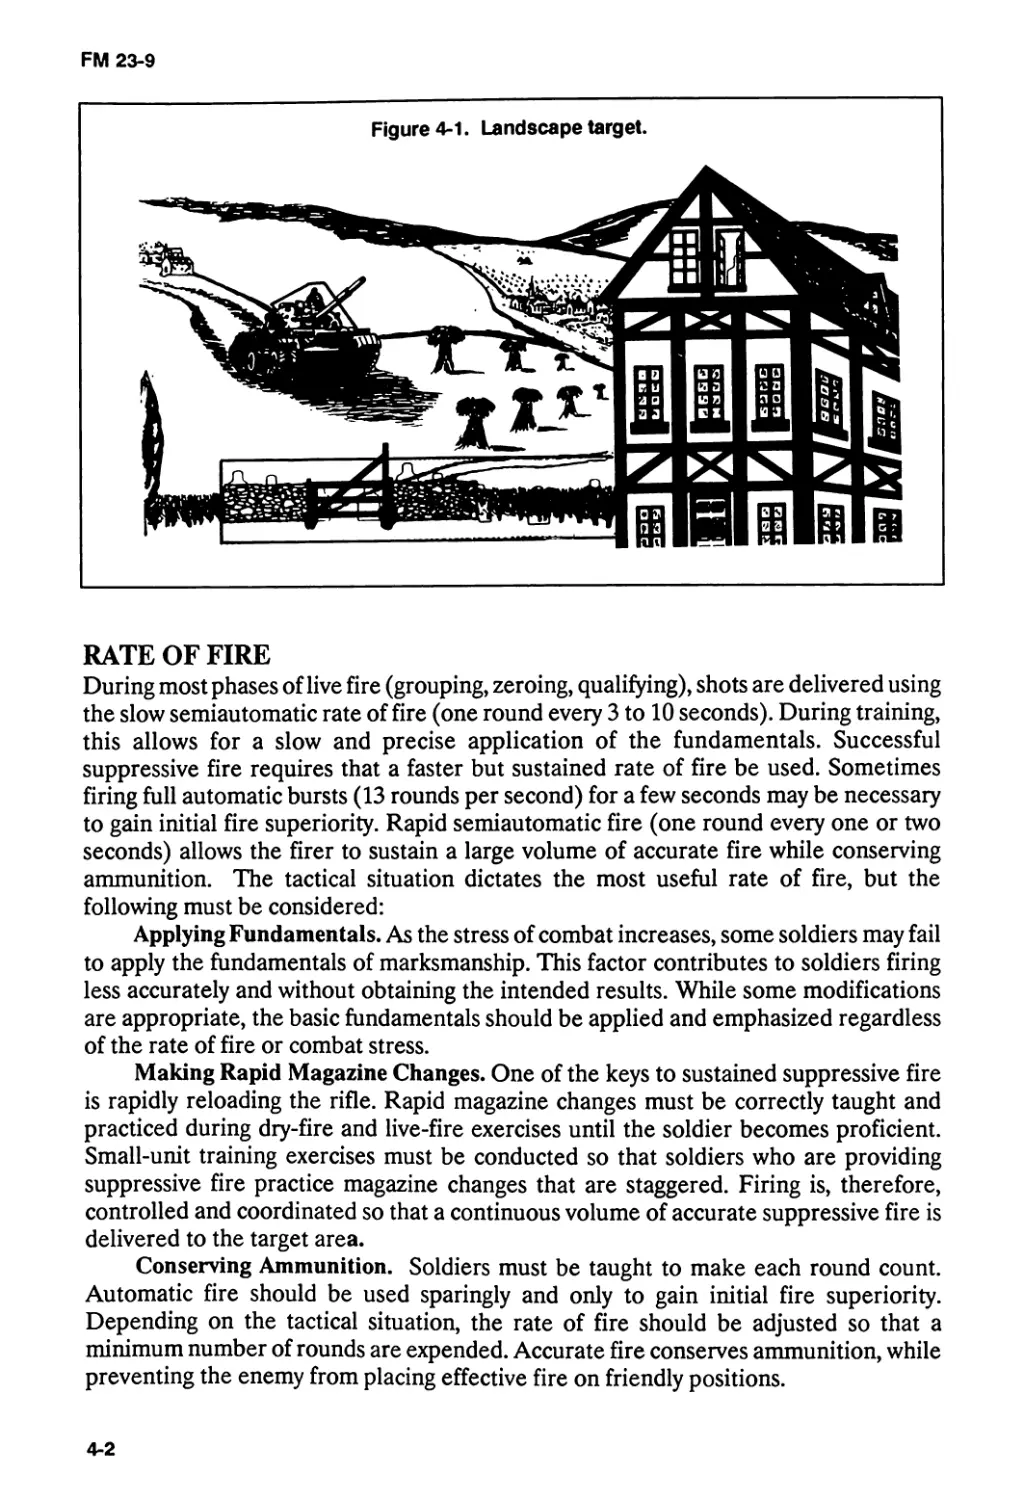
Nature of the Target..........................................4-1
Point of Aim..................................................4-1
Rate of Fire..................................................4-2
II. Rapid Semiautomatic Fire......................................4-3
Effectiveness of Rapid Fire...................................4-3
Modifications for Rapid Fire..................................4-3
Rapid-Fire Training...........................................4-7
III. Automatic Fire................................................4-7
Effectiveness of Automatic Fire...............................4-8
Modifications for trhe Automatic Fire Position ...............4-9
Training of Automatic Fire Techniques........................4-10
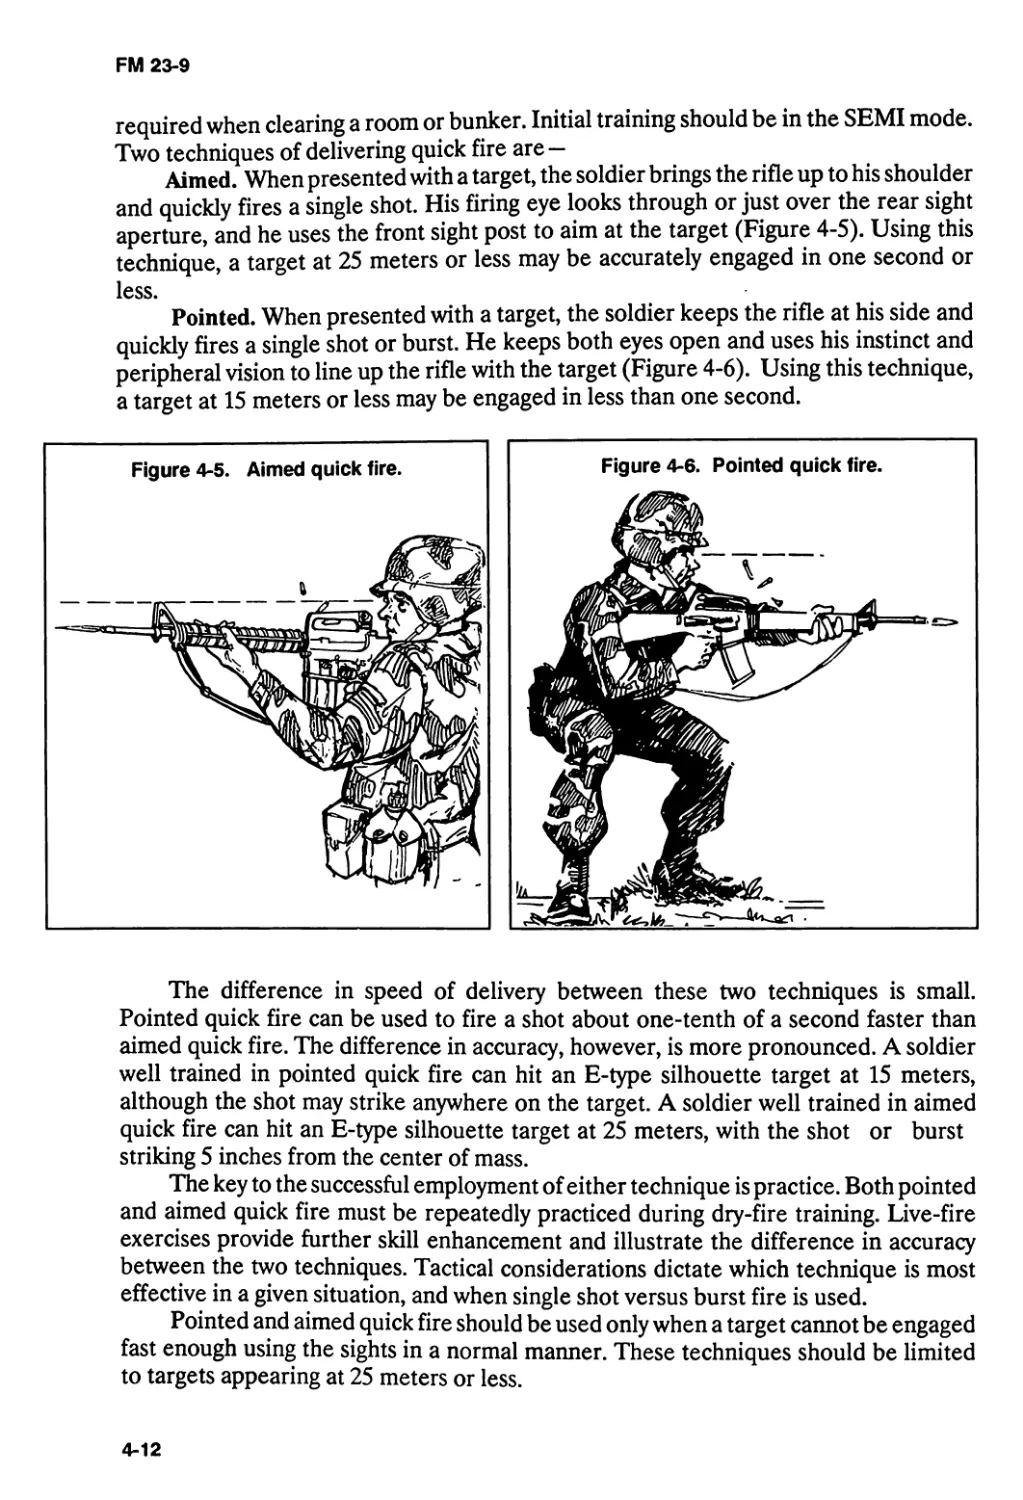
IV. Quick Fire...................................................4-11
Effectiveness of Quick Fire..................................4-11
Modifications for Quick-Fire Techniques......................4-13
Training for Quick-Fire Techniques...........................4-13
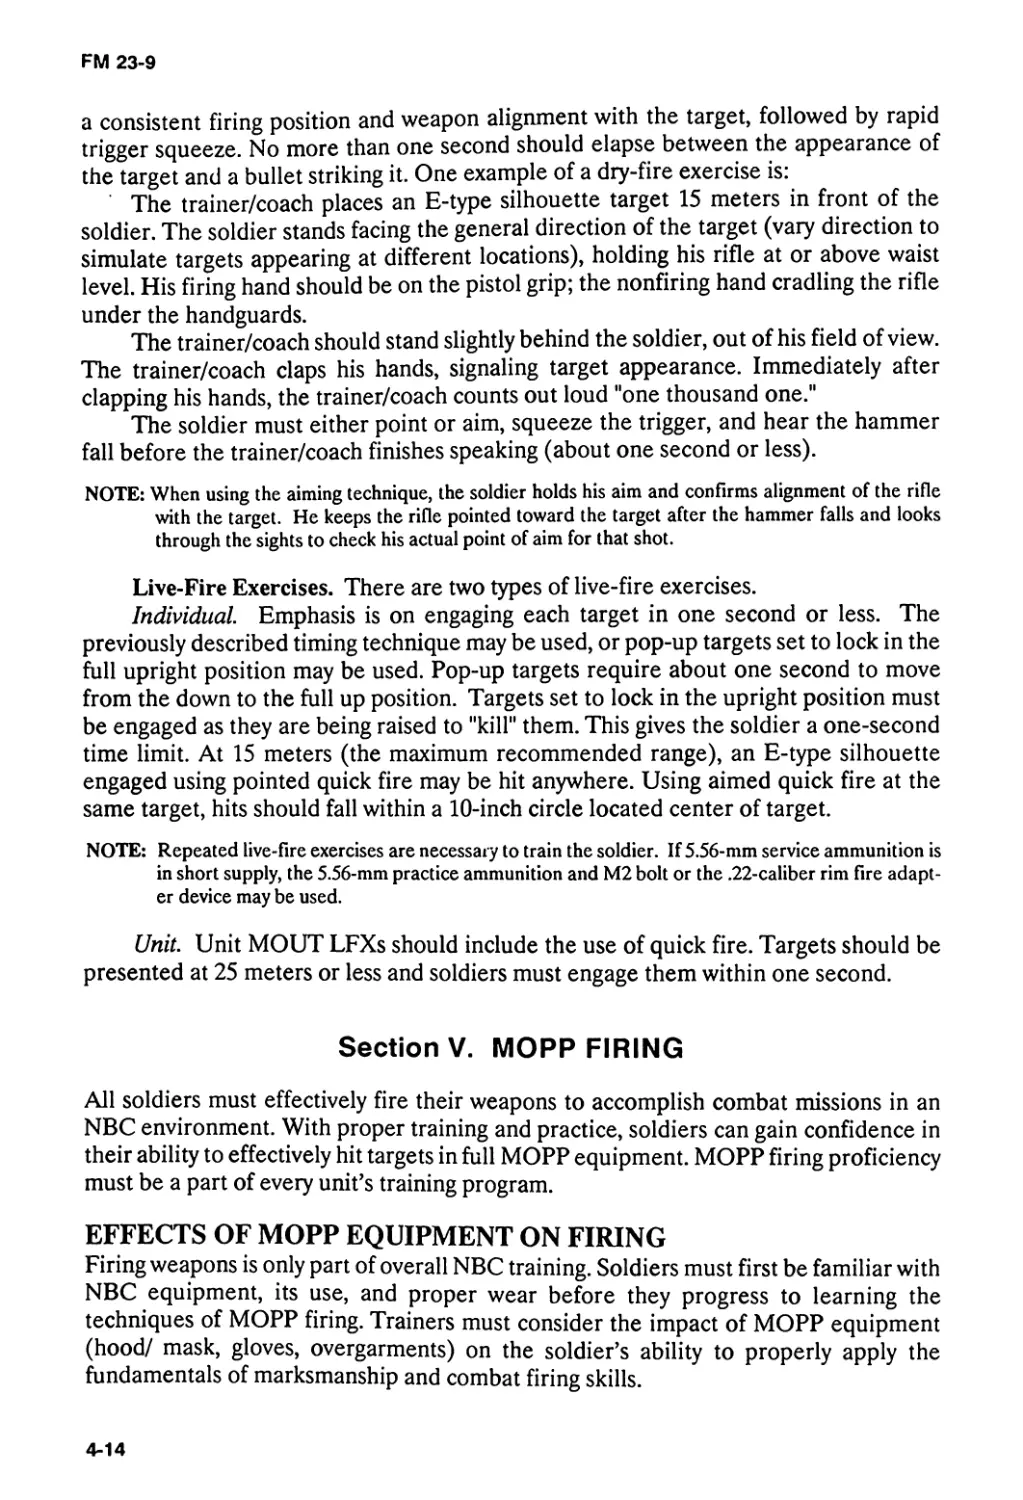
V. MOPP Firing..................................................4-14
Effects of MOPP Equipment on Firing..........................4-14
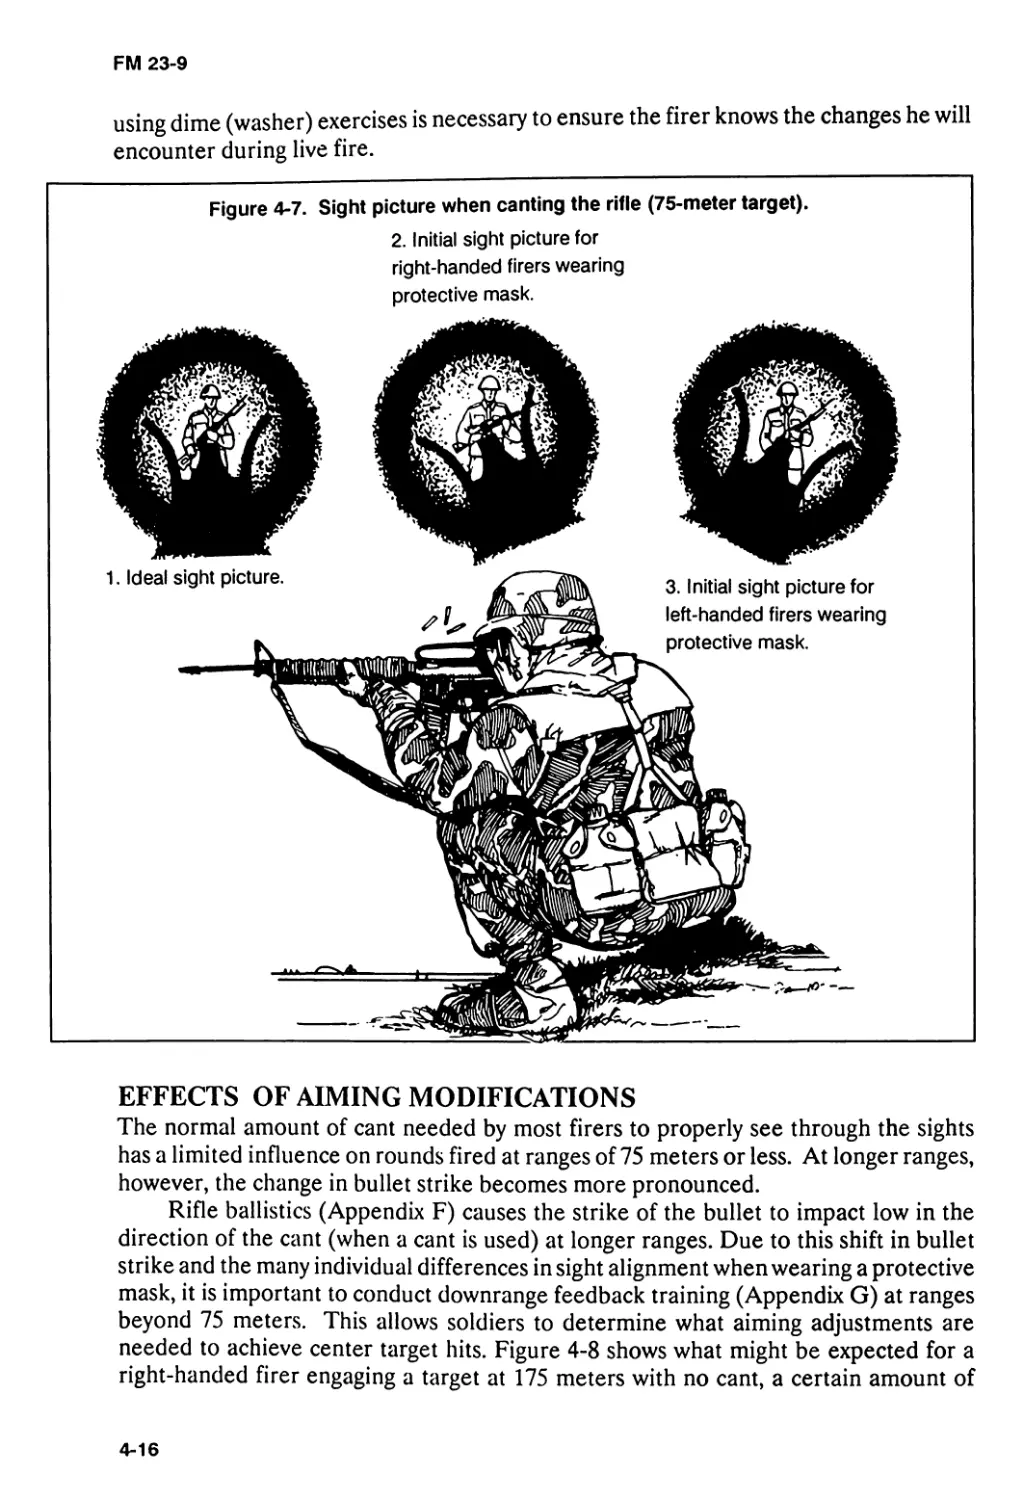
Effects of Aiming Modifications..............................4-16
Operation and Function Modifications.........................4-17
MOPP Fire Exercises..........................................4-18
VI. Moving Target Engagement ....................................4-19
Moving Target Techniques.....................................4-19
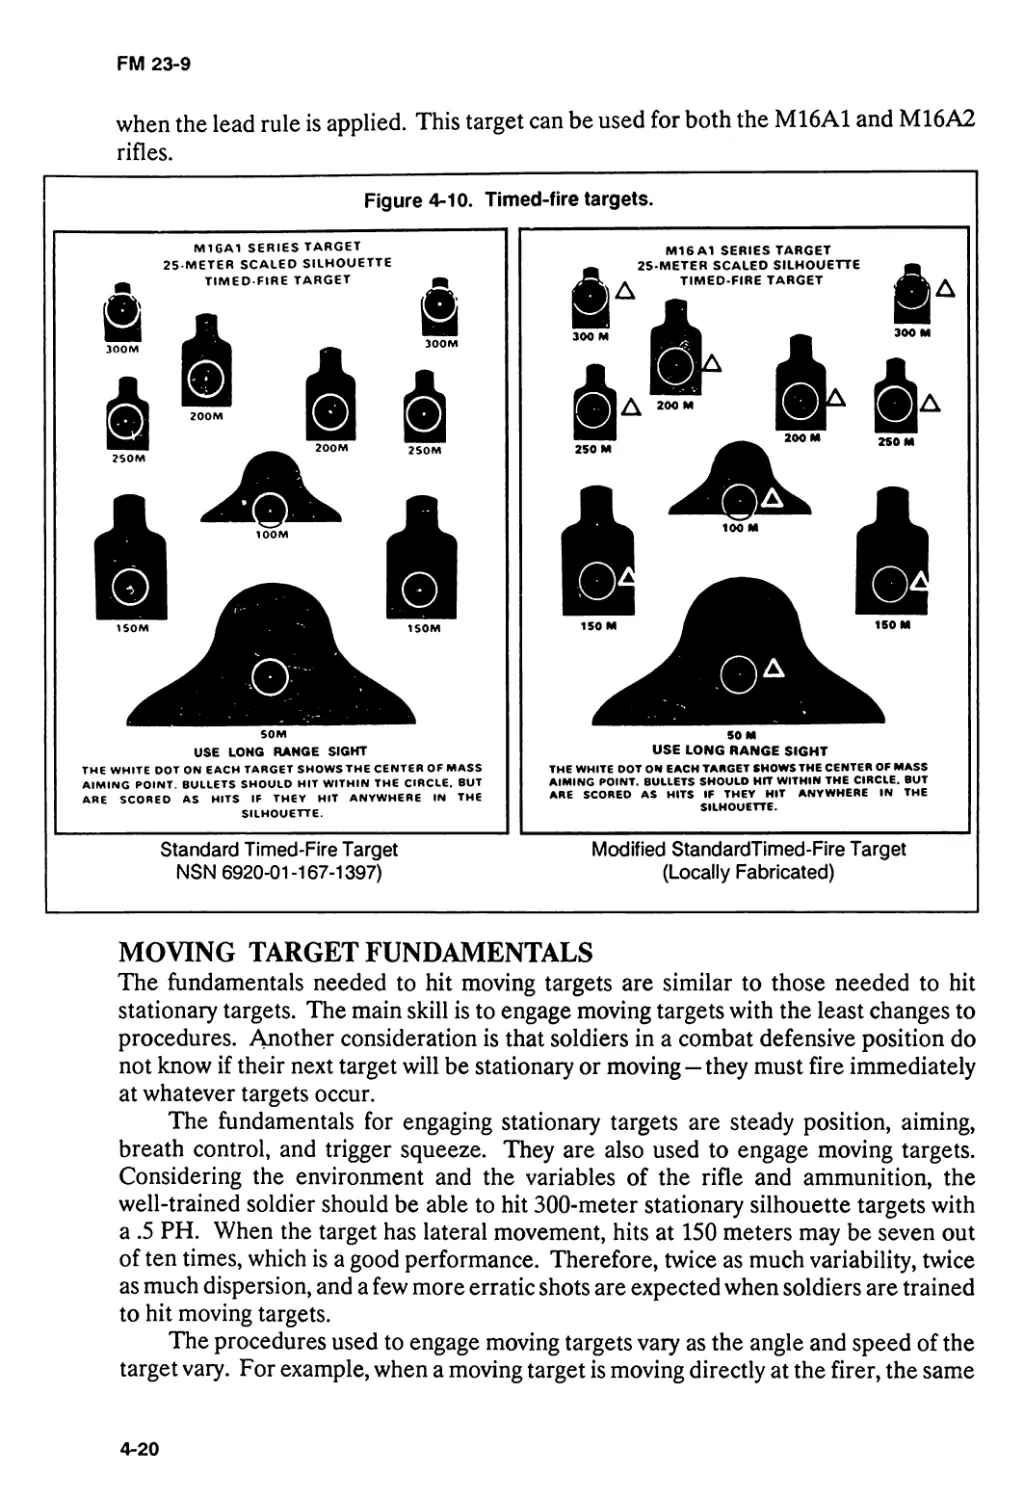
Moving Target Fundamentals...................................4-20
Single-Lead Rule for Moving Targets..........................4-21
Lead Requirements............................................4-22
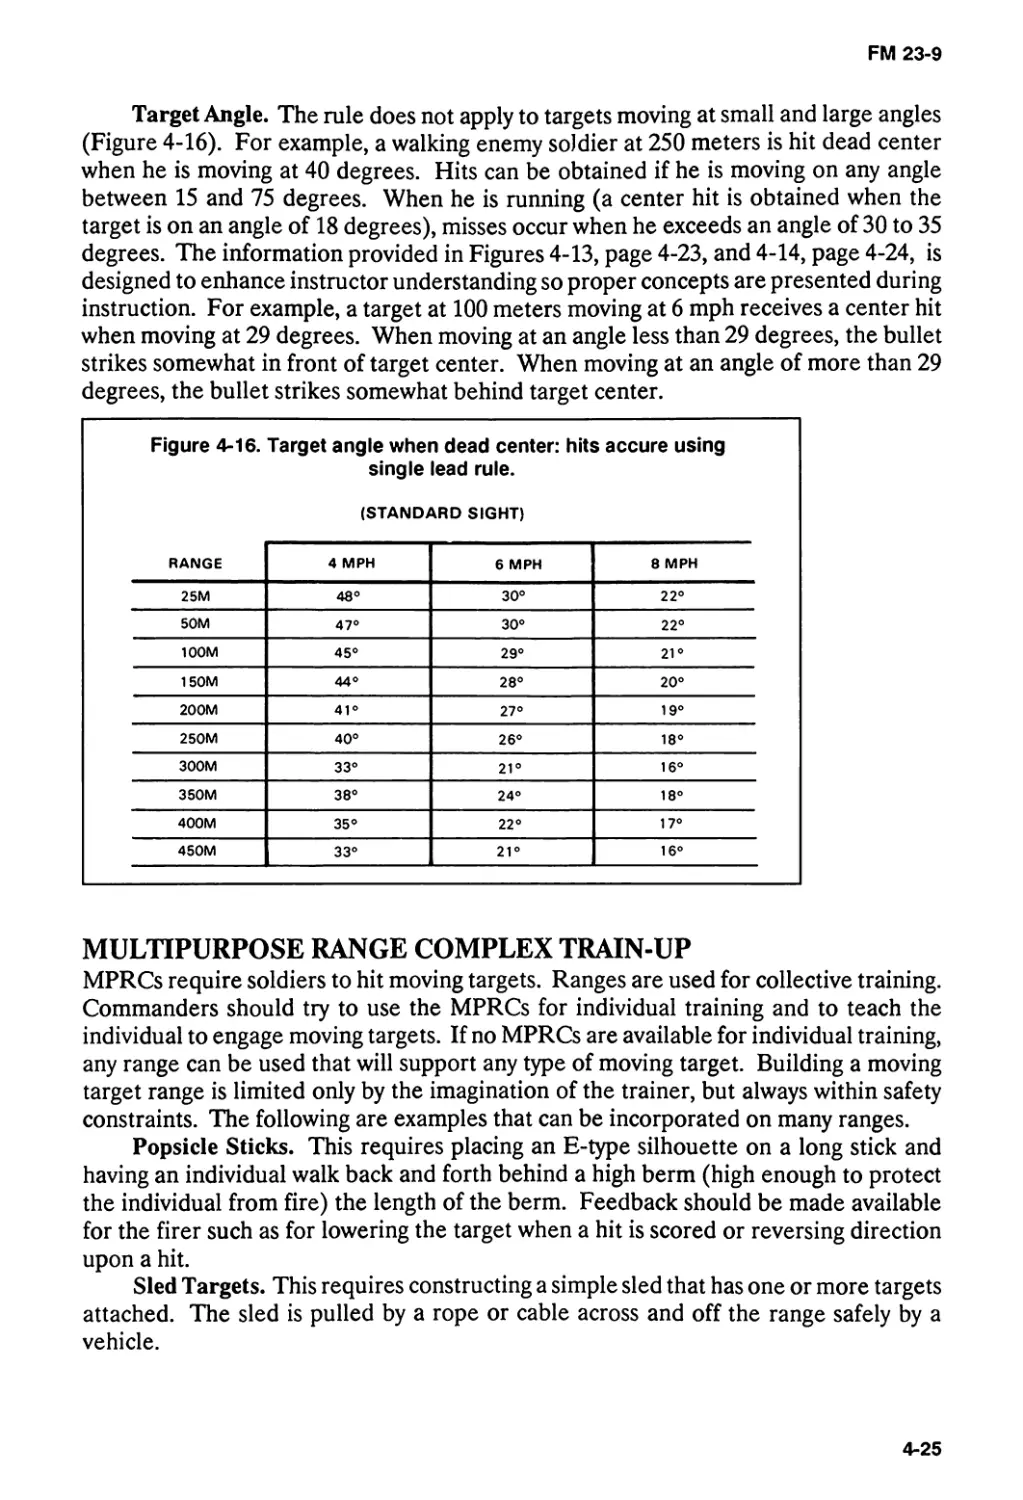
Multipurpose Range Complex Train-Up..........................4-25
CHAPTER 5. NIGHT FIRING
Considerations................................................5-1
Principles of Night Vision....................................5-2
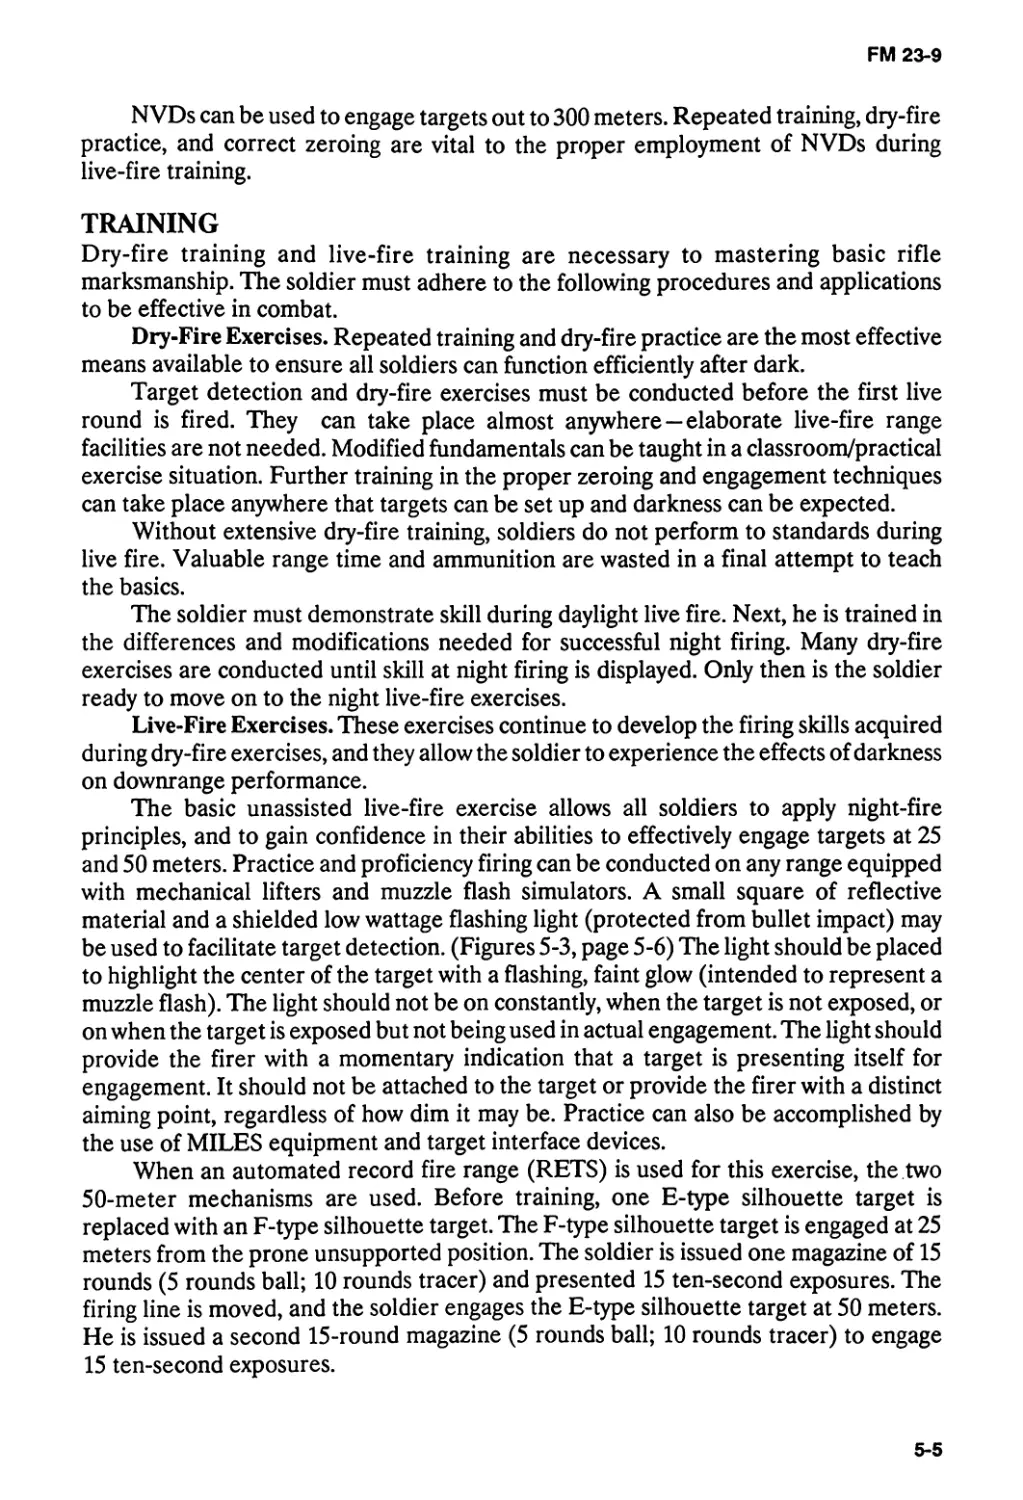
Target Engagement Techniques..................................5-4
Training......................................................5-5
APPENDIX A. YEAR-ROUND MARKSMANSHIP TRAINING.A-l
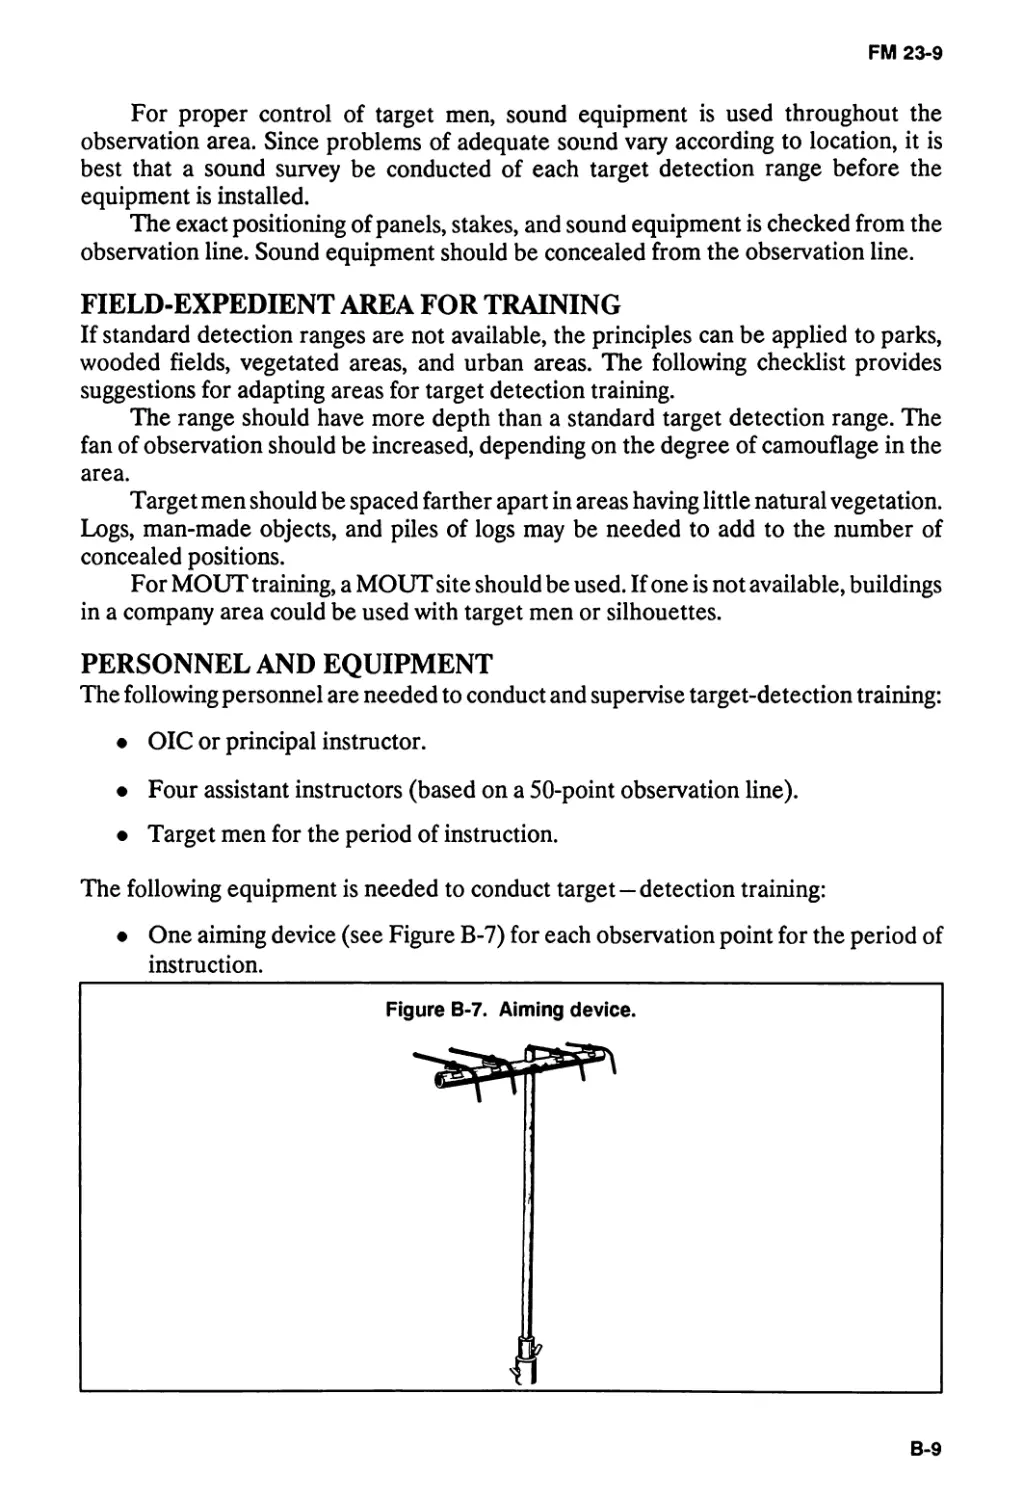
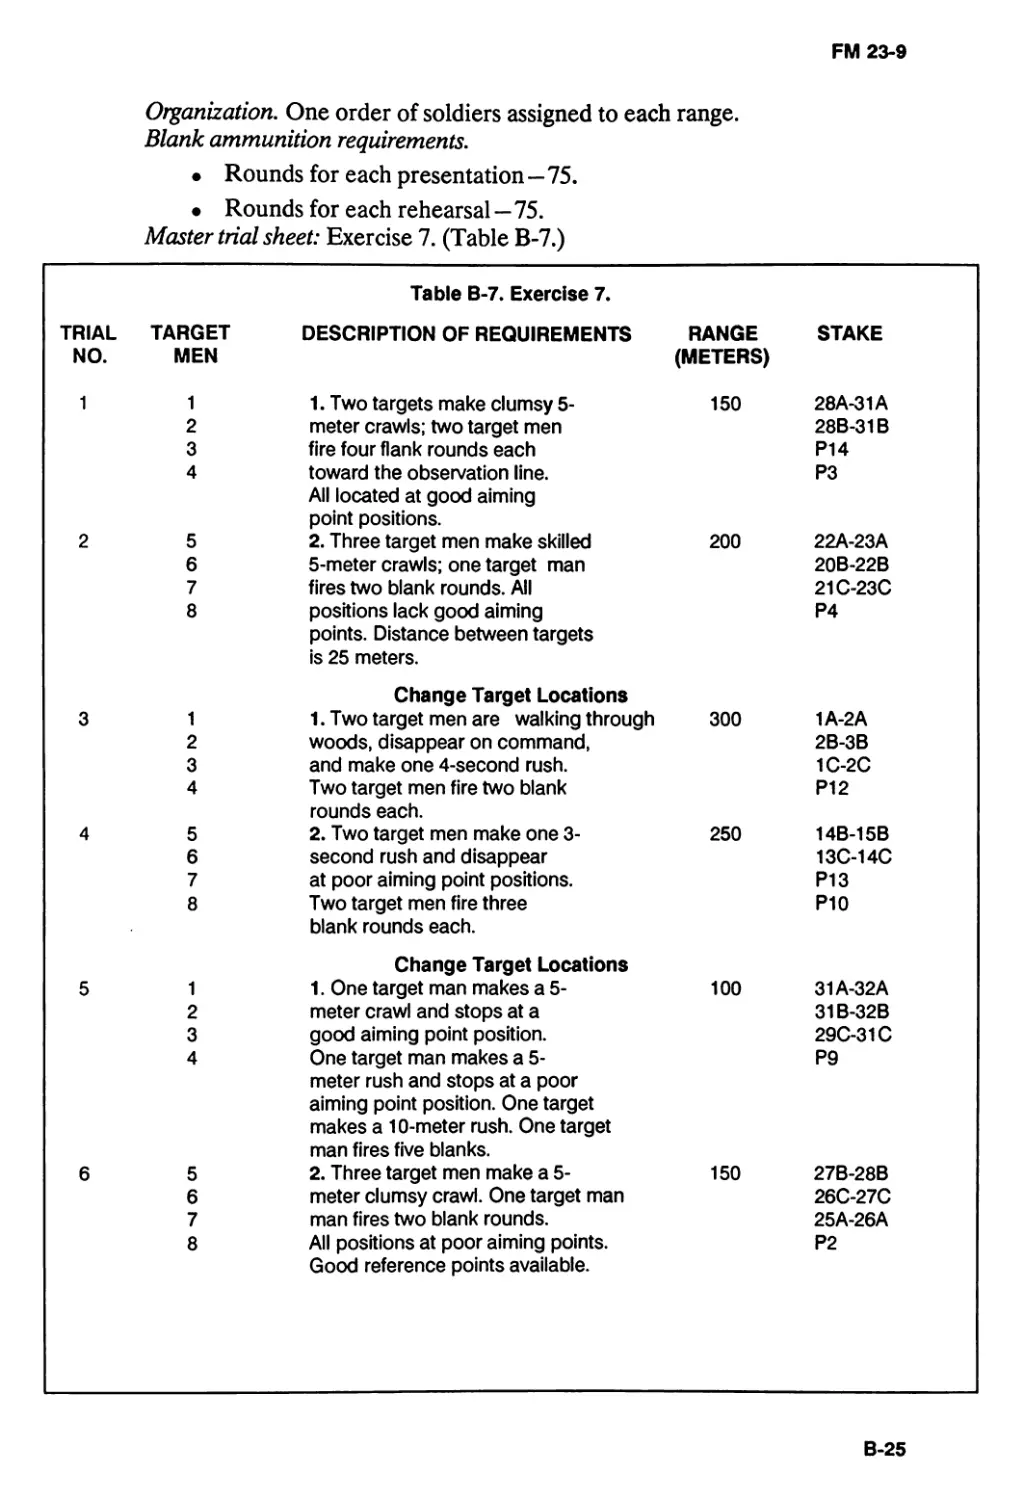
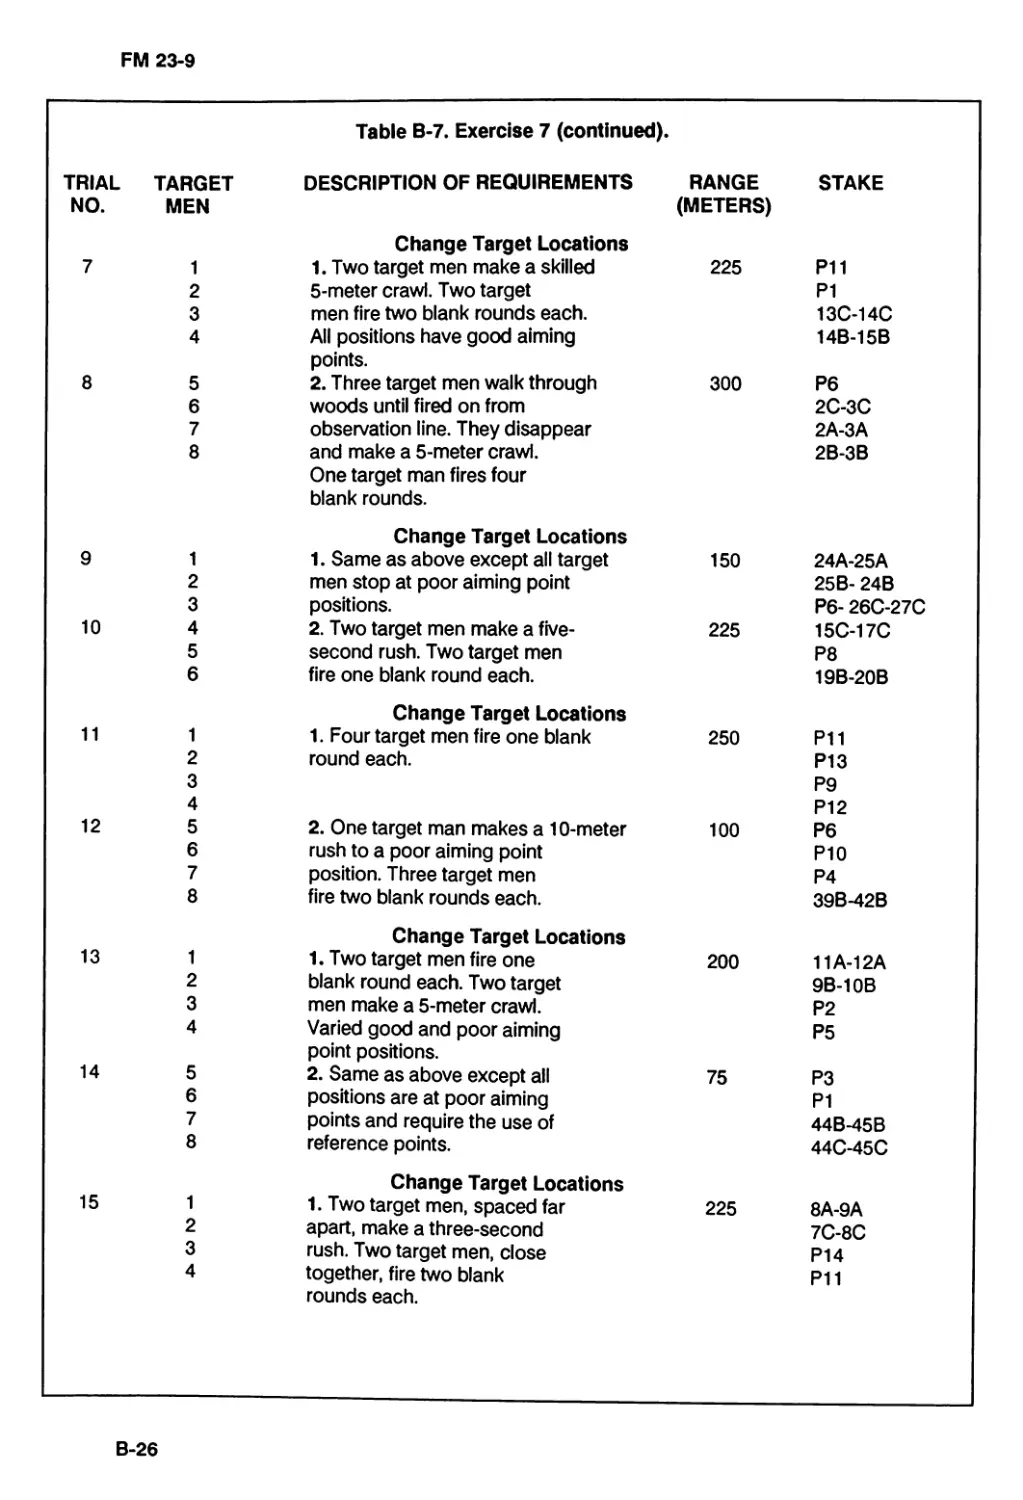
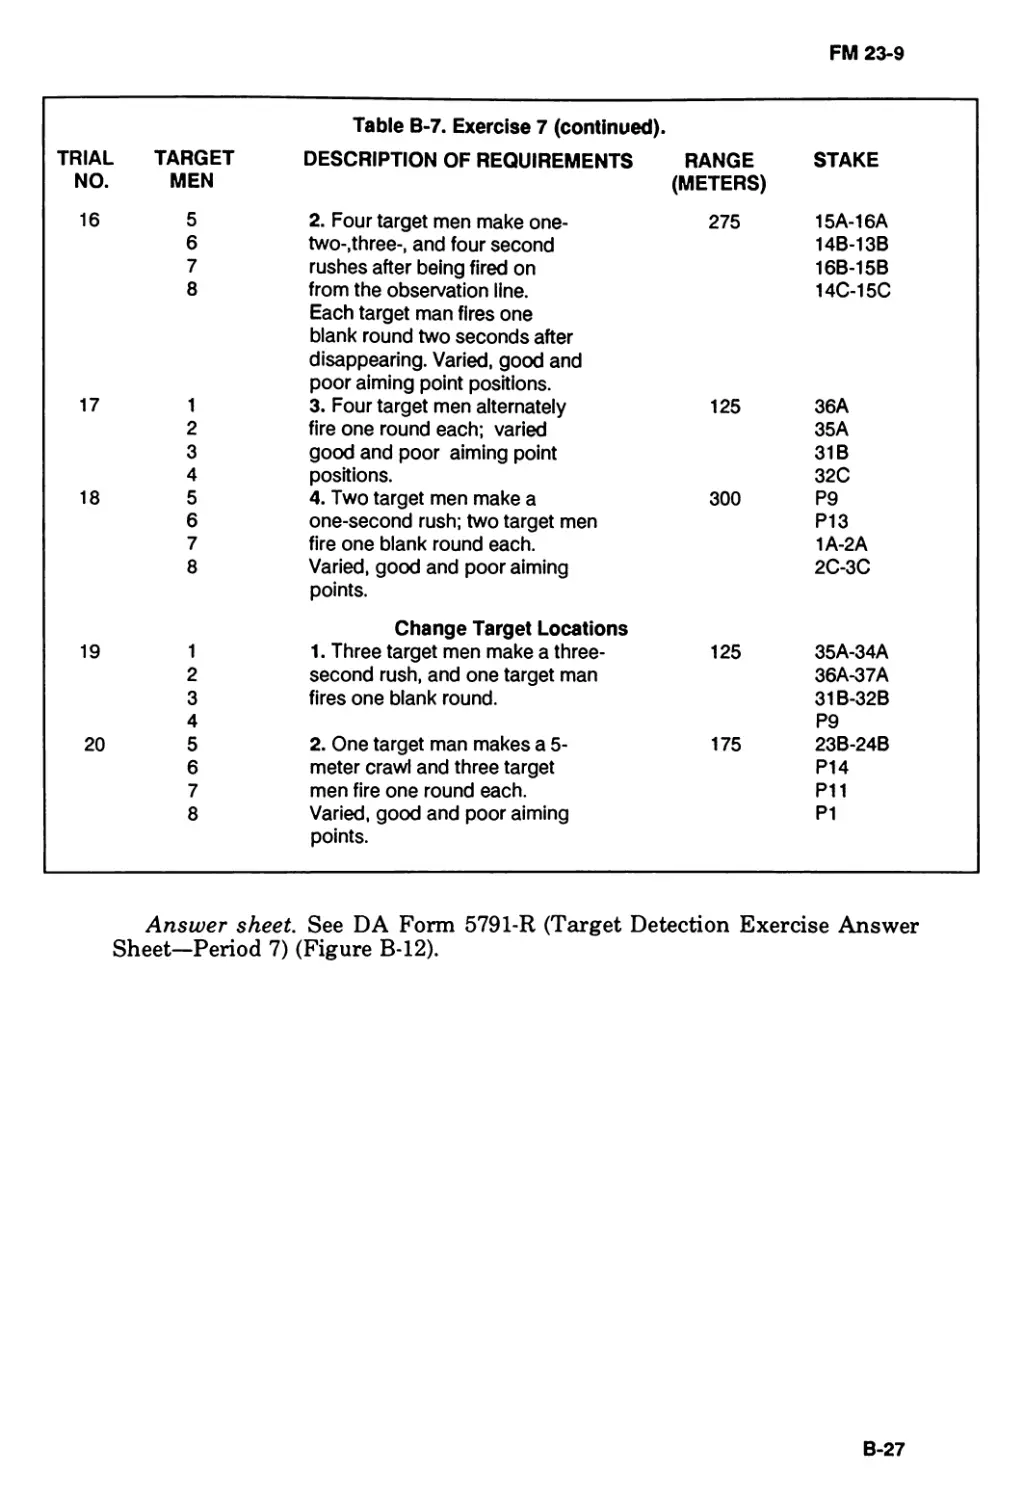
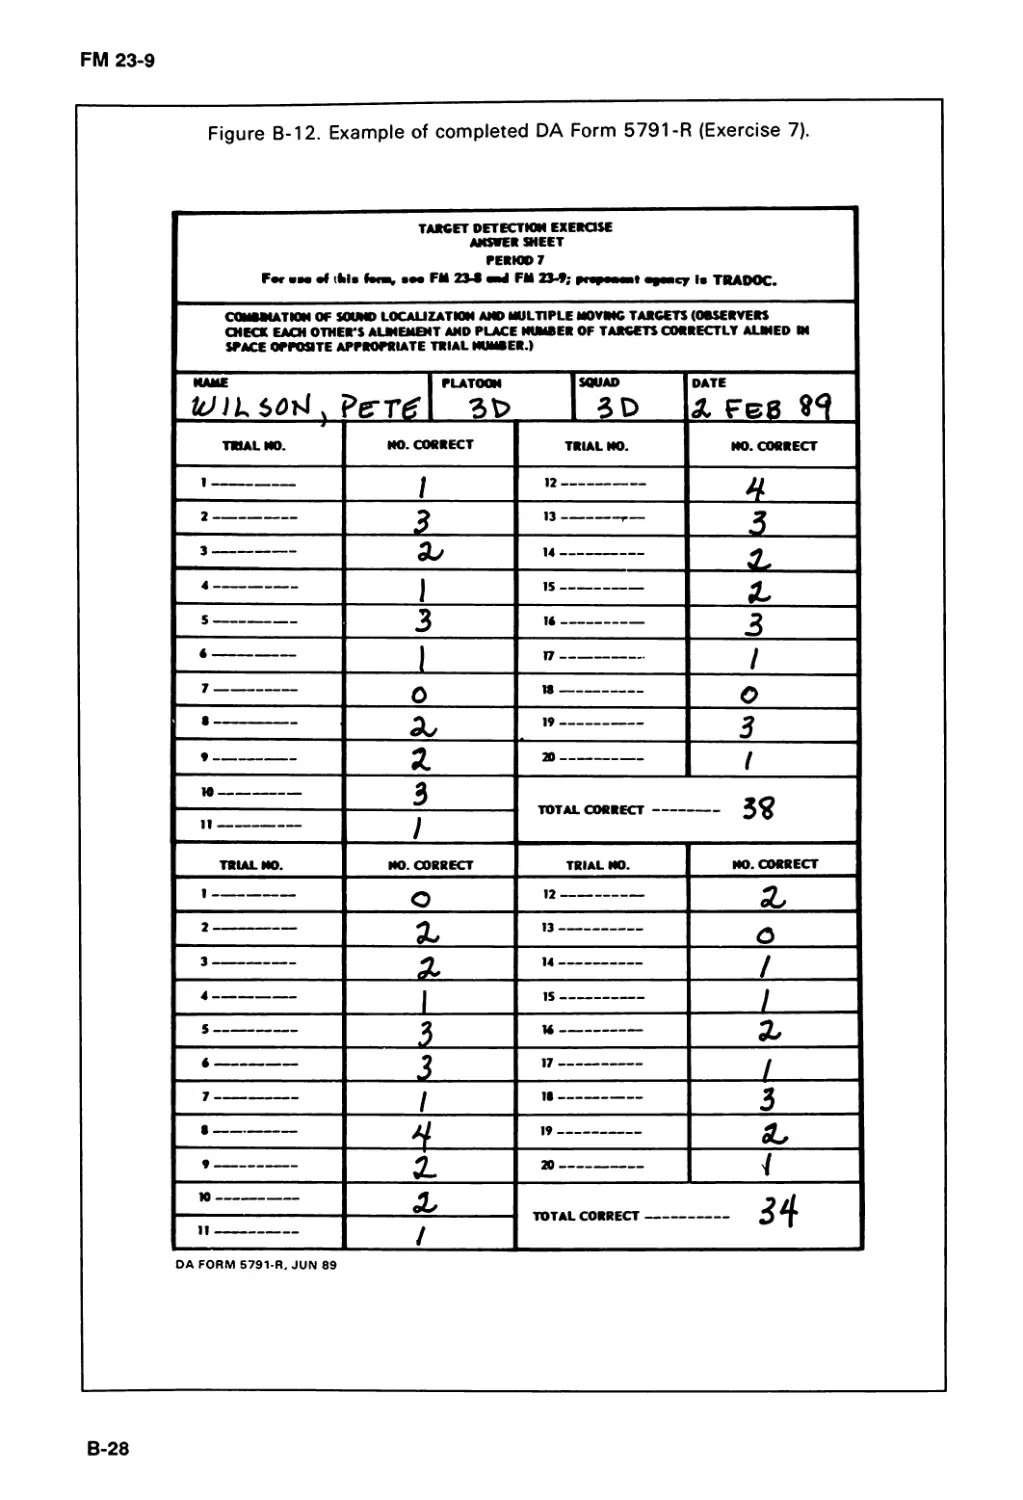
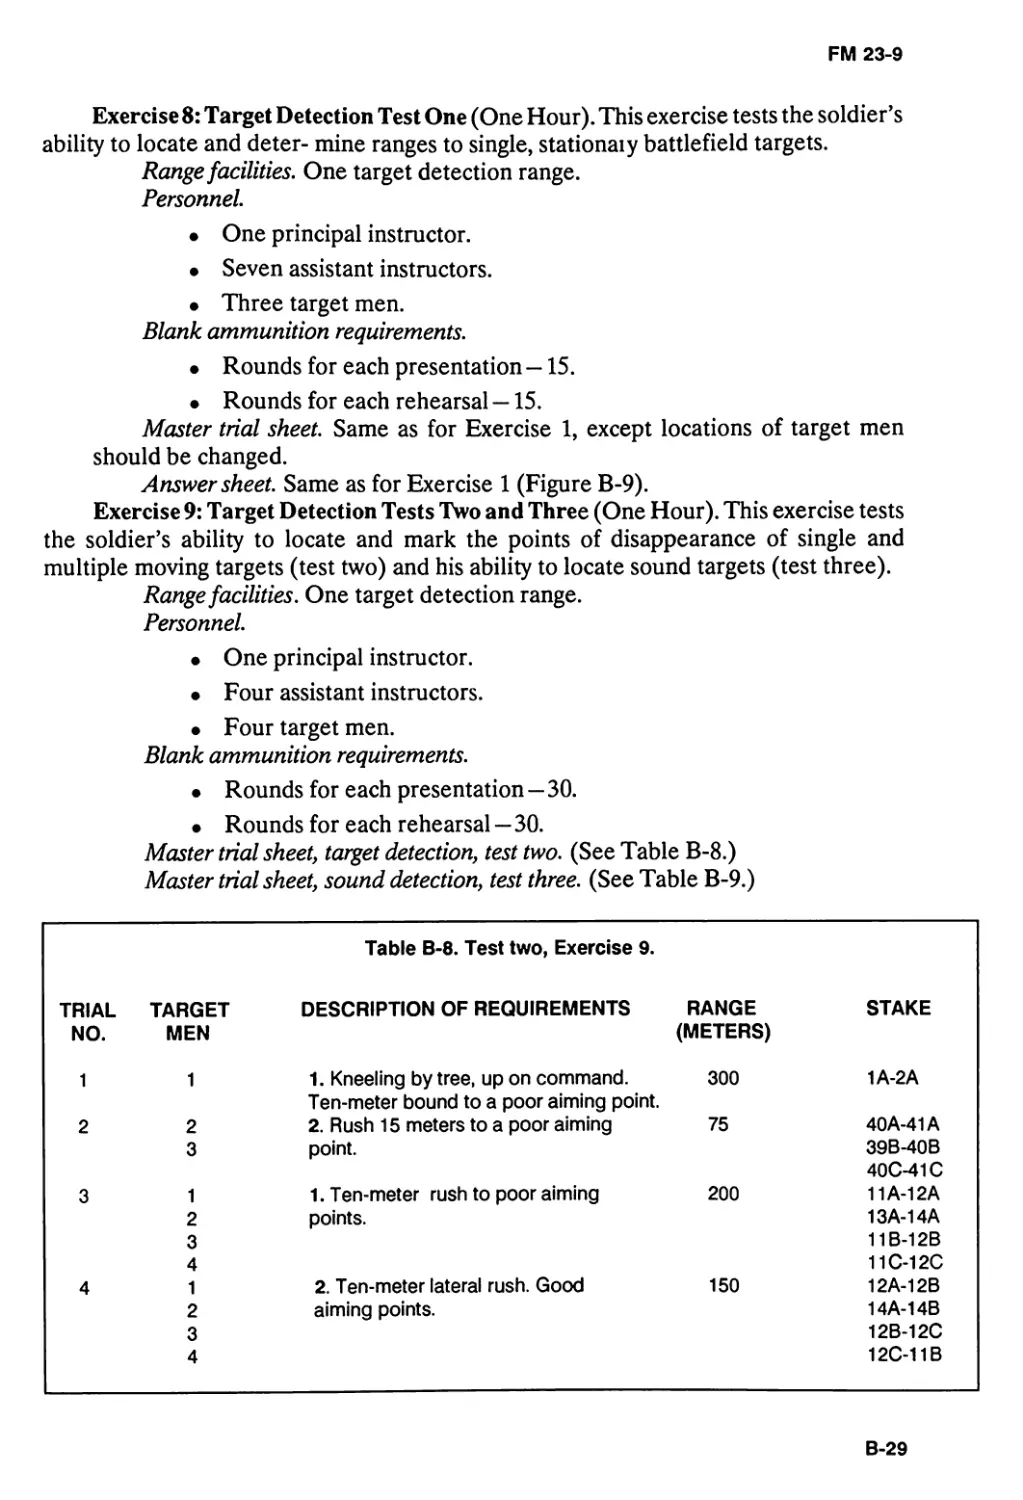
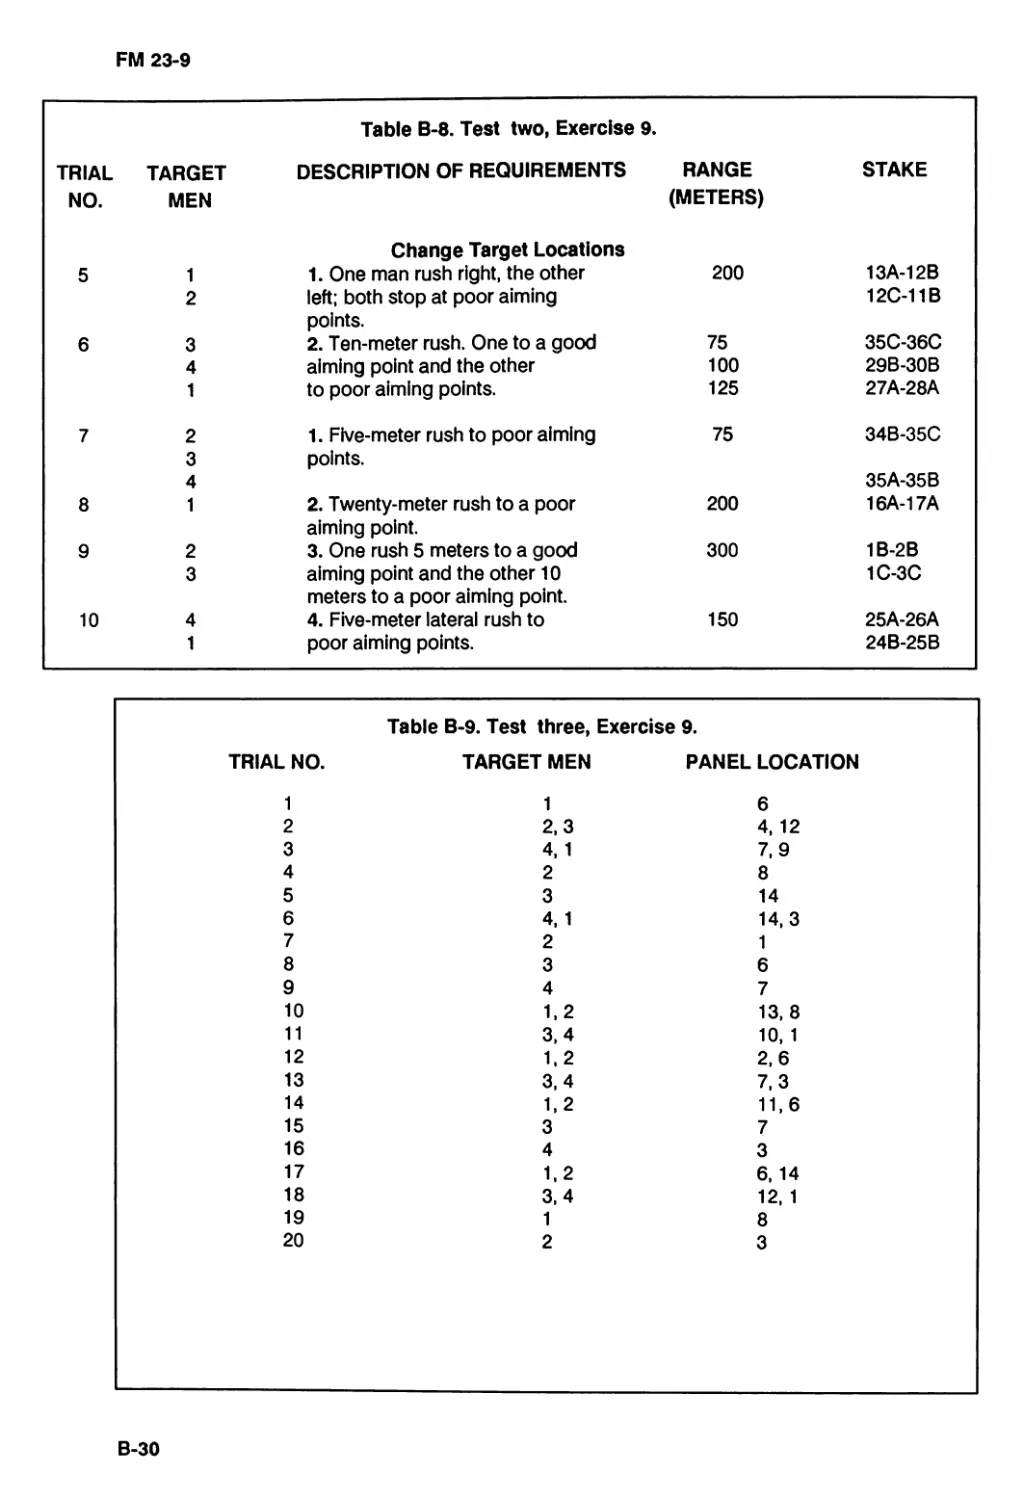
APPENDIX B. TARGET DETECTION.B-l
APPENDIX C. TRAINING AIDS AND DEVICES.C-l
ii
Page
APPENDIX D. RIFLE RANGE SAFETY BRIEFING/RANGE
OPERATIONS CHECKLIST.......................D-l
APPENDIX E. SCALED SILHOUETTE TARGETS.....................E-l
APPENDIX F. PRECISION FIRING INFORMATION .................F-l
APPENDIX G. LIVE-FIRE EXERCISES ..........................G-l
APPENDIX H. REPRODUCIBLE FORMS ...........................H-l
GLOSSARY...............................Glossary-1
REFERENCES...........................References-1
INDEX.....................................Index-1
Preface
This manual provides guidance for planning and executing training on the 5.56-mm
M16A1 and M16A2 rifles to include the conduct of basic rifle marksmanship and
advanced rifle marksmanship. It is a guide for commanders, leaders, and instructors to
develop training programs, plans, and lessons that meet the objectives/intent of the
United States Army rifle marksmanship program and FM 25-100.
This manual is organized to lead the trainer through the material needed to
conduct training in IET and units. Preliminary subjects include discussions on
mechanical training, the weapons’ capabilities, and the principles and fundamentals of
marksmanship. Live-fire applications are scheduled after the soldier has demonstrated
preliminary skills. Initial firing will be a grouping exercise that leads to the soldier
adjusting the sights on the weapon and to setting the battlesight zero.
The proponent of this publication is HQ TRADOC. Submit changes for improving
this publication on DA Form 2028 (Recommended Changes to Publications and Blank
Forms) and forward it to Commandant, US Army Infantry School, ATTN:
ATSH-I-V-P, Fort Benning, GA 31905-5593.
Unless otherwise stated, whenever the masculine
gender is used, both men and women are included.
iv
FM 23-9
CHAPTER 1
Introduction
The procedures and methods used in the Army rifle marksmanship program are based on
the concept that soldiers must be skilled marksmen who can effectively apply their firing
skills in combat. FM 25-100 stresses marksmanship as a paramount soldier skill. The
basic firing skills and exercises outlined in this manual must be a part of every unit’s
marksmanship training program. Unit commanders must gear their advanced
marksmanship training programs to their respective METLs. The proficiency attained by
a soldier depends on the proper training and application of basic marksmanship
fundamentals. During initial marksmanship training emphasis is on learning the firing
fundamentals, which are taught in a progressive program to prepare soldiers for
combat-type exercises.
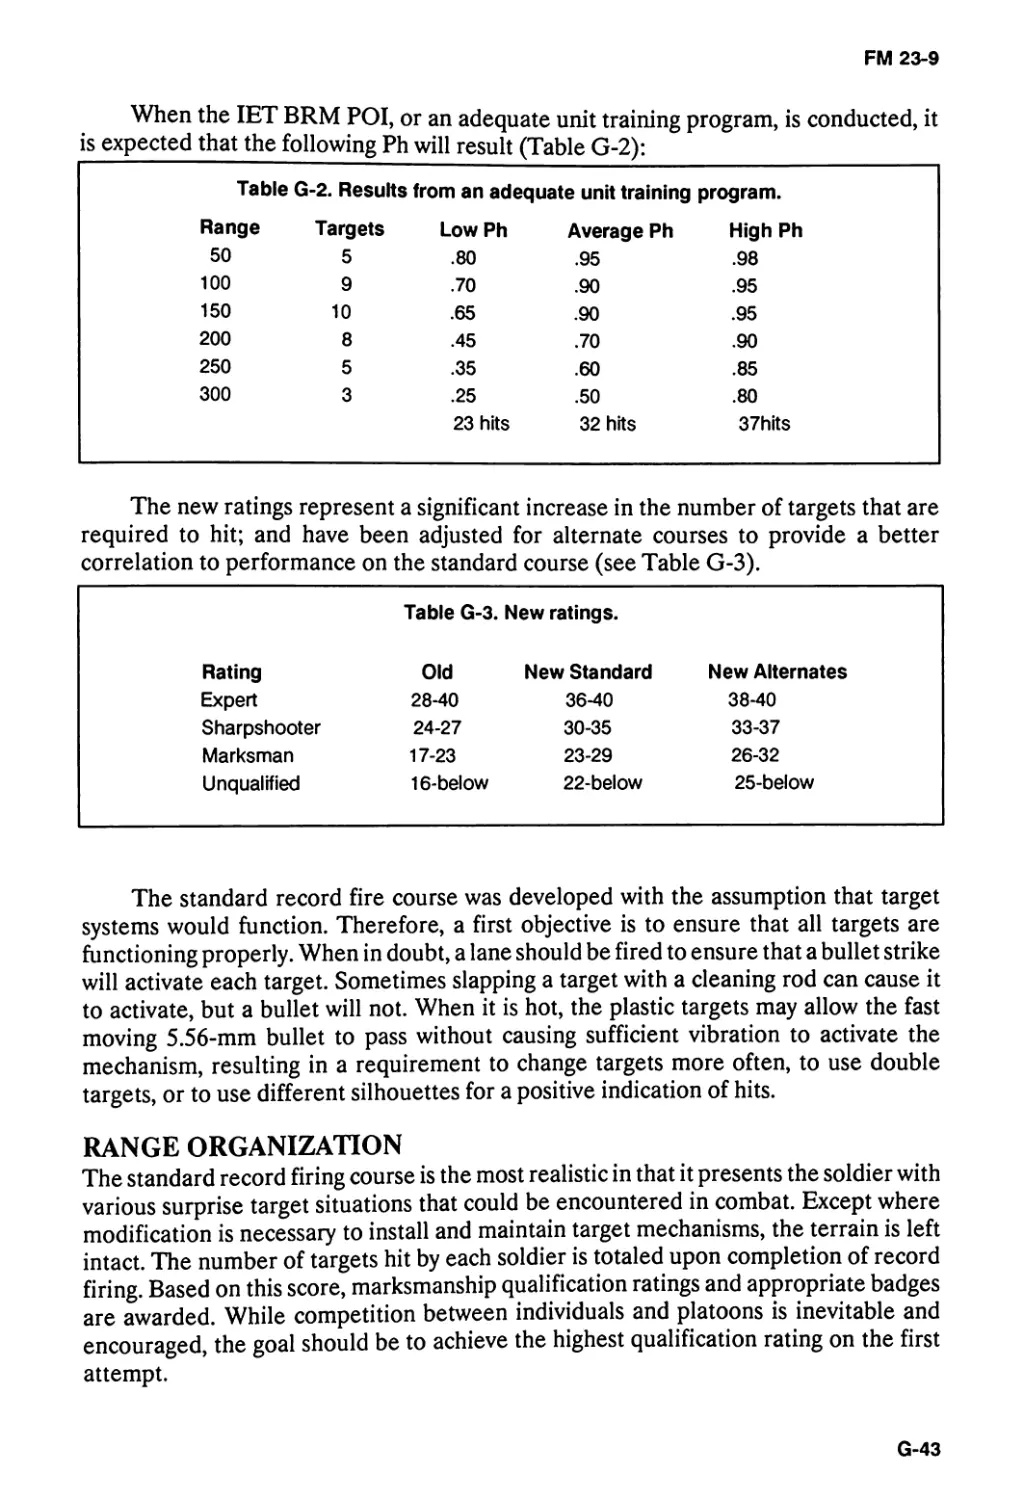
TRAINING STRATEGY
Training strategy is the overall concept for integrating resources into a program to train
individual and collective skills needed to perform a unit’s wartime mission.
Training strategies for rifle marksmanship are implemented in TRADOC
institutions (IET, NCOES, basic and advanced officer’s courses) and in units. The
overall training strategy is multifaceted and is inclusive of the specific strategies used
in institution and unit programs. Also included are the supporting strategies that use
resources such as publications, ranges, ammunition, training aids, devices, simulators,
and simulations. These strategies focus on developing critical soldier skills, and on
leader skills that are required for success in combat.
Two primary components compose the training strategies: initial training and
sustainment training. Both may include individual and collective skills. Initial training
is critical. A task that is taught correctly and learned well is retained longer and skills
can be quickly regained and sustained. Therefore, initial training must be taught
correctly the first time. However, eventually an individual or unit loses skill proficiency.
This learning decay depends on many factors such as the difficulty and complexity of
the task. Personnel turnover is a main factor in decay of collective skills, since the loss
of critical team members requires retraining to regain proficiency. If a long period
elapses between initial and sustainment training sessions or training doctrine is altered,
retraining may be required.
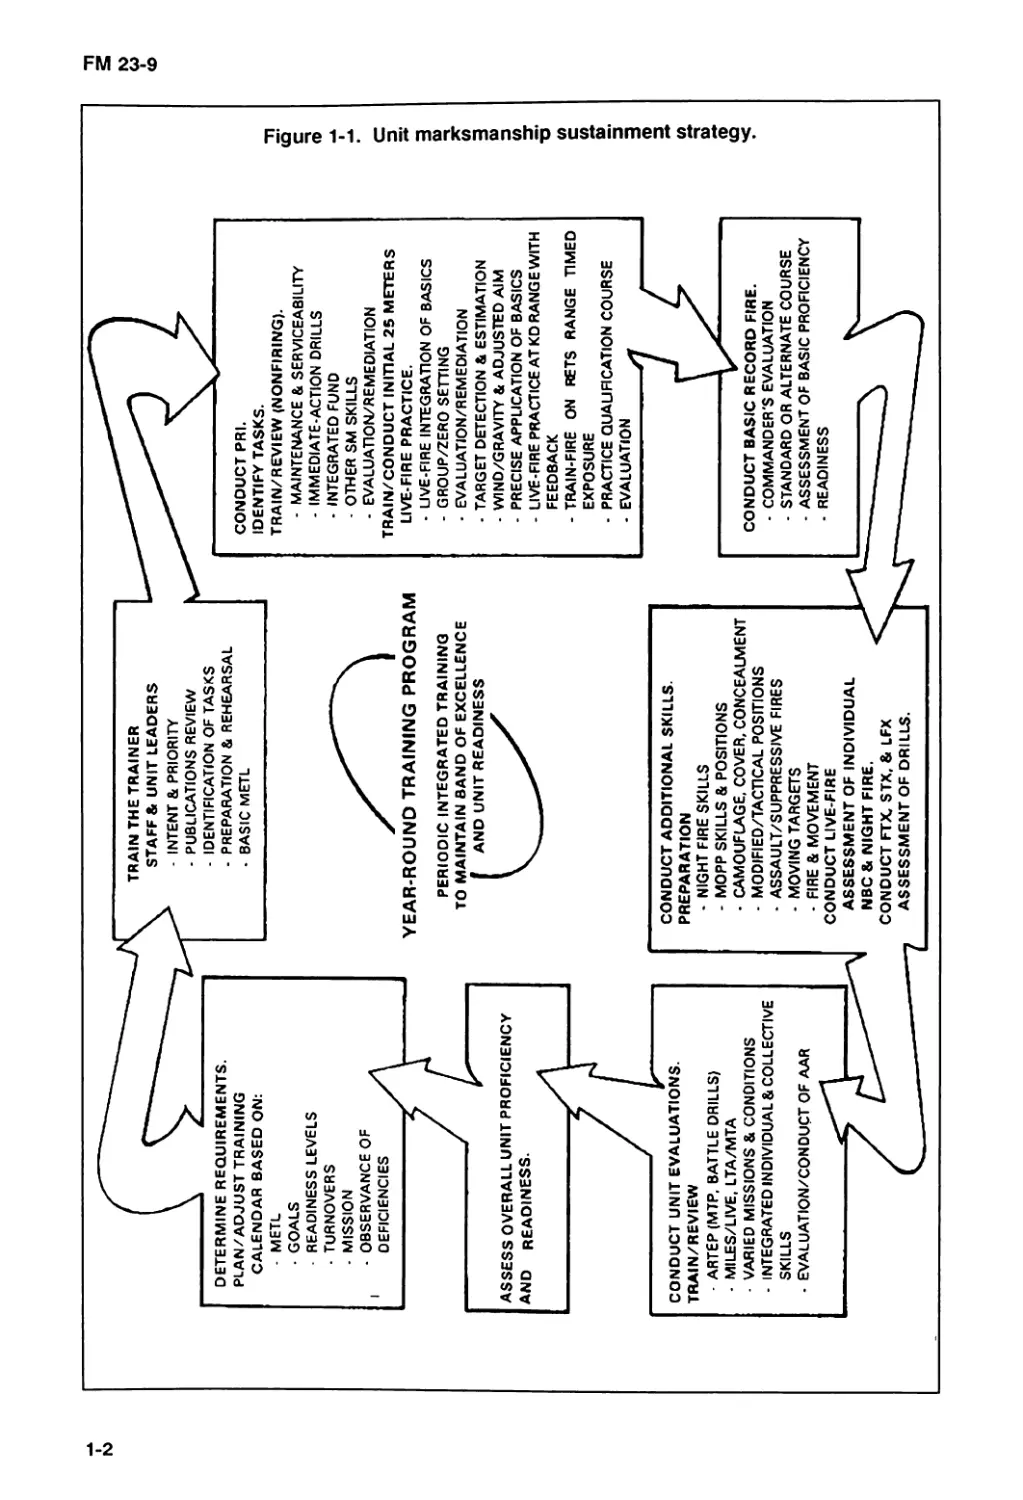
The training strategy for rifle marksmanship begins in IET and continues in the
unit. An example of this overall process is illustrated in Figure 1-1 and provides a
concept of the flow of unit sustainment training (Appendix A). IET provides field units
with soldiers who have been trained and who have demonstrated proficiency to
standard in basic marksmanship tasks. The soldier graduating from these courses has
been trained to maintain the rifle and to hit a point target. He has learned target
detection, application of marksmanship fundamentals, and other skills needed to
engage a target. The specific tasks and programs taught in IET are explained in
Appendix A, FM 21-3, and in commanders’ manuals.
1-1
I
го
DETERMINE REQUIREMENTS.
PLAN/ADJUST TRAINING
CALENDAR BASED ON:
- METL
• GOALS
READINESS LEVELS
• TURNOVERS
- MISSION
- OBSERVANCE OF
DEFICIENCIES
TRAIN THE TRAINER
STAFF & UNIT LEADERS
- INTENT & PRIORITY
- PUBLICATIONS REVIEW
- IDENTIFICATION OF TASKS
- PREPARATION & REHEARSAL
. BASIC METL
FM 23-9
YEAR-ROUND TRAINING PROGRAM
PERIODIC INTEGRATED TRAINING
TO MAINTAIN BAND OF EXCELLENCE
AND UNIT READINESS
ASSESS OVERALL UNIT PROFICIENCY
AND READINESS.
CONDUCT UNIT EVALUATIONS.
TRAIN/REVIEW
- ARTEP (MTP, BATTLE DRILLS)
• MILES/LIVE, LTA/MTA
- VARIED MISSIONS & CONDITIONS
- INTEGRATED INDIVIDUAL & COLLECTIVE
SKILLS
- EVALUATION/CONDUCTOF AAR
CONDUCT ADDITIONAL SKILLS.
PREPARATION
- NIGHT FIRE SKILLS
- MOPP SKILLS & POSinONS
• CAMOUFLAGE, COVER, CONCEALMENT
- MODIFIED/TACTICAL POSITIONS
• ASSAULT/SOPPRESSIVE FIRES
- MOVING TARGETS
- FIRE & MOVEMENT
CONDUCT LIVE-FIRE
ASSESSMENT OF INDIVIDUAL
NBC & NIGHT FIRE.
CONDUCT FTX, STX, & LFX
ASSESSMENT OF DRILLS.
CONDUCT PRI.
IDENTIFY TASKS.
TRAIN/REVIEW (NONFIRING).
- MAINTENANCE & SERVICEABILITY
- IMMEDIATE-ACTION DRILLS
- INTEGRATED FUND
- OTHER SM SKILLS
- EVALUATION/REMEOIATION
TRAIN/CONDUCT INITIAL 25 METERS
LIVE-FIRE PRACTICE.
- LIVE-FIRE INTEGRATION OF BASICS
- GROUP/ZERO SETTING
• EVALUATION/REMEDIATION
- TARGET DETECTION & ESTIMATION
- WIND/GRAVITY & ADJUSTED AIM
- PRECISE APPLICATION OF BASICS
- LIVE-FIRE PRACTICE AT KD RANGE WITH
FEEDBACK
- TRAIN-FIRE ON RETS RANGE TIMED
EXPOSURE
- PRACTICE QUAUACATION COURSE
- EVALUATION
CONDUCT BASIC RECORD FIRE.
• COMMANDER'S EVALUATION
- STANDARD OR ALTERNATE COURSE
- ASSESSMENT OF BASIC PROFICIENCY
- READINESS
“П
(5*
C
Ф
FM 23-9
Training continues in units on the basic skills taught in IET. Additional skills such
as area fire are trained and then integrated into collective training exercises, which
include platoon and squad live-fire STXs. (A year-round unit marksmanship training
program is explained in Appendix A.) The strategy for sustaining the basic
marksmanship skills taught in IET is periodic preliminary rifle instruction, followed by
instructional and qualification range firing. However, a unit must set up a year-round
program to sustain skills. Key elements include training of trainers, refresher training
of nonfiring skills, and use of the Weaponeer or other devices for remedial training.
Additional skills trained in the unit include semiautomatic and automatic area
fires, night fire, MOPP firing, and moving target training techniques. Related soldier
skills of camouflage, cover and concealment, fire and movement, and preparation and
selection of a fighting position are addressed in FM 21-3, which must be integrated into
tactical training.
In the unit, individual and leader proficiency of marksmanship tasks are integrated
into collective training to include squad, section, and platoon drills and STXs; and for
the collective tasks in these exercises, and how they are planned and conducted, are in
the MTP and battle drills books for each organization. (Force-on-force exercises using
MILES are discussed in detail in TC 25-6). Based on the type organization, collective
tasks are evaluated to standard and discussed during leader and trainer after-action
reviews. Objective evaluations of both individual and unit proficiency provide
readiness indicators and future training requirements.
A critical step in the Army’s overall marksmanship training strategy is to train the
trainers and leaders first. Leader courses and unit publications develop officer and
NCO proficiencies necessary to plan and conduct marksmanship training and to
evaluate the effectiveness of unit marksmanship programs. Training support materials
are provided by the proponent schools to include field manuals, training aids, devices,
simulators, and programs that are doctrinal foundations and guidance for training the
force.
Once the soldier understands the weapon and has demonstrated skill in zeroing,
additional live-fire training and a target acquisition exercise at various ranges are
conducted. Target types and scenarios of increasing difficulty must be mastered to
develop proficiency.
Initial individual training culminates in the soldier’s proficiency assessment, which
is conducted on the standard record fire range or approved alternates. This evaluation
also provides an overview of unit proficiency and training effectiveness.
General marksmanship training knowledge and firing well are acquired skills,
which perish easily. Skill practice should be conducted for short periods throughout
the year. Most units have a readiness requirement that al) soldiers must zero their rifles
within a certain time after unit assignment. Also, soldiers must confirm the zeros of
their assigned rifles before conducting a qualification firing. Units should conduct
preliminary training and practice firing throughout the year due to personnel turnover.
A year-round marksmanship sustainment program is needed for the unit to maintain
the individual and collective firing proficiency requirements to accomplish its mission
(see Appendix A).
1-3
FM 23-9
COMBAT FACTORS
The ultimate goal of a unit rifle marksmanship program is well-trained marksmen. In
order for a unit to survive and win on the battlefield, the trainer must realize that rifle
qualification is not an end but a step toward reaching this combat requirement. To reach
this goal, the soldier should consider some of the factors of combat conditions.
• Enemy personnel are seldom visible except when assaulting.
• Most combat fire must be directed at an area where the enemy has been detected
or where he is suspected of being located but cannot be seen. Area targets
consist of objects or outlines of men irregularly spaced along covered and
concealed areas (ground folds, hedges, borders of woods).
• Most combat targets can be detected by smoke, flash, dust, noise, or movement
and are visible only for a moment.
• Some combat targets can be engaged by using nearby objects as reference points.
• The range at which enemy soldiers can be detected and effectively engaged
rarely exceeds 300 meters.
• The nature of the target and irregularities of terrain and vegetation may require
a firer to use a variety of positions in addition to the prone or supported position
to fire effectively on the target. In a defensive situation, the firer usually fires
from a supported position.
• Choosing an aiming point in elevation is difficult due to the low contrast outline
and obscurity of most combat targets.
• Time-stressed fire in combat can be divided into three types:
- A single, fleeing target that must be engaged quickly.
- Area targets that must be engaged with distributed fires that cover the entire
area. The firer must maintain sustained fire on the sector he is assigned.
- A surprise target that must be engaged at once with accurate, instinctive fire.
1-4
FM 23-9
CHAPTER 2
Operation and Function
The procedures and techniques described in this chapter provide commanders, planners,
and trainers information on the M16A1 and M16A2 rifles. These include mechanical
training, operation, functioning, preventive maintenance, and common malfunctions.
Technical data are presented in a logical sequence from basic to the more complex.
Additional information is provided in technical manuals for the rifle.
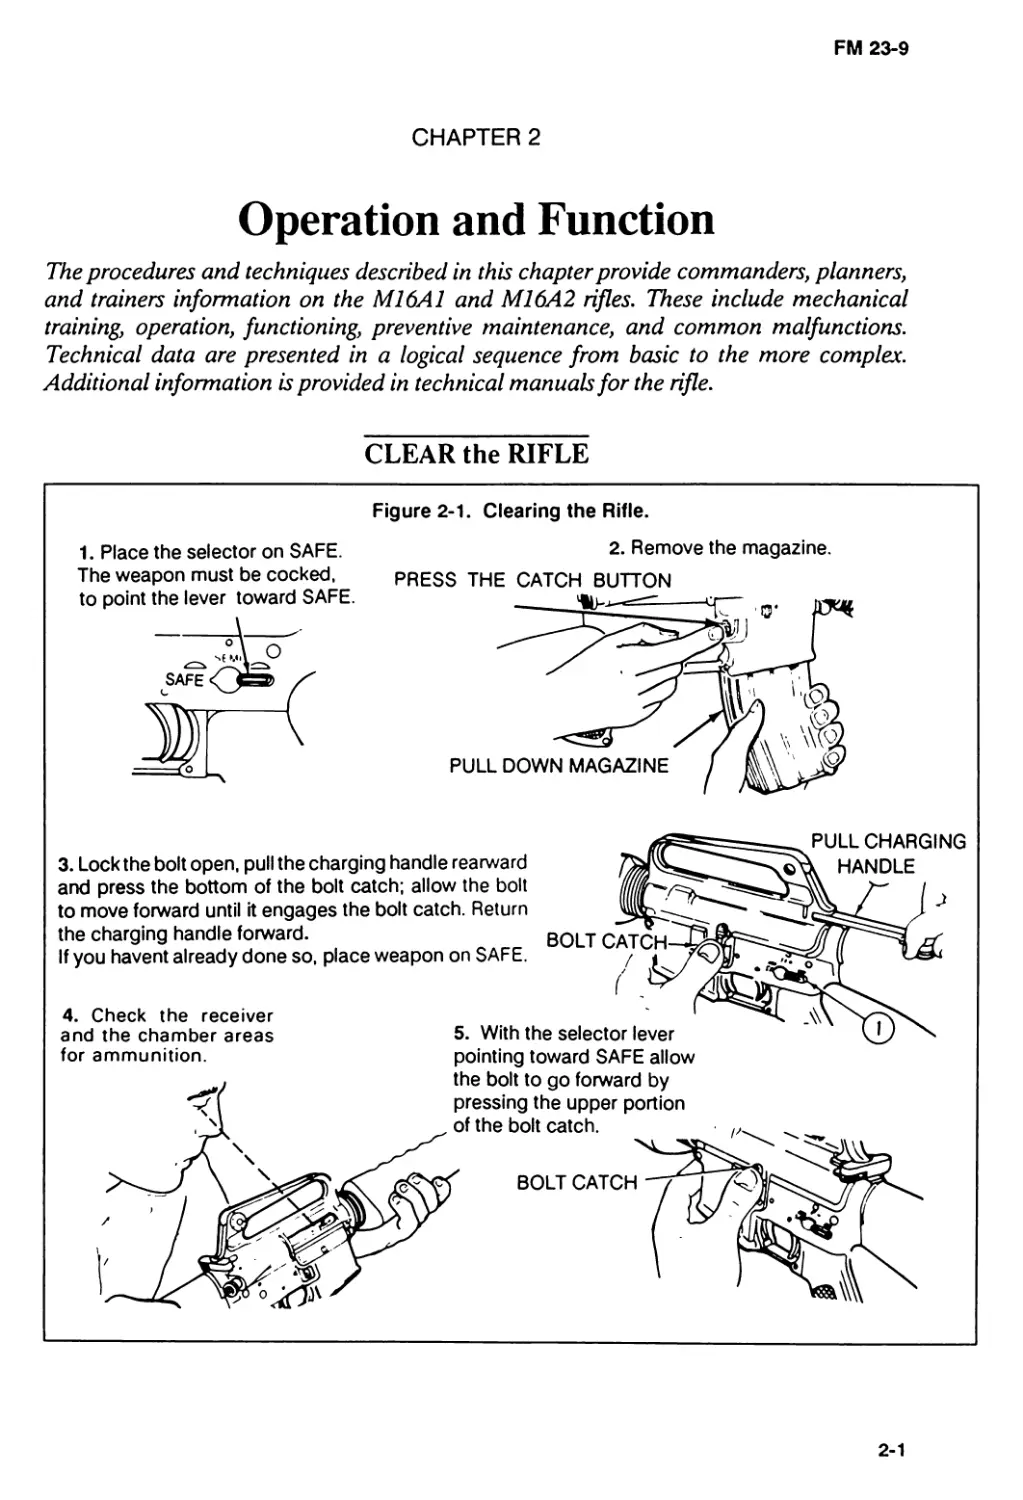
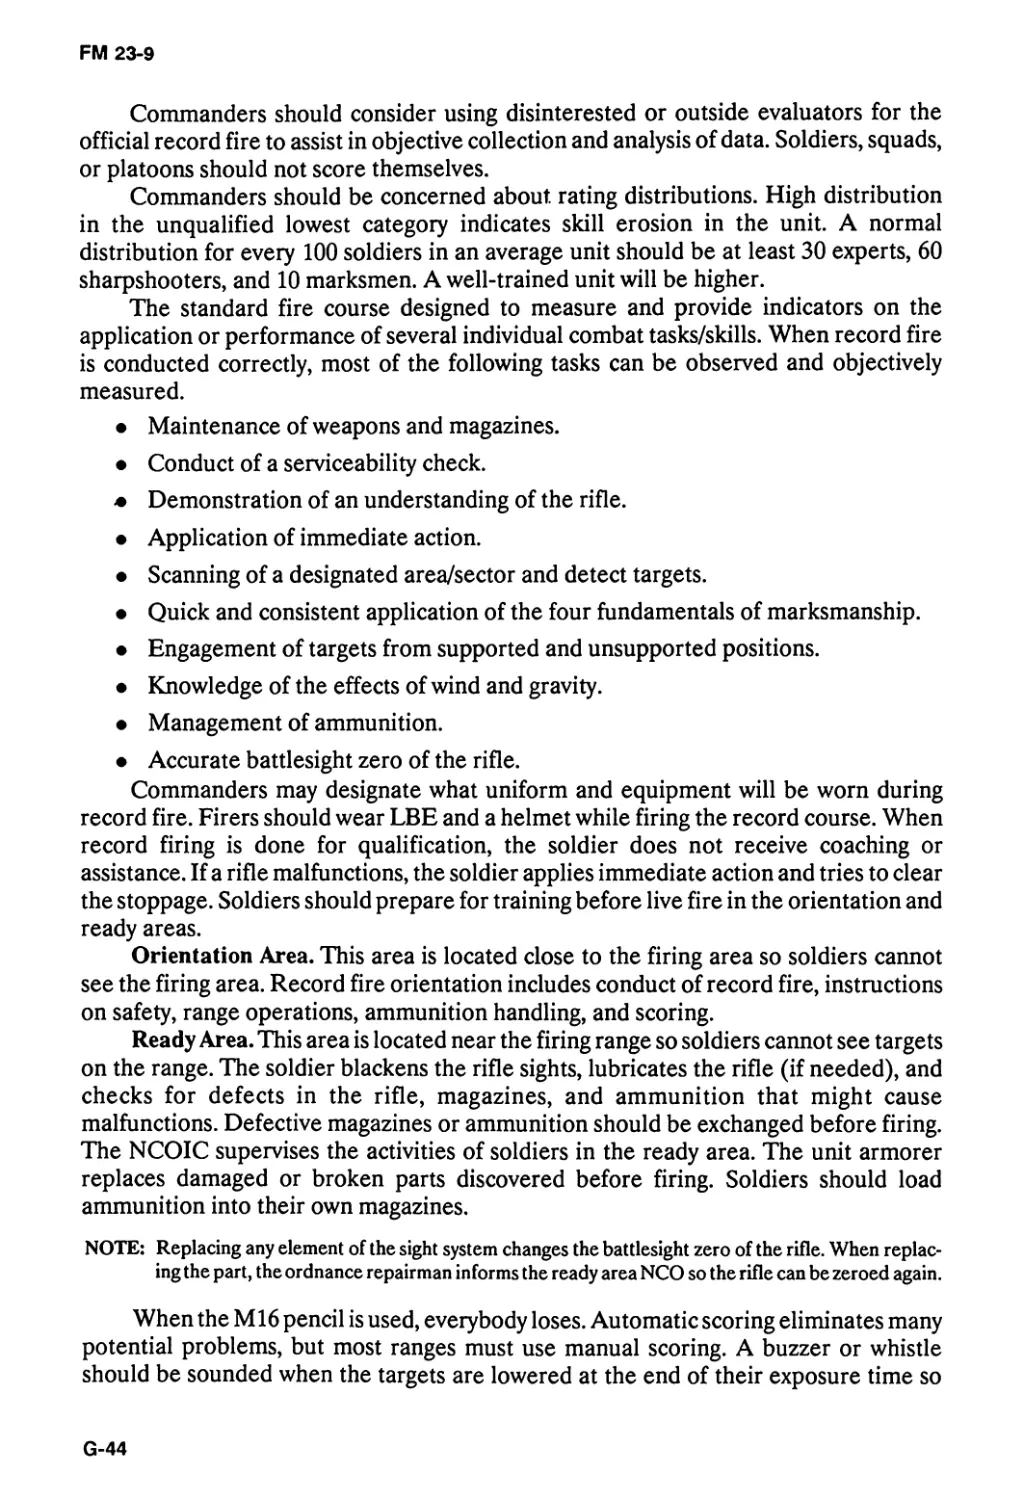
CLEAR the RIFLE
1. Place the selector on SAFE.
The weapon must be cocked,
to point the lever toward SAFE.
Figure 2-1. Clearing the Rifle.
2. Remove the magazine.
PRESS THE CATCH BUTTON
3. Lock the bolt open, pull the charging handle rearward
and press the bottom of the bolt catch; allow the bolt
to move forward until it engages the bolt catch. Return
the charging handle forward.
If you havent already done so, place weapon on SAFE.
4. Check the receiver
and the chamber areas
for ammunition.
BOLT CATCH
PULL CHARGING
HANDLE
5. With the selector lever
pointing toward SAFE allow
the bolt to go forward by
pressing the upper portion
of the bolt catch.
BOLT CATCH
2-1
FM 23-9
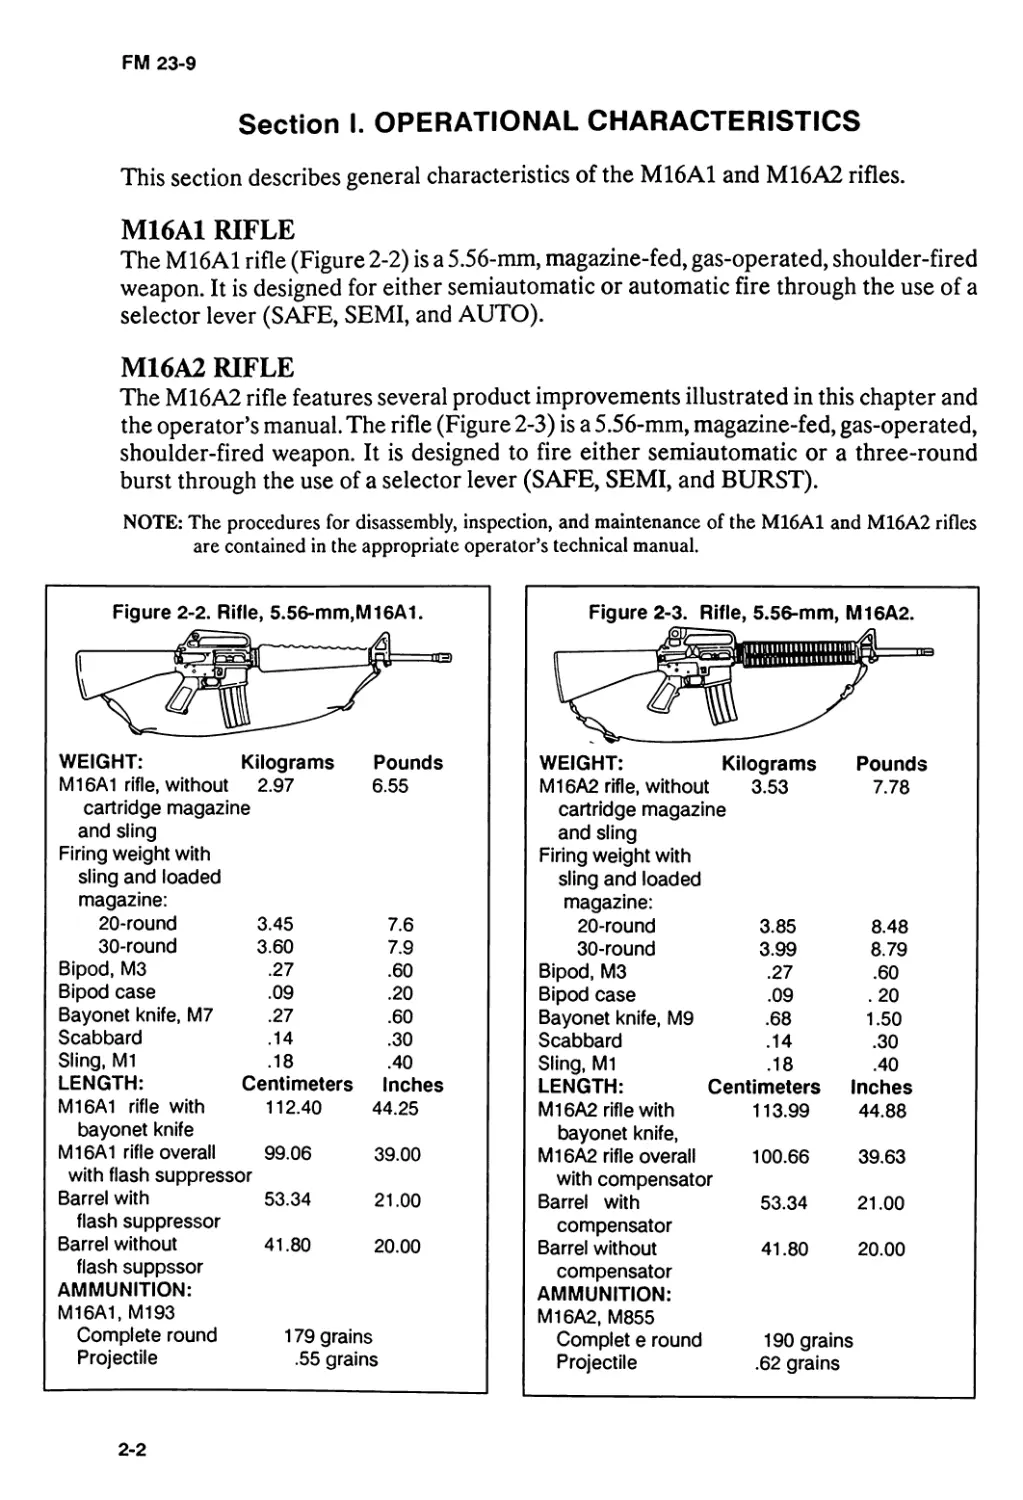
Section I. OPERATIONAL CHARACTERISTICS
This section describes general characteristics of the M16A1 and M16A2 rifles.
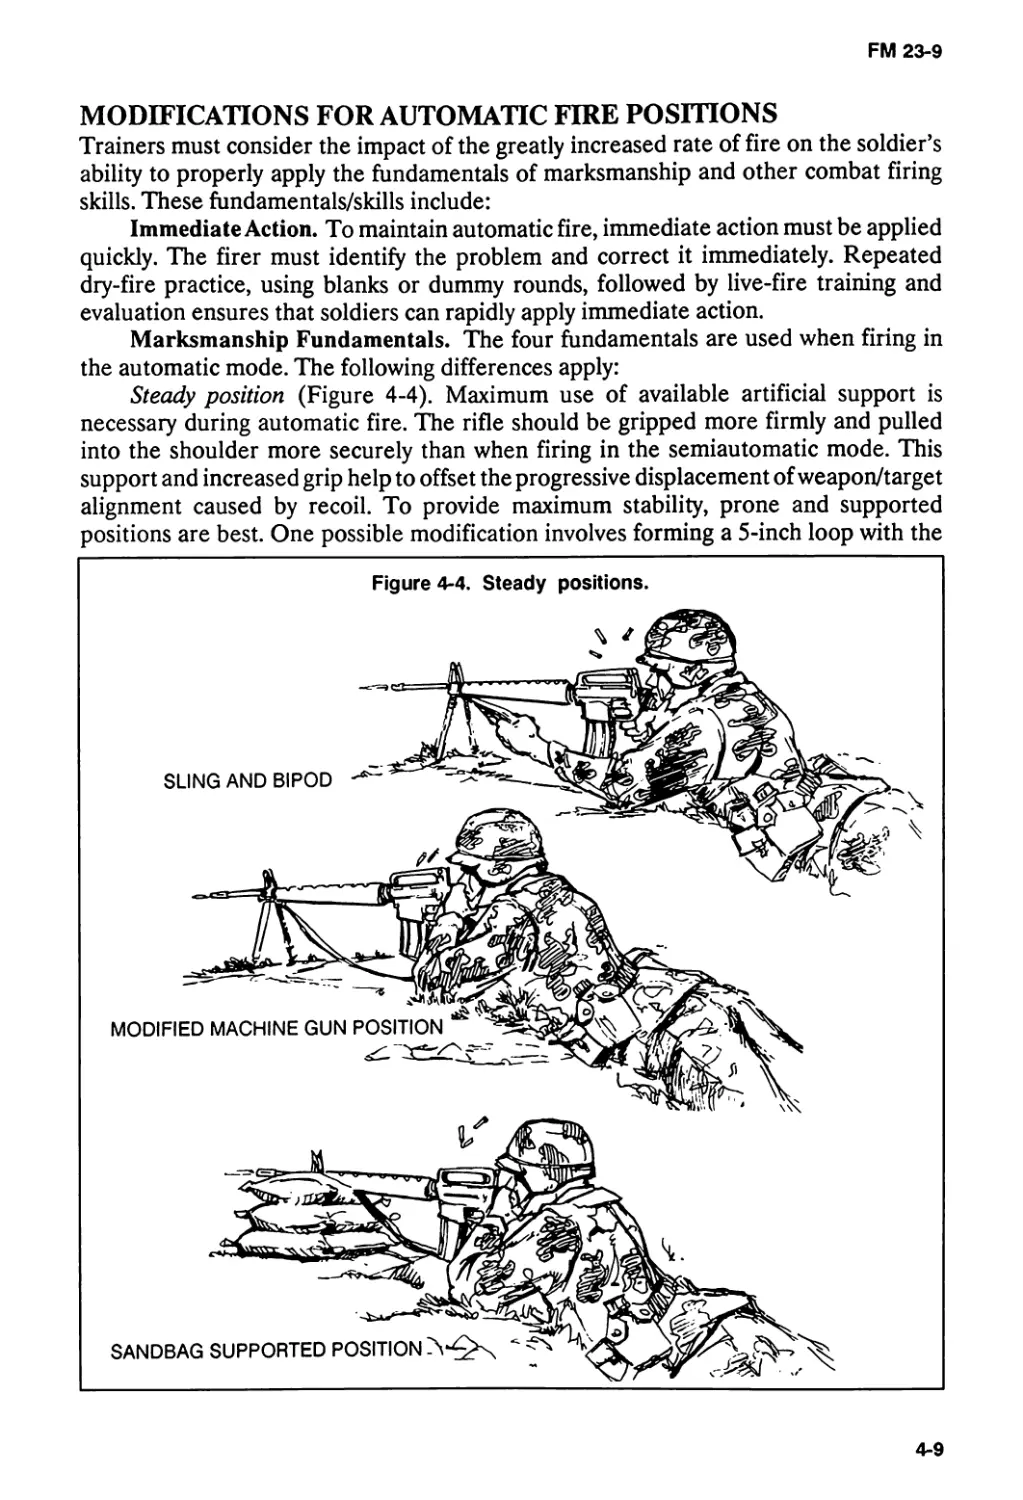
M16A1 RIFLE
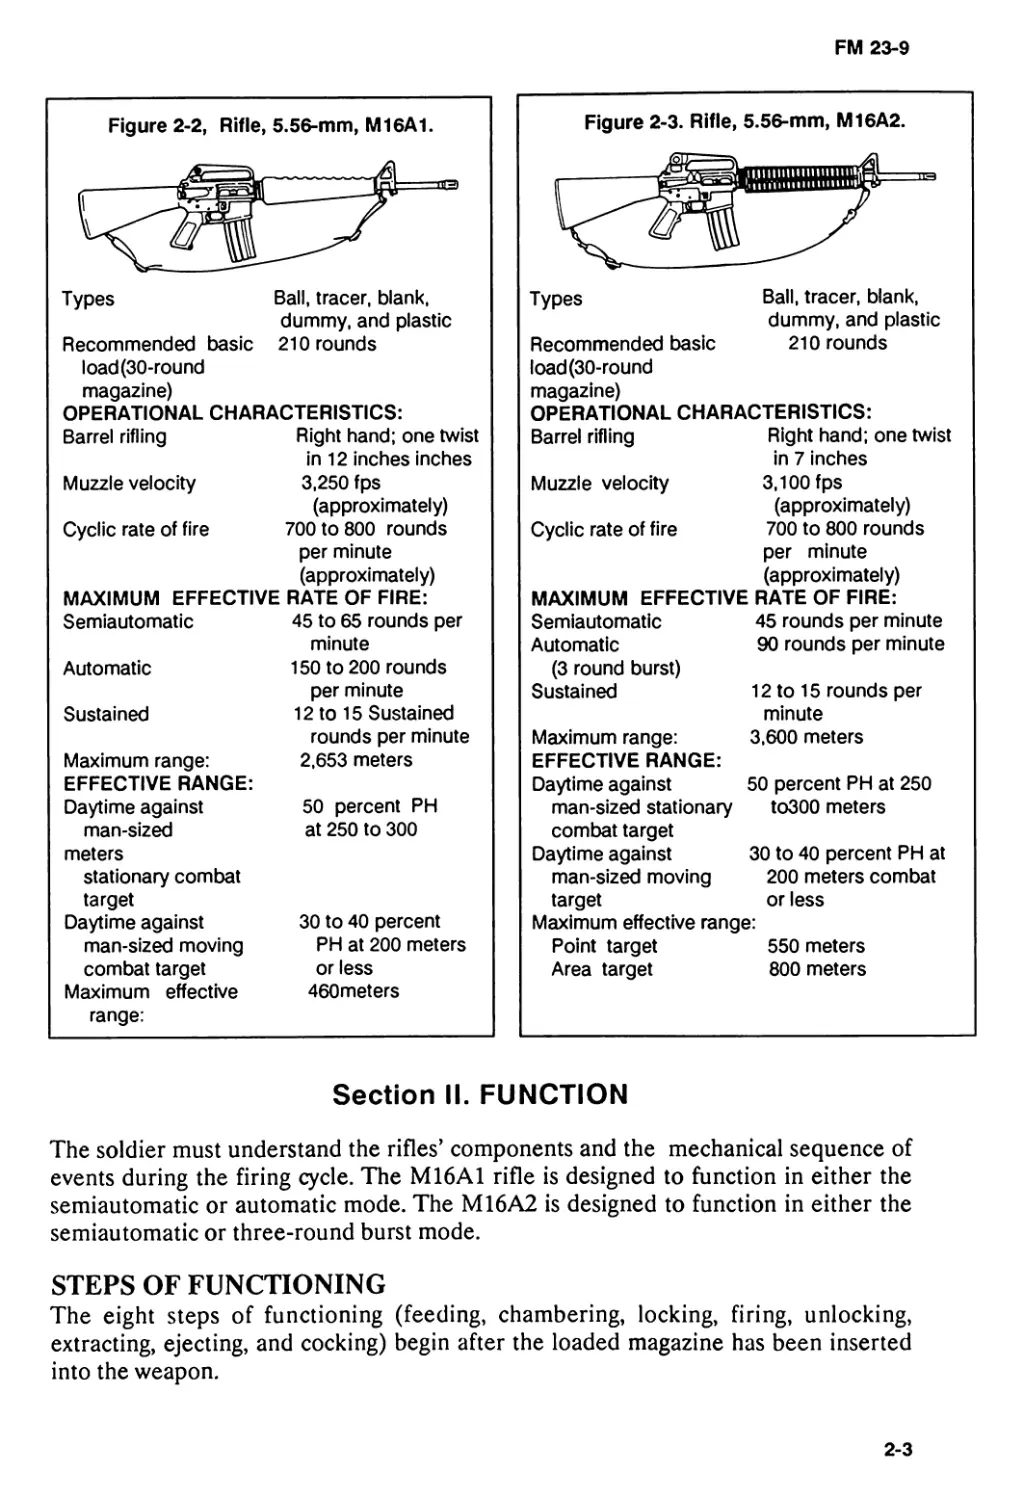
The M16A1 rifle (Figure 2-2) is a 5.56-mm, magazine-fed, gas-operated, shoulder-fired
weapon. It is designed for either semiautomatic or automatic fire through the use of a
selector lever (SAFE, SEMI, and AUTO).
M16A2 RIFLE
The M16A2 rifle features several product improvements illustrated in this chapter and
the operator’s manual. The rifle (Figure 2-3) is a 5.56-mm, magazine-fed, gas-operated,
shoulder-fired weapon. It is designed to fire either semiautomatic or a three-round
burst through the use of a selector lever (SAFE, SEMI, and BURST).
NOTE: The procedures for disassembly, inspection, and maintenance of the M16A1 and M16A2 rifles
are contained in the appropriate operator’s technical manual.
Figure 2-2. Rifle, 5.56-mm,Ml6A1.
Figure 2-3. Rifle, 5.56-mm, M16A2.
WEIGHT: Kilograms Pounds
M16A1 rifle, without 2.97 6.55
cartridge magazine
and sling
Firing weight with
sling and loaded
magazine:
WEIGHT: Kilograms Pounds
M16A2 rifle, without 3.53 7.78
cartridge magazine
and sling
Firing weight with
sling and loaded
20-round 3.45 7.6
30-round 3.60 7.9
Bipod, М3 .27 .60
Bipod case .09 .20
Bayonet knife, M7 .27 .60
Scabbard .14 .30
Sling, M1 .18 .40
LENGTH: Centimeters Inches
M16A1 rifle with 112.40 44.25
bayonet knife M16A1 rifle overall 99.06 39.00
with flash suppressor
Barrel with 53.34 21.00
flash suppressor Barrel without 41.80 20.00
flash suppssor AMMUNITION: M16A1, M193 Complete round 179 grains
Projectile .55 grains
magazine:
20-round 3.85 8.48
30-round 3.99 8.79
Bipod, М3 .27 .60
Bipod case .09 .20
Bayonet knife, M9 .68 1.50
Scabbard .14 .30
Sling, M1 .18 .40
LENGTH: Centimeters Inches
M16A2 rifle with 113.99 44.88
bayonet knife, M16A2 rifle overall 100.66 39.63
with compensator Barrel with 53.34 21.00
compensator Barrel without 41.80 20.00
compensator
AMMUNITION:
M16A2, M855
Complet e round 190 grains
Projectile .62 grains
2-2
FM 23-9
Figure 2-2, Rifle, 5.56-mm, M16A1.
Types Ball, tracer, blank,
Recommended basic dummy, and plastic 210 rounds
load(30-round magazine)
OPERATIONAL CHARACTERISTICS:
Barrel rifling Right hand; one twist
Muzzle velocity in 12 inches inches 3,250 fps
Cyclic rate of fire (approximately) 700 to 800 rounds
per minute (approximately) MAXIMUM EFFECTIVE RATE OF FIRE:
Semiautomatic 45 to 65 rounds per
Automatic minute 150 to 200 rounds
Sustained per minute 12 to 15 Sustained
Maximum range: rounds per minute 2,653 meters
EFFECTIVE RANGE:
Daytime against 50 percent PH
man-sized at 250 to 300
meters stationary combat target
Daytime against 30 to 40 percent
man-sized moving PH at 200 meters
combat target or less
Maximum effective 460meters
range:
Figure 2-3. Rifle, 5.56-mm, M16A2.
Types Ball, tracer, blank, dummy, and plastic
Recommended basic load(30-round magazine) 210 rounds
OPERATIONAL CHARACTERISTICS:
Barrel rifling Right hand; one twist in 7 inches
Muzzle velocity 3,100 fps
(approximately)
Cyclic rate of fire 700 to 800 rounds per minute (approximately)
MAXIMUM EFFECTIVE RATE OF FIRE:
Semiautomatic 45 rounds per minute
Automatic 90 rounds per minute
(3 round burst) Sustained 12 to 15 rounds per
minute
Maximum range: EFFECTIVE RANGE: 3,600 meters
Daytime against 50 percent PH at 250
man-sized stationary combat target to300 meters
Daytime against 30 to 40 percent PH at
man-sized moving 200 meters combat
target or less
Maximum effective range:
Point target 550 meters
Area target 800 meters
Section II. FUNCTION
The soldier must understand the rifles’ components and the mechanical sequence of
events during the firing cycle. The M16A1 rifle is designed to function in either the
semiautomatic or automatic mode. The M16A2 is designed to function in either the
semiautomatic or three-round burst mode.
STEPS OF FUNCTIONING
The eight steps of functioning (feeding, chambering, locking, firing, unlocking,
extracting, ejecting, and cocking) begin after the loaded magazine has been inserted
into the weapon.
2-3
FM 23-9
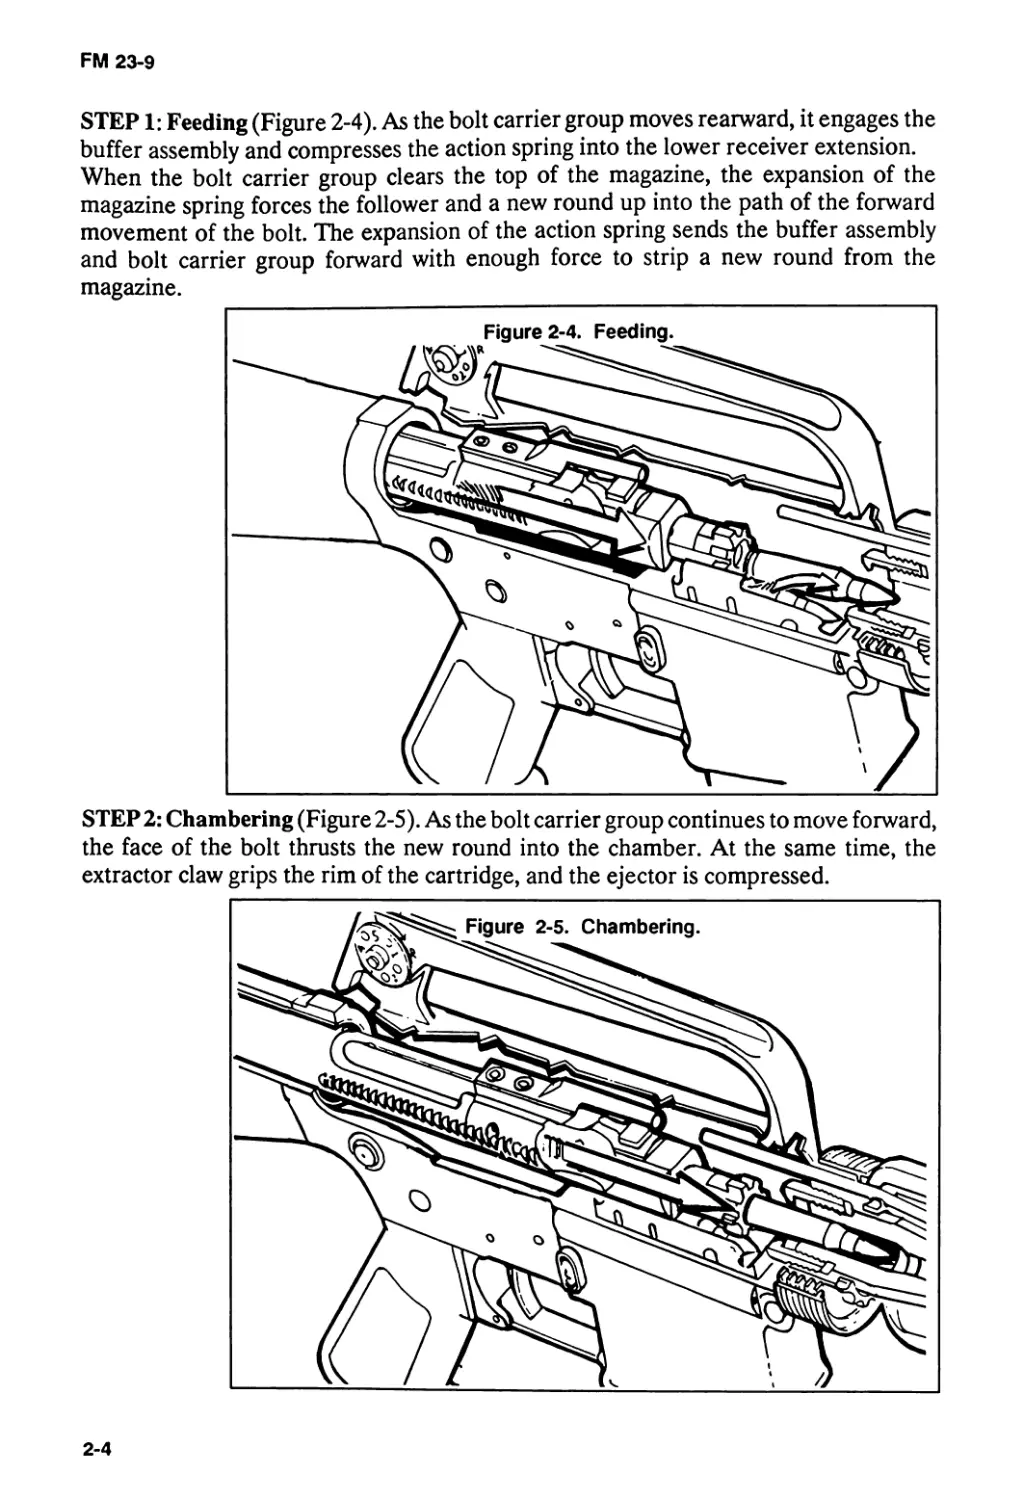
STEP 1: Feeding (Figure 2-4). As the bolt carrier group moves rearward, it engages the
buffer assembly and compresses the action spring into the lower receiver extension.
When the bolt carrier group clears the top of the magazine, the expansion of the
magazine spring forces the follower and a new round up into the path of the forward
movement of the bolt. The expansion of the action spring sends the buffer assembly
and bolt carrier group forward with enough force to strip a new round from the
magazine.
Figure 2-4. Feeding.
STEP 2: Chambering (Figure 2-5). As the bolt carrier group continues to move forward,
the face of the bolt thrusts the new round into the chamber. At the same time, the
extractor claw grips the rim of the cartridge, and the ejector is compressed.
2-4
FM 23-9
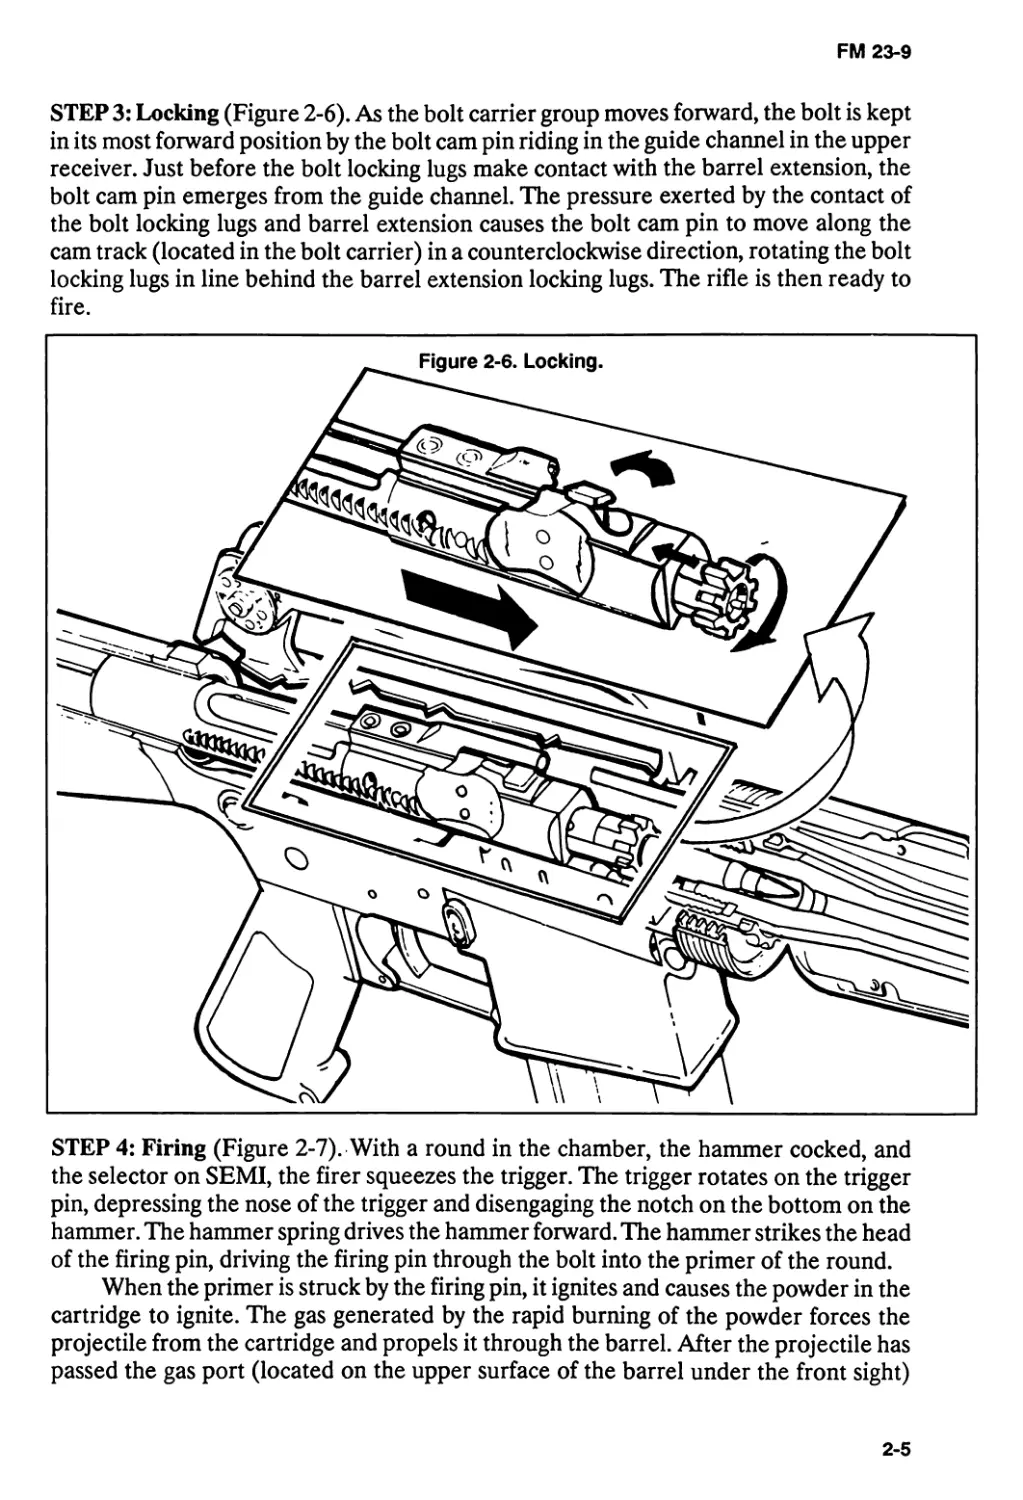
STEP 3: Locking (Figure 2-6). As the bolt carrier group moves forward, the bolt is kept
in its most forward position by the bolt cam pin riding in the guide channel in the upper
receiver. Just before the bolt locking lugs make contact with the barrel extension, the
bolt cam pin emerges from the guide channel. The pressure exerted by the contact of
the bolt locking lugs and barrel extension causes the bolt cam pin to move along the
cam track (located in the bolt carrier) in a counterclockwise direction, rotating the bolt
locking lugs in line behind the barrel extension locking lugs. The rifle is then ready to
fire.
STEP 4: Firing (Figure 2-7). With a round in the chamber, the hammer cocked, and
the selector on SEMI, the firer squeezes the trigger. The trigger rotates on the trigger
pin, depressing the nose of the trigger and disengaging the notch on the bottom on the
hammer. The hammer spring drives the hammer forward. The hammer strikes the head
of the firing pin, driving the firing pin through the bolt into the primer of the round.
When the primer is struck by the firing pin, it ignites and causes the powder in the
cartridge to ignite. The gas generated by the rapid burning of the powder forces the
projectile from the cartridge and propels it through the barrel. After the projectile has
passed the gas port (located on the upper surface of the barrel under the front sight)
2-5
FM 23-9
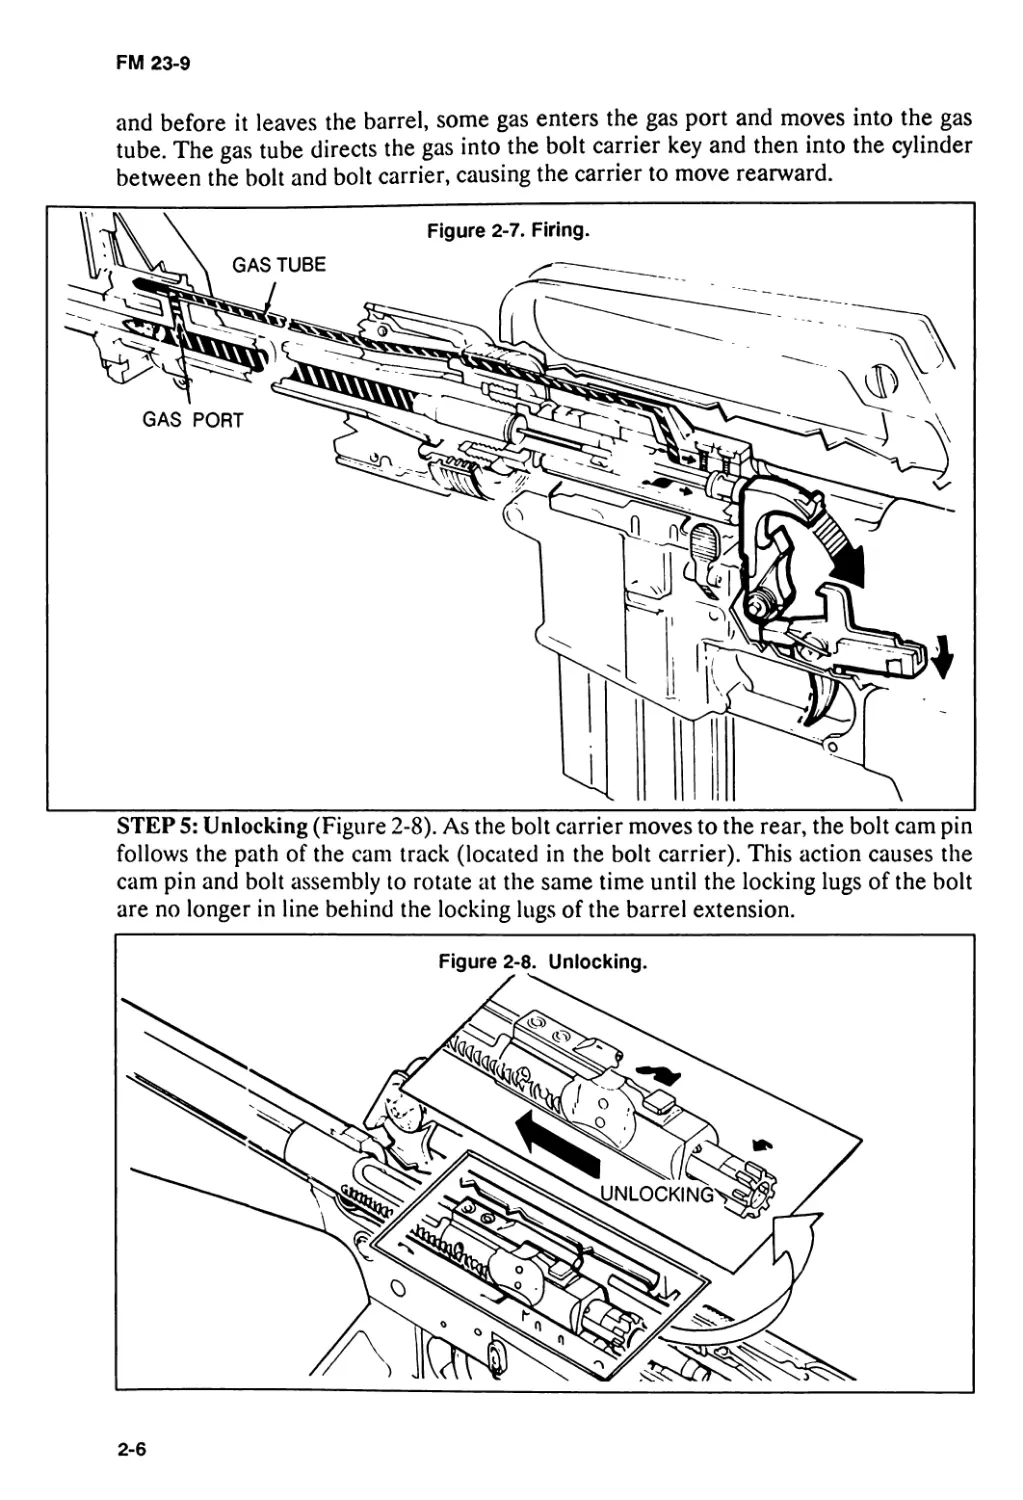
and before it leaves the barrel, some gas enters the gas port and moves into the gas
tube. The gas tube directs the gas into the bolt carrier key and then into the cylinder
between the bolt and bolt carrier, causing the carrier to move rearward.
STEP 5: Unlocking (Figure 2-8). As the bolt carrier moves to the rear, the bolt cam pin
follows the path of the cam track (located in the bolt carrier). This action causes the
cam pin and bolt assembly to rotate at the same time until the locking lugs of the bolt
are no longer in line behind the locking lugs of the barrel extension.
Figure 2-8. Unlocking.
2-6
FM 23-9
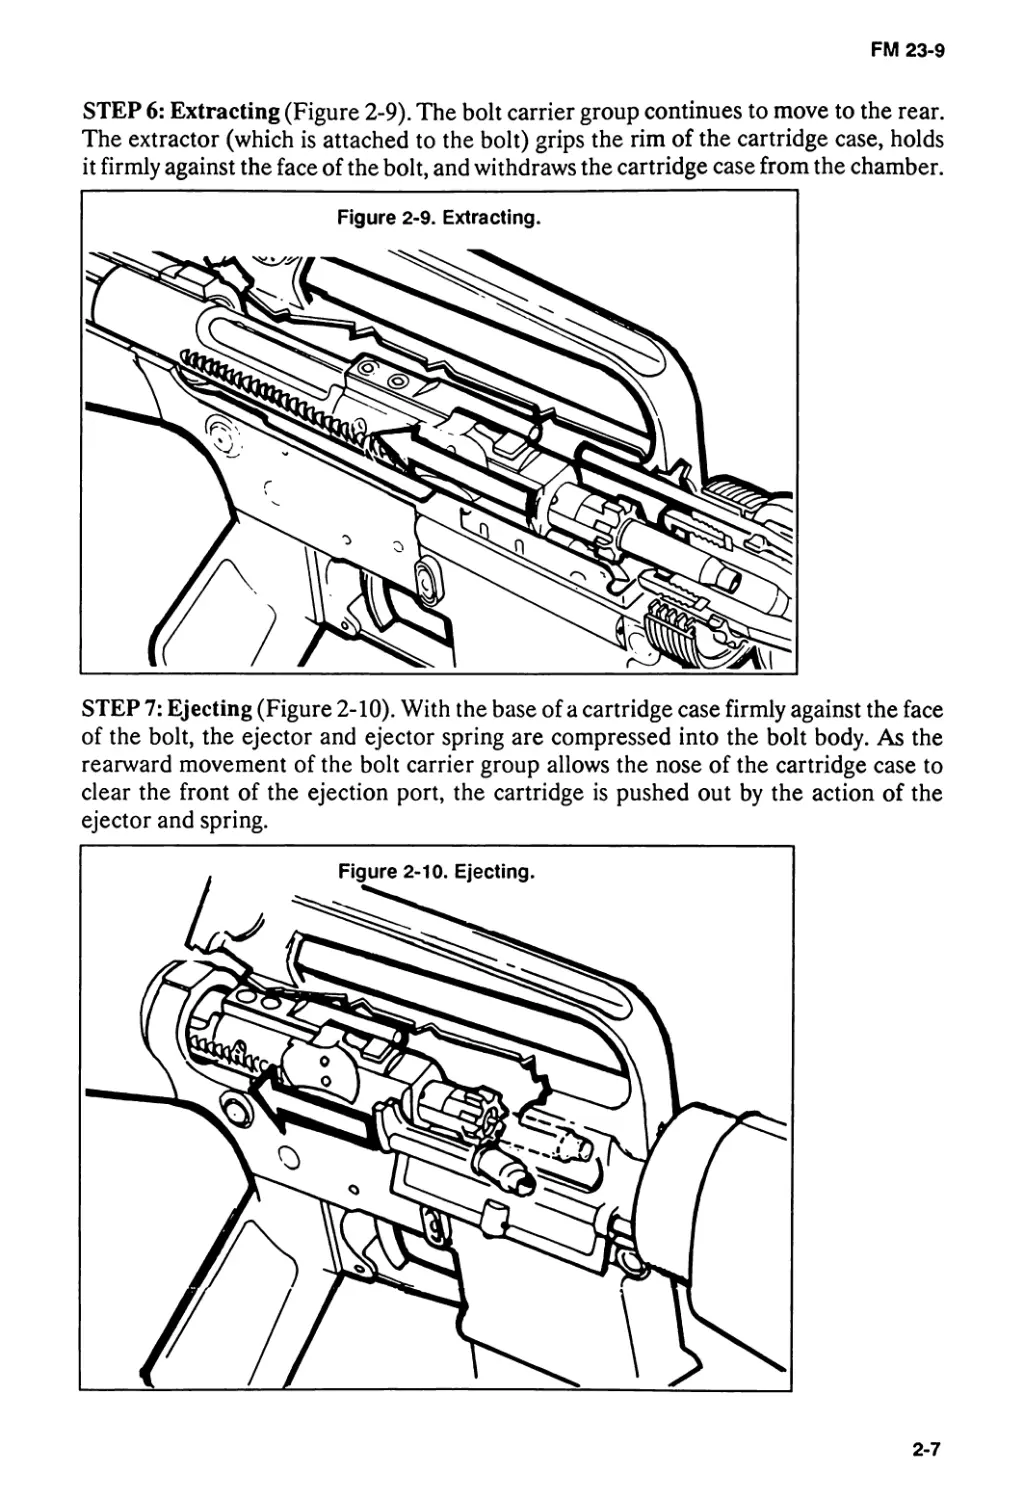
STEP 6: Extracting (Figure 2-9). The bolt carrier group continues to move to the rear.
The extractor (which is attached to the bolt) grips the rim of the cartridge case, holds
it firmly against the face of the bolt, and withdraws the cartridge case from the chamber.
STEP 7: Ejecting (Figure 2-10). With the base of a cartridge case firmly against the face
of the bolt, the ejector and ejector spring are compressed into the bolt body. As the
rearward movement of the bolt carrier group allows the nose of the cartridge case to
clear the front of the ejection port, the cartridge is pushed out by the action of the
ejector and spring.
2-7
FM 23-9
STEP 8: Cocking (Figure 2-11). The rearward movement of the bolt carrier overrides
the hammer, forcing it down into the receiver and compressing the hammer spring,
cocking the hammer in the firing position. The action of the rifle is much faster than
human reaction; therefore, the firer cannot release the trigger fast enough to prevent
multiple firing.
SEMIAUTOMATIC MODE (M16A1 AND M16A2)
The disconnector is mechanism installed so that the firer can fire single rounds in the
M16A1 and M16A2 rifles. It is attached to the trigger and is rotated forward by action
of the disconnector spring. When the hammer is cocked by the recoil of the bolt carrier,
the disconnector engages the lower hook of the hammer and holds it until the trigger
is released. Then the disconnector rotates to the rear and down, disengaging the
hammer and allowing it to rotate forward until caught by the nose of the trigger. This
prevents the hammer from following the bolt carrier forward and causing multiple
firing. The trigger must be squeezed again before the next round will fire.
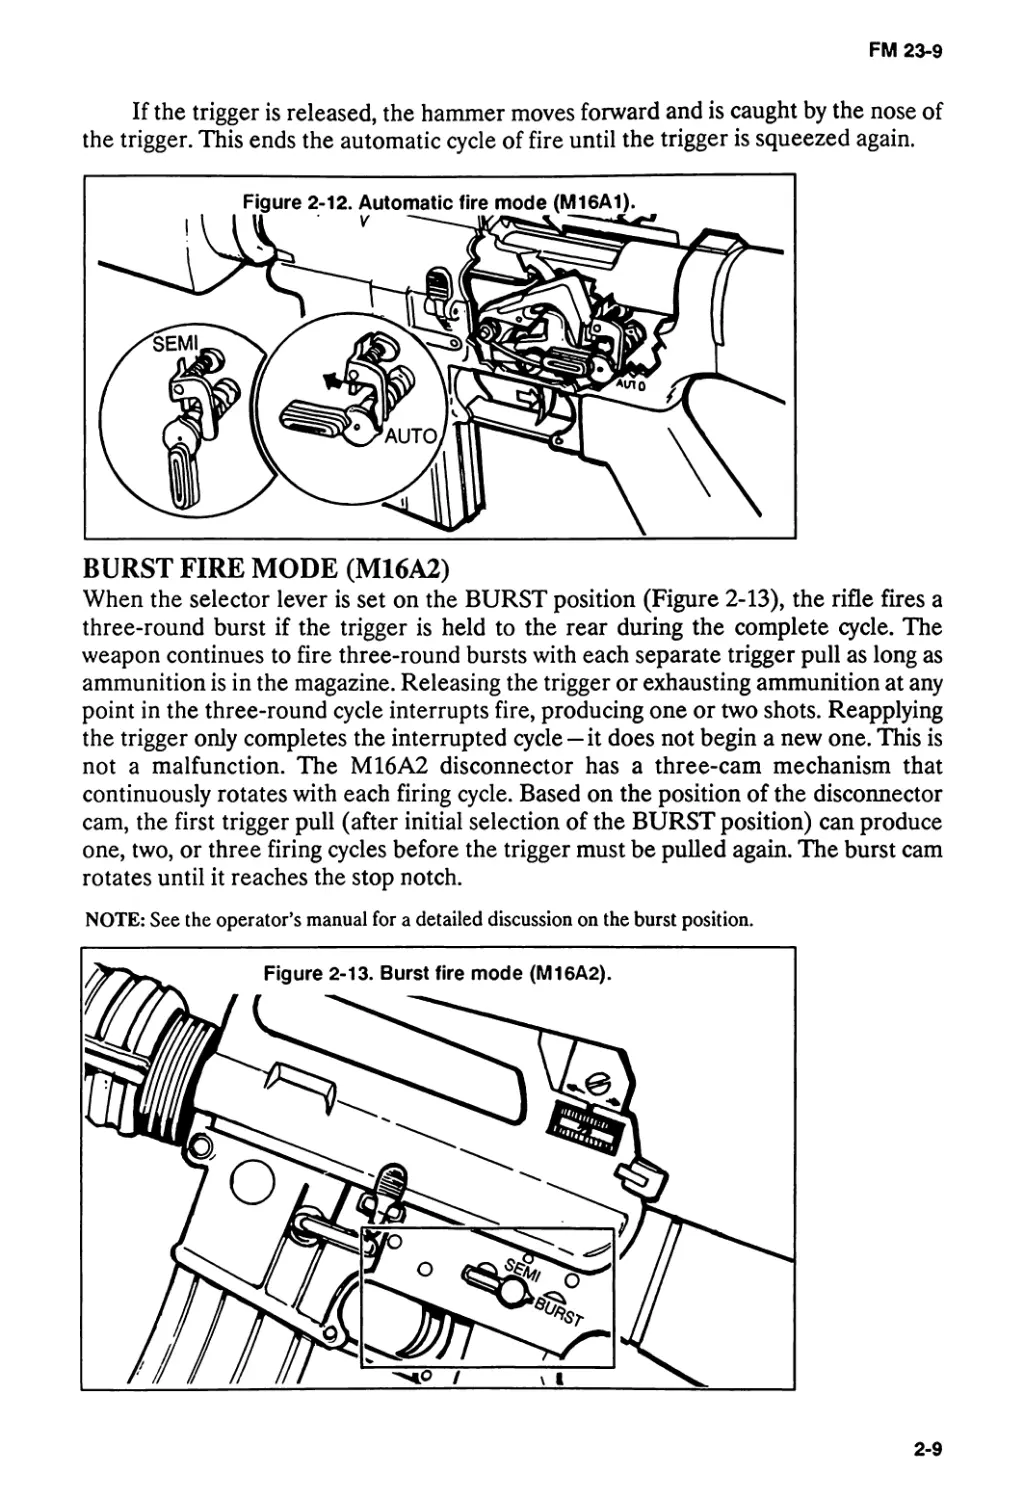
AUTOMATIC FIRE MODE (M16A1)
When the selector lever (Figure 2-12) is set on the AUTO position, the rifle continues
to fire as long as the trigger is held back and ammunition is in the magazine. The
functioning of certain parts of the rifle changes when firing automatically.
Once the trigger is squeezed and the round is fired, the bolt carrier group moves
to the rear and the hammer is cocked. The center cam of the selector depresses the
rear of the disconnector and prevents the nose of the disconnector from engaging the
lower hammer hook. The bottom part of the automatic sear catches the upper hammer
hook and holds it until the bolt carrier group moves forward. The bottom part strikes
the top of the sear and releases the hammer, causing the rifle to fire automatically.
2-8
FM 23-9
If the trigger is released, the hammer moves forward and is caught by the nose of
the trigger. This ends the automatic cycle of fire until the trigger is squeezed again.
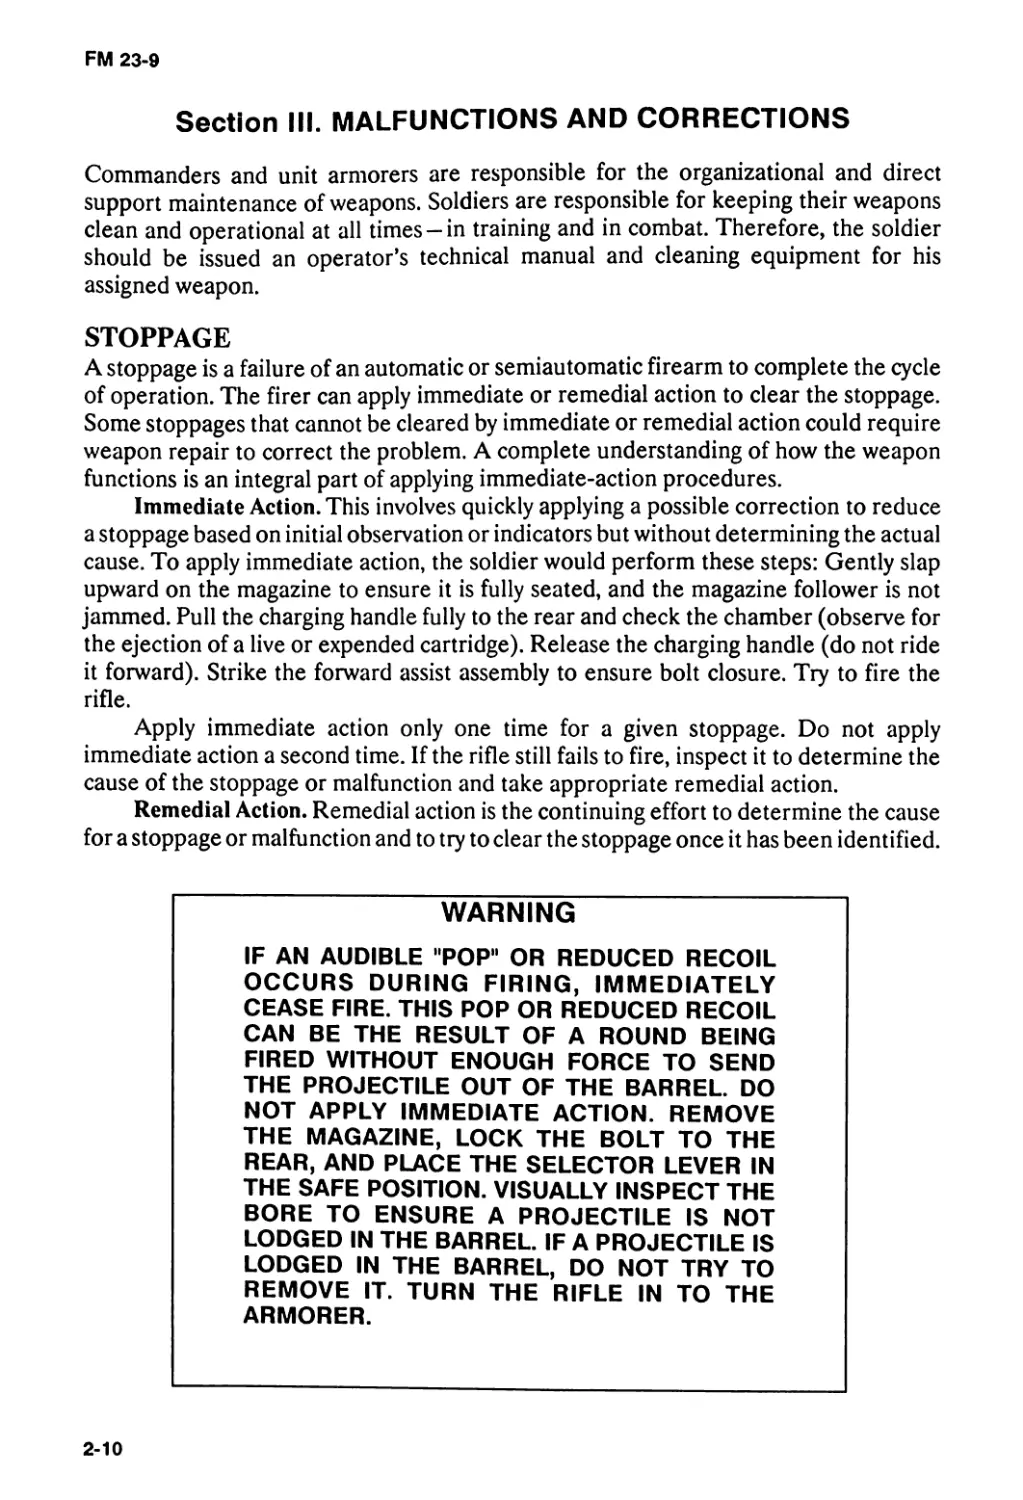
BURST FIRE MODE (M16A2)
When the selector lever is set on the BURST position (Figure 2-13), the rifle fires a
three-round burst if the trigger is held to the rear during the complete cycle. The
weapon continues to fire three-round bursts with each separate trigger pull as long as
ammunition is in the magazine. Releasing the trigger or exhausting ammunition at any
point in the three-round cycle interrupts fire, producing one or two shots. Reapplying
the trigger only completes the interrupted cycle—it does not begin a new one. This is
not a malfunction. The M16A2 disconnector has a three-cam mechanism that
continuously rotates with each firing cycle. Based on the position of the disconnector
cam, the first trigger pull (after initial selection of the BURST position) can produce
one, two, or three firing cycles before the trigger must be pulled again. The burst cam
rotates until it reaches the stop notch.
NOTE: See the operator’s manual for a detailed discussion on the burst position.
2-9
FM 23-9
Section III. MALFUNCTIONS AND CORRECTIONS
Commanders and unit armorers are responsible for the organizational and direct
support maintenance of weapons. Soldiers are responsible for keeping their weapons
clean and operational at all times-in training and in combat. Therefore, the soldier
should be issued an operator’s technical manual and cleaning equipment for his
assigned weapon.
STOPPAGE
A stoppage is a failure of an automatic or semiautomatic firearm to complete the cycle
of operation. The firer can apply immediate or remedial action to clear the stoppage.
Some stoppages that cannot be cleared by immediate or remedial action could require
weapon repair to correct the problem. A complete understanding of how the weapon
functions is an integral part of applying immediate-action procedures.
Immediate Action. This involves quickly applying a possible correction to reduce
a stoppage based on initial observation or indicators but without determining the actual
cause. To apply immediate action, the soldier would perform these steps: Gently slap
upward on the magazine to ensure it is fully seated, and the magazine follower is not
jammed. Pull the charging handle fully to the rear and check the chamber (observe for
the ejection of a live or expended cartridge). Release the charging handle (do not ride
it forward). Strike the forward assist assembly to ensure bolt closure. Try to fire the
rifle.
Apply immediate action only one time for a given stoppage. Do not apply
immediate action a second time. If the rifle still fails to fire, inspect it to determine the
cause of the stoppage or malfunction and take appropriate remedial action.
Remedial Action. Remedial action is the continuing effort to determine the cause
for a stoppage or malfunction and to try to clear the stoppage once it has been identified.
WARNING
IF AN AUDIBLE POP* OR REDUCED RECOIL
OCCURS DURING FIRING, IMMEDIATELY
CEASE FIRE. THIS POP OR REDUCED RECOIL
CAN BE THE RESULT OF A ROUND BEING
FIRED WITHOUT ENOUGH FORCE TO SEND
THE PROJECTILE OUT OF THE BARREL. DO
NOT APPLY IMMEDIATE ACTION. REMOVE
THE MAGAZINE, LOCK THE BOLT TO THE
REAR, AND PLACE THE SELECTOR LEVER IN
THE SAFE POSITION. VISUALLY INSPECT THE
BORE TO ENSURE A PROJECTILE IS NOT
LODGED IN THE BARREL. IF A PROJECTILE IS
LODGED IN THE BARREL, DO NOT TRY TO
REMOVE IT. TURN THE RIFLE IN TO THE
ARMORER.
2-10
FM 23-9
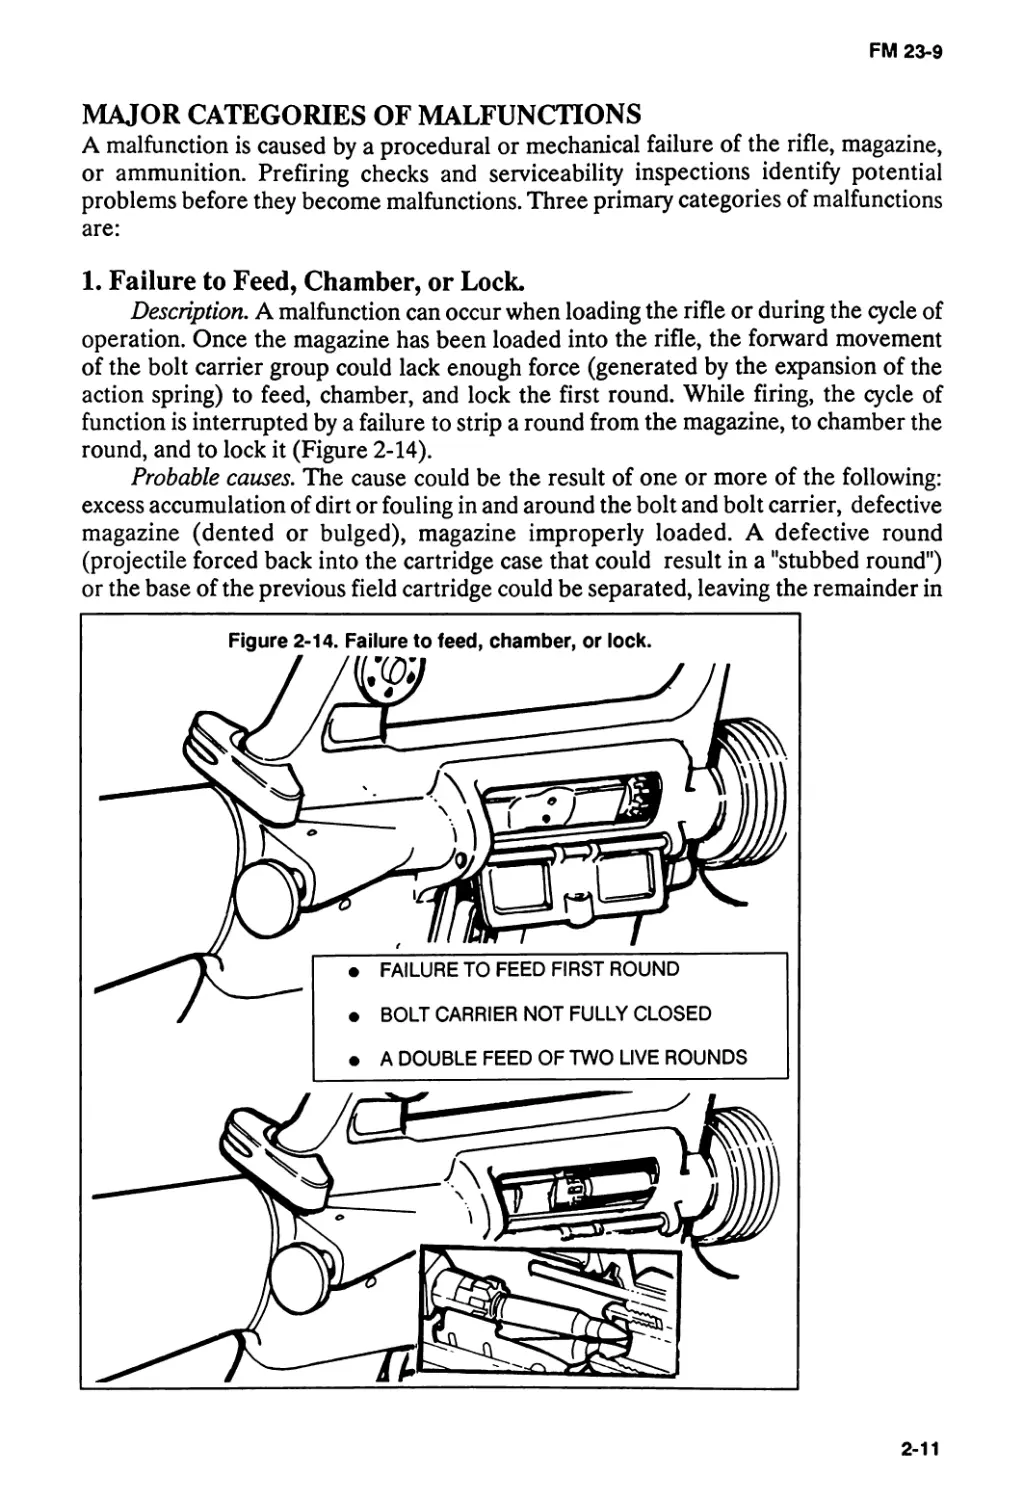
MAJOR CATEGORIES OF MALFUNCTIONS
A malfunction is caused by a procedural or mechanical failure of the rifle, magazine,
or ammunition. Prefiring checks and serviceability inspections identify potential
problems before they become malfunctions. Three primary categories of malfunctions
are:
1. Failure to Feed, Chamber, or Lock.
Description. A malfunction can occur when loading the rifle or during the cycle of
operation. Once the magazine has been loaded into the rifle, the forward movement
of the bolt carrier group could lack enough force (generated by the expansion of the
action spring) to feed, chamber, and lock the first round. While firing, the cycle of
function is interrupted by a failure to strip a round from the magazine, to chamber the
round, and to lock it (Figure 2-14).
Probable causes. The cause could be the result of one or more of the following:
excess accumulation of dirt or fouling in and around the bolt and bolt carrier, defective
magazine (dented or bulged), magazine improperly loaded. A defective round
(projectile forced back into the cartridge case that could result in a "stubbed round")
or the base of the previous field cartridge could be separated, leaving the remainder in
Figure 2-14. Failure to feed, chamber, or lock.
2-11
FM 23-9
the chamber. Other causes could be: damaged or broken action spring, exterior
accumulation of dirt in the lower receiver extension, or fouled gas tube resulting in
short recoil.
Corrective action. Applying immediate action usually corrects the malfunction.
However, to avoid the risk of further jamming, the firer should watch for ejection of a
cartridge and ensure that the upper receiver is free of any loose rounds. If immediate
action fails to clear the malfunction, remedial action must be taken. The carrier should
not be forced. If resistance is encountered, which can occur with an unserviceable
round, the bolt should be locked to the rear, magazine removed, and malfunction
cleared—for example, a bolt override is when a cartridge has wedged itself between
the bolt and charging handle. The best way to relieve this problem is by-
• Ensuring that the charging handle is pushed forward and locked in place.
• Holding the rifle securely and pulling the bolt to the rear until the bolt seats
completely into the buffer well.
• Turning the rifle upright and allowing the overridden cartridge to fall out.
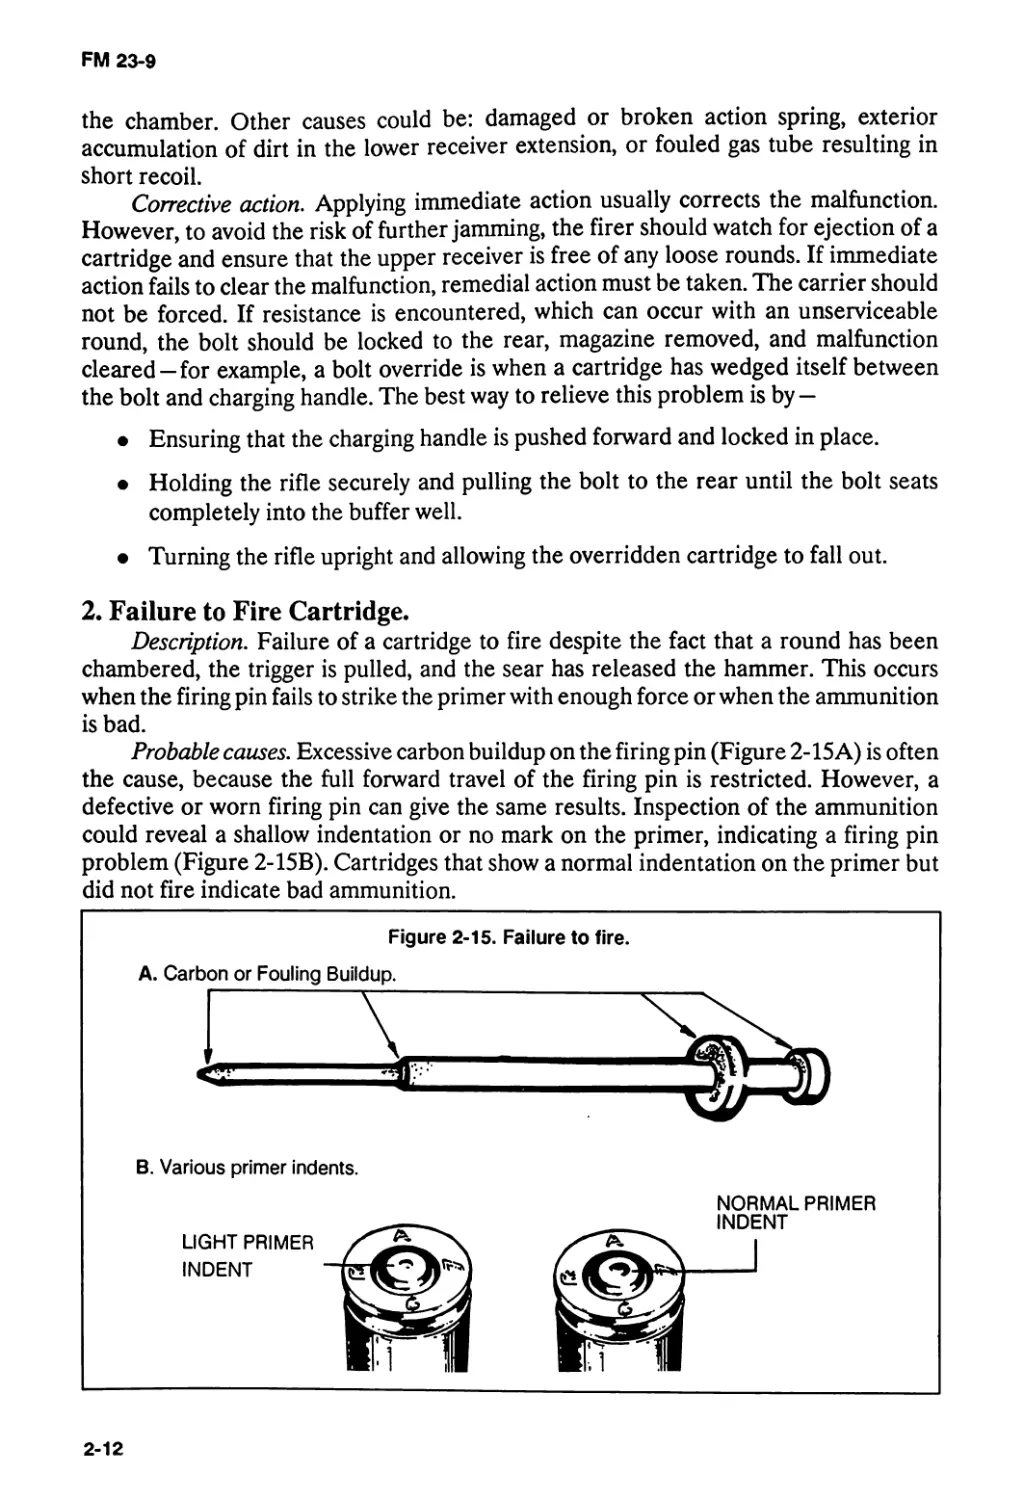
2. Failure to Fire Cartridge.
Description. Failure of a cartridge to fire despite the fact that a round has been
chambered, the trigger is pulled, and the sear has released the hammer. This occurs
when the firing pin fails to strike the primer with enough force or when the ammunition
is bad.
Probable causes. Excessive carbon buildup on the firing pin (Figure 2-15 A) is often
the cause, because the full forward travel of the firing pin is restricted. However, a
defective or worn firing pin can give the same results. Inspection of the ammunition
could reveal a shallow indentation or no mark on the primer, indicating a firing pin
problem (Figure 2-15B). Cartridges that show a normal indentation on the primer but
did not fire indicate bad ammunition.
NORMAL PRIMER
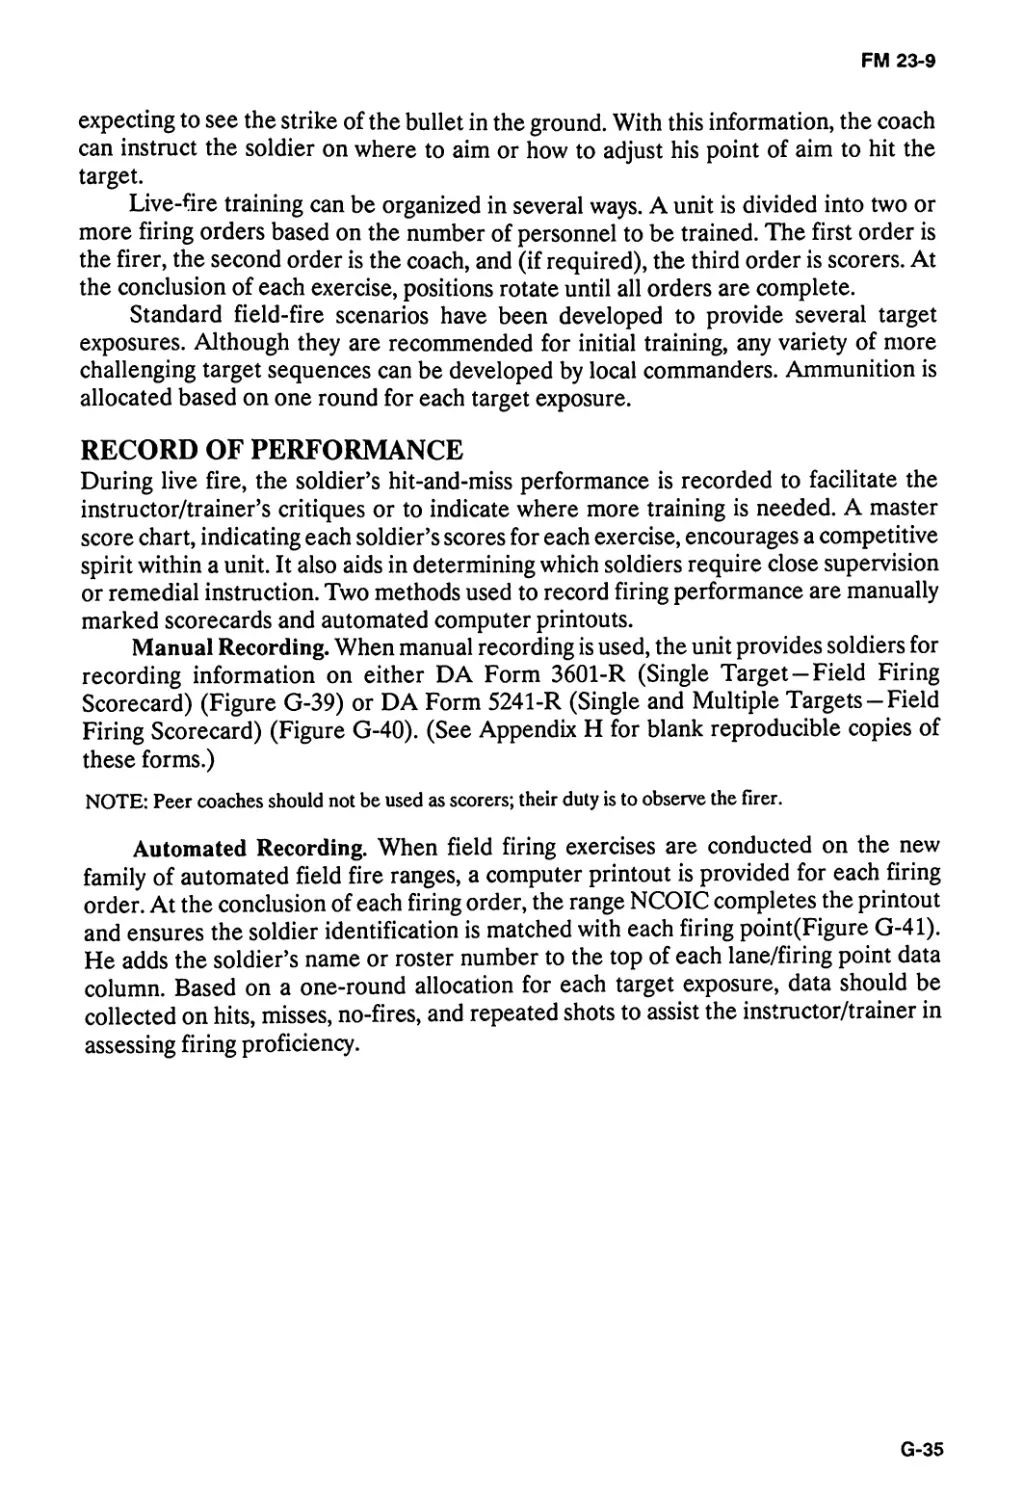
INDENT
B. Various primer indents.
2-12
FM 23-9
Corrective action. If the malfunction continues, the firing pin, bolt, carrier, and
locking lug recesses of the barrel extension should be inspected, and any accumulation
of excessive carbon or fouling should be removed. The firing pin should also be
inspected for damage. Cartridges that show a normal indentation on the primer but
failed to fire could indicate a bad ammunition lot. Those that show a complete
penetration of the primer by the firing pin could also indicate a bad ammunition lot or
a failure of the cartridge to fully seat in the chamber.
NOTE: If the round is suspected to be faulty, it is reported and returned to the agency responsible for is-
suing ammunition
3. Failure to Extract and Eject.
Failure to extract. The cartridge must extract before it can eject.
Description. A failure to extract results when the cartridge case remains in the rifle
chamber. While the bolt and bolt carrier could move rearward only a short distance,
more commonly the bolt and bolt carrier recoil fully to the rear, leaving the cartridge
case in the chamber. A live round is then forced into the base of the cartridge case as
the bolt returns in the next feed cycle. This malfunction is one of the hardest to clear.
NOTE: Short recoil can also be caused by a fouled or obstructed gas tube.
WARNING
A FAILURE TO EXTRACT IS CONSIDERED TO BE AN
EXTREMELY SERIOUS MALFUNCTION, REQUIRING
THE USE OF TOOLS TO CLEAR. A LIVE ROUND
COULD BE LEFT IN THE CHAMBER AND BE
ACCIDENTALLY DISCHARGED. IF A SECOND LIVE
ROUND IS FED INTO THE PRIMER OF THE
CHAMBERED LIVE ROUND, THE RIFLE COULD
EXPLODE AND CAUSE PERSONAL INJURY. THIS
MALFUNCTION MUST BE PROPERLY IDENTIFIED
AND REPORTED. FAILURES TO EJECT SHOULD NOT
BE REPORTED AS EXTRACTION FAILURES.
Probable cause. Short recoil cycles and fouled or corroded rifle chambers are the
most common causes of failures to extract. A damaged extractor or weak/broken
extractor spring can also cause this malfunction.
Corrective action. The severity of a failure to extract determines the corrective
action procedures. If the bolt has moved rearward far enough so that it strips a live
round from the magazine in its forward motion, the bolt and carrier must be locked to
the rear.
The magazine and all loose rounds must be removed before clearing the stoppage.
Usually, tapping the butt of the rifle on a hard surface causes the cartridge to fall out
of the chamber. However, if the cartridge case is ruptured, it can be seized. When this
occurs, a cleaning rod can be inserted into the bore from the muzzle end. The cartridge
2-13
FM 23-9
case can be forced from the chamber by tapping the cleaning rod against the inside base
of the fired cartridge. When cleaning and inspecting the mechanism and chamber
reveal no defects but failures to extract persist, the extractor and extractor spring should
be replaced. If the chamber surface is damaged, the entire barrel must be replaced.
Failure to Eject. A failure to eject a cartridge is an element in the cycle of
functioning of the rifle, regardless of the mode of fire. A malfunction occurs when the
cartridge is not ejected through the ejection port and either remains partly in the
chamber or becomes jammed in the upper receiver as the bolt closes. When the firer
initially clears the rifle, the cartridge could strike an inside surface of the receiver and
bounce back into the path of the bolt.
Probable cause. Ejection failures are hard to diagnose but are often related to a
weak or damaged extractor spring and/or ejector spring. Failures to eject can also be
caused by a buildup of carbon or fouling on the ejector spring or extractor, or from short
recoil. Short recoil is usually due to a buildup of fouling in the carrier mechanism or
gas tube, which could result in many failures to include a failure to eject. Resistance
caused by a carbon-coated or corroded chamber can impede the extraction, and then
the ejection of a cartridge.
Corrective action. While retraction of the charging handle usually frees the
cartridge and permits removal, the charging handle must not be released until the
position of the next live round is determined. If another live round has been sufficiently
stripped from the magazine or remains in the chamber, then the magazine and all live
rounds could also require removal before the charging handle can be released. If
several malfunctions occur and are not corrected by cleaning and lubricating, the
ejector spring, extractor spring, and extractor should be replaced.
OTHER MALFUNCTIONS
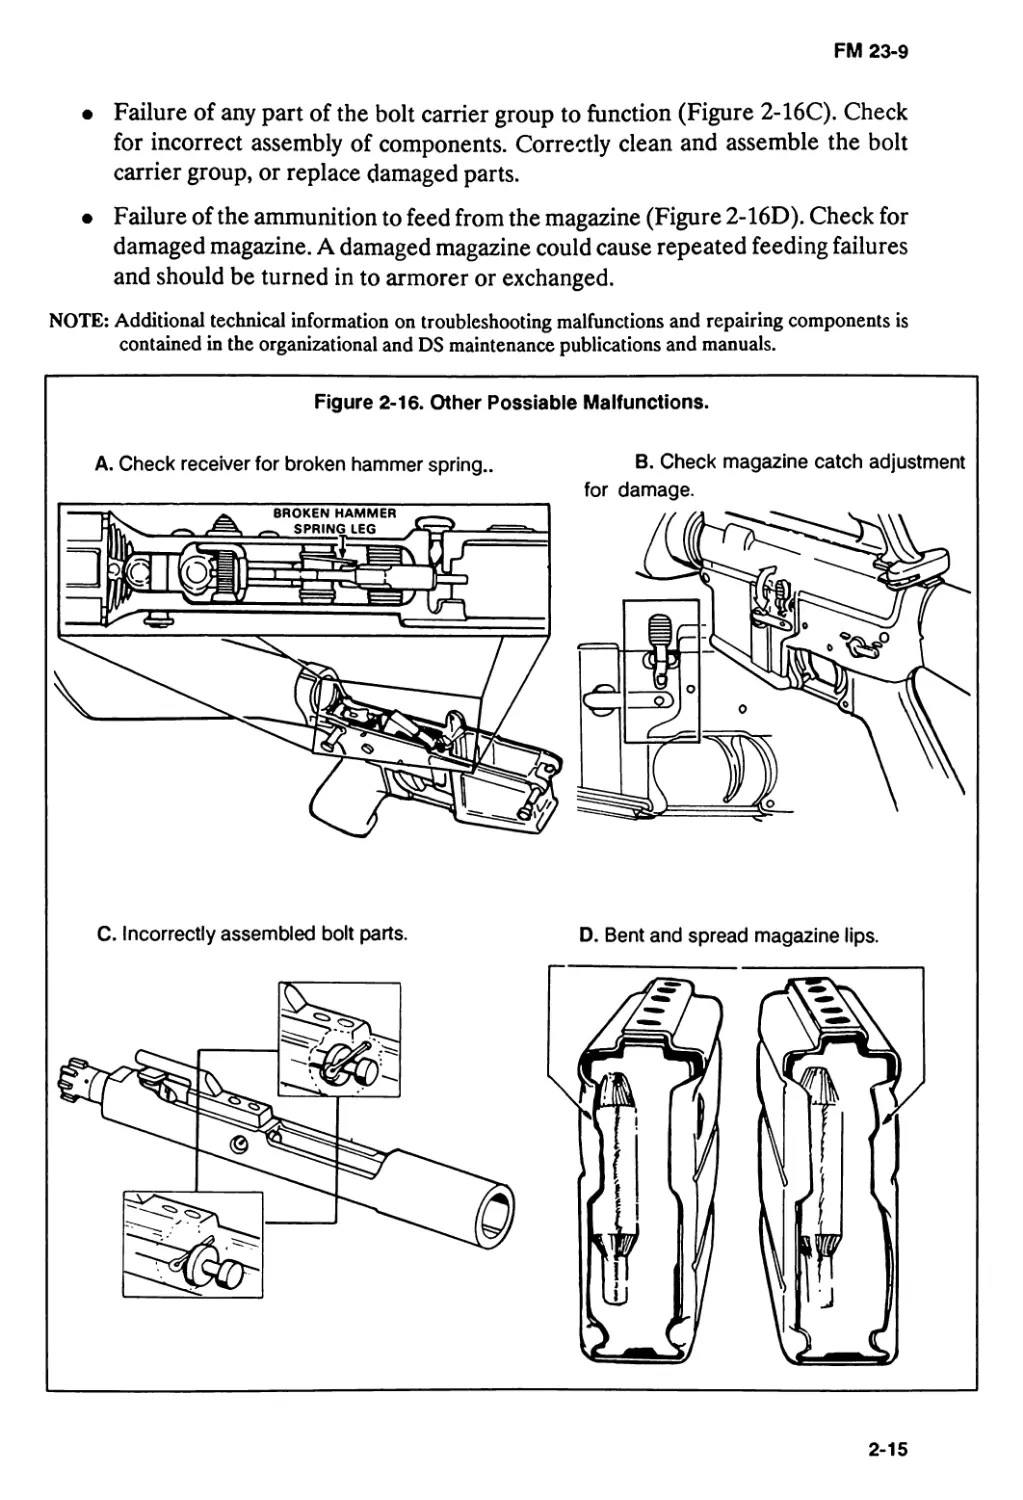
Some other malfunctions that can occur are as follows.
• Failure of the bolt to remain in a rearward position after the last round in the
magazine is fired. Check for a bad magazine or short recoil.
• Failure of the bolt to lock in the rearward position when the bolt catch has been
engaged. Check bolt catch; replace as required.
• Firing two or more rounds when the trigger is pulled and the selection lever is
in the SEMI position. This indicates a worn sear, cam, or disconnector. Turn in
to armorer to repair and replace trigger group parts as required.
• Trigger will not pull or return after release with the selector set in a firing
position. This indicates that the trigger pin (Figure 2-16A)has backed out of the
receiver or the hammer spring is broken. Turn in to armorer to replace or repair.
• Failure of the magazine to lock into the rifle (Figure 2-16B). Check the magazine
and check magazine catch for damage. Turn in to armorer to adjust the catch;
replace as required.
2-14
FM 23-9
• Failure of any part of the bolt carrier group to function (Figure 2-16C). Check
for incorrect assembly of components. Correctly clean and assemble the bolt
carrier group, or replace damaged parts.
• Failure of the ammunition to feed from the magazine (Figure 2-16D). Check for
damaged magazine. A damaged magazine could cause repeated feeding failures
and should be turned in to armorer or exchanged.
NOTE: Additional technical information on troubleshooting malfunctions and repairing components is
contained in the organizational and DS maintenance publications and manuals.
2-15
FM 23-9
Section IV. AMMUNITION
This section contains information on different types of standard military ammunition
used in the M16A1 and M16A2 rifles. Use only authorized ammunition that is
manufactured to US and NATO specifications.
TYPES AND CHARACTERISTICS
The characteristics of the M16 family of ammunition are described in this paragraph.
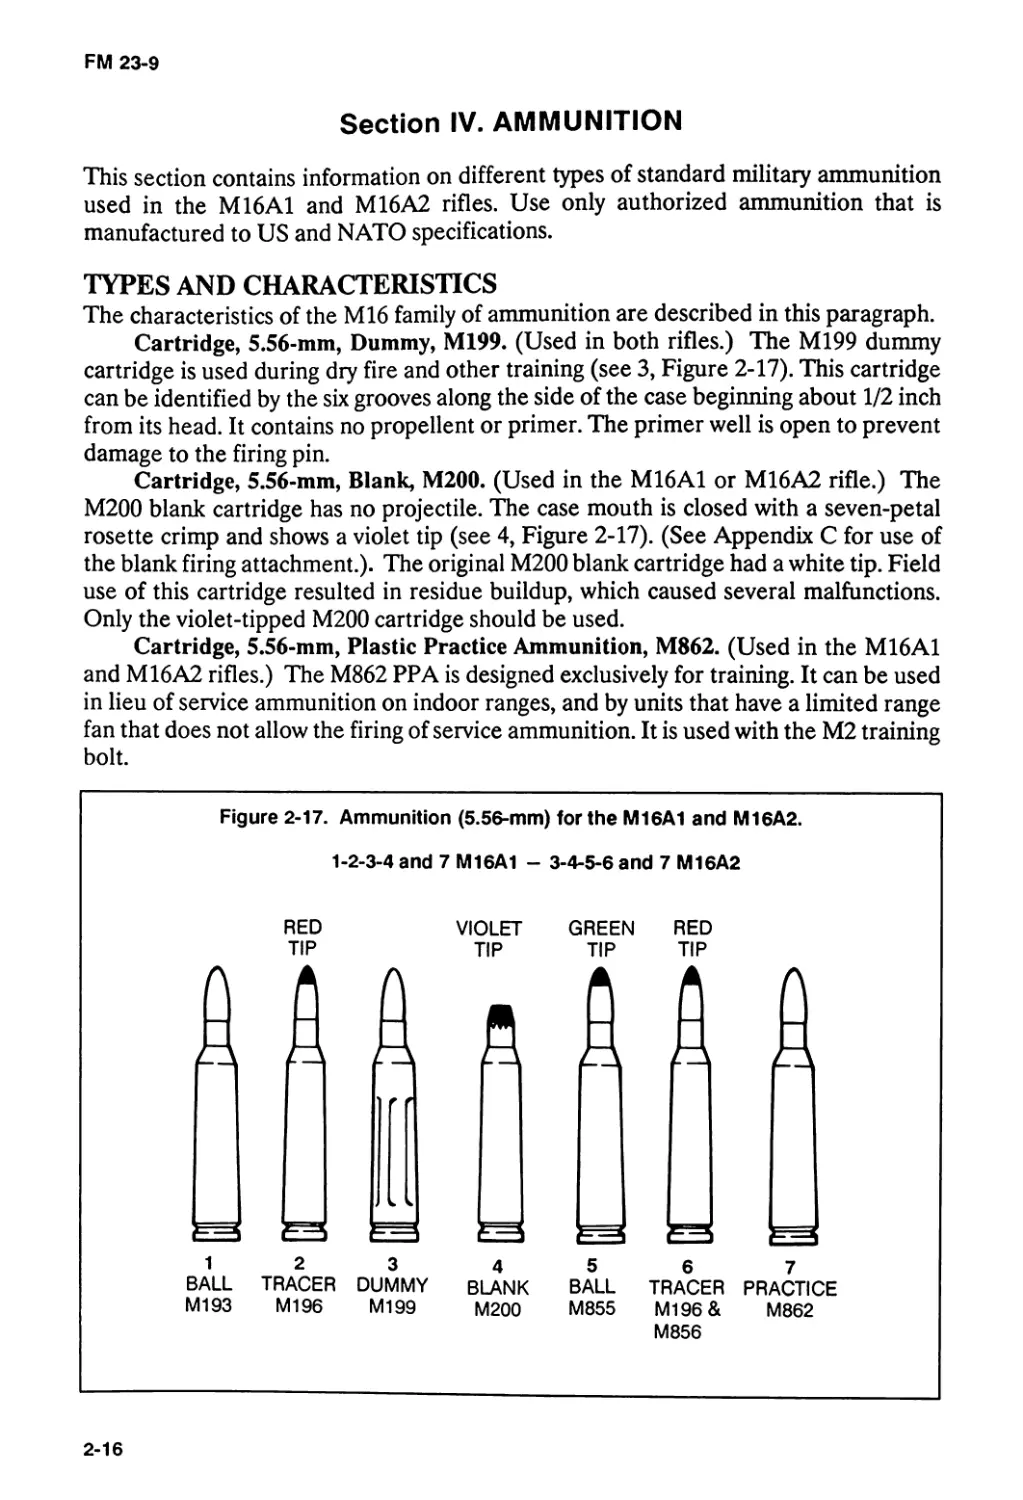
Cartridge, 5.56-mm, Dummy, M199. (Used in both rifles.) The M199 dummy
cartridge is used during dry fire and other training (see 3, Figure 2-17). This cartridge
can be identified by the six grooves along the side of the case beginning about 1/2 inch
from its head. It contains no propellent or primer. The primer well is open to prevent
damage to the firing pin.
Cartridge, 5.56-mm, Blank, M200. (Used in the M16A1 or M16A2 rifle.) The
M200 blank cartridge has no projectile. The case mouth is closed with a seven-petal
rosette crimp and shows a violet tip (see 4, Figure 2-17). (See Appendix C for use of
the blank firing attachment.). The original M200 blank cartridge had a white tip. Field
use of this cartridge resulted in residue buildup, which caused several malfunctions.
Only the violet-tipped M200 cartridge should be used.
Cartridge, 5.56-mm, Plastic Practice Ammunition, M862. (Used in the M16A1
and M16A2 rifles.) The M862 PPA is designed exclusively for training. It can be used
in lieu of service ammunition on indoor ranges, and by units that have a limited range
fan that does not allow the firing of service ammunition. It is used with the М2 training
bolt.
Figure 2-17. Ammunition (5.56-mm) for the M16A1 and M16A2.
1-2-3-4 and 7 M16A1 - 3-4-5-6 and 7 M16A2
RED VIOLET GREEN RED
M193 M196 M199 M200 M855 M196& M862
M856
2-16
FM 23-9
Although PPA (see 7, Figure 2-17) closely replicates the trajectory and
characteristics of service ammunition out to 25 meters, it should not be used to set the
combat battlesight zero of weapons to fire service ammunition. The setting that is
placed on the sights for a weapon firing PPA could be different for service ammunition.
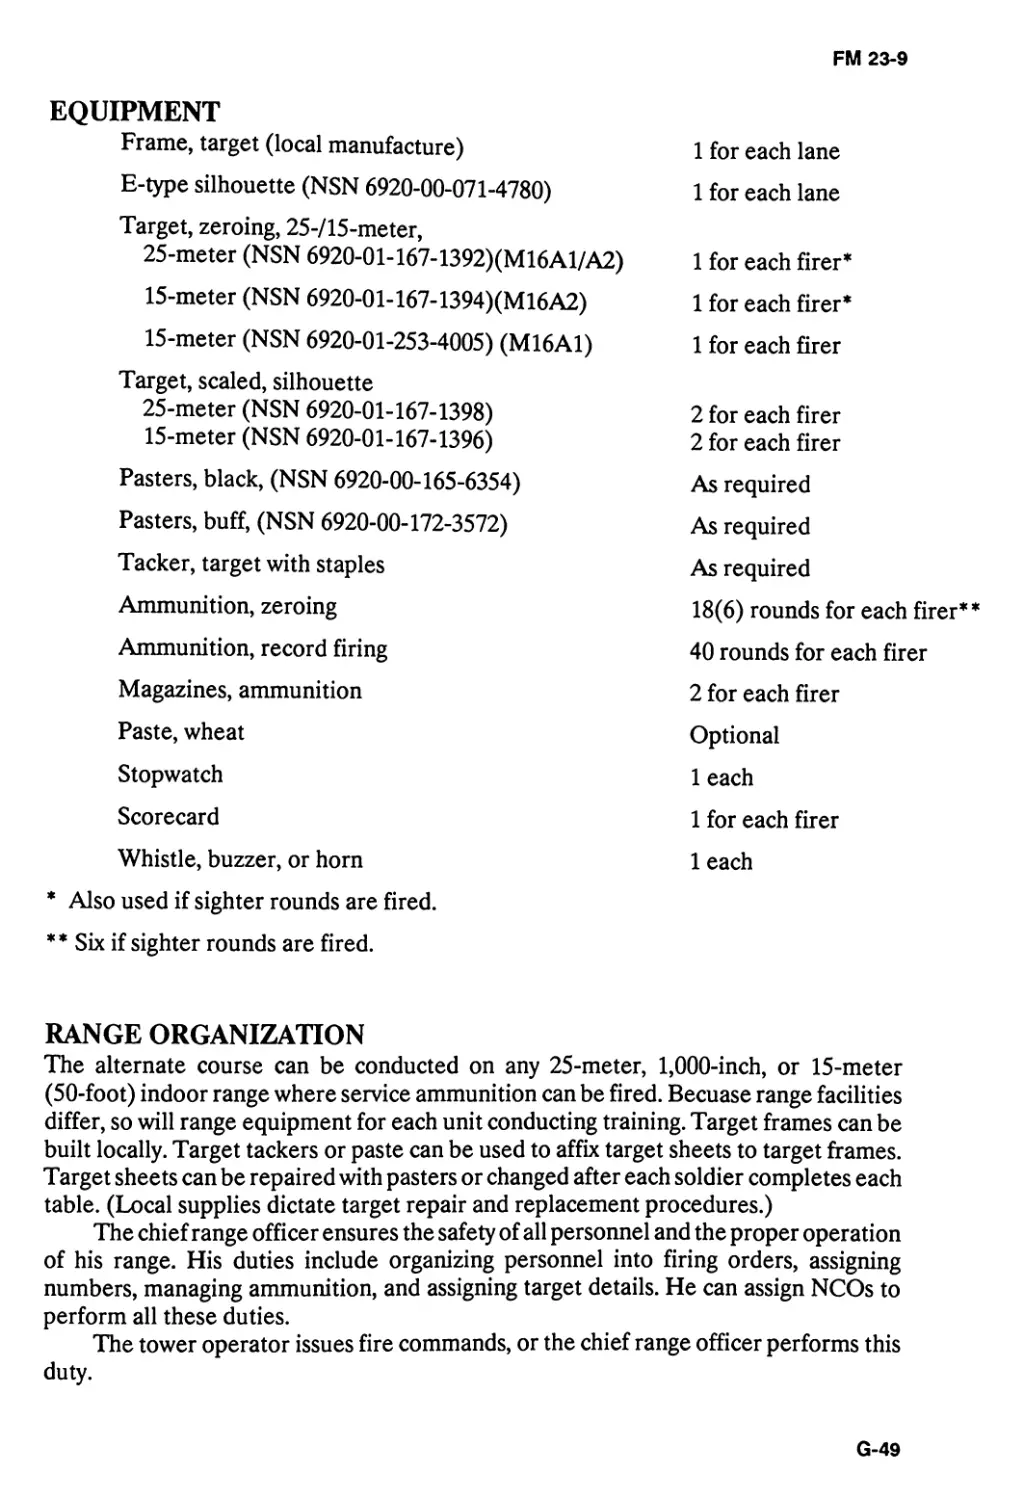
If adequate range facilities are not available for sustainment (particularly Reserve
Components), PPA can be used for any firing exercises of 25 meters or less. This
includes the 25-meter scaled silhouette, 25-meter alternate qualification course, and
quick-fire training. Units that have an indoor range with adequate ventilation or
MOUT site could use PPA. (See Appendix C for use in training.)
Cartridge, 5.56-mm, Ball, M193. The M193 cartridge is a center-fire cartridge with
a 55-grain, gilding-metal, jacketed, lead alloy core bullet. The primer and case are
waterproof. The M193 round is the standard cartridge for field use with the M16A1
rifle and has no identifying marks (see 1, Figure 2-17). This cartridge has a projectile
weight of 55 grains and is 1.9 cm long, with a solid lead core.
Figure 2-21. Ammunition for 5.56-mm M16A1 (1 through 4 and 7) and M16A2 (3 through 7).
Cartridge, 5.56-mm, Tracer, M196. (Used in the M16A1 rifle.) The M196
cartridge is identified by a red- or orange-painted tip (see 2, Figure 2-17). Its main uses
are for observation of fire, incendiary effect, and signaling. Soldiers should avoid
long-term use of 100-percent tracer rounds. This could cause deposits of incendiary
material/chemical compounds that could cause damage to the barrel. Therefore, when
tracer rounds are fired, they are mixed with ball ammunition in a ratio no greater than
one-to-one with a preferred ratio of three or four ball rounds to one tracer round.
Cartridge, 5.56-mm, Ball, M855. The M855 cartridge has a 62-grain,
gilding-metal, jacketed, lead alloy core bullet with a steel penetrator. The primer and
case are waterproof. This is the NATO standard round for the M16A2 rifle (also used
in the M249 SAW). It is identified by a green tip (see 5, Figure 2-17). This cartridge
has a projectile weight of 62 grains and is 2.3 cm long, with a steel penetrator in the
nose.
Cartridge, 5.56-mm, Tracer, M856. (Used in the M16A2 rifle.) The M856 tracer
cartridge has similar characteristics as the M196 but slightly longer tracer burnout
distance. This cartridge has a 63.7-grain bullet. The M856 does not have a steel
penetrator. It is also identified by a red tip (orange when linked 4 and 1) (6, Figure
2-17).
CARE AND HANDLING
When necessary to store ammunition in the open, it must be raised on dunnage at least
6 inches from the ground and protected with a cover, leaving enough space for air
circulation. Since ammunition and explosives are adversely affected by moisture and
high temperatures, the following must be adhered to:
• Do not open ammunition boxes until ready to use.
• Protect ammunition from high temperatures and the direct rays of the sun.
• Do not attempt to disassemble ammunition or any of its components.
• Never use lubricants or grease on ammunition.
2-17
FM 23-9
Section V. DESTRUCTION OF MATERIEL
Rifles subject to capture or abandonment in the combat zone are destroyed only by the
authority of the unit commander IAW orders of or policy established by the Army
commander. The destruction of equipment is reported through regular command
channels.
MEANS OF DESTRUCTION
Certain procedures outlined require use of explosives and incendiary grenades. Issue
of these and related principles, and specific conditions under which destruction is
effected, are command decisions. Of the several means of destruction, the following
apply:
• Mechanical. Requires axe, pick mattock, sledge, crowbar, or other heavy
implement.
• Burning. Requires gasoline, oil, incendiary grenades, and other flammables, or
welding or cutting torch.
• Demolition. Requires suitable explosives or ammunition. Under some
circumstances, hand grenades can be used.
• Disposal. Requires burying in the ground, dumping in streams or marshes, or
scattering so widely as to preclude recovery of essential parts.
It is important that the same parts be destroyed on all like materiel, including spare
parts, so that the enemy cannot rebuild one complete unit from several damaged units.
If destruction is directed, appropriate safety precautions must be observed.
FIELD-EXPEDIENT METHODS
If destruction of the individual rifle must be performed to prevent enemy use, the rifle
must be damaged so it cannot be restored to a usable condition. Expedient destruction
requires that key operational parts be separated from the rifle or damaged beyond
repair. Priority is given in the following order:
FIRST: Bolt carrier group; removed and discarded or hidden.
SECOND: Upper receiver group; separated and discarded or hidden.
THIRD: Lower receiver group; separated and discarded or hidden.
2-18
FM 23-9
CHAPTER 3
Rifle Marksmanship Training
The procedures and techniques for implementing the Army rifle marksmanship training
program are based on the concept that all soldiers must understand common firing
principles, be proficient marksmen, and be confident in applying their firing skills in
combat. This depends on their understanding of the rifle and correct application of
marksmanship fundamentals. Proficiency is accomplished through practice that is
supervised by qualified instructors/trainers and through objective performance assessments
by unit leaders. During preliminary training, instructors/trainers emphasize initial learning,
reviewing, reinforcing, and practicing of the basics. Soldiers must master weapon
maintenance, functions checks, and firing fundamentals before progressing to advanced
skills and firing exercises under tactical conditions. The skills the soldier must learn are
developed in the following four phases:
- PHASE I. Preliminary Rifle Instruction.
- PHASE II. Downrange Feedback Range Firing.
- PHASE III. Field Firing on Train-Fire Ranges.
- PHA SEIV. A dvanced and Collective Firing Exercises.
Each soldier progresses through these phases to meet the objective of rifle marksmanship
training and sustainment. The accomplishment of these phases are basic and necessary in
mastering the correct techniques of marksmanship and when functioning as a soldier in
a combat area. (See Chapter 1 and Appendix A.)
Section I. BASIC PROGRAM IMPLEMENTATION
Knowledgeable instructors/cadre are the key to marksmanship performance. All
commanders must be aware of maintaining expertise in marksmanship
instruction/training. (See Appendix D.)
INSTRUCTOR/TRAINER SELECTION
Institutional and unit instructors/trainers are selected and assigned from the most
highly qualified soldiers. These soldiers must have an impressive background in rifle
marksmanship; be proficient in applying these fundamentals; know the importance of
marksmanship training; and have a competent and professional attitude. The
commander must ensure that selected instructors/trainers can effectively train other
soldiers. Local instructor/trainer training courses and marksmanship certification
programs must be established to ensure that instructor/trainer skills are developed.
Cadre/trainer refers to a marksmanship instructor/trainer that has more
experience and expertise than the firer. He trains soldiers in the effective use of the
rifle by maintaining strict discipline on the firing line, insisting on compliance with
range procedures and program objectives, and enforcing safety regulations. A good
3-1
FM 23-9
instructor/trainer must understand the training phases and techniques for developing
marksmanship skills, and he must possess the following qualifications:
Knowledge. The main qualifications for an effective instructor/trainer are
thorough knowledge of the rifle, proficiency in firing, and understanding supporting
marksmanship manuals.
Patience. The instructor/trainer must relate to the soldier calmly, persistently, and
patiently.
Understanding. The instructor/trainer can enhance success and understanding by
emphasizing close observance of rules and instructions.
Consideration. Most soldiers enjoy firing regardless of their performance and
begin with great enthusiasm. The instructor/trainer can enhance this enthusiasm by
being considerate of his soldiers feelings and by encouraging firing abilities throughout
training, which can also make teaching a rewarding experience.
Respect. An experienced cadre is assigned the duties of instructor/trainer, which
classifies him as a technical expert and authority. The good instructor/trainer is alert
for mistakes and patiently makes needed corrections.
Encouragement. The instructor/trainer can encourage his soldiers by convincing
them to achieve good firing performance through practice. His job is to impart
knowledge and to assist the soldier so he can gain the practical experience needed to
become a good firer.
DUTIES OF THE INSTRUCTOR/TRAINER
The instructor/trainer helps the firer master the fundamentals of rifle marksmanship.
He ensures that the firer consistently applies what he has learned. Then, it is a matter
of practice, and the firer soon acquires good firing skills. When training the beginner,
the instructor/trainer could confront problems such as fear, nervousness, forgetfulness,
failure to understand, and a lack of coordination or determination. An expert firer is
often unaware that some problems are complicated by arrogance and carelessness.
With all types of firers, the instructor/trainer must ensure that firers are aware of their
firing errors, understand the causes, and apply remedies. Sometimes errors are not
evident. The instructor/trainer must isolate errors, explain them, and help the firer
concentrate on correcting them.
Observing the Firer. The instructor/trainer observes the firer during drills and in
the act of firing to pinpoint errors. If there is no indication of probable error, then the
firer’s position, breath control, shot anticipation, and trigger squeeze are closely
observed.
Questioning the Firer. The firer is asked to detect his errors and to explain his
firing procedure to include position, aiming, breath control, and trigger squeeze.
Analyzing the Shot Group. This is an important step in detecting and correcting
errors. When analyzing a target, the instructor/trainer critiques and correlates
observations of the firer to probable errors in performance, according to the shape and
size of shot groups. A poor shot group is usually caused by more than one observable
error.
NOTE: To assist instructors/trainers, TVTs 7-1 and 7-2 should be viewed before conducting training.
3-2
FM 23-9
Section II. CONDUCT OF TRAINING
In the conduct of marksmanship training, the instructor/trainer first discusses an
overview of the program to include the progression and step-by-step process in
developing firing skills. (This can be accomplished by showing TVT 7-13.) Once the
soldier realizes the tasks and skills involved, he is ready to begin. He receives
preliminary rifle instruction before firing any course. Also during this initial phase, an
understanding of the service rifle developes through review.
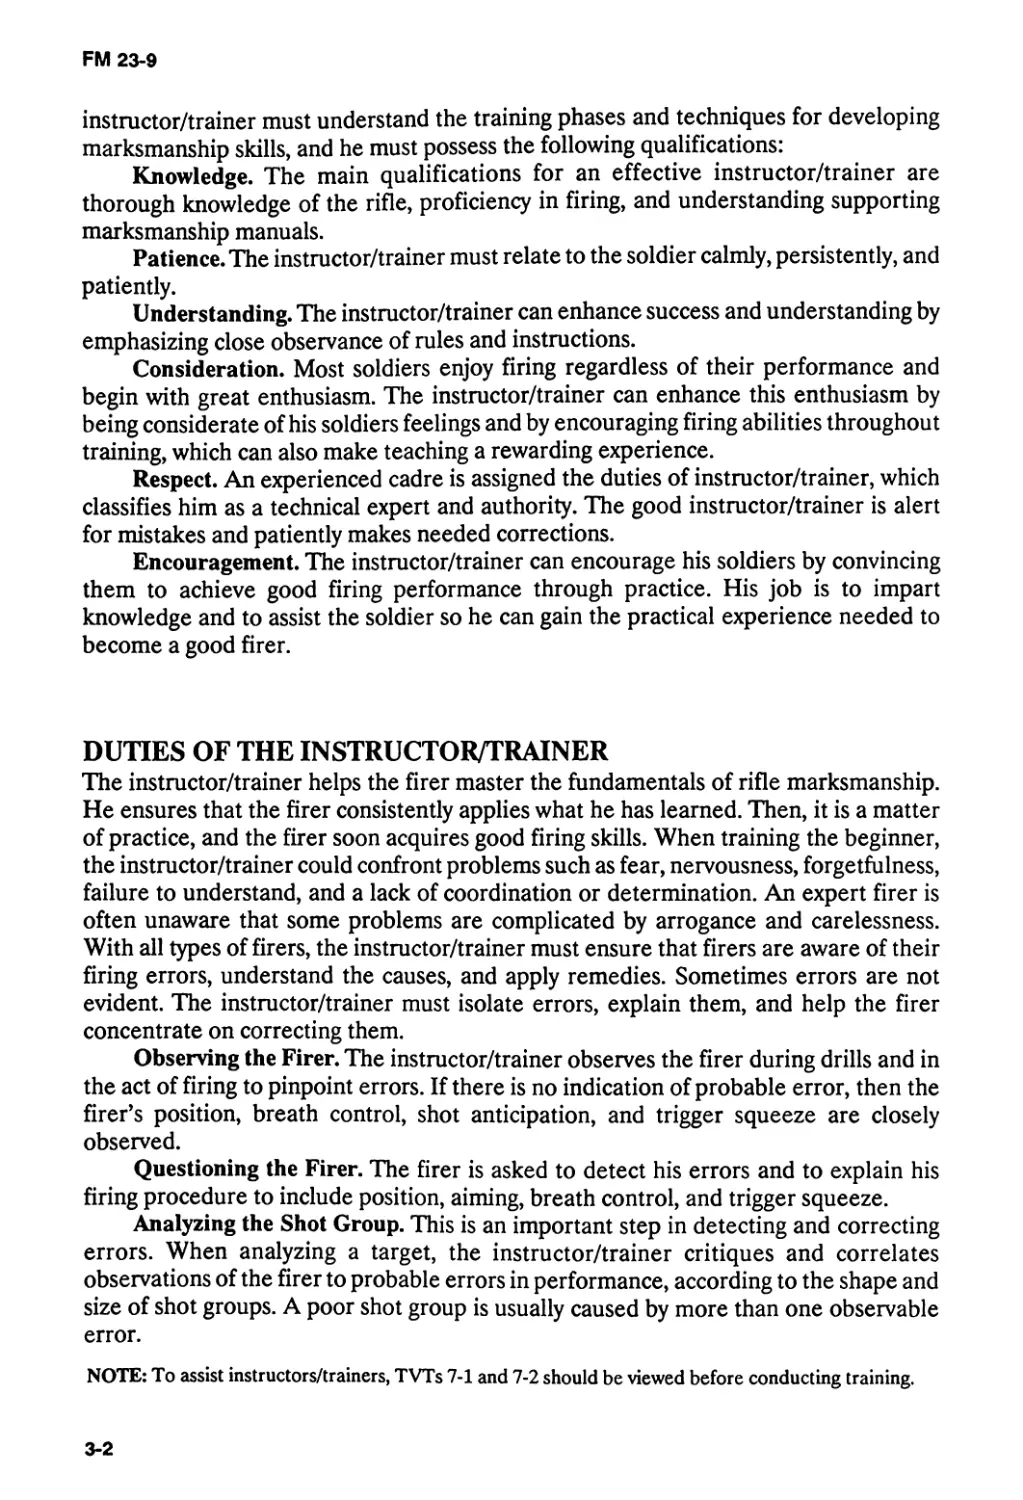
MECHANICAL TRAINING
Mechanical training includes characteristics and capabilities, disassembly and
assembly, operations and functioning, serviceability checks, and weapons maintenance.
It also stresses the performance of immediate action to clear or reduce a stoppage, and
the safe handling of rifles and ammunition (see Chapter 2). Examples of mechanical
training drills, along with tasks, conditions, and standards, are provided in Appendix A.
These examples are also used for initial entry training at the Army training centers.
Mechanical training must encompass all related tasks contained in the soldier’s manual
of common tasks (SMCT) to include the correct procedures for disassembly, cleaning,
inspection, and reassembly of the rifle and magazine (Figure 3-1).
Serviceability inspections and preventive maintenance checks must be practiced
to ensure soldiers have reliable weapons systems during training and in combat.
Technical information necessary to conduct mechanical training is contained in the
soldier’s operator’s manual (M16A1—TM 9-1005-249-10; M16A2 —TM
9-1005-319-10). Once the basic procedures have been demonstrated, soldiers should
3-3
FM 23-9
practice the mechanical training skills under varied conditions to include during
nighttime, and in MOPP and arctic clothing.
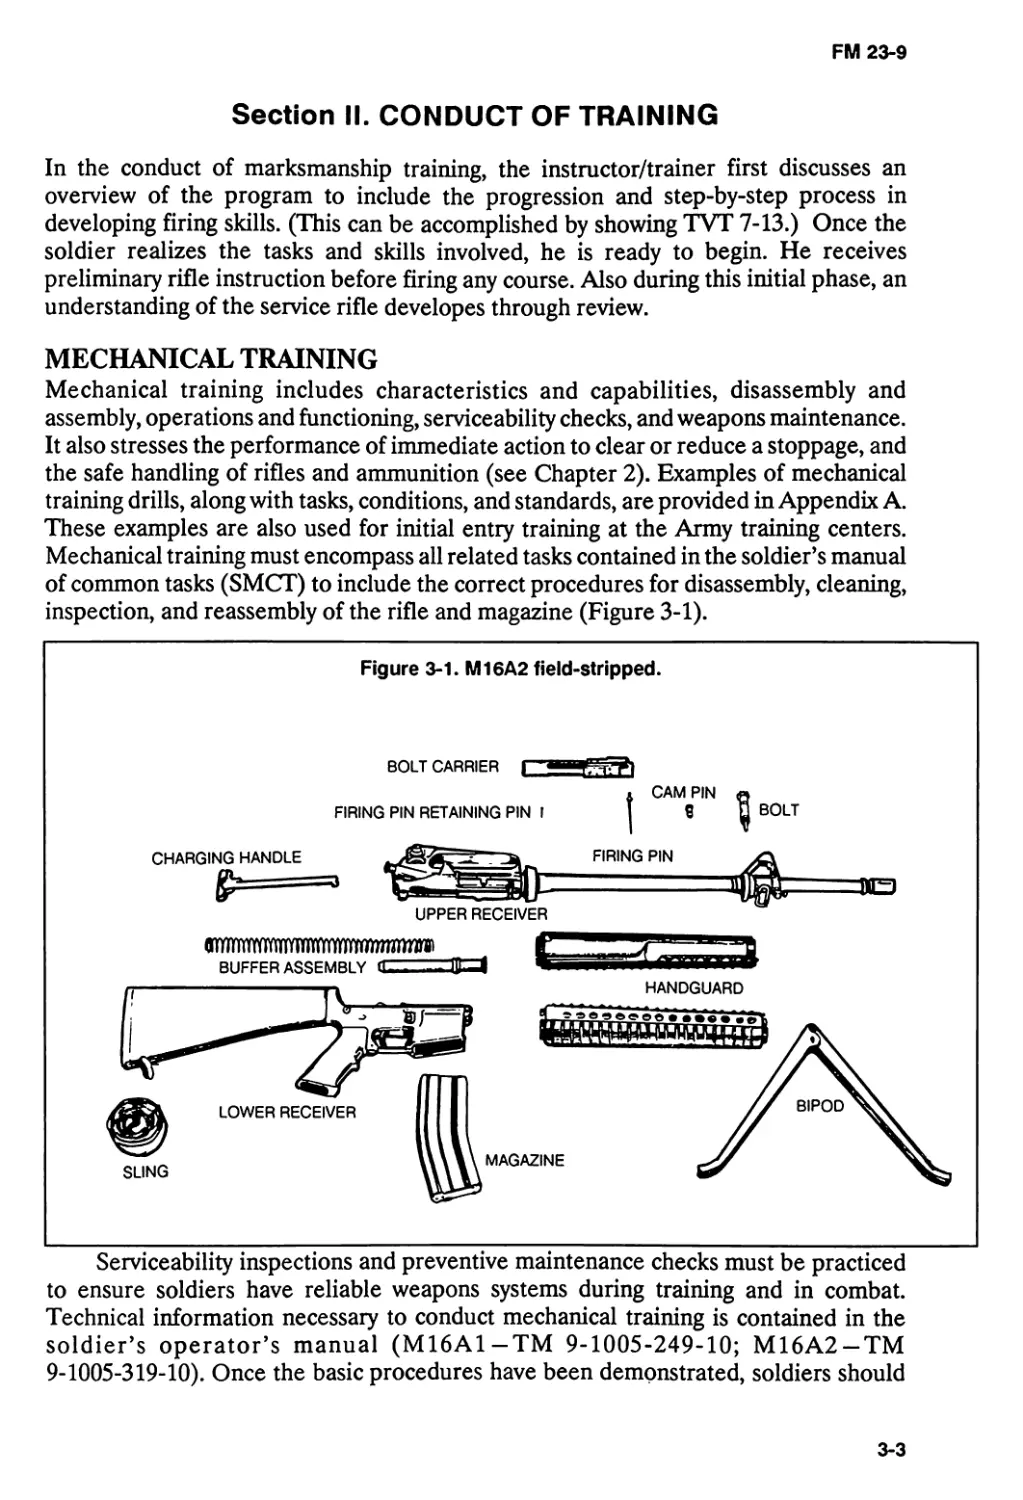
As part of mechanical training, soldiers must be taught and must practice
procedures for properly loading ammunition into magazines to include both single
loose rounds and speed loading of 10-round clips (Figure 3-2).
Figure 3-2. Loading and unloading magazine.
Emphasis on maintenance and understanding of the rifle can prevent most
problems and malfunctions. However, a soldier could encounter a stoppage or
malfunction. The soldier must quickly correct the problem by applying immediate
action and continue to place effective fire on the target.
Immediate-action procedures contained in Chapter 2 and the operator’s technical
manual should be taught and practiced as part of preliminary dry-fire exercises, and
should be reinforced during live-fire exercises.
Immediate-action drills should be conducted using dummy ammunition (M199)
loaded into the magazine. The soldier chamber the first dummy round and assume a
firing position. When he squeezes the trigger and the hammer falls with no recoil, this
is the cue to apply the correct immediate-action procedure and to refire. Drill should
continue until soldiers can perform the task in three to five seconds.
3-4
FM 23-9
The word SPORTS is a technique for assisting the soldier in learning the proper
procedures for applying immediate action to the M16A1 and M16A2 rifles.
First, THINK, then:
Slap up on the bottom of the magazine.
Pull the charging handle to the rear.
Observe the chamber for an ejection of the round.
Release the charging handle.
Tap the forward assist.
Squeeze the trigger again.
NOTE: When slapping up on the magazine, be careful not to knock a round out of the magazine into the
line of the bolt carrier, causing more problems. Slap hard enough only to ensure the magazine is
fully seated.
MARKSMANSHIP FUNDAMENTALS
The soldier must understand the four key fundamentals before he approaches the firing
line. He must be able to establish a steady position that allows observation of the target.
He must aim the rifle at the target by aligning the sight system, and he must fire the
rifle without disturbing this alignment by improper breathing or during trigger squeeze.
The skills needed to accomplish these are known as rifle marksmanship fundamentals.
These simple procedures aid the firer in achieving target hits under many conditions
when expanded with additional techniques and information. Applying these four
fundamentals rapidly and consistently is called the integrated act of firing.
Steady Position. When the soldier approaches the firing line, he should assume a
comfortable, steady firing position in order to hit targets consistently. The time and
supervision each soldier has on the firing line are limited (illustrated on the following
page in Figure 3-3). Therefore, he must learn how to establish a steady position during
dry-fire training. The firer is the best judge as to the quality of his position. If he can
hold the front sight post steady through the fall of the hammer, he has a good position.
The steady position elements are as follows:
Nonfiring hand grip. The rifle handguard rests on the heel of the hand in the V
formed by the thumb and fingers. The grip of the nonfiring hand is light, and slight
rearward pressure is exerted.
Rifle butt position. The butt of the stock is placed in the pocket of the firing
shoulder. This reduces the effect of recoil and helps ensure a steady position.
Firing hand grip. The firing hand grasps the pistol grip so that it fits the V formed
by the thumb and forefinger. The forefinger is placed on the trigger so that the lay of
the rifle is not disturbed when the trigger is squeezed. A slight rearward pressure is
exerted by the remaining three fingers to ensure that the butt of the stock remains in
the pocket of the shoulder, thus minimizing the effect of recoil.
3-5
FM 23-9
3-6
FM 23-9
Firing elbow placement. The location of the firing elbow is important in providing
balance. The exact location, however, depends on the firing/fighting position used—for
example, kneeling, prone, or standing. Placement should allow shoulders to remain
level.
Nonfiring elbow. The nonfiring elbow is positioned firmly under the rifle to allow
for a comfortable and stable position. When the soldier engages a wide sector of fire,
moving targets, and targets at various elevations, his nonfiring elbow should remain
free from support.
Stock weld. The stock weld is taught as an integral part of various positions. Two
key factors emphasized are that the stock weld should provide for a natural line of sight
through the center of the rear sight aperture to the front sight post and to the target.
The firer’s neck should be relaxed, allowing his cheek to fall naturally onto the stock.
Through dry-fire training, the soldier is encouraged to practice this position until he
assumes the same stock weld each time he assumes a given position. This provides
consistency in aiming, which is the purpose of obtaining a correct stock weld. Proper
eye relief is obtained when a soldier establishes a good stock weld. There is normally
a small change in eye relief each time he assumes a different firing position. Soldiers
should begin by trying to touch his nose close to the charging handle when assuming a
firing position.
Support. If artificial support (sandbags, logs, stumps) is available, it should be used
to steady the position and to support the rifle. If it is not available, then the bones, not
the muscles, in the firer’s upper body must support the rifle.
Muscle relaxation. If support is properly used, the soldier should be able to relax
most of his muscles. Using artificial support or bones in the upper body as support
allows him to relax and settle into position. Using muscles to support the rifle can cause
it to move.
Natural point of aim. When the soldier first assumes his firing position, he orients
his rifle in the general direction of his target. Then he adjusts his body to bring the rifle
and sights exactly in line with the desired aiming point. When using proper support and
consistent stock weld, the soldier should have his rifle and sights aligned naturally on
the target. When this correct body-rifle-target alignment is achieved, the front sight
post must be held on target, using muscular support and effort. As the rifle fires, the
muscles tend to relax, causing the front sight to move away from the target toward the
natural point of aim. Adjusting this point to the desired point of aim eliminates this
movement. When multiple target exposures are expected (or a sector of fire must be
covered), the soldier should adjust his natural point of aim to the center of the expected
target exposure area (or center of sector).
Aiming. Focusing on the front sight post is a vital skill the firer must acquire during
practice. Having mastered the task of holding the rifle steady, the soldier must align
the rifle with the target in exactly the same way for each firing. The firer is the final
judge as to where his eye is focused. The instructor/trainer emphasizes this point by
having the firer focus on the target and then focus back on the front sight post. He
checks the position of the firing eye to ensure it is in line with the rear sight aperture.
He uses the M16 sighting device to see what the firer sees through the sights. (See
Appendix C.)
3-7
FM 23-9
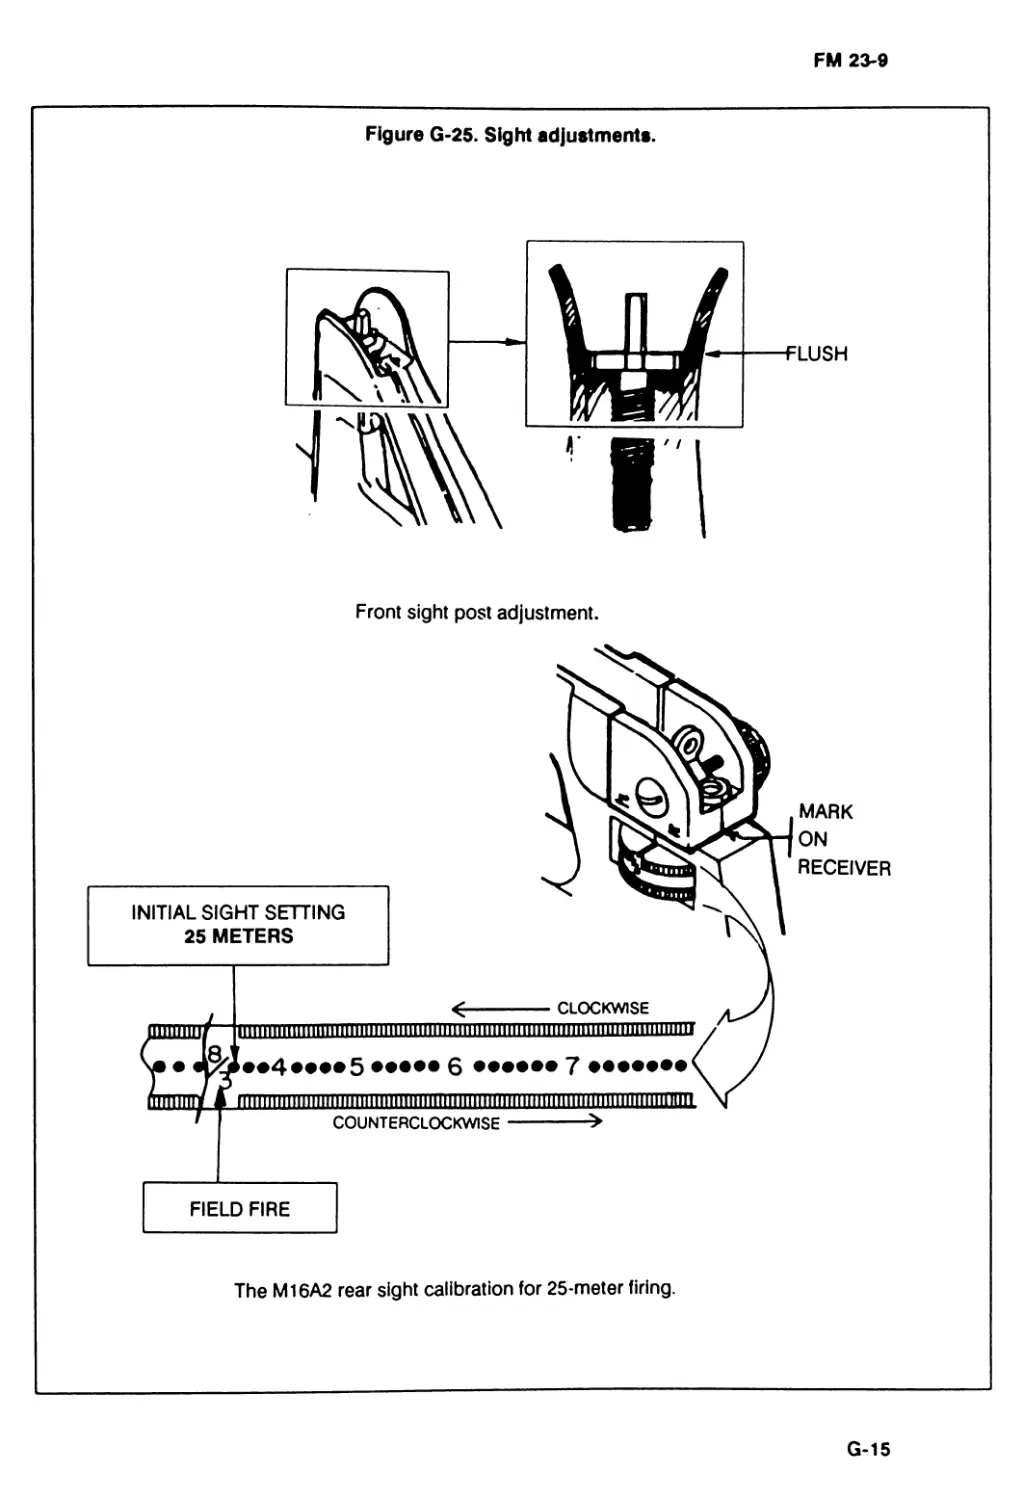
Rifle sight alignment. Alignment of the rifle with the target is critical. It involves
placing the tip of the front sight post in the center of the rear sight aperture. (Figure
3-4.) Any alignment error between the front and rear sights repeats itself for every 1/2
meter the bullet travels. For example, at the 25-meter line, any error in rifle alignment
is multiplied 50 times. If the rifle is misaligned by 1/10 inch, it causes a target at 300
meters to be missed by 5 feet.
Figure 3-4. Correct sight alignment.
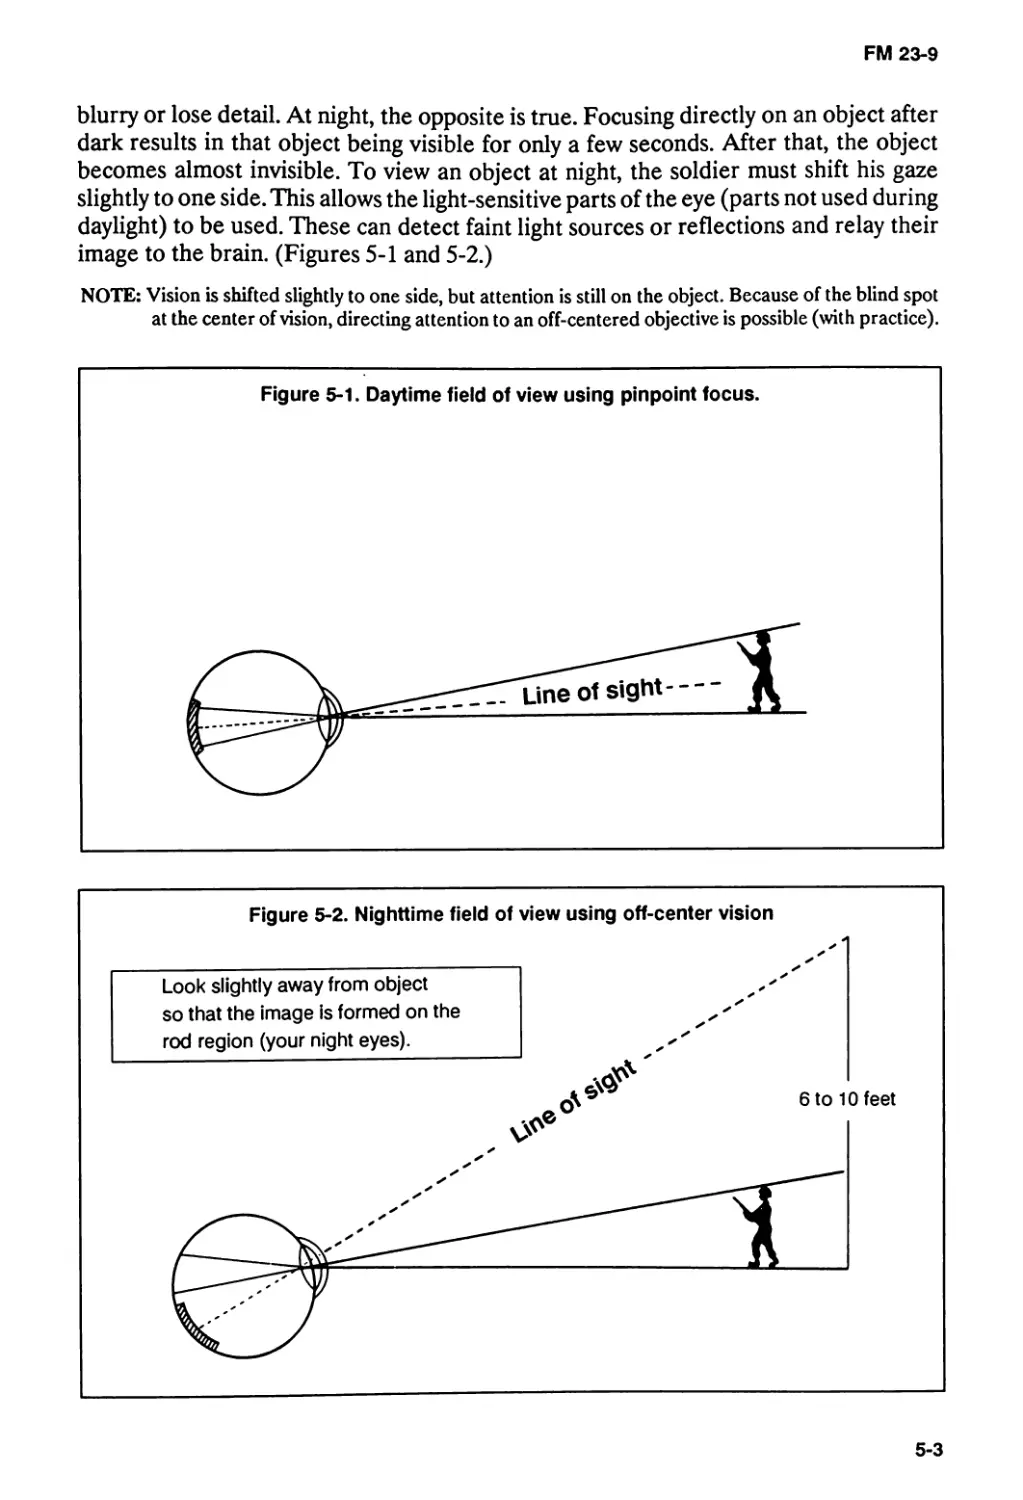
Focus of the eye. A proper firing position places the eye directly on line with the
center of the rear sight. When the eye is focused on the front sight post, the natural
ability of the eye to center objects in a circle and to seek the point of greatest light
(center of the aperture) aid in providing correct sight alignment. For the average soldier
firing at combat-type targets, the natural ability of the eye can accurately align the sights.
Therefore, the firer can place the tip of the front sight post on the aiming point, but the
eye must be focused on the tip of the front sight post. This causes the target to appear
blurry, while the front sight post is seen clearly. Two reasons for focusing on the tip of
the front sight post are:
• Only a minor aiming error should occur since the error reflects only as much as
the soldier fails to determine the target center. A greater aiming error can result
if the front sight post is blurry due to focusing on the target or other objects.
• Focusing on the tip of the front sight post aids the firer in maintaining proper
sight alignment (Figure 3-4).
Sight picture. Once the soldier can correctly align his sights, he can obtain a sight
picture. A correct sight picture has the target, front sight post, and rear sight aligned.
The sight picture includes two basic elements: sight alignment and placement of the
aiming point.
Placement of the aiming point varies, depending on the engagement range. For
example, Figure 3-5 shows a silhouette at 250 meters —the aiming point is the center
of mass, and the sights are in perfect alignment; this is a correct sight picture.
3-8
FM 23-9
Figure 3-5. Correct sight picture.
A technique to obtain a good sight picture is the side aiming technique (Figure
3-6). It involves positioning the front sight post to the side of the target in line with the
vertical center of mass, keeping the sights aligned. The front sight post is moved
horizontally until the target is directly centered on the front sight post.
Front sight. The front sight post is vital to proper firing and should be replaced
when damaged. Two techniques that can be used are the carbide lamp and the burning
plastic spoon. The post should be blackened anytime it is shiny since precise focusing
on the tip of the front sight post cannot be done otherwise.
Aiming practice. Aiming practice is conducted before firing live rounds. During
day firing, the soldier should practice sight alignment and placement of the aiming
point. This can be done by using training aids such as the M15A1 aiming card and the
Riddle sighting device. (See Appendix C.)
3-9
FM 23-9
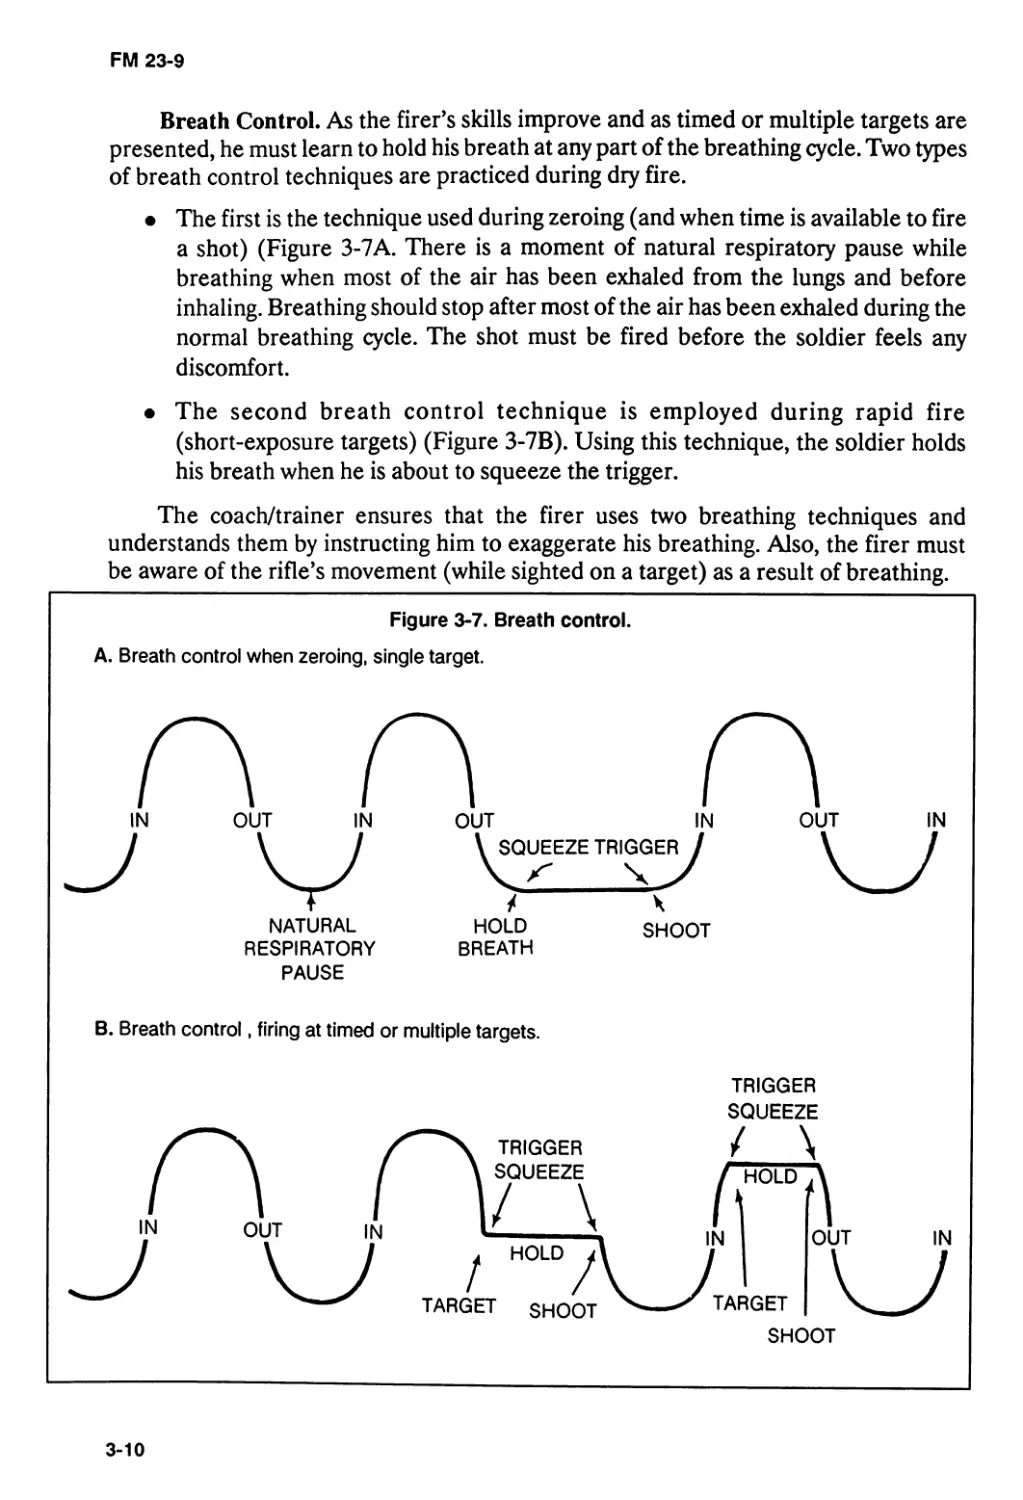
Breath Control. As the firer’s skills improve and as timed or multiple targets are
presented, he must learn to hold his breath at any part of the breathing cycle. Two types
of breath control techniques are practiced during dry fire.
• The first is the technique used during zeroing (and when time is available to fire
a shot) (Figure 3-7A. There is a moment of natural respiratory pause while
breathing when most of the air has been exhaled from the lungs and before
inhaling. Breathing should stop after most of the air has been exhaled during the
normal breathing cycle. The shot must be fired before the soldier feels any
discomfort.
• The second breath control technique is employed during rapid fire
(short-exposure targets) (Figure 3-7B). Using this technique, the soldier holds
his breath when he is about to squeeze the trigger.
The coach/trainer ensures that the firer uses two breathing techniques and
understands them by instructing him to exaggerate his breathing. Also, the firer must
be aware of the rifle’s movement (while sighted on a target) as a result of breathing.
3-10
FM 23-9
Trigger Squeeze. A novice firer can learn to place the rifle in a steady position and
to correctly aim at the target if he follows basic principles. If the trigger is not properly
squeezed, the rifle is misaligned with the target at the moment of firing.
Rifle movement. Trigger squeeze is important for two reasons:
• First, any sudden movement of the finger on the trigger can disturb the lay of
the rifle and cause the shot to miss the target.
• Second, the precise instant of firing should be a surprise to the soldier.
The soldier’s natural reflex to compensate for the noise and slight punch in the
shoulder can cause him to miss the target if he knows the exact instant the rifle will fire.
The soldier usually tenses his shoulders when expecting the rifle to fire, but it is difficult
to detect since he does not realize he is flinching. When the hammer drops on a dummy
round and does not fire, the soldier’s natural reflexes demonstrate that he is improperly
squeezing the trigger.
NOTE: See Appendix C for the Weaponeer and ball-and-dummy exercise. They are good training devices
in detecting improper trigger squeeze.
Trigger finger. The trigger finger (index finger on the firing hand) is placed on the
trigger between the first joint and the tip of the finger (not the extreme end) and is
adjusted depending on hand size, grip, and so on. The trigger finger must squeeze the
trigger to the rear so that the hammer falls without disturbing the lay of the rifle. When
a live round is fired, it is difficult to see what affect trigger pull had on the lay of the
rifle. Therefore, it is important to experiment with many finger positions during dry-fire
training to ensure the hammer is falling with little disturbance to the aiming process.
As the firer’s skills increase with practice, he needs less time spend on trigger
squeeze. Novice firers can take five seconds to perform an adequate trigger squeeze,
but, as skills improve, he can squeeze the trigger in a second or less. The proper trigger
squeeze should start with slight pressure on the trigger during the initial aiming process.
The firer applies more pressure after the front sight post is steady on the target and his
is holding his breath.
The coach/trainer observes the trigger squeeze, emphasizes the correct
procedure, and checks the firer’s applied pressure. He places his finger on the trigger
and has the firer squeeze the trigger by applying pressure to the coach/trainer’s finger.
The coach/trainer ensures that the firer squeezes straight to the rear on the trigger
avoiding a left or right twisting movement. A steady position reduces disturbance of
the rifle during trigger squeeze.
From an unsupported position, the firer experiences a greater wobble area than
from a supported position. Wobble area is the movement of the front sight around the
aiming point when the rifle is in the steadiest position. If the front sight strays from the
target during the firing process, pressure on the trigger should be held constant and
resumed as soon as sighting is corrected. The position must provide for the smallest
possible wobble area. From a supported position, there should be minimal wobble area
and little reason to detect movement. If movement of the rifle causes the front sight to
leave the target, more practice is needed. The firer should never try to quickly squeeze
the trigger while the sight is on the target. The best firing performance results when the
trigger is squeezed continuously, and the rifle is fired without disturbing its lay.
3-11
FM 23-9
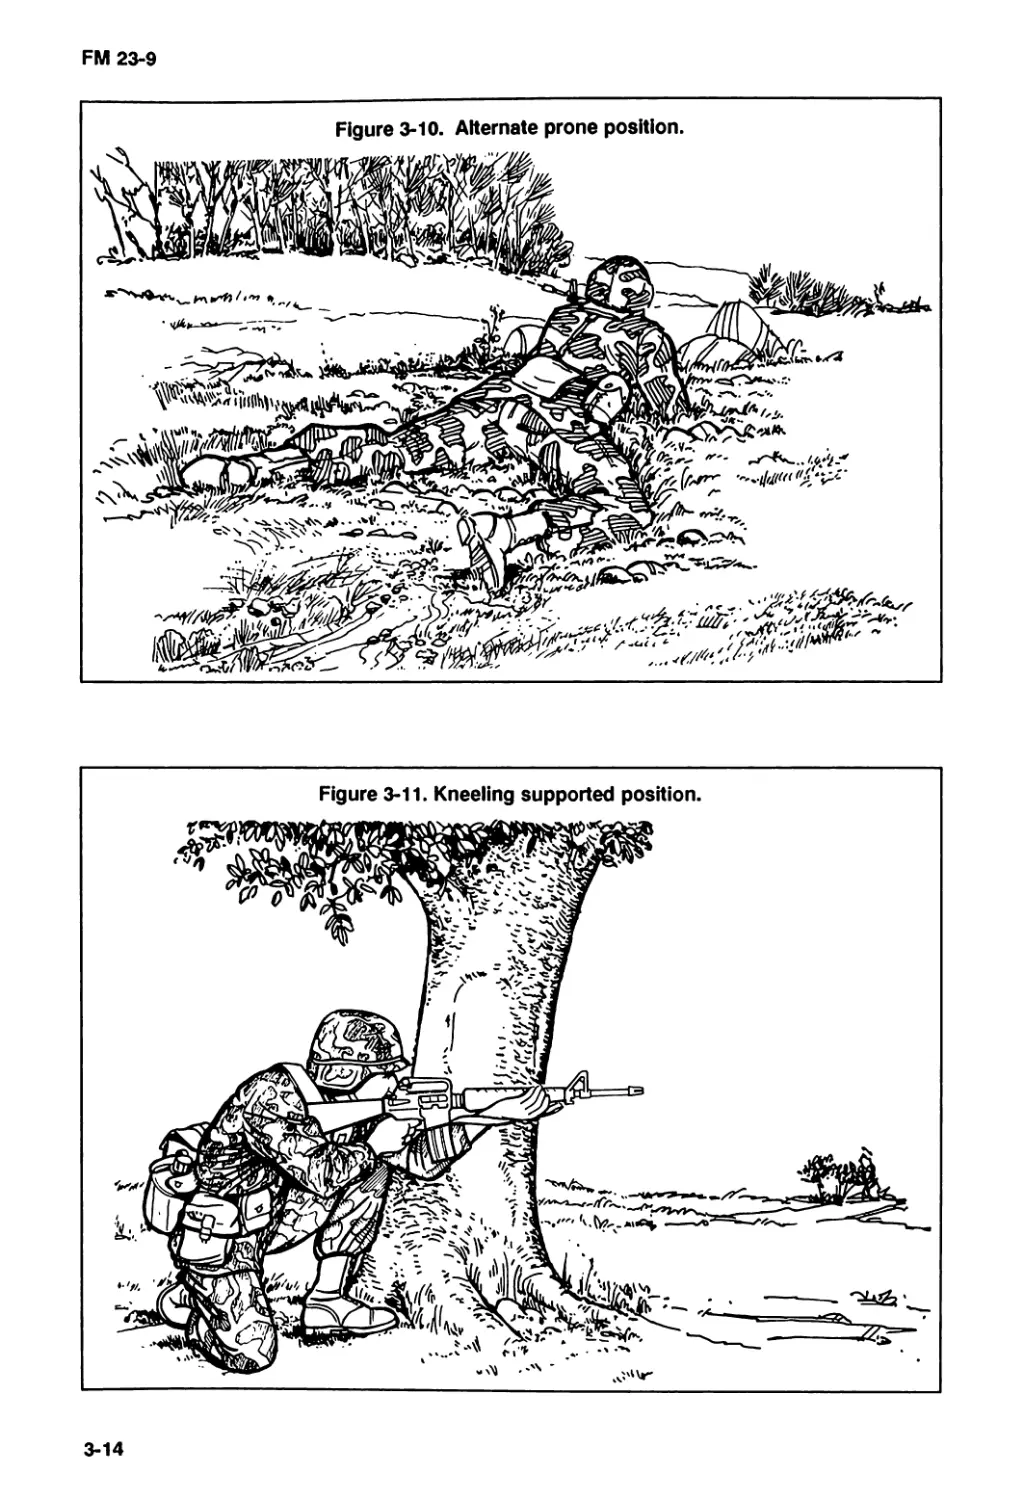
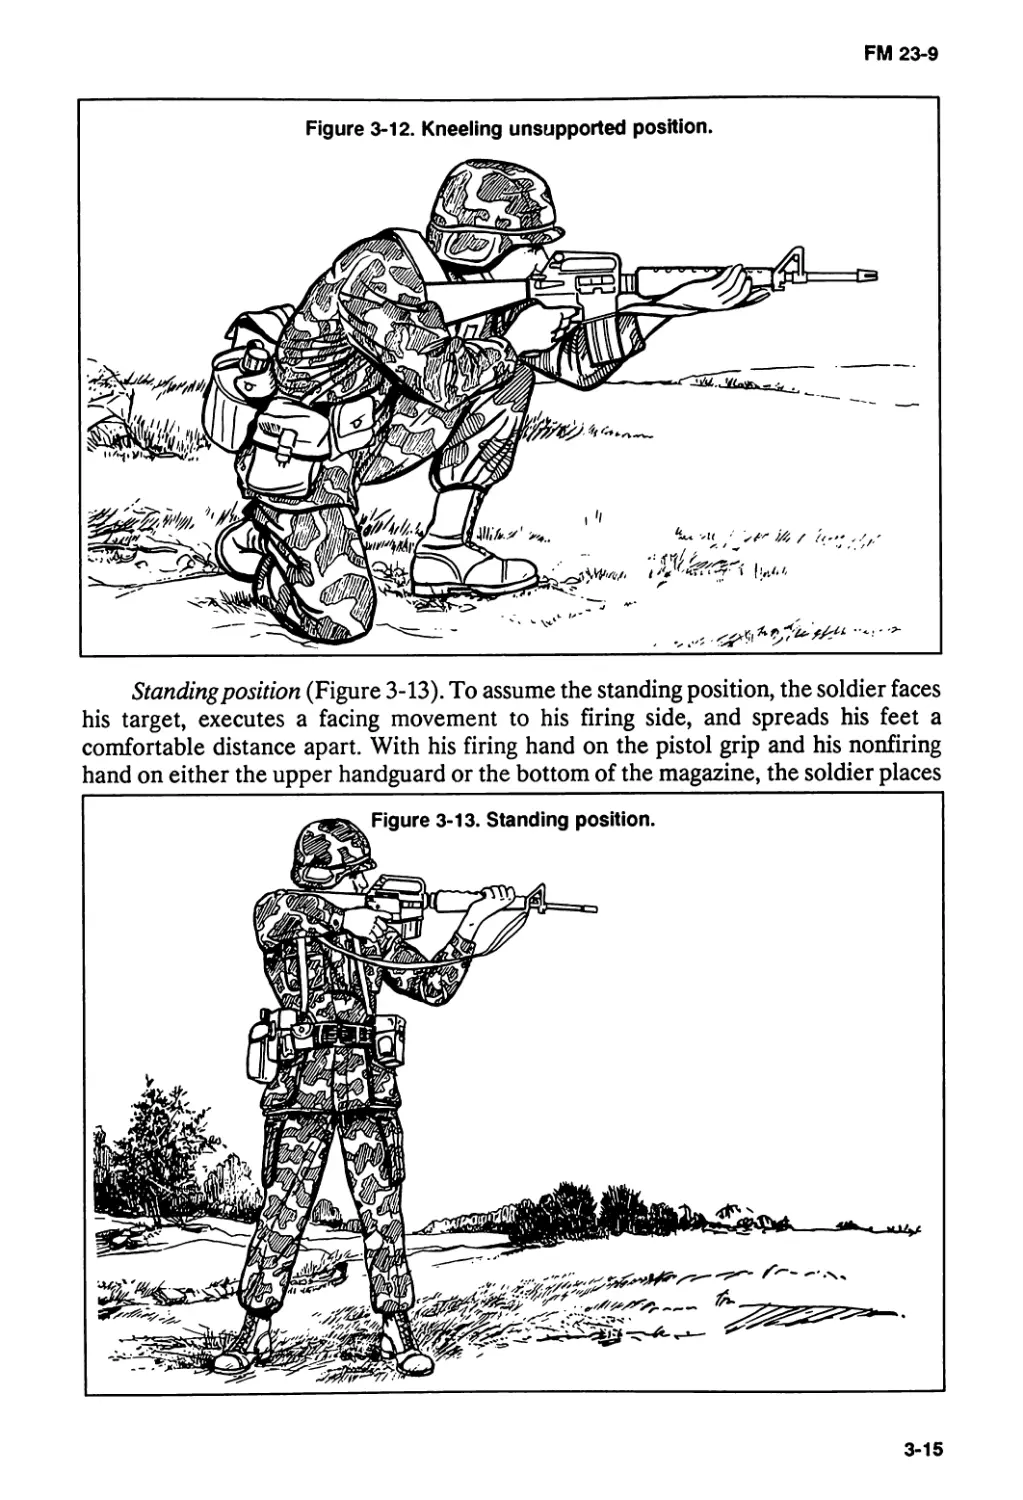
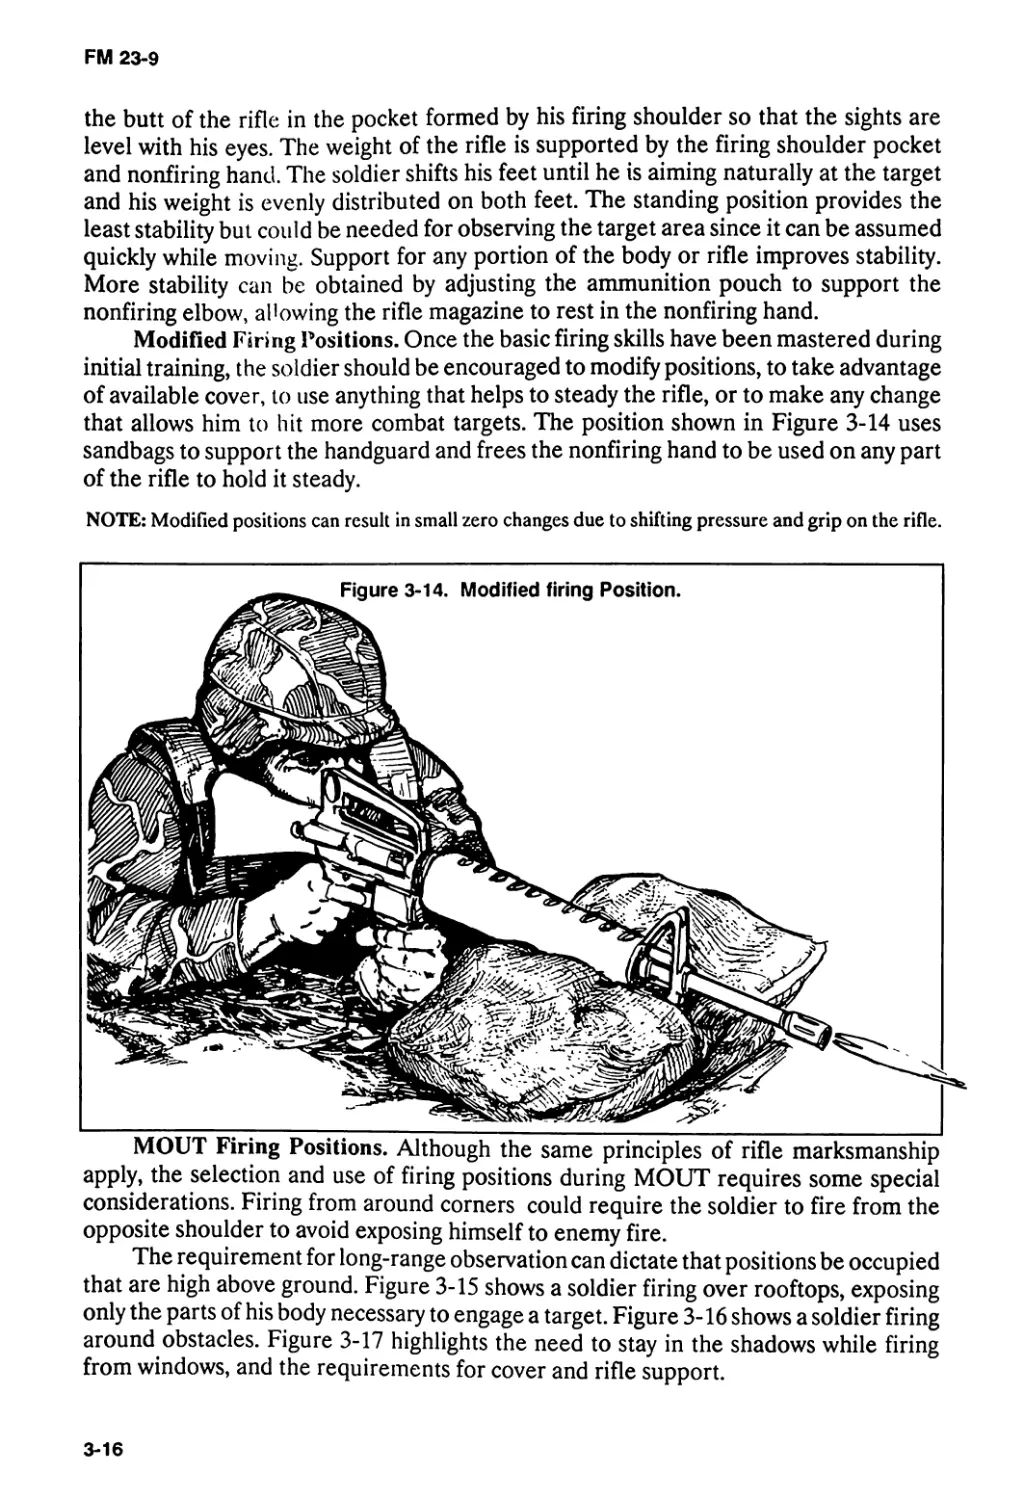
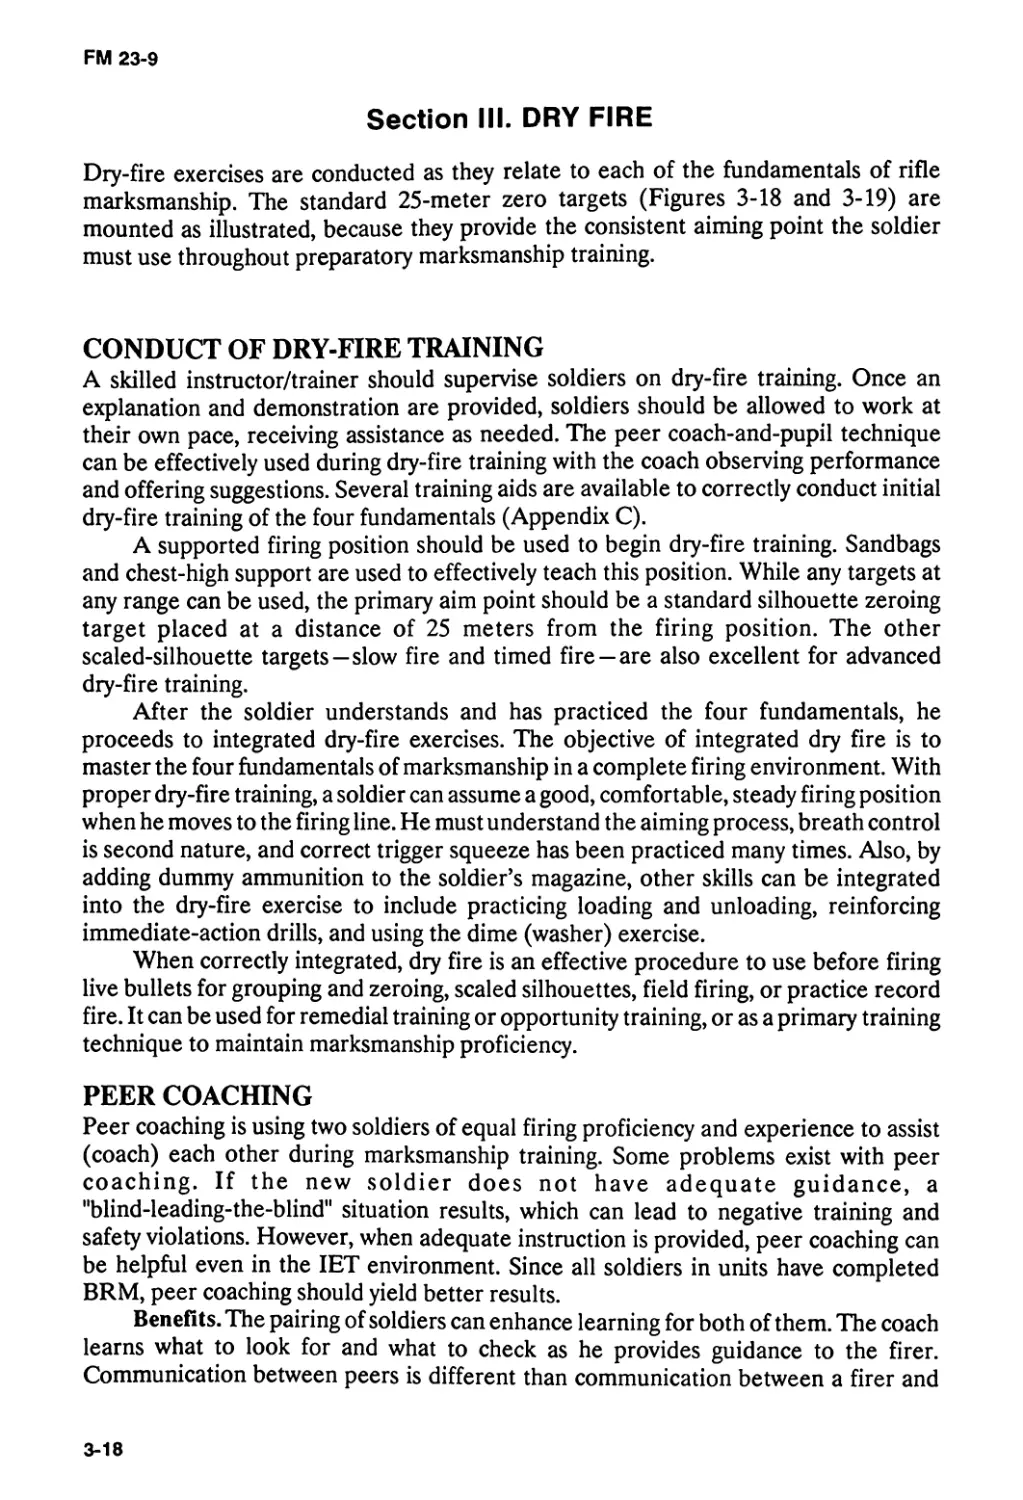
FIRING POSITIONS
All firing positions are taught during basic rifle marksmanship training. During initial
fundamental training, the basic firing positions are used. The other positions are added
later in training to support tactical conditions.
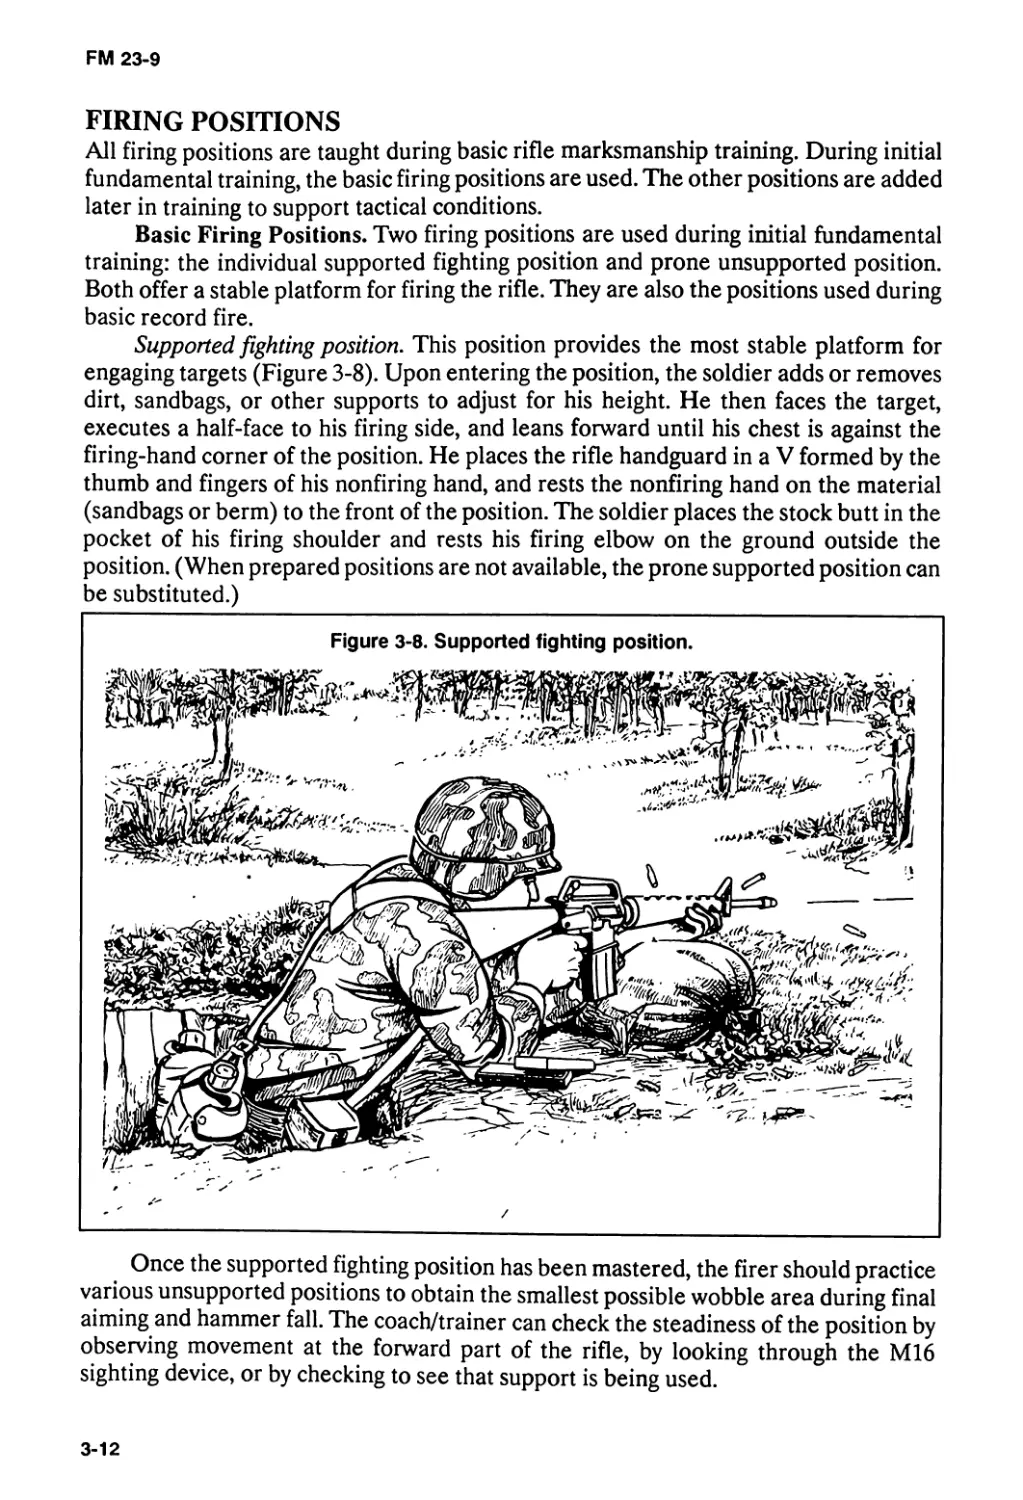
Basic Firing Positions. Two firing positions are used during initial fundamental
training: the individual supported fighting position and prone unsupported position.
Both offer a stable platform for firing the rifle. They are also the positions used during
basic record fire.
Supported fighting position. This position provides the most stable platform for
engaging targets (Figure 3-8). Upon entering the position, the soldier adds or removes
dirt, sandbags, or other supports to adjust for his height. He then faces the target,
executes a half-face to his firing side, and leans forward until his chest is against the
firing-hand corner of the position. He places the rifle handguard in a V formed by the
thumb and fingers of his nonfiring hand, and rests the nonfiring hand on the material
(sandbags or berm) to the front of the position. The soldier places the stock butt in the
pocket of his firing shoulder and rests his firing elbow on the ground outside the
position. (When prepared positions are not available, the prone supported position can
be substituted.)
Figure 3-8. Supported fighting position.
Once the supported fighting position has been mastered, the firer should practice
various unsupported positions to obtain the smallest possible wobble area during final
aiming and hammer fall. The coach/trainer can check the steadiness of the position by
observing movement at the forward part of the rifle, by looking through the M16
sighting device, or by checking to see that support is being used.
3-12
FM 23-9
NOTE: The objective is to establish a steady position under various conditions. The ultimate performance
of this task is in a combat environment. Although the firer must be positioned high enough to ob-
serve all targets, he must remain as low as possible to provide added protection from enemy fire.
Prone unsupported position. This firing position (Figure 3-9) offers another stable
firing platform for engaging targets. To assume this position, the soldier faces his target,
spreads his feet a comfortable distance apart, and drops to his knees. Using the butt of
the rifle as a pivot, the firer rolls onto his nonfiring side, placing the nonfiring elbow
close to the side of the magazine. He places the rifle butt in the pocket formed by the
firing shoulder, grasps the pistol grip with his firing hand, and lowers the firing elbow
to the ground. The rifle rests in the V formed by the thumb and fingers of the nonfiring
hand. The soldier adjusts the position of his firing elbow until his shoulders are about
level, and pulls back firmly on the rifle with both hands. To complete the position, he
obtains a stock weld and relaxes, keeping his heels close to the ground.
Advanced Positions. After mastering the four marksmanship fundamentals in the
Figure 3-9. Prone unsupported position.
two basic firing positions, the soldier is taught the advanced positions. He is trained to
assume different positions to adapt to the combat situation.
Alternate prone position (Figure 3-10). This position is an alternative to both prone
supported and unsupported fighting positions, allowing the firer to cock his firing leg.
The firer can assume a comfortable position while maintaining the same relationship
between his body and the axis of the rifle. This position relaxes the stomach muscles
and allows the firer to breathe naturally.
Kneeling supported position (Figure 3-11). This position allows the soldier to obtain
the height necessary to better observe many target areas, taking advantage of available
cover. Solid cover that can support any part of the body or rifle assists in firing accuracy.
Kneeling unsupported position (Figure 3-12). Ibis position is assumed quickly,
places the soldier high enough to see over small brush, and provides for a stable firing
position. The nonfiring elbow should be pushed forward of the knee so that the upper
arm is resting on a flat portion of the knee to provide stability. The trailing foot can be
placed in a comfortable position.
3-13
FM 23-9
Figure 3-10. Alternate prone position.
3-14
FM 23-9
Standing position (Figure 3-13). To assume the standing position, the soldier faces
his target, executes a facing movement to his firing side, and spreads his feet a
comfortable distance apart. With his firing hand on the pistol grip and his nonfiring
hand on either the upper handguard or the bottom of the magazine, the soldier places
3-15
FM 23-9
the butt of the rifle in the pocket formed by his firing shoulder so that the sights are
level with his eyes. The weight of the rifle is supported by the firing shoulder pocket
and nonfiring hand. The soldier shifts his feet until he is aiming naturally at the target
and his weight is evenly distributed on both feet. The standing position provides the
least stability but could be needed for observing the target area since it can be assumed
quickly while moving. Support for any portion of the body or rifle improves stability.
More stability can be obtained by adjusting the ammunition pouch to support the
nonfiring elbow, allowing the rifle magazine to rest in the nonfiring hand.
Modified Firing Positions. Once the basic firing skills have been mastered during
initial training, the soldier should be encouraged to modify positions, to take advantage
of available cover, to use anything that helps to steady the rifle, or to make any change
that allows him to hit more combat targets. The position shown in Figure 3-14 uses
sandbags to support the handguard and frees the nonfiring hand to be used on any part
of the rifle to hold it steady.
NOTE: Modified positions can result in small zero changes due to shifting pressure and grip on the rifle.
MOUT Firing Positions. Although the same principles of rifle marksmanship
apply, the selection and use of firing positions during MOUT requires some special
considerations. Firing from around corners could require the soldier to fire from the
opposite shoulder to avoid exposing himself to enemy fire.
The requirement for long-range observation can dictate that positions be occupied
that are high above ground. Figure 3-15 shows a soldier firing over rooftops, exposing
only the parts of his body necessary to engage a target. Figure 3-16 shows a soldier firing
around obstacles. Figure 3-17 highlights the need to stay in the shadows while firing
from windows, and the requirements for cover and rifle support.
3-16
FM 23-9
Figure 3-15. Firing over rooftops.
3-17
FM 23-9
Section III. DRY FIRE
Dry-fire exercises are conducted as they relate to each of the fundamentals of rifle
marksmanship. The standard 25-meter zero targets (Figures 3-18 and 3-19) are
mounted as illustrated, because they provide the consistent aiming point the soldier
must use throughout preparatory marksmanship training.
CONDUCT OF DRY-FIRE TRAINING
A skilled instructor/trainer should supervise soldiers on dry-fire training. Once an
explanation and demonstration are provided, soldiers should be allowed to work at
their own pace, receiving assistance as needed. The peer coach-and-pupil technique
can be effectively used during dry-fire training with the coach observing performance
and offering suggestions. Several training aids are available to correctly conduct initial
dry-fire training of the four fundamentals (Appendix C).
A supported firing position should be used to begin dry-fire training. Sandbags
and chest-high support are used to effectively teach this position. While any targets at
any range can be used, the primary aim point should be a standard silhouette zeroing
target placed at a distance of 25 meters from the firing position. The other
scaled-silhouette targets—slow fire and timed fire—are also excellent for advanced
dry-fire training.
After the soldier understands and has practiced the four fundamentals, he
proceeds to integrated dry-fire exercises. The objective of integrated dry fire is to
master the four fundamentals of marksmanship in a complete firing environment. With
proper dry-fire training, a soldier can assume a good, comfortable, steady firing position
when he moves to the firing line. He must understand the aiming process, breath control
is second nature, and correct trigger squeeze has been practiced many times. Also, by
adding dummy ammunition to the soldier’s magazine, other skills can be integrated
into the dry-fire exercise to include practicing loading and unloading, reinforcing
immediate-action drills, and using the dime (washer) exercise.
When correctly integrated, dry fire is an effective procedure to use before firing
live bullets for grouping and zeroing, scaled silhouettes, field firing, or practice record
fire. It can be used for remedial training or opportunity training, or as a primary training
technique to maintain marksmanship proficiency.
PEER COACHING
Peer coaching is using two soldiers of equal firing proficiency and experience to assist
(coach) each other during marksmanship training. Some problems exist with peer
coaching. If the new soldier does not have adequate guidance, a
"blind-leading-the-blind" situation results, which can lead to negative training and
safety violations. However, when adequate instruction is provided, peer coaching can
be helpful even in the IET environment. Since all soldiers in units have completed
BRM, peer coaching should yield better results.
Benefits. The pairing of soldiers can enhance learning for both of them. The coach
learns what to look for and what to check as he provides guidance to the firer.
Communication between peers is different than communication between a firer and
3-18
FM 23-9
Figure 3-18. The M16A1 and M16A2 zero targets.
25 METER ZEROING TARGET
M16A2
ruur MU
I Mutt (icvim* leot и м «'J иш«
nw W ш Cbrt »Mi St 300 evt Iff шм«
и Л мил
t bBMtHtticmtr
cmtf it dtu it кием u nt wihM м и »t
cttttr d at t»wt
‘ (NSN 6920-01-253-4005)
WW» TktUtotaflteHrttdltrXOMri
Figure 3-19. Zero target placed in the center of an E-type silhouette.
3-19
FM 23-9
drill sergeant or senior NCO. Peers have the chance to ask simple questions and to
discuss areas that are not understood. Pairing soldiers who have demonstrated good
firing proficiency with those who have firing problems can improve the performance
of problem firers
Duties. The peer coach assists the firer in obtaining a good position and in
adjusting sandbags. He watches the firer-not the target-to see that the firer
maintains a proper, relaxed, steady position; that he holds his breath before the final
trigger squeeze; that he applies initial pressure to the trigger; and that no noticeable
trigger jerk, flinch, eye blink, or other reaction can be observed in anticipating the rifle
firing. The peer coach can use an M16 sighting device, allowing him to see what the
firer sees through the sights. (Appendix C.)
The peer coach can load magazines, providing a chance to use ball and dummy.
At other times, he could be required to observe the target area—for example, when
field-fire targets are being engaged and the firer cannot see where he is missing targets.
The peer coach can add to range safety procedures by helping safety personnel with
preliminary rifle checks.
NOTE: When a peer coach is used during M16A1 live-fire exercises, a brass deflector should be attached
to the rifle and eye protection should be worn.
CHECKLIST FOR THE COACH
The procedures to determine and eliminate rifle and firer deficiencies follows.
The coach checks to see that the—
• Rifle is cleared and defective parts have been replaced.
• Ammunition is clean, and the magazine is properly placed in the pouch.
• Sights are blackened and set correctly for long/short range.
The coach observes the firer to see that he—
• Uses the correct position and properly applies the steady-position elements.
• Properly loads the rifle.
• Obtains the correct sight alignment (with the aid of an M16 sighting device).
• Holds his breath correctly (by watching his back at times).
• Applies proper trigger squeeze; determines whether he flinches or jerks by
watching his head, shoulders, trigger finger, and firing hand and arm.
• Is tense and nervous. If the firer is nervous, the coach has the firer breathe deeply
several times to relax.
Supervisory personnel and peer coaches correct errors as they are detected. If
many common errors are observed, it is appropriate to call the group together for more
discussion and demonstration of proper procedures and to provide feedback.
3-20
FM 23-9
POSITION OF THE COACH
The coach constantly checks and assists the firer in applying marksmanship
fundamentals during firing. He observes the firer’s position and his application of the
steady position elements. The coach is valuable in checking factors the firer is unable
to observe for himself and in preventing the firer from repeating errors.
During an exercise, the coach should be positioned where he can best observe the
firer when he assumes position. He then moves to various points around the firer (sides
and rear) to check the correctness of the firer’s position. The coach requires the firer
to make adjustments until the firer obtains a correct position.
When the coach is satisfied with the firing position, he assumes a coaching position
alongside the firer. The coach usually assumes a position like that of the firer (Figure
3-20), which is on the firing side of the soldier.
Figure 3-20. Prone position of coach (right-handed firer).
GROUPING
Shot grouping is a form of practice firing with two primary objectives: firing tight shot
groups and consistently placing those groups in the same location. Shot grouping should
be conducted between dry-fire training and zeroing. The initial live-fire training should
be a grouping exercise with the purpose of practicing and refining marksmanship
fundamentals. Since this is not a zeroing exercise, few sight changes are made. Grouping
exercises can be conducted on a live-fire range that provides precise location of bullet
hits and misses such as a 25-meter zeroing range or KD range.
CONCEPT OF ZEROING
The purpose of battlesight zeroing is to align the fire control system (sights) with the
rifle barrel, considering the given ammunition ballistics. When this is accomplished
3-21
FM 23-9
correctly, the fire control and point of aim are point of impact at a standard battlesight
zero range such as 250 (300) meters.
When a rifle is zeroed, the sights are adjusted so that bullet strike is the same as
point of aim at some given range. A battlesight zero (250 meters, M16A1; 300 meters,
M16A2) is the sight setting that provides the highest hit probability for most combat
targets with minimum adjustment to the aiming point.
When standard zeroing procedures are followed, a rifle that is properly zeroed for
one soldier is close to the zero for another soldier. When a straight line is drawn from
target center to the tip of the front sight post and through the center of the rear aperture,
it makes little difference whose eye is looking along this line. There are many subtle
factors that result in differences among individual zeros; however, the similarity of
individual zeros should be emphasized instead of the differences.
Most firers can fire with the same zeroed rifle if they are properly applying
marksmanship fundamentals. If a soldier is having difficulty zeroing and the problem
cannot be diagnosed, having a good firer zero the rifle could find the problem. When
a soldier must fire another soldier’s rifle without opportunity to verify the zero by
firing—for example, picking up another man’s rifle on the battlefield —it is closer to
actual zero if the rifle sights are left unchanged. This information is useful in deciding
initial sight settings and recording of zeros. All rifles in the arms room, even those not
assigned, should have their sights aligned (zeroed) for battlesight zero.
There is no relationship between the specific sight setting a soldier uses on one
rifle (his zero) to the sight setting he needs on another rifle. For example, a soldier
could be required to move the rear sight of his assigned rifle 10 clicks left of center for
zero, and the next rifle he is assigned could be adjusted 10 clicks right of center for zero.
This is due to the inherent variability from rifle to rifle, which makes it essential that
each soldier is assigned a permanent rifle on which all marksmanship training is
conducted. Therefore, all newly assigned personnel should be required to fire their rifle
for zero as soon as possible after assignment to the unit. The same rule must apply
anytime a soldier is assigned a new rifle, a rifle is returned from DS or GS maintenance,
or the zero is in question.
M16A1 STANDARD SIGHTS AND ZEROING
To battlesight zero the rifle, the soldier must understand sight adjustment procedures.
The best possible zero is obtained by zeroing at actual range. Because facilities normally
do not exist for zeroing at 250 meters, most zeroing is conducted at 25 meters. By
pushing the rear sight forward so the L is exposed, the bullet crosses line of sight at 25
meters, reaches a maximum height above line of sight of about 11 inches at 225 meters,
and crosses line of sight again at 375 meters (Figure 3-21).
To gain the many benefits associated with having bullets hit exactly where the rifle
is aimed during 25-meter firing, the long-range sight is used on the zero range.
Therefore, when bullets are adjusted to hit the same place the rifle is aimed at 25
meters, the bullet also hits where the rifle is aimed at 375 meters. After making this
adjustment and flipping back to the short-range sight and aiming center of mass at a
42-meter target, the bullet crosses the line of sight at 42 meters and again at 250 meters
as shown in Figure 3-22.
3-22
FM 23-9
Most combat targets are expected to be engaged in the ranges from 0 to 300
meters; therefore, the 250-meter battlesight zero is the setting that remains on the rifle.
At 25 meters, the bullet is about 1 inch below line of sight, crossing line of sight at 42
meters. It reaches its highest point above the line of sight (about 5 inches) at a range
3-23
FM 23-9
of about 175 meters, crosses line of sight again at 250 meters, and is about 7 inches
below line of sight at 300 meters. Targets can be hit out to a range of 300 meters with
no adjustments to point of aim. (A somewhat higher hit probability results with minor
adjustments to the aiming point.)
Sights. The sights are adjustable for both elevation and windage. Windage
adjustments are made on the rear sight; elevation adjustments on the front sight.
Rear sight. The rear sight consists of two apertures and a windage drum with a
spring-loaded detent (Figure 3-23). The aperture marked L is used for ranges beyond
300 meters, and the unmarked or short-range aperture is used for ranges up to 300
meters. Adjustments for windage are made by pressing in on the spring-loaded detent
with a sharp instrument (or the tip of a cartridge) and rotating the windage drum in the
desired direction of change (right or left) in the strike of the bullet.
Figure 3-23. M16A1 rear sight apertures and windage drum.
Front sight. The front sight consists of a round rotating sight post with a
five-position, spring-loaded detent (Figure 3-24). Adjustments are made by using a
sharp instrument (or the tip of a cartridge). To move the front sight post, the
spring-loaded detent is depressed, and the post is rotated in the desired direction of
change (up or down) in the strike of the bullet.
3-24
FM 23-9
Sight Changes. To make sight changes, the firer first locates the center of his
three-round shot group and then determines the distance between it and the desired
location. An error in elevation is measured vertically, while a windage error is measured
horizontally. When using standard zero targets or downrange feedback targets, sight
adjustment guidance on the target is provided. (See Appendix F for the elevation and
windage rule.)
To raise the strike of the bullet, the firer rotates the front sight post the desired
number of clicks clockwise (in the direction of the arrow marked UP in Figure 3-24).
Thus, the strike of the bullet is raised but the post is lowered. He reverses the direction
of rotation to move the strike of the bullet down.
To move the strike of the bullet to the right, the windage drum is rotated the
desired number of clicks clockwise (in the direction of the arrow marked R, Figure
3-23). The firer reverses the direction of rotation to move the strike of the bullet to the
left.
NOTE: Before making any sight changes, the firer should make a serviceability check of the sights, look-
ing for any bent, broken, or loose parts. The firer must also be able to consistently fire 4-cm shot
groups.
M16A2 STANDARD SIGHTS AND ZEROING
When the soldier can consistently place three rounds within a 4-cm circle at 25 meters,
regardless of group location, he is ready to zero his rifle.
The front and rear sights are set as follows:
Rear sight. The rear sight consists of two sight apertures, a windage knob, and an
elevation knob (Figure 3-25).
3-25. M16A2 rear sight.
3-25
FM 23-9
The larger aperture, marked 0-2, is used for moving target engagement and during
limited visibility. The unmarked aperture is used for normal firing situations, zeroing,
and with the elevation knob for target distances up to 800 meters. The unmarked
aperture is used to establish the battlesight zero.
After the elevation knob is set, adjustments for elevation are made by moving the
front sight post up or down to complete zeroing the rifle. Adjustments for windage are
made by turning the windage knob.
The rear windage knob start point is when the index mark on the 0-2 sight is aligned
with the rear sight base index (Figure 3-26).
elevation knob
8/3 + 1 click
Figure 3-26. Initial rear sight adjustment.
Front sight. The front sight is adjusted the same as the front sight of the M16A1.
It consists of a square, rotating sight post with a four-position, spring-loaded detent
(Figure 3-27). Adjustments are made by using a sharp instrument or the tip of a
cartridge. To raise or lower the front sight post, the spring-loaded detent is depressed,
and the post is rotated in the desired direction of change. (Figure 3-28).
Figure 3-28. Front sight adjustment.
3-26
FM 23-9
DOWNRANGE FEEDBACK TRAINING
The term downrange feedback describes any training method that provides precise
knowledge of bullet strike (exactly where bullets hit or miss the intended target) at
ranges beyond 25 meters. The soldier gains confidence in his firing abilities by knowing
what happens to bullets at range. The inclusion of downrange feedback during the
initial learning process and during refresher training improves the soldier’s firing
proficiency and record fire scores. Downrange feedback can be incorporated into any
part of a unit’s marksmanship program. However, an ideal sequence is to conduct
downrange feedback following 25-meter firing and before firing on the field fire range.
(See Appendix G.)
The use of a KD firing range is an excellent way of providing downrange feedback.
Also a good way to obtain downrange feedback is to modify existing field fire ranges
by constructing target-holding frames, which requires the soldier to walk from the firing
line to the target to locate bullet strike.
Units can design their own downrange feedback training to accommodate
available facilities. Any silhouette target with a backing large enough to catch all bullet
misses can be set up at any range. For example, it would be ideal if the confirmation of
weapon zero could be conducted at the actual zero range of 250 meters/300 meters.
FIELD FIRE TRAINING
Field fire training provides the transition from unstressed slow firing at
known-distance/feedback targets to engaging fleeting combat-type pop-up silhouettes.
Two basic types of field firing exercises are single-target and multiple-target
engagements, which use 75-, 175-, and 300-meter targets. Once the soldier has
developed the unstressed firing skills necessary to hit single KD targets, he must learn
to detect and quickly engage combat-type targets at various ranges. Time standards are
provided during this instruction to add stress and to simulate the short exposure times
of combat targets. The soldier must, therefore, detect, acquire, and engage the target
before the exposure ends. During field fire training, the firer learns to quickly detect
and apply the fundamentals at the same time. (See Appendix G.)
PRACTICE RECORD FIRE
Practice record fire is a training exercise designed to progressively develop and refine
the soldiers combat firing skills. During this exercise, the soldier is exposed to a more
difficult course of fire with increased time stress to include single and multiple target
engagements at six distances ranging from 50 to 300 meters. This exercise also provides
the opportunity to practice and demonstrate skills learned during target detection. To
perform well, a soldier must integrate all the tasks learned from previous training.
When firing exercises are properly organized, conducted, and critiqued, the soldier
gains knowledge and confidence in his firing performance. Through close observation,
coaching, and critiquing, instructors/trainers can base remedial training on specific
needs. (See Appendix G.)
RECORD FIRE
Qualification ratings and first-time GO rates are important during record fire, if
properly used. They provide goals for the soldier and aid the commander in identifying
3-27
FM 23-9
CHAPTER 4
Combat Fire Techniques
The test of a soldier’s training is applying the fundamentals of marksmanship and firing
skills in combat. The marksmanship skills mastered during training, practice, and record
fire exercises must be applied to many combat situations (attack, assault, ambush,
MOUT). Although these situations present problems, only two modifications of the basic
techniques and fundamentals are necessary (see Chapter 3): changes to the rate of fire
and alterations in weapon! target alignment. The necessary changes are significant and
must be thoroughly taught and practiced before discussing live-fire exercises.
NOTE: For tactical applications of fire see FM 7-8.
Section I. SUPPRESSIVE FIRE
In many tactical situations, combat rifle fire will be directed to suppress enemy
personnel or weapons positions. Rifle fire, which is precisely aimed at a definite point
or area target, is suppressive fire. Some situations may require a soldier to place
suppressive fire into a wide area such as a wood line, hedgerow, or small building. While
at other times, the target may be a bunker or window. Suppressive fire is used to control
the enemy and the area he occupies. Suppressive fire is employed to kill the enemy or
to prevent him from observing the battlefield or effectively using his weapons. When
a sustained volume of accurate suppressive fire is placed on enemy locations to contain
him, it can be effective even though he cannot be seen. When the enemy is effectively
pinned down behind cover, this reduces his ability to deliver fire and allows friendly
forces to move.
NATURE OF THE TARGET
Many soldiers have difficulty delivering effective suppressive fire when they cannot see
a definite target. They must fire at likely locations or in a general area where the enemy
is known to exist. Even though definite targets cannot be seen, most suppressive fire
should be well aimed. Figure 4-1, page 4-2, shows a landscape target suitable for
suppressive fire training. When this type target is used, trainers must develop a firing
program to include areas of engagement and designated target areas that will be
credited as sustained effective suppressive fire. At 25 meters, this target provides the
firer with an area to suppress without definite targets to engage.
POINT OF AIM
Suppressive fire should be well-aimed, sustained, semiautomatic fire. Although lacking
a definite target, the soldier must be taught to control and accurately deliver fire within
the limits of the suppressed area. The sights are used as when engaging a point-type
target—with the front sight post placed so that each shot impacts within the desired
area (window, firing portal, tree line).
4-1
FM 23-9
RATE OF FIRE
During most phases of live fire (grouping, zeroing, qualifying), shots are delivered using
the slow semiautomatic rate of fire (one round every 3 to 10 seconds). During training,
this allows for a slow and precise application of the fundamentals. Successful
suppressive fire requires that a faster but sustained rate of fire be used. Sometimes
firing full automatic bursts (13 rounds per second) for a few seconds may be necessary
to gain initial fire superiority. Rapid semiautomatic fire (one round every one or two
seconds) allows the firer to sustain a large volume of accurate fire while conserving
ammunition. The tactical situation dictates the most useful rate of fire, but the
following must be considered:
Applying Fundamentals. As the stress of combat increases, some soldiers may fail
to apply the fundamentals of marksmanship. This factor contributes to soldiers firing
less accurately and without obtaining the intended results. While some modifications
are appropriate, the basic fundamentals should be applied and emphasized regardless
of the rate of fire or combat stress.
Making Rapid Magazine Changes. One of the keys to sustained suppressive fire
is rapidly reloading the rifle. Rapid magazine changes must be correctly taught and
practiced during dry-fire and live-fire exercises until the soldier becomes proficient.
Small-unit training exercises must be conducted so that soldiers who are providing
suppressive fire practice magazine changes that are staggered. Firing is, therefore,
controlled and coordinated so that a continuous volume of accurate suppressive fire is
delivered to the target area.
Conserving Ammunition. Soldiers must be taught to make each round count.
Automatic fire should be used sparingly and only to gain initial fire superiority.
Depending on the tactical situation, the rate of fire should be adjusted so that a
minimum number of rounds are expended. Accurate fire conserves ammunition, while
preventing the enemy from placing effective fire on friendly positions.
4-2
FM 23-9
Section II. RAPID SEMIAUTOMATIC FIRE
Rapid semiautomatic fire delivers a large volume of accurate fire into a target or target
area. Increases in speed and volume should be sought only after the soldier has
demonstrated expertise and accuracy during slow semiautomatic fire. The rapid
application of the four fundamentals will result in a well-aimed shot every one or two
seconds. This technique of fire allows a unit to place the most effective volume of fire
in a target area while conserving ammunition. It is the most accurate means of
delivering suppressive fire.
EFFECTIVENESS OF RAPID FIRE
When a soldier uses rapid semiautomatic fire, he is sacrificing accuracy to deliver a
greater volume of fire. The difference in accuracy between slow and rapid
semiautomatic fire diminishes with proper training and repeated practice. Training and
practice improve the soldier’s marksmanship skills to the point that accuracy
differences become minimal. There is little difference in the volume of effective fire
that would be delivered by units using much less accurate automatic fire.
NOTE: Learning rapid fire techniques also improves the soldier’s response time to short-exposure, mul-
tiple, and moving targets.
MODIFICATIONS FOR RAPID FIRE
Trainers must consider the impact of the increased rate of fire on the soldier’s ability
to properly apply the fundamentals of marksmanship and other combat firing skills.
These fundamentals/skills include:
Immediate Action. To maintain an increased rate of suppressive fire, immediate
action must be applied quickly. The firer must identify the problem and correct the
stoppage immediately. Repeated dry-fire practice, using blanks or dummy rounds,
followed by live-fire training and evaluation ensures that soldiers can rapidly apply
immediate action while other soldiers initiate fire.
Marksmanship Fundamentals. The four fundamentals are used when firing in
the rapid semiautomatic mode. The following differences apply:
Steady position. Good support improves accuracy and reduces recovery time
between shots, somewhat tighter grip on the handguards assists in recovery time and
in rapidly shifting or distributing fire to subsequent targets. When possible, the rifle
should pivot at the point where the nonfiring hand meets the support. The soldier
should avoid changing the position of the nonfiring hand on the support, because it is
awkward and time-consuming when rapidly firing a series of shots.
Aiming. The aiming process does not change during rapid semiautomatic fire.
The firer’s head remains on the stock, his firing eye is aligned with the rear aperture,
and his focus is on the front sight post.
Breath control. Breath control must be modified because the soldier does not have
time to take a complete breath between shots. He must hold his breath at some point
in the firing process and take shallow breaths between shots.
4-3
FM 23-9
Trigger squeeze. To maintain the desired rate of fire, the soldier has only a short
period to squeeze the trigger (one well-aimed shot every one or two seconds).
The firer must cause the rifle to fire in a period of about one-half of a second or
less and still not anticipate the precise instant of firing. Rapid semiautomatic trigger
squeeze is difficult to master. It is important that initial trigger pressure be applied as
soon as a target is identified and while the front sight post is being brought to the desired
point of aim. When the post reaches the point of aim, final pressure must be applied to
cause the rifle to fire almost at once. This added pressure, or final trigger squeeze, must
be applied without disturbing the lay of the rifle.
Repeated dry-fire training, using the Weaponeer device, and live-fire practice
ensure the soldier can squeeze the trigger and maintain a rapid rate of fire consistently
and accurately.
NOTE: When presented with multiple targets, the soldier may fire the first round, release pressure on
the trigger to reset the sear, then reapply more pressure to fire the next shot. This technique
eliminates the time used in releasing all the trigger pressure. It allows the firer to rapidly deliver
subsequent rounds. Training and practice sessions are required for soldiers to become profi-
cient in the technique of rapid trigger squeeze.
Magazine Changes. Rapid magazine changes are an integral part of sustaining
rapid semiautomatic suppressive fire. Soldiers must quickly reload their rifles and
resume accurate firing.
Magazine handling. Most units establish the soldier’s basic load of ammunition
and loaded magazines. The number of magazines vary based on the mission and tactical
situation. During combat, some magazines are lost, but it is the soldier’s responsiblility
to keep this loss to a minimum. While training a soldier to reload his magazines, the
trainer must emphasize the need to account for these magazines.
The sequence for magazine handling during rapid changes is illustrated for right-
and left-handed firers in Figure 4-2.
Rifle loading. Removing a magazine from the firing side ammunition pouch is the
same for both right- and left-handed firers. Empty magazines must be removed from
the rifle before performing the following.
To remove a magazine from the pouch, the magazine is grasped on the long edge
with the thumb, and the first and second fingers are placed on the short edge.
The magazine is withdrawn from the ammunition pouch, and the arm is extended
forward, rotating the hand and wrist so that the magazine is in position (open end up
and long edge to the rear) to load into the rifle.lt is loaded into the rifle by inserting
the magazine straight up into the magazine well until it is seated. The base of the
magazine is tapped with the heel of the hand to ensure the magazine is fully seated.
Removing a magazine from the nonfiring side of the ammunition pouch requires
the firer to support the rifle with his firing hand. His nonfiring hand grasps the magazine
and loads it into the rifle.
Rapid magazine changing. Training and repeated practice in this procedure
improves soldier proficiency. The firer does not move the selector lever to SAFE during
a rapid magazine change, but he must maintain a safe posture during the change.
4-4
FM 23-9
Figure 4-2. Rapid magazine changing.
B. Rotation of the hand and wrist (right-handed) C. Magazine in position for loading (right-handed)
4-5
FM 23-9
The following is a step-by-step sequence for rapid magazine changing.
• Right-handed firer. Remove the index finger from the trigger and depress the
magazine catch button while keeping a secure grip on the rifle with the nonfiring
hand (Figure 4-3). Release the pistol grip, grasp and remove the empty magazine
with the right (firing) hand, and secure it. Grasp the loaded magazine with the
right hand (rounds up and forward). Insert the loaded magazine into the
magazine well and tap upward with the palm of the right hand. This ensures that
the magazine is fully seated and locked into the rifle. Depress the upper half of
the bolt catch with the fingers of the right hand. This allows the bolt to go forward,
chambering the first round. If necessary, use the right hand to tap the forward
assist to fully chamber the first round. Return the right hand to its original firing
position on the pistol grip. Return the index finger to the trigger.
Figure 4-3. Magazine release catch button being depressed (right-handed firer).
• Left-handed firer. Remove the index finger from the trigger and release the
pistol grip. Depress the magazine catch button with the index finger of the left
(firing) hand. Remove the empty magazine with the left hand and secure it.
Grasp the loaded magazine with the left hand (rounds up, bullets forward).
Insert the loaded magazine into the magazine well and tap upward with the palm
of the left hand. This ensures that the magazine is fully seated and locked into
the rifle. Depress the upper half of the bolt catch with a finger of the left hand.
This allows the bolt to go forward, chamberng the first round. If necessary, use
the right hand to tap the forward assist to fully chamber the first round. Return
the left hand to its original firing position on the pistol grip. Return the index
finger to the trigger. The firer must maintain a safe posture during the change.
When loading from the nonfiring side, the previous steps are followed with with
this exception: the loaded magazine is secured and inserted into the magazine well with
4-6
FM 23-9
the nonfiring hand. The firing hand supports the rifle at the pistol grip. After the
magazine is inserted, the firer should shift the rifle’s weight to his nonfiring hand and
continue with the recommended sequence.
RAPID-FIRE TRAINING
Soldiers should be well trained in all aspects of slow semiautomatic firing before
attempting any rapid-fire training. Those who display a lack of knowledge of the
fundamental skills should not advance to rapid semiautomatic training until these skills
are learned. Initial training should focus on the modifications to the fundamentals and
other basic combat skills necessary during rapid semiautomatic firing.
Dry-Fire Exercises. Repeated dry-fire exercises are the most efficient means
available to ensure soldiers can apply modifications to the fundamentals. Multiple
dry-fire exercises are needed, emphasizing a rapid shift in position and point of aim,
followed by breath control and fast trigger squeeze. Blanks or dummy rounds may be
used to train rapid magazine changes and the application of immediate action. The
soldier should display knowledge and skill during these dry-fire exercises before
attempting live fire.
Live-Fire Exercises. There are two types of live-fire exercises.
Individual. Emphasis is on each soldier maintaining a heavy volume of accurate
fire. Weapon down time (during immediate action and rapid magazine changes) is kept
to a minimum. Firing should begin at shorter ranges, progressing to longer ranges as
soldiers display increased proficiency. Exposure or engagement times are shortened
and the number of rounds increased to simulate the need for a heavy volume of fire.
Downrange feedback is necessary to determine accuracy of fire.
Unit. Rapid semiautomatic fire should be the primary means of delivering fire
during a unit LFX. It is the most accurate technique of placing a large volume of fire
on poorly defined targets or target areas. Emphasis should be on staggered rapid
magazine changes, maintaining a continuous volume of fire and conserving
ammunition.
Section III. AUTOMATIC FIRE
Automatic fire delivers the maximum amount of rounds into a target area. It should be
trained only after the soldier has demonstrated expertise during slow and rapid
semiautomatic fire. Automatic fire involves the rapid application of the four
fundamentals while delivering from 3 to 13 rounds per second into a designated area.
This technique of fire allows a unit to place the most fire in a target area (when
conserving ammunition is not a consideration). It is a specialized technique of
delivering suppressive fire and may not apply to most combat engagements. The
M16A1 rifle has a full automatic setting. (The M16A2 uses a three-round burst
capability.) Soldiers must be taught the advantages and disadvantages of automatic
firing so they know when it should be used. Without this knowledge, in a life-threatening
situation the soldier will tend to switch to the automatic/burst mode. This fire can be
effective in some situations. It is vital for the unit to train and practice the appropriate
use of automatic fire.
4-7
FM 23-9
EFFECTIVENESS OF AUTOMATIC FIRE
Automatic fire is inherently less accurate than semiautomatic fire. The first automatic
shot fired may be on target, but recoil and high-cyclic rate of fire often combine to place
subsequent rounds far from the desired point of impact. Even controlled (three-round
burst) automatic fire may place only one round on the target. Because of these
inaccuracies, it is difficult to evaluate the effectiveness of automatic fire, and even more
difficult to establish absolute guidelines for its use.
Closely spaced multiple targets, appearing at the same time at 50 meters or closer,
may be engaged effectively with automatic/burst fire. More widely spaced targets
appearing at greater distances should be engaged with semiautomatic fire.
The M16A1 and M16A2 rifles should normally be employed in the semiautomatic
mode. Depending on the tactical situation, the following conditions would be factors
against the use of automatic fire:
• Ammunition is in short supply or resupply may be difficult.
• Single targets are being engaged.
• Widely spaced multiple targets are being engaged.
• The distance to the target is beyond 50 meters.
• The effect of bullets on the target cannot be observed.
• Artificial support is not available.
• Targets may be effectively engaged using semiautomatic fire.
In some combat situations, the use of automatic fire can improve survivability and
enhance mission accomplishment. Clearing buildings, final assaults, FPF, and
ambushes may require the limited use of automatic fire. Depending on the tactical
situation, the following conditions may favor the use of automatic fire:
• Enough available ammunition. Problems are not anticipated with resupply.
• Closely spaced multiple targets appear at 50 meters or less.
• Maximum fire is immediately required at an area target.
• Tracers or some other means can be used to observe the effect of bullets on the
target.
• Leaders can maintain adequate control over rifles firing on automatic.
• Good artificial support is available.
• The initial sound of gunfire disperses closely spaced targets.
Trainers must ensure soldiers understand the capabilities and limitations of
automatic fire. They must know when it should and should not be used.
4-8
FM 23-9
MODIFICATIONS FOR AUTOMATIC FIRE POSITIONS
Trainers must consider the impact of the greatly increased rate of fire on the soldier’s
ability to properly apply the fundamentals of marksmanship and other combat firing
skills. These fundamentals/skills include:
Immediate Action. To maintain automatic fire, immediate action must be applied
quickly. The firer must identify the problem and correct it immediately. Repeated
dry-fire practice, using blanks or dummy rounds, followed by live-fire training and
evaluation ensures that soldiers can rapidly apply immediate action.
Marksmanship Fundamentals. The four fiindamentals are used when firing in
the automatic mode. The following differences apply:
Steady position (Figure 4-4). Maximum use of available artificial support is
necessary during automatic fire. The rifle should be gripped more firmly and pulled
into the shoulder more securely than when firing in the semiautomatic mode. This
support and increased grip help to offset the progressive displacement of weapon/target
alignment caused by recoil. To provide maximum stability, prone and supported
positions are best. One possible modification involves forming a 5-inch loop with the
Figure 4-4. Steady positions.
4-9
FM 23-9
sling at the upper sling swivel, grasping this loop with the nonfiring hand, and pulling
down and to the rear while firing. Another modification involves grasping the small of
the stock with the nonfiring hand, and applying pressure down and to the rear while
firing. If a bipod is not available, sandbags may be used to support the rifle. The
nonfiring hand may be positioned on the rifle wherever it provides the most stability
and flexibility. The goal is to maintain weapon stability and minimize recoil.
Aiming. The aiming process does not change during automatic fire. The firer’s
head remains on the stock, his firing eye stays aligned with the rear sight aperture, and
his focus is on the front sight post. Although recoil may disrupt this process, the firer
must try to apply the aiming techniques throughout recoil.
Breath control. Breath control must be modified because the firer will not have
the time to breathe between shots. He must hold his breath for each burst and adapt
his breathing cycle, taking breaths between bursts.
Trigger squeeze. Training and repeated dry-fire practice will aid the soldier in
applying proper trigger squeeze during automatic firing. Live-fire exercises will enable
him to improve this skill.
NOTE: The trigger is not slapped or jerked. It is squeezed and pressure is quickly released.
• M16A1. Trigger squeeze is applied in the normal manner up to the instant the
rifle fires. Because three-round bursts are the most effective rate of fire,
pressure on the trigger should be released as soon as possible. The index finger
should remain on the trigger, but a quick release of pressure is necessary to
prevent an excessive amount of rounds from being fired in one burst. With much
dry-fire practice, the soldier can become proficient at delivering three-round
bursts with the squeeze/release technique.
• M16A2. Trigger squeeze is applied in the normal manner up to the instant the
rifle fires. Using the burst-mode, the firer holds the trigger to the rear until three
rounds are fired. He then releases pressure on the trigger until it resets, then
reapplies pressure for the next three-round burst.
NOTE: Depending on the position of the burst cam when the selector is moved to the burst mode, the
rifle may fire one, two, or three rounds when the trigger is held to the rear the first lime. If the
rifle fires only one or two rounds, the firer must quickly release pressure on the trigger and
squeeze again, holding it to the rear until a three-round burst is completed.
Magazine Changes. Rapid magazine changes are vital in maintaining automatic
fire. (See SECTION II. RAPID SEMIAUTOMATIC FIRE, Magazine Handling, for
detailed information on rapid magazine changes.)
TRAINING OF AUTOMATIC FIRE TECHNIQUES
Soldiers should be well trained in all aspects of slow semiautomatic firing before
attempting any automatic training. Those who display a lack of knowledge of the
fundamental skills should not advance to automatic fire training until these skills are
learned. Initial training should focus on the modifications to the fundamentals and
other basic combat skills necessary during automatic firing.
4-10
FM 23-9
Dry-Fire Exercises. Repeated dry-fire exercises are the most efficient means
available to ensure soldiers can apply these modifications. Multiple dry-fire exercises
are needed, emphasizing a stable position and point of aim, followed by breath control
and the appropriate trigger squeeze. Blanks or dummy rounds may be used to train
trigger squeeze, rapid magazine changes, and application of immediate action. The
soldier should display knowledge and skill during these exercises before attempting live
fire.
Live-Fire Exercises. There are two types of live-fire exercises.
Individual. Emphasis is on each individual maintaining a heavy volume of fire.
Weapon down time (during immediate action and rapid magazine changes) is held to
a minimum. Firing can begin at 25 meters, progressing to 50 meters as soldiers display
increased proficiency. Exposure or engagement times, as well as ranges, are varied to
best simulate the need for a heavy volume of fire. Downrange feedback is necessary
to determine effectiveness of fire. The course of fire should allow the soldier to decide
whether he should engage a given target or area with automatic or semiautomatic fire.
A soldier’s zero during automatic fire may be different than his semiautomatic
(battlesight) zero. This is due to the tendency of the lightweight M16 barrel to respond
to external pressure such as the bipod or pulling on the sling. However, it is
recommended that the battlesight zero be retained on the rifle and holdoff used to
place automatic fire on the target. This holdoff training requires downrange feedback
and should be conducted before other live-fire exercises.
The soldier can begin by loading and firing one round from an automatic fire
position. Three of these rounds, treated as a single group, can establish where the first
shot qf a three-round burst will probably strike. Loading and firing two rounds simulates
the dispersion of the second shot of a three-round burst. Finally, several three-round
bursts should be fired to refine any necessary holdoff to center these larger groups on
the desired point of impact.
Unit. Unit LFXs should include the careful use of automatic fire. Emphasis should
be on staggered rapid magazine changes, maintaining a continuous volume of heavy
fire, and conserving ammunition.
Section IV. QUICK FIRE
The two main techniques of directing fire with a rifle are to aim using the sights; and
to use weapon alignment, instinct, bullet strike, or tracers to direct the fire. The
preferred technique is to use the sights, but sometimes quick reflex action is needed to
survive. Quick fire is a technique used to deliver fast, effective fire on surprise personnel
targets at close ranges (25 meters or less). Quick-fire procedures have also been
referred to as "instinct firing" or "quick kill."
EFFECTIVENESS OF QUICK FIRE
Quick-fire techniques are appropriate for soldiers who are presented with close,
suddenly appearing, surprise enemy targets; or when close engagement is imminent.
Fire may be delivered in the SEMIAUTO or BURST/AUTO mode. For example, a
point man in a patrol may carry the weapon on BURST/AUTO. This may also be
4-11
FM 23-9
required when clearing a room or bunker. Initial training should be in the SEMI mode.
Two techniques of delivering quick fire are —
Aimed. When presented with a target, the soldier brings the rifle up to his shoulder
and quickly fires a single shot. His firing eye looks through or just over the rear sight
aperture, and he uses the front sight post to aim at the target (Figure 4-5). Using this
technique, a target at 25 meters or less may be accurately engaged in one second or
less.
Pointed. When presented with a target, the soldier keeps the rifle at his side and
quickly fires a single shot or burst. He keeps both eyes open and uses his instinct and
peripheral vision to line up the rifle with the target (Figure 4-6). Using this technique,
a target at 15 meters or less may be engaged in less than one second.
The difference in speed of delivery between these two techniques is small.
Pointed quick fire can be used to fire a shot about one-tenth of a second faster than
aimed quick fire. The difference in accuracy, however, is more pronounced. A soldier
well trained in pointed quick fire can hit an E-type silhouette target at 15 meters,
although the shot may strike anywhere on the target. A soldier well trained in aimed
quick fire can hit an E-type silhouette target at 25 meters, with the shot or burst
striking 5 inches from the center of mass.
The key to the successful employment of either technique is practice. Both pointed
and aimed quick fire must be repeatedly practiced during dry-fire training. Live-fire
exercises provide further skill enhancement and illustrate the difference in accuracy
between the two techniques. Tactical considerations dictate which technique is most
effective in a given situation, and when single shot versus burst fire is used.
Pointed and aimed quick fire should be used only when a target cannot be engaged
fast enough using the sights in a normal manner. These techniques should be limited
to targets appearing at 25 meters or less.
4-12
FM 23-9
MODIFICATIONS FOR QUICK- FIRE TECHNIQUES
Quick-fire techniques require major modifications to the four fundamentals of
marksmanship. These modifications represent a significant departure from the normal
applications of the four fundamentals. Initial training in these differences, followed by
repeated dry-fire exercises, will be necessary to prepare the soldier for live fire.
Steady Position. The quickness of shot delivery prevents the soldier from
assuming a stable firing position. He must fire from his present position when the target
appears. If the soldier is moving, he must stop. Adjustments for stability and support
cannot be made before the round being fired.
Aimed. The butt of the rifle is pulled into the pocket of the shoulder as the cheek
comes in contact with the stock. Both hands firmly grip the rifle, applying rearward
pressure. The firing eye looks through or just over the rear sight aperture (Figure 4-5,
page 4-12). The firer’s sight is in focus and placed on the target.
Pointed. The rifle is pulled into the soldier’s side and both hands firmly grip the
rifle, applying rearward pressure (Figure 4-6, page 4-12).
Aiming. This fundamental must be highly modified because the soldier may not
have time to look through the rear sight, find the front sight, and align it with the target.
Aimed. The soldier’s initial focus is on the target. As the rifle is brought up, the
firing eye looks through or just over the rear sight aperture at the target. Using his
peripheral vision, the soldier locates the front sight post and brings it to the center of
the target. When the front sight post is in focus, the shot is fired. Focus remains on the
front sight post throughout the aiming process.
Pointed. The soldier’s focus is placed on the center or slightly below the center of
the target as the rifle is aligned with it and is fired. The soldier’s instinctive pointing
ability and peripheral vision are used to aid in proper alignment.
NOTE: When using either aiming technique, bullets may tend to impact above the desired location.
Repeated live-fire practice is necessary to determine the best aim point on the target or the best
focus. Such practice should begin with the soldier using a center mass arms/iecus.
Breath Control. This fundamental has little application to the first shot of quick
fire. The round must be fired before a conscious decision can be made about breathing.
If subsequent shots are necessary, breathing must not interfere with the necessity to
fire quickly. When possible, use short, shallow breaths.
Trigger Squeeze. Initial pressure is applied as weapon alignment is moved toward
the target. Trigger squeeze is exerted so that when weapon/target alignment is achieved,
the round is fired at once. The soldier requires much training and practice to perfect
this rapid squeezing of the trigger.
TRAINING OF QUICK- FIRE TECHNIQUES
Initial training should focus on the major modifications to the fundamentals during
quick fire.
Dry-Fire Exercises. This dry-fire exercise requires no elaborate preparations or
range facilities, yet it provides the soldier with an opportunity to learn and practice
quick-fire techniques. Repeated dry-fire exercises ensure soldiers can apply the
modifications to the fundamentals. Multiple dry-fire exercises are needed, emphasizing
4-13
FM 23-9
a consistent firing position and weapon alignment with the target, followed by rapid
trigger squeeze. No more than one second should elapse between the appearance of
the target and a bullet striking it. One example of a dry-fire exercise is:
The trainer/coach places an E-type silhouette target 15 meters in front of the
soldier. The soldier stands facing the general direction of the target (vary direction to
simulate targets appearing at different locations), holding his rifle at or above waist
level. His firing hand should be on the pistol grip; the nonfiring hand cradling the rifle
under the handguards.
The trainer/coach should stand slightly behind the soldier, out of his field of view.
The trainer/coach claps his hands, signaling target appearance. Immediately after
clapping his hands, the trainer/coach counts out loud "one thousand one."
The soldier must either point or aim, squeeze the trigger, and hear the hammer
fall before the trainer/coach finishes speaking (about one second or less).
NOTE: When using the aiming technique, the soldier holds his aim and confirms alignment of the rifle
with the target. He keeps the rifle pointed toward the target after the hammer falls and looks
through the sights to check his actual point of aim for that shot.
Live-Fire Exercises. There are two types of live-fire exercises.
Individual. Emphasis is on engaging each target in one second or less. The
previously described timing technique may be used, or pop-up targets set to lock in the
full upright position may be used. Pop-up targets require about one second to move
from the down to the full up position. Targets set to lock in the upright position must
be engaged as they are being raised to "kill" them. This gives the soldier a one-second
time limit. At 15 meters (the maximum recommended range), an E-type silhouette
engaged using pointed quick fire may be hit anywhere. Using aimed quick fire at the
same target, hits should fall within a 10-inch circle located center of target.
NOTE: Repeated live-fire exercises are necessary to train the soldier. If 5.56-mm service ammunition is
in short supply, the 5.56-mm practice ammunition and М2 bolt or the .22-caliber rim fire adapt-
er device may be used.
Unit. Unit MOUT LFXs should include the use of quick fire. Targets should be
presented at 25 meters or less and soldiers must engage them within one second.
Section V. MOPP FIRING
All soldiers must effectively fire their weapons to accomplish combat missions in an
NBC environment. With proper training and practice, soldiers can gain confidence in
their ability to effectively hit targets in full MOPP equipment. MOPP firing proficiency
must be a part of every unit’s training program.
EFFECTS OF MOPP EQUIPMENT ON FIRING
Firing weapons is only part of overall NBC training. Soldiers must first be familiar with
NBC equipment, its use, and proper wear before they progress to learning the
techniques of MOPP firing. Trainers must consider the impact of MOPP equipment
(hood/ mask, gloves, overgarments) on the soldier’s ability to properly apply the
fundamentals of marksmanship and combat firing skills.
4-14
FM 23-9
Immediate Action. Under normal conditions a soldier should be able to clear a
stoppage in three to five seconds. Under full MOPP, however, this may take as long as
ten seconds to successfully complete. Dry-fire practice under these conditions is
necessary to reduce time and streamline actions. Hood/mask and gloves must be worn.
Care must be taken not to snag or damage the gloves or dislodge the hood/mask during
movements. Applying immediate action to a variety of stoppages during dry fire must
be practiced using dummy or blank ammunition until such actions can be performed
by instinct.
Target Detection. Techniques and principles outlined in Chapter 3 remain valid
for target detection while in MOPP, but considerations must be made for limiting
factors imposed by MOPP equipment.
Vision is limited to what can be seen through the mask lenses/faceplate.
Peripheral vision is severely restricted. The lenses/faceplate may be scratched or partly
fogged, thus further restricting vision. Soldiers requiring corrective lenses must be
issued insert lenses before training.
Scanning movement may be restricted by the hood/mask. Any of these factors
could adversely affect the soldier’s ability to quickly and accurately detect targets.
Additional skill practice should be conducted.
Marksmanship Fundamentals. Although the four marksmanship fundamentals
remain valid during MOPP firing, some modifications may be needed to accommodate
the equipment.
Steady position. Due to the added bulk of the overgarments, firing positions may
need adjustment for stability and comfort. Dry and live firing while standing, crouching,
or squatting may be necessary to reduce body contact with contaminated ground or
foliage. A consistent spot/stock weld is difficult to maintain due to the shape of the
protective masks. This requires the firer to hold his head in an awkward position to
place the eye behind the sight.
Aiming. The wearing of a protective mask may force firers to rotate (cant) the rifle
a certain amount to see through the rear aperture. The weapon should be rotated the
least amount to properly see through and line up the sights, as previously discussed in
Chapter 3. The center tip of the front sight post should be placed on the ideal aiming
point. This ideal aiming procedure (Figure 4-7, page 4-16) should be the initial
procedure taught and practiced. If this cannot be achieved, a canted sight picture may
be practiced.
Breath control. Breathing is restricted and more difficult while wearing the
protective mask. Physical exertion can produce labored breathing and make settling
down into a normal breath control routine much more difficult. More physical effort is
needed to move around when encumbered by MOPP equipment, which can increase
the breath rate. All of these factors make holding and controlling the breath to produce
a well-aimed shot more energy- and time-consuming. Emphasis must be placed on
rapid target engagement during the limited amount of time a firer can control his
breath.
Trigger squeeze. Grasping the pistol grip and squeezing the trigger with the index
finger are altered when the firer is wearing MOPP gloves. The action of the trigger
finger is restricted, and the fit of the glove may require the release of the swing-down
trigger guard. Because the trigger feels different, control differs from that used in
bare-handed firing. This difference cannot be accurately predicted. Dry-fire training
4-15
FM 23-9
using dime (washer) exercises is necessary to ensure the firer knows the changes he will
encounter during live fire.
Figure 4-7. Sight picture when canting the rifle (75-meter target).
2. Initial sight picture for
right-handed firers wearing
protective mask.
EFFECTS OF AIMING MODIFICATIONS
The normal amount of cant needed by most firers to properly see through the sights
has a limited influence on rounds fired at ranges of 75 meters or less. At longer ranges,
however, the change in bullet strike becomes more pronounced.
Rifle ballistics (Appendix F) causes the strike of the bullet to impact low in the
direction of the cant (when a cant is used) at longer ranges. Due to this shift in bullet
strike and the many individual differences in sight alignment when wearing a protective
mask, it is important to conduct downrange feedback training (Appendix G) at ranges
beyond 75 meters. This allows soldiers to determine what aiming adjustments are
needed to achieve center target hits. Figure 4-8 shows what might be expected for a
right-handed firer engaging a target at 175 meters with no cant, a certain amount of
4-16
FM 23-9
cant, and the adjustment in point of aim needed to move the bullet strike to the center
of the target. Figure 4-9 shows what might be expected for a right-handed firer engaging
a 300-meter target. (The adjustments in point of aim for left-handed firers are the
opposite of those shown in Figures 4-8 and 4-9.)
Figure 4-8. Engagement of 175-meter target.
Figure 4-9. Engagement of 300-meter target.
Although bullet strike is displaced when using a cant, individual differences are
such that center-of-mass aiming should be used until the individual knows what aiming
adjustment is needed. When distant targets are missed, a right-handed firer should
usually adjust his point of aim to the right and high; a left-handed firer should adjust to
the left and high. Then, the aiming rules are clear. All targets should initially be engaged
by aiming center mass, regardless of cant. When targets are missed while using a cant,
firers should adjust the point of aim higher and opposite the direction of the cant. Actual
displacement of the aiming point must be determined by using downrange feedback
targets at ranges beyond 75 meters.
OPERATION AND FUNCTION MODIFICATIONS
Handling the rifle, performing operation and function checks, loading and unloading,
and cleaning are affected by MOPP equipment. Movements are slowed, tasks take
longer to complete and often require more effort, vision is impaired, and care is needed
to avoid damaging MOPP equipment and possible exposure to lethal agents. Because
4-17
FM 23-9
of the great differences between no MOPP and MOPP4, soldiers must be trained in all
aspects of operation and maintenance of the weapon while practicing at the highest
MOPP level. Only through repeated training and practice can the soldier be expected
to perform all tasks efficiently.
MOPP FIRE EXERCISES
The many difficulties the soldier encounters while firing with MOPP gear must be
experienced and overcome during training.
Dry-Fire MOPP Exercises. Repeated dry-fire exercises covering all aspects of
MOPP firing are the most effective means available to ensure all soldiers can function
during a live-fire MOPP situation. Multiple dry-fire exercises must be conducted before
the first live round is fired. Otherwise, valuable ammunition and training time are
wasted in trying to teach soldiers the basics. The soldier is trained in the fundamentals;
repeated dry-fire or Weaponeer exercises are conducted; grouping, zeroing, qualifying,
and evaluating are performed using standard non-MOPP firing; the differences and
modifications are trained for MOPP firing; and repeated MOPP dry-fire exercises are
conducted. The soldier is now ready to move on to MOPP live fire.
Live-Fire MOPP Exercises. These exercises further develop the learned firing
skills and allow the soldier to experience the effects of wearing MOPP equipment on
downrange performance.
Individual. Application of immediate action, rapid magazine changes, grouping,
and adjusted point of aim at 25 meters should all be tested and evaluated for further
training. After soldiers exhibit proficiency at these tasks, further training and
evaluation at extended ranges are indicated.
Unit. Parts of unit LFXs should be conducted in the highest MOPP level with a
planned system of target hit evaluation. As in all aspects of marksmanship training, the
emphasis is on soldier knowledge and skills displayed.
Basic 25-meter proficiency course. Initial live-fire exercises are conducted at 25
meters. This training provides all soldiers the basic techniques and introduces firing
the rifle in MOPP equipment. This basic proficiency exercise must be fired while
wearing gloves and protective mask with hood. The basic 25-meter proficiency exercise
is fired to standard and is an annual/semiannual GO/NO-GO requirement for most
soldiers. It is entered on the record fire scorecard when completed.
The course of fire can be conducted on any range equipped with mechanical target
lifters. Soldiers are given initial instruction and a demonstration of the techniques of
firing in MOPP equipment.
Each soldier is issued 20 rounds of 5.56-mm ball ammunition to engage 20
three-to-five-second exposures of F-type silhouette targets at 25 meters. Initial firing
is performed with 10 rounds from the individual fighting position (supported), and 10
rounds from a prone unsupported position. Each soldier must obtain a minimum of 11
target hits out of 20 exposures to meet the basic requirement. This initial basic
25-meter exercise prepares soldiers for future individual and unit training in full MOPP
gear.
Downrange feedback. Once the soldier has mastered basic marksmanship
proficiency, he should be introduced to firing at range. This phase of firing should
provide the maximum hit-and-miss performance feedback; it can be conducted on a
KD or modified field fire range at 75,175, and 300 meters.
4-18
FM 23-9
Practice firing under full MOPP can also be conducted on the standard RETS
ranges—for example, the standard record fire tables may be fired in MOPP. MOPP
fire must also be part of unit tactical exercises, which are fired on MPRC as part of
STXs.
NOTE: The .22-caliber rimfire adapter or plastic practice ammunition may be used during live-fire prac-
tice at scaled 25-meter targets when 5.56-mm ammunition is not available.
When the rimfire adapter, plastic ammunition, or live-fire range is not available,
the Weaponeer device may be used. Scaled silhouette targets may also be used at this
distance to introduce the many target sizes common at longer ranges. The slow-fire
target and course outlined in Appendix E are appropriate.
Having mastered the 25-meter firing phase, the soldier is then introduced to firing
at range, using the standard 75-, 175-, and 300-meter downrange feedback targets
(Chapter 3). Adjusted point of aim, for individual differences of cant, is first used
during this training. Live-fire training is conducted on a KD or modified field fire
range, giving the soldier feedback on targets engaged at many ranges.
Section VI. MOVING TARGET ENGAGEMENT
The enemy normally moves by rushes from one covered or concealed position к
another. While making the rush, the enemy soldier presents a rapidly moving target
However, for a brief time as he begins, movement is slow since many steps are needed
to gain speed. Many steps are needed to slow down at the new position. A moving
target is open to aimed fire both times.
MOVING TARGET TECHNIQUES
There are two primary techniques of engaging moving targets.
Tracking. Tracking is a more accurate technique of engaging targets by
experienced firers. It involves the establishment and maintaining of the aiming point
in relationship to the target and maintaining that sight picture (moving with the target)
while squeezing the trigger. As the target moves, this technique puts the firer in
position for a second shot if the first one misses.
Trapping. Trapping is the setting up of an aiming point forward of the target and
along the target path. The trigger is squeezed as the target comes into the sights. This
is a technique that works on targets with slow lateral movement. It does not require
tracking skills. It does require that the firer know precisely when the rifle is going to
fire. Some soldiers can squeeze the trigger without reacting to the rifle firing, and they
may fire better using this technique.
Another technique is to use a modified 25-meter scaled timed-fire silhouette (see
Figure 4-10). Trainers evaluate performance based on where shot groups are placed
4-19
FM 23-9
when the lead rule is applied. This target can be used for both the M16A1 and M16A2
rifles.
Figure 4-10. Timed-fire targets.
M16A1 SERIES TARGET
25-METER SCALED SILHOUETTE
SOM
USE LONG RANGE SIGHT
THE WHITE DOT ON EACH TARGET SHOWS THE CENTER OF MASS
AIMING POINT. BULLETS SHOULD HIT WITHIN THE CIRCLE. BUT
ARE SCORED AS HITS IF THEY HIT ANYWHERE IN THE
SILHOUETTE.
M16A1 SERIES TARGET
THE WHITE DOT ON EACH TARGET SHOWS THE CENTER OF MASS
AIMING POINT. BULLETS SHOULD HIT WITHIN THE CIRCLE. BUT
ARE SCORED AS HITS IF THEY HIT ANYWHERE IN THE
SILHOUETTE.
Standard Timed-Fire Target
NSN 6920-01-167-1397)
Modified StandardTimed-Fire Target
(Locally Fabricated)
MOVING TARGET FUNDAMENTALS
The fundamentals needed to hit moving targets are similar to those needed to hit
stationary targets. The main skill is to engage moving targets with the least changes to
procedures. Another consideration is that soldiers in a combat defensive position do
not know if their next target will be stationary or moving—they must fire immediately
at whatever targets occur.
The fundamentals for engaging stationary targets are steady position, aiming,
breath control, and trigger squeeze. They are also used to engage moving targets.
Considering the environment and the variables of the rifle and ammunition, the
well-trained soldier should be able to hit 300-meter stationary silhouette targets with
a .5 PH. When the target has lateral movement, hits at 150 meters may be seven out
of ten times, which is a good performance. Therefore, twice as much variability, twice
as much dispersion, and a few more erratic shots are expected when soldiers are trained
to hit moving targets.
The procedures used to engage moving targets vary as the angle and speed of the
target vary. For example, when a moving target is moving directly at the firer, the same
4-20
FM 23-9
procedures are used as would be used if the target were stationary. However, if it is a
close, fast-moving target at a 90-degree angle, the rifle and entire upper body of the
firer must be free from support so that the target can be tracked. To hit moving targets,
the firer must move the rifle smoothly and steadily as the target moves. The front sight
post is placed with the trailing edge at target center, breath is held, and the trigger is
squeezed. Several factors complicate this process.
Steady position. When firing from a firing position, the firer is in the standard
supported position and is flexible enough to track any target in his sector. When a
moving target is moving directly at the firer, directly away, or at a slight angle, the target
is engaged without changing the firing position. When targets have much lateral
movement, only minor changes are needed to allow for effective target engagement.
Most moving targets are missed in the horizontal plane (firing in front of or behind the
target) and not in the vertical plane (firing too low or too high). Therefore, a smooth
track is needed on the target, even if the support arm must be lifted. Other adjustments
include the following:
- Nonfiring hand. The grip of the nonfiring hand may need to be increased and
more pressure applied to the rear. This helps to maintain positive control of
the rifle and steady it for rapid trigger action.
- Nonfiring elbow. The elbow is lifted from the support position only to
maintain a smooth track.
- Grip of the right hand. Rearward pressure may be applied to the pistol grip
to steady the rifle during trigger squeeze.
- Firing elbow. The firing elbow is lifted from support only to help maintain a
smooth track.
NOTE: The rifle pocket on the shoulder and the stock weld are the same for stationary targets.
Aiming. The trailing edge of the front sight post is at target center.
Breath control. Breathing is locked at the moment of trigger squeeze.
Trigger squeeze. Rearward pressure on the handguard and pistol grip is applied
to hold the rifle steady while pressure is applied to the trigger. The trigger is squeezed
fast (almost a controlled jerk). Heavy pressure is applied on the trigger (at least half
the pressure it takes to make the rifle fire) before squeezing the trigger.
SINGLE-LEAD RULE FOR MOVING TARGETS
A target moving directly toward the firer can be engaged the same way as a stationary
target. However, to hit a target moving laterally, the firer places the trailing edge of
the front sight sight post at target center. The sight-target relationship is shown in
Figure 4-11 (page 4-22). The single-lead rule automatically increases the lead as the
range to the target increases.
Figure 4-12 (page 4-22) shows how this works, with the front sight post covering
about 1.6 inches at 15 meters and about 16 inches at 150 meters. Since the center of
the front sight post is the actual aiming point, this technique of placing the trailing edge
of the front sight post at target center provides for an .8-inch lead on a 15-meter target,
and an 8-inch lead on a target at 150 meters.
4-21
FM 23-9
This rules provides for a dead-center hit on a 15-meter target that is moving at 7
mph at a 25-degree angle because the target moves .8 inch between the time the rifle
is fired and the bullet arrives at the target. A 150-meter target moving at 7 mph at a
25-degree angle moves 8 inches between the time the weapon is fired and the bullet
arrives. This rule provides for hits on the majority of high-priority combat targets.
LEAD REQUIREMENTS
To effectively engage moving targets on the battlefield, soldiers must understand
lead requirements. Figure 4-13 shows the amount of lead required to hit a 300-meter
target when it is moving 8 mph at an angle of 90 degrees. Aiming directly at the target
would result in missing it. When an enemy soldier is running 8 mph, 90 degrees to the
firer, and at a range of 300 meters, he covers 4 1/2 feet while the bullet is traveling
toward him. To get a hit, the firer must aim and fire at position D when the enemy is
at position A. This indicates the need for target lead and for marksmanship trainers to
know bullet speed and how it relates to the range, angle, and speed of the target.
Soldiers must understand that targets moving fast and laterally are led by some distance
if they are to be hit.
4-22
FM 23-9
Target Speed. Figure 4-14 reflects the differences in lateral speed for various
angles of target movement for a target that is traveling at 8 mph at a distance of 150
meters from the firer. The angle of target movement is the angle between the
target-firer line and the target’s direction of movement. An 8-mph target moves 24
inches during the bullet’s flight time. If the target is moving on a 15-degree angle, it
moves 6 inches (the equivalent of 2 mph). For the firer to apply precise lead rules, he
must accurately estimate speed, angle, and range to the target during the enemy
soldier’s brief exposure. The single-lead rule (place the trailing edge of the front sight
post at target center) places effective fire on most high-priority combat targets. At 100
meters, the rule begins to break down for targets moving at slight and large angles.
Since the target lead is half the perceived width of the front sight post, at 100
meters the standard sight provides for 5.4 inches of lead for the M16A1 and M16A2
front sights (Figure 4-15, page 4-24).
Target Distance. The front sight post covers only a small part of close-in targets,
providing for target hits on close targets moving at any angle and any speed. However,
if the lead rule is applied on more distant targets moving at a slight angle — for example,
5 degrees at 100 meters—the bullet strikes forward of target center, about 4 inches with
standard sights and about 7 inches with LLLSS sights. Therefore, soldiers are taught
to fire at targets as though they are stationary until lateral movement is observed (15
degrees).
The rule provides for many speed-angle combinations that place the bullet within
2 inches of target center (Figure 4-16, page 4-25). Since the soldier is expected to fire
a 12-inch group on moving targets at 100 meters, the rule provides for hits on the
majority of targets. Even the worst case (a 90-degree target moving at 8 mph) would
result in the shot-group center being located 9.8 inches behind target center. If bullets
were evenly distributed within a 12-inch group, this would result in hitting the target
40 percent of the time.
Soldiers should be taught to increase their lead when targets are missed. This
increases their probability of hitting all targets. The amount of additional lead required
4-23
FM 23-9
Figure 4-15. Angle of target movement.
RANGE: 100 METERS
(STANDARD SIGHT) TARGET SPEED
ANGLE OF TARGET MOVEMENT 4 MPH 6 MPH 8 MPH
5° ♦4 9" *4 5" *4 3"
10° *4 1" *3 5" *2 7"
15° *3 5" *2 5" *1 5"
20° *2.8" *1.5" * 2"
25° *2 2" * 7" -1 0"
30° *1 7" -.2" -2.0"
35° *1 1" •1 1" -3 2"
40° *6" -1 9" -4 3"
45° •2 7" •5.4"
50° -4" •3 3" •6.2"
55° - 8" •4 0" -7 0"
60° -1.2" •4 5" -7.7"
65° •1.5" -4 9" -8 4"
70° •1.7” -5.3" •8.8"
75° -1.9" •5 6” -9.2"
80° •2 0" •5.9" -9 6"
85° -2 1" •5 9" •9 7"
90° -2 1" -6 0" •9 8”
NOTE: Plus (+) indicates bullet strike in the direction of movement; minus (-) indicates bullet strike behind the target center.
should be developed through experience with only general guidance provided. For
example, if there is much lateral movement of the target and the soldier feels by
applying the lead rule and firing fundamentals he has missed the target, then he should
increase his lead.
The training program must be simple and provide soldiers with only relevant
information to improve their performance in combat. First, all soldiers should
understand and apply the single-lead rule in the absence of more information. Second,
soldiers should understand that moving targets coming toward them or on a slight angle
(0 to 15 degrees) should be engaged as stationary targets. Third, information should
be presented and practice allowed on applying additional lead to targets for soldiers
who demonstrate an aptitude for this skill.
4-24
FM 23-9
Target Angle. The rule does not apply to targets moving at small and large angles
(Figure 4-16). For example, a walking enemy soldier at 250 meters is hit dead center
when he is moving at 40 degrees. Hits can be obtained if he is moving on any angle
between 15 and 75 degrees. When he is running (a center hit is obtained when the
target is on an angle of 18 degrees), misses occur when he exceeds an angle of 30 to 35
degrees. The information provided in Figures 4-13, page 4-23, and 4-14, page 4-24, is
designed to enhance instructor understanding so proper concepts are presented during
instruction. For example, a target at 100 meters moving at 6 mph receives a center hit
when moving at 29 degrees. When moving at an angle less than 29 degrees, the bullet
strikes somewhat in front of target center. When moving at an angle of more than 29
degrees, the bullet strikes somewhat behind target center.
Figure 4-16. Target angle when dead center: hits accure using
single lead rule.
(STANDARD SIGHT)
RANGE 4 MPH 6 MPH 8 MPH
25M 48° 30° 22°
5OM 47° 30° 22°
1OOM 45° 29° 21°
15OM 44° 28° 20°
2OOM 41° 27° 19°
25OM 40° 26° 18°
3OOM 33° 21° 16°
35OM 38° 24° 18°
400M 35° 22° 17°
450M 33° 21° 16°
MULTIPURPOSE RANGE COMPLEX TRAIN-UP
MPRCs require soldiers to hit moving targets. Ranges are used for collective training.
Commanders should try to use the MPRCs for individual training and to teach the
individual to engage moving targets. If no MPRCs are available for individual training,
any range can be used that will support any type of moving target. Building a moving
target range is limited only by the imagination of the trainer, but always within safety
constraints. The following are examples that can be incorporated on many ranges.
Popsicle Sticks. This requires placing an E-type silhouette on a long stick and
having an individual walk back and forth behind a high berm (high enough to protect
the individual from fire) the length of the berm. Feedback should be made available
for the firer such as for lowering the target when a hit is scored or reversing direction
upon a hit.
Sled Targets. This requires constructing a simple sled that has one or more targets
attached. The sled is pulled by a rope or cable across and off the range safely by a
vehicle.
4-25
FM 23-9
CHAPTER 5
Night Firing
All units must be able to fight during limited visibility. All soldiers should know the
procedures for weapons employment during such time. Soldiers must experience the
various conditions of night combat—from total darkness, to the many types of artificial
illumination, to the use of surveillance aids. All units must include basic, unassisted night
fire training annually in their unit marksmanship programs. Combat units should conduct
tactical night fire training at least quarterly. This tactical training should include MILES
during force-on-force training as well as live fire. Night-fire training must include the use
of applicable night vision devices when this equipment is part of a TOE. The many effects
darkness has on night firing are discussed herein.
NOTE: Although this chapter addresses night firing, the appropriate modifications to the fundamentals
of firing may be applied whenever visibility is limited.
CONSIDERATIONS
Trainers must consider the impact of limited visibility on the soldier’s ability to properly
apply the fundamentals of marksmanship and combat firing skills. These fundamentals/
skills include:
Operation and Maintenance of the Weapon. Handling the weapon, performing
operation and function checks, loading and unloading, and maintenance are affected
by nighttime conditions. Movements are slowed, tasks take longer to complete, vision
is impaired, and equipment is more easily misplaced or lost. Because combat conditions
and enforcement of noise and light discipline restrict the use of illumination, soldiers
must be trained to operate (load, unload, and clear), service, and clean their weapons
using the lowest lighting conditions. Although initial practice of these tasks should
occur during daylight (using simulated darkness) to facilitate control and error
correction, repeated practice during actual nighttime conditions should be integrated
with other training. Only through repeated practice and training can the soldier be
expected to perform all tasks efficiently.
Immediate Action. Under normal conditions, a soldier should clear a stoppage in
three to five seconds. After dark, this task usually takes longer. Identifying the problem
may be frustrating and difficult for the soldier. A tactile (hands only) technique of
identifying a stoppage must be taught and practiced. Clearing the stoppage using few
or no visual indicators must also be included. The firer must apply immediate action
with his eyes closed. Dry-fire practice using dummy or blank rounds under these
conditions is necessary to reduce time and build confidence. Training should be
practiced first during daylight for better control and error correction by the trainer.
Practice during darkness can be simulated by closing the eyes or using a blindfold. Once
the soldier is confident in applying immediate action in daylight or darkness, he can
perform such actions rapidly on the firing line.
Target Detection. Many of the skills discussed in Appendix В apply to target
detection after dark. Light from a cigarette or flashlight, discharge of a rifle (muzzle
5-1
FM 23-9
flash), or reflected moonlight/starlight are the main means of target location. Sounds
may also be indicators of target areas. Because the other techniques of detection
(movement, contrast) are less apparent at night, light and sound detection must be
taught, trained, and reviewed repeatedly in practice exercises. Exercises should also
emphasize shortened scanning ranges, night vision adaptation, and use of off-center
vision. Target detection exercises should be integrated into all collective training tasks.
NOTE: Binoculars are often overlooked as night vision aids. Because they amplify the available light,
binoculars or spotting/rifle scopes can provide the firer with another means to locate targets
during limited visibility. Also, the use of MILES equipment is effective for use in engaging
detected targets.
Marksmanship Fundamentals. The four marksmanship fundamentals apply to
night firing. Some modifications are needed depending on the conditions. The firer
must still place effective fire on the targets or target areas that have been detected.
Steady position. When the firer is firing unassisted, changes in his head
position/stock weld will be necessary, especial when using weapon-target alignment
techniques. When using rifle-mounted night vision devices, head position/stock weld
must be changed to bring the firing eye in line with the device. Also, such mounted
devices alter the rifle’s weight and center of gravity, forcing a shift in placement of the
support (nonfiring arm or sandbags). Repeated dry-fire practice, followed by live-fire
training, is necessary to learn and refine these modifications and still achieve the most
steady position.
Aiming. Modifications to the aiming process vary from very little (when using
LLLSSs) to extensive (when using modified quick-fire techniques). When firing
unassisted, the firer’s off-center vision is used instead of pinpoint focus. When using a
mounted night vision device, the firer’s conventional iron sights are not used. The
soldier uses the necessary aiming process to properly use the device.
Breathing. Weapon movement caused by breathing becomes more apparent when
using night vision devices that magnify the field of view. This fundamental is not greatly
affected by night fire conditions.
Trigger squeeze. This important fundamental does not change during night fire.
The objective is to not disrupt alignment of the weapon with the target.
PRINCIPLES OF NIGHT VISION
For a soldier to effectively engage targets at night, he must apply the three principles
of night vision:
Dark Adaptation. Moving from lighted to darkened areas (as in leaving a tent)
can be temporarily blinding. After several minutes have passed, the soldier can slowly
see his surroundings. If he remains in this completely darkened environment, he adapts
to the dark in about 30 minutes. This does not mean he can see in the dark at the end
of this time. After about 30 minutes, his visibility reaches its maximum level. If light is
encountered, the eyes must adapt again. The fire on the end of a cigarette or a
red-lensed flashlight can degrade night vision; larger light sources cause more severe
losses.
Off-Center Vision. During the day, the soldier focuses his vision on the object he
wants to see. Shifting this pinpoint focus slightly to one side causes the object to become
5-2
FM 23-9
blurry or lose detail. At night, the opposite is true. Focusing directly on an object after
dark results in that object being visible for only a few seconds. After that, the object
becomes almost invisible. To view an object at night, the soldier must shift his gaze
slightly to one side. This allows the light-sensitive parts of the eye (parts not used during
daylight) to be used. These can detect faint light sources or reflections and relay their
image to the brain. (Figures 5-1 and 5-2.)
NOTE: Vision is shifted slightly to one side, but attention is still on the object. Because of the blind spot
at the center of vision, directing attention to an off-centered objective is possible (with practice).
5-3
FM 23-9
Scanning. Scanning is the short, abrupt, irregular movement of the soldier’s eyes
around an object or area every 4 to 10 seconds. Off-center vision is used. Scanning
ranges vary according to visibility.
NOTE: For detailed information on the three principles, see FM 21-75.
TARGET ENGAGEMENT TECHNIQUES
Night fire usually occurs under three general conditions.
Unassisted Firing Exercise.The firer must detect and engage targets without
artificial illumination or night vision devices. Potential target areas are scanned. When
a target is detected, the firer should engage it using a modified quick-fire position. His
head is positioned high so that he is aligning the weapon on the target and looking just
over the iron sights. His cheek should remain in contact with the stock.
The firer should take a few seconds to improve weapon/target alignment by
pointing slightly low to compensate for the usual tendency to fire high. Both eyes are
open to the maximum advantage of any available light, and the focus is downrange.
Off-center vision is used to keep the target in sight. Tracer ammunition may provide
feedback on the line of trajectory and facilitate any adjustments in weapon/target
alignment.
Repeated dry-fire training, target detection, and proper aiming practice are the
most efficient means to ensure the soldier can successfully engage short-range targets
(50 meters or closer) unassisted during MILES exercises, and then live-fire training.
Artificial Illumination. Targets as distant as 175 meters can be engaged
successfully with some type of artificial illumination. Illumination may be from hand
flares, mortar or artillery fire, or bright incandescent lights such as searchlights.
When artificial illumination is used, the eyes lose most of their night adaption, and
off-center vision is no longer useful. Aiming is accomplished as it is during the day.
Artificial illumination allows the firer to use the iron sights as he does during the day.
(M16A2 users should keep the large rear sight aperture flipped up during darkness.)
Engaging targets under artificial illumination allows for better target detection
and long-range accuracy than the unassisted technique. When the light is gone, time
must be spent in regaining night vision and adaptation. Only when the light level drops
enough so that the target cannot be seen through the iron sights should the firer resume
short-range scanning, looking just over the sights.
Soldiers have sometimes been taught to close their eyes during artificial
illumination to preserve their night vision. This technique is effective but also renders
the soldier (or entire unit) blind for the duration of the illumination. Keeping one eye
closed to preserve its night vision results in a drastically altered sense of perception
when both eyes are opened, following the illumination burnout. Tactical considerations
should be the deciding factor as to which technique to use. Repeated dry-fire training
and target detection practice are the keys to successful engagement of targets out to
150 meters or more during live fire under artificial illumination.
Night Vision Devices. Rifle-mounted night vision devices are the most effective
night fire aids. By using these devices, the firer can observe the area, detect and engage
any suitable targets, and direct the fire of soldiers who are firing unassisted.
5-4
FM 23-9
N VDs can be used to engage targets out to 300 meters. Repeated training, dry-fire
practice, and correct zeroing are vital to the proper employment of NVDs during
live-fire training.
TRAINING
Dry-fire training and live-fire training are necessary to mastering basic rifle
marksmanship. The soldier must adhere to the following procedures and applications
to be effective in combat.
Dry-Fire Exercises. Repeated training and dry-fire practice are the most effective
means available to ensure all soldiers can function efficiently after dark.
Target detection and dry-fire exercises must be conducted before the first live
round is fired. They can take place almost anywhere—elaborate live-fire range
facilities are not needed. Modified fundamentals can be taught in a classroom/practical
exercise situation. Further training in the proper zeroing and engagement techniques
can take place anywhere that targets can be set up and darkness can be expected.
Without extensive dry-fire training, soldiers do not perform to standards during
live fire. Valuable range time and ammunition are wasted in a final attempt to teach
the basics.
The soldier must demonstrate skill during daylight live fire. Next, he is trained in
the differences and modifications needed for successful night firing. Many dry-fire
exercises are conducted until skill at night firing is displayed. Only then is the soldier
ready to move on to the night live-fire exercises.
Live-Fire Exercises. These exercises continue to develop the firing skills acquired
during dry-fire exercises, and they allow the soldier to experience the effects of darkness
on downrange performance.
The basic unassisted live-fire exercise allows all soldiers to apply night-fire
principles, and to gain confidence in their abilities to effectively engage targets at 25
and 50 meters. Practice and proficiency firing can be conducted on any range equipped
with mechanical lifters and muzzle flash simulators. A small square of reflective
material and a shielded low wattage flashing light (protected from bullet impact) may
be used to facilitate target detection. (Figures 5-3, page 5-6) The light should be placed
to highlight the center of the target with a flashing, faint glow (intended to represent a
muzzle flash). The light should not be on constantly, when the target is not exposed, or
on when the target is exposed but not being used in actual engagement. The light should
provide the firer with a momentary indication that a target is presenting itself for
engagement. It should not be attached to the target or provide the firer with a distinct
aiming point, regardless of how dim it may be. Practice can also be accomplished by
the use of MILES equipment and target interface devices.
When an automated record fire range (RETS) is used for this exercise, the two
50-meter mechanisms are used. Before training, one E-type silhouette target is
replaced with an F-type silhouette target. The F-type silhouette target is engaged at 25
meters from the prone unsupported position. The soldier is issued one magazine of 15
rounds (5 rounds ball; 10 rounds tracer) and presented 15 ten-second exposures. The
firing line is moved, and the soldier engages the E-type silhouette target at 50 meters.
He is issued a second 15-round magazine (5 rounds ball; 10 rounds tracer) to engage
15 ten-second exposures.
5-5
FM 23-9
When the automated range is used, the soldier’s performance is recorded in the
tower. If automatic scoring is not available, F-type and E-type silhouette paper facings
are attached to the mechanical target, and bullet holes are counted. Facings may be
repaired or replaced for each firer.
To meet the annual/semiannual minimum performance requirements, all soldiers
must hit and kill seven separate targets out of 30 exposures. The results are annotated
on the soldier’s record fire scorecard.
• Individual. Application of immediate action, rapid magazine changes, and
refinements of the modified quick-fire aiming point should be tested and
evaluated for further training.
- Unassisted. After soldiers exhibit proficiency of individual tasks, training and
evaluation at ranges beyond those possible using only the rifle are indicated.
- Artificial illumination. After mastering the unassisted night fire task and after
repeated dry-fire training under artificial illumination, the soldier is ready to
be tested and evaluated using live fire under illumination. Pop-up or
5-6
FM 23-9
stationary targets at ranges out to 175 meters (depending on light conditions,
terrain features, and vegetation) may be used. Illumination is provided by
flares, mortar/artillery, or floodlights. Once these tasks are mastered, further
training and evaluation using NVDs is indicated. Multipurpose range
complexes can be used for night firing by using artificial illumination.
Automated field fire or record fire ranges can also be used by adding lighting.
During this training, soldiers engage targets at 75 to 175 meters. Several
target scenarios are possible. A typical training exercise would present 30
random exposures of the 75-meter and 175-meter targets (or optional
100-meter and 200-meter targets). Soldiers should be expected to hit at least
10 targets. Tracer ammunition can be used to enhance training.
- Night vision devices. Repeated training and dry-fire practice on the proper use
of NVDs are essential to the successful conduct of any live-fire training using
these devices. Firers must understand the equipment and skillfully employ it.
NVDs can provide engagement capabilities out to 300 meters.
NOTE: Spotlights or floodlights can be modified through use of a rheostat to simulate the flickering,
bright/dim nature of artificial illumination. Lights should not be used to continuously spotlight
targets. Unanticipated artificial illumination may render NVDs difficult to see through or may
shut the device off. Live-fire training should consider any problems incurred by such unexpected
illumination.
• Unit. Parts of unit STXs, FTXs, and LFXs should be conducted at night. This
training should include target detection, unassisted MILES and live fire,
artificial illumination, and NVDs. Targets out to 300 meters may be used,
depending on the existing conditions. Emphasis is on soldier knowledge and
skills displayed.
NOTE: See FM 25-7 for a description of ranges available and recommended for live-fire training.
5-7
FM 23-9
APPENDIX A
Year-Round Marksmanship Training
An effective unit marksmanship program reflects the priority, emphasis, and interest of
commanders and trainers. This appendix proposes a rifle marksmanship training strategy
as guidance in establishing and conducting an effective training program. The strategy
consists of the individual and leader refresher training for maintaining the basic skills
learned during IET. It progresses to training advanced and collective skills under
near-combat conditions during live-fire STXs.
MARKSMANSHIP AND THE METL
Marksmanship proficiency is critical and basic to soldiering and is required for any unit
deployed to a wartime theater. All commanders should develop a METL and organize
a training program that devotes adequate time to marksmanship.
The unit’s combat mission must be considered when establishing training
priorities. This not only applies to the tasks selected for the unit’s METL but also the
conditions under which the tasks are to be performed. If a unit may be employed in a
MOUT environment, the effects of range, gravity, and wind may not be too important,
but automatic/burst fire, quick fire, and assault fire would be. The reverse may be true
of a unit that expects to engage the enemy at long range with rifle fire.
ASSESSMENT OF MARKSMANSHIP STATUS
To conduct an effective marksmanship program, the unit commander must determine
the current marksmanship proficiency of all assigned personnel. To check the
effectiveness of a unit’s marksmanship program, constant evaluation is required.
Observing and accurately recording performance reveals the status of rifle and
magazine maintenance, the quality of rifle zeros, and the ability of each soldier to hit
targets. This also allows the commander to identify soldiers who need special assistance
in order to reach required standards, and to recognize soldiers who exceed these
standards. Based on this evaluation, marksmanship training programs can be developed
and executed.
This assessment is continuous, and the program is modified as required.
Spot-checks of individual marksmanship performance, such as interviews and
evaluations of soldiers, provide valuable information as to whether the soldier knows
how to zero, to use NVDs, and to perform other marksmanship tasks.
In addition to spot-checks and direct observation of training, assessment includes
a review of past training, which provides valuable information for developing a training
plan. The assessment should include how record fire was conducted, what course of fire
was used, how often the units conducted collective NBC or night fire, and so on. The
results are reviewed to determine unit weaknesses and which individuals require
special attention.
Based on the commander’s evaluation, goals, and missions, training events are
identified that should be conducted quarterly, semiannually, or annually —rifle
A-1
FM 23-9
marksmanship programs must be continuous. While the unit may only qualify its
soldiers annually or semiannually, test results show that sustainment training is required
at least quarterly to maintain marksmanship skills.
TRAINING THE TRAINER
Knowledgeable small-unit leaders are the key to marksmanship training. This manual
and other training publications provide the unit instructor with the required
information for developing a good train-the-trainer program. The commander should
identify unit personnel who have had assignments as marksmanship instructors. These
individuals should be used to train other unit cadre by conducting preliminary rifle
instruction and live-fire exercises for their soldiers.
Assistance and expertise from outside the unit may also be available such as the
Army Marksmanship Unit, Fort Benning, Georgia. A suggested train-the-trainer
program is outlined below:
• Marksmanship diagnostic test.
• Review of operation and function, immediate action, and safety of rifle and
ammunition.
• Conduct of PRI; review of four fundamentals.
• Review of coaching techniques and device usage.
• Principles and execution of grouping and zeroing.
• Effects of wind and gravity on long-range firing out to 300 meters (then 400 to
500 meters).
• Purpose and conduct of practice fire, and scaled target, and at range out to 300
meters (then 400 to 500 meters).
• Range operations.
• Purpose and conduct of qualification/record firing.
• Diagnosis of firing problems
References.
• AR 350-41.
• DA Pamphlet 350-38.
• TRADOC BT/OSUT POL
• FC 23-11.
• FM 25-1, -2, -3, and -4.
• Supporting television tapes that teach BRM parts TVT 7-1 and TVT 7-2.
• FM25-7.
A-2
FM 23-9
QUALIFICATION TRAINING
Although marksmanship is a continuous training requirement, units normally conduct
a refresher program before qualification. Soldiers must be well-rounded in
marksmanship fundamentals and have preparatory marksmanship training before
qualification. This applies to qualification for the entire unit or for newly assigned
personnel. All trainers must understand that rifle marksmanship is not a series of
exercises to be trained in a planned sequence.The unit must prepare for training by—
• Issuing soldiers a serviceable and accurately firing rifle.
• Repairing and replacing bad magazines.
• Issuing and assigning each soldier his own rifle that only he zeros and fires.
• Considering available or required resources early such as targets, ranges,
ammunition, training aids, devices, and publications.
Before the soldier can fire, he must know how to adjust rifle sights and should
understand ballistics to include the effects of wind and gravity on a bullet strike. A
refresher training program can prevent frustration and loss of confidence in the soldier,
and also prevent wasting ammunition and training time. This program is conducted for
all soldiers so they can meet the standards outlined in this manual and soldier’s manuals.
NOTE: Many individual marksmanship tasks, such as operation and function checks, immediate action,
target detection, and dry fire, DO NOT require live fire.
Feedback (precise knowledge of bullet strike) must be included in all live-fire
training. Downrange feedback, known-distance (KD) firing, or scaled-silhouette target
exercises provide the results at extended ranges. Feedback is not adequate when bullets
from previous firings cannot be identified such as previous shot groups on a zero target
that are not triangulated and clearly marked.
The initial live fire should be a grouping exercise, which allows soldiers to apply
marksmanship fundamentals to obtain tight, consistent shot groups. Following a
successful grouping exercise, zeroing is quick and simple using only a few rounds.
After zeroing, downrange feedback should be conducted. A series of
scaled-silhouette targets provide unlimited situations for training on the 25-meter
range if modified field-fire or KD ranges are not available. The timed-fire
scaled-silhouette target can add to successful record fire performance since it
represents targets at six different ranges, requires quick response, and allows precise
feedback. It is another way to confirm zero and requires the application of the four
fundamentals. This exercise can benefit units that have access only to 25-meter ranges.
(See Appendix E for use of scaled targets.)
Field-fire training is a transitional phase that stresses the focusing on a certain
area. Soldiers must detect the target as soon as it comes up and quickly fire with only
hit-or-miss feedback; this is an important combat skill. Soldiers who are exposed to the
field-fire range before they have refined their basic firing skills cannot benefit from the
exercise. For example, if most 175- and 300-meter targets are missed, additional
feedback or PRI training should be conducted.
A-3
FM 23-9
The Army standard record fire course involves an element of surprise in that the
soldier is not be familiar with the lane in which he qualifies. He must scan the sector
and apply detection skills and range estimation skills. However, practice can be
repeated on the record fire course when available. This course provides the best
opportunity for practicing target detection skills and for engaging targets at ranges from
50 to 300 meters.
For poor firers, remedial training is conducted to include the use of the
Weaponeer device discussed in Appendix C. Soldiers proficient in marksmanship skills
can assist in the remedial training effort.
MARKSMANSHIP TRAINING TASKS
The following marksmanship training guide contains the current tasks that are trained
in basic rifle marksmanship programs, during basic combat training at ATCs, and
during infantry OSUT. It provides a basis for structuring unit sustainment programs.
The unit normally trains by performing a diagnostic test of the tasks and conducts
training only for soldiers who must improve their firing skills. Training is usually
conducted in a shorter time frame than at IET.
Introduction to Rifle Marksmanship and Mechanical Training.
(4 hours)
TASK: Perform operator maintenance on M16A1/A2 rifle, magazine, and ammunition.
CONDITIONS: Given an M16A1/A2 rifle, magazine, 5.56-mm dummy ammunition,
and small-arms maintenance equipment case.
STANDARDS:
a. Clear and disassemble an M16A1/A2 rifle.
b. Inspect, clean, and lubricate the rifle.
c. Assemble the rifle and perform a functional check.
d. Disassemble the magazine.
e. Clean and lubricate the magazine.
f. Assemble the magazine.
g. Clean the ammunition.
TASK: Perform immediate-action procedures on the M16A1/A2 rifle to reduce a
stoppage.
CONDITIONS: Given an M16A1/A2 rifle, 5 rounds of dummy 5.56-mm ammunition,
and a 20-/30-round magazine.
A-4
FM 23-9
STANDARDS: Soldiers must demonstrate the ability to reduce a stoppage by applying
the six steps of immediate action.
NOTE: Care must be taken in teaching immediate action (SPORTS) to clear a weapon stoppage. This
technique must not be confused with the procedure for correctly loading a magazine into the
weapon due to the position of the bolt.
TASK: Load and unload an M16A1/A2 rifle magazine.
CONDITIONS: Given either a 20- or 30-round magazine and 5 rounds of dummy
ammunition.
STANDARDS: Load and unload the magazine.
a. Loading the Magazine. Cartridges are loaded into the magazine so that the
projectile or the rounds point in the same direction as the raised portion of the
follower.
b. Unloading the Magazine. Hold the magazine open end away from the body and
depress the center of the top round in the magazine, allowing the first round to be
slipped out of the magazine. This process is repeated until all rounds have been
removed.
TASK: Adjust front and rear sights on the M16A1/A2 rifle.
CONDITIONS: Given an M16A1/A2 rifle, dummy 5.56-mm bullet, nail or other
suitable instrument, explanation, demonstration, and practical exercise.
STANDARDS: Demonstrate an understanding of sight adjustment procedures by
moving the front and rear sights in relationship to the intended movement of the strike
of a bullet.
Fundamentals of Rifle Marksmanship (Dry Fire).
(6 hours)
TASK: Apply the four basic fundamentals of marksmanship.
a. Steady position.
b. Aiming.
c. Breath control.
d. Trigger squeeze.
CONDITIONS: Day, in a suitable training area given, an M16A1 rifle from either the
supported or prone unsupported position; and using the target-box exercise, dime
(washer) exercise, M16 sighting device, and riddle sighting device while wearing a
helmet and LBE.
A-5
FM 23-9
STANDARDS: Correctly apply the basic fundamentals while dry firing from or using—
a. The supported position at 250-meter (M16A1) or 300-meter (M16A2) zero
targets.
b. The prone unsupported position at 250-meter (M16A1) or 300-meter (M16A2)
zero targets.
c. The dime (washer) exercise, M16 sighting device, riddle device, immediate
action, 250-meter (M16A1) or 300-meter (M16A2) zero target, and target-box
exercise.
Fundamentals of Rifle Marksmanship and Diagnostic: (Dry Fire).
(6 hours)
TASK: Demonstrate the integrated act of firing while using the Weaponeer device.
CONDITIONS: Given a demonstration and practical application with 12 shots and a
diagnostic of 9 shots in a suitable training area, and with a Weaponeer and simulated
supported firing position while wearing a helmet and LBE.
STANDARDS: Each soldier demonstrates the integrated act of firing by the proper
application of the four fundamentals of marksmanship and achieves 6 hits out of 9 shots
on the 250-meter (M16A1) or 300-meter (M16A2) zero target displayed on the device.
NOTE: Soldiers who do not meet the standard will receive remedial training on the fundamentals of rifle
marksmanship before subsequent instruction.
Shot Grouping: (Live Fire).
(4 hours)
TASK: Apply the four fundamentals of rifle marksmanship in the integrated act of firing
with the M16A1/A2 rifle (live fire).
CONDITIONS: Day, on a 25-meter firing range, given a 250-meter (M16A1) or
300-meter (M16A2) zero target placed in the center of an E-type silhouette, M16A1/A2
rifle, and 27 rounds of ammunition while wearing a helmet and LBE.
STANDARDS: From the supported position, fire up to 27 rounds or less in 3-round
shot groups and achieve two consecutive 3-round shot groups (measured separately)
within the plastic target-box paddle template (DVC-T 7-86) 4-cm circle.
NOTE: Once the soldier has demonstrated a consistency in his point of aim and achieved the standard in
less than 27 rounds, a bold sight adjustment can be made to bring the groups closer to the aim
point in preparation for subsequent training.
25-meter Battlesight Zeroing.
(8 hours)
TASK: Battlesight zero an M16A1/A2 rifle.
CONDITIONS: On a 25-meter range, given an M16A1/A2 from the supported position,
18 rounds of 5.56-mm ammunition, 250-meter (M16A1) or 300-meter (M16A2)
A-6
FM 23-9
zeroing target placed on the standard E-type silhouette, sandbag for support, and an
M16A1/A2 rifle while wearing a helmet and LBE.
STANDARDS: Each student must adjust the sights so that 5 out of 6 rounds in two
consecutive shot groups strike within the 4-cm circle on the 25-meter zero target.
NOTE: Bullets that break the line of the 4-cm circle should be used in evaluating the soldier’s overall per-
formance of the standard. Soldiers not achieving an acceptable zero in 18 rounds will be diag-
nosed on the Weaponeer and given appropriate remedial training. Once the soldier’s problem
has been corrected, he returns to the firing line and is given up to 18 additional rounds for zero-
ing. A careful serviceability check of the weapon is made for all soldiers failing to zero on the
second attempt.
Downrange Feedback Firing: (75,175,300 meters).
(8 hours)
TASK: Confirm zero at 175 meters.
CONDITIONS: Day, from the supported position, on a modified field or
known-distance (KD) firing range with an E-type silhouette feedback target at 175
meters and given an M16A1/A2 rifle and 6 rounds of 5.56-mm ammunition while
wearing a helmet and LBE.
STANDARDS: Demonstrate consistent application of the integrated act of firing and
obtain 4 out of 6 hits within the 11-inch circle on the 175-meter downrange feedback
target.
NOTES:1. Soldiers are given preliminary instructions on the effects of wind and gravity, and proper hold-
off at range before conducting live fire. Soldiers go downrange and record target hits after each
3-round shot group.
2. Instructors/cadre critique the soldier’s performance after each 3-round shot group and have
the soldier make the necessary sight or aiming adjustments to bring the shot groups within the
11-inch circle. If a KD range is used, feedback is provided by spotters in the pits, and soldiers do
not leave the firing line.
3. Soldiers not confirming zero at range receive remedial training by instructors/cadre personnel
and refire with the last firing order.
TASK: Obtain downrange feedback at 75,175, and 300 meters.
CONDITIONS: Day, given an M16A1/A2 rifle on a modified field or known-distance
firing range with F&E feedback targets while wearing a helmet and LBE, engage the
75-meter target with 5 rounds from the prone unsupported position and with 5 rounds
from the supported position, engage the 175-meter target from the supported position
with 10 rounds and with 10 rounds from the prone unsupported position, and engage
the 300-meter target with 5 rounds from the supported position and with 5 rounds from
the prone unsupported position.
STANDARDS: Demonstrate consistent application of the four fundamentals in the
integrated act of firing and obtain 8 hits out of 10 shots on the 75-meter target, 14 hits
A-7
FM 23-9
out of 20 shots on the 175-meter target, and 5 hits out of 10 shots on the 300-meter
target.
NOTES:1. If a KD or location-of-misses-and-hits (LOMAH) range is available, training should be con-
ducted there. If not, use a modified field-fire range.
2. Soldiers go downrange and record target hits after each 5-round shot group. Instructors/cadre
critique the soldier’s performance after each 5-round exercise. Sights or aiming point is adjusted
as necessary. Soldiers should do not adjust sights to zero for each range versus using the correct
hold-off or adjusted aiming point for range.
Field Fire I (Single Timed Targets) and Target Detection.
(3 hours)
TASK: Detect and engage single timed targets with the M16A1/A2 rifle.
CONDITIONS: Day, given an M16A1/A2 rifle on a field-fire range with timed single
target exposures presented at 75,175, and 300 meters; and given 18 rounds of 5.56-mm
ammunition for an introduction to field fire and 36 rounds of ammunition, and a
requirement to engage all targets within the time exposed while wearing a helmet and
LBE.
STANDARDS: Detect and achieve a total of 22 target hits out of 36 timed target
exposures.
TASK: Detect targets.
CONDITIONS: Given instruction on target detection during daylight hours on a
target-detection range with 10 target exposures at ranges from 50 to 300 meters.
STANDARDS: Each soldier must detect 9 out of 10 targets to receive a GO.
Field Fire П (Single and Multiple Timed Targets).
(3 hours)
TASK: Detect and engage single and multiple timed targets with the M16A1/A2 rifle.
CONDITIONS: Day, given an M16A1/A2 rifle, while wearing a helmet and LBE, on a
field-fire range with timed single and multiple target exposures presented at 75,175,
and 300 meters; and given 10 rounds of 5.56-mm ammunition for an introduction to
field fire single and multiple targets and 44 rounds of ammunition, and a requirement
to engage all targets within the time exposed.
STANDARDS: Detect and achieve 27 target hits out of the 44 timed target exposures.
NOTE: Using peer coaching for firing performance and for assisting in target detection on the firing line
is permitted during Practice Record I and II.
A-8
FM 23-9
Practice Record Fire I.
(4 hours)
TASK: Detect and engage timed targets with the M16A1/A2 rifle.
CONDITIONS: Day, given an M16A1/A2 rifle on a record fire range, 40 timed target
exposures at ranges from 50 meters to 300 meters, and 40 rounds of ammunition.
Engage 20 targets from the supported position and 20 targets from the prone
unsupported position while wearing a helmet and LBE.
STANDARDS: Detect and obtain at least 23 target hits on the 40 exposed timed targets.
Practice Record Fire П.
(4 hours)
TASK: Detect and engage timed targets with the M16A1/A2 rifle.
CONDITIONS: Given an M16A1/A2 rifle on a record fire range, 40 target exposures
at ranges from 50 to 300 meters, and 40 rounds of ammunition; engage 20 targets from
the supported position and 20 targets from the prone unsupported position while
wearing a helmet and LBE.
STANDARDS: Obtain at least 23 hits on the 40 targets exposed.
NOTE: Practice Record Fire I should not be fired on the same range as Practice Record Fire II. If schedul-
ing requires use of the same practice range, soldiers fire from different positions or lanes. The
same range is not used for Practice Record Fire II and Record Fire Qualification, which are not
conducted on the same day. Coaching the firer on the firing lane is permitted during Practice
Record Fire II.
Record Fire.
(4 hours)
TASK: Detect and engage timed targets with an M16A1/A2 rifle.
CONDITIONS: Given an M16A1/A2 rifle on a record fire range, 40 target exposures
at ranges from 50 meters to 300 meters and 40 rounds of ammunition; engage 20 targets
from the supported position and 20 targets from the prone unsupported position while
wearing a helmet and LBE.
STANDARDS: Without assistance, the soldier detects and engages targets with the
M16A1/A2 rifle, and achieves a minimum of 23 target hits out of 40 target exposures.
Qualification Table
• Personnel hitting 22 or fewer targets are unqualified.
• Personnel hitting 23 to 29 targets qualify as marksman.
• Personnel hitting 30 to 35 targets qualify as sharpshooter.
• Personnel hitting 36 to 40 targets qualify as expert.
A-9
FM 23-9
NOTE: Verifiable inoperative targets are the only alibis allowed during record fire. Soldiers whose
weapons fail to operate due to broken parts or bad ammunition are withdrawn from the firing
line to have the weapon repaired or ammunition replaced. Then the soldier retires as a first-time
firer. Failures to fire due to the soldier not applying immediate action or detecting a target are
not considered alibis.
Automatic Firing (M16A1)/Burst Firing (M16A2).
(2 hours)
TASK: Apply the integrated act of automatic rifle/burst firing using automatic firing
positions.
CONDITIONS: Given an explanation, demonstration, M16A1/A2 rifle with bipod, 21
rounds of ammunition, and using the automatic firing position from a supported
position on a field fire range, engage target exposures at 75,175, and 300 meters while
wearing a helmet and LBE.
STANDARDS: Correctly fire the weapon in 3-round bursts and obtain target hits at
each range while demonstrating control of the weapon in the automatic/burst mode
(instructional requirement only).
Protective Mask Firing.
(3 hours)
TASK: Engage targets in an NBC environment with the M16A1/A2 rifle.
CONDITIONS: Given an explanation, demonstration, M16A1/A2 rifle, and 20 rounds
of 5.56-mm ammunition, engage 20 five-second exposures of F-type silhouette targets
at 25 meters, firing 10 from the the prone unsupported and 10 from the prone or
supported position, using semiautomatic fire, while wearing helmet, mask with hood,
gloves, and LBE.
STANDARDS: Obtain a total of 11 hits out of the 20 target exposures. This is a
GO/NO-GO exercise.
Night Fire.
(3 hours)
TASK: Engage targets while applying night-fire techniques with the M16A1/A2 rifle.
CONDITIONS: Given an explanation, demonstration, and practical exercise with 5
rounds during the day, and with semiautomatic fire at night (EENT), engage F-type
silhouette targets at 25 meters from the prone unsupported position and E-type
silhouette targets at 50 meters from the prone supported position; given 35 rounds of
tracer and ball mix ammunition and an M16A1/A2 rifle while wearing a helmet and
LBE.
STANDARDS: Achieve 7 hits out of 30 target exposures. This is a GO/NO-GO
exercise.
NOTE: Five rounds are fired during daylight hours, using night-fire techniques for a practice exercise.
A-10
FM 23-9
Advanced Rifle Marksmanship.
(8 hours)
TASK: Detect and engage moving and stationary targets with the M16A1/A2 rifle
(practice).
CONDITIONS: Day, on a remoted target system range, given an M16A1/A2 rifle, 8
moving target exposures at ranges from 35 to 125 meters, 2 stationary target exposures
at ranges of 175 and 300 meters, and 10 rounds of ammunition; engage targets from the
semisupported firing position while wearing a helmet and LBE.
STANDARDS: Obtain at least 5 target hits on the 10 targets exposed.
NOTE: Soldiers who do not hit at least 5 out of 10 target exposures will perform remedial training before
firing the 40-round scenario.
TASK: Explain the semisupported firing position.
CONDITIONS: Given an explanation and demonstration.
STANDARDS: Explain the following performance measures:
a. Increase the grip of the nonfiring hand.
b. Lift the nonfiring elbow to maintain a smooth track.
c. Maintain rearward pressure with the firing hand.
d. Lift the firing elbow to maintain a smooth track.
e. Spread feet a comfortable distance apart.
f. Do not assume chest-to-wall contact.
TASK: Apply lead guidance rules using the Aid to Improved Marksmanship (AIM)
booklet.
CONDITIONS: Given an explanation and practical application using the AIM booklet.
STANDARDS: Each soldier must select the correct lead on a target in an AIM booklet
exercise.
NOTE: Each soldier is tested by the instructor at the end of the exercise.
TASK: Perform rapid magazine change.
CONDITIONS: Given an M16A1/A2 rifle and two magazines.
STANDARDS: Perform a rapid magazine change within 5 seconds.
TASK: Engage the dry-fire mover.
CONDITIONS: Given an explanation, practical exercise, and an M16A1/A2 rifle, the
dry-fire mover is engaged from the semisupported firing position.
A-11
FM 23-9
STANDARDS: Correctly apply the moving target techniques of tracking and trapping.
TASK: Detect and engage moving and stationary targets with the M16A1/A2 rifle
(record fire).
CONDITIONS: Day, on a remoted target system range, given an M16A1/A2 rifle, 30
moving target exposures at ranges from 35 to 125 meters, 10 stationary target exposures
at ranges of 175 and 300 meters, and 40 rounds of ammunition; engage targets from the
semisupported firing position.
STANDARDS: Obtain at least 15 target hits on the 40 targets exposed.
Advanced Rifle Marksmanship Qualification.
(8 hours)
TASK: Detect and engage moving and stationary targets with the M16A1/A2 rifle.
CONDITIONS: Day, on a remoted target system range, given an M16A1/A2 rifle, 25
moving target exposures at ranges from 35 to 185 meters, 25 stationary target exposures
at ranges from 50 to 300 meters, and two magazines with 25 rounds each of 5.56-mm
ball ammunition.
STANDARDS: Each soldier must achieve 18 target hits out of 50 target exposures.
NOTE: Firing scenario is engaged once for practice and then for qualification. Soldiers who fail to qualify
on the initial day of qualification receive only one refire the same day.
Quick Fire.
(2 hours)
TASK: Engage F-type and E-type silhouettes at 15 and 25 meters, respectively, using
quick-fire techniques.
CONDITIONS: Day, given an operational M16A1/A2 rifle, 20 rounds of 5.56-mm ball
ammunition, and 10 target exposures of 2 seconds each at 15 meters and 25 meters.
STANDARDS: Achieve 7 target hits at 15 meters and 5 target hits at 25 meters for 10
target exposures.
NBC Fire.
(2 hours)
TASK: Engage personnel targets while wearing a protective mask.
CONDITIONS: Day, on a field-fire range, given an M16A1/A2 rifle, 30 rounds of
5.56-mm ball ammunition, 3 magazines, and E-type silhouette targets at 75,175, and
300 meters.
STANDARDS: Each firer has 60 seconds at each target distance. The standard for each
distance is as follows:
A-12
FM 23-9
• 75 meters: 7 target hits of 10 rounds.
• 175 meters: 6 target hits of 10 rounds.
• 300 meters: 2 target hits of 10 rounds.
Night Fire.
(4 hours)
TASK: Engage targets under artificial illumination.
CONDITIONS: Night, on a field-fire range, given an M16A1/A2 rifle with bipod, 20
rounds of 5.56-mm ball ammunition, 10 rounds of 5.56-mm tracer ammunition, and 2
magazines of 15 rounds each; assuming a prone bipod supported position; using 75-
and 175-meter E-type silhouettes; and given 90 seconds at each distance.
STANDARDS: Each soldier must obtain a total of 5 target hits out of 15 rounds at 75
meters and 3 target hits out of 15 rounds at 175 meters.
TASK: Engage targets using an AN/PVS-4 and M16A1/A2 rifle.
CONDITIONS: Night, on a field-fire range, given an M16A1/A2 rifle, 30 rounds of
5.56-mm ball ammunition, 3 magazines of 10 rounds each, and E-type silhouettes at 75,
175, and 300 meters.
STANDARDS: Each firer has 60 seconds at each distance. The standards for each
distance are as follows:
• 75 meters: 7 target hits of 10 rounds.
• 175 meters: 5 target hits of 10 rounds.
• 300 meters: 2 target hits of 10 rounds.
TASK: Mount, dismount, and place into operation the AN/PVS-4.
CONDITIONS: During daylight or limited visibility, given an AN/PVS-4 with mounting
knob assembly and M16A1/A2 rifle.
STANDARDS: Each firer performs the following to the standard:
a. Mount the AN/PVS-4 to an M16A1/A2 rifle in three minutes.
b. Dismount the AN/PVS-4 from an M16A1/A2 rifle in one minute.
c. Place the AN/PVS-4 into operation in five minutes.
TASK: Determine the effects of wind and gravity on sight adjustments for engagements
out to 400 meters (500 meters, M16A2).
A-13
FM 23-9
CONDITIONS: Given an M16A1/A2 rifle, scaled targets that represent various ranges,
scaled sight training aid, information on wind, paper and pencil, and an explanation and
practical application.
STANDARDS: Each soldier demonstrates the correct sight adjustment technique,
considering the effects of wind and gravity on a bullet at long ranges, and how to apply
hold-off on a silhouette target.
TASK: Zero the M16A1/A2 rifle at ranges of 300,400,500, and 600 yards.
CONDITIONS: Given an E-type silhouette and 36 rounds of 5.56-mm ammunition
fired in four 3-round shot groups at each range from the prone supported position.
STANDARDS: Each soldier correctly demonstrates the techniques of sight adjustment
to zero the M16A1/A2 rifle for each range, and obtains a zero within 12 rounds at 300,
400, and 500 yards.
TASK: Engage targets at distances of 300,400,500, and 600 yards with the M16A1/A2
rifle.
CONDITIONS: Given an M16A1/A2 rifle and 46 rounds of 5.56-mm ammunition on
a KD range from the prone supported position, fire at E-type silhouette targets with 2
sighter rounds fired at each range, 10 rounds at 300, 15 at 400, and 15 at 500 fired in
succession.
STANDARDS: Within the time specified, one minute at 300, two minutes at 400 and
two minutes at 500, each soldier is required to meet the minimum gate at each range
and an overall score of 30 hits out of 40 rounds on an E-type silhouette. Times specified
are: 300 yards: 1 minute, 10 rounds achieve 8 hits minimum; 400 yards: 2 minutes, 15
rounds achieve 12 hits minimum; and 500 yards: 2 minutes, 15 rounds achieve 10 hits
minimum.
TASK: Engage scaled silhouette targets using rapid semiautomatic fire.
CONDITIONS: During daylight hours on a 25-meter range; given an M16A1 rifle, one
20-round magazine of 5.56-mm ball ammunition, and a 25-meter scaled silhouette
timed-fire target; using the prone supported firing position; fire 1 round at each of the
10 silhouettes on the timed-fire target using rapid semiautomatic fire.
NOTE: This exercise is fired twice: the first iteration is fired in a time limit of 40 seconds, and the
second iteration is fired in a time limit of 30 seconds. Targets are inspected and posted after
each iteration.
STANDARDS: Each soldier must obtain 14 silhouette target hits.
TASK: Engage a scaled landscape target using suppressive fire.
CONDITIONS: During daylight hours on a 25-meter range, given an M16A1/A2 rifle,
25-meter scaled landscape suppressive fire range, one 15-round magazine, one
10-round magazine, and three 5-round magazines of 5.56-mm ball ammunition; using
A-14
FM 23-9
the supported firing position. Using rapid semiautomatic fire, fire 9 rounds at the "open
window" area of the target and 12 rounds at the "fence/hedgerow" area of the target.
Using automatic fire, fire three 3-round bursts at the "tank turret" area of the target.
STANDARDS: Each soldier must obtain 10 hits inside the dotted lines surrounding the
"fence/hedgerow" area within 24 seconds, 5 hits inside the "open window" area within
18 seconds, and 3 hits inside the "tank turret" area (no time limit).
TASK: Apply the integrated act of automatic rifle firing using the automatic firing
position.
CONDITIONS: Given the M16A1/A2 rifle with bipod, 36 rounds of ammunition, and
scaled silhouette targets at 25 meters; assume the M60 modified prone position or M60
modified supported position.
STANDARDS: Fire the weapon in rapid 3-round bursts and obtain 5 target hits while
demonstrating control of the weapon in the automatic mode.
UNIT LIVE-FIRE EXERCISES
Unit live-fire exercises are planned, prepared, and performed as outlined in the mission
training plan for the infantry platoon and squad. It is within the framework of these
exercises that the soldier performs marksmanship tasks under realistic combat
conditions.
During training, the fundamentals must apply to combat as well as to the range.
Too often soldiers disregard the fundamentals while under the pressure of combat.
Therefore, it is imperative the soldier receives feedback regarding his firing results and
his use of the fundamentals during collective live-fire exercises. This training should
also discuss target acquisition, area fire, quick fire, assuming firing positions,
responding to oral fire commands, and safety. Dry fire or MILES rehearsals at crawl,
walk, and run paces are required to learn SOPs and proper procedures.
Enough evaluators must be present during training to observe each soldier to
provide performance feedback. The evaluator must know the scenario, the location of
targets, the friendly plan, and SOPs. He must watch to determine if the soldier identifies
targets in his sector and successfully engages them. The evaluator must also know the
fundamentals of marksmanship to detect soldier mistakes and review them during the
AAR.
UNIT SUSTAINMENT TRAINING
A unit cannot sustain marksmanship proficiency based only on qualification preceded
by preliminary training. Soldier skills and marksmanship fundamentals deteriorate
within two months, and mechanical skills weaken even sooner. Dry-fire training can
strengthen marksmanship skills and assess their deterioration.
Each new soldier should be assigned a rifle and must perform shot grouping, zero
firing, and diagnostic testing to assess training status. Many of the nonfiring tasks may
be accomplished as opportunity training or concurrent training.
A-15
FM 23-9
NOTE: Mechanical training can be considered as part of the normal weapons maintenance. Using details
to clean weapons deprives soldiers of refresher training.
Problem firers must be given special attention. They must participate in bimonthly
training on the Weaponeer or dry-fire exercises. When fielded, the basic/advanced rifle
marksmanship trainer will provide leaders with a better method of sustaining
marksmanship skills since it provides accurate feedback.
SAMPLE EVALUATION GUIDE
The following questions are provided as an example of a self-evaluation guide for
commanders/leaders to help evaluate unit marksmanship training and small-arms
readiness. Other areas of interest should be developed locally, based on the unit’s
missions and state of training.
COMMANDER’S/LEADER’S RIFLE MARKSMANSHIP
EVALUATION GUIDE
1. Have you clearly stated the priority of rifle (small-arms) proficiency in your
unit? What is it? Is this priority supported by the staff and subordinates? Is it
based on your METL and an understanding of FM 25-100?
2. Have you clearly stated the intent of record fire? Are leaders accurately
evaluating firing performance, based on accurately recorded data and results?
3. Have you clearly stated that weapons qualification or record fire is one of the
commander’s opportunities to assess several skills relating to small-arms
readiness?
4. What qualification course will be used to evaluate your unit’s rifle (small-arms)
readiness?
a. Is the standard combat course 300-yard KD or 25-meter scaled target
used?
b. How will it be conducted? Will the prescribed procedures be followed?
c. Who will collect the data?
5. Have you clearly stated the purpose and intent of PRI?
a. What skills will PRI address?
b. Will PRI be performance-oriented? Are tasks integrated?
6. Do soldiers maintain their assigned weapons and magazines IAW the technical
manual? Do they have a manual?
7. Do soldiers conduct serviceability checks of weapons and magazines before
training? Were maintenance deficiencies corrected?
8. Do soldiers demonstrate an understanding of the weapon’s operation,
functioning, and capabilities?
A-16
FM 23-9
9. Can your soldiers correctly apply immediate-action procedures to reduce
weapon stoppages and then quickly continue to fire? Have they demonstrated
this during dry fire?
10. Are your soldiers firing their assigned weapons?
a. How often are weapons reassigned between individuals?
b. What is the value of a recorded zero?
11. Can your soldiers precisely and consistently apply the four fundamentals of
rifle marksmanship? To what standard? Have they demonstrated their mastery
on a device —
a. During dry fire?
b. During live fire?
c. During firing on the 25-meter course?
d. During KD firing?
12. Can your soldiers accurately battlesight zero their assigned rifle to standards?
a. Do they understand sight adjustment procedures?
b. Do they record rifle zeros? How is it done? Why?
c. Do they record the date the specific soldier last zeroed his specific
rifle? What is the specific sight setting? Are these linked? How do you
check this?
13. Do your soldiers demonstrate their knowledge of the effects of wind and gravity
while firing out to 300 meters? What feedback was provided? How?
14. Can your soldiers scan a designated area or sector of fire and detect all targets
out to 300 meters? If not, why?
15. Can your soldiers quickly engage timed single and multiple targets from both
supported and unsupported firing positions out to 300 meters? If not, which
targets were not engaged? Which were missed? Why?
16. During individual and collective training, do soldiers demonstrate their ability
to manage allocated ammunition and to service all targets? Do they fire several
rounds at one target? Which targets? Why?
17. Based on an analysis of individual qualification scores, what is the distribution?
a. Are most soldiers just meeting the minimum acceptable performance
(marksman)?
b. Are most soldiers distributed in the upper half of the performance
spectrum (sharpshooter, expert)?
c. What is the hit distribution during collective LFXs?
18. Do your soldiers demonstrate proficiency during night-fire, target detection
and acquisition, and night fire engagement techniques? Use of night vision
devices?
A-17
FM 23-9
19. Do your soldiers demonstrate individual marksmanship proficiency during
MOPP firing conditions? During collective exercises?
20. Do your soldiers demonstrate proficiency in moving target engagements? Do
they demonstrate proficiency collectively at the multipurpose range complex by
hitting moving targets? If not, do you conduct moving target training?
21. Do you integrate marksmanship skills into tactical exercises and unit live-fire
exercises? If so, do you conduct suppressive fire, rapid-semiautomatic fire, and
automatic/burst fire? What tasks in the mission training plan are evaluated?
22. Based on your on-site observations and analysis of training and firing
performance, what skills or tasks show a readiness deficiency?
a. What skills need training emphasis? Individual emphasis? Leader
emphasis?
b. What are your performance goals?
23. Who has trained or will train the trainers?
a. What is the subject matter expertise of the cadre?
b. Are they actually training the critical skills?
c. Have they addressed the nonfiring skills first?
d. What aids and devices are being used?
24. What administrative constraints or training distractors can you overcome for
the junior officer and NCO?
a. At what level are the recourses necessary to train marksmanship
controlled — time, aids, weapons, ammunition, ranges?
b. Do the sergeants do the job they are charged with?
A-18
FM 23-9
APPENDIX В
Target Detection and Exercises
The material contained in this appendix provides the detailed information on the skills
required forproper target detection and identification. The exercises contained herein will
train and sustain those skills.
Section I. TARGET DETECTION AND ENGAGEMENT
Target detection is the process of locating, marking, and determining the range to
combat targets. For most soldiers, finding the target can be a greater problem than
hitting it. Target detection must be conducted as part of individual training and tactical
exercises and must be integrated into night live-fire exercises. The observation lines on
target detection ranges approximate the location a soldier might occupy when in
combat. Provisions must be made to incorporate night target detection.
TARGET LOCATION
The ability to locate a combat target depends on the observer’s position and skill in
searching and maintaining observation of an area, and the target indications of the
"enemy" during day or night.
Selection of a Position. A good position is one that offers maximum visibility of
the area while affording cover and concealment. Position has two considerations —the
observer’s tactical position in a location and his body position at that location.
Usually, the firer is told where to prepare his defensive position. However, some
situations (such as the attack and reorganization on the objective) require him to choose
his own defensive position.
Although target training courses prescribe conferences and demonstrations on
choice of steady firing positions, the instruction does not normally include applying this
skill. Therefore, instructors/trainers must emphasize the importance of the observer’s
position when conducting practical exercises in other target-detection techniques.
Observation of an Area. When a soldier moves into a new area, he quickly checks
for enemy activity that could be an immediate danger. This search entails quick glances
at specific points throughout the area rather than just sweeping the eyes across the
terrain. The eyes are sensitive to slight movements occurring within the arc on which
they are focused. However, they must be focused on a certain point to have this
sensitivity.
If the soldier fails to locate the enemy during the initial search, he then begins a
systematic examination known as the 50-meter overlapping strip technique of search
(Figure B-l). Normally, the area nearest the soldier offers the greatest danger to him.
Therefore, the search begins with the terrain nearest the observer’s position.
Beginning at either flank, the soldier searches the terrain to his front in a
180-degree arc that is 50 meters deep. After reaching the opposite flank, the soldier
B-1
FM 23-9
searches over a second 50-meter strip farther out but overlapping the first strip by about
10 meters. The soldier continues until the entire area has been searched.
To benefit from his side vision, the soldier looks at certain points as he searches
from one flank to the other. He remembers prominent terrain features and areas that
offer cover and concealment to the enemy, learning the terrain as he searches it.
After completing his detailed search, the soldier maintains observation of the area.
He should use a technique the same as his initial quick search of the area. He uses quick
glances at various points throughout the entire area, focusing his eyes on certain
features as he conducts this search. He devises a set sequence of searching the area to
ensure complete coverage of all terrain. Since this quick search could fail to detect the
initial enemy movement, the soldier routinely repeats a systematic search of the area.
This systematic search is conducted anytime the attention of the soldier has been
distracted from his area of responsibility.
Target Indicators. A target indicator is anything a soldier (friendly or enemy) does
or fails to do that reveals his position. Since these indicators apply to both sides of the
battlefield, a soldier learns target indicators from the standpoint of locating the enemy.
At the same time, he must prevent the enemy from using the same indicators to locate
him. These indicators can be grouped into three areas for instruction: sound,
movement, and identifiable shapes.
B-2
FM 23-9
Sound. Potential targets indicated by sounds (footsteps, coughing, or equipment
noises) provide only a direction and general location. It is difficult to pin-point a specific
target’s location only by sound. However, the fact that an observer was alerted by a
sound greatly increases the chances that he will locate the target through subsequent
target indicators.
Movement. The problem in locating moving targets depends mainly on the speed
of movement. Slow, deliberate movements are much harder to notice than those that
are quick and jerky. The techniques previously outlined are the best procedures for
locating moving targets.
Identifiable shapes. The lack of or poor use of camouflage and concealment are
indicators that reveal most of the targets on the battlefield. Light reflecting from shiny
surfaces or a contrast that presents a clearly defined outline are indicators easily noticed
by an alert observer. For instruction, camouflage indicators are divided into three
groups:
• Shine. Items such as belt buckles or other metal objects reflect light and act as
a beacon to the wearer’s position; therefore, such objects should be
camouflaged. This is true during the day or night.
• Outlines. The human body and most types of military equipment are outlines
known to all soldiers. The reliability of this indicator depends upon the visibility
and experience of the observer. On a clear day, most soldiers can identify the
enemy or equipment if there is a distinct outline. During poor visibility, it is not
only harder to see outlines, but inexperienced troops often mistake stumps and
rocks for enemy soldiers. Therefore, the soldier should learn the terrain during
good visibility.
• Contrasts. If a soldier wearing a dark uniform moves in front of a snowbank, the
contrast between the white snow and dark uniform makes him clearly visible.
However, if he wears a white (or light-colored) uniform, he is harder to see.
Contrast with the background is one of the hardest target indicators to avoid.
During operations in which the soldier is moving, he is usually exposed to many
types of color backgrounds. No camouflage uniform exists that can blend into
all backgrounds. Therefore, a moving soldier must always be aware of the
surrounding terrain and vegetation. A parapet of freshly dug earth around a
fighting position is noticeable. Even if camouflaged, the position can still be
located due to the materials used for concealing. Camouflage materials are
usually cut from vegetation close by but eventually wilt and change color. An
observer, seeing an area that has been stripped of natural growth, can assume
there are close camouflaged emplacements.
TARGET MARKING
When a target has been located, the soldier should mark its location in relation to visible
terrain or a man-made feature. If the soldier observes several targets at one time, he
can fire on only one of them; therefore, he must mark the locations of the others for
later engagement. To mark the location of a target, the soldier uses an aiming or
B-3
FM 23-9
reference point. An aiming point is a feature directly on line between the soldier and
target, such as a tree trunk, which is usually the most effective means of delivering
accurate fire. Using a reference point or aiming point to mark targets moving from one
location to another depends on the following factors:
Number of Targets. If several targets appear and disappear at the same time, the
point of disappearance of each is hard to determine.
Exposure Time. Usually, moving targets are exposed for only a short period;
therefore, the observer must be alert to see the point of disappearance for most of the
targets.
Target Spacing. The greater the distance between targets, the harder it is to see
the movements of each. When there is a great distance between targets, the observer
should carefully locate and mark the one nearest his position first.
Aiming Points. Aiming points can be either good or poor. Good aiming points are
easily determined in the nearby terrain. Targets disappearing behind good aiming
points, such as man-made objects and large terrain features, can be easily marked for
future engagement. Poor aiming points are not easily distinguishable within the
surrounding terrain. Targets disappearing behind poor aiming points are hard to mark
and are easily lost, and they should be engaged first.
RANGE DETERMINATION
Range determination is the process of finding the distance between two points—one
point is usually the observer’s own position and the other a target or prominent feature.
Range determination is an important skill in completing several types of missions since
it affects combat marksmanship proficiency. It is needed in reporting information, and
in adjusting artillery and mortar fires.
Many techniques are used to determine range: measuring distances on maps,
pacing the distance between two points, using an optical range finder. However, the
soldier does not usually have a map, and he rarely has access to an optical range finder.
Pacing the distance between two points is one technique a soldier can use, as long as
the enemy is not near. A sector sketch is a rough schematic map of an observer’s area
of responsibility (Figure B-2). It shows the range and direction from the soldier’s
position to recognizable objects, terrain features, avenues of approach, and possible
enemy positions. The soldier paces the distance between his position and reference
points to reduce range errors. By referring to the sector sketch, the soldier can quickly
find the range to a target appearing near a reference point.
The 100-Meter Unit-of-Measure Technique. To use this technique, the soldier
must visualize a distance of 100 meters on the ground. For ranges up to 500 meters, he
determines the number of 100-meter increments between the two points (Figure B-3).
Beyond 500 meters, the soldier must be select a point halfway to the target, determine
the number of 100-meter increments to the halfway point, and then double it to find
the range to the target (Figure B-4). During training exercises, the soldier must aware
of the effect that sloping ground has on the appearance of a 100-meter increment.
Ground that slopes upward gives the illusion of greater distance and soldiers have a
tendency to overestimate a 100-meter increment. Conversely, ground that slopes
downward gives the illusion of a shorter distance; therefore, the soldier tends to
underestimate.
B-4
FM 23-9
Figure B-2. Sector sketch.
To obtain proficiency in the 100-meter unit-of-measure technique requires
dedicated practice. Throughout training, the soldier should compare his estimated
range to the actual range determined by pacing or other reliable means. The best
training technique is to require the soldier to pace the range after he has made a visual
estimation, realizing the actual range for himself. This teaches him more than being
told by the instructor/trainer.
One shortcoming of the 100-meter unit-of-measure technique is that its accuracy
is depends upon the amount of visible terrain for ranges up to 500 meters. If a target
appears at a range greater than 500 meters, and the soldier can see only a portion of
the ground between himself and the target, it is hard to accurately use the 100-meter
unit-of-measure technique.
The Appearance-of-Objects Technique. This technique determines range by the
size of the object observed. This is a common technique of determining distances and
is used by most people in their everyday living. For example, a motorist trying to pass
another car must judge the distance of an oncoming vehicle. He does this based on his
knowledge of how vehicles appear at various distances. Suppose the motorist knows
that at a distance of 1 mile an oncoming vehicle seems to be 1 inch wide and 2 inches
high. Then, anytime he sees another oncoming vehicle that fits this dimension, he knows
it is about 1 mile away. This same technique can be used by the firer to determine ranges
on the battlefield. If he knows the size and detail of personnel and equipment at known
B-5
FM 23-9
ranges, then he can compare these traits to like objects at unknown ranges—when the
traits match, so do the ranges.
The Front Sight Post Estimation. The front sight post can be used to estimate
range. The targets in Figure B-4 show the soldier perceives the front sight post to be
the same width as a man-size target when the target is located at a distance of 175
meters. A man can be covered using half of the front sight post when the range to the
target is doubled to 350 meters. An easy rule to remember: if the target is bigger than
the front sight post, the target must be within 175 meters; when the target is less than
the full width of the front sight post, the target is beyond 175 meters. The silhouette
zeroing target provides the same perception to the firer as a man-sized target at 250
meters. The various scaled-silhouette targets provide a means for soldiers to practice
range estimation with the front sight post. This is a method of dry-fire training, and
soldiers should be aware of the importance of range estimation during all of their
B-6
FM 23-9
Section II. TARGET DETECTION RANGES
The following information gives specific instructions on target detection range design.
Additional information should be reviewed in FM 25-7.
CONSTRUCTION
Target detection ranges must be located in areas having good natural vegetation
and close to the firing range. (Figure B-5.)
The observation line should be the first area of the target detection range to be
built. The location of all downrange panels, sound systems, and foliage depends on the
degree of visibility from the defensive position (observation) line. The observation line
should be wide enough to accommodate 50 points. The distance between observation
points should be no closer than two meters. An observation line of this size can
accommodate half of a 200-man unit (50 two-man teams).
NOTE: An initial rehearsal should be conducted for each target detection exercise. More rehearsals are
needed only if target men are changed. A presenta-tion refers to each time one exercise is con-
ducted. A rehearsal is counted as a presentation.
The observation fan should cover an area between 30 degrees left of the left flank
point of the observation line to 30 degrees right of the right flank point. To provide
maximum flexibility in conducting exercises in range determination, the target
detection range should be deeper than 500 meters. Installations having limited training
space can conduct effective training on ranges at least 300 meters deep.
Figure B-5. Target detection range.
50 POINT OBSERVATION LINE
B-7
FM 23-9
Both lettered and numbered panels are placed throughout the observation area.
The lettered panels serve two purposes: first, they divide the range into sectors defining
a firer’s area of responsibility; and second, they serve as reference points for marking
targets. The numbered panels are used during exercises to locate sound targets. These
panels are built so they can be raised or lowered, as needed.
The number of panels needed depends on the size of the range. For a range having
a 50-point observation line and 300 meters deep, about 7 lettered panels and 14
numbered panels will be needed.
Numbered stakes are placed downrange. These stakes are not visible from the
observation line since they are used only by instructors and target men in presenting
target situations. The number of stakes needed depends on the depth of the range. As
a guide, a range 300 meters deep has about 150 stakes. When placing numbered stakes,
one technique is to divide the range into three sectors: A, B, and C. This allows for easy
reference. Stakes are then numbered beginning at the maximum depth of the range
and proceeding forward to the observation line. All stakes in one sector would have the
sector letter following the number. For example, if the right sector is designated A, all
numbers on stakes in that sector are followed by the letter A. Stakes in the center and
left sectors have the letter В or C, respectively, after the number. The location of all
panels and stakes must be recorded on the master trial sheets (see Figure B-6).
Figure B-6. Example master trial sheet.
Trial No. Range (meters) Target man Description of requirements
1 2 3 4 5 (> 7 8 <) 10 200 150 175 300 300 175 175 200 300 300 1 2 3 I 2 3 3 1 2 3 Standing exposed by tree. Down to kneeling, exposed. Slow movement to out-of-sight position. Out-of-sight fire round for smoke indications. Stake 1A. Same as above with a poor aiming point. Stake 3B. Start standing. Disappear on command. Reappear in same position. Make five 4-second rushes with a good aiming point. Fire one round from last position. Stakes 2C-3C-4C-5C-6Q- 7C. Start from kneeling position behind bush. Make five 4- to 5-second rushes. Disappear where there is a poor aiming point. Reappear from same position. 5-3-3-5-5-seconds. Fire round from last position. Stakes 1A-2A-3A-4A-5A-6A. Start prone. Make five 4-5-8-second rushes. Disappear after each rush and roll or crouch to new position. Three-second rush, crawl left. Six-second rush, rush, crawl right. Cross small draw. Appear and make 8-second rush, crawl left. Three-second rush, crawl right. Fire one round from last position. Stakes 3B-4B-5B-6B-7B-8B. Start prone. Make three 4-second and two 6-second lateral rushes to new concealment. Reappear at same point of disappearance. Vary time between rushes. Fire one round from last position. Stakes 7L-8L-9L-10C-1IC-12C. Do same in reverse. Crawl or roll to new position after disappearing. Fire round from last position. Stakes 12C-1IC-10C-9C-8C-7C. Run 200 yards from tree to position with a poor aiming point. Fire two blanks 1 minute after disappearance. Stakes 6A-11C. Start prone. Three-second rush, crawl left. Five-second rush, crawl right. 5-L-3-3-6-R-4-5. through draw. Fire round from last position. (Numbers indicate duration of rush; letters L and R indicate direction of roll or crawl after each rush. I Stakes 8B-9B-10B-11B. Start behind bush. 6-8-R-3-R-4-3. Fire round from last position. Stakes 7L-9L-10L-11L-12C. Note.Target (rial sheets should be prepared from a master trial sheet similar to the one above con- taining only the trials and target indications performed by a specific target.
B-8
FM 23-9
For proper control of target men, sound equipment is used throughout the
observation area. Since problems of adequate sound vary according to location, it is
best that a sound survey be conducted of each target detection range before the
equipment is installed.
The exact positioning of panels, stakes, and sound equipment is checked from the
observation line. Sound equipment should be concealed from the observation line.
FIELD-EXPEDIENT AREA FOR TRAINING
If standard detection ranges are not available, the principles can be applied to parks,
wooded fields, vegetated areas, and urban areas. The following checklist provides
suggestions for adapting areas for target detection training.
The range should have more depth than a standard target detection range. The
fan of observation should be increased, depending on the degree of camouflage in the
area.
Target men should be spaced farther apart in areas having little natural vegetation.
Logs, man-made objects, and piles of logs may be needed to add to the number of
concealed positions.
For MOUT training, a MOUT site should be used. If one is not available, buildings
in a company area could be used with target men or silhouettes.
PERSONNEL AND EQUIPMENT
The following personnel are needed to conduct and supervise target-detection training:
• OIC or principal instructor.
• Four assistant instructors (based on a 50-point observation line).
• Target men for the period of instruction.
The following equipment is needed to conduct target—detection training:
• One aiming device (see Figure B-7) for each observation point for the period of
instruction.
Figure B-7. Aiming device.
B-9
FM 23-9
• One master trial sheet (Figure B-8) for each instructor and assistant instructor.
• One answer sheet for each observer.
• One target trial card (Figure B-9) for each target man.
• Camouflage paint tubes.
• One rifle for each observation point (for exercises in which observers simulate
firing on target men).
• Combat field equipment including helmet and rifle for target men.
Section III. CONDUCT OF TRAINING
Demonstrators for target detection training wear combat field equipment. This
increases their value as target men simulating the movements and appearance of
"enemy" soldiers. Target detection is taught in three phases: first, how to locate a target;
second, how to mark the location of the target; and third, how to determine the range
to the target.
MASTER TRIAL SHEETS AND TARGET TRIAL CARDS
Trial sheets and trial cards contain the following information:
Master Trial Sheets. The master trial sheet (Figure B-6) shows the number of
target men needed for an exercise, the actions to be performed by the target men, the
duration of the actions, and the panel or stake locations where the actions occur. A
master trial sheet is made for each period of instruction.
Target Trial Cards. A target trial card (Figure B-8) is issued to each man who acts
as an enemy "target" in the area of observation. These men, called target men, use the
target trial cards as a basis for their location and actions throughout an exercise. All
actions performed by a target man, which lead to his eventual disclosure, are termed
trials.
CONDUCT OF TRIALS
Before a trial is conducted, soldiers face away from the range area so that target men
can assume their positions unobserved. When target men are in position, soldiers are
told to face downrange. There are four types of trials conducted during target detection
training: stationary trials, moving trials, stationary sound trials, and multiple moving
and sound target trials. Certain factors can affect the appearance of objects and should
be known by the firer (Table B-l, page B-12).
Stationary Trials. Normally, there are four phases in each stationary trial. The
first three phases last 30 seconds each.
PHASE ONE: The target man remains motionless in a slightly exposed position.
This allows him to observe the heads and chests of soldiers along the observation line.
PHASE TWO: The same target man slowly raises his head and shoulders until he
can observe the soldiers on the observation line from the ground up.
B-10
FM 23-9
Figure B-8. Example of target trial card (locally fabricated).
BACK TARGET MAN NO. 1
TRIAL NO. 1 stake; цослпам 2
5 25-25A-25B-3C-15D-25C
6 13-1ЗА-1 ЗВ-1 ЭС-! 3D
8 9-9A-9B-9C
TRIAL (PHASE) 1- 1- ACTIONS MOTIONLESS IN PRONE POSITION
2- SLOWLY RAISE AND LOWER HEAD AND SHOULDERS
3- SLOWLY RAISE HEAD AND SHOULDERS. DROP ABRUPTLY
4- FIRE TWO BLANKS
5-RUSH TO EACH POSITION. AWAIT COMMANDS TO STAND. DISAPPEAR.
AND MAKE NEXT MOVEMENT.
6-CRAWL TO EACH POSITION. AWAIT COMMANDS TO STAND. DISAPPEAR.
AND MAKE NEXT MOVEMENT.
8-RUSH TO EACH POSITION. STOPPING TWO SECONDS AT EACH.
RANGE J
PERIOD 16
B-11
FM 23-9
PHASE THREE: The same target man makes quick, jerky movements constantly
for 30 seconds.
PHASE FOUR: The same target man fires one or two blank rounds toward the
observation line (safety permitting). The command to begin a stationary target trial is
TRIAL ONE, PHASE ONE, OBSERVE.
Table B-1. Factors affecting the appearance of objects.
Factors in determining range by eye Objects appear nearer than they are— Objects appear more distant than they are—
The target-its clearness of out line and details. When most of the target is visible and offers a clear outline. When only a small part of the target may be seen or is small in relation to its sur- roundings.
Nature of the terrain or position of the observer. When looking across a depression, most of which is hidden from view. When looking across a depression, all of which is visible.
When looking downward from high ground. When looking from low ground toward high ground
When looking down a straight, open road or along a railroad track. When field of vision is narrowly confined as in twisted streets, draws, or forest trails.
Light and atmosphere. When looking over uniform surfaces like water, snow, desert, or grain fields or when the sun is shining from behind the observer. In poor light such as dawn and dusk in rain, snow, or fog, or when the sun is in the observer’s eyes. When the target blends into the background or terrain.
When the target is in sharp contrast with the background or is silhouetted by reason of size, shape, or color.
When seen in the clear atmosphere of high altitudes.in bright light
B-12
FM 23-9
If during the first phase the observer thinks he has located the target, he notes the
letter of the panel nearest the target and determines the range from his position to the
target. He enters this information on his answer sheet, and an assistant instructor checks
his answer. A range error of not more than 10 percent is satisfactory. If the observer
has chosen the wrong panel or the error in range exceeds 10 percent, he is told his
answer is incorrect and to continue his observation.
If the answer is correct, the soldier continues his observation of the area, recording
the required information on his answer sheet for the subsequent phases. This procedure
is followed throughout the four phases of stationary trials.
NOTE: For more detailed information, see Exercise 1 and 2.
Moving Trials. The target trial cards for moving trials indicate the certain trials in
which the target man engages, the stake location to which he moves, and the type of
movement or other actions he performs. For example, the target trial card for target
man No. 1 might indicate that he engages in trials 1,5,6, and 8. In trial 1, the instructions
state that he perform four phases of a stationary target exercise. In trial 5, he is told to
make five short rushes from stake 25 to stake 25C.
To check the accuracy of soldiers, aiming devices are used to mark the points of
disappearance of multiple moving targets.
The observer aligns the two sight knobs on the aiming device where he thinks the
targets are located. Normally, two soldiers are assigned to an aiming device: one to act
as the observer and one to check the observer’s work.
To begin a moving trial, the command is MOVING TARGET(S) STAND UP;
DISAPPEAR AND BEGIN YOUR MOVEMENTS. On these commands, the
applicable target men reveal themselves to the observers, move back into their
concealed positions, and begin the movements as directed on their target trial cards.
During some exercises, the target men may fire blank rounds after reaching a new
location. Observers are allowed 30 seconds to mark the point(s) of disappearance with
the aiming device. The instructor then commands, TARGETS STAND UP,
ALTERNATE OBSERVERS CHECK ALIGNMENT. The alternate observer then
checks the accuracy of the observer’s work. This procedure continues until all of the
trials have been conducted.
NOTE: For more detailed information, see Exercises 3,4, and 6.
Stationary Sound Trials. Before the trials begin, the observers should draw a
sector sketch of the area.
All of the numbered panels should then be raised for stationary sound trials. Each
target man occupies a concealed position near one of the numbered panels. The
instructor then informs the observer that a shot will be fired from one of the numbered
panels. The observers must determine the panel location nearest the sound and record
the information on their answer sheets. The commands to conduct the exercise are
TRIAL NUMBER (ONE): READY, AIM, FIRE. OBSERVERS RECORD YOUR
ANSWERS.
Should it be necessary to reposition target men for subsequent trials, the observers
should face away from the range while the movement is taking place. In some trials,
B-13
FM 23-9
two target men should fire at the same time to demonstrate how hard it is to locate
similar sounds coming from two directions at the same time.
NOTE: For more detailed information, see Exercise 5.
Multiple Moving and Sound Targets. To conduct multiple moving and sound
target trials, eight target men are needed (two 4-man teams).
Soldiers are divided into two groups with each pair having one aiming device. The
command to begin the exercise is MOVING TARGETS STAND UP; DISAPPEAR
AND BEGIN YOUR MOVEMENT. The moving target men expose themselves,
resume their concealed positions, and begin their rushes forward. After making their
move, some of the target men should fire one or more blank rounds. The observer uses
the aiming device to mark the point of disappearance of as many moving targets as
possible.
Upon completing a trial, the instructor commands, TARGETS STAND UP,
CHECK ALIGNMENT. The target men stand up and the alternate observer checks
the accuracy of the observer’s work. In the next trial, the alternate observer and
observer change places.
NOTE: For more detailed information, see Exercise 7.
TESTS
In the final stage of target detection training, soldiers are tested on their ability to detect
and determine ranges to single stationary targets. They mark the points of
disappearance of single and multiple moving targets and locate targets by sound.
Test Number One—Stationary Targets. Test number one is conducted using the
same four phases prescribed for the target detection trials of stationary targets. The
soldier receives points in proportion to the number of phases needed to detect the
target. If the soldier detects the target in phase one, he receives four points; in phase
two, three points; and so on down to zero points if he fails to detect the target after four
phases. To be considered correct, the soldier (again) selects the lettered panel nearest
the target and determines the range from his position to the target. A range error of 10
percent or less is satisfactory. Master trial sheets, target cards, and range procedures
are the same as prescribed for the practical exercises in detecting stationary targets.
Each soldier is given 16 trials involving detection of stationary targets to provide enough
informa- tion to judge his ability.
NOTE: For more detailed information, see Exercise 8.
Test Number Two—Moving Targets. Target detection test number two requires
the soldier to mark the points of disappearance of multiple moving targets. These tests
are conducted the same as the practical exercises for moving targets. After the target
men have completed their movements, soldiers are allowed 30 seconds to mark the
points of disappearance using the aiming device. Assistant instructors check the results
and award one point for each correctly marked target location.
NOTE: For more detailed information, see Exercise 9.
B-14
FM 23-9
Test Number Three—Sound Targets. Test number three involves sound targets.
The test is conducted the same as practical exercises for locating sound targets. On
command, one or two target men fire their rifles, and the observer tries to locate the
sound using the numbered panels as reference points. One point is awarded for each
correct answer.
NOTE: For more detailed information see Exercis 9. All reproducible forms are contained in-
Appendix H.
EXERCISES
The following exercises teach soldiers the skills and techniques of detecting, marking,
and determining the range to realistic battlefield targets.
Exercise 1: Introduction to Target Detection (Two Hours).
Range facilities. Two target detection ranges.
Personnel.
• Two principal instructors (one for each range).
• Six target men (three for each range).
NOTE: One principal instructor is needed at each range. He sets up the range, trains target men, and
conducts the class. Four assistant instructors are needed for each range. They control the ob-
servers, assist in scoring, and are familiar with the position of the targets. The six target men (three
for each range) must be trained to perform the duties of "targets.” Each is assigned a number of
target placements within a certain area. All target men are given a target trial card containing
only the trial numbers and the indications he is to perform.
Blank ammunition requirements.
• For each presentation:
First hour: Five rounds for demonstration.
Second hour: Fifteen rounds for practice exercise.
• For each rehearsal:
First hour: Five rounds.
Second hour: Fifteen rounds.
Master trial sheet: Exercises 1, 2 and 8. (Table B-2).
Table B-2. Exercises 1, 2, and 8.
TRIAL NO. TARGET MEN DESCRIPTION OF REQUIREMENTS LOCATION RANGE (METERS) STAKE
1 1 1. Slightly exposed, motionless. A-B 2. Raise and lower head, slowly. 3. Repeat 2 (above), rapidly. 4. Fire one blank round. 22 41A
2 2 1. Slightly exposed, motionless. B-D 2. Slowly move head from side to side. 3. Raise head slowly, drop quickly. 4. Fire one blank round. 66 31В
B-15
FM 23-9
Table B-2. Exercises 1,2, and 8 (continued).
TRIAL NO. TARGET MEN DESCRIPTION OF REQUIREMENTS LOCATION RANGE (METERS) STAKE
3 3 1. Slightly exposed, motionless. 2. Move forward and back every ten seconds. 3. Step out and back rapidly. 4. Fire two blank rounds. E-F 161 11C
4 1 Change Target Locations 1. Slightly exposed, motionless. 2. Shake bush every five seconds. 3. Raise and lower head slowly while wearing shiny helmet liner. 4. Fire two blank rounds. G 119 13B
5 2 1. Kneeling partly exposed, motionless. 2. Slowly move head and shoulders from side to side. 3. Jump out and back every five seconds. 4. Fire one blank round. C 44 32A
6 3 1. Slightly exposed, motionless. 2. Slowly assume kneeling position. 3. Raise up slowly; drop quickly. 4. Fire two blank rounds. D 95 19B
7 1 Change Target Locations 1. Slightly exposed, kneeling. 2. Raise head slowly; drop quickly. 3. Repeat 2 (above), rapidly. 4. Fire two blank rounds. В 91 29B
8 2 1. Slightly exposed, motionless. 2. Slowly move up and down. 3. Make rapid, jerky movements. 4. Fire one blank round. D 51 27
9 3 1. Slightly exposed, motionless. 2. Slowly move head and shoulders from side to side. 3. Same as 2 (above) with shiny helmet liner. 4. Fire one blank round. A-D 41 29A
10 1 Change Target Locations 1. Slightly exposed. 2. Move slowly. 3. Move quickly. 4. Fire two blank rounds. D-E 88 28B
В-16
FM 23-9
NOTE: An individual target trial card (Figure B-8) is prepared for each target man. It contains only those
trials in which he engages, the location (stake number) used, and the action performed in each
trial. Although each target man has rehearsed, the target trial cards ensure that no mistakes are
made.
Answer sheet. See DA Form 3009-R (Target Detection Exercise Answer
Sheet—Periods 1,2, and 8) (Figure B-9).
Figure B-9. Example of completed DA Form 3009-R (Exercises 1,2, and 8).
TARGET DETECTION EXERCISE ANSWER SHEET PERIODS 1,2, AND 8 For uao of thia form, aoo FM 23-8 ond FM 23-9; proponent ogoncy la TRADOC.
NAME (LAST) FIRST) Sa PLATOON SQUAD NK 3D 3D DATE 4 Apk 23
TRIAL NO. PHASE NUMBER WHERE (LETTER OF NEAREST LANDMARK) RANCE (METERS)
1 2 3 4
I c 3*0
2 X X у/ D 75“
3 X. 8 5*0
4 X X X yf r <379 _
5 X / A 83
6 X X & /75"
7 X C /96
8 X y^ 8
9 X X X X
10 X X F №
11 X yj D 8 9
12 X у/ 0 G3
13 X / A 9Q
14 X X yj 0 70
15 ЕГ /<20
16 у/ c <230
TOTAL /Г /s _L_
DA FORM 3009-R, 1 Nov 73 replaces oa form зооо-я. i jun es. which is obsolete.
B-17
FM 23-9
Exercise 2: Detection of Realistic Battlefield Targets (Two Hours). If possible,
this exercise is conducted the same as Exercise 1, but on a different range. Range
facilities, personnel, organization, ammunition requirements, master trial sheet, and
answer sheet are the same as outlined for Exercise 1.
Exercise 3: Detection of Single Moving Targets (Two Hours). This exercise gives
the soldier practice in detecting and simulating the engagement of single, combat- type
moving targets.
Range facilities. One target detection range.
Personnel.
• One principal instructor.
• Three target men.
Blank ammunition requirements.
• Rounds for each presentation —10.
• Rounds for each rehearsal —10.
Master trial sheet: Exercise 3. (Table B-3).
Table B-3. Exercise 3.
TRIAL NO. TARGET MEN DESCRIPTION OF REQUIREMENTS RANGE (METERS) STAKE
1 1 1. Standing by tree. 2. Kneel slowly. 3. Move slowly from view. 200 6A
2 2 4. Fire two blank rounds. Same as trial 1 (above). Poor aiming point location. 150 28B
3 3 5. Start standing. Disappear; on command, reappear in same position. Make four 4-second rushes to good aiming points. Change Target Locations 175 27C-28C-29C- 30C-32C
4 1 1. Start from kneeling position behind bush. Make five rushes. Disappear at poor aiming points. Reappear from same position; 5-3-3-5-5 seconds. Fire one blank round from last position. 300 1A-2A-3A-4A- 5A-6A
5 3 2. Start prone. Make five rushes. Disappear after each rush and roll or crawl to a new location before reappearing; 5-3-2-8-8 seconds. Fire one blank round from last position. 300 1C-2C-3C-4C- 5C-6C
6 2 3. Start prone. Make five lateral rushes. Reappear at same location; 4-5-4-4-3 seconds. Fire one blank round from last position. 175 28B-29B-30B- 31B-32B-33B
B-18
FM 23-9
TRIAL NO. Table B-3. Exercise 3 (continued)
TARGET MEN DESCRIPTION OF REQUIREMENTS I RANGE (METERS) STAKE
7 2 Change Target Location 1. Run 6 meters in reverse 175 33B-32B-31B-
8 3 2. Run 100 meters from tree to 200 30B-29B-28B 25C-39C
9 1 position with poor aiming point. 3. Start prone; 5-L-3-3-6-R-4-5 260 6A-7A-8A-9A
10 2 seconds; through draw. Fire one blank round from last position. (Numbers indicate duration of rush; letters indicate direction of roll or crawl after each rush.) 4. Start behind bush; 6-8-R-3-R- 300 10A-11A 1B-2B-3B-4B-
4-3 seconds. Fire one blank round from last position. 5B-6B
Answer sheet: See DA Form 3010-R (Target Detection Exercise Answer
Sheet —Period 3) (Figure B-10).
Figure B-10. Example of completed DA Form 3010-R (Exercise 3).
TARGET detection exercise ANSWER SHEET PERIOD 3 For wee of this form, FM 23*8 and FM 23«9; proponent agency 1* TRADOC*
NAME THlSLE PLATOON 3b SOU A0 Зь date ЗА TUPttlto
/ TRIAL NO. WHERE «LETTER OF NEAREST LANDMARK1 RANGE METERS;
1 у/ & V file
2 X A X %)
3 v € V no
4 у/ В V 225
5 VC у/ 50
6 X й VIW
7 \J &
8 V b y/105
9 у/ #/ V15
•0 Zj
DA FORM 3010-R, 1 Nov 73 replaces oa form >0- o-R. • jmn as. is oaso. C’L.
B-19
FM 23-9
Exercise 4: Detection of Multiple Moving Targets (Two Hours). This exercise
gives the soldier practice in detecting and aiming at multiple, combat-type moving
targets.
Range facilities. Two target detection ranges.
Personnel.
• Two principal instructors (one for each range).
• Eight assistant instructors (four for each range).
• Sixteen target men (eight for each range).
Organization. One order of soldiers is assigned to each range.
Blank ammunition requirements.
• Rounds for each presentation—47.
• Rounds for each rehearsal—47.
Master trial sheet: Exercise 4. Soldiers use target aiming device to mark the
points of disappearance of moving targets (Table B-4).
TRIAL NO. Table B-4. Exercise 4.
TARGET MEN DESCRIPTION OF REQUIREMENTS RANGE (METERS) STAKE I
1 1 1. Kneeling exposed. Crawl to new position in five 5-meter crawling movements. Fire one blank round from each new 2 position. (Five rounds for each target man.) Good aiming point positions. 75 42A-43A-44A-45A- 46A 40B-41B-42B-43B- 44B
2 3 4 2. Same as above. Poor aiming point positions, but reference points available. Reference points increase in difficulty each time. 100 39A-40A-41A-42A- 43A 37B-38B-39B-40B 41В
3 5 6 3. Start with target men walking through woods or other partial concealment. Disappear when fired on. Make five 4-second rushes to positions with good aiming points. Fire one blank round from last position. 300 9A-10A-11A-12A- 13A-14A 11B-12B-13B-14B- 15B-16B- 7C-8C-9C-10C- 11C-12C- 9C-10C-11C-12C- 13C-14C
4 7 8 4. Start from kneeling position behind bush. Make five rushes. Disappear where there is a poor aiming point. Reference points available but not easy; 4-2-4-4 seconds. Fire one blank round from last position. 200 12C-13C-14C-15C- 16C-17C 14C-15C-16C-17C- 18C-19C
B-20
FM 23-9
Table B-4. Exercise 4 (continued).
TRIAL NO. TARGET MEN DESCRIPTION OF REQUIREMENTS RANGE (METERS) Change Target Locations STAKE
5 4 5 6 1. Start prone. Make five rushes, good and poor aiming point positions; 2-4-6-2 seconds. Fire one blank round from last position. 300 8A-9A-10A-11A- 12A-13A 11A-12A-13A-15A- 16A 10B-11B-12B-13B- 14B-15B
6 1 2. Start at tree. Make five rushes to new positions affording good and poor aiming points; 2-3-4-2 seconds. Fire one blank round from last position. 175 14A-15A-16A-17A- 18A-19A 18B-19B-20B-21B- 22B-23B 17C-18C-19C-20C- 21C-22C 19C-20C-21C -22C- 23C-24C
7 3 3. Start at different distances. Make five approach rushes; 4-2-4-3-4 seconds. Varied good and poor aiming point positions. Fire one blank from last position. Change Target Locations 175 17A-18A-19A-20A- 21A-22A 13A-14A-15A-16A- 17A-18A 16A-17A-18A-19A 20A-21A
8 1 1. Make five 5-meter crawling movements to positions with good aiming points. Reference points increase in difficulty each time. Fire one blank round from last position. 200 11A-12A-13A-14A- 15A-16A 12B-13B-14B-15B- 16B 12C-13C-14C-15C- 16C 9A-10A-11A- 12A-13A-14A
9 3 4 5 2. Start walking In woods. Make five rushes; 4-2-2-6-4 seconds. Fire one blank round from last position. 300 10B-11B-12B-13B- 14B-15B 10C-11C-12C-13C- 14C-15C
10 3 4 5 6 3. Make five rushes; 4-3-6-2-3 seconds. Fire one blank round from last position. 150 20A-21A-22A-23A- 24A-25A 21B-22B-23B-24B- 25B-26B
18B-19B-
20B-21B- 22B-23B
19C-20C-21C-22C-
23C-24C
В-21
FM 23-9
Exercise 5: Locating Target by Sound (Two Hours). This exercise gives the soldier
practice in locating targets by the sound of firing from hostile firing position.
Range facilities. One target detection range.
Personnel.
• One principal instructor.
• One assistant instructor for every 10 soldiers.
• Five target men.
Organization. One order of soldiers on the range at a time.
Blank ammunition requirements.
• Rounds for each presentation—46.
• Rounds for each rehearsal—46.
Master trial sheet: Exercise 5 (Table B-5).
TRIAL NO. Table B-5. Exercise 5. TARGET MEN PANEL LOCATION
1 1 14
2 2 11
3 4
3 4 7
5 9
4 1 14
2 11
5 3 4
6 4 7
7 5 9
2 11
Change Target Locations
8 1 2
3 8
9 4 12
10 2 13
5 6
11 3 8
4 12
12 1 2
2 13
13 4 12
5 6
Change Target Locations
15 4 1
5 3
16 1 10
17 3 5
2 9
18 4 1
1 10
19 3 5
B-22
FM 23-9
Table B-5. Exercise 5 (continued).
TRIAL NO. TARGET MEN I PANEL LOCATION
20 5 3
2 9
21 4 1
3 5
Change Target Locations
22 1 3
23 2 9
24 3 14
4 10
25 5 8
1 3
26 2 9
3 14
27 4 10
5 8
28 4 8
Answer sheet. See DA Form 3011-R (Target Detection Answer
Sheet—Period 5) (Figure B-ll).
Figure B-11. Example of completed DA Form 3011-R (Exercise 5).
TARGET dection exercise ANSWER sheet PERIOD S F«r ••• H All Urw, ••• FM ZJ-S ob4 FM 23-9. A« ч—су •« TRADOC.
OBSERVER'S NAME (LAST) «FIRST) PLATOON №s 3t>
OBSERVATION POINT DATE 33
TRIAL NO. SOUND POSITION TRIAL NO SOUND POSITION
1 7-3 IS L-/3
2 6 X 16 /ч-¥
3 17 9
4 /*-/# 18 /3
$ ЛЗХ 19
6 7 20 7-/X
7 --- H 21 3
s 3'5 2? 7
9 23
10 -- ?4 7-/a
II 'f- 25 ID-/
»2 9 it 26 -
n Ю 27 3
14 28 - — bdEA
TOTAL RIGHT WRONG
DA FORM 3R1I-R, 1 M— 73 «pucti ол гоям «oit-я. t juh which » OMOitic,
B-23
FM 23-9
Exercise 6: Detection of Movement by Opposing Teams, Personal Camouflage.
This exercise gives soldiers practical work in target detection and movement as target
teams. Demonstrations and practical work in personal camouflage are conducted.
Range facilities. Two target detection ranges.
Personnel.
• Two principal instructors (one for each range).
• Four assistant instructors (two for each range).
• Four demonstrators (two for each range).
Organization. One order of observers is assigned to each range.
Blank ammunition requirements. None.
Master trial sheet, Exercise 6. (Table B-6.)
Table B-6. Exercise 6.
Trial NO. (1) 6-sec rush (2) 2-sec rush (3) 5-m low crawl (4) 4-sec rush (5) 5-m low crawl (6) 4-sec rush (7) 10-m high crawl (8) 2-sec rush (9) 6-sec rush (Ю) 50-m bound
1 X X X X X
2 X X X X X
3 X X X X X
4 X X X X X
5 X X X X X
6 X X X X X
7 X X X X X
8 X X X X X
9 X X X X X
10 X X X X X
11 X X X X X
12 X X X X X
13 X X X X X
14 X X X X X
This master trial sheet reflects 10 trials for 14 soldiers acting as
targets. Units may revise the master trial sheet to include additional
target requirements to ensure maximum participation when larger
squads are used.
Exercise 7: Combination of Sound and Multiple Moving Targets (Two Hours).
This exercise gives soldiers practice in locating, marking, aiming, and firing at moving
combat-type targets.
Range facilities. Two target detection ranges.
Personnel.
• Two principal instructors (one for each range).
• Ten assistant instructors (five for each range).
• Sixteen target men (eight for each range).
B-24
FM 23-9
Organization. One order of soldiers assigned to each range.
Blank ammunition requirements.
• Rounds for each presentation—75.
• Rounds for each rehearsal—75.
Master trial sheet: Exercise 7. (Table B-7.)
Table B-7. Exercise 7.
TRIAL TARGET DESCRIPTION OF REQUIREMENTS RANGE STAKE
NO. MEN (METERS)
1 1 1. Two targets make clumsy 5- 150 28A-31A
2 meter crawls; two target men 28B-31B
3 fire four flank rounds each P14
4 toward the observation line. All located at good aiming point positions. P3
2 5 2. Three target men make skilled 200 22A-23A
6 5-meter crawls; one target man 20B-22B
7 fires two blank rounds. All 21C-23C
8 positions lack good aiming points. Distance between targets is 25 meters. P4
Change Target Locations
3 1 1. Two target men are walking through 300 1A-2A
2 woods, disappear on command, 2B-3B
3 and make one 4-second rush. 1C-2C
4 Two target men fire two blank rounds each. P12
4 5 2. Two target men make one 3- 250 14B-15B
6 second rush and disappear 13C-14C
7 at poor aiming point positions. P13
8 Two target men fire three blank rounds each. P10
Change Target Locations
5 1 1. One target man makes a 5- 100 31A-32A
2 meter crawl and stops at a 31B-32B
3 good aiming point position. 29C-31C
4 One target man makes a 5- meter rush and stops at a poor aiming point position. One target makes a 10-meter rush. One target man fires five blanks. P9
6 5 2. Three target men make a 5- 150 27B-28B
6 meter clumsy crawl. One target man 26C-27C
7 man fires two blank rounds. 25A-26A
8 All positions at poor aiming points. Good reference points available. P2
B-25
FM 23-9
Table B-7. Exercise 7 (continued).
TRIAL TARGET DESCRIPTION OF REQUIREMENTS RANGE STAKE
NO. MEN (METERS)
Change Target Locations
7 1 1. Two target men make a skilled 225 P11
2 5-meter crawl. Two target P1
3 men fire two blank rounds each. 13C-14C
4 All positions have good aiming 14B-15B
points.
8 5 2. Three target men walk through 300 P6
6 woods until fired on from 2C-3C
7 observation line. They disappear 2A-3A
8 and make a 5-meter crawl. 2B-3B
One target man fires four
blank rounds.
Change Target Locations
9 1 1. Same as above except all target 150 24A-25A
2 men stop at poor aiming point 25B-24B
3 positions. P6- 26C-27C
10 4 2. Two target men make a five- 225 15C-17C
5 second rush. Two target men P8
6 fire one blank round each. 19B-20B
Change Target Locations
11 1 1. Four target men fire one blank 250 P11
2 round each. P13
3 P9
4 P12
12 5 2. One target man makes a 10-meter 100 P6
6 rush to a poor aiming point P10
7 position. Three target men P4
8 fire two blank rounds each. 39B-42B
Change Target Locations
13 1 1. Two target men fire one 200 11A-12A
2 blank round each. Two target 9B-10B
3 men make a 5-meter crawl. P2
4 Varied good and poor aiming P5
point positions.
14 5 2. Same as above except all 75 P3
6 positions are at poor aiming P1
7 points and require the use of 44B-45B
8 reference points. 44C-45C
Change Target Locations
15 1 1. Two target men, spaced far 225 8A-9A
2 apart, make a three-second 7C-8C
3 rush. Two target men, close P14
4 together, fire two blank P11
rounds each.
B-26
FM 23-9
Table B-7. Exercise 7 (continued).
TRIAL TARGET NO. MEN DESCRIPTION OF REQUIREMENTS RANGE STAKE (METERS)
16 5 6 7 8 2. Four target men make one- 275 15A-16A two-,three-, and four second 14B-13B rushes after being fired on 16B-15B from the observation line. 14C-15C Each target man fires one blank round two seconds after disappearing. Varied, good and poor aiming point positions.
17 1 2 3 4 3. Four target men alternately 125 36A fire one round each; varied 35A good and poor aiming point 31В positions. 32C
18 5 6 7 8 4. Two target men make a 300 P9 one-second rush; two target men P13 fire one blank round each. 1A-2A Varied, good and poor aiming 2C-3C points. Change Target Locations
19 1 2 3 4 1. Three target men make a three- 125 35A-34A second rush, and one target man 36A-37A fires one blank round. 31B-32B P9
20 5 6 7 8 2. One target man makes a 5- 175 23B-24B meter crawl and three target P14 men fire one round each. P11 Varied, good and poor aiming P1 points.
Answer sheet. See DA Form 5791-R (Target Detection Exercise Answer
Sheet—Period 7) (Figure B-12).
B-27
FM 23-9
Figure B-12. Example of completed DA Form 5791-R (Exercise 7).
TARGET DETECTION EXERCISE ANSWER SHEET PERIOD 7 F«r ef ibi. foe*. FM 23-1 «*1 FM 23-9; prw—> «*«icy l« TRADOC.
COMBMATION OF SOUND LOCALIZATION AND MULTIPLE MOVMG TARGETS (OBSERVERS CHECK EACH OTHER'S AUNEMEHT AND PLACE NUMBER OF TARGETS CORRECTLY ALMED M SPACE OPPOSITE APPROPRIATE TRIAL NUMBER.)
NAME Per# PLATOON 3D SQUAD 3D DATE X FeS
TRIAL NO. NO.CORRECT TRIAL NO. NO. CORRECT
1 / 12 H
2 3 13 3
3 z 14 Z
4 1 15
5 3 14 3
4 1 17 /
7 0 18 О
• 19 3
♦ 2. 20 1
Ю 3 TOTAL CORRECT
П 1
TRIAL NO. HO. CORRECT TRIAL NO. HO. CORRECT
1 О 12 z
2 13 о
3 X 14 /
4 . 1 15 /
5 2 14
4 3 17 /
/ 18 3
• 19
9 — _ 20 4
Ю Лг TOTAL CORRECT £
11 I
OA FORM 5791-R. JUN 89
B-28
FM 23-9
Exercise 8: Target Detection Test One (One Hour). This exercise tests the soldier’s
ability to locate and deter- mine ranges to single, stationaiy battlefield targets.
Range facilities. One target detection range.
Personnel.
• One principal instructor.
• Seven assistant instructors.
• Three target men.
Blank ammunition requirements.
• Rounds for each presentation —15.
• Rounds for each rehearsal —15.
Master trial sheet. Same as for Exercise 1, except locations of target men
should be changed.
Answer sheet. Same as for Exercise 1 (Figure B-9).
Exercise 9: Target Detection Tests Two and Three (One Hour). This exercise tests
the soldier’s ability to locate and mark the points of disappearance of single and
multiple moving targets (test two) and his ability to locate sound targets (test three).
Range facilities. One target detection range.
Personnel.
• One principal instructor.
• Four assistant instructors.
• Four target men.
Blank ammunition requirements.
• Rounds for each presentation—30.
• Rounds for each rehearsal—30.
Master trial sheet, target detection, test two. (See Table B-8.)
Master trial sheet, sound detection, test three. (See Table B-9.)
Table B-8. Test two, Exercise 9.
TRIAL NO. TARGET MEN DESCRIPTION OF REQUIREMENTS RANGE (METERS) STAKE
1 1 1. Kneeling by tree, up on command. 300 1A-2A
Ten-meter bound to a poor aiming point.
2 2 2. Rush 15 meters to a poor aiming 75 40A-41A
3 point. 39B-40B
40C-41C
3 1 1. Ten-meter rush to poor aiming 200 11A-12A
2 points. 13A-14A
3 11B-12B
4 11C-12C
4 1 2. Ten-meter lateral rush. Good 150 12A-12B
2 aiming points. 14A-14B
3 12B-12C
4 12C-11B
B-29
FM 23-9
Table B-8. Test two, Exercise 9.
TRIAL TARGET DESCRIPTION OF REQUIREMENTS RANGE STAKE
NO. MEN Change Target Locations (METERS)
5 1 1. One man rush right, the other 200 13A-12B
2 left; both stop at poor aiming points. 12C-11B
6 3 2. Ten-meter rush. One to a good 75 35C-36C
4 aiming point and the other 100 29B-30B
1 to poor aiming points. 125 27A-28A
7 2 1. Five-meter rush to poor aiming 75 34B-35C
3 points.
4 35A-35B
8 1 2. Twenty-meter rush to a poor aiming point. 200 16A-17A
9 2 3. One rush 5 meters to a good 300 1B-2B
3 aiming point and the other 10 meters to a poor aiming point. 1C-3C
10 4 4. Five-meter lateral rush to 150 25A-26A
1 poor aiming points. 24B-25B
Table B-9. Test three, Exercise 9.
TRIAL NO. TARGET MEN PANEL LOCATION
1 1 6
2 2.3 4, 12
3 4, 1 7,9
4 2 8
5 3 14
6 4, 1 14,3
7 2 1
8 3 6
9 4 7
10 1.2 13,8
11 3,4 10. 1
12 1.2 2,6
13 3,4 7.3
14 1.2 11,6
15 3 7
16 4 3
17 1.2 6, 14
18 3,4 12, 1
19 1 8
20 2 3
В-30
FM 23-9
Answer sheet. See DA Form 3014-R (Target Detection Exercise Answer Sheets
Tests No. 2 and 3—Period 9) (see Figure B-15).
Figure B-15. Example of completed DA Form 3014-R (Exercise 9).
target detection exercise
ANSWERSHEETS TESTS NO 2 ANO J
PERIOD ♦
Fw ««• e4 *14 444 FM ZM e»d FM ZX-F. *e «pwrr U TtAOOC.
oesetvff $ MAJMf tLAST) iFiBSYi Я1АТООЯ
_____________________HegBAKO. John
observation po«nt' date
ал___________ зпммШ
TflAl NUMBtft но of TAiceisFtf$fMTen FiCHT vtONG
I । 1 о
2 2^ \
) 4 1 3
4 4 3 1
s 2 о
4 1
7 ) 1
at i — 1 e
1 2 \ 1
Ю 2 о
TOTAL al5*________ «’СИТ VI___________________ «аомс ___________Я
OA JU' < * .'.f'* -1 »
B-31
FM 23-9
APPENDIX C
Training Aids and Devices
Training aids and devices must be included in a marksmanship program. This appendix
lists those that are available and provides information on how to obtain them for
marksmanship training.
Section I. TRAINING RESOURCES
This section provides the classification and nomenclature for training aids, devices, and
targets.
CLASSIFICATIONS
Information on the classification of various training resources are listed below along
with a general description and source publication.
TYPE DISCRIPTION SOURCE PUBLICATION
Graphic Training Aids Charts, handout cards, diagrams, posters, overhead transparencies, 35-mm slides, and small plastic aids DA Pam 108-1 Index of Army Motion Picture and related autovisual aids.
Devices Three-dimensional training aids such as scale models and simu- lators Da Pam 310-12 Index Description of Army Training Devices.
Training Extension Course Leassons Audiovisual 8-mm film cartridge audiocassette and student instruc- tion sheet. Extension training material status list published by the US Army Training Sup- port Center, Fort Eustis, Va 23604, Catalog of Training Extension Course Lessons.
TRAINING AND AUDIOVISUAL SUPPORT CENTER
TASCs are located throughout the world and are the POCs for obtaining all training
aids and devices. Each TASC provides training aid services to customers in their
geographic area of support to include Active Army units and schools, Reserve
Components, and ROTC units.
C-1
FM 23-9
NOTE: For more information concerning TASC operations, write Commander, United States Army
Training Support Center, Al I N: ATIC-DM, Fort Eustis, VA 23604.
TRAINING DEVICES AND EXERCISES
Several marksmanship training devices are available to aid in sustainment training
when used with the appropriate training strategies. They are beneficial when
ammunition is limited for training or practice exercises. Some training devices are
complex, costly, and in limited supply, while others are relatively simple, cheap, and in
large supply. Devices and aids can be used alone or in combinations. Individuals or
squads can sustain/practice basic marksmanship skills and fundamentals with
devices/aids.
Aiming Card. The M15A1 card (Figure C-l) determines if the soldier understands
how to aim at target center of mass. The card is misaligned, and the soldier is instructed
to establish the correct point of aim. It is checked by a trainer. Several aimings provide
an understanding of center of mass. Also, this card is used to ensure the soldier
understands adjustment of the aiming point, how to allow for gravity, and how to engage
a moving target. The sight-target relationship on the card is the same visual perception
the soldier should have when he is zeroing on a standard silhouette target.
Figure C-1. The M15A1 aiming card (NSN 6910-00-716-0930).
M15A1
AIMING CARD
IMIS CARD SHOWS IHI I HOM I SIGH I
POST PROP! RIY Cl Nil KI () IN I HI
Hi AR SIGH! API RIlJRI iHOl I
ш/
MOVI THl IAKGI I IDCOHIUCIIY
Pi AC! THI AIMING POINI At Cl NUR
Ol VISIBll MASS
TARGET
250 METERS
Riddle Sighting Device. The Riddle sighting device (Figure C-2) indicates to the
trainer if the soldier understands the aiming process while using the rifle. It is a small
plastic plate with a magnet and a drawing of an E-type silhouette target. A two-man
team is needed. The soldier assumes a supported or prone firing position. The assistant
places the Riddle device on the front sight assembly and adjusts the plastic plate at the
direction of the firer until he reports the proper sight picture. Without disturbing the
plastic plate, the trainer or coach must aim through the sights to determine if the soldier
C-2
FM 23-9
has aligned the target and sight properly. Many sightings are conducted, and the trainer
may include variations to ensure the soldier understands the process.
This device is provided with a small metal clip that slips over the front sight assembly. It allows a smoother
surface for attachment of the magnet; however, the device can be used without the metal clip.
M16 Sighting Device. The M16 sighting device (Figure C-3) is made of metal with
a tinted square of glass placed at an angle.
When the device is attached to the rear of the M16A1 carrying handle, an observer
can look through the sight to see what the firer sees. The M16 sighting device can be
mounted on the M16A2 rifle. The charging handle must be pulled to the rear first. Then,
C-3
FM 23-9
the M16 sighting device is mounted on the rear of the carrying handle, and the charging
handle is returned.
The M16 sighting device can be used in a diy-fire or live-fire environment, but a
brass cartridge deflector must be used during live fire. The observer must practice with
the sight for it to be effective. For example, the observer looks at a reflected image; if
the soldier is aiming to the right, it appears left to the observer. Also, the device must
be precisely positioned on the rifle (it may need to be bent to stay on). The observer’s
position must remain constant. At the same time, the observer talks with the firer to
Blank Firing Attachment (BFA), M15A2. This device (Figure C-4) is attached to
the muzzle of the M16A1 or M16A2 rifle. It is designed to keep sufficient gas in the
barrel of the weapon to allow semiautomatic, automatic, or burst firing with blank
ammunition (M200). After firing 50 rounds, the attachment should be checked for a
tight fit. Continuous blank firing results in a carbon buildup in the bore, gas tube, and
carrier key. When this occurs, the cleaning procedures in TM 9-1005-249-10 for TM
9-1005-249-34 should be followed.
Target-Box Exercise. The target-box exercise checks the consistency of aiming and
placement of three-round shot groups in a diy-fire environment (Figure C-5).
To conduct the exercise, the target man places the silhouette anywhere on the
plain sheet of paper and moves the silhouette target as directed by the firer. The two
positions must have already been established so that the rifle is pointed at some place
on the paper. The positions are separated by 15 yards or 25 meters. When the firer
establishes proper aiming, he signals the target man to "Mark." Only hand signals are
C-4
FM 23-9
Figure C-4. Blank firing attachment.
used since voice commands would be impractical when training several pairs of soldiers
at one time.
The target man then places the pencil through the hole in the silhouette target and
makes a dot on the paper. Then he moves the silhouette to another spot on the paper
and indicates to the firer that he is ready for another shot. When the three shots are
C-5
FM 23-9
completed, the target man triangulates the three shots and labels it shot group number
one. The firer and instructor view the shot group.
A simulated shot group covered within a 1-cm (diameter) circle indicates
consistent aiming. Since no rifle or ammunition variability is involved and since there
is no requirement to place the shot group in a certain location, a 1-cm standard may be
compared to obtaining a 4-cm shot group on the 25-meter live-fire zero range. The
soldier fires several shot groups. After two or three shot groups are completed in one
location, the rifle, paper holder, or paper is moved so shots fall on a clean section of
the paper.
Any movement of the rifle or paper between the first and third shots of a group
voids the exercise. Two devices are available to hold the rifle (Figures C-6 and Figure
C-7). The rifle holding device and rifle holding box are positioned on level ground, or
are secured by sandbags or stakes to ensure there is no rifle movement during the firing
of the three shots. Movement of the paper is eased by using a solid backing (Figure
C-8). Any movement of either is reflected in the size of the shot group. Several varieties
of wooden target boxes have been locally fabricated. A new rifle holder has been
developed and should be used (Figure C-7).
The silhouettes on the plastic paddle (Figure C-9) are scaled to represent an
E-type silhouette target at 250 meters. The visual perception during the target-box
exercise is similar to what a soldier sees while zeroing on a standard zeroing target. The
small E-type silhouette is the same scale at 15 yards as the larger silhouette is at the
25-meter range (some training areas are set up at 15 yards; others are set up at 25
meters). While there are some benefits to representing a 250-meter target, the main
benefit of this exercise can be obtained at any distance. A standard zero target can be
used at 25 meters in place of the paddle by placing a small hole in the center (dot),
moving the target sheet over the paper, and marking as previously outlined.
C-6
FM 23-9
Figure C-7. Rifle holder (locally fabricated).
The shot-group exercise provides a chance for the trainer to critique the soldier
on his aiming procedures, aiming consistency, and placement of shot groups. Assuming
that the rifle and paper remain stationary and that the target man properly marks the
three shots, the only factor to cause separation of the dots on the paper is error in the
soldier’s aiming procedures. When the soldier can consistently direct the target into
alignment with the sights on this exercise, he should be able to aim at the same
center-of-mass point on the zero range or on targets at actual range.
Ball-and-Dummy Exercise. This exercise is conducted on a live-fire range. The
coach or designated assistant inserts a dummy round into a magazine of live rounds. In
this way, the coach can detect if the firer knows when the rifle is going to fire. The firer
must not know when a dummy round is in the magazine. When the hammer falls on a
dummy round, which the firer thought was live, the firer and his coach may see
C-7
FM 23-9
movement. This is caused by the firer anticipating the shot or using improper trigger
squeeze. Proper trigger squeeze results in no movement when the hammer falls. If the
firer knows when the hammer is going to fall, movement can often be observed at that
moment.
Dime (Washer) Exercise. This dry-fire technique is used to teach or evaluate the
skill of trigger squeeze and is effective when conducted from an unsupported position.
When using the M16A1 rifle for this exercise, the soldier must cock the weapon, assume
an unsupported firing position, and aim at the target. An assistant places a dime
(washer) on the rifle’s barrel between the flash suppressor and front sight post
assembly. The soldier then tries to squeeze the trigger naturally without causing the
dime (washer) to fall off. Several repetitions of this exercise must be conducted to
determine if the soldier has problems with trigger squeeze.
If the dime (washer) is allowed to touch the sight assembly or flash suppressor, it
may fall off due to the jolt of the hammer. Also, the strength of the hammer spring on
some rifles can make this a difficult exercise to perform. Instructors should allow
soldiers to use another rifle when the one they are using is defective or needs repair.
When using the M16A2 rifle, the dime (washer) exercise is conducted the same
except that a locally fabricated device must be attached to the weapon. A piece of
3/4-inch bonding material is folded into a clothes-pin shape and inserted into the
compensator of the weapon so that the dime (washer) can be placed on top of it.
NOTE: The Weaponeer is discussed in Section II.
SELECTION OF TRAINING AIDS AND DEVICES
After training requirements have been established, appropriate training aids and
devices can be selected from the TASC. To help in selecting these aids and devices,
many of those available and their identification numbers are listed here.
TYPE/NOMENCLATURE
Training Aids and Devices
Weaponeer —Remedial Rifle
Marksmanship Trainer
M15A2 Blank Firing Aattachment
Chamber Block (M16A1/A2)
M16 Sighting Device (Al or
Target Box Paddle
Riddle Device
M16 Rifle Brass Deflector
C-8
A2)(Left and
DENTIFICATION NUMBER
DVC7-57
Supply Item (see TM)
Local TASC Expendable
Item
Right) DVC-T7-84
DVC-T7-86
DVC-T7-87
DVC-T7-87
FM 23-9
M15A1 Aiming Card M16A1 Disassembly Mat (Paper) M16A1 Display Mat (Canvas) Rifle Rest (for target-box exercise) Rifle Rest (Portable) Front and Rear Sight, M16 Rifle Front and Rear Sight, M16A2 Rifle Rotating Panel Chalkboard Holder for GTA Charts Graphic Training Aids (GTAs) Rifle, 5.56-mm, M16AlMechanical Training (1973) Rifle, M16 Disassembly (M16A1) M16A1 Rifle Malfunction DVC-T-07-26 GTA 09-06-43 TAD-0034 (locally) TAD-12 (locally) TAD-12 (locally) TAD-26 (locally) TAD-0026A TAD-4 (locally) GTA 7-1-26 GTA 9-6-43 GTA 9-6-44
M16A1 Rifle Maintenance Card GTA 21-1-3
Training Films
*Rifle, M16A1—Part I, Care, Cleaning, Lubrication ‘Rifle, M16A1--Part II, Field Expedients * Also available in video tape. TF 21-3907 TF 21-3908
TYPE/NOMENCLATURE IDENTIFICATION NUMBER
Video Tapes Engagement of Moving Personnel Targets with the M16A1 Rifle Team from the Foxhole Position 2E/010-071-1271-B
Cycle of Functioning M16A1 Rifle Overview of BRM Training 7-13 (Feb 87) TVT 7-1 Teaching Rifle Marksmanship: Part One. TVT 7-2 Teaching Rifle Marksmanship: Part Two. 2E/010-071-0444-B 010-071-0086-B 2E/010-071-0725-B
TEC Lessons
Loading and Unloading the M16A1 Rifle Disassembly and Assembly M16A1 Rifle 1-939-071-0009-F 1-939-071-0010-F
C-9
FM 23-9
Maintaining the M16A1 Rifle
Preventing and Correcting
Common Malfunctions
Zero the M16A1 Rifle
Zero M16A1 Aim and Fire Techniques
Zero M16A1 Analyze and Correct Errors
Perform Operator Maintenance on an M16A1
Rifle, Magazine, and Ammunition
(Plus hands-on test)
Load, Reduce a Stoppage, and Clear
an M16A1 Rifle (Plus hands-on test)
Battlesight Zero an M16A1 Rifle
1-939-071-0011-F
1-939-071-0012-F
1-939-071-0213-J
1-939-071-0214-F
1-939-071-0215-F
071-311-2001
071-311-2003
071-311-2004
TARGET ORDERING NUMBERS
The following numbers can be used when ordering marksmanship targets.
Designation D prone Description Full-length face with V through two scoring areas NSN 6920-00-922-7450
D prone Repair center with V through two scoring areas 6920-00-922-7451
Disignation Discription NSN
E-Silhouette Full-length face, solid-color paper 6920-00-600-6874
E-Silhouette Full-length, pop-up, solid-color plastic 6920-00-071-4780
E-Silhouette Full-length face,
cardboard, kneeling
F-Silhouette Short-length face,
solid-color paper
F-Silhouette Short-length, pop-up,
solid-color plastic
6920-00-795-1806
6920-00-610-9086
6920-00-071-4589
C-10
FM 23-9
F-Silhouette Short-length face pasteboard 6920-00-795-1807
25-Meter Alternate- Course Scaled Qualification Target 50- to 300-meter scaled-silhouette target 6920-01-167-1398
15-meter Battlesight- Zero Target (.22-Caliber RFA) 250-meter scaled- silhouette target (50-foot indoor range) 6920-01-167-1393
15-Meter Alternate Course C (.22-Caliber RFA) 50- to 300-meter scaled-silhouette (50-foot in door range) 6920-01-167-1396
25-Meter M16A1 Zero Target 250-meter scaled silhouette-target 6920-01-167-1392
DESIGNATION DESCRIPTION NSN
25-Meter M16A2 Zero Target 300-meter scaled- silhouette target 6920-01-253-4005
25-meter M16A1 Slow-Fire Target 75- to 300-meter scaled-silhouette target 6920-01-167-1391
25-Meter M16A1 Timed-Fire Target 50- to 300-meter scaled-silhouette target 6920-01-167-1397
75-Meter M16A1 Feedback Target 75-meter scaled F-type silhouette 6920-01-169-6921
75-Meter M16A2 Feedback Target 75-meter scaled F-type silhouette 6920-01-253-4006
175-Meter M16A Feedback Target 1175-meter scaled E-type silhouette 6920-01-167-1395
175-Meter M16A2 Feedback Target 175-meter scaled E-type silhouette 6920-01-167-1395
Pasters, Black 6920-00-165-6354
С-11
FM 23-9
Pasters, Buff
Landscape Target
Spindle, Target Spotter Wood
Spotters, 1 1/2 inches in diameter
Spotters, 3 inches in diameter
6920-00-172-3572
6920-00-713-8253
6920-00-713-8257
6920-00-789-0864
6920-00-713-8255
LOCATION OF MISS AND HIT (LOMAH) SYSTEM
LOMAH is a range aid used during downrange feedback exercises. The device uses
acoustical triangulation to compute the exact location of a supersonic bullet as it passes
through a target. The bullet impact is displayed instantly on a video monitor at the firing
line. Of more importance, it shows the location of a bullet miss, thereby, allowing the
firer to make either a sight adjustment or a holdoff for subsequent shots.
LOMAH, like other devices, is only an aid. Understanding the weapon and firing
techniques, and having a coach/instructor are required when the soldier uses LOMAH.
LOMAH ranges have been fielded in USAREUR and Korea. In locations where
known distance (KD) ranges are not available and restrictions prohibit walking
downrange, LOMAH is a practical alternative to essential downrange feedback.
Requests for LOMAH devices should be sent to: Commander, US Army Training
Support Center, ATIC-DM, Fort Eustis VA 23604.
CALIBER .22 RIMFIRE ADAPTER, M261
The RFA can contribute to a unit’s marksmanship program when 5.56-mm ammunition
is not available or when ranges that allow the firing of 5.56-mm ammunition are not
available. The RFA can be useful for marksmanship training such as night fire, quick
fire, and assault fire. It is not recommended for primary marksmanship training.
Training Considerations. When service ammunition is in short supply, the RFA
can be used to complement a unit’s training program.
Rifle performance. The RFA/.22-caliber rimfire ammunition cannot replicate the
exact ballistics of the 5.56-mm ammunition. Efforts to match RFAs with specific rifles
can result in reasonable replication. Under ideal training conditions, the RFA should
be used with dedicated rifles. Some variability can be eliminated by finding the right
match of RFA and rifle. A trial-and-error technique can match RFAs to rifles, which
results in good firing weapons. The RFA cannot be depended on to fire in the same
place as 5.56-mm ammunition; therefore, it is not necessary for the soldier to use his
own weapon during RFA training.
Rifle zero. The RFA will not usually group in the same location as 5.56-mm
ammunition at 25 meters; therefore, it cannot be used for weapon zero. It normally
fires a slightly larger shot group than 5.56-mm ammunition. When a soldier uses an
RFA in his rifle, he must be careful not to lose his 5.56-mm zero. This can be
accomplished by using hold-off while firing .22-caliber ammunition or keeping a record
of sight changes so the sights can be moved back. The .22-caliber round approximates
C-12
FM 23-9
the 5.56-mm trajectory out to 25 meters. The correct zeroing target or appropriate
scaled-silhouette targets can be used for practice firing exercises at 15 meters (50 feet)
or 25 meters.
Advantages and Disadvantages. If the RFA is selected as a training aid, the
advantages and disadvantages of the service must be considered during training.
Advantages. The .22-caliber ammunition is cheaper and, therefore, may be
available in larger quantities than 5.56-mm ammunition. It can be fired on all approved
indoor ranges and in other close-in ranges where 5.56-mm ammunition is prohibited.
RFA training can be used to sustain marksmanship skills between periods when full
caliber 5.56-mm ammunition training cannot be conducted.
Disadvantages. Some negative training aspects exist because of differences in the
weapon’s functioning when using the RFA. These differences include the forward assist
not working, and the bolt not locking to the rear after the last round is fired. More
malfunctions can occur with the RFA than with 5.56-mm ammunition, and
immediate-action procedures are different.
MULTIPURPOSE ARCADE COMBAT SIMULATOR
MACS has been developed by the US Army as an inexpensive part-task marksmanship
trainer (Figure C-10).
The system consists of a Commodore 64 microcomputer, 13-inch color monitor,
specially designed long-distance light pen, and mount, which attaches to the M16 rifle.
(Some versions use a permanent mount on a demilitarized rifle.) The system is
activated by a program cartridge, which contains several training exercises.
Figure C-10. Multipurpose arcade combat simulator.
C-13
FM 23-9
MACS was designed to enhance other training techniques and existing training
aids and devices that are used to train and sustain marksmanship skills. It is not designed
to replace live-fire training or to eliminate the need for knowledgeable instructors.
MACS provides additional practice for those units that do not have access to adequate
range facilities or have other resource constraints.
Section II. М2 BOLT and SHORT-RANGE TRAINING
AMMUNITION
To augment the use of the 5.56-mm ammunition, a new generation of short-range
training ammunition (SRTA), M862, is available.
SHORT-RANGE TRAINING AMMUNITION
The SRTA is about .06-inch shorter than the corresponding service cartridge, and has
a blunt nose and projectile. The case and base that enclose the primer cap are made of
brass, which is lined with plastic. The projectile is made of light-blue plastic. SRTA has
an overall weight of about 114.6 grains. The muzzle velocity of the projectile is about
4,750 feet per second. Because of the light weight of the projectile, the velocity The
projectile has a usable range of 25 meters and a maximum range of less than 300 meters.
NOTE: The SRTA can be used in an unmodified rifle; however, the rifle only functions as a single-shot
weapon.
WARNING
THE PROJECTILE CAUSES CONSIDERABLE
DAMAGE OUT TO 50 METERS AND IS
CONSIDERED DANGEROUS OUT TO ITS
MAXIMUM RANGE.
М2 BOLT
The М2 bolt is required to cycle the rifle when firing the SRTA (Figure C-ll), and is
interchangeable with the M16A1 and M16A2 rifles. Use of the М2 bolt converts the
rifle from gas-operated weapons to blowback-operated weapons. The modified rifle
functions in both semiautomatic and automatic modes. The bolts are stored and issued
by the installation TASC. Issue of the М2 bolt is based on the percentage of troop
population.
C-14
FM 23-9
WARNING
THE RECESS IN THE М2 BOLT FACE AND THE
SRTA CARTRIDGE RIM ARE SMALLER THAN THE
REGULAR M16A1/A2 AMMUNITION AND BOLT
FACE. DO NOT USE REGULAR AMMUNITION WITH
THE М2 BOLT INSTALLED.
SRTA AND М2 BOLT USE IN TRAINING
The US Army is constantly faced with training constraints such as lack of suitable real
estate, safety restrictions, and cost of transporting troops to live-fire ranges. Short-range
training ammunition allows training in small local training areas without fixed training
facilities, in MOUT facilities, and in combat training theaters. With its 25-meter usable
range, the SRTA can train on grouping, zeroing, 25-meter scaled silhouette firing,
Section III. WEAPONEER
The Weaponeer is an effective rifle marksmanship training device that simulates the
life firing of the M16A1/A2 rifle. The system can be used for developing and sustaining
marksmanship skills, diagnosing and correcting problems, and assessing basic skills.
CHARACTERISTICS
The Weaponeer operates on 110 to 130 volts AC, 10 amperes, 50 or 60 Hz, grounded
electrical power. (A stand-alone voltage transformer is provided for oversea units.)
The recommended training area for Weaponeer is 10 by 23 by 8 feet. The operational
temperature range is 40 degrees to 100 degrees F. The Weaponeer must be protected
from the elements, and it should not be subjected to excessive vibration, high dust
levels, or condensing humidity. The M16A1/A2 attached to the Weaponeer is
demilitarized and does not require the usual weapon security.
C-15
FM 23-9
EQUIPMENT DATA
Major Components Weight Length Width Height
(unpacked) (pounds) (inches) (inches) (inches)
Range assembly 119 99 30 8*/60
Target assembly 64 20 30 24
Operator’s console 94 24 29 31
Firing pads -
(stacked) 120 93 26 6
(prone layout) 120 93 74 2
(supported position) 120 93 52 46
Elevator ladder 20 3 24 61
*Prone position or when closed for transit.
DESCRIPTION
The Weaponeer is shown in Figure C-12 in the standing supported firing position. The
rifle, with the exception of smoke and cartridge ejection, operates normally, and has
the same weight and balance as the standard weapon. An infrared aiming sensor
simulates round trajectory and hit point to an accuracy of better than
one-minute-of-angle. Recoil is provided by the recoil rod that attaches at the muzzle
end of the rifle. Recoil is provided in both semiautomatic and automatic modes of fire,
and is adjustable from no-net force to 30 percent more than that of a live M16. Sound
is provided through headphones and is adjustable from 115 to 135 decibels. Special
magazines are used. One magazine simulates a continuous load; the other (used to train
rapid magazine change) can be loaded with 1 to 30 simulated rounds. Selectable misfire
can be used to detect gun shyness and drill immediate action. The front and rear sights
are zeroed the same as standard rifles.
The Weaponeer range can be raised or lowered to accommodate all firing
positions. The target assembly contains four targets: a scaled 25-meter zero target and
three pop-up targets are standard. E-type and F-type silhouettes at ranges from 75
meters can be used on the Weaponeer. Also, known-distance and various other types
of targets can be used, and can be displayed in fixed or random sequences. Target
exposure times may be set to unlimited or from 1 to 30 seconds. The fall-when-hit mode
can be selected with the KILL button.
The operator’s console contains the system control buttons, graphics printer, and
video feedback monitor. The back of the console has counters that total rounds and
hours, and a storage bin for storing magazines, printer paper and ribbon, headphones,
two wrenches for assembling the Weaponeer, and a small alien wrench for aligning the
rifle sensor. A remote control, which attaches to the back of the console, enables a
trainer or firer to operate select functions away from the console.
C-16
FM 23-9
Figure C-12. Weaponeer set up in the standing supported position.
FEEDBACK
The Weaponeer provides feedback to help trainers to teach and soldiers to learn
marksmanship skills.
Fall-When-Hit Mode. The fall-when-hit mode is enabled by lighting the KILL
button. When the button is activated, targets fall when hit. This feedback provides the
same hit/miss information as a train-fire (RETS) range.
Real-Time Aiming Point Display. When a firer aims on or near a target, his aiming
point relative to the target is continuously displayed on the video screen. The aiming
point display allows the trainer to teach and verify aiming techniques, and to
continuously monitor the firer’s steadiness, techniques, time on target, trigger squeeze,
and recovery from recoil.
Immediate-Shot-Impact Display. When a shot is fired, its impact relative to the
target is immediately displayed on the video screen as a blinking white dot. (The left
target in Figure C-13.)
C-17
FM 23-9
Replay. After a shot is fired, a real-rate display of how the firer engaged the target
can be replayed on the video screen.
The target to the right in Figure C-14 shows the type of information that can be
replayed on the video screen after a series of shots are fired. To show the sequence, the
dots have been numbered.
To show a replay, the firer first selects the shot he wishes to replay by operating
the EACH SHOT button. Then he presses the REPLAY button. Some Weaponeers
record and store replays for just the first three shots.
Shot Groups. The impact location of up to 32 shots is automatically stored in the
Weaponeer memory and displayed on the video screen. Each impact is indicated by a
white dot, which blinks when indicating the last shot. All 32 shots can be fired at and
displayed on a single target, or split among any combination of targets. The CLEAR
button erases all shots from the Weaponeer memory.
Printer. A hard-copy printer is provided for postfiring analysis, for firer progress
tracking, and for record keeping. Pressing the PRINT button causes the target displayed
on the video to print. (Sample printouts are shown in Figure C-14.) Some Weaponeers
can print the three pop-up targets at the same time by holding in the REPLAY button
and then pressing the PRINT button.
Figure C-14. Weaponeer printouts.
USE OF THE WEAPONEER
In BRM, the Weaponeer is used early in the program to evaluate firer’s ability to apply
the four fundamentals. It is used throughout the program to help diagnose and
remediate problems. In the unit, the Weaponeer should be used much like it is used in
BRM. Concurrent use of the Weaponeer at the rifle range provides valuable remedial
training.
The preferred training configuration for the Weaponeer is shown in Figure C-14.
One trainer operates the system while three to six soldiers observe the training. Soldiers
C-18
FM 23-9
should rotate, each receiving several short turns on the system. Where high throughput
is required, consolidation of available Weaponeers may be considered.
When training soldiers on the Weaponeer:
• Proceed at a relaxed pace, and emphasize accuracy before speed.
• If possible, train with small groups, allowing each soldier several 10- to
15-minute turns on the device.
• For remedial training, try to relax the soldier; a nervous soldier will have trouble
learning and gaining confidence in his marksmanship skills. For sustainment
training, encourage competition between individuals or units.
In Figure C-15, five soldiers are being trained. One is firing and four are observing,
awaiting their turns on the device. The video screen is carefully positioned just outside
the vision of the firer, but the firer can easily turn his head to see replays and hit points.
The position of the trainer is also important so he can see both the firer and video
screen. This is a good position for detecting and correcting firing faults. When the firer
is in the standing supported firing position, the console should be placed on a table so
the trainer can see the video screen above the firer’s rifle. (Figure C-16.) Observers
can see the targets, firer, and video screen to help them perform during their turn.
Observers learn procedures that speed up training and help avoid firing faults.
MOBILE CONFIGURATION
To use the Weaponeer in a mobile configuration, it must be shock mounted. (The
manufacturer’s conceptural mobile training unit is shown in Figure C-17.) The
Training Audiovisual Support Center, Fort Benning, Georgia, has adopted a mobile
C-19
FM 23-9
CONTROL CONSOLE INSTRUCTOR STORAGE
TARGET HOUSING
C-20
FM 23-9
mounting stand for supporting Weaponeer’s range assembly and computer console
(Figure C-18)
DIAGNOSIS OF FIRING PROBLEMS
Diagnosis of firing problems is the main purpose of the Weaponeer. The following
seven-step program is recommended as a guide. Depending on the extent of the firer’s
problems and time constraints, the number of shots may be increased.
STEP 1. Tell the soldier to assume a good firing position, to aim at a target, and
to hold steady (supported and prone unsupported positions).
STEP 2. Visually check the firer’s firing position and correct any gross errors.
STEP 3. Observe the video screen. If there is no aiming dot on the video screen
or if the aiming dot is far from target center, teach sight picture to the firer. If excessive
movement is shown by the light dot, check and correct the techniques of the steady
position and natural point of aim.
C-21
FM 23-9
STEP 4. Tell the soldier to fire a three-round shot group aimed at the target’s
center of mass. Watch the video screen and firer as he fires. Note violations of the four
fundamentals.
STEP 5. Replay each shot to show the firer his aim, steadiness, and trigger
squeeze. In Figure C-13, page C-17, the target on the right shows a numbered series of
16 shots. Dots 1 through 4 indicate that the firer approached the target from high right.
Dots 5 through 15 show that he is aiming near the center of the target but does not have
a steady position. The sudden shift from dot 15 to 16 (dot 16 is the hit point of the shot)
indicates that gun-shyness or improper trigger squeeze caused the firer to pull his
aiming point down and to the right just before firing. Replay helps the firer understand
and correct his firing errors.
STEP 6. Confirm and refine the diagnosis by allowing the soldier to fire additional
three-round shot groups. Use replay to show the firer his firing faults.
STEP 7. Summarize and record the soldier’s basic firing problems.
These seven steps are designed to efficiently diagnose and to show the soldier his
firing errors. This could be enough to immediately correct the error. However,
diagnosis should be followed up with remedial exercises either with the Weaponeer,
target-box exercise, or dime (washer) exercise.
UNIT SUSTAINMENT TRAINING
Sustainment training and prequalification refresher training can be conducted,
depending on the availability of the Weaponeers.
Direct the soldier to zero the Weaponeer rifle (sandbag supported position).
Emphasize tight, consistently placed shot groups. Starting with the closest target and
working out to the most distant, direct the soldier to practice slow precision fire at each
target (supported and prone unsupported positions).
Direct the soldier to slow fire at random pop-up targets (both firing positions).
Emphasize speed and precision. Direct him to slow fire at random pop-up targets with
short exposure times (both firing positions).
OPTION: Direct the soldier to practice windage hold-off, rapid magazine change,
and immediate action (both firing positions).
OPTION: Direct the soldier to practice night fire, automatic fire, and gas-mask
fire.
ASSESSMENT OF SKILLS
The Weaponeer can aid in the objective assessment of basic marksmanship; therefore,
periodic Weaponeer diagnosis should be conducted and recorded. Each soldier fires
until zeroed on the Weaponeer. If unable to zero in 9 to 15 rounds, he should be
withdrawn from testing and given remedial training. The soldier fires a surrogate
record-fire scenario according to the following:
Scenario of target presentation. Presentation of the targets is controlled by the
operator who uses the target buttons.
C-22
FM 23-9
Order of target presentation. The scaled 100-meter and 250-meter targets (or 75
meters, 175 meters, and 300 meters) are presented in a mixed order according to a
planned schedule.
Ratio of target presentation. Targets are presented in a ratio of three 250-meter
targets to one 100-meter target (or three 300 meters, two 175 meters to one 75 meters).
A 64-target scenario consisting of two 32-target scenarios (the first engaged from the
supported position; the second from the prone unsupported position) is conducted with
a short break.
Target exposure time. Exposure time is four seconds for the scaled 250-meter
targets (or 175 meters and 300 meters) and two seconds for the scaled 100-meter target
(or 75 meters).
Intertarget interval. The time between target exposures should be varied from
one to eight seconds.
Target mode. The kill mode is used so that targets fall when they are hit.
A score of 41 hits out of the 64 targets on Weaponeer indicates that soldiers
canproceed to actual record fire. Soldiers who score lower than 41 should receive
remedial training.
C-23
FM 23-9
APPENDIX D
Rifle Range Safety Briefing/ Range
Operations Checklist
A llpersonnel training on a rifle range should be briefed on the safety and local requirements
for that range. The briefing fulfills the minimum requirements for a rifle range safety
briefing. Information may be added to conform to local requirements and safety regulation
AR 210-21 should be reviewed.
RECOMMENDED BRIEFING
The first priority of this range is training, but safety must be at the forefront of the
training program. The safety program will be corrected immediately. The safety
program should include the following:
• The two red and white candy-striped poles, located on the far right and far left
(point to them), are the range left and right limits. Firers never fire or point
their rifles outside the limits of these poles.
• When not on the firing line, the selector lever is on SAFE, the bolt is locked to
the rear, and the dust cover is open. (Demonstrate.)
• Firers will always enter and exit the firing line at the base of the tower. (Point.)
• Before occupying the firing positions, inspect the positions for harmful animals
and insects.
• Firers will always point the muzzle of the rifle downrange whenever on the firing
line. The firing finger is not placed within the trigger housing area.
(Demonstrate.)
• Lock the bolt to the rear and place the rifle on SAFE on the firing line. Chamber
blocks may be used.
• Smoke only in designated smoking areas. (Inform soldiers where.)
• You will not eat or drink on the firing line unless the tower operator permits you
to drink from your canteen. Drink water often to prevent heat injuries.
• Never touch your rifle while personnel are downrange or in front of the firing
line.
• Load the magazine into the rifle only on the command of the tower.
• Never fire without wearing hearing protection when within 25 meters of the
firing line.
• Before leaving the firing line, the safety NCO must rod the rifle.
D-1
FM 23-9
• Consider the rifle loaded at all times, even in the break areas. Never point the
rifle at anyone.
• Left-handed firers will fire the M16A1 with left-handed brass deflectors
attached to the rifle.
• Anyone observing an unsafe act will immediately call CEASE FIRE, place his
rifle on SAFE, place it in the V-notch stake or on the sandbags, and then give
both the vocal alarm and visual signal of cease fire. (Demonstrate and have
soldiers demonstrate.)
• Once cleared off the firing line, firers report immedately to the ammunition
point and turn in all ammunition and expended brass.
• No one will leave the range until he has been inspected for ammunition and
brass.
NOTE: When an electrical storm occurs, the safety NCO will direct the tower operator to prepare to dis-
perse soldiers. At that time, the tower gives the command LOCK AND CLEAR ALL
WEAPONS AND GROUND ALL EQUIPMENT (except for wet-weather gear). Then the
tower operator directs soldiers to a safe area.
The instructor/trainer should ask the firers if there are any questions concerning
the safety procedures of the range.
PERSONNEL AND DUTIES
To provide both a safe and efficient range operation and effective instruction, the
following is an example of personnel and duties that may be required.
OIC. He is responsible for the overall operation of the range before, during, and
after live firing.
Range Safety Officer. He is responsible for the safe operation of the range to
include conducting a safety orientation before each scheduled live-fire exercise.
He ensures that a brass and ammunition check is made before the unit leaves the
range. He ensures that all personnel comply with the safety regulations and
procedures prescribed for the conduct of a live-fire exercise. He should ensure
that left-handed firing devices are used by all left-handed firers. This officer
should not be assigned other duties.
NCOIC. He assists the OIC and safety officer, as required—for example, by
supervising enlisted personnel who are supporting the live-fire exercise.
Ammunition Detail. This detail is composed of one or more ammunition handlers
whose responsibilities are to break down, issue, receive, account for, and safeguard
live ammunition. The detail also collects expended ammunition casings and other
residue.
D-2
FM 23-9
Unit Armorer. He repairs the rifles to include replacing parts, as required.
Assistant Instructor. One assistant instructor is assigned for each one to ten firing
points. Each assistant ensures that all firers observe safety regulations and
procedures, and he assists firers having problems.
Medical Personnel. They provide medical support as required by regulations
governing live-fire exercises.
Control Tower Operators. They raise and lower the targets, time the exposures,
sound the audible signal, and give the fire commands. If possible, two men should
be chosen to perform these functions.
Maintenance Detail. This detail should be composed of two segments: one to
conduct small-arms repair and one to perform minor maintenance on the
target-holding mechanisms.
RANGE PROCEDURES
Before beginning live-fire exercises, all personnel must receive an orientation on range
operations. The orientation should outline the procedures for conducting the exercise
to include the duties of the nonfiring orders. Scorers maintain the score of the firer.
They may assist the firers by indicating the impact of the bullet in relation to the
target—for example, short, right or high, left.
Regardless of unit size, soldiers are organized into four orders: one firing, one
coaching, and two pulling targets. One order may be shifted from pulling targets to
concurrent training. However, if a unit must use five or more orders due to range
limitations, concurrent training must be conducted to effectively use waiting periods;
no more than two orders should be sent to pull targets.
Practice Record Fire and Record Fire
Simple, standard fire commands are needed to avoid confusion and
misunderstanding during practice record fire and record fire.
Practice record fire.
FIRERS, ASSUME A GOOD SUPPORTED (PRONE UNSUPPORTED)
POSITION.
SCORERS, POINT OUT THE LIMITS OF YOUR LANE.
FIRERS, LOCK YOUR FIRST MAGAZINE, LOAD.
WATCH YOUR LANE.
CEASE FIRE.
CLEAR ALL WEAPONS.
D-3
FM 23-9
Record fire.
FIRERS, ASSUME A GOOD SUPPORTED (PRONE UNSUPPORTED)
POSITION.
SCORERS, POINT OUT THE LIMITS OF YOUR LANE.
FIRERS, LOCK YOUR FIRST 20-ROUND MAGAZINE, LOAD.
WATCH YOUR LANE.
CEASE FIRE.
CLEAR ALL WEAPONS.
Field Firing Exercises
Simple, standard fire commands are needed to avoid confusion during field firing
exercises. Commands for exercises from stationary positions are as follows:
FIRERS, ASSUME A GOOD (_______) POSITION.
LOCK ONE MAGAZINE OF () ROUNDS, LOAD.
READY ON THE RIGHT?
READY ON THE LEFT?
THE FIRING LINE IS READY.
PLACE YOUR SELECTOR LEVER ON SEMIAUTOMATIC.
WATCH YOUR LANES.
CEASE FIRE. LOCK YOUR WEAPONS.
(Place the selector lever in the SAFE position.)
Repeat the first seven commands above, or give the following commands:
Commands for conduct of firing are minimal and standard. The proper commands
are listed in the following paragraphs. Preliminary commands to describe the particular
exercise may be used.
The range officer relays his commands either by radio or telephone to the pit
NCOIC so he can keep abreast of the conduct of fire. Before each firing exercise, the
D-4
FM 23-9
range officer informs the pit NCOIC of the next exercise and any special instructions
for target operation - for example, ‘The next firing will be for zero. Mark targets after
each three-round group shot, or for slow fire, The next firing will be ten rounds, slow
fire. Mark targets after each shot."
RATELOs relay commands to the pits and pass on special instructions to target
operators as requested by the assistant instructors. RATELOs never identify a firer on
a certain firing point. The command MARK TARGET NUMBER_ indicates that
the target has been fired upon but has not been withdrawn for marking.
General Commands
The following are general commands and may be altered when necessary.
FIRERS, ASSUME THE POSITION.
(Issue the firer rounds of ammunition.)
COACH, SECURE ROUNDS OF AMMUNITION.
LOCK ONE ROUND, LOAD.
READY ON THE RIGHT?
READY ON THE LEFT?
READY ON THE FIRING LINE?
COMMENCE FIRING WHEN YOUR TARGET APPEARS.
CEASE FIRING.
Rapid Fire Exercises
The following commands are used for rapid-fire exercises:
LOCK AND CLEAR ALL WEAPONS.
CLEAR ON THE RIGHT?
CLEAR ON THE LEFT?
THE FIRING LINE IS CLEAR.
FIRERS, ASSUME THE POSITION.
ASSISTANTS, SECURE TWO MAGAZINES OF FIVE ROUNDS EACH.
(Issue the firer one magazine of five rounds.)
LOCK ONE MAGAZINE, LOAD.
D-5
FM 23-9
READY ON THE RIGHT?
READY ON THE LEFT?
READY ON THE FIRING LINE?
WATCH YOUR TARGETS!
(Firers assume the appropriate firing position and commence firing when the
targets are presented.)
When all the targets are withdrawn, the range officer checks for slow firers or
malfunctions and then allows them to fire.
The pit NCOIC organizes, orients, and provides safety for the pit detail. The
success of KD firing depends on efficient operation of the targets and the close
coordination between the pit NCOIC and range officer. All operators must know the
proper procedure for operating and marking the target.
Marking targets for zeroing and slow fire. Targets are marked quickly after each
shot or group of shots without command. During slow fire, the firer has a time limit of
one minute for each shot. Twenty seconds is considered the maximum time limit for
marking. A marker (spotter) is placed in the hit regardless of its location on the target.
Each time the target is marked, the marker is removed from the previous hit, and the
hole is pasted. (Three-inch markers are used for 100, 200, and 300 meters; five-inch
markers are used for 500 meters.)
Using disk markers. The target markers are painted black on one side and white
on the opposite side. They may be procured in three dimensions: 1 1/2 inches (NSN
6920-00-789-0864), 3 inches (NSN 6920-00-713-8255), and 5 inches (NSN
6920-00-713-8254). The disk spindle may also be procured through supply channels
(NSN 6920-00-713-8257).
RANGE OPERATIONS CHECKLIST
This checklist consists of nine sections, each covering a different topic relating to range
operations.
The checklist should be modified to include local policy changes to the regulations
or SOPs. The person responsible for the training must answer the questions in each
section. Ask yourself each question in order. Record each "Yes" answer by placing a
check in the GO column. Record a "No" or "Don’t know" by checking the NO-GO
column. Refer to the checklist to find the GO and NO-GO columns.
When all the questions in a section are asked, look back over the NO-GOs.
Contact the people who reported them and ask if they have corrected each problem.
If so, change the answer to GO. If any NO-GO remains, analyze it and implement a
countermeasure for the shortfall. Afterwards, check to ensure the countermeasures
work. Before range operations start, be sure a workable countermeasure is
implemented for each safety hazard presented by a NO-GO answer.
D-6
FM 23-9
Section 1—Mission Analysis
1. Who will be firing on the range?
Number of personnel Units
2. What weapons and course will be used?
Weapon Course___________________________________________
3. Where will the training be conducted?
Range________________________________________
4. When is the range scheduled for operations?
Date Opens__________________________________Closes
Section 2 — Double-Check------------------------------------
l.Has sufficient ammunition been requested for the number of personnel? 2 .Are the range facilities adequate for the type of training to be conducted? 3 .Has enough time been scheduled to complete the training? 4 .Have conflicts that surfaced been resolved? go no-go REMARKS
Section 3—Become an Expert
1. Review TMs and FMs on the weapons to
be fired
2. Talk with the armorers and other
personnel experienced with the weapons to
be fired.
3. Review AR 385-63
4. Visit range control and read installation
range instructions.
go no-go REMARKS
D-7
FM 23-9
5. Reconnoiter the range (preferably while it is in use). 6. Check ARTEPs and SQT manuals to see if training tasks can be integrated into the range training plan. go no-go REMARKS
Section 4 — Determine Requirements-------------------------------
PERSONNEL
1. OIC.
2. Safety officer.
3. Assistant safety officer.
4. NCOIC.
5. Ammunition NCO.
6. Ammunition personnel (determined by type of range).
7. Target detail and target operators.
8. Tower operator.
9. Concurrent training instructors.
10. Assistant instructors.
ll. RATELO.
12. Guards (range requirements).
13. Medic(s).
14. Air guard.
15. Armorer.
16. Truck driver (range personnel and equipment).
17. Mechanic for vehicles.
18. Have you overstaffed your range?
EQUIPMENT:
1. Range packet and clearance form.
2. Safety fan and diagram if applicable
3. Other safety equipment (aiming circle, compass).
4. Appropriate publications pertaining to the training that
will be conducted.
5. Lesson plans, status reports, and reporting folder.
6. Range flag and light (night firing).
7. Radios.
8. Field telephone and wire.
9. 292 antenna, if necessary.
10. PA set with backup bullhorn(s).
11. Concurrent training markers.
12. Training aids for concurrent training stations.
13. Sandbags.
14. Tentage (briefing tent, warm-up tent).
15. Space heaters, if needed.
D-8
FM 23-9
16. Colored helmets for control personnel.
17. Safety paddles and vehicle flag sets or lights.
18. Ambulance or designated vehicle.
19. Earplugs.
20. Water for drinking and cleaning.
21. Scorecards.
22. Master score sheet.
23. Armorers’ tools and cleaning equipment for weapons.
24. Brooms, shovels, and other cleaning supplies and equipment.
25. Tables and chairs, if needed.
26. Target accessories.
27. Fire extinguishers.
28. Tarp, stakes, and rope to cover the ammunition.
29. Toilet paper
30. Spare weapons and repair parts as needed.
31. Tow bar and slave cables for vehicles.
32. Fuel and oil for vehicles and target mechanisms.
Section 5 — Determine Available Resources--------------------------------------
1. Fill personnel spaces.
2. Keep unit integrity.
3. Utilize NCOs.
4. Effect coordination with supporting organizations:
• Ammunition.
• Transportation.
• Training Aids.
• Medics.
• Weapons.
• Other equipment.
Section 6—Foolproofing---------------------------------------------------------
1. Write an overall lesson plan for the range.
2. Organize a plan for firing:
• Determine range organization.
• Outline courses of fire to be used.
• Have fire commands typed for use on range.
• Set rotation of stations.
3. Rehearse concurrent training instructors and assistants.
4. Brief RATELO on unique range control radio procedures.
5. Brief and rehearse reporting NCO on range operation and all his
duties.
D-9
FM 23-9
6. Collect and concentrate equipment for use on the range
in one location.
7. Obtain training aids.
8. Pick up targets from range warehouse, if required.
9. Report to range control for safety briefing (if required) and
sign for any special items.
10. Publish LOI:
• Uniform of range and firing personnel (helmets and
earplugs).
• Mode of transportation, departure times and places.
Methods of messing to be used.
Any special requirements being placed on units.
Section 7 — Occupying the Range and Conducting Training----------------------
OCCUPY THE RANGE
1. Request permission to occupy the range.
2. Establish good communications.
3. Have designated areas prepared:
• Parking.
• Ammunition point.
• Medical station.
• Water point.
• Concurrent training.
• Mess.
• Helipad.
• Armorer.
4. Inspect range for operational condition.
5. Raise flag when occupying or firing according to the local SOP.
6. Check ammunition to ensure it is correct type and quantity.
7. Ensure that range personnel are in proper uniform and
the equipment is in position.
8. Receive firing units.
9. Conduct safety checks on weapons.
10. Check for clean, fully operational weapons.
11. Conduct safety briefing (to include administrative personnel on range).
12. Organize personnel into firing orders (keep unit integrity if possible).
13. Request permission to commence firing from range control.
D-10
FM 23-9
CONDUCT OF FIRING:
1. Are communications to range control satisfactory?
2. Commands from tower clear and concise?
3. Range areas policed?
4. Ammunition accountability maintained?
5. Master score sheet updated?
6. Personnel accountability maintained?
7. Vehicles parked in appropriate areas?
8. Air guard on duty and alert?
9. Personnel in proper uniform?
10. Earplugs in use?
11. Troops responding properly to commands?
12. On-the-spot corrections being made when troops use poor techniques
or fail to hit the target?
13. Conservation of ammunition enforced?
14. Weapons cleared before they are taken from the firing line?
15. Personnel checked for brass or ammunition before they leave the
range?
16. Anyone standing around not involved in training or support?
Section 8 —Closing of Range----------------------------------------------
1. Close downrange control according to the local SOP.
2. Remove all equipment and ammunition from range.
3. Police range.
4. Repaste and resurface targets as required by range instructions.
5. Perform other maintenance tasks as required by local SOP.
6. Request a range inspector from range control when ready to be cleared.
7. Submit after-action report to headquarters.
8. Report any noted safety hazards to proper authorities.
Section 9 —Known Distance Range------------------------------------------
PERSONNEL: In addition to those identified in Section 4.
1. NCOIC of pit detail.
2. Assistant safety officer for pit area.
EQUIPMENT: In addition to equipment identified in Section 4.
1. Sound set for pit area.
2. Positive communication from the firing line to the pit area.
3. Pasters.
4. Glue and brushes for resurfacing targets.
5. Lubricant for target frames.
6. Proper targets mounted in target frames.
7. Briefing on how to operate a KD range.
8. Procedure for marking targets.
9. Procedure for pit safety.
D-11
FM 23-9
APPENDIX E
Scaled Silhouette Targets
Scaled silhouette targets were developed in conjunction with the zero target to expand the
use of widely available 25-meter ranges beyond that of just zeroing weapons. They are
designed to provide an alternative to fill a significant training void. In the past, soldiers
went directly from the zero range to the field fire environment. They fired at pop-up targets
located at ranges of 75 to 300 meters and received only hit or miss feedback as to
performance. The pop-up silhouette target represents an important skill that all soldiers
should perform well. But hit and miss information does not constitute a good learning
environment for the development and refinement of good marksmanship skills. The bad
firer will miss most targets and never know what he is doing wrong. The good firer will hit
most targets but will be unable to refine his skills to hit near target center.
BACKGROUND
The scaled silhouette target provides the same visual perception at 25 meters as the
firer would see when firing targets at actual range. The use of this target at 25 meters
allows the firer to practice aiming at various range targets and to see precisely where
his bullets hit, whether they are target hits or misses. Scaled silhouette targets fit well
into a marksmanship training program between zeroing and field fire training, but they
provide for excellent training whenever a 25-meter range and ammunition are
available. They are also appropriate targets for use during dry-fire training and for
teaching adjusted aiming points, for making allowances for wind and range estimation,
and when authorized to conduct record for qualification. Two scaled silhouette targets
are appropriate for use during unit sustainment:
Slow-Fire Target. The slow-fire target shown in Figure E-l may be used
immediately following the zeroing period of instruction. This target is used to provide
a smooth transition from firing at 25 meters to the engagement of KD feedback targets
or pop-up targets on the field fire range. This target provides the same visual perception
as the three targets the soldier will be required to engage on the field fire range. It
allows the soldier to practice aiming at various range targets while seeing precisely
where his bullets hit or miss the targets.
The soldier learns that a 75-meter target can be hit easily but that a good steady
position, precise aiming, and smooth trigger squeeze are necessary to consistently hit
the 300-meter target. The 4-cm circle is drawn at the center of each scaled silhouette
so the soldier can relate his performance from the zeroing period to his performance
on the scaled silhouettes. (All scaled targets in this manual have been reduced in size.
The actual target sheet is about 18 by 23 inches.) During training, 18 rounds are fired
on the slow-fire target. From the supported fighting position, the soldier fires three
rounds at each of the three targets on the left side of the target sheet. He then moves
downrange to inspect his target and to discuss his performance with his sergeant or
instructor/trainer. Training the instructor/trainer may find that the soldier does not
E-1
FM 23-9
understand how to aim at target center of mass, that he aims too low at the 300-meter
target, that his rifle does not have a good zero, or that he is not applying good firing
fundamentals.
Moving back to the firing line, the soldier fires three rounds at each of the three
targets on the right side of the target sheet from the prone unsupported position. The
second inspection of the target allows the soldier to compare his firing ability in an
unsupported position to that in a supported position. His sergeant or instructor/trainer
has another opportunity to observe and critique the soldier’s performance. For
example, the soldier who fired the target in Figure E-2 is not doing a good job of
applying the four firing fundamentals. Some soldiers will begin to lose precision after
they complete zeroing. This soldier needs to work on the supported position, but
particularly on the unsupported position. Target number 3 indicates he may have aimed
too low on the 300-meter target. The 300-meter target is so small that when the rifle is
aimed at center of mass, there is little black visible above the front sight. Target Number
6 indicates he may have overcompensated for this error with at least two shots.
Placement of all 18 bullets also indicates that the firer’s rifle zero may be too far
to the right. With a better firing performance, sight adjustments can be made while
using this target. The analysis procedures used on the zeroing target may be applied to
shot groups on these silhouette targets.
The shot-group center on each target indicates aiming techniques. The
comparison between the targets fired supported and those fired unsupported also
provides useful information. A good performance on this target indicates that the
soldier is ready to engage targets at actual range. The soldier who does not hit these
scaled silhouette targets at 25 meters should receive remedial training before being
allowed to continue to a downrange feedback or the hit and miss portion of the program.
Timed-Fire Target. Following unit field fire training, the soldier may be brought
back to the 25-meter range to confirm his zero (he should fire better now than at the
start of the program) and to fire the timed-fire target shown in Figure E-3. This target
sheet includes a scaled silhouette for each range target represented on the record fire
course—50 to 300 meters. While the slow-fire target was fired at the soldier’s own
speed, the timed-fire target is designed to stress the soldier, emphasizing the task
requirements of rapid target engagement under time pressure. The soldier must rapidly
shift his point of aim from silhouette to silhouette in the absence of a pattern of clearly
defined silhouettes on the target.
The initial firing of the timed-fire target is from the supported fighting position.
The soldier is given 45 seconds and 10 rounds of ammunition with instructions to fire
one round at each silhouette target. Upon inspection of the target, the soldier can
review his own performance, which provides an excellent diagnostic checkpoint for his
sergeant/instructor/trainer. The soldier who hits most of these targets will probably
qualify with a good score. After the target has been critiqued and bullet holes have been
marked or pasted, the soldier repeats the exercise from the prone unsupported position,
having 55 seconds to engage the 10 targets.
The target shown in Figure E-4 represents a good firing performance from the
fighting and prone positions. A good firer is aware of the bullet that was pulled (right
side—middle target). Only with the worst firers are there any problems telling which
bullet was fired at which target. Although there is room for improvement, this soldier
E-2
FM 23-9
Figure E-1. The 25-meter scaled slow-fire target.
Fired with L aperture on standard sights.
Figure E-2. Slow- fire silhouette target.
Nine rounds from a supported fighting position and nine
rounds from a prone unsupported position.
E-3
FM 23-9
can be expected to fire well on record fire. Following the critique of the second firing,
these results are recorded and the targets are retained for future reference. No shot
groups are fired on this target, but the concept of shot-group analysis is still valid.
Considerable information can be obtained by checking the direction and distance of
each 10 shots from target center as though they were a 10-shot group.
Targets in Figure E-1 have the 4-cm circle located at target center while the targets
in Figure E-3 have the circle located either above or below target center, except for the
250-meter target. During the training exercise, these targets are scored as hits if the
bullets hit within the black. However, the objective is to put all bullets within the circle.
To progress at a pace that is not too fast for the soldier to understand, the initial targets
use center-of-mass aiming so the soldier understands center of mass while aiming on
various size targets. On the timed-fire targets, the option is provided for making
adjusted aiming allowances for gravity. That is, the circles are placed on the timed-fire
target at the aiming point that will place bullets at target center when firing a target at
the range indicated. For example, the soldier must aim low on a 150-meter target to hit
target center, and he must aim high on a 300-meter target to hit target center. Therefore,
the option to use this adjusted aiming point is incorporated into the timed-fire target.
TRAINING
Units are flexible in conducting 25-meter firing exercises with scaled silhouette
targets. The proper use of scaled silhouette targets can make a valuable contribution
to a unit’s marksmanship program by accomplishing the following:
Soldiers learn how best to aim at targets located at various ranges while receiving
precise feedback concerning bullet strike—whether it is a target hit or miss. Soldiers
can acquire knowledge of range estimation. What they see through the sights is similar
to what they would see if they were firing a target at the actual distance.
• Soldiers learn that close targets can be hit with a quick shot while more distant
targets take a more deliberate application of the four marksmanship
fundamentals.
• The use of an adjusted aiming point to allow for gravity, target movement, or
wind may be effectively practiced.
• The silhouette target provides a permanent record for analysis by the soldier and
his leader to assist in identifying and correcting firing problems.
• Soldiers develop confidence in their ability to successfully engage pop-up targets
located at actual range.
• This target serves as an important diagnostic checkpoint. If soldiers cannot hit
the scaled silhouettes, they cannot hit targets at actual range. Therefore,
remedial training is probably needed before field firing is allowed.
• Having developed good firing skills and knowing what happens to bullets while
firing at silhouette targets from supported and unsupported positions, the
soldier’s pop-up field fire practice results in a worthwhile training experience.
E-4
FM 23-9
Figure E-4. Timed -fire silhouette target.
10 shots fired from a supported position, bullet holes marked,
E-5
FM 23-9
The mode of fire may be either slow or timed, any firing position can be used, and
any number of shots may be fired before checking the target. (Checking the target after
only a few bullets have been fired is more beneficial than checking the target after
several bullets have been fired.) When spotting scopes are available, the target can be
checked from the firing line without clearing the firing line, which would allow a target
check after each bullet fired. The scaled silhouette targets are also excellent for dry-fire
training. They incorporate an adjusted aiming point to help the soldier learn the effects
of gravity. They could be used, with instructor assistance, to learn about wind—for
example, where should point of aim be for each target on the 10-target silhouette if
there were a 10-mph full-value wind from the right.
All firing at the Army training centers is conducted with rifles that are equipped
with standard sights. The long-range sight is used on the 250-meter range so the point
of aim is equal to point of impact. The targets shown in Figures E-l and E-3 are available
for use by units that have rifles equipped with standard sights. For units that have some
rifles equipped with the LLLSS, the slow-fire target shown in Figure E-5 and the
timed-fire target shown in Figure E-6 are available. These targets are used the same as
the previous targets. From the firing line, the soldier sees exactly the same thing and
aims at the black silhouette exactly as he does the previous targets. The only difference
is that bullet strike is evaluated based on the dotted circle and the dotted silhouette.
The target shown in Figure E-7, page E-8, is a silhouette target designed to be
used as alternate course C at 25 meters. The target shown in Figure E-8, page E-8, is
also an alternate course C target, but it has been scaled for 15 meters (50 feet or 600
inches) for use on indoor ranges. (A validated qualification course of fire for these
targets is contained in Chapter 4.) Units may use any of the scaled silhouette targets
to develop their own unique competitive program. Any action that encourages
competition among soldiers can generate interest in developing good firing habits, and
can motivate soldiers and sub-units to conduct practice required to develop good
marksmanship skills.
While the targets scaled for live fire at 25 meters can serve several useful purposes
on the 25-meter live-fire range, the perceived range to the target can be changed for
dry-fire training by changing the distance to the target. Then, the targets are scaled
based on a visual angle from the firing position, which means the 50-meter target is
one-half actual size, the 100-meter target is one-fourth actual size, and so on. If the firer
views the target from one-half the intended distance (12.5 meters), the perceived range
to the target would be one-half—for instance, the 50-meter target would become a
25-meter target, and the 300-meter target would become a 150-meter target. Of course,
the opposite would occur if the range to the target were doubled. When viewed from
a range of 50 meters, the 50-meter target would appear as a 100-meter target, and the
300-meter target would appear as a 600-meter target. (The reduced targets in this
manual could be used for indoor dry-fire training.) A simple procedure for finding the
correct range is to adjust the distance while looking through the rifle sights until the
175-meter target appears to be the same size as the standard front sight post.
E-6
FM 23-9
Figure E-5. The 25-meter silhouette slow-fire target.
Fired using unmarked aperture on standard sights or L sight
aperture on LLLSS.
Figure E-6. The 25-meter scaled silhouette timed-fire target.
Fired using unmarked aperture on standard sights or L sight
aperture on LLLSS.
so м
E-'
FM 23-9
Figure E-8. The 15-meter alternate course C—record fire
qualification.
250 м
100 м
100 M 100 M
50 M
E-8
FM 23-9
APPENDIX F
Precision Firing Information
This appendix provides information to assist instructors/trainers in effectively training
M16A1 and M16A2 firers. Instructors/trainers must be knowledgeable on the effects of
wind and gravity, ballistics, the elevation and windage rule, and bullet dispersion as they
apply to firing proficiency.
Section I. EFFECTS OF GRAVITY
All soldiers should have basic knowledge of how the bullet is affected by gravity.
Instructors/trainers must know the information contained herein.
EFFECTS ON AMMUNITION
The bullet begins to fall as soon as it leaves the muzzle of the rifle. The maximum speed
or velocity of the bullet is at the muzzle, so it also begins to slow down as soon as it is
fired. Figure F-l, page F-2, shows that the M193 ammunition drops 24 inches in slightly
over one-third of a second. The chart shows the amount of drop relative to the departure
line or bore line at 25-meter intervals and the time required to reach each range
distance.
At first, the bullet travels fast, covering the first 25 meters at an average speed of
almost 2,200 mph. The last 25-meter segment shown in Figure F-l (275 to 300 meters)
is covered at an average speed of about 1,450 mph. Gravity causes the rate of drop to
increase as flight time increases. Since it takes the bullet more time to travel as the
speed slows, the effects of gravity and wind increase as the range increases. Each band
on the chart represents 25 meters—the width of the band indicates the length of time
it takes to travel that 25-meter segment.
The drop in inches from the rifle bore line is shown on the left side in Figure 1. In
this example, finding the number 5 on the left side of the chart and going across to
where the bullet is indicated shows the bullet has dropped 5 inches when it reaches 150
meters and has taken .17 second (column at right) to arrive. The bullet drops 2 inches
more between 150 meters and 175 meters, and it takes about .03 second to travel that
extra 25-meter distance.
M16A1 and M193 ammunition.
Bullet drop. The bullet is affected by gravity just like any other falling object. Even
though the bullet is traveling fast, once it has been fired from the rifle, it falls to the
ground as though it were dropped by hand. Figure F-2 shows how much the bullet drops
from the bore line of the rifle. If the bore of the rifle were to be lined up on a 450-meter
target (the same as looking through the bore and aligning the bore with the target), the
bullet would hit 64 inches below the spot where the bore was pointing. This much drop
is important if soldiers are to be effective marksmen.
F-1
FM 23-9
Figure F-1. Example of effects of gravity and flight time (M193 ball).
METERS
Compensation for gravity. The firer must compensate for the effects of gravity to
engage high-priority targets. The objective of the battlesight zero is to find a zero range
that allows for target engagement out to the maximum possible range while requiring
minimum adjustments to the aiming point. A study of M16 trajectory data reveals that
setting the sights to hit at 250 meters is the best compromise for hitting all targets from
0 to 325 meters without major adjustments to the aiming point. As shown in Figure
F-2B, the bullet stays close to the line of sight, but this has been accomplished by
pointing the bore well above the target. The bullet drop from the bore line applies
equally in this figure. The bore is actually pointing 16 inches above the aiming point at
250 meters and 24 inches above the point where the bullet will strike at 300 meters.
With graphics showing only line of sight and trajectory, it appears that the bullet rises
and then falls, but this is not true. The bullet’s line of departure is the bore line, and it
always drops from that line as shown in Figure F-2A The line of sight and bullet
trajectory actually coincide at 42 meters (the bullet starts out about 2.6 inches below
the sights) and again at 250 meters, giving the illusion that the bullet rises and falls.
F-2
FM 23-9
Figure F-2. M16A1 short-range trajectory (250-meter zero).
ol d
LINE OF SIGHT...........
BORELINE________________
TRAJECTORY_______________
250M
A. Illustrates that the bore line and line of sight are parallel, gravity causes the bullet to drop.
B. Illustrates that by raising the bore line above the line of sight, the effects of
gravity are compensated for and the bullet hits all targets near center mass. Notice
how the line of sight, bore line, and trajectory coinside at 42 meters,
and how the line of sight and trajectory again coincide at 250 meters but
the bore line is 16 inches above the target.
While the trajectory shown in Figure F-2B provides for target engagement out to
325 meters, targets beyond this range would require major adjustments in the aiming
point. Therefore, after the 250-meter zero has been obtained, flipping to the long-range
sight provides a zero of 375 meters as shown in Figure F-3. This provides for effective
target engagement from 350 meters out to the maximum effective range of 460 meters.
Figure F-3. M16A1 long-range trajectory (375-meter zero).
EFFECTIVE
RANGE
F-3
FM 23-9
• Trajectory (short-range sight) — passes through mass of all targets out to 300
meters.
• Trajectory (long-range sight) - passes through mass of all targets from 325
meters to maximum effective range.
It should be noted that the same scale was used in Figures F-2, F-3, and F-4.
Therefore, the relationship between the bore line and trajectory is similar in all figures.
The bullet drops from the bore line the same way regardless of the zero range.
M16A2 and M855 ammunition.
Bullet drop. The bullet drop for the M16A2 is similar to that discussed for the
M16A1. The M16A2 rifle is zeroed for 300 meters. Therefore, point of aim and point
of impact are center of mass at 300 meters with subsequent rear sight elevation settings
out to 800 meters. The adjusted aiming points for all targets less than 300 meters are
shown in Figure F-5.
Trajectory. For engagement at ranges greater than 300-meters, setting the correct
range on the rear sight elevation knob results in the point of impact being the same.
ADJUSTED AIMING POINT
Teaching an adjusted aiming point is intended to increase hit probability when properly
presented. However, soldiers can be easily confused, which could result in degraded
performance. Therefore, all soldiers should be taught to aim at target center unless they
are confident they know the range to the target, or they have just engaged a close target
and missed (presumably high), or they have just engaged a distant target and missed
(presumably low), or the strike of the bullet had been observed. Soldiers must be given
F-4
FM 23-9
Figure F-5. The M16A2 trajectories of aimed rifle fire.
Point of aimat each target, at all ranges, is "center of mass" or in the center of the chest.
Point of impact is also center of mass. Note that fire on targetat 300meters is also effective
on 400meter target. At 600meters, fire does not exceed the height of a man at any point
along its trajectory.
the correct information so they can improve their firing performance by adjusting their
aiming point to allow for the effects of gravity.
The use of an adjusted aiming point could be more important for combat than
for qualification since the combat environment is unstructured. For example, the
soldier who must fire into a small bunker aperture located at a range of 150 meters
could be more effective if he understands he must aim low. Also, a soldier who is trying
to hit a head-and-shoulders type target at a range of 325 meters could increase his hit
probability if he aimed high using a regular sight or aims low using the long-range sight.
Usually a soldier should aim low for targets closer than 250 meters and aim high for
targets farther away than 250 meters. This increases combat effectiveness while adding
minimum complications to the marksmanship training program.
M16A1. Theoretically, using these aiming points places the center of each shot
group (assuming a perfect zero) at target center, allowing for a maximum number of
other variables and soldier error. These adjustments are small and should only be
applied by competent firers who wish to improve their firing performance. The aiming
points in Figure F-6, page F-5, are for use with the long-range sight. Since the sight is
zeroed for 375 meters, the 350- and 400-meter targets can be engaged with
center-of-mass aiming. As ranges exceed 400 meters, some adjustment of the aiming
point is required for a better chance of hitting the target.
F-5
FM 23-9
Figure F-6. M16A1 aiming points.
Use of the M16A1 short-range sight—the aiming points shown result in the highest
probability of bullets hitting target center.
" L" SIGHT
Use of the M16A1 long-range sight-the aiming points shown result in the highest
probability of bullets hitting target center.
F-6
FM 23-9
M16A2. With the rifle zeroed for 300 meters, the correct adjusted aiming point
for targets less than 300 meters is shown in Figure F-7.
Figure F-7. For targets less than 300 meters, the M16A2 aiming points result in the highest
probability of bullets hitting target center with a 300-meter zero.
Section II. EFFECTS OF WIND
Marksmanship instructors/trainers should know how the effects of wind influence the
flight of the bullet, and soldiers should know how to compensate for such bullet
displacement. This instruction is appropriate for all marksmanship training and
concurrent training. Wind affects the bullet similar to gravity—as range increases, the
effects of wind increase.
WIND SPEED AND DIRECTION
The effects of wind vary depending on changes in wind speed and direction. Wind is
classified by the direction it is blowing in relationship to the firer/target line. The clock
system is used to indicate wind direction and value (Figure F-8, page F-8). Winds that
blow from the left (9 o’clock) or right (3 o’clock) are called full-value winds, because
they have the most effect on the bullet. Winds that blow at an angle from the front or
rear area are called half-value winds, because they have about one-half the effect on
the bullet as full-value winds. Winds that blow straight into the firer’s face or winds that
blow straight into the target are termed no-value winds, because their effect on the
bullet is too small to be concerned with.
Figure F-9, page F-8, illustrates how the effects of wind on the bullet are similar
to the effects of gravity—as range increases, the effects of wind increase.
A 10-mph full-value wind moves an M16A1 (M193) bullet about 1/2 inch at 25
meters to about 46 inches at 475 meters. (Using the data presented, wind effects for all
F-7
FM 23-9
conditions can be determined.) A wind of greater speed increases bullet movement by
a uniform amount—a 15-mph wind moves the bullet at all ranges 11/2 times more than
a 10-mph wind. Using these data, firers can determine wind effects for all conditions.
Figure F-9. Example of effects of a 10-mph wind.
M
E
T
E
R
S
F-8
FM 23-9
Effects of wind are much greater at longer ranges; however, they are uniform in
relation to speed—for example, a 5-mph full-value wind would have exactly one-half
the effect shown in the figure, moving the bullet 5 inches at 250 meters, then 10 inches,
and so on. A wind of greater speed would move bullets at all ranges 11/2 times more
than a 10-mph wind, or 7 1/2 inches at 175 meters. The same rule also applies to a
half-value wind. A 5-mph half-value wind would move bullets one-fourth the amount
shown in Figure F-9—3 3/4 inches at 300 meters.
An easy way to remember the effects of wind is that a 10-mph wind moves the
bullet 10 inches at the battlesight zero range of 250 meters. If this information is taken
to the standard field fire range with targets at 75, 175, and 300 meters, it is easy to
remember that a 10-mph wind moves the bullet 1,5,10, and 15 inches at the ranges of
75,175,250, and 300 meters, respectively. These numbers can be converted to a 1-mph
wind —1/10 inch at 75 meters, 1/2 inch at 175 meters, 1 inch at 250 meters, and 1-1/2
inches at 300 meters — so that when the wind speed has been determined, it can be
multiplied with the mph figure to determine bullet displacement.
WIND MEASUREMENT
A wind gage can be used for precise measurement of wind velocity. When a gage is not
available, velocity is estimated by one of the following methods:
Flag method. If the firer can observe a flag or any clothlike material hanging from
a pole, he should be able to estimate the angle formed at the juncture of the flag and
pole. As shown in Figure F-10, dividing this angle by the constant number 4 equals the
Pointing method. If a flag is not visible, a piece of paper or other light material
can be dropped from the shoulder. By pointing directly at the spot where it lands, the
angle can be estimated. As shown in Figure F-ll, this angle is also divided by the
F-9
FM 23-9
constant number 4 to determine the approximate wind speed in mph. Ibis indicates
conditions at the firing position, which could be different at the target position.
Observation method. If the two methods already described cannot be used, the
following information can assist in determining wind velocities:
• Winds under 3 mph can barely be felt by the firer, but the presence of slight wind
can be determined by drifting smoke.
• Winds of 3 to 5 mph can be felt lightly over the firer’s face.
• Winds of 5 to 8 mph constantly move the leaves of trees.
• Winds of 8 to 12 mph raise dust and loose paper.
• Winds of 12 to 15 mph cause small trees to sway.
Wind is highly variable and sometimes quite different at the firing position than
at the target position. Even though the wind is blowing hard at the firing line, the bullet
path could be protected by trees, brush, or terrain. The wind can vary by several mph
between the time a measurement is taken and when the bullet is fired. Therefore,
trianing time should not be wasted trying to teach soldiers an exact way to measure wind
speed. Soldiers should understand that the wind can blow the bullet off course but not
to overcompensate and miss targets because of applying too much holdoff.
ADJUSTED AIMING POINT
Given the nature of the record fire course and combat, it is not appropriate to make
sight adjustments for wind; therefore, the holdoff technique must compensate for the
effects of wind. Placement of the aiming point causes bullets to hit target center when
F-10
FM 23-9
firing the M16A1 rifle in a full-value 10-mph wind (Figure F-ll). The firer displaces
the center of the front sight post the number of inches shown in Figure F-12 for that
particular range.
Figure F-12. Placement of the M16A1 front sight (M16A2 is similar).
10 mph WIND
150 METERS
Wind has a minor effect on the M16 bullet relative to the size of the target at ranges
out to 100 meters. When engaging targets in excess of 150 meters in heavy winds,
adjusting the aiming point into the wind increases the probability of a hit. Wind effects
are uniform in relation to speed, that is, a 5-mph wind has one-half the effect of a
10-mph wind, and a 20-mph wind has twice the effect of a 10-mph wind.
Firers must adjust their aiming point into the wind to compensate for the effects
of wind. If they miss a distant target and the wind is blowing from the right, they should
aim to the right for the next shot. A guide for the initial adjustment is to split the front
sight post on the edge of the target facing the wind.
The newly assigned soldier should aim at target center for the first shot and then
adjust for wind when he is confident that wind caused the target miss. Experienced
firers should be able to apply the appropriate holdoff for the first shot, but the basic
rule must be followed—when in doubt, aim at target center.
Section III. ELEVATION AND WINDAGE RULE
The elevation and windage rule states that one click of elevation or windage moves the
strike of the bullet a specific distance at a specific range. At a range of 25 meters, one
click of windage moves the strike of the bullet .33 cm, and one click of elevation on the
front sight moves the strike of the bullet .83 cm. To compute the distance (D) that one
click of elevation (front sight) or windage moves the strike of a bullet at a given range
F-11
FM 23-9
(R), divide the range (expressed in meters) by 25, and multiply by either .33 cm for
windage or .83 cm for elevation.
R
Windage: D = 25 m x .33 D = Distance in centimeters
R
Elevation: D = 25 m x .83 R = Range in meters
WINDAGE
To compute the distance that one click of windage moves the strike of the bullet at a
range of 300 meters, divide 300 meters by 25 meters and multiply by .33 cm.
300 m
D = 25 m x .33 = 12 x .33 = 4 cm (4.0 or 3.96)
Therefore, one click of windage moves the strike of the bullet 4 cm at a range of
300 meters. Table F-l illustrates the amount of change in both centimeters and inches
of one click of windage at various ranges.
Table F-1. Windage measurements.
Distance (in meters) Impact*
25 0.33 cm (1/8 inch)
100 1.45 cm (5/8 inch)
200 2.9 cm (7/8 inch)
300 4.4 cm (1 3/4 inches)
400 5.8 cm (2 1/4 inches)
500 7.3 cm (2 7/8 inches)
600 8.7 cm (3 1/2 inches)
700 10.2 cm (4 inches)
800 11.6 cm (4 5/8 inches)
* All values rounded off.
ELEVATION
Front sight. To compute the distance that one click of elevation (front sight) moves the
strike of the bullet at a range of 300 meters, divide 300 metes by 25 meters and multiply
by .83 cm.
300 m
D = 25 m x .83 = 12 x .83 = 10 cm
Therefore, one click of elevation on the front sight moves the strike of the bullet
10.9 cm at a range of 300 meters. Table F-2 shows the amount of change in both
centimeters and inches of one click of elevation on the front sight at various ranges.
F-12
FM 23-9
Table F-2. Change in elevation for one click on front sight.
Distance (in meters) Impact*
25 100 200 300 *AII values rounded off. 0.83 cm (3/8 inch) 3.6 cm (1 3/8 inches) 7.3 cm (2 7/8 inches) 10.9 cm (4 1/8 inches)
Rear Sight. The elevation knob adjusts elevation 1.1 inch for each click at 100
meters. If the scale on the elevation knob were cut in half and flattened out it would
look like Figure F-13, with each dot and each number representing one click of
elevation.
Figure F-13. M16A2 rear sight elevation scale.
F-13
FM 23-9
Table F-3 shows the amount of change in elevation of the strike of the bullet for
each click at various ranges—one click equals one minute of angle.
Table F-3. Change in elevation for one click at various ranges on rear sight.
Distance Change in Elevation for Each Click
When aiming at- 300 meters, 1 click = 400 meters, 1 click = 500 meters, 1 click = 600 meters, 1 click = 700 meters, 1 click = 3.3 inches (7.9 cm) 4.4 inches (10.5 cm) 5.5 inches (13.1 cm) 6.6 inches (15.7 cm) 7.7 inches (18.3 cm)
APPLICATION
The squares on the M16A2 25-meter zero target are designed so that one click of
elevation moves the strike of the bullet one square on the target. Three clicks of
windage move the strike of the bullet one square on the target.
Section IV. BALLISTICS
Commanders and marksmanship trainers must understand some aspects of ballistics
to teach the principles of zeroing and engagement of long-range targets. Ballistics is a
science dealing with the motion and flight characteristics of projectiles. The study of
ballistics in rifles is divided into three categories: internal, external, and terminal.
• Internal ballistics concerns what happens to the bullet before it leaves the
muzzle of the rifle.
• External ballistics deals with factors affecting the flight path of the bullet
between the muzzle of the rifle and the target.
• Terminal ballistics deals with what happens to the bullet when it comes in
contact with the target.
INTERNAL BALLISTICS FACTORS
The overall dimensions of the combat service 5.56-mm cartridges are the same, which
allow cartridges to be fired safely in M16A1 or M16A2 rifles. There are internal
differences that affect firing accuracy. An ammunition comparison is provided in Figure
F-14.
This increase in projectile length, weight, and configuration requires different
twists in the barrels, lands, and grooves to stabilize the M855 bullet in flight (Figure
F-15). The M16A1 has a 1:12 barrel twist. (The bullet rotates by the lands once for
F-14
FM 23-9
Figure F-14. Projectile differences.
0.906 IN
(29.3-MM)
M855
BALL
M193
TRACER
M196
TRACER
M856
every 12 inches of travel down the barrel.) The M16A2 has a 1:7 barrel twist. (The
bullet rotates once for every 7 inches of travel down the barrel.)
The M16A1, with its 1:12 twist, does not put enough spin on the heavier M855
bullet to stabilize it in flight, causing erratic performance and inaccuracy for training
or full combat usage (30.48- to 35.56-cm shot group at 91.4 meters and 72-inch shot
group at 274.2 meters)(Figure F-15A). Therefore, while it is safe to fire the M855
F-15
FM 23-9
cartridge in the M16A1 rifles, it should only be used in a combat emergency, and then
only for close ranges of 91.4 meters or less.
The M16A2 rifle with its 1:7 twist fires both types of ammunition with little
difference in accuracy out to a range of 500 meters. The M16A2 and its ammunition
are more effective at ranges out to and beyond 500 meters due to a better stabilization
of the round.
The two 10-round shot groups in Figure F-15A were fired by a skilled marksman
at a distance of 274.2 meters, using the same M16A1 rifle. The 25.4-cm shot group on
the left was fired (and zeroed) with M193 ammunition. The 6-foot shot group on the
right was fired after substituting M855 ammunition.
Figure F-15B shows two 25.4-cm shot groups fired by the same skilled marksman
at a distance of274.2 meters, using an M16A2 rifle. The shot group on the left was fired
(and zeroed) with M855 ammunition. The shot group on the right was fired after
substituting M193 ammunition.
NOTE: Both the M193 and M855 ball ammunition can be used in training and accurately function in the
M16A2; however, do not substitute between the types during firing. Do not zero with one type
and then fire the other for any type of training. Due to the different characteristics of each round,
be sure to zero with the same type ammunition that will be used for training. Figure F-15B il-
lustrates how the group changes when an M16A2 is zeroed with M855 ammunition but fires M193
ammunition. The reverse occurs if zeroed with M193 and fires M855.
A simple rule of thumb to use to preclude any problems is:
• When firing the M16A1 rifle, use only the ammunition specifically designed for
the rifle (M193 ball ammunition).
• When firing the M16A2 rifle, use the ammunition that was designed for the
weapon (M855 ball ammunition).
EXTERNAL BALLISTICS FACTORS
When the bullet is launched into the earth’s atmosphere at some 2,200 mph, its path is
influenced by various forces and elements. As the temperature rises, the bullet hits
higher on the target. As the atmospheric pressure rises, the bullet hits lower—the
higher the humidity, the lower the bullet strikes. A strong wind from the rear causes
the bullet to hit high while a strong head wind causes the bullet to hit low. Firing uphill
or downhill normally causes the bullet to hit high. Changing light conditions (bright to
cloudy, different sun angles) can affect aiming and cause the bullet to hit in different
locations.
These factors combined with slight differences in bullet shape and weight, powder
charge, chamber pressure, muzzle velocity, barrel erosion influence the flight of the
bullet. For these reasons, the firer will probably never see three bullets in the same
target hole.
Some factors, such as temperature, produce only small effects at range—for
example, a bullet that hits the center of a target at 250 meters when the temperature is
0 degrees Fahrenheit would strike the target 1.905 cm higher when the temperature is
increased to 120 degrees Fahrenheit. One click of elevation at this range is almost 7.62
cm. Soldiers should not try to adjust their point of aim by 1.905 cm on a 250-meter
F-16
FM 23*9
target. However, there are a few factors that can influence shooting performance to
such an extent that they should be discussed in detail.
The instructor/trainer must know that several variables exist. Some of these
variables have a small influence on the bullet, and can complicate and confuse
marksmanship training. Time should be spent only on mastering the most significant
factors such as effects of gravity and flight time.
TERMINAL BALLISTICS FACTORS
Bullet penetration depends on the range, velocity, bullet characteristics, and target
material. Greater penetration does not always occur at close range with certain
materials since the high velocity of the 5.56-mm bullet causes it to disintegrate soon
after impact (see Table F-4).
Table F-4. Example penetration comparisons.
50 meters 300 meters
Pine boards:
M193 7.5 inches (190.50 mm) 10.5 inches (265.00 mm)
M855 9.0 inches (231.30 mm) 12.0 inches (304.80 mm)
Mild steel plate:
M193 0.413 inch (10.5 mm) 0.137 inch (3.5 mm)
M855 0.551 inch (14.0 mm) 0.413 inch (10.5 mm)
BULLET DISPERSION AT RANGE
The effects of bullet dispersion and accuracy at various ranges are discussed in this
paragraph. Instructors/trainer must have a working knowledge of normal shot
dispersion.
Minute of Angle. Minute of angle is a term used to discuss shot dispersion. It is
the standard unit of measurement used in adjusting rifle sights and other
ballistic-related measurements. It is also used to indicate the accuracy of a rifle. A circle
is divided into 360 degrees. Each degree is further divided into 60 minutes, so that a
circle contains 21,600 minutes. A minute of angle is an angle beginning at the muzzle
that would cover 2.540 cm at a distance of 91.4 meters (Figure F-16,page F-18). When
the range is increased to 182.8 meters, the angle covers twice the distance, or 5.08 cm.
The rule applies as range increases: 7.62 cm at 274.2 meters, 10.16 cm at 365.6 meters,
and so on.
Increase of Shot-Group Size. Just as the distance covered by a minute of angle
increases each time the range changes, a shot group can be expected to do the same. If
there is 2.540 cm between bullets on a 25-meter target, then there will be an additional
2.540 cm of dispersion for each 25 meters of range —a 2.540-cm group at 25 meters
(about 3.5 minute of angle) is equal to a 25.4-cm group at 250 meters (Figure F-17).
The 25-Meter Zero Standard (Figure F-18, page F-18). A standard E-type
silhouette is about 48.26 cm wide; a circle (angle) that is 48.26 cm at 300 meters is 4 cm
at 25 meters. Therefore, a soldier that can fire all bullets well within a 4-cm circle at 25
meters and adjusts the sights for zero will hit the target at all ranges out to 300 meters.
F-17
FM 23-9
Figure F-17. Increase in shot-group size as range increases.
-------1-----
10-INCH
SHOT GROUP
О 25M 50M 75M 100M 125M 150M 175M 200M 225M 250M
Figure F-18. An angle that covers 4 cm at 25 meters covers 48.26 cm at 300 meters.
0 25M 50M 75M 100M 125M 150M 175M 200M 225M 250M 275M 3Q0M
F-18
FM 23-9
APPENDIX G
LIVE-FIRE EXERCISES
This appendix contains guidelines for the instructor/trainer for organizing ranges,
conducting training, and selecting personnel and equipment to establish a live-fire range
during rifle marksmanship training. It also contains the intent, requirements, and brief
description of each range.
NOTE: Any change to the authorized qualification courses must be approved by the TRADOC com-
mander. All questions concerning authorized qualification courses should be forwarded to: Com-
mandant, US Army Infantry School, ATTN: ATSH-I-V, Fort Benning, GA 31905.
Section I. GROUPING RANGE
This section provides guidelines for the instructor/trainer for the conduct of a grouping
range. It is designed to include organization, conduct of fire, analysis of shot groups,
and shot group sizes.
CONDUCT OF GROUPING RANGE
Fundamental exercises are conducted in two situations: during IET at the Army training
centers, and as part of the soldier’s individual and collective sustainment training
programs within his unit. The organization and conduct of a grouping range are based
on the availability of ammunition and the firing ability of personnel in training.
Initial training consists of an explanation of the purpose of a grouping exercise. It
highlights individual actions needed to receive maximum benefit from the expended
ammunition.
Each shot is fired using exactly the same aiming point (target center of mass). The
objective is to fire tight shot groups and to place those shot groups in a consistent
location (the actual location of groups on the target is not important). Each three-round
shot group must be connected with lines and labeled in sequence—for example, 1,2,3
and so on.
Initial firing is conducted from an individual fighting position or from a prone
supported position. Once firing proficiency has been demonstrated from the supported
position, grouping exercises can be conducted from the prone unsupported position.
For example, if 27 rounds are available for the grouping exercise, 18 rounds can be fired
from a supported position and the remaining 9 rounds from an unsupported position.
If proficiency is not demonstrated for the first 18 rounds, the soldier continues in the
supported position for the remaining 9 rounds.
RANGE ORGANIZATION
Organization for training is based on a 200-man unit and a standard 25-meter range of
110 firing points. The unit is divided into two orders-the first order fires while the
second order performs coaching duties. The extra 10 firing points are used to conduct
corrective instruction. (The organization described herein refers to Army training
G-1
FM 23-9
centers with proper facilities. When using smaller ranges, the unit is divided into three
or more orders.)
On 25-meter ranges, a firing position and sandbags should be provided at each
firing point so instruction in firing from supported positions can be conducted (see
Figure G-l).
Figure G-1. The 25-meter range.
The control tower manages live-firing operations and monitors the progress of
training. It is not intended that instruction and training be performed from the
tower —training is conducted on the firing line by the instructor/trainer. Before each
live-fire exercise, personnel must be briefed on range safety regulations and have
hearing protection.
A control or point tower should be centrally located to the rear of the firing line.
It should be elevated to permit unrestricted observation of the range, both to the rear
of the firing line and to a safe distance beyond the line of targets to the front. All firing
commands are issued from the control tower and must be obeyed immediately. The
only exception is if an unsafe act occur—the first soldier to see such an act should
command CEASE FIRE.
CONDUCT OF TRAINING
The instructor/trainer must understand how to correctly analyze shot groups.
Shot-Group Marking. If the soldier is to benefit from this exercise and if the
instructor/trainer (or coach) is to provide useful guidance, the soldier must mark each
shot group for a clear record of his firing practice (Figure G-2). He connects his three
bullet holes on his target with a straight line and places a number by the shot group.
Then the soldier marks the approximate center of the shot group with an X. (Various
shot groups are shown in Figure G-3.)
G-2
FM 23-9
Marking the X. The X represents the center of the three shots. When two shots are
near one end of the group and the third shot is toward the other end, the X is placed
closer to the two near shots. This is not a precise marking that requires a measurement
but is a procedure to help in shot-group analysis. The three-round shot group confirms
the variation inherent in the rifle, ammunition, and firer. While some of the variation
within a single shot group is due to the rifle and ammunition, the firing of more shot
groups indicates any firer errors. (Figure G-4 shows three marked shot groups.)
Figure G-4. Central point of nine shots.
G-3
FM 23-9
Locating center of shot groups. The central point of all nine bullets fired can be
found by treating the X as a single bullet. If the soldier maintains the same point of aim
for each shot, this indicates firing errors or needed sight changes.
Shot-Group Analysis. Shot-group analysis begins by the instructor/trainer
observing the soldier while he fires. The purpose of shot-group analysis is to determine
firer errors so that the soldier can apply corrections for the next shot group. The target
shown in Figure G-5 illustrates that a match-grade quality rifle-ammunition
combination, which places all bullets in almost the same hole, helps detect the slightest
error. When firing a standard service rifle-ammunition combination, the soldier
displays a dispersion pattern that is discounted as firer error.
Figure G-5. Shot groups fired with a match-grade quality rifle ammunition.
The targets shown in Figure G-6 reflect possible 25-mm zero performances by
standard rifle-ammunition combinations and proper soldier performance. The soldier
can fire on all combat targets out to ranges beyond 300 meters. Because the variability
of the standard rifle must be considered for accurate and useful shot-group analysis,
the instructor/trainer must promote confidence in the soldier and his rifle.
Shot-Group Size. A key to analyzing shot groups is shot-group size. Figures G-7
and G-8 show (near) actual shot-group size. The circles on the reduced targets shown
in Figures G-8 through G-ll are 4 cm in diameter, and each block on the target is .7
cm. As in Figure G-7, any shot group within 2 cm (about three squares on the target)
indicates that no firer error is involved or that none can be detected. Regardless of the
arrangement of the three bullets within the group, no useful information is provided to
improve the soldier’s firing performance.
G-4
FM 23-9
Figure G-7. Shot group indicates proper application of marksman fundamentals.
Shot groups—about 3 cm. The targets shown in Figure G-8 represent acceptable
firing performances and possibly the ability of some rifles. Regardless, a better firing
performance should be expected, and the instructor/trainer should ensure that the
soldier is properly applying the four marksmanship fundamentals. Also, the he should
explain that group size is not due to weapon performance (an experienced firer tests
the rifle). The placement of shots within these groups (about 3 cm or four squares on
G-5
FM 23-9
the target) reflects no useful information. Firing another shot group (without a sight
change) could provide more information to determine possible firer error.
Shot groups—about 4 cm. The three shot groups shown in Figure G-9 are about 4
cm (six squares on the target) and indicate firer error.
Firers are checked for a proper steady position, that the eye is focused on the front
sight post tip (which is placed at target center for each firing), that the breath is locked
during trigger squeeze, and that the trigger squeeze is correct.
More shot groups provide better information from which to direct remedial
training. The vertical aiming point may not be the same for each shot since the vertical
dispersion is greater than the horizontal dispersion. Any problem with finding target
center of mass is probably in the vertical plane and not in the horizontal plane. If the
soldier has his eye focused on the front sight post, his vertical aiming error should be
minimal, which usually cannot be detected on the target. Any of these three shot groups
could have one round that was pulled by the firer or was a flier (an erratic round over
which the firer has no control). Therefore, another shot group must be fired.
NOTE: Location of the shot group is not important when conducting a grouping exercise. Size of the
group and the ability to place two or more groups in the same location are important.
Shot groups-6 cm or larger. The three shot groups shown in Figure G-10 are the
easiest to analyze, indicating obvious firer error-improper trigger squeeze is part of
the problem. Shot groups that are about 6 cm or larger (about nine squares on the
target) are normally the result of the soldier knowing when the rifle is going to fire.
Therefore, the instructor/trainer tries to improve trigger squeeze by using the
ball-and-dummy technique so the soldier can tighten his shot group (Appendix C).
Firers with these shot groups should receive extensive dry-fire training to help correct
firing problems.
G-6
FM 23-9
Figure G-9. Shot groups that indicate improper trigger squeez.
Figure G-10. Shot groups that indicate firer error.
G-7
FM 23-9
Grouping performance—example 1. The shot groups in Figure G-ll represent
acceptable shot groups (4 cm or less) in the same location. It is appropriate to make a
sight change of left 4 and down 6. Any change should be clearly marked on the target
and saved for reference.
Grouping performance—example 2. The groups in Figure G-12 indicate that
proper firing fundamentals are being applied by the soldier for each shot group, but
that the soldier could be using a different aiming point each time a shot group is fired.
The soldier’s understanding of the aiming process is questioned, and his position is
checked for consistency. The instructor/trainer cannot determine which shot group best
represents the firer’s zero; therefore, a sight change should not be made.
Figure G-11. Tight shot groups in the same
Figure G-12. Acceptable shot groups
Grouping performance—example 3. The groups in Figure G-13 indicate consistent
aiming, but the soldier probably knows when the rifle is going to fire (improper trigger
squeeze) or he is firing from an unsteady position.
Grouping performance—example 4. The groups shown in Figure G-14 indicate
problems with shot-group size and with consistent placement of groups. The four
marksmanship fundamentals should be checked.
Grouping performance—example 5. The shot groups shown in Figure G-15, when
viewed as nine shots, reflect proper horizontal placement of shots but unsatisfactory
vertical dispersion. This indicates a failure to aim at target center of mass for each shot.
The soldier’s aiming procedure is checked along with other marksmanship
fundamentals.
Grouping performance—example 6. The shot groups shown in Figure G-16 are
proper groups, but vertical dispersion indicates that a different aiming point is used for
each group. The soldier’s understanding of the target center of mass and aiming process
should be questioned.
G-8
FM 23-9
Figure G-13. Improper shot groups with
consistent placement (M16A1).
Figure G-15. Marginal shot groups; improper
vertical placement and proper horizontal
placement (M16A1).
G-9
FM 23-9
Grouping performance-example 7. The shot groups in Figure G-17 are improper
groups. A sight change is made to bring the groups closer to target center. If the initial
group is close to the paper’s edge, the groups are still completed to provide the needed
information for a sight change. A large sight change moves the groups close to target
center of mass. Assuming that the last bullet in the third group is to the right of the
target, a change of 10 clicks left and 10 clicks up is indicated.
Grouping performance—example 8. The groups shown in Figure G-18 indicate
improper firing. Trigger jerk is indicated as a probable cause, but all fundamentals are
checked.
Figure G-17. Improper shot groups on the edge
NOTE: Targets are changed after firing the first nine rounds. These targets are saved since all bullets fired
are important for self-analysis, coaching, or future sight changes.
Section II. ZERO RANGE
This section establishes guidelines for the instructor/trainer on the conduct of a zero
range. It contains information on the setup, operation, and conduct of training.
CONDUCT OF ZEROING ON A 25-METER RANGE
When the soldier can consistently place two consecutive three-round shots within the
same general area at 25 meters, he is ready to zero his rifle.
The soldier fires a three-round shot group at the 25-meter zero target. The firing
line is cleared, and he moves downrange to examine the shot group. The soldier
connects the bullet holes with a pencil line and marks the holes with the number 1. With
the instructor/trainer, the soldier examines the shot group for size placement and
G-10
FM 23-9
fundamental errors. If the shot group is on the paper target, no sight changes should be
made.
The soldier then returns to the firing line and fires a second three-round shot
group. Again, he moves downrange and examines the second shot group. The soldier
connects the second set of bullet holes and marks them with the number 2. He then
determines, along with the instructor/trainer, if any sight changes are needed. To make
a sight change, both shot groups should be in the same location and no larger than 4
cm. All sight changes should be recorded on the target. A review of previous firings
(groupings) is helpful.
After the sight changes are made, two more three-round shot groups are fired,
using the same procedure to confirm the zero. The shot groups must be centered within
the zero circle. When the instructor/trainer is satisfied that the soldier has achieved the
best possible zero, the soldier is removed from the firing line.
Using this information, the zeroing process would be conducted as outlined in the
following example:
Using the L-sight and applying the fundamentals, the soldier consistently aims
target center of mass as shown in Figure G-19.The soldier fires two separate
three-round shot groups, as shown in Figure G-20, and numbers them. Based
on the location of these two groups (Figure G-20), the soldier would make the
sight adjustments shown in Figure G-21.
Figure G-20. Initial shot-group results.
G-11
FM 23-9
Figure G-21. Sight adjustments.
After making the correct sight changes, the soldier fires two more separate
three-round shot groups to confirm that the adjustments have aligned the sights with
the center of the target and that the bullets are well within the 4-cm circle (Figure G-22).
Figure G-22. Final shot-group results.
26 METER ZEROING TARGET FOR M16A1 RIFLE
(WITH STANDARD SIGHTS)
G-12
FM 23-9
MECHANICAL ZERO
To mechanically zero the weapon, the firer adjusts the front sight post up or down until
the base of the front sight post is flush with the well. Then he adjusts the front sight post
11 clicks in the direction of UP. This moves the post down into the well 11 clicks. The
soldier turns the rear sight windage drum until it moves all the way to the left side and
locks. Then, he turns the windage drum back (right) 17 clicks so the rear sight is
approximately centered (see Figure G-23).
REAR SIGHT ADJUSTMENT
RECORDING OF ZERO, M16A1
Using the example in Figure G-22 and assuming that the initial setting was correctly
adjusted, the soldier would record his zero setting as follows:
Front sight.
Elevation zero. Since the center of the shot groups was determined to be two
squares high, the correction would be two clicks down. With the initial setting of 11,
this would be 11 minus 2, or 9 and should be recorded as 9 UP.
G-13
FM 23*9
Rear sight.
Windage zero. Since the center of the shot groups was determined to be seven
squares to the right, the correction would be seven clicks left. This would be 17 minus
7 or 10 and should be recorded as R 10.
The data recorded for the firer in this example would be as shown in Figure G-24.
Figure G-24. Recording of data.
SPG GARV Roane
2.1 APR 8?
x/9------- Rio
WPN# 1ХЪ45С»7
NOTE: These data are not transferable to another rifle that the soldier is assigned.
INITIAL SIGHT SETTING, 25METERS
Before firing, the soldier sets the initial sight setting for 25-meters on his weapon. (This
is equivalent to using the L sight on the M16A1.) To do this, he adjusts the front sight
up or down until the base of the sight post is flush with the sight post well. He, then,
turns the rear windage knob until the index mark on the 0-2 sight is aligned with the
rear sight base index (Figure G-25). The elevation knob is turned one click past the 8/3
mark (8/3 +1). The elevation knob remains in this position until the battlesight zero
is obtained.
During zeroing for elevation, the soldier makes all adjustments with the front sight
post. To place the actual 300-meter zero on the rifle, he rotates the elevation knob down
one click so that the 8/3 mark on the range scale is aligned with the alignment mark on
the side of the rifle receiver. Once zero is accomplished, for engagements at ranges
greater than 300 meters, he places the correct range setting on the elevation knob to
obtain point of aim/point of impact.
INITIAL SIGHT SETTING FOR FIELD FIRE, M16A2
When zeroing on either a modified field fire range or a KD range using the M16A2
300-meter feedback targets, the initial sight setting field fire must be placed on the
weapon. To do this, the soldier flushes the front sight post, centers the 0-2 aperture on
the rear sight, and sets the elevation knob to the 8/3 mark. Point of aim should be on
the 300-meter feedback target center of mass. During zeroing, the soldier makes all
adjustments for elevation with the front sight post. If the rifle has been zeroed by
another soldier, the weapon is closer to being zeroed than if returned to the initial sight
setting. Therefore, the sight setting on the rifle is usually used as received by the soldier.
G-14
FM 23-9
Figure G-25. Sight adjustments.
FLUSH
Front sight post adjustment.
MARK
ON
RECEIVER
FIELD FIRE
The M16A2 rear sight calibration for 25-meter firing.
G-15
FM 23-9
With the rear elevation knob calibrated and applying the fundamentals, the soldier
consistently aims target center of mass as shown in Figure G-26.
The soldier fires two separate, three-round shot groups and numbers them as
shown in Figure G-27.
Figure G-26. Target center of mass.
Based on the shot groups in Figure G-27 and the information provided on the
target, the soldier computes the changes as shown in Figure G-28 to move the group
down and to the left.
Once the changes are made, the soldier fires two more three-round groups to
confirm that the adjustments have moved the strike of the bullet into target center of
mass (Figure G-29).
RECORDING OF ZERO, M16A2
The concept for zeroing on the M16A2 rifle is the same as for the M16A1 rifle. The
conduct of fire on the 25-meter range follows the previous examples but uses the
M16A2 (300 meters) zero target.
Section III. DOWNRANGE FEEDBACK
Downrange feedback provides precise knowledge of what happens to bullets at range.
It provides for an effective transition between 25-meter firing and firing on the field
fire range. Having precise knowledge of where all bullets are hitting or missing the
target, the poor firer (with instructor/trainer assistance) can improve his performance
and the good firer can bring his shots to target center. Firers develop the knowledge
and skills required to perform with confidence on the field fire range, where only
hit-or-miss information is available.
G-16
FM 23-9
Figure G-27. Initial shot group results.
25 METER ZEROING TARGET
M16A2
•t П
Figure G-29. Final shot-group results.
25 METER ZEROING TARGET
M16A2
Figure G-28. Sight adjustments.
G-17
FM 23-9
CONDUCT OF DOWNRANGE FEEDBACK
During IET basic rifle marksmanship, downrange feedback is conducted with paper
targets at 75 meters, 175 meters, and 300 meters. Shot groups are fired progressively at
the 75-meter target, then the 175-meter and 300-meter range targets. Half of the bullets
are fired from the supported fighting position and the other half from the prone
unsupported position. After each group is fired, soldiers move downrange to mark their
targets. Based on this feedback, soldiers receive a critique from their
instructor/trainer/coach, and apply any needed sight changes or aiming adjustments.
Army training centers conduct modified versions of downrange feedback based on the
availability of the KD range or modified field fire range.
The downrange feedback exercise must be conducted within the constraints of
time, ammunition, and available ranges. If 30 rounds of ammunition are available for
training, firing 3-round shot groups 10 times is preferable over firing 5-round shot
groups 6 times. Once the soldier understands the concept for adjusting the aiming point
to compensate for the effects of wind and gravity, he is ready to apply his knowledge
on the field-fire range.
To confirm zero, soldiers are placed in firing orders and issued one magazine of
6 to 10 rounds. Firers confirm their zero by firing two 3-round or 5-round shot groups
at the 175- or 300-meter feedback targets. The firing line is then cleared, and firers
move downrange to inspect their targets, to review their adjusted aiming performance,
or to make sight adjustments. Each firer repairs his target by placing target pasters over
the holes (black on black, white on white) and then moves back to the firing line.
Firing at 75-meter targets. Feedback can be provided after each round, each
3-round shot group, or each 5-round shot group on the 75-meter feedback targets.
Soldiers fire from the supported and prone unsupported positions. The firing line is
then cleared, and each firer and instructor/trainer/coach move downrange to inspect
targets. Feedback consists of a critique of performance, adjustments to point of aim for
gravity or wind effects, and evaluation of shot placement. Target spotters (markers)
(Figure G-30) are placed in the bullet holes so hits can be viewed from the firing line.
Firing at 175-meter targets. Firers engage the 175-meter target using the same
downrange procedure as the 75-meter target. The 175-meter target is engaged from
the supported and prone unsupported positions.
Firing at 300-meter targets. The 300-meter target is engaged using the same
downrange procedure as the 75-meter target. Firers use the supported and prone
unsupported positions.
Target marking. When the initial shot group is fired, target spotters (markers)
should be placed in each bullet hole, placing white spotters on the silhouette and black
spotters off the silhouette.
This procedure ensures that the firer can see his performance when he returns to
the firing line, that the tower operator can direct instructors/trainers to soldiers having
the greatest problems, and that instructors/trainers can quickly assess firing problems
(Figure G-30). Soldiers are motivated to fire better since their peers can observe their
performance. On the second and subsequent trips to the target, the target spotters
(markers) should be moved and placed in the holes of the new shot group. The old
holes must be pasted, using black pasters on black and white pasters on white. Failure
G-18
FM 23-9
Figure G-30. Target spotters (markers).
Spotters on 175-meter targets as they would appear from
the firing line.
to paste all bullet holes makes training ineffective since the soldier cannot clearly
identify all bullets holes of his last shot group.
MODIFIED FIELD FIRE RANGE
A modified field fire range can be used for downrange feedback. To conduct downrange
feedback, minor changes must be made to a standard field firing range (Figure G-31).
Target frames, like those used on the 25-meter range, are placed at 75 meters, 175
meters, and 300 meters.
G-19
FM 23*9
Loudspeakers are placed downrange to allow firers at the 175-meter and
300-meter lines to hear the tower operator’s instructions as firers move to the targets.
After placing target spotters in the bullet holes, soldiers wait for an evaluation of their
performance. The tower operator is also in a position to assess the effects of wind, which
should be told to firers.
With these changes and the use of the downrange feedback targets, an effective
training period can be conducted. A tower operator and one instructor/trainer for each
five firing points are needed to operate the range.
RECORD OF PERFORMANCE
During the conduct of downrange feedback, a record of performance should be kept
to facilitate, critique, and perform an after-action review.
As soldiers complete each phase and achieve the performance standard for that
range, they should receive a critique. Instructors/trainers must ensure soldiers do not
progress to a greater range until they become proficient at closer ranges. For example,
the soldier who is having problems firing a 6-inch group at 75 meters should not be
expected to fire an 11-inch group at 175 meters—progressing to greater ranges would
only frustrate the soldier.
The DA Form 5239-R (75-, 175-, and 300-Meter Downrange Feedback
Scorecard) is an effective way of recording target hit-and-miss information as the
soldier completes each phase of firing (Figure G-32). (See Appendix H for a blank
reproducible copy of this form.)
DOWNRANGE FEEDBACK TARGETS
The M16A1/M16A2 75-meter feedback target is the size of an actual F-type silhouette
target with 6 inches cut from the bottom to allow for the target-holding mechanism and
skip plate. When viewed from a distance of 75 meters, the target looks similar to a
standard F-type silhouette on the field-fire range. However, there are important
differences.
The target and surrounding space are large enough to capture all bullets fired. The
firer moves to the target and actually locates each bullet hole. Information similar to
that on the zero target has been overprinted to assist in applying sight adjustments. The
12-cm circle provides a standard equivalent to the 4-cm requirement on the zero range.
An X is placed in the bottom portion of the circle to show the firer where he must aim
on this target so his bullets will hit target center of mass when his rifle is zeroed. This
target can be used at any range to capture bullet strike; however, the overprinted
material is valid only at 75 meters.
The M16A1/M16A2175-meter and 300-meter feedback targets are designed for
use at 175 or 300 meters and have the same features as the 75-meter target (Figure
G-33). Both targets can be used to confirm weapon zero or to refine the zero obtained
on the 25-meter range. The zero obtained on these targets are more valid than the zero
obtained on the 25-meter range. For example, when engaging this actual-size target at
175 or 300 meters from a supported position, it is a closer approximation to the actual
task than the scaled target at 25 meters. By allowing for the adjusted aiming point and
for wind, this exercise can contribute to a refinement of the zero.
G-20
FM 23-9
G-21
FM 23-9
Figure G-33. Feedback targets.
М16A1 75-meter feedback target (NSN 6920-01 -169-6921).
М16A2 75-meter feedback target (NSN 6920-01 -253-4006)
G-22
FM 23-9
Figure G-33. Feedback targets (continued).
М16A1 175-meter feedback target
(NSN 6920-01-167-1395).
M16A2 175-meter feedback target
(NSN 6920-01-253-4008)
М16A1 300-meter feedback target М16A2 300-meter feedback target
(NSN 6920-01 -253-4009). (NSN 6920-01 -253-4007).
G-23
FM 23-9
Downrange feedback training should include detailed explanations of the targets:
how the 12-cm circle on the 75-meter target and 28-cm circle on the 175-meter equate
to the 4-cm zeroing standard on the 25-meter range; the small difference that should
be experienced between point of aim and bullet strike; how the grid can be used for
making sight adjustments; and how the targets should be marked. Training should also
include how wind can affect bullets and should emphasize the fundamentals of firing.
The information provided to the firer and instructor/trainer should be visualized
for the targets shown in Figure G-34A. These two firing performances provide the same
information back to the firing line — the target was hit one time and missed twice. When
bullet locations can be seen, the firing problems are quite different. The firer on the
left is failing to apply fundamentals, and the firer on the right has a zeroing problem.
The targets in Figure G-34B indicate that both firers are turning in an excellent
performance by hitting with all three bullets. However, when the actual bullet strikes
can be seen, it is obvious that the firer on the left needs assistance.
Figure G-34. Comparison of firing performances.
A. 75 meters.
G-24
FM 23-9
Section IV. KNOWN-DISTANCE RANGE
The known-distance range is used for testing and marksmanship training. The firing
task on a known-distance range is an intermediate step toward the firing task of a
combat soldier. Program changes (pop-up targets) and ranges have provided a much
better simulation of combat requirements. The soldier is provided information
concerning the precise hit-or-miss location of every bullet fired. KD firing is conducted
with a single, clearly visible target at a known distance, and the soldier can establish a
position that provides a natural point of aim on that single target. While this is good for
its intended purpose, overuse often results in KD training being more
competition-oriented than combat-oriented.
CONDUCT OF KNOWN-DISTANCE RANGE
The proper use of the known-distance range contributes to the unit rifle marksmanship
program. Effective training can be conducted on the KD range (Figure G-35) using
standard silhouette target facings; however, the downrange feedback targets are
G-25
FM 23-9
recommended for the KD range. The F-type silhouette 75-meter feedback target can
be engaged from the 100-yard line; the E-type silhouette 175-meter target from the
200-yard line; and the 300-meter target from the 300-yard line.
The KD range does not require the soldier to detect targets, to estimate range to
targets, to scan a sector of fire, to respond to surprise targets, to respond to short
exposure targets, to engage multiple targets, and so on.
NOTE: FM 25-7 and Appendix D provide information on pit crew operations, construction of target car-
riers for KD ranges, and ordering the sliding combination target frame (NSN 6920-049-9579).
An advantage of a KD range is the ability to see precisely where each bullet hits.
Therefore, to benefit from this training, procedures must be established so soldiers can
clearly see the results of each firing, whether a group, single shot, or 10-round exercise.
This can be accomplished by single spotters alone at the closer ranges, using larger
spotters as the range increases, supplementing the spotters with a marking disc, or using
scopes and binoculars at the extended ranges.
RANGE ORGANIZATION
Known-distance ranges are organized and operated differently than other ranges.
Personnel are organized into firing line safety and pit crews. The firing line safety crew
operates under orders from the chief range officer. The pit crew operates under orders
from the pit officer.
Chief Range Officer. The chief range officer ensures the safety of all personnel
and proper operation of his range. He may appoint a tower operator to issue fire
commands or perform those duties himself. The chief range officer performs the
following:
• Gives the range safety briefings to all soldiers and support personnel before
organizing firing orders and pit crews. Local regulations may require an
appointed safety officer to perform this duty.
• Is responsible for ammunition details.
• Organizes soldiers into firing orders for testing. If a pit detail is provided, the
chief range officer may use as many firing points as he chooses to conduct his
range. When a pit detail is not provided, the chief range officer must assign four
soldiers for each firing point. For example, if a unit has 100 personnel, the chief
range officer should use 25 firing points.
• Numbers the firing orders. Firing orders 1 and 2 remain at the firing line, while
firing orders 3 and 4 perform pit crew duties. Firing order 1 fires first and firing
order 2 performs as coaches.
• Informs the pit officer when refires are to be conducted.
• Informs the pit officer when pit crew changeovers are executed. Pit crew
changeovers occur when firing orders 1 and 2 have completed the
known-distance course or the alternate course, including initial refires. Refires
are conducted when that firing table is completed or during alibi firings.
G-26
FM 23-9
Pit Officer. The pit officer is the main link in the range chain of command and
operates under the orders of the chief range officer. He may be an NCO, depending
on local restrictions. The pit officer performs the following:
• Maintains radio or telephone contact with the chief range officer during
operation of the range.
• Serves as the timekeeper for target exposures.
• Is responsible to the chief range officer for the safety and conduct of the pit crew.
• Prepares and operates targets, scoring, and alibi target exposures.
• Conducts a pit safety briefing before firing and each time a pit crew changeover
occurs.
• Briefs the pit crew to ensure each firing point pair understands their duties. The
pit crew raises, lowers, disks, and repairs its respective targets upon command
from the pit officer. All targets must be raised or lowered at the same time on
order of the pit officer. The crew scores its assigned target only upon command
from the pit officer.
• Announces alibi and refire targets. Alibi and refire targets are raised and
lowered on order from the pit officer. All other targets remain lowered.
• Collects the scorecards from the pit crew at the end of each firing order.
• Verifies an signs the scorecards.
• Announces individual scores if requested by the chief range officer.
Firing Line Assistant Instructors/Trainers. Firing line assistant
instructors/trainers perform as safety personnel and confirm allowable alibis during
record fire.
Firing Line Safety Personnel. Firing line safety personnel are responsible for
precise timing of individual alibi firers. They inform the chief range officer of rounds
fired after the time allowed for alibis. The chief range officer informs the pit officer of
rounds fired after the allotted time, which are scored as misses.
All Personnel. All personnel complete scorecards. The pit officer maintains
scorecards by firing order and firing point number in the pits.
CONDUCT OF TRAINING
Before engaging targets, soldiers are issued one magazine of 6 to 10 rounds and confirm
or refine their zero at the 300-yard line by firing two 3-round or 5-round shot groups.
Targets are spotted by the pit crews after each group.
NOTES: 1. M16A1. The unmarked aperture (short-range) is used on the M16A1 for refinement of zero
at 300 yards. For target engagement beyond the 300-yard line, the long-range aperture (L) is
used.
2. M16A2. The unmarked aperture is used for both refinement of zero and target engagement
at all distances on the KD range.
G-27
FM 23-9
When the zero is confirmed, the firing line is moved to the 100-yard line. Soldiers
are issued one magazine of 6 to 10 rounds and engage the (75-meter feedback target)
F-type silhouette target from either the prone unsupported position or prone supported
position (if fighting positions are not available). After each group has been fired, the
target is withdrawn and the rounds are spotted by the pit detail (white on black and
black on white). The holes from earlier rounds fired are pasted (black on black and
white on white). The instructors/trainers critique the firers after each round.
When all firers have expended 6 to 10 rounds or when proficiency has been
demonstrated, the firing line is moved to the 200-yard line. The conduct of fire from
the 200- and 300-yard lines is the same procedure as described for the 100-yard line.
If the pit crew has been drawn from the firing unit, the exercise is conducted twice.
After completion, the firers on the firing line become the pit-crew, and the firers
performing pit detail complete the same firing exercise.
Section V. KNOWN-DISTANCE ALTERNATE COURSE
The known-distance alternate course gives soldiers the chance to engage targets at
range with time constraints and feedback. The effects of wind and gravity are
demonstrated while firing on the course. Before firing the course, all soldiers confirm
the zero of their assigned rifles at 300 yards with six sighter rounds.
Training/sustainment ammunition is used for sighter rounds if a zeroing exercise is not
conducted on the day of record fire. The six sighter rounds are fired in the prone
supported position from the 300-yard line before qualification —sighter rounds do not
count for score. The known-distance alternate course is a 12-hour course of instruction
as follows:
25-meter zeroing: 4 hours
Record fire: 8 hours
CONDUCT OF KNOWN-DISTANCE ALTERNATE COURSE
The chief range officer or tower operator gives fire commands verbatim as written
herein to conduct the known-distance alternate course.
TABLE 1: Prone supported position, 300 yards, 2 magazines of 10 rounds each, 60
seconds for each exercise, E-type silhouette.
FIRERS, ASSUME A PRONE SUPPORTED POSITION.
COACHES, ISSUE THE FIRER ONE MAGAZINE OF TEN ROUNDS.
THE FIRING LINE IS NO LONGER CLEAR.
LOCK, ONE MAGAZINE OFTEN ROUNDS, LOAD. (Pause.)
IS THE LINE READY? (Pause to observe the firing line to ensure all soldiers
are in position and are ready. If not, try to get them in position. If all soldiers are ready,
continue the commands.)
READY ON THE RIGHT?
READY ON THE LEFT?
THE FIRING LINE IS READY.
FIRERS, WATCH YOUR LANE.
G-28
FM 23-9
At this time the pit officer issues the command TARGETS UP. When the targets
are in the fully raised position, the pit officer starts his stopwatch. The raising of the
targets is the command to commence fire. The chief range officer may also command
COMMENCE FIRE. When the allotted time is completed, the pit officer commands
TARGETS DOWN to the pit crew. The chief range officer commands CEASE FIRE,
CEASE FIRE, CEASE FIRE when he observes the targets being lowered. The chief
range officer can also keep time with the pit officer; however, the pit officer is the
official timekeeper.
ARE THERE ANY ALIBIS?
Allowable alibis are allotted six seconds for each unfired round. An allowable alibi
is a malfunction of the rifle or ammunition, which is not associated with firer error.
Rounds not expended during the allotted time do not constitute an alibi and are
counted as misses. Only one alibi for each table is authorized. If a rifle continues to
malfunction, it is removed from the firing line so the armorer can inspect or repair it.
The chief range officer repeats the fire commands for alibi firers. Cross-fires are
not allowable alibis for the cross-firing soldier. The recipient of the cross-fired rounds
refire the table. The cross-firer is awarded misses for those shots on the wrong target.
The cross-firer may refire the course. Regardless of his total hits during refire, he can
be rated only as a marksman with a score of 26. The recipient is not penalized.
The firing line safety personnel "time" their firers. When alibi firings are
completed and on order from the pit officer, all targets are scored, disked, and raised
by the pit crew. Firers receive feedback regarding shot group size and location. The pit
officer lowers the targets when all soldiers have observed their shot groups. The disks
are removed and targets repaired for the next firing table. The chief range officer
informs the pit officer if he elects to have all personnel fire at each yard line before
moving to the next firing line. The firing line safety crew clears all rifles after completing
each firing table and before changing yards lines. The tower operator commands:
CLEAR ALL WEAPONS.
CLEAR ON THE RIGHT?
CLEAR ON THE LEFT?
THE FIRING LINE IS CLEAR. (Commands are repeated for second 10-round
exercise.)
TABLE 2: Prone unsupported position, 200 yards, 1 magazine of 10 rounds, 60
seconds, E-type silhouette.
TABLE 3: Prone unsupported position, 100 yards, 1 magazine of 10 rounds, 60
seconds, F-type silhouette.
Fire commands for Tables 2 and 3 are the same as for Table 1, including alibi and
refire procedures. The pit officer has the targets changed from E-type to F-type
silhouettes while the soldiers are moving from the 200-yard line to the 100-yard line.
The pit officer informs the chief range officer when the target changeover is completed.
G-29
FM 23-9
EQUIPMENT E-type silhouette facing, paper, NSN 6920-00-600-6874 2 for each firer
F-type silhouette facing, paper, NSN 6920-00-610-9086 1 for each firer
Pasters, black, NSN 6920-00-165-6354 As required
Pasters, buff, NSN 6920-00-172-3572 As required
Disk, spotter with spindle, NSN 6920-00-713-8255 20 for each lane used
Communication set with loudspeakers 2 sets
Field telephone or wireless radio 2 each
Ammunition, zeroing 6 rounds for each firer
Ammunition, record firing 40 rounds for each firer
Magazines, ammunition 4 for each firer
Paste, wheat Optional
Tacker, target with staples As required
Stopwatch 1 each
Scorecard 1 for each firer
RECORD OF PERFORMANCE
The known-distance alternate course is fired IAW DA Form 5789-R (Record
Firing Scorecard—Known Distance Course) (Figure G-36.)(See Appendix H
for a blank reproducible copy of this form.)
QUALIFICATION STANDARDS
The pit officer scores the targets. The pit crew responds promptly to commands from
the pit officer and informs the pit officer of cross-fires. The pit crew accurately counts
hits and misses. A hit is any bullet hole that is either completely within or touches some
part of the silhouette facing. If a bullet hole does not touch some part of the silhouette
facing, it is counted as a miss. Richochets are counted as hits or misses. The pit crew
clearly completes scorecards and quickly repairs targets. Qualification standards for
the known-distance alternate course are as follows:
• Expert: Hits 38 to 40 targets • Marksman: Hits 26 to 32 targets
• Sharpshooter: Hits 33to37 targets • Unqualified: Hits 25 targets and
below
G-30
FM 23-9
Figure G-36. Example of completed DA Form 5789-R (Record Firing Scorecard—
Known-Distance Course)(front).
G-31
G-32
FM 23-9
This scorecard is used to score Known Distance Course record fire
qualification when the Known Distance Range is used. This course is
used only when the standard record fire course is not available.
NOTE: If zeroing/grouping exercises are not performed on the
day of record fire, 6 rounds of training/sustainment
ammunition are fired from the 300 yard/meter line for
confirmation of zero prior to conducting the
Qualification Course.
CONDUCT OF FIRE
For Table 1. the firer is given two 10-round magazines to engage an E-
silhouette at 300 yards within 120 seconds in the prone supported
position. Table 2 is fired with a 10-round magazine at an E-silhouette
at 200 yards within 60 seconds in the prone unsupported position.
Table 3 is fired with a 10-round magazine at an F-silhouette at 100
yards within 60 seconds in the prone unsupported position.
SCORING
Scoring is conducted in the pits, with the results provided after each
table. One point is awarded for each round hitting the target. A hit is
scored for any bullethole that is within or touches some part of the
silhouette facing.
FM 23-9
Section VI. FIELD FIRE RANGE
When soldiers receive adequate training before field firing, they gain confidence in
their ability to hit targets. When hit-and-miss information is available, soldiers develop
techniques for observing their sector of fire, for engaging targets rapidly, and for
engaging multiple targets—all preparing them for practice on the record fire course.
Field firing should be scheduled to follow downrange feedback or known-distance
firing, or other suitable training that assures soldiers they have developed adequate
firing skills.
CONDUCT OF FIELD FIRE RANGE
The field fire range usually consists of 35 points—each point consisting of an F-type
silhouette at 75 meters, and E-type silhouettes at 175 meters and 300 meters. When a
bullet hits the target, the vibration activates a mechanism that causes the target to fall,
simulating a kill (Figures G-37 and G-38).
Figure G-37. Field firing with mechanical lifters or modification for downrange feedback.
TARGET BOOTS/MECHANICAL LIFTERS
fl^fl fl^fl jjfl^fl fl a
TARGET BOOTS/MECHANICAL LIFTERS
300 METERS
175 M
TARGET BOOTS/MECHANICAL LIFTERS
CONTROL POINTS
75 M
34
.35
5M
S FARWARD
_NUMBERED
STAKES
'REAR
NUMBERED
STAKES
LOUDSPEAKERS
POINTED DOWN
RANGE
TARGET BOOTH/MECHANICaFT
__ -^LIFTERSy-----Г-77
CONTROL
TOWER
TARGET BOOTH/MECHANICAL LIFTERS
TARGET BOOTH/MECHANICAL LIFTER
। *4 METERS
L AcITd*^f,Ght,NG POSITIONS
1 Me I bn
G-33
FM 23-9
Figure G-38. M13A1 target-holding mechanism (NSN 6920-00-657-7533) with E-type
silhouette (NSN 6920-00-795-1086).
RANGE CHECKS
Field fire ranges must be checked for proper operation of targets, mechanisms, and hit
recording equipment. Soldiers must learn to fire while receiving only hit-and-miss
information; however, when incorrect information is provided (for example, when the
target is hit and does not go down), the learning process is disrupted. Therefore, range
mechanisms must be in proper working condition, the target must be correctly and
securely attached to the mechanism, and the holes on the target should be small enough
to allow bullets to vibrate the target to activate the mechanism.
CONDUCT OF TRAINING
The field fire course should be fired from the supported fighting position and prone
unsupported position. After these are mastered, other firing positions can be
considered for training. Initial training should be with single exposed targets and
increased time for engagement. As skills improve, multiple targets with shorter
exposure times can be engaged.
Soldiers who miss most targets should be removed from the firing line for remedial
training if their problem cannot be corrected. When a soldier fires a 300-meter target
10 times and misses it 10 times, it is obvious that he is not learning but instead is losing
confidence in his ability. The typical soldier should hit the 300-meter target at least 7
out of 10 times.
Peer coaches should assist soldiers in observing the strike of rounds and in
identifying firing problems. If the target is missed and the coach cannot observe the
bullet strike, the coach should instruct the soldier to aim lower for the next shot,
G-34
FM 23-9
expecting to see the strike of the bullet in the ground. With this information, the coach
can instruct the soldier on where to aim or how to adjust his point of aim to hit the
target.
Live-fire training can be organized in several ways. A unit is divided into two or
more firing orders based on the number of personnel to be trained. The first order is
the firer, the second order is the coach, and (if required), the third order is scorers. At
the conclusion of each exercise, positions rotate until all orders are complete.
Standard field-fire scenarios have been developed to provide several target
exposures. Although they are recommended for initial training, any variety of more
challenging target sequences can be developed by local commanders. Ammunition is
allocated based on one round for each target exposure.
RECORD OF PERFORMANCE
During live fire, the soldier’s hit-and-miss performance is recorded to facilitate the
instructor/trainer’s critiques or to indicate where more training is needed. A master
score chart, indicating each soldier’s scores for each exercise, encourages a competitive
spirit within a unit. It also aids in determining which soldiers require close supervision
or remedial instruction. Two methods used to record firing performance are manually
marked scorecards and automated computer printouts.
Manual Recording. When manual recording is used, the unit provides soldiers for
recording information on either DA Form 3601-R (Single Target—Field Firing
Scorecard) (Figure G-39) or DA Form 5241-R (Single and Multiple Targets —Field
Firing Scorecard) (Figure G-40). (See Appendix H for blank reproducible copies of
these forms.)
NOTE: Peer coaches should not be used as scorers; their duty is to observe the firer.
Automated Recording. When field firing exercises are conducted on the new
family of automated field fire ranges, a computer printout is provided for each firing
order. At the conclusion of each firing order, the range NCOIC completes the printout
and ensures the soldier identification is matched with each firing point(Figure G-41).
He adds the soldier’s name or roster number to the top of each lane/firing point data
column. Based on a one-round allocation for each target exposure, data should be
collected on hits, misses, no-fires, and repeated shots to assist the instructor/trainer in
assessing firing proficiency.
G-35
FM 23-9
Figure G-39. Example of completed DA Form 3601-R (Single Target -Field Firing Scorecard).
SINGLE TARGET FIELD FIRING SCORECARD For use of Um form sec FM 23 9 The proponent agency •» ТЙАООС DATA REQUIRED BY PRIVACY ACT OF 1974 AUTHORITY 10 USC3012(g)/E»ecutive Order 9397. PRINCIPAL PURPOSE(S). FeolrUle» individual'» tranwuon to dutant Urge! and provides feed back ROUTINE USE(S) EvakMtomdnndualproficiencY. SSN <s used for powtrve idontrficalion purpose» only MANDATORY OR VOLUNTARY DISCLOSURE ANO EFFECT ON INDIVIDUAL NOT PROVIDING INFORMATION Voluntary individual» not providing information cannot be rated'«cored on а там ban* 5 ROStfR NO 9. SCORE (Л (Л S -fi о л а ас с И DATE SIGNED J 12 SCORERS SIGNATURE - /Ь DA FORM 3601-R, JUN 89. f
к I d
Ш CD О
8. TABLE 3 - PRONE POSITION (Л </) 5 X X К X X X э
к I X X X X X X X X X X X X ГС
2 SSN 3 GRADE 4 UNIT 35T-50-^ixo PNTX 8431 TIME (SEC) T - о - - е о о - - - о
RANGE (Mf 2 r* § рч Л Рч § § л рч сг рч 2 § л Рч £ § £ л Рч § л
Q ОС - о -1 Л «о ф с 2 г> 2 Л со
7. TABLE 2 - SUPPORTING FIGHTING POSITION (Л СЛ 5 X X ! X X 3й
t i X X X X X X X - J X 1 X X X X X X £
TIME (SEC) чО co о ® * с о * X -> X - с X * о о
RANGE (M) Л рч Л рч § Рч £ § § £ л Рч § - § рч 2 § л Рч
О ОС - л ® о с г м л о ®
I NAME (LAST FIRST MIDDLE INITIAL) T4QW\hS . &U.L T. 6. INTRODUCTION * TABLE 1 - SUPPORTED FIGHTING POSITION </) </) 5 X X X X
к I X X X X X X X X X X X X X
Ш о S LU p 12 - -- -• • • ® ® » X ® <ю X о с с о с с о
RANGE (M) £ Л 2 Л 2 2 2' • £ 2 л £ £ § § § § § 8 РЛ
Q ОС - *» ° -- - * со 0. 1 с 1 '1 1 2 1 л 2 £
G-36
FM 23-9
Figure G-40. Example of completed DA Form 5241-R (Single and Multiple Targets- Field Firing Scorecard).
SINGLE AND MULTIPLE TARGETS FIELD FIRING SCORECARD fot ol tru» totm tec FM 23 9 Tim (woponrni agency it TRADOC DATA REQUIRED BY PRIVACY ACT Of 1974 AUTHORITY 1OUSC3O12 (g) E»*cuiiv«Ordor9397 PRINCIPAL PURPOSEfSl Faciiitateair»drvKluar»lianut»oniodi»iant Iargotar»dprov»dea1oodb*ck ROUTINE USE(S) Evalualaindtvidualproloencv SSN it utad for po&itrva dactil'cation ригром» only MANDATORY OR VOLUNTARY DISCLOSURE ANO EFFECT ON INDIVIDUAL NOT PROVIDING INFORMATION Voluntary Individual not piovidiog information cannot bo ratod scored on a ma»» baw* 1? о чП 9. SCORE (0 co S 3 О 10 REMARKS снеск /ц>аъ$г*ь ai/h 3 ил. И ОАТЕ SIGNED 12 SCORER S SIGNATURE ал *1/ ТЧ £а^. Q. Р. DA FORM 5241-R, JUN 89 ° *
H X 3
Ш a 2 - - в
4 UNIT a a >/a\ 8. TABLE 3 • PRONE POSITION CO co i X X X X X X •Э
ь X X X X X X X X X X X X X X X X X -9
1 NAME (LAST FIRST MIDDLE INITIAL» 2 SSN 3 GRADE VCVMGr. L.M Nbl 0 \a3-024iu PNT X TIME (SEC) • * - - 2 - a: • z 2 z 2 -J <
RANGE (M) £ * £ $ £ § £ £ £ - £ £ § £ £ £ §
О X - - - J - о - 2 2 £ - X s о 2
7. TABLE 2 • SUPPORTING AGHTING POSITION co co 5 X 1 X X X
H X X X X X X x X X X X X X X X X x X V» ««О
Ш □ S ш p - £ e. c - - z Z о о -J
RANGE (M) £ 8 £ 8 £ £ £ £ £ £ £ £ § £ £ £ § £
О CC - - - X * О z 2 •J £ о 2
6. INTRODUCTION ' TABLE 1 - SUPPORTED FIGHTING POSITION co co S x X X X
X X X X X X X э
TIME (SEC) - z о о Z -J «< о
RANGE (M) £ £ £ § £ £ £ - - 8
О X - n. -1 О X c 3
G-37
FM 23-9
Figure G-41. Example of automated scoring printout.
. JKQHLEJUBEJHHEJEHKL..
SCENARIO 1.D.I REfffM 8/JUU1988 8(54
1МПАЛА.9ЛХ11/12 _ JIRINQOHEU 4 ТАЛ-Е PERIOD RECORD ELEVEN
ITO ITO 11U_ JU 110 in :TO ITO •
IM IOS IM /О» > IM/07 IM iof IM / 09 1» no irn /" IM //z 1
1 UK 1 1 UK 2 t UK 3 1 i AH* 4 1 UK 5 1 UK A 1 UK 7 LUK..— 1
1 ТАЛЫ 1 ТАЛЕ-1 1 TMU-1 1 ТАЛЫ 1 ТАЛЫ 1 TABLE-1 : талы 1 ТАЛЫ 1
AA 30A 1 1 90L. 1. J 90ft. 1. A30A 1_ 1 3DA . 1 L30A 1 1
1 200 1 1 200 0 1 200 1 1 200 1 1 200 1 1 200 0 1 200 0 1 200 1
_ATOD 1 1 100 . JO 1 100.. JL 1.100. 1 1_TOCL_ 1 11® 1. 1.TO0. . QAADQ 1 I
1 190 1 1 190 0 1 150 1 1 190 0 1 150 1 1 150 1 1 150 1 1 150 1 1
1 300 1 I 300 1 1 300 0 1 300 _ 0 1 300 _OL JL3QQ 0 1 300 1 i эро
1 250 1 1 250 0 1 250 1 1 230 1 1 250 0 1 250 0 1 250 0 1 250 1 1
1 901 _ 0 1 900 1 UML _ 1 L3QL. AL 1.909 . А.АЭ09 0_L3M 1 1
1 200 1 1 200 1 1 200 1 1 200 1 1 200 1 1 200 0 1 200 1 1 200 1 1
1 190 JL J 1»_ .Llffl .1 LI® JL 1 IX— 1 JA90 1. L190. LA 130 1 1
1 290 1 1 250 1 1 290 ! 1 250 0 1 290 1 1 250 0 1 250 0 1 250 1 1
1 100 ft | 1 100 ft 1 I 100 * 1 1 100 ♦ 1 1 100 ft 1 1 TOO • 1 1 TOO ft 1 1 TOD ft d A
1 200 • 1 1 200 • 0 1 200 • 1 1 200 • 0 1 200 ft . 1 1 200 ft 1 1 200 ft 0 1 200 • 0 1
1 1® « 1 ИЖ » JL_1 1®_Л A LULL l-JLl&.J . L. А1Э0.А. LA 130 _L 1 113) ft L 1
1 300 • 0 1 300 • 0 1 300 • 0 1 300 • 0 1 300 • 0 1 300 ft 1 1 300 ft 1 1 300 • 0 1
1 100 0 1 1 100 • 1 1 100 • 1 1 100 ♦ 1 1 100 4 A_JL100_1_ A L100 A A 1
1 290 • 1 1 290 • 1 1 290 • 0 t 290 i 1 1 250 ft 1 1 250 • 0 1 290 ft t 1 2® • 0 I
1 300 1 1200 0 1 200 0 1200 1 1200 1 1 200 1 1 200 1 12М _JL A
1 190 1 1 190 0 1 190 1 । 150 1 11® 1 11® 1 1 150 1 1 150 1 I
1 900 • 1 1 Д0Й * 1 1X» _ JL LXL * . JL JJMl-L- -1 150ft .ft- 1 1901 t_ 1 1
1 100 • 0 1 too » 0 1 100 • 0 I 10» • 1 1 100 • 0 1 100 ft 0 1 100 • 0 1 100 ft 1 1
i total 17 I ТОТЛ 11 1 TOTAL 14 1 TOTAL 15 1 TOTAL IS 1 TOTAL 13 1 ТОТЛ ГзТтотл 13 1
1 TABUE-2 1 TAOUE-2 1 ТАЛЫ 1 ТАЛЫ 1 ТАЛЫ 1 ТАЛЫ 1 ТАЛЫ 1 ТАЛЕ-2 1
1 100 0 1 100 1 1 100 1 1 100 A J 100 11 TOO AA1Q0 JA.1OL 1. 1
1 29» 1 I 290 0 1 290 1 1 250 1 1 250 0 1 250 0 1 250 1 1 250 1 1
1 19» 1 1 190 L1.1X_. _O_ 1 190 —1-1.IX -M Q-JA5Q 1 1130 1 1
1900 • 1 19» • 0 1 509 t 1 1 909 ft 1 1 909 • I 1 909 ft 1 1 909 ft 1 1 909 ft 1
1 200 0 1 200 0 0 1 200 0 1 1200 ft 1 1 200 ft о 1 200 ft 9 1 200 ft 1 1 200 ft 0 A
1 190 • 1 1 190 » 0 1 190 • 111®» 1 1 190 • 1 1 190 «М I 1 190 ft 1 1 150 • 1 1
1 200 о jt taoo _1_L M_* 1A2W_JL. AA2Q0LA- 0 1 200 ft JU2O.L 1 1
1 900 • 1 1 90A • 0 1 90A » 1 1 9M • 1 1 50A • 1 1 50ft • 1 1 50A • 1 1 50A • 1 1
1 190 • 1 1 190 ft 0 1 190 • 11 190 ft 1 1 190 ft 0 1 ISO «Н 0 1 150 ft 0 1 150 ft 1 .1
1 IM 1 1 100 I I 100 1 1 100 1 1 100 I 1 100 1 1 100 1 1 too 0 1
11» 1 J 190 0 1 190 1 1 190 1 1 190 1 1 150 N 1 1 150 0 1 150 _ 0 A
1 300 0 1 300 0 1 300 0 1 300 » 1 X» 1 1 300 1 1 300 0 1 300 0 1
1 100 ft JL 1 100 • 111®» 1 1 200 ft 1 1 100 ft l.Al«LA_ 1 1 200 • ALTOQ-ft 0 1 200 ft 1 1
1 2t0 • 1 1 200 • 0 1 200 • 1 1 300 • 1 1 200 • 1 1
-LULL-. . LJJSLt. 1A130AL .1 1J90L • A L190-ft_ 1 1 1® M J 1.130. A_ LA13Q J 1 1
1 29» • 1 I 29» • 1 1 290 • 1 1 290 ft 0 t 290 • I 1 250 ft 1 1 250 ft 0 1 250 • 1 1
1 1»» • 1 J 100 • 1 1 100 ft 1 1 100 ft 1 1 100 ft 1 1 100 ft 1 1 100 ft 1 1 100 t _ 1 J l
1 190 ft 1 1 190 • 0 1 150 ft 1 1 190 • I 1 190 ft 1 1 190 И1 0 1 ISO ft 0 1 ISO ft 1
. IJMlJL 0.JLW..1 -1. 1 200. 0_L2M_L JLJL200_ 0 1 2QQ ft 1. 1 200A 0. 1 200 ft 0 ।
1 100 ft 1 1 100 • 1 1 100 • 0 1 100 t 1 1 100 • 1 1 100 » 1 1 100 • 0 1 100 • 0 ।
'i total ' ‘ io’ i TOTAL 0 1 TOTAL П I TOTAL ii 1 TOTAL u 1 ТОТЛ 14 “l ТОТЛ 11 : ТОТЛ 14 1
1 SCORE 33 1 SCORE 20 t SCORE 31 1 SCORE 31 1 SCORE 31 1 SCORE 27 1 SCORE “241 SCoS~ 77 1
IjMNBKMHL i iwuFia i sHwpsHoora i.awyawret j 1 MHW 1 | l 1
G-38
FM 23-9
Section VII. PRACTICE RECORD FIRE RANGE
Although the soldier receives a practice rating based on the number of target hits,
practice record fire should also be considered a valuable training exercise. When
practice record fire is correctly conducted, all soldiers gain valuable experience and
become more confident in engaging combat targets.
CONDUCT OF PRACTICE RECORD FIRE RANGE
The unit receives an orientation on the conduct of practice record fire and exercise
scenarios to include a review of the fundamentals, lanes and target detection,
immediate-action drills, and practice record fire performance standards. After the
orientation, soldiers are divided into firing orders: the first order is the firer, the second
order is coaches/scorers, and the third order is in the ready area. As each order is
completed, duties are rotated.
The standard practice record fire range is divided into 16 lanes (see Figure G-42).
Each lane is 30 meters wide with one fighting position and seven targets in each lane.
The E-type and F-type silhouette targets (attached to RETS or M31A1 target
mechanisms) are used for record fire. Two targets are placed 10 meters apart at a range
of 50 meters from the line of fighting positions. Subsequent targets are placed at
50-meter intervals out to 300 meters.
Figure G-42. Standard practice record fire range.
CONTROL
TOWER
G-39
FM 23-9
RANGE CHECKS
For exercises to provide effective practice and training, the operation of target
mechanisms and recording equipment must be verified. A firer can lose confidence in
his abilities due to targets that do not fall when hit or by hits that are not recorded. Also,
accurate information cannot be provided for after-action reviews.
CONDUCT OF TRAINING
During practice record fire, soldiers fire at 40 single or multiple target exposures. They
are issued 20 rounds of ammunition to be fired from the supported fighting position,
and 20 rounds to be fired from the prone unsupported position. Based on the total
number of hits achieved in each table, soldiers are critiqued on the practice record fire
score.
Exposure times are three to seven seconds at ranges of 50 to 300 meters. Since it
requires one to two seconds for the manually activated target mechanism to raise the
target, timing begins when the target is fully exposed rather then when the target switch
is activated by the tower operator. When practice record fire is conducted on the new
family of automated record fire ranges, these factors are included in the computer
program.
Alibi Firing. Alibi firing should be conducted at the end of each firing table and
IAW the tower operator commands. Alibis are provided during practice record fire for
three reasons: malfunction of the rifle, malfunction of the target mechanism, or faulty
ammunition.
Uniform and Equipment. Soldiers do not need to wear full field equipment while
firing the practice record fire course. Wearing helmets and LBE have little or no effect
on performance; however, local commanders could require that they be worn. If so, the
same equipment should be worn during the official record fire.
Range Training Areas. Three range/training areas are as follows:
Orientation Area. This area is located so firers cannot see the firing area. Practice
record fire orientation includes conduct of fire, instructions on safety, and range
operations (procedures in ready and retired areas).
Ready Area. This area is near the firing range and is located so firers cannot see
targets on the range. The firer blackens the rifle sights, lubricates the rifle, and checks
for defects that might cause malfunctions.
Retired Area. This area is about 100 meters behind the ready area. Soldiers
completing practice record fire move to the retired area to clean their rifles and to be
critiqued on their firing performance.
RECORD OF PERFORMANCE
Practice record fire is conducted IAW DA Form 3595-R (Record Firing Scorecard)
(Figure G-43). (See Appendix H for a blank reproducible copy of DA Form 3595-R.)
QUALIFICATION STANDARDS
Accurate performance data are critical. The firer’s scores are recorded in two ways:
manually by using the practice record fire scorecard, or automated by using a computer
printout provided on the automated range (see Section VI). Based on the data
G-40
FM 23-9
Figure G-43. Example of completed DA Form 3595-R (Record Fire Scorecard).
RECORD FIRE SCORECARD For use of this form, see FM 23-9. The proponent agency is TRADOC. DATA REQUIRED BY PRIVACY ACT OF 1074 AUTHORITY 10USC3012(g| Eaecubvr Order 9397 PRINCIPAL PURPOSE(S) Facilitate* individual's training on multiple limed target engagement at varying range* ROUTINE USE(S) Evalute individual prnlic.rncv SSN isused for positive identification puiposcsonly MANDATORY OR VOLUNTARY DISCLOSURE ANO EFFECT ON INDIVIDUAL NOT PROVIDING INFORMATION Voluntary Individuals not providing information cannot be rated scored on a mass basis 5 ROSTER NO V7 % 7 TABLE 2 - PRONE UNSUPPORTED POSITION X —— 9 QUALIFICATION SCORES RATING (CHECK ONE) I 1 36 40 |X/3O35 ।1 23 29 1—| 22 BELOW 1 1 EXPERT LX SHARPSHOOTER 1 1 MARKSMAN 1 1 UNQUALIFIED 10 FIRER S QUALIFICATION SCORE л *\ SHARPSHOOTER ^PRACTICE -2 JL о H £ и * * К u of о 3 13 SCORER'S SIGNATURE A tg . 15 OFFICER'S SIGNATURE V DA FORM 3595-R, JUN 89.
СС (Л 5 X а—*
i X X X X X о©
TIME (SEC) co C 2 00 о < о 1—
RANGE (M) о о 8 8 CM о in о in c о c in 8 8
xas ‘уч UNO V О ОС CM co * in ID r- 00 <T> О CM
X
(Л V) 5 X
i X X X X X X X X о®
TIME (SEC) Ш co <n 00 CM 00 00 < о NIGHT FIRE EXERCISE | DATE | HIT | MISS | GO | NO GO | NBC FIRE EXERCISE | DATE | HIT | MISS | GO | NO GO | —
RANGE (M) 8 c in о m о in 8 О in 8 о in c in о о
О a: - cs co n to 00 - о
1 NAME (LAST FIRST. MIDDLE INITIAL) 2 SSN 3 GRADE CAffVPBeil .Tern e. aj5-ix-1410 e-5 6 TABLE 1 • SUPPORTED FIGHTING POSITION X X к U * r Q3N9IS 3JLV0 г I 14 DATE SIGNED _
(/) (/) X
У X X X X X -а
TIME (SEC) co о о ID n < о н-
’ 8 SCORE Ш C О z tv ci
RANGE (M) 8 8 о m о о 8 о tn CM 8 CM О in о in 8 1 1 REMARKS
О cr CM co <7 in ID 00 О см in <n KI 4 in
о
(/) 5 X X rt 3 J о «•)
t- X X X X X X X X У &
TIME (SEC) co e -7 in co r- co <D tn О >- UJ < - CM < о >-
RANGE (M) О 8 8 О in о о О in CM s 8 CM о tn О in СМ
o a: гм co tn <d co С
G-41
FM 23-9
recorded, an after-action review can be performed by range and firing position to
discuss firing performance.
A practice qualification rating is granted to soldiers as follows:
• Marksman: Hits 23 to 29 targets.
• Sharpshooter: Hits 30 to 35 targets.
• Expert: Hits 36 to 40 targets.
A firer who fails to qualify on his first try should refire the practice record fire
range after his problem has been diagnosed and remedial training provided.
Section VIII. RECORD FIRE RANGE
The intent of record fire is to facilitate the commander’s evaluation of several
individual tasks and integrated marksmanship skill performance, and to provide unit
readiness indicators. The qualification standards are specifically related to a prescribed
procedure for the conduct of record fire. Individual performance must be evaluated
IAW three components:
1. What test was used (standard, known-distance, or scaled).
2. How the test was administered.
3. What were the individual and unit performance distributions (23 to 40 or 26 to
40 for alternates), and at what target ranges.
CONDUCT OF RECORD FIRE RANGE
Since all soldiers must fire the record fire course at least once each year for
qualification, the record fire course can provide excellent firing performance
evaluations. It also provides excellent diagnostic information for instructors/trainers
who are concerned with scheduling training to overcome the most serious firing
weaknesses. The standard qualification course should be used for all soldiers. However,
there are times when a qualification exercise must be conducted on an alternate course.
The following information concerning the development of the record fire course is
provided to assist in understanding how standards were established.
The testing and development indicates that the soldier should hit at least 39 of 40
targets if he applies the marksmanship fundamentals correctly (assumes target
mechanisms have been checked and are functional). This probability of hit (Ph) is
provided as a guide concerning the capability of the typical rifle, ammunition, and
soldier firing a standard course(Table G-l).
Table G-1. Probability of hits.
Range (meters) Ph Number of Targets
50 1.0 05
100 1.0 09
150 1.0 10
200 .99 08
250 .95 05
300 .90 03
G-42
FM 23-9
When the IET BRM POI, or an adequate unit training program, is conducted, it
is expected that the following Ph will result (Table G-2):
Table G-2. Results from an adequate unit training program.
Range Targets Low Ph Average Ph High Ph
50 5 .80 .95 .98
100 9 .70 .90 .95
150 10 .65 .90 .95
200 8 .45 .70 .90
250 5 .35 .60 .85
300 3 .25 .50 .80
23 hits 32 hits 37hits
The new ratings represent a significant increase in the number of targets that are
required to hit; and have been adjusted for alternate courses to provide a better
correlation to performance on the standard course (see Table G-3).
Table G-3.1 New ratings.
Rating Old New Standard New Alternates
Expert 28-40 36-40 38-40
Sharpshooter 24-27 30-35 33-37
Marksman 17-23 23-29 26-32
Unqualified 16-below 22-below 25-below
The standard record fire course was developed with the assumption that target
systems would function. Therefore, a first objective is to ensure that all targets are
functioning properly. When in doubt, a lane should be fired to ensure that a bullet strike
will activate each target. Sometimes slapping a target with a cleaning rod can cause it
to activate, but a bullet will not. When it is hot, the plastic targets may allow the fast
moving 5.56-mm bullet to pass without causing sufficient vibration to activate the
mechanism, resulting in a requirement to change targets more often, to use double
targets, or to use different silhouettes for a positive indication of hits.
RANGE ORGANIZATION
The standard record firing course is the most realistic in that it presents the soldier with
various surprise target situations that could be encountered in combat. Except where
modification is necessary to install and maintain target mechanisms, the terrain is left
intact. The number of targets hit by each soldier is totaled upon completion of record
firing. Based on this score, marksmanship qualification ratings and appropriate badges
are awarded. While competition between individuals and platoons is inevitable and
encouraged, the goal should be to achieve the highest qualification rating on the first
attempt.
G-43
FM 23-9
Commanders should consider using disinterested or outside evaluators for the
official record fire to assist in objective collection and analysis of data. Soldiers, squads,
or platoons should not score themselves.
Commanders should be concerned about rating distributions. High distribution
in the unqualified lowest category indicates skill erosion in the unit. A normal
distribution for every 100 soldiers in an average unit should be at least 30 experts, 60
sharpshooters, and 10 marksmen. A well-trained unit will be higher.
The standard fire course designed to measure and provide indicators on the
application or performance of several individual combat tasks/skills. When record fire
is conducted correctly, most of the following tasks can be observed and objectively
measured.
• Maintenance of weapons and magazines.
• Conduct of a serviceability check.
♦ Demonstration of an understanding of the rifle.
• Application of immediate action.
• Scanning of a designated area/sector and detect targets.
• Quick and consistent application of the four fundamentals of marksmanship.
• Engagement of targets from supported and unsupported positions.
• Knowledge of the effects of wind and gravity.
• Management of ammunition.
• Accurate battlesight zero of the rifle.
Commanders may designate what uniform and equipment will be worn during
record fire. Firers should wear LBE and a helmet while firing the record course. When
record firing is done for qualification, the soldier does not receive coaching or
assistance. If a rifle malfunctions, the soldier applies immediate action and tries to clear
the stoppage. Soldiers should prepare for training before live fire in the orientation and
ready areas.
Orientation Area. This area is located close to the firing area so soldiers cannot
see the firing area. Record fire orientation includes conduct of record fire, instructions
on safety, range operations, ammunition handling, and scoring.
Ready Area. This area is located near the firing range so soldiers cannot see targets
on the range. The soldier blackens the rifle sights, lubricates the rifle (if needed), and
checks for defects in the rifle, magazines, and ammunition that might cause
malfunctions. Defective magazines or ammunition should be exchanged before firing.
The NCOIC supervises the activities of soldiers in the ready area. The unit armorer
replaces damaged or broken parts discovered before firing. Soldiers should load
ammunition into their own magazines.
NOTE: Replacing any element of the sight system changes the battlesight zero of the rifle. When replac-
ing the part, the ordnance repairman informs the ready area NCO so the rifle can be zeroed again.
When the M16 pencil is used, everybody loses. Automatic scoring eliminates many
potential problems, but most ranges must use manual scoring. A buzzer or whistle
should be sounded when the targets are lowered at the end of their exposure time so
G-44
FM 23-9
the scorer knows when he should no longer give credit for a target hit. However, efforts
to be fair also include giving the soldier the benefit of the doubt when warranted. The
scorer should immediately report suspected malfunctioning targets.
CONDUCT OF TRAINING
The record fire course provides 40 bullets for the engagement of two 20-round
exercises. Twenty single or multiple targets are engaged from the supported fighting
position. Twenty targets are engaged from the prone unsupported position. Once firing
begins, no cross-loading is allowed.
Credit for target hits should not be given when bullets are "saved" from difficult
targets to be used on easier targets—for example, not firing a 300-meter target so an
additional bullet can be fired at a 150-meter target. However, when double targets are
exposed, the soldier should fire two bullets. If the first target is missed, he may fire at
that same target with the second bullet.
While it is doctrinally sound to first engage the target what poses the greatest
threat (normally assumed to be the closer target), no scoring distinction is made
between near targets and far targets or the sequence in which they are engaged. Also,
credit is not given if unused ammunition from one 20-round table is added to the
magazine provided for the next table.
Soldiers who fail to qualify on the first attempt should be given appropriate
remedial training and allowed to refire within a few days. When a soldier refires the
course, he will be unqualified if he hits 22 targets or less and will be rated as a marksman
if he hits 23 to 40. When automated scoring procedures are available that allow the
performance of the soldier to be stored and retrieved before the malfunction, his
performance is added to the score of his first attempt after weapons repair and refire.
If a soldier’s weapon becomes inoperable but his performance before the malfunction
precludes qualification, he is considered unqualified and must refire.
Alibi firing is reserved for those soldiers who have encountered a malfunctioning
target, ammunition, or rifle. A soldier will not be issued more than 20 rounds of
ammunition for each table. If he fires all 20 rounds despite a target malfunction, he will
not be issued anymore alibi rounds. Also, there are no alibis for soldier-induced weapon
malfunctions or for targets missed during application of immediate action. The
following are the procedures that must be strictly adhered to when a malfunction
occurs.
NOTE: The ammunition procedures/allocation and alibi procedures for practice record fire and record
fire are conducted the same. The only exception is that for practice record fire, coaching is
authorized.
The NCOIC/scorer monitoring that lane must verify the target malfunction. The
soldier continues to fire the exercise. On a computerized range, the tower operator
confirms which target and how many malfunctions occurred.
The NCOIC verifies the malfunction. The soldier is permitted to fire at that
target(s) with the exact number of rounds equal to the target malfunctions. For
example, the soldier had two confirmed target malfunctions at 250 meters, although he
may have had five rounds left from the overall exercise. The soldier would be given
only two rounds to engage the two 250-meter target exposures, if repaired, or the next
G-45
FM 23-9
closer target. He would not be allowed to fire all remaining five rounds at the two
250-meter target exposures.
The soldier must apply immediate action and continue to fire the exercise. After
firing, the soldier notifies the NCOIC to determine if the ammunition was bad or target
malfunctioned.
Inoperable weapons are uncorrectable malfunctions such as a broken firing pin,
jam caused by double feed which was not caused by the soldier, failure to extract due
to broken extractor, or round in the bore. The soldier must have attempted to apply
correct immediate action to eliminate the stoppages. If the stoppage is determined to
be correctable—for example, the soldier did not apply correct immediate action—and
as a result did not engage the required amount of targets, he is at fault.
Qualified weapons personnel/NCOIC must verify weapon malfunctions before
the soldier can refire the course. Soldiers who erroneously claim a malfunction on the
firing line are considered an unqualified and refire as a second-time firer.
On-site observation, detailed analysis and evaluation of individual results, and unit
performance identify weaknesses. Training can then focus on combat tasks, skills, or
other factors that address these weaknesses. Examples are: rifles that are not
serviceable could be the cause of poor zeros or failures to fire and, therefore, failures
to qualify. Some soldiers may not qualify because of a lack of understanding of
immediate-action procedures or maintenance of the rifle and magazine. Soldiers who
miss targets are not applying the four fundamentals or are not accurately zeroing the
rifle. Soldiers who do not fire at exposed targets during qualification may indicate —
• Failure to scan the designated area.
• Lack of ability to detect targets.
• Lack of ability to shift from one target to another.
• Failure to manage ammunition.
• A stoppage.
RECORD OF PERFORMANCE
The record fire range is fired IAW DA Form 3595-R (Record Fire Scorecard). (Figure
G-44). (See Appendix H for a blank reproducible copy of DA Form 3595-R.)
QUALIFICATION STANDARDS
To achieve the lowest possible individual qualification rating, a soldier must
achieve a minimum score of 23 target hits on a standard record fire range.
A qualification rating is granted to soldiers who demonstrate performance as
follows:
Expert: Hits 36 to 40 targets.
Sharpshooter: Hits 30 to 35 targets.
Marksman: Hits 23 to 29 targets.
A qualification rating is granted to soldiers on the alternate course as follows:
Expert: Hits 38 to 40 targets.
Sharpshooter: Hits 33 to 37 targets.
Marksman: Hits 26 to 32 targets.
G-46
FM 23-9
Figure G-44. Example of a completed DA Form 3595-R (Record Fire Scorecard).
G-47
FM 23-9
If the test is changed or not conducted as prescribed, the standards are irrelevant.
Many performance indicators are not observed and give false results as to individual
and unit readiness.
A soldier who fails to qualify on his first try must receive remedial training before
firing again. However, whether or not the soldier exceeds the minimum qualification
standard, the official rating is marksman. For example, if the soldier fires a 37 on his
second firing, the qualification rating is recorded as 23.
Section IX. ALTERNATE QUALIFICATION COURSES
Units should conduct rifle qualification on a standard record fire range. Convenience
and comfort should not be the prime consideration when choosing a range. The
known-distance alternate course is used by all components of the Active Army, US
Army Reserve, and Army National Guard when a standard record fire range is not
available. The 25-meter alternate course is used when neither a standard record fire
nor a known-distance range is available for rifle qualification. Units are permitted to
use the 15-meter scaled alternate course only if a 25-meter range is not available.
The official records of personnel who are using an alternate rifle qualification
course are noted to distinguish alternate qualification ratings from standard record fire
course ratings. For example, official personnel records are annotated as follows:
JONES, John Q. 000-00-0000 Expert 36 (RF)
JONES, John Q. 000-00-0000 Expert 38 (KDAC)
JONES, John Q. 000-00-0000 Expert 38 (AC)
THE 25-/15-METER ALTERNATE COURSE
The 25-/15-meter alternate course provides units a way to test a soldier’s rifle
marksmanship proficiency. A soldier undergoing rifle qualification should first confirm
the zero setting on his rifle before engaging the alternate course. The zero may be
confirmed with the 25-meter battlesight zero procedure of six sighter rounds, which are
fired in the prone supported position. Sighter rounds do not count for score.
Training/sustainment ammunition is used for sighter rounds if a zeroing exercise is not
conducted the day of record fire.
Firing at scaled silhouettes gives the soldier the chance to engage targets with time
limits and feedback. Engaging targets at 25/15 meters precludes any training value
received on target detection or the effects of wind and gravity, which is learned when
firing at longer distances. Rifle qualification requirements are scheduled on the
25-/15-meter alternate course when a standard record fire or known-distance range is
not available. The alternate course is an eight-hour course of instruction, as follows:
25-/15-meter zeroing 4 hours
Record fire 4 hours
G-48
FM 23-9
EQUIPMENT
Frame, target (local manufacture)
E-type silhouette (NSN 6920-00-071-4780)
Target, zeroing, 25-/15-meter,
25-meter (NSN 6920-01-167-1392)(M16A1/A2)
15-meter (NSN 6920-01-167-1394)(M16A2)
15-meter (NSN 6920-01-253-4005) (M16A1)
Target, scaled, silhouette
25-meter (NSN 6920-01-167-1398)
15-meter (NSN 6920-01-167-1396)
Pasters, black, (NSN 6920-00-165-6354)
Pasters, buff, (NSN 6920-00-172-3572)
Tacker, target with staples
Ammunition, zeroing
Ammunition, record firing
Magazines, ammunition
Paste, wheat
Stopwatch
Scorecard
Whistle, buzzer, or horn
* Also used if sighter rounds are fired.
* * Six if sighter rounds are fired.
1 for each lane
1 for each lane
1 for each firer*
1 for each firer*
1 for each firer
2 for each firer
2 for each firer
As required
As required
As required
18(6) rounds for each firer**
40 rounds for each firer
2 for each firer
Optional
1 each
1 for each firer
1 each
RANGE ORGANIZATION
The alternate course can be conducted on any 25-meter, 1,000-inch, or 15-meter
(50-foot) indoor range where service ammunition can be fired. Becuase range facilities
differ, so will range equipment for each unit conducting training. Target frames can be
built locally. Target tackers or paste can be used to affix target sheets to target frames.
Target sheets can be repaired with pasters or changed after each soldier completes each
table. (Local supplies dictate target repair and replacement procedures.)
The chief range officer ensures the safety of all personnel and the proper operation
of his range. His duties include organizing personnel into firing orders, assigning
numbers, managing ammunition, and assigning target details. He can assign NCOs to
perform all these duties.
The tower operator issues fire commands, or the chief range officer performs this
duty.
G-49
FM 23-9
The safety officer gives required range safety briefings and organizes firing orders,
or the chief range officer performs this duty. Local regulations can require appointing
a safety officer.
Personnel in firing orders perform as firing line safety crew, coaches, and scorers.
CONDUCT OF TRAINING
Firers engage each of the 10 scaled silhouettes with one round from the first magazine.
They perform a rapid magazine change and engage each scaled silhouette again with
one round from the second magazine. Fire commands are given by the chief range
officer or tower operator.
TABLE 1: Prone supported position, 2 magazines of 10 rounds each, 120 seconds.
FIRERS, ASSUME A PRONE SUPPORTED POSITION.
COACHES, ISSUE THE FIRER TWO MAGAZINES OF TEN ROUNDS
EACH.
THE FIRING LINE IS NO LONGER CLEAR.
LOCK, ONE MAGAZINE OF TEN ROUNDS, LOAD. (Pause.)
LOAD YOUR SECOND MAGAZINE OF TEN ROUNDS AT YOUR OWN
COMMAND.
IS THE LINE READY?
The chief range officer pauses to observe the firing line to ensure all soldiers are
in position and ready to begin the engagement. If not, the firing line safety crew gets
them in position and informs the chief range officer when all soldiers are ready. If no
problems exist, the chief range officer continues with the fire commands.
READY ON THE RIGHT?
READY ON THE LEFT?
THE FIRING LINE IS READY.
FIRERS, WATCH YOUR LANE.
A whistle, buzzer, horn, or other loud audible signal is sounded to begin the
exercise and sounded again to cease fire.
CEASE FIRE, CEASE FIRE, CEASE FIRE. (Given at the same time as the
signal.)
ARE THERE ANY ALIBIS?
Allowable alibis are allotted six seconds for each unfired round. An allowable alibi
is a malfunction of the rifle or ammunition — it is not associated with firer error. Rounds
not expended during the allotted time do not constitute an alibi and are counted as
misses. The firing line safety crew notes the number of alibi rounds to be fired and times
the soldier. If a rifle continues to malfunction, the armorer removes it from the firing
line for inspection and repair.
Cross-fires are not allowable alibis for the cross-firing soldier. The recipient of the
cross-fired rounds refires the table. The cross-firer is awarded misses for those shots
on the wrong target, and he may be allowed to refire the course. Regardless of his total
hits during refire, he can be rated only as a marksman with a score of 26. The recipient
is not penalized. If there are alibis, the chief range officer repeats the fire commands;
otherwise, he continues the exercise.
CLEAR ALL WEAPONS.
G-50
FM 23-9
CLEAR ON THE RIGHT?
CLEAR ON THE LEFT?
THE FIRING LINE IS CLEAR.
FIRERS AND COACHES MOVE DOWNRANGE, SCORE AND REPAIR
OR REPLACE YOUR TARGET.
TABLE 2: Prone unsupported position, 2 magazines of 10 rounds each, 120
seconds.
NOTE: The fire commands and alibi procedures are the same as in Table 1.
QUALIFICATION STANDARDS
The chief range officer briefs all soldiers on the proper scoring procedures. The
firing line safety crew—
• Perform as scorers.
• Inform the chief range officer of cross-fires.
• Inform the chief range officer of allowable alibis.
• Accurately count hits and misses. A hit is any bullet hole that is either completely
within or touches some part of the scaled silhouette. If a bullet hole does not
touch some part of the scaled silhouette, it is counted as a miss. Richochets are
counted as hits or misses.
• Count only two hits for each silhouette for score in each table.
• Complete the scorecard.
• Assist the soldier with target repair.
• Total, sign, and return the completed scorecard to the chief range officer.
Qualification ratings for the alternate course are as follows:
• Expert: Hits 38 to 40 targets
• Sharpshooter: Hits 33 to 37 targets
• Marksman: Hits 26 to 32 targets
• Unqualified: Hits 25 and below
These courses are fired IAW DA Form 5790-R (Record Firing Scorecard-
Scaled Target Alternate Course)(Figure G-45.)(See Appendix H for a blank
reproducible copy of this form.)
G-51
G-52
> T.
RECORD FIRING SCORECARD ‘ SCALED TARGET ALTERNATE COURSE Fur n\e ol Ihi* form irr Ьлск The proponeni «qency n TRADOC jure G-45. Example of completed DA Form 5790-R (Record Firing Scorecard—Scaled Target ternate Course)(front)(25 and 15 meters).
DATA REQUIRED ВУ PRIVACY ACT OF 1974 AUTHORITY luuSC 301 ?9yt E»ecui«vr Order 9397 PRINCIPAL PURPOSE(S) Records «ndrvrdual s performance on record fir»-range ROUTINE USEiSl Ev Hi. iIh-л oi mdivrduai $ рго1<»елс> and ba$»s for determination of award of рго^оепсу badge SSN used for positive identification MANDATORY OR VOLUNTARY DISCLOSURE AND EFFECT ON INDIVIDUAL NOT PROVIDING INFORMATION Voh.nta.v in.f.^Ki., ii-. ..... {<i.^iii<D.i mfiirinaimn cannot be rated scored on a mass bas«s
l АДОМ .IASI frRSf MlODlf INITIAI. 2 SSN 3 GRADE 4 UNIT > у _ . 5 ROSTER NO Hardy Loa/ <w- ass-/о-ata/ 2 Ar. Лео. Лт Саг/lm/ £&. гч
6 TABLE 1 - SUPPORTED FlGHTING/PRONE SUPPORTED 7 TABLE 2 • PRONE UNSUPPORTED 8 QUALIFICATION 9 REMARKS
targei RANGE • Mi HIT (^1 TARGET range IMJ HIT (e)
1 300 u** i 300 vZ^ 38 40 EXPERT
2 300 2 300 VZ NIGHT FIRE EXERCISE
250 250 IZ’ I vZ| 33 37 1 SHARPSHOOTER 1 1 2632 I 1 MARKSMAN | | 25 BELOW 1 1 UNQUALIFIED DATE HIT MISS GO NO GO
4 250 о 4 250 Z” / 2.
200 tZ 5 200 VZ
6 200 V* 6 200 lZ
/ 200 vz- 7 200 vz
В 200 Z И 200 z NBC FIRE EXERCISE
-i 150 о 9 150 VZ DATE HIT MISS GO NO GO
150 VZ* 10 150 Vz- l-/t>-SI /2. ¥ X
150 VZ” 1 1 150 ✓
7 150 Vz> 12 150 vz wpv* 5^24 3/0
t 100 vz 13 100 о
14 100 v** 14 100 6
15 100 Vz* 15 100 vZ
16 100 v- 16 100
1 7 100 V*" 17 100
IB 100 Z** 18 100
19 50 vZ 19 50
20 50 Vz*z 20 50
TIME 120 SEC HITS 19 TIME 120 SEC HITS 19 TOTAL HITS
'FIRER ISSUED 40 ROUNDS TO ENGAGE 20TARGETS-NO MORETHAN 2RDS PER TARGET THE ROUNDS WILL BE PRELOADEO IN 4 10 ROUND MAGAZINES TWO PER TABLE ALL ROUNDS WILL BE FIRED WITH THE LONG RANGE SIGHT ON THE M16A1 RIFLE HITS ARE DENOTED BY A
12 DATE SIGNED л л __ _ 3 - F- &? 13 DATE SIGNED^
14 SCORES SIGNATURE St?/. 15 OFFICER S SIGNATURE >• . 1 a t та a cd.
DA FORM 5790-R, JUN 89. f (// U
FM 23-9
FM 23-9
Figure G-45. Example of completed DA Form 5790-R (Record Firing Scorecard—Scaled Target
Alternate Course)(back)(25 or 15 meters)(continued).
This scorecard will be used to score Alternate Course record fire qualification when the 25M (NSN 6920-01-167-1398) or 15M (NSN 69204)1-167-1396)
scaled silhouette target Is used. The Alternate Course will be used only when standard record fire and known Distance ranges are unavailable.
NOTE: If zeroing/grouping exercises are not performed on the day of record fire. 6 rounds of training/sustainment ammunition will be
fired for 25 meter zero confirmation prior to conducting the Qualification Course.
CONDUCT OF FIRE
The firer will be given two 10-round magazines to engage the 10 silhouettes on the target This includes 2 rounds for each silhouette from
the foxhole supported position to be completed in 120 seconds, including the magazine change No more than two hits for each silhouette
will be scored.
The firer will then be given 2 additional 10-round magazines to engage the 10 silhouettes on a second target sheet. This includes 2 rounds
for each silhouette from the prone unsupported position to be completed in 120 seconds, including the magazine change. No more than two
hits for each target will be scored from the prone unsupported position
The prone supported position can be substituted for the foxhole position
SCORING
Award one hit for each round that is within or touches some part of the silhouette for a maximum of two hits for each silhouette on each
target sheet.
50 M
THE WHITE OOT ON EACH TARGET SHOWS 'tNTER
ОГ MASS AIMING POINT BUllETS SHOULD •« WITHIN
THT CIRCU BUT ARE SCORfO AS HITS • < »»'f V HU
ANY PART ОТ UH SHIlOUl «II
G-53
FM 23-9
APPENDIX H
Reproducible Forms
This appendix provides a blank copy of DA Form 3009-R (Target Detection Exercise
Answer Sheet, Periods 1, 2, and 8), DA Form 3010-R (Target Detection Exercise
Answer Sheet, Period 3), DA Form 3011-R (Target Detection Exercise Answer Sheet,
Period 5), DA Form 5791-R (Target Detection Exercise Answer Sheet, Period 7), DA
Form 3014-R (Target Detection Exercise Answer Sheets Test No. 2 and No. 3, Period
9), DA Form 3601-R (Single Target Field Firing Scorecard), DA Form 3595-R (Record
Fire Scorecard), DA Form 5241-R (Single and Multiple Targets—Field Firing
Scorecard), DA Form 5239-R (75-, 175-, and 300-Meter Downrange Feedback
Scorecard), DA Form 5789-R (Record Firing Scorecard—Known-Distance Course),
and DA Form 5790-R (Record Firing Scorecard—Scaled Target Alternate Course).
These forms are not available through normal supply channels. You may reproduce
them locally on 8V2 x 11 inch paper.
H-1
TARGET DETECTION EXERCISE ANSWER SHEET PERIODS 1,2, AND 8 For uee of th 1 • form, ••• FM 23-8 and FM 23-9; proponent agency la TRADOC.
NAME (LAST) ( FIRST) PLATOON SQUAD DATE
TRIAL NO. PHASE NUMBER WHERE (LETTER OF NEAREST LANDMARK) RANGE (METERS)
1 2 3 4
1
2
3
4
5
6
7
8
9
10
11
12
13
14
15
16
TOTAL
DA FORM 3009-R, 1 Nov 73 replaces da form зооо-R. i jun es. which is obsolete.
target detection exercise ANSWER SHEET PERIOD 3 For uat of this form, see FM 23-8 and FM 23-9; proponent agency it TRADOC*
name PLATOON SQUAD DATE
TRIAL NO. WHERE ILETTER OF NEAREST LANDMARK' RANGE 'METERS)
1
2
3
4
5
6
7
8
9
iO
DA FORM 3010-R, 1 Nov 73 replaces da form зою-r. i jun оз, which is obsolete.
TARGET DECTION EXERCISE ANSWER SHEET PERIOD 5 For via of this torn. seo FM 23-8 and FM 23-9; Ae prop on ant прайсу •• TRADOC-
OBSERVER'S NAME (LAST) (FIRST) PLATOON
OBSERVATION POINT DATE
TRIAL NO. SOUND POSITION TRIAL NO. SOUND POSITION
1 IS
2 16
3 17
4 18
5 19
6 20
7 21
8 2?
9 23 -
10 24
11 25
12 26
13 27
14 28
TOTAL RIGHT WRONG
DA FORM 3011-R, 1 Nov 73 replaces da form aoi i-r. i jun ев. which is obsolete.
TARGET DETECTION EXERCISE ANSWER SHEETS TESTS NO. 2 AND 3 PERIOD 9 For use of this form, see FM 23-8 and FM 23-9; the proponent agency Is TRADOC.
OBSERVER S NAME (LAST) (FIRST) PLATOON
OBSERVATION POINT DATE
TRIAL NUMBER NO. OF TARGETS PRESENTED RIGHT WRONG
1 1
2 3
3 4
4 4
5 2
6 3
7 3
8 1
9 2
10 2
DA FORM 3014-R, JUN 89
SINGLE TARGET FIELD FIRING SCORECARD uw iV Ihrt I >M> I*c«*oo»nl *»nii > It 1HAIXM* DATA RtOUIRCD BY PRIVACY ACT ОТ 1974 AUTHORITY 1OUSC 3O12(g> ( iKvhrt Order 9397 PRINCIPAL PURPOSt(B) Facdrtaie» indrvtduai • Wan»rt<on to d»»t*ni targei and provide» feedback ROUTINf USllSl tvaluawmdnndualproHoency SSN и utrd for po»rlrve Mlenlifcabon puipoMt onif MANDATORY OR VOLUNTARY OISCLOSURt ANO f FT t CT ON INDIVIDUAL NOT PROVIDING INFORMATION Voluntary «ndnndtMl» nol provKWvg mlormalton can no 1 be rated «cored on a ma»» Ьаа«»
t SAMI .Ast I’HSl MiOLst iStliAi 1 «’ SS-, 1 GRAIN 4 lINil •. nOSUH NO
6. INTRODUCTION TABLE 1 • SUPPORTED FIGHTING POSITION 7. TABLE 2 - SUPPORTING FIGHTING POSITION 8. TABLE 3 • PRONE POSITION 9. SCORE
RD RANGE (M) TIME (SEC) HIT MISS RD RANGE (M) TIME (SEC) HU MISS RD RANGE (M) TIME (SEC) HIT MISS TABLE HIT MISS
- 75 • • 75
’*> — —-— 1 f. i> 1 l‘,
• 7 5 Ml t . j ») 1 •
4 1Ъ 4 1 75 A 4 1 }•.
7s 75 )•, /
! 1 75 M t. КП . • •• • 1
} • 75 и t IP 7 4 M
Л 175 H H 75 « 1 1 /
« 175 1 75 к 1 •1 175 1
<0 175 1 1 • 1 I to '75 •
11 1 75 A ! 11 300 11
76 К H 1? ’75,
t J 300 l.t 1 1 f r — IJ 75 f
14 301 in 14 ЗЛ7 to 14 300 11
15 300 in 14 I 75 и •5 175
1». 300 in in 75 1» 16 75 1
1 1 300 IO 1 7 3oo io 1 7 ЗПО M
18 300 IO IB 75 H IB 75 7
707*1 701*4 TOI*l TOTAL
IO KJ МАИСS
11 DAI F SIGNED 12 SCORTR S SIGNATURL
DA FORM 3601-R, JUN 89
RECORD FIRE SCORECARD For use of this form, sou FM 23-9 The proponent agency •* TRADOC
DATA REQUIRED BY PRIVACY ACT Of 1974 AUTHORITY 10USC 3O17(gl E«rcubv»Order 9397 PRINCIPAL PURPOSElSl FactMaies rndrvidual »Iraeirng on multiple timed target engagement at varying range* ROUTINE USE(S) Cvalute individual p.ol<.rncv SSN i*u*ed for povliveadentificat>on purpose* onty MANDATORY OR VOLUNTARY DISCLOSURE ANO EFFECT ON INDIVIDUAL NOT PROVIDING INFORMATION Voluntary Individual*not provtdinq information cannul be rated scored on a mass batts
1 NAME (LAST FIRST MIDDLE INITIAL* 2 SSN 3 GRADE 4 UNIT 5 ROSTER NO
° TABLE 1 • SUPPORTED FIGHTING POSHION 7 TABLE 2 PRONE UNSUPPORTED POSITION
RD RANGE (M) TIME (SECl HIT MISS NO FIRE RD RANGE (Ml TIME (SEC) HIT MISS NO FIRE RD RANGE IM) TIME (SEC) HIT MISS NO FIRE RD RANGE (M) TIME ISEC) HIT MISS NO FIRE
1 50 3 11 100 8 1 100 5 1 1 150 8
2 200 6 12 200 „> 250 8 12 300 9
3 100 .1 13 1 t>i» 10 3 150 b 13 100 Ю
4 150 5 14 300 4 50 8 14 200
5 300 8 15 1(Y) 9 5 200 1 5 150 1 2
it 250 7 16 25') G 150 12 16 250
7 50 3 17 200 b 7 200 17 100 8
8 200 6 18 150 b 8 50 8 18 150
9 150 •j 19 50 6 150 19 200 9
10 250 7 20 190 *O ion 8 20 100
total TOTAL TOTAL TOTAL
SCORE 9 QUALIFICATION SCORES RATING (CHECK ONEl | 1 36 40 | 1 30 35 | 1 23 29 I 1 22 BEIOW LJ EXPERT | (SHARPSHOOTER I 1 MARKSMAN 1 1 UNOUAl IFIED
TABLE HIT MISS NO FlRF
1
2
10 FIRER S QUALIFICATION SCORE
TOTAL
1 1 REMARKS NIGHT FIRE EXERCISE
DATE HIT MISS GO NO GO
NBC FIRE EXERCISE
DATE HIT MISS GO NO GO
12 DATE SIGNED 13 SCORER S SIGNATURE
14 DATE SIGNED 15 OFFICER S SIGNATURE
NIGHT FIRE EXERCISE
DATE HIT MISS GO NO GO
NBC FIRE EXERCISE
DATE HIT MISS GO NO GO
DA FORM 3595-R, JUN 89
SINGLE AND MULTIPLE TARGETS FIELD FIRING SCORECARD F<x им, ol ihts form see FM 23-9 The proponeni agency •» TRADOC DATA REQUIRED BY PRIVACY ACT OF 1974 AUTHORITY 10 USC 3012/(gpE«ecutiveOrder9397 PRINCIPAL PURPOSE(S) Facilitate* individual's transition todistanl target and provides feedback ROUTINE USE(S): Evaluate individual proficiency. SSN is used for positive identification purposes only MANDATORY OR VOLUNTARY DISCLOSURE ANO EFFECT ON INDIVIDUAL NOT PROVIDING INFORMATION: Voluntary. Individual not providing information cannot be rated/scored on a mass basis
1 NAME (LAST FIRST MIDDLE INITIAL) 2 SSN 3 GRADE 4 UNIT 5 ROSTER NO
6. INTRODUCTION TABLE 1 - SUPPORTED FIGHTING POSITION 7. TABLE 2 - SUPPORTING FIGHTING POSITION 8. TABLE 3 - PRONE POSITION 9. SCORE
RD RANGE (M) TIME (SEC) HIT MISS RD RANGE (M) TIME (SEC) HIT MISS RD RANGE (M) TIME (SEC) HIT MISS TABLE HIT MISS
75 5 i 175 7 i 75 6 2
2 »75 7 2 75 10 2 175 8 3
3 75 11 3 300 3 75 13
4 300 4 75 9 4 300
5 75 9 5 175 5 75 11
6 175 6 300 9 6 175
7 75 Ю 7 75 9 7 75 12
8 300 8 175 8 300
9 175 11 9 175 11 9 175 13
10 300 10 300 10 300
11 75 9 11 75 11
12 175 •2 175
13 175 11 13 175 8
14 300 14 75 C
15 75 5 15 75
16 175 16 175
7 I 1 ’?
9 • И 1
- *»
-J 10
. 1 7- J
7? •75 7 ;? TV'
TOTAL TOTAL TOTAL 1 TOTAL
10 REMARKS
11 OATE SIGNED 12 SCORER S SIGNATURE
DA FORM 5241-R, JUN 89
75-, 175- AND 300-METER DOWN RANGE FEEDBACK SCORECARD For u*e of (his form, им FM 23-9. The proponent agency is TRADOC DATA REQUIRED BY PRIVACY ACT OF 1874 AUTHORITY: 10 USC 3012(g)/Eaecutive Order 9397. PRINCIPAL PURPOSE(S): Facilitates Individual’s training on aflhouetta target* at varying ranges. ROUTINE USE(S): Evaluate Individual proficiency; SSN la used for positive Identification purpose* only. MANDATORY OR VOLUNTARY DISCLOSURE AND EFFECT ON INDIVIDUAL NOT PROVIDING INFORMATION: Voluntary. Individuals not providing Information cannot bo rated/scored on a mate basis.
1 NAME (LAST. FIRST. MIDDLE INITIAL! 2. SSN 3. GRADE 4 UNIT
5. ZERO CONARMADON 7. TABLE 1 • DOWN RANGE SILHOUETTES. SUPPORTED FIGHTING POSITION 8. TABLE 2 - DOWN RANGE SILHOUETTES. PRONE POSIDON 9. SCORE
RANGE (M) HIT MISS RDS RANGE (M) HIT MISS RDS RANGE (M) HIT MISS TABLE HIT MISS
175 5 75 5 75 1
6. ZERO CONFIRMATION REFIRE 10 175 10 175 2
RANGE (M) HIT MISS 5 300 5 300
175 TOTAL TOTAL TOTAL
10. ZERO SHOT LI 3CATIONS 11. SHOTLC FIG ICATIONS SUPPORTED / \ HTING POSITION^/
75M PRONE f \ UNSUPPORTED / \ 175M 300M
175M WIND SPEED: (MPH) WIND DIRECTION: (USE ARROW)
75M 175M 300M
12. DATE 13. SCORER'S SIGNATURE
DA FORM 5239-R, JUN 89.
RECORD FIRING SCORECARD’ KNOWN DISTANCE COURSE
For use of this form, see back The proponent agency is TRAOOC
DATA REQUIRED BY PRIVACY ACT OF 1974
AUTHORITY 10 USC 30129g) Executive Order 9397 PRINCIPAL PURPOSE(S): Records individual's performance on record fire range ROUTINE
USE(S) Evaluation ol individual's proficiency and basis for determination of award of proficiency badge. SSN is used for positive identification
purposes only MANDATORY OR VOLUNTARY DISCLOSURE AND EFFECT ON INDIVIDUAL NOT PROVIDING INFORMATION: Voluntary
individuals not providing information cannot be rated/scored on a mass basis
1 NAME HAST FIRST MIDDLE INITIAL)
2 SSN
3 GRADE 4 UNIT
5 FIRING POINT ANO
ORDER
6 TABLE 1 PRONE SUPPORTED 7 TABLE 2 PRONE UNSUPPORTED 8 TABLE 3 PRONE UNSUPPORTED
ROUND RANGE 300 HIT MISS ROUND RANGE 200 HIT MISS ROUND RANGE 100 HIT MISS
1 E SIL 1 E-SIL 1 F-SIL
2 2 2
3 3 3
4 4 4
5 5 5
6 6 6
7 7 7
8 8 8
9 9 9
10 10 10
1 1 TIME 60 SEC total TIME 60 SEC TOTAL
12
13 11 REMARKS
1 4 NIGHT FIRE EXERCISE
15 DATE HIT MISS GO NO GO
16
1 7 1 NBC FIRE EXERCISE
18
19 DATE HIT MISS GO NO GO
20
TOTAL
ELEV
12 DATE SIGNED
9 SCORE
38-40
EXPERT
33-37
SHARPSHOOTER
26-32
MARKSMAN
25-BELOW
UNQUALIFIED
ZERO
WIND
•FIRER ISSUED 40 ROUNDS THE ROUNDS WILL BE PRELOADED IN FOUR 10-R0UND MAGAZINES • TWO FOR
TABLE 1. ONE FOR EACH REMAINING TABLE. ALL ROUNDS WILL BE FIRED WITH THE Ml 6A1 SHORT RANGE SIGHT
13 DATE SIGNED
14 SCORER S SIGNATURE
15 OFFICER’S SIGNATURE
DA FORM 5789-R, JUN 89.
This scorecard is used to score Known Distance Course record fire
qualification when the Known Distance Range is used. This course is
used only when the standard record fire course is not available.
NOTE: If zeroing/grouping exercises are not performed on the
day of record fire, 6 rounds of training/sustainment
ammunition are fired from the 300 yard/meter line for
confirmation of zero prior to conducting the
Qualification Course.
CONDUCT OF FIRE
For Table 1, the firer is given two 10-round magazines to engage an E-
silhouette at 300 yards within 120 seconds in the prone supported
position. Table 2 is fired with a 10-round magazine at an E-silhouette
at 200 yards within 60 seconds in the prone unsupported position.
Table 3 is fired with a 10-round magazine at an F-silhouette at 100
yards within 60 seconds in the prone unsupported position.
SCORING
Scoring is conducted in the pits, with the results provided after each
table. One point is awarded for each round hitting the target. A hit is
scored for any bullethole that is within or touches some part of the
silhouette facing.
RECORD FIRING SCORECARD • SCALED TARGET ALTERNATE COURSE
For iisi* of this form, see back The proponent agency is TRADOC
" DATA REQUIRED BY PRIVACY ACT OF 1974
AUTHORITY 10 USC 30129g) Executive Order 9397 PRINCIPAL PURPOSE(S): Records individual s performance on record fire range ROUTINE
USE(S). Evaluation of individual s proficiency and basis for determination of award of proficiency badge. SSN is used for positive identification
pufiiosi s only MANDATORY OR VOLUNTARY DISCLOSURE AND EFFECT ON INDIVIDUAL NOT PROVIDING INFORMATION: Voluntary
individuals noi providing information cannot be rated/scored on a mass basis
1 NAME ilAST FIRST MIDDLE INITIAL» 2 SSN 3 GRADE 4 UNIT 5 ROSTER NO
6. TABLE 1 - SUPPORTED FIGHTING/PRONE SUPPORTED 7. TABLE 2 - PRONE UNSUPPORTED 8. QUALIFICATION 9. REMARKS
TARGET RANGE IMI HIT M TARGET RANGE (M) HIT M
1 300 1 300 38-40 EXPERT
2 300 2 300 NIGHT FIRE EXERCISE
3 250 3 250 DATE HIT MISS GO NO GO
4 250 4 250 33-37 SHARPSHOOTER
5 200 5 200
6 200 6 200
7 200 7 200 26-32 MARKSMAN
8 200 8 200 I NBC FIRE EXERCISE
9 150 9 150 DATE HIT MISS GO NO GO
K- 150 10 150 25-BELOW UNQUALIFIED
’ 1 150 11 150
2 150 12 150
1 : 100 13 100
14 100 14 . 100
15 100 15 100
16 100 16 100
1 7 100 17 100
18 100 18 100
19 50 19 50
20 50 20 50
TIME 120 SEC HITS TIME 120 SEC HITS TOTAL HITS
‘FIRER ISSUED 40 ROUNDS TO ENGAGE 20 TARGETS—NO MORE THAN 2 ROS PER TARGET. THE ROUNDS WILL BE PRELOADED IN 4. 10 ROUND MAGAZINES TWO
PER TABLE ALL ROUNDS WILL BE FIRED WITH THE LONG RANGE SIGHT ON THE M16A1 RIFLE. HITS ARE DENOTED BY A
12 OATF SIGNED 13 DATE SIGNED
14 SCORER S SIGNATURE 15 OFFICER S SIGNATURE
DA FORM 5790-R, JUN 89
This scorecard will be used to score Alternate Course record fire qualification when the 25M (NSN 6920-01-167-1398) or 15M (NSN 6920-01-167-1396)
scaled silhouette target is used. The Alternate Course will be used only when standard record fire and known Distance ranges are unavailable.
NOTE: If zoroing/grouping exercises are not performed on the day of record fire. 6 rounds of training/sustainment ammunition will be
fired for 25 meter zero confirmation prior to conducting the Qualification Course
CONDUCT OF FIRE
The firer will be given two 1О-round magazines to engage the 10 silhouettes on the target This includes 2 rounds for each silhouette from
the foxhole supported position to be completed in 1 20 seconds, including the magazine change No more than two hits for each silhouette
will be scored.
The firer will then be given 2 additional 10-round magazines to engage the 10 silhouettes on a second target sheet. This includes 2 rounds
for each silhouette from the prone unsupported position to be completed in 120 seconds, including the magazine change. No more than two
hits for each target will be scored from the prone unsupported position
The prone supported position can be substituted for the foxhole position
SCORING
Award one hit for each round that is within or touches some part of the silhouette for a maximum of two hits for each silhouette on each
target sheet.
!H( WMIT( DOT ON I ACM TARG(T SHOWS THf CCNTfR
OF MASS AIMING POINT BULLETS SHOULD HIT WITHIN
THT ClRCll HUT ARI SCORfD AS HITS 1Г ’ • Mil
ANY PART П1 IKI SHHOilllll
FM 23-9
TARGET DETECTION EXE RO IE AKSVER SHEET period 7 «м •< this fo«^ FM Z3-R on4 FM O-F; угиу—f ц ту |« ТКДООС.
COMMMATIOM OF S4XMD LOCALIZATION AMD MULTIPLE MOVMC TARGETS (OBSERVERS CHECK EACH OTMTJ ALM EMEM T AMD PLACE NUMA EK OF TARGETS CORR ECT LT AUMED M SPACE OPPOSITE APPROPRIATE TRIAL NUMBER.)
**** PLATOON SQUAD DATE
TRIAL NO. NO. CORRECT TRIAL NO. NO. CORRECT
1 12
2 1)
J 14
4 IS
S 14
A Г7
7 It
• IF
F N
M || TOTAL CORRECT
TRIAL MOL NO. CORRECT TRIAL MO. NO. CORRECT
| n
2 13
3 14
4 ts
S U
4 17
7 M ———————
• It
F 33
M TOTAL CORRECT
11
DA FORM 5791-R,JUN 89
H-23
FM 23-9
Glossaiy
Section I. ACRONYMS AND ABBREVIATIONS
AC — Alternate course
AMU — Army marksmanship unit
AR— Army regulation
ARM — advanced rifle marksmanship
ARTEP — Army training and evaluation
program
АТС — US Army Training Command
BRM — basic rifle marksmanship
ВТ— basic training
C— centigrade
cm— centimeter
DA— Department of the Army
DS— direct support
F— Fahrenheit
FM — frequency modulation
fps— feet per second
FPF— final protective fire
FSN — Federal stock number
FTX— field training exercise
GS — general support
GTA— graphic training aid
Hz— hertz
IAW — in accordance with
IET- initial entry training
KD— known distance
kg— kilogram
km— kilometer
kmph— kilometers per hour
LBE— load-bearing equipment
LFX— live-fire exercise
LLLSS— low-light level sight system
LOI — letter of instruction
MAIT— maintenance assistance and
instruction team
METL- mission-essential task list
m— meter
mg— milligram
MILES —multiple integrated laser
engagement system
mm— millimeter
MOPP— mission-oriented protective
posture
MOS— military occupational specialty
MOUT— military operations on
urbanized terrain
mph — miles per hour
MPRC— multipurpose range complex
NBC— nuclear, biological, chemical
NCO— noncommissioned officer
Glossary-1
FM 23*9
NCOIC— noncommissioned officer in
charge
NG — Army National Guard
NSN — national stock number
NVD — night vision device
OIC — officer in charge
OSUT— one station unit training
PH — probability of hit
РОС— point of contact
POI — program(s) of instruction
PPA— plastic practice ammunition
PRI — preliminary rifle instruction
RATELO — radiotelephone operator
RETS — remote electronic target system
RFA— rimfire adapter
ROTC— Reserve Officers’ Training
Corps
SAAD — small-arms air defense
SAW— squad automatic weapon
SOP— standing operating procedure
SQT— skill qualification test
TASC— Training and Audiovisual
Support Center
TEC— training extension course
TM — technical manual
TRADOC— Training and Doctrine
Command
TVT— television tape
US AMU— US Army Marksmanship
Unit
USAR— United States Army Reserve
Section II. DEFINITIONS
Active Army—All Regular Army (RA) forces in the Active Army.
Adjusted Aiming Point —An aiming point that allows for gravity, wind, target
movement, zero changes, and MOPP firing.
Advanced Marksmanship —Normally refers to marksmanship skills taught during
ARM.
Advanced Rifle Marksmanship (ARM) — Normally refers to the formal marksmanship
instruction received by infantrymen upon completion of BRM during OSUT.
Aiming—A marksmanship fundamental; refers to the precise alignment of the rifle
sights with the target.
Aiming Card —The M15A1 aiming card is a cardboard sleeve with a moveable insert.
The rear sight aperture, front sight post, and target are pictured. This training device
is used in conjunction with aiming instructions.
Aiming Point—A place on a target in which the rifle sights are aligned, normally the
target center of mass.
Glossary-2
FM 23-9
Alibi Target—A target or additional target a soldier is allowed to engage during
qualification firing when unable to complete a record fire scenario due to circumstances
beyond his control; for example, a target mechanism, weapon, or ammunition
malfunction.
Alternate Course (AC)—Alternatives to standard qualifications are discussed in
Appendix G.
Ammunition Lot—A quantity of cartridges each of which is made by one manufacturer
under uniform conditions and is expected to work in a uniform manner.
Ammunition Lot Number—Code number that identifies a particular quantity of
ammunition from one manufacturer.
Aperture—The hole in the rear sight.
Armorer—One who services and makes repairs on small arms and performs similar
duties to keep small arms ready for use.
Army Training and Evaluation Program (ARTEP)—A guide for the training and
evaluation of critical unit combat missions—crew/squad through battalion/task force
echelon.
Army Training Center (АТС)—Conducts OSUT and BRM. Locations are Fort
Benning, GA; Fort Jackson, SC; Fort Dix, NJ; Fort Leonard Wood, MO; Fort
McClellan, AL; Fort Knox, KY; Fort Sill, OK; and Fort Bliss, TX.
Artificial Illuminationa—Any light from a man-made source.
Assault Course—An area of ground used for training soldiers in attacking an enemy in
close combat.
Automatic Fire—A firing mode that causes the weapon to continue firing as long as
the trigger is held or until all ammunition has been expended.
Ball—The projectile; the bullet.
Ball Ammunition—General-purpose standard service ammunition with a solid core
bullet.
Ball and Dummy—An exercise that substitutes a dummy round for a live round without
the firer knowing it. An excellent exercise for identifying and correcting trigger jerk.
Ballistics—A science that deals with the motion and flight characteristics of projectiles.
Barrel Erosion — Wearing away of the surface of the bore due to the combined effects
of gas washing, coring, and mechanical abrasion.
Basic Marksmanship—Fundamental marksmanship skills taught in BRM during IET
and OSUT.
Basic Rifle Marksmanship (BRM) —The formal course of marksmanship instruction
received by all soldiers.
Glossary-3
FM 23-9
Battlesight Zero—A sight setting that soldiers keep on their weapons. It provides the
highest probability of hitting most high-priority combat targets with minimum
adjustment to the aiming point, a 250-meter sight setting as on the M16A1 rifle, and a
300-meter sight setting as on the M16A2 rifle.
Blank Ammunition —A complete cartridge without the bullet used to simulate
weapon firing.
Blank Firing Adapter (BFA) — A device that fits in the muzzle of the rifle; used only
with blank ammunition.
Brass—An alloy of copper and zinc used to make cartridge cases and bullet jackets.
Also, a common name for expended cases.
Breath Control—The third marksmanship fundamental; refers to the control of
breathing to help keep the rifle steady during firing.
Bullet—The projectile or ball; the part that goes downrange. It may also be used to
refer to the complete cartridge.
Bull’s-Eye Target—Any target with a round black circle and scoring rings. Normally
used in competitive marksmanship training.
Buttplate —Metal or rubber covering of the end of the stock on the rifle.
Cadre Coach—A trainer with expertise and knowledge exceeding that of the firer.
Caliber—Diameter of the bore; for example, the M16-series rifle bore is 5.56 mm (.223
inch).
Cartridge —A complete round of ammunition.
Center Of Mass —A point that is horizontally (left and right) and vertically (up and
down) at the center of the target.
Chambering—The step in the cycle of operation that refers to fully seating the round
in the chamber.
Chamber Plug—A range safety device that is a small plastic plug designed to fit into
the chamber of the M16. A handle extends out the ejection port so safety personnel
can see at a glance that the rifle is clear of ammunition.
Clock Method — Method of calling shots by referring to the figures on an imaginary
clock dial assumed to have the target at its center. Also a method of determining the
strength and direction of wind.
Coach—Any individual who assists firers on the firing line.
Coach-and-Pupil Method — Method of training in which pairs of pupils take turns
practicing a procedure explained by the instructor/trainer.
Cocking—The step in the cycle of operation that refers to the rearward movement of
the bolt riding over the hammer, resetting the weapon for subsequent firing.
Glossary-4
FM 23-9
Collective Firing Proficiency—Units delivering effective fire in a tactical setting. It
requires individual skill plus command and control to engage all targets within an
assigned sector.
Concurrent Training—Training that occurs at the same time other unit members are
using the primary training facilities.
Cookoff—A round that fires as a result of a hot chamber without the trigger being
pulled. It can occur any time until the weapon has cooled.
Crack and Thump—A method to determine the general direction and distance to an
enemy firer who is shooting at you.
Cradle—A vise-like mechanism that holds a weapon in a secured position for test firing.
Cross Dominance—A soldier with a dominant hand and a dominant eye that are not
the same; for example, a right-handed firer with a dominant left eye.
Cycle of Operation—The eight steps involved in firing a round: feeding, chambering,
locking, firing, unlocking, extracting, ejecting, and cocking.
Cyclic Rate of Fire—The maximum rate at which a weapon will fire in the automatic
mode.
Dime (Washer) Exercise—A dry-fire exercise used to practice trigger squeeze.
Downrange Feedback—Used to describe any training technique that provides precise
knowledge of bullet strike (whether hit or miss).
Dry Fire—A technique used to simulate the firing of a live round with an empty weapon.
Any application of the fundamentals of marksmanship without live ammunition may
be referred to as dry fire.
Dry-Fire Moving Target Trainer—A small motorized scaled target device used to
teach the engagement of moving personnel targets.
Dummy Ammunition—A cartridge without a primer or powder. Primarily used for
ball-and-dummy exercises on the live-fire line.
Effective Wind — The average of all the varying winds encountered.
Ejection —The step in the cycle of operation that removes the expended cartridge from
the weapon out of the ejection port.
Elevation Adjustment - Rotating the front sight post to cause the bullet to strike higher
or lower on the target.
Expert—The highest qualification rating.
External Ballistics - What happens to the bullet between the time it leaves the rifle
and the time it arrives at the target.
Extraction—The step in the cycle of operation that pulls the round from the chamber.
Glossary-5
FM 23-9
Eye Relief—The distance from the firing eye to the rear sight. Eye relief is a function
of stock weld.
Feedback—Obtaining knowledge of performance.
Feedback Target—Targets designed for use at 75, 175, or 300 meters; includes an
overprinted grid similar to a zero target.
Feeding—The step in the cycle of operation that is the forward movement of the bolt,
stripping the top round from the magazine and moving it toward the chamber.
Field Firing—Training on the standard field firing range with target banks at 75,175,
and 300 meters.
Firing—The step in the cycle of operation that refers to pulling the trigger, releasing
the hammer to strike the firing pin, which strikes the primer. The primer ignites and,
in turn, ignites the powder charge within the cartridge case.
Firing Hand—The right hand of a right-handed firer. The left hand of a left-handed
firer.
Firing Pin —Plunger in the bolt of a rifle that strikes the primer.
Fleeting Target—A moving target remains within observing or firing distance for such
a short period that it affords little time for deliberate adjustment and fire against it.
Functioning—(See cycle of operation.)
Fundamentals of Rifle Marksmanship—The four essential elements needed to hit
targets: steady position, aiming, breath control, and trigger squeeze.
Gravity—The natural pull of all objects to the center of the earth.
Grouping—A live-fire exercise with the objective of shooting tight shot groups.
Gun Bore Line—A reference line established by the linear extension of the bore axis
of a gun.
Headspace—The distance between the face of the bolt (fully closed) and the face of a
fully chambered cartridge.
Hold-off—(See adjusted aiming point.)
Horizontal Dispersion—The left-to-right displacement of bullets on a target.
Immediate Action — A procedure applied to rapidly reduce any rifle stoppage without
determining its cause.
Individual Firing Proficiency — Individual firing skills; for example, an individual’s
performance on the record fire course.
Infantry Remoted Target System (IRETS) —(See RETS.)
Infrared Aiming Light—A unique night sighting system that uses infrared light to assist
in the aiming process.
Glossary-6
FM 23-9
Initial Entry Training (IET) — Indicates the first training received by a new soldier,
including the MOS-producing portion of his training such as one-station unit training
(OSUT).
Initial Pressure—The application of about half of the total trigger pressure it takes to
fire the rifle.
Instructor/Trainer Ratio—The number of soldiers for which each instructor/trainer is
responsible.
Internal Ballistics—What happens to the bullet before it leaves the muzzle of the rifle.
Known Distance (KD) — Describes the older range complexes with large target frames
behind a large berm and firing lines at 100-yard or 100-meter increments. (See FM
25-7.)
Laser—Light amplification by simulated emission of radiation.
Lead—Distance ahead of a moving target that a rifle must be aimed to hit the target.
Lead Rule—Provides a soldier guidance on how to adjust his aiming point to hit moving
targets.
Line of Sight—A line between the rifle and the aiming point, extending from the firing
eye through the center of the rear aperture, across the tip of the front sight post, and
onto the target.
Location of Miss and Hit (LOMAH)—A projectile location system that provides
immediate and precise information to the firer concerning bullet strike (hit or miss).
Locking—The step in the cycle of operation that is a counterclockwise rotation of the
bolt, securing it into the barrel locking lugs.
Long-Range Sight—The aperture marked L on the M16A1 rifle equipped with
standard sights; provides for a zero at 375 meters. The M16A1 rifle equipped with
LLLSS has an aperture marked L, but it is a regular sight.
Low-Light Level Sight System (LLLSS) — A sighting system for low visibility firing that
replaces the standard front and rear sights on the M16A1 rifle.
Marksman —The designation given to the lowest qualification rating.
Maximum Effective Range—The greatest distance at which a soldier may be expected
to deliver a target hit.
Maximum Effective Rate of Fire-The highest rate of fire that can be maintained and
still achieve target hits.
Maximum Range-The longest distance a projectile travels when fired from a weapon
held at the optimum angle.
Minute of Angle-An angle that would cover 1 inch at a distance of 100 yards, 2 inches
at 200yards, and so on. Each click of sight adjustment on the M16A1 rifle with standard
sights is equal to one minute of angle.
Glossary-7
FM 23-9
Multiple Integrated Laser Engagement System (MILES) — A tactical shooting device
that uses a low-powered laser to activate detectors placed on people or vehicles.
Multipurpose Arcade Combat Simulator (MACS) — A part-task weapons trainer that
is under development. The system consists of a light pen attached to the weapon, video
monitor, and microcomputer.
Muzzle Velocity—The speed of a projectile as it leaves the muzzle of the weapon.
Natural Point of Aim—The direction the body/rifle combination is oriented while in a
stable, relaxed firing position.
Natural Respiratory Pause—The temporary cessation of breathing between an exhale
and inhale.
Night Firing—Firing performed under all conditions of limited visibility.
Nonfiring Hand —The opposite of the firing hand.
Optical Sight—Sight with lenses, prisms, or mirrors used in lieu of iron sights.
Paige Sighting Device—A device with a small-scaled target that fits into the muzzle of
the weapon, allowing the soldier to practice aiming.
Pasters—Small white or black gum-backed paper used for covering bullet holes.
Peep Sight—The rear sight; a sight with a small aperture (hole).
Peer Coach—A soldier with shooting experience and knowledge equal to that of the
firer he is coaching.
Pit — The target area behind the large berm of a KD range.
Plastic Ammunition—Ammunition with a plastic projectile, high-muzzle velocity (the
light weight causes it to lose velocity rapidly with a maximum range of 500 meters or
less) designed for use in close-in training areas; frangible bullet.
Point of Aim — The exact spot on a target the rifle sights are aligned with.
Point of Impact —The point that a bullet strikes; usually considered in relation to point
of aim.
Pop, No Kick—A firing condition when the primer ignites and the powder charge does
not. This normally results in lodging the bullet in the bore.
Pop-Up Target—A silhouette target that is activated remotely so it can suddenly appear
and fall when struck by a bullet.
Practice Record—Firing conducted on a qualification course for practice.
Predetermined Fire—A technique of aligning the rifle during good visibility so the rifle
can be aligned and fired on designated areas when they cannot be seen due to darkness,
smoke, or fog.
Preparatory Marksmanship Training (PMT)—All marksmanship training that takes
place before live fire.
Glossary-8
FM 23-9
Primer—A small explosive device in the center base of the cartridge case that is struck
by the firing pin to fire the round.
Probability of Hit (PH)—Ranging from 0 to 1.0, it refers to the odds of a given round
hitting the target at a given range.
Qualification Firing—Firing on any authorized course that results in meeting
qualification requirements; may also be called record fire. (See record fire.)
Quick Fire—A technique of fire used to engage surprise targets at close ranges.
Range Card — Small chart on which ranges and directions to various targets and other
important points in the area under fire are recorded.
Rapid Semiautomatic Fire—A firing procedure that results in an accurate shot being
fired every one or two seconds.
Receiver—That portion of a firearm that holds the barrel and houses the bolt and firing
mechanism.
Recoil—The rearward motion or kick of a gun upon firing.
Record Fire—Any course of fire used to determine if qualification standards are met.
The standard record fire course consists of 40 target exposures at ranges between 50
and 300 meters. The standard course requires 23 hits to qualify as marksman, 30 for
sharpshooter, and 36 for expert.
Reduced Range Ammunition—Ammunition that is designed to be a ballistic match
with service ammunition to an appropriate range for training (may be less than
maximum effective range) and a reduced maximum range.
Regular Rear Sight—The M16A1 rifle rear sight that is zeroed for 250 meters (the
unmarked aperture on rifles with standard sights and the aperture marked L on rifles
equipped with LLLSS).
Reinforcement Training—Training conducted that is over and above scheduled
training.
Remedial Action—A procedure applied after immediate action has failed to correct a
malfunction, which determines the cause of the malfunction.
Remedial Training—Additional training presented to soldiers who have demonstrated
special shooting problems.
Remote Electronic Target System (RETS)-New range complexes. Some ranges
include moving targets.
Reserve Components-Includes Army National Guard and Army Reserve forces.
Ricochet Fire-Fire in which the projectile glances from a surface after impact.
Riddle Sighting Device-A small magnetic device with a scaled target that attaches to
the front sight assembly, allowing the soldier to practice aiming.
Glossary-9
FM 23-9
Rifle Cant—Any leaning of the rifle to the left or right from a vertical position during
firing.
Rimfire Adapter—The caliber .22 rimfire adapter (M261) consists of a bolt and a
magazine insert, which allows standard .22-caliber ammunition to be fired in the M16
rifle.
Round—May refer to a complete cartridge or to the bullet.
Scaled-Silhouette Target—Any target that is reduced in size. When it is observed from
25 meters, it looks the same size as though at a greater range.
Sector of Fire—An area assigned to an individual, weapon, or unit to be covered by
fire.
Semiautomatic Fire—A mode of fire that allows one round to be fired each time the
trigger is pulled.
Serviceability Checks—A technical inspection of the rifle to determine if it is safe to
fire and in working condition. (May not ensure accuracy.)
Service Ammunition — Standard ammunition used by the military. Ammunition
designed for combat.
Service Rifle—The primary rifle of a military force.
Service School—Branch schools such as the US Army Infantry School at Fort Benning,
GA, and the Armor School at Fort Knox, KY.
Sharpshooter—The middle rating of qualification.
Shot Group—A number of shots fired using the same aiming point, which accounts for
rifle, ammunition, and firer variability. Three shots are enough, but any number of
rounds may be fired in a group.
Shot-Group Analysis—A procedure for analyzing the size of shot groups on a target to
determine firer error.
Sight Alignment—Placing the center tip of the front sight post in the exact center of
the rear aperture.
Sighter Rounds—Rounds fired that allow the bullet strike to be observed in relation
to the aiming point.
Sight Picture—Placing correct sight alignment on a selected aiming point on a target.
Sight Radius—The distance from the front sight post to the rear sight aperture of a
rifle.
Sighting Device (M16)—A small metal device with a tinted square of glass that is placed
on the carrying handle, allowing a coach to see what the firer sees through the sights.
Silhouette Target—A target that represents the outline of a man.
Glossary-10
FM 23-9
Spotters—A round cardboard disk placed in bullet holes with a small wooden peg so
that bullet strike can be observed from the firing line.
Squad Automatic Weapon (SAW)—A lightweight, one-man, 5.56-mm machine gun.
Starlight Scope—A weapon scope that amplifies ambient light so targets can be seen
and effectively engaged during darkness. ТЪе AN/PVS-2 and AN/PVS-4 are used on
the M16 rifle.
Steady Position—The first marksmanship fundamental, which refers to the
establishment of a position that allows the weapon to be held still while it is being fired.
Stock Weld — The contact of the cheek with the stock of the weapon.
Supported Position—Any position that uses something other than the body to steady
the weapon (artificial support).
Suppressive Fire—Any engagement that does not have a definite or visible target.
Firing in the general direction of known or suspected enemy location.
Sustained Rate of Fire—Rate of fire that a weapon can continue to deliver for an
indefinite period without overheating.
Terminal Ballistics—What happens to the bullet when it comes in contact with the
target.
Tight Shot Group—A shot group with all bullet holes close together.
Tracer Ammunition—Ammunition with a substance at the rear of the bullet that ignites
soon after firing. It burns brightly so the trajectory of the bullet can be seen.
Tracking—Engaging moving targets where the lead is established and maintained;
moving with the target as the trigger is squeezed.
Train the Trainer—Describes any training that is designed to train marksmanship
instructors or coaches.
Trainfire—A marksmanship program using pop-up targets in a realistic environment.
Trajectory—The flight path the bullet takes from the rifle to the target.
Trapping—A technique for engaging moving targets. The aiming point is established
forward of the target. The rifle is held stationary and fired as the target approaches the
aiming point.
Trigger Squeeze—The fourth fundamental; squeezing the trigger so that the
movement of firing is a surprise, the lay of the weapon is not disturbed, and a large
target hit can be expected.
Unit Marksmanship—All marksmanship training that is conducted by units.
Unlocking—The step in the cycle of operation that refers to the clockwise rotation of
the bolt after firing, freeing the bolt from the barrel locking lugs.
Glossary-11
FM 23-9
Unsupported Position—Any position that requires the firer to hold the weapon steady
using only his body (bone support).
Vertical Dispersion—The up-and-down displacement of bullets on a target.
Weaponeer—A training device that simulates the firing of the M16 rifle to provide
performance feedback.
Windage Adjustment—Moving the rear sight aperture to cause the bullet to strike left
or right on the target.
Wind Value—The effect the wind will have on the trajectory of the bullet.
Wobble Area—The natural movement of the weapon/sights on and around an aiming
point when the weapon is being held in a steady position.
Zero Criterion—The standard or requirement for zeroing; 4-centimeter or smaller
group at 25 meters.
Zeroing—Adjusting the rifle sights so bullets hit the aiming point at a given range.
Zero Target—A scaled-silhouette target with a superimposed grid for use at 25 meters.
Glossary-12
FM 23-9
References
REQUIRED PUBLICATIONS
Required publications are sources that users must read in order to understand or to
comply with this publication.
Army Regulations (ARs)
190-11 Physical Security of Arms, Ammunition, and Explosives
210-21 Ranges and Training Areas
385-63 Policies and Procedures for Firing Ammunition for Training, Target Practice and Combat
Army Training and Evaluation Programs (ARTEPs)
7-20-MTP Mission Training Plan for the Infantry Battalions
71-2-MTP Mission Training Plan for the Tank and Mechanized Battalion Task Force Department of the Army Forms (DA Forms)
3009-R Target Detection Exercise—Answer Sheet (Periods 1,2, & 8)
3010-R Target Detection Exercise—Answer Sheet (Period 3)
3011-R Target Detection Exercise—Answer Sheet (Period 5)
3014-R Target Detection Exercise—Answer Sheet (Period 9)
3595-R Record Fire Scorecard
3601-R Field Firing Single Target Scorecard
5239-R 75-, 175-, and 300-Meter Down Range Feedback Scorecard
References-1
FM 23-9
5241-R Multiple Target Scorecard —Field Firing Score Card
5789-R Record Firing Scorecard, Known-Distance Course
5790-R Record Firing Scorecard, Scaled Target Alternate Course
5791-R Target Detection Exercise—Answer Sheet (Period 7) Technical Manuals (TMs)
7-6920-703-14&P Trainer, Rifle Marksmanship (Weaponeer) (US Navy)
9-1005-249-10 Operator’s Manual for Rifle, 5.56-mm, M16
9-1005-319-10 US Marine Corps Operator’s Manual of Components List, 5.56-mm, M16A2 W/E
11-5855-203-10 Operator’s Manual for Night Vision Sight, Individual Served Weapon AN/PVS-2, AN/PVS-2A, and AN/PVS-2B
11-5855-213-10 Operator’s Manual for Night Vision Sight, Individual Served Weapon, AN/PVS-4 (NSN 5855-629-5334)
11-5855-238-10 Operator’s Manual for Night Vision Goggles AN/PVS-5 and AN/PVS-5A (5855-150-1820)
11-5855-261-10 Operator’s Manual for Aiming Light, Infrared, AN/PAQ-4 (5855-01-107-5925) Television Tapes (TVTs)
7-1 Teaching Basic Rifle Marksmanship, Part I
7-2 Teaching Basic Rifle Marksmanship, Part II
7-13 Overview of the Basic Rifle Marksmanship Training Program
RELATED PUBLICATIONS
Related publications are sources of additional information. They are not required in
order to understand this publication.
Army Regulations (AR)
350-6 Army-Wide Small Arms Competitive Marksmanship
350-41 Army Forces Training
References-2
FM 23-9
Department of the Army Pamphlets (DA Pams)
25-30 Consolidated Index of Army Publications and Blank Forms
310-12 Index and Description of Army Training Devices
350-38 Standards in Weapons Training Field Manuals (FMs)
5-20 Camouflage
7-8 (HTF) The Infantry Platoon and Squad (Infantry, Airborne, Air Assault, Ranger) (How to Fight)
21-75 Combat Skills of the Soldier
22-5 Drill and Ceremonies
22-6 Guard Duty
23-31 40-mm Grenade Launchers, M203 and M79
25-1 Training
25-2 Unit Training Management
25-3 Training in Units
25-4 How to Conduct Training Exercises
25-7 Training Ranges
25-100 Training the Force Graphic Training Aids (GTAs)
21-1-3 M16A1 (Rifle) Maintenance Card
25-6-1 MILES Instructor’s Lesson Plan Booklet
25-6-7 Instructor’s Controller Training Guide
25-6-9 Instructor’s MILES Equipment Training Guide - Infantry Student Training Publication (STP)
7-11BCHM14-SM-TG Soldier’s Manual and Trainer’s Guide, MOS 1 IB, 11C
11H, and 1 IM Infantry, Levels 1/2/3/4
23-14 Training Circular (TC) Sniper Training and Employment
References-3
FM 23-9
Training Extension Course Lessons (TEC Lessons)
939-071-0009-F Loading/Unloading M16A1 Rifle
939-071-0010-F Disassemble/Assemble M16A1 Rifle
939-071-0011-F Maintaining the M16A1 Rifle
939-071-0012-F Preventing and Correcting Common Malfunctions Technical Manuals (TMs)
9-1005-249-23&P Organizational and Intermediate Maintenance (Including Repair Parts and Special Tools List) for Rifle, 5.56-mm, M16A2
9-1005-249-24&P Organizational, Direct Support, and General Support Maintenance Manual Including Repair Parts and Special Tools List for Rifle, 5.56-mm, M16andM16Al
9-6920-363-12&P Operator and Organizational Maintenance Manual (Including Repair Parts and Special Tools List) for Conversion Kit (Cal. .22 Rimfire Adapter) M261 for Rifle: 5.56-mm, M16 and M16A1
9-1005-319-23&P Organizational and Intermediate Maintenance (Including Repair Parts and Special Tools List) for Rifle, 5.56-mm, M16A2
References-4
FM 23-9
INDEX
aiming card, C-2 (illus)
ammunition, 2-16
bolt, М2, C-14
care and handling, 2-17
short-range training, C-14
types and characteristics, 2-16 (illus)
automatic Are
effectiveness, 4-8
modifications, 4-9
training, 4-20
ball-and-dummy exercise, C-7
ballistics
bullet dispersion, F-17
external, F-16
internal, F-14
terminal, F-17
blank firing attachment, C-4, C-5 (illus)
caliber .22 rimfire adapter, M261, C-12
characteristics, 2-2
clearing, 2-1 (illus)
M16A1 and M16A2,2-2 (table)
coach checklist, 3-20
combat fire techniques
automatic fire, 4-7
MOPP firing, 4-14
moving target engagement, 4-19
quick fire, 4-11
rapid semiautomatic fire, 4-3
suppressive fire, 4-1
DA Form 3009-R (Target Detection
Exercise Answer Sheet — Periods 1,2,
and 8), B-17
DA Form 3010-R (Target Detection
Exercise Answer Sheet—Period 3), B-19
DA Form 3011-R (Target Detection
Exercise Answer Sheet — Period 5), B-23
DA Form 3014-R (Target Detection
Exercise Answer Sheets Tests No. 2 and
3-Period 9), B-31
DA Form 3595-R (Record Fire Scorecard),
G-41, G-47
DA Form 3601-R (Single Target —Field
Firing Scorecard), G-36
DA Form 5239-R (75-, 175-, and 300-Meter
Downragne Feedback Scorecard), G-21
DA Form 5241-R (Single and Multiple
Targets—Field Firing Scorecard), G-37
DA Form 5789-R (Record Firing Score-
card— Known-Distance Course), G-31
DA Form 5790-R (Record Firing
Scorecard — Scaled Target Alternate
Course), G-52
DA Form 5791-R (Target Detection Answer
Sheet—Period 7), B-27
destruction of materiel
field-expedient, 2-18
means, 2-18
dime (washer) exercise, C-8
downrange feedback, G-16
training, 3-27,4-18
dry fire
concept of zeroing, 3-21
conduct of, 3-18
downrange feedback training, 3-27
exercises, 4-11,4-13,4-18, 5-5
field fire training, 3-27
grouping, 3-21
peer coaching, 3-18
practice record fire, 3-27
record fire, 3-27
Index 1
FM 23-9
elevation and windage rule, F-ll
exercises,
dry fire, 4-11,4-13,5-5
live fire, 4-11,4-14,4-18,5-5, A-15, G-l
MOPP fire, 4-18
'target detection, B-l, B-15
field fire training, 3-27
firing positions
advanced positions, 3-13 to 3-16 (illus)
modified firing positions, 3-16
MOUT firing positions,3-16,3-17(illus)
prone unsupported position, 3-13 (illus)
supported fighting position, 3-12 (illus)
flag method, F-9
function, 2-1
automatic fire mode, 2-8,2-9 (illus)
burst fire mode, 2-9 (illus)
semiautomatic mode, 2-8
steps, 2-3 to 2-8 (illus)
gravity, effects of
aiming point, adjusted, F-4, F-6 (illus),
F-7 (illus)
M16A1 ammunition, F-l
M16A2 ammunition, F-4
on ammunition, F-l, F-2 (illus)
trajectory, F-3 (illus)
grouping, 3-21
range, G-l
live fire exercises, 4-11,4-14,4-18,5-5
alternate qualification courses, G-48
downrange feedback, G-16
field fire range, G-33
known-distance alternate course, G-28
known-distance range, G-25
grouping range, G-l
practice record fire range, G-39
record fire range, G-42
zero range, G-10
location of miss and hit (LOMAH) system,
C-12
M16 sighting device, C-3, C-4 (illus)
magazine changes, 4-4
malfunctions and corrections, 2-15 (illus)
stoppage, 2-10
major categories, 2-11 to 2-14
marksmanship fundamentals, 3-5,4-15
aiming, 3-7
breath control, 3-10 (illus)
steady position, 3-5,3-6 (illus)
trigger squeeze, 3-11
master trial sheet, B-8 (illus), B-10
mechanical training, 3-3
MOPP firing aiming modifications, 4-16
effects, 4-14
exercises, 4-18
operation and function modifications,
4-17
moving target engagement
fundamentals, 4-20
lead requirements, 4-22
multipurpose range complex train-up,
4-25
single-lead rule, 4-21
techniques, 4-19
multipurpose arcade combat
simulator,C-13
multipurpose range complex train-up, 4-25
night firing considerations, 5-1
night vision, principles of, 5-2
target engagement techniques, 5-4,
training, 5-5
observation method, F-10
peer coaching, 3-18
pointing method, F-9
practice record fire, 3-27
precision firing
ballistics, F-14
elevation and windage rule, F-ll
gravity, effects of, F-l
wind, effects of, F-7
program, rifle marksmanship
basic, 3-1
combat factors, 1-4
fundamentals, 3-5
instructor/trainer
Index 2
FM 23-9
selection, 3-1
duties, 3-2
qualification training, A-3
quick fire
effectiveness, 4-11
modifications, 4-13
training, 4-13
ranges
alternate qualification courses, G-48
field fire, G-33
grouping, G-l
known-distance, G-25
known-distance alternate course, G-28
operations checklist, D-6
personnel, D-2
practice record fire, G-39
procedures, D-3
record fire, G-42
target detection, B-9
zero, G-10
rapid magazine changes, 4-4,4-5 (illus)
rapid semiautomatic fire, 4-3
effectiveness, 4-3
magazine changes, 4-4
modifications, 4-3
training, 4-7
rate of fire, 4-2
record fire, 3-27
Record Fire Scorecard(DA Form 3595-R)
G-41, G-47
Record Firing Scorecard—Known-
Distance Course (DA Form 5789-R),
G-31
Record Firing Scorecard — Scaled Target
Alternate Course (DA Form 5789-R),
G-52
Riddle sighting device, C-2, C-3 (illus)
rifle holding device, C-6 (illus)
75-, 175-, and 300-Meter Downrange
Feedback Scorecard (DA Form 5239-R),
G-21
safety briefing, D-l
sights
standard (M16A1), 3-22,3-24
standard (M16A2), 3-25
Single and Multiple Targets—Field Firing
Scorecard (DA Form 5241-R), G-37
single-lead rule, 4-21
Single Target—Field Firing Scorecard
(DA Form 3601-R), G-36
suppressive fire, 4-1
target box exercise, C-4, C-5 (illus)
target detection, B-1
exercises, B-1, B-15
MOPP firing, 4-15
range determination, B-4
ranges, B-7
target location, B-1
target marking, B-3
tests, B-14
training, conduct of, B-10
trials, conduct of, B-10
Target Detection Exercise Answer Sheet —
Periods 1,2, and 8 (DA Form 3009-R),
B-17
Target Detection Exercise AnswerSheet —
Period 3 (DA Form 3010-R), B-19
Target Detection Exercise Answer Sheet —
Period 5 (DA Form 3011-R), B-23
Target Detection Exercise Answer Sheet-
Period 7 (DA Form 5791-R), B-27
Target Detection Exercise Answer Sheets
Tests No. 2 and 3—Period 9 (DA Form
3014-R), B-31
target engagement techniques, 5-4
target marking, B-3
targets, scaled silhouette, E-l
slow-fire target, E-l, E-3 (illus),
E-7(illus)
timed-fire target, E-2, E-5 (illus),
E-7 (illus)
training, E-4
target trial card, B-10, B-ll (illus)
training aids and devices
caliber .22 rimfire adapter, M261, C-12
classifications, C-l
exercises, C-2
location of miss and hit (LOMAH)
system, C-12
Index 3
FM 23-9
multipurpose arcade combat simulator,
C-13
resources, C-l
selection of, C-8
target ordering numbers, C-10
Weaponeer, C-17
training, rifle marksmanship, 3-1
automatic fire, 4-10
basic program, 3-1
conduct of, 3-3
downrange feedback, 3-27
dry fire, 3-18
field fire, 3-27
firing positions, 3-12
night firing, 5-5
practice record fire, 3-27
quick fire, 4-13
rapid-fire, 4-7
record fiere, 3-27
target detection, B-10
training strategy, 1-1,1-2 (illus)
initial training, 1-3
sustainment training, 1-3
training, year-round marksmanship, A-l
live-fire exercises, A-15
sample evaluation quide, A-16
tasks, A-4 to A-15
training the trainer, A-2
qualification training, A-3
unit sustainment, A-15
unit sustainment training, A-15, C-22
wind, effects of, F-7
aiming point, adjusted, F-10
measurement, F-9
flag method, F-9
observation method, F-10
pointing method, F-9
wind speed and direction, F-7
Weaponeer, C-17 (illus)
characteristics, C-15
description, C-16
equipment data, C-16
mobile configuration, C-19
mobile mounting stand, C-21 (illus)
mobile training unit, C-20 (illus)
use,C-18
zeroing
M16A1,3-21,3-22
M16A2,3-25
☆ U.S. GOVERNMENT PRINTING OFFICE: 198Э- 6 2 7 - 0 2 7 / 8 0 2 1 U
Index 4
FM 23-9
3 JULY 1989
By Order of the Secretary of the Army:
CARLE. VUONO
General, United States Army
Chief of Staff
Official:
WILLIAM J. MEEHAN II
Brigadier General, United States Army
The Adjutant General
DISTRIBUTION:
Active Army, USAR, and ARNG: To be distributed in accordance with DA Form 12-1 IE,
requirements for FM 23-9, M16A1 Rifle and Rifle Marksmanship (Qty rqr block no. 187).